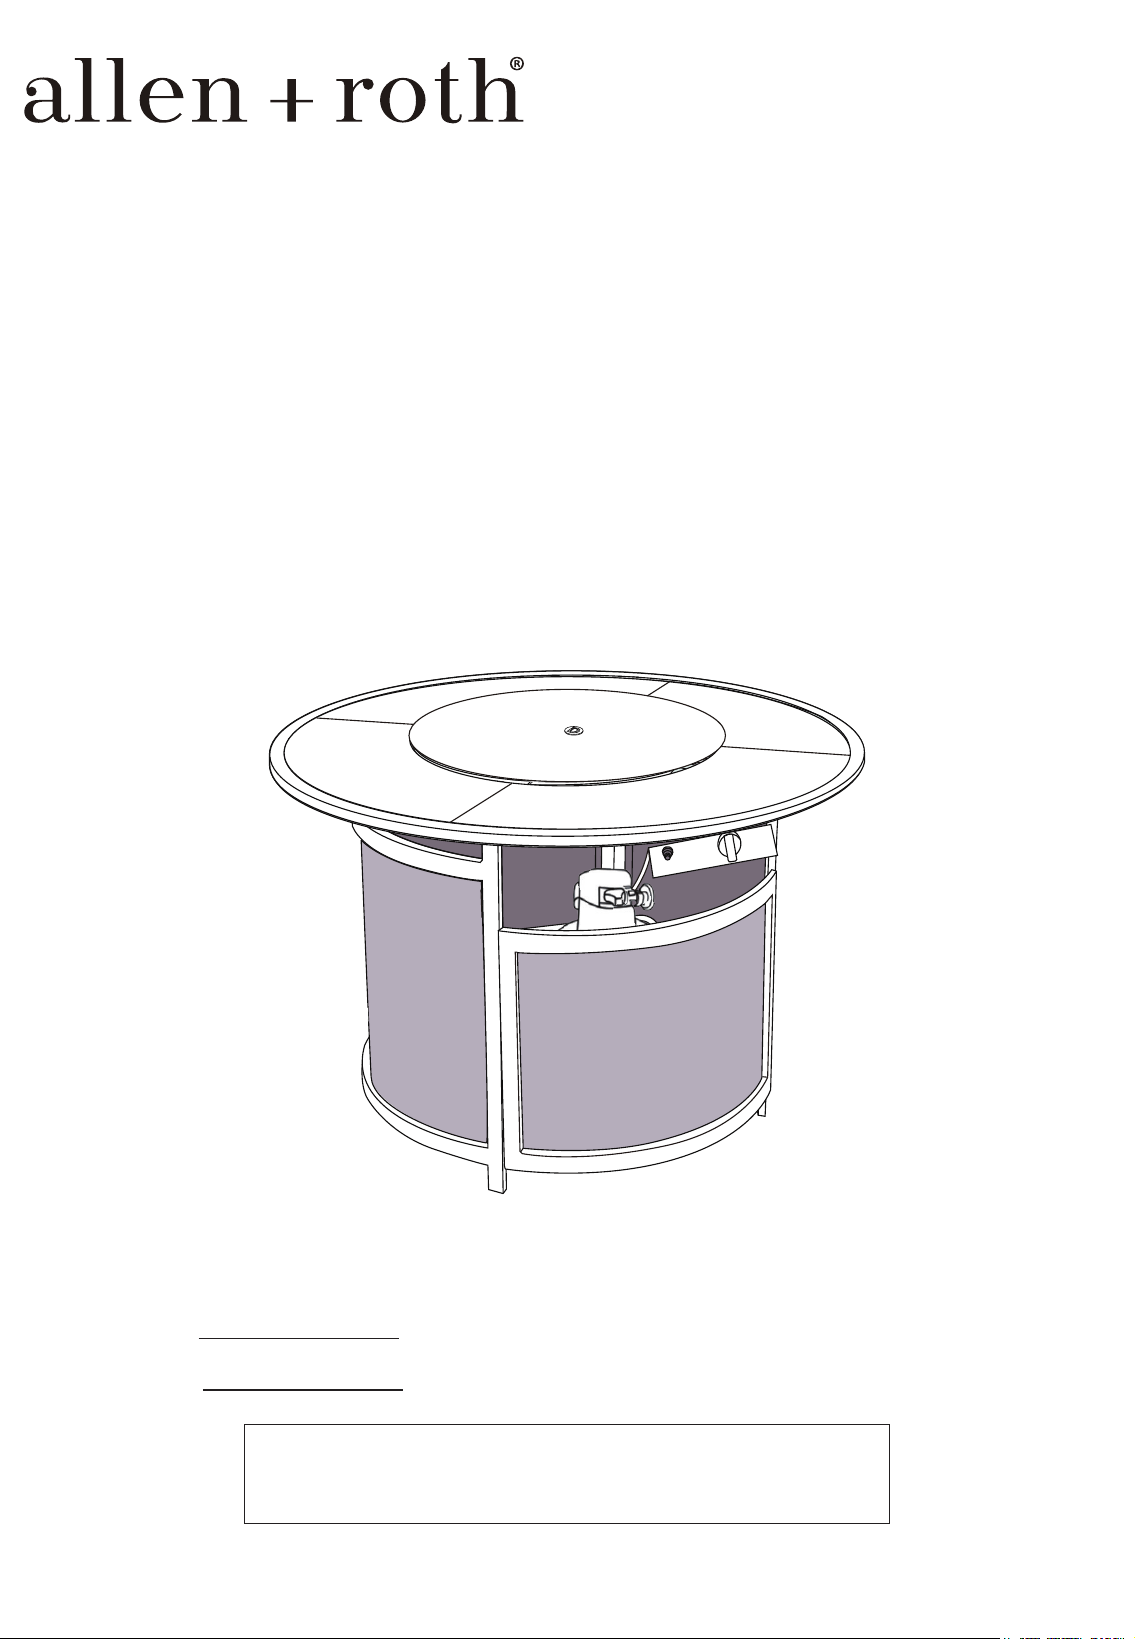
ITEM #5998254
MODEL #H24S7420G
42IN. ROUND TILE
GAS FIREPIT TABLE
Serial Number
Purchase Date
SG24908
1
ALLEN + ROTH and logo design are trademarks
or registered trademarks of LF, LLC. All rights
reserved.
SEDGEBROOK
Thank you for purchasing this ALLEN + ROTH product.
Questions, problems or missing parts?
Before returning, contact us on:
866-439-9800, 8 a.m. - 8 p.m., EST, Monday - Sunday or [email protected].
ATTACH YOUR RECEIPT HERE

TABLE OF CONTENTS
Package Contents...........................................................................................................................3
Hardware Contents..........................................................................................................................4
Safety Information............................................................................................................................5
Preparation.....................................................................................................................................5
Assembly or Installation Instructions ..............................................................................................8
Operating Instructions ...................................................................................................................12
Care and Maintenance...................................................................................................................12
Troubleshooting.........................................................................................................................12
Warranty..................................................................................................................................13
Replacement Parts List ................................................................................................................. 13
2
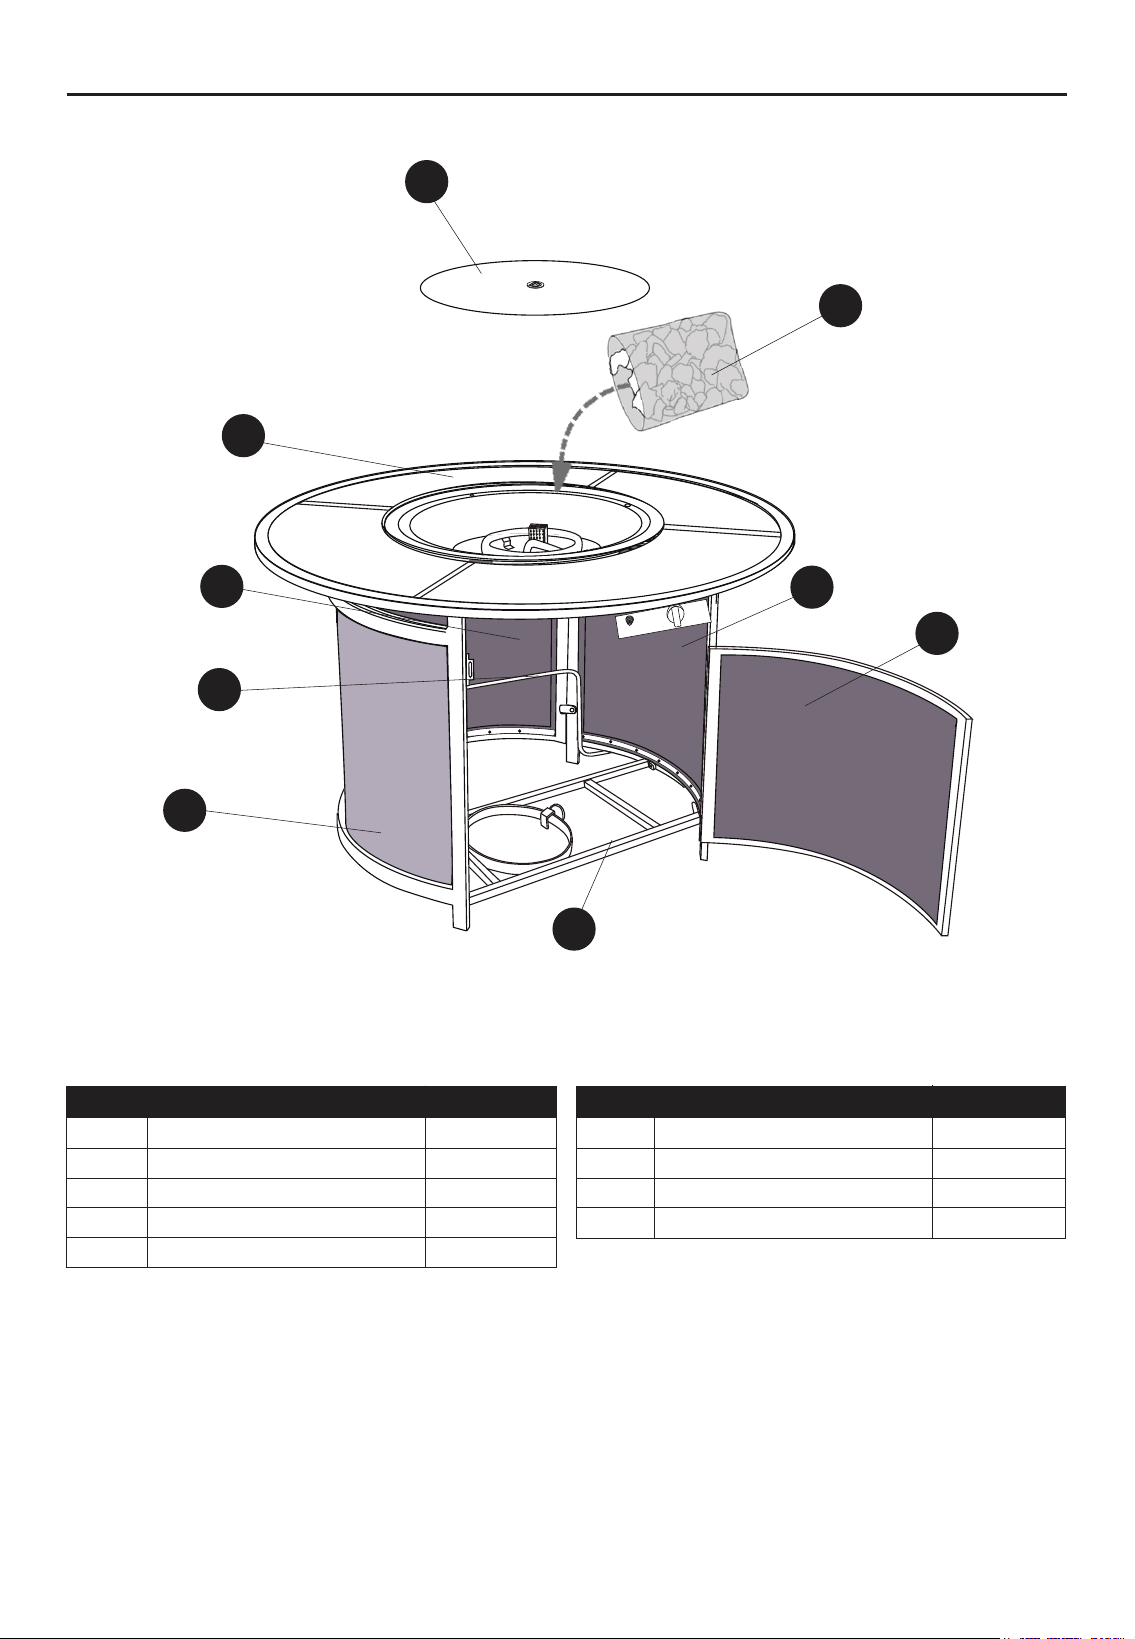
PACKAGE CONTENTS
PART DESCRIPTION QUANTITY
A Rear Frame 1
B Frame A 1
C Frame B 1
D
Bottom Frame
1
E
Front Door
1
F Cross Brace 1
G
Table Top 1
H
Cover 1
I
Lava Rocks 1
PART DESCRIPTION QUANTITY
3
H
I
C
E
D
B
F
A
G

HARDWARE CONTENTS (Not actual size)
M6 x 15 mm
Bolt
Qty. 13
ST4.8 x 16 mm
Screw
Qty. 2
d6.5 x D13 x 1.0
Washer
Qty. 13
Upper
Connector
Qty. 1
AA BB CC DD
4
EE
4 mm
Wrench
Qty. 1

SAFETY INFORMATION
Please read and understand this entire manual before attempting to assemble, operate or install the
product.
• Use the correct bolts as indicated. Do not tighten any of the bolts until the chair is completely
assembled.
• Some parts may contain sharp edges. Wear protective gloves as necessary.
• Children under the age of 16 should not be engaged in the assembly, removal or disassembly of
the product.
• Children under the age of 10 should be supervised by a competent adult while using this furniture.
• This set is heavy, and may require two adults for safe assembly.
• Never use this product as a support. Do not shake, lean, or climb on the product at any time.
• Do not discard of any of the packaging until you have checked that you have all of the parts and
fittings required.
• Keep children away during assembly. This item contains small parts that can be swallowed by
children. Children should always be under direct adult supervision while using this product.
CAUTION
• Do not overtighten any of the bolts as this may damage the threads.
• Repeated assembly can weaken the locking ability of the washers.
• Periodically check all bolted connections on the furniture to make sure they are tight and secure.
• Retain these instructions for future reference.
• Paint on this product might peel off if it is hit or used improperly.
• This outdoor furniture is designed and made for personal non-commercial use.
• This item should not be used as a toy or a tool.
• Do not locate the product near any heat source.
• Do not place heavy objects on the table top.
WARNING
Before beginning assembly of product, make sure all parts are present. Compare parts with package
contents list and hardware contents list. If any part is missing or damaged, do not attempt to
assemble the product.
Estimated Assembly Time: 30 minutes
PREPARATION
5
Note:
• The labels marked “2” and “3” on the frames should coincide with Figure 1 to ensure proper assembly.
WARNING: For Outdoor Use Only
Installation and service must be
performed by a qualified installer,
service agency, or the gas supplier.
!
SERVICE CENTER TOLL FREE NO.
TEL: 866-439-9800
!
!
!
!
!
!
!
Warning: If the information in this manual is not followed exactly, a fire or explosion
may result causing property damage, personal injury, or loss of life.
• Do not store or use gasoline, or other flammable vapors and liquids, in the vicinity
of this or any other appliance.
An Propane-cylinder not connected for use shall not be stored in the vicinity of this
or any other appliance.
DANGER: FIER OR EXPLOSION HAZARD
If you smell gas:
• Shut off gas to the appliance.
• Extinguish any open flame.
• If odor continues, leave the area immediately.
• After leaving the area, call your gas supplier or fire department.
Failure to follow these instructions could result in fire or explosion, which could cause
property damage, personal injury, or death.
INSTALLER: Leave this manual with the appliance.
CONSUMER: Retain this manual for future reference.
Warning: Improper installation, adjustment, alteration, service or maintenance can
cause property damage, personal injury or loss of life. Refer to the owner’s information
manual provided with this appliance. Installation and service must be performed by a
qualified installer, service agency, or the gas supplier.
!
!
!
DANGER
CARBON MONOXIDE HAZARD
This appliance can produce carbon monoxide which has
no odor.
Using it in an enclosed space can kill you.
Never use this appliance in an enclosed space; such as
a camper, tent, car, or home.
!
Use the correct bolts as indicated. Do not tighten any of the bolts until the appliance is completely assembled.
Do not sit or stand on this appliance.
Keep children away during assembly. This item contains small parts that can be swallowed by children.
Do not use indoors or inside of any enclosure.
Retain these assembly instructions for future reference.
Installer - Leave these instructions with the owner.
Quote the following FQC No. when contacting the service center.
6
7
Keep the appliance area clear and free from
combustible materials, gasoline, and other
flammable vapors and liquids.
Solid fuels should not be burned in this gas
appliance.
Inspect the hose before each use of the appliance.
The hose assembly must be replaced prior to the
appliance being put into operation if there is
evidence of excessive abrasion, wear, or if the
hose is damaged. The replacement hose assembly
is specified in this manual.
The burner must be inspected before each use.
The burner must be replaced prior to the appliance
being put into operation if it is evident that the
burner is damaged. The replacement burner is
specified in this manual.
The burner should always be cleaned:
Disconnect it from the appliance, use a cleaner to
remove blockages attached on the ports, and drain
the blockages from the gas inlet. A high pressured
stream of water may also be used.
Do not use this appliance if any part has been
under water. Immediately call a qualified service
technician to inspect the appliance and to replace
any part of the control system and any gas
control that has been under water.
This appliance is for outdoor use only in a
well-ventilated space and should not be used in
a building, garage, or any other enclosed area.
Other cylinders may be acceptable for use with the
appliance provided that they are compatible with the
appliance retention means and accompanied by
illustration(s) depicting the cylinder mounted to the
appliance utilizing the cylinder retention means and
the point of contact between the cylinder and the
retention means. The cylinder should be 12 inches
in diameter and 18 inches high. The capacity is
20 lbs. of propane.
If the appliance is not in use, the gas must be turned
off at the supply cylinder.
Storage of an appliance indoors is permissible only
if the cylinder is disconnected and removed from the
appliance.
Cylinders must be stored outdoors in a well-ventilated
area and out of children’s reach.
Disconnected cylinders must have a dust cap
secured at the end of the valve and cannot be stored
in a building, garage, or any other enclosed area.
The pressure regulator and hose assembly supplied
with this appliance must be used. Replacement
pressure regulators and hose assemblies must be
the ones specified in this manual.
The cylinder supply system must be arranged for
vapor withdrawal.
The cylinder used must include a collar to protect
the cylinder valve.
The Procedure for Checking for Gas Leaks:
Never test for leaks with a flame. Prior to first use, at
the beginning of each season, or every time your propane
gas tank is changed, you must check for gas leaks.
Follow these three steps:
1. Make a soap solution by mixing one part liquid
detergent and one part water.
2. Make sure that the burner is off and then turn the
gas on at source.
3. Apply the soap solution to all gas connections,
especially to the inlet/manifold pressure tap on the
gas valve after reading the pressure. Bubbles will
appear in the soap solution if the gas connections
are not properly sealed. If you have a gas leak,
tighten gas connections, turn off the gas at the
source, disconnect the fuel line from your appliance,
and call 866-439-9800 for repair assistance.
WARNING
!
WARNING
!
WARNING
!
WARNING
!
The Propane-gas supply cylinder to be used must be:
1. Constructed and marked in accordance with the
U.S. Department of Transportation (D.O.T.)
Specifications for Propane-Gas Cylinders, or the
Standard for Cylinders, Spheres and Tubes for
Transportation of Dangerous Goods; and
Commission, CAN/CSA-B339 as applicable;
2. Provided with a listed overfilling prevention device;
3. Provided with a cylinder connection device
compatible with the connection for the appliance.
Locate the gas hose and make sure that it is not in any
pathways where people may trip over it or in any areas
where the hose may be subject to accidental damage.
When an appliance is for connection to a fixed
piping system, the installation must conform
with local codes or, in the absence of local codes,
with the National Fuel Gas Code, ANSI Z223.1
NFPA 54; National Fuel Gas Code; Natural Gas
and Propane Installation Code, CSA B149.1; or
Propane Storage and Handling Code, CSA
B149.2, as applicable.
8
ASSEMBLY INSTRUCTIONS
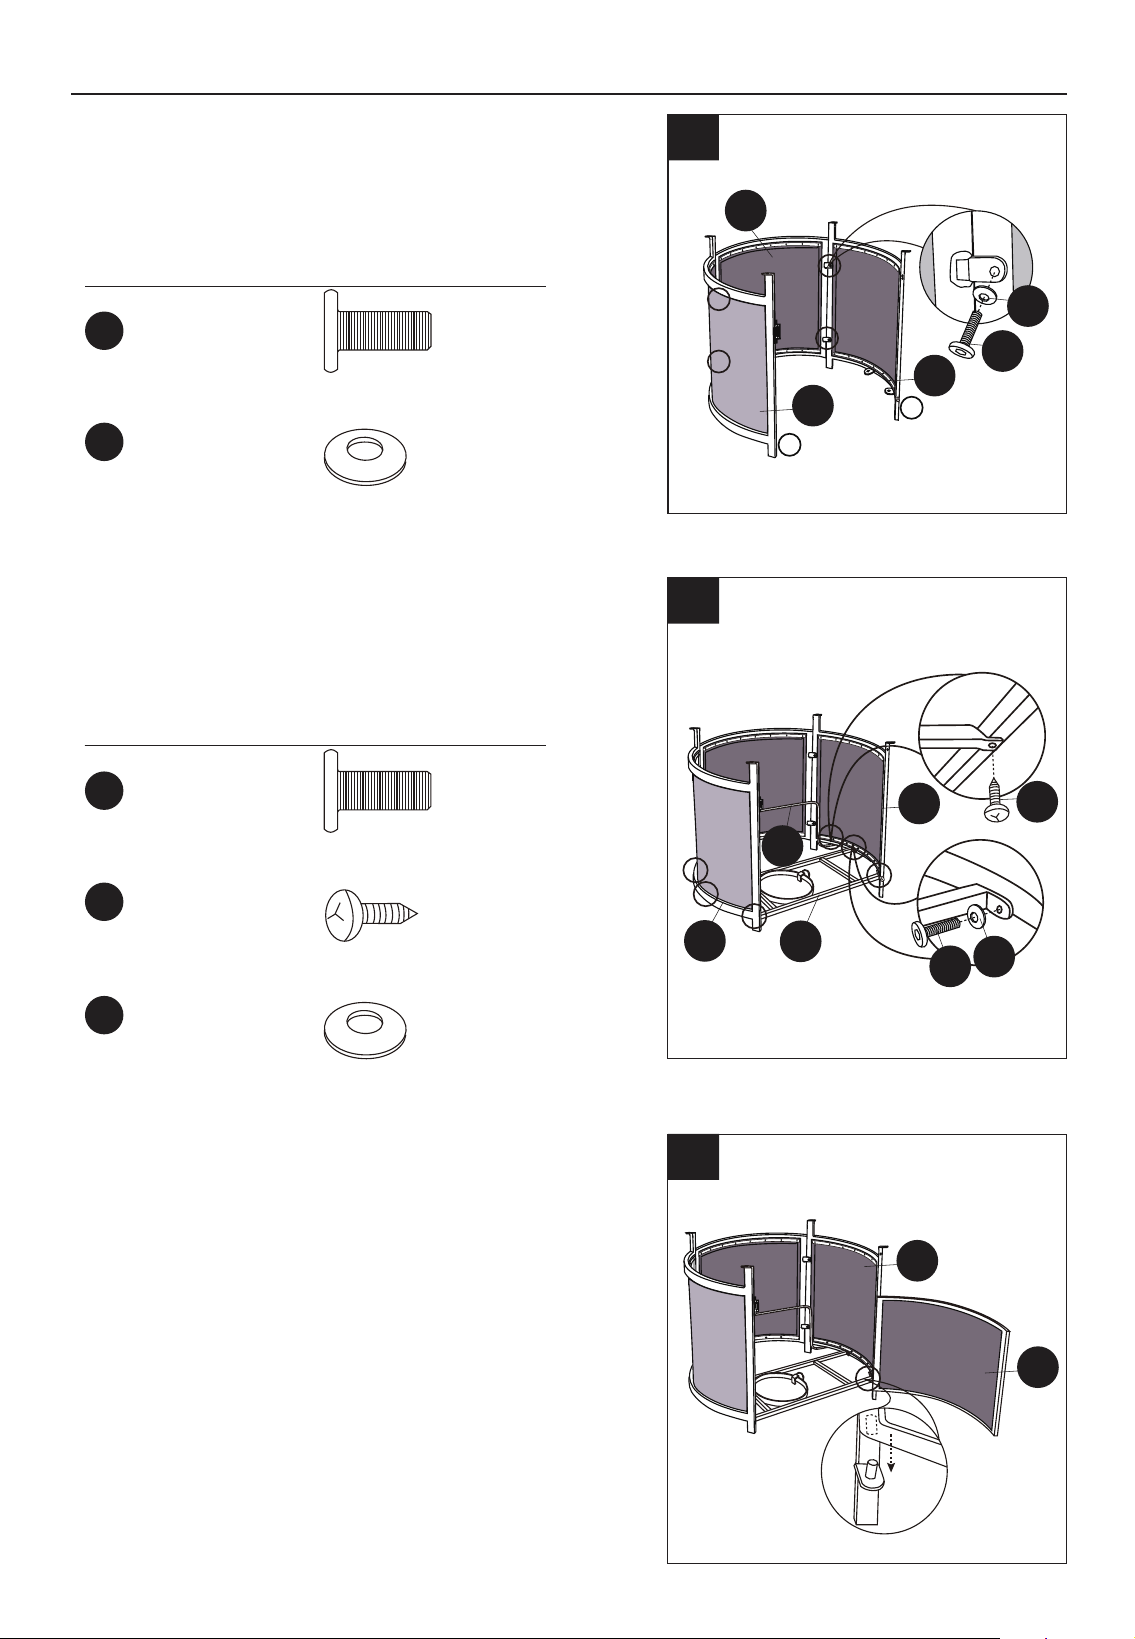
1. PARTS REQUIRED: AA, CC, A, B & C
Keep the bolts loose.
Hardware Used
AA
x 4
M6 x 15 mm Bolt
1
3
CC
x 4
d6.5 x D13 x 1.0
Washer
2
3
A
B
C
AA
CC
C
E
3. PARTS REQUIRED: C & E
Hardware Used
2. PARTS REQUIRED: AA, BB, CC, B, C, D & F
Keep the bolts loose.
2
AA
x 4
M6 x 15 mm Bolt
BB
x 2
ST4.8 x 16 mm
Bolt
CC
x 4
d6.5 x D13 x 1.0
Washer
B
D
C
BB
F
AA
CC
Insert the front door into the connector tab of
frame (B).
9
ASSEMBLY INSTRUCTIONS
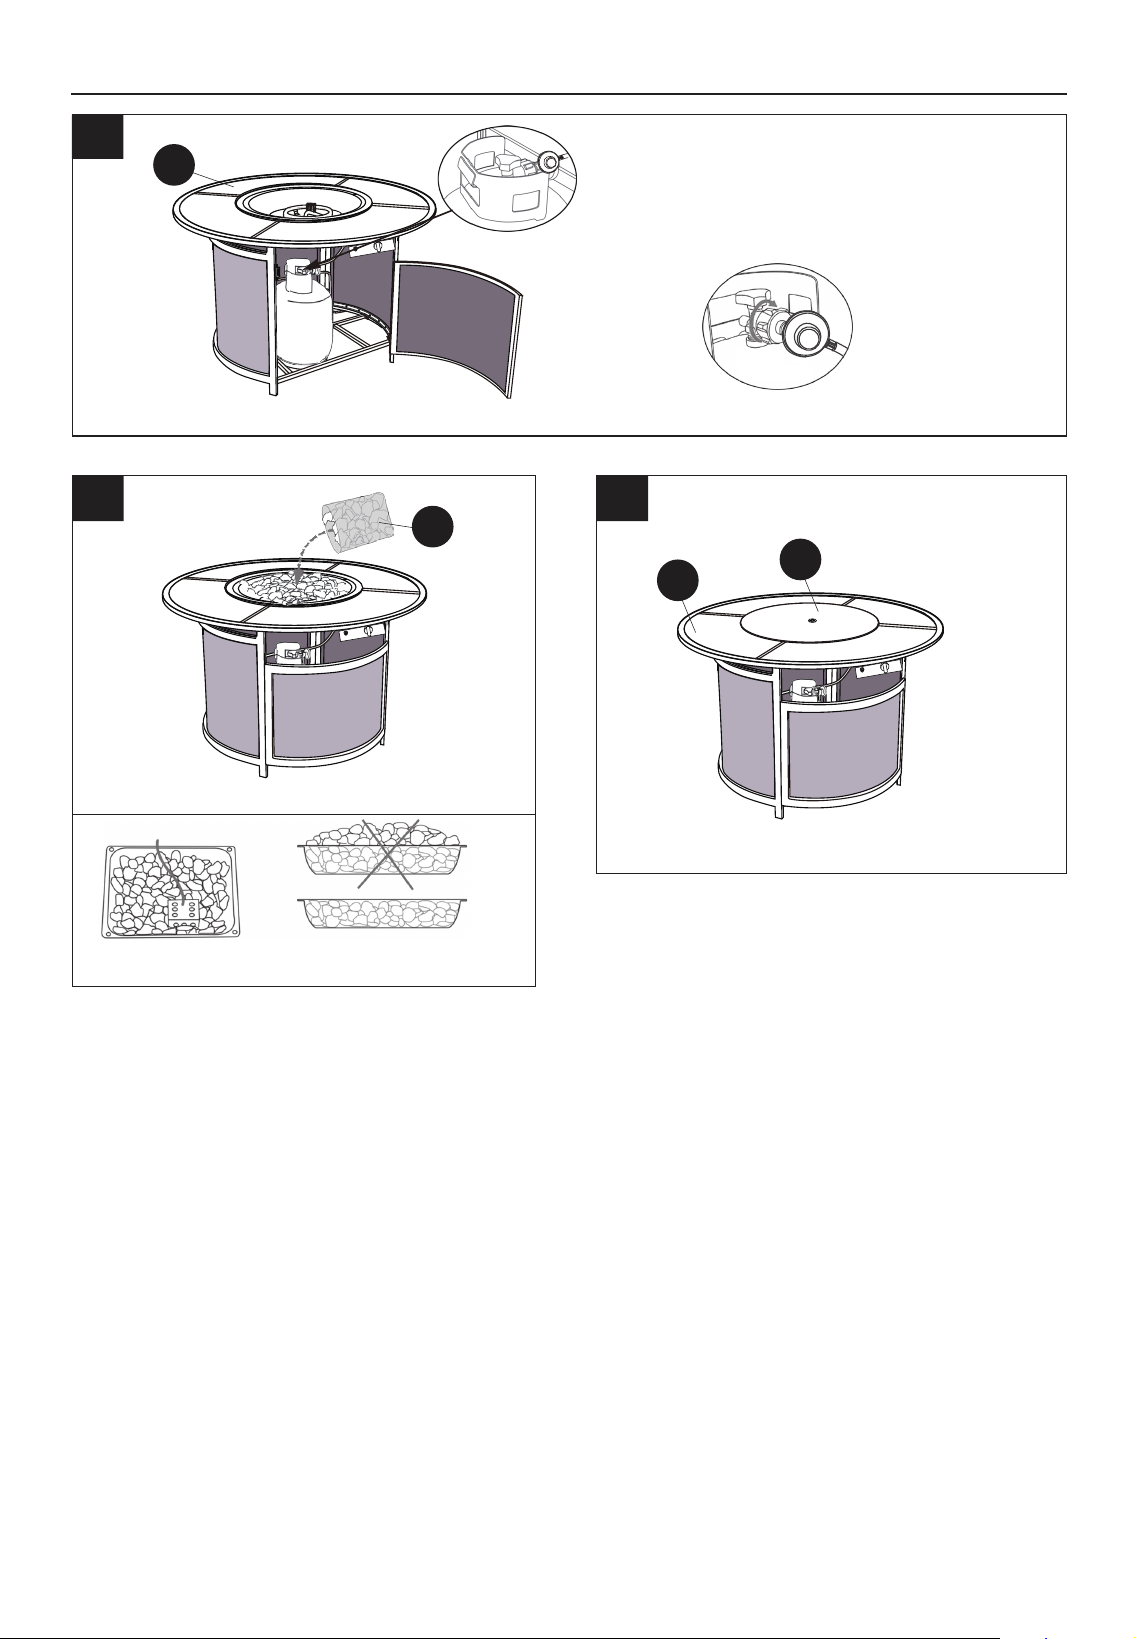
4. PARTS REQUIRED: AA, CC, DD, C & E
Tighten all bolts by using the supplied Hex key.
Hardware Used
4
5
C
AA
DD
CC
E
Igniter
Valve
G
AA
CC
6
Plastic
Screw
E
Note:
Secure the tank in place by turning the plastic
screw clockwise as illustrated above.
Hardware Used
5. PARTS REQUIRED: AA, CC & G
Tighten all bolts by using the supplied Hex key.
AA
x 1
M6 x 15 mm Bolt
CC
x 1
d6.5 x D13 x 1.0
Washer
AA
x 4
M6 x 15 mm Bolt
CC
x 4
d6.5 x D13 x 1.0
Washer
6. PARTS REQUIRED: E
10
ASSEMBLY INSTRUCTIONS
7
8
Rotate
Clockwise
Caution: The Tank
must face this way.
G
Note:
The igniter valve should be facing towards the front left side of the appliance.
Fire Shield
Note:
The fire shield on the burner
system must be exposed.
Note:
The glass cannot be exposed over
top of the steel cover surface.
I
9
H
G
Note:
In order to protect the burner system, when the fire is not in use and
on rainy days, the cover should be used.
SPECIFIC WARNINGS:
1) Both children and adults should be aware of the hazards of high surface temperatures and should
keep their distance in order to avoid burns and ignition of clothing.
2) Children should be under adult supervision when in the vicinity of this appliance.
3) Clothing or any other flammable materials should not be hung from or near this appliance.
4) Any guard or protective device removed for servicing the appliance must be replaced prior to use.
5) Installation and repair should be done by a qualified person. The appliance should be inspected
before use and at least annually by a qualified service technician. Frequent cleaning may be required.
It is imperative that the control compartment, burners, and circulating air passageways of the appliance
be kept clean at all times.
8. PARTS REQUIRED: I
9. PARTS REQUIRED: H
11
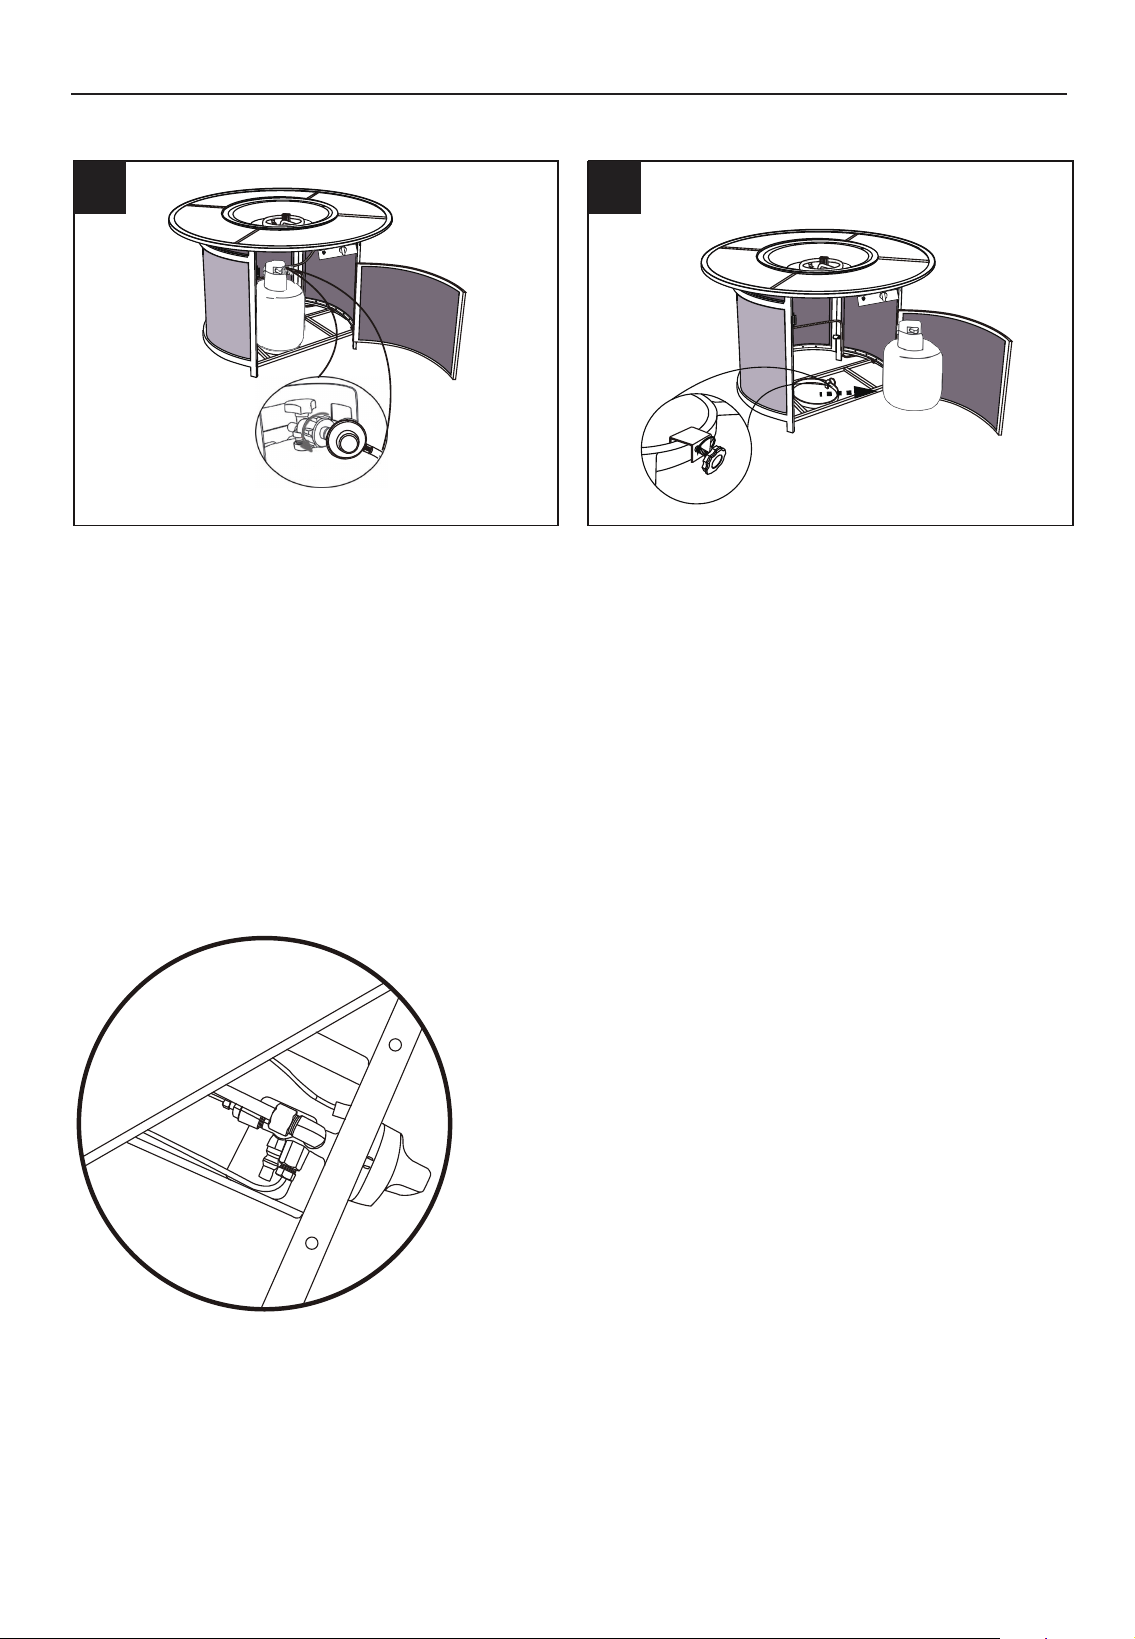
Counter-Clockwise
1 2
Plastic
Screw
NOTE:
Keep this manual for future reference.
Step 1:
To remove the fuel supply hose from the tank,
rotate counter-clockwise. See Figure 1.
Step 2:
Remove the tank from the tank-support assembly
and through the tank fastener. See Figure 2.
Note:
To replace the tank, repeat Step 6 and Step 7 in the
assembly instructions.
NOTE:
You must make periodic checks to
ensure that all connections are secured.
CARE INSTRUCTIONS
Note:
Close the valve tightly before removing the tank.
INSTRUCTIONS FOR REMOVING THE TANK
ASSEMBLY INSTRUCTIONS

12
OPERATING INSTRUCTIONS
Assemble on a soft surface, such as a carpet to avoid scratching the product.
CARE AND MAINTENANCE
• Wash frame, wicker, and fabric parts with mild soap and water, rinse thoroughly, and dry
completely. Do not use bleach, acid, or other solvents on the frame, wicker, or fabric parts.
• The cushions may be washed on the surface only by using mild soap and water or a commercial
foaming upholstery cleaner if necessary. If washed, rinse well and hang to dry. Do not machine
wash or dry.
• We recommend the use of furniture covers when not in use.
• Inspect and tighten all of the bolts and fasteners on a regular basis to ensure the proper
performance and safety of your chair.
• In order to prolong the life and beauty of your chair, we recommend that it be stored in a dry and
protected area during off season periods.
TROUBLESHOOTING
PROBLEM POSSIBLE CAUSE CORRECTIVE ACTION
Parts won't properly
align.
Bolts tightened before assembly
complete.
Loosen all bolts, properly align
all parts according to assembly
instructions, and only tighten
bolts once assembly is complete.

13
WARRANTY
REPLACEMENT PARTS LIST
For replacement parts, call our customer service department at 866-439-9800, 8 a.m. - 8 p.m., EST,
Monday - Sunday. You could also contact us at [email protected].
Printed in China
PART DESCRIPTION PART #
A Rear Frame HTVS42GE-HJ YES
B Frame A HTVS42GE-JA YES
C Frame B HTVS42GE-JB YES
D Bottom Frame
HTVS42GE-DG YES
E Front Door
HTVS42GE-MK YES
F Cross Brace
HTVS42GE-ZG YES
G Table Top
HTVS42GE-ZM YES
H Cover HTVS42GE-GB YES
I Lava Rocks HTVS42GE-HSS YES
Three years limited warranty.
Proof of purchase (dated register receipt) is required for warranty claims.
It remains the customer’s responsibility for freight and packing charges to and from the service
center.
This limited warranty is extended to the original purchaser and applies to defects in materials and
workmanship of your patio furniture, provided your furniture is maintained with care and used only for
personal, residential purposes.
Exclusions: Items used for commercial, contract or other non-residential purposes; display models;
items purchased “as is;” or items damaged due to acts of nature, vandalism, misuse or improper
assembly are not covered. Discoloration or fading of the finish or fabrics as a result of exposure to
the elements, chemicals or spills; tabletop breakage; corrosion or rusting of hardware; and damages
to frames or welds caused by improper assembly, misuse or natural causes are not covered.
If within the stated warranty period a product is found to be defective in material or workmanship, the
purchaser must contact the manufacturer’s customer service department at
866-439-9800,
8 a.m. - 8 p.m., EST, Monday - Sunday. You could also contact us at
The manufacturer, at its option, will repair or replace the defective parts.
The warranty is to the original purchaser and is non-transferable. Any replacement of warranted
items will be in the original style and color, or a similar style and color if the original is unavailable or
has been discontinued. As some states do not allow exclusions or limitations on an implied warranty,
the above exclusions and limitations may not apply. This warranty gives you specific rights and you
may also have other rights which vary from state to state.
COVERED UNDER WARRANTY