
Technical Support and E-Warranty Certificate
www.vevor.com/support
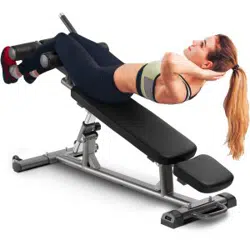
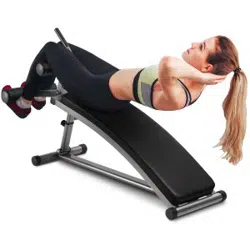
SIT UP BENCH
MODEL:TL903
We continue to be committed to provide you tools with competitive price.
"Save Half", "Half Price" or any other similar expressions used by us only represents an
estimate of savings you might benefit from buying certain tools with us compared to the major
top brands and does not necessarily mean to cover all categories of tools offered by us. You
are kindly reminded to verify carefully when you are placing an order with us if you are
actually saving half in comparison with the top major brands.


1
MODEL:TL903
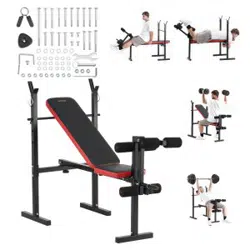
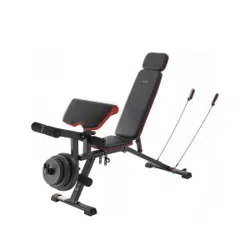
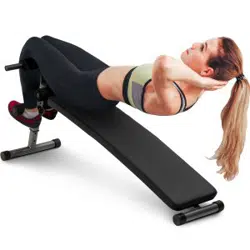
Note:The product picture is for reference, the actual details shall prevail
NEED HELP? CONTACT US!
Have product questions? Need technical support? Please feel free to
contact us:
Technical Support and E-Warranty Certificate
www.vevor.com/support
This is the original instruction, please read all manual instructions
carefully before operating. VEVOR reserves a clear interpretation of our
user manual. The appearance of the product shall be subject to the
product you received. Please forgive us that we won't inform you again if
there are any technology or software updates on our product.
Thank you very much for choosing this product.
SIT UP BENCH

2
Please read all of the instructions before using it.The information will help
you achieve the best possible results.
Operation safety
WARNING:
Please read all instructions before using this product
It is the Owner's responsibility to ensure that all users of this
product are fully aware of all warnings and precautions.
·Do not use it if you are pregnant
·Before beginning any exercise program consult your physician.
·Read all instruction before using this sit-up bench
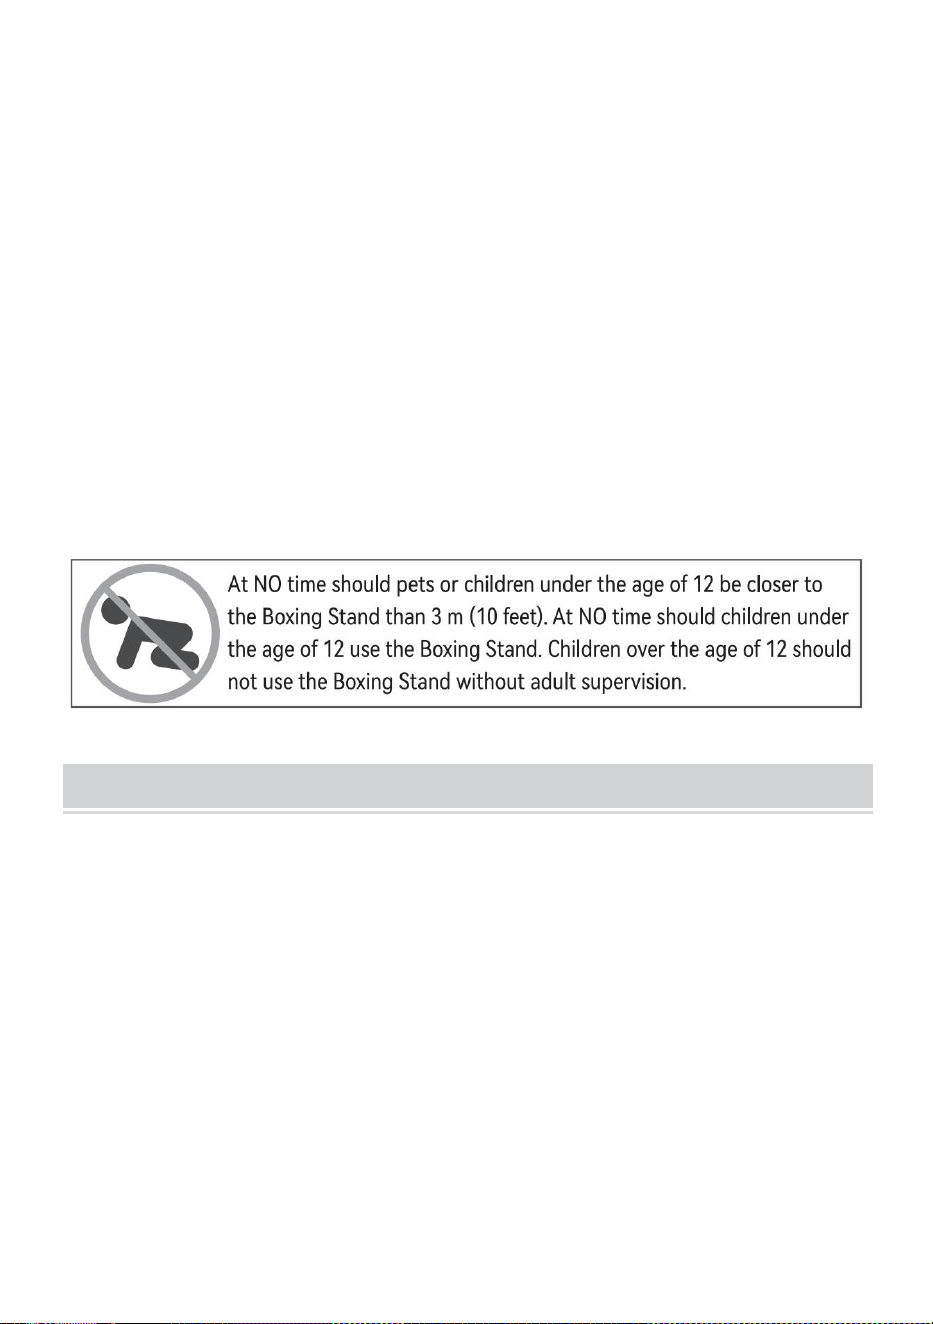
·Keep children and pets away from sit-up bench while in use.Children
should not use.The sit-up bench without adult supervision.
·Inspect and tighten all parts each time before using this sit-up bench.
·Please clean this machine using damped wipes only.Do not use any
cleansers.Please Consult with customer service if you have any questions.
·This sit-up bench should be placed on a flat surface when using.Place an
anti-slippery mat under the machine if needed.
·Please wear proper clothes when using this sit-up bench
·Do not use it if it is not functional or parts are not well-assembled.
·If you feel any chest pains,nausea,dizziness,or short of breadth,you
should stop exercising immediately and consult your physician before
continuing.
3
Exercise Plans
1.Beginners are recommended to start with less reps,5 reps as 1set for
example and add reps as goes.
2.Please do not exercise half an hour before /after meals or 1 hour before
sleep
3.Please make exercise plans.
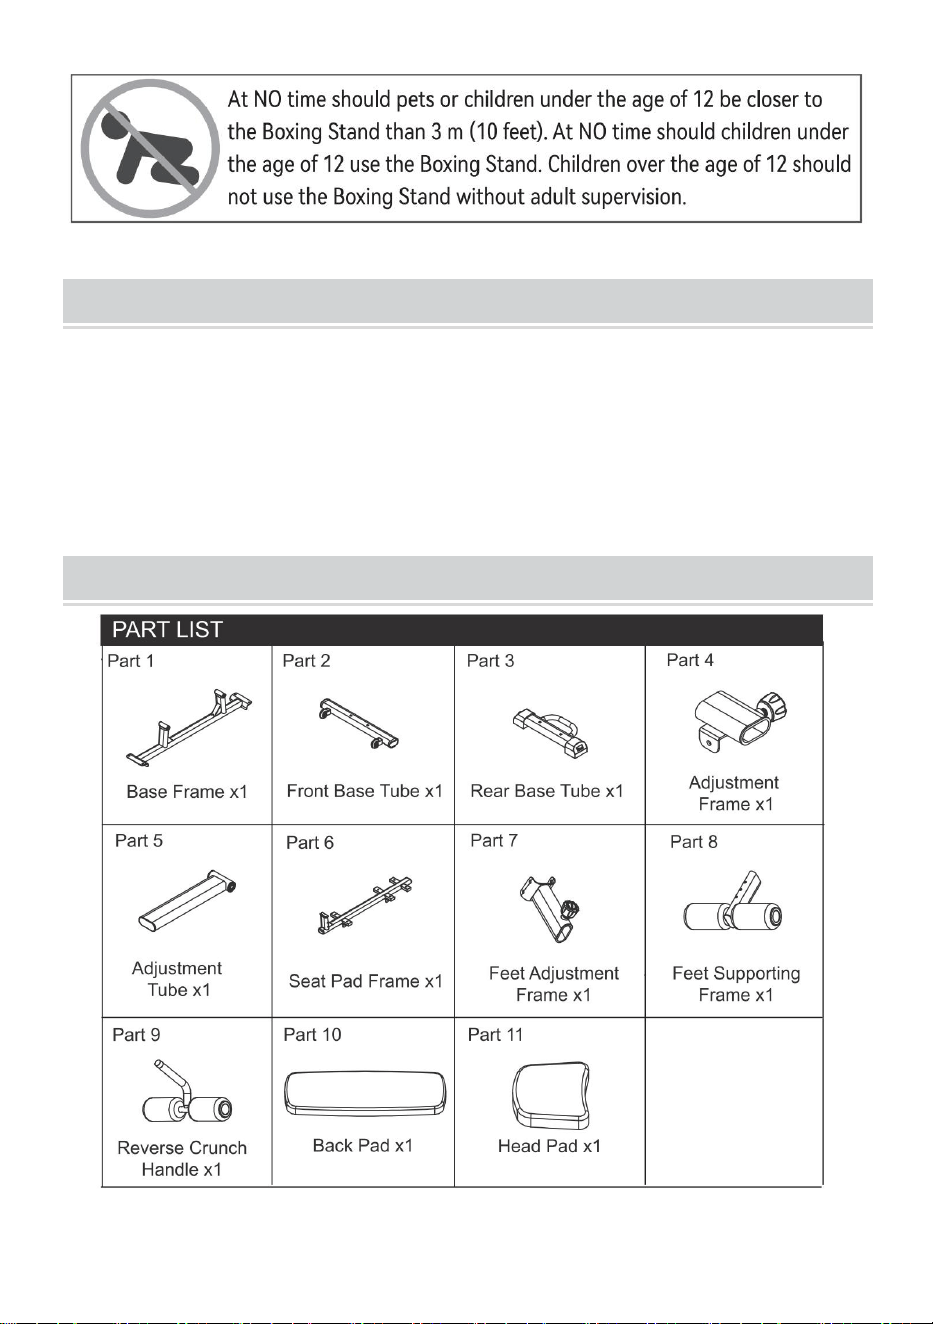
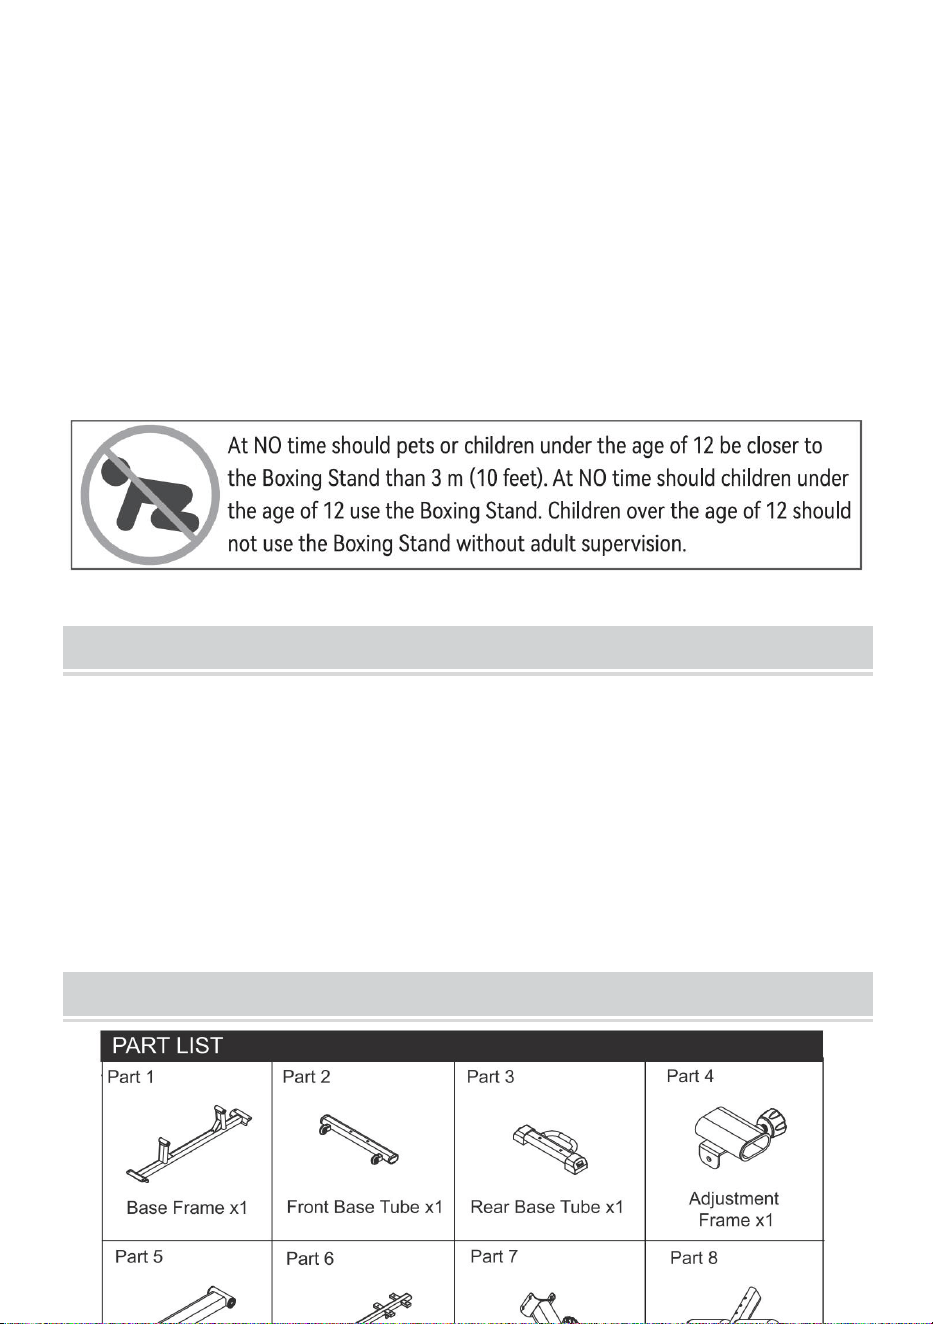
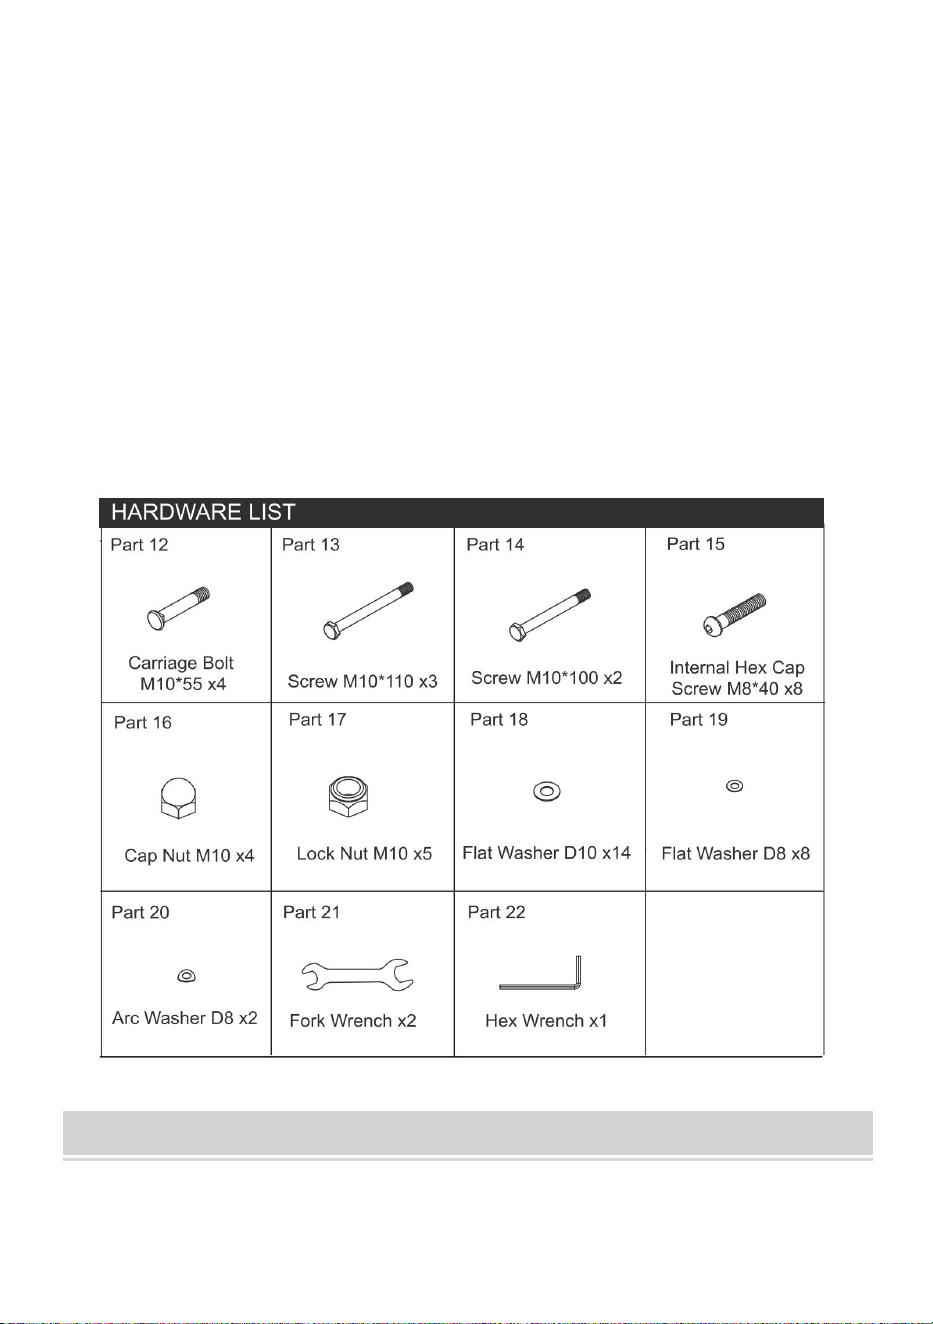
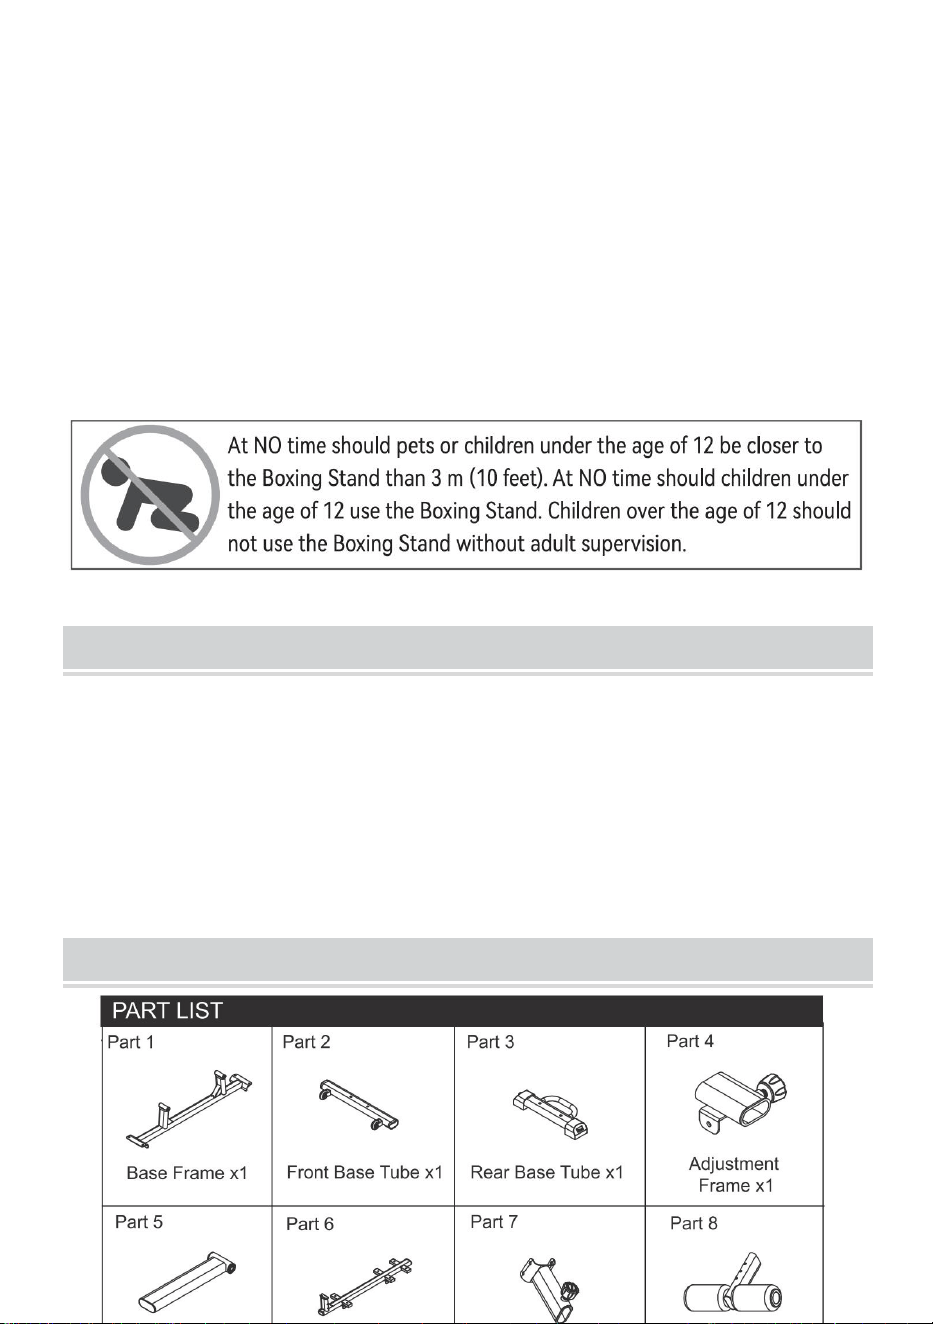
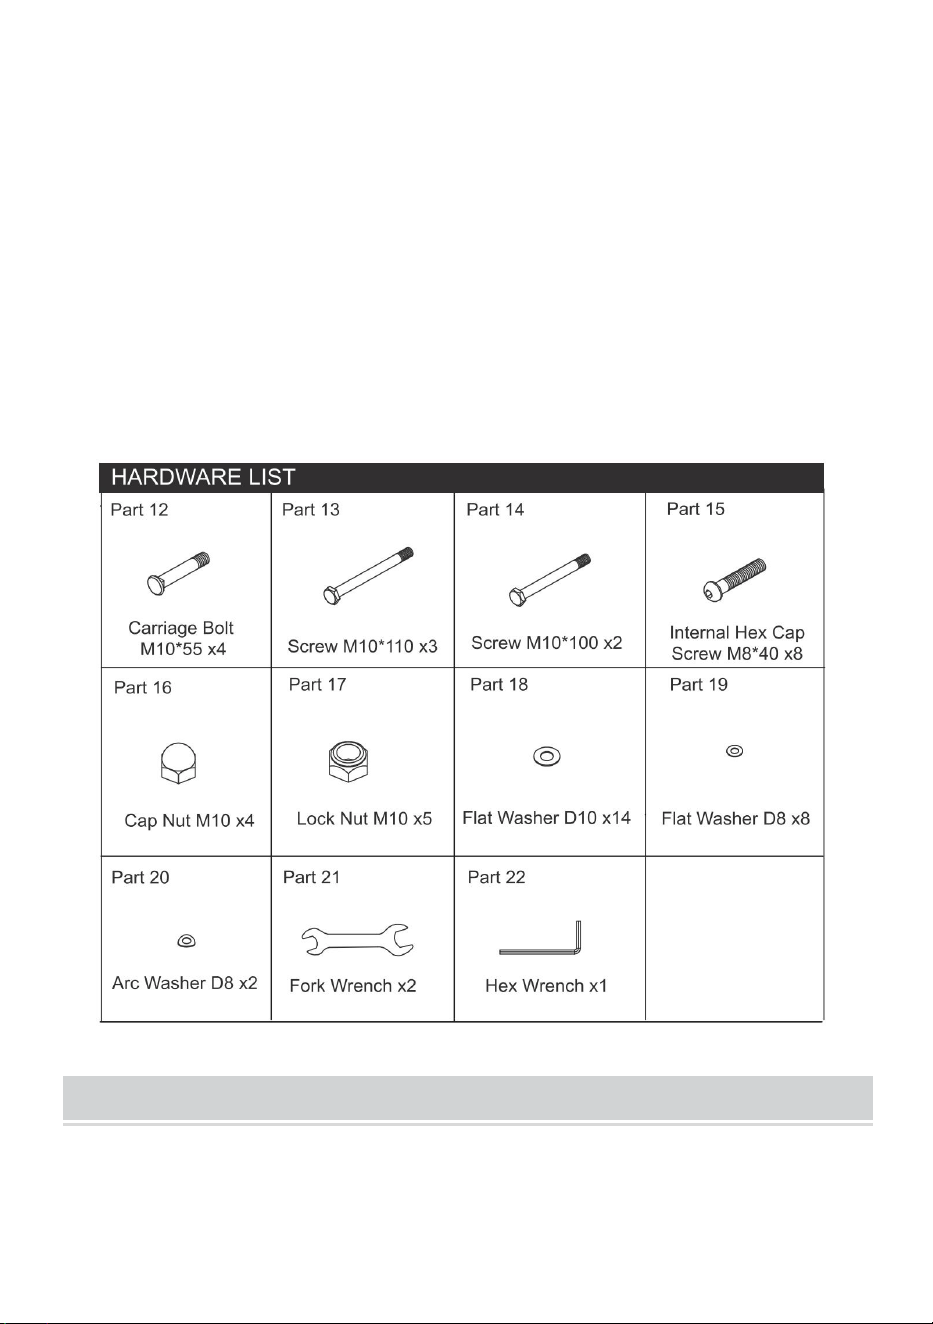
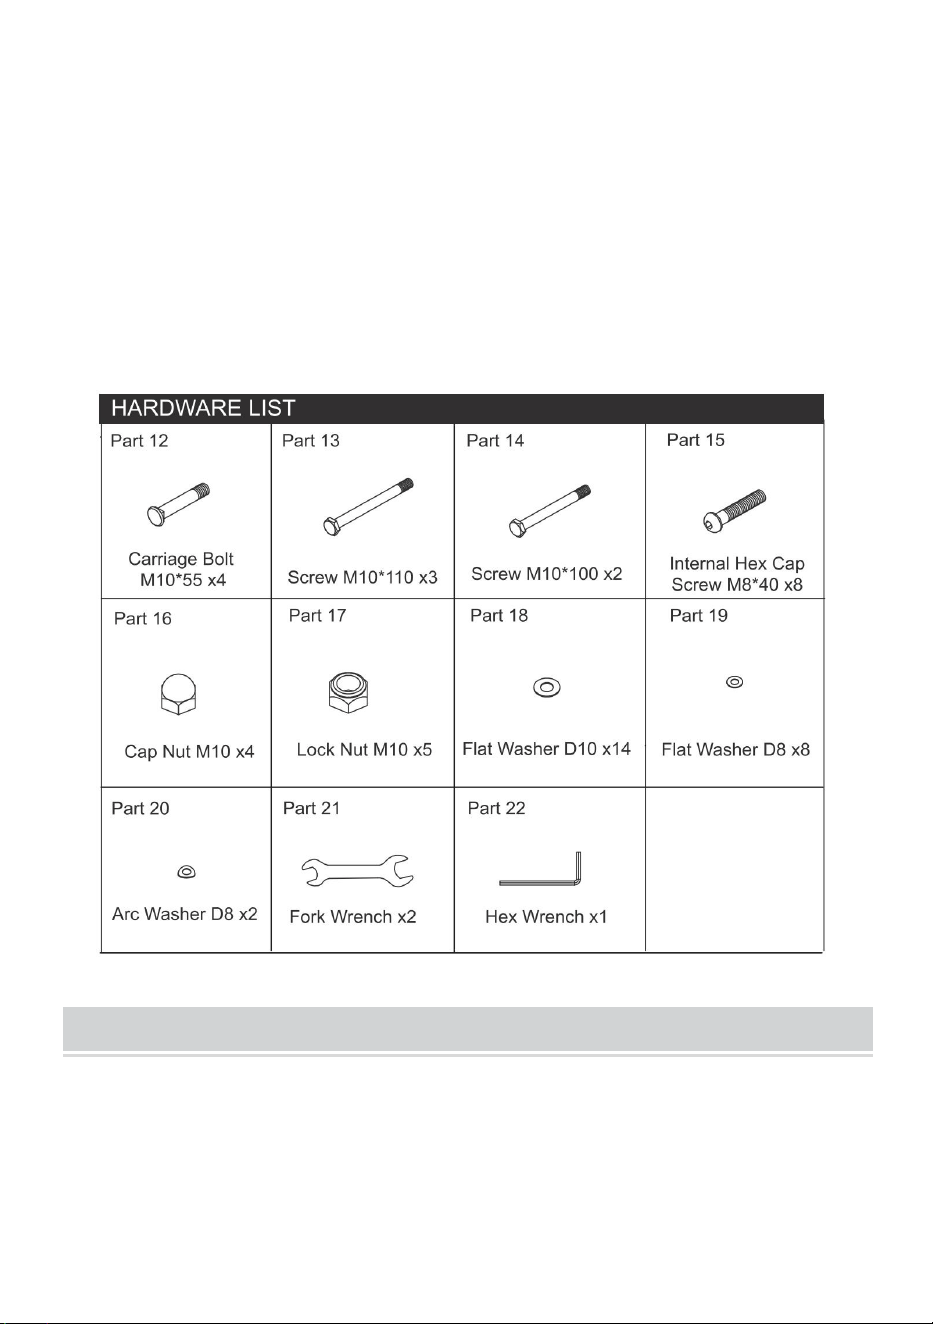
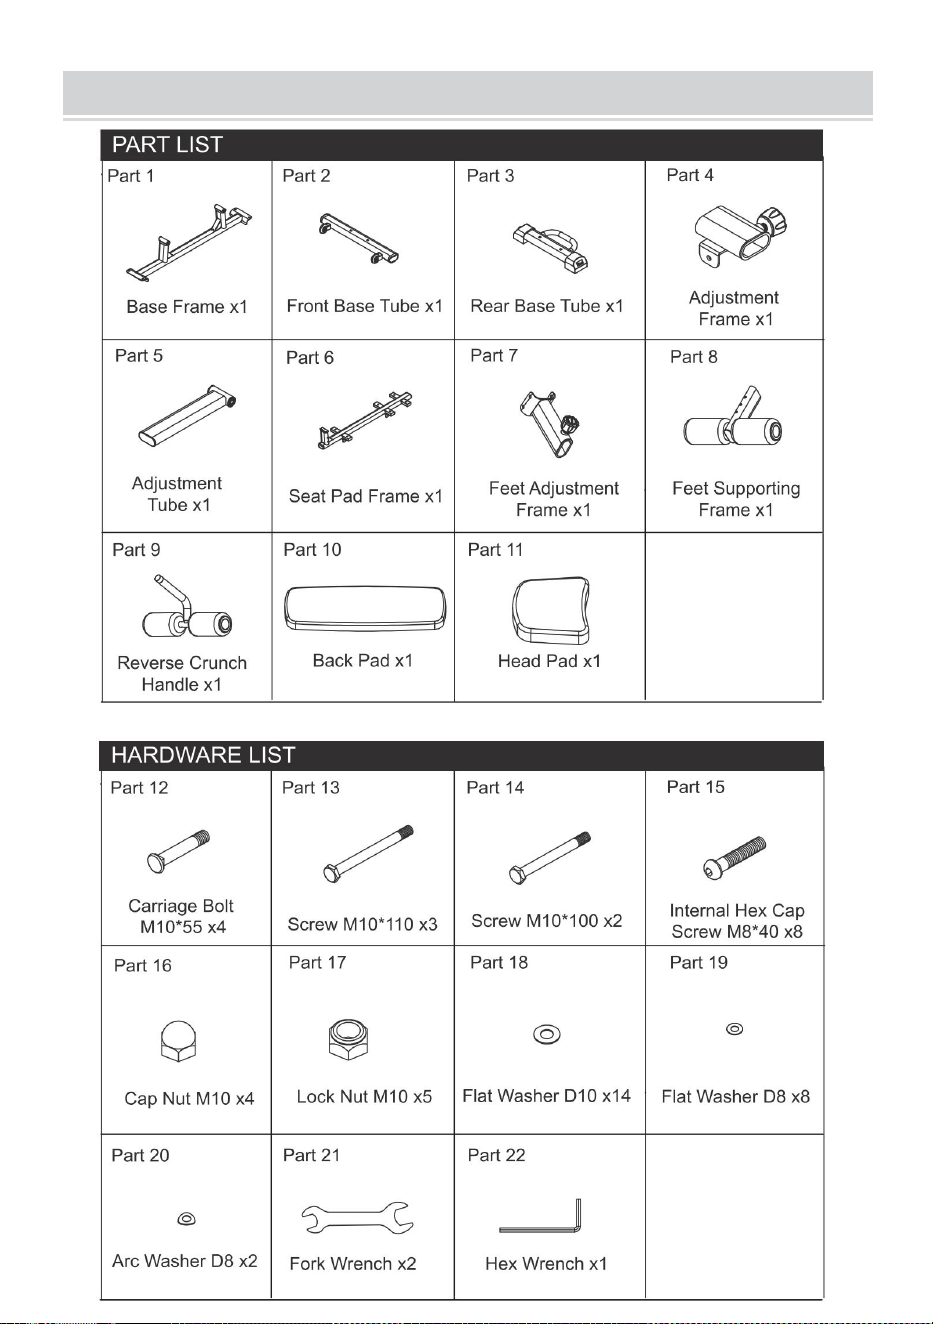
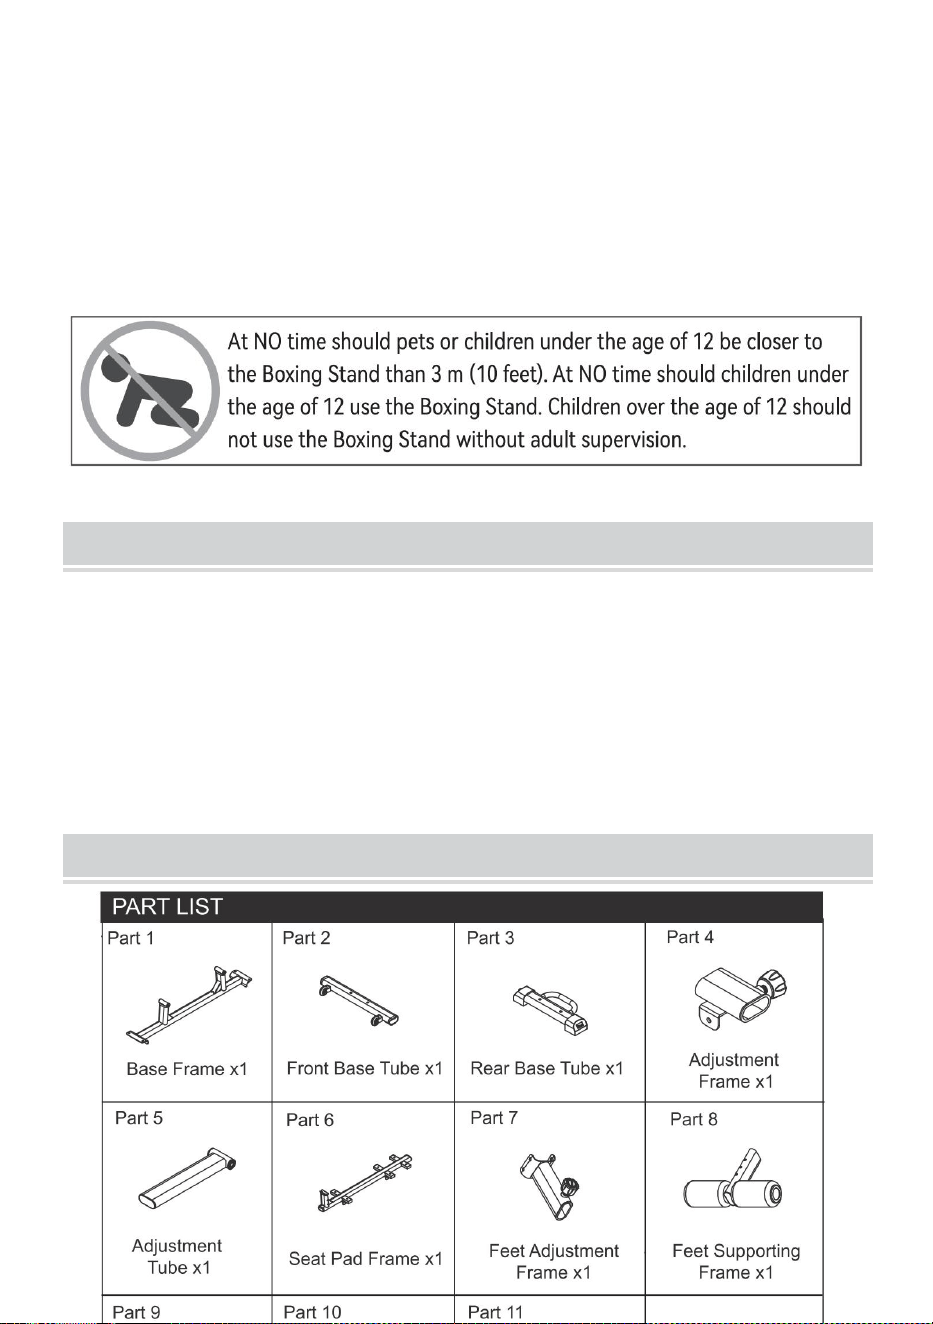
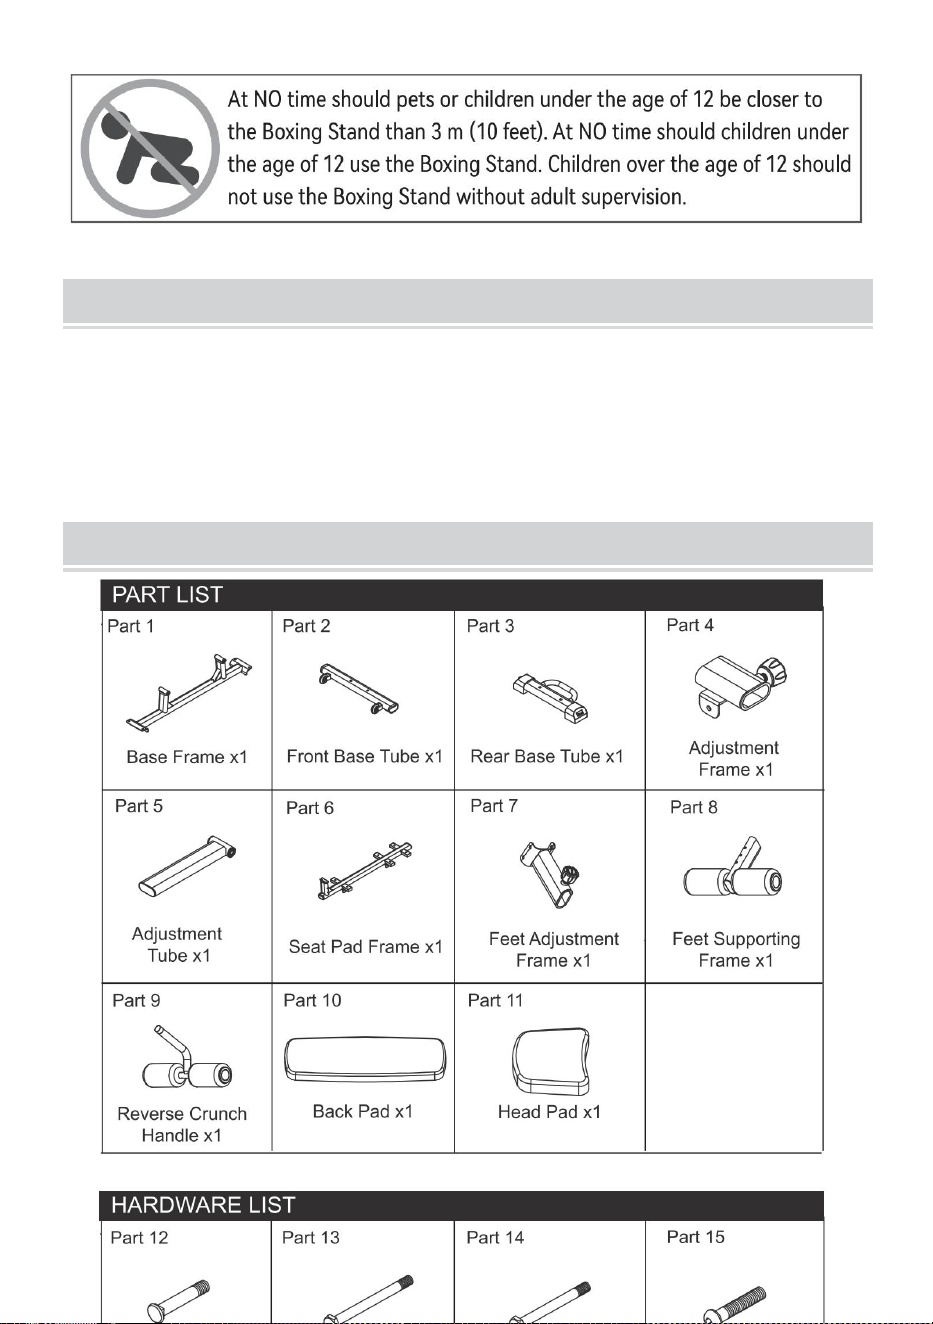
Part List

4
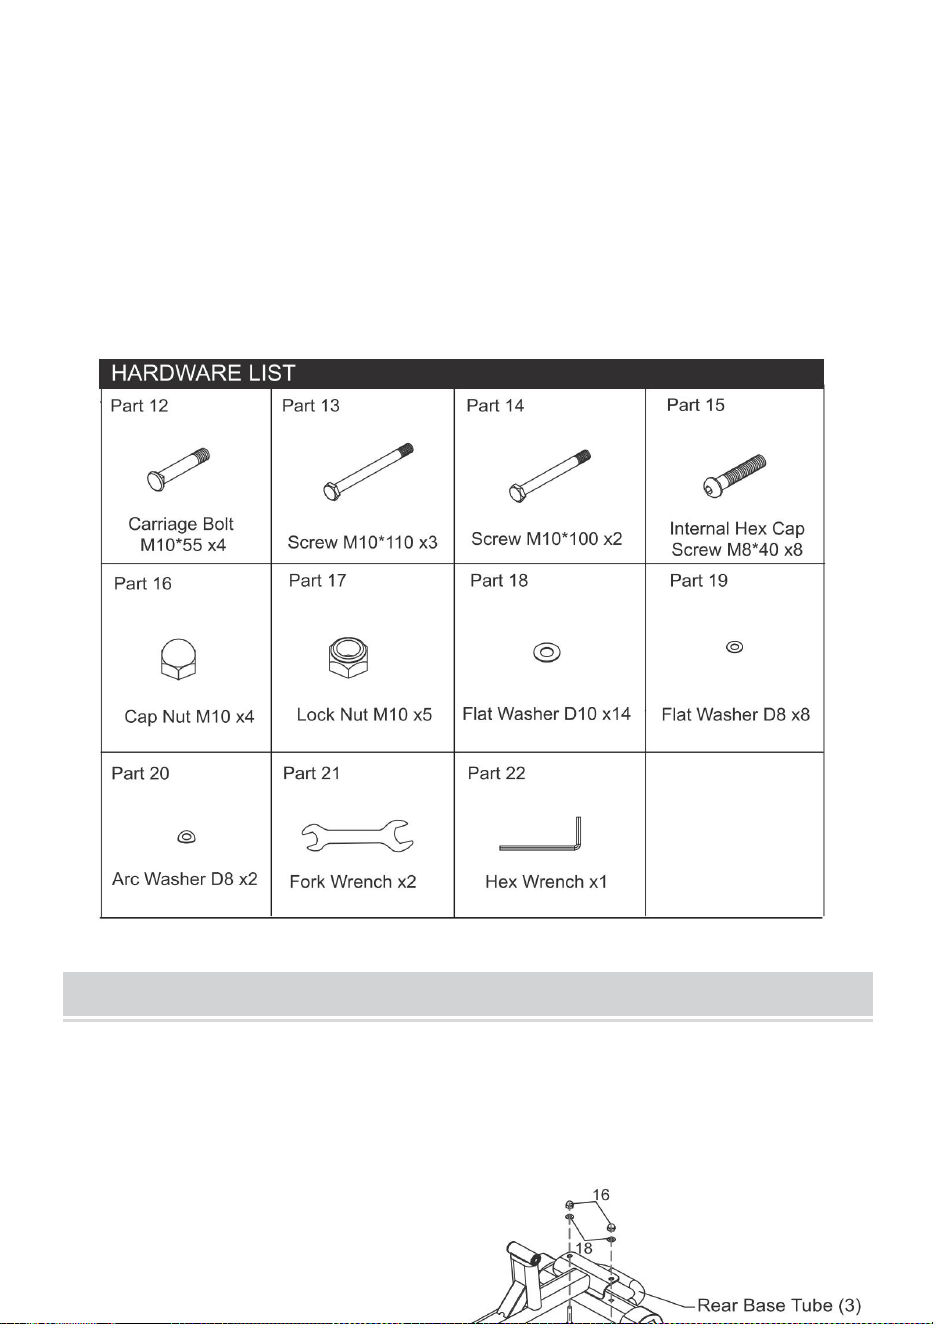
Assembly
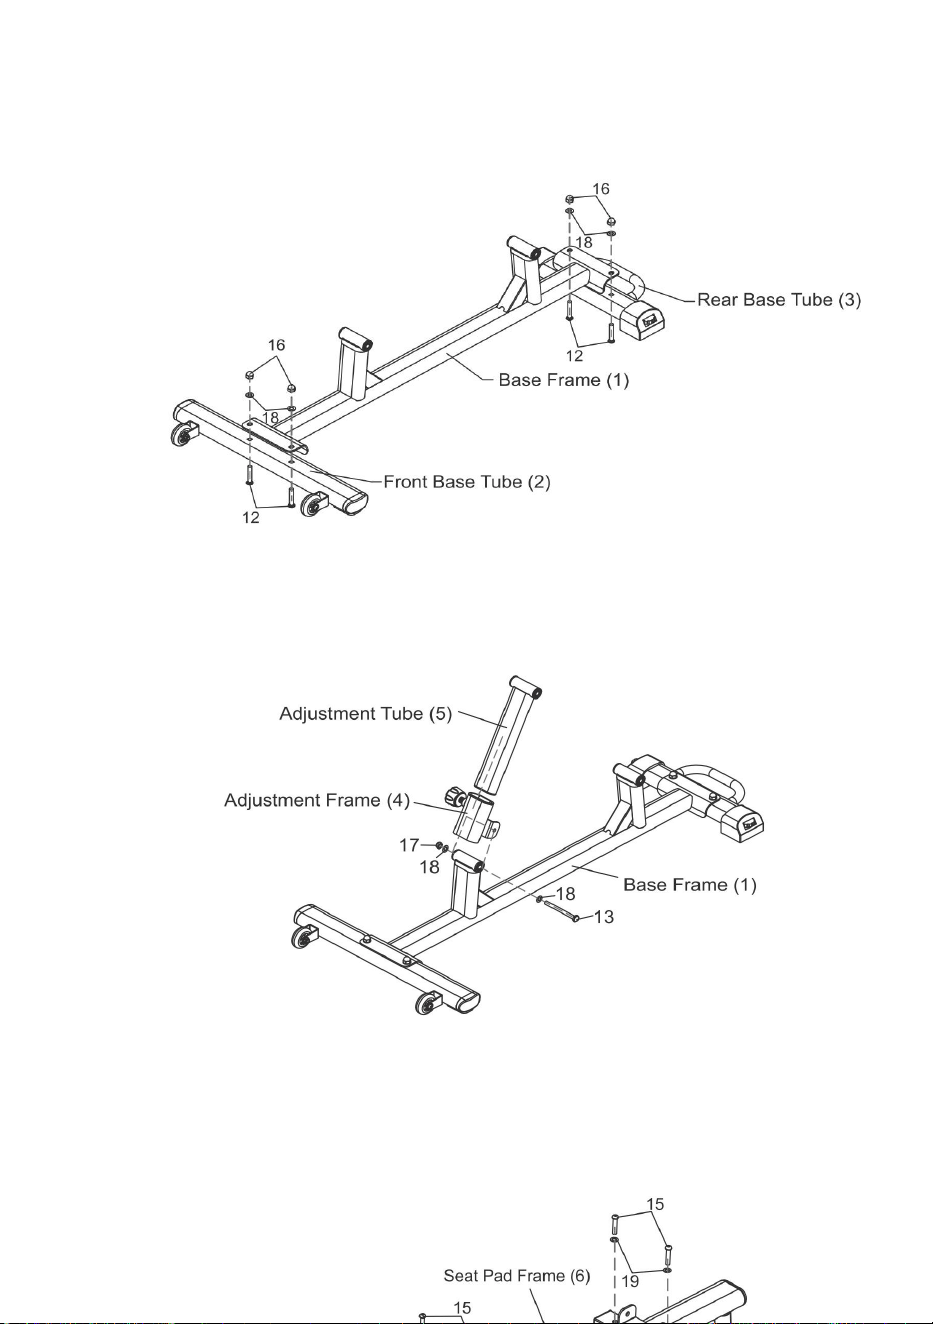
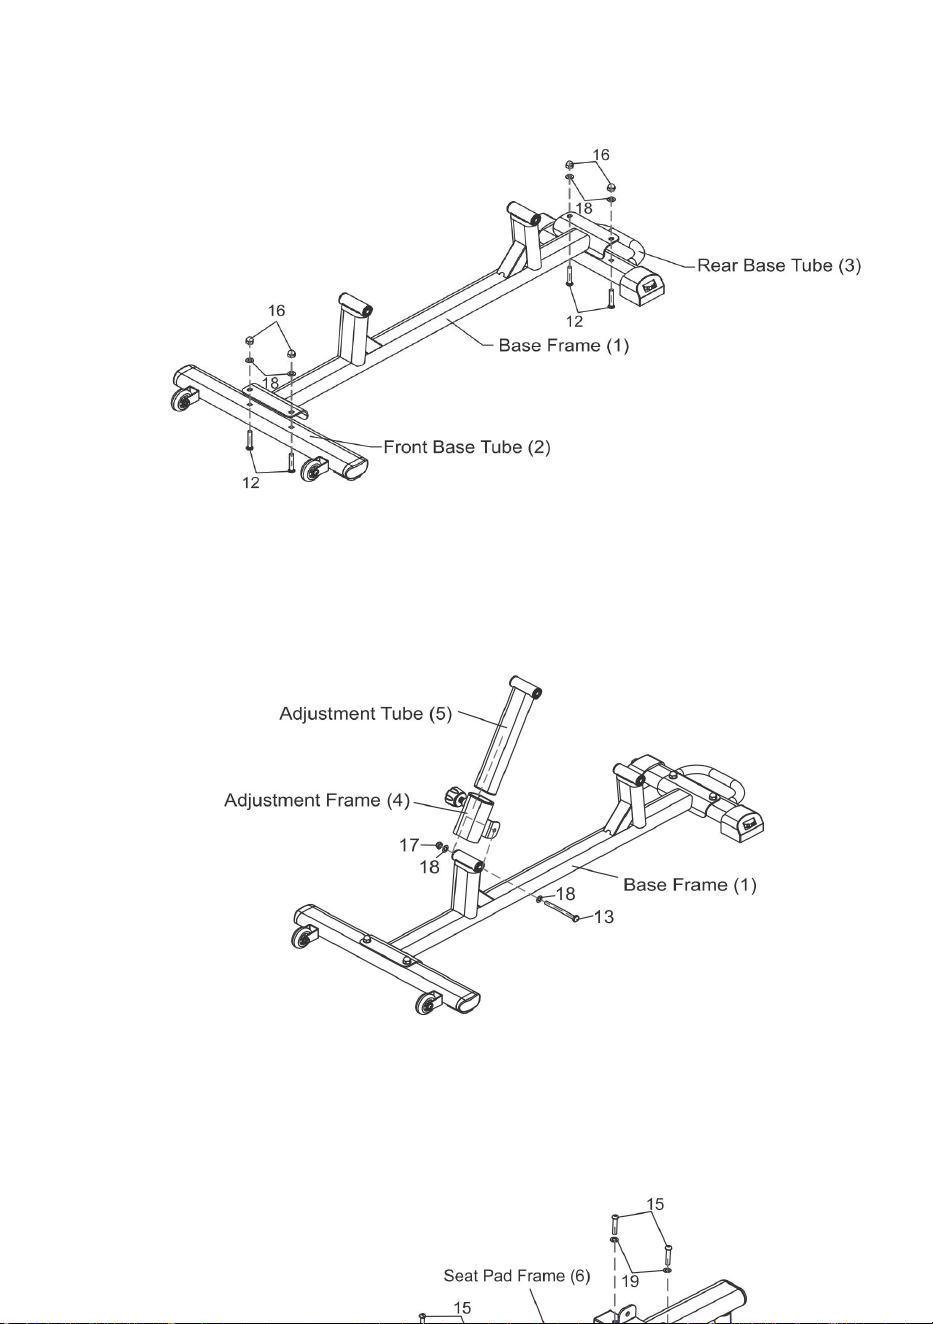
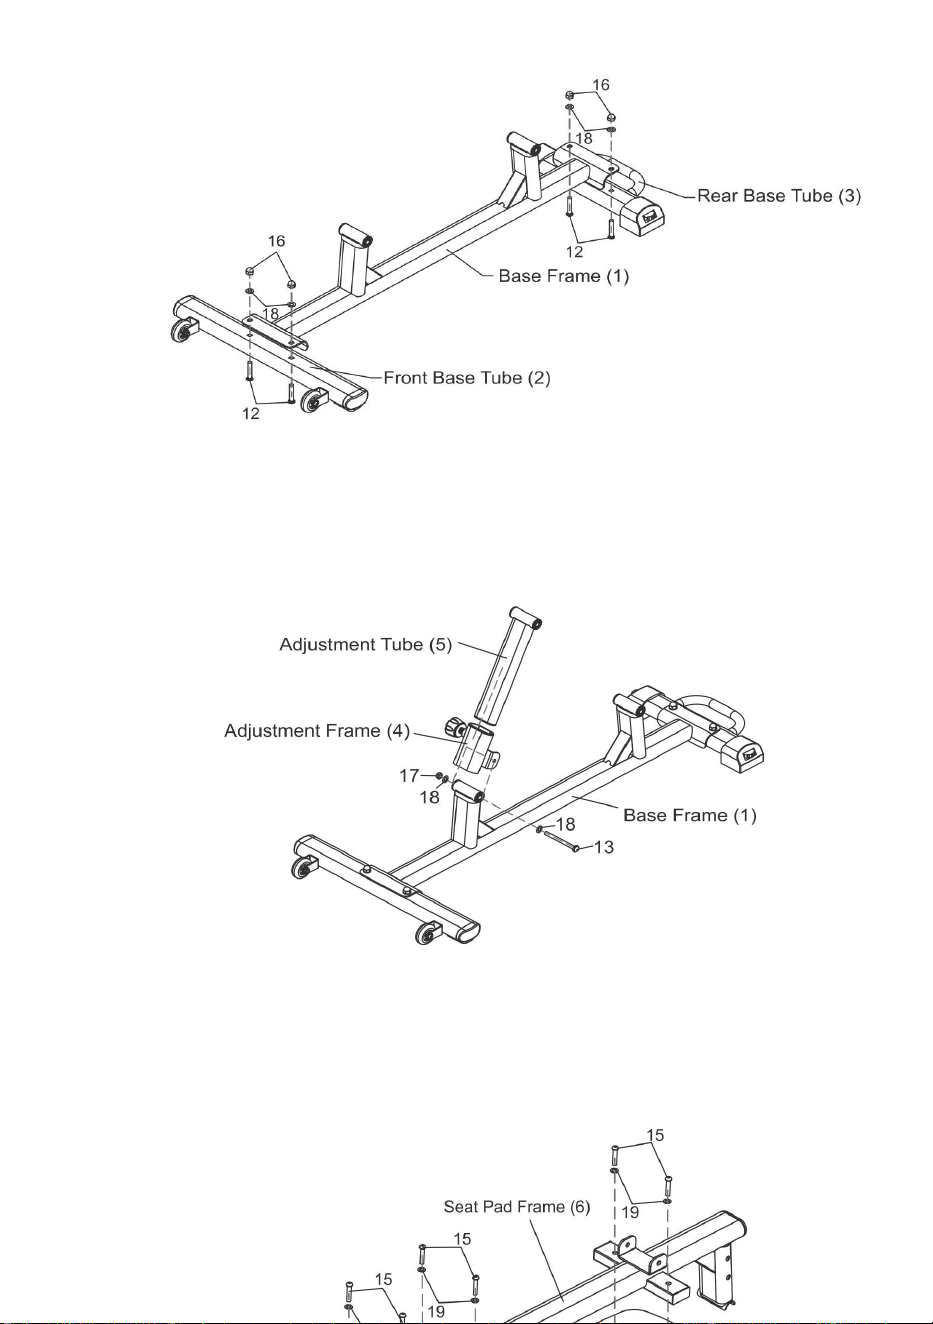
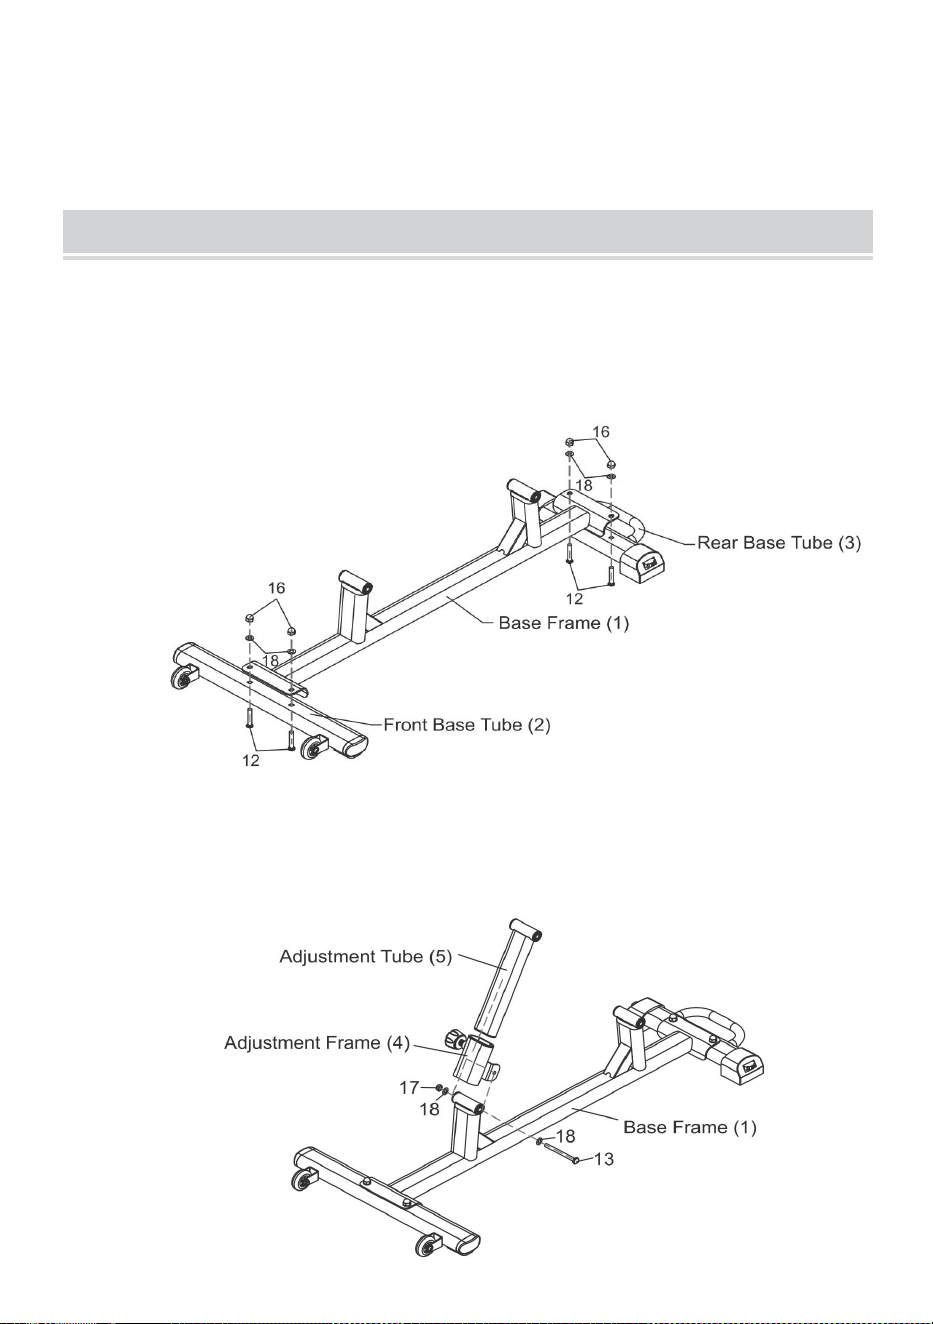
Step 1:
Attach Front Base Tube (2)and Rear Base Tube (3)to Base Frame (1).Use
Carriage Bolt M10*55 (12), Cap Nut M10 (16), and Flat Washer D10 (18).
Tighten the screws.
5
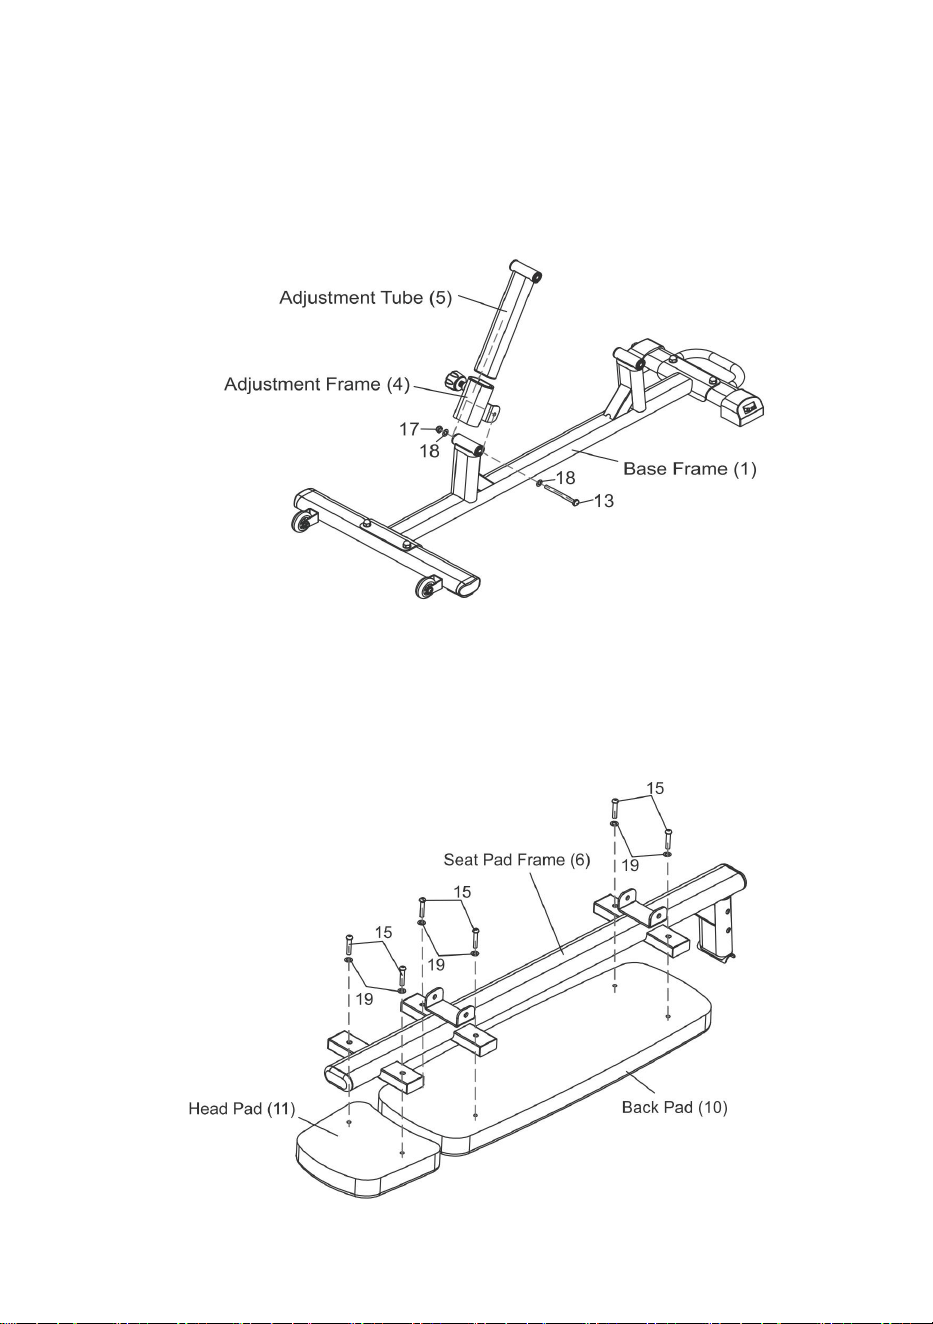
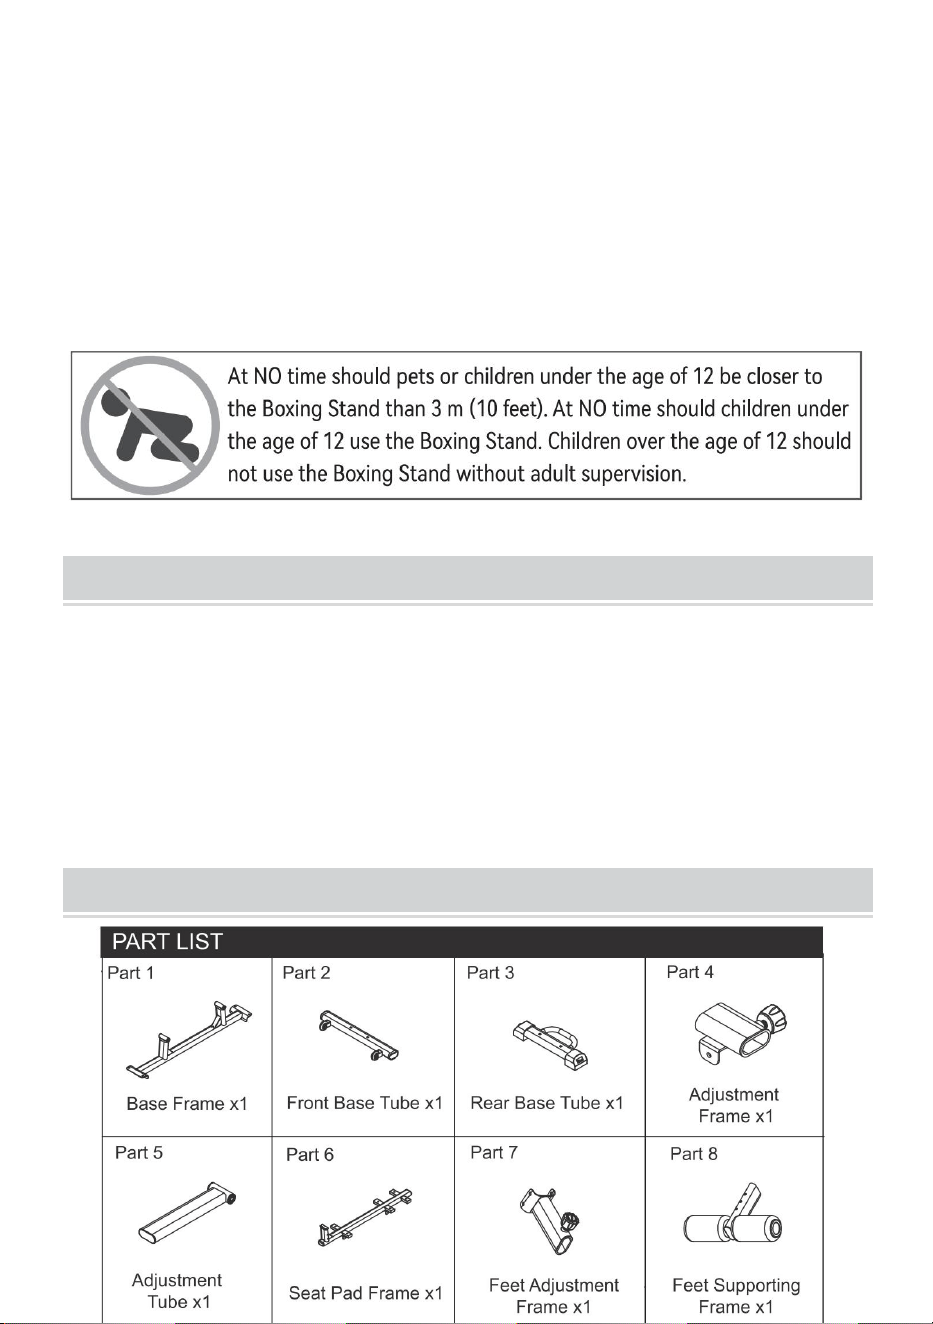
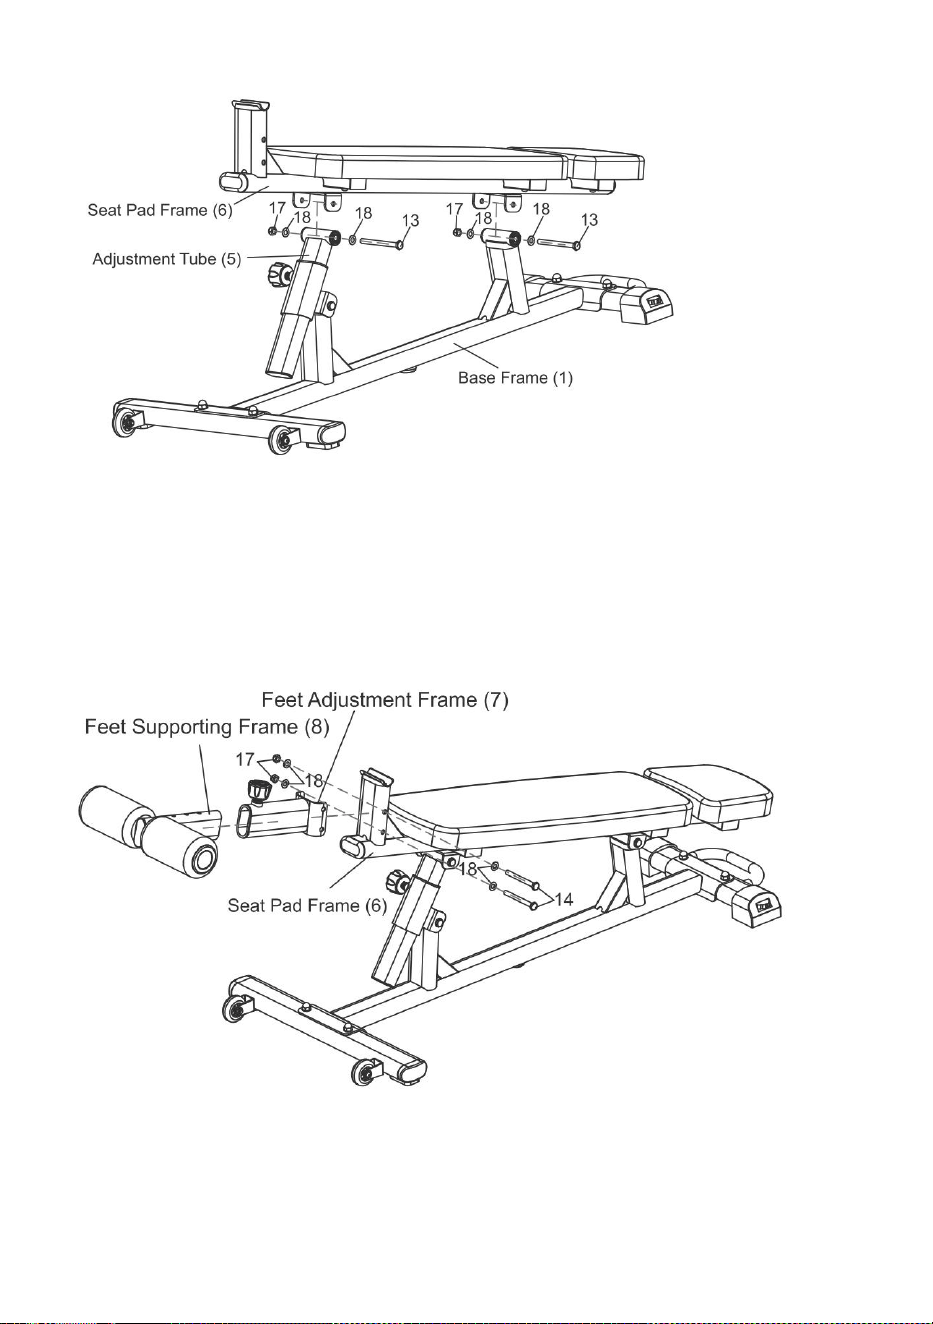
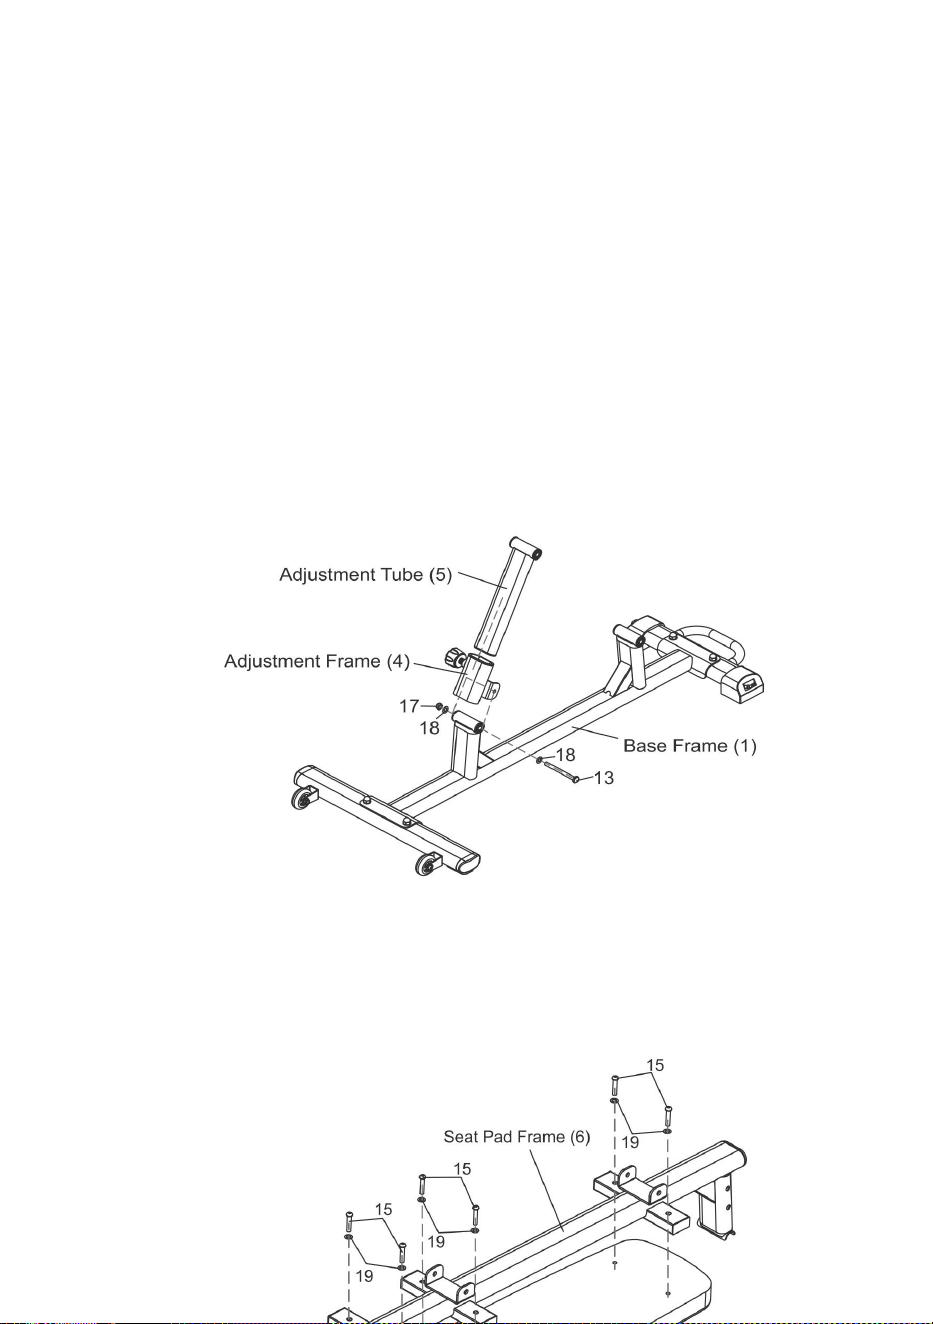
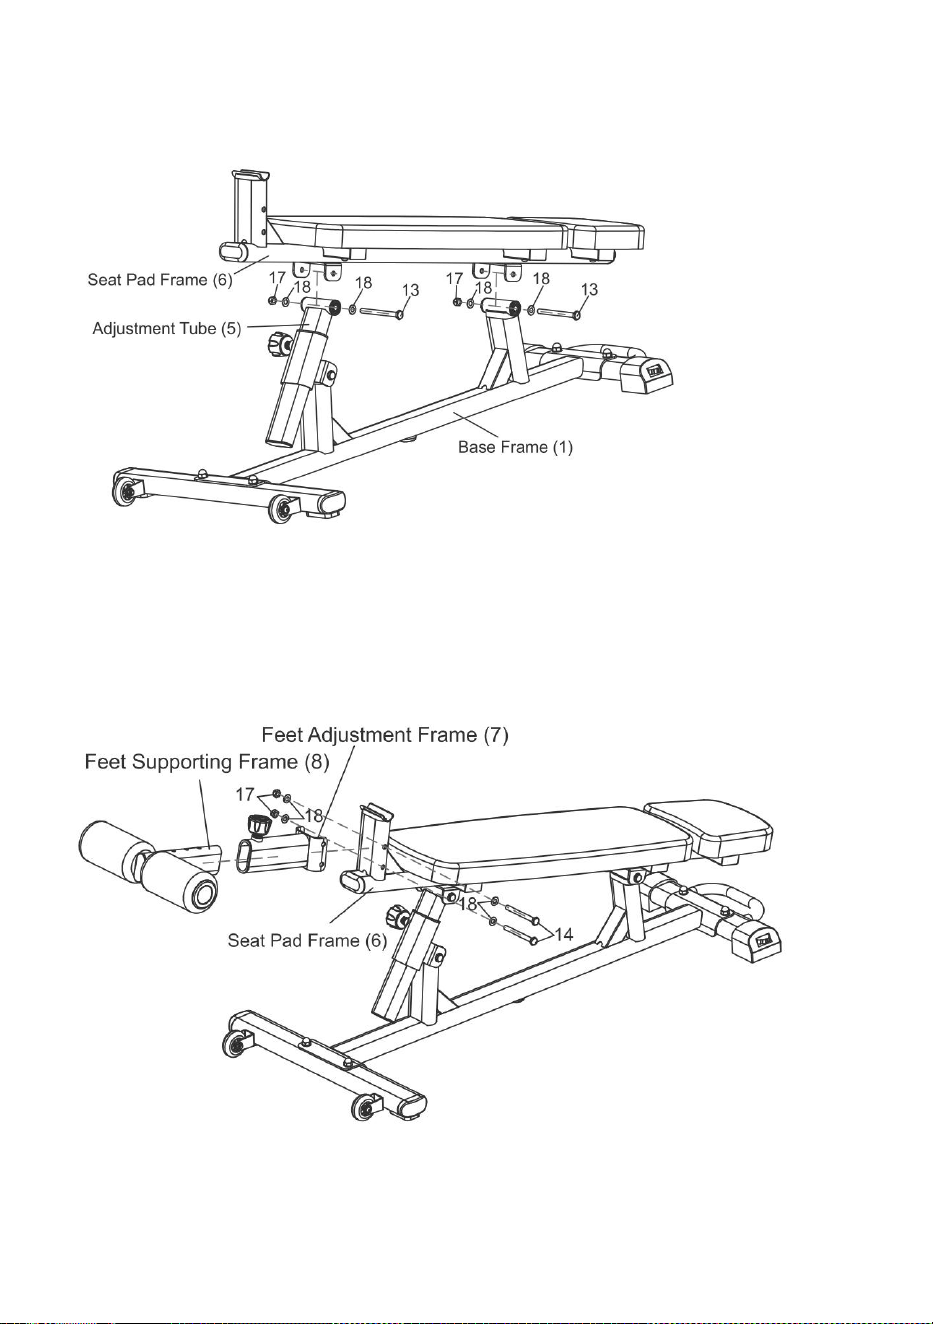
Step 2:
Attach Adjustment Frame (4)to Base Frame (1).Use Screw
M10*110(13)Flat Washer D10 (18), and Lock Nut M10 (17).Tighten the
screws. Insert Adjustment Tube (5)into Adjustment Frame(4).
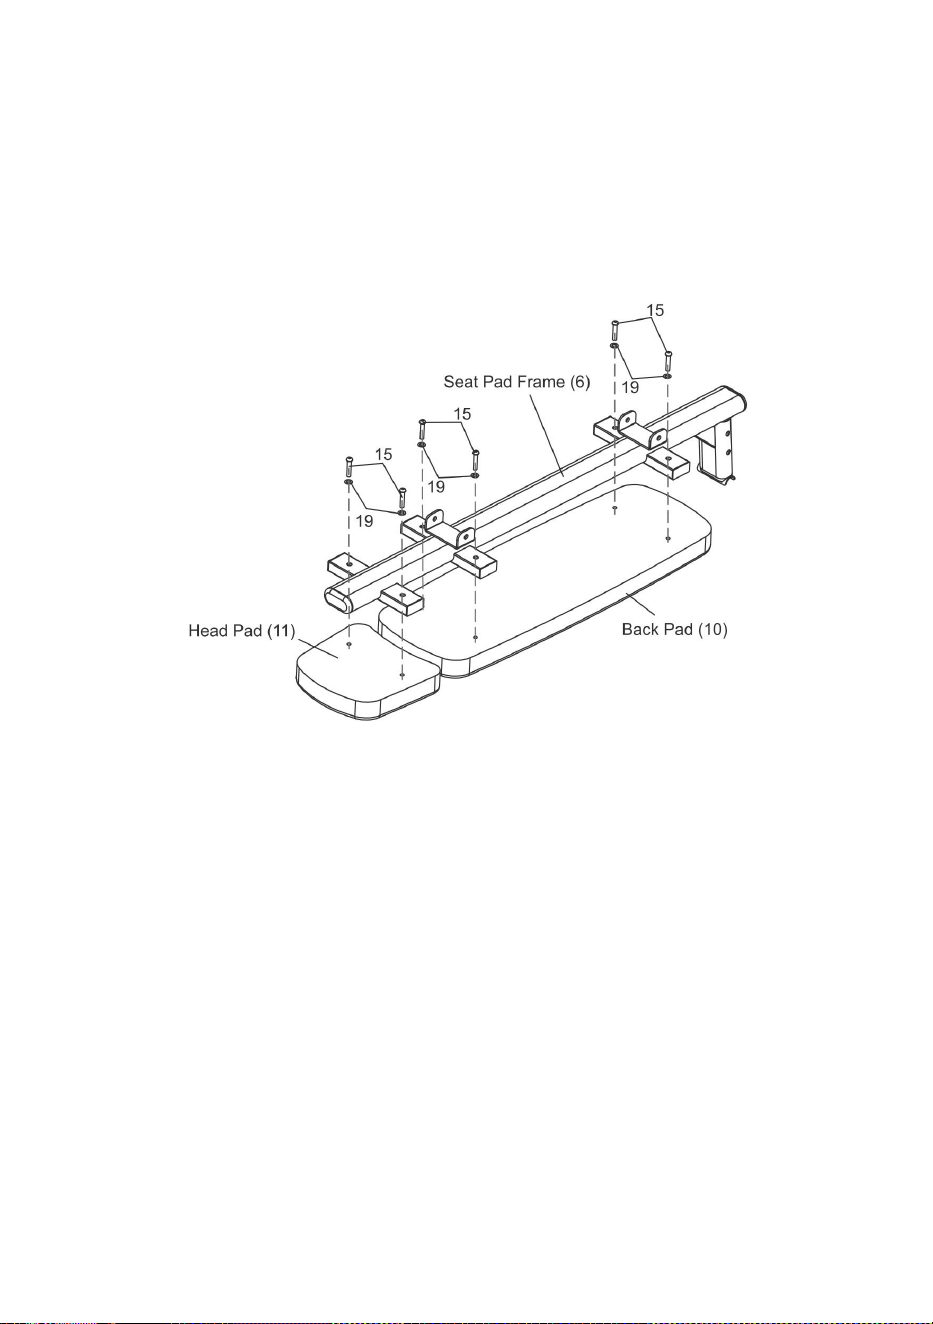
Step 3:
Attach Head Pad (11) and Back Pad (10) to Seat Pad Frame (6). Use
Internal Hex Cap Screw M8*40 (15) and Flat Washer D8 (19). Tighten the
screws.
6
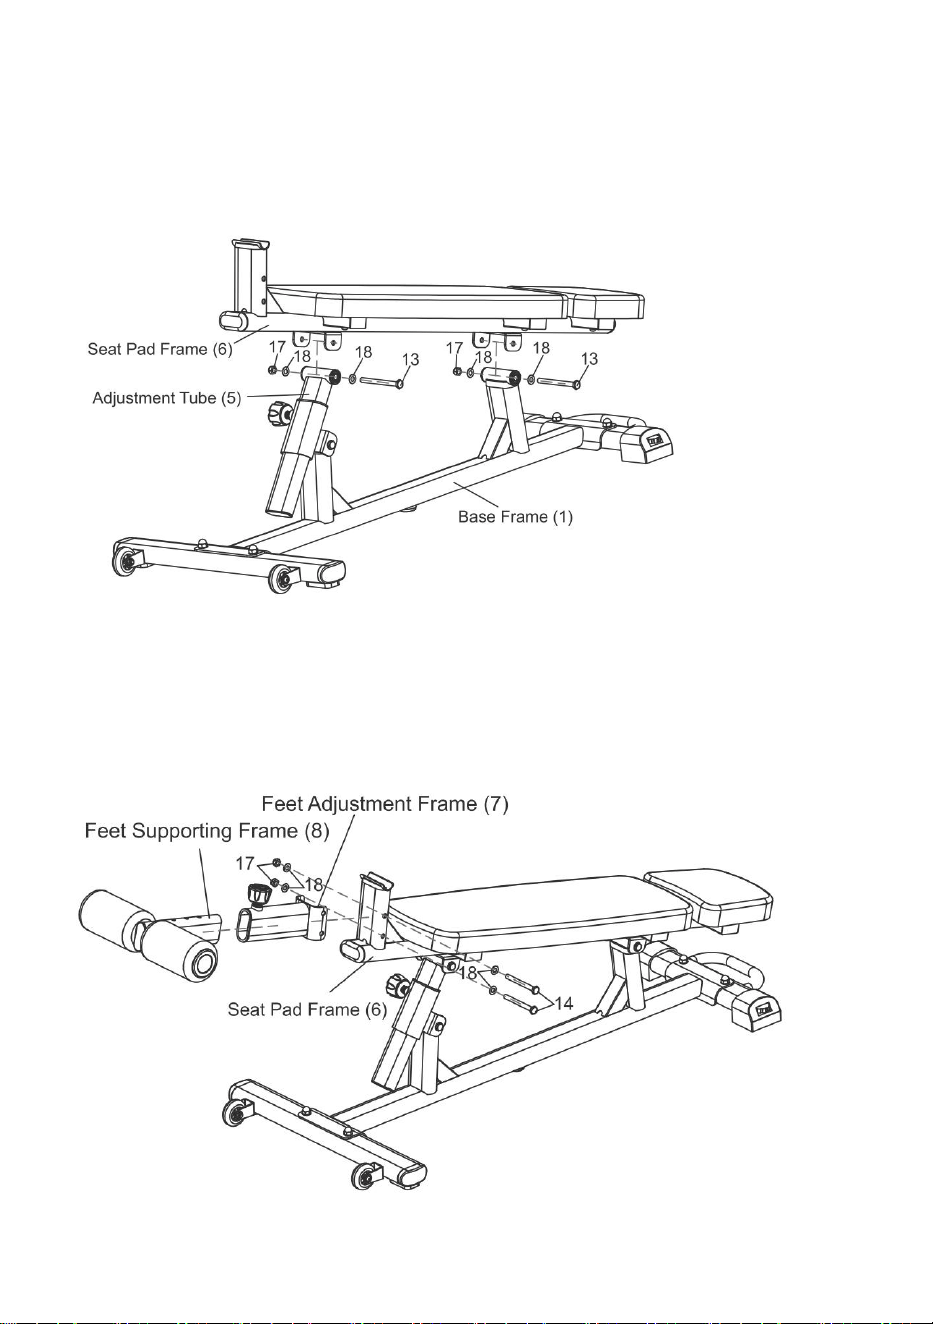
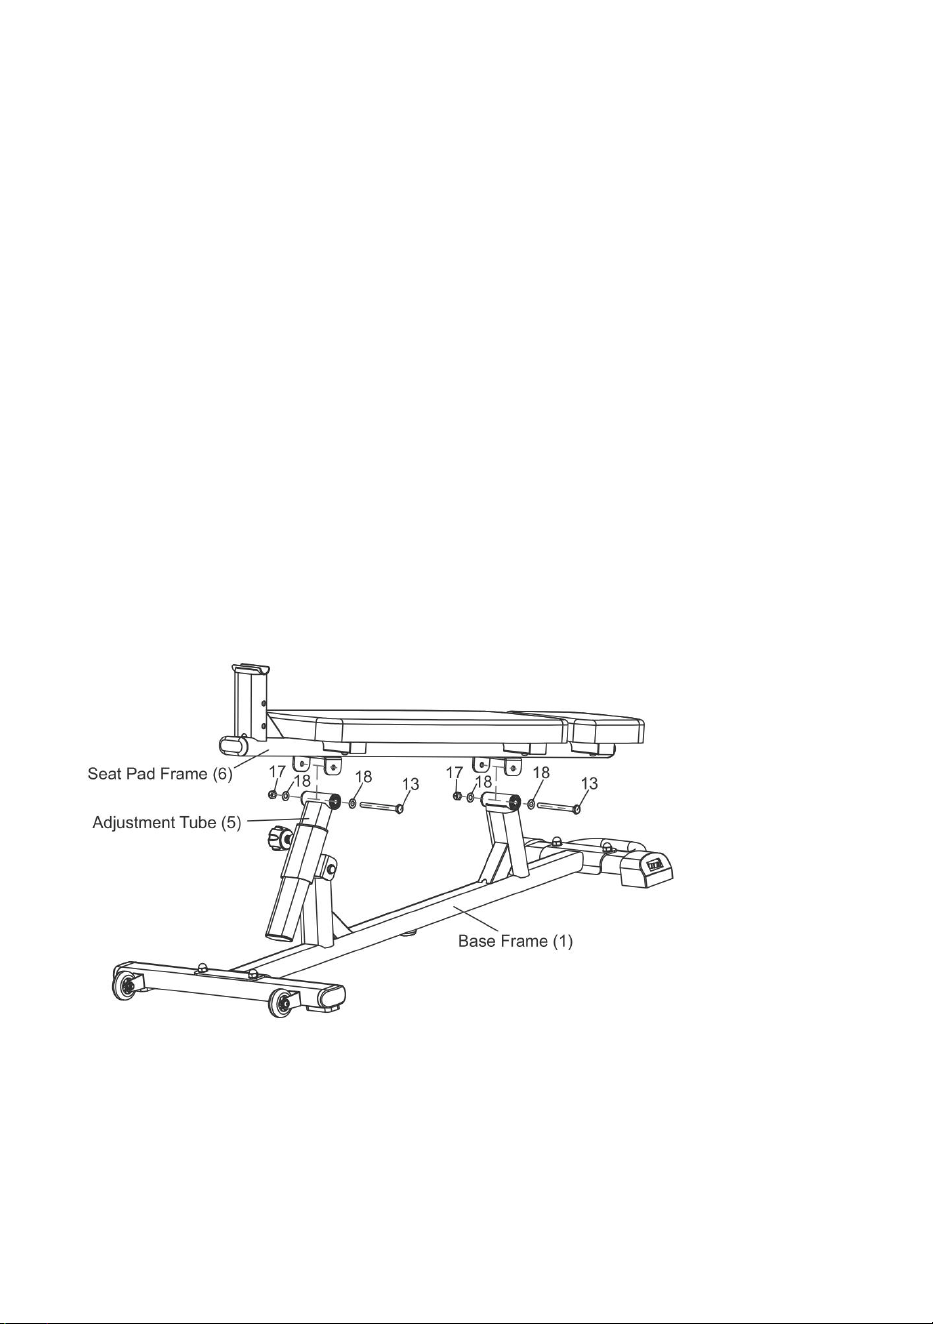
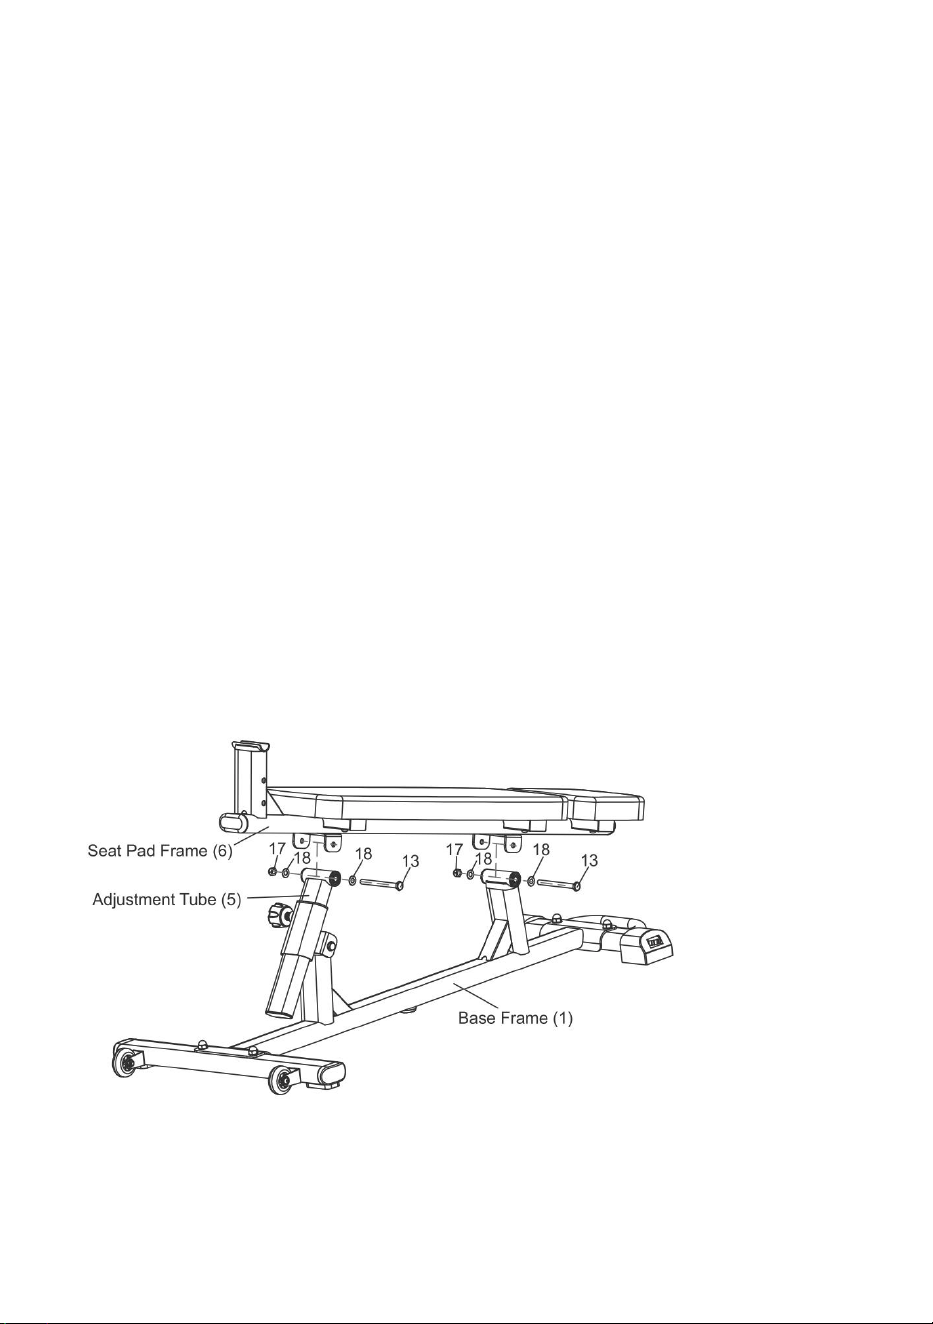
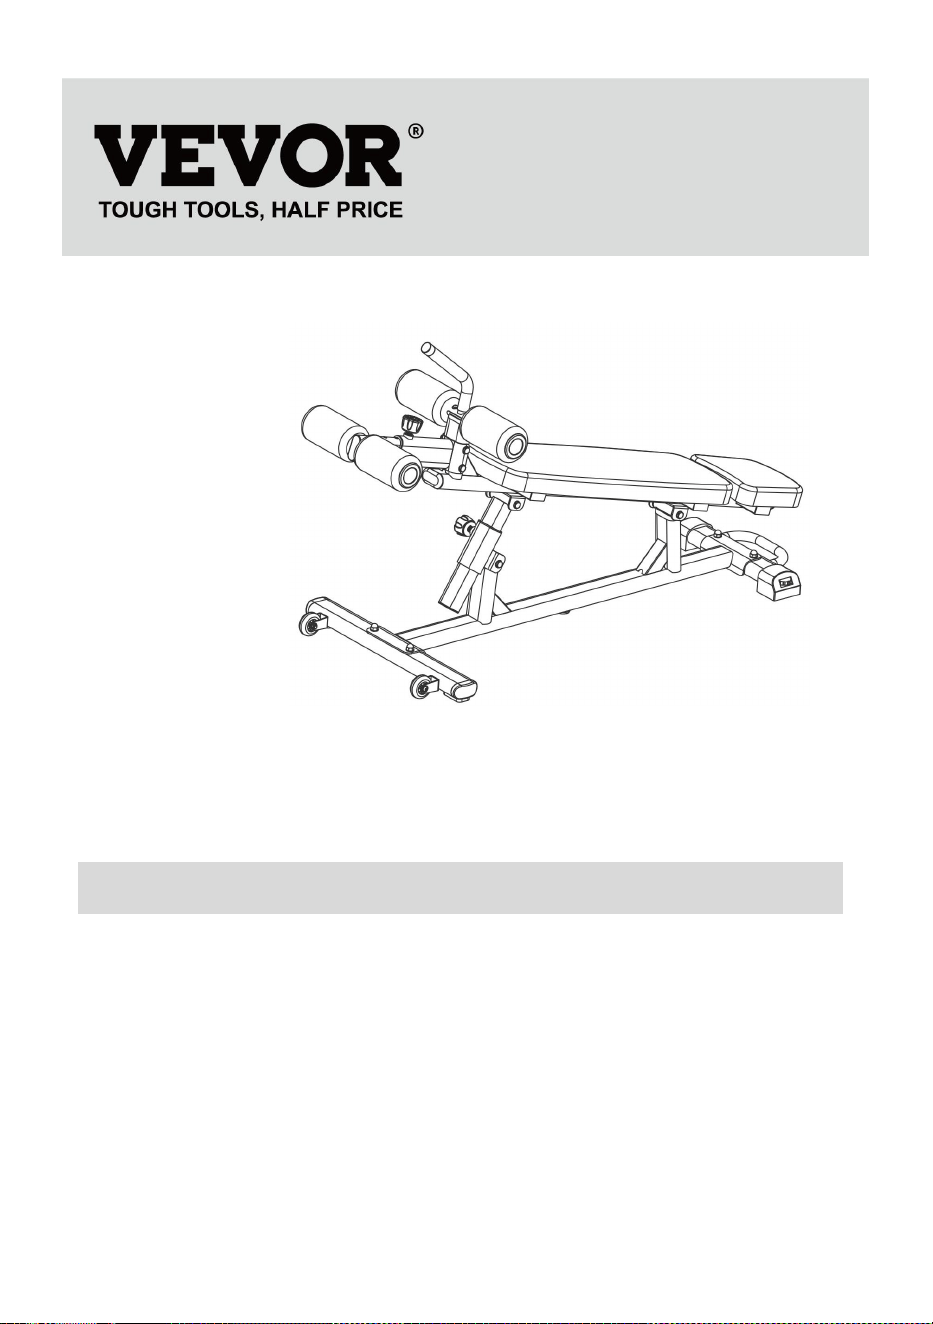
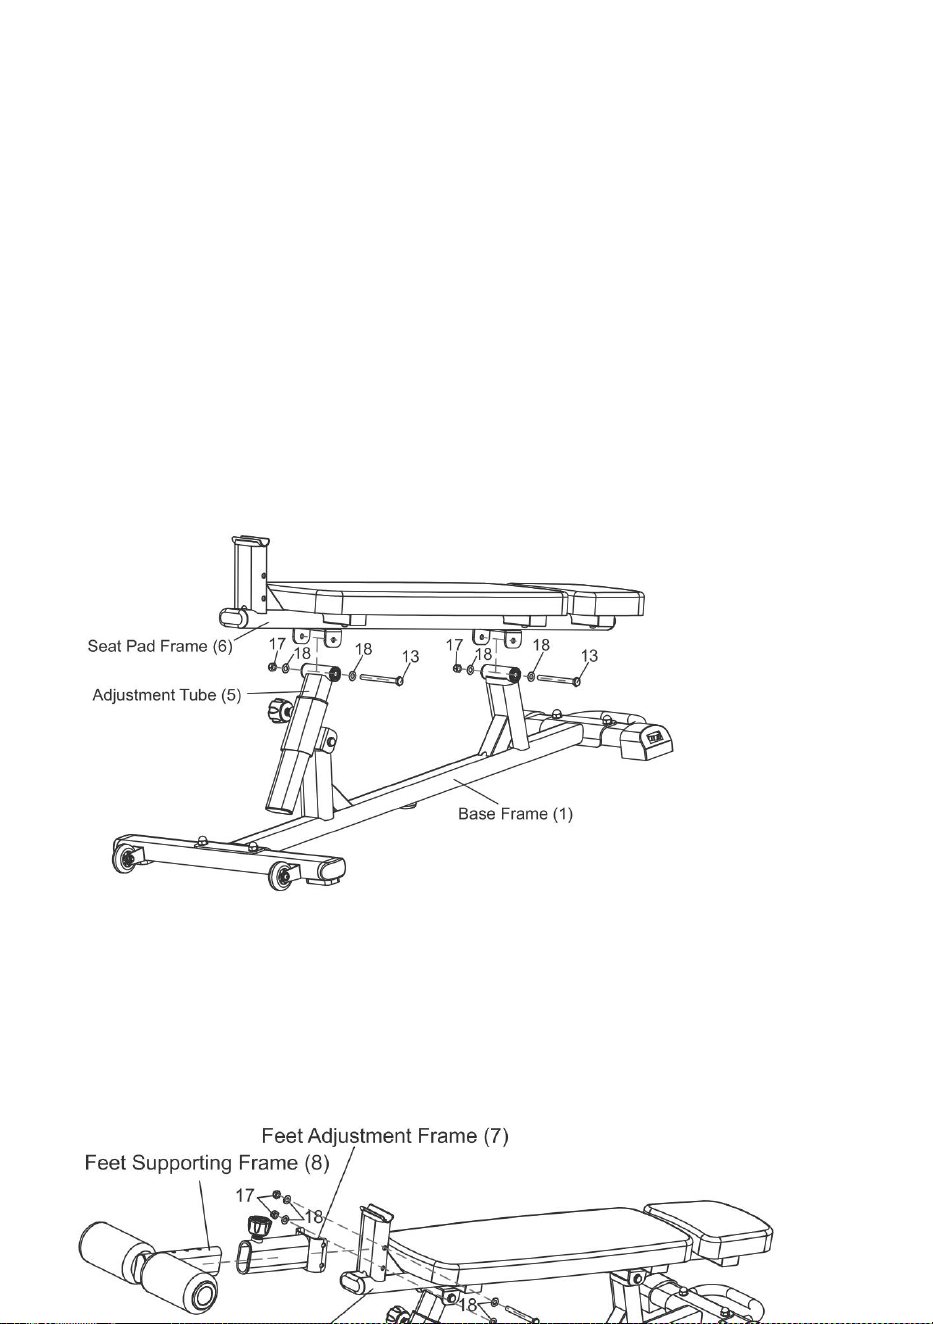
Step 4:
Attach Seat Pad Frame (6) to Adjustment Tube (5) and Base Frame
(1).Use Lock Nut M10 (17), Flat Washer D10 (18) and Screw M10*110 (13).
Tighten the screws.
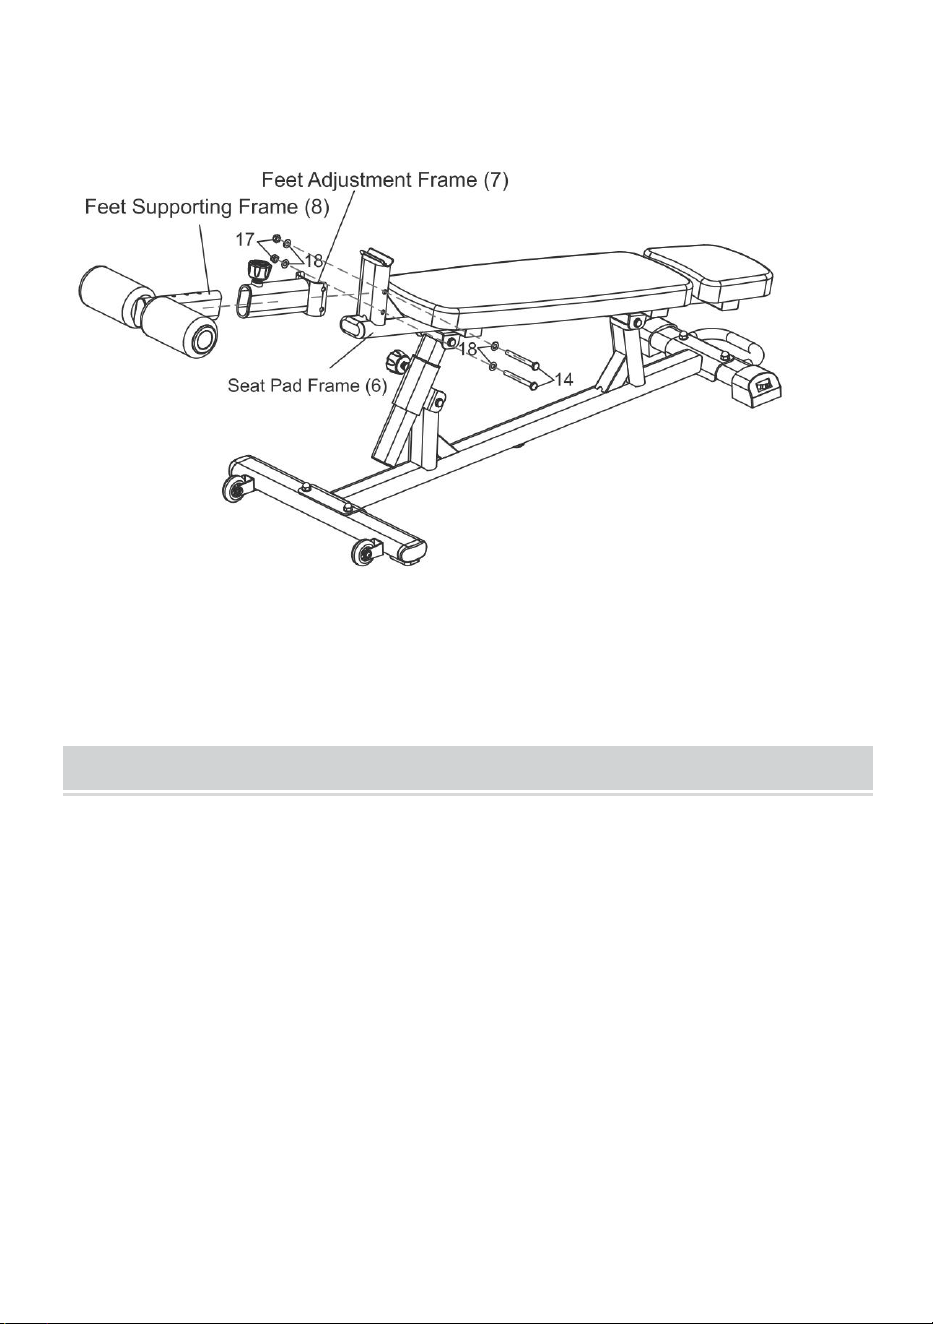
Step 5:
Attach Feet Adjustment Frame (7)to Seat Pad Frame (6). Use Screw
M10*100 (14),Lock Nut M10 (17), and Flat Washer D10 (18). Tighten the
screws. Insert Feet Supporting Frame (8)into Feet Adjustment Frame (7).

7
NOTE :The Maximum Weight Capacity for this product is 1000 lbs or
453kgs. Only one person should use this piece of equipment at one time.
Cleaning and disinfection
1. Wipe the surface with a wet cotton cloth.
2. Check the screws regularly every 3 months for loosening and tighten
the screws

Manufacturer: Shanghaimuxinmuyeyouxiangongsi
Address: Shuangchenglu 803nong11hao1602A-1609shi, baoshanqu,
shanghai 200000 CN.
Imported to AUS: SIHAO PTY LTD. 1 ROKEVA STREETEASTWOOD
NSW 2122 Australia
Imported to USA: Sanven Technology Ltd. Suite 250, 9166 Anaheim
Place, Rancho Cucamonga, CA 91730
REP
UK
YH CONSULTING LIMITED. C/O YH Consulting
Limited Office 147, Centurion House, London
Road, Staines-upon-Thames, Surrey, TW18 4AX
REP
EC
E-CrossStu GmbH
Mainzer Landstr.69,
60329 Frankfurt am Main.


Technique Assistance et certificat de garantie électronique
www.vevor.com/support
BANC ASSIS
MODÈLE : TL903
We continue to be committed to provide you tools with competitive price.
"Save Half", "Half Price" or any other similar expressions used by us only represents an
estimate of savings you might benefit from buying certain tools with us compared to the major
top brands and does not necessarily mean to cover all categories of tools offered by us. You
are kindly reminded to verify carefully when you are placing an order with us if you are
actually saving half in comparison with the top major brands.


1
MODÈLE : TL903
Remarque : l'image du produit est à titre de référence, les détails réels
prévaudront.
BESOIN D'AIDE? CONTACTEZ-NOUS!
Vous avez des questions sur les produits ? Besoin d'une assistance
technique ? N'hésitez pas à nous contacter:
Assistance technique et certificat de garantie électronique
www.vevor.com/support
Il s'agit des instructions originales, veuillez lire attentivement toutes les
instructions du manuel avant de l'utiliser. VEVOR se réserve une
interprétation claire de notre manuel d’utilisation. L'apparence du produit
dépend du produit que vous avez reçu. Veuillez nous pardonner que nous
ne vous informerons plus s'il y a des mises à jour technologiques ou
SIT UP BENCH

2
logicielles sur notre produit.
Merci beaucoup d'avoir choisi ceci produit .
Veuillez lire toutes les instructions avant de l'utiliser. Les informations vous
aideront à obtenir les meilleurs résultats possibles.
Operation safety
AVERTISSEMENT:
Veuillez lire toutes les instructions avant d'utiliser ce produit
Il est de la responsabilité du propriétaire de s'assurer que tous
les utilisateurs de ce produit sont pleinement conscients de tous les
avertissements et précautions.
·Ne l'utilisez pas si vous êtes enceinte
· Avant de commencer tout programme d'exercice, consultez votre
médecin.
·Lire tous instruction avant en utilisant ce banc assis
·Gardez les enfants et les animaux domestiques à l'écart du banc assis
pendant son utilisation. Les enfants ne doivent pas l'utiliser. Le banc assis
sans la surveillance d'un adulte.
·Inspectez et serrez toutes les pièces à chaque fois avant d'utiliser ce
banc assis.
·Veuillez nettoyer cette machine uniquement à l'aide de lingettes humides.
N'utilisez aucun
nettoyants. Veuillez consulter le service client si vous avez des questions.
·Ce banc assis doit être placé sur une surface plane lors de son utilisation.
Placez un
tapis anti-dérapant sous la machine si besoin.
3
·Veuillez porter des vêtements appropriés lorsque vous utilisez ce banc
assis
·Ne l'utilisez pas s'il n'est pas fonctionnel ou si les pièces ne sont pas bien
assemblées.
· Si vous ressentez des douleurs thoraciques, des nausées, des
étourdissements ou un manque de largeur, vous devez arrêter
immédiatement l'exercice et consulter votre médecin avant de continuer.
Exercise Plans
1. Il est recommandé aux débutants de commencer avec moins de
répétitions, 5 répétitions pour 1 série par exemple et ajoutez des
répétitions au fur et à mesure.
2. Veuillez ne pas faire d'exercice une demi-heure avant/après les repas
ou 1 heure avant de dormir.
3. Veuillez établir des plans d’exercices.
Part List
4
Assembly
Étape 1:
5
Fixez le tube de base avant (2) et le tube de base arrière (3) au cadre de
base (1).Utilisez Boulon de carrosserie M10*55 (12), écrou borgne M10
(16) et rondelle plate D10 (18). Serrer le des vis.
Étape 2:
Fixez le cadre de réglage (4) au cadre de base (1). Utilisez la vis M10*110
(13), la rondelle plate D10 (18) et le contre-écrou M10 (17). Serrez les vis.
Insérer Tube de réglage (5) dans le cadre de réglage (4).
Étape 3:
Fixez le coussin de tête (11) et le coussin de dossier (10) au cadre du
coussin de siège (6). Utilisez la vis d'assemblage hexagonale interne
M8*40 (15) et la rondelle plate D8 (19). Serrer les vis.
6
Étape 4:
Fixez le cadre du coussin de siège (6) au tube de réglage (5) et au cadre
de base (1). Utilisez le contre-écrou M10 (17), la rondelle plate D10 (18) et
la vis M10*110 (13). Serrer les vis.
Étape 5 :
Fixez le cadre de réglage des pieds (7) au cadre du coussin de siège (6).
Utilisez la vis M10*100 (14), le contre-écrou M10 (17) et la rondelle plate
D10 (18). Serrer les vis. Insérez le cadre de support des pieds (8) dans le
cadre de réglage des pieds (7).

7
REMARQUE : La capacité de poids maximale de ce produit est de 1 000 lb
ou 453 kg. Une seule personne à la fois doit utiliser cet équipement.
Cleaning and disinfection
3. Essuyez la surface avec un chiffon en coton humide.
4. Vérifiez régulièrement les vis tous les 3 mois pour le desserrage et
serrez les vis.

8

Fabricant : Shanghaimuxinmuyeyouxiangongsi
Adresse : Shuangchenglu 803nong11hao1602A-1609shi, baoshanqu,
Shanghai 200 000 CN.
Importé en Australie : SIHAO PTY LTD. 1 RUE ROKEVAASTWOOD
NSW 2122 Australie
Importé aux États-Unis : Sanven Technology Ltd. Suite 250, 9166
Anaheim
Lieu, Rancho Cucamonga, CA 91730
REP
UK
YH CONSULTING LIMITED. C/O YH Consulting
Limited Office 147, Centurion House, London
Road, Staines-upon-Thames, Surrey, TW18 4AX
REP
EC
E-CrossStu GmbH
Mainzer Landstr.69,
60329 Frankfurt am Main.


Technique Assistance et certificat de garantie électronique


Technisch Support und E-Garantie-Zertifikat
www.vevor.com/support
SIT-UP-BANK
MODELL: TL903
We continue to be committed to provide you tools with competitive price.
"Save Half", "Half Price" or any other similar expressions used by us only represents an
estimate of savings you might benefit from buying certain tools with us compared to the major
top brands and does not necessarily mean to cover all categories of tools offered by us. You
are kindly reminded to verify carefully when you are placing an order with us if you are
actually saving half in comparison with the top major brands.


1
MODELL: TL903
Hinweis: Das Produktbild dient als Referenz. Die tatsächlichen Details
sind maßgebend.
Brauchen Sie Hilfe? Kontaktieren Sie uns!
Sie haben Fragen zu unseren Produkten? Sie benötigen technischen
Support? Dann kontaktieren Sie uns gerne:
Technischer Support und E-Garantie-Zertifikat
www.vevor.com/support
Dies ist die Originalanleitung. Bitte lesen Sie alle Anweisungen sorgfältig
durch, bevor Sie das Gerät in Betrieb nehmen. VEVOR behält sich eine
klare Auslegung unserer Bedienungsanleitung vor. Das Erscheinungsbild
des Produkts richtet sich nach dem Produkt, das Sie erhalten haben. Bitte
verzeihen Sie uns, dass wir Sie nicht erneut informieren, wenn es
SIT UP BENCH

2
Technologie- oder Software-Updates für unser Produkt gibt .
Vielen Dank, dass Sie sich für dieses Produkt .
Lesen Sie vor der Anwendung bitte alle Hinweise sorgfältig durch. Die
Informationen helfen Ihnen dabei, optimale Ergebnisse zu erzielen.
Operation safety
WARNUNG:
Bitte lesen Sie alle Anweisungen, bevor Sie dieses Produkt
verwenden
Es liegt in der Verantwortung des Eigentümers, sicherzustellen, dass alle
Benutzer dieses Produkts über alle Warnungen und Vorsichtsmaßnahmen
informiert sind.
· Verwenden Sie es nicht, wenn Sie schwanger sind
· Konsultieren Sie Ihren Arzt, bevor Sie mit einem Trainingsprogramm
beginnen.
·Lesen alle Anweisung Vor mit Das Sit-Up-Bank
· Halten Sie Kinder und Haustiere während der Benutzung der
Sit-Up-Bank fern. Kinder sollten die Sit-Up-Bank nicht ohne Aufsicht eines
Erwachsenen benutzen.
· Überprüfen Sie vor jedem Gebrauch dieser Sit-Up-Bank alle Teile und
ziehen Sie sie fest.
· Reinigen Sie das Gerät nur mit feuchten Tüchern. Verwenden Sie keine
Reinigungsmittel. Bei Fragen wenden Sie sich bitte an den Kundendienst.
· Diese Sit-Up-Bank sollte bei der Verwendung auf einer ebenen Fläche
platziert werden.
bei Bedarf eine Anti-Rutsch-Matte unter der Maschine.
3
· Bitte tragen Sie geeignete Kleidung, wenn Sie diese Sit-Up-Bank
benutzen
·Verwenden Sie es nicht, wenn es nicht funktioniert oder Teile nicht richtig
zusammengebaut sind.
· Wenn Sie Schmerzen in der Brust, Übelkeit, Schwindel oder
Kurzatmigkeit verspüren, sollten Sie das Training sofort abbrechen und
Ihren Arzt konsultieren, bevor Sie fortfahren.
Exercise Plans
1. Anfängern wird empfohlen, mit weniger Wiederholungen zu beginnen,
beispielsweise 5 Wiederholungen als 1 Satz und fügen Sie nach und nach
Wiederholungen hinzu.
2. Bitte trainieren Sie eine halbe Stunde vor/nach den Mahlzeiten oder 1
Stunde vor dem Schlafengehen nicht
3. Bitte machen Sie Trainingspläne.
Part List
4
Assembly
Schritt 1:
Befestigen Sie das vordere Basisrohr (2) und das hintere Basisrohr (3) am
5
Basisrahmen (1). Schlossschraube M10*55 (12), Hutmutter M10 (16) und
Unterlegscheibe D10 (18). Festziehen Die Schrauben.
Schritt 2:
Befestigen Sie den Einstellrahmen (4) am Grundrahmen (1). Verwenden
Sie dazu die Schraube M10*110 (13), die Unterlegscheibe D10 (18) und
die Kontermutter M10 (17). Ziehen Sie die Schrauben fest. Einstellrohr (5)
in den Einstellrahmen (4).
Schritt 3:
Befestigen Sie Kopfpolster (11) und Rückenpolster (10) am
Sitzpolsterrahmen (6). Verwenden Sie dazu eine Innensechskantschraube
M8*40 (15) und eine Unterlegscheibe D8 (19). Ziehen Sie die Schrauben
fest.
6
Schritt 4:
Befestigen Sie den Sitzpolsterrahmen (6) am Einstellrohr (5) und am
Grundrahmen (1). Verwenden Sie dazu eine Kontermutter M10 (17), eine
Unterlegscheibe D10 (18) und eine Schraube M10*110 (13). Ziehen Sie
die Schrauben fest.
Schritt 5:
Befestigen Sie den Fußverstellrahmen (7) am Sitzpolsterrahmen (6).
Verwenden Sie dazu Schraube M10*100 (14), Kontermutter M10 (17) und
7
Unterlegscheibe D10 (18). Ziehen Sie die Schrauben fest. Setzen Sie den
Fußstützrahmen (8) in den Fußverstellrahmen (7) ein.
HINWEIS: Die maximale Gewichtskapazität für dieses Produkt beträgt
1000 lbs oder 453 kg. Dieses Gerät sollte jeweils nur von einer Person
verwendet werden.
Cleaning and disinfection
5. Wischen Sie die Oberfläche mit einem feuchten Baumwolltuch ab.
6. Überprüfen Sie die Schrauben regelmäßig alle 3 Monate auf Lockerheit
und ziehen Sie die Schrauben fest

8

Hersteller: Shanghaimuxinmuyeyouxiangongsi
Adresse: Shuangchenglu 803nong11hao1602A-1609shi, baoshanqu,
Shanghai, 200.000 CN.
Nach AUS importiert: SIHAO PTY LTD. 1 ROKEVA
STREETEASTWOOD
NSW 2122 Australien
Importiert in die USA: Sanven Technology Ltd. Suite 250, 9166 Anaheim
Ort, Rancho Cucamonga, CA 91730
REP
UK
YH CONSULTING LIMITED. C/O YH Consulting
Limited Office 147, Centurion House, London
Road, Staines-upon-Thames, Surrey, TW18 4AX
REP
EC
E-CrossStu GmbH
Mainzer Landstr.69,
60329 Frankfurt am Main.


Technisch Support und E-Garantie-Zertifikat


Tecnico Supporto e certificato di garanzia elettronica
www.vevor.com/support
PANCA PER SIT UP
MODELLO: TL903
We continue to be committed to provide you tools with competitive price.
"Save Half", "Half Price" or any other similar expressions used by us only represents an
estimate of savings you might benefit from buying certain tools with us compared to the major
top brands and does not necessarily mean to cover all categories of tools offered by us. You
are kindly reminded to verify carefully when you are placing an order with us if you are
actually saving half in comparison with the top major brands.


1
MODELLO: TL903
Nota: l'immagine del prodotto è di riferimento, prevarranno i dettagli reali
HO BISOGNO DI AIUTO? CONTATTACI!
Hai domande sul prodotto? Hai bisogno di supporto tecnico? Non
esitate a contattarci:
Supporto tecnico e certificato di garanzia elettronica
www.vevor.com/support
Queste sono le istruzioni originali, leggere attentamente tutte le istruzioni
del manuale prima dell'uso. VEVOR si riserva una chiara interpretazione
del nostro manuale d'uso. L'aspetto del prodotto sarà soggetto al prodotto
ricevuto. Ti preghiamo di perdonarci se non ti informeremo più se sono
presenti aggiornamenti tecnologici o software sul nostro prodotto.
Grazie mille per aver scelto questo Prodotto .
SIT UP BENCH

2
Si prega di leggere tutte le istruzioni prima di utilizzarlo. Le informazioni ti
aiuteranno a ottenere i migliori risultati possibili.
Operation safety
AVVERTIMENTO:
Si prega di leggere tutte le istruzioni prima di utilizzare questo
prodotto
È responsabilità del proprietario garantire che tutti gli utenti di questo
prodotto siano pienamente consapevoli di tutte le avvertenze e
precauzioni.
·Non usarlo se sei incinta
·Prima di iniziare qualsiasi programma di esercizi consultare il proprio
medico.
·Leggere Tutto istruzione Prima utilizzando Questo panca per addominali
·Tenere i bambini e gli animali domestici lontano dalla panca per
addominali durante l'uso. I bambini non devono utilizzare la panca per
addominali senza la supervisione di un adulto.
·Ispezionare e stringere tutte le parti ogni volta prima di utilizzare questa
panca per addominali.
·Pulire la macchina esclusivamente utilizzando salviette umidificate. Non
utilizzarne
detergenti. In caso di domande, consultare il servizio clienti.
·Questa panca per addominali deve essere posizionata su una superficie
piana durante l'uso. Posizionare un
tappetino antiscivolo sotto la macchina se necessario.

3
·Si prega di indossare abiti adeguati quando si utilizza questa panca per
addominali
·Non utilizzarlo se non è funzionale o se le parti non sono ben assemblate.
·Se avverti dolori al petto, nausea, vertigini o mancanza di respiro, dovresti
interrompere immediatamente l'esercizio e consultare il tuo medico prima
di continuare.
Exercise Plans
1. Si consiglia ai principianti di iniziare con meno ripetizioni, ad esempio 5
ripetizioni come 1 serie e aggiungi ripetizioni man mano che procedi.
2. Si prega di non fare esercizio mezz'ora prima/dopo i pasti o 1 ora prima
di andare a dormire
3. Si prega di pianificare gli esercizi.
Part List
4
Assembly
Passo 1:
Collegare il tubo base anteriore (2) e il tubo base posteriore (3) al telaio
base (1).Utilizzare Bullone di trasporto M10*55 (12), dado cieco M10 (16) e
rondella piatta D10 (18). Stringere IL viti.
5
Passo 2:
Collegare il telaio di regolazione (4) al telaio di base (1). Utilizzare la vite
M10*110 (13), la rondella piatta D10 (18) e il dado di bloccaggio M10 (17).
Stringere le viti. Inserire Tubo di regolazione (5) nel telaio di regolazione
(4).
Passaggio 3:
Attaccare l'imbottitura per la testa (11) e l'imbottitura per lo schienale (10)
al telaio dell'imbottitura del sedile (6). Utilizzare la vite a testa esagonale
interna M8*40 (15) e la rondella piatta D8 (19). Stringere le viti.

6
Passaggio 4:
Collegare il telaio del cuscino del sedile (6) al tubo di regolazione (5) e al
telaio della base (1). Utilizzare il dado di bloccaggio M10 (17), la rondella
piatta D10 (18) e la vite M10*110 (13). Stringere le viti.
Passaggio 5:
Attaccare il telaio di regolazione dei piedi (7) al telaio del cuscino del sedile
(6). Utilizzare la vite M10*100 (14), il controdado M10 (17) e la rondella
piatta D10 (18). Stringere le viti. Inserire il telaio di supporto dei piedi (8)
nel telaio di regolazione dei piedi (7).

7
NOTA: la capacità di peso massima per questo prodotto è di 1000 libbre o
453 kg. Solo una persona alla volta dovrebbe utilizzare questo
apparecchio.
Cleaning and disinfection
7. Pulisci la superficie con un panno di cotone bagnato.
8. Controllare le viti regolarmente ogni 3 mesi per allentarle e serrarle

8

Produttore: Shanghaimuxinmuyeyouxiangongsi
Indirizzo: Shuangchenglu 803nong11hao1602A-1609shi, baoshanqu,
shanghai 200000 CN.
Importato in AUS: SIHAO PTY LTD. 1 ROKEVA STREETEASTWOOD
NSW 2122Australia
Importato negli Stati Uniti: Sanven Technology Ltd. Suite 250, 9166
Anaheim
Luogo, Rancho Cucamonga, CA 91730
REP
UK
YH CONSULTING LIMITED. C/O YH Consulting
Limited Office 147, Centurion House, London
Road, Staines-upon-Thames, Surrey, TW18 4AX
REP
EC
E-CrossStu GmbH
Mainzer Landstr.69,
60329 Frankfurt am Main.


Tecnico Supporto e certificato di garanzia elettronica


Técnico Certificado de soporte y garantía electrónica
www.vevor.com/support
BANCO PARA SENTARSE
MODELO: TL903
We continue to be committed to provide you tools with competitive price.
"Save Half", "Half Price" or any other similar expressions used by us only represents an
estimate of savings you might benefit from buying certain tools with us compared to the major
top brands and does not necessarily mean to cover all categories of tools offered by us. You
are kindly reminded to verify carefully when you are placing an order with us if you are
actually saving half in comparison with the top major brands.


1
MODELO: TL903
Nota: La imagen del producto es de referencia, prevalecerán los detalles
reales.
¿NECESITAS AYUDA? ¡CONTÁCTENOS!
¿Tiene preguntas sobre el producto? ¿Necesita soporte técnico?
Siéntete libre de contactarnos:
Soporte técnico y certificado de garantía electrónica
www.vevor.com/support
Estas son las instrucciones originales; lea atentamente todas las
instrucciones del manual antes de operar. VEVOR se reserva una
interpretación clara de nuestro manual de usuario. La apariencia del
producto estará sujeta al producto que recibió. Perdone que no le
informaremos nuevamente si hay actualizaciones de tecnología o
SIT UP BENCH

2
software en nuestro producto.
Muchas gracias por elegir esto. producto .
Lea todas las instrucciones antes de usarlo. La información le ayudará a
lograr los mejores resultados posibles.
Operation safety
ADVERTENCIA:
Lea todas las instrucciones antes de usar este producto.
Es responsabilidad del propietario asegurarse de que todos los
usuarios de este producto conozcan plenamente todas las advertencias y
precauciones.
·No lo utilices si estás embarazada.
·Antes de comenzar cualquier programa de ejercicios consulte a su
médico.
·Leer todo instrucción antes usando este banco para sentarse
·Mantenga a los niños y las mascotas alejados del banco de abdominales
mientras esté en uso. Los niños no deben utilizar el banco de abdominales
sin la supervisión de un adulto.
·Inspeccione y apriete todas las piezas cada vez antes de usar este banco
de abdominales.
·Limpie esta máquina únicamente con toallitas húmedas. No utilice ningún
Limpiadores. Consulte con el servicio de atención al cliente si tiene alguna
pregunta.
·Este banco de abdominales debe colocarse sobre una superficie plana
cuando se utilice.Coloque un
Alfombrilla antideslizante debajo de la máquina si es necesario.
3
· Utilice ropa adecuada cuando utilice este banco para abdominales.
·No lo utilice si no funciona o las piezas no están bien ensambladas.
·Si siente algún dolor en el pecho, náuseas, mareos o falta de amplitud,
debe dejar de hacer ejercicio inmediatamente y consultar a su médico
antes de continuar.
Exercise Plans
1. Se recomienda a los principiantes comenzar con menos repeticiones, 5
repeticiones como 1 serie, por ejemplo. y agregue repeticiones a medida
que avanza.
2. No haga ejercicio media hora antes o después de las comidas ni 1 hora
antes de dormir.
3. Haga planes de ejercicio.
Part List

4
Assembly
Paso 1:
Conecte el tubo de base delantero (2) y el tubo de base trasero (3) al
marco de base (1). Perno de carro M10*55 (12), tuerca ciega M10 (16) y
arandela plana D10 (18). Apretar el tornillos.

5
Paso 2:
Conecte el marco de ajuste (4) al marco de base (1). Utilice el tornillo
M10*110 (13), la arandela plana D10 (18) y la contratuerca M10 (17).
Apriete los tornillos. Insertar Tubo de ajuste (5) en el marco de ajuste (4).
Paso 3:
Conecte la almohadilla para la cabeza (11) y la almohadilla para el
respaldo (10) al marco del cojín del asiento (6). Utilice un tornillo
hexagonal interno M8*40 (15) y una arandela plana D8 (19). Apretar los
tornillos.
6
Etapa 4:
Conecte el marco de la almohadilla del asiento (6) al tubo de ajuste (5) y al
marco de la base (1). Utilice la contratuerca M10 (17), la arandela plana
D10 (18) y el tornillo M10*110 (13). Apretar los tornillos.
Paso 5:
Conecte el marco de ajuste de los pies (7) al marco del cojín del asiento
(6). Utilice el tornillo M10*100 (14), la contratuerca M10 (17) y la arandela
plana D10 (18). Apretar los tornillos. Inserte el marco de soporte de los
pies (8) en el marco de ajuste de los pies (7).

7
NOTA: La capacidad máxima de peso de este producto es 1000 lbs o 453
kg. Sólo una persona debe utilizar este equipo a la vez.
Cleaning and disinfection
9. Limpia la superficie con un paño de algodón húmedo.
10.Revise los tornillos regularmente cada 3 meses para aflojarlos y
apretarlos.

8

Fabricante: Shanghaimuxinmuyeyouxiangongsi
Dirección: Shuangchenglu 803nong11hao1602A-1609shi, baoshanqu,
Shanghái 200000 CN.
Importado a AUS: SIHAO PTY LTD. 1 ROKEVA CALLE ASTWOOD
Nueva Gales del Sur 2122 Australia
Importado a EE. UU.: Sanven Technology Ltd. Suite 250, 9166 Anaheim
Lugar, Rancho Cucamonga, CA 91730
REP
UK
YH CONSULTING LIMITED. C/O YH Consulting
Limited Office 147, Centurion House, London
Road, Staines-upon-Thames, Surrey, TW18 4AX
REP
EC
E-CrossStu GmbH
Mainzer Landstr.69,
60329 Frankfurt am Main.


Techniczny Certyfikat wsparcia i e-gwarancji
www.vevor.com/support
ŁAWKA DO SIEDZENIA
MODEL: TL903
We continue to be committed to provide you tools with competitive price.
"Save Half", "Half Price" or any other similar expressions used by us only represents an
estimate of savings you might benefit from buying certain tools with us compared to the major
top brands and does not necessarily mean to cover all categories of tools offered by us. You
are kindly reminded to verify carefully when you are placing an order with us if you are
actually saving half in comparison with the top major brands.

1
MODEL: TL903
Uwaga: zdjęcie produktu ma charakter poglądowy, pierwszeństwo mają
rzeczywiste szczegóły
POTRZEBUJĘ POMOCY? SKONTAKTUJ SIĘ Z NAMI!
Masz pytania dotyczące produktu? Potrzebujesz wsparcia
technicznego? Śmiało możesz się z nami skontaktować:
Wsparcie techniczne i certyfikat e-gwarancji
www.vevor.com/support
To jest oryginalna instrukcja. Przed przystąpieniem do obsługi prosimy o
dokładne zapoznanie się ze wszystkimi instrukcjami. VEVOR zastrzega
sobie jasną interpretację naszej instrukcji obsługi. Wygląd produktu
SIT UP BENCH

2
zależy od produktu, który otrzymałeś. Proszę wybaczyć nam, że nie
będziemy ponownie informować Państwa, jeśli pojawią się jakieś
aktualizacje technologii lub oprogramowania naszego produktu.
Dziękuję bardzo za wybranie tego produkt .
Przed użyciem przeczytaj całą instrukcję. Informacje te pomogą Ci
osiągnąć najlepsze możliwe rezultaty.
Operation safety
OSTRZEŻENIE:
Przed użyciem tego produktu przeczytaj wszystkie instrukcje
Obowiązkiem właściciela jest upewnienie się, że wszyscy
użytkownicy tego produktu są w pełni świadomi wszystkich ostrzeżeń i
środków ostrożności.
·Nie używaj go, jeśli jesteś w ciąży
·Przed rozpoczęciem jakiegokolwiek programu ćwiczeń skonsultuj się z
lekarzem.
·Czytać Wszystko instrukcja zanim za pomocą Ten ławka do siedzenia
· Trzymaj dzieci i zwierzęta domowe z dala od ławki do ćwiczeń, gdy jest
ona używana. Dzieci nie powinny używać ławki do ćwiczeń. Ławka do
ćwiczeń bez nadzoru osoby dorosłej.
·Za każdym razem przed użyciem ławki do brzuszków sprawdź i dokręć
wszystkie części.
·Proszę czyścić to urządzenie wyłącznie za pomocą zwilżonych
chusteczek. Nie używaj żadnych
środki czyszczące. Jeśli masz jakiekolwiek pytania, skonsultuj się z
3
obsługą klienta.
· Podczas używania ławeczkę do brzuszków należy ustawić na płaskiej
powierzchni
w razie potrzeby mata antypoślizgowa pod maszynę.
· Podczas korzystania z ławki do ćwiczeń należy nosić odpowiednie
ubranie
·Nie używaj go, jeśli nie działa lub jeśli części nie są dobrze zmontowane.
·Jeśli odczuwasz bóle w klatce piersiowej, nudności, zawroty głowy lub
brak szerokości, powinieneś natychmiast przerwać ćwiczenia i
skonsultować się z lekarzem przed kontynuowaniem.
Exercise Plans
1. Początkującym zaleca się rozpoczęcie od mniejszej liczby powtórzeń,
na przykład 5 powtórzeń w 1 serii i dodawaj powtórzenia w miarę upływu
czasu.
2. Proszę nie ćwiczyć pół godziny przed/po posiłku lub 1 godzinę przed
snem
3. Proszę sporządzić plany ćwiczeń.
4
Part List
5
Assembly
Krok 1:
Przymocuj przednią rurę podstawy (2) i tylną rurę podstawy (3) do ramy
podstawy (1). Użyj Śruba nośna M10*55 (12), nakrętka kołpakowa M10
(16) i podkładka płaska D10 (18). Dokręcać the śruby.
Krok 2:
Przymocuj ramę regulacyjną (4) do ramy podstawy (1). Użyj śruby
M10*110(13), płaskiej podkładki D10 (18) i nakrętki zabezpieczającej M10
(17). Dokręć śruby. Wstawić Rura regulacyjna (5) do ramy regulacyjnej (4).
6
Krok 3:
Przymocuj podkładkę pod głowę (11) i podkładkę pod plecy (10) do ramy
poduszki siedziska (6). Użyj wewnętrznej śruby z łbem sześciokątnym
M8*40 (15) i płaskiej podkładki D8 (19). Dokręć śruby.
Krok 4:
Przymocuj ramę poduszki siedziska (6) do rury regulacyjnej (5) i ramy
podstawy (1). Użyj nakrętki zabezpieczającej M10 (17), płaskiej podkładki
D10 (18) i śruby M10*110 (13). Dokręć śruby.
7
Krok 5:
Przymocuj ramę regulacyjną nóżek (7) do ramy poduszki siedziska (6).
Użyj śruby M10*100 (14), nakrętki zabezpieczającej M10 (17) i płaskiej
podkładki D10 (18). Dokręć śruby. Włóż ramę podtrzymującą stopy (8) do
ramy regulacyjnej stóp (7).
UWAGA: Maksymalna nośność tego produktu wynosi 1000 funtów lub 453
kg. Z tego urządzenia powinna korzystać jednocześnie tylko jedna osoba.

8
Cleaning and disinfection
11.Przetrzyj powierzchnię wilgotną bawełnianą szmatką.
12.Regularnie co 3 miesiące sprawdzaj śruby pod kątem poluzowania i
dokręcania śrub

Producent: Shanghaimuxinmuyeyouxiangongsi
Adres: Shuangchenglu 803nong11hao1602A-1609shi, baoshanqu,
Szanghaj 200000 CN.
Import do AUS: SIHAO PTY LTD. 1 ROKEVA STREETEASTWOOD
Nowa Południowa Walia 2122 Australia
Import do USA: Sanven Technology Ltd. Suite 250, 9166 Anaheim
Place, Rancho Cucamonga, Kalifornia 91730
REP
UK
YH CONSULTING LIMITED. C/O YH Consulting
Limited Office 147, Centurion House, London
Road, Staines-upon-Thames, Surrey, TW18 4AX
REP
EC
E-CrossStu GmbH
Mainzer Landstr.69,
60329 Frankfurt am Main.


Technisch Ondersteuning en e-garantiecertificaat
www.vevor.com/support
ZIT BANK
MODEL: TL903
We continue to be committed to provide you tools with competitive price.
"Save Half", "Half Price" or any other similar expressions used by us only represents an
estimate of savings you might benefit from buying certain tools with us compared to the major
top brands and does not necessarily mean to cover all categories of tools offered by us. You
are kindly reminded to verify carefully when you are placing an order with us if you are
actually saving half in comparison with the top major brands.

1
MODEL: TL903
Opmerking: de productfoto is ter referentie, de werkelijke details hebben
voorrang
HULP NODIG? NEEM CONTACT MET ONS OP!
Heeft u productvragen? Technische ondersteuning nodig? Neem dan
gerust contact met ons op:
Technische ondersteuning en e-garantiecertificaat
www.vevor.com/support
Dit is de originele instructie. Lees alle instructies in de handleiding
zorgvuldig door voordat u ermee aan de slag gaat. VEVOR behoudt zich
een duidelijke interpretatie van onze gebruikershandleiding voor. Het
uiterlijk van het product is afhankelijk van het product dat u heeft
ontvangen. Vergeef ons alstublieft dat we u niet opnieuw informeren als er
SIT UP BENCH

2
technologie- of software-updates zijn voor ons product.
Hartelijk dank dat u hiervoor heeft gekozen Product .
Lees alle instructies voordat u het gebruikt. De informatie zal u helpen de
best mogelijke resultaten te bereiken.
Operation safety
WAARSCHUWING:
Lees alle instructies voordat u dit product gebruikt
Het is de verantwoordelijkheid van de eigenaar om ervoor te
zorgen dat alle gebruikers van dit product volledig op de hoogte zijn van
alle waarschuwingen en voorzorgsmaatregelen.
·Gebruik het niet als u zwanger bent
·Raadpleeg uw arts voordat u met een trainingsprogramma begint.
·Lezen alle instructie voor gebruik makend van dit zit-bank
·Houd kinderen en huisdieren uit de buurt van de zitbank terwijl deze in
gebruik is. Kinderen mogen de zitbank niet gebruiken zonder toezicht van
een volwassene.
·Inspecteer en draai alle onderdelen telkens aan voordat u deze zitbank
gebruikt.
· Maak deze machine uitsluitend schoon met vochtige doekjes. Gebruik
geen doekjes
reinigingsmiddelen. Neem bij vragen contact op met de klantenservice.
·Deze sit-up bank moet bij gebruik op een vlakke ondergrond worden
geplaatst.Plaats een
indien nodig een antislipmat onder de machine.
·Draag geschikte kleding wanneer u deze zitbank gebruikt
3
·Gebruik het niet als het niet functioneel is of als de onderdelen niet goed
gemonteerd zijn.
·Als u pijn op de borst, misselijkheid, duizeligheid of kortademigheid
ervaart, moet u onmiddellijk stoppen met trainen en uw arts raadplegen
voordat u doorgaat.
Exercise Plans
1. Beginners wordt aangeraden om met minder herhalingen te beginnen,
bijvoorbeeld 5 herhalingen in 1 set en voeg herhalingen toe zoals
gebruikelijk.
2. Sport a.u.b. niet een half uur voor/na de maaltijd of 1 uur voor het slapen
gaan
3. Maak oefenplannen.
Part List
4
Assembly
Stap 1:
Bevestig de voorste basisbuis (2) en de achterste basisbuis (3) aan het
basisframe (1). Gebruiken Slotbout M10*55 (12), dopmoer M10 (16) en
platte sluitring D10 (18). Draai vast de schroeven.
5
Stap 2:
Bevestig het verstelframe (4) aan het basisframe (1). Gebruik schroef
M10*110 (13), platte sluitring D10 (18) en borgmoer M10 (17). Draai de
schroeven vast. Invoegen Afstelbuis (5) in het afstelframe (4).
Stap 3:
Bevestig het hoofdkussen (11) en het rugkussen (10) aan het frame van
het zitkussen (6). Gebruik interne zeskantschroef M8*40 (15) en platte
sluitring D8 (19). Draai de schroeven vast.
6
Stap 4:
Bevestig het frame van het zitkussen (6) aan de verstelbuis (5) en het
basisframe (1). Gebruik borgmoer M10 (17), platte sluitring D10 (18) en
schroef M10*110 (13). Draai de schroeven vast.
Stap 5:
Bevestig het voetenverstelframe (7) aan het frame van het zitkussen (6).
Gebruik schroef M10*100 (14), borgmoer M10 (17) en platte sluitring D10
(18). Draai de schroeven vast. Steek het voetensteunframe (8) in het
voetenverstelframe (7).

7
OPMERKING: De maximale gewichtscapaciteit voor dit product is 1000
lbs of 453 kg. Er mag slechts één persoon tegelijk dit apparaat gebruiken.
Cleaning and disinfection
13.Veeg het oppervlak af met een natte katoenen doek.
14.Controleer de schroeven regelmatig elke 3 maanden op losdraaien en
vastdraaien

8

Fabrikant: Shanghaimuxinmuyeyouxiangongsi
Adres: Shuangchenglu 803nong11hao1602A-1609shi, baoshanqu,
Shanghai 200.000 CN.
Geïmporteerd naar AUS: SIHAO PTY LTD. 1 ROKEVA
STREETEASTWOOD
NSW 2122 Australië
Geïmporteerd in de VS: Sanven Technology Ltd. Suite 250, 9166
Anaheim
Plaats, Rancho Cucamonga, CA 91730
REP
UK
YH CONSULTING LIMITED. C/O YH Consulting
Limited Office 147, Centurion House, London
Road, Staines-upon-Thames, Surrey, TW18 4AX
REP
EC
E-CrossStu GmbH
Mainzer Landstr.69,
60329 Frankfurt am Main.


Teknisk Support och e-garanticertifikat
www.vevor.com/support
SIT UPP BÄNK
MODELL: TL903
We continue to be committed to provide you tools with competitive price.
"Save Half", "Half Price" or any other similar expressions used by us only represents an
estimate of savings you might benefit from buying certain tools with us compared to the major
top brands and does not necessarily mean to cover all categories of tools offered by us. You
are kindly reminded to verify carefully when you are placing an order with us if you are
actually saving half in comparison with the top major brands.

1
MODELL: TL903
Obs: Produktbilden är för referens, de faktiska detaljerna ska råda
BEHÖVS HJÄLP? KONTAKTA OSS!
Har du produktfrågor? Behöver du teknisk support? Kontakta oss
gärna:
Teknisk support och e-garanticertifikat
www.vevor.com/support
Detta är den ursprungliga instruktionen, läs alla instruktioner noggrant
innan du använder den. VEVOR reserverar sig för en tydlig tolkning av vår
användarmanual. Utseendet på produkten är beroende av den produkt du
fått. Ursäkta oss att vi inte kommer att informera dig igen om det finns
någon teknik eller mjukvaruuppdateringar på vår produkt.
Tack så mycket för att du valde detta produkt .
SIT UP BENCH

2
Läs alla instruktioner innan du använder den. Informationen hjälper dig att
uppnå bästa möjliga resultat.
Operation safety
VARNING:
Läs alla instruktioner innan du använder denna produkt
Det är ägarens ansvar att se till att alla användare av denna
produkt är fullt medvetna om alla varningar och försiktighetsåtgärder.
·Använd den inte om du är gravid
·Konsultera din läkare innan du påbörjar ett träningsprogram.
·Läsa Allt instruktion innan använder sig av detta sittbänk
·Håll barn och husdjur borta från sittbänken när den används.Barn ska inte
använda.Sittbänken utan uppsikt av vuxen.
·Inspektera och dra åt alla delar varje gång innan du använder denna
sittbänk.
· Rengör denna maskin endast med fuktade våtservetter. Använd inga
rengöringsmedel. Kontakta kundtjänst om du har några frågor.
·Denna sittbänk bör placeras på en plan yta vid användning. Placera en
halkskyddsmatta under maskinen vid behov.
· Bär lämpliga kläder när du använder denna sittbänk
·Använd den inte om den inte fungerar eller om delar inte är välmonterade.
·Om du känner några bröstsmärtor, illamående, yrsel eller brist på bredd,
bör du sluta träna omedelbart och rådfråga din läkare innan du fortsätter.
3
Exercise Plans
1. Nybörjare rekommenderas att börja med färre reps, 5 reps som 1 set till
exempel och lägg till reps allt eftersom.
2. Träna inte en halvtimme före/efter måltider eller 1 timme före sömn
3. Gör träningsplaner.
Part List

4
Assembly
Steg 1:
Fäst främre basrör (2) och bakre basrör (3) till basram (1). Använd Slidbult
M10*55 (12), lockmutter M10 (16) och plattbricka D10 (18). Spänna de
skruvar.
Steg 2:

5
Fäst justeringsramen (4) på basramen (1). Använd skruv M10*110(13)Platt
bricka D10 (18) och låsmutter M10 (17). Dra åt skruvarna. Föra in Justera
röret (5) i justeringsramen (4).
Steg 3:
Fäst huvuddynan (11) och ryggdynan (10) på sittdynans ram (6). Använd
intern sexkantsskruv M8*40 (15) och platt bricka D8 (19). Dra åt skruvarna.
Steg 4:
Fäst sittdynans ram (6) på justeringsröret (5) och basramen (1). Använd
6
låsmutter M10 (17), plattbricka D10 (18) och skruv M10*110 (13). Dra åt
skruvarna.
Steg 5:
Fäst fotjusteringsramen (7) på sittdynans ram (6). Använd skruv M10*100
(14), låsmutter M10 (17) och plattbricka D10 (18). Dra åt skruvarna. Sätt in
fotstödsramen (8) i fotjusteringsramen (7).
OBS: Den maximala viktkapaciteten för denna produkt är 1000 lbs eller
453 kg. Endast en person bör använda denna utrustning åt gången.

7
Cleaning and disinfection
15.Torka av ytan med en våt bomullstrasa.
16.Kontrollera regelbundet att skruvarna lossnar var tredje månad och dra
åt dem

Tillverkare: Shanghaimuxinmuyeyouxiangongsi
Adress: Shuangchenglu 803nong11hao1602A-1609shi, baoshanqu,
shanghai 200 000 CN.
Importerad till AUS: SIHAO PTY LTD. 1 ROKEVA STREETEASTWOOD
NSW 2122 Australien
Importerad till USA: Sanven Technology Ltd. Suite 250, 9166 Anaheim
Place, Rancho Cucamonga, CA 91730
REP
UK
YH CONSULTING LIMITED. C/O YH Consulting
Limited Office 147, Centurion House, London
Road, Staines-upon-Thames, Surrey, TW18 4AX
REP
EC
E-CrossStu GmbH
Mainzer Landstr.69,
60329 Frankfurt am Main.