
Technical Support and E-Warranty Certificate
www.vevor.com/support
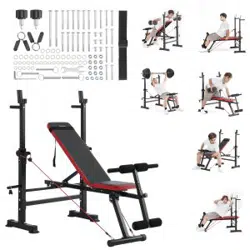
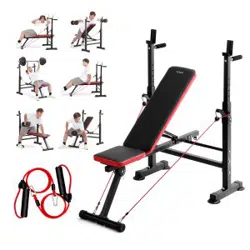
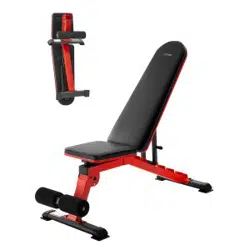
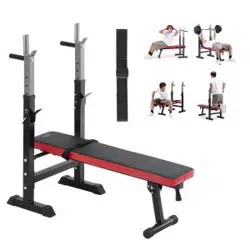
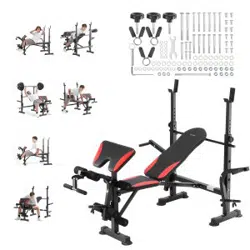
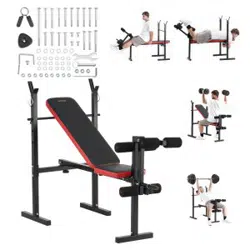
Multifunctional Weightlifting bed
MODEL:SJ7821
We continue to be committed to provide you tools with competitive price.
"Save Half", "Half Price" or any other similar expressions used by us only
represents an estimate of savings you might benefit from buying certain tools
with us compared to the major top brands and does not necessarily mean to cover
all categories of tools offered by us. You are kindly reminded to verify carefully
when you are placing an order with us if you are actually Saving
Half in comparison with the top major brands.

1
MODEL:SJ7821
NEED HELP? CONTACT US!
Have product questions? Need technical support? Please feel free to
contact us:
Technical Support and E-Warranty Certificate
www.vevor.com/support
This is the original instruction, please read all manual instructions
carefully before operating. VEVOR reserves a clear interpretation of our
user manual. The appearance of the product shall be subject to the
product you received. Please forgive us that we won't inform you again if
there are any technology or software updates on our product.
Multifunctional Weightlifting bed

2
Thank you very much for choosing this product.
Please read all of the instructions before using it.The information will help
you achieve the best possible results.
Operation safety
WARNING:
Please read all instructions before using this product
It is the Owner's responsibility to ensure that all users of this
product are fully aware of all warnings and precautions.
·Do not use it if you are pregnant
·Before beginning any exercise program consult your physician.
·Read all instruction before using this product.
·Keep children and pets away from sit-up bench while in use.Children
should not use.The product. without adult supervision.
·Inspect and tighten all parts each time before using this sit-up bench.
·Please clean this machine using damped wipes only.Do not use any
cleansers.Please Consult with customer service if you have any questions.
·This product should be placed on a flat surface when using.Place an
anti-slippery mat under the machine if needed.
·Please wear proper clothes when using this product.
·Do not use it if it is not functional or parts are not well-assembled.
·If you feel any chest pains,nausea,dizziness,or short of breadth,you
should stop exercising immediately and consult your physician before
continuing.
·Before use, always ensure that your product is positioned on a solid,
hard-flat surface.
·Store idle equipment out of reach of children and do not allow anyone
unfamiliar with the equipment to use it. This tool is dangerous in the hands
of untrained users.
· When using the product, the crowd of onlookers must keep adistance of 3
meters to avoid accidental injury.

3
At NO time should pets or children under the age of 12 be
closer to the product than 3 m (10 feet). At NO time should
children under the age of 12 use the product. Children over
the age of 12 should not use the product without adult
supervision.
Exercise Plans
1.Beginners are recommended to start with less reps,5 reps as 1set for
example and add reps as goes.
2.Please do not exercise half an hour before /after meals or 1 hour before
sleep.
3.Please make exercise plans.
4
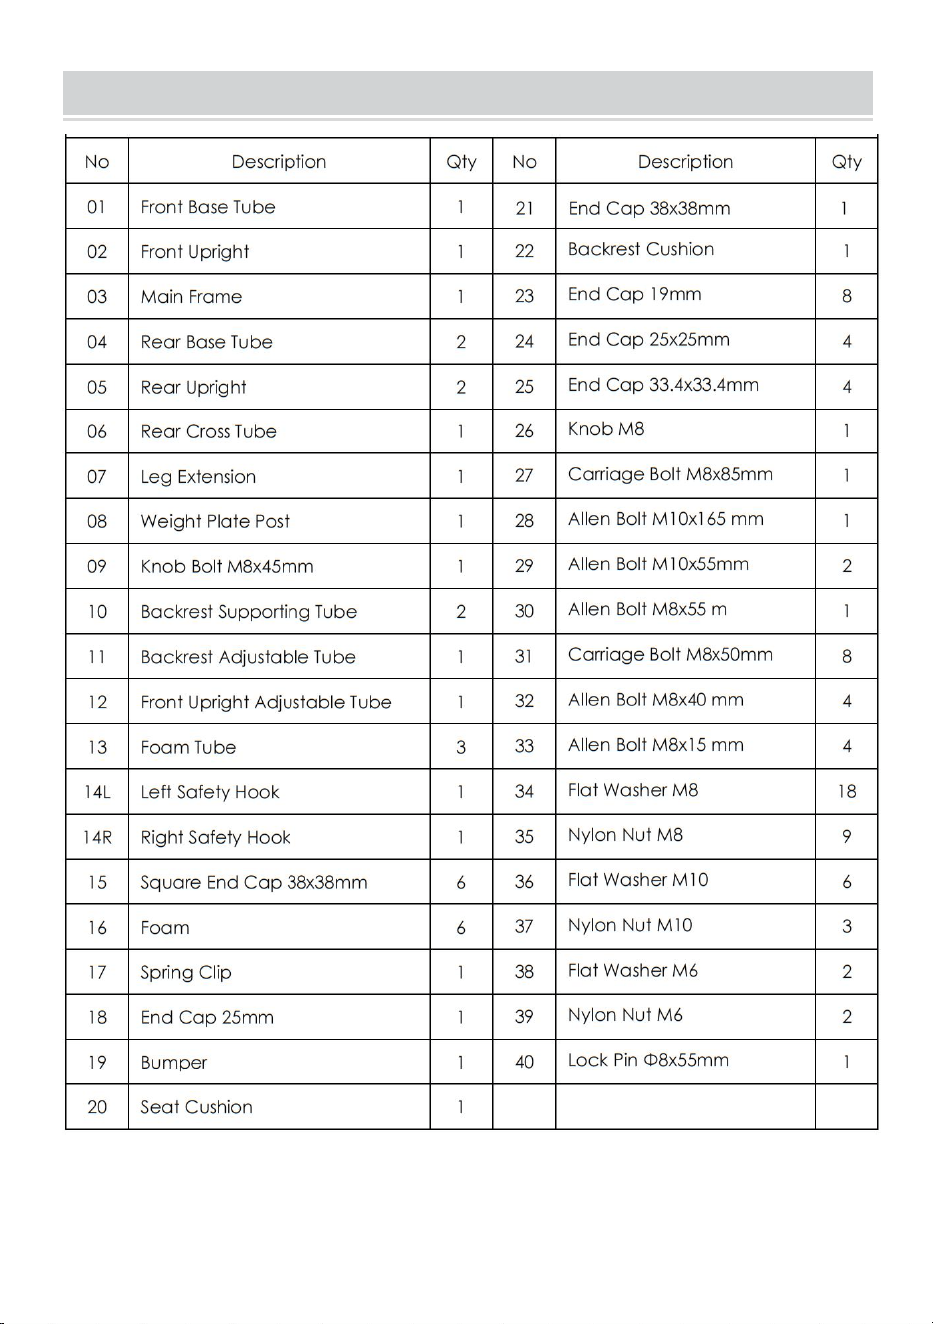
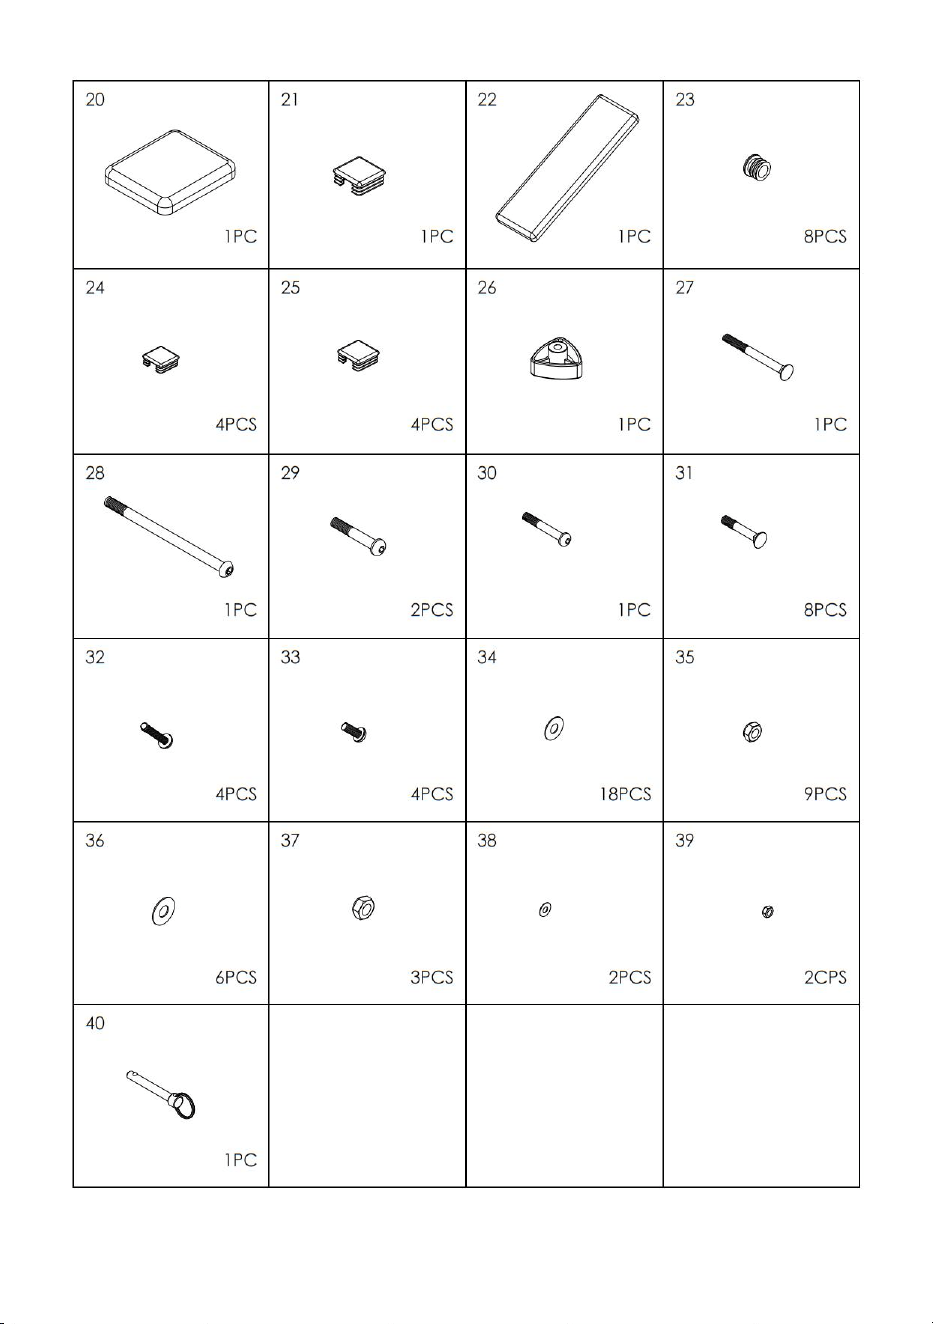
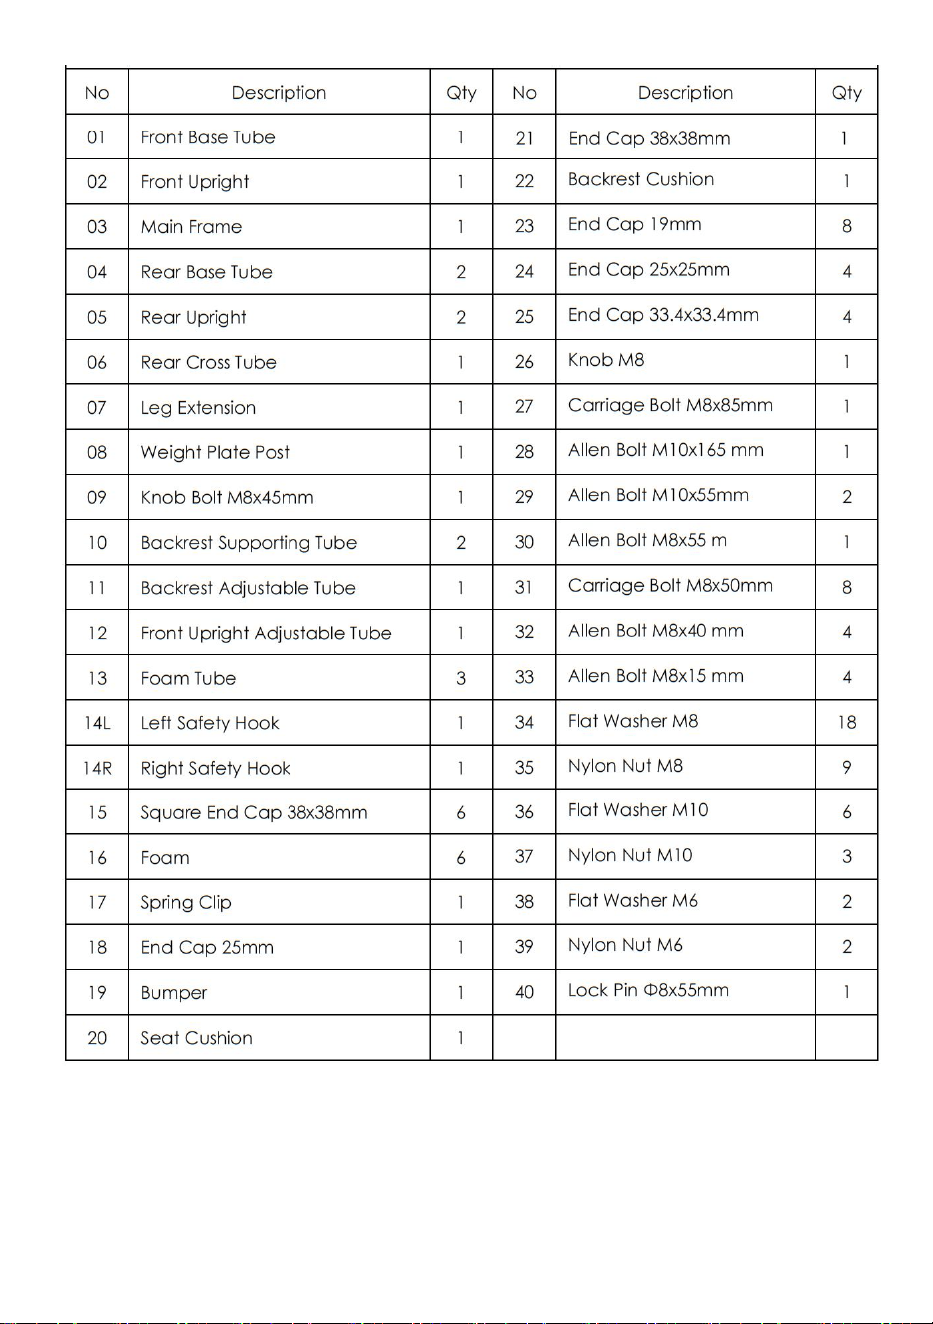
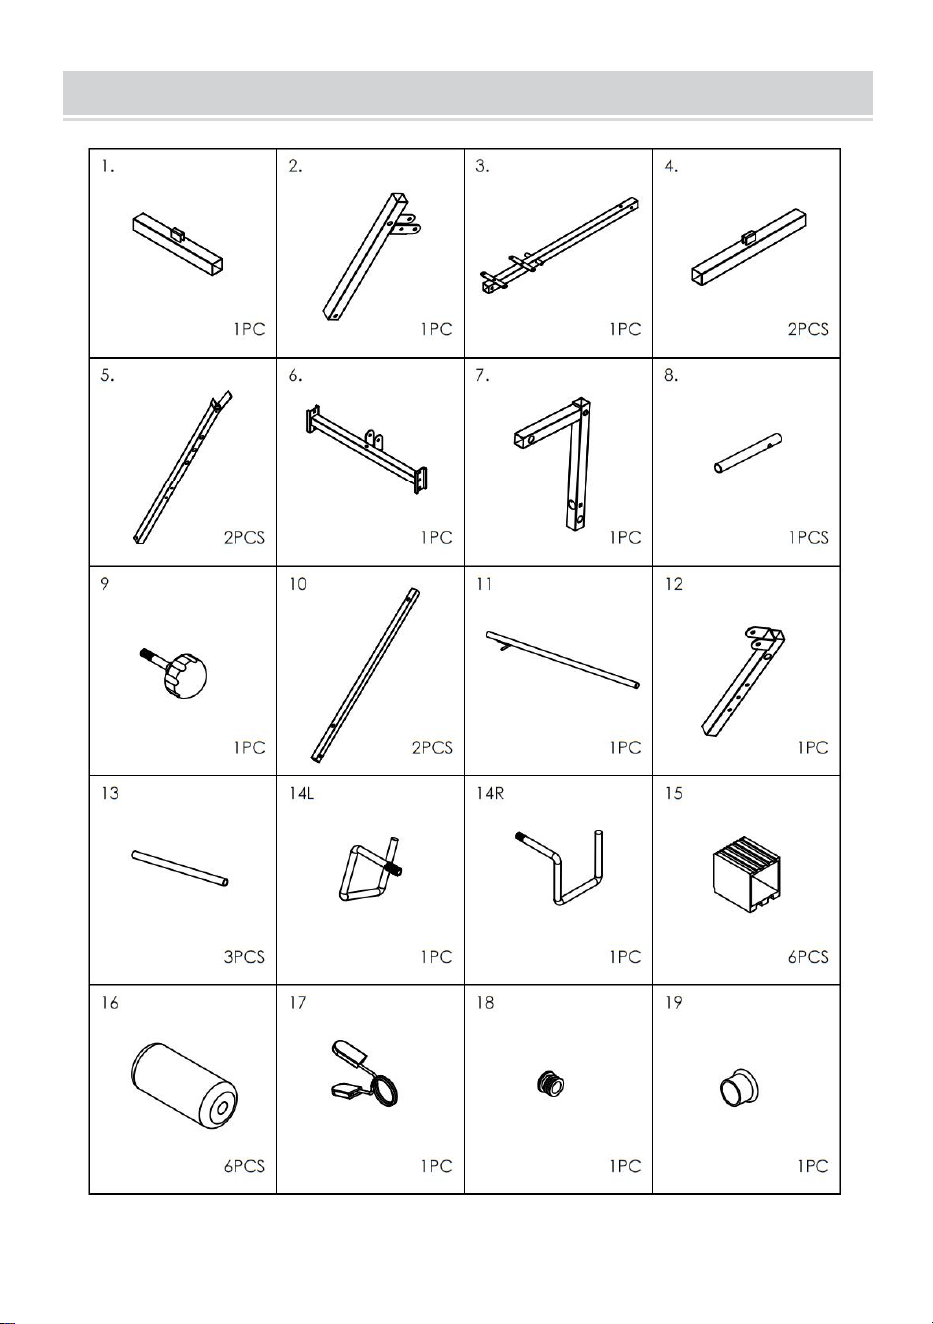
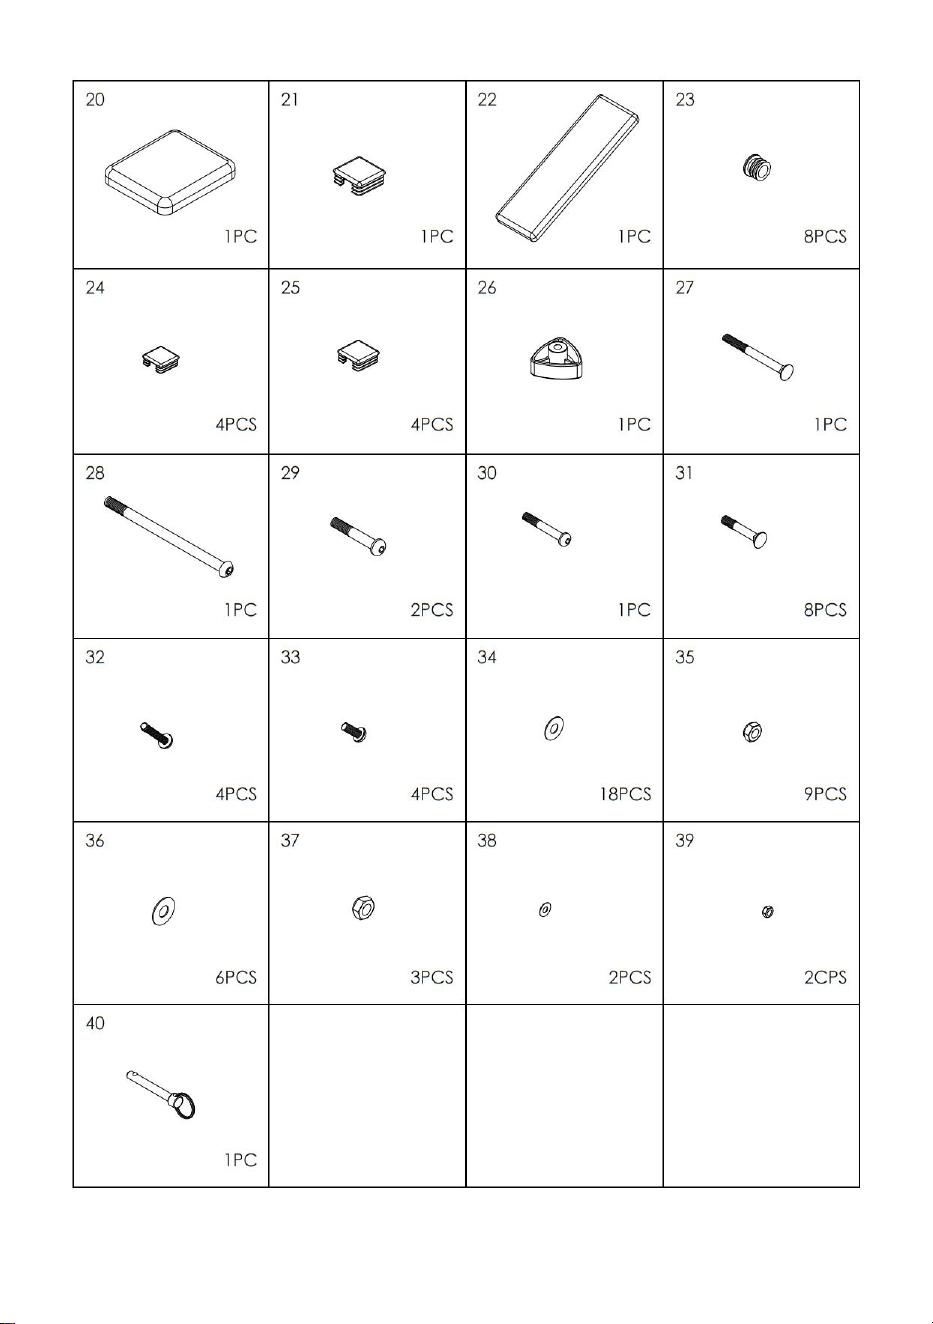
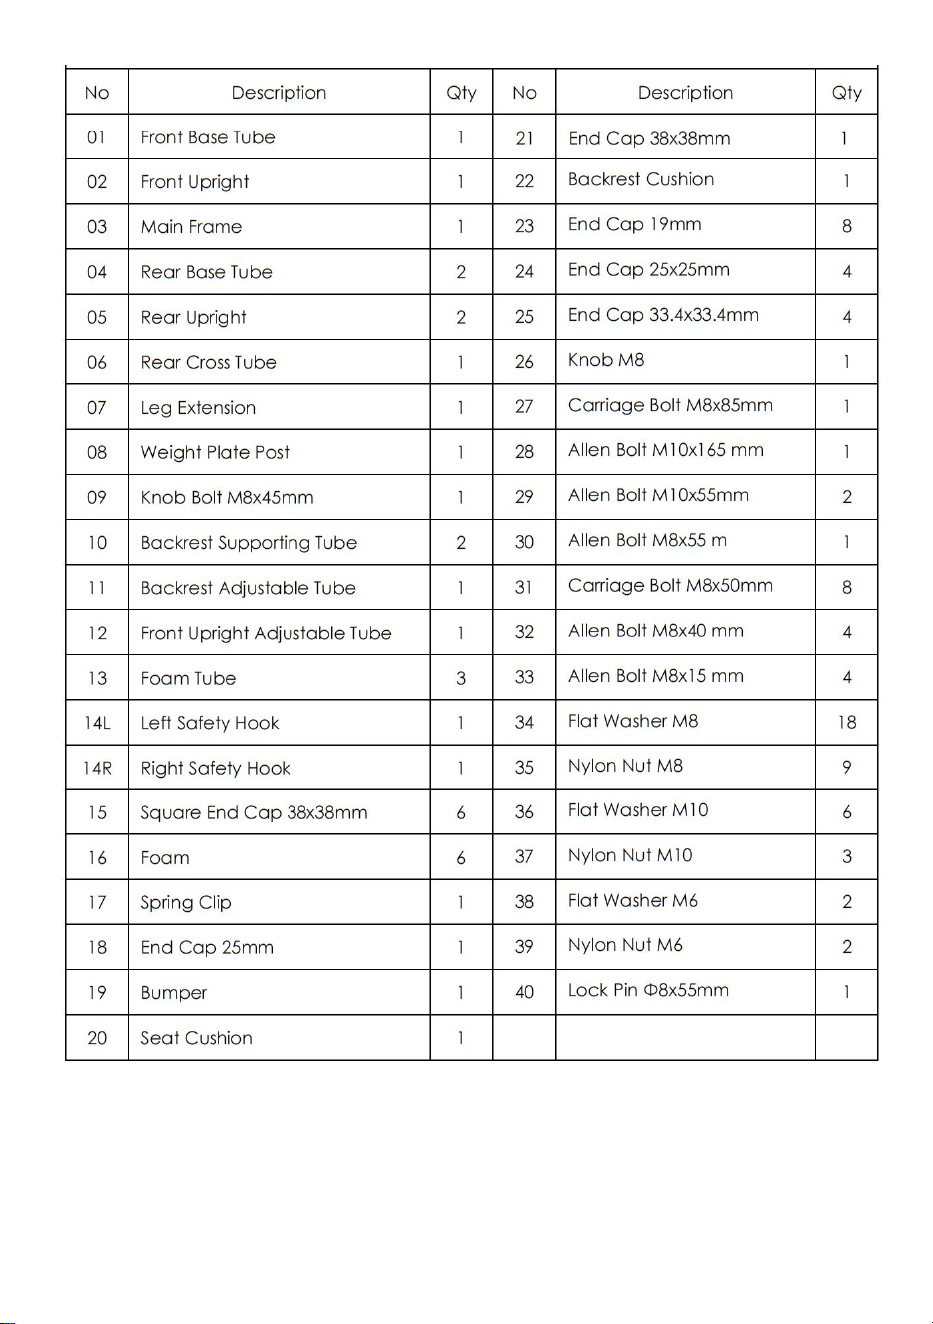
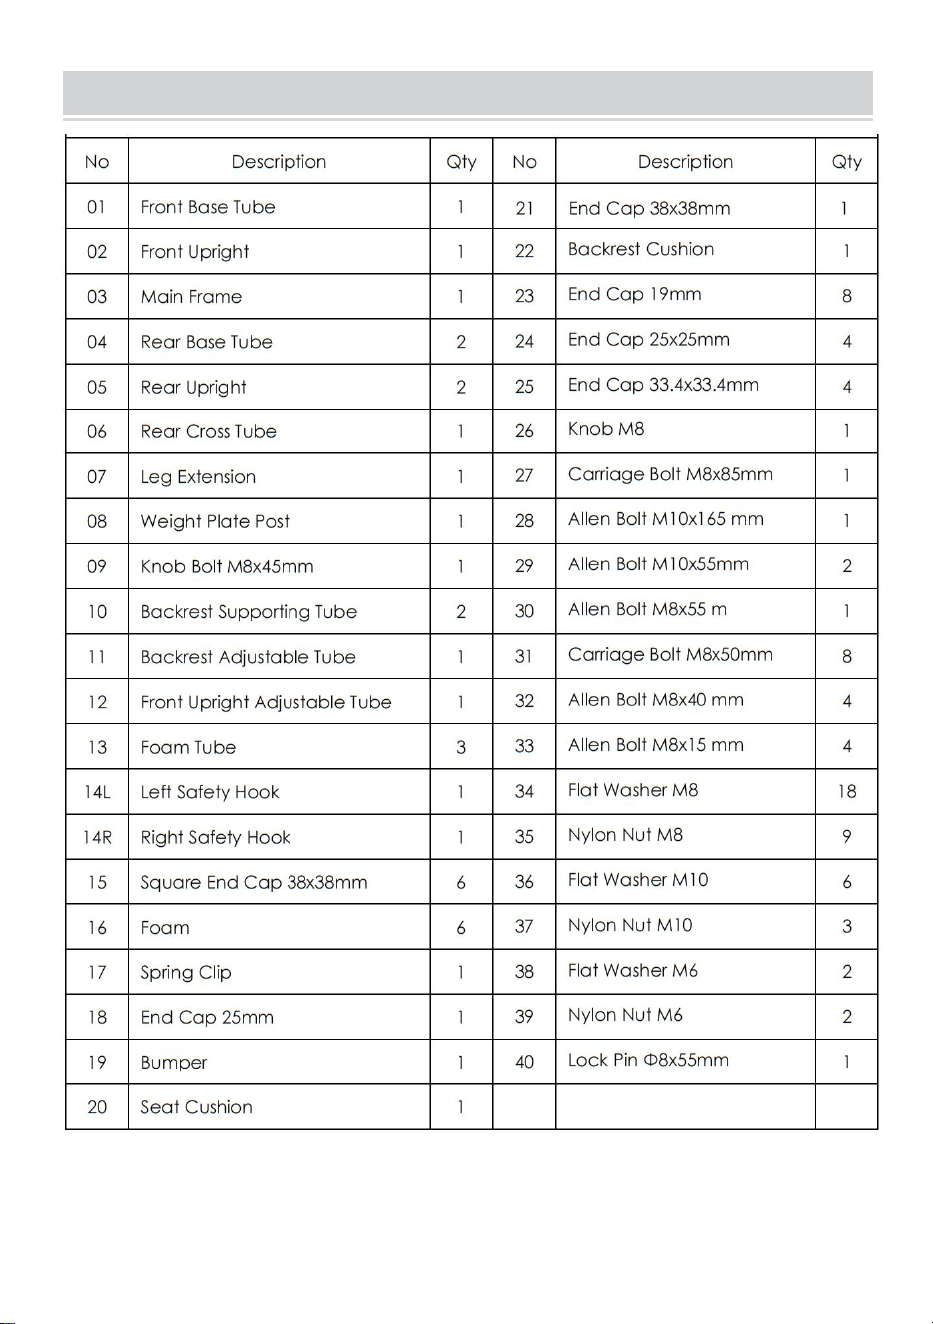
Part List

5
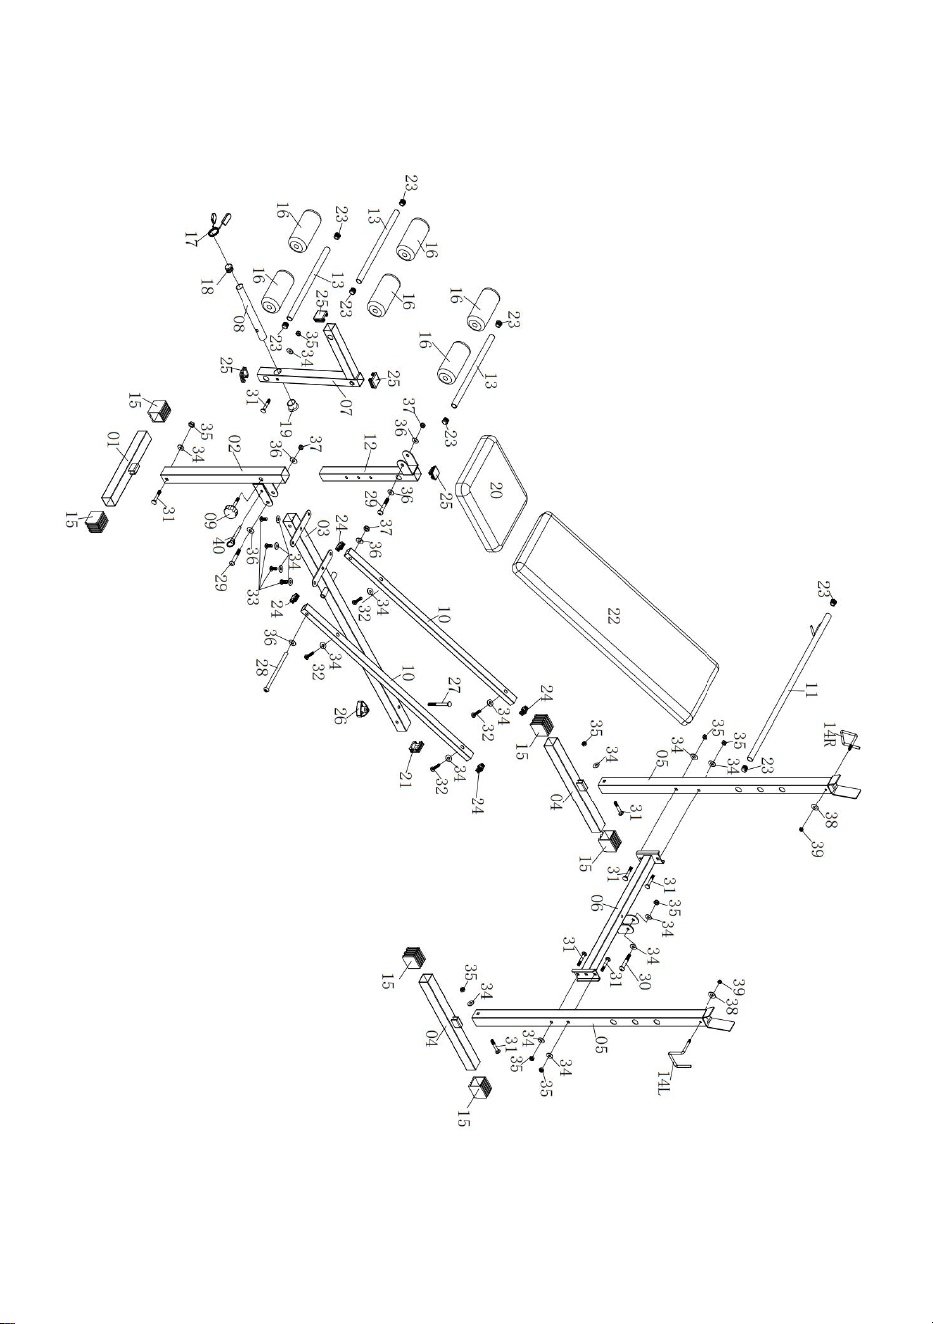
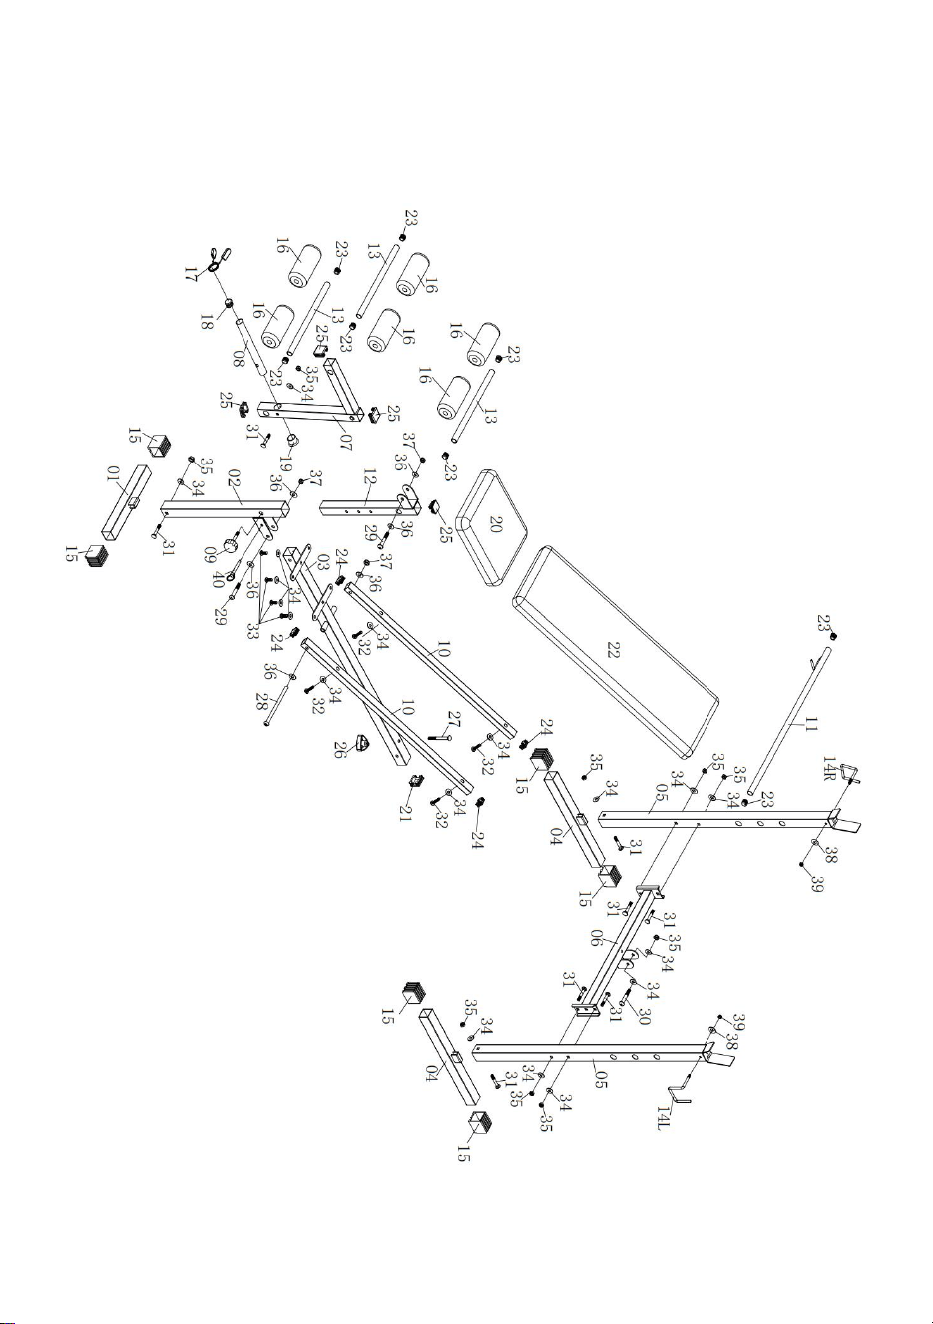
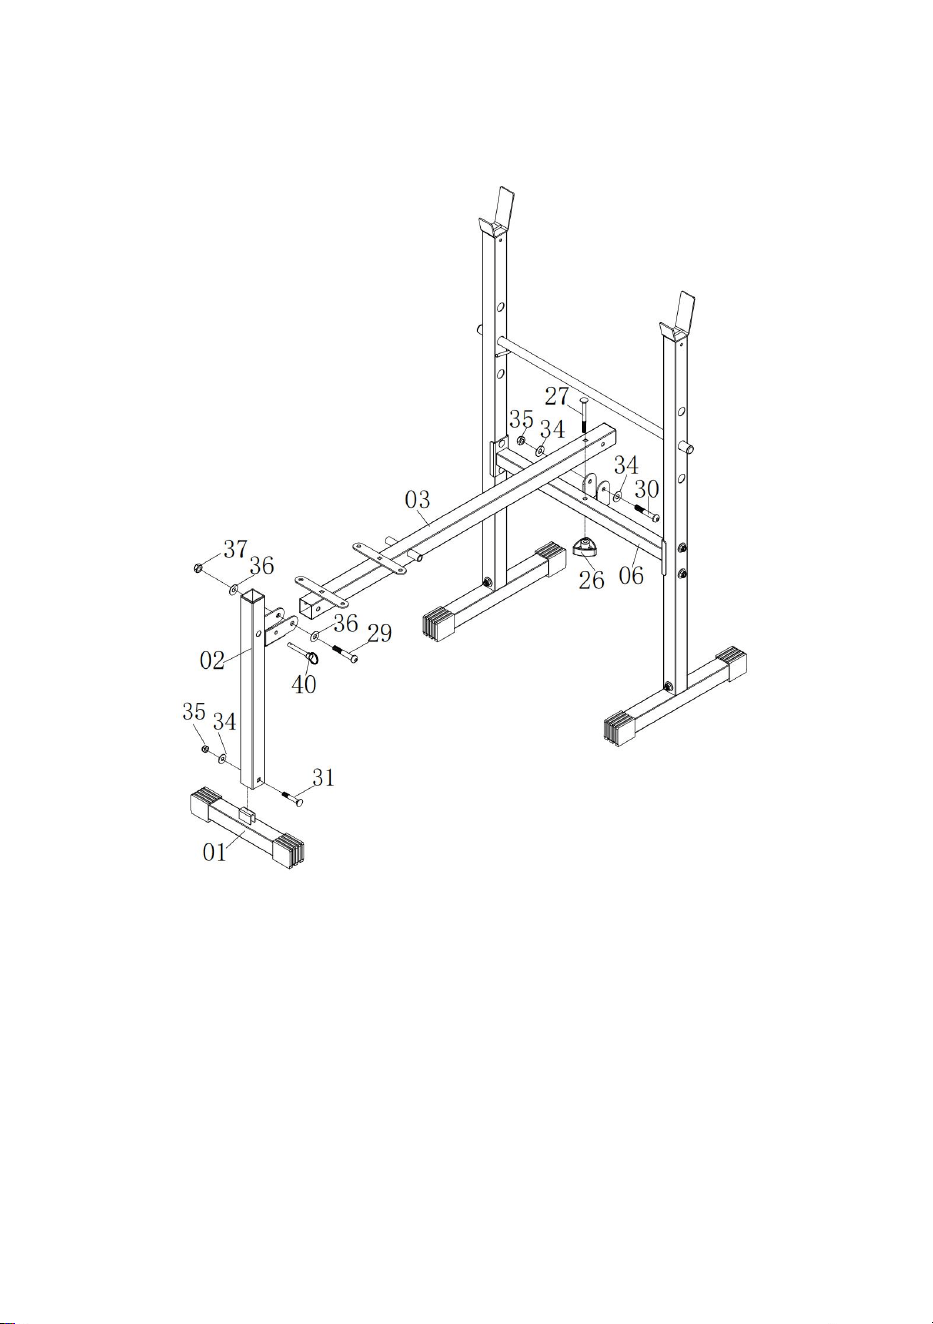
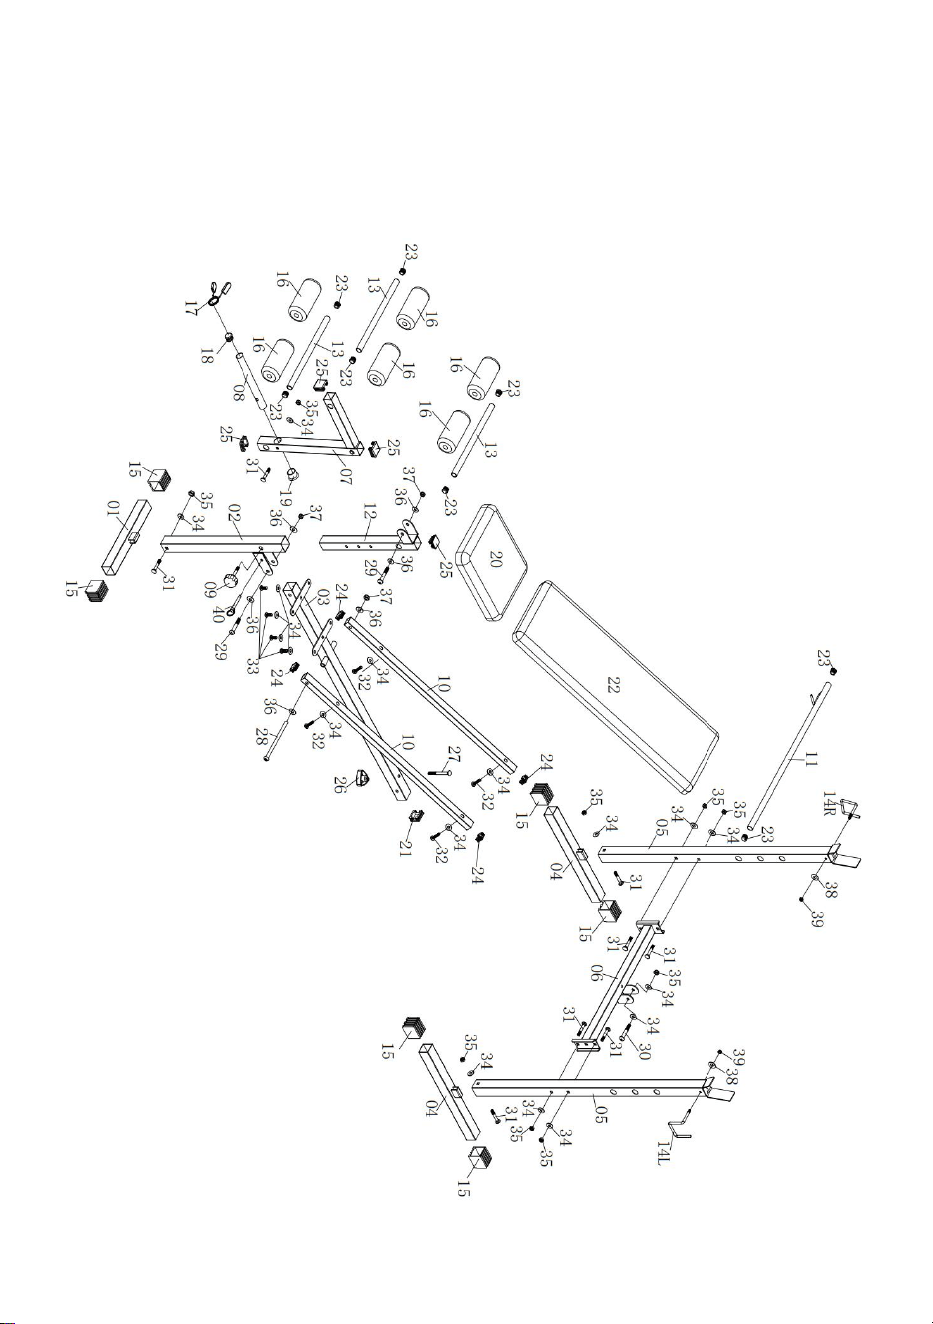
Exploded Diagram
Please note that not all of the parts and hardware you see here will be
used while you are
assembling the machine because some of these are already pre-installed.

6
Part List
7

8
NOTE: To avoid misalignment due to over-tightening, please do not use a
wrench at this time.
Hand-tightening for now will help ensure easy assembly.
Wrench-tightening should be performed after all parts are assembled to
ensure all nuts, bolts, and parts are tightly secured before use.
With the help of an assistant.
9
Assembly
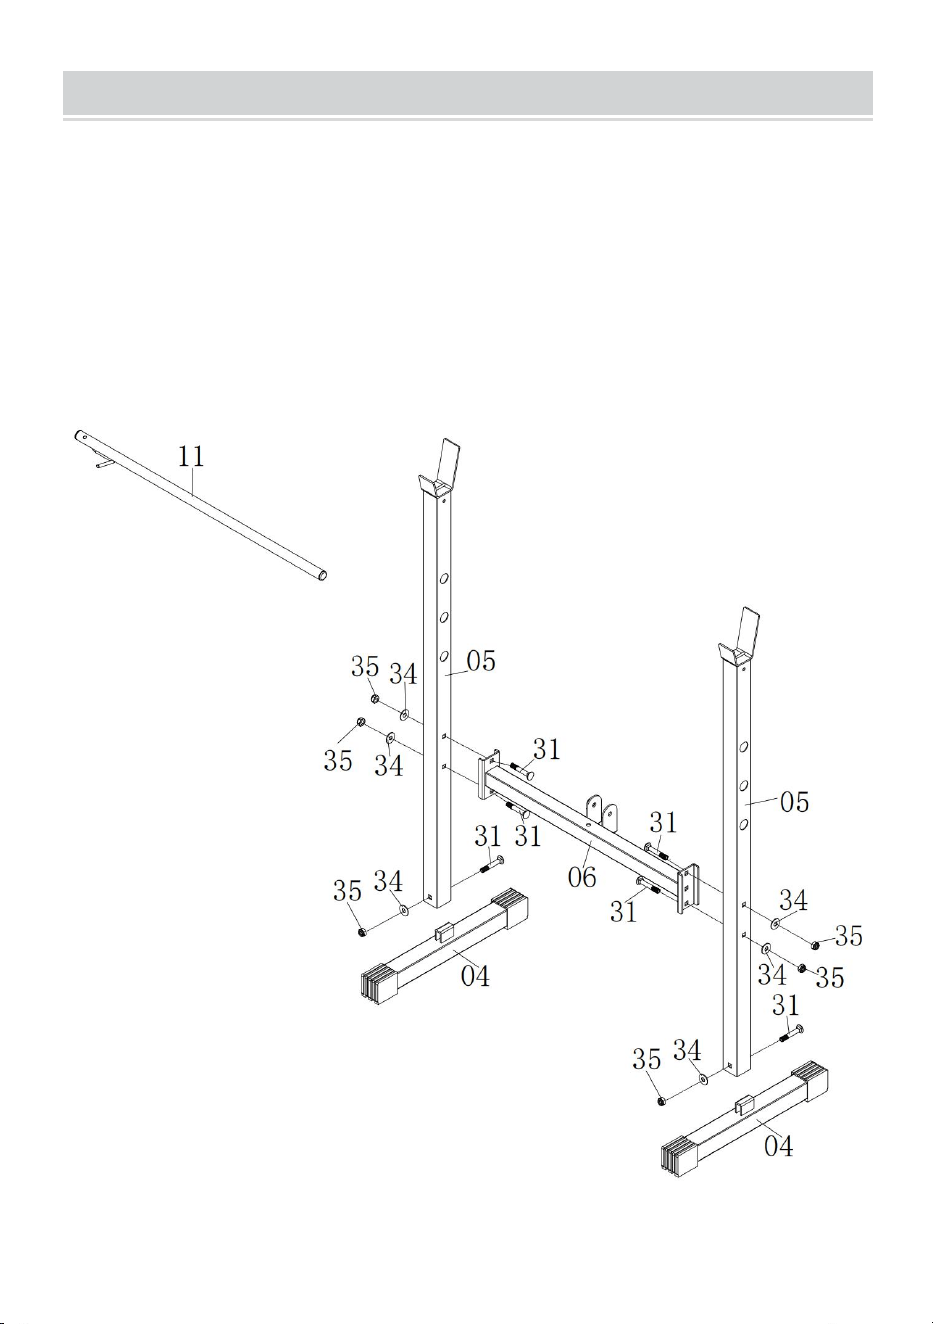
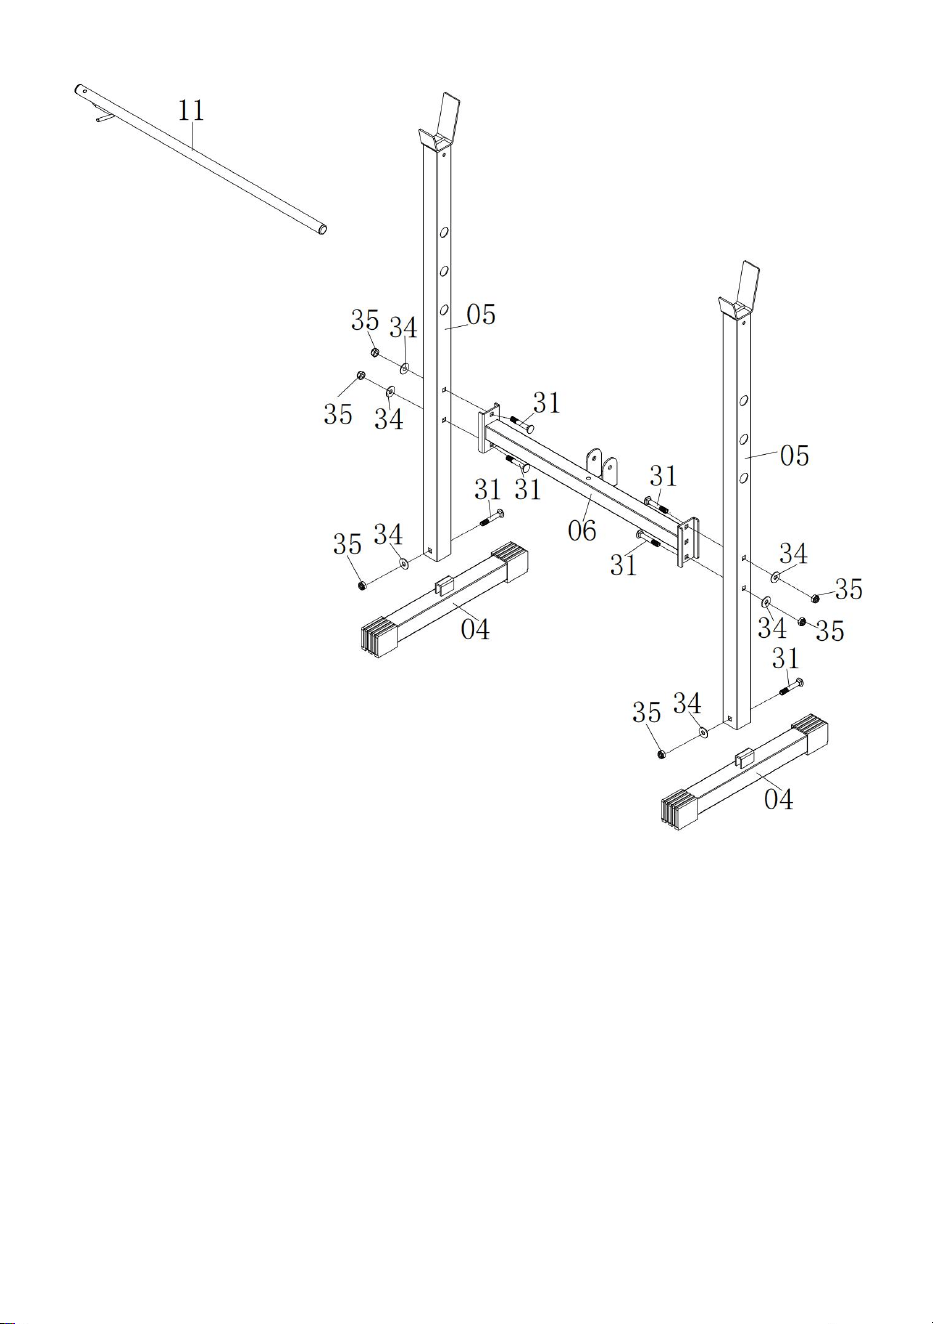
Step 1:
A) Attach two Rear Uprights (05) to two Rear Base tubes (04) total by two
Carriage Bolts (31),
two Flat Washers (34) and two Nylon Nuts (35).
B) Attach the Rear Cross Tube (06) to Rear Uprights (05), secure with total
four Carriage Bolts (31),
four Flat Washers (34) and four Nylon Nuts (35).
C) Insert Backrest Adjustable Tube (11) to both Rear Uprights (05),
10
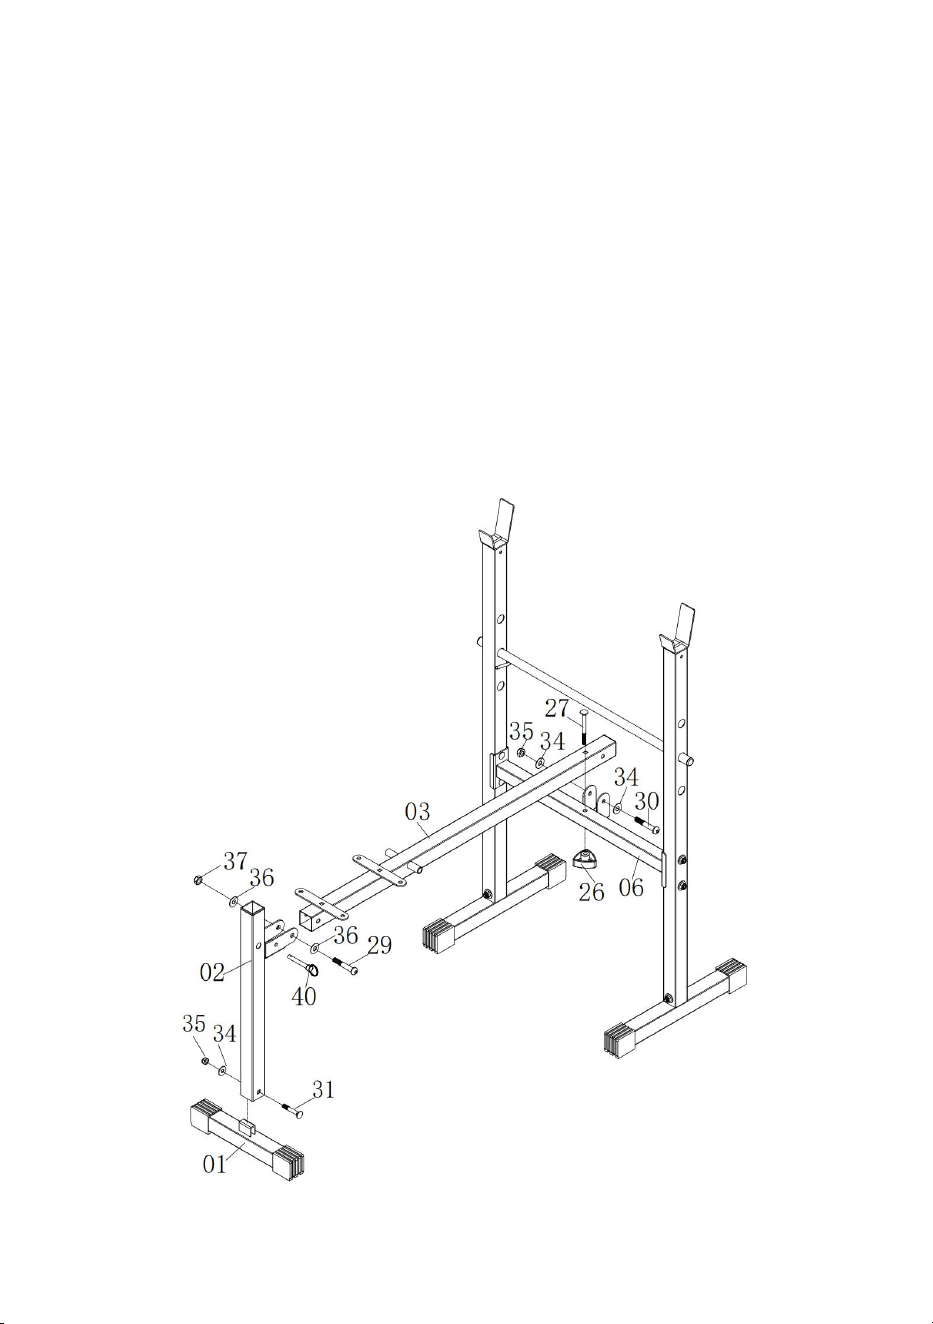
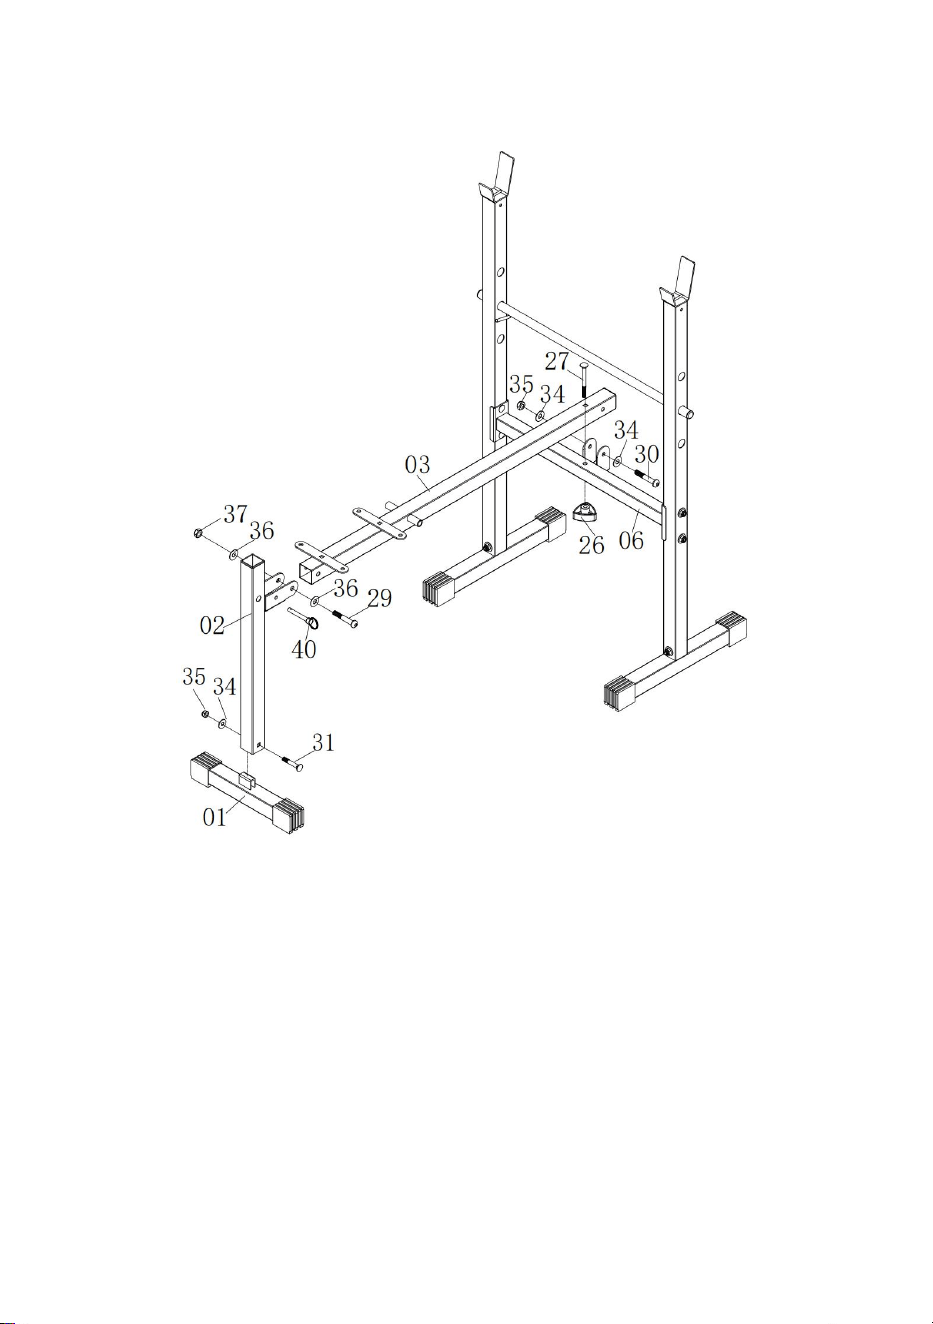
Step 2:
A) Attach the Front Upright (02) to Front Base Tube (01) by using one
Carriage Bolt (31), one Flat
Washer (34) and one Nylon Nut (35)
B) Attach the front side of Main Frame (03) to Front Upright (02) using one
Allen Bolt (29), two Flat
Washers (26) and one Nylon Nut (37), then insert the Lock Pin (40). Attach
the other side of Main
Frame (03) to the Rear Cross Tube (06) using one Allen Bolt (30), two Flat
Washers (34) and one
Nylon Nut (35) from side, secure with one Carriage Bolt (27) and Knob (26)
from above.
11
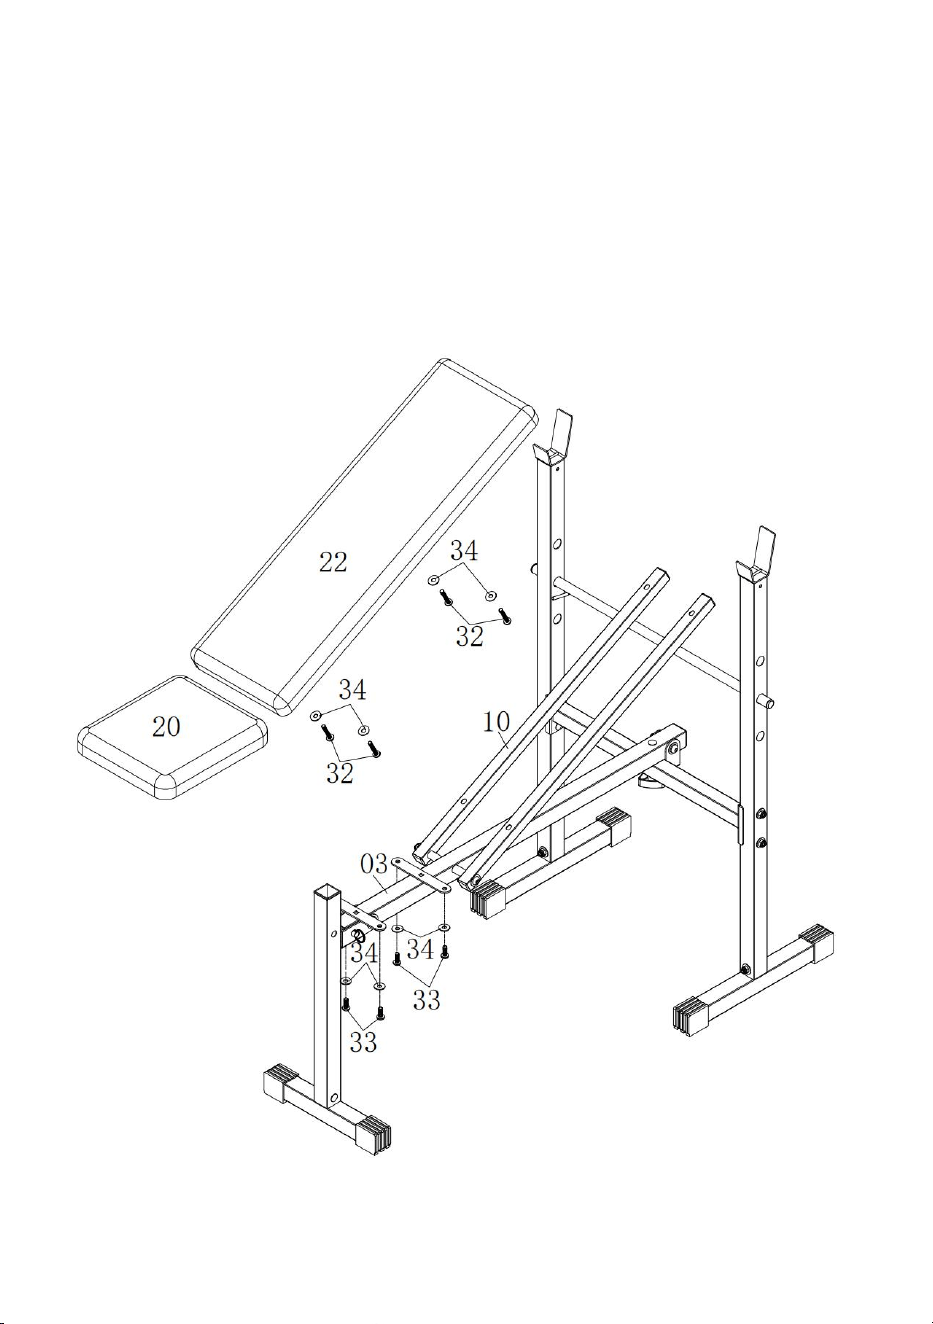
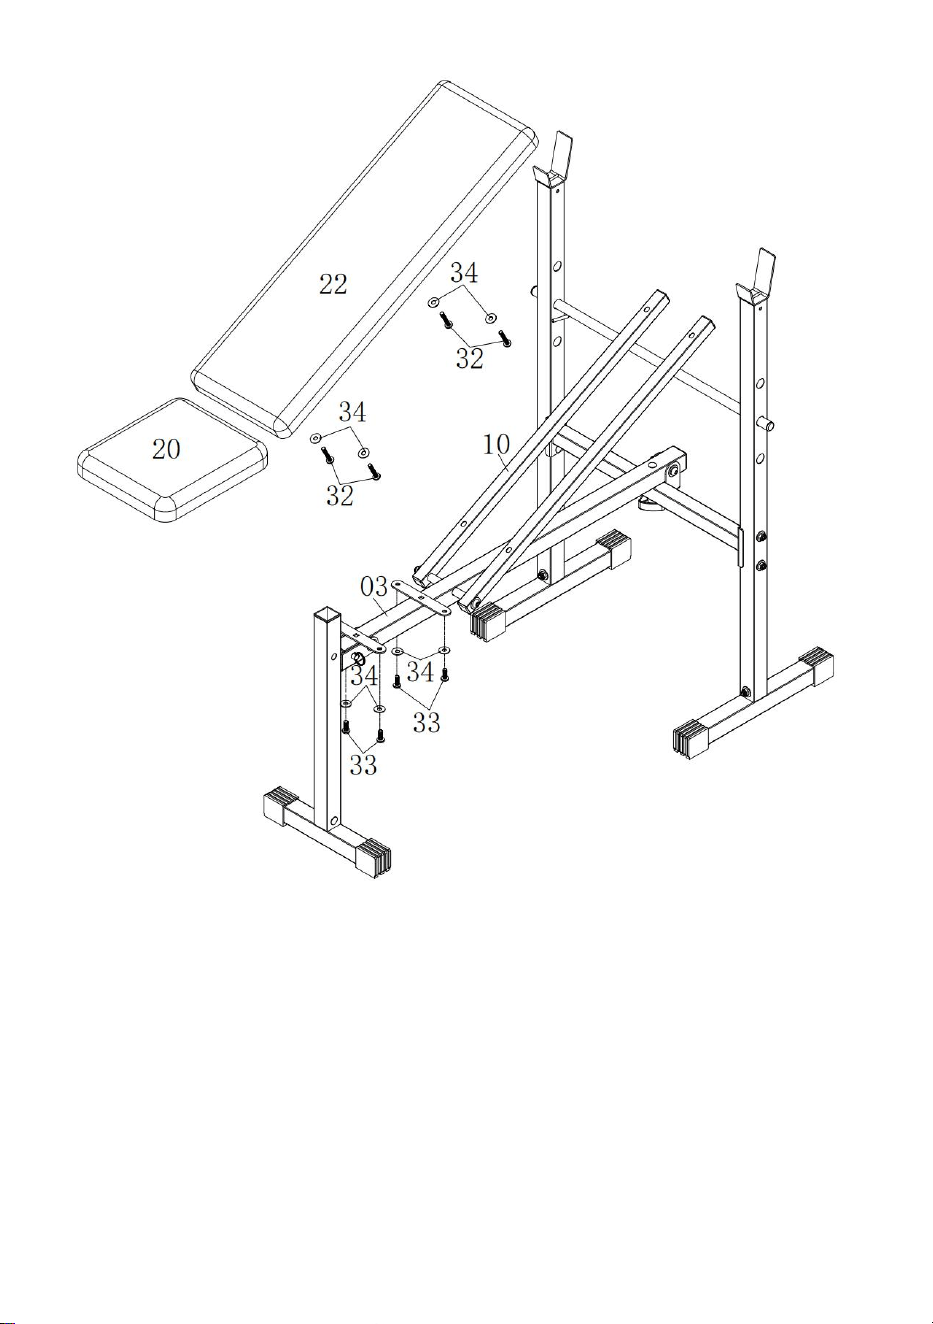
Step 3:
Attach the Seat Cushion (41) to the Main Frame (08) by using four Allen
Bolts (33) and four Flat
Washers (34).
Attach the Backrest Cushion (42) to the Backrest Supporting Tubes (10) by
using four Allen Bolts
(32) and four Flat Washers (34).
12
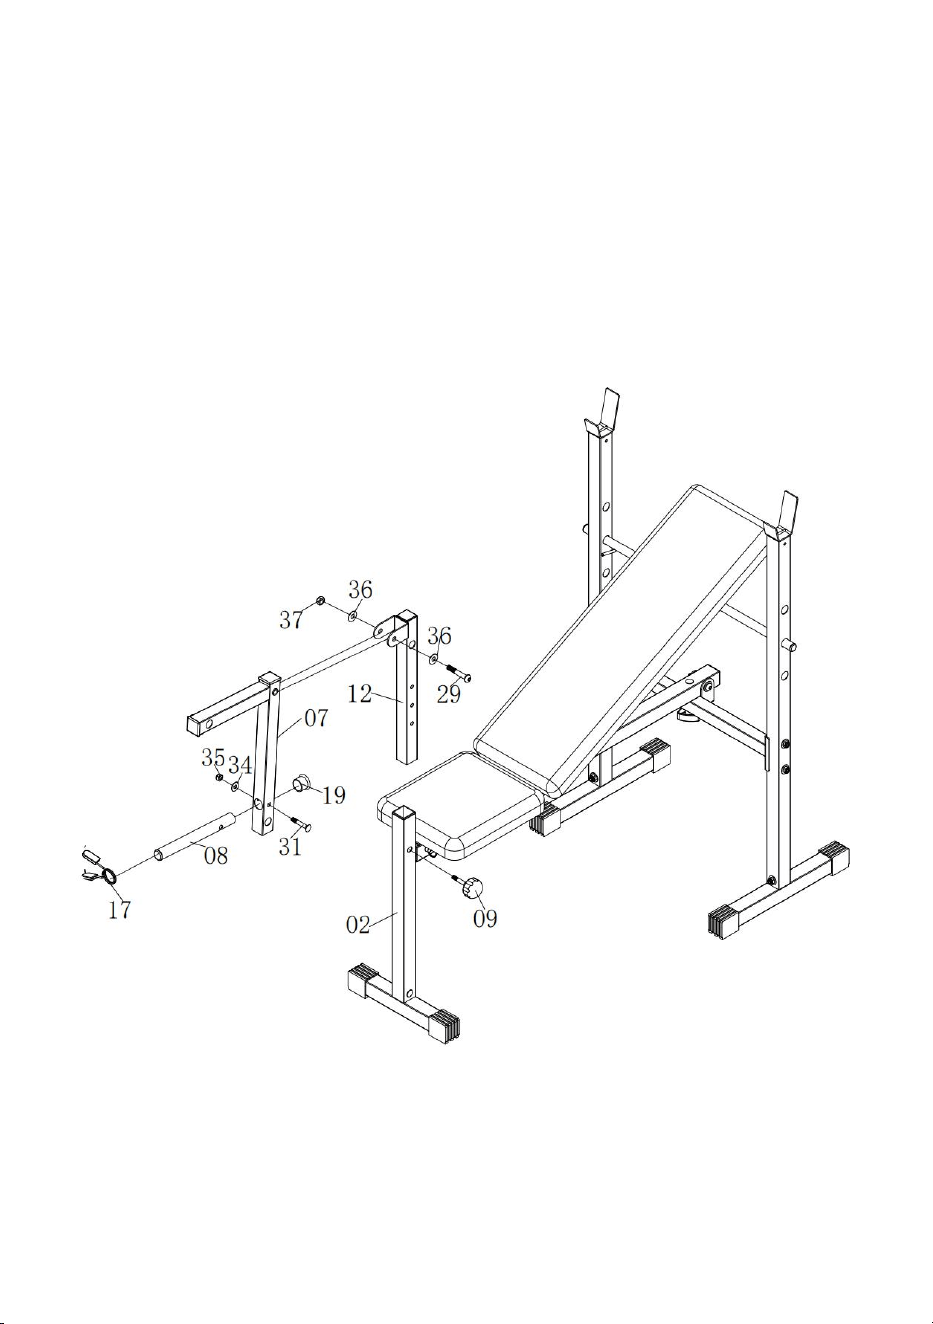
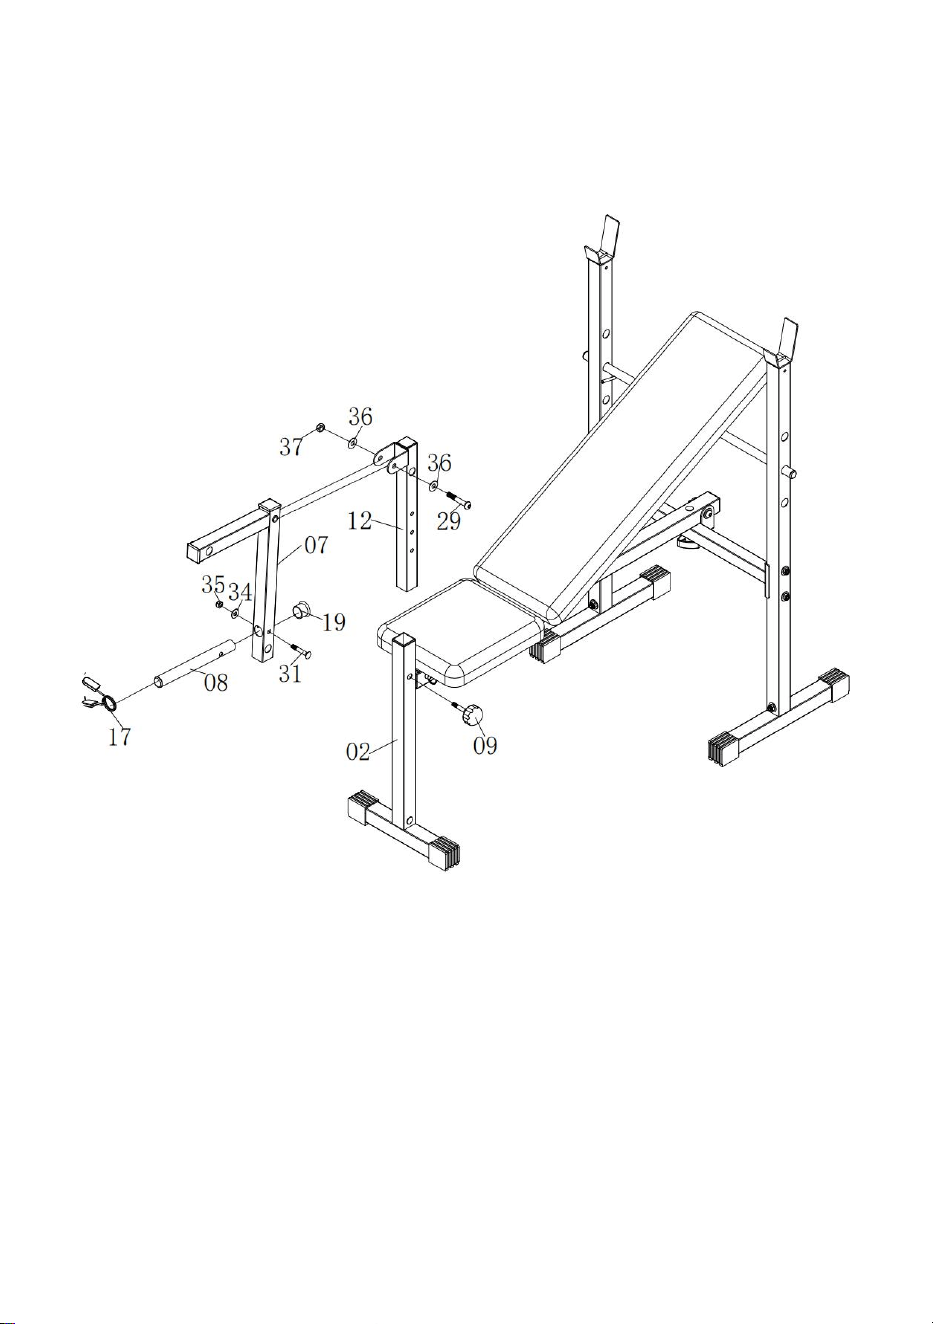
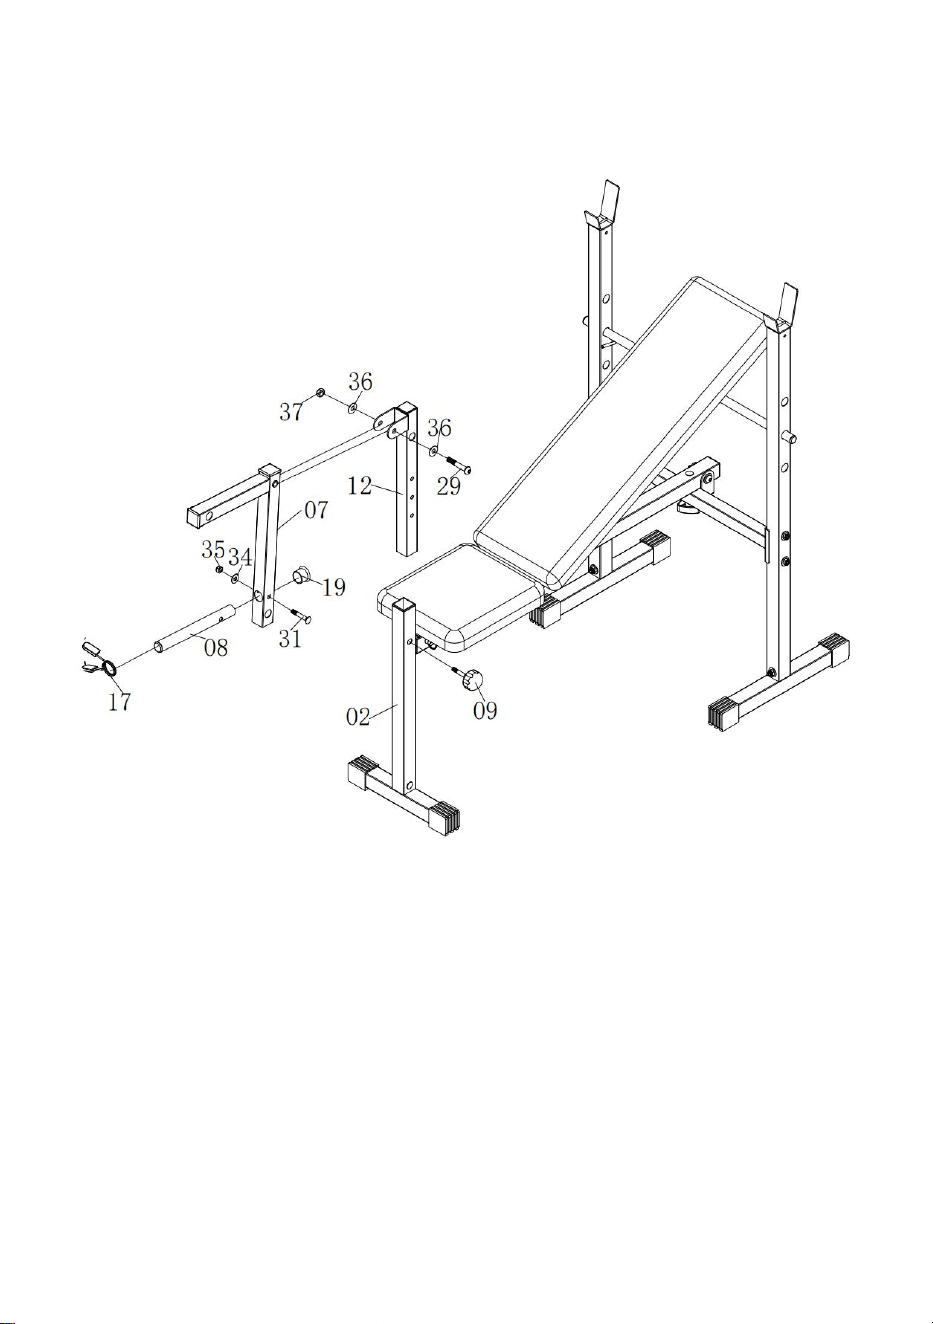
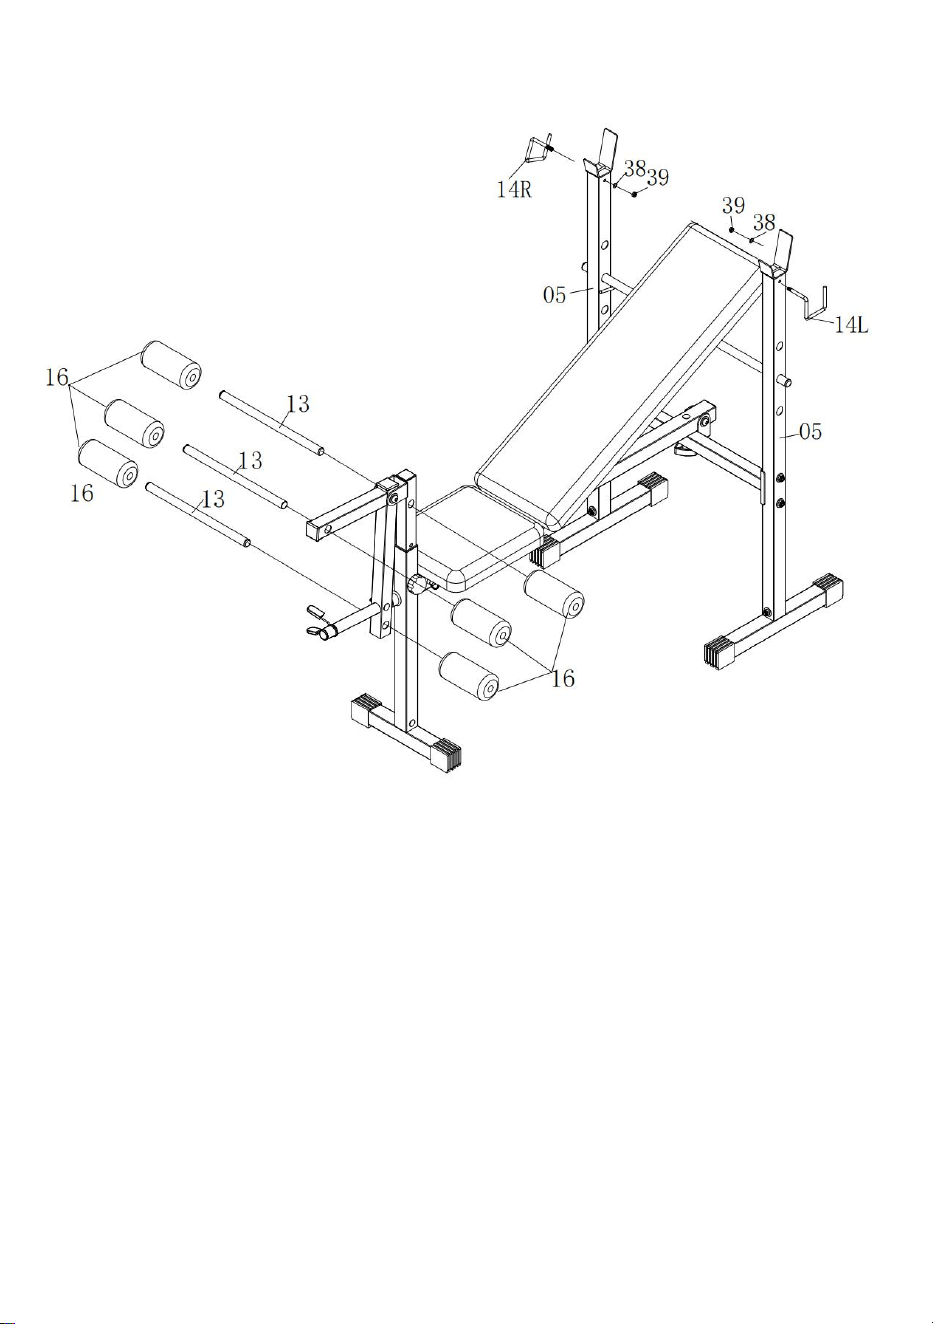
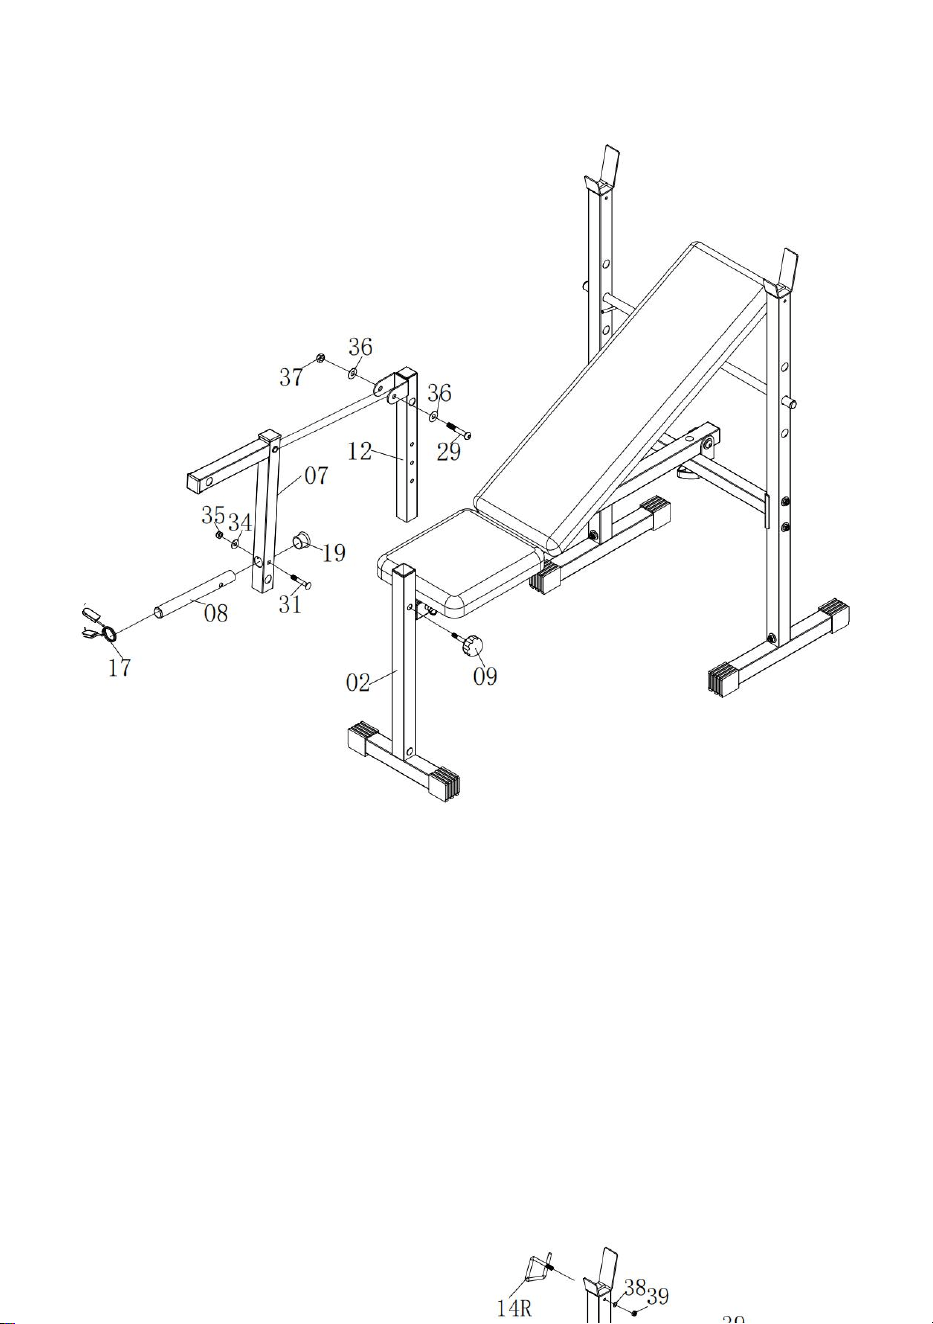
Step 4:
A) Attach Front Upright Adjustable Tube (12) to Front Upright (02), after
selecting the appropriate hole position, lock it with the knob Bolt (09).
B) Attach Leg Extension (07) to Front Upright Adjustable Tube (12) using
one Allen Bolt (29), two Flat Washers (36) and one Nylon Nut (37).
Slide Weight Plate Post (08) to Leg Extension (07) using one Carriage Bolt
(31), one Flat Washer (34) and one Nylon Nut (35), and install the Spring
Clip (17).
13
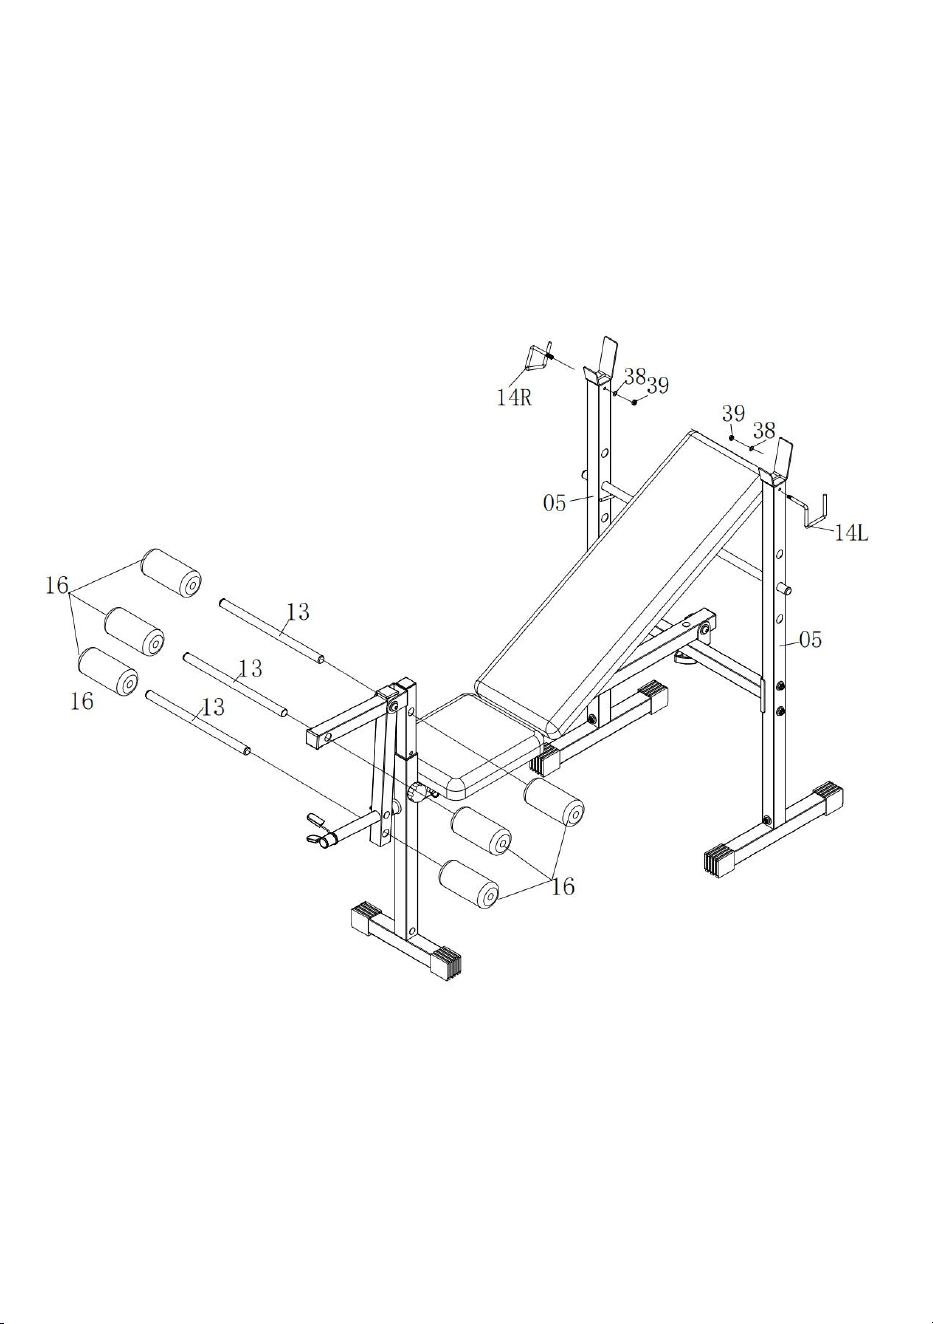
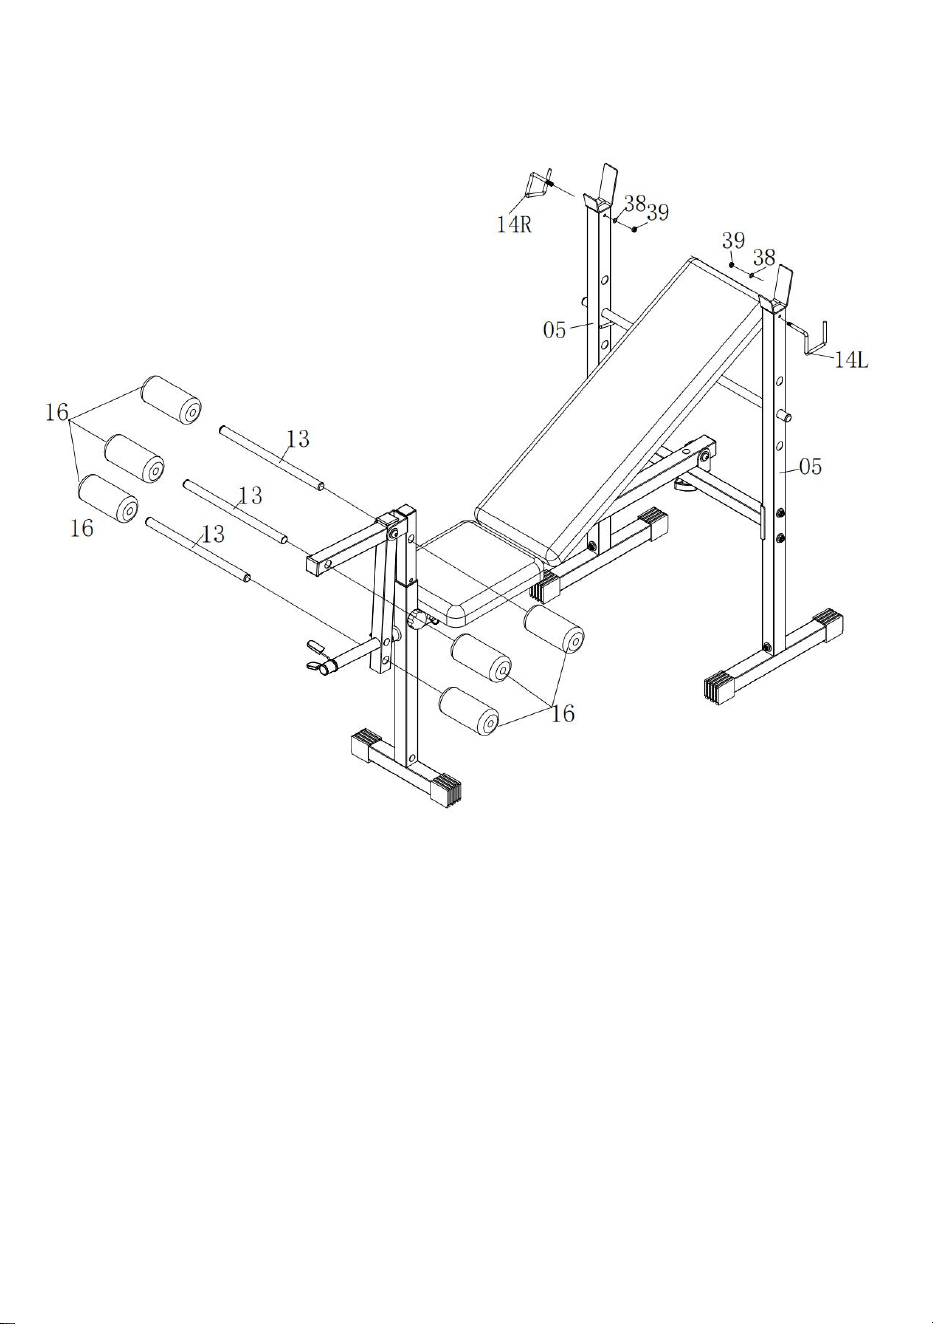
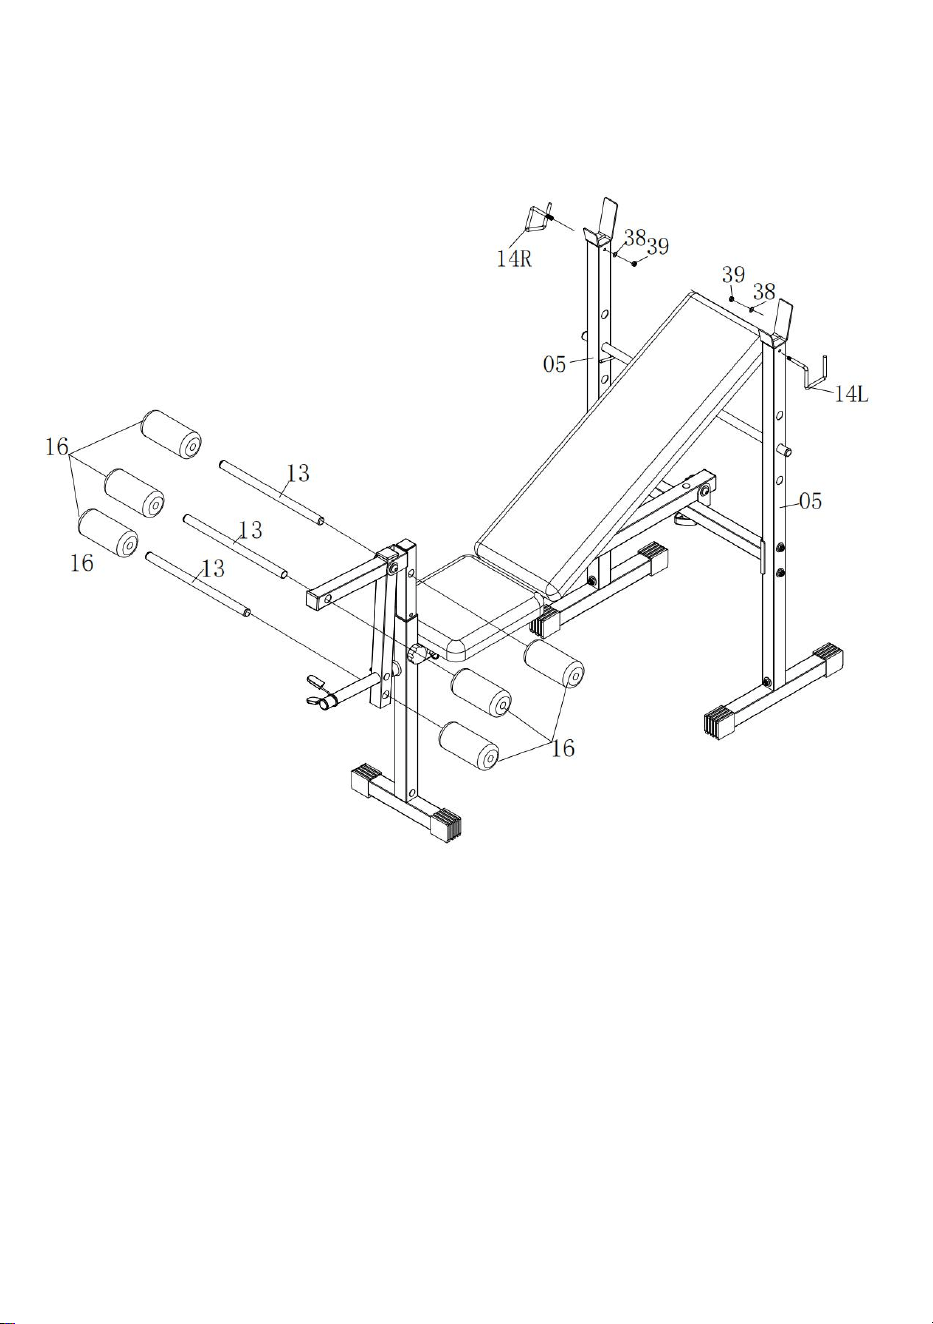
Step 5:
A) Slide two Foam tubes (13) to Leg Extension (07), one Foam tube (13) to
Front Upright
Adjustable Tube (12), and Slide six Foams (16) to each Foam tube (13)
B) Attach Left Safety Hook (14L) and Right Safety Hook (14R) to Rear
Uprights (05) using one Flat
Washer (38) and Nylon Nut (39).
THE ASSEMBLY PROCESS IS NOW COMPLETE.
For your safety, Please tighten the screw and adjust it to the appropriate
position.
Please visually and functionally inspect and test the unit after assembly is
complete.

14
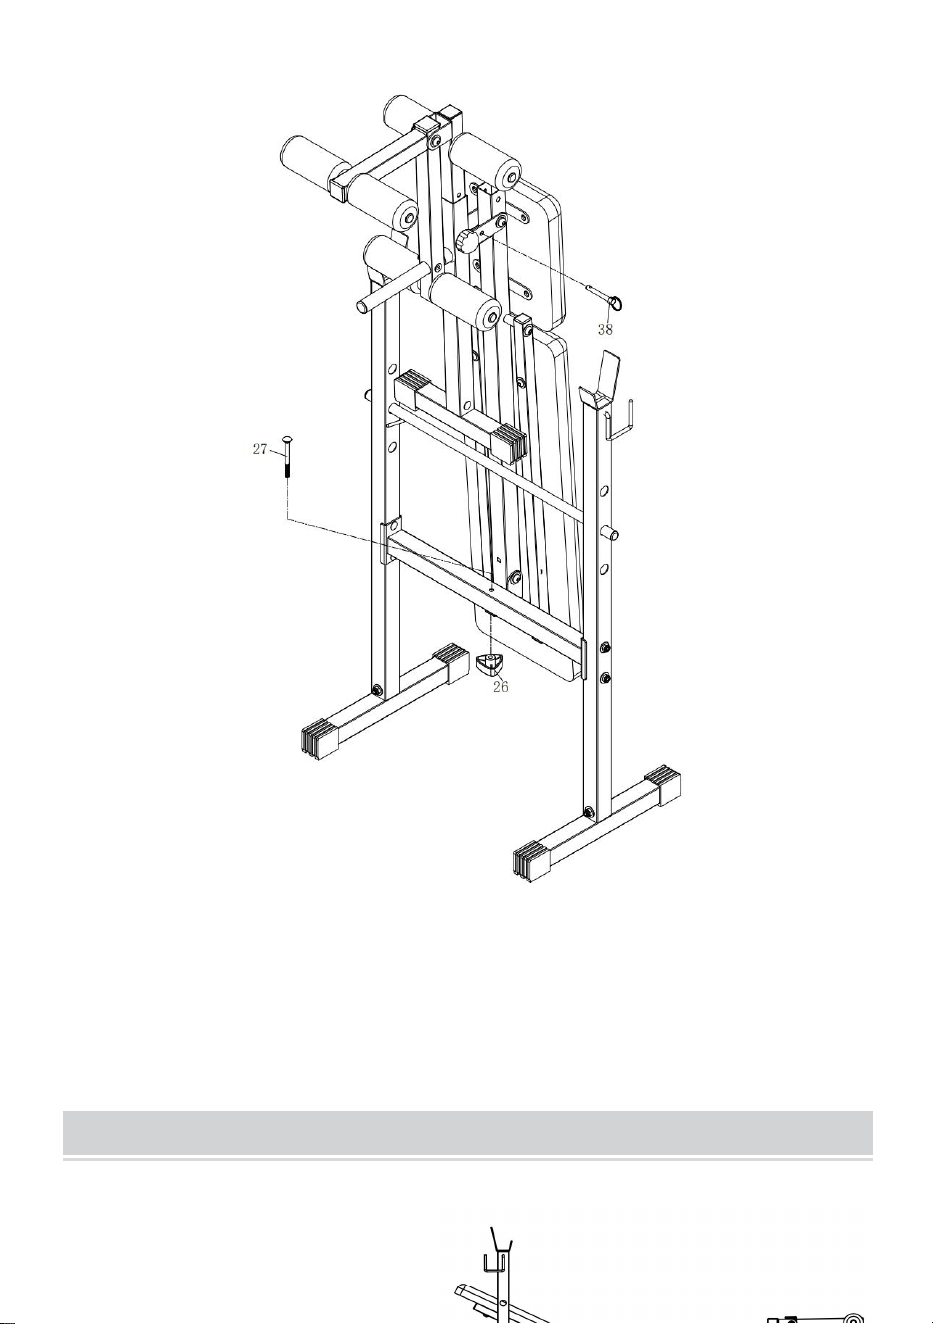
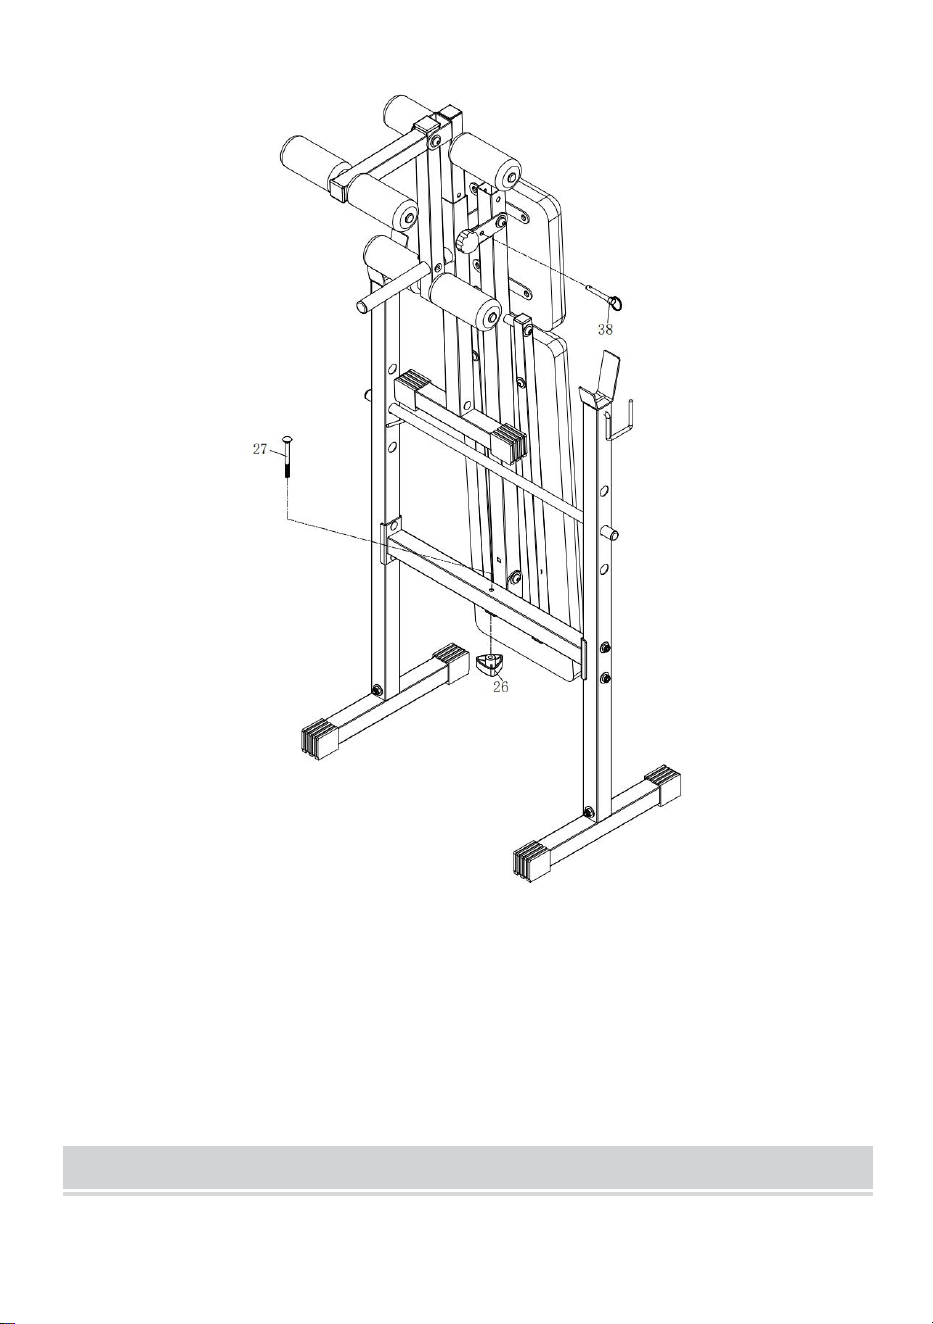
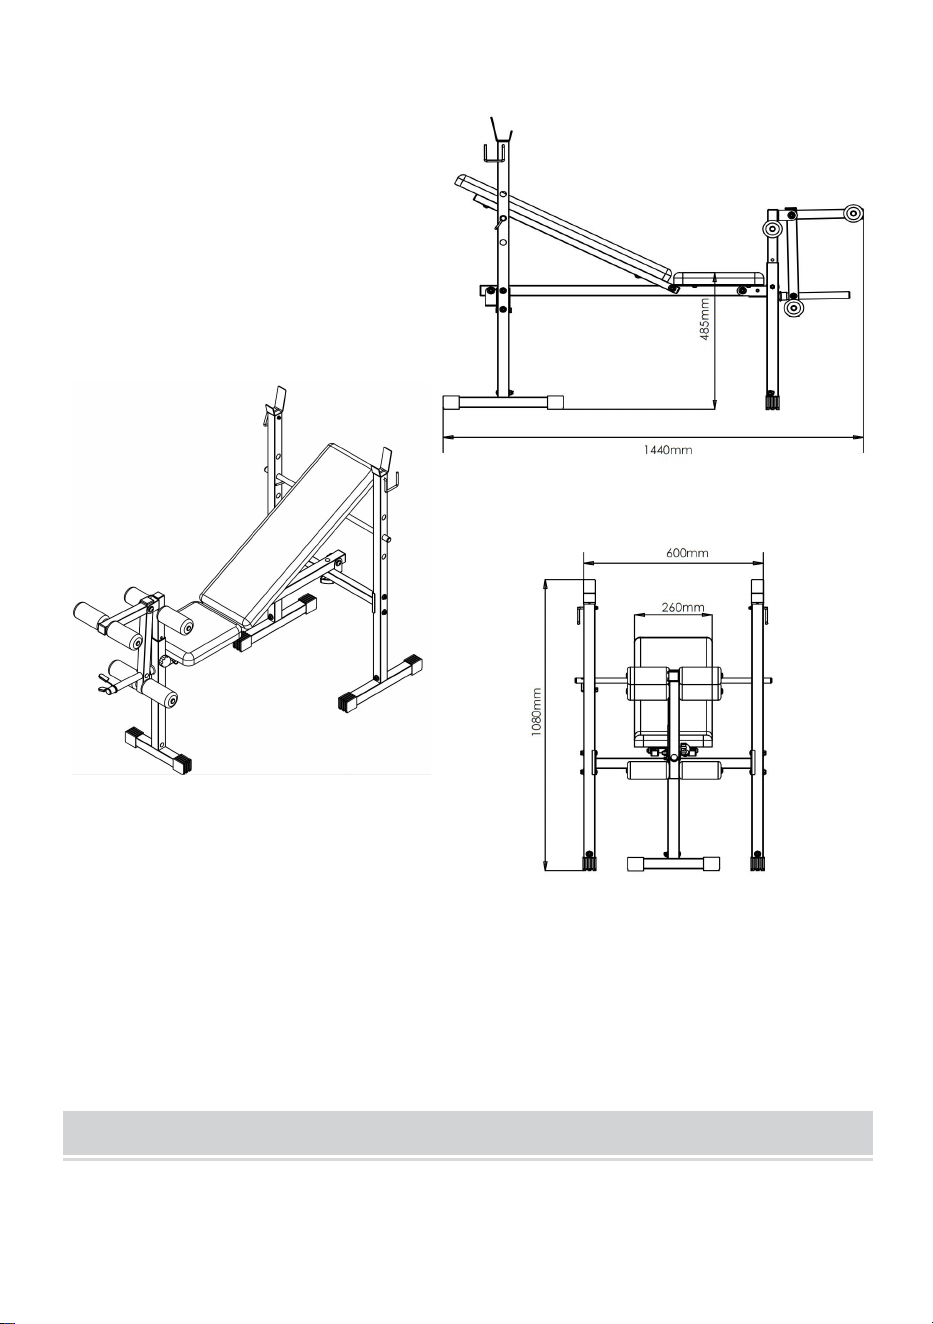
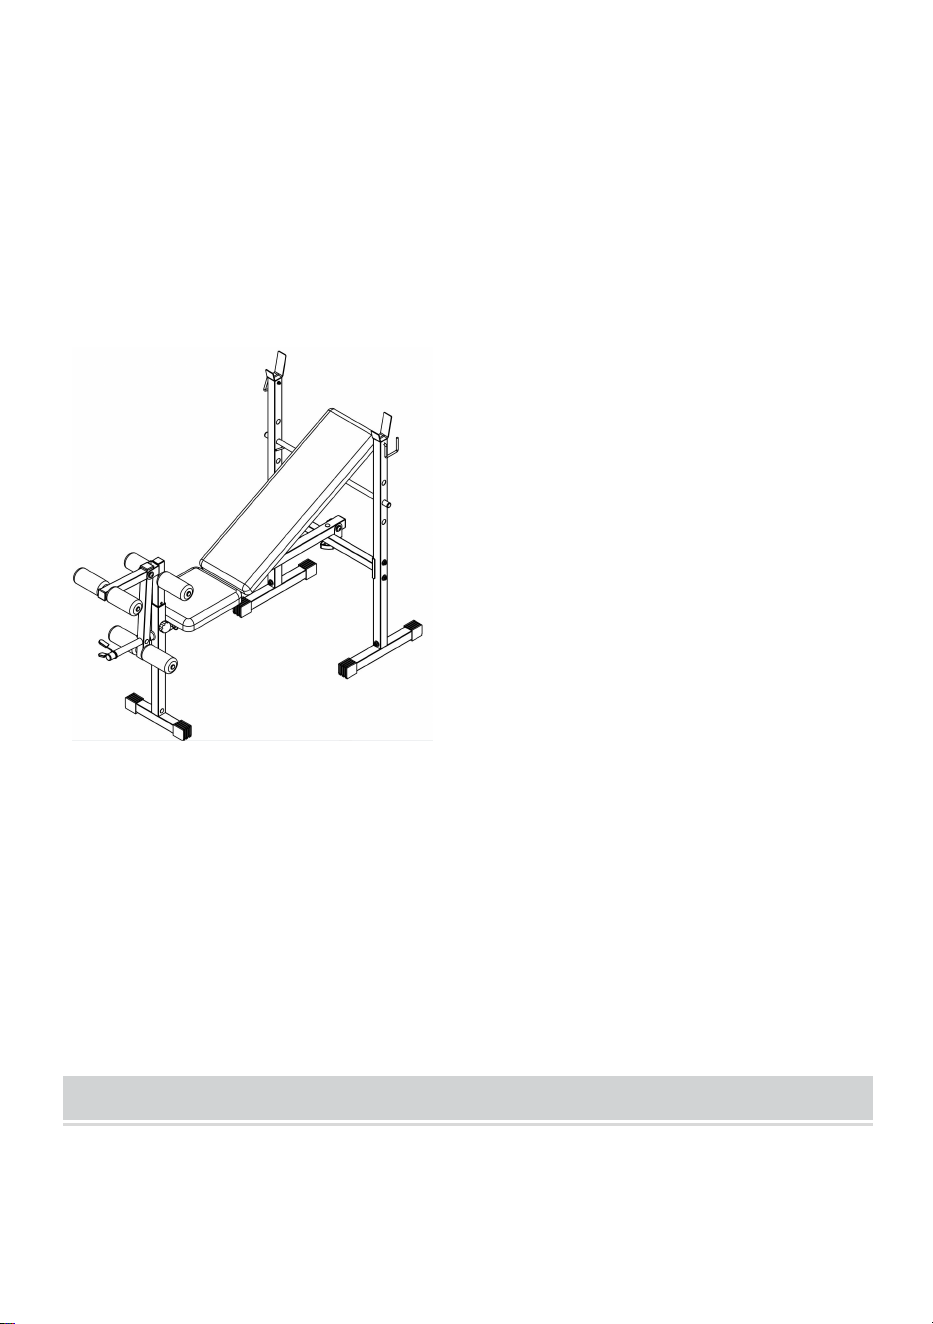
Step 6: The following figure shows the folded state of the product
NOTE : The Maximum Weight Capacity for this product is 380 lbs or
172kgs. Only one person should use this piece of equipment at one time.

15
Product size chart

16
Cleaning and disinfection
1. Wipe the surface with a wet cotton cloth.
2. Check the screws regularly every 3 months for loosening and tighten
the screws
Manufacturer: Shanghaimuxinmuyeyouxiangongsi
Address: Shuangchenglu 803nong11hao1602A-1609shi, baoshanqu,
shanghai 200000 CN.
Imported to AUS: SIHAO PTY LTD. 1 ROKEVA STREETEASTWOOD
NSW 2122 Australia
Imported to USA: Sanven Technology Ltd. Suite 250, 9166 Anaheim
Place, Rancho Cucamonga, CA 91730
REP
UK
YH CONSULTING LIMITED. C/O YH Consulting
Limited Office 147, Centurion House, London
Road, Staines-upon-Thames, Surrey, TW18 4AX
REP
EC
E-CrossStu GmbH
Mainzer Landstr.69,
60329 Frankfurt am Main.


Technique Certificat d'assistance et de garantie électronique
www.vevor.com/support
Lit d'haltérophilie multifonctionnel
MODÈLE : SJ78 21
Nous continuons à nous engager à vous fournir des outils à des prix compétitifs.
« Économisez la moitié », « Moitié prix » ou toute autre expression similaire utilisée par
nous uniquement
représente une estimation des économies dont vous pourriez bénéficier en achetant
certains outils
avec nous par rapport aux grandes marques et ne signifie pas nécessairement couverture
toutes les catégories d'outils que nous proposons. Nous vous rappelons de bien vouloir
vérifier soigneusement
lorsque vous passez une commande chez nous si vous êtes réellement Économie
Moitié par rapport aux plus grandes marques.


1
MODÈLE : SJ78 21
BESOIN D'AIDE? CONTACTEZ-NOUS!
Vous avez des questions sur nos produits ? Vous avez besoin
d'assistance technique ? N'hésitez pas à nous contacter :
Assistance technique et certificat de garantie électronique
www.vevor.com/support
Il s'agit de la notice d'utilisation d'origine. Veuillez lire attentivement toutes
les instructions du manuel avant de l'utiliser. VEVOR se réserve le droit
d'interpréter clairement notre manuel d'utilisation. L'apparence du produit
dépend du produit que vous avez reçu. Veuillez nous excuser, nous ne
vous informerons plus en cas de mise à jour technologique ou logicielle
Multifunctional Weightlifting bed

2
de notre produit.
Merci beaucoup d'avoir choisi ceci produit .
Veuillez lire toutes les instructions avant de l'utiliser. Les informations vous
aideront à obtenir les meilleurs résultats possibles.
Operation safety
AVERTISSEMENT:
Veuillez lire toutes les instructions avant d'utiliser ce produit
Il est de la responsabilité du propriétaire de s'assurer que tous
les utilisateurs de ce produit sont pleinement conscients de tous les
avertissements et précautions.
·Ne l'utilisez pas si vous êtes enceinte
·Avant de commencer tout programme d’exercice, consultez votre
médecin.
·Lisez toutes les instructions avant d’utiliser ce produit.
· Gardez les enfants et les animaux domestiques éloignés du banc assis
pendant son utilisation. Les enfants ne doivent pas utiliser le produit sans
la surveillance d'un adulte.
·Inspectez et serrez toutes les pièces avant chaque utilisation de ce banc
de musculation.
·Veuillez nettoyer cette machine uniquement à l'aide de lingettes humides.
N'utilisez pas
nettoyants.Veuillez consulter le service client si vous avez des questions.
·Ce produit doit être placé sur une surface plane lors de son utilisation.
Placez un
tapis antidérapant sous la machine si besoin.
·Veuillez porter des vêtements appropriés lorsque vous utilisez ce produit.
·Ne l'utilisez pas s'il n'est pas fonctionnel ou si les pièces ne sont pas bien
assemblées.
·Si vous ressentez des douleurs thoraciques, des nausées, des
étourdissements ou un manque d’amplitude, vous devez arrêter
immédiatement l’exercice et consulter votre médecin avant de continuer.

3
·Avant utilisation, assurez-vous toujours que votre produit est positionné
sur une surface solide, dure et plane.
· Rangez l'équipement inutilisé hors de portée des enfants et ne laissez
personne
ne pas être familier avec l'équipement pour l'utiliser. Cet outil est
dangereux entre les mains
des utilisateurs non formés.
· Lors de l'utilisation du produit , la foule de spectateurs doit garder une
distance de 3 mètres pour éviter les blessures accidentelles.
At NO time should pets or children under the age of 12 be
closer to the product than 3 m (10 feet). At NO time should
children under the age of 12 use the product. Children over
the age of 12 should not use the product without adult
supervision.
Exercise Plans
1. Il est recommandé aux débutants de commencer avec moins de
répétitions, 5 répétitions en 1 série par exemple et ajoutez des répétitions
au fur et à mesure.
2. Veuillez ne pas faire d’exercice une demi-heure avant/après les repas
ou une heure avant de dormir .
3. Veuillez faire des plans d’exercice.

4
Part List
5
Diagramme éclaté
Veuillez noter que toutes les pièces et le matériel que vous voyez ici ne
6
seront pas utilisés pendant votre séjour.
assembler la machine car certains d'entre eux sont déjà
pré-installés.
7
Part List
8

9
NOTE: Pour éviter tout désalignement dû à un serrage excessif, n'utilisez
pas de clé pour le moment.
Pour l'instant, serrez à la main pour garantir un assemblage facile.
Le serrage à la clé doit être effectué une fois toutes les pièces assemblées
pour garantir que tous les écrous, boulons et pièces sont bien fixés avant
utilisation.
Avec l'aide d'un assistant.

10
Assembly
Étape 1 :
A) Fixez deux montants arrière (05) à deux tubes de base arrière (04) au
total à l'aide de deux boulons de carrosserie (31),
deux rondelles plates (34) et deux écrous en nylon (35).
B) Fixez le tube transversal arrière (06) aux montants arrière (05), fixez-le
avec quatre boulons de carrosserie au total (31),
quatre rondelles plates (34) et quatre écrous en nylon (35).
C) Insérez le tube réglable du dossier (11) dans les deux montants arrière
(05),

11
Étape 2 :
A) Fixez le montant avant (02) au tube de base avant (01) à l'aide d'un
boulon de carrosserie (31), d'un boulon plat
Rondelle (34) et un écrou en nylon (35)
B) Fixez le côté avant du cadre principal (03) au montant avant (02) à l'aide
d'un boulon Allen (29), de deux boulons plats
Rondelles (26) et un écrou en nylon (37), puis insérez la goupille de
verrouillage (40). Fixez l'autre côté du bloc principal
Cadre (03) sur le tube transversal arrière (06) à l'aide d'un boulon Allen
(30), de deux rondelles plates (34) et d'un
12
Écrou en nylon (35) sur le côté, fixez-le avec un boulon de carrosserie (27)
et un bouton (26) par le haut.
Étape 3 :
Fixez le coussin de siège (41) au cadre principal (08) à l'aide de quatre
boulons Allen (33) et de quatre vis plates.
Rondelles (34).
Fixez le coussin du dossier (42) aux tubes de support du dossier (10) à
l'aide de quatre boulons Allen
(33) et quatre rondelles plates (34).

13
Étape 4 :
A) Fixez le tube réglable du montant avant (12) au montant avant (02),
après avoir sélectionné la position du trou appropriée, verrouillez-le avec le
boulon à bouton (09).
B ) Fixez l'extension de jambe (07) au tube réglable du montant avant (12)
à l'aide d'un boulon Allen (29), de deux rondelles plates (36) et d'un écrou
en nylon (37).
Faites glisser le poteau de la plaque de poids (08) sur l'extension de jambe

14
(07) à l'aide d'un boulon de carrosserie (31), d'une rondelle plate (34) et
d'un écrou en nylon (35), puis installez le clip à ressort (17).
Étape 5 :
A) Faites glisser deux tubes en mousse (13) vers l'extension de jambe (07),
un tube en mousse (13) vers le montant avant
Tube réglable (12) et faites glisser six mousses (16) sur chaque tube en
mousse (13)
B) Fixez le crochet de sécurité gauche (14L) et le crochet de sécurité droit

15
(14R) aux montants arrière (05) à l'aide d'un plat
Rondelle (38) et écrou en nylon (39).
LE PROCESSUS D'ASSEMBLAGE EST MAINTENANT TERMINÉ.
Pour votre sécurité, veuillez serrer la vis et l'ajuster à la position
appropriée.
Veuillez inspecter et tester visuellement et fonctionnellement l'unité une
fois l'assemblage terminé.
Étape 6 : La figure suivante montre l'état plié du produit
16
NOTE : La capacité de poids maximale de ce produit est de 380 lb ou 172
kg. Une seule personne à la fois peut utiliser cet équipement.
Product size chart

17
Cleaning and disinfection
3. Essuyez la surface avec un chiffon en coton humide.
4. Vérifiez régulièrement les vis tous les 3 mois pour voir si elles sont

18
desserrées et resserrez-les
Fabricant : Shanghaimuxinmuyeyouxiangongsi
Adresse : Shuangchenglu 803nong11hao1602A-1609shi, baoshanqu,
Shanghai 200 000 CN.
Importé en Australie : SIHAO PTY LTD. 1 ROKEVA
STREETEASTWOOD
NSW 2122 Australie
Importé aux États-Unis : Sanven Technology Ltd. Suite 250, 9166
Anaheim
Lieu, Rancho Cucamonga, CA 91730
REP
UK
YH CONSULTING LIMITED. C/O YH Consulting
Limited Office 147, Centurion House, London
Road, Staines-upon-Thames, Surrey, TW18 4AX
REP
EC
E-CrossStu GmbH
Mainzer Landstr.69,
60329 Frankfurt am Main.


Technisch Support und E-Garantie-Zertifikat
www.vevor.com/support
Multifunktionales Gewichtheberbett
MODELL: SJ78 21
Wir sind weiterhin bestrebt, Ihnen Werkzeuge zu wettbewerbsfähigen Preisen anzubieten.
"Sparen Sie die Hälfte", "Halber Preis" oder andere ähnliche Ausdrücke, die wir nur
verwenden
stellt eine Schätzung der Einsparungen dar, die Sie durch den Kauf bestimmter Werkzeuge
erzielen können
mit uns im Vergleich zu den großen Top-Marken und bedeutet nicht unbedingt, Abdeckung
alle von uns angebotenen Werkzeugkategorien. Wir möchten Sie bitten, zu überprüfen
sorgfältig
wenn Sie bei uns eine Bestellung aufgeben, wenn Sie tatsächlich Speichern
Hälfte im Vergleich mit den Top-Großmarken.


1
MODELL: SJ78 21
Brauchen Sie Hilfe? Kontaktieren Sie uns!
Sie haben Fragen zu unseren Produkten? Sie benötigen technischen
Support? Dann kontaktieren Sie uns gerne:
Technischer Support und E-Garantie-Zertifikat
www.vevor.com/support
Dies ist die Originalanleitung. Bitte lesen Sie alle Anweisungen sorgfältig
durch, bevor Sie das Gerät in Betrieb nehmen. VEVOR behält sich eine
klare Auslegung unserer Bedienungsanleitung vor. Das Erscheinungsbild
des Produkts richtet sich nach dem Produkt, das Sie erhalten haben. Bitte
verzeihen Sie uns, dass wir Sie nicht erneut informieren, wenn es
Multifunctional Weightlifting bed

2
Technologie- oder Software-Updates für unser Produkt gibt .
Vielen Dank, dass Sie sich für dieses Produkt .
Lesen Sie vor der Anwendung bitte alle Hinweise sorgfältig durch. Die
Informationen helfen Ihnen dabei, optimale Ergebnisse zu erzielen.
Operation safety
WARNUNG:
Bitte lesen Sie alle Anweisungen, bevor Sie dieses Produkt
verwenden
Es liegt in der Verantwortung des Eigentümers, sicherzustellen, dass alle
Benutzer dieses Produkts über alle Warnungen und Vorsichtsmaßnahmen
informiert sind.
· Verwenden Sie es nicht, wenn Sie schwanger sind
· Konsultieren Sie Ihren Arzt, bevor Sie mit einem Trainingsprogramm
beginnen.
· Lesen Sie alle Anweisungen, bevor Sie dieses Produkt verwenden.
· Halten Sie Kinder und Haustiere während der Benutzung von der
Sit-Up-Bank fern. Kinder sollten das Produkt nicht ohne Aufsicht eines
Erwachsenen verwenden.
· Überprüfen Sie vor jedem Gebrauch dieser Sit-Up-Bank alle Teile und
ziehen Sie sie fest.
· Reinigen Sie das Gerät nur mit feuchten Tüchern. Verwenden Sie keine
Reinigungsmittel. Bei Fragen wenden Sie sich bitte an den Kundendienst.
· Dieses Produkt sollte bei der Verwendung auf einer ebenen Fläche
platziert werden.
bei Bedarf eine Anti-Rutsch-Matte unter der Maschine.
· Bitte tragen Sie bei der Verwendung dieses Produkts geeignete Kleidung.
· Verwenden Sie es nicht, wenn es nicht funktioniert oder Teile nicht richtig
zusammengebaut sind.
· Wenn Sie Schmerzen in der Brust, Übelkeit, Schwindel oder
Kurzatmigkeit verspüren, sollten Sie das Training sofort abbrechen und
Ihren Arzt konsultieren, bevor Sie fortfahren.

3
· Stellen Sie vor der Verwendung immer sicher, dass Ihr Produkt auf einer
festen, harten und ebenen Oberfläche steht.
· Bewahren Sie unbenutzte Geräte außerhalb der Reichweite von Kindern
auf und lassen Sie niemanden
mit der Ausrüstung nicht vertraut, um sie zu verwenden. Dieses Werkzeug
ist gefährlich in den Händen
von ungeschulten Benutzern.
· Bei der Verwendung des Produkts müssen Zuschauer einen Abstand von
3 Metern einhalten, um versehentliche Verletzungen zu vermeiden.
At NO time should pets or children under the age of 12 be
closer to the product than 3 m (10 feet). At NO time should
children under the age of 12 use the product. Children over
the age of 12 should not use the product without adult
supervision.
Exercise Plans
1. Anfängern wird empfohlen, mit weniger Wiederholungen zu beginnen,
beispielsweise 5 Wiederholungen als 1 Satz und fügen Sie nach und nach
Wiederholungen hinzu.
2. Bitte treiben Sie eine halbe Stunde vor/nach dem Essen und eine
Stunde vor dem Schlafengehen keinen Sport .
3. Bitte machen Sie Trainingspläne.

4
Part List

5
Explosionszeichnung
Bitte beachten Sie, dass nicht alle Teile und Hardware, die Sie hier sehen,

6
während Ihres Aufenthalts verwendet werden.
Zusammenbau der Maschine, da diese teilweise bereits vorinstalliert
sind.

7
Part List

8

9
NOTIZ: Um eine Fehlausrichtung durch zu festes Anziehen zu vermeiden,
verwenden Sie zu diesem Zeitpunkt bitte keinen Schraubenschlüssel.
Durch Festziehen mit der Hand wird eine einfache Montage gewährleistet.
Das Anziehen mit dem Schraubenschlüssel sollte nach der Montage aller
Teile erfolgen, um sicherzustellen, dass alle Muttern, Schrauben und Teile
vor der Verwendung fest sitzen.
Mit Hilfe eines Assistenten.

10
Assembly
Schritt 1:
A) Befestigen Sie zwei hintere Pfosten (05) an zwei hinteren Basisrohren
(04) mit insgesamt zwei Schlossschrauben (31).
zwei flache Unterlegscheiben (34) und zwei Nylonmuttern (35).
B) Befestigen Sie das hintere Querrohr (06) an den hinteren Pfosten (05)
und befestigen Sie es mit insgesamt vier Schlossschrauben (31).
vier Unterlegscheiben (34) und vier Nylonmuttern (35).
C) Stecken Sie das verstellbare Rückenlehnenrohr (11) in die beiden
hinteren Pfosten (05).

11
Schritt 2:
A) Befestigen Sie den vorderen Pfosten (02) am vorderen Basisrohr (01)
mit Hilfe einer Schlossschraube (31), einer
Unterlegscheibe (34) und eine Nylonmutter (35)
B) Befestigen Sie die Vorderseite des Hauptrahmens (03) mit einer
Inbusschraube (29), zwei Flachkopfschrauben
Unterlegscheiben (26) und eine Nylonmutter (37), dann den
Sicherungsstift (40) einsetzen. Befestigen Sie die andere Seite des Haupt
Rahmen (03) an das hintere Querrohr (06) mit einer Inbusschraube (30),
zwei Unterlegscheiben (34) und einer

12
Nylonmutter (35) von der Seite, mit einem Schlossbolzen (27) und einem
Knopf (26) von oben sichern.
Schritt 3:
Befestigen Sie das Sitzpolster (41) mit vier Inbusschrauben (33) und vier
Flachkopfschrauben (36) am Hauptrahmen (08).
Unterlegscheiben (34).
Befestigen Sie das Rückenpolster (42) mit vier Inbusschrauben an den
Rückenstützrohren (10).
(34) und vier Unterlegscheiben (34).

13
Schritt 4:
A) Befestigen Sie das verstellbare vordere Pfostenrohr (12) am vorderen
Pfosten (02). Wählen Sie die entsprechende Lochposition aus und
verriegeln Sie es mit dem Knopfbolzen (09).
B ) Befestigen Sie die Beinverlängerung (07) mit einer Inbusschraube (29),
zwei Unterlegscheiben (36) und einer Nylonmutter (37) am vorderen
aufrechten verstellbaren Rohr (12).
Schieben Sie den Hantelscheibenpfosten (08) mit Hilfe einer
14
Schlossschraube (31), einer Unterlegscheibe (34) und einer Nylonmutter
(35) zur Beinstreckerstange (07) und montieren Sie die Federklammer
(17).
Schritt 5:
A) Schieben Sie zwei Schaumstoffrohre (13) zur Beinverlängerung (07),
ein Schaumstoffrohr (13) zum vorderen Pfosten
Verstellbares Rohr (12) und schieben Sie sechs Schaumstoffe (16) auf
jedes Schaumstoffrohr (13)

15
B) Befestigen Sie den linken Sicherheitshaken (14L) und den rechten
Sicherheitshaken (14R) mit einem flachen
Unterlegscheibe (38) und Nylonmutter (39).
DER MONTAGEVORGANG IST JETZT ABGESCHLOSSEN.
Bitte ziehen Sie zu Ihrer Sicherheit die Schraube fest und bringen Sie sie in
die entsprechende Position.
Bitte führen Sie nach Abschluss der Montage eine Sicht- und
Funktionsprüfung des Geräts durch und testen Sie es.
Schritt 6: Die folgende Abbildung zeigt den gefalteten Zustand des
Produkts

16
NOTIZ : Die maximale Gewichtskapazität für dieses Produkt beträgt 380
lbs oder 172 kg. Dieses Gerät sollte jeweils nur von einer Person
verwendet werden.
Product size chart

17
Cleaning and disinfection
5. Wischen Sie die Oberfläche mit einem feuchten Baumwolltuch ab.

18
6. Überprüfen Sie die Schrauben regelmäßig alle 3 Monate auf Lockerheit
und ziehen Sie die Schrauben fest

Hersteller: Shanghaimuxinmuyeyouxiangongsi
Adresse: Shuangchenglu 803nong11hao1602A-1609shi, baoshanqu,
Shanghai, 200.000 CN.
Nach AUS importiert: SIHAO PTY LTD. 1 ROKEVA
STREETEASTWOOD
NSW 2122 Australien
Importiert in die USA: Sanven Technology Ltd. Suite 250, 9166 Anaheim
Ort, Rancho Cucamonga, CA 91730
REP
UK
YH CONSULTING LIMITED. C/O YH Consulting
Limited Office 147, Centurion House, London
Road, Staines-upon-Thames, Surrey, TW18 4AX
REP
EC
E-CrossStu GmbH
Mainzer Landstr.69,
60329 Frankfurt am Main.


Tecnico Supporto e certificato di garanzia elettronica
www.vevor.com/support
Letto multifunzionale per sollevamento pesi
MODELLO: SJ78 21
Continuiamo a impegnarci per fornirvi strumenti a prezzi competitivi.
"Risparmia la metà", "Metà prezzo" o altre espressioni simili utilizzate solo da noi
rappresenta una stima dei risparmi che potresti ottenere acquistando determinati strumenti
con noi rispetto ai principali marchi top e non significa necessariamente copertina
tutte le categorie di strumenti da noi offerti. Ti ricordiamo cortesemente di verificare
accuratamente
quando effettui un ordine con noi se sei effettivamente Risparmio
Metà rispetto ai marchi più importanti.

1
MODELLO: SJ78 21
HAI BISOGNO DI AIUTO? CONTATTACI!
Hai domande sui prodotti? Hai bisogno di supporto tecnico? Non
esitare a contattarci:
Supporto tecnico e certificato di garanzia elettronica
www.vevor.com/support
Questa è l'istruzione originale, si prega di leggere attentamente tutte le
istruzioni del manuale prima di utilizzare. VEVOR si riserva una chiara
interpretazione del nostro manuale utente. L'aspetto del prodotto sarà
soggetto al prodotto ricevuto. Vi preghiamo di perdonarci se non vi
informeremo di nuovo se ci sono aggiornamenti tecnologici o software sul
Multifunctional Weightlifting bed

2
nostro prodotto.
Grazie mille per aver scelto questo prodotto .
Si prega di leggere attentamente le istruzioni prima di utilizzare il prodotto.
Le informazioni fornite vi aiuteranno a ottenere i migliori risultati possibili.
Operation safety
AVVERTIMENTO:
Si prega di leggere tutte le istruzioni prima di utilizzare questo
prodotto
È responsabilità del proprietario garantire che tutti gli utenti di questo
prodotto siano pienamente consapevoli di tutte le avvertenze e
precauzioni.
·Non utilizzarlo se sei incinta
·Prima di iniziare qualsiasi programma di esercizi, consultare il proprio
medico.
·Leggere tutte le istruzioni prima di utilizzare questo prodotto.
·Tenere bambini e animali domestici lontani dalla panca per esercizi
durante l'uso. I bambini non devono utilizzare il prodotto senza la
supervisione di un adulto.
·Ispezionare e serrare tutte le parti prima di ogni utilizzo della panca per
sit-up.
·Si prega di pulire questa macchina utilizzando solo salviette umide. Non
utilizzare alcun
detergenti. Per qualsiasi domanda, consultare il servizio clienti.
·Questo prodotto deve essere posizionato su una superficie piana durante
l'uso. Posizionare un
tappetino antiscivolo sotto la macchina, se necessario.
·Si prega di indossare abiti adatti quando si utilizza questo prodotto.
·Non utilizzarlo se non è funzionante o se i componenti non sono ben
assemblati.
·Se avverti dolori al petto, nausea, vertigini o mancanza di respiro,
interrompi immediatamente l'allenamento e consulta il tuo medico prima di

3
continuare.
·Prima dell'uso, assicurarsi sempre che il prodotto sia posizionato su una
superficie solida, dura e piana.
· Conservare l'attrezzatura inutilizzata fuori dalla portata dei bambini e non
consentirne l'uso a nessuno.
non familiarità con l'attrezzatura per utilizzarlo. Questo strumento è
pericoloso nelle mani
di utenti non formati.
· Durante l'utilizzo del prodotto , gli astanti devono mantenere una distanza
di 3 metri per evitare lesioni accidentali.
At NO time should pets or children under the age of 12 be
closer to the product than 3 m (10 feet). At NO time should
children under the age of 12 use the product. Children over
the age of 12 should not use the product without adult
supervision.
Exercise Plans
1. Si consiglia ai principianti di iniziare con meno ripetizioni, ad esempio 5
ripetizioni come 1 serie e aggiungere ripetizioni man mano che si procede.
2. Si prega di non fare esercizio fisico mezz'ora prima/dopo i pasti o un'ora
prima di dormire .
3. Si prega di pianificare gli esercizi.

4
Part List
5
Diagramma esploso
Si prega di notare che non tutte le parti e l'hardware che vedi qui verranno

6
utilizzati mentre sei
assemblare la macchina perché alcuni di questi sono già
preinstallati.

7
Part List

8

9
NOTA: Per evitare disallineamenti dovuti a un serraggio eccessivo, non
utilizzare una chiave inglese in questa fase.
Per facilitare il montaggio, per ora è consigliabile stringere a mano.
Dopo aver assemblato tutti i componenti, serrare le viti con la chiave
inglese per garantire che tutti i dadi, i bulloni e i componenti siano ben
serrati prima dell'uso.
Con l'aiuto di un assistente.

10
Assembly
Fase 1:
A) Fissare due montanti posteriori (05) a due tubi di base posteriori (04) in
totale tramite due bulloni per carrozze (31),
due rondelle piatte (34) e due dadi in nylon (35).
B) Fissare il tubo trasversale posteriore (06) ai montanti posteriori (05),
fissare con un totale di quattro bulloni per carrozze (31),
quattro rondelle piatte (34) e quattro dadi in nylon (35).
C) Inserire il tubo regolabile dello schienale (11) su entrambi i montanti
posteriori (05),

11
Fase 2:
A) Fissare il montante anteriore (02) al tubo di base anteriore (01)
utilizzando un bullone per carrozze (31), un bullone piatto
Rondella (34) e un dado in nylon (35)
B) Fissare il lato anteriore del telaio principale (03) al montante anteriore
(02) utilizzando un bullone a brugola (29), due bulloni a testa piatta (29),
Rondelle (26) e un dado in nylon (37), quindi inserire il perno di bloccaggio
(40). Fissare l'altro lato del dado principale
Telaio (03) al tubo trasversale posteriore (06) utilizzando un bullone a
brugola (30), due rondelle piatte (34) e una

12
Dado in nylon (35) dal lato, fissare con un bullone per carrozza (27) e
manopola (26) dall'alto.
Fase 3:
Fissare il cuscino del sedile (41) al telaio principale (08) utilizzando quattro
bulloni Allen (33) e quattro viti piatte
Rondelle (34).
Fissare il cuscino dello schienale (42) ai tubi di supporto dello schienale
(10) utilizzando quattro bulloni Allen
(35) e quattro rondelle piatte (34).

13
Fase 4:
A) Fissare il tubo regolabile del montante anteriore (12) al montante
anteriore (02), dopo aver selezionato la posizione del foro appropriata,
bloccarlo con il bullone della manopola (09).
B ) Fissare l'estensione della gamba (07) al tubo regolabile del montante
anteriore (12) utilizzando un bullone a brugola (29), due rondelle piatte (36)
e un dado in nylon (37).
Far scorrere il supporto della piastra del peso (08) sull'estensione della
14
gamba (07) utilizzando un bullone per carrozze (31), una rondella piatta
(34) e un dado in nylon (35) e installare la clip a molla (17).
Fase 5:
A) Far scorrere due tubi di schiuma (13) verso l'estensione della gamba
(07), un tubo di schiuma (13) verso il montante anteriore
Tubo regolabile (12) e fai scorrere sei schiume (16) su ciascun tubo di
schiuma (13)
B) Fissare il gancio di sicurezza sinistro (14L) e il gancio di sicurezza
15
destro (14R) ai montanti posteriori (05) utilizzando un gancio piatto
Rondella (38) e dado in nylon (39).
IL PROCESSO DI ASSEMBLAGGIO È ORA COMPLETATO.
Per la vostra sicurezza, stringete la vite e regolatela nella posizione
appropriata.
Una volta completato il montaggio, ispezionare e testare visivamente e
funzionalmente l'unità.
Fase 6: La figura seguente mostra lo stato piegato del prodotto
16
NOTA: La capacità massima di peso per questo prodotto è di 380 libbre o
172 kg. Solo una persona alla volta dovrebbe usare questo pezzo di
equipaggiamento.
Product size chart

17
Cleaning and disinfection
7. Pulire la superficie con un panno di cotone umido.

18
8. Controllare regolarmente le viti ogni 3 mesi per allentarle e stringerle
Produttore: Shanghaimuxinmuyeyouxiangongsi
Indirizzo: Shuangchenglu 803nong11hao1602A-1609shi, baoshanqu,
shanghai 200000 CN.
Importato in AUS: SIHAO PTY LTD. 1 ROKEVA STREETEASTWOOD
Nuovo Galles del Sud 2122 Australia
Importato negli USA: Sanven Technology Ltd. Suite 250, 9166 Anaheim
Luogo, Rancho Cucamonga, CA 91730
REP
UK
YH CONSULTING LIMITED. C/O YH Consulting
Limited Office 147, Centurion House, London
Road, Staines-upon-Thames, Surrey, TW18 4AX
REP
EC
E-CrossStu GmbH
Mainzer Landstr.69,
60329 Frankfurt am Main.


Técnico Certificado de soporte y garantía electrónica
www.vevor.com/support
Cama de levantamiento de pesas multifuncional
MODELO: SJ78 21
Seguimos comprometidos a brindarle herramientas a precios competitivos.
"Ahorra la mitad", "mitad de precio" o cualquier otra expresión similar utilizada únicamente
por nosotros
Representa una estimación de los ahorros que podría obtener al comprar ciertas
herramientas.
con nosotros en comparación con las principales marcas líderes y no significa
necesariamente cubrir
Todas las categorías de herramientas que ofrecemos. Le recordamos que debe verificar
con cuidado
Cuando realiza un pedido con nosotros, si realmente está Ahorro
Medio en comparación con las principales marcas líderes.


1
MODELO: SJ78 21
¿NECESITA AYUDA? ¡CONTÁCTENOS!
¿Tiene preguntas sobre el producto? ¿Necesita asistencia técnica? No
dude en ponerse en contacto con nosotros:
Soporte técnico y certificado de garantía electrónica
www.vevor.com/support
Estas son las instrucciones originales, lea atentamente todas las
instrucciones del manual antes de utilizar el producto. VEVOR se reserva
una interpretación clara de nuestro manual de usuario. La apariencia del
producto estará sujeta al producto que recibió. Perdónenos por no
informarle nuevamente si hay actualizaciones de tecnología o software
Multifunctional Weightlifting bed

2
en nuestro producto.
Muchas gracias por elegir este producto .
Lea todas las instrucciones antes de usarlo. La información le ayudará a
lograr los mejores resultados posibles.
Operation safety
ADVERTENCIA:
Lea todas las instrucciones antes de utilizar este producto.
Es responsabilidad del propietario asegurarse de que todos los
usuarios de este producto conozcan plenamente todas las advertencias y
precauciones.
·No lo use si está embarazada.
·Antes de comenzar cualquier programa de ejercicios consulte con su
médico.
·Lea todas las instrucciones antes de usar este producto.
· Mantenga a los niños y las mascotas alejados del banco de abdominales
mientras esté en uso. Los niños no deben utilizar el producto sin la
supervisión de un adulto.
·Inspeccione y apriete todas las piezas cada vez antes de utilizar este
banco de abdominales.
·Limpie esta máquina únicamente con toallitas húmedas. No utilice ningún
Limpiadores. Consulte con el servicio de atención al cliente si tiene alguna
pregunta.
·Este producto debe colocarse sobre una superficie plana cuando se
utilice.Coloque un
Alfombrilla antideslizante debajo de la máquina si es necesario.
·Use ropa adecuada al utilizar este producto.
·No lo utilice si no funciona o las piezas no están bien ensambladas.
·Si siente dolor en el pecho, náuseas, mareos o falta de aire, debe dejar de
hacer ejercicio inmediatamente y consultar a su médico antes de
continuar.

3
·Antes de usar, asegúrese siempre de que el producto esté colocado
sobre una superficie dura, sólida y plana.
· Guarde el equipo fuera del alcance de los niños y no permita que nadie lo
utilice.
No está familiarizado con el equipo para utilizarlo. Esta herramienta es
peligrosa en las manos.
de usuarios no capacitados.
· Al utilizar el producto , la multitud de espectadores debe mantener una
distancia de 3 metros para evitar lesiones accidentales.
At NO time should pets or children under the age of 12 be
closer to the product than 3 m (10 feet). At NO time should
children under the age of 12 use the product. Children over
the age of 12 should not use the product without adult
supervision.
Exercise Plans
1. Se recomienda a los principiantes comenzar con menos repeticiones,
por ejemplo, 5 repeticiones por serie. y agregue repeticiones a medida que
avanza.
2. No haga ejercicio media hora antes o después de las comidas ni una
hora antes de dormir .
3. Por favor haga planes de ejercicio.

4
Part List

5
Diagrama despiezado
Tenga en cuenta que no todas las piezas y el hardware que ve aquí se

6
utilizarán mientras esté
montar la máquina porque algunos de estos ya vienen
preinstalados.

7
Part List

8

9
NOTA: Para evitar desalineaciones debido a un apriete excesivo, no utilice
una llave en este momento.
Apretarlo a mano por ahora ayudará a garantizar un montaje fácil.
El apriete con llave debe realizarse después de ensamblar todas las
piezas para garantizar que todas las tuercas, pernos y piezas estén bien
apretados antes de su uso.
Con la ayuda de un asistente.

10
Assembly
Paso 1:
A) Conecte dos montantes traseros (05) a dos tubos de base traseros (04)
en total mediante dos pernos de porte (31),
dos arandelas planas (34) y dos tuercas de nailon (35).
B) Conecte el tubo transversal trasero (06) a los montantes traseros (05),
asegúrelo con cuatro pernos de transporte en total (31),
cuatro arandelas planas (34) y cuatro tuercas de nailon (35).
C) Inserte el tubo ajustable del respaldo (11) en ambos montantes traseros
(05),
11
Paso 2:
A) Fije el montante delantero (02) al tubo base delantero (01) utilizando un
perno de carruaje (31), una placa plana
Arandela (34) y una tuerca de nailon (35)
B) Fije el lado frontal del marco principal (03) al montante frontal (02)
usando un perno Allen (29), dos tornillos planos
Arandelas (26) y una tuerca de nailon (37), luego inserte el pasador de
bloqueo (40). Coloque el otro lado del soporte principal
Marco (03) al tubo transversal trasero (06) usando un perno Allen (30), dos
arandelas planas (34) y una

12
Tuerca de nailon (35) desde el lateral, asegure con un perno de carruaje
(27) y una perilla (26) desde arriba.
Paso 3:
Fije el cojín del asiento (41) al marco principal (08) utilizando cuatro pernos
Allen (33) y cuatro tornillos planos.
Arandelas (34).
Fije el cojín del respaldo (42) a los tubos de soporte del respaldo (10)
utilizando cuatro pernos Allen
(36) y cuatro arandelas planas (34).

13
Paso 4:
A) Conecte el tubo ajustable del montante delantero (12) al montante
delantero (02), después de seleccionar la posición del orificio adecuada,
bloquéelo con el perno de perilla (09).
B ) Conecte la extensión de la pierna (07) al tubo ajustable vertical
delantero (12) usando un perno Allen (29), dos arandelas planas (36) y
una tuerca de nailon (37).
Deslice el poste de la placa de peso (08) hacia la extensión de la pierna

14
(07) usando un perno de carruaje (31), una arandela plana (34) y una
tuerca de nailon (35), e instale el clip de resorte (17).
Paso 5:
A) Deslice dos tubos de espuma (13) hacia la extensión de piernas (07),
un tubo de espuma (13) hacia el montante vertical delantero
Tubo ajustable (12) y deslice seis espumas (16) a cada tubo de espuma
(13)
B) Conecte el gancho de seguridad izquierdo (14L) y el gancho de
15
seguridad derecho (14R) a los montantes traseros (05) usando una placa
plana.
Arandela (38) y Tuerca de Nylon (39).
EL PROCESO DE MONTAJE YA ESTÁ COMPLETO.
Para su seguridad, apriete el tornillo y ajústelo a la posición adecuada.
Inspeccione y pruebe visual y funcionalmente la unidad una vez
completado el ensamblaje.
Paso 6: La siguiente figura muestra el estado plegado del producto.

16
NOTA : La capacidad máxima de peso de este producto es de 380 lb o
172 kg. Solo una persona debe utilizar este equipo a la vez.
Product size chart

17
Cleaning and disinfection
9. Limpie la superficie con un paño de algodón húmedo.
10.Revise regularmente los tornillos cada 3 meses para ver si están flojos

18
y apriételos.

Fabricante: Shanghaimuxinmuyeyouxiangongsi
Dirección: Shuangchenglu 803nong11hao1602A-1609shi, baoshanqu,
Shangai 200000 CN.
Importado a Australia: SIHAO PTY LTD. 1 ROKEVA
STREETEASTWOOD
Nueva Gales del Sur 2122 Australia
Importado a EE. UU.: Sanven Technology Ltd. Suite 250, 9166 Anaheim
Lugar, Rancho Cucamonga, CA 91730
REP
UK
YH CONSULTING LIMITED. C/O YH Consulting
Limited Office 147, Centurion House, London
Road, Staines-upon-Thames, Surrey, TW18 4AX
REP
EC
E-CrossStu GmbH
Mainzer Landstr.69,
60329 Frankfurt am Main.


Techniczny Wsparcie i certyfikat e-gwarancji
www.vevor.com/support
Wielofunkcyjne łóżko do podnoszenia ciężarów
MODELE: SJ78 21
Nadal staramy się oferować Państwu narzędzia w konkurencyjnych cenach.
„Oszczędź połowę”, „Połowa ceny” lub jakiekolwiek inne podobne wyrażenia używane
wyłącznie przez nas
przedstawia szacunkowe oszczędności, jakie możesz uzyskać kupując określone
narzędzia
z nami w porównaniu do głównych, najlepszych marek i niekoniecznie oznacza to okładka
wszystkie kategorie narzędzi oferowanych przez nas. Przypominamy o sprawdzeniu
ostrożnie
gdy składasz u nas zamówienie, jeśli faktycznie Oszczędność
Połowa w porównaniu z wiodącymi markami.


1
MODELE: SJ78 21
POTRZEBUJESZ POMOCY? SKONTAKTUJ SIĘ Z NAMI!
Masz pytania dotyczące produktu? Potrzebujesz wsparcia
technicznego? Skontaktuj się z nami:
Wsparcie techniczne i certyfikat e-gwarancji
www.vevor.com/support
To jest oryginalna instrukcja, przed użyciem należy uważnie przeczytać
wszystkie instrukcje. VEVOR zastrzega sobie jasną interpretację naszej
instrukcji obsługi. Wygląd produktu będzie zależał od produktu, który
otrzymałeś. Prosimy o wybaczenie, że nie poinformujemy Cię ponownie,
jeśli w naszym produkcie pojawią się jakiekolwiek aktualizacje
Multifunctional Weightlifting bed

2
technologiczne lub oprogramowania.
Dziękujemy bardzo za wybranie tego produkt .
Przed użyciem należy przeczytać całą instrukcję. Zawarte w niej
informacje pomogą w osiągnięciu najlepszych możliwych rezultatów.
Operation safety
OSTRZEŻENIE:
Przed użyciem tego produktu należy przeczytać wszystkie
instrukcje.
Właściciel jest odpowiedzialny za to, aby wszyscy użytkownicy tego
produktu byli w pełni świadomi wszystkich ostrzeżeń i środków
ostrożności.
· Nie stosować w ciąży.
·Przed rozpoczęciem jakiegokolwiek programu ćwiczeń skonsultuj się z
lekarzem.
·Przed użyciem produktu należy przeczytać całą instrukcję.
·Trzymaj dzieci i zwierzęta domowe z dala od ławki do ćwiczeń fizycznych
podczas jej użytkowania. Dzieci nie powinny używać produktu bez nadzoru
osoby dorosłej.
·Za każdym razem przed użyciem ławki do ćwiczeń sprawdź i dokręć
wszystkie części.
·Należy czyścić to urządzenie wyłącznie za pomocą wilgotnych ściereczek.
Nie należy używać żadnych
środki czyszczące. Jeśli masz jakiekolwiek pytania, skontaktuj się z
obsługą klienta.
·Podczas używania produkt należy umieścić na płaskiej
powierzchni.Umieść
mata antypoślizgowa pod maszyną, jeśli to konieczne.
·Podczas korzystania z produktu należy nosić odpowiednią odzież.
·Nie używaj urządzenia, jeśli nie działa prawidłowo lub jego części nie są
prawidłowo zmontowane.
·Jeśli odczuwasz ból w klatce piersiowej, nudności, zawroty głowy lub

3
uczucie duszności, natychmiast przerwij ćwiczenia i skonsultuj się z
lekarzem przed kontynuacją.
·Przed użyciem należy zawsze upewnić się, że produkt jest umieszczony
na stabilnej, twardej i płaskiej powierzchni.
· Przechowuj nieużywany sprzęt w miejscu niedostępnym dla dzieci i nie
pozwalaj nikomu
nieznajomość sprzętu do jego użycia. To narzędzie jest niebezpieczne w
rękach
nieprzeszkolonych użytkowników.
Podczas korzystania z produktu osoby postronne powinny zachować
odległość co najmniej 3 metrów, aby uniknąć przypadkowych obrażeń.
At NO time should pets or children under the age of 12 be
closer to the product than 3 m (10 feet). At NO time should
children under the age of 12 use the product. Children over
the age of 12 should not use the product without adult
supervision.
Exercise Plans
1. Początkującym zaleca się rozpoczęcie od mniejszej liczby powtórzeń,
np. 5 powtórzeń w 1 serii i dodawaj powtórzenia w miarę postępów.
2. Prosimy nie ćwiczyć na pół godziny przed/po posiłku i na 1 godzinę
przed snem .
3. Proszę o zaplanowanie ćwiczeń.

4
Part List

5
Schemat wybuchowy
Należy pamiętać, że nie wszystkie części i elementy wyposażenia, które

6
widzisz tutaj, będą używane podczas Twojego pobytu.
montażu maszyny, ponieważ niektóre z nich są już zainstalowane
fabrycznie.

7
Part List

8

9
NOTATKA: Aby uniknąć rozbieżności spowodowanej zbyt mocnym
dokręceniem, w tym momencie nie należy używać klucza.
Na razie dokręcanie ręczne ułatwi montaż.
Dokręcenie kluczem francuskim należy wykonać po zmontowaniu
wszystkich części, aby mieć pewność, że wszystkie nakrętki, śruby i części
są mocno dokręcone przed użyciem.
Z pomocą asystenta.

10
Assembly
Krok 1:
A) Przymocuj dwa tylne słupki (05) do dwóch tylnych rur podstawy (04)
łącznie za pomocą dwóch śrub nośnych (31),
dwie podkładki płaskie (34) i dwie nakrętki nylonowe (35).
B) Przymocuj tylną rurę poprzeczną (06) do tylnych słupków (05),
zabezpiecz łącznie czterema śrubami podwoziowymi (31),
cztery podkładki płaskie (34) i cztery nakrętki nylonowe (35).
C) Włóż regulowaną rurę oparcia (11) do obu tylnych słupków (05),

11
Krok 2:
A) Przymocuj przedni słupek (02) do przedniej rury podstawy (01) za
pomocą jednej śruby podporowej (31), jednego płaskiego wkręta
Podkładka (34) i jedna nakrętka nylonowa (35)
B) Przymocuj przednią stronę ramy głównej (03) do przedniego słupka (02)
za pomocą jednej śruby imbusowej (29), dwóch śrub płaskich
Podkładki (26) i jedna nakrętka nylonowa (37), następnie włóż sworzeń
blokujący (40). Zamocuj drugą stronę głównego
Ramę (03) do tylnej rury poprzecznej (06) za pomocą jednej śruby
imbusowej (30), dwóch podkładek płaskich (34) i jednej śruby

12
Nakrętkę nylonową (35) z boku, zabezpiecz jedną śrubą zamkową (27) i
pokrętłem (26) od góry.
Krok 3:
Przymocuj poduszkę siedziska (41) do ramy głównej (08) za pomocą
czterech śrub imbusowych (33) i czterech płaskich śrub
Podkładki (34).
Przymocuj poduszkę oparcia (42) do rur podtrzymujących oparcie (10) za
pomocą czterech śrub imbusowych
(37) i cztery podkładki płaskie (34).

13
Krok 4:
A) Przymocuj regulowaną rurę przedniego słupka (12) do przedniego
słupka (02), po wybraniu odpowiedniego położenia otworu zablokuj ją za
pomocą pokrętła (09).
B ) Przymocuj przedłużenie nogi (07) do regulowanej rury przedniej
kolumny (12) za pomocą jednej śruby imbusowej (29), dwóch podkładek
płaskich (36) i jednej nakrętki nylonowej (37).
Przesuń słupek talerza ciężarka (08) do przedłużenia nogi (07) za pomocą

14
jednej śruby podsadzkowej (31), jednej podkładki płaskiej (34) i jednej
nakrętki nylonowej (35), a następnie zamontuj zacisk sprężynowy (17).
Krok 5:
A) Przesuń dwie rurki piankowe (13) do przedłużenia nogi (07), jedną rurkę
piankową (13) do przedniego słupka
Regulowana rurka (12) i nasuń sześć pianek (16) na każdą rurkę piankową
(13)
B) Przymocuj lewy hak bezpieczeństwa (14L) i prawy hak bezpieczeństwa

15
(14R) do tylnych słupków (05) za pomocą jednego płaskiego haka.
Podkładka (38) i nakrętka nylonowa (39).
PROCES MONTAŻU ZOSTAŁ ZAKOŃCZONY.
Ze względów bezpieczeństwa dokręć śrubę i ustaw ją w odpowiedniej
pozycji.
Po zakończeniu montażu należy przeprowadzić kontrolę wizualną i
funkcjonalną oraz przetestować urządzenie.
Krok 6: Na poniższym rysunku przedstawiono złożony stan produktu.

16
NOTATKA : Maksymalna nośność tego produktu wynosi 380 funtów lub
172 kg. Tylko jedna osoba powinna używać tego urządzenia w tym samym
czasie.
Product size chart
17
Cleaning and disinfection
11.Przetrzyj powierzchnię wilgotną bawełnianą ściereczką.

18
12.Regularnie co 3 miesiące sprawdzaj, czy śruby się nie poluzowały, i
dokręcaj je.
Producent: Shanghaimuxinmuyeyouxiangongsi
Adres: Shuangchenglu 803nong11hao1602A-1609shi, baoshanqu,
Szanghaj 200000 CN.
Importowane do AUS: SIHAO PTY LTD. 1 ROKEVA
STREETEASTWOOD
NSW 2122 Australia
Importowane do USA: Sanven Technology Ltd. Suite 250, 9166 Anaheim
Miejsce, Rancho Cucamonga, CA 91730
REP
UK
YH CONSULTING LIMITED. C/O YH Consulting
Limited Office 147, Centurion House, London
Road, Staines-upon-Thames, Surrey, TW18 4AX
REP
EC
E-CrossStu GmbH
Mainzer Landstr.69,
60329 Frankfurt am Main.


Technisch Ondersteuning en E-garantiecertificaat
www.vevor.com/support
Multifunctioneel gewichthefbed
MODEL: SJ78 21
Wij streven er voortdurend naar om u gereedschappen tegen concurrerende prijzen te
leveren.
"Bespaar de helft", "halve prijs" of andere soortgelijke uitdrukkingen die alleen door ons
worden gebruikt
geeft een schatting van de besparingen die u kunt behalen door bepaalde gereedschappen
te kopen
bij ons vergeleken met de grote topmerken en betekent niet per se dat omslag
alle categorieën van tools die wij aanbieden. U wordt vriendelijk verzocht om te verifiëren
voorzichtig
wanneer u een bestelling bij ons plaatst, als u daadwerkelijk Besparing
Half in vergelijking met de grote topmerken.


1
MODEL: SJ78 21
HULP NODIG? NEEM CONTACT MET ONS OP!
Heeft u vragen over het product? Heeft u technische ondersteuning
nodig? Neem dan gerust contact met ons op:
Technische ondersteuning en e-garantiecertificaat
www.vevor.com/support
Dit is de originele instructie, lees alle handleidingen zorgvuldig door
voordat u het product gebruikt. VEVOR behoudt zich een duidelijke
interpretatie van onze gebruikershandleiding voor. Het uiterlijk van het
product is afhankelijk van het product dat u hebt ontvangen. Vergeef ons
dat we u niet opnieuw zullen informeren als er technologie- of
Multifunctional Weightlifting bed

2
software-updates voor ons product zijn .
Hartelijk dank dat u hiervoor heeft gekozen product .
Lees de volledige instructies aandachtig door voordat u het product
gebruikt. Deze informatie helpt u om de best mogelijke resultaten te
behalen.
Operation safety
WAARSCHUWING:
Lees alle instructies voordat u dit product gebruikt
Het is de verantwoordelijkheid van de eigenaar om ervoor te
zorgen dat alle gebruikers van dit product volledig op de hoogte zijn van
alle waarschuwingen en voorzorgsmaatregelen.
·Gebruik het niet als u zwanger bent
·Raadpleeg uw arts voordat u met een trainingsprogramma begint.
·Lees alle instructies voordat u dit product gebruikt.
·Houd kinderen en huisdieren uit de buurt van de sit-up bank terwijl deze in
gebruik is. Kinderen mogen het product niet gebruiken zonder toezicht van
een volwassene.
·Controleer en draai alle onderdelen iedere keer goed vast voordat u de
sit-up bank gebruikt.
·Maak dit apparaat alleen schoon met vochtige doekjes. Gebruik geen
reinigingsmiddelen. Neem contact op met de klantenservice als u vragen
heeft.
·Dit product moet op een vlakke ondergrond worden geplaatst tijdens
gebruik. Plaats een
Indien nodig een antislipmat onder de machine leggen.
·Draag geschikte kleding wanneer u dit product gebruikt.
·Gebruik het niet als het niet functioneel is of als onderdelen niet goed
gemonteerd zijn.
·Als u pijn op de borst, misselijkheid, duizeligheid of kortademigheid
ervaart, moet u onmiddellijk stoppen met trainen en uw arts raadplegen
voordat u verdergaat.

3
·Zorg er vóór gebruik altijd voor dat het product op een stevige, harde en
vlakke ondergrond staat.
· Berg ongebruikte apparatuur op buiten bereik van kinderen en laat
niemand deze gebruiken.
onbekend met de apparatuur om het te gebruiken. Dit gereedschap is
gevaarlijk in de handen
van ongetrainde gebruikers.
· Bij gebruik van het product moet het publiek een afstand van 3 meter
aanhouden om onbedoeld letsel te voorkomen.
At NO time should pets or children under the age of 12 be
closer to the product than 3 m (10 feet). At NO time should
children under the age of 12 use the product. Children over
the age of 12 should not use the product without adult
supervision.
Exercise Plans
1. Beginners wordt aangeraden om te beginnen met minder herhalingen,
bijvoorbeeld 5 herhalingen als 1 set en voeg gaandeweg herhalingen toe.
2. Sport niet een half uur voor/na de maaltijd en niet een uur voor het
slapengaan .
3. Maak een trainingsschema.

4
Part List

5
Explosietekening
Houd er rekening mee dat niet alle onderdelen en hardware die u hier ziet,
6
worden gebruikt terwijl u
het monteren van de machine, omdat sommige hiervan al
voorgeïnstalleerd
zijn.

7
Part List

8

9
OPMERKING: Om verkeerde uitlijning door te strak aandraaien te
voorkomen, raden wij u aan om op dit moment geen sleutel te gebruiken.
Door het voorlopig met de hand vast te draaien, verloopt de montage
gemakkelijker.
Draai de sleutel pas vast nadat alle onderdelen zijn gemonteerd. Zo weet u
zeker dat alle moeren, bouten en onderdelen goed vastzitten voordat u ze
gebruikt.
Met hulp van een assistent.

10
Assembly
Stap 1:
A) Bevestig twee achterste staanders (05) aan twee achterste basisbuizen
(04) in totaal met twee wagenbouten (31),
twee platte ringen (34) en twee nylon moeren (35).
B) Bevestig de achterste dwarsbuis (06) aan de achterste staanders (05),
bevestig met in totaal vier wagenbouten (31),
vier vlakke ringen (34) en vier nylon moeren (35).
C) Plaats de verstelbare buis voor de rugleuning (11) in beide achterste
staanders (05),

11
Stap 2:
A) Bevestig de voorste staander (02) aan de voorste basisbuis (01) met
behulp van één wagenbout (31), één platte
Ring (34) en één nylon moer (35)
B) Bevestig de voorkant van het hoofdframe (03) aan de voorste staander
(02) met behulp van één inbusbout (29), twee platte bouten (29) en twee
platte bouten (29).
Sluitringen (26) en één nylon moer (37), plaats vervolgens de borgpen (40).
Bevestig de andere kant van de hoofdas
Frame (03) aan de achterste dwarsbuis (06) met behulp van één inbusbout
12
(30), twee platte ringen (34) en één
Nylonmoer (35) vanaf de zijkant, vastzetten met één wagenbout (27) en
knop (26) vanaf de bovenkant.
Stap 3:
Bevestig het zitkussen (41) aan het hoofdframe (08) met behulp van vier
inbusbouten (33) en vier platte bouten.
Ringen (34).
Bevestig het rugleuningkussen (42) aan de ondersteunende buizen van de
rugleuning (10) met behulp van vier inbusbouten.
(38) en vier vlakke ringen (34).

13
Stap 4:
A) Bevestig de verstelbare voorste staanderbuis (12) aan de voorste
staander (02). Nadat u de juiste gatpositie hebt geselecteerd, vergrendelt u
deze met de knopbout (09).
B ) Bevestig de beenverlenging (07) aan de voorste verstelbare buis (12)
met behulp van één inbusbout (29), twee platte ringen (36) en één nylon
moer (37).
Schuif de gewichtsplaatpaal (08) op de beenverlenging (07) met behulp

14
van één wagenbout (31), één platte ring (34) en één nylon moer (35) en
installeer de veerclip (17).
Stap 5:
A) Schuif twee schuimbuizen (13) naar de beenstrekker (07), één
schuimbuis (13) naar de voorste rechtopstaande
Verstelbare buis (12) en schuif zes schuimen (16) in elke schuimbuis (13)
B) Bevestig de linker veiligheidshaak (14L) en de rechter veiligheidshaak
(14R) aan de achterste staanders (05) met behulp van één platte haak.
15
Ring (38) en nylon moer (39).
HET MONTAGEPROCES IS NU VOLTOOID.
Voor uw veiligheid, draai de schroef vast en stel deze in op de juiste
positie.
Controleer en test het apparaat visueel en functioneel nadat de montage is
voltooid.
Stap 6: De volgende afbeelding toont de gevouwen toestand van het
product

16
OPMERKING : Het maximale draagvermogen voor dit product is 380 lbs of
172 kg. Slechts één persoon mag dit stuk apparatuur tegelijk gebruiken.
Product size chart
17
Cleaning and disinfection
13.Veeg het oppervlak af met een natte katoenen doek.
14.Controleer de schroeven regelmatig, elke 3 maanden, op losdraaien en

18
vastdraaien van de schroeven

Fabrikant: Shanghaimuxinmuyeyouxiangongsi
Adres: Shuangchenglu 803nong11hao1602A-1609shi, baoshanqu,
Sjanghai 200000 CN.
Geïmporteerd naar AUS: SIHAO PTY LTD. 1 ROKEVA
STREETEASTWOOD
NSW 2122 Australië
Geïmporteerd naar de VS: Sanven Technology Ltd. Suite 250, 9166
Anaheim
Plaats, Rancho Cucamonga, CA 91730
REP
UK
YH CONSULTING LIMITED. C/O YH Consulting
Limited Office 147, Centurion House, London
Road, Staines-upon-Thames, Surrey, TW18 4AX
REP
EC
E-CrossStu GmbH
Mainzer Landstr.69,
60329 Frankfurt am Main.


Teknisk Support och e-garanticertifikat
www.vevor.com/support
Multifunktionell tyngdlyftssäng
MODELL: SJ78 21
Vi fortsätter att vara engagerade i att ge dig verktyg till konkurrenskraftiga priser.
"Spara hälften", "Halva priset" eller andra liknande uttryck som endast används av oss
representerar en uppskattning av besparingar du kan dra nytta av att köpa vissa verktyg
med oss jämfört med de stora toppmärkena och betyder inte nödvändigtvis att täcka
alla kategorier av verktyg som erbjuds av oss. Du påminns vänligen om att verifiera
försiktigt
när du gör en beställning hos oss om du faktiskt gör det Sparande
Halv i jämförelse med de främsta varumärkena.

1
MODELL: SJ78 21
BEHÖVER HJÄLP? KONTAKTA OSS!
Har du produktfrågor? Behöver du teknisk support? Kontakta oss
gärna:
Teknisk support och e-garanticertifikat
www.vevor.com/support
Detta är den ursprungliga instruktionen, läs alla instruktioner noggrant
innan du använder den. VEVOR reserverar sig för en tydlig tolkning av vår
användarmanual. Utseendet på produkten är beroende av den produkt du
fått. Ursäkta oss att vi inte kommer att informera dig igen om det finns
någon teknik eller mjukvaruuppdateringar på vår produkt.
Multifunctional Weightlifting bed

2
Tack så mycket för att du valde detta produkt .
Läs alla instruktioner innan du använder den. Informationen hjälper dig att
uppnå bästa möjliga resultat.
Operation safety
VARNING:
Läs alla instruktioner innan du använder denna produkt
Det är ägarens ansvar att se till att alla användare av denna
produkt är fullt medvetna om alla varningar och försiktighetsåtgärder.
·Använd den inte om du är gravid
·Konsultera din läkare innan du påbörjar ett träningsprogram.
·Läs alla instruktioner innan du använder denna produkt.
·Håll barn och husdjur borta från sittbänken när de används.Barn ska inte
använda.Produkten. utan uppsikt av vuxen.
·Inspektera och dra åt alla delar varje gång innan du använder denna
sittbänk.
· Rengör denna maskin endast med fuktade våtservetter. Använd inga
rengöringsmedel. Kontakta kundtjänst om du har några frågor.
·Denna produkt bör placeras på en plan yta vid användning. Placera en
halkskyddsmatta under maskinen vid behov.
· Bär lämpliga kläder när du använder denna produkt.
·Använd den inte om den inte fungerar eller om delar inte är välmonterade.
·Om du känner några bröstsmärtor, illamående, yrsel eller brist på bredd,
bör du sluta träna omedelbart och rådfråga din läkare innan du fortsätter.
·Före användning, se alltid till att din produkt är placerad på en solid, hård
och plan yta.
· Förvara inaktiv utrustning utom räckhåll för barn och låt inte någon
obekant med utrustningen för att använda den. Detta verktyg är farligt i
händerna
av outbildade användare.
· När du använder produkten måste publiken av åskådare hålla ett avstånd
på 3 meter för att undvika oavsiktlig skada.

3
At NO time should pets or children under the age of 12 be
closer to the product than 3 m (10 feet). At NO time should
children under the age of 12 use the product. Children over
the age of 12 should not use the product without adult
supervision.
Exercise Plans
1. Nybörjare rekommenderas att börja med färre reps, 5 reps som 1 set till
exempel och lägg till reps allt eftersom.
2. Träna inte en halvtimme före/efter måltider eller 1 timme före sömn .
3. Gör träningsplaner.
4
Part List
5
Sprängt diagram
Observera att inte alla delar och hårdvara du ser här kommer att användas
medan du är
montering av maskinen eftersom några av dessa redan är
förinstallerade.

6

7
Part List

8

9
NOTERA: För att undvika felinställning på grund av överdragning, använd
inte en skiftnyckel just nu.
Att dra åt för hand för tillfället hjälper till att säkerställa enkel montering.
Skiftnyckelåtdragning bör utföras efter att alla delar har monterats för att
säkerställa att alla muttrar, bultar och delar är ordentligt säkrade före
användning.
Med hjälp av en assistent.

10
Assembly
Steg 1:
A) Fäst två bakre stolpar (05) till två bakre basrör (04) totalt med två
vagnbultar (31),
två platta brickor (34) och två nylonmuttrar (35).
B) Fäst det bakre tvärröret (06) på de bakre stolparna (05), fäst med totalt
fyra vagnbultar (31),
fyra platta brickor (34) och fyra nylonmuttrar (35).
C) Sätt in ryggstödets justerbara rör (11) i båda bakre stolparna (05),

11
Steg 2:
A) Fäst den främre stolpen (02) på det främre basröret (01) med en
vagnbult (31), en platt
Bricka (34) och en nylonmutter (35)
B) Fäst framsidan av huvudramen (03) till den främre stolpen (02) med en
insexbult (29), två platta
Brickor (26) och en nylonmutter (37), sätt sedan in låsstiftet (40). Fäst den
andra sidan av Main
Ram (03) till det bakre tvärröret (06) med en insexbult (30), två platta
brickor (34) och en

12
Nylonmutter (35) från sidan, fäst med en vagnsbult (27) och knopp (26)
uppifrån.
Steg 3:
Fäst sittdynan (41) på huvudramen (08) med fyra insexbultar (33) och fyra
platta
Brickor (34).
Fäst ryggstödskudden (42) på ryggstödsstöden (10) med hjälp av fyra
insexbultar
(39) och fyra platta brickor (34).
13
Steg 4:
A) Fäst justerbart rör för den främre stolpen (12) på den främre stolpen
(02), efter att ha valt lämpligt hålläge, lås den med rattbulten (09).
B ) Fäst benförlängningen (07) på det främre upprättstående justerbara
röret (12) med en insexbult (29), två plana brickor (36) och en nylonmutter
(37).
Skjut viktplattans stolpe (08) till benförlängningen (07) med en vagnsbult
(31), en platt bricka (34) och en nylonmutter (35), och installera
14
fjäderklämman (17).
Steg 5:
A) Skjut två skumrör (13) till benförlängningen (07), ett skumrör (13) till den
främre upprättstående
Justerbart rör (12) och skjut sex skum (16) till varje skumrör (13)
B) Fäst den vänstra säkerhetskroken (14L) och den högra
säkerhetskroken (14R) på de bakre stolparna (05) med en platt
Bricka (38) och nylonmutter (39).

15
MONTERINGSPROCESSEN ÄR NU AVSLUTAD.
För din säkerhet, Vänligen dra åt skruven och justera den till lämplig
position.
Inspektera och testa enheten visuellt och funktionellt efter att monteringen
är klar.
Steg 6: Följande bild visar produktens vikta tillstånd

16
OBS: Den maximala viktkapaciteten för denna produkt är 380 lbs eller 172
kg. Endast en person bör använda denna utrustning åt gången.
Product size chart

17
Cleaning and disinfection
15.Torka av ytan med en våt bomullstrasa.
16.Kontrollera skruvarna regelbundet var tredje månad för att lossa och

18
dra åt skruvarna

Tillverkare: Shanghaimuxinmuyeyouxiangongsi
Adress: Shuangchenglu 803nong11hao1602A-1609shi, baoshanqu,
shanghai 200 000 CN.
Importerad till AUS: SIHAO PTY LTD. 1 ROKEVA STREETEASTWOOD
NSW 2122 Australien
Importerad till USA: Sanven Technology Ltd. Suite 250, 9166 Anaheim
Place, Rancho Cucamonga, CA 91730
REP
UK
YH CONSULTING LIMITED. C/O YH Consulting
Limited Office 147, Centurion House, London
Road, Staines-upon-Thames, Surrey, TW18 4AX
REP
EC
E-CrossStu GmbH
Mainzer Landstr.69,
60329 Frankfurt am Main.