英文
X0806****
X0806****
!" #$
%1&'1 &
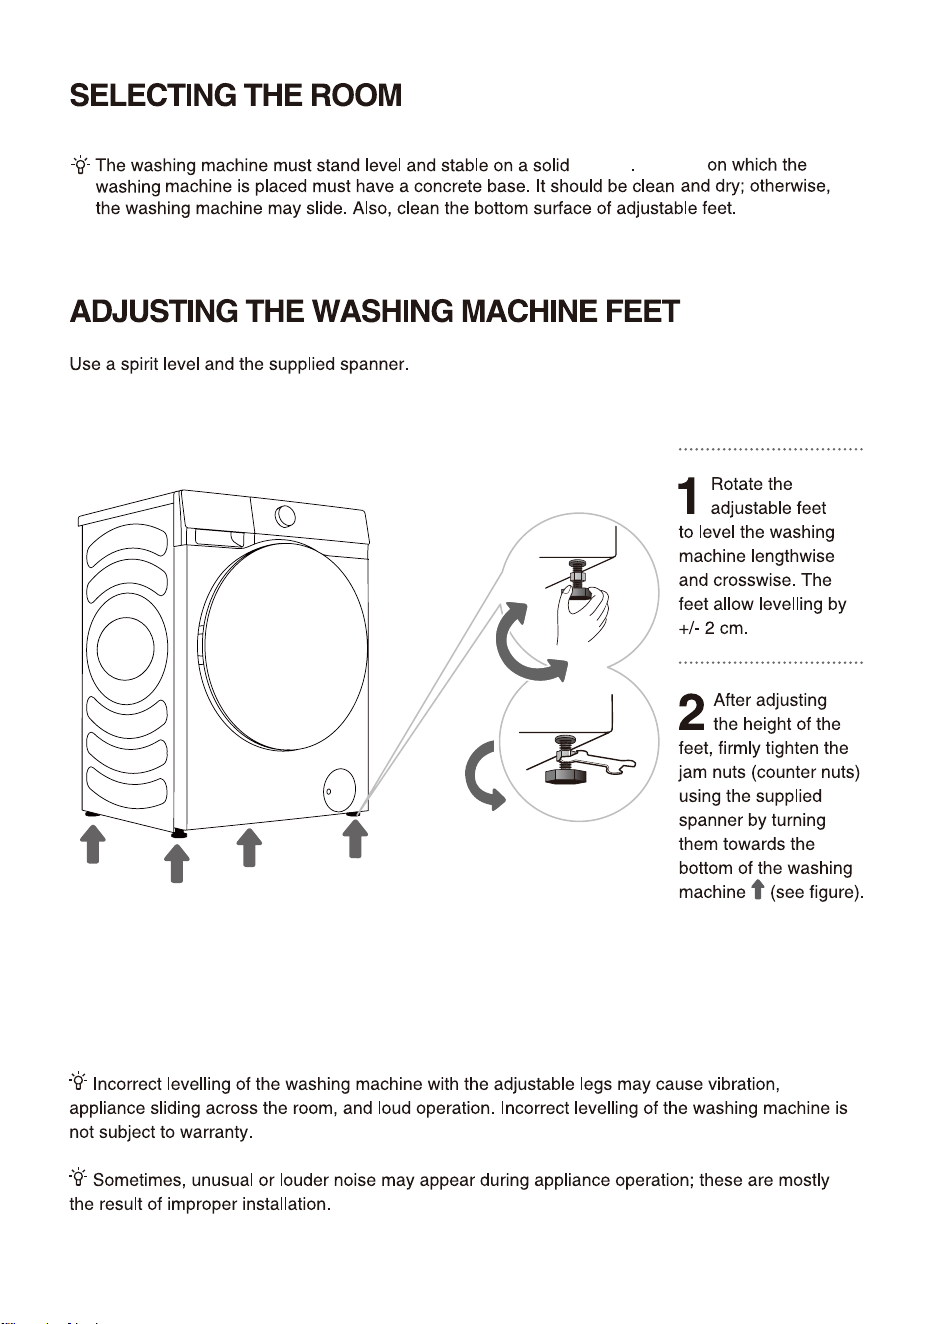
70g߫ᄜ
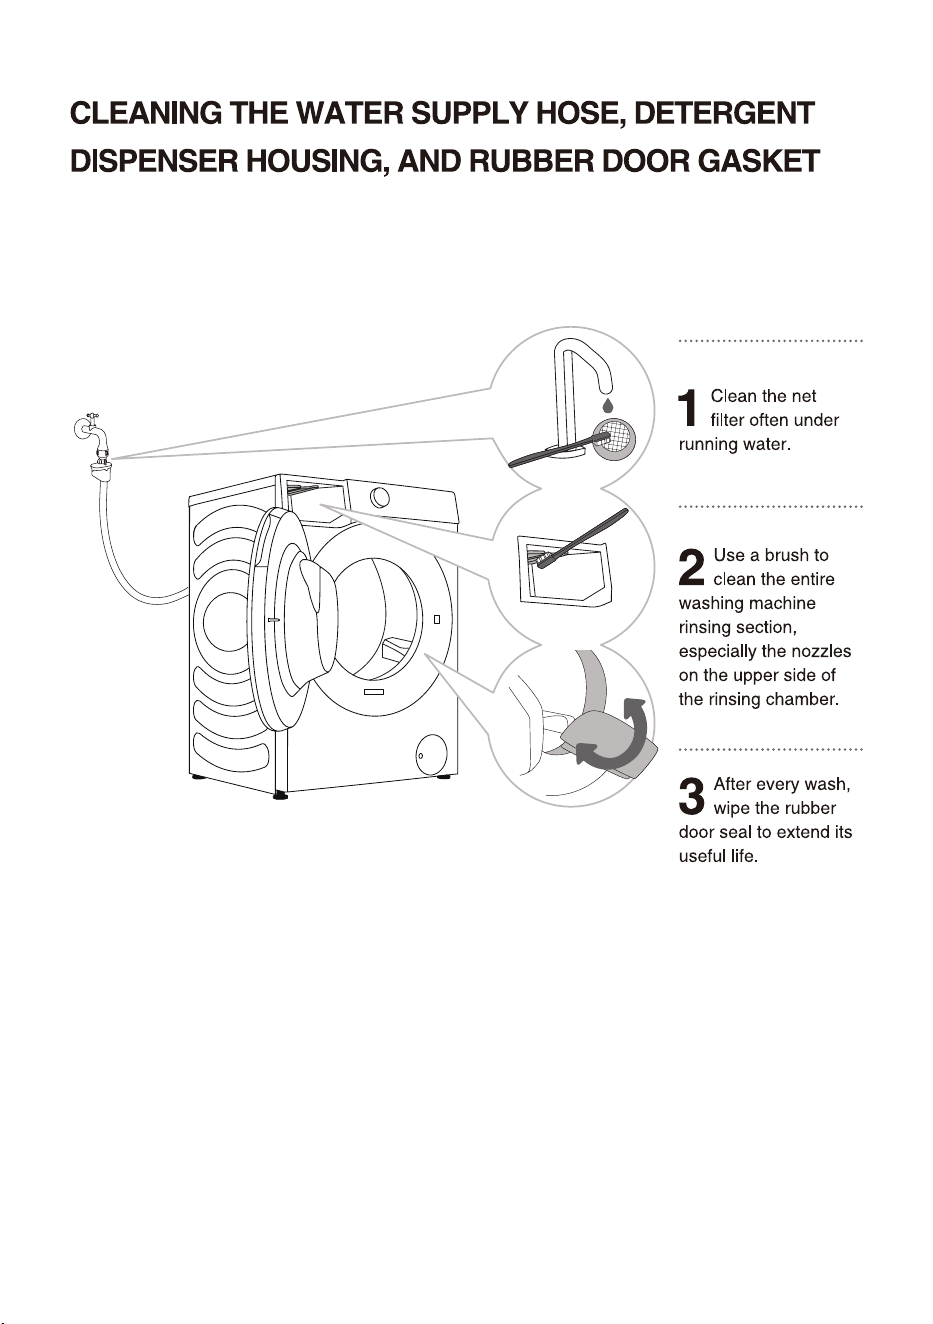
./01
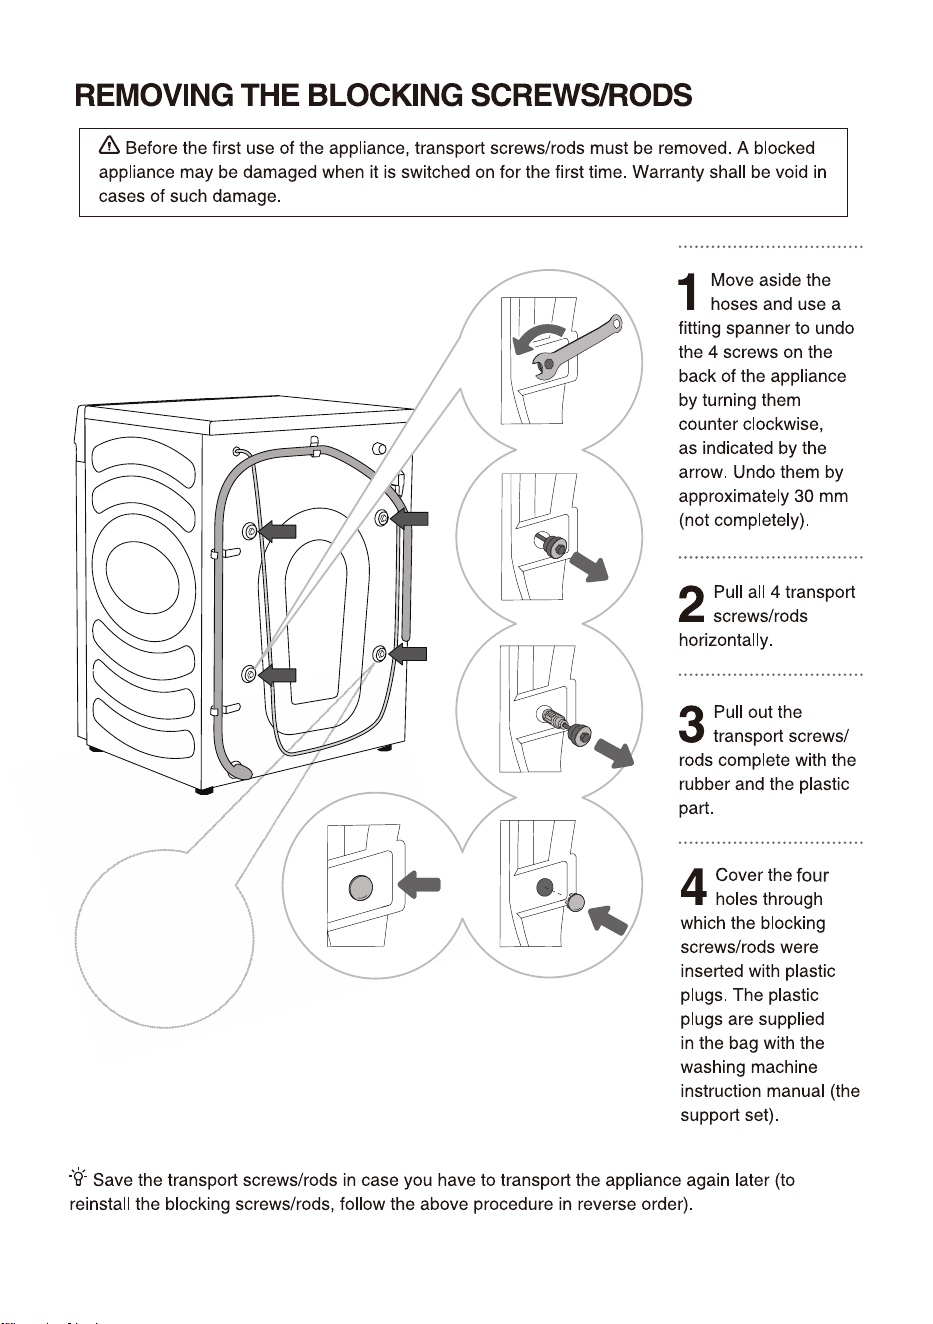
1.
234߫ᄜ56789:;
2. 9:<=>??9:;
3. @A9:BC6DEFG5HIAJ9EK95L9:MN;
4. O84P210S3QXP145S3Q5PR4mmQ;
5.
TUVWXY*%7PĢ
6. _?`abcdefghijkDl+mnop5pqrstuvw<
;
7. xRoHS[\01yREACHz{|
娄叶菁2023.11.21
高 洁2023.11.21
ёઁҲ2023.11.21
张新新2023.11.21
匡永坤2023.11.21
A
物料号:

USER’S OPERATION MANUAL
Before operating this unit, please read this manual
thoroughly, and retain for future reference.
English
EN
HWFS7514S
HWFS7514SB
HWFS7512S
HWFS7512SB
HWFS7514ST
HWFS7514S*
HWFS7512ST
HWFS7512S*
12
21
22
38
40
7
1
6
37
0
1
2
3
5
46
45
4
44
47
50
4
1
7
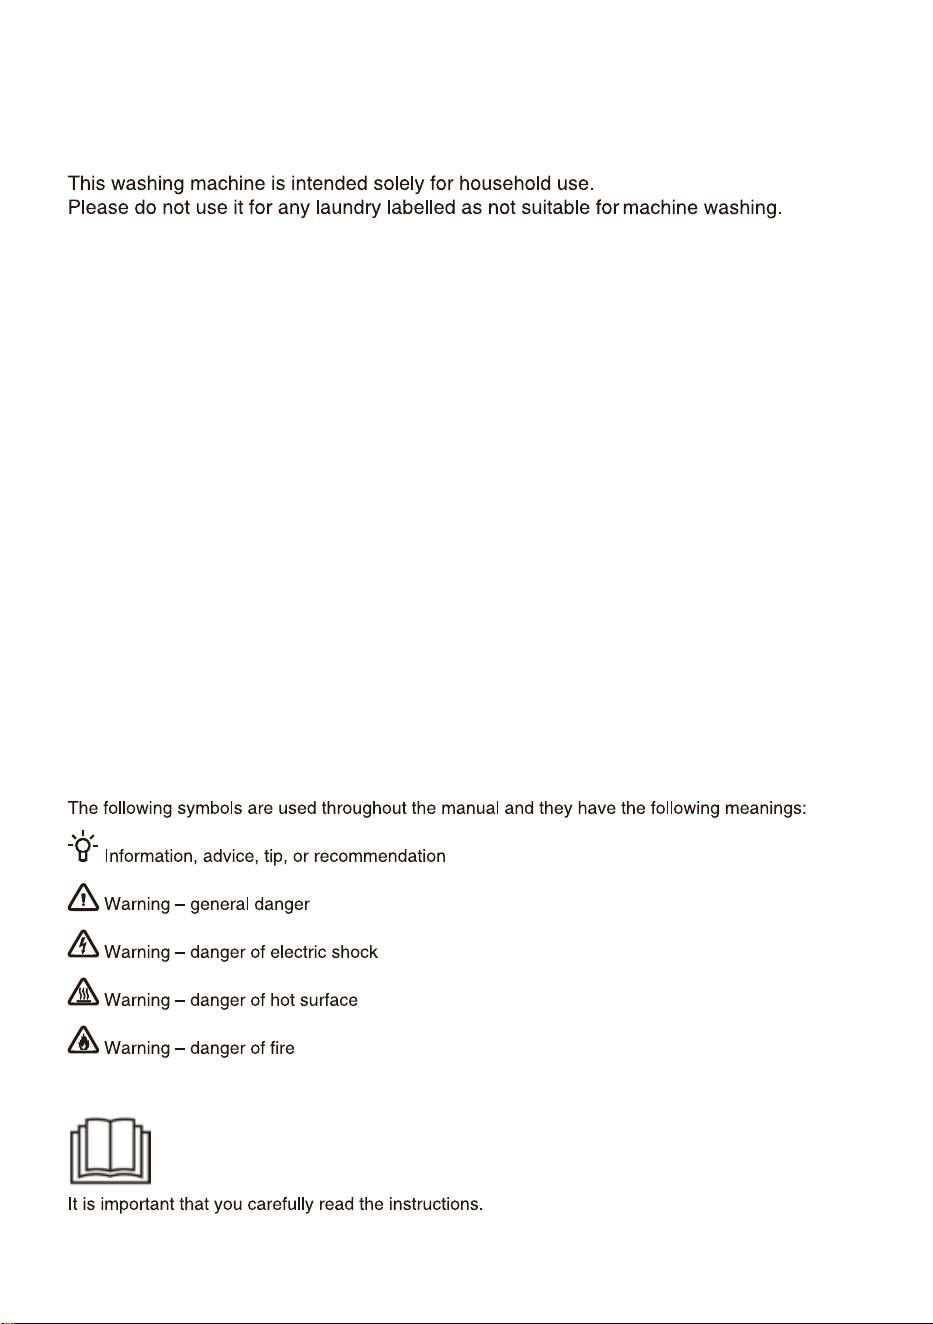
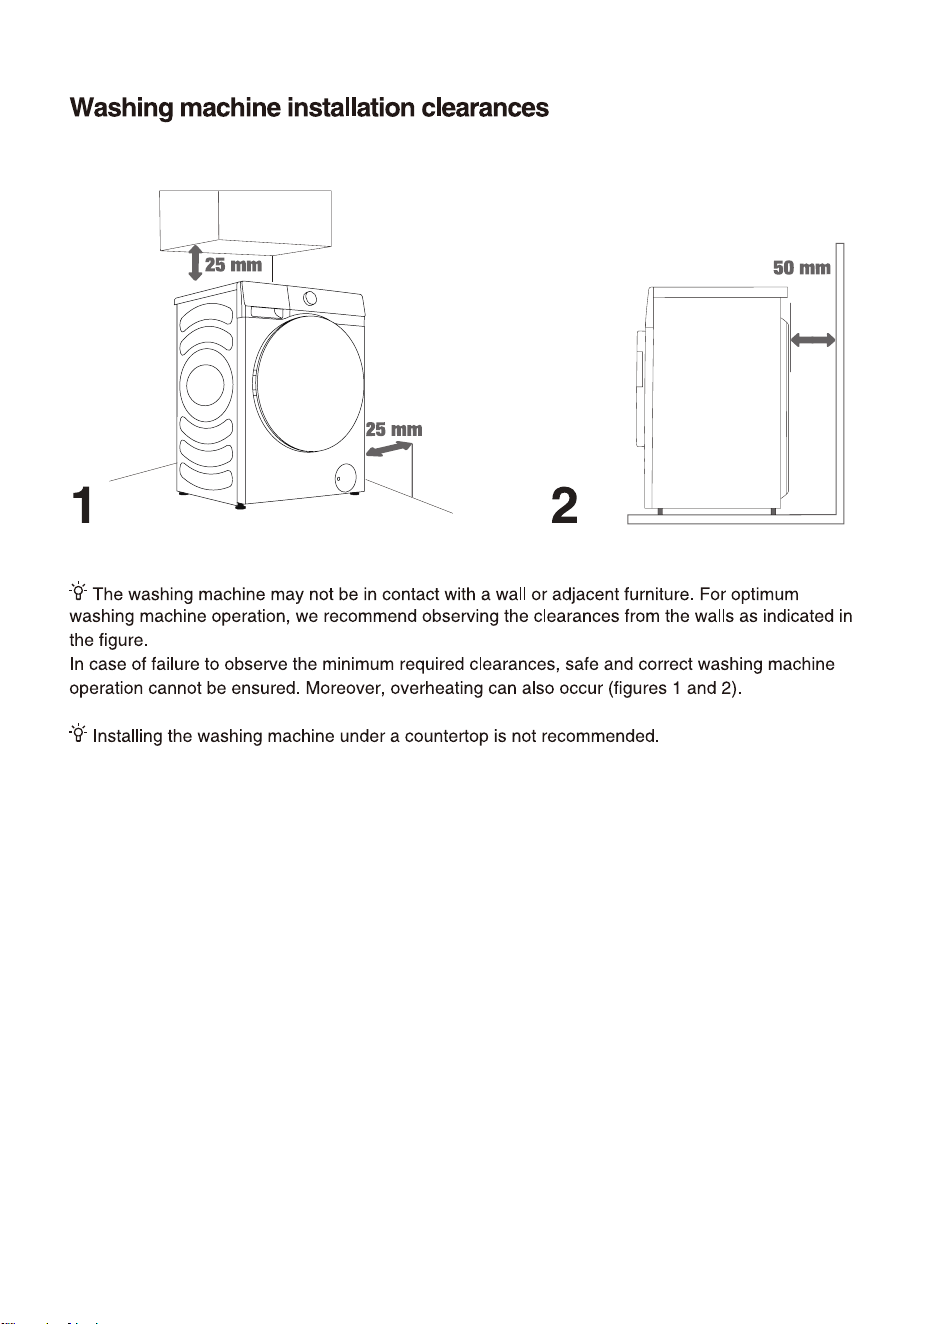
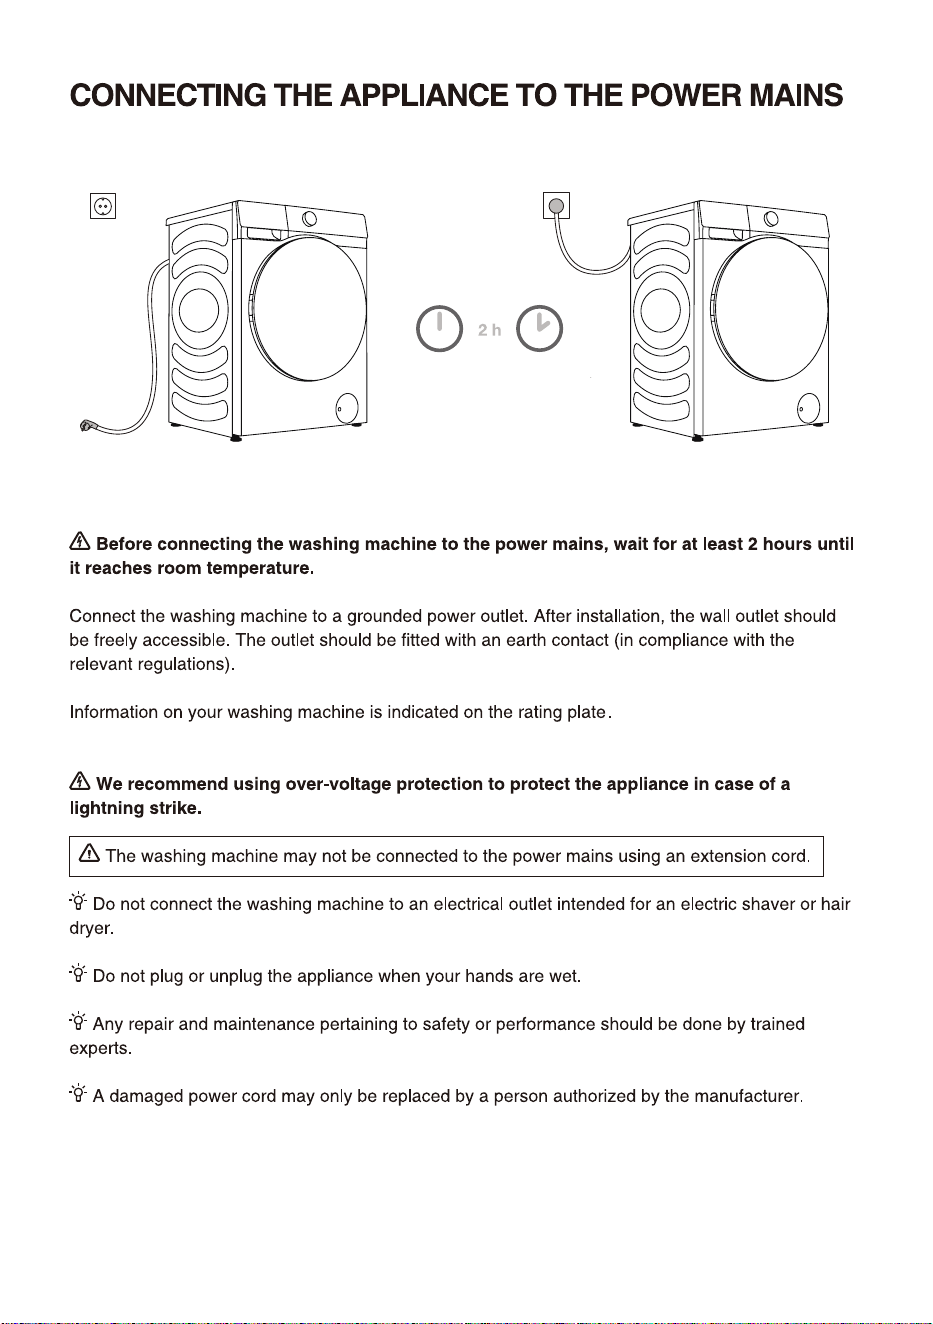
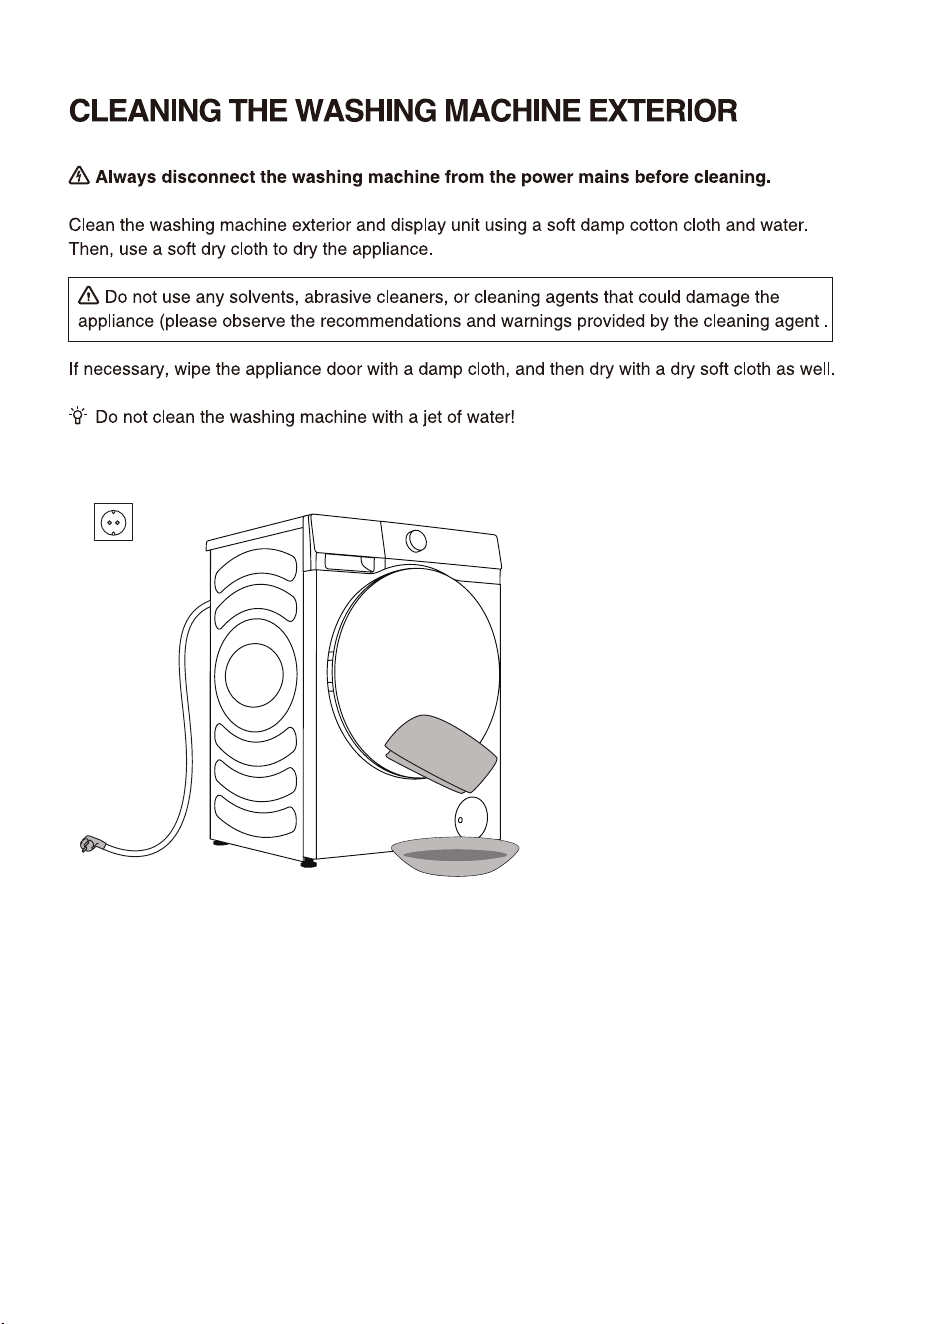
This appliance is intended to be used in household.
a damaged power
Drum clean
Drum clean
If the supply cord is damaged, it must be replaced by
the manufacturer, its service agent or similarly
qualified persons in order to avoid a hazard.
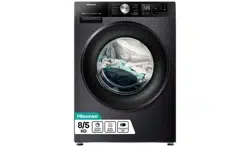
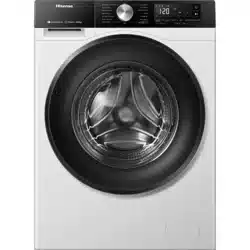
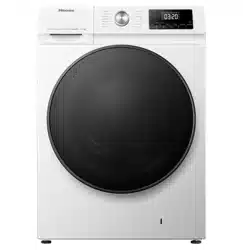
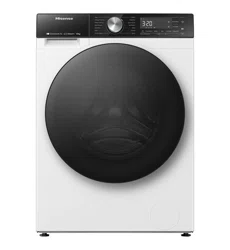
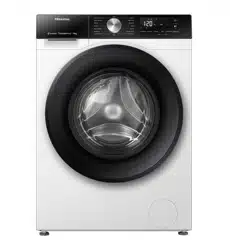
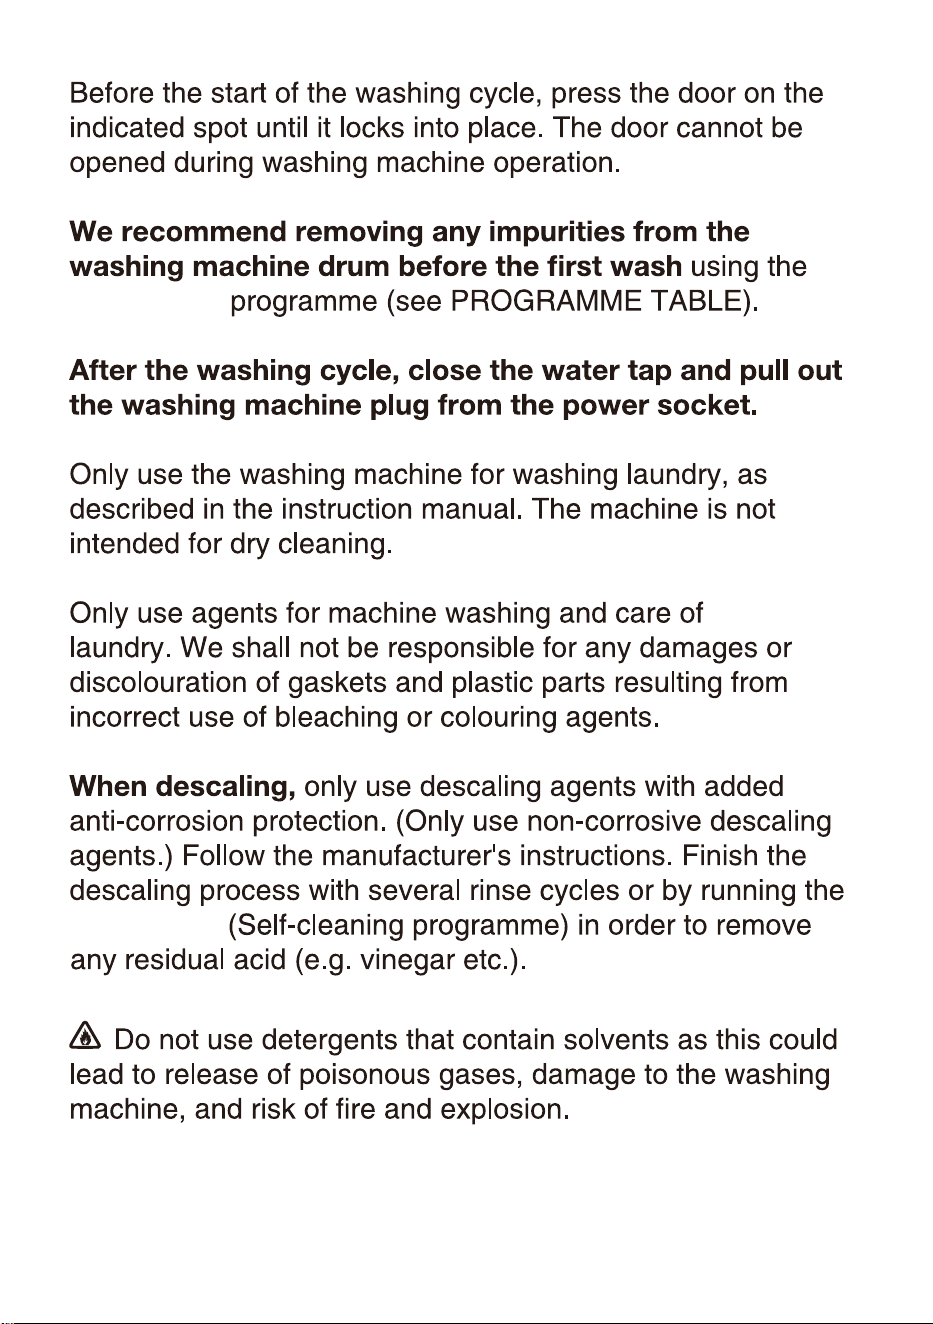
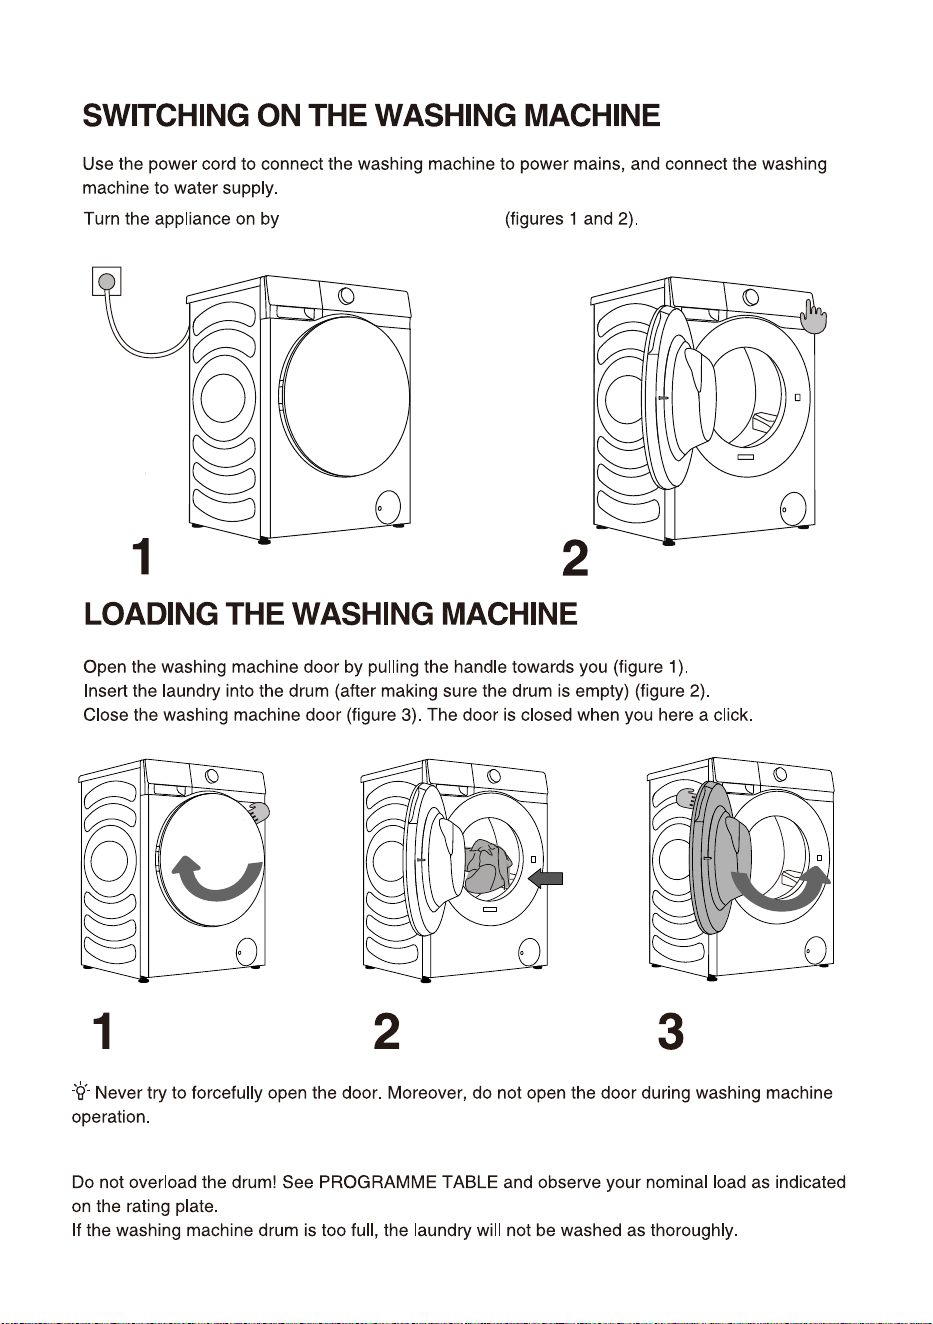
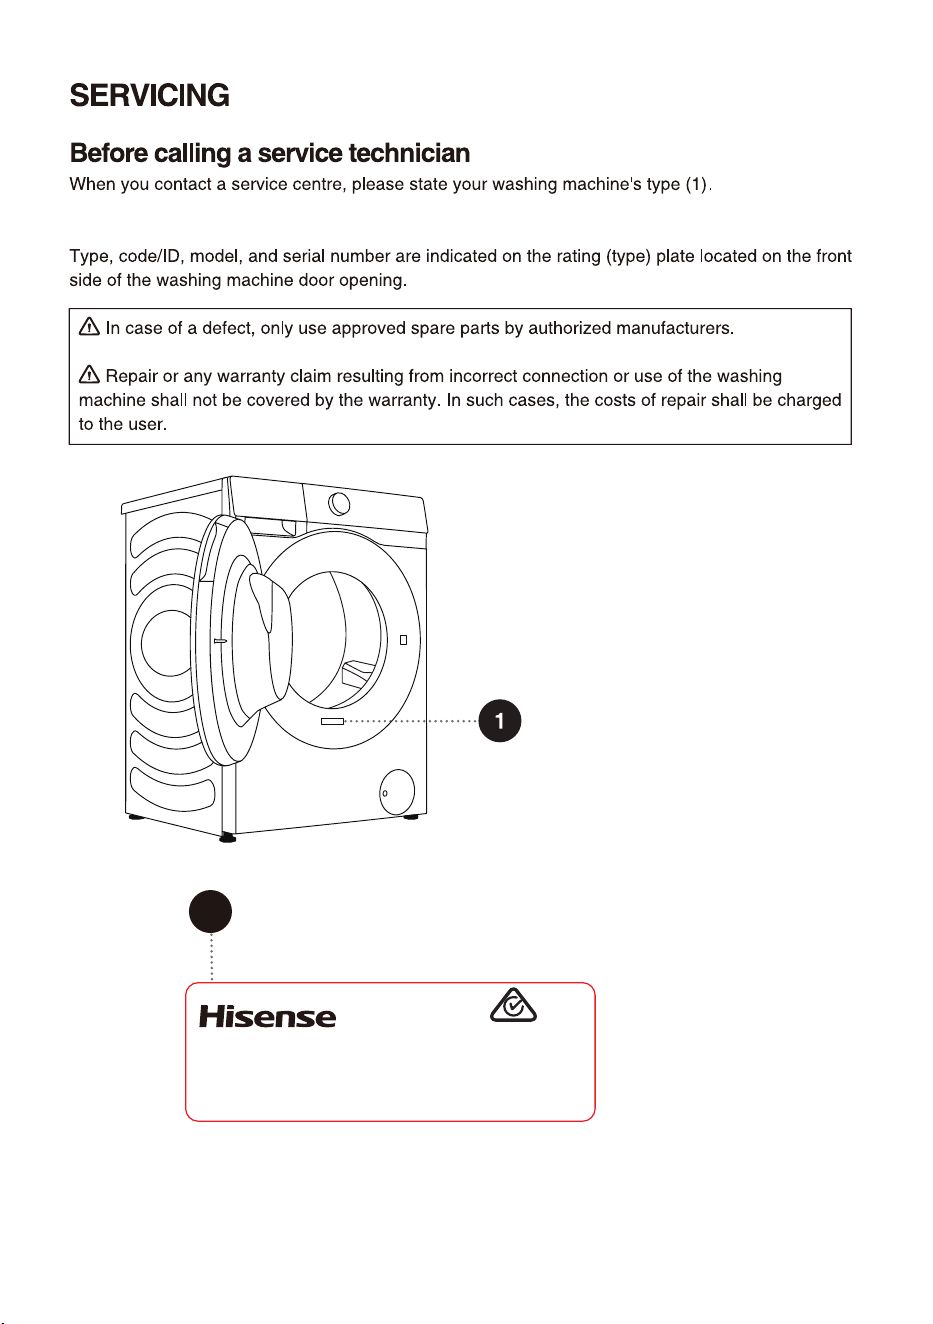
WASHING MACHINE DESCRIPTION
FRONT
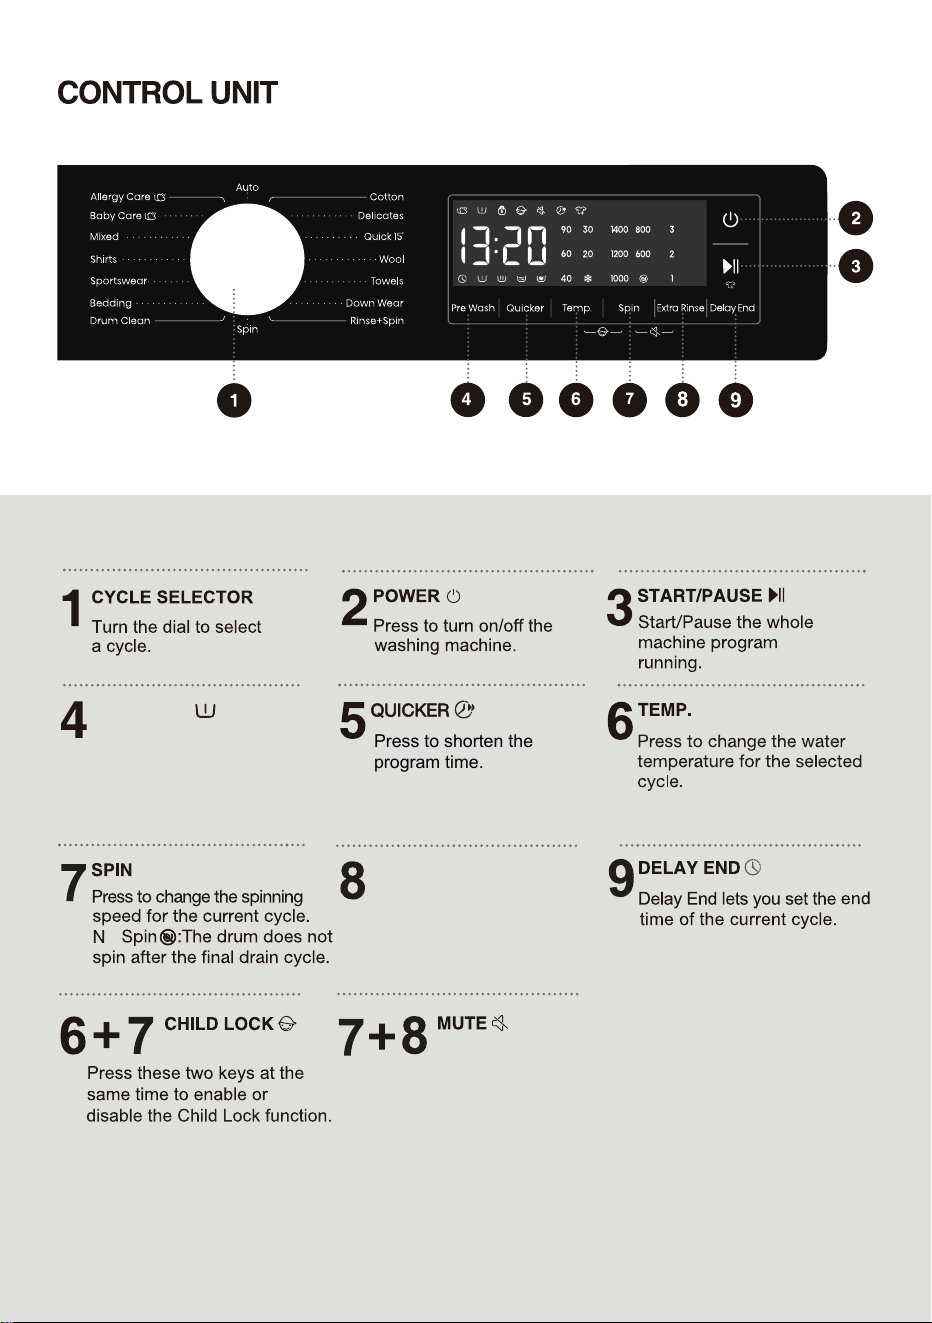
1 Control unit
2 Programme selector knob
3 Detergent compartment
4 Door
5 Rating plate
6 Pump filter cover
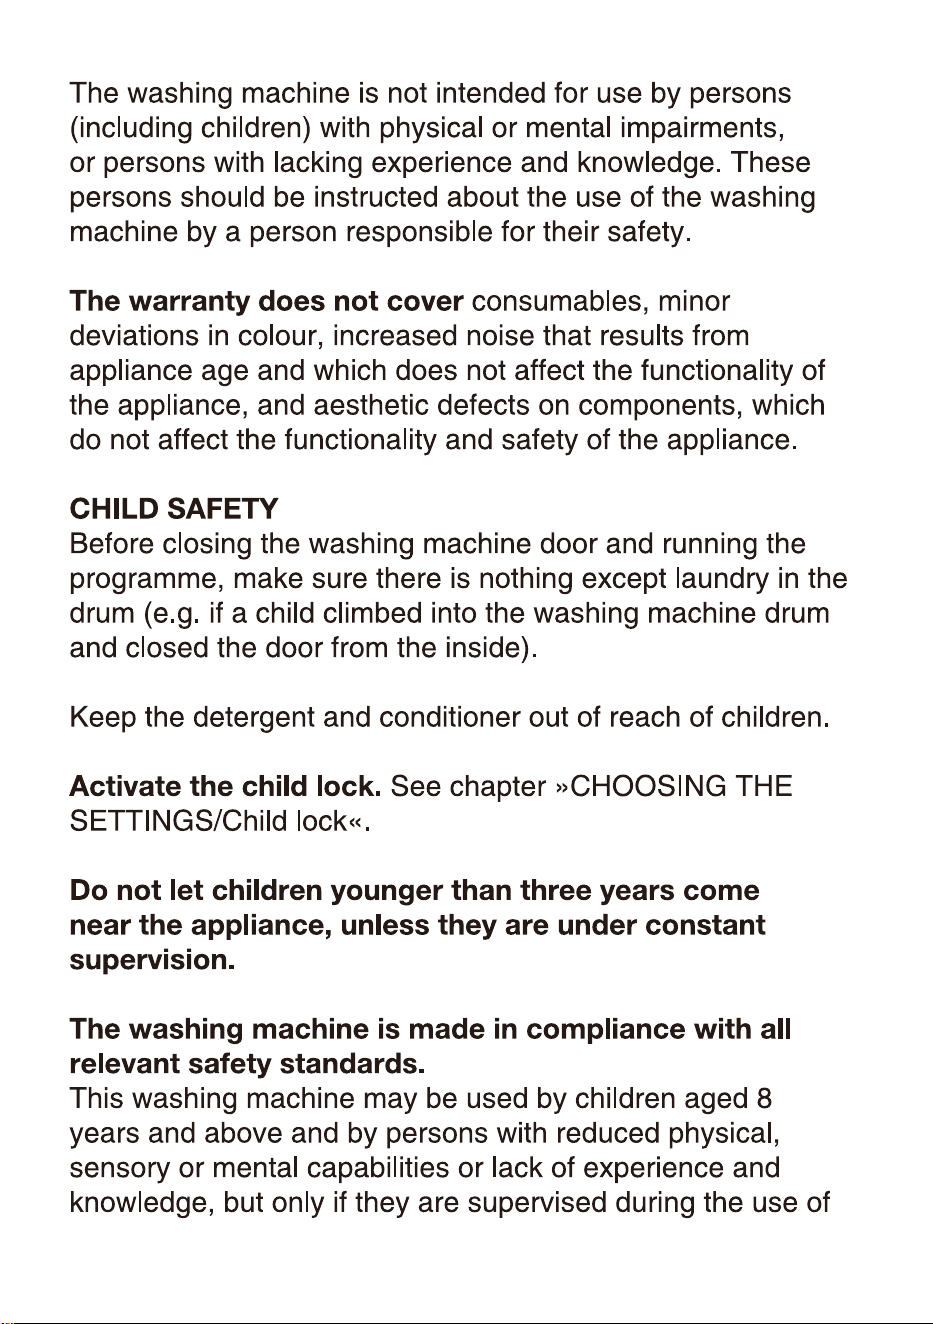
BACK
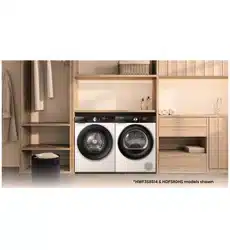
The illustrations in this manual are for reference purpose only. As our products are subject to
continual improvement, the appearance, color and functional parts of your actual product may vary
from the illustrations.
1 Water supply hose
2 Power cord
3 Water discharge hose
4 Adjustable feet
5 Blocking rods/screws

7.5
58
7_
)[
8008
45
480
510
540
020
"
#
$
%
&
'
%JNFOTJPONN
*OEFY
Clothes Washing Machine
HWF
S7514S
7.5
kg
220-240V~ 50Hz 1800W IPX4
Made in China
SGS-220091-EA
APPROVAL NO.
Hisense Australia Pty Ltd.
E6101
Instructions for use;
4 plastic plugs;
Supply hose;
Drain hose holder;
Wrench;
Noise reduction board.
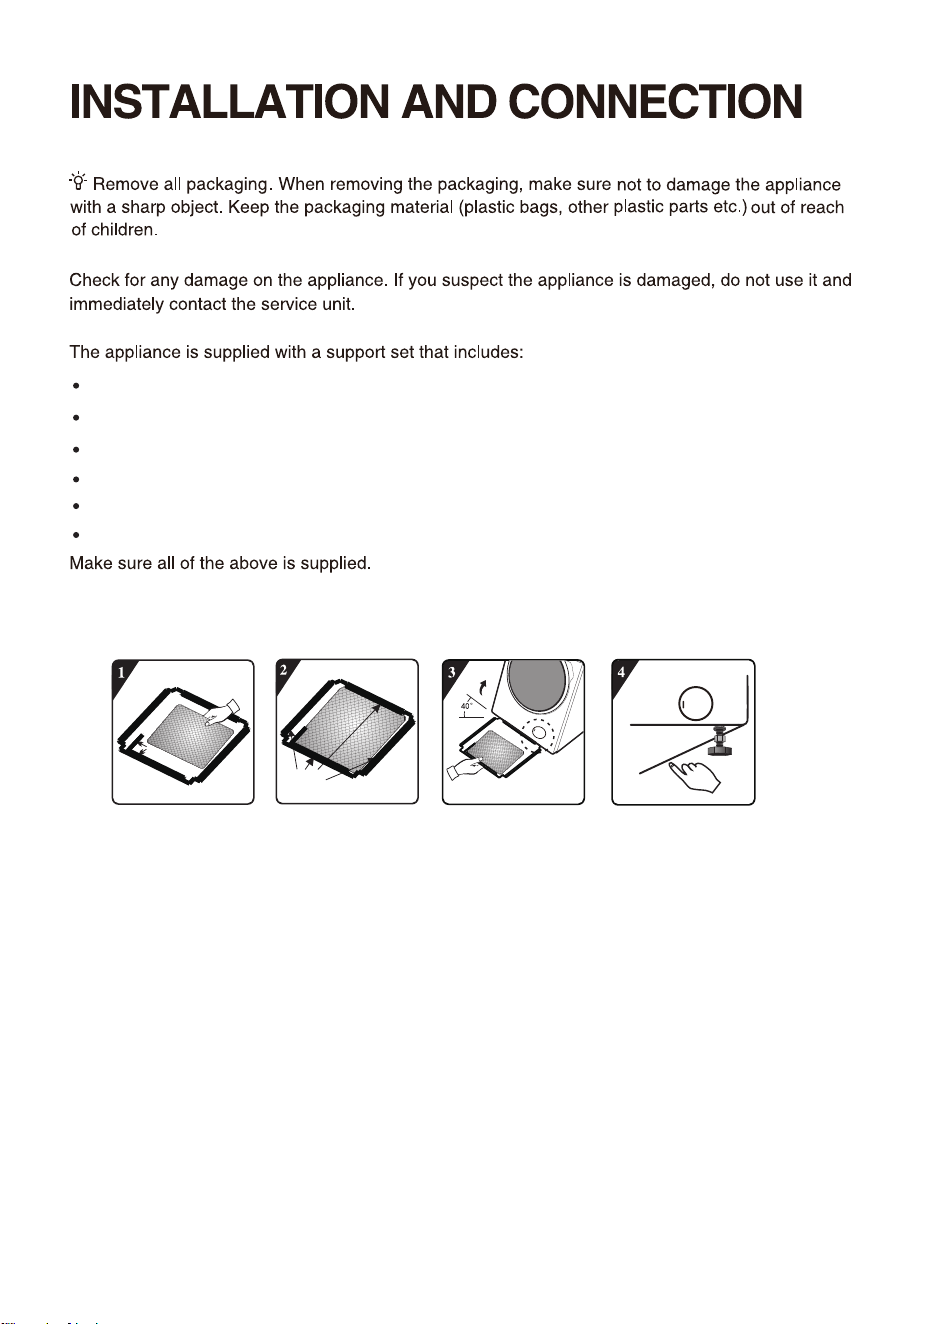
HOW TO INSTALL THE NOISE REDUCTION BOARD
3. Incline the machine to an angle of 40° and
let the side with right-angle notch face
towards front of the washing machine, as
shown in the figure. Insert the side with
oblique-angle notch between two foot
screws at back of the washing machine
completely in place. Then, install the noise
reduction board and ensure that it contacts
with bottom of the washing machine closely.
1.
Before installing the noise reduction board,
align and paste the acoustic absorption wool
with and along the right-angle impression on
the noise reduction board (this procedure is
unnecessary for some of the models without
acoustic absorption wool).
2. Remove surface paper on double sided
tape at four sides of the bottom plate.
4. Press the double sided tape on four sides
manually to secure the noise reduction board
to the machine body firmly.
Right-angle impression
Pump
Double sided tape
A power cord clip
is provided here,
which should also
be removed.
HSPVOE
(SPVOE

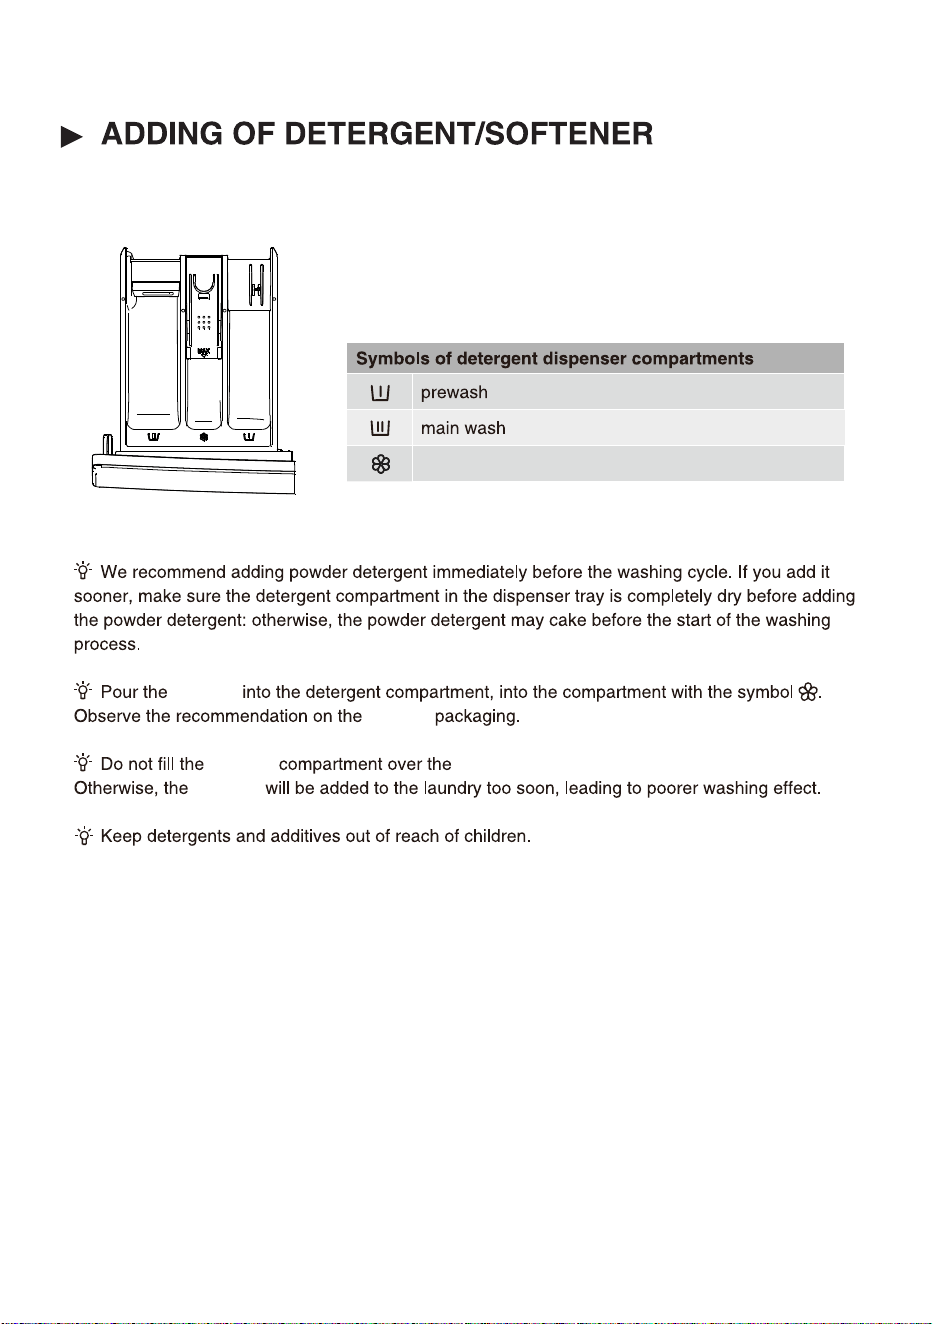
softener
softener
softener
softener
softener
Max indicated level.
5
QSFTTUIFCVUUPO108&3
26
PRE WASH
o
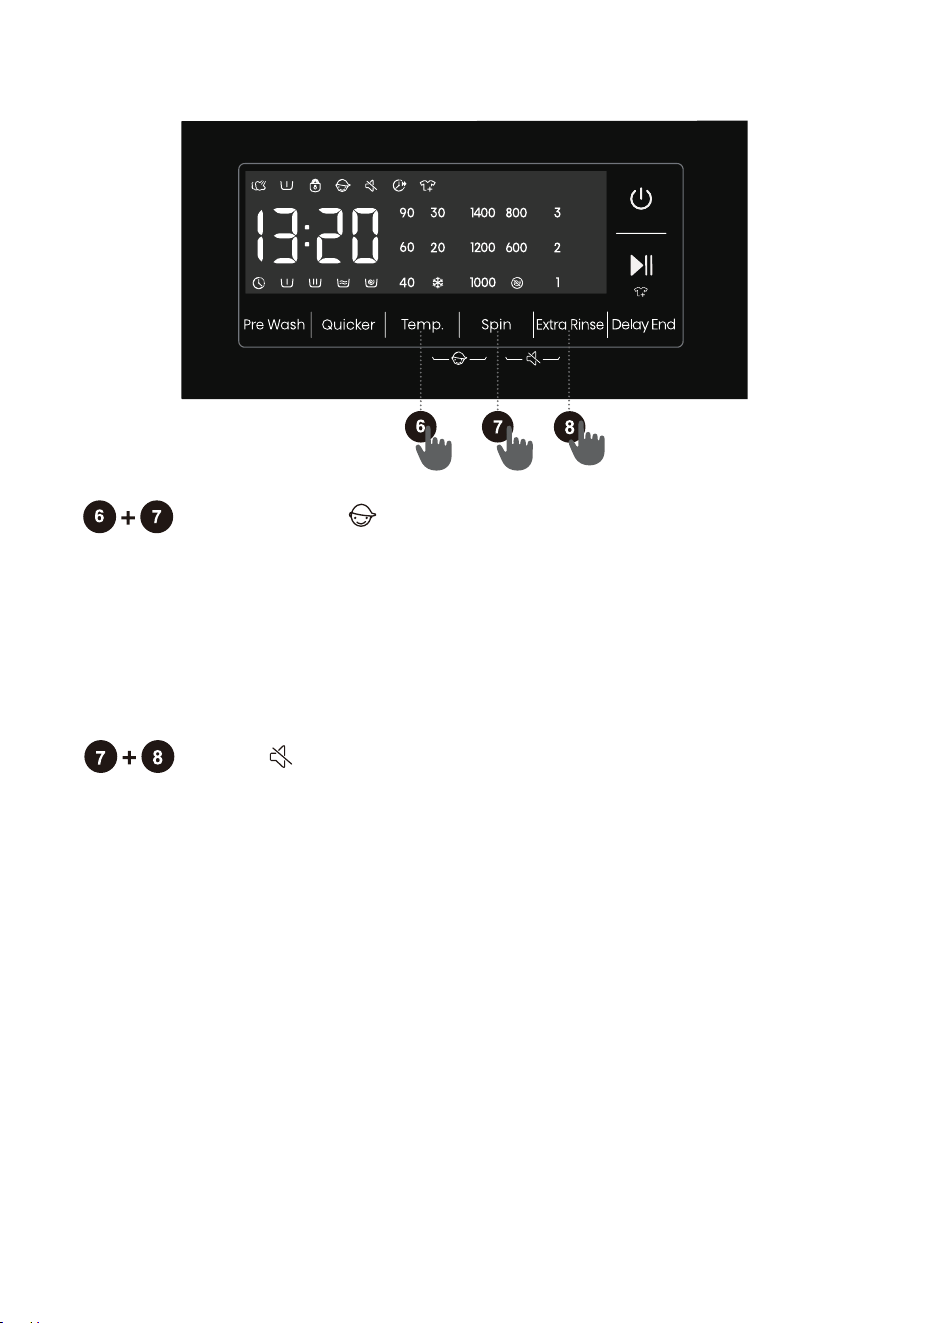
Press these two keys at the
same time to switch off or
restore the acoustic signals.
Press to add a Pre wash
program before the Main
Wash stage.
Press to shorten the
program time.
EXTRA RINSE
Press to change the rinse
count for current cycle.
27
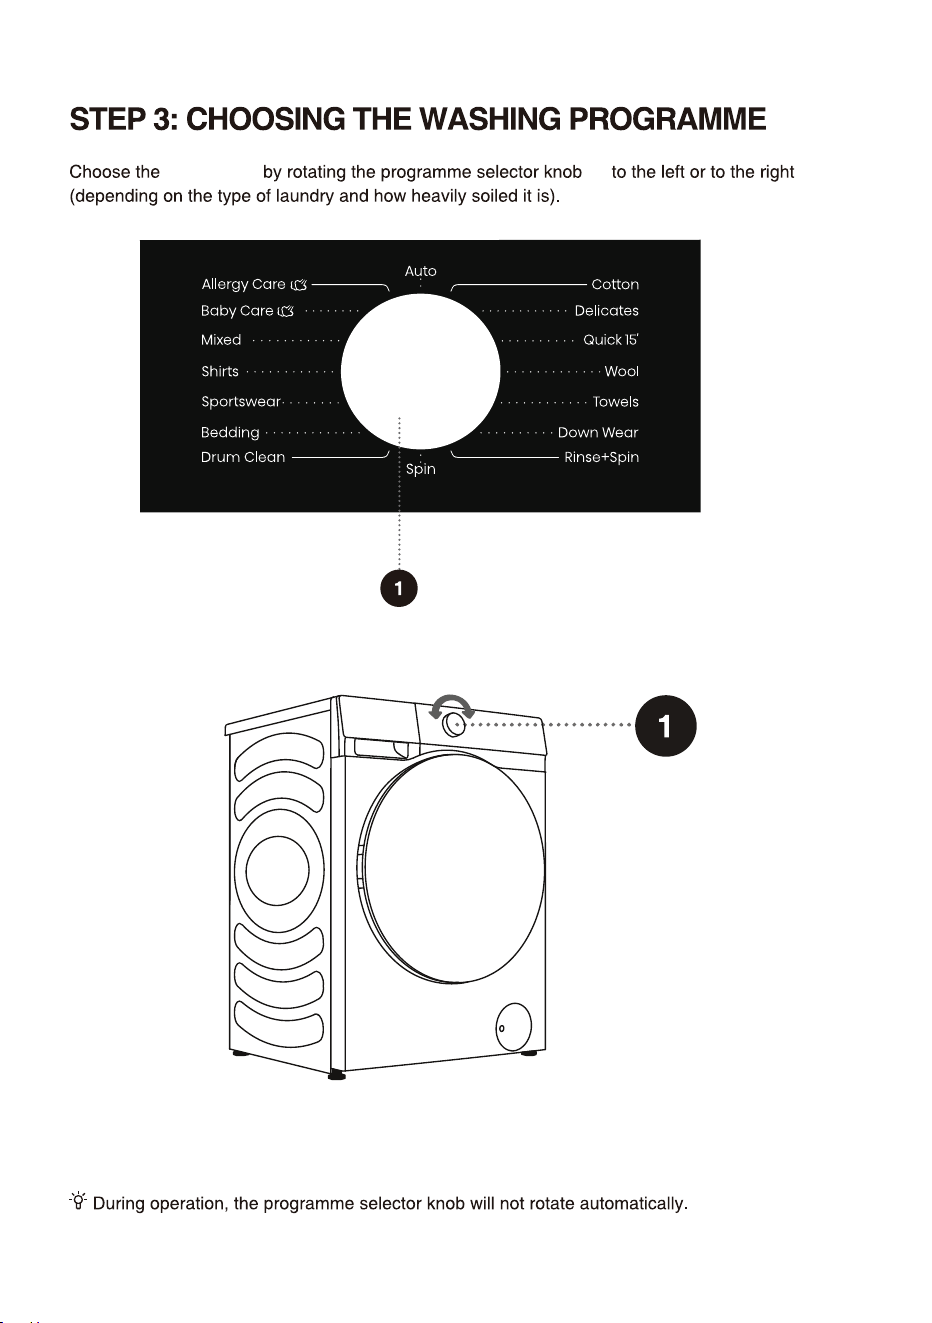
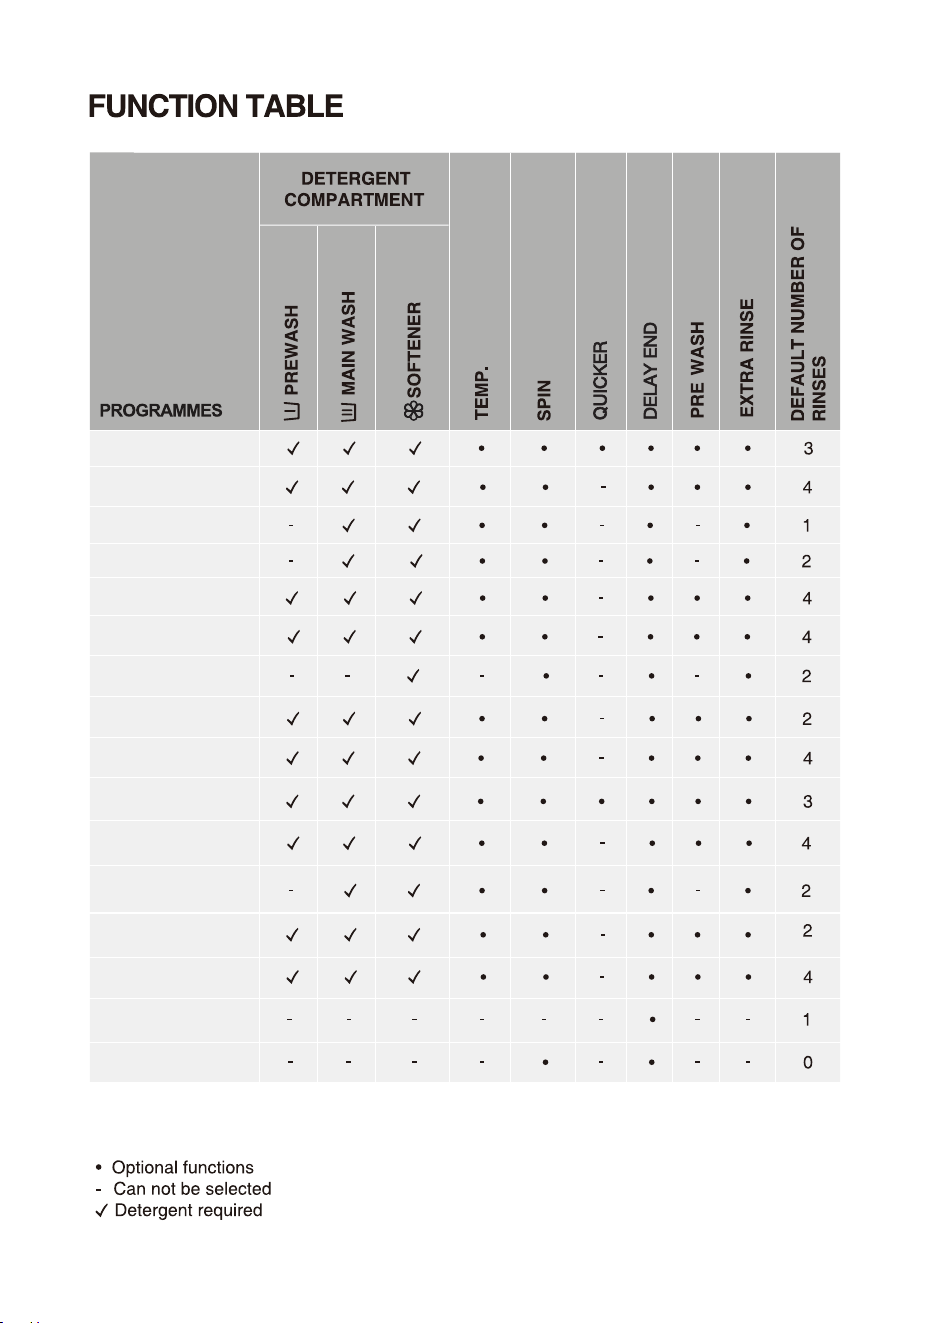
programme
See programme table.
(1)
28
5kg
kg
2kg
kg
kg
1 00
2kg 600
1kg 800
1 00
1 00
1 00
1 00
Delicates
Down Wear
Towels
1 00
2kg
1 00
2kg
1 00
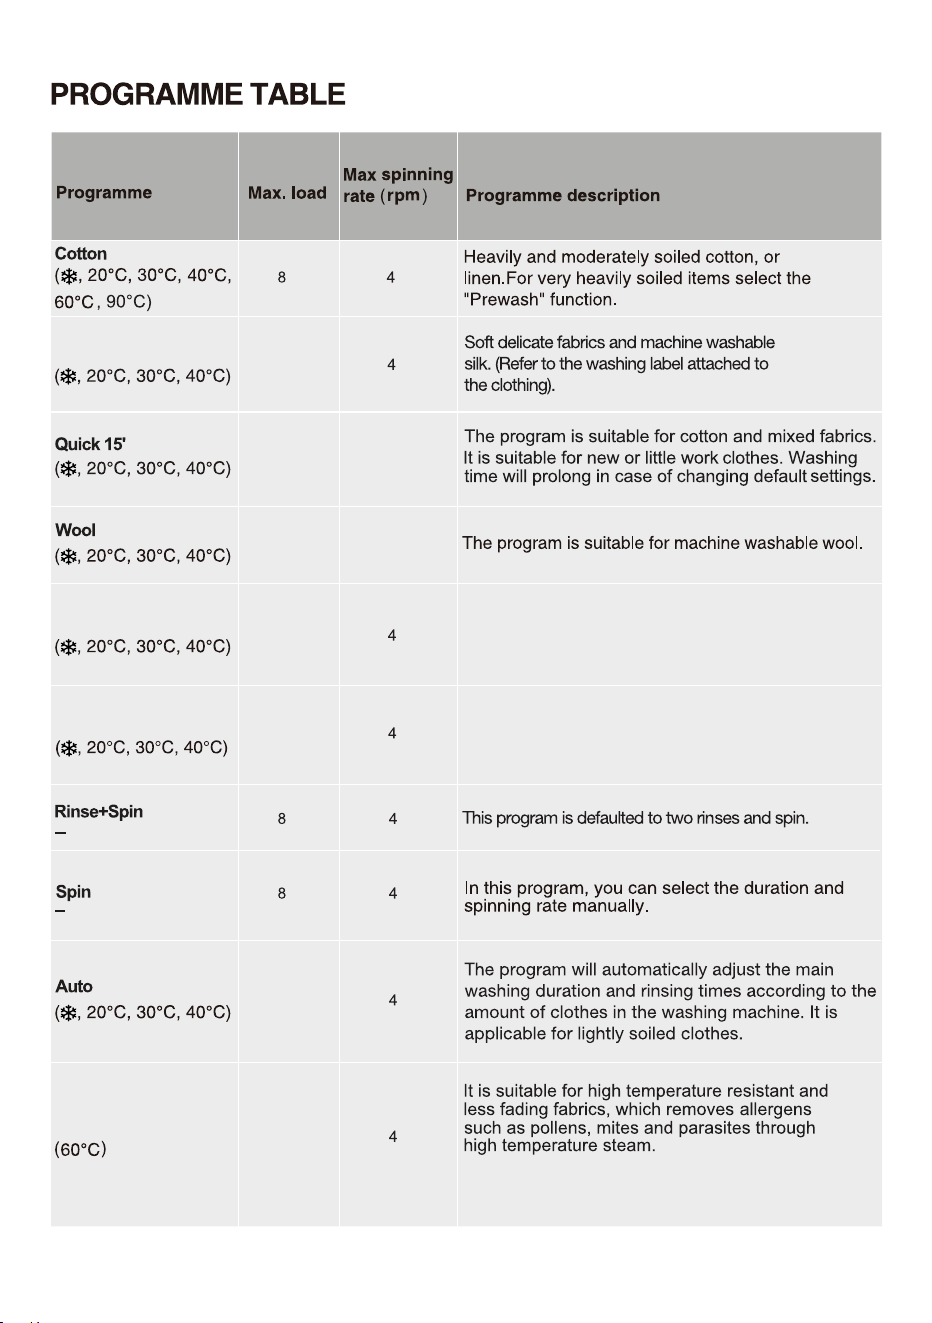
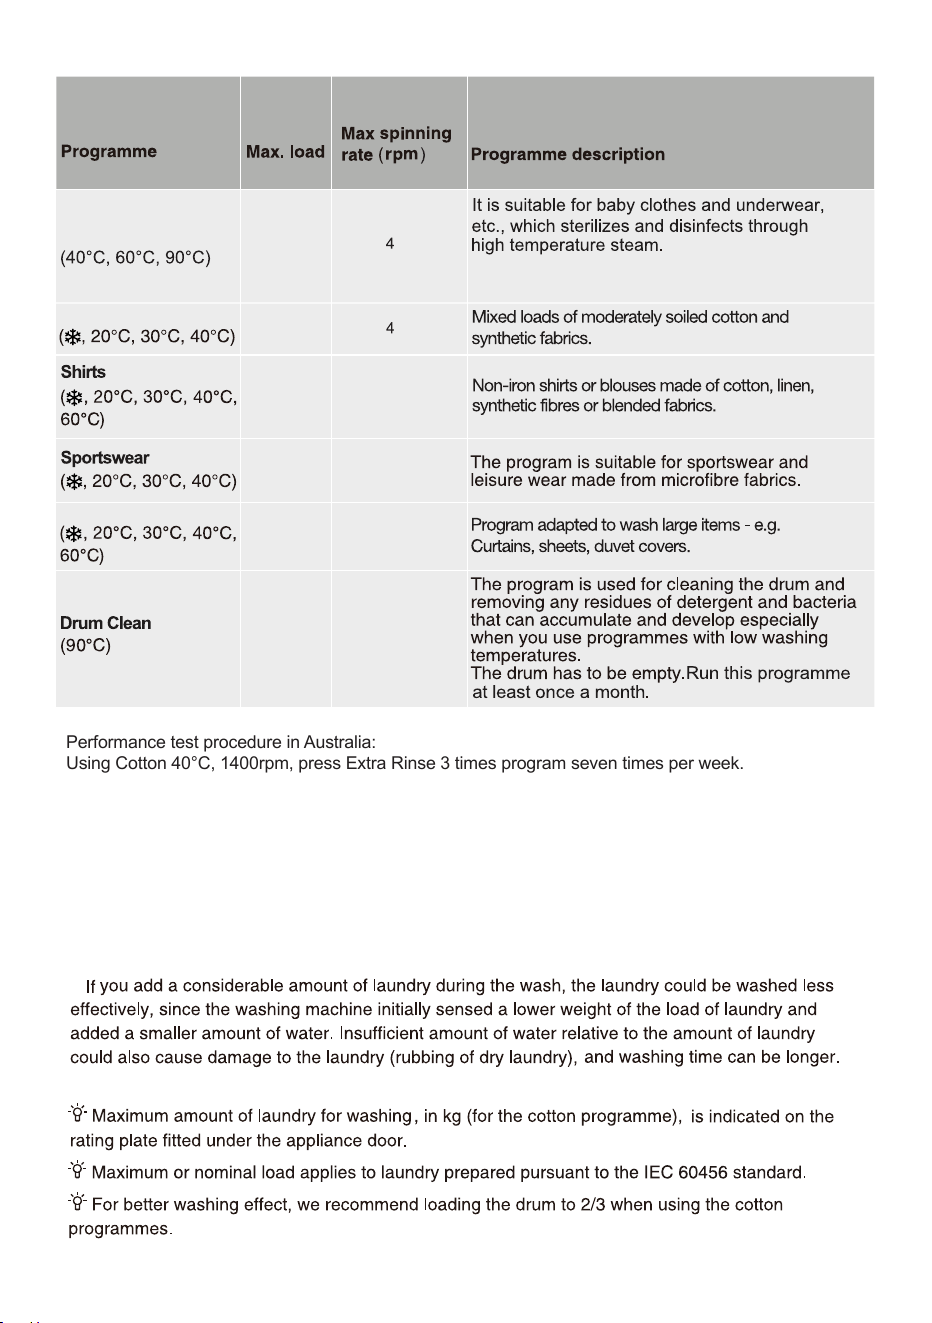
For low level of soil cotton items such as towels.
This program come with the steam function by
default and it cannot be deactivated.
Allergy Care
This program is suitable for down wear.
2kg
29
Mixed
Bedding
1000
8002kg
3kg
800-
1 002kg
1400
2kg
1 004kg
This program come with the steam function by
default and it cannot be deactivated.
Baby Care
Performance test procedure in Australia:
Using Cotton 40°C, 1400rpm, press Extra Rinse 3 times program seven times per week.
/05&
8BUFS5FNQFSBUVSF4FMFDUUIFBQQSPQSJBUFXBUFSUFNQFSBUVSFGPSDIPTFOXBTIQSPHSBNNF"MXBZT
GPMMPXHBSNFOUNBOVGBDUVSFShTDBSFMBCFMPSJOTUSVDUJPOTXIFOXBTIJOHUPBWPJEEBNBHFUPDMPUIFT
"DUVBMXBUFSUFNQFSBUVSFNBZEJG
GFSGSPNUIFEFDMBSFEDZDMFUFNQFSBUVS
F
5IF
washing effec
t
EFQFOEPOXBUFSQSFTTVSFXBUFSIBSEOFTTXBUFSJOMFU
UFNQFSBUVSFSPPNUFNQFSBUVSF
UZQFBOEBNPVOUPGMPBEEFHSFFPGTPJMJOHVUJMJ[
FEEFUFSHFOUGMVDUVBUJPOTJOUIFNBJOFMFDUSJDUZTVQQMZBOE
DIPTFOBEEJUJPOBMPQUJPOT
/FUVSBMOPOTVETJOHEFUFSHFOUJTSFDPNNFOEFE
30
31
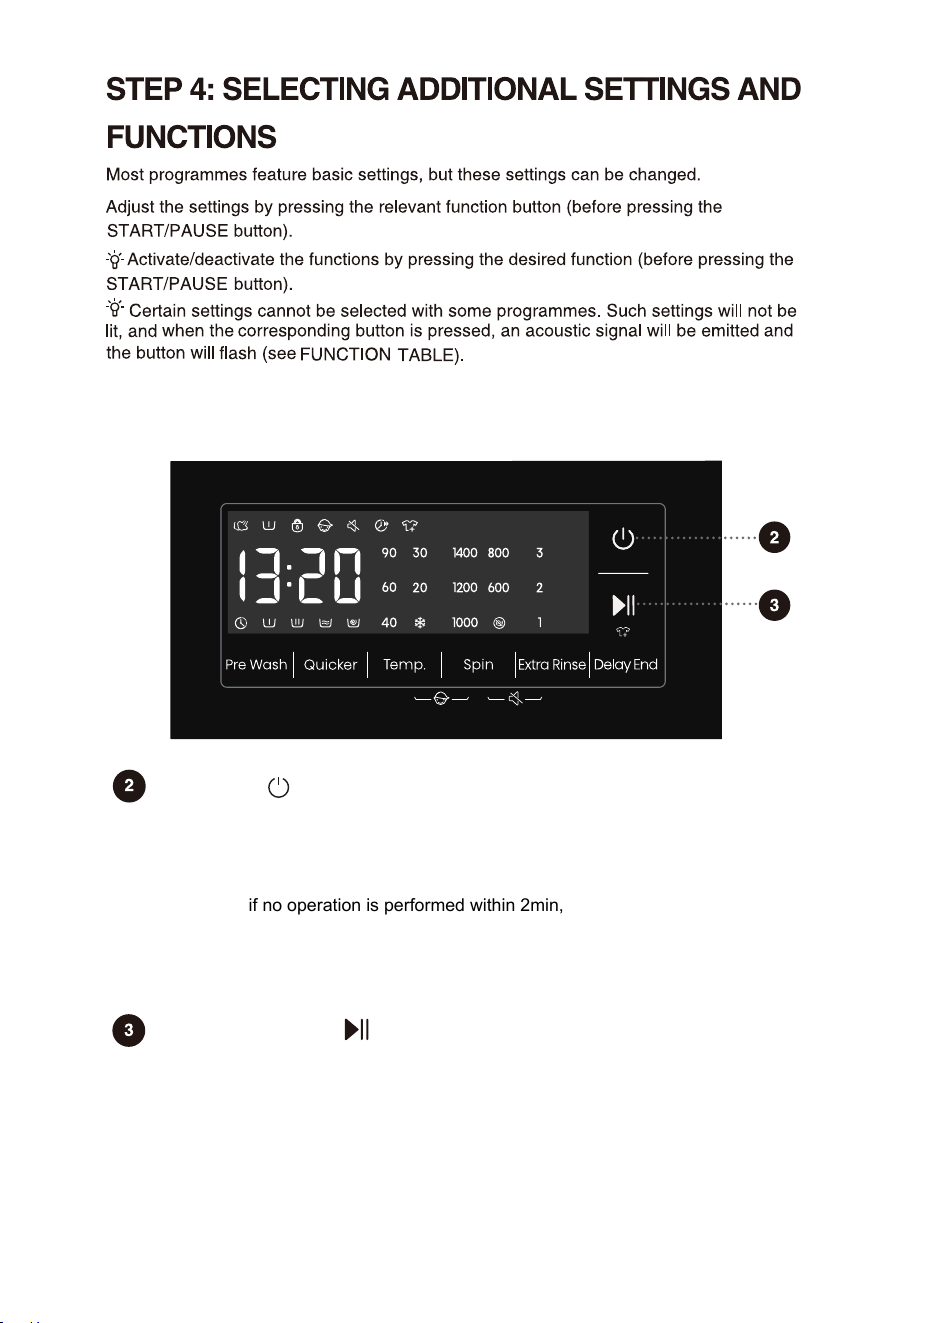
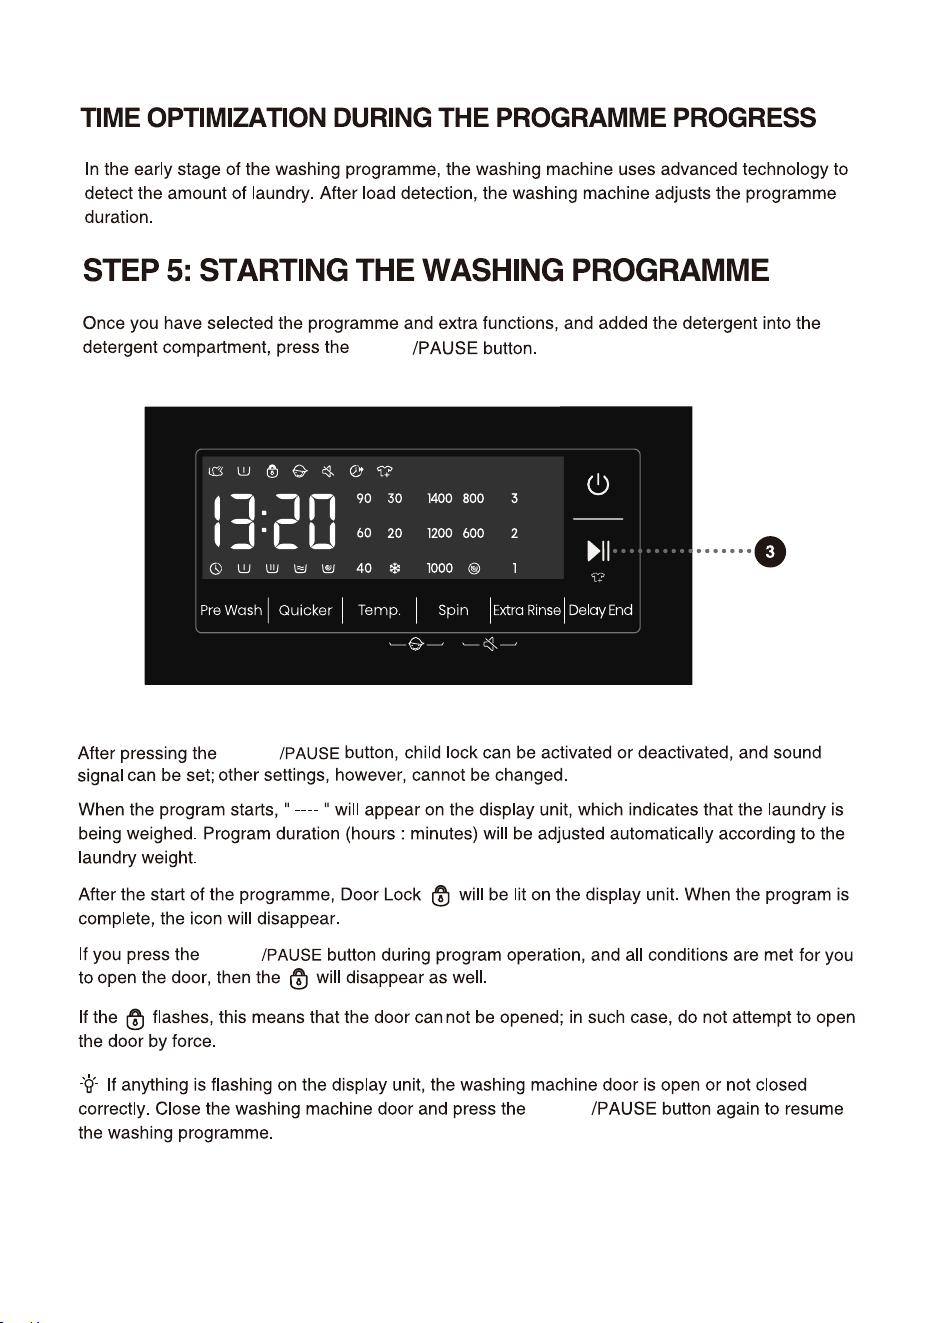
Start/Pause
For starting a program, or suspending a running program.
If the machine door isn't closed or the door lock is not engaged, the washing machine
will not start, and an alarm will be displayed on the screen.
After a program is started, or when the pause state is selected, the set functions and
parameters cannot be changed. Press and hold the Power button to turn off the
machine, and then restart it to reset the parameter.
For powering on/off the washing machine.
When the washing machine is in standby, or after the screen displays the program
end interface, press and hold the Power key to enter the power-off state.
In standby mode, or in the program end interface or Wash retry reminder
interface, if no operation is performed within 2min, the washing machine will shut
down automatically.
In power-off state, all displays and outputs will be off, and remote startup is not
supported.
Power
The additional settings and functions can only be set in the standby mode of the applicable
program, that is, before the program starts running, and cannot be selected after the
program runs.
32
When this function is selected,before the prewash is complete, the prewash flow
indicator " " blinks. After the prewash is complete, the prewash flow indicator
is off.
When this function is selected, the pre-wash function indicator " " is always
on from the beginning to the end of the program.
Press to Increase the "Pre Wash" function, press twice to cancel the function,
and cycle in sequence.
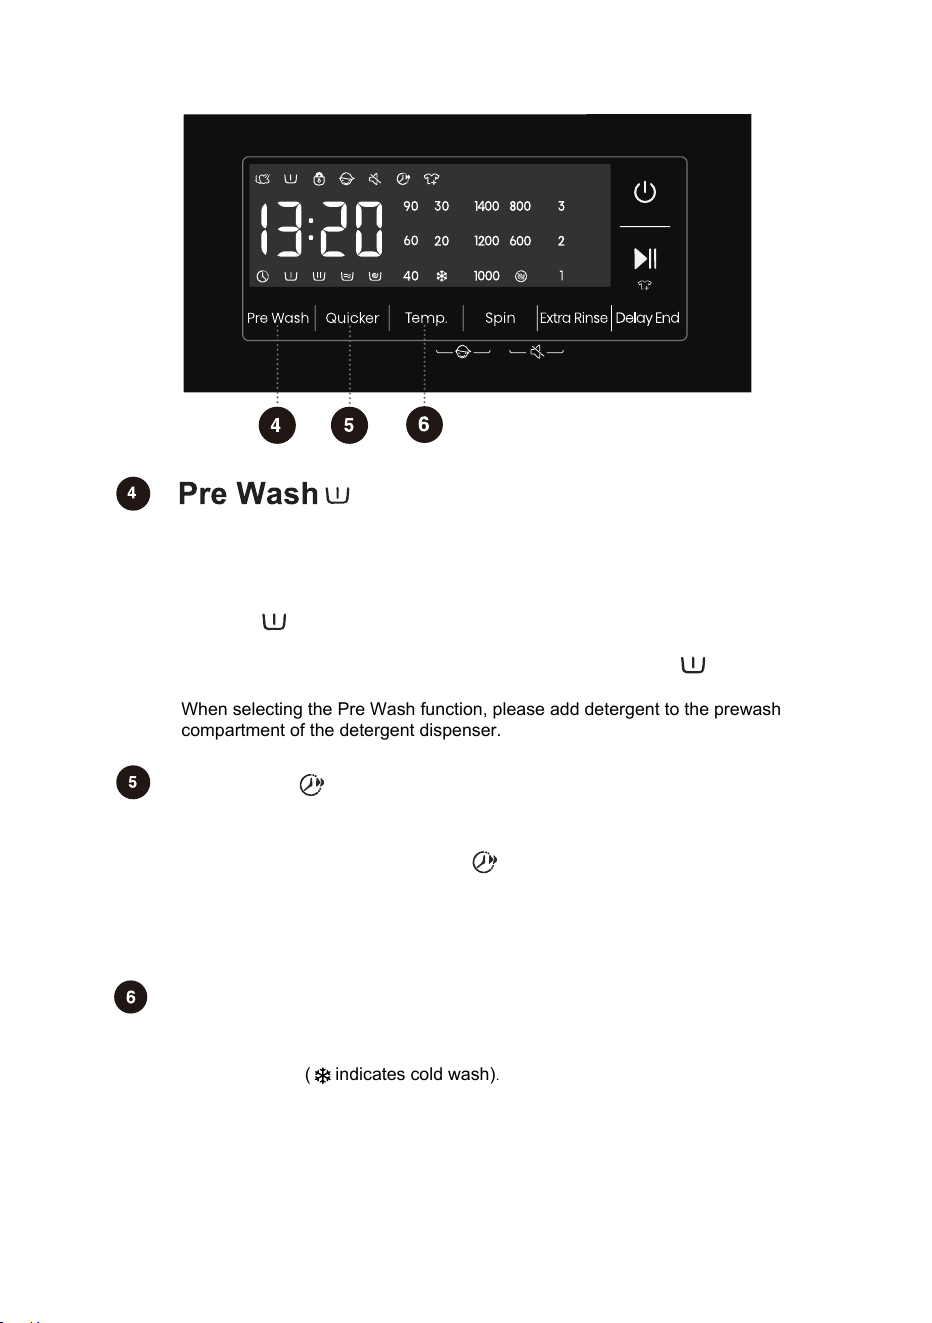
Select this function to add a Pre Wash program before the Main Wash stage.
Quicker
Temp.
Changing the temperature for the selected program.
Each program has a preset temperature that can be changed by pressing the
position TEMP. ( indicates cold wash).
The temperature is displayed on the display unit above the button.
After pressing this function key, the program time will be shortened by setting, and
press it again, the program time will be increased back to the original setting. After
the program is started, the indicator " " is always on.
When this function is selected, the main wash time or the number of rinsing times
will be reduced.
Weighing will be canceled after triggering this function, weighing will be resumed
if the function is canceled.
When selecting the Pre W
ash function, please add detergent to the prewash
compartment of the detergent dispenser.
33
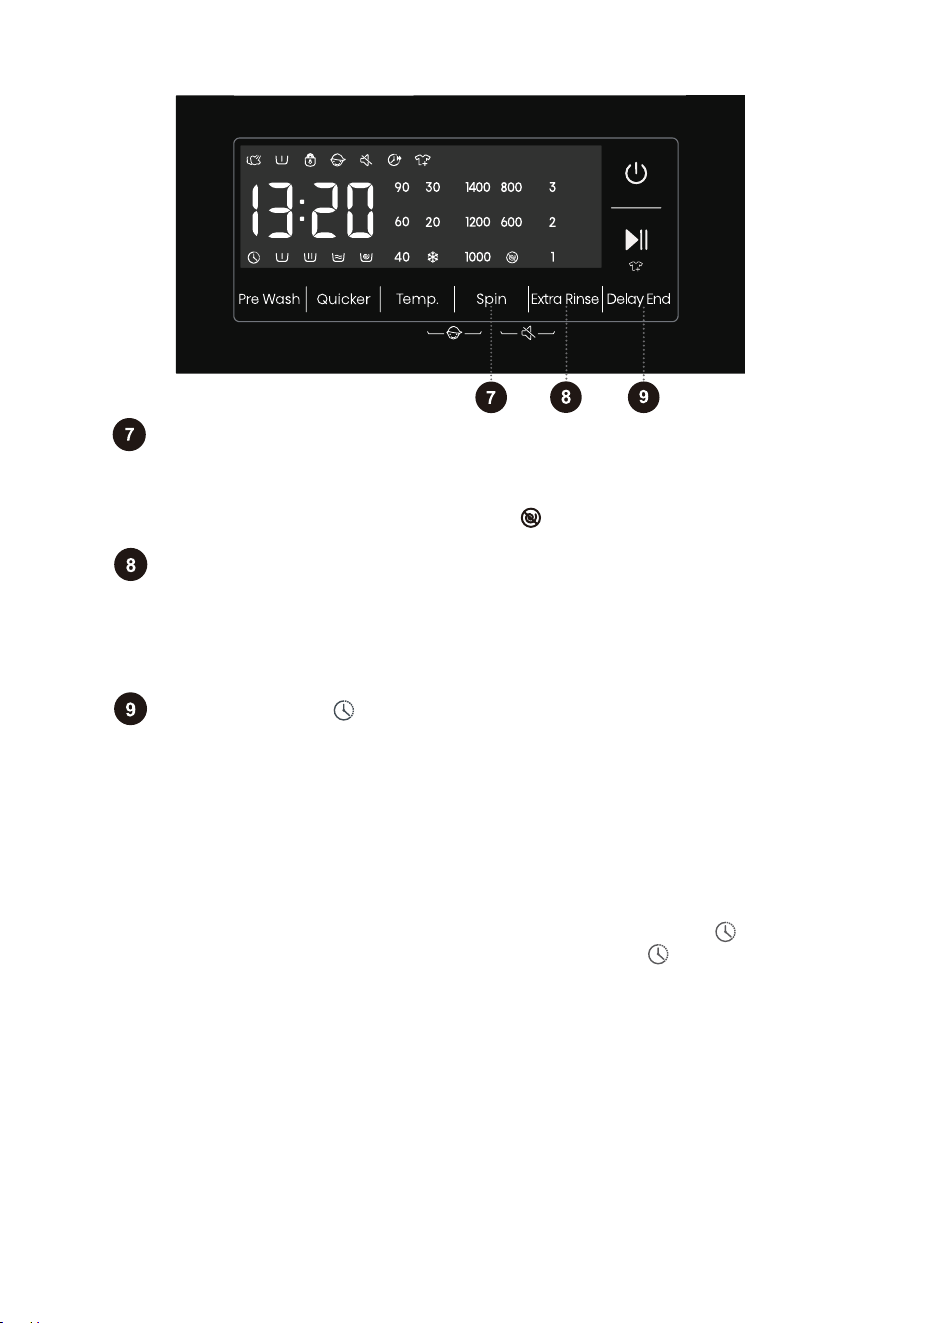
Extra Rinse
Spin
Use this to adjust the spinning rate. With preset or selected spinning rate,
the selected spinning rate will be lit on the display unit.
If you select draining without spinning, the " " will appear on the display unit.
Delay End
In the standby state, after Extra Rinse is selected, the number of Extra Rinse
is shown,which may be used a maximum of three times. In addition, the
default rinsing times plus the number of Extra Rinse cannot exceed five times.
After the program is started, the indicator is always on.
If the Delay End function was chosen before starting a program, it can be
canceled by pressing any other function key. Once the program has started, you
need to press and hold the Power button to turn off and restart the machine to
cancel the Delay End function.
When the Delay End function is being selected (set), the Clock icon" "is always on;
When the Delay End programme is running, the Clock icon" "flashes.
Use this feature to schedule washing at a convenient time.
Press this key to set the Delay End time.This key is only valid in standby mode.
After the Delay End function is selected, each time the Delay End key is pressed,
the time increases by 1h. The maximum selectable time range is 24 hours.
The Delay End time is the end time, that is, it includes the washing time, so the
Delay End time must be greater than the washing time.Based on your settings, the
start time of the cycle will be determined by the machine's internal logic.Press to
choose a preset unit of hours.
34
Child Lock
This is a safety feature. To activate it, simultaneously press the positions
Temp. and Spin, and hold them for at least 2 seconds, Child Lock icon
will light up, and then Child Lock is set up.Repeat the same operation,
the Child Lock will be released.
When the Child Lock is set, all function buttons will be shielded except
the power button.
After completing program, child lock will automatically unlock.
Mute
Use this to switch off or restore the acoustic signals.
When the machine is in the state of holding, pause or operation, press
"Spin+Extra Rinse" buttons for 2 seconds, The display will show mute
function icon. All the buzzing will be turned off except the alarms.
When the machine is in the mute state, press "Spin+Extra Rinse"
buttons for 2 seconds until mute function icon light off. All the buzzing
will be activated.
35
Delicates
Quick 15'
Cotton
Allergy Care
Baby Care
Sportswear
Mixed
Spin
Drum Clean
Rinse+Spin
Bedding
Shirts
Auto
Down Wear
Towels
Wool
36
" "
" "
" "
START
START
START
START
37
38
PAUSE
To stop and cancel a washing programme,
temporarily paused
I
When the program is suspended in spin state and then restarted, it will run again from the initial
state of spin.
2
CHANGE OF WASHING PROGRAMME
To stop and cancel a washing programme,
2
To select a new programme, choose the programme by rotating the knob and select extra functions.
Press the start/pause button, without adding the detergent again.
START
During a pause, the time on the display will blink. If the "Add Clothes" icon " " lights up, it
indicates that the door can be opened. The door lock will automatically release, allowing you
to add clothes. If the "Add Clothes" icon isn't lit, pressing pause won't unlock the door, and it
cannot be opened.
After adding clothes midway, press start/pause button and the washing program will resume
running.
39
.
0
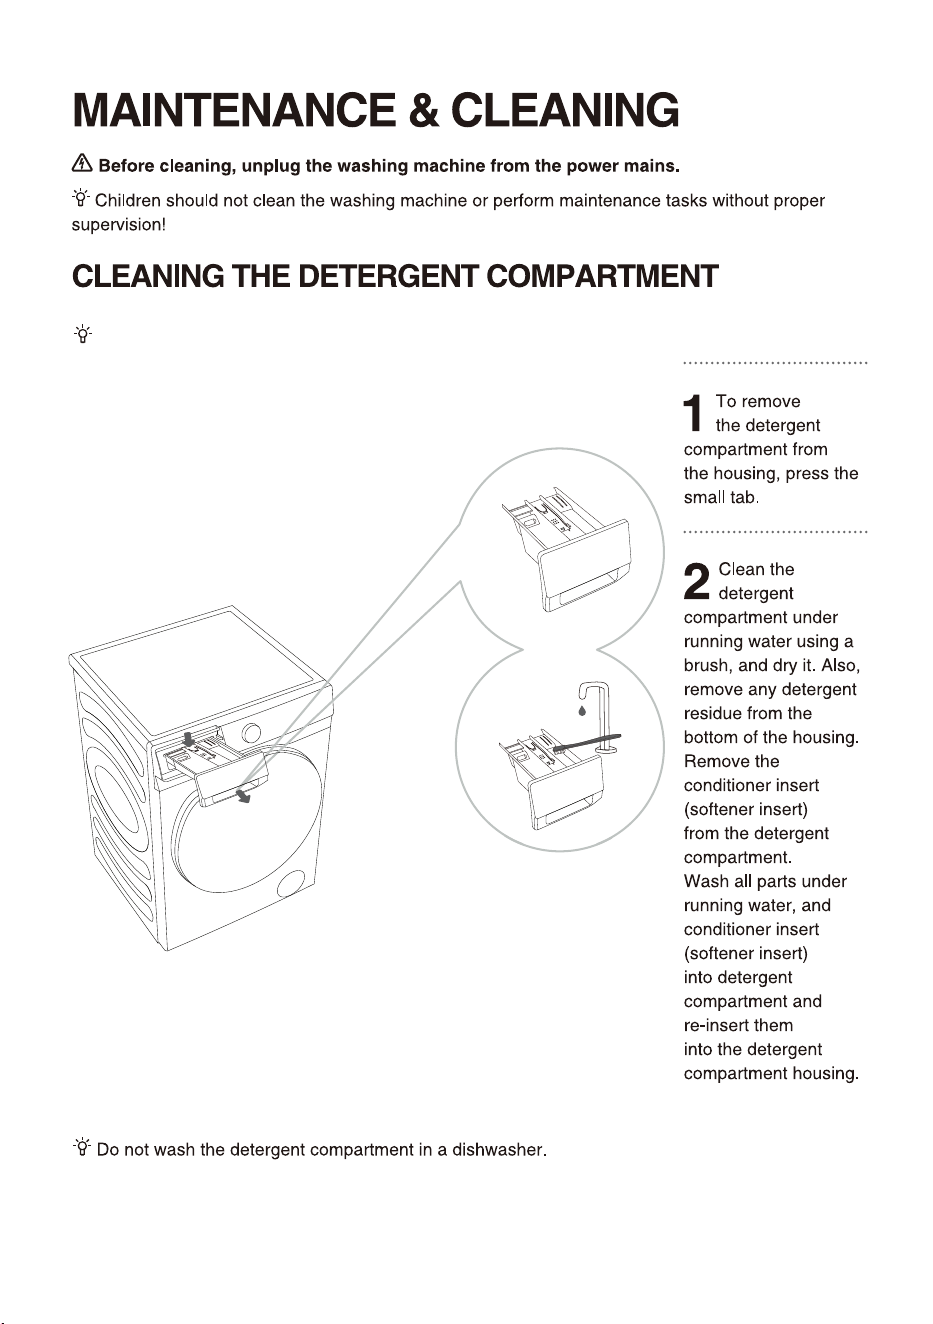
Clean the detergent compartment regularly.
1
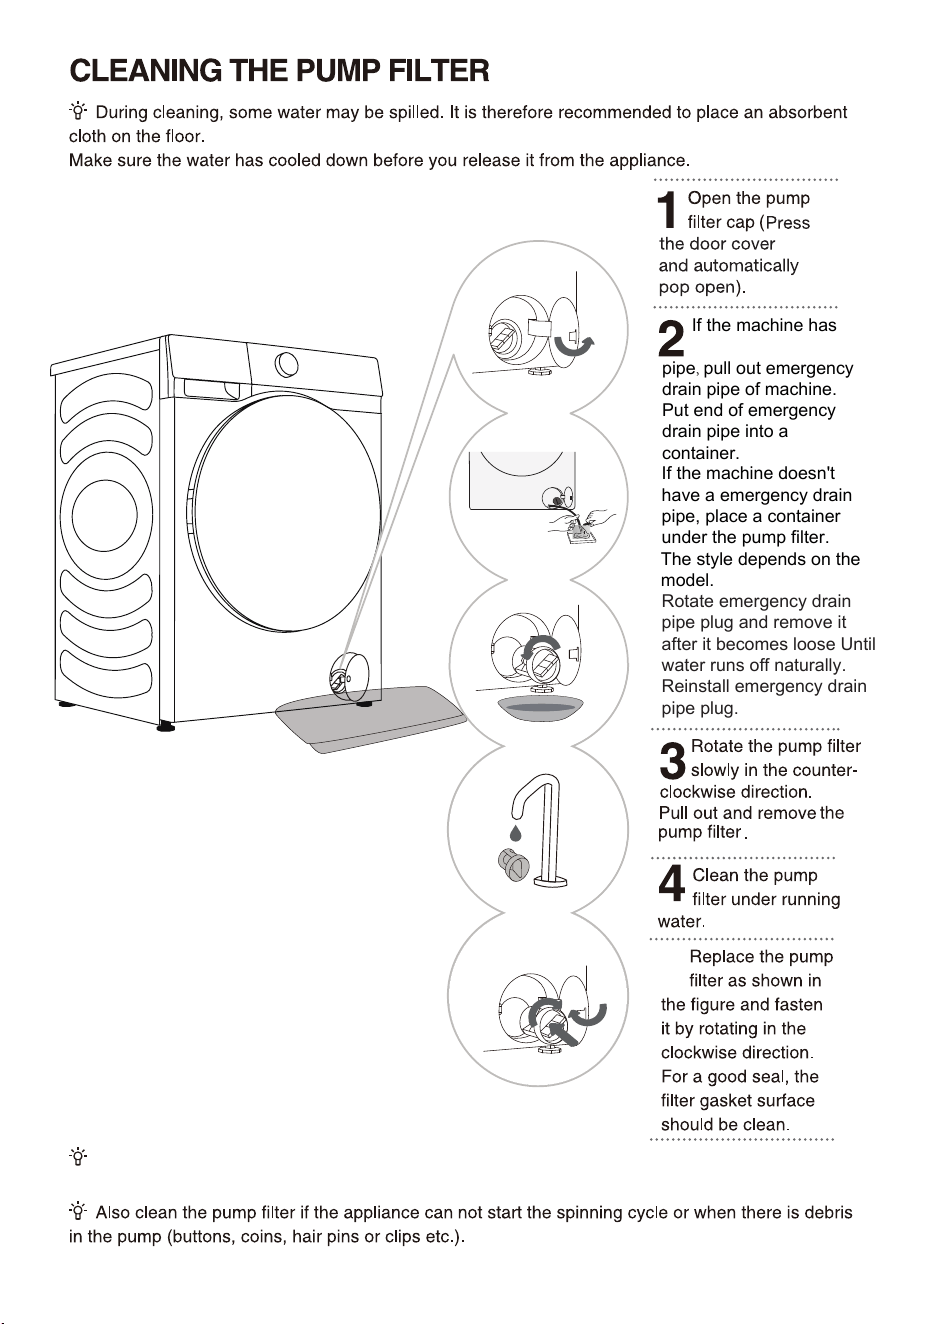
2
a emergency drain
pipe, pull out emergency
drain pipe of machine.
Put end of emergency
drain pipe into a
container.
If the machine doesn't
have a emergency drain
pipe, place a container
under the pump filter.
The style depends on the
model.
Rotate emergency drain
pipe plug and remove it
after it becomes loose Until
water runs off naturally.
Reinstall emergency drain
pipe plug.
5
The pump filter must be timely cleaned, especially after washing very fleecy, woolly, or very old
laundry.
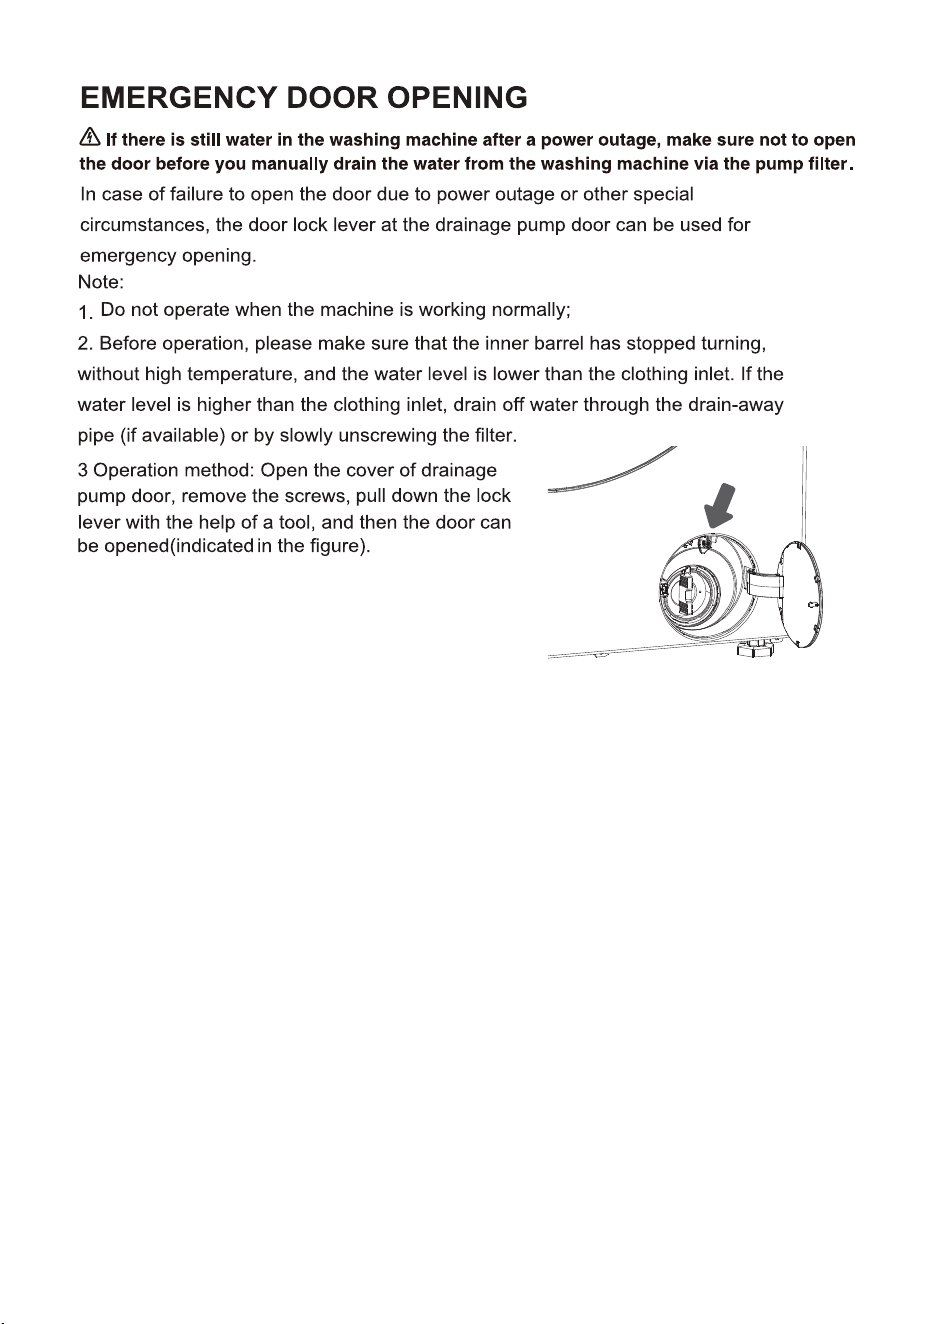
If the machine has
3
4
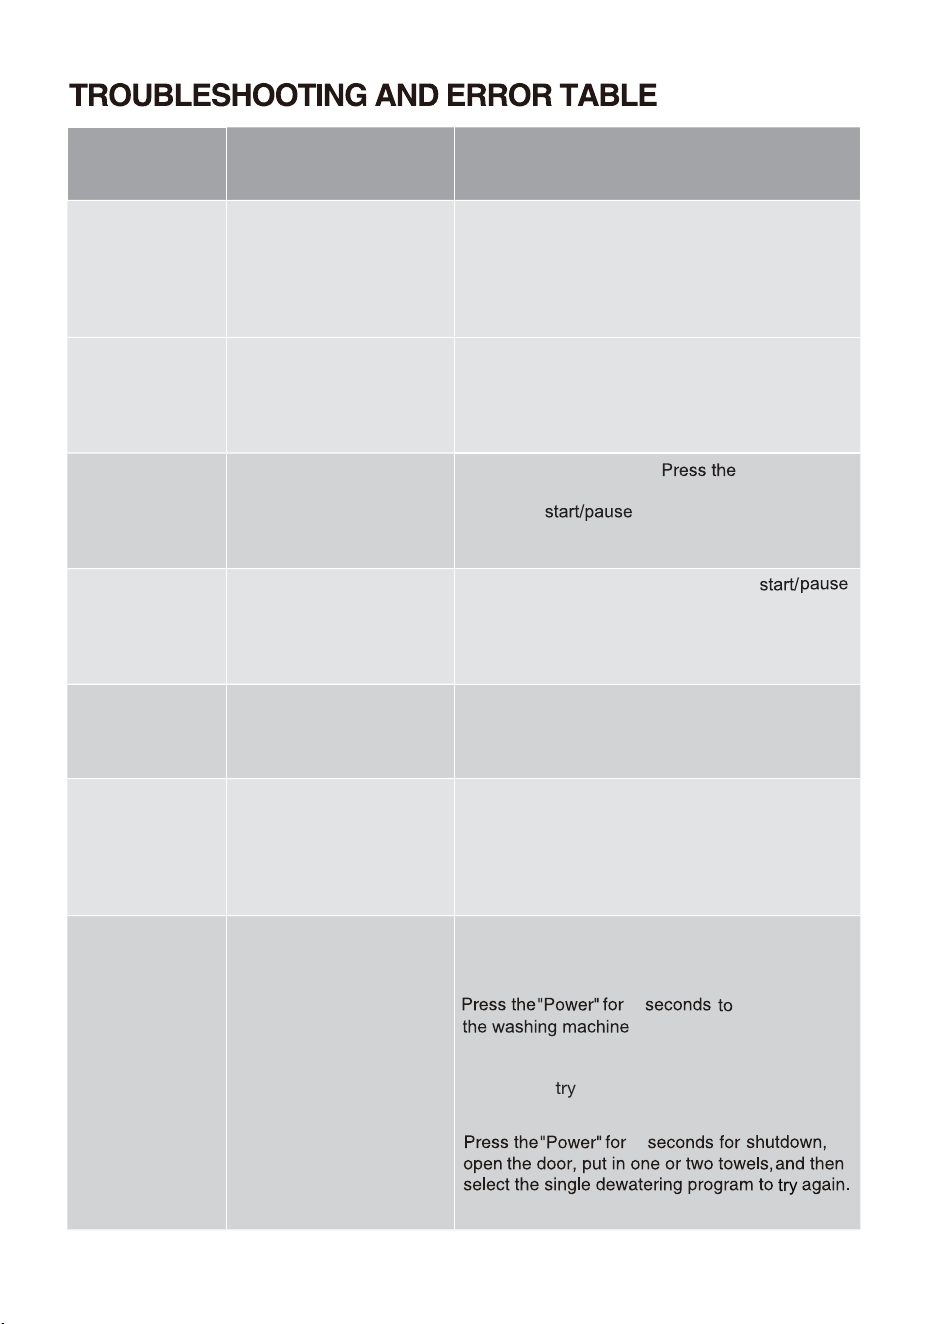
Problem/
error
Indication on the display
unit and problem
description
What to do?
F01
Water inflow fault
$IFDLUIFGPMMPXJOH
t*TUIFXBUFSTVQQMZUBQPQFOBOEJTUIF
QSFTTVSFUPPMPX
t*TUIFXBUFSTVQQMZIPTFQJODIFE
t*TUIFGJMUFSPOUIFXBUFSTVQQMZIPTFDMPHHFE
t*TUIFIPTFGSP[FO
F03
Drainage fault
$IFDLUIFGPMMPXJOH
t*TUIFIPTFQJODIFEEPFTUIFXBUFSGMP
UISPVHIJU
t*TUIFGJMUFSPOUIFESBJOIPTFDMPHHFE
t*TUIFIPTFGSP[FO
F04/F05/F06/
F07/F23
Electronic module fault
4XJUDIPGGUIFBQQMJBODF
1SFTTUIF"
"CVUUPOBHBJO*GUIF error
SFPDDVSTDBMMBTFSWJDFUFDIOJDJBO
F24
Water level reaches
overflow level
4UPQUIFQSPHSBNNFCZQSFTTJOHUIF" "
CVUUPO3FTUBSUUIFQSPHSBNNF
*GUIFBQQMJBODFDPOUJOVFTUPQVNQXBUFSJOUP
UIFUVCDMPTFUIFXBUFSUBQBOEDBMMBTFSWJDF
UFDIOJDJBO
F13
Error while locking the
door
%PPSJTDMPTFECVUJUDBOOPUCFMPDLFE
4XJUDIPGGUIFXBTIJOHNBDIJOF4XJUDIJUCBDL
POBOESFTUBSUUIFXBTIJOHQSPHSBNNF
*GUIFFSSPSSFPDDVSTDBMMBTFSWJDFUFDIOJDJBO
F14
Error while locking the
door
%PPSJTDMPTFECVUJUDBOOPUCFVOMPDLFE
5VSOPGGUIFBQQMJBODFUIFOUVSOJUCBDLPO*G
UIFFSSPSSFPDDVSTDBMMBTFSWJDFUFDIOJDJBO
Unb Unb Unbalance alarm
6OCBMBODFBMBSNTIBMMCFTPMWFECZUIFGPMMPXJOH
NFUIPET
-BVOESZXJOEJOH
TIVUEPXO
PQFOUIFEPPSTIBLFUIF
DMPUIFTBOEQVUUIFNCBDLJOUPUIFXBTIJOH
NBDIJOFUIFOTFMFDUUIFTJOHMFEFXBUFSJOH
QSPHSBNUPtSZBHBJO
5PPMJHIUXFJHIUFEMBVOESZ
5
for 2 seconds.
2
2
"Power"
try
46
Clothes Washing Machine
HWF
S7514S
7.5
kg
220-240V~ 50Hz 1800W IPX4
Made in China
SGS-220091-EA
APPROVAL NO.
Hisense Australia Pty Ltd.
E6101
%SVN$MFBO
47
48
49
0
Packaging
The symbol
disposing
disposal

物料号:-X0806****