
USER’S OPERATION MANUAL
English
EN
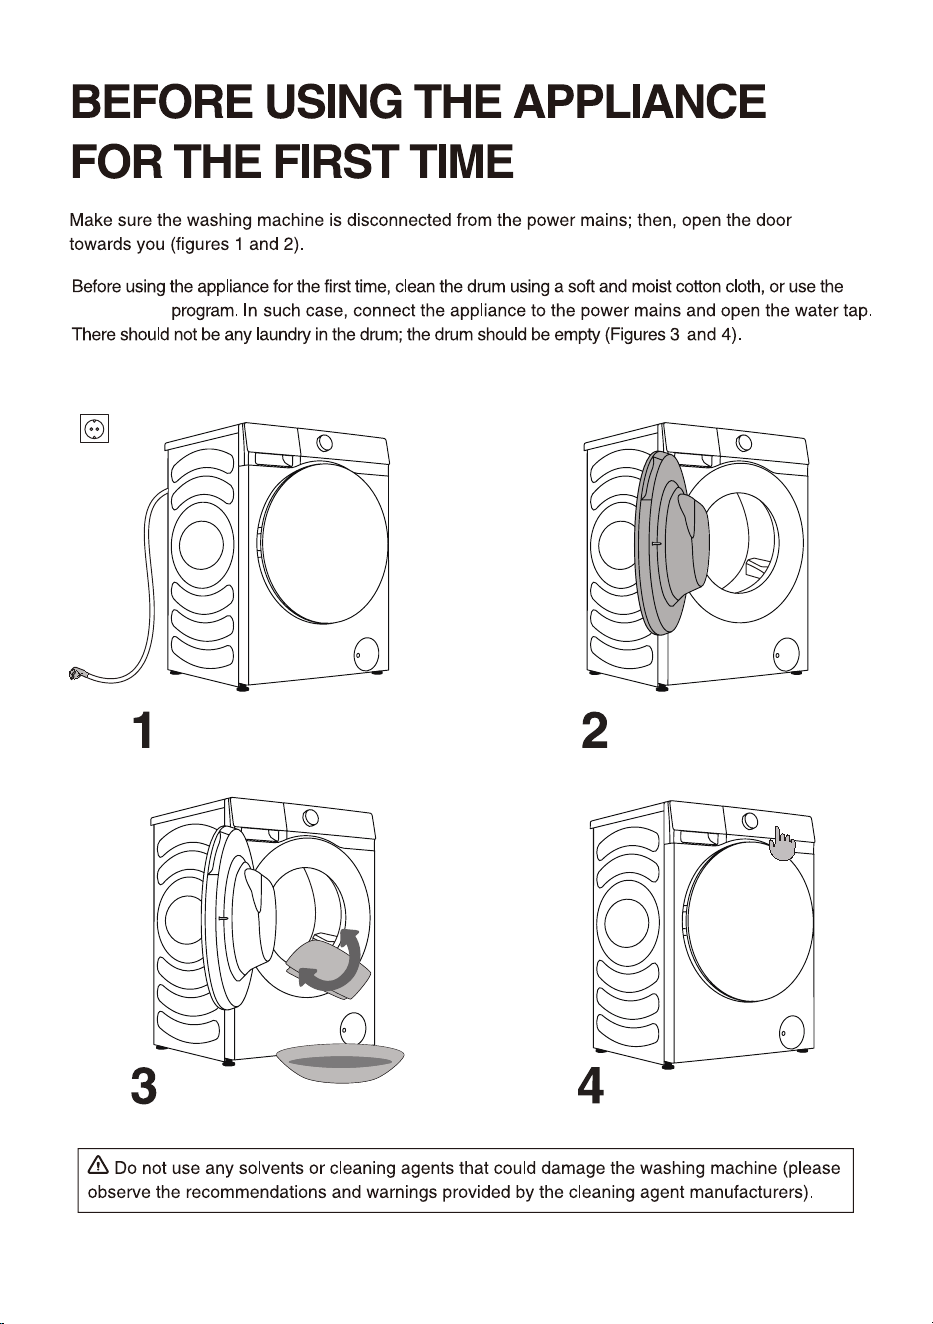
Before operating this unit, please read this manual
thoroughly, and retain for future reference.
HWF5S1214HWF5S1214*HWF5S12142
HWF5S1214*2
12
21
13
14
15
15
17
17
18
20
3
22
38
40
22
23
27
31
36
37
40
41
42
43
45
46
48
44
44
47
50
51
4
1 6
Wi-Fi connection
4
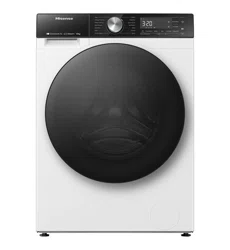
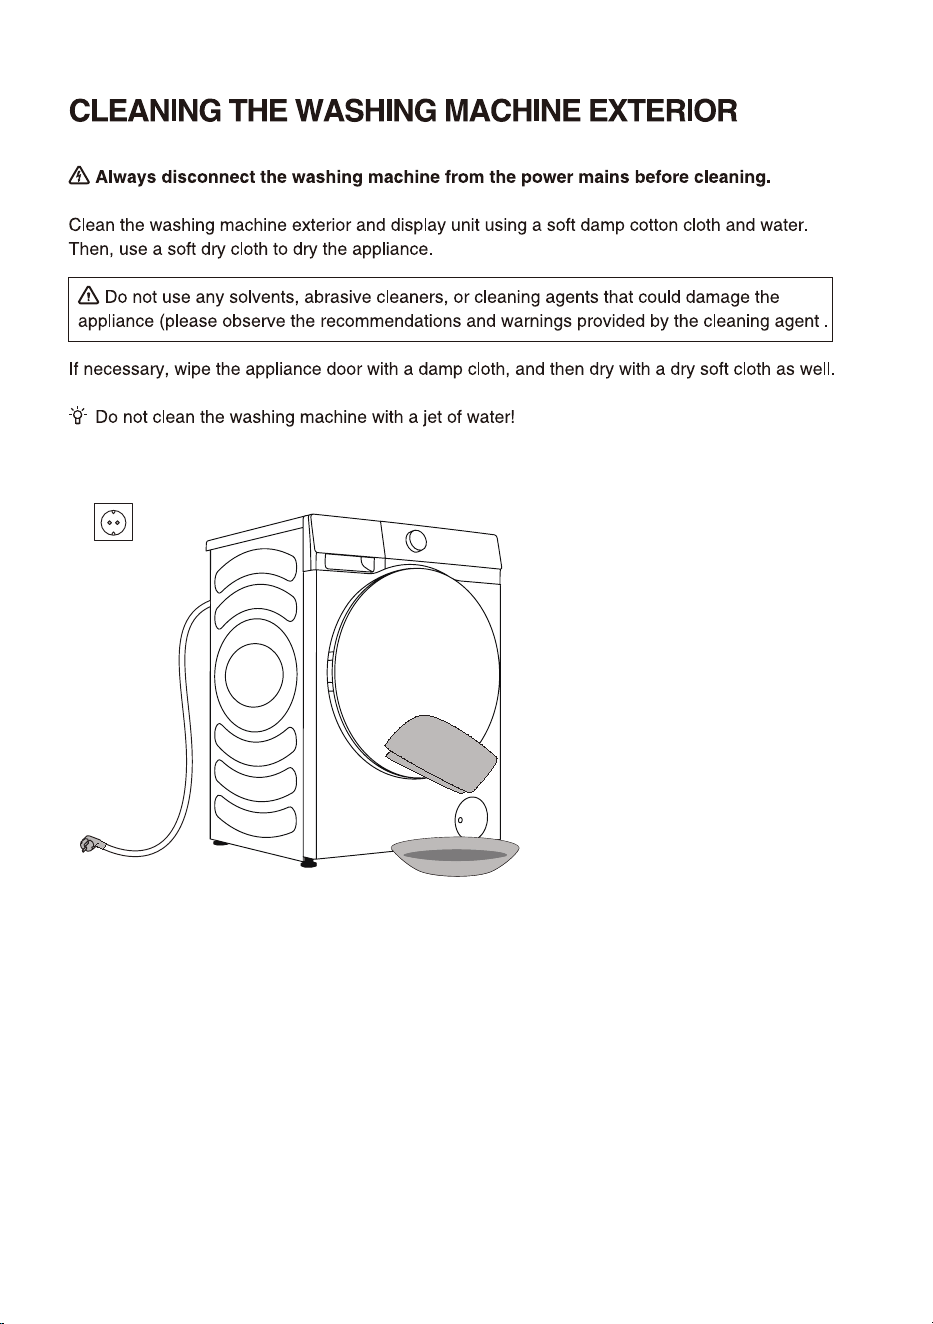
This appliance is intended to be used in household.
5
a damaged power
6
Drum clean
Drum clean
7
8
9
If the supply cord is damaged, it must be replaced by
the manufacturer, its service agent or similarly
qualified persons in order to avoid a hazard.
10
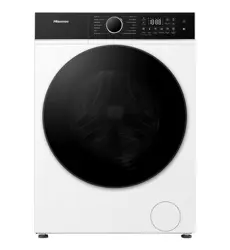
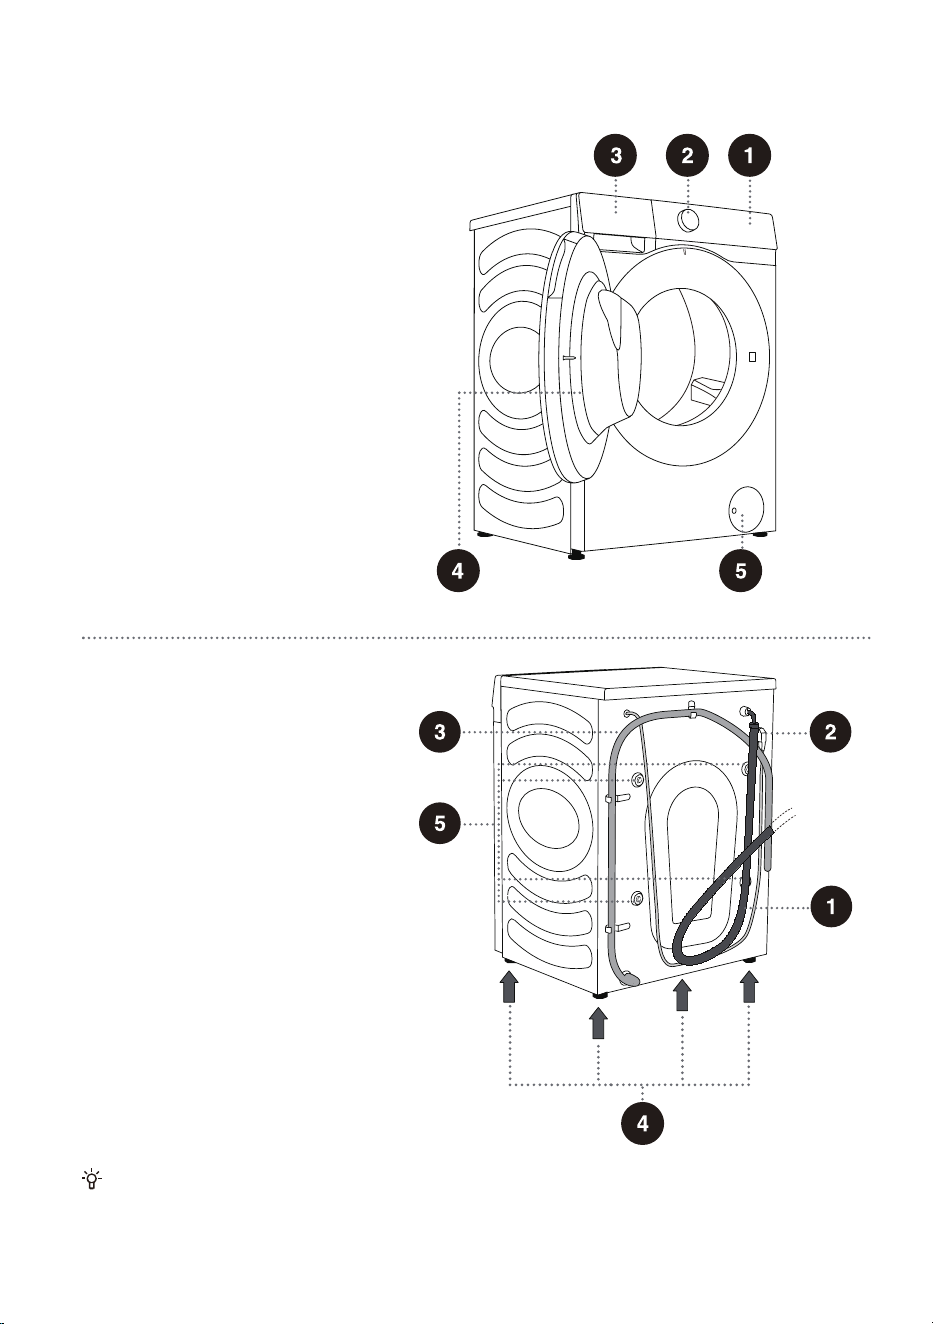
WASHING MACHINE DESCRIPTION
FRONT
1 Control unit
2 Programme selector knob
3 Detergent compartment
4 Door
5 Pump filter cover
BACK
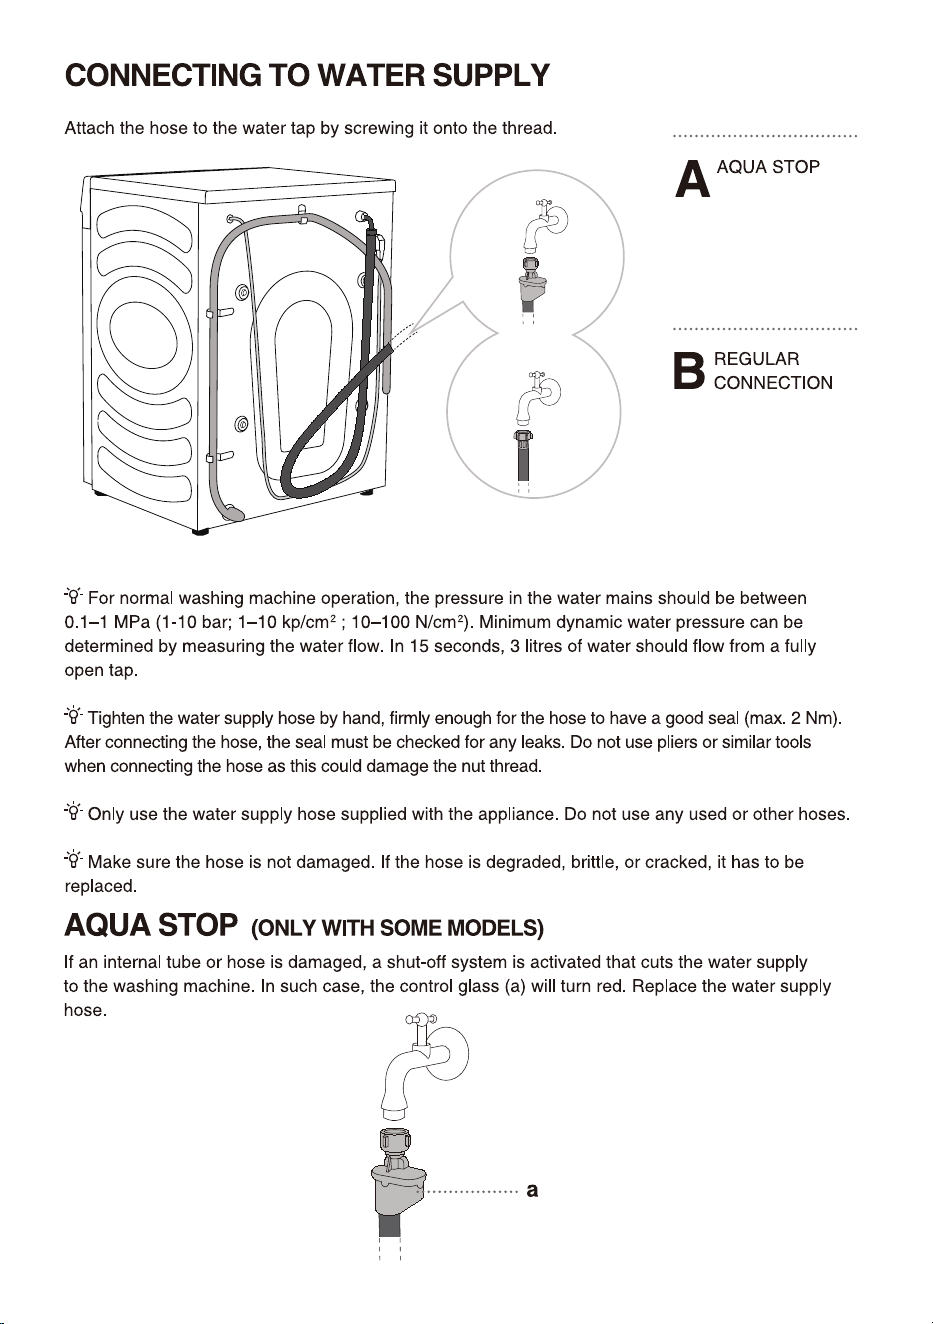
1 Water supply hose
2 Power cord
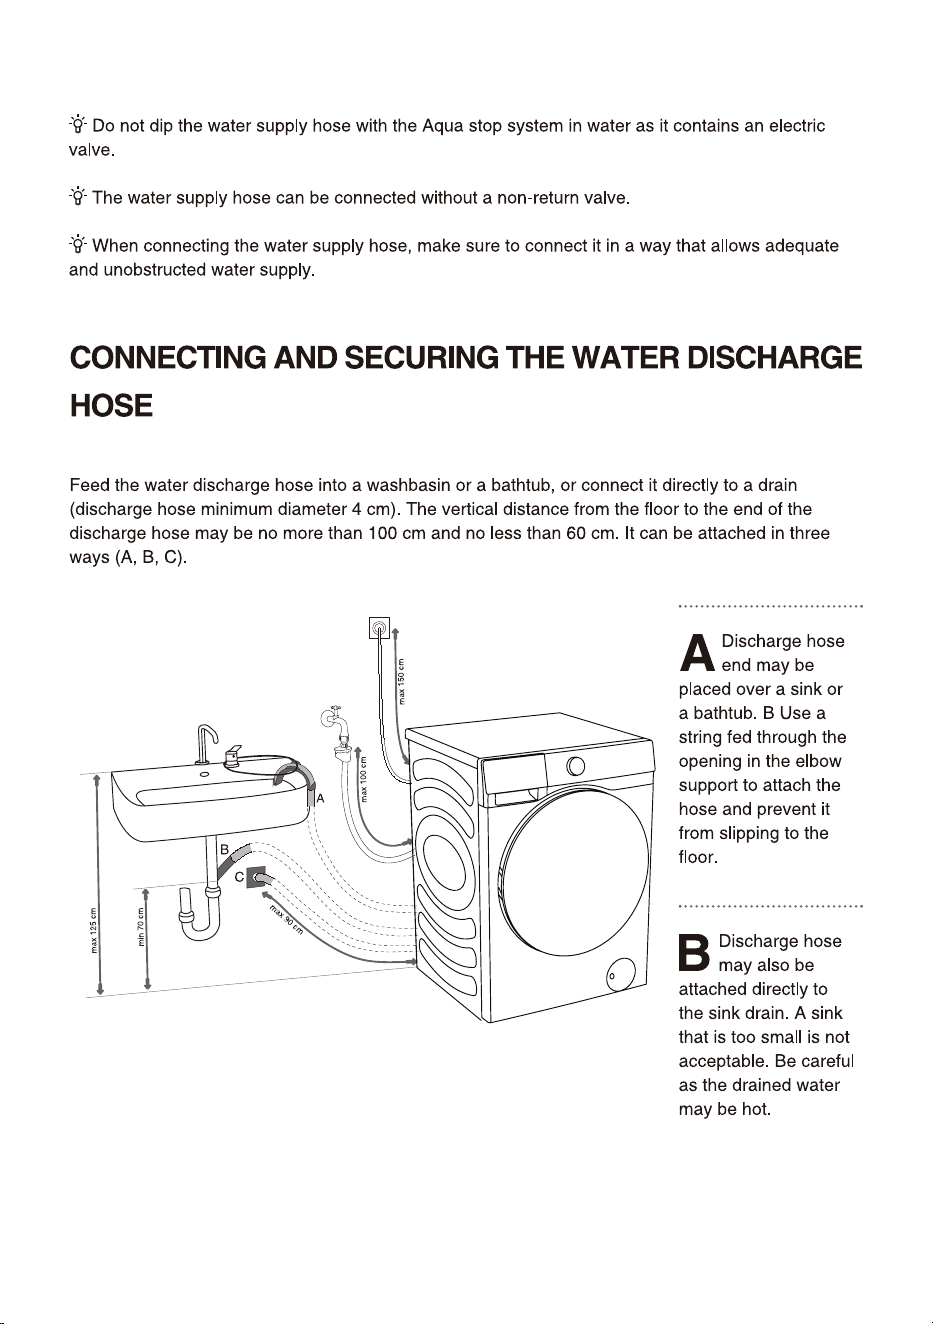
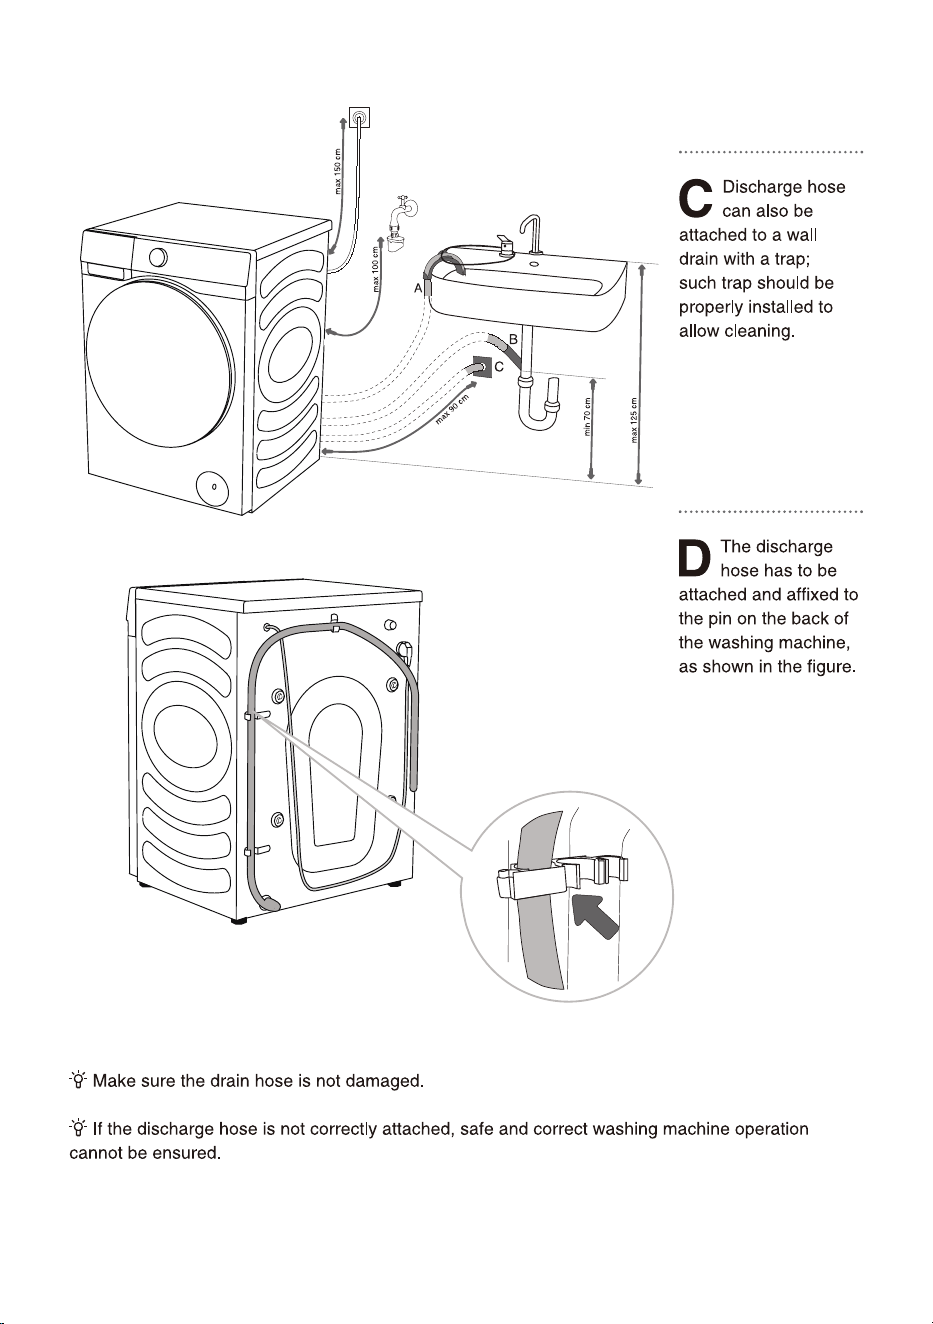
3 Water discharge hose
4 Adjustable feet
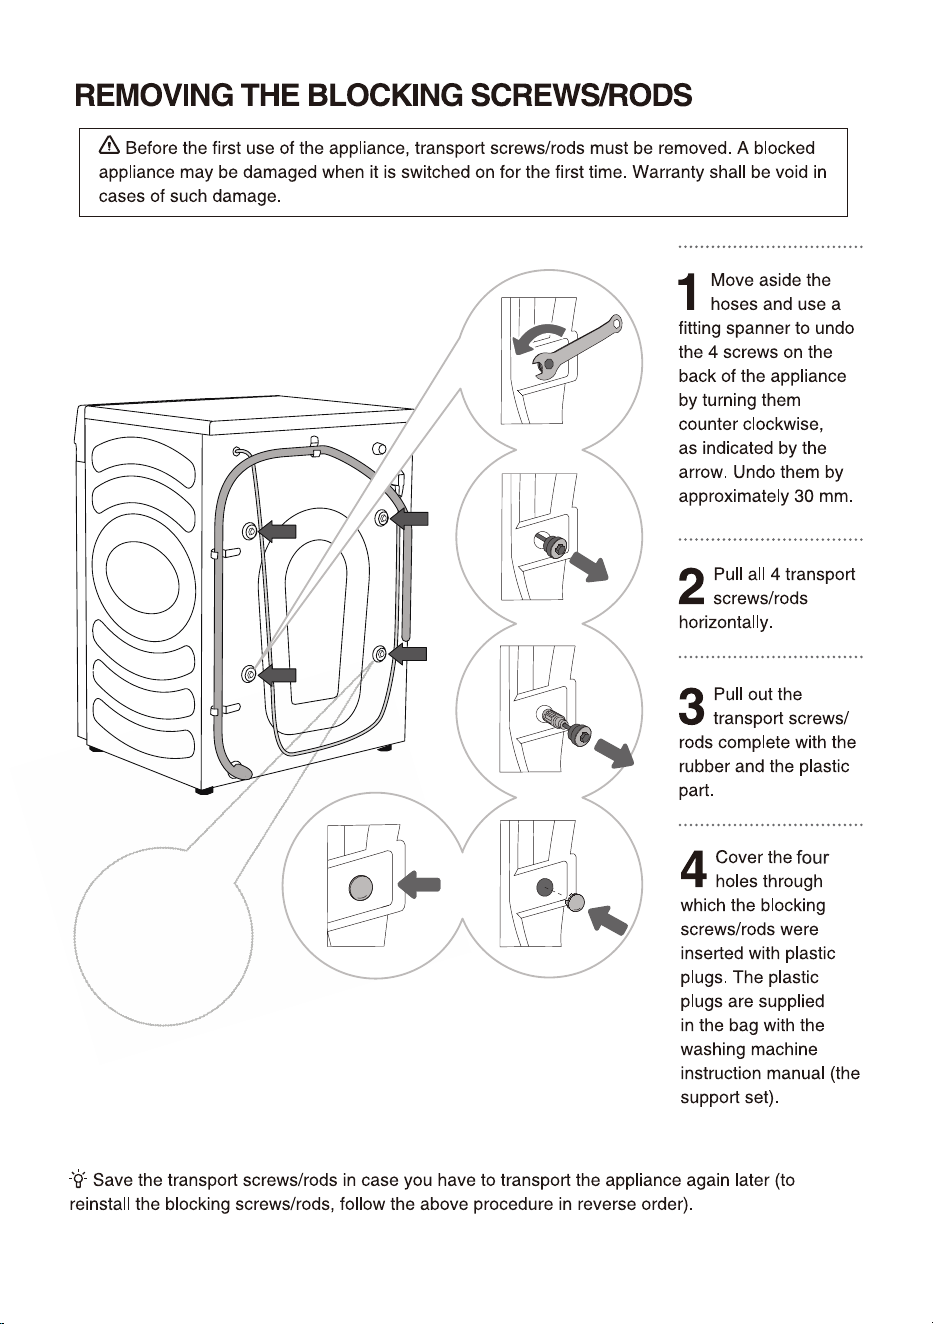
5 Blocking rods/screws
The illustrations in this manual are for reference purpose only. As our products are subject to
continual improvement, the appearance, color and functional parts of your actual product may vary
from the illustrations.
11
12
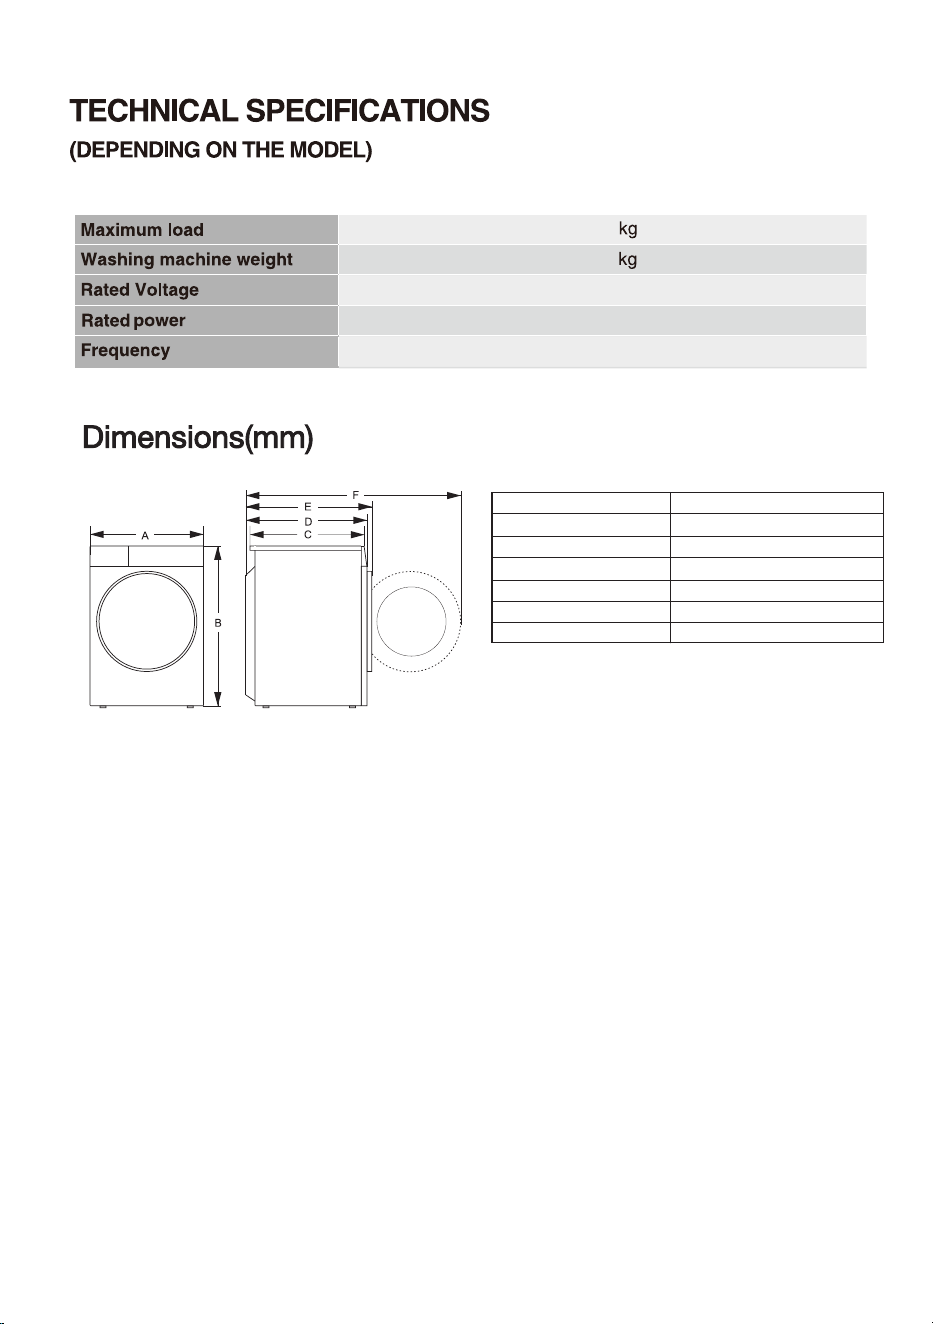
73
220-240V~
50Hz
1750W
595
845
610
640
670
1150
A
B
C
D
E
F
Dimension(mm)
Index
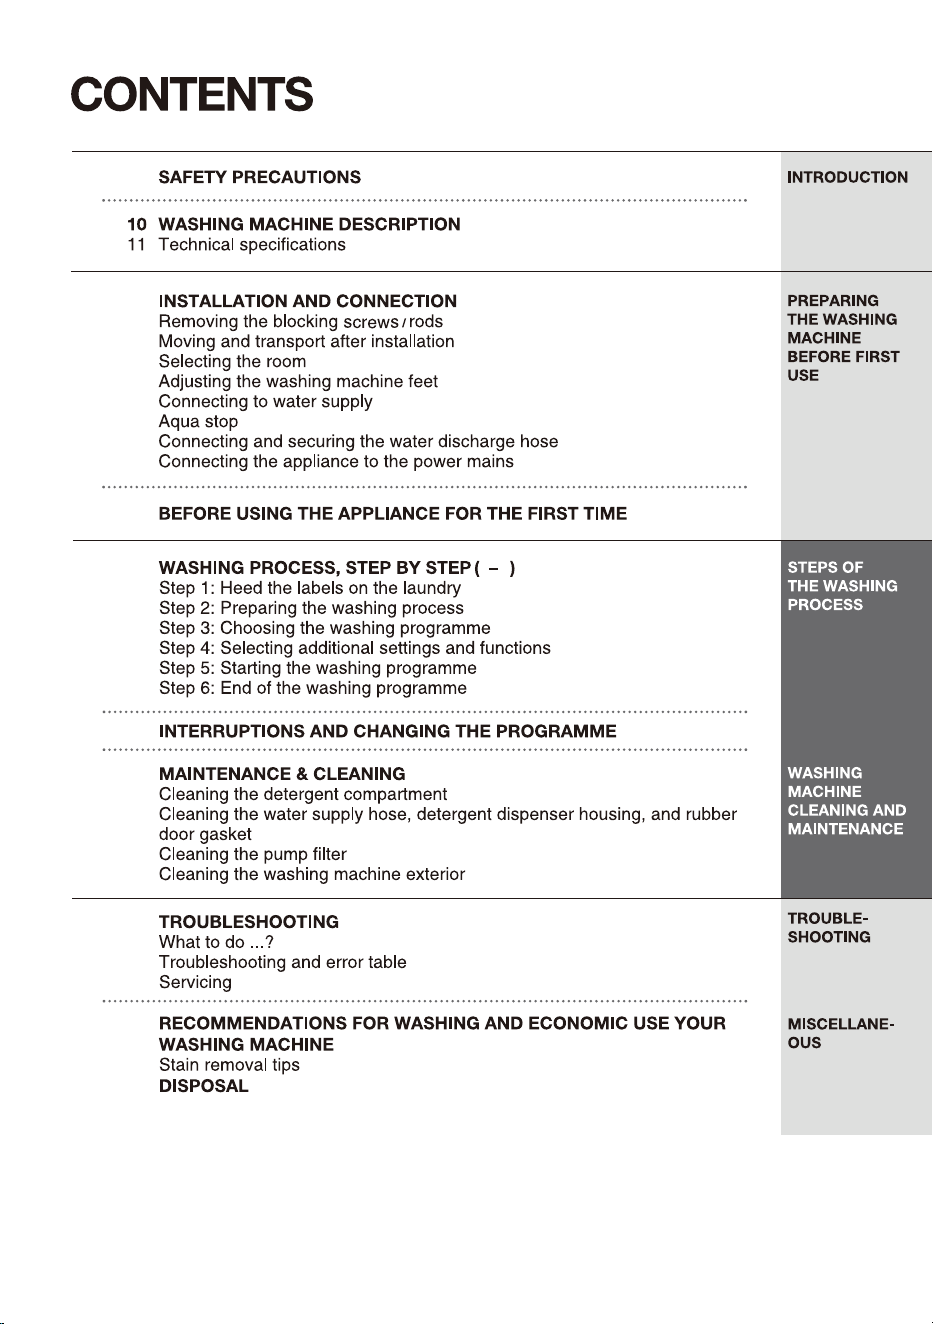
12
Instructions for use;
4 plastic plugs;
Supply hose;
Drain hose holder;
Wrench;
Noise reduction board(only with some models).
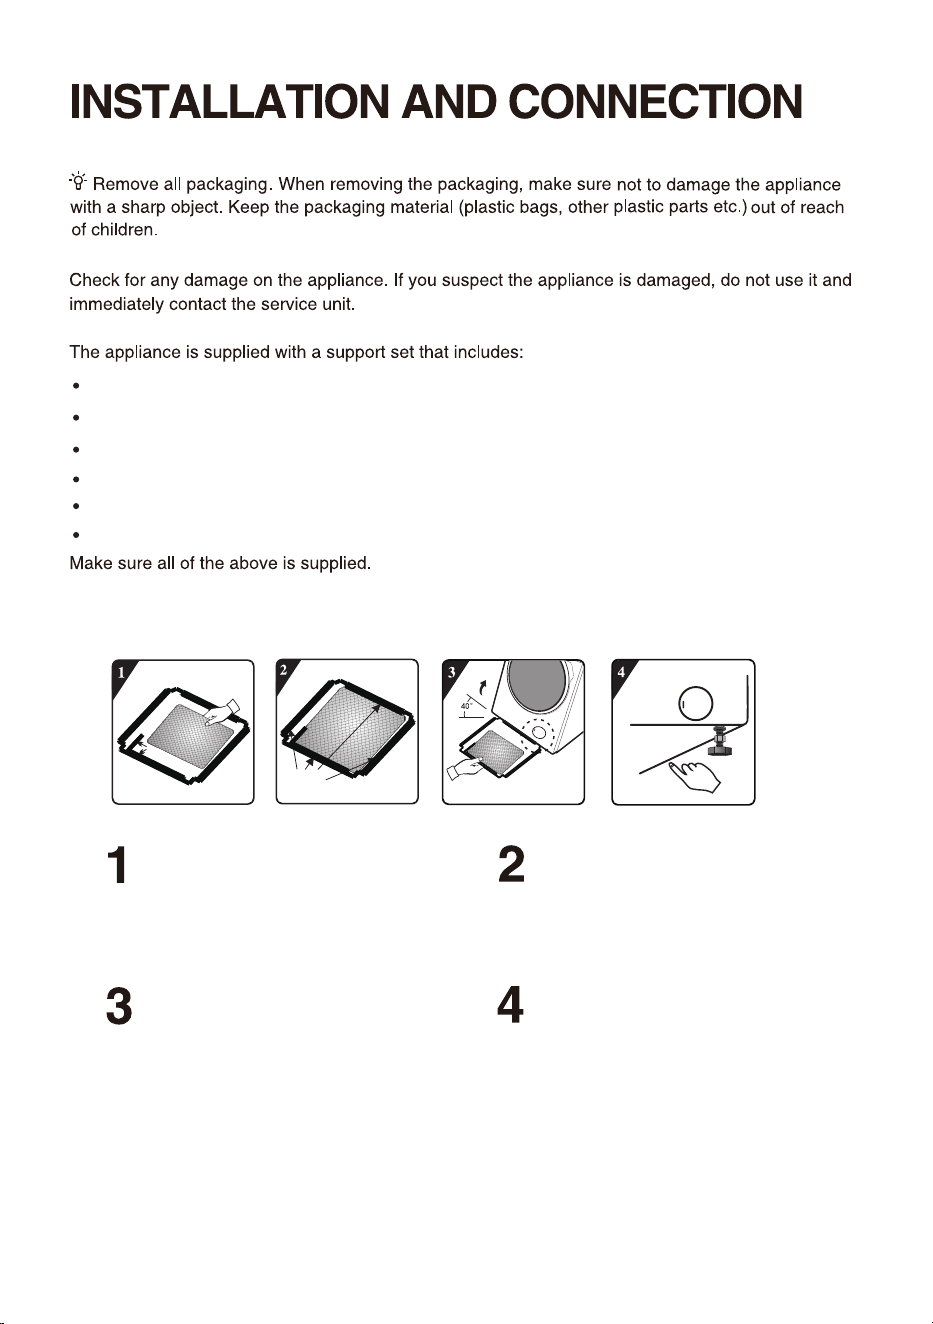
HOW TO INSTALL THE NOISE REDUCTION BOARD
Right-angle impression
Pump
Double sided tape
Incline the machine to an angle of 40°and
let the side with right-angle notch face
towards front of the appliance, as shown in the
figure. Insert the side with oblique-angle notch
between two foot screws at back of the
appliance completely in place. Then, install the
noise reduction board and ensure that it
contacts with bottom of the appliance closely.
Before installing the noise reduction board,
align and paste the acoustic absorption
wool with and along the right angle impression
on the noise reduction board (this procedure is
unnecessary for some of the models without
acoustic absorption wool).
Remove surface paper on double sided
tape at four sides of the bottom plate.
Press the double sided tape on four sides
manually to secure the noise reduction
board to the machine body firmly.
13
A power cord clip
is provided here,
which should also
be removed.
14
Pack all the packaging material (plastic bags, other plastic parts etc.).
15
ground
Ground
16
17
18
19
20
21
Drum Clean
22
23
24
softener
softener
softener
softener
softener
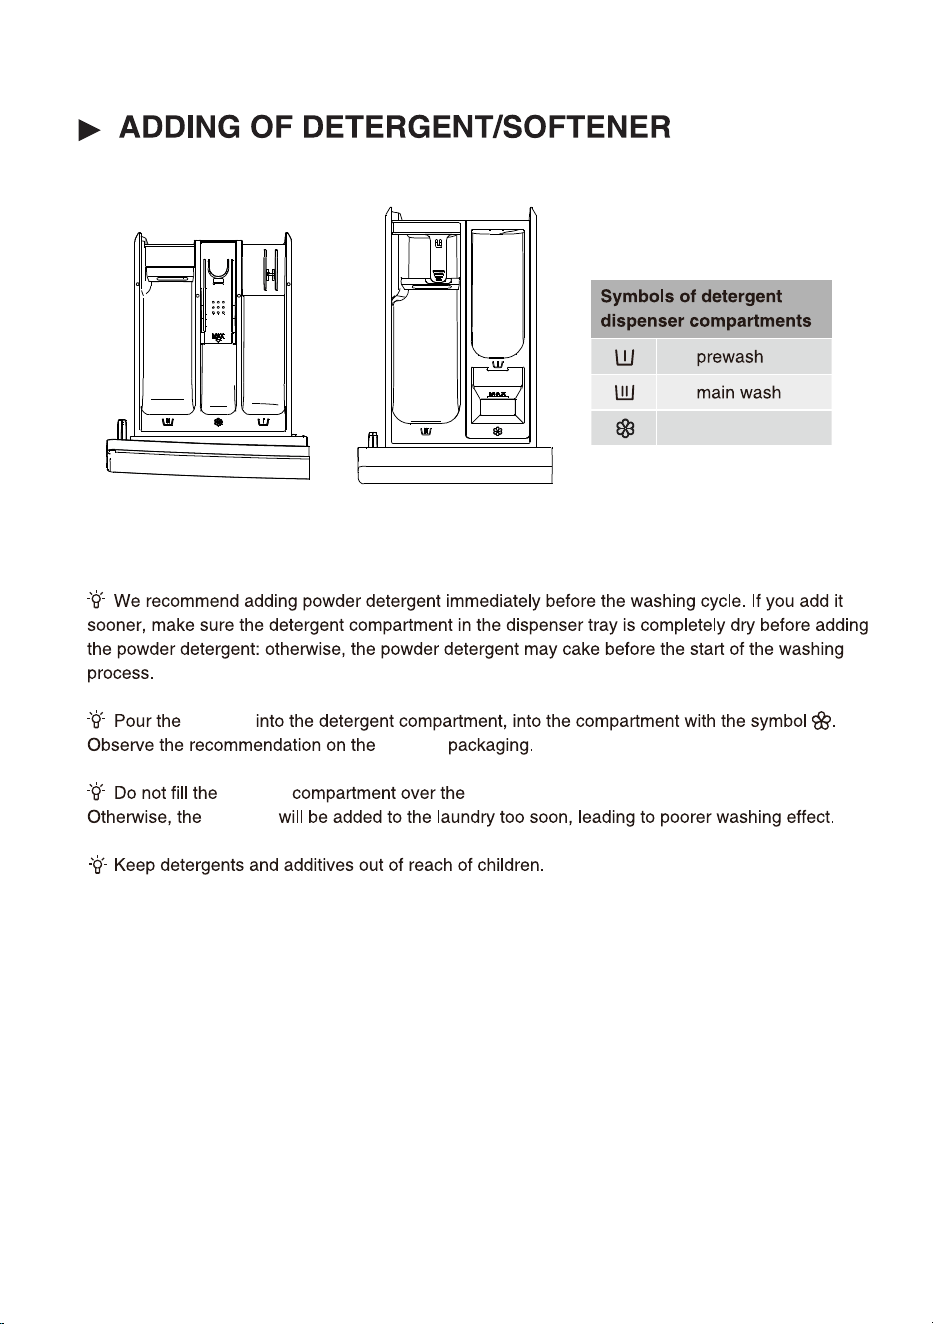
Max indicated level.
Style ①
Style ②
(The detergent compartment style depends on the model)
25
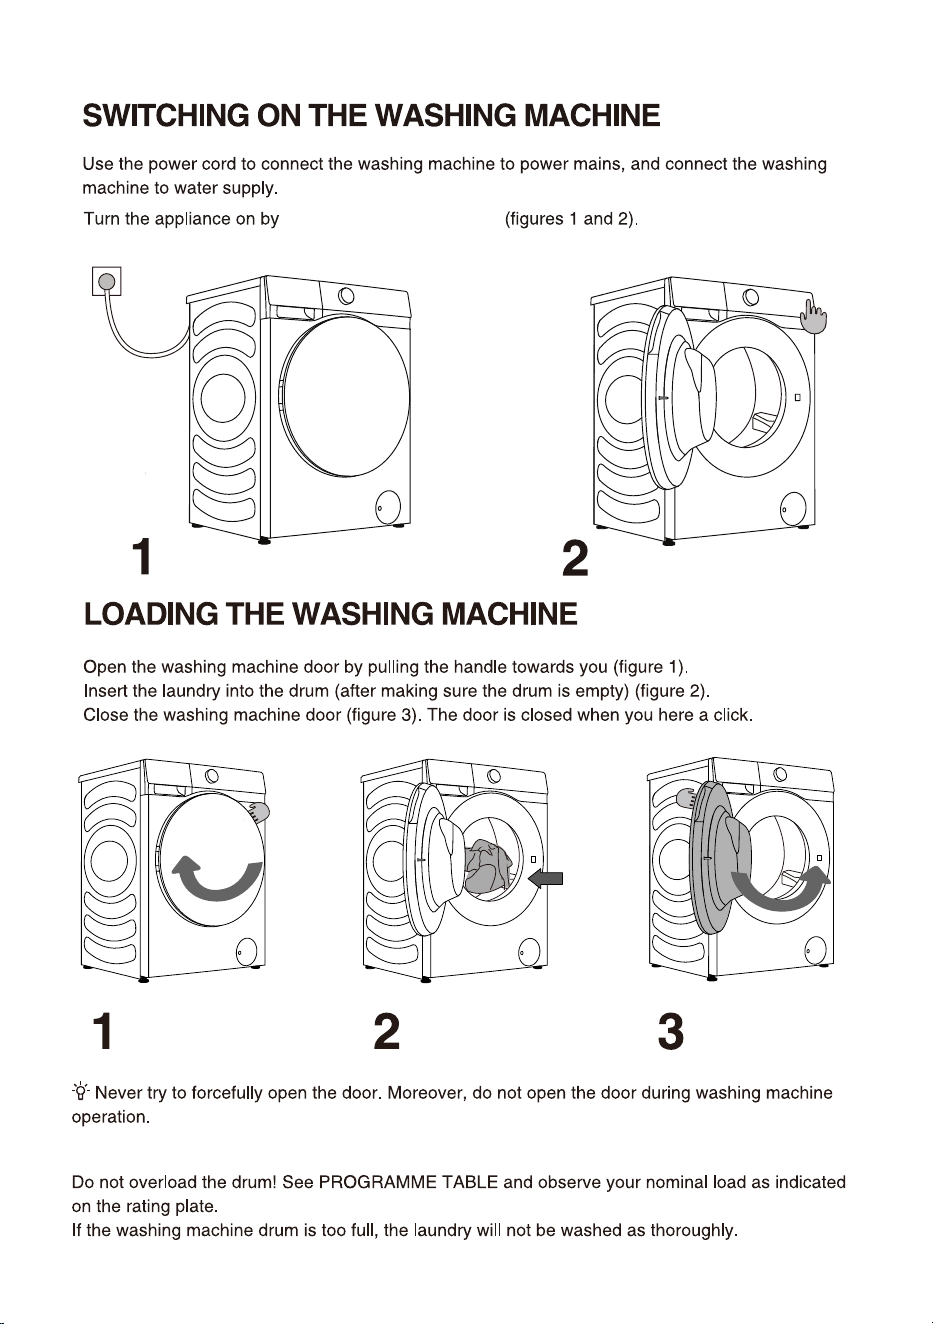
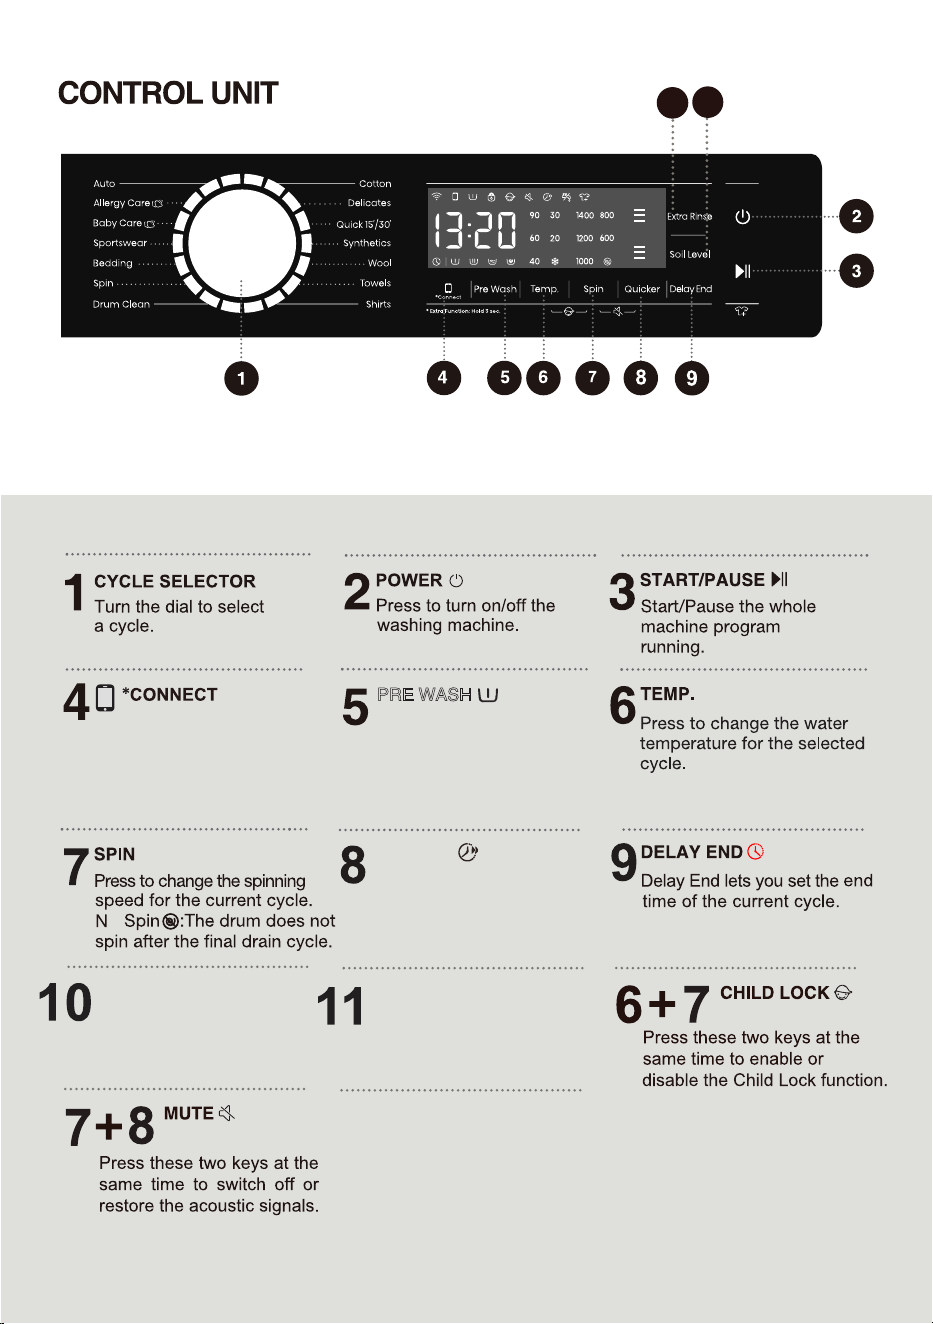
press the button "POWER"
PRE WASH
QUICKER
o
Press to add or subtract
Pre Wash function.
26
Washing machine
network control key.
See the Wi-Fi guide on
the last page for how to
configure the network.
Press to change the rinse
count for current cycle.
10
11
For extra function: Press and
hold for 3 seconds.
SOIL LEEL
ETRA RINSE
Press to change the rinse
count for current cycle.
By selecting different
levels to wash clothes
with different dirt levels.
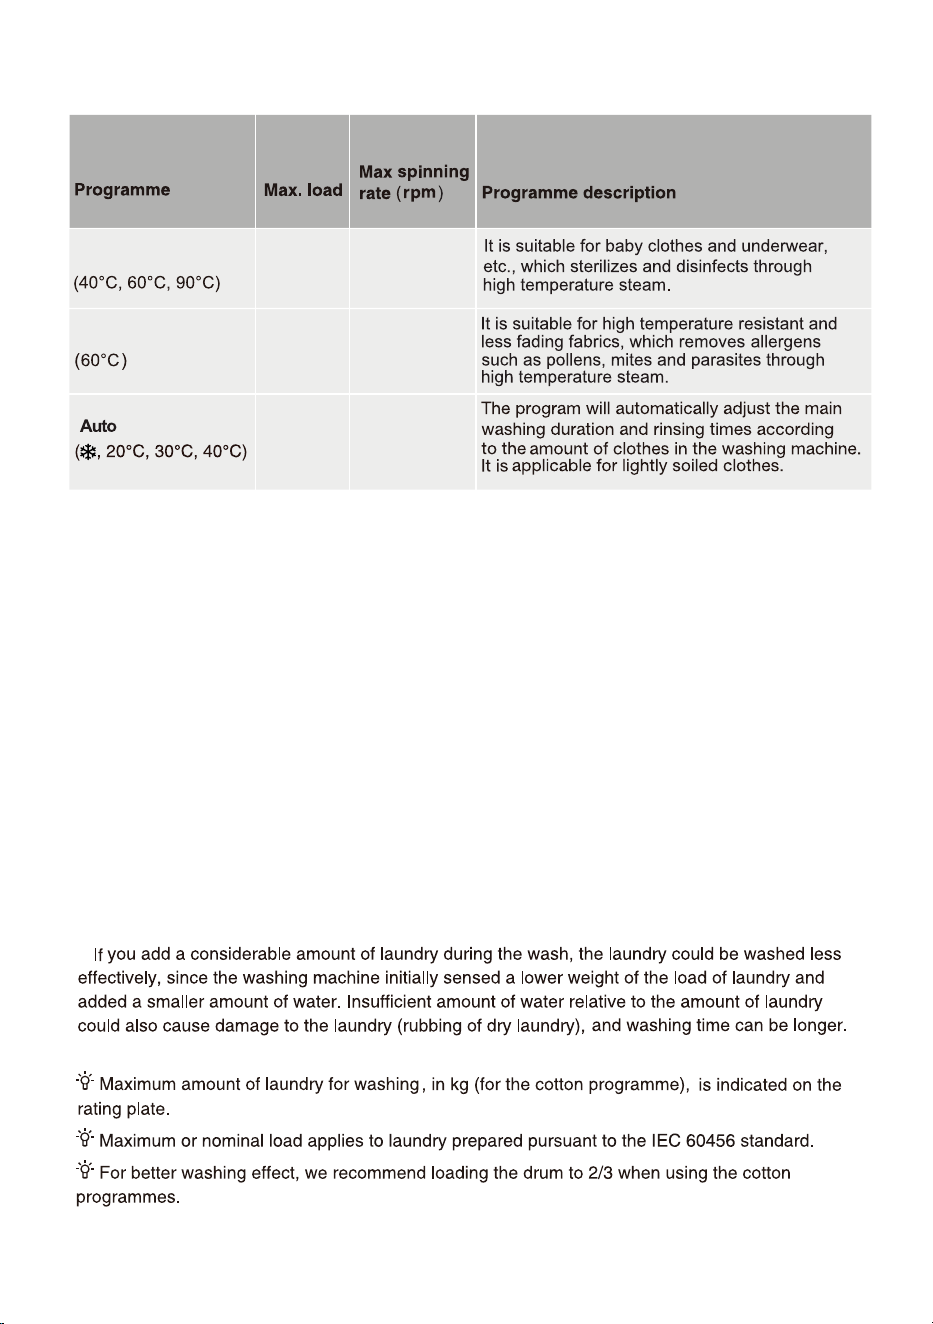
27
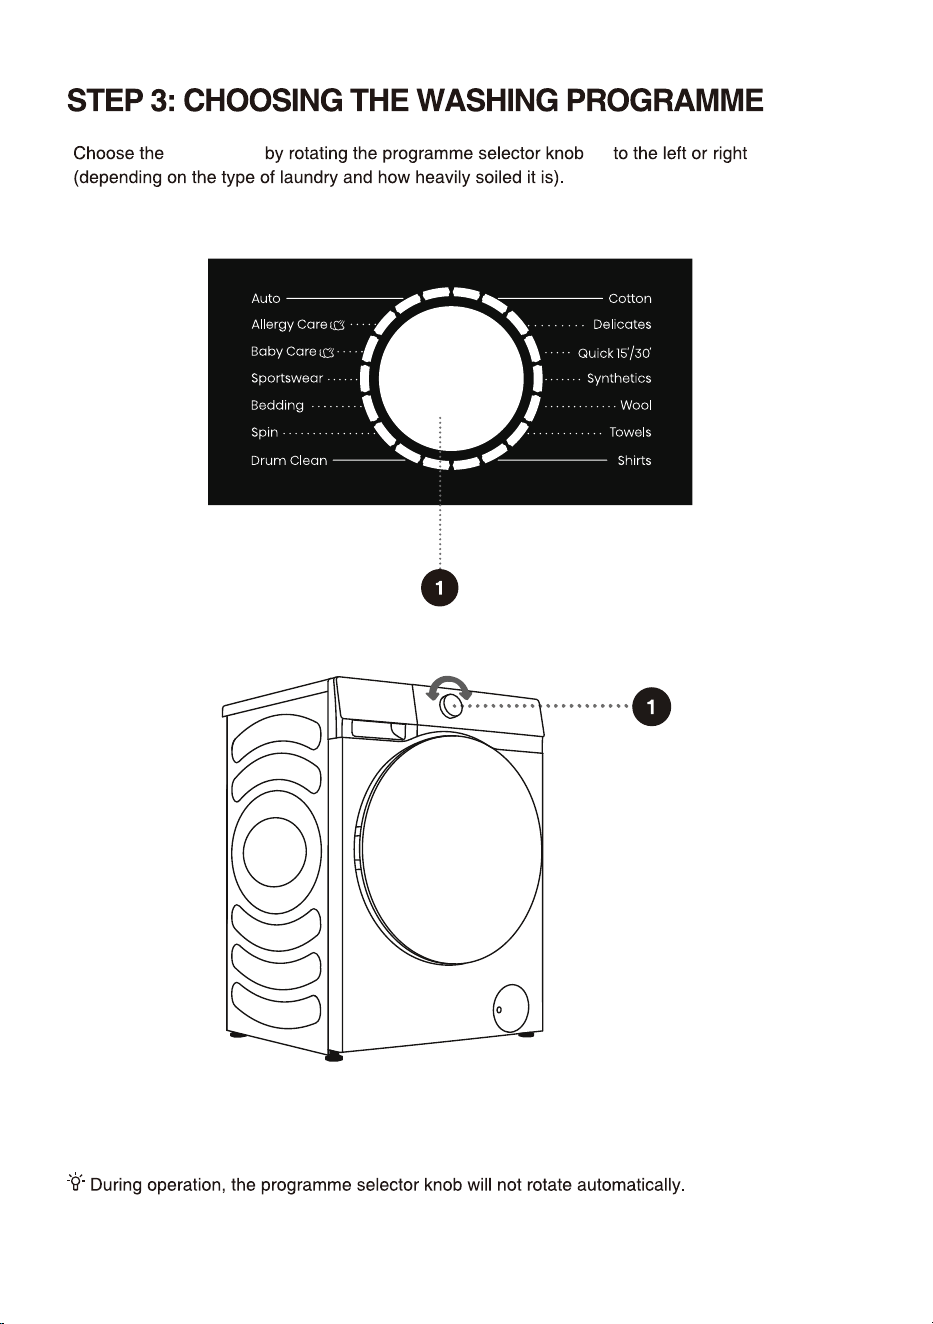
programme
(1)
See programme table.
28
1400
1
4
00
600
6kg
3kg
12kg
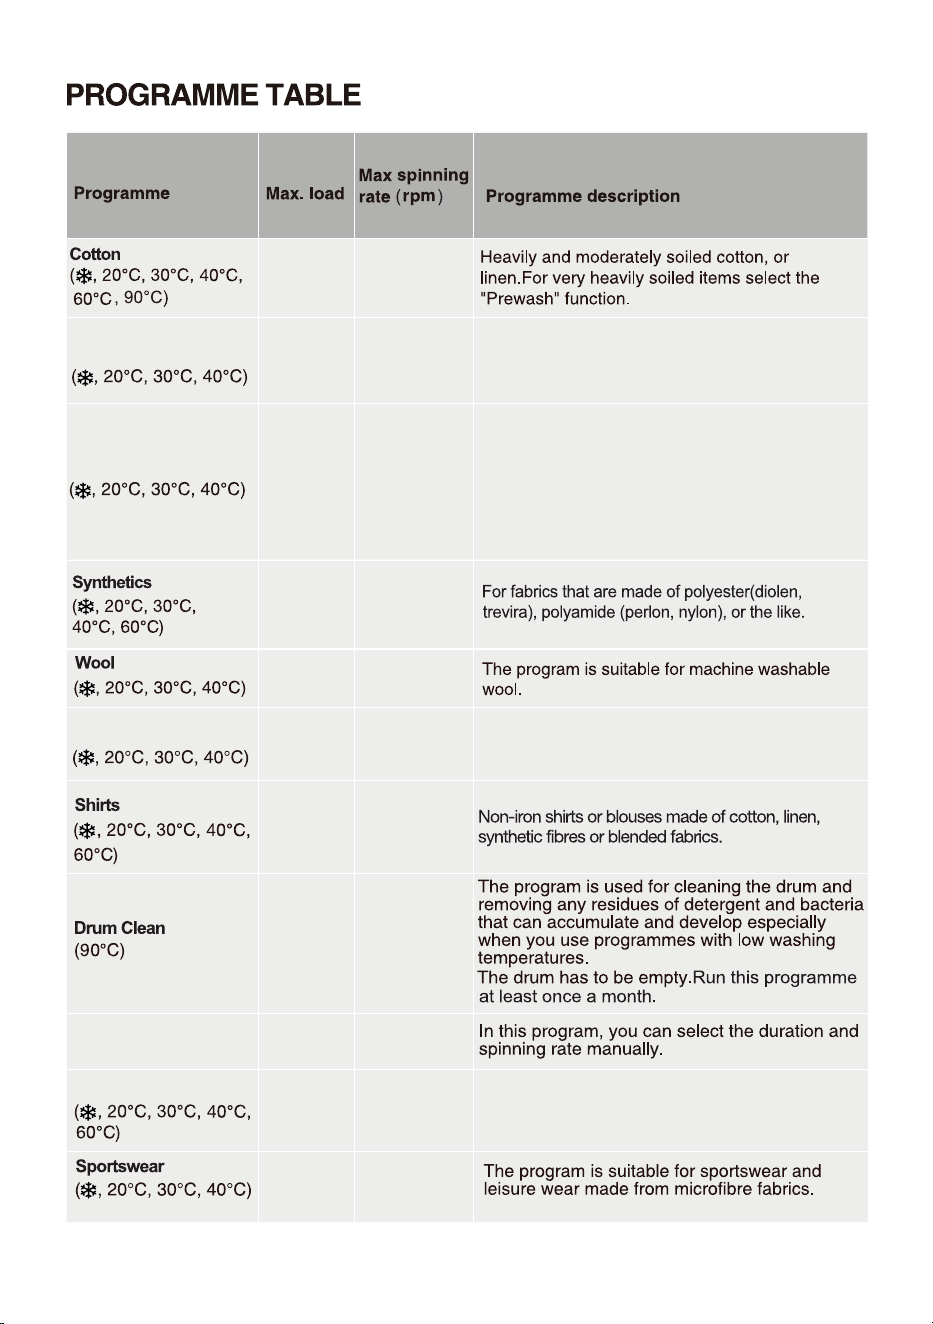
Delicates
Soft delicate fabrics and machine washable silk.
(Refer to the washing label attached to the clothing).
600
3kg
800
Quick 15/
2kg
The program is suitable for cotton and mixed
fabrics.It is suitable for new or little work clothes.
Washing time will prolong in case of changing
default settings.
The default programme is Quick 30', press
"Quicker" button to switch to Quick 15', and the
Quicker indicator will be on.
Towels
For low level of soil cotton items such as towels.
1400
800
4kg
800
/
Spin
12kg
1400
Bedding
3kg
Program adapted to wash large items - e.g.
Curtains, sheets, duvet covers.
1400
1000
5kg
3kg
29
NOTE:
1) Water Temperature: Select the appropriate wat
er temperature for chosen wash progr
amme. Always
foll
ow garment manufacturer's care label or instructions when washing to avoid damage to clothes.
2) Actual water temperature may dif
fer from the declared cycle temperatur
e.
3) The
washing effect depend on water pressure, water hardness, water inlet temperature, room temperature,
type and amount of load, degree of soiling utiliz
ed detergent, fluctuations in the main electricty supply and
chosen additional options.
4) Netural (non sudsing) detergent is recommended.
5)
1400
7kg
1400
2kg
Allergy Care
1400
2kg
Baby Care
Performance test procedure in Australia:
The program " 'Cotton', Temp: 40 ℃ Spin speed: 1400 rpm" is recommended for a normally soiled
load equal to the rated load capacity.
30
31
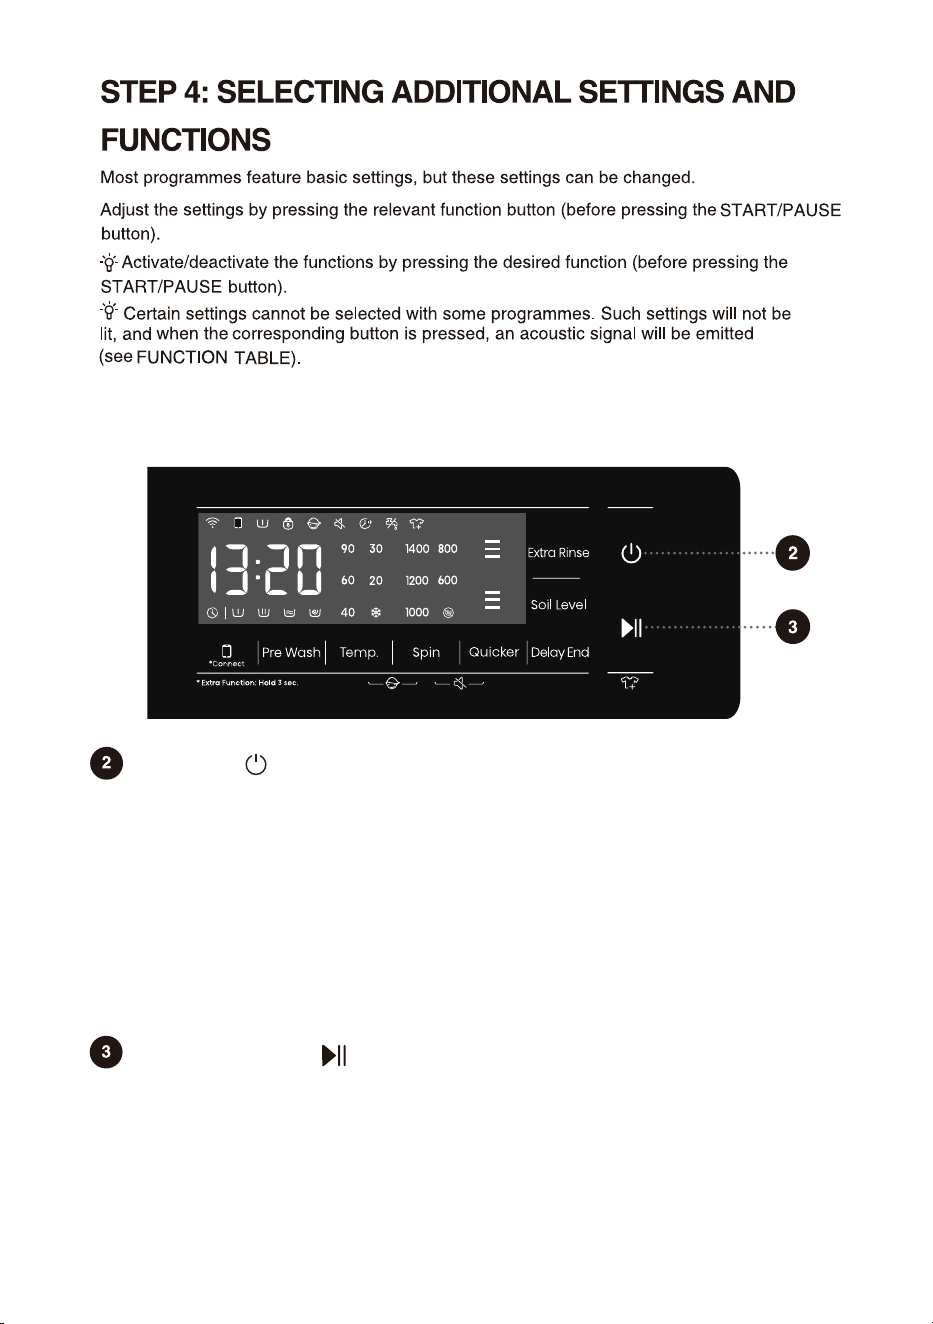
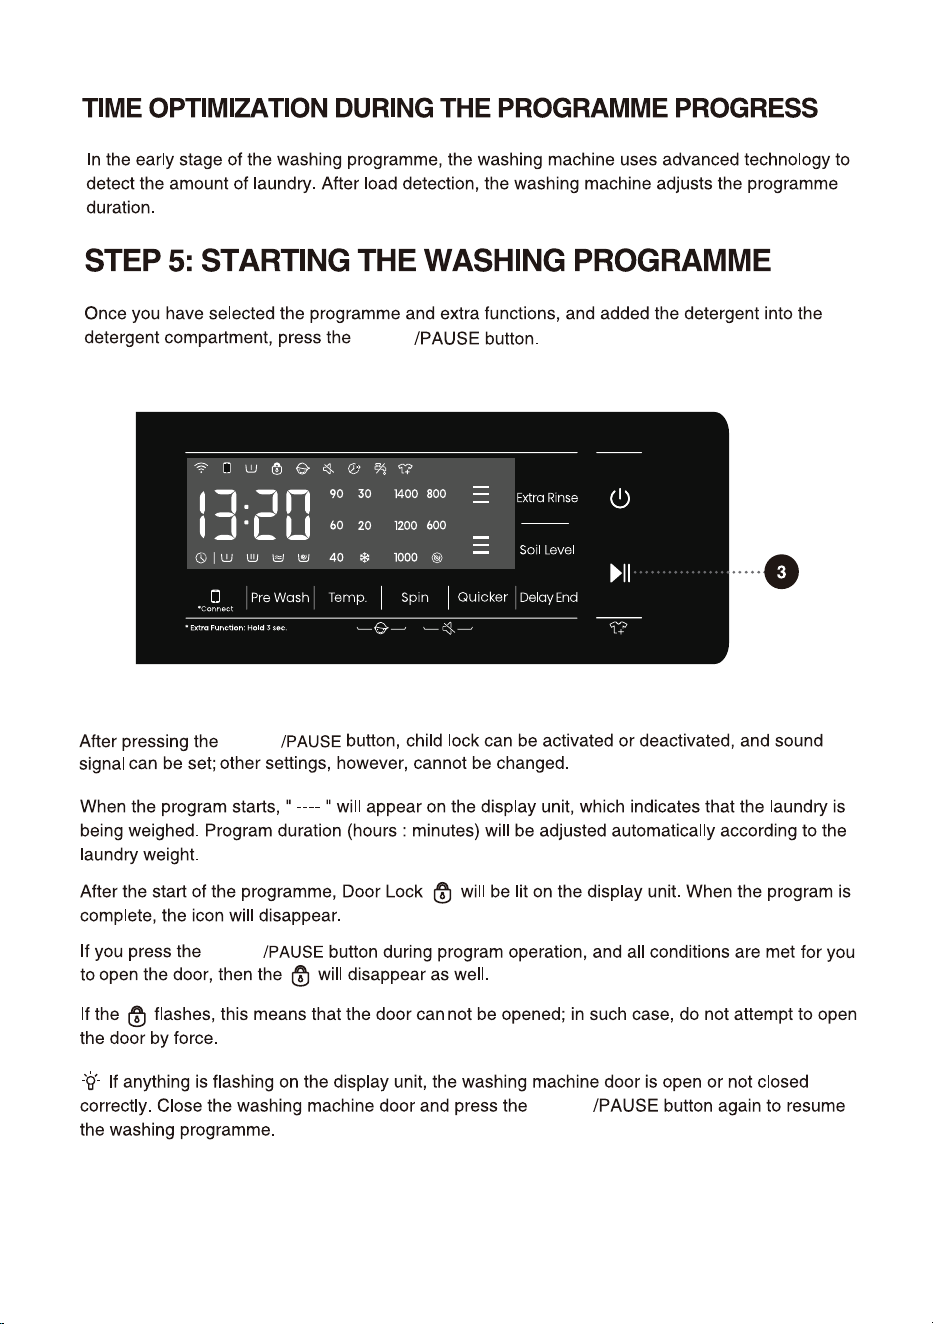
Start/Pause
For starting a program, or suspending a running program.
If the machine door isn't closed or the door lock is not engaged, the washing machine
will not start, and an alarm will be displayed on the screen.
After a program is started, or when the pause state is selected, the set functions and
parameters cannot be changed. Press and hold the Power button to turn off the
machine, and then restart it to reset the parameter.
The additional settings and functions can only be set in the standby mode of the applicable
program, that is, before the program starts running, and cannot be selected after the
program runs.
For powering on/off the washing machine.
When the washing machine is in standby, or after the screen displays the program
end interface, press and hold the Power key to enter the power-off state.
In standby mode, or in the program end interface or Wash retry reminder interface,
if no operation is performed within 10min, the washing machine will shut down
automatically.
In power-off state, all displays and outputs will be off, and remote startup is not
supported.
When the remote control mode is enabled, the appliance enters energy-saving
mode 10 minutes after being powered off and will automatically shut off if there is
no operation for 7 days.
Power

32
Press to add "Pre wash" function, press twice to cancel the function, and cycle in
sequence.
Select this function to add a Pre Wash program before the Main Wash stage.
Changing the temperature for the selected program.
Each program has a preset temperature that can be changed by pressing the
position TEMP. ( indicates cold wash).
The temperature is displayed on the display unit above the button.
Use this to adjust the spinning rate. With preset or selected spinning rate, the
selected spinning rate will be lit on the display unit.
If you select draining without spinning, the " " will appear on the display unit.
When this function is selected, before the prewash is complete, the prewash flow
indicator " " blinks. After the prewash is complete, the prewash flow indicator
is off.
When this function is selected,the pre-wash function indicator " " is always on
from the beginning to the end of the program.
When selecting the Pre Wash function, please add detergent to the prewash
compartment of the detergent dispenser.
It is divided into two modes: "press briefly" and "press and hold".
Press briefly: start the remote control permission of the appliance; Remote Control
icon " " is on, the remote control is set successfully and the door is locked;
Remote Control icon is off, the remote control is closed.
Press and hold: Connect the Wi-Fi of the appliance until the control panel symbol
" " flashes, and then conduct the networking operation. See the networking
description for the specific networking method.
10
33
Delay End
If the Delay End function was chosen before starting a program, it can be
canceled by pressing any other function key. Once the program has started, you
need to press and hold the Power button to turn off and restart the machine to
cancel the Delay End function.
When the Delay End function is being selected (set), the Clock icon " " is always
on; When the Delay End programme is running, the Clock icon " " flashes.
Use this feature to schedule washing at a convenient time.
Press this key to set the Delay End time. This key is only valid in standby mode.
After the Delay End function is selected, each time the Delay End key is pressed,
the time increases by 1h. The maximum selectable time range is 24 hours.
The Delay End time is the end time, that is, it includes the washing time, so the
Delay End time must be greater than the washing time.Based on your settings,
the start time of the cycle will be determined by the machine's internal logic. Press
to choose a preset unit of hours.
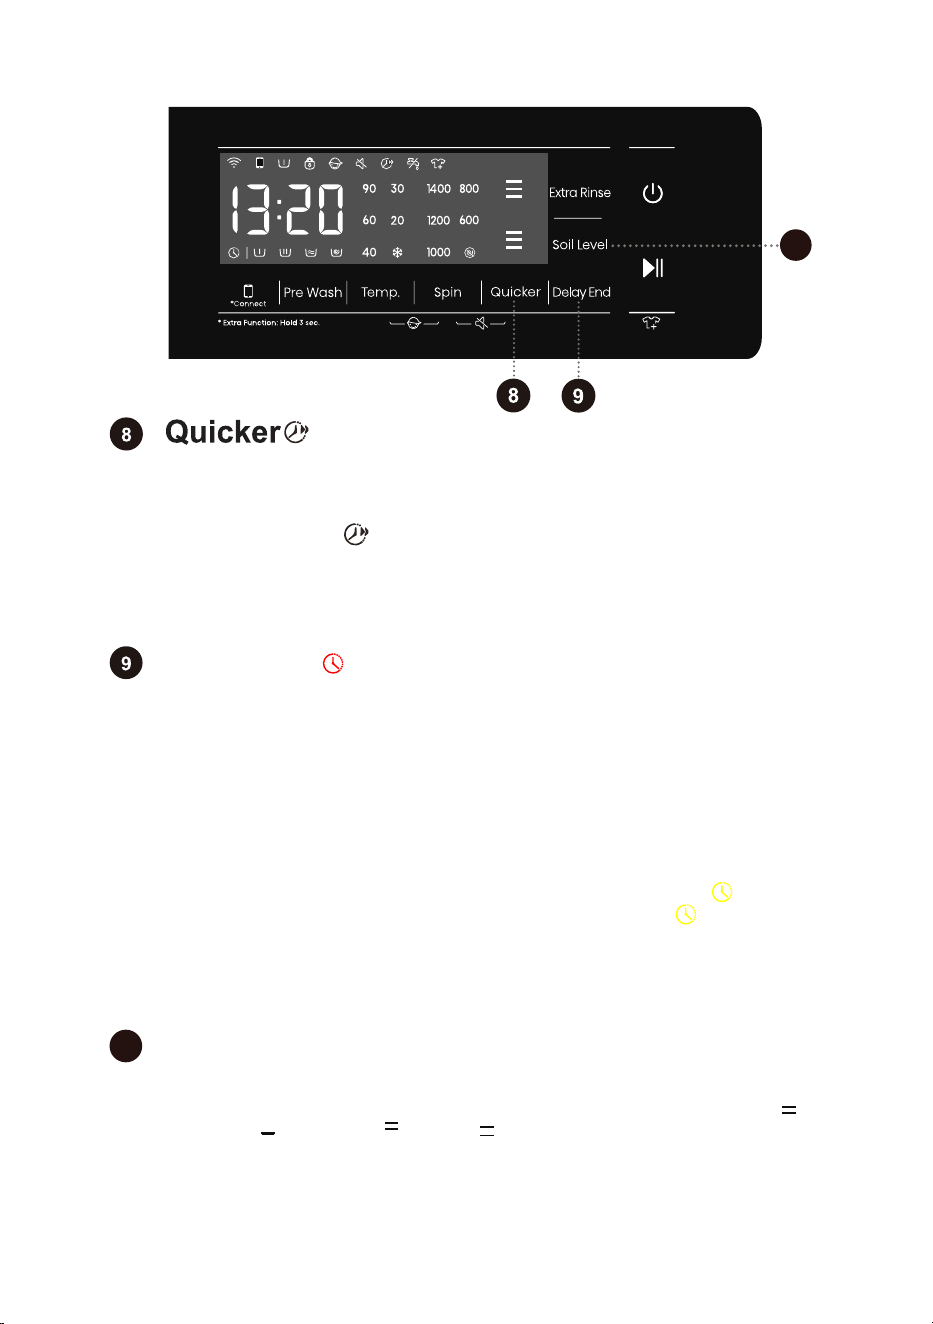
Press to add "Quicker" function. After pressing this function key, the
program time will be shortened by setting, and press it again, the program
time will be increased back to the original setting. After the program is
started, the indicator " " is always on,
When this function is selected, the main wash time or the number of rinsing
times will be reduced.
Weighing will be canceled after triggering this function, weighing will be
resumed if the function is canceled.
10
Soil Level
This function is only available in standby mode. Press this button to set the soil
level of your laundry. Press the button to cycle through the options, including [ ]
(Medium), [ ] (Low), and [ ] (High). [ ] (Medium) is selected by default.
Choose a higher level for heavily soiled laundry. The machine will automatically
adjust the washing time according to the soil level you selected.
11
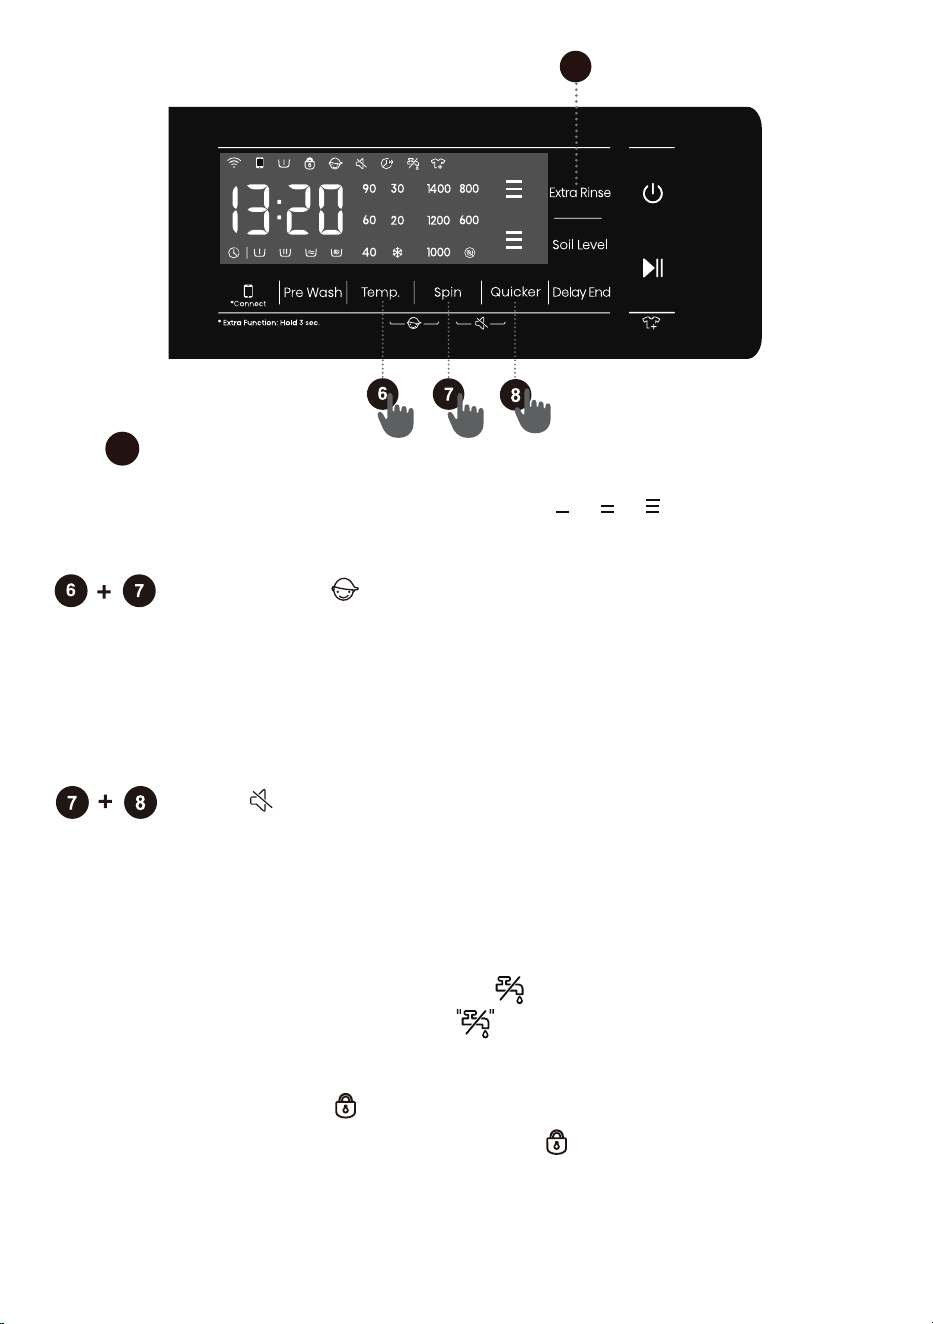
Child Lock
This is a safety feature. To activate it, simultaneously press the positions
"Temp.+Spin" buttons for 2 seconds, Child Lock icon will light up, and then
Child Lock is set up. Repeat the same operation, the Child Lock will be
released.
When the Child Lock is set, all function buttons will be shielded except the
Power button.
After completing program, child lock will automatically unlock.
34
Mute
Use this to switch off or restore the acoustic signals.
When the machine is in the state of holding, pause or operation, press "Spin
+Quicker" buttons for 2 seconds, the display will show mute function icon.
All the buzzing will be turned off except the alarms.
When the machine is in the mute state, repeat the same operation until
mute function icon light off. All the buzzing will be activated.
11
This function can be selected in standby state and can not be changed after startup.
In the standby state, after Extra Rinse is
selected, the [ ] / [ ] / [ ] (once, twice, three
times) is shown, which may be used a maximum
of three times.
After the program is started, the indicator is always on.
Extra Rinse
Water Intake Warning
When the water intake warning icon is displayed, it means that the
faucet is not opened, or the water pressure is too low, and the display
prompts ''F01'' alarm.
Door Lock
When the program has started, door lock icon " " will lights up,door lock
will set up. Do not force the door open at this time to avoid injury.
When the machine is paused or after the program is end, if the unlocking
conditions are met, the door lock will be automatically released, door lock
icon will light off.
35
Shirts
3uick 15'
5portswear
#llergy CCTG
#uto
6QYGNU
Bedding
5pKP
&TWO%NGCP
9QQN
%QVVQP
5[PVJGVKEU
SOIL LEVEL
DELAY END
QUICKER
&GNKECVGU
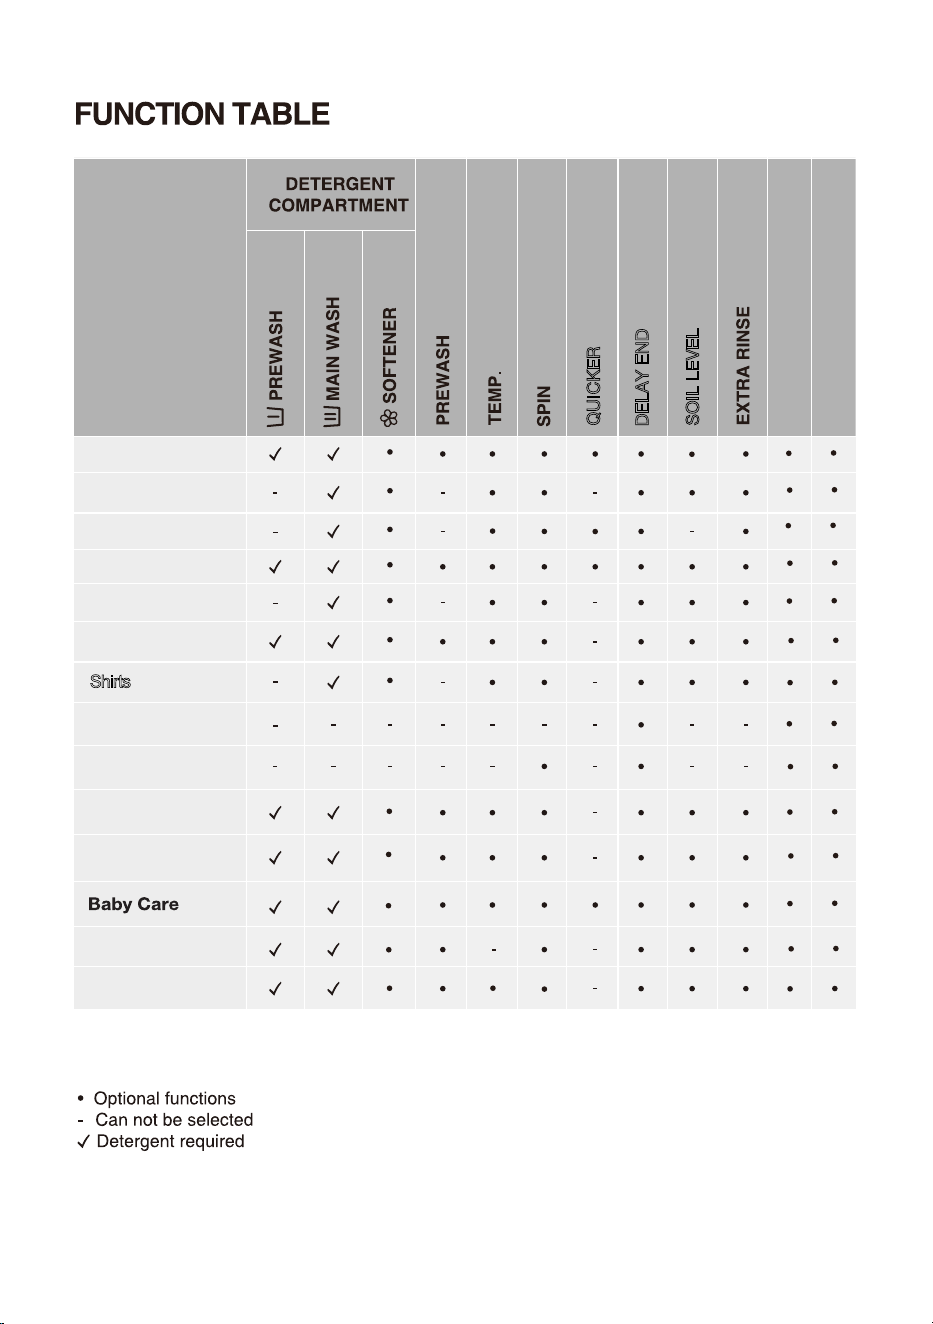
PROGRAMMES
○
Function non-cancellable
CHILD LOCK
MUTE
36
" "
" "
" "
START
START
START
START
37
38
I
START
When the program is suspended in spin state and then restarted, it will run again from the initial
state of spin.
PAUSE
To stop and cancel a washing programme,
temporarily paused
2
After adding clothes midway, press start/pause button and the washing program will resume
running.
CHANGE OF WASHING PROGRAMME
To stop and cancel a washing programme,
2
To select a new programme, choose the programme by rotating the knob and select extra functions.
Press the start/pause button, without adding the detergent again.
During a pause, the time on the display will blink. If the "Add Clothes" icon " " lights up, it
indicates that the door can be opened. The door lock will automatically release, allowing you
to add clothes. If the "Add Clothes" icon isn't lit, pressing pause won't unlock the door, and it
cannot be opened.
39
.
40
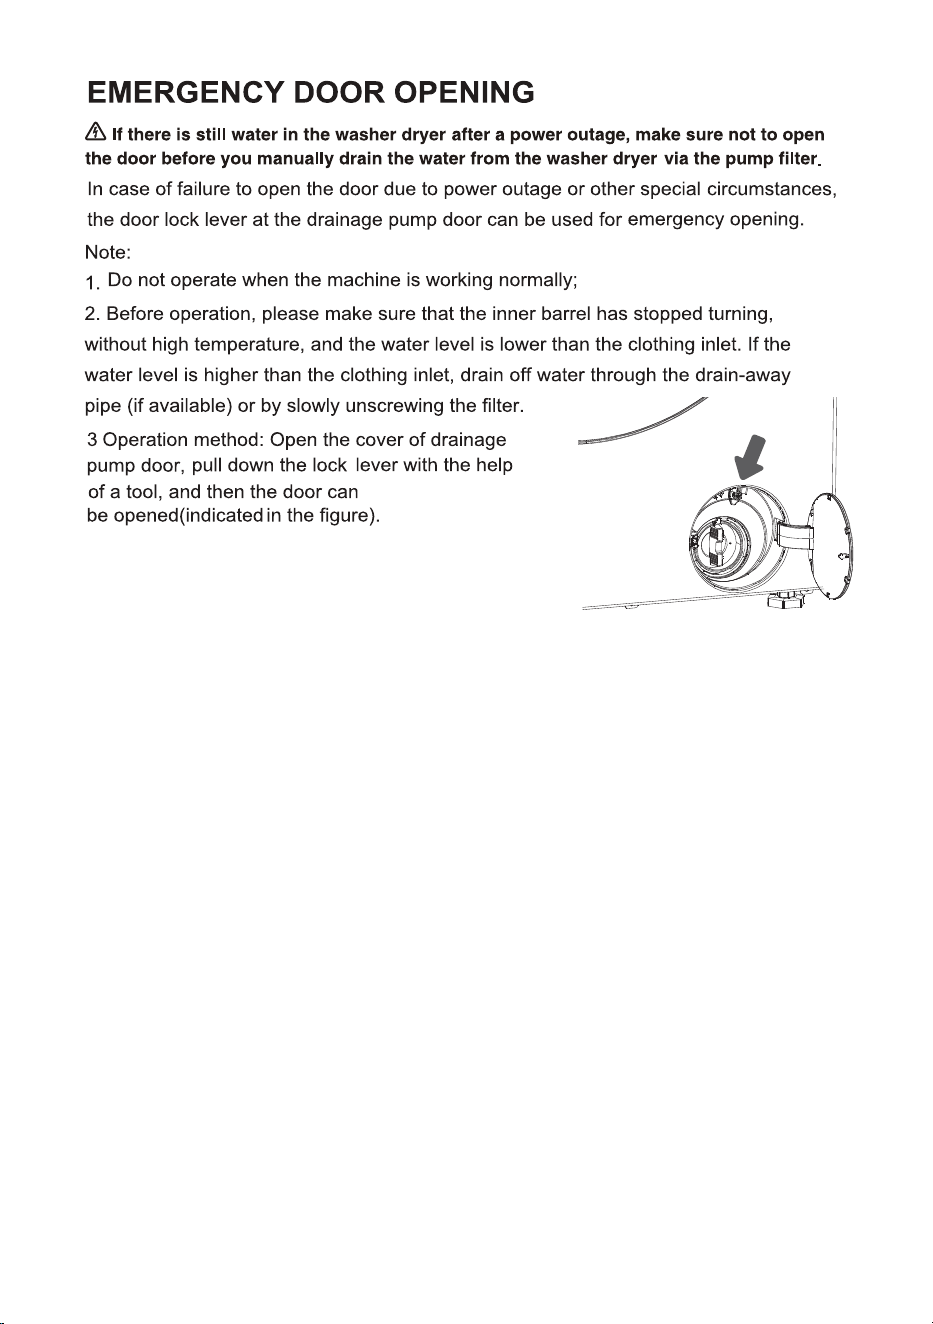
Clean the detergent compartment regularly.
Style ①
Style
②
41
1
2
3
3
4
5
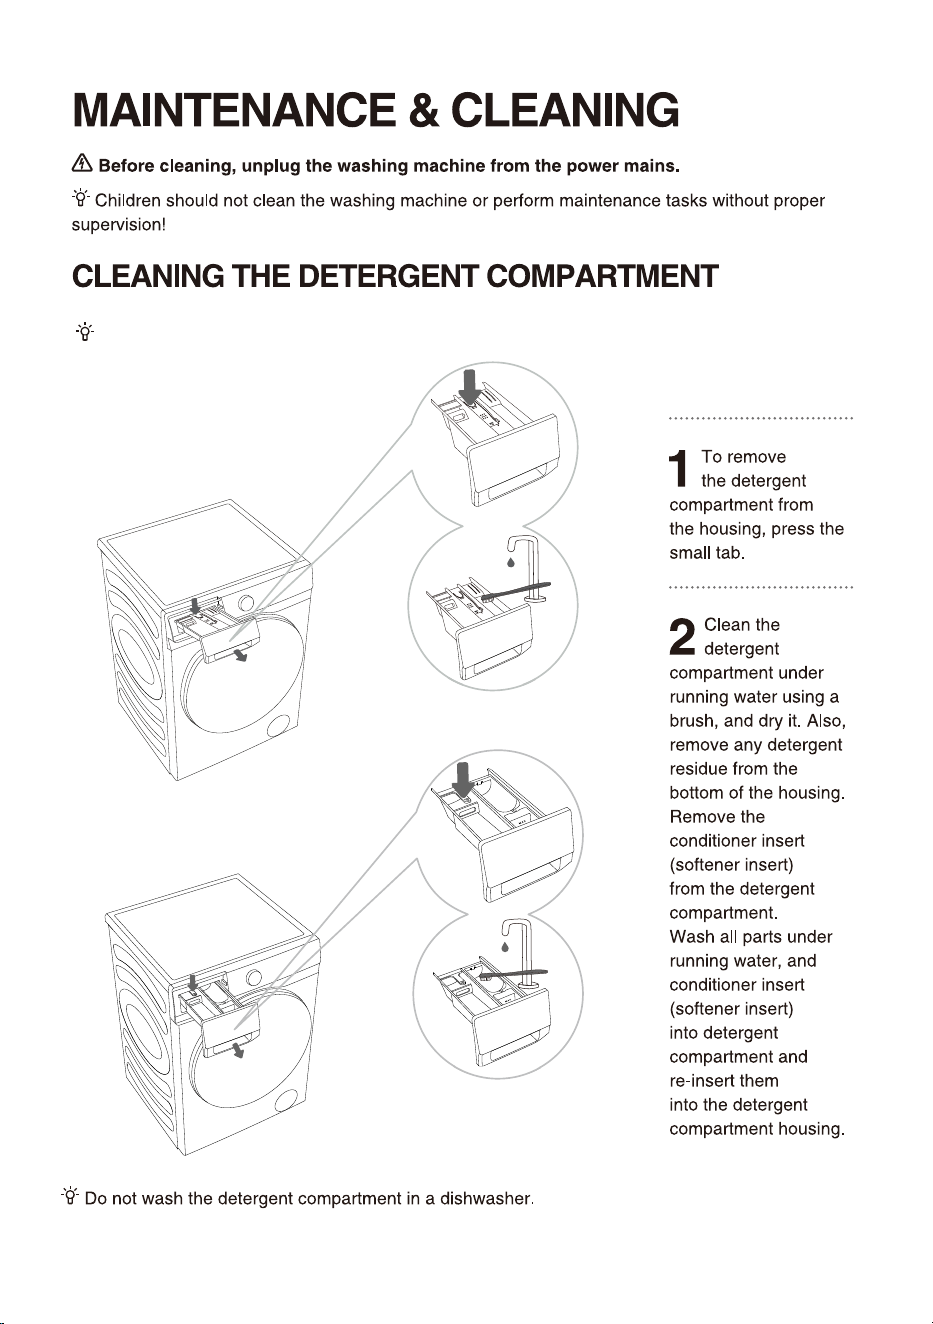
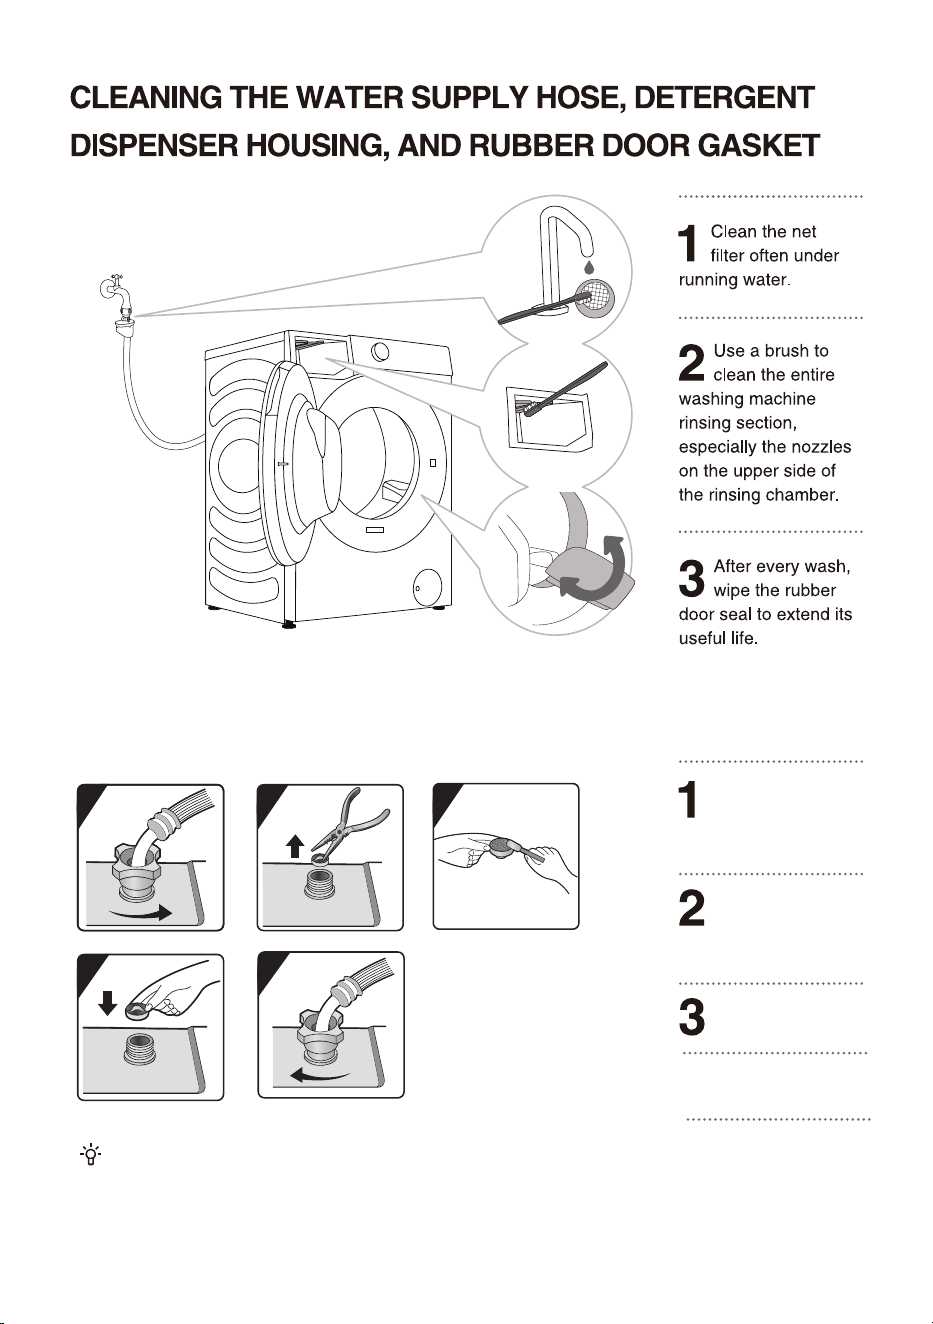
CLEANING THE WATER INLET FILTER REGULARLY
Pull off the mesh filter
from the appliance
connection with universal
pliers.
Close the tap and
unscrew the inlet
hose on the rear of
the appliance.
Clean the internal
mesh filter.
4
Refit the mesh filter
again.
5
Screw the inlet hose
on. Turn on the tap
and ensure that the
connections are
completely water-tight.
The water inlet filter collects lime or any sediment that may be in
water that is supplied to the appliance.
Clean the inlet filter every six months or so, or more often if the
water is very hard or contains traces of limescale.
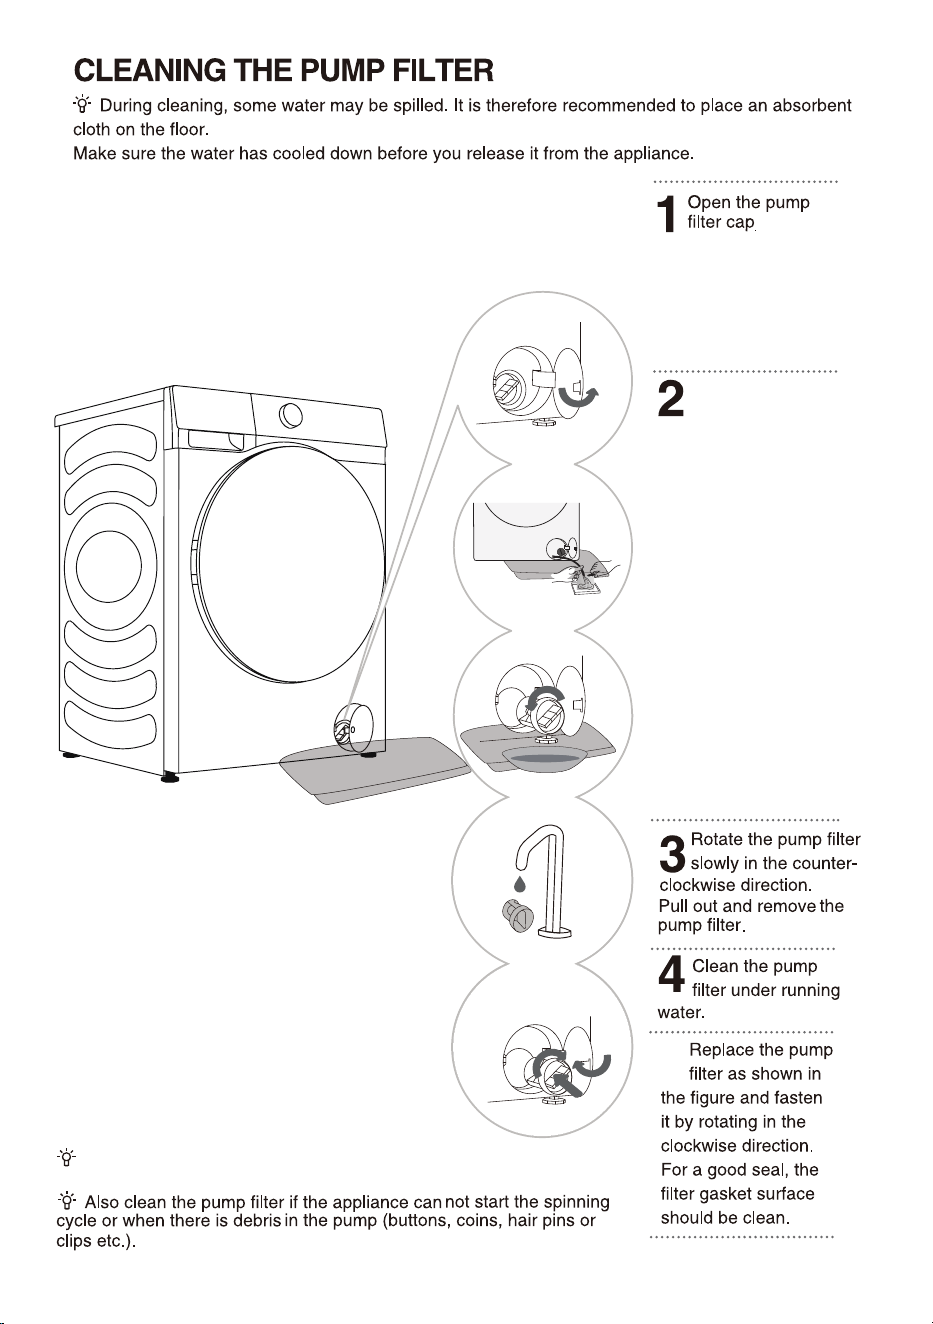
42
the filter door.
If the machine has a
emergency drain pipe, pull
out emergency drain pipe
of machine. Put end of
emergency drain pipe into
a container.
If the machine doesn't have
a emergency drain pipe,
place a container under the
pump filter.
The style depends on the
model.
Rotate emergency drain
pipe plug and remove it
after it becomes loose Until
water runs off naturally.
Reinstall emergency drain
pipe plug.
5
Style1: Press the door cover
and automatically pop open.
Style2: Open the pump filter
cap using a suitable tool.
The style depends on the
model.
The pump filter must be timely cleaned, especially after
washing very fleecy, woolly, or very old laundry.
Place a towel under
43
)
44

45
Problem/
error
Indication on the display
unit and problem
description
What to do?
F01
Water inflow fault
Check the following:
• Is the water supply tap open and is the
pressure too low?
• Is the water supply hose pinched?
• Is the filter on the water supply hose clogged
• Is the hose frozen?
F03
Drainage fault
Check the following:
• Is the hose pinched, does the water flo
through it?
• Is the filter on the drain hose clogged
• Is the hose frozen?
F04/F05/F06/
F07/F23
Electronic module fault
Press the"
"button again. If the error
reoccurs, call a service technician.
F24
Water level reaches
overflow level
"
Stop the programme by pressing the"
button. Restart the programme.
If the appliance continues to pump water into
the tub, close the water tap and call a service
technician.
F13
Error while locking the
door
Door is closed, but it cannot be locked.
Switch off the washing machine. Switch it back
on and restart the washing programme.
If the error reoccurs, call a service technician.
F14
Error while locking the
door
Door is closed, but it cannot be unlocked.
Turn off the appliance, then turn it back on. If
the error reoccurs, call a service technician.
Unb Unb Unbalance alarm
Unbalance alarm shall be solved by the following
methods
1.Laundry winding
2
shutdown
, open the door, shake the
clothes and put them back into the washing
machine, then select the single dewatering
program to try again.
2.Too light-weighted laundry
Switch off the appliance;
for 2 seconds.
2
"Power"
try
46
Drum Clean.
47
48
49
50
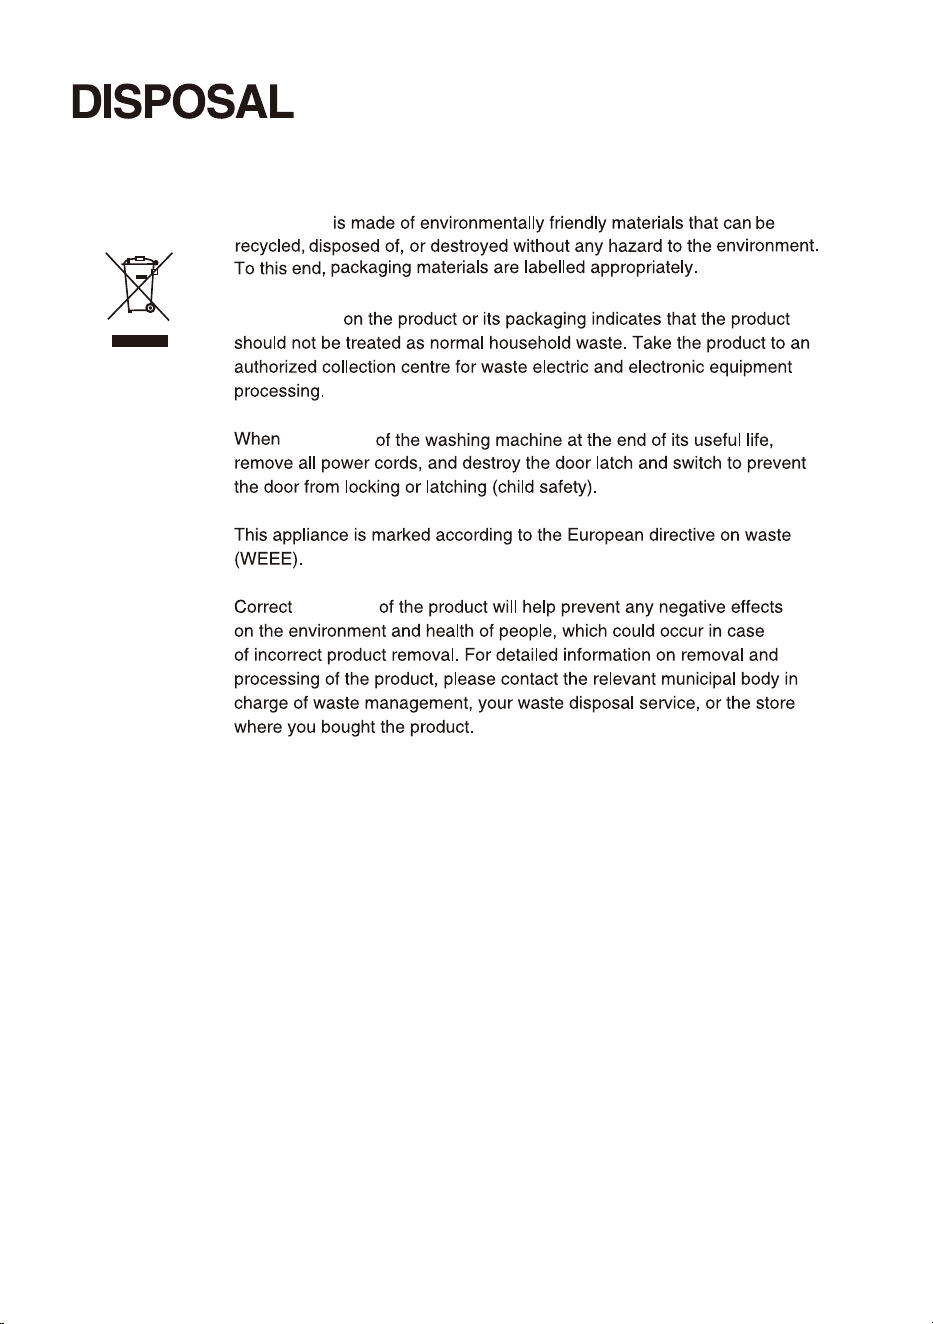
Packaging
The symbol
disposing
disposal
51
Wi-Fi CONNECTION
When the Wi-Fi function is turned on, the machine's energy consumption will increase. But the Wi-Fi
power is just less than 2W,so it has no effect on the machine's energy efficiency rating.
Washing Machine
choose "Add device" or "Scan".
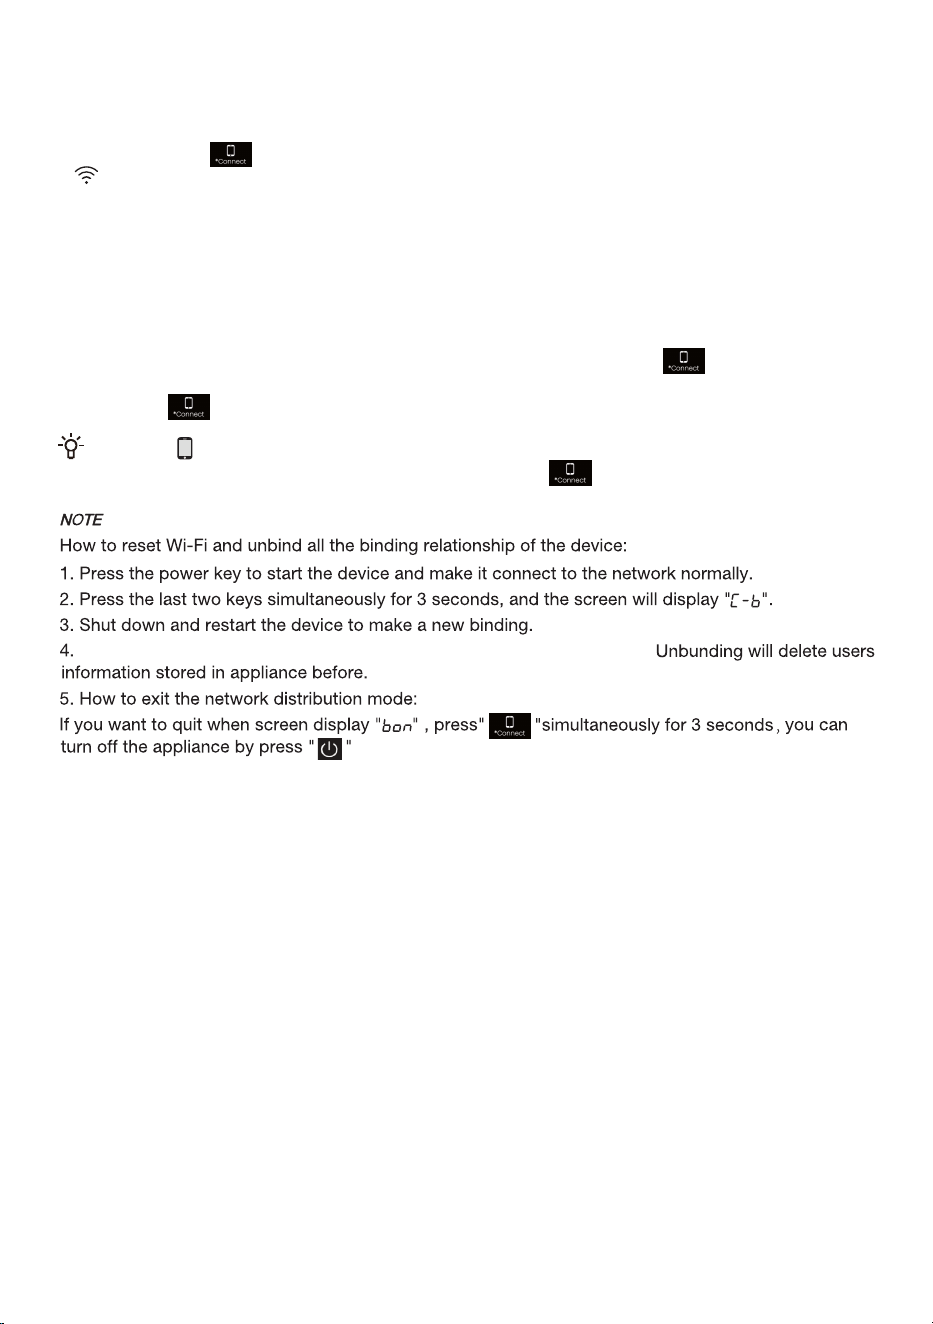
How to active the Wi-Fi function?
1. Long press the " " button to connect the Wi-Fi of the appliance until the control panel symbol
" " flashes.
2. Long press "Temp.", and you can see "Bon" on the display.
3. After the above steps, your appliance is ready to connect to the Internet, and then you can follow the
guide on your APP .
4. Otherwise, you can turn off the machine and start from the first step.
When the " " display light on the display window is not on, you cannot remotely control the machine
through the mobile phone. To enable this function, press the " " button on the dashboard.
How to active the Remote Control?
2. Press the " " button to power on the Remote Control module.
1. Verify that the Wi-Fi switch is on. If the Wi-Fi switch is not on, long press " " to turn on the Wi-Fi
network.
.
After unbinding, the device must be restarted, or the next binding will fail.
52

物料号:-X0806****