
Due to the regular upgrades of systems and products, ZKTeco could not guarantee exact consistency between the
actual product and the written information in this manual.
Quick Start Guide
Model: D0BPA
Version: 1.0
English

1.
If you have any problems, please read this manual
carefully or contact Customer Care.
2.
The device can only connect to 2.4GHz Wi-Fi networks.
Make sure your phone is linked to the 2.4GHz network if
you have a dual-band router with separate 2.4GHz and
5GHz networks.
3.
Make sure the entered Wi-Fi password is correct when
adding a new device.
4.
Please make sure the device is close to the router for a
stable network connection.
5.
Before mounting the device on the wall for the first time,
use fully charged battery. Make sure that the power
adapter provides a DC 5V/1A output.
6.
Do not mount the device before confirming a successful
network connection and smooth live video.
Important Notes
7.
We couldn't guarantee the exact consistency between
the actual product and the written information in this
manual due to the regular app and product updates.
1

Table of Contents
2
What's in the Box...............................................................3
Product Overview..............................................................4
Doorbell....................................................................................................4
Chime........................................................................................................5
Setup..................................................................................6
Connecting the Device to ZSmart App..........................................6
Pair the Doorbell Chime......................................................................7
Watching the Videos from Browser.................................................9
Connec ting the Device to Amazon Alexa or Go og le
Assistant...................................................................................................9
Installation......................................................................10
Installation Location..........................................................................10
Installation Steps................................................................................10
Recharging the Battery...................................................11
Product Features.............................................................12
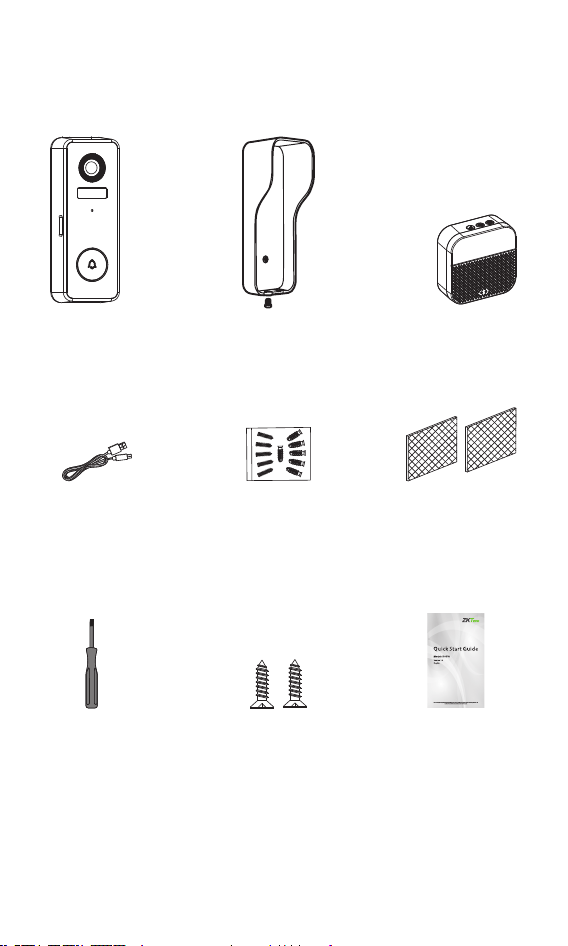
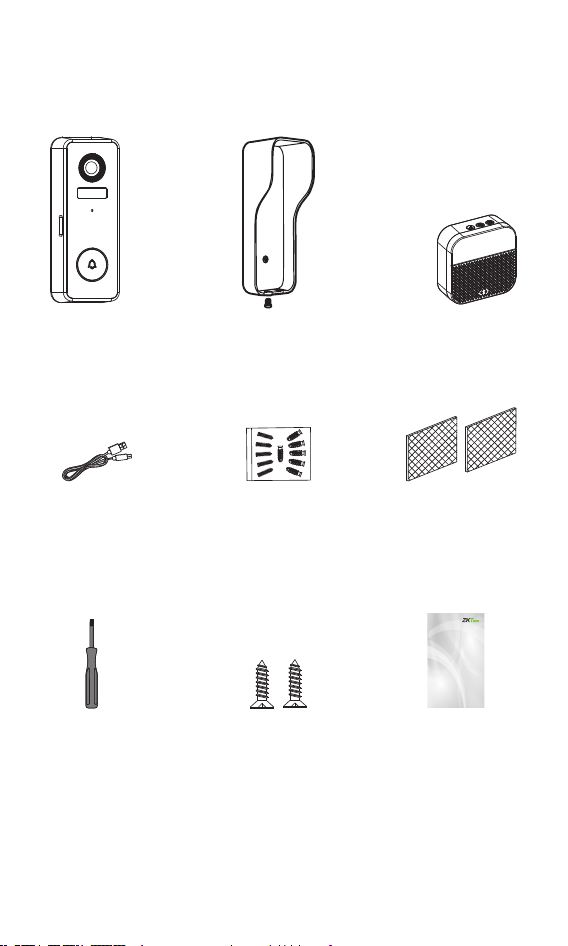
What's in the Box
Doorbell
Mounting Plate Chime
USB Charging
Cable
Screw Kit
(mounting screws*3,
anchors*3)
Double Sided
Tapes*2
Screwdriver
Security Screws*2
Quick Start Guide
3
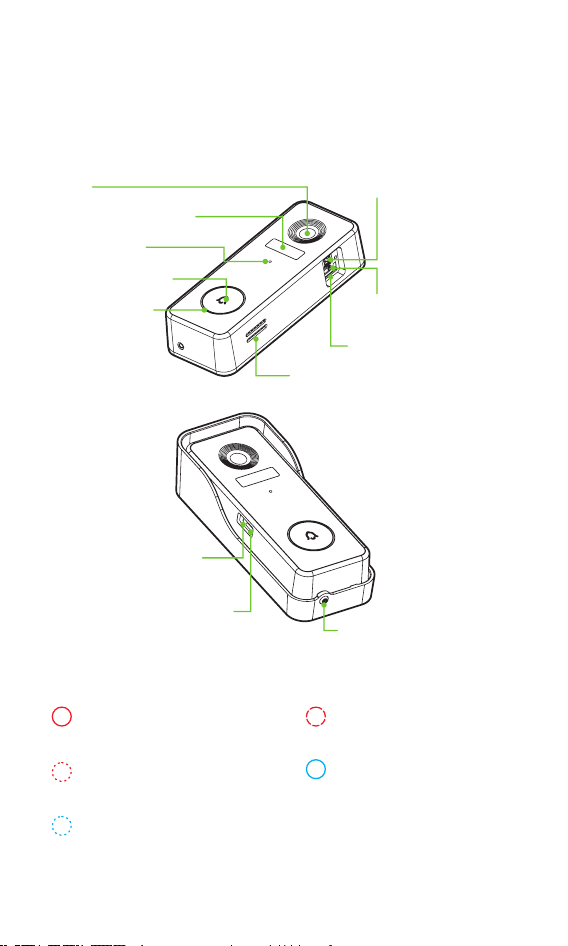
Product Overview
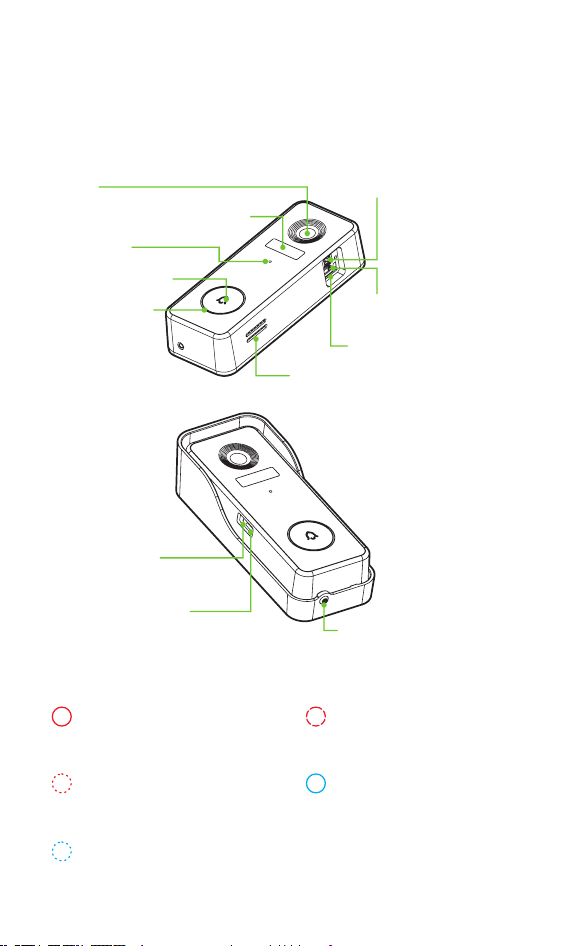
Doorbell
Lens
PIR (Motion Sensor)
Microphone
Doorbell Button
LED Indicator
Speaker
ON/OFF Switch
Micro-SD
Reset Button
Security Screw
Micro-USB Charging Port
Charging Status LED
Status LED Description:
Solid Red
Abnormal Status In Pairing Mode
Blinking Blue (twice/sec)
Firmware Upgrading
Solid BlueBlinking Red (twice/sec)
Network Connecting
Blinking Red (once/sec)
Viewing Live Video
Doorbell Pressed
4
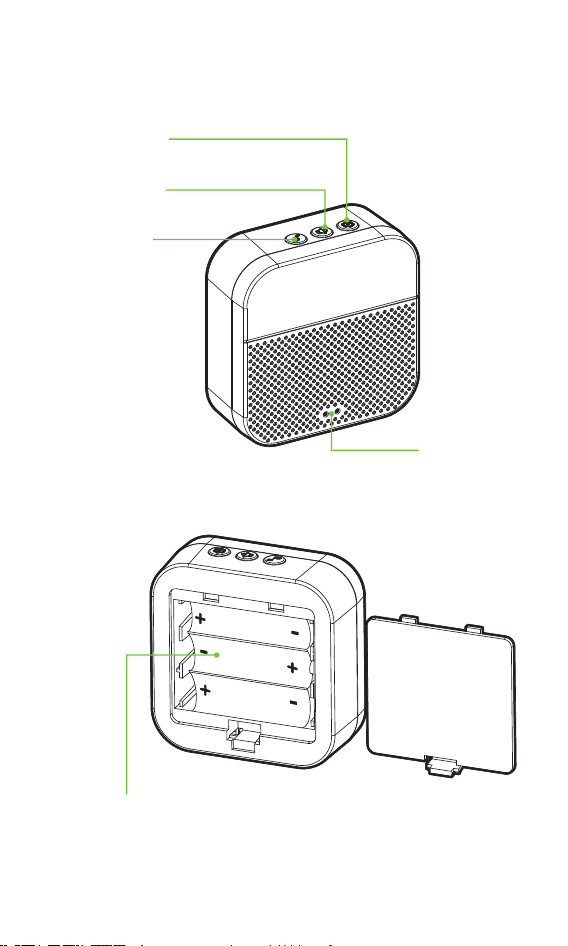
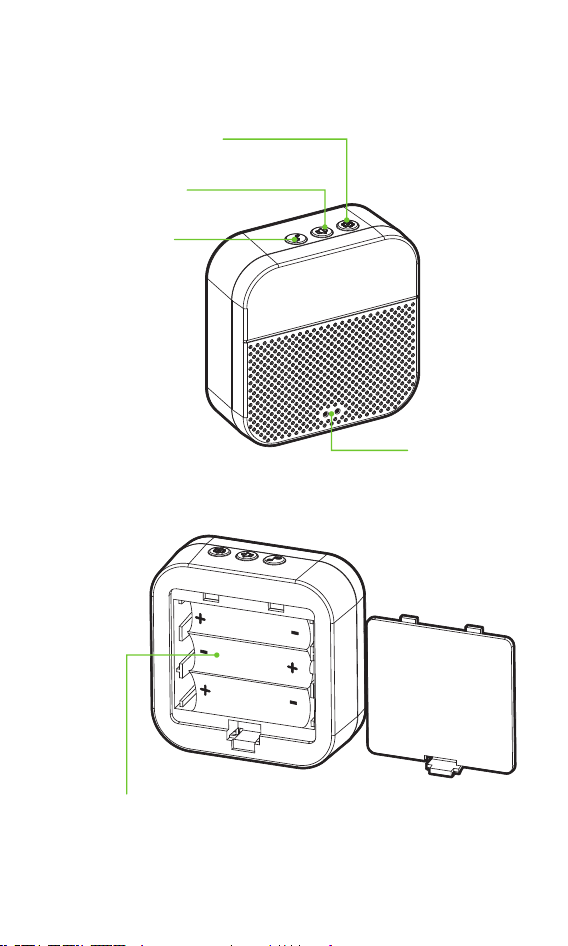
Chime
Settings Button
Volume Button
Music Button
Status LED
Battery Slot
5
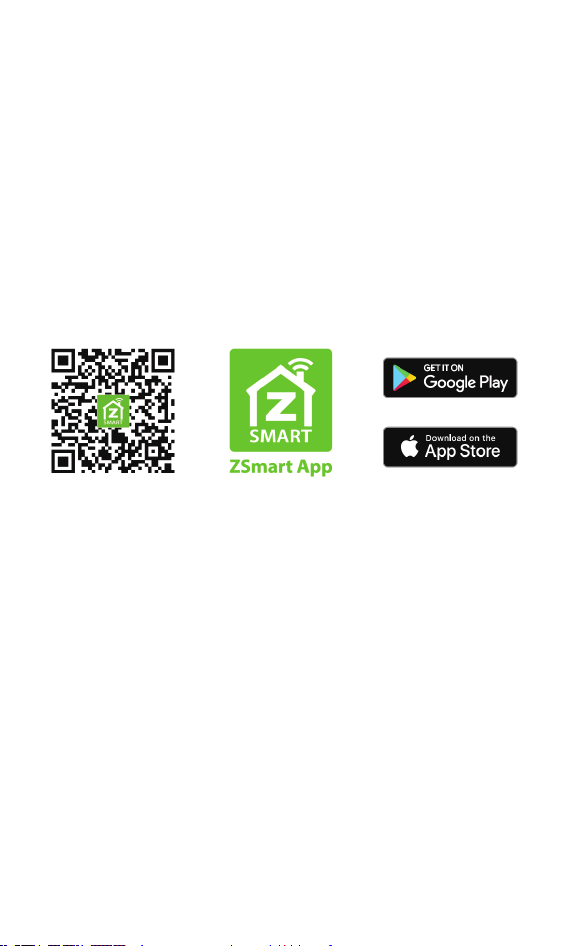
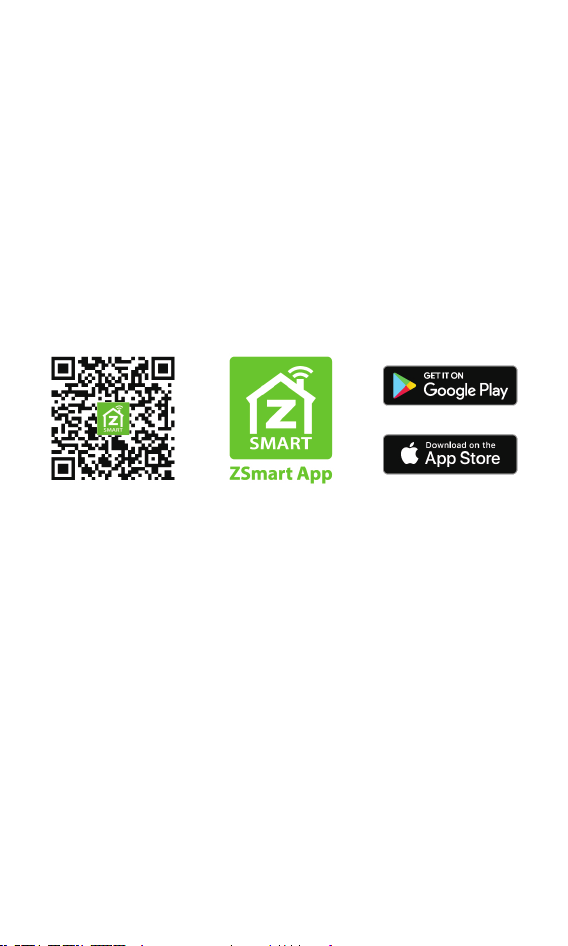
Connecting the Device to ZSmart App
Search for the ZSmart App in Apple App Store or Google
Play Store and download the App to your smartphone.
Open the ZSmart App and log in with your account. If you
do not have an account, create an account with your phone
number or Email ID.
Setup
Step 1: Download the App and Register Your
Account
Step 2: Power on the Device
1.
Open the silicone cover at the side of the device.
2.
To power on the device, turn on the On/Off Switch. Wait a
few seconds until the Status LED blinks red rapidly
(once per second), indicating that Pairing Mode is active.
Note: If the device doesn't display the above status, press
and hold the Reset Button for 5 seconds until the LED
indicator begins to flash red (once per second).
6

2.
Tick "Next" if you have finished the above steps on the
interface. Select the desired Wi-Fi and enter the correct
password. Then tap the "Next" button.
3.
Show the QR code towards the device lens, and the
device will scan the QR code. Once you see the LED
indicator blinks red rapidly (twice per second), tap the
"I Heard a Prompt" button on your mobile, the App will
connect the device automatically.
Note: Please hold the phone about 15 to 20 cm (6 to 8
inches) away from the doorbell. You can slightly move your
mobile device forward and backward for better scanning.
4.
You can manually change the name of the device once
you see the message "Added successfully" on the
mobile app. To finish the setting, tap the "Done" button.
Note: If you failed to connect your device to Wi-Fi, press and
hold the RESET Button for 5 seconds until the LED indicator
begins to blink red (once per second), then repeat the above
steps.
Step 3: Add the Device to the App
1.
Open the app, tap the "+" button on the top right corner
of the interface, and then select the ”Add Device” option.
Select the “Video Doorbell” option and then choose the
corresponding model purchased.
Operation Steps:
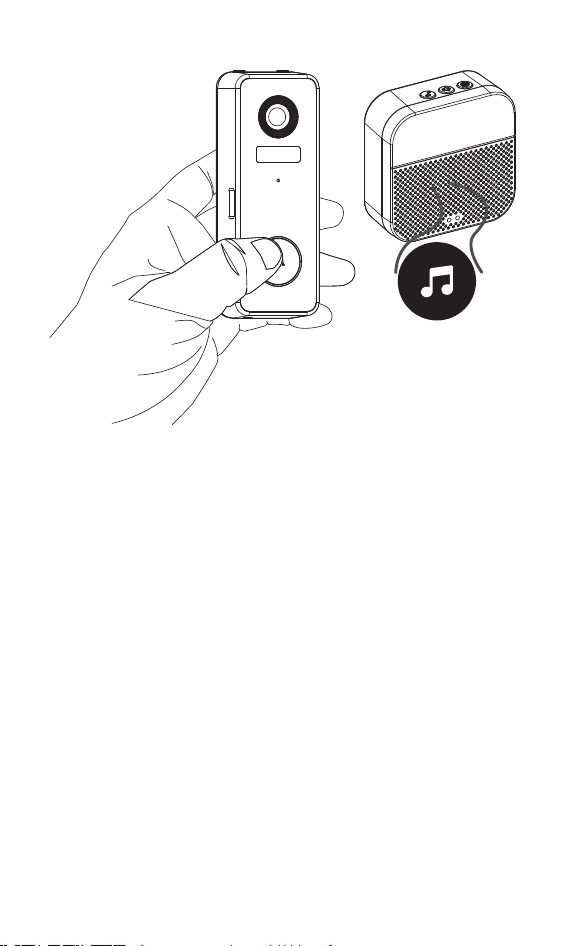
Pair the Doorbell Chime
1.
To power on the device, use a universal power adapter
with a DC 5V/1A output or insert three LR6/AA batteries.
2.
Press the Settings Button on the doorbell chime, then the
red LED will blink, indicating that pairing mode is active.
3.
Press the Doorbell Button to match the indoor chime,
then the doorbell chime will generate a sound and its
blue LED will blink, indicating that pairing operation is
successful.
7
Feature Settings:
Music: Press the Music Button once to change the default
music, the indoor chime offers four different kinds of music
for options.
Volume: Press the Volume Button once to adjust the
volume level, which supports four levels of 110dB, 100dB,
90dB and 80dB.
Settings: Press the Settings Button once to enter or exit the
pairing mode, or press and hold for 5 seconds to restore the
default factory settings.
8
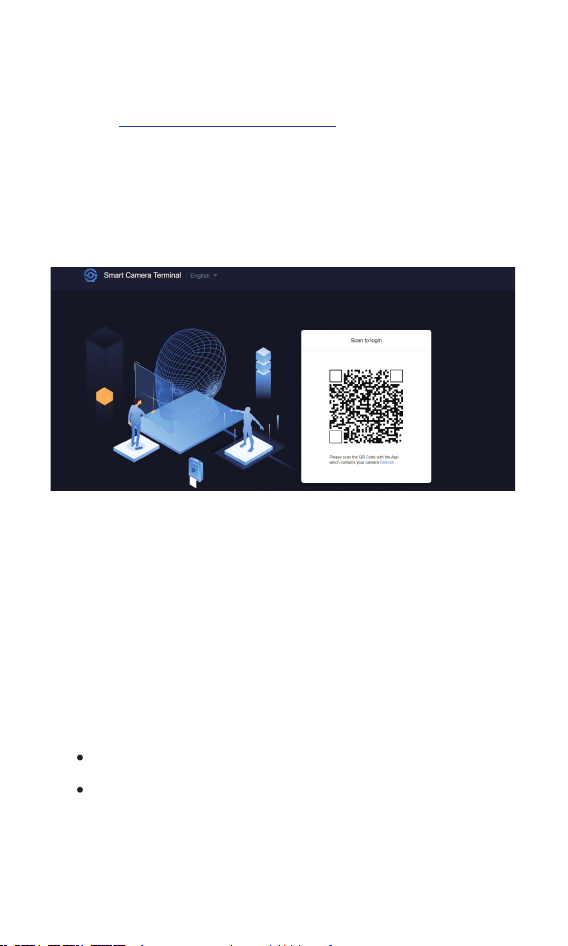
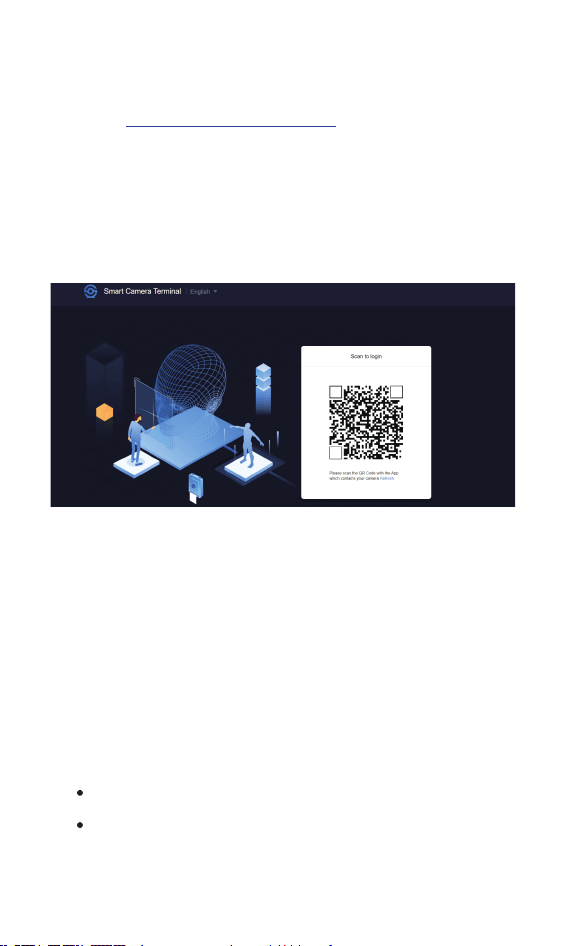
Visit , and then select the https://ipc-us.ismartlife.me
corresponding data server on the top right corner of the
interface.
1.
Watching the Videos from Browser
2.
Use ZSmart App to scan the QR code to login to your
account.
3.
Click the corresponding device to watch the live videos.
Connecting the Device to Amazon
Alexa or Google Assistant
Tap the EDIT Button in the upper right corner of the device
interface after successfully connecting the device to the
ZSmart App. To link your ZSmart Account to Amazon Alexa or
Google Assistant, select the Amazon Alexa or Google
Assistant icon and follow the on-screen instructions.
After completing the setup, you can use the supported voice
commands that include:
Echo, show me <device name>.
Hey Google, show me <device name>.
Note: Every time you change the name of a linked device,
you must identify it again to update the name.
9
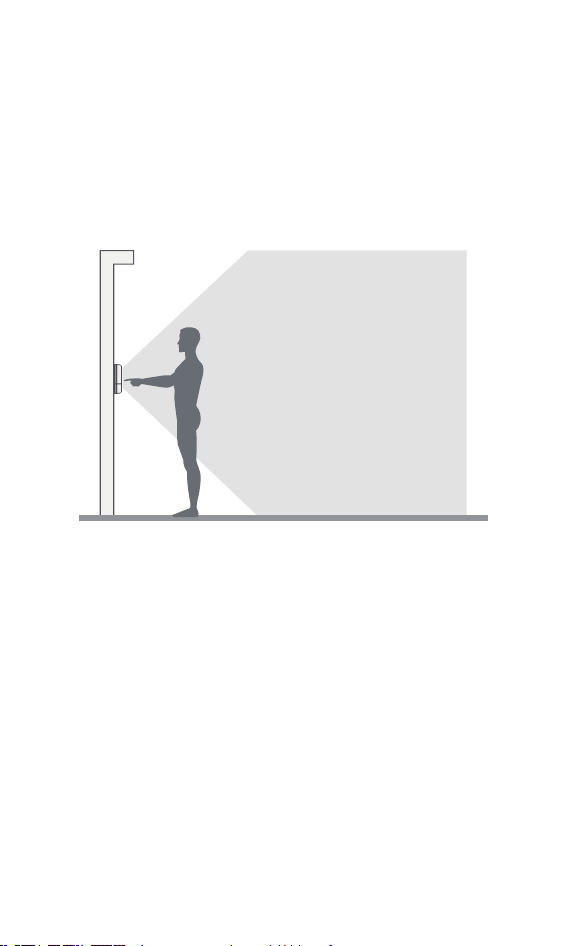
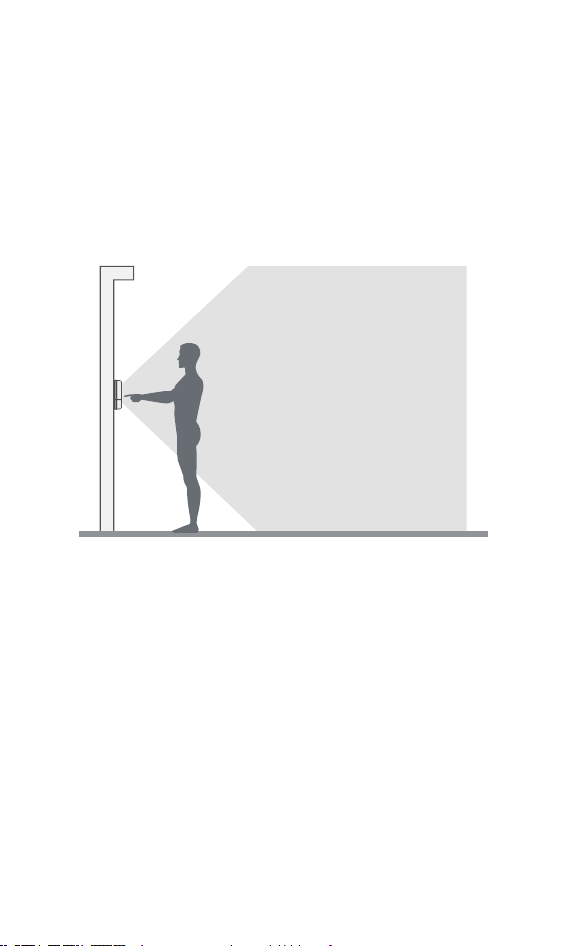
Installation Location
Installation
The device can be put on the wall. Choose a location with a
clear, unblocked field of view and with a good wireless signal
to the device. The recommended installation height is 1.2 m
(4 ft).
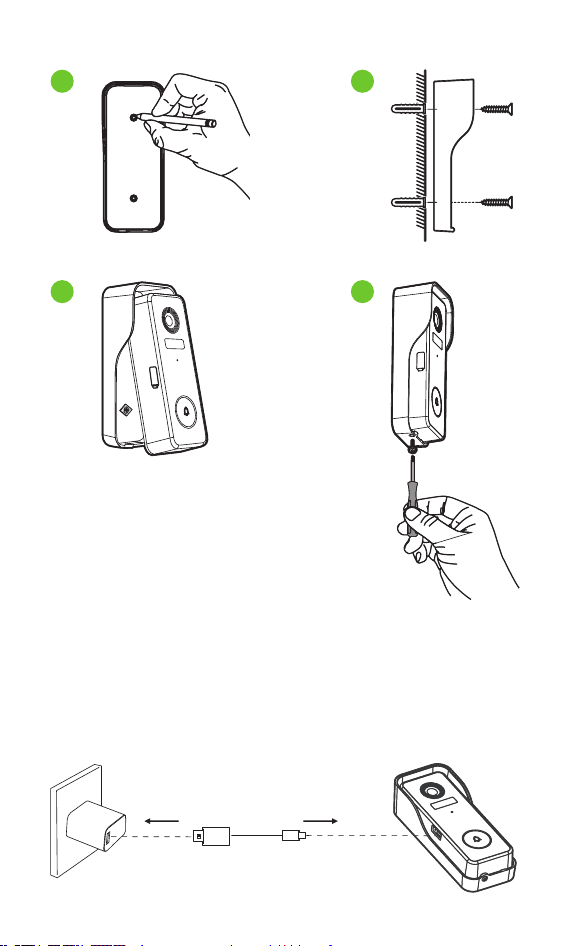
Installation Steps
After confirming a successful Wi-Fi connection and smooth
live video, you can select the required position to mount the
device. The installation steps are as follows:
1.
Drill two holes in the wall according to the hole positions
of the mounting plate, and then insert the plastic anchor
into the holes; anchors are necessary for walls that are
made of hard materials such as concrete, brick or stucco.
2.
Fix the mounting plate onto the wall with the two screws.
3.
Install the doorbell on the mounting plate.
4.
Use the provided screwdriver to lock the bottom of the
doorbell by the security screws.
10

Recharging the Battery
Charge the doorbell with universal power adapter that
deliver a DC 5V/1A output. The red LED will light up when the
device is charging. You could check the remaining battery
level in the App.
11
1
2
3 4
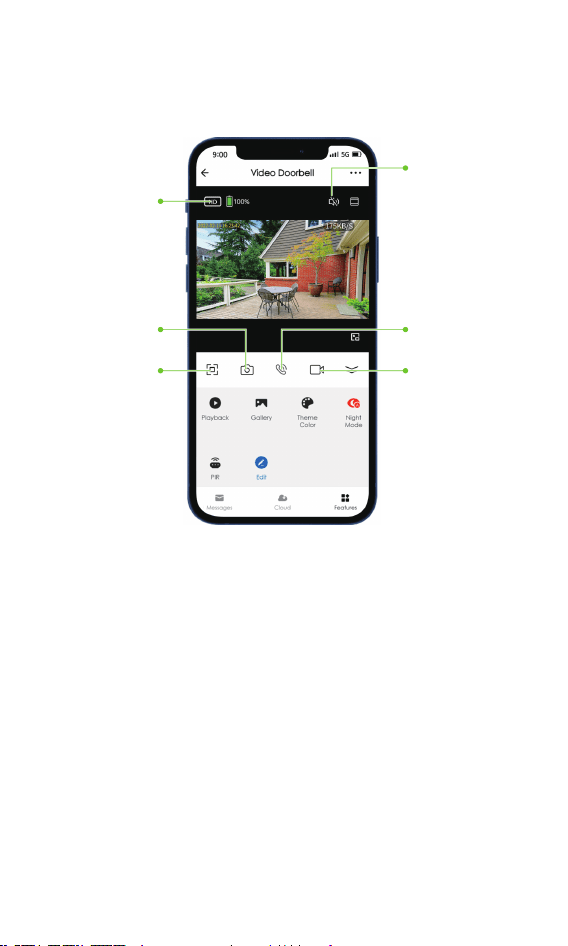
Product Features
Main Interface:
Battery Level: Check the remaining battery level and the
charging status.
Sound: To mute or unmute the sound from the device.
Fullscreen: Tap it to switch to the full screen.
Screenshot: Capture a picture to the photo album in the App.
Speak: Tap it to talk to people in front of the device.
Record: Manually record a video to the photo album in the App.
Playback: Watch the recorded videos in the Micro-SD Card.
Image Quality: To switch the image quality between HD and SD.
12
Image Quality
Sound
Fullscreen
Screenshot Speak
Record

Theme Color: Change the UI theme to light mode or dark mode.
Night Mode: Switch on/off the night vision mode or set it to
Auto Mode.
Messages: Check the logs for each motion detection or
video call.
*Cloud: This Video Cloud Storage service is needed to pay
for the monthly or annually subscription. You could check the
video from cloud storage with App anytime, anywhere. The
cloud storage only supports recording the events video clips.
Gallery: Review the recorded photos when detecting the
motion.
PIR: The PIR can be enabled or disabled, or be adjusted the
sensitivity level as required.
More Setting:
Basic Settings:
Flip Screen: Rotate the current monitoring image at
180 degrees.
Time Watermark: Choose whether the monitoring
interface displays the real time watermark.
Talk Mode: To fit into the actual requirements, select
the one-way or two-way talk mode.
Detection Alarm Settings:
Human Body Filtering: Reduce false alerts with smart
tech which differentiates humans from other objects.
Power Management: Check the remaining battery level and
the power source, or set the threshold of the low battery
alarm.
Tamper alarm: Enable or disable the tamper alarm. If the
trigger of device’s back detects the disassembly, the device
will generate a 30-second siren alarm.
13

Storage Settings: After inserting the Micro-SD card, you
could check the status of storage capacity.
Voice Control: To see live video from the Amazon Echo or
Google Home device, use Amazon Alexa or Google Assistant
voice commands.
Offline Notication: It enables to receive the offline push
message of the device.
Remove Device: Remember to REMOVE the device from the
current account when the camera owner changes.
14

Modelo: D0BPA
Versión: 1.0
Español
Guía Rápida
Debido a las actualizaciones periódicas de los sistemas y productos, ZKTeco no puede garantizar la consistencia
exacta entre el producto real y la información escrita en este manual.

1.
Lea atentamente este manual o comuníquese con
atención al cliente para cualquier consulta.
2.
Este dispositivo sólo trabaja con redes Wi-Fi de 2.4GHz.
Si tiene un enrutador doble banda con redes de 2.4 GHz y
5 GHz, asegúrese de que su teléfono esté conectado a la
de 2.4 GHz.
3.
Asegúrese de que la contraseña Wi-Fi ingresada sea
correcta alagregar un nuevo dispositivo.
4.
Para una conexión de red estable, asegúrese de que el
dispositivo esté colocado cerca del enrutador.
5.
Antes de montar el dispositivo en la pared por primera
vez, cargue la batería al 100%. Asegúrese de que el
adaptador de corriente proporcione una salida de DC de
5V/1A.
6.
No instale el dispositivo antes de confirmar una conexión
de red exitosa y un video en vivo fluido.
7.
Debido a las actualizaciones periódicas de la aplicación y
los productos, no podemos garantizar la coherencia
exacta entre el producto real y la información escrita en
este manual.
1
Notas Importantes

2
Tabla de Contenidos
Contenido..........................................................................3
Descripción del Producto..................................................4
Timbre.......................................................................................................4
Timbre Interior.......................................................................................5
Conguración ...................................................................6
Conexión del Dispositivo con la App ZSmart...............................6
Emparejar el Timbre Interior..............................................................7
Revisar Grabaciones desde Navegador..........................................9
Conexión del Dispositivo con Amazon Alexa o Google
Assistant...................................................................................................9
Instalación.......................................................................10
Ubicación de la Instalación..............................................................10
Pasos de la Instalación.......................................................................10
Recargando la Batería.....................................................11
Características del Producto...........................................12
3
Contenido
Video Timbre Adaptador de Corriente Timbre Interior
Cable de
Carga USB
Kit de Tornillos
(tornillos de montaje*3,
anclajes*3)
Tornillos de Seguridad*2 Guía RápidaDestornillador
Cinta de Doble
Cara*2
Modelo: D0BPA
Versión: 1.0
Español
Guía Rápida
Debido a las actualizaciones periódicas de los sistemas y productos, ZKTeco no puede garantizar la consistencia
exacta entre el producto real y la información escrita en este manual.
Descripción del Producto
Timbre
Lente
PIR (Sensor de Movimiento)
Micrófono
Botón de Timbre
LED de Estado
Altavoz
Ranura para Tarjeta
Micro-SD
Botón de Reinicio
Tornillo de Seguridad
Interfaz de Energía
4
Interruptor
Encendido/Apagado
LED de Estado
de Carga
Rojo Fijo
Estado Anormal
Azul intermitente (dos
veces por segundo)
Rojo intermitente (dos
veces por segundo)
Conectando a la Red
Rojo intermitente (una
vez por segundo)
Descripción del Estado del Indicador LED:
En Modo de Emparejamiento
Azul Fijo
Ver Video en Vivo Video
Timbre Presionado
Actualizando el Firmware
Timbre Interior
5
Botón de Volumen
Botón de Música
Botón de Configuración
LED de Estado
Ranura de la Batería
Busque la aplicación ZSmart en Apple App Store o Google
Play Store y descargue la aplicación en su teléfono móvil.
Abra la aplicación ZSmart e inicie sesión con su cuenta. Si no
tiene una cuenta, cree una cuenta con su número de
teléfono o correo electrónico.
Paso 1: Descargue la App y Registre su Cuenta
Paso 2: Encienda el Dispositivo
1.
Abra la tapa de silicona en el lateral del dispositivo.
2.
Enci en da el Inter ru pt or En cendido/A pa gado para
encender el dispositivo. Espere unos segundos hasta que
el LED de estado parpadee en rojo rápidamente (una
vez por segundo), lo que indica que el modo de
emparejamiento está activo.
No t a: Si el dispositivo no muestra el estado anterior,
mantenga presionado el Botón de Reinicio durante 5
segundos hasta que el idicador LED comience a parpadear
en rojo (una vez por segundo).
6
Configuración
Conexión del Dispositivo con la App
ZSmart

2.
Marque "Siguiente" si ha terminado los pasos anteriores
en la interfaz. Seleccione el Wi-Fi deseado e ingrese la
contraseña correcta. Luego toque el botón "Siguiente".
3.
Muestre el código QR hacia la lente del dispositivo y el
dispositivo escaneará el código QR. Una vez que vea que
el indicador LED parpadea en rojo rápidamente (dos
veces por segundo), toque el botón "Oír el tono de
aviso" en su móvil, la aplicación conectará el dispositivo
automáticamente.
Nota: Sostenga el teléfono a unos 15-20 cm de distancia
de el dispositivo. Puede mover ligeramente su dispositivo
móvil hacia adelante y hacia atrás para escanear mejor.
4.
Una vez que vea el mensaje "Se agregó con éxito" en la
aplicación, puede editar el nombre del dispositivo
ma n u alm e nte . To que e l b otó n "Finalizado" p a ra
completar la configuración.
Nota: Si no pudo conectar su dispositivo a Wi-Fi, mantenga
presionado el Botón de Reinicio durante 5 segundos hasta
que el indicador LED parpad ee en rojo(un a ve z por
segundo), luego repita los pasos anteriores.
Paso 3: Encienda el Dispositivo
1.
Abra la aplicación, toque el botón "+" en la esquina
superior derecha de la interfaz y luego seleccione la
opción "Agregar dispositivo". Seleccione la opción
"Video Timbre" y luego elija el modelo correspondiente
comprado.
7
Pasos de Operación:
Emparejar el Timbre Interior
1.
Encienda el dispositivo utilizando un adaptador de
corriente universal con una salida de DC de 5V/1A o
inserte tres pilas alcalinas LR6/AA.
2.
Presione el Botón de Conguración en el chime del
timbre, luego el LED rojo parpadeará, lo que indica que el
modo de emparejamiento está activo.

3.
Presione el Botón de Timbre para coincidir con el chime
interior, luego el chime del timbre generará un sonido y
su LED azul parpadeará, lo que indica que la operación de
emparejamiento se realizó exitosamente.
Configuración de Características:
Música: Presione el Botón de Música una vez para cambiar
la música predeterminada, el timbre interior ofrece cuatro
tipos diferentes de música para las opciones.
Volumen: Presione el Botón de Volumen una vez para
ajustar el nivel de volumen, que soporta cuatro niveles de
110 dB, 100 dB, 90 dB y 80 dB.
Ajustes: Presione el Botón de Conguración una vez para
ingresar o salir del modo de emparejamiento, o manténgalo
p r e s i o n a d o d u r a n t e 5 s e g u n d o s p a r a r e s t a u r a r l a
configuración predeterminada de fábrica.
8
1.
Revisar Grabaciones desde Navegador
2.
Use la aplicación ZSmart para escanear el código QR para
iniciar sesión en su cuenta.
3.
Haga clic en el dispositivo correspondiente para ver los
videos en vivo.
C o n e x i ó n d e l D i s p o s i t i v o c o n
Amazon Alexa o Google Assistant
Después de conectar correctamente el dispositivo a la
aplicación ZSmart, toque el botón EDITAR en la esquina
superior derecha de la interfaz del dispositivo. Seleccione el
ícono de Amazon Alexa o Google Assistant, luego siga las
instrucciones en pantalla para vincular su cuenta ZSmart a
Amazon Alexa o Google Assistant.
Después de completar la configuración, puede usar los
comandos de voz admitidos que incluyen:
Alexa, muéstrame <nombre del dispositivo>.
Hey Google, muéstrame <nombre del dispositivo>.
Nota: Después de cambiar el nombre del dispositivo vinculado,
actualice nuevamente la cuenta para actualizar el nombre.
9
Visite y luego seleccione el https://ipc-us.ismartlife.me
servidor de datos correspondiente en la esquina superior
derecha de la interfaz.
Ubicación de la Instalación
Instalación
El dispositivo se puede colocar en la pared. Elija una
ubicación con una visión despejada para tener un amplio
campo de visión sin obstrucciones y con una buena señal
inalámbrica para el dispositivo. La altura de instalación
recomendada es de 1,2 m (4 ft).
Pasos de la Instalación
Después de confirmar una conexión Wi-Fi exitosa y un video en
vivo fluido, puede seleccionar la posición requerida para montar
el dispositivo. Los pasos de instalación son los siguientes:
1.
Taladre dos orificios en la pared de acuerdo con las
posiciones de los orificios de la placa de montaje y luego
inserte el anclaje de plástico en los orificios. Los anclajes
son necesarios para paredes hechas de materiales duros
como hormigón, ladrillo o estuco.
2.
Fije la placa de montaje a la pared con dos tornillos.
3.
Instale el timbre en la placa de montaje.
4.
Utilice el destornillador proporcionado para fijar la parte
inferior del timbre con los tornillos.
10
Recargando la Batería
Cargue el video timbre con un adaptador de corriente
universal que ofrece una salida de DC de 5V/1A. El LED rojo
se encenderá cuando el dispositivo se esté cargando. Puede
verificar el nivel de batería restante en la APP.
11
1
2
3 4

Video Timbre
Características del Producto
Interfaz Principal:
Nivel de Batería: Verifique el nivel restante de la batería y el
estado de carga.
Sonido: Silencie o reactive el sonido del dispositivo.
12
Sonido
Pantalla
Completa
Tomar Fotos Hablar
Grabar
Calidad de Imagen: Para cambiar la calidad de imagen entre
HD y SD.
Pantalla Completa: Tóquelo para cambiar a la pantalla
completa.
Tomar Fotos: Tome una imagen en el álbum de fotos en la APP.
Hablar: Tóquelo para hablar con las personas frente al
dispositivo.
Calidad de
Imagen

Reproducir: Vea los videos grabados en la tarjeta Micro-SD.
Grabar: Grabe manualmente un video en el álbum de fotos
en la APP.
Color de Tema: Cambie el tema de la interfaz de usuario al
modo claro o al modo oscuro.
Álbum de Fotos: Revise las fotos grabadas al detectar el
movimiento.
Visión Nocturna: Encienda/apague el modo de Visión
Nocturna o configúrelo en Modo Automático.
PIR: La función del PIR se puede activar o desactivar o se
puede ajustar el nivel de sensibilidad según su necesidad.
Mensaje: Verifique los registros específicos de toda la
detección de movimiento o videollamada.
*Cloud: Este servicio de Almacenamiento en la Nube
requiere pagar la suscripción mensual o anual. Puede ver el
video desde el almacenamiento en la nube con la aplicación
e n c u a l q u i e r m o m e n t o y e n c u a l q u i e r l u g a r. E l
almacenamiento en la nube solo admite la grabación de
videoclips por eventos.
Más Configuraciones:
Ajustes Básicos:
Vuelta de imagen: Gire la imagen de monitoreo
actual a 180 grados.
Filigrana de tiempo: Elija si la interfaz de monitoreo
muestra la filigrana de tiempo real.
Modo de audio: Para adaptarse a los requisitos reales,
seleccione el modo de conversación unidireccional o
bidireccional.
Conguración de Alarma de Detección:
Detección Corporal: Reduzca las falsas alertas con
tecnología inteligente que diferencia a los humanos
de otros objetos.
13

Alarma de Sabotaje: Active o desactive la alarma de
sabotaje. Si el disparador de la parte posterior del dispositivo
detecta el desmontaje, el dispositivo generará una alarma de
sirena de 30 segundos.
Administración de Energía: Verifique el nivel de batería
restante y la fuente de corriente, o configure el umbral de la
alarma de batería baja.
Control por Voz: Para ver videos en vivo desde el dispositivo
Amazon Echo o Google Home, use los comandos de voz de
Amazon Alexa o Google Assistant.
Conguración de Almacenamiento: Después de insertar la
tarjeta Micro-SD, puede verificar el estado de la capacidad de
almacenamiento.
Recordatorio de Falta de Conexión: Habilite para recibir
una notificación cuando el dispositivo no tenga conexión.
Eliminar Dispositivo: Recuerde ELIMINAR el dispositivo de
la c u e nta a c t u a l cua n d o camb i e el pro p ieta r i o del
dispositivo.
14
Warning:
This device complies with Part 15 of the FCC Rules. Operation is subject to the
following two conditions: (1) This device may not cause harmful interference, and
(2) this device must accept any interference received, including interference that
may cause undesired operation.
This equipment has been tested and found to comply with the limits for a Class B
digital device, pursuant to Part 15 of the FCC Rules. These limits are designed to
provide reasonable protection against harmful interference in a residential
installation. This equipment generates, uses, and can radiate radio frequency
energy and, if not installed and used in accordance with the instructions, may
cause harmful interference to radio communications. However, there is no
guarantee that interference will not occur in a particular installation. If this
equipment does cause harmful interference to radio or television reception,
which can be determined by turning the equipment off and on, the user is
encouraged to try to correct the interference by one or more of the following
measures:
FCC RF Radiation Exposure Statement:
Connect the equipment into an outlet on a circuit different from that to
which the receiver is connected.
Consult the dealer or an experienced radio/TV technician for help.
Reorient or relocate the receiving antenna.
Increase the separation between the equipment and receiver.
This Transmitter must not be co-located or operating in conjunction with any
other antenna or transmitter.
IMPORTANT! Any changes or modifications not expressly approved by the party
responsible for compliance could void the user's authority to operate the
equipment.
This equipment complies with RF radiation exposure limits set forth for an
uncontrolled environment.

ZKTeco Industrial Park, No. 32, Industrial Road,
Tangxia Town, Dongguan, China.
Phone : +86 769 - 82109991
Fax : +86 755 - 89602394
www.zkteco.com
Copyright © 2022 ZKTECO CO., LTD. All Rights Reserved.


