
Due to regular upgrades of systems and products, ZKTeco could not guarantee exact consistency
betweenthe actual product and the written information in this manual.
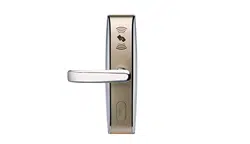
Installation Guide
Model: LH4000
Version: 2.0
English
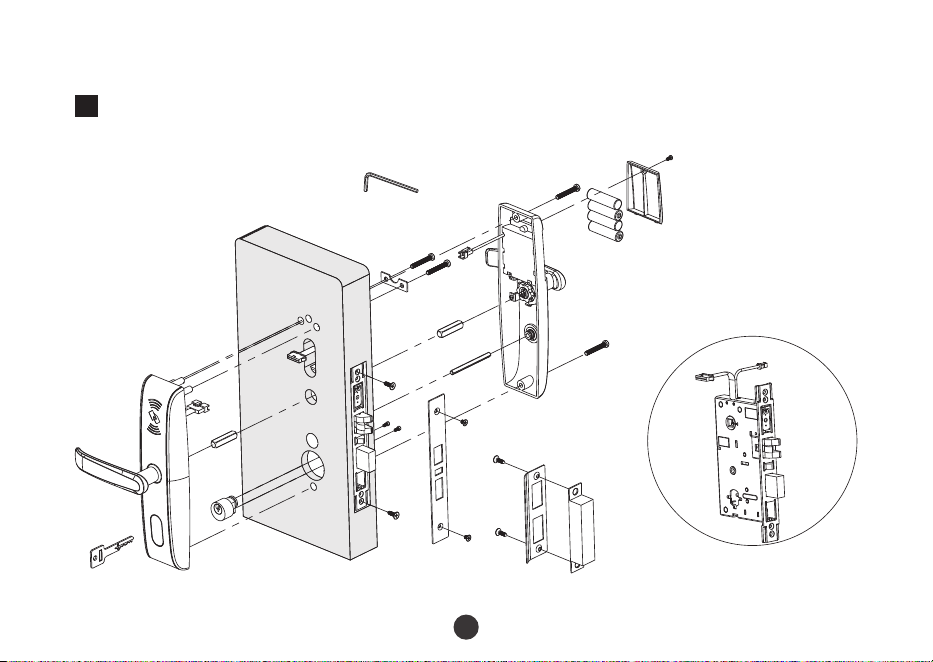
Diagram and Caution
Diagram
1
P
A
E
H
I
T
A
B
C
D
F
G
J
K
L
M
K
N
O
Q
R
H
S
1
2
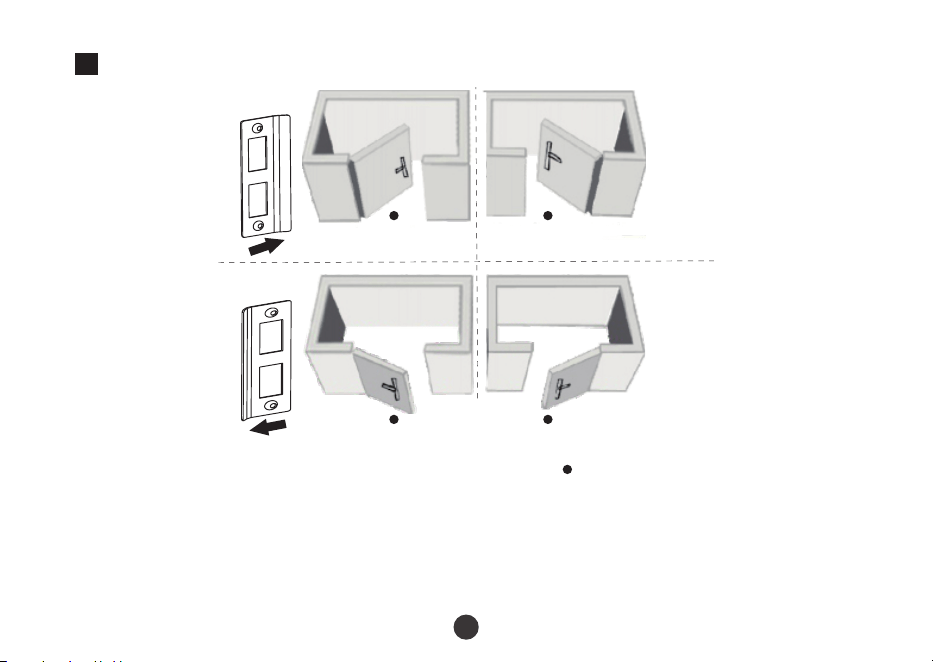
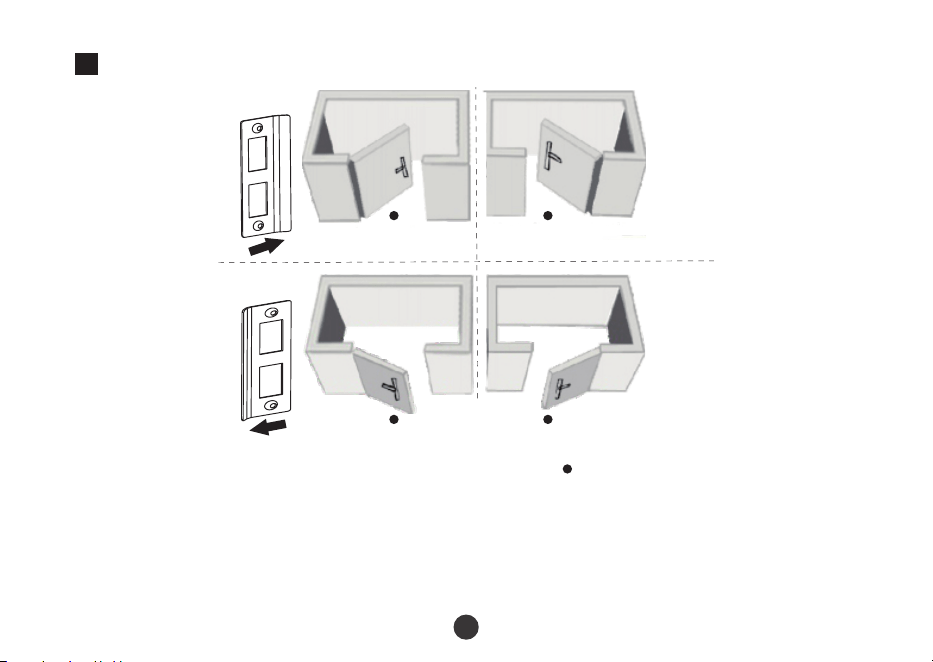
Caution
2
Person Location
Left Inward
Right Inward
Left Outward
Right Outward
Note:
1.
Do not overexert when tighten the screws.
2.
Do not use electric tool to tighten the screws.
3.
Please wear eye-protection device to protect your eyes when drilling and slotting.
R
R
3
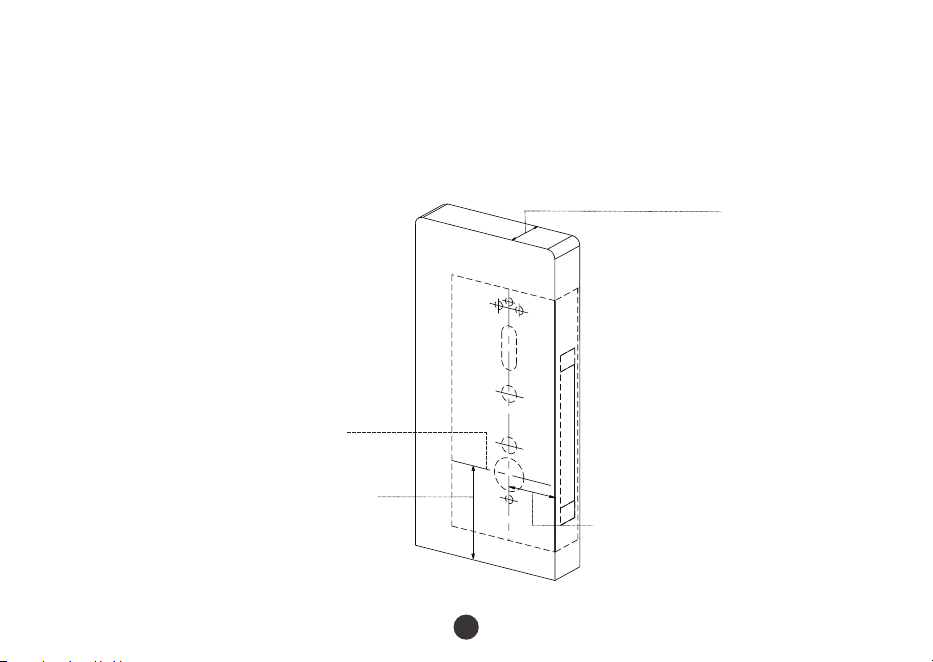
Installation Step
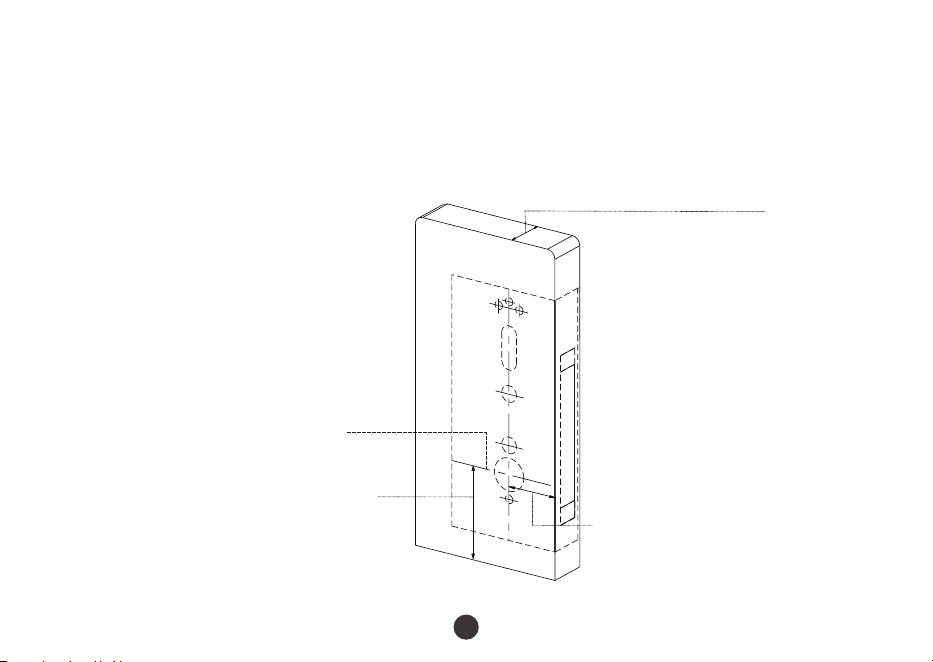
1.
Align the template along the vertical center line of the mortise at the desired handle
height, and tape it to the door. Drill the hole on the door.
Desired handle height
Handle centerline
Door
thick
ness 35~54mm
Backset
70mm

4
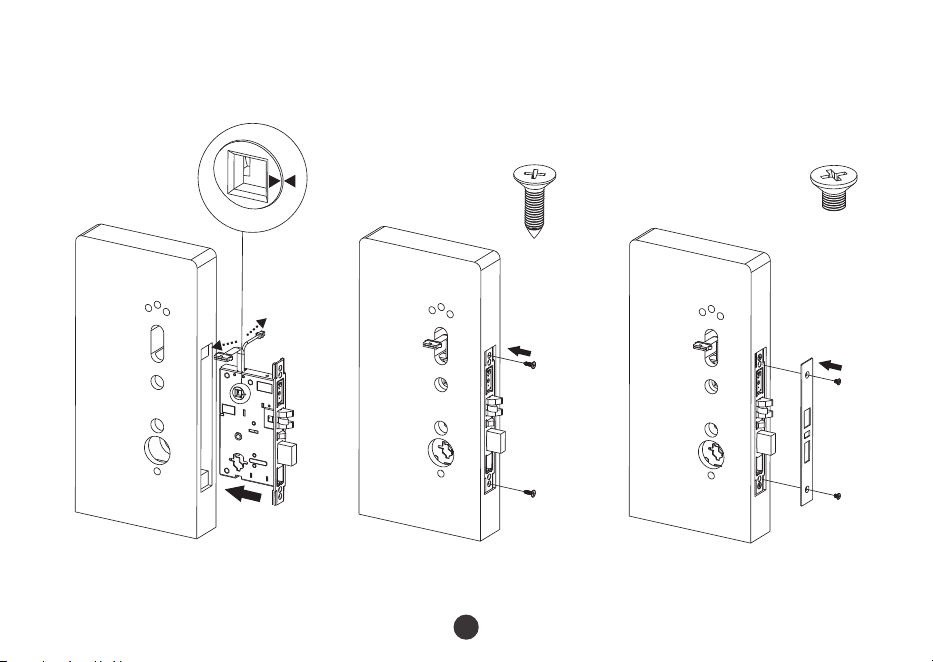
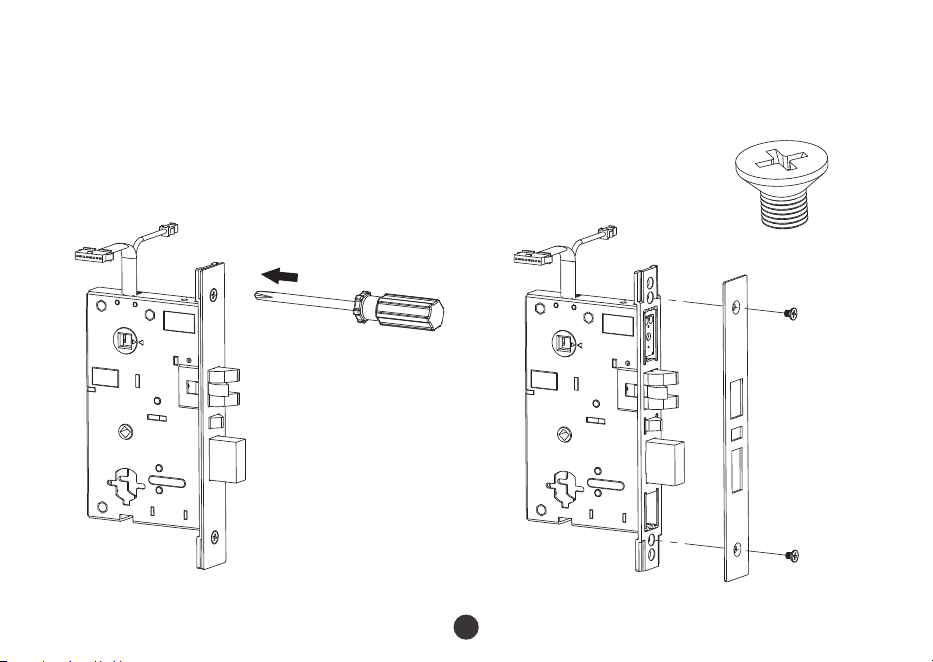
2.
Remove two screws (D) from mortise latch plate.
A
C
D
D
A
5
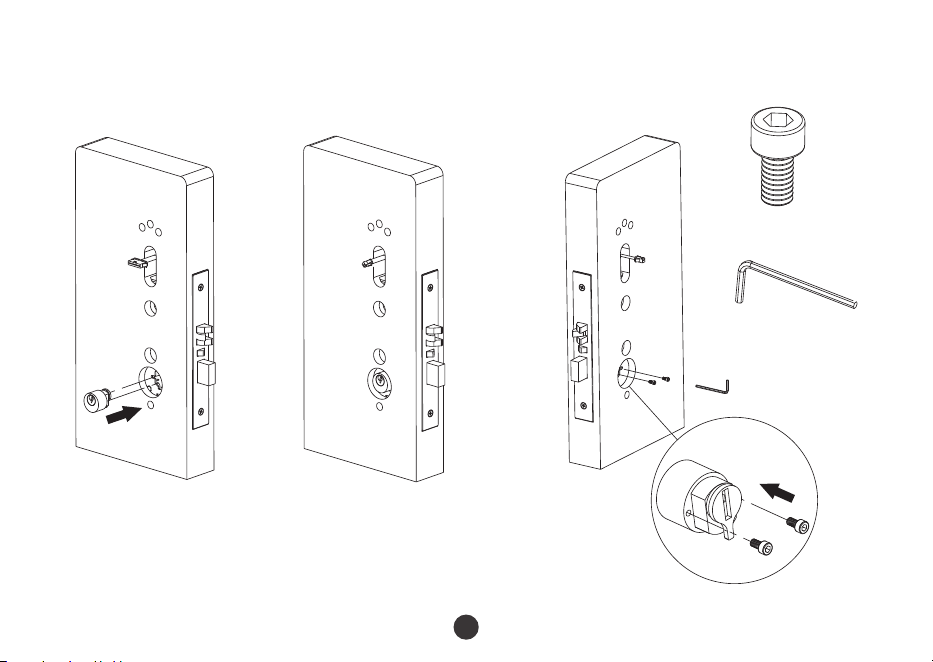
3.
Install mortise (A).
4.
Install mortise latch plate (C).
D
B
A
B
D
C
Note: Two Triangles on the mortise must be in horizontal alignment (as the above enlarged figure).

6
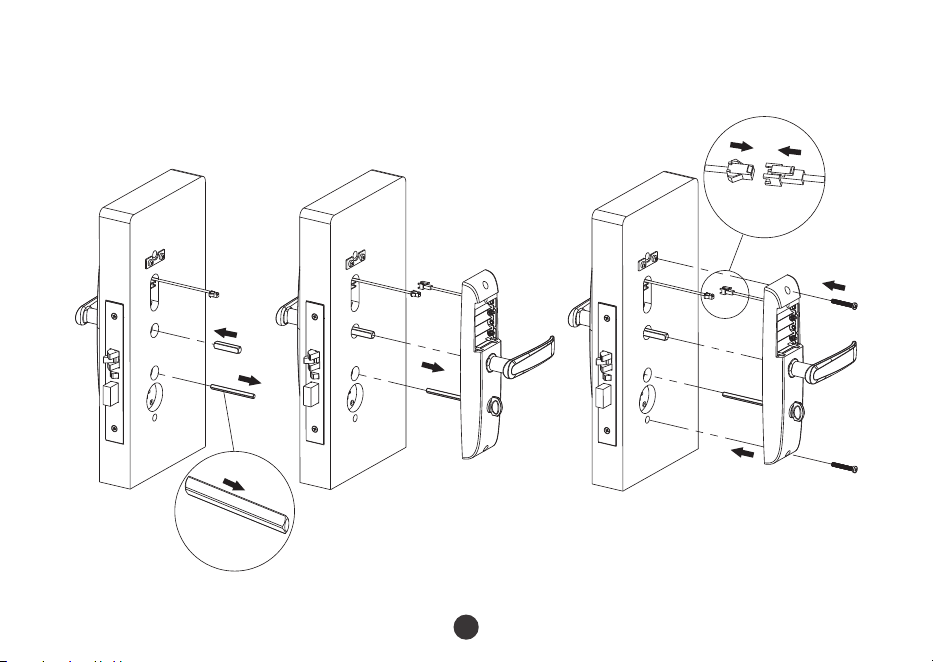
5.
Install lock cylinder (E).
E
F
G
G
F
E
F
E

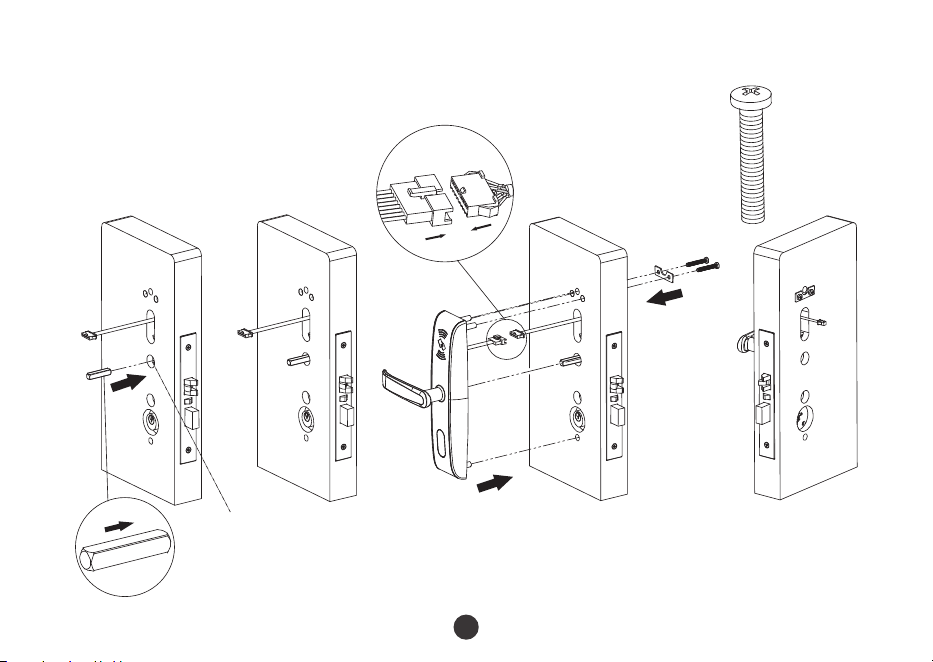
6.
Install 8X8 spindle (H) and fix outdoor unit (I).
H
H
H
H
I
J
Note:
K
Please confirm the two triangles of the mortise be in horizontal position
always! As step3 in this installation instruction.
K
J
K
7
H
L
H
L
H
K
M
L
L
M
7.
Install 8X8 spindle (H) and 5X5 spindle (L), and fix the indoor unit (M).
8
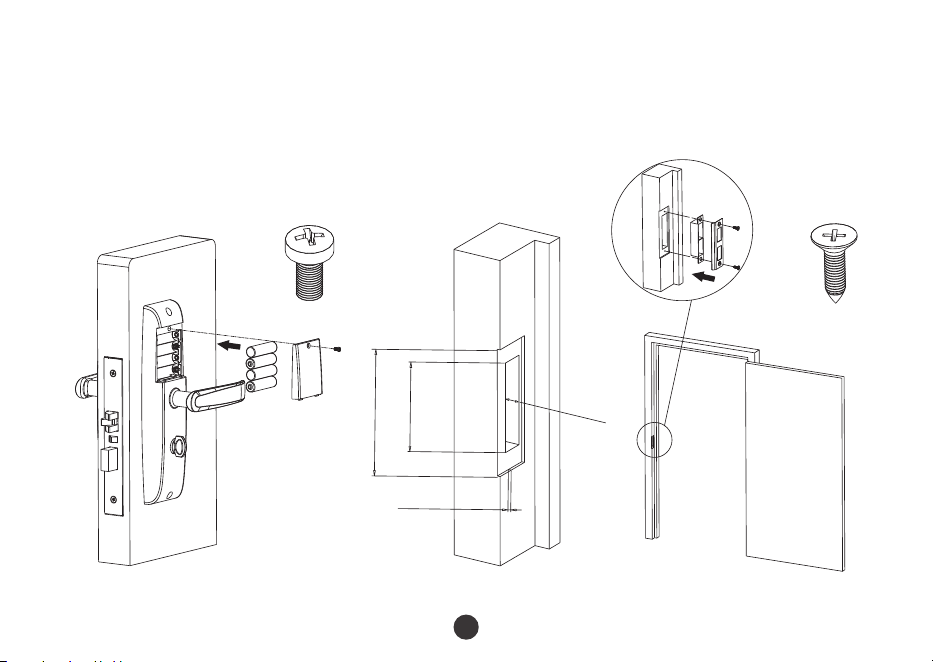
8.
Install batteries (N).
9.
Measure the doorframe for strike dimensions and drill the hole.
O
N
125mm
89mmX25mm
22mm
3mm
S
S
Q
R
P
P
9

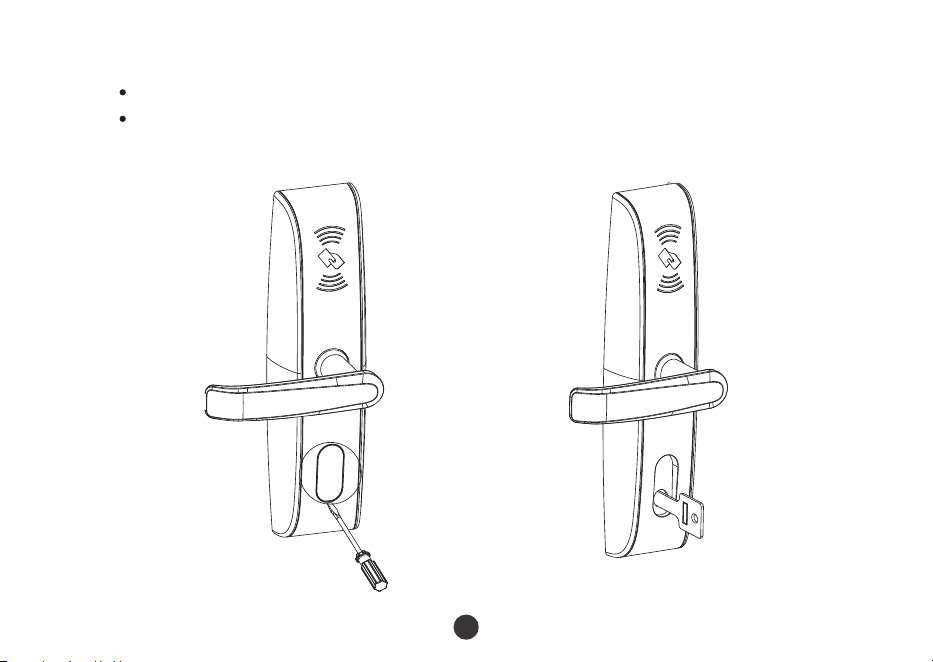
10.
Test lock.
Test lock by rotating handle and emergency key.
10
You can use emergency key by removing the cover on the lock cylinder with
screwdriver or nails.

Warm Tips
Maintenance
1.
Avoid contacting with corrosive substances.
2.
Do not hang objects on the handle.
3.
When battery power is lower, the lock will beep to remind user to renew the batteries.
4.
Please do not mix up positive and negative while replacing battery.
5.
To avoid leaking, it is better to renew battery at least once in half year. Do not use
battery of poor quality.
1.
The demonstration figure in this installation instruction maybe different with your
actual product, the actual product shall prevail.
2.
The software within the lock manages the RFID cards, for more details please refer to
the software user manual.
3.
Please keep the emergency key in a safe place, as backup.
4.
If there are any questions, please do not hesitate to contact the seller.
11

Modelo: LH4000
Versión: 2.0
Guía de Instalación
Español
Debido a las actualizaciones periódicas de los sistemas y productos, ZKTeco no puede garantizar
quela información escrita en este manual coincida exactamente con la del producto real.
Guía de Instalación
Modelo: LH4000
Versión: 2.0
Español

1
P
A
E
H
I
T
A
B
C
D
F
G
J
K
L
M
K
N
O
Q
R
H
S
1
Antes de la Instalación
Diagrama
2
Precauciones
2
Nota:
1.
No tense demasiado los tornillos.
2.
No utilice desarmador eléctrico para tensar los tornillos.
3.
Utilice equipo de protección para sus ojos al perforar o ranurar.
R
R
Entrada por la Izquierda Entrada por la Derecha
Salida por la Izquierda Salida por la Derecha
Punto de Vista
3
1.
Debe alinear la plantilla conforme a la línea vertical de la cerradura a la altura deseada
de la manija y pegarla con cinta adhesiva a la porta.Posteriormente realice las
perforaciones a la puerta como se indica en la plantilla.
G
ro
s
o
r d
e l
a pu
e
r
ta
3
5
~54
m
m
F
ondo
70mm
Pasos de Instalación
Línea central de la manija
Altura deseada de la manija
4
2.
Remueva los dos tornillos (D) de la cubierta de la cerradura.
A
C
D
D
A

5
3.
Instale la cerradura (A).
4.
Instale la cubierta (C).
D
B
A
B
D
C
Nota: Los 2 triángulos de la cerradura deben estar en alineación horizontal como se
muestra en la figura agrandada.
6
5.
Instale el cilindro de la llave (E).
E
F
G
G
F
E
F
E
6.
Instale el eje de 8X8 (H), conecte los arneses y fije la parte exterior de la cerradura (I).
H
H
H
H
I
J
Nota:
K
Confirme que los dos triángulos de la cerradura siempre se encuentren
en alineación horizontal como en el paso 3.
K
J
K
7

H
L
H
L
H
K
M
L
L
M
7.
Instale el eje de 8X8 (H) y el eje de 5X5 (L), conecte los arneses y fije la parte interior de
la cerradura (M).
8

8.
Instale las baterías (N).
9.
Mida el marco de la puerta para las dimensiones de la contra y perfore.
O
N
125mm
89mmX25mm
22mm
3mm
S
S
Q
R
P
P
9
10.
Pruebe la cerradura.
10
Pruebe la cerradura con la manija y la llave.
Puede utilizar la llave de emergencia removiendo la cubierta del cilindro con un
desarmador de punta fina.

Tips
1.
No utilice sustancias corrosivas para limpiar la cerradura.
2.
No cuelgue objetos en la manija.
3.
Cuando las baterías se encuentren bajas, la cerradura emitirá una alarma audible para
recordar al usuario reemplazarlas.
4.
Al reemplazar las baterías tenga cuidado de no invertir los polos positivo y negativo.
5.
Para evitar que se derramen las baterías es recomendable reemplazarlas cada medio
año. No utilice baterías de baja calidad.
1.
Las figuras de demostración en esta guía pudieran ser diferentes de la instalación real.
2.
El software interno de la cerradura administra las tarjetas RFID, para más información
consulte el manual del software.
3.
Guarde la llave de emergencia en un lugar seguro.
4.
Para mayor información contacte a su proveedor.
11
Mantenimiento

Warning:
This device complies with Part 15 of the FCC Rules. Operation is subject to the following two conditions: (1) This device may not cause
harmful interference, and (2) This device must accept any interference received, including interference that may cause undesired
operation.
This equipment has been tested and found to comply with the limits for a Class B digital device, pursuant to Part 15 of the FCC Rules.
These limits are designed to provide reasonable protection against harmful interference in a residential installation. This equipment
generates, uses, and can radiate radio frequency energy and, if not installed and used in accordance with the instructions, may cause
harmful interference to radio communications. However, there is no guarantee that interference will not occur in a particular installation.
If this equipment does cause harmful interference to radio or television reception, which can be determined by turning the equipment
off and on, the user is encouraged to try to correct the interference by one or more of the following measures:
Reorient or relocate the receiving antenna.
Increase the separation between the equipment and receiver.
Consult the dealer or an experienced radio/TV technician for help.
Connect the equipment into an outlet on a circuit different from that to which the receiver is connected.
FCC RF Radiation Exposure Statement:
This Transmitter must not be co-located or operating in conjunction with any other antenna or transmitter.
This equipment complies with RF radiation exposure limits set forth for an uncontrolled environment.
IMPORTANT! Any changes or modifications not expressly approved by the party responsible for compliance could void the user's
authority to operate the equipment.

ZKTeco Industrial Park, No. 32, Industrial Road,
Tangxia Town, Dongguan, China.
Phone : +86 769 - 82109991
Fax : +86 755 - 89602394
www.zkteco.com
Copyright © 2024 ZKTECO CO., LTD. All Rights Reserved.
