FOR YOUR SAFETY
READ AND UNDERSTAND THE ENTIRE MANNUAL
BEFORE OPERATING MACHINE
SKU: TCA-0053
Both model number and serial number may be found on the main label.
You should record both of them in a safe place for future use.
Save This Manual For Future Reference
Customer Support: (888)680-2849, [email protected]
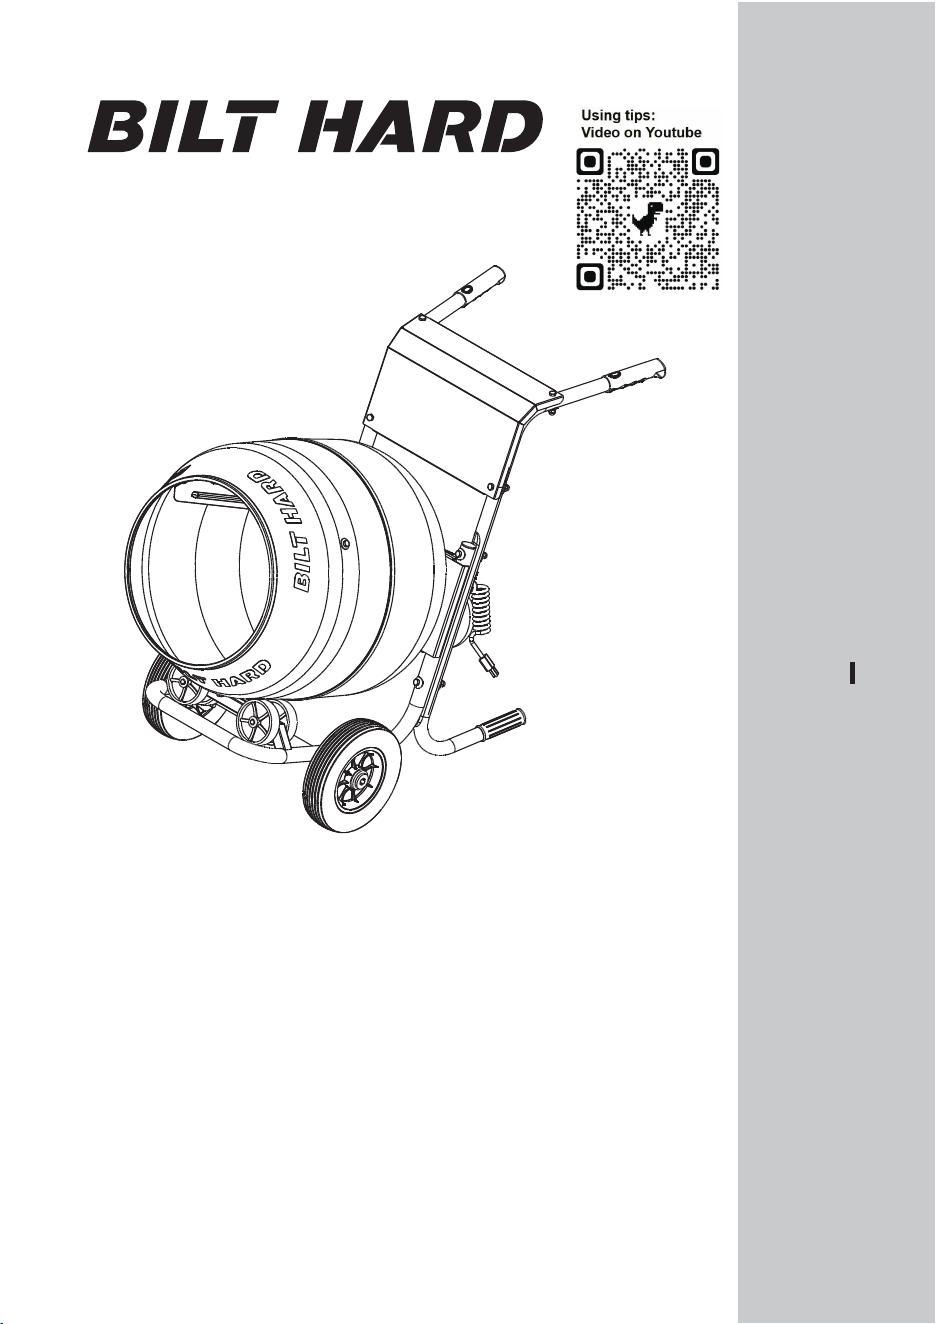
Owner’s Manual
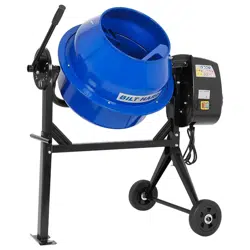
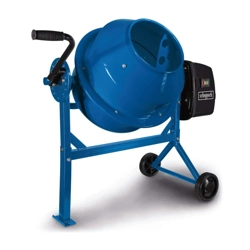
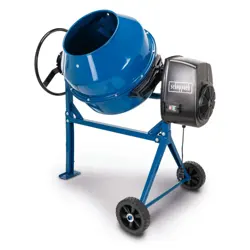
CEMENT MIXER
Contents
NOTICE
FOR CEMENT AND MORTAR ONLY.
Do not use with Epoxy 2-part resin mix.
NOTICE
FOR CEMENT AND MORTAR ONLY.
Electrical Input
Motor No Load Speed
Horse Power
Drum Speed
Drum Capacity
Drum Opening
Drum Diameter
Overall Sizes
Mixer Weight
Mixering Capacity
115VAC / 60Hz / 4.3A
1680RPM
0.5
24RPM
4 Cubic Feet
15”
21.65”
48.8”
21.9”
32.9”
82.89 lbs
235 lbs
2
Specifications
Safety Alert Symbols
Safety Information & Guidelines
Parts List And Diagram
Assembly
Operating Instructions
General Operating Instructions
Maintenance And Servicing
Cleaning, Maintenance, And Lubrication
Troubleshooting
LIMITED WARRANTIES
2
3-4
5-7
8
9-12
13
13-14
14
15
15
16
L
W
H
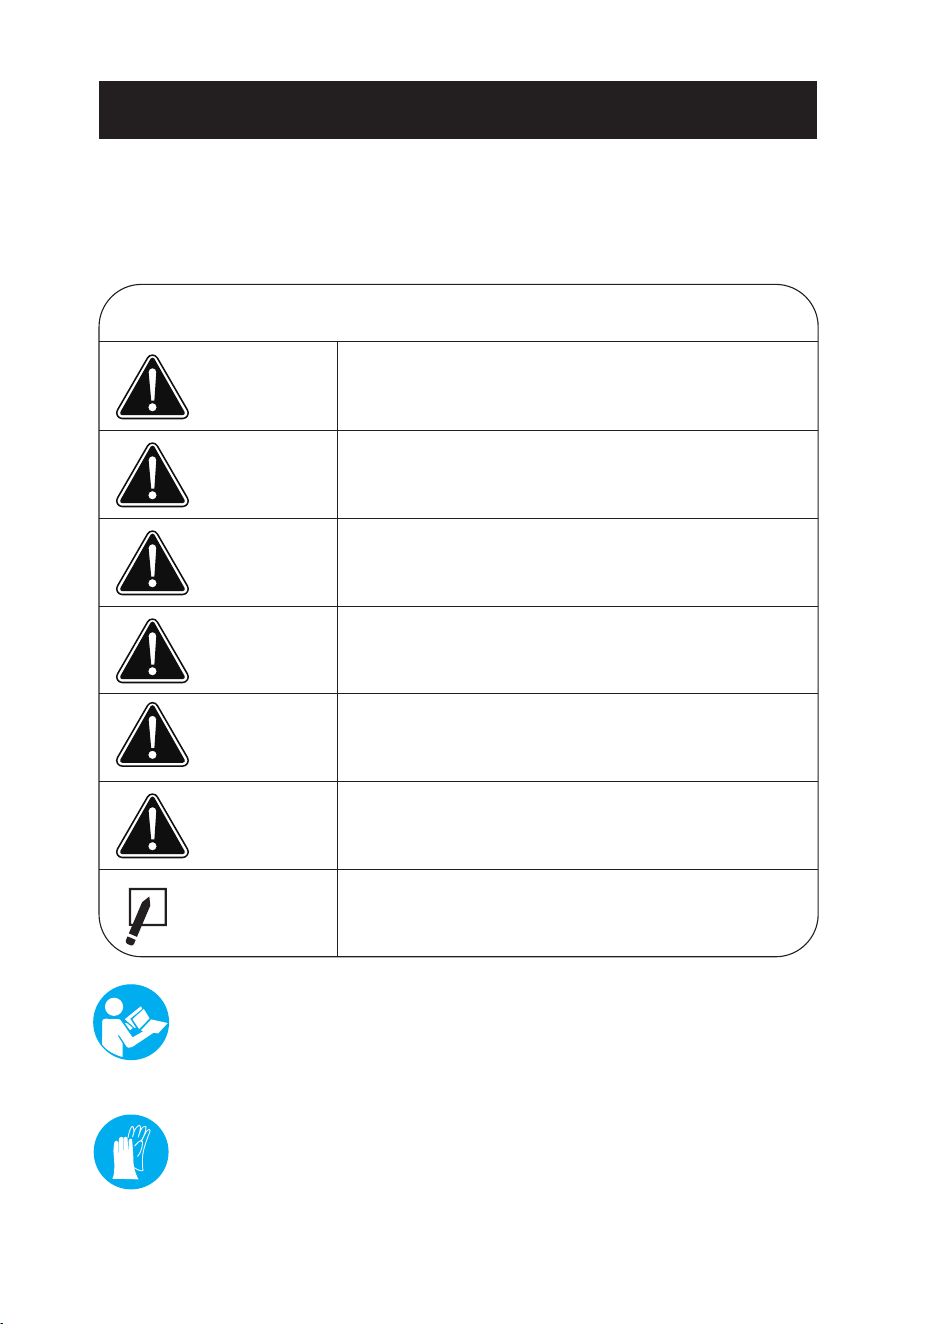
SAFETY ALERT SYMBOLS
3
Indicates danger, warning, or caution. Attention is required in order to avoid
serious personal injury. The signal word ( DANGER, WARNING, OR CAUTION )
is used with the alert symbol to alert you to special instruction about a particular
operation that may be hazardous if performed incorrectly or carelessly. Observe
them carefully.
DANGER
WARNING
CAUTION
CAUTION
NOTE
SYMBOL EXPLANATION
Which an imminently hazardous situation
indicates, if not avoided, will result in death or
serious injury.
Which a potentially hazardous situation
indicates, if not avoided, could result in death or
serious injury.
WARNING
To reduce the risk of injury, read the instruction
manual.
WARNING
This product is known to the State of California
to contain chemicals that cause cancer, birth
defects and/or reproductive harm.
Which a potentially hazardous situation
indicates, if not avoided, may result in minor or
moderate injury.
Wash hands after handling.
Which a practice not related to personal injury
indicates, if not avoided, may result in property
damage.
UNDERSTAND YOUR MIXER
Read and understand the owner’s manual and labels affixed to the
mixer. Learn its application and limitations as well as the specific
potential hazards peculiar to it. Become familiar with the controls before
operating this mixer.
DRESS PROPERLY
Do not wear loose clothing, gloves, neckties or jewelry (rings, wrist
watches). They can be caught in moving parts. Protective electrically
non-conductive gloves and non-skid footwear are recommended when

SAFETY ALERT SYMBOLS
4
KEEP VISITORS AND CHILDREN AWAY
Keep unauthorized persons away from the mixer.
Do not allow children to handle or climb on or in the mixer.
DISCONNECT POWER
Never open the motor cover before unplugging the mixer.
Disconnect from power supply when not in use, before
moving, making adjustments, changing parts, cleaning, or
working on the mixer. Consult technical manual before
servicing.
AVOID INJURY FROM UNEXPECTED ACCIDENT
Keep hands out of the way of all moving parts. Do not place any part of
your body or any tool, like shovel in the drum during operation.
DO NOT FORCE TOOL
It will do a better and safer job at its design rate. Always work within the
rated capacity. Do not start the motor if the drum is fully loaded. Do not
turn mixer off while full of concrete. Do not use the mixer for a purpose
for which it was not intended.
PROTECT THE ENVIRONMENT
Take left over materials to an authorized collection point or follow the
stipulations in the country where the mixer is used. Do not discharge
into drains, soil or water.
AVOID DANGEROUS CONDITIONS
Make sure there is adequate surrounding workspace. Keep your work
area clean and well lighted. Cluttered areas invite injuries. Keep area
around the mixer clear of obstructions, grease, oil, trash and other
debris which could cause persons fall onto moving parts.
Only use or operate the mixer on solid, flat, level ground that is capable
to support the weight of the mixer and its load to prevent the mixer from
tipping over. Do not attempt to move the mixer when it is loaded and/or
in operation. This mixer is intended for the production of concrete,
mortar and plaster. It is not suitable for the mixing of flammable or
explosive substances. Do not use it in areas where fumes from paint,
solvents or flammable liquids pose a potential hazard.
working. Wear protective hair covering to contain long hair, preventing it
from getting caught in machinery. Wear a face or dust mask if the
operation is dusty.
Always wear safety goggles and/or face shields. Everyday eyeglasses
have only impact resistant lenses. They are not safety glasses.

Safety Information & Guidelines
5
DANGER
DANGER
WARNING
WARNING
IMPORTANT SAFETY INSTRUCTIONS
This product is not intended for use by persons suffering from diminished physical,
ensory or mental abilities; lack of experience, knowledge or skills unless they are
supervised by a person responsible for their safety. Keep children away.
• Do not operate cement mixer in explosive atmospheres, such as in the
presence of flammable liquids, gases or dust. Electric motors create sparks
which may ignite the dust or fumes.
• Do not use in wet conditions.
• Keep children and bystanders away while operating the cement mixer.
• Work area should be clear of debris and obstructions.
•Ensure all tools and other equipment are removed from area and the
cement mixer drum before operating.
•The cement mixer should be on a level surface to prevent tipping, rolling or falling.
• Do not abuse the cord. Never use the cord for carrying, pulling or
unplugging the unit. Keep cord away from heat, oil, sharp edges or moving
parts. Ensure power cord is in good condition before each use. Damaged or
entangled cords increase the risk of electric shock.
• When operating the cement mixer outdoors or in a damp location, use a
ground fault circuit interrupter (GFCI) protected supply.
• When operating the cement mixer outdoors, use an extension cord suitable
for outdoor use.
• Avoid body contact with earthed or grounded surfaces such as pipes,
radiators, ranges and refrigerators. There is an increased risk of electric shock
if your body is earthed or grounded.
• Do not expose cement mixer to rain or wet conditions. Water entering an
electric motor will increase the risk of electric shock.
OBSERVE WORK AREA CONDITIONS
ELECTRICAL SAFETY

Safety Information & Guidelines (Continued)
6
WARNING (Continued)
WARNING
WARNING
• Never modify the plug in any way. Unmodified plugs and matching outlets will
reduce risk of electric shock.
•If the power cord is damaged, it must be replaced by the manufacturer, its
service agent or similarly qualified person in order to avoid a hazard.
• Do not wear loose clothing or jewelry. Keep your hair, clothing and gloves
away from moving parts. Loose clothes, jewelry or long hair can be caught in
moving parts.
• Do not place hands or tools (ie. shovel) in or around the drum while
operating. Personal injury could occur.
• Do not use the cement mixer while you are tired or under the influence of
drugs, alcohol or medication. A moment of inattention while operating may
result in serious personal injury.
• Use personal protective equipment. Always wear eye protection. Protective
equipment such as a dust mask, non-skid safety shoes, hard hat or hearing
protection used for appropriate conditions will reduce the risk of personal injuries.
• Never leave cement mixer running unattended.
• Do not allow persons unfamiliar with the cement mixer or these
instructions to operate the cement mixer.
• Disconnect the plug from the power source before servicing, adjusting,
installing accessories or attachments.
• Use On/Off buttons for Starting/Stopping the cement mixer.
CAUTION
PERSONAL SAFETY
DANGER
CEMENT MIXER USE AND CARE

Safety Information & Guidelines (Continued)
7
WARNING
• Ensure drum is empty before transporting.
• Do not overload mixer. See Specifications, page 2 for load capacity.
Overloading could cause damage to the cement mixer.
• Store cement mixer out of the reach of children.
• Maintain the cement mixer. Check for wear and damaged parts. Before each
use ensure the cement mixer operates properly. Any broken or missing parts must
be repaired or replaced before using. Many accidents are caused by poorly
maintained cement mixers.
• Keep the cement mixer clean. Clean after each use.
• Ensure drum is rotating when filling or emptying the mixer. This ensures a
good mix and prevents damage to the motor.
• Be familiar with concrete mix being used, particularly quick set formulas.
This is important when motor overload protection shuts off the motor to prevent
motor damage.
• Always practice environment pollution procedures. Clean out the drum in a
designated area where the concrete and rinse water can be contained. Concrete
and rinse water can pollute storm drains and surface water.
• Use the cement mixer in accordance with these instructions, taking into
account the working conditions and the work to be performed. Use of the
cement mixer for operations different from those intended could result in a
hazardous situation.
• Only use accessories recommended by the manufacturer.
• Have the cement mixer serviced by a qualified repair person using identical
replacement parts. This ensures the cement mixer is properly maintained.
CAUTION
NOTE
SERVICE
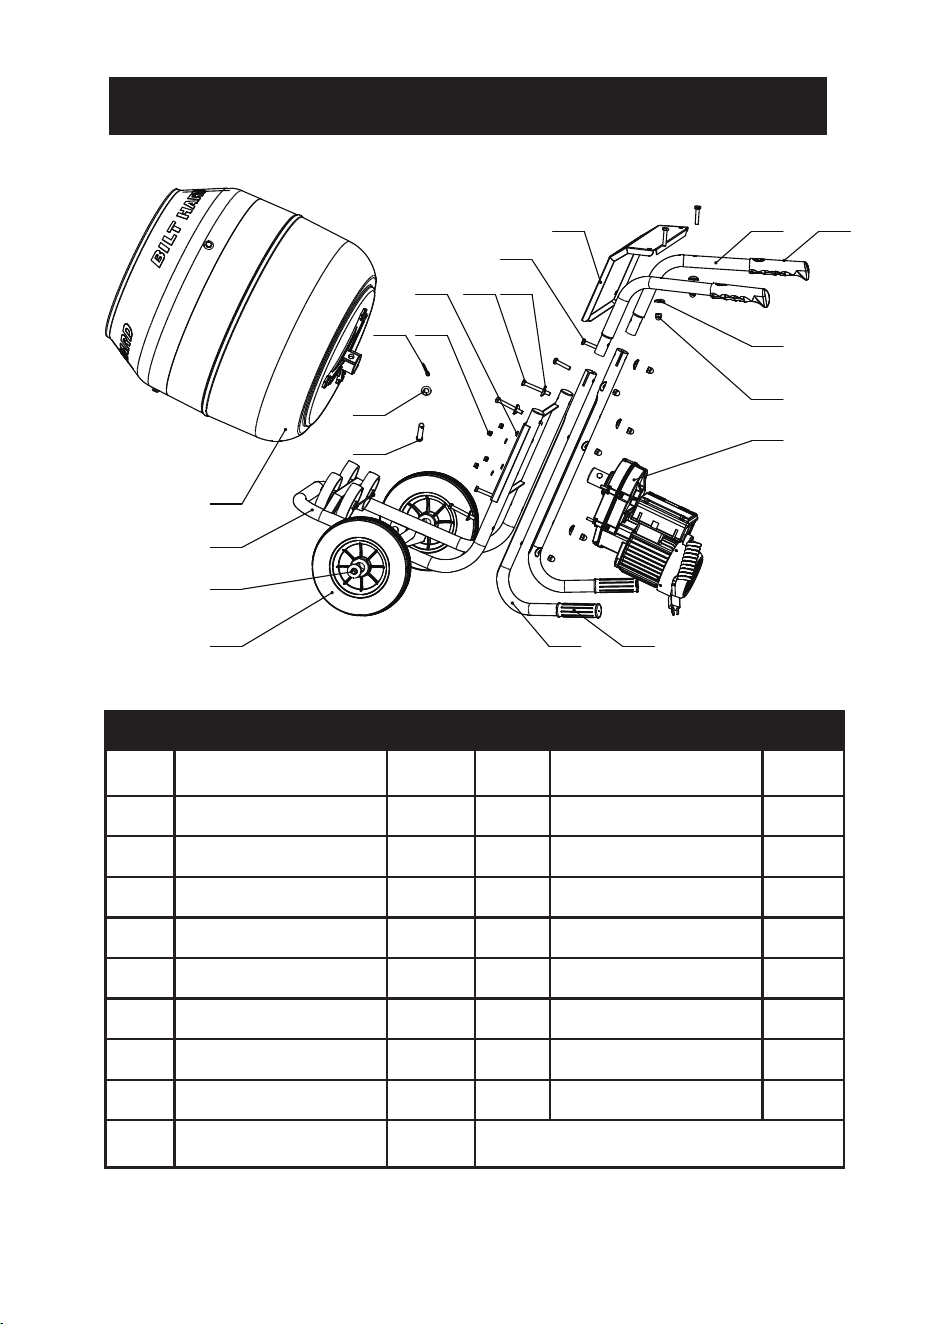
R14M8 Washer
M8*45 Screw
Top Cover
Handle
Rubber Sleeve
M8 Cap Nut
Gear Motor Assembly
Support Leg Sleeve
Support Leg
PARTS LIST AND DIAGRAM
1
2
3
4
5
6
7 8
9 10 11
11
12
13 14 15
16
17
1819
Part
Description
Qty
Wheel
Wheel Plug
Lower Frame
Drum Assembly
Motor shaft Pin
G1/4’’ Washer
Cotter Pin
M8 Nut
M8 Washer
M8*70 Screw
1
2
3
4
5
6
7
8
9
10
2
3
1
1
1
1
1
4
4
4
12
4
1
2
2
8
1
2
2
11
12
13
14
15
16
17
18
19
Part
Description
Qty
8
Setup - Before Use
ASSEMBLY
9
WARNING
TO PREVENT SERIOUS INJURY FROM ACCIDENTAL OPERATION:
Turn the Power Switch of the tool off before performing any procedure in this
section.
Note: For additional information regarding the parts listed in the following pages,
refer to the Assembly Diagram near the end of this manual.
Read the ENTIRE IMPORTANT SAFETY INFORMATION section at
the beginning of this document including all text under
subheadings there in before set up or use of this product.
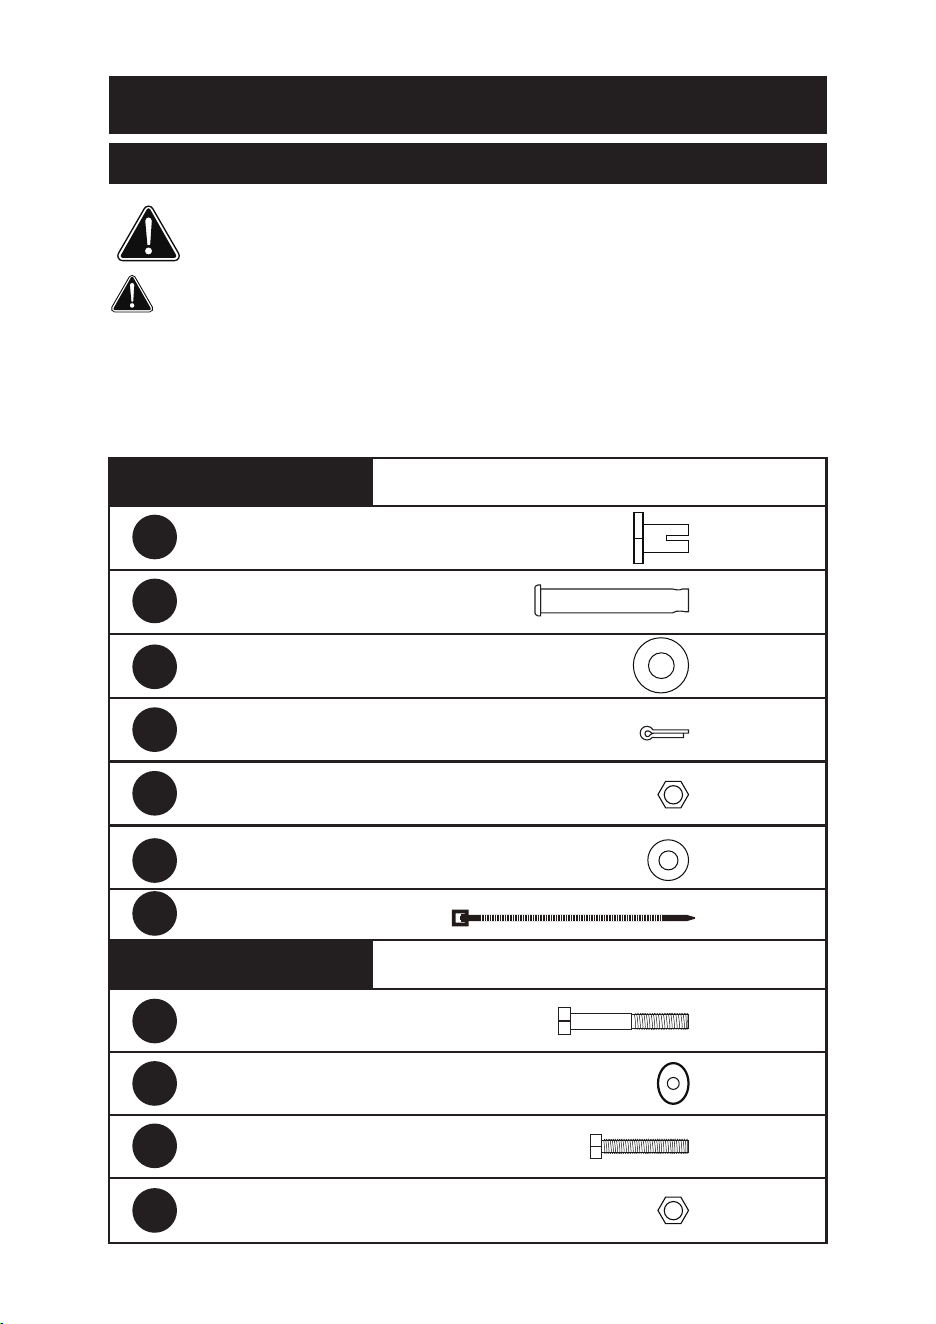
SCREW PACKAGE B
10
11
12
16
4
12
4
8
R14M8 Washer
M8 Cap Nut
M8*70 Screw
M8*45 Screw
5
7
9
A
6
8
2
SCREW PACKAGE A
Motor shaft Pin 1
1
1
3
4
2
4
Cotter Pin
G1/4’’ Washer
M8 Nut
Wheel Plug
M8 Washer
Cable Tie
ASSEMBLY
Wheel(1)Wheel(1)
Wheel
Plug(2)
Wheel
Plug(2)
Lower Frame(3)
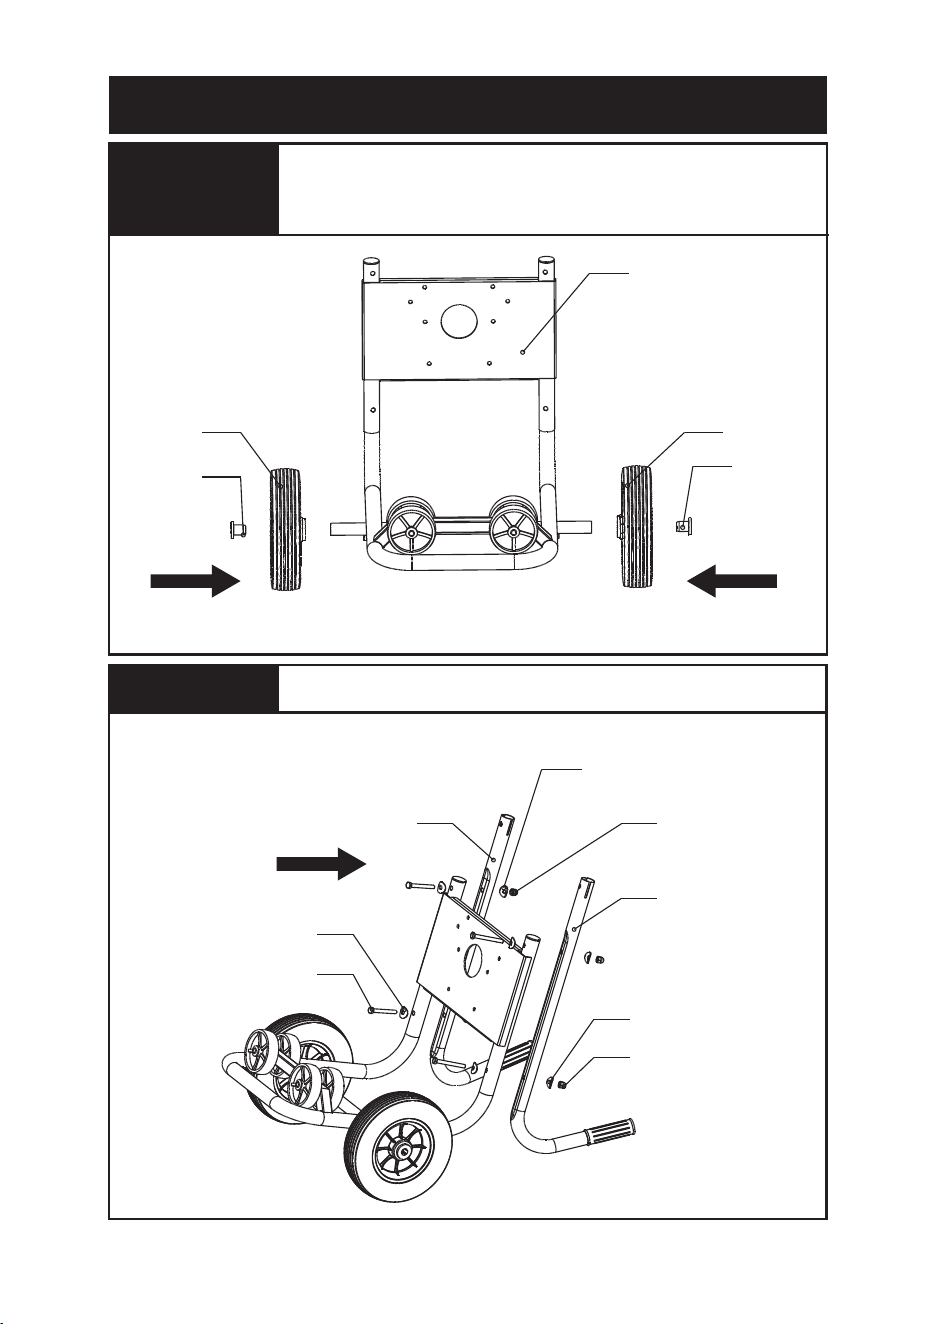
Step 1
10
Install two wheels(1) to the lower frame(3) and use the wheel
plug(2) to fix the wheel. Note:When disassemble the wheel plugs,
use diameter 12MM, length over 600MM round rod to tap the hole
on the inside of the plug.Then the plugs will easy to take out.
Step 2
Support Leg(19)
Support Leg(19)
M8 Cap Nut(16)
M8 Cap Nut(16)
R14M8 Washer (11)
R14M8 Washer (11)
R14M8 Washer (11)
M8*70 Screw(10)
Assemble support leg(19) to lower frame(3) using M8
washer(11), M8 cap nut(16) and M8 screw(10).
ASSEMBLY
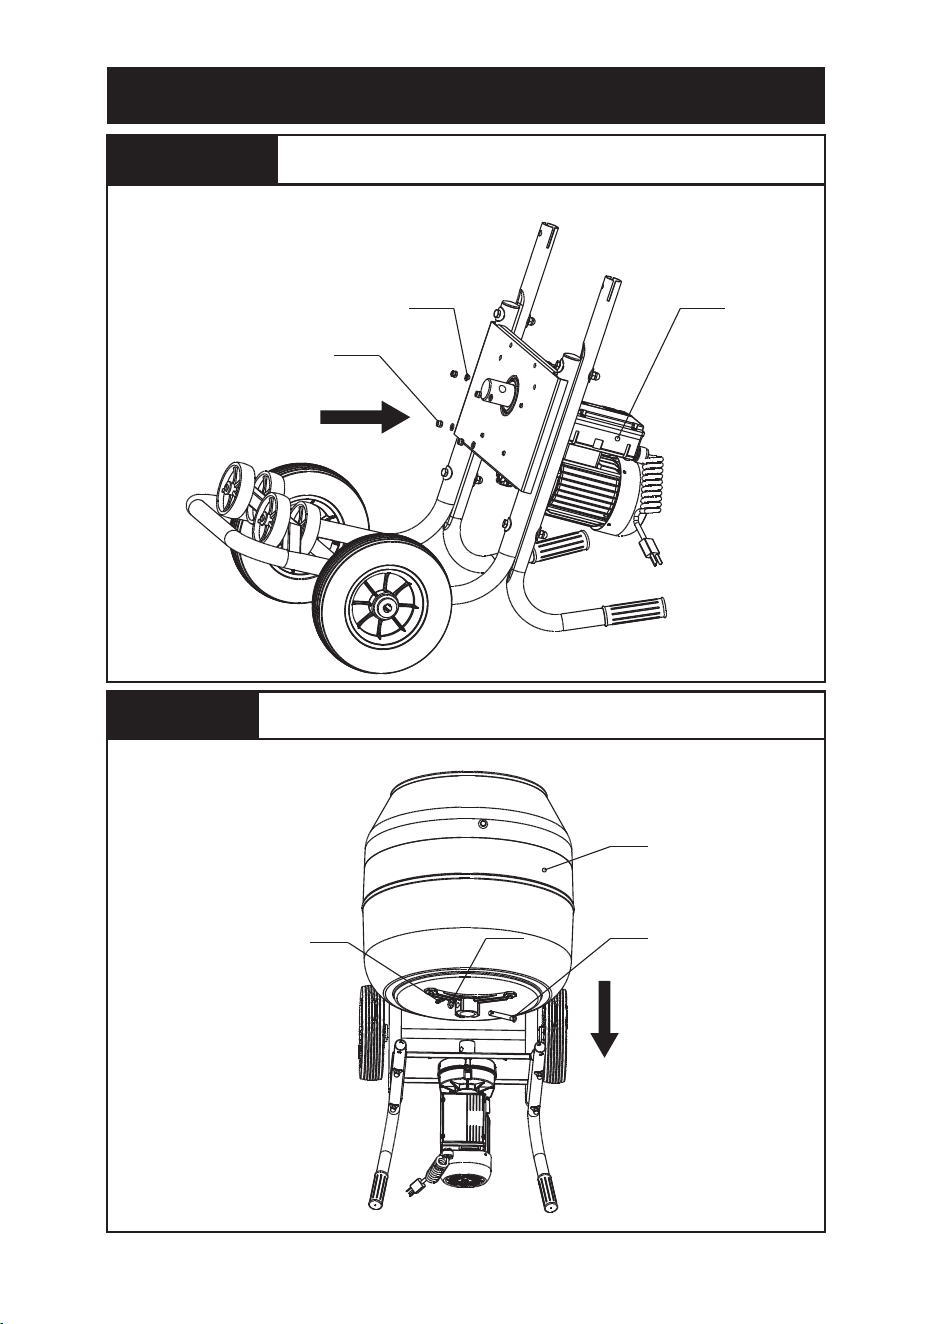
Step 3
Gear Motor
Assembly(17)
M8 Washer (9)
M8 Nut (8)
11
Assemble gear motor(17) to lower frame(3) using M8
washer(9), M8 nut(8).
Step 4
Drum Assembly(4)
Motor shaft Pin(5)
G1/4’’ Washer(6)
Cotter Pin(7)
Assemble drum Assembly(4) to motor(17) using motor shaft pin(5) and
cotter pin(7). SECURE COTTER PIN PROPERLY BEFORE MIXING.
ASSEMBLY
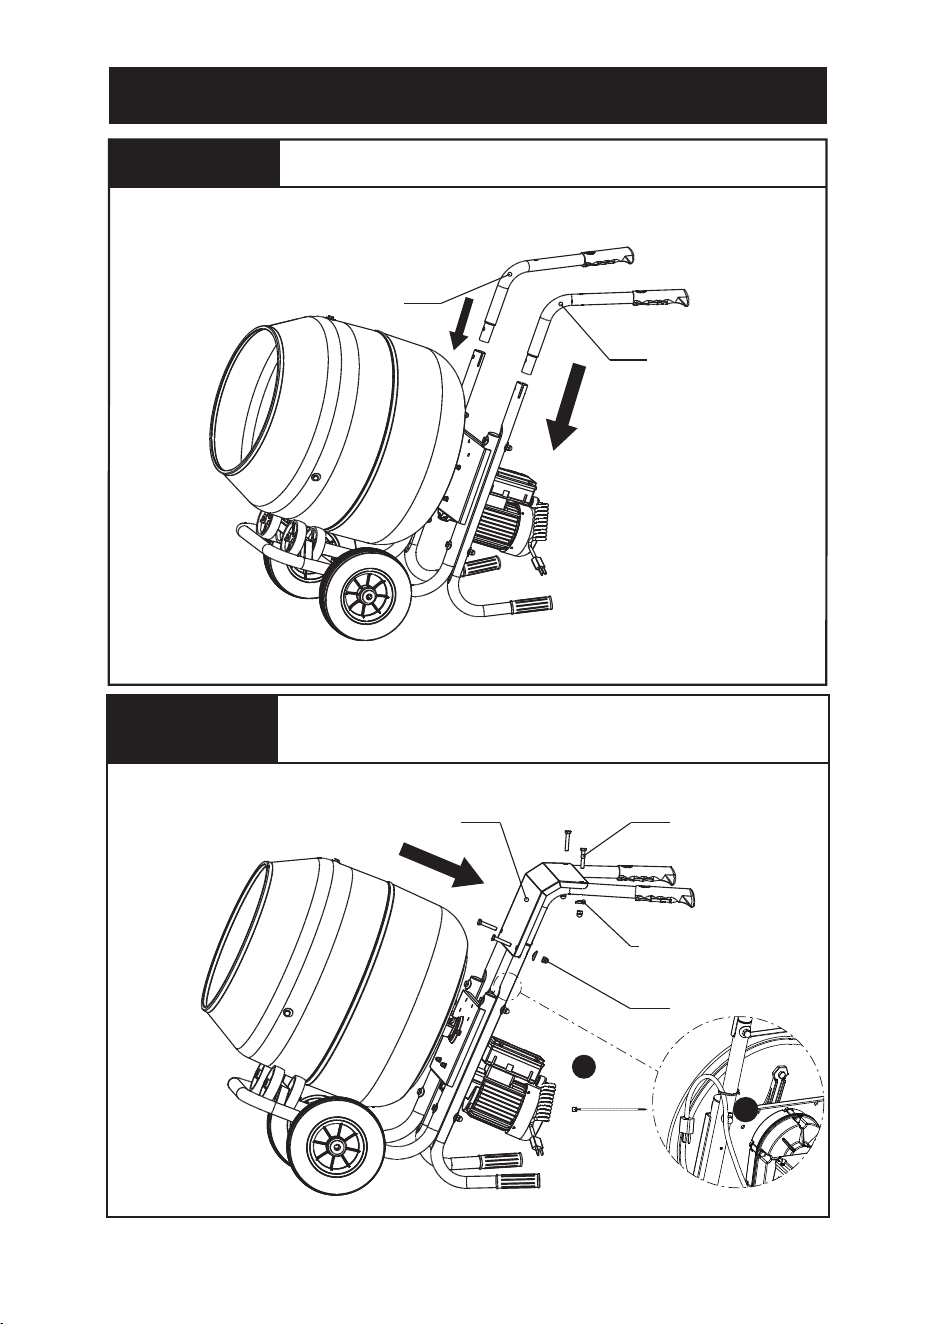
Step 5
Handle(14)
Handle(14)
Step 6
M8 Cap Nut(16)
R14M8
Washer (11)
M8*45 Screw(12)
Top Cover(13)
12
Slide two handles into lower frame(3) tube.
Attach top cover(13) to lower frame(3) & handles using M8
screw(12), M8 washer(11) and M8 cap nut(16). Note:The plug cable
of gear motor can use A cable tie to fasten.
A
A
Cable Tie
Operating Instructions
Read the ENTIRE IMPORTANT SAFETY
INFORMATION section at the beginning of
this document including all text under
subheadings therein before set up or use of
this product.
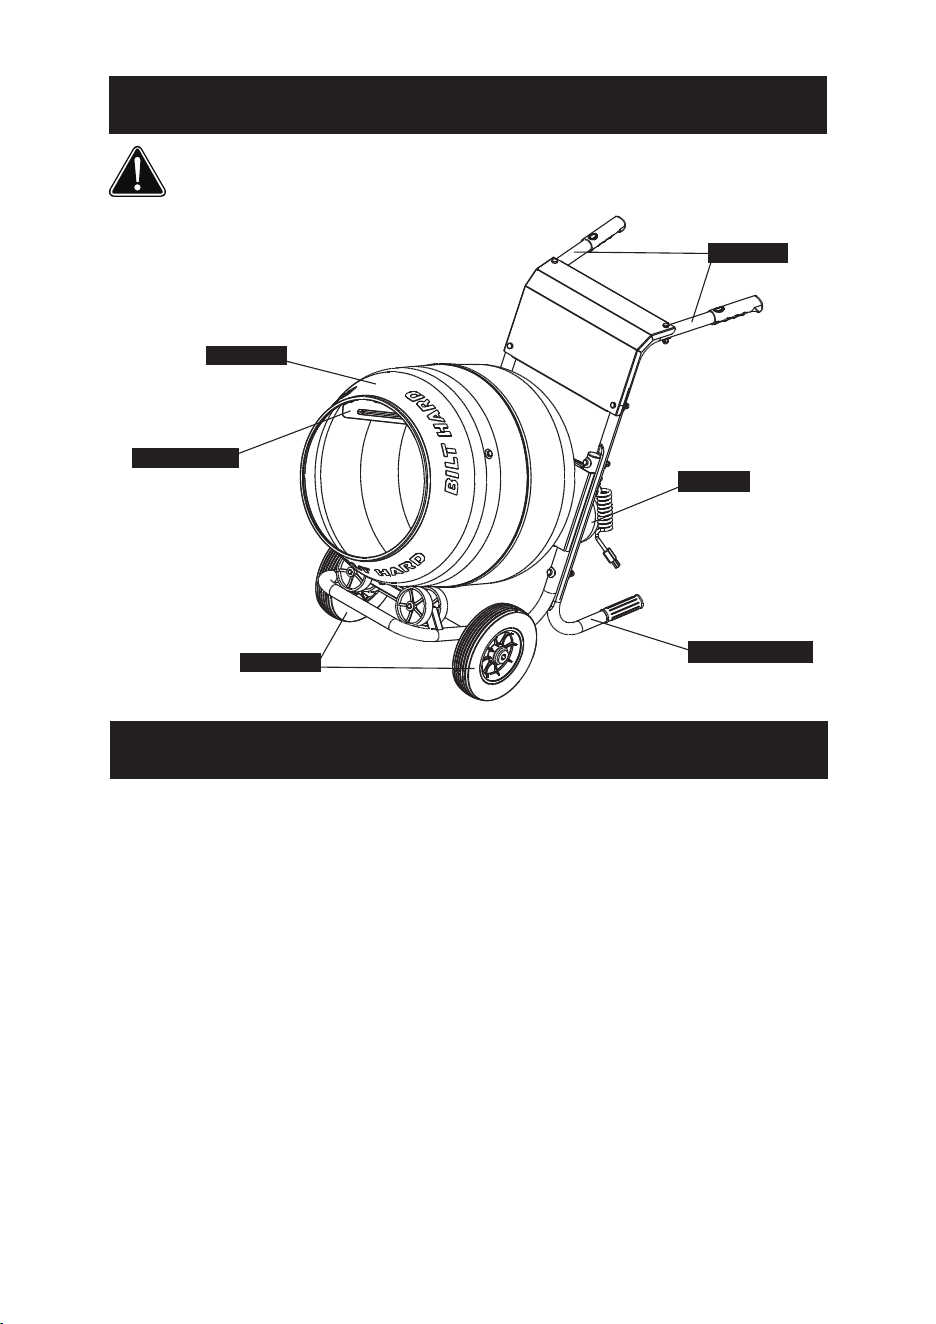
Wheel
Drum
Handle
Support Leg
Motor
Mixer Blade
WARNING! TO PREVENT SERIOUS INJURY :
Do not operate the Mixer on slopes or uneven surfaces with an incline greater than
5º. Ensure the Mixer is stable before and after starting the Motor.
WARNING! TO PREVENT SERIOUS INJURY :
Do not attempt to move the Mixer when it is full and/or in operation. Block the
wheels with wheel chocks (not included).
WARNING! TO PREVENT SERIOUS INJURY :
Keep clear of rollers and other pinch points when running the Mixer, pivoting, or
changing the angle of the Drum.
1. Place the Cement Mixer on a solid, even surface.
2. Connect the Power Cord to an electric outlet (or properly rated grounded three
prong extension cord).
Note: Turn the Motor on before filling the Drum, this will protect the Motor and
evenly mix materials.
3. Press the green “ON” Button, the drum will spin.
Note: Inspect the mix frequently to ensure it does not harden or dry. Allowing mix
to harden or dry could damage the mixer or cause a malfunction.
General Operating Instructions
13

General Operating Instructions(Continued)
14
TO PREVENT SERIOUS INJURY FROM ACCIDENTAL OPERATION:
Turn the Power Switch of the tool to its “OFF” position and unplug the tool
from its electrical outlet before performing any inspection, maintenance, or
cleaning procedures.
TO PREVENT SERIOUS INJURY FROM TOOL FAILURE:
Do not use damaged equipment. If abnormal noise or vibration occurs, have
the problem corrected before further use.
Procedures not specifically explained in this manual must be
performed only by a qualified technician.
Maintenance and Servicing
WARNING
4. Add material to the Drum. Typical maximum quantities include: two 80lb bags of
cement mix and up to 2 gallons of water. Refer to material manufacturer’s
instructions.
5. Once materials are mixed, Tilt drum opening downward and dump materials
where needed. The materials are dumped while the Drum is rotating.
6. When finished, press the red “OFF” Button, the Drum will stop. Disconnect the
Power Cord.
7. Tilt the Drum angle as far down as possible to drain all fluids from Drum.
8. Clean, then store out of children’s reach.
1. BEFORE EACH USE, inspect the general condition of the tool. Check for:
• Loose hardware
• Misalignment or binding of moving parts
• Cracked or broken parts
• Damaged electrical wiring
• Damaged or cracked belts
• Any other condition that may affect its safe operation.
2. AFTER USE, immediately wash out all debris from the inside and outside of
the Cement Mixer. Scrub the inside of the Drum with a stiff, long handled bristle
brush for best results. Wipe external surfaces of the tool with clean cloth.
3. DO NOT apply water in or around the Motor.
4. PERIODICALLY recheck all fasteners and other connections for tightness.
WARNING! TO PREVENT SERIOUS INJU: If the supply cord of this
power tool is damaged, it must be replaced only by a qualified
service technician.
Cleaning, Maintenance, and Lubrication
15
Troubleshooting
ELECTRICAL
PROBLEM RESOLUTION
Motor does not run with
concrete loaded.
Check power connection. Connect if needed.
Ensure power connection voltage is 110 V - 120 V.
Ensure the green ON button is pressed
Motor overload protector tripped.
Allow unit to cool then restart.
Mixer shuts down
suddenly while mixing.
Check power connection. Connect if needed.
Motor overload protector tripped.
Allow unit to cool then restart.
MECHANICAL
PROBLEM RESOLUTION
Drum does not turn
when motor is running.
Ensure Motor shaft pin is properly placed
Irregular noise when
drum is spinning
Remove drum and clean the gearbox drive shaft
and drum with soft clean cloth

Our company makes every effort to assure that its products meet high
quality and durability standards, and warrants to the original purchaser that
this product is free from defects in materials and workmanship for the period
of 90 days from the date of purchase. This warranty does not apply to
damage due directly or indirectly, to misuse, abuse, negligence or accidents,
repairs or alterations outside our facilities, criminal activity, improper
installation, normal wear and tear, or to lack of maintenance. We shall in no
event be liable for death, injuries to persons or property, or for incidental,
contingent, special or consequential damages arising from the use of our
product. Some states do not allow the exclusion or limitation of incidental or
consequential damages, so the above limitation of exclusion may not apply
to you. To take advantage of this warranty, the product or part must be
returned to us with transportation charges prepaid. Proof of purchase date
and an explanation of the complaint must accompany the merchandise.
If our inspection verifies the defect, we will either repair or replace the
product at our election or we may elect to refund the purchase price if we
cannot readily and quickly provide you with a replacement. We will return
repaired products at our expense, but if we determine there is no defect, or
that the defect resulted from causes not within the scope of our warranty,
then you must bear the cost of returning the product.
This warranty gives you specific legal rights and you may also have other
rights which vary from state to state.
LIMITED WARRANTIES
16