© BERNINA International AG
Steckborn CH, www.bernina.com
User Manual


TABLE OF CONTENTS
2024-12 EN 5060800.00A.04
3
Table of Contents
IMPORTANT SAFETY INSTRUCTIONS .................. 4
General Information ............................................ 6
1 My bernette ......................................................... 8
1.1 Overview Machine .................................................. 8
Overview - Front ......................................................... 8
Overview Sewing Area ................................................ 8
Overview of Operating Elements ................................. 9
Overview - Back Panel ................................................. 9
Overview Top .............................................................. 10
1.2 Accessory ............................................................... 10
Included Accessories ................................................... 10
Overview Presser Feet .................................................. 11
1.3 Needle, Thread, Fabric ............................................ 12
Overview Needles ........................................................ 12
Thread Selection ......................................................... 12
Thread and Needle Overview ....................................... 13
Needle/Thread Combination ........................................ 13
2 Sewing Preparation ............................................. 14
2.1 Connection and Switching On ................................ 14
Connecting the Machine and Foot Control .................. 14
Switching the Machine On .......................................... 14
Knee Lifter .................................................................. 14
Positioning the Thread Guide ...................................... 15
2.2 Spool Pin ................................................................ 16
Placing the Thread Spool and the Spool Cap ............... 16
Using the Spool Net .................................................... 16
2.3 Using the Slide-on Table ......................................... 16
2.4 Needle .................................................................... 17
Needle Stop Up/Down (Permanent) ............................. 17
Raising and Lowering the Needle ................................ 17
Changing the Needle .................................................. 18
2.5 Presser Foot ............................................................ 18
Raising/Lowering the Presser Foot ............................... 18
Changing the Presser Foot .......................................... 19
2.6 Threading ............................................................... 19
Winding the Bobbin Thread ........................................ 19
Threading the Bobbin Thread ...................................... 21
Bringing up the Bobbin Thread .................................... 22
Threading the Upper Thread ....................................... 22
2.7 Sewing Settings ..................................................... 25
Adjusting the Lower Thread Tension ........................... 25
Adjusting the Upper Thread Tension ........................... 25
Regulating the Speed ................................................. 27
Setting the Stitch Length ............................................ 28
Setting the Presser Foot Pressure ................................ 28
3 Sewing ................................................................. 29
3.1 Quick Reverse ........................................................ 29
3.2 Automatic Thread Cutter ....................................... 29
3.3 Sewing thick Areas using the Height Compensation
Tool ....................................................................... 29
3.4 Sewing Corners ..................................................... 29
3.5 Sewing Difficult-to-Feed Fabrics ............................. 30
3.6 Sewing in a Zipper ................................................. 30
3.7 Sewing in an Invisible Zipper .................................. 31
3.8 Stitching narrow edges .......................................... 31
3.9 Edgestitching Using the Seam Guide ...................... 32
3.10 Wide Edgestitching ................................................ 32
3.11 Sewing hem edges ................................................ 32
3.12 Sewing a Narrow Hem ........................................... 32
3.13 Sewing Basting Stitches ......................................... 33
3.14 Gathering .............................................................. 33
4 Quilting ................................................................ 35
4.1 Free-Motion Quilting ............................................. 35
4.2 Sewing Patchwork ................................................. 35
5 Maintenance and Cleaning ................................ 36
5.1 Cleaning the Feed Dog and the Hook .................... 36
5.2 Cleaning the Bobbin Case ...................................... 36
5.3 Lubricating the Machine ........................................ 37
6 Troubleshooting ................................................. 38
7 Technical Data ..................................................... 41

IMPORTANT SAFETY INSTRUCTIONS
4
2024-12 EN 5060800.00A.04
IMPORTANT SAFETY
INSTRUCTIONS
Please be aware of the following basic safety
instructions when using your machine. Before
using this machine, read instruction manual
carefully.
DANGER!
To reduce the risk of electrical shock:
• Never leave the machine unattended as
long as it is plugged in.
• Always unplug the machine from the
electrical outlet immediately after using.
Protection against LED radiation:
• Do not view the LED light directly with
optical instruments (e.g. magnifier). The
LED light corresponds with protection
class 1M.
• When the LED light is damaged or
defective, contact your bernette specialist
dealer.
WARNING
To reduce the risk of burns, fire, electric shock
or injury to persons:
• To operate the machine always use the
supplied power cable. USA and Canada
only: Do not connect power plug NEMA
1-15 to circuits exceeding 150Volt to
ground.
• This machine may only be used for the
purpose described in this instruction
manual.
• Only use the machine in dry rooms.
• Do not use the machine in a damp
condition or in a damp environment.
• Do not use this machine as a toy. You
must take extra care if the machine is
being used by children or in the vicinity of
children.
• This machine may be used by children
eight years of age and older as well as
persons with restricted physical, sensory
or mental capacities or lack of experience
and knowledge under supervision or
having received instruction on the safe
use of the machine and the resulting
hazards.
• Children are not allowed to play with the
machine.
• Cleaning and maintenance work must not
be carried out by children unless they are
supervised.
• Do not use this machine if the cable or
plug is damaged, the machine is not
functioning correctly, it is dropped or
becomes damaged or falls in water. Never
operate this machine if it has a damaged
cord or plug, if it is not working properly,
if it has been dropped or damaged, or
dropped into water. Contact the nearest
authorized bernette dealer to arrange
further details.
• Only use the accessories recommended by
the manufacturer.
• Do not use this machine if the ventilation
openings are blocked. Keep all ventilation
openings and foot control free of lint,
dust and loose cloth.
• Do not insert any objects into the
openings of the machine.
• Do not place any objects on the foot
control.
• Always use the machine with a foot
control of this type 21381.
• Do not operate the machine where
aerosol products (sprays) or oxygen are
being used.

IMPORTANT SAFETY INSTRUCTIONS
5
2024-12 EN 5060800.00A.04
• Keep fingers away from all moving parts.
Special care is required around the
needle.
• Neither pull nor push the fabric while
sewing. This can cause needle breakage.
• When making any adjustments in the
needle area – such as such as threading
the needle, changing the needle,
threading the hook or changing the
presser foot – turn power switch to «0».
• Do not use bent needles.
• Always use an original bernette stitch
plate. The wrong stitch plate can cause
needle breakage.
• To disconnect, turn power switch to «0»
and then remove the plug from the
outlet. Do not unplug by pulling the cord,
instead grasp the plug to pull it from the
outlet.
• Disconnect the plug before removing or
opening the covers, oiling the machine or
performing any cleaning or maintenance
work described in this instruction manual.
• This machine is double-insulated (except
for USA, Canada and Japan). Use only
original replacement parts. Note the
information on maintaining double-
insulated products.
SAFE THESE
INSTRUCTIONS

GENERAL INFORMATION
6
2024-12 EN 5060800.00A.04
General Information
Availability of the Instruction Manual
The short manual is part of the machine.
• Keep the short manual of the machine in a suitable place near the machine and have it ready for
reference.
• The latest version of the detailed instruction manual can be downloaded at www.bernette.com.
• When passing on the machine to a third party, enclose the short manual of the machine.
Proper Use
Your bernette machine is conceived and designed for private household use. It is intended for sewing fabrics
and other materials as described in this instruction manual. Any other use is not considered proper. BERNINA
assumes no liability for consequences resulting from improper use.
Equipment and Scope of Delivery
Example images are used in these instructions for the purposes of illustration. The machines shown in the
images and the accessories shown therefore do not always match the actual items included with your
machine. The supplied accessory can vary depending on the country of delivery. You can acquire any
accessories mentioned or shown that are not included in the scope of delivery as optional accessories from a
specialist bernette dealer. Further accessories can be found at www.bernette.com.
For technical reasons and in order to improve the product, changes may be made to the equipment of the
machine and the scope of delivery at any time and without prior notice.
Servicing of Double-insulated Products
In a double-insulated product two systems of insulation are provided instead of grounding. No grounding
means is provided on a double-insulated product nor should a means for grounded be added to the product.
Servicing a double-insulated product requires extreme care and knowledge of the system and should only be
done by qualified service personnel. Replacement parts for a double-insulated product must be identical to
the original parts in the product. A double insulated product is marked with the words: «Double-Insulation»
or «double-insulated».
The symbol may also be marked on the product.
Environmental Protection
BERNINA International AG is committed to environmental protection. We strive to minimize the
environmental impact of our products by continuously improving product design and our technology of
manufacturing.
The machine is labeled with the symbol of the crossed-out wastebin. This means that the machine should
not be disposed of in household waste when it is no longer needed. Improper disposal can result in
dangerous substances getting into the groundwater and thus into our food chain, damaging our health.
The machine must be returned free of charge to a nearby collection point for waste electrical and electronic
equipment or to a collection point for the reuse of the machine. Information on the collection points can be
obtained from your local administration. When purchasing a new machine, the dealer is obliged to take back
the old machine free of charge and dispose of it properly.
If the machine contains personal data, you are responsible for deleting the data yourself before returning the
machine.

GENERAL INFORMATION
7
2024-12 EN 5060800.00A.04
Explanation of Symbols
DANGER
Designates a danger with a high risk which can lead to serious injuries or even death unless it is avoided.
WARNING
Designates a medium-risk hazard which can lead to serious injuries if not avoided.
CAUTION
Designates a low-risk hazard which can lead to minor or moderate injuries if not avoided.
NOTICE
Designates a hazard which can lead to material damage if not avoided.
Tips from the BERNINA sewing experts.

MY BERNETTE
8
2024-12 EN 5060800.00A.04
1 My bernette
1.1 Overview Machine
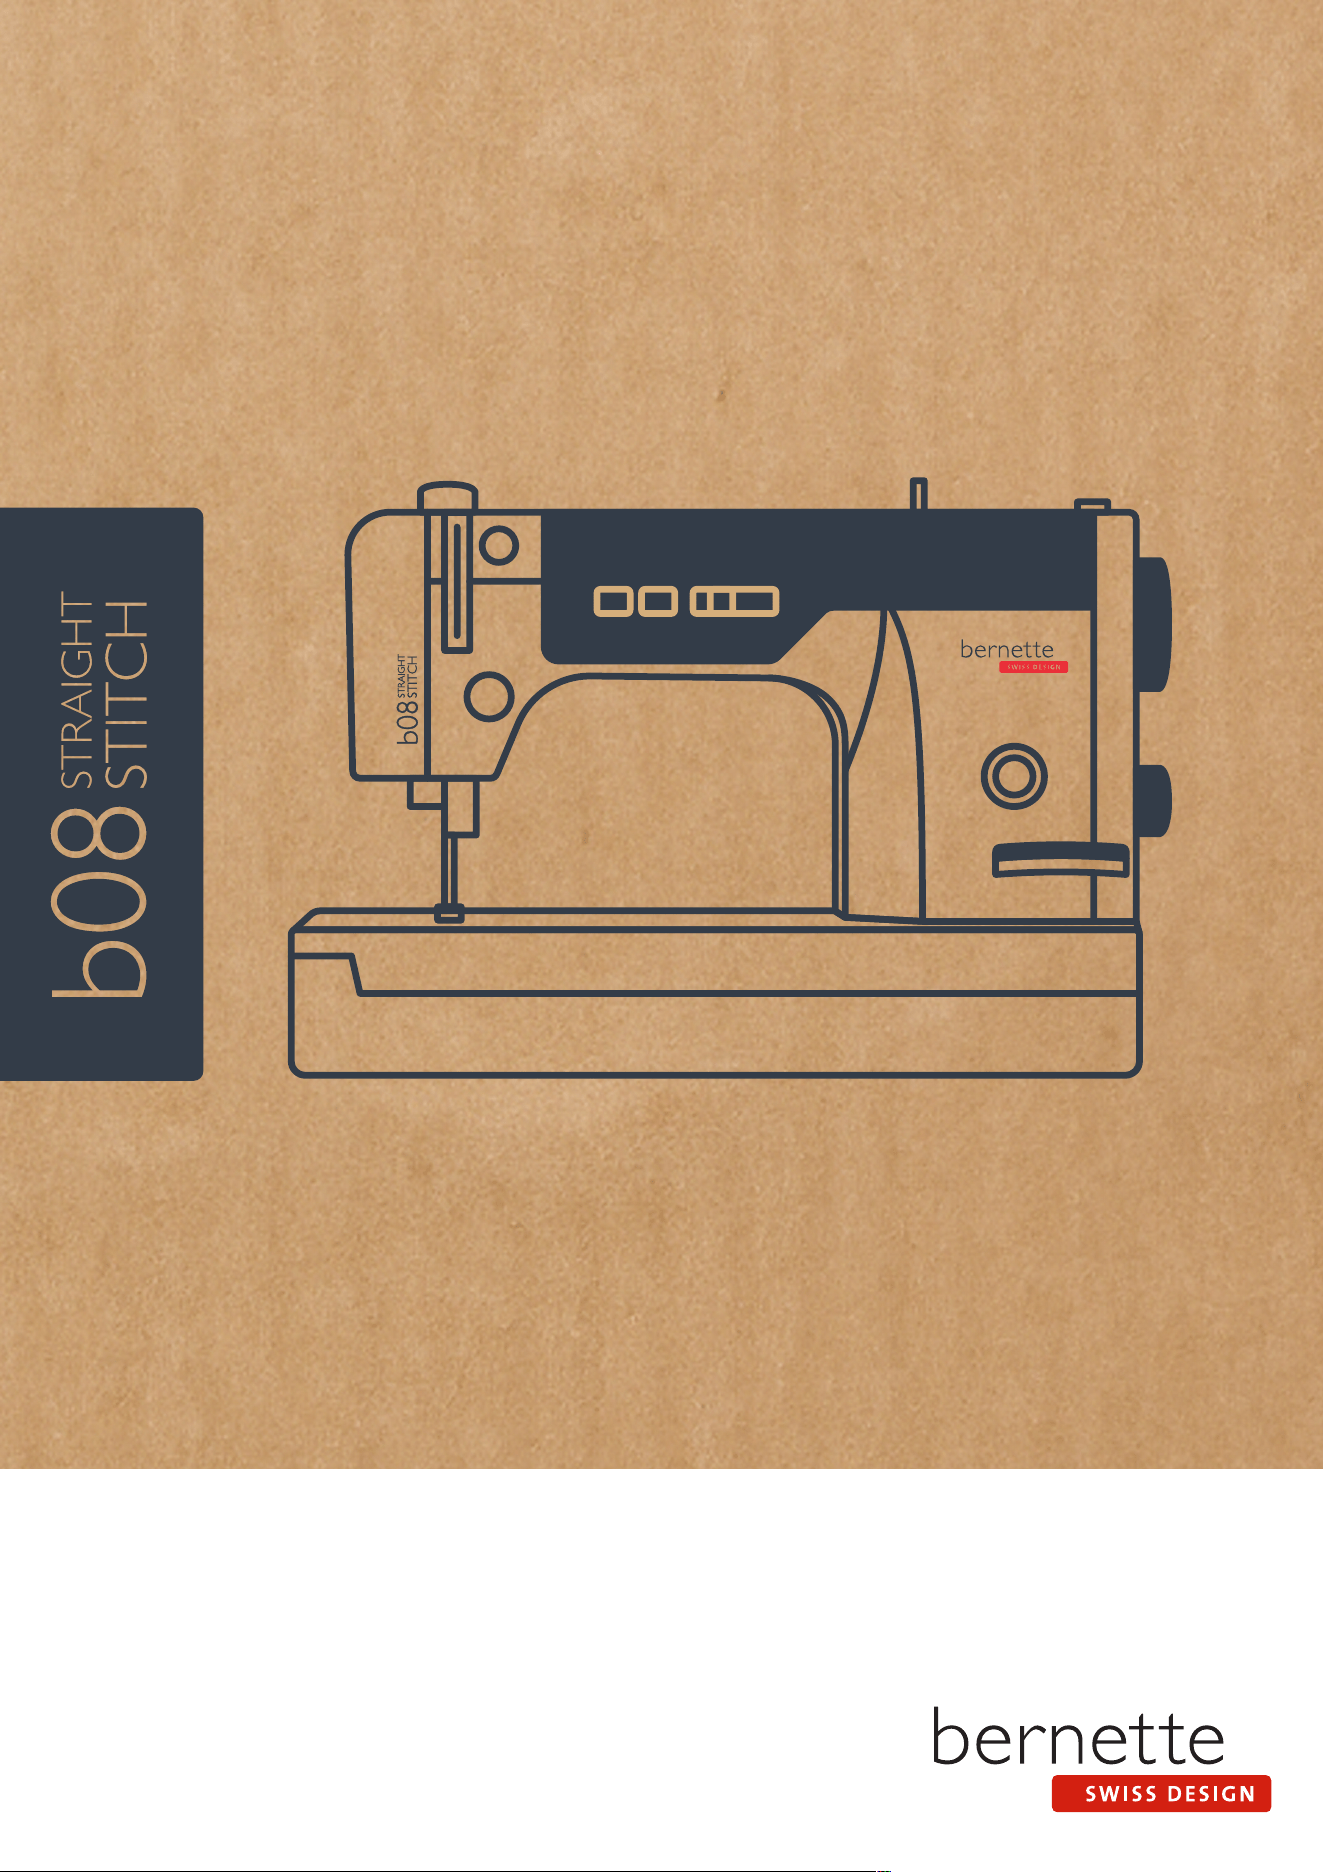
Overview - Front
1
2
3
4
5
6
7
8
9
1 Bobbin Cover 6 Thread Take-up Lever
2 Top Bobbin Cover 7 Thread Guide
3 Thread Cutter 8 «Stitch Length» Display
4 Thread Guide 9 Connection for Free Hand System
5 «Presser Foot Pressure» Display
Overview Sewing Area
1
2
3
4
5
6
7
8
9
10
1 Stitch Plate 6 Needle Threader
2 Feed Dog 7 Needle Holder
3 Presser Foot 8 Needle Holder Thread Guide
4 Fixing Screw for Presser Foot 9 Needle
5 Thread Guide 10 Holes for Attachments
MY BERNETTE
9
2024-12 EN 5060800.00A.04
Overview of Operating Elements
1
2
3
4
5
6
7
1 «Thread tension» Dial 5 Speed Control
2 «Thread Pretension» Dial 6 «Thread Cutter» Button
3 «Needle Stop Up/Down» Button 7 Quick Reverse Lever
4 «Bobbin Winder» Button
Overview - Back Panel
1
2
3
4
5
6
7
8
9
10
1 Connection Power Cable 6 Air Vents
2 Connection for Automatic Thread Cutter 7 Handwheel
3 Connection for Foot Control 8 Spool Pins
4 Power Switch 9 Retractable Thread Guide
5 Stitch Length Adjustment Dial 10 Presser Foot Lifter
MY BERNETTE
10
2024-12 EN 5060800.00A.04
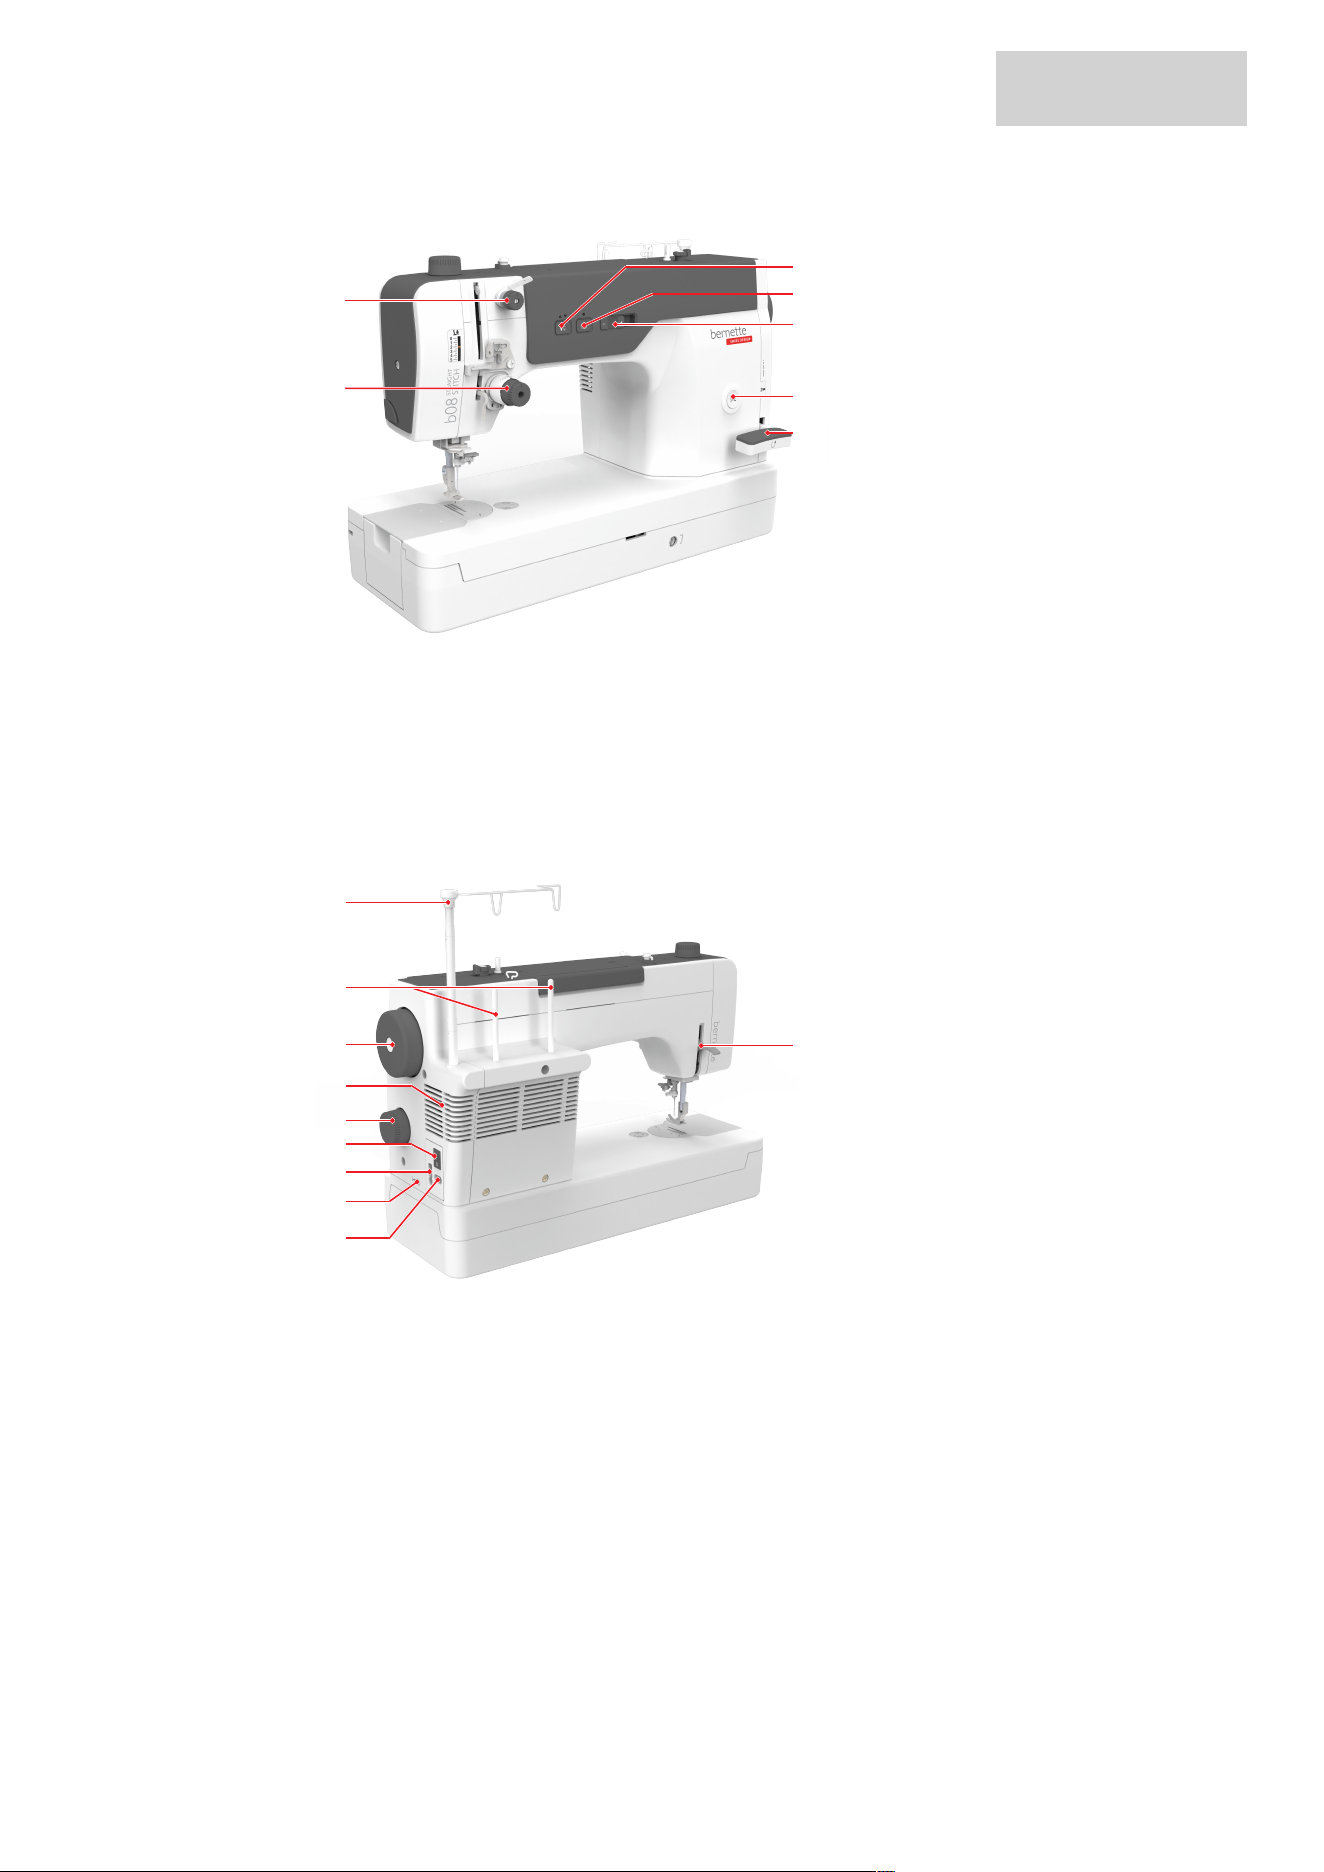
Overview Top
1
2
3
4
5
6
1 «Presser Foot Pressure» Dial 4 Thread Guide
2 Bobbin Winder Pretension 5 Bobbin Winder Unit
3 Carry Handle 6 Stopper Bobbin Winder Unit
1.2 Accessory
Included Accessories
Visit www.bernette.com/accessories for more accessory information.
Illustration Name Illustration Name
Slide-On Table Bobbin (4x)
Foot Control Needle Assortment
Quick Start Guide Sewing Machine Oil
Knee Lifter Seam Guide
MY BERNETTE
11
2024-12 EN 5060800.00A.04
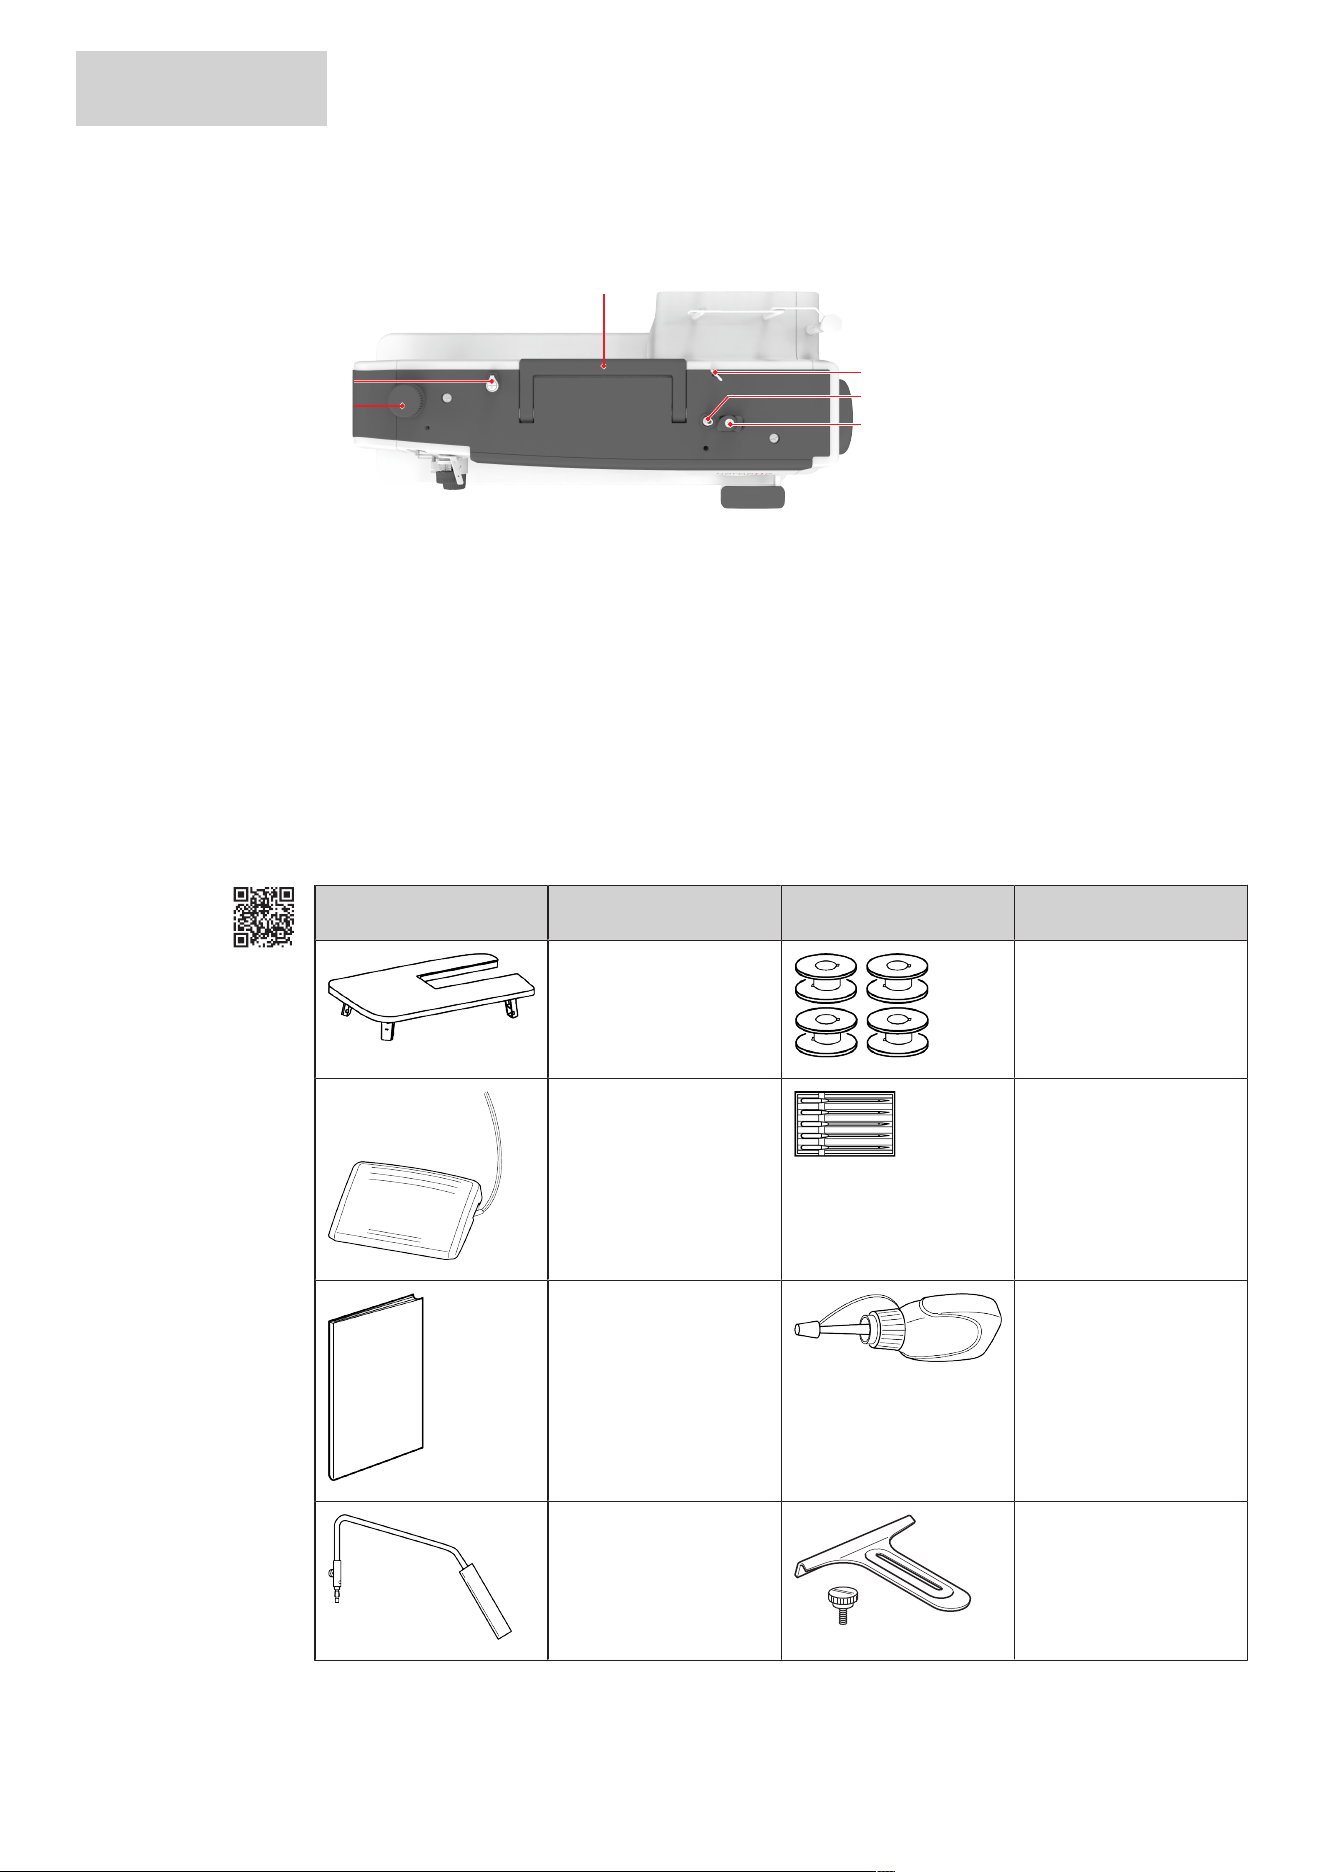
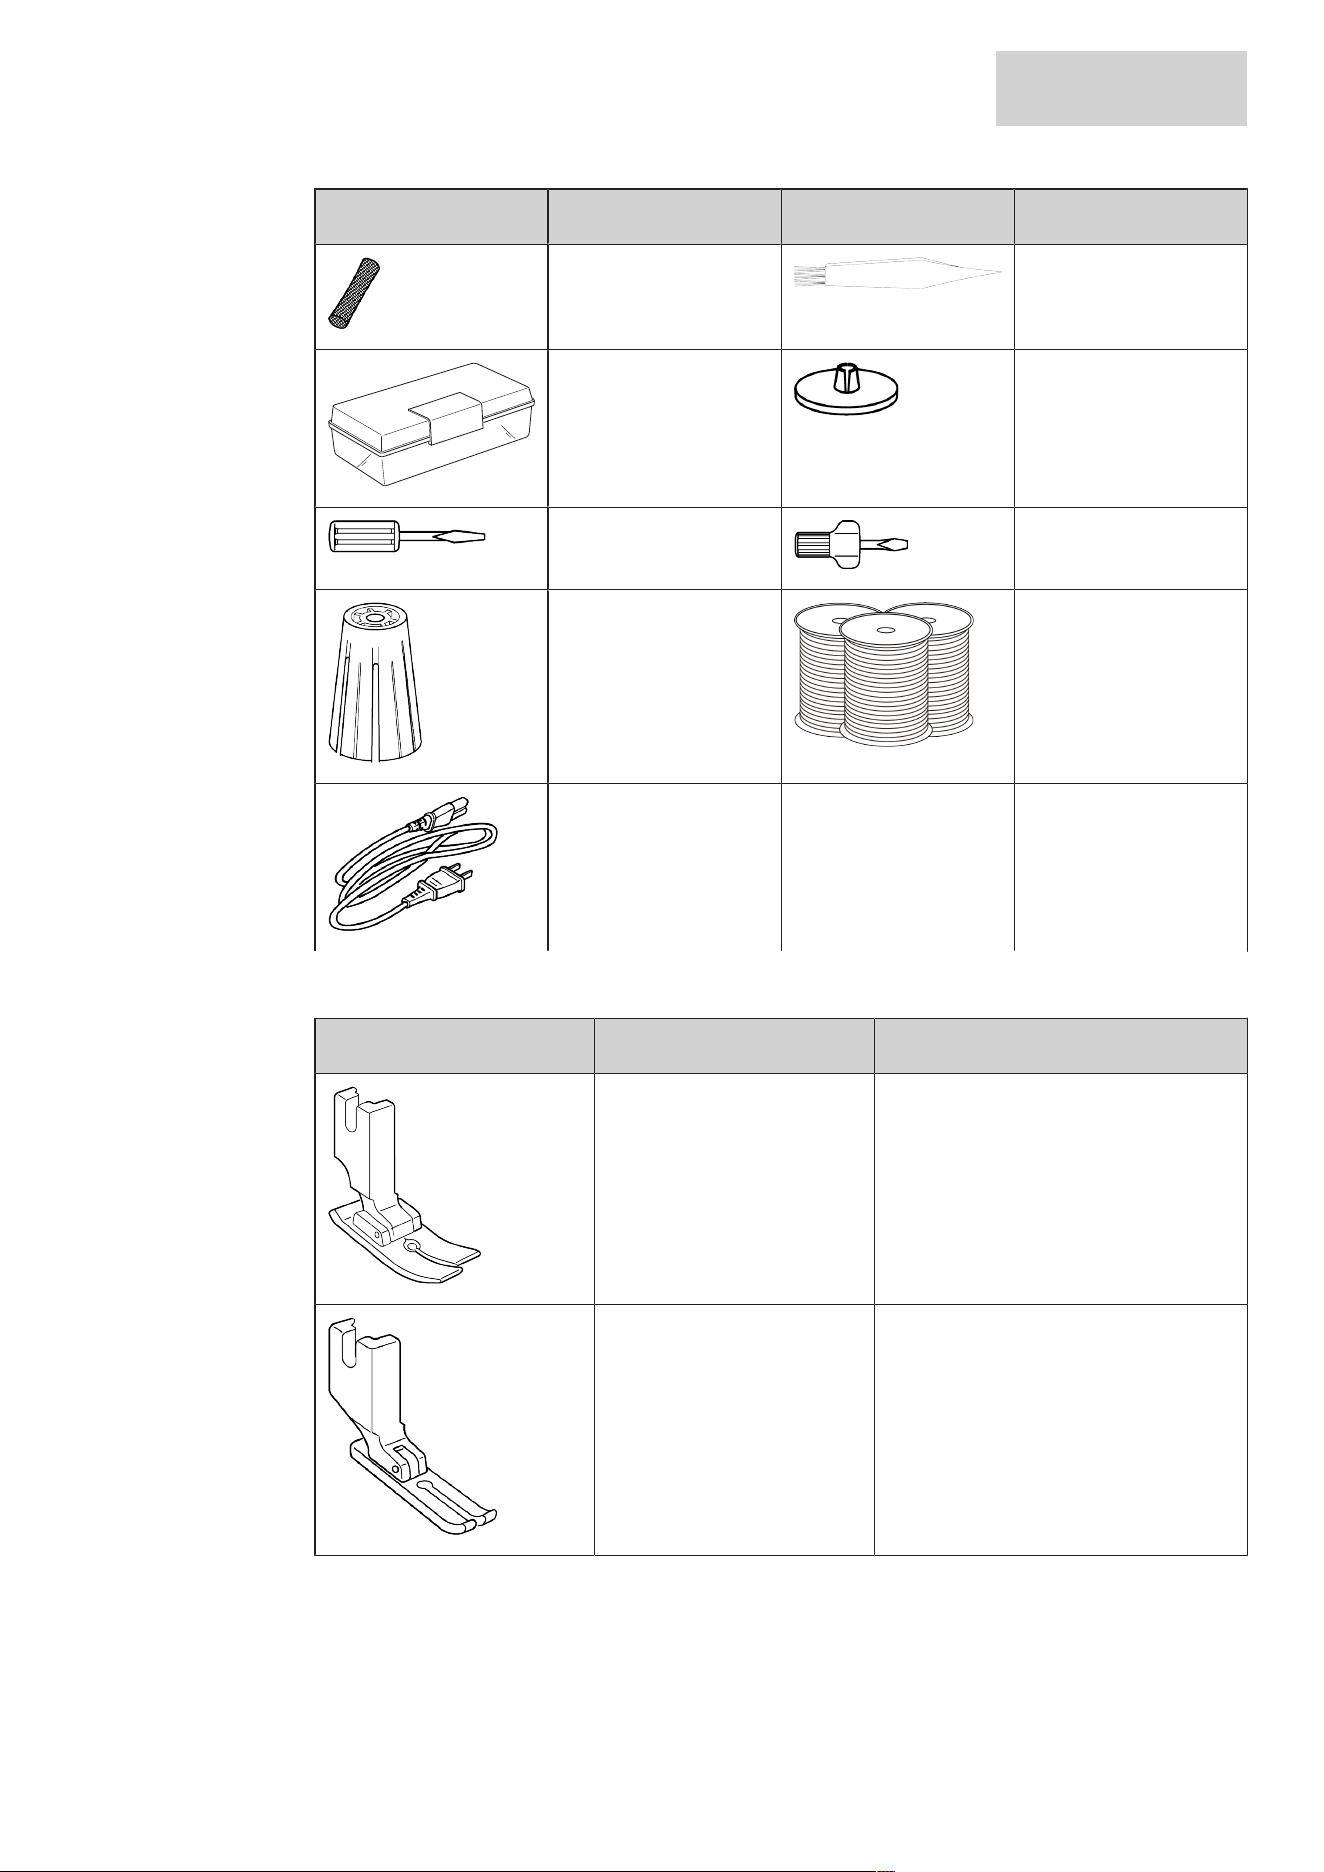
Illustration Name Illustration Name
Spool net (1x) Lint Brush
Accessories Box Spool Disc, large (1x)
Screw Driver, large Screw Driver, small
Spool Stabilizer Mettler Thread Starter
Kit
Power Cable
Overview Presser Feet
Illustration Name Purpose
Straight Stitch Foot For straight stitch seams on all fabrics.
Narrow Straight Stitch Foot For topstitching edges and zippers.

MY BERNETTE
12
2024-12 EN 5060800.00A.04
1.3 Needle, Thread, Fabric
Needles will wear down over time. Therefore, needles should be replaced regularly. Only a perfect point
results in a good stitching result. In general it can be said: the thinner the thread, the finer the needle.
• Needle sizes 65, 75: For lightweight fabrics
• Needle sizes 75, 90: For medium fabrics
• Needle sizes 90, 100: For heavyweight fabrics
Overview Needles
Needle Art. No.
Speed Sewing Needles Special 65/9 HLx5 5020601507
Speed Sewing Needles Special 75/11 HLx5 5020601508
Speed Sewing Needles Special 90/14 HLx5 5020601509
Speed Sewing Needles Special 100/16 HLx5 5020601510
Speed Sewing Needles Special HLx5 5020601511
Thread Selection
For a perfect sewing result, thread and fabric quality play an important role.
We recommend purchasing quality threads to achieve good sewing results.
• Cotton threads have the advantage of being a natural fiber and therefore are especially suitable for
sewing cotton fabrics.
• Mercerized cotton threads have a slight sheen that remains even after washing.
• Polyester threads have a high tensile strength and are particularly colorfast.
• Polyester threads are more flexible and are recommended where a strong and elastic seam is required.
• Rayon threads are made of natural fibers and have a brilliant sheen.
• Rayon threads are suitable for decorative stitches and create a more beautiful effect.
MY BERNETTE
13
2024-12 EN 5060800.00A.04
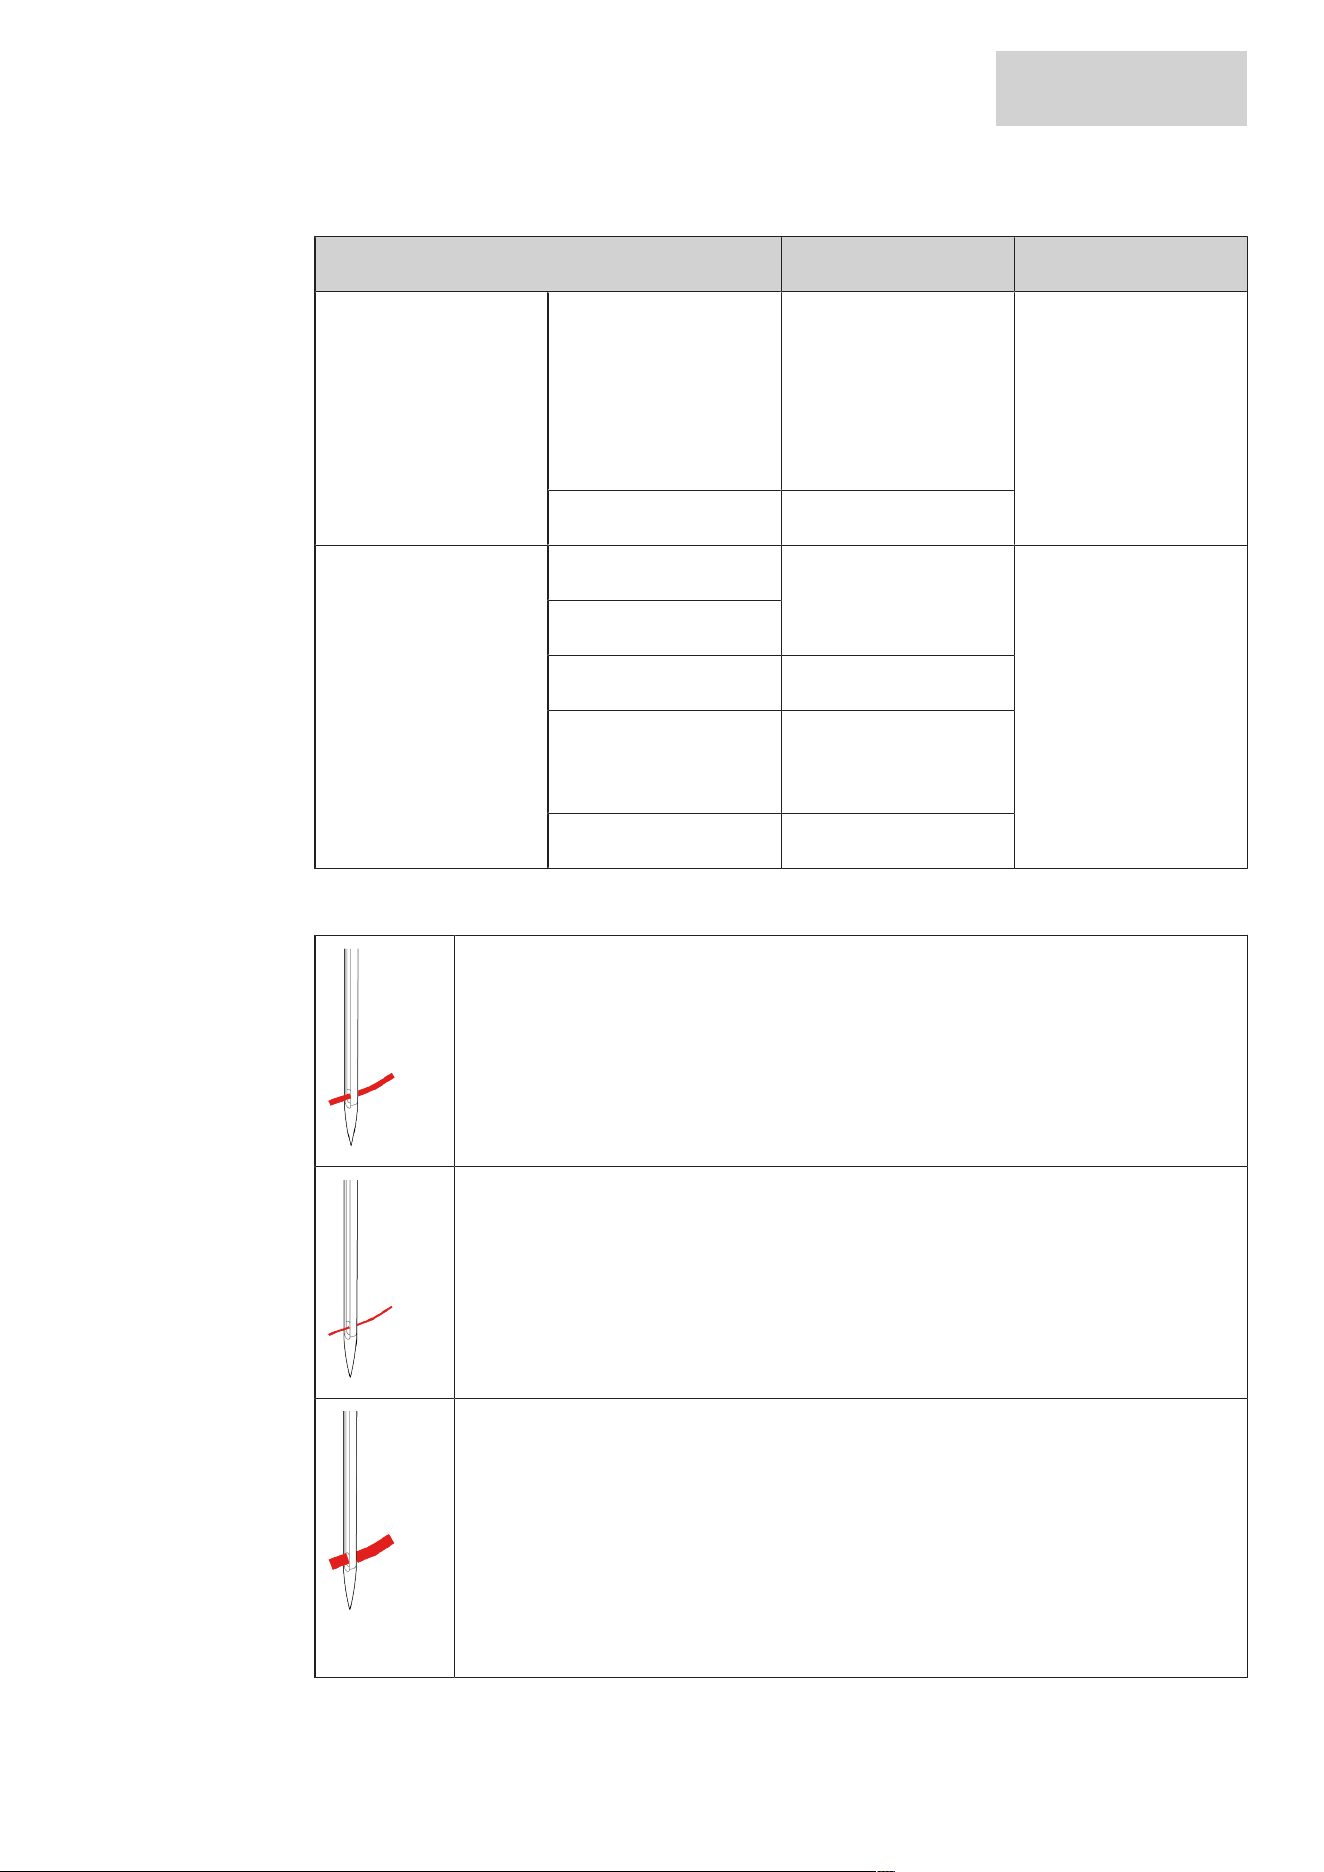
Thread and Needle Overview
Fabric Thread Needle size (HLx5)
Thin fabrics Wool
Foil
Gabardine
Thin jersey
Cotton 50 – 60
Synthetic 50 – 60
65/9
75/11
90/14
Flannel wool Synthetic 50 – 60
Thick fabrics Denim Synthetic 20 – 50 90/14
100/16
Canvas
Imitation leather Synthetic 20 – 30
Tweed fabrics Cotton 20 – 50
Synthetic 30 – 50
Jersey Synthetic 20 – 50
Needle/Thread Combination
The needle/thread combination is correct, when the thread fits perfectly into the long
groove and goes easily through the needle eye. This allows the thread to be stitched
optimally.
If the thread has too much room to move in the long groove and in the needle eye, this
can result in the thread breaking or missing stitches.
If the thread rubs along the edge of the long groove and cannot be guided properly
through the needle eye, this can result in the thread breaking or jamming.
SEWING PREPARATION
14
2024-12 EN 5060800.00A.04
2 Sewing Preparation
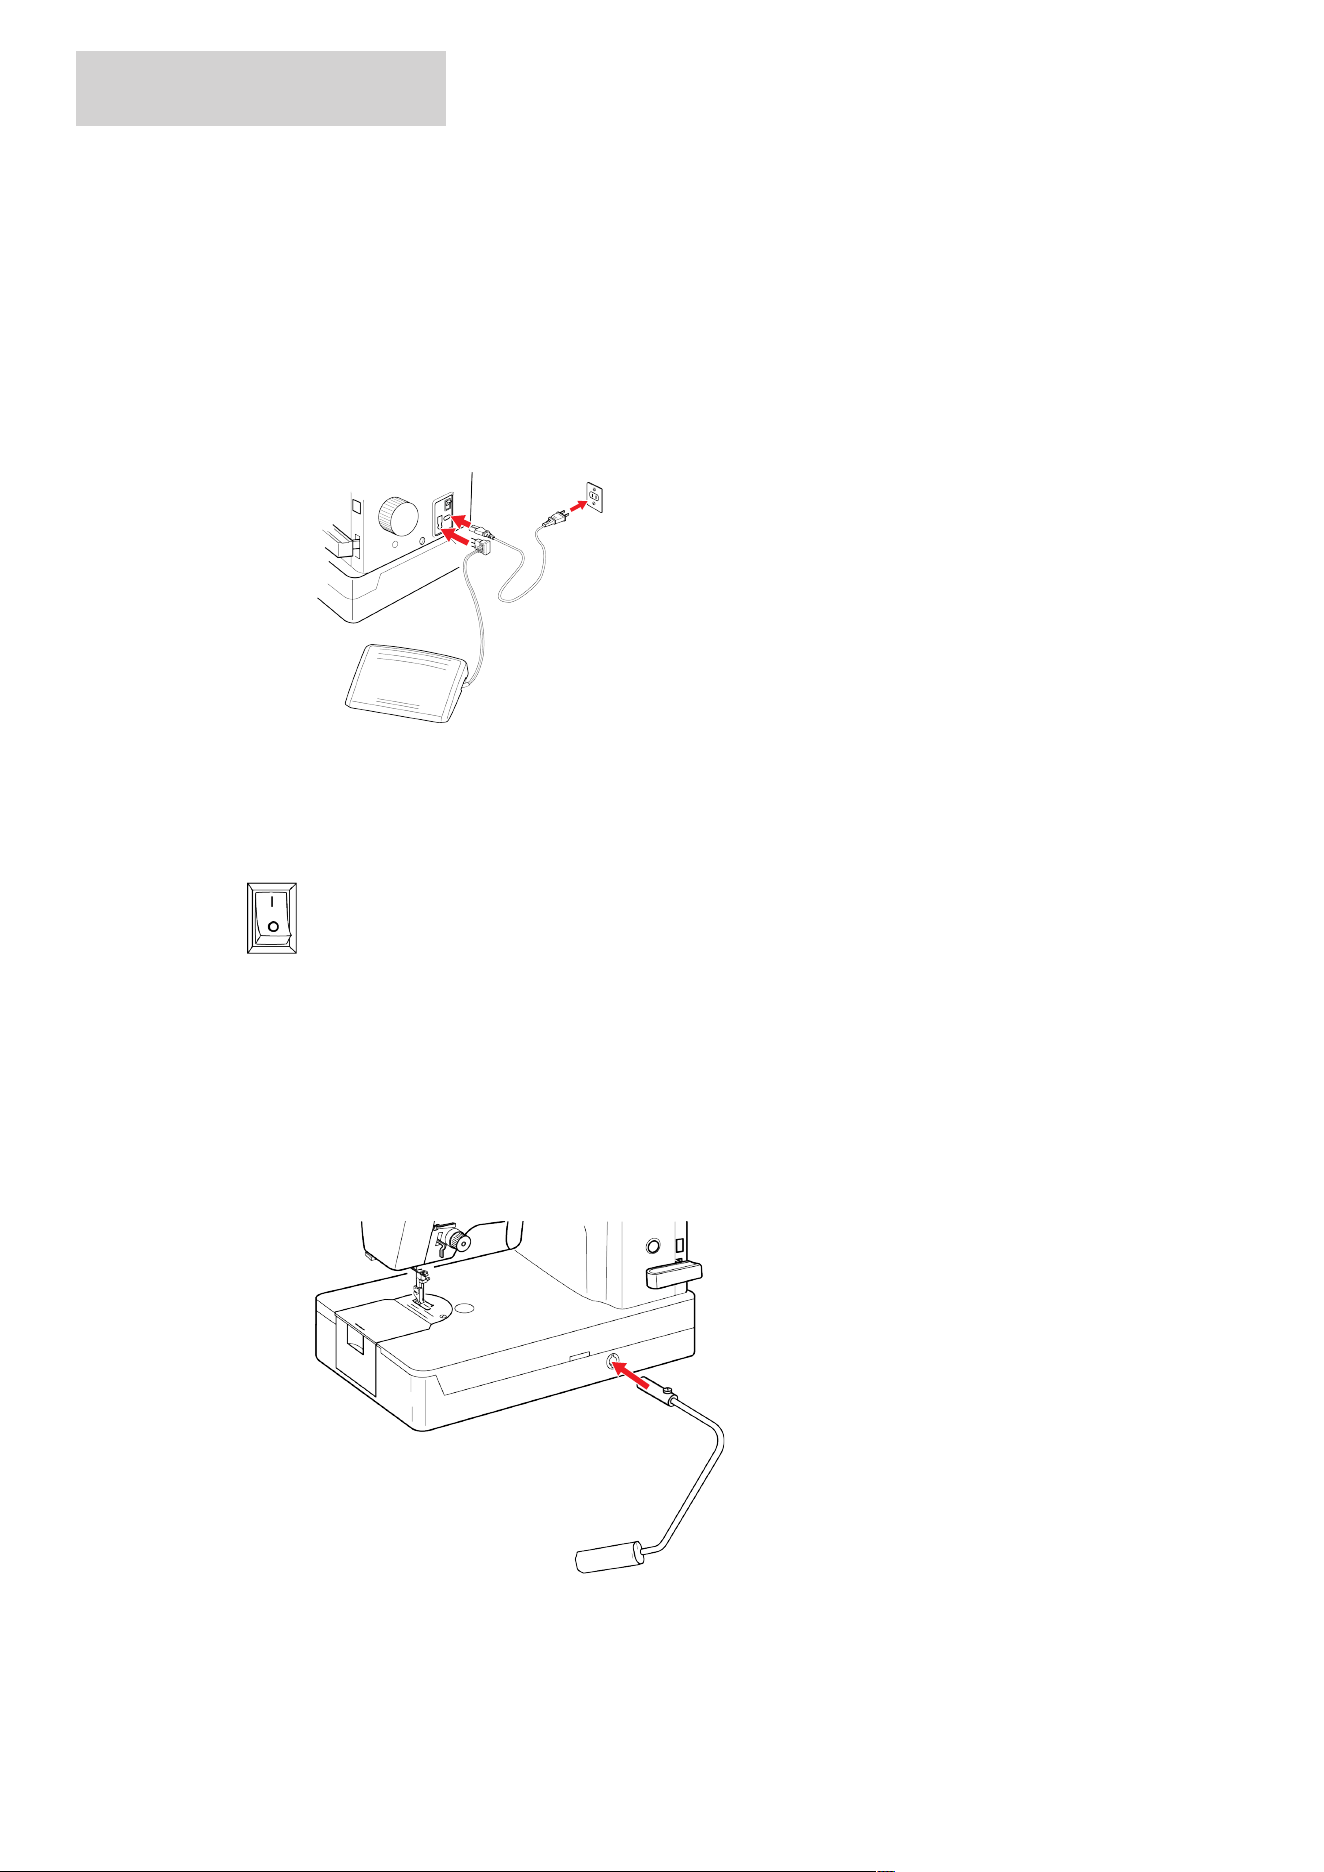
2.1 Connection and Switching On
Connecting the Machine and Foot Control
> Insert the device plug of the power cable into the machine's power cable connection.
> Insert the power plug of the power cable into the socket.
> Insert the cable of the foot control into the foot control connection.
Switching the Machine On
Prerequisite:
• The power plug is connected.
> Set the power switch to «I».
Knee Lifter
The presser foot may be temporarily raised and lowered with the Free Hand System. The knee lifter is
extremely helpful when sewing appliqué, patchwork and quilting since it allows you to handle the fabric
while your knee controls the presser foot.
Attaching the Knee Lifter of the Free Hand System
> Insert the knee lifter into the knee lifter connection.
> Adjust the sitting height so that the Knee Lifter can be operated with the knee.
SEWING PREPARATION
15
2024-12 EN 5060800.00A.04
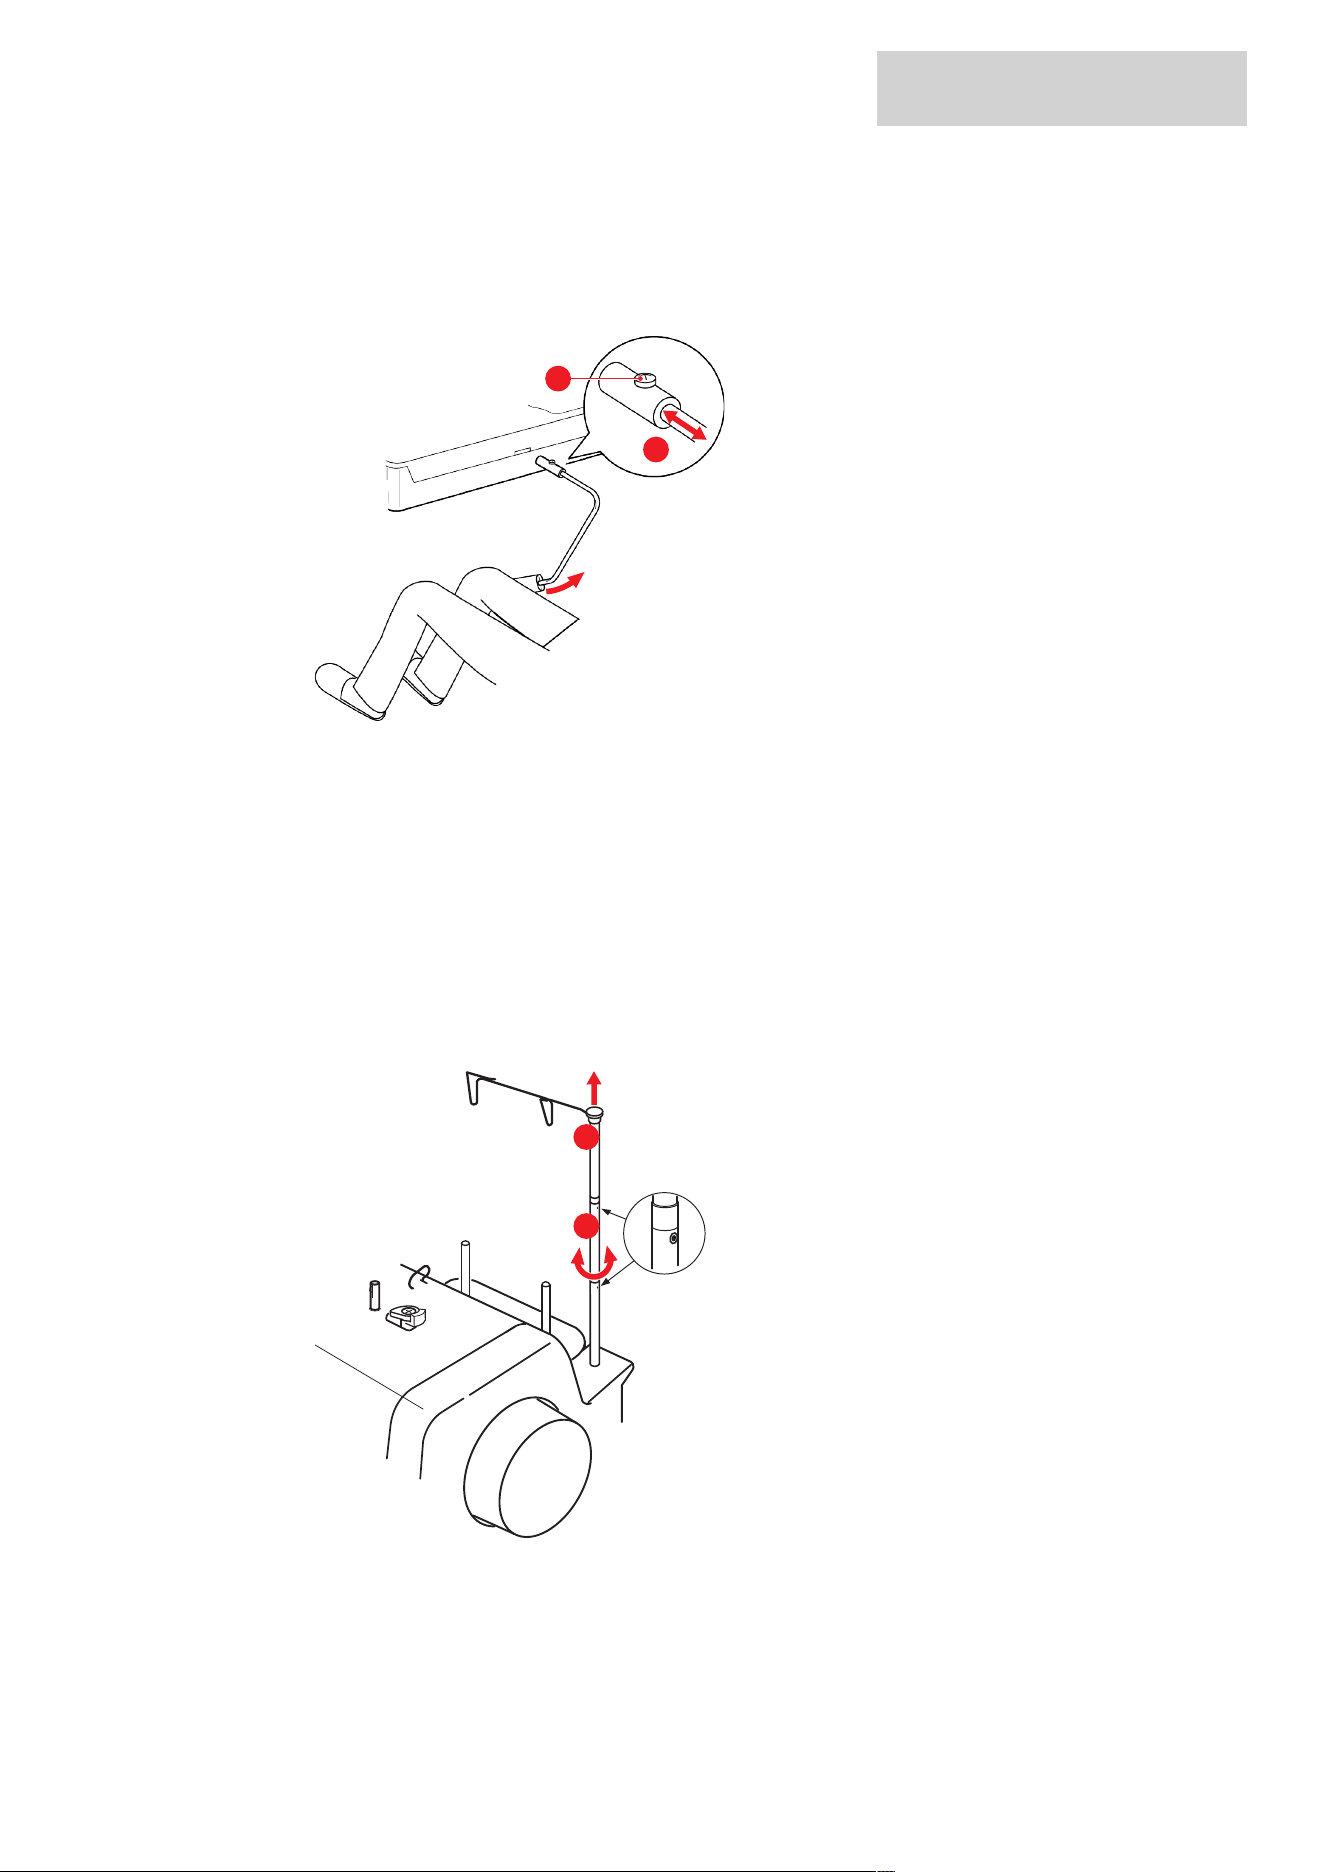
Adjusting the Knee Lifter
The position and angle of the knee lifter can be optimally adjusted to the individual sitting position.
> Insert the knee lifter into the knee lifter connection.
> Loosen the fixing screw and adjust the angle by moving the lifter.
1
2
> Tighten the fixing screw.
Positioning the Thread Guide
The thread guide ensures that the thread is pulled properly from the thread spools. Each thread is guided
through a thread guide wire located directly above the thread spool.
> To position the retractable thread guide, hold the thread guide and pull it up as far as it will go.
> Turn the thread guide to the left and right until the two positioning pins engage.
– The outer thread guide wires are parallel to the machine front.
1
2
> To retract the thread guide, push the thread guide down with a little pressure.
SEWING PREPARATION
16
2024-12 EN 5060800.00A.04
2.2 Spool Pin
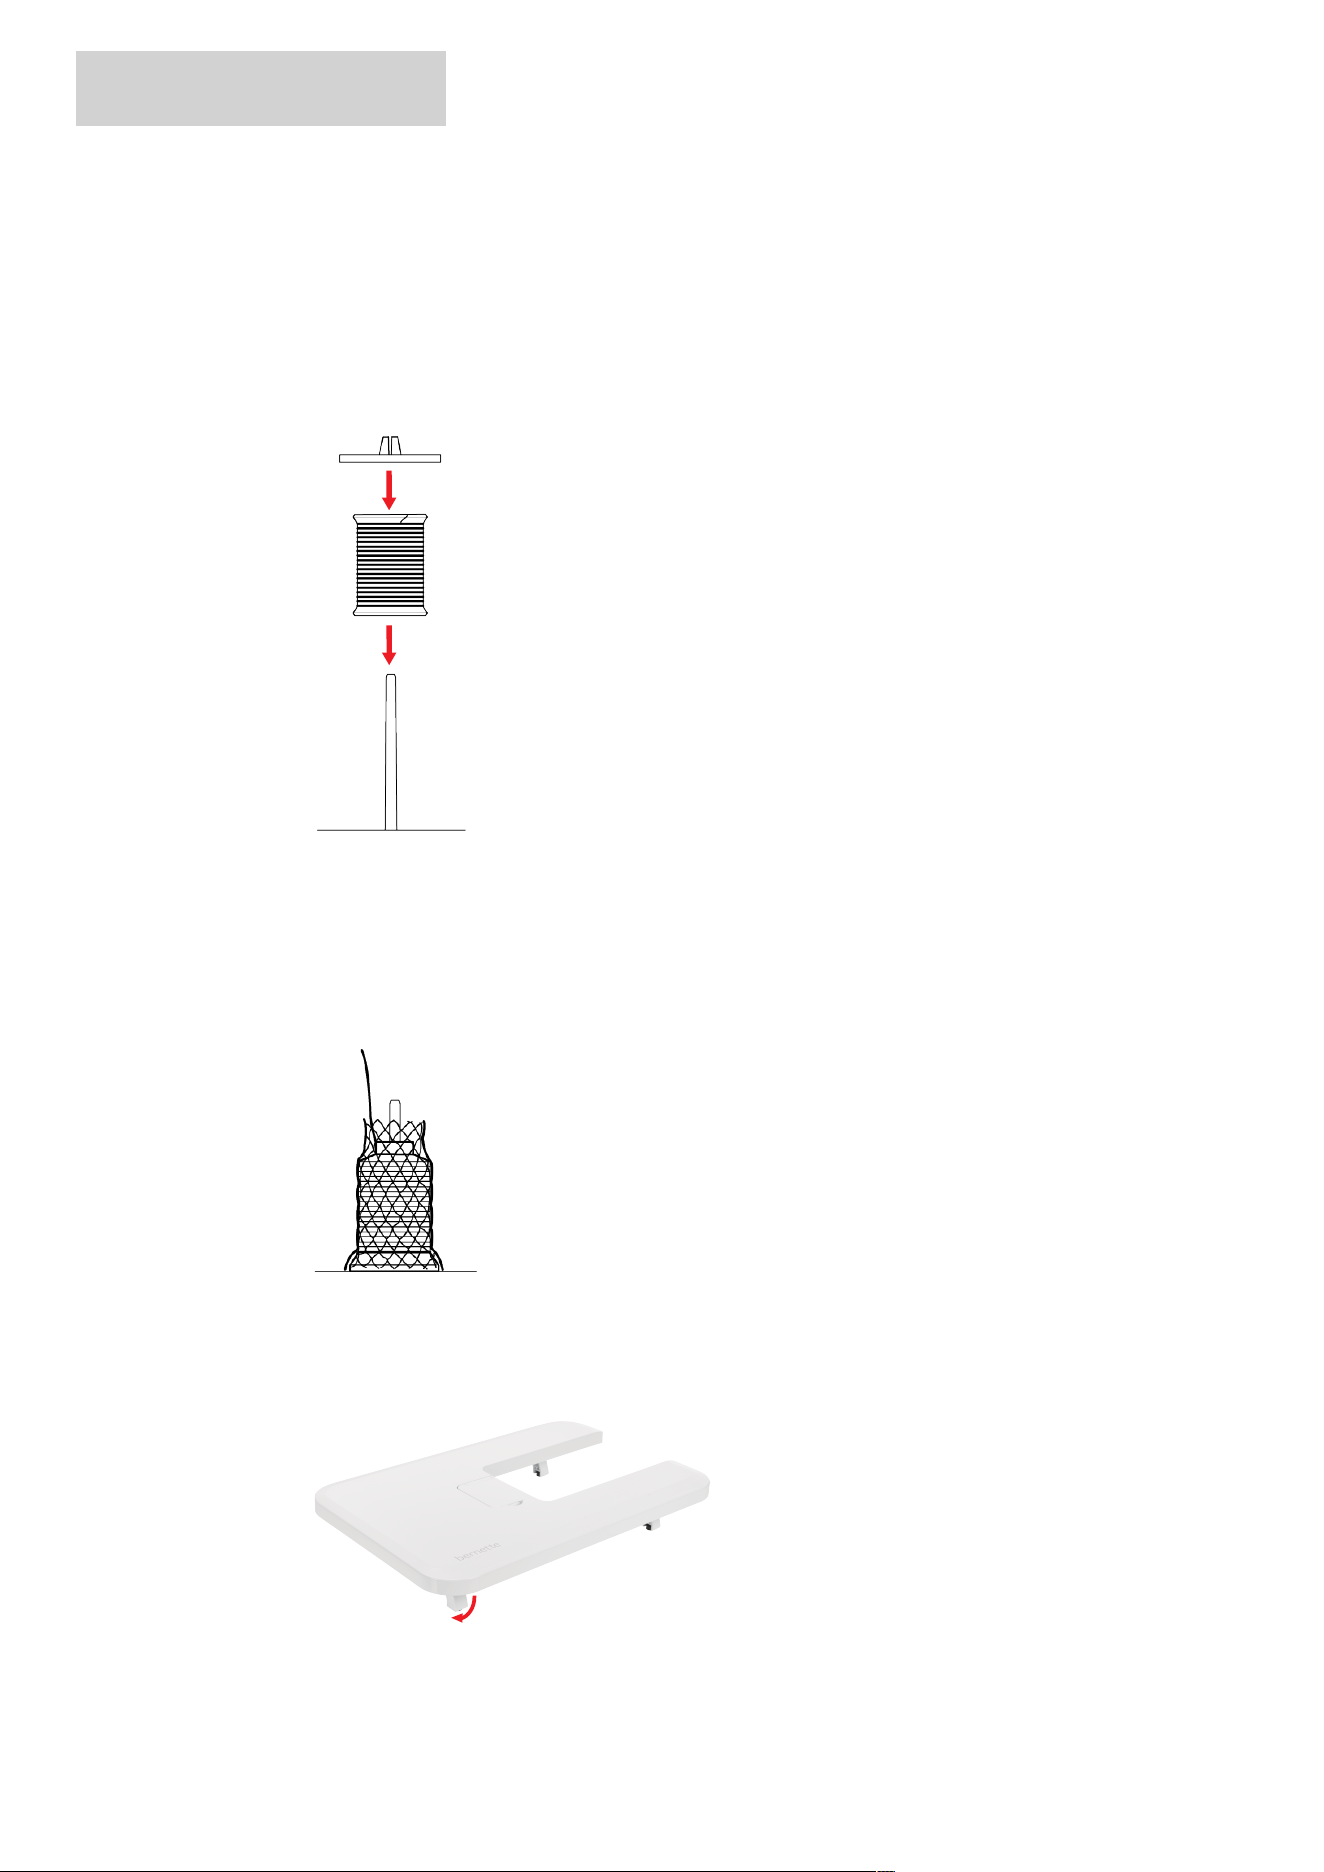
Placing the Thread Spool and the Spool Cap
Spool discs hold the thread spool in place for proper release of thread from the spool.
> Place the thread spool on the spool pin.
> Position the appropriate spool cap on the spool pin so that there is no space between the spool cap and
the thread spool.
Using the Spool Net
The spool net holds the thread on the thread spool and prevents the thread from knotting and breaking.
> Pull the spool net over the thread spool. Ensure when doing so that the spool net does not slip off the
thread spool, e.g. double-insert the net over the thread spools or insert a part of the net into the thread
spool at the rear.
2.3 Using the Slide-on Table
Attached to the machine, the slide-on table enables the available sewing area to be extended.
> Unfold the feet of the slide-on table.
SEWING PREPARATION
17
2024-12 EN 5060800.00A.04
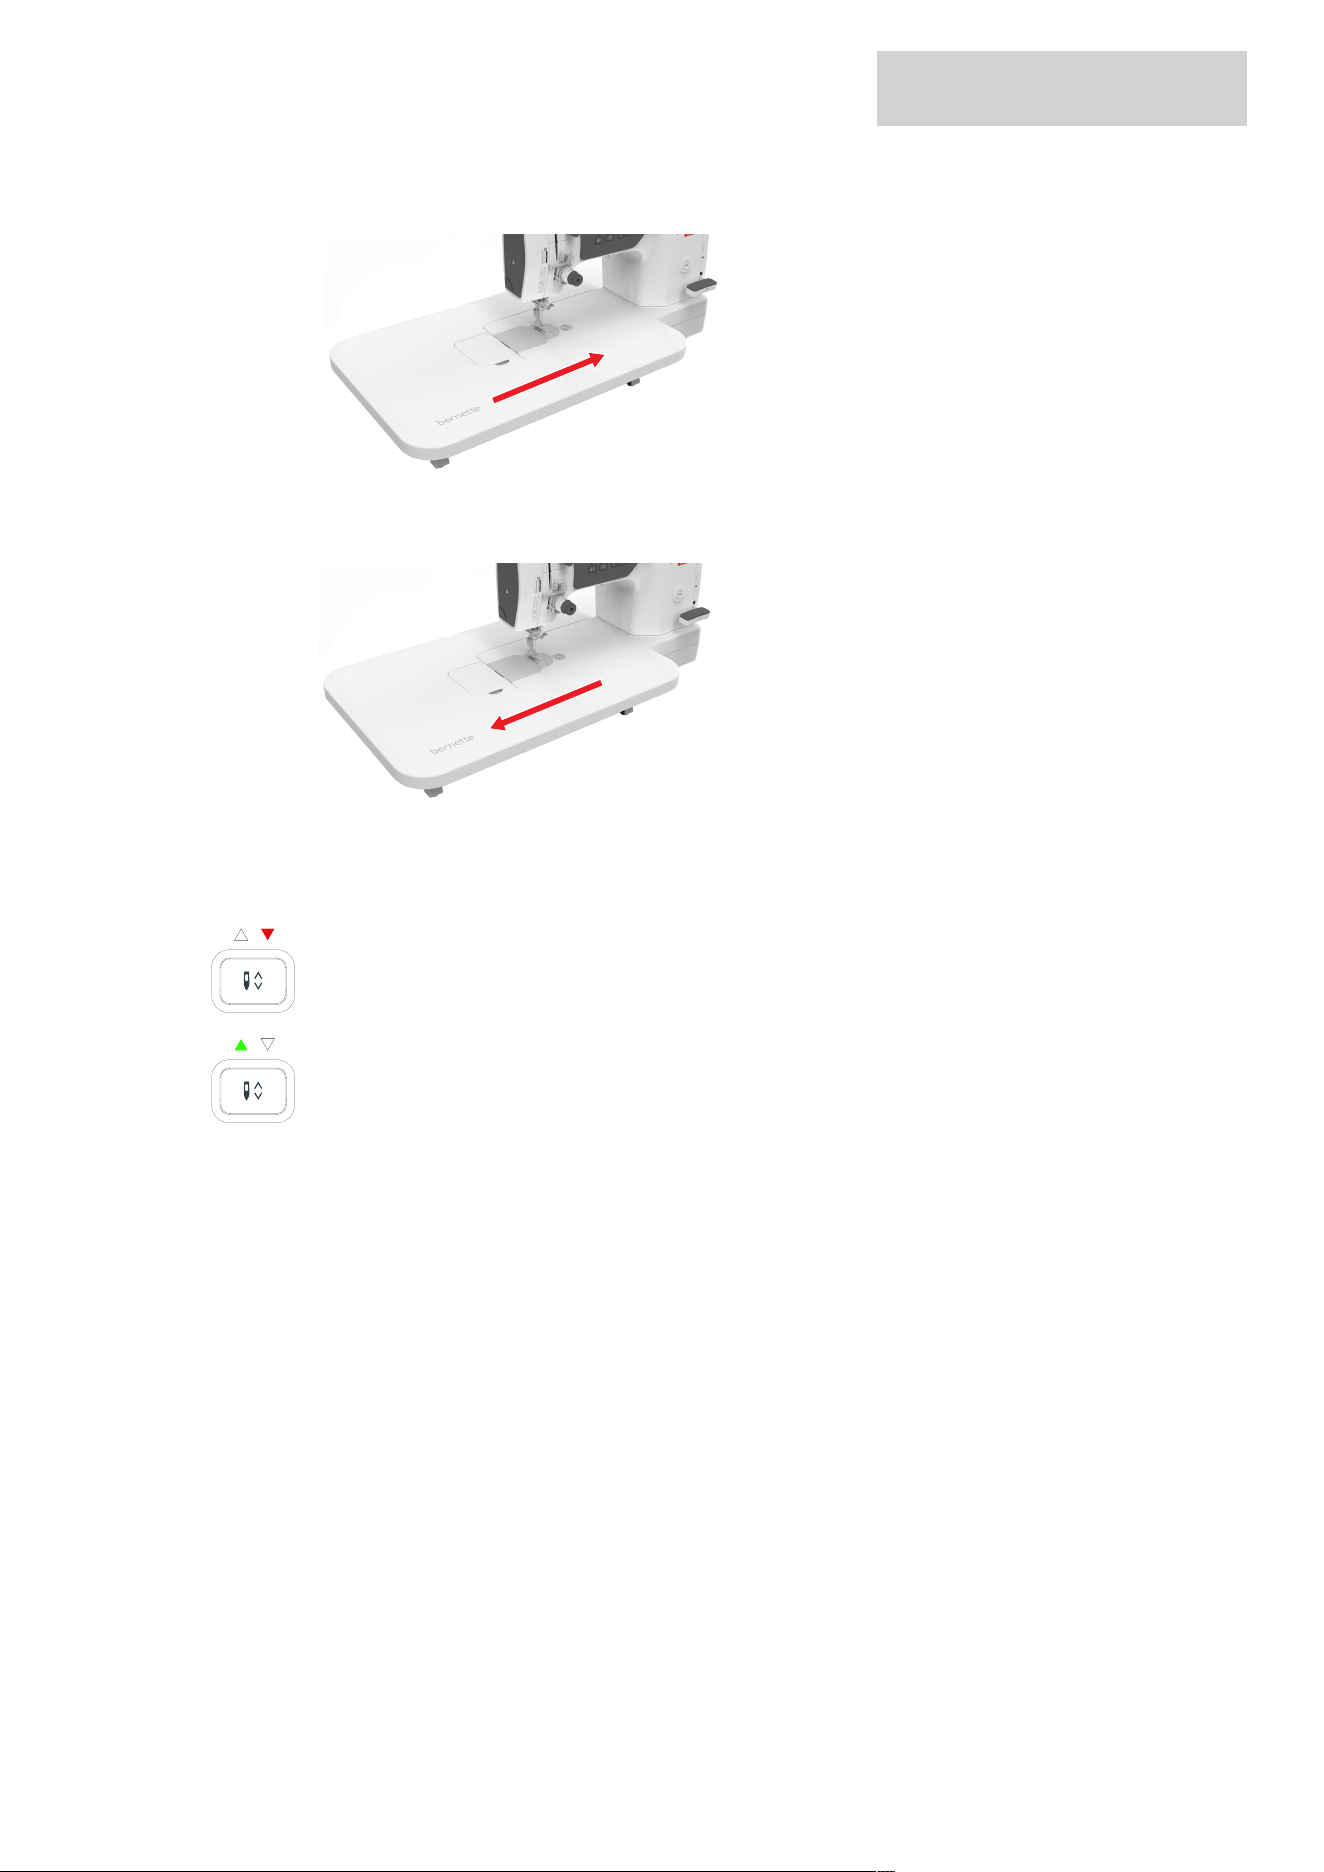
> Push the slide-on table from left to right over the machine bed.
> Rotate the adjustable feet to adjust the height of the slide-on table.
> To remove the slide-on table, pull the slide-on table over the machine bed to the left.
2.4 Needle
Needle Stop Up/Down (Permanent)
> To set the needle position "down", press the button «Needle Stop Up/Down».
– The right-hand LED lights up in red.
– As soon as the foot control is released, the machine stops with the needle in the "down" position.
> To set the needle position "up", press the button «Needle Stop Up/Down».
– The left-hand LED lights up in green.
– As soon as the foot control is released, the machine stops with the needle in the "up" position.
Raising and Lowering the Needle
> To raise the needle, turn the handwheel counterclockwise until the needle is in the highest position.
> To lower the needle, continue turning the handwheel counterclockwise until the needle pierces the
fabric.

SEWING PREPARATION
18
2024-12 EN 5060800.00A.04
Changing the Needle
> Switch the machine off.
> Lower the presser foot.
> Raise the needle.
> Loosen the fixing screw.
> Pull the needle down to remove.
> Hold the new needle with the flat side to the right and insert it as far up as it will go into the needle
holder.
> Tighten the fixing screw.
2.5 Presser Foot
Raising/Lowering the Presser Foot
> To raise the presser foot, press the presser foot lever upwards.
1
2
> To raise the presser foot higher than the normal position, press the presser foot lever all the way up and
hold it in place.
> To lower the presser foot, press the presser foot lever downwards.
SEWING PREPARATION
19
2024-12 EN 5060800.00A.04
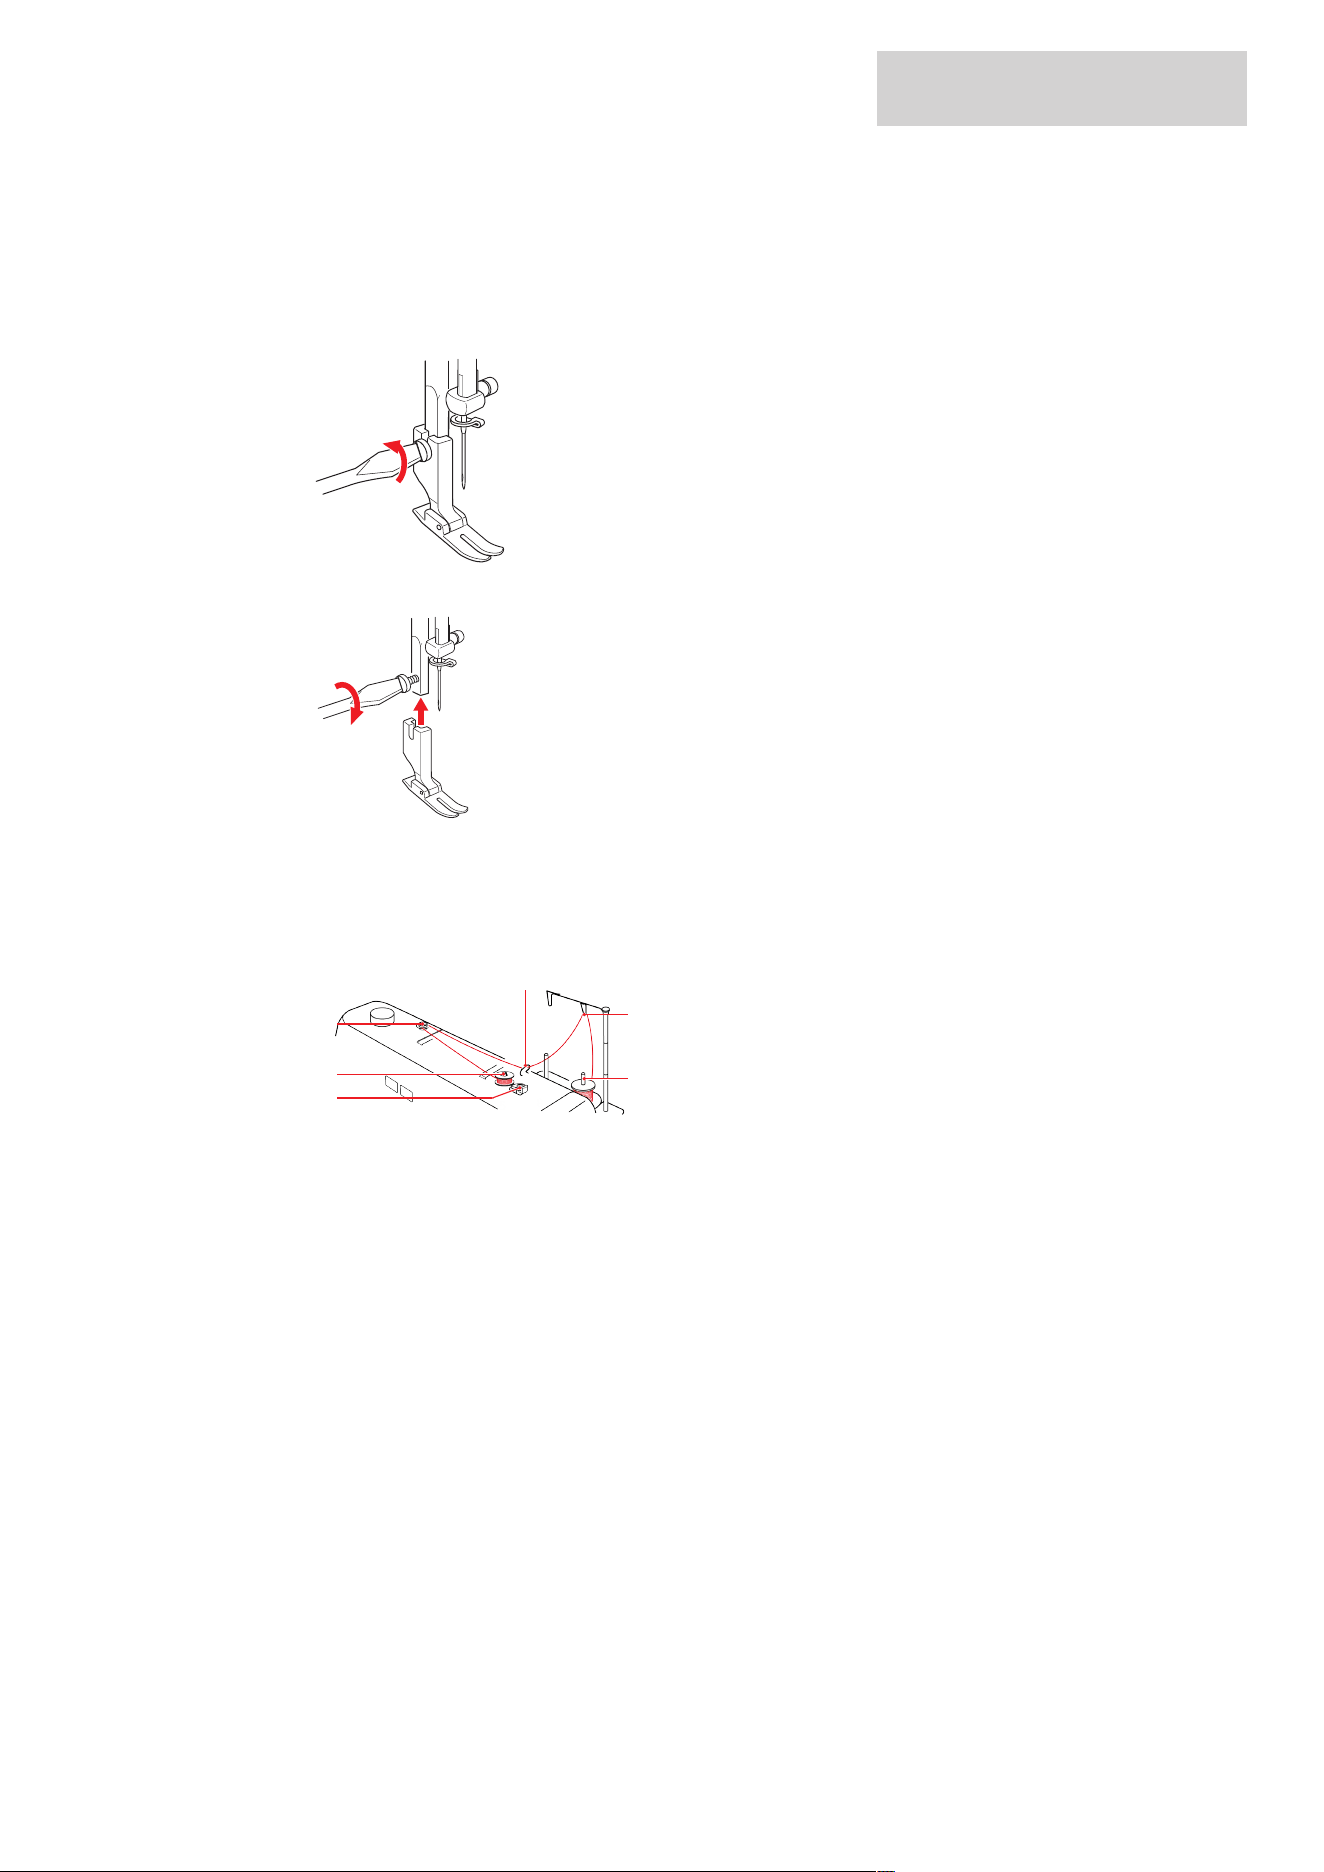
Changing the Presser Foot
> Switch the machine off.
> Raise the presser foot.
> Raise the needle.
> Loosen the fixing screw and remove the presser foot.
> Fit the new presser foot and tighten the fixing screw.
2.6 Threading
Winding the Bobbin Thread
4
1
4
5
6
2
3
1 Stopper 4 Thread Guide
2 Bobbin Winder Unit 5 Thread Guide Wires
3 Bobbin Winder Pretension 6 Spool Pin
> To prevent slippery threads from catching or breaking, pull the spool net over the spool.
> Place the thread spool and the spool disc on the spool pin.
> Feed the thread through the thread guide wire and the thread guide.
> Feed the thread around the bobbin winder pre-tensioner.
SEWING PREPARATION
20
2024-12 EN 5060800.00A.04
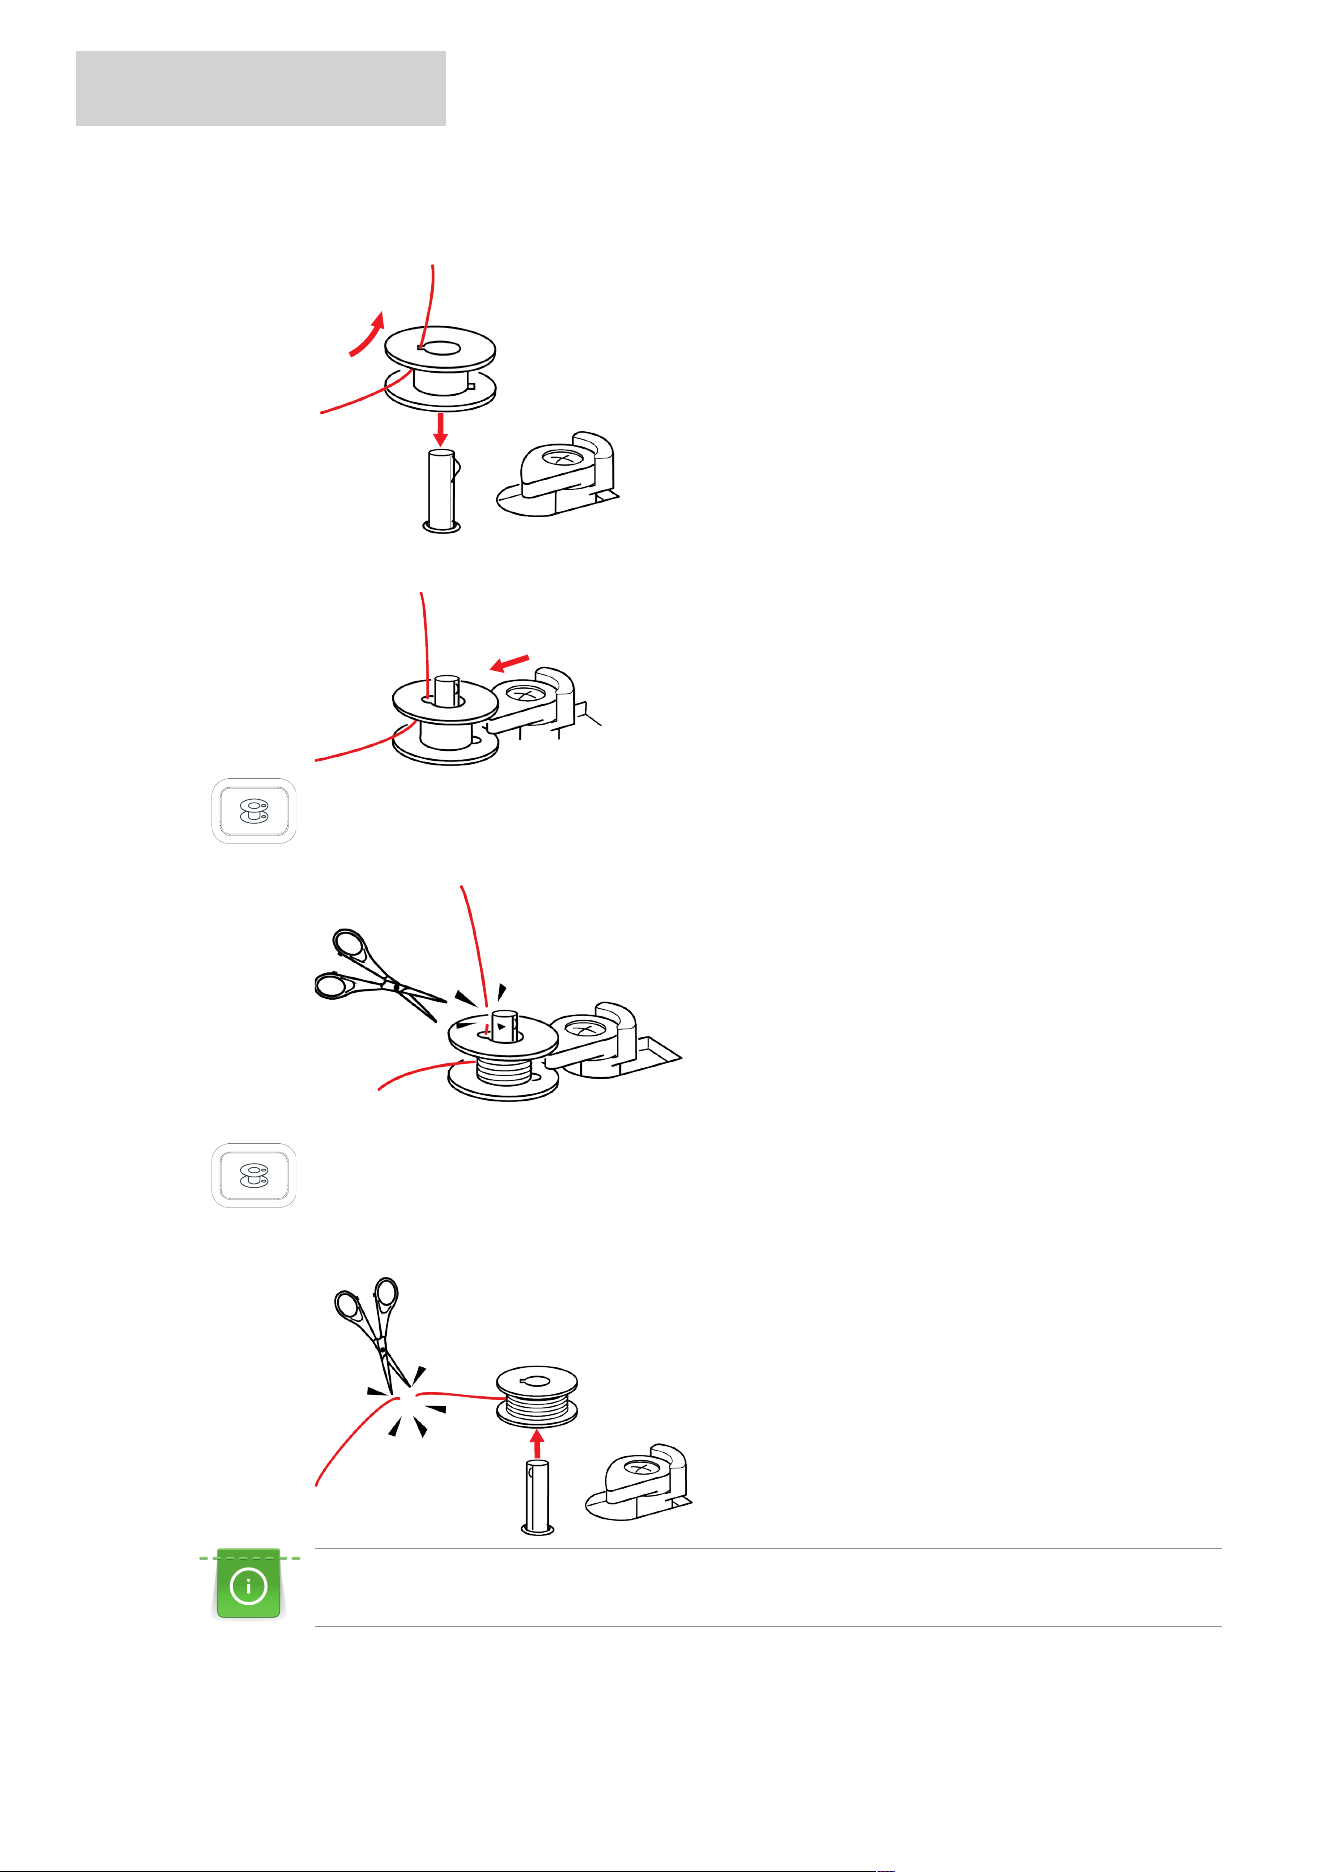
> Pull the end of the thread through one of the inner holes on the bobbin and place the empty bobbin on
the bobbin winding unit.
> Press the stopper of the bobbin winder unit to the left against the bobbin until the position engages.
> Push the button «Bobbin Winder».
– The machine winds.
> To stop the winding process, press the button «Bobbin Winder» after a few rotations again.
> Cut the end of the thread just above the bobbin.
> To start the winding process, push the button «Bobbin Winder».
> To stop the winding process, push the button «Bobbin Winder» again.
– As soon as the bobbin is full, the machine stops the winding process automatically.
> Remove the bobbin and cut the thread.
The machine is equipped with a separate winding motor so that winding can also be performed during
sewing.
SEWING PREPARATION
21
2024-12 EN 5060800.00A.04
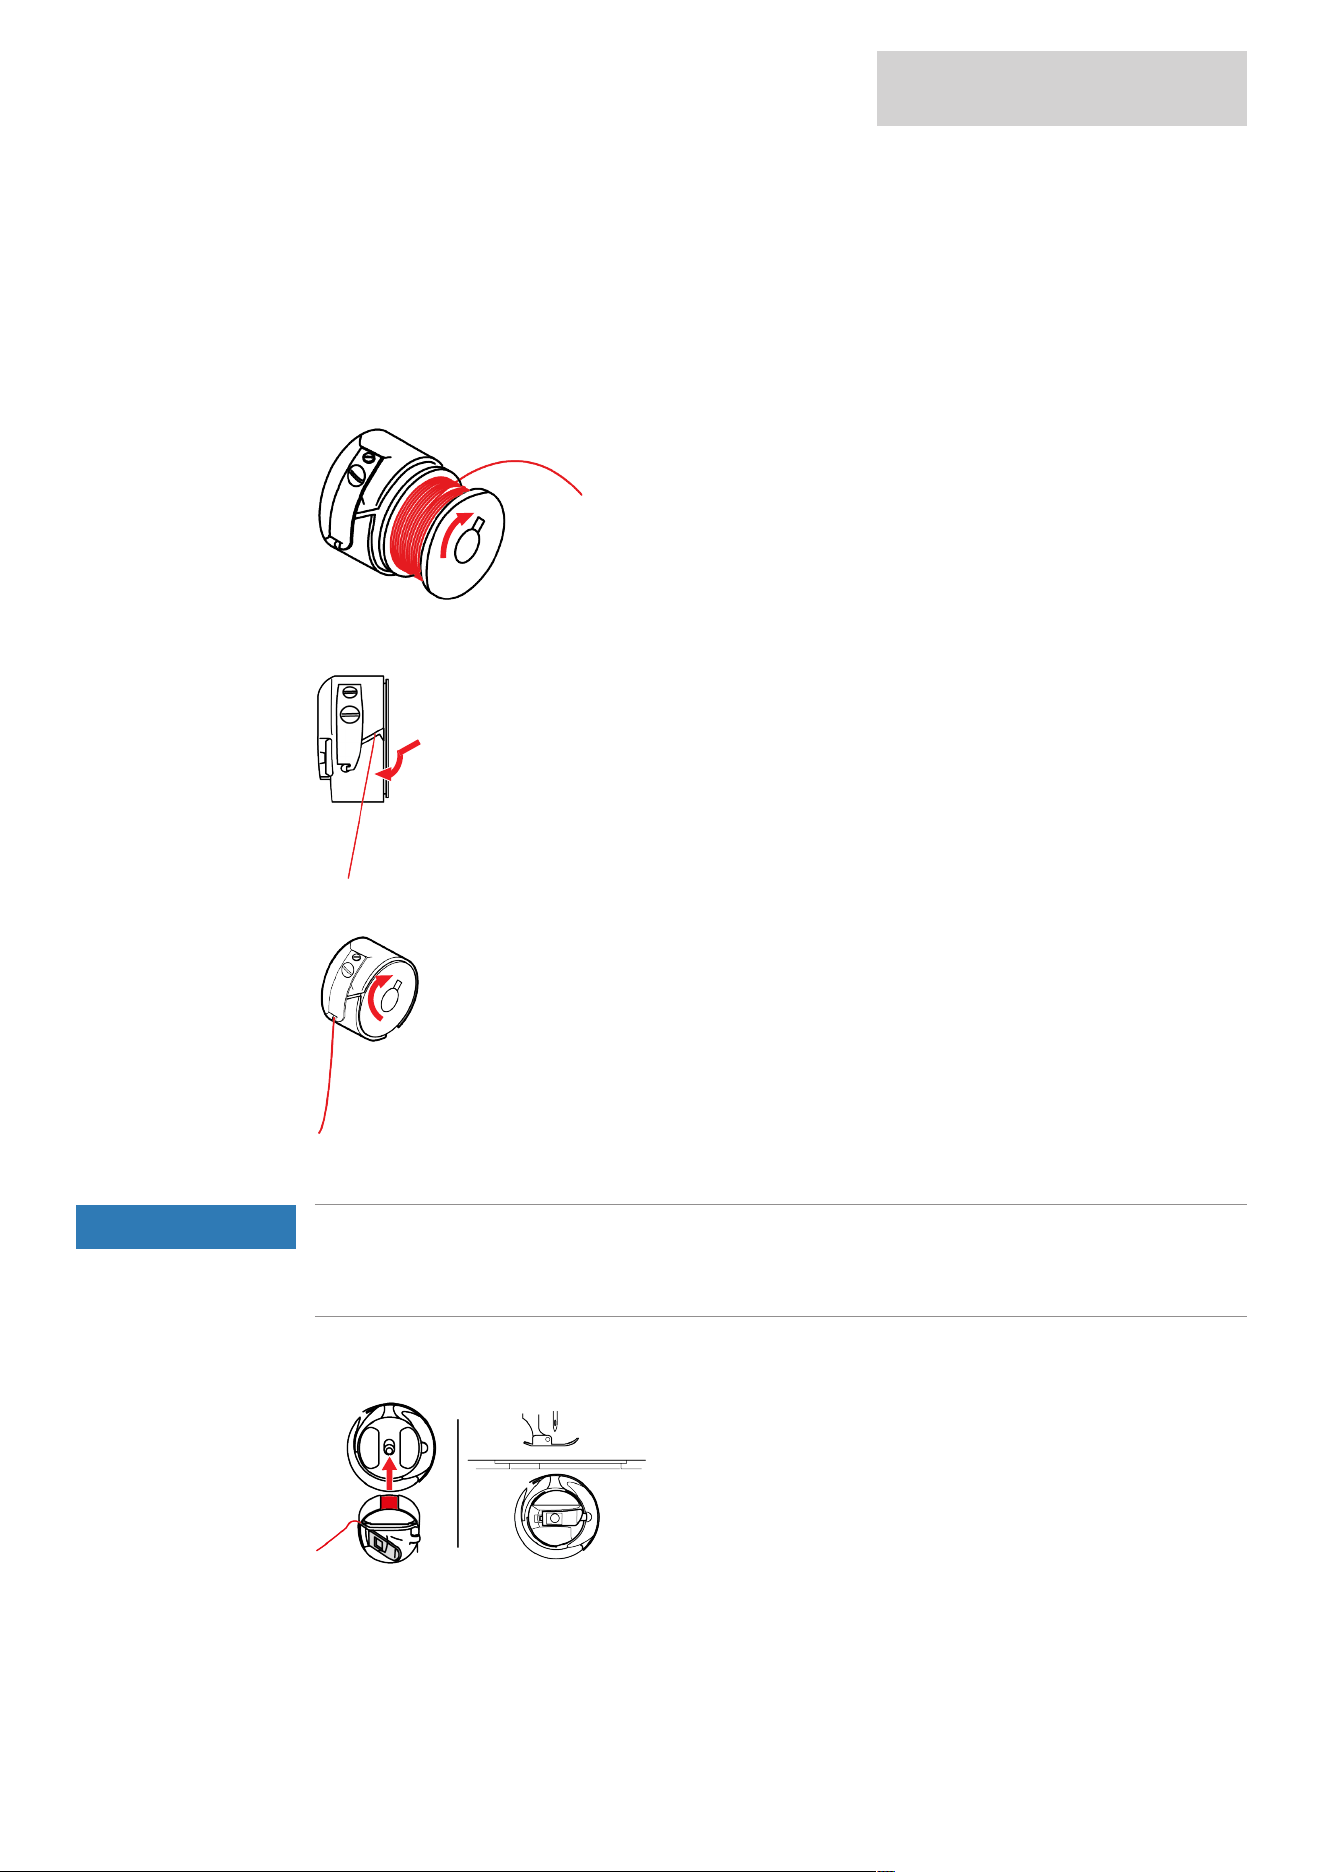
Threading the Bobbin Thread
> Raise the needle.
> Open the bobbin cover.
> Remove the top bobbin cover.
> Switch the machine off.
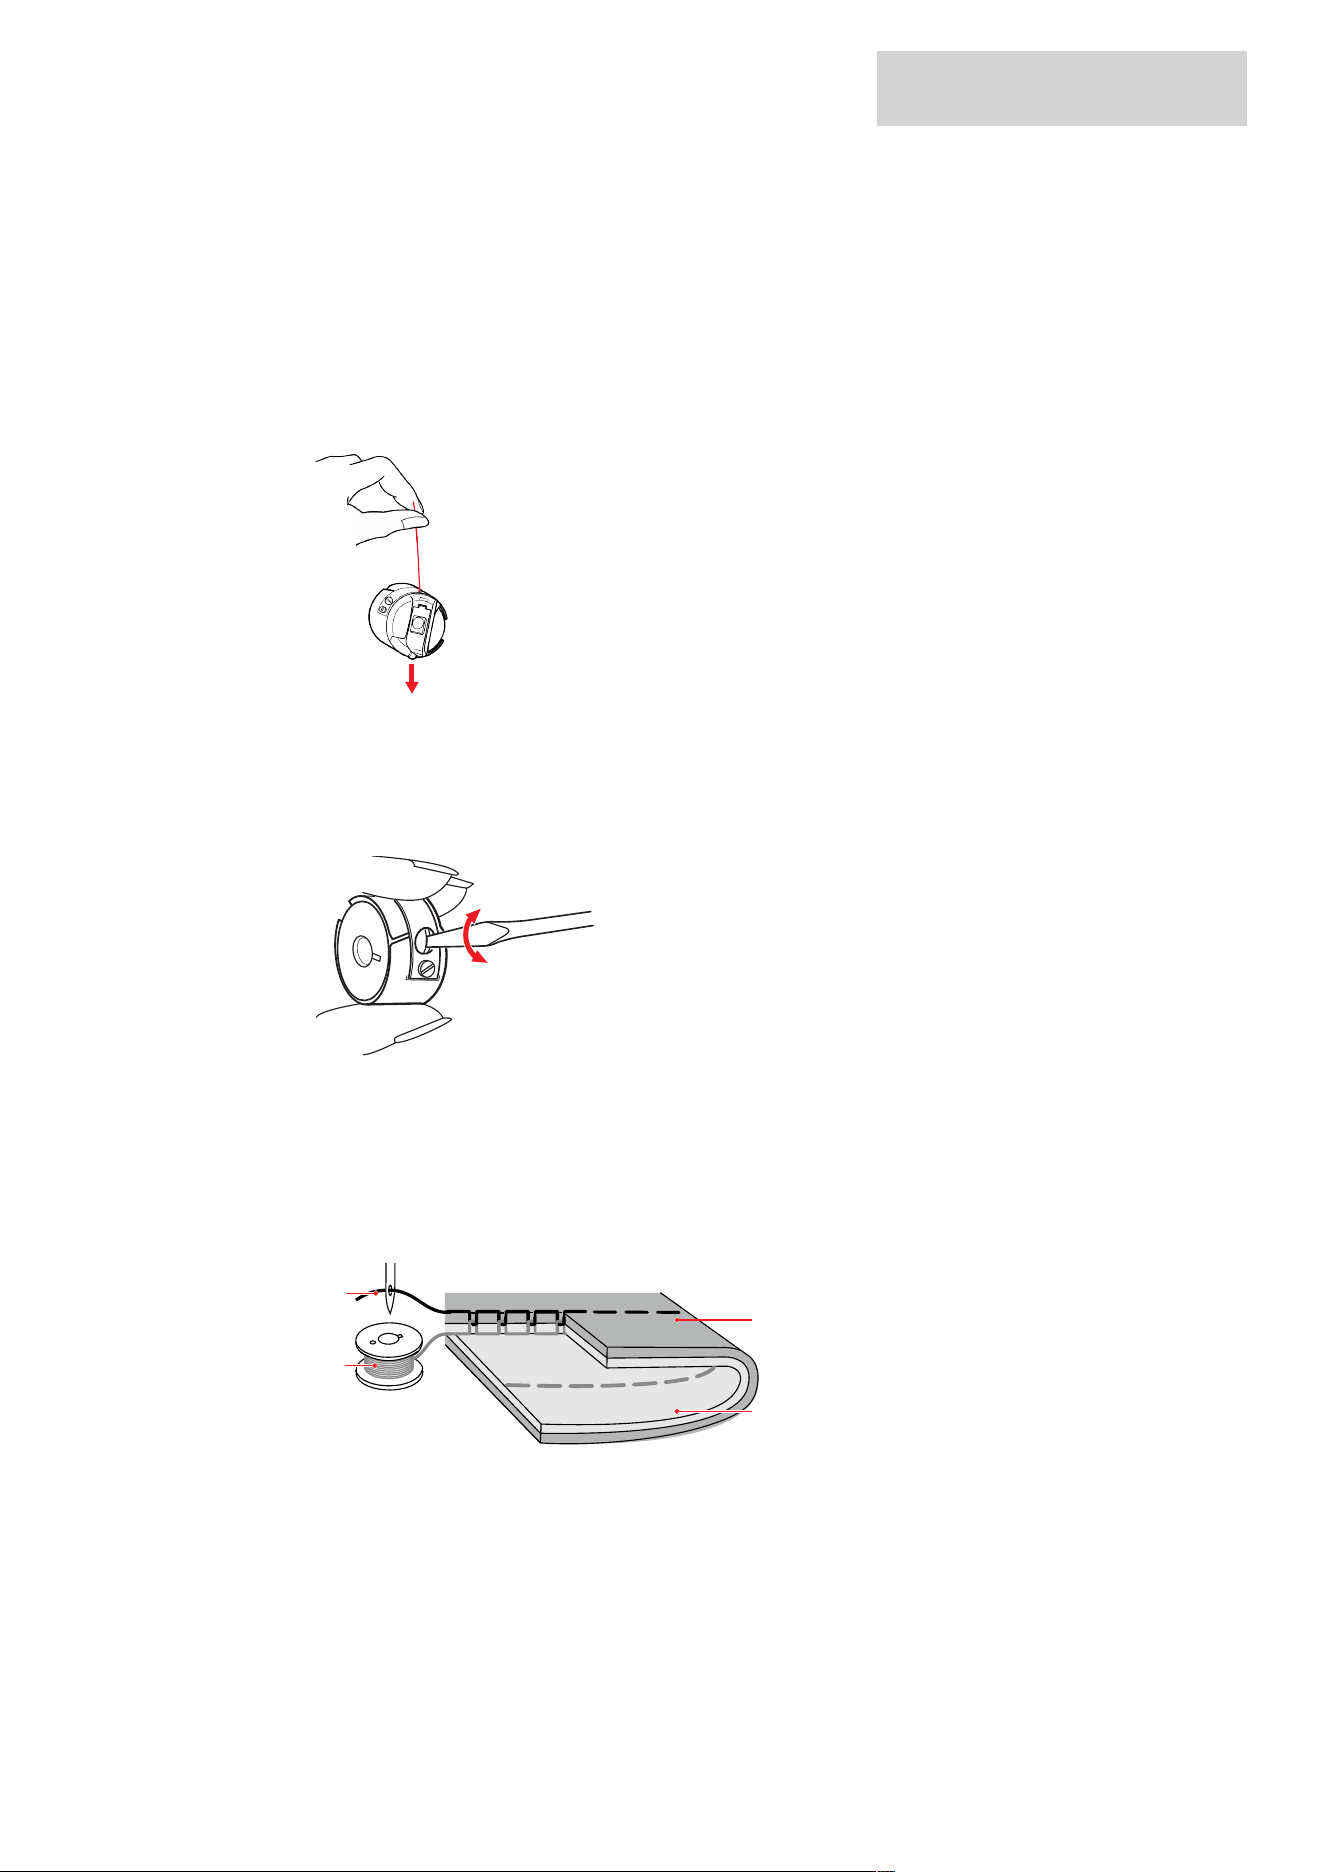
> Open the bobbin case flap and remove the bobbin case.
> Insert the bobbin into the bobbin case so that the thread is wound clockwise.
> Pull the thread into the slit from the right.
> Pass the thread further beneath the spring through the opening.
> Pull the thread to ensure that the bobbin is wound clockwise.
NOTICE
Needle Breakage Caused by Unevenly Wound Bobbins
Unevenly wound bobbins can lead to incorrect thread tension or cause needles to break.
> Only use evenly wound bobbins.
> Hold the bobbin case at the flap and insert it into the hook until it clicks into position.
> Fit the top bobbin cover.
> Close the bobbin cover.
SEWING PREPARATION
22
2024-12 EN 5060800.00A.04
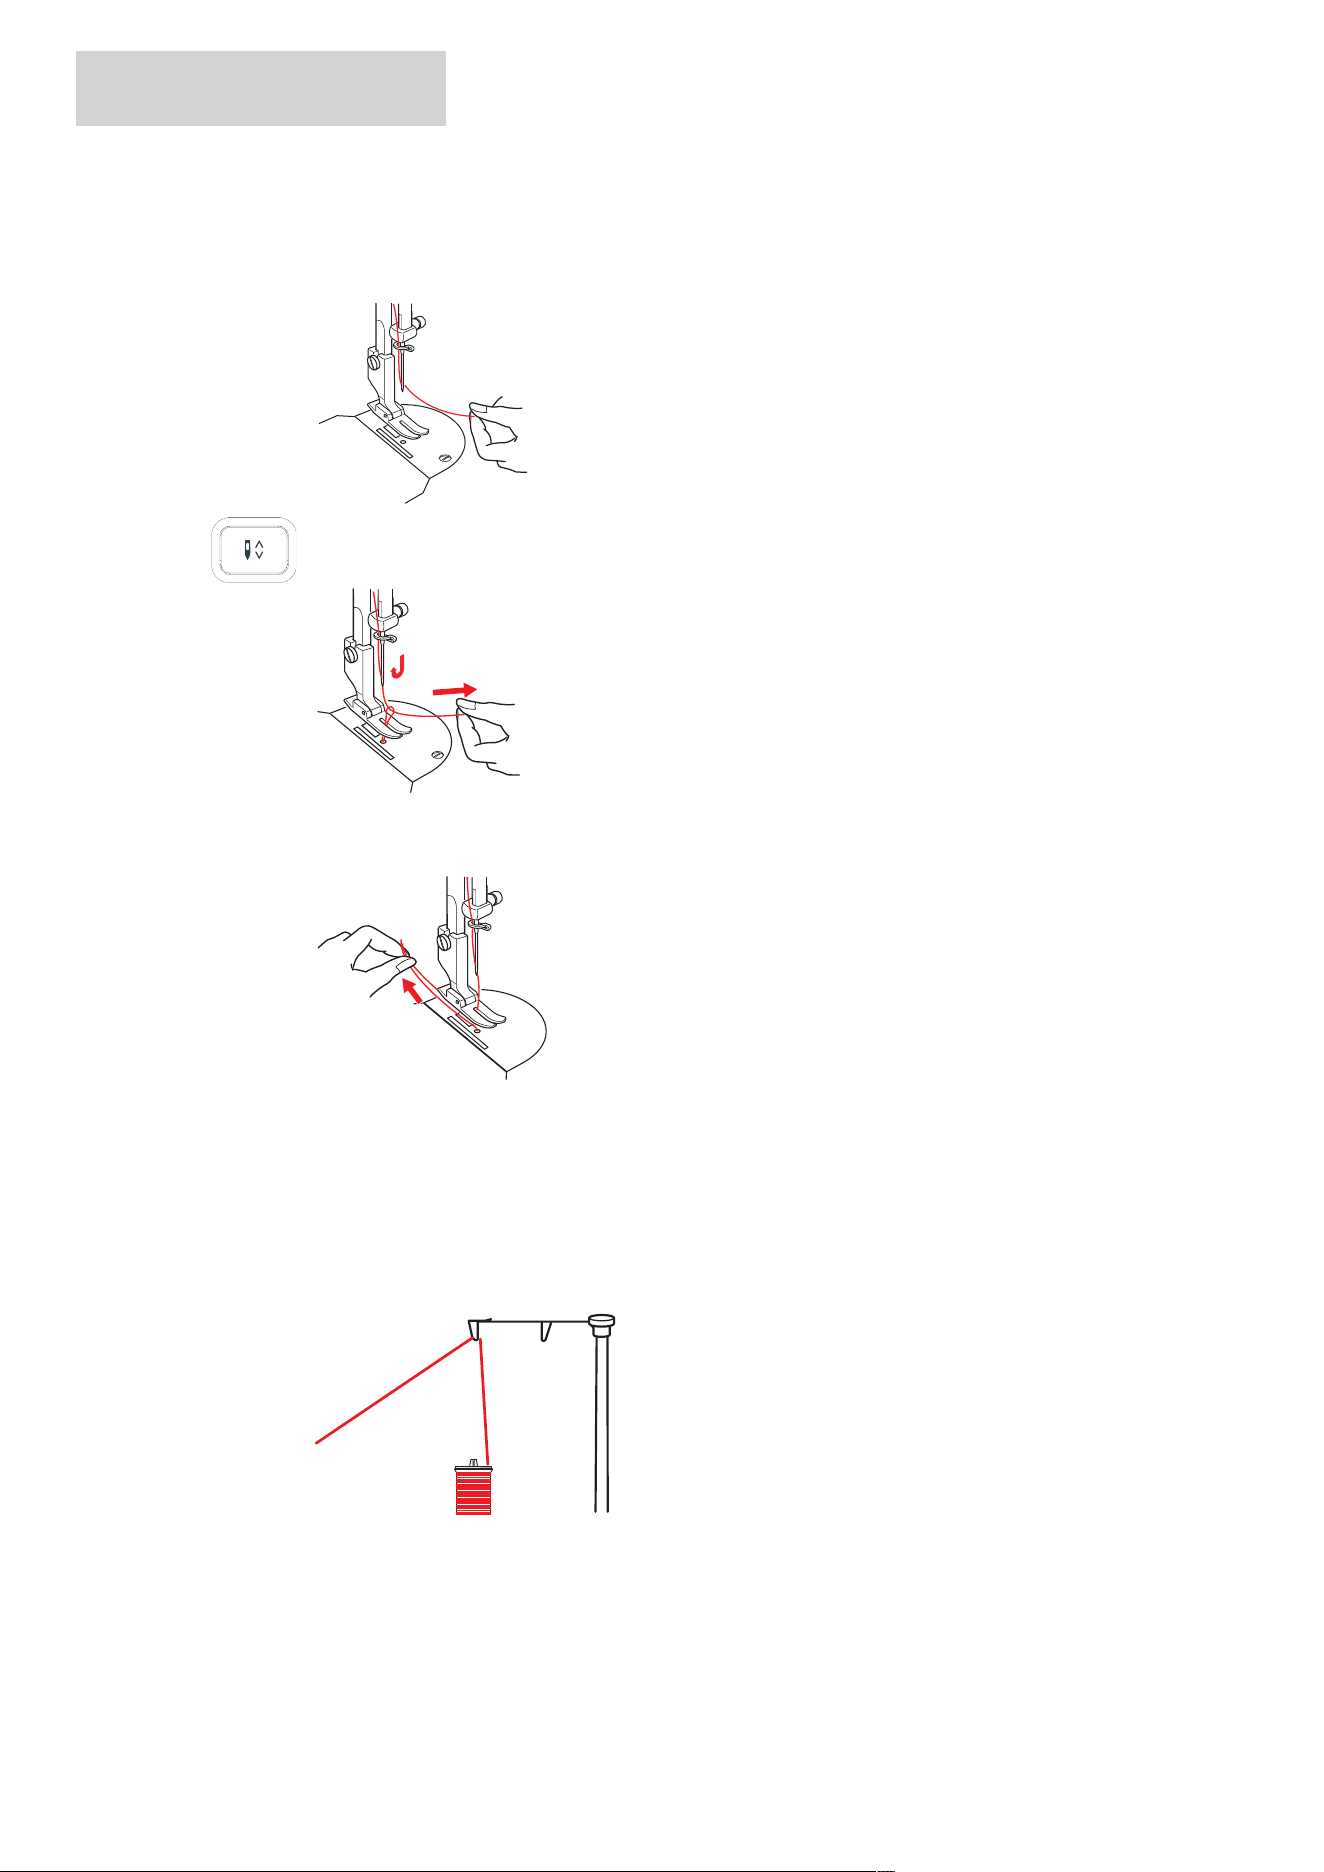
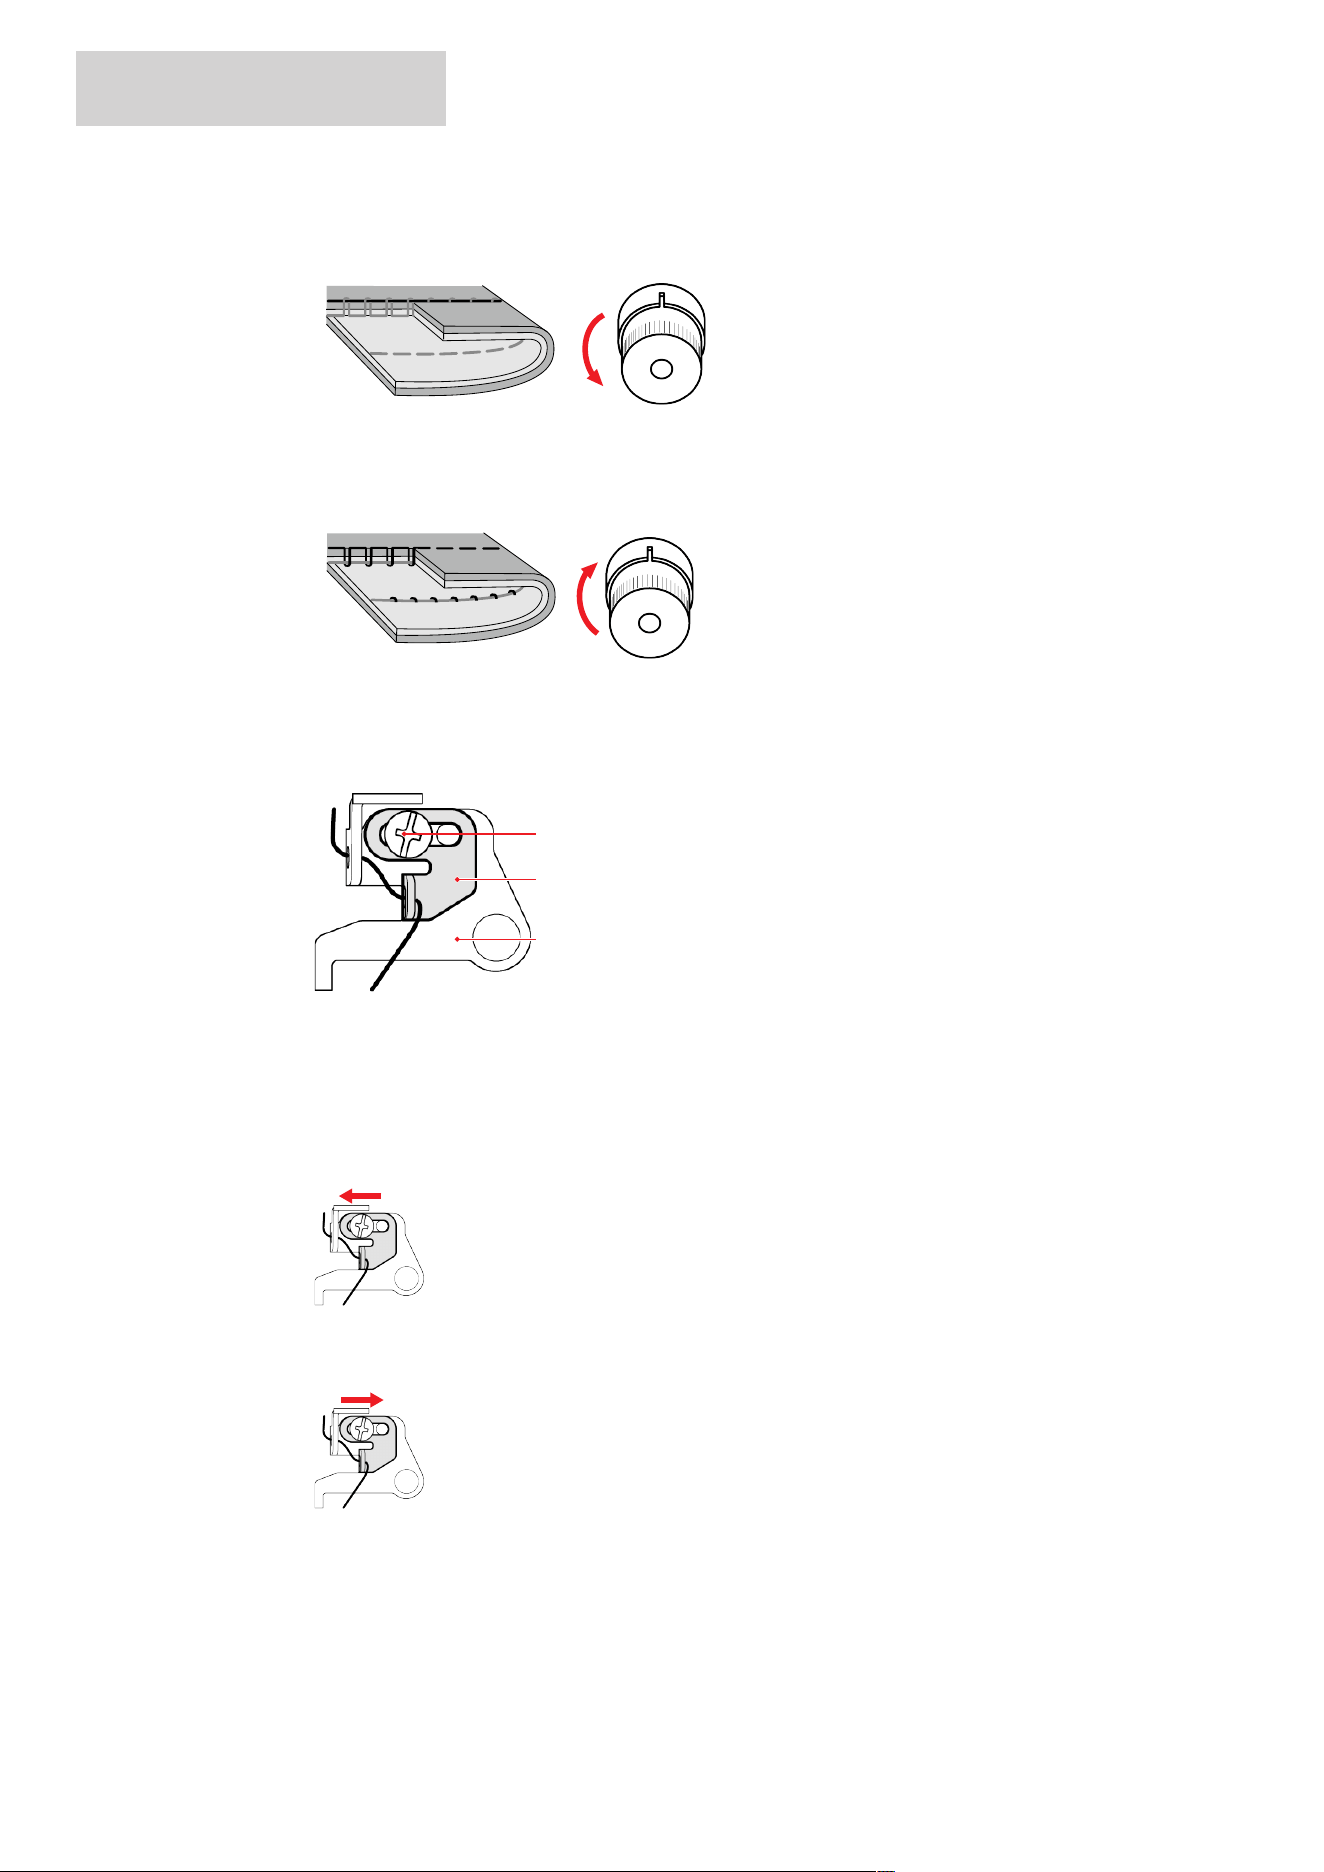
Bringing up the Bobbin Thread
> Raise the needle.
> Raise the presser foot and hold the needle thread lightly with your left hand.
> Push the button «Needle Stop Up/Down» 2x.
> Pull the upper thread upwards until the bobbin thread forms a loop.
> Pull the bobbin thread all the way up.
> Pull both threads approx. 4in (10cm) to the back and place them under the presser foot.
Threading the Upper Thread
> Switch the machine off.
> Raise the needle.
> Raise the presser foot.
> Place the thread spool on the spool pin so that the thread unwinds clockwise.
> Place the thread from the back through the thread guide.
SEWING PREPARATION
23
2024-12 EN 5060800.00A.04
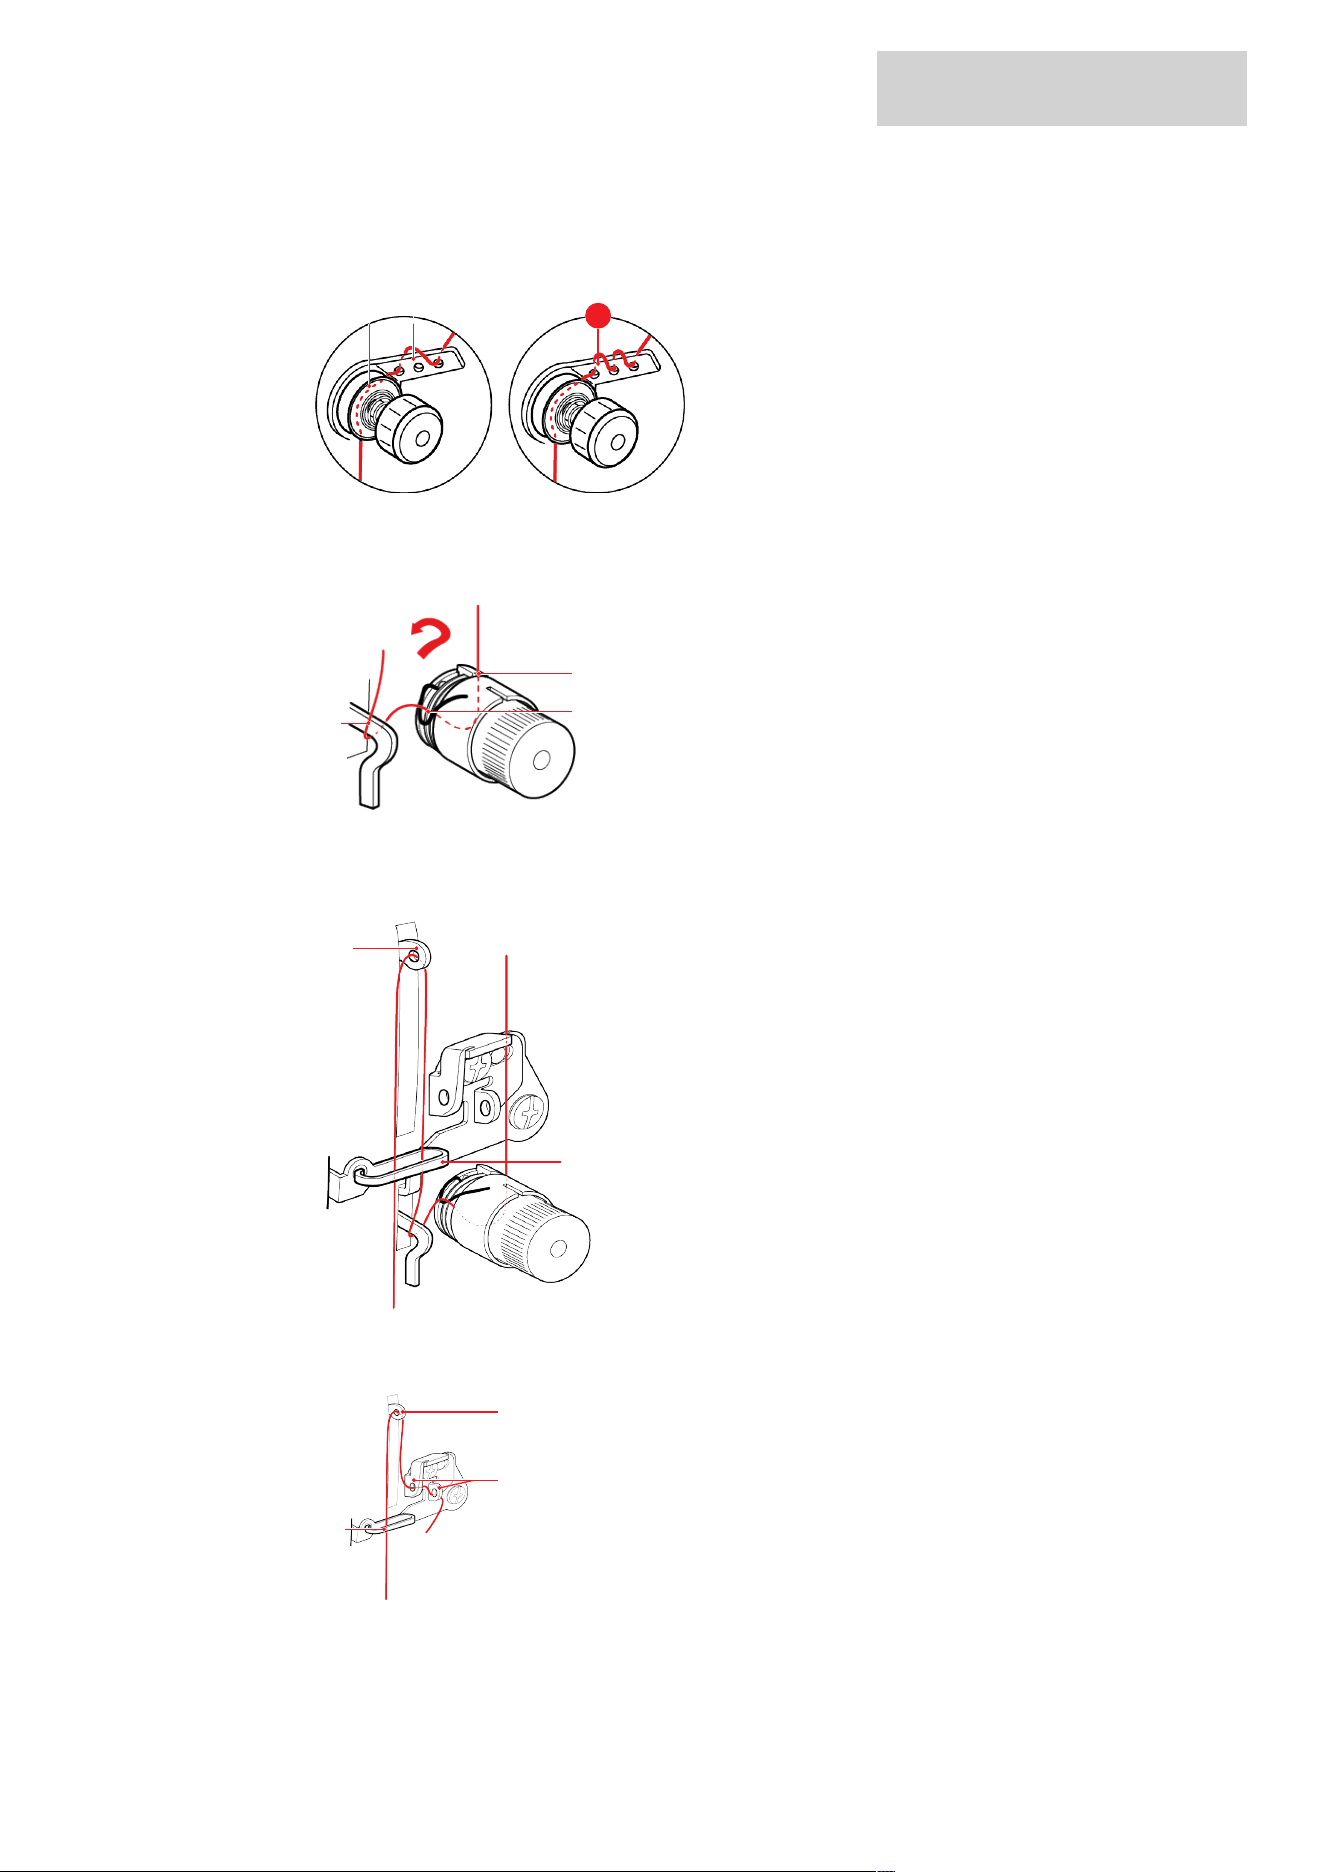
> Pass the thread through the thread guide plate(1) and then insert the thread between the thread tension
discs(2) of the adjusting wheel for the thread pre-tension. Note: If the thread tends to twist a lot, feed
the thread through the 3 holes in the thread guiding plate (A), as shown in illustration (A).
A
1
2
> Hold the thread with both hands and place it clockwise around the thread tension adjustment wheel(1).
Guide the thread over the end of the thread guide spring(2). Pass the thread from bottom to top into
the thread guide(3).
1
2
3
> For regular threads: Hold the thread with both hands and insert it into the guide(1) from below. Feed
the thread from right to left through the thread take-up lever(2). Feed the thread through the guide(1)
from above.
1
2
> For thicker threads: Feed the thread through the 2 holes of the thread guide(1). Feed the thread from
right to left through the thread take-up lever(2) and down through the guide(3).
1
2
3
SEWING PREPARATION
24
2024-12 EN 5060800.00A.04
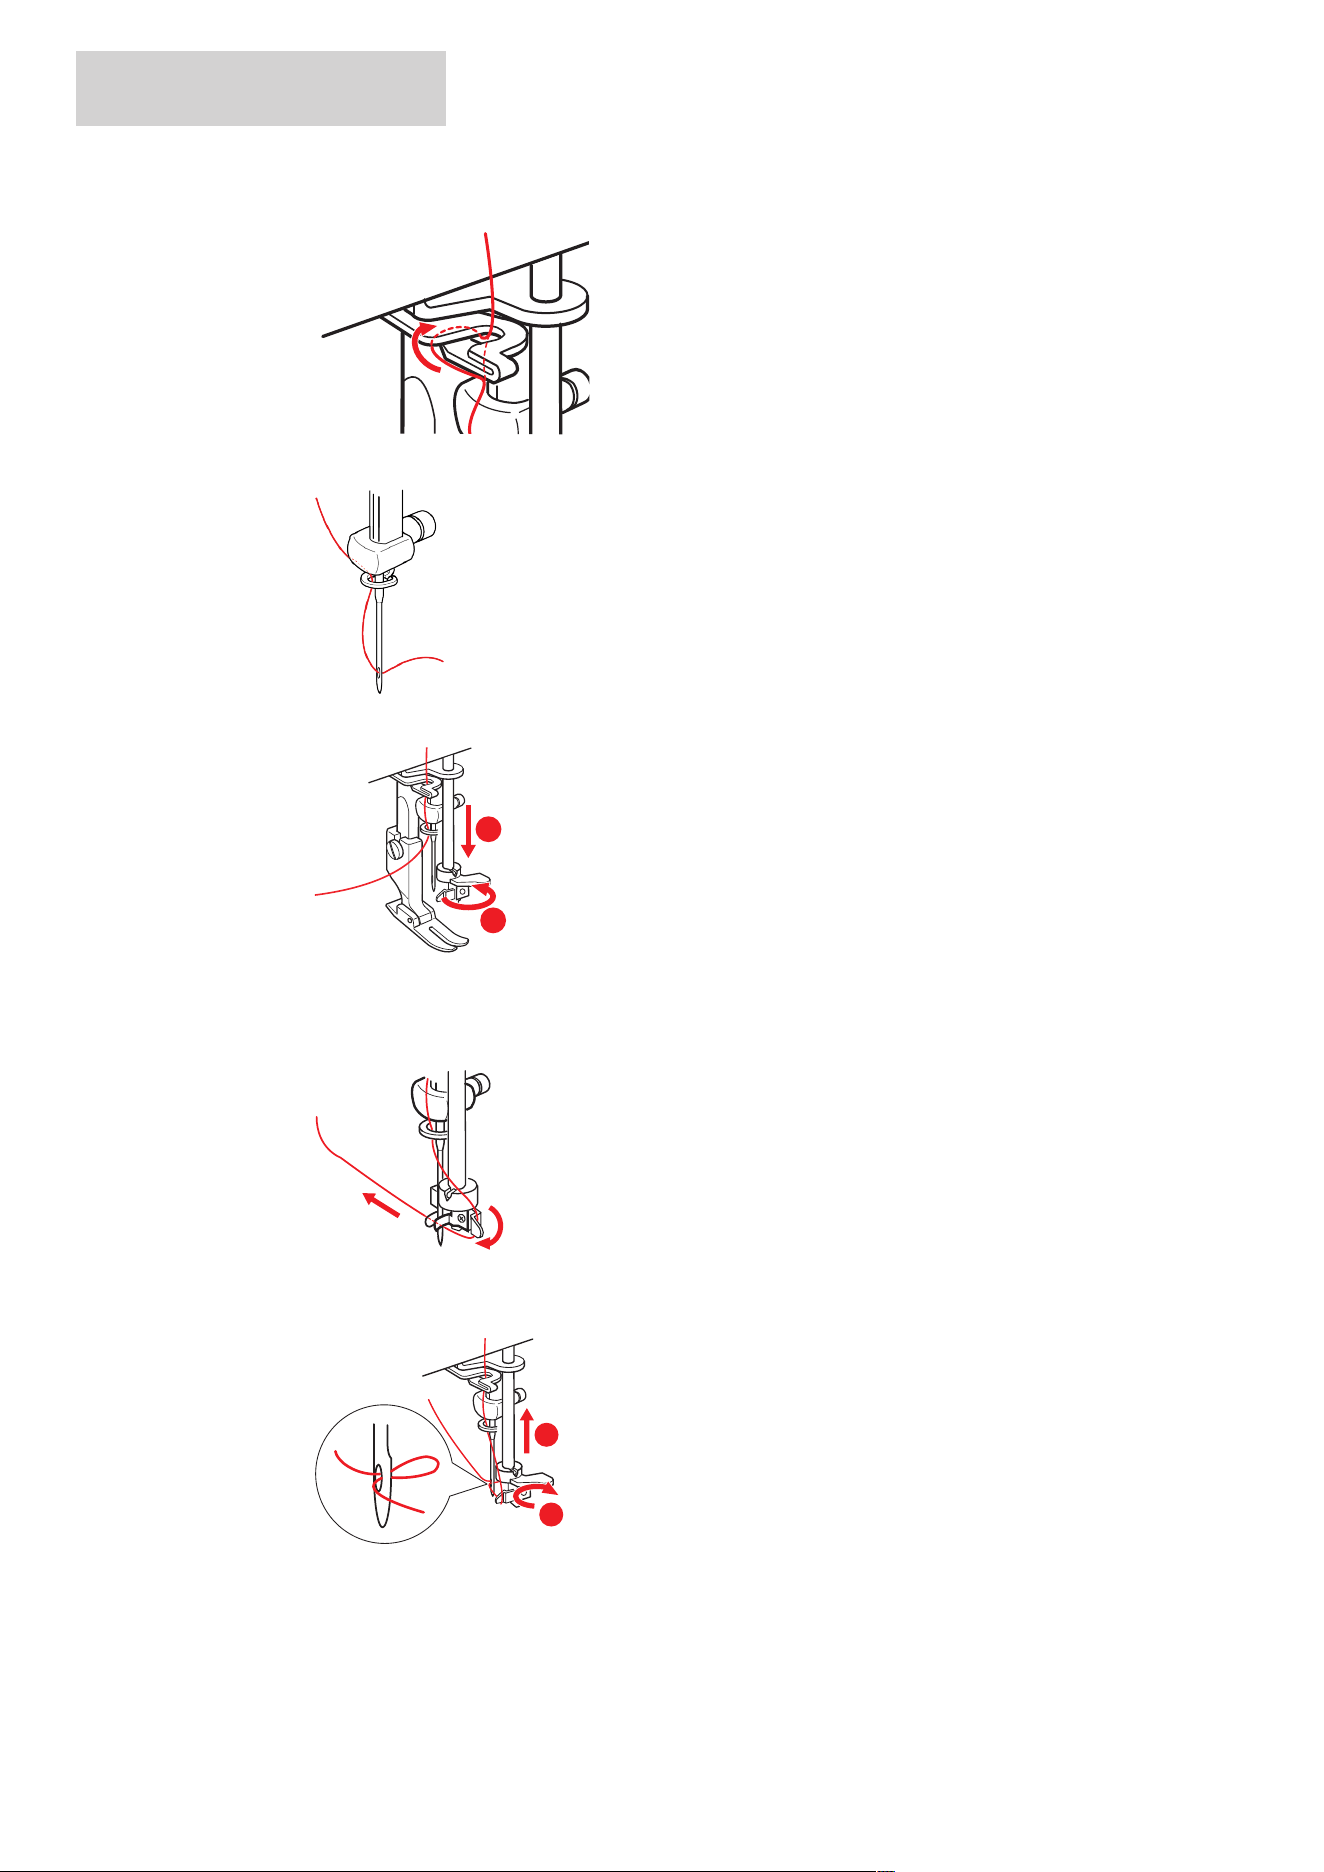
> Hold the thread with both hands and insert it into the guide from the front left to the back right.
> Guide the thread through the guides on the right of the needle.
> Press the threading lever of the needle threader down as far as possible and turn it backwards.
1
2
– The wire hook runs through the eye of the needle from the right to the left.
> Place the thread around the thread guide of the needle threader from the front to the back.
> Guide the thread to the left of the needle beneath the wire hook and hold it in place.
> Turn the threading lever forwards and release it so that it returns to the starting position. While doing so,
hold the thread loosely.
2
1
– The wire hook pulls the thread to the right through the eye of the needle to form a loop.
> Pull the thread completely through the eye of the needle.
SEWING PREPARATION
25
2024-12 EN 5060800.00A.04
2.7 Sewing Settings
Adjusting the Lower Thread Tension
The bobbin thread tension is preset at the factory to suit standard threads. When using thicker or special
threads, e.g. elastic threads, it may be necessary to adjust the bobbin thread tension. Always perform a
sewing test before adjusting the bobbin thread tension.
> Insert the bobbin with thread into the bobbin case.
> Hold the end of the thread and let the bobbin case drop down once abruptly.
– If the thread runs continuously out of the bobbin case, the bobbin thread tension is too low.
– If the thread does not run out of the bobbin case, the bobbin thread tension is too high.
> To increase the thread tension, turn the larger screw on the bobbin case to the right.
> To reduce the thread tension, turn the larger screw on the bobbin case to the left.
Adjusting the Upper Thread Tension
Adjusting the Upper Thread Tension with the Adjusting Dial
The upper thread tension can be adjusted using the adjusting dial «thread tension». The default value for the
upper thread tension is 3.
1
2
3
4
1 Upper Thread 3 Right side (top side) of the fabric
2 Bobbin Thread 4 Wrong side (bottom side) of the fabric
With an optimal straight stitch, the bobbin thread is not visible on the right side of the fabric.
SEWING PREPARATION
26
2024-12 EN 5060800.00A.04
> If the bobbin thread is visible on the right side of the fabric, adjust the upper thread tension to a lower
value using the adjusting wheel.
> If the upper thread is visible on the wrong side of the fabric, adjust the upper thread tension to a higher
value using the adjusting wheel.
Adjusting the Upper Thread Tension in the Thread Guide (Thicker Threads)
Additionally, the upper thread tension can be altered by moving the adjustment plate.
1
2
3
1 Fixing Screw 3 Thread Guide
2 Adjustment Plate
> To reduce the upper thread tension, loosen the fixing screw, slide the adjustment plate to the left and
tighten the fixing screw.
> To increase the upper thread tension, loosen the fixing screw, slide the adjustment plate to the right and
tighten the fixing screw.
SEWING PREPARATION
27
2024-12 EN 5060800.00A.04
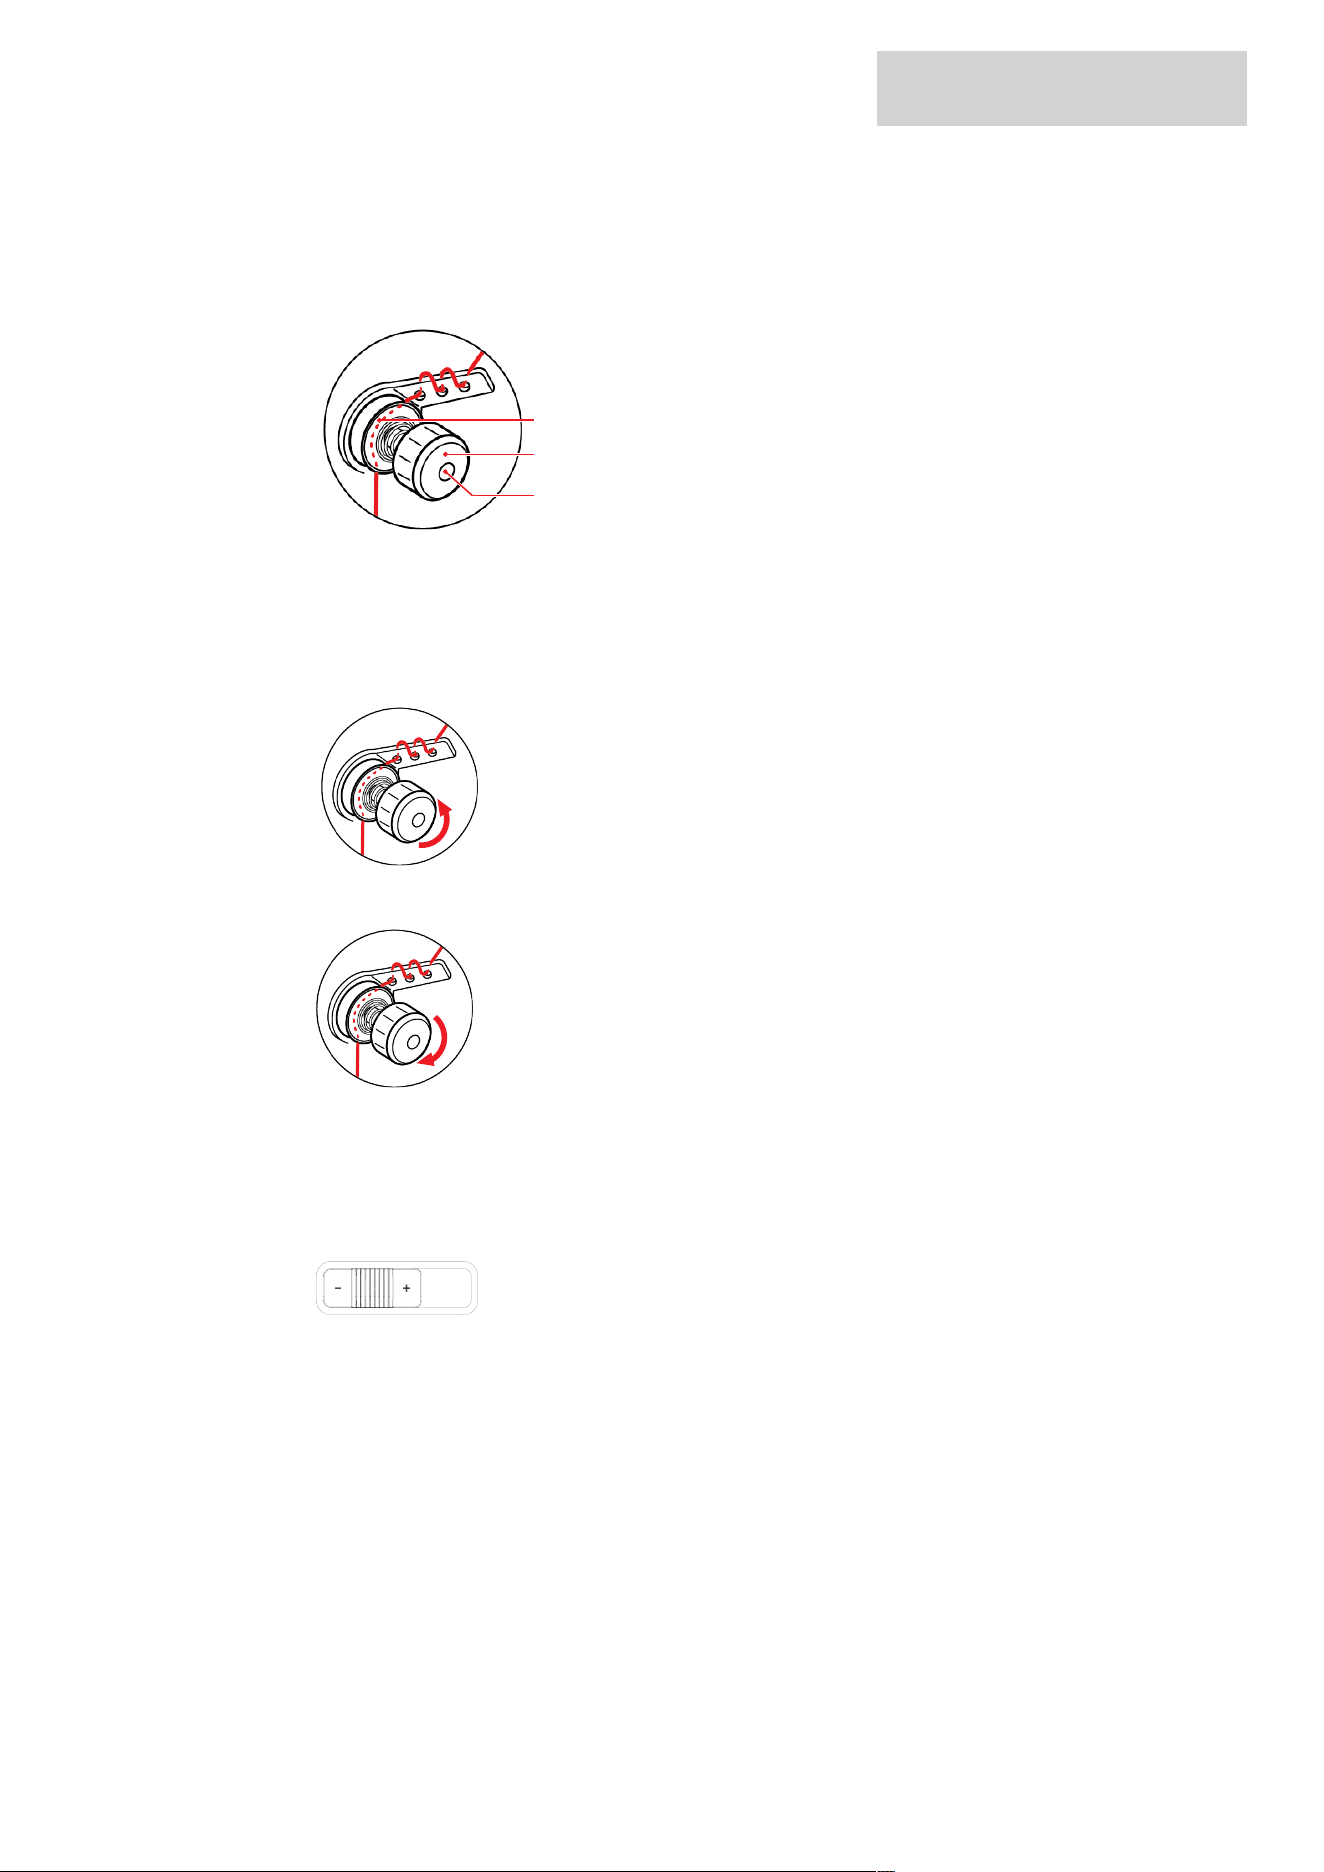
Adjusting the Upper Thread Tension in the Thread Pretension
Additionally, the upper thread tension can be altered by turning the adjusting wheel «Thread Pretension». By
turning, the tension between the thread tension discs is changed. The default setting specifies that the screw
head sinks about 4mm (1/8 to 3/16˝) into the adjusting wheel.
1
2
3
1 Thread Tensions Discs 3 Screw Head
2 Thread Pretension Dial
> To reduce the upper thread tension, turn the adjusting wheel counterclockwise.
> To increase the upper thread tension, turn the adjusting wheel clockwise.
Regulating the Speed
Regulating the Speed with the Speed Control
The maximum possible sewing speed is infinitely variable via the speed control.
> To reduce the sewing speed, move the speed control to the left.
> To increase the sewing speed, move the speed control to the right.
Regulating the Speed via the Foot Control
The sewing speed can be continuously varied up to the maximum possible speed via the foot control.
> Press the foot control down carefully to start the machine.
> To sew more quickly, press the foot control further down.
> Release the foot control to stop the machine.
SEWING PREPARATION
28
2024-12 EN 5060800.00A.04
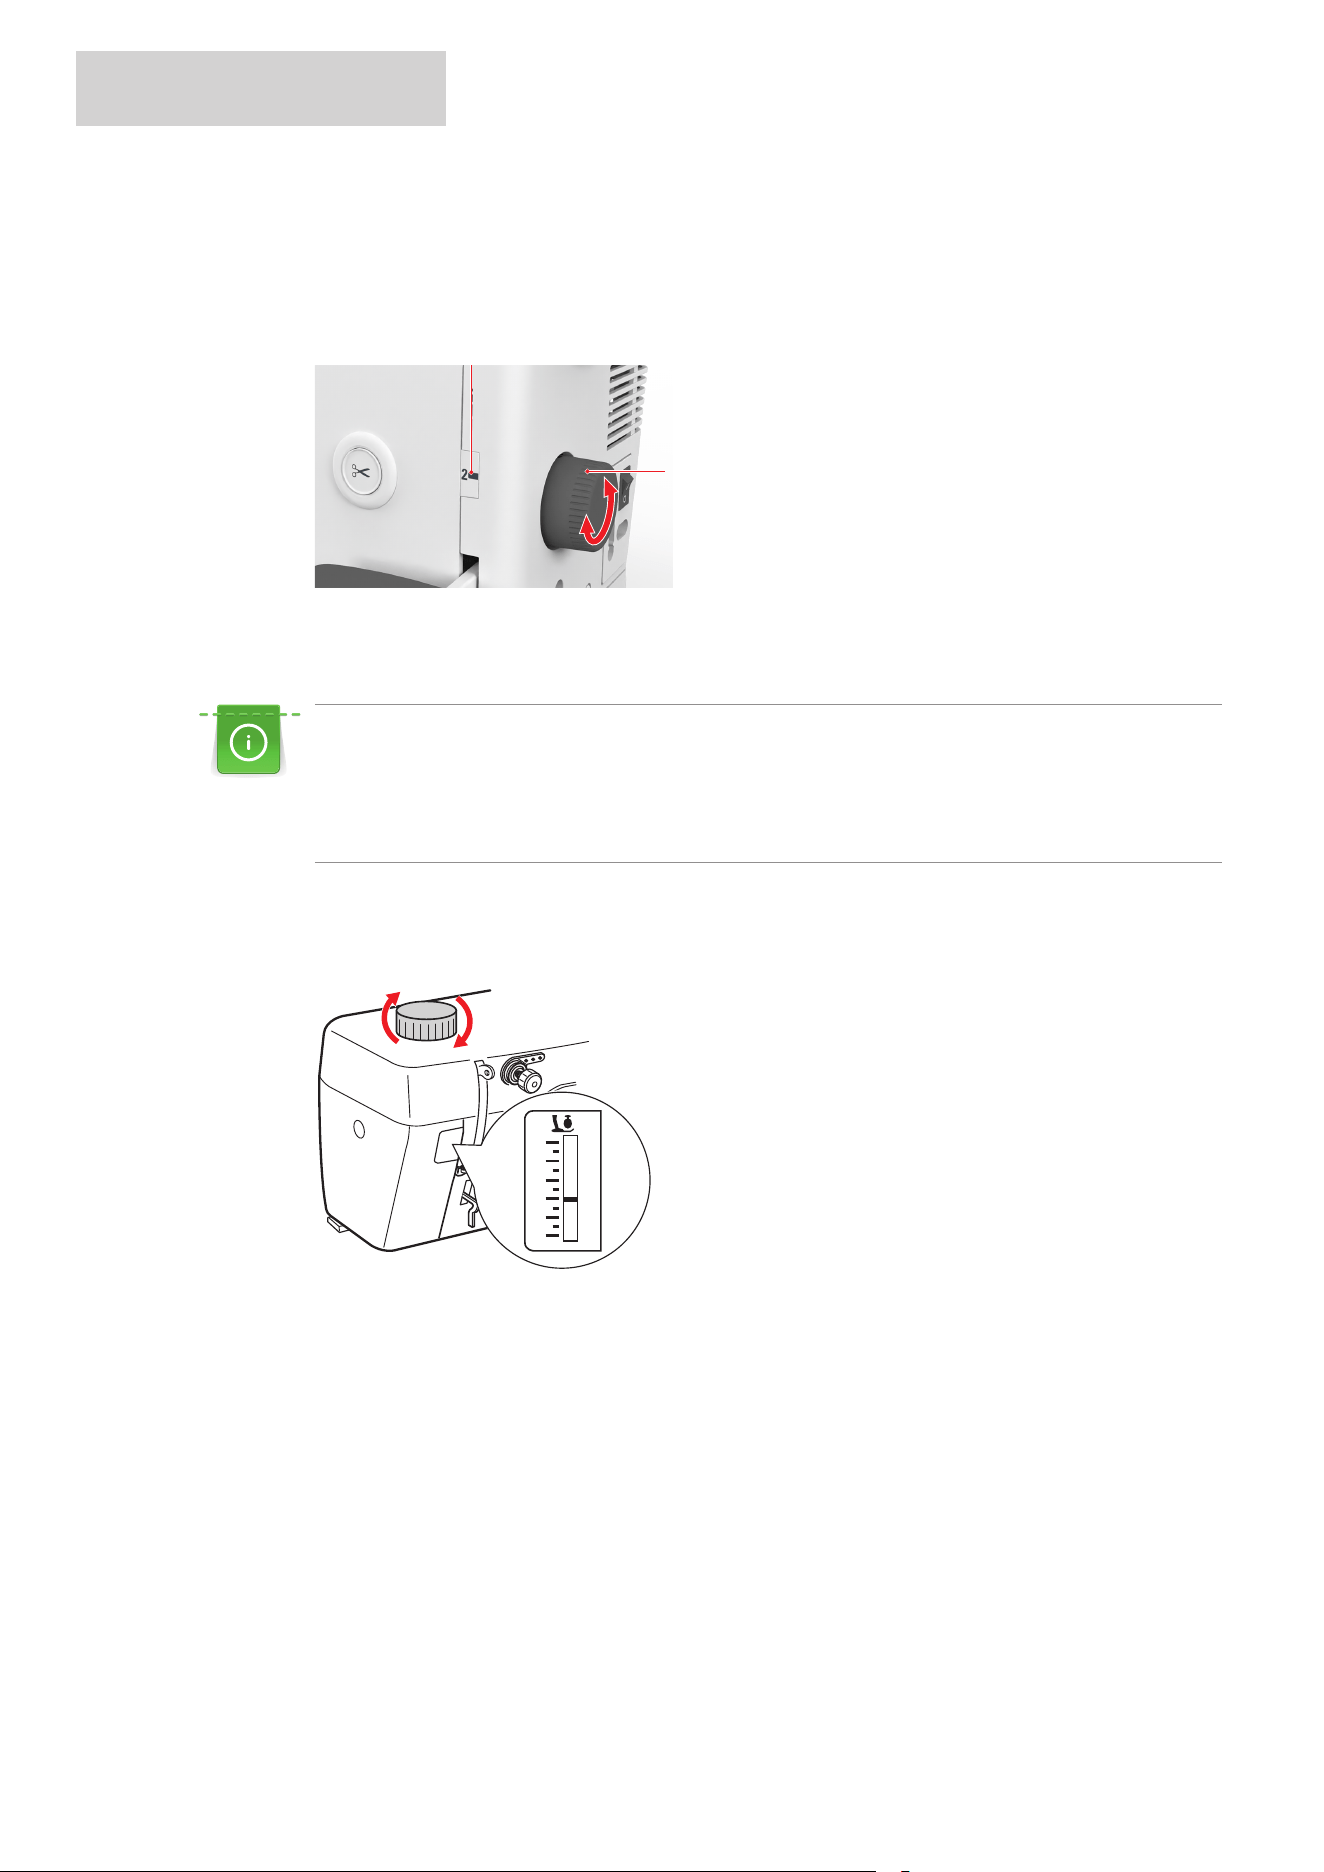
Setting the Stitch Length
The stitch length can be set from 0–6mm by turning the adjustment dial «Stitch Length».
> Turn the adjustment dial «Stitch Length»(1) until the desired stitch length is shown on the stitch length
display(2).
2
1
Setting the Presser Foot Pressure
The presser foot pressure can be set via the adjusting dial «Presser Foot Pressure».
The presser foot pressure is designed to adjust the pressure of the presser foot optimally to the fabric
thickness. When working with thick fabrics, it is recommended to reduce the presser foot pressure. This
provides the advantage that the fabric can be moved more easily. When working with thin fabrics, it is
recommended to increase the presser foot pressure. This provides the advantage that the fabric cannot
be moved too easily under the presser foot.
> To increase the presser foot pressure, turn the adjusting dial «Presser Foot Pressure» clockwise.
> To reduce the presser foot pressure, turn the adjusting dial «Presser Foot Pressure» counterclockwise.
Note: Do not reduce the presser foot pressure below «0», otherwise the fabric will not be fed.
SEWING
29
2024-12 EN 5060800.00A.04
3 Sewing
3.1 Quick Reverse
Sewing in reverse is used at the beginning and end of the seam to secure the seam.
> Press the lever «Quick Reverse» and keep it pressed.
> Press the foot control.
– The machine sews in reverse until the lever «Quick Reverse» is released.
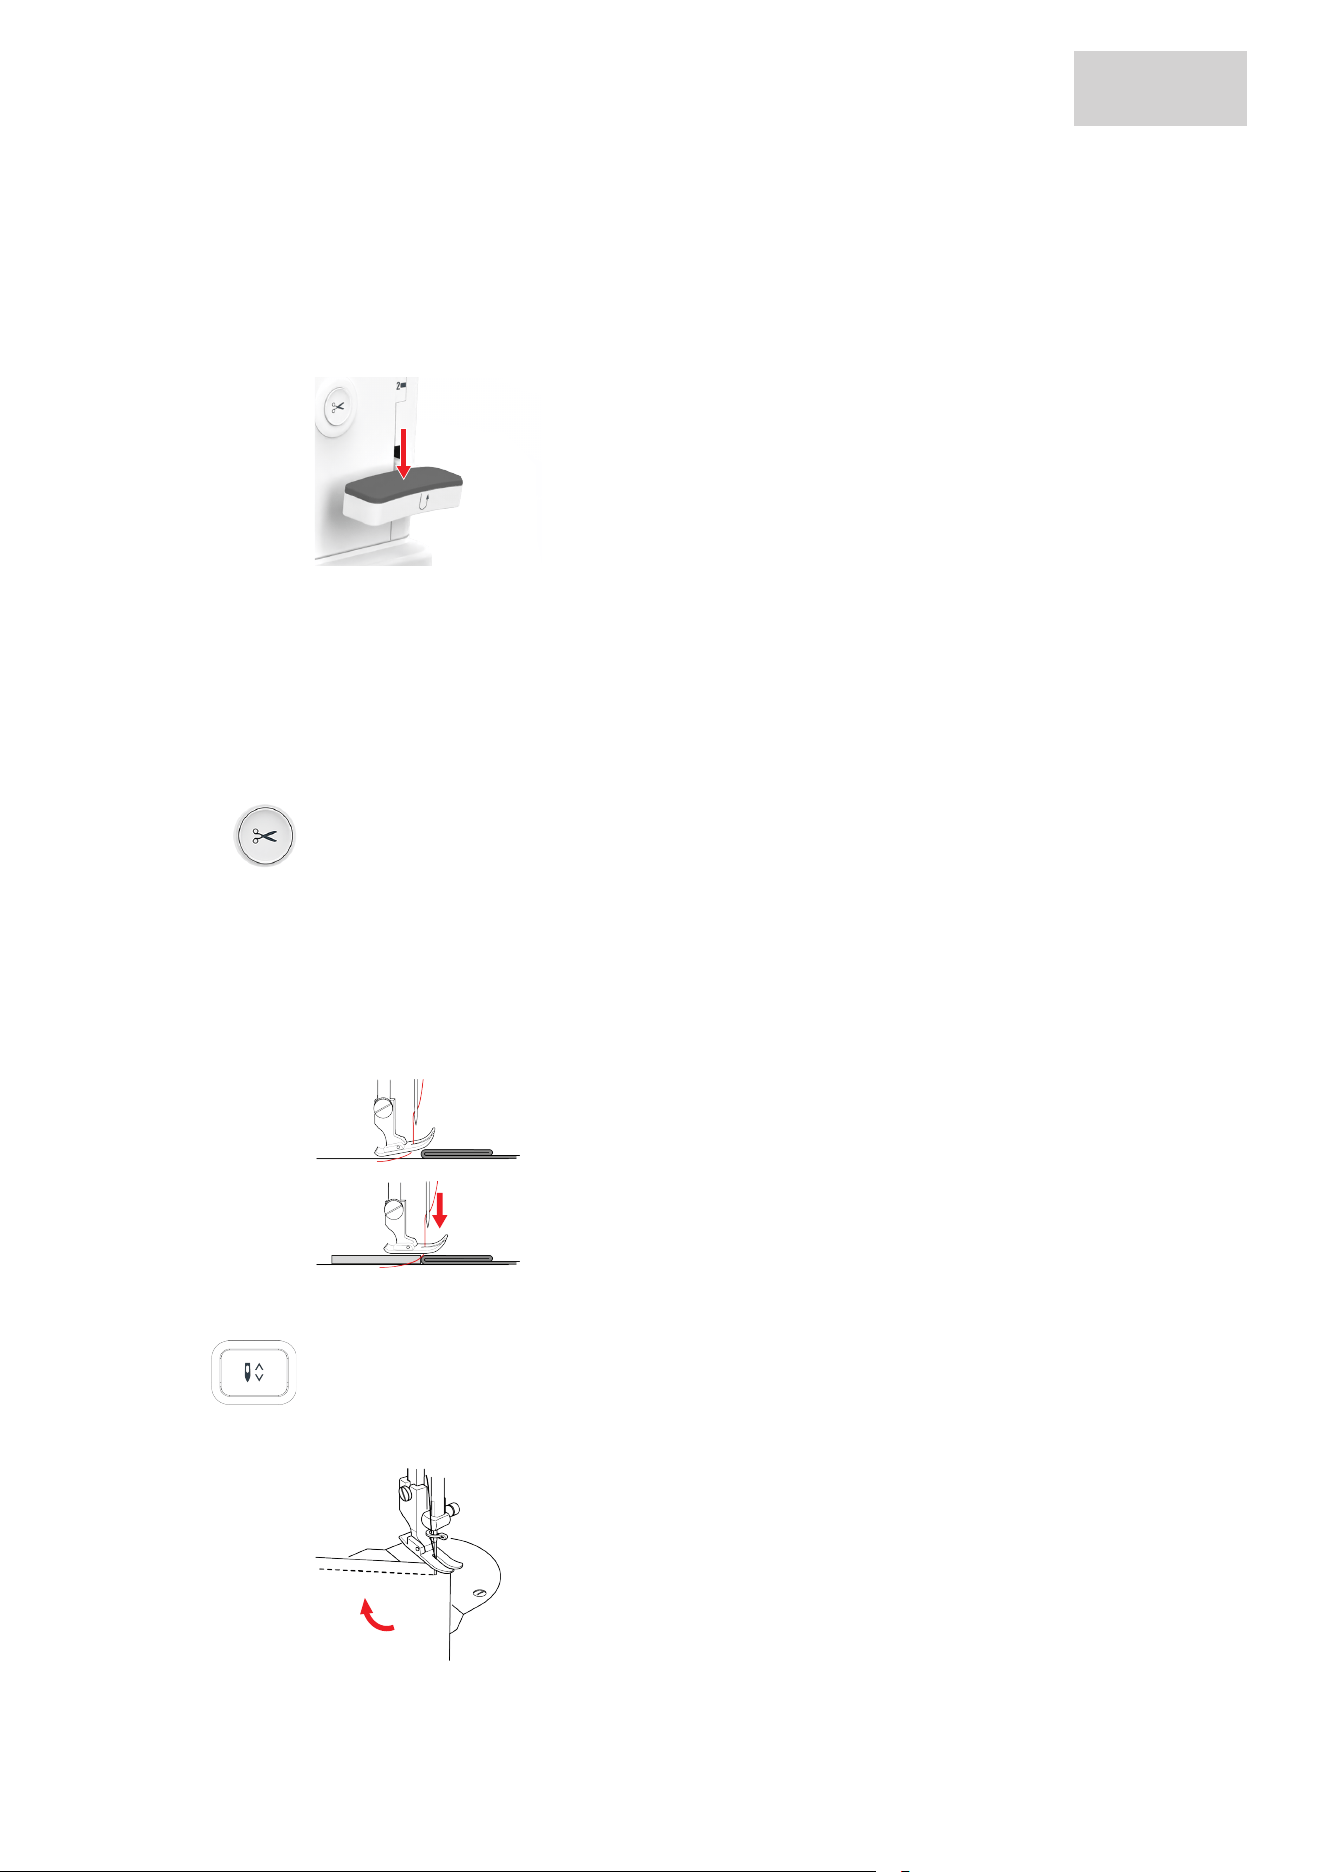
3.2 Automatic Thread Cutter
The automatic thread cutter can be activated for thread thicknesses from 30 and higher. The thread cutter
on the sew head must be used for thread thicknesses below 30.
The function of the automatic thread cutter may vary for special threads.
> To cut the upper thread and the bobbin thread automatically, press the «Thread Cutter» button.
3.3 Sewing thick Areas using the Height Compensation Tool
The height compensation tool (optional accessory) is a useful aid when sewing over thick areas.
> Once the highest point has been reached, lower the needle and raise the presser foot.
> Level the height of the presser foot by placing one, two or three height compensation plates under the
presser foot and behind the needle.
3.4 Sewing Corners
> Activate the «Needle stop down».
> Stop the machine when the corner is reached.
> Raise the presser foot.
> Use the needle as a pivot and turn the fabric.
> Lower the presser foot and continue sewing.
SEWING
30
2024-12 EN 5060800.00A.04
3.5 Sewing Difficult-to-Feed Fabrics
Materials that are difficult to slide such as leather, artificial leather, plastic or vinyl can be easily sewn using
the straight stitch foot with non-stick sole (optional accessory).
> Fit the straight stitch foot with non-stick sole.
> Set the required stitch length.
> Sew at a slow, constant speed. Adjust the presser foot pressure and the thread tension if necessary.
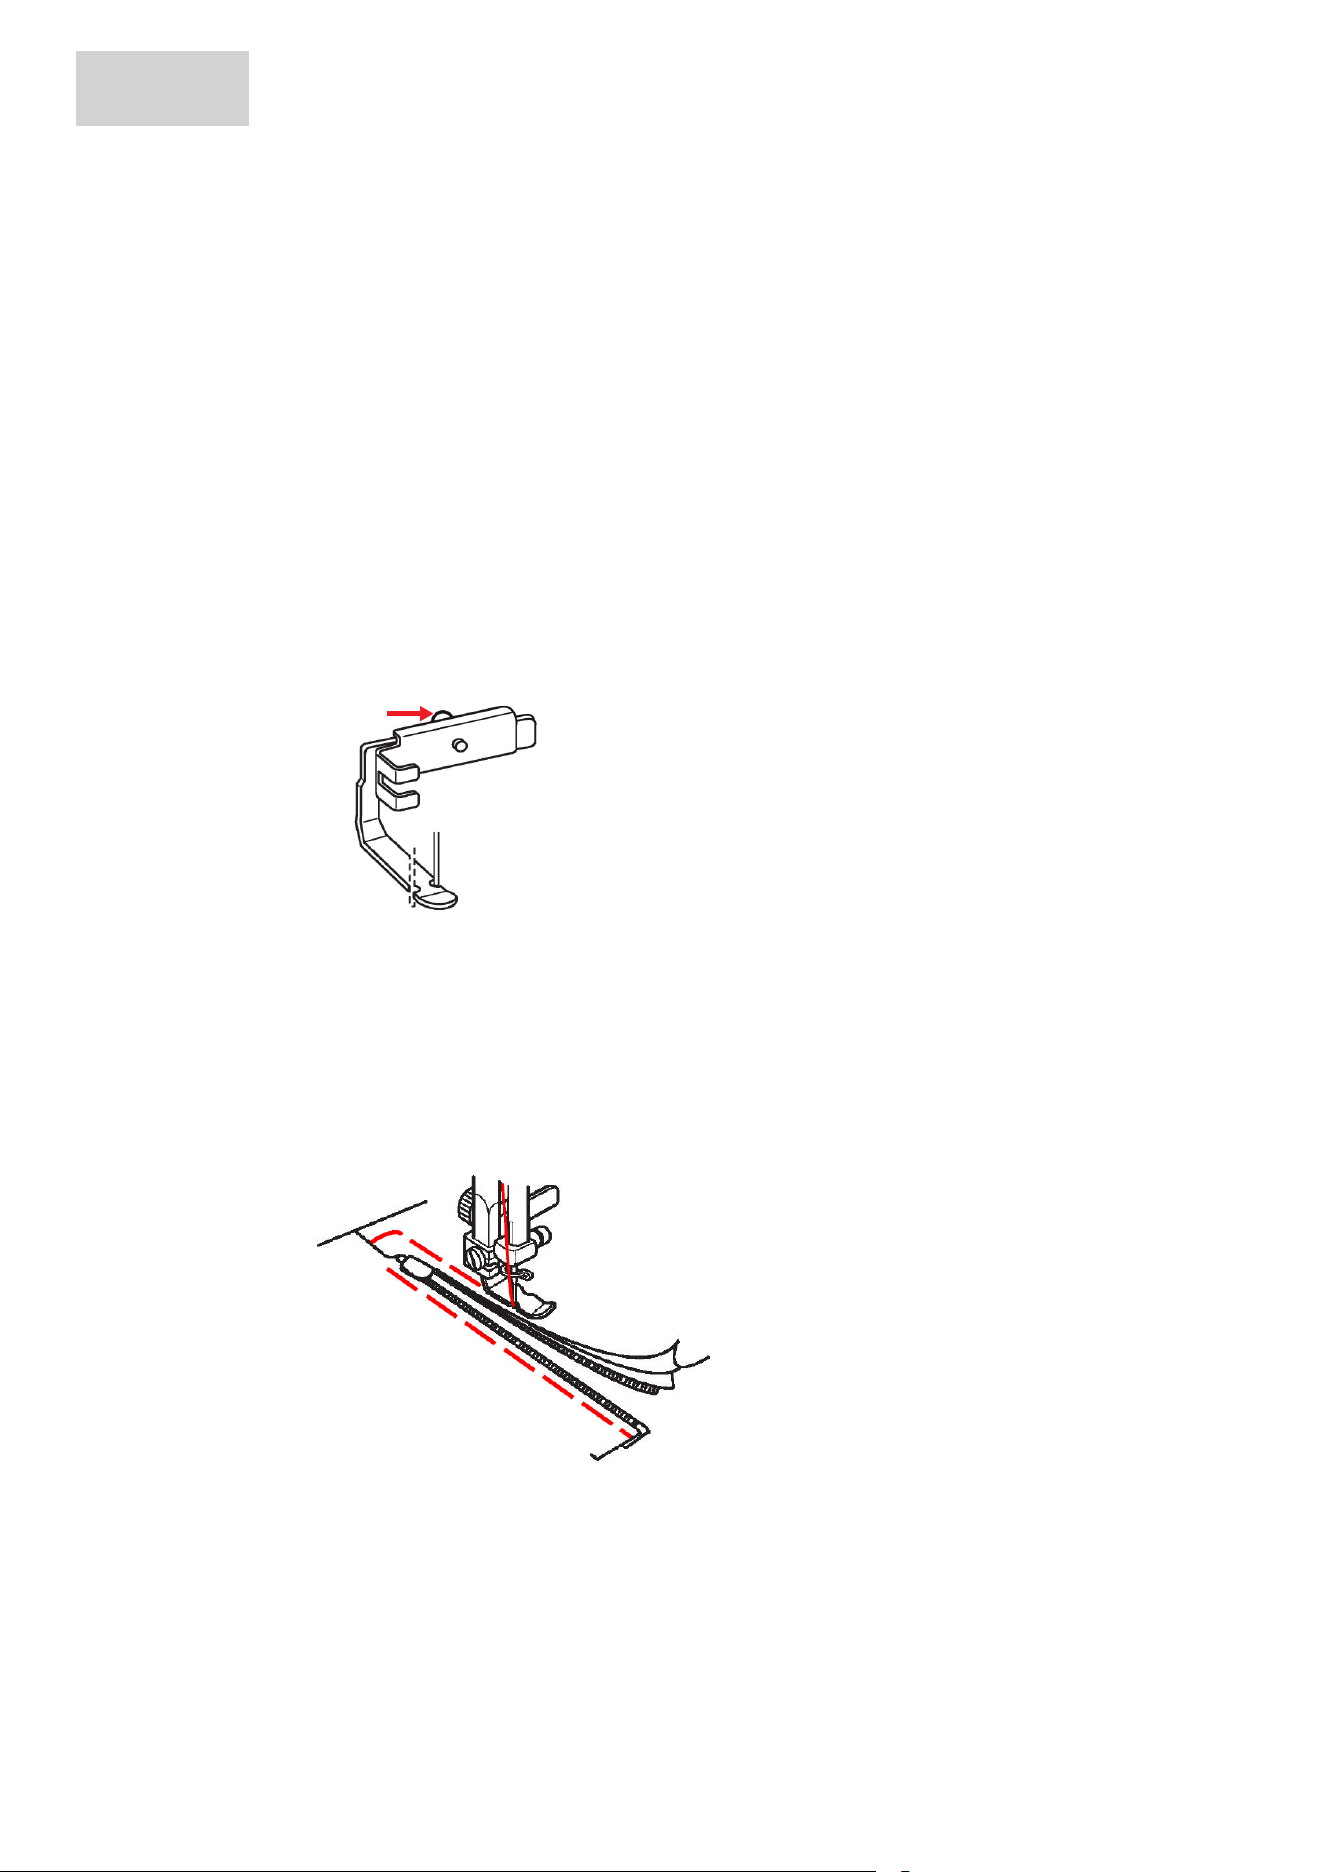
3.6 Sewing in a Zipper
As the fabric feed can be difficult when starting to sew, it is recommended to hold the threads firmly or to
pull the fabric slightly to the back for a few stitches or to sew 0.5 - 1in (1–2cm) reverse first.
> Set the stitch length to «0,5–4».
> Set the thread tension to «4–5».
> Set the presser foot pressure to «3–5».
> Fit the adjustable zipper foot (optional accessory).
> Loosen the screw, adjust the position of the zipper foot in relation to the needle and tighten the screw.
> To sew the right side of the zipper, position the zipper foot to the right of the needle.
> Lower the zipper foot at the end of the zipper so that the needle pierces the fabric next to the fold and
the zipper tape.
> To sew the left side of the zipper, position the zipper foot to the left of the needle.
SEWING
31
2024-12 EN 5060800.00A.04
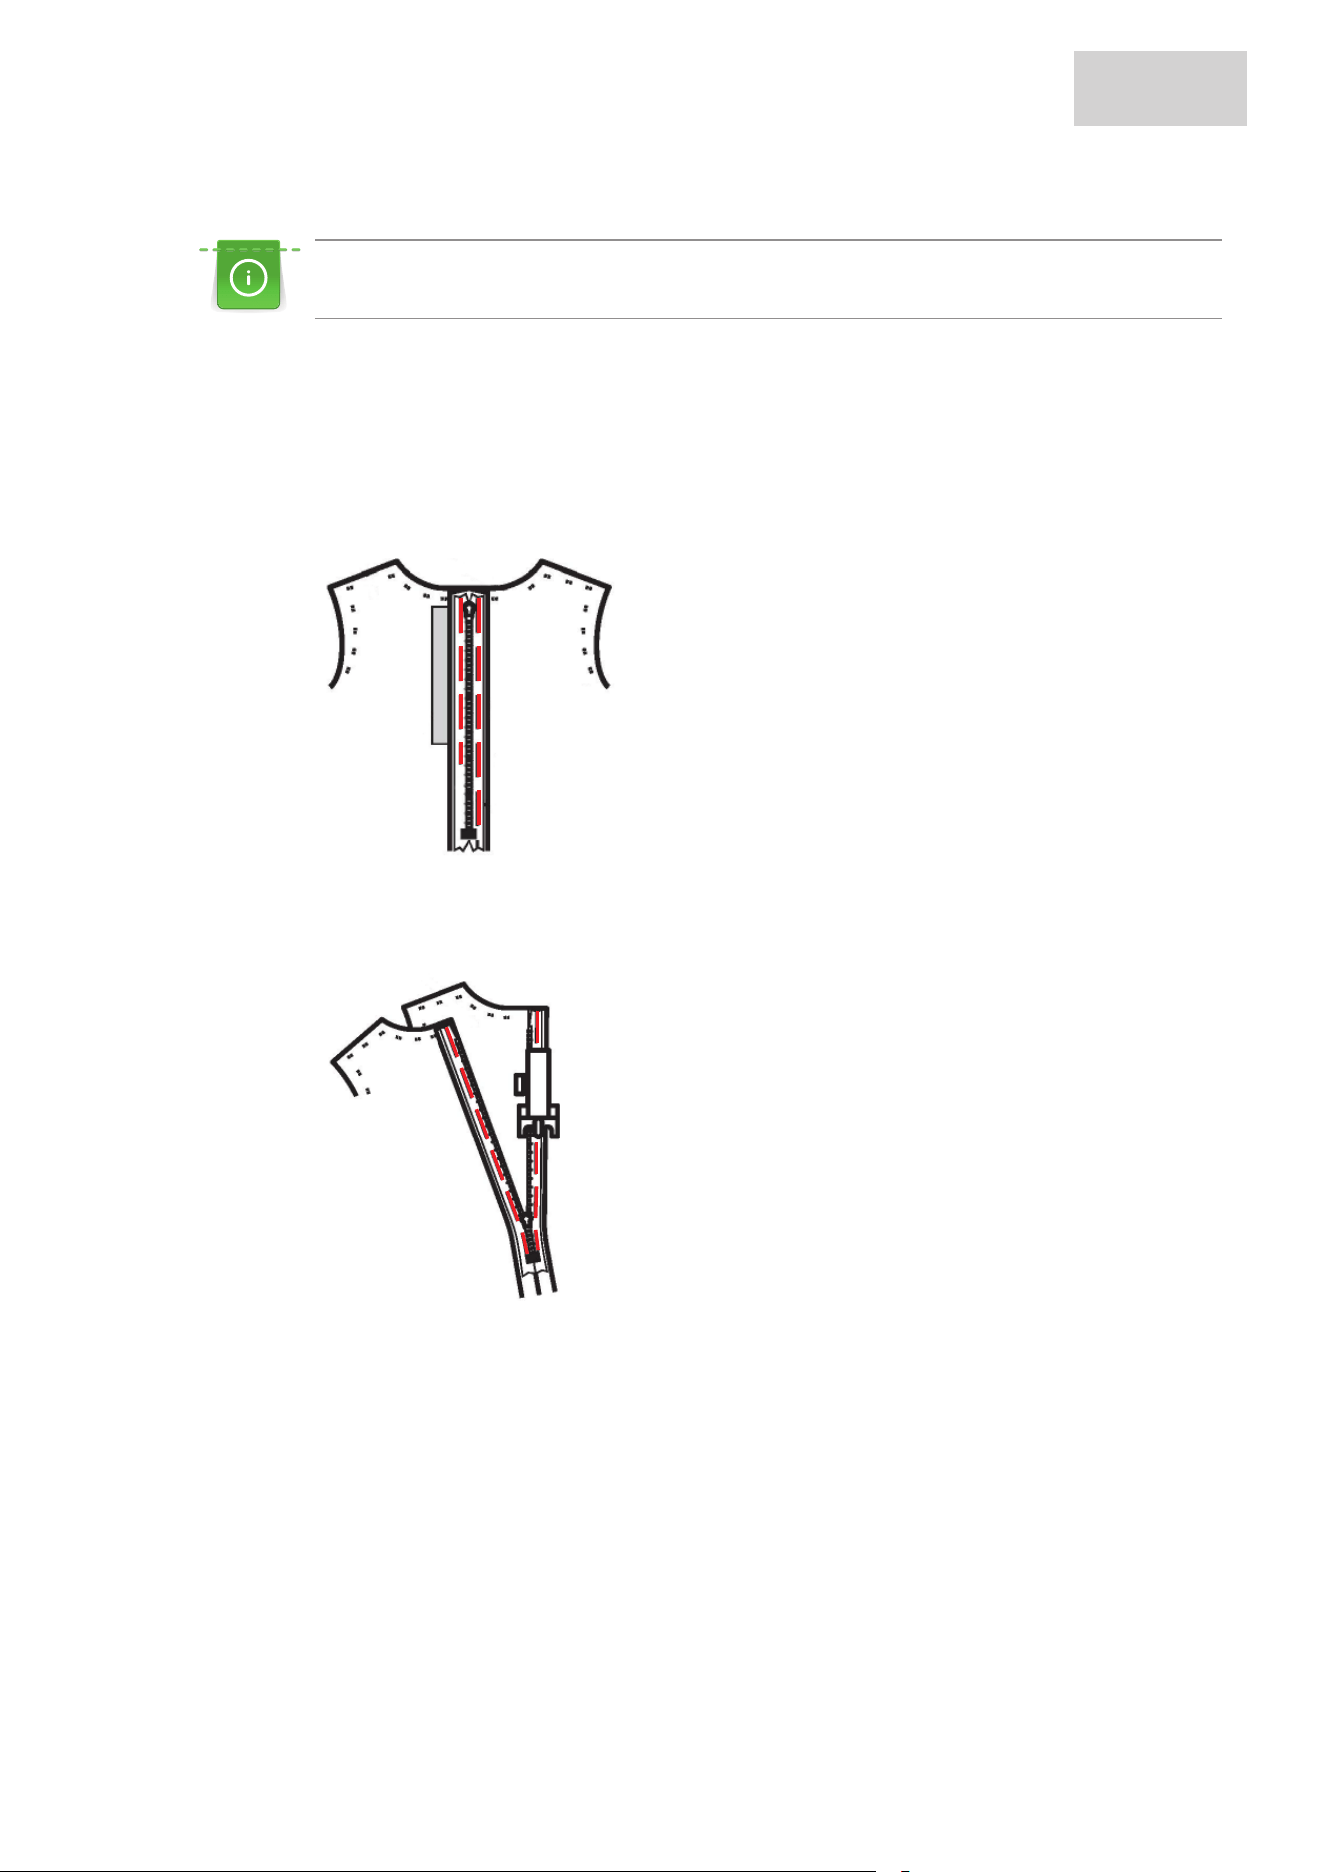
3.7 Sewing in an Invisible Zipper
As the fabric feed can be difficult when starting to sew, it is recommended to hold the threads firmly or
to pull the fabric slightly to the back for a few stitches or to sew 0.5 - 1in (1–2cm) reverse first.
For seam-covered zippers, the Invisible zipper foot (optional accessory) is required.
> Set the stitch length.
> Open zipper all the way.
> Pin the right half of the zipper right side on right side on the fabric.
> Fit the invisible zipper foot.
> Baste the zipper on the garment. To do this, place a thick piece of paper between the zipper and the
fabric.
> Remove the center basting thread and open the zipper.
> Sew the right and left sides of the zipper to the ends of the zipper opening.
3.8 Stitching narrow edges
> Fit the narrow straight stitch foot.
> Set the required stitch length.
> Place the edge on the left against the narrow straight stitch foot.
SEWING
32
2024-12 EN 5060800.00A.04
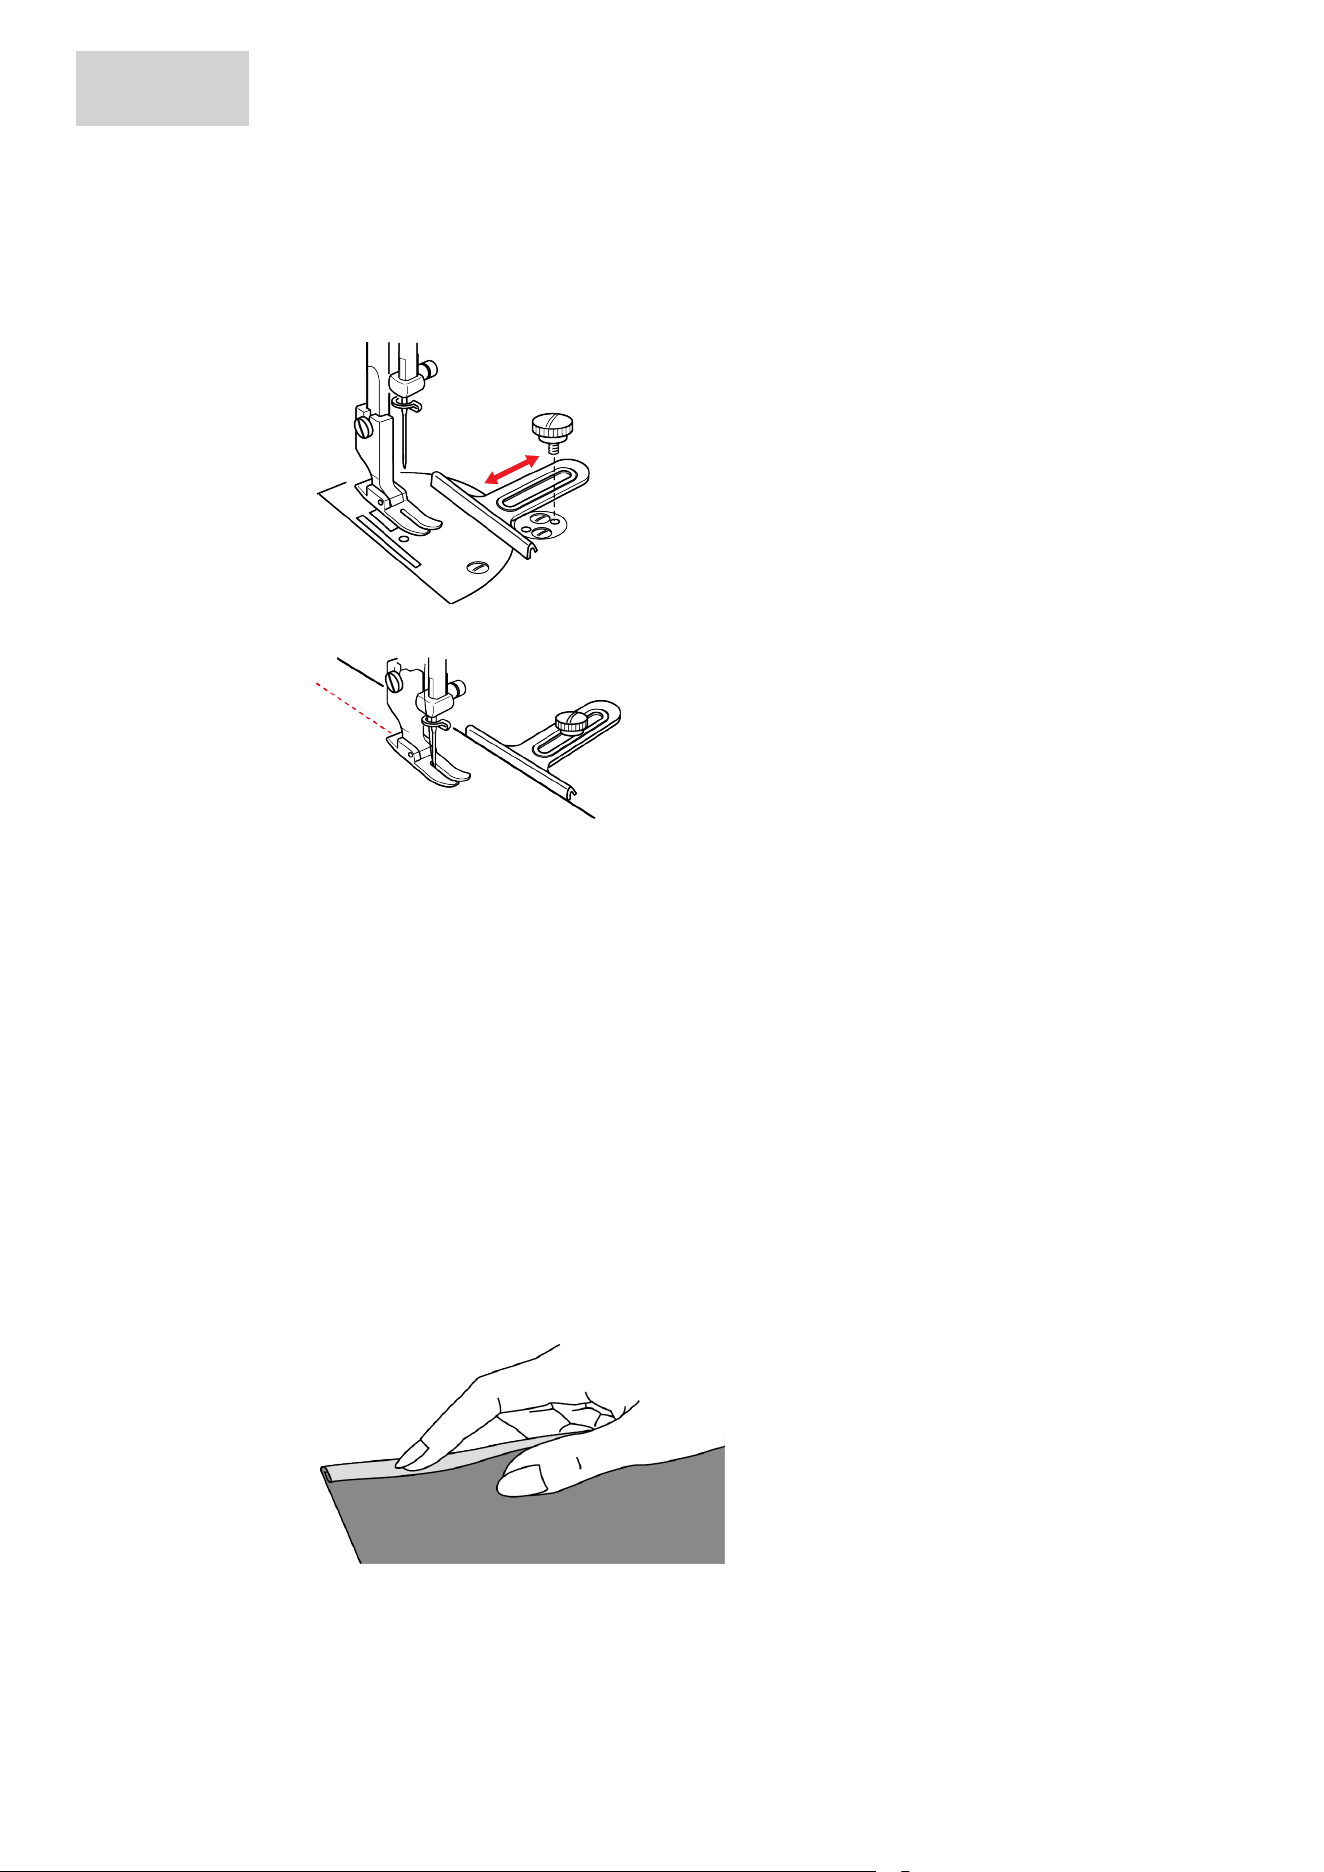
3.9 Edgestitching Using the Seam Guide
When sewing parallel wide top-stitching lines, we recommend guiding the seam guide along a sewn line.
> Set the required stitch length.
> Fit the seam guide to the holes for attachments and adjust the desired distance to the needle.
> Tighten the screw.
3.10 Wide Edgestitching
> Fit the seam guide and adjust the desired distance to the needle.
> Set the required stitch length.
> Guide the fabric edge along the seam guide.
3.11 Sewing hem edges
> Set the required stitch length.
> Attach the Straight Stitch Foot or the Narrow Straight Stitch Foot.
> Guide the inner, upper hem edge on the right along the edge of the presser foot.
3.12 Sewing a Narrow Hem
The hemmer foot (optional accessory) is required.
> Fit the hemmer foot.
> Set the required stitch length.
> Fold the edge of the fabric by approx. 3mm and fold it over again. Fold the first 5cm of the fabric edge
to be sewn over.
> Place the fabric edge with the wrong side of the fabric facing upwards under the presser foot, slightly
less than the width of the presser foot.
> Sew 4–5 stitches.
> Raise the needle and presser foot.
SEWING
33
2024-12 EN 5060800.00A.04
> Pull the fabric backwards by about 10–15cm. Do not cut the thread.
> Hold the 4 threads in your left hand. Pull the edge of the fabric into the spiral guide on the hemmer foot
using your right hand.
> Lower the presser foot.
> Continue sewing slowly while slightly folding the cut edge of the fabric in front of the hemmer foot and
holding it to the left. Guide the edge of the fabric evenly into the spiral guide on the hemmer foot and
sew.
3.13 Sewing Basting Stitches
The basting stitch is suitable for basting several layers of fabric. When sewing basting stitches, it is
recommended to use a fine darning thread. The darning thread is easier to remove.
> Fit the straight stitch foot.
> Set the maximum stitch length.
Pin the fabric layers at a right angle to basting direction to prevent the layers from slipping.
3.14 Gathering
Ideal for fine and medium-weight fabrics. To decorate clothes or decorative items.
> Fit the straight stitch foot.
> Set the stitch length to «4».
> Set the thread tension to «2» or less.
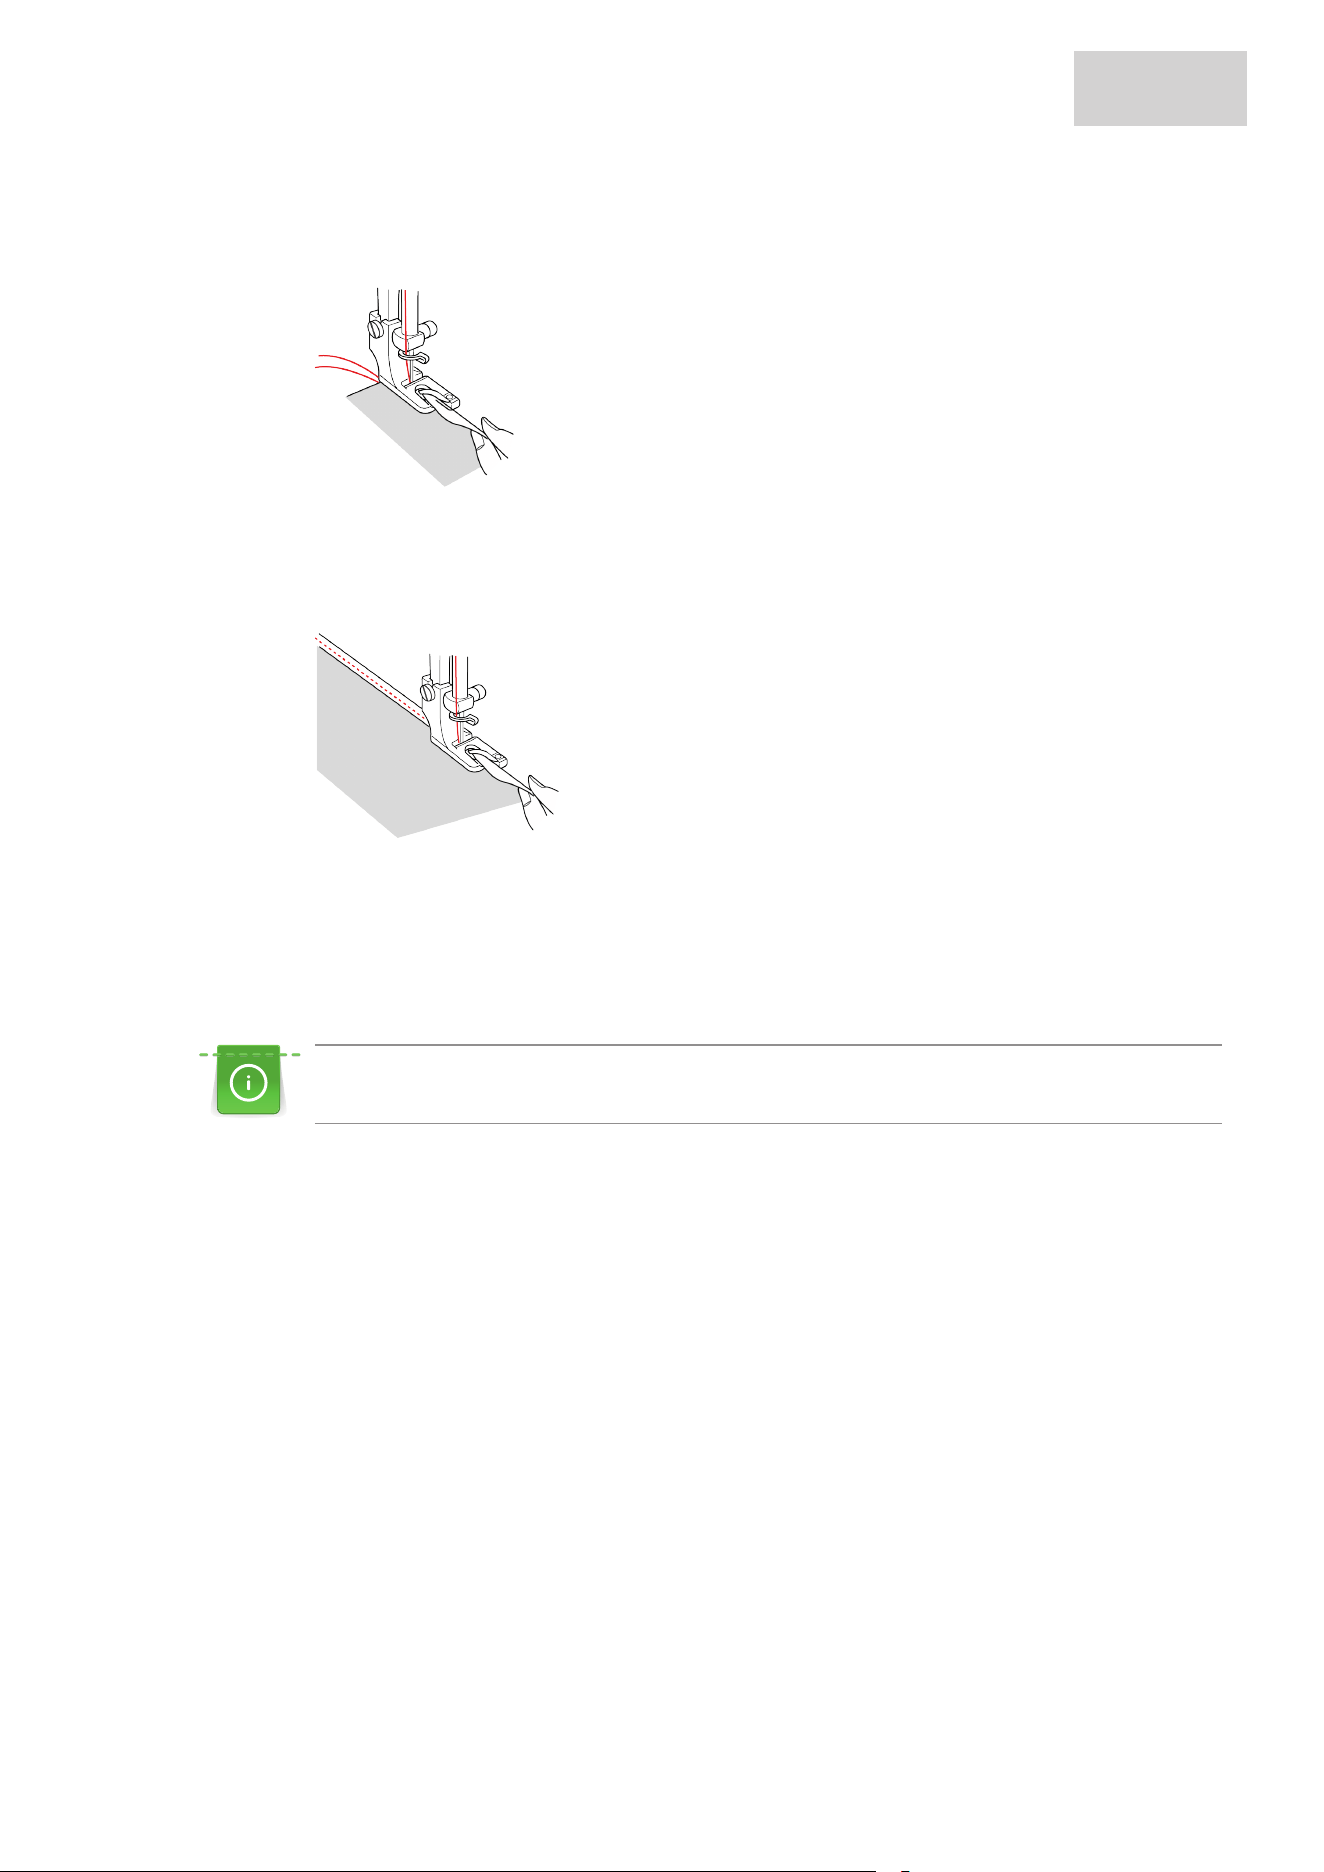
> Pull out the upper and bobbin threads by approx. 5in (20cm).
> Sew along the fabric edge at the width of the foot. Sew with a few reverse stitches at the beginning.
Leave the thread ends about 4–5in (10–12cm) long when finished.
> Sew an additional line at a distance of approx. 1/4in (5mm). Sew with a few reverse stitches at the
beginning. Leave the thread ends about 4–5in (10–12cm) long when finished.

SEWING
34
2024-12 EN 5060800.00A.04
> Pull the bobbin threads and spread the little pleats evenly.
QUILTING
35
2024-12 EN 5060800.00A.04
4 Quilting
4.1 Free-Motion Quilting
The quilting stitch plate (optional accessory) and the free-motion quilting foot (optional accessory) are used
for quilting work.
It is recommended to use the slide-on table. With free motion quilting, it is of advantage to quilt from the
center outwards and to guide the fabric using smooth, round movements to form the design of your choice.
With stipple quilting, entire surfaces of the fabric are filled with quilt stitches. The single lines of stitching are
rounded and never cross one another.
Quilting gloves with rubber nubs make it easier to guide the fabric.
Prerequisite:
• The top layer, the batting and the backing are pinned together or basted.
> Fit the quilting stitch plate.
> Remove the presser foot and fit the free-motion quilting foot to the presser foot bar.
> Tighten the free-motion quilting foot with the screw.
> Set the stitch length «0».
> If required, adjust the upper thread tension.
> Press the foot control.
> Hold both hands close to the presser foot like an embroidery hoop to guide the fabric.
> If the thread is lying on top of the fabric, slow down the movement of the sewing project.
> If there are knots on the wrong side of the fabric, move the sewing project faster.
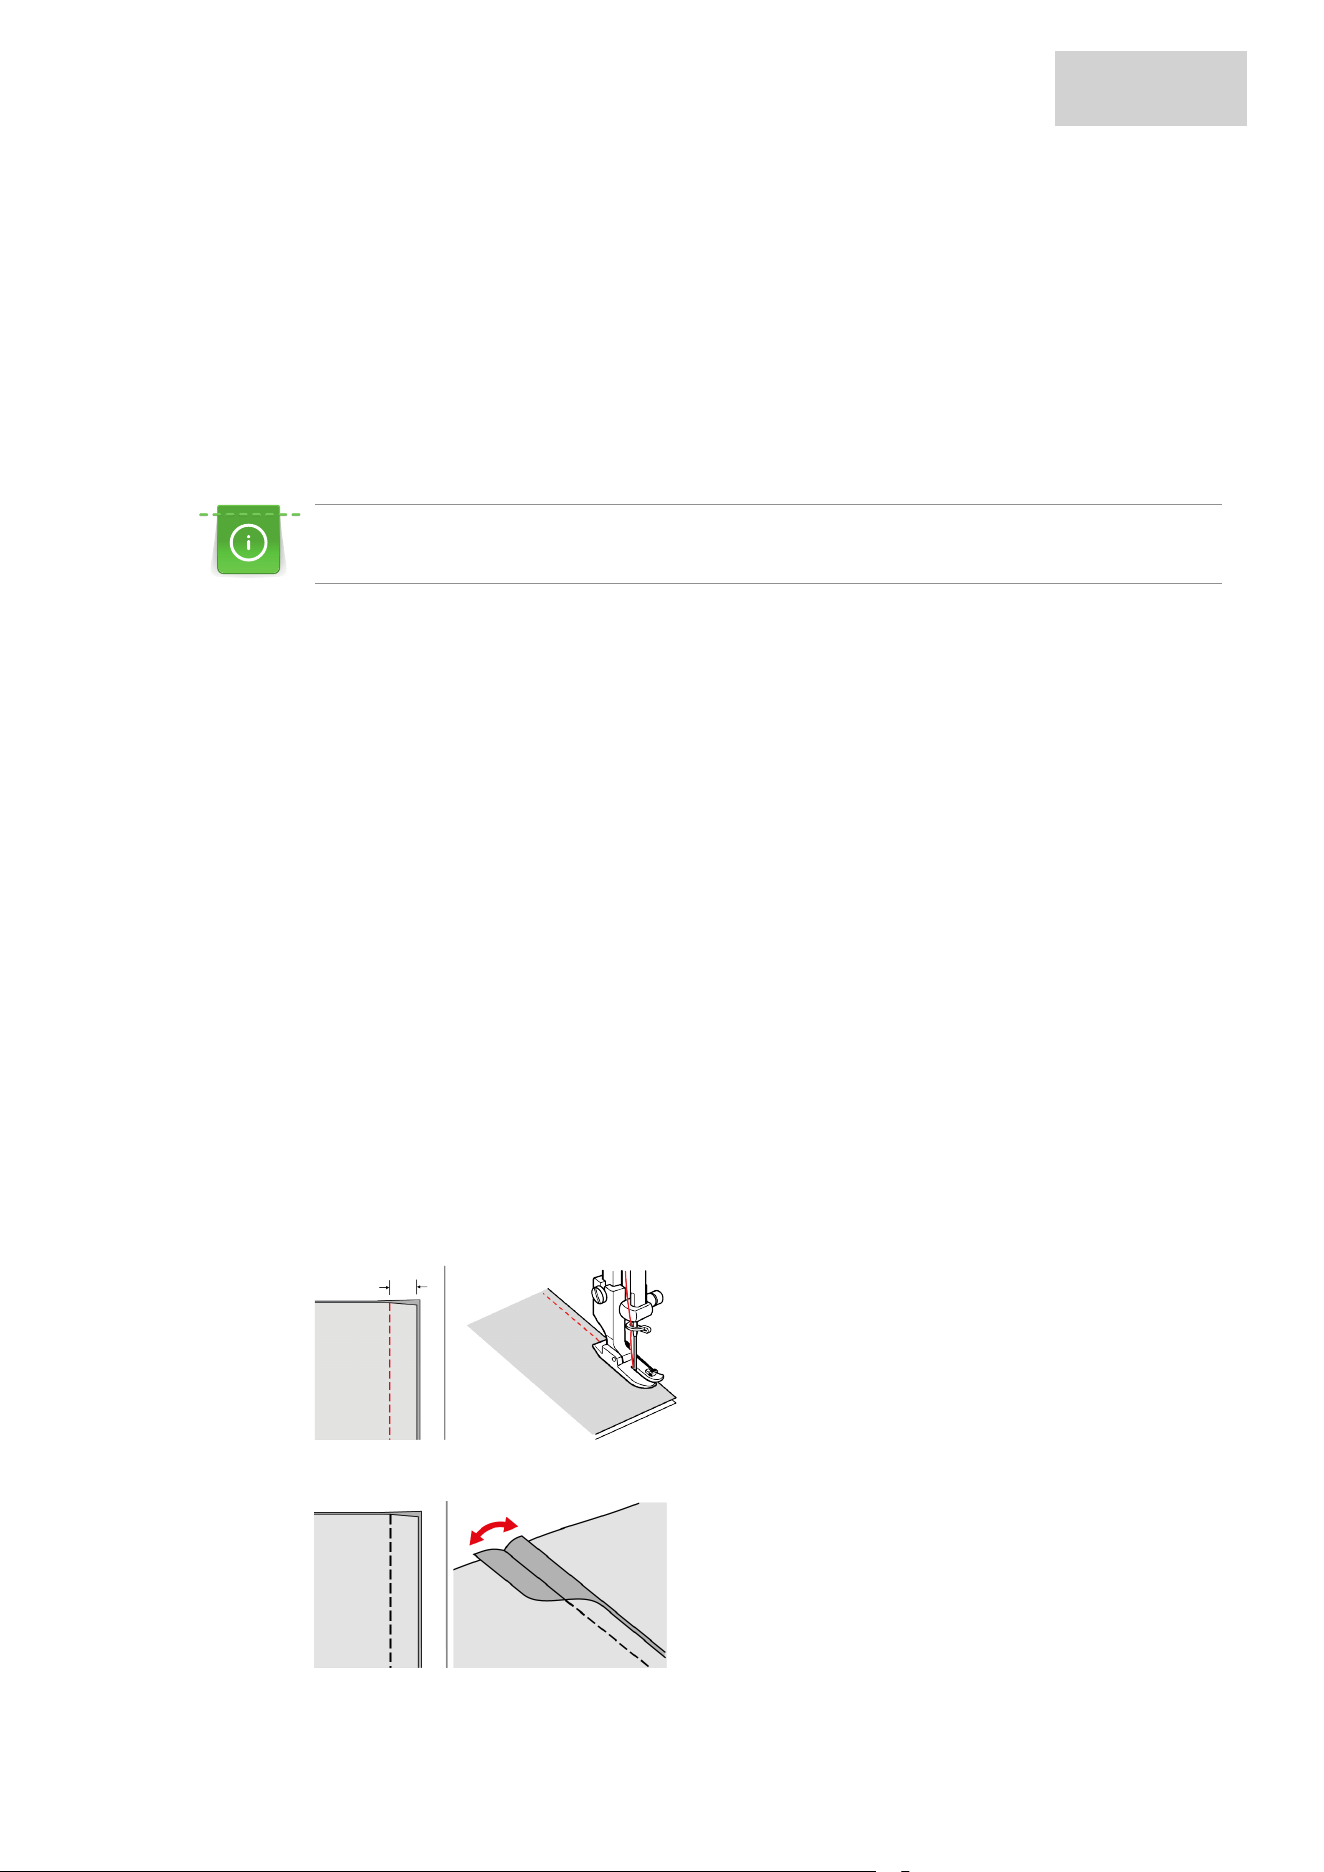
4.2 Sewing Patchwork
Piecing
> Fit the patchwork foot (optional accessory).
> Set the stitch length to «0.5–4».
> Set the thread tension to «4–5».
> Set the presser foot pressure to «3–5».
> Place 2 pieces right sides together.
> Sew the pieces together with a seam allowance of 5mm or guide them along the guide of the
patchwork foot.
5 mm
> Press the seam allowances open.
MAINTENANCE AND CLEANING
36
2024-12 EN 5060800.00A.04
5 Maintenance and Cleaning
5.1 Cleaning the Feed Dog and the Hook
Remaining threads under the stitch plate must occasionally be removed.
CAUTION
Electronically Driven Components
Risk of injury near the needle and the hook.
> Switch the machine off and disconnect it from the power supply.
> Remove the presser foot and the needle.
> Open the bobbin cover and remove the top bobbin cover.
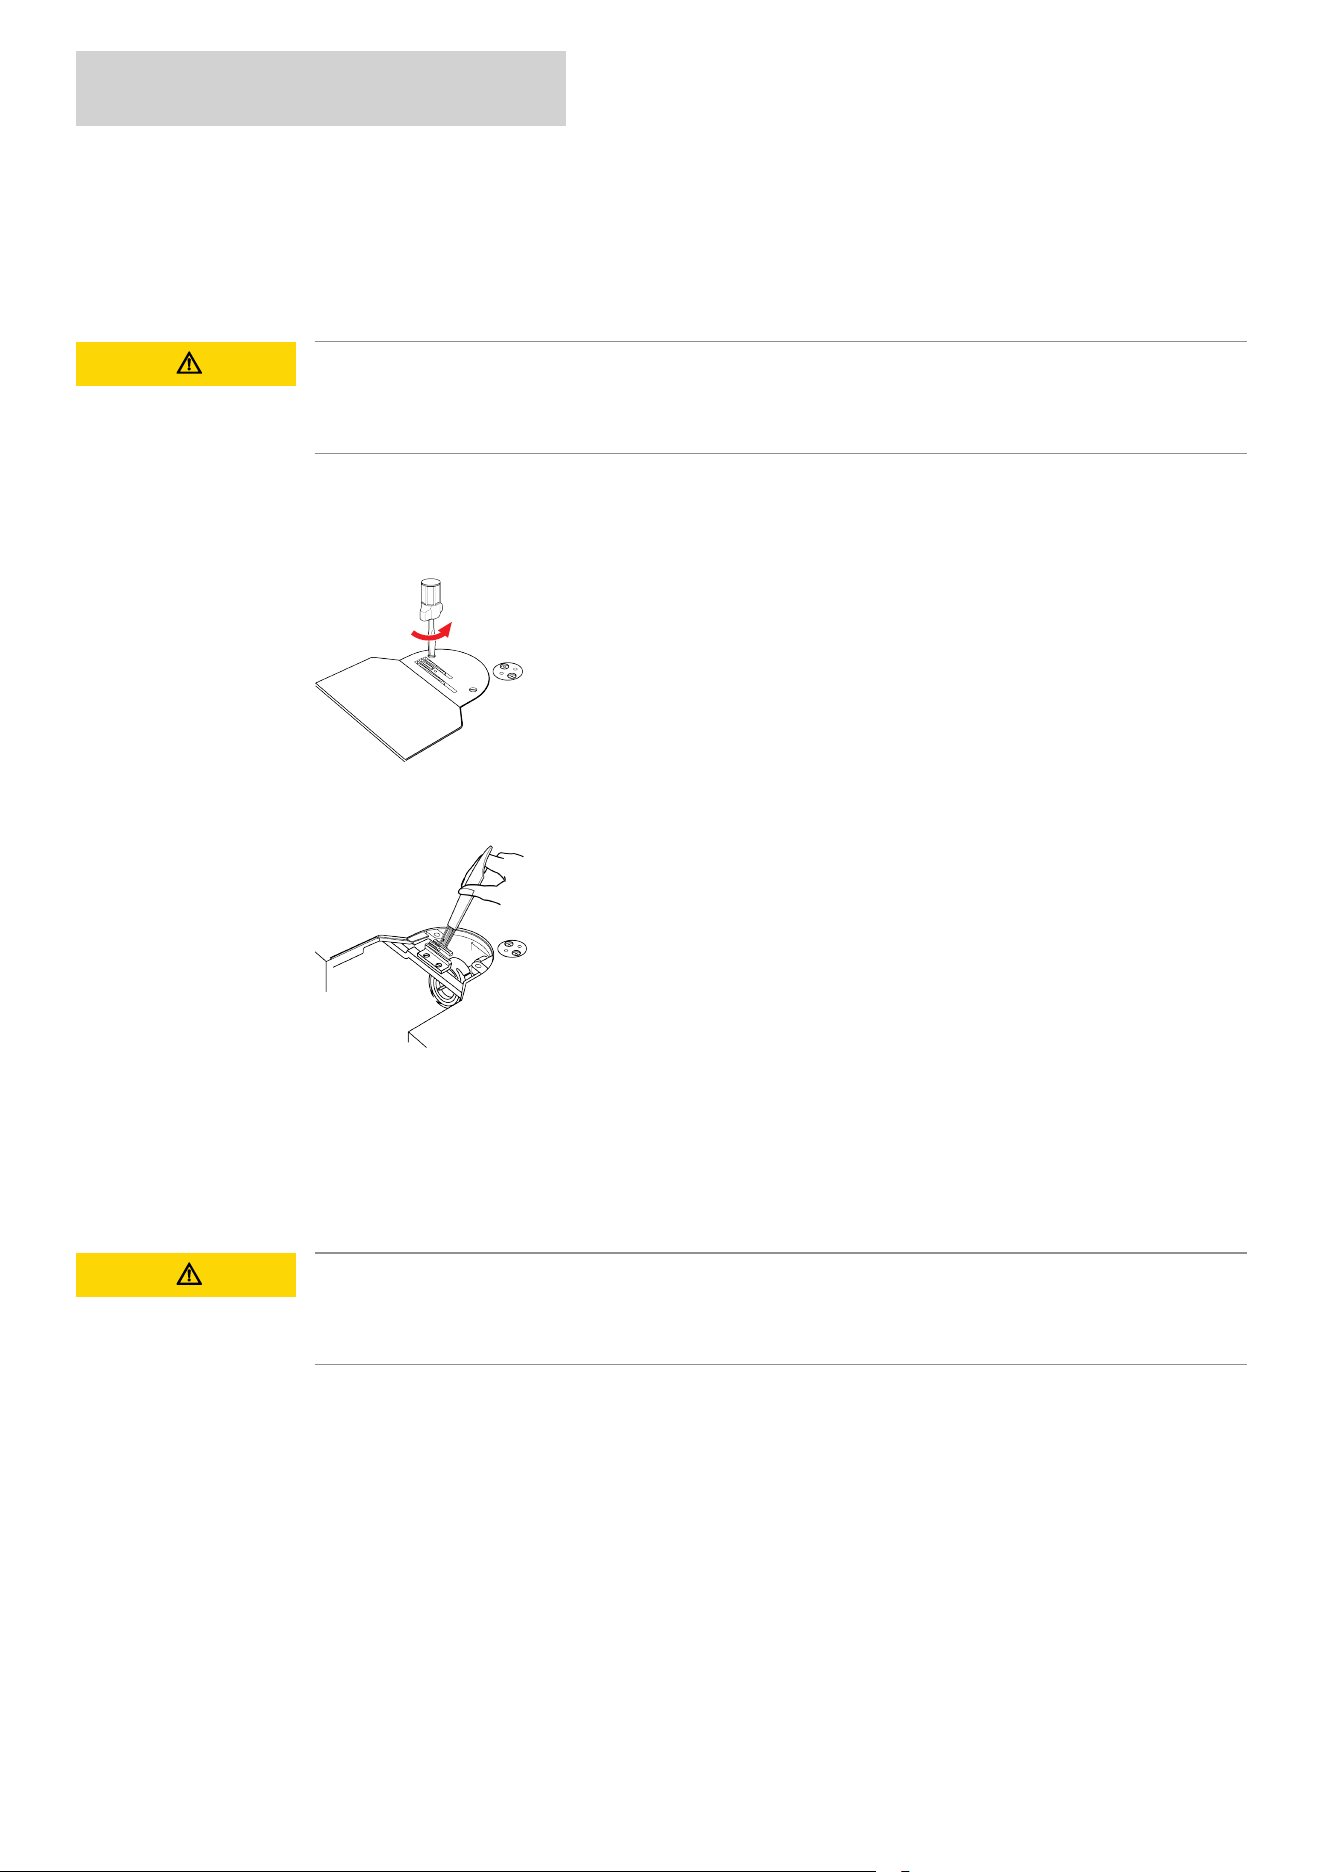
> Loosen both screws and remove the stitch plate.
> Remove the bobbin case and the bobbin.
> Clean the feed dog and the hook with the brush.
> Refit the stitch plate. Insert both screws and tighten them.
> Attach the top bobbin cover and close the bobbin cover.
> Insert a needle.
> Attach the presser foot.
5.2 Cleaning the Bobbin Case
CAUTION
Electronically Driven Components
Risk of injury near the needle and the hook.
> Switch the machine off and disconnect it from the power supply.
> Remove the presser foot and the needle.
> Open the bobbin cover and remove the top bobbin cover.
> Remove the stitch plate.
> Remove the bobbin from the bobbin case.
> Clean the bobbin case with the brush.
> Set needle to topmost position.
> Clean the shuttle race with the brush.
> Insert the bobbin into the bobbin case.
> Fit the stitch plate.
> Attach the top bobbin cover and close the bobbin cover.
> Fit the needle and presser foot.
MAINTENANCE AND CLEANING
37
2024-12 EN 5060800.00A.04
5.3 Lubricating the Machine
By oiling the hook, the occurrence of unwanted noises in the hook area can be avoided. Only use the
supplied sewing machine oil «M0-70» or alternatively the sewing machine oil «OP-8J» or «Klüber OY 100»
for this sewing machine. bernette recommends oiling the hook at the following occasions:
• Prior to the machine's first use
• after a longer downtime of the machine
• in case of intensive use: daily before sewing
• in case of unwanted noises in the hook area
CAUTION
Electronically Driven Components
Risk of injury near the needle and the hook.
> Raise the presser foot.
> Switch the machine off and disconnect it from the power supply.
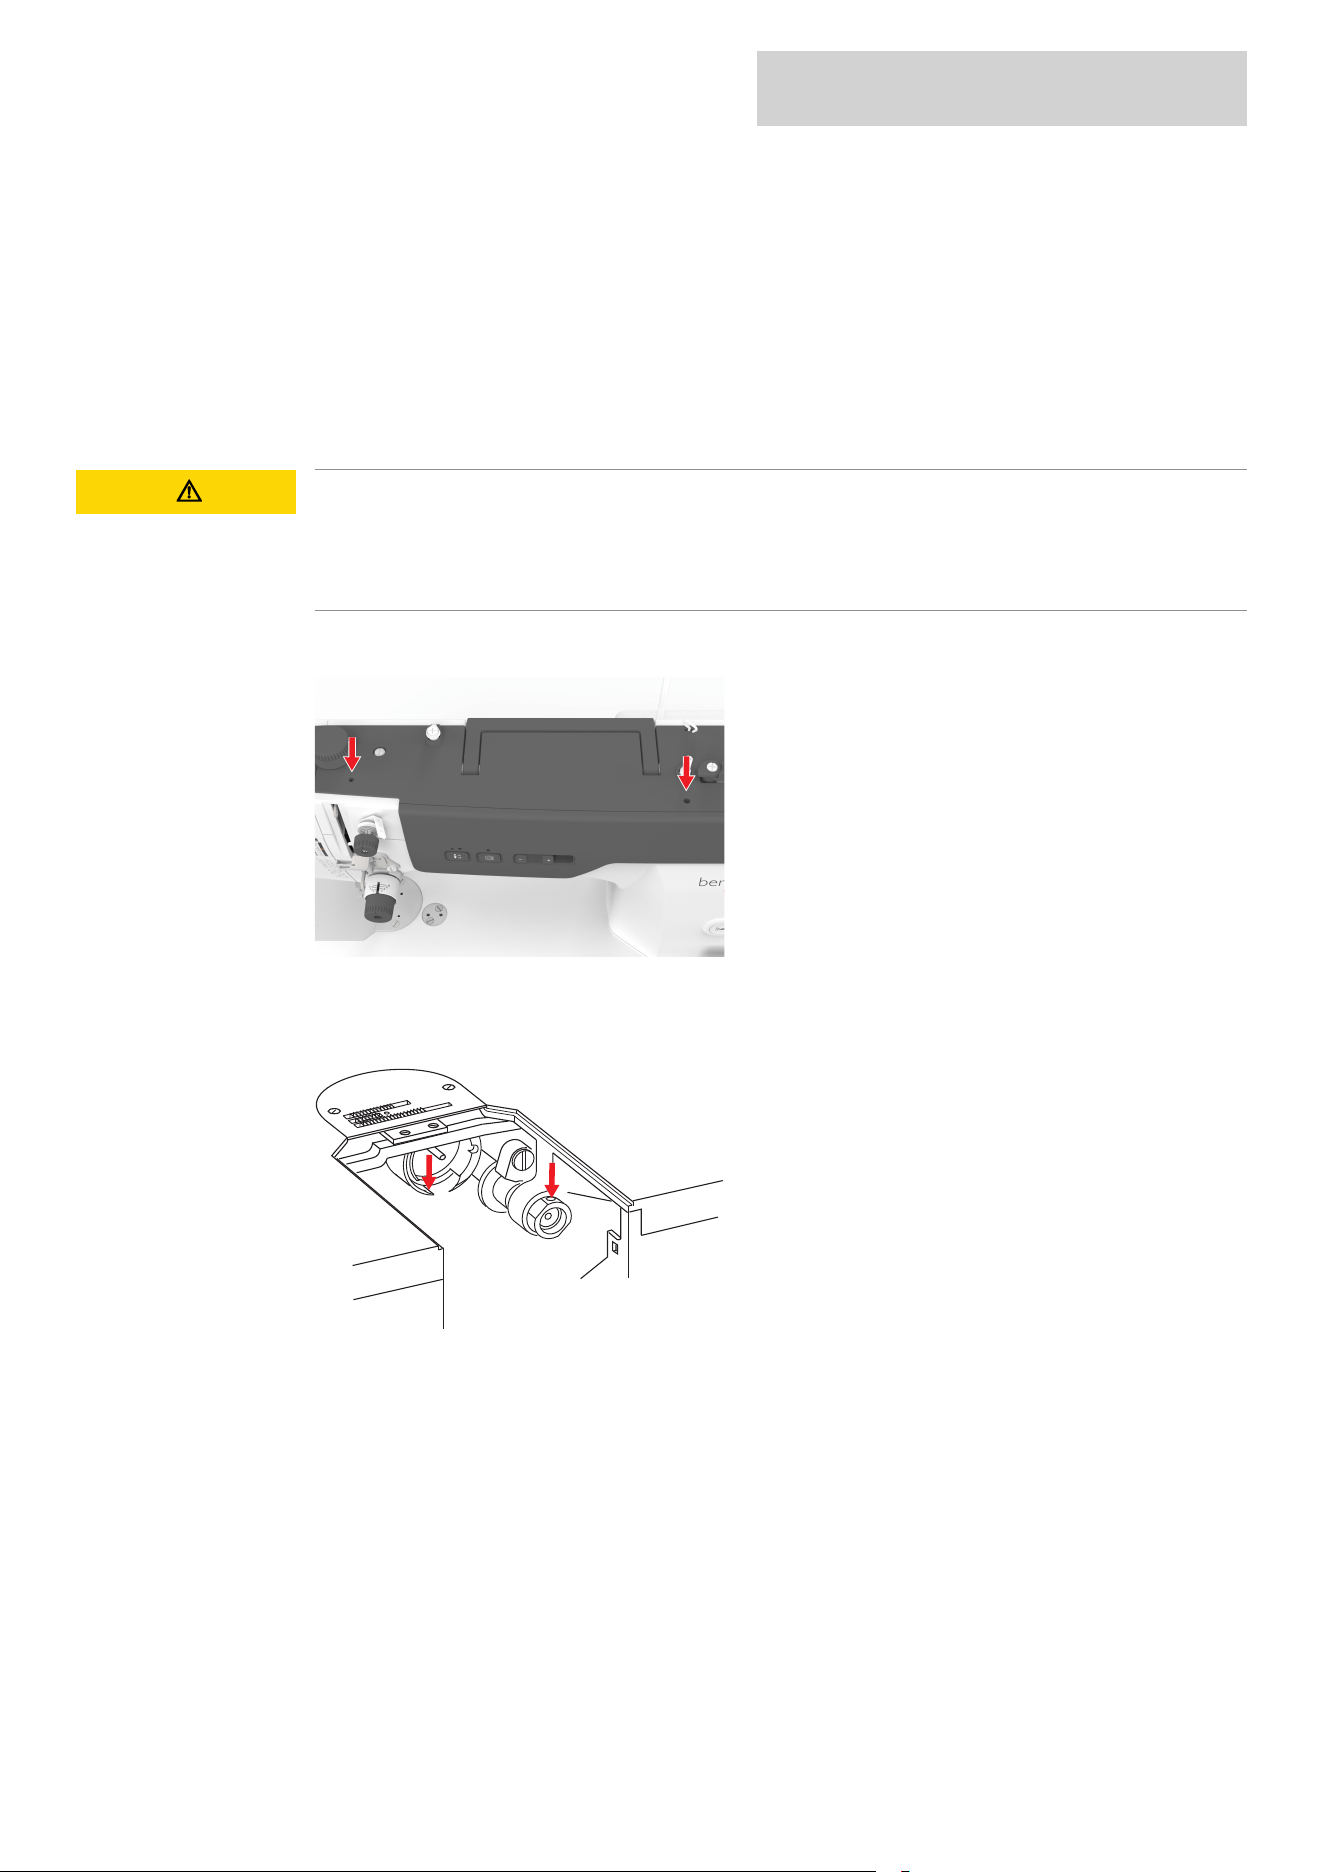
> Lubricate the marked areas with 3 drops of oil each.
> Remove the bobbin case.
> Clean the hook race area with a brush and a soft cloth. Never use any sharp instruments.
> Lubricate the marked areas with 1 drops of oil each on the felt.
> Turn the handwheel counterclockwise a few times and remove any excess oil with a cloth.
> Insert the bobbin case.
> Sew on a test fabric.

TROUBLESHOOTING
38
2024-12 EN 5060800.00A.04
6 Troubleshooting
Fault Possible Cause Troubleshooting
Uneven Stitch Formation
Upper thread too tight or too
loose.
> Adjust the upper thread tension. (see page25)
Needle blunt or bent. > Replace the needle, make sure that a new BERNINA
quality needle is used. (see page18)
Poor quality needle. > Use a new needle.
Poor quality thread. > Use quality thread.
Incorrect needle/thread
combination.
> Match the needle with the thread size.
Incorrectly threaded. > Rethread.
Fabric was pulled. > Feed the fabric evenly.
Dust or thread remnants under the
tension spring of the bobbin case.
> Cleaning the bobbin case. (see page36)
Skipped Stitches
Incorrect needle. > Use needles from the needle system HLx5. (see
page12)
Needle blunt or bent. > Replace the needle. (see page18)
Poor quality needle. > Use a new needle.
The needle is incorrectly inserted. > Insert the needle with the flat side to the right as far
up as it will go and tighten the screw.
Incorrect needle point. > Match the needle point to the texture of the material.
Light on the button "Bobbin
Winder" does not light up
Lighting Defective. > Contact your bernette dealer.
Light on the button "Needle
Stop Up/Down" does not light
up
Lighting Defective. > Contact your bernette dealer.

TROUBLESHOOTING
39
2024-12 EN 5060800.00A.04
Fault Possible Cause Troubleshooting
Needle Breaks
The needle is incorrectly inserted. > Insert the needle with the flat side to the right as far
up as it will go and tighten the screw. (see page18)
Fabric was pulled. > Feed the fabric evenly.
Thick fabric has been pushed. > Use a suitable presser foot for thick fabric, e.g.roller
foot.
> Use the height compensation tool (optional accessory)
when sewing over a thick seam. (see page29)
Knotted thread. > Use quality thread.
Upper Thread Breaks
Incorrect needle/thread
combination.
> Match the needle with the thread size.
Upper thread is too tight. > Reduce the upper thread tension. (see page25)
Incorrectly threaded. > Rethread.
Poor quality thread. > Use quality thread.
The hook tip or the stitch hole in
the stitch plate is damaged.
> Replace the stitch plate.
> Contact your bernette dealer.
Lower Thread Breaks
The bobbin is not inserted
correctly.
> Remove and reinsert the bobbin and pull on the
thread.
– The thread should run easily.
The bobbin is wound incorrectly. > Check the bobbin and wind it correctly. (see page19)
The stitch hole in the stitch plate is
damaged.
> Replace the stitch plate.
> Contact your bernette dealer.
Needle blunt or bent. > Replace the needle.
Faulty Stitching
Thread remnants in the thread
pretension.
> Fold a piece of thin fabric (don't use outer edges) and
pull it through the thread tension discs several times.
Incorrectly threaded. > Rethread.
Thread is caught in the hook. > Remove the upper thread and the bobbin case, turn
the handwheel backwards and forwards by hand and
remove the thread remnants.
Incorrect needle/thread
combination.
> Match the needle with the thread size.
Thread is not cut
Thread is too thick. > Cut the thread manually.

TROUBLESHOOTING
40
2024-12 EN 5060800.00A.04
Fault Possible Cause Troubleshooting
The Machine doesn't Start
The machine is switched off. > Switch the machine on. (see page14)
The machine is not connected to
the power supply.
> Connect the machine or plug in the power cable. (see
page14)
The machine is defective. > Contact the specialized bernette dealer.
Unfavorable room temperature. > Place the machine in a warm room one hour before
use.
> Connect the machine and switch it on.
The presser foot is raised. > Lower the presser foot. (see page18)
Foot control is not connected. > Connect the foot control. (see page14)

TECHNICAL DATA
41
2024-12 EN 5060800.00A.04
7 Technical Data
Term Value Unit
Maximum Speed 1600 Stitches per Minute
Measurements (W × H × D) 498 × 338 × 228
(19.6 × 13.3 × 9.0)
mm
(in)
Weight 14.6
(32.2)
kg
(lb)
Input Voltage 110
230
V
V
Energy Consumption 95 W
Sound Pressure Level < 80 dB (A)
Protection Class (Electrical Engineering) II

www.bernette.com/b08
© BERNINA International AG
Steckborn CH, www.bernina.com
2024-12 EN
5060800.00A.04
