
User Manual
BESTMOW T100 Robotic Lawn Mower
Copyright © 2025 BESTMOW.com, All Rights Reserved.

1. Safety Warnings
IMPORTANT
READ CAREFULLY BEFORE USE
KEEP FOR FUTURE REFERENCE
•
Installation and Operation: Ensure that the BESTMOW robotic mower (referred to as “the mower” in
this manual) and its charging station are installed and operated strictly according to the instructions. Visit
www.bestmow.com or access the Help & Support section via the app for the complete User Manual and the
latest updates.
TEL: 1 800-882-2131
Email: support@bestmow.com
•
Intended Use: This product is designed for lawn mowing only. Using it for purposes other than mowing
can result in serious injury. Always read and understand all warnings and safety instructions. While following
these instructions can reduce risks, it cannot eliminate them entirely. The user is responsible for ensuring safe
operation and preventing accidents or hazards for others.
•
Safety Around People and Pets: BESTMOW is equipped with built-in safety sensors, but risks still exist.
Only schedule mowing times when no people or pets are present on the lawn. If your lawn is publicly accessible
or open to neighbors, install a fence, barrier, or warning sign that reads:
WARNING!
Automatic Lawn Mower in Operation. Keep Away! Supervise Children!
•
Unauthorized Repairs & Modications: DO NOT attempt to modify, repair, or manually adjust the
mower. Unauthorized changes can cause malfunctions, serious injury, or damage, and may void the
warranty. Use only BESTMOW-approved parts and accessories.
•
User Age & Training: The manufacturer recommends that users be 18–70 years old. Proper training is
required before operating the mower.
WARNING!
•
NEVER allow children, individuals with reduced physical, sensory, or mental capabilities to operate
the mower.
•
Local regulations may restrict the minimum age for operators.

1.1 Before Mowing
Pre-Check: Regularly inspect all mower parts to ensure they function normally.
Weather Conditions:
• Mow only in dry conditions for optimal performance.
• DO NOT operate in extreme weather conditions.
Lawn Inspection:
• Before each mowing session, remove stones, sticks, wires, toys, bones, and other foreign objects from the
lawn.
• The warranty does not cover damage caused by user negligence.
Sprinkler Systems:
• DO NOT schedule mowing and irrigation at the same time.
Child Safety:
• NEVER allow children to touch the power supply, charging station, blades, battery compartment, or
wheels.
WARNING!
DO NOT operate the mower if safety guards, shields, or power cords are damaged or missing.
1.2 During Mowing
Blade Safety:
• KEEP HANDS AND FEET AWAY from rotating blades.
• DO NOT attempt to touch, lift, or carry the mower while the blades are moving.
Objects in Mowing Area:
• Beware of thrown objects—keep a safe distance while the mower is operating.
Unattended Operation:
• DO NOT leave the mower unattended if pets, children, or people are nearby.
Safe Movement on Slopes:
• Maintain balance and avoid overreaching when working on slopes.
• Walk—never run—while operating the mower or its peripherals.
DO NOT mow on slopes exceeding:
• 25° (46% slope) incline inside the mowing area
• 15° (17% slope) incline along boundaries
Emergency Situations:
• If the mower emits an unusual sound or alarm, press the STOP button immediately.
• If there are abnormal vibrations, turn o the mower, place it on level ground for 30 seconds, and restart it. If
the issue persists, contact authorized service support.
WARNING!
•
DO NOT allow children to play near the mower while it is operating.
•
DO NOT lift or ride on the mower.

1.3 Safe Usage
Temperature Limitations:
• Operate and charge the mower only within the temperature range 0–40°C (32–104°F).
• Extreme cold or heat can reduce performance and lead to accidents.
Prohibited Actions:
• DO NOT place objects on the mower or the charging station or canopy.
• By following these safety guidelines, you can ensure safe and ecient operation of your BESTMOW robotic
lawn mower.
1.4 Regular Maintenance and Safe Charging Guidelines – BESTMOW
Routine Maintenance:
• Regular maintenance should be performed by an adult to ensure optimal performance and longevity of the
mower. (Refer to the Maintenance section in the User Manual for details.)
• Check safety indicators frequently, including:
• The speaker for audible alerts
• The LED light on the charging station
• The ambient light on the mower
Charging Safety Precautions:
• Before charging, carefully read the "How to Charge" section in the User Manual to avoid hazards. Improper
use may cause electric shock, overheating, or leakage of corrosive liquids.
• Only use the original battery pack or a replacement of the same model as specied by BESTMOW. The
mower contains one battery pack with a rated capacity depending on the model.
• For battery replacements, contact after-sales service and have a qualied technician install a new battery.
Battery Safety Warnings:
• DO NOT use non-rechargeable batteries.
• For recharging, only use the original detachable power supply unit provided with this mower.
Handling & Storage Precautions:
• DO NOT dismantle or puncture the battery casing.
• Keep batteries away from metal objects to prevent short circuits.
• Store away from re, heat sources, and direct sunlight to avoid thermal hazards.
• For safe disposal, contact local waste management authorities or recycling services.
Blade & Power Cord Safety:
• When replacing blades, always insert the blade installation xture and wear protective gloves to prevent injury.
• If the power cord or extension cable is damaged or tangled during use:
• Disconnect from the power socket rst before attempting to untangle.
• DO NOT pull on the cord directly; always hold the plug when disconnecting.
• Contact after-sales service for professional repair or replacement of damaged cords.
By following these safety and maintenance guidelines, you can ensure the longevity and safe operation of your
BESTMOW robotic mower.
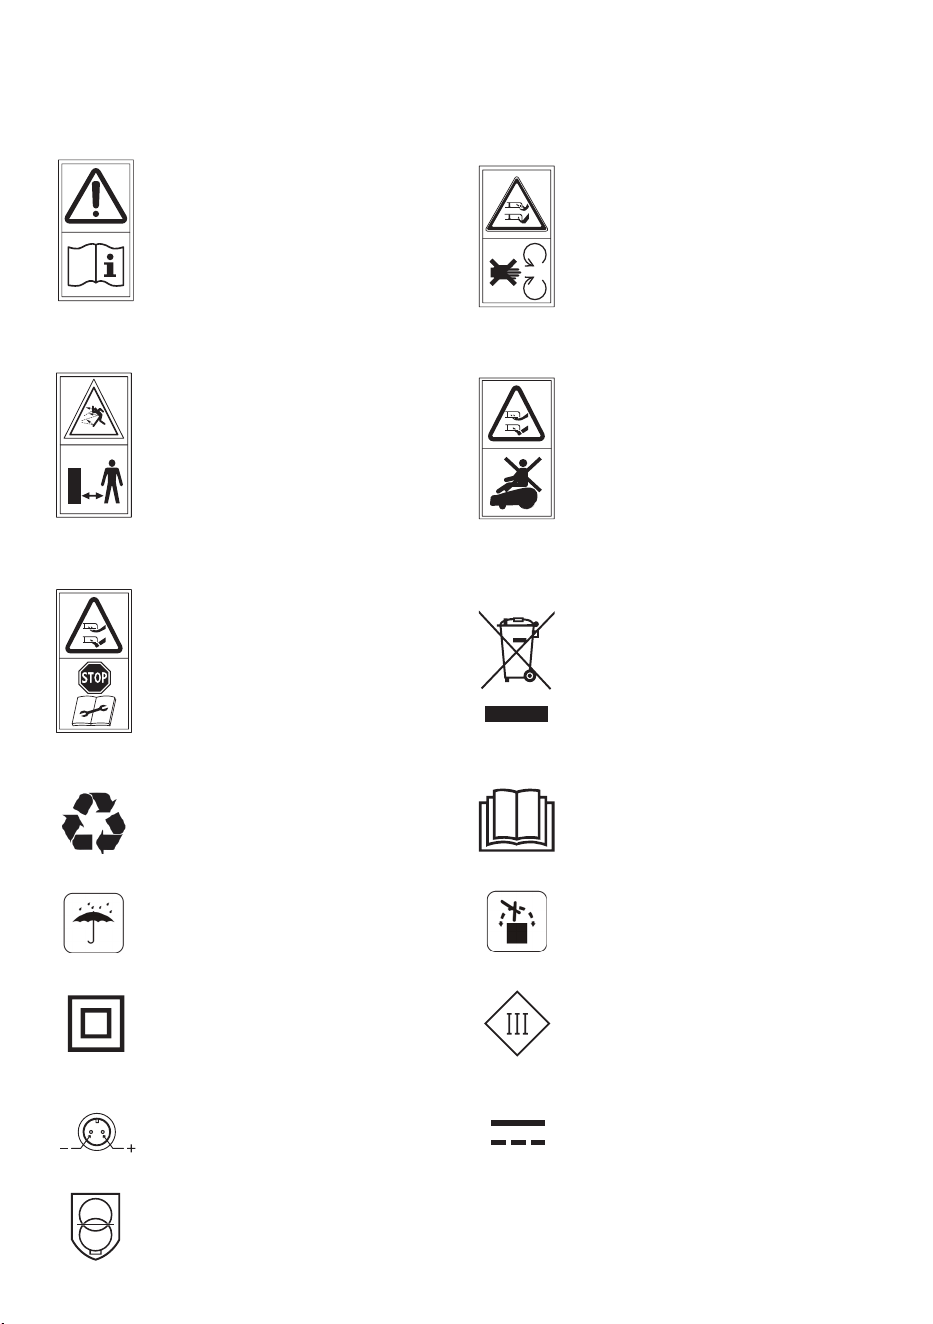
1.5 Symbols and Decals
WARNING!
Read instruction manual before
operating the machine.
WARNING!
Do not touch rotating blade.
WARNING!
Keep a safe distance from the machine
when operating.
WARNING!
Do not ride on the machine.
WARNING!
Operate the disabling device before
working on or lifting the machine
WARNING!
It is not permitted to dispose of this product
as normal household waste. Ensure that
the product is recycled in accordance with
local legal requirements.
The recycling symbol shows that the
item can be recycled
Before charging, read the instructions.
Keep the pack of this product dry Prohibit flipping
Class II appliance Class III appliance
Polarity of the charging port Direct current
SMPS incorporating a short-circuit-proof
safety isolating transformer (inherently or
non-inherently)
Alternating current
~
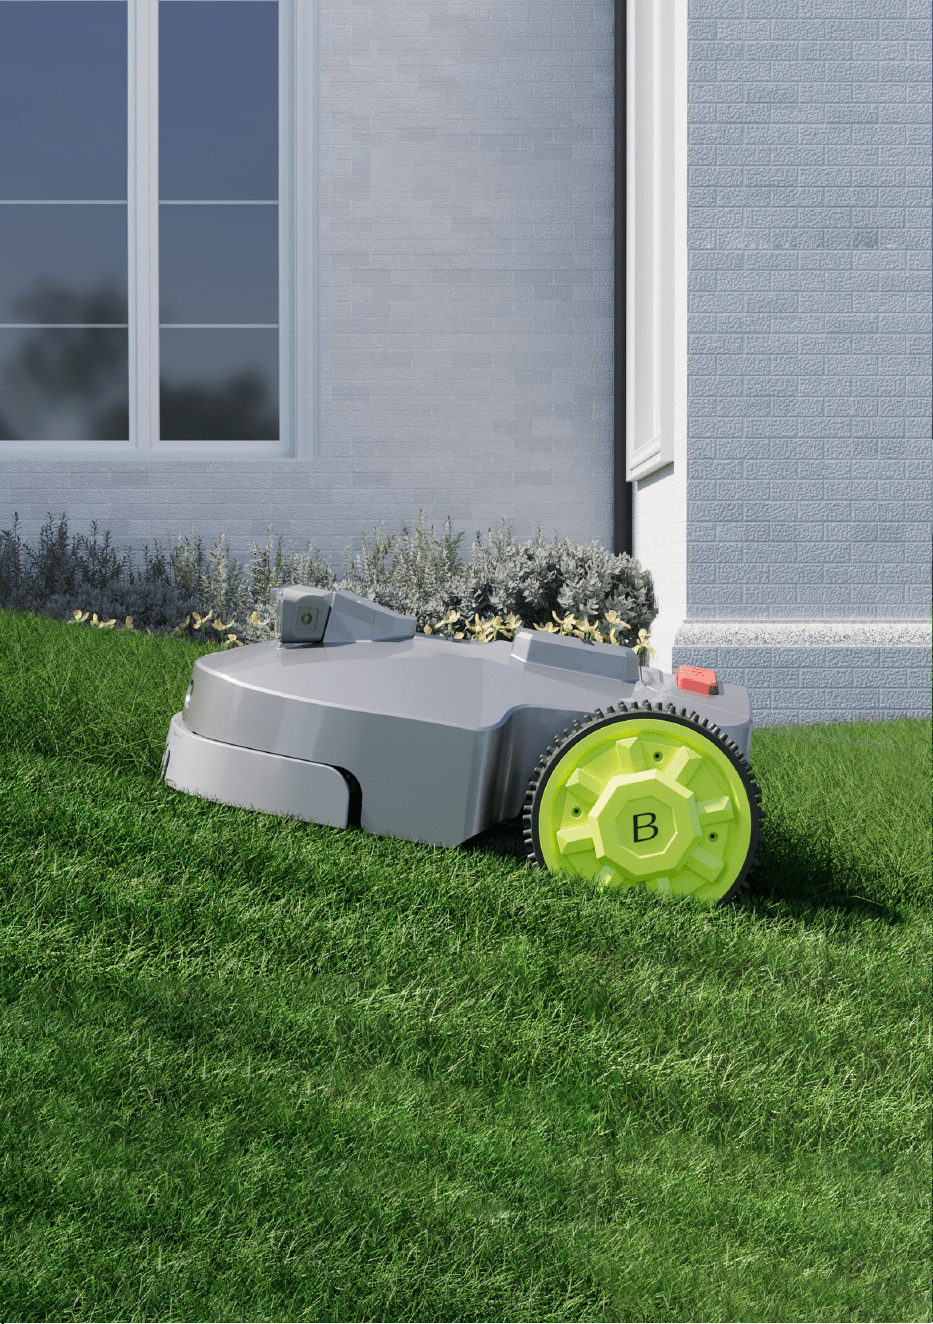
2. Product Overview & Technical Specications
2.1 Specications
Capacity
Category Specs
Max Mowing Size 6000m² (1.5 acre)
Boundary Type Virtual boundaries (No perimeter wire required)
Net Weight 18.8 kg
Dimension 609mm × 506mm × 264mm (23.9 in × 19.9 in × 10.4 in)
Max Climbing Ability 25° (46% slope)
Waterproof Level IP66
Positioning & Navigation
Feature Details
Navigation RTK & Vision
User Interface APP control
Firmware Update Over-the-Air (OTA) via App
Connectivity 2.4G Wi-Fi & Bluetooth
Cutting System
Feature Details
Cutting Width 220mm ( 8.7 in )
Cutting Height Range 40 - 100mm ( 1.5 - 4 in )
Mowing Speed Range 0.04 – 1m/s
Blade Type 3 pivoting stainless steel blades
Cutting Mode Parallel stripes at a specic angle
Product Safety
Feature Details
Noise Level 60 dB
Object Detection & Avoidance Camera & collision sensors
Lift Sensor Yes
Security System PIN access, alarm, charging station pairing, GPS theft tracking
Tilt Sensor Yes
Battery & Charging
Feature Details
Battery Capacity 7.5 Ah
Battery Type Lithium-ion
Charging Mode Automatic & manual
Auto-Recharging Yes
Mowing Time Per Full Charge 210 min
Charging Time Approx. 180 minutes

FCC Statement
This equipment complies with FCC Part 15 regulations for Class B digital devices, designed to limit harmful
interference in residential environments. While the device generates and uses radio frequency energy, proper
installation minimizes potential interference with communications.
To mitigate interference, follow these recommendations:
• Reorient or relocate the receiving antenna.
• Increase the separation between the device and receiver.
• Plug the equipment into a dierent electrical circuit.
• Consult a radio/TV technician for further assistance.
Unauthorized modications may void compliance and the user’s authority to operate the device.
FCC Radiation Exposure Statement
This device meets FCC radiation exposure limits for uncontrolled environments. Maintain a minimum distance
of 20cm (8 inches) between the device’s radiator and your body during operation.
IC Statement
This device complies with the Code of Federal Regulations (CFR) and must:
• Not cause harmful interference.
• Accept any received interference, even if it leads to undesired operation.
Users can refer to U.S. RF exposure and compliance guidelines for further details.
IC Radiation Exposure Statement
Similarly, this device follows IC radiation exposure limits for uncontrolled environments, requiring a minimum
20cm (8 inches) distance between the equipment and the user’s body.
WARNING!
•
This equipment meets FCC Part 15 conditions and should not cause harmful interference while tolerating
any incoming interference.
•
The manufacturer is not responsible for radio or TV interference caused by unauthorized
modications.
•
To comply with FCC radiation exposure limits, maintain a minimum separation of 20 cm from the
equipment.
2.2 Introduction
This section provides a detailed overview of BESTMOW, helping you understand its advanced AI-driven capabilities
and sensor technology. BESTMOW is designed to handle complex mowing scenarios autonomously.
Multi-Map Mowing
BESTMOW supports the creation of multiple mowing
maps (up to three maps currently). It can mow a
single lawn or switch between several lawns in
sequence, intelligently planning the optimal mowing
path to complete the task eciently.
Intelligent Mowing
BESTMOW leverages panoramic vision, RTK
positioning, and visual perception technology
to enable advanced features such as:Intelligent
mapping, Precision mowing, Autonomous
charging, Obstacle avoidance
Autonomous Charging
When the battery is low, BESTMOW automatically
pauses mowing and returns to the charging station.
Once fully charged, it resumes the unnished
mowing task or remains docked until the next
scheduled mowing session.
Obstacle Avoidance
Equipped with AI-powered obstacle detection,
BESTMOW actively avoids interference from objects
on the lawn. Using the BESTMOW App, users can
mark obstacle zones to prevent the mower from
entering restricted areas.
Smart Scheduling & Security
Users can set mowing schedules and security
routines via the BESTMOW App. The mower
can either follow a preset schedule or activate
Watchdog Mode for enhanced security monitoring
and autonomous operation.
Grass Clipping Mulching – No Cleanup Required
BESTMOW cuts grass into ne clippings, which
naturally decompose and act as organic fertilizer,
enriching the soil. No need for collection—just a
healthier, greener lawn!
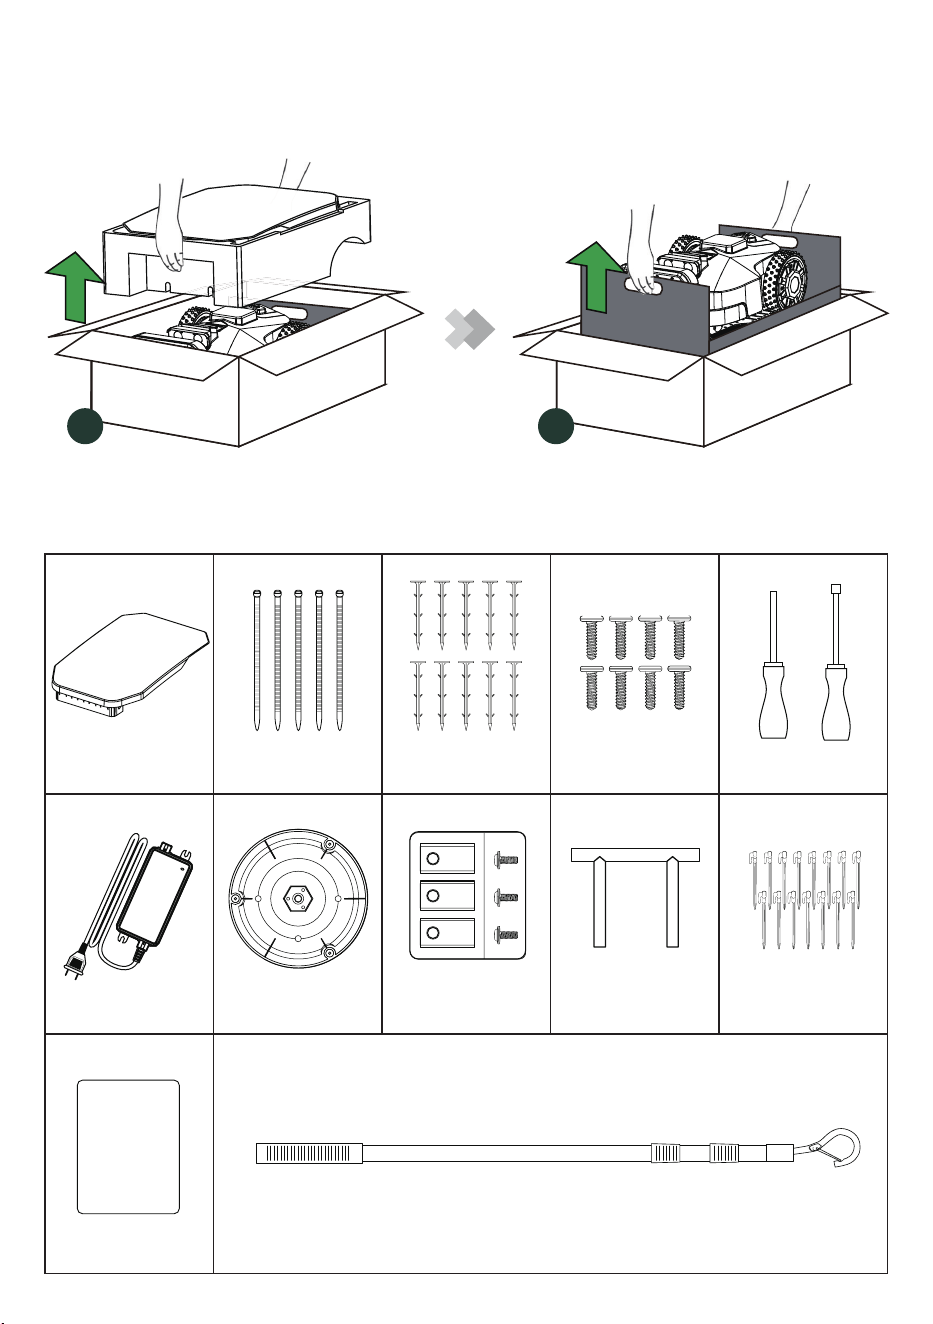
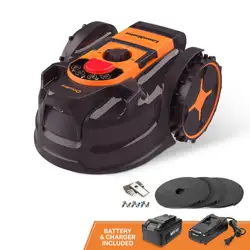
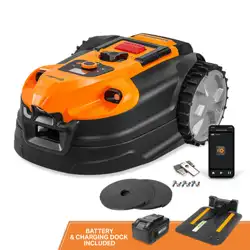
Unboxing
Please check the items in the package shown as below
What’s inside the box
Garage (*Optional)
×1
Cable Ties
×5
Ground Peg
×10
Screw
×8
Screwdriver
×2
Power Adapter
×1
Blade Disc
×1
Blade Set x1
(Including 12 Blades)
Blade Installation
Fixture x1
Stake
x15
User Manual
×1
Drag and Mow Tool
×1
USER MANUAL
01
02
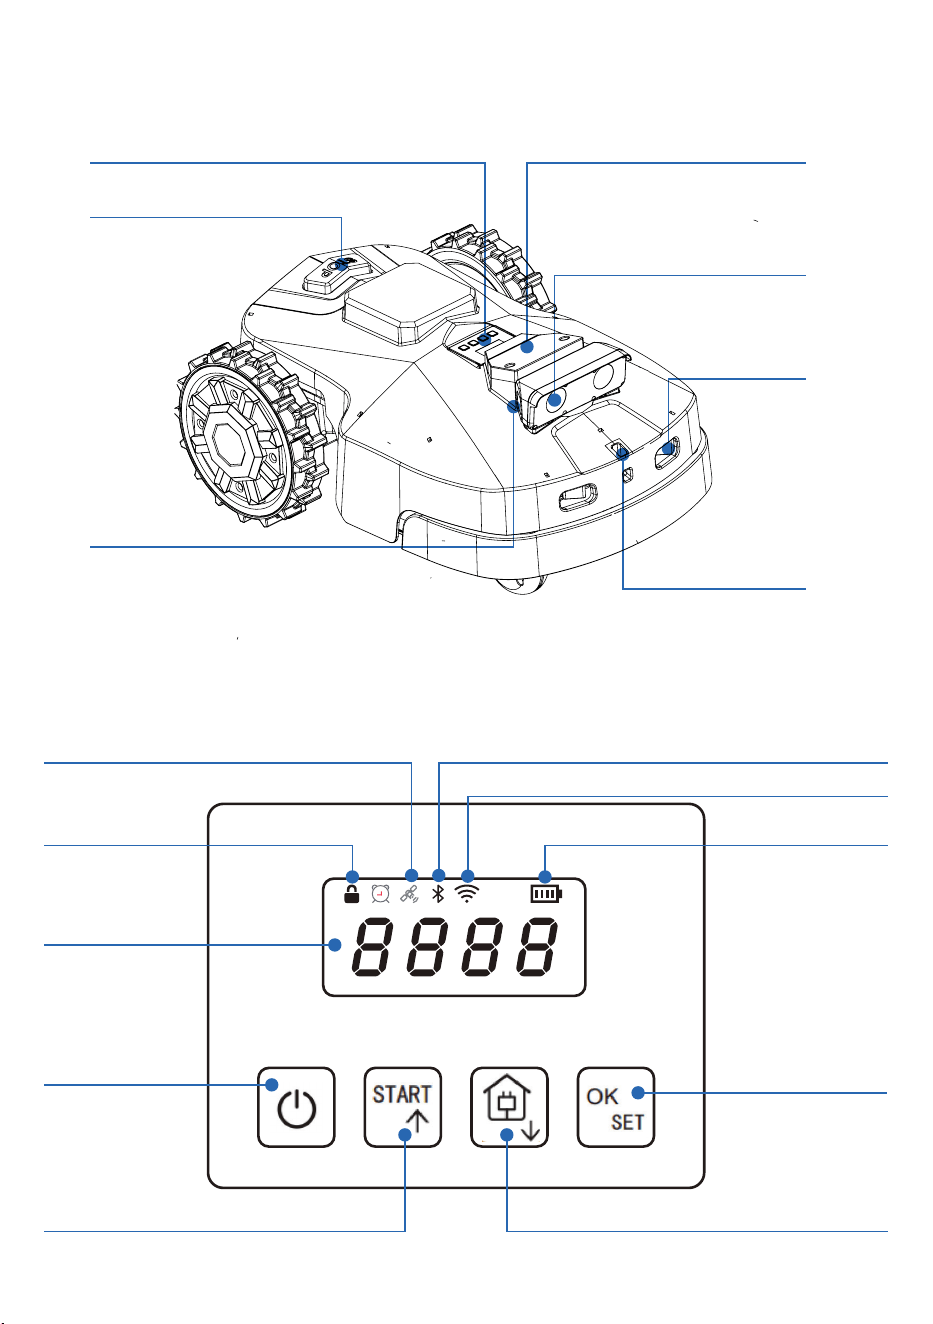
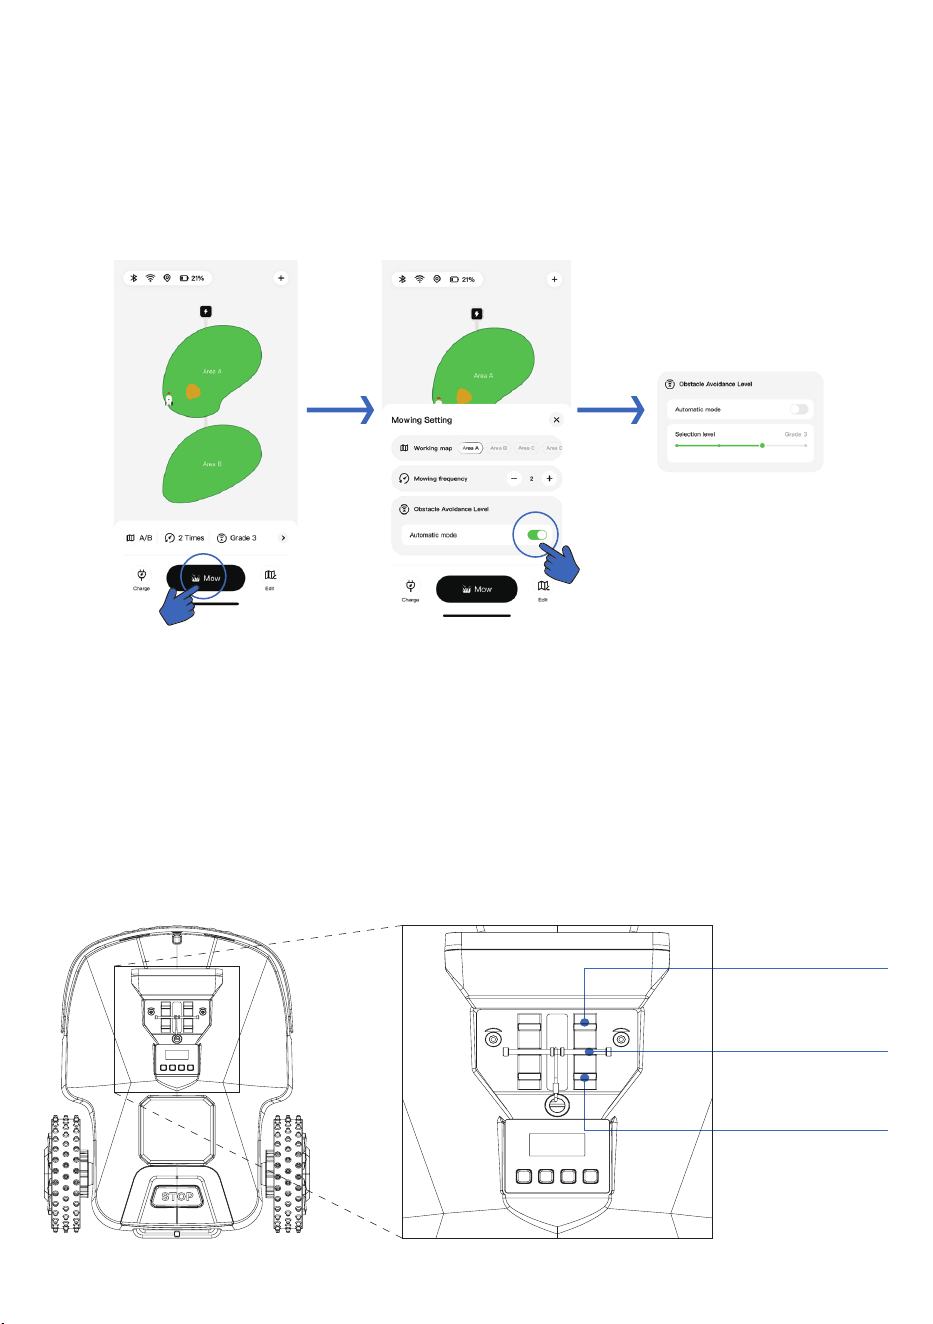
2.2.1 Main Components
Top View
Bluetooth Connectivity
Wi-Fi Connectivity
Battery Status
OK/Set:
Conrms selections or
settings.
Home (Return):
Returns mower to charging station.
Satellite Signal
Lock Status
Start:
Begins mowing
operation.
PIN Code Entry
Power On/O:
Turns the mower on
or o.
Control Panel & Display
Emergency Stop Button
Side Camera
Control Panel Cutter Height Adjustment Lever
Front Camera
Charging Port
Pull Handle
• Power On/O: Press and hold the power button for 3 seconds to turn the mower on/o.
• Satellite: Illuminates when satellite connection is strong.
• Bluetooth/Wi-Fi: Stays lit when connected; otherwise, it turns o.
• Battery Level: Displays battery level in three stages. Running lights indicate active charging.
• Four-Digit Display: Displays error codes (e.g., E-03).
• Up and Down Buttons (Short Press): Increase or decrease the password number by 1, or adjust the mowing
height.
• Up and Down Buttons (Long Press): Hold ▲ to start, hold ▼ to return to the charging station.
• OK / SET: Conrm selection.
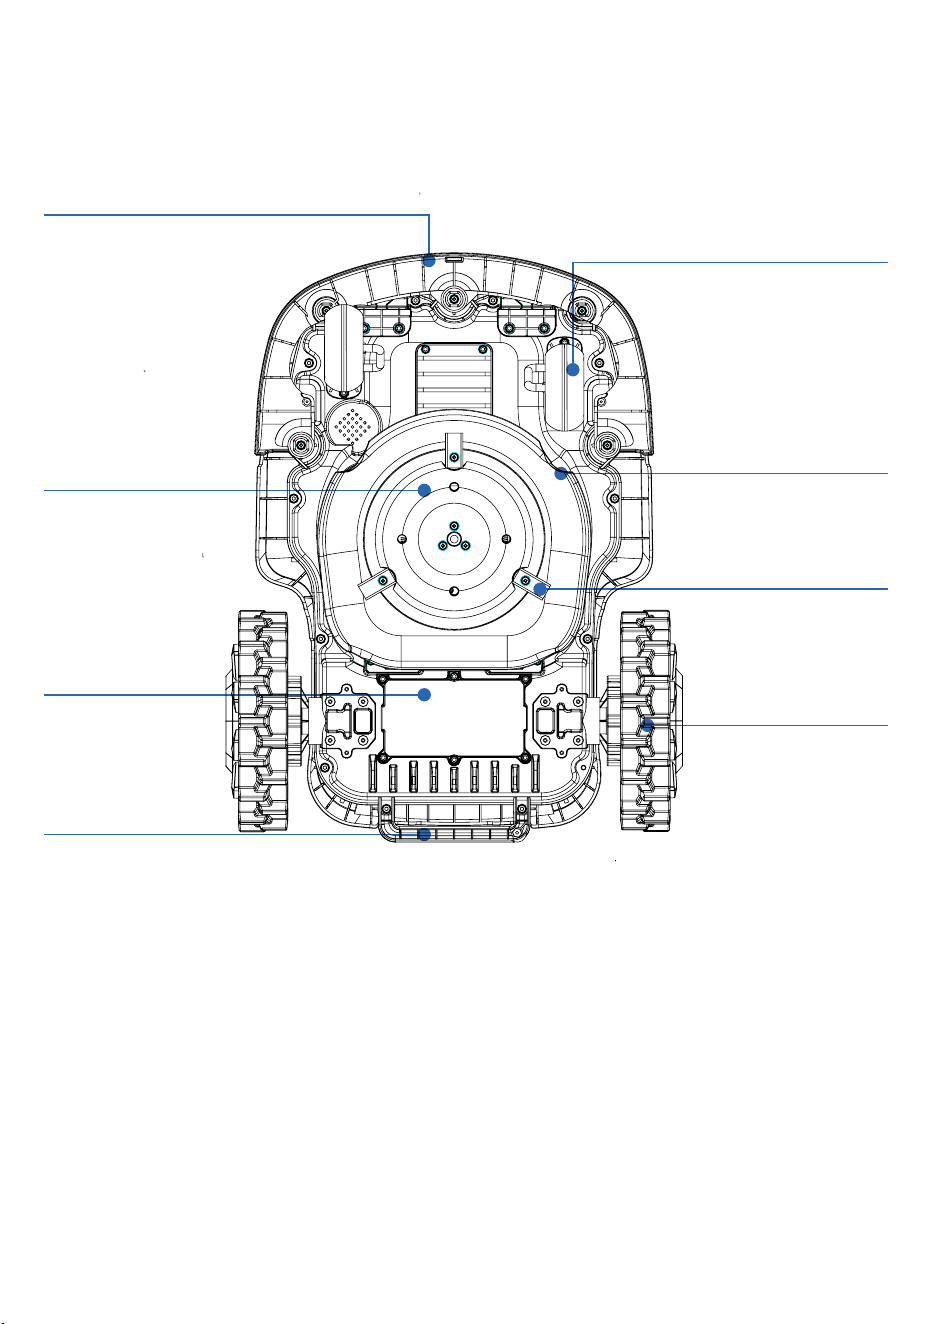
Front Wheels
Assist in maneuverability and smooth
operation on various terrains
Blade
Precision-cutting
mechanism designed for
ecient and even mowing
Rear Wheels
Provide traction and
drive force.
Collision Sensor
Detects obstacles for safe navigation.
Blade Fender
Protective cover over
blade area.
Battery Holder
Secures the internal
battery pack.
Handle
Allows for safe lifting and
transportation.
Blade Disc
Rotating disc that holds
the cutting blades.
Bottom View
The diagram below illustrates the key components of the BESTMOW robotic mower from the underside:
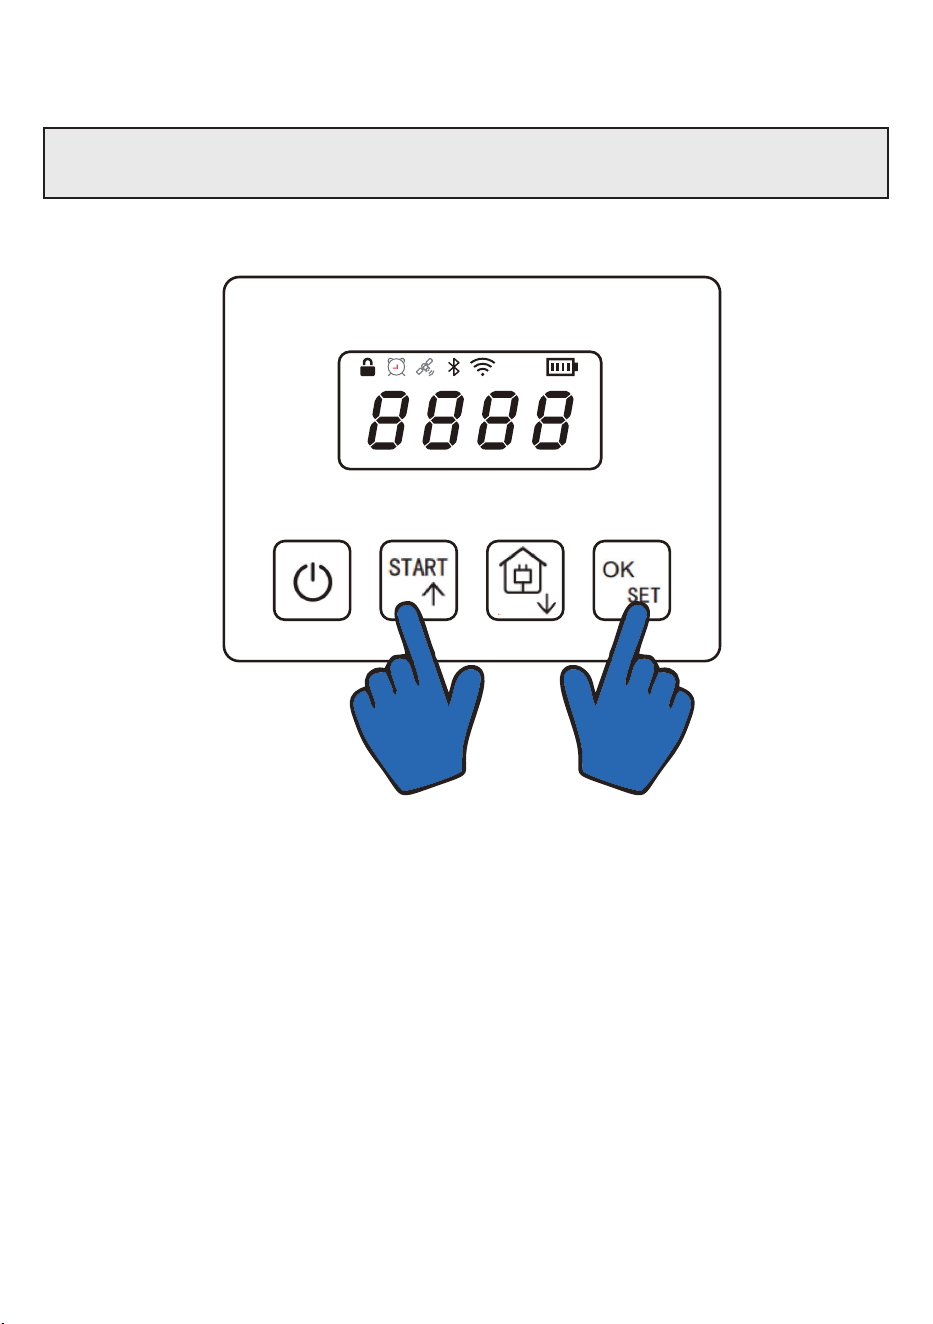
2.2.2 Unlocking Instructions
Attention
If the mower is locked due to an issue, unlock it by pressing the “Start” and “OK” keys simultaneously.

3. Instructions for Use
3.1 Charging Pile Installation
• Select a location with strong Wi-Fi signal coverage.
• Ensure the charging station is placed on level ground for optimal docking.
3.2 Preparation Before Adding Devices
Ensure the charging station is positioned away from rooftops, tree canopies, and any large obstacles.
The garage is an optional accessory. Please refer to the items included in your package.
The mower’s waterproof performance is not aected by the presence or absence of the garage.
Assemble the Canopy Screw on
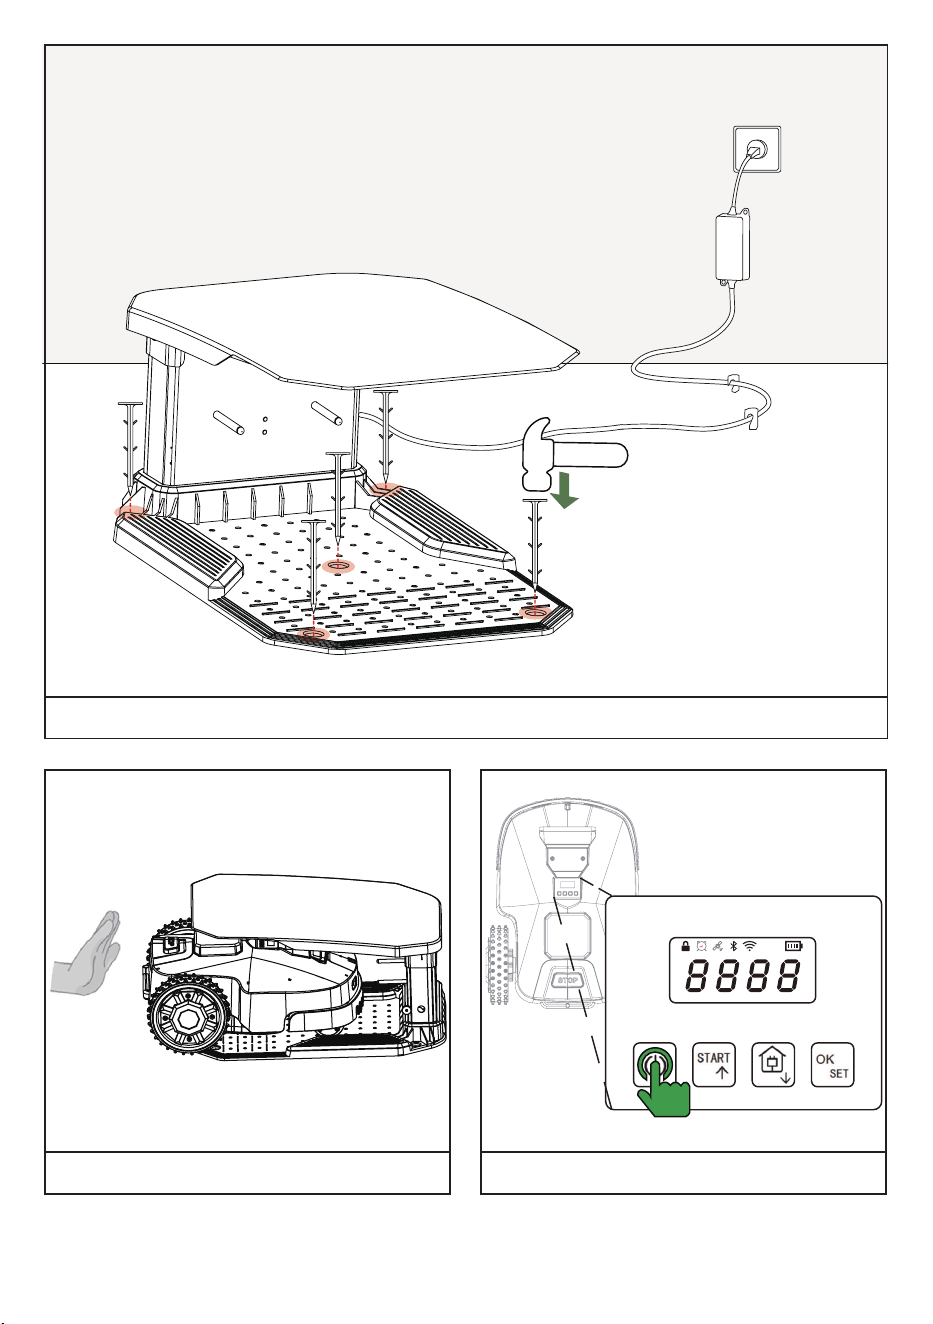
Press the Power button on BESTMOW to turn it onPlace BESTMOW on charging pile
Piling and plug the power supply into a wall socket

3.3 Connect to BESTMOW
• Download the BESTMOW app from the Google Play Store or Apple App Store.
• Install the app and complete user registration.
• Log in to your account to proceed with device setup.
3.4 Add Device
• Click “+” to add your BESTMOW device.
• Follow the on-screen instructions to connect BESTMOW via Bluetooth and set up the network successfully.
3. Instructions for use
3.2 Search and dawnload BestMow
Download BestMow APP from Goole Play or Apple app stores.
After installing BestMow APP,please complete the registration and login.
Connect to BestMow
3.1 Preparation before adding devices.
Plug the power supply into a wall socket . Press the Power button on BestMow to turn it on.
3.3 Add Device
· Click + to add your BestMow.
· Follow the onscreen instructions to connect BestMow via Bluetooth and set network successfull

4 in from the border
3.4 Create a Map
Before mapping, it is important to be aware of key considerations.
· Remove debris, piles of leaves, toys, wires, stones, and other obstacles from the lawn. Make sure no children
or animals are on the lawn.
· BestMow's status shows Ready and the positioning status is good.
· We highly recommend you leave 15 cm/6 in distance if you device along the edge of a wall/fence/obstacles
/ditches.
· Do not drive BestMow on uneven curbs.
A、 Click the Enter button on the Map page.
B、Now,you can use your phone or manually drag Bestmow to create a map around the lawn.
Mapping
3.5 Mapping and Creating Inaccessible Areas
Before starting the mapping process, ensure the lawn is free of debris, leaves, toys, wires, stones, or any obstacles.
Make sure no children or pets are present during mapping.
A. Creating a Map
•
Click the Enter button on the Map page in the BESTMOW app.
•
You can either use your phone or manually drag BESTMOW to map the
lawn boundary.
•
Leave a minimum clearance of 10 cm (4 in) if mapping along walls,
fences, or other obstacles.
•
Avoid driving BESTMOW over uneven curbs.
>4in
border
Click the Drag Mapping button in the APP Dragging along the edge
Drag Mapping Mode
•
Use the Drag and Mow tool in the app to drag along the edge of the lawn.
•
This method allows for quick and ecient mapping using on-screen controls.
B. Mapping Modes
App-Driven Mapping Mode
•
Drive the mower along the lawn boundary using the app controls.
•
Once the mapping is accurate, click “DONE” to save the map
•
BESTMOW will automatically detect pathways between mowing zones for optimized navigation.
C、 Use drag and drop or directional keys to control BestMow to draw maps. The solid line marks the
boundary that you have set, while the dotted line will help you to get back to the starting point. The
lawn map will not be created until you control BestMow to the starting point.After controlling BestMow
to the start point, the map will be automatically created and saved.(Or you can draw the map by manually
dragging the machine.)
D、 Click“ReCharge”to back the charging station.
Obstacles avoidance example
C、 Use drag and drop or directional keys to control BestMow to draw maps. The solid line marks the
boundary that you have set, while the dotted line will help you to get back to the starting point. The
lawn map will not be created until you control BestMow to the starting point.After controlling BestMow
to the start point, the map will be automatically created and saved.(Or you can draw the map by manually
dragging the machine.)
D、 Click“ReCharge”to back the charging station.
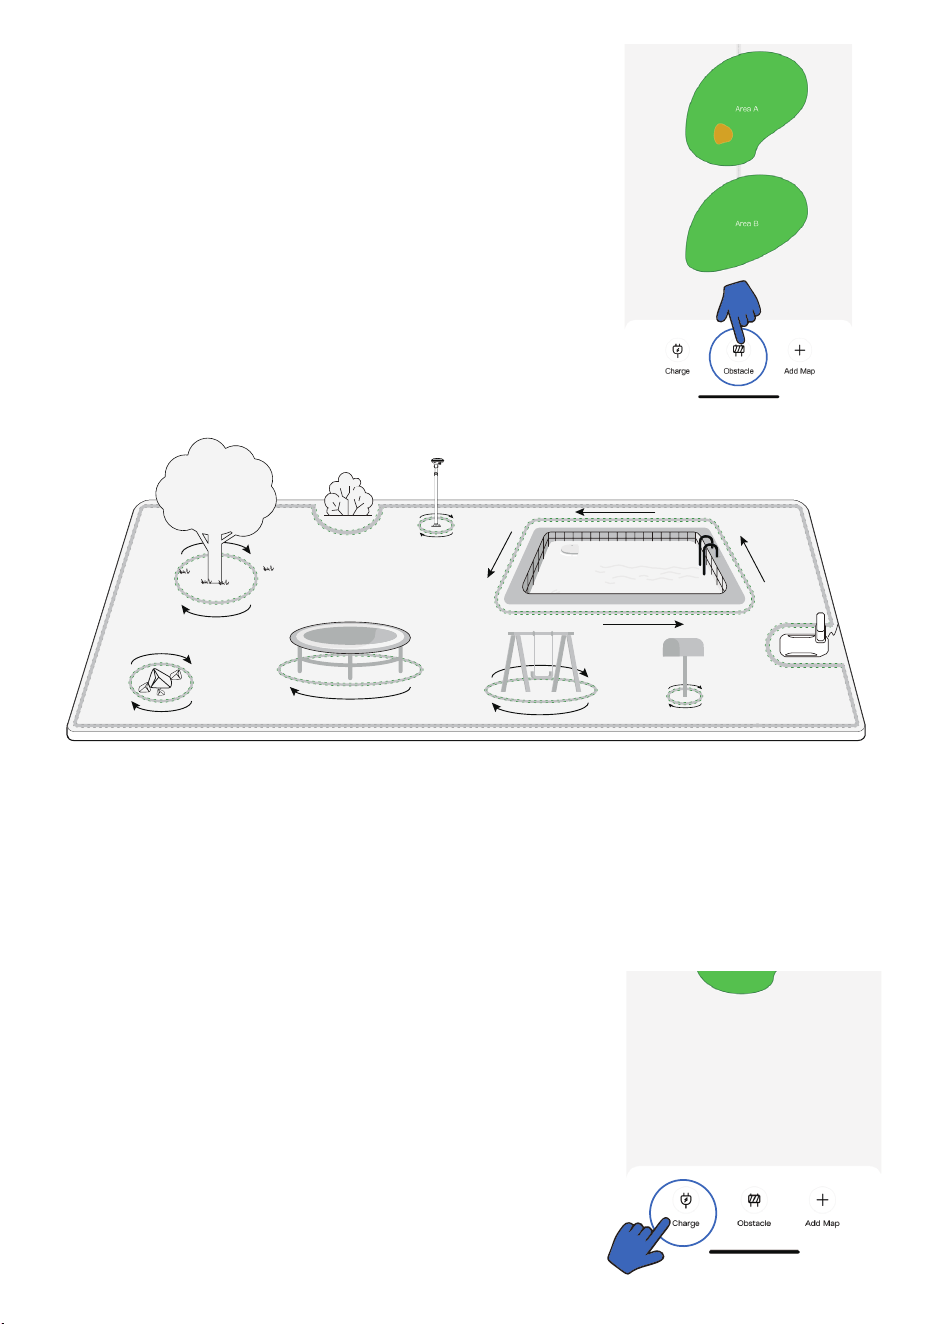
3.5 Create the inaccessible areas
A、Click“ ” to switch to the page for creating thinaccessible areas.
B、Now,you can use your phone or manually drag BestMow to create inaccessible areas of the map.
C. Mapping Obstacles
• Identify large xed obstacles and circle them using either App-Driven
or Drag Mapping Mode.
• When mapping islands (areas to be avoided), ensure the turns are
smooth and no sharper than 90°.
• Always walk along the edge of obstacles when setting islands to
ensure accurate mapping.
• Click the Obstacle button in the BESTMOW app to mark restricted
zones.
• You can manually drag BESTMOW or use your phone to dene these
areas.
• These inaccessible zones prevent the mower from entering specic
regions, such as pools, flower beds, or delicate landscaping.
D. Finalizing the Mapping Process
• The solid line marks the set boundary, while the dotted line helps you navigate back to the starting point.
• The system will automatically detect pathways between mowing zones.
E. Returning to the Charging Station
• Click "Recharge" in the app to send BESTMOW back to its charging
station.
• The mower will automatically navigate to its dock and prepare for the
next scheduled mowing session.
NOTES:
• During the mowing process, if the battery is too low (below 20%), the robotic lawn mower will automati-
cally stop mowing and return to recharge. Once the battery level reaches the resumed mowing threshold (default
80%), the robotic lawn mower will automatically return to the last mowing point and resume mowing opera-
tions.
Automatic recharge:
When the robotic lawn mower completes mowing tasks normally or triggers the resume mowing condition, it
will attempt to return to the charging station and recharge.To trigger the recharge function, the robotic lawn
mower needs to be within the established working zones and not within any no-go zone.
3.7 Return to charge
3.6 Select Mow > Automatic to start mowing settings.
· The automatic obstacle avoidance level can be selected to be turned on or off.
· If automatic obstacle avoidance is turned off, the obstacle avoidance level can be adjusted through levels
1-4. Level 1 is to disable obstacle avoidance, and Level 4 is to enable all automatic obstacle avoidance functions
3.6 Mowing Settings
To start mowing, follow these steps:
• Select "Mow" > "Automatic" in the BESTMOW app to begin the mowing operation.
• Adjust the automatic obstacle avoidance level, which can be turned on or o based on preference.
• If obstacle avoidance is disabled, you can manually set the avoidance level between 1 and 4:
Level 1: Disables obstacle avoidance.
Level 4: Enables full obstacle avoidance functionality.
3.7 Mowing Height Adjustment
• The mowing height can be adjusted manually using the built-in height adjustment mechanism.
• This allows the mower to cut grass up to 4 inches, accommodating various lawn conditions.
Height Settings:
High Gear
100mm (4 inches)
Medium Gear (Default)
60mm (2.36 inches)
Low Gear
40mm (1.57 inches)
Operating Steps:
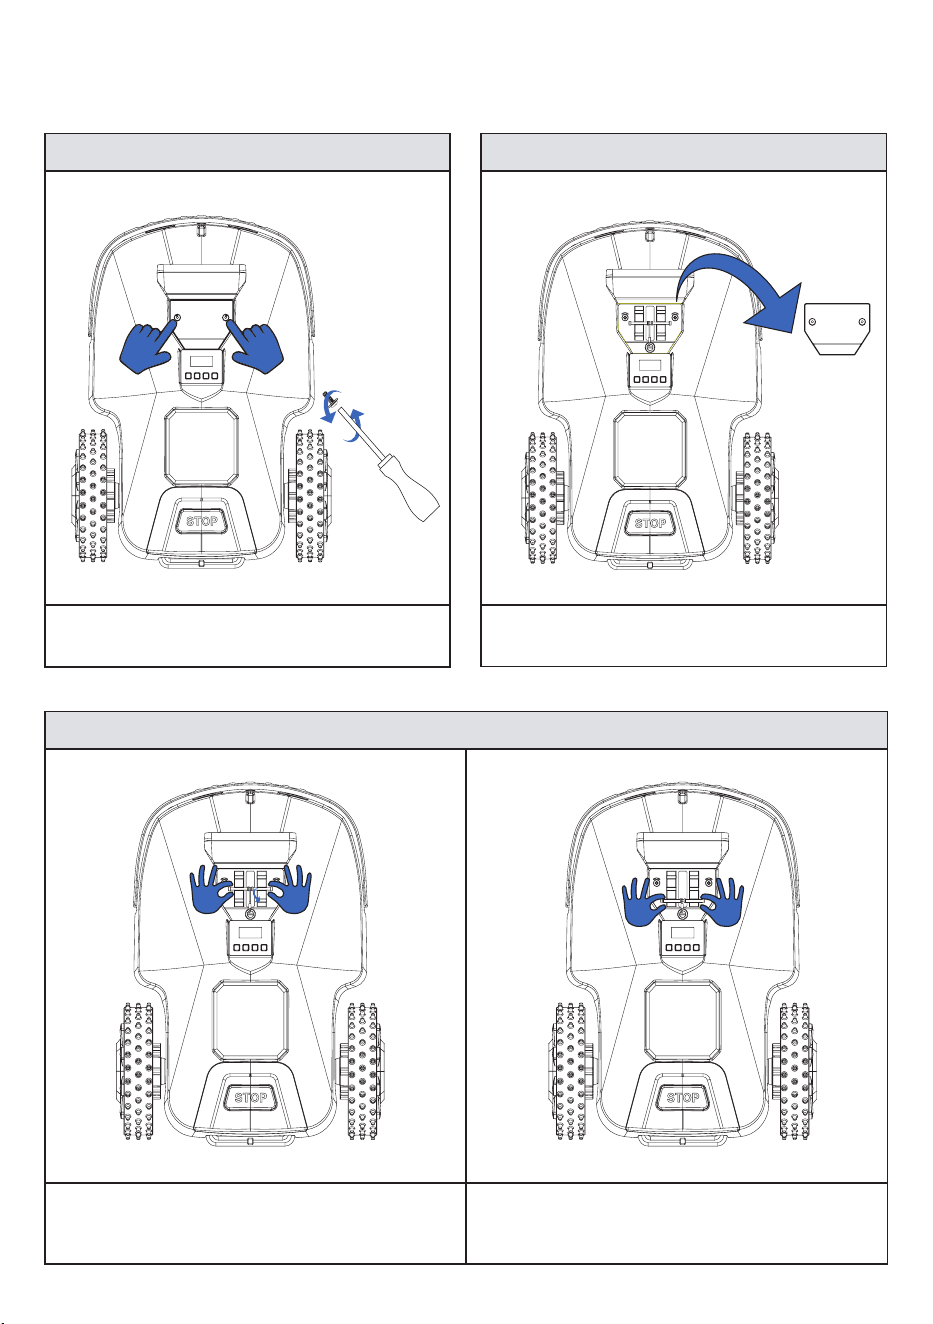
1. Unscrew the lifting cover
Use a screwdriver to remove the two screws
securing the lifting cover.
3. Adjust the height
Grip the lifting rod with both hands and pull it out.
Place it into the gear corresponding to the desired
mowing height, ensuring it ts securely into the
groove.
2. Remove the lifting cover
Carefully lift o the cover to access the height
adjustment mechanism.
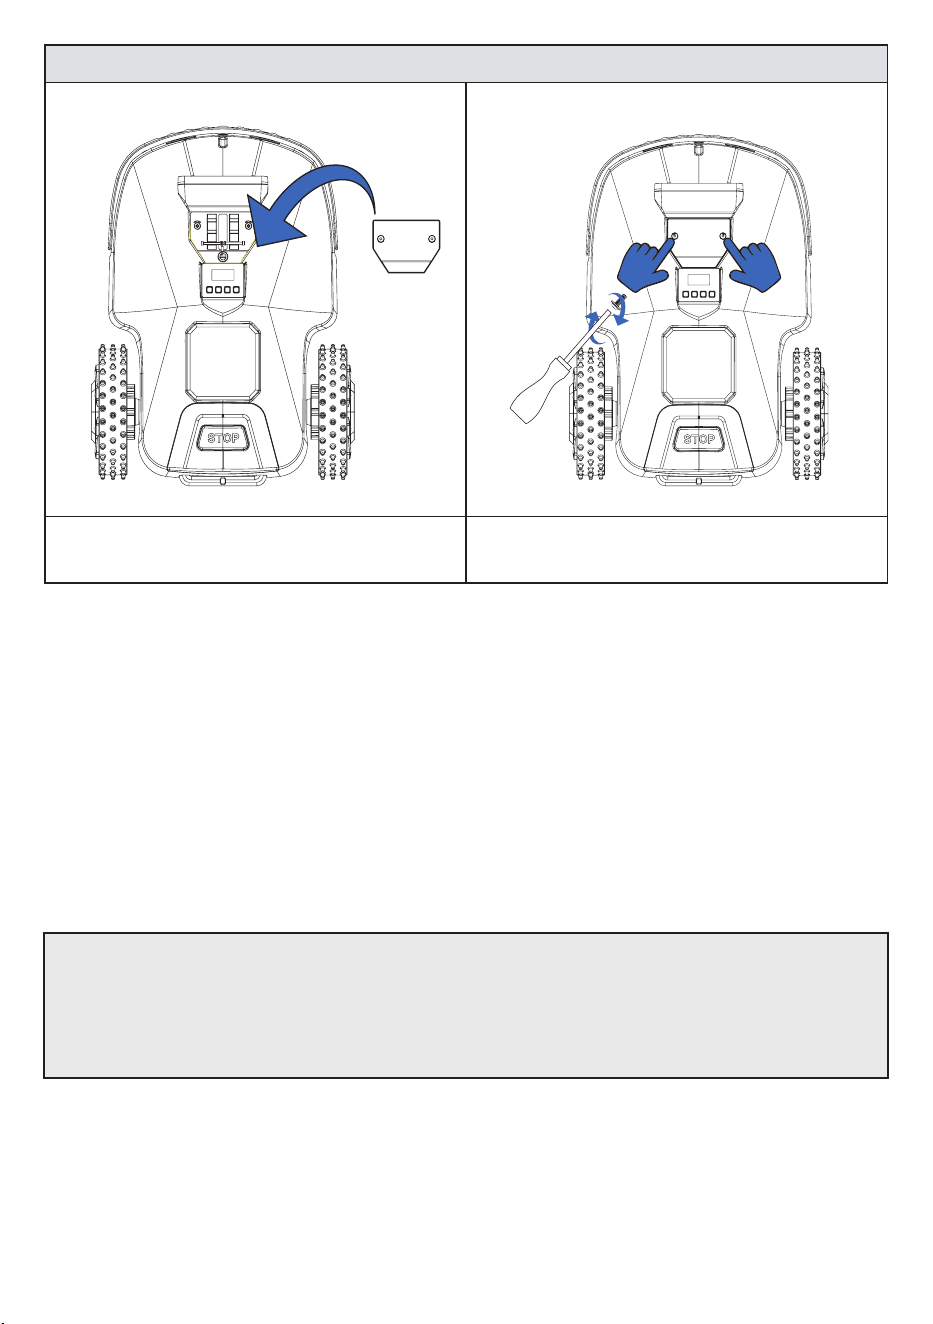
4. Reassemble the cover
Place the lifting cover back, making sure there are no
gaps when closed.
Tighten the two screws to secure it in place.
3.8 Return to Charge
Automatic Recharge:
• When the robotic lawn mower completes its mowing task or enters low battery mode, it will automatically
navigate back to the charging station.
• To successfully recharge, the mower must be within the designated working zones and not inside any no-go
zone.
Attention
•
If the mower’s battery level drops below 20%, it will automatically stop mowing and return to the
charging station.
•
Once the battery reaches 80% charge, the mower will resume from the last mowing point and continue
operation.

Manual recharge:
By operating the top panel button or issuing instructions through the APP, the robotic lawn mower can return to
the charging station.
Execute via the top panel button
• Unlock the PIN code on the top panel.
• Click the home icon, then click OK.
• The robotic lawn mower will make a “beep” sound, indicating that the task instruction has been re
ceived.
• The robotic lawn mower will activate the return to charge function.
Execute via the app
• Click the recharge icon on the homepage of the robotic lawn mower app.
•
• The robotic lawn mower will activate the return to charge function
Manual Recharge:
The robotic lawn mower can be manually directed to the charging station
using the top panel button or the BESTMOW app.
Executing via the Top Panel Button:
• Press the home icon, then OK to conrm.
• The mower will emit a "beep" sound, indicating it has received the command.
• The mower will then activate the return-to-charge function and navigate back to the charging station.
Executing via the App:
• Open the BESTMOW app and tap the Recharge icon on the homepage.
• Click Conrm to initiate the return-to-charge process.
• The mower will automatically navigate back to the charging station.
4. Maintenance
4.1 Carrying BESTMOW
WARNING!
•
Turn o the mower before lifting or moving BESTMOW.
•
The mower has blades on the bottom—handle with care to avoid injury.
•
Do not lift the mower while it is charging at the charging station.
•
For safety, do not reach into the charging port when carrying the machine.
Proper Lifting Methods:
4.2 Cleaning
Maintaining a proper cleaning routine will keep BESTMOW in good condition.
WARNING!
•
Disconnect BESTMOW from power before cleaning.
•
Use appropriate personal protective equipment, including gloves, protective clothing, and closed-toe
shoes.
•
Avoid cleaning with corrosive agents such as alcohol or gasoline, as they may degrade materials and
components.
Blade Facing Outward:
Lift BESTMOW by the handle using one or both
hands.
Blade Facing Down:
Hold the handle and front collision area with both hands.
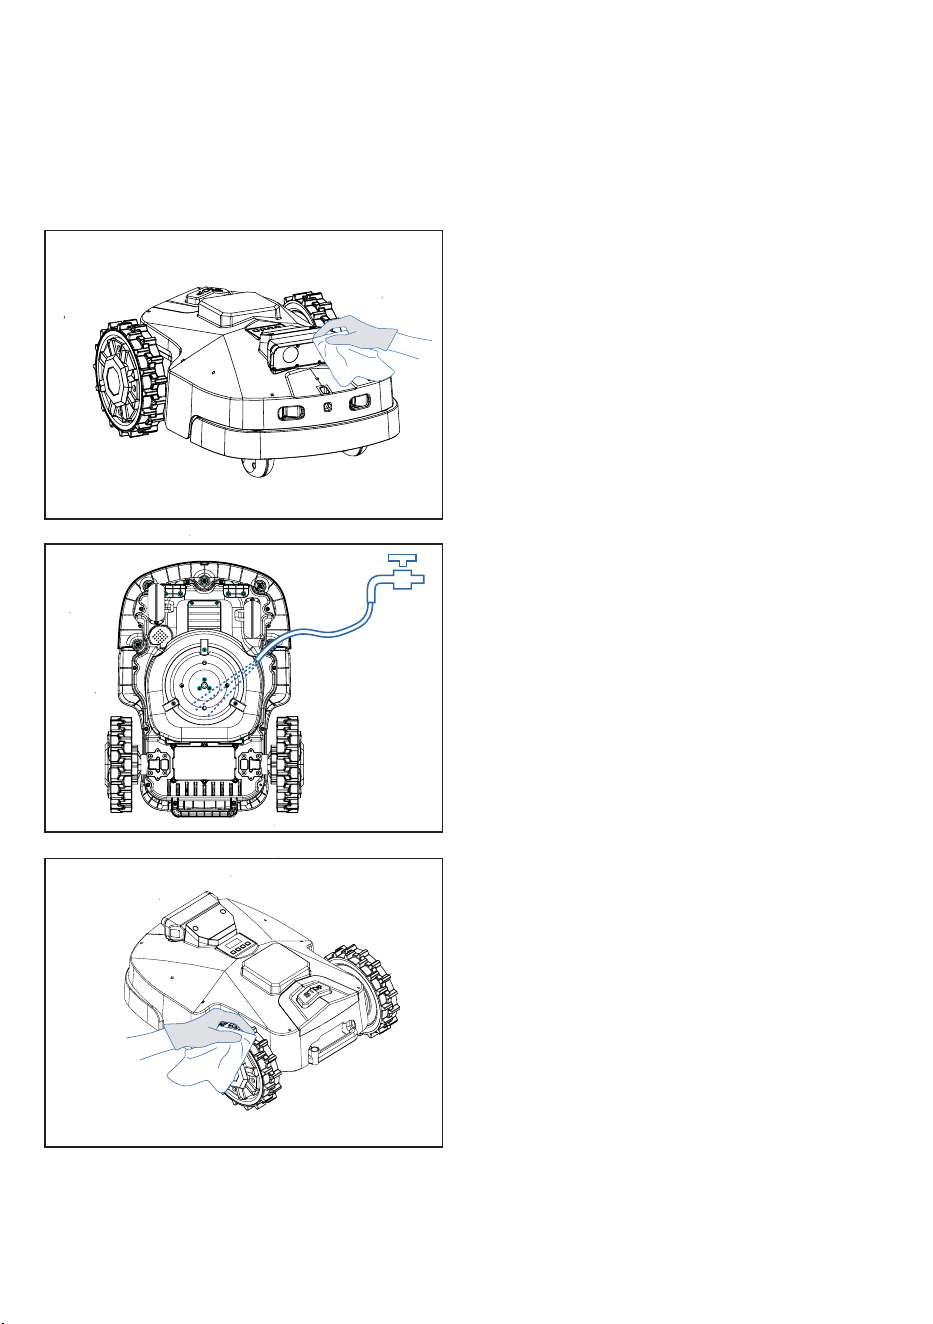
General Cleaning Precautions
• Avoid using high-pressure water jets to prevent water from entering electronic components.
• Use mild cleaning agents and avoid corrosive substances such as alcohol or gasoline.
• When placing BESTMOW upside down, ensure it is on a soft surface to prevent scratches.
Cleaning the Upper Body
•
Wipe the upper surface and front camera using a
damp cloth.
•
Check for debris, such as branches, stones, or
leaves, and remove them.
•
Inspect the charging port for foreign objects.
Cleaning the Blade Disc
•
Use a brush to remove dirt from the blade disc.
•
Ensure the blades are undamaged and can pivot
freely for smooth operation.
Cleaning the Wheels
•
Use a brush to remove dirt and debris from the
wheels to maintain traction.
•
After cleaning, apply a small amount of precision
machinery oil or WD-40 to the moving parts to
improve lubrication.
4.3 Replacing the Blade Disc
Blade Replacement Frequency
If you use the mower regularly, we recommend replacing the blade disc approximately every 3 monthes of
operation to maintain optimal mowing eciency.
Note:
• This replacement interval may need adjustment depending on the mowing area and frequency. If mowing occurs
daily, blades may need to be replaced monthly or less frequently.
• Pay attention to maintenance related tips in the App.
WARNING & Residual Risks
•
BESTMOW must be powered o before replacing the blade disc.
•
We recommend wearing gloves when changing out the blades.
•
Use only ocial replacement blades, available via the BESTMOW app or BESTMOW website. These
are also provided through the subscription plan.
•
When replacing the blade disc, always use new screws to ensure proper balance and stability.
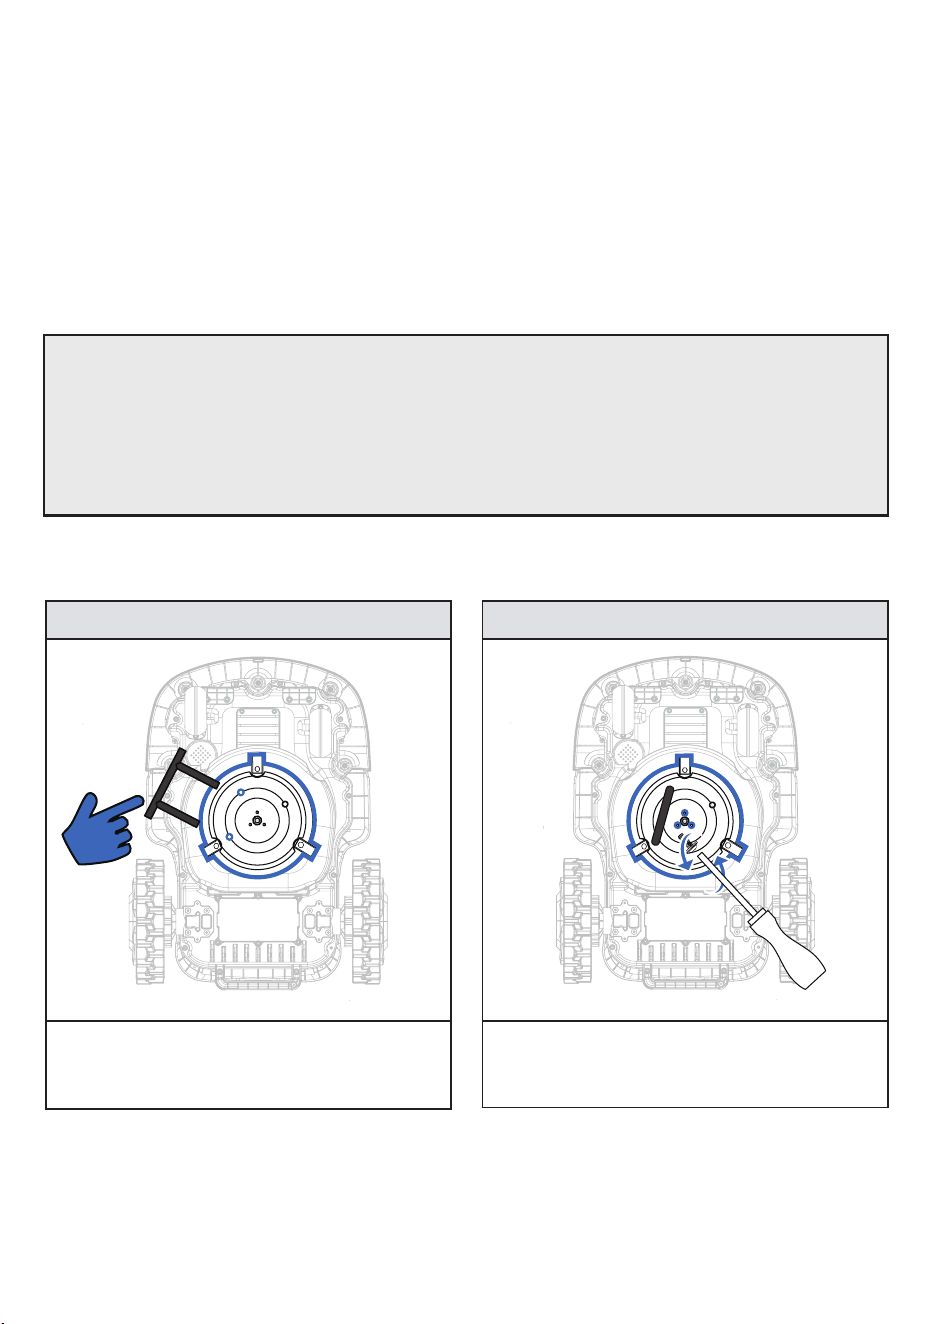
Blade Disc Replacement Steps
1. Align the Cutter Disc
• Rotate the cutter disc gently until the holes align.
• Insert the blade installation xture into the holes
to secure the disc and prevent accidental cuts.
2. Remove the Screws
• Use a socket screwdriver to remove the three
screws in the center of the blade disc.
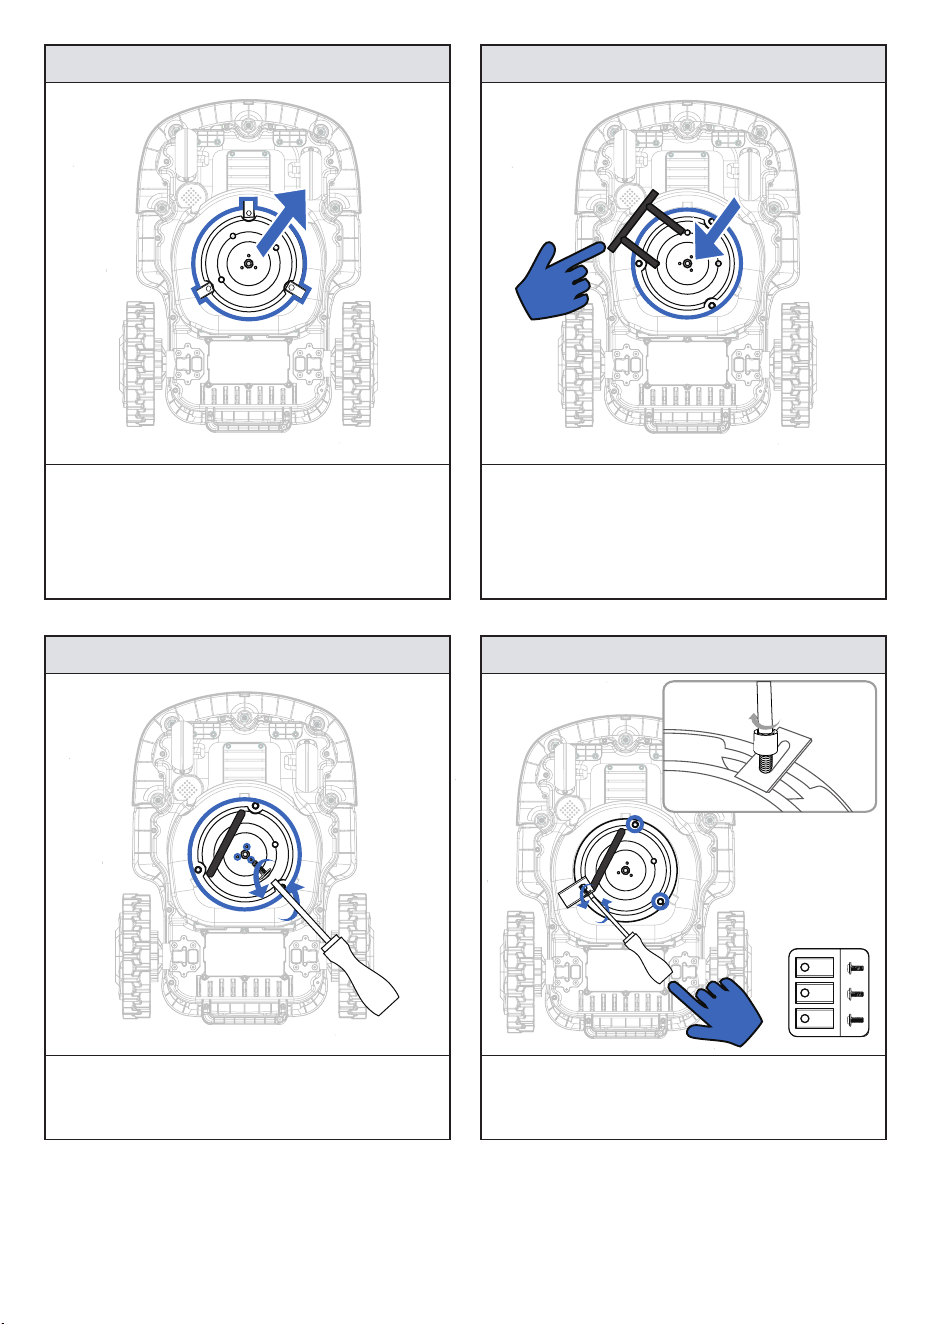
3. Detach the Blade Disc
• Carefully remove the blade disc once the screws
are detached.
4. Install the New Blade Disc
• Position the new blade disc onto the mower.
• Use the blade installation xture to hold it in
place.
• Secure it using new screws for stability and
performance.
5. Tighten the Screws
• Secure the three screws tightly to ensure stability.
6. Lock the Blades
• Prepare the blade set and use a socket-head
screwdriver to attach the blades onto the blade
disc.
Important Notes:
• After installing new blades, remove the blade installation xture before operation.
• If left in place, the cutter disc will not rotate, which may damage the motor.
• If you are only replacing the blades (not the entire disc):
1. Secure the blade installation xture.
2. Remove the old blades.
3. Follow steps 6–8 to install the new blades.
4.4 Changing the Battery
When the BESTMOW app noties you that battery health is too low, or if the battery performance signicantly
declines, the ocial BESTMOW battery needs to be replaced. The battery is available via the BESTMOW app
store or BESTMOW website.
Subscription Plan:
• The BESTMOW subscription provides a free battery replacement, so users do not need to purchase a new
battery separately.
Attention
•
The battery cannot be charged alone -it must be charged using the BESTMOW charging station.
•
Only use an authorized BESTMOW battery.
•
Do not replace the battery without the permission of the sta.
•
Install the new battery according to the polarity markings on the battery case.
•
Before disposal, wrap exposed metal terminals with insulating tape to prevent short circuits.
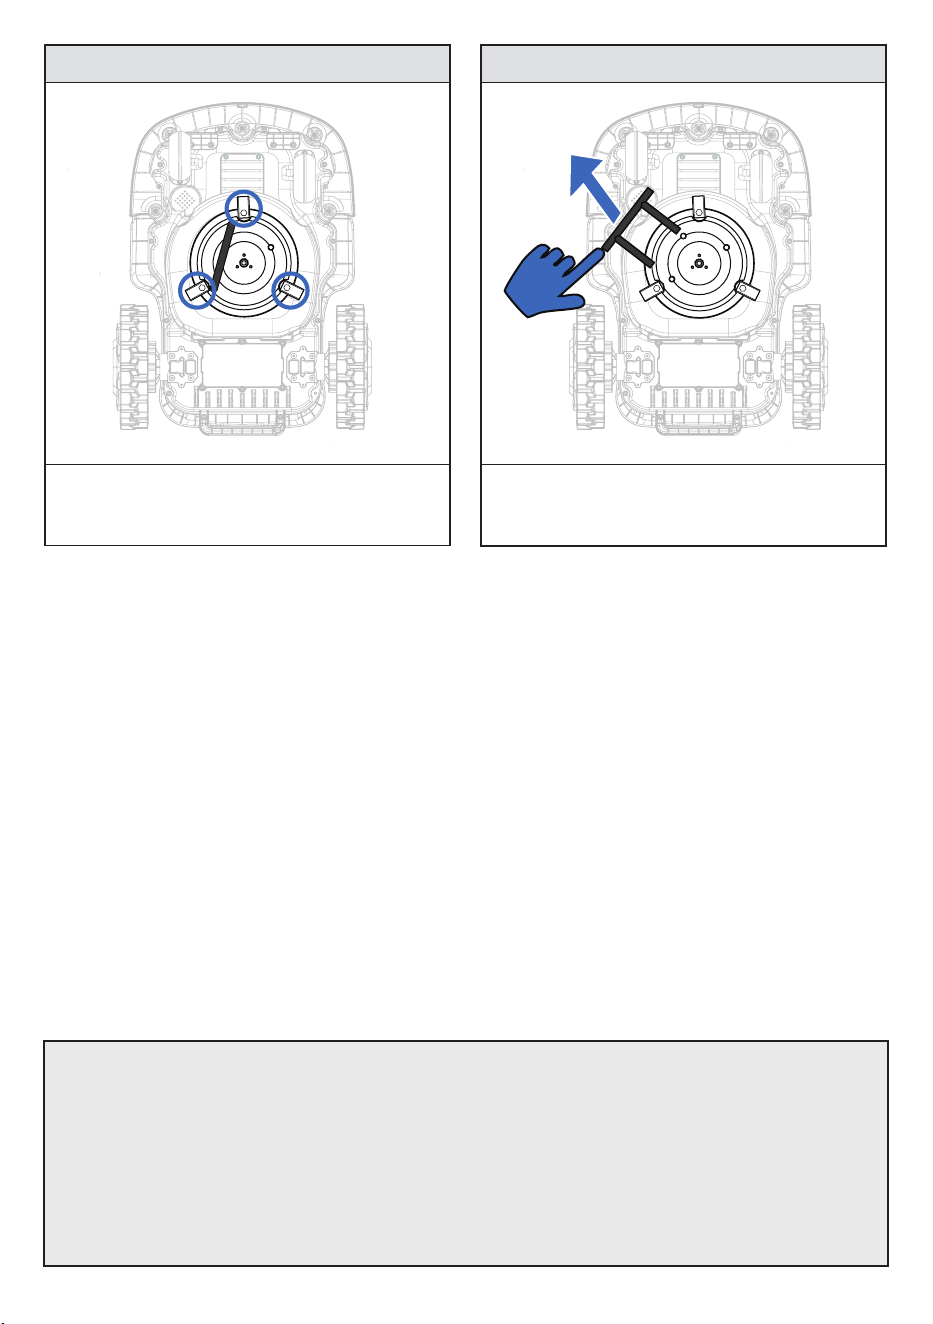
7. Secure the Blades
• Ensure that all three blades are rmly locked in
place.
8. Remove the Blade Installation Fixture
• After securing the blades, remove the blade
installation xture to allow the cutter disc to
rotate properly.
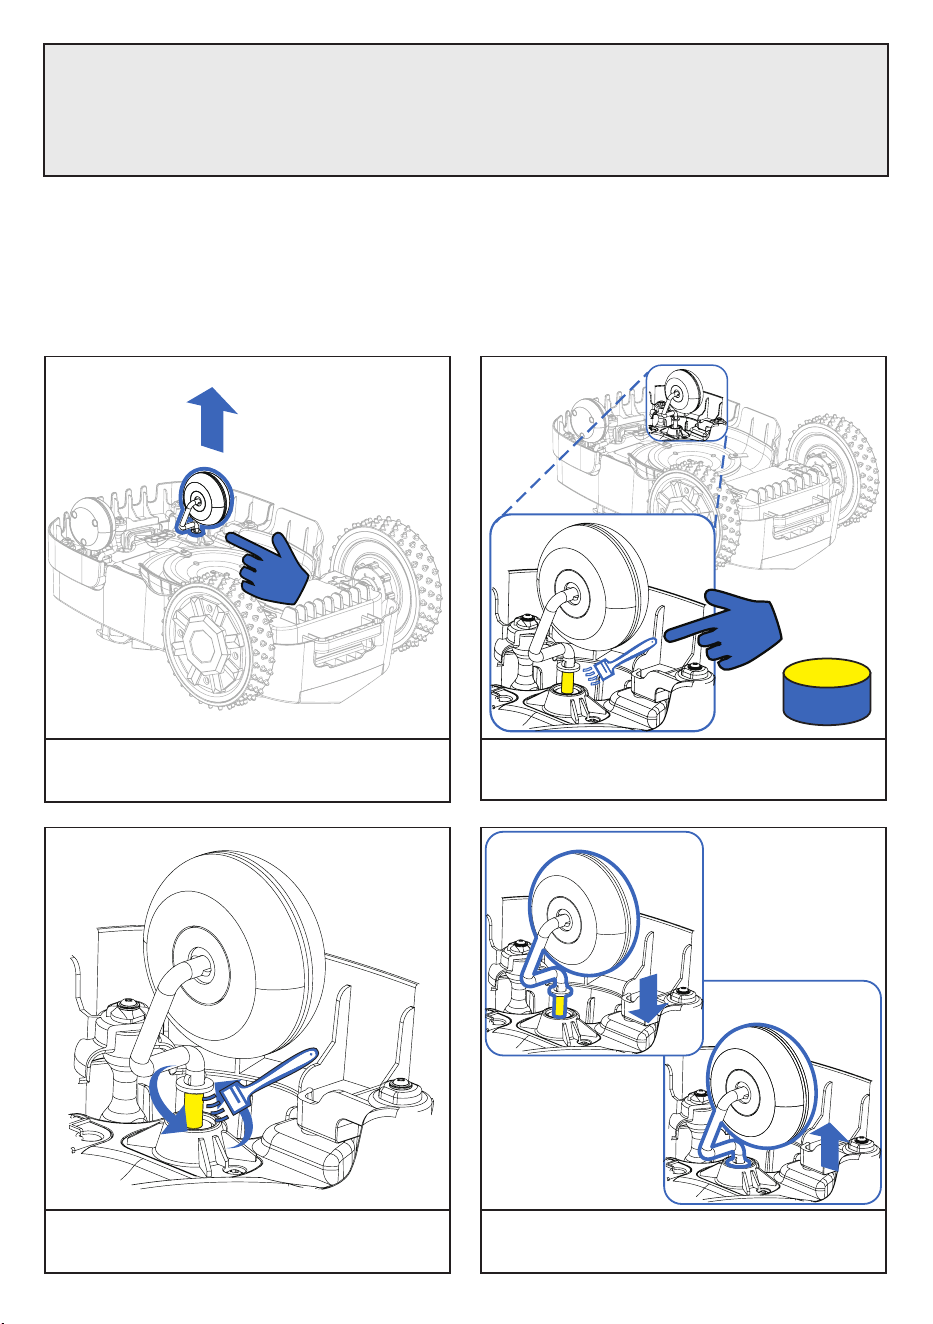
4.5 Steering wheel maintenance
When the BESTMOW App noties you that the steering wheel needs maintenance, or if you experience diculty
turning, you need to lubricate the steering wheel.
Attention
•
If battery liquid contacts skin or clothing, rinse immediately with water. If it enters the eyes, do not rub,
rinse thoroughly, and seek medical attention.
•
Battery Disposal: Contact your local waste management oce for proper disposal.
1. Lift the front wheel.
2. Apply lubricant grease to the lifted part of the
front axle.
3. Rotate the wheel to evenly distribute grease
along the moving components.
4. Move the wheel up and down until grease fully
coats the axle mechanism.
GREASE

4.6 Storage
Storing BESTMOW:
• Avoid extreme temperatures. Store in an environment between 0°C to 45°C (32°F to 113°F).
• Store in a dry, low-humidity location free of dust and corrosive gases.
Storing the Battery:
• Ensure the battery is fully charged before storage.
• Recommended storage temperature: 0°C to 45°C (32°F to 113°F).
• Store in a low-humidity, dust-free, and corrosion-free environment.
• Recharge every 60 days to prevent battery damage.
Attention
Failure to follow this guideline may void the warranty.

5. Troubleshooting
Attention
Before troubleshooting, ensure the following:
•
APP software is updated to the latest version.
•
BESTMOW software is updated to the latest version.
•
Mobile device system is running the latest version.
If the issue persists, contact BESTMOW after-sales service via the app or ocial website. If the product is
still under warranty, report the failure for support.
•
Charging & Battery Issues
SYMPTOM CAUSE SOLUTIONS
BESTMOW cannot
charge
•
Power supply failure.
•
Charging plug not connected or dirty.
•
Battery temperature too high/low.
•
Check the power supply.
•
Ensure the contacts are connected
properly and clean.
•
Wait for the temperature to return to
normal before charging.
Charging time exceeds
the rated time
•
Foreign objects or dirt on the charging
contacts.
•
Clean the contacts.
Shorter charging time
•
Battery health is lower than normal.
•
Poor contact at the charging point.
•
Replace with a BESTMOW original
battery.
•
Check the charging point and plug.
LED light on the
charging station does
not turn on
•
Power adapter is faulty or
malfunctioning.
•
Check the power supply.
BESTMOW cannot
connect to the charging
station
•
Identication code on the charging
plug is blocked/stained, aecting
visual positioning.
•
Foreign objects or dirt on the charging
plug.
•
Remove/clean the covering.
•
Clean the charging plug.
BESTMOW shuts o
when docking the
charging station
•
Power supply/mower temperature is
too high.
•
Charging plug is dirty.
•
If ambient temperature is too high,
remove the adapter and wait for
cooling before charging.
•
Clean the charging plug.
•
Mowing & Security Troubleshooting
Please reach out to BESTMOW support team or utilize the chart below
TEL: 1 800-882-2131
Email: support@bestmow.com
WARNING!
•
If BESTMOW encounters an issue during mowing or security operation, press the red stop button to stop the
machine.
•
After resolving the issue, BESTMOW will automatically resume its task and return to the charging station if
necessary.
SYMPTOM CAUSE SOLUTIONS
BESTMOW is stuck.
•
Trapped in multiple obstacle areas.
•
On a steep slope, soft sand, or deep
ditch.
•
Reduced wheel traction.
•
Cutting height set too low.
•
Set the trapped location as an
obstacle area in the app.
•
Flatten the lawn or set it as an
obstacle area.
•
Remove debris (stones, soil, etc.)
from wheels.
•
Increase cutting height gradually.
BESTMOW slipping.
•
Wet grass.
•
On a steep slope.
•
Reduced wheel traction.
•
Stuck by branches or stones.
•
Wait for the lawn to dry before
mowing.
•
Flatten the lawn or set as an obstacle
area.
•
Remove stones, soil, or debris from
wheels.
•
Clean the mower’s bottom.
Vibration / abnormal
sound.
•
Unbalanced or damaged blade disc.
•
Use of unocial blades.
•
Incorrect blade count (too few or too
many).
•
Inspect the blade disc and blades;
replace if necessary.
•
Use only ocial blades (available
via the BESTMOW app/website).
•
Check the number of blades for
balance.
BESTMOW does not
work within the set area.
•
Time zone settings are out of sync.
•
Incorrect scheduling settings.
•
Sync the app time with BESTMOW.
•
Conrm and adjust the mowing
schedule in the app.
BESTMOW does not
respond when pressing
the start button.
•
Stop button is stuck.
•
Check if the stop button is jammed.

Uneven Mowing Height & Adjustment Issues
SYMPTOM CAUSE SOLUTIONS
Uneven mowing height.
•
Single mowing time is too short.
•
Mowing area is too large or grass
is too high.
•
Unbalanced/damaged blade disc.
•
Cutting height is set too low.
•
Increase mowing time.
•
Reduce mowing area or increase
cutting height gradually.
•
Inspect the blade disc and blades;
replace if necessary.
•
Adjust cutting height as needed.
•
Signal & Connectivity Troubleshooting
SYMPTOM CAUSE SOLUTIONS
Bluetooth connection
failed.
•
BESTMOW system error.
•
Possible hardware damage.
•
Restart BESTMOW App. If the issue
persists, contact after-sales service.
Bluetooth signal is
unstable / interrupted.
•
BESTMOW system error.
•
Device is too far from the mobile
phone Bluetooth connection.
•
Restart BESTMOW App. If the issue
persists, contact after-sales service.
•
Keep the mobile phone and BESTMOW
within 1-2 meters.
Wi-Fi connection failed.
•
BESTMOW system error.
•
Device is too far from the home
Wi-Fi.
•
Wi-Fi is unrecognized.
•
Restart BESTMOW App. If the issue
persists, contact after-sales service.
•
Relocate the charging station nearer to
your home Wi-Fi network.
•
Restart the home Wi-Fi or update the
Wi-Fi password.
Unstable / interrupted
Wi-Fi signal.
•
BESTMOW system error.
•
Too far from home Wi-Fi.
•
Restart BESTMOW App. If the issue
persists, contact after-sales service.
•
Relocate the charging station nearer to
your home Wi-Fi network.
Weak GPS signal.
•
BESTMOW system error.
•
Obstacles blocking the GNSS
antenna signal.
•
Restart BESTMOW App. If the issue
persists, contact after-sales service.
•
Place the robot in an open and
unobstructed location.

•
Installation & Mapping Troubleshooting
SYMPTOM CAUSE SOLUTIONS
BESTMOW operation is
delayed / uncontrolled
during mapping.
•
BESTMOW system error.
•
Mobile phone Bluetooth is too far
from BESTMOW.
•
Restart BESTMOW App. If the issue
persists, contact after-sales service.
•
Keep the mobile phone and BESTMOW
within 1–2 meters.
Bluetooth connection
failed.
•
BESTMOW system error.
•
Mobile phone Bluetooth or system
version is outdated.
•
Restart BESTMOW App. If the issue
persists, contact after-sales service.
•
Update the mobile phone Bluetooth
and system to the latest version.
Bluetooth signal is
unstable / interrupted.
•
BESTMOW system error.
•
Device is too far from the mobile
phone Bluetooth connection.
•
Restart BESTMOW App. If the issue
persists, contact after-sales service.
•
Keep the mobile phone and BESTMOW
within 1–2 meters.
Wi-Fi connection failed.
•
BESTMOW only supports 2.4G
Wi-Fi, compatibility issues may
arise.
•
Contact after-sales service for
assistance.
Unstable / interrupted
Wi-Fi signal.
•
BESTMOW system error.
•
Too far from home Wi-Fi.
•
Restart BESTMOW. If the issue persists,
contact after-sales service.
•
Relocate the charging station nearer
to your home Wi-Fi network.
Tel: 1 800-882-2131
Email: support@bestmow.com
tiktok.com/@bestmow
@bestmow_north_america
@bestmow_ocal
youtube.com/
@bestmow
facebook.com/
BESTMOWROBOT
instagram.com/
bestmow
“A Robot On Every Lawn”