
OWNER'S MANUAL
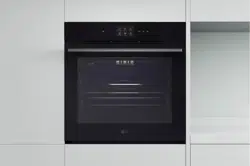
BUILT-IN OVEN
Before beginning installation, read these instructions
carefully. This will simplify installation and ensure that the
product is installed correctly and safely. Leave these
instructions near the product after installation for future
reference.
ENGLISH
WSED7667M, WSED7665B
MFL71927511
Rev.05_062424
www.lg.com
Copyright © 2023-2024 LG Electronics. All Rights Reserved

TABLE OF CONTENTS
This manual may contain images or
content that may be different from the
model you purchased.
This manual is subject to revision by the
manufacturer.
IMPORTANT SAFETY INSTRUCTIONS
READ ALL INSTRUCTIONS BEFORE USE .................................................... 5
Safety Messages...................................................................................................5
WARNING .................................................................................................... 6
Installation ............................................................................................................6
Operation ..............................................................................................................7
Maintenance .........................................................................................................9
Risk of Fire and Flammable Materials..............................................................10
CAUTION.................................................................................................... 11
Operation ............................................................................................................11
Maintenance .......................................................................................................12
Using Steam Function........................................................................................12
CARING FOR THE ENVIRONMENT ........................................................... 13
Disposal ...............................................................................................................13
Used Appliances .................................................................................................14
INSTALLATION INSTRUCTIONS............................................................... 14
Safety Instructions for the Installer.................................................................15
Electrical connection..........................................................................................15
PRODUCT OVERVIEW
Product Features ...................................................................................... 17
Exterior / Interior ...............................................................................................17
Accessories..........................................................................................................18
OPERATION
Operating Control Panel ......................................................................... 20
Control Panel Features......................................................................................20
Energy Saving Tips .............................................................................................22
Changing Settings .................................................................................... 22
Getting Started ...................................................................................................22
Settings................................................................................................................22
Control Lock........................................................................................................22
Time .....................................................................................................................22

Wi-Fi .....................................................................................................................23
Remote Start.......................................................................................................23
Start Screen.........................................................................................................23
Brightness ...........................................................................................................23
Language ............................................................................................................23
Volume.................................................................................................................23
InstaView.............................................................................................................24
Preheat Light ......................................................................................................24
Temperature Adjustment..................................................................................24
Smart Diagnosis .................................................................................................25
Factory Data Reset .............................................................................................25
Demo Mode ........................................................................................................25
Oven Cooling ......................................................................................................26
Timer....................................................................................................................26
Operating the Oven ................................................................................. 26
Before Using the Oven ......................................................................................26
Assembling Rail(Telescopic) Rack.....................................................................27
Removing Rail Rack............................................................................................27
Using the Telescopic Runners ..........................................................................27
Manual Cook.......................................................................................................30
Hot Air / Economic Hot Air ................................................................................36
Recommended Economic Hot Air Guide.........................................................37
Baking..................................................................................................................37
Recommended Baking Guide...........................................................................38
Roasting...............................................................................................................44
Probe Mode (Model WSED7667M) ...................................................................45
Recommended Probe Guide.............................................................................47
Grilling .................................................................................................................48
Recommended Grilling Guide ..........................................................................49
Air Fry...................................................................................................................50
Recommended Air Frying Guide ......................................................................52
Air Sous-Vide (Model WSED7665B) ..................................................................55
Recommended Air Sous-Vide Guide................................................................56
Defrosting ...........................................................................................................56
Steam Function...................................................................................................58
Steam Cook .........................................................................................................59
Sous-Vide (Model WSED7667M) .......................................................................61
Recommended Sous-Vide Guide......................................................................63
Recipe Cook.........................................................................................................64
My Recipes ..........................................................................................................80
Information for Test Institutes.........................................................................82

SMART FUNCTIONS
LG ThinQ Application ............................................................................... 85
LG ThinQ Application Features.........................................................................85
Installing LG ThinQ Application and Connecting an LG Appliance..............85
Open Source Software Notice Information ....................................................86
Smart Diagnosis Feature ......................................................................... 86
Using LG ThinQ to Diagnose Issues.................................................................86
Using Audible Diagnosis to Diagnose Issues .................................................86
MAINTENANCE
Cleaning..................................................................................................... 88
Interior.................................................................................................................88
Exterior ................................................................................................................88
EasyClean ............................................................................................................89
Pyrolysis (Model WSED7665B) ..........................................................................91
Cleaning the Water Tank...................................................................................93
Using Descaling Function..................................................................................93
Using Draining Function ...................................................................................94
Using Evaporation Function..............................................................................94
Periodic Maintenance .............................................................................. 94
Changing the Oven Light ..................................................................................94
Removing, Assembling and Dismantling the Oven Door .............................95
TROUBLESHOOTING
FAQs ........................................................................................................... 99
Frequently Asked Questions.............................................................................99
Before Calling for Service ...................................................................... 100
Cooking .............................................................................................................100
Parts & Features...............................................................................................102
Noises ................................................................................................................103
Wi-Fi ...................................................................................................................103
Customer Service & Spare Parts.....................................................................104
After Sales Service (Egypt Only)......................................................................105
5
IMPORTANT SAFETY INSTRUCTIONS
ENGLISH
IMPORTANT SAFETY INSTRUCTIONS
READ ALL INSTRUCTIONS BEFORE USE
Safety Messages
Your safety and the safety of others are very important.
We have provided many important safety messages in this manual and
on your appliance. Always read and follow all safety messages.
Read and follow instructions when you use the appliance to avoid fire
risks, electric shock, bodily injuries or damage. This guide does not
include all possible situations that could happen. Always contact your
technical service agent or the manufacturer when any
incomprehensible problem appears. These instructions are only valid if
the country symbol appears on the appliance. If the symbol does not
appear on the appliance, it is necessary to refer to the technical
instructions which will provide the necessary instructions concerning
modification of the appliance to the conditions for use in the country.
All safety messages will tell you what the potential hazard is, tell you
how to reduce the chance of injury, and tell you what may happen if the
instructions are not followed.
This is the safety alert symbol.
This symbol alerts you to potential hazards that can kill or
injure you and others. All safety messages will follow the safety
alert symbol and either the word WARNING or CAUTION.
These words mean:
WARNING
You may be killed or seriously injured if you do not follow
instructions.
CAUTION
You may be injured or cause damage to the product if you do
not follow instructions.

6
IMPORTANT SAFETY INSTRUCTIONS
WARNING
WARNING
• To reduce the risk of explosion, fire, death, electric shock, injury or
scalding to persons when using this product, follow basic
precautions, including the following:
Installation
• Never allow anyone to climb, sit, stand or hang on the oven door.
Injury might result from contact with hot food or the oven itself.
• Do not line the oven walls, racks, bottom, or any other part of the
oven with aluminum foil or any other material. Doing so will disrupt
heat distribution, produce poor baking results and cause permanent
damage to the oven interior (aluminum foil will melt to the interior
surface of the oven).
• Do not use aluminum foil or any other material to line the oven
bottom. Improper installation of oven liners may result in a risk of
electric shock or fire.
• Make sure your appliance is properly installed and grounded by a
qualified installer, according to the installation instructions. Any
adjustment and service should be performed only by qualified
installers or service technicians.
• Be certain that all packing materials are removed from the appliance
before operating. Keep plastic, clothes, paper, and other flammable
materials away from parts of the appliance that may become hot.
• The electrical power must be shut off while the electrical connections
are being made.
• Improper connection of aluminum house wiring to copper leads can
result in an electrical hazard or fire. Use only connectors designed for
joining copper to aluminum and follow the manufacturer’s
recommended procedure closely.
• Do not open or close the oven door by foot using excessive force.
• Do not obstruct vent hole with tissue.
• Do not use the oven to dry a live animal.

7
IMPORTANT SAFETY INSTRUCTIONS
ENGLISH
• Do not place, store, or cook any living animals or organism in the
oven.
• Do not use the oven for firing of pottery or curing of painted items.
• The appliance must not be installed behind a decorative door in order
to avoid overheating.
• Do not install the appliance on the floor.
• Ensure that the appliance is switched off before replacing the lamp to
avoid the possibility of electric shock.
Operation
• Do not use this oven for Commercial applications. This oven is
exclusively and intended for Domestic use only.
•
DO NOT TOUCH HEATING ELEMENTS OR INTERIOR SURFACES OF
THE OVEN.
Heating elements may be hot even though they are dark
in color. Interior surfaces of an oven become hot enough to cause
burns. During and after use, do not touch or let clothing or other
flammable materials contact heating elements or interior surfaces of
the oven until they have had sufficient time to cool. Other surfaces,
such as oven vent openings and surfaces near these openings, oven
doors, and windows of oven doors, also get hot and may cause burns
if not allowed to cool.
• Use care when opening the door. The hot air and steam that escape
can cause burns to hands, face and eyes. Let hot air or steam escape
from the oven before removing or replacing food in the oven.
• Do not use plastic to cover food. Use foil or oven-safe lids only.
• Never attempt to dry a pet in the oven.
• Never use your appliance for warming or heating the room.
• Always use pot holders or oven mitts when removing food from an
oven. Cookware will be hot. Use only dry pot holders. Moist or damp
pot holders on hot surfaces may result in burns from steam. Do not
let the pot holder touch hot heating elements. Do not use a towel or
other bulky cloth to remove food.
• Do not heat unopened food containers. Pressure in the containers
may cause them to burst which may result in injury.

8
IMPORTANT SAFETY INSTRUCTIONS
• Do not allow aluminum foil or the temperature probe to contact
heating elements.
• Do not touch the oven racks while they are hot.
• If a rack must be moved while the oven is hot, do not let the pot
holder contact the hot heating element in the oven.
• Pull the oven rack to the stop-lock position when loading and
unloading food from the oven. This helps prevent burns caused by
touching hot surfaces of the door and oven walls.
• Do not use the oven if a heating element develops a glowing spot
during use or shows other signs of damage. A glowing spot indicates
the heating element may fail and present a potential burn, fire, or
shock hazard. Turn the oven off immediately and have the heating
element replaced by a qualified service technician.
• DO NOT block the oven vent during operation. This can damage the
electric parts of the oven. Air must be able to circulate freely. The
bottom vent trim should be properly assembled on the front bottom
of the oven before installing the oven door.
• Do not put large, heavy items such as whole turkeys on the open oven
door.
• Take care when the door is open to avoid injury.
• If the door or door seals are damaged, the oven must not be
operated until it has been repaired by a competent qualified person.
• Do not allow children to crawl into the oven.
• Do not put your hand under the controller or between the door and
bottom vent trim during operation. The outside of the oven can
become very hot to the touch.
• This appliance can be used by children aged from 8 years and above
and persons with reduced physical, sensory or mental capabilities or
lack of experience and knowledge if they have been given supervision
or instruction concerning use of the appliance in a safe way and
understand the hazards involved. Children shall not play with the
appliance. Cleaning and user maintenance shall not be made by
children without supervision.

9
IMPORTANT SAFETY INSTRUCTIONS
ENGLISH
• Young children should be supervised to ensure that they do not play
with the appliance.
• During use, the appliance becomes hot. Care should be taken to
avoid touching heating elements inside the oven. Young children
should be kept away.
- These surfaces may be hot enough to burn skin even after cooking
is finished, though they may not appear to be so, avoid placing
hands and arms inside the oven.
• Accessible parts may become hot during use. Young children should
be kept away.
• Exposed parts of the oven can become hot during grilling. Keep
children at a distance.
• The instructions shall state that under such conditions the surfaces
may get hotter than usual and children should be kept away.
Maintenance
• Do not store items of interest to children on the back guard or in
cabinets above a cooking appliance. Children climbing on the oven to
reach items could be seriously injured.
• Let hot cookware and utensils cool in a safe place, out of reach of
small children.
• If the door glass, surface, or oven heating unit of the appliance are
damaged, discontinue use of the appliance and call for service.
• Always disconnect power from the appliance before servicing.
• Before replacing the oven light, switch off the electrical power to the
oven at the main fuse or circuit breaker panel.
• Never pour cold water over a hot oven for cleaning purposes.
• Do not clean with metal scouring pads. Pieces can burn off the pad
and touch electrical parts causing a risk of electric shock.
• Do not store any materials, other than manufacturer’s recommended
accessories, in this oven when not in use.
• Do not cover racks or any other part of the oven with metal foil. This
will cause overheating of the oven.

10
IMPORTANT SAFETY INSTRUCTIONS
• If the oven is heavily soiled with oil, pyrolyze the oven before using
the oven again. The oil could cause a fire.
• If there is a fire in the oven during pyrolysis, turn the oven off and
wait for the fire to go out. Do not force the door open. Introduction
of fresh air at pyrolysis temperatures may lead to a burst of flame
from the oven. Failure to follow this instruction may result in severe
burns.
• If your oven is dropped or damaged, have it thoroughly checked by a
qualified service technician before using it.
• If the supply cord is damaged, it must be replaced by the
manufacturer, its service agent or similarly qualified persons in order
to avoid a hazard. (on some models only)
•
DO NOT TOUCH HEATING ELEMENTS OR INTERIOR SURFACES OF
OVEN CAVITY
. During and after use or cleaning the interior, do not
touch other flammable materials contact heating elements or
interior surfaces of oven cavity until they have had sufficient time to
cool. Other surfaces, such as windows of oven door, oven lamp, also
get hot and may cause burns if not allowed to cool.
Risk of Fire and Flammable Materials
• Do not store or use flammable material in or near the oven.
Flammable materials include paper, plastic, pot holders, linens, wall
coverings, curtains, and gasoline or other flammable vapors and
liquids such as grease or cooking oil. These materials can ignite when
the oven is in use.
• Use extreme caution when moving or disposing of hot grease.
• Wear proper apparel. Do not wear loose-fitting or hanging garments,
which may ignite if they contact hot surfaces, and cause severe burns.
• Do not use the oven for drying clothes. Only use the oven for its
intended purpose.
• If cabinet storage is provided directly above the oven, use it to store
items that are not frequently used and can be safely stored in an area
subjected to heat. Temperatures may be unsafe for volatile items
such as flammable liquids, cleaners or aerosol sprays.

11
IMPORTANT SAFETY INSTRUCTIONS
ENGLISH
• Do not use water on grease fires. Should an oven fire occur, leave the
oven door closed and turn the oven off. If the fire continues, throw
baking soda on the fire or use a fire extinguisher. Do not put water or
flour on the fire. Flour may be explosive and water can spread a
grease fire and cause personal injury.
CAUTION
Operation
• Always heat fat slowly, and watch as it heats.
• If frying combinations of oils and fats, stir them together before
heating.
• Use a deep fat thermometer, if possible, to prevent overheating fat
beyond the smoking point.
• Use the least possible amount of fat for effective shallow or deep-fat
frying. Filling the pan with too much fat can cause spillovers when
food is added.
• Accessible parts may become hot when the grill is in use.
• When using cooking or roasting bags in the oven, follow the
manufacturer’s directions.
• The door or the outer surface may get hot when the appliance is
operating.
• Do not use this oven for purposes other than cooking.
• Use caution if opening the door when the oven is operating. Hot
surfaces can cause serious burns.
• In order to avoid a hazard due to inadvertent resetting of the thermal
cut-out, this appliance must not be supplied through an external
switching device, such as a timer, or connected to a circuit that is
regularly switched on and off by the utility.
• Excess spillage must be removed before cleaning.
• When using cleaning mode, remove the baking tray, deep baking
tray, wire grill, all cookware, aluminum foil, or any other material
from the oven.
• Only use the recommended probe temperature for this oven model.

12
IMPORTANT SAFETY INSTRUCTIONS
Maintenance
• Do not repair or replace any part of the appliance unless specifically
recommended in the manual. All other servicing should be
performed by a qualified technician.
• Do not use harsh etching, abrasive cleaners or sharp metal scrapers
to clean the oven door glass since they can scratch the surface.
Scratches may cause the glass to shatter.
• Make sure oven lights are cool before cleaning.
• Do not clean the door gasket. The door gasket is essential for a good
seal. Care should be taken not to rub, damage, or move the gasket.
• Do not rinse trays and racks by placing them in water just after
cooking. This may cause breakage or damage.
• The oven should be cleaned regularly and any food deposits should
be removed. Failure to maintain the oven in a clean condition could
lead to deterioration of the surface that could shorten the life of the
appliance and possibly result in a hazardous situation.
• Never use oven cleaner in the cooking compartment when it is still
warm, and never heat up the oven unless all oven cleaner has been
wiped off.
• Do not clean the accessories in a dishwasher.
• Do not use oven cleaners, steam cleaners, harsh chemical cleaners,
bleach, vinegar, steel scouring pads, or abrasive pads or cleansers to
clean the oven, as they can permanently damage the oven surface.
Using Steam Function
• Hot steam may cause scalding.
• Don't open the door and don't touch the vent holes while steam
function is working.
• Use care when opening the door. The hot air and steam that escape
can cause burns to hands, face and eyes. Let hot air or steam escape
from the oven before opening the door.
• Steam may condense on the inside of the door. Do not wipe
condensation off until the door has cooled.
13
IMPORTANT SAFETY INSTRUCTIONS
ENGLISH
CARING FOR THE ENVIRONMENT
Disposal
CAUTION
• Your new oven has been correctly packaged for transportation.
Remove all of the packaging material before putting the appliance
into use.
• Do not forget to remove the foils from the telescoping runners and
from the control panel.
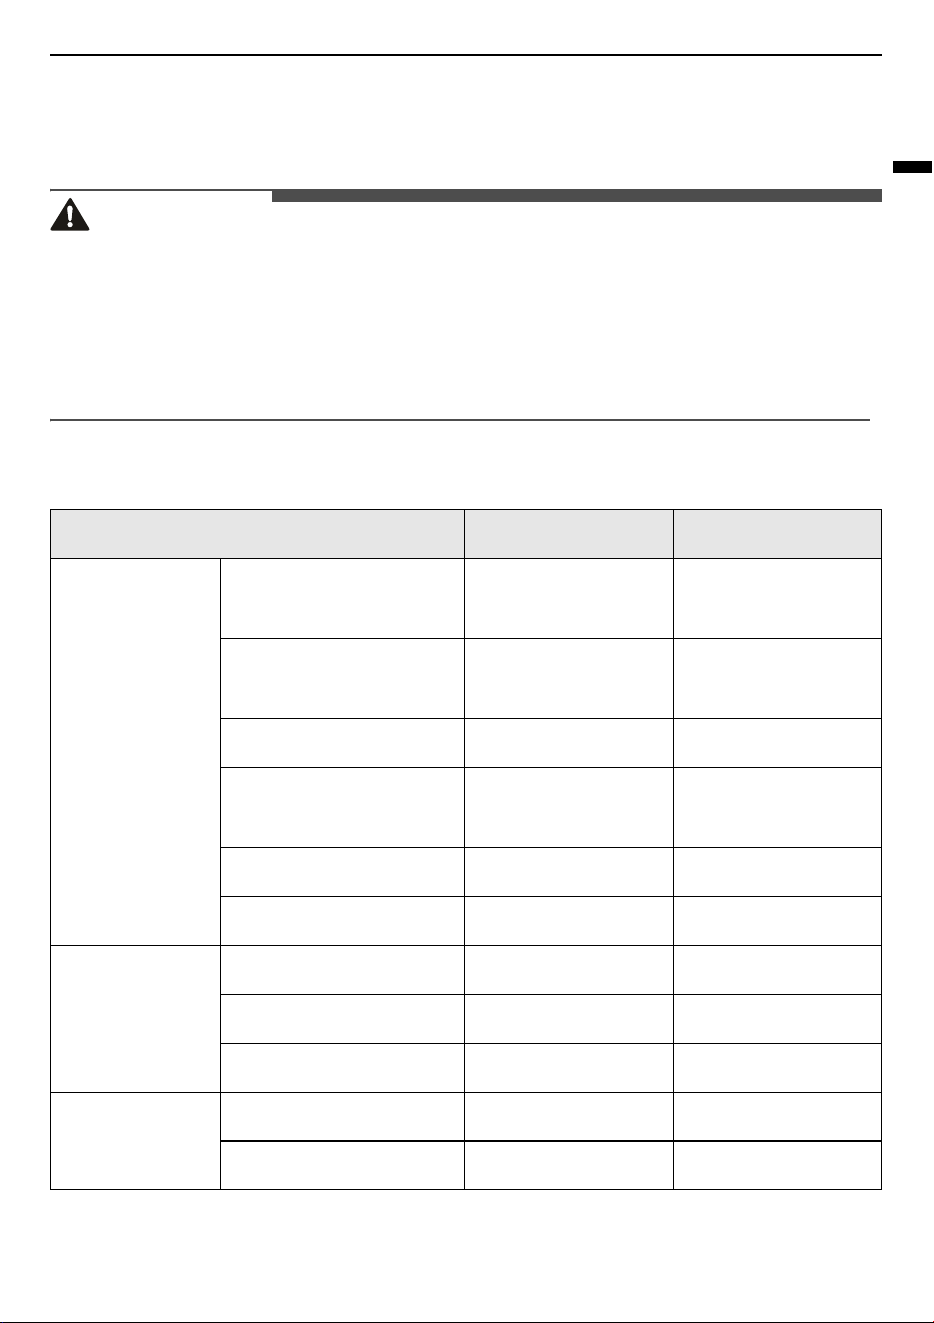
Single material of packaging
Packaging material Alphabetical Numerical
Plastic
Polyethylene
terephtalate
PET 1
High-density
polyethylene
HDPE 2
Polyvinylchloride PVC 3
Low-density
polyethylene
LDPE 4
Polypropylene PP 5
Polystrene PS 6
Paper &
Cardboard
Corrugated board PAP 20
Another board PAP 21
Paper PAP 22
Metals
Steel FE 40
Aluminum ALU 41
14
IMPORTANT SAFETY INSTRUCTIONS
• If you wish to store your oven away temporarily, choose a dry, dust-
free place. Dust and damp may adversely affect the working parts in
the oven.
Used Appliances
CAUTION
• Used appliances must be rendered unusable prior to disposal so that
they no longer present a risk. To achieve this, disconnect from the
mains supply and remove the power supply cable.
For the protection of the environment, used appliances must be
disposed of properly.
• The appliance must not be disposed of along with normal domestic
waste.
INSTALLATION INSTRUCTIONS
Installation should be undertaken by a qualified professional
electrician only.
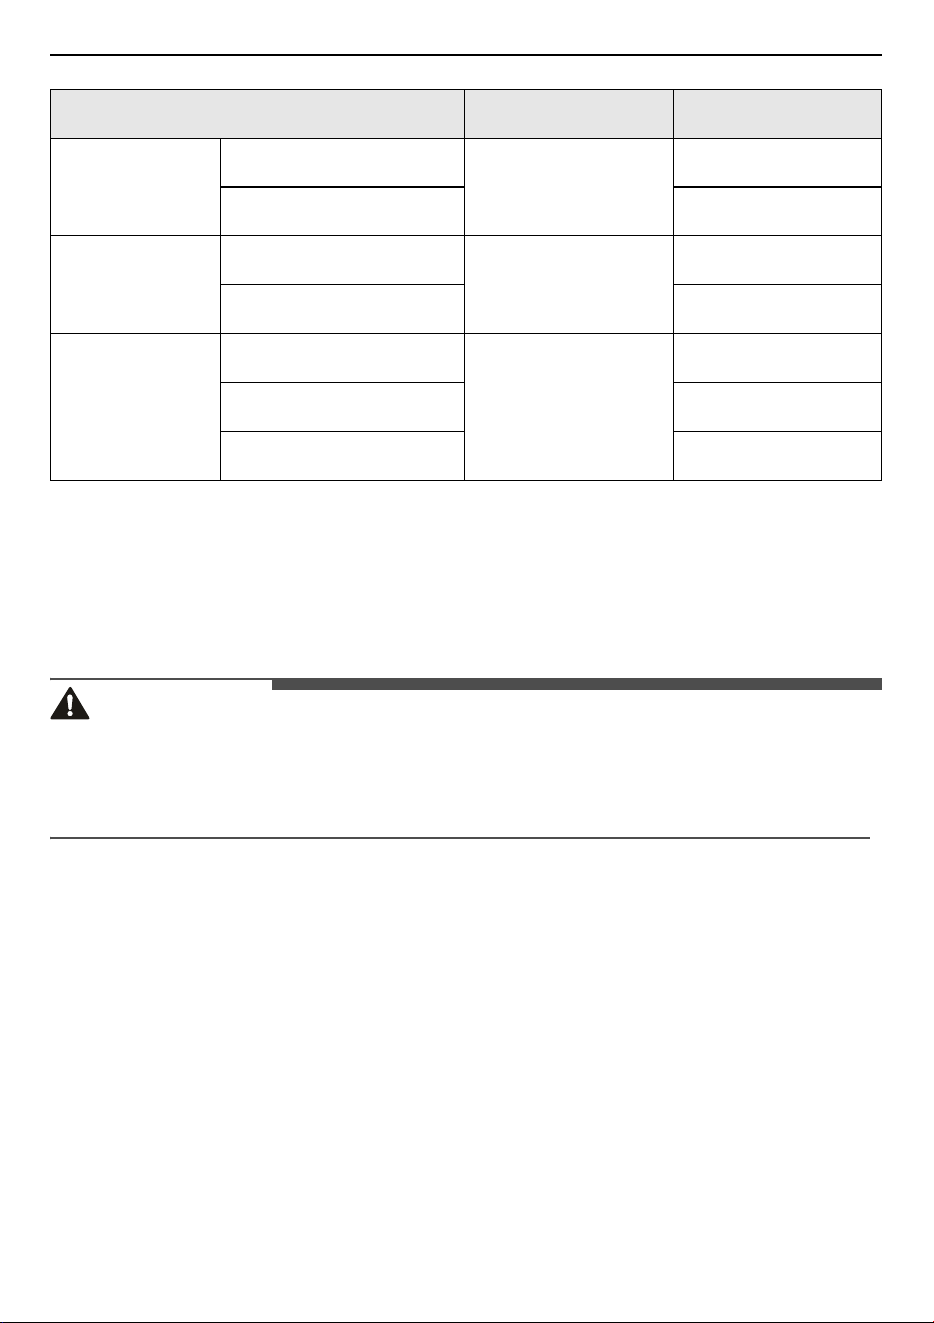
Wood
Wood
FOR
50
Cork 51
Textile
Cotton
TEX
60
Jute 61
Glass
Clear glass
GL
70
Green glass 71
Brown glass 72
Packaging material Alphabetical Numerical

15
IMPORTANT SAFETY INSTRUCTIONS
ENGLISH
Safety Instructions for the Installer
The oven must be installed in compliance with the manufacturer’s
instructions. For more information about installation, please refer to
the installation manual.
• Do not install the appliance if there is a transport damage. Contact an
LG Electronics customer information centre.
• During installation, ensure that no persons can come into contact
with live components.
• The oven must be installed by a qualified professional electrician, in
accordance with the corresponding regulations and standards.
• The oven is a heavy appliance and must be transported with great
care at least by two persons.
• Before initial use, remove all packaging, both external and from
inside the appliance.
• No modification may be made to the oven’s technical characteristics.
• Disconnect the electrical power to the appliance at the main fuse or
circuit breaker panel. Failure to do so can result in severe personal
injury, death, or electrical shock.
• Make sure to slide the tray and wire grill in a correct position as the
telescopic runner pins are inserted through the holes on both sides.
Electrical connection
The range should always be plugged into its own individual properly
grounded electrical outlet.
• This prevents overloading house wiring circuits which could cause a
fire hazard from overheated wires.
• It is recommended that a separate circuit serving only this appliance
be provided.
• Connection of this appliance must comply with national and local
safety regulations.
• Connection to a switched socket is recommended as this provides
easier access in the case of a service call.

16
IMPORTANT SAFETY INSTRUCTIONS
• For extra safety, it is advisable to protect the appliance with a suitable
residual current device (RCD) with a trip current of 30 mA.
• If the switch is not accessible after installation an additional means of
disconnection must be provided for all poles. The means of
disconnection must be incorporated in the fixed wiring in accordance
with the wiring rules.
• When switched off there must be an all pole contact gap of 3 mm in
the isolator switch (including switch, fuses and relays).
• Connection data
- Blue : Neutral Wire
- Green + Yellow : Ground Wire
- Brown : Live Wire
- The voltage and rated load are given on the data plate situated at
the front of the oven frame visible with the oven door open. Please
ensure the connection data matches the household supply.
• This appliance incorporates an earth connection for functional
purposes.
17
PRODUCT OVERVIEW
ENGLISH
PRODUCT OVERVIEW
Product Features
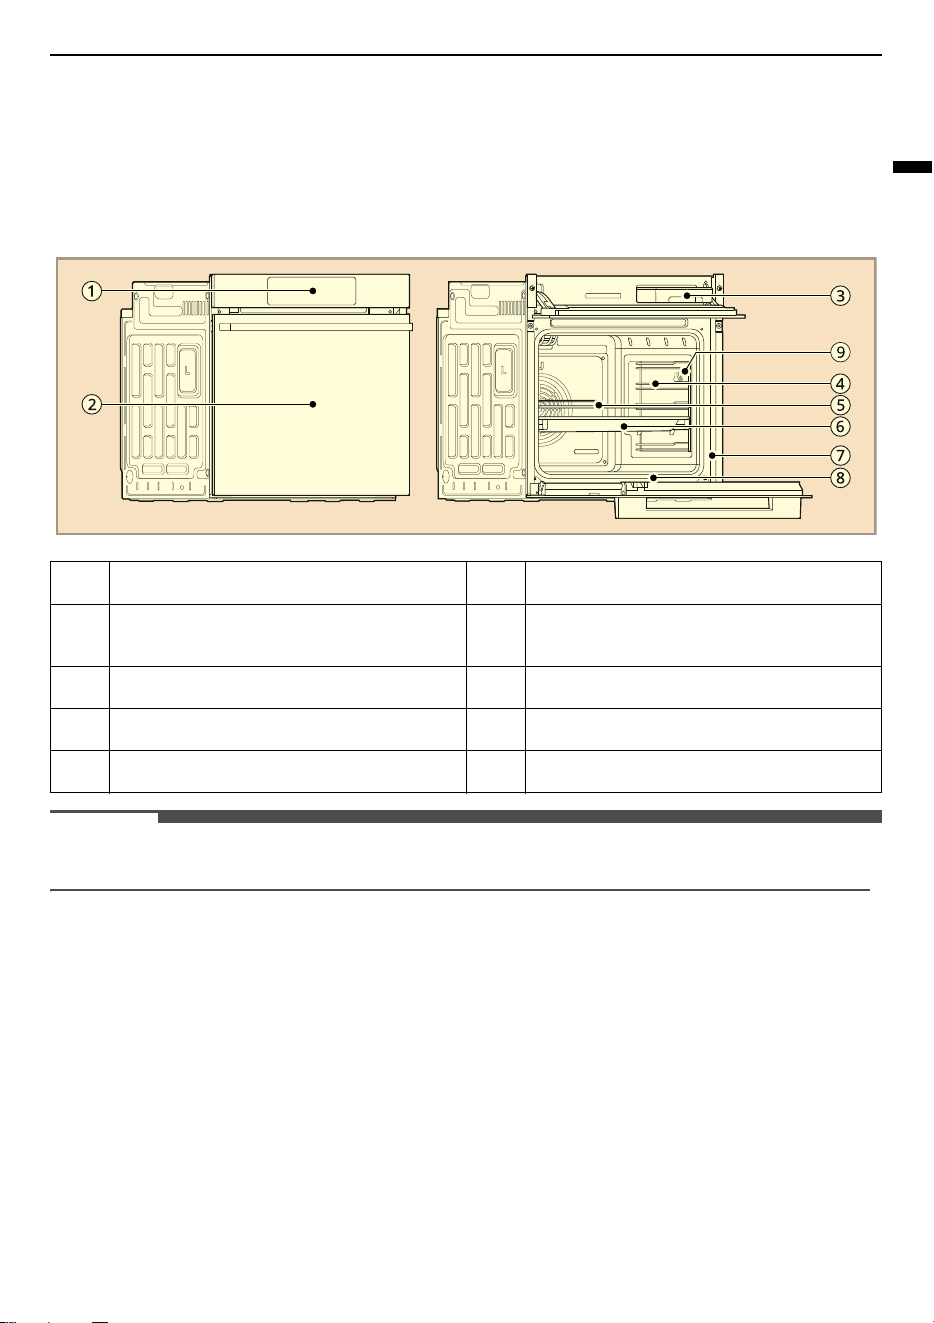
Exterior / Interior
NOTE
• The model and serial number can be verified at the rating label.
A
Oven Controller
F
Baking Tray
B
Oven Door
G
Rating Label, Model and Serial Number
Plate
C
Water Tank
H
Gasket
D
Rail Rack (2 ea)
I
Meat Probe Socket (Model WSED7667M)
E
Wire Grill
18
PRODUCT OVERVIEW
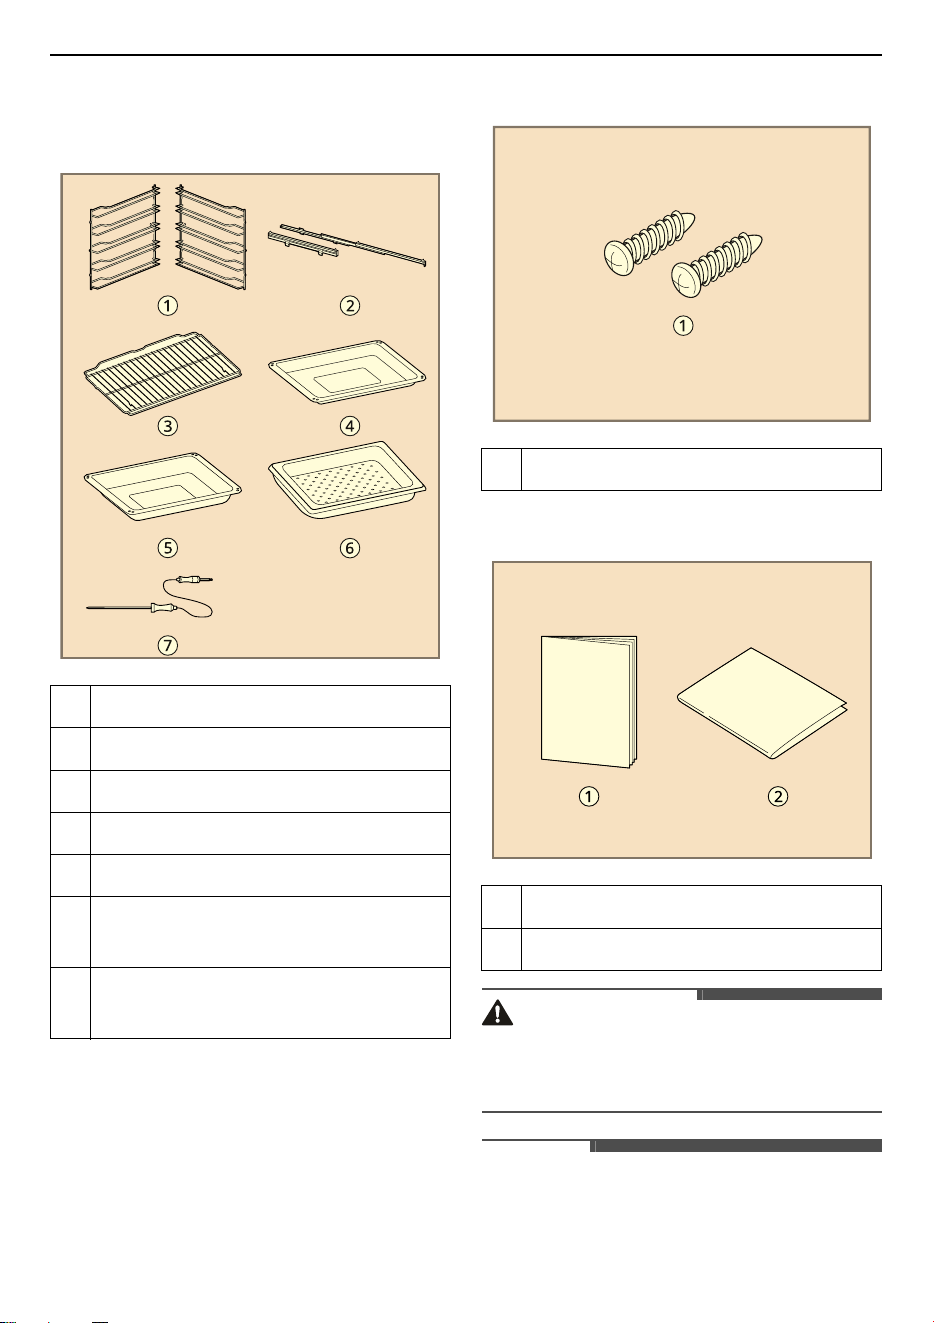
Accessories
Accessories for Cooking
Accessories for Installation
Manuals
WARNING
• After installation, pull off the protection film
from the control panel as well as from the
telescoping runners.
NOTE
• Contact an LG Electronics customer information
center if any accessories are missing.
A
Rail Rack (2 ea)
B
Telescopic Runner (2 ea)
C
Wire Grill (1 ea)
D
Baking Tray (1 ea)
E
Deep Pan (1 ea)
F
Perforated Tray (1 ea)
• Model WSED7667M
G
Meat Probe (1 ea)
• Model WSED7667M
A
Wood Screws for Mounting (2 ea)
A
Owner’s Manual
B
Installation Guide

19
PRODUCT OVERVIEW
ENGLISH
• For your safety and for extended product life,
only use authorized components.
• The manufacturer is not responsible for product
malfunction or accidents caused by the use of
separately purchased, unauthorized
components or parts.
• The images in this guide may be different from
the actual components and accessories, which
are subject to change by the manufacturer
without prior notice for product improvement
purposes.
20
OPERATION
OPERATION
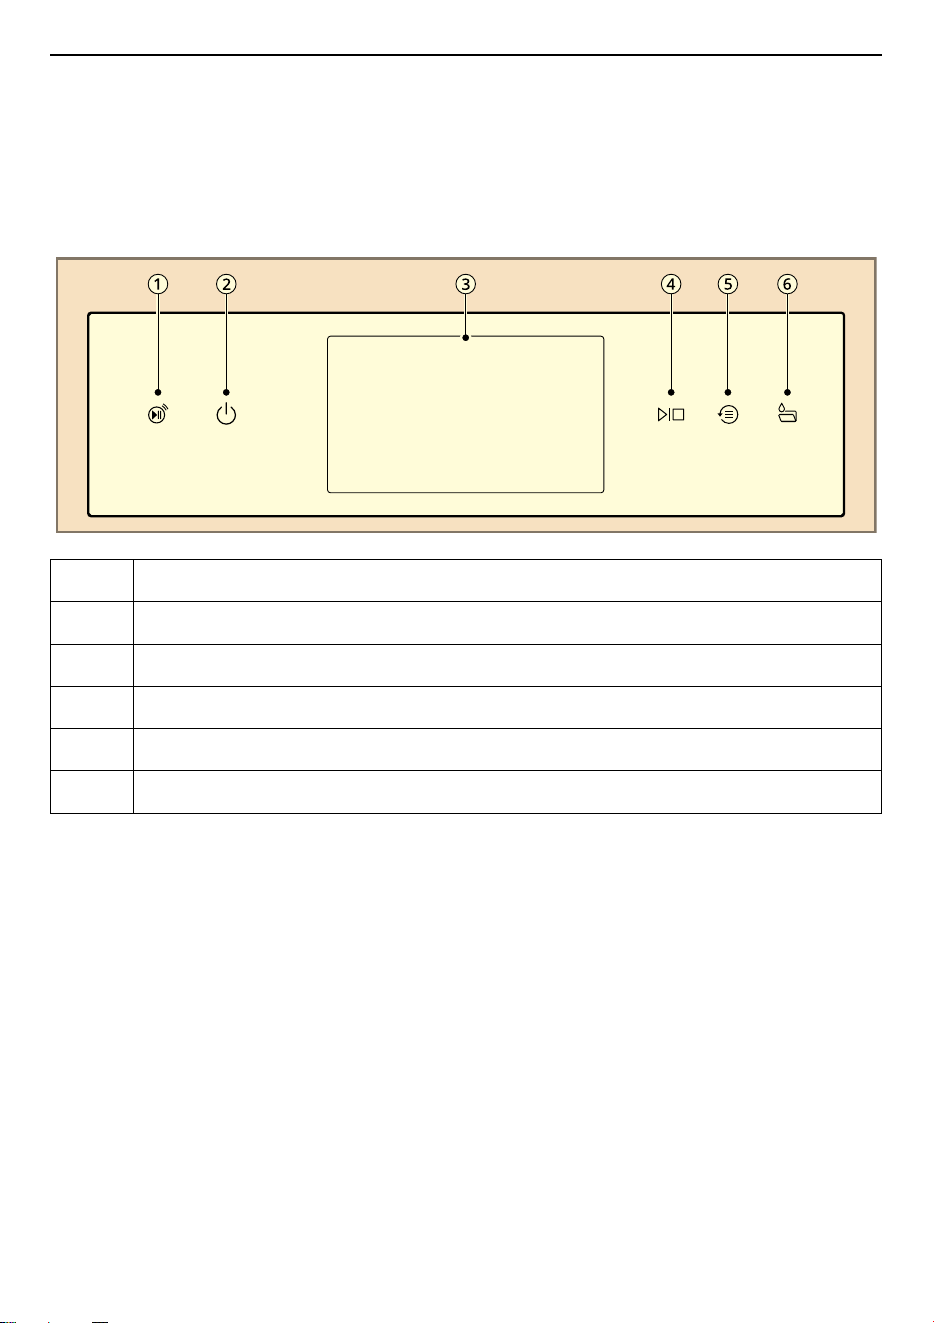
Operating Control Panel
Control Panel Features
A
Remote Start
Indicator
B
Power On/Off
C
LCD Touchscreen
D
Start/Stop
E
Recent Cook
F
Water Tank
21
OPERATION
ENGLISH
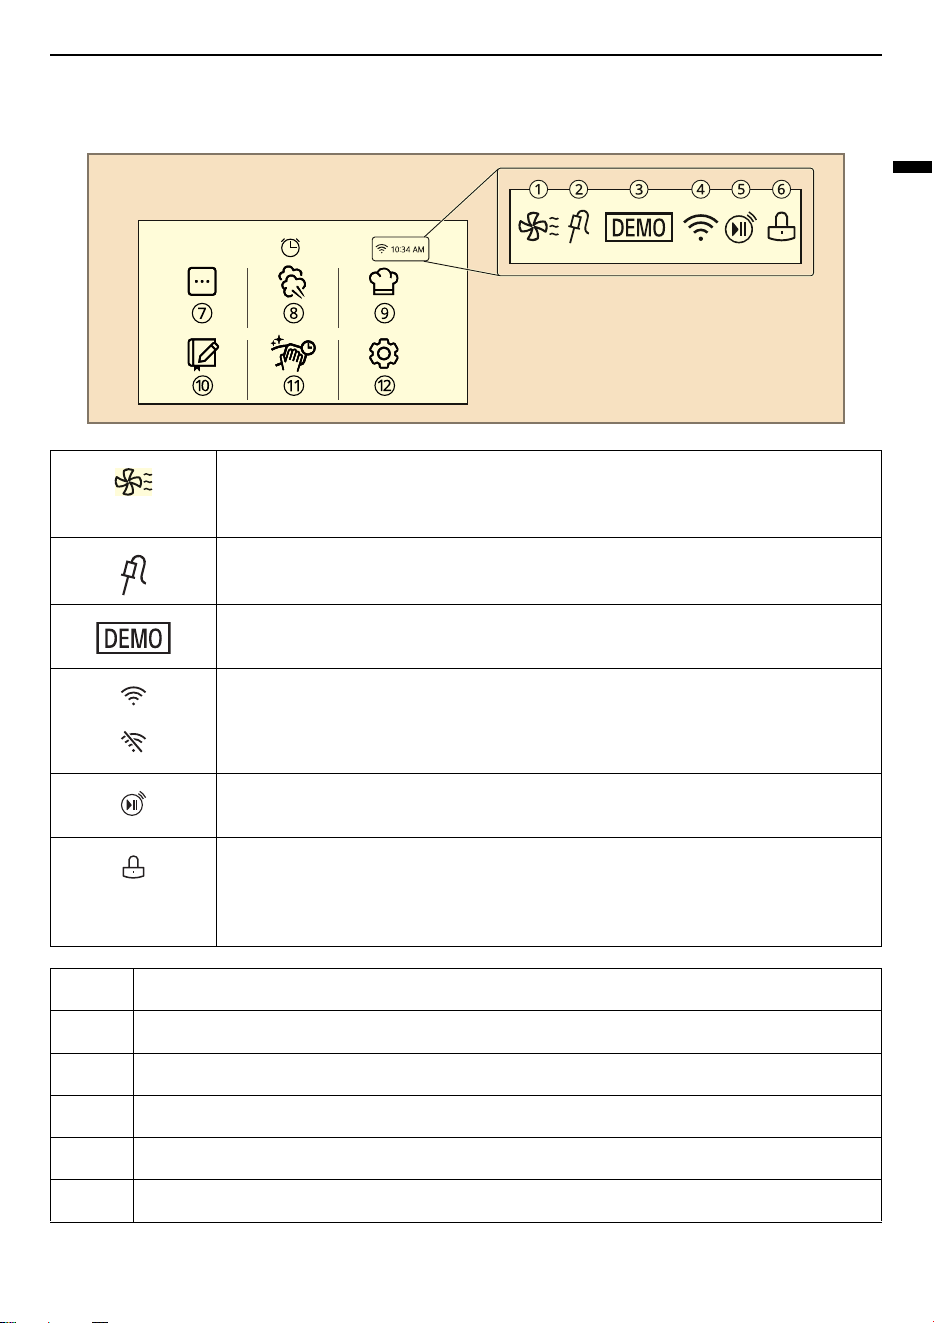
Display Icons
Icons appear in display when activated.
A
Oven Cooling
Appears during or after oven operation to indicate cooling fan is running in the
oven.
B
Probe
Appears when probe is connected. (Model WSED7667M)
C
Demo
Appears when Demo mode is active.
D
Wi-Fi
• Appears when oven is connected to Wi-Fi.
• Appears when oven is not connected to Wi-Fi.
E
Remote Start
Appears when
Remote Start
is active.
F
Lock
Appears when
Control Lock
is activated.
Once the door has been locked, the lock indicator light stops flashing and remains
on.
G
Manual Cook
H
Steam Cook
I
Recipe Cook
J
My Recipes
K
Cleaning
L
Settings

22
OPERATION
Energy Saving Tips
• Multiple-rack cooking saves time and energy.
Whenever possible, cook foods requiring the
same cooking temperature together in one
oven.
• For optimal performance and energy savings,
follow the guides for proper rack and pan
placement.
• Reduce energy use by cleaning light oven soil
with the
EasyClean
feature instead of
Pyrolysis
.
• Avoid opening the oven door more than
necessary during use. This helps the oven
maintain temperature, prevents unnecessary
heat loss, and saves on energy use.
Changing Settings
Getting Started
After turning on the oven for the first time, adjust
the settings to suit your preferences.
1) Press the
Power On/Off
button on the control
panel if the LCD display is turned off.
2) After the startup animation, select the desired
language, then press
Next
.
3) Set the time, then press
Done
.
4) The
Main Menu
screen appears in the display.
NOTE
• These settings are stored in memory, see
Time
and
Language
section to change.
Settings
To adjust settings after the initial setup, press the
Power On/Off
button to open the
Main Menu
screen. Press
Settings
at the bottom right of the
Main Menu
screen.
Swipe the screen to navigate through the
Settings
screens.
Control Lock
The
Control Lock
feature automatically prevents
most oven controls from being turned on. All
function are disabled except the
Power On/Off
button. It does not lock the oven door.
Lock
1) Press
Settings
at the right bottom of the
Main
Menu
screen, and press
Control Lock
.
2) When
Control Lock
is activated, the lock icon
k
appears at the top of the display.
Unlock
1) Press any part of screen while
Control Lock
is
on.
2) A popup screen appears. Press and hold
Unlock
for 3 seconds until the countdown
ends.
3) The lock icon
k
disappears from the top of the
display.
Time
The time shows in the LCD display.
Setting Time of Day
1) Press
Settings
at the right bottom of the
Main
Menu
screen, then press
Time
.
2) Press
Current Time
. Press
J
or
K
to raise or
lower the numbers, then press
!
several
times to save the settings until the
Main
Menu
screen is displayed.
You can also use the number pad icon to set
the correct hour and minutes directly, then
press
OK
.
3) Press
!
.
Setting Time Format
1) Press
Settings
at the right bottom of the
Main
Menu
screen, then press
Time
.
2) Press
Time Format
and select a 12-hour or 24-
hour clock mode.
23
OPERATION
ENGLISH
Wi-Fi
Connect the appliance to a home Wi-Fi network to
use Remote Start and other smart functions. See
the Smart Functions section for more details.
Setting Up Wi-Fi
1) Press
Settings
at the right bottom of the
Main
Menu
screen, then press
Wi-Fi
.
2) Press
Set Up Wi-Fi
.
3) Follow the instructions in the Wi-Fi Guide in
the display.
Resetting Wi-Fi
1) Press
Settings
at the right bottom of the
Main
Menu
screen, then press
Wi-Fi
.
2) Press
Reset Wi-Fi
.
3) Follow the instructions in the Wi-Fi Guide in
the display.
Remote Start
This feature can be used with the
Manual Cook
modes. Remotely starts or stops the cooking
operation. The appliance must be connected to a
home Wi-Fi network to use Remote Start.
Setting Remote Start
1) Press
Settings
at the right bottom of the
Main
Menu
screen, then press
Remote Start
.
2) Select
On
or
Off
.
3) If
On
is selected, the
Remote Start
icon
w
appears at the top of the display.
"
Remote Start is on. Check the LG ThinQ
app to use Remote Start.
" appears in the
display when the
Remote Start
is activated.
4) Follow the instructions in the LG ThinQ app for
using the Remote Start function.
Start Screen
There are five different screen themes available.
Setting Start Screen
1) Press
Settings
at the right bottom of the
Main
Menu
screen, then press
Start Screen
.
2) Select the desired start screen theme.
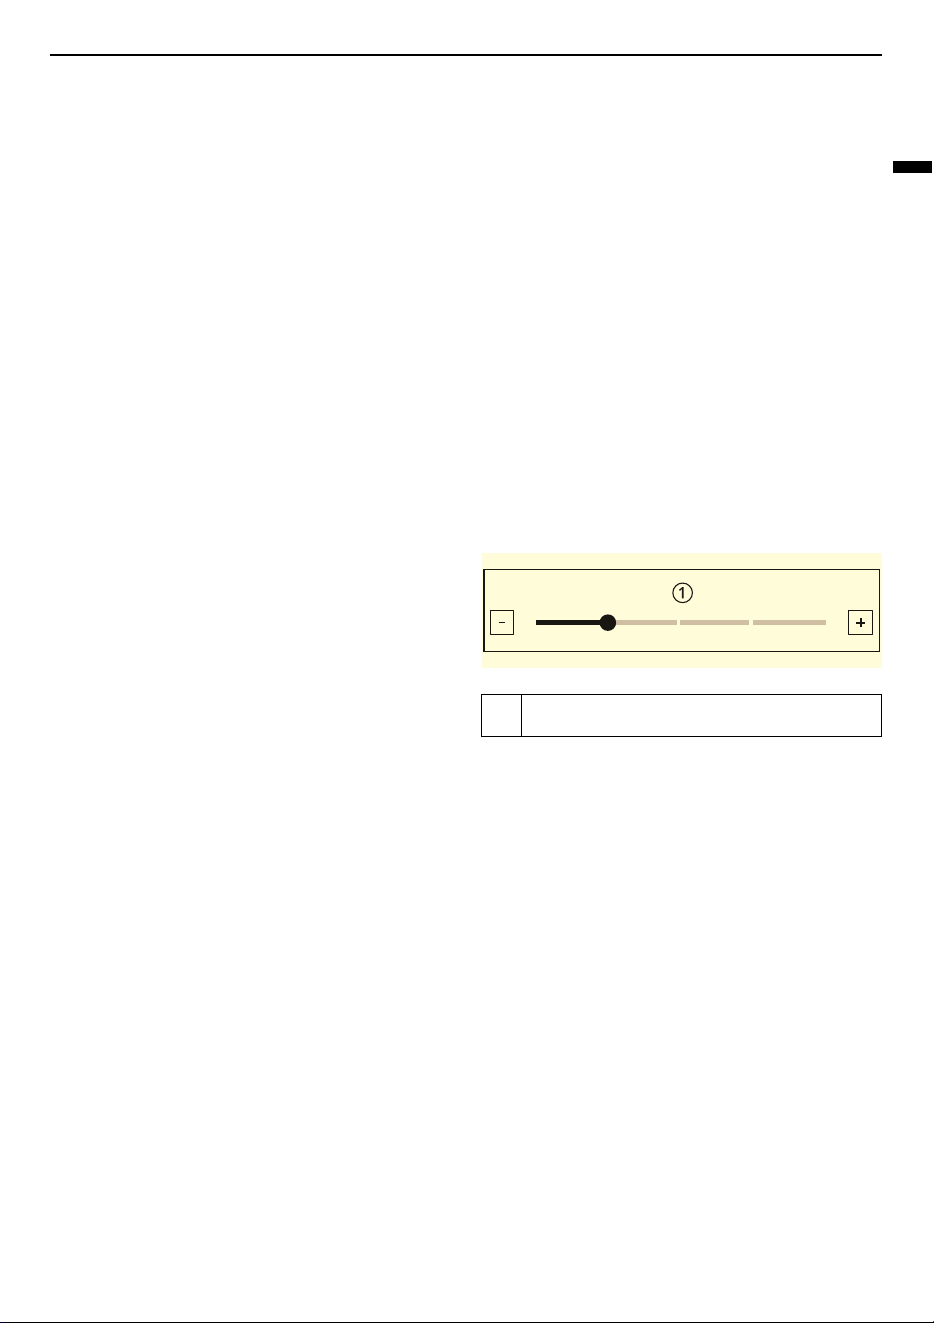
Brightness
Adjust the brightness of the LCD display from Level
1 (20 %) to Level 5 (100 %) in increments of 20 %.
Setting Display Brightness
1) Press
Settings
at the center bottom of the
Main Menu
screen, swipe the Settings screen,
then press
Brightness
.
2) Adjust the display brightness by pressing and
dragging the dot across the bar, by tapping
anywhere on the bar, or by pressing
~
or
!
.
3) Press
!
.
Language
Set the display language.
Selecting a Language
1) Press
Settings
at the right bottom of the
Main
Menu
screen, swipe the Settings screen, then
press
Language
.
2) Select the desired language.
Volume
Adjust the volume of the following features: Oven
start, Button operation, End of cooking, Preheating
complete.
A
Level 2
24
OPERATION
Setting the Volume
1) Press
Settings
at the right bottom of the
Main
Menu
screen, swipe the Settings screen, then
press
Volume
.
2) Select
Mute
,
Low
, or
High
.
3) Press
!
.
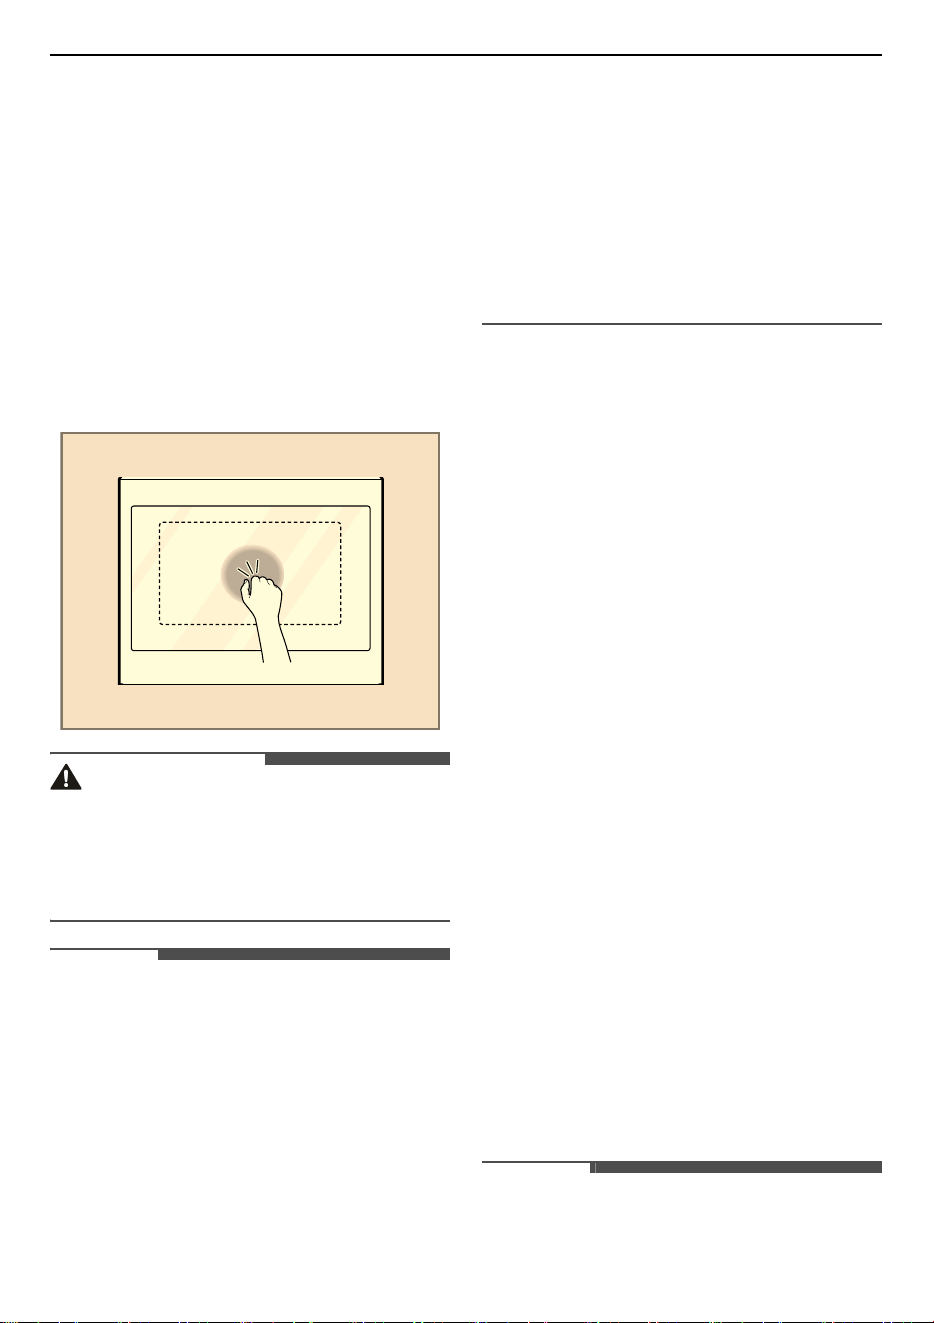
InstaView
Knock twice on the center of the glass panel to
reveal the contents of the oven without opening
the door.
CAUTION
• Do not hit the glass door panel with excessive
force. Do not allow hard objects like cookware or
glass bottles to hit the glass door panel. The
glass could break, resulting in a risk of personal
injury.
NOTE
• Knocking twice on the glass panel turns the
interior light on or off.
• The light stays ON during cooking.
• The light turns off automatically after 5 minutes
and switches to standby mode when cooking is
finished or the oven is not in operation.
• The InstaView function is disabled when the
oven door or oven controller is opened and for
one second after closing the door.
• The InstaView function is disabled during
Pyrolysis
,
Control Lock
Mode and initial power
input (on some models only).
• Tapping the edges of the glass panel may not
activate the InstaView function.
• The taps on the glass panel must be hard
enough to be audible.
• The taps on the control panel or loud noises near
the oven may activate the InstaView function.
Setting InstaView
1) Press
Settings
at the right bottom of the
Main
Menu
screen, then press
InstaView
.
2) "
Knock twice on the centre of the glass
panel to reveal the contents of the oven
without opening the door
" appears in the
display when the
InstaView
feature is
activated. Press
OK
.
Preheat Light
When the oven reaches its set-temperature, the
preheating light flashes 5 times or until the oven
door is opened.
You can turn the preheat light on or off.
Setting the Preheat Light
1) Press
Settings
at the right bottom of the
Main
Menu
screen, swipe the screen, then press
Preheat Light
.
2) Select
On
or
Off
.
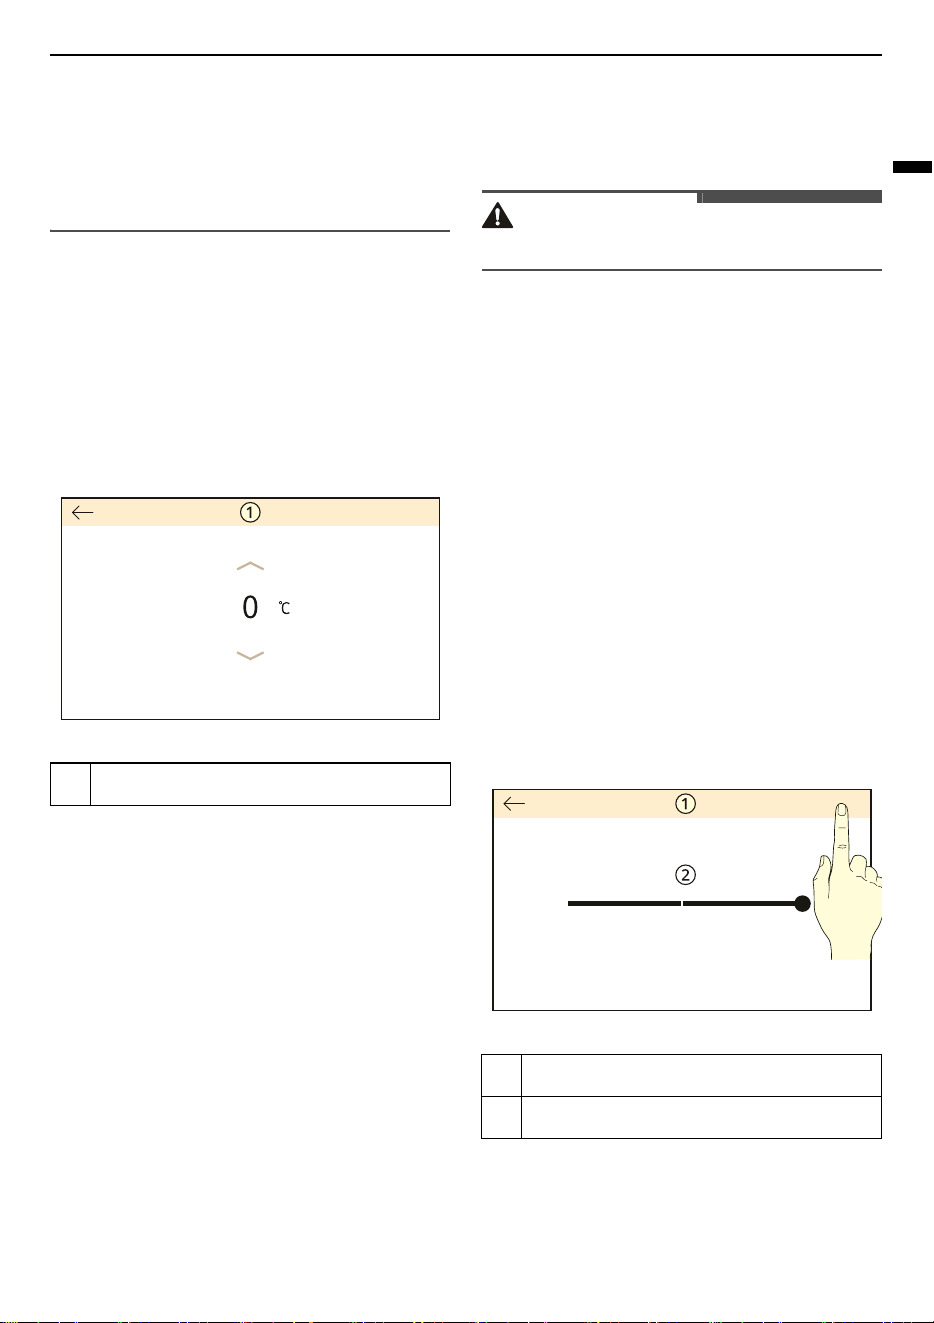
Temperature Adjustment
Your new oven may cook differently than the one it
replaced. Use your new oven for a few weeks to
become more familiar with it before changing the
temperature settings. If after familiarizing yourself
with the new oven, you still think that it is too hot
or too cold, you can adjust the oven temperature
yourself.
NOTE
• To begin, either raise or lower the temperature
19 ℃. Try the oven with the new setting. If the
oven still needs adjustment, raise or lower the
25
OPERATION
ENGLISH
temperature again, using the first adjustment as
a gauge. For example, if the adjustment was too
much, raise or lower the temperature 5 ℃. If the
adjustment was not enough, raise or lower the
temperature 12 ℃. Proceed in this way until the
oven is adjusted to your satisfaction.
Adjusting the Temperature
1) Press
Settings
at the right bottom of the
Main
Menu
screen, swipe the screen, then press
Temperature Adjustment
.
2) Press
J
or
K
to raise or lower the
temperature in 1-degree increments. Press
and hold
J
or
K
to scroll up or down the
scale.
3) When the desired change appears above the
range, press
!
.
Smart Diagnosis
Smart Diagnosis can be run through a smartphone
application or by calling for support. Place your
smartphone's mouthpiece near the top left corner
of the screen. See "Smart Diagnosis Function" in
the Smart Functions section for detailed
instructions.
1) Press
Settings
at the right bottom of the
Main
Menu
screen, swipe the screen, then press
Smart Diagnosis
.
2) Press
START
to start the diagnostic tone.
Factory Data Reset
This function returns all settings to the factory
defaults.
CAUTION
• All stored data will be deleted.
1) Press
Settings
at the right bottom of the
Main
Menu
screen, swipe the screen, then press
Factory Data Reset
.
2) If you want to reset data to the factory
defaults, press
RESET
. A popup will appear in
the display, then press
RESET
.
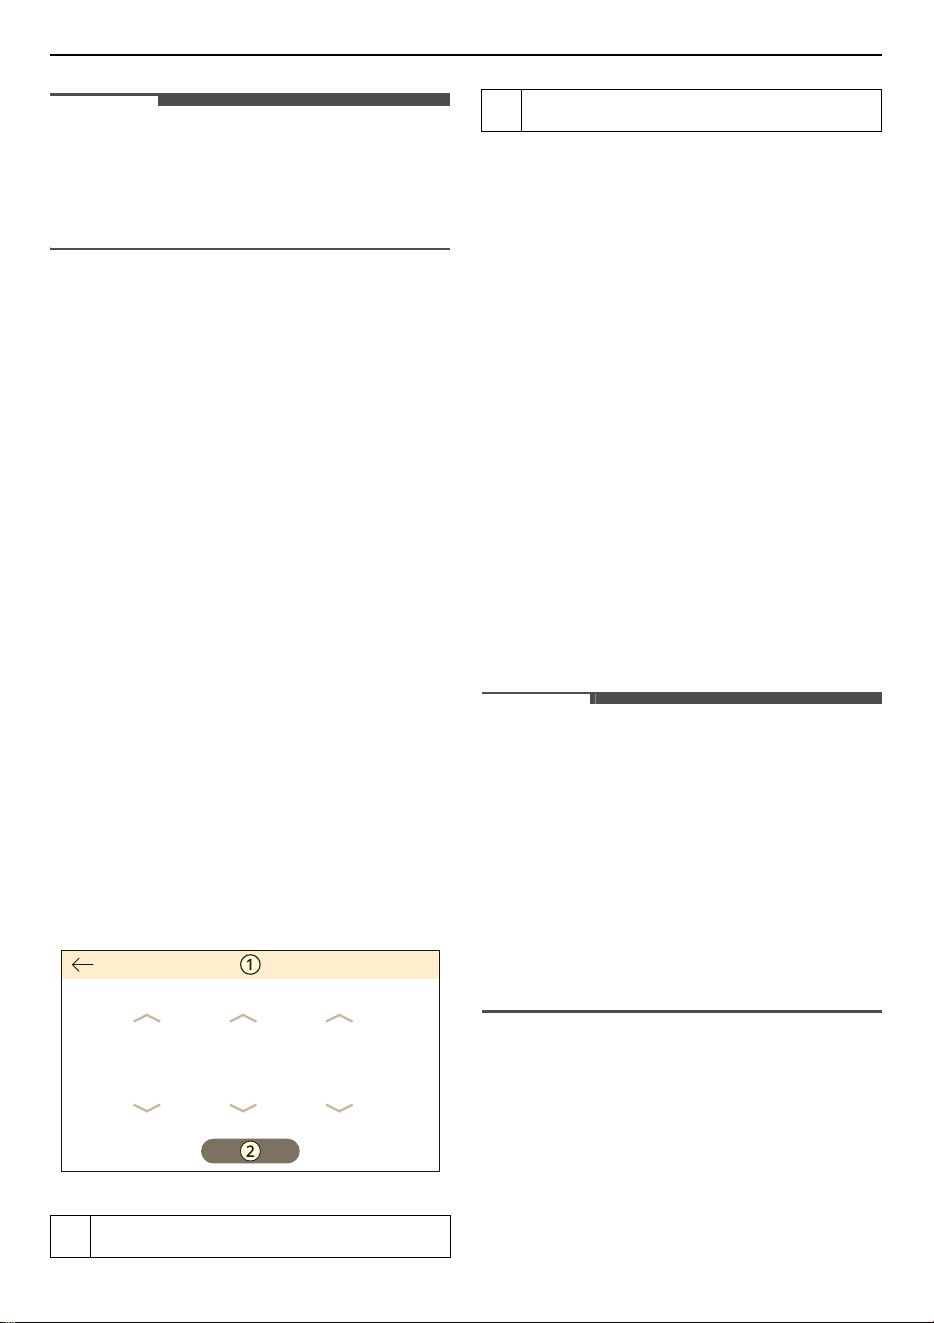
Demo Mode
Demo Mode for showroom use only. The oven will
not heat up.
1) Press
Settings
at the right bottom of the
Main
Menu
screen, swipe the screen, then press
Volume
.
2) Tap the upper right corner of the screen 15
times to enable or disable demo mode.
•
DEMO
is displayed in the right corner of the
Main Menu
screen.
3) To deactivate the mode, repeat step 1) and 2)
again.
A
Temperature Adjustment
A
Volume
B
High
26
OPERATION
NOTE
• When Demo Mode is on, the appliance will not
heat up.
• The oven Demo Mode icon appears in the display
if the Demo Mode is on.
Oven Cooling
The oven cooling icon
:
appears in the display if
the temperature inside the oven is high during or
after operation. The oven cooling icon disappears if
the oven temperature is low.
The oven cooling icon
:
disappears if the oven
temperature is low.
• In some modes, the cooling fan can be operated
regardless of the oven temperature.
Timer
The oven timers don't affect oven operation or
cooking time. Use them as extra kitchen timers.
Once the time runs out, the oven chimes and
Timer
Ended
appears in the display.
Setting the Timer
1) Press the clock icon
U
at the center top of the
display.
2) Scroll through the numbers in the popup until
the desired time appears in the display, then
press
START
.
3) The time remaining appears next to the clock
icon in the display.
A chime sounds when the set time runs out
and
Timer Ended
appears in the display. The
chime sounds every 15 seconds until
OK
is
pressed.
Adjusting or Cancelling the Timer
1) Press the remaining time next to the clock
icon in the display.
2) To cancel the timer, press
STOP
in the display.
3) To adjust the time, scroll through the numbers
in the popup until the desired time appears in
the display, then press
RESTART
.
4) The remaining time in the display is adjusted.
Operating the Oven
Before Using the Oven
NOTE
• Because the oven temperature cycles, an oven
thermometer placed in the oven cavity may not
show the same temperature that is set on the
oven.
• The heat turns off if the door is open during
operating. The heat turns back on automatically
once the door is closed.
• Avoid opening the oven door more than
necessary during use. This helps the oven
maintain temperature, prevents unnecessary
heat loss, and saves on energy use.
Oven Vent
Areas near the vent may become hot during
operation and may cause burns. Avoid placing
plastics near the vent as heat may distort or melt
the plastic.
It is normal for steam to be visible when cooking
foods with high moisture content.
A
Timer
PLQ
V
K
B
START
27
OPERATION
ENGLISH
WARNING
• Do not block the vent between the oven door
and the controller.
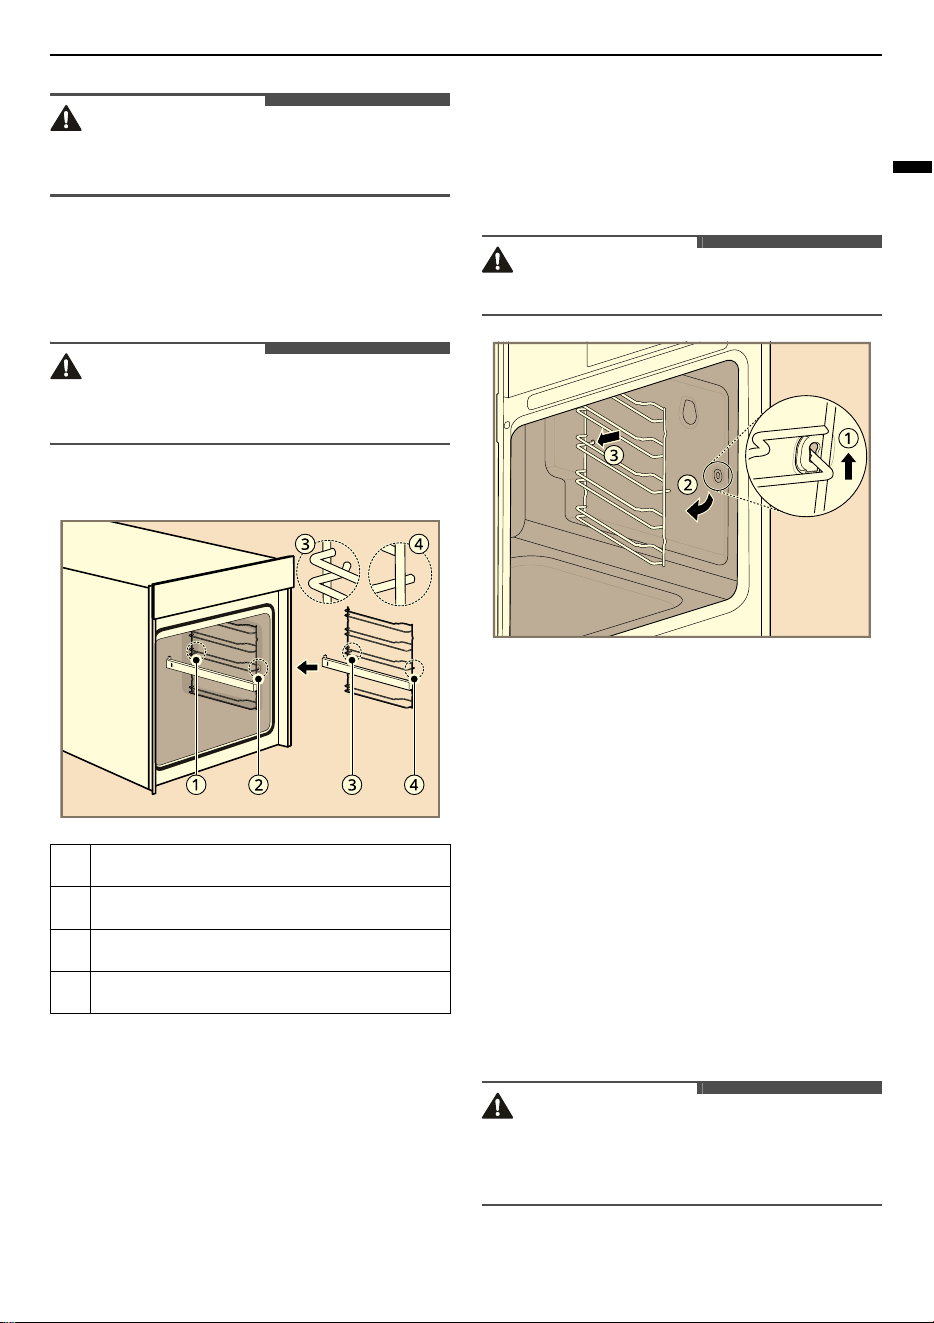
Assembling Rail(Telescopic)
Rack
WARNING
• Remove the protection film from all telescopic
runners.
Assemble the rail racks on both sides of the oven
cavity before operating the oven for the first time.
1) Align the rack inside the oven cavity. So that
the curvature of the rack is pointing to the
oven door.
2) Insert the rear rail rack hook
C
into the oven
cavity hole
A
.
3) Insert the front rail rack hook
D
into the oven
cavity hole
B
and press down to secure the
fitting.
4) Repeat steps 1-3 for the other side of the oven
cavity.
Removing Rail Rack
WARNING
• Do not touch the oven racks while they are hot.
1) Lift up the rack slightly
A
.
2) Pull the front of the rack away from the side
wall
B
.
3) Continue to Swing the front of the rack to the
center of the oven
B
while pulling the rear of
the rack away from the side wall to release its
hook
C
.
4) Repeat steps 1-3 for the other side of the oven
cavity.
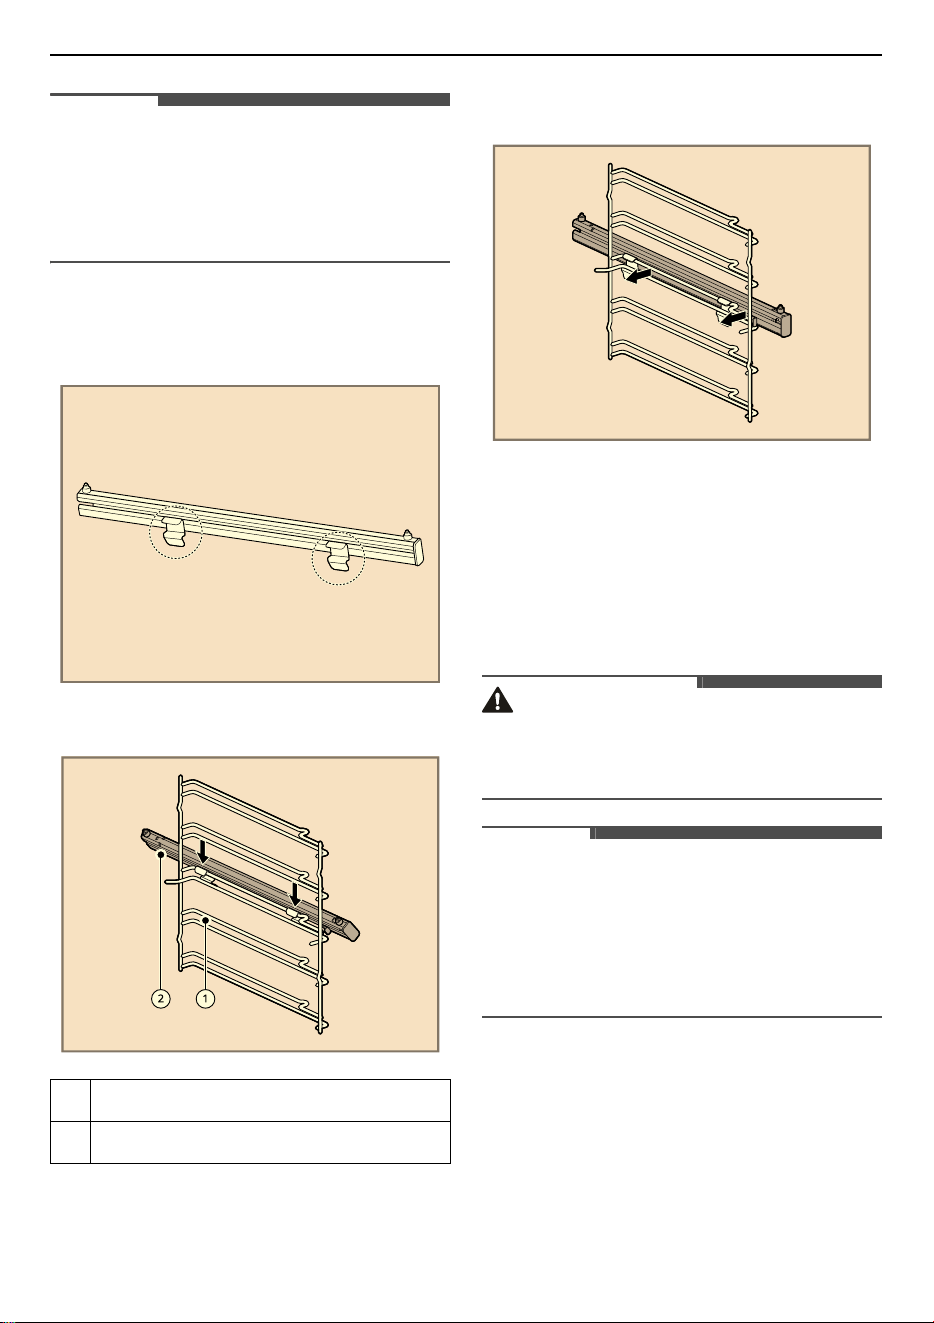
Using the Telescopic Runners
Installing the Telescopic Runners
Install the telescopic runners before operating the
oven for the first time.
WARNING
• Allow the oven to cool before installing or
removing the telescopic runners to prevent
burns.
A
Rear Hole
B
Front Hole
C
Rear Rail Rack Hook (curved)
D
Front Rail Rack Hook (straight)
28
OPERATION
NOTE
• Place a soft cloth on the floor to avoid damaging
the parts. It is essential that the telescopic
runners are fitted and secured correctly. Failing
to do so could cause the runner and its contents
to fall causing serious damage to the oven.
1) Check the telescopic runner direction, as the
long part of the telescopic clip facing down
and the pins of the telescopic runner are
pointing upwards.
2) Place the telescopic runner parallel with the
rail rack horizontally.
3) Hook both the telescopic runner clips onto the
upper rail of the desired rack position.
4) Place the telescopic runner onto the rail rack
until the lower part of the telescopic runner
clip buckle clips onto the lower rail of the
desired rack position.
5) Repeat steps 1-4 for the other telescopic
runner to install on the other side.
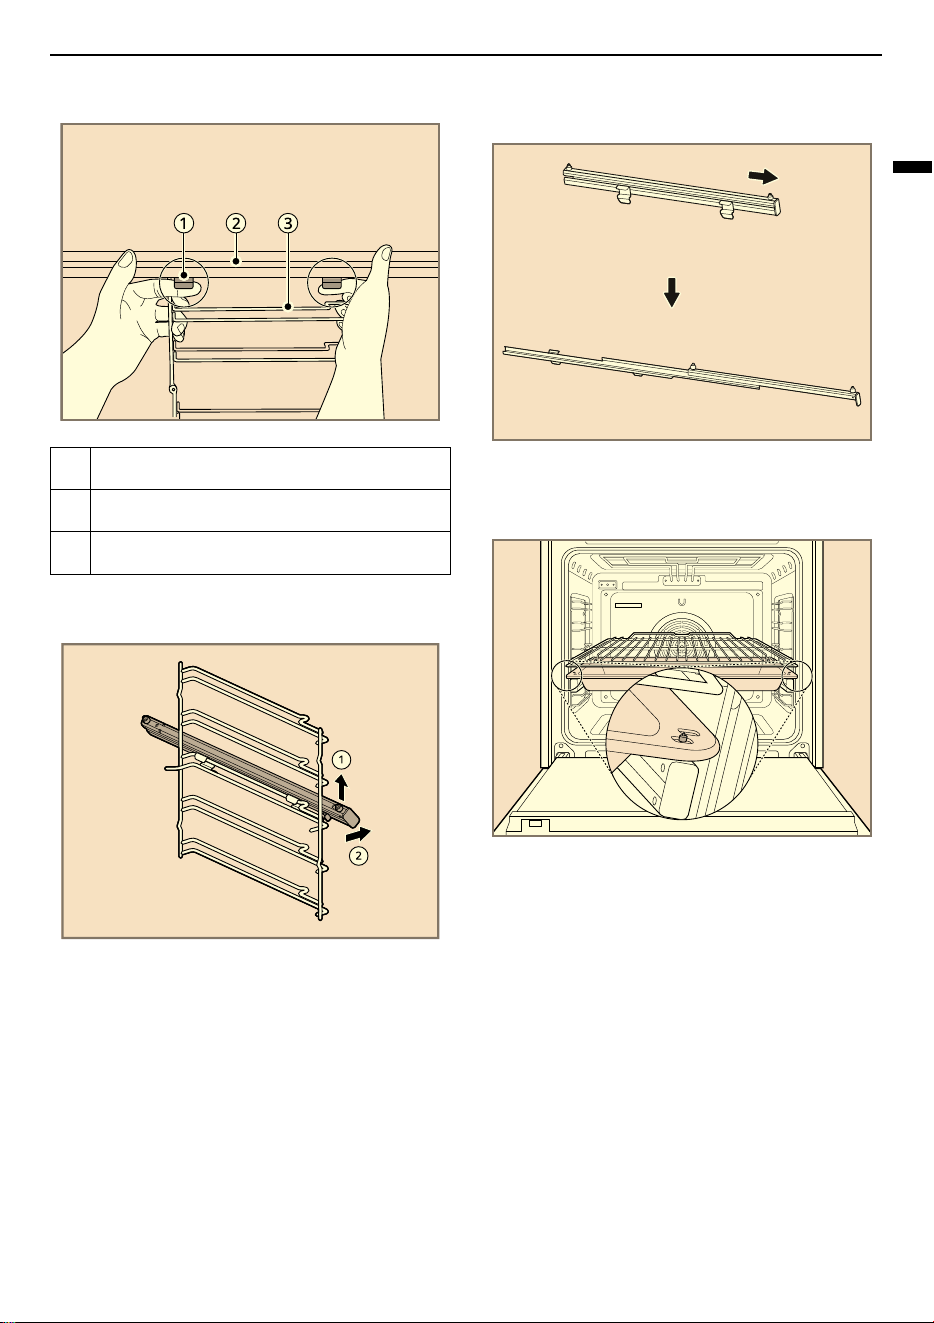
Removing the Telescopic Runners
WARNING
• Allow the oven to cool before installing or
removing the telescopic runners to prevent
burns.
NOTE
• Place a soft cloth on the floor to avoid damaging
the parts. It is essential that the telescopic
runners are fitted and secured correctly each
time. Failing to do so cold cause the runner and
its contents to fall causing serious damage to the
oven.
A
Rail Rack
B
Telescopic Runner
29
OPERATION
ENGLISH
1) Pull forward the telescopic runner clips
2) Lift up the whole telescopic runner and pull it
away to detach from the rail rack.
Using the Telescopic Runners
The telescopic runners slide in and out on a frame.
This keeps heavy cookware level and prevents it
from sliding forward when the telescopic runner is
completely extended.
• Make sure to slide the tray and wire grill in a
correct position as the telescopic runner pins are
inserted through the holes on both sides.
A
Telescopic Runner Clip
B
Telescopic Runner
C
Rail Rack
30
OPERATION
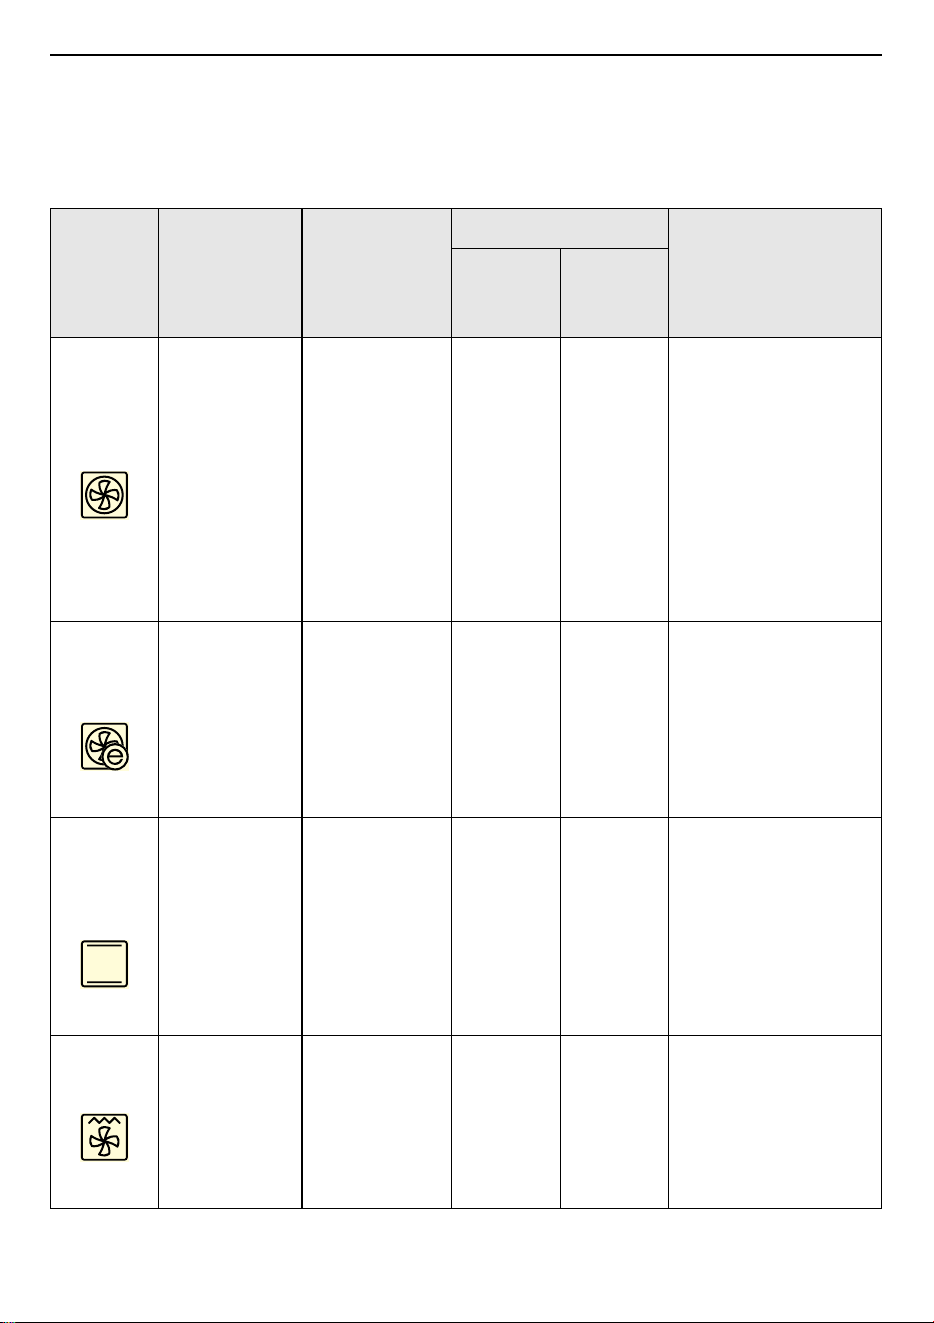
Manual Cook
Read the below guide and select the desired cooking mode to meet your specific cooking needs.
•
#
: Available / X: Not available
Function
Temperature
Range
Default
Temperature
Option
Description
Rapid
Preheat
44
Probe
1
(WSED766
7M)
Hot Air
30-275 ℃
(WSED7665B)
30-250 ℃
(WSED7667M)
160 ℃
##
Hot Air
mode uses only
the heating element in
the back wall and the
convection fan. It is also
possible to bake on
more than one level in
Hot Air
mode. This
means that it is suitable
for fruit cakes and
stirred cake or yeast-
dough, for example a
bread plait.
Economic
Hot Air
30-275 ℃
(WSED7665B)
30-250 ℃
(WSED7667M)
160 ℃ XX
Economic Hot Air
mode
uses the optimised
heating system to save
energy while cooking
food. In this mode,
residual heat can be
used to conserve
energy.
Top
Bottom
Heat
30-300 ℃
(WSED7665B)
30-250 ℃
(WSED7667M)
170 ℃
##
In
Top Bottom Heat
mode, the upper and
concealed lower
heating elements are
used. This operating
mode is suitable for
baking cakes, baking for
a short time, and
sensitive doughs.
Roasting
30-300 ℃
(WSED7665B)
30-250 ℃
(WSED7667M)
190 ℃ X
#
In
Roasting
mode, the
upper heating elements
and the convection fan
are on. This function is
suitable for large pieces
of meat or poultry, such
as rolled roast or turkey.
31
OPERATION
ENGLISH
Pizza
Mode
30-300 ℃
(WSED7665B)
30-250 ℃
(WSED7667M)
180 ℃ XX
In
Pizza Mode
mode,
the concealed heating
element at the bottom
of the oven cavity and
the element in the back
wall and convection fan
are activated. When
using the
Pizza Mode
,
the cooking time must
vary depending on the
type and thickness of
the dough and topping.
Fan
Assisted
Air
30-300 ℃
(WSED7665B)
30-250 ℃
(WSED7667M)
160 ℃
#
X
In addition to the
Top
Bottom Heat
mode
(upper and concealed
lower), the
Fan Assisted
Air
mode uses the
convection fan. This
means that the roasting
and baking
temperature can be
reduced by 20-40 ℃.
This mode is suitable for
cakes and biscuits, as it
is possible to bake on
more than one level at
the same time.
Large
Grill
High / Medium
/ Low
High X X
Large Grill
mode uses
the entire grill heating
element. No specific
temperature can be set.
You can choose
between three settings.
The Large grill is
suitable for cooking
steaks, cutlets, fish or
making toast, and for
browning when cooking
larger dishes with a
gratin topping. The
preset level is high.
Always grill with the
door closed.
Function
Temperature
Range
Default
Temperature
Option
Description
Rapid
Preheat
44
Probe
1
(WSED766
7M)
32
OPERATION
Small Grill
High / Medium
/ Low
High X X
Small Grill
mode
operates in the same
way as the
Large grill
,
however, only part of
the grill heating
element is used. This
makes it suitable for
smaller dishes. The
preset level is High.
Always grill with the
door closed.
Bottom
Heat
30 - 250 ℃ 170 ℃ XX
In
Bottom Heat
mode,
only the concealed
heating element in the
oven floor is used. This
function is particularly
suitable for finishing off
cakes or pizzas on one
of the lower oven levels.
Economic
Top
Bottom
Heat
30 - 300 ℃
(WSED7665B)
30 - 250 ℃
(WSED7667M)
170 ℃ XX
Economic Top Bottom
Heat
mode uses the
optimised heating
system to save energy
while cooking food. In
this mode, residual heat
can be used to conserve
energy. To avoid losing
heat, always keep the
door closed when
cooking.
Air Fry
150 - 275 ℃
(WSED7665B)
150 - 250 ℃
(WSED7667M)
200 ℃ XX
Air Fry
function is
specially designed for
oil free frying.
Air Sous-
Vide
(WSED766
5B)
30 - 100 ℃ 50 ℃ XX
Air Sous-Vide
mode
uses air to cook foods
“low and slow”. Use it to
cook meat, fish,
seafood, poultry or
vegetables. Food must
be vacuum packed in
pouches before cooking
Function
Temperature
Range
Default
Temperature
Option
Description
Rapid
Preheat
44
Probe
1
(WSED766
7M)
33
OPERATION
ENGLISH
Drying
30 - 150 ℃ 80 ℃ XX
Drying
mode uses only
the heating element in
the back wall and the
convection fan.
For drying herbs, fruits
and vegetables.
Warm
40 - 100 ℃ 75 ℃ XX
In
Warm
mode, the
heating element at the
top and concealed
element at the bottom
of the oven cavity are
activated. You can use
this function for keeping
food warm until ready
to serve. In this mode, a
selectable temperature
from 40 to 100 ℃ can be
set. The duration of this
function can also be set.
Defrost
--XX
In
Defrost
mode, only
the fan is used without
heating. The circulating
air speeds up the
defrosting process.
Place the frozen food in
a suitable container to
trap the liquid produced
during defrosting.
Where appropriate, you
can use the wire grill
and a deep pan (or
baking tray) to avoid
soiling the oven. If water
is allowed to run out
into the oven, the door
seals will be
contaminated and an
unpleasant odour may
result.
Function
Temperature
Range
Default
Temperature
Option
Description
Rapid
Preheat
44
Probe
1
(WSED766
7M)

34
OPERATION
Frozen
Meal
30 - 250 ℃ 200 ℃ XX
For the quick
preparation of frozen
products. The
temperature depends
on the manufacturer's
instructions. Use the
highest temperature
specified on the
packaging. The cooking
time is as specified or
shorter.
Proof
30 - 60 ℃ 40 ℃ XX
Proof
mode maintains a
warm oven for rising
yeast leavened products
before baking. To avoid
lowering the oven
temperature and
lengthening proofing
time, do not open the
oven door
unnecessarily. Check
bread products early to
avoid over proofing. Do
not use the proofing
mode for warming food
or keeping food hot. The
proofing oven
temperature is not hot
enough to keep foods at
safe temperatures. Use
the
Warm
feature to
keep food warm.
Function
Temperature
Range
Default
Temperature
Option
Description
Rapid
Preheat
44
Probe
1
(WSED766
7M)
35
OPERATION
ENGLISH
Warm
Dishes
30 - 70 ℃ 50 ℃ XX
Warm Dishes
mode is
used to keep dishes
warm evenly. In this
operating mode, the
system uses the
convection heating
element and fan located
at the back of the oven
to circulate warm air. A
selectable temperature
from 30 to 70 ℃ can be
set. The duration of this
function can also be set.
Please ensure that the
dishes are oven
compatible.
Function
Temperature
Range
Default
Temperature
Option
Description
Rapid
Preheat
44
Probe
1
(WSED766
7M)

36
OPERATION
Hot Air / Economic Hot Air
CAUTION
• Pressing the
Power On/Off
button during
cooking clears all settings.
NOTE
• If no cook time is set, the oven turns off
automatically after 12 hours.
Setting Hot Air / Economic Hot Air
Mode
1) Press
Manual Cook
in the
Main Menu
screen.
2) Select
Hot Air
or
Economic Hot Air
in the
cooking mode screen.
3) Press
Temp.
to set the desired cooking
temperature. Press
J
or
K
to raise or lower
the numbers, then press
!
to save the
settings.
You can also use the number pad icon to set
the cooking temperature directly, then press
OK
.
4) If desired, press
Time
.
And press
Cook Time
or
Cooking ends at.
to
set the cook time or cooking end time.
Press
J
or
K
to raise or lower the numbers,
then press
!
to save the settings.
You can also use the number pad icon to set
the cooking time directly, then press
OK
.
5) Press the
Start/Stop
button on the control
panel. The oven starts to preheat.
6) If the cook time is set, the remaining time
appears in the display. If a cooking end time is
set, the start time appears in the display.
7) A chime sounds once preheating is complete.
8) A chime sounds at the end of the set cook time
and a notification appears in the display. Open
the oven door and remove the food.
Changing the Hot Air or Economic
Hot Air Settings
1) Press
Edit
to bring up the Cook Settings
screen.
2) Adjust the settings using the number pad or
scroll function.
3) Press the
Start/Stop
button on the control
panel.
To Stop Cooking
1) Press the
Start/Stop
button on the control
panel, then press
Stop
in the display.
NOTE
• The oven fan runs during the
Hot Air
cycle. The
fan stops when the door is open. In some cases,
the fan may shut off during the
Hot Air
cycle.
Tips for Hot Air
• Use
Hot Air
for faster and more even multiple-
rack cooking of pastries, cookies, muffins,
biscuits, and breads of all kinds.
• Bake cookies and biscuits on pans with no sides
or very low sides to allow heated air to circulate
around the food. Food baked on pans with a dark
finish will cook faster.
• Multiple oven rack cooking may slightly increase
cook times for some foods.
• Cakes, cookies and muffins have better results
when using multiple racks.
Tips for Economic Hot Air
• When possible, do not preheat the oven before
placing food inside.
• Only preheat if it is specified in the recipe.
• To maximise energy efficiency, do not open the
door during cooking.
• Use dark black enameled tins that absorb heat
particularly well.
• Remove unused accessories from the oven.
37
OPERATION
ENGLISH
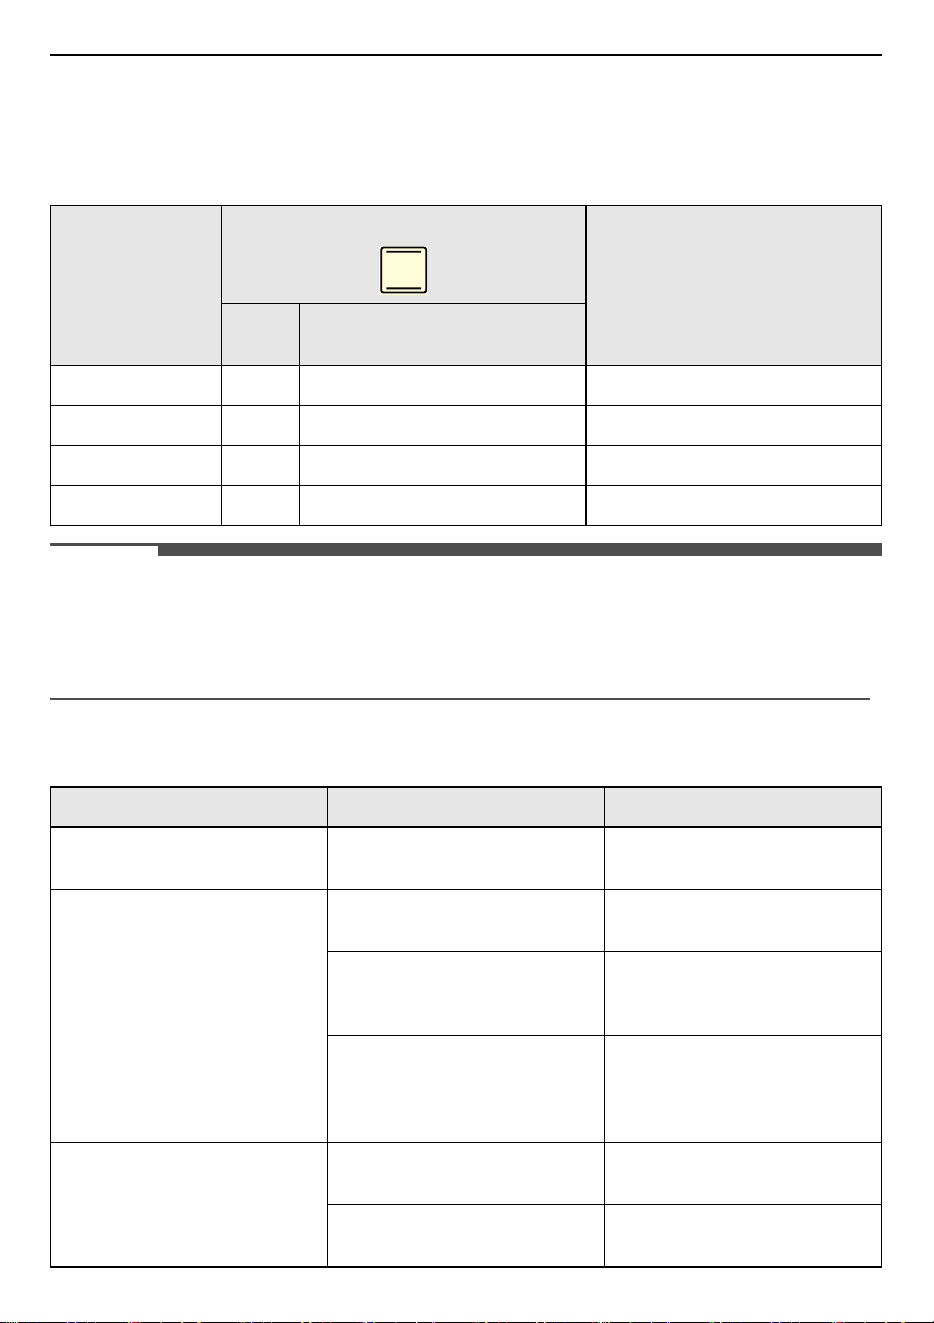
Recommended Economic Hot Air Guide
This table is intended as a guide only, individual tastes and cuts of meat will vary.
Always count the oven rack position from the bottom up.
The durations given are for an oven which has not been preheated.
• Rack: Rack Position
Baking
When baking, use the
Hot Air
or
Top Bottom Heat
modes.
Baking Tins
• When baking in
Top Bottom Heat
modes, use
baking tins with a dark metal or coated surface.
• When baking with
Hot Air
, you can also use
baking tins with a bright metal surface.
• Always place cake tins in the middle of the tray or
wire grill.
• When baking with
Top Bottom Heat
, you can
place two baking tins side by side in the oven.
This means that the baking time is only slightly
longer.
NOTE
• Included tray may differ depending on the
product.
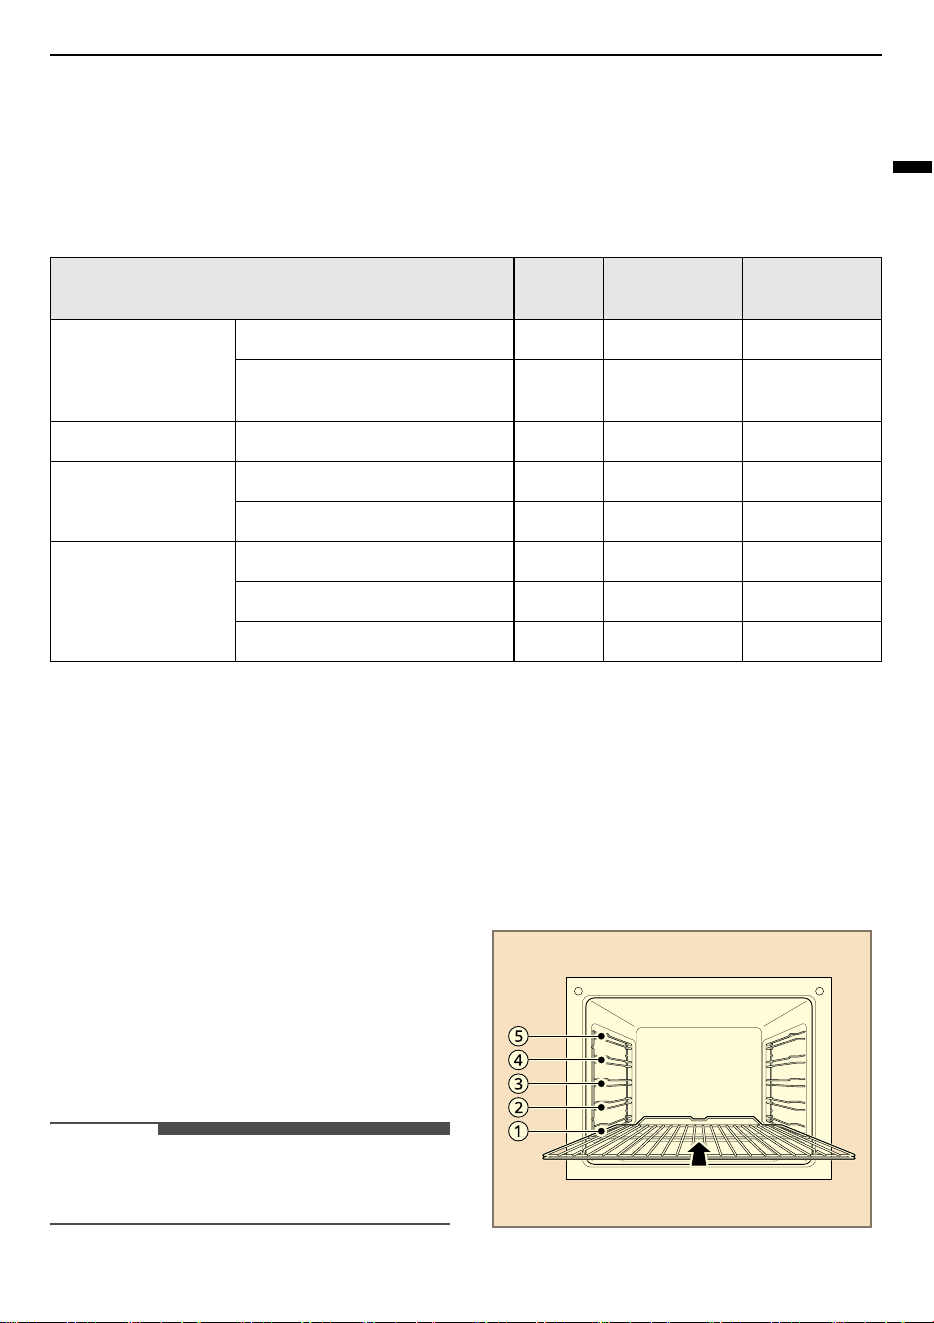
Oven Rack Position
The Oven Rack Positions are numbered from the
bottom up.
When using
Top Bottom Heat
, you can bake on
one rack only, for example on rack position
C
.
When using
Hot Air
, you can bake sponge bases
and biscuits on up to two baking trays at the same
time, for example on rack position
B
and
D
.
Food Rack
Temp.
(℃)
Time
(minute)
In a baking tin
Flan base - cake mixture 3 150-170 35-45
Spicy cakes and flan base
(e.g. quiche lorraine)
2 160-180 30-70
On a baking tray Pizza (thin base) 1 200-220 15-30
Biscuits
Iced 3 140-150 10-40
Cake mixture 3 150-160 25-35
Meat
Beef (approx. 1 kg) 2 190 60-80
Poultry (approx. 1 kg) 2 210 50-70
Poultry (approx. 2 kg) 2 210 60-80
38
OPERATION
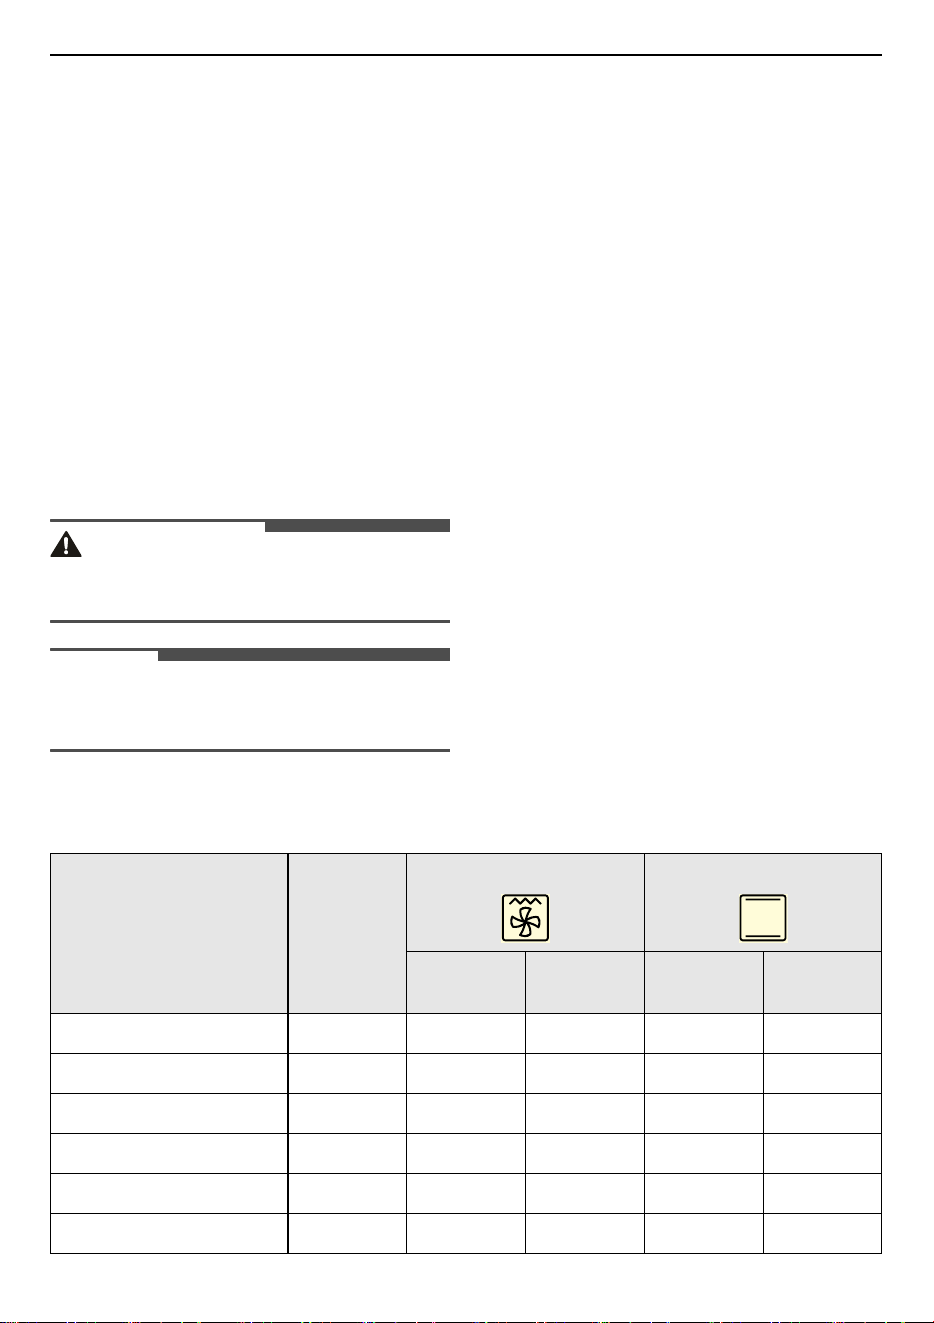
Recommended Baking Guide
The baking guide contains the temperature
settings, baking times and oven rack positions for
a selection of typical dishes.
• Temperatures and baking times should be
regarded as reference figures only. The actual
values depend on the type of preparation,
quality of ingredients and the baking tin in use.
• We recommend first selecting a lower
temperature and then increasing it if necessary,
for example if you want a higher degree of
browning or the baking time is too long.
• If you cannot work out the settings for a specific
recipe, simply use the settings for the most
similar recipe.
• When baking cakes on baking trays or in tins on
more than one rack, the baking time may be
extended by 10-15 minutes.
• Foods with a high liquidity content (e.g. pizza,
fruit cakes, etc.) should be baked on a single rack
only.
• With cakes and baked items with different racks
of dough, uneven browning may take place
initially. In this case, do not alter the
temperature setting. The degree of browning
will even itself out over the baking process.
• For energy saving, use the residual heat for 8
minutes before you finish cooking.
NOTE
• Always count rack position from the bottom up.
Baking on a single oven rack
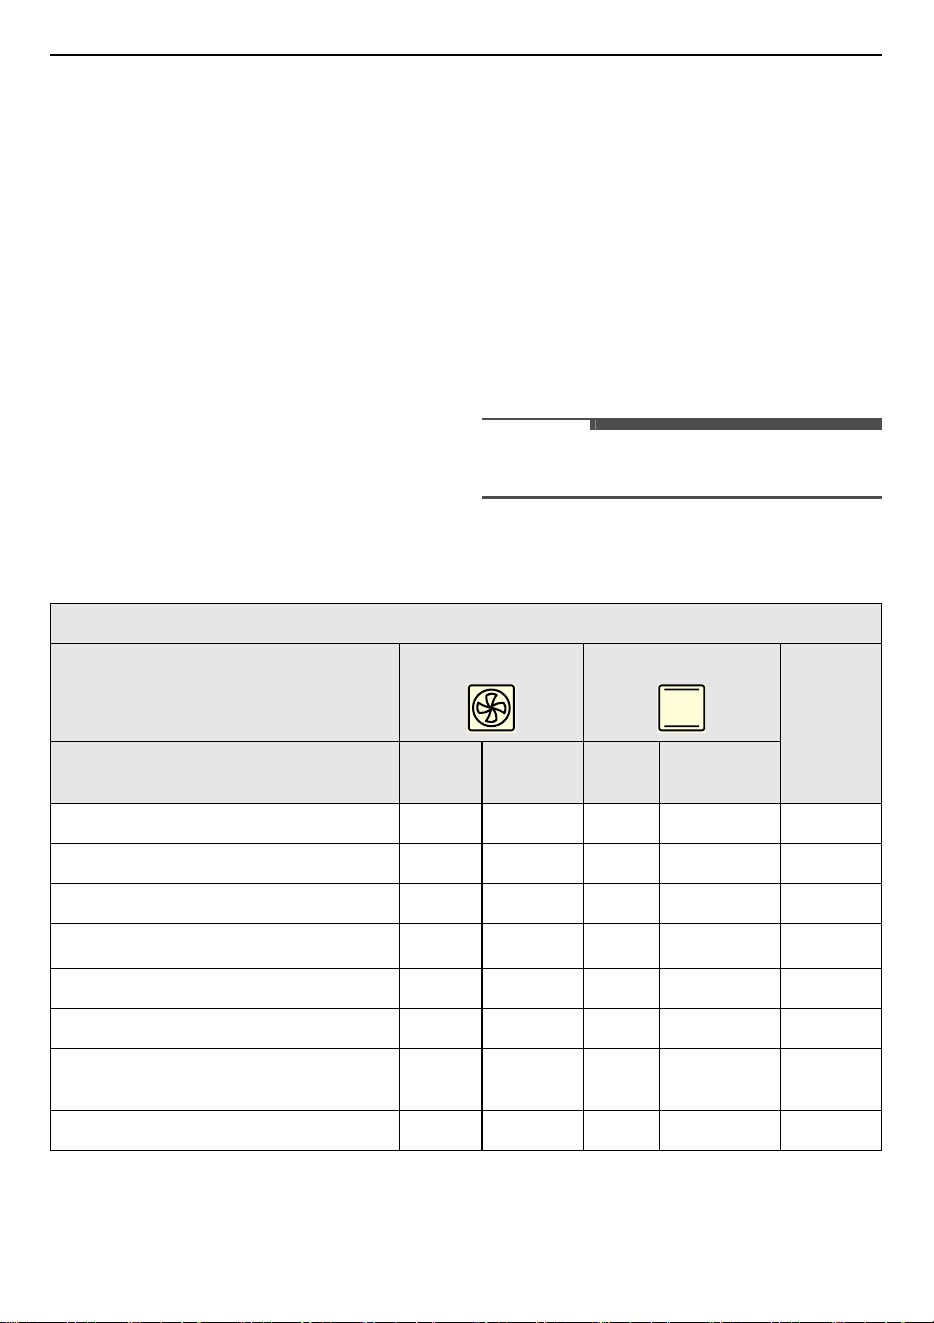
• Rack: Rack Position
Cakes in baking tins
Cook Mode
Hot Air Top Bottom Heat
Time
(minute)
Category Rack
Temp.
(℃)
Rack
Temp.
(℃)
Ring-shaped pound cake
2 150-160 2 160-180 50-70
Biscuits / pancakes
2 140-160 2 150-170 30-60
Sponge finger
2 150-160 2 160-180 25-40
Flan base – shortcrust pastry
3 170-180 2
190-210
*1
10-25
Flan base – cake mixture
3 150-170 2 170-190 20-25
Apple pie
3 160-180 1 170-190 65-75
Spicy cakes and flan base
(e.g. quiche lorraine)
2 160-180 2 190-210 30-70
Cheesecake
2 140-160 2 170-190 60-90

39
OPERATION
ENGLISH
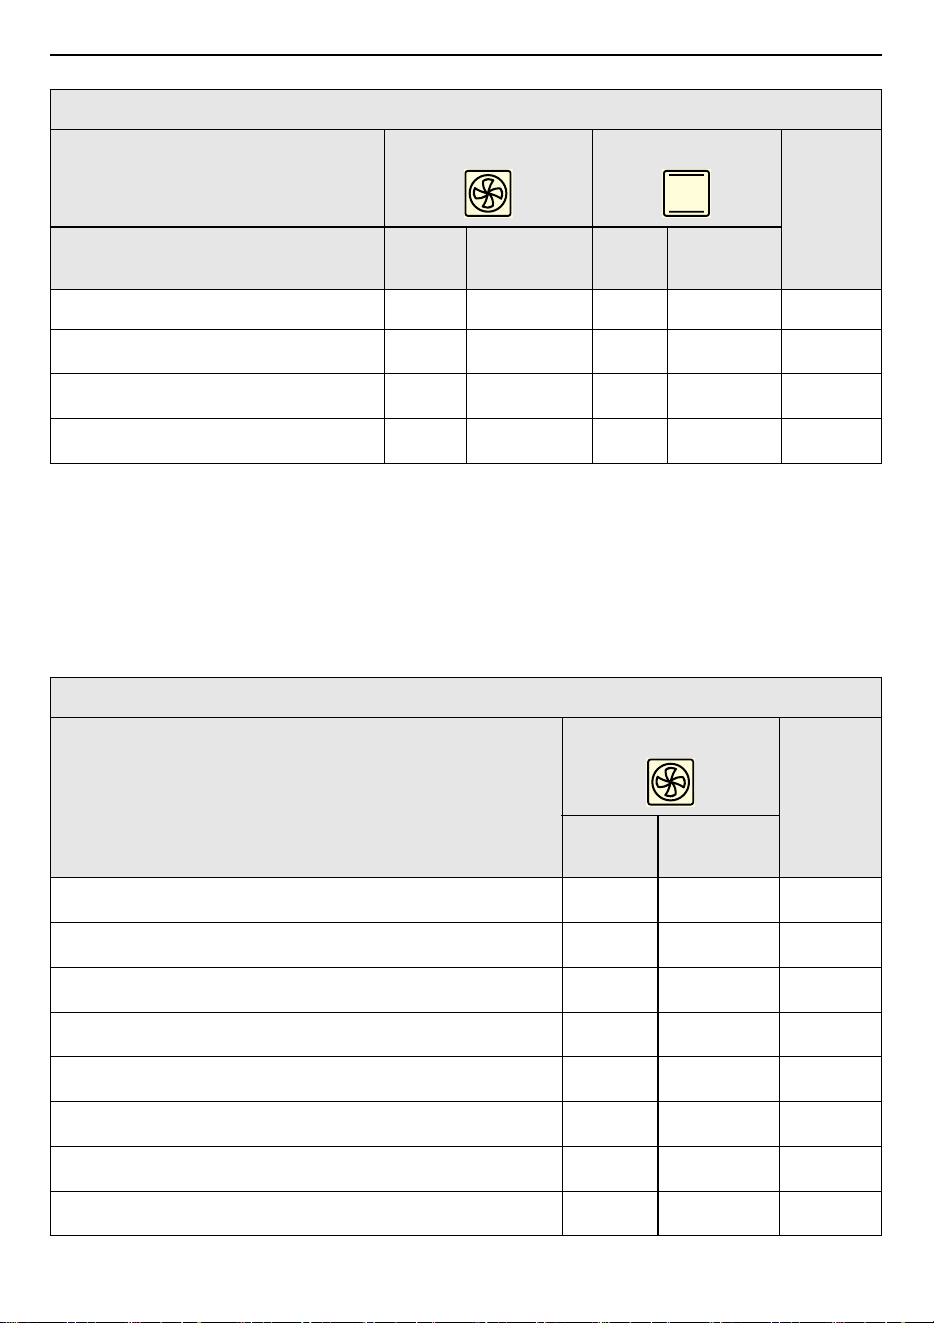
Cakes on baking tray
Cook Mode
Hot Air Top Bottom Heat
Time
(minute)
Category Rack
Temp.
(℃)
Rack
Temp.
(℃)
Bread plaits / larger cakes
3 160-170 4 170-190 30-40
Christmas stollen
3
150-170
*1
4
160-180
*1
40-60
Bread (rye bread)
Fermentation is required
2
180-200
*1
140-160
2
230
*1
160-180
20
30-60
Pie / eclair
3
160-170
*1
4 190-210 15-30
Swiss roll
3
150-170
*1
4
180-200
*1
10-20
Fruit cake with shortcrust pastry
3
160-170
*1
4
170-190
*1
40-80
Slices with topping / filling
e.g. quark, cream, sugar, almonds
--4
160-180
*1
40-80
Pizza (thick base)
*2*3
1 180-200 1
190-210
*1
30-60
Pizza (thin base)
*2
1 200-220 1
230
*1
10-25
Unleavened bread
1 200-220 1
230
*1
08-15
Swiss flan
1 180-200 1 210-230 35-50
Biscuits
Cook Mode
Hot Air Top Bottom Heat
Time
(minute)
Category Rack
Temp.
(℃)
Rack
Temp.
(℃)
Shortcrust biscuits
*2
3 150-160 4
170-190
*1
06-20
Iced biscuits
*2
3 140-150 4 160-180 10-40
Cake mixture biscuits
*2
3 150-160 4 170-190 15-20
Cakes and pastries with egg white,
meringues
3 80-100 4 100-120 120-150
40
OPERATION
*1 Preheat the oven.
*2 Always switch off
Rapid Preheat
when baking
on more than one oven rack.
*3 Use deep pan (or baking tray).
Baking on more than one oven rack
• Rack: Rack Position
Macaroons
3 100-120 4 120-140 30-60
Yeast dough biscuits
*2
3 160-170 4 170-190 20-40
Puff pastry cakes and pastries
3
160-180
*1
4
190-210
*1
20-30
Bread rolls
3
180-200
*1
4
180-220
*1
20-35
Biscuits
Cook Mode
Hot Air Top Bottom Heat
Time
(minute)
Category Rack
Temp.
(℃)
Rack
Temp.
(℃)
Cakes /cakes and pastries on baking sheet
Category
Hot Air
Time
(minute)
Rack
Temp.
(℃)
Pie / eclair
*2
2, 4
160-180
*1
35-60
Dry sponge cake with crumble topping
*2
2, 4 140-160 30-60
Shortcrust biscuits
*2
2, 4 150-160 15-35
Iced biscuits
*2
2, 4 140-150 20-60
Cake mixture biscuits
*2
2, 4 160-170 25-40
Cakes and pastries with egg white, meringues
*2
2, 4 80-100 130-170
Macaroons
*2
2, 4 100-120 40-80
Yeast dough biscuits
*2
2, 4 160-170 30-60
41
OPERATION
ENGLISH
NOTE
• This is optional for products with two trays.
• Place the deep pan (or baking tray) on rack position
E
.
*1 Preheat the oven.
*2 Always switch off
Rapid Preheat
when baking
on more than one oven rack.
*3 Use deep pan (or baking tray).
Guide for strudel and baked dishes
• Rack: Rack Position
*1 Preheat the oven. *2 Always switch off
Rapid Preheat
when baking
on more than one oven rack.
Puff pastry cakes and pastries
*2
2, 4
170-180
*1
30-50
Bread rolls
*2
2, 4
180-190
*1
30-55
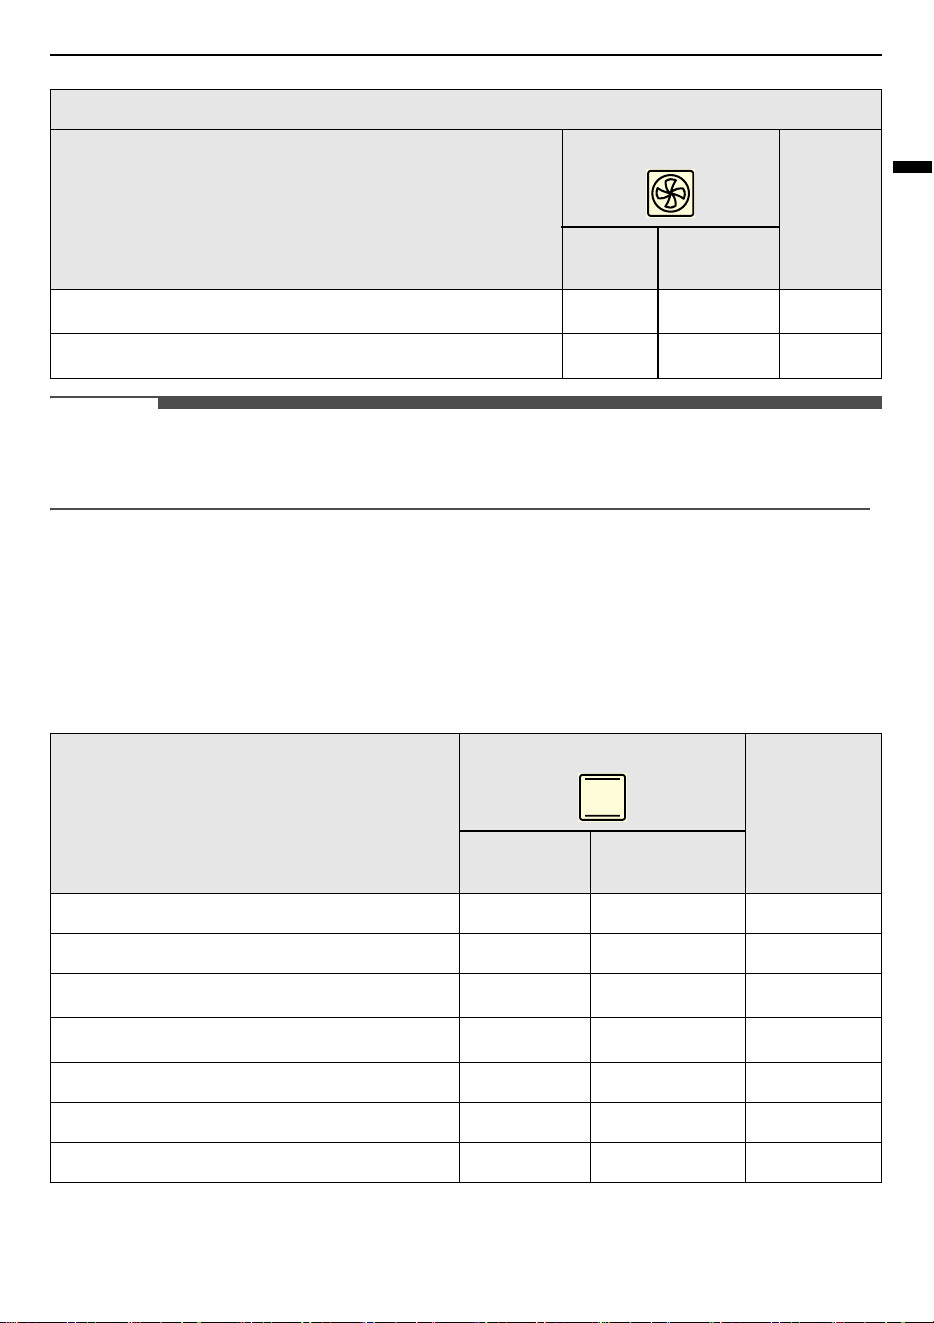
Cakes /cakes and pastries on baking sheet
Category
Hot Air
Time
(minute)
Rack
Temp.
(℃)
Category
Top Bottom Heat
Time
(minute)
Rack
Temp.
(℃)
Baked Pasta
1 180-200 45-60
Lasagne
1 180-200 30-60
Baked Vegetables
1
200-220
*1
15-30
Pizza Baguette
1
200-220
*1
15-30
Soufflé
1 180-200 20-50
Fish Pie
1 180-200 30-60
Stuffed Vegetables
1 180-200 30-60
42
OPERATION
*3 Use deep pan (or baking tray).
Guide for frozen ready–made dishes
• Rack: Rack Position
NOTE
• Turn chips 2 or 3 times when heating.
• When heating frozen dishes, the baking tray may bend out of shape because of the great difference in
the temperature of the frozen food and the oven. Trays normally return to their original shape once they
have cooled down.
Tips for baking
Category
Top Bottom Heat
Time
(minute)
Rack
Temp.
(℃)
Frozen pizza
3 Follow instructions on pack. Follow instructions on pack.
Baguette
3 Follow instructions on pack. Follow instructions on pack.
Fruit Cake Base
3 Follow instructions on pack. Follow instructions on pack.
Chips
3 200-220 15-25
Results of Baking Possible Cause Solution
The cake base is too light Wrong oven rack position
Use a dark baking tin or put the
cake one rack lower down.
Cake collapses
(turns lumpy, soggy)
Oven temperature too high
Set the temperature slightly
lower.
Baking time too short
Set a longer baking time. The
baking time cannot be reduced
by setting a higher temperature.
Mixture contains too much
liquid
Use less liquid. Follow
instructions for dough mixing
times, especially when using
kitchen appliances.
Cakes are too dry
Oven temperature too low
Next time set a slightly higher
temperature.
Baking time too long
Set a slightly shorter baking
time.

43
OPERATION
ENGLISH
Cakes are browned unevenly
Baking temperature too high
and baking time too short
Set a slightly lower baking
temperature and a slightly
higher baking time.
Mixture unevenly distributed
Distribute the mixture evenly
over the baking tray/tin.
Baking time too long Temperature too low
Next time set a slightly higher
temperature.
Results of Baking Possible Cause Solution
44
OPERATION
Roasting
When roasting, use the
Roasting
or the
Top
Bottom Heat
mode.
The roasting guide contains the required
temperatures, roasting times and oven rack
positions for various kinds of meat. The figures
stated are approximate figures only.
• We recommend cooking meat and fish weighing
over 1 kg in the oven.
• For lean meat and fish, use
Top Bottom Heat
.
For all other kinds of meat we recommend
Roasting
mode.
• Add a little liquid to prevent roasting juices or fat
from getting burned onto the pan surfaces.
• Turn the food over after about half or two thirds
of the cooking time.
WARNING
• Allow the oven to cool down enough to ensure
there is no risk of burning yourself.
NOTE
• This roasting guide is intended as a guide only,
individual tastes and cuts of meat will vary.
Setting Roasting Mode
1) Press
Manual Cook
in the
Main Menu
screen.
2) Select
Roasting
in the cooking mode screen.
3) Press
Temp.
to set the desired cooking
temperature. Press
J
or
K
to raise or lower
the numbers, then press
!
to save the
settings.
You can also use the number pad icon to set
the cooking temperature directly, then press
OK
.
4) If desired, press
Time
.
And press
Cook Time
or
Cooking ends at.
to
set the cook time or cooking end time. Press
J
or
K
to raise or lower the numbers, then
press
!
to save the settings.
You can also use the number pad icon to set
the cooking time directly, then press
OK
.
5) Press the
Start/Stop
button on the control
panel. The oven starts to preheat.
6) If the cook time is set, the remaining time
appears in the display. If a cooking end time is
set, the start time appears in the display.
7) A chime sounds once preheating is complete.
8) A chime sounds at the end of the set cook time
and a notification appears in the display. Open
the oven door and remove the food.
Recommended Roasting Guide
Food
Rack
Position
Roasting Top Bottom Heat
Temp. (℃)
*1
Time
(minute)
Temp. (℃)
*1
Time
(minute)
Beef
(approx. 1 kg) 2 190 50-70 200 70-90
Venison
(approx. 1 kg) 2 180 75-100 200-230 100-120
Leg of lamb
(approx. 1 kg) 2 180 110-130 200 150
Poultry
(approx. 1 kg) 2 210 50-60 200-220 70-90
Poultry
(approx. 2 kg) 2 200 60-80 200-220 110-120
Poultry
(approx. 4 kg) 2 180-190 120-140 190-210 130-150
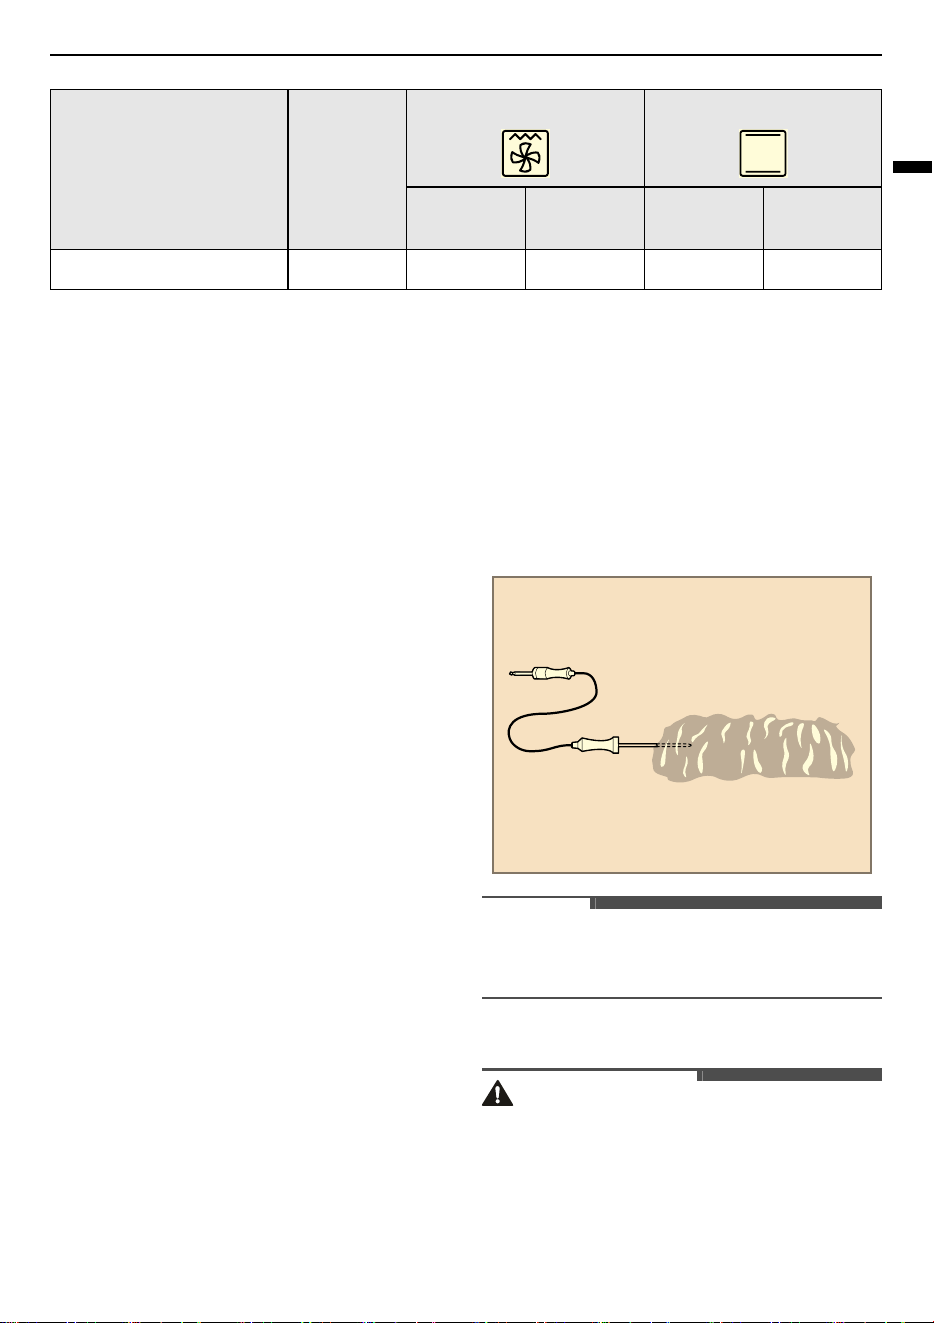
45
OPERATION
ENGLISH
*1 Set the pot roasting temperature 20 °C higher.
Tips for Roasting
• For better roasting results, baste joints and
poultry with their own juices a number of times
during the roasting process.
• Use heat resistant dishes when roasting (follow
manufacturer’s instructions).
• Stainless steel roasting pans are only of limited
use, as they reflect the heat to a very large
extent.
• When using dishes with plastic handles, ensure
that the handles are heat resistant (follow
manufacturer’s instructions).
• Large items for roasting or a number of items
can be placed directly on the wire grill above the
deep pan (or baking tray) (e.g. turkey, goose, 3~4
chickens, 3~4 knuckles of veal).
• Lean meat should be roasted in a roasting tray
with a lid (e.g. veal, braised beef, deep frozen
meat). This keeps the juices in the meat.
• Pour enough water into the deep pan (or baking
tray) to prevent smoke generation when you use
roasting mode.
• Clean the oven as soon as possible after use if
you are roasting in an open-topped tin or dish. It
is easier to remove fat splashes when the oven is
still warm.
Probe Mode (Model
WSED7667M)
The probe accurately measures the internal
temperature of meat, poultry and casseroles.
Always unplug and remove the probe from the
oven before removing food. Before using, insert
the probe into the center of the thickest part of
meat or into the inner thigh or breast of poultry,
away from fat or bone. Place food in the oven and
connect the meat probe to the jack. Keep the probe
as far away from heat sources as possible.
• The probe can be used in the
Hot Air
,
Top
Bottom Heat
or
Roasting
modes.
• For thin cuts of meat, insert probe in thickest
side of meat.
NOTE
• Only use the recommended probe temperature
for this oven model.
Using the Meat Probe Feature
CAUTION
• Always use an oven mitt to remove the
temperature probe. Do NOT touch the grilling
element. Failure to follow this warning can result
in severe personal injury.
• To avoid damage to the meat probe, do not use
tongs to pull on the probe when removing it.
Whole fish
(approx. 1.5 kg) 2 160-180 35-55 200-220 35-55
Food
Rack
Position
Roasting Top Bottom Heat
Temp. (℃)
*1
Time
(minute)
Temp. (℃)
*1
Time
(minute)
46
OPERATION
CAUTION
• Do not store the meat probe in the oven.
NOTE
• To avoid breaking the probe, make sure food is
completely defrosted before inserting the probe.
• See the Recommended Probe Temperature
Chart to set the probe temperature.
1) Insert the probe into the food.
2) Open the flap upwards and connect the probe
to the jack in the oven.
Probe connected
appears in the display and the probe icon
appears at the top of the display.
3) Select a desired cooking mode. The probe can
be used with
Hot Air
,
Top Bottom Heat
and
Roasting
modes.
4) Press
Temp.
to set the desired cooking
temperature. Press
J
or
K
to raise or lower
the numbers, then press
!
to save the
settings.
You can also use the number pad icon to set
the cooking temperature directly, then press
OK
.
• The default probe temperature is 65 ℃, but
can be changed to any temperature
between 30 ℃ and 99 ℃ in step of 1 ℃.
5) If desired, press
Time
to set the cooking end
time.
Press
J
or
K
to raise or lower the numbers,
then press
!
to save the settings.
You can also use the number pad icon to set
the cooking time directly, then press
OK
.
6) Press the
Start/Stop
button on the control
panel. If a delayed start time has been set, the
start time appears in the display.
7) When the set probe temperature is reached,
the oven shuts off automatically.
Changing the Probe Temperature
while Cooking
1) Press
Edit
in the display to bring up the Cook
Settings screen.
2) Adjust the settings as desired.
3) Press the
Start/Stop
button on the control
panel.
To Stop Cooking
Press the
Start/Stop
button on the control panel,
then press
Stop
in the display.
NOTE
• Press the
Start/Stop
button on the control panel
at any time to cancel a cooking operation.
• While the meat probe mode is running,
EasyClean does not respond.
Probe icon
Number pad icon
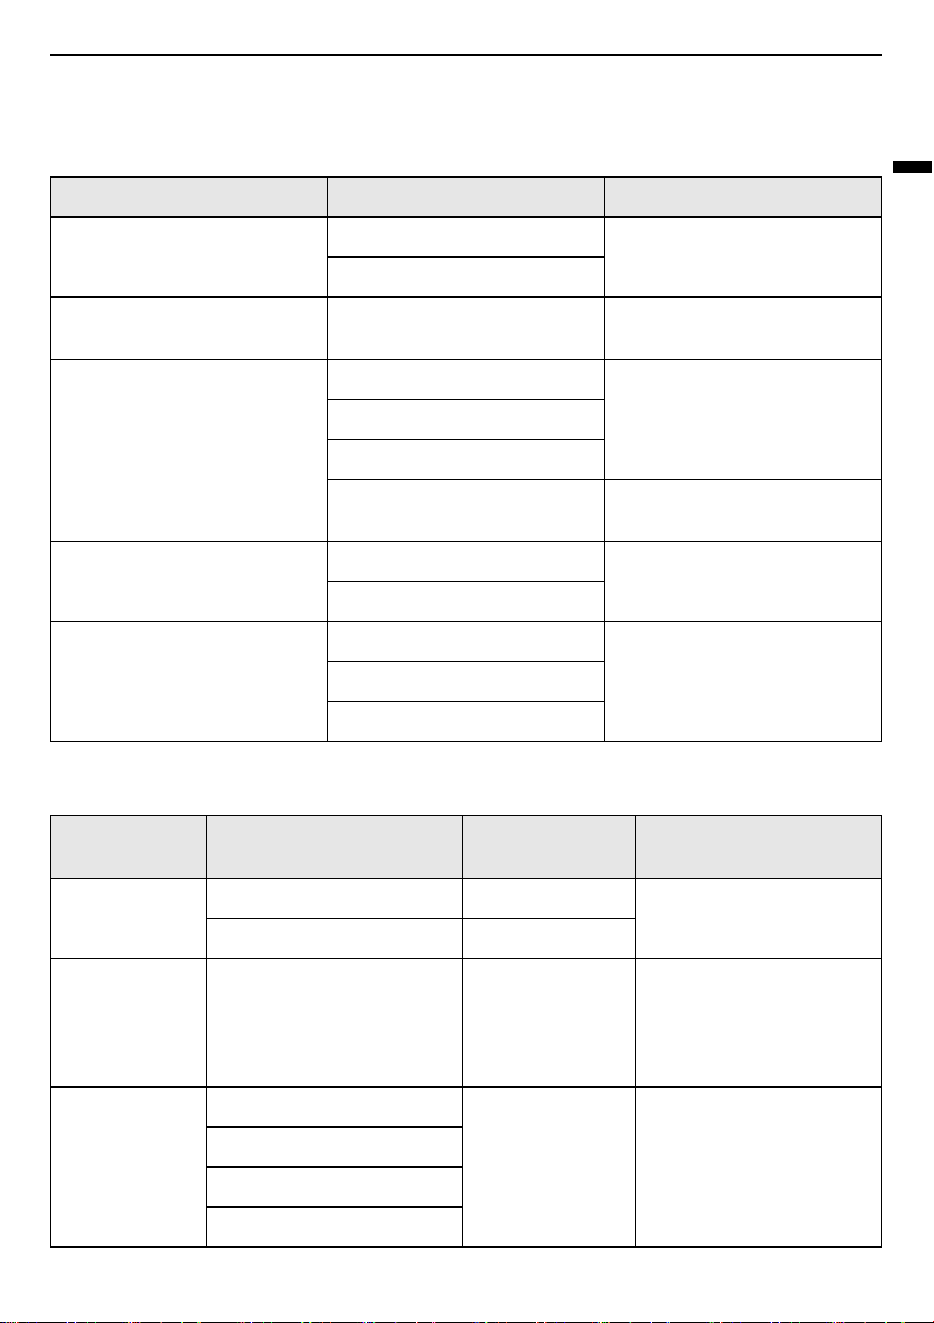
47
OPERATION
ENGLISH
Recommended Probe Guide
Recommended Probe Placement Chart
Recommended Probe Temperature Chart
Category Examples of Food Probe Placement
Ground Meat & Meat Mixtures
Meatloaf
Insert in the thickest part
Meatballs
Fresh Beef, Veal, Lamb Steaks, Roasts, Chops
Insert in the thickest part, away
from bone, fat and gristle
Poultry
Whole Chicken or Turkey
Insert in the thickest part of
thigh, avoiding bone
Poultry Breasts or Roasts
Duck, Goose, Pheasant
Stuffing (Alone or in Bird)
Insert in the thickest part of the
dish
Leftovers & Casseroles
Leftovers
Insert in the thickest part of the
dish
Casseroles
Seafood
Whole Fish
Insert in the thickest part of the
fish
Fish Fillet (Side of Fish)
Fish Steaks or Portions
Category Examples of Food
Target Internal
Temp.
Desired Doneness
Ground Meat &
Meat Mixtures
Meatloaf 71 ℃
-
Meatballs 74 ℃
Fresh Beef, Veal,
Lamb
Roasts 63 ℃
Rare: 49 ℃
Medium rare: 52 ℃
Medium: 54 ℃
Medium well done: 57 ℃
Well done: 60 ℃
Poultry
Whole Chicken or Turkey
74 ℃ -
Poultry Breasts or Roasts
Duck, Goose, Pheasant
Stuffing (Alone or in Bird)

48
OPERATION
Grilling
For grilling, you have a choice of 2 different
operating modes. Preheat for 5 minutes when
grilling.
• For larger quantities of flat food for grilling, for
top-baking in large tins. Choose power levels
(
Low
,
Medium
,
High
), as suitable for the food
being grilled.
• For smaller quantities of flat food for grilling, for
top-baking in small tins. Choose power levels
(
Low
,
Medium
,
High
), as suitable for the food
being grilled.
WARNING
• Exposed parts of the oven can become hot
during grilling. Keep children at a distance.
NOTE
• Close the door to set the Grill function. If the
door is open, the Grill function cannot be set. If
the door is open, the grill heater turns off. Once
the door is closed, the grill heater turns back on
automatically.
Setting the Grill Mode
1) Press
Manual Cook
in the
Main Menu
screen.
2) Select
Large Grill
or
Small Grill
in the cooking
mode screen.
3) Select the desired temperature:
Low
,
Medium
, or
High
.
4) If desired, press
Time
.
And press
Cook Time
or
Cooking ends at.
to
set the cook time or cooking end time. Press
J
or
K
to raise or lower the numbers, then
press
!
to save the settings.
You can also use the number pad icon to set
the cooking time directly, then press
OK
.
5) Press the
Start/Stop
button on the control
panel.
6) Let the oven preheat for approximately 5
minutes before cooking the food.
7) If the cook time is set, the remaining time
appears in the display. If a cooking end time is
set, the start time appears in the display.
8) Press the
Start/Stop
button on the control
panel to cancel at any time or when cooking is
complete.
Changing the Grill Settings
1) Press
Edit
in the display to bring up the Cook
Settings screen.
2) Adjust the settings using scroll function.
3) Press the
Start/Stop
button on the control
panel.
To Stop Cooking
Press the
Start/Stop
button on the control panel,
then press
Stop
in the display.
Leftovers &
Casseroles
Leftovers
74 ℃ -
Casseroles
Seafood
Whole Fish
63 ℃ -Fish Fillet (Side of Fish)
Fish Steaks or Portions
Category Examples of Food
Target Internal
Temp.
Desired Doneness

49
OPERATION
ENGLISH
Recommended Grilling Guide
The grilling times are intended as approximate values only. The actual times may vary depending on the
quality of the actual meat or fish. Grilling is particularly suitable for cooking flat pieces of meat and fish.
Turn the grilled food over about half way through the cooking time.
Always count oven rack position from the bottom up.
*1 Wire grill or deep pan or baking tray.
NOTE
• Use rack position
D
or
E
for grilling flat pieces of meat.
Tips for Reducing Smoke
Due to the intense heat associated with grilling, it is normal to experience smoke during the cooking
process. This smoke is a natural byproduct of searing and should not cause you to worry. If you are
experiencing more smoke than you are comfortable with, use the following tips to reduce the amount of
smoke in your oven.
• Always use a griller pan. Do not use saute pans or regular baking sheets for safety reasons.
• The griller pan should always be thoroughly cleaned and at room temperature at the beginning of
cooking.
• ALWAYS run your cooktop ventilation system or vent hood during grilling.
• Keep the interior of your oven as clean as possible. Leftover debris from prior meals can burn or catch
fire.
• Avoid fatty marinades and sugary glazes. Both of these will increase the amount of smoke you
experience. If you would like to use a glaze, apply it at the very end of cooking.
• If you are experiencing significant smoke with any food item, consider:
- Lowering the griller to the
Low
setting.
- Lowering the rack position to cook the food farther away from the griller.
- Using the
High
grill setting to achieve the level of searing you desire, and then either switching to the
Low
grill setting, or switching to the
Medium
grill setting.
• As a rule, fattier cuts of meat and fish will produce more smoke than leaner items.
Food Rack Position
Large Grill Step 3 (min.)
1st Side 2nd Side
Rissoles 5 8-10 6-8
Beef or Veal Steaks 5 10-15 10-15
Beef Fillet
(1 kg approx.)
4 10-12 10-12
Toast
*1
42-42-4
Toast with Topping 4 6-8 -

50
OPERATION
• Adhere to the recommended grill settings and cooking guidelines in the chart on the following page
whenever possible.
Air Fry
The
Air Fry
function is specially designed for oil-
free frying.
NOTE
• No preheating is required when using the
Air
Fry
mode.
• If cooking multiple batches, the later batches
may take less time to cook.
• Wet batters and coatings will not crisp or set
when using the
Air Fry
mode.
Setting Air Fry Mode
1) Press
Manual Cook
in the
Main Menu
screen.
2) Select
Air Fry
in the cooking mode screen.
3) Press
Temp.
to set the desired cooking
temperature. Press
J
or
K
to raise or lower
the numbers, then press
!
to save the
settings.
You can also use the number pad icon to set
the cooking temperature directly, then press
OK
.
4) If desired, press
Time
.
And press
Cook Time
or
Cooking ends at.
to
set the cook time or cooking end time. Press
J
or
K
to raise or lower the numbers, then
press
!
to save the settings.
You can also use the number pad icon to set
the cooking time directly, then press
OK
.
5) Press the
Start/Stop
button on the control
panel. The oven starts to preheat.
6) If the cook time is set, the remaining time
appears in the display. If a cooking end time is
set, the start time appears in the display.
7) A chime sounds at the end of the set cook time
and a notification appears in the display. Open
the oven door and remove the food.
To Stop Cooking
1) Press the
Start/Stop
button on the control
panel, then press
Stop
in the display.
Tips for Air Fry
• For best results, cook food on a single rack
placed in positions suggested in the chart in this
manual.
• Spread the food out evenly in a single layer.
• Use either an air fry tray or a dark baking tray
with no sides or short sides that does not cover
the entire rack. This allows for better air
circulation.
• If desired, spray the baking tray or air fry tray
with a pan spray. Use an oil that can be heated to
a high temperature before smoking, such as
avocado, grapeseed, peanut or sunflower oil.
• Place a foil-lined baking tray on a rack in position
1 to catch the oil falling from the food. For high-
fat foods like chicken wings, add a few sheets of
parchment paper to absorb the fat.
• Check food often and shake it or turn it over for
crisper results.
• Prepared frozen foods may cook faster with the
Air Fry mode than stated on the package. Reduce
the cooking time by about 20 percent, check
food early, and adjust cooking time as needed.
• Use a food thermometer to make sure food has
reached a safe temperature for consumption.
Eating undercooked meats can increase your
risk of food-borne illness.
• For the crispiest results, dredge fresh chicken
wings or tenders in seasoned flour. Use 1/3 cup
flour for 2 pounds of chicken.
Recommendations When Air Frying
High-Fat Foods
Foods high in fat will smoke when using the Air Fry
mode. For best results, follow these
recommendations when air frying foods that are
high in fat, such as chicken wings, turkey legs, lamb
chops, ribs, duck breasts, or some plant-based
proteins.

51
OPERATION
ENGLISH
CAUTION
• Never cover slots, holes, or passages in the oven
bottom or cover entire racks with materials such
as aluminum foil. Doing so blocks airflow
through the oven and can result in carbon
monoxide poisoning. Aluminum foil can also
trap heat, causing a fire hazard or poor oven
performance.
• Open a window or sliding glass door, if possible,
to make sure the kitchen is well-ventilated.
• Keep the oven free from grease buildup. Wipe
down the interior of the oven before and after air
frying (once the oven has cooled).
• Run oven cleaning cycles (EasyClean or Pyrolysis)
regularly, depending on how often and what
types of food you Air Fry.
• Avoid opening the oven door more than
necessary to help maintain the oven
temperature, prevent heat loss, and save
energy.
• Air-frying fresh chicken pieces such as wings or
drumsticks with the skin left on can produce
smoke as the fat renders at high temperatures.
If the smoke is excessive, use the Roast mode
instead of Air Fry.
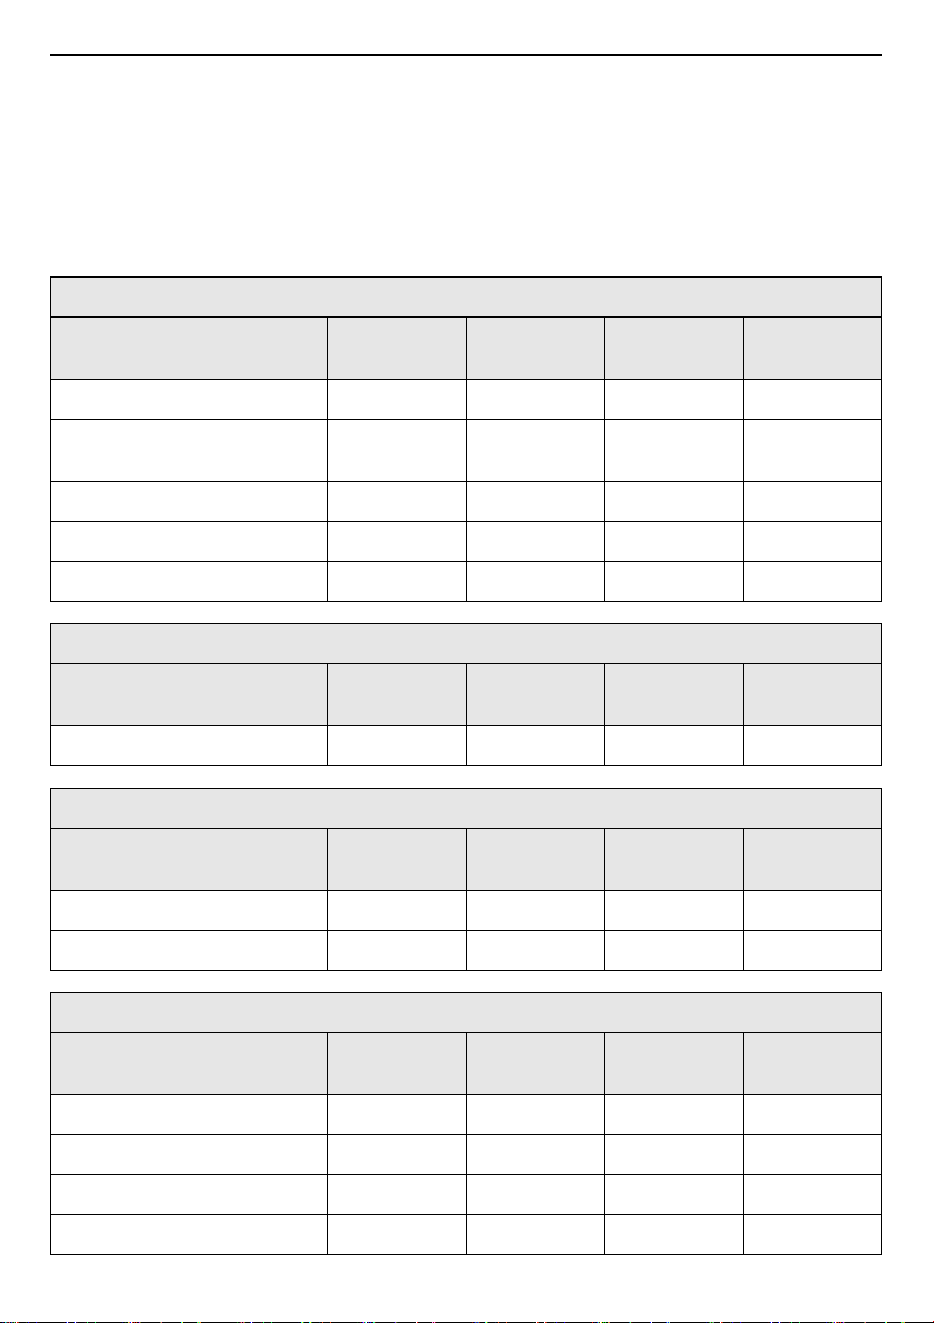
52
OPERATION
Recommended Air Frying Guide
Cooking on a baking tray
• Arrange food evenly in a single layer.
• Place the baking tray on rack position
C
.
• Flip food over during cooking to avoid burning it.
POTATOES-Frozen
Menu
Quantity
(kg)
Temp.
(℃)
Rack Position
Time
(minute)
Frozen french fries (Shoestring) 0.4 200 3 15-25
Frozen french fries (Crinkle cut,
10x10 mm)
0.8 200 3 20-30
Frozen sweet potato fries 0.6 200 3 17-27
Frozen tater tots 1.0 220 3 17-27
Frozen hash browns 1.0 220 3 15-25
POTATOES-Fresh/Homemade
Menu
Quantity
(kg)
Temp.
(℃)
Rack Position
Time
(minute)
Homemade potato wedges 1.3 230 3 25-35
CHICKEN-Frozen
Menu
Quantity
(kg)
Temp.
(℃)
Rack Position
Time
(minute)
Frozen chicken nuggets, Crispy 0.6 200 3 15-25
Frozen chicken strips 0.8 210 3 20-30
CHICKEN-Fresh, Skin on
Menu
Quantity
(kg)
Temp.
(℃)
Rack Position
Time
(minute)
Fresh chicken wings 1.2 230 3 27-37
Fresh chicken drumsticks 2.0 230 3 35-45
Thighs 1.2 230 3 27-37
Breasts 1.2 230 3 27-37
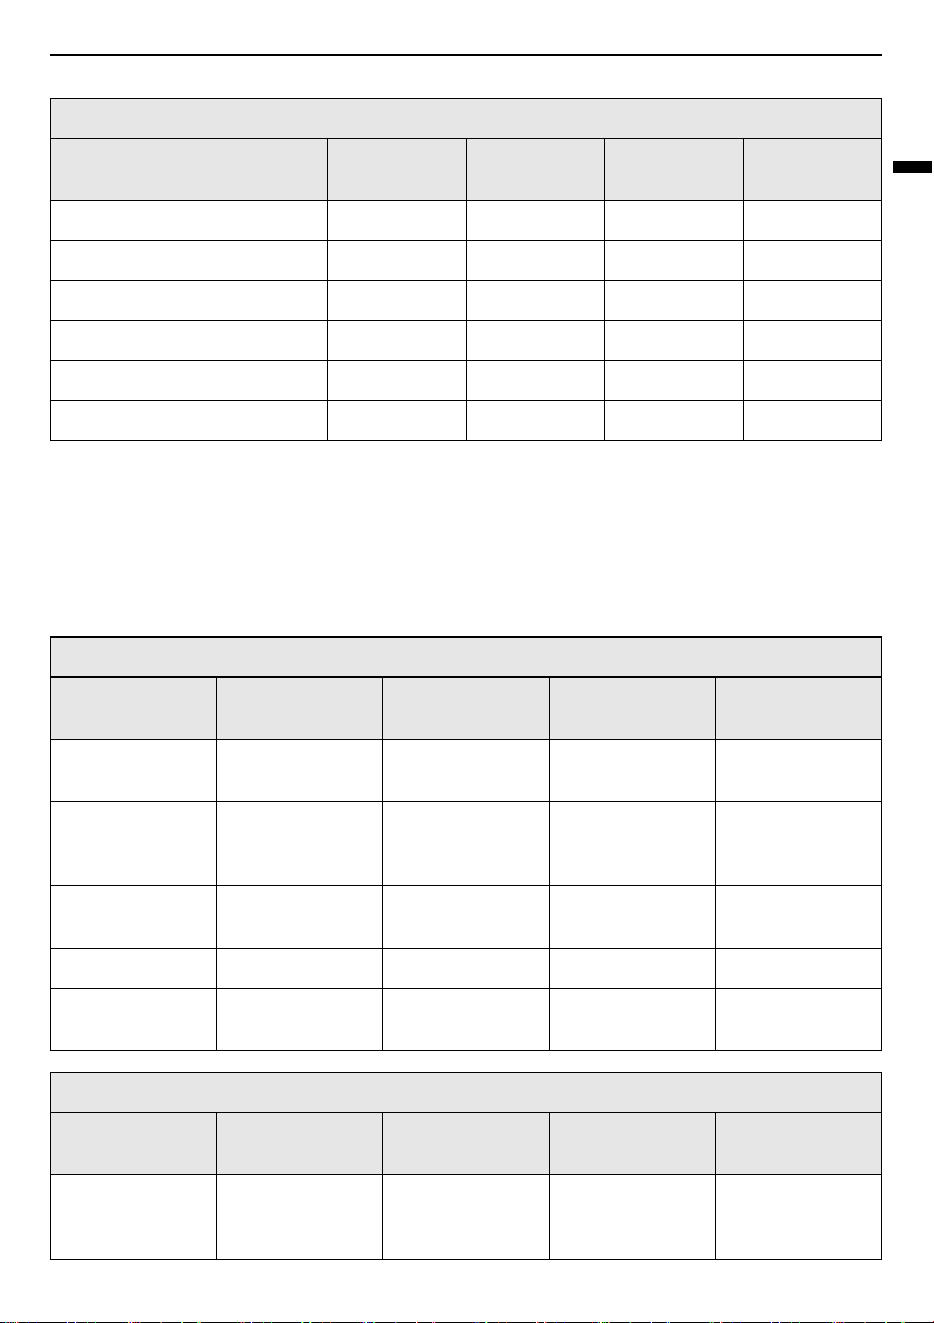
53
OPERATION
ENGLISH
Cooking on an air fry tray
• Arrange food evenly in a single layer.
• Put a foil-lined baking pan on rack position
B
to catch drips. If needed, add parchment paper to absorb
oil and reduce smoking.
• Flip food over during cooking to avoid burning it.
OTHER
Menu
Quantity
(kg)
Temp.
(℃)
Rack Position
Time
(minute)
Frozen onion rings, Breaded 0.5 200 3 15-25
Frozen spring rolls (20 g each) 1.2 210 3 20-30
Frozen coconut shrimps 0.7 200 3 20-30
Fresh scallops on the half shell 1.0 210 3 15-25
Fresh shrimps 1.0 200 3 20-30
Mixed vegetables 1.0 220 3 17-27
POTATOES-Frozen
Menu
Quantity
(kg)
Temp.
(℃)
Rack Position
Time
(minute)
Frozen french
fries (Shoestring)
0.4 200 3 15-25
Frozen french
fries (Crinkle cut,
10x10 mm)
0.8 200 3 20-30
Frozen sweet
potato fries
0.6 200 3 17-27
Frozen tater tots 1.0 220 3 17-27
Frozen hash
browns
1.0 220 3 15-25
POTATOES-Fresh/Homemade
Menu
Quantity
(kg)
Temp.
(℃)
Rack Position
Time
(minute)
Homemade
french fries
(10x10 mm)
0.6 220 3 20-30
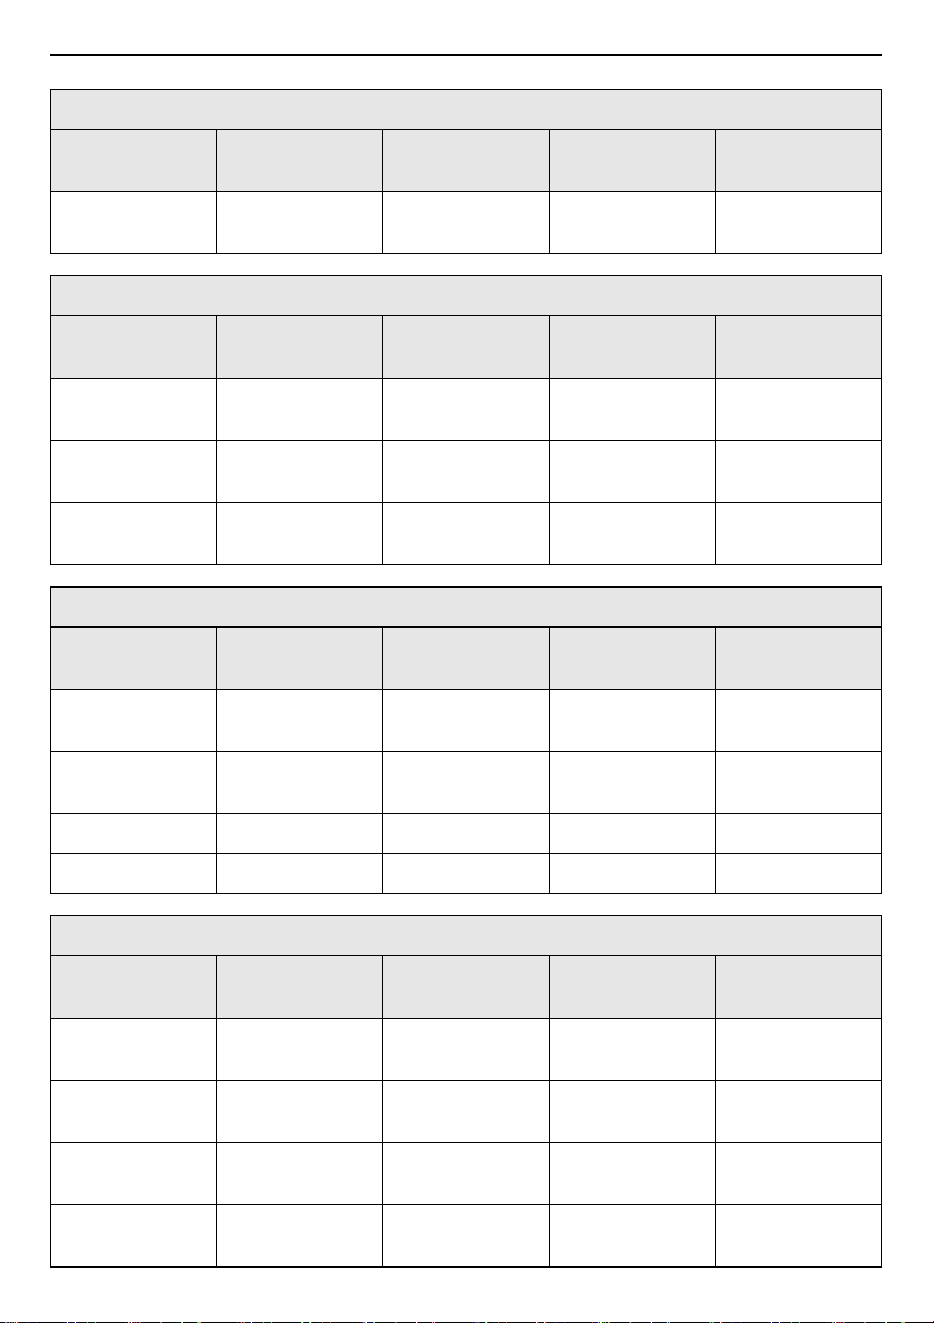
54
OPERATION
Homemade
potato wedges
1.3 230 3 25-35
CHICKEN-Frozen
Menu
Quantity
(kg)
Temp.
(℃)
Rack Position
Time
(minute)
Frozen chicken
nuggets, Crispy
0.6 200 3 15-25
Frozen chicken
strips
0.8 210 3 20-30
Frozen hot wings,
Bone-in
1.2 200 3 30-40
CHICKEN-Fresh, Skin on
Menu
Quantity
(kg)
Temp.
(℃)
Rack Position
Time
(minute)
Fresh chicken
wings
1.2 230 3 27-37
Fresh chicken
drumsticks
2.0 230 3 35-45
Thighs 1.2 230 3 27-37
Breasts 1.2 230 3 27-37
OTHER
Menu
Quantity
(kg)
Temp.
(℃)
Rack Position
Time
(minute)
Frozen onion
rings, Breaded
0.5 200 3 15-25
Frozen spring
rolls (20 g each)
1.2 210 3 20-30
Frozen coconut
shrimps
0.7 200 3 20-30
Fresh scallops on
the half shell
1.0 210 3 15-25
POTATOES-Fresh/Homemade
Menu
Quantity
(kg)
Temp.
(℃)
Rack Position
Time
(minute)

55
OPERATION
ENGLISH
Air Sous-Vide (Model
WSED7665B)
This feature is only available on some models.
Air Sous-Vide
cooking uses air to cook foods "low
and slow." Use it to cook meat, fish, seafood,
poultry or vegetables. Food must be vacuum
packed in pouches.
It is not necessary to preheat the oven when using
Air Sous-Vide
.
Refer to the cooking guide for recommended
Air
Sous-Vide
settings.
Setting Air Sous-Vide Mode
1) Place the wire grill and place the sealed food
bag on it.
2) Press
Manual Cook
in the
Main Menu
screen.
3) Select
Air Sous-Vide
in the cooking mode
screen.
4) Press
Temp.
to set the desired cooking
temperature. Press
J
or
K
to raise or lower
the numbers, then press
!
to save the
settings.
You can also use the number pad icon to set
the cooking temperature directly, then press
OK
.
5) If desired, press
Time
.
And press
Cook Time
or
Cooking ends at.
to
set the cook time or cooking end time. Press
J
or
K
to raise or lower the numbers, then
press
!
to save the settings.
You can also use the number pad icon to set
the cooking time directly, then press
OK
.
6) Press the
Start/Stop
button on the control
panel. The oven starts to preheat.
7) If the cook time is set, the remaining time
appears in the display. If a cooking end time is
set, the start time appears in the display.
8) A chime sounds at the end of the set cook time
and a notification appears in the display. Open
the oven door and remove the food.
To Stop Cooking
1) Press the
Start/Stop
button on the control
panel, then press
Stop
in the display.
Benefits of Air Sous-Vide
The lower temperatures and long cooking times
used in
Air Sous-Vide
cooking provide many
benefits.
•
Healthier
Compared to other cooking methods, Air Sous-
Vide retains most of the original nutrients in
food.
•
Safe and Convenient
The long cooking times used in Air Sous-Vide
cooking allow food to be pasteurized. Because
food is vacuum packed before cooking, the
unopened pouches can be quickly chilled then
easily stored after cooking.
•
Crisp and Moist Results
The fine temperature control of Air Sous-Vide
cooking is an excellent way to achieve the
perfect texture when cooking meat and poultry.
The low temperatures used retain more of the
moisture in food than conventional cooking
methods. After cooking, a final sear in a frying
pan adds the perfect crisp finish.

56
OPERATION
Recommended Air Sous-Vide Guide
The size, weight, thickness, starting temperature, and your personal preferences will affect operating
times. This guide is only for reference. Adjust cook time according to your preference.
• Rack: Rack Position
• Cook 30 minutes or 1 hour more if you use meats thicker than 2.5 cm.
• If you use larger cuts of meat, cut to match the recommended weight. Be careful not to put pouches of
meat too close to each other.
Defrosting
Use the Defrost
#
operating mode to defrost food.
Defrosting Dishes
• Remove the dish from its packaging, put it on a
plate and place the plate on the wire grill.
• Do not cover the dish with a plate or bowl, as this
can considerably extend the defrosting time.
• Do not use the liquid produced during
defrosting for cooking the dish to avoid the risk
of salmonella. Ensure that the liquid produced
during defrosting is free to run off the food onto
the plate or a baking pan if using the wire grill.
Oven Rack Position
For defrosting, use the wire grill on rack position
A
or
B
for larger dishes.
Setting Defrosting Mode
1) Press
Manual Cook
in the
Main Menu
screen.
2) Select
Defrost
in the cooking mode screen.
3) If desired, press
Time
.
And press
Cook Time
or
Cooking ends at.
to
set the cook time or cooking end time. Press
J
or
K
to raise or lower the numbers, then
press
!
to save the settings.
You can also use the number pad icon to set
the cooking time directly, then press
OK
.
4) Press the
Start/Stop
button on the control
panel. The oven starts to preheat.
5) The remaining time appears in the display. If a
cooking end time is set, the start time appears
in the display.
6) A chime sounds at the end of the set cook time
and a notification appears in the display. Open
the oven door and remove the food.
To Stop Cooking
1) Press the
Start/Stop
button on the control
panel, then press
Stop
in the display.
Food
Quantity
(each)
Temp.
(℃)
Rack
Time
(min.)
Min Target Max
Beef Steak
(Medium rare)
2.5 cm thick
0.3~0.5 kg
58 2 - 150 180
Chicken, Breasts
0.1~0.2 kg 67 2 - 120 180
Salmon
2.5 cm thick
0.1~0.2 kg
60 2 - 120 150
Asparagus
15~20 g 85 2 20 30 45

57
OPERATION
ENGLISH
Recommended Defrosting Guide
• Rack: Rack Position
Food
Weight
(kg)
Time
(minute)
Instructions
Chicken
1.0 100-140
Use the wire grille with the deep pan (or baking tray).
Turn the chicken after half of the time.
Meat
1.0 100-140
Turn the meat after half of the time or cover with tin foil.
0.5 90-120
Trout
0.15 25-35 Do not cover.
Strawberries
0.3 20-30 Do not cover.
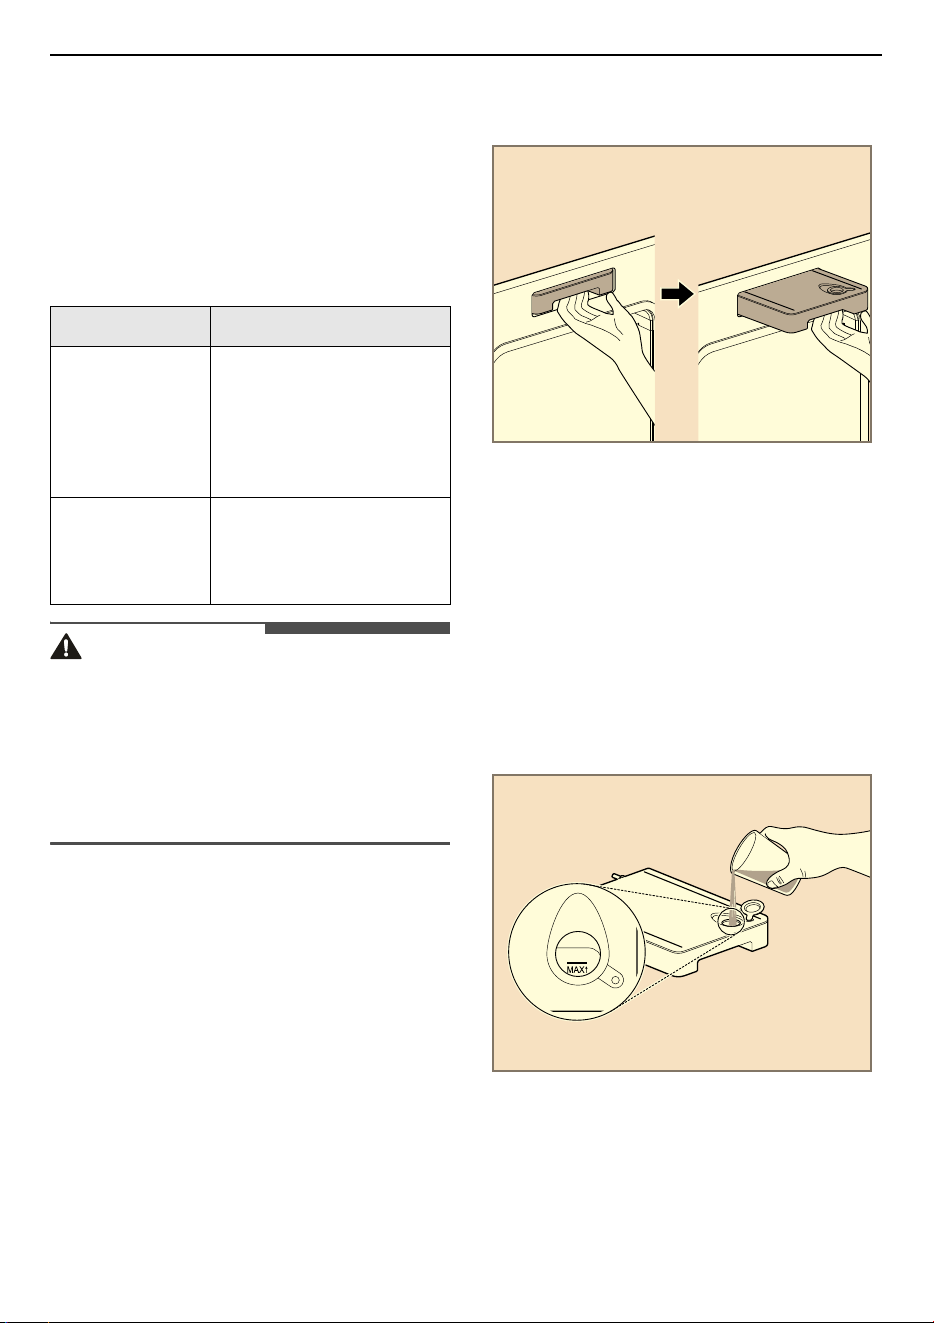
58
OPERATION
Steam Function
Steam cooking uses the moist heat of steam to
cook food. This is an ideal cooking method for
delicate food items such as seafood, which can lose
nutrients when boiled.
Steam Cook
modes may vary depending on the
appliance. Refer to the below table to see available
cooking modes.
CAUTION
• Take care when opening the oven door during or
after steam cooking. Hot steam can cause
scalding.
• After any steam cooking cycle, the drying
function will run automatically. It is normal to
hear the steam pump running during the drying
function.
Using the Water Tank
The water tank is located behind the control panel.
1) Press the
Water Tank
button on the control
panel.
• For Model WSED7667M, the control panel
automatically fully opens.
• For Model WSED7665B, the control panel
opens a little. Manually open the control
panel fully.
2) Remove the tank and place it on a flat surface.
3) Remove the tank cover or flip open the fill lid
at the front of the tank cover.
4) Fill the tank to the
Max
line. Use softened,
filtered water, if possible. Hard water may clog
the steam generator more quickly with scale
buildup.
Model Steam Cooking Modes
WSED7667M
Steam
,
Steam-Hot Air
,
Steam-Roasting
,
Steam-Baking
,
Steam-Regenerating
,
Sous-Vide
WSED7665B
Steam-Hot Air
,
Steam-Roasting
,
Steam-Baking
,
Steam-Regenerating
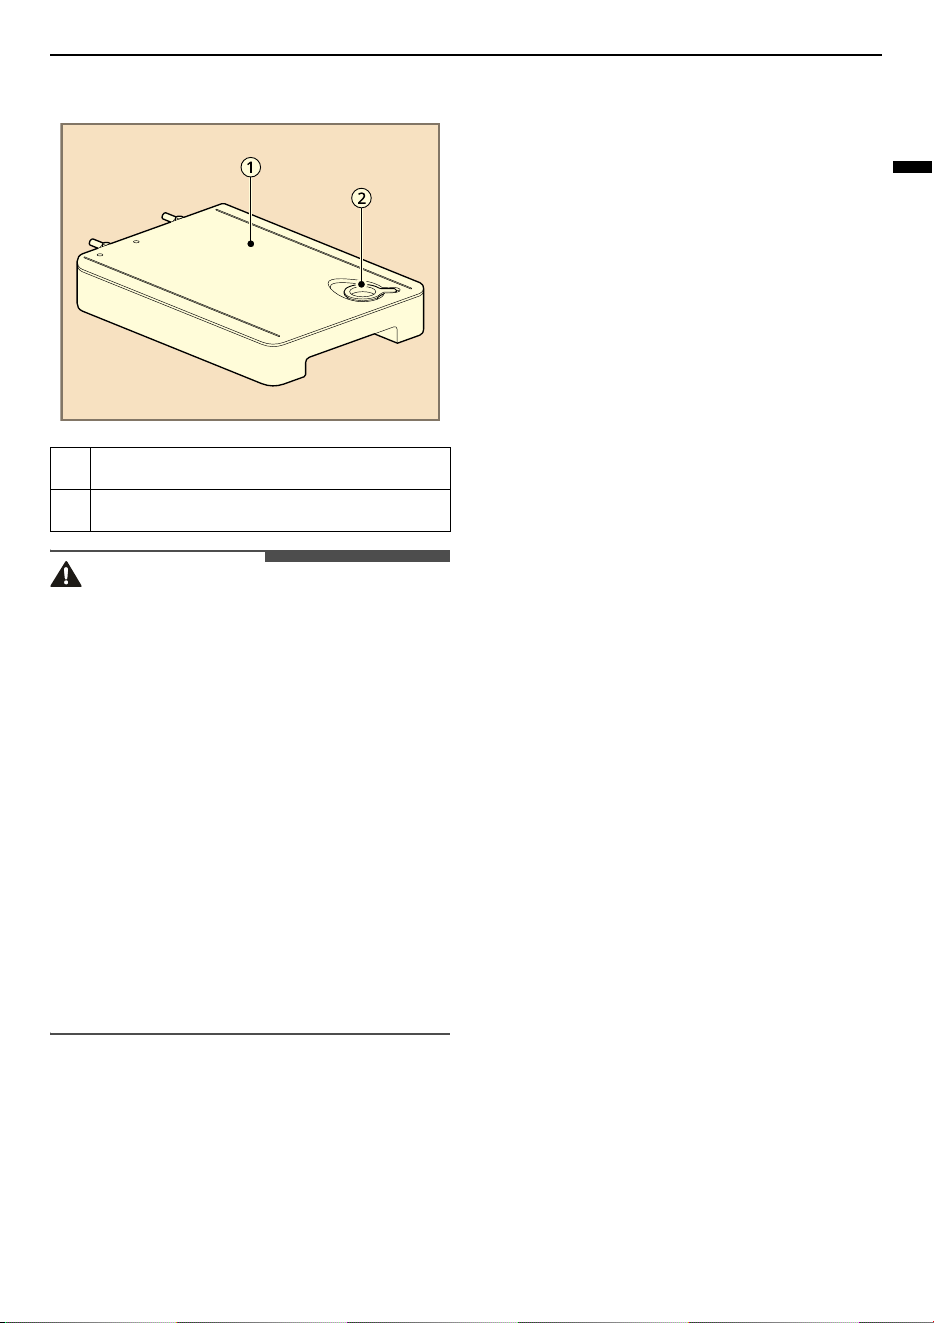
59
OPERATION
ENGLISH
5) Assemble the tank cover and the fill lid.
CAUTION
• Make sure the tank cover and fill lid are closed
before putting the tank in the oven.
• Use potable water only.
• Do not fill the water tank with any fluid or
mixture other than water.
• Do not fill the tank with hot water.
• Fill the water tank up to the line indicated on the
front.
• Do not tilt the water tank while it is full.
• Discard any remaining water and clean the
water tank after cooking.
• Use the water tank only for its intended purpose
of providing water for steam cooking.
• Monitor the water level in the tank and refill as
needed for steam cooking. Use oven mitts to
avoid burns when handling the hot tank.
6) Carefully insert the water tank into correct
position in the control panel, making sure to
keep the tank level while carrying it. If the tank
is not kept level, water will drain out of the
tubes in the back.
7) Close the control panel.
Steam Cook
Setting Steam-Hot Air
The
Steam-Hot Air
mode heats food gradually,
using heating element in the back wall and moist
steam heat. The oven can be programmed to cook
at any temperature from 30 ℃ to 250 ℃. Preset
temperature options start at 160 ℃.
1) Press
Steam Cook
in the
Main Menu
screen.
2) Press
Steam-Hot Air
.
3) Press
Steam Level
and select the desired
Steam Level
High
,
Medium
or
Low
.
• The
Steam Level
defaults to
High
unless
changed by the user.
4) Press
Temp.
to set the desired cooking
temperature. Press
J
or
K
to raise or lower
the numbers, then press
!
to save the
settings.
You can also use the number pad icon to set
the cooking temperature directly, then press
OK
.
5) If desired, press
Time
.
And press
Cook Time
or
Cooking ends at.
to
set the cook time or cooking end time. Press
J
or
K
to raise or lower the numbers, then
press
!
to save the settings.
You can also use the number pad icon to set
the cooking time directly, then press
OK
.
6) Press the
Start/Stop
button on the control
panel.
7) Once cooking is finished, allow oven to cool
completely, then wipe up any water on the
oven interior.
To Stop Cooking
1) Press the
Start/Stop
button on the control
panel, then press
Stop
in the display.
Setting Steam-Roasting
The
Steam-Roasting
mode is designed to quickly
roast poultry. The combination of intense heat
from the upper heating elements and steam
results in crispier food and shorter cooking times.
The Steam-Roasting mode is especially good for
medium sized poultry. The oven can be
programmed to cook at any temperature from 30
A
Tank cover
B
Fill lid

60
OPERATION
℃ to 250 ℃. Preset temperature options start at
190℃.
1) Press
Steam Cook
in the
Main Menu
screen.
2) Press
Steam-Roasting
.
3) Press
Temp.
to set the desired cooking
temperature. Press
J
or
K
to raise or lower
the numbers, then press
!
to save the
settings.
You can also use the number pad icon to set
the cooking temperature directly, then press
OK
.
4) If desired, press
Time
.
And press
Cook Time
or
Cooking ends at.
to
set the cook time or cooking end time. Press
J
or
K
to raise or lower the numbers, then
press
!
to save the settings.
You can also use the number pad icon to set
the cooking time directly, then press
OK
.
5) Press the
Start/Stop
button on the control
panel.
6) Once cooking is finished, allow oven to cool
completely, then wipe up any water on the
oven interior.
NOTE
•
Steam-Roasting
is designed to reduce the
cooking time. There is no need for preheating.
To Stop Cooking
1) Press the
Start/Stop
button on the control
panel, then press
Stop
in the display.
Setting Steam-Baking
The
Steam-Baking
mode heats food gradually,
using both the top & bottom oven heating
elements and moist steam heat. The oven can be
programmed to cook at any temperature from 30
℃ to 250 ℃. Preset temperature options start at
180℃.
1) Press
Steam Cook
in the
Main Menu
screen.
2) Press
Steam-Baking
.
3) Press
Steam Level
and select the desired
Steam Level
High
,
Medium
or
Low
.
• The
Steam Level
defaults to
High
unless
changed by the user.
4) Press
Temp.
to set the desired cooking
temperature. Press
J
or
K
to raise or lower
the numbers, then press
!
to save the
settings.
You can also use the number pad icon to set
the cooking temperature directly, then press
OK
.
5) If desired, press
Time
.
And press
Cook Time
or
Cooking ends at.
to
set the cook time or cooking end time. Press
J
or
K
to raise or lower the numbers, then
press
!
to save the settings.
You can also use the number pad icon to set
the cooking time directly, then press
OK
.
6) Press the
Start/Stop
button on the control
panel.
7) Once cooking is finished, allow oven to cool
completely, then wipe up any water on the
oven interior.
To Stop Cooking
1) Press the
Start/Stop
button on the control
panel, then press
Stop
in the display.
Setting Steam-Regenerating
The
Steam-Regenerating
mode heats food gently
and makes the pastry crispy. Steam ensures that
the food does not dry out. The oven can be
programmed to cook at any temperature from 80
℃ to 180 ℃. Preset temperature options start at
120℃.
1) Press
Steam Cook
in the
Main Menu
screen.
2) Press
Steam-Regenerating
.
3) Press
Temp.
to set the desired cooking
temperature. Press
J
or
K
to raise or lower
the numbers, then press
!
to save the
settings.
You can also use the number pad icon to set
the cooking temperature directly, then press
OK
.
4) If desired, press
Time
.
And press
Cook Time
or
Cooking ends at.
to
set the cook time or cooking end time. Press

61
OPERATION
ENGLISH
J
or
K
to raise or lower the numbers, then
press
!
to save the settings.
You can also use the number pad icon to set
the cooking time directly, then press
OK
.
5) Press the
Start/Stop
button on the control
panel.
6) Once cooking is finished, allow oven to cool
completely, then wipe up any water on the
oven interior.
To Stop Cooking
1) Press the
Start/Stop
button on the control
panel, then press
Stop
in the display.
Setting Steam (Model WSED7667M)
The
Steam
mode cooks food without the
assistance of the oven heating elements, using
only the moist heat produced by steam. The
available temperature range is 80 °C to 99 °C. Make
sure to empty the water tank after use.
1) Press
Steam Cook
in the
Main Menu
screen.
2) Press
Steam
.
3) Press
Temp.
to set the desired cooking
temperature. Press
J
or
K
to raise or lower
the numbers, then press
!
to save the
settings.
You can also use the number pad icon to set
the cooking temperature directly, then press
OK
.
4) If desired, press
Time
.
And press
Cook Time
or
Cooking ends at.
to
set the cook time or cooking end time. Press
J
or
K
to raise or lower the numbers, then
press
!
to save the settings.
You can also use the number pad icon to set
the cooking time directly, then press
OK
.
5) Press the
Start/Stop
button on the control
panel.
6) Once cooking is finished, allow oven to cool
completely, then wipe up any water on the
oven interior.
To Stop Cooking
1) Press the
Start/Stop
button on the control
panel, then press
Stop
in the display.
NOTE
• Once steam cooking is started, an indicator on
the display shows the status of the steam
function.
• Make sure the water tank is filled with water
before starting the steam cooking. If the water in
the tank runs out during cooking, a chime
sounds and a popup appears in the display. The
oven continues to cook without steam.
• Remember to drain the water tank after use.
• When the temperature rises in the oven, steam
may not be visible.
• It is normal to hear the sound of boiling water
from the steam generator while running the
steam functions.
• If mineral deposits remain on the oven bottom
after steam mode, use a cloth or sponge soaked
in vinegar or a weak citric acid solution to
remove them before using the steam mode
again. See the Maintenance section under
Descaling for more info. To remove stubborn
hard water scale, use the Descaling function.
• Wipe away excess water left over after cooling.
• To avoid damage and extend product life,
descale the steam feeder after every 8 hours of
use, or more often if needed.
• If the descaling reminder appears, press
OK
to
run the Descaling function.
• After the steam mode is used for 8 hours, a
reminder to descale the product appears in the
display the next time the steam mode is
selected. You will not be able to use the steam
mode until the Descaling function is run. To
avoid this delay, run the Descaling function after
every 2-3 uses of the steam mode.
Sous-Vide (Model WSED7667M)
Sous-Vide cooking uses steam to cook foods "low
and slow." Use it to cook meat, fish, seafood,
poultry or vegetables. Food must be vacuum
packed in pouches.
It is not necessary to preheat the oven when using
Sous-Vide.

62
OPERATION
Refer to the cooking guide for recommended Sous-
Vide settings.
Preset temperature options start at 60 ℃.
Benefits of Sous-Vide
The lower temperatures and long cooking times
used in Sous-Vide cooking provide many benefits.
•
Healthier
Compared to other cooking methods, Sous-Vide
retains most of the original nutrients in food.
•
Safe and Convenient
The long cooking times used in Sous-Vide
cooking allow food to be pasteurized. Because
food is vacuum packed before cooking, the
unopened pouches can be quickly chilled then
easily stored after cooking.
•
Crisp and Moist Results
The fine temperature control of Sous-Vide
cooking is an excellent way to achieve the
perfect texture when cooking meat and poultry.
The low temperatures used retain more of the
moisture in food than conventional cooking
methods. After cooking, a final sear in a frying
pan adds the perfect crisp finish.
Setting Sous-Vide Mode
1) Fill the tank to the
Max
line. Use softened,
filtered water, if possible. Hard water may clog
the steam generator more quickly with scale
buildup.
2) Place the wire grill on rack position
C
and
place the sealed food bag on it.
3) Press
Steam Cook
in the
Main Menu
screen.
4) Press
Sous-Vide
.
5) Press
Temp.
to set the desired cooking
temperature. Press
J
or
K
to raise or lower
the numbers, then press
!
to save the
settings.
You can also use the number pad icon to set
the cooking temperature directly, then press
OK
.
6) If desired, press
Time
.
And press
Cook Time
or
Cooking ends at.
to
set the cook time or cooking end time. Press
J
or
K
to raise or lower the numbers, then
press
!
to save the settings.
You can also use the number pad icon to set
the cooking time directly, then press
OK
.
7) Press the
Start/Stop
button on the control
panel.
8) Once cooking is finished, allow the oven to
cool completely. Then wipe up any water left
on the oven interior.
Changing the Sous-Vide Settings
1) Press
Edit
in the display to bring up the Cook
Settings screen.
2) Adjust the settings using scroll function.
3) Press the
Start/Stop
button on the control
panel.
To Stop Cooking
1) Press the
Start/Stop
button on the control
panel, then press
Stop
in the display

63
OPERATION
ENGLISH
Recommended Sous-Vide Guide
The size, weight, thickness, starting temperature, and your personal preferences will affect operating
times. This guide is only for reference. Adjust cook time according to your preference.
• Rack: Rack Position
Food
Quantity
(each)
Temp. (℃) Rack
Time
(min.)
Min Target Max
Beef Steak
2.5 cm thick
0.3~0.5 kg
58 2 - 150 180
Chicken,
Breasts
0.1~0.2 kg 67 2 - 120 180
Salmon
2.5 cm thick
0.1~0.2 kg
60 2 - 120 150
Asparagus
15~20 g 85 2 20 30 45
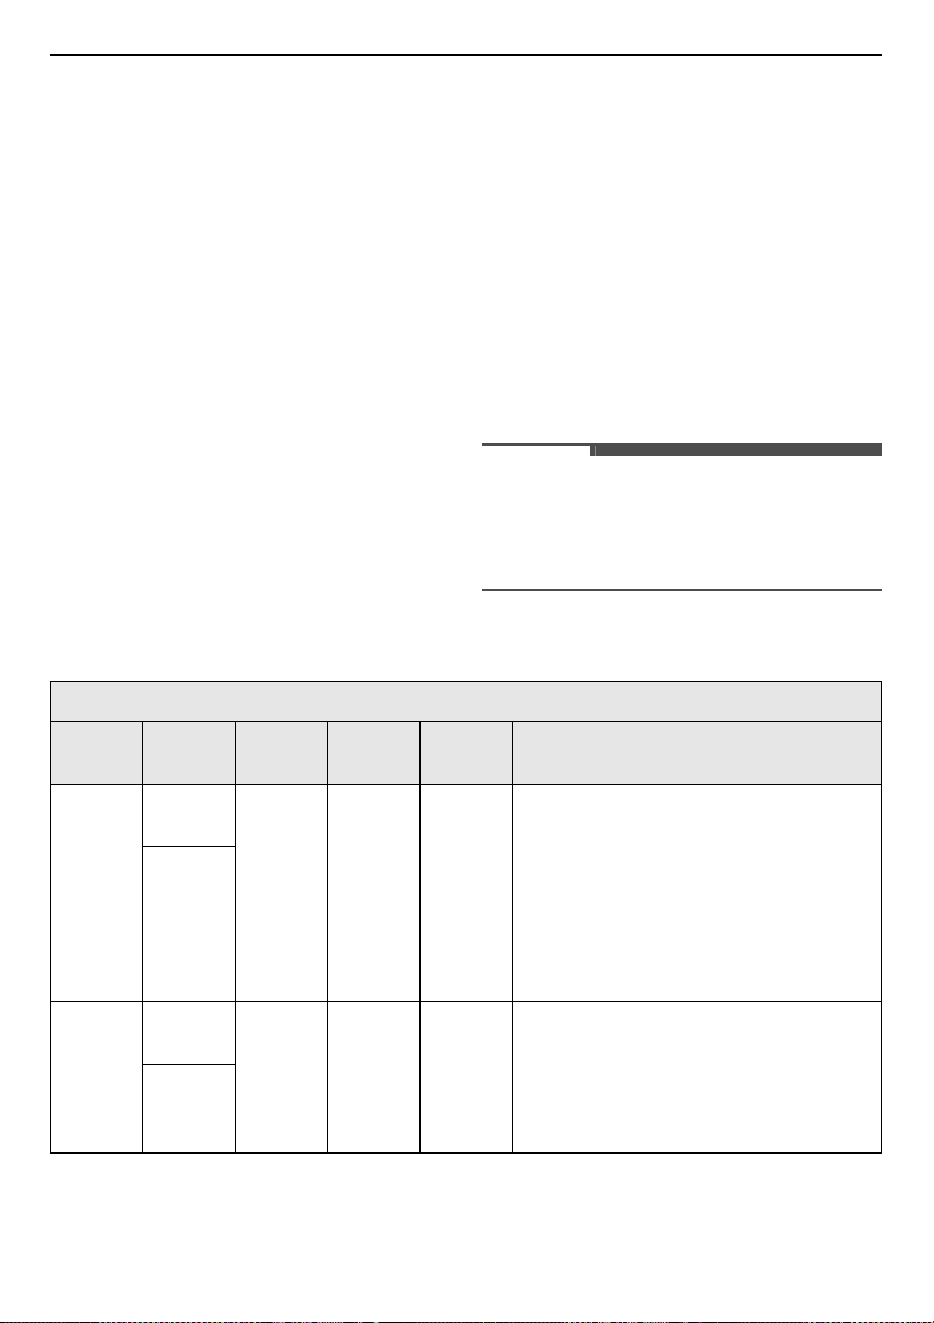
64
OPERATION
Recipe Cook
The
Recipe Cook
function provides guidance for
cooking foods or dishes that may be unfamiliar. It
contains preset programs for cooking many
popular food items, with information on
recommended preheating, accessories, and rack
position for optimal results. The remaining time is
automatically adjusted and appears in the display.
Setting Recipe Cook Mode
1) Press
Recipe Cook
in the
Main Menu
screen.
2) Press a category to filter the options.
3) Scroll through or tap the letters to find and
select an item.
4) Press
Weight
to set the weight of the food.
Press
J
or
K
to increase or decrease the
weight, then press
!
.
• The Weight feature can be used with some
menu. Refer to the Recipe Cook Guide for
more information.
5) Press
Info.
to see the recommended recipe.
• The recommendations may differ
depending on the category and weight of
your food.
• Follow the recommendations in the display
regarding accessories and rack position.
6) Press
!
.
7) Press the
Start/Stop
button on the display.
Recipe Cook Guide
• Preheat oven first for most items.
• Preheat for 5 minutes when grilling.
NOTE
• When cooking thin cuts of meat, insert the probe
into the thickest part of the meat. If the probe is
inserted incorrectly, the oven could turn off too
soon. See the Probe section for instructions.
Recipe Cook Guide
Poultry
Menu Weight Step
Food
Temp.
Rack
Position
Instructions
Chicken
, Legs
*1*3
0.6-1.8
kg
0.2 kg
Refriger
ated
3
Brush chicken legs with oil or melted butter,
season as desired. Place chicken legs on the
wire grill. Put into the oven. To catch
drippings or fat from food, place the deep
pan (or baking tray) below of the wire grill.
When oven beeps, turn food over. After
cooking, allow to rest covered with foil for 3
minutes. Use generated juice for gravy or
sauce.
Default
1.2 kg
Chicken
,
Breasts
*11*12
0.2-1.0
kg
0.2 kg
Refriger
ated
3
Model WSED7667M
Prepare chicken breast (about 200 g each).
Place chicken breast in the perforated pan
on the wire grill. Put into the oven. To catch
drippings or fat from food, place the deep
pan (or baking tray) below of the wire grill.
Default
0.6 kg

65
OPERATION
ENGLISH
Chicken
, Whole
*1*3
1.0-2.0
kg
0.2 kg
Refriger
ated
2
Brush chicken with oil or melted butter,
season as desired. Wrap thin part of the legs
in foil, place chicken on the wire grill. Put
into the oven. To catch drippings or fat from
food, fill a big cup of water into the deep pan
(or baking tray) and place below of the wire
grill. When oven beeps, turn food over. After
cooking, allow to rest covered with foil for 3
minutes. Use generated juice for gravy or
sauce.
Default
1.4 kg
Duck,
Breasts
*11*12
0.2-1.0
kg
0.2 kg
Refriger
ated
3
Model WSED7667M
Prepare duck breast (about 200 g each).
Place duck breast in the perforated tray on
the wire grill. Put into the oven. To catch
drippings or fat from food, place the deep
pan (or baking tray) below of the wire grill.
Default
0.6 kg
Duck,
Whole
*1*3
1.7-2.5
kg
0.2 kg
Refriger
ated
2
Brush duck with oil or melted butter, season
as desired. Wrap thin part of the legs in foil,
place duck on the wire grill. Put into the
oven. To catch drippings or fat from food, fill
a big cup of water into the deep pan (or
baking tray) and place below of the wire grill.
When oven beeps, turn food over. After
cooking, allow to rest covered with foil for 3
minutes. Use generated juice for gravy or
sauce.
Default
2.1 kg
Turkey,
Whole
*1*3
3.2-4.7
kg
0.5 kg
Refriger
ated
1
Brush turkey with oil or melted butter,
season as desired. Wrap thin part of the legs
in foil, place turkey on the wire grill. Put into
the oven. To catch drippings or fat from
food, fill a big cup of water into the deep pan
(or baking tray) and place below of the wire
grill. When oven beeps, turn food over. After
cooking, allow to rest covered with foil for 3
minutes. Use generated juice for gravy or
sauce.
Default
4.2 kg
Poultry
Menu Weight Step
Food
Temp.
Rack
Position
Instructions

66
OPERATION
Beef
Menu Weight Step
Food
Temp.
Rack
Position
Instructions
Kebab
*3
0.5 Kg
0.5 kg Room 4
Ingredients
1.2 kg ground meat (Mix beef and veal at a
ratio of 3 to 1), 2 eggs, ½ tsp minced garlic, 1
small onion chopped, ½ cup breadcrumbs, 1
tbsp. salt, ½ tsp pepper, ¼ cup finely
chopped fresh mint, ¼ cup olive oil
Method
Combine the ground meat, eggs, garlic
onion, breadcrumbs, salt, pepper, mint, and
olive oil into a large bowl and mix the
ingredients. Roll into balls of 50 g each and
pierce each ball through with bamboo
skewers and spread into long kebabs, about
3 inch or longer on the skewer. Position the
skewers onto a wire grill. Put into the oven
and place the deep pan(or baking tray)
below of the wire grill. After cooking, let cool
kebabs before serving.
Default
1.5 kg
Kafta
*12
0.4 Kg
0.4 kg Room 4
Ingredients
1 kg ground beef with some fat(15 %), 1 ½
tsp ground cardamom, 2 ½ tsp ground
allspice, 2 tsp salt, 1 tsp black pepper, 1
packed cup (25 g) chopped parsley, 2-3 hot
green chile peppers, 4-5 cloves garlic, 1
medium onion
Method
Place the ground meat in a large bowl and
add the spices. Run the parsley, chiles, garlic
and onion together through a meat grinder
or pulse them gently, adding one ingredient
at a time, in a food processor, beginning
with the parsley and ending with the onions.
Combine with the ground meat. Mould a
small quantity of the meat mixture around
skewers, forming elongated, thin kebabs.
Position the skewers onto a wire grill. Put
into the oven and place the deep pan(or
baking tray) below of the wire grill.
Default
1.2 kg

67
OPERATION
ENGLISH
Goulash
*3
1
serving
-Room3
Ingredients
1 tbsp. olive oil, 1 small onion, 680 g lean
ground beef, 1 tsp allspice, ½ tsp ground
black pepper, 1 tsp salt, ¼ tsp ground
cinnamon, ¼ tsp ground ginger, 1 tbsp.
tomato paste
A packet (45 g) phyllo dough thawed, ½ cup
light tasting olive oil, ¼ cup ghee or butter
melted, 1 cup milk, 1 large egg, salt and
pepper
Method
Add the olive oil in a large non-stick saute
pan and heat, then saute onion for 2-3
minutes until tender. Add the ground beef,
breaking it apart then add all the other
ingredients. Cook until browned, set aside.
Melt ghee in a small sauce pan or in the
microwave. Mix in olive oil. Brush or spray
an oven safe dish with the oil, take 2-3
sheets of phyllo dough and lay them flat on
dish, then brush with oil mixture. Continue
layering the phyllo dough 2-3 sheets at a
time and brushing them until done with half
the package. Add the minced meat mixture
and spread evenly. Continue layering and
brushing the remaining phyllo sheets until
done with the package. Cut into squares or
diamond shape. In a measuring cup, beat
the egg and add the milk, sprinkle some salt
and pepper, then carefully pour into the
dish, tilt the dish in all directions so the milk
mixture will spread evenly. Put into the
oven.
Roast
Beef
*1*3
1.0-2.5
kg
0.5 kg
Refriger
ated
2
Brush beef with oil or melted butter, season
as desired. Place beef on the wire grill. Put
into the oven. To catch drippings or fat from
food, fill a big cup of water into the deep pan
(or baking tray) and place below of the wire
grill. When oven beeps, turn food over. After
cooking, allow to rest covered with foil for 10
minutes. Use generated juice for gravy or
sauce.
Default
1.5 kg
Beef
Menu Weight Step
Food
Temp.
Rack
Position
Instructions

68
OPERATION
Roast
Veal
*1*3
1.0-2.0
kg
0.5 kg
Refriger
ated
2
Brush veal (back of veal) with oil or melted
butter, season as desired. Place veal on the
wire grill. Put into the oven. To catch
drippings or fat from food, fill a big cup of
water into the deep pan (or baking tray) and
place below of the wire grill. When oven
beeps, turn food over. After cooking, allow
to rest covered with foil for 10 minutes. Use
generated juice for gravy or sauce.
Default
1.5 kg
Fillet of
Beef
*1*3
0.4-1.2
kg
0.2 kg
Refriger
ated
4
Brush fillet of beef with oil or melted butter,
season as desired. Place beef on the wire
grill. Put into the oven. To catch drippings or
fat from food, place the deep pan (or baking
tray) below of the wire grill. When oven
beeps, turn food over. After cooking, allow
to rest covered with foil for 5 minutes. Use
generated juice for gravy or sauce.
Default
0.8 kg
Beef
Bourgui
gnon
*4*7*13
1
serving
-Room2
Ingredients
1 kg beef, 50 g oil, 750 ml red wine, 200-300
ml broth, 5 onions, 5 cloves of garlic, 200 g
mushrooms, 100 g tomato puree, 1 tsp
sweet paprika, 5 bay leaves, salt, pepper
Method
Cut the beef into 1 cm cubes. Put the oil in a
roasting pot, add the meat and roast it on a
hob. Deglaze the roasted meat with red
wine and broth. Peel and dice the onions
and garlic. Clean the mushrooms and slice.
Add the ingredients, season and mix it,
cover with a lid. Place roasting pot on the
wire grill. Put into the oven. After cooking,
allow to rest covered with foil for 10
minutes.
Beef
Menu Weight Step
Food
Temp.
Rack
Position
Instructions

69
OPERATION
ENGLISH
Lamb
Menu Weight Step
Food
Temp.
Rack
Position
Instructions
Leg of
Lamb
*1*3
1.0-2.0
kg
0.5 kg
Refriger
ated
2
Brush leg of lamb with oil or melted butter,
season as desired. Place lamb on the wire
grill. Put into the oven. To catch drippings or
fat from food, fill a big cup of water into the
deep pan (or baking tray) and place below of
the wire grill. When oven beeps, turn food
over. After cooking, allow to rest covered
with foil for 10 minutes. Use generated juice
for gravy or sauce.
Default
1.5 kg
Lamb
Chops
*1*3
0.4-1.2
kg
0.2 kg
Refriger
ated
4
Brush lamb chops with oil or melted butter,
season as desired. Place lamb chops on the
wire grill. Put into the oven. To catch
drippings or fat from food, place the deep
pan (or baking tray) below of the wire grill.
When oven beeps, turn food over. After
cooking, allow to rest covered with foil for 3
minutes. Use generated juice for gravy or
sauce.
Default
0.8 kg
Fish
Menu Weight Step
Food
Temp.
Rack
Position
Instructions
Salmon
*1*3
0.4-1.2
kg
0.2 kg
Refriger
ated
4
Choose salmon steaks of 200 g weight and
2.5 cm thickness each. Brush salmon with oil
or melted butter, season as desired. Place
salmon on the wire grill. Put into the oven.
To catch drippings or fat from food, place
the deep pan (or baking tray) below of the
wire grill. When oven beeps, turn food over.
After cooking, allow to rest covered with foil
for 3 minutes. Use generated juice for gravy
or sauce.
Default
0.8 kg
Trout
*1*3
0.4-1.2
kg
0.2kg
Refriger
ated
4
Choose trout of 200 g weight each. Brush
trout with oil or melted butter, season as
desired. Place trout on the wire grill. Put into
the oven. To catch drippings or fat from
food, place the deep pan (or baking tray)
below of the wire grill. When oven beeps,
turn food over. After cooking, allow to rest
covered with foil for 3 minutes. Use
generated juice for gravy or sauce.
Default
0.8 kg
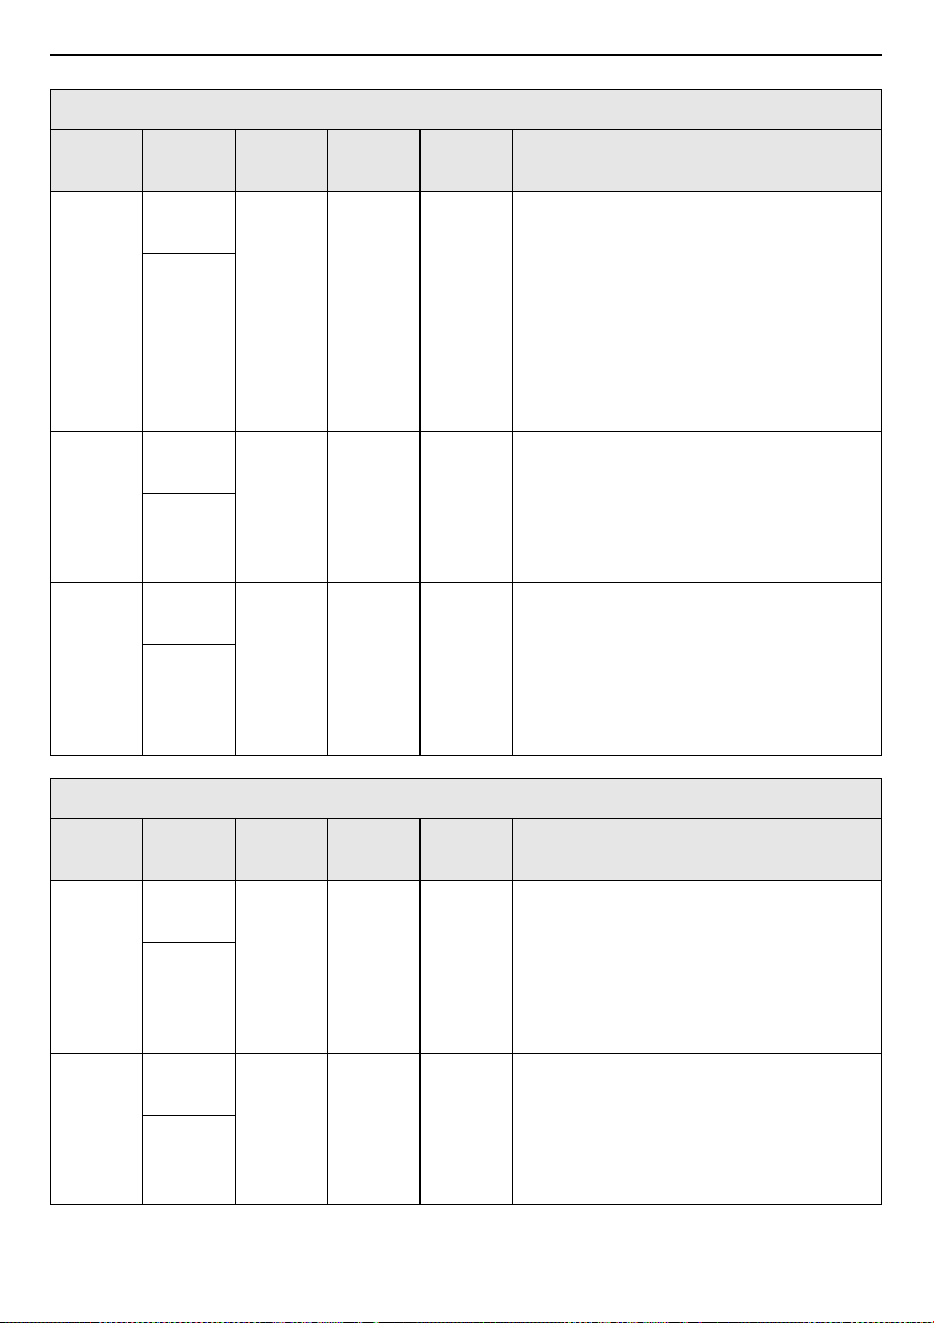
70
OPERATION
Tuna
*1*3
0.4-1.2
kg
0.2 kg
Refriger
ated
4
Choose tuna fish steaks of 200 g weight and
2.5 cm thickness each. Brush tuna with oil or
melted butter, season as desired. Place tuna
on the wire grill. Put into the oven. To catch
drippings or fat from food, place the deep
pan (or baking tray) below of the wire grill.
When oven beeps, turn food over. After
cooking, allow to rest covered with foil for 3
minutes. Use generated juice for gravy or
sauce.
Default
0.8 kg
Shrimps
*1*3
0.4-0.8
kg
0.2 kg
Refriger
ated
4
Brush shrimp with oil or melted butter,
season as desired. Place shrimp on the deep
pan. Put into the oven. When oven beeps,
turn food over. After cooking, allow to rest
covered with foil for 5 minutes. Use
generated juice for gravy or sauce.
Default
0.6 kg
Scallops
*3
0.4-0.8
kg
0.2 kg
Refriger
ated
4
Put sherry with scallops. Place scallops on
the deep pan. Brush melted butter over
scallops. Cover with breadcrumbs. Add
melted butter over breadcrumbs. Put into
the oven. After cooking, allow to rest
covered with foil for 5 minutes. Use
generated juice for gravy or sauce.
Default
0.6 kg
Vegetables
Menu Weight Step
Food
Temp.
Rack
Position
Instructions
Broccoli
*11*12
0.2-0.6
kg
0.2 kg
Refriger
ated
3
Model WSED7667M
Cut broccoli into even size pieces (about 15
g for each). Wash the broccoli. Place broccoli
in the perforated tray on the wire grill. Put
into the oven. To catch drippings from food,
place the deep pan(or baking tray) below of
the wire grill.
Default
0.4 kg
Green
Beans
*11*12
0.1-0.3
kg
0.1 kg
Refriger
ated
3
Model WSED7667M
Wash green beans. Place green beans in the
perforated tray on the wire grill. Put into the
oven. To catch drippings from food, place
the deep pan (or baking tray) below of the
wire grill.
Default
0.2 kg
Fish
Menu Weight Step
Food
Temp.
Rack
Position
Instructions

71
OPERATION
ENGLISH
Asparag
us
*11*12
0.2-0.4
kg
0.1 kg
Refriger
ated
3
Model WSED7667M
Wash asparagus. Place asparagus in the
perforated tray on the wire grill. Put into the
oven. To catch drippings from food, place
the deep pan (or baking tray) below of the
wire grill.
Default
0.3 kg
Spinach
*11*12
0.1-0.3
kg
0.1 kg
Refriger
ated
3
Model WSED7667M
Wash spinach. Place spinach in the
perforated tray on the wire grill. Put into the
oven. To catch drippings from food, place
the deep pan (or baking tray) below of the
wire grill.
Default
0.2 kg
Carrot
*11*12
0.2-0.6
kg
0.2 kg
Refriger
ated
3
Model WSED7667M
Cut carrots into even size pieces (about 1-2
cm cube shape). Wash the carrots. Place
carrots in the perforated tray on the wire
grill. Put into the oven. To catch drippings
from food, place the deep pan (or baking
tray) below of the wire grill.
Default
0.4 kg
Grilled
Vegetab
les
*1*3
0.8 kg -
Refriger
ated
4
Ingredients
Eggplants, cut into 1-2 cm thickness
zucchinis, cut into 1-2 cm thickness onions,
cut into wedges sweet peppers, cut in half
lengthwise and discard seeds, whole cherry
tomatoes, mushrooms-cut in half, butter (or
oil)
Method
Brush vegetables with melted butter or oil
and season as desired. Place food on the
deep pan. Put into oven. When oven beeps,
turn food over. After cooking, allow to rest
covered with foil for 5 minutes. Use
generated juice for gravy or sauce.
Potato
Menu Weight Step
Food
Temp.
Rack
Position
Instructions
Roasted
Potato
*1*4*8*13
0.4-1.6
kg
0.2 kg Room 2
Choose small potatoes (150-200 g each).
Peel, wash, dry and cut potatoes into halves.
Mix potatoes with salt, pepper and oil or
melted butter. Place potatoes in a heat proof
pan. Put into the oven. When oven beeps,
turn food over.
Default
1.0 kg
Vegetables
Menu Weight Step
Food
Temp.
Rack
Position
Instructions

72
OPERATION
Gratina
ted
Potato
*4*8*13
0.5-1.5
kg
0.5 kg Room 2
Cut pre-cooked gratin potatoes with slices.
Place potatoes in a heat proof pan, cover
with grated cheese (30 g per 500 g gratin
potatoes). Put into the oven.
Default
1.0 kg
Diced
Potato
*11*12
0.2-0.8
kg
0.2 kg Room 3
Model WSED7667M
Cut potatoes into even size pieces (about 1-
2 cm cube shape). Wash the potatoes. Place
diced potatoes in the perforated tray on the
wire grill. Put into the oven. To catch
drippings from food, place the deep pan (or
baking tray) below of the wire grill.
Default
0.4 kg
Potato
Menu Weight Step
Food
Temp.
Rack
Position
Instructions

73
OPERATION
ENGLISH
Bread/Pastries
Menu Weight Step
Food
Temp.
Rack
Position
Instructions
Umm
Ali
*3
1
serving
-Room3
Ingredients
4 all-butter croissants, 2 tbsp. raisins or
dried mixed berries, 2 tbsp. flaked/slivered
almonds, 2 tbsp. pine nuts, 2 tbsp. roughly
chopped shelled unsalted pistachios, 250 ml
milk, 5 tbsp caster sugar, ¼ tsp ground
cinnamon, 2 tsp orange blossom water, 250
ml whipping cream, 4 tbsp shredded
coconut, 1 small egg (optional)
Method
Tear up the croissants into bite-size pieces,
place on the baking sheet and bake in the
180
7
oven for 10 minutes until crisp and
golden. Spread the baked croissant pieces
across the base of a baking dish, about 23
cm in square. Sprinkle over the raisins,
almonds, pine nuts and pistachios, making
sure they are spread evenly. Heat the milk in
a heavy-based saucepan over a medium
heat, add 3 tablespoons of the sugar and
mix well to dissolve. Reduce the heat to low,
add the cinnamon and orange blossom
water and heat through at a gentle simmer
for 3-4 minutes. Remove the pan from the
heat and leave it to cool so that the egg will
not scramble when it’s added to it. Put the
cream and the remaining sugar in a mixing
bowl and whisk until the mixture forms soft
peaks. Sprinkle in the coconut and gently
fold to incorporate. Add the egg to the cool
milk mixture and whisk to combine. Ladle
the mixture into the baking dish and spread
the whipped cream over the top. Put into the
oven.

74
OPERATION
Baklaw
a
*3
1
serving
-Room3
Ingredients
175 g melted butter, 400 g thawed filo
pastry, 2 tbsp. lemon juice, 4 tbsp. clear thick
honey, 59 g caster sugar, finely grated rind
of 1 lemon, 2 tsp cinnamon, 200 g blanched
almonds copped, 200 g chopped walnuts, 75
g chopped pistachios or hazelnuts
359 g caster sugar, 115 g clear honey, 600 ml
water, 2 strips of thinly pared lemon rind, 1
tsp orange flower or rose water
Method
Brush the base of a shallow 30x20 cm loose-
bottomed or Swiss roll tin (jelly roll pan) with
a little of the melted butter. Using the tin as
a guide, cut the sheets of filo pastry with a
sharp knife so that they fit the tin exactly. To
make filing, place the lemon juice, honey
and sugar in a pan and heat gently until
dissolved. Stir in the lemon rind, cinnamon
and chopped nuts. Mix thoroughly. Spread
half the filling over the pastry, cover with
three layers of the filo pastry and butter
then spread the remaining filling over the
pastry. Finish by using up the remaining
sheets of pastry and butter on top and brush
the top of the pastry liberally with butter.
Using a sharp knife, carefully mark the
pastry into squares or diamond shape,
almost cutting through the filing. Put into
the oven. Place the caster sugar, honey,
water and lemon rind in a pan and stir over
a low heat until the mixture has thickened
slightly. Take the syrup off the heat and
leave to cool slightly. Remove the baklawa
from the oven. Remove and discard the
lemon rind from the syrup and stir in the
orange flower or rose water, then pour over
the pastry. Leave to soak for 6 hours. Cut
into squares and serve, decorated with
chopped pistachios.
Bread/Pastries
Menu Weight Step
Food
Temp.
Rack
Position
Instructions

75
OPERATION
ENGLISH
Kobaiba
*3
1
serving
-Room2
Ingredients
1 tbsp butter, 100 g coarsely ground or
chopped walnuts, 750 g ground lamb (10 %
fat), 500 g finely chopped onion, 1 tsp salt, 1
tsp freshly ground black pepper, ½ tsp
ground allspice, 1 egg
500 g fine grain bulgur, 500 ml water, 500 g
lean ground lamb or beef, 1 onion, 1 tsp salt,
1 tsp freshly ground black pepper
120 g room temperature butter, ½ cup
blanched almond
Method
Melt the butter in a large saute pan set over
medium heat, then add the walnuts and
cook, stirring occasionally, for 10 to 15
minutes, until toasted. Remove from pan
and add the ground lamb, onion, salt,
pepper, and allspice. Cook, stirring often,
until the juices evaporate, about 30 to 50
minutes. Remove from heat and stir in the
toasted walnuts. Set aside to cool slightly,
then add the egg and mix thoroughly. Put
the bulgur in the bowl of a food processor,
then add the water. Stir well with a fork and
let sit for 15 minutes. Add the lamb or beef,
onion, salt, and pepper, then pulse about 3
times, or just until malleable paste.
Butter a 40x25 cm baking dish and spread
half of the bulgur paste into the dish, patting
with moistened hands to make it as even as
possible. Next spread the filling, again
making it as even as possible. Finish with the
rest of the bulgur paste, pressing down with
our hands to ensure that it sticks to the
filling. Cut into 16 diamond shapes, make a
small indentation in the center of each
diamond, and press one almond in each
dimple. Spread the butter over the kobaiba
using hand. Put into the oven. Remove from
the oven and sprinkle some water over top
with fingers.
Bread/Pastries
Menu Weight Step
Food
Temp.
Rack
Position
Instructions

76
OPERATION
Cookies
*4*9*13
1
serving
-
Refriger
ated
2
Ingredients
(2 servings) 250 g butter, 250 g sugar, 500 g
flour, 3 eggs, 2 g salt, 1 packet vanilla sugar
(ca. 8 g), 1 egg yolk and milk
Method
Method Cream together the butter, sugar,
vanilla sugar and salt. Gradually add the
eggs. Add the flour and mix it with the butter
mixture. Cover and put the dough overnight
in a refrigerator. Portions of the dough roll
out about 5 mm thick. Cut out the rolled out
dough with various cutters and place on
greased baking sheet. Mix the egg yolk with
a little bit milk and brush the surface of the
cookies with it. Put into the oven.
Muffins
*4*10*13
1
serving
-Room2
Ingredients
150 g flour, 1 ½ tsp baking powder, 60 g
granulated sugar, 1 egg beaten, 130 ml milk,
70 ml vegetable oil, ½ tsp vanilla extract, 50
g semisweet chocolate chips, 50 g chopped
walnuts, sifted confectioners’ sugar
Method
Ingredients 150 g flour, 1 ½ tsp baking
powder, 60 g granulated sugar, 1 egg
beaten, 130 ml milk, 70 ml vegetable oil, ½
tsp vanilla extract, 50 g semisweet chocolate
chips, 50 g chopped walnuts, sifted
confectioners’ sugar Method Combine flour
and sugar in a mixing bowl; make a well in
center of mixture. Combine remaining
ingredients except for confectioners' sugar;
add to dry ingredients, stir just until
moistened. Spoon into greased and floured
muffin pan, filling about two-thirds full. Put
into the oven. Remove from pans and
sprinkle with confectioners' sugar.
Bread/Pastries
Menu Weight Step
Food
Temp.
Rack
Position
Instructions

77
OPERATION
ENGLISH
Buns
*4*9
1
serving
-Room3
Ingredients
400 g flour, 200 ml warm milk, 70 g sugar, 30
g yeast, 50 g butter, 15 g vanilla sugar, 2 g
salt, 120 g raisins (optional)
Method
Method Put the flour in a mixing bowl and
make a well. Add yeast and 20 g sugar to
milk and mix. Pour the liquid into the well
and cover with some flour. Leave to rise in a
warm place until cracks appear on the
surface. Add the remaining sugar, softened
butter, vanilla sugar, salt and knead into a
smooth yeast dough. Let the dough rise in a
warm place until it doubles in size. Put
raisins into the batter. Divide the dough into
12 pieces and shape into rounds. Place on a
baking sheet lined with parchment paper on
the wire grill. Let rise again and brush with
milk. Put into the oven.
Brownie
s
*4*8*13
1
serving
-Room2
Ingredients
225 g melted butter, 400 g white sugar, 100
g cocoa powder, 1 tsp vanilla extract, 2 eggs,
130 g all-purpose flour, ½ tsp baking
powder, ½ tsp salt, 70 g walnut halves
Method
Combine the melted butter, sugar, cocoa
powder and mix well. Add vanilla, eggs,
flour, baking powder and salt. Spread the
batter into the heat proof pan lined with
baking paper. Decorate with walnut halves,
if desired. Put into the oven.
Bread/Pastries
Menu Weight Step
Food
Temp.
Rack
Position
Instructions
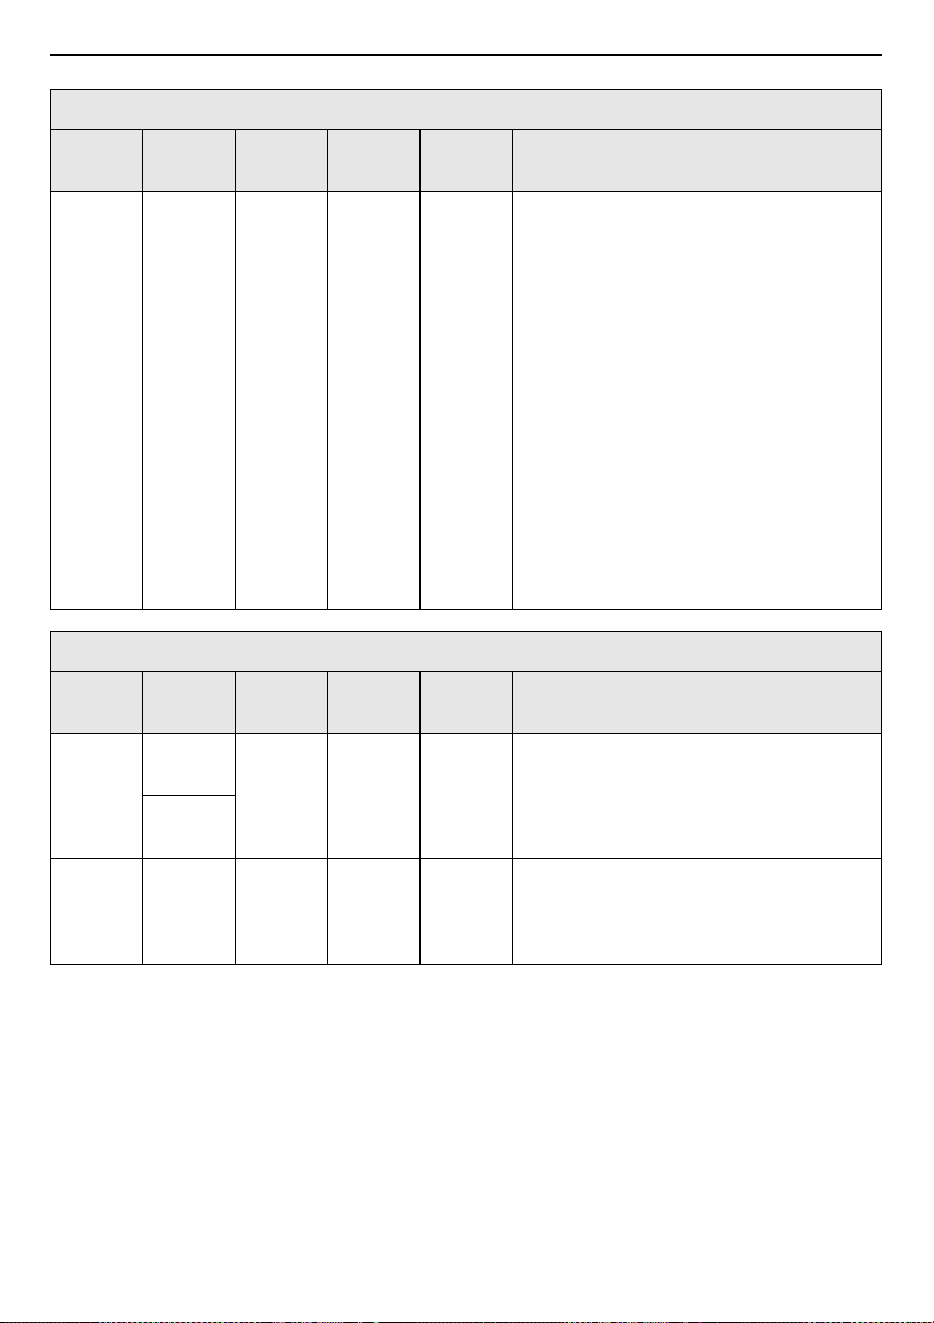
78
OPERATION
Apple
Pie
*4*13
1
serving
-
Refriger
ated
3
Ingredients
150 g white sugar, 2 tbsp all-purpose flour,
½ tsp ground cinnamon, ¼ tsp ground
nutmeg, ½ tsp lemon zest, 1.2 kg thinly
sliced apples, 2 tsp lemon juice, 1 tbsp
butter, 1 recipe pastry for a 9 inch double
crust pie, 4 tbsp milk (optional)
Method
Mix together the sugar, flour, cinnamon,
nutmeg and lemon zest. Line one crust in a
9-inch deep-dish pie pan. Layer 1/3 of apples
on pie crust. Sprinkle with sugar mixture
and repeat until done. Sprinkle with lemon
juice and dot with butter. Place second pie
crust on top of filling and flute the edges.
Cut vents in top crust and brush with milk
for a glazed appearance if desired. Put into
the oven.
Pizza
Menu Weight Step
Food
Temp.
Rack
Position
Instructions
Frozen
Pizza
(thin
base)
0.2-0.4
kg
0.1 kg Frozen 2
Place frozen pizza on the wire grill. Put into
the oven. Use only one frozen pizza at a
time.
Default
0.3 kg
Frozen
Pizza
(thick
base)
0.5 kg - Frozen 2
Place frozen pizza on the wire grill. Put into
the oven. Use only one frozen pizza at a
time.
Bread/Pastries
Menu Weight Step
Food
Temp.
Rack
Position
Instructions

79
OPERATION
ENGLISH
•
White Bread
(1 searving)
*4*11*13
- Category :
Bread/Pastries
- Food Temperature: Room
- Rack Position: 3
- Ingredients: 400 g bread flour, 100 g all-purpose flour, 300 g water, 10 g instant yeast, 8 g salt
- Method
1) In a mixing bowl of a stand mixer, whisk together the bread flour and all-purpose flour, yeast and
salt. Make sure that the salt and yeast do not come into direct contact.
2) With a paddle attachment, slowly pour in water. Then switch to a dough hook and knead for 8
minutes.
3) Transfer dough to a lightly flour-dusted work surface. Shape the dough into a ball. Cover with
plastic wrap. Let rest for 30 minutes.
4) Knead dough for 5 minutes by hand. Cover the dough and let rest 1 ½ hours. Stretch and fold the
dough. Start from the top of the dough pull forwards (away from you) then bring it to the middle.
5) Then pull bottom of the dough backward (towards yourself) and fold to the middle.
6) Place a loaf pan on the wire grill. Put into oven.
•
Baguette
(1 serving)
*11*12*13
- Category :
Bread/Pastries
- Food Temperature: Room
- Rack Position: 3
- Ingredients: 400 g Bread flour, 100 g All-purpose flour, 300 g Water, 10 g Instant yeast, 8 g Salt
- Method
Homem
ade
Pizza
*4*9*13
1
serving
-Room2
Ingredients
20 g yeast, 200 ml warm water, 5 g salt, 350
g flour, 10 g sugar, 10 g vegetable oil, 1 small
jar tomato sauce, 250 g grated cheese, 200 g
Mozzarella cheese, 1 small can of sliced
mushrooms, oregano, salt, pepper
Method
Dissolve yeast in warm water. Stir in salt and
sugar. Add flour slowly, kneading
constantly. Add oil and keep kneading. If
dough is sticky, add a little more flour. Cover
dough and allow to rise for ½ hour. Using
floured hands, knead dough and spread it
on greased baking sheet with fingertips.
Spread tomato sauce over dough, add
toppings in layers. Sprinkle cheese over
dough. Put into the oven.
Pizza
Menu Weight Step
Food
Temp.
Rack
Position
Instructions

80
OPERATION
1) In a mixing bowl of a stand up mixer, whisk together the bread flour, all-purpose flour, yeast and
salt.
2) With a paddle attachment, slowly add the water. Then switch to a dough hook and knead for 8
minutes.
3) Turn the dough out onto a lightly flour-dusted countertop. Shape into a ball. Cover with plastic
wrap. Let rest for 30 minutes.
4) Knead the dough by hand for 1-3 minutes. Cover the dough and let rest 1 ½ hours.
5) Decompress the dough by gently indenting with fingers into the center of the dough. Stretch and
fold the dough. Working along the length of the dough, start from the upper edge of the dough,
pull forward, away from you and then bring it to the center. Pull the bottom of the dough
backwards (toward yourself) and fold to the center.
6) Do the same for the left and right side of the dough.
7) Flip the dough and cover with plastic wrap. Let rest 1 hour.
8) Divide the dough into two equal portions. Shape the dough into 6” cylinders. Working with one
piece of dough at a time (keeping the other covered in plastic wrap), shape into a rectangle.
Working along the length of the dough, press with three fingers gently making several
indentations into the dough.
9) Repeat the process; roll the dough over onto itself three times until the upper edge meets the
lower edge and creates a deep seam. Sealing each turn with your fingers. Pinch the seam tight
and let rest for about 5 minutes (or when the dough is relaxed enough to roll) with the seam
facing up. Cover with a towel. Roll and shape the baguettes to fit a perforated baguette pan.
10) Place on a baguette pan, seam side down, and let rest for about 5 minutes covered with a towel.
Make five cuts on the surface of the dough.
11) Place a perforated baguette pan on the wire grill. Put into the oven.
*1 After the BEEP, turn the food over.
*2 After the BEEP, remove the lid.
*3 Use wire grill over the deep pan (or baking tray).
*4 Use wire grill.
*5 Use your own heat proof glass dish on the wire
grill.
*6 Use deep pan (or baking tray).
*7 Use your roasting pot.
*8 Use your heat proof pan.
*9 Use your baking sheet.
*10 Use your muffin pan.
*11 Fill the water tank to the max line located at the
front of the tank.
*12 Use perforated tray on the wire grill over the
deep pan.
*13 Use your own cooking containers.
My Recipes
My Recipes
allows you to download a new and
special cooking recipe to your appliance with a
smartphone. Cook food according to your
preference.
Install the
LG ThinQ
application in your
smartphone. Follow the instructions on the
LG
ThinQ
application to create, edit or delete
My
Recipes
. If the appliance is connected to a home
Wi-Fi network and the
LG ThinQ
application,
My
Recipes
can be downloaded to the appliance.
NOTE
• Creating, editing, or deleting
My Recipes
is only
available in the
LG ThinQ
application.

81
OPERATION
ENGLISH
• Make sure to remove the probe from the oven
before using the
My Recipes
feature (Model
WSED7667M).
• To change the
My Recipes
settings
permanently, edit the recipe in the
LG ThinQ
application.
Setting My Recipes Mode
1) Press
My Recipes
in the
Main Menu
screen.
2) Select one of the created recipes.
3) Press the
Start/Stop
button on the control
panel.
To Stop Cooking
1) Press the
Start/Stop
button on the control
panel, then press
Stop
in the display.

82
OPERATION
Information for Test Institutes
This table is only for use by test institutes. It includes the best settings for the test recipes out of the
standard IEC 60350-1.
Dish
Heating
Mode
Temp.
(℃)
Accessor
ies
Rack
Position
Preheat
Cooking
Time
(minute)
Handlings
Small
cake
Top Bottom
Heat
170 Baking
tray
3 Yes 20-30 -
Hot Air
150 Baking
tray
3 Yes 20-30 -
Hot Air
150 Baking
tray
/
Deep
pan
4
/
2
Yes 25-35 Baking tray
at the 4,
Deep pan at
the 2 from
down
Sponge
cake
Top Bottom
Heat
170 Wire grill 2 Yes 20-30 -
Hot Air
160 Wire grill 3 Yes 30-40 -
Apple
pie
Top Bottom
Heat
180 Wire grill 1 No 65-75 One tin in
the left back
and the
other one in
the right
front
Hot Air
170 Wire grill 2 No 65-75
Pastry
stripes
Top Bottom
Heat
170 Baking
tray
3 Yes 20-30 -
Hot Air
140 Baking
tray
3 Yes 20-30 -
Baking
tray
/
Deep
pan
4
/
2
Yes 20-30 Baking tray
at the 4,
Deep pan at
the 2 from
down
Toast Large Grill Low
Wire grill 4 Yes
5
minutes
2-4 -
Beef
steak
Large Grill High
Wire grill 4
/
1
Yes
5
minutes
10-15
each side
Turn after
half time
Mering
ue
Hot Air
80 Baking
tray
3 No 120-150 -

83
OPERATION
ENGLISH
Roast
Chicken
Roasting
190 Wire grill
/
Deep
pan
2 Yes 55-65 Turn after
half time
Dish
Heating
Mode
Temp.
(℃)
Accessor
ies
Rack
Position
Preheat
Cooking
Time
(minute)
Handlings

84
OPERATION
Steam
• Model WSED7667M
Dish
Heating
Mode
Temp.
(℃)
Accessori
es
Rack
Position
Preheat
Cooking
Time
(minute)
Handlings
Broccoli
: 300 g
Steam
99
Perforate
d tray
3 No 12-18
Baking tray
at the 2,
from down
Broccoli
: 2 x 300
g
Steam
99
Perforate
d tray
3 No 12-18
Baking tray
at the 2,
from down
Broccoli
: max.
amount
Steam
99
Perforate
d tray
3 No 15-20
Baking tray
at the 2,
from down
Peas
:
800 g
Steam
99
Perforate
d tray
3No-
Baking tray
at the 2,
from down
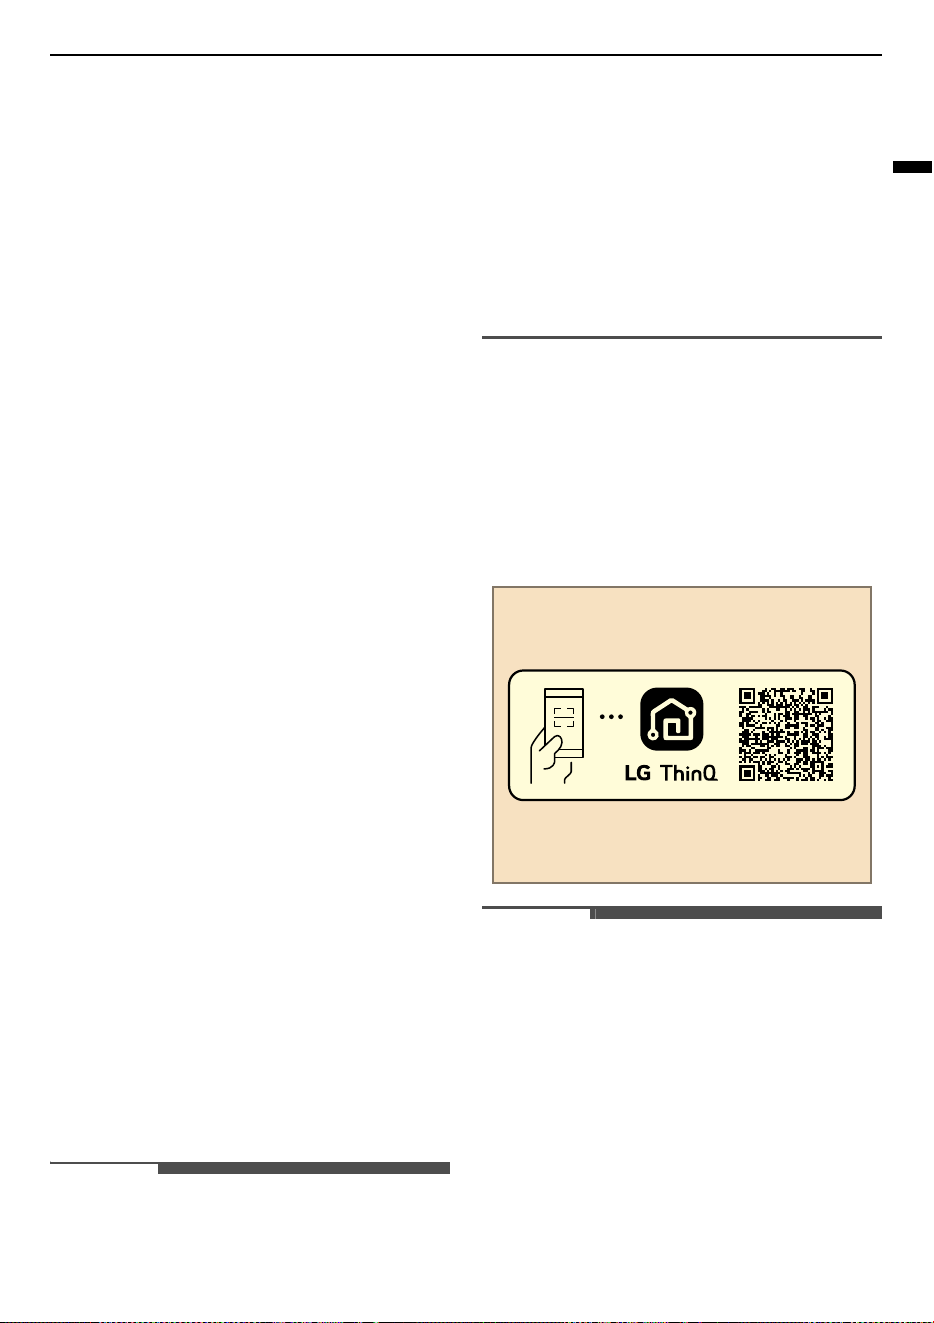
85
SMART FUNCTIONS
ENGLISH
SMART FUNCTIONS
LG ThinQ Application
This feature is only available on models with Wi-Fi.
The
LG ThinQ
application allows you to
communicate with the appliance using a
smartphone.
LG ThinQ Application Features
Communicate with the appliance from a
smartphone using the convenient smart features.
•
Settings
- Allows you to set various options on the oven
and in the application.
•
My Recipes
- Download new and special cooking recipes
that are not included in the standard cooking
mode on the appliance. Once
My Recipes
download is completed in the appliance, the
appliance keeps the recipes. You can only
create, edit or delete the recipes in the
LG
ThinQ
application.
•
Smart Diagnosis
- This function provides useful information for
diagnosing and solving issues with the
appliance based on the pattern of use.
•
Monitoring
- This function helps you check the current
status, remaining time, cook settings and end
time in one place.
•
Product Notifications
- Turn on the Push Alerts to receive appliance
status notifications. The notifications are
triggered even if the
LG ThinQ
application is
not open.
•
Timer
- You can set the timer from the application.
•
Firmware Update
- Keep the appliance updated.
NOTE
• If you change your wireless router, Internet
service provider, or password, delete the
registered appliance from the
LG ThinQ
application and register it again.
• This information is current at the time of
publication. The application is subject to change
for product improvement purposes without
notice to users.
• Functions may vary by model.
Installing LG ThinQ Application
and Connecting an LG
Appliance
Scan the QR code attached to the product using the
camera or a QR code reader application on your
smartphone.
NOTE
• To verify the Wi-Fi connection, check that the
f
icon on the control panel is lit.
• The appliance supports 2.4 GHz Wi-Fi networks
only. To check your network frequency, contact
your Internet service provider or refer to your
wireless router manual.
•
LG ThinQ
is not responsible for any network
connection problems or any faults,
malfunctions, or errors caused by network
connection.
• The surrounding wireless environment can
make the wireless network service run slowly.

86
SMART FUNCTIONS
NOTE
• If the appliance is having trouble connecting to
the Wi-Fi network, it may be too far from the
router. Purchase a Wi-Fi repeater (range
extender) to improve the Wi-Fi signal strength.
• The network connection may not work properly
depending on the Internet service provider.
• The Wi-Fi may not connect or the connection
may be interrupted because of the home
network environment.
• If the appliance cannot be connected due to
problems with the wireless signal transmission,
unplug the appliance and wait about a minute
before trying again.
• If the firewall on your wireless router is enabled,
disable the firewall or add an exception to it.
• The wireless network name (SSID) should be a
combination of English letters and numbers. (Do
not use special characters.)
• Smartphone user interface (UI) may vary
depending on the mobile operating system (OS)
and the manufacturer.
• If the security protocol of the router is set to
WEP
, network setup may fail. Change the
security protocol (
WPA2
is recommended), and
connect the product again.
Open Source Software Notice
Information
To obtain the source code that is contained in this
product, under GPL, LGPL, MPL, and other open
source licenses that have the obligation to disclose
source code, and to access all referred license
terms, copyright notices and other relevant
documents, please visit https://
opensource.lge.com.
LG Electronics will also provide open source code to
you on CD-ROM for a charge covering the cost of
performing such distribution (such as the cost of
media, shipping, and handling) upon email request
to openso[email protected]om.
This offer is valid to anyone in receipt of this
information for a period of three years after our
last shipment of this product.
Smart Diagnosis Feature
Use this feature to help you diagnose and solve
problems with your appliance.
NOTE
• For reasons not attributable to LGE’s negligence,
the service may not operate due to external
factors such as, but not limited to, Wi-Fi
unavailability, Wi-Fi disconnection, local app
store policy, or app unavailability.
• The feature may be subject to change without
prior notice and may have a different form
depending on where you are located.
Using LG ThinQ to Diagnose
Issues
If you experience a problem with your Wi-Fi
equipped appliance, it can transmit
troubleshooting data to a smartphone using the
LG ThinQ
application.
• Launch the
LG ThinQ
application and select the
Smart Diagnosis
feature in the menu. Follow
the instructions provided in the
LG ThinQ
application.
Using Audible Diagnosis to
Diagnose Issues
Follow the instructions below to use the audible
diagnosis method.
• Launch the
LG ThinQ
application and select the
Smart Diagnosis
feature in the menu. Follow
the instructions for audible diagnosis provided
in the
LG ThinQ
application.
1) Press
Settings
at the right bottom of the
Main
Menu
screen, swipe the screen, then press
Smart Diagnosis
.
• If the display has been locked, you must
deactivate the lock and then reactivate it.
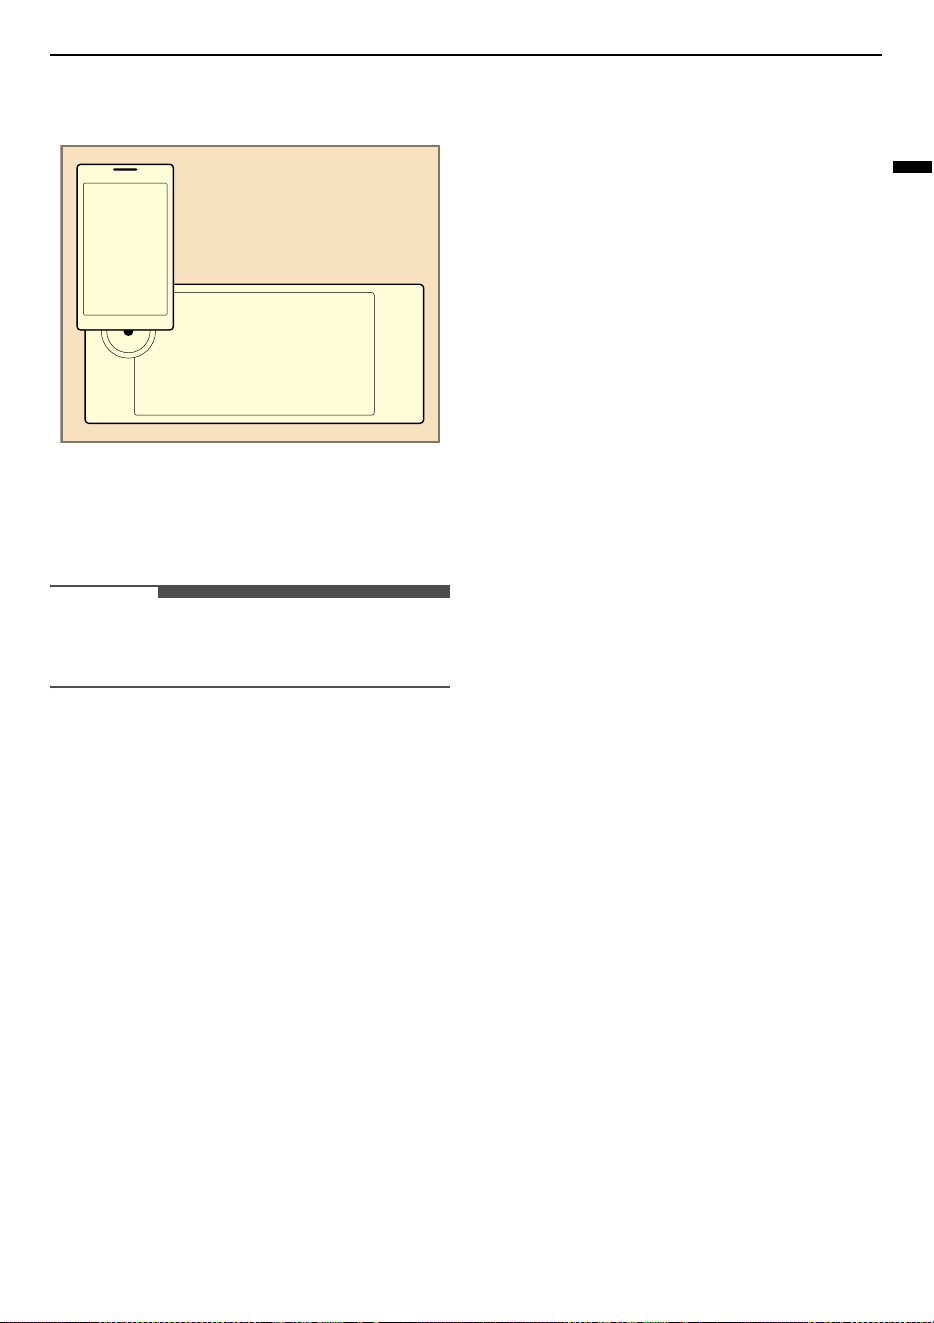
87
SMART FUNCTIONS
ENGLISH
2) Place your phone's mouthpiece near the top
left corner of the screen.
3) Keep the phone in place until the tone
transmission has finished. The display will
count down the time. Once the countdown is
over and the tones have stopped, the
diagnosis will be displayed in the application.
NOTE
• For best results, do not move the phone while
the tones are being transmitted.

88
MAINTENANCE
MAINTENANCE
Cleaning
Interior
WARNING
• Never wipe a warm or hot porcelain surface with
a damp sponge; it may cause chipping or crazing
(tiny hairlike cracks).
CAUTION
• Do not use oven cleaners, steam cleaners, harsh
chemical cleaners, bleach, vinegar, steel
scouring pads, or abrasive pads or cleansers to
clean the oven, as they can permanently damage
the oven surface.
• Do not clean the gasket.
• Do not clean the interior with the oven light on.
• To prevent burns, wait until the oven has cooled
down before touching any of its parts.
Do not use oven cleaners to clean the oven cavity.
Use the product's
EasyClean
function regularly to
clean light soil. For stubborn soil, use the
Pyrolysis
function or clean manually using the following tips.
• A plastic spatula can be used as a scraper to
scrape off any chunks or debris before and after
oven cleaning.
• Using the rough side of a non-scratch scouring
pad may help to take off burnt-on stains better
than a soft sponge or towel.
• Certain non-scratch scrubbing sponges, such as
those made of melamine foam, available at local
stores, can also help improve cleaning.
• Food spills should be cleaned when the oven
cools immediately after the cooking has ended.
Leaving spills or splatter unattended to may
cause surface etching or discoloration.
• At high temperature, foods react with porcelain
and a permanent dull spot can result. When
cleaning a spot, use only non-abrasive cleaners
or scrubbers.
• When cleaning a spot, use only non-abrasive
cleaners or scrubbers.
Exterior
Painted and Decorative Trim
For general cleaning, use a cloth with hot soapy
water. For more difficult soils and built-up grease,
apply a liquid detergent directly onto the soil.
Leave it on for 30 to 60 minutes. Rinse with a damp
cloth and dry. Do not use abrasive cleaners.
Stainless Steel Surfaces
WARNING
• To avoid scratches, do not use steel wool pads.
NOTE
• To clean the stainless steel surface, use warm
sudsy water or a stainless steel cleaner or polish.
• Always wipe in the direction of the metal surface
finish.
• Stainless steel appliance cleaner or polish can be
purchased online or from most retailers of
appliances or home goods.
1) Place a small amount of stainless steel
appliance cleaner or polish on a damp cloth or
paper towel.
2) Clean a small area, rubbing with the grain of
the stainless steel if applicable.
3) Dry and buff with a clean, dry paper towel or
soft cloth.
4) Repeat as necessary.
Oven Door
CAUTION
• Do not use harsh cleaners or harsh abrasive
cleaning materials on the outside of the oven
door. Doing so can cause damage.
• Do not use harsh abrasive cleaners or sharp
metal scrapers to clean the oven door glass,
since they can scratch the surface, which may
result in shattering of the glass.
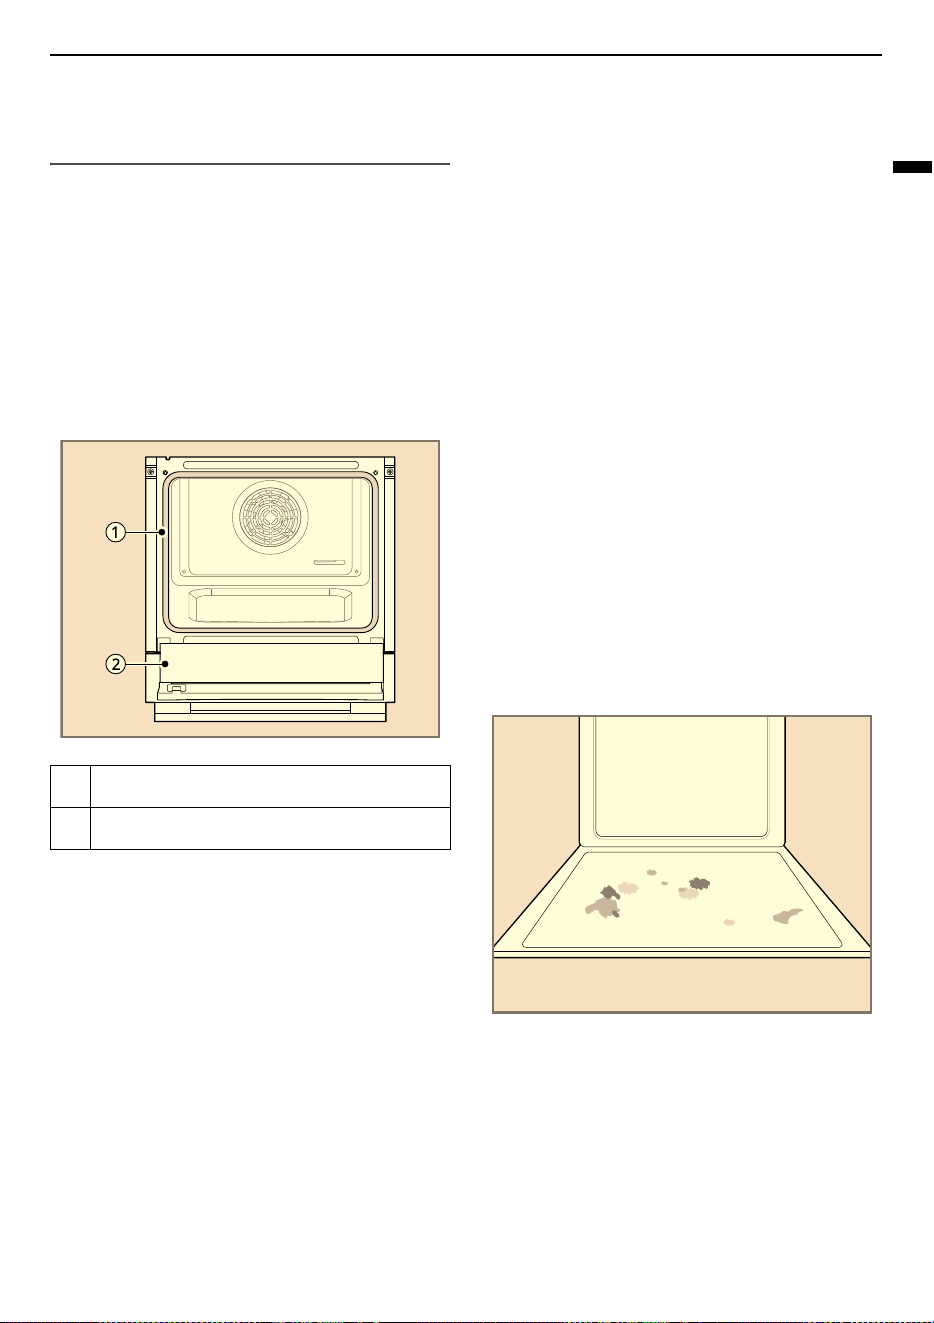
89
MAINTENANCE
ENGLISH
• Do not use oven cleaners, cleaning powders, or
harsh abrasive cleaning materials on the outside
of the oven door.
• Use soapy water to thoroughly clean the oven
door. Rinse well. Do not immerse the door in
water.
• You may use a glass cleaner on the outside glass
of the oven door. Do not spray water or glass
cleaner on the door vents.
• Do not clean the oven door gasket. The oven
door gasket is made of a fiberglass material that
is essential for a good seal. Care should be taken
not to rub, damage, or remove this gasket.
Oven Racks
Remove the oven racks before cleaning them.
1) Clean with a mild, abrasive cleaner.
• Food spilled into the tracks could cause the
racks to become stuck.
2) Rinse with clean water and dry.
Accessories
• Clean the wire grill, baking tray, and other
accessories with a soft cloth and hot, soapy
water.
• Do not clean the accessories in the dishwasher.
EasyClean
The
EasyClean
feature takes advantage of LG’s
new enamel to help lift soils without harsh
chemicals, and it runs using ONLY WATER for just
10 minutes in low temperatures to help loosen
LIGHT soils before hand cleaning.
Your LG oven gives you the option of cleaning with
LESS HEAT, LESS TIME, and virtually NO SMOKE OR
FUMES. You can reduce energy use by cleaning
light oven soils with the
EasyClean
feature instead
of
Pyrolysis
.
Benefits of EasyClean
• Helps loosen light soils before hand-cleaning.
•
EasyClean
only uses water; no chemical
cleaners.
• Makes for a better
Pyrolysis
experience.
- Delays the need for a
Pyrolysis
cycle
- Minimizes smoke and odors
- Can allow shorter
Pyrolysis
time
When to Use EasyClean
• Example of oven soiling
Case 1
- Soil pattern: Small drops or spots
- Types of soils: Cheese or other ingredients
- Common food items that can soil your oven:
Pizza
Case 2
- Soil pattern: Light splatter
- Types of soils: Fat/grease
A
Don’t hand clean oven door gasket
B
Do hand clean door
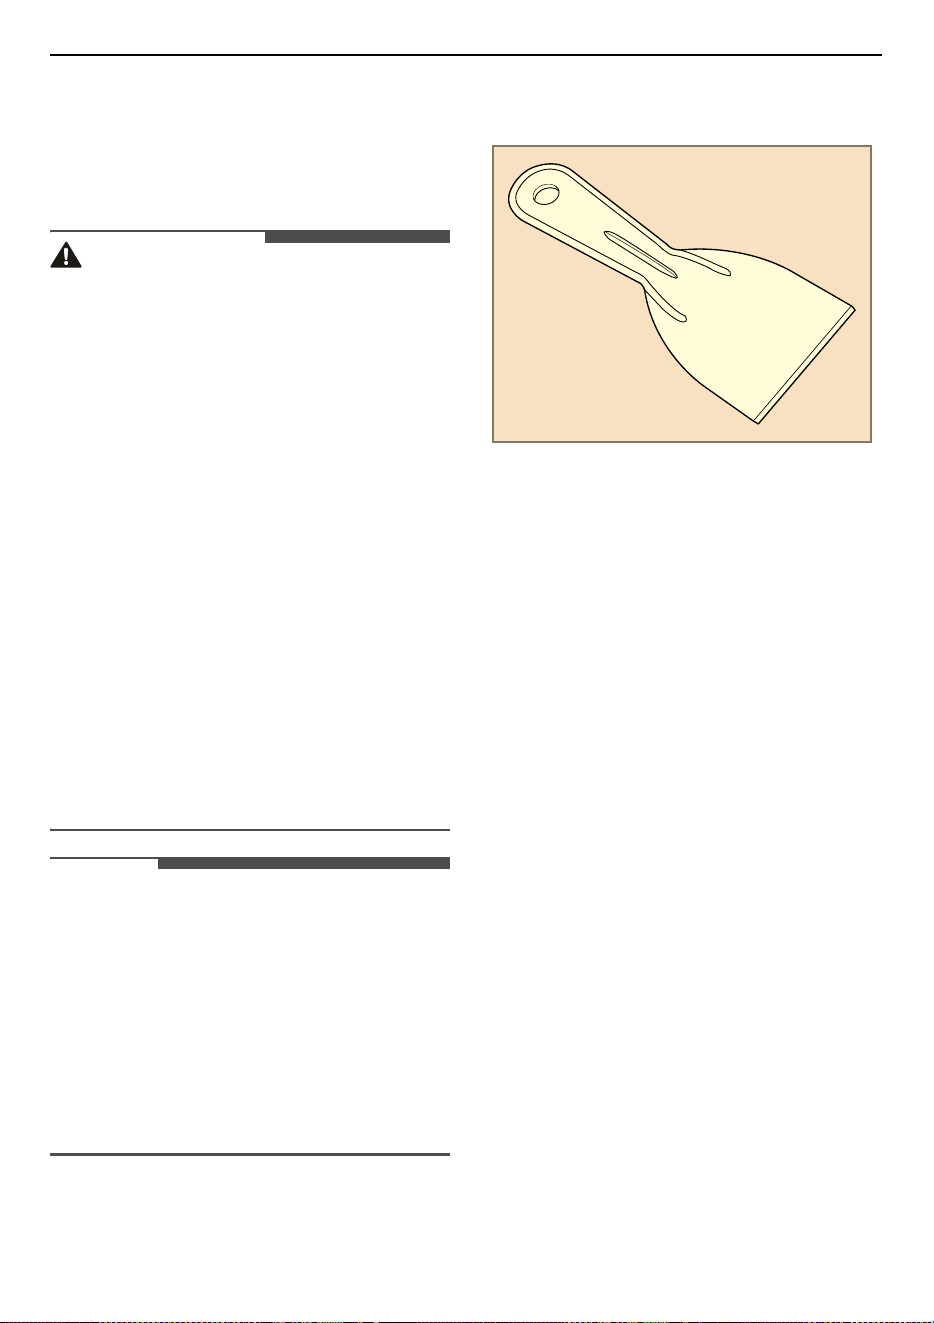
90
MAINTENANCE
- Common food items that can soil your oven:
Steaks, grilled / Fish, grilled / Meat roasted at
low temperatures
EasyClean Instruction Guide
CAUTION
• The oven should be level to ensure that the
bottom surface of the oven cavity is entirely
covered by water at the beginning of the
EasyClean
cycle.
• Do not open the oven door during the
EasyClean
cycle. Water will not get hot enough if
the door is opened during the cycle.
• Some surfaces may be hot after the
EasyClean
cycle. Wear rubber gloves while cleaning to
prevent burns.
• During the
EasyClean
cycle, the oven becomes
hot enough to cause burns. Wait until the cycle is
over before wiping the inside surface of the
oven. Failure to do so may result in burns.
• Avoid leaning or resting on the oven door glass
while cleaning the oven cavity.
• Do not use any steel scouring pads, abrasive
pads or cleaners as these materials can
permanently damage the oven surface.
• Remove the baking tray, deep baking tray, wire
grill, all cookware, aluminum foil, or any other
material from the oven.
NOTE
• Allow the oven to cool to room temperature
before using the
EasyClean
cycle. If your oven
cavity is above 65 ℃, the
EasyClean
cycle will not
be activated until the oven cavity cools down.
• For best results, use distilled or filtered water.
Tap water may leave mineral deposits on the
oven bottom.
• Soil baked on through several cooking cycles will
be more difficult to remove with the
EasyClean
cycle.
1) Remove oven racks and accessories from the
oven.
2) Scrape off and remove any burnt-on debris
with a plastic scraper.
• Suggested plastic scrapers:
- Hard plastic spatula
- Plastic pan scraper
- Plastic paint scraper
- Old credit card
3) Fill the tank to the
Max
line. Use softened,
filtered water, if possible. Hard water may clog
the steam generator more quickly with scale
buildup.
4) Press
Cleaning
in the
Main Menu
screen,
then press
EasyClean
.
5) Press the
Start/Stop
button on the control
panel. The remaining time appears in the
display.
6) A tone will sound at the end of the 10 minutes
cycle and
Cleaning is finished
appears in the
display. Press the
Start/Stop
button on the
display.
7) After the cleaning cycle and during hand-
cleaning, enough water should remain on the
oven bottom to completely submerge all soils.
Add water if necessary. Place a towel on the
floor in front of the oven to capture any water
that may spill out during hand-cleaning.
8) Clean the oven cavity immediately after the
EasyClean
cycle by scrubbing with a wet, non-
scratch scouring sponge or pad. (The scouring
side will not scratch the finish.) Some water
may spill into the bottom vents while cleaning,
but it will be captured in a pan under the oven
cavity and will not hurt the burner.

91
MAINTENANCE
ENGLISH
9) Once the oven cavity is cleaned, wipe any
excess water with a clean dry towel. Replace
racks and any other accessories.
10) If some light soils remain, repeat the above
steps, making sure to thoroughly soak the
soiled areas.
• If stubborn soils remain after multiple
EasyClean
cycles, run the
Pyrolysis
cycle.
Be sure that the oven cavity is empty of
oven racks and other accessories, and that
the oven cavity surface is dry before
running the
Pyrolysis
cycle. Consult the
Pyrolysis
section of your owner’s manual
for further details. (Model WSED7665B)
NOTE
• The cavity gasket may be wet when the
EasyClean
cycle finishes. This is normal. Do not
clean the gasket.
• If mineral deposits remain on the oven bottom
after cleaning, use a cloth or sponge soaked in
vinegar to remove them.
• Using commercial oven cleaners or bleach to
clean the oven is not recommended. Instead,
use a mild liquid cleanser with a pH value below
12.7 to avoid discoloring the enamel.
Pyrolysis (Model WSED7665B)
The
Pyrolysis
cycle uses extremely hot
temperatures to clean the oven cavity. While
running the
Pyrolysis
cycle, you may notice
smoking or an odor. This is normal, especially if the
oven is heavily soiled. During
Pyrolysis
, the kitchen
should be well ventilated to minimize the odors
from cleaning.
Before Starting Pyrolysis
• The kitchen should be well ventilated to
minimize the odors from cleaning. Open a
window or turn on a ventilation fan or hood
before
Pyrolysis
.
• Excess spillage must be removed before
cleaning.
• Wipe any heavy spillovers on the bottom of the
oven.
• Make sure that the oven light cover is in place.
• Clean the frame of the oven and door with hot
soapy water. Rinse well.
WARNING
• If the oven is heavily soiled with oil, use the
Pyrolysis
to clean the oven before using the
oven again. If left, the oil could cause a fire.
• If there is a fire in the oven during
Pyrolysis
, turn
the oven off and wait for the fire to go out. Do
not force the door open. Introduction of fresh air
at
Pyrolysis
temperatures may lead to a burst of
flame from the oven. Failure to follow this
instruction may result in severe burns.
CAUTION
• Do not use oven cleaners. Commercial oven
cleaner or oven liner protective coating of any
kind should not be used in or around any part of
the oven.
• Clean only parts listed in the manual. Remove
the baking tray, deep baking tray, wire grill, all
cookware, aluminum foil or any other material
from the oven.
- If oven racks are left in the oven cavity during
the
Pyrolysis
cycle, they will discolor and
become difficult to slide in and out.
• The oven displays an
F
error code and sounds
three long beeps during the
Pyrolysis
cleaning
process if it malfunctions in the
Pyrolysis
mode.
Switch off the electrical power to the main fuse
or breaker and have the oven serviced by a
qualified technician.
• If the
Pyrolysis
mode malfunctions, turn the
oven off and disconnect the power supply. Have
it serviced by a qualified technician.
• It is normal for parts of the oven to become hot
during a
Pyrolysis
cycle. Avoid pressing the
door, window or oven vent area during a
Pyrolysis
cycle.
• Do not leave small children unattended near the
appliance. During the
Pyrolysis
cycle, the
outside of the oven can become very hot to
touch.
• If you have pet birds, move them to another well-
ventilated room. The health of some birds is
extremely sensitive to the fumes given off during
the
Pyrolysis
cycle of an oven.
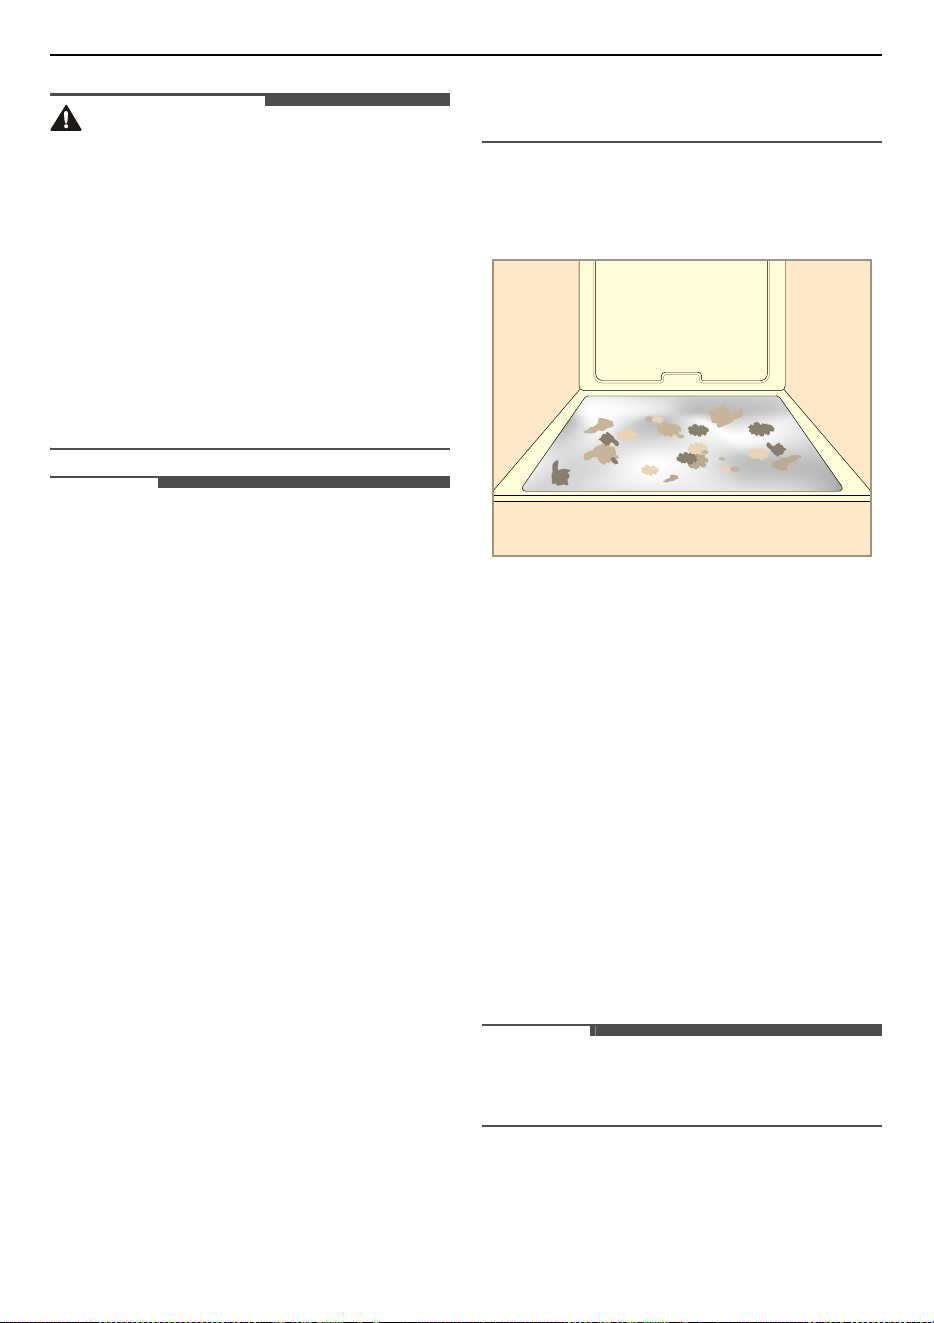
92
MAINTENANCE
CAUTION
• Do not line the oven walls, racks, bottom or any
other part of the oven with aluminum foil or any
other material. Doing so will inhibit heat
distribution, produce poor baking results and
cause permanent damage to the oven interior
(aluminum foil will melt to the interior surface of
the oven).
• Do not force the door open. This can damage the
automatic door locking system. Use care when
opening the oven door after the
Pyrolysis
cycle.
Stand to the side of the oven when opening the
door to allow hot air or steam to escape. The
oven may still be VERY HOT.
NOTE
• The oven light cannot be turned on during a
Pyrolysis
cycle. The oven light cannot be turned
on until the oven temperature has cooled below
250 ℃ after a
Pyrolysis
cycle is complete.
• Clean the frame of the oven and door with hot
soapy water. Rinse well.
• Do not clean the gasket. The fiberglass material
of the oven door gasket cannot withstand
abrasion. It is essential for the gasket to remain
intact. If you notice it becoming worn or frayed,
replace it by a service technician.
• It is normal for the fan to operate during the
Pyrolysis
cycle.
• As the oven heats, you may hear sounds of metal
parts expanding and contracting. This is normal
and will not damage the oven.
• You may notice some white ash in the oven. Wipe
it off with a damp cloth or a soap-filled steel wool
pad after the oven cools. If the oven is not clean
after one
Pyrolysis
cycle, repeat the cycle.
• After a
Pyrolysis
cycle, fine lines may appear in
the porcelain because it went through heating
and cooling. This is normal and will not affect
performance.
• The
Pyrolysis
cycle cannot be started if the
Control Lock
feature is active.
• Once the
Pyrolysis
cycle is set, the oven door
locks automatically. You will not be able to open
the oven door until the oven is cooled. The lock
releases automatically.
When to Use Pyrolysis
• Example of oven soiling
Case 1
• Soil pattern: Medium to heavy splatter
• Types of soils: Fat/grease
• Common food items that can soil your oven:
Meat roasted at high temperatures
Case 2
• Soil pattern: Drops or spots
• Types of soils: Filling or sugar based soils
• Common food items that can soil your oven: Pies
Case 3
• Soil pattern: Drops or spots
• Types of soils: Cream or tomato sauce
• Common food items that can soil your oven:
Casseroles
NOTE
• The
Pyrolysis
cycle can be used for soil that has
been built up over time.
Setting Pyrolysis
1) Remove all racks and accessories from the
oven.
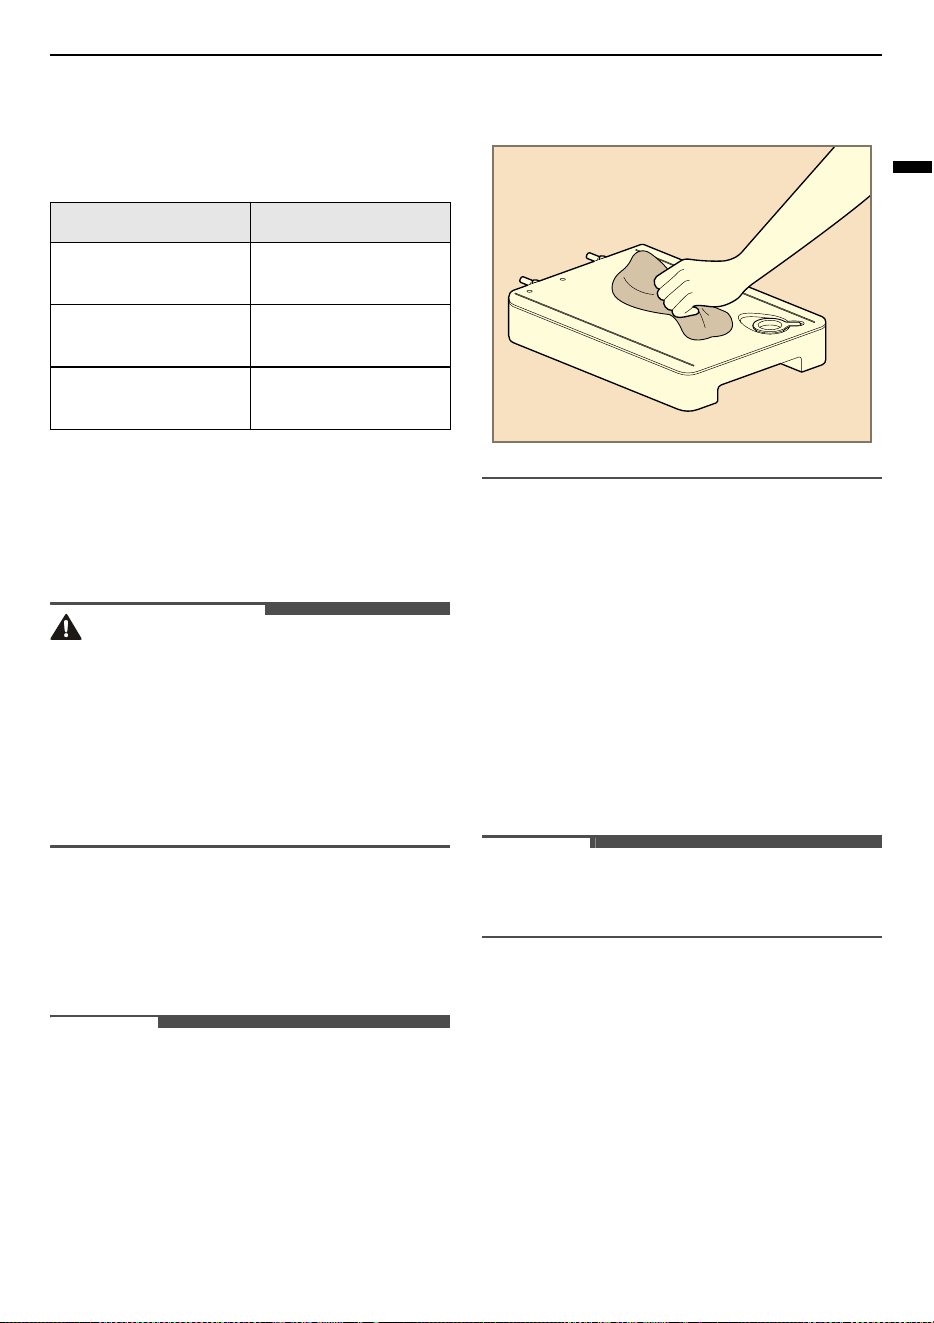
93
MAINTENANCE
ENGLISH
2) Press Cleaning, and then press
Pyrolysis
.
3) Select the desired cycle time and then press
the
Start/Stop
button on the control panel.
The remaining time appears in the display.
4) Once the
Pyrolysis
cycle is set, the oven door
locks automatically and the lock icon
k
displays.
• You will not be able to open the oven door
until the oven has cooled. The lock releases
automatically when the oven has cooled.
CAUTION
• Do not force the oven door open when the lock
icon is displayed. The oven door remains locked
until the oven temperature has cooled. Forcing
the door open will damage the door.
• It may become necessary to cancel or interrupt a
Pyrolysis
cycle due to excessive smoke or fire in
the oven. To cancel the
Pyrolysis
function, press
the
Start/Stop
button on the control panel.
Cleaning the Water Tank
The water tank is used during the steam cooking
functions. Use filtered, softened water if possible.
NOTE
• After using the steam function, the water tank
should be drained. To avoid bacteria or odors,
clean and dry the steam feeder tank after every
use.
• Do not clean in a dishwasher.
• If the water tank does not slide in as smoothly as
it should, clean the bottom of the tank.
Hard Water Scale
If hard water is used in the water tank, the steam
generator may become clogged with hard water
scale. In areas with hard water, run the
Descaling
function frequently or use softened water.
Using Descaling Function
To remove mineral deposits that remain on the
oven bottom after using the steam mode, use a
cloth or sponge soaked in vinegar or a weak citric
acid solution. For more stubborn or extensive
scaling, use the
Descaling
function.
NOTE
• Use the Descaling function after every 2-3 uses
of steam mode.
Descaling
Use this function to remove the white deposits that
form after the steam generator is used for a long
period.
The
Descaling
function runs for 1 hour 43 minutes.
Water will come out of the steam generator while it
is being cleaned.
For instructions on removing and filling the water
tank, see "
Using the Water Tank
."
Soil Level Cycle Setting
Lightly Soiled Oven
Cavity
1 h 15 m
Moderately Soiled
Oven Cavity
1 h 30 m
Heavily Soiled Oven
Cavity
2 h

94
MAINTENANCE
Setting Descaling
NOTE
• After a power failure, the
Descaling
function will
resume automatically even if the
Rinsing
function was running.
• If water remains on the oven bottom after
descaling, see the instructions under "Using
Draining
Function" for residual water inside the
steam generator.
• After running the
Descaling
function, clean the
water tank.
1) Fill the water tank with a premixed 50:1
mixture of water and citric acid. For example,
use 4 tsp of citric acid in 4 1/4 cups water (20 g
citric acid in 1000 ml water).
2) Carefully insert the water tank into correct
position in the control panel, making sure to
keep the tank level while carrying it. If the tank
is not kept level, water will drain out of the
tubes in the back.
3) Press
Cleaning
in the
Main Menu
screen.
Press
Steam Maintenance
, then press
Descaling
.
4) After 1 hour 32 minutes of descaling, a popup
will appear in the display. Following the
instructions, drain the tank and fill it with
clean water.
5) Insert the tank and start the
Rinsing
function.
The
Rinsing
takes about 11 minutes.
6) Once the
Rinsing
function is complete, dry the
inside of the oven with a soft cloth. Leave the
oven door open and allow the oven to dry
completely.
Using Draining Function
The
Draining
function removes residual water
inside the steam generator. The function takes a
little over 1 minute and runs automatically after
any steam cooking cycle. The
Draining
function
can also be started manually, if needed.
Setting Draining
1) Make sure that the water tank is empty.
2) Press
Cleaning
in the
Main Menu
screen.
Press
Steam Maintenance
, then press
Draining
.
3) Press the
Start/Stop
button on the display to
begin
Draining
. The remaining time appears
in the display.
Using Evaporation Function
The
Evaporation
function removes residual water
inside the oven cavity. The function takes a little
over 20 minutes.
Setting Evaporation
1) Press
Cleaning
in the
Main Menu
screen.
Press
Steam Maintenance
, then press
Evaporation
.
2) Press the
Start/Stop
button on the display to
begin
Evaporation
. The remaining time
appears in the display.
Periodic Maintenance
Changing the Oven Light
Model WSED7667M
The oven light is a standard LED lamp. If the LED
lamp does not turn on, please contact the LG
Electronics Customer Service. Do not attempt to
replace or remove the LED lamp.
Model WSED7665B
The oven light is a standard 25-watt or 40-watt
appliance halogen. Please read the following
instructions to replace the halogen lamp.
WARNING
• Ensure that the appliance is switched off before
replacing the lamp to avoid the possibility of
electric shock.
• Make sure that the oven and bulb are cool.
• Disconnect the electrical power to the appliance
at the main fuse or circuit breaker panel. Failure
to do so can result in severe personal injury,
death, or electrical shock.
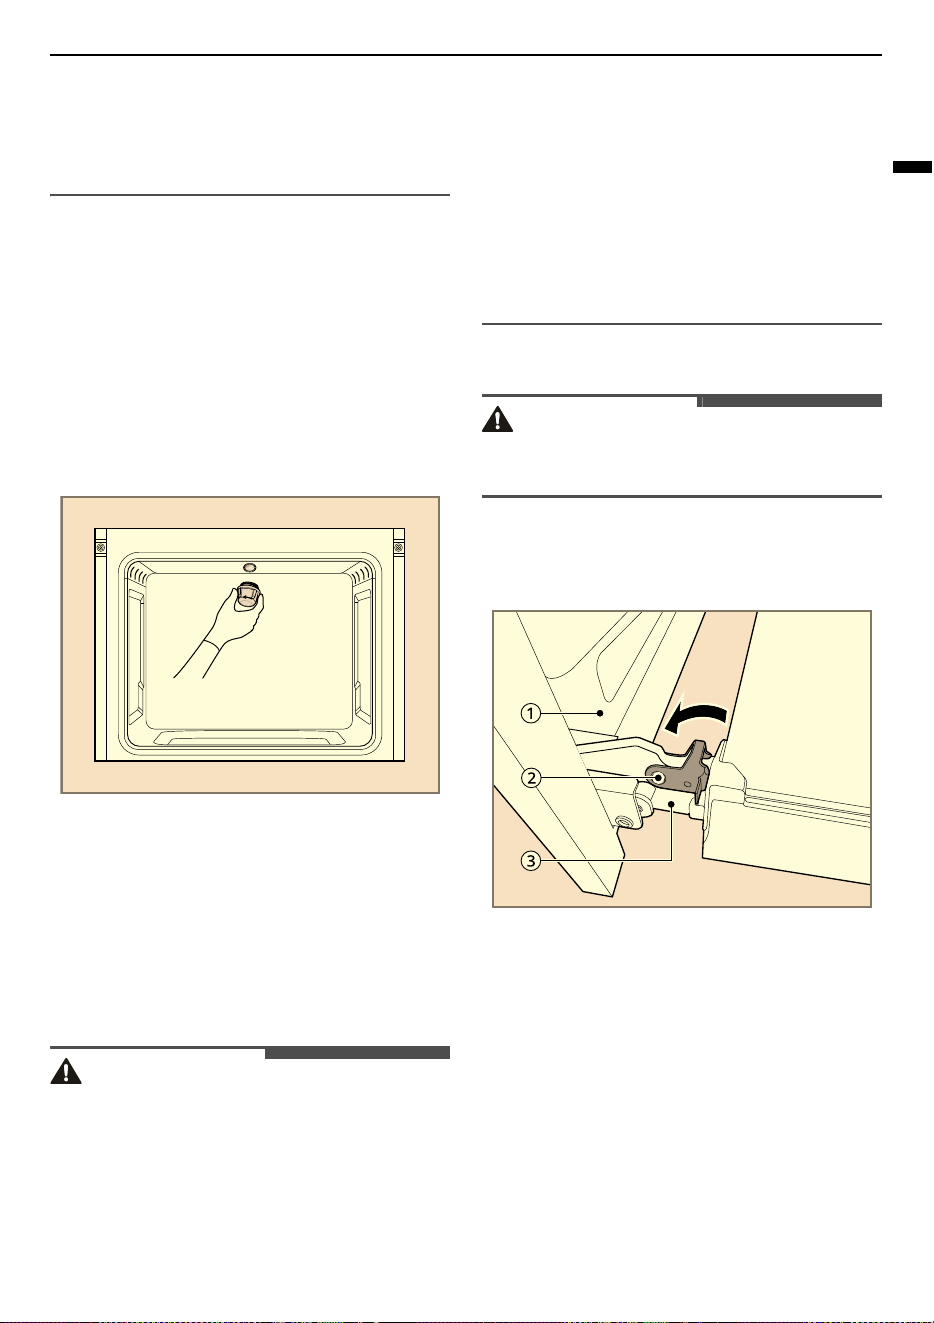
95
MAINTENANCE
ENGLISH
• Wear gloves while changing the oven light. Glass
fragments from broken bulbs can cause risk of
injury.
• If you apply force, the glass or oven may crack
1) Unplug the oven or disconnect power.
2) Turn the glass lamp cover counterclockwise to
remove.
3) Remove the halogen lamp from the socket
and dispose it in an environmentally friendly
way.
4) Insert the new halogen lamp.
5) Insert the glass lamp cover and turn it
clockwise.
6) Plug in the range or reconnect the power.
Removing, Assembling and
Dismantling the Oven Door
Removing and dismantling the oven door may be
needed to achieve better cleaning performance.
The oven door contains glass that can break. Care
should be taken when removing, assembling and
dismantling the oven door.
CAUTION
• To prevent burns, wait until the oven has cooled
down before touching any of its parts.
• The door is very heavy. Be careful when
removing, lifting and replacing the door.
• Do not lift the door by its handle. The handle is
not designed to support the weight of the door,
doing so can result in serious damage to the
door of the appliance.
• Do not hit the glass with pots, pans, or any other
object.
• Scratching, hitting, jarring or stressing the glass
may weaken its structure, causing an increased
risk of breakage at a later time.
• Do not close the oven door until all the oven
racks are fully in place.
Removing the Oven Door
CAUTION
• Clip the clamp completely in order to prevent
damaging the oven cavity.
1) Fully open the door.
2) Lift up the door clamp
B
and flip it towards
the oven
A
completely.
3) Firmly grasp both sides of the door at the top.
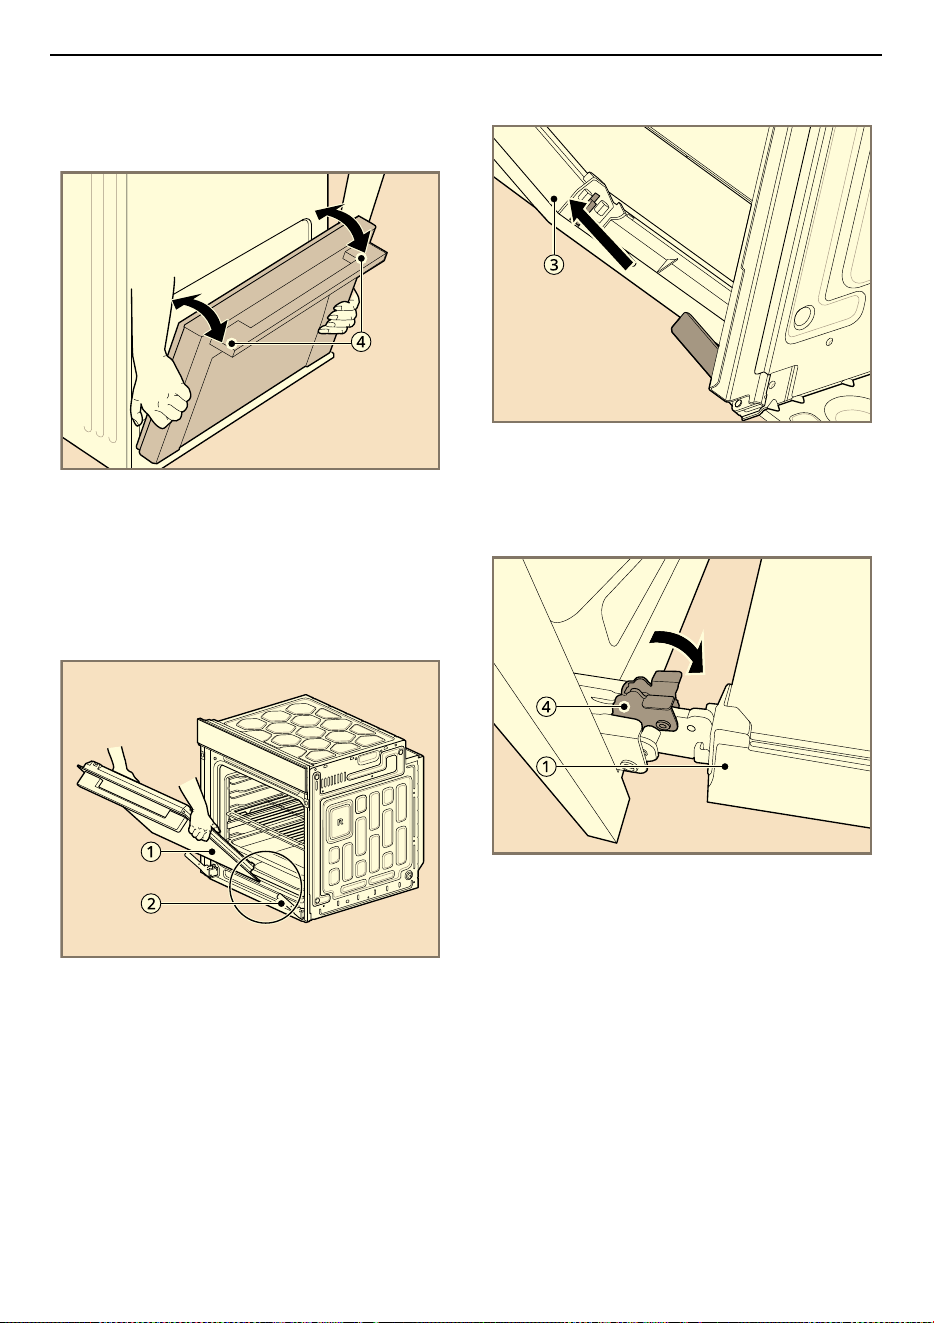
96
MAINTENANCE
4) Partially close the door to approximately 70
degrees
D
. If the position is correct, the
hinges
C
will move freely.
5) Lift and pull the door towards you until the
hinge latches are completely loosened.
Assembling the Oven Door
1) Firmly grasp both sides of the door
A
near the
top.
2) Fully insert the hinges
B
into the slots
C
.
3) Slowly open the door fully. Make sure that the
hinges
B
are properly engaged in the slots
C
.
4) Lift up the door clamp
D
and flip it towards
the oven door
A
until it clicks into position.
5) Close the door.
Dismantling the Oven Door
The oven door contains three layers of glass
panels. Remove the oven door from the oven
before dismantling the oven door.
1) Remove the oven door from the oven and
place it on a soft, flat surface to prevent
breakage and scratching with the door handle
facing the floor.
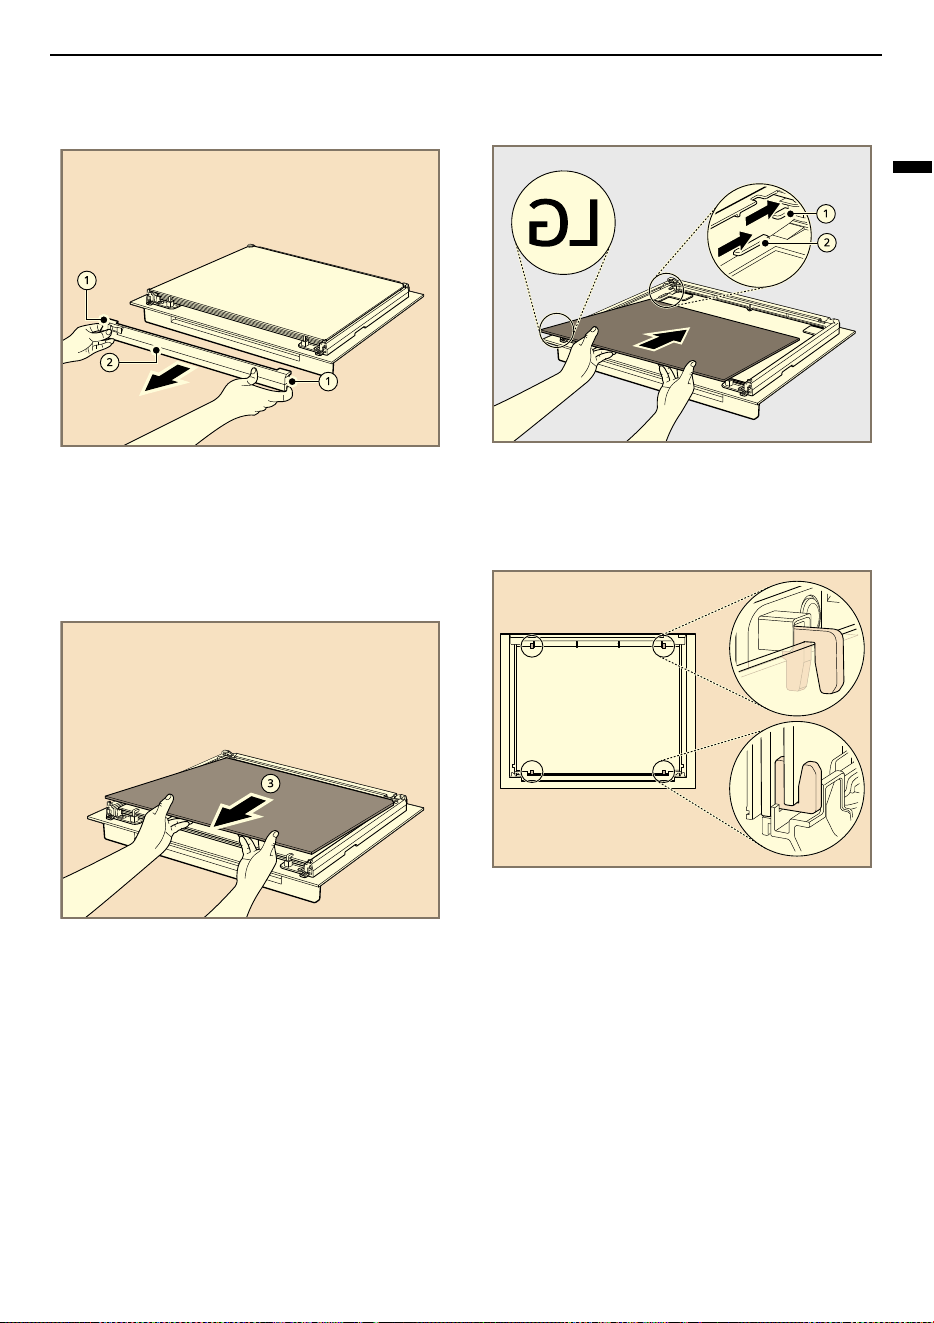
97
MAINTENANCE
ENGLISH
2) Push the locks
A
on both sides of the door top
cover
B
and pull forwards.
3) With both hands, grab and lift up the glass
panel
C
slightly and pull forward to remove it
from the oven door.
Set aside the gasket (4 ea) inserted into glass.
Repeat to remove all three layers of glass
panels.
Assembling the Glass Panel
Assemble the glass panels in the reverse sequence
of its removal.
1) Slide in the bottom glass panel into
B
and the
second glass panel into
A
of the oven door.
• Place the glass panel as the
LG
printed side
toward the oven door handle.
2) Assemble the 4 packings on the second glass
panel as follows.
• The packings hold the glass in place
reducing noise and vibration in a door.
3) Slide in the top glass panel
C
on top of the
second glass panel into the oven door.
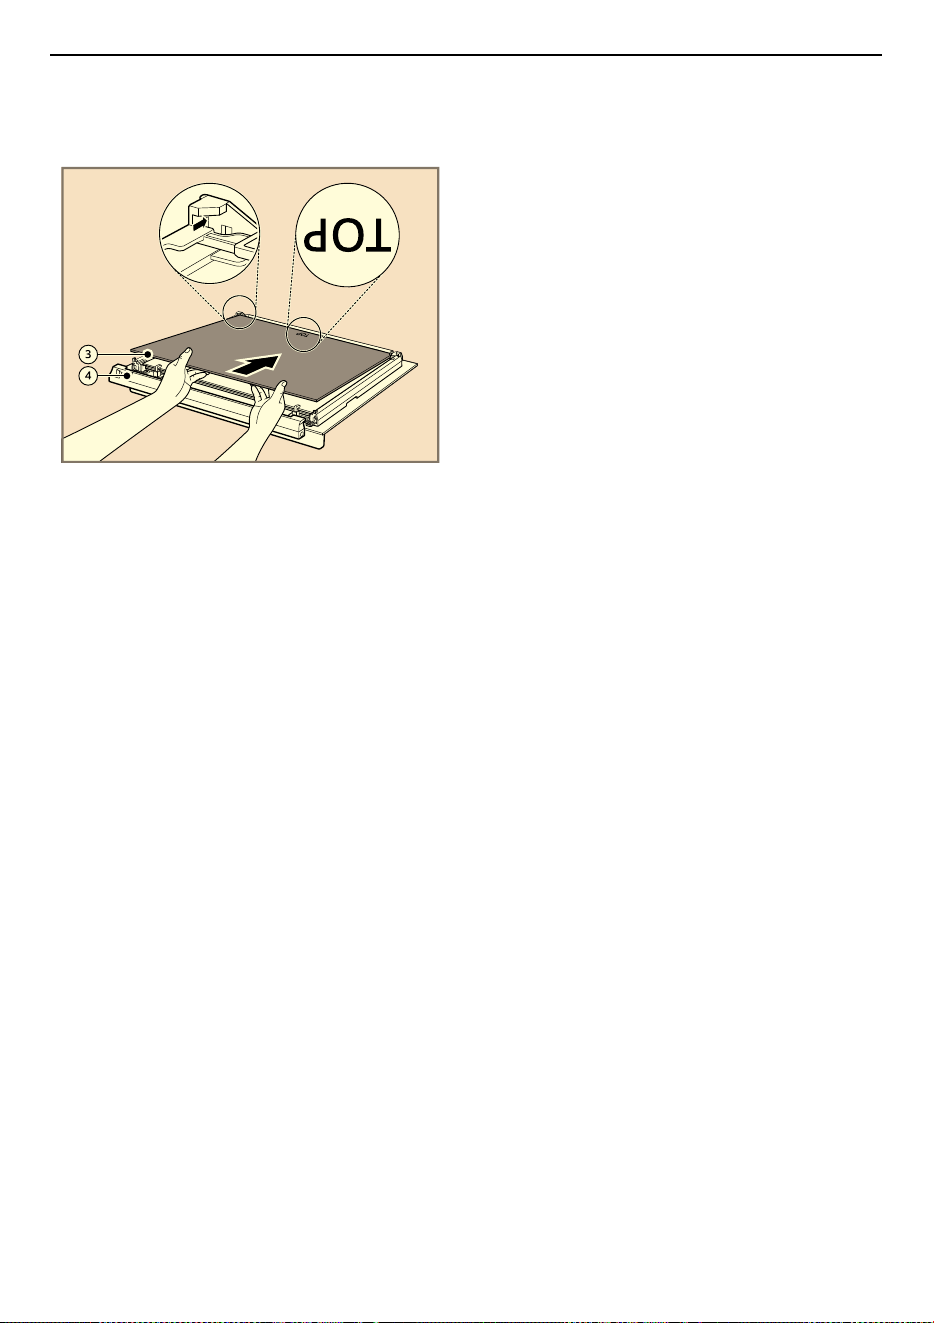
98
MAINTENANCE
• If correctly placed, you will see
TOP
printed
on the bottom of the glass panel to indicate
the correct surface orientation.
4) Assemble the door top cover
D
.
• Ensure that it is fixed (click!).

99
TROUBLESHOOTING
ENGLISH
TROUBLESHOOTING
FAQs
Frequently Asked Questions
CAUTION
• Foil may be used to wrap food in the oven, but do not allow the foil to come into contact with the exposed
heating/grilling elements in the oven. The foil could melt or ignite, causing smoke, fire, or injury.
Q: My new oven doesn’t cook like my old one. Is there something wrong with the
temperature settings?
A: No. Your oven has been factory tested and calibrated. For the first few uses, follow your recipe
times and temperatures carefully. If you still think your new oven is too hot or too cold, you can
adjust the oven temperature yourself to meet your specific cooking needs. Refer to the
Changing Settings
section in this manual for easy instructions on how to adjust your
thermostat.
Q: Is it normal to hear a clicking noise coming from the back of my oven when I am using it?
A: Your new appliance is designed to maintain a tighter control over your oven’s temperature. You
may hear your oven’s heating elements click on and off more frequently on your new oven. This
is normal.
Q: During convection cooking the fan stops when I open the door. Is that normal?
A: Yes, this is normal. When the door is opened, the convection fan will stop until the door is
closed.
Q: Can I use aluminum foil to catch drippings in my oven cavity?
A: Never use aluminum foil to line the bottom or sides of the oven. The foil will melt and stick to
the bottom surface of the oven and will not be removable. Use a foil-lined sheet pan placed on
a lower oven rack to catch drippings instead. (If foil has already melted onto the bottom of the
oven, it will not interfere with the oven’s performance.)
Q: Can I use aluminum foil on the racks?
A: Do not cover racks with aluminum foil. Covering entire racks with foil restricts air flow, leading
to poor cooking results. Use a sheet pan lined with foil under fruit pies or other acidic or sugary
foods to prevent spillovers from damaging the oven finish.
Q: What should I do if my racks are sticky and have become hard to slide in and out?
A: Over time, the racks may become hard to slide in and out. Apply a small amount of olive oil to
the sides of the racks. This will work as a lubricant for easier gliding.
Q: Should I grill with the door open or closed?

100
TROUBLESHOOTING
Before Calling for Service
Cooking
A: Your electric oven isn't designed for open door grilling. If you grill with the oven door open, it
can damage the oven door or display.
Q: Why aren't the function buttons working?
A:
Check if
Control Lock
is activated. The lock icon
k
will show in the display if
Control Lock
is
activated. To deactivate
Control Lock
, refer to the
Control Lock
in
Operation
chapter.
Q: How can I help keep children safe around the appliance?
A: Children should be supervised around the appliance whenever it is in use, and after use until
the oven surfaces have cooled. You can also use
Control Lock
to prevent children from
accidentally turning on the oven.
Control Lock
disables most of oven controls. Refer to the
Control Lock
in
Operation
section.
Symptoms Possible Cause & Solution
Oven will not work Plug on appliance is not completely inserted in the electrical outlet.
• Make sure electrical plug is plugged into a live, properly grounded outlet.
A fuse in your home may be blown or the circuit breaker tripped.
• Replace the fuse or reset the circuit breaker.
Oven controls improperly set.
• See the "Operating the Oven" section in the Operation chapter.
Oven too hot.
• Allow the oven to cool to below locking temperature.
Steam is exhausted
through the oven vent.
Cooking foods with high moisture produces steam.
• This is normal.
Appliance does not
operate.
Cord is not plugged in correctly.
• Make sure cord is plugged correctly into outlet. Check circuit breakers.
Service wiring is not complete.
• Contact your electrician for assistance.
Power outage.
• Check house lights to be sure. Call your local electric company for service.
Oven smokes
excessively during
grilling.
Oven is not installed properly.
• Refer to the Installation Guide.

101
TROUBLESHOOTING
ENGLISH
Oven smokes
excessively during
grilling.
Meat too close to the element.
• Reposition the rack to provide proper clearance between the meat and the
element. Preheat grill element for searing.
Meat not properly prepared.
• Remove excess fat from meat. Cut remaining fatty edges to prevent
curling.
Grease has built up on oven surfaces. Old grease or food spatters cause
excessive smoking.
• Regular cleaning is necessary when grilling frequently.
Food does not bake or
roast properly
Oven controls improperly set.
• See the "Operating the Oven" section in the Operation chapter.
Rack position is incorrect or the rack is not level.
• See the "Operating the Oven" section in the Operation chapter.
Incorrect cookware or cookware of improper size being used.
• See the "Operating the Oven" section in the Operation chapter.
Food does not grill
properly
Oven controls improperly set.
• Make sure you select the Grill mode properly.
Improper rack position being used.
• See the Recommended Grilling Guide.
Cookware not suited for grilling.
• Use grilling pan and grid.
In some areas the power voltage may be low.
• Preheat the grill element for 5-7 minutes.
Moisture collects on
oven window or steam
comes from oven vent
This happens when cooking foods high in moisture.
• This is normal.
Excessive moisture was used when cleaning the window.
• Do not use excessive moisture when cleaning the window.
Warm air venting into
kitchen after oven has
been turned off.
Warm air exhaust is needed to maintain and cool down oven
temperatures. It turns off automatically when the heat cools to a safe
temperature.
• This is normal.
Oven will not steam
cook
Improper assembly
• Make sure to insert the water tank into correct position in the control
panel.
Symptoms Possible Cause & Solution

102
TROUBLESHOOTING
Parts & Features
Oven will not steam
cook
The drain in the water tank may be clogged with hard water scale.
• If this happens, the descaling function must be run before the steam
function can be used.
Water pools in the
bottom of the oven
during or after steam
cooking
During steam cooking, the water in the water tank is transferred to the
bottom of the oven.
• It is normal for water to fill the bottom of the oven during or after the
Steam
function.
• If the water leaves mineral deposits on the oven bottom, remove the
deposits with a cloth or sponge soaked in vinegar.
White residue appears
on the oven bottom
after steam cooking
Using hard water in the water tank can result in hard water scale on the
oven bottom.
• To remove mineral deposits that remain on the oven bottom, use a cloth
or sponge soaked in vinegar or a weak citric acid solution.
Symptoms Possible Cause & Solution
Symptoms Possible Cause & Solution
Oven control beeps
and displays any F code
error.
Electronic control has detected a fault condition.
• Turn off the oven function you are using to clear the display and stop the
beeping. Reprogram the oven. If the fault recurs, record the fault number
and call for service.
k
is on in the display
when you want to cook
The oven door is locked because the temperature inside the oven has
not dropped below the locking temperature.
• Press the
Start/Stop
button on the control panel. Allow the oven to cool.
The Control Lock is activated
• To deactivate
Control Lock
, refer to the
Control Lock
in Operation
chapter.
Oven light does not
work. (Model
WSED7665B)
It is time to replace the bulb or the bulb is loose.
• Replace or tighten the bulb. See "Changing the Oven Light" in the Periodic
Maintenance section.
Cooling fan continues
to run after oven is
turned off.
The fan turns off automatically when the electronic components have
cooled sufficiently.
• This is normal.
Oven will not start
Pyrolysis. (Model
WSED7665B)
The oven temperature is too high to set a Pyrolysis operation.
• Allow the appliance to cool and reset the controls.
Oven controls improperly set.
• See the
Pyrolysis
in the Cleaning section. (Model WSED7665B)

103
TROUBLESHOOTING
ENGLISH
Noises
Wi-Fi
Oven will not start
Pyrolysis. (Model
WSED7665B)
A pyrolysis cycle cannot be started if the oven door is open.
• Close the oven door.
Oven door does not
open after a Pyrolysis
cycle. (Model
WSED7665B)
Oven is too hot.
• Allow the oven to cool below locking temperature.
The control and door may be locked.
• Allow about one hour for the oven to cool after the completion of a
Pyrolysis cycle. The door can be opened when the lock
k
is no longer
displayed.
The oven is not clean
after a Pyrolysis cycle.
(Model WSED7665B)
Oven controls not properly set.
• See the
Pyrolysis
in the Cleaning section.
Oven was heavily soiled.
• Clean up heavy spillovers before starting the clean cycle. Heavily soiled
ovens may need to do
Pyrolysis
again or for a longer period of time.
Convection fan stops. Convection fan stops during a Hot Air cycle. It is done to allow more even
heating during the cycle.
• This is not a failure of the range and should be considered normal
operation.
Symptoms Possible Cause & Solution
Symptoms Possible Cause & Solution
“Crackling” or
“popping” sound
This is the sound of the metal heating and cooling during both the
cooking and EasyClean functions.
• This is normal.
Fan noise A convection fan may automatically turn on and off.
• This is normal.
Symptoms Possible Cause & Solution
Your home appliance
and smartphone are
not connected to the
Wi-Fi network.
The password for the Wi-Fi that you are trying to connect to is incorrect.
• Find the Wi-Fi network connected to your smartphone and remove it, then
register your appliance on
LG ThinQ
.

104
TROUBLESHOOTING
Customer Service & Spare Parts
Customer Service
If the fault cannot be rectified by the above
measures, contact the LG Service.
• If faulty, the appliance must not be used. If a
fault occurs, the appliance must be isolated by
removing the mains plug or switched off by
removing the fuse or turning off the circuit
breaker in the house fuse box.
• The appliance must only be repaired by a
specially trained and qualified electrical
professional. Repairs carried out improperly
may result in considerable damage.
CAUTION
• Repairs to the appliance must be carried out by
a specially licensed technician only. Considerable
danger may result from incorrect repairs.
• Do not use the appliance if damaged. In the
event of a fault or failure, switch off at the mains.
In the event of a fault, visits by technicians from
Customer Service or dealers may not be covered
by the warranty if the cause of failure is the
result of abnormal customer use.
Spare Parts
If you require spare parts or a technician, contact
the LG Service.
• Your call will be automatically passed on to the
Customer Service Centre responsible for your
post code area.
• You can find the address of your local Customer
Service Centre and other information for
customers on the Internet at www.lg.com
Please ensure you have the following details to
hand:
• Your name and address, including your post
code.
• Your telephone number.
• Exact details of the nature of the problem.
• The model, series and serial number. These
details are found on the rating plate located at
the left-hand inner edge of the oven door.
• Your dated receipt of purchase. Please note that
proof of purchase is required for any warranty
claim. Before requesting a warranty claim,
please ensure that you have read through the
section on “TROUBLESHOOTING”. There will be a
charge for any inspection carried out by a
technician if it should transpire that there is no
Your home appliance
and smartphone are
not connected to the
Wi-Fi network.
Mobile data for your smartphone is turned on.
• Turn off the
Mobile data
of your smartphone and register the appliance
using the Wi-Fi network.
The wireless network name (SSID) is set incorrectly.
• The wireless network name (SSID) should be a combination of English
letters and numbers. (Do not use special characters.)
The router frequency is not 2.4 GHz.
• Only a 2.4 GHz router frequency is supported. Set the wireless router to 2.4
GHz and connect the appliance to the wireless router. To check the router
frequency, check with your Internet service provider or the router
manufacturer.
The distance between the appliance and the router is too far.
• If the distance between the appliance and the router is too far, the signal
may be weak and the connection may not be configured correctly. Move
the location of the router so that it is closer to the appliance.
Symptoms Possible Cause & Solution

105
TROUBLESHOOTING
ENGLISH
mechanical or electrical fault present in the
appliance.
After Sales Service (Egypt Only)
• Shelf Life Time : 6 Years
• LG is committed to providing all spare parts of
this appliance during the shelf life time.

Memo

Memo