Amarey Customer Care
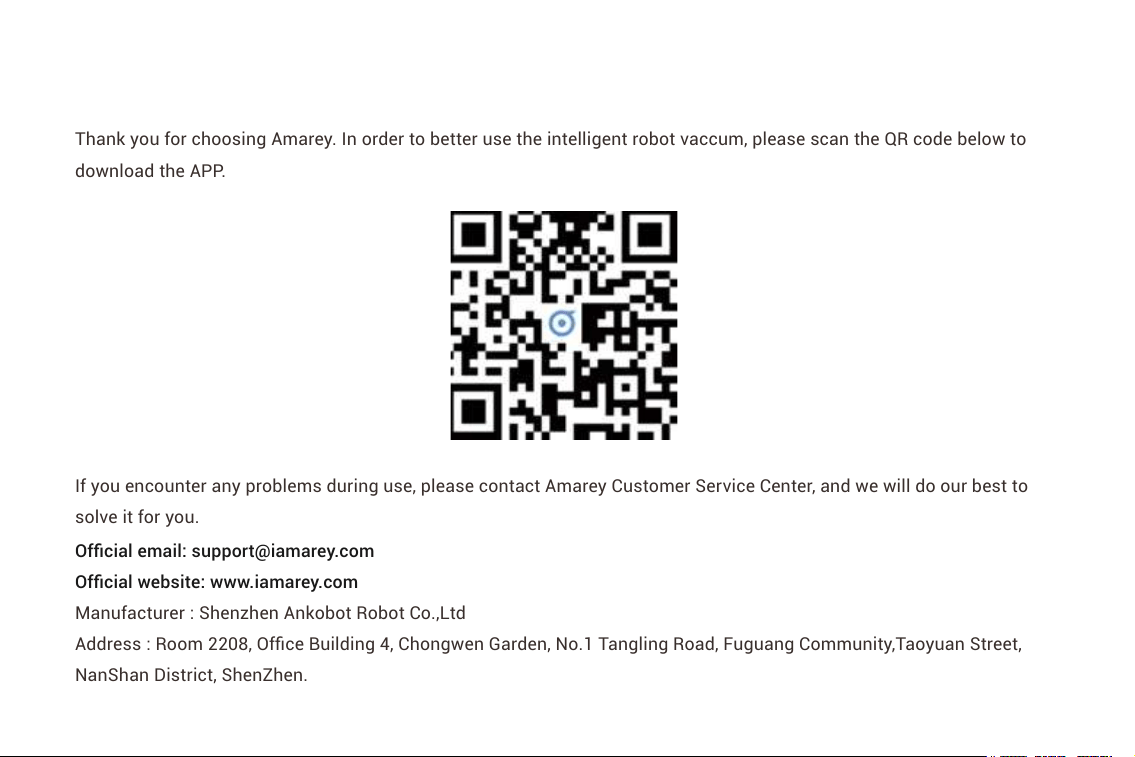
Thank you for choosing Amarey. In order to better use the intelligent robot vaccum, please scan the QR code below to
download the APP.
If you encounter any problems during use, please contact Amarey Customer Service Center, and we will do our best to
solve it for you.
Official email: support@iamarey.com
Official website: www.iamarey.com
Manufacturer : Shenzhen Ankobot Robot Co.,Ltd
Address : Room 2208, Office Building 4, Chongwen Garden, No.1 Tangling Road, Fuguang Community,Taoyuan Street,
NanShan District, ShenZhen.
1
Important Safety Instructions
READ ALL INSTRUCTIONS BEFORE USING THIS APPLIANCE.
• If you have special objects that could potentially be damaged by the bumping,remove these objects from the floor.
• Do not let kids sit or stand on Robot. Children and pets should be supervised when Robot is operating.
• For INDOOR household use ONLY. Do not use the Robot in outdoor, commercial or industrial environments.
• Do not use Robot on wet surfaces or surfaces with standing water.
• Do not use Robot to pick up spills of water bleach, paint, and other chemicals.
• Do not use in extremely hot or cold environments (below -5˚C/23˚F or above 40˚C/104˚F).
• Do not allow the Robot to pick up large objects like stones, large pieces of paper or any item that may clog the Appliance.
• Do not use Robot to pick up flammable or combustible materials such as gasoline, printer or copier toner, or use in areas
where they may be present.
• Do not use Appliance to pick up anything that is burning or smoking, such as cigarettes, matches, hot ashes, or anything
that could cause a fire.
• Only charge the following amarey batteries: maximum 14.4V,2600mAh Lithium-ion battery. Other type of batteries may
burst causing injury. Always contact Amarey Customer Service Center for the correct replacement of battery.
2
• The battery must be removed and discarded according to local laws and regulations before disposal of the Robot.
• Please dispose of used batteries according to local laws and regulations.
• WARNING Chemical Exposure: If the battery pack is leaking, do not allow the liquid to come in contact with skin or eyes.
If contact has been made, wash the affected area with copious amounts of water and seek medical advice. Place the battery
(the used battery pack included when the robot will be disposed) in a sealed plastic bag and dispose of safely according
to local environmental regulation.
• WARNING Fire or Explosion Hazard: Do not crush or dismantle battery packs, Do not heat or place the battery pack near
any heat source or direct sunlight, Do not incinerate or short-circuit the battery pack. Do not subject batteries to mechanical
shock.
Battery and Charging/Information
Lithium-ion Battery
Important: Lithium-ion batteries and products that contain Lithium-ion are subject to stringent transportation regulations.
If you need to ship this product (with the battery included) for service, travel or any other reason, you MUST comply with
the following shipping instructions:
• Remove the Lithium-ion battery from the product.
• Place a piece of tape over the battery's metal charging contacts.
3
• Reinstall the battery (with the tape on it) in the product and secure the battery cover.
• Pack the product in original packaging or in a suitable packaging that prevents any movement during transportation.
• Can only use land transportation (Air transport is prohibited).
Battery Storage
• If the robot will not be used for a long time, please remove the battery. Then store the robot and battery in a cool and dry place.
FCC Warning
This device complies with part 15 of the FCC Rules. Operation is subject to the following two conditions:
(1) This device may not cause harmful interference,
(2) This device must accept any interference received, including interference that may cause undesired operation. Any
Changes or modifications that not expressly approved by the party responsible for compliance could void the user's
authority to operate the equipment.
This Transmitter must not be co-located or operating in conjunction with any other antenna or transmitter.
This equipment complies with RF radiation exposure limits set forth for an uncontrolled environment.
This equipment should be installed and operated with minimum distance 20cm between the radiator and your body.
4
CE Warning
1. Risk of explosion if battery is replaced by an incorrect type. Dispose of used batteries according to the instructions.
2. Adapter shall be installed near the equipment and shall be easily accessible.
3. The operating temperature of the device can′t exceed 40℃ and shouldn′t be lower than 0℃.
4. The plug considered as disconnect device of adapter.
5. The device complies with RF specifications when used at 20cm from the body.
6. Hereby, Shenzhen Ankobot Robot Co.,Ltd declares that this product is in compliance with essential requirements and
other relevant provisions of Directive 2014/53/EU. This product is allowed to be used in all EU member states.
5

CONTENTS
1. Package Contents............................................................................................................................7
2. Instructions....................................................................................................................................11
3. Maintenance..................................................................................................................................24
4. Troubleshooting.............................................................................................................................29
5. Technical Specifcations................................................................................................................33
6
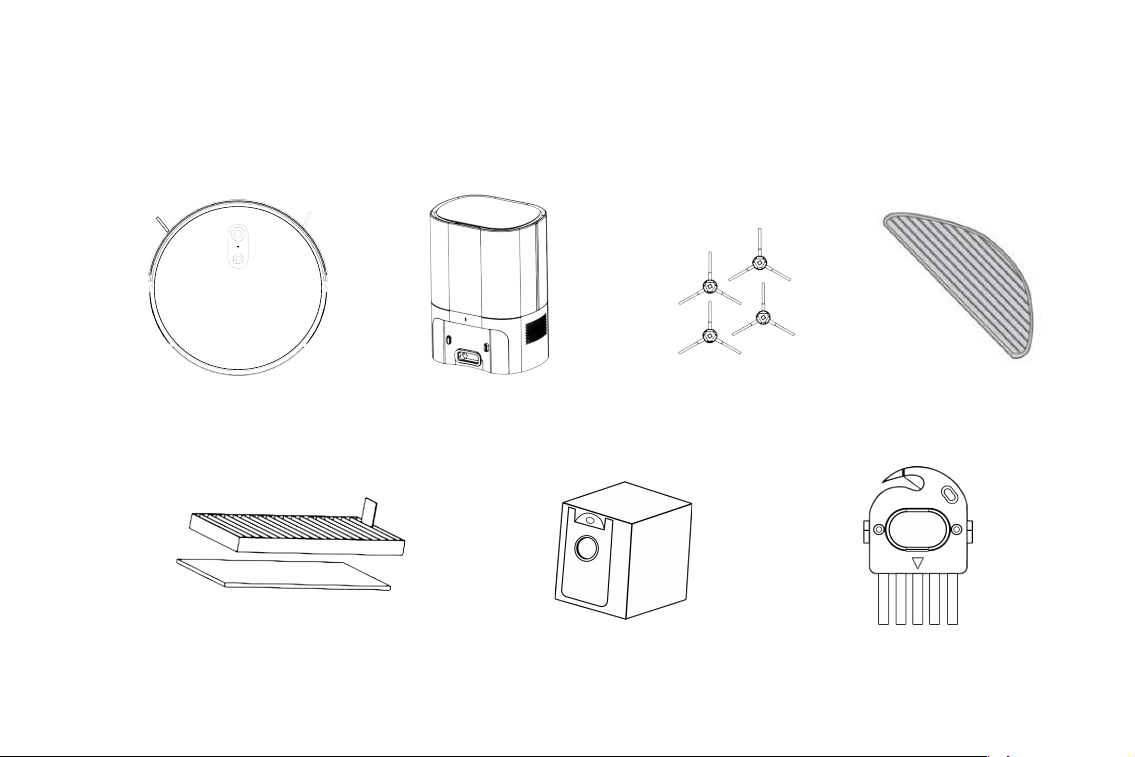
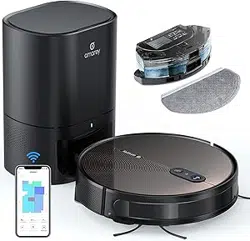
1. Package Contents
1.1 Package Contents
Amarey A90+ Self-Empty Base 4 X Side Brush 2 X Cleaning Cloth
Cleaning Tool2 X Dust BagSponge Filter and High Efficiency Filter
7
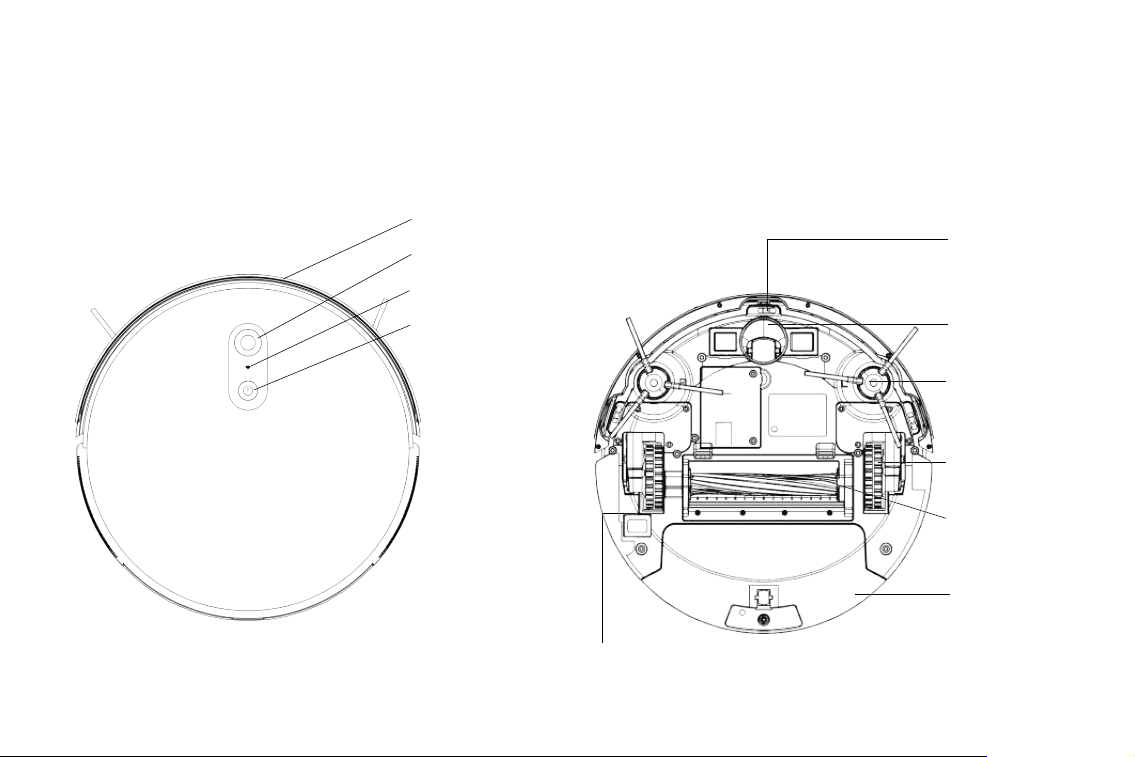
1.2 Product Diagram
①Top View ②Bottom View
Anti-collision Sensors and Bumper
Anti-fall Sensors
Universal Wheel
Side Brushes
Wheel
Main Brush
Dust Bin
Reservoir 2 in 1
Main Power Switch (On/Off)
Camera
Wi-Fi Indicator
Start/Pause
8
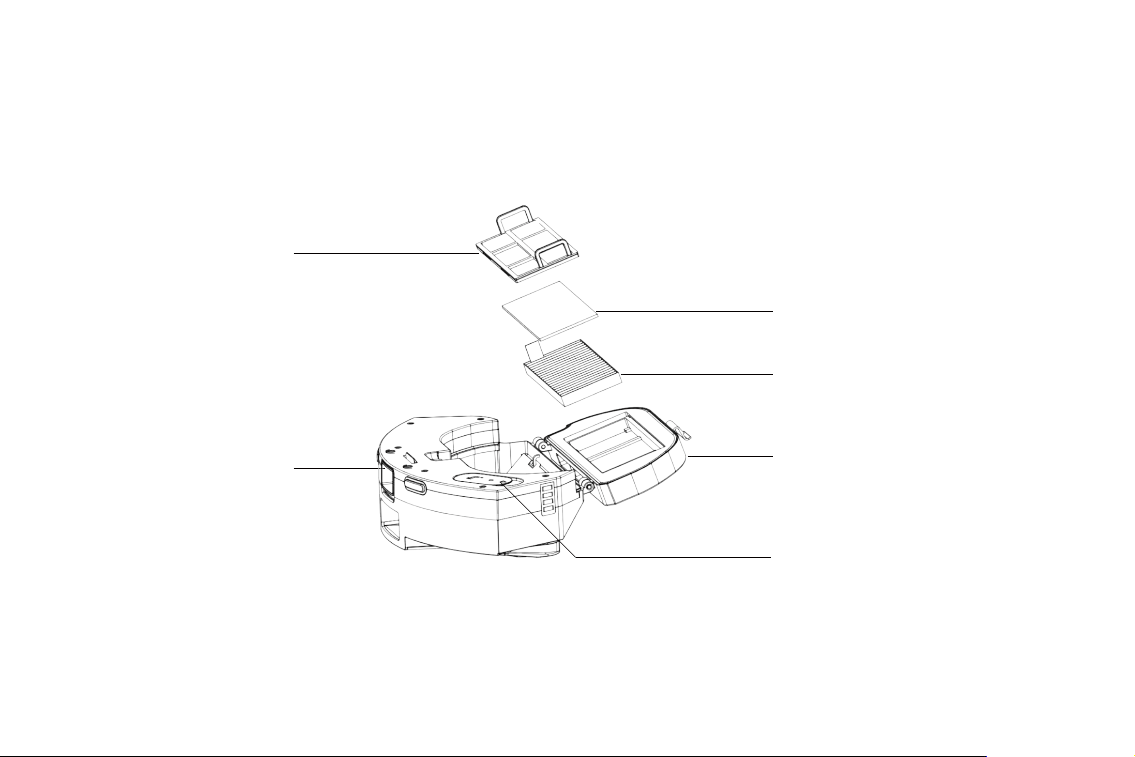
③Dust Bin
Primary Filter
Sponge Filter
High Efficiency Filter
Dust Bin Cover
Water Inlet
Dust Bin Release Button
9
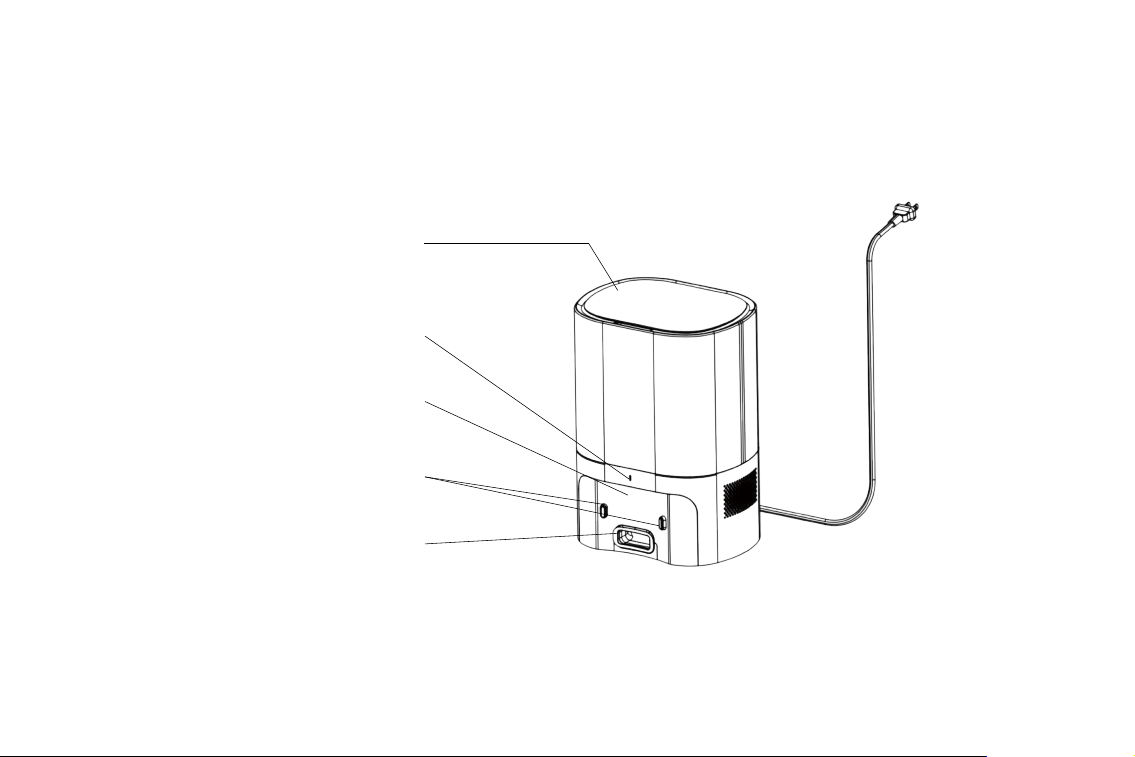
④Self-Empty Base
Upper Cover
Signal Emission Area
Charging Indicator
Charging Contact Points
Vacuuming Mouth
10
2. Instructions
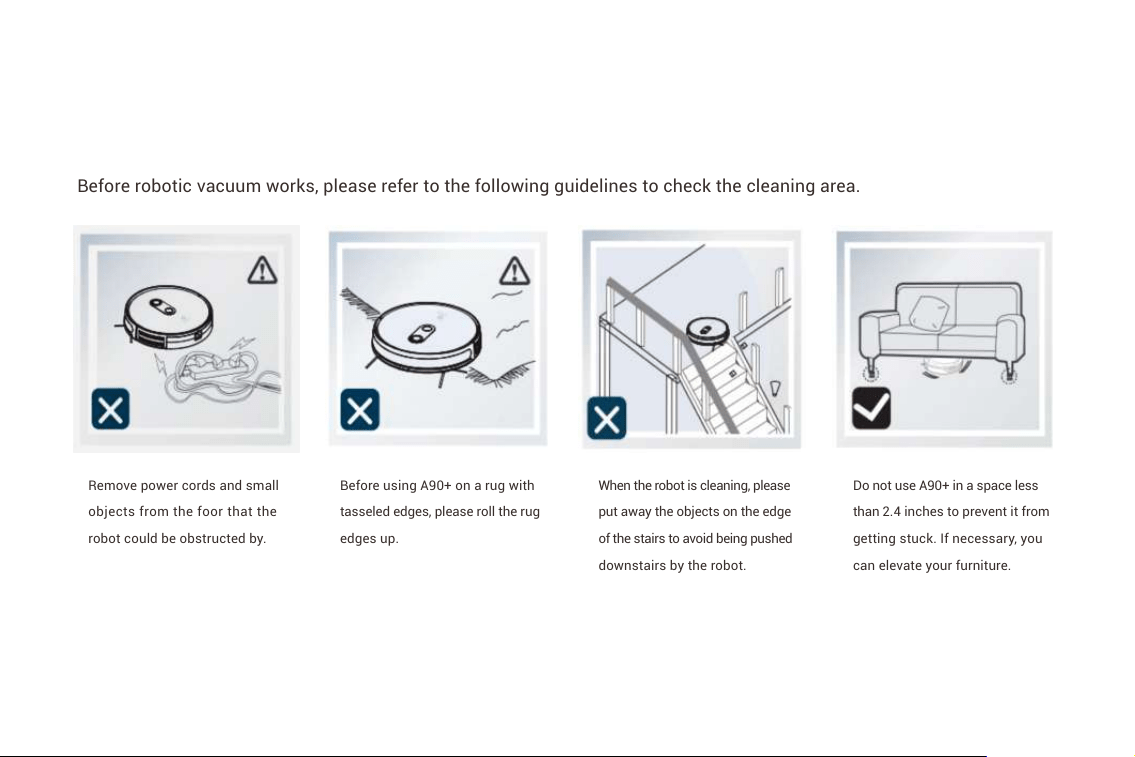
2.1 Notes Before Cleaning
Before robotic vacuum works, please refer to the following guidelines to check the cleaning area.
Remove power cords and small
objects from the foor that the
robot could be obstructed by.
Before using A90+ on a rug with
tasseled edges, please roll the rug
edges up.
When the robot is cleaning, please
put away the objects on the edge
of the stairs to avoid being pushed
downstairs by the robot.
Do not use A90+ in a space less
than 2.4 inches to prevent it from
getting stuck. If necessary, you
can elevate your furniture.
11
2.2 Preparation
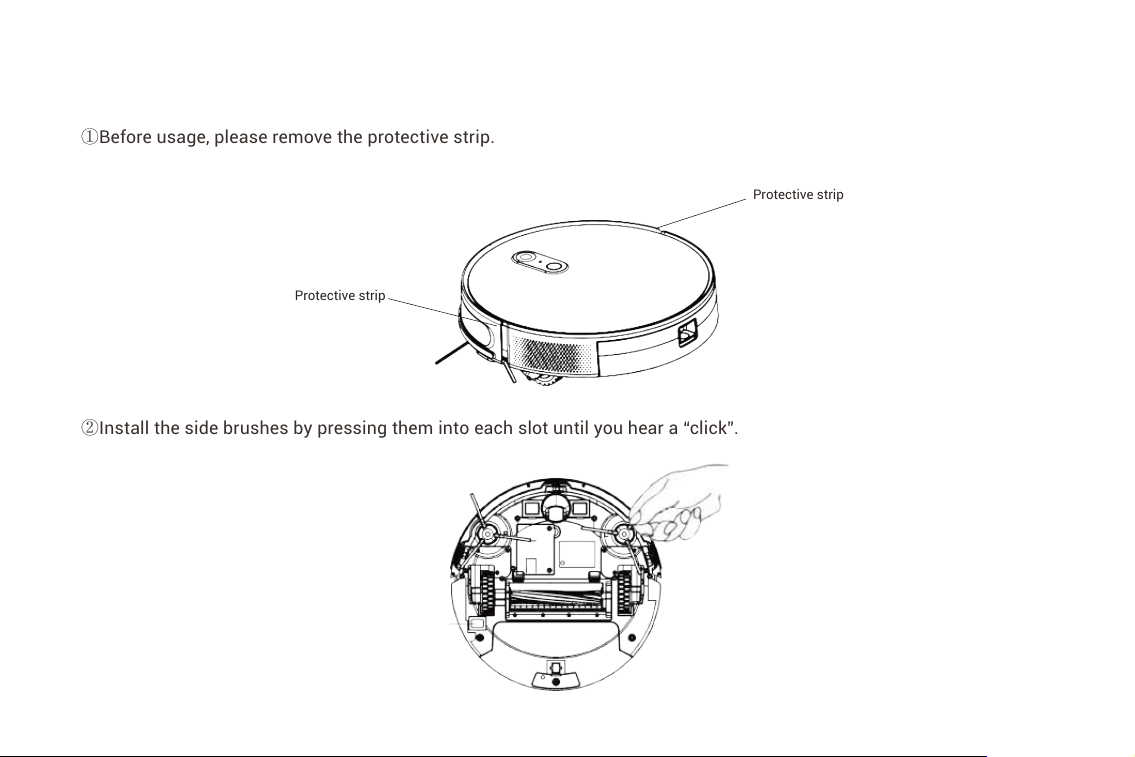
①Before usage, please remove the protective strip.
②Install the side brushes by pressing them into each slot until you hear a “click”.
Protective strip
Protective strip
12
2.3 Charge The Robot
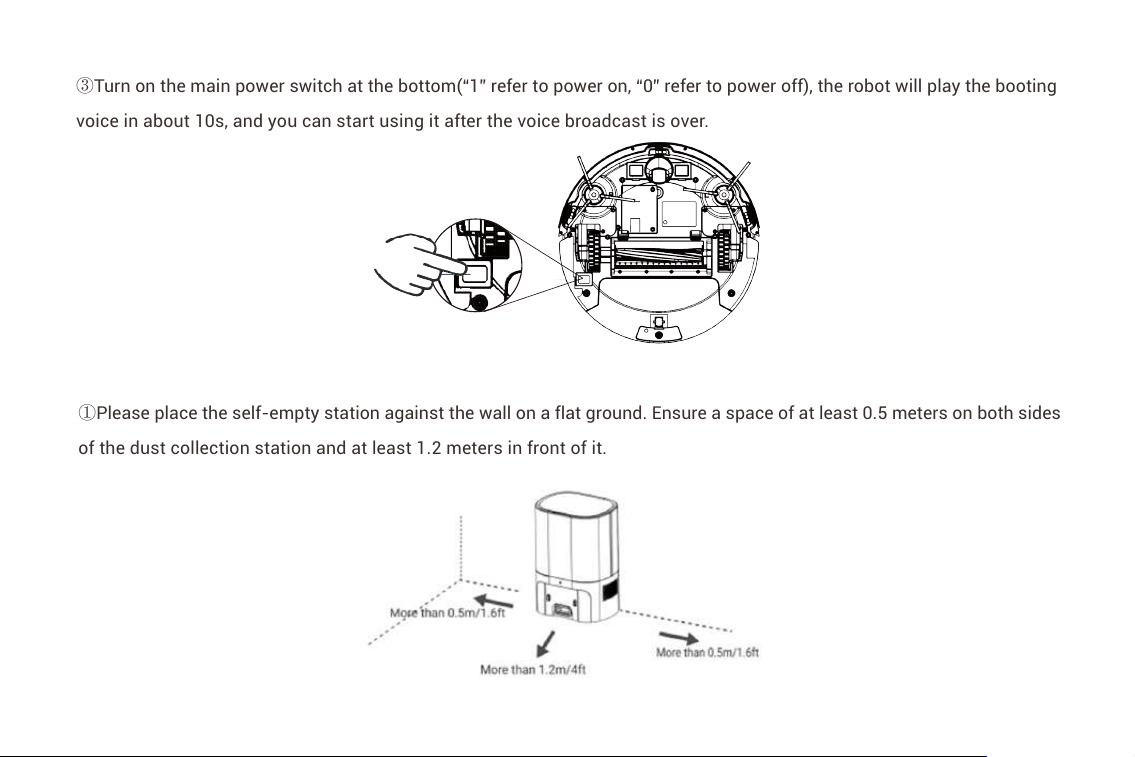
③Turn on the main power switch at the bottom(“1” refer to power on, “0” refer to power off), the robot will play the booting
voice in about 10s, and you can start using it after the voice broadcast is over.
①Please place the self-empty station against the wall on a flat ground. Ensure a space of at least 0.5 meters on both sides
of the dust collection station and at least 1.2 meters in front of it.
13
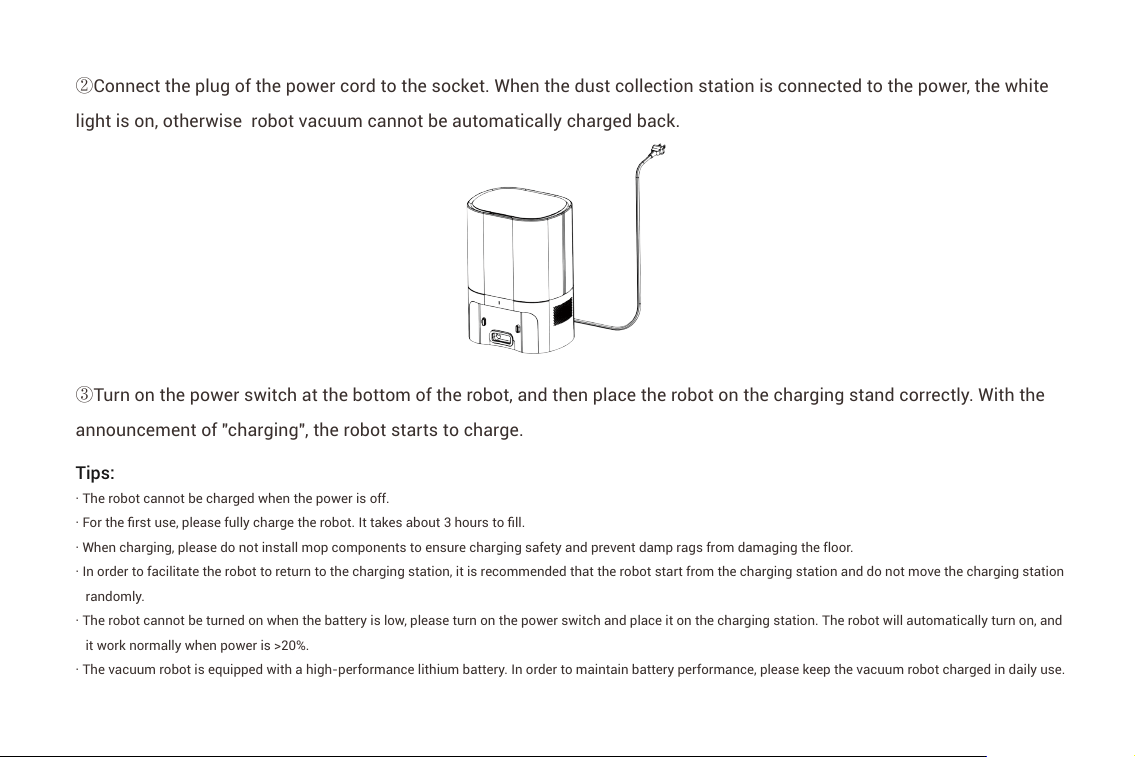
②Connect the plug of the power cord to the socket. When the dust collection station is connected to the power, the white
light is on, otherwise robot vacuum cannot be automatically charged back.
③Turn on the power switch at the bottom of the robot, and then place the robot on the charging stand correctly. With the
announcement of "charging", the robot starts to charge.
Tips:
· The robot cannot be charged when the power is off.
· For the first use, please fully charge the robot. It takes about 3 hours to fill.
· When charging, please do not install mop components to ensure charging safety and prevent damp rags from damaging the floor.
· In order to facilitate the robot to return to the charging station, it is recommended that the robot start from the charging station and do not move the charging station
randomly.
· The robot cannot be turned on when the battery is low, please turn on the power switch and place it on the charging station. The robot will automatically turn on, and
it work normally when power is >20%.
· The vacuum robot is equipped with a high-performance lithium battery. In order to maintain battery performance, please keep the vacuum robot charged in daily use.
14
2.4 Install The Dust Bag
(1) Open the upper cover (2) Install a new dust bag (3) Make sure the dust bag
is in place
(4) Close the cover
15

-APP control
①Download APP by scanning below QR code.
②Press for 5s, and you will hear voice prompt "Reset
WI-FI, enter network configuration mode", and the blue Wi-Fi
indicator will flash rapidly, which means the robot start entering
network configuration mode.
③Enter the home page of APP, click "+" in the upper right corner and add device according to the APP prompt. The device will
show in the home page list after successfully added. After the device is successfully added, click "Start" and the robot can
start cleaning.
16
-Voice Control
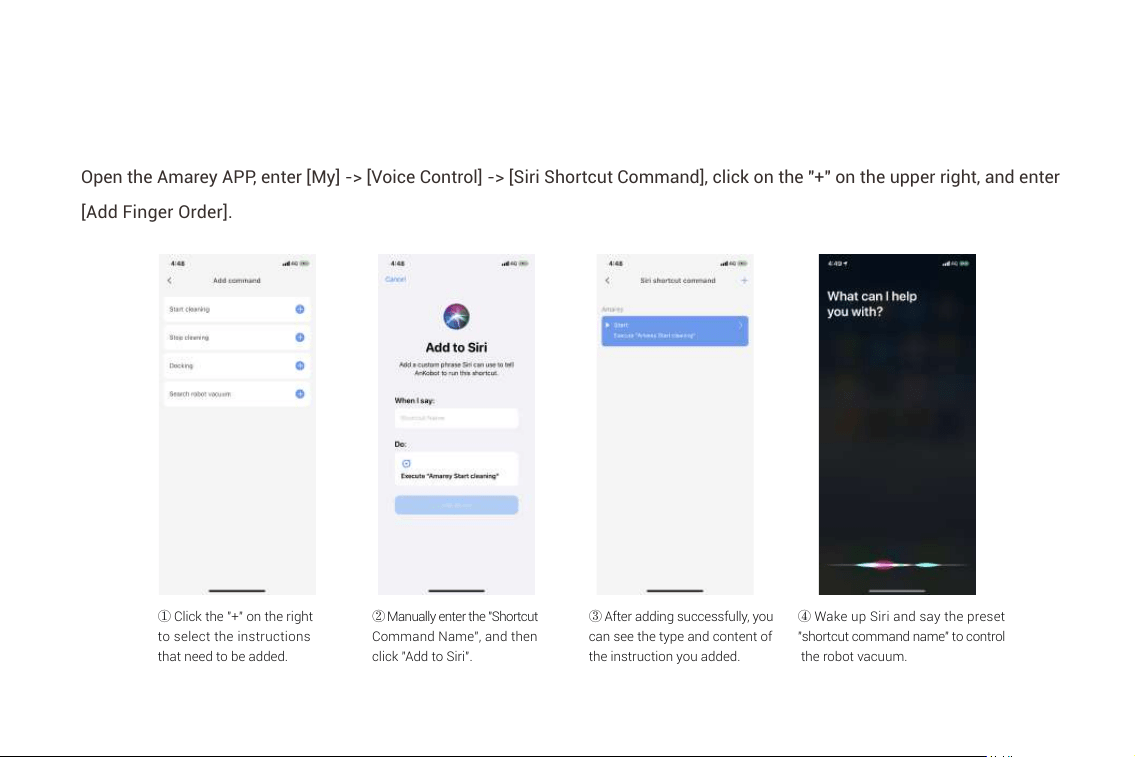
How to connect Siri?
Open the Amarey APP, enter [My] -> [Voice Control] -> [Siri Shortcut Command], click on the "+" on the upper right, and enter
[Add Finger Order].
① Click the "+" on the right
to select the instructions
that need to be added.
② Manually enter the "Shortcut
Command Name", and then
click "Add to Siri".
③ After adding successfully, you
can see the type and content of
the instruction you added.
④ Wake up Siri and say the preset
"shortcut command name" to control
the robot vacuum.
17
How to Connect Amazon Alexa?
The Amarey A90+ robot vacuum supports Alexa voice control.
You can learn how to configure Alexa through the URL below.
https://app.ankobot.com:8143/web/APPHelp/us/voice/alexa.html
Tips:
· Due to App upgrading, the operation may have little difference with above instruction, please follow the instruction in APP.
· Only support 2.4GHz WIFI, not 5GHz.
· Siri voice commands can support English, French, Spanish, Italian, German, Portuguese and other language control.
18
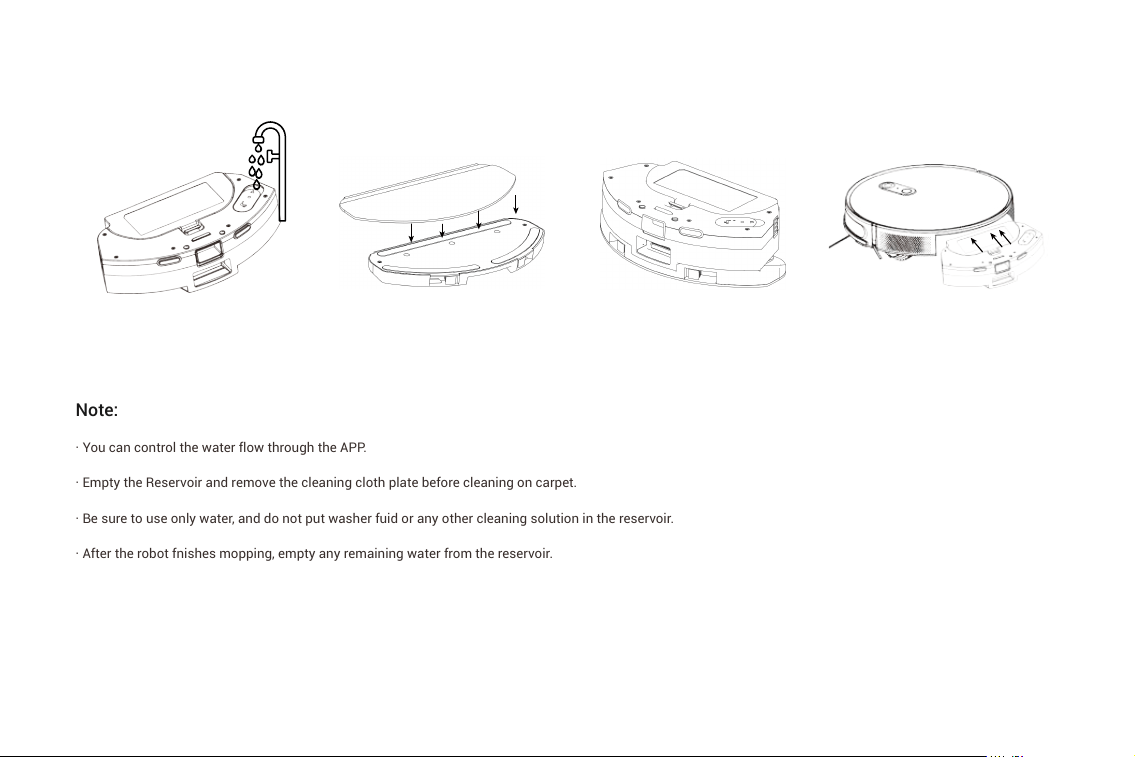
2.6 2 in 1 Vacuum and Mop
Note:
· You can control the water flow through the APP.
· Empty the Reservoir and remove the cleaning cloth plate before cleaning on carpet.
· Be sure to use only water, and do not put washer fuid or any other cleaning solution in the reservoir.
· After the robot fnishes mopping, empty any remaining water from the reservoir.
① Remove the dust bin, and
pour water into the reservoir
through the water inlet.
②Stick the cleaning cloth on
the plate.
③Fix the cleaning cloth plate
on the dust bin.
④Install the dust bin back into
the robot.
19
2.7 Self-empty
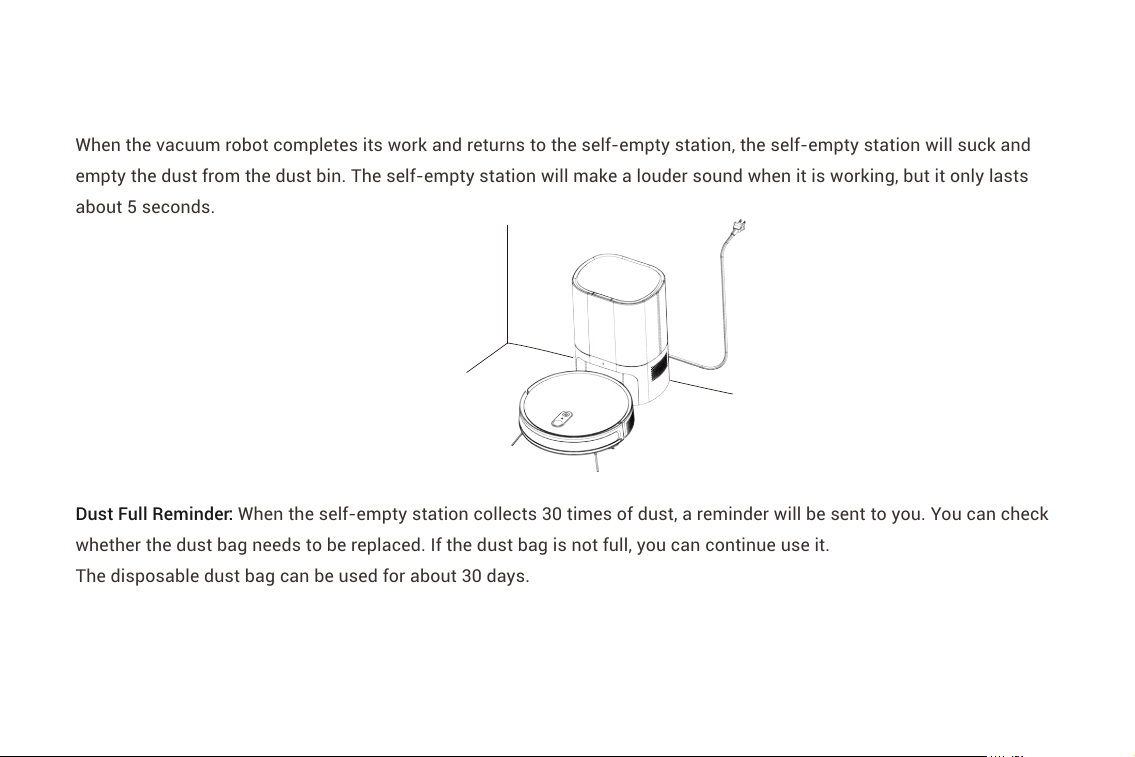
When the vacuum robot completes its work and returns to the self-empty station, the self-empty station will suck and
empty the dust from the dust bin. The self-empty station will make a louder sound when it is working, but it only lasts
about 5 seconds.
Dust Full Reminder: When the self-empty station collects 30 times of dust, a reminder will be sent to you. You can check
whether the dust bag needs to be replaced. If the dust bag is not full, you can continue use it.
The disposable dust bag can be used for about 30 days.
20

2.8 Clean Mode
1) Auto Cleaning
2) Spot Cleaning
Method 1: Power on robot, after the startup music, press on panel.
Method 2: Click“Start cleaning”on APP to start cleaning.
Note:
If power is less than 20%, Robot will not work, please charge it before next cleaning.
If power is less than 20% during cleaning, the robot returns to the charging dock for recharge and resumes cleaning where it left off.
Click spot cleaning on APP Remote Control interface. After hearing “Start Spot Cleaning”, the robot will clean in “Spiral” route.
When cleaning is finished, robot will keep in standby mode.
3) Scheduled Cleaning
Set the scheduled cleaning time on APP. The robot will automatically start cleaning at the time you set and return to the
charging base after cleaning.
21

4) Smart Area
5) Docking Mode
Area cleaning
After Smart Map generated successfully, you can divide the map into different areas according the cleaning needs. You can
set one or more cleaning areas. The robot will only clean the selected area.
No-go Zone
You can set the area that does not need to be cleaned as“No-go Zone”through the APP, and the vacuum robot will not enter
the no-go zone.
• Please make sure the robot has generated the smart map. The No-go zone will be lost when the map is rebuilt.
• The No-go zone may be lost due to changes in the location of the self-empty station or furniture.
Auto mode:When the battery power is low, the robot will prompt“Low power, start docking mode”, and returns to the charging
dock for recharge.
Manual mode:In any cleaning mode, press clean key twice or use app control, after voice prompt "start docking mode”, the
robot will automatically returns to the charging dock.
Note:
22
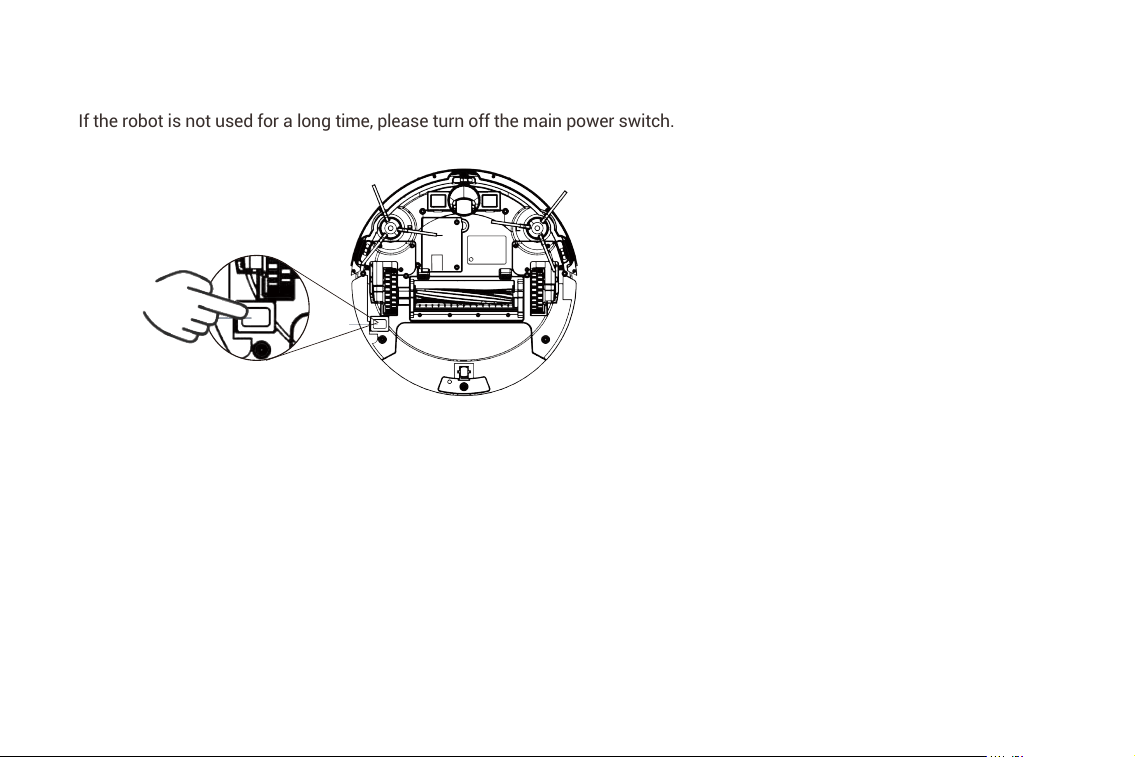
6) Power Off
If the robot is not used for a long time, please turn off the main power switch.
23
3. Maintenance
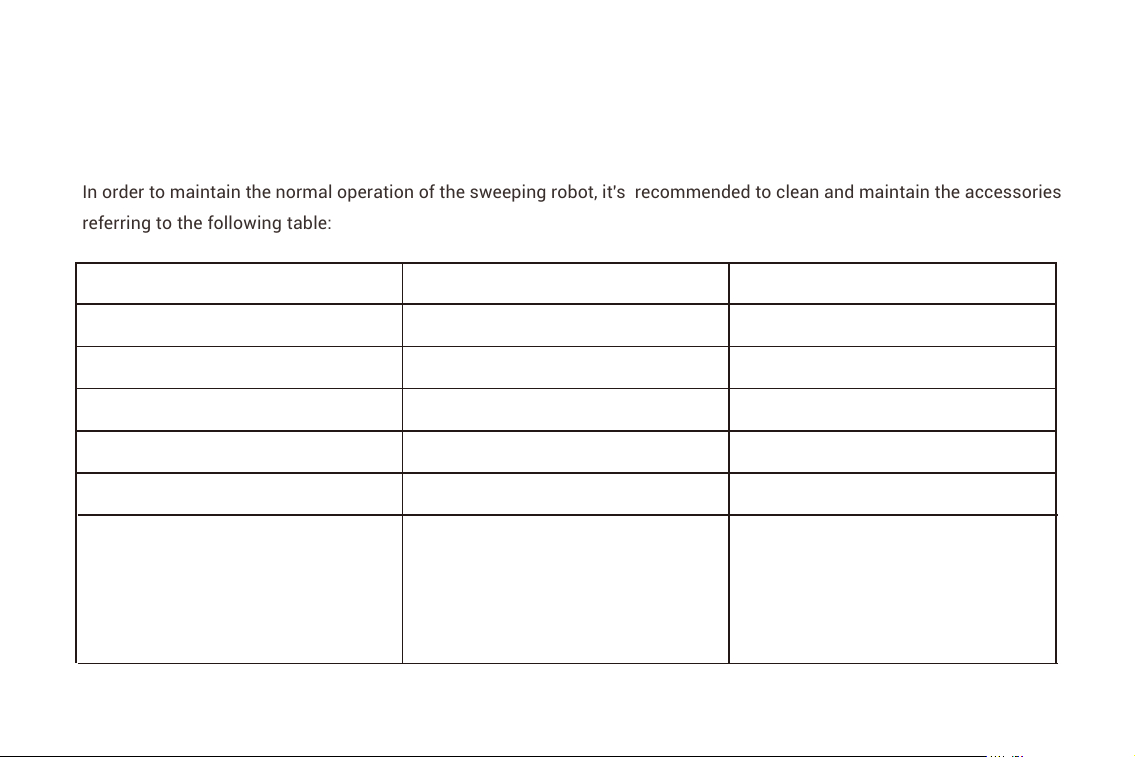
3.1 Accessories Cleaning and Maintenance
In order to maintain the normal operation of the sweeping robot, it's recommended to clean and maintain the accessories
referring to the following table:
Accessories
Mop
Side brush
Main brush
Primary filter and sponge
High efficiency filter
Universal wheel
Driving wheel
Charging pole piece
Anti-fall sensor
Camera
Replacement Frequency
After each use
Every 2 weeks
Every week
Every week
Every week
Every week
Cleaning Frequency
Every 3-6 months
Every 3-6 months
Every 3-6 months
Every 3-6 months
Every 3-6 months
/
24
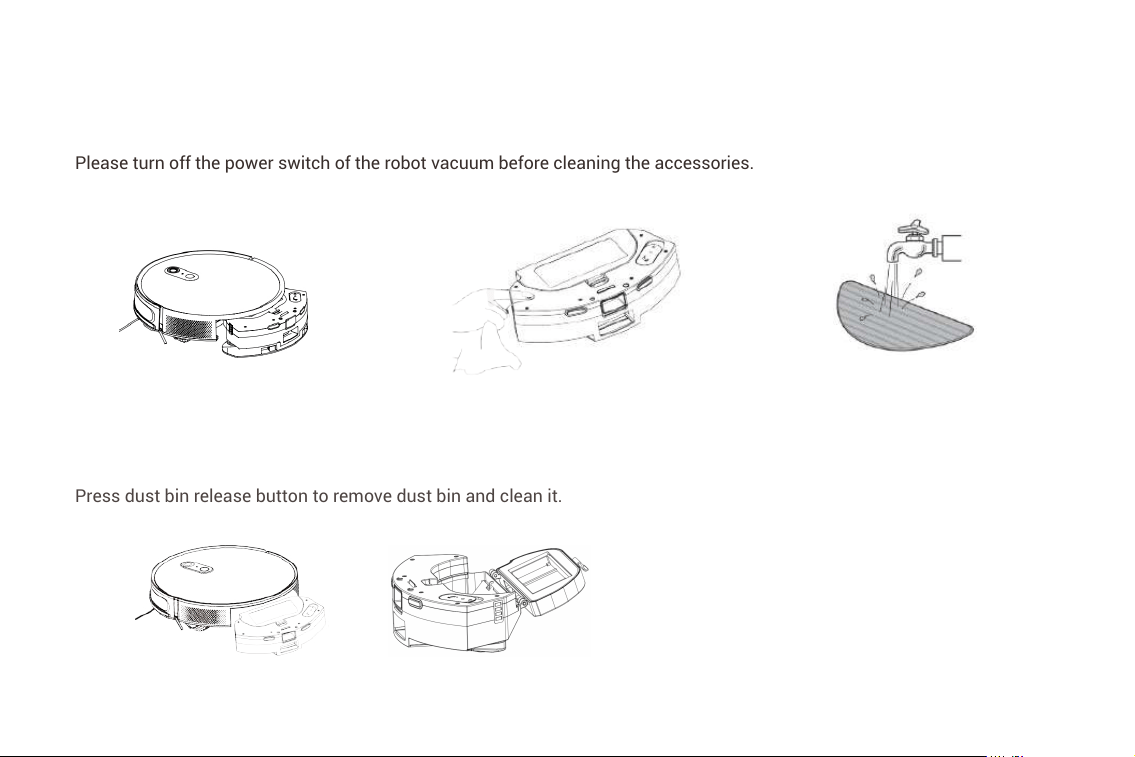
Please turn off the power switch of the robot vacuum before cleaning the accessories.
Press dust bin release button to remove dust bin and clean it.
3.2 Cleaning Instructions
①. Mopping System
(1) Remove the dust bin and the cleaning cloth plate. (2) Wipe the parts of the reservoir with a clean cloth,
don't wash with water.
(3) Remove the mop from the plate,
wash and dry it.
②.Dust Bin
25
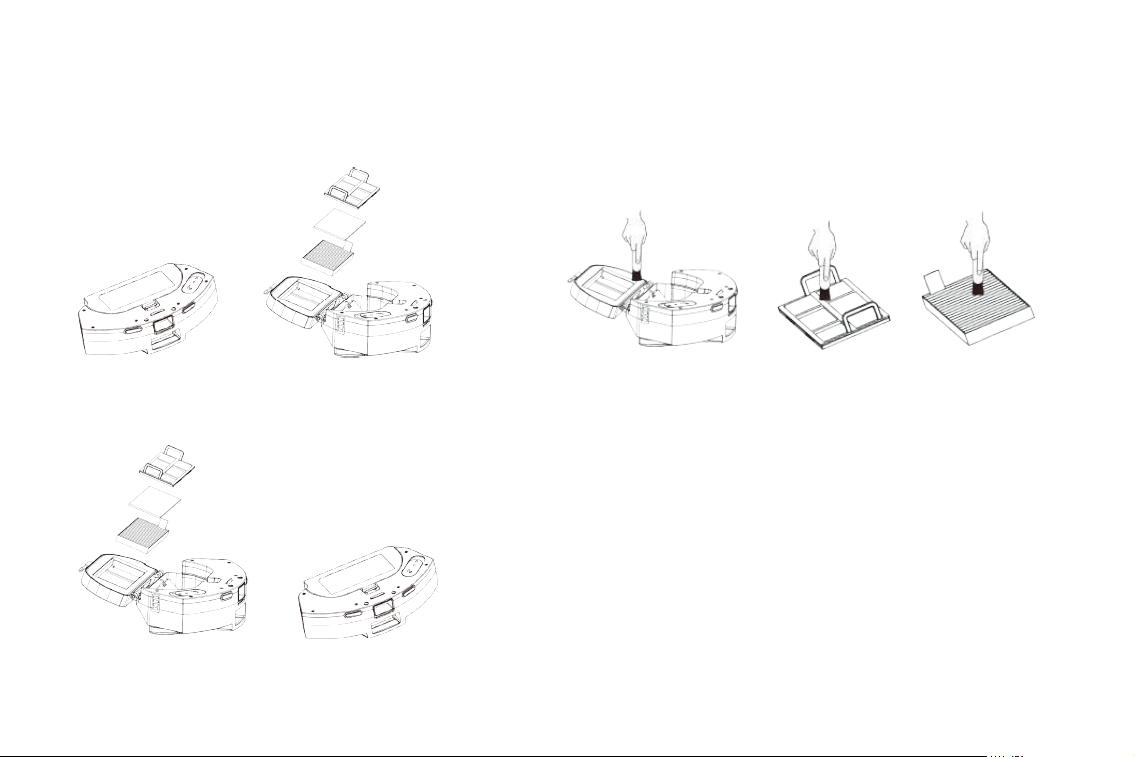
(1) Take the filters out from the dust bin.
(3) Put the filters back together in the dust bin.
③.Filters
(2) Clean the dust bin and filters with provided Cleaning Tool.
26
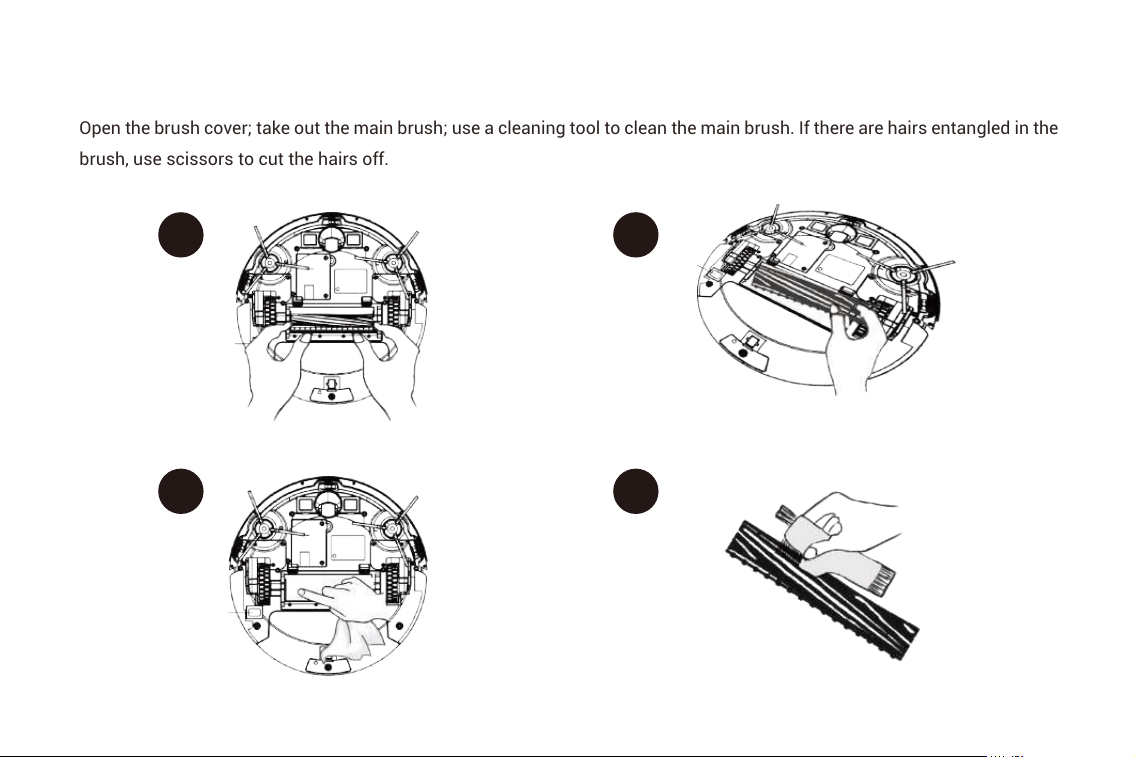
④. Main Brush
Open the brush cover; take out the main brush; use a cleaning tool to clean the main brush. If there are hairs entangled in the
brush, use scissors to cut the hairs off.
1 2
3 4
27
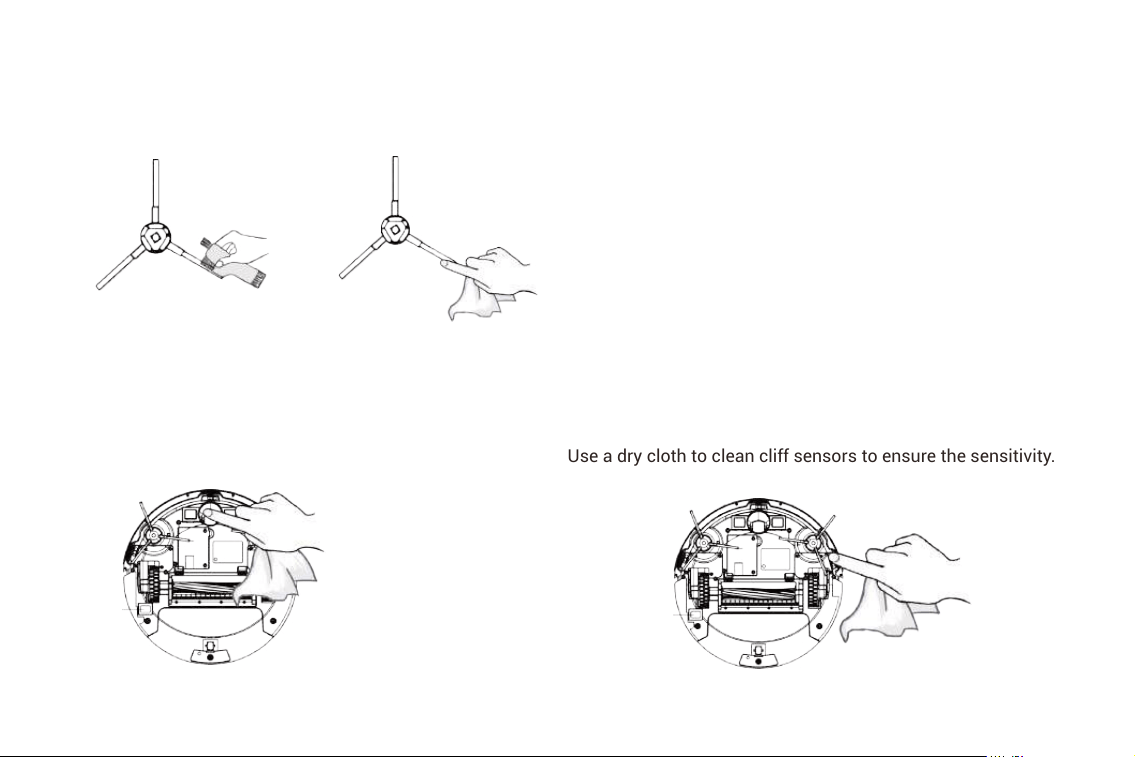
⑤.Side Brush
⑥.Universal Wheel
⑦.Anti-fall sensor
Use a dry cloth to clean cliff sensors to ensure the sensitivity.
28
After removing the side brush, use a cleaning tool to clean the side brush.
Clean the universal wheel with a cloth.
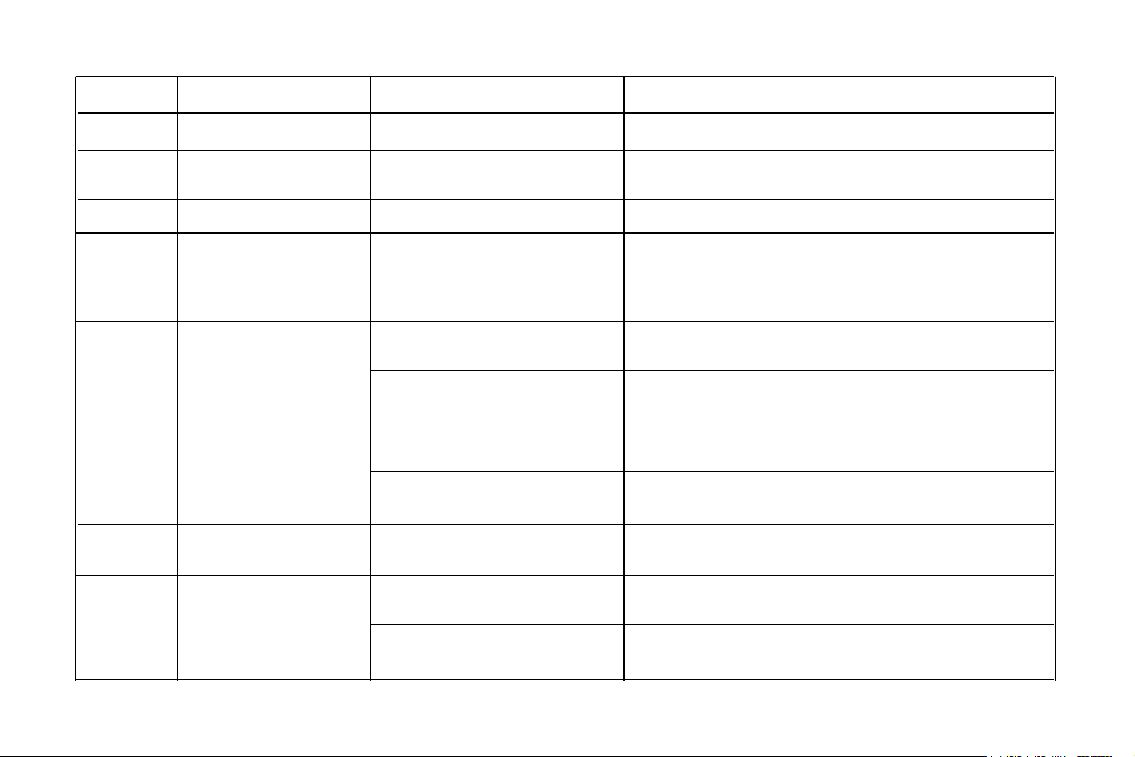
4. Troubleshooting
During the use of the product, if you encounter the following situations, you can check it and solve it independently.
No. Problems
Robot cannot be charged
Charging Dock has no electricity.
Get stuck by objects.
Get stuck under furniture.
Get stuck on carpet.
Charging Dock has no electricity.
The location of Charging Dock is
not correct.
Ensure the charging cord is plugged into the dock and wall outlet,
and the light on the Charging Dock is white.
Clean the charging connection points on both Charging Dock and
bottom of the Robot with dry cloth.
Please turn the robot over and check if the main power switch at the
bottom is turned on. "1" means power on, and "0" means power off.
It can be charged normally only when the main power switch is turned on.
Pick up objects like clothing, scraps of paper, power cords, and
fragile objects to avoid Robot stuck before it starts working.
Robot’s slimmer body would work with most of the furniture but it still
probably gets stuck. Notice: the lowest height is 3 inches.
Robot is not suitable for use on long-pile carpet. Before using Robot on
a short-pile area rug with tasseled edges, please fold area rug’s edges
to prevent Robot from tangling.
Ensure the charging cord is plugged into the dock and wall outlet,
and the light on the Charging Dock is white.
Position the Charging Dock on a hard level surface (not on a dark-colored
surface or high-pile carpet) and refer to the suction“position the charging
dock”in Manual.
The poor connection of the charging
contact points.
The power switch at the bottom of the
robot vacuum is off.
Robot cannot be charged
Robot cannot dock
Causes Solutions
1
2
3
29
Robot cannot dock
The robot vacuum has been suspended
for more than 30 minutes.
The side brush is not installed correctly.
The left / right wheel may be entangled.
The Main Power Switch on the bottom
of Robot is off
Power is too low to start cleaning
The scheduled time have been set
incorrectly.
It is recommended to suspend the robot vacuum for no more than
30 minutes.
It is recommended to let the robot vacuum start cleaning from the
charging stand.
Keep the recharge route unobstructed.
Avoid moving the charging stand as much as possible. Let the robot
vacuum complete the autonomous cleaning.
Put the side brush into the slot and hear a "click".
Check left / right wheel for entanglement and clean the side wheel.
Turn on the Main Power Switch at the bottom of Robot.
Charge Robot.
Set schedule cleaning according to APP Instruction.
The robot vacuum did not start cleaning
from the charging stand.
The refill route is blocked. For example,
the door of the room where the charging
station is placed is closed.
The charging stand was moved artificially.
Side brush falling down
Left / right wheel abnormal
3
4
5
The dust bin is full
Filter clogged or wet
Empty dust bin
Clean and dry the fifilter or replace it with a new one.
Weak suction
Cannot schedule cleaning
Left/right side brush abnormal
Main brush abnormal
Left / right side brushes may be entangled.
Main brush is stuck or entangled.
Check whether the left/right side brush is entangled and clean the
side brush.
Check whether the main brush is entangled and clean the main brush.
6
7
8
9
30
Robot suspended in the air
Robot is suspended or stuck near a cliff.
The robot is familiar with the environment
and is drawing a map.
Clean the route chaos
The robot vacuum is not within the
network signal coverage of the router.
Please put the robot on the flfloor,or clean the cliff sensors
Wipe camera with alcohol cotton ball gently.
Pat the left, middle and right sides of the infrared bumper to
make it flflexible.
Install dust bin again.
The robot has just arrived at your home and needs to be familiar with
your home environment and draw a clean map. Normally,
it will intelligently plan a route according to your home environment and
generate a map after 2-3 cleanings.
Ensure that the robot vacuum is within the network signal coverage of
the router.
The network configuration can be performed on the robot vacuum only
when it is in the state to be configured. Power on the robot vacuum, open
the panel, short press the power button, and hear the robot vacuum's
prompt tone, which means that the robot vacuum enters the state to be
configured.
Not compatible with 5G network, please use 2.4G network configuration
when connecting.
Don't worry, the robot vacuum can create a cleaning map again.
The robot vacuum must start cleaning from the charging stand.
During the cleaning process, avoid moving the robot vacuum as
much as possible.
Camera is dirty.
Camera abnormal
Bumper abnormal
The bumper may get stuck.
Dust bin maybe installed incorrectly.Dust bin abnormal
The robot vacuum cannot
connect to the App
The cleaning map is lost
Unable to create a family map
on the app
10
11
12
The robot vacuum is not in a
state to be configured.
Not using 2.4GHz network.
Moving the robot vacuum to another
floor may lose the map.
The sweeper did not start from the
charging stand.
Moving the robot vacuum during the
cleaning process caused it to fail to locate.
13
14
15
16
17
31

17
18
19
Unable to create a family
map on the app
When the robot vacuum is
working, the sound is loud
The robot vacuum cannot
connect to the home WiFi
network
The robot vacuum isn't within the wifi
signal range.
When the network is connected, the robot
vacuum is not yet ready to configure the
network.
The robot vacuum doesn't support 5G
networks.
The automatic cleaning task has not
been completed.
After the robot vacuum has finished cleaning, it will automatically return
to the charging stand.
Don't use the mopping function when creating the map for the first time.
Use the mopping function when creating
the map for the first time.
Side brushes, roller brushes are entangled
with hair; dust box, filter accessories are
blocked.
The robot vacuum enters a strong
cleaning mode.
It is recommended to clean and maintain side brushes, roller brushes,
dust boxes, and filter accessories regularly.
Change to standard cleaning mode.
Please make sure the robot vacuum is within the wifi signal range.
Turn on the power switch of the robot vacuum and press the power
button. The robot vacuum wifi indicator flashes slowly, indicating it's
ready to configure the network.
Please make sure that the robot vacuum is connected to the 2.4G
network.
32
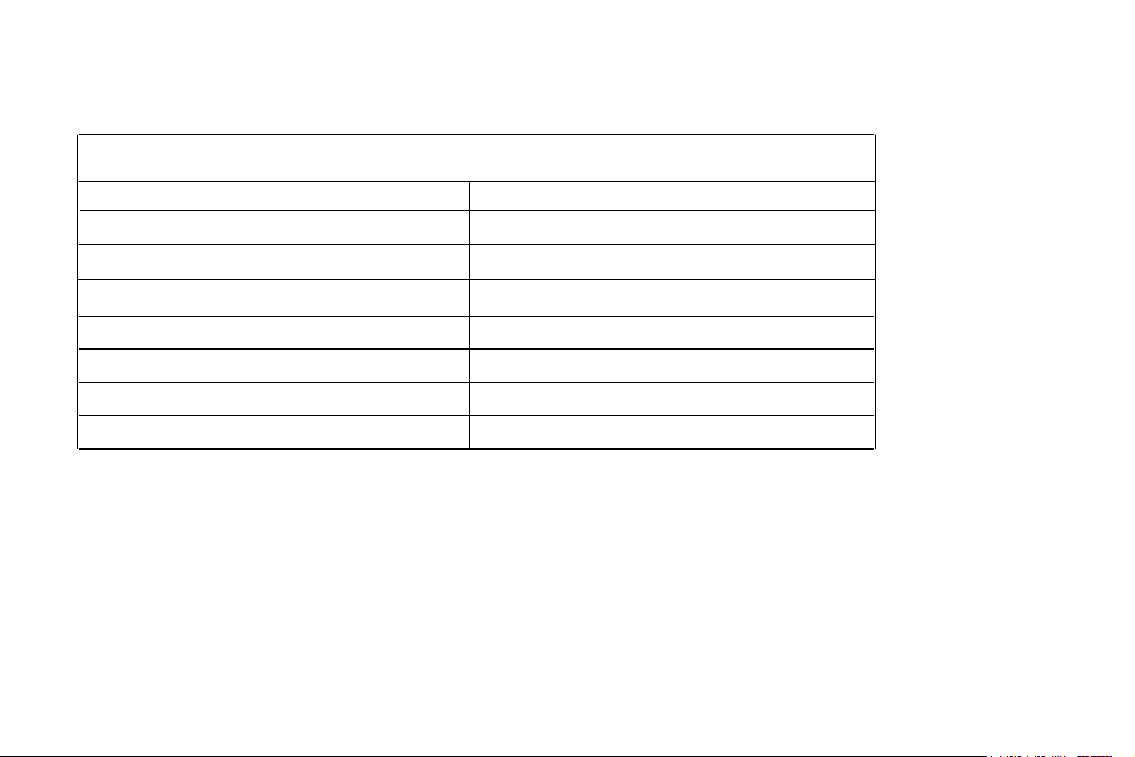
5. Technical Specifcations
Robot Vacuum
Dimensions 325*325*80mm
Battery 2600mAH
Wireless connection 2.4GHz WiFi
Rated Power 28W
Rated Voltage 14.4V
Charging Time 3H
Working Hours 120min
Dimensions 256*200*350mm
Adapter Input Voltage 110-240VAC
Rated Output 20V/1.2A
Rated Frequency 50/60Hz
Dust Collection Station
33
A90+ Robotic Vacuum Cleaner
