Before using your new product, please read these instructions to prevent any damage.
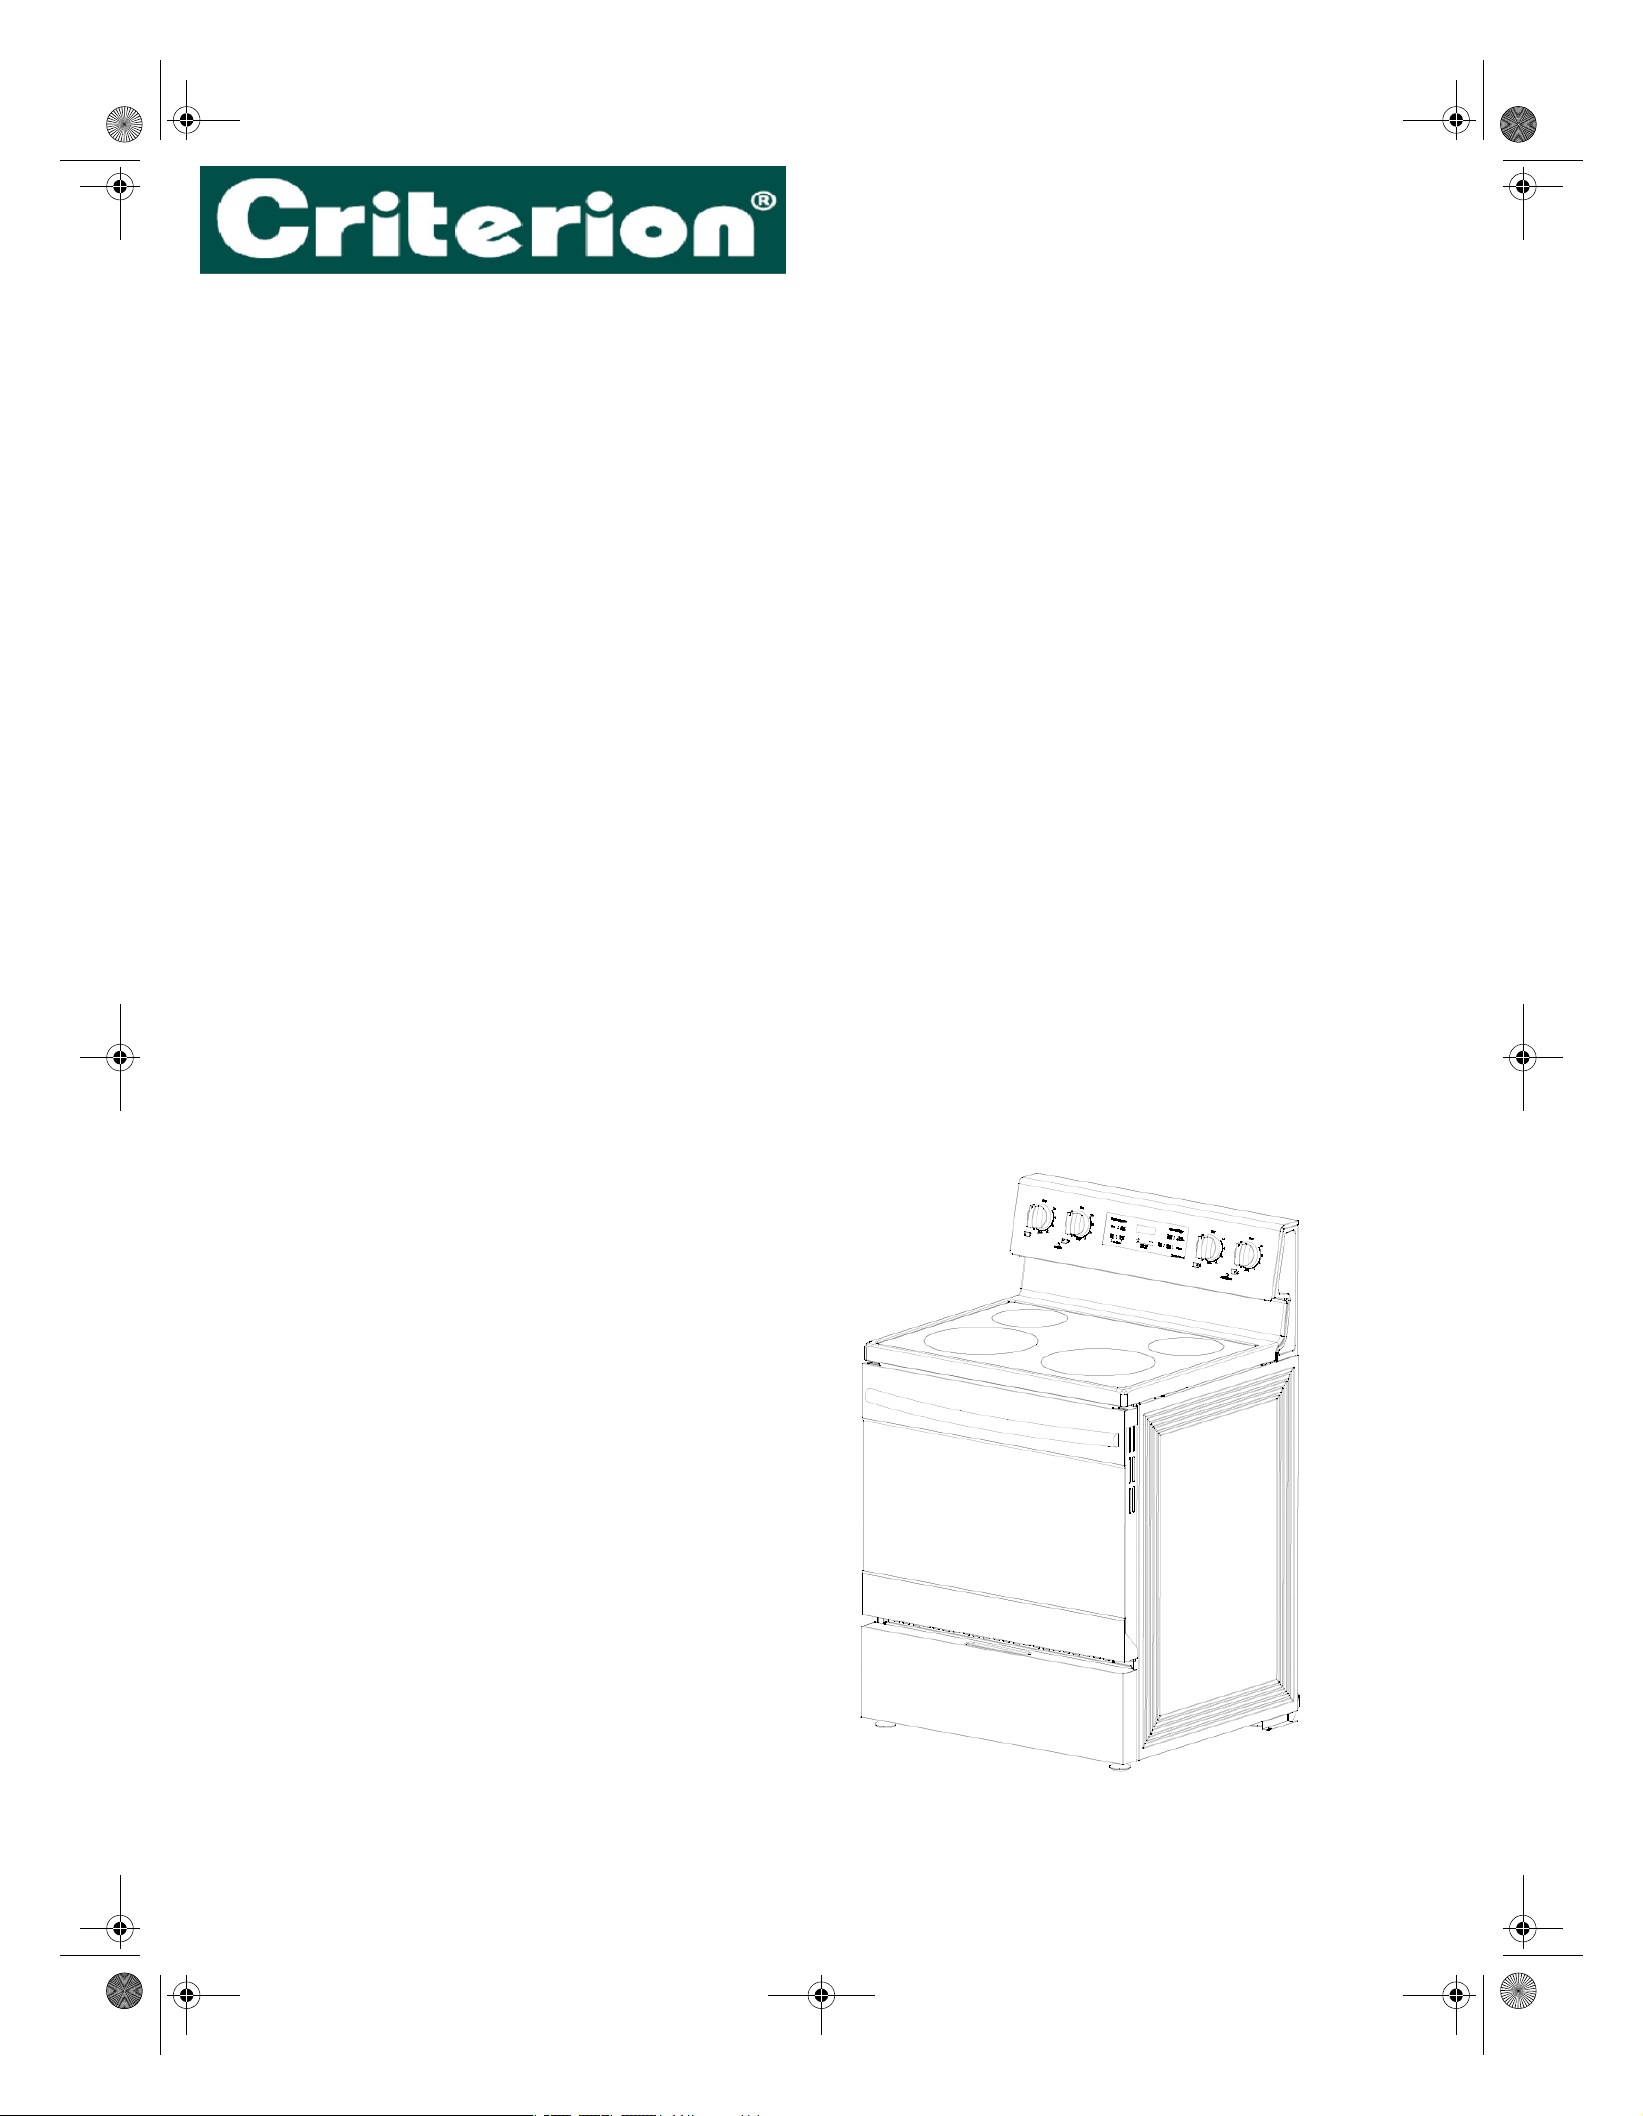
USER GUIDE
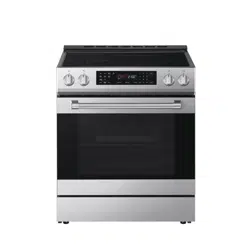
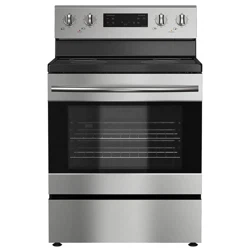
5.0 Cu. Ft. Electric
Range with Steam
Cleaning
455-4606 / 455-4607 / 455-4608
CRE30RCWT / CRE30RCWT / CRE30RCSS
V6
FINAL
FOR PRINT

2
Contents
IMPORTANT SAFETY PRECAUTIONS. . . . . . . . . . . . . . . . . . . . . . . . . . . . . . . . . . . . . . . . . . . . . . . . . . . . . . . . . . . . . . . . . . . . 3
Anti-tip device. . . . . . . . . . . . . . . . . . . . . . . . . . . . . . . . . . . . . . . . . . . . . . . . . . . . . . . . . . . . . . . . . . . . . . . . . . . . . . . . . . . . . . . . . . . . . . . . . . . . 3
IMPORTANT SAFETY INSTRUCTIONS . . . . . . . . . . . . . . . . . . . . . . . . . . . . . . . . . . . . . . . . . . . . . . . . . . . . . . . . . . . . . . . . . . . 4
Features . . . . . . . . . . . . . . . . . . . . . . . . . . . . . . . . . . . . . . . . . . . . . . . . . . . . . . . . . . . . . . . . . . . . . . . . . . . . . . . . . . . . . . . . . . . . .10
Package contents . . . . . . . . . . . . . . . . . . . . . . . . . . . . . . . . . . . . . . . . . . . . . . . . . . . . . . . . . . . . . . . . . . . . . . . . . . . . . . . . . . . . . . . . . . . . . . . . 10
Main components . . . . . . . . . . . . . . . . . . . . . . . . . . . . . . . . . . . . . . . . . . . . . . . . . . . . . . . . . . . . . . . . . . . . . . . . . . . . . . . . . . . . . . . . . . . . . . . 10
Oven control panel . . . . . . . . . . . . . . . . . . . . . . . . . . . . . . . . . . . . . . . . . . . . . . . . . . . . . . . . . . . . . . . . . . . . . . . . . . . . . . . . . . . . . . . . . . . . . . 11
Range dimensions . . . . . . . . . . . . . . . . . . . . . . . . . . . . . . . . . . . . . . . . . . . . . . . . . . . . . . . . . . . . . . . . . . . . . . . . . . . . . . . . . . . . . . . . . . . . . . . 12
INSTALLING . . . . . . . . . . . . . . . . . . . . . . . . . . . . . . . . . . . . . . . . . . . . . . . . . . . . . . . . 13
Selecting a location . . . . . . . . . . . . . . . . . . . . . . . . . . . . . . . . . . . . . . . . . . . . . . . . . . . . . . . . . . . . . . . . . . . . . . . . . . . . . . . . . .14
Clearances and dimensions . . . . . . . . . . . . . . . . . . . . . . . . . . . . . . . . . . . . . . . . . . . . . . . . . . . . . . . . . . . . . . . . . . . . . . . . . . . . . . . . . . . . . .14
Electrical requirements. . . . . . . . . . . . . . . . . . . . . . . . . . . . . . . . . . . . . . . . . . . . . . . . . . . . . . . . . . . . . . . . . . . . . . . . . . . . . . .15
Installing your range . . . . . . . . . . . . . . . . . . . . . . . . . . . . . . . . . . . . . . . . . . . . . . . . . . . . . . . . . . . . . . . . . . . . . . . . . . . . . . . . .16
Tools you need (not included). . . . . . . . . . . . . . . . . . . . . . . . . . . . . . . . . . . . . . . . . . . . . . . . . . . . . . . . . . . . . . . . . . . . . . . . . . . . . . . . . . . .16
Items not included. . . . . . . . . . . . . . . . . . . . . . . . . . . . . . . . . . . . . . . . . . . . . . . . . . . . . . . . . . . . . . . . . . . . . . . . . . . . . . . . . . . . . . . . . . . . . . . 16
Notes to the installer: . . . . . . . . . . . . . . . . . . . . . . . . . . . . . . . . . . . . . . . . . . . . . . . . . . . . . . . . . . . . . . . . . . . . . . . . . . . . . . . . . . . . . . . . . . . . 16
Before installing your range . . . . . . . . . . . . . . . . . . . . . . . . . . . . . . . . . . . . . . . . . . . . . . . . . . . . . . . . . . . . . . . . . . . . . . . . . . . . . . . . . . . . . . 16
Connecting the power cord . . . . . . . . . . . . . . . . . . . . . . . . . . . . . . . . . . . . . . . . . . . . . . . . . . . . . . . . . . . . . . . . . . . . . . . . . . . . . . . . . . . . . .17
Installing the anti-tip device. . . . . . . . . . . . . . . . . . . . . . . . . . . . . . . . . . . . . . . . . . . . . . . . . . . . . . . . . . . . . . . . . . . . . . . . . . . . . . . . . . . . . . 20
Placing your range and connecting to power . . . . . . . . . . . . . . . . . . . . . . . . . . . . . . . . . . . . . . . . . . . . . . . . . . . . . . . . . . . . . . . . . . . . .20
Leveling your range. . . . . . . . . . . . . . . . . . . . . . . . . . . . . . . . . . . . . . . . . . . . . . . . . . . . . . . . . . . . . . . . . . . . . . . . . . . . . . . . . . . . . . . . . . . . . . 21
Finishing the installation . . . . . . . . . . . . . . . . . . . . . . . . . . . . . . . . . . . . . . . . . . . . . . . . . . . . . . . . . . . . . . . . . . . . . . . . . . . . . . . . . . . . . . . . . 21
Installing the oven door handle . . . . . . . . . . . . . . . . . . . . . . . . . . . . . . . . . . . . . . . . . . . . . . . . . . . . . . . . . . . . . . . . . . . . . . . . . . . . . . . . . . 21
Installing the plastic pads . . . . . . . . . . . . . . . . . . . . . . . . . . . . . . . . . . . . . . . . . . . . . . . . . . . . . . . . . . . . . . . . . . . . . . . . . . . . . . . . . . . . . . . . 22
OPERATING INSTRUCTIONS . . . . . . . . . . . . . . . . . . . . . . . . . . . . . . . . . . . . . . . . . 23
Before you begin using your range . . . . . . . . . . . . . . . . . . . . . . . . . . . . . . . . . . . . . . . . . . . . . . . . . . . . . . . . . . . . . . . . . . .24
Tips for saving energy. . . . . . . . . . . . . . . . . . . . . . . . . . . . . . . . . . . . . . . . . . . . . . . . . . . . . . . . . . . . . . . . . . . . . . . . . . . . . . . . . . . . . . . . . . . . 24
Using the surface burners . . . . . . . . . . . . . . . . . . . . . . . . . . . . . . . . . . . . . . . . . . . . . . . . . . . . . . . . . . . . . . . . . . . . . . . . . . . .24
Identifying the burners . . . . . . . . . . . . . . . . . . . . . . . . . . . . . . . . . . . . . . . . . . . . . . . . . . . . . . . . . . . . . . . . . . . . . . . . . . . . . . . . . . . . . . . . . . 25
Cooking areas . . . . . . . . . . . . . . . . . . . . . . . . . . . . . . . . . . . . . . . . . . . . . . . . . . . . . . . . .
. . . . . . . . . . . . . . . . . . . . . . . . . . . . . . . . . . . . . . . . . . 25
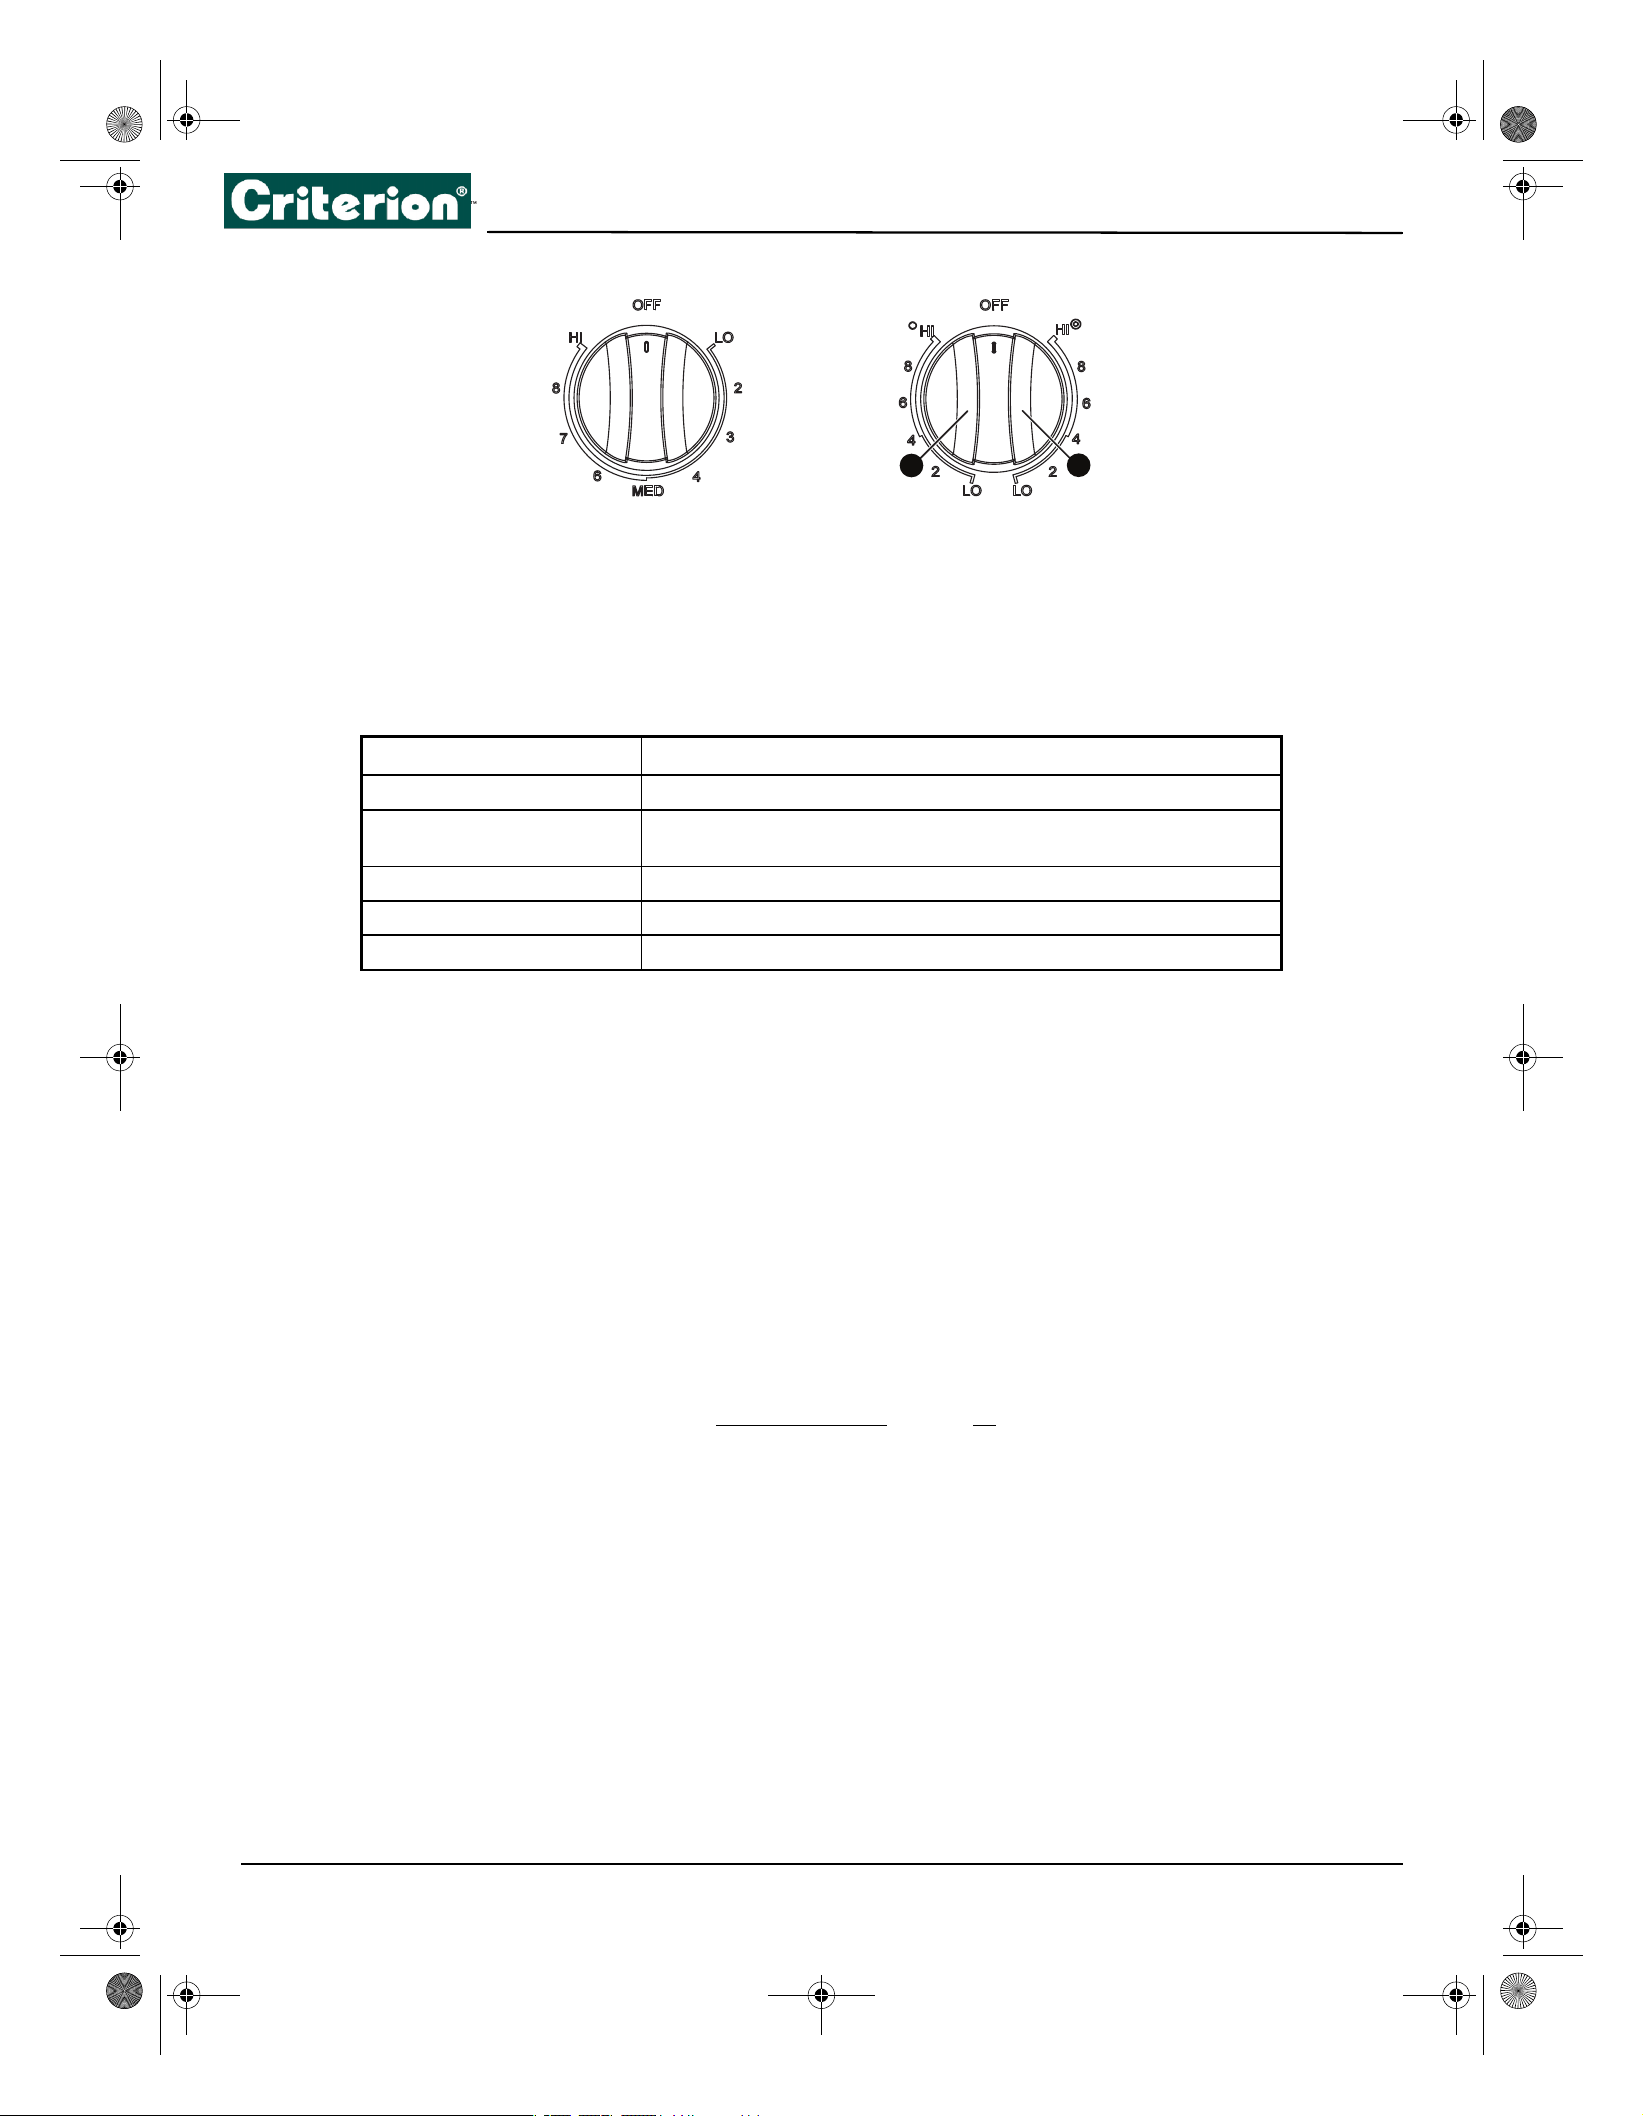
Using a surface element control knob . . . . . . . . . . . . . . . . . . . . . . . . . . . . . . . . . . . . . . . . . . . . . . . . . . . . . . . . . . . . . . . . . . . . . . . . . . . . 26
Using the warming center. . . . . . . . . . . . . . . . . . . . . . . . . . . . . . . . . . . . . . . . . . . . . . . . . . . . . . . . . . . . . . . . . . . . . . . . . . . . . . . . . . . . . . . . 26
U
sing the correct cookware . . . . . . . . . . . . . . . . . . . . . . . . . . . . . . . . . . . . . . . . . . . . . . . . . . . . . . . . . . . . . . . . . . . . . . . . . . . . . . . . . . . . . . 26
Protecting the ceramic cooktop . . . . . . . . . . . . . . . . . . . . . . . . . . . . . . . . . . . . . . . . . . . . . . . . . . . . . . . . . . . . . . . . . . . . . . . . . . . . . . . . . . 27
Using the oven . . . . . . . . . . . . . . . . . . . . . . . . . . . . . . . . . . . . . . . . . . . . . . . . . . . . . . . . . . . . . . . . . . . . . . . . . . . . . . . . . . . . . .28
Minimum and maximum settings . . . . . . . . . . . . . . . . . . . . . . . . . . . . . . . . . . . . . . . . . . . . . . . . . . . . . . . . . . . . . . . . . . . . . . . . . . . . . . . . 28
Positioning the oven racks . . . . . . . . . . . . . . . . . . . . . . . . . . . . . . . . . . . . . . . . . . . . . . . . . . . . . . . . . . . . . . . . . . . . . . . . . . . . . . . . . . . . . . . 29
U
sing the oven vent . . . . . . . . . . . . . . . . . . . . . . . . . . . . . . . . . . . . . . . . . . . . . . . . . . . . . . . . . . . . . . . . . . . . . . . . . . . . . . . . . . . . . . . . . . . . . 30
Using the oven light . . . . . . . . . . . . . . . . . . . . . . . . . . . . . . . . . . . . . . . . . . . . . . . . . . . . . . . . . . . . . . . . . . . . . . . . . . . . . . . . . . . . . . . . . . . . . 30
Tip
s for baking. . . . . . . . . . . . . . . . . . . . . . . . . . . . . . . . . . . . . . . . . . . . . . . . . . . . . . . . . . . . . . . . . . . . . . . . . . . . . . . . . . . . . . . . . . . . . . . . . . . 30
Setting the clock. . . . . . . . . . . . . . . . . . . . . . . . . . . . . . . . . . . . . . . . . . . . . . . . . . . . . . . .
. . . . . . . . . . . . . . . . . . . . . . . . . . . . . . . . . . . . . . . . . 30
Selecting the 12-hour or 24-hour display setting . . . . . . . . . . . . . . . . . . . . . . . . . . . . . . . . . . . . . . . . . . . . . . . . . . . . . . . . . . . . . . . . . .31
Using the timer . . . . . . . . . . . . . . . . . . . . . . . . . . . . . . . . . . . . . . . . . . . . . . . . . . . . . . . . . . . . . . . . . . . . . . . . . . . . . . . . . . . . . . . . . . . . . . . . . . 31
Baki
ng. . . . . . . . . . . . . . . . . . . . . . . . . . . . . . . . . . . . . . . . . . . . . . . . . . . . . . . . . . . . . . . . . . . . . . . . . . . . . . . . . . . . . . . . . . . . . . . . . . . . . . . . . . . 31
Adjusting the thermostat . . . . . . . . . . . . . . . . . . . . . . . . . . . . . . . . . . . . . . . . . . . . . . . . . . . . . . . . . . . . . . . . . . . . . . . . . . . . . . . . . . . . . . . . 31
Pr
ogramming the cook time . . . . . . . . . . . . . . . . . . . . . . . . . . . . . . . . . . . . . . . . . . . . . . . . . . . . . . . . . . . . . . . . . . . . . . . . . . . . . . . . . . . . . 32
Programming a delayed start time . . . . . . . . . . . . . . . . . . . . . . . . . . . . . . . . . . . . . . . . . . . . . . . . . . . . . . . . . . . . . . . . . . . . . . . . . . . . . . . 33
Broiling
. . . . . . . . . . . . . . . . . . . . . . . . . . . . . . . . . . . . . . . . . . . . . . . . . . . . . . . . . . . . . . . . . . . . . . . . . . . . . . . . . . . . . . . . . . . . . . . . . . . . . . . . . . 33
Keeping food warm. . . . . . . . . . . . . . . . . . . . . . . . . . . . . . . . . . . . . . . . . . . . . . . . . . . . . . . . . . . . . . . . . . . . . . . . . . . . . . . . . . . . . . . . . . . . . . 33
3
5.0 Cu. Ft. Electric Range with Steam Cleaning
Switching between Fahrenheit or Celsius . . . . . . . . . . . . . . . . . . . . . . . . . . . . . . . . . . . . . . . . . . . . . . . . . . . . . . . . . . . . . . . . . . . . . . . . . 34
Turning sound on or off . . . . . . . . . . . . . . . . . . . . . . . . . . . . . . . . . . . . . . . . . . . . . . . . . . . . . . . . . . . . . . . . . . . . . . . . . . . . . . . . . . . . . . . . . . 34
Locking oven controls . . . . . . . . . . . . . . . . . . . . . . . . . . . . . . . . . . . . . . . . . . . . . . . . . . . . . . . . . . . . . . . . . . . . . . . . . . . . . . . . . . . . . . . . . . . 34
MAINTENANCE . . . . . . . . . . . . . . . . . . . . . . . . . . . . . . . . . . . . . . . . . . . . . . . . . . . . . 35
Cleaning and maintenance. . . . . . . . . . . . . . . . . . . . . . . . . . . . . . . . . . . . . . . . . . . . . . . . . . . . . . . . . . . . . . . . . . . . . . . . . . .36
Using the oven vent . . . . . . . . . . . . . . . . . . . . . . . . . . . . . . . . . . . . . . . . . . . . . . . . . . . . . . . . . . . . . . . . . . . . . . . . . . . . . . . . . . . . . . . . . . . . . 36
Cleaning the control panel . . . . . . . . . . . . . . . . . . . . . . . . . . . . . . . . . . . . . . . . . . . . . . . . . . . . . . . . . . . . . . . . . . . . . . . . . . . . . . . . . . . . . . . 36
Cleaning painted parts and decorative trim. . . . . . . . . . . . . . . . . . . . . . . . . . . . . . . . . . . . . . . . . . . . . . . . . . . . . . . . . . . . . . . . . . . . . . . 36
Cleaning stainless steel surfaces . . . . . . . . . . . . . . . . . . . . . . . . . . . . . . . . . . . . . . . . . . . . . . . . . . . . . . . . . . . . . . . . . . . . . . . . . . . . . . . . . .36
Cleaning the oven racks. . . . . . . . . . . . . . . . . . . . . . . . . . . . . . . . . . . . . . . . . . . . . . . . . . . . . . . . . . . . . . . . . . . . . . . . . . . . . . . . . . . . . . . . . . 37
Cleaning the oven door . . . . . . . . . . . . . . . . . . . . . . . . . . . . . . . . . . . . . . . . . . . . . . . . . . . . . . . . . . . . . . . . . . . . . . . . . . . . . . . . . . . . . . . . . . 37
Cleaning the surface element control knobs . . . . . . . . . . . . . . . . . . . . . . . . . . . . . . . . . . . . . . . . . . . . . . . . . . . . . . . . . . . . . . . . . . . . . . 37
Cleaning the cooktop . . . . . . . . . . . . . . . . . . . . . . . . . . . . . . . . . . . . . . . . . . . . . . . . . . . . . . . . . . . . . . . . . . . . . . . . . . . . . . . . . . . . . . . . . . . . 38
Removing and replacing the oven door . . . . . . . . . . . . . . . . . . . . . . . . . . . . . . . . . . . . . . . . . . . . . . . . . . . . . . . . . . . . . . . . . . . . . . . . . .39
Removing and replacing the storage drawer. . . . . . . . . . . . . . . . . . . . . . . . . . . . . . . . . . . . . . . . . . . . . . . . . . . . . . . . . . . . . . . . . . . . . . 44
Steam cleaning the oven. . . . . . . . . . . . . . . . . . . . . . . . . . . . . . . . . . . . . . . . . . . . . . . . . . . . . . . . . . . . . . . . . . . . . . . . . . . . . . . . . . . . . . . . . 44
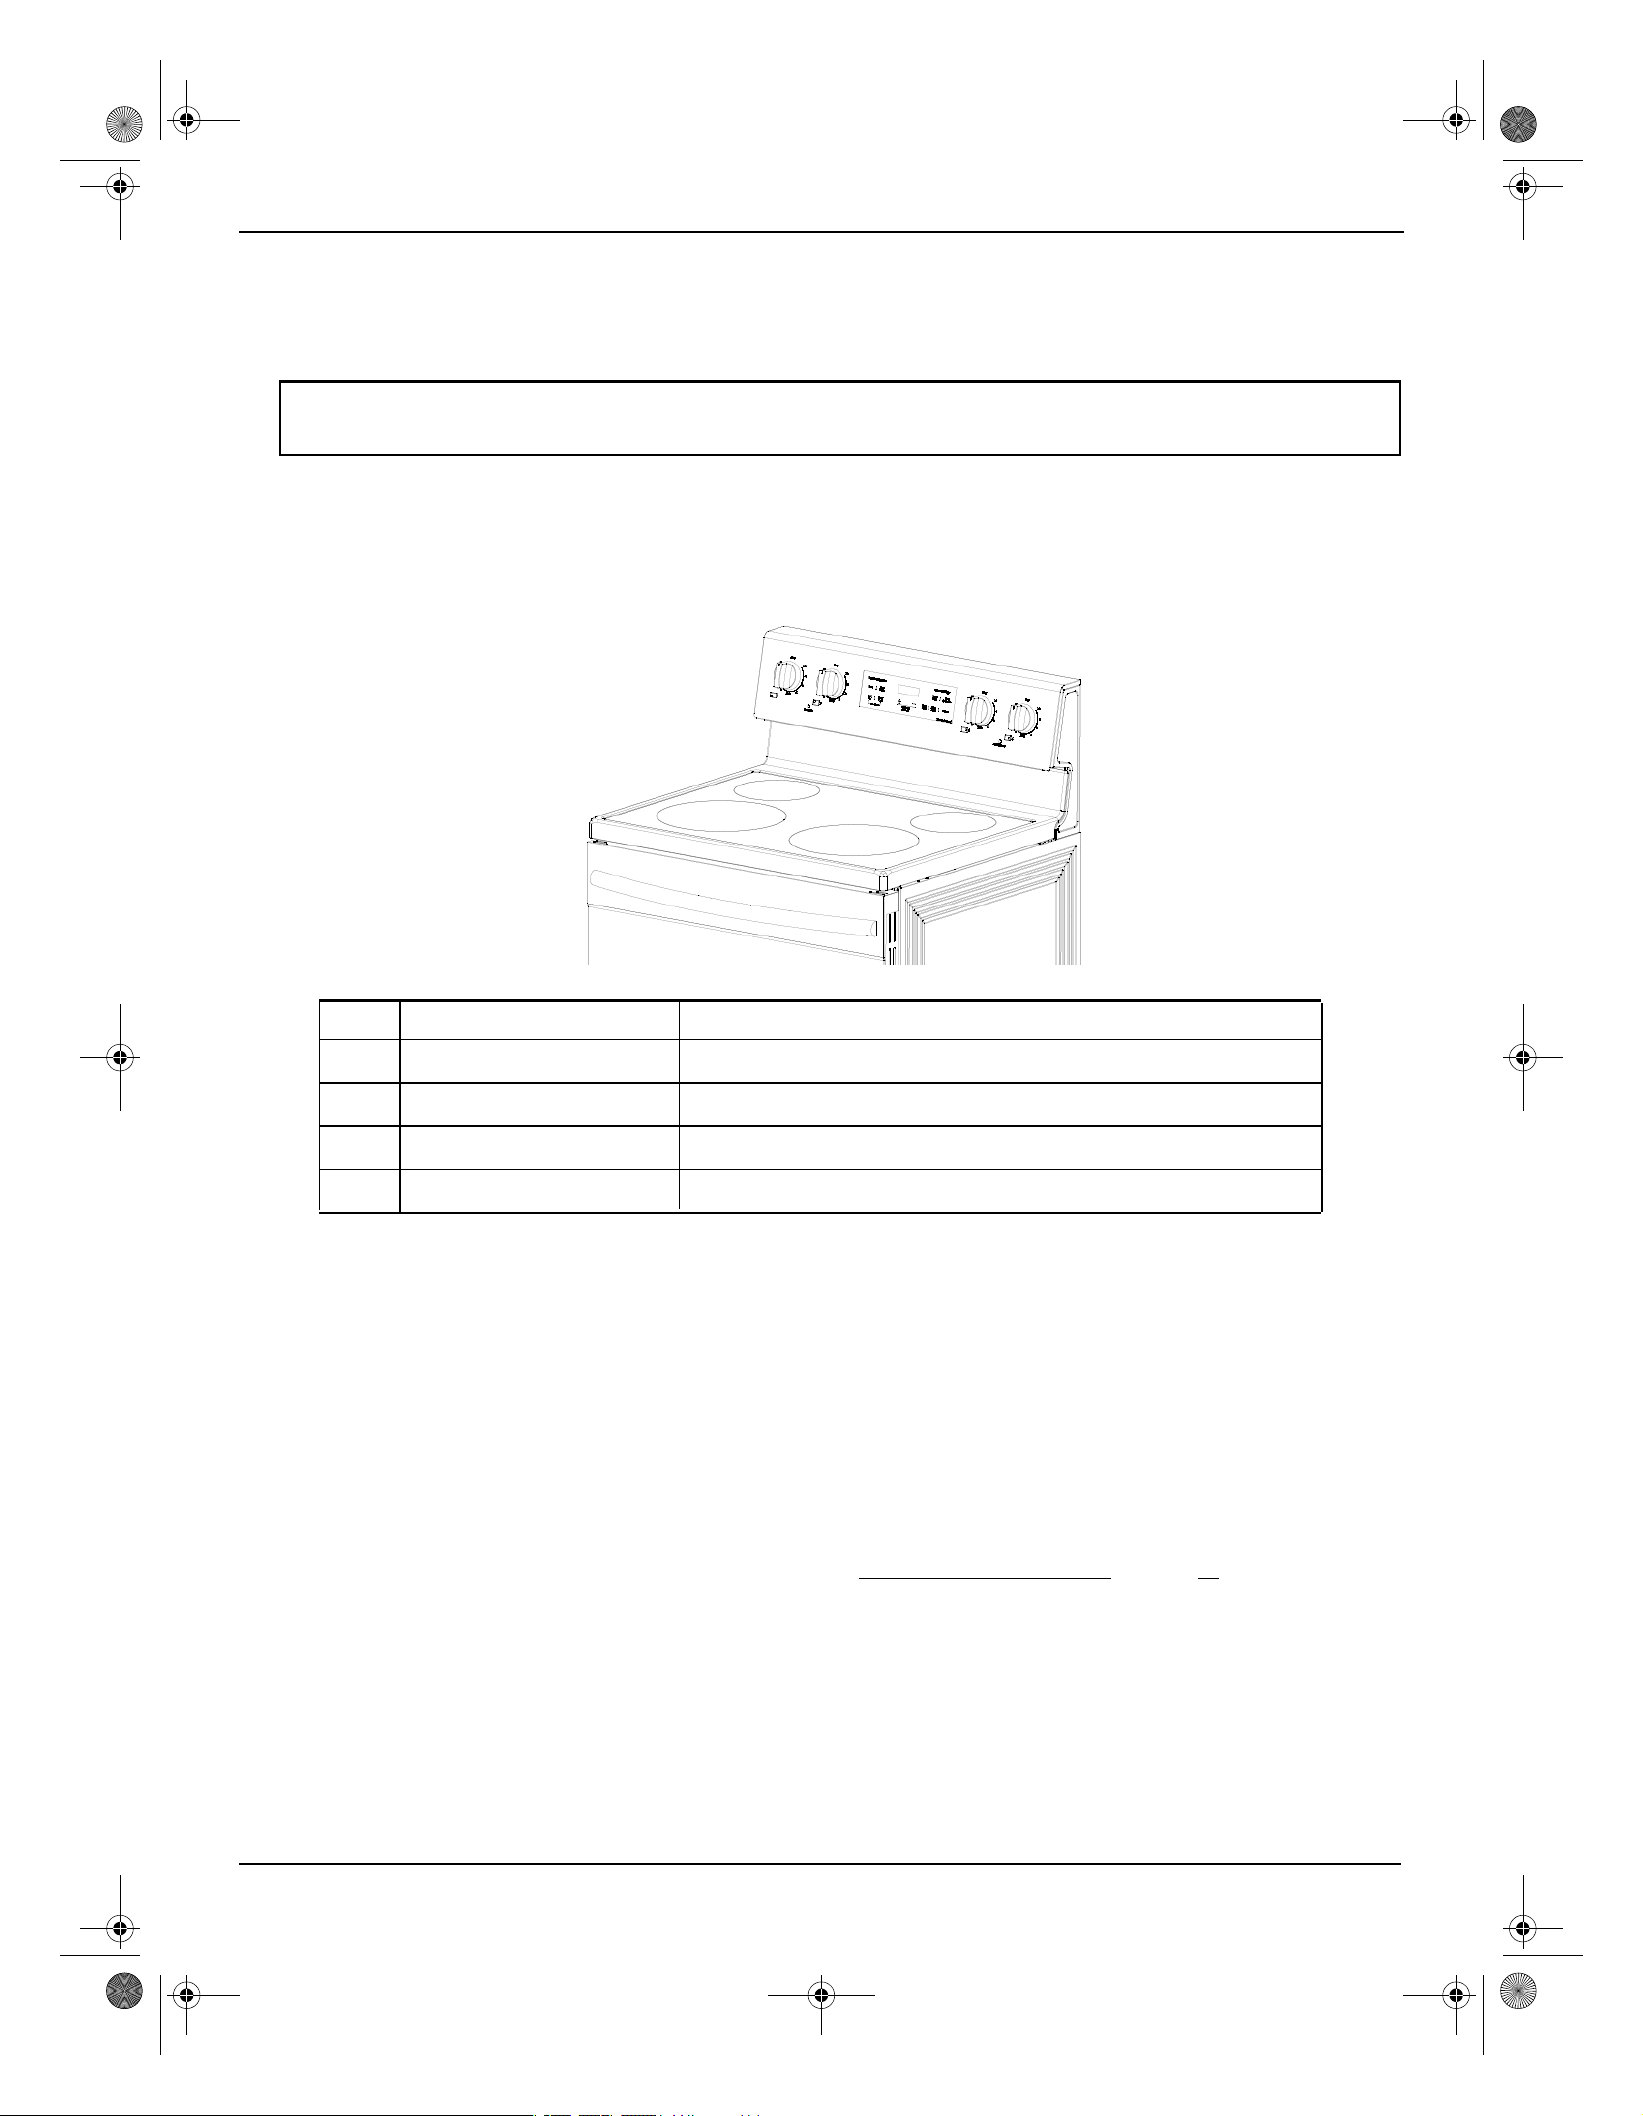
Troubleshooting. . . . . . . . . . . . . . . . . . . . . . . . . . . . . . . . . . . . . . . . . . . . . . . . . . . . . . . . . . . . . . . . . . . . . . . . . . . . . . . . . . . . .45
Control panel display . . . . . . . . . . . . . . . . . . . . . . . . . . . . . . . . . . . . . . . . . . . . . . . . . . . . . . . . . . . . . . . . . . . . . . . . . . . . . . . . . . . . . . . . . . . . 45
Cooktop. . . . . . . . . . . . . . . . . . . . . . . . . . . . . . . . . . . . . . . . . . . . . . . . . . . . . . . . . . . . . . . . . . . . . . . . . . . . . . . . . . . . . . . . . . . . . . . . . . . . . . . . . 45
Oven . . . . . . . . . . . . . . . . . . . . . . . . . . . . . . . . . . . . . . . . . . . . . . . . . . . . . . . . . . . . . . . . . . . . . . . . . . . . . . . . . . . . . . . . . . . . . . . . . . . . . . . . . . . . 47
Drawer . . . . . . . . . . . . . . . . . . . . . . . . . . . . . . . . . . . . . . . . . . . . . . . . . . . . . . . . . . . . . . . . . . . . . . . . . . . . . . . . . . . . . . . . . . . . . . . . . . . . . . . . . . 48
Error codes . . . . . . . . . . . . . . . . . . . . . . . . . . . . . . . . . . . . . . . . . . . . . . . . . . . . . . . . . . . . . . . . . . . . . . . . . . . . . . . . . . . . . . . . . . . . . . . . . . . . . . 48
Specifications. . . . . . . . . . . . . . . . . . . . . . . . . . . . . . . . . . . . . . . . . . . . . . . . . . . . . . . . . . . . . . . . . . . . . . . . . . . . . . . . . . . . . . . .49
ONE-YEAR LIMITED WARRANTY . . . . . . . . . . . . . . . . . . . . . . . . . . . . . . . . . . . . . . . . . . . . . . . . . . . . . . . . . . . . . . . . . . . . . .50
IMPORTANT SAFETY PRECAUTIONS
Read and follow all instructions before using your oven to prevent the risk of fire, electric shock, personal injury, or damage
when using the range.This guide does not cover all possible conditions that may occur. Always contact your service agent
or manufacturer about problems that you do not understand.
WHAT YOU NEED TO KNOW ABOUT SAFETY INSTRUCTIONS
Anti-tip device
WARNING
To reduce the risk of tipping the range, the range must be secured
by a properly installed Anti-Tip device.
AFTER THE RANGE HAS BEEN INSTALLED, CONFIRM THAT THE ANTI-TIP DEVICE HAS BEEN PROPERLY
INSTALLED AND VERIFY THAT THE ANTI-TIP DEVICE IS PROPERLY ENGAGED.
• If the anti-tip device is not installed, a child or adult can tip the range and be killed.
• Verify that the anti-tip device has been properly installed and engaged at the rear right (or rear left) of the range
bottom.
• If y
ou move the range and then move it back into place, ensure the anti tip-device is re-engaged at the right or left rear
of the range bottom.
• Do not operate the range without the anti-tip device in place and engaged.
• Failure to do so can result in death or serious burns to children or adults.
WARNING
• Do not step, lean, or sit on the doors of the range. You can cause the range to tip, resulting in burns or serious injuries.
• Confirm that the Anti-Tip device is installed properly. Then, to verify that the Anti-Tip device is engaged, grasp th
e top
rear edge of the range and carefully attempt to tilt it forward.
The Anti-Tip device should prevent the range from tilting
forward more than a few inches.
4
• If you pull the range out from the wall for any reason, make sure the anti-tip device is properly engaged when you
push the range back against the wall. If it is not, there is a risk of the range tipping over and causing injury if you or a
child stand, sit,
or lean on the open door.
• Never completely remove the leveling legs. If you remove the leveling legs, the range will not be secured to the anti-
tip device properly.
IMPORTANT SAFETY INSTRUCTIONS
Read and follow all instructions before using your oven to prevent the risk of fire, electric shock, personal injury, or damage
when using the range. This guide does not cover all possible conditions that may occur. Always contact your service agent
or manufacturer about problems that you do not understand.
What you need to know about safety instructions
Warnings and Important Safety Instructions in this manual do not cover all possible conditions and situations that may
occur. It is your responsibility to use common sense, caution, and care when installing, maintaining, and operating your
oven.
What the icons and signs in this user manual mean:
CALIFORNIA PROPOSITION 65 WARNING
FOR YOUR SAFETY
When using electrical appliances, you should follow basic safety precautions, including the following:
CAUTION
• Use this appliance only for its intended
purpose as described in this User Guide.
• Potentially hot surfaces include the cooktop, areas facing the cooktop, oven vent opening, surfaces near the opening,
and crevices around the oven door.
• Be sure your appliance is properly installed and grounded by a qualified technician.
• User servicing - Do not repair or replace any part of the appliance unless specifically recommended in this manual
. All
other servicing should be referred to a qualified technician.
• A
lways disconnect the power to the appliance before servicing by removing the fuse or switching off the circuit
breaker.
• Do not
store items of interest to children in cabinets above a range or on the back guard of a range. Children climbing
on the range to reach items could be seriously injured.
• Do not leave children alone. Never leave children alone or unattended in an area where this appliance is in use. They
should never be allowed to sit or stand on any part of the appliance.
• Never use your appliance for warming or heating the room.
• Do not use water on grease fires. Turn off the oven to avoid spreading the flames. Smother the fire or flames by closin
g
the door or use a dry chemical, baking soda,
or foam-type extinguisher.
CAUTION
To reduce the risk of fire, explosion, electric shock, or personal injury when using you oven, follow these basic safety
• Avoid scratching or impacting glass doors, cooktops, or control panels. Doing so may lead to glass breakage. Do not
cook on a product with broken glass. Shock, fire, or cuts may occur.
precautions.
Hazards or unsafe practices that may result in severe personal injury or death.
Hazards or unsafe practices that may result in minor personal injury or property
damage.
WARNING
Cancer and Reproductive Harm-www.P65Warnings.ca.gov.
WARNING
CAUTION

5
5.0 Cu. Ft. Electric Range with Steam Cleaning
Additional safety instructions
• Do not store items in or on the appliance. Do not store flammable materials in the oven or near the surface elements.
Be sure all packing materials are removed from
the appliance before operating it. Keep plastics, clothes, and paper
away from parts of the appliance that may become hot.
• Wear proper apparel. Never wear loose-fitting or hanging garments while using the appliance.
• Use only dry potholders. Placing moist or damp potholders on hot surfaces may result in burns from steam. Do not let
the potholder touch hot heating elements. Do not use a towel or other bulky cloth.
• Teach
children not to play with the controls or any other part of the range.
• For your safety, do not use high-pressure water cleaners or steam jet cleaners.
• If the power cord is damaged, it must be replaced by the manufacturer, its service agent, or similarly qualified
persons
to avoid creating a hazard.
• The
appliance is not intended for use by persons (including children) with reduced physical, sensory, or mental
capabilities, or lack of experience and knowledge, unless they have been given supervision or instruction concerning
use of the appliance by a person responsible for their safety.
Surface cooking elements
• Never leave surface elements unattended at high heat settings. Boilovers cause smoking and greasy spillovers that
may ignite.
• Protective Liners –
Do not use aluminum foil to line surface element drip bowls or oven bottoms, except as suggested
in the manual. Improper installation of these liners may result in a risk of electric shock or fire.
• To avoid oil spillover and fire, use a minimum amount of oil when shallow pan-frying and avoid cooking frozen foods
with excessive amounts of ice.
• Do not lift the cooktop. Lifting the cooktop can damage the range and cause the range to malfunction.
• Do not operate the cooktop without cookware. If the cooktop operates without cookware, the control knobs will
become hot.
• Never use the glass cooktop surface as a cutting board.
• Use care when touching the cooktop. The glass surface of the cooktop will retain heat after the controls have been
turned off.
• Be careful when placing spoons or other stirring utensils on the glass cooktop surface when it is in use. They may
become hot and could cause burns.
• Use proper pan sizes. This appliance is equipped with surface elements of different size. Select pots and pans that have
flat bottoms large enough to cover the surface area of the heating element. Using undersized cookware will expose a
portion of the heating element to direct contact and may result in the ignition of clothing. Matching the size of the pot
or pan to the element will also improve efficiency.
• Utensil handles should be turned inward and not extended over adjacent surface elements – To reduce the risk of
burns, ignition of flammable materials, or spillage due to unintentional contact with utensils, position utensil handles
so that they are turned inward and do not extend over adjacent surface elements.
• Glazed cooking utensils – Only certain types of glass, glass/ceramic, ceramic, earthenware, or other glazed cookware can
be used for range top service without breaking due to sudden changes in temperature.
• Cleaning – Read and follow all instructions and warnings on the cleaning cream labels.
• Be sure you know which control knob operates each surface element. Make sure you turned on the correct surface
element.
• Always turn the surface elements off before removing cookware.
• When preparing flaming foods under the hood, turn the fan on.
• Keep an eye on foods being fried at high or medium high heat settings.
• Do not store heavy items above the cooktop surface that could fall and damage it.
• Do not use decorative surface element covers – If an element is accidentally turned on, the decorative cover will
become hot and possibly melt. Burns will occur if the hot covers are touched. Damage may also be done to the
cooktop.
Electrical safety
• Proper Installation - Be sure your appliance is properly installed and grounded by a qualified technician.
• Flush-mounted appliances may be operated only after they have been installed in cabinets and workplaces that
conform to the relevant standards. This ensures that the appliances are installed in compliance with the appropriate
safety standards.
• If your appliance malfunctions or if fractures, cracks, or splits appear:
• Switch off all cooking zones
• Unplug the range from the AC wall outlet
• Contact your local service center.
6
WARNING
If the surface is cracked, switch off and unplug th
e appliance to avoid the possibility of electrical shock. Do not use your
cooktop until the glass surface has been replaced.
WARNING
• Disconnect the range from AC power or turn off its breaker circui
t before replacing the lamp to avoid the possibility of
electric shock.
• The
range should not be placed on a base.
Child safety
WARNING
• This appliance is not intended for use by young children or infirm persons without the adequate supervision of a
responsible adult.
• Young children should be supervised to ensure that they do not play with the appliance.
• Keep children away from the door when opening or closing it as they may bump themselves on the door or catch their
fingers in the door.
• The cooking zones will become hot when you cook. To keep small children from being burned, always keep them away
from the appliance while you are cooking.
WARNING
• Accessible parts may become hot during use. To avoid burns, young children should be kept away.
Oven
• DO NOT TOUCH THE HEATING ELEMENTS OR INTERIOR SURFACES OF THE OVEN. Heating elements may be hot
even though they are dark in color. Interior surfaces of an oven become hot enough to cause burns. During and after
use, do not touch or let clothing or other flammable materials contact the heating elements or interior surfaces of the
oven until they have had sufficient time to cool. Other surfaces of the appliance may become hot enough to cause
burns
. Among these surfaces are oven vent openings and surfaces near these openings, the oven door, and the
window of the oven door.
• Do not heat
unopened food containers. The build-up of pressure may cause the container to burst and result in
injury.
• Do not use the oven
for a storage area. Items stored in an oven can ignite.
• Use care when opening the door. Let hot air or steam escape before you remove food from or put food into the oven.
• Protective liners. Do not use aluminum foil to line the oven bottoms. Improper installation of these liners may result in
a risk of electric shock or fire.
• Keep oven vent ducts unobstructed. The oven vent is located above the right rear surface element. This area
could
become hot during oven use. Never block this vent or place plastic or heat-sensitive items on it.
• Placement
of oven racks. Always place oven racks in the desired location while the oven is cool. If the rack must be
moved while the oven is hot, use potholders. Do not let the potholders come in contact with the hot heating element
in the oven.
• Do
not allow aluminum foil or a meat probe to contact the heating elements.
• During use, the appliance becomes hot. Care should be taken to avoid touching heating elements inside the oven.
• Do not use harsh abrasive cleaners or sharp metal scrapers to clean the oven door glass. They can scratch the surfac
e
which may result in the glass shattering.
Ventilating hood
• Clean ventilating hoods frequently. Do not let grease accumulate on the hood or filter.
• When flaming foods are under the hood, turn the hood fan on.
Glass/ceramic cooking surfaces
• DO NOT TOUCH SURFACE ELEMENTS OR AREAS NEAR ELEMENTS. Surface elements may be hot even though they are
dark in color. Areas near surface elements may become hot enough to cause burns. During and after use, do not touch,
or let clothing or other flammable materials contact the surface elements or areas near the elements until they have
had sufficient time to cool. Among these areas are the cooktop and areas directly facing the cooktop.
• Do not cook on a broken cooktop. If the cooktop should break, cleaning solutions and spillovers may penetrate the
broken cook-top and create a risk of electric shock. Contact a qualified technician immediately.
• Clean the cooktop with caution. If a wet sponge or cloth is used to wipe spills on a hot cooking area, be careful to avoid
steam burns. Some cleaners can produce noxious fumes if applied to a hot surface.

7
5.0 Cu. Ft. Electric Range with Steam Cleaning
Critical installation warnings
WARNING
• This appliance must be installed by a qualified technician or service company.
• Failing to have a qualified technician install the range may result in electric shock, fire, an explosion, problems with
the product, or injury.
• Unpack the oven, remove all packaging material and examine the oven for any damage such as dents on the interior or
exterior of the oven, broken door latches, cracks in the door, or a door that is not lined up correctly. If there is any
damage, do not operate the oven and notify your dealer immediately.
• Plug the power cord into a properly grounded outlet with the proper configuration. Your oven should be the only ite
m
connected to this circuit.
• Keep all packaging materials out of the reach of children. Children may use them for play and injure themselves.
• Install your appliance on a level and hard floor that can support its weight.
• Failing to do so may result in abnormal vibrations, noise, or problems with the product.
• This appliance must be properly grounded.
• Do not ground the appliance to a gas pipe, plastic water pipe, or telephone line.
• This may result in electric shock, fire, an explosion, or problems with the product.
• Do not cut or remove the ground prong from the power cord under any circumstances.
• Connect the range to a circuit that provides the correct amperage.
• Do not install this appliance in a humid, oily, or dusty location, or in a location exposed to direct sunlight or water (rain
drops).
• This may result in electric shock or fire.
• Do not use a damaged power cord or loose wall socket.
• This may result in electric shock or fire.
• Do not pull or excessively bend the power cord.
• Do not twist or tie the power cord.
• Do not hook the power cord over a metal object or insert the power cord between objects.
• This may result in electric shock or fire.
• If the power cord is damaged, contact your nearest service center.
Critical installation warnings
CAUTION
• If the appliance is floode
d by any liquid, disconnect the appliance from power by turning off the circuit breaker that is
powering it.
Please contact your
nearest
service center. Failing
to do so may result in electric shock or fire.
• If the appliance produces a strange noise, a burning smell, or smoke, unplug the power plug immediately and contact
your nearest service center.
• Failing to do so may result in electric shock or fire.
• Do not touch the power cord. Do not touch the appliance.
• A spark may result in an explosion or fire.
• Take care not to contact the oven door, heating elements, or any of the other hot parts with your body while cooking or
just after cooking.
• Failing to do so may result in burns.
• If materials inside the oven should ignite, keep the oven door closed, turn the oven off and disconnect the power cord,
or shut off power at the fuse or circuit breaker panel. If the door is opened, the fire may spread.
• Always observe safety precautions when using your oven. Never try to repair the oven on your own - there is
dangerous voltage inside. If the oven needs to be repaired, contact an authorized service center near you.
• If you use the appliance when it is contaminated by foreign substances such as food waste, it may result in a problem
with the appliance.
• Take care when removing the wrapping from food taken out of the appliance.
• If the food is hot, hot steam may be emitted abruptly when you remove the wrapping and this may result in burns.
• Do not attempt to repair, disassemble, or modify the appliance yourself.
• Since a high voltage current enters the product chassis, it may result in electric shock or fire.
• When a repair is needed, contact your nearest service center.
• If any foreign substance such as water has entered the appliance, contact your nearest service center.
• Failing to do so may result in electric shock or fire.
• Do not touch the power cord with wet hands.
• This may result in electric shock.
• Keep all packaging materials well out of the reach of children, as packaging materials can be dangerous to children.
• If a child places a plastic bag over their head, the child can suffocate.
8
• Do not let children or any person with reduced physical, sensory, or mental capabilities use this appliance
unsupervised.
• Make sure that the appliance’s controls and cooking areas are out of the reach of children.
• Failing to do so may result in electric shock, burns, or injury.
• Do not
touch the inside of the appliance immediately after cooking. The inside of the appliance will be hot.
• Failing to do so may result in burns.
• Do not use or place flammable sprays or objects near the oven.
• Flammable items or sprays can cause fires or an explosion.
• Do not insert fingers, foreign substances, or metal objects such as pins or needles into inlets, outlets, or holes. If foreign
substances are inserted into any of these holes, contact your product provider or nearest service center.
• Any adjustments or repairs to the oven door must be done by a licensed professional.
• Do not tamper with or make any adjustments or repairs to the door. Under no circumstances should you remove the
door or outer shell of the oven.
• Do not store or use the oven outdoors.
• Never use this appliance for purposes other than cooking.
• Using the appliance for any purpose other than cooking may result in fire.
• Open the cap or stopper of sealed containers (herb tonic tea bottle, baby bottle, milk bottle and so on) before heating
them. Make a hole in food items that have shells (eggs, chestnuts, etc) with a knife before cooking them.
• Failing to do so may result in burns or injury.
• Never heat plastic or paper containers and do not use them for cooking.
• Failing to do so may result in fire.
• Do not heat food wrapped in paper from magazines, newspapers, etc.
• This may result in fire.
• Do not open the door when the food in the oven is burning.
• If you open the door, it causes an inflow of oxygen and may cause the food to ignite.
• Do not apply excessive pressure to the door or the inside of the appliance. Do not strike the door or the inside or the
appliance.
• Hanging on to the door may result in the product falling and cause serious injury.
• If the door is damaged, do not use the appliance. Contact a service center.
• Do not hold food in your bare hands during or immediately after cooking.
• Use cooking gloves. The food may be very hot and you could burn yourself.
• Handle and oven surfaces may be hot enough to cause burns after cooking.
Usage cautions
CAUTION
• If the surface is cracked, turn the appliance
off.
• Failing to do so may result in electric shock.
• Dishes and containers can become hot. Handle with care.
• Hot foods and steam can cause burns. Carefully remove container coverings, directing the steam away your hands an
d
face.
• Take
care as beverages or food may be very hot after heating, especially when feeding a child. Check that it has cooled
sufficiently.
• Take care when heating liquids such as water or other beverages.
• Make sure to stir during or after cooking.
• Avoid using a slippery container with a narrow neck.
• Wait at least 30 seconds after heating before removing the heated liquid.
• Failing to do so may result in an abrupt overflow of the contents and cause burns.
• Do not stand on top of the appliance or place objects (such as laundry, oven cover, lighted candles, lighted cigarettes
,
dishes, chemicals, metal objects, etc.) on the appliance.
• Ite
ms, such as a cloth, may get caught in the door.
• This may result in electric shock, fire, problems with the product, or injury.
• Do not operate the appliance with wet hands.
• This may result in electric shock.
• Do not spray volatile substances such as insecticide onto the surface of the appliance.
• As well as being harmful to humans, it may also result in electric shock, fire, or problems with the product.
• Do not put your face or body close to the appliance while cooking or when opening the door just after cooking.
• Take care that children do not come too close to the appliance.
• Failing to do so may result in children burning themselves.
9
5.0 Cu. Ft. Electric Range with Steam Cleaning
• Do not place food or heavy objects over the edge of the oven door.
• If you open the door, the food or object may fall and this may result in burns or injury.
• Do not abruptly cool the door, the inside of the appliance, or a dish by pouring water over it during or just after
cooking.
• This may result in damage to the appliance. The steam or water spray may result in burns or injury.
• Do not operate while empty except for self-cleaning.
• Do not scratch the glass of the oven door with a sharp object.
• This may result in the glass being damaged or broken.
• Do not store anything directly on top of the appliance when it is in operation.
• Do not use sealed containers. Remove seals and lids before cooking. Sealed containers can explode due to the build up
of pressure even after the oven has been turned off.
• Take care that food you are cooking in the oven does not come into contact with the heating element.
• This may result in fire.
• Do not overheat food.
• Overheating food may result in fire.
Critical cleaning warnings
CAUTION
• Do not clean the appliance by spraying water directly on to it.
• Do
not use benzene, thinner, or alcohol to clean the appliance.
• This may result in discoloration, deformation, damage, electric shock, or fire.
• Take care not to hurt yourself when cleaning the appliance (externally or internally).
• You may hurt yourself on the sharp edges of the appliance.
• Do not clean the oven with a steam cleaner. Instead use the appliance’s built-in steam cleaning function.
• This may result in corrosion.
• Keep the inside of the oven clean. Food particles or spattered oils stuck to the oven walls or floor can cause
paint
damage and reduce the efficiency of the oven.
SAVE THESE INSTRUCTIONS
10
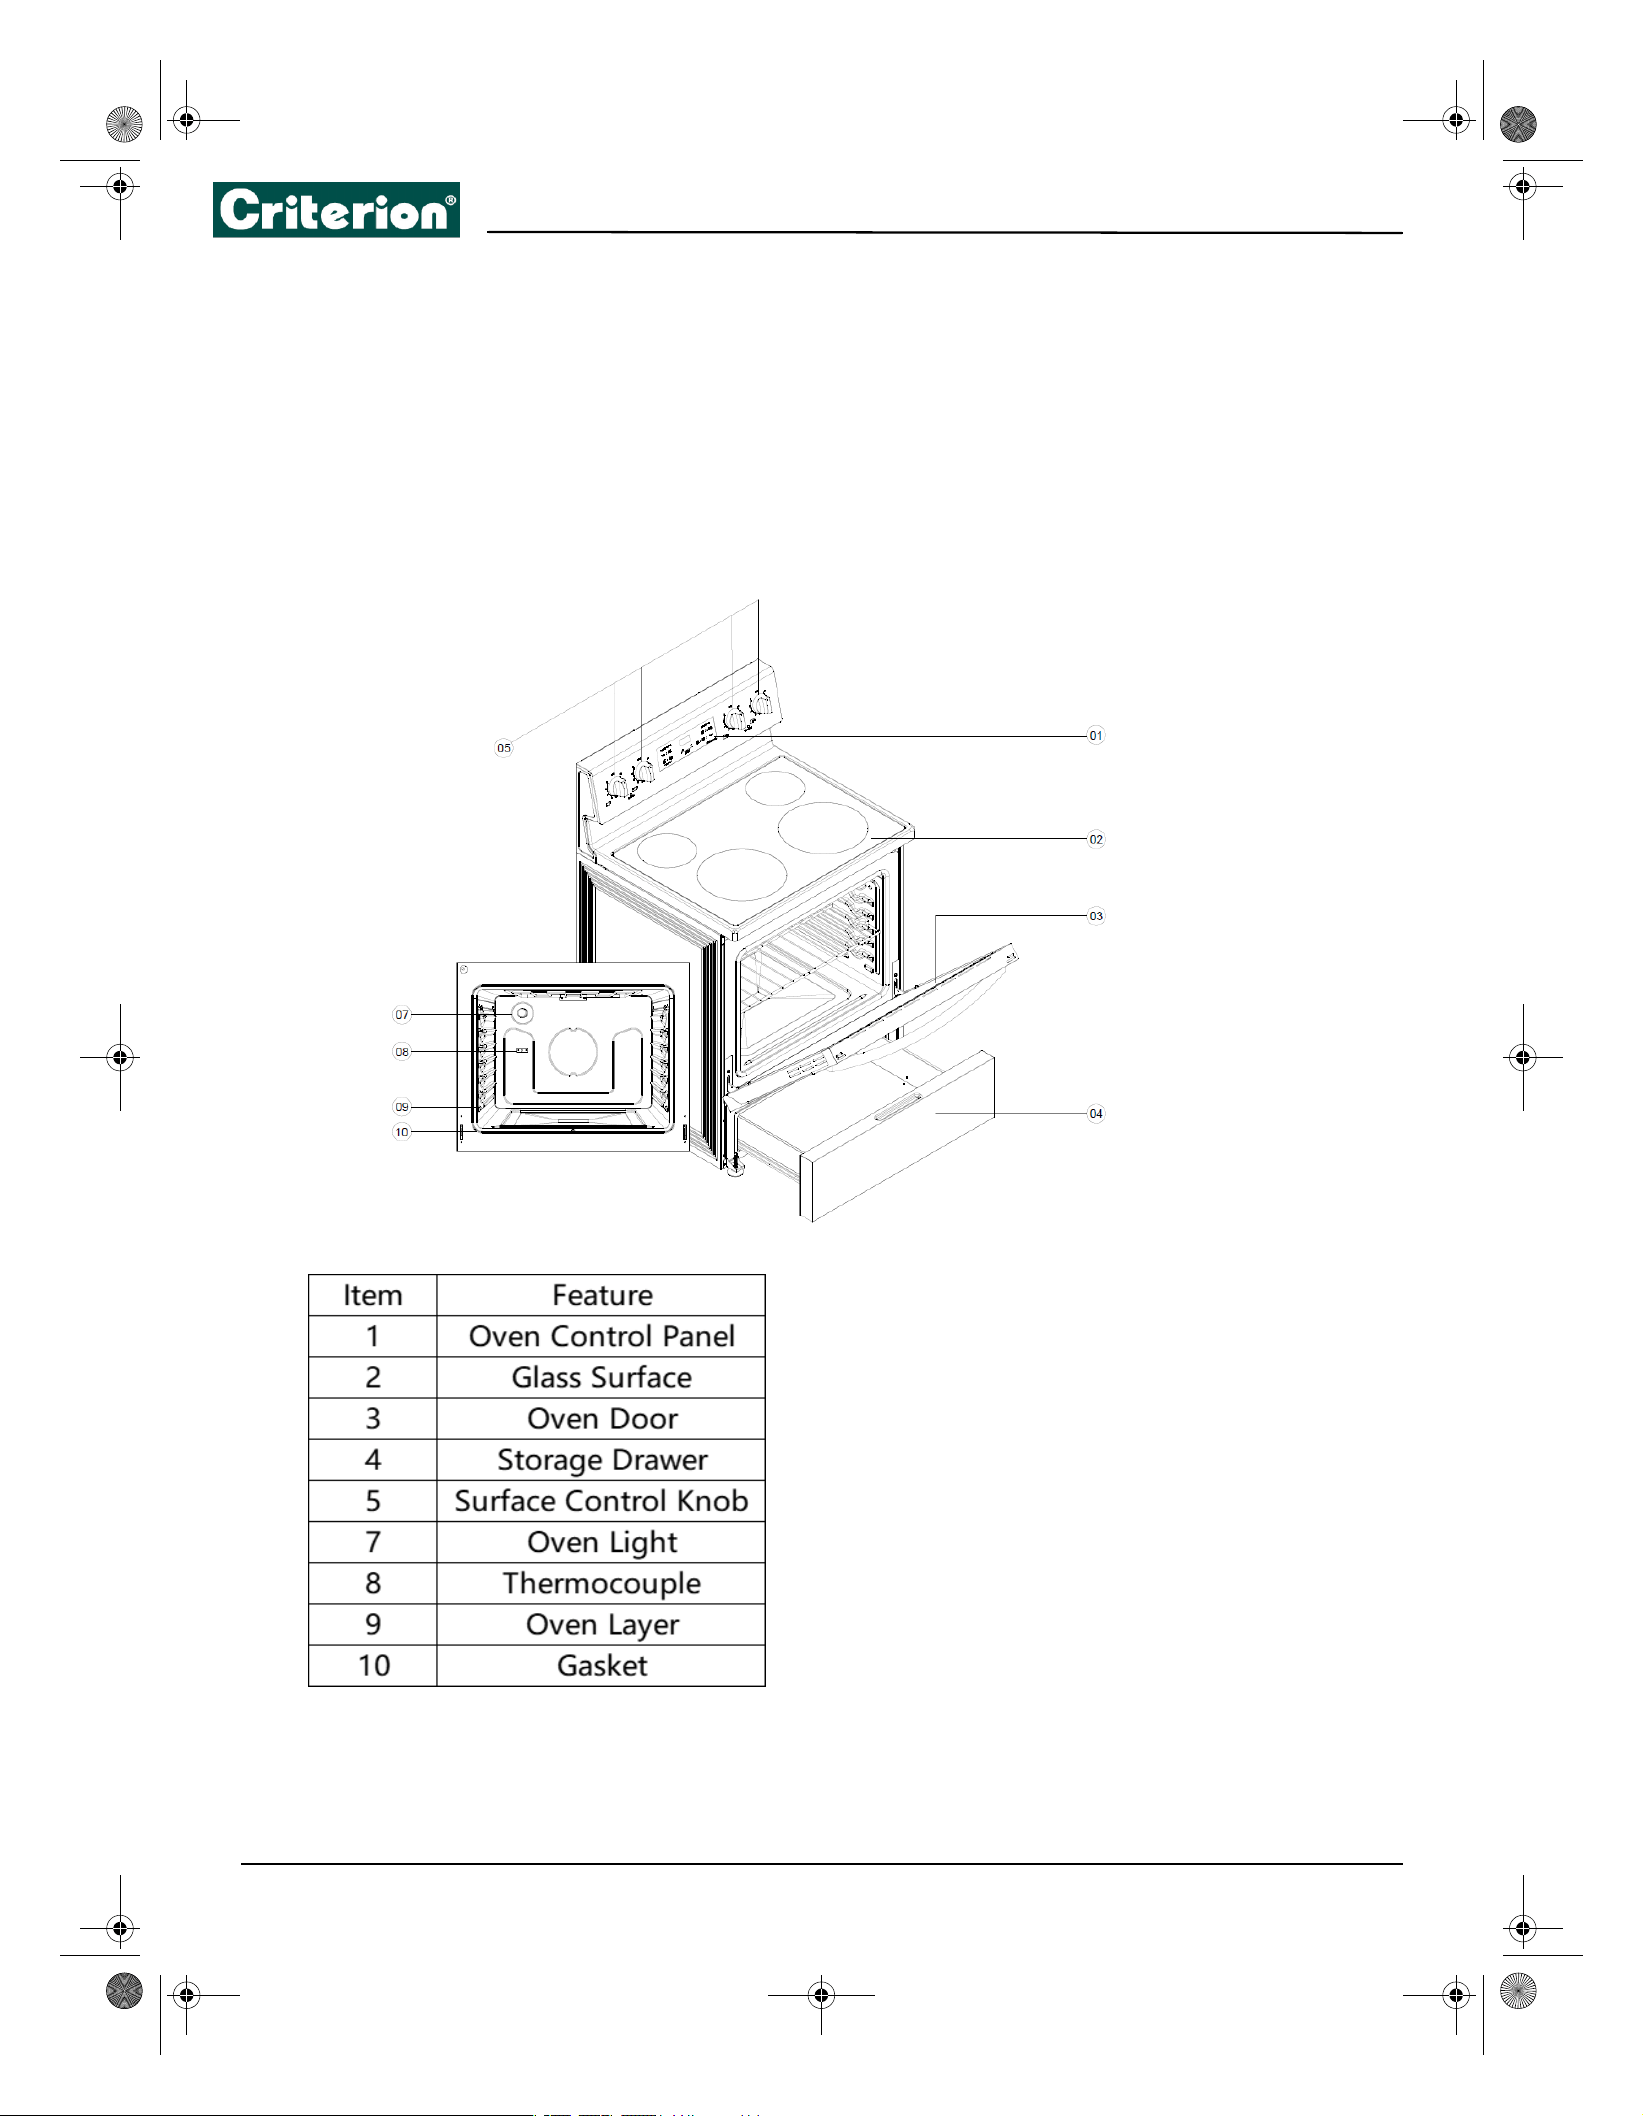
Features
Package contents
• 5.0 Cu. Ft. Freestanding Electric Range with Steam Cleaning
• Anti-tip device (1) and ST5*40 mm screws (4)
• Oven handle (1) with hex wrench (1)
• Oven racks (2)
• Back plastic pads (2) with ST5*20 mm screws (2)
• User Guide
Main components
11
5.0 Cu. Ft. Electric Range with Steam Cleaning
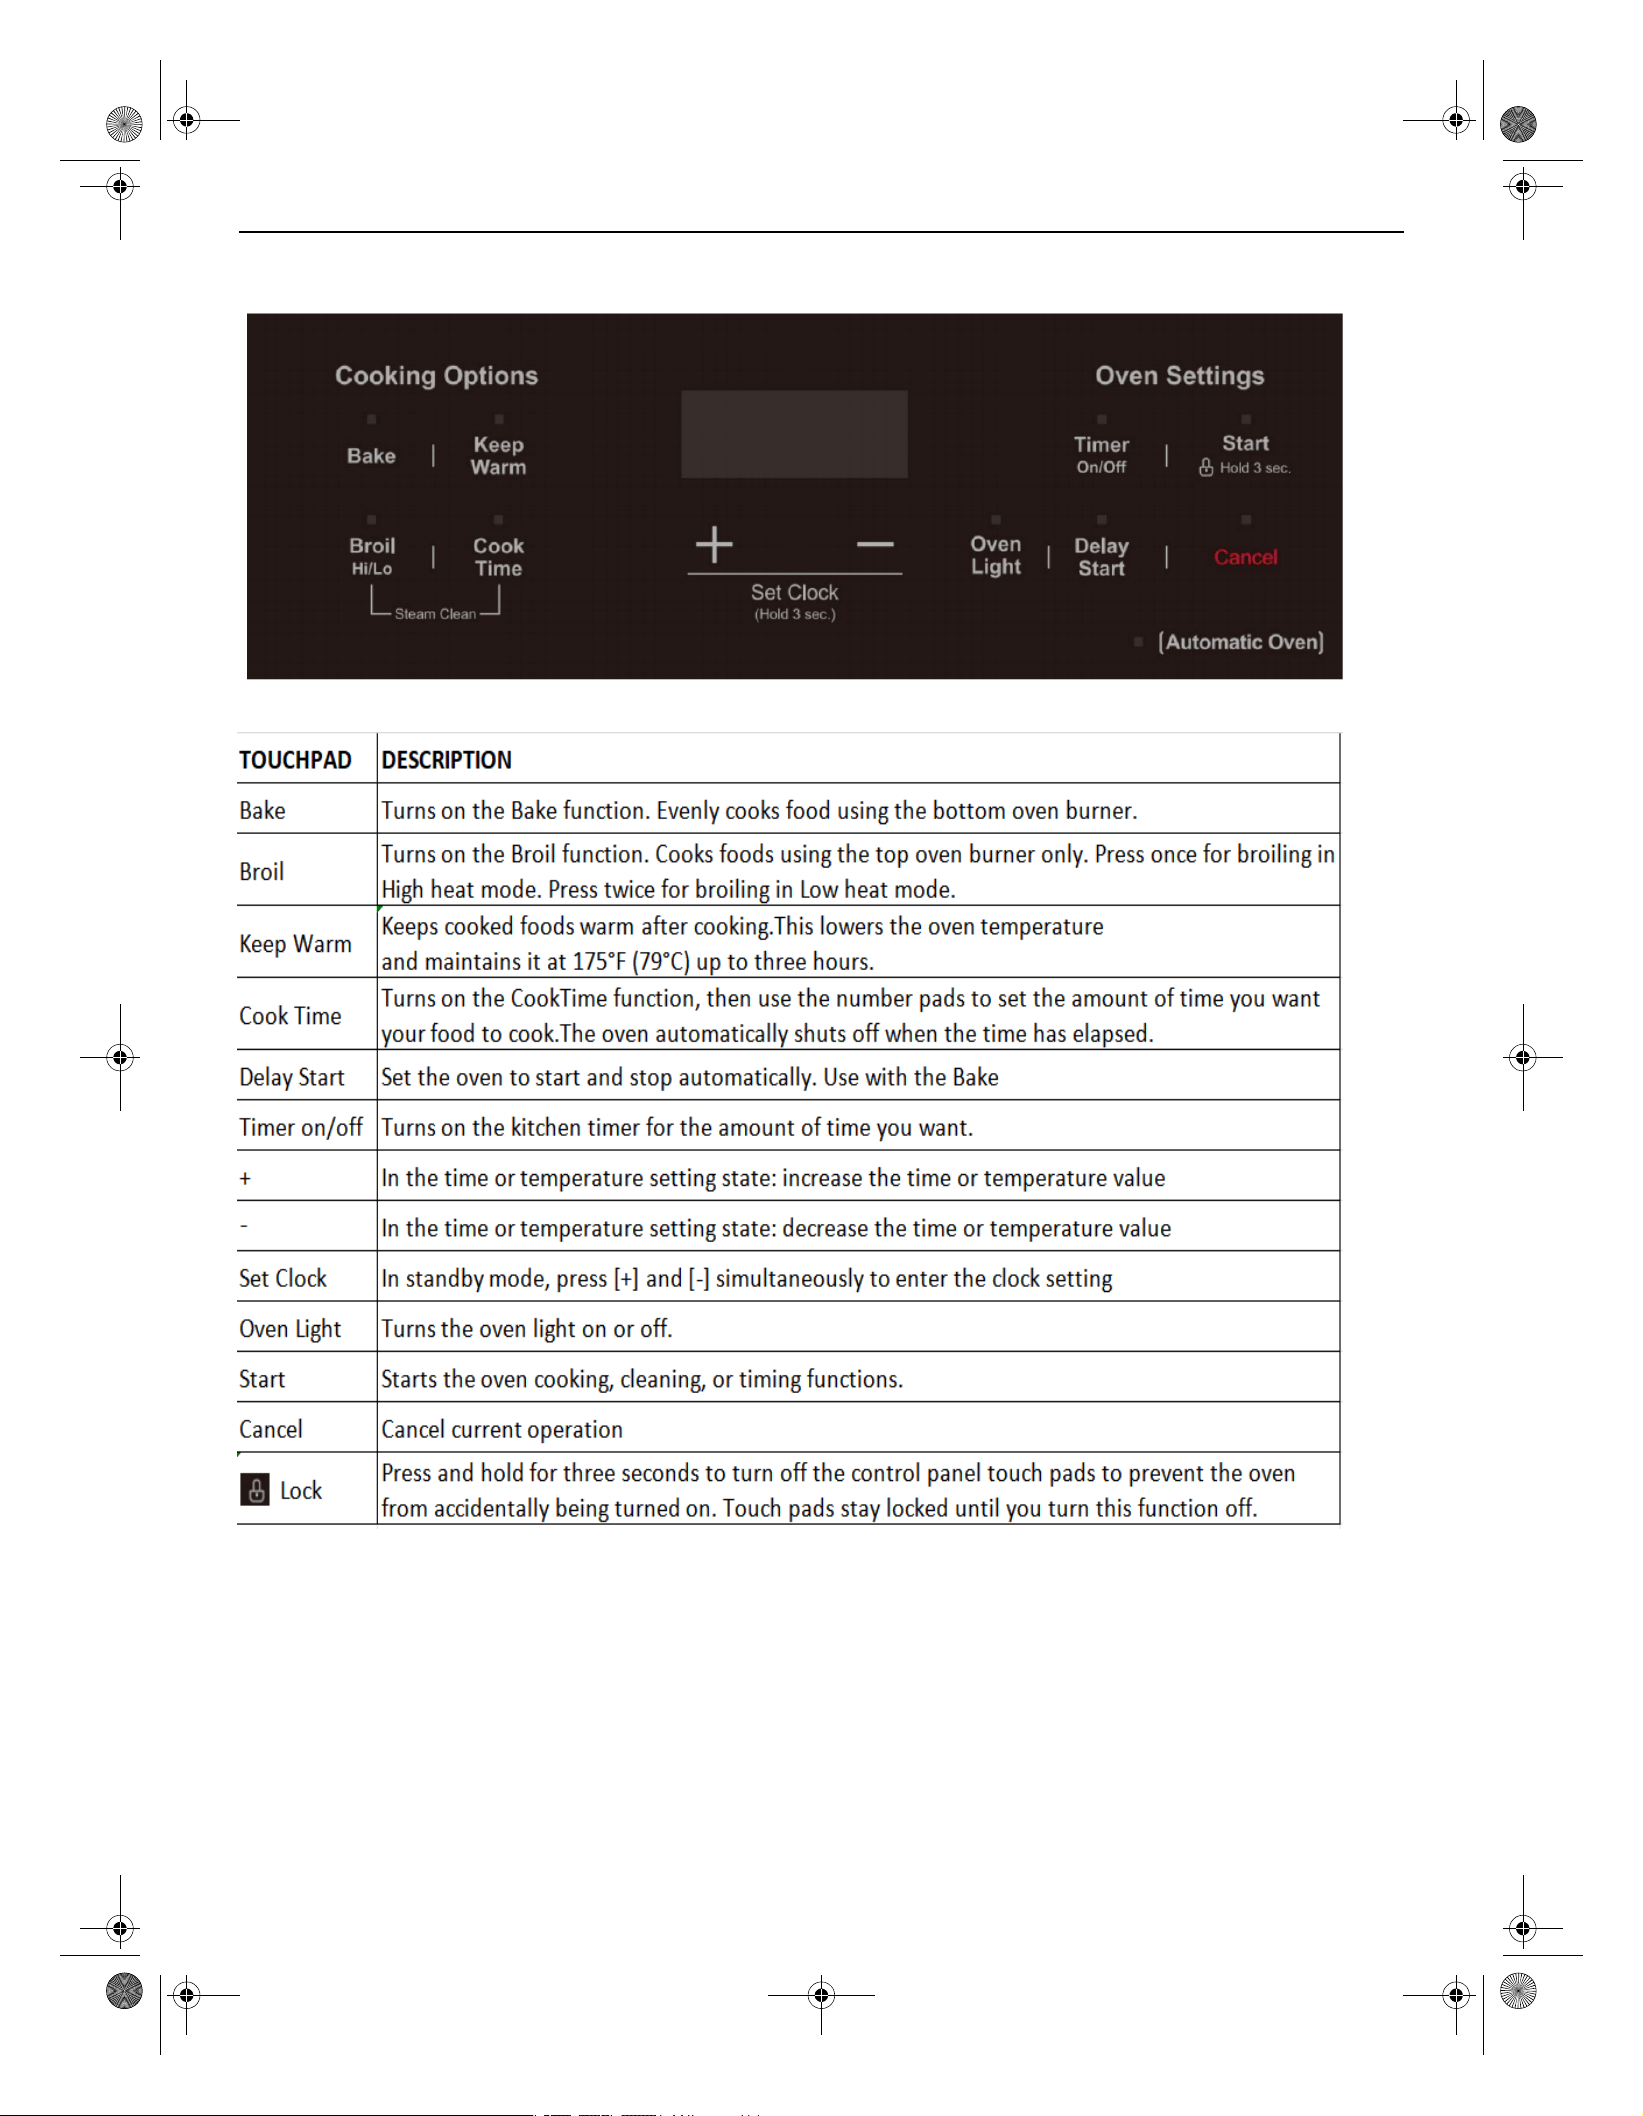
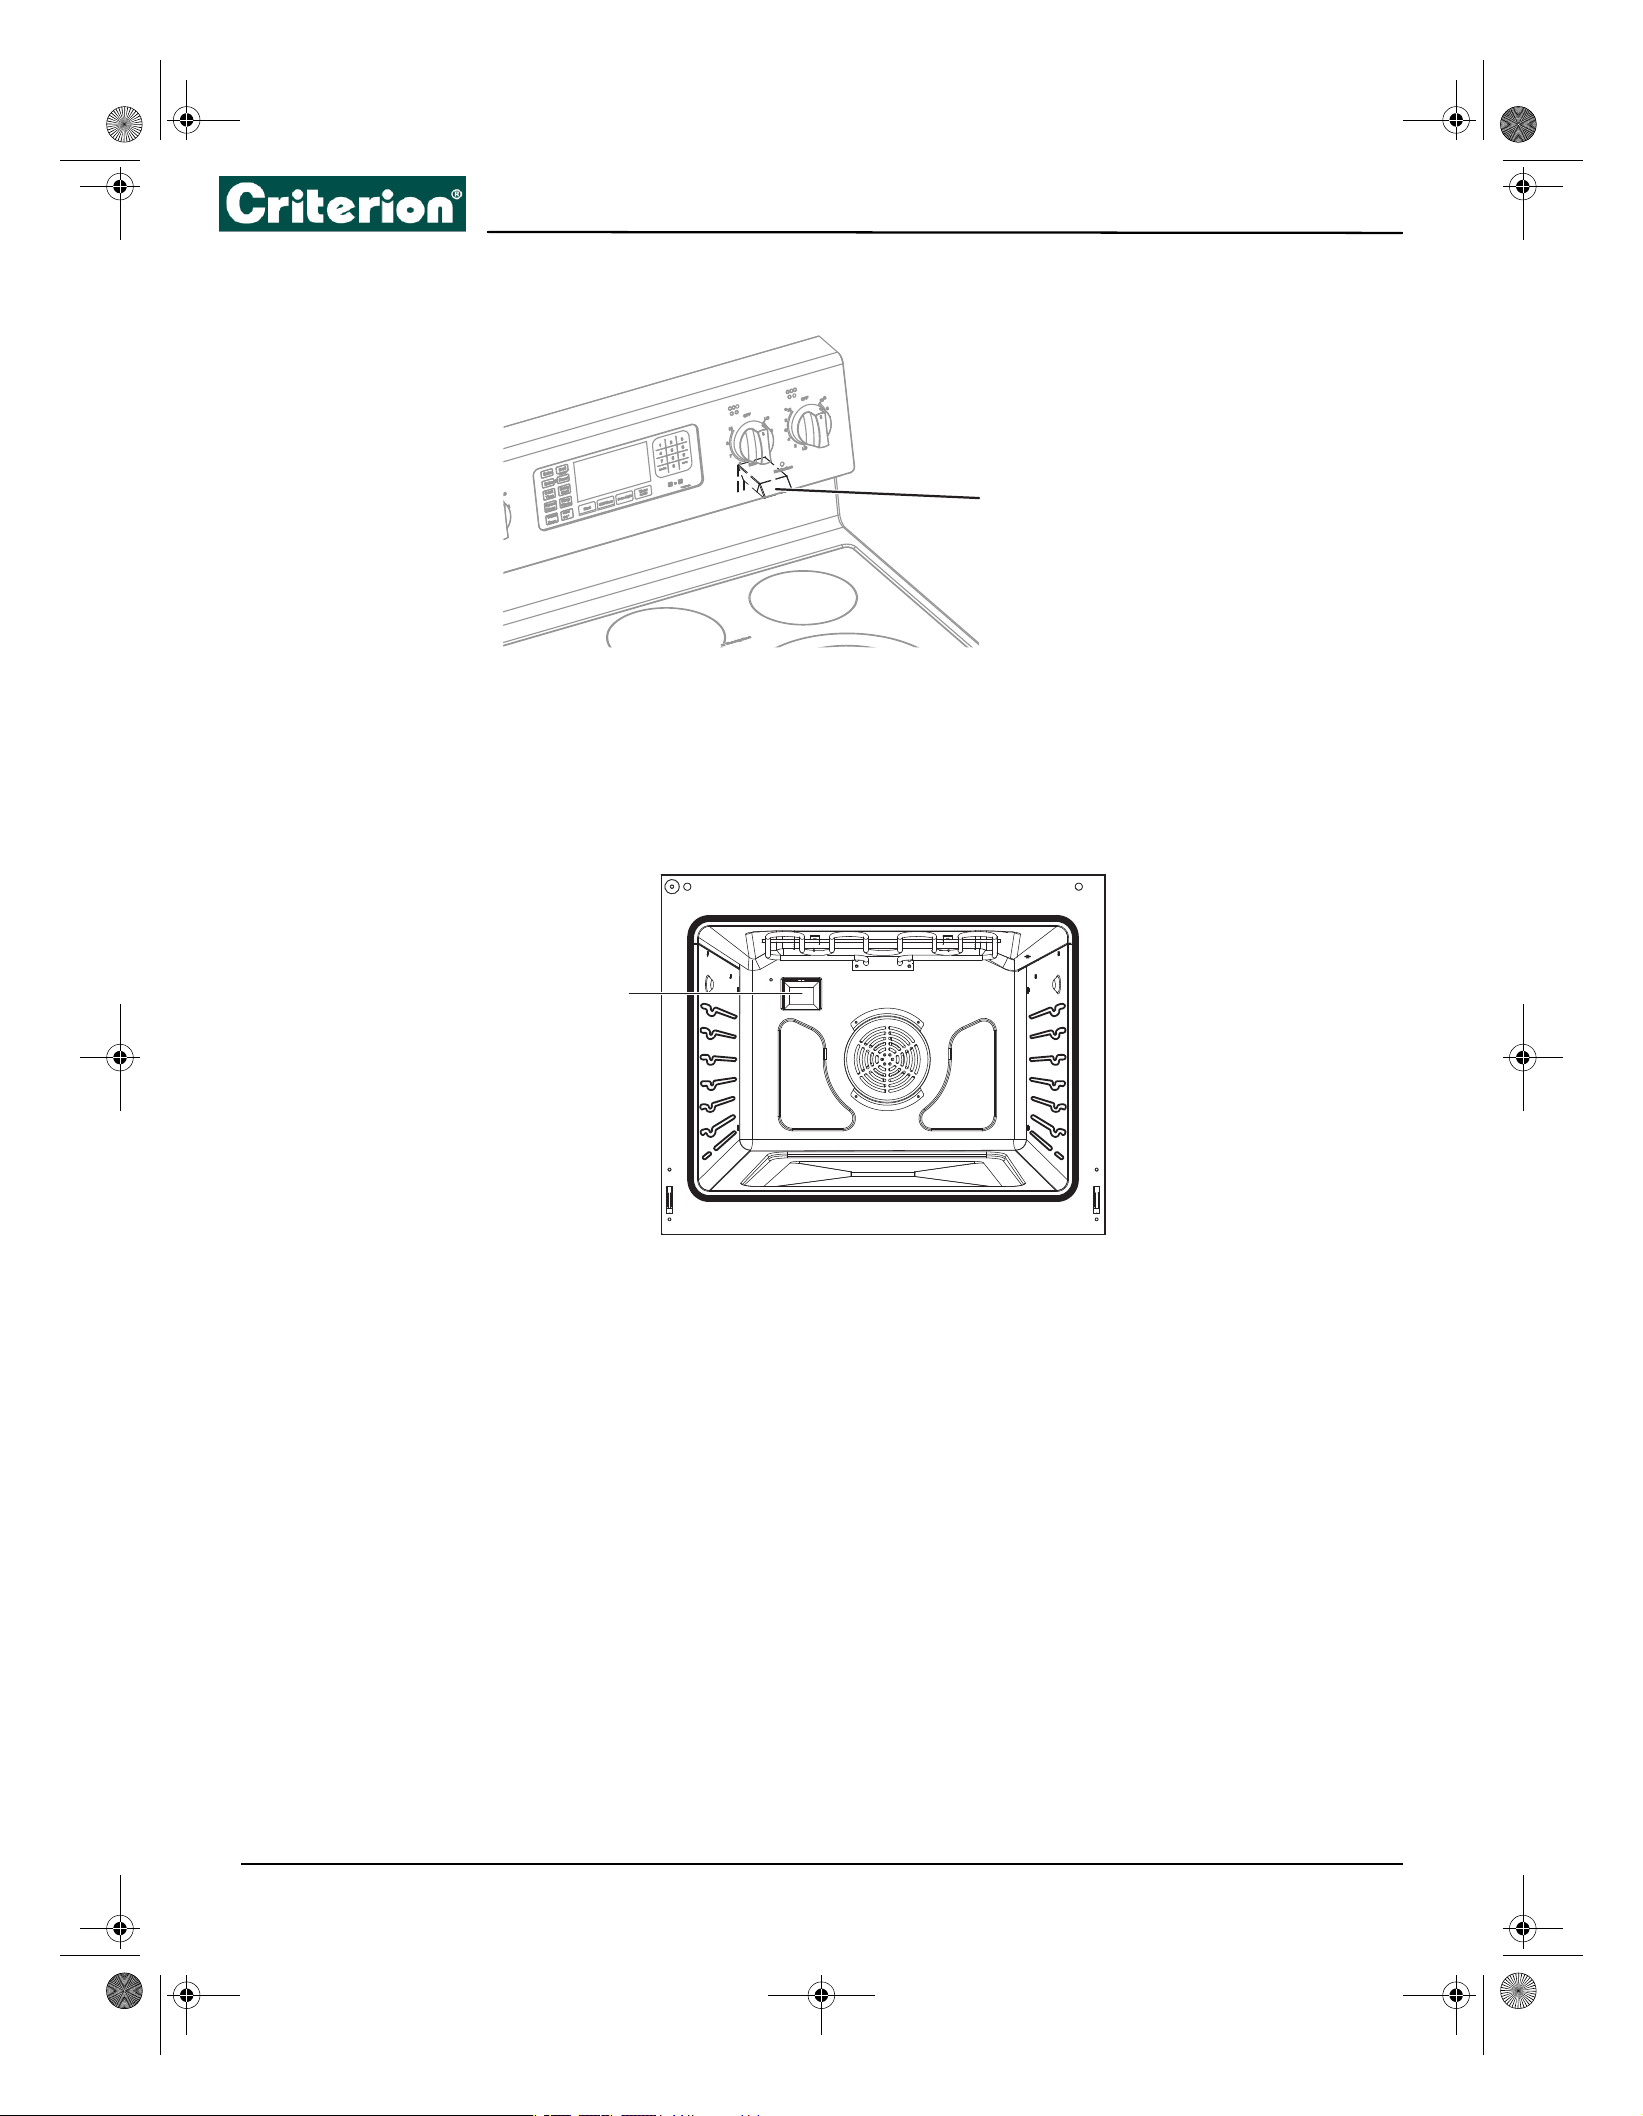
Oven control panel
12
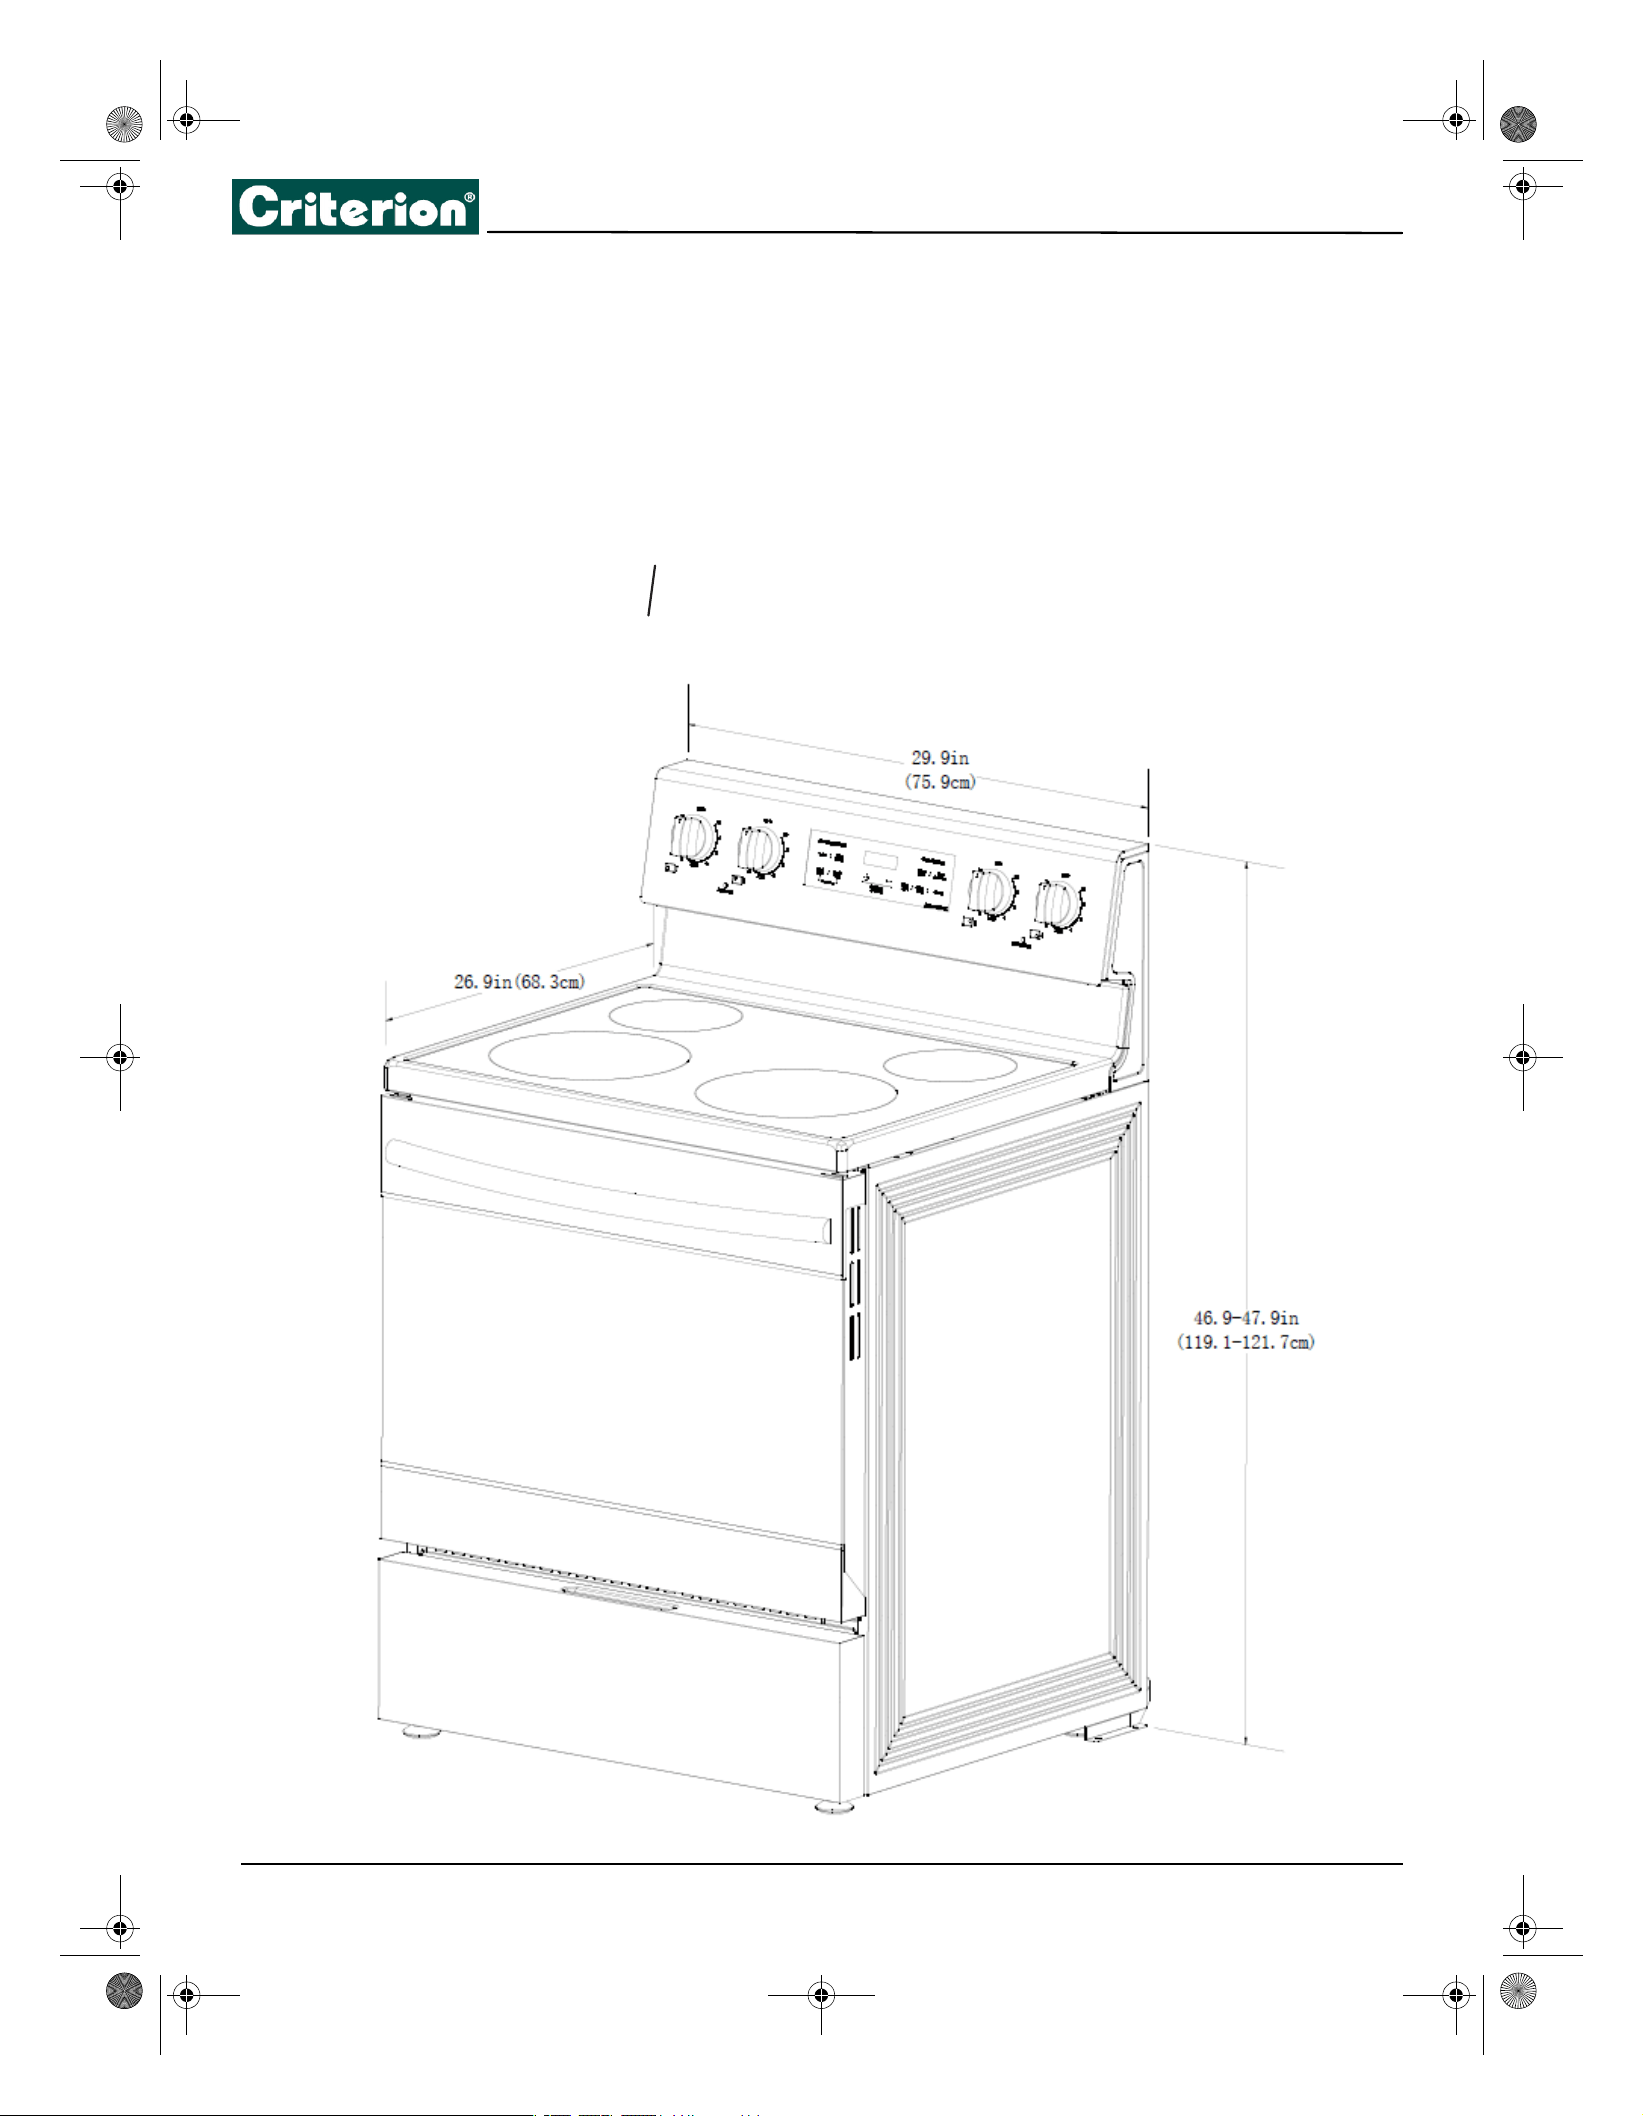
Range dimensions
13
5.0 Cu. Ft. Electric Range with Steam Cleaning
5.0 Cu. Ft. Electric Range with Steam Cleaning
Selecting a location . . . . . . . . . . . . . . . . . . . . . . . . . . . . . . . . . . . . . . . . . . . . . . . . . . . . . . . . . . . . . . . . . . . . . . . . . . . . . . . . . .14
Clearances and dimensions . . . . . . . . . . . . . . . . . . . . . . . . . . . . . . . . . . . . . . . . . . . . . . . . . . . . . . . . . . . . . . . . . . . . . . . . . . . . . . . . . . . . . .14
Electrical requirements. . . . . . . . . . . . . . . . . . . . . . . . . . . . . . . . . . . . . . . . . . . . . . . . . . . . . . . . . . . . . . . . . . . . . . . . . . . . . . .15
Installing your range . . . . . . . . . . . . . . . . . . . . . . . . . . . . . . . . . . . . . . . . . . . . . . . . . . . . . . . . . . . . . . . . . . . . . . . . . . . . . . . . .16
Tools you need (not included). . . . . . . . . . . . . . . . . . . . . . . . . . . . . . . . . . . . . . . . . . . . . . . . . . . . . . . . . . . . . . . . . . . . . . . . . . . . . . . . . . . .16
Items not included. . . . . . . . . . . . . . . . . . . . . . . . . . . . . . . . . . . . . . . . . . . . . . . . . . . . . . . . . . . . . . . . . . . . . . . . . . . . . . . . . . . . . . . . . . . . . . . 16
Notes to the installer . . . . . . . . . . . . . . . . . . . . . . . . . . . . . . . . . . . . . . . . . . . . . . . . . . . . . . . . . . . . . . . . . . . . . . . . . . . . . . . . . . . . . . . . . . . . . 16
Before installing your range . . . . . . . . . . . . . . . . . . . . . . . . . . . . . . . . . . . . . . . . . . . . . . . . . . . . . . . . . . . . . . . . . . . . . . . . . . . . . . . . . . . . . . 16
Connecting the power cord . . . . . . . . . . . . . . . . . . . . . . . . . . . . . . . . . . . . . . . . . . . . . . . . . . . . . . . . . . . . . . . . . . . . . . . . . . . . . . . . . . . . . .17
Installing the anti-tip device. . . . . . . . . . . . . . . . . . . . . . . . . . . . . . . . . . . . . . . . . . . . . . . . . . . . . . . . . . . . . . . . . . . . . . . . . . . . . . . . . . . . . . 20
Placing your range and connecting to power . . . . . . . . . . . . . . . . . . . . . . . . . . . . . . . . . . . . . . . . . . . . . . . . . . . . . . . . . . . . . . . . . . . . .20
Leveling your range. . . . . . . . . . . . . . . . . . . . . . . . . . . . . . . . . . . . . . . . . . . . . . . . . . . . . . . . . . . . . . . . . . . . . . . . . . . . . . . . . . . . . . . . . . . . . . 21
Finishing the installation . . . . . . . . . . . . . . . . . . . . . . . . . . . . . . . . . . . . . . . . . . . . . . . . . . . . . . . . . . . . . . . . . . . . . . . . . . . . . . . . . . . . . . . . . 21
14
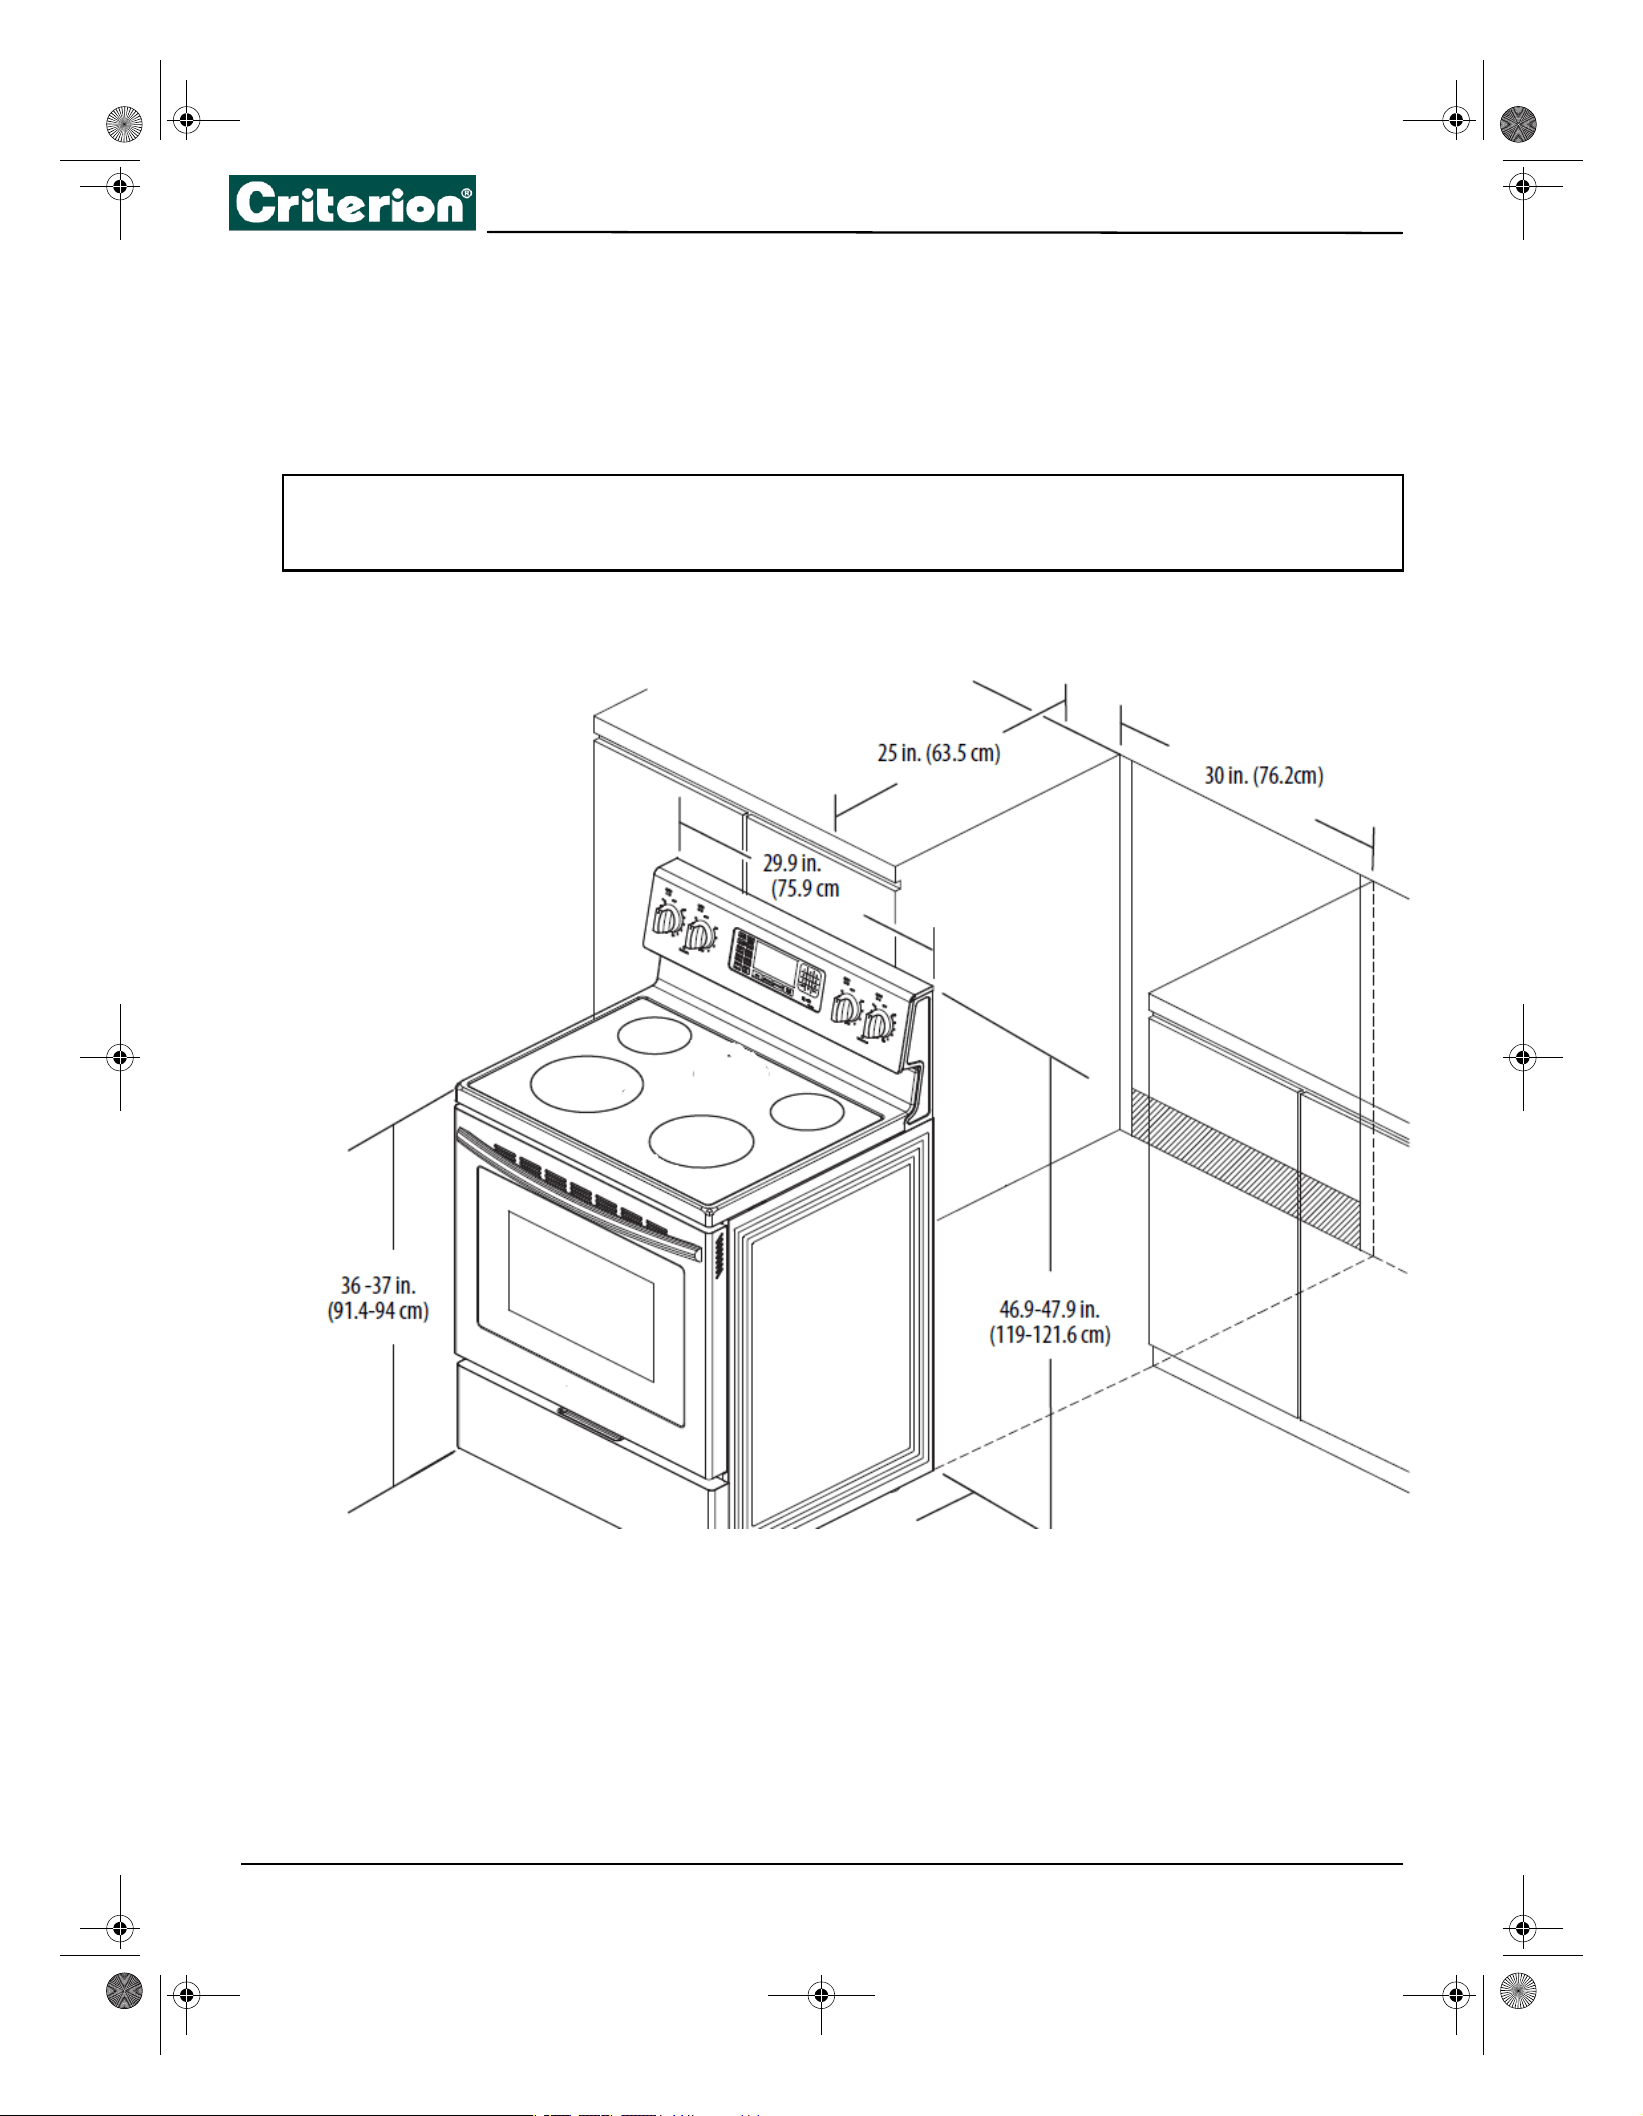
Selecting a location
Clearances and dimensions
BEFORE YOU BEGIN to install your range, refer to the following information, dimensions, and clearances. Do not locate your
range where it may be subject to strong drafts. Provide adequate clearances between your range and adjacent
combustible surfaces. These dimensions must be met for safe use of your range. The location of the electrical outlet may
be adjusted to meet the following dimensions and clearances.
For installation in Canada, a free-standing range is not to be installed closer than 4.7 in. (12 cm) from any adjacent surface.
CAUTION:
Your range has been designed to comply with the maximum allowable wood cabinet temperature of 194° F (90 °C). Make sure that the
wall covering, counter tops, and cabinets around your range can withstand the heat (up to 194° F (90° C)) generated by your range. If
not, discoloration, de-lamination, or melting may occur.

15
5.0 Cu. Ft. Electric Range with Steam Cleaning
Minimum dimensions
Make sure that the wall covering, countertop, flooring, and cabinets around your range can withstand the heat up to the
194° F
(90° C) that your range generates.
Allow a 30 in. (76.2 cm) minimum clearance between the surface elements and the bottom of unprotected wood or
metal cabinets, or allow a 24 in. (61 cm) minimum when the bottom of the wood or metal cabinet is protected by no less
than .25 in. (.6 cm) thick flame retardant mill board covered with not less than No. 28 MSG sheet steel, .015 in. (.038 cm)
stainless steel, .024 in. (.061 cm) aluminum, or .020 in. (.051 cm) copper.
Your range has been approved for 0 in. (0 cm) spacing to adjacent surfaces above the cooktop. However, we recommend a
6 in. (15.2 cm) minimum spacing to surfaces less than 15 in. (38.1 cm) above the cooktop and adjacent cabinet to reduce
exposure to steam, grease splatter, and heat.
To reduce the risk of burns or fire when reaching over hot surface elements, cabinet storage space above the cooktop
should be avoided. If cabinet storage space is above the cooktop, the risk can be reduced by installing a range hood that
projects at least 5 in. (12.7 cm) beyond the front of the cabinets. Cabinets installed above the cooktop must be no deeper
than 16 in. (40.6 cm).
Electrical requirements
Effective January1, 1996, the National Electrical Code requires that new construction (non-existing) utilize a 4-
conductor connection to an electric range.
• When installing an electric range in new construction, follow the instructions in Connect a 4-wire power cord on
page 18.
• You must use a 3-wire or 4-wire, single-phase A.C. 208Y/120 volt or 240/120 volt, 60 hertz electrical system.
• If the electrical service provided does not meet the above specifications, have a licensed electrician install an approved
outlet.
• Use only a 3-conductor or 4-conductor UL-listed range cord. These cords may be provided with ring terminals on the
wires and a strain relief device.
• A
range cord rated at 40 amps with a 125/250 minimum volt range is required. We do not recommend a 50 amp range
cord, but if used, it should be marked for use with nominal 13
.8 in. (35 cm) diameter connection openings. Make sure
that you center the cable and strain relief within the knockout hole to keep the edge from damaging the cable.
WARNING:
• Because range terminals are not accessible after the range is in position, a flexible service conduit or cord must be
used.
To reduce the risk of fire, electric shock, or personal injury:
• Remove the house fuse or open the circuit breaker before beginning installation.
• Your range must be supplied with the correct voltage and frequency, and must be connected to an individual, correctly grounded
branch circuit, protected by a circuit breaker or fuse having the amperage as specified on the rating plate located above the top
panel of the bottom drawer.
• We recommend you have the electrical wiring and hookup of your range connected by a qualified electrician. After installation, have
the electrician show you where your main range disconnect is located.
• Check with your local utilities for electrical codes which apply in your area. Failure to wire your oven according to governing codes
could result in a hazardous condition. If there are no local codes, your range must be wired and fused to meet the requirements of
the National Electrical Code, ANSI/NFPA No. 70–Latest Edition.
30 in. (76.2 cm)
15 in. (38.1 cm)
0 in.
(0 cm)
0 in. (0 cm)
on all sides
16
Installing your range
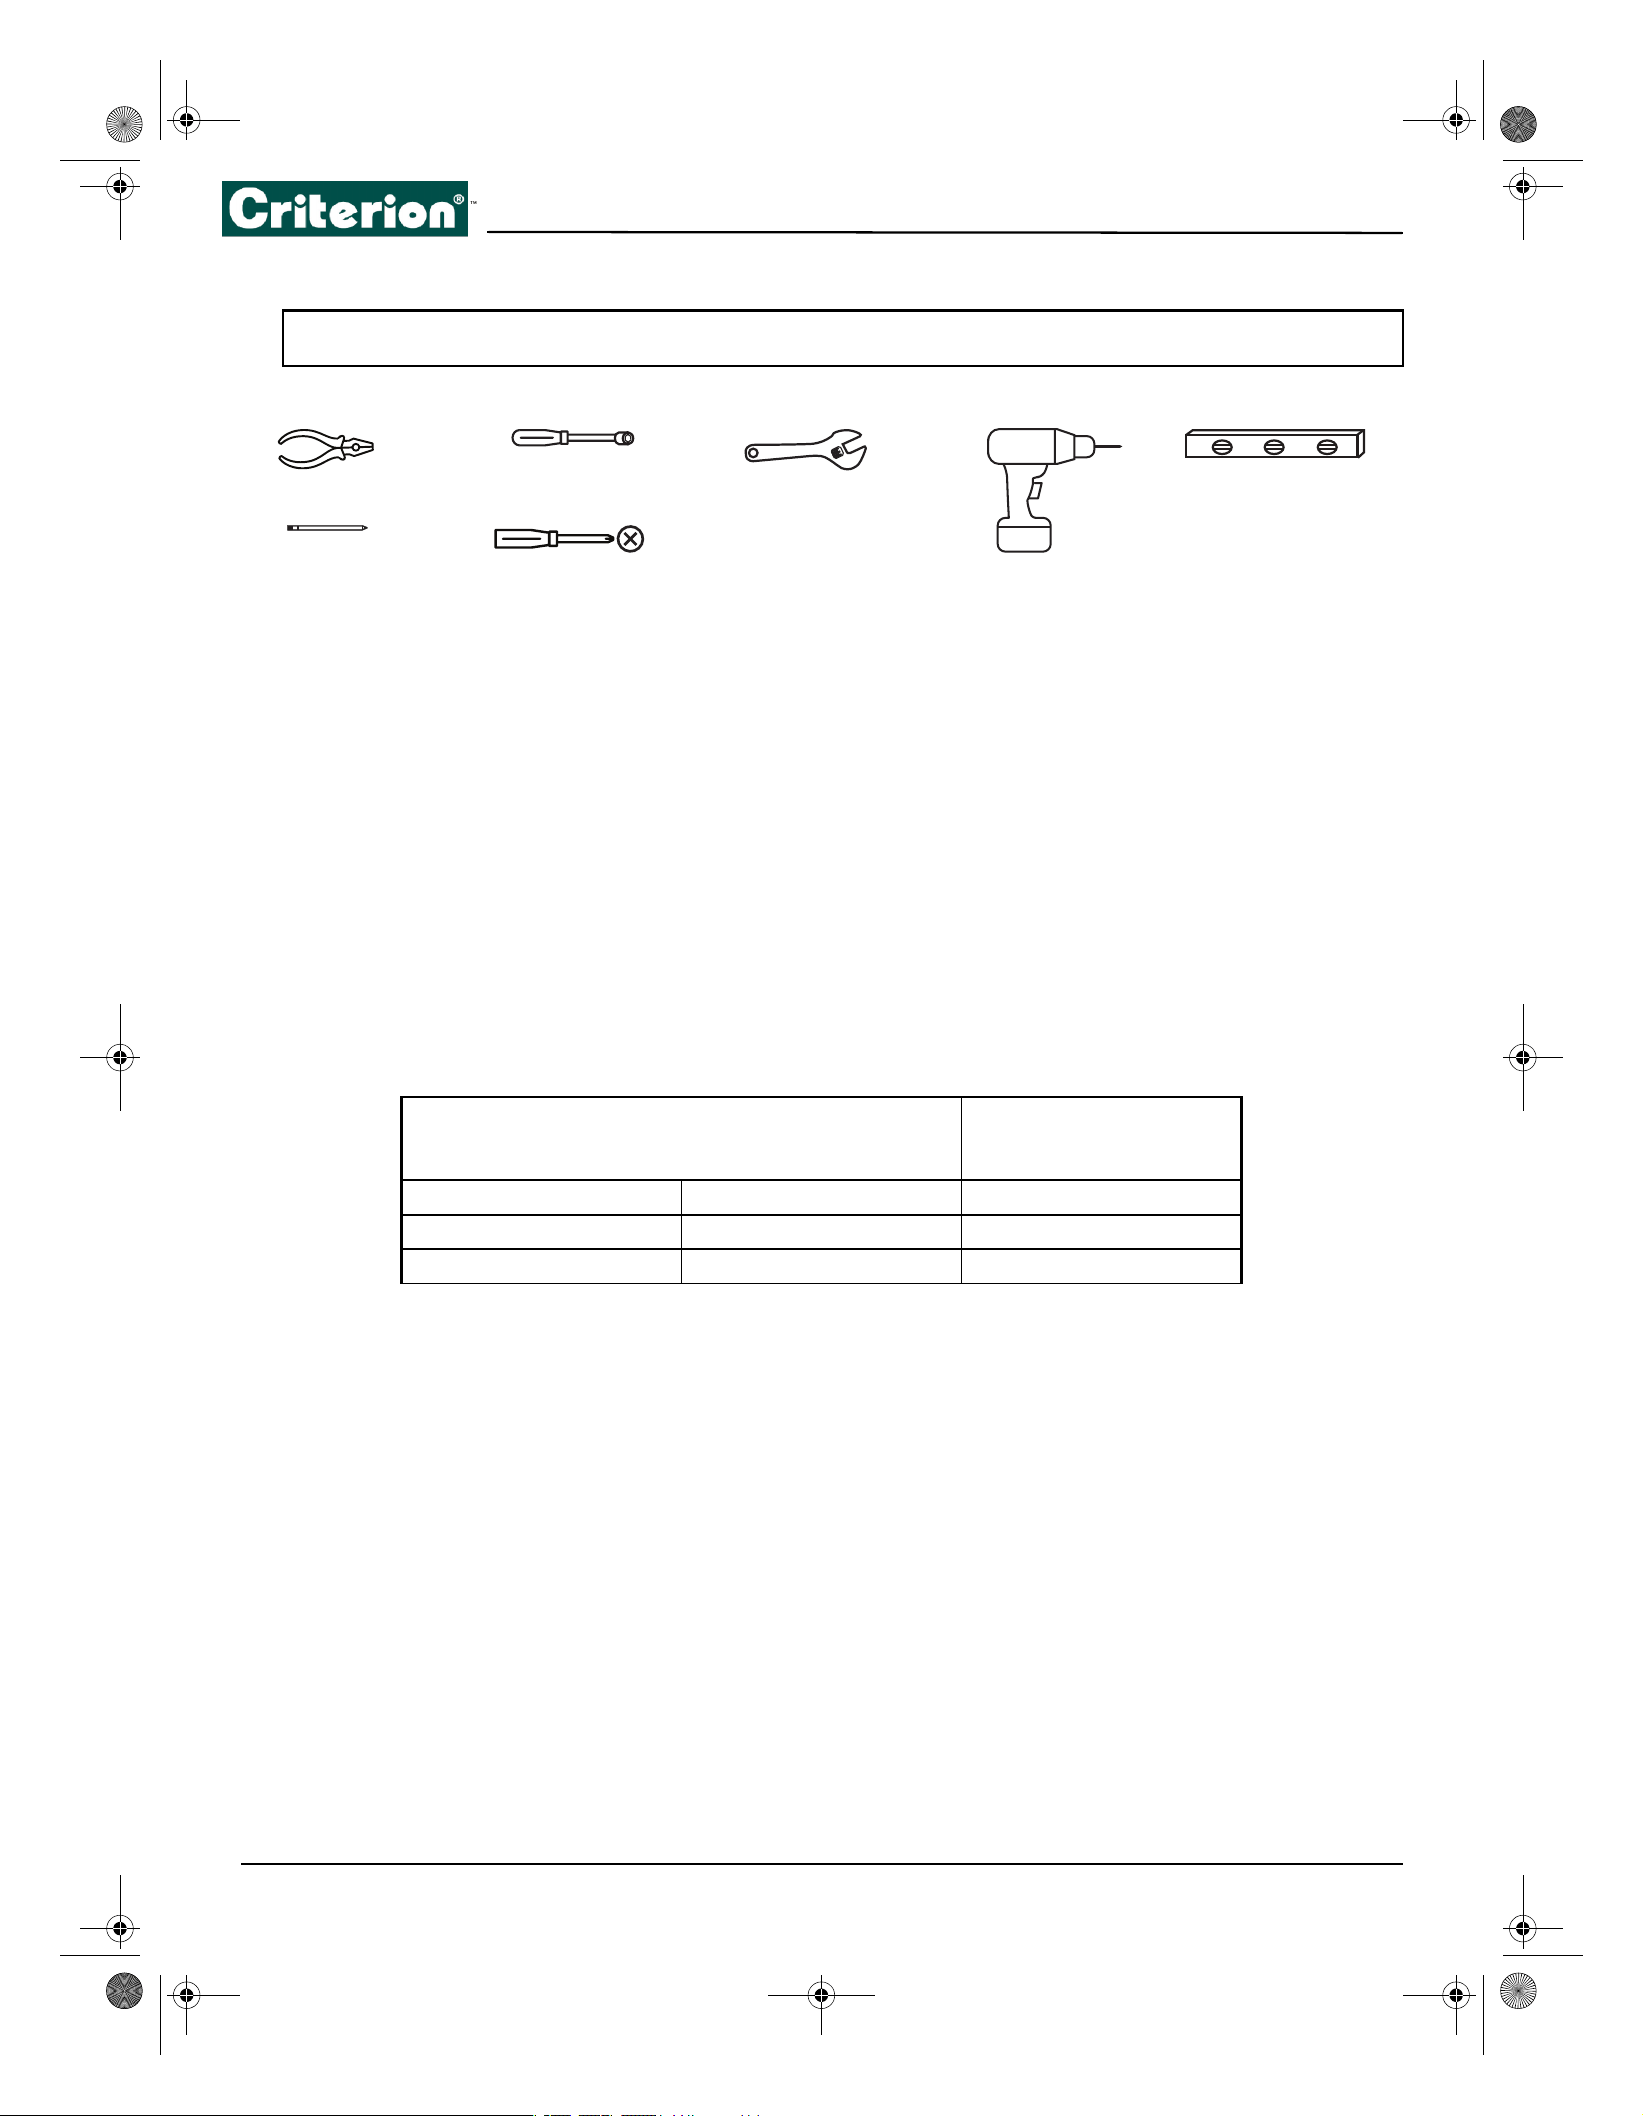
Tools you need (not included)
Items not included
• 4-wire or 3-wire power cord
•Strain relief
Notes to the installer:
1 Read this manual before installing your range.
2 Observe all governing codes and ordinances.
3 Make sure that you keep these instructions with your range.
4 Before installing your range in an area covered with linoleum or any synthetic floor covering, make sure that the floor
covering can withstand temperatures of at least 180°F (82°C) without shrinking, warping, or discoloring.
5 Do not install your range over carpeting unless you place an insulating pad or sheet of .25 in. (.6 cm) thick plywood
between your range and carpeting.
Before installing your range
1 Remove the exterior and interior packing.
2 Wipe the surfaces of your range with a damp cloth or sponge, then wipe them dry with a clean, dry cloth.
WARNING: We recommend that a professional installer install your range.
If your range is not installed correctly, incorrect electrical grounding can cause a fire or explosion which can lead to injury
This range can be connected directly to the circuit breaker box (or fused disconnected) through flexible or nonmetallic
sheathed, copper cable.
Allow 2 to 3 ft (61 cm to 91.4 cm) of slack in the line so that the range can be moved i
f servicing is ever necessary.
A UL listed conduit connector must be provided at each end of the power supply cable (at the range and at the junction
box).
Wire sizes and connections must conform with the rating of the range.
The wiring diagram is located on the rear panel.
or death.
Specified rating of power
supply cord kit and circuit Range rating*
protection
120/240 Volts 120/208 Volts Amps
8.8 – 16.5 KW 7.8 – 12.5 KW 40 or 50**
16.6 – 22.5 KW 12.6 – 18.5 KW 50
Phillips screwdriver
Pliers
1/4 in. nut driver
Pencil
Adjustable
Drill
wrench
Level

17
5.0 Cu. Ft. Electric Range with Steam Cleaning
Connecting the power cord
1 Remove the two screws that secure the terminal block cover to the back of your range. Don’t discard the screws. You
need them to reinstall the cover.
2 For the power cord installation, hook the strain relief over the 1 3/8 in. (3.5 cm) power cord hole located below the rear
3 For the conduit installation, insert the conduit strain relief in the 1 1/8 in. (2.8 cm) conduit hole, then install the conduit
through the body of the strain relief and fasten the strain relief with its ring.
WARNING:
• Electrical ground is required on your range.
• Do not connect to the electrical supply until your range is permanently grounded.
• Your range must be connected to a grounded, metallic, permanent wiring system, or a grounding connector should be connected
to the grounding terminal or wire lead on your range.
Failure to do any of the above could result in a fire, personal injury, or electrical shock.
Remove the terminal block cover
of the oven. Insert the power cord through the strain relief, then tighten the relief.
Note: You must install the power cord with a strain relief. Attach the strain relief to the opening in the conduit connection plate.
Terminal block
Conduit hole
Power cord
Strain relief
hole
Power cord
hole
Power cord hole
Ring
Body
Conduit hole
18
If you are connecting a 4-wire power cord, go to Connect a 4-wire power cord on page 18.
If you are connecting a 3-wire power cord, go to Connect a 3-wire power cord on page 19.
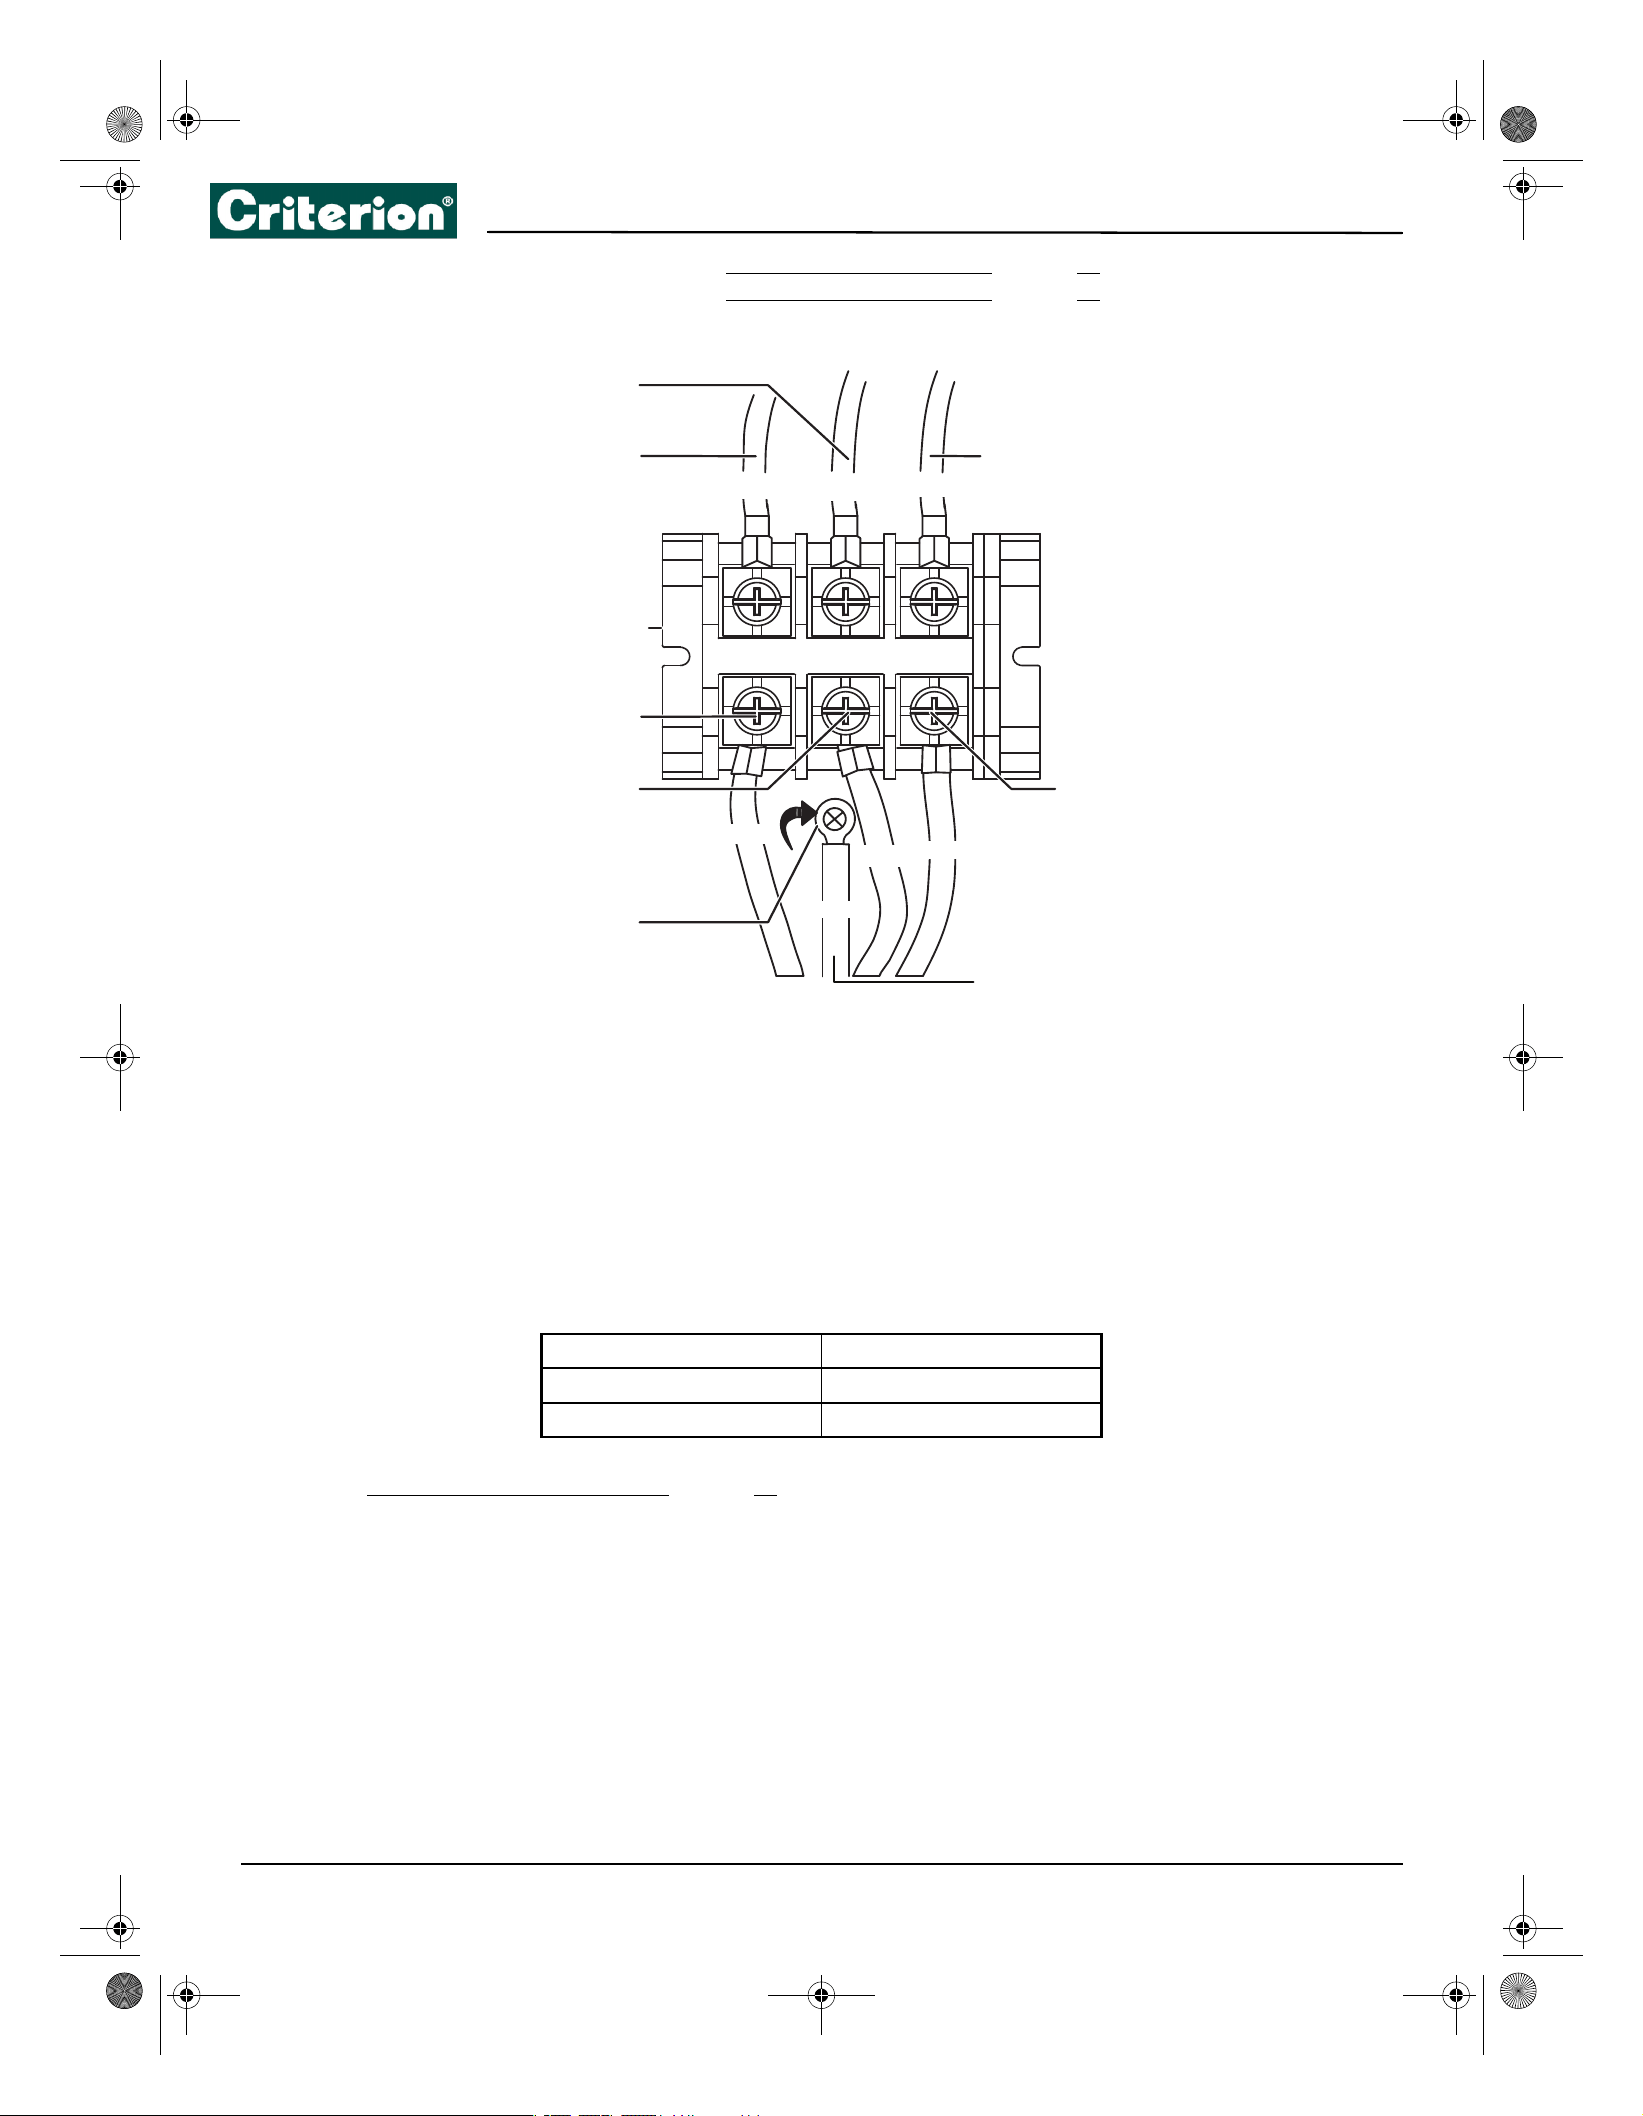
Connect a 4-wire power cord
1 Disconnect power to the circuit breaker or fuse box before making the electrical connection.
2 Remove the three lower terminal screws from the terminal block and remove the ground screw.
3 Remove and discard the ground strap located between the middle terminal screw and the ground screw. Do not
discard any screws.
4 Insert the ground screw into the power cord ground wire terminal ring and into the frame of the range.
5 Insert the three terminal screws (removed earlier) through each power cord terminal ring and into the lower terminals
of the terminal block. Be certain that the center wire (white/neutral) is connected to the center position of the terminal
block.
6 Reinstall and tighten screws securely to the terminal block.
7 CAUTION: Check the voltage after connecting the power cord.
8 Go to Replace the terminal block cover on page 20.
Live 1 - Neutral 120 V
Live 2 - Neutral 120 V
Live 1 - Live 2 208 V / 240 V
L1
L2
N
Neutral
Live 2
Live 1
Terminal block
Neutral
Live 2
Live 1
Red
Black
White
Red
Black
White
Remove
ground
Green
strap
Ground wire
19
5.0 Cu. Ft. Electric Range with Steam Cleaning
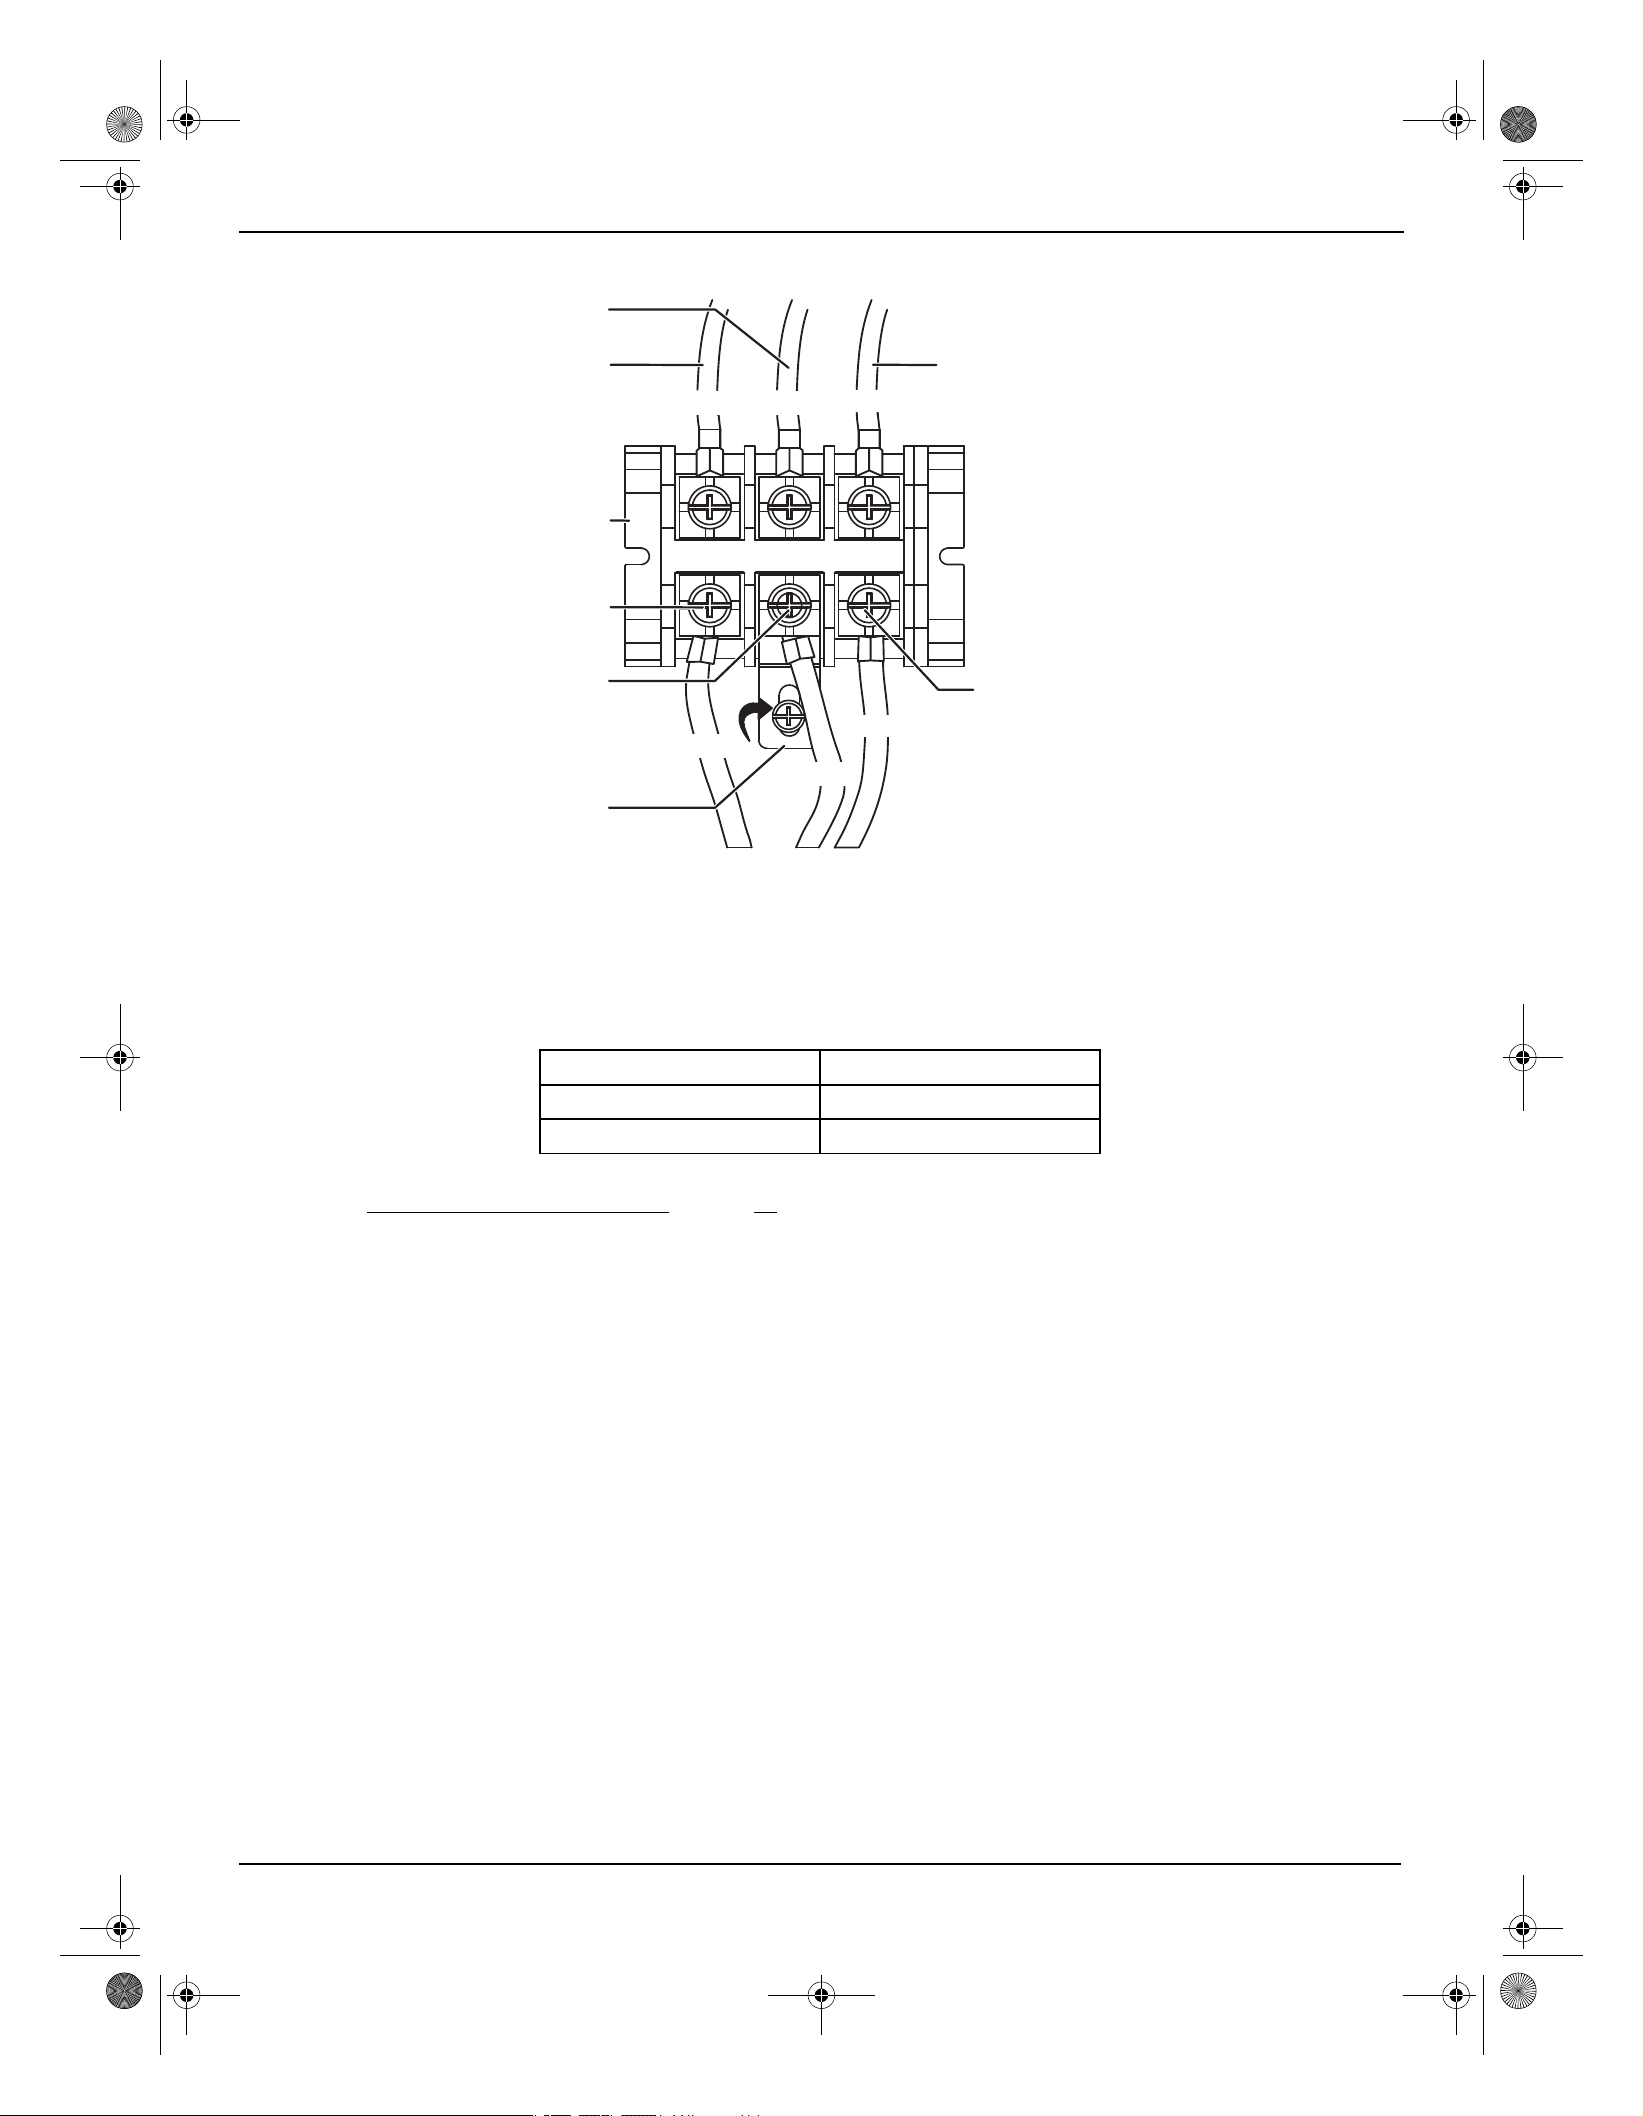
Connect a 3-wire power cord
1 Remove the three lower terminal screws from the terminal block.
2 Insert the three terminal screws through each power cord terminal ring and into the lower terminals of the terminal
block. Be certain that the center wire (white/neutral) is connected to the center lower position of the terminal block.
3 Tighten screws securely to the terminal block. DO NOT remove the ground strap connection.
4 CAUTION: Check the voltage after connecting the power cord.
5 Go to Replace the terminal block cover on page 20.
Live 1 - Neutral 120 V
Live 2 - Neutral 120 V
Live 1 - Live 2 208 V / 240 V
L1
L2
N
Neutral
Live 2Live 1
Terminal block
Ground strap
Live 2
Live 1
Red
Black
White
Neutral
Red
Black
White

20
Replace the terminal block cover
1 Make sure that the cable is tightened in place
using the strain relief.
2 Align the terminal block cover with the screw holes on the back of your range.
3 Insert the two screws you removed earlier through the holes in the cover and into the holes on the back of your
range.
4 Tighten the screws.
Installing the anti-tip device
An anti-tip bracket and screws with installation instructions came with your range. If the bracket is not installed correctly,
your range could be tipped by you or a child standing, sitting, or leaning on an open oven door.
1 Release and extend the leveling leg to a minimum clearance of .7 in. (1.8 cm) between the range bottom and the floor.
2 Follow the instructions that came with the anti-tip device.
3 Rem
ove the storage drawer and look underneath your range to make sure that the leveling leg is engaged in the
bracket. See Removing and replacing the storage drawer on page 44.
4 Carefully tip your range forward. The bracket should stop your range within 4 in. (10.2 cm) of tipping. If it does not, you
need to re-install the bracket.
Placing your range and connecting to power
1 Plug in the power cord. Make sure that the outlet meets local or national electrical codes.
2 Slide your range into place.
3 Make sure that the back leg of your range slid into the anti-tip bracket. Carefully tip your range forward to make sure
WARNING:
that the anti-tip bracket prevents a tip-over.
To reduce the risk of tipping, your range must be secured by the provided anti-tip device.
• All ranges can tip and cause personal injury.
• A child or adult can tip your range and be killed.
• Install the anti-tip device to your range and structure by following the installation instructions.
• Make sure that your range is connected to the anti-tip device installed to the structure.
• If you pull your range away from the wall for cleaning, service, or any other reason, make sure that the anti-tip device is correctly
reengaged when you push your range back against the wall. In the event of abnormal usage (such as a person standing, sitting, or
leaning on an open door), failure to take this precaution can result in tipping of your range. Personal injury might result from spilled
hot liquids or from your range itself.
Failure to follow these instructions can result in death or serious burns to children or adults.
21
5.0 Cu. Ft. Electric Range with Steam Cleaning
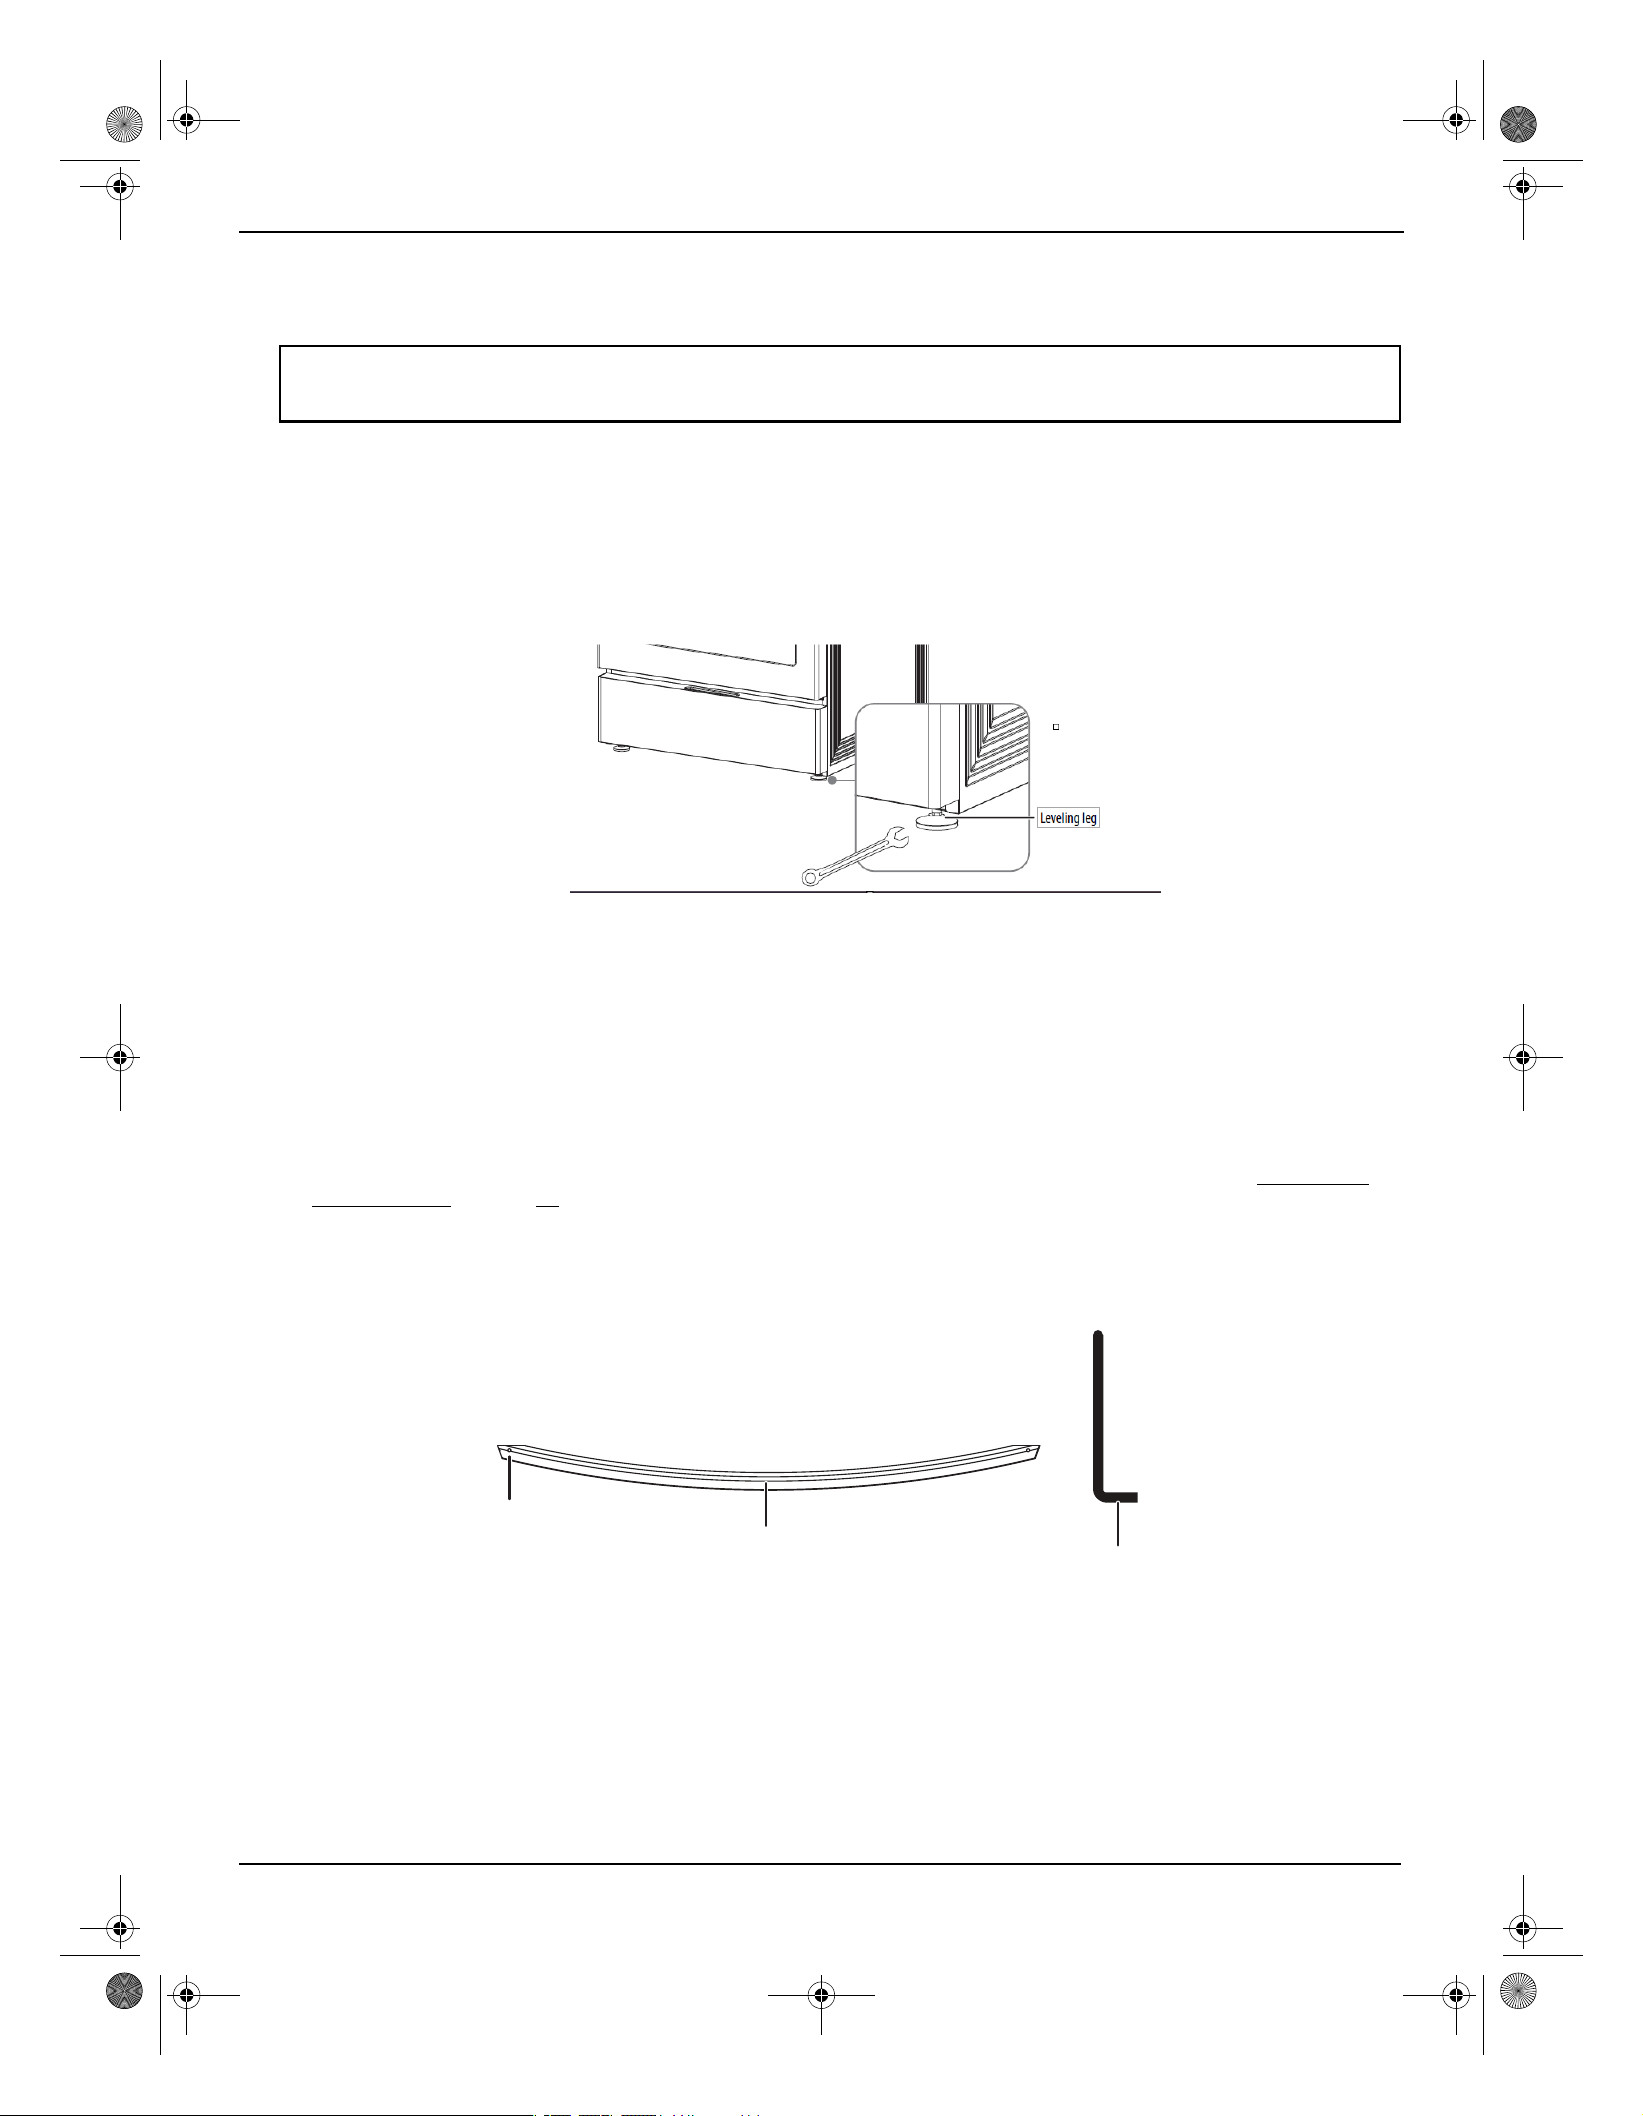
Leveling your range
Your range should be level. If your range is not level, the door may not close or seal correctly which can cause uneven
heating and electric wastage problems.
1 Make sure that your range is positioned where you want it.
2 Using a wrench, level your range by turning the front leveling legs if necessary. Counterclockwise shortens the leg and
lowers your range. Clockwise lengthens the leg and raises your range.
Adjust the leveling legs only as far as necessary to level your range. Extending the leveling legs more than necessary or
removing the legs can make your range unstable.
3 If your range is next to or between cabinets, make sure that the cooktop is level with the counter tops.
Finishing the installation
1 Move your range close enough to the power outlet you plan to use, then plug in the power cord.
2 Slide your range into position. Make sure that the rear left (or rear right) leg slides under the anti-tip bracket. Your
range should sit 0.8 in. (2 cm) away from the back wall when correctly installed.
3 Carefully tip your range forward to make sure that the anti-tip bracket is installed correctly and prevents a tip-over.
4 Turn on the electrical power. Make sure that your range is working correctly. For more information, see OPERATING
INSTRUCTIONS on page 23.
Installing the oven door handle
You range may have a “KD handle” that you need to install.
1 Check your installation kits for the handle and hex wrench.
2 Make sure that the side with screw holes faces towards the oven door.
Note:
• To make it easier to adjust the feet, have someone push against the top of your range to tilt it slightly.
• Adjusting the two front legs is usually sufficient, but all four legs adjust if necessary.
Handle
Screw
hole
Hex wrench
22
3 Place the door handle against to the oven door and fit it on the connection part.
4 Use the Allen wrench to tighten both sides of the door handle.
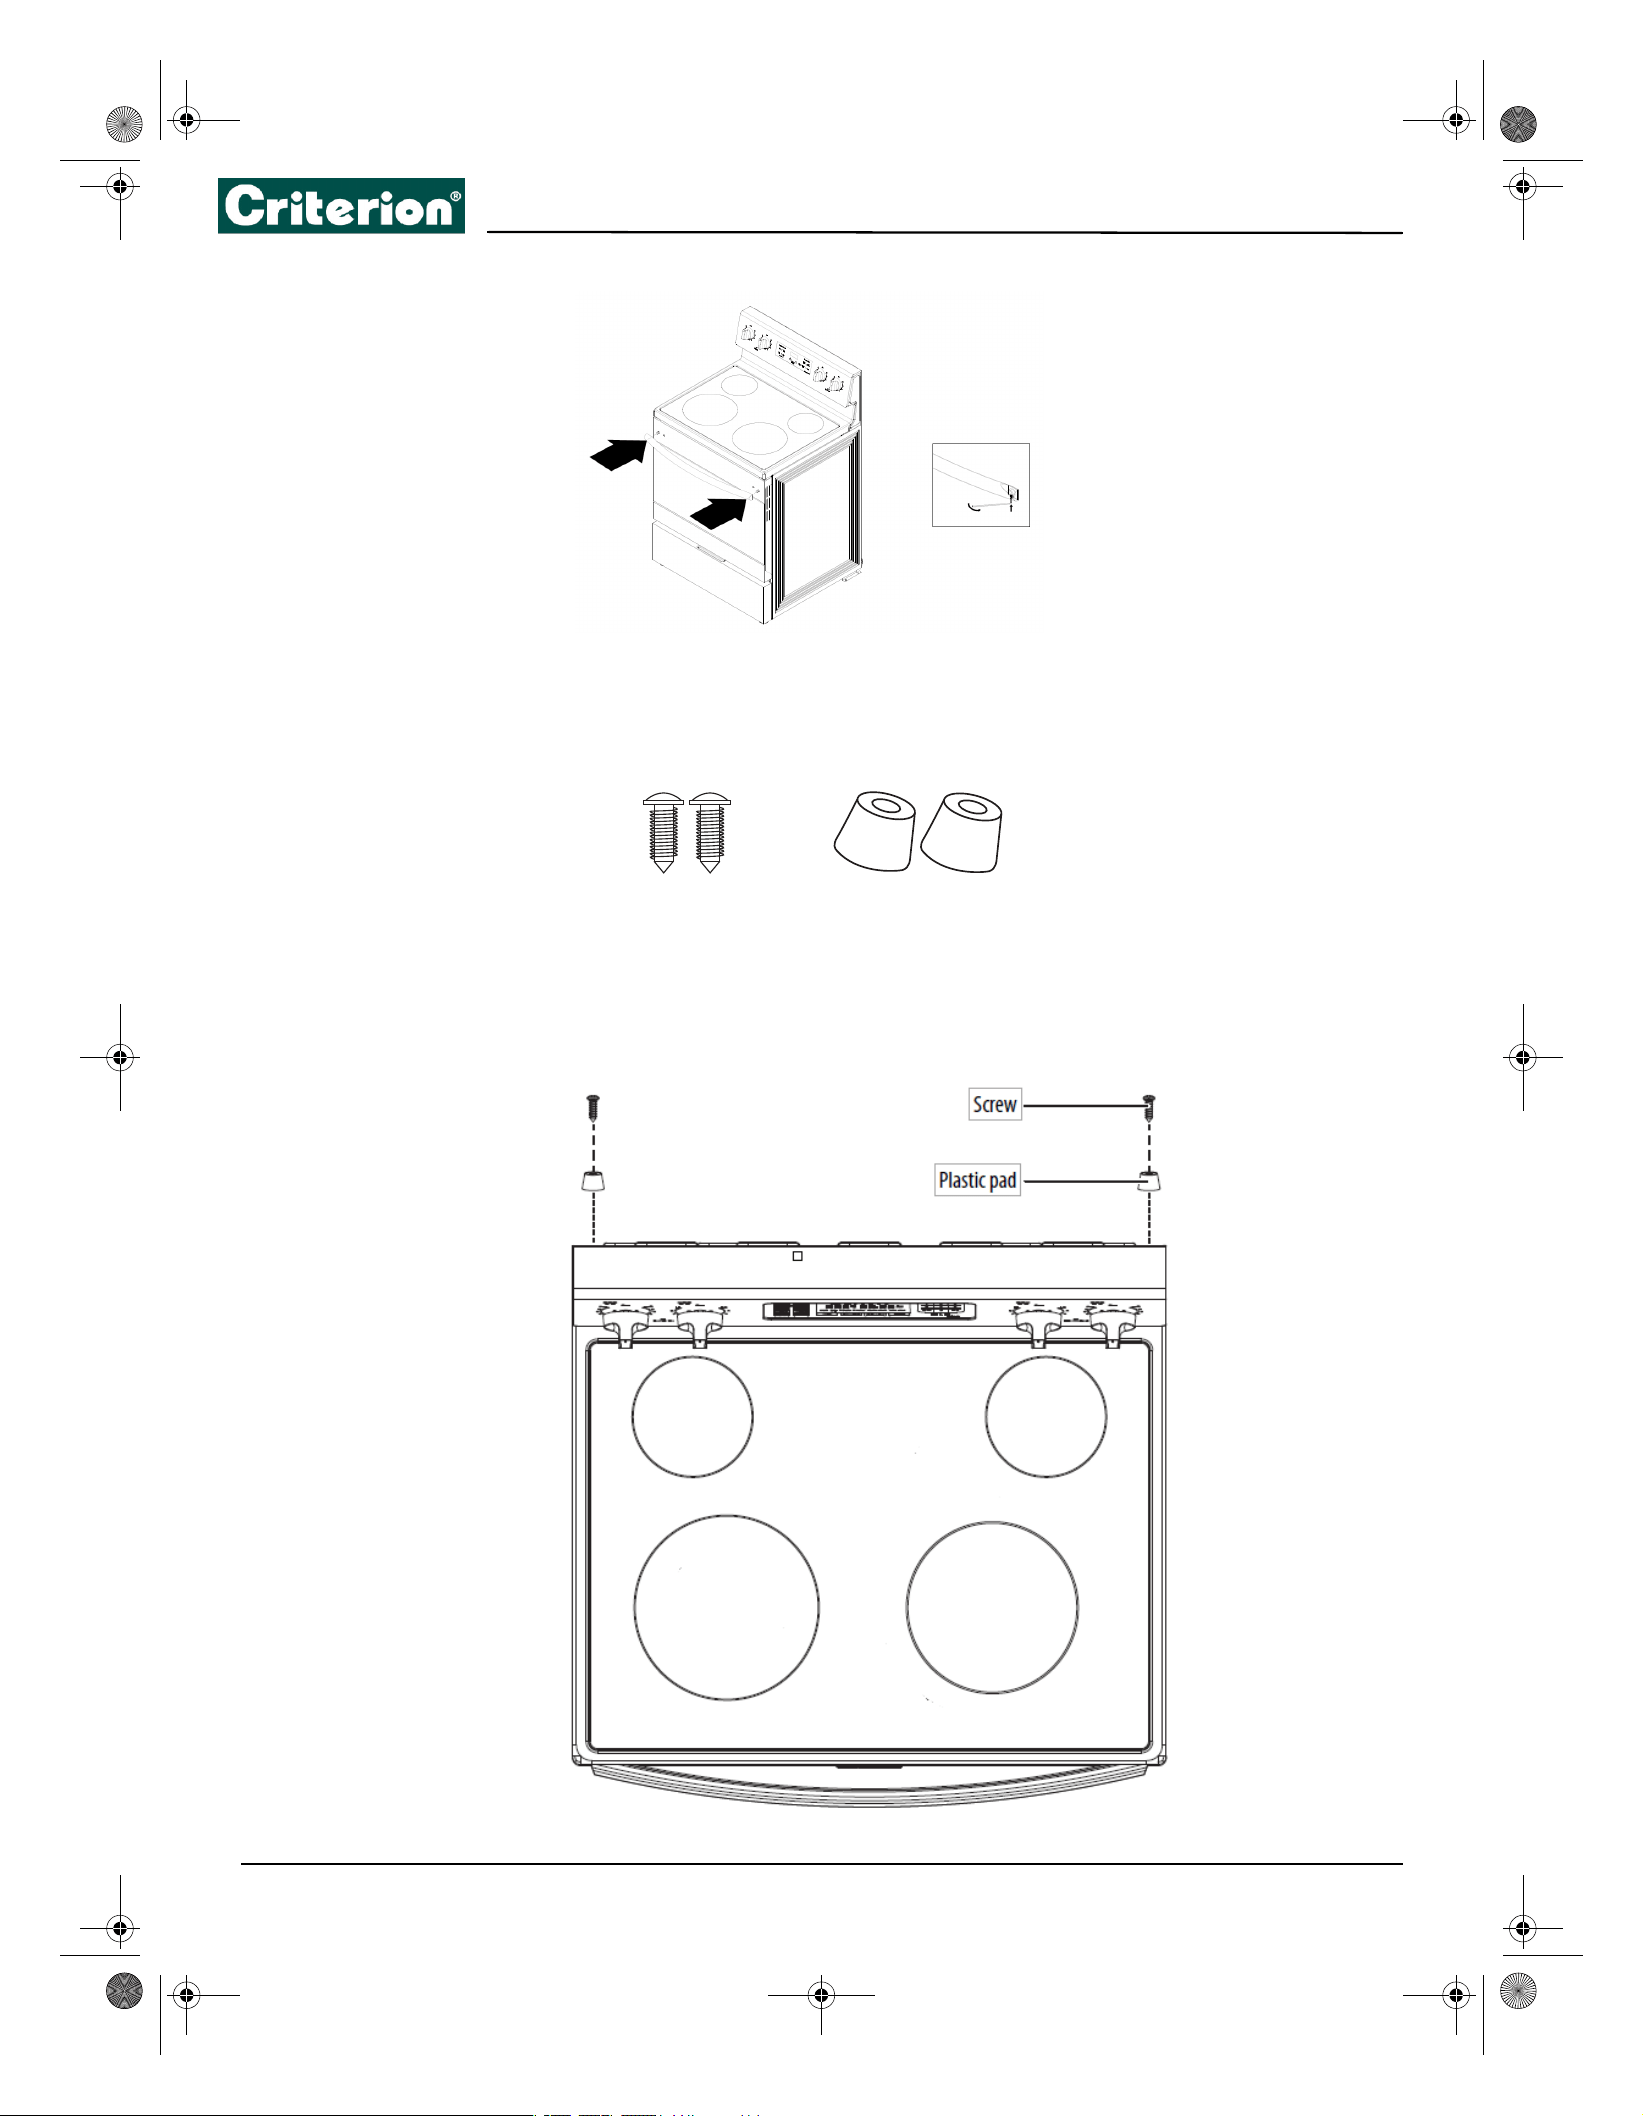
Installing the plastic pads
To prevent your range from getting too close to the wall behind the range, install the included plastic pads.
1 Locate the plastic pad kit. It includes:
2 Align the holes in the plastic pads with the holes on the top, back of your range, then secure the pads to your range
with the provided screws.
Screws (2)
Plastic pads

23
5.0 Cu. Ft. Electric Range with Steam Cleaning
OPERATING
INSTRUCTIONS
5.0 Cu. Ft. Electric Range with Steam Cleaning
Before you begin using your range . . . . . . . . . . . . . . . . . . . . . . . . . . . . . . . . . . . . . . . . . . . . . . . . . . . . . . . . . . . . . . . . . . .24
Tips for saving energy. . . . . . . . . . . . . . . . . . . . . . . . . . . . . . . . . . . . . . . . . . . . . . . . . . . . . . . . . . . . . . . . . . . . . . . . . . . . . . . . . . . . . . . . . . . .24
Using the surface burners . . . . . . . . . . . . . . . . . . . . . . . . . . . . . . . . . . . . . . . . . . . . . . . . . . . . . . . . . . . . . . . . . . . . . . . . . . . .24
Identifying the burners . . . . . . . . . . . . . . . . . . . . . . . . . . . . . . . . . . . . . . . . . . . . . . . . . . . . . . . . . . . . . . . . . . . . . . . . . . . . . . . . . . . . . . . . . .25
Cooking areas . . . . . . . . . . . . . . . . . . . . . . . . . . . . . . . . . . . . . . . . . . . . . . . . . . . . . . . . . . . . . . . . . . . . . . . . . . . . . . . . . . . . . . . . . . . . . . . . . . . 25
Using a surface element control knob . . . . . . . . . . . . . . . . . . . . . . . . . . . . . . . . . . . . . . . . . . . . . . . . . . . . . . . . . . . . . . . . . . . . . . . . . . . .26
Using the correct cookware . . . . . . . . . . . . . . . . . . . . . . . . . . . . . . . . . . . . . . . . . . . . . . . . . . . . . . . . . . . . . . . . . . . . . . . . . . . . . . . . . . . . . . 26
Protecting the ceramic cooktop . . . . . . . . . . . . . . . . . . . . . . . . . . . . . . . . . . . . . . . . . . . . . . . . . . . . . . . . . . . . . . . . . . . . . . . . . . . . . . . . . . 27
Using the oven . . . . . . . . . . . . . . . . . . . . . . . . . . . . . . . . . . . . . . . . . . . . . . . . . . . . . . . . . . . . . . . . . . . . . . . . . . . . . . . . . . . . . .28
Minimum and maximum settings . . . . . . . . . . . . . . . . . . . . . . . . . . . . . . . . . . . . . . . . . . . . . . . . . . . . . . . . . . . . . . . . . . . . . . . . . . . . . . . .28
Positioning the oven racks . . . . . . . . . . . . . . . . . . . . . . . . . . . . . . . . . . . . . . . . . . . . . . . . . . . . . . . . . . . . . . . . . . . . . . . . . . . . . . . . . . . . . . . 29
Using the oven vent . . . . . . . . . . . . . . . . . . . . . . . . . . . . . . . . . . . . . . . . . . . . . . . . . . . . . . . . . . . . . . . . . . . . . . . . . . . . . . . . . . . . . . . . . . . . . 30
Using the oven light . . . . . . . . . . . . . . . . . . . . . . . . . . . . . . . . . . . . . . . . . . . . . . . . . . . . . . . . . . . . . . . . . . . . . . . . . . . . . . . . . . . . . . . . . . . . . 30
Tips for baking. . . . . . . . . . . . . . . . . . . . . . . . . . . . . . . . . . . . . . . . . . . . . . . . . . . . . . . . . . . . . . . . . . . . . . . . . . . . . . . . . . . . . . . . . . . . . . . . . . . 30
Setting the clock. . . . . . . . . . . . . . . . . . . . . . . . . . . . . . . . . . . . . . . . . . . . . . . . . . . . . . . . . . . . . . . . . . . . . . . . . . . . . . . . . . . . . . . . . . . . . . . . .30
Selecting the 12-hour or 24-hour display setting . . . . . . . . . . . . . . . . . . . . . . . . . . . . . . . . . . . . . . . . . . . . . . . . . . . . . . . . . . . . . . . . . .31
Using the timer . . . . . . . . . . . . . . . . . . . . . . . . . . . . . . . . . . . . . . . . . . . . . . . . . . . . . . . . . . . . . . . . . . . . . . . . . . . . . . . . . . . . . . . . . . . . . . . . . . 31
Baking. . . . . . . . . . . . . . . . . . . . . . . . . . . . . . . . . . . . . . . . . . . . . . . . . . . . . . . . . . . . . . . . . . . . . . . . . . . . . . . . . . . . . . . . . . . . . . . . . . . . . . . . . . . 31
Adjusting the thermostat . . . . . . . . . . . . . . . . . . . . . . . . . . . . . . . . . . . . . . . . . . . . . . . . . . . . . . . . . . . . . . . . . . . . . . . . . . . . . . . . . . . . . . . . 31
Fan baking and roasting . . . . . . . . . . . . . . . . . . . . . . . . . . . . . . . . . . . . . . . . . . . . . . . . . . . . . . . . . . . . . . . . . . . . . . . . . . . . . . . . . . . . . . . . .31
Programming the cook time . . . . . . . . . . . . . . . . . . . . . . . . . . . . . . . . . . . . . . . . . . . . . . . . . . . . . . . . . . . . . . . . . . . . . . . . . . . . . . . . . . . . .32
Programming a delayed start time . . . . . . . . . . . . . . . . . . . . . . . . . . . . . . . . . . . . . . . . . . . . . . . . . . . . . . . . . . . . . . . . . . . . . . . . . . . . . . . 33
Broiling. . . . . . . . . . .
. . . . . . . . . . . . . . . . . . . . . . . . . . . . . . . . . . . . . . . . . . . . . . . . . . . . . . . . . . . . . . . . . . . . . . . . . . . . . . . . . . . . . . . . . . . . . . . 33
Keeping food warm. . . . . . . . . . . . . . . . . . . . . . . . . . . . . . . . . . . . . . . . . . . . . . . . . . . . . . . . . . . . . . . . . . . . . . . . . . . . . . . . . . . . . . . . . . . . . . 33
Switching between Fahrenheit or Celsius. . . . . . . . . . . . . . . . . . . . . . . . . . . . . . . . . . . . . . . . . . . . . . . . . . . . . . . . . . . . . . . . . . . . . . . . .34
Turning sound on or off. . . . . . . . . . . . . . . . . . . . . . . . . . . . . . . . . . . . . . . . . . . . . . . . . . . . . . . . . . . . . . . . . . . . . . . . . . . . . . . . . . . . . . . . . .34
Locking oven controls . . . . . . . . . . . . . . . . . . . . . . . . . . . . . . . . . . . . . . . . . . . . . . . . . . . . . . . . . . . . . . . . . . . . . . . . . . . . . . . . . . . . . . . . . . .34
24
Before you begin using your range
Before turning on the burners or oven:
• Remove all packaging materials.
• Wipe the surfaces of your range with a damp cloth or sponge, then dry with a clean, dry cloth.
When you turn on an element or the oven for the first time, smoke and odors may be emitted. This is normal. Make sure
that the room is well ventilated.
Tips for saving energy
• During cooking, keep the oven door closed except when you turn food over.
• To maintain the oven temperature, do not open the door frequently during cooking.
• If cooking time is more than 30 minutes, switch the oven off 5 to 10 minutes before the end of the cooking time. The
residual heat completes the cooking process.
• T
o reduce the time needed for re-heating the oven, plan oven use to avoid turning the oven off between cooking one
item and the next.
• W
henever possible, cook more than one item at a time.
WARNING: All electrical equipment with moving parts can be dangerous. Make sure that you read and understand all safety
information. See IMPORTANT SAFETY PRECAUTIONS on page 3
Using the surface burners
.
CAUTION: Do not use harsh detergents, scouring powder, or any sharp objects to clean your range. These items can damage the
surfaces of your range.
WARNING:
• Do not touch any hot surface on your range. Use oven gloves or potholders.
• Do not let children near your range.
WARNING:
• Before using the surface burners, make sure that you follow all the safety warnings and precautions as listed. Failure to do so could
result in product damage, personal injury, or death.
• When you want to move a pot or pan onto another element, lift it up and place it on the other element. Do not slide a pot or pan
from one element to another. Sliding can scratch surfaces.
CAUTION: Before cooking
• Do not use the glass cooktop surface as a cutting board.
• Do not place or store items that can melt or catch fire on the glass cooktop, even when it is not being used.
• Turn the surface burners on only after placing cookware on them.
• Do not store heavy items above the cooktop surface. They could fall and damage it.
CAUTION: While cooking
• Do not place aluminum foil or plastic items such as salt and pepper shakers, spoon holders, or plastic wrappings on your range
when it is in use. The hot air from the vent could melt plastics or ignite flammable items.
• Make sure that you turn on the correct element.
• Never cook directly on the glass. Always use cookware.
• Always place a pan in the center of the surface element you are cooking on.
• Never leave surface burners unattended while using a high heat setting. Boilovers cause smoking and greasy spillovers that may
catch on fire.
• Turn the surface burners off before removing cookware.
• Do not use plastic wrap to cover food. Plastic may melt onto the surface and be difficult to remove.
CAUTION: After cooking
• Do not touch the surface burners until they cool down.
• The surface may still be hot and burns may occur if you touch the glass surface before it has cooled down sufficiently.
• Immediately clean spills on the cooking area to prevent tough cleanup chores later.
• If cabinet storage is directly above the cooking surface, make sure that the items in the cabinet are used infrequently, and that they
can be safely stored in an area subjected to heat. Temperatures may be unsafe for items such as volatile liquids, cleaners, or aerosol
sprays.
25
5.0 Cu. Ft. Electric Range with Steam Cleaning
Identifying the burners
Your range
cooktop has four surface burner. The different element sizes make sure that you have the correct heat
source for each cooking job.
Cooking areas
The cooktop burners are radiant surface elements. When you turn on an element, the temperature rises gradually and
evenly. As the temperature rises, the radiant element glows red.
To maintain the selected setting, the element cycles on and off. The heating element retains enough heat to help provide
a more uniform and consistent heat during the off cycle. For efficient cooking, turn off the element several minutes before
cooking is complete. This lets residual heat complete the cooking process.
Note: A radiant element has a limiter that lets the element cycle on and off, even at the HI setting. This is normal and helps
prevent damage to the ceramic cooktop. Excessive cycling at the HI setting can occur if the cookware is too small for the
The cooking areas on your range are identified by permanent circles on the glass cooking surface. For the most efficient
cooking, fit the pan size to the element size.
Pans should not extend more
th
an .5
to 1 in. (1.3 to 2.5 cm) beyond the cooking area.
When a control is turned on, you can see a glow through the glass cooking surface. The element cycles on and off to
maintain the preset heat setting, even at high settings.
For more information about the correct types of cookware, see Using the correct cookware on page 26.
radiant element or if the cookware bottom is not flat.
No.
Item
Description
1
Left Front
2100 W
2
3
Left Rear
1200 W
4
Right Rear
1200 W
Right Front
2100W
26
Using a surface element control knob
1 Push the knob in.
2 For the left and right rear burners, turn knob in either direction to the setting you want.
3 For the left and right front dual burners, turn the knob to the A side to use the element as single element. Turn the
knob to the B side to use both elements. When you use the B side, the element heat increases.
Using the correct cookware can prevent many problems, such as uneven cooking or extended cooking times. Look for the
Using the correct cookware
following pan characteristics:
• Flat bottom and straight sides
• Tight-fitting lid
• Weight of handle does not tilt pan
• Pan is well-balanced
• Pan size matches the amount of food being prepared and the size of the surface element.
• Made of material that conducts heat well. See Types of cookware on page 27.
SETTING TYPE OF COOKING
HIGH Starting most
foods, bringing water to a boil, or pan broiling
MEDIUM HIGH
Continuing a rapid boil, frying, deep fat frying, or steaming
vegetables
MEDIUM
Maintaining a slow boil or thickening sauces and gravies
MEDIUM LOW Keeping foods cooking, poaching, or stewing
LOW
Keeping food warm or melting
Single
(left rear, right rear)
Singlel
(Left front, right front)
AB
27
5.0 Cu. Ft. Electric Range with Steam Cleaning
Types of cookware
What your cookware is made of determines how evenly and quickly heat is transferred from the surface element to the
pan bottom.
Protecting the ceramic cooktop
Cleaning
• Clean the cooktop before using it for the first time.
• Clean your cooktop daily or after each use. This helps keep your cooktop looking good and can prevent damage.
• If a spillover occurs while you are cooking, turn off the burner elements and immediately clean the spill from the
cooking area while it is hot to prevent a tough cleaning chore later. Using extreme care, wipe the spill with a clean dry
towel. Wear protective gloves or mitts to avoid burning yourself.
• Do not
let spills remain on the cooking area or the cooktop trim for a long period of time.
• Do not use abrasive cleansing powders or scouring pads because they can scratch the cooktop.
• Do not use chlorine bleach, ammonia, or other cleansers not specifically recommended for use on a glass ceramic
surface.
Preventing marks and scratches
• Do not use glass cookware. It may scratch the cooktop.
• Do not place a trivet or wok ring between the cooktop and the pan. These items can mark or scratch the cooktop.
• Make sure that the cooktop and the pan bottoms are clean.
• Do not slide metal pans across the cooktop.
Preventing stains
• Do not use a soiled dish cloth or sponge to clean the cooktop surface. They may leave a film, which may cause stains on
the cooking surface after the area is heated.
• Continuously cooking on a soiled surface can result in a permanent stain.
Preventing other damage
• Do not let plastic, sugar, or foods with high sugar content melt onto the hot cooktop. Should this happen, clean
immediately.
• Do not
let a pan boil dry. This may damage the cooktop and the pan.
• Do not use the cooktop as a work surface or cutting board.
MATERIAL DESCRIPTION
Aluminum Excellent heat conductor. Some types of food cause aluminum to darken.
(Anodized aluminum cookware resists staining and pitting.) If you slide
aluminum pans across the ceramic cooktop, they may leave metal marks that
resemble scratches. Remove these marks as soon as the cooktop cools down.
Copper Excellent heat conductor, but discolors easily. If you slide copper pans across
the ceramic cooktop, they may leave metal marks that resemble scratches.
Remove these marks as soon as the cooktop cools down.
Stainless Steel Slow heat conductor with uneven cooking results. It is durable, easy to clean,
and resists staining.
Cast-iron A poor conductor, but retains heat well. Cooks evenly once cooking
temperature is reached. Not recommended for use on ceramic cooktops.
Enamelware Heating characteristics vary depending on base material. Porcelain enamel
coating must be smooth to avoid scratching ceramic cooktops.
Glass Slow heat conductor. Not recommended for ceramic cooktops because it may
scratch the glass.
28
Using the oven
Minimum and maximum settings
WARNING: Stand away from the oven when opening the oven door. Escaping hot air or steam can burn your hands, face, or eyes. Let
hot air or steam escape before removing or replacing food.
Note: Always bake or broil with the oven door closed. If you open the oven door while the oven is operating and leave it open, the
oven element stops in one minute. This is not a product failure. The oven automatically starts again when you close the door.
29
5.0 Cu. Ft. Electric Range with Steam Cleaning
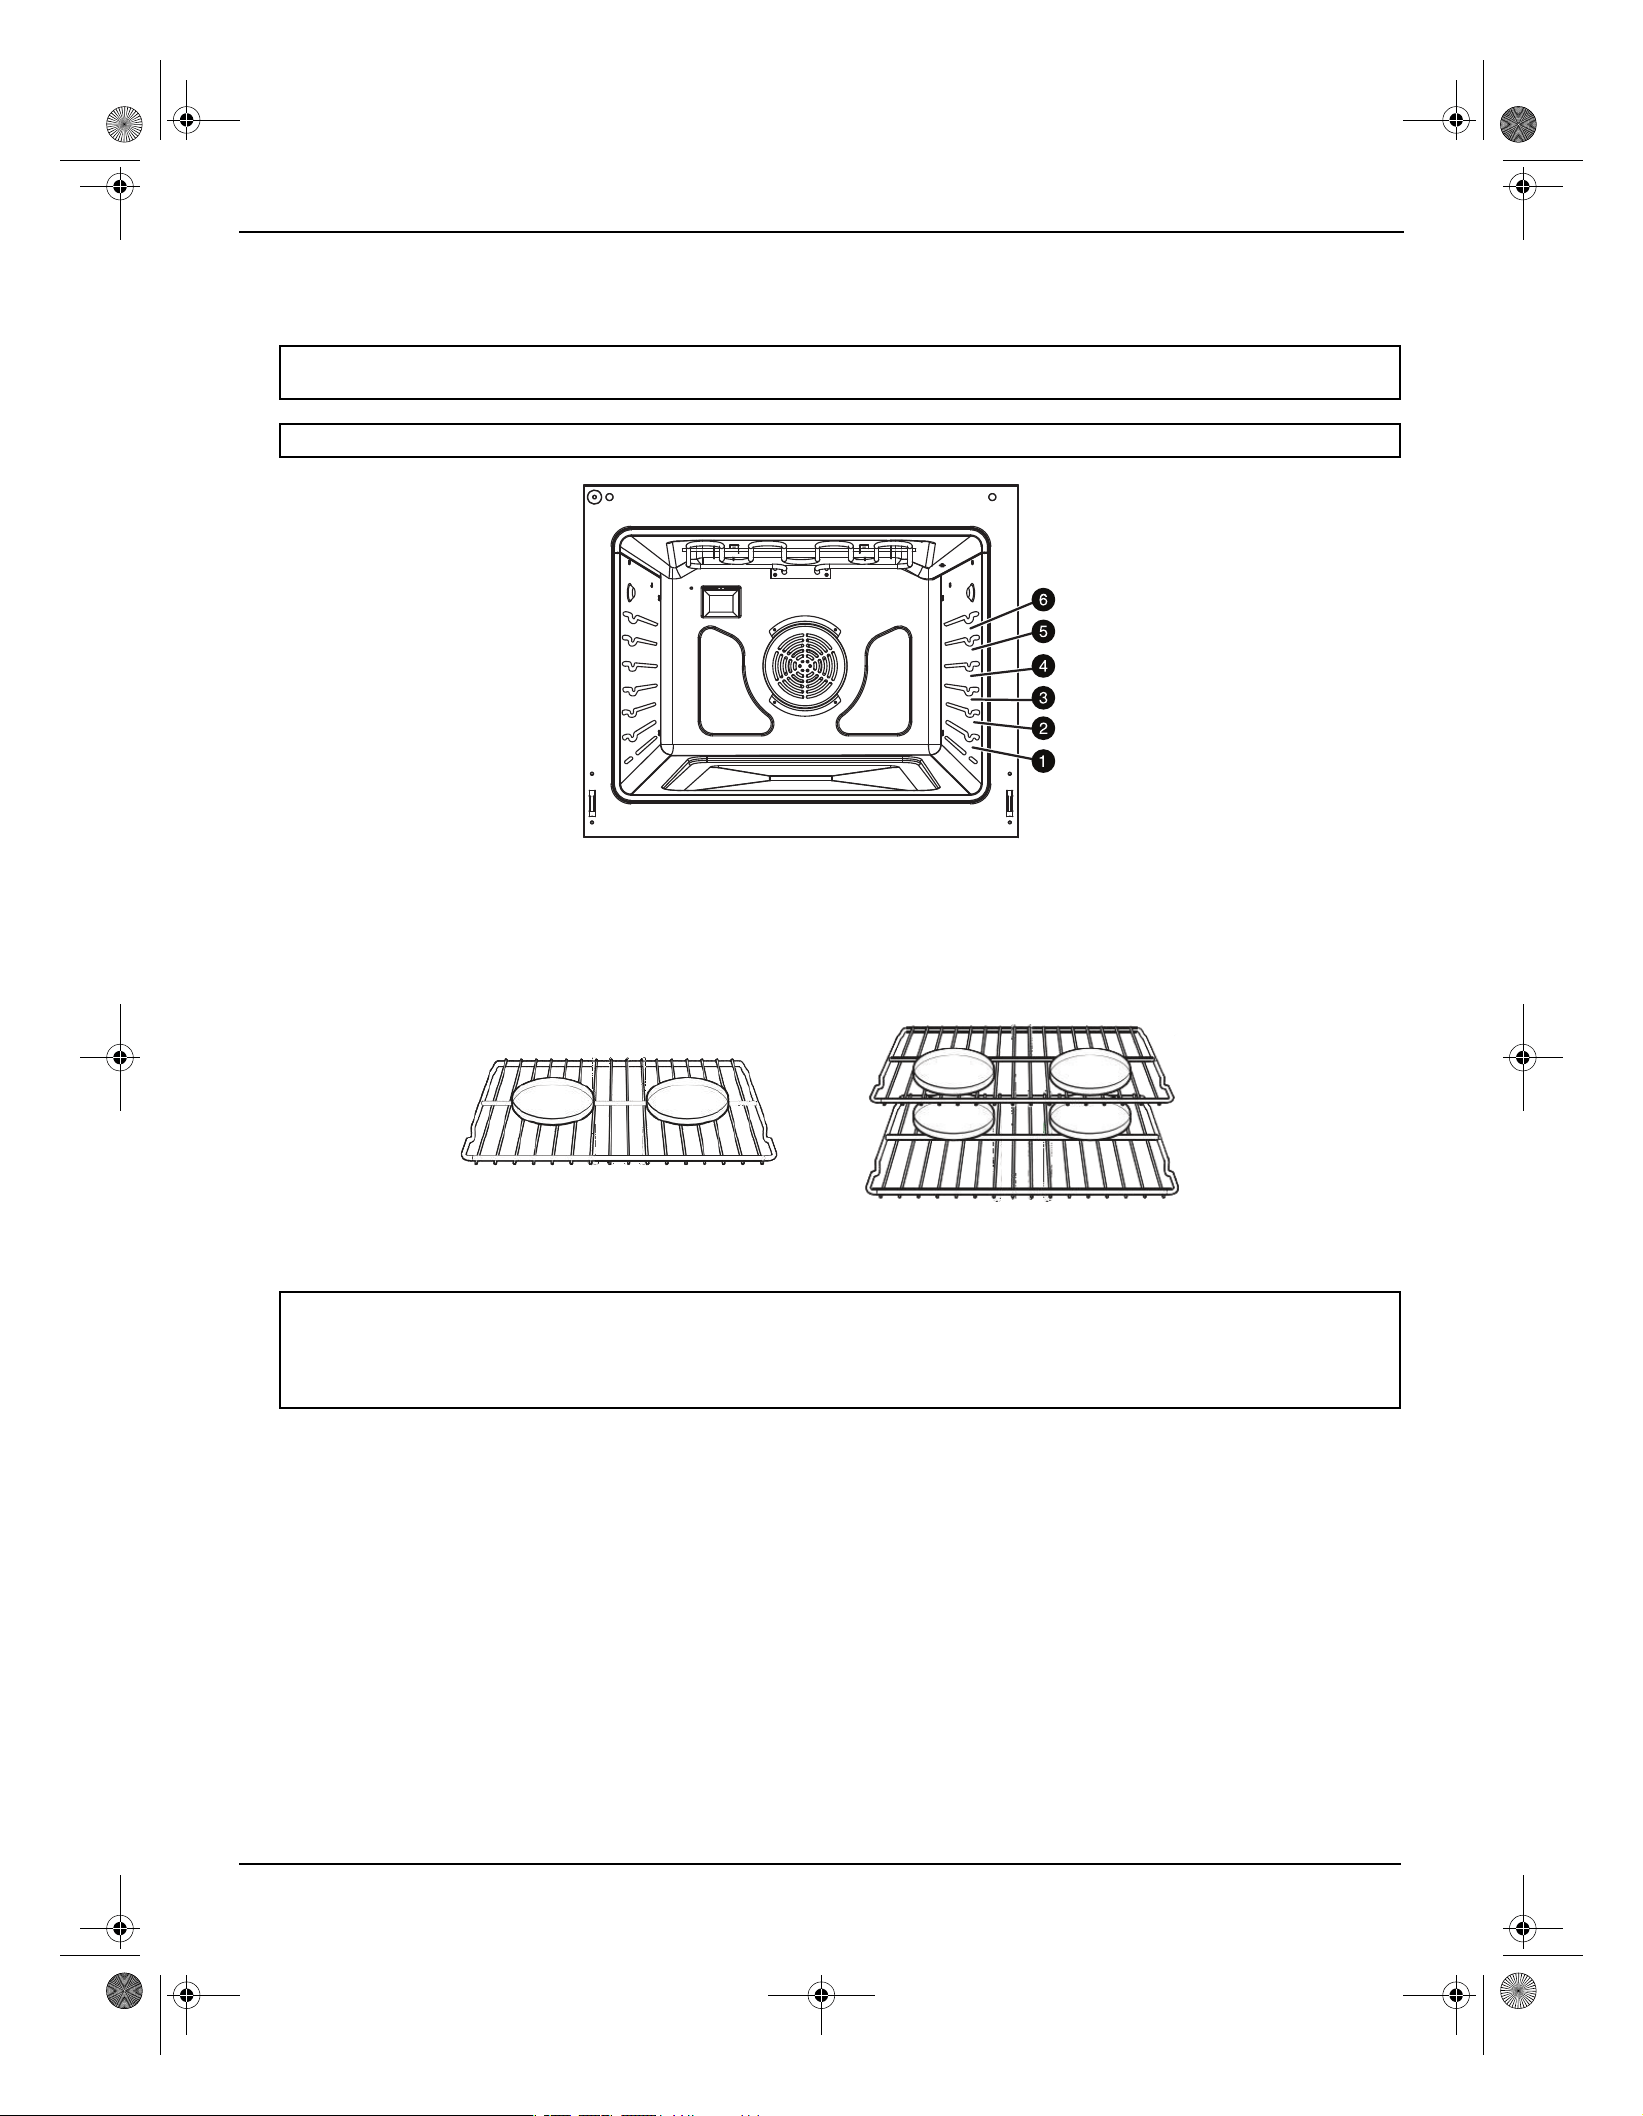
Positioning the oven racks
You can remove and reposition the oven racks in any of the six rack positions. Each oven rack has a built-in stop to prevent
it from accidentally being pulled completely out. Correct positioning of the oven racks provides the best cooking results.
• Centering the baking pans in the oven produces better cooking results.
• When baking multiple items, make sure that you leave a 1 to 1.5 in. (2.5 to 3.8 cm) space around each item.
• When baking or fan baking on a single rack, place the oven rack in position 3 or 4.
WARNING: Stand away from the oven when opening the oven door. Escaping hot air or steam can burn your hands, face, or eyes. Let
• When baking or fan baking on multiple racks, place the oven racks in positions 3 and 5. Place two pans in the rear of
the top rack and the other two pans in th
e front of the bottom rack.
hot air or steam escape before removing or replacing food.
Note: The rack position above 6 is not usable.
CAUTION:
• Do not cover an oven rack with aluminum foil. This disturbs the heat circulation and results in poor baking.
• Do not place aluminum foil on the oven bottom because it could cause damage.
• Arrange the oven racks only when the oven is cool.
• When placing an oven rack in the top most rack position, make sure that the rack is stably situated on the embossed stop.
Removing an oven rack
1 Pull the rack straight out until it stops.
2 Lift the front of the oven rack and pull to remove it from the oven.
Replacing an oven rack
1 Place the back edge of the rack on the a rack support.
2 Lift the front of the rack and slide it into the oven.
6
5
4
3
2
1
Single rack pan placement
Multi rack pan placement
30
Using the oven vent
The oven vent is located over the right-rear element.
• Do not block or place items in front of the oven vent. Proper air circulation helps prevent combustion issues with the
oven's heating element and ensures optimal cooking results.
• Because the oven vent and surrounding area can become hot, use care when placing items near the vent. Hot steam
could heat or melt items placed in front of the vent.
Using the oven light
The oven has a light that is located on the rear oven wall in the upper left rear corner.
•Touch the Oven Light pad to turn the light on or off. The oven light lets you check the cooking progress without
opening the oven door.
Tips for baking
• Use appropriate non-stick coated metal sheets or aluminum containers or use heat-resistant silicone molds.
• Make the best use of the space on the rack. We recommend placing the baking pan in the middle of the rack.
• Select the correct shelf position before turning the oven on.
• Do not move oven shelves when hot. If you must move a rack while the oven is hot, do not the let the potholde
r
contact the hot oven element.
• Keep the oven door closed as much as possible.
Setting the clock
1) In standby mode, short press [+] and [-] at the same time to enter the clock hour setting state. The clock hours flash
and the clock minutes are always on (displays 12:00 when powered on, and displays the real-time clock after powered
on). Short press [+] or [-] to adjust 1 value, and long press [+] or [-] to adjust 10 values.
2) In the clock hour setting state, short press [+] and [-] at the same time to enter the clock minute setting state. The
clock hours are always on and the clock minutes are flashing. Short press [+] or [-] to adjust 1 value, and long press [+] or
[-] to adjust 10 values.
3) In the clock minute setting state, press [+] and [-] simultaneously to confirm the clock setting and enter the standby
state.
4) The 12-hour time setting range is 1:00--12:59, and the 24-hour time setting range is 0:00--23:59.
Oven vent
Oven light
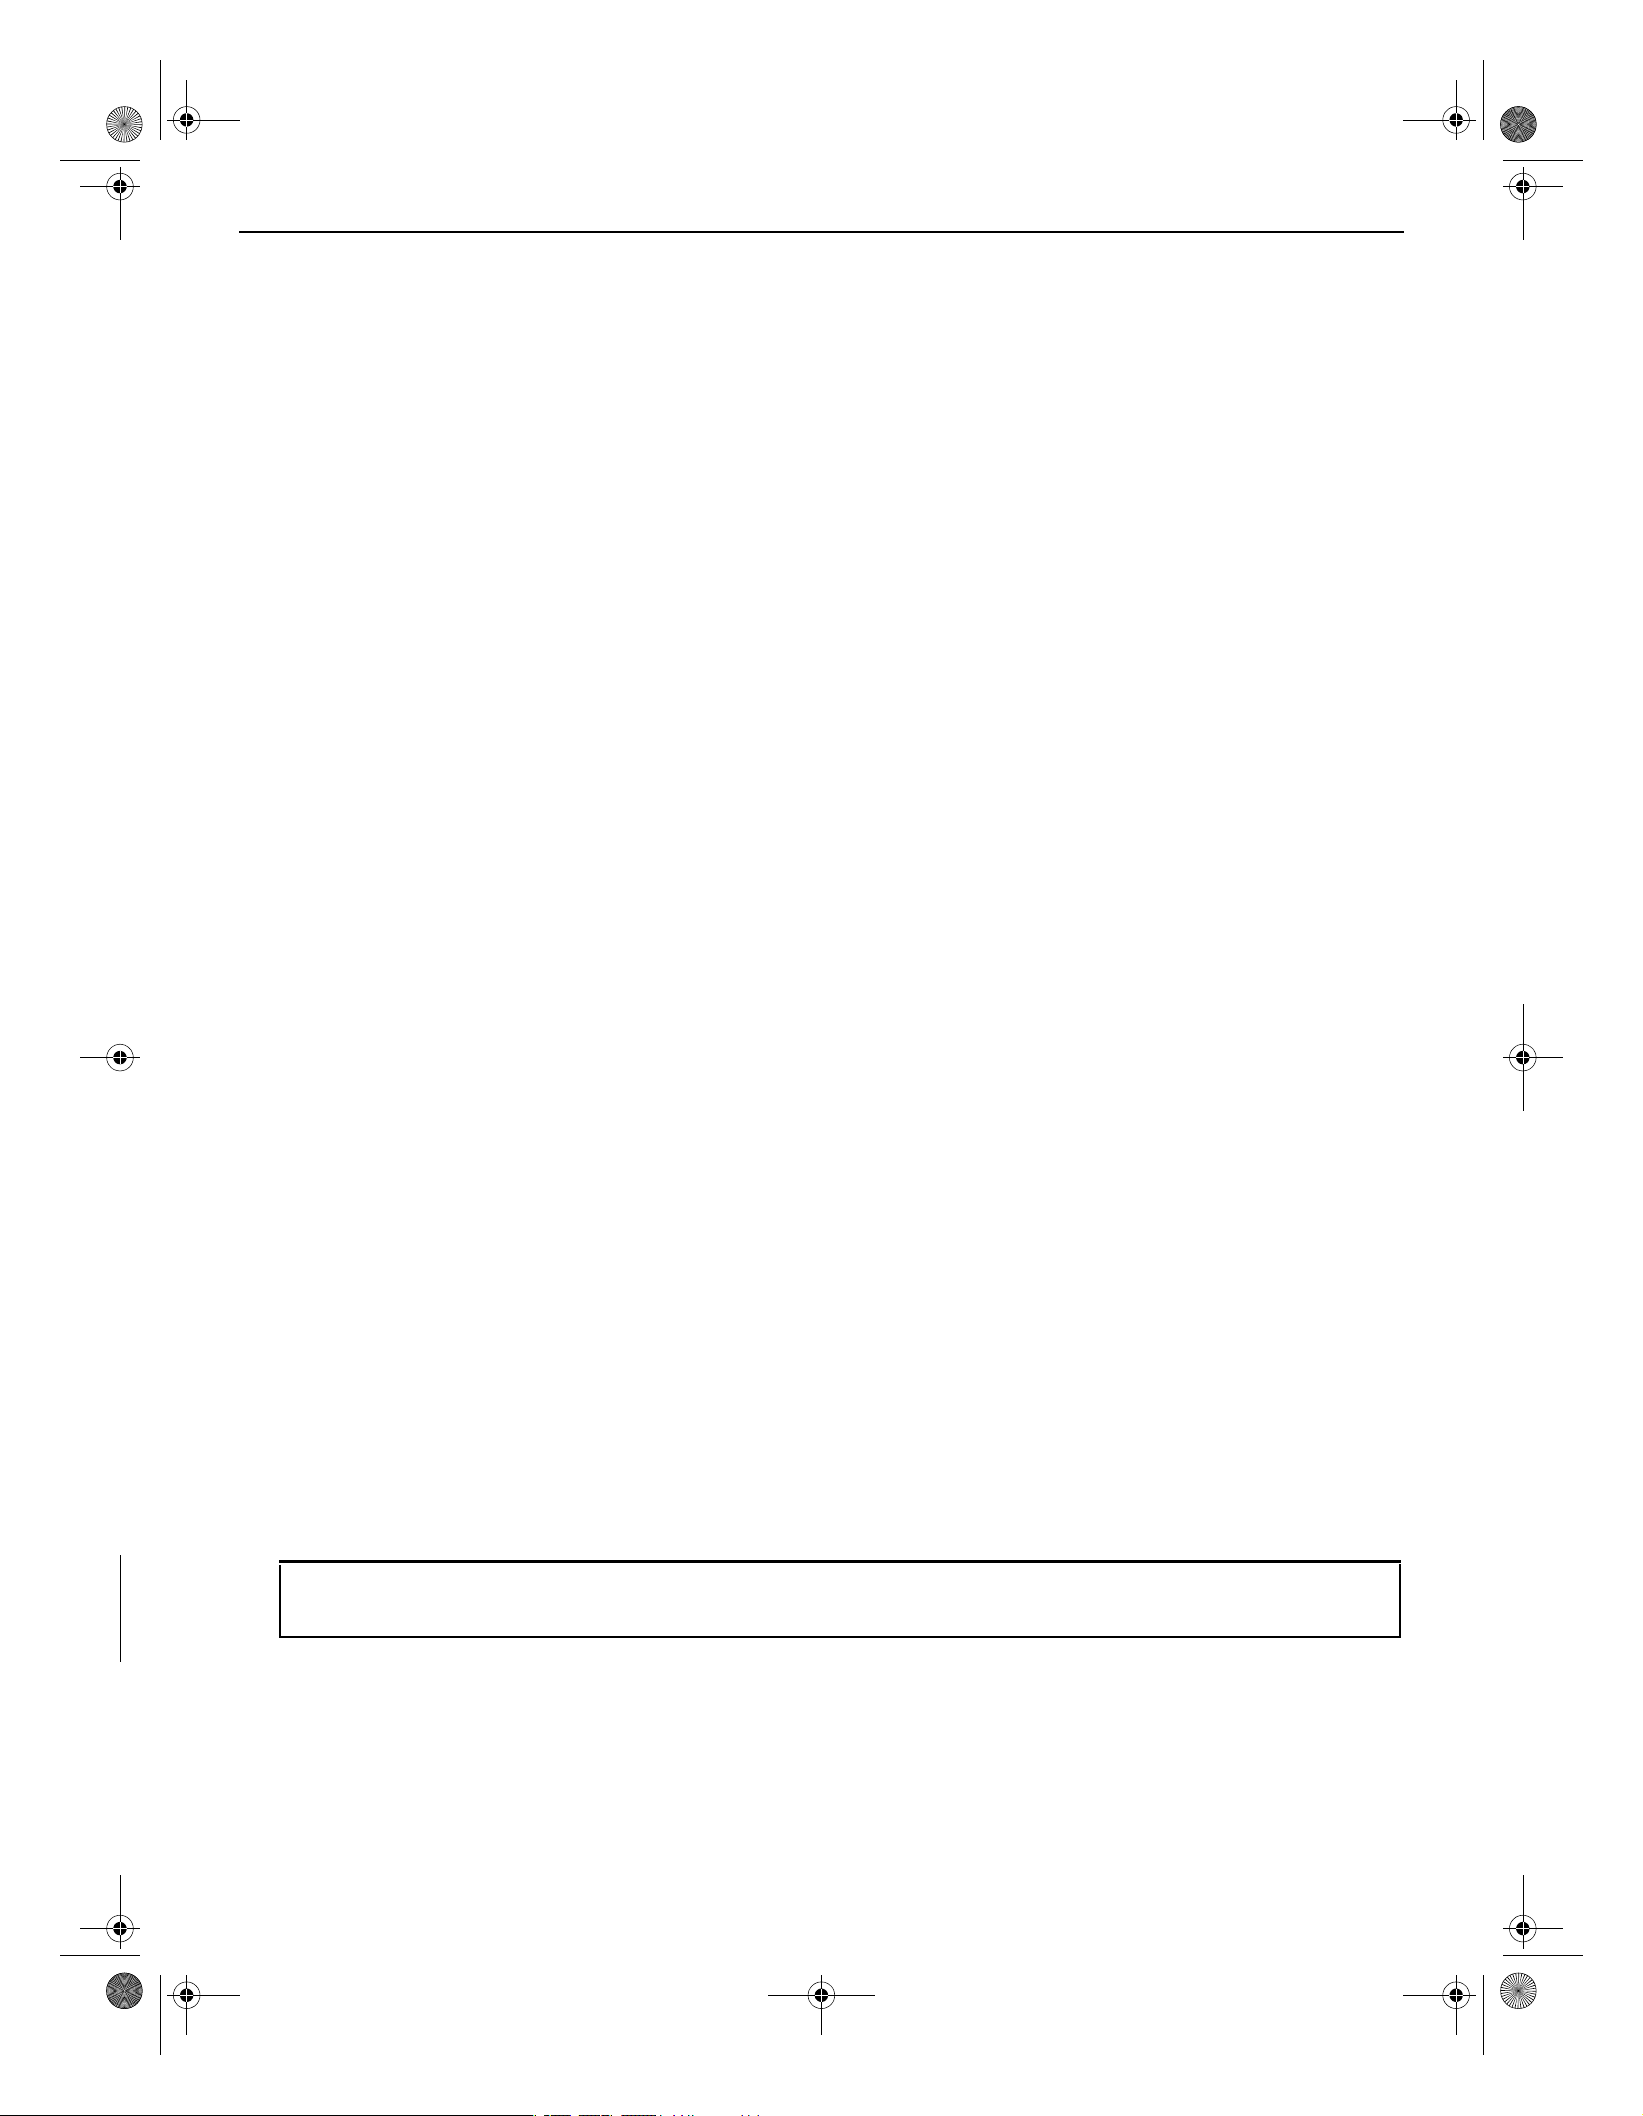
5.0 Cu. Ft. Electric Range with Steam Cleaning
Selecting the 12-hour or 24-hour display setting
Using the Timer
1) In standby mode, press and hold [+] and [-] at the same time for 3 seconds to enter the clock 12/24 hour switching function. When the
setting is successful, the buzzer will beep once.
2) Every time the clock enters the 12/24 hour switching state, switching between 12 and 24, the screen displays "12" or "24". Time
synchronization is converted according to the current hour format.
3) After the clock switches to 12/24 hour format for 3 seconds, it enters standby mode.
Adjusting the
Baking
The Bake function lets you program the oven to bake to any temperature between 150 °F (66 °C) and 550 °F (288 °C).
1 Position the oven rack where you want it.
2 Press the Bake pad. The display blinks bake icon and shows of 350°. If the default temperature is the cooking
temperature you want, skip to step 4.
3 (Optional) Press the +, - to enter the cooking temperature you want. The display blinks the temperature.
4 Press the Start pad. The oven automatically turns on and starts preheating. Place food in the oven after preheating is
complete. Preheating is important for good baking results.
The display shows PRE, 100°, and bake icons until the oven reaches 100°. Then, the display shows the actual oven temperature. When
the oven reaches the temperature you set, it beeps three times.
5 When baking is complete, remove the food from the oven, close the oven door, then press Cancel. The oven shuts
off and the display shows the time of day.
6 To change a programmed baking temperature, press Bake, enter the new baking temperature, then press Start. The
oven completes cooking at the new temperature.
thermostat
If your baking results are not what you are used to, the present oven cooking thermostat can be adjusted by up to ±35° F
(±19° C).
1) In standby mode, press and hold [Bake] and [Broil] at the same time for 3 seconds to enter the temperature adjusting
setting. The screen flashes to display the compensation temperature, and the temperature unit remains consistent with the
system temperature. Temperature setting range: ±35℉ (±19℃) . Short press [+] or [-] to adjust 1 value, and long press [+] or [-]
to adjust 5 values. When the compensation temperature is +5℉, "5F" is displayed, and when the compensation temperature
is -5℉, "-5F" is displayed.
2) In the setting state, short press [Start] to confirm and return to standby. (If you do not press [Start] within 30 seconds after
setting, you will return to standby mode)
3) The compensation temperature does not affect the setting and display of the original operating temperature, but the
temperature control is handled according to the compensation temperature. Compensation temperature is valid for all
heating modes.
4) When switching the temperature compensation unit, please note that the temperature difference value is converted, not
the actual value.
Note: This temperature adjustment is retained in memory after a power failure. This adjustment will be used in all future baking
including Bake, Broil, and Keep Warm. Adjusting the thermostat does not affect steam-cleaning.
1) When the timer is not running, short press [Timer] to enter the timing setting state. At this time, the [Timer] indicator light is always on and the
screen flashes "00:00". Short press [+] or [-] to adjust for
1 minute. , long press [+] or [-] to adjust for 10 minutes.
2) In the timer setting state, short press [Timer] to confirm the setting. The [Timer] indicator light is always on, the screen is always on to display
the time, and the countdown starts. (If there is no operation within 60 seconds, exit the scheduled state. If the confirmation time is "00:00", exit the
scheduled state.)
3) When the timer is running, other cooking functions are also running. At this time, short press [Timer] to switch to the timer time display, and
after 3 seconds, it will switch to the other cooking function display.
4) When the timer ends, the buzzer will beep 10 times and the screen will flash and display "00:00". You can click any key to exit the timer state.
5) When the timer is running, press and hold [Timer] for 3 seconds to exit the timer state, and the [Timer] indicator light goes out.
32
Programming the cook time
The Cook Time function lets you program the oven to cook food at a set temperature for a specified length of time. At the
end of the set time, the oven automatically shuts off.
1 Position the oven rack in the location you want, then place the food in the oven and close the oven door.
2 Press Bake. The display shows the default temperature and the bake icon blinks. If the defau
lt temperature is the
temperature you want, skip to step 4.
3 (Optional) Press Cook time pad and adjust the temperature by pressing + or - for the temperature you want.
Preheating is important for good baking results.
4 Press the Cook Time pad. The display will show 00:00.
5 Press the + or - for the cooking time you want. The display shows the selected time. You can set the time to any
duration from 1 minute to 10 hours.
6 Press the Start pad. The oven automatically turns on and starts preheating.
The display shows the de
fault or
selected temperature, Bake, and selected cook time, until the oven reaches the
temperature you set. When the oven reaches that temperature, it beeps three times. The oven starts cooking for the
set amount of time, and the display shows the remaining cooking time.
7 To change the programmed baking temperature, press the Bake pad, press + or - for new baking temperature, then
press
the Start pad. The oven completes cooking at the new temperature.
8 To change the cooking time, press the Cook Time pad, press + or -, then press the Start pad. The oven continues
cooking for the remaining time you set.
CAUTION: Use caution when using the Cooking Time function. This function is best used when cooking cured or frozen meats and
most fruits and vegetables. Foods that can easily spoil, like milk, eggs, fish, poultry, and meats, should be chilled in a refrigerator
before they are placed in the oven. Even when chilled, they should not stand for more than one hour before cooking begins and
should be removed promptly when cooking is completed. Eating spoiled food can result in sickness from food poisoning.
Note:
Place food in the oven after preheating if the recipe calls for it. Preheating is important for good baking results.
33
5.0 Cu. Ft. Electric Range with Steam Cleaning
Programming a delayed start time
1 Position the oven rack in the location you want, then place
The Delay Start function lets you use the kitchen timer to automatically start and stop another cooking program
the food in the oven and close the oven door.
2 Press the pad for the baking operation you want. The display blinks the function icon and shows the default
temperature (350°). If the default temperature is the temperature you want, skip to step 4.
3 (Optional) Press the + or - for the temperature you want. The display shows the temperature yo
u set.
4 Press the Cook Time pad. The display shows the cooking temperature, Bake, and 00:00.
5 Press the + or - for the cooking duration you want. The display blinks the cooking duration you set. You can set
the duration to any amount of time from 1 minute to 10 hours.
6 Press Delay Start. The display shows Delay and 00:00 blinks.
7 Press + or - to enter the duration of time you want, duration to any amount of time from 1 minute to 10 hours.
8 Press Start. The oven automatically turns on and starts preheating.
9 To change the programmed baking temperatur
e, press Bake, enter the new baking temperature, then press Start. The
oven completes cooking at the new temperature.
10 To change the cooking time, press Cook Time, enter the new cooking time, then press Start. The oven continues
cooking for the remaining time you set.
Broiling
The Broil function lets you cook and brown foods using only a top heat source. The oven door must remain closed during
broiling. Meat or fish should always be placed on a broiling grid in a broiling pan.
1 Position the oven rack so that the top of the food is at least 3 to 5 inches (7.6 to 12.7 cm)
2 Place the food on a broiling pan with an insert grid and into the oven. Close the oven door.
3 Press Broil once for Hi and twice for Lo. Use Lo to cook foods such as poultry or thick cuts of meat thoroughly without
over browning them.
4 Press Start. The oven automatically lights the top oven burner and starts cooking. The display shows the broil setting
(Hi or Lo) you selected and Broil.
Broil on one side until food is browned, then turn and broil on the other side.
5 When broiling is completed, press Off/Clear to shut off the oven. The display shows the time of day.
6 To change a programmed broiling setting, press Broil to change the setting between Hi and Lo, then press Start. The
oven changes the broil setting and completes cooking at the new temperature.
Keeping food warm
CAUTION: Use caution when using the Delay Time function. This function is best used when cooking cured or frozen meats and most
fruits and vegetables. Foods that can easily spoil, like milk, eggs, fish, poultry, and meats, should be chilled in a refrigerator before they
are placed in the oven. Even when chilled, they should not stand for more than one hour before cooking begins and should be
removed promptly when cooking is completed. Eating spoi
The Keep Warm function lets you keep cooked foods warm at a low baking temperature for up to three hours.
1 Position the oven rack in the location you want, then place the food in the oven and close the oven door.
2 Press the Keep Warm pad, then press the Start pad. The oven automatically turns on and heats to 150° F (65° C). The
display shows Warm and the time of day.
3 When warming is complete, press the Cancel pad. The display shows the time of day.
led food can result in sickness from food poisoning.
WARNING: If an oven fire occurs, close the oven door and turn the oven off. If the fire continues, throw baking soda on the fire or use
a foam-type fire extinguisher. Do not put water or flour on the fire. Flour may explode and water can cause a grease fire to spread. Both
can cause personal injury or property damage.

34
Switching between Fahrenheit or Celsius
You can program the oven control to display temperatures in Fahrenheit or Celsius. The oven was preset at the factory to
display in Fahrenheit.
1 Press and hold the BAKE pad for three seconds. The display shows F or C. The default is F.
2 Press and hold the BAKE pad for three seconds to change between F and C.
3 Press the Start pad to save the temperature selection.
Locking oven controls
The Lock function turns off the control panel touch pads to prevent the oven from accidentally being turned on. Touch pads stay
lo
cked until you turn this function off.
1 Press and hold the (lock) pad (START) for three seconds. The oven beeps and the display shows Loc, the time of day, and the
lock icon.
2 To unlock the controls, press and hold the (lock) pad (start) for three seconds.

35
5.0 Cu. Ft. Electric Range with Steam Cleaning
MAINTENANCE
5.0 Cu. Ft. Electric Range with Steam Cleaning
Cleaning and maintenance. . . . . . . . . . . . . . . . . . . . . . . . . . . . . . . . . . . . . . . . . . . . . . . . . . . . . . . . . . . . . . . . . . . . . . . . . . .36
Using the oven vent . . . . . . . . . . . . . . . . . . . . . . . . . . . . . . . . . . . . . . . . . . . . . . . . . . . . . . . . . . . . . . . . . . . . . . . . . . . . . . . . . . . . . . . . . . . . . 36
Cleaning the control panel . . . . . . . . . . . . . . . . . . . . . . . . . . . . . . . . . . . . . . . . . . . . . . . . . . . . . . . . . . . . . . . . . . . . . . . . . . . . . . . . . . . . . . . 36
Cleaning painted parts and decorative trim. . . . . . . . . . . . . . . . . . . . . . . . . . . . . . . . . . . . . . . . . . . . . . . . . . . . . . . . . . . . . . . . . . . . . . . 36
Cleaning stainless steel surfaces . . . . . . . . . . . . . . . . . . . . . . . . . . . . . . . . . . . . . . . . . . . . . . . . . . . . . . . . . . . . . . . . . . . . . . . . . . . . . . . . . .36
Cleaning the oven racks. . . . . . . . . . . . . . . . . . . . . . . . . . . . . . . . . . . . . . . . . . . . . . . . . . . . . . . . . . . . . . . . . . . . . . . . . . . . . . . . . . . . . . . . . . 37
Cleaning the oven door . . . . . . . . . . . . . . . . . . . . . . . . . . . . . . . . . . . . . . . . . . . . . . . . . . . . . . . . . . . . . . . . . . . . . . . . . . . . . . . . . . . . . . . . . . 37
Cleaning the surface element control knobs . . . . . . . . . . . . . . . . . . . . . . . . . . . . . . . . . . . . . . . . . . . . . . . . . . . . . . . . . . . . . . . . . . . . . . 37
Cleaning the cooktop . . . . . . . . . . . . . . . . . . . . . . . . . . . . . . . . . . . . . . . . . . . . . . . . . . . . . . . . . . . . . . . . . . . . . . . . . . . . . . . . . . . . . . . . . . . . 38
Removing and replacing the oven door . . . . . . . . . . . . . . . . . . . . . . . . . . . . . . . . . . . . . . . . . . . . . . . . . . . . . . . . . . . . . . . . . . . . . . . . . .39
Removing and replacing the storage drawer. . . . . . . . . . . . . . . . . . . . . . . . . . . . . . . . . . . . . . . . . . . . . . . . . . . . . . . . . . . . . . . . . . . . . . 44
Steam cleaning the oven. . . . . . . . . . . . . . . . . . . . . . . . . . . . . . . . . . . . . . . . . . . . . . . . . . . . . . . . . . . . . . . . . . . . . . . . . . . . . . . . . . . . . . . . . 44
Troubleshooting. . . . . . . . . . . . . . . . . . . . . . . . . . . . . . . . . . . . . . . . . . . . . . . . . . . . . . . . . . . . . . . . . . . . . . . . . . . . . . . . . . . . .45
Control panel display . . . . . . . . . . . . . . . . . . . . . . . . . . . . . . . . . . . . . . . . . . . . . . . . . . . . . . . . . . . . . . . . . . . . . . . . . . . . . . . . . . . . . . . . . . . . 45
Cooktop. . . . . . . . . . . . . . . . . . . . . . . . . . . . . . . . . . . . . . . . . . . . . . . . . . . . . . . . . . . . . . . . . . . . . . . . . . . . . . . . . . . . . . . . . . . . . . . . . . . . . . . . . 45
Oven . . . . . . . . . . . . . . . . . . . . . . . . . . . . . . . . . . . . . . . . . . . . . . . . . . . . . . . . . . . . . . . . . . . . . . . . . . . . . . . . . . . . . . . . . . . . . . . . . . . . . . . . . . . . 47
Drawer . . . . . . . . . . . . . . . . . . . . . . . . . . . . . . . . . . . . . . . . . . . . . . . . . . . . . . . . . . . . . . . . . . . . . . . . . . . . . . . . . . . . . . . . . . . . . . . . . . . . . . . . . . 48
Error codes . . . . . . . . . . . . . . . . . . . . . . . . . . . . . . . . . . . . . . . . . . . . . . . . . . . . . . . . . . . . . . . . . . . . . . . . . . . . . . . . . . . . . . . . . . . . . . . . . . . . . . 48
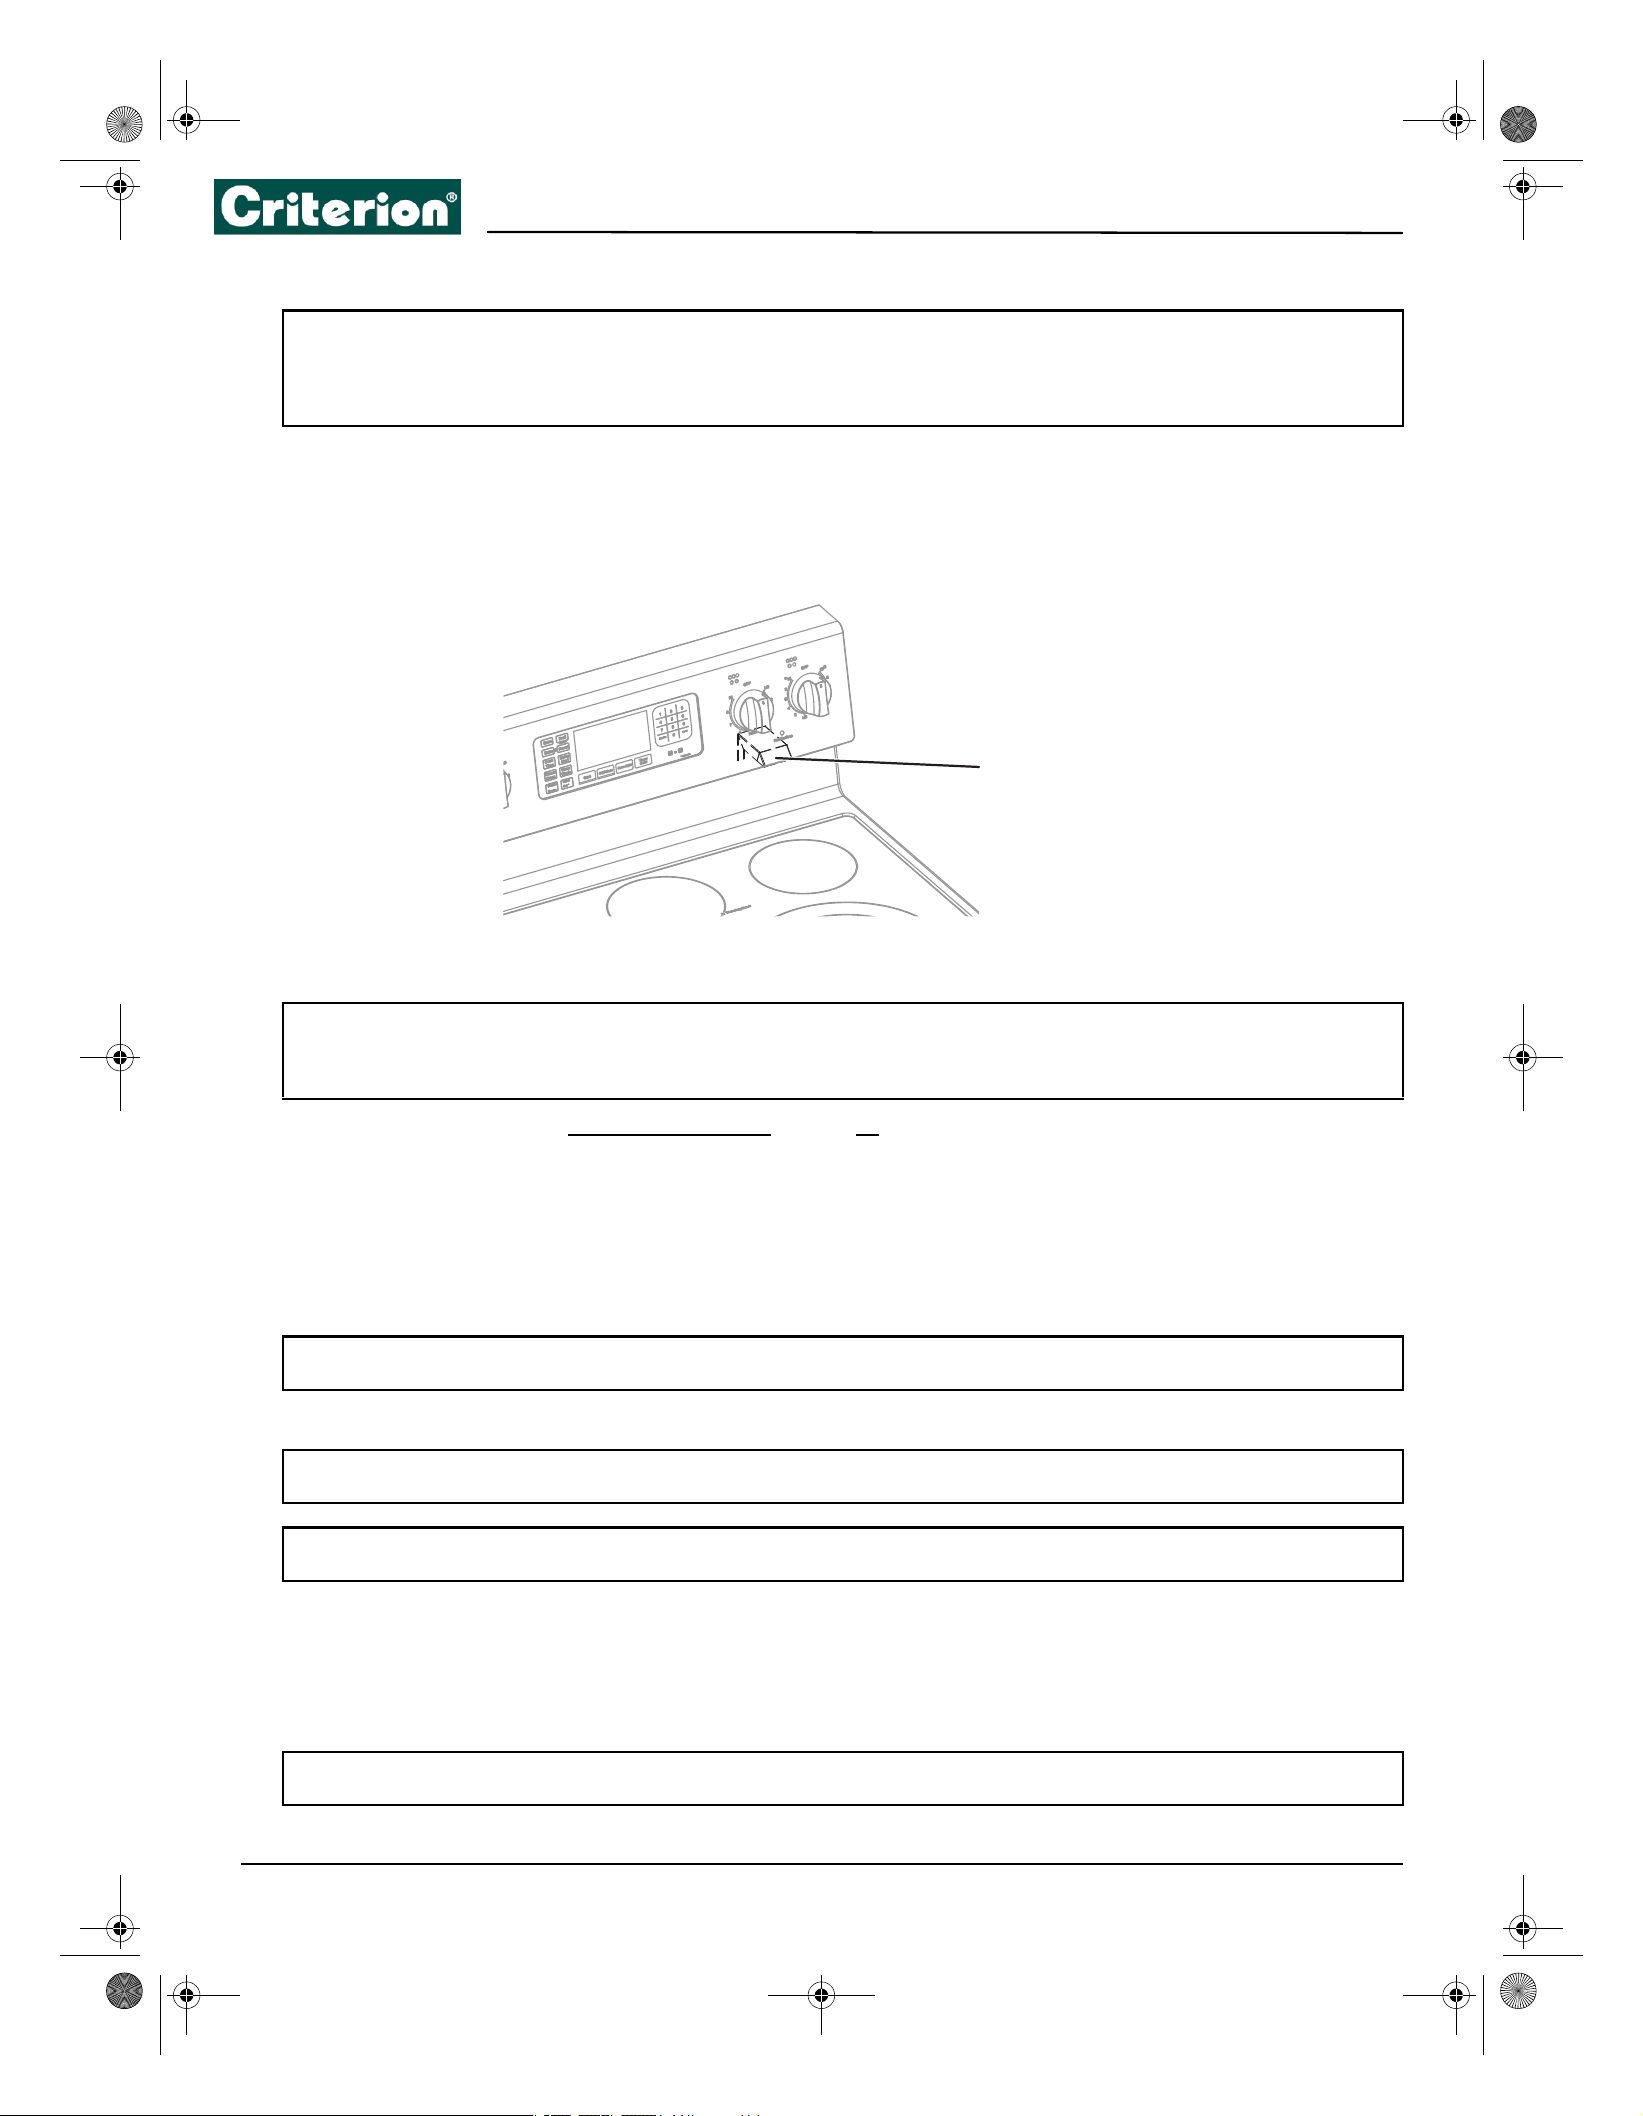
36
Cleaning and maintenance
Using the oven vent
• The oven vent is located above the right-rear surface element.
• The vent area can become hot during oven use.
• Steam coming out of the vent is normal.
• The vent is important for correct air circulation. Never block this vent.
Cleaning the control panel
1 Lock the oven controls. See Locking oven controls on page 34.
2 Clean spatters with a damp cloth or glass cleaner. You can use warm, soapy water to clean heavily soiled areas.
3 When cleaning is done, unlock the oven controls.
Cleaning painted parts and decorative trim
• For general cleaning, use a cloth with hot, soapy water, then dry with a clean, dry, soft cloth.
Cleaning stainless steel surfaces
1 Place a small amount of a stainless steel cleaner designed for use with appliances on a damp cloth or damp paper
towel.
2 Clean a small area, rubbing with the grain of the stainless steel, if applicable.
3 Dry and buff with a clean, dry paper towel or soft cloth.
4 Repeat as necessary.
WARNING:
• Always make sure that the controls are off and all surfaces are cool before removing or cleaning any of the range parts. This will
prevent you from getting burned.
• If your range is pulled out from the wall for any reason, make sure that the anti-tip device is reengaged after your range has been
pushed back into place. Failure to take this precaution could result in your range tipping and personal injury.
CAUTION:
• Never use steel wool or abrasive cleansers.
• Protect the surface from sharp objects.
These items can damage the surface.
• For more difficult residue and built-up grease, apply a liquid detergent directly onto the area and leave for 30 to 60
minutes. Wipe with a damp cloth and dry
with a clean, dry, soft cloth.
CAUTION: Do not use a steel-wool pad or abrasive cleaners on stainless steel surfaces. Abrasive pads and cleaners will scratch the
surface and damage the finish.
CAUTION: Do not use a steel-wool pad or abrasive cleaners on stainless steel surfaces. Abrasive pads and cleaners will scratch the
surface and damage the finish.
Note: To prevent any discolorations or grease stains, we recommend that you clean and remove any spills, spots, and grease from your
range after each use.
Note: If you previously used a mineral oil-based stainless steel appliance cleaner, wash the surface with dish washing liquid and water
before using the stainless steel cleaner.
Oven vent
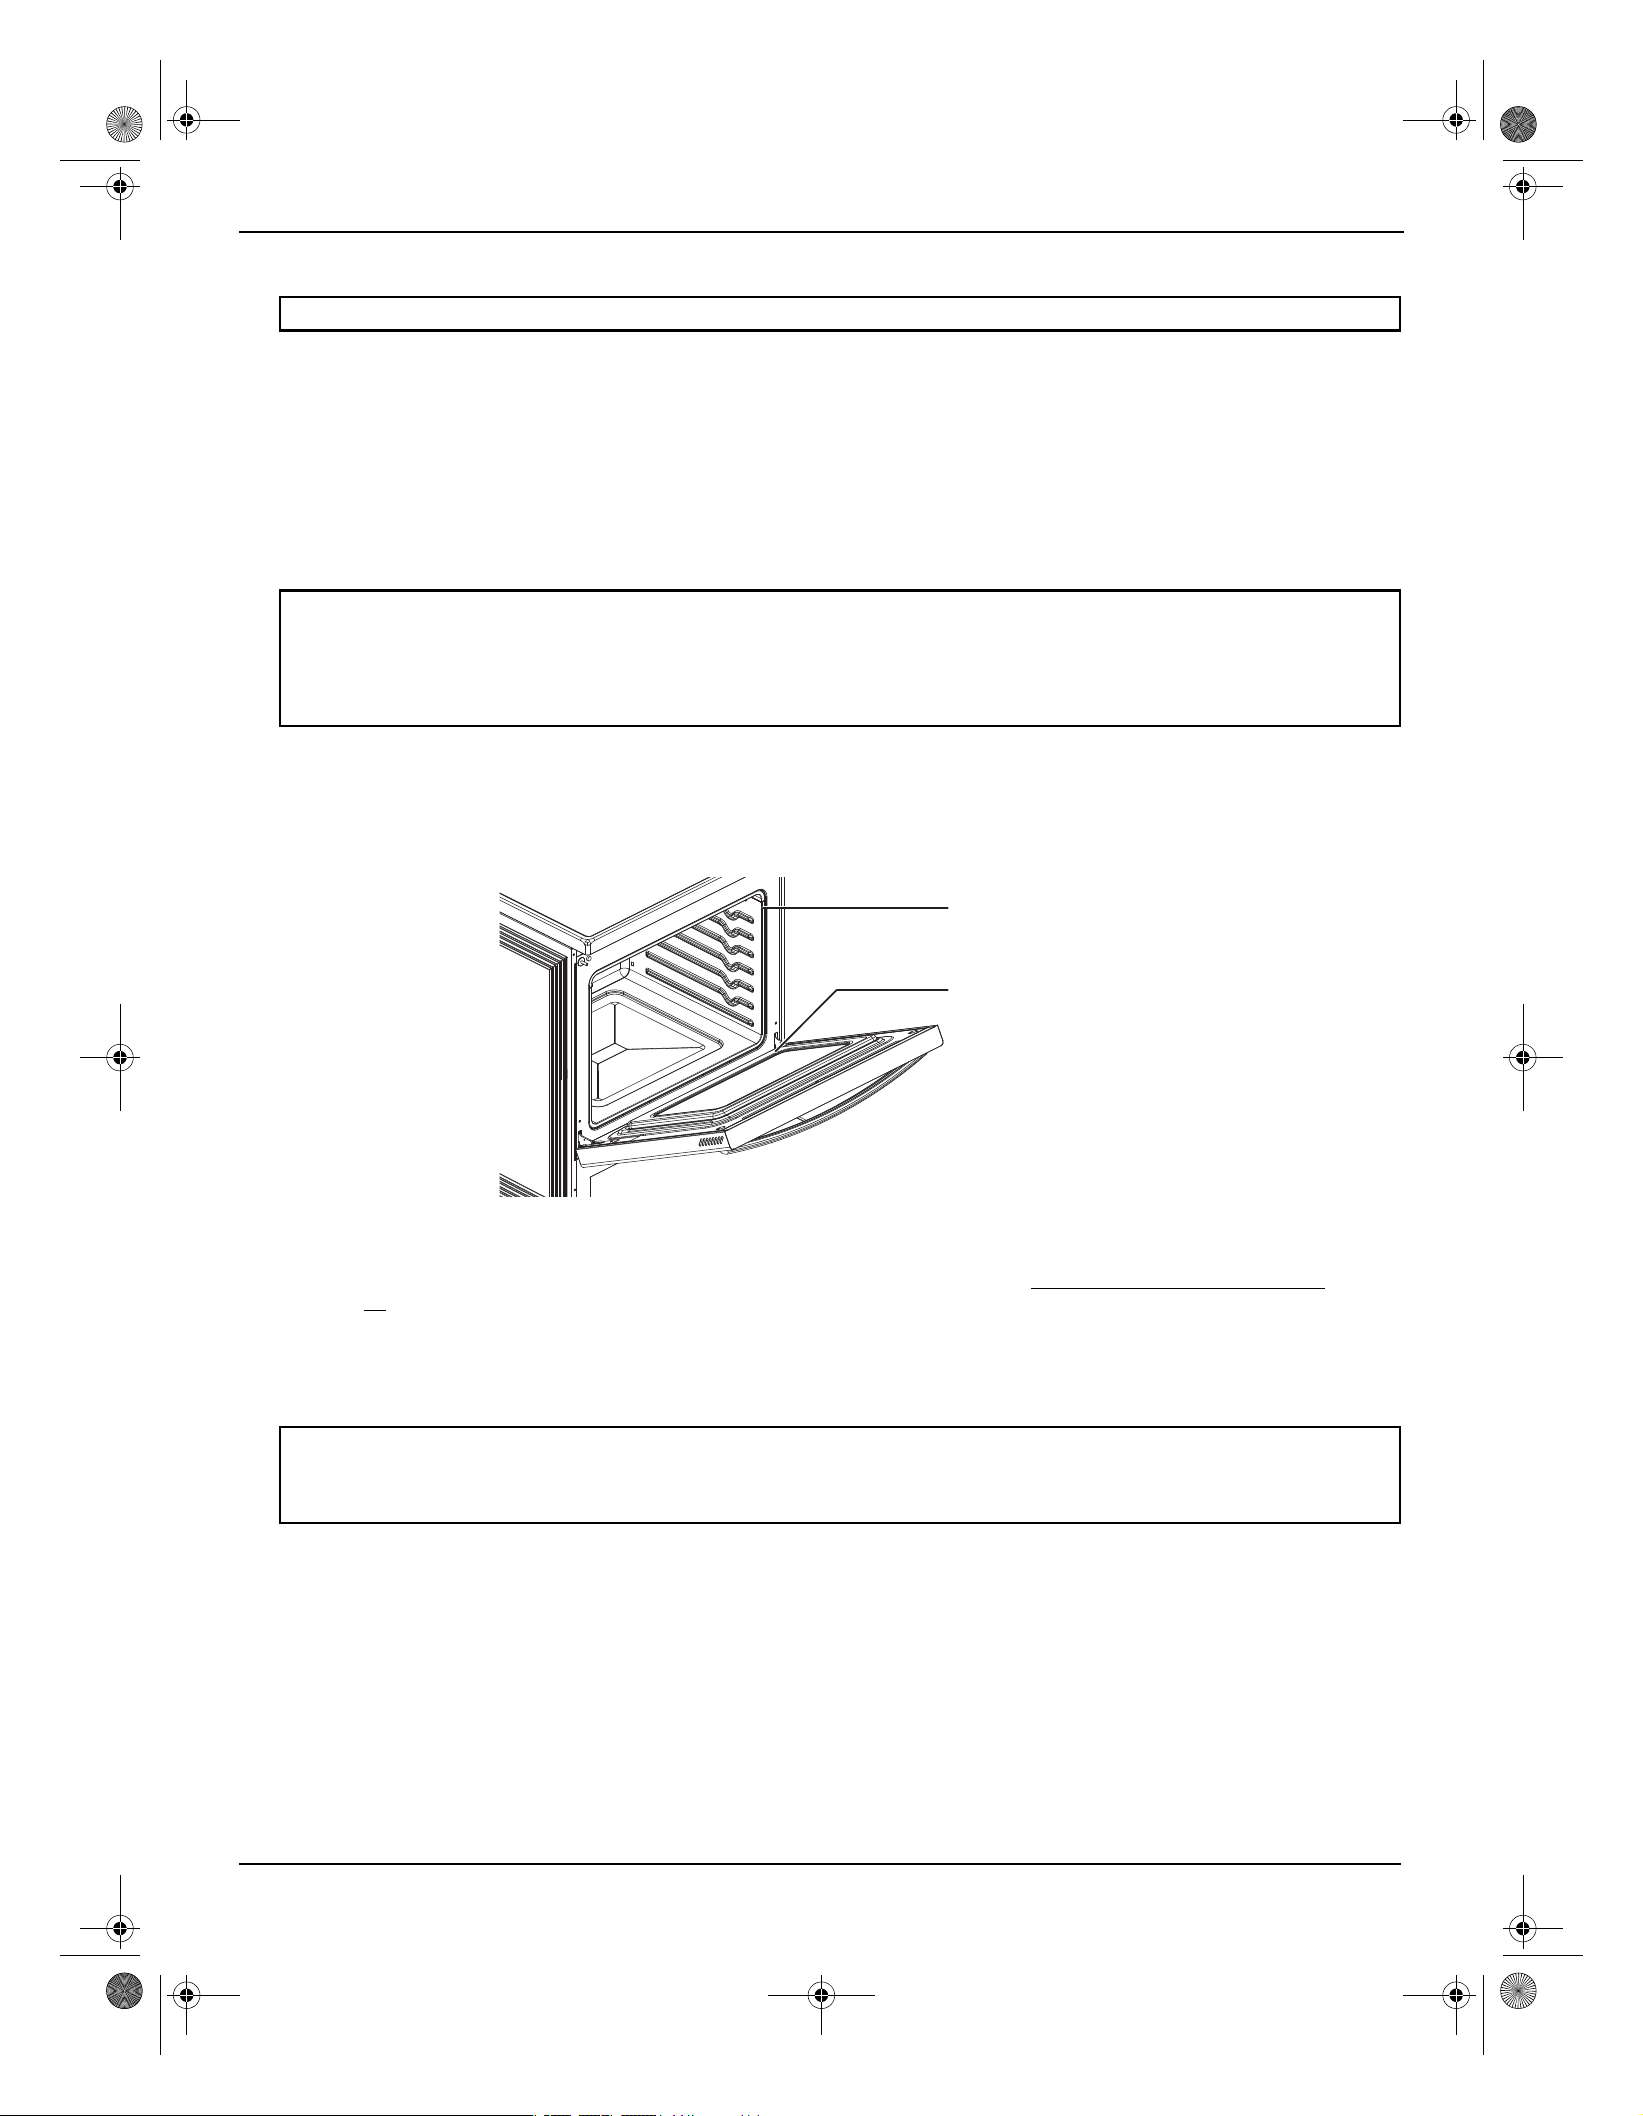
37
5.0 Cu. Ft. Electric Range with Steam Cleaning
Cleaning the oven racks
1 Pull a rack straight out until it stops.
2 Lift the front of the oven rack and pull to remove it from the oven.
3 Clean by hand in hot, soapy water with a plastic or soap-filled scouring pad or sponge, then dry with a soft cloth. Do
not use steel wool,
4 To replace the rack, place the back edge of the rack on the a rack support, then lift the front of the rack and slide it into
the oven. If a rack becomes difficult to slide, rub the side rails with wax paper or a cloth containing a small amount of
cooking oil. This helps the rack slide more easily in the tracks.
Cleaning the oven door
The oven door has multiple surfaces that require different cleaning techniques. The gasket on the oven door frame should
never be cleaned or moved to clean other surfaces. The gasket is made of woven material which is essential for a good
heat seal.
1 Clean the inside door surface by hand with hot, soapy water and a soapy plastic scouring pad. Do not let moisture get
inside the door assembly.
2 Rinse and dry thoroughly with a clean, soft cloth.
3 Clean the outside door stainless steel surfaces by following the instructions in Cleaning stainless steel surfaces on
page 36.
4 Clean the glass window with glass cleaner or warm, soapy water with a thorough rinse. Do not let moisture get inside
the door assembly.
Cleaning the surface element control knobs
1 Make sure that all surface element knobs are in the OFF position.
2 Pull the control knobs straight off the surface element control valve stems. Do not clean the control knobs in a
CAUTION: Make sure that the oven racks ha
dishwasher. They are not dishwasher-safe.
3 Clean the knobs in warm, soapy water. Rinse and completely dry all surfaces (including back and stem hole).
4 Clean stainless steel surfaces with a stainless steel cleaner on a damp, soft cloth.
5 Replace the control knobs in the OFF position by pushing them straight onto the control valve stems.
ve cooled before removing them.
CAUTION:
• DO NOT clean the oven door gasket. The oven door gasket is made of a woven material which is essential for a good seal. Care
should be taken not to rub, damage, or remove this gasket.
• DO NOT immerse the door in water.
• DO NOT spray or let water or the glass cleaner to enter the door vents.
• DO NOT use oven cleaners, cleaning powders, or any harsh abrasive cleaning materials on the outside of the oven door.
WARNING:
• Do not use spray cleaners on the surface element control panel. Spray entering the valve holes could contact electrical components
resulting in death, personal injury, or product damage.
• The knobs and the valve stems must be completely dry before you reinstall them.
Door gasket–Do not
clean.
Oven door
38
Cleaning the cooktop
The cooktop surface is a porcelain-enamel surface. To prevent this surface from becoming dull, wipe up and clean spills as
they happen. Foods with a lot of acid (for example, tomatoes, sauerkraut, and fruit juices) or foods with high sugar content
can cause dull spots if allowed to set.
Normal daily use cleaning
Use only a ceramic cooktop cleaner. Other creams may not be as effective. By following these steps, you can maintain and
protect the surface of the glass cooktop.
Before using the cooktop for the first time, clean it with a ceramic cooktop cleaner. This helps protect the top and makes
cleanup easier.
1 Shake the cleaning cream well, then apply a few drops of cleaner directly on the cooktop.
2 Use a paper towel or a cleaning pad for ceramic cooktops to clean the entire cooktop surface.
3 Use a dry cloth or paper towel to remove all cleaning residue. You do not need to rinse.
Cleaning sugary spills and melted plastics
Sugary spillovers (such jellies, fudge, candy, and syrups) or melted plastics can cause pitting of the cooktop surface. This is
not covered under the warranty.
You should clean the spill while it is still hot. Take special care when removing hot substances.
When using a scraper, make sure that it is new and the razor blade is still sharp. Do not use a dull or nicked blade.
1 Turn off all surface burners. Remove hot pans.
2 Wearing an oven mitt, use a single-edge, razor-blade scraper to move the spill to a cool area of the cooktop. Remove
the spill with paper towels.
3 Wait until the cooktop has cooled, then remove any remaining spillover.
Don’t use the surface burners again until all of the residue has been completely removed.
Removing burned-on residue
1 Make sure that all surface burners are turned off, then let the cooktop cool.
2 Spread a few drops of ceramic cooktop cleaner on the entire burned residue area.
3 Using a cleaning pad for ceramic cooktops, rub the residue area. Apply pressure as needed.
4 If any residue remains, repeat the steps listed above as needed.
5 For additional protection, after all residue has been removed, polish the entire surface with a ceramic cooktop cleaner
and a paper towel.
Removing heavy, burned-on residue
1 Make sure that all surface burners are turned off, then let the cooktop cool.
2 Use a single-edge, razor-blade scraper at approximately a 45° angle against the glass surface and scrape the residue.
You need to apply pressure remove the residue. Do not scrape the seal.
3 After scraping with the scraper, spread a few drops of ceramic cooktop cleaner on the entire burned residue area. Use
the cleaning pad to remove any remaining residue.
4 For additional protection, after all residue has been removed, polish the entire surface with a ceramic cooktop cleaner
and a paper towel.
Cleaning the cooktop seal
• Lay a wet cloth on the seal for a few minutes, then wipe clean with a nonabrasive cleaner.
CAUTION:
• Do not use a steel-wool pad or abrasive cleaners on stainless steel surfaces. Abrasive pads and cleaners will scratch the surface and
damage the finish.
• Carefully check the bottoms of pans for roughness that may scratch the cooktop.
Note: Daily use of a ceramic cooktop cleaner helps keep the cooktop looking new.
Note: If pitting or indentations in the glass surface have already occurred, they can’t be repaired.The cooktop glass will have to be
replaced.
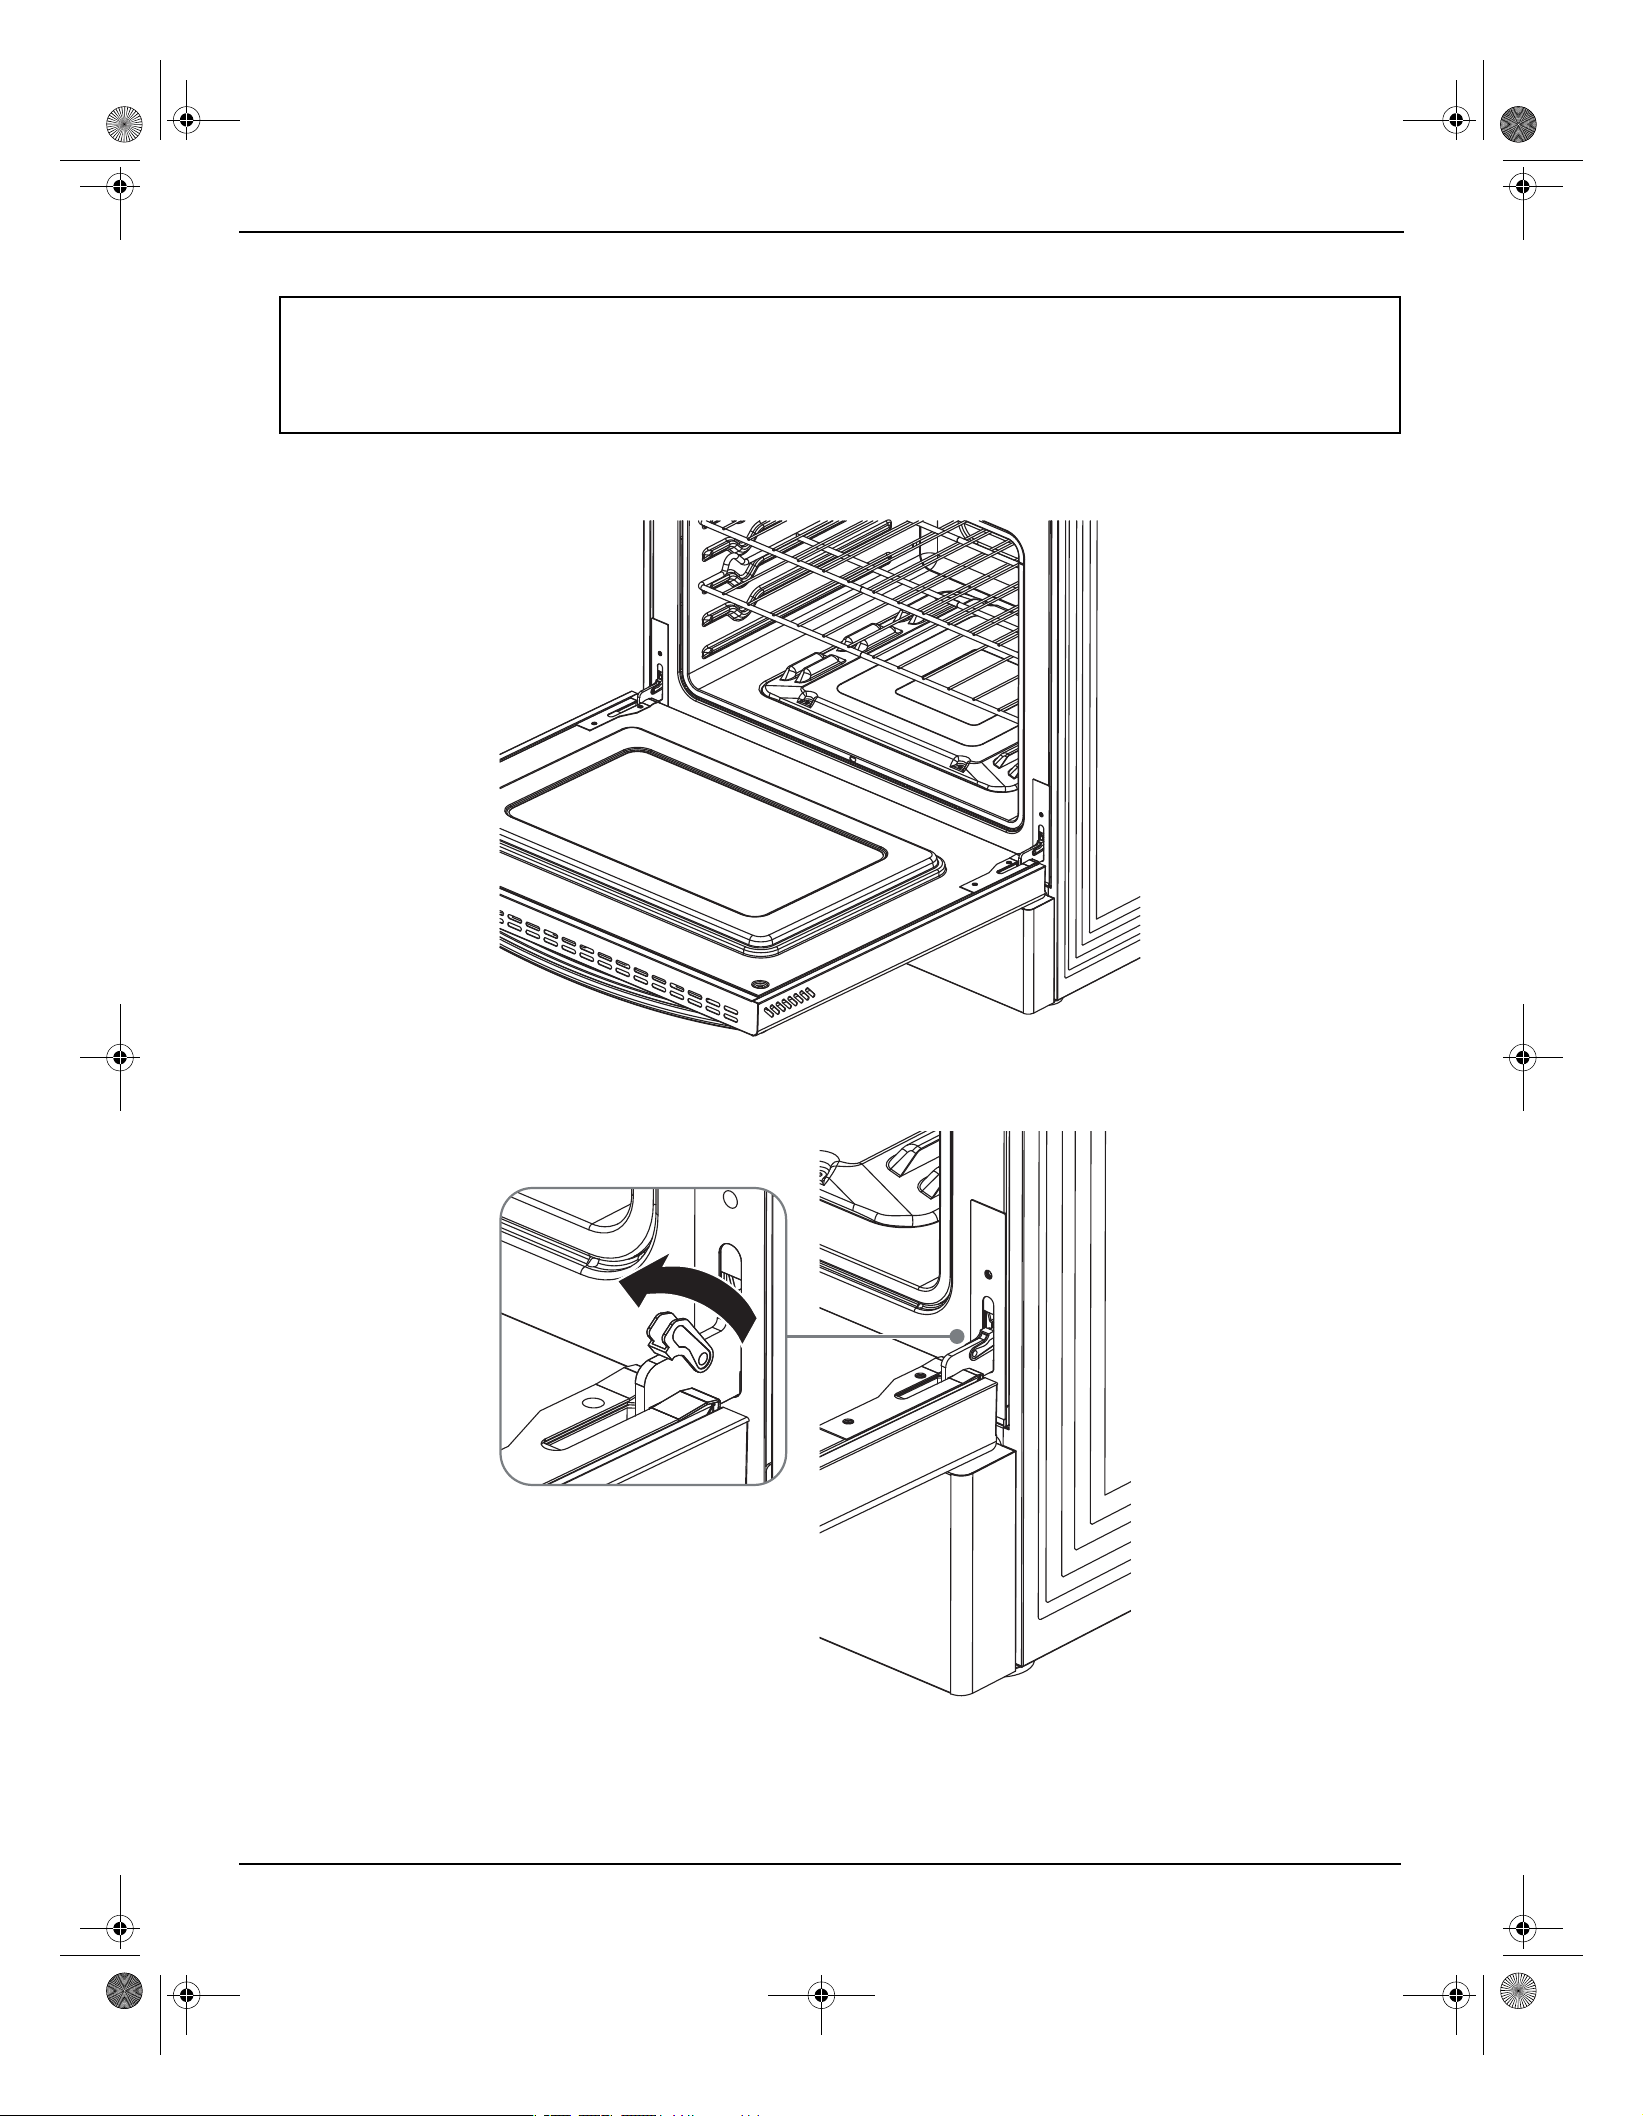
39
5.0 Cu. Ft. Electric Range with Steam Cleaning
Removing and replacing the oven door
2 Open the levers fully on both sides.
WARNING:
• We recommend that
you do not remove the door unless directed to do so by Criterion Customer Service.
• The oven door is heavy. Do not lift the door by its handle. Be careful not to drop the door during removal. Incorrect handling
could result in personal injury.
• Disconnect the electrical power to your range before removing the oven door. This prevents the oven from accidentally being
turned on while the door is removed.
Removing the door
1 Completely open the oven door.

40
3 Hold the door firmly on both sides.
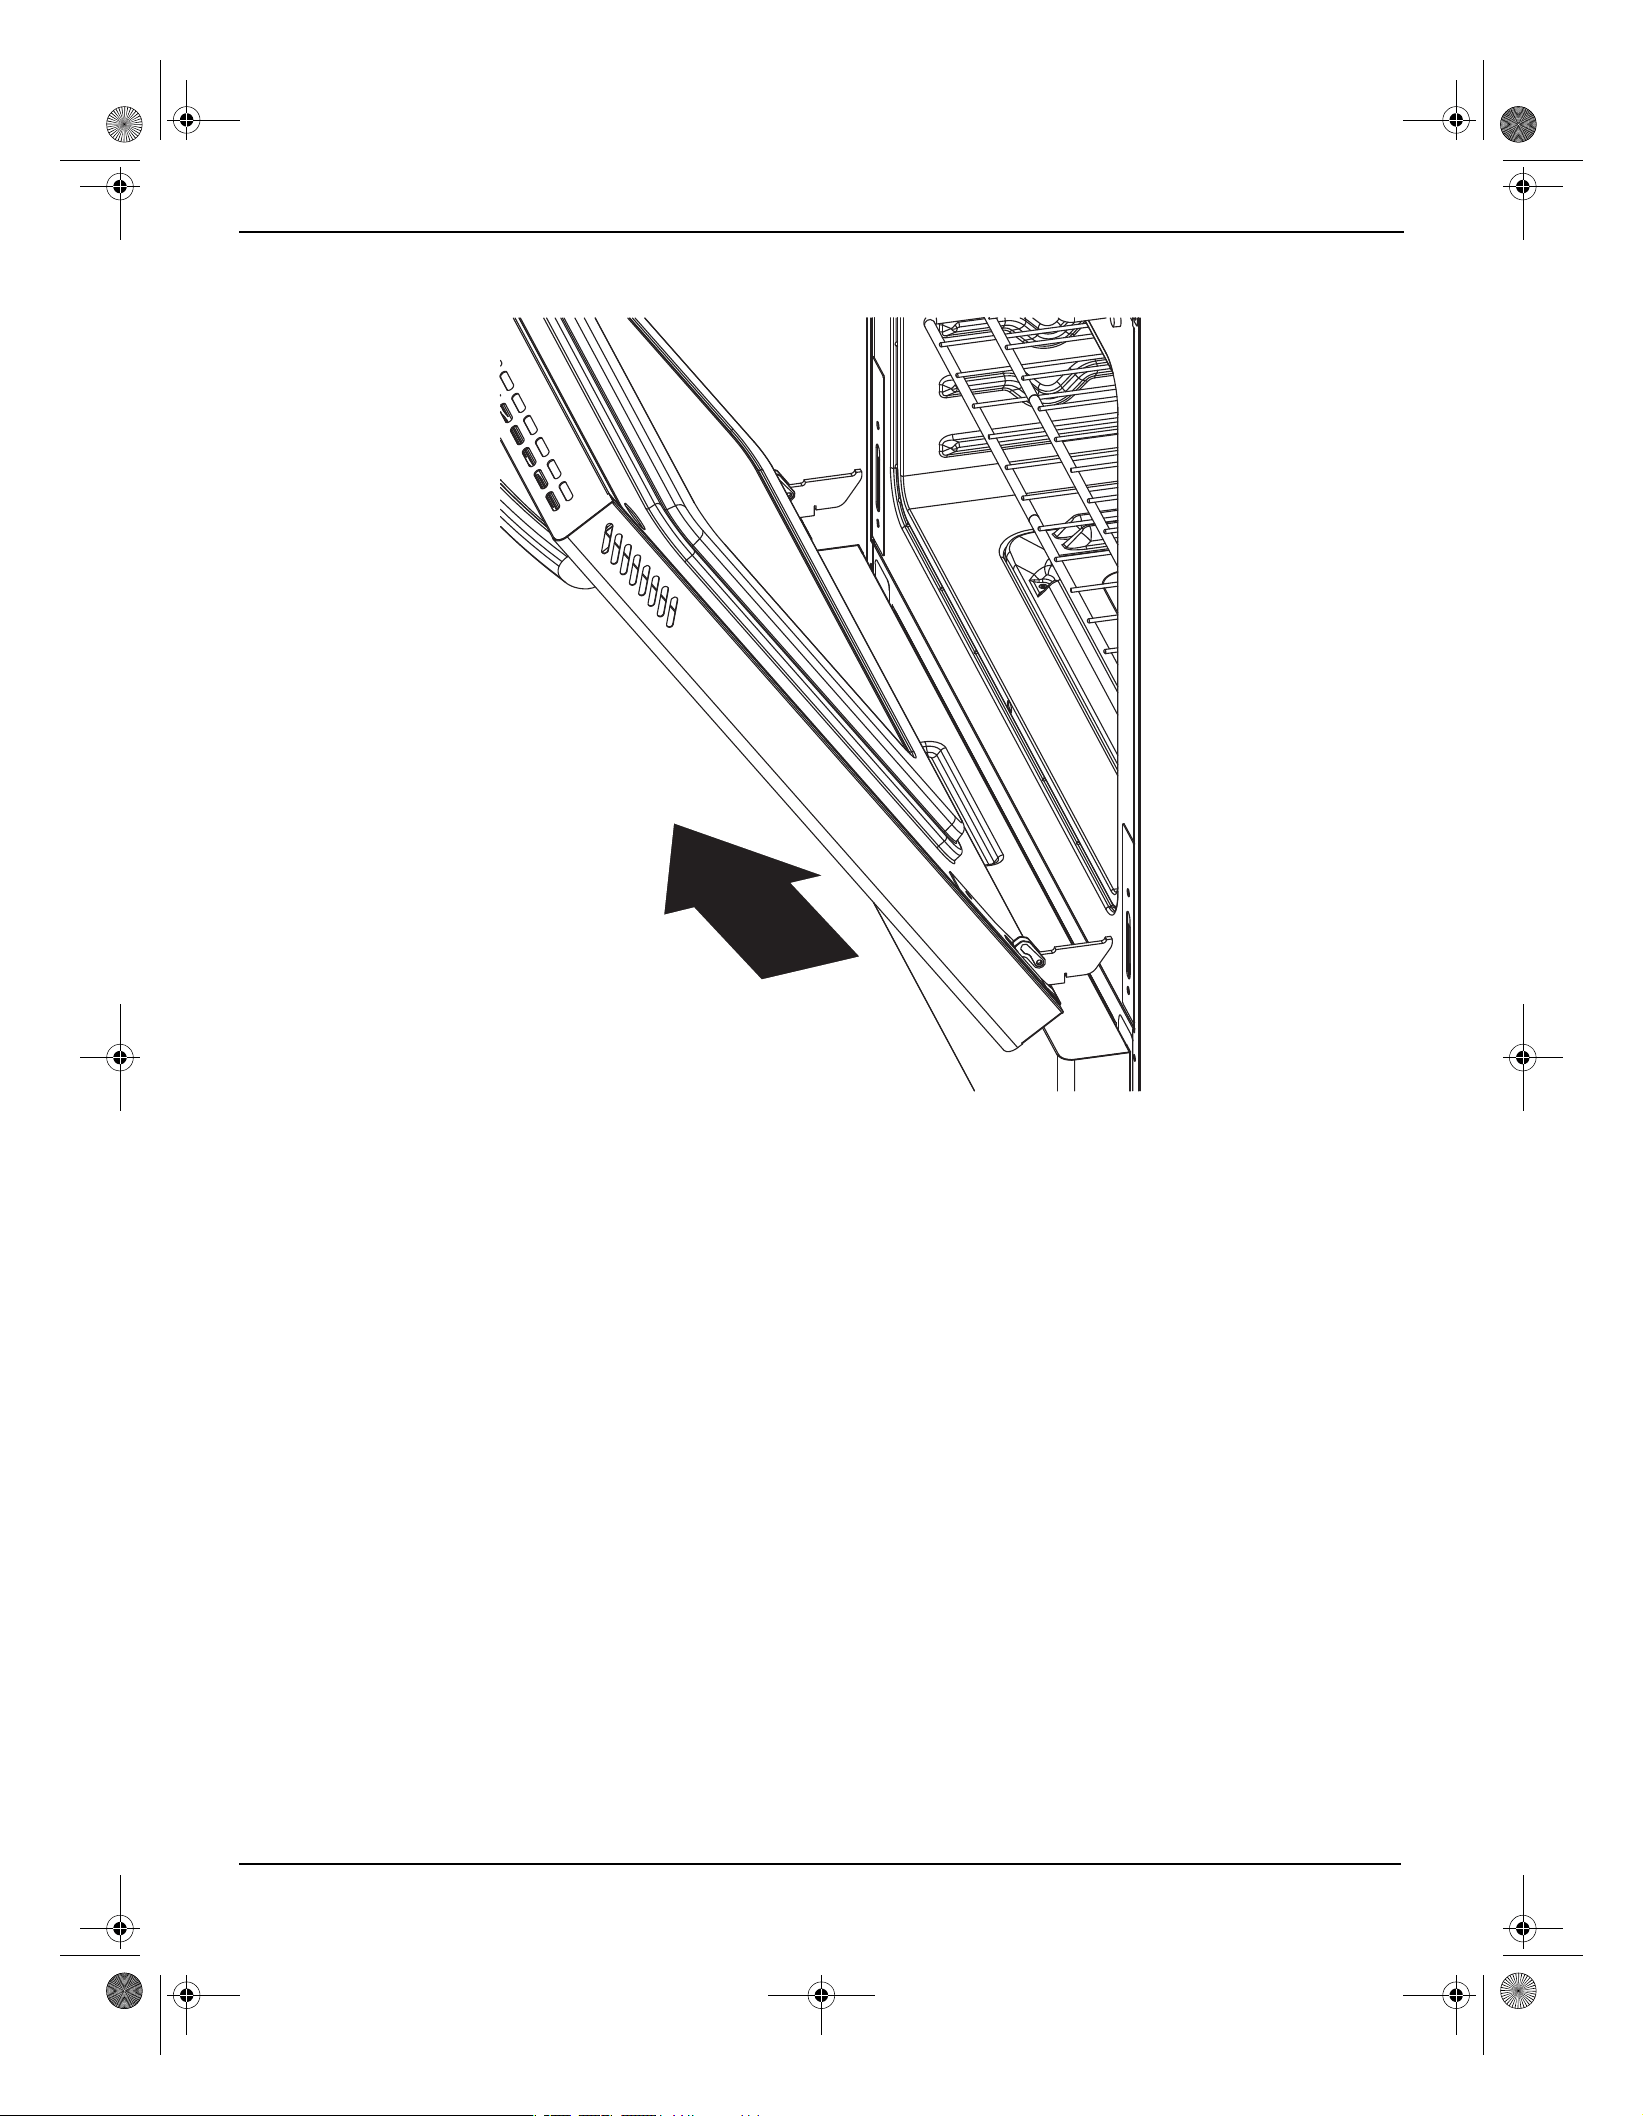
41
5.0 Cu. Ft. Electric Range with Steam Cleaning
4 Disengage the hinges and remove the door gently with a 30° angle between the door and the oven. Place the door on
a protected surface.
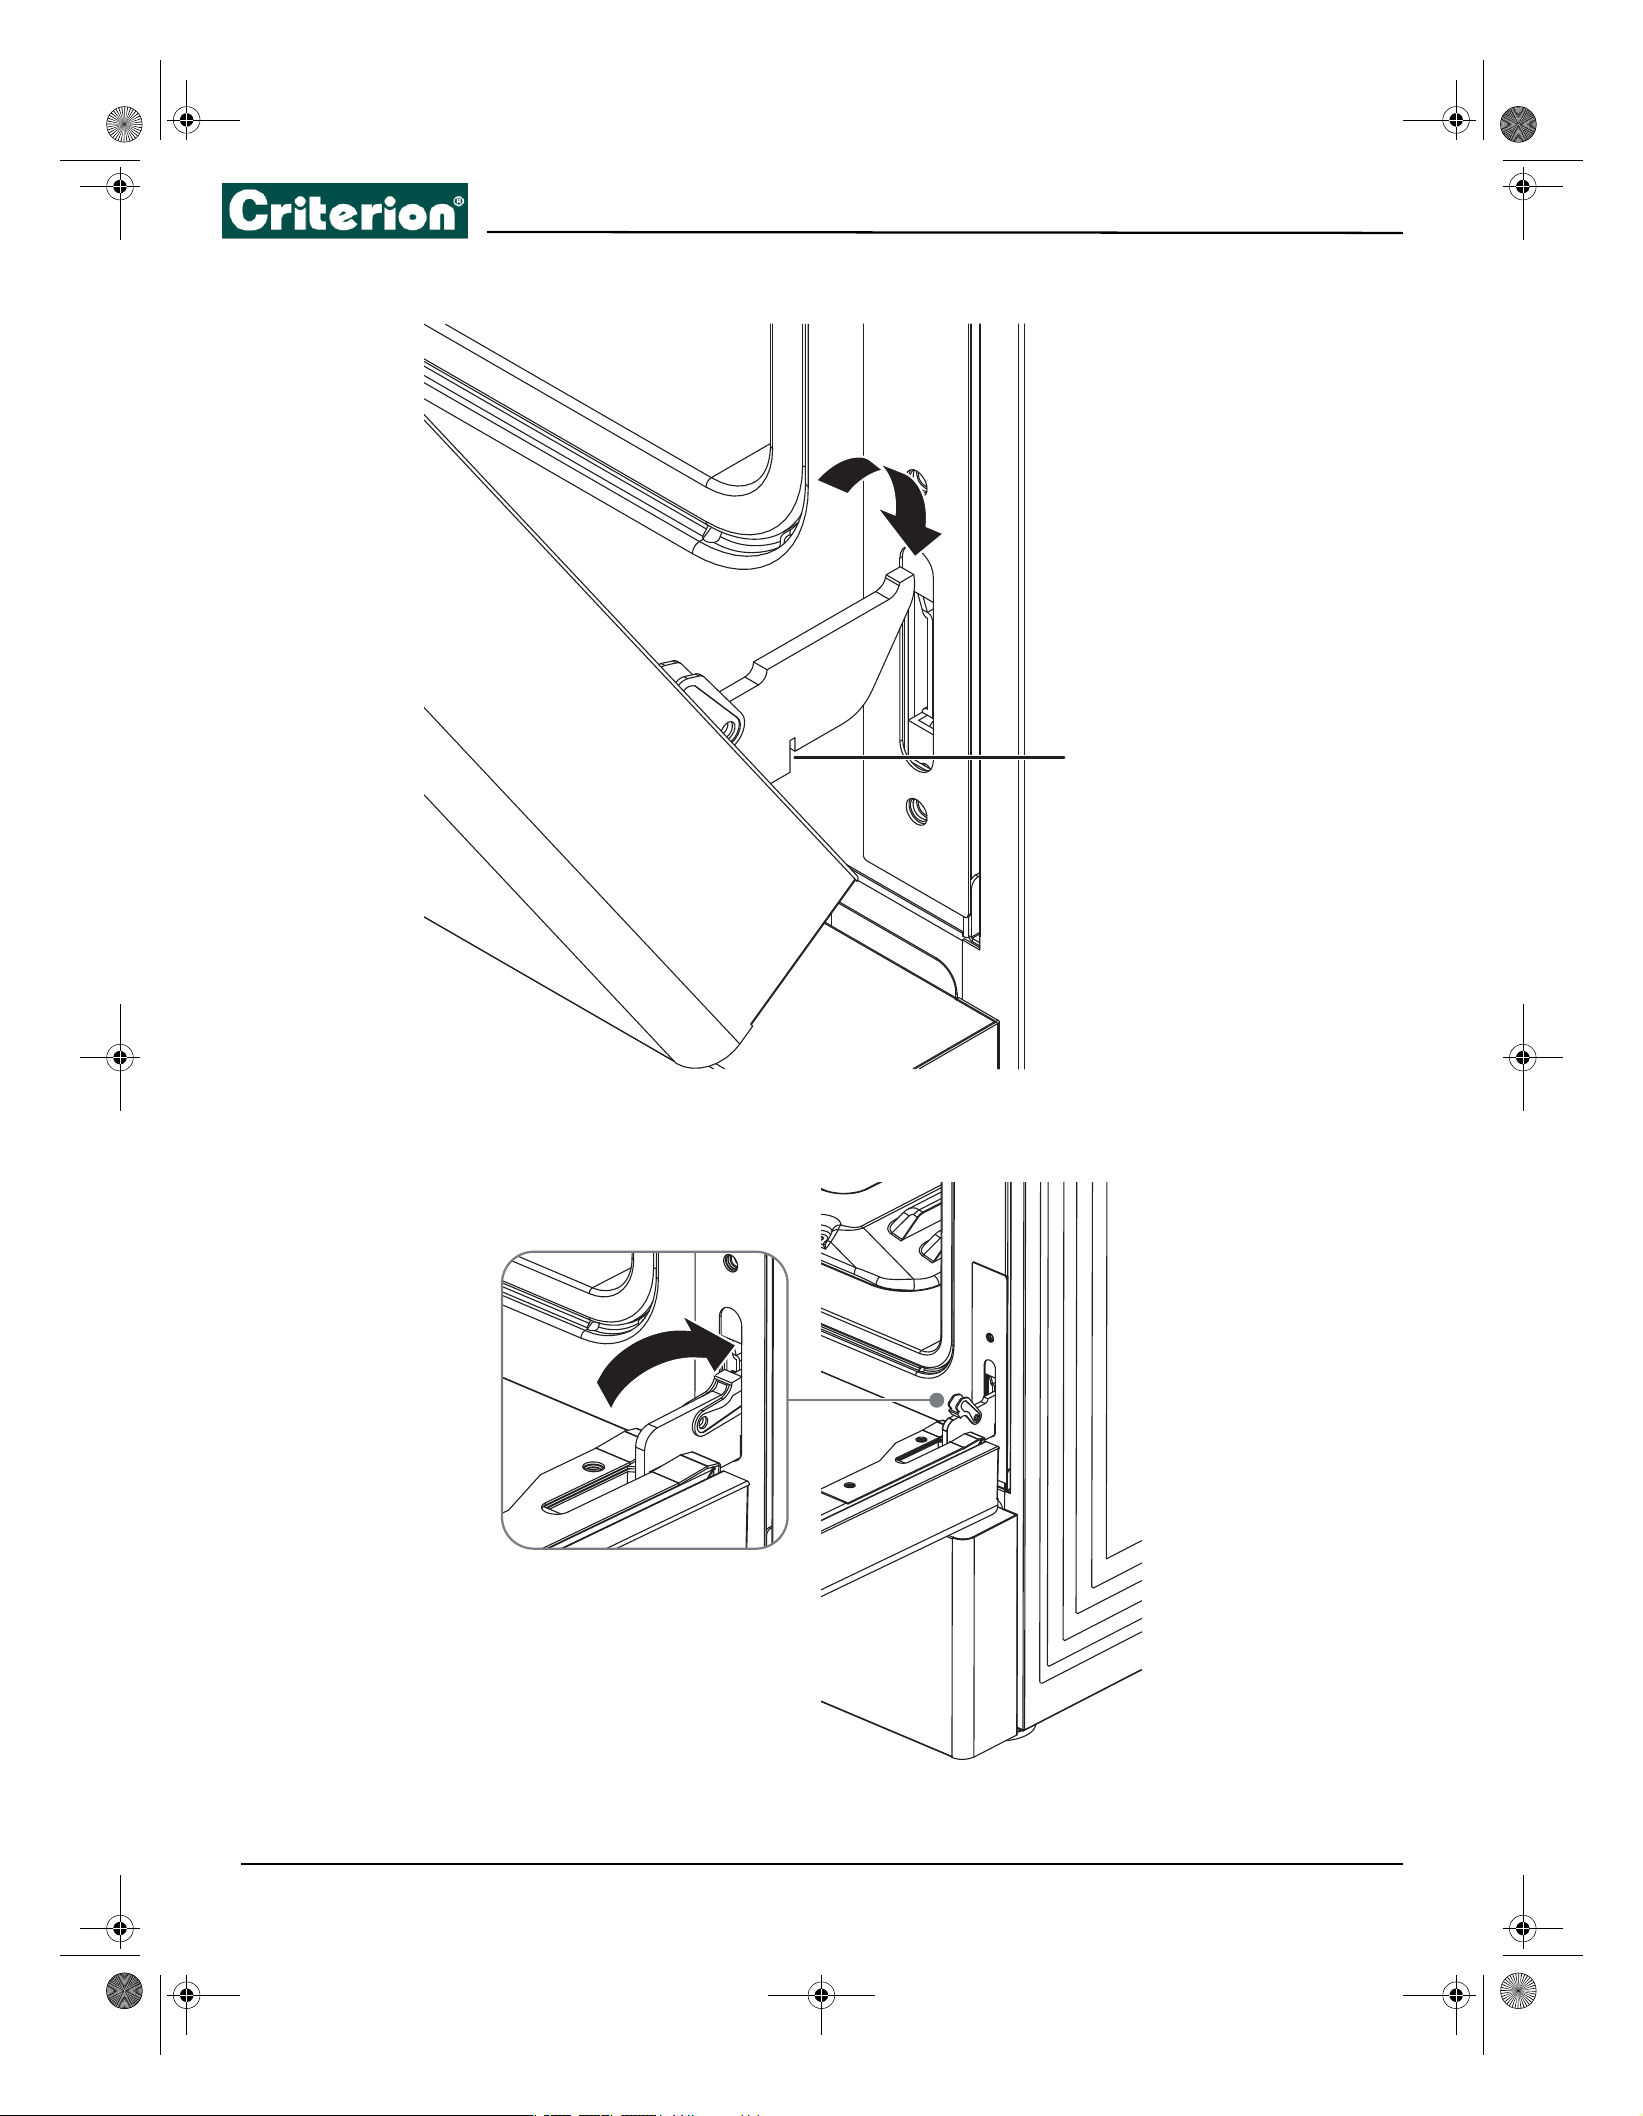
42
Replacing the door
1 Hold the door firmly in almost half open position.
2 Insert the hinge tongues into the slots making sure that the notches on both sides drop into place.
3 Open the door fully.
Notch
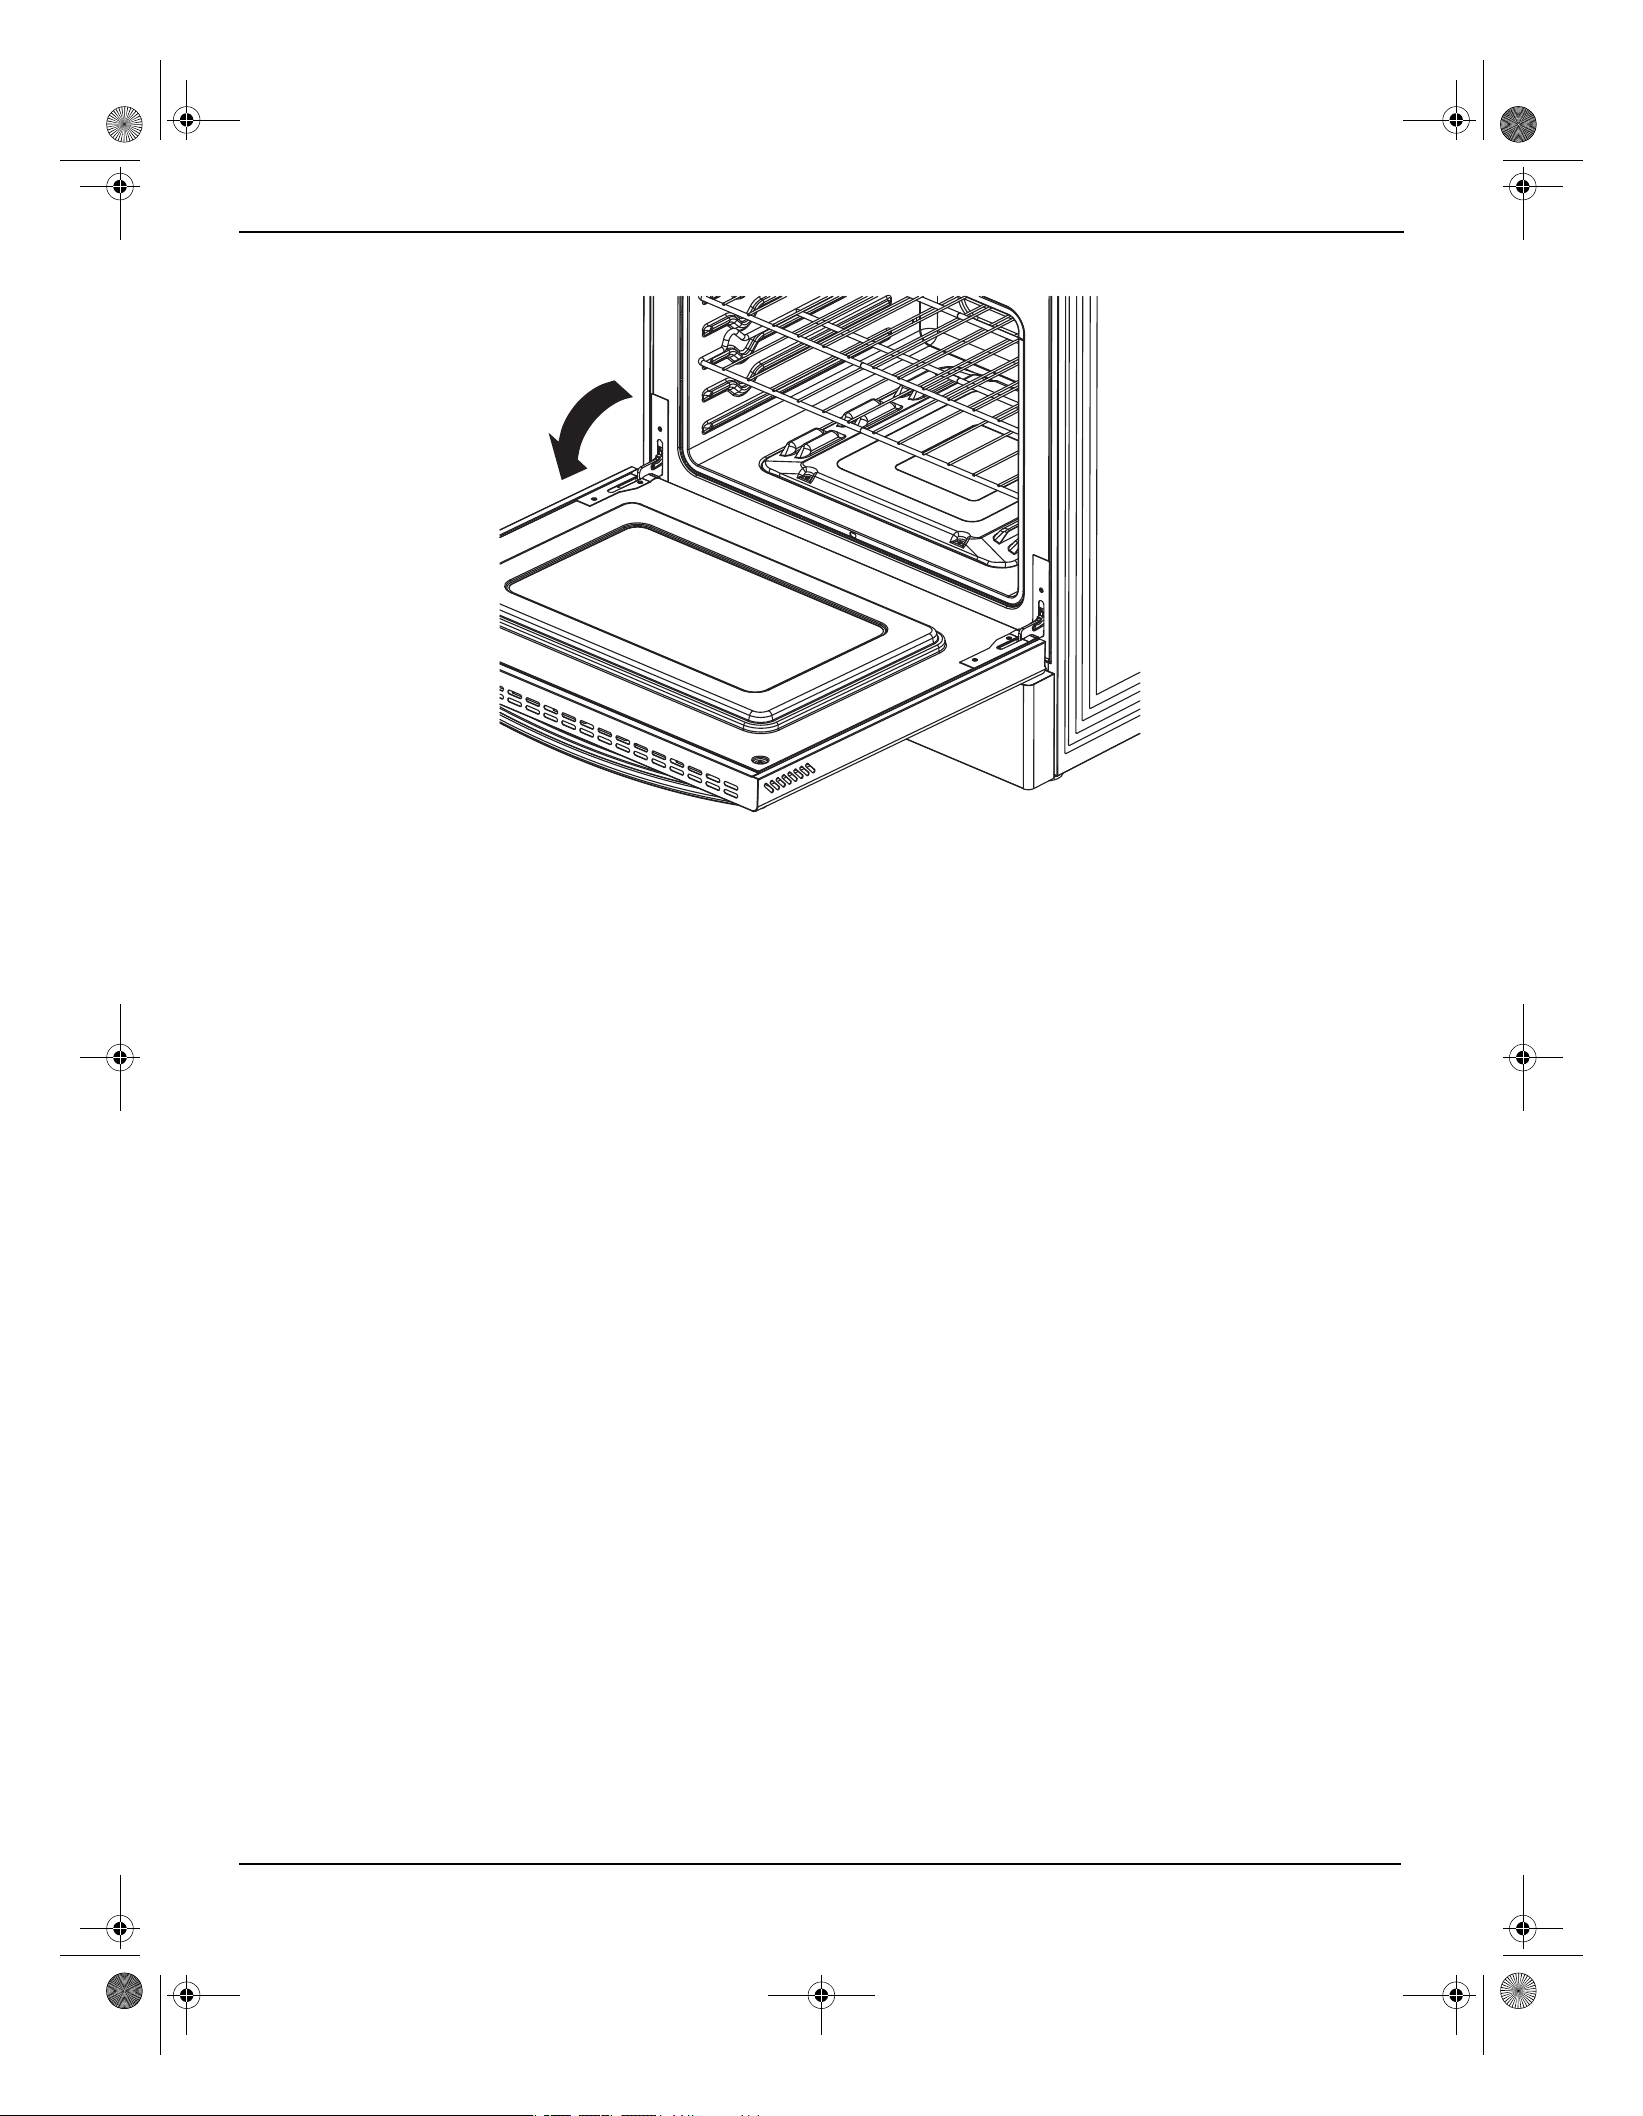
43
5.0 Cu. Ft. Electric Range with Steam Cleaning
4 Fully close the levers on the left and right hinges, then close the door.
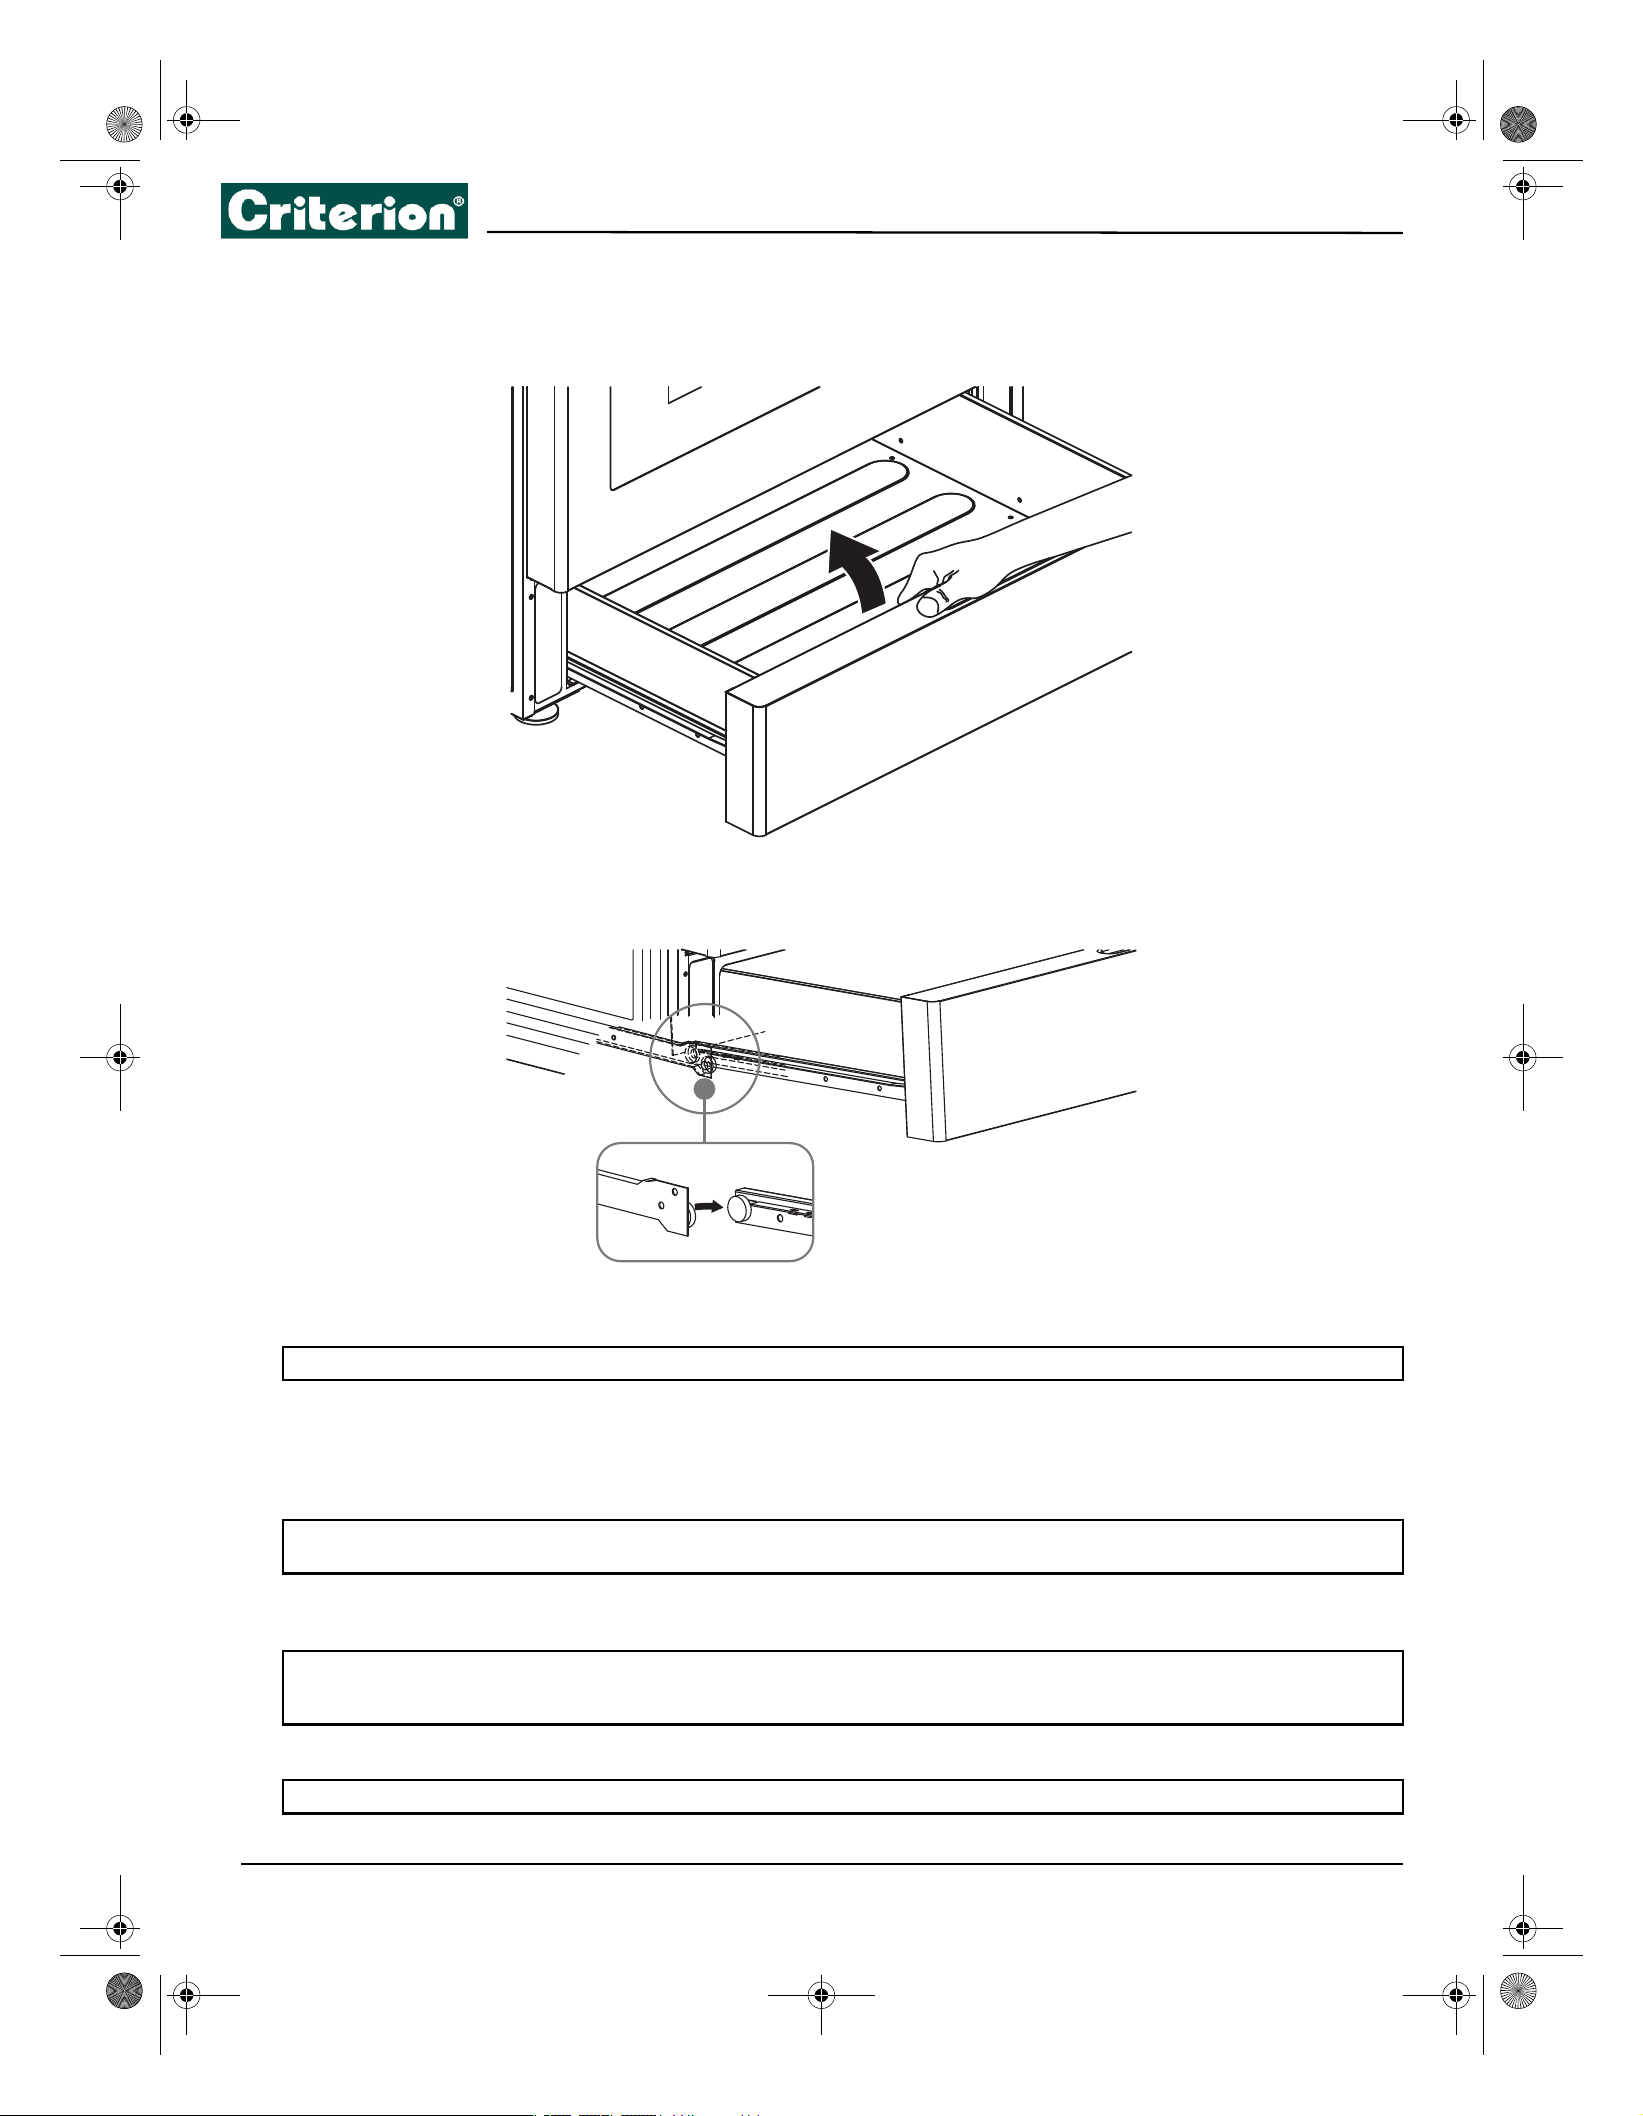
44
Removing and replacing the storage drawer
The storage drawer is a good place to store cookware and bakeware. Do not store plastics or flammable material in the
drawer. Clean the storage drawer with a damp cloth or sponge. Never use harsh abrasives or scouring pads.
1 Open storage drawer fully, lift the storage drawer, then remove the drawer.
2 To replace the drawer, make sure that the white wheel on the drawer aligns with the rails well, then slide the drawer
back into your range.
Steam cleaning the oven
1 Remove all accessories from the oven.
2 Pour 10 oz. (300 ml) of water onto the bottom of the empty oven and close the oven door. Use normal water only, not
distilled water.
When steam-cleaning, use exactly 10 oz. of water because this produces the best results.
3 Press both Broil and Cook time pads at the same time and hold for 3 seconds to get Steam Clean, then press the
Start pad.
Note: Steam cleaning the ov
en takes about 20 minutes
4 Press the Cancel pad.
and is automatically controlled by the oven.
Note: For heavy residue, such as grease left over from roasting, we recommend that you rub detergent into the residue before
activating the steam-cleaning function.
Note: If you press the Steam Clean pad when the oven temperature is above 150° F (65° C), Hot appears in the display. Because this
function produces the best results when started while the oven is cool, we recommend that you wait until the oven has cooled down
and Hot disappears from the display.
WARNING: Be c
areful when opening the door before a steam-cleaning procedure has ended. The water on the bottom is hot.
45
5.0 Cu. Ft. Electric Range with Steam Cleaning
5 Open the oven door and remove the remaining water with a sponge. Do not leave the residual water in the oven for
any length of time. A significant amount of water remains on the bottom of the oven after a steam-cleaning cycle.
6 Use a detergent-soaked sponge, a soft brush, or a nylon scrubber to wipe the oven interior. Remove stubborn residue
with a nylon scourer. You can remove lime deposits with a cloth soaked in vinegar. If the oven remains dirty, repeat the
procedure after the oven has cooled.
7 After cleaning, leave the oven door ajar at a 15° angle to let the interior enamel surface dry thoroughly.
Troubleshooting
If the solutions in this section do not solve a problem, contact a qualified service technician or criterion customer service.
Control panel display
Cooktop
PROBLEM POSSIBLE CAUSE SOLUTION
My range is not level. Your range has been installed
• Place an oven rack in the center of the oven.
Place a level on the oven rack. Adjust the
leveling legs at the base of your range until
incorrectly.
the ov
en rack is level.
• Make sure that the floor is level and strong
and stable enough to adequately support
your
range.
The floor is sagging or
sloping.
Contact a carpenter to correct the situation.
The kitchen cabinets are not
correctly aligned and make
your range appear to not be
level.
Make sure that the cabinets are square and provide
sufficient room for installation.
My range needs to be
accessed for servicing and
can’t be moved easily.
The oven leg is inside the
anti-tip device.
Slide your range forward until the leg is out of the
anti-tip device, then move your range as needed.
Make sure that you reinstall the range leg into the
anti-tip device when you are through.
The kitchen cabinets are not
square and too close to your
range.
Contact a builder or installer to make your range
accessible.
Carpet is interfering with
movement of your range.
Provide sufficient space so your range can be lifted
over the carpet.
PROBLEM POSSIBLE CAUSE SOLUTION
The display goes blank. A fuse in your home may be
blown or the circuit breaker
tripped.
Replace the fuse or reset the circuit breaker.
The display flashes. There was a power failure. Reset the clock.
I turned off the beeper, but it
still beeps.
Some beep tones can’t be
turned off.
The clock and beep warning tones stay on even
when you turn the beeper off. This is normal.
PROBLEM POSSIBLE CAUSE SOLUTION
The surface burners do not
produce a rolling boil or do
not cook fast enough.
You may be using
inappropriate cookware.
Use pans which are flat and match the diameter of
the surface element you selected.
In some areas, the power
(voltage) may be low.
Cover the pan with a lid until the desired heat is
obtained.
Disconnect the circuit breaker to cut power to the
range and follow instructions on pages 18 or 19 to
make sure the power cord wires are connected in
the correct order and that the wire colors match
the diagram shown, or contact criterion customer
care for
If your range was recently
installed, its power cord
connection may be incorrect
causing the burners and
oven to receive half the
normal voltage. support.
46
The surface burners do not
turn on.
A fuse in your home may be
blown or the circuit breaker
tripped.
Replace the fuse or reset the circuit breaker.
The cooktop controls are set
incorrectly.
Make sure that you have selected the correct
control for the element you are using.
The cooktop has areas of
discoloration.
Food spillover was not
cleaned up.
See Cleaning the cooktop on page 38.
The surface is hot and the
model features a
light-colored cooktop.
This is normal. The surface may appear discolored
when it is hot. This is temporary and disappears as
the glass cools.
This is normal operation, and not a system failure. The element cycles on and
off to maintain the power
The surface element
frequently cycles on and off.
The surface element stops
glowing when changed to a
lower setting.
setting.
Use the cooktop as usual.
Scratches or abrasions on the
cooking surface.
The cooktop is being cleaned
incorrectly.
Scratches are not removable. Tiny scratches
become less visible in time as a result of cleaning.
Use a ceramic glass top cleaning cream. Do not use
chemical or corrosive agents. These agents may
damage the surface of the product.
To avoid scratches, use the recommended cleaning
procedures. Make sure that cookware bottoms are
clean before use, and use cookware with smooth
Cookware with rough
bottoms was used on the
cooktop or there were coarse
particles (for example, salt or
sand) between the cookware
and the surface of the
cooktop.
bottoms.
Cookware has been slid
across the cooktop surface.
The cooktop has brown
streaks or specks.
Boilovers have been cooked
onto the surface.
Wait until the surface cools down. Then, use a
scraper to remove those impurities. Use a blade
scraper to remove soil. See Cleaning the cooktop
on page 38.
Cooktop areas have
discoloration with a metallic
sheen.
Mineral deposits from water
and food have been left on
the surface of the cooktop.
• Remove using a ceramic-glass cooktop
cleaning cream.
• Use cookware with clean, dry bottoms.
• Clean the cooktop with a ceramic cleaning
agent regularly every week.
I hear a “cracking” or
“popping” sound.
This is the sound of the metal
heating and cooling during
both the cooking and
self-cleaning functions.
This is normal operation, and not a system failure.
Use the cooktop as usual.
47
5.0 Cu. Ft. Electric Range with Steam Cleaning
Oven
PROBLEM POSSIBLE CAUSE SOLUTION
The oven does not turn on. Your range is not completely Make sure that the electrical plug is inserted into a live,
plugged into the electrical
outlet.
correctly grounded outlet.
A fuse in your home may be
blown or the circuit breaker
tripped.
Replace the fuse or reset the circuit breaker.
The oven controls have been
set incorrectly.
See Using the oven on page 28.
The oven is too hot. Let the oven cool.
Incomplete service wiring. Call for service.
Power outage. Check to see if the house lights turn on. If required, call your
local electric company for service.
A delayed start time has been
set.
Press the Cancel pad to cancel the delayed start time
.
The oven door doesn’t close
correctly.
Open the oven door and make sure that an item, like a
baking dish, is not too big for the oven or is not placed
correctly on the oven shelf.
The oven light does not turn
on.
The light bulb is loose or
defective.
Tighten or replace the bulb.
The switch operating the
light is broken.
Call for service.
Oven smokes excessively
during broiling.
The control has not been set
correctly.
See Broiling on page 33.
The meat has been placed
too close to the element.
Reposition the rack to provide the correct clearance
between the meat and the element. Preheat the broil
element for searing.
The meat has not been
correctly prepared.
Remove the excess fat from the meat. Cut away fatty edges
that may curl, leaving the lean intact.
Grease has built up on oven
surfaces.
Regular cleaning is necessary when broiling frequently.
Food does not bake or roast
correctly.
The oven controls have not
been set correctly.
See Using the oven on page 28.
The oven rack has been
positioned incorrectly or is
not level.
See Positioning the oven racks on page .29.
Incorrect cookware or
cookware of incorrect size is
being used.
The oven sensor needs to be
adjusted.
See Adjusting the thermostat on page 31.
Food does not broil correctly. The serving size may not be Refer to the cooking guide on the food packaging for
appropriate. serving sizes and try again.
The rack has not been
correctly positioned.
See Minimum and maximum settings on page 28.
Cookware not suited for
broiling.
Use suitable cookware.
In some areas, the power
(voltage) may be low.
Preheat the broil element for 10 minutes. See Minimum and
maximum settings on page 28.
The oven temperature is too
hot or too cold.
The oven sensor needs to be
adjusted.
See Adjusting the thermostat on page 31.
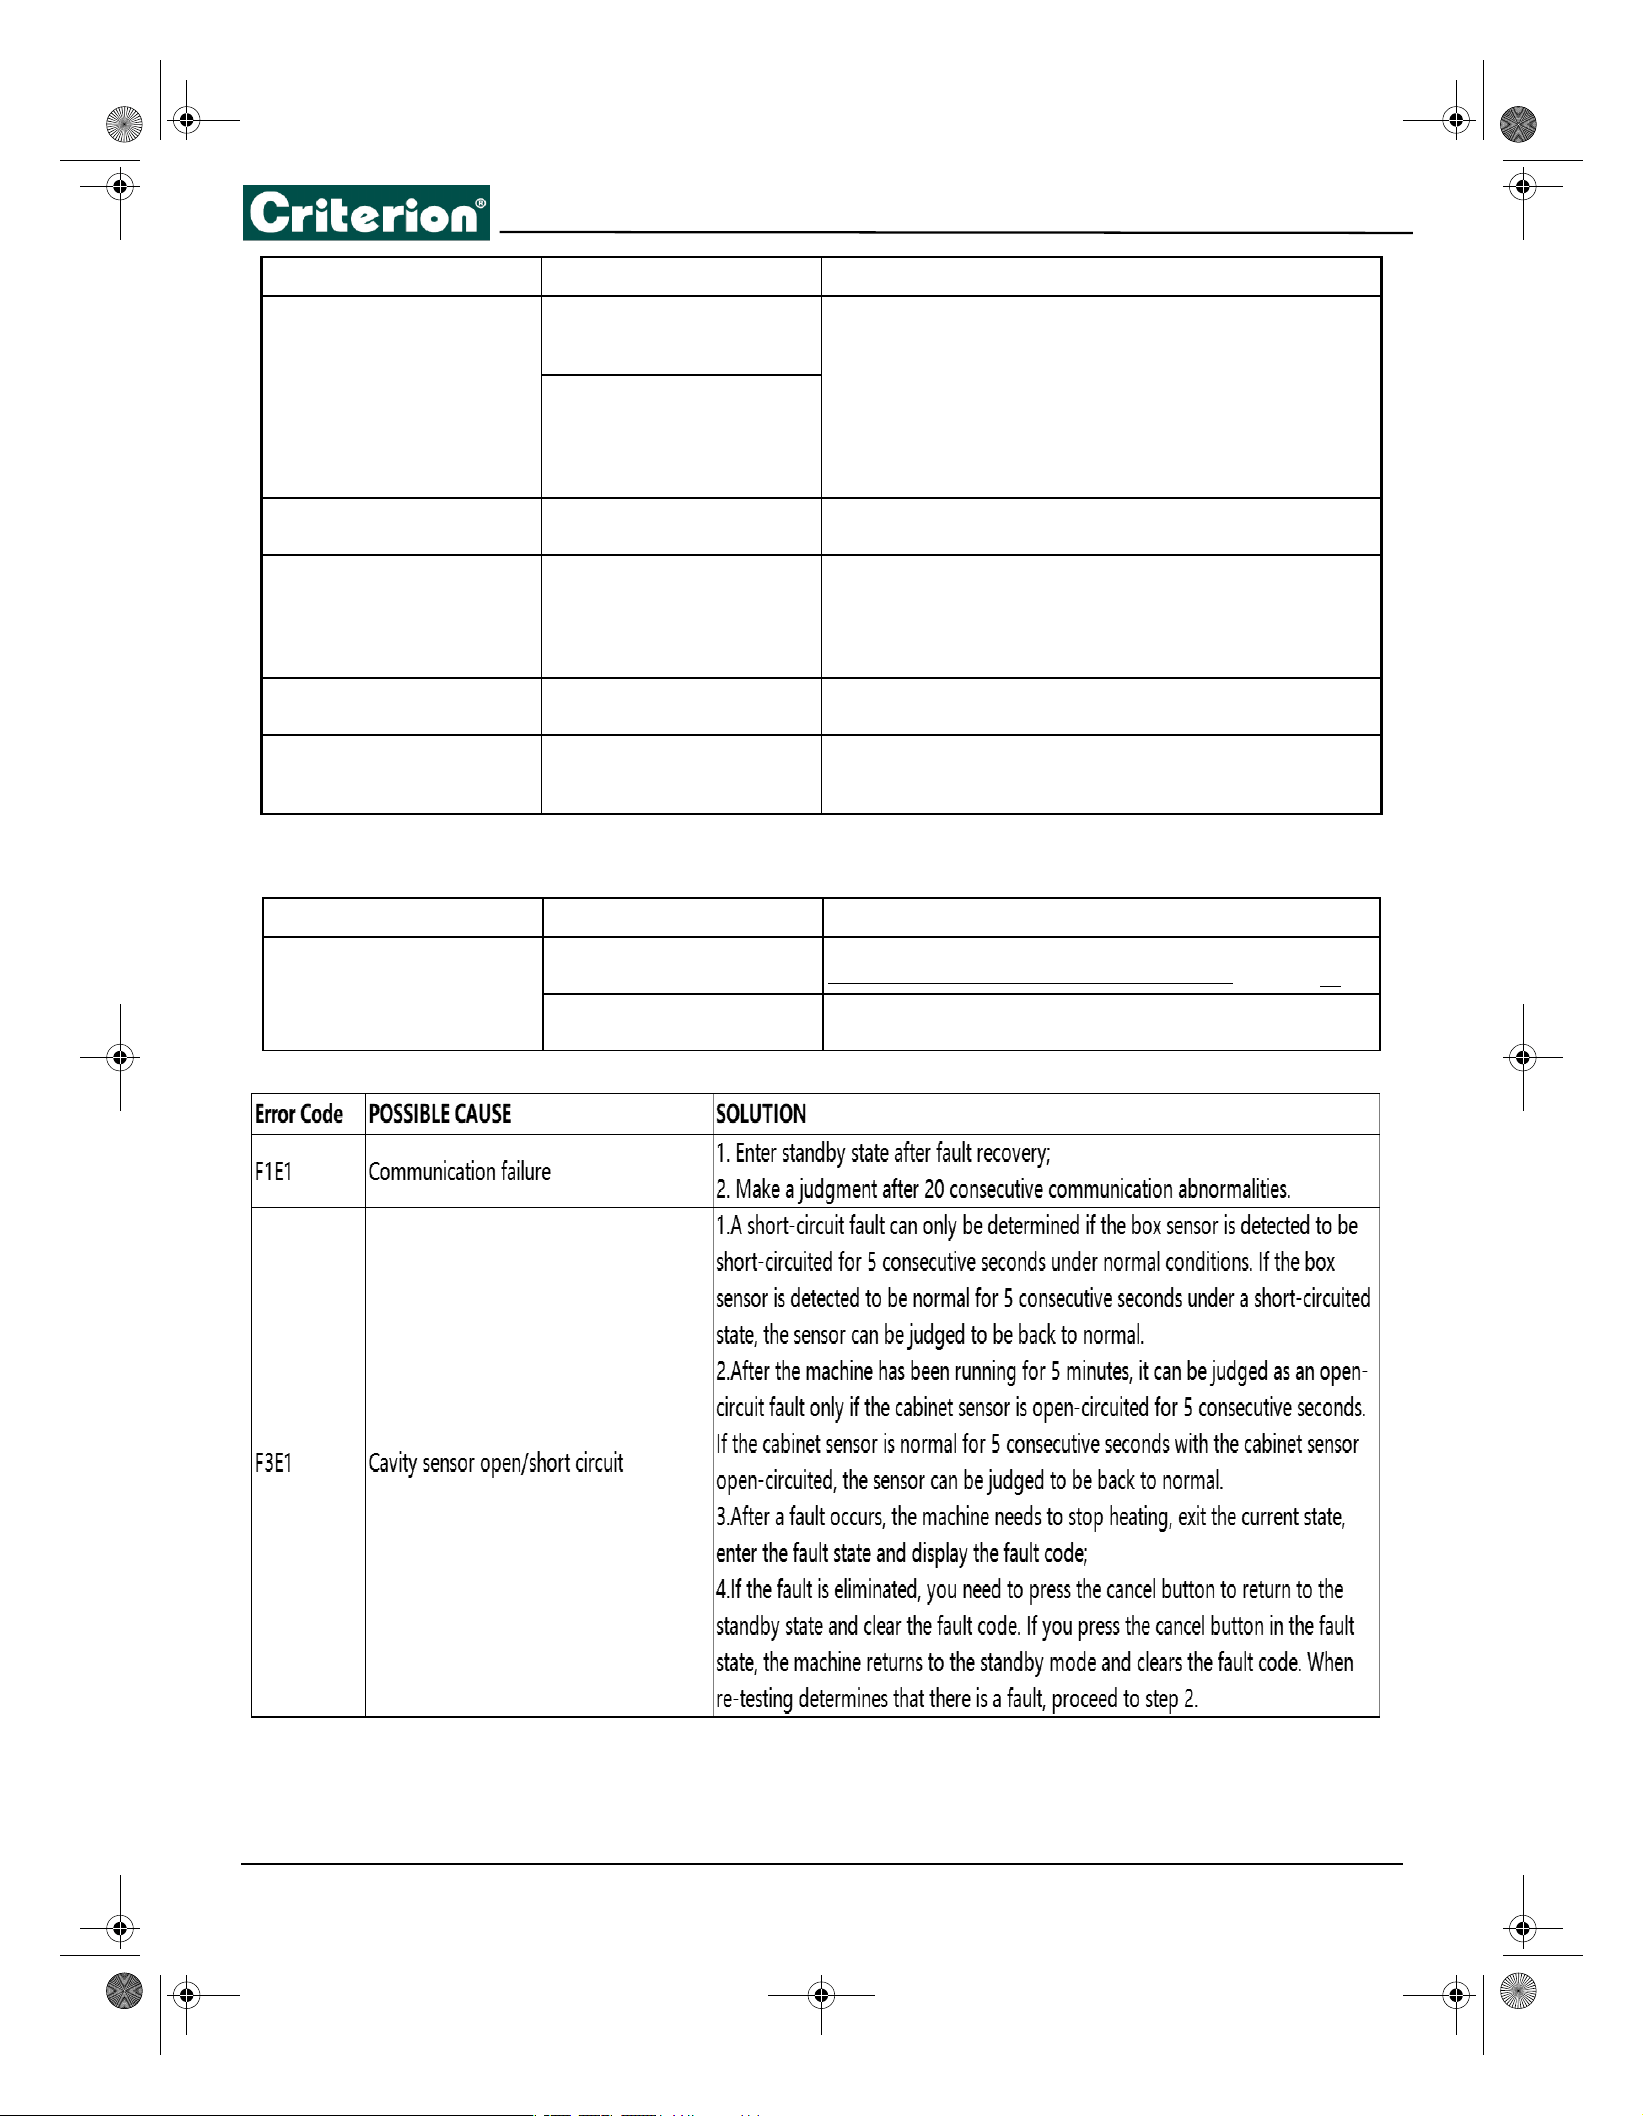
48
Drawer
Error codes
Steam is coming out of
the
vent.
When using the fan feature, it
is normal to see steam
coming out of the oven vent.
This is normal operation, and not a system failure. Use
the oven as usual.
As the number of ra
cks
or amount of food being
cooked increases, the
amount of visible steam
increases.
A burning or oily odor is
coming from the vent.
This is normal in a new
oven and disappears in
time.
Strong odor. An odor coming from the
insulation around the inside
of the oven is normal for
the
first few times the oven
is used.
Operate the oven at the bake setting at 400 °F (204° C) for
one hour.
Oven racks are difficult to
slide.
Apply a small amount of vegetable oil to a paper towel and The shiny, silver-colored
racks were cleaned in a
self-cleaning cycle.
wipe the edges of the oven racks with the paper towel.
PROBLEM POSSIBLE CAUSE SOLUTION
The drawer does not
slide smoothly or drags.
The drawer is out
of alignment
Fully extend the drawer and push it all the way in. See
Removing and replacing the storage drawer on page 44.
The drawer is over-loaded
or the load is unbalanced.
Reduce weight. Redistribute drawer contents.
PROBLEM POSSIBLE CAUSE SOLUTION
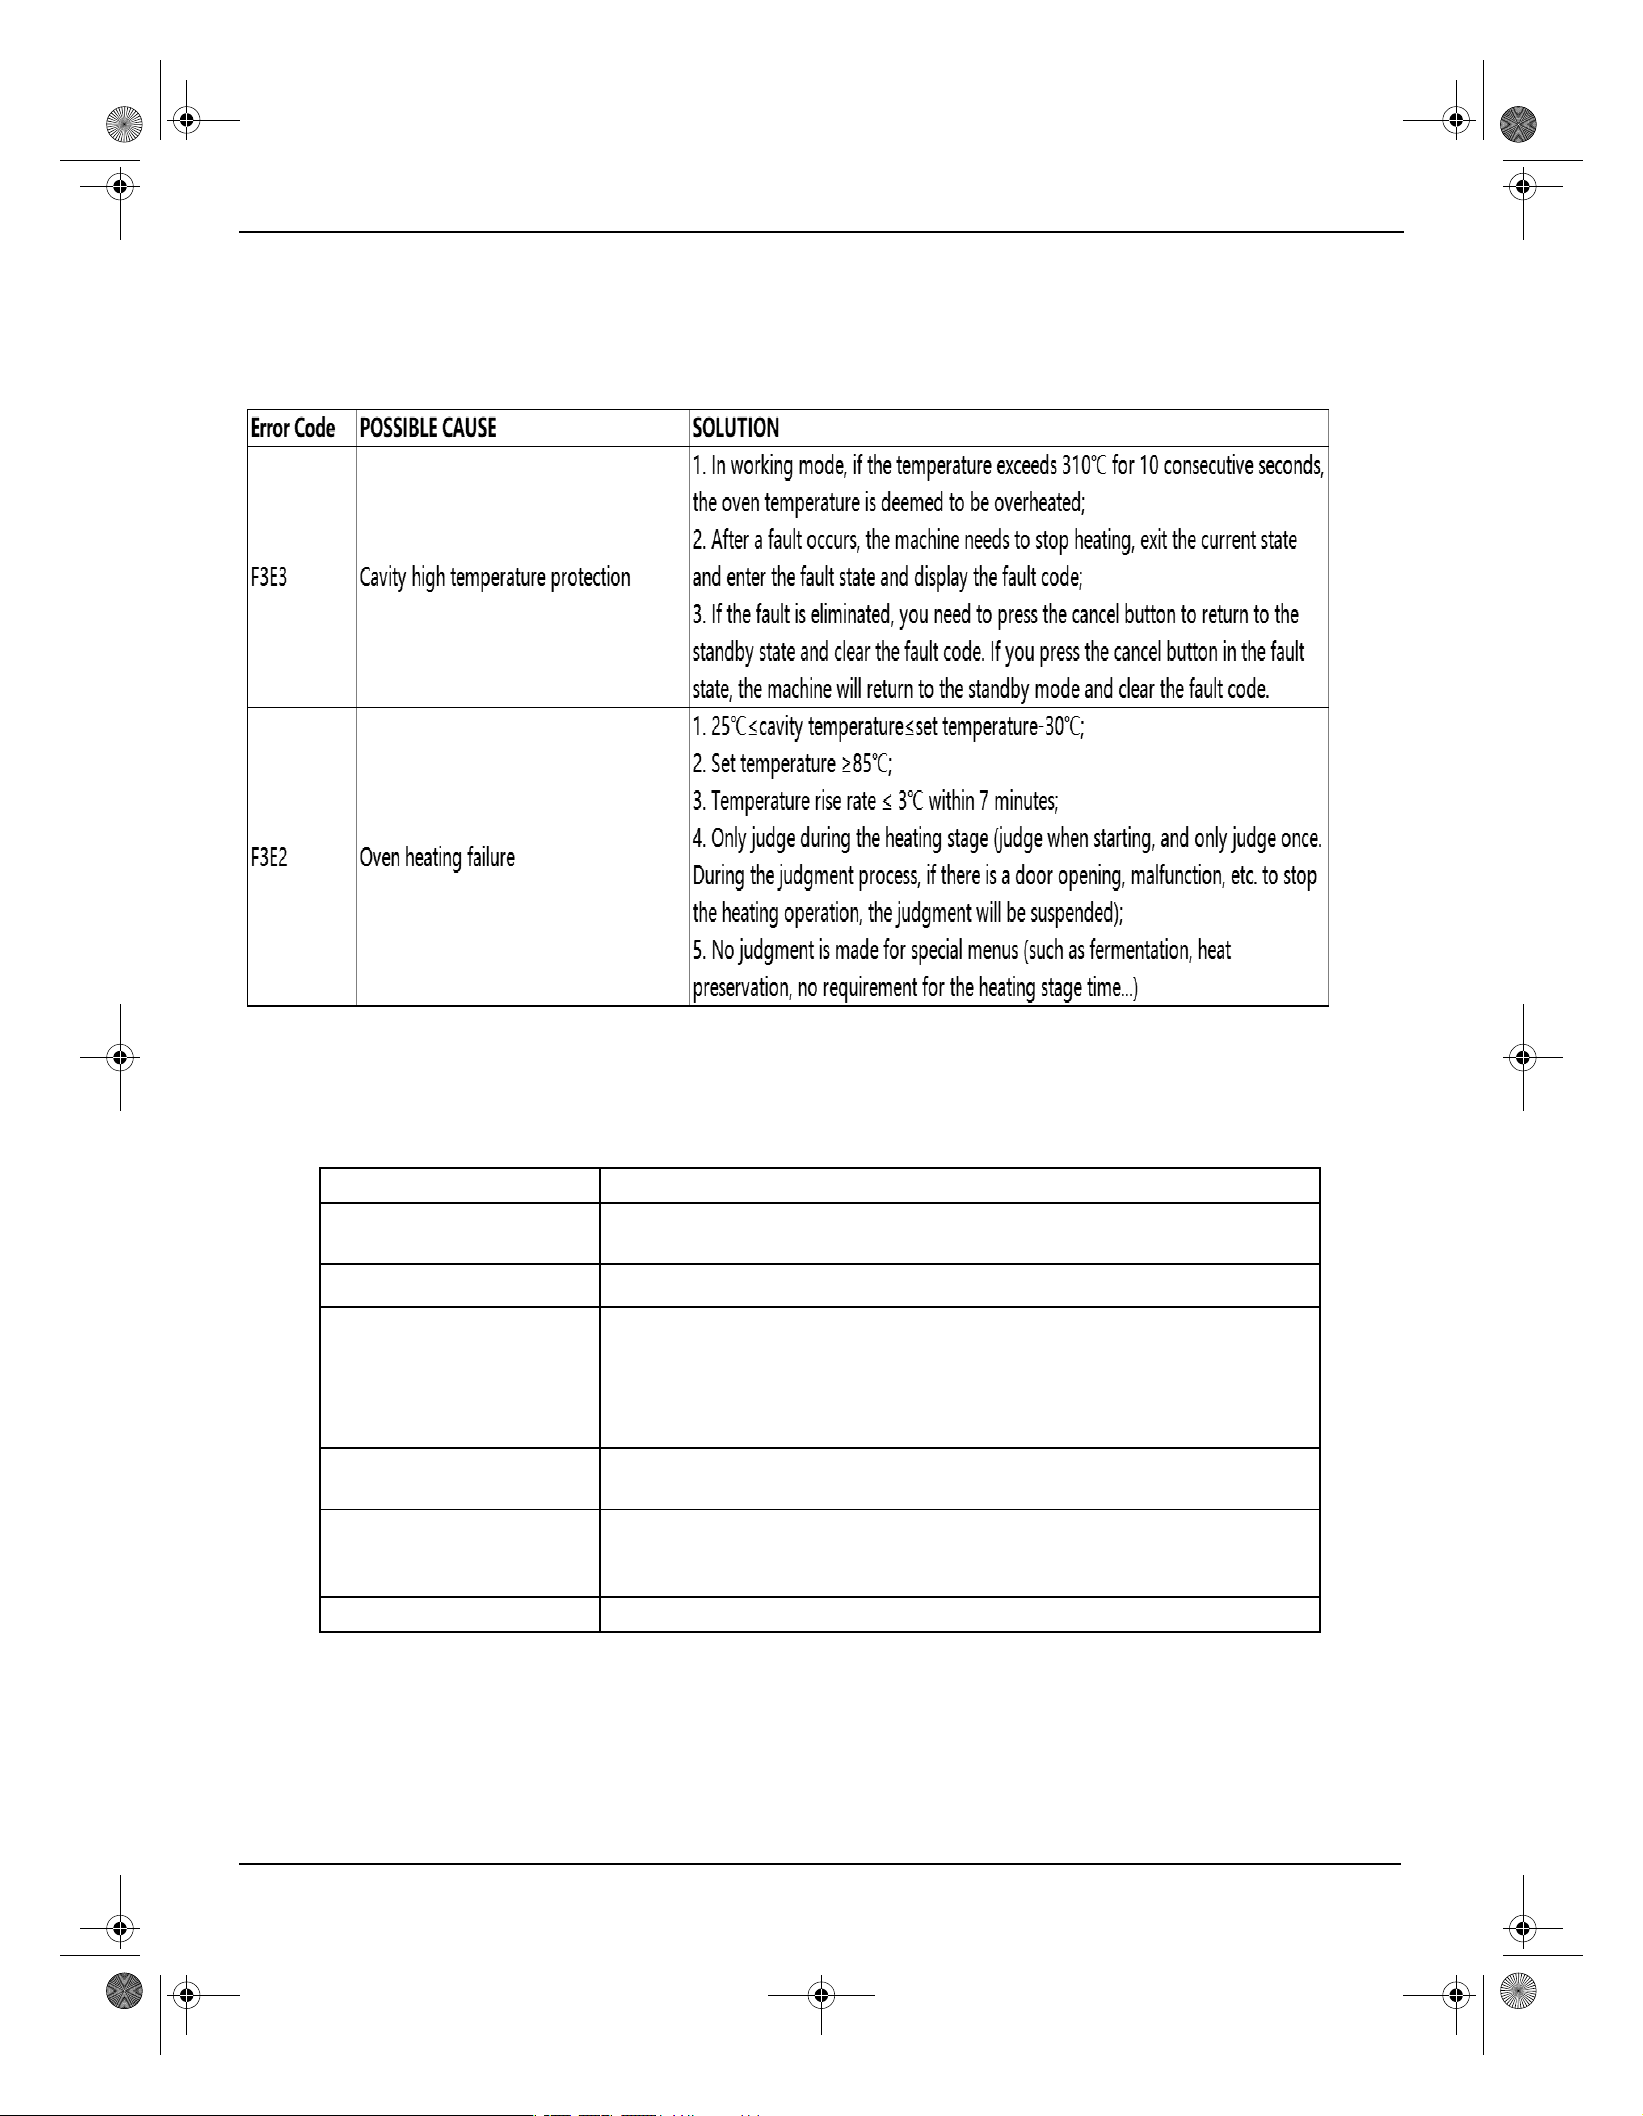
49
5.0 Cu. Ft. Electric Range with Steam Cleaning
Specifications
Dimensions (H × W × D) 46.9 to 47.9 × 29.9 × 26.9 in.(119.1 to 121.7 × 75.9 × 68.3 cm)
Gross Weight: 216 lbs. (98 kg)
Weight
Net Weight: 184 lbs. (83.5 kg)
Power requirements 208 ~ 240 VAC, 60 Hz, 48 ~ 55 A
Cooktop elements
Right Front: 2100 W
Left Front: 2100 W
Right Rear: 1200 W
Left Rear: 1200 W
Oven element Hidden Bake Element: 3000W
Broil Element: 3500W
Oven temperatures
Bake: 150 ~ 550° F (65.6 ~ 287.8° C) )
Oven light 40 W Halogen type, designed for oven use

ONE-YEAR LIMITED WARRANTY
Manufacturer provides a limited warranty for each new range to be free from defects in material and workmanship for a period of one
year from the date of purchase. Manufacturer agrees to remedy any such defective inside accessory components to furnish a new unit
if the unit proves to have failed, at the company’s option, for one year from your original date of purchase. In the event the unit
requires replacement or refund under the terms of this limited warranty, the Buyer is responsible for all transportation expenses to
return the unit prior to receiving a replacement unit or refund.
The unit needs to be registered. A copy of the dated sales receipt/invoice is required to receive benefits of this limited warranty.
THIS LIMITED WARRANTY DOES NOT COVER THE FOLLOWING
1. Products with original serial numbers that have been removed, altered or cannot be readily determined.
2. Products that have been transferred from its original owner to another party or removed
outside the USA.
3. Rust on the interior or exterior of the unit.
4. Damages due to shipping damage or improper installation.
5. Damages due to misuse or abuse.
6. Service calls, repairs, and labor expenses for any purpose.
7. Replacement or resetting of house fuses or circuit breakers.
8. Failure or defects of this product if used for other purposes than its intended purpose or used other than in accordance with the
provided instructions.
9. Disposal costs for failed unit not returned to Manufacturer.
10. Any delivery/installation costs incurred as the result of a unit that fails to perform as specified.
11. Expenses for travel and transportation for product if you are exchanging or returning the unit.
12. Expenses related to the removal and re-installation of your unit or for making the unit accessible, such as removal of trim,
cupboards, shelves, etc. or if not installed in accordance with the provided installation instructions.
13. Damages to the finish of the unit or home incurred during installation, including but not limited to floors, cabinets, walls, etc.
14. Damages caused by external causes such as abuse, misuse, inadequate power supply, accidents, fires, or acts of God.
15. Refunds for returned products are limited to the price paid for the unit per the sales receipt. DISCLAIMER OF IMPLIED
WARRANTIES, LIMITATION OF REMEDIES AND EXCLUSIONS
EXCEPT FOR THE EXPRESS WARRANTIES SET FORTH HEREIN, MANUFACTURER MAKES NO WARRANTY WHATSOEVER (OR THE
SHORTEST PERIOD ALLOWED BY LAW) REGARDING THE GOODS, INCLUDING ANY (1) WARRANTY OF MERCHANTABILITY; (2)
WARRANTY OF FITNESS
FOR A PARTICULAR PURPOSE; (3) WARRANTY OF TITLE; OR (4) WARRANTY AGAINST INFRINGEMENT OF INTELLECTUAL PROPERTY
RIGHTS OF A THIRD PARTY; WHETHER ARISING
BY LAW, COURSE OF DEALING, COURSE OF PERFORMANCE, USAGE OF TRADE, OR OTHERWISE. BUYER ACKNOWLEDGES THAT IT HAS
NOT RELIED ON ANY REPRESENTATION OR
WARRANTY MADE BY MANUFACTURER, OR ANY OTHER PERSON ON MANUFACTURER’S
BEHALF. REPLACEMENT OF UNIT AND LISTED PARTS IN ACCORDANCE WITH THE TERMS
HEREIN, IS YOUR SOLE AND EXCLUSIVE REMEDY UNDER HIS LIMITED WARRANTY. MANUFACTURER IS NOT LIABLE FOR INCIDENTAL
OR CONSEQUENTIAL DAMAGES AND NO REPRESENTATIVE
OR PERSON IS AUTHORIZED TO ASSUME FOR MANUFACTURER ANY OTHER
LIABILITY IN CONNECTION WITH THE SALE OF THIS PRODUCT. UNDER NO CIRCUMSTANCE
IS THE CONSUMER PERMITTED TO RETURN THE UNIT TO MANUFACTURER WITHOUT THE
PRIOR WRITTEN CONSENT OF MANUFACTURER
Customer Service: 844-303-8048 between the hours of 8:00 am and 4:00 pm EST, EMAIL: [email protected]