To Reduce The Risk Of Injury, User Must Read And
Understand Operator’s Manual. Save These Instructions For Future Reference.
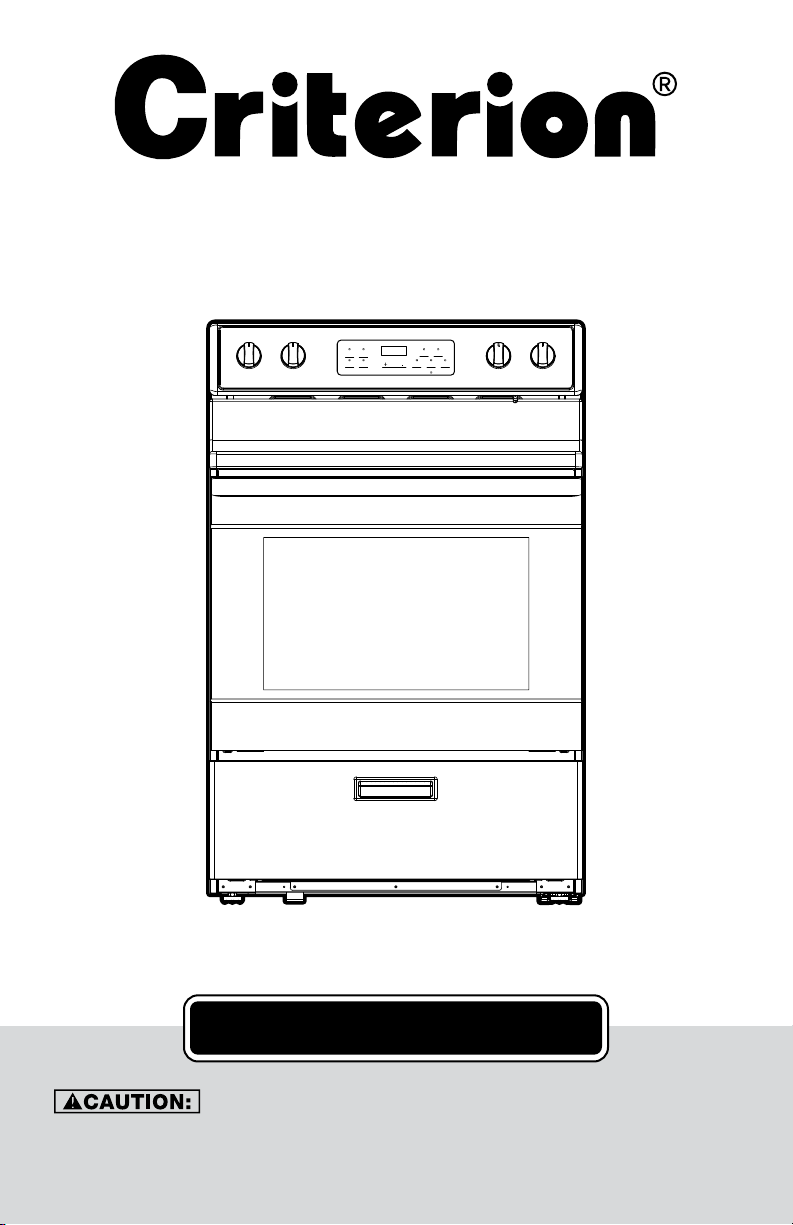
455-4600 / 455-4601 / 455-4602
30" Standard Electric Range
User Manual
Cook Options
Bake Start
Oven Settings
Automatic Oven
Lock Controls
Hold 3 Seconds
Broil Hi/Lo Cancel/O
Oven / Light
Cook / Time
Delay Time
Timer / On/o
Set / Clock
88:88
USER’S MANUAL

2 3
TABLE OF CONTENTS
SAFETY INFORMATION 3
Anti-Tip Bracket 4
General Safety 4
PARTS AND FEATURES 6
Hot Surface Indicator Light 6
Control Panel Diagram 6
Ceramic Glass Cooktop 7
COOKWARE 8
ELECTRONIC RANGE CONTROLS 10
Control Panel Diagram 10
Control Knob 10
Setting Clock 11
Cancel/Off 11
Oven Lights 11
Start 11
Timer 11
Oven Temperature Format 11
Delay Time 12
Lock Controls 12
OVEN USE 13
Positioning Racks and Bakeware 13
Preheating the Oven 14
Bake 14
Broil 14
Cook Time 15
Food Safety 15
OVEN CARE 16
Oven Door 16
Oven Gasket 17
Oven Light 17
Cooktop Cleaning 18
General Cleaning 19
TROUBLESHOOTING TIPS 20
WARRANTY 21
CUSTOMER SERVICE 21
SAFETY INFORMATION
NOTE: PLEASE READ ALL SAFETY INSTRUCTIONS BEFORE USING THE APPLIANCE.
There are important safety messages in this manual for the appliance. Failure to follow in-
structions may result in potential safety hazards to the product and/or cause bodily injury.
All safety messages will explain what the potential hazards are, explain how to reduce the
chance of injury, and state what can happen if the instructions are not followed.
SYMBOL MEANING
ALL SAFETY MESSAGES WILL EXPLAIN WHAT THE POTENTIAL HAZARDS ARE, EXPLAIN
HOW TO REDUCE THE CHANCE OF INJURY, AND STATE WHAT CAN HAPPEN IF THE
INSTRUCTIONS ARE NOT FOLLOWED.
• This is the safety alert symbol.
• This symbol alerts you to potential hazards that can hurt or kill you
and others.
• All safety messages will follow the safety alert symbol with either the
word: “DANGER” or “WARNING.”
• ALL SAFETY MESSAGES WILL EXPLAIN WHAT THE POTENTIAL
HAZARDS ARE, EXPLAIN HOW TO REDUCE THE CHANCE OF INJURY,
AND STATE WHAT CAN HAPPEN IF THE INSTRUCTIONS ARE NOT
FOLLOWED.
YOU MAY BE SERIOUSLY INJURED OR KILLED IF YOU DO NOT IMMEDIATELY FOLLOW
INSTRUCTIONS!
DO NOT STORE OR USE GASOLINE OR OTHER FLAMMABLE VAPORS AND LIQUIDS IN
THE VICINITY OF THIS OR ANY OTHER APPLIANCE.
IF THE INFORMATION IN THIS MANUAL IS NOT FOLLOWED EXACTLY, A FIRE OR
EXPLOSION MAY RESULT IN CAUSING PROPERTY DAMAGE, PERSONAL INJURY, OR
DEATH!
YOU MAY BE SERIOUSLY INJURED OR KILLED IF YOU DO NOT FOLLOW INSTRUCTIONS!
4 5
SAFETY INFORMATION (continued) SAFETY INFORMATION
ANTI-TIP BRACKET
The range will not tip during normal use. However, the range can tip if you apply too much
force or weight to the open door without the anti-tip bracket fastened down properly.
NEVER USE THE RANGE FOR WARMING OR HEATING THE
ROOM. DOING SO MAY RESULT IN CARBON MONOXIDE
POISONING AND OVERHEATING THE OVEN!
• Do Not Leave Children Unattended Near Range! Children should not be left alone or
unattended in area where range is in use. This can lead to potential burns, injury, or
death.
• Wear Proper Apparel: Loose-fitting or hanging garments should never be worn while
using the range. Excess material has the potential to catch on fire and cause burns.
• Storage in the Oven: Do not store any items or flammable materials inside the oven.
Items inside could ignite and start a fire.
• Do Not Use Water on Grease Fires: In case of a grease fire, smother fire or flame with
well-fitted lid or use a fire extinguisher.
• Use Only Dry Potholders: Do not use wet or damp potholders on hot surfaces. May
result in burns from steam! Do not let potholder touch hot heating elements. Do not use
a towel or other bulky cloth.
• Use Care When Opening Oven Door: Let hot air or steam escape before removing or
inserting food into the oven.
• Do Not Heat Unopened Food Containers: Unopened food containers will build-up
pressure and will cause container to burst and result in injury.
• Keep Oven Vent Ducts Unobstructed: The air inlets and outlets are necessary for the
range to operate properly.
• Placement of Oven Racks: Always place oven racks in desired position when oven is
off. If a rack must be moved while oven is hot, use potholders to protect hands from hot
heating elements in the oven.
• DO NOT TOUCH HEATING ELEMENTS OR INTERIOR SURFACES OF OVEN: Heating
elements may be hot even though they are dark in color. Interior surfaces of the oven will
become hot enough to cause burns! Potential hot surfaces include, burners, and other
exterior surfaces around the oven.
• During and After Use: Do not touch, or let clothing or other flammable materials come
in contact with the heating elements and/or interior surfaces of oven until they have had
sufficient time to cool.
• Potential Surfaces of the Oven May Become Hot Enough to Cause Burns: Among
these surfaces are the oven vent openings, surfaces near these openings, oven door,
and windows of the oven door.
• Clean Oven Gasket with a Mild Soap and Warm Water: The gasket is essential for a
good seal. Care should be taken not to rub, damage, or move the gasket.
• Do Not Use Oven Cleaners: No commercial oven cleaner or oven liner protective coat-
ing of any kind should be used in or around any part of the oven.
• Clean Only Parts Listed in Manual.
READ AND SAVE THESE SAFETY INSTRUCTIONS
FOR FUTURE REFERENCE.
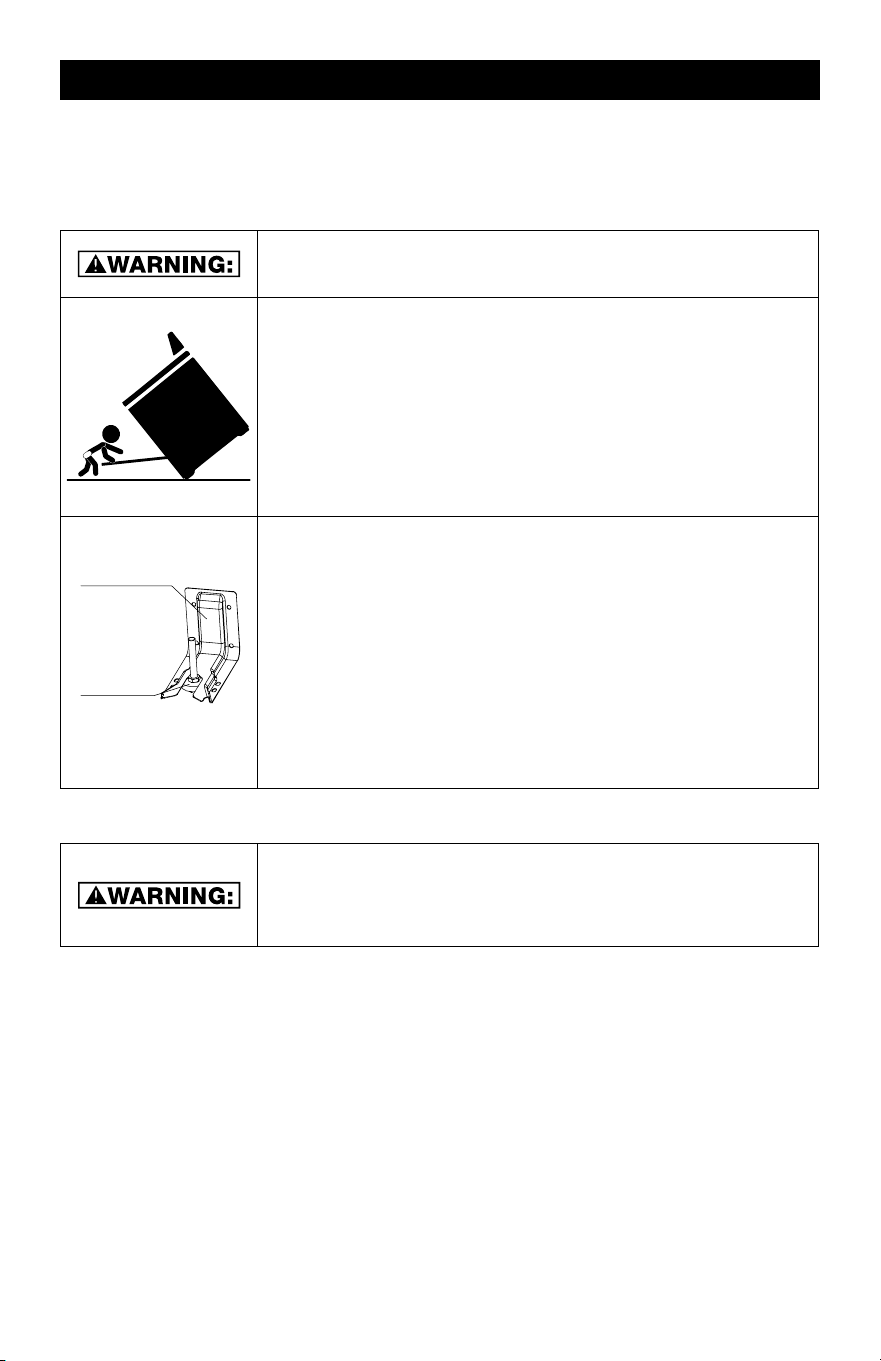
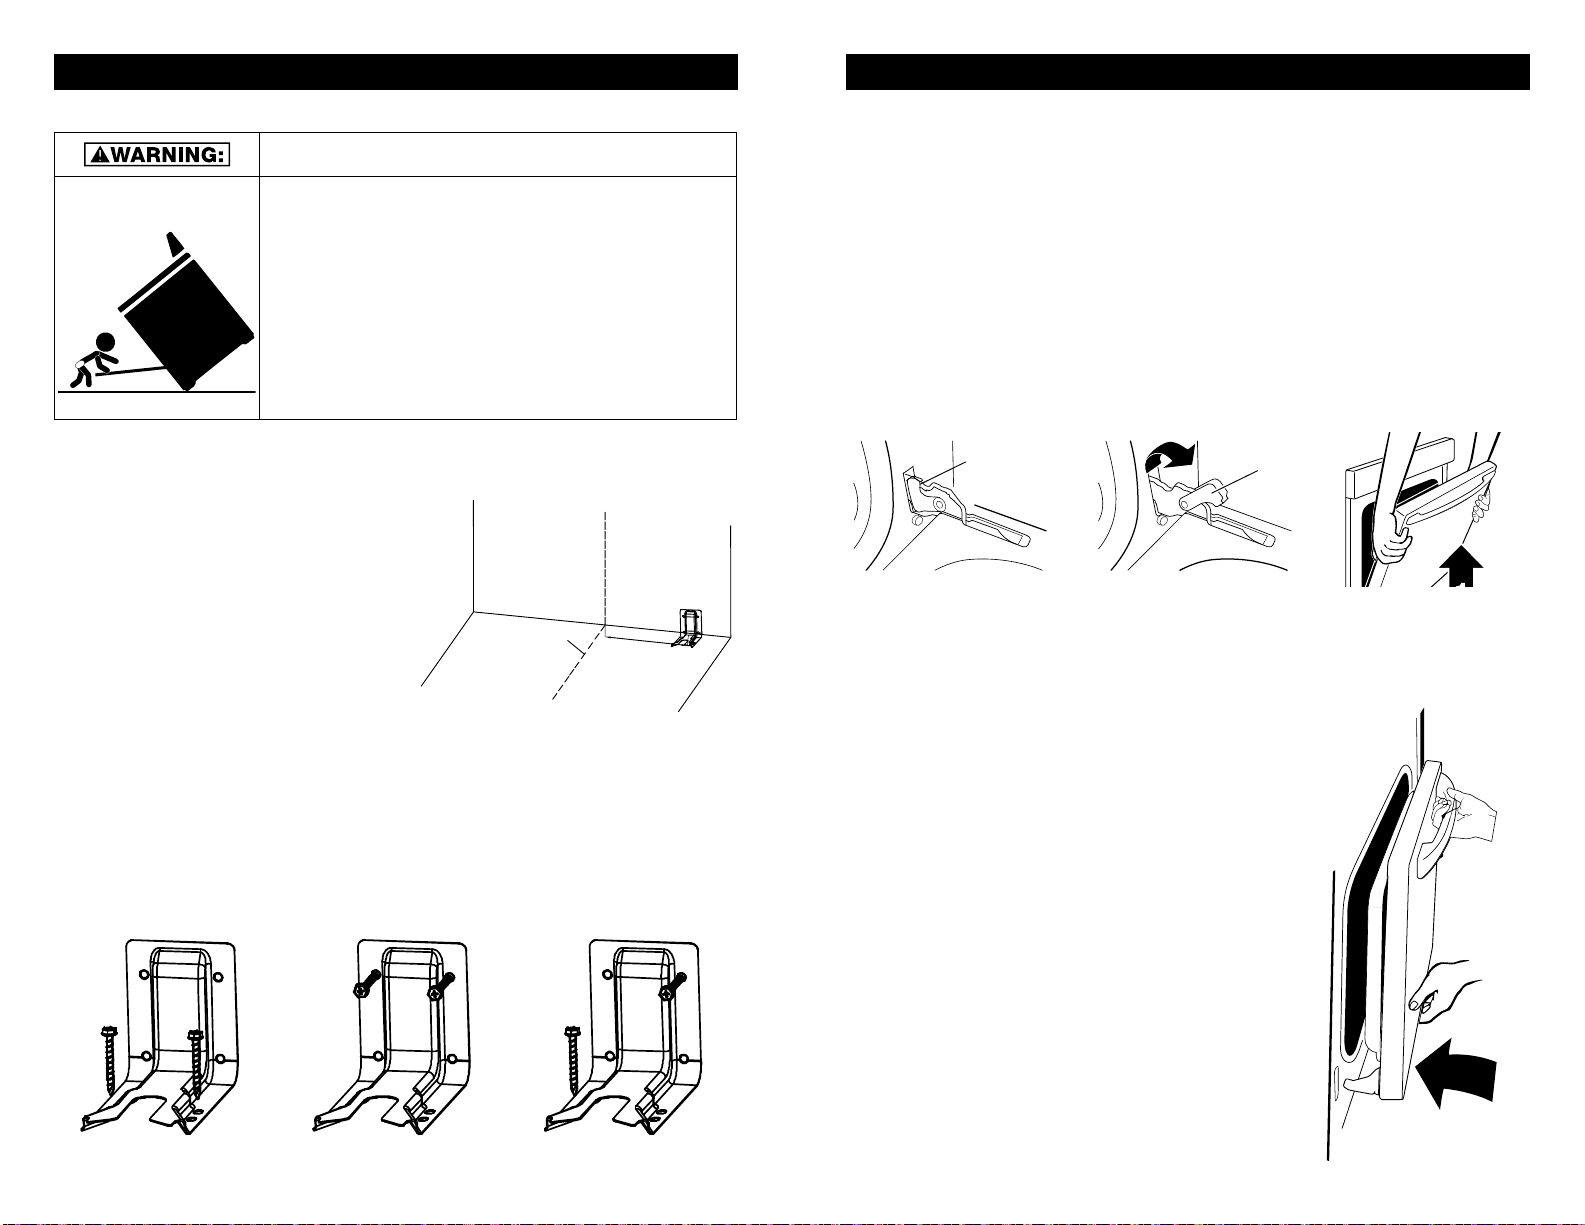
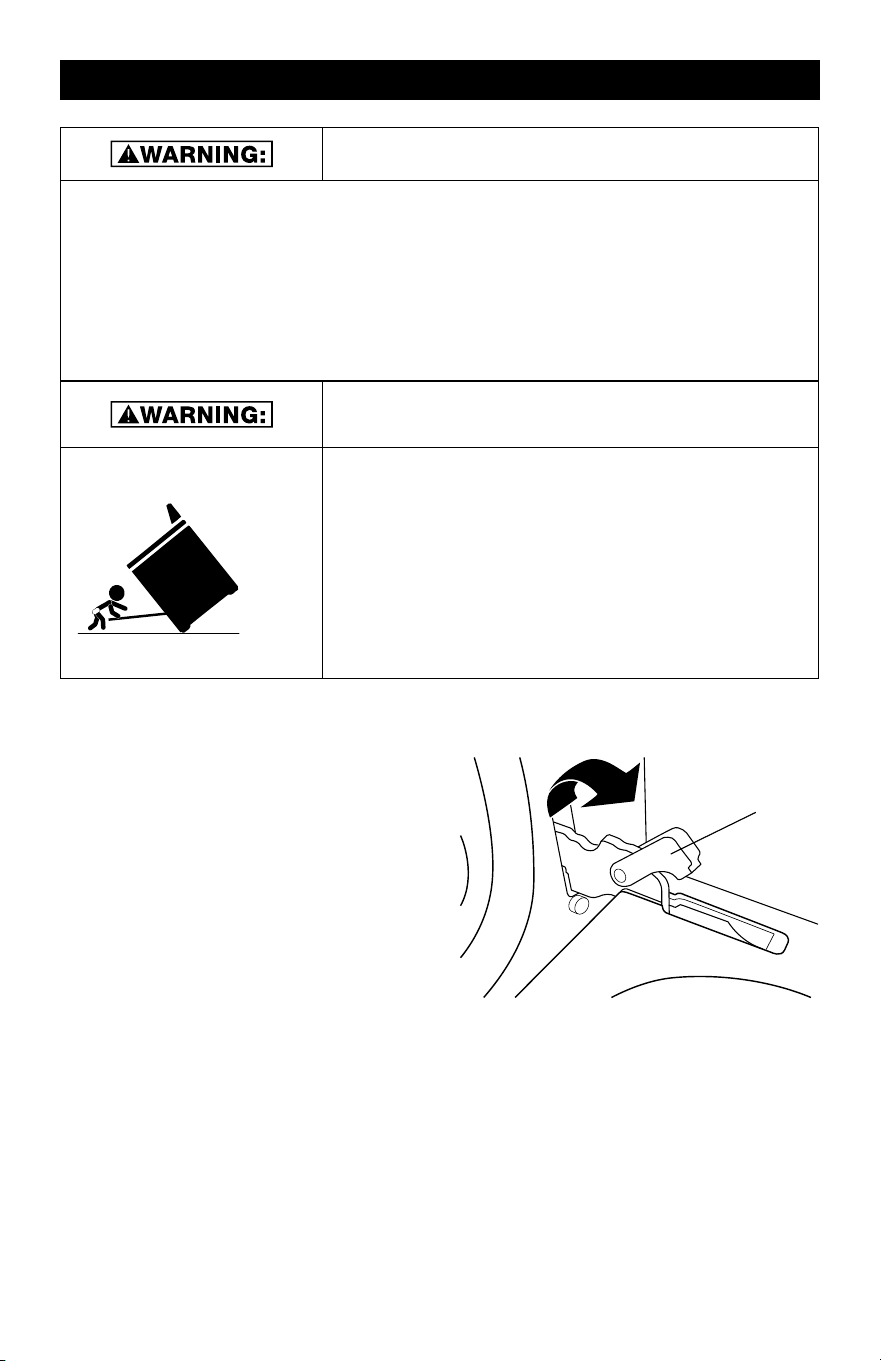
TIP OVER HAZARD
• A child or adult can tip the range and be killed.
• Make sure the anti-tip bracket has been properly installed and
secured per the installation instructions.
• Re-secure the anti-tip bracket if range is moved.
• Do not operate the range without the
anti-tip bracket installed and secured.
• Failure to follow these instructions can result in death or
serious burns to adults and children.
Range Foot
Anti-Tip Bracket
TO VERIFY THE ANTI-TIP BRACKET IS INSTALLED
AND SECURED PROPERLY:
1. Slide range forward
2. Look for the anti-tip bracket attached to the floor or wall,
then slide range back so rear range foot is under anti-tip
bracket.
3. If the range can be tipped away from the wall, the range has
not been secured in place. Repeat steps 1-2 to ensure rear
range foot is set properly.
NOTE:
SEE SAFETY INSTRUCTIONS BELOW FOR FURTHER DETAILS.
Before using your appliance, make sure all the packaging material is removed from the
exterior and interior parts of the range.
• Do not climb, sit, stand, or hang on any parts of the appliance.
• To reduce the risk of tipping, the range must be secured by properly installing the anti-tip
bracket.
• To check if the device is installed properly, slide the range forward, look for the anti-tip
bracket attached to the floor or wall, then slide the range back so the rear range foot is
under the anti-tip bracket.
• To ensure proper installation, be sure the range is installed correctly and grounded by a
qualified technician.
• Before performing any service on your appliance, make sure to disconnect the power
supply and the range is unplugged.
• Service Repair: Do not repair or replace any part of the oven unless specifically recom-
mended in the manual. Allother servicing should be referred to a qualified technician.
GENERAL SAFETY INSTRUCTIONS
TO REDUCE THE RISK OF FIRE, ELECTRICAL SHOCK,
INJURY TO PERSONS, OR DAMAGE WHEN USING THE
RANGE, FOLLOW BASIC PRECAUTIONS, INCLUDING THE
FOLLOWING:
4 5
SAFETY INFORMATION (continued) SAFETY INFORMATION
ANTI-TIP BRACKET
The range will not tip during normal use. However, the range can tip if you apply too much
force or weight to the open door without the anti-tip bracket fastened down properly.
NEVER USE THE RANGE FOR WARMING OR HEATING THE
ROOM. DOING SO MAY RESULT IN CARBON MONOXIDE
POISONING AND OVERHEATING THE OVEN!
• Do Not Leave Children Unattended Near Range! Children should not be left alone or
unattended in area where range is in use. This can lead to potential burns, injury, or
death.
• Wear Proper Apparel: Loose-fitting or hanging garments should never be worn while
using the range. Excess material has the potential to catch on fire and cause burns.
• Storage in the Oven: Do not store any items or flammable materials inside the oven.
Items inside could ignite and start a fire.
• Do Not Use Water on Grease Fires: In case of a grease fire, smother fire or flame with
well-fitted lid or use a fire extinguisher.
• Use Only Dry Potholders: Do not use wet or damp potholders on hot surfaces. May
result in burns from steam! Do not let potholder touch hot heating elements. Do not use
a towel or other bulky cloth.
• Use Care When Opening Oven Door: Let hot air or steam escape before removing or
inserting food into the oven.
• Do Not Heat Unopened Food Containers: Unopened food containers will build-up
pressure and will cause container to burst and result in injury.
• Keep Oven Vent Ducts Unobstructed: The air inlets and outlets are necessary for the
range to operate properly.
• Placement of Oven Racks: Always place oven racks in desired position when oven is
off. If a rack must be moved while oven is hot, use potholders to protect hands from hot
heating elements in the oven.
• DO NOT TOUCH HEATING ELEMENTS OR INTERIOR SURFACES OF OVEN: Heating
elements may be hot even though they are dark in color. Interior surfaces of the oven will
become hot enough to cause burns! Potential hot surfaces include, burners, and other
exterior surfaces around the oven.
• During and After Use: Do not touch, or let clothing or other flammable materials come
in contact with the heating elements and/or interior surfaces of oven until they have had
sufficient time to cool.
• Potential Surfaces of the Oven May Become Hot Enough to Cause Burns: Among
these surfaces are the oven vent openings, surfaces near these openings, oven door,
and windows of the oven door.
• Clean Oven Gasket with a Mild Soap and Warm Water: The gasket is essential for a
good seal. Care should be taken not to rub, damage, or move the gasket.
• Do Not Use Oven Cleaners: No commercial oven cleaner or oven liner protective coat-
ing of any kind should be used in or around any part of the oven.
• Clean Only Parts Listed in Manual.
READ AND SAVE THESE SAFETY INSTRUCTIONS
FOR FUTURE REFERENCE.
TIP OVER HAZARD
• A child or adult can tip the range and be killed.
• Make sure the anti-tip bracket has been properly installed and
secured per the installation instructions.
• Re-secure the anti-tip bracket if range is moved.
• Do not operate the range without the
anti-tip bracket installed and secured.
• Failure to follow these instructions can result in death or
serious burns to adults and children.
Range Foot
Anti-Tip Bracket
TO VERIFY THE ANTI-TIP BRACKET IS INSTALLED
AND SECURED PROPERLY:
1. Slide range forward
2. Look for the anti-tip bracket attached to the floor or wall,
then slide range back so rear range foot is under anti-tip
bracket.
3. If the range can be tipped away from the wall, the range has
not been secured in place. Repeat steps 1-2 to ensure rear
range foot is set properly.
NOTE:
SEE SAFETY INSTRUCTIONS BELOW FOR FURTHER DETAILS.
Before using your appliance, make sure all the packaging material is removed from the
exterior and interior parts of the range.
• Do not climb, sit, stand, or hang on any parts of the appliance.
• To reduce the risk of tipping, the range must be secured by properly installing the anti-tip
bracket.
• To check if the device is installed properly, slide the range forward, look for the anti-tip
bracket attached to the floor or wall, then slide the range back so the rear range foot is
under the anti-tip bracket.
• To ensure proper installation, be sure the range is installed correctly and grounded by a
qualified technician.
• Before performing any service on your appliance, make sure to disconnect the power
supply and the range is unplugged.
• Service Repair: Do not repair or replace any part of the oven unless specifically recom-
mended in the manual. Allother servicing should be referred to a qualified technician.
GENERAL SAFETY INSTRUCTIONS
TO REDUCE THE RISK OF FIRE, ELECTRICAL SHOCK,
INJURY TO PERSONS, OR DAMAGE WHEN USING THE
RANGE, FOLLOW BASIC PRECAUTIONS, INCLUDING THE
FOLLOWING:

6 7
PARTS AND FEATURES PARTS AND FEATURES (continued)
B
D
F
L
E
H
G
I
C
K
A
J
RANGE PARTS DIAGRAM:
A. Control Knob
B. Control Panel
C. Control Knob
D. Ceramic Glass Surface
E. Oven Light
F. Oven Racks
G. Gasket
H. Oven Door with Handle
I. Storage Drawer
J. Broiler
K. Oven Vent
L. Adjustable Feet x 4
BURN HAZARD
COOKTOP SURFACE MAY STILL BEHOT EVEN THOUGH
ELEMENT SURFACE IS NOT GLOWING RED.
CHOKING HAZARD
SMALL PARTS. NOT FOR CHILDREN UNDER 3 YEARS OLD.
HOT SURFACE INDICATOR LIGHT
• Hot Surface Indicator Light is located on the front center area of the glass cooktop.
• The Hot Surface Indicator Light will glow if any surface cooking area is too hot to touch,
even after the surface cooking area is turned off. Use caution as the cooktop surface
may still be warm after the hot surface indicator light has shut off.
CERAMIC GLASS COOKTOP
• The surface cooking area will glow red when an element is on. Some parts of the surface
cooking area may not glow red when an element is on. This is normal operation. It will
also randomly cycle off and back on again, even while on High, to keep the cooktop from
extreme temperatures.
• It is normal for the surface of ceramic glass to change color when surface cooking areas
are hot. As the glass cools, it will return to its original color.
• Clean the cooktop after each use to help avoid scratches, pitting, abrasions and to
condition the glass surface. Ceramic glass cooktop cleaner and a cooktop scraper are
also recommended for stubborn soils. Do not use abrasive cleaners, cleaning pads or
harsh chemicals for cleaning. Refer to the “Oven Care” section for additional informa-
tion.
• Use flat-bottomed cookware for best heat conduction and energy efficiency. Cookware
with rounded, warped, ribbed, or dented bottoms could cause uneven heating and poor
cooking results.
• Cookware designed with slightly indented bottoms or small expansion channels can be
used.
• Make sure the bottoms of pots and pans are clean and dry before using them. Residue
and water can leave deposits on ceramic glass when heated.
• Avoid storing jars or cans above the cooktop. Dropping a heavy or hard object onto the
cooktop could crack the cooktop.
• To avoid damage to the cooktop, do not leave a hot lid on the cooktop. As the cooktop
cools, air can become trapped between the lid and the cooktop, and the ceramic glass
could break when the lid is removed.
• For foods containing sugar in any form, clean up all spills and soils as soon as possible.
Allow the cooktop to cool down slightly. Then, while wearing oven mitts, remove the
spills using a scraper while the surface is still warm. If sugary spills are allowed to cool
down, they can adhere to the cooktop and can cause pitting and permanent marks.
• To avoid scratches, do not slide cookware or bakeware across the cooktop. Aluminum or
copper bottoms and rough finishes on cookware or bakeware could leave scratches or
marks on the cooktop.
• Do not cook popcorn in pre-packaged aluminum containers on the cooktop. They could
leave aluminum marks that cannot be removed completely.
• To avoid damage to the cooktop, do not allow objects that could melt, such as plastic or
aluminum foil, to touch any part of the entire cooktop.
• To avoid damage to the cooktop, do not use the cooktop as a cutting board.
• To avoid damage to the cooktop, do not cook foods directly on the cooktop.
CONTROL PANEL DIAGRAM
+ -
Automatic Oven
Cook Options
Bake Start
Broil
Hi/Lo
Cancel
Off
Lock Controls
Hold 3 Seconds
Oven Settings
Timer
On/off
Set
Clock
Oven
Light
Cook
Time
Delay
Time
Time of Day
OFF
IGNITE
Hi
Lo
OFF
IGNITE
Hi
Lo
OFF
IGNITE
Hi
Lo
OFF
IGNITE
Hi
Lo
A B C D E F
A FRONT LEFT
BURNER
C COOK OPTION E REAR RIGHT
BURNER
B REAR LEFT
BURNER
D OVEN SETTINGS F FRONT RIGHT
BURNER
FIRE HAZARD
• Never leave the range unattended
• Turn off controls when not cooking
• Failure to follow these instructions can result in death or fire
• When range is in use, the entire cooktop may become hot!

8 9
COOKWARE COOKWARE (continued)
STORAGE DRAWER
WHEN THE OVEN IS IN USE, THE DRAWER MAY BECOME HOT. DO NOT STORE
PLASTICS, CLOTH, OR OTHER ITEMS THAT COULD MELT OR BURN IN THE DRAWER.
OVEN VENT
THE OVEN VENT RELEASES HOT AIR AND MOISTURE FROM THE OVEN, IT SHOULD
NOT BE BLOCKED OR COVERED. DO NOT SET PLASTICS, PAPER OR OTHER ITEMS
THAT COULD MELT OR BURN NEAR THE OVEN VENT.
CLEANING COOKTOP
TO AVOID PERMANENT DAMAGE TO THE COOKTOP SURFACE AND TO MAKE
SPILLS EASIER TO REMOVE, CLEAN THE COOKTOP AFTER EACH USE.
EMPTY COOKWARE
DO NOT LEAVE EMPTY COOKWARE ON A HOT SURFACE COOKING AREA, ELE-
MENT, OR SURFACE BURNER.
Ideal cookware should have a flat bottom, straight sides and a well fitted lid, and the
material should be of medium-to-heavy thickness.
• Rough finishes may scratch the
cooktop or grates. Aluminum and
copper may be used as a core or
base in cookware.
• Cookware material is a factor in
how quickly and evenly heat is
transferred, which affects cooking
results.
• Cookware with nonstick surfaces
should not be used under the
broiler.
• Check for flatness by placing the
straight edge of a ruler across the
bottom of the cookware. While
you rotate the ruler, no space or
light should be visible between it
and the cookware.
1
2
3
4
5
6
7
8
9
1 0
1 1
1 2
1 3
1 4
1 5
1 6
1 7
1 8
1 9
2 0
1
2
3
4
5
6
7
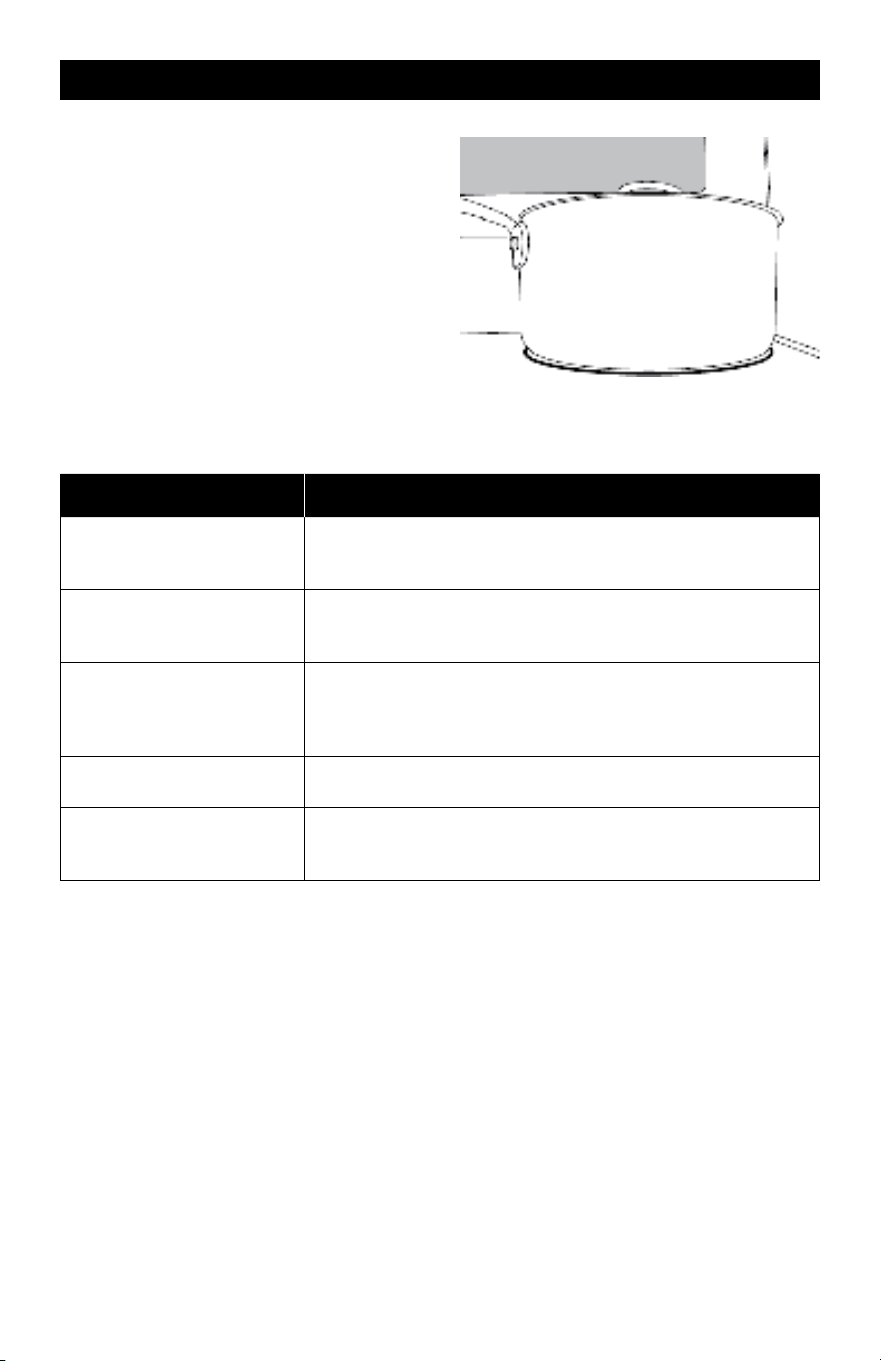
Use flat-bottomed cookware for best
cooking results and energy efficiency. The
cookware should be about the same size as
the cooking area outlined on the cooktop.
Cookware should not extend more than ½"
(1.3 cm) outside the area.
Use the following chart as a general guide for cookware material characteristics. Individual
results may vary.
COOKWARE CHARACTERISTICS
Aluminum
Heats quickly and evenly.
Suitable for all types of cooking.
Medium or heavy thickness is best for most cooking tasks.
Cast iron
Heats slowly and evenly.
Good for browning and frying.
Maintains heat for slow cooking.
Ceramic or Ceramic Glass
Follow manufacturer’s instructions.
Heats slowly, but unevenly.
Ideal results on low to medium heat settings.
May scratch the cooktop.
Porcelain Enamel-On
Steel or Cast Iron
See stainless steel or cast iron.
Stainless Steel
Heats quickly, but unevenly.
A core/base of aluminum or copper on stainless steel pro-
vides even heating.
8 9
COOKWARE COOKWARE (continued)
STORAGE DRAWER
WHEN THE OVEN IS IN USE, THE DRAWER MAY BECOME HOT. DO NOT STORE
PLASTICS, CLOTH, OR OTHER ITEMS THAT COULD MELT OR BURN IN THE DRAWER.
OVEN VENT
THE OVEN VENT RELEASES HOT AIR AND MOISTURE FROM THE OVEN, IT SHOULD
NOT BE BLOCKED OR COVERED. DO NOT SET PLASTICS, PAPER OR OTHER ITEMS
THAT COULD MELT OR BURN NEAR THE OVEN VENT.
CLEANING COOKTOP
TO AVOID PERMANENT DAMAGE TO THE COOKTOP SURFACE AND TO MAKE
SPILLS EASIER TO REMOVE, CLEAN THE COOKTOP AFTER EACH USE.
EMPTY COOKWARE
DO NOT LEAVE EMPTY COOKWARE ON A HOT SURFACE COOKING AREA, ELE-
MENT, OR SURFACE BURNER.
Ideal cookware should have a flat bottom, straight sides and a well fitted lid, and the
material should be of medium-to-heavy thickness.
• Rough finishes may scratch the
cooktop or grates. Aluminum and
copper may be used as a core or
base in cookware.
• Cookware material is a factor in
how quickly and evenly heat is
transferred, which affects cooking
results.
• Cookware with nonstick surfaces
should not be used under the
broiler.
• Check for flatness by placing the
straight edge of a ruler across the
bottom of the cookware. While
you rotate the ruler, no space or
light should be visible between it
and the cookware.
1
2
3
4
5
6
7
8
9
1 0
1 1
1 2
1 3
1 4
1 5
1 6
1 7
1 8
1 9
2 0
1
2
3
4
5
6
7
Use flat-bottomed cookware for best
cooking results and energy efficiency. The
cookware should be about the same size as
the cooking area outlined on the cooktop.
Cookware should not extend more than ½"
(1.3 cm) outside the area.
Use the following chart as a general guide for cookware material characteristics. Individual
results may vary.
COOKWARE CHARACTERISTICS
Aluminum
Heats quickly and evenly.
Suitable for all types of cooking.
Medium or heavy thickness is best for most cooking tasks.
Cast iron
Heats slowly and evenly.
Good for browning and frying.
Maintains heat for slow cooking.
Ceramic or Ceramic Glass
Follow manufacturer’s instructions.
Heats slowly, but unevenly.
Ideal results on low to medium heat settings.
May scratch the cooktop.
Porcelain Enamel-On
Steel or Cast Iron
See stainless steel or cast iron.
Stainless Steel
Heats quickly, but unevenly.
A core/base of aluminum or copper on stainless steel pro-
vides even heating.
10 11
ELECTRIC RANGE CONTROL ELECTRIC RANGE CONTROL (continued)
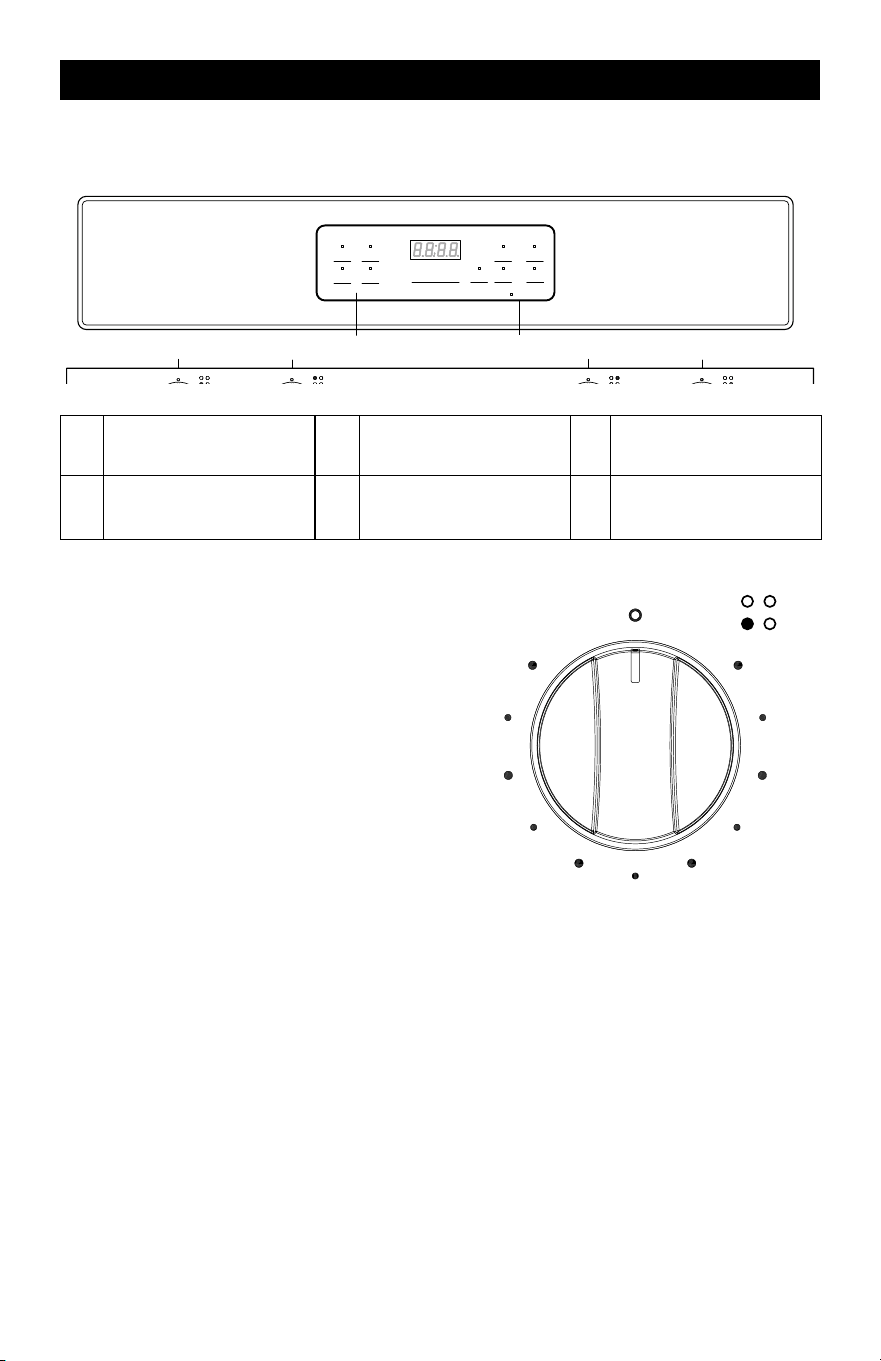
The oven’s controls are accessed through its control panel.
CONTROL PANEL DIAGRAM
+ -
Automatic Oven
Cook Options
Bake Start
Broil
Hi/Lo
Cancel
Off
Lock Controls
Hold 3 Seconds
Oven Settings
Timer
On/off
Set
Clock
Oven
Light
Cook
Time
Delay
Time
Time of Day
OFF
IGNITE
Hi
Lo
OFF
IGNITE
Hi
Lo
OFF
IGNITE
Hi
Lo
OFF
IGNITE
Hi
Lo
A B C D E F
A
FRONT LEFT
BURNER
C COOK OPTION E
REAR RIGHT
BURNER
B
REAR LEFT
BURNER
D OVEN SETTINGS F
FRONT RIGHT
BURNER
CONTROL KNOB
• The control knobs can be set to any-
where between “Hi” and “Low.”
• Push in and turn to setting
OFF
Hi
Low
2
4
6
8
When power is first supplied to the range or if a power failure occurs, “12:00” will appear on
the display and flash. When the oven is not in use, the display will show only the time.
NOTES:
• The clock function on this range has two available time settings. 12-hour or 24-hour
time.
• The range is programed with the 12-hour time mode set as the default setting.
• Before setting the clock, make sure the oven and timer are off.
• If you would like to change the time mode from the default setting, you must change it
before setting the clock.
HOW TO SELECT THE 12-HOUR OR 24-HOUR TIME SETTING:
1) To switch the clock mode from 12-hour or 24-hour time, press the “Set Clock” pad, and
hold for 3 seconds.
2) After 3 seconds, 12 or 24 will appear on the display.
• If the display shows “12” you are switching the time mode to 12-hour time.
• If the display shows “24” you are switching the time mode to 24-hour time.
3) Once your desired time mode appears, the display will automatically switch back to the
clock display indicating that your time mode has been updated.
HOW TO SET THE CLOCK
After the desired time setting mode has been selected you can now set the clock time on
the range.
1) To set the clock, press the “Set Clock” pad, and the hours will begin to flash, press the
“+ or –” pad to adjust the hour. To lock in the hour, press the “Set Clock” pad.
2) Once the hour is locked in, the minutes will begin to flash on the display, next press the
“+ or –” pad to adjust the minutes. To lock in the minutes, press the “Set Clock” pad.
3) The clock time on your range is now set.
CANCEL/OFF
The Cancel/Off pad stops any function except the Control Lock.
OVEN LIGHT
Press the “Oven Light” pad to turn the lights on or off. When the “Bake” or “Broil” start, the
Oven Light will light up automatically.
START
The “Start” Pad begins the oven function. If the “Start” pad is not pressed within 30 seconds
after pressing a function pad, the display will begin to flash for 30 seconds, then 5 reminder
tones will sound, and “PUSH" icon and “On” icon will begin to flash alternately on the dis-
play for 30 seconds. If the “Start” pad is not pressed the oven function will be canceled and
the display will return to showing the clock time.
TIMER
The timer can be set in hours or minutes up to 11 hours and 59 minutes (in the 12-hour time
mode; 23-hours and 59 minutes in the 24-hour time mode), and counts down the set time
programmed into the system. The timer does not start or stop the oven.
HOW TO SET THE TIMER
1. To set the Timer, press the “Timer On/Off” pad. The Timer indicator light will light up.
2. Next, the display will begin to flash, to set the desired hour or minutes, press the “+ or –”
pad.
3. Then press the “Timer On/Off” pad to begin the Timer.
4. When the set time ends, the end-of-cycle tones will sound.
5. Press the “Timer On/Off” pad to stop the timer and the reminder tones.
NOTE: If you would like to stop the Timer at any time, press the “Timer On/Off” pad twice.
OVEN TEMPERATURE FORMAT
• The default temperature scale setting for the oven is set to Fahrenheit.
• When using the oven, the oven temperature on the display will appear in Fahrenheit (F).
• However, if you would like to change the temperature scale to Celsius (C), please see
directions below.

10 11
ELECTRIC RANGE CONTROL ELECTRIC RANGE CONTROL (continued)
The oven’s controls are accessed through its control panel.
CONTROL PANEL DIAGRAM
+ -
Automatic Oven
Cook Options
Bake Start
Broil
Hi/Lo
Cancel
Off
Lock Controls
Hold 3 Seconds
Oven Settings
Timer
On/off
Set
Clock
Oven
Light
Cook
Time
Delay
Time
Time of Day
OFF
IGNITE
Hi
Lo
OFF
IGNITE
Hi
Lo
OFF
IGNITE
Hi
Lo
OFF
IGNITE
Hi
Lo
A B C D E F
A
FRONT LEFT
BURNER
C COOK OPTION E
REAR RIGHT
BURNER
B
REAR LEFT
BURNER
D OVEN SETTINGS F
FRONT RIGHT
BURNER
CONTROL KNOB
• The control knobs can be set to any-
where between “Hi” and “Low.”
• Push in and turn to setting
OFF
Hi
Low
2
4
6
8
When power is first supplied to the range or if a power failure occurs, “12:00” will appear on
the display and flash. When the oven is not in use, the display will show only the time.
NOTES:
• The clock function on this range has two available time settings. 12-hour or 24-hour
time.
• The range is programed with the 12-hour time mode set as the default setting.
• Before setting the clock, make sure the oven and timer are off.
• If you would like to change the time mode from the default setting, you must change it
before setting the clock.
HOW TO SELECT THE 12-HOUR OR 24-HOUR TIME SETTING:
1) To switch the clock mode from 12-hour or 24-hour time, press the “Set Clock” pad, and
hold for 3 seconds.
2) After 3 seconds, 12 or 24 will appear on the display.
• If the display shows “12” you are switching the time mode to 12-hour time.
• If the display shows “24” you are switching the time mode to 24-hour time.
3) Once your desired time mode appears, the display will automatically switch back to the
clock display indicating that your time mode has been updated.
HOW TO SET THE CLOCK
After the desired time setting mode has been selected you can now set the clock time on
the range.
1) To set the clock, press the “Set Clock” pad, and the hours will begin to flash, press the
“+ or –” pad to adjust the hour. To lock in the hour, press the “Set Clock” pad.
2) Once the hour is locked in, the minutes will begin to flash on the display, next press the
“+ or –” pad to adjust the minutes. To lock in the minutes, press the “Set Clock” pad.
3) The clock time on your range is now set.
CANCEL/OFF
The Cancel/Off pad stops any function except the Control Lock.
OVEN LIGHT
Press the “Oven Light” pad to turn the lights on or off. When the “Bake” or “Broil” start, the
Oven Light will light up automatically.
START
The “Start” Pad begins the oven function. If the “Start” pad is not pressed within 30 seconds
after pressing a function pad, the display will begin to flash for 30 seconds, then 5 reminder
tones will sound, and “PUSH" icon and “On” icon will begin to flash alternately on the dis-
play for 30 seconds. If the “Start” pad is not pressed the oven function will be canceled and
the display will return to showing the clock time.
TIMER
The timer can be set in hours or minutes up to 11 hours and 59 minutes (in the 12-hour time
mode; 23-hours and 59 minutes in the 24-hour time mode), and counts down the set time
programmed into the system. The timer does not start or stop the oven.
HOW TO SET THE TIMER
1. To set the Timer, press the “Timer On/Off” pad. The Timer indicator light will light up.
2. Next, the display will begin to flash, to set the desired hour or minutes, press the “+ or –”
pad.
3. Then press the “Timer On/Off” pad to begin the Timer.
4. When the set time ends, the end-of-cycle tones will sound.
5. Press the “Timer On/Off” pad to stop the timer and the reminder tones.
NOTE: If you would like to stop the Timer at any time, press the “Timer On/Off” pad twice.
OVEN TEMPERATURE FORMAT
• The default temperature scale setting for the oven is set to Fahrenheit.
• When using the oven, the oven temperature on the display will appear in Fahrenheit (F).
• However, if you would like to change the temperature scale to Celsius (C), please see
directions below.

12 13
ELECTRIC RANGE CONTROL (continued) OVEN USE
HOW TO CHANGE THE OVEN TEMPERATURE SCALE TO CELSIUS:
1. To change the oven temperature scale to Celsius (C), press the “Bake” pad and hold for
3 seconds.
2. Next, the letter “C” will appear on the display for a few seconds.
3. The “C” will disappear from the display, and the clock time will reappear on the display
indicating the oven temperature scale has been switched.
4. When using the Bake function, the oven temperature will now display the letter “C” next
to the temperature.
HOW TO CHANGE THE OVEN TEMPERATURE SCALE BACK TO FAHRENHEIT:
• To change the oven temperature scale back to Fahrenheit (F), repeat above steps 1-3.
However, during the adjustment the letter “F” will appear on the display instead of a “C”.
DELAY TIME
The delay time function is available in the Bake or Broil mode.
HOW TO SET THE DELAY TIME:
1) To set the Delay Time, press the “Delay Time” pad, and the display will begin to flash.
2) Next, press the “+ or –” pad to set the time to when you would like your cooking time to
begin.
3) Once you have set your desired delay time, press the “Delay Time” pad again to lock in
the set time.
4) Next, press the “Bake” OR “Broil Hi/Lo” pad.
a. If the “Bake” pad has been pressed, press the “+ or –” pad to adjust to the desired
oven temperature.
b. If the “Broil Hi/Lo” pad has been pressed, the “HI” will automatically appear on dis-
play. Press the “Broil Hi/Lo” pad twice to set the “LO.”
5) Next, press the “Start” pad to begin the delay time and the set time will appear on the
display indicating that your Delay Time mode has been start.
6) When your delay time has been programmed, the Automatic Oven indicator will light up.
7) If you would like to cancel the Delay Time function, press the “Cancel/Off” pad
LOCK CONTROLS
The Lock Controls function locks the control panel pads from being used to avoid any unin-
tended use of the cook functions. When the control panel is locked, only the Oven Light will
function.
To Lock/Unlock Control Panel:
1. To lock the control panel, press both the “+ and –” pads at the same time and hold for
three seconds, then “LOC” icon will appear on the display and begin to flash. Once
“LOC” stops flashing, your control panel is now locked.
2. To unlock the control panel, press both the “+ and –” pads at the same time and hold
for three seconds, then “OPN” icon will appear on the display and begin to flash. Once
“OPN” icon stops flashing, your control panel is now unlocked.
LOCK CONTROLS
LOCK CONTROLS FUNCTION DOES NOT LOCK THE OVEN DOOR.
IMPORTANT: To avoid permanent damage to the porcelain finish, do not place food or
bakeware directly on the oven door or bottom. Do not line the oven bottom or racks with foil
or liner.
NOTE: To avoid damage to the Oven Shelves surface, do not use steel-wool pads, steel
wool, abrasive powder cleaners, abrasive paper towels, gritty washcloths, rust remover or
harsh chemicals for cleaning.
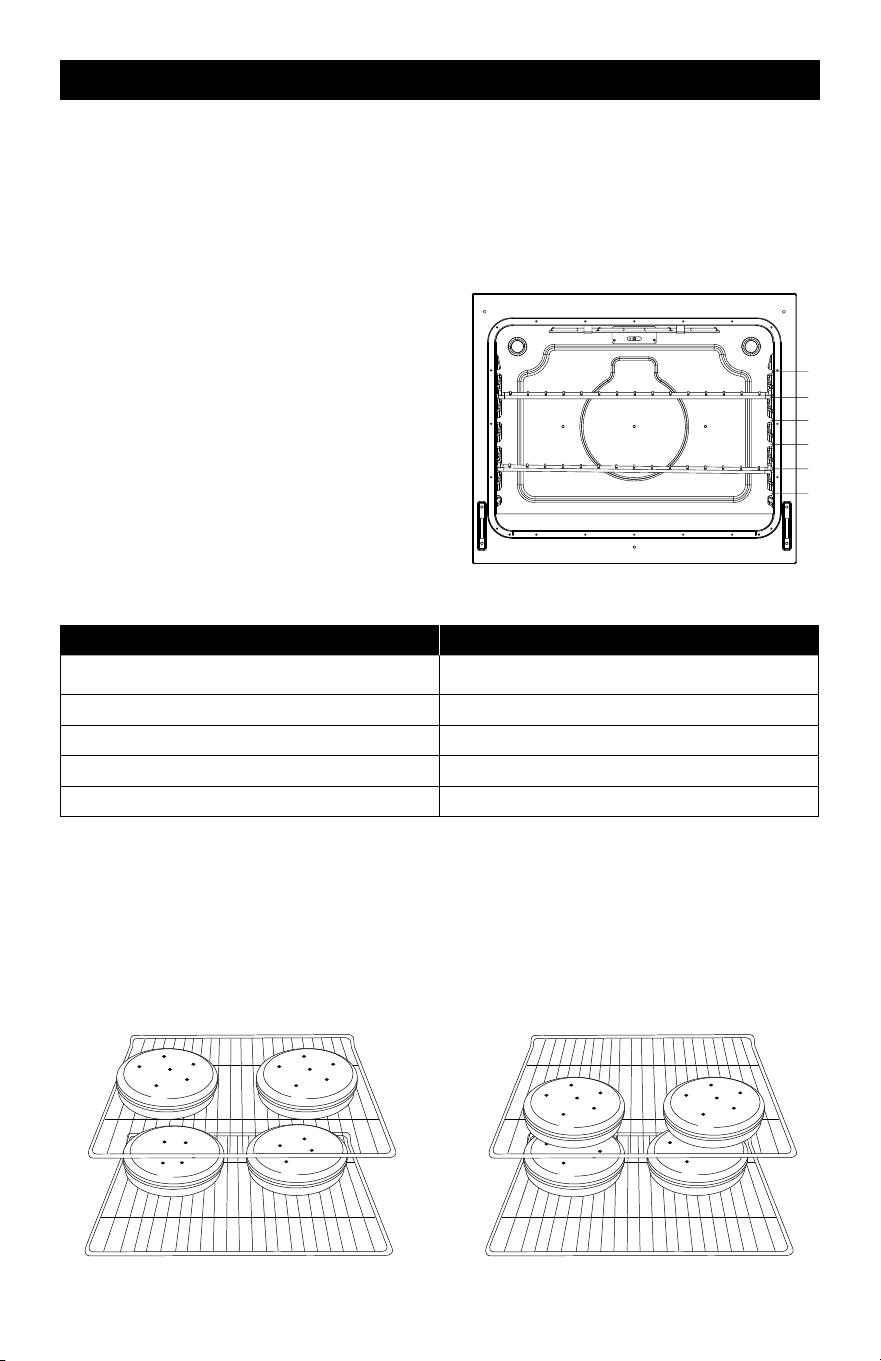
POSITIONING RACKS AND
BAKEWARE
• Position racks before turning on the oven.
• Do not position racks with bakeware on
them.
• Make sure racks are level.
To Remove Oven Racks:
Pull rack out to the stop position, raise the
front edge, and then lift out.
To Replace Oven Racks:
Place rack on the rack support in the oven.
Tilt the front edge up slightly, and slide rack
back until it clears the stop position. Lower
front and slide back into the oven.
6
5
4
3
1
2
OVEN FUNCTION RACK POSITION
BAKING
Large Roast/Turkey Use Rack 1
Meat/Poultry Use Rack 2
Cake/Cookies Use Rack 3
Batch Baking Use Rack 2 and 5
For best results when baking layer cakes
on 2 racks, use racks 2 and 5 in the lower
and upper section of the oven. For an even
bake, stagger the cake pans on the bottom
rack so that it is not positioned directly
below the pans on the top rack. Place the
cake pans on the racks as shown in the
illustration below. (Diagram A)
For best results when baking layer cakes
on 2 racks in the middle section of the
oven, use racks 3 and 5. For an even bake,
stagger the cake pans on the bottom rack
so that it is not positioned directly below
the cake pans on the top rack. Place the
cake pans on the racks as shown in the
illustration below. (Diagram B)
12 13
ELECTRIC RANGE CONTROL (continued) OVEN USE
HOW TO CHANGE THE OVEN TEMPERATURE SCALE TO CELSIUS:
1. To change the oven temperature scale to Celsius (C), press the “Bake” pad and hold for
3 seconds.
2. Next, the letter “C” will appear on the display for a few seconds.
3. The “C” will disappear from the display, and the clock time will reappear on the display
indicating the oven temperature scale has been switched.
4. When using the Bake function, the oven temperature will now display the letter “C” next
to the temperature.
HOW TO CHANGE THE OVEN TEMPERATURE SCALE BACK TO FAHRENHEIT:
• To change the oven temperature scale back to Fahrenheit (F), repeat above steps 1-3.
However, during the adjustment the letter “F” will appear on the display instead of a “C”.
DELAY TIME
The delay time function is available in the Bake or Broil mode.
HOW TO SET THE DELAY TIME:
1) To set the Delay Time, press the “Delay Time” pad, and the display will begin to flash.
2) Next, press the “+ or –” pad to set the time to when you would like your cooking time to
begin.
3) Once you have set your desired delay time, press the “Delay Time” pad again to lock in
the set time.
4) Next, press the “Bake” OR “Broil Hi/Lo” pad.
a. If the “Bake” pad has been pressed, press the “+ or –” pad to adjust to the desired
oven temperature.
b. If the “Broil Hi/Lo” pad has been pressed, the “HI” will automatically appear on dis-
play. Press the “Broil Hi/Lo” pad twice to set the “LO.”
5) Next, press the “Start” pad to begin the delay time and the set time will appear on the
display indicating that your Delay Time mode has been start.
6) When your delay time has been programmed, the Automatic Oven indicator will light up.
7) If you would like to cancel the Delay Time function, press the “Cancel/Off” pad
LOCK CONTROLS
The Lock Controls function locks the control panel pads from being used to avoid any unin-
tended use of the cook functions. When the control panel is locked, only the Oven Light will
function.
To Lock/Unlock Control Panel:
1. To lock the control panel, press both the “+ and –” pads at the same time and hold for
three seconds, then “LOC” icon will appear on the display and begin to flash. Once
“LOC” stops flashing, your control panel is now locked.
2. To unlock the control panel, press both the “+ and –” pads at the same time and hold
for three seconds, then “OPN” icon will appear on the display and begin to flash. Once
“OPN” icon stops flashing, your control panel is now unlocked.
LOCK CONTROLS
LOCK CONTROLS FUNCTION DOES NOT LOCK THE OVEN DOOR.
IMPORTANT: To avoid permanent damage to the porcelain finish, do not place food or
bakeware directly on the oven door or bottom. Do not line the oven bottom or racks with foil
or liner.
NOTE: To avoid damage to the Oven Shelves surface, do not use steel-wool pads, steel
wool, abrasive powder cleaners, abrasive paper towels, gritty washcloths, rust remover or
harsh chemicals for cleaning.
POSITIONING RACKS AND
BAKEWARE
• Position racks before turning on the oven.
• Do not position racks with bakeware on
them.
• Make sure racks are level.
To Remove Oven Racks:
Pull rack out to the stop position, raise the
front edge, and then lift out.
To Replace Oven Racks:
Place rack on the rack support in the oven.
Tilt the front edge up slightly, and slide rack
back until it clears the stop position. Lower
front and slide back into the oven.
6
5
4
3
1
2
OVEN FUNCTION RACK POSITION
BAKING
Large Roast/Turkey Use Rack 1
Meat/Poultry Use Rack 2
Cake/Cookies Use Rack 3
Batch Baking Use Rack 2 and 5
For best results when baking layer cakes
on 2 racks, use racks 2 and 5 in the lower
and upper section of the oven. For an even
bake, stagger the cake pans on the bottom
rack so that it is not positioned directly
below the pans on the top rack. Place the
cake pans on the racks as shown in the
illustration below. (Diagram A)
For best results when baking layer cakes
on 2 racks in the middle section of the
oven, use racks 3 and 5. For an even bake,
stagger the cake pans on the bottom rack
so that it is not positioned directly below
the cake pans on the top rack. Place the
cake pans on the racks as shown in the
illustration below. (Diagram B)

14 15
OVEN USE (continued) OVEN USE (continued)
NOTES:
• Please wear an oven mitt when touching the oven racks or placing food in/removing
food from the oven!
• During cooking, if you want to change the temperature, you must first press the “Cancel/
Off” pad then repeat the setting steps to reset the temperature.
PRE-HEATING THE OVEN
• To begin pre-heating the oven, press the “Bake” pad, and then press the “Start” pad.
“PrE” icon will appear on the display when the oven is pre-heating and it will sound 3
reminder tones when the preheat is done.
• The oven will take approximately 11 to 15 minutes to reach 350°F (177°C) with all of the
oven racks provided with your oven inside the oven cavity. Higher temperatures will take
longer to preheat.
• The preheat cycle rapidly increases the oven temperature. The actual oven temperature
will go above your set temperature to offset the heat lost when your oven door is opened
to insert food. This ensures that when you place your food in the oven, the oven will
begin at the proper temperature. Insert your food when the preheat tone sounds.
• Do not open the door during preheat before the tone sounds.
BAKE
Before baking, position racks according to the “Positioning Racks and Bakeware” section.
How To Set Oven To Bake Functon:
1) To set the oven to Bake mode, press the “Bake” pad on the control panel.
2) 350°F (177°C) will appear on the display.
3) Use the “+ or –” pad to enter the desired oven temperature
• The temperature of the oven can be set from 170°F (77°C) to 550°F (288°C)
4) Once the oven temperature has been set, press the “Start” pad to begin the Bake, “PrE”
icon will appear on the display indicating to begin the oven heating process.
5) Once the oven has reached the specified temperature, the set temperature will appear
on the display, place your food in the oven when 3 reminder tones sound.
6) When you are finished using the oven, press the “Cancel Off” pad to turn off the oven.
7) Remove food from the oven.
BROIL
Broiling uses direct radiant heat to cook food. The lower the temperature, the slower the
cooking. Thicker cuts and unevenly shaped pieces of meat, fish and poultry may cook better
at lower broiling temperatures.
HOW TO SET THE OVEN TO BROIL FUNCTION:
High Setting:
1) To set the Broiler, press the “Broil Hi/Lo” pad on the control panel.
2) Next, press the “Start” pad. The display will show HI and is set to the highest tempera-
ture setting of 550 F.
Low Setting:
1) To set the Broiler on low, press the “Broil Hi/Lo” pad twice on the control panel.
2) Next, press the “Start” pad. The display will show LO and is set to the lowest tempera-
ture setting of 450 F.
Once the HI Or LO Broiler Setting is Selected, you can now use the broiler
1) The oven has reached the specified temperature when 3 reminder tones sound, open the
oven door and pull the rack out to the stop position.
2) Place food on a broiler safe pan, then place it in the center of the oven rack.
3) Push the oven rack to the original position. Close the door to ensure the proper broiler
temperature.
4) Press the “Cancel/Off” pad when finished using the broiler.
COOK TIME
The cook time function is available in the Bake or Broil Hi/Lo mode.
HOW TO SET THE COOK TIME FUNCTION
1) When you’re cooking with “Bake” OR “Broil Li/Lo,” If a set cooking time is desired, press
the “Cook Time” pad.
2) Use the “+ or –” pad to enter the desired cooking time.
3) Once you have set your cooking time, press the “Cook Time” pad again to begin the set
cooking time, and the Automatic Oven indictor will light up.
5) At the end of the set time, the oven will automatically turn off, and the “OFF” icon appear
on the display and begin to flash and the end of cycle tone will sound. You can press any
pad on the control panel to stop the “OFF” icon.
* NOTE: If you would like to set a cooking time first, press the “Cook Time” pad, and use the
“+ or –” pad to enter the desired cooking time, then press the “Cook Time” pad again to
begin the set cooking time. Next, select to press the “Bake” or “Broil Hi/Lo” pad, and use
the “+ or –” pad to adjust to the desired oven temperature, then press the “Start” pad to
begin the oven heating process to cooking, and the Automatic Oven indicator will light up.
At the end of the set time, same as step 5 above.
FOOD SAFETY
Cook food thoroughly to help protect against any food borne illnesses. Use a food thermom-
eter to take food temperatures and check in different locations.
FOOD POISONING HAZARD
DO NOT LET FOOD SIT IN THE OVEN MORE THAN ONE HOUR BEFORE OR AFTER
COOKING. DOING SO CAN RESULT IN FOOD POISONING OR SICKNESS.
16 17
OVEN CARE OVEN CARE (continued)
TO AVOID OVEN DOOR GLASS BREAKAGE:
• Do not close the oven door if the racks are not fully inserted into the oven cavity or
when bakeware extends past the front edge of an oven rack.
• Do not set objects on the glass surface of the oven door.
• Do not hit glass surfaces with bakeware or other objects.
• Do not wipe down glass surfaces until the oven has completely cooled.
• For normal oven use, it is not suggested to remove the oven door. However, if re-
moval is necessary, make sure the oven is off and cool. Then, follow the instructions
below. The oven door is heavy.
TIP OVER HAZARD
• A child or adult can tip the range and be killed.
• Make sure the anti-tip bracket has been properly
installed and secured per the installation instructions.
• Re-secure the anti-tip bracket if range is moved.
• Do not operate the range without the
anti-tip bracket installed and secured.
• Failure to follow these instructions can result in death
or serious burns to adults and children.
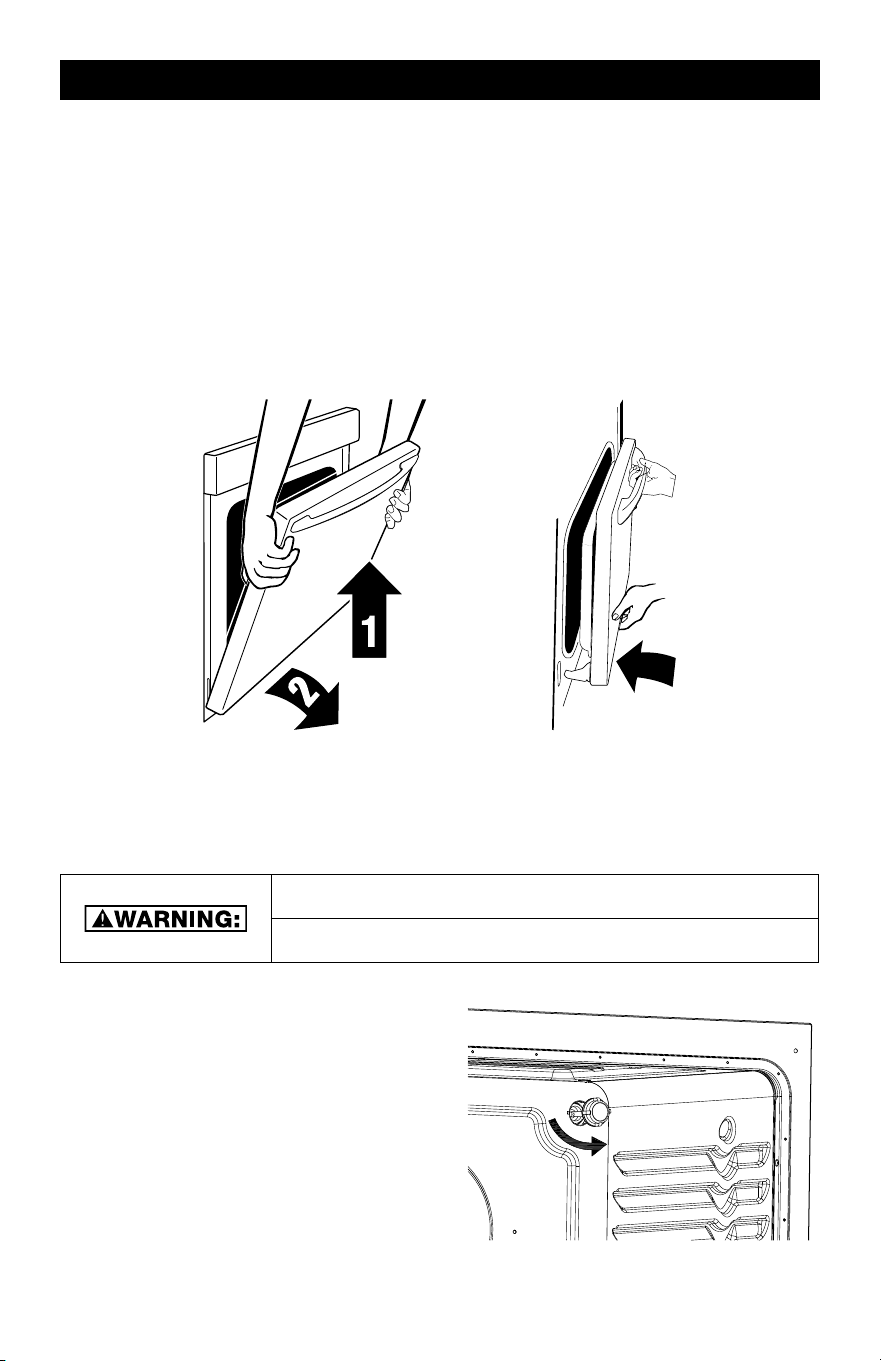
OVEN DOOR
IMPORTANT: Use both hands to remove
oven door(s).
1. Open the oven door fully so it is at a 90
degree angle.
2. Next, locate the the oven door latches
in both corners of the oven door, then
flip up the hinge latch on each
side to the unlocked position. (See
diagram below). Pliers may be required
to unlock hinges.
3. Once the latch is in the unlocked
position, grasp the oven door with both
hands, and then gently close the oven
door to as far as it will shut.
4. Using both hands, lift and pull the oven door towards you and remove.
5. Set the oven door(s) aside on a covered work surface.
A
HOW TO REINSTALL THE OVEN DOOR
1. To reinstall the oven door, insert both hanger arms of the oven door into the range. The
hinge latches on both sides should be in the unlocked position before inserting hanger
arms into the range.
2. Once the hanger arms are placed into the range, open the oven door fully. It is recom-
mended to use a rubber mallet to ensure hinges are securely locked into place.
3. Next, locate the hinge lever latches, and move them back to the locked position.
4. Once the oven door levers are locked, gently close the door and check that the door can
open and close with no issues.
5. Check to see if there are any gaps on both sides of the oven door. If there are gaps, the
door has not been reinstalled correctly. Repeat the removal and installation procedure.
OVEN GASKET
The gasket is essential for a good seal. Care should be taken not to rub, damage, or move
the gasket. If the gasket is damaged, call customer service: (toll free: 1-833-953-1758) be-
tween the hours of 8:00 am and 4:00 pm EST
CHOKING HAZARD
SMALL PARTS. NOT FOR CHILDREN UNDER 3 YEARS OLD.
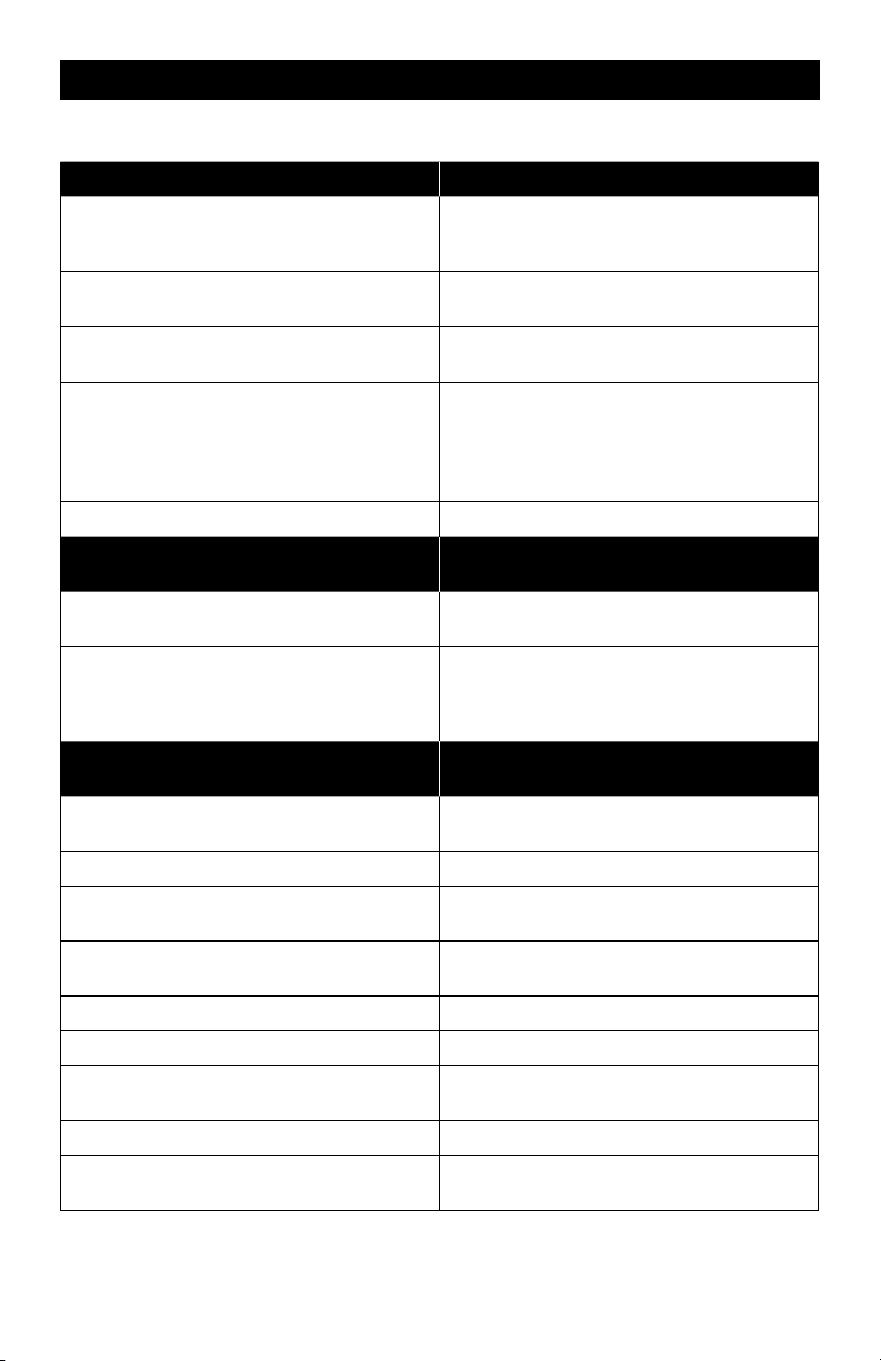
OVEN LIGHT
The ovens light is a standard 25-watt (G9
Halogen) appliance bulb. Before replacing,
makesure the oven and cooktop are cool and
the control knobs are off.
HOW TO REPLACE OVEN LIGHT
1. Disconnect the power supply.
2. Turn the glass cover counter clockwise to
remove.
3. Pull out the bulb straight out of the socket.
4. Replace bulb by pushing in, then reinsert
glass cover clockwise
5. Reconnect power.
16 17
OVEN CARE OVEN CARE (continued)
TO AVOID OVEN DOOR GLASS BREAKAGE:
• Do not close the oven door if the racks are not fully inserted into the oven cavity or
when bakeware extends past the front edge of an oven rack.
• Do not set objects on the glass surface of the oven door.
• Do not hit glass surfaces with bakeware or other objects.
• Do not wipe down glass surfaces until the oven has completely cooled.
• For normal oven use, it is not suggested to remove the oven door. However, if re-
moval is necessary, make sure the oven is off and cool. Then, follow the instructions
below. The oven door is heavy.
TIP OVER HAZARD
• A child or adult can tip the range and be killed.
• Make sure the anti-tip bracket has been properly
installed and secured per the installation instructions.
• Re-secure the anti-tip bracket if range is moved.
• Do not operate the range without the
anti-tip bracket installed and secured.
• Failure to follow these instructions can result in death
or serious burns to adults and children.
OVEN DOOR
IMPORTANT: Use both hands to remove
oven door(s).
1. Open the oven door fully so it is at a 90
degree angle.
2. Next, locate the the oven door latches
in both corners of the oven door, then
flip up the hinge latch on each
side to the unlocked position. (See
diagram below). Pliers may be required
to unlock hinges.
3. Once the latch is in the unlocked
position, grasp the oven door with both
hands, and then gently close the oven
door to as far as it will shut.
4. Using both hands, lift and pull the oven door towards you and remove.
5. Set the oven door(s) aside on a covered work surface.
A
HOW TO REINSTALL THE OVEN DOOR
1. To reinstall the oven door, insert both hanger arms of the oven door into the range. The
hinge latches on both sides should be in the unlocked position before inserting hanger
arms into the range.
2. Once the hanger arms are placed into the range, open the oven door fully. It is recom-
mended to use a rubber mallet to ensure hinges are securely locked into place.
3. Next, locate the hinge lever latches, and move them back to the locked position.
4. Once the oven door levers are locked, gently close the door and check that the door can
open and close with no issues.
5. Check to see if there are any gaps on both sides of the oven door. If there are gaps, the
door has not been reinstalled correctly. Repeat the removal and installation procedure.
OVEN GASKET
The gasket is essential for a good seal. Care should be taken not to rub, damage, or move
the gasket. If the gasket is damaged, call customer service: (toll free: 1-833-953-1758) be-
tween the hours of 8:00 am and 4:00 pm EST
CHOKING HAZARD
SMALL PARTS. NOT FOR CHILDREN UNDER 3 YEARS OLD.
OVEN LIGHT
The ovens light is a standard 25-watt (G9
Halogen) appliance bulb. Before replacing,
makesure the oven and cooktop are cool and
the control knobs are off.
HOW TO REPLACE OVEN LIGHT
1. Disconnect the power supply.
2. Turn the glass cover counter clockwise to
remove.
3. Pull out the bulb straight out of the socket.
4. Replace bulb by pushing in, then reinsert
glass cover clockwise
5. Reconnect power.

18 19
OVEN CARE (continued) OVEN CARE (continued)
CERAMIC GLASS COOKTOP CLEANING
To avoid damaging the cooktop, do not
use steel wool, abrasive powder cleansers,
chlorine bleach, rust remover or ammonia.
1. Remove food/residue with a cooktop
scraper.
• For best results, use the cooktop
scraper while the cooktop is still
warm, but not hot to the touch.
• It is recommended to wear an oven
mitt while scraping the warm cooktop.
• Hold the cooktop scraper at approx-
imately a 45° angle against the glass
surface and scrape the residue. It will
be necessary to apply pressure to
remove the residue.
• Allow the cooktop to cool down com-
pletely before proceeding to Step 2.
2. Apply a few dime-sized drops of cook-
top cleaner to the affected areas.
• Rub cooktop cleaner onto the cook-
top surface with a cooktop cleaning
pad.
• Some pressure is needed to remove
stubborn stains.
• Allow the cleaner to dry to a white
haze before proceeding to Step 3.
3. Gently rub surface to remove dried
cooktop cleaner with a non-abrasive
cleaning pad.
• Then wipe cooktop surface with a
clean damp cloth.
• Dry with a clean dry cloth or paper
towel
GENERAL CLEANING
IMPORTANT: Before cleaning, make sure all controls are off and the oven is cool. Always
follow label instructions on cleaning products.
• Use soap and water along with a soft cloth or sponge to clean the surface areas of the
range. Wipe with a clean damp cloth, then wipe dry.
• To clean control panel and knobs, wipe surfaces with soapy soft cloth, then wipe down
with cloth rinsed in water. Dry with clean, soft cloth.
STAINLESS STEEL (ON SOME MODELS)
TO AVOID DAMAGE TO STAINLESS STEEL SUR-
FACES, DO NOT USE SOAP-FILLED SCOUR-
ING PADS, ABRASIVE CLEANERS, COOKTOP
CLEANER, STEEL-WOOL PADS, GRITTY WASH-
CLOTHS OR ABRASIVE PAPER TOWELS.
CLEANING METHOD FOR STAINLESS STEEL
• Use a stainless-steel cleaner, or a mild cleaner recommended on stainless steel surfaces.
• Wipe cleaner with a soft cloth in the direction of the grain to avoid damage.
• Rinse with clean water and dry with soft, lint-free cloth.
• May use stainless steel polish for appliances afterwards
CLEANING THE OVEN DOOR EXTERIOR
• Clean with a mild soap and warm water.
• Rinse with clean water, then dry with a soft cloth.
CLEANING THE OVEN CAVITY
• Do not use strong oven cleaners as they may scratch the interior coating.
• Food spills should be cleaned when oven cools. At high temperatures, foods may react
with the porcelain coating resulting in staining, etching, pitting or faint white spots.
• Do not use a steel-wool pad to clean inside surfaces.
• Use a non-scratch sponge to scrub tough surfaces areas.
• Clean interior areas with a mild soap and warm water.
• Rinse with a clean damp cloth, then dry with a soft cloth.
20 21
TROUBLE SHOOTING TIPS
Try the solutions suggested here first to avoid the cost of an unnecessary service call.
OVEN WILL NOT OPERATE POSSIBLE SOLUTIONS
Has a household fuse blown, or has a
circuit breaker tripped?
Replace the fuse or reset the circuit
breaker. If the problem continues, call an
electrician.
Is the Electronic Oven Control set
correctly?
See “Electronic Oven Controls” section.
Display shows “E02” Temperature sensor error. Call Customer
Service.
Display shows “E03” High temperature warning. Oven function
will shut off automatically. Allow oven to
cool for 30 minutes and resume using
oven functions. If error continues to occur
call Customer Service.
Is the Oven Control Lockout set? See “Control Lockout” section.
OVEN TEMPERATURE
TOO HIGH OR TOO LOW
Does the Oven Temperature Calibration
need adjustment?
See “Oven Temperature Control” section.
Do the Oven Indicator Lights flash? See the “Display” and/or the “Oven Lights”
section. If the indicator light(s) keeps
flashing, call for service. See “Assistance
or Service” section.
OVEN COOKING RESULTS NOT WHAT
EXPECTED
Is the proper oven temperature
calibration set?
See “Oven Temperature Control” section.
Was the Oven preheated? See “Baking” section.
Are the racks positioned properly? See “Positioning Racks and Bakeware”
section.
Is there proper air circulation around
bakeware?
See “Positioning Racks and Bakeware”
section.
Is the batter evenly distributed in the pan? Check that batter is level in the pan.
Is the proper length of time being used? Adjust cooking time.
Has the oven door been opened while
cooking?
Oven peeking releases oven heat and can
result in longer cooking times.
Are baked items too brown on the bottom? Move rack to higher position in the oven.
Are pie crust edges browning early? Use aluminum foil to cover the edge of the
crust and/or reduce backing temperature.
Criterion 30" Standard Electric Range User Manual
Manufacturer provides a limited warranty for each new range to be free from defects in material
and workmanship for a period of one year from the date of purchase. Manufacturer agrees to reme-
dy any such defective inside accessory components to furnish a new unit if the unit proves to have
failed, at the company’s option, for one year from your original date of purchase.
Buyer must register unit at: PlasticDevelopmentGroup.com/applianceregistration. In the event the
unit requires replacement or refund under the terms of this limited warranty, the Buyer is responsi-
ble for all transportation expenses to return the unit prior to receiving a replacement unit or refund.
A copy of the dated sales receipt/invoice is required to receive benefits of this limited warranty.
This limited warranty covers appliances in use within the continental United States, Alaska, Hawaii
and Puerto Rico.
THIS LIMITED WARRANTY DOES NOT COVER THE FOLLOWING
1. Products with original serial numbers that have been removed, altered or cannot be readily
determined.
2. Products that have been transferred from its original owner to another party or removed
outside the USA.
3. Rust on the interior or exterior of the unit.
4. Damages due to shipping damage or improper installation.
5. Damages due to misuse or abuse.
6. Service calls, repairs, and labor expenses for any purpose.
7. Replacement or resetting of house fuses or circuit breakers.
8. Failure or defects of this product if used for other purposes than its intended purpose or used
other than in accordance with the provided instructions.
9. Disposal costs for failed unit not returned to Manufacturer.
10. Any delivery/installation costs incurred as the result of a unit that fails to perform as specified.
11. Expenses for travel and transportation for product if you are exchanging or returning the unit.
12. Expenses related to the removal and re-installation of your unit or for making the unit accessi-
ble, such asremoval of trim, cupboards, shelves, etc. or if not installed in accordance with the
provided installation instructions.
13. Damages to the finish of the unit or home incurred during installation, including but not limited
to floors, cabinets, walls, etc.
14. Damages caused by external causes such as abuse, misuse, inadequate power supply, acci-
dents, fires, or acts of God.
15. Refunds for returned products are limited to the price paid for the unit per the sales receipt.
DISCLAIMER OF IMPLIED WARRANTIES, LIMITATION OF REMEDIES AND EXCLUSIONS
EXCEPT FOR THE EXPRESS WARRANTIES SET FORTH HEREIN, MANUFACTURER MAKES NO
WARRANTY WHATSOEVER (OR THE SHORTEST PERIOD ALLOWED BY LAW) REGARDING THE
GOODS, INCLUDING ANY (1) WARRANTY OF MERCHANTABILITY; (2) WARRANTY OF FITNESS
FOR A PARTICULAR PURPOSE; (3) WARRANTY OF TITLE; OR (4) WARRANTY AGAINST IN-
FRINGEMENT OF INTELLECTUAL PROPERTY RIGHTS OF A THIRD PARTY; WHETHER ARISING
BY LAW, COURSE OF DEALING, COURSE OF PERFORMANCE, USAGE OF TRADE, OR OTHER-
WISE. BUYER ACKNOWLEDGES THAT IT HAS NOT RELIED ON ANY REPRESENTATION OR
WARRANTY MADE BY MANUFACTURER, OR ANY OTHER PERSON ON MANUFACTURER’S
BEHALF. REPLACEMENT OF UNIT AND LISTED PARTS IN ACCORDANCE WITH THE TERMS
HEREIN, IS YOUR SOLE AND EXCLUSIVE REMEDY UNDER THIS LIMITED WARRANTY. MANU-
FACTURER IS NOT LIABLE FOR INCIDENTAL OR CONSEQUENTIAL DAMAGES AND NO REPRE-
SENTATIVE OR PERSON IS AUTHORIZED TO ASSUME FOR MANUFACTURER ANY OTHER
LIABILITY IN CONNECTION WITH THE SALE OF THIS PRODUCT. UNDER NO CIRCUMSTANCE
IS THE CONSUMER PERMITTED TO RETURN THE UNIT TO MANUFACTURER WITHOUT THE
PRIOR WRITTEN CONSENT OF MANUFACTURER
Customer Service: (toll free: 1-833-953-1758) between the hours of 8:00 am and 4:00 pm EST
EMAIL: criterion@customer-appliance.com
Product Registration: plasticdevelopmentgroup.com/applianceregistration
ONE YEAR LIMITED WARRANTY

NOTES
NOTES

NOTES
NOTES

24
455-4600 / 455-4601 / 455-4602
30" Standard Electric Range
User Manual