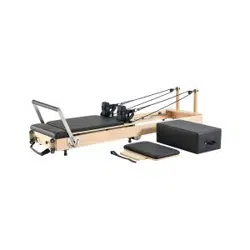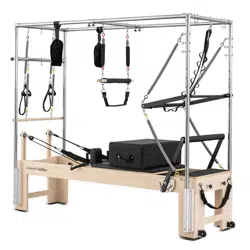

Contour Cadillac Pilates Reformer
with Full Trapeze Table (Black)
USER MANUAL
Product may vary slightly from the item pictured due to model upgrades.
Read all instructions carefully before using this product.
Retain this owner’s manual for future reference.
NOTE:
This manual should not be used to guide your purchasing decision. Your product, and the contents inside its carton, may vary
from what is listed in this manual. This manual may also be subject to updates or changes. Updated manuals are available
through our website at www.lifespanfitness.com.au
Find the
Digital Manual
Online

2
TABLE OF
CONTENTS
I. Important Safety Instructions . . . . . . . . . . . . . . . . . . . . . . . . . . . . . . . 03
II. Parts List . . . . . . . . . . . . . . . . . . . . . . . . . . . . . . . . . . . . . . . . . . . . . . . . . . . . . . 05
III. Assembly Instructions . . . . . . . . . . . . . . . . . . . . . . . . . . . . . . . . . . . . . . . 08
IV. Exercise Guide . . . . . . . . . . . . . . . . . . . . . . . . . . . . . . . . . . . . . . . . . . . . . . . 17
V. Warranty . . . . . . . . . . . . . . . . . . . . . . . . . . . . . . . . . . . . . . . . . . . . . . . . . . . . . . 19
| TABLE OF CONTENTS

3
I. IMPORTANT SAFETY
INSTRUCTIONS
Equipment Safety Instructions:
The proper use of Pilates equipment enhances the performance of many exercises in a secure and
efficient manner. However, care and caution are vital due to the potential risks associated with exercise
equipment, particularly when spring resistance is involved.
If you are inexperienced or using this equipment for the first time, it is crucial to have a trained
professional supervise your usage. Ensure that you and any clients or patients have received adequate
instruction on the correct and safe use of the equipment.
1. Place the equipment on a stable, level surface to prevent movement during use.
2. This equipment is for indoors use only.
3. Allow at least 1 meter of clear space around the Reformer for optimal safety and performance.
4. Assemble the equipment according to the manufacturer’s instructions, ensuring all parts are
securely fastened.
5. Regularly inspect the equipment for loose or damaged components. Do not use the equipment if any
parts are broken or malfunctioning.
6. For Trapeze use: Ensure all connections, such as the bars, springs, and support straps, are securely
fastened before use.
7. Do not exceed the weight capacity of the equipment as specified by the manufacturer.
IMPORTANT SAFETY INSTRUCTIONS |
User Precautions:
1. Consult a qualified healthcare professional before beginning a new exercise program, particularly if
you have medical conditions, injuries, or are pregnant.
2. Wear comfortable, fitted workout attire to ensure freedom of movement while preventing
interference with moving parts.
3. Keep body, clothing, and hair clear of all moving parts to avoid entanglement.
4. Remove jewellery, watches, or other accessories that could interfere with exercises or damage the
equipment.
5. Begin with a warm-up to prepare your body for exercise, including gentle stretches and mobilization
exercises.
6. Familiarize yourself with the Reformer components, including the foot bar, carriage, straps, springs,
and the Full Trapeze frame.
7. Maintain proper form and alignment during exercises. Engage your core, keep your spine neutral,
and avoid overextending joints.
8. Breathe naturally and avoid holding your breath.
9. Perform exercises within a comfortable range of motion. Avoid sudden or jerky movements to
minimize injury risk.
10. Cease exercising if you experience pain, dizziness, or discomfort. Listen to your body and rest when
needed.

4 | IMPORTANT SAFETY INSTRUCTIONS
Equipment Usage:
1. Adjust the equipment settings, such as foot bar height, spring tension, and Trapeze components,
according to your instructor’s guidance and fitness level.
2. Inspect springs, straps, and safety chains to ensure they are in good condition and securely
attached.
3. Do not sit on the carriage while making adjustments.
4. Attach and detach springs carefully to avoid snapping or injury.
5. Place hands and feet in designated areas on the carriage and foot bar during exercises.
6. Use a secure grip and maintain control to ensure stability during movements.
7. Avoid sudden or excessive force that may cause the carriage or Trapeze components to move
uncontrollably.
8. Be mindful of the equipment’s weight limit and adhere to it.
9. When using the Full Cadillac, it is not recommended to take your centre of gravity outside the frame
as this may affect the stability of the equipment and could result in an accident.
10. The safety strap MUST be used when the push-through springs are attached to the push-through bar
from the bottom side. If you do not take this precaution, the user can get seriously injured.
11. The user must never let go of the swing bar when under spring tension.
Cleaning and Maintenance:
1. Clean the equipment regularly with a mild, non-abrasive cleanser and a soft cloth.
2. Inspect all components for signs of wear or damage, including springs, ropes, rollers, and Trapeze
components. Do not use the equipment if any parts are damaged.
3. Check all hardware every two months to ensure nuts, bolts, and fasteners are tight. Retighten
immediately if any hardware becomes loose.
4. Lubricate moving parts, such as wheels or springs, as recommended by the manufacturer.
5. Store the equipment in a clean, dry area when not in use.
6. Seek assistance when moving the reformer.
7. Replace any spring showing early signs of fatigue, such as coil separation, immediately. High-use
facilities should replace springs more frequently.
8. Inspect ropes for fraying, tearing, or other damage. Replace ropes with significant wear immediately.
9. For Trapeze components, ensure all bars, straps, and springs are checked for wear and securely
fastened during each use.
10. Use manufacturer-approved replacement parts to maintain safety and performance.
11. Hand check all eyelets on the sliding spring eyelets, swing through and roll down bar are tight and
cannot rotate. If loose remove, apply blue Loctite and retighten.
5
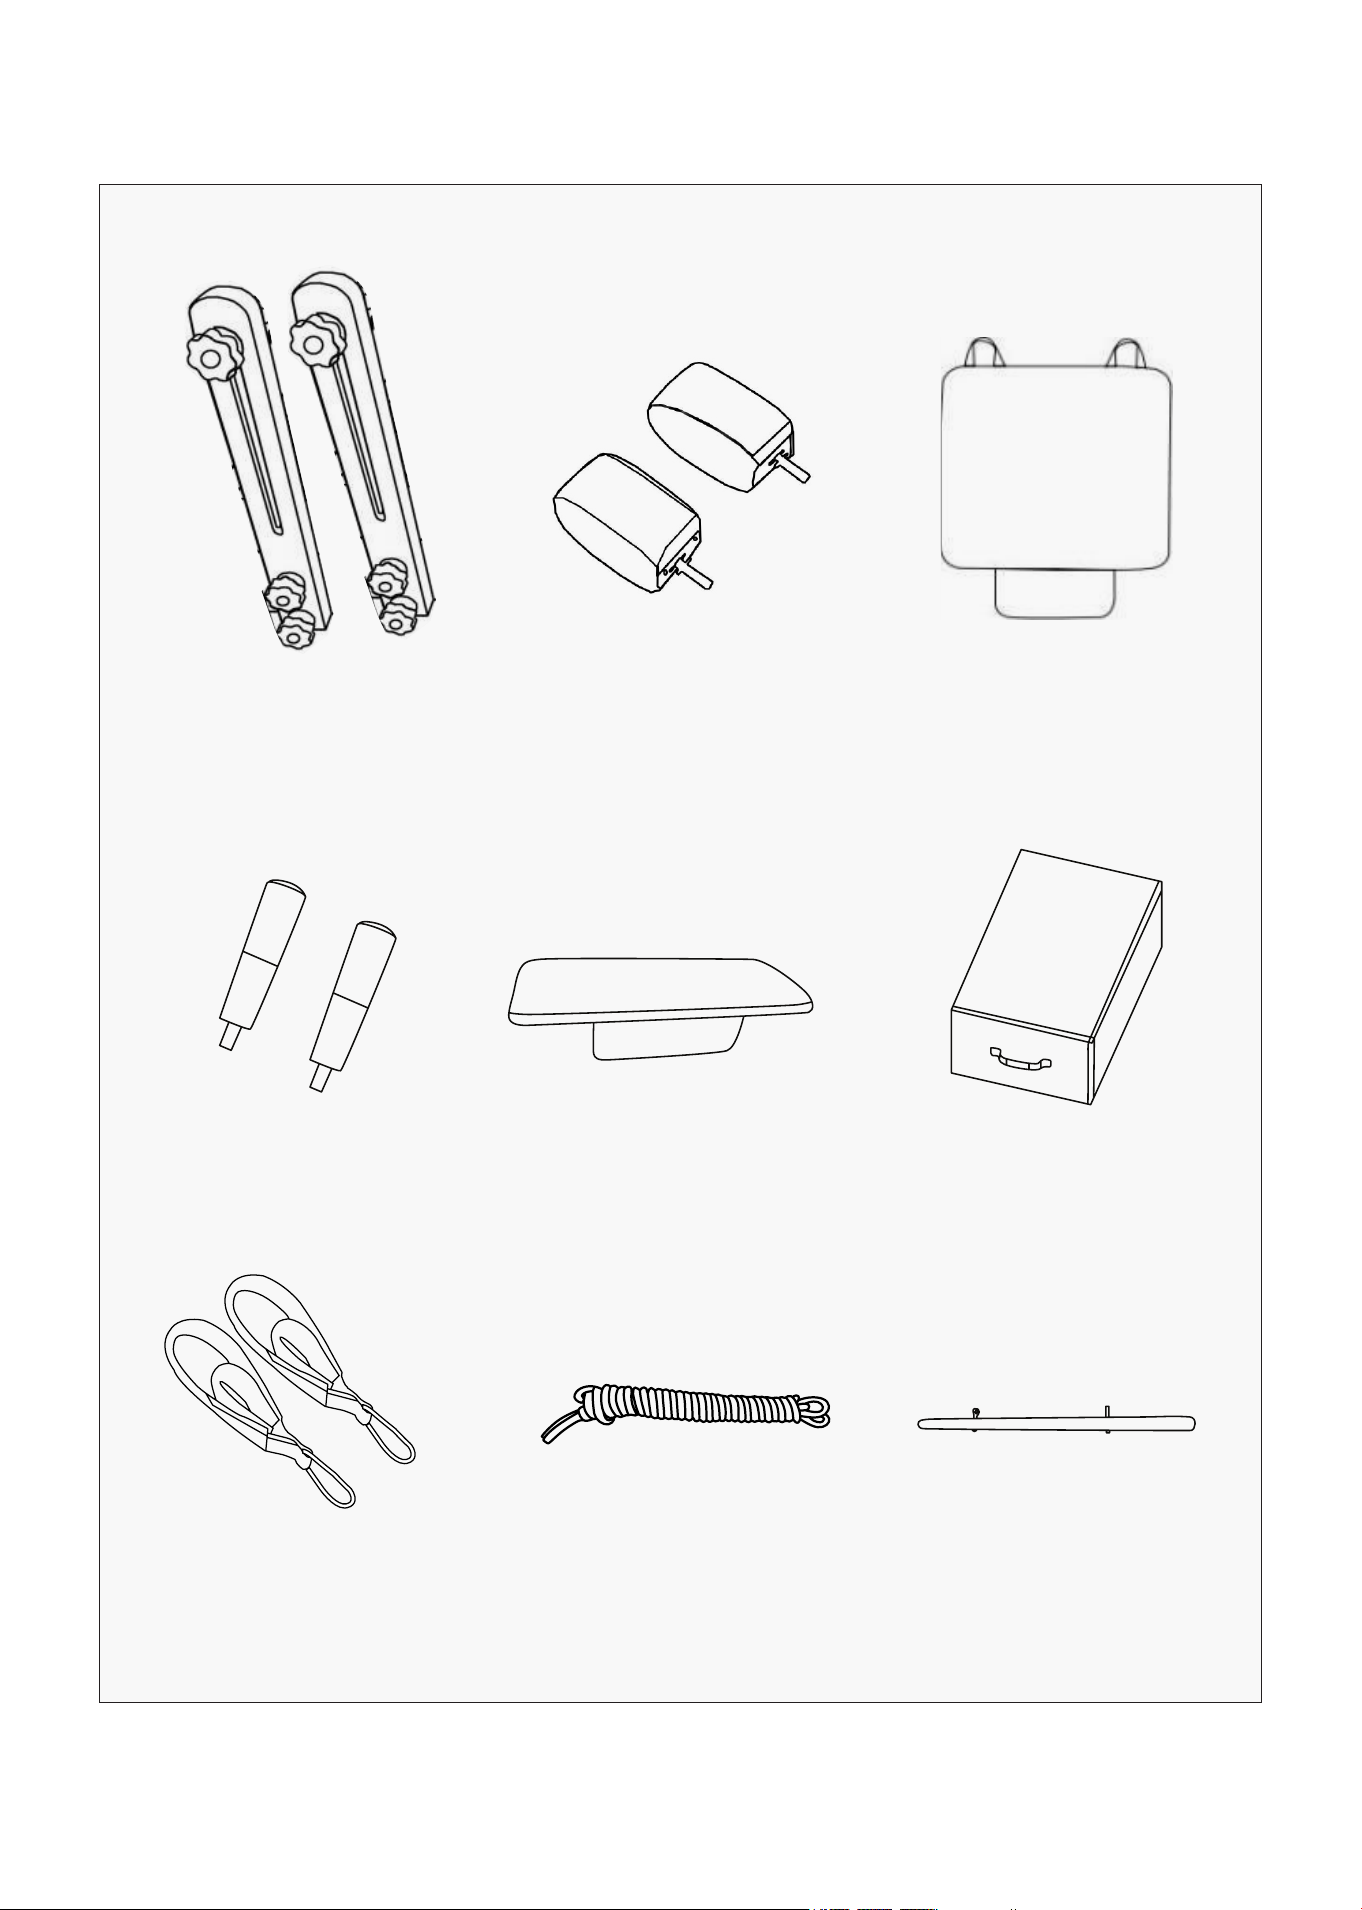
II. PARTS LIST
PARTS LIST |
Risers (2x) &
Locking Knobs (6x)
Shoulder Rest
Block Set (2x)
Jump Board (1x)
Handles (2x) Cushioned Foot
Platform (1x)
Pilates Box (1x)
Handle
Straps (2x)
Rope (2x) Roll Down Bar (1x)
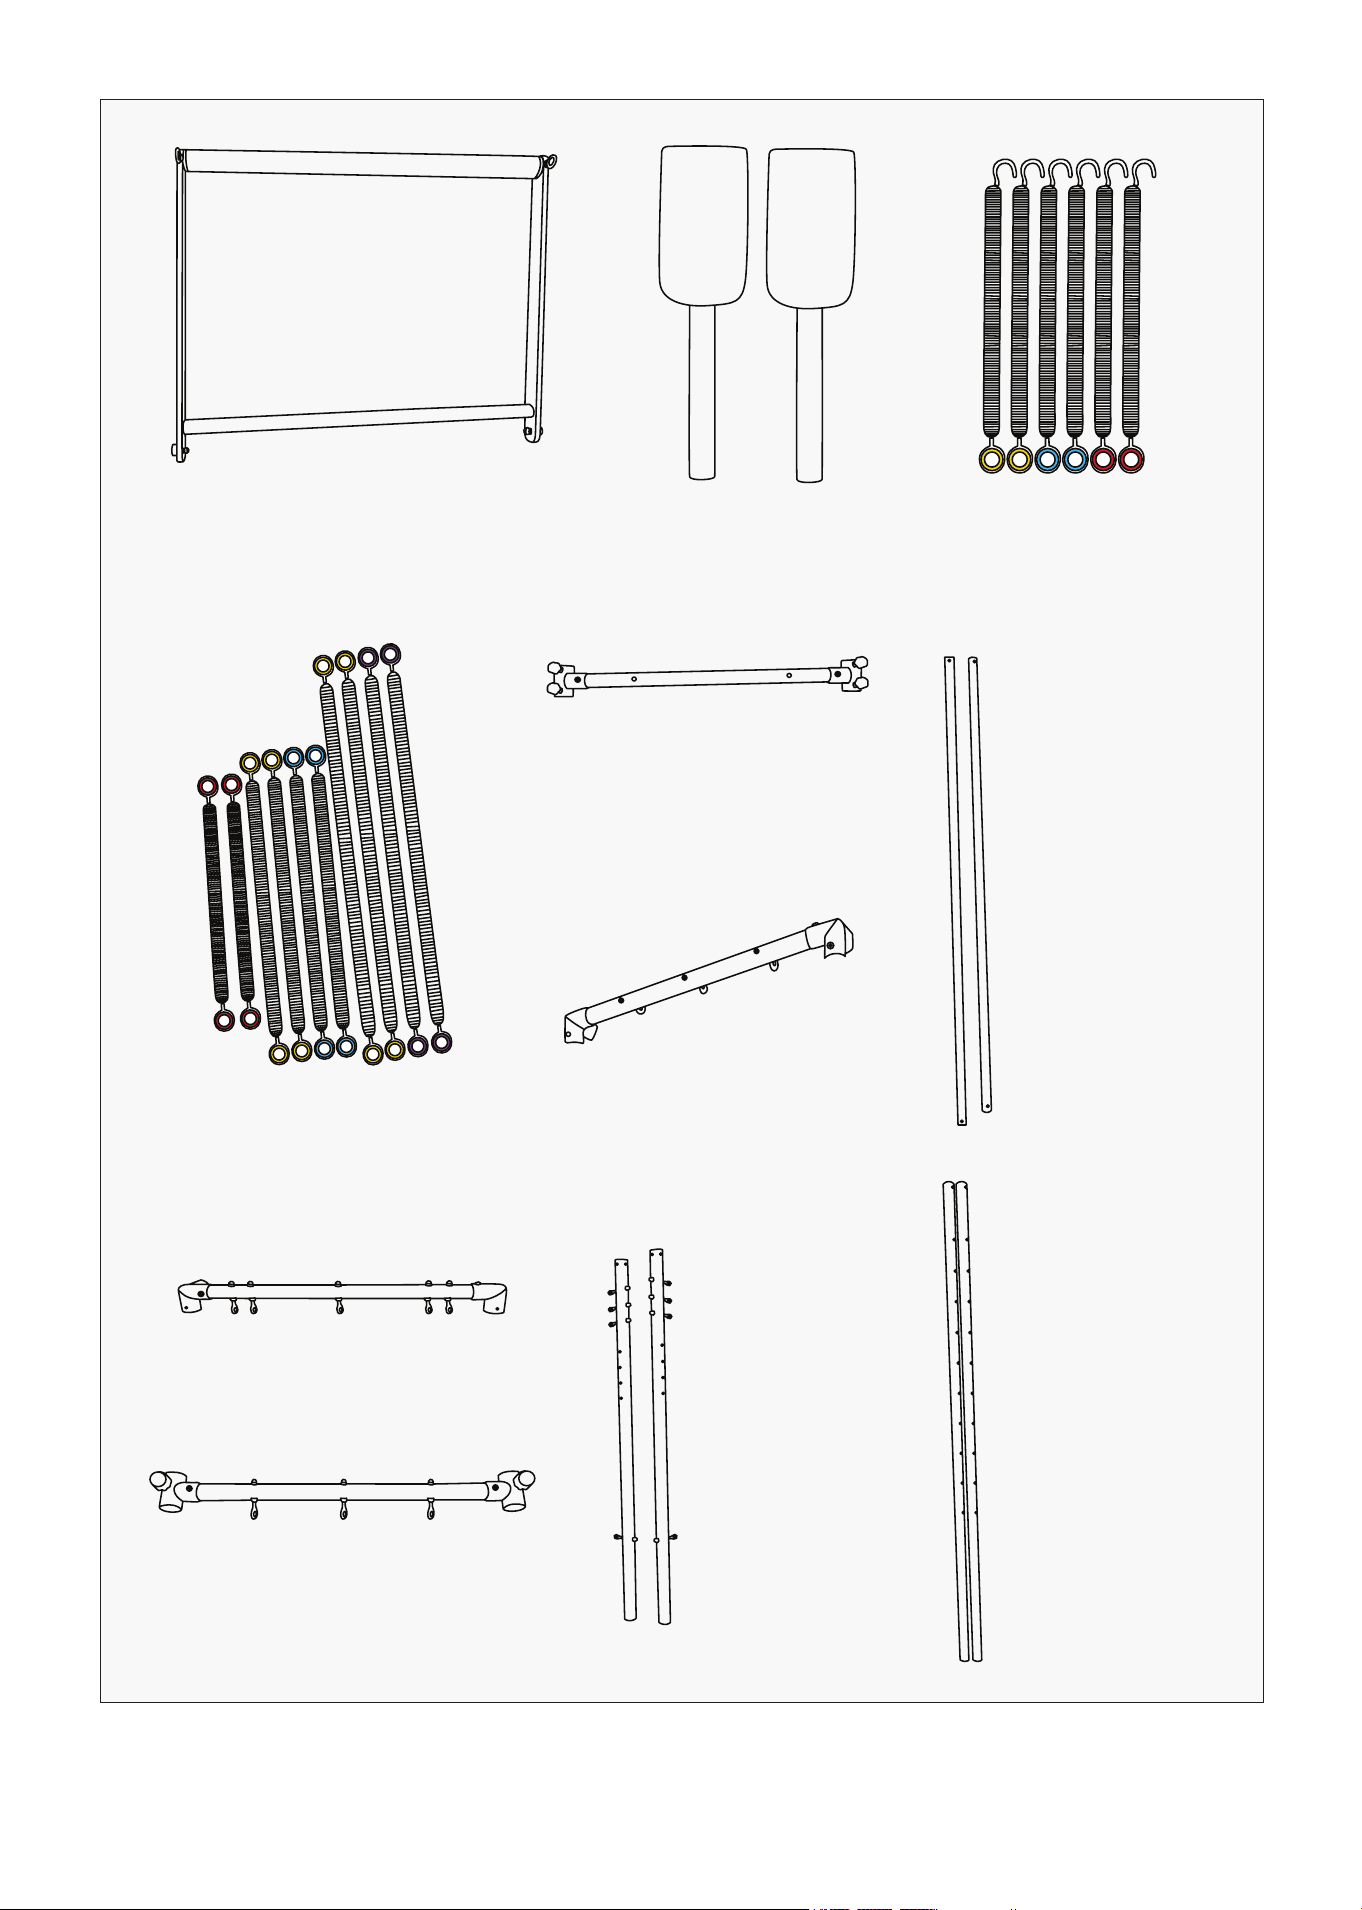
6 | PARTS LIST
Push Through Bar (1x)
w/ 2x Pins
Plush Cover (2x) Carriage
Springs (6x)
Trapeze Springs
(2x small, 4x medium
& 4x long length)
Horizontal Pipe w/2x
Eyelets & 4x Locking
Knobs (1x)
Horizontal Pipe w/
3x Eyelets (1x)
Long Vertical Pipe
– No Holes (2x)
Horizontal Pipe w/
5x Eyelets (1x)
Vertical Pipe w/
4x Eyelets (2x)
Horizontal Pipe w/3x Eyelets
& 2x Locking Knobs (1x)
Long Vertical Pipe
w/Holes (2x)
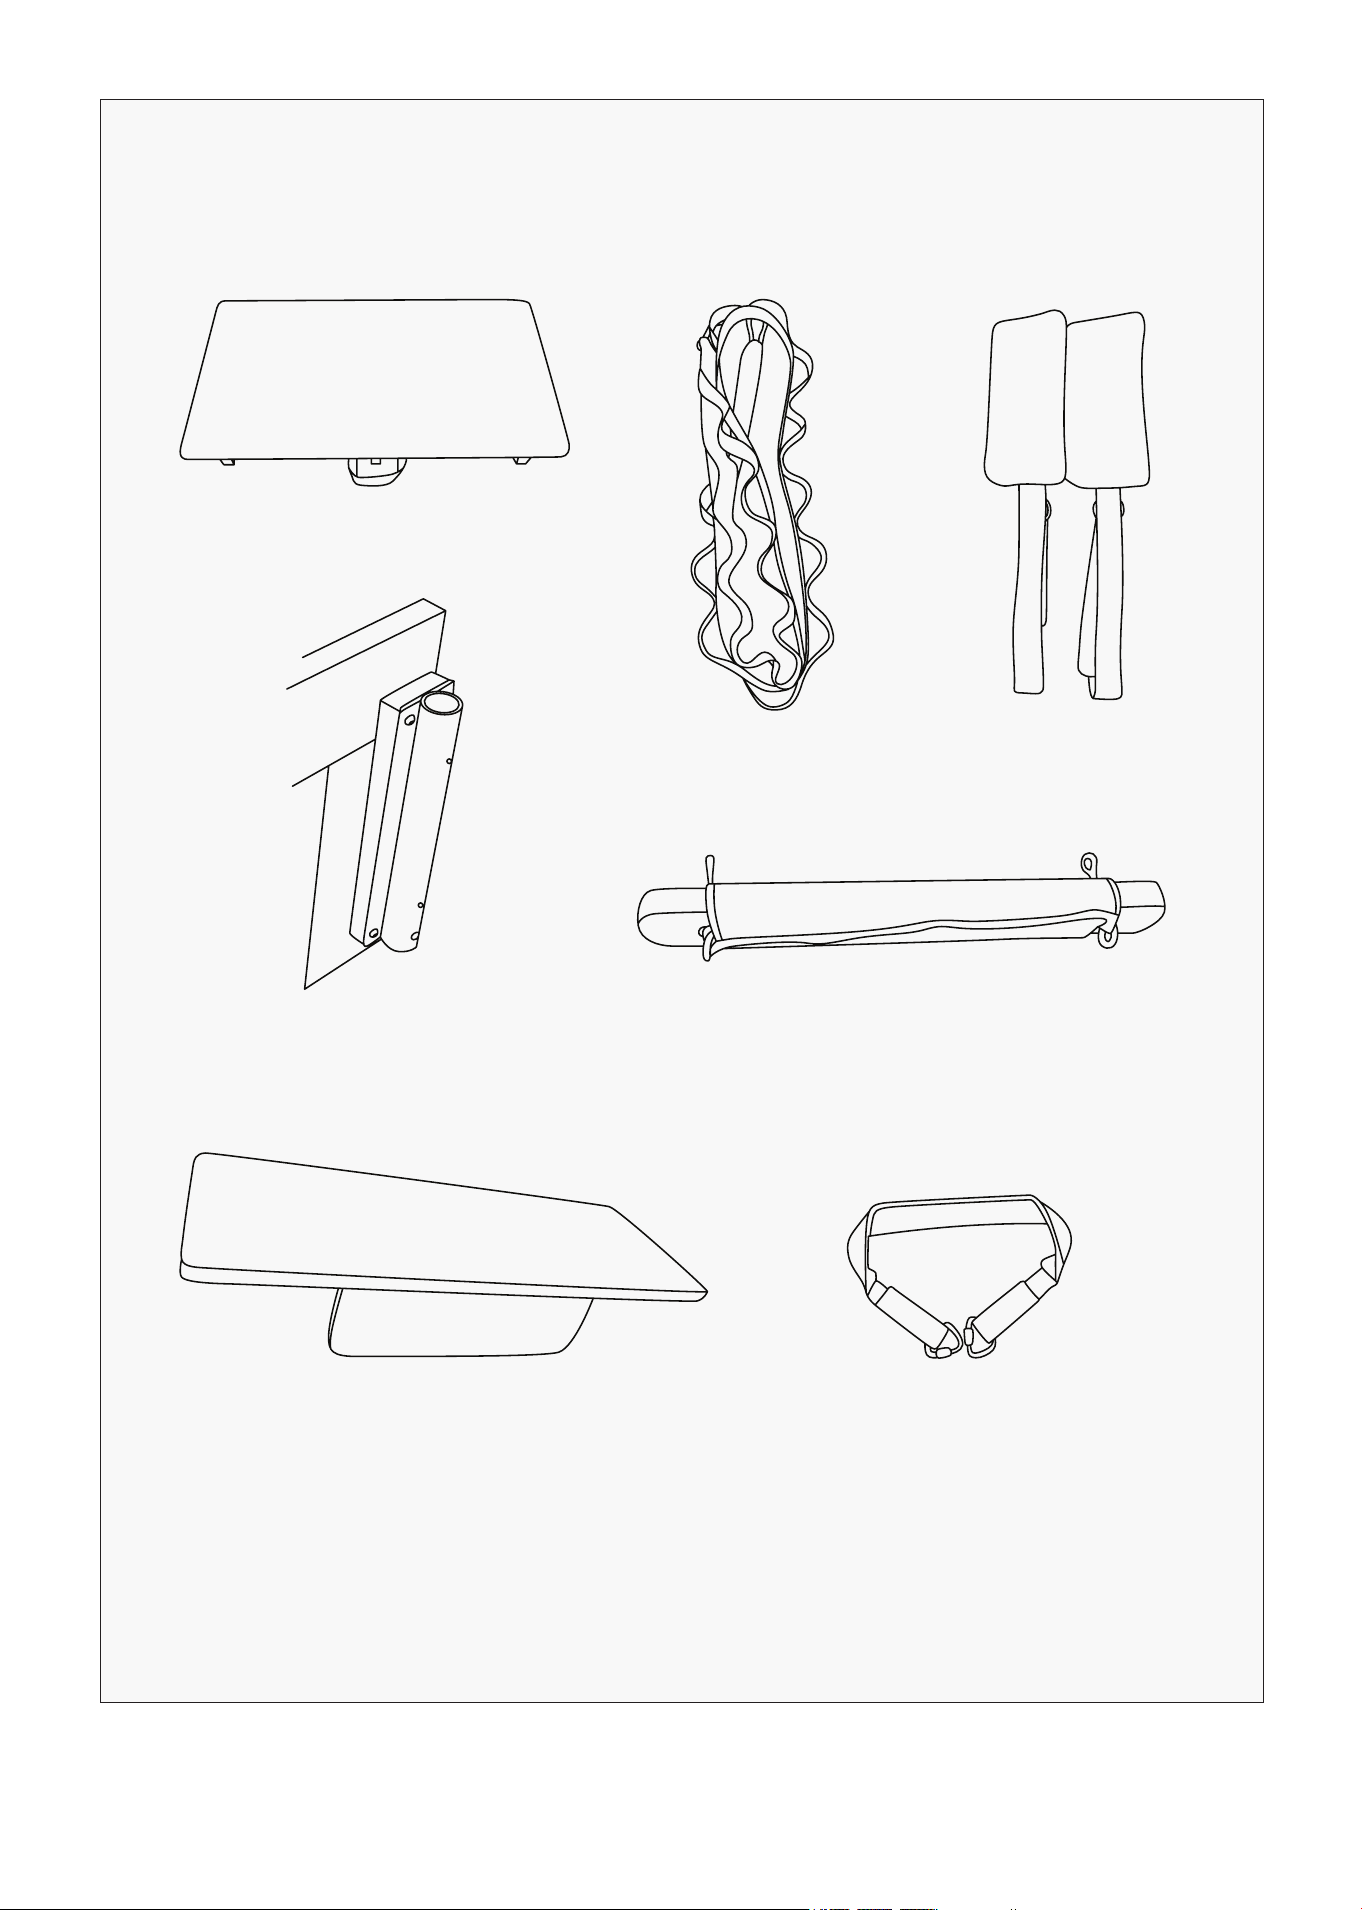
7PARTS LIST |
Cushion Insert
Pipe Seat (4x)
Safety Strap Plush Drawstring
Transverse Plate
Foot Platform (1x) Foot Strap Attachment (1x)
8 | ASSEMBLY INSTRUCTIONS
III. ASSEMBLY INSTRUCTIONS
UNPACKING THE BOX
Remove the parts from the box and make sure there is enough space for assembly.
CAUTION
You may need 2 people to lift the reformer frame out of box.
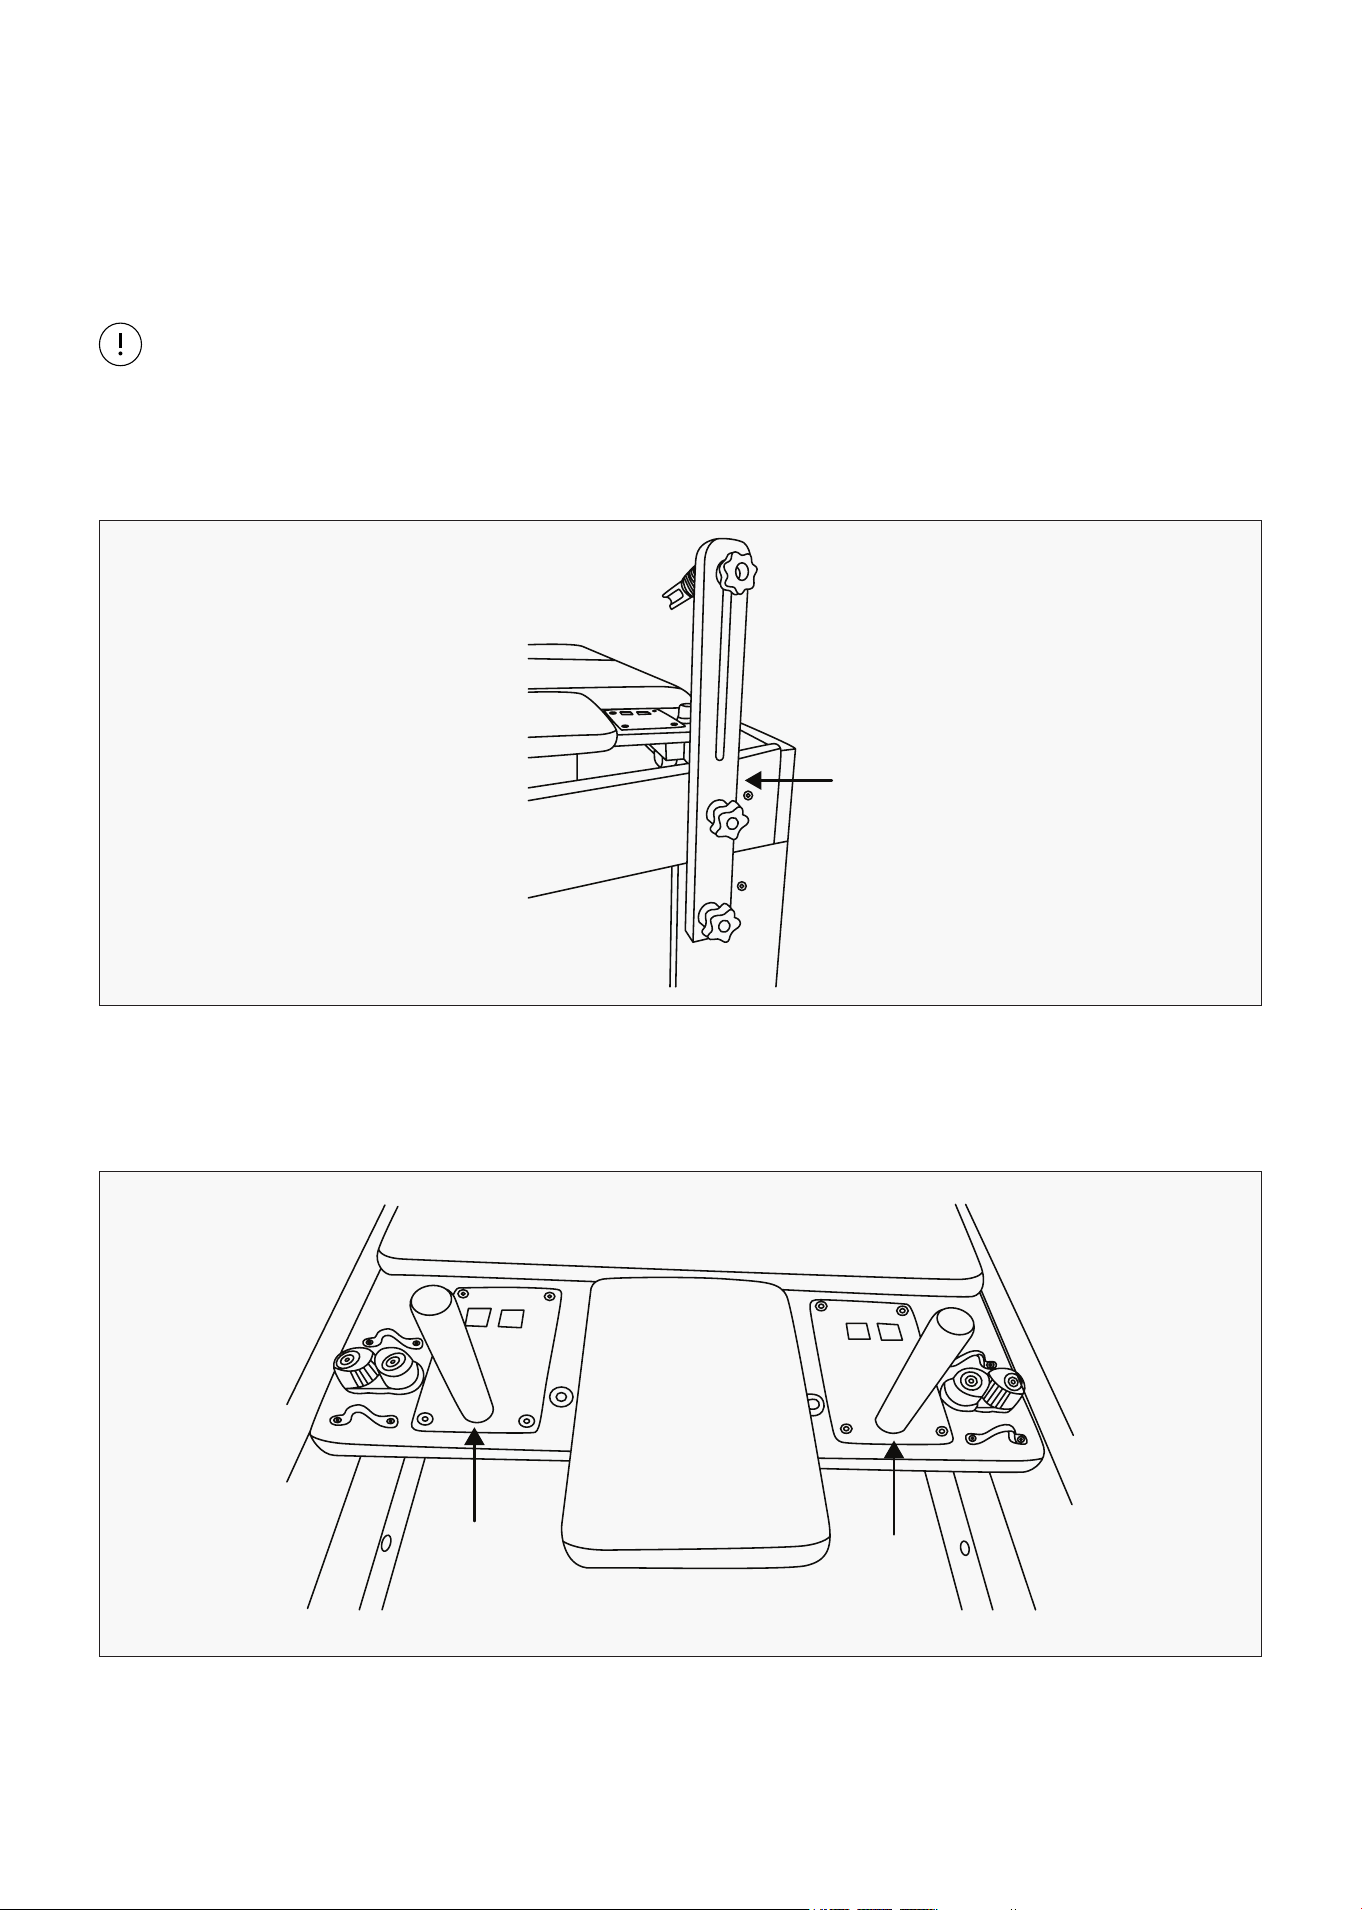
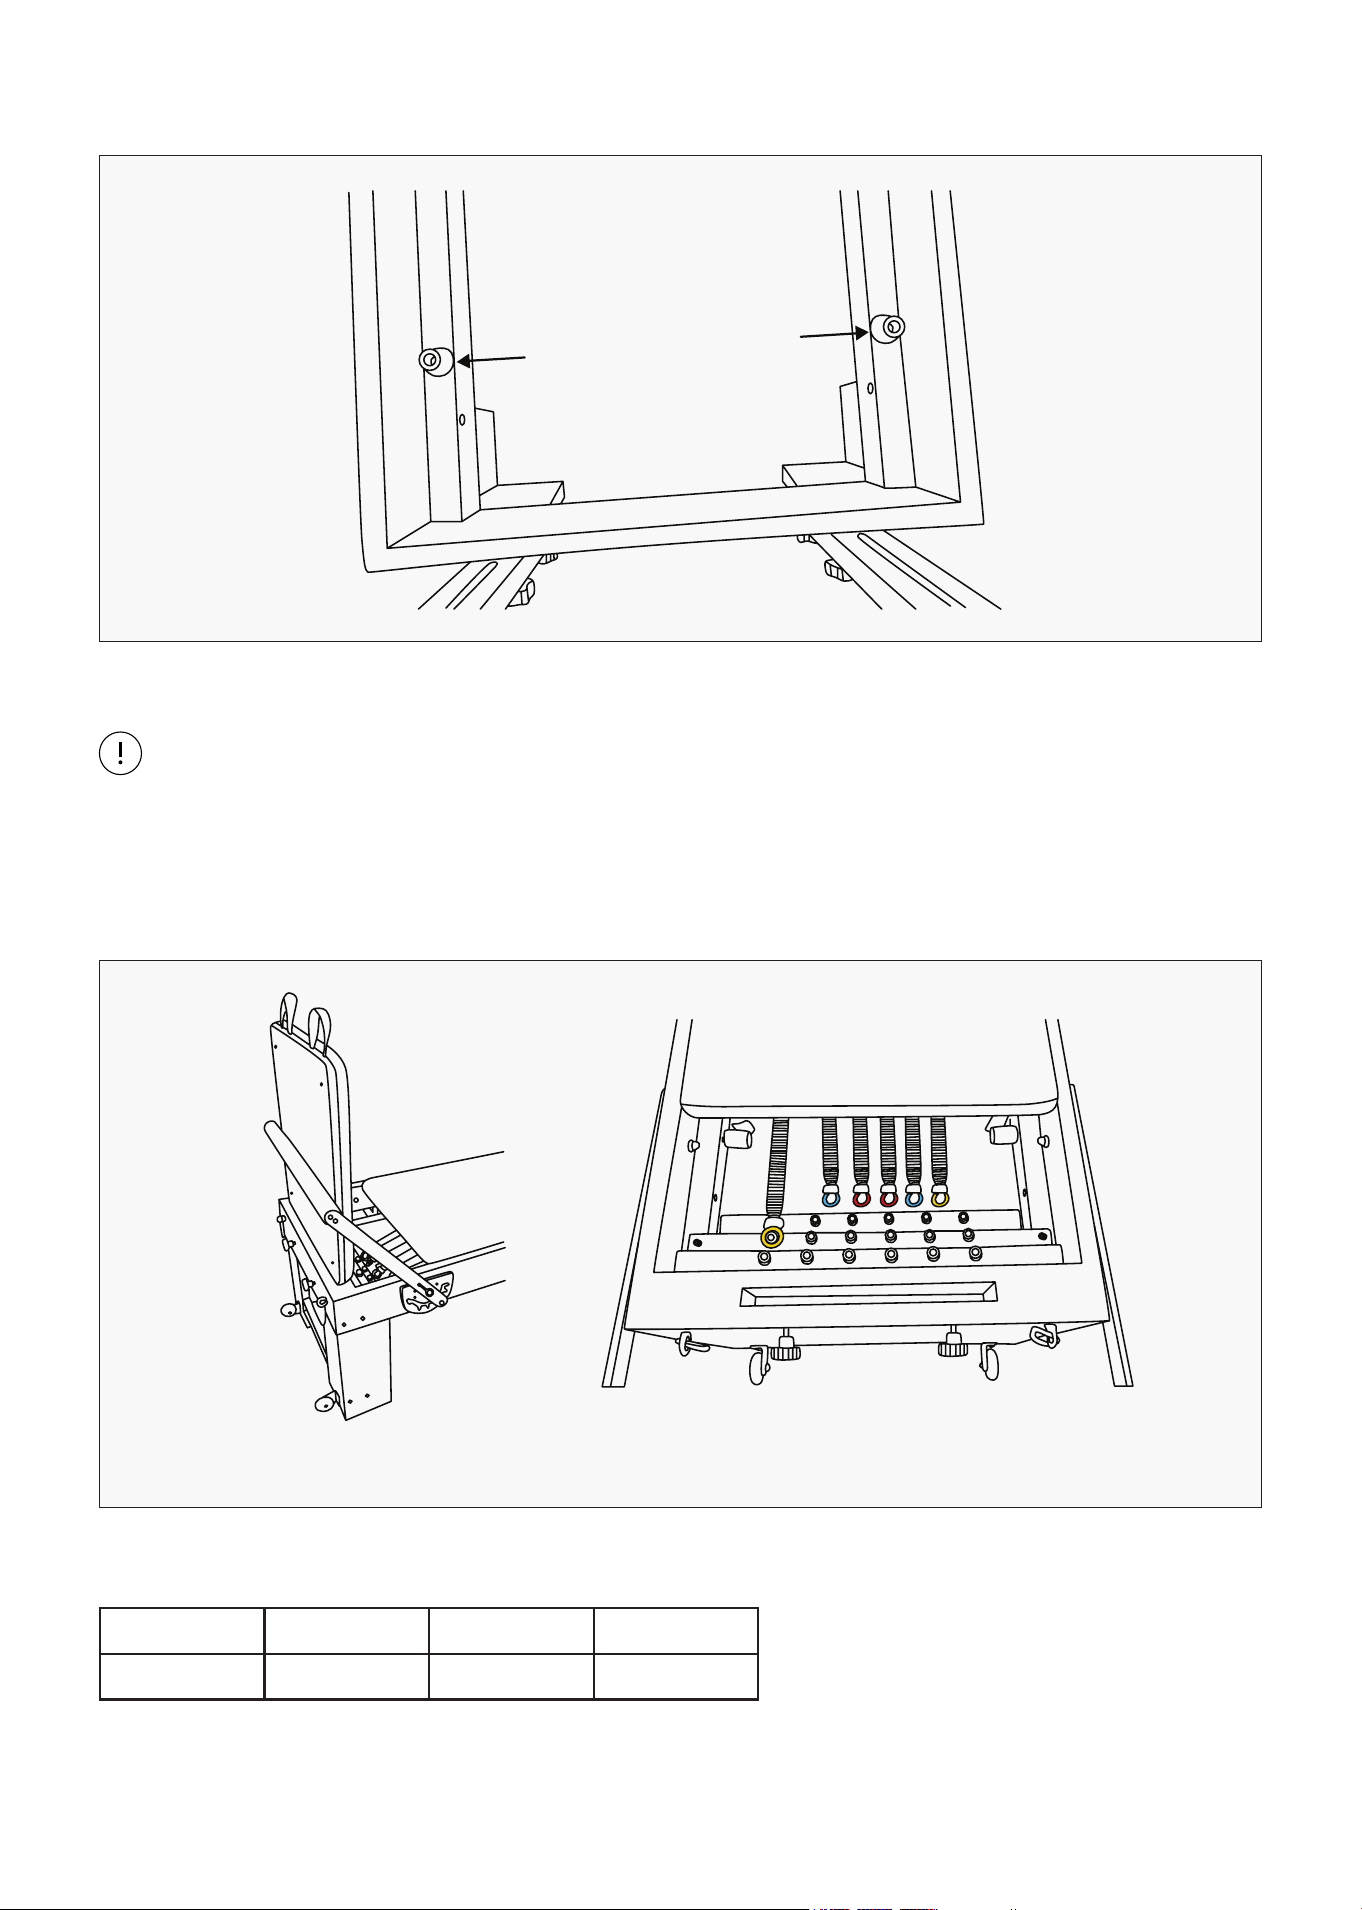
ASSEMBLE THE RISERS/PULLEYS
Align the holes on the column with the holes on the bed and screw on the locking knobs.
ASSEMBLE THE HANDLE
Insert the handle screw into the carriage headstock and tighten it to the handles.
9ASSEMBLY INSTRUCTIONS |
ASSEMBLE THE SHOULDER REST BLOCKS
Install the shoulder rest blocks as pictured behind the handle the use the washer and nut that is pre-
installed on the blocks.
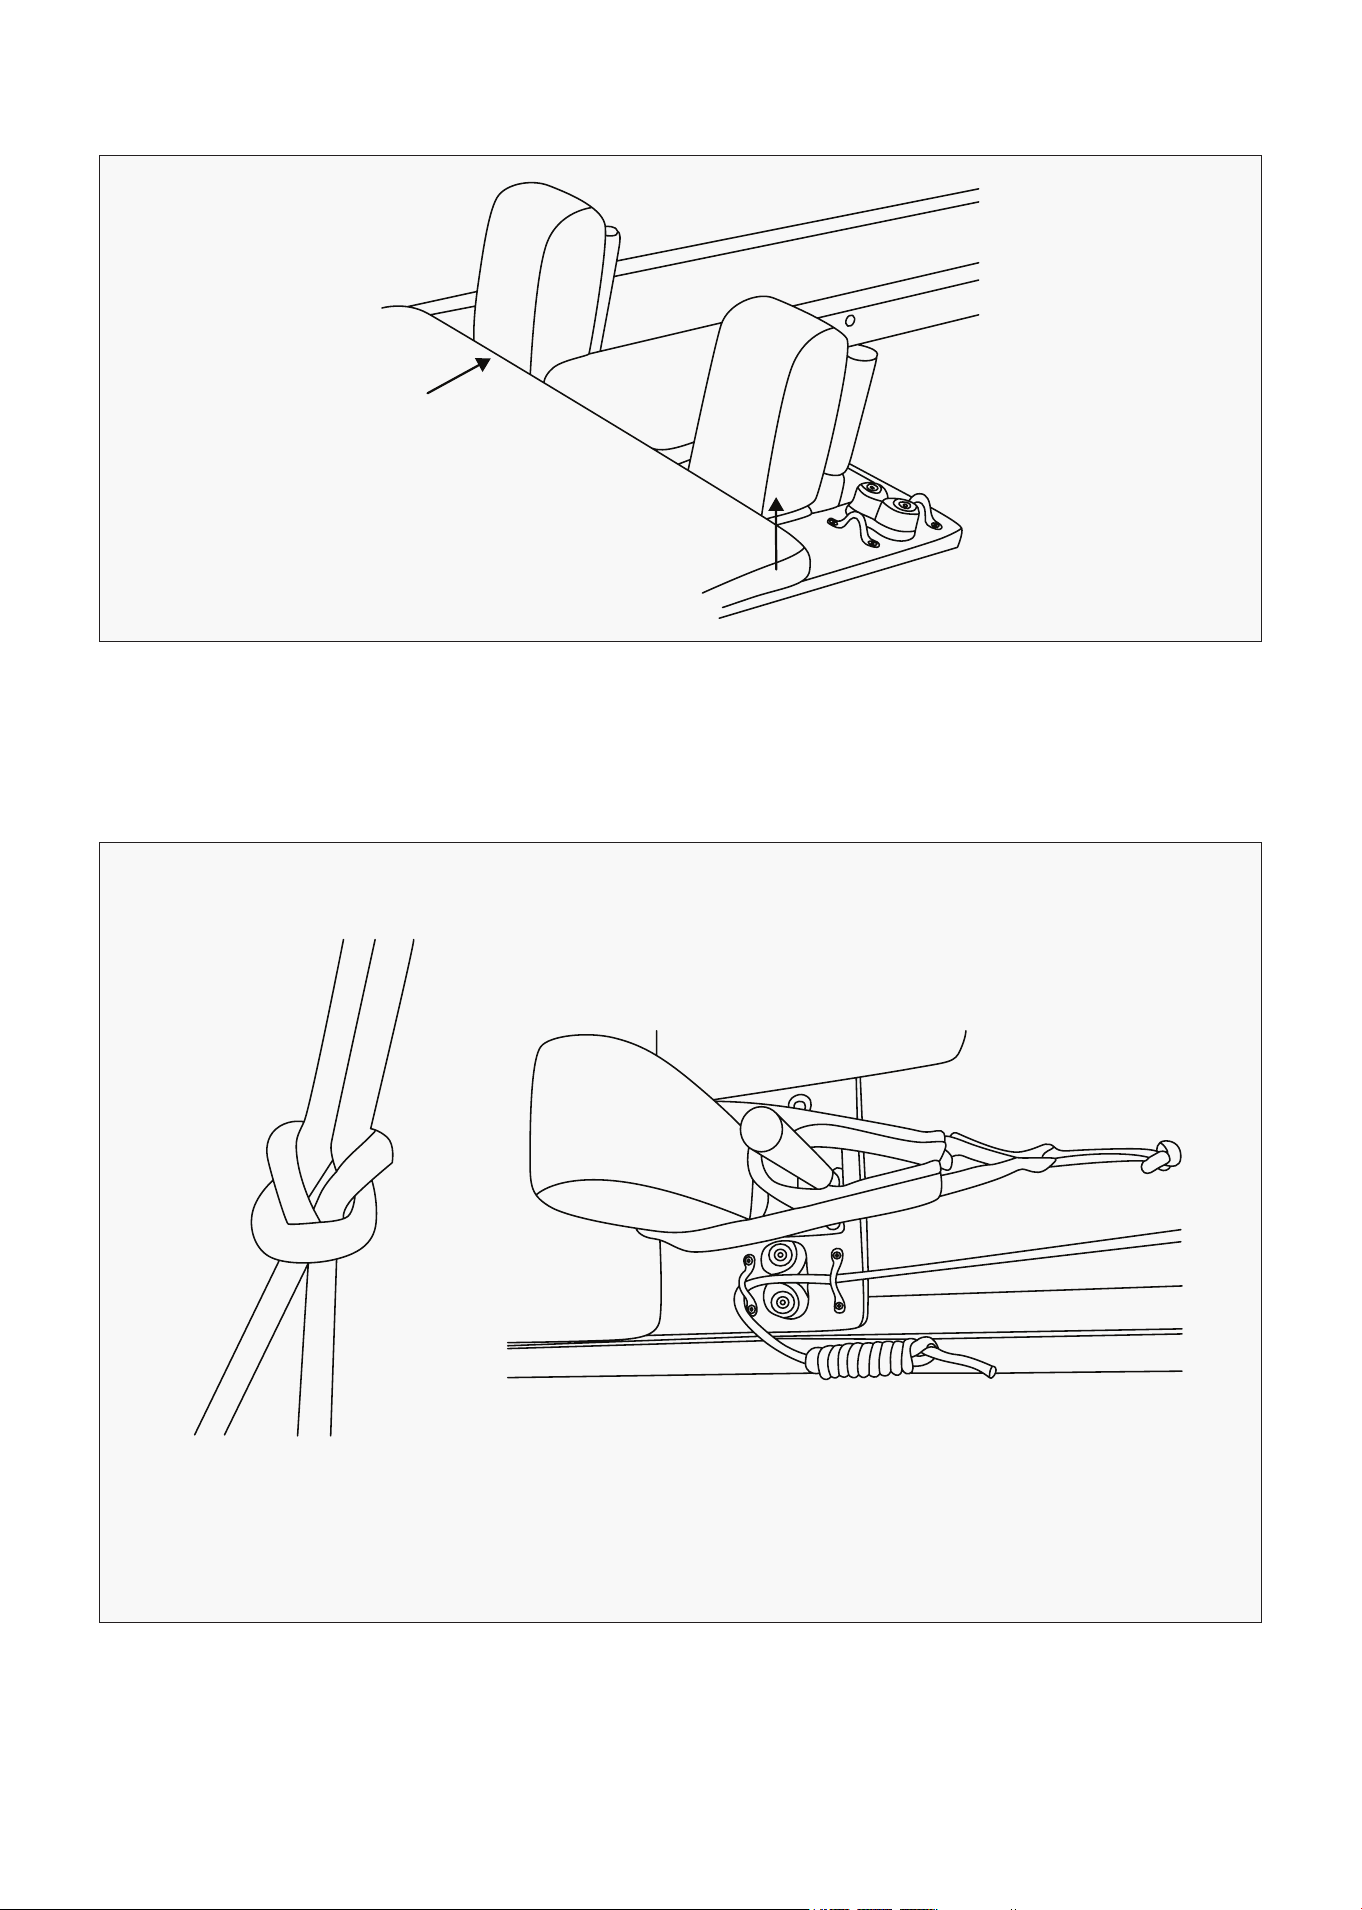
ASSEMBLE THE ROPES & HANDLE STRAPS
1. Attach the handle strap to the looped end of the rope to form a loop-to-loop knot (Fig 1). Repeat for the
other rope then rest your handles on the shoulder blocks (Fig 2).
Fig 1 Fig 2
10 | ASSEMBLY INSTRUCTIONS
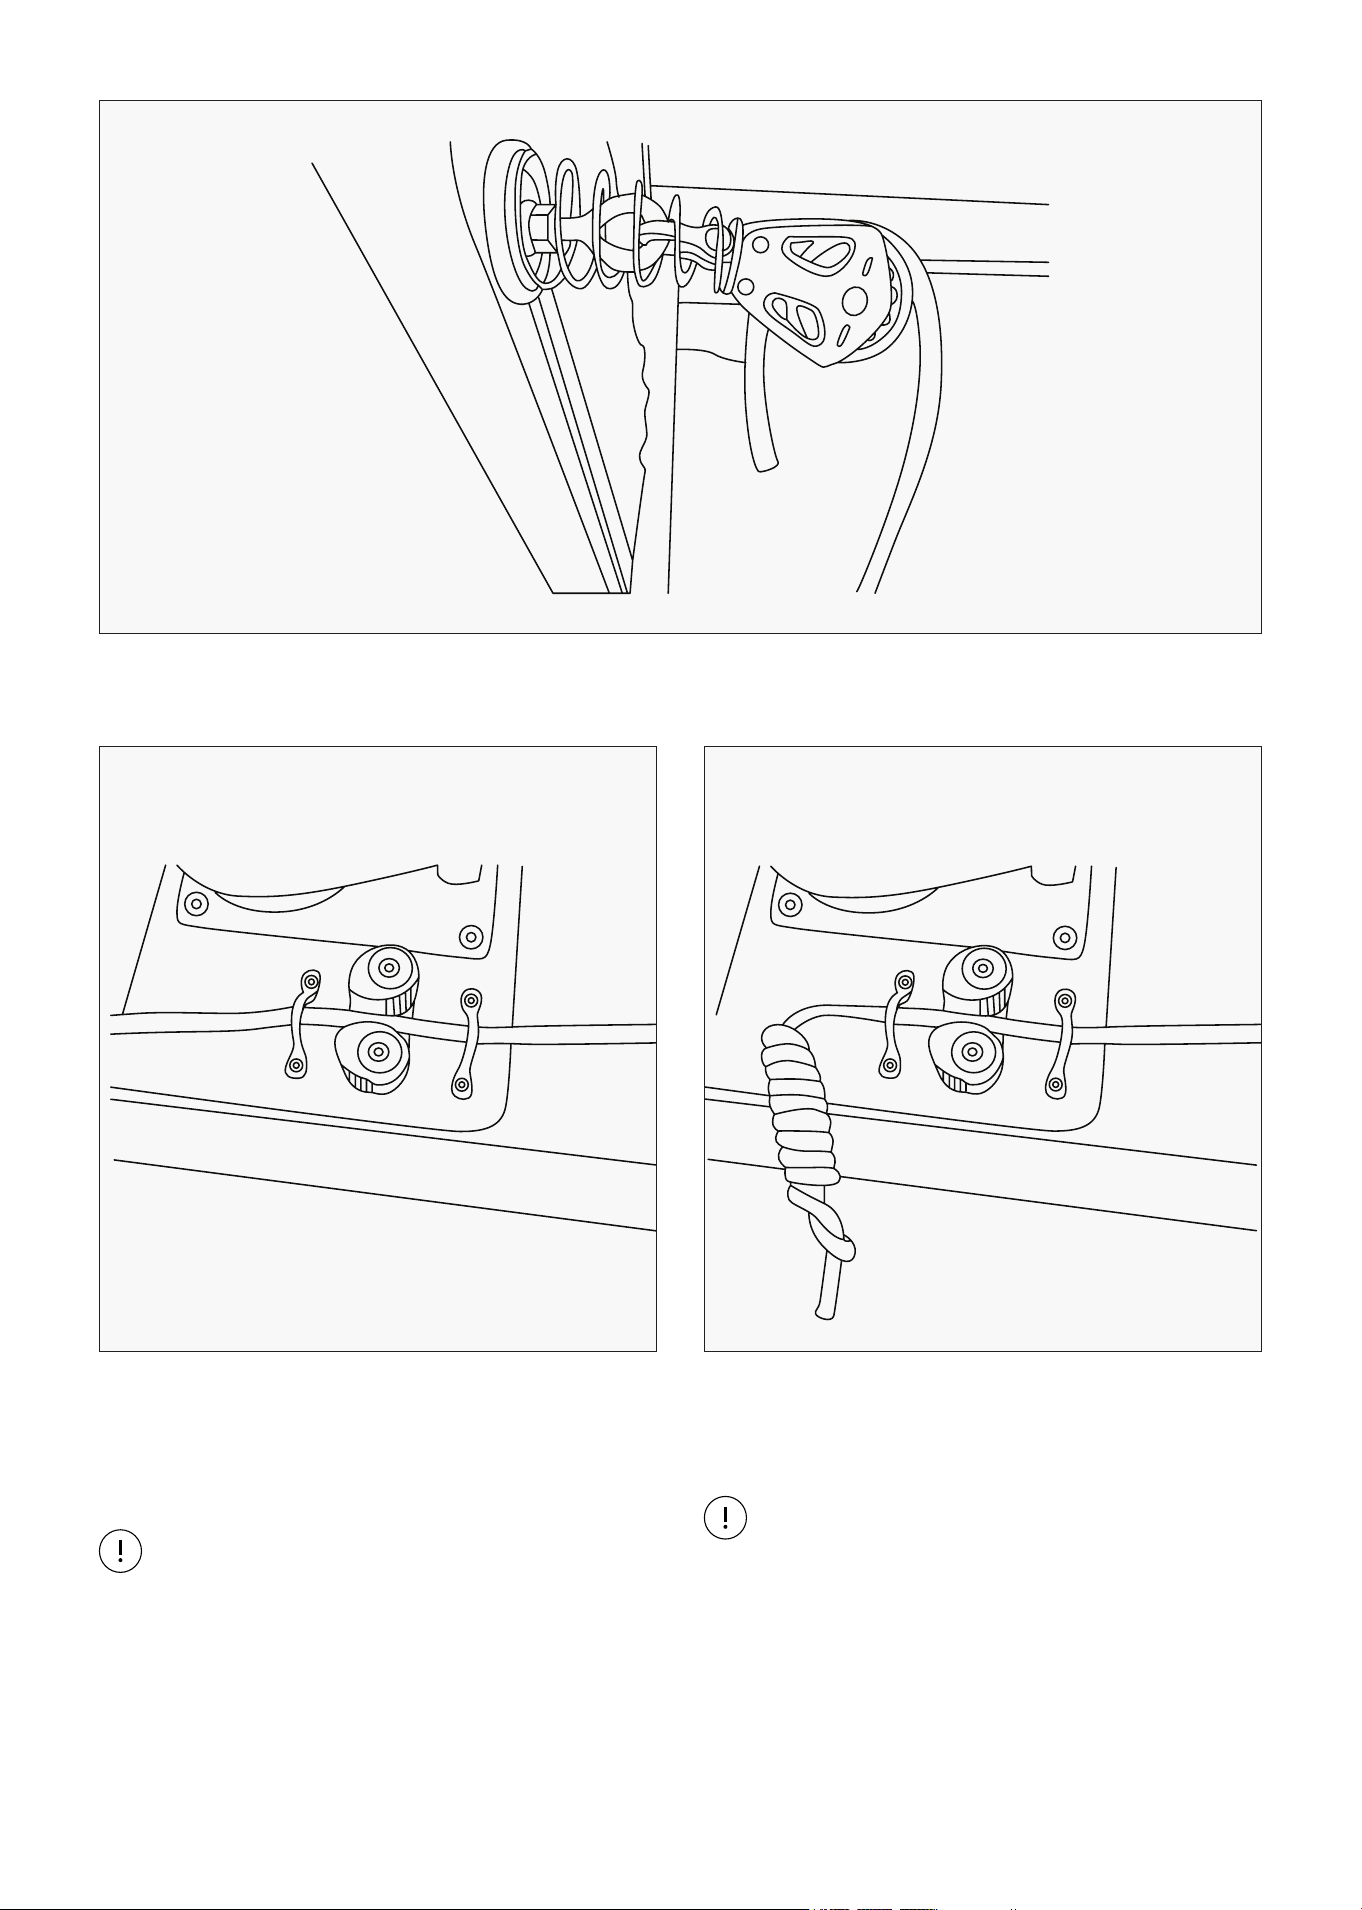
2. Feed the other end of the ropes into the pulleys on the risers.
3. Then insert the rope into the rope clamps
on the carriage to your preferred length and
according to the exercise you wish to perform.
NOTE:
Longer ropes produce smaller tension, and
shorter ropes produce greater tension.
4. For the excess ropes, wrap them around the
clamp or form a knot as shown.
NOTE:
Make sure that the ropes are adjusted to
equal lengths and the ropes are properly
secured. You can ensure they are even by
placing them on the shoulder rest blocks
and pulling the rope to the preferred length.
11ASSEMBLY INSTRUCTIONS |
CARRIAGE STOPPERS
Carriage stoppers are pre-installed on the frame, but you can move them according to your height.
WARNING
The carriage stopper must be always inserted. Using the Reformer without the carriage stopper
may cause damage to the gear bar assembly, rollers or spring holder.
HOW TO USE THE FOOT BAR & SPRINGS
1. Pull the foot bar up, it will un-slot then lift and slot to the position for your exercise (Fig. 1).
2. Place the springs onto the gear bar for your preferred resistance level (Fig 2).
Colour Red Blue Yellow
Load Hard Medium Light
Fig 1 Fig 2
12 | ASSEMBLY INSTRUCTIONS
USING THE JUMP BOARD & PILATES BOX
1. To use the jump board, you will need to remove the foot platform by lifting it out of the slot. Then
insert the jump board into the same slot.
2. Move the foot bar so that it rests behind the jump board firmly.
WARNING
Failure to follow this step can cause damage to your frame or board and affect your warranty
claim.
3. To use the Pilates box, place it by the two shoulder pads vertically or horizontally depending on your
exercise.
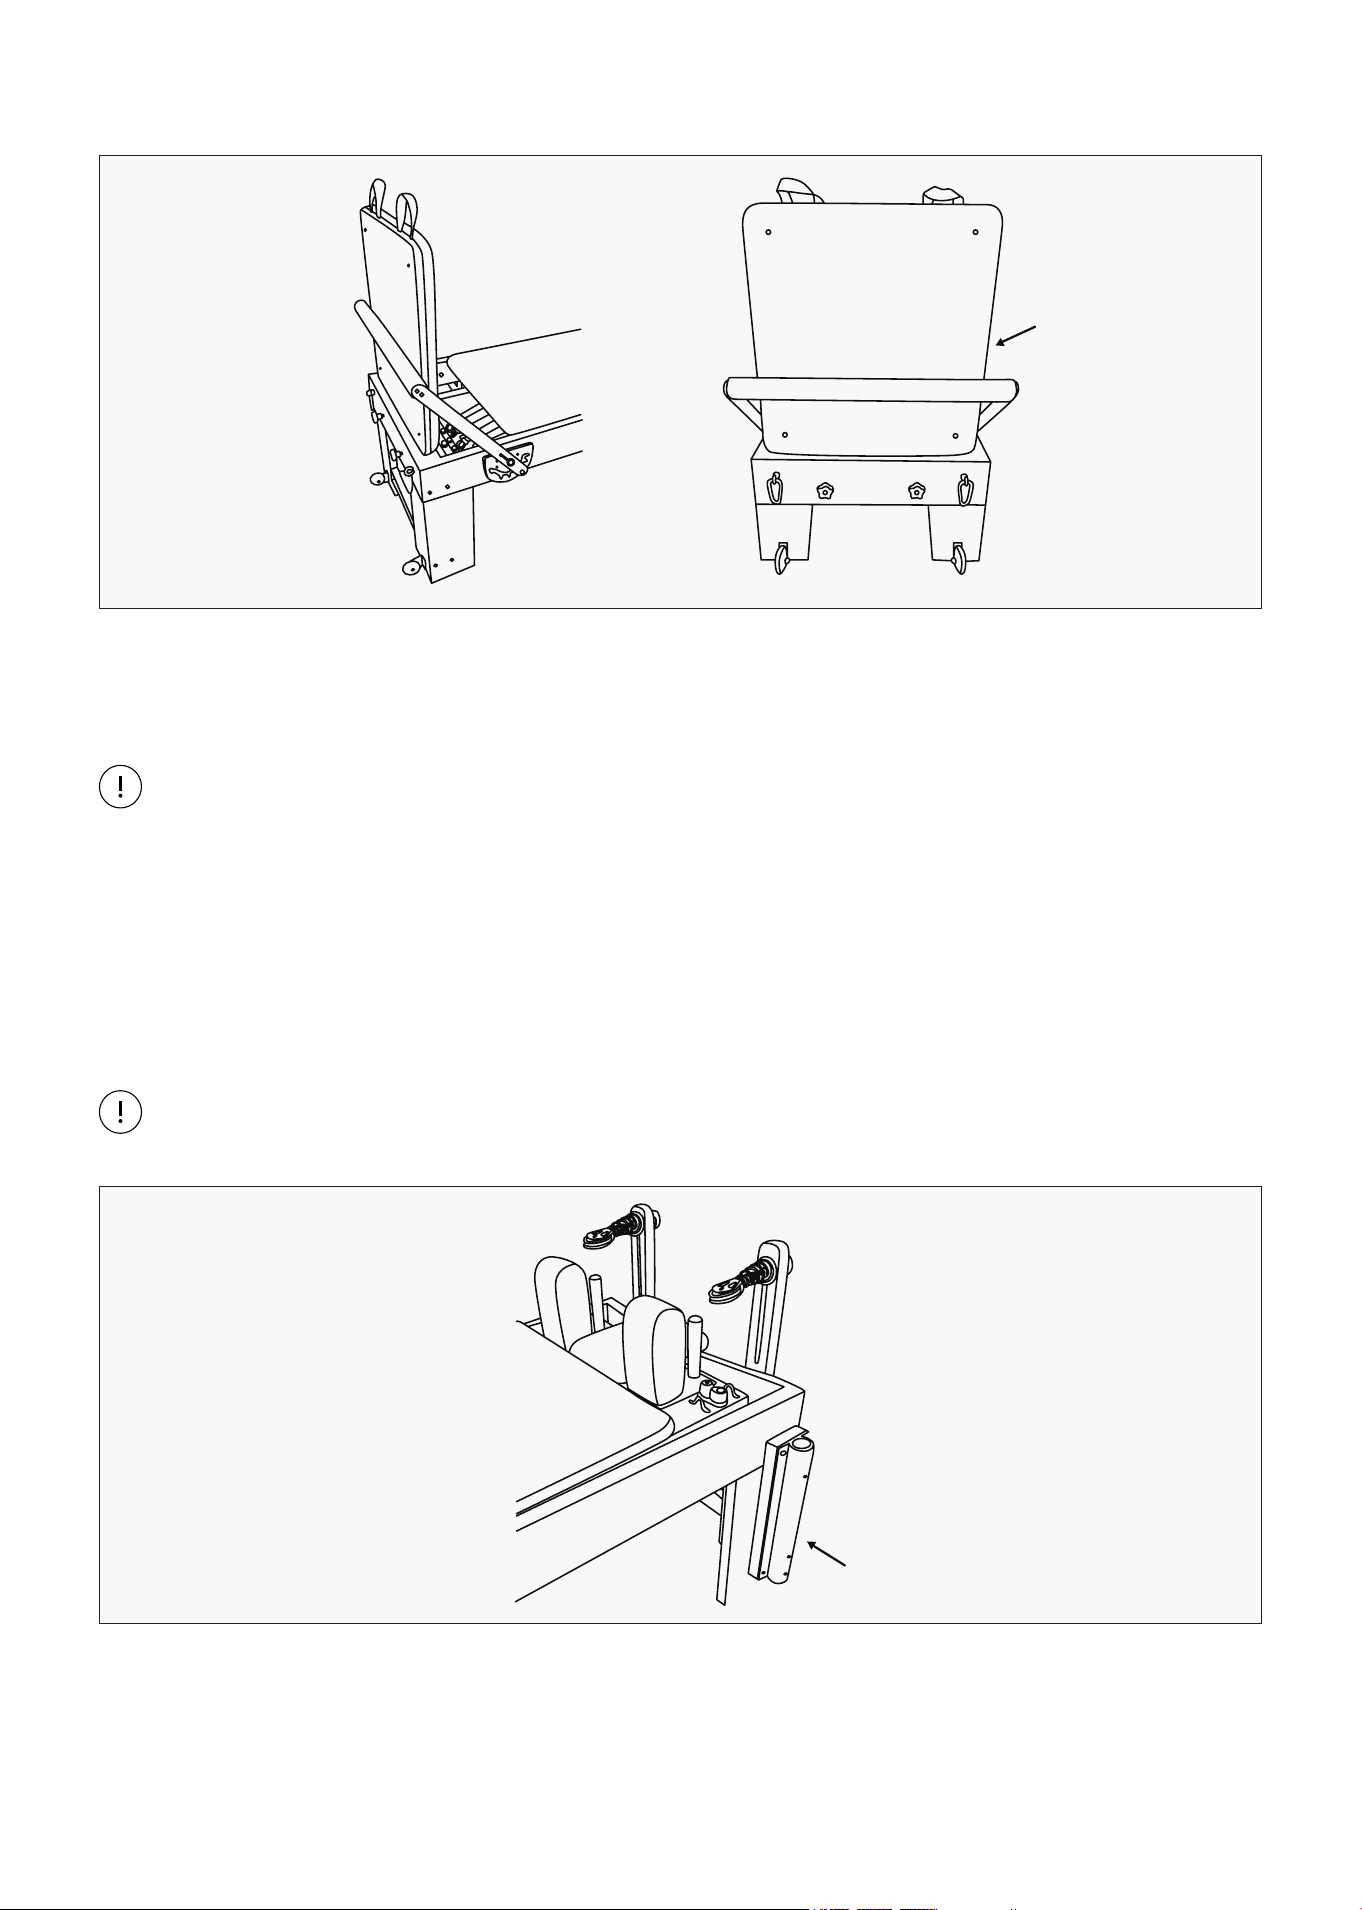
SETTING UP THE TRAPEZE TABLE
NOTE:
Screws are pre-installed on the parts.
1. Remove pipe seat from the packing box and install it onto the frame as shown in the figure using the
pre-installed screws on the part.
13ASSEMBLY INSTRUCTIONS |
2. Connect the horizontal pipe (Fig 1) & 4 pins together with the 2x long vertical pipe with no holes
(Fig 2) together, securing with the 4x locking knobs (Fig 3).
Fig 1: Horizontal Pipe &
4x Locking Knobs
Fig 2: Long Vertical
Pipe - No Holes
Fig 3: Joined
Together
3. From the previously installed parts (Fig 3), turn it so that the locking knobs are facing the ground.
Then use the other two horizontal pieces (Fig 4 & 5) to install onto the long poles, forming a rectangle.
(Screws are pre-installed on the parts). Note that the corners with the T pipe should be facing
downward (Fig. 6). Set aside for installation later.
NOTE:
The Horizontal pipe with the 4x locking knobs is adjustable horizontally on the Long vertical pipe
(Fig. 3).
Fig 4 Fig 5
Fig 6
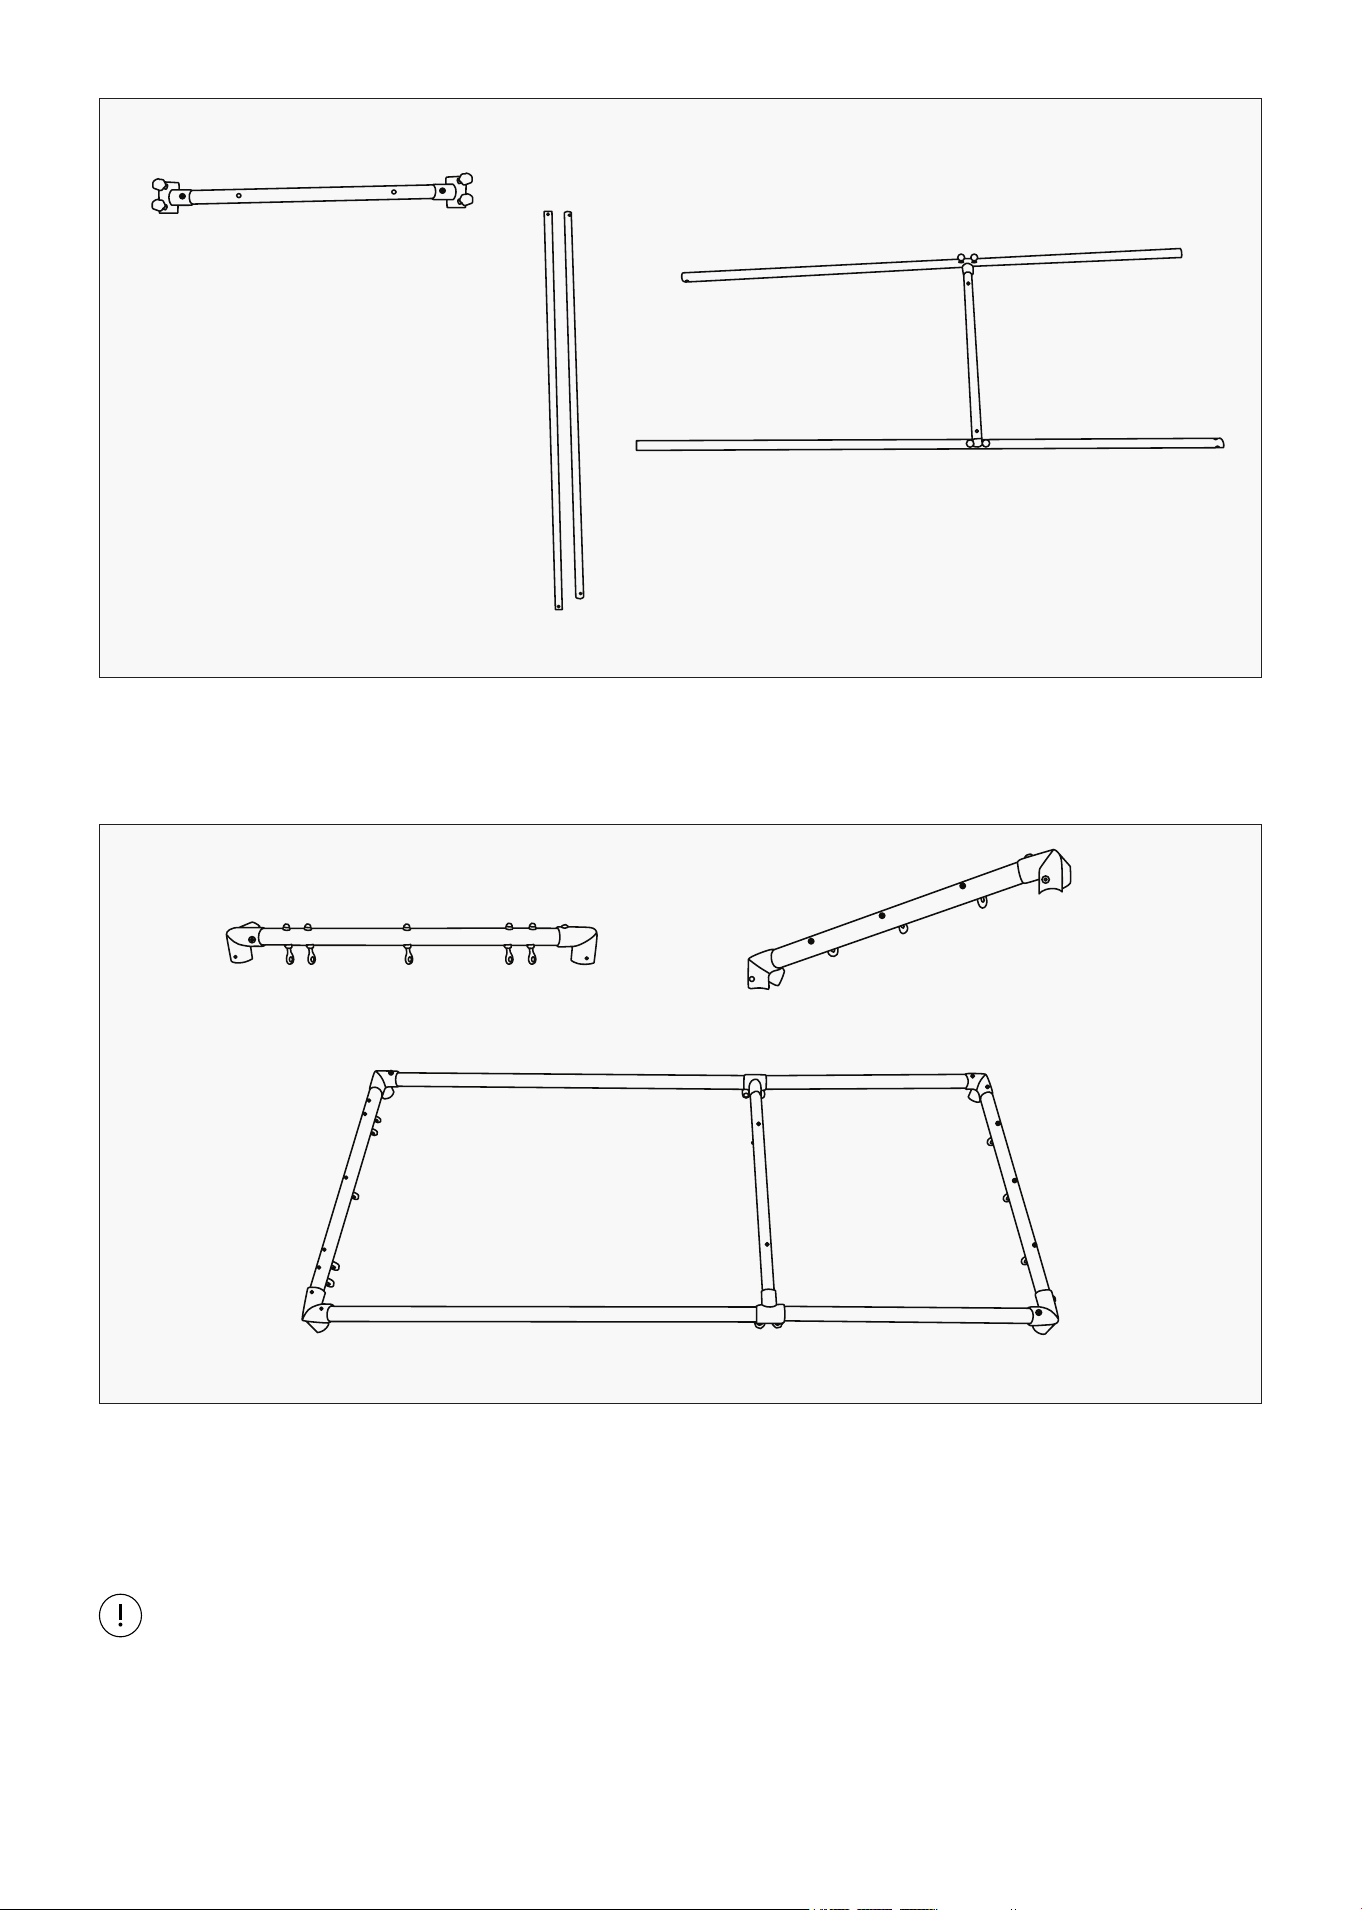
14 | ASSEMBLY INSTRUCTIONS
4. Insert the two vertical pipes with 4x eyelets (Fig 7) into the installed pipe seat on the frame, with the 3
eyelets facing the to the leg bar.
Move the carriage (no springs hooked) with the head rest to the pulley end, then place the cushion
insert to the frame (Fig 8) on the other end.
5. Insert the two vertical pipes with holes (Fig 9) into the Horizontal Pipe w/3x eyelets & 2x Locking
knobs (Fig 10) tighten with the lock pins, then insert the pipes into the pipe seat as pictured (Fig 11).
This section is height adjustable for the horizontal pipe with 2x locking pins.
Fig 7 Fig 8
Fig 9: Vertical
Pipe w/Holes
Fig 10: Horizontal
Pipe w/ 3x Eyelets &
2x Locking knobs
Fig 11
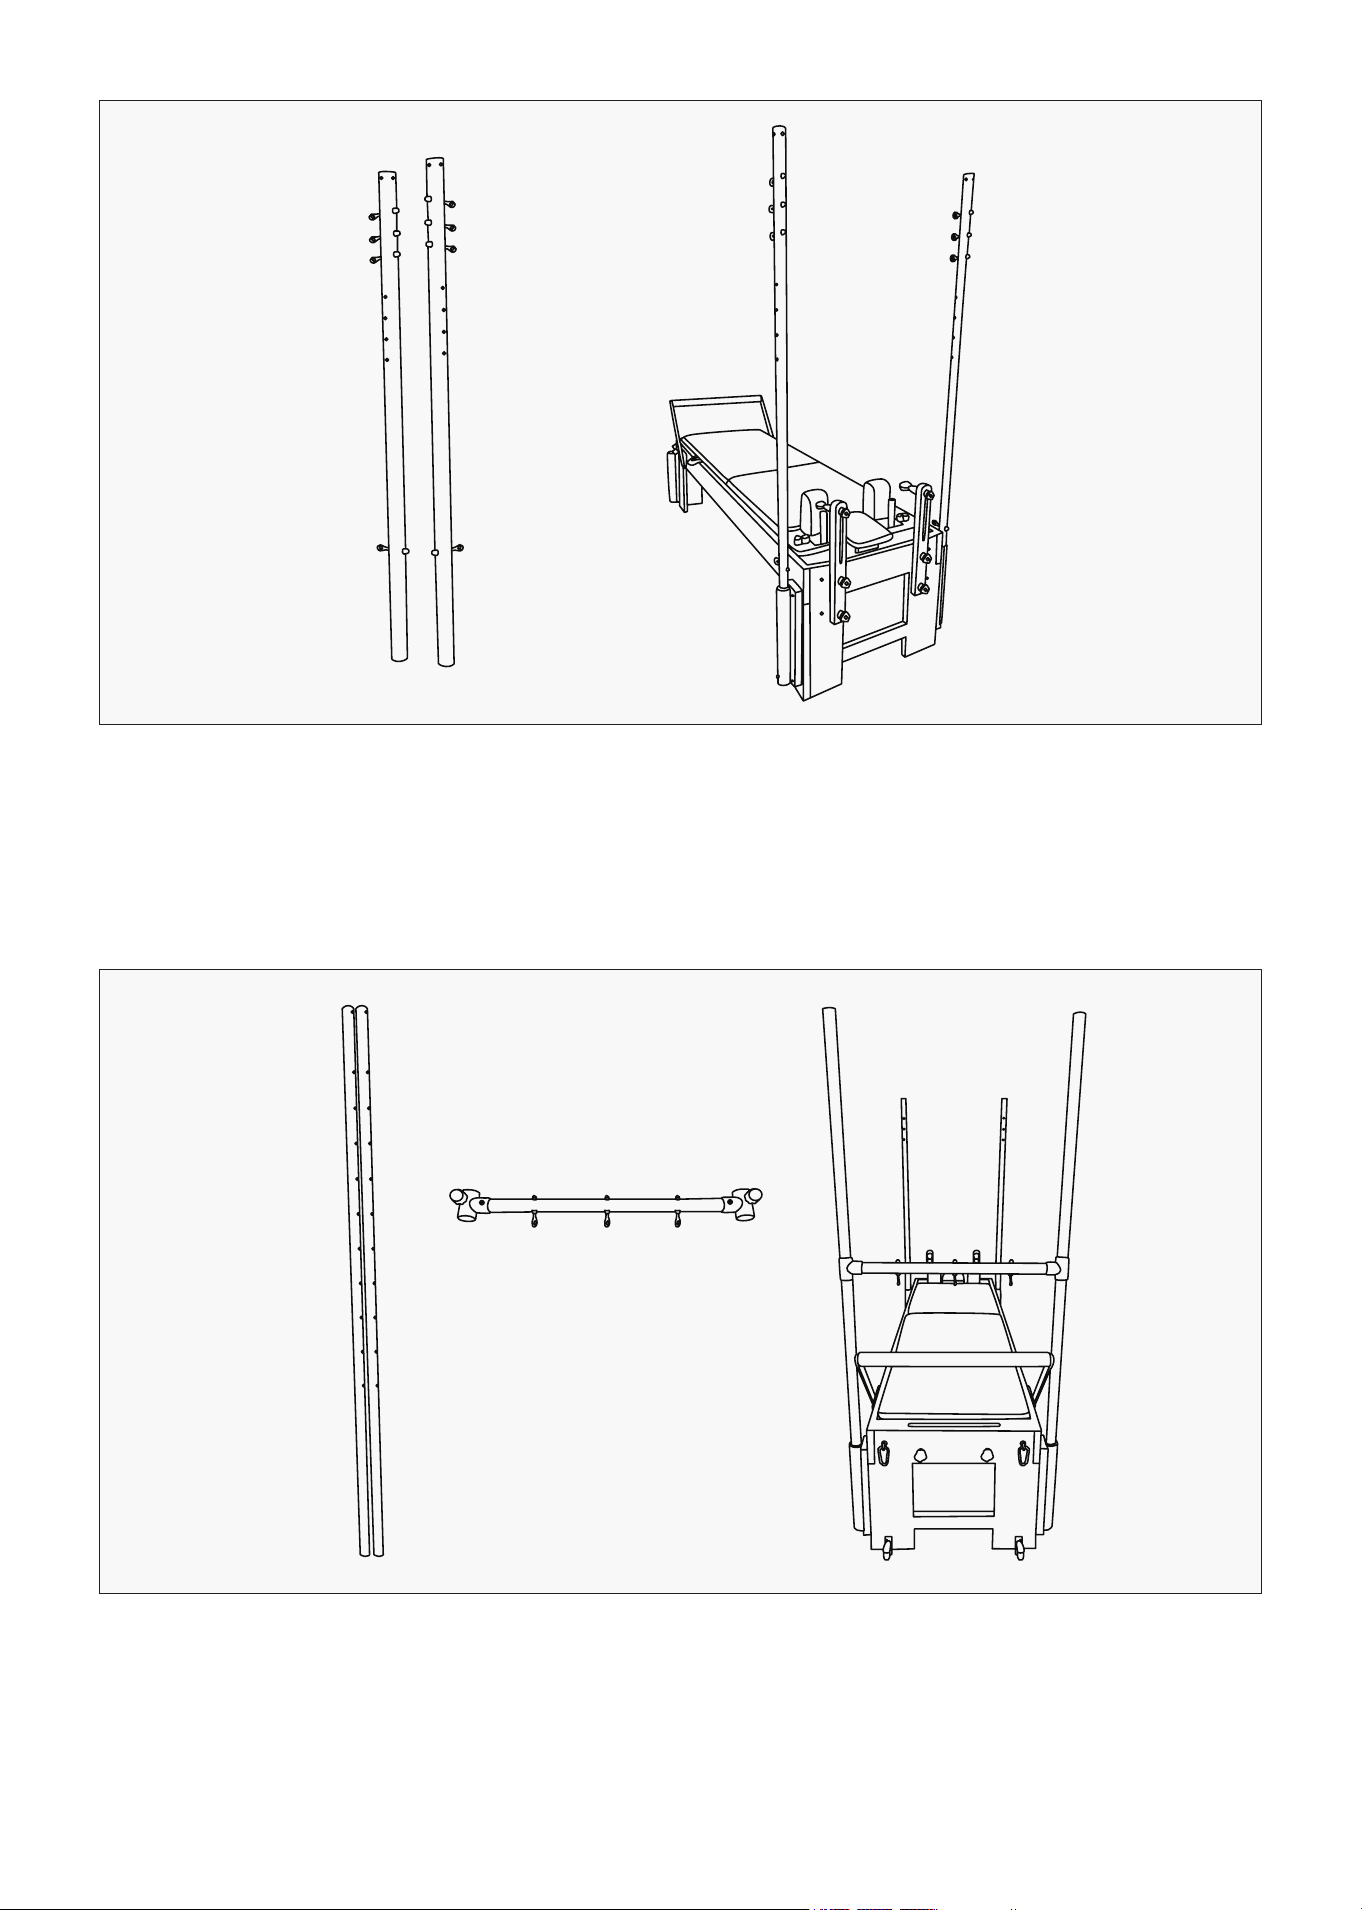
15ASSEMBLY INSTRUCTIONS |
6. Place the assembled frame in step 3 (Fig. 6) onto the top of the installed vertical pipes from step 5
(Fig. 11) and secure with the screws.
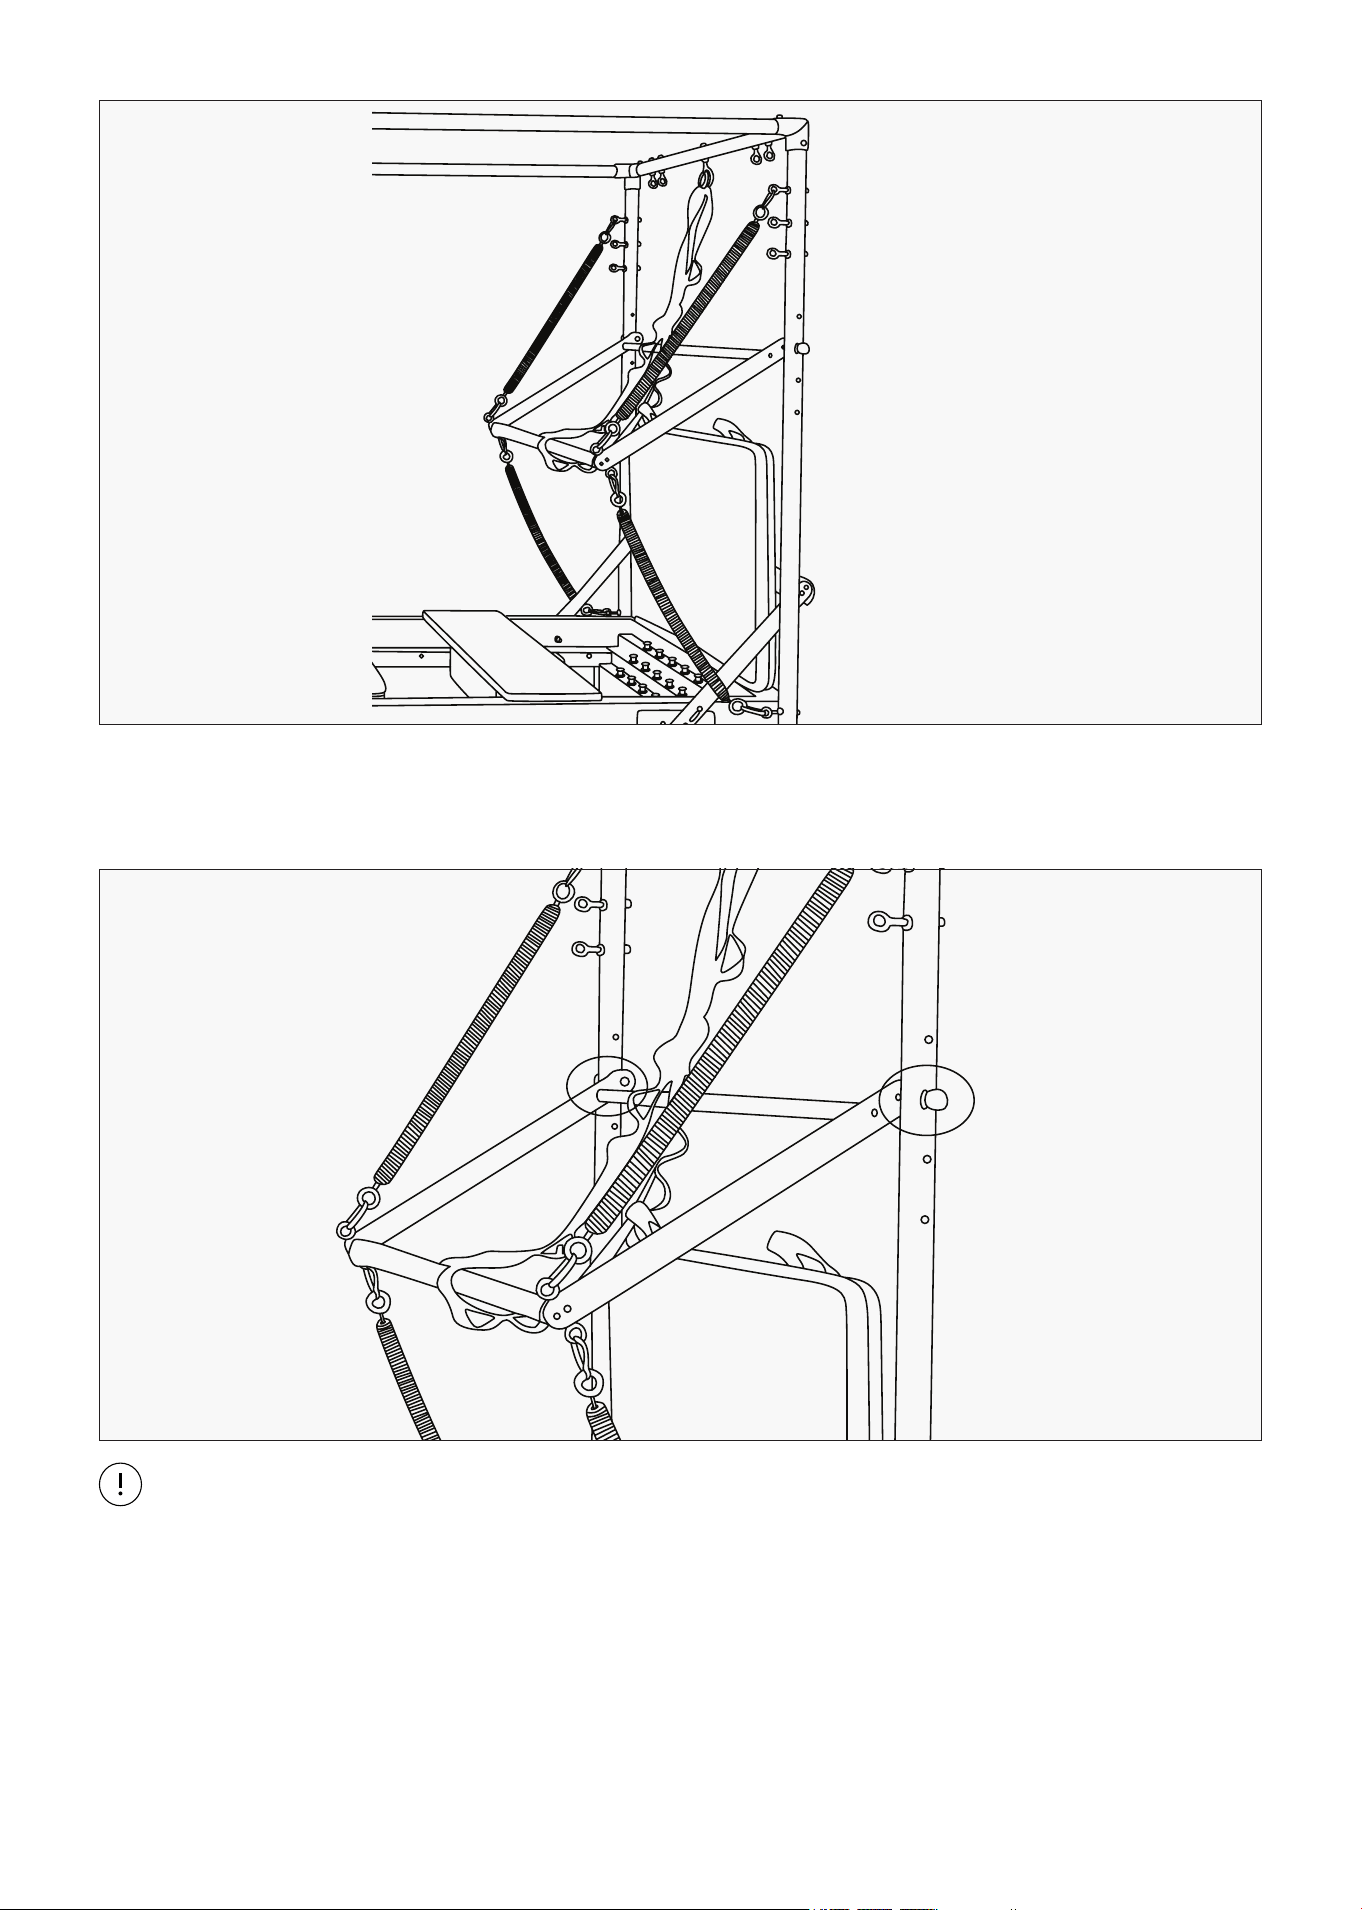
7. Secure the push through bar to the vertical post with holes as pictured using the pins (Fig. 12). You
can adjust the height by un-slotting and re-slotting the pins. Use the long length springs (600mm)
and connect it to the top or bottom rings on the Square-shaped frame, according to the exercise.
IMPORTANT
Safety strap must be attached to the push through bars and frame. Length of the strap can be
adjusted via the loops on the straps.
Fig 12
16 | ASSEMBLY INSTRUCTIONS
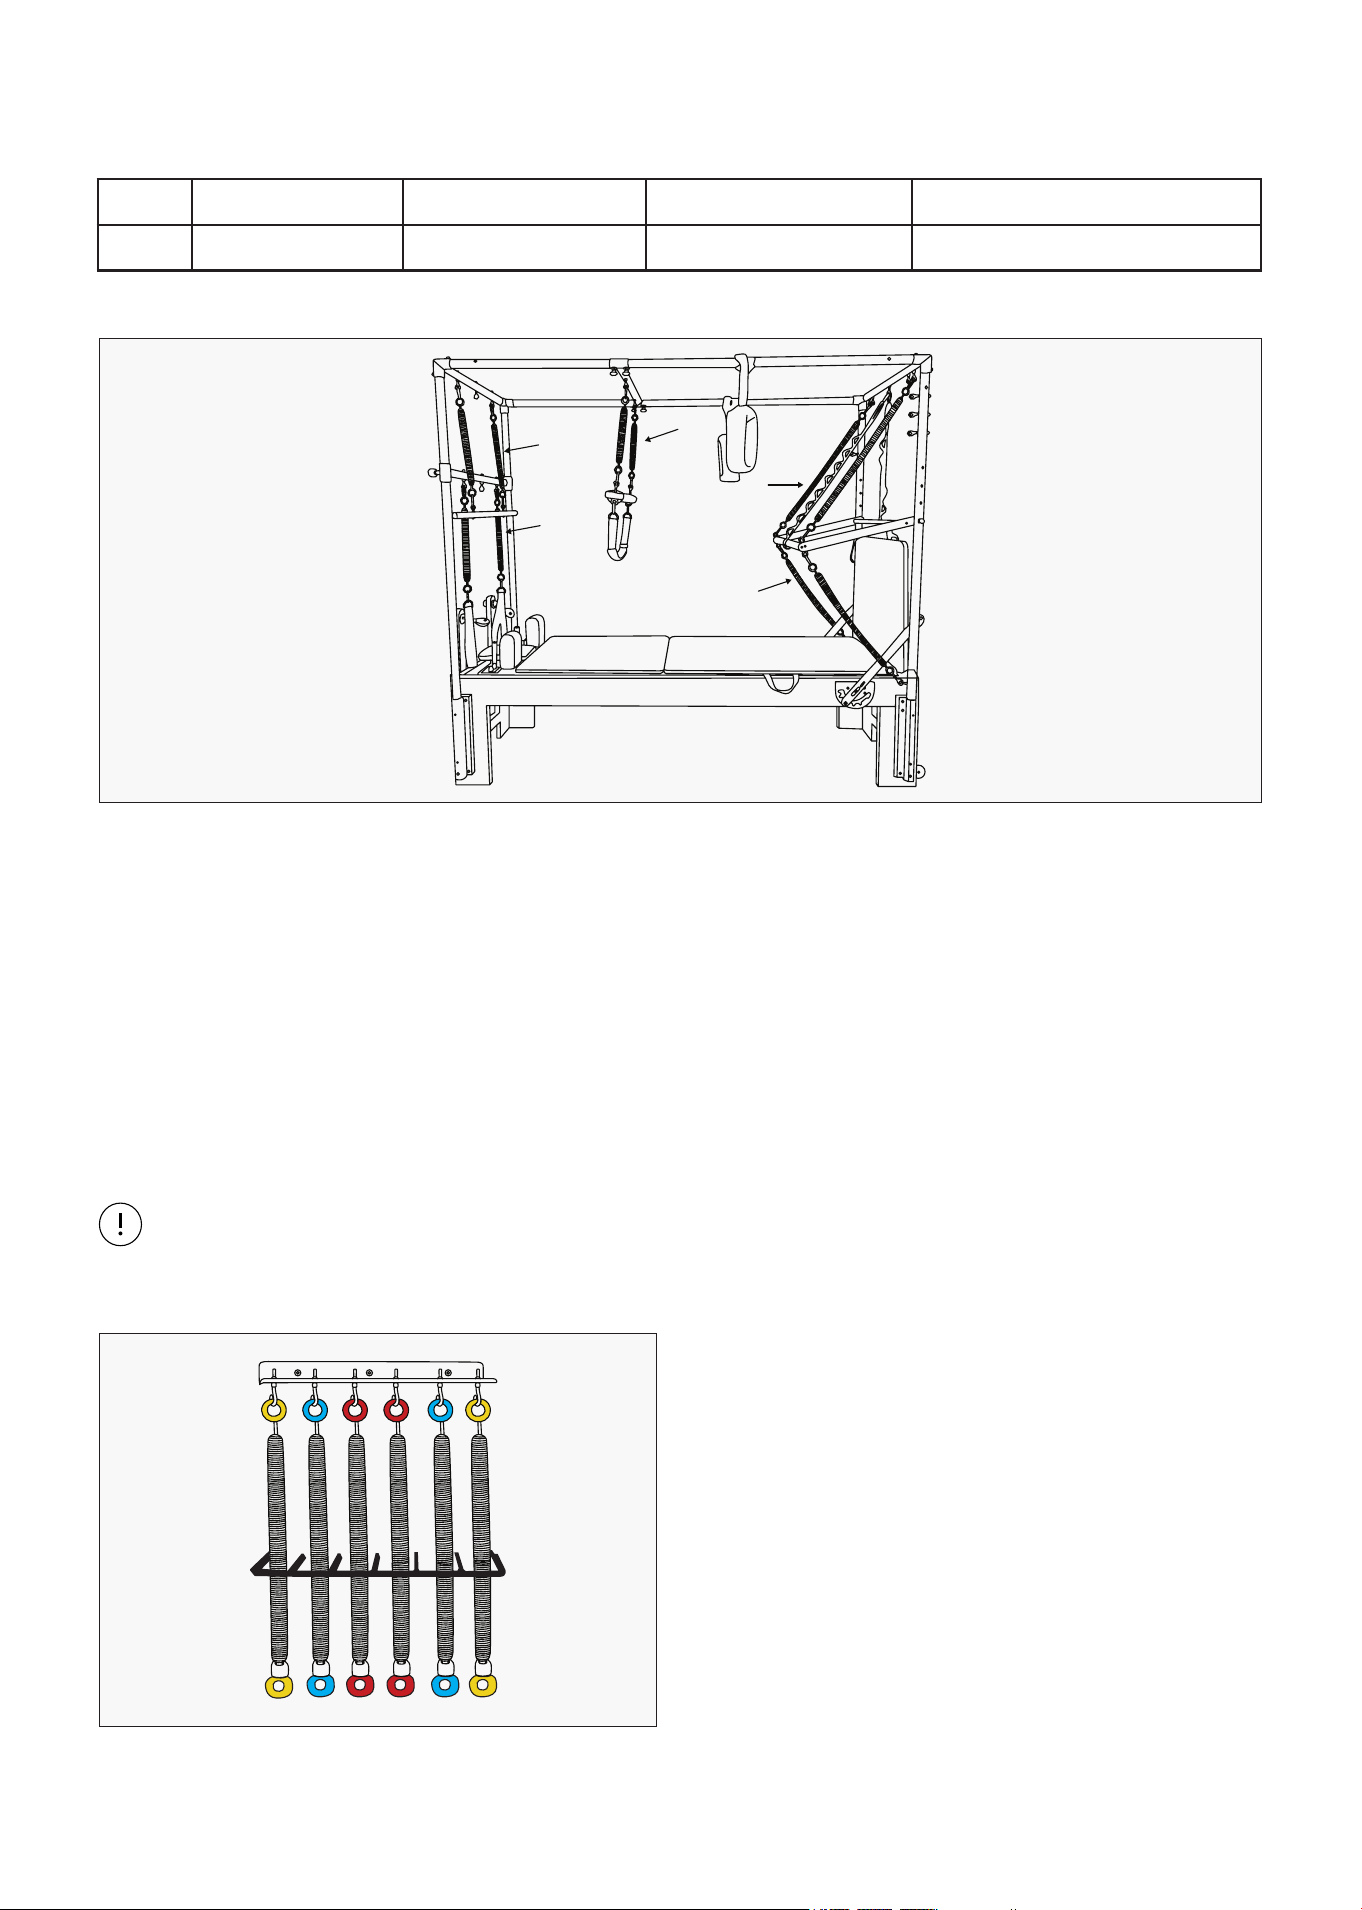
8. Secure the other trapeze springs and accessories using the carabiner hooks and attaching them to
the eyelets on the frame, when in use.
Where to attach the accessories on the Trapeze frame (Per image above):
Traverse Plate: Attach to the 2x short length springs (370mm) and hook to the top of the Trapeze frame.
Bottom section rings are attached to the Foot straps.
Plush Draw String: Form a loop tie to the top frame.
Roll Down Bar: Hook: Attach the 2x medium length springs (460mm) to the roller and the other end of
the springs attaches to the trapeze frame.
Handle straps: Remove them from the pulley ropes and add it to 2x medium length springs.
WARNING
Before use check all components for wear and after installation, ensure all parts are properly
secured. Failure to conduct these checks can result in injury.
Replacement of Springs
To replace a worn spring, simply unhook the
spring from both ends.
Make sure to place the colored spring in the
same location.
460mm
460mm
370mm
600mm
600mm
Colour Red (Short Length) Blue (Medium Length) Purple (Medium Length) Yellow (Medium & Long Length)
Load Hard Medium Medium Light
Springs are attached in the following sections by the lengths, see image:
17
IV. EXERCISE GUIDE
PLEASE NOTE:
Before beginning any exercise program, consult your physician. This is important especially if you are
over the age of 45 or individuals with pre-existing health problems.
The pulse sensors are not medical devices. Various factors, including the user’s movement, may
affect the accuracy of heart rate readings. The pulse sensors are intended only as an exercise aid in
determining heart rate trends in general.
Exercising is great way to control your weight, improving your fitness and reduce the effect of aging and
stress. The key to success is to make exercise a regular and enjoyable part of your everyday life.
The condition of your heart and lungs and how efficient they are in delivering oxygen via your blood to
your muscles is an important factor to your fitness. Your muscles use this oxygen to provide enough
energy for daily activity. This is called aerobic activity. When you are fit, your heart will not have to work
so hard. It will pump a lot fewer times per minute, reducing the wear and tear of your heart.
So as you can see, the fitter you are, the healthier and greater you will feel.
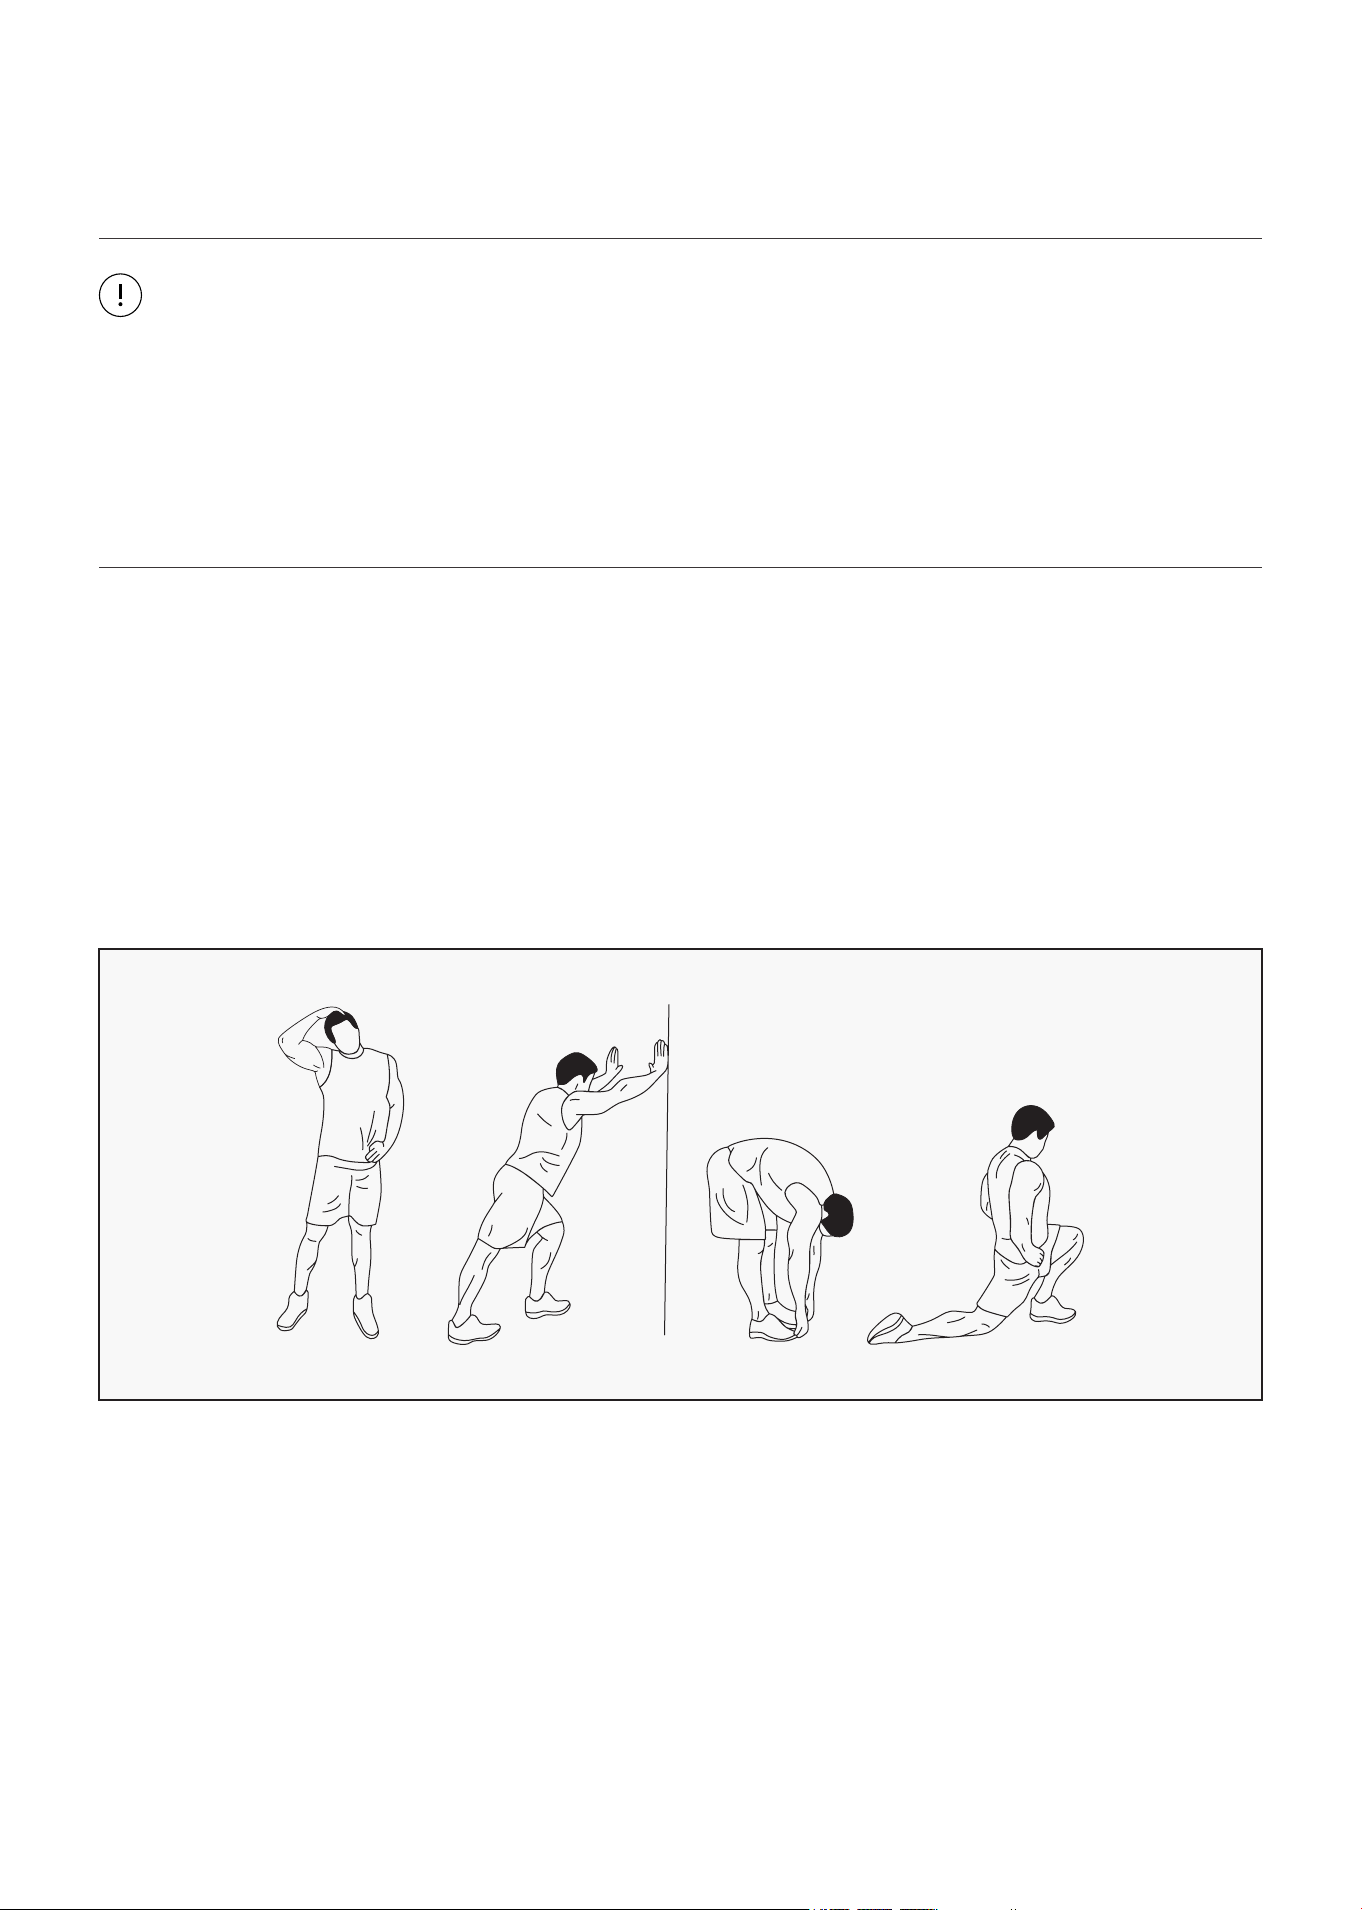
WARM UP
Start each workout with 5 to 10 minutes of stretching and some light exercises. A proper warm-up
increases your body temperature, heart rate and circulation in preparation for exercise. Ease into your
exercise.
After warming up, increase the intensity to your desired exercise program. Be sure to maintain your
intensity for maximum performance. Breathe regularly and deeply as you exercise.
EXERCISE GUIDE |
18 | EXERCISE GUIDE
COOL DOWN
Finish each workout with a light jog or walk for at least 1 minute. Then complete 5 to 10 minutes of
stretching to cool down. This will increase the flexibility of your muscles and will help prevent post-
exercise problems.
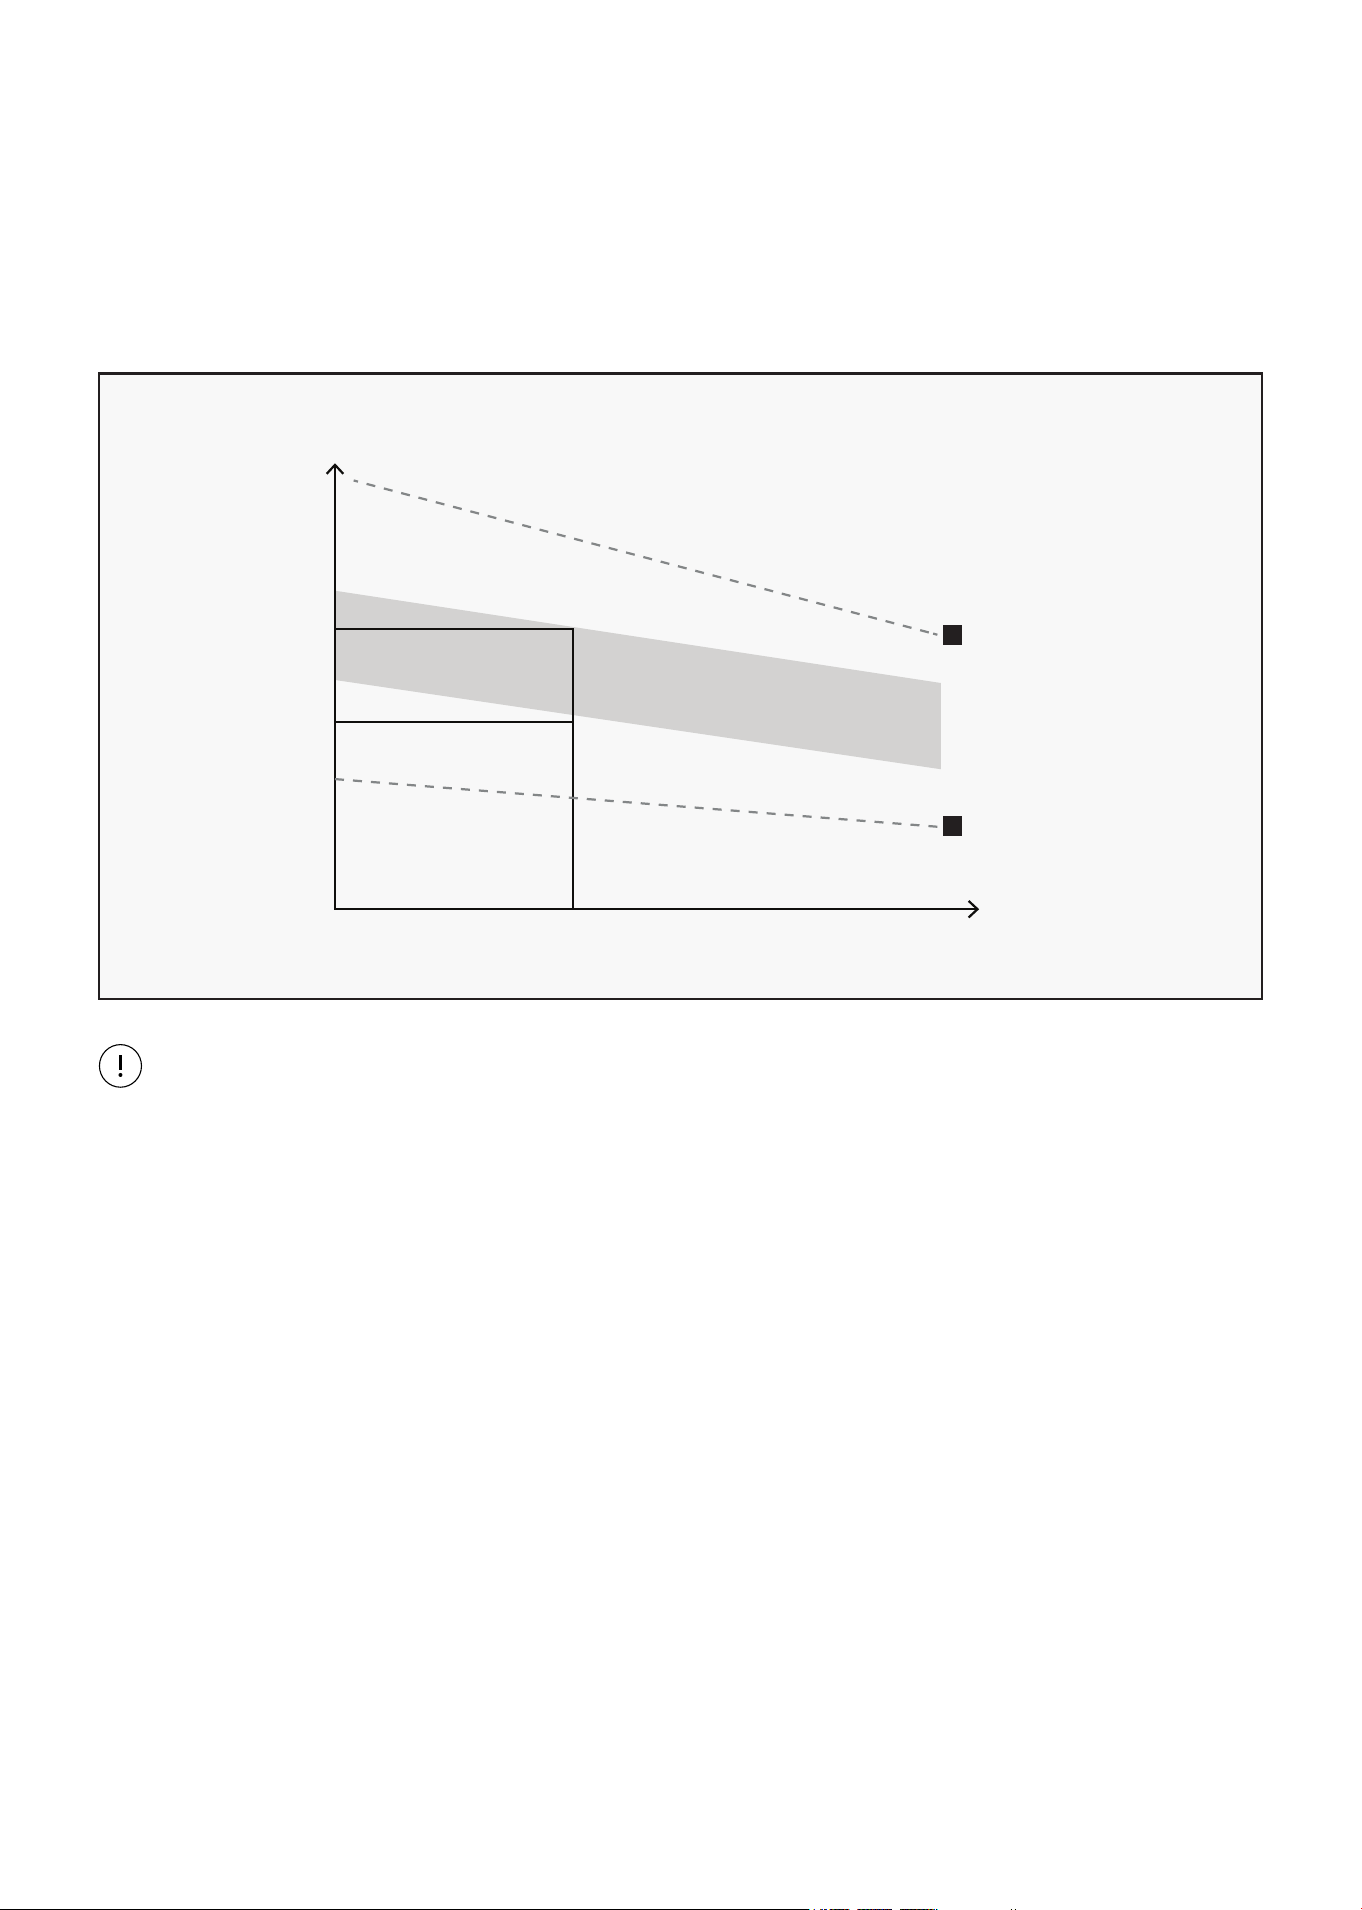
WORKOUT GUIDELINES
This is how your pulse should behave during general fitness exercise. Remember to warm up and
cool down for a few minutes.
TARGET ZONE
MAXIMUM
85%
70%
COOL DOWN
AGE
HEART RATE
200
180
160
140
120
100
80
20 25 30 35 40 45 50 55 60 65 70 75

19
V. WARRANTY
AUSTRALIAN CONSUMER LAW
Many of our products come with a guarantee or warranty from the manufacturer. In addition, they come
with guarantees that cannot be excluded under the Australian Consumer Law. You are entitled to a
replacement or refund for a major failure and compensation for any other reasonably foreseeable loss
or damage.
You are entitled to have the goods repaired or replaced if the goods fail to be of acceptable quality and
the failure does not amount to a major failure. Full details of your consumer rights may be found at
www.consumerlaw.gov.au.
Please visit our website to view our full warranty terms and conditions:
http://www.lifespanfitness.com.au/warranty-repairs
WARRANTY AND SUPPORT
Any claim against this warranty must be made through your original place of purchase.
Proof of purchase is required before a warranty claim may be processed.
If you have purchased this product from the Official Lifespan Fitness website, please visit
https://lifespanfitness.com.au/warranty-form
For support outside of warranty, if you wish to purchase replacement parts or request a repair or
service, please visit https://lifespanfitness.com.au/warranty-form and fill in our Repair/Service
Request Form or Parts Purchase Form.
Scan this QR code with your device to go to lifespanfitness.com.au/warranty-form
WARRANTY |

WWW.LIFESPANFITNESS.COM.AU