

I
Preface
Welcome to the Pantum Series products!
We heartily appreciate your using of Pantum Series products!
To protect your vital interests, please carefully read the following statements.
For more information, please visit our official website (
www.pantum.com).
Legal Notice
Trademark
Pantum and Pantum logos are registered trademarks of Zhuhai Pantum Electronics Co.,Ltd.
Microsoft
®
, Windows
®
, Windows Server
®
and Windows Vista
®
are trademarks registered by
Microsoft Corporation in the United States or other countries/regions.
Apple, AirPrint, Mac, and macOS are trademarks of Apple Inc., registered in the U.S. and other
countries.Use of the Works with Apple badge means that an accessory has been designed to work
specifically with the technology identified in the badge and has been certified by the developer to
meet Apple performance standards.
The Mopria™ wordmark and the Mopria™ Logo are registered and/or unregistered trademarks of
Mopria Alliance, Inc. in the United States and other countries. Unauthorized use is strictly
prohibited.
Wi-Fi Direct,Wi-Fi Protected Setup(WPS),WPA,WPA2 and Wi-Fi Protected Access are marks of the
Wi-Fi Alliance.
The ownership to the names of the software in this User Guide belongs to their respective
companies in accordance with corresponding license agreement, and they are referred for
instructions only.
All other product and brand names herein may be the registered trademarks, trademarks or service
marks of their respective owners, and they are referred for instructions only.
Copyright
The Copyright of this User Guide is owned by Zhuhai Pantum Electronics Co., Ltd.
It is prohibited to copy, translate, modify and transmit this User Guide by any means or in any form
without the prior written consent of Zhuhai Pantum Electronics Co., Ltd.
Version:V3.1
Disclaimer
For a better user experience, Zhuhai Pantum Electronics Co., Ltd. reserves the right to make
changes to the User Guide. The information contained herein is subject to change without notice.
Users are responsible for any damages arising from failing to follow this User Guide. Meanwhile,
except the express warranty made in the product maintenance manual or service commitment,
Zhuhai Pantum Electronics Co., Ltd. does not make any express or implied warranty or guarantee
to this User Guide (including composing or words).
Using this product to copy, print, scan certain documents or images or make other forms of
operations may be prohibited by the local laws. If you are uncertain about the legality of using this
product for certain documents or images, you should consult your legal advisor in advance.
II
Safety Precautions
Disconnect the power supply
The product should be placed close to or easily accessible to power sockets, so as to allow easy
disconnection of power supply!
Laser Safety
The laser radiation is harmful to the human body. Since laser components are completely sealed in
the printer, laser radiation will not leak. To avoid laser radiation, please do not randomly
disassemble the printer!
Caution – Use of controls or adjustments or performance of procedures other than those specified
herein may result in hazardous radiation exposure.
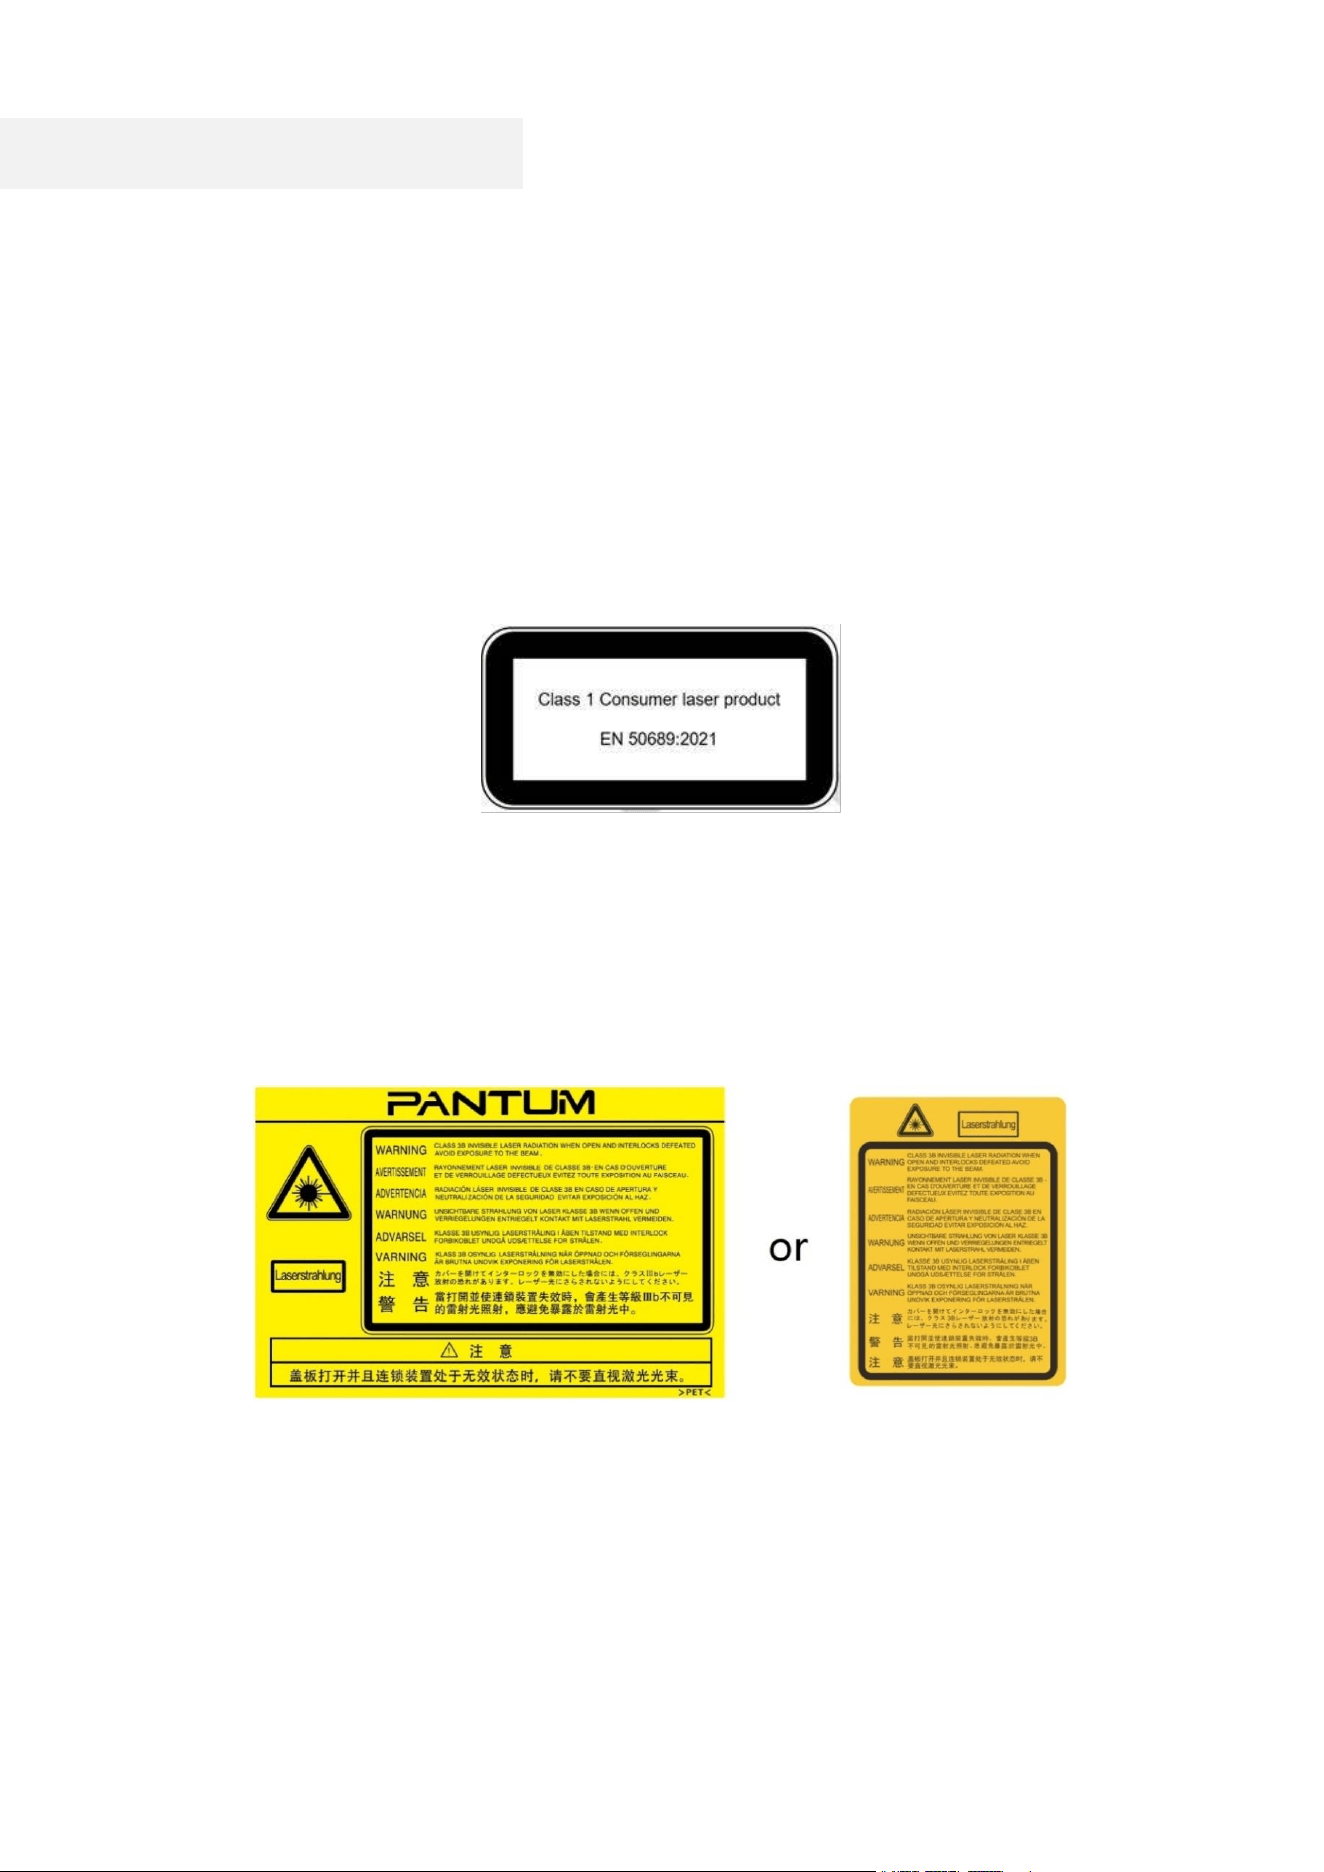
The printer follows the provisions of Class 1 laser products under CFR standard.
The printer has a Class 3B laser diode, which has no laser radiation leakage among laser
components.
The laser components shall complies with the requirements of: U.S. Code of Federal Regulations,
21 CFR 1040, IEC 60825-1.
The following label is attached to the laser components inside the printer:
III
Safety Warning
Please note the following safety warnings before using the printer:
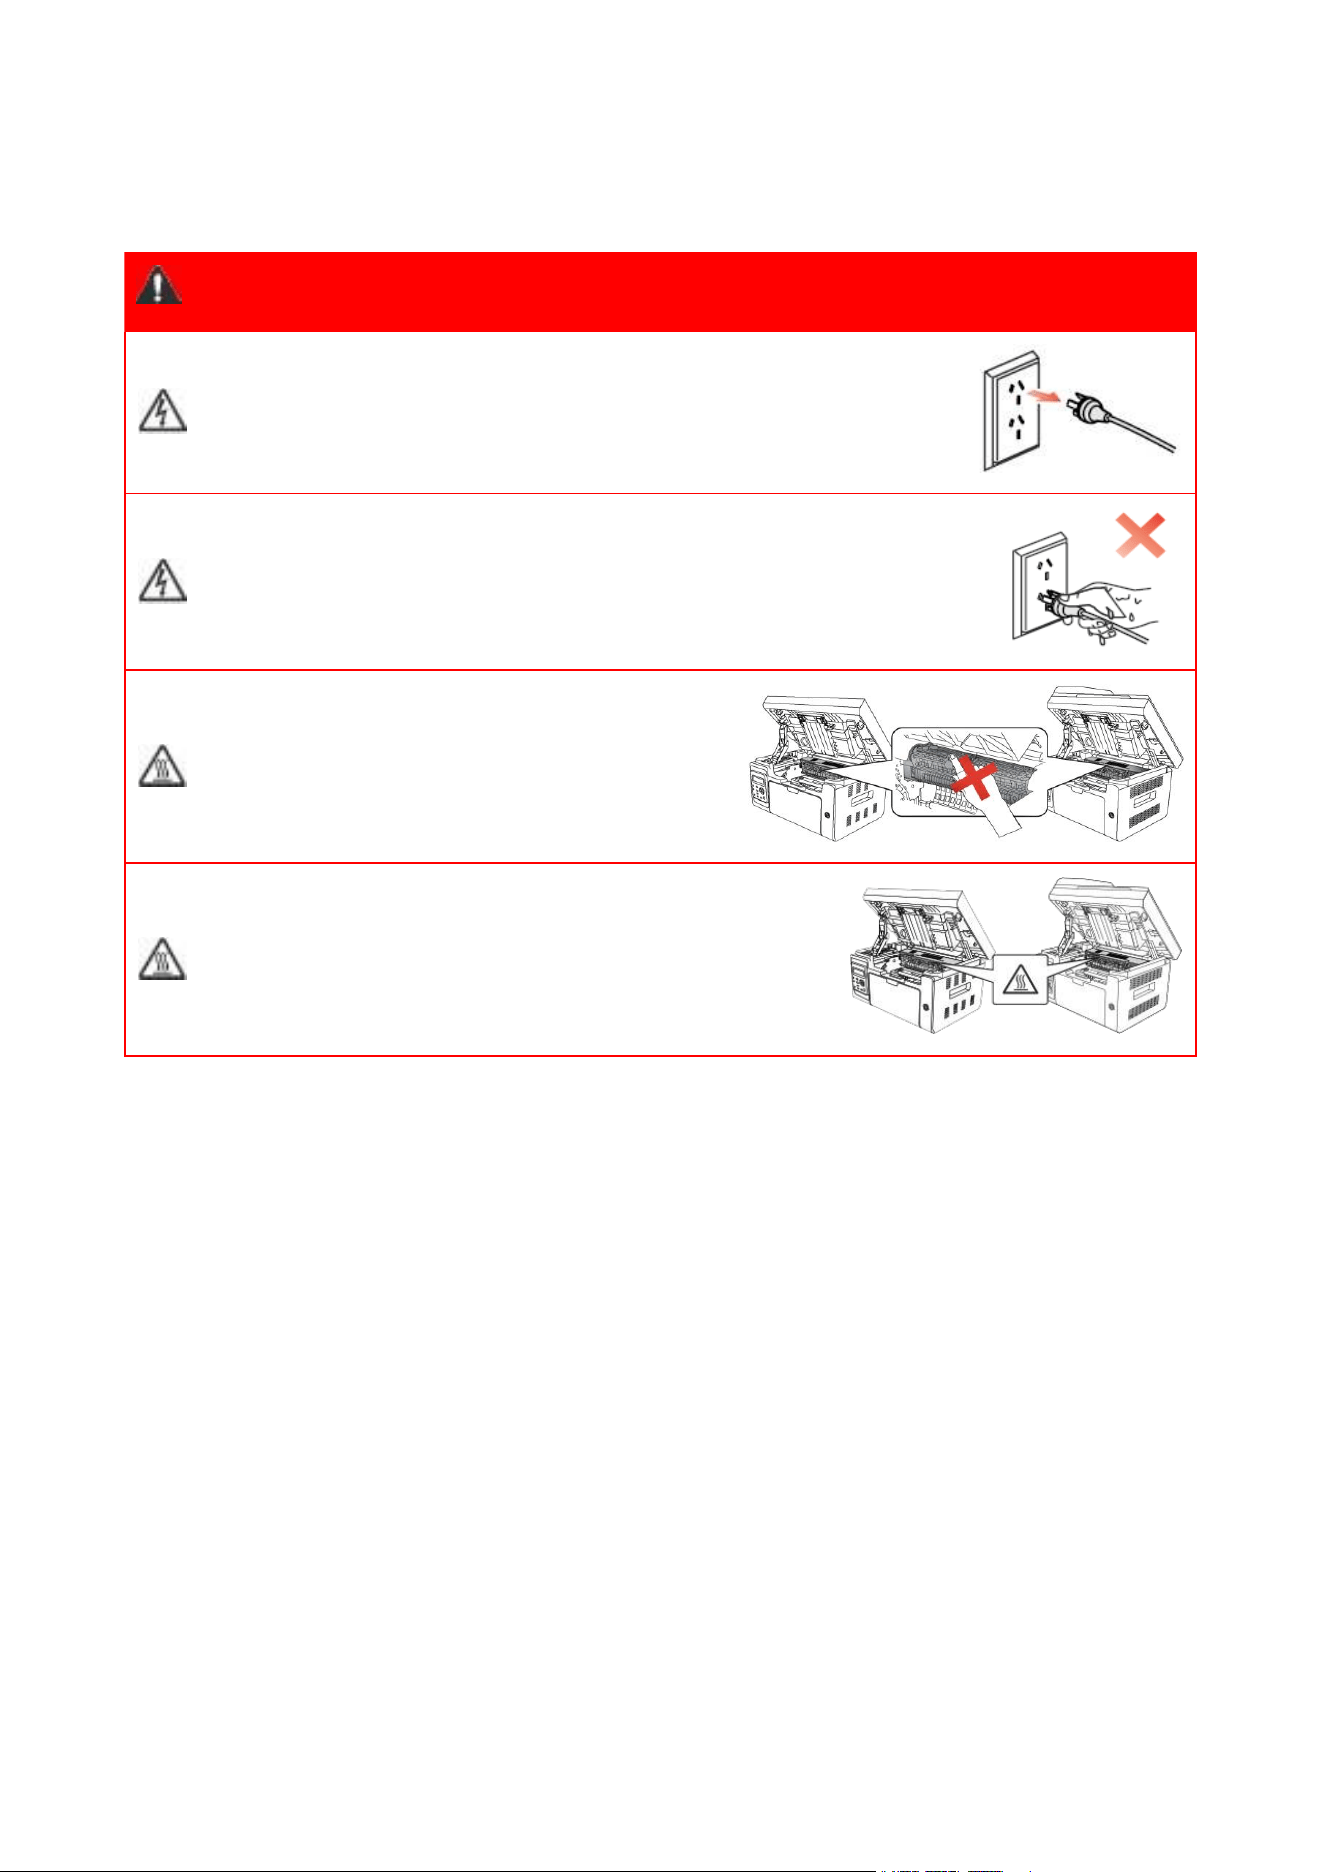
Warning
There is high-voltage electrode inside the printer.
Before cleaning the printer, make sure the power
is turned off!
Plugging and unplugging the power cord plug
with a wet hand can result in an electric shock.
The fuser unit is hot when and after printing.
Touching the fuser unit (the shaded area as
shown) may cause burns!
The fuser unit is attached with a high
temperature warning label. Please do not remove
or damage this label.

IV
Precautions
Precautions before Using the Printer:
1. Read and understand all instructions;
2. Familiarize yourself with the basic principles associated with operating electrical appliances;
3. Comply with all warnings and instructions marked on the equipment or specified in the manual
supplied with the equipment;
4. If the operating instructions conflict with the safety information, please refer back to the safety
information, as you may have misunderstood the operating instructions. If you cannot resolve the
conflicts, please call the Customer Service Hotline or contact a service representative for help;
5. Before cleaning the equipment, remove the power cord from the AC power supply outlet. Do not
use liquid or aerosol cleaners;
6. Please make sure that the equipment is put on a stable desktop surface to avoid serious
damage caused by the falling of the equipment;
7. Do not put the equipment near a radiator, an air conditioner, or a ventilation pipe;
8. Do not put any articles on the power cord. Do not put the equipment at the place where its power
cord could be stepped on by people;
9. Outlets and extension cords must not be overloaded. This may reduce performance and could
result in fire or electric shock;
10. Do not allow pets to chew on the AC power cord or the computer interface cable;
11. Do not allow sharp objects piercing equipment slot, so as to avoid contact with the
high-voltage device, which otherwise may result in fire or electric shock. Take care not to spill
liquids onto the equipment;
12. Do not disassemble the equipment so as to avoid the risk of electric shock. Necessary repairs
may only be carried out by professional maintenance personnel. Opening or removing the cover
could result in an electric shock or other potential hazards. Incorrect disassembly and assembly
could also result in an electric shock during future use;
13. If any one of the following occurs, disconnect the equipment from the computer and pull out
the power cord from the AC wall socket and contact a qualified member of the service personnel
for maintenance:
• Liquid has been spilled into the equipment.
• The equipment has been exposed to rain or water.
• The equipment falls, or the cover is damaged.
• Significant changes in the equipment’s performance.
14. Only adjust the control mentioned in the instructions. Incorrect adjustment of other controls
may result in damage and mean that professional maintenance personnel need to spend more
time fixing it;
15. Do not use the equipment in a thunderstorm so as to avoid the risk of an electric shock. If
possible, pull out the AC power cord during a thunderstorm;
16. If you continuously print multiple pages, the surface of the tray will become very hot. Take care
not to touch this surface, and keep children away from this surface;
17. The signal wire of the device connected with the printer can not be connected to the outdoors;
18. Please ensure timely ventilation in case of a prolonged use or printing huge amounts of
documents in a poorly ventilated room;

V
19. In standby status, the product will automatically enter into the power saving (sleep) mode if it
does not receive any job order for a while (such as 1 minute); and it can realize zero power
consumption only if it has not been connected with any external input power supply;
20. As the Class 1 equipment, the product must be connected to the power supply outlet with
protective grounding line when using;
21. This product should be placed according to the shipping marks on the product package box
during delivery;
22. This product is a kind of low-voltage equipment. When using this product below the specified
voltage range, please refer to the product precautions or call Pantum Aftersales Service Centre, if
the toner comes off the printed contents, or the equipment starts slowly;
23. This product is sold as a complete machine. The consumers can go to Pantum Aftersales
Service Centre to purchase parts they need. If the product sold is inconsistent with the package list,
please go to the specified Aftersales Service Centre to solve the problem;
24. Install this product in a place with the temperature between 10°C and 32.5°C and the relative
humidity between 20% and 80%;
25. For security and other reasons the printer may switch to intermittent printing after a certain
amount of continuous printing.
26. This device contains Part 15 of the FCC Rules and licence-exempt transmitter(s)/receiver(s)
that comply with Innovation, Science and Economic Development Canada’s licence-exempt RSS(s).
Operation is subject to the following two conditions:
(1) this device may not cause harmful interference, and
(2) this device must accept any interference received, including interference that may cause
undesired operation.
27. Radiation Exposure Statement:
This equipment complies with Canada and FCC radiation exposure limits set forth for uncontrolled
environments.
This equipment should be installed and operated with a minimum distance of 20cm between the
radiator and your body.
This transmitter must not be co-located or operating in conjunction with any other antenna or
transmitter.
28. NOTE: This equipment has been tested and found to comply with the limits for a Class B digital
device, pursuant to Part 15 of the FCC Rules. These limits are designed to provide reasonable
protection against harmful interference in a residential installation. This equipment generates,
uses and can radiate radio frequency energy and, if not installed and used in accordance with the
instructions, may cause harmful interference to radio communications. However, there is no
guarantee that interference will not occur in a particular installation.
If this equipment does cause harmful interference to radio or television reception, which can be
determined by turning the equipment off and on, the user is encouraged to try to correct the
interference by one or more of the following measures:
• Reorient or relocate the receiving antenna.
• Increase the separation between the equipment and receiver.
• Connect the equipment into an outlet on a circuit different from that to which the receiver is
connected.
• Consult the dealer or an experienced radio/TV technician for help.

VI
29. Warning: Changes or modifications to this unit not expressly approved by the party responsible
for compliance could void the user’s authority to operate the equipment.
30. The power consumption of the product is 3.137W in networked standby if all wired network
ports are connected and all wireless network ports are activated;
31. Shielded cables must be used with this unit to ensure compliance with the Class B FCC limits.
32. This Class B digital apparatus complies with Canadian ICES-003.
33. This equipment complies with Part 68 of the FCC rules and the requirements adopted by the
ACTA. On the back of this equipment is a label that contains, among other information, a product
identifier in the format US: VFCFA00B66-1. If requested, this number must be provided to the
telephone company. This equipment uses the following USOC jacks: RJ-11, RJ-45, USB jacks and
power jacks.
34. REN (RINGER EQUIVALENT NUMBERS) STATEMENT
Notice: The Ringer Equivalence Number (REN: 0.01B) assigned to each terminal device provides an
indication of the maximum number of terminals allowed to be connected to a telephone interface.
The termination on an interface may consist of any combination of devices subject only to the
requirement that the sum of the Ringer Equivalence Numbers of all the devices does not exceed 5.
35. ATTACHMENT LIMITATIONS STATEMENT
Notice: This equipment meets telecommunications network protective, operational and safety
requirements as prescribed in the appropriate Terminal Equipment Technical Requirements
document(s). This is confirmed by marking the equipment with the Industry Canada certification
number. The Department does not guarantee the equipment will operate to the user's satisfaction.
Before installing this equipment, users should ensure that it is permissible to be connected to the
facilities of the local telecommunications company. The equipment must also be installed using an
acceptable method of connection. The customer should be aware that compliance with the above
conditions may not prevent degradation of service in some situations.
Repairs to certified equipment should be coordinated by a representative designated by the
supplier. Any repairs or alterations made by the user to this equipment, or equipment malfunctions,
may give the telecommunications company cause to request the user to disconnect the
equipment.
Users should ensure for their own protection that the electrical ground connections of the power
utility, telephone lines and internal metallic water pipe system, if present, are connected together.
This precaution may be particularly important in rural areas.
Caution: Users should not attempt to make such connections themselves, but should contact the
appropriate electric inspection authority, or electrician, as appropriate.
36. This product meets the applicable Industry Canada technical specifications.
37. To avoid the danger of fire or electric shock, please only use the power cord provided with this
product or authorized replacements approved by the manufacturer.
38. The power cord provided with this product is intended for this product only. Do not use it with
other devices as it may cause fire, electric shock, or other injuries.
39. Do not use flammable sprays or combustible solvents near or inside the machine. Additionally,
do not place them near or inside the machine as it may cause fire or electric shock.
40. The printer is a class 1 consumer laser product that is compliant with EN 50689:2021
41. Please keep this User Guide properly.
VII
Legal Information
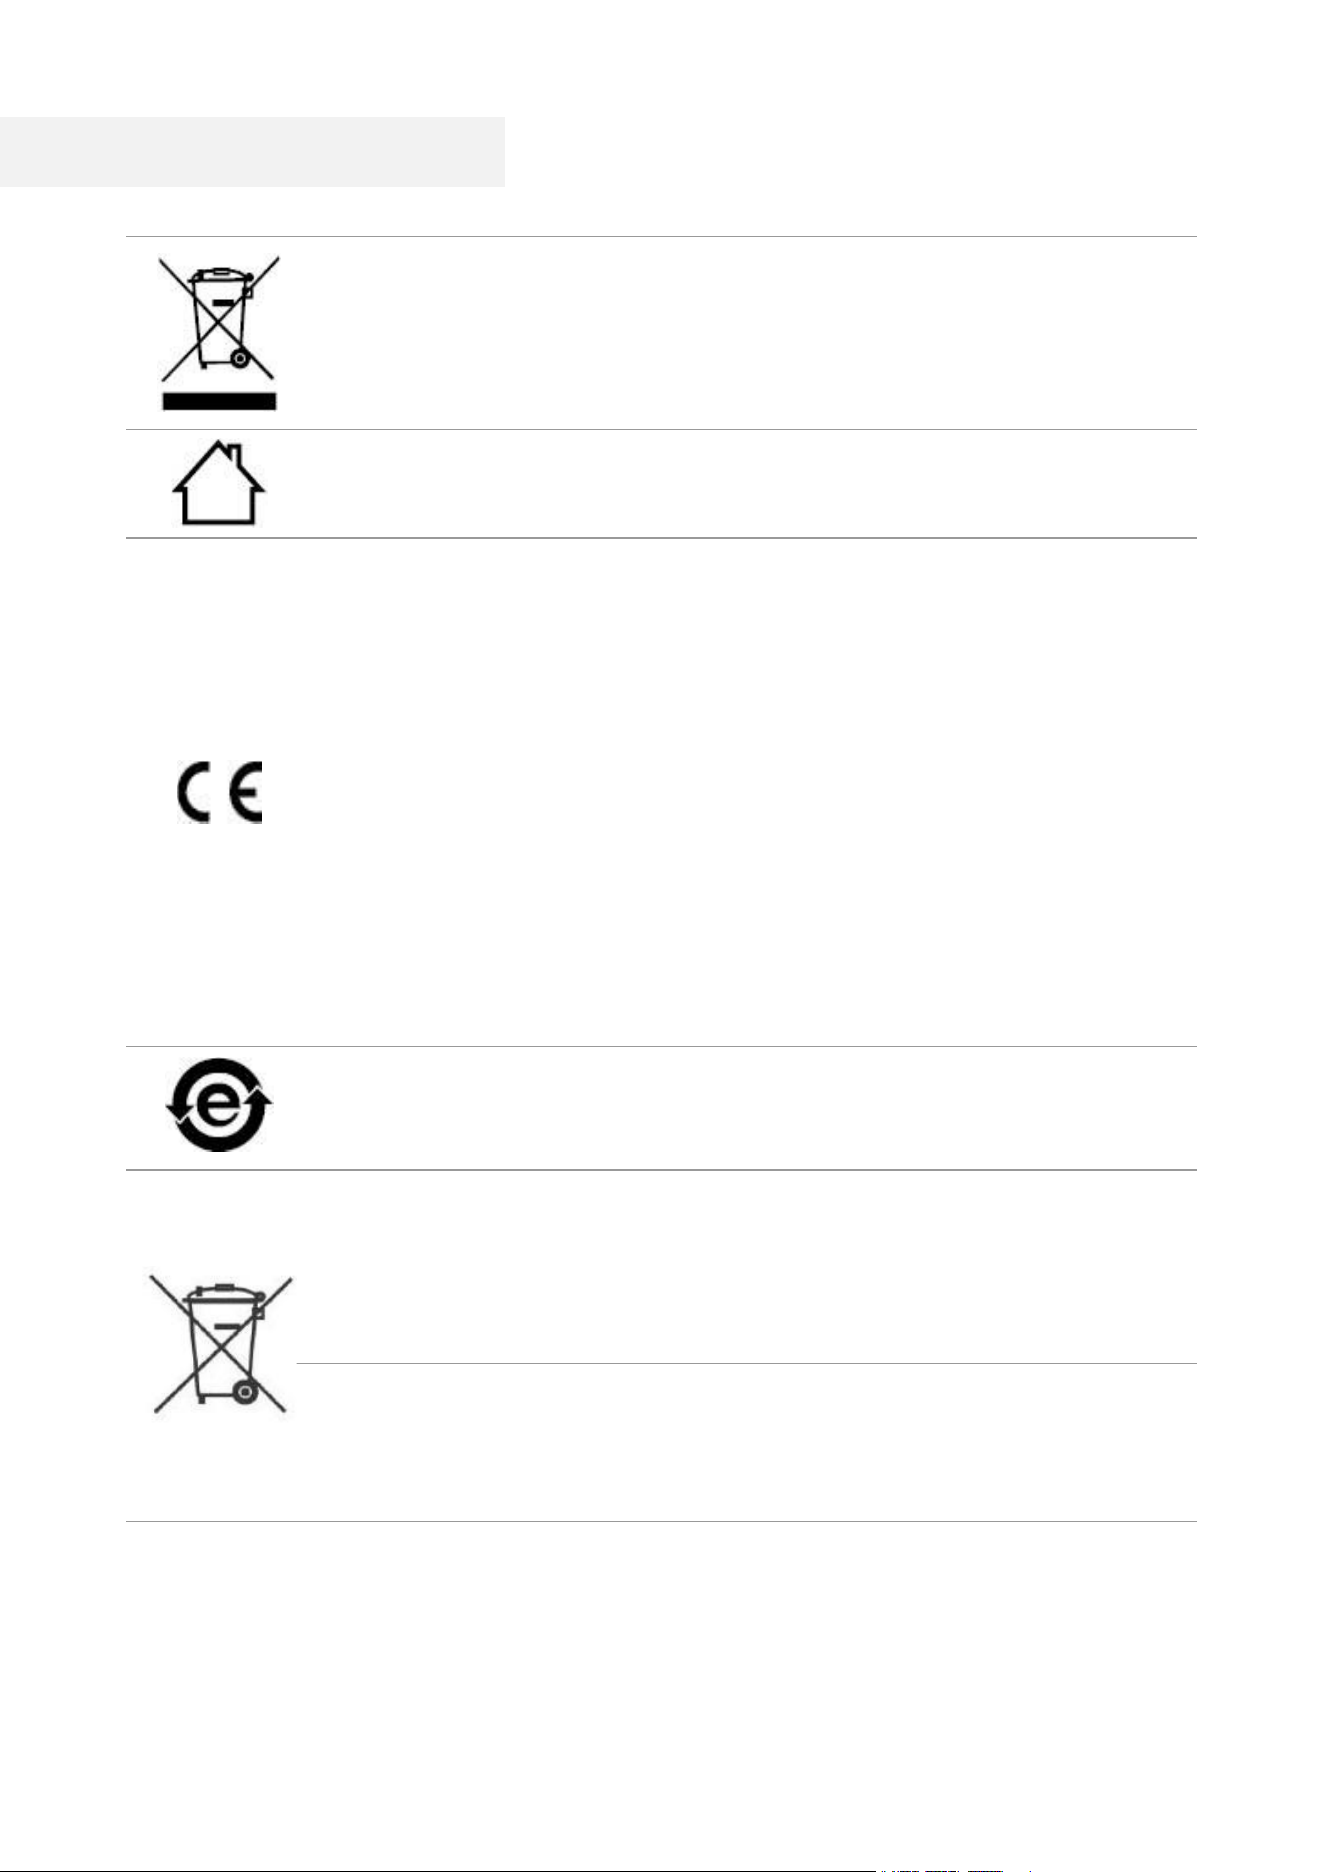
This symbol indicates that, at the end of your product’s life, it must not be discarded
as domestic waste. Instead, you should dispose of your used equipment at a
designated collection point for the recycling of waste electrical and electronic
equipment. Ref: EU Directive 2002/96/EC on Waste Electrical and Electronic
Equipment (WEEE). Please contact your distributor / supplier for further information.
This symbol indicates that the product is applicable to indoor use instead of outdoor
use.
European Community (EC) directives conformity
This symbol indicates that the product complies with the protection requirements
related to electromagnetic compatibility and safety of electrical device (for use within
a specific voltage range) in the approximate and harmonized regulations of members
of Directive 2014/30/EU and Directive 2014/35/EU of the European Parliament and of
the Council.
Radio Equipment directive 2014/53/EU only for models ending with suffix “W”.
The manufacturer of this product is: Zhuhai Pantum Electronics Co., Ltd., Building
02,06 and 08,No.888 Shengping Avenue, Pingsha Town, Zhuhai City, Guangdong
Province, 519000 PR China.
A declaration of conformity to the requirements of the Directives is available upon
request from the Authorized Representative.
This product satisfies the Class B limits of EN 55032 / EN 55035 and safety
requirements of EN 62368-1.
This printer is fully compliant with the ROHS Directive 2009/95/EC and the
requirements of the revised Directive 2011/65/EU for managing toxic and hazardous
substances.
A battery is built in the product with the faxing feature. When the product battery is
scraped, it should never be disposed with other household waste. In order to protect
the natural resources and promote the reuse of materials, please separate the battery
from other types of waste, and deliver it to your local battery recycling systems for
recycling.
Warning: 1. The battery of this product is non-rechargeable, and it should never be
dismantled, crushed, heated or burned. Improper replacement operations may cause
ire and burns; 2. The battery should be placed beyond the reach of children to prevent
them swallowing.

VIII
To protect natural resources and promote the utilization of materials, please
separate the battery from other types of waste for recycle by your local battery
recovery system.
Warning: 1. The battery of this product is non-rechargeable, and it should never be
dismantled, crushed, heated or burned. Improper replacement operations may cause
ire and burns; 2. The battery should be placed beyond the reach of children to prevent
them swallowing.
SVHC (Substances of Very High Concern)content stated in REACH Regulation: Battery built in the
equipment with faxing feature contains SVHC including: 1, 2-dimethoxyethane; ethylene glycol
dimethyl ether (EGDME) with concentration of 0.707%.

IX
Table of Contents
01 Before Using the Printer ................................................................................................................. 1
Product View ................................................................................................................................. 1
Control Panel ................................................................................................................................. 4
Overview of control panel ..................................................................................................... 4
Function of numeric keyboard ............................................................................................. 6
Function of status indicator ......................................................................................................... 7
02 Paper and Print Media .................................................................................................................... 8
Paper Specification ...................................................................................................................... 8
Loading Paper ............................................................................................................................... 8
Load paper in automatic tray ............................................................................................... 8
Paper and Manuscript Use Process .......................................................................................... 10
Scanning With Tablet .......................................................................................................... 10
Scan with the automatic document feeder (ADF) ............................................................ 12
03 Driver installation and uninstallation ........................................................................................... 13
Driver Setup ................................................................................................................................. 13
One-click Installation(For Windows and macOS) ............................................................. 13
Uninstall Driver ............................................................................................................................ 14
Method to uninstall driver under Windows ....................................................................... 14
Method to uninstall driver under macOS .......................................................................... 14
04 Wired network setup (applicable to wired network models) ..................................................... 15
Set IP Address ............................................................................................................................. 15
Automatic Setting ............................................................................................................... 15
Manual Setting .................................................................................................................... 15
05 Wireless network setup (applicable to Wi-Fi models) ................................................................ 16
Basic structure mode ................................................................................................................. 16
Wireless network setup tools ............................................................................................. 17
How to disable the Wi-Fi network connected ................................................................... 17
06 Web server ..................................................................................................................................... 18
Visit the embedded Web server ................................................................................................. 18
07 Print ................................................................................................................................................ 19
Print Function .............................................................................................................................. 19
Print Settings ............................................................................................................................... 20
Setting the printing parameters ......................................................................................... 20
Duplex Print ......................................................................................................................... 20
08 Copying .......................................................................................................................................... 21

X
Copying function ......................................................................................................................... 21
Common copying setting ........................................................................................................... 21
Multipage ............................................................................................................................. 22
Collated copy ...................................................................................................................... 23
manual duplex copying ...................................................................................................... 23
ID card copying setting ............................................................................................................... 25
Receipt setting ............................................................................................................................ 25
09 Scan ............................................................................................................................................... 26
Windows system scan ........................................................................................................ 26
macOS System Scan .......................................................................................................... 27
Push Scan ................................................................................................................................... 27
Scan to PC ........................................................................................................................... 28
Scan to E-mail ..................................................................................................................... 28
Scan to FTP ......................................................................................................................... 29
10 Fax.................................................................................................................................................. 30
Connect Devices ......................................................................................................................... 30
Fax Settings................................................................................................................................. 30
Fax Functions .............................................................................................................................. 31
Send Fax .............................................................................................................................. 31
Receive Fax ......................................................................................................................... 32
Set the interference and the telephone line compatibility of VoIP system..................... 33
11 Routine Maintenance .................................................................................................................... 34
Cleaning the Printer .................................................................................................................... 34
Maintenance of Laser Toner Cartridge ..................................................................................... 37
About laser toner cartridge ................................................................................................ 37
Replace Laser Toner Cartridge .......................................................................................... 38
12 Troubleshooting ............................................................................................................................ 41
Cleaning Jammed Paper ............................................................................................................ 41
Middle jam ........................................................................................................................... 41
A paper jam occurs on the automatic document feeder (ADF) ...................................... 43
Software Failure .......................................................................................................................... 45
Error Message ............................................................................................................................. 46
Common Troubleshooting ......................................................................................................... 47
Common Trouble ................................................................................................................ 47
Image Defects ..................................................................................................................... 48
Fax faults ..................................................................................................................................... 52
13 Product Specifications ................................................................................................................. 53

XI
Overview of the Specifications .................................................................................................. 53
Print Specifications .................................................................................................................... 54
Copy Specifications .................................................................................................................... 54
Scan Specifications .................................................................................................................... 54
Fax specification ......................................................................................................................... 55
1
01 Before Using the Printer
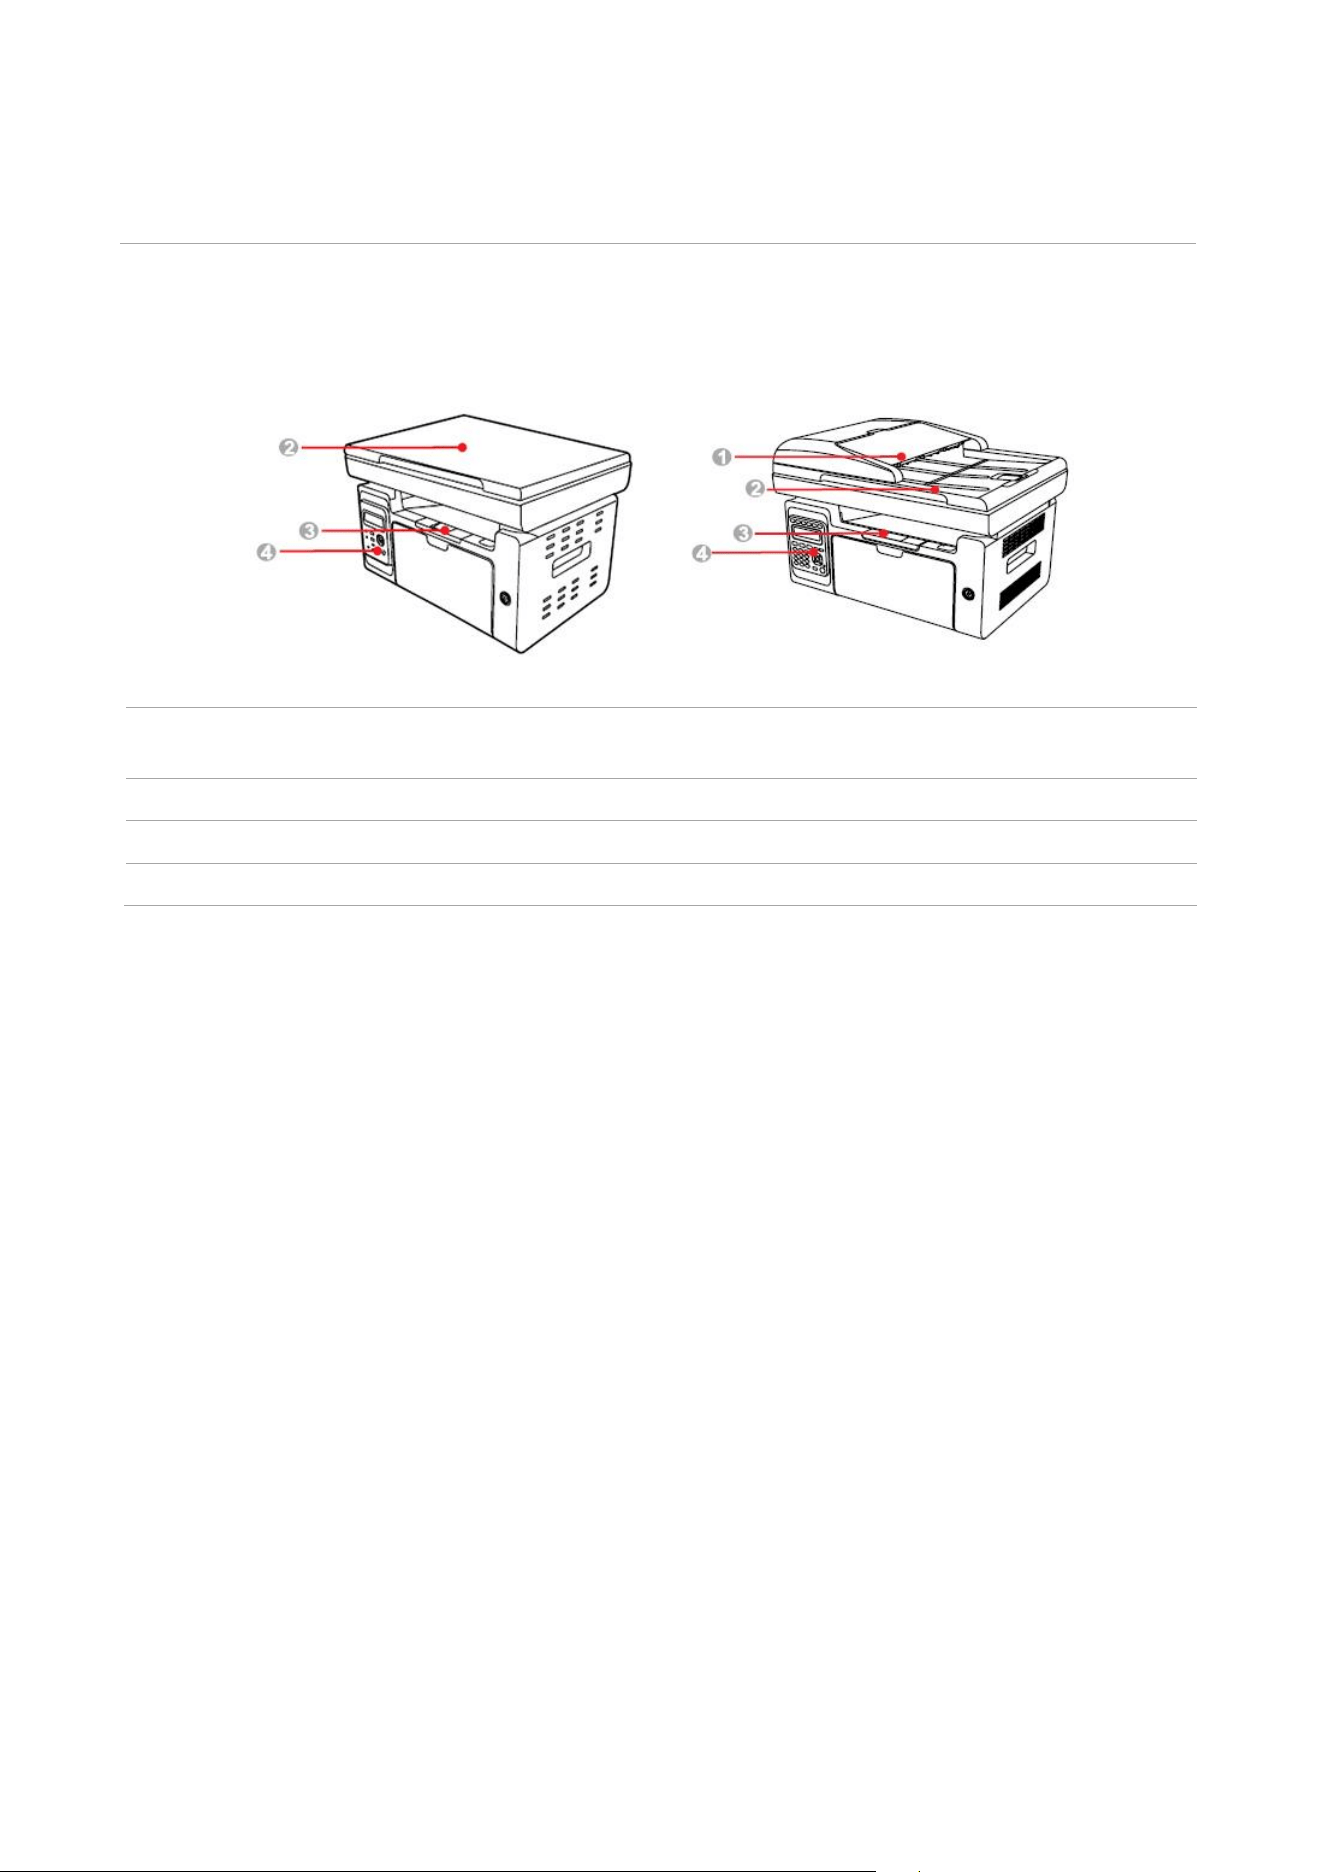
Product View
Side view(1)
1
Automatic
document feeder
This is used to remove the paper jammed in scanning
for the ADF.
2
Cover
Open the cover of scanner to place the scanned originals on its glass plate.
3
Output Bin
For storing the printed paper.
4
Control Panel
Indicate printer status to conduct set operation.
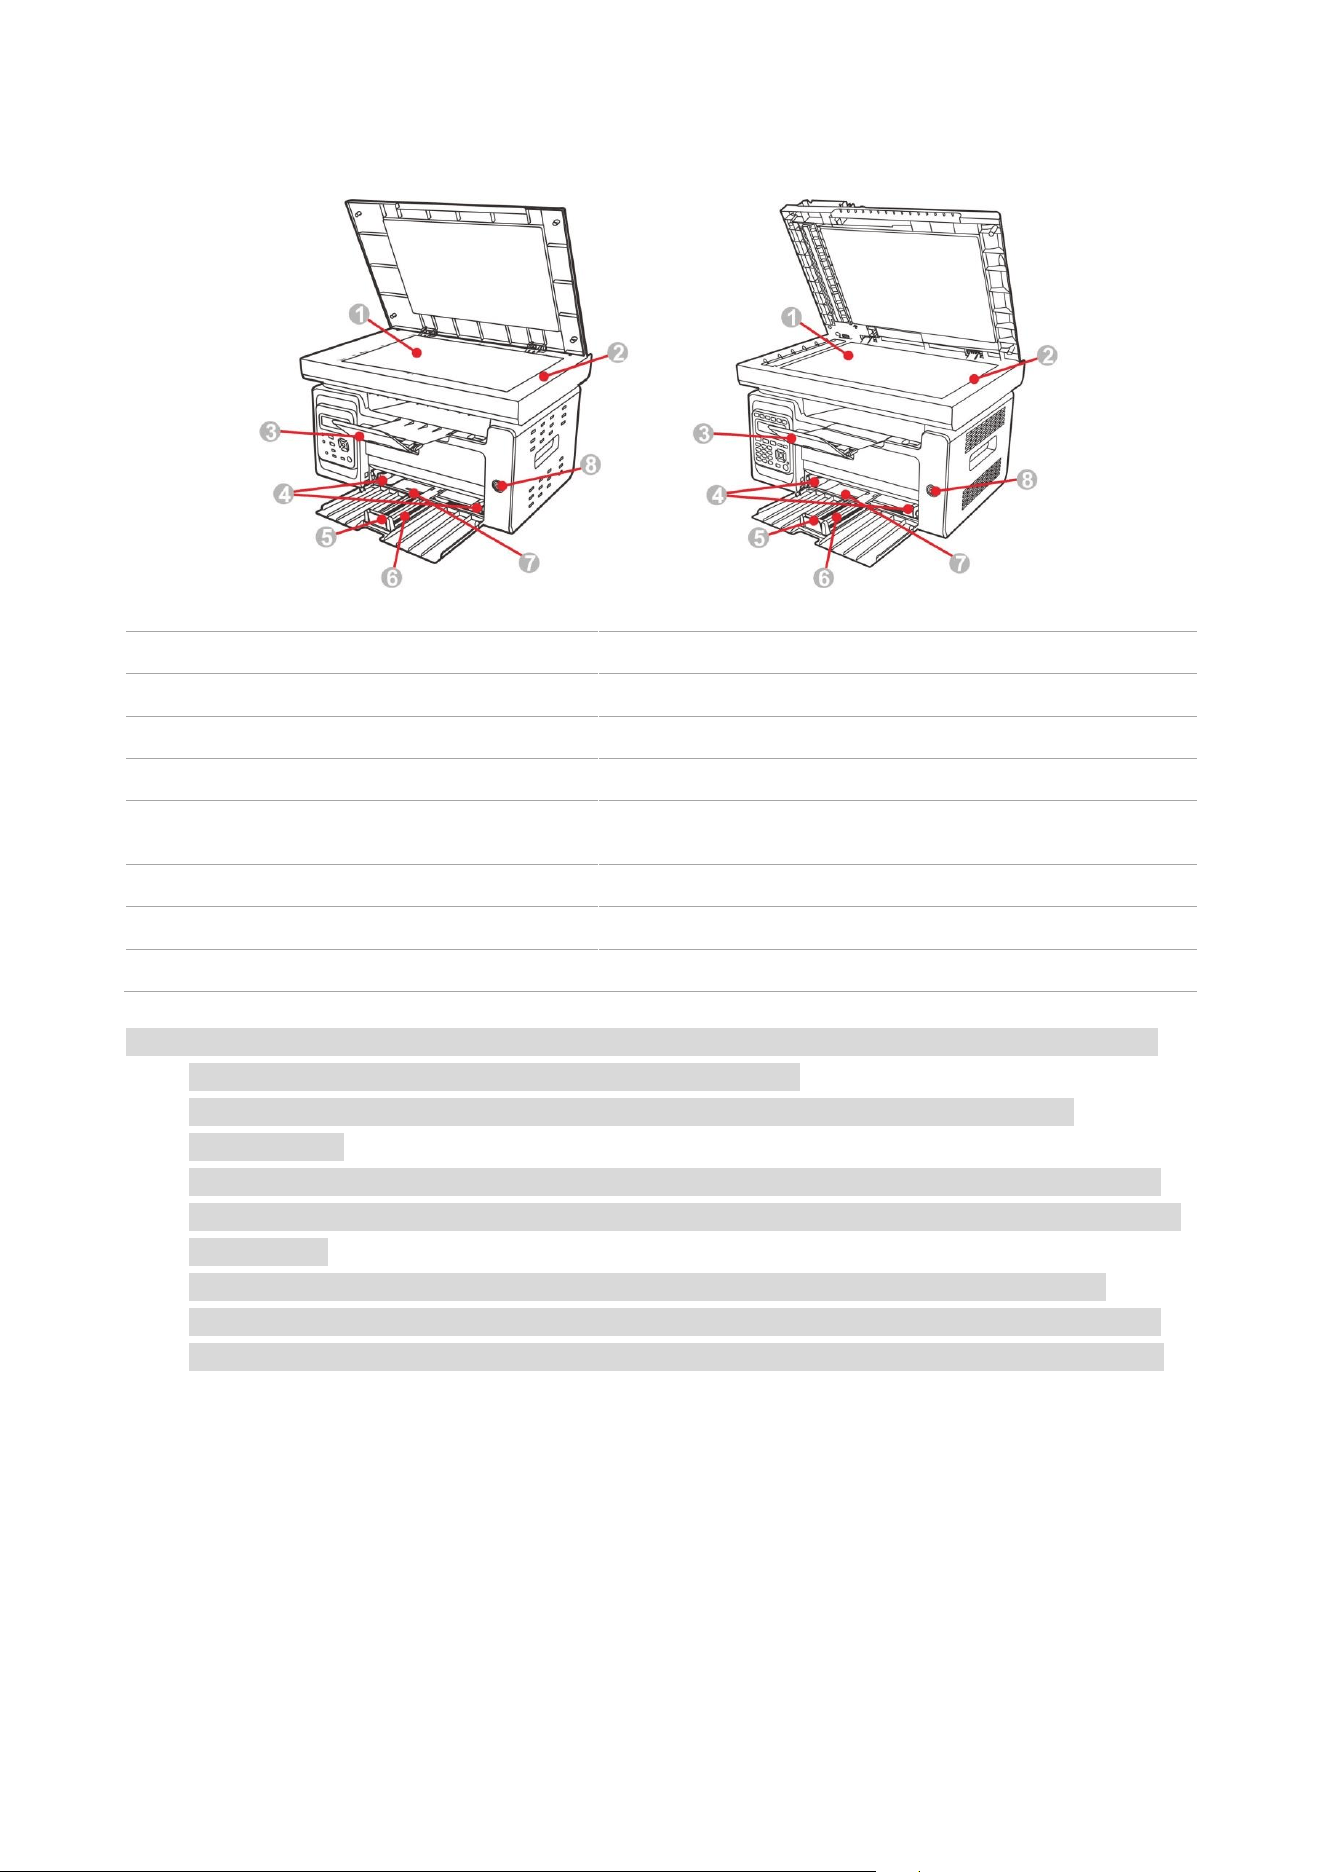
2
Side view(2)
1
Glass Platen
This is used to place originals scanned from platen.
2
Scanning Platform
It is used to place the original document to be scanned
3
Output Tray
To prevent the printed paper from falling.
4
Automatic Feed Paper Deflector
Slide the paper guide to match the width of the paper
5
Paper Stop
Slide the paper stopper to match the length of the
paper
6
Feeder Tray
It is used to place the print media.
7
Automatic Feeder Tray
It is used to place the print media.
8
Power switch
It is used to power on/off the printer
Note:• The power switch of the printer is divided into two types: “touch type” and “self-locking type”.
The actual appearance of the purchased printer will prevail.
• The “touch type” power switch of the printer only has one mode, and can be reset by
short-pressing.
1) ON: short-press the power switch in the OFF state to turn on the power supply of the printer.
2) OFF: long-pressure the power switch for about 3s in the ON state to turn off the power supply
of the printer.
• The “self-locking type” power switch of the printer has two modes: lock and disconnect.
1) ON: short-press the power switch in the OFF state to turn on the power supply of the printer.
2) OFF: short-press the power switch in the ON state to turn off the power supply of the printer.
3
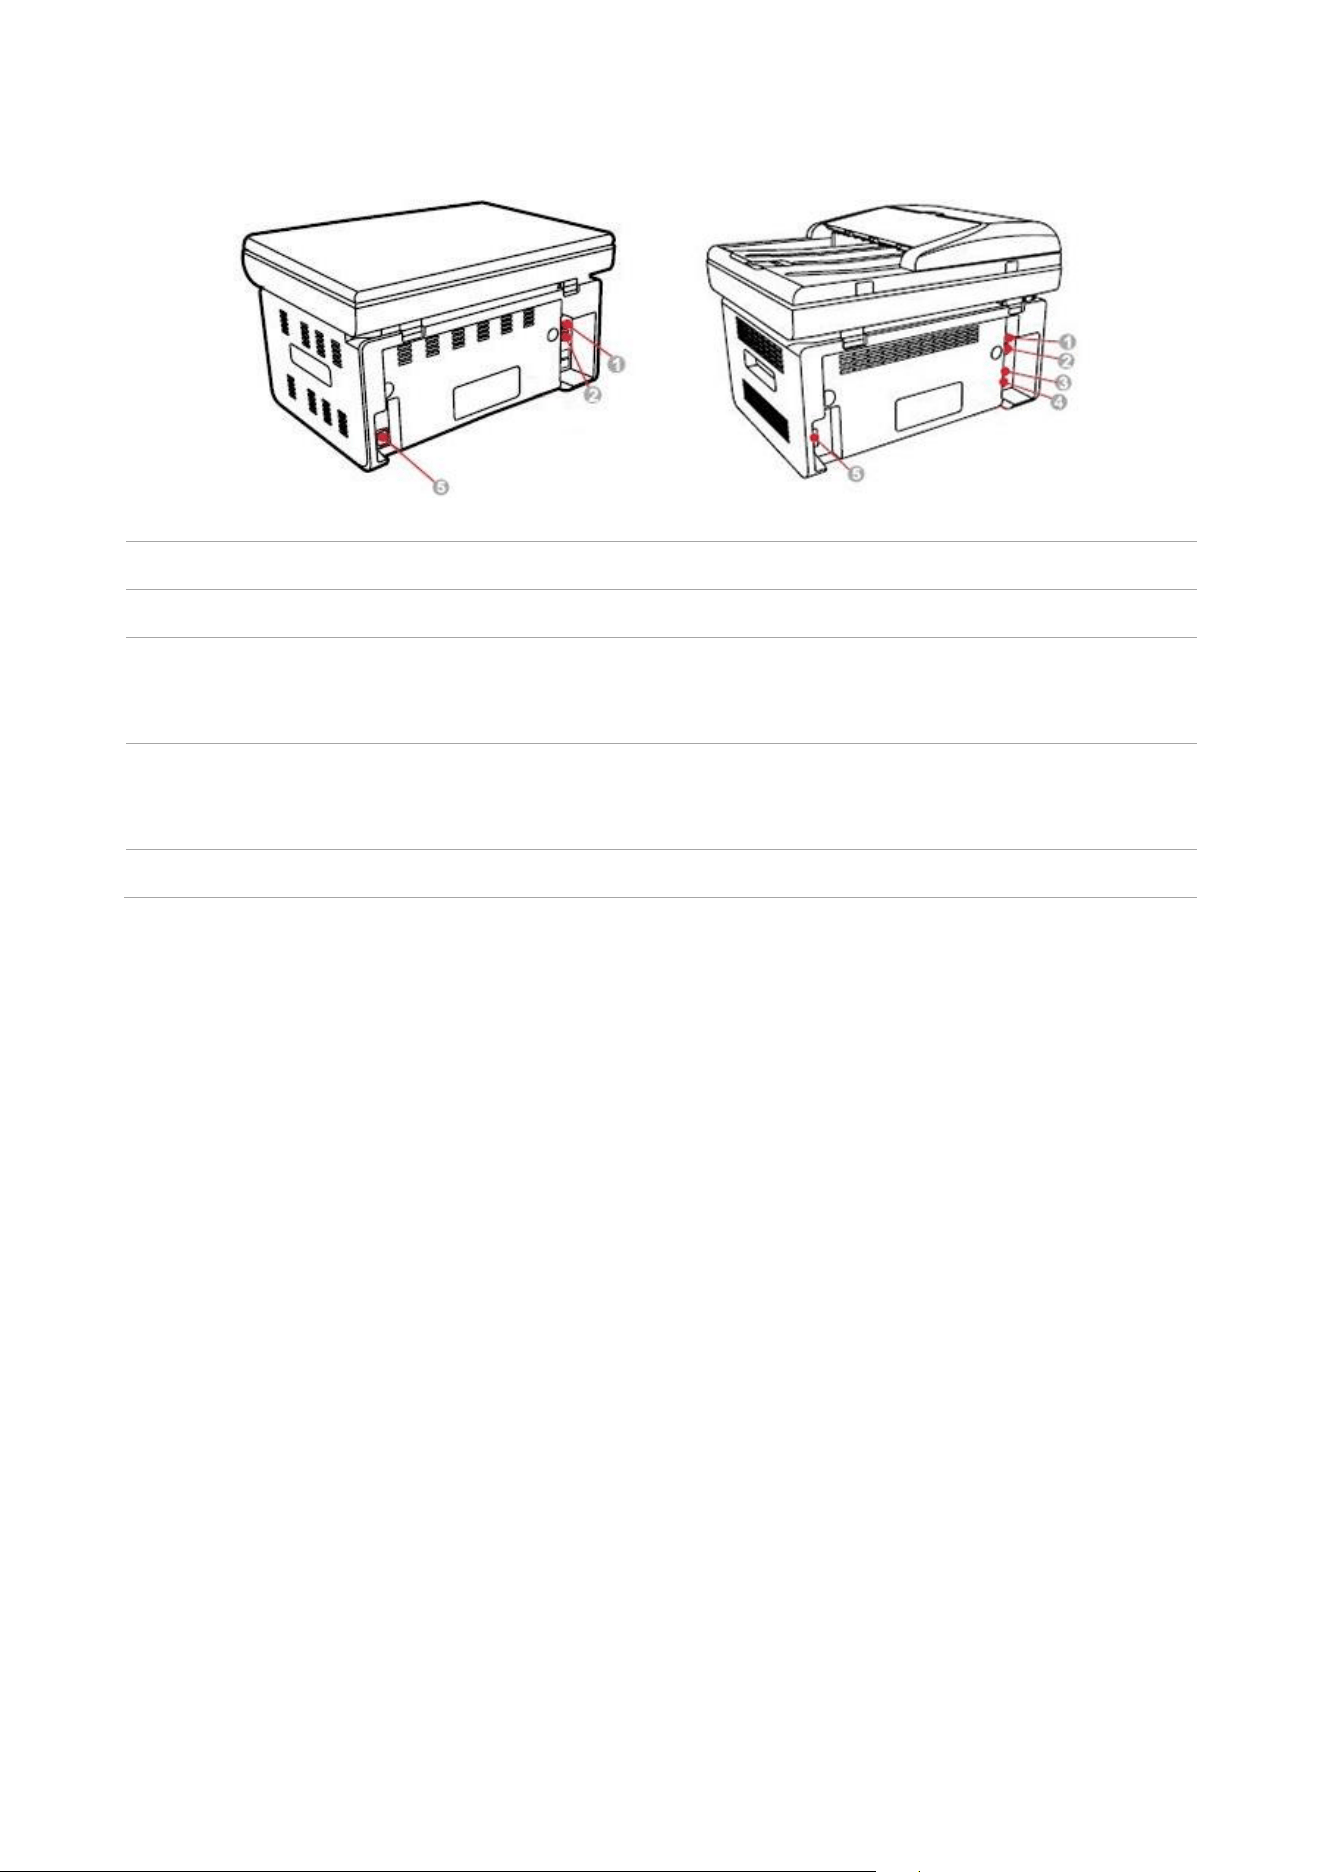
Rear View
1
USB Interface
For connecting product to computer with USB cable.
2
Network Interface
For connecting product to network with network cable.
3
EXT. interface (only for
machine with the fax
feature.)
Extension interface, used for connection with external extension
telephone.
4
LINE interface (only for
machine with the fax
feature.)
Telephone line interface, used for connection of this product to the
telephone circuit.
5
Power Interface
For connecting product to power with power cord.
4
Control Panel
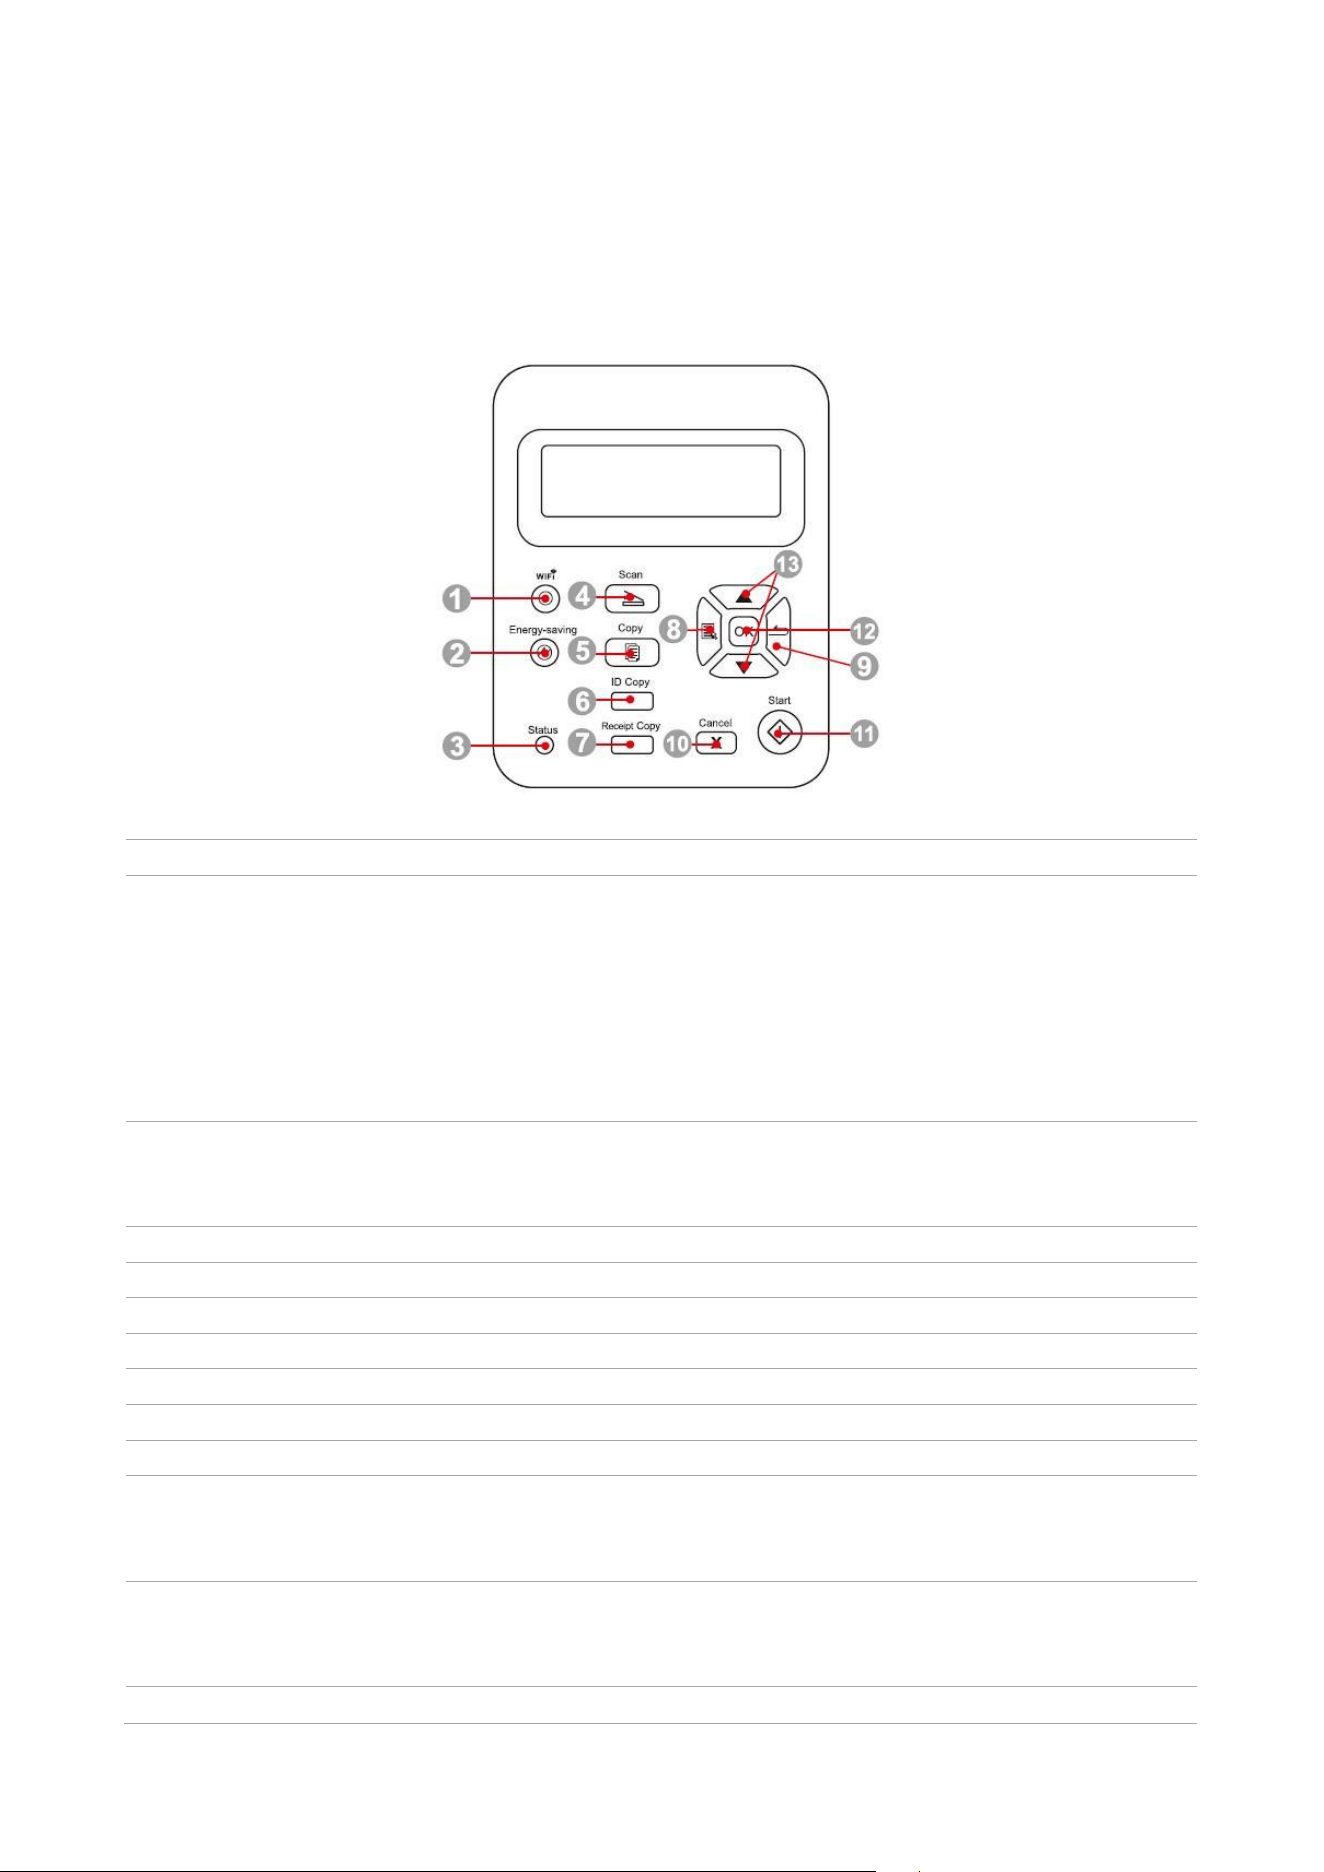
Overview of control panel
The layout of the printer control panel is shown below:
Control panel without the fax feature
No.
Name
Functions
1
Wi-Fi button
Short press Wi-Fi button to turn on direct Wi-Fi connection of the printer
and automatically print out "Mobile Device Wi-Fi Connection Wizard" page
(for models with Wi-Fi function only).
Long press Wi-Fi button for over 2s to start WPS when Wi-Fi is not
connected or to disconnect Wi-Fi when it has already been connected (for
models with Wi-Fi function only).
Open save toner function (applicable to non-Wi-Fi model only).
2
Power
Saving/Wake-up
Button
Press this button to switch to power saving status or wake the machine
from power saving status
3
Status Light
Indicate the status of printe.
4
Scan Button
Press this button to enter into scan mode.
5
Copy Button
Press this button to enter into copy mode.
6
ID Card Copy
Press this button to enter into ID Card Copy mode.
7
Bill Copy Button
Press this button to enter into Bill Copy mode.
8
Menu
Open the main menu of control panel.
9
Back
Return to the previous menu.
10
Cancel
Execute cancel operation.
Idle state interface under copy mode, to reset the "Number of Copies" to
01.
11
Start Button
This is used to start relevant operations after finishing operation settings.
In case of a feed failure, please press this key for pick-up and printing
again.
12
OK
Confirm the selection on screen.
5
13
“ ”and“ ”
Scroll through the menus and options.
In the "copy" mode, the page is addressed and reduced by 1 copy.
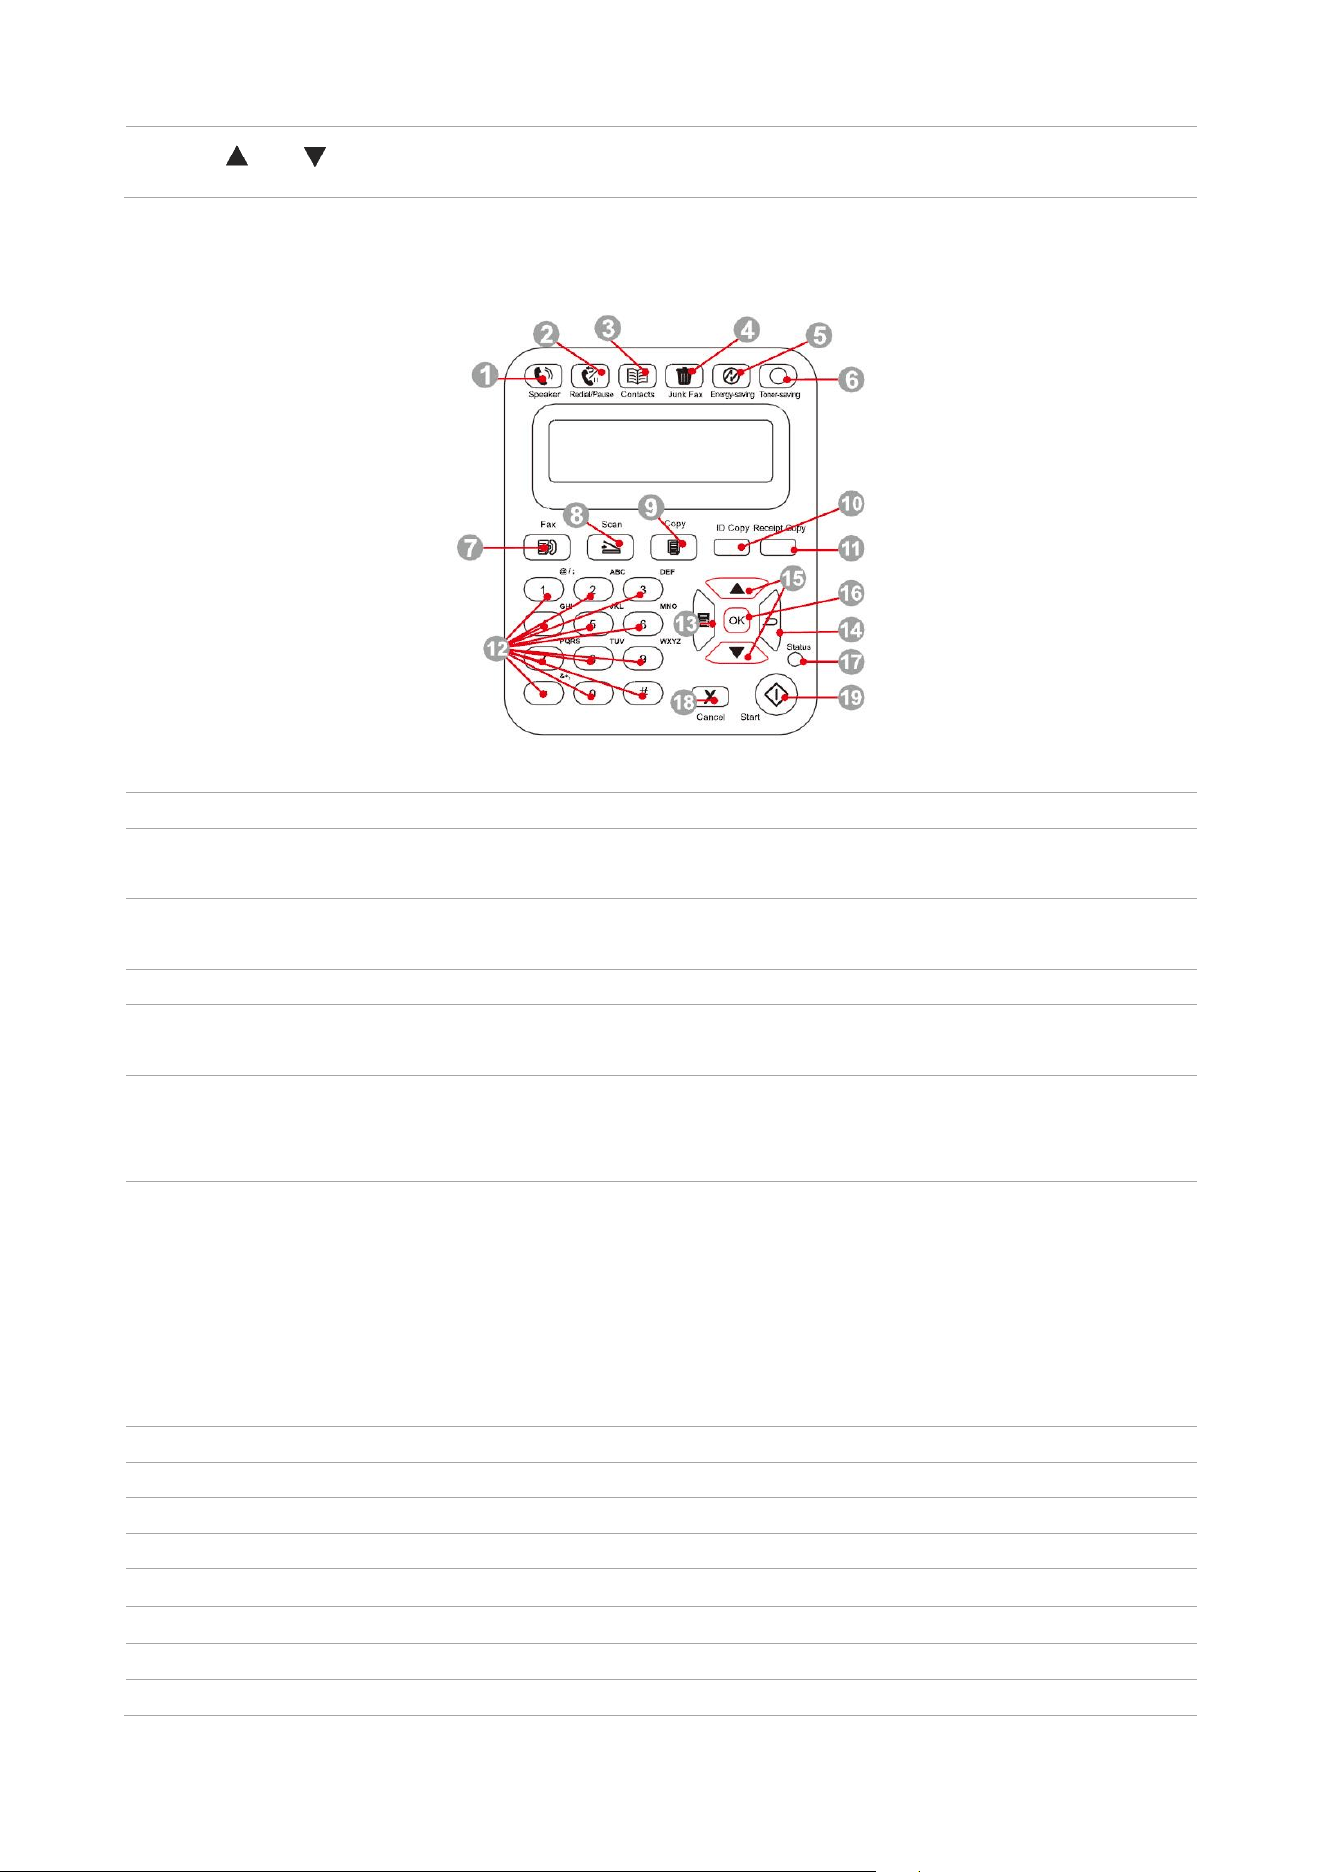
Control panel with the fax feature
No.
Name
Functions
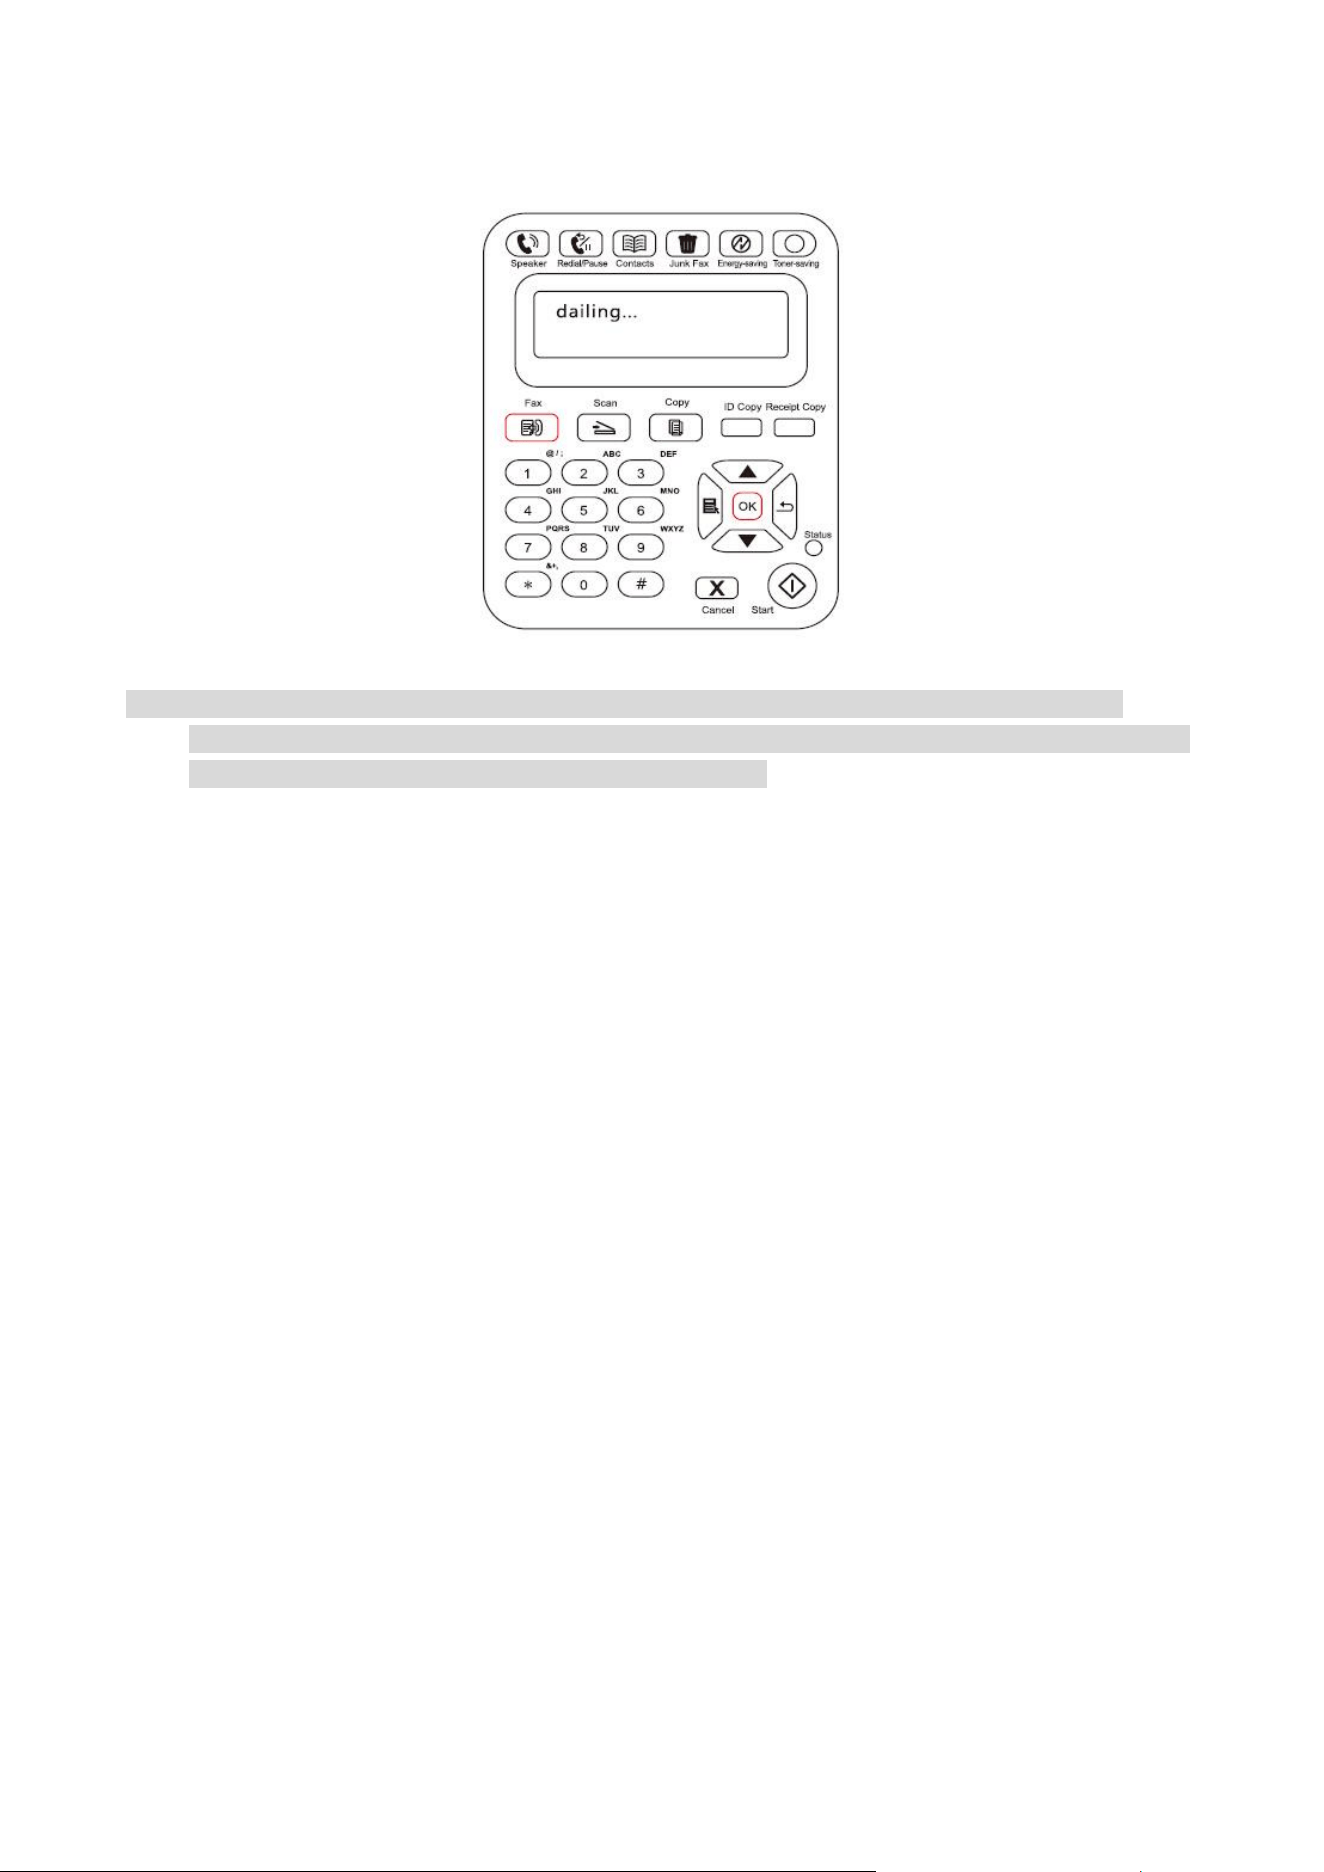
1
Speaker
This is used to manually receive and send faxes under Fax mode, or for
phone calls.
2
Redial/Pause
This is used to redial the last number dialed before under Standby mode
or to insert a pause symbol in the fax number under Edit mode.
3
Contacts
This button allows you to dial the speed dial number directly.
4
Junk Fax
When you receive a Fax, press this button to add the currently received
Fax number to the junk Fax number list;
5
Power
Saving/Wake-up
Button
Press this button to switch to power saving status or wake the machine
from power saving status
6
Wi-Fi button
Short press Wi-Fi button to turn on direct Wi-Fi connection of the printer
and automatically print out "Mobile Device Wi-Fi Connection Wizard"
page (for models with Wi-Fi function only).
Long press Wi-Fi button for over 2s to start WPS when Wi-Fi is not
connected or to disconnect Wi-Fi when it has already been connected
(for models with Wi-Fi function only).
Open save toner function (applicable to non-Wi-Fi model only).
7
Fax
Press this button to enter into the Fax mode.
8
Scan Button
Press this button to enter into scan mode.
9
Copy Button
Press this button to enter into copy mode.
10
ID Card Copy
Press this button to enter into ID Card Copy mode.
11
Bill Copy Button
Press this button to enter into Bill Copy mode.
12
Clavier numérique
Composer ou entrer le caractère, le chiffre.
13
Menu
Open the main menu of control panel.
14
Back
Return to the previous menu.

6
15
“ ”and“ ”
Scroll through the menus and options.
In the "copy" mode, the page is addressed and reduced by 1 copy.
16
OK
Confirm the selection on screen.
17
Status Light
Indicate the status of printe.
18
Cancel
Execute cancel operation.
Idle state interface under copy mode, to reset the "Number of Copies" to
01.
19
Start Button
This is used to start relevant operations after finishing operation
settings.
In case of a feed failure, please press this key for pick-up and printing
again.
Function of numeric keyboard
Sometimes it needs to input names and numbers in executing some tasks. Letters, numbers and
characters on the keyboard are distributed as below:
Keys
Numbers, letters and characters distributed
0
0
1
@ / ; . 1
2
a b c A B C 2
3
d e f D E F 3
4
g h I G H I 4
5
j k l J K L 5
6
m n o M N O 6
7
p q r s P Q R S 7
8
t u v T U V 8
9
w x y z W X Y Z 9
*
(Space) & + , - * % ~ ! $ ( ) [ ]
#
# = ’ | _ ? " : { } < >
Note: • It may not allow to input all special characters above mentioned in different input environments.
a. Input of fax/phone number. It supports only inputting with 0-9 number keys and the "*" and "#"
keys. In addition, it is available to input spaces with the Down key and the symbol "-" with the
Redial/Pause key.
b. Mixed input of letters, numbers and symbols. It is only allowed to input with 0-9 number keys
and the "*" and "#" keys. Specific corresponding characters are different according to the
difference of input environments. (Under this condition, pressing the Down key could make the
cursor move backward; the symbol "-" could not be input with the Redial/Pause key.)
• When inputting a number or name, short pressing Cancel could clear the last number or
character; while to clear all numbers or characters, please long press it. You may also use the Up
key to clear the last number or character.

7
Function of status indicator
The meanings of status displayed by the status indicator are as below:
No.
Status displayed by
the status indicator
Status
Status Description
1
Die out
Shutdown or sleep state
2
Green indicator
normally on
Printer is ready
3
Green indicator
blinks
Operative modes of Print, Copy, Scan, Fax and others
4
Orange
indicator blinks
Low toner warning
5
Red indicator
normally on
• Laser carbon powder box error (laser carbon powder
box does not match, laser carbon powder box life)
• Paper error (a paper out, paper jam or feed failure
occurs)
• Scan error (a scanning failure occurs, and the ADF
has an open cover or a paper jam.)
• Printer errors such as fax errors, paper grooves are
opened

8
02 Paper and Print Media
Paper Specification
Automatic
Feeder Tray
Media Type
Plain paper, thick paper, transparent film, carton paper, label
paper, envelope, thin paper
Media size
A4, A5, A6, JIS B5, ISO B5, B6, Letter, Legal, Executive, Statement,
Monarch envelope, DL envelope, C5 envelope, C6 envelope,
NO.10 envelope, Japanese Postcard, Folio, Oficio, Big 16k, 32k,
16k, Big 32k, ZL, Yougata4, Postcard, Younaga3, Nagagata3,
Yougata2, Custom
Media weight
60~163 g/m²
Feeder tray volume
150 pages
Output tray volume
100 pages
Note:• 80 g/m² standard paper is recommended for this printer.
• It is not recommended to use special paper extensively, which may affect the service life of the
printer.
• The print media that does not meet the guidelines listed in this User Guide may result in poor
print quality, increased paper jam and excessive wear of the printer.
• Properties such as weight, composition, texture and humidity are important factors affecting the
printer performance and output quality.
Loading Paper
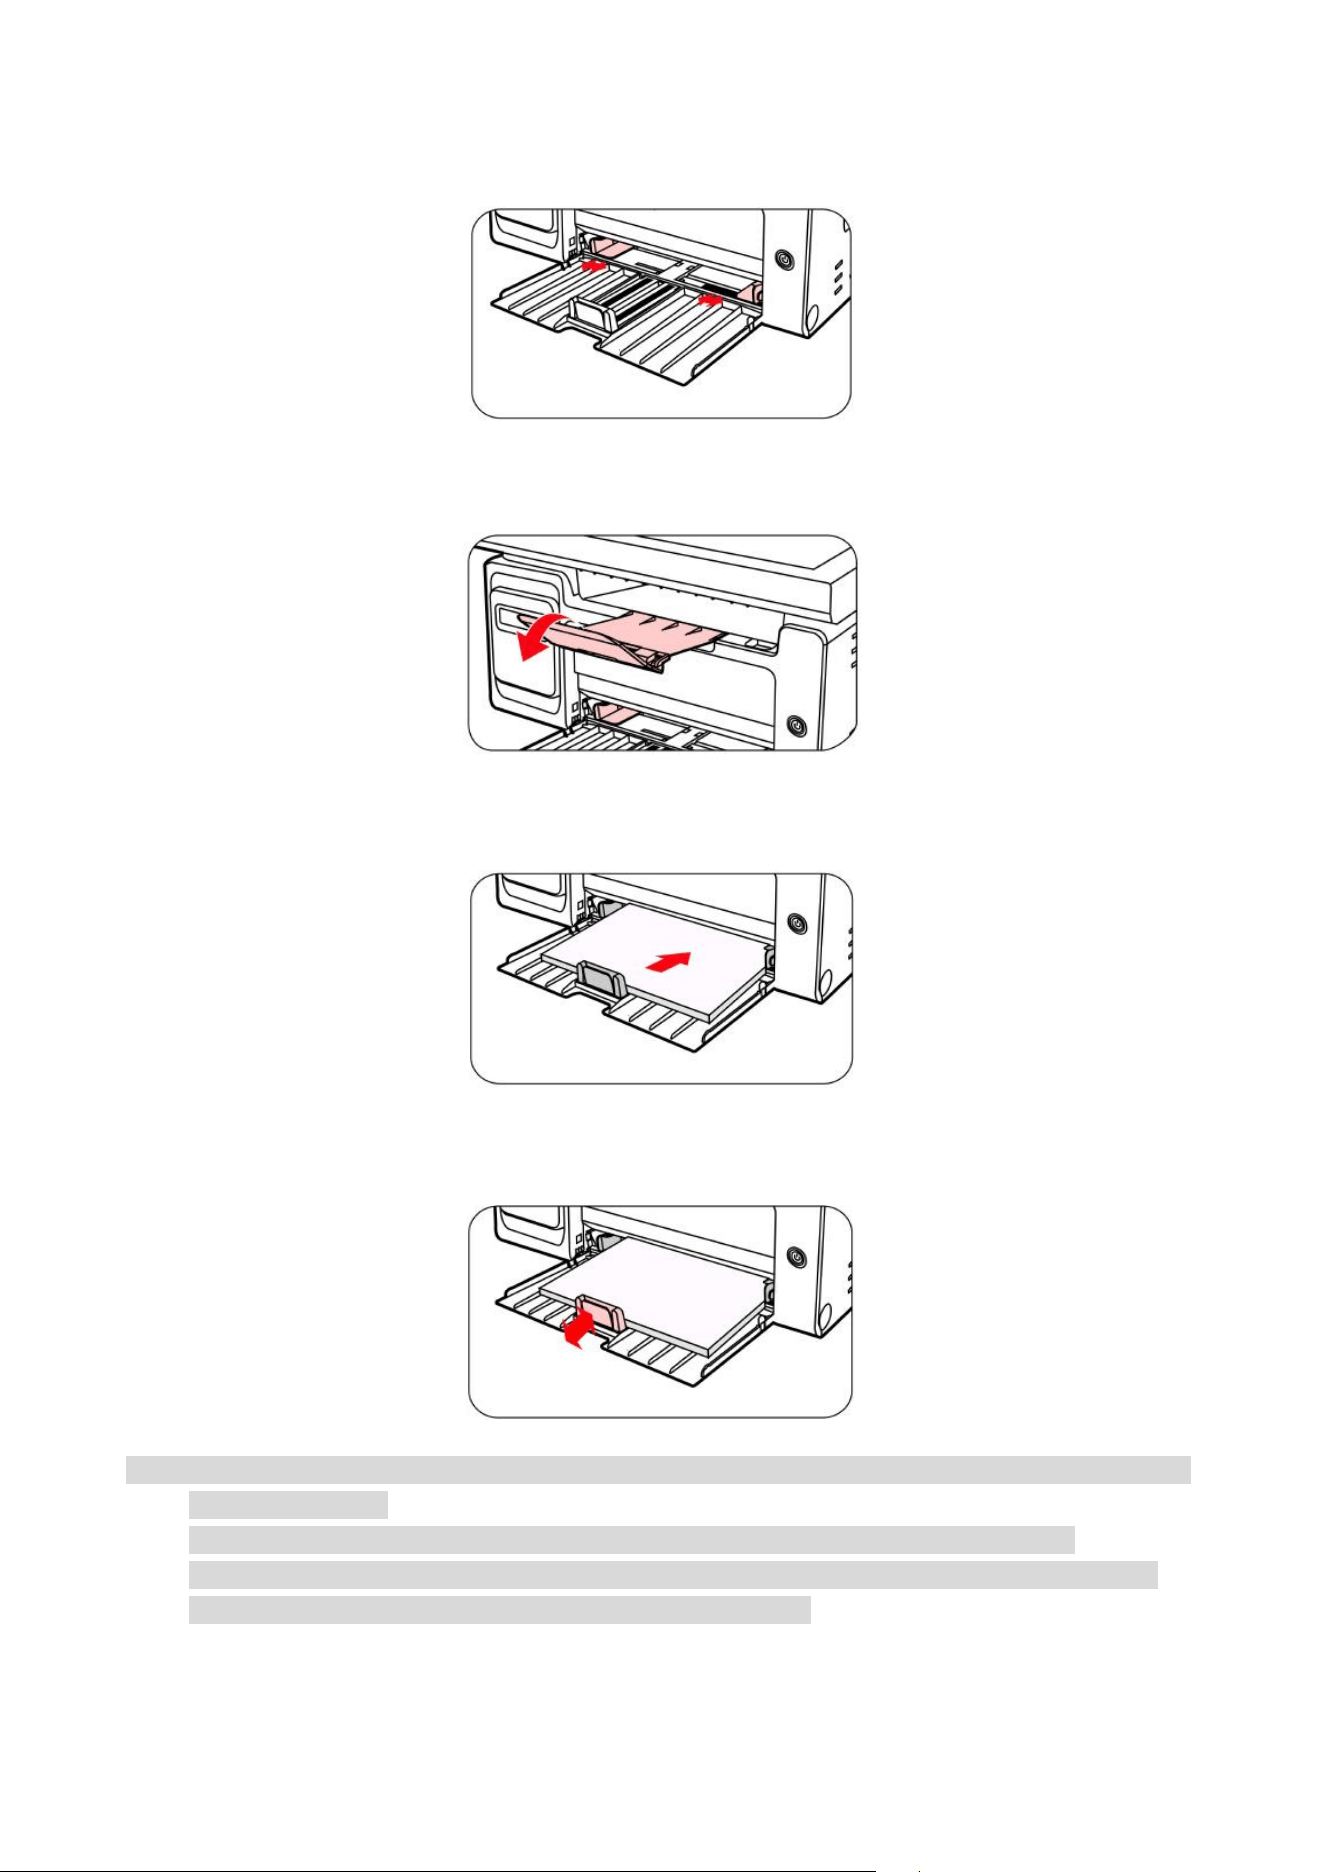
Load paper in automatic tray
Steps are as follows:
1. Open the feeder tray.
9
2. Slide the automatic feed guides to match both sides of the paper.
3. Raise the output tray to avoid the paper from slipping and falling.
4. Load the paper into the automatic feeder tray with the print-side up.
5. Adjust the paper stop to match the paper size.
Note:• If the paper loaded into the automatic feeder tray at one time exceeds 150 pages, paper will jam
or cannot be fed in.
• When using the printed paper, please make the side to be printed (the blank side) up.
• When printing on A5 paper, it is recommended that the paper is fed in landscape orientation,
which can extend the service life of the laser toner cartridge.
10
Warning
After printing, please immediately remove the paper, envelopes or transparent film paper.
Stacking paper or envelopes may cause a paper jam or the paper curling.
Paper and Manuscript Use Process
Manuscript requirements:
Source
Type
Size
Automatic document
feeder (ADF)
Plain paper
A4, A5, B5, A6,Letter,Folio,Legal
Platen
Plain paper, thick paper, transparent
film, carton paper, label paper,
envelope, thin paper
A4, A5, B5, Letter, Full Scanning
Platen, Custom
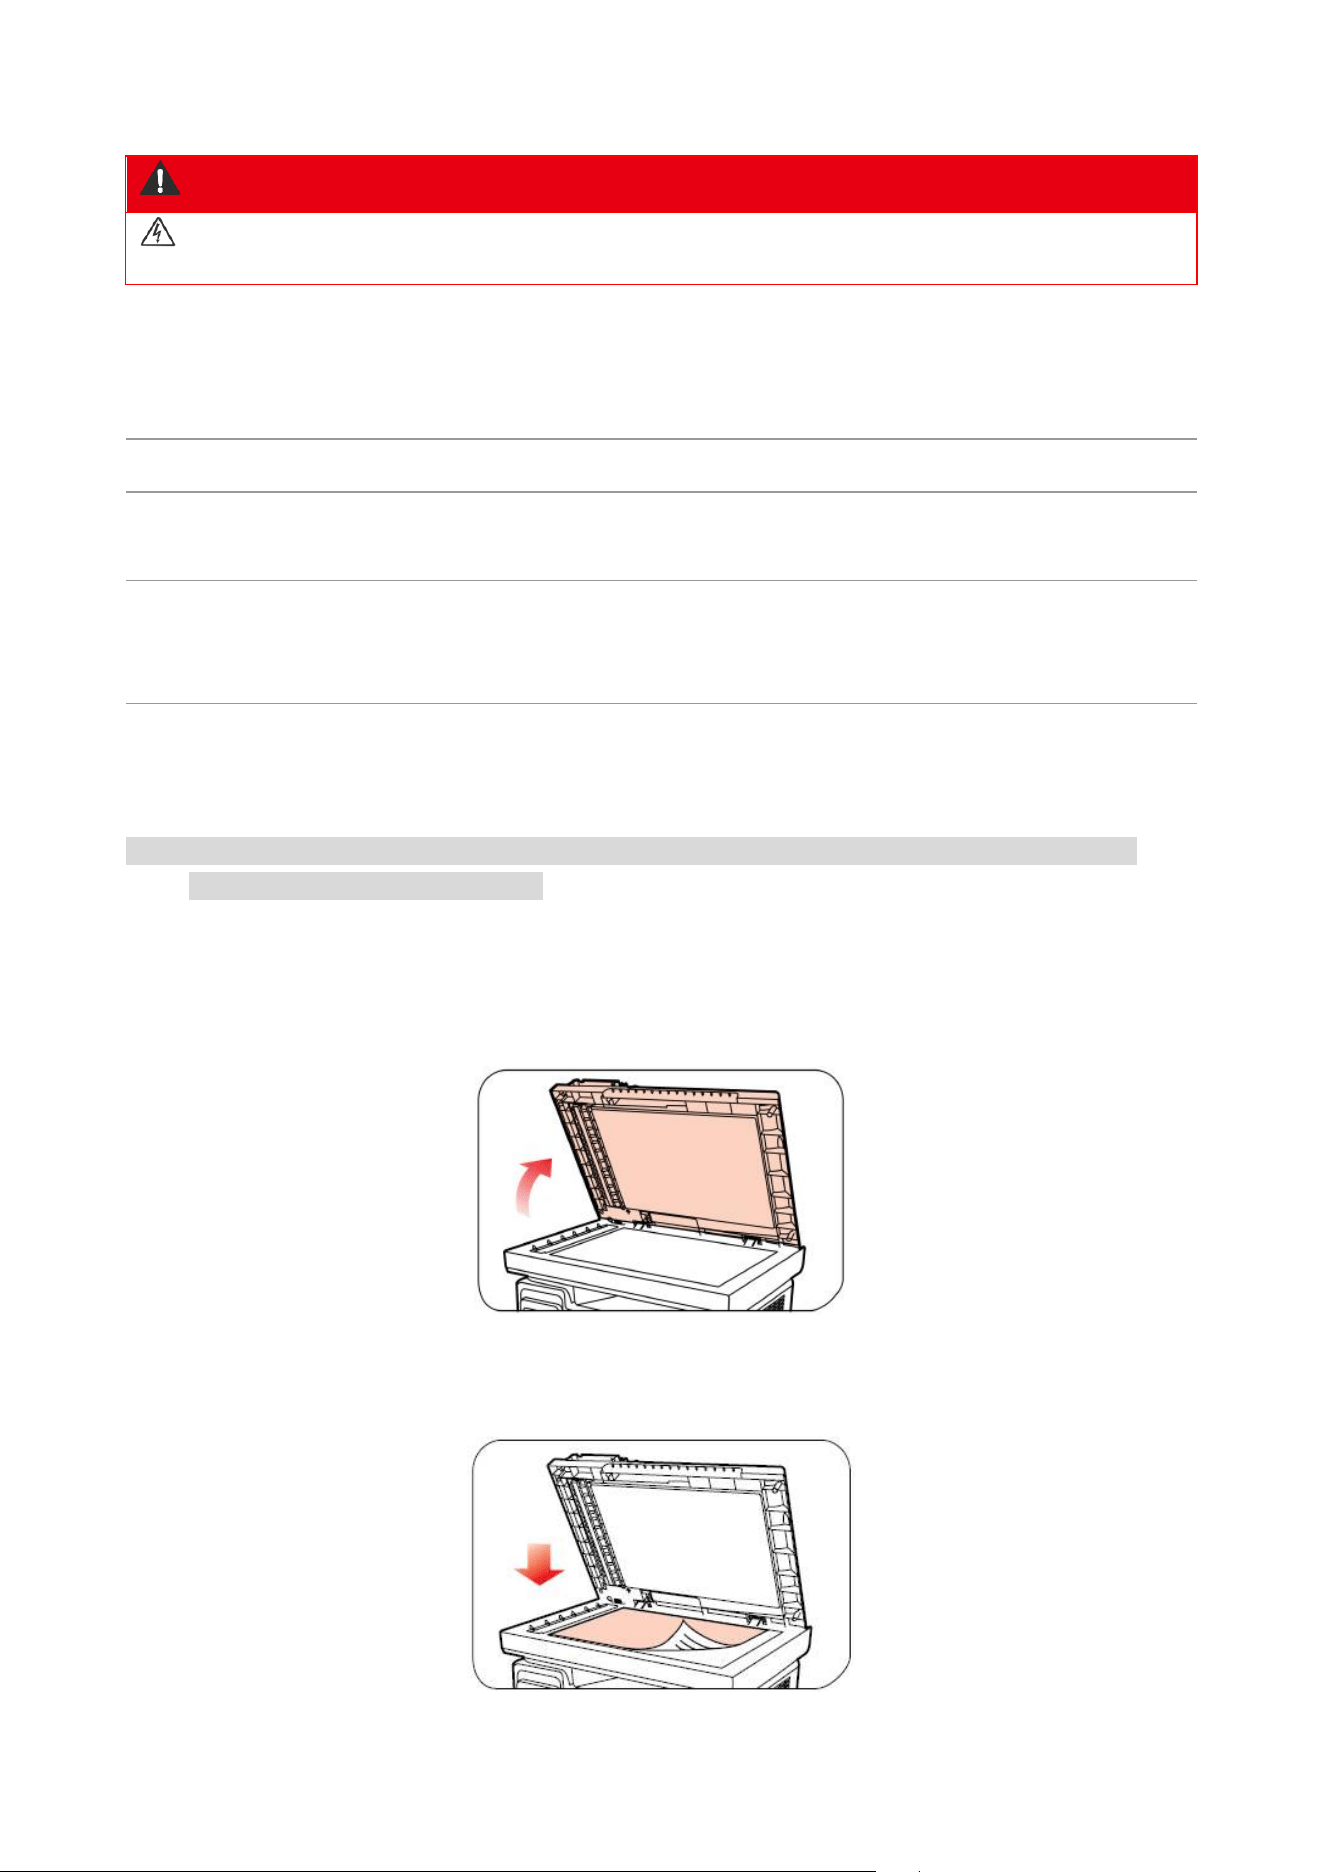
Scanning With Tablet
Note: • Printer appearance may differ because of various models and functions, so the schematic
diagram is only for your reference.
Steps of Use:
1. Lift up the scanner cover.
2. Load the manuscript face down.
11
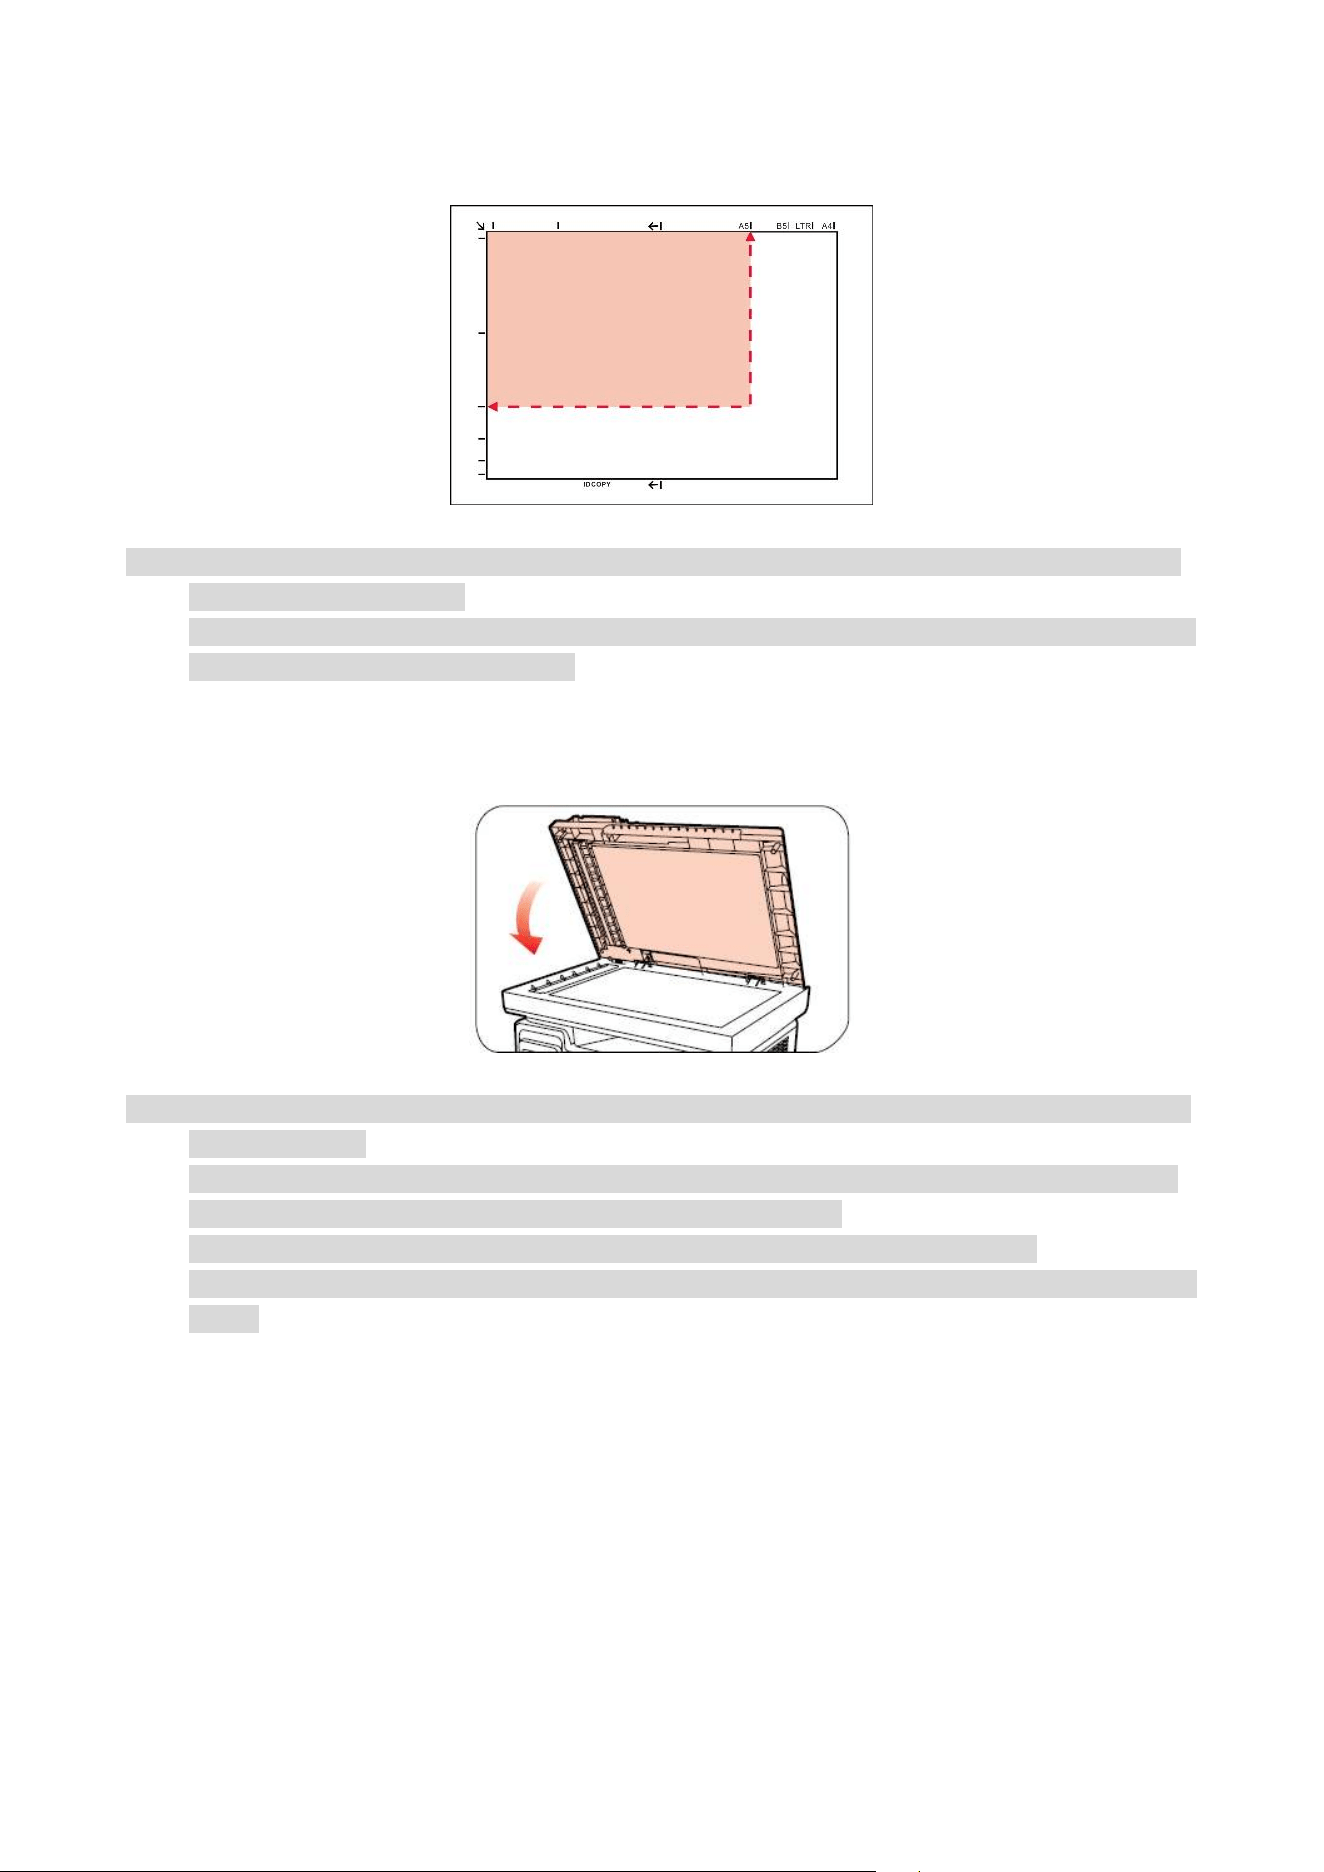
3. Align the manuscript to match the appropriate paper size.
Note:• If the manuscript does not match with any size marker, please align the upper-left corner of the
manuscript with the arrow.
• Make sure there is no document in the ADF. If a document is detected in the ADF, it will be more
preferential than that on glass platen.
4. Close the scanner cover gently.
Note: • Please put the paper or document on the scanner glass after the glue, ink or correction fluid are
completely dried.
• Rough textured, uneven, oil stained and extremely smooth paper will make printing effect poor.
• Please make sure that there is no dust, fluff, etc. on the paper.
• Paper shall be put on a flat surface and stored under a cool and dry environment.
• To avoid influencing the definition, please don’t open the scanner cover during scanning with the
platen.
12
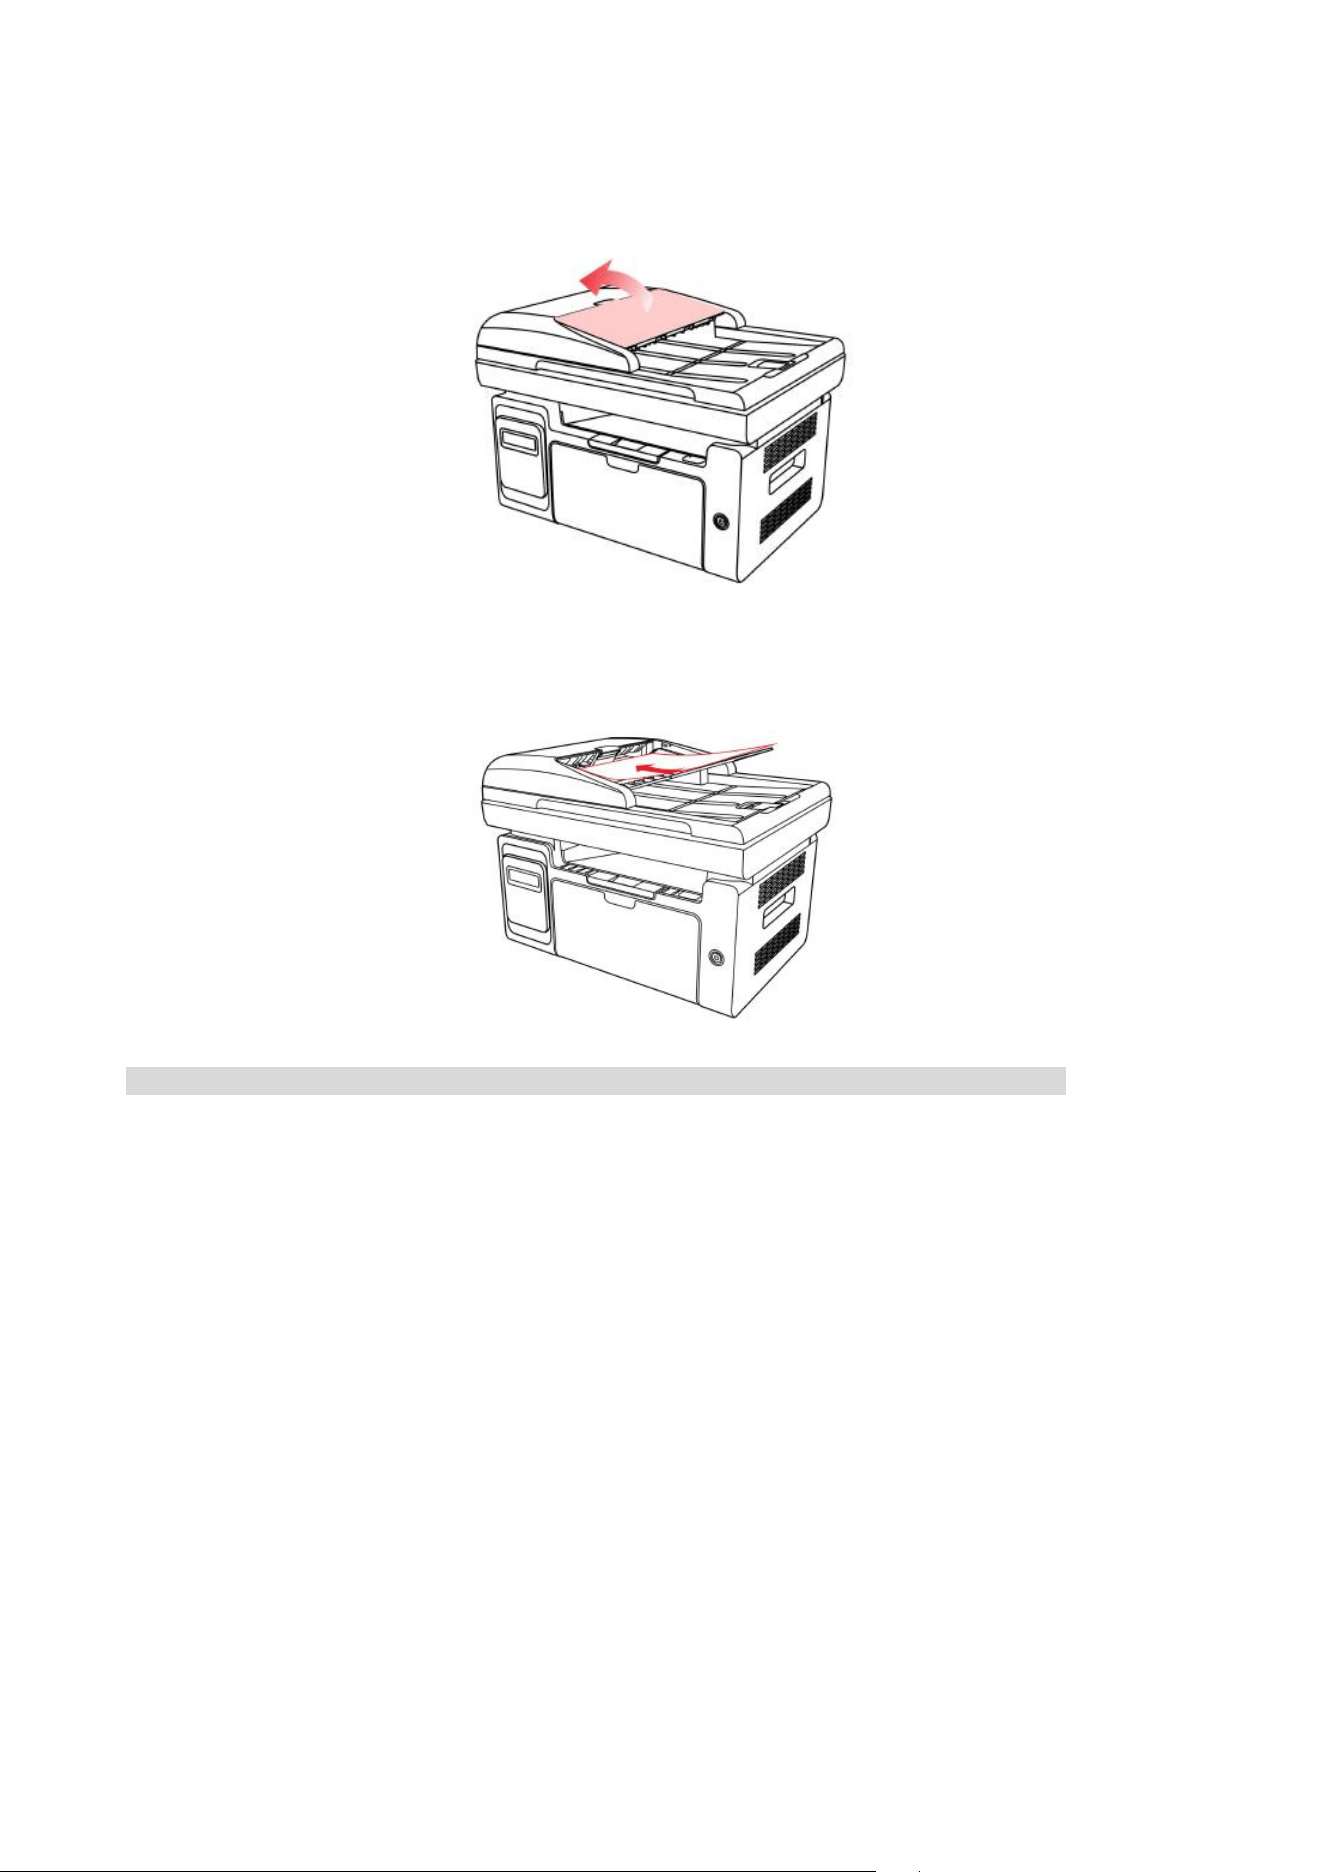
Scan with the automatic document feeder (ADF)
1. Put the original into the ADF with its front upward and top fed first.
2. Adjust the document guide till it gets close to the paper stack.
Note:• The ADF supports feeding 35 pieces of paper at most that should be fed one by one.

13
03 Driver installation and uninstallation
Driver Setup
This device supplies driver setup applications for Windows and macOS. We recommend One-click
installation, which helps you install the driver automatically in a faster and easier way. Should you
encounter trouble when using the One-click installation, you may try more setup methods.
Note: • Driver installation interface may differ because of different models and functions, so the
schematic diagram is only for your reference.
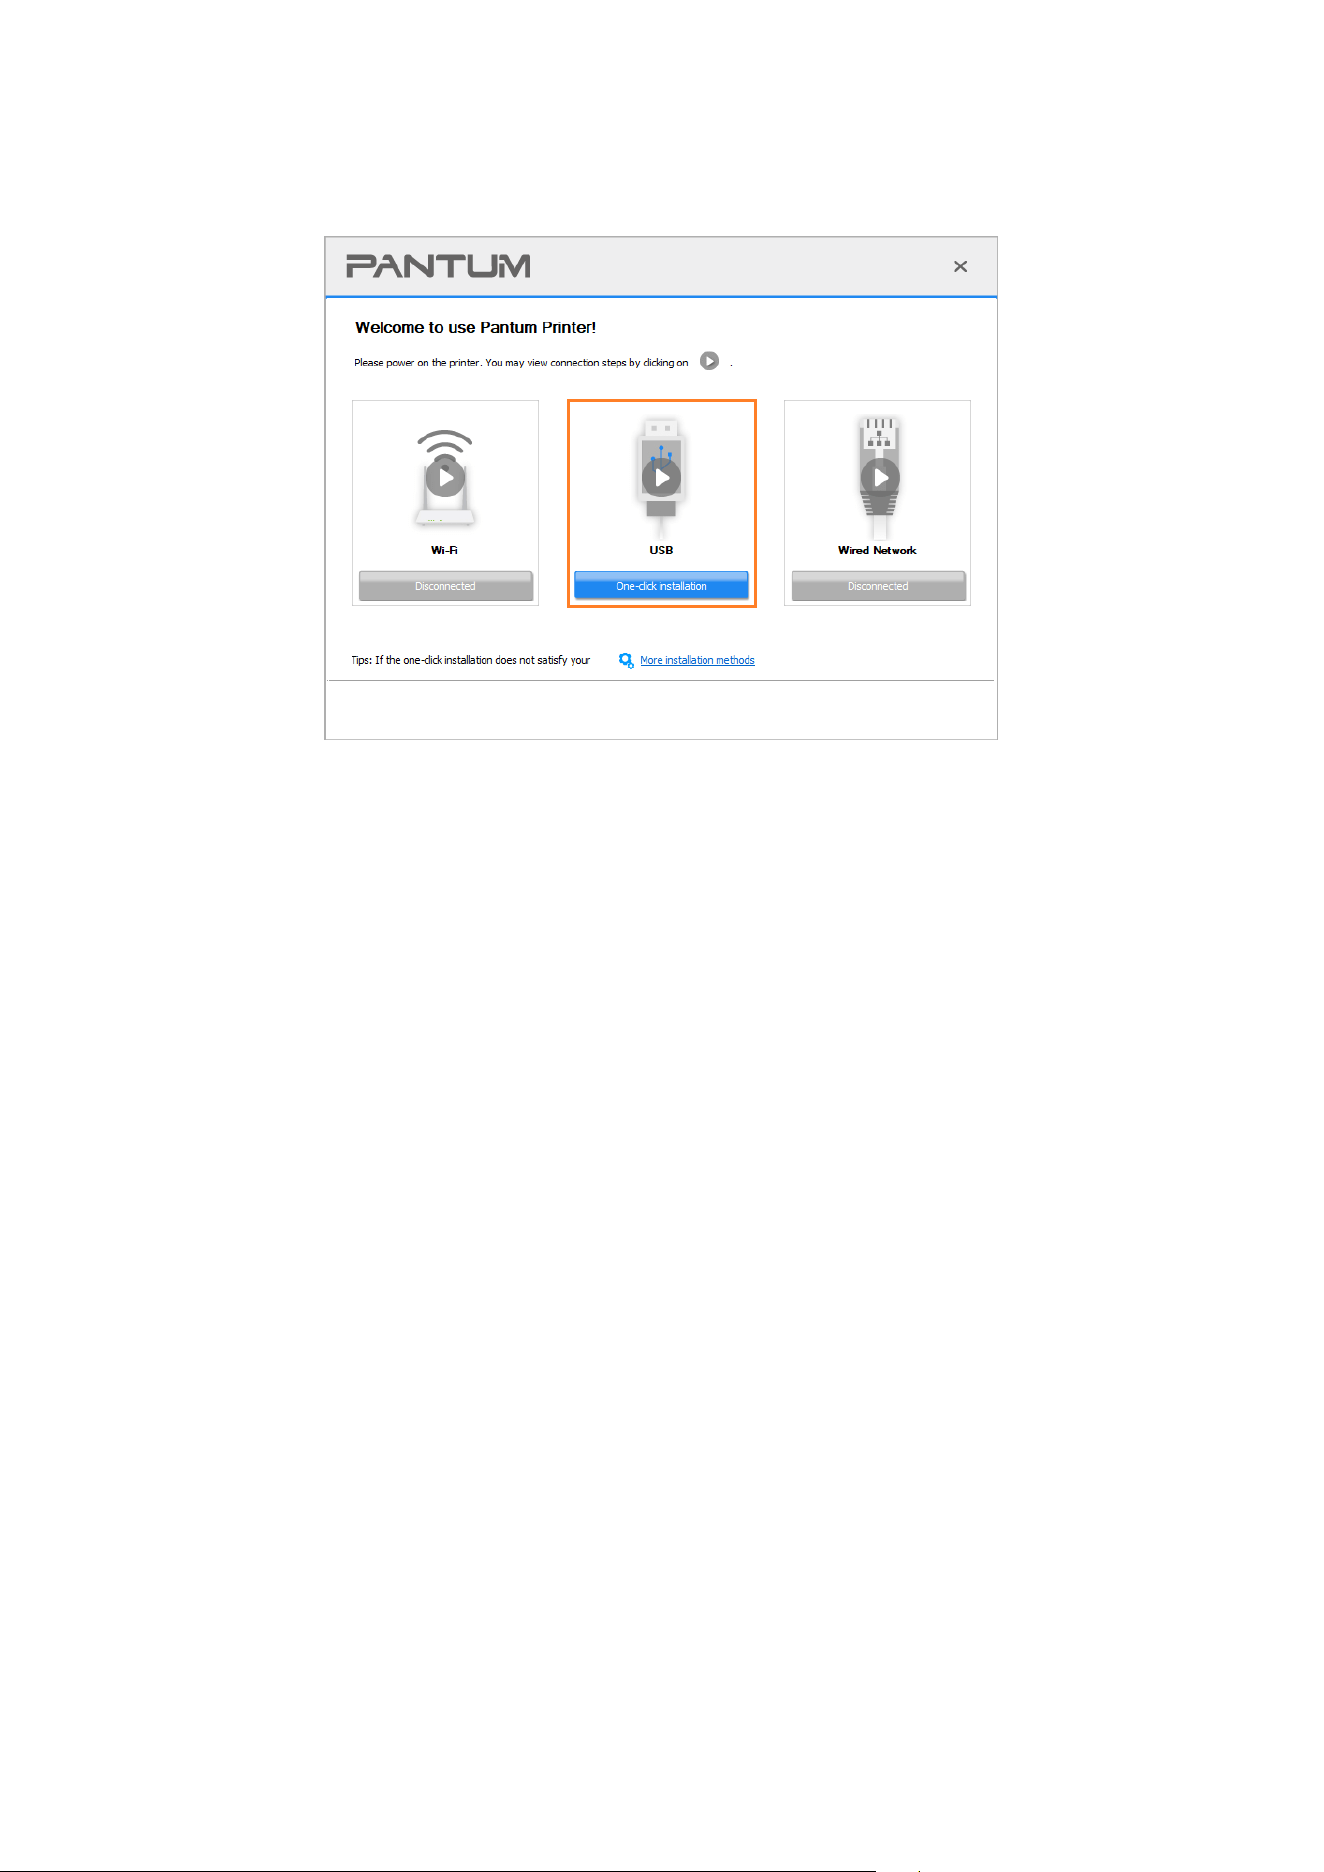
One-click Installation(For Windows and macOS)
One-click installation provides you with three installation methods: "Wi-Fi", "USB", and "Wired
Network". This manual focuses on the "Printer Installation by USB Connection".
Connect printer via USB cable
1. Connect the printer to computer via USB cable, power the printer and computer on.
2. Insert the accompanying installation disk into the computer CD drive, or log in to Pantum official
website (
www.pantum.com) to download the drive.
Note: • Some computers may be unable to auto play the CD beacase of system configuration. Please
double click "Computer" icon, find "DVD RW driver", then double click "DVD RW driver" to run the
installation procedure.
3. Read and agree to the terms contained in the End User License Agreement and the Privacy
Policy, click the “Next” button in the lower right corner of the interface to enter the driver
installation interface.
4. For Windows, follow Step 5. For macOS, enter PC password before proceeding to Step 5.
14
5. The setup will start when you click on "One-click installation" under USB. The setup may take a
while, depending on your PC configuration. Please wait.
6. After the installation, click "Print &Test Page" button. If your printer prints the test page
successfully, it means that you have installed the driver correctly. (If you need to install the OCR
software under the Windows system, please install it when the computer is connected to the
Internet.)
Uninstall Driver
Method to uninstall driver under Windows
Windows 7 is taken as the example in the following operation. The information on your computer
screen may differ because of multiple operating systems.
1. Click the Start menu of computer and then click All programs.
2. Click Pantum, and then Click Pantum XXX Series.
Pantum XXX Series where XXX represents product model.
3. Click uninstall to delete the driver according to instructions on uninstall window.
4. Restart computer after finishing unloading.
Method to uninstall driver under macOS
macOS10.14 is taken as the example in the following operation. The information on your computer
screen may differ because of multiple operating systems.
1. Click "Go" - "Applications" - "Pantum" - "Utilities" - "Pantum Un-install Tool".
2. Delete the driver as instructed in the pop-up Uninstall window.
3. Uninstall complete.

15
04 Wired network setup (applicable to wired
network models)
In case printers support wired network printing, they can be connected to network to control printer
to print in wired network mode.
Set IP Address
The IP address of the printer may be automatically obtained through DHCP function or set
manually.
Automatic Setting
DHCP automatic setting function is enabled by default on the printer.
1. Connect the printer to the network through a network cable and complete the startup
preparation work.
2. The printer will receive the IP address assigned by server automatically. It may take server
minutes to receive IP address under the influence of network environment.
You can check the IP address of printer by printing "Network setup page" out or check network
information by viewing the control panel of printer . If the IP address is not listed, please check
network environment and then try again after waiting for several minutes.
Note: • If DHCP server fails to assign IP address automatically, the printer will get the link-local address
assigned by printer automatically: 169.254.xxx.xxx.
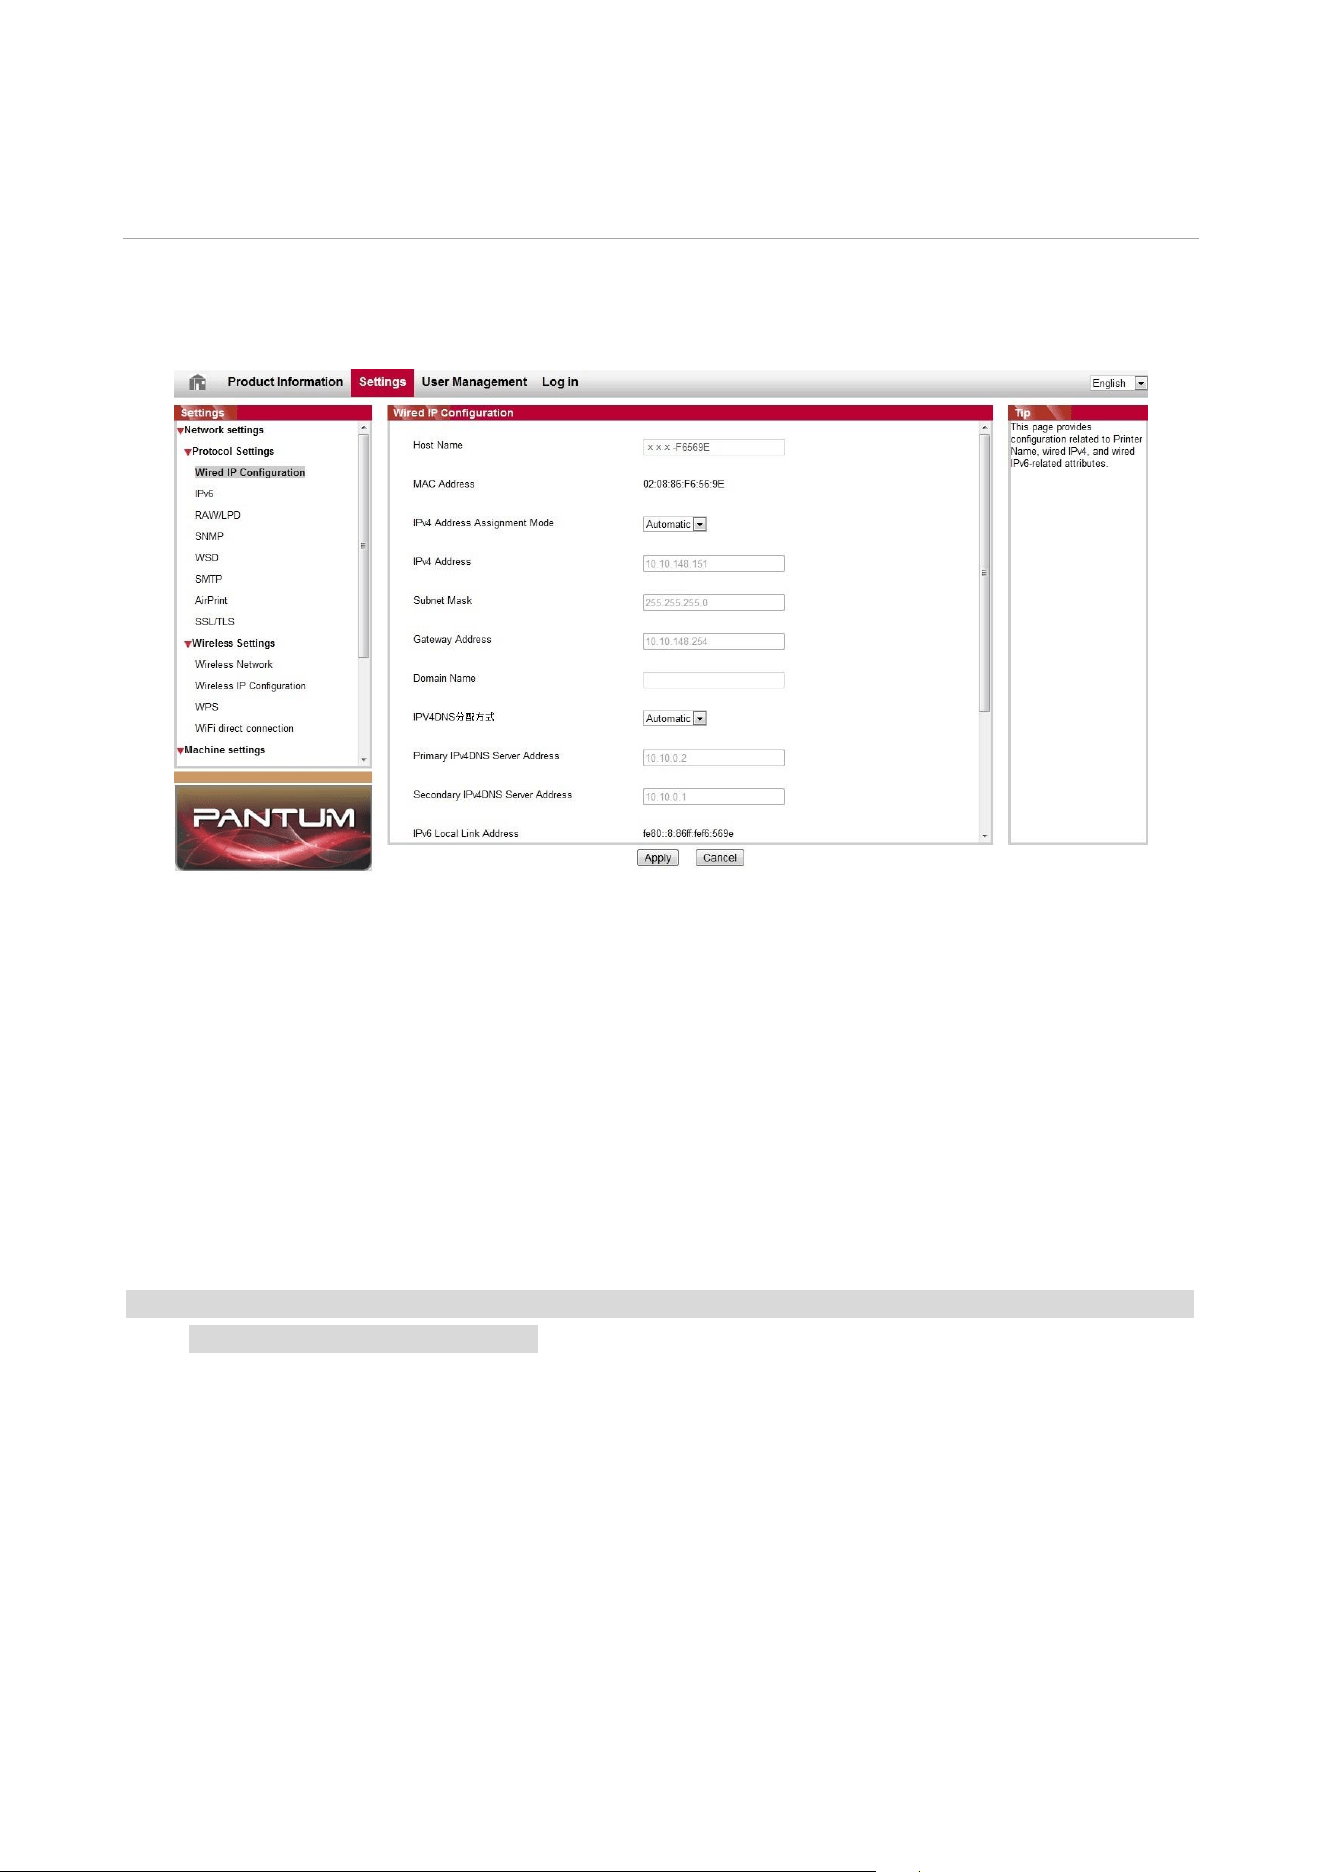
Manual Setting
To set up IP address for printer through the control panel of printer manually.
To set up IP address for printer through the embedded Web server manually.
16
05 Wireless network setup (applicable to Wi-Fi
models)
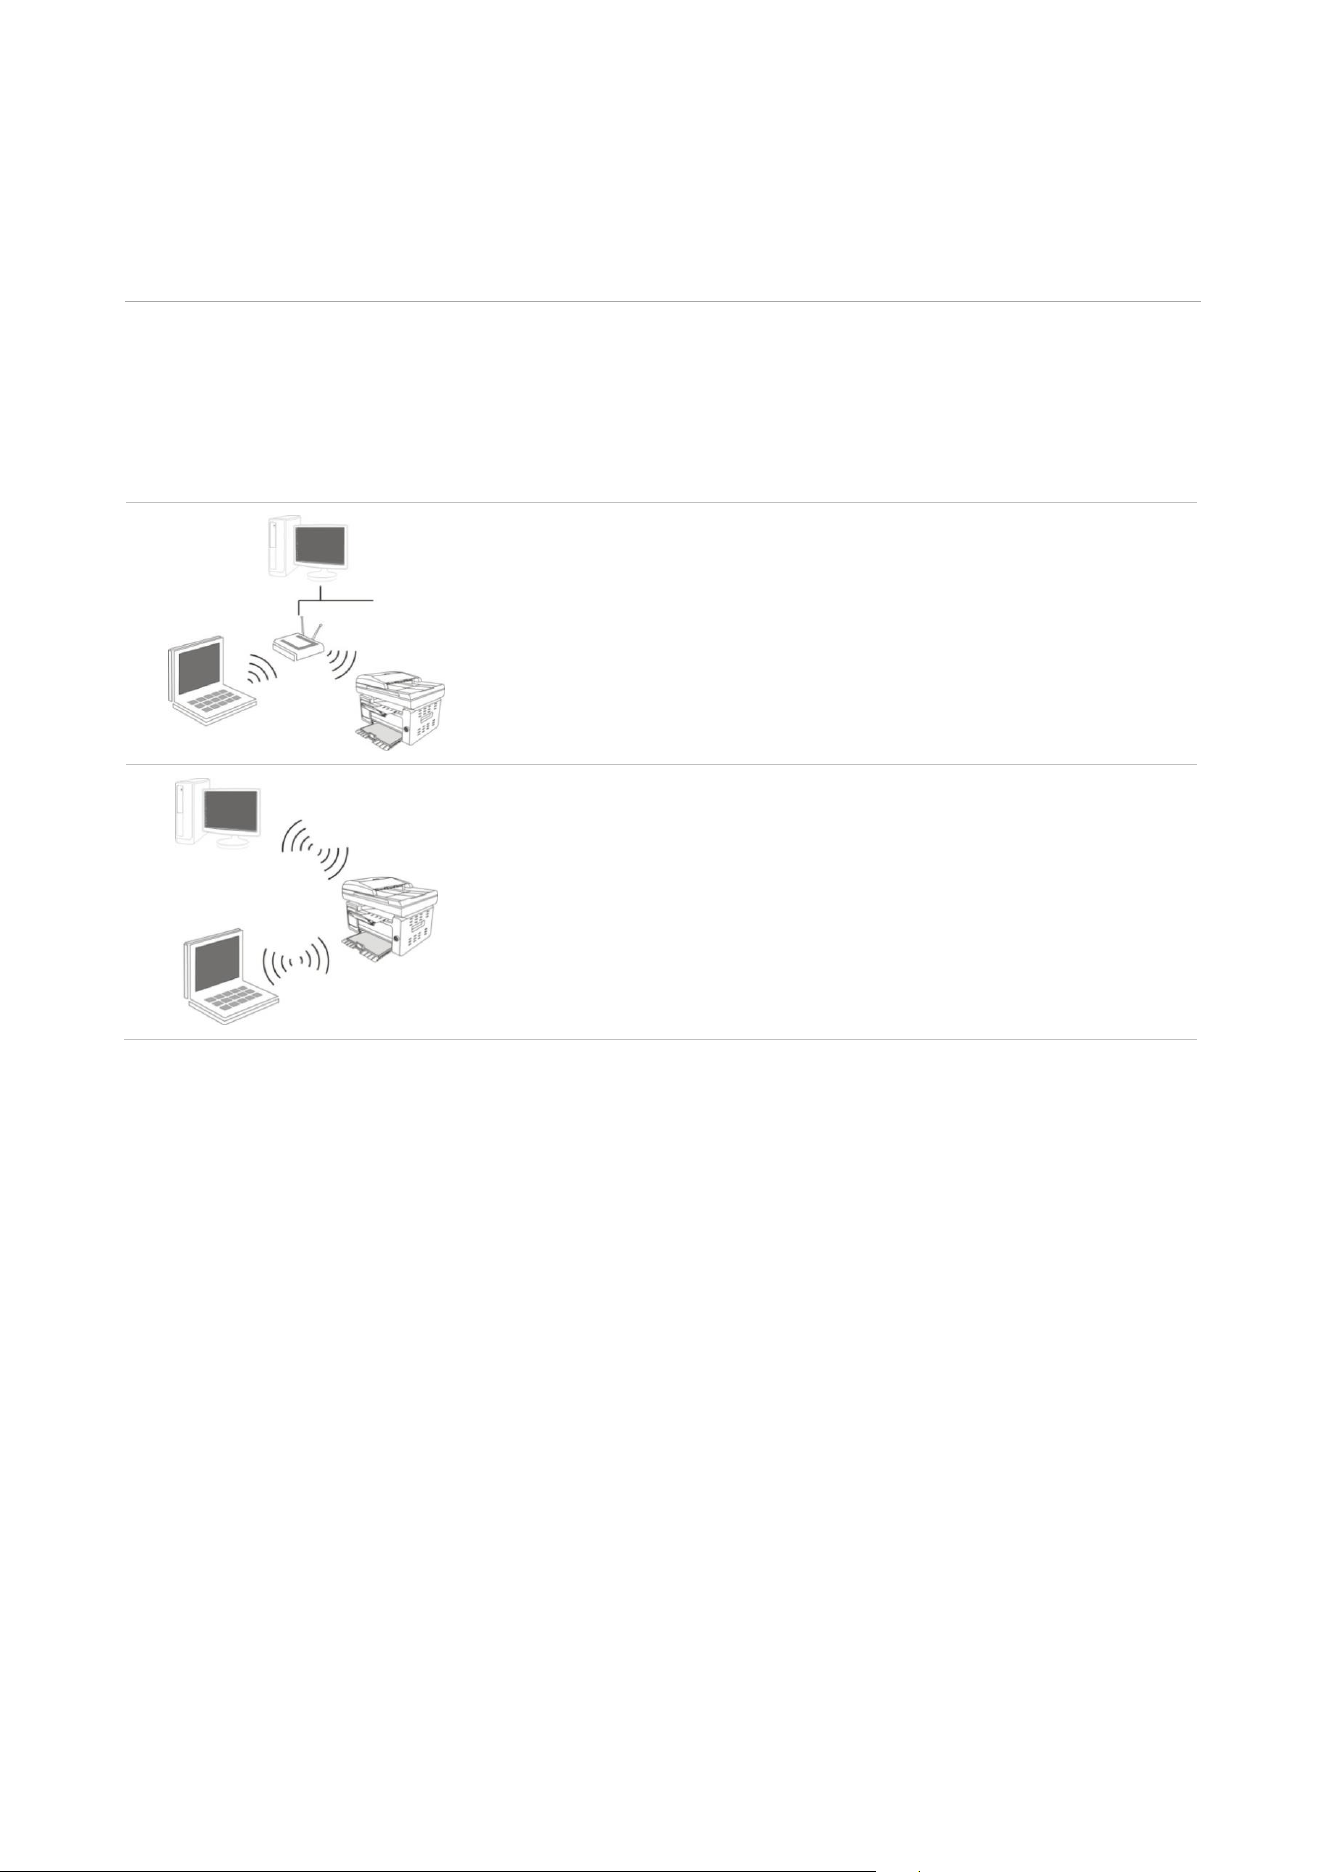
According to the model, the printer model with Wi-Fi printing function supports the two wireless
network connection types of Wi-Fi hotspot connection in the basic structure mode. Usually, there is
only one connection between the computer and the printer.
Basic structure mode: connecting to a wireless device via router
1. Access point (wireless router)
2. Wireless network printer
3. Computer connecting to access point via wireless network
4. Computer connecting to access point via network cable
Wi-Fi hotspot connection mode
1.The wireless computer is directly connected with the wireless
device.
Basic structure mode
You can connect a computer to your printer via access point (wireless router) as the medium.
Access point (wireless router) connection is divided into wireless network setup and Wi-Fi
Protected Setup (WPS).
Important: Before wireless network installation, you must learn about the service set identifier
(SSID) and password of your access point in order to use them during wireless network setup. If
they cannot be determined, please consult your network administrator or access point (wireless
router) manufacturer.

17
Wireless network setup tools
If your computer has been installed with a driver and had been connected to wireless network, but
the wireless network was changed, you can set it again with wireless network setup tools.
Preliminary preparations
1. Access point (wireless router).
2. A computer that has been connected to network.
3. A printer that has wireless network function.
Setup methods of wireless network setup tools
Take the wireless network setup tool in computer.
1) Windows system: Click the “Start menu” - “All programs” - “Pantum”- Product name - “Wireless
network setup tool”.
2) macOS system: click "Go" - "Applications" - "Pantum" - "Utilities" - "Wireless Network
Configuration Tool" on the computer Finder menu bar.
How to disable the Wi-Fi network connected
Connect the wireless network in infrastructure mode by the steps above. If connected, the Wi-Fi
light on the control panel is normally on. Press and hold this button for more than 2s to disconnect
from Wi-Fi network (Wi-Fi light will be off).
18
06 Web server
You can manage printer setup via the embedded Web server.
Visit the embedded Web server
1. Turn on the power of printer and computer.
2. Connect the printer to network to ensure that the printer is connected to the network where the
computer is connected to
3. Input the IP address of printer in the address bar of Web browser to visit the Web server
imbedded in printer.
4. Click “Log in” option, input user name and password (the default user name is admin and the
initial password is 000000) and click “Log in”.
Note: • For safety reasons, you are suggested to change the default password, which can be finished in
the “User Management” interface.

19
07 Print
Print Function
You can set the print function through "Start"-"Devices and Printers"- select corresponding printer-
right click – set print function in "Printing preferences". Some functions are as follows:
Functions
Diagram
Automatic Two-Sided Printing
Collate Print
Reverse Print
N-in-1
Poster Print(for Windows
Operation System only)
Zoom Print
Custom Size
Note: • You can realize poster printing feature by selecting 2x2 poster printing in multipage.
• You can enable Printing Preferences and click the Help button to view detailed function
description.

20
Print Settings
Setting the printing parameters
Before sending a print job, you can set the printing parameters in the following two ways.
Operating
system
Temporary printing setup change
Permanent default setup change
Windows
1. Click “File” menu - “Print” - “Select
printer" - “Printer properties” (the
detailed steps may differ because of
multiple operating systems).
1. Click “Start” menu- “Control Panel” - “Devices
and Printers”.
2. Right click on the printer icon, select “Printing
preference” and then change setup and save it.
macOS
1. Click “File” menu - “Print”.
2. Change setup in the window
popping out.
1. Click “File” menu - “Print”.
2. Change setup in the window popping out and
click to save the preset. (Select preset every time
before printing, or print according to default
setup.)
Note:• Priority of App setup is senior to printer setup.
Duplex Print
1. The printer driver supports manual duplex.
2. Ensure that certain amount of paper is loaded into the automatic feeder tray before printing.
Note: • If the paper is thin, it may wrinkle.
• If the paper is curled, make it flat and put it back into the manual feeder tray.
• If the manual duplex function causes a paper jam, see Cleaning Jammed Paper for handling it.
• When "Paper Type" is "Thick Paper" or "Transparent Film", please do not try "Duplex Print".
• Paper may get jammed or cannot be fed in when the automatic feeder tray is loaded with more
than 150 sheets.
How to perform Manual Duplex
1. Open the print job to be printed from the application (such as a Notepad).
2. Select Print from the File menu.
3. Select printer of the corresponding model.
4. Single click “Preferences” for printing setup.
5. Select the “Duplex” in “Basic” tab and then select “Long Edge” or “Short Edge”.
6. Click "OK" to complete the print setting. Click "Print" to enable Manual Duplex.

21
08 Copying
Copying function
Copy
Instructions
Common copying
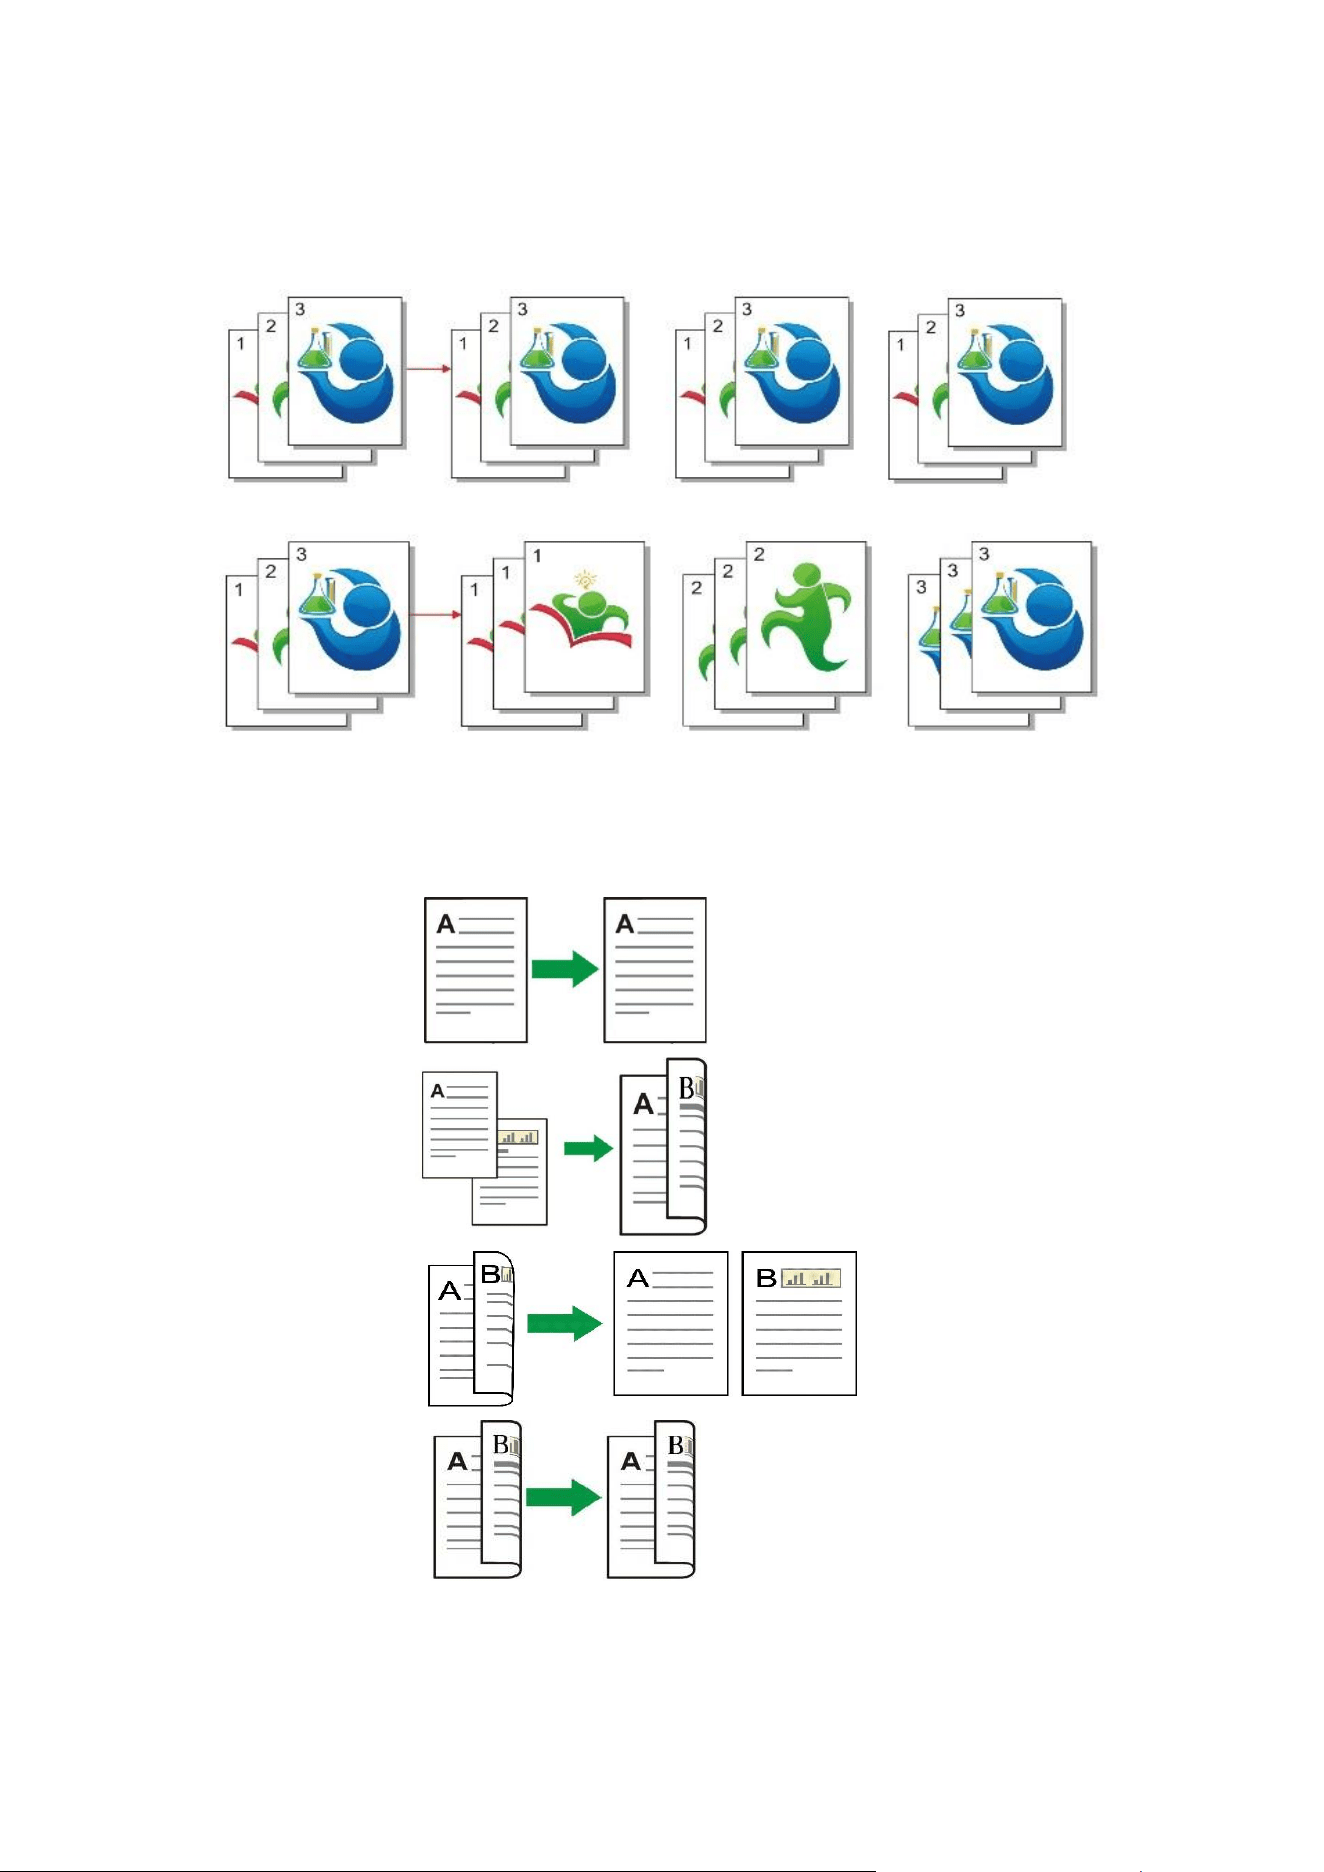
Multipage
Print a multi-page document to a piece of paper.
Clone
Print several identical images to a piece of paper.
Poster
Print a one-page original to pieces of paper.
Collated copy
Collate copies of an original.
Manual dual-side
It supports manual duplex copying for originals.
Image quality
Set the definition mode to improve the copying effect.
Intensity
Adjust deep-light copying effect by setting intensity.
Resizing
Reduce or enlarge the size of image copied.
Watermark
Add watermark to the copies via Watermark Settings.
ID card copying
Arrangement mode
Set the ID copy layout.
Intensity
Adjust deep-light copying effect by setting intensity.
Paper Size
Set the paper size.
Receipt copying
Intensity
Adjust deep-light copying effect by setting intensity.
Paper Size
Set the paper size.
Common copying setting
Change related setting through setting menu for better copy result.
1. Press “copying key” on control panel and then press “OK key” to enter “copying setting”
interface.
2. Press “direction key” to select options and then press “OK key” to enter setting interface.
3. Press “direction key to select option to be set and press “OK key” to set option.
Note: • The image quality, intensity, resizing and paper setting can keep valid after options are set.
• For multipage, clone, poster, collated copy and manual dual-side setting, set recovery mode as
default setting after completing copying, switching panel key or restarting machine.
22
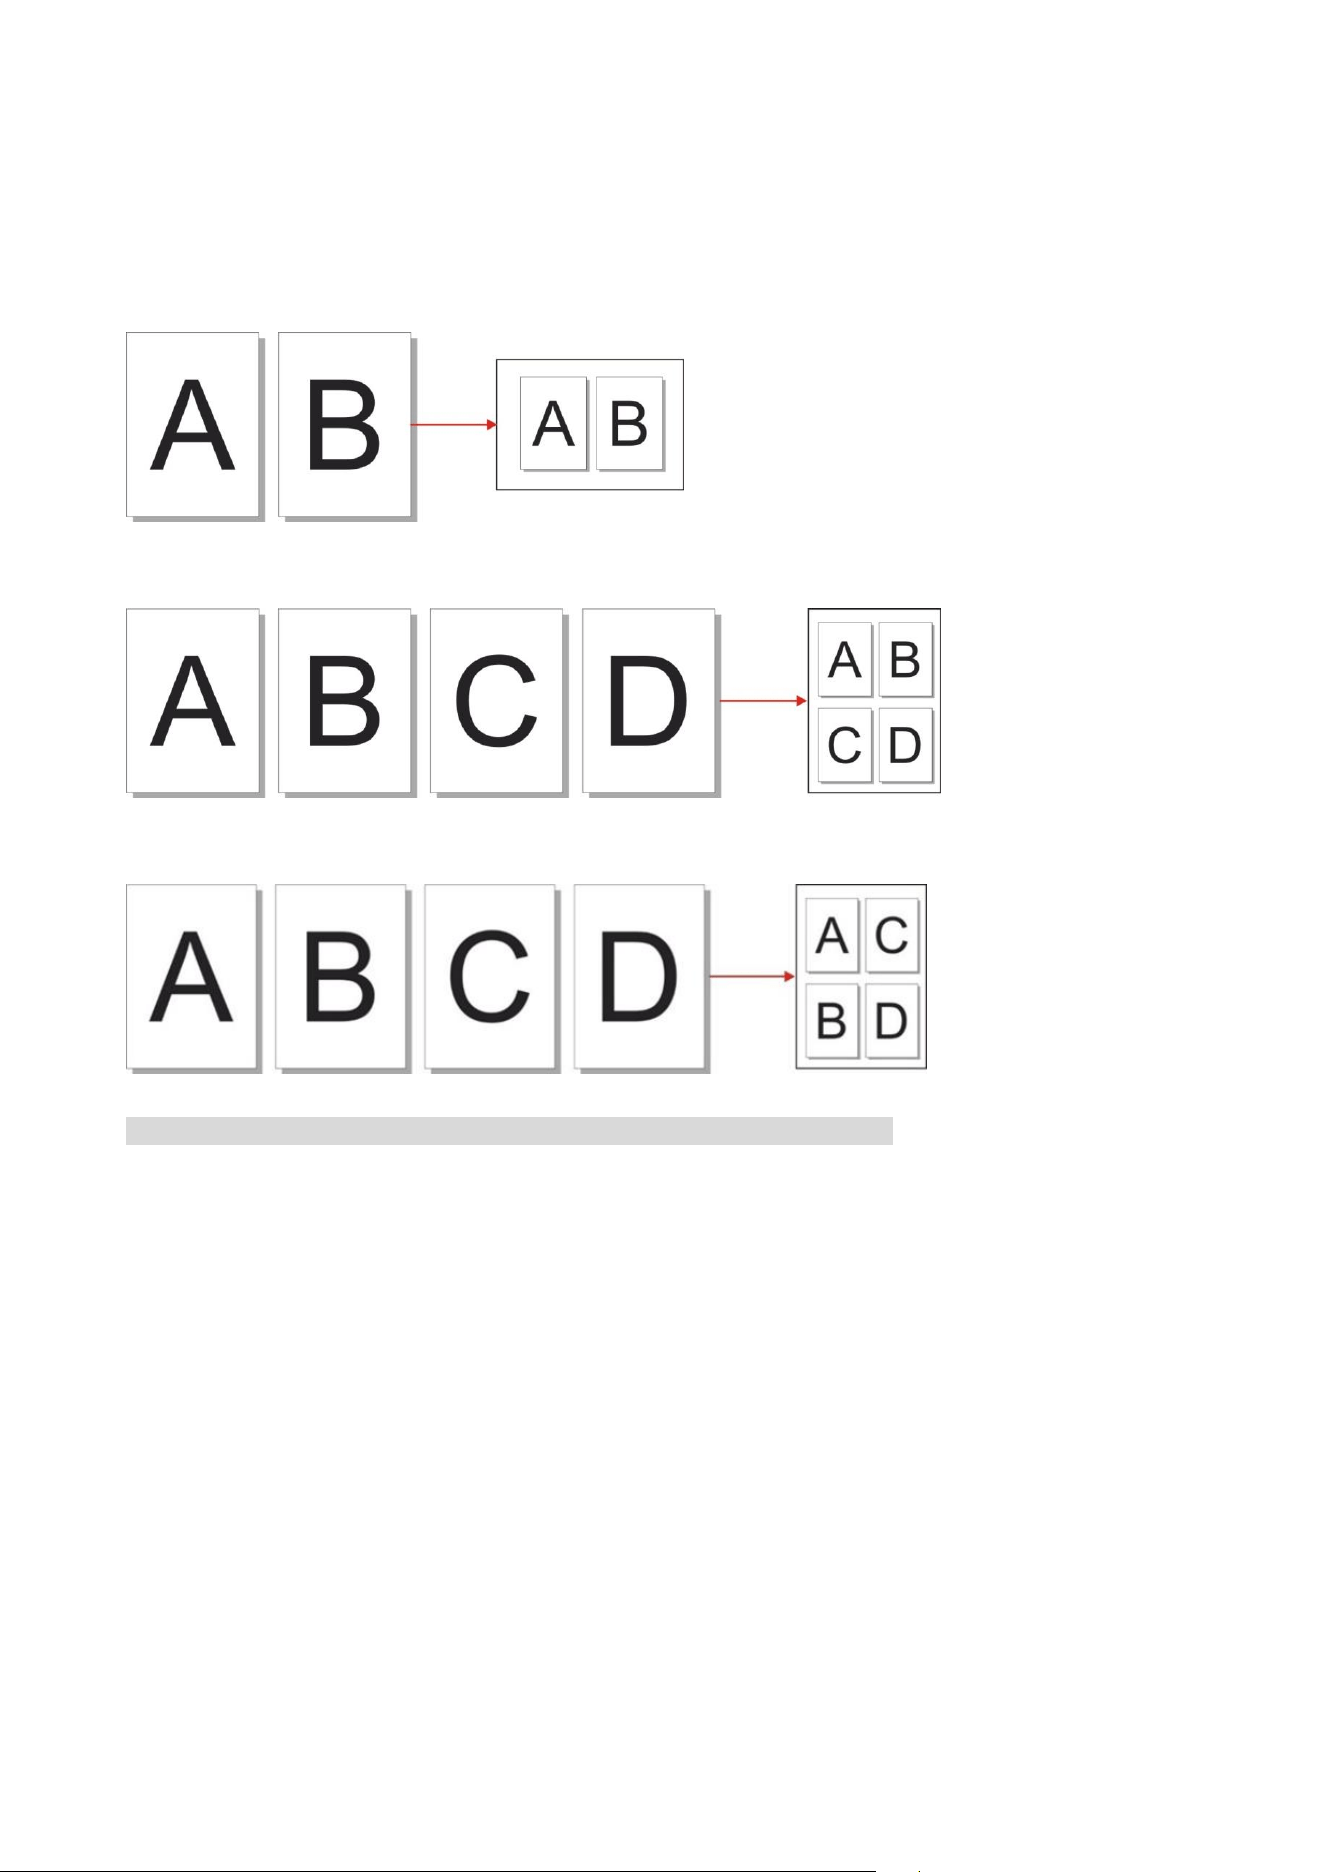
Multipage
With setting on all-in-one feature, a 2- or 4-page document could be copied to one piece of paper.
Copying with the ADF and the glass platen are both supported.
The multipage includes 3 modes:
(1) Two-in-one:
(2)Horizontal four-in-one:
(3)vertical four-in-one:
Note: • "Multipage” and “resizing function” cannot be set at the same time.
23
Collated copy
The "Collated Copies" feature supports only copying with the automatic document feeder (ADF).
The collated copy includes 2 modes:
Startup:
Closed:
manual duplex copying
In case of manual duplex copying of original, choose ADF mode.
There are 4 modes in total for duplex copying:
1.
One-sided One-sided:
2. One-sided Two-sided:
3. Two-sided One-sided:
4. Two-sided Two-sided:
24
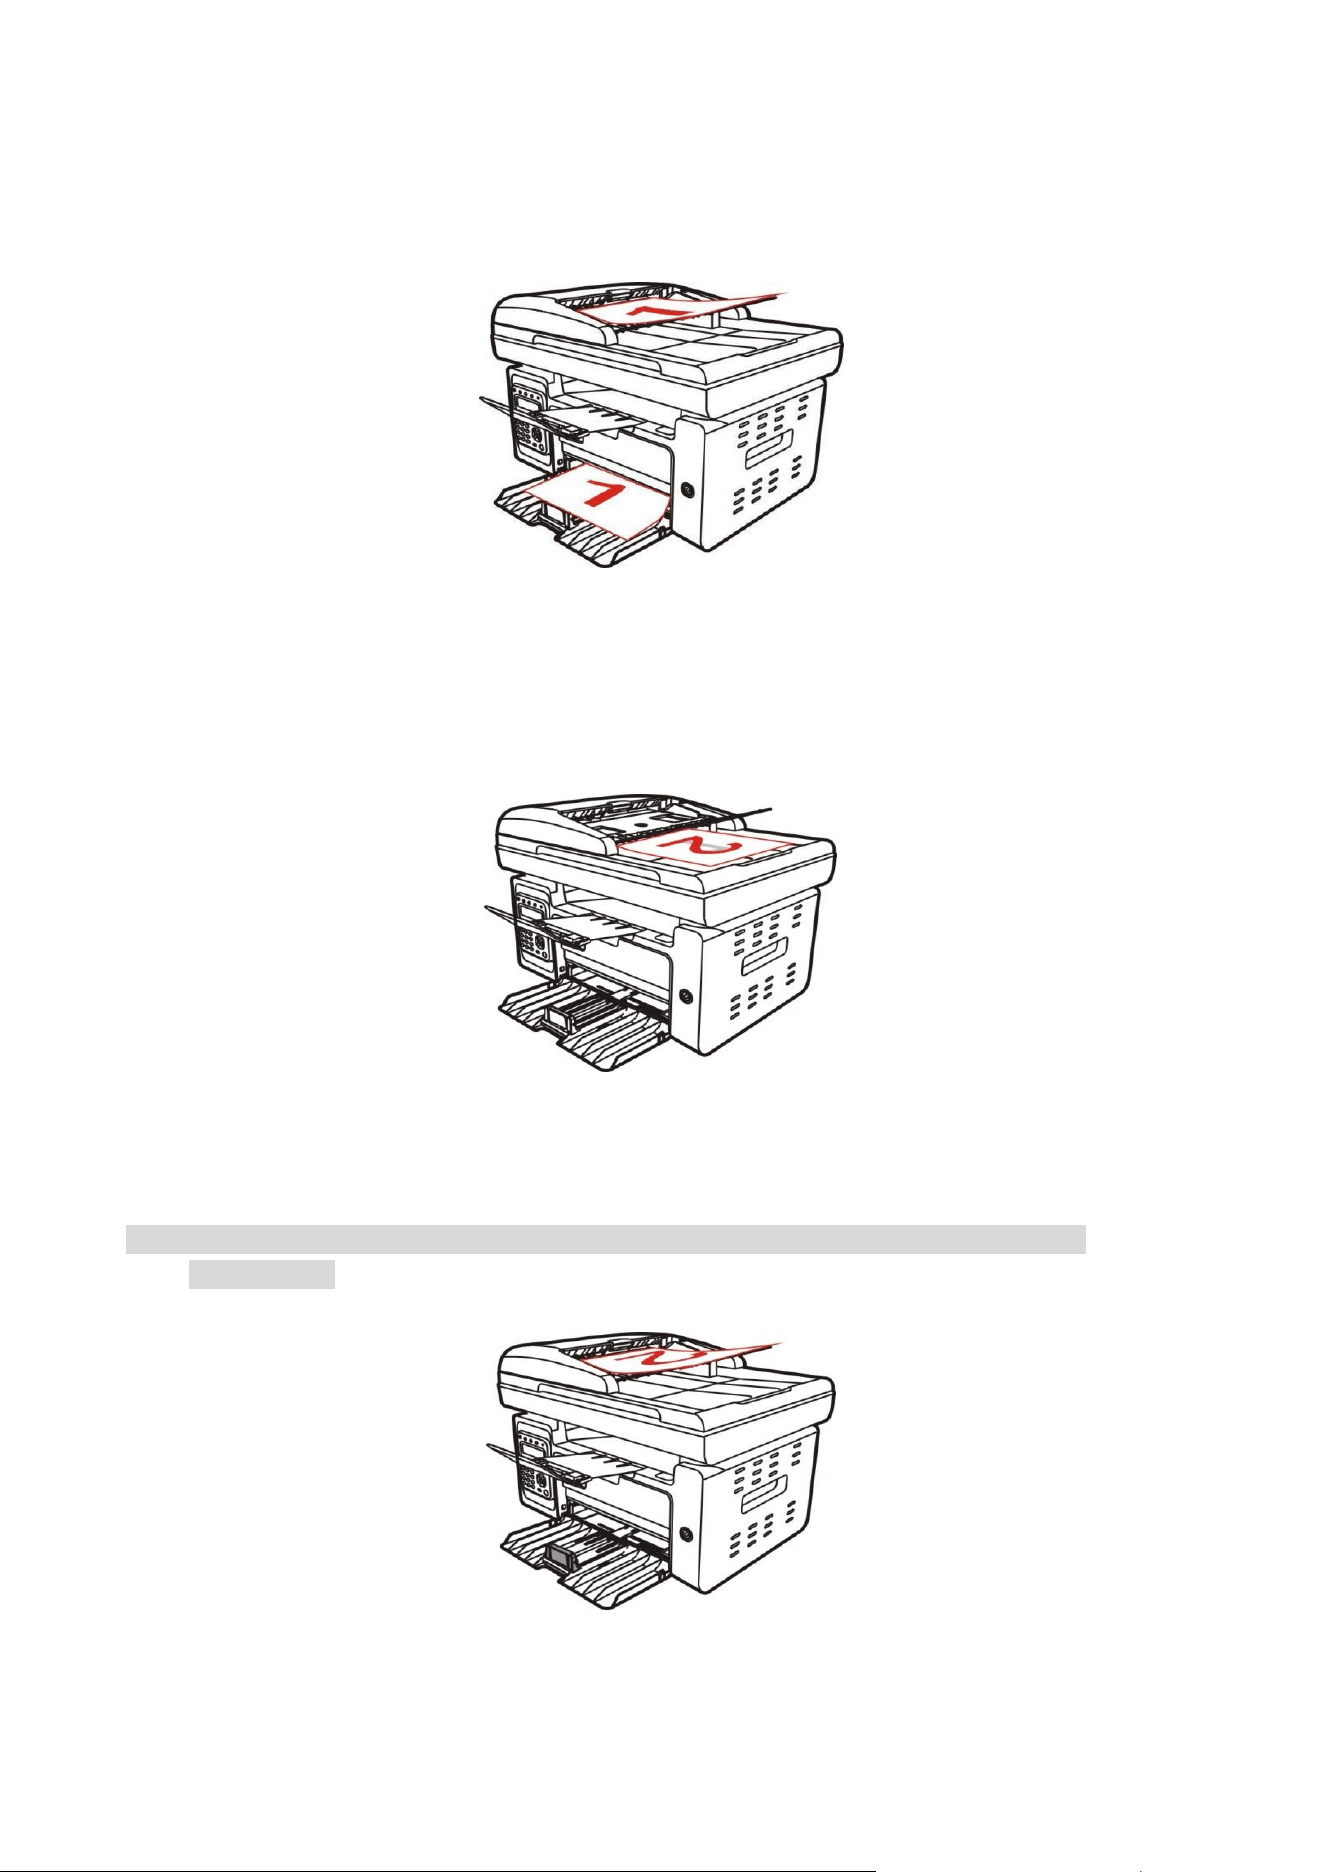
Steps to use Manual Duplex Original Copying
1. Put an original into the ADF with its front upward and its top fed first; meanwhile, make sure
there are some paper in the carton.
2. Operate in accordance with the procedure of ordinary copy; choose the “manual duplex copy”
mode and press “OK” to save the settings.
3. Press “Start” to begin copying.
4. Paper exited should be with the direction as shown in the figure:
5. After completion of copying one side, put the paper into the entrance as shown in figure (without
turnover or rotation).
Note:• If the turnover prompt on panel times out, the machine will execute one-sided copying
automatically.
6. Press "Start" to begin copying the other side.

25
ID card copying setting
Change related setting through setting menu for better copy result.
1. Press "ID Card Copy" and then "Menu" on control panel to enter the "Menu Settings" interface.
2. Press "OK" to enter the "ID Card Copy Settings" interface.
3. Press “direction key to select option to be set and press “OK key” to set option.
Receipt setting
Change related setting through setting menu for better copy result.
1. Press "Bill Copy" and then "Menu" on control panel to enter the "Menu Settings" interface.
2. Press "OK" to enter the "Bill Copy Setting" interface.
3. Press “direction key to select option to be set and press “OK key” to set option.
26
09 Scan
This printer provides two scan modes: "push-broom", that is, scanning via the operation of the
printer's own control panel; and"push-scan", that is, scanning via the PC scanning application.
Make sure that the printer driver has been installed on the computer before scanning.
This product complies with the TWAIN and Windows Image Application (WIA) standard. If using
the application which supports TWAIN and WIA standard, users can use the scan function and
directly scan the images to the open application.
Push Scan
You can scan from the PC scan application via USB, wired, or wireless connection. Make sure the
the printer is properly connected before scanning.
Windows system scan
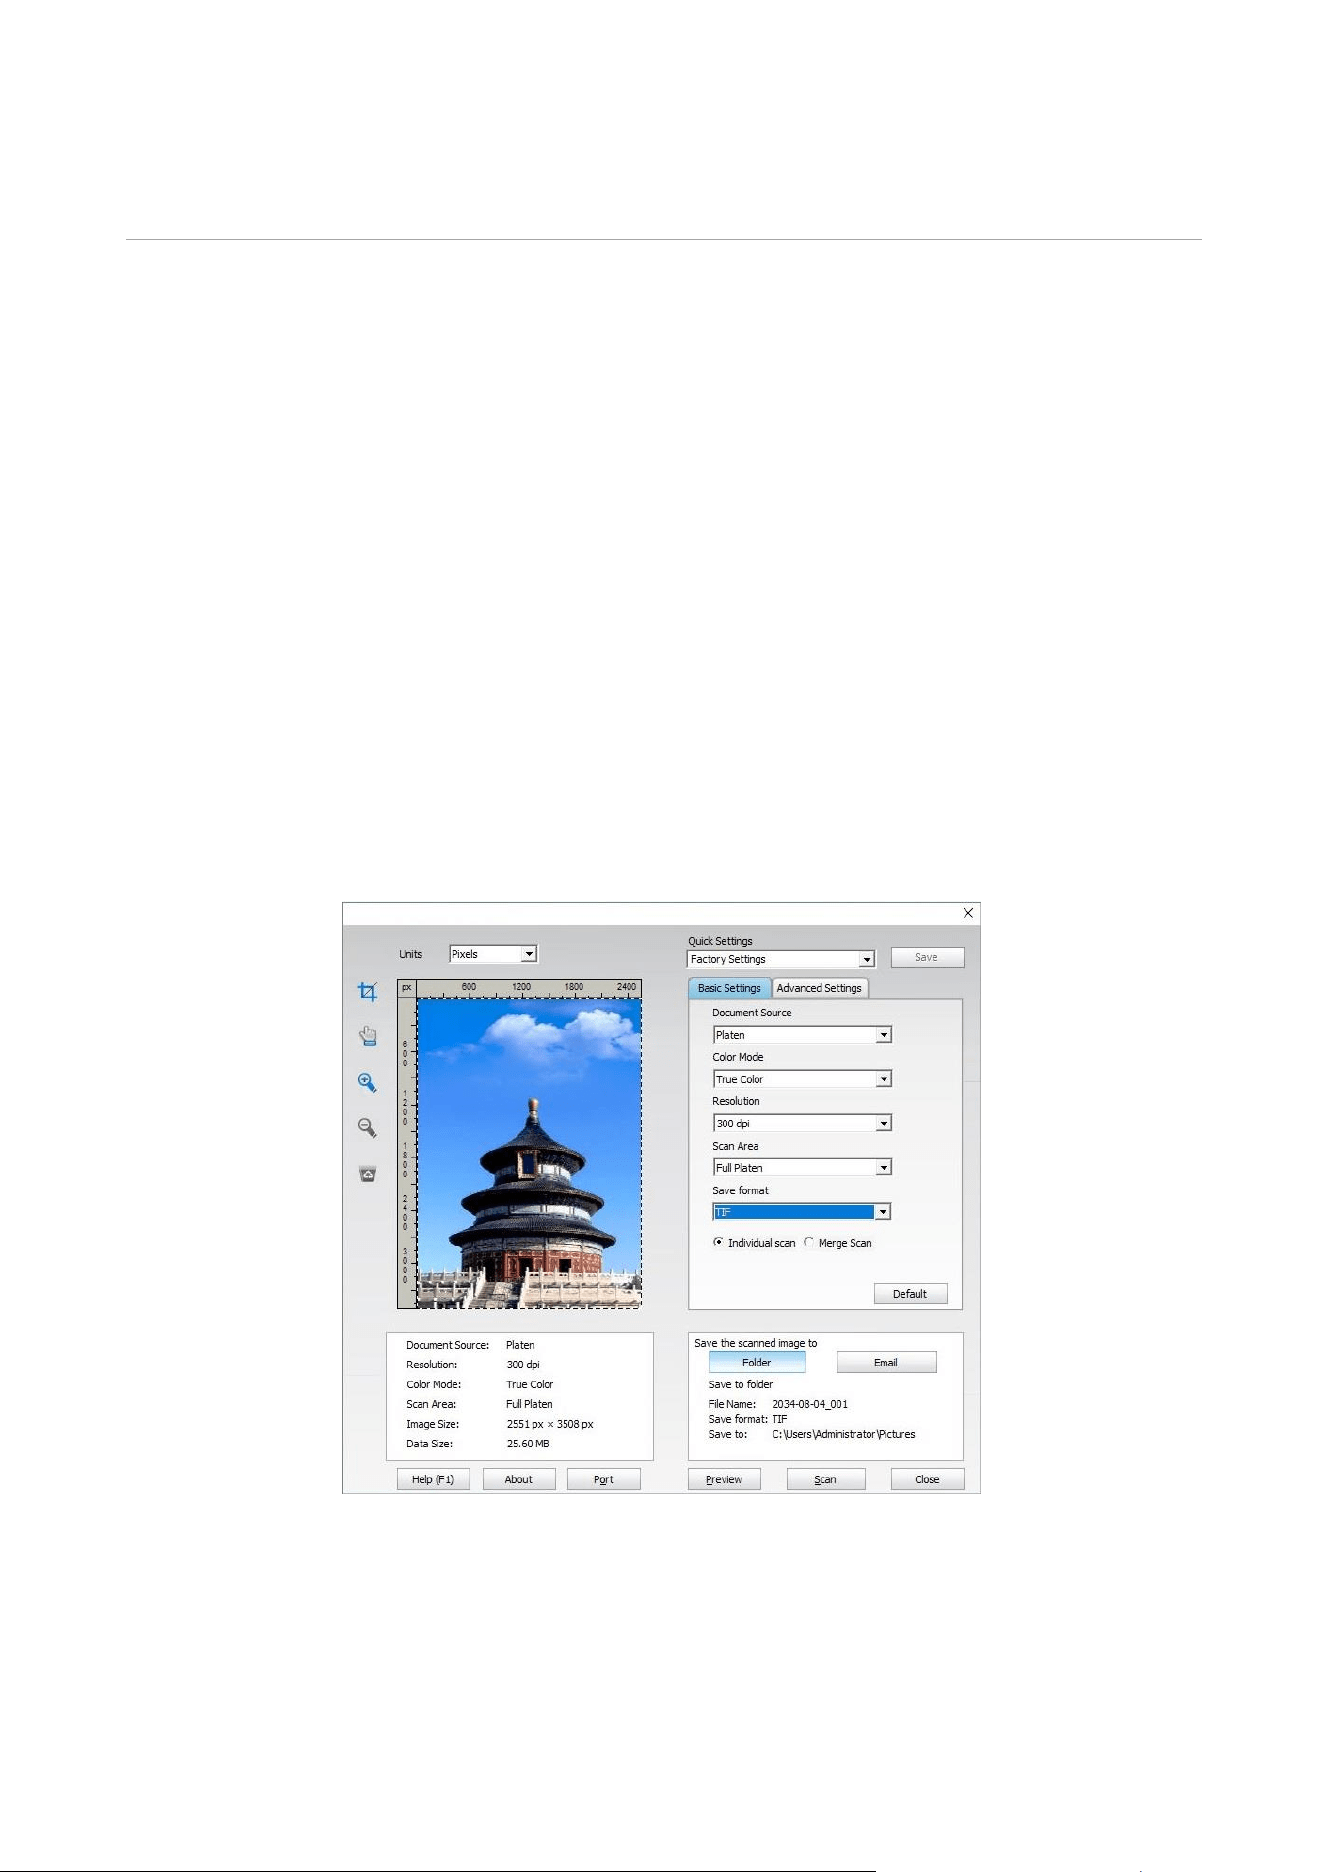
Pantum Scan Application
Operation Steps:
1. Double click on "Pantum Scan Application" on the computer.
2. The prompt window is shown as below:
3. Set Scan in the right list. Click "Scan" on the bottom right corner and start scan.

27
Note: • Images in the format of BMP, JPG, TIF, PDF, PNG, and OFD can be scanned by the Pantum
scanning application software. The image text recognition is available for documents in the
format of DOCX, XLS, XLSX, PPTX, TXT and searchable PDF. (If you need to use the image text
recognition function, please download and install the OCR software according to the interface
prompts after the driver installation. For the installation method, please refer to Driver Setup)
macOS System Scan
ICA Scan
Open ICA via "Print and Scan"
Operation Steps:
1. After installing the printer driver, click "System Preferences" icon on the bottom left corner of the
computer desktop.
2. After the window pops up, click on "Print and Scan".
3. After the window pops up, click on "Scan".
4. Click on "Open Scanner" and the scan window will pop up.
5. Click on "Show Details" on the bottom right corner to set the scan parameters.
6. Click on "Scan" on the bottom right corner and start scan.
Call ICA through applications
Operation Steps:
1. Click on "Finder" icon on the bottom left corner of the computer desktop,Find "Image Capture" in
"Applications",and click to launch the application.
2. After selecting the printer in the left list, set the scan parameters in the right list. Click on "Scan"
on the bottom right corner and start scan.
TWAIN Scan
Take Photoshop as an example. (CS2 and earlier versions are supported)
Operation Steps:
1. Launch Photoshop, click on "File" – "Import" on the top left corner and select TWAIN Scan, as is
shown below:
2. After the window pops up,set the scan information in the right list of "Basic Setting" and
"Advanced Setting". Click on "Scan" and start scan.
Push Scan
This section introduces how to use the printer control panel to scan the document to PC, Email,
FTP.
Note: • Single -page scanned to PC/Email/FTP can be saved as PDF, TIFF, JPEG.
• Scan the PC in the combined scan mode and the PDF document. Scanned to Email/FTP can be
saved as PDF, TIFF, JPEG.

28
Scan to PC
You may operate the printer’s control panel to scan a file to PC. (Only support connection method
of USB connection line.)
1. Be sure the printer and the computer are both switched on and connected with each other
properly.
2. Put an original on the glass platen or into the ADF
3. Press "Scan" and then "
" or " " on control panel to select "One-page Scan" or "Merge Scan";
then, press OK.
4. Press "Menu" and then "OK" to enter the "Scan Setting" interface.
5. Press "
" or " " to select "Scan To" options; then, press OK.
6. Press " " or " " to select "Scan to PC" and then press OK; press "Start" to begin scanning.
7. For merge scan, please put files to be scanned on the glass platen and then press "Start" to scan
the next page (directly continuous scanning is available if scanning with the ADF).
Scan to E-mail
You may scan a black-white or color file as an appendix to the e-mail application, with specific
operation steps as follow:
1. Be sure the printer and the computer are both switched on and connected with each other
properly.
2. configure the SMTP Client.
3. configure the e-mail address book.
4. Put an original on the glass platen or into the ADF
5. Press "Scan" button on the control panel, and press “ ” or “ " to select "Single Page Scan" or
"Merge Scan", then press "OK" button.
6. Press "Menu" and then "OK" to enter the "Scan Setting" interface.
7. Press "
" or " " to select "Scan To" options; then, press OK.
8. Press "
" or " " to select "Scan to E-mail" and press "OK" button.
9. Press “
” or “ " to select "E-mail Address Book" or "Group Mail" and press "OK" button.
10. Press “
” or “ " to select address or group and then press "OK" button; press "Start" button to
start scan.
11. For merge scan, please put files to be scanned on the glass platen and then press "Start" to
scan the next page (directly continuous scanning is available if scanning with the ADF).
Please follow these instructions on the settings for group emails:
Set the group name for group e-mail sending by webpage, and set the members, i.e.the receivers,
in the group of group email. After finishing scanning, firmware will send the scanned documents to
the mail server. Then mail server sends the documents to every member of the group.

29
Scan to FTP
Be sure the user is in an Internet-connected environment in scanning files to FTP server. If you
want to scan large files, you may need to input the server address, user name and password to log
in the server, with specific operation steps as below:
1. Be sure the printer and the computer are both switched on and connected with each other
properly.
2. configure the FTP address book.
3. Put an original on the glass platen or into the ADF
4. Press "Scan" button on the control panel, and press “
” or “ " to select "Single Page Scan" or
"Merge Scan", then press "OK" button.
5. Press "Menu" and then "OK" to enter the "Scan Setting" interface.
6. Press "
" or " " to select "Scan To" options; then, press OK.
7. Press “
” or “ " to select "Scan to FTP" and press "OK" button.
8. Press “
” or “ " to select the server and press "OK" button; Press "Start" button to start scan.
9. For merge scan, please put files to be scanned on the glass platen and then press "Start" to scan
the next page (directly continuous scanning is available if scanning with the ADF).

30
10 Fax
Connect Devices
• “ ” port is used to connect fax with telephone line.
• “ ” is used to connect external telephone
Note:• It is recommended to use the traditional analog phone service (PSTN: Public Switched
Telephone Network) in connecting telephone line. If a digital environment (for examples, DSL,
PBX, ISDN or VoIP) used, please be sure to use a proper filter and configure digital settings
correctly. For more information, please contact your digital service provider.
Fax Settings
Fax setting interface includes the following functional setting:
No.
Options
Description
1
Resolution
You may select the faxing definition from options of “Standard, Fine, Super Fine
and Image”. It defaults to “Standard”.
2
Original Size
You can select the desired size of the document to be Faxed. The available
options are A4, Letter and Legal.
3
Luminosity
You can adjust the luminosity of Fax documents manually or automatically.
4
Group Sending
You can enter each Fax number you want to send Fax to through group
sending and the maximum for group sending is 10 Fax numbers.
5
Delay Sending
With Delay Sending, you can set the Fax number and time (within 24 hours) for
Delay sending to send the Fax job on the time you set.
6
Forward the
Received
After enabling "Forward to Fax", please set the number to be forwarded; upon
receiving the fax, it will forward to the number set immediately; if enabling
"Forward and Print" at the same time, the printer will automatically print a copy
of fax job for saving after receiving the fax.
7
Send Settings
You can use the options in Send Settings to set the parameters for sending
Fax.
8
Receive
Settings
You can use the options in Receive Settings to set the parameters for receiving
Fax.
9
Compatibility
If Fax is sent or received abnormally due to disturbance on telephone line, try to
switch to VOIP compatibility mode.
10
Country or
Set different countries or regions to adapt to telephone networks in different
31
Region
countries.
11
Fax Report
You can use the options in Fax Report to print the Fax report as you need.
12
Active Job
Query for the list of all Faxes for Delay sending and you can press the Cancel
button to delete a Delay sending job.
13
Communication
record
Inquire the latest 30 times of Fax sending/ receiving.
14
Contacts
You can edit the contacts, group numbers, and print the contacts as well as the
list of group numbers from Contacts.
Fax Functions
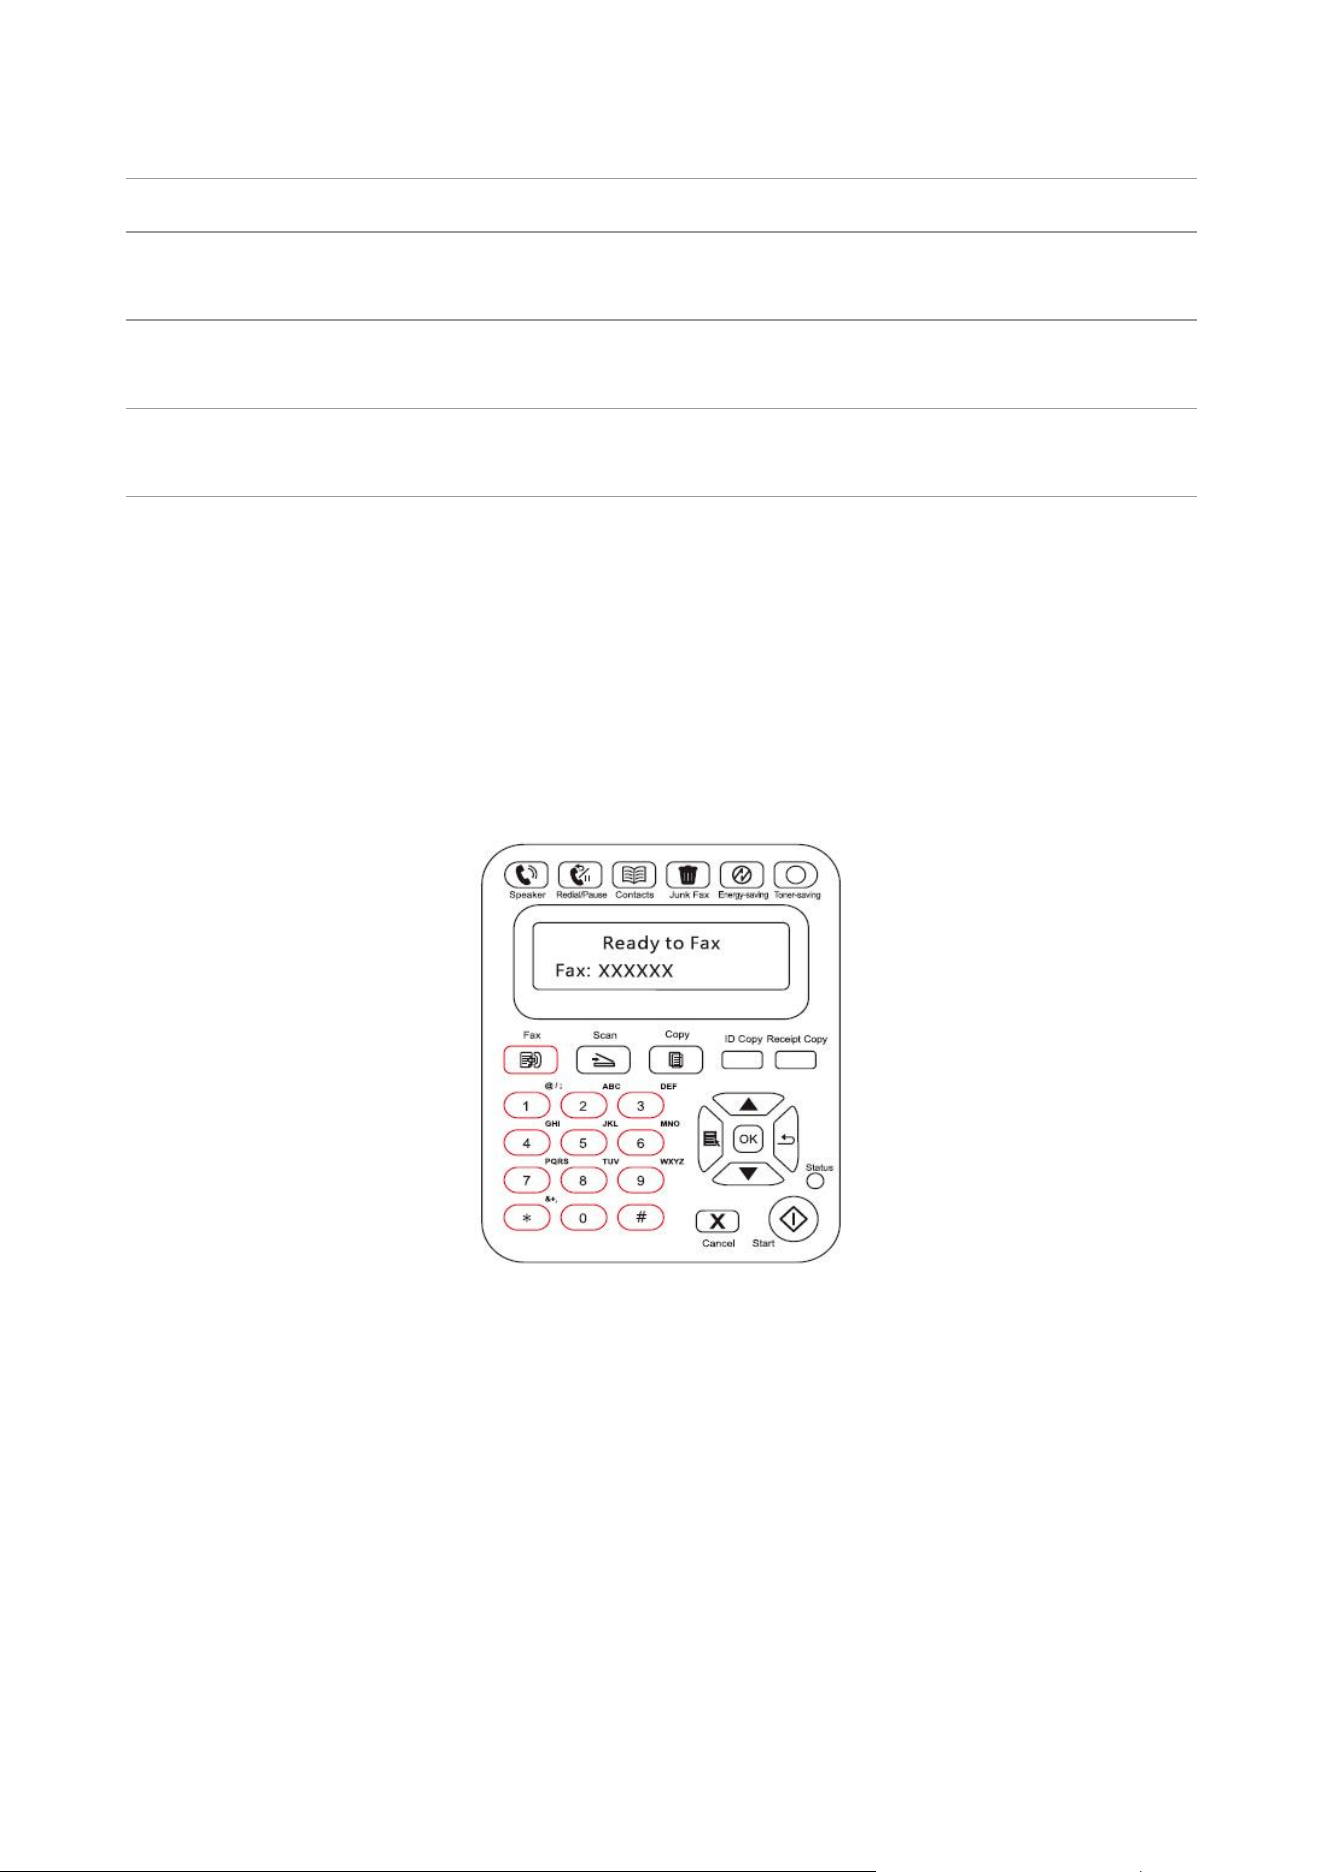
Send Fax
Auto fax sending
1. Put an original on the glass platen or into the ADF
2. Press the Fax button and use the number buttons to enter the Fax number.
3. Press the Start button to start scanning the document.
4. If the original is put on the glass platen, the printer will give a prompt of "Scan the Next Page"
after scanning one page. If the next page exists, please remove the original scanned and put the
next page on the glass platen; then, press "Start". After all pages have been scanned, please press
"OK".
32
5. After all scanning complete, activate the fax to send.
Note: • In order to prevent damage to this product, do not use a manuscript with correction tape,
correction fluid, paper clips or staples on it. In addition, do not load photos, small manuscripts or
brittle manuscripts into the automatic document feeder.
Manual fax sending
1. Put an original on the glass platen or into the ADF
2. Press the Fax button and use the number buttons to enter the Fax number.
3. Press “Speaker” or pick up the receiver to input the fax number.
4. After hearing the fax prompt, press “Start” to confirm sending.
• If the party called receives the call, you may have a voice communication; after confirming the fax
sending and hearing the fax prompt, press “Start” to begin sending.
Receive Fax
You have two ways to receive Fax, and the default for the printer is Fax mode.
Fax mode: determine each call from the calling party as a fax. When arriving the ring count set, it
gives fax receiving signals and receives the fax automatically.
Telephone mode: determine each call from the calling party as a call. With this mode, you may
need to pick up the receiver manually and then press “Start” on control panel to receive the fax.
Auto receiving under fax mode
In receiving the fax, the machine answers the call with the set ring count and then receive the fax
automatically. The ring count defaults to 4 times.
Manual receiving under telephone mode
Under telephone mode, there are 3 ways to receive a fax when there is a fax call:
1. Press “Start” on control panel and then the machine begins to receive.
2. Pick up the receiver or press “Speaker” and then “Start” on control panel; the machine begins to
receive.
3. Use remote receiving method (only for external telephone), and after picking up the receiver,
press "*90" on telephone panel and then the machine begins to receive.

33
Note: • The default for remote code is "*90". You can modify it by the path “Menu"—"Fax
Settings"—"Receive Settings"—“Remote Code”—“Turn On”—edit.
• Received fax job may not be printed in case of low cartridge, please renew cartridge or turn
“Continue to print in low cartridge” function on in fax receiving setting.
Set the interference and the telephone line compatibility of VoIP system
If the fax is sent or received abnormally due to interference to telephone line, please improve the
fax receiving and sending with the following methods.
1. Switch to VoIP Compatible mode with panel setting.
Please follow steps below to set :
1) After the machine is ready, press "Fax“ and then ”Menu“ to enter the ”Menu Settings" interface.
2) Press "OK" to enter the "Fax Settings" interface; next, press "OK".
3) Press "
" or " " to find out the "Compatibility" option and then press "OK".
4) Press "
" or " " to select "VoIP". Then, the VoIP Compatible mode is switched to.
2. Try to resend the fax in off-peak hours.
3. Consult your VoIP provider on if the network setting on fax transmission could be optimized.
34
11 Routine Maintenance
Note: • Printer appearance may differ because of various models and functions, so the schematic
diagram is only for your reference.
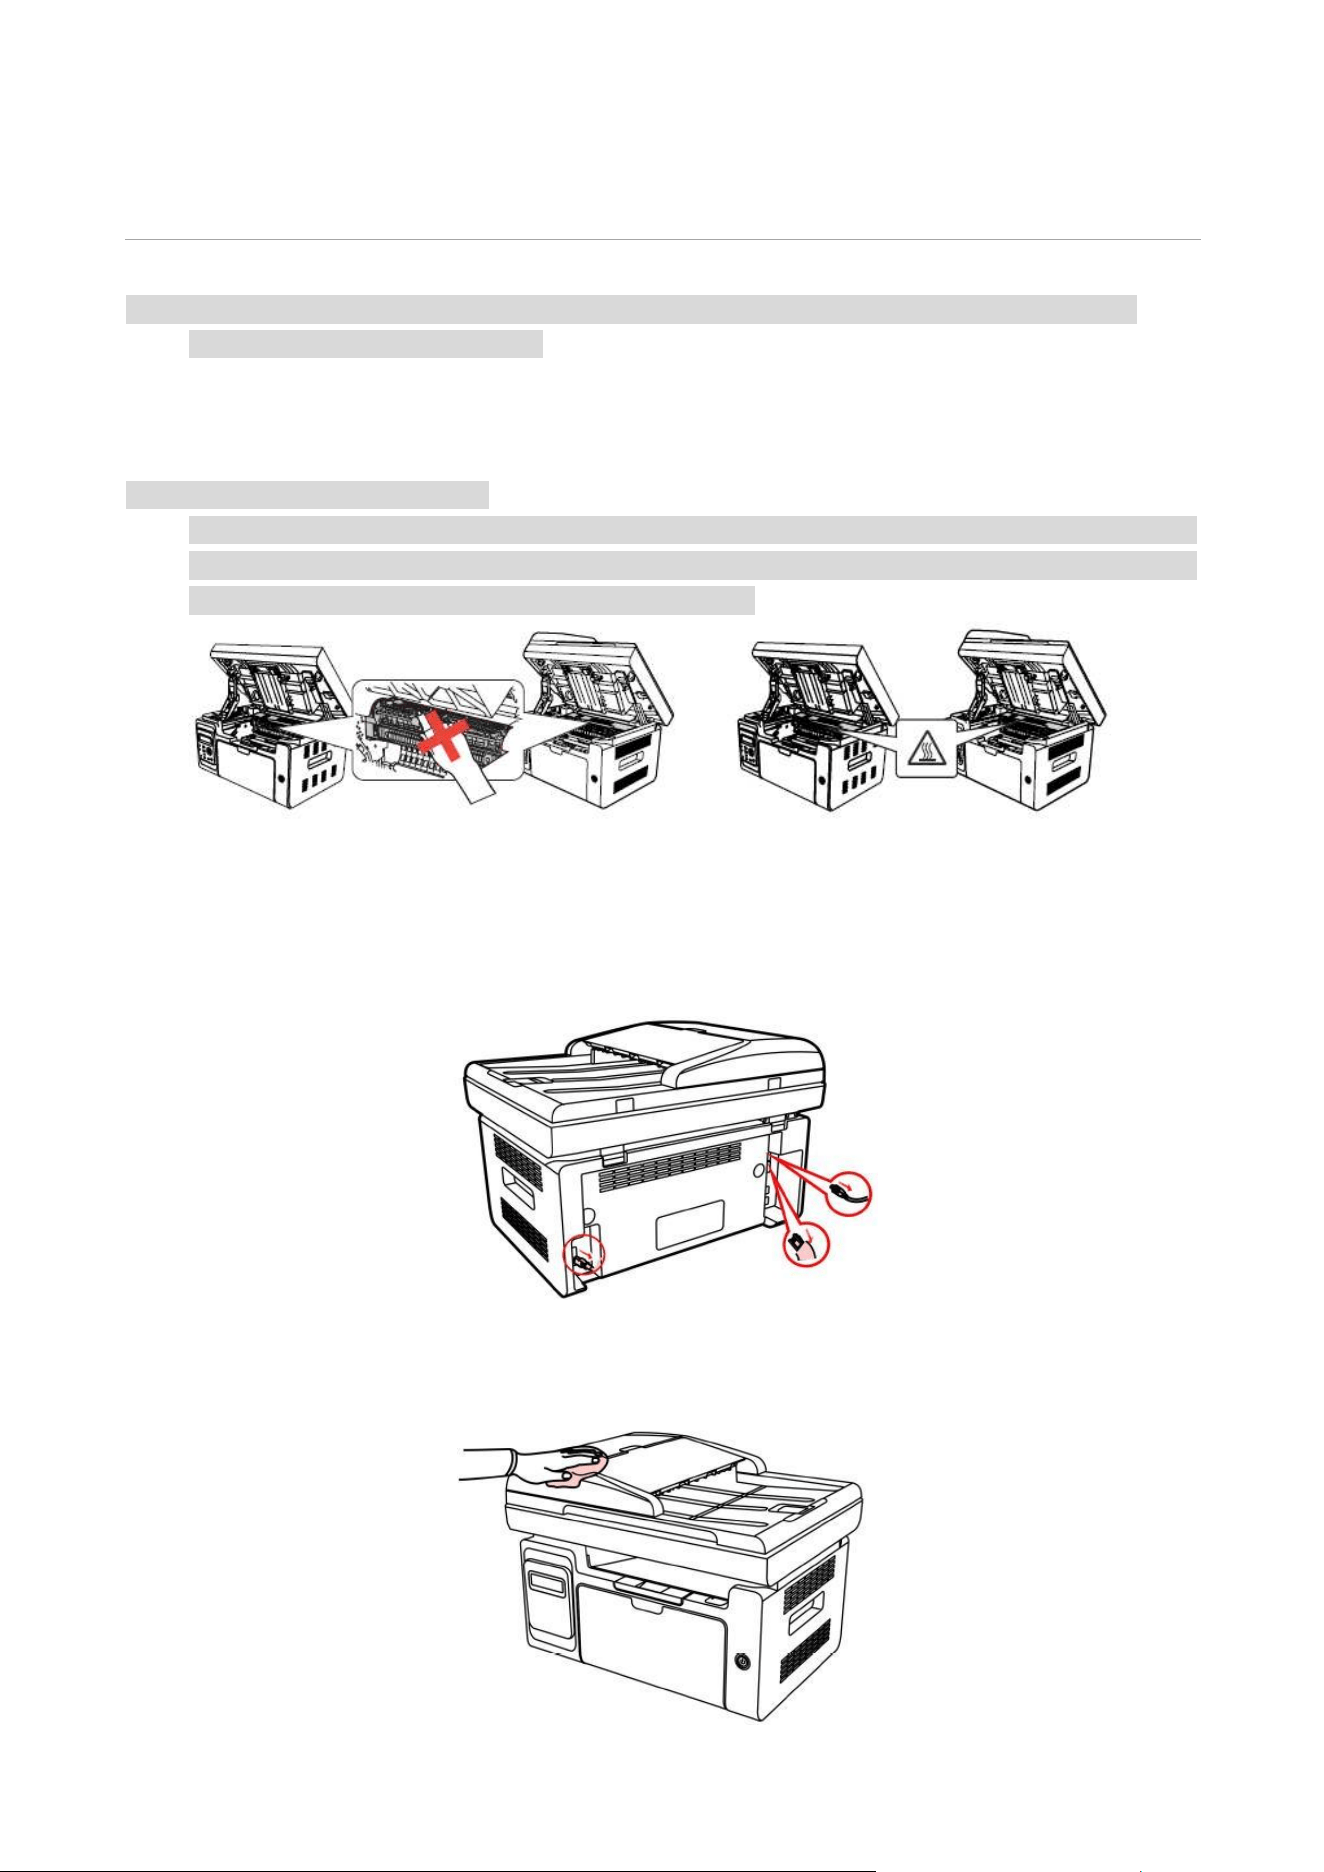
Cleaning the Printer
Note: • Please use mild detergents.
• Some parts of the printer are still hot within a short time after use. When opening the front cover
or rear cover to clean the parts inside the printer, please do not touch the parts in the shaded area
as shown in the following picture, so as to avoid burns.
Please clean the printer in accordance with the following steps:
1. Turn off the main power switch and unplug the power cord, USB cable, phone cord and the
network cable.
2. Use a soft cloth to wipe the outside of the printer and remove the dust.
35
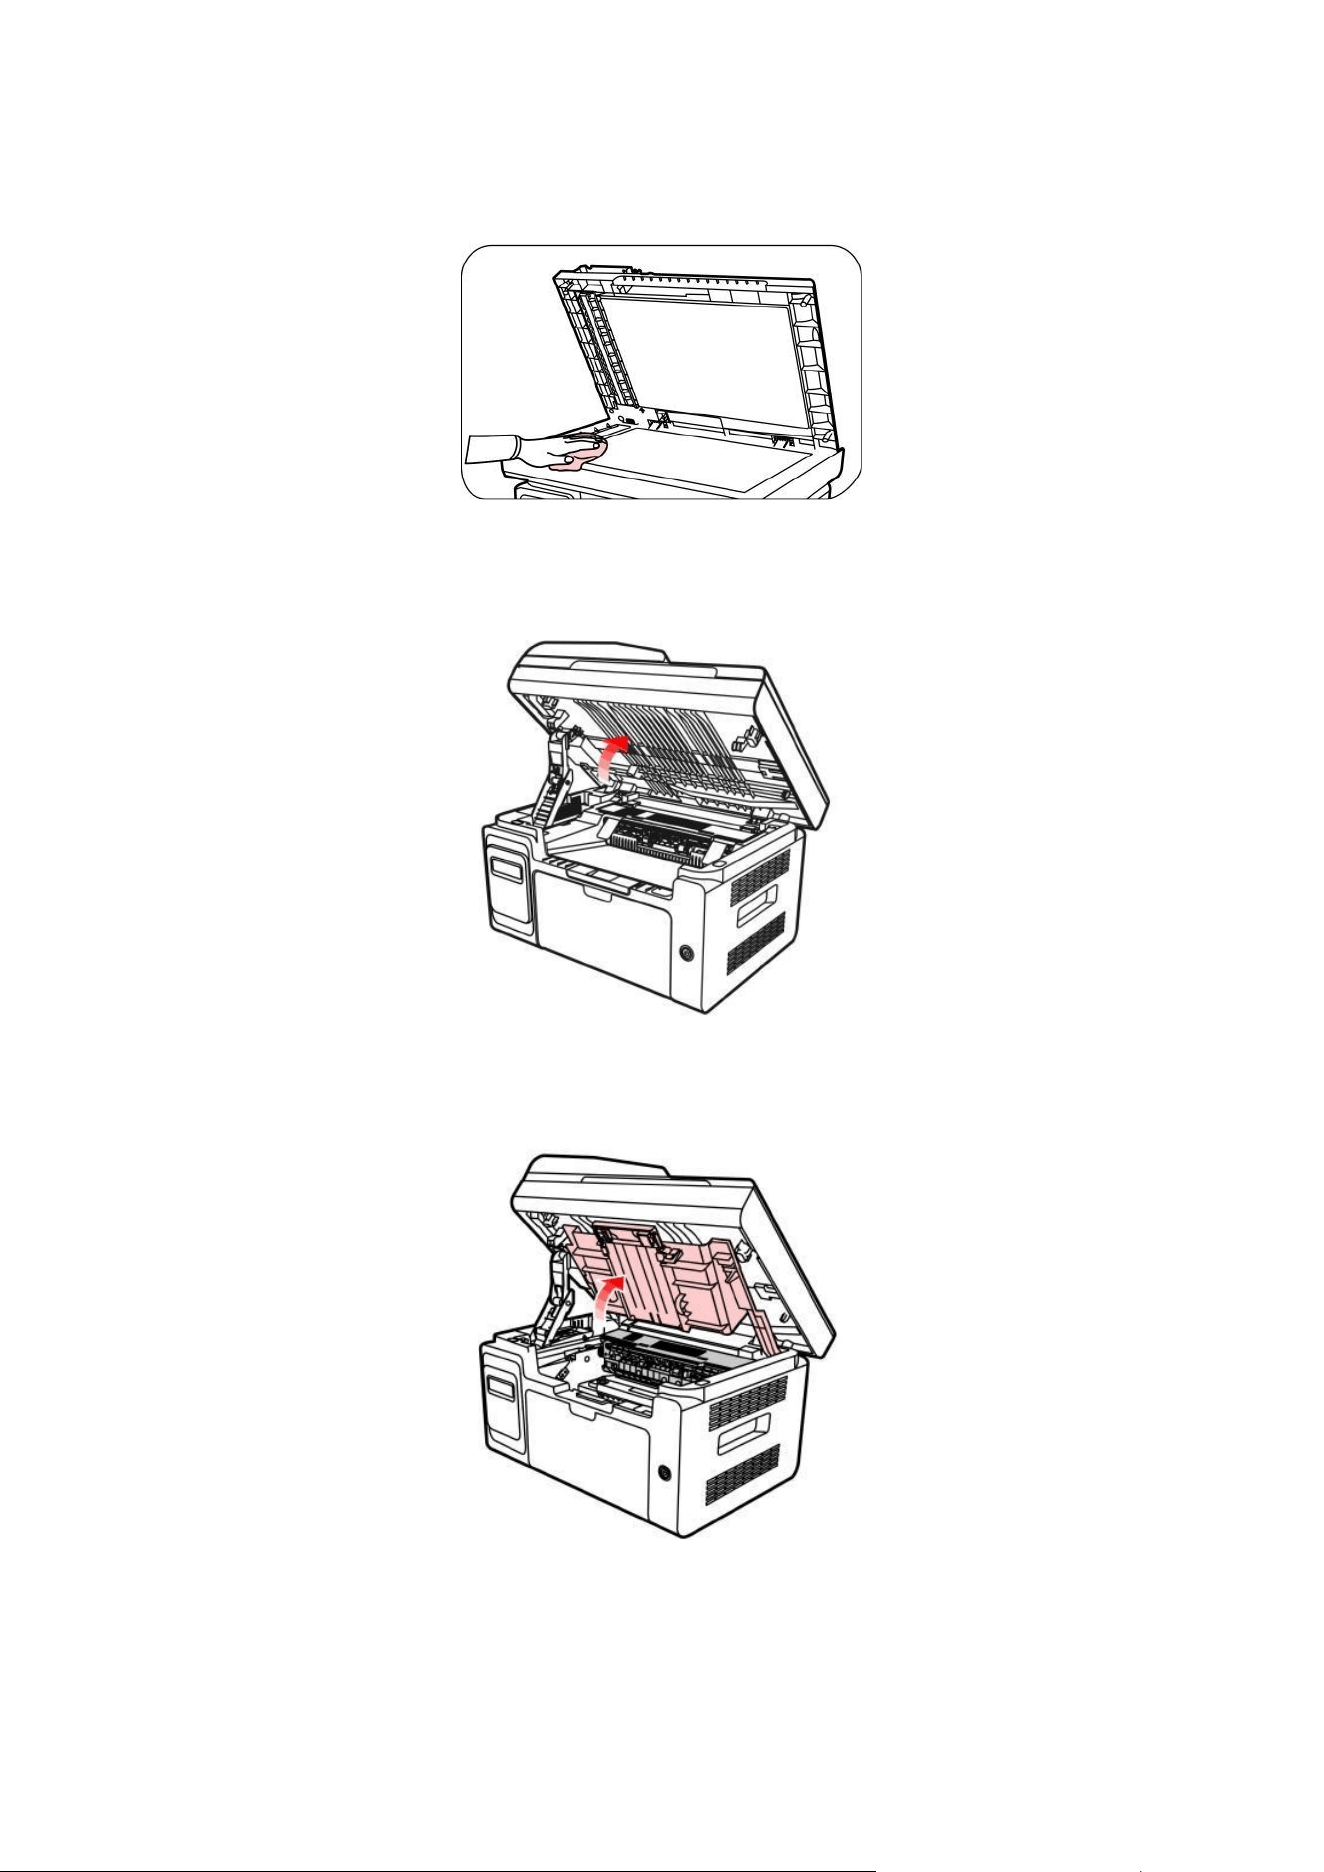
3.
Open the scanner cover and then wipe the glass platen gently with a soft cloth.
4. Raise the scanning platform until it is locked.
5. Open the output bin by the upper right ridge of the concave section.
36
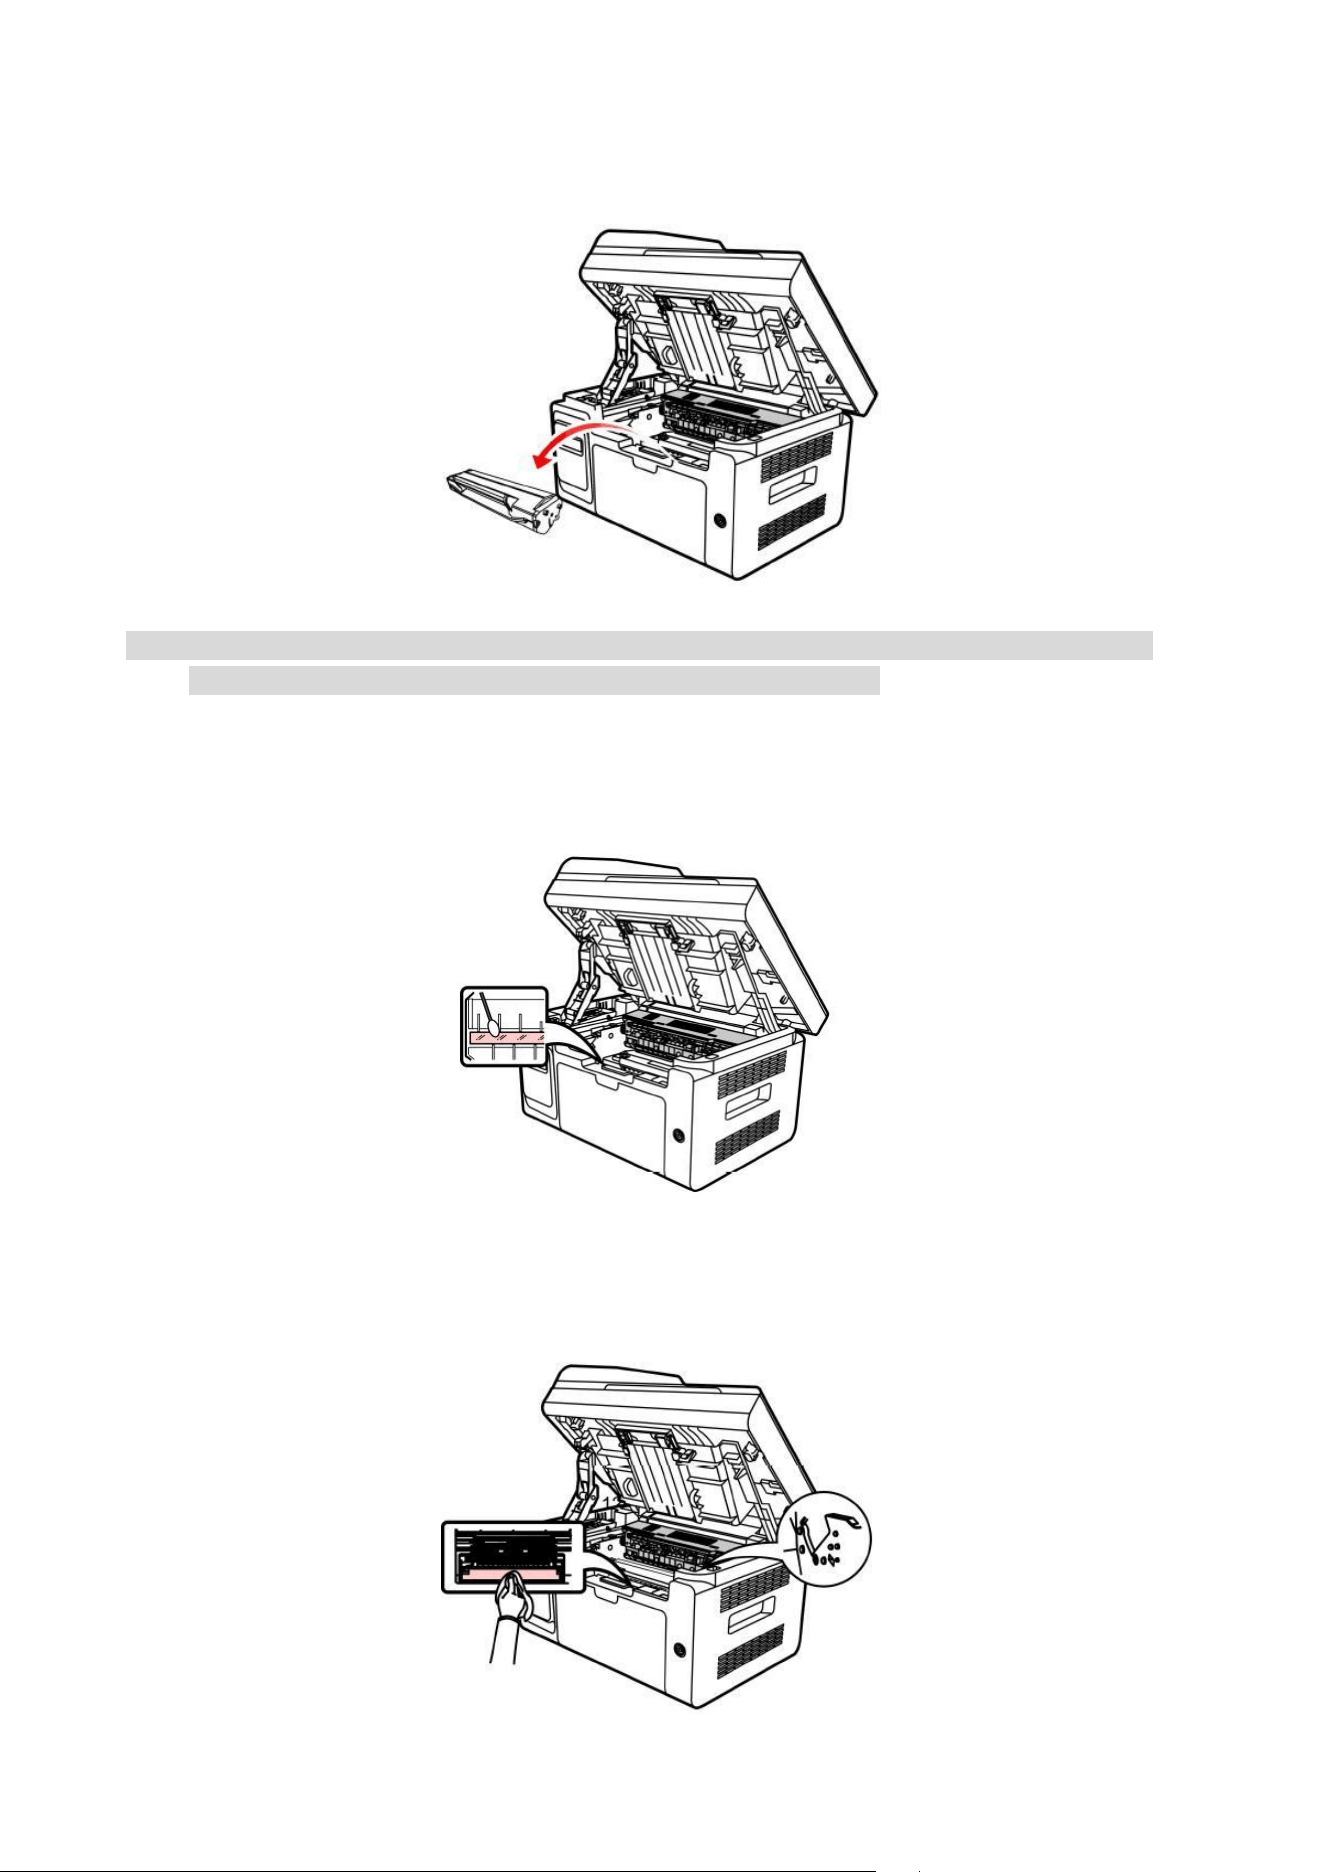
6. Remove the laser toner cartridge along the guides.
Note: • When removing the laser toner cartridge, put the cartridge in a protective bag or wrap it with
thick paper to avoid direct light damaging the photosensitive drum.
7. Gently wipe the dustproof mirror of laser scanning surface with a cotton swab or a dry and
lint-free soft cloth with a little alcohol.
8. Clean the inside of the printer by using a dry and lint-free cloth to gently wipe the shaded area as
shown in the picture below.

37
Note:• For ADF machine, you need to regularly clear scraps. Please use a soft cloth to wipe the location
shown in the figure.
Maintenance of Laser Toner Cartridge
About laser toner cartridge
1. Use and Maintenance of Laser Toner Cartridge
For better print quality, please use the original laser toner cartridge.
• Please store the laser toner cartridge in a dry dark place.
• Do not refill the laser toner cartridge without authorization. Otherwise, the resulting damage is not
included in the printer warranty.
• Please store the laser toner cartridge under a cool and dry environment.
• Toner inside the laser toner cartridge is combustible. Please do not put the laser toner cartridge
near any source of ignition, so as to avoid causing a fire.
• When removing or disassembling the laser toner cartridge, please pay attention to the toner
leakage problem. In case of the toner leakage resulting in that the toner contacts with your skin or
splashes into your eyes and mouth, please immediately wash with clear water, and consult a
doctor immediately if you feel unwell.
• When placing the laser toner cartridge, please keep it away from the area reachable by children.
2. Service Life of the Laser Toner Cartridge
• Service life of the laser toner cartridge depends on the amount of toner that print jobs require.
• "Laser toner cartridge end of life" displayed on the LCD screen means the laser toner cartridge
has reached its service life. Please replace the laser toner cartridge.
38
Replace Laser Toner Cartridge
Note: Before replacing the laser toner cartridge, please pay attention to the following:
• The laser toner cartridge surface may contain toner. Please remove it carefully to avoid spilling.
• Put the removed laser toner cartridge on a piece of paper to avoid the toner from accidentally
spilling.
• After removing the protective cover, please immediately install the laser toner cartridge into the
printer, so as to avoid photosensitive drum damage caused by exposing to too much direct
sunlight or indoor light.
• While installing the laser toner cartridge, do not touch the surface of the photosensitive drum so
as not to scratch it.
Replacement steps are as follows:
1. Turn off the printer and raise the scanning platform until it is locked.
2. Open the output bin by the upper right ridge of the concave section.
39
3. Remove the exhausted cartridge along the guides.
4. Open the package of a new laser toner cartridge, hold the handle of the cartridge and gently
shake around 5 to 6 times, so as to make the toner evenly distributed inside the cartridge.
5. Remove the cartridge protector (blister cover), insert the cartridge along the guides into the
printer, then push it firmly along the direction of the arrow until you hear a "click" assuring you that
the cartridge is fully inserted.
Note:• Check whether there is any seal before installing the laser toner cartridge into the printer; if there
is any, please tear off the seal and then install the cartridge.

40
6. Cover the output bin and close the scanning platform.
7. Restart the printer, and use the control panel to print an information page.

41
12 Troubleshooting
Please read this section carefully. It can help you solve common malfunctions in the printing
process. If the problems appeared cannot be solved, please timely contact Pantum Aftersales
Service Center.
Prior to handling common trouble, first check that:
• Whether the power cord is connected correctly and the printer is powered on.
• Whether all protective parts are removed.
• Whether the laser toner cartridge is correctly installed.
• Whether the paper is correctly loaded into the tray.
• Whether the interface cable is correctly connected between the printer and the computer.
• Whether the correct printer driver is selected and installed properly.
• Whether the computer port is properly configured and is connected to the proper printer port.
Cleaning Jammed Paper
Middle jam
Note: • Remove the jammed paper in accordance with the following steps, close the upper cover and
tidy the paper in the tray, then the printer will automatically resume printing. If the printer cannot
automatically start printing, please press the button on the control panel.
• If the printer still does not start printing, please check whether all the jammed paper inside the
printer are cleared.
• If you can not remove the jammed paper yourself, please contact your local Pantum Authorized
Repair Center or send the printer to the nearest Pantum Authorized Service Center for repair.
Please follow the following steps to clear the jammed paper if you are prompted of a paper jam by
the LCD.
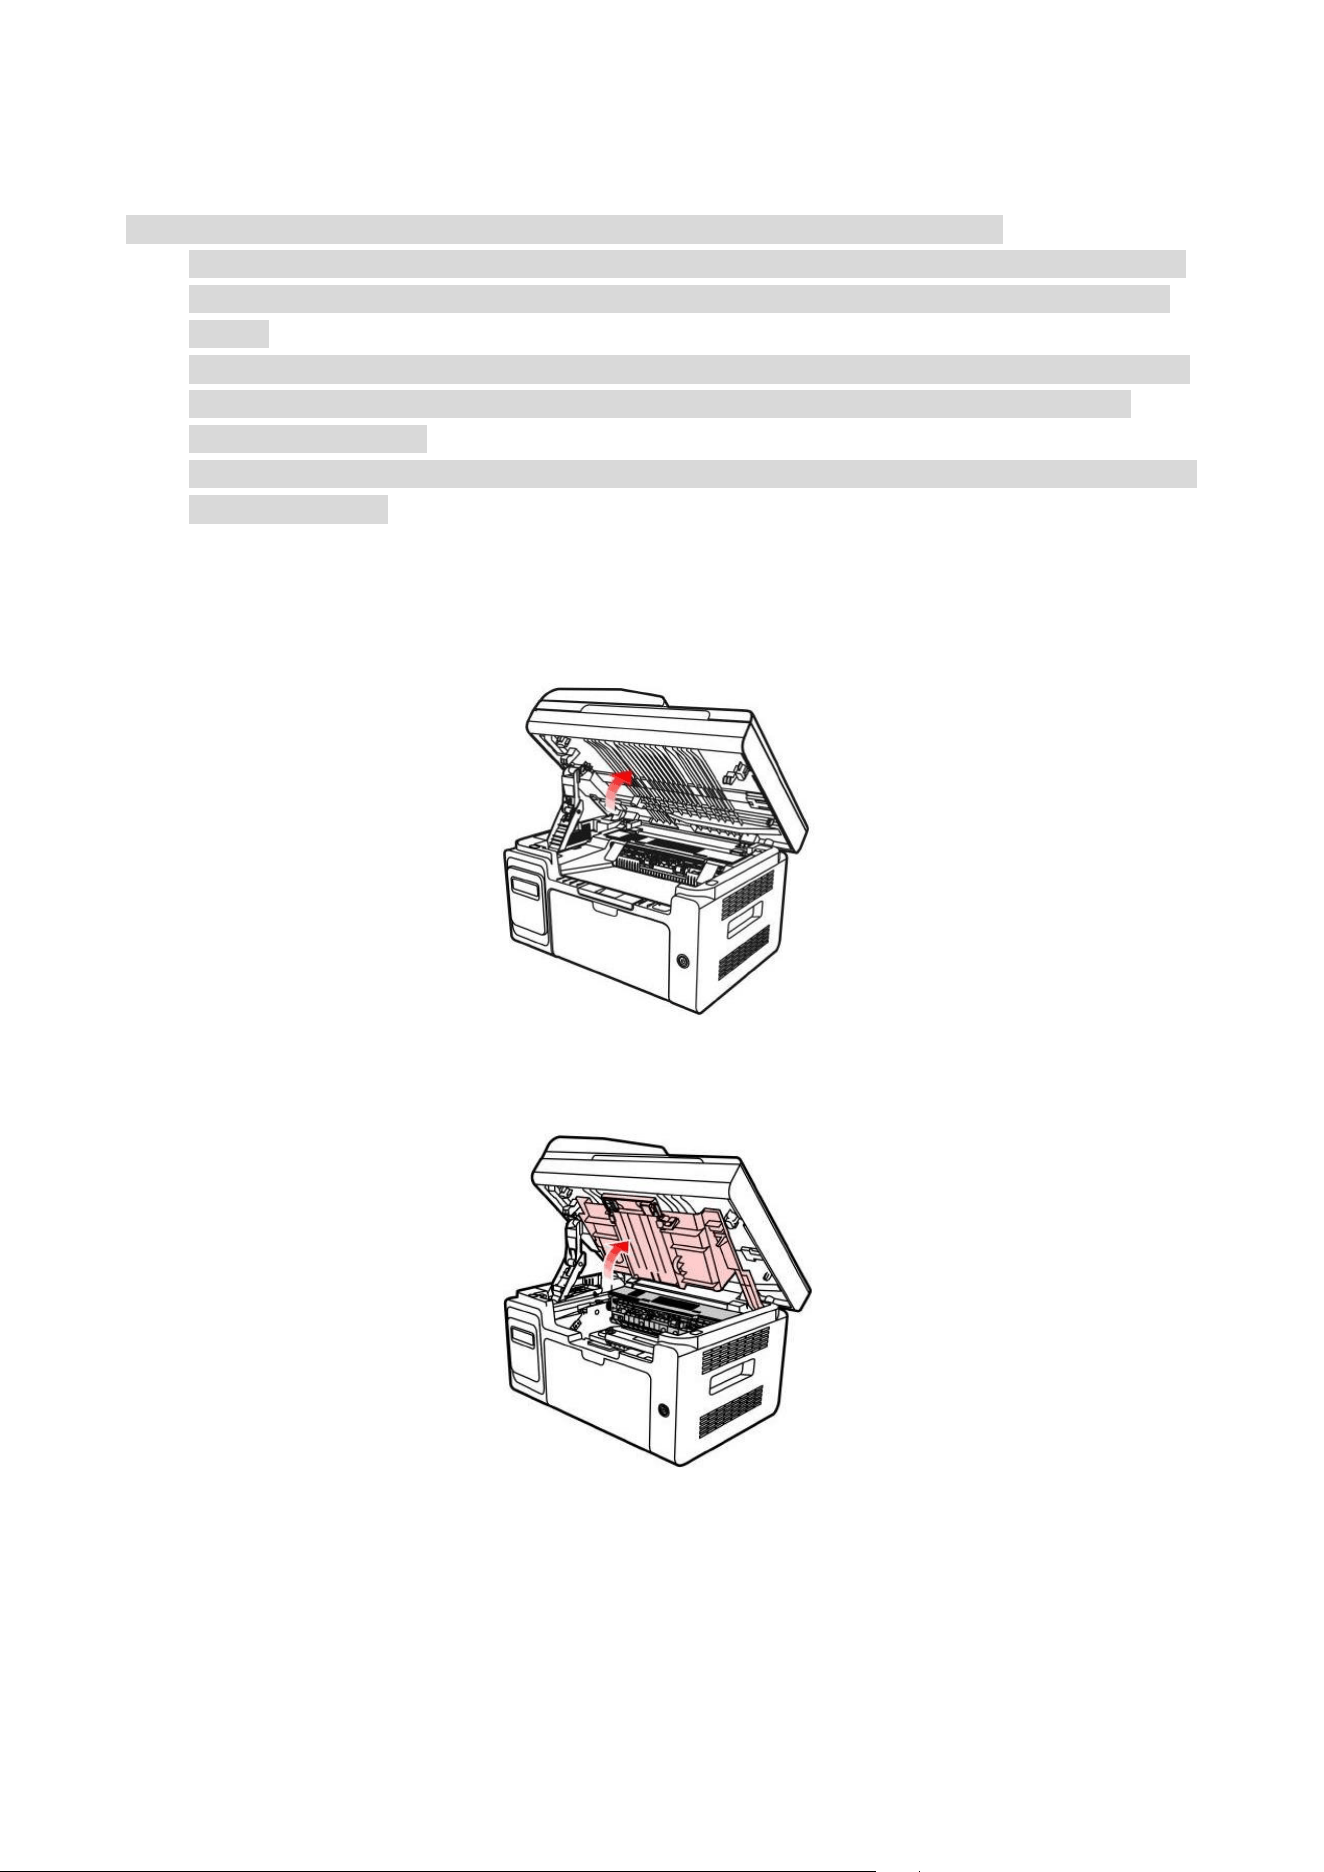
1. Raise the scanning platform until it is locked.
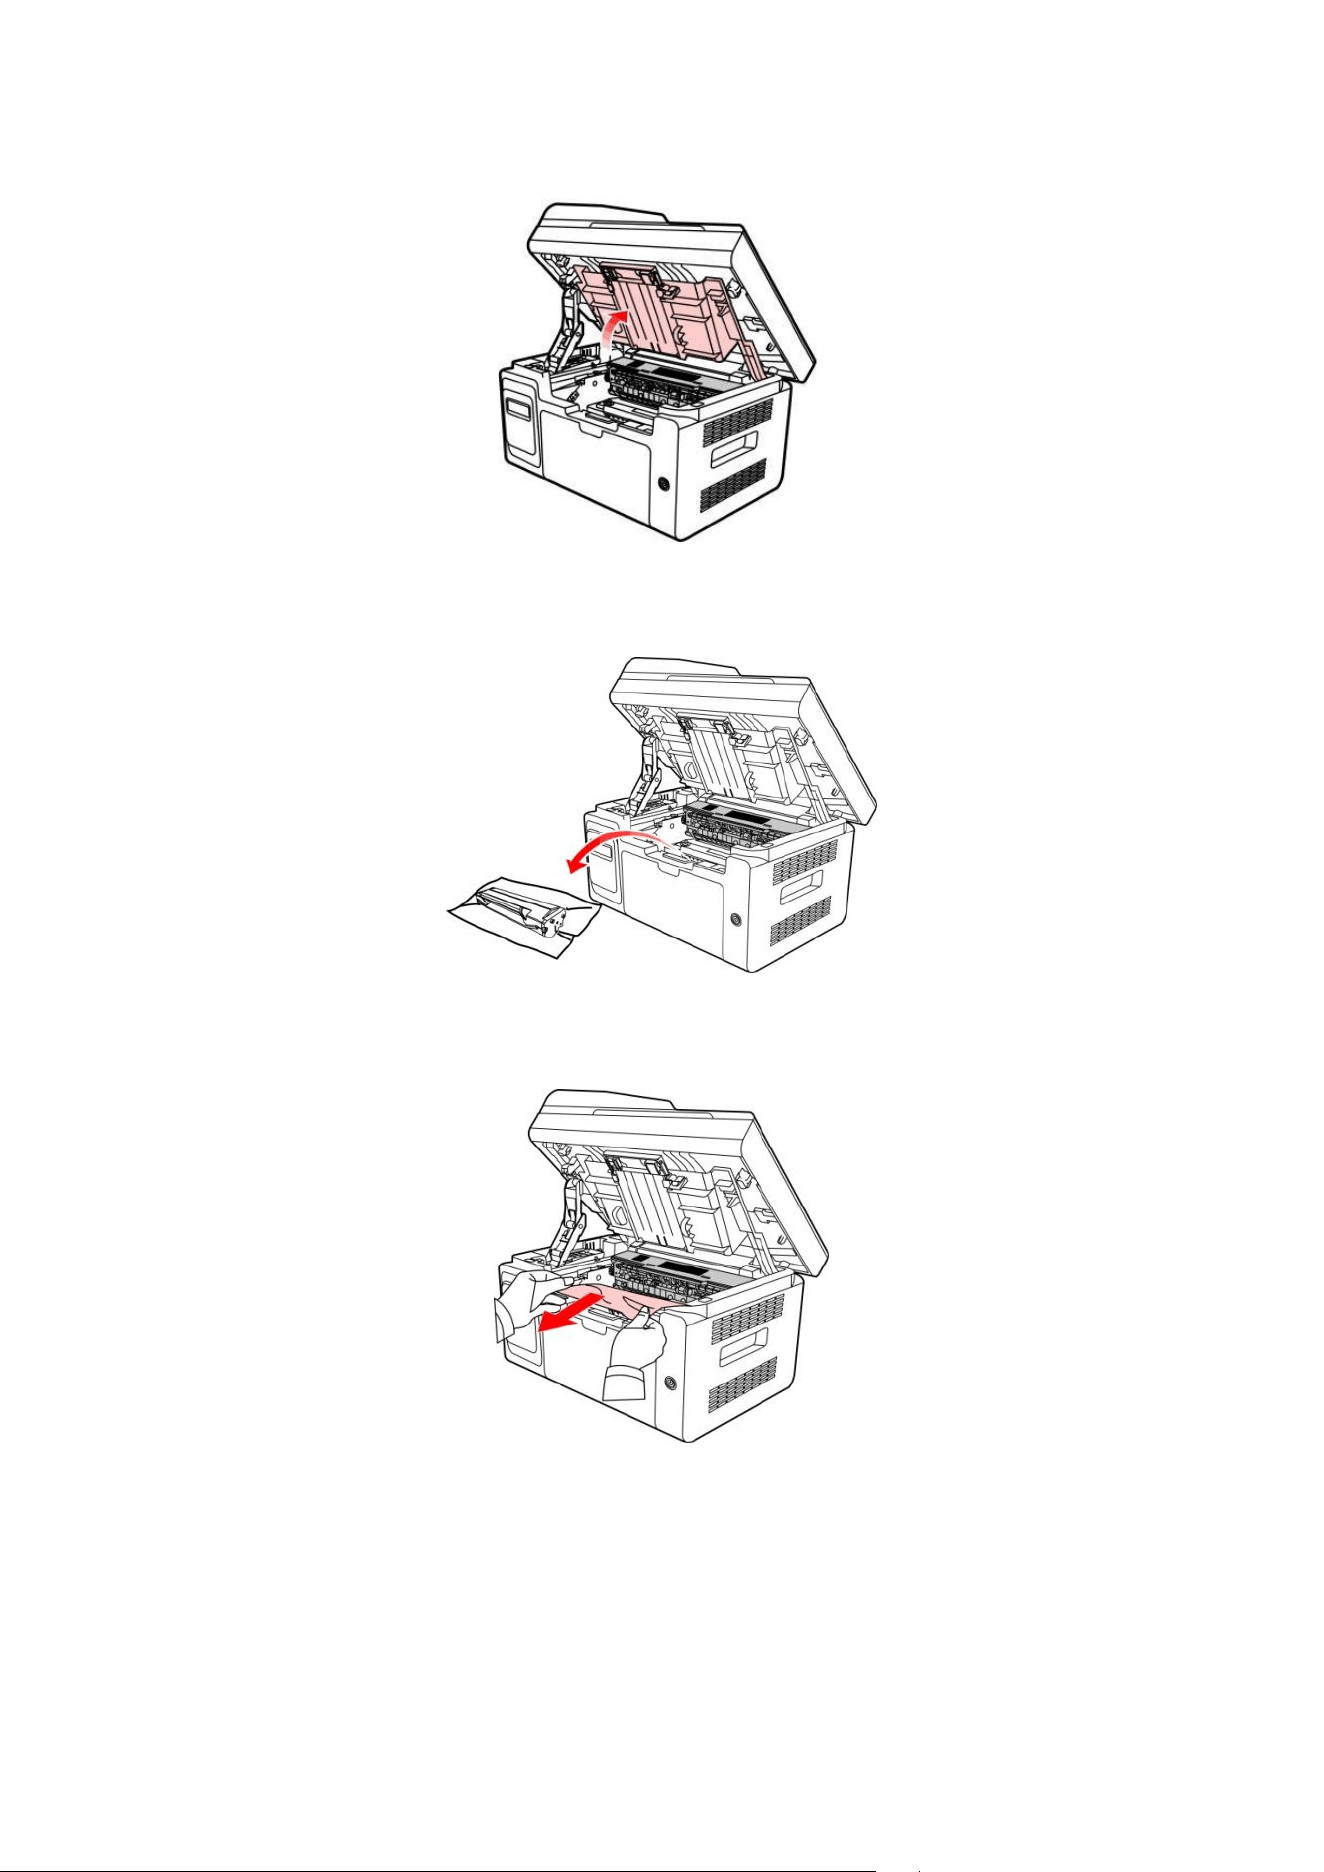
42
2. Open the output bin by the upper right ridge of the concave section.
3. Remove the laser toner cartridge along the guides.
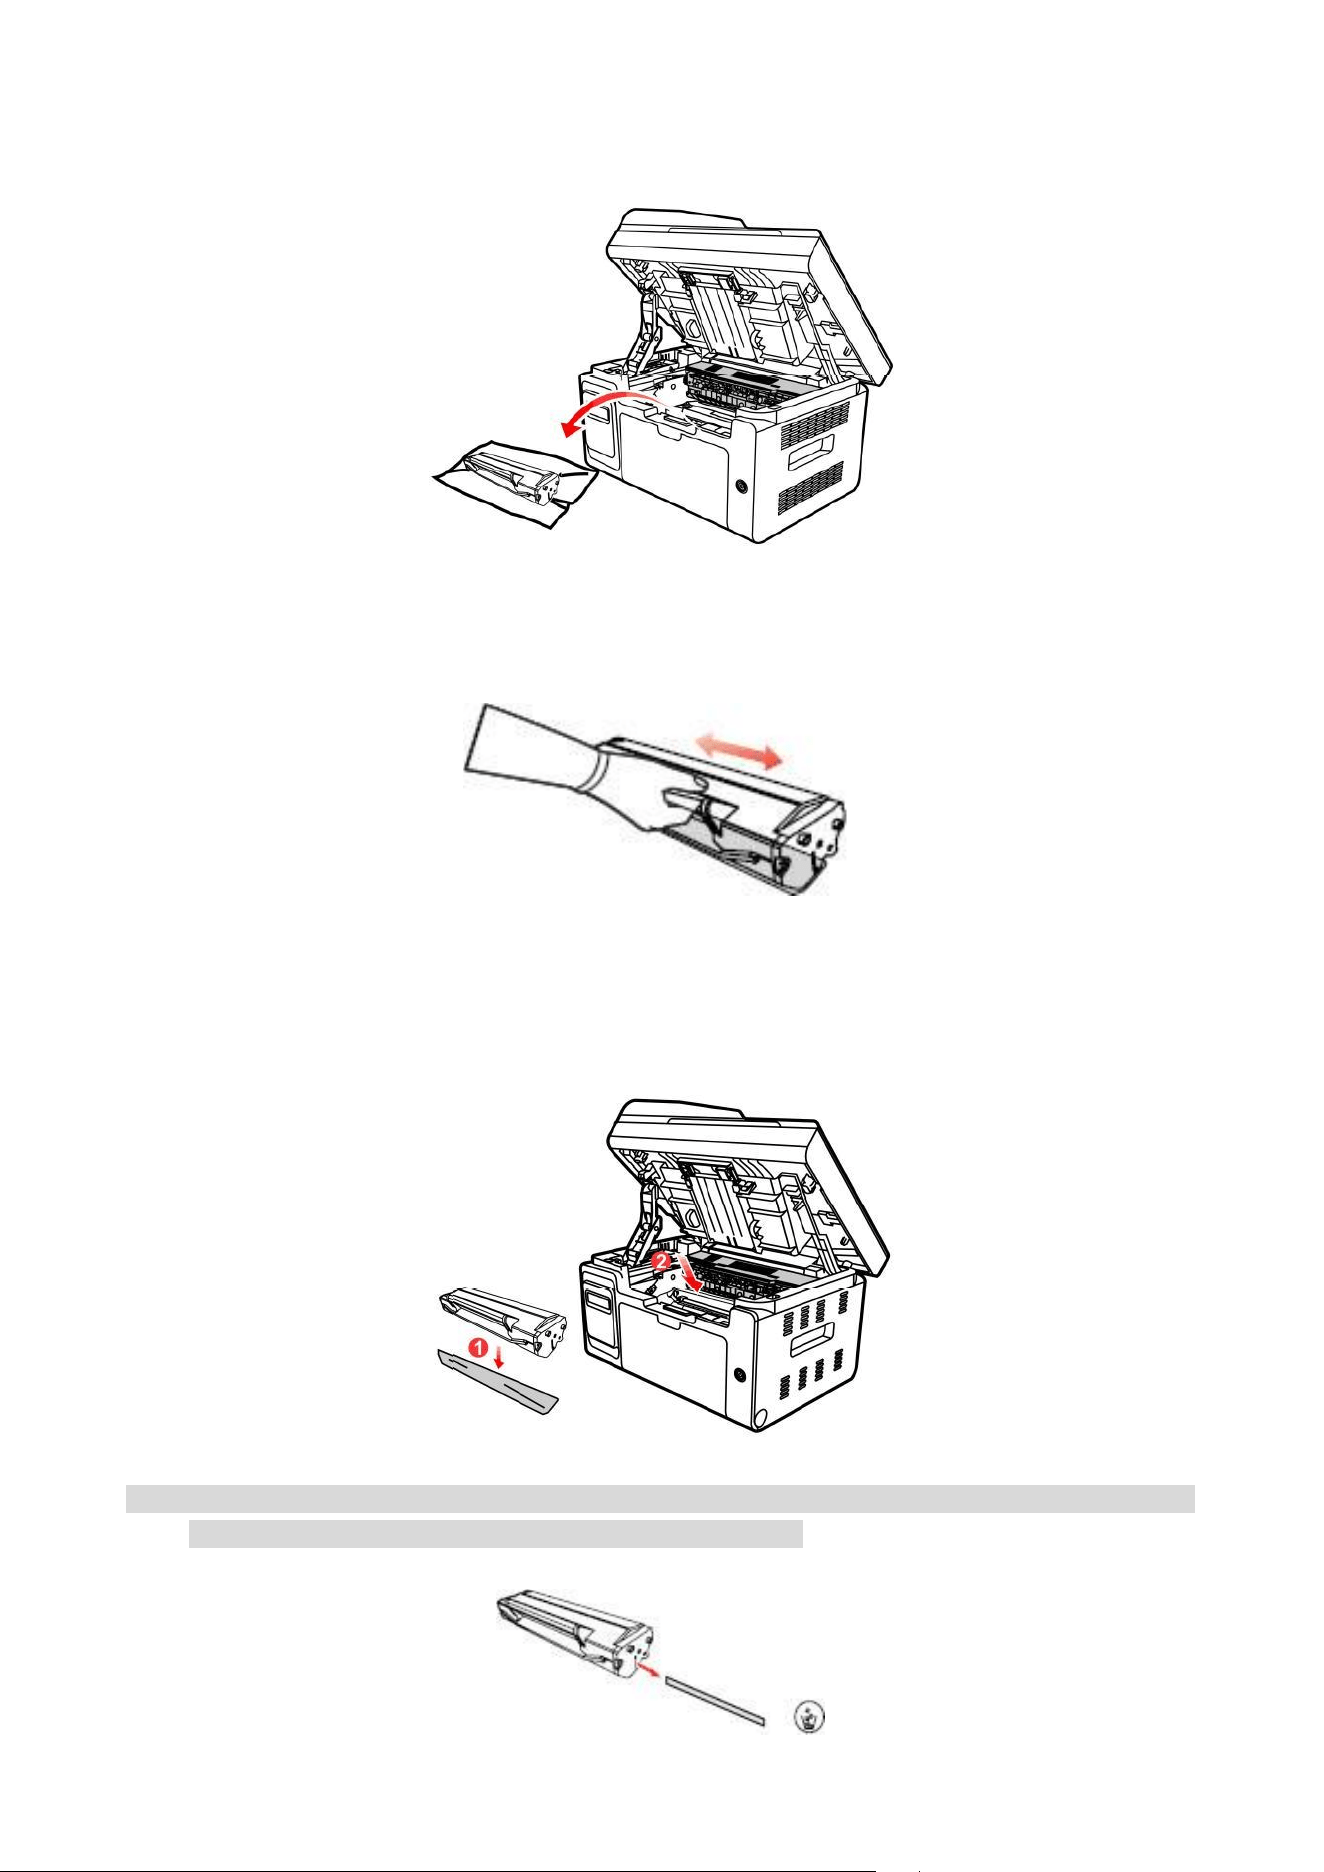
4. Gently draw the jammed paper out along the paper output direction.
43
5. After removing the jammed paper, insert the laser toner cartridge into the printer along the
guides until you hear a "click" assuring you that the cartridge is fully inserted.
6. Neatly put the paper in the tray, and do not carry out the next print until the indicator light
resumes print-ready status.
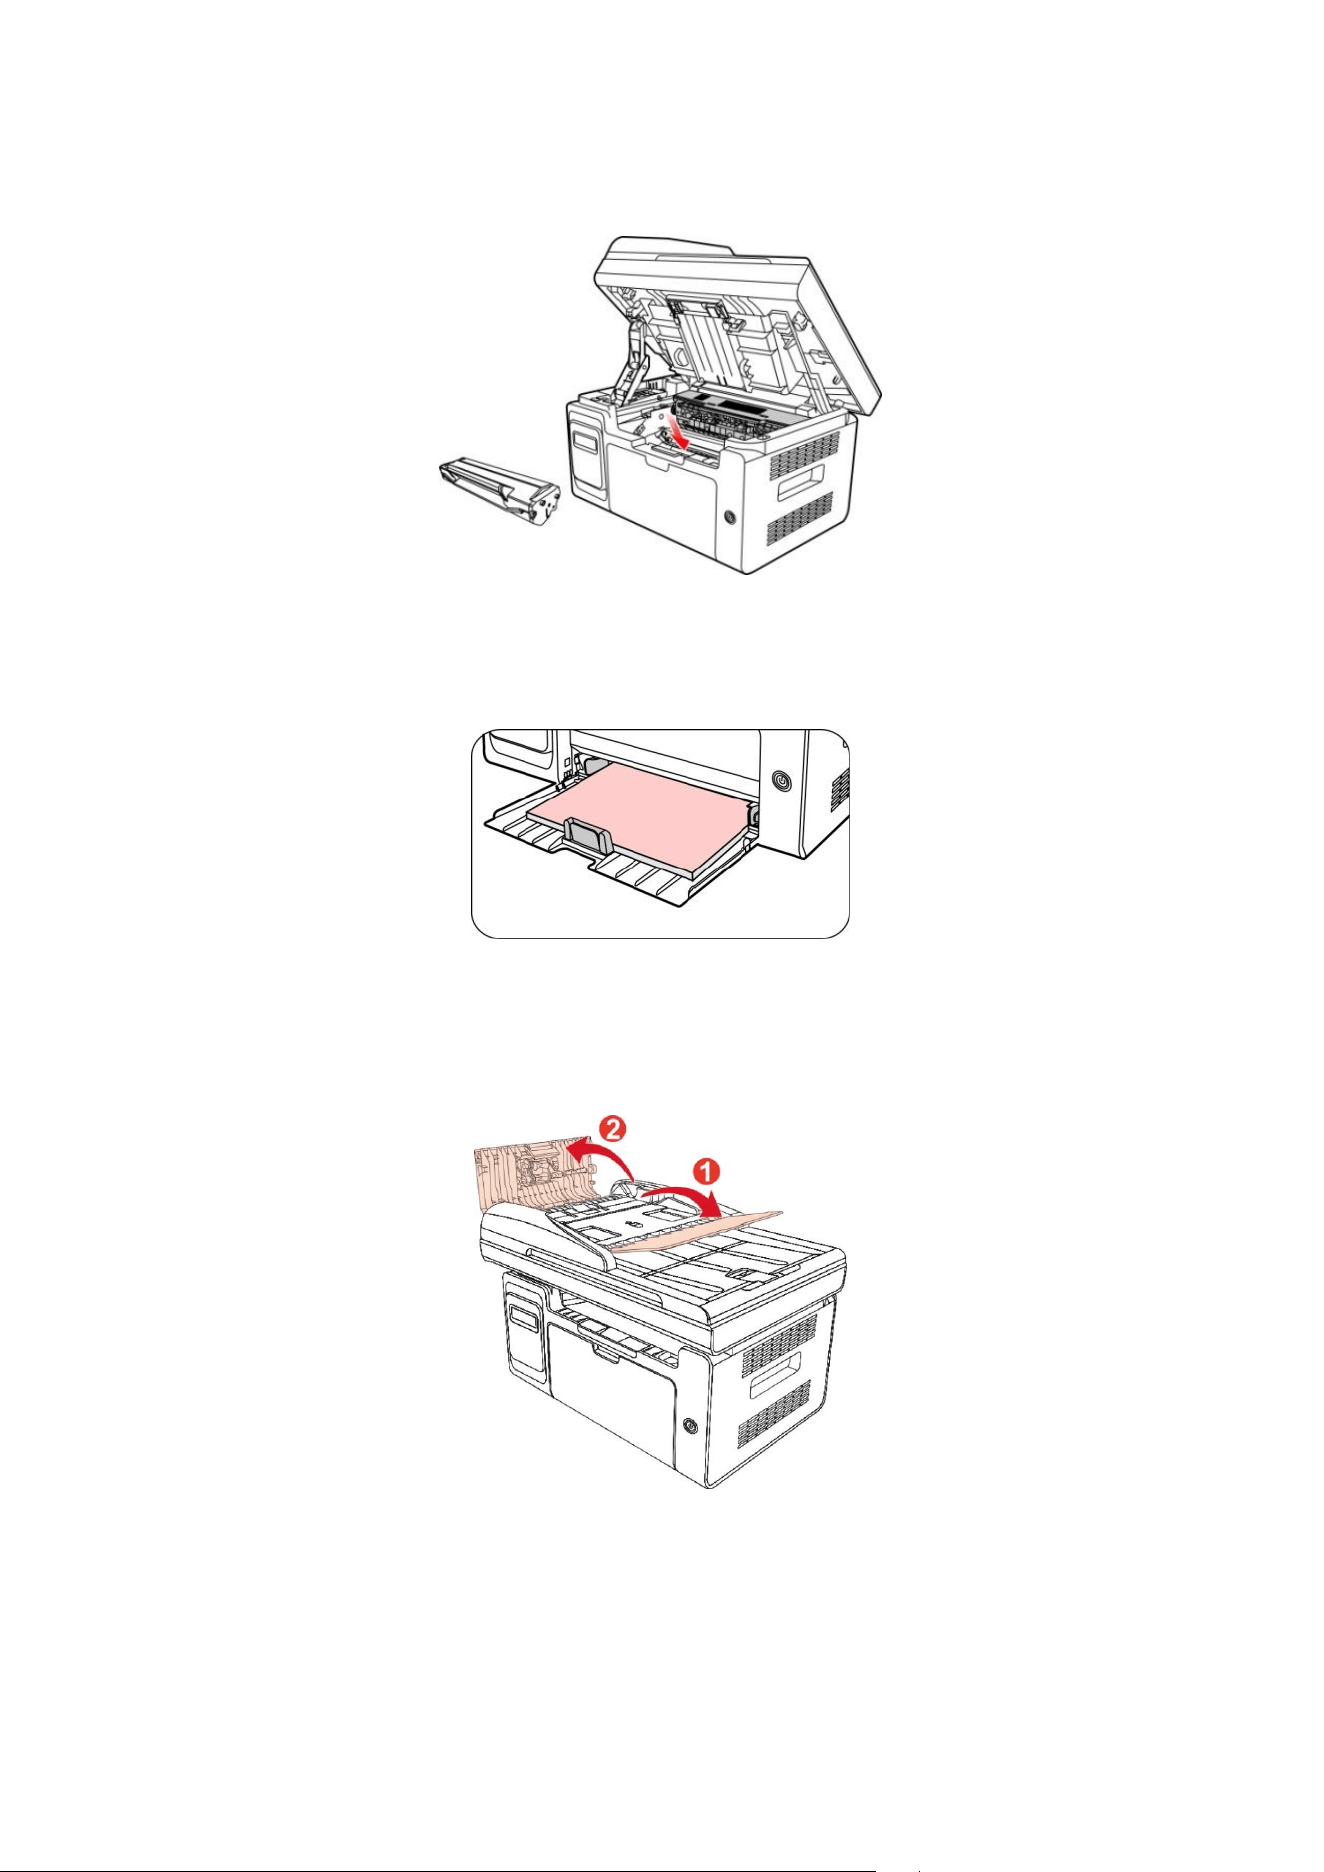
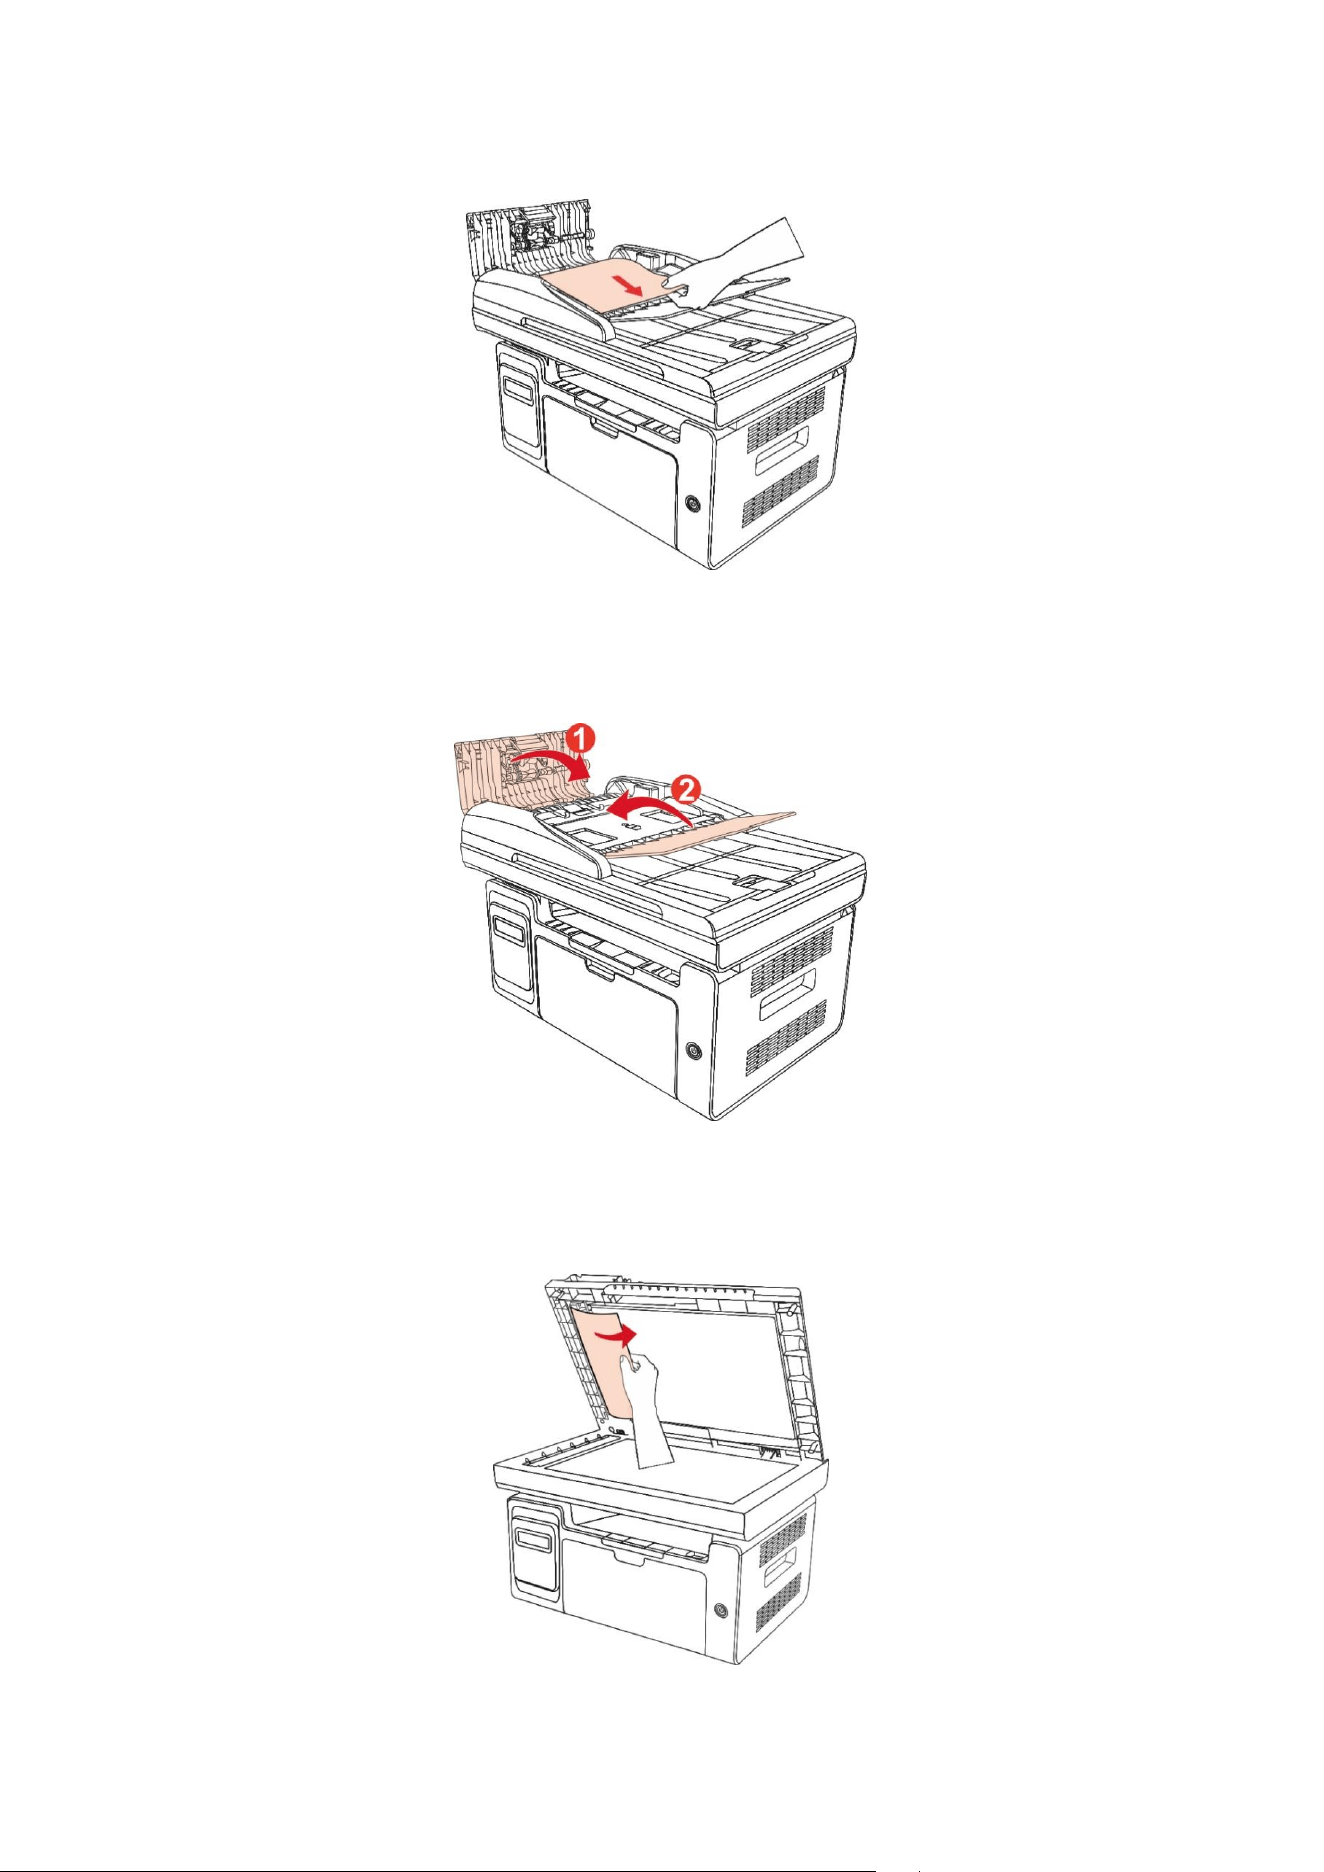
A paper jam occurs on the automatic document feeder (ADF)
1. Open the ADF’s top cover.
44
2. Remove the paper jammed from the ADF.
3. After removing the paper jamed, close the top cover and then the printer will be back to the
ready state.
If it is difficult to remove the paper jammed, please try to open the scanner cover and remove it
from the pressing block.

45
Software Failure
Problem
Solution
The printer icon does not appear in the
"Devices and Printers" folder.
Reinstall the printer driver.
Ensure that the USB interface cable and the power cord are
properly connected.
The printer is in Ready mode but it will
not perform any print job.
If the failure still exists after restarting the Make sure the
network cable of USB cable is connected correctly.
Failed to install the driver
Check whether the print spooler service is enabled.
Check the power supply and the connection of the printer.
The driver cannot be used if the IP
address of the printer has been
changed
Modify the port IP address of the printer driver.
If the above method does not work, please reinstall the
printer driver.
It is recommended that a fixed IP address should be set to
the network printer.
In the DHCP network, it is recommended to bind the IP
address with the MAC address of the printer.

46
Error Message
Error Message
Cause
Measure
Close Output Bin
The paper bin is not fully closed.
Close Output Bin.
No Laser Toner
Cartridge Detected
The laser toner cartridge is installed
incorrectly or laser toner cartridge is
damaged.
The laser toner cartridge is installed
correctly or new laser toner cartridge is
replaced.
Toner Low (this
prompt is displayed
together with the
standby picture
alternately.)
The toner in cartridge runs low.
Please replace with a new toner cartridge.
As the toner is low,
it is not available to
accept the printing
job (this prompt is
displayed together
with the standby
picture alternately.)
If the toner in cartridge runs low, the
printing of fax job received cannot
be executed. (Normal in fax
sending, file printing, copying and
scanning.)
Please replace with a new toner cartridge
or find out the " Low in Toner, Continue to
Print" option among the fax receiving
setting options and then set it as "On" for
continuous printing.
(Note: once the printer detects that the
toner in cartridge doesn’t run low during
booting or opening and closing its cover, it
will set the "Low in Toner, Continue to
Print" option enabled before by user back
to “Off”.)
The toner cartridge
life has expired
Cartridge toner is exhausted.
Replace New Laser Toner Cartridge
Feed jam
The print paper is loaded
incorrectly. The paper is outside of
the specification range.
Please correctly load the print paper.
Printer paper jam
The print paper is loaded
incorrectly.
Please correctly load the print paper.
Scanner is Busy
With other scan jobs.
Please cancel the current scan job or wait
for the completion of other scan jobs.
Scan failed
Scanner internal failure.
Please contact Pantum Customer Service.
No paper in ADF
If you have selected ADF as the
scan source, this message appears
when you start a copy or scan job
without loading paper in the ADF.
Please put in the original properly.
Paper jam occurred
on ADF
This prompt appears when there is
a feed jam or feed failure in copying
or scanning with the ADF.
Please remove the paper jam, arrange well
and put originals into the ADF for
scanning again.

47
Note: • If the problem persists, please contact the customer service center. See the Three Guarantees
certificate for contact details.
Common Troubleshooting
Common Trouble
Trouble Type
Fault phenomenon
Cause
Solution
Problems in
printing
Poor print quality
See Image Defects.
See Image Defects.
Problems in
copying
Failed to copy
The scanner is damaged.
Please contact Pantum Customer
Service.
Copy Image
Abnormal
• The scanner is dirty or
defective.
• The toner cartridge is dirty
or damaged.
• Clean the scanner.
• It is suggested to replace the
original toner cartridge.
Problems
with the
Printer
The printer does
not work
• Power cord of the device is
not properly connected.
• The cable between the
computer and the printer is
not connected properly.
• Error in specifying the print
port.
• The printer is offline and
User Guide of Printer is
checked.
• The printer has not
recovered from an internal
error, such as a paper jam,
paper empty, etc.
• Driver program of printer is
not installed correctly.
• The LCD screen prompts
error messages.
• Ensure proper connection of the
power cord.
• Please disconnect the printer
cable and then connect it again.
• Please check printer settings of
the Windows to make sure the
printing job could be sent to the
correct port. If the computer is
equipped with several ports,
please be sure to connect the
printer to the correct port.
• Please make sure the printer is
online without any abnormality.
• Please remove errors to make
the printer return to normal.
• Please uninstall and then
reinstall the printer driver.
Online printing
does not work
• The cable between the
computer and the printer is
not connected properly.
• Driver program of printer is
not installed correctly.
• Printer internal failure.
• Please disconnect the printer
cable and then connect it again.
• Please uninstall and then
reinstall the printer driver.

48
Problems in
scanning
Scanning error
• Data cable of the device is
not properly connected.
• The scan driver is installed
incorrectly.
• The LCD screen prompts
error messages.
• Ensure proper connection of the
data cable.
• Reinstall the scan driver.
Problems
with Paper
Handling
Paper feed failure
• The print media is beyond
the usage specification
range.
• The pickup roller is dirty.
• Please use the print media within
the specification range.
• Please clean the pickup roller.
Paper Jam
• The print media is beyond
the usage specification
range.
• There is foreign matter in
the feed channel.
• The feed roller is dirty.
• Internal parts failure.
• Make sure to use the paper
that meets specifications.
• Clean the paper path.
• Please clean the pickup roller.
Print multipage
feed
• Excessive static electricity
on the print media.
• The print media is damp or
sticks together.
• Internal parts failure.
• Re-separate the print media to
eliminate some static electricity. It
is suggested that you use the
recommended print media.
• Re-separate the print media or
use new print media.
Note: • If the problem persists, please contact the customer service center. See the Three Guarantees
certificate for contact details.
Image Defects
Trouble
Cause
Solution
The printout is
whitish or
light
• Toner is low.
• The print media does not meet usage
specification, such as the media is
damp or too rough.
• The resolution in the print program is
set too low, concentration setting is
too low, or toner saving mode is
ticked.
• The laser toner cartridge is damaged.
• Please properly use the print media within
the specification range.
• Set the print resolution, concentration, or
cancel ticked toner saving mode in the
program.
• It is recommended to replace the original
laser carbon powder box.

49
Toner spots
• The laser toner cartridge is dirty or
leaks toner.
• The laser toner cartridge is damaged.
• The print media that does not meet
usage specification is used. For
example, the media is damp or too
rough.
• The feed channel is dirty.
• If toner spots appear when copying
and scanning, the platen glass may be
dirty.
• The scanner is dirty or damaged.
• It is recommended to replace the original
laser carbon powder box.
• Please use the print media within the
specification range.
• Clean the feed channel.
• Clean the platen glass.
White spots
• The print media that does not meet
usage specification is used. For
example, the media is damp or too
rough.
• The feed channel is dirty.
• The internal part of the laser toner
cartridge is damaged.
• LSU lens inside the printer are dirty.
• Please use the print media within the
specification range.
• Clean the feed channel.
• Clean the reflective glass of the laser.
• Please clean the LSU lens.
Toner comes
off
• The print media that does not meet
usage specification is used. For
example, the media is damp or too
rough.
• The printing paper medium set and
paper medium placed are not
consistent.
• The inside of the printer is dirty.
• The laser toner cartridge is damaged.
• The internal part of the printer is
damaged.
• Please use the print media within the
specification range.
• Please print with corresponding
paper medium.
• Clean the inside of the printer.
• It is recommended to replace the original
laser carbon powder box.
Black vertical
stripes
• The laser toner cartridge is dirty.
• The internal part of the laser toner
cartridge is damaged.
• The reflective glass of the laser
inside the printer is dirty.
• The feed channel is dirty.
• If black vertical stripes appear when
copying or scanning, the scanner or
the platen glass may be dirty.
• Scanner Light bulb has smudges.
• The scanner is damaged.
• Clean the laser toner cartridge or replace
it with a new one.
• Clean the reflective glass of the laser at
the back of the printer.
• Clean the feed channel at the back of the
printer.
• Clean the scanner or the platen glass.
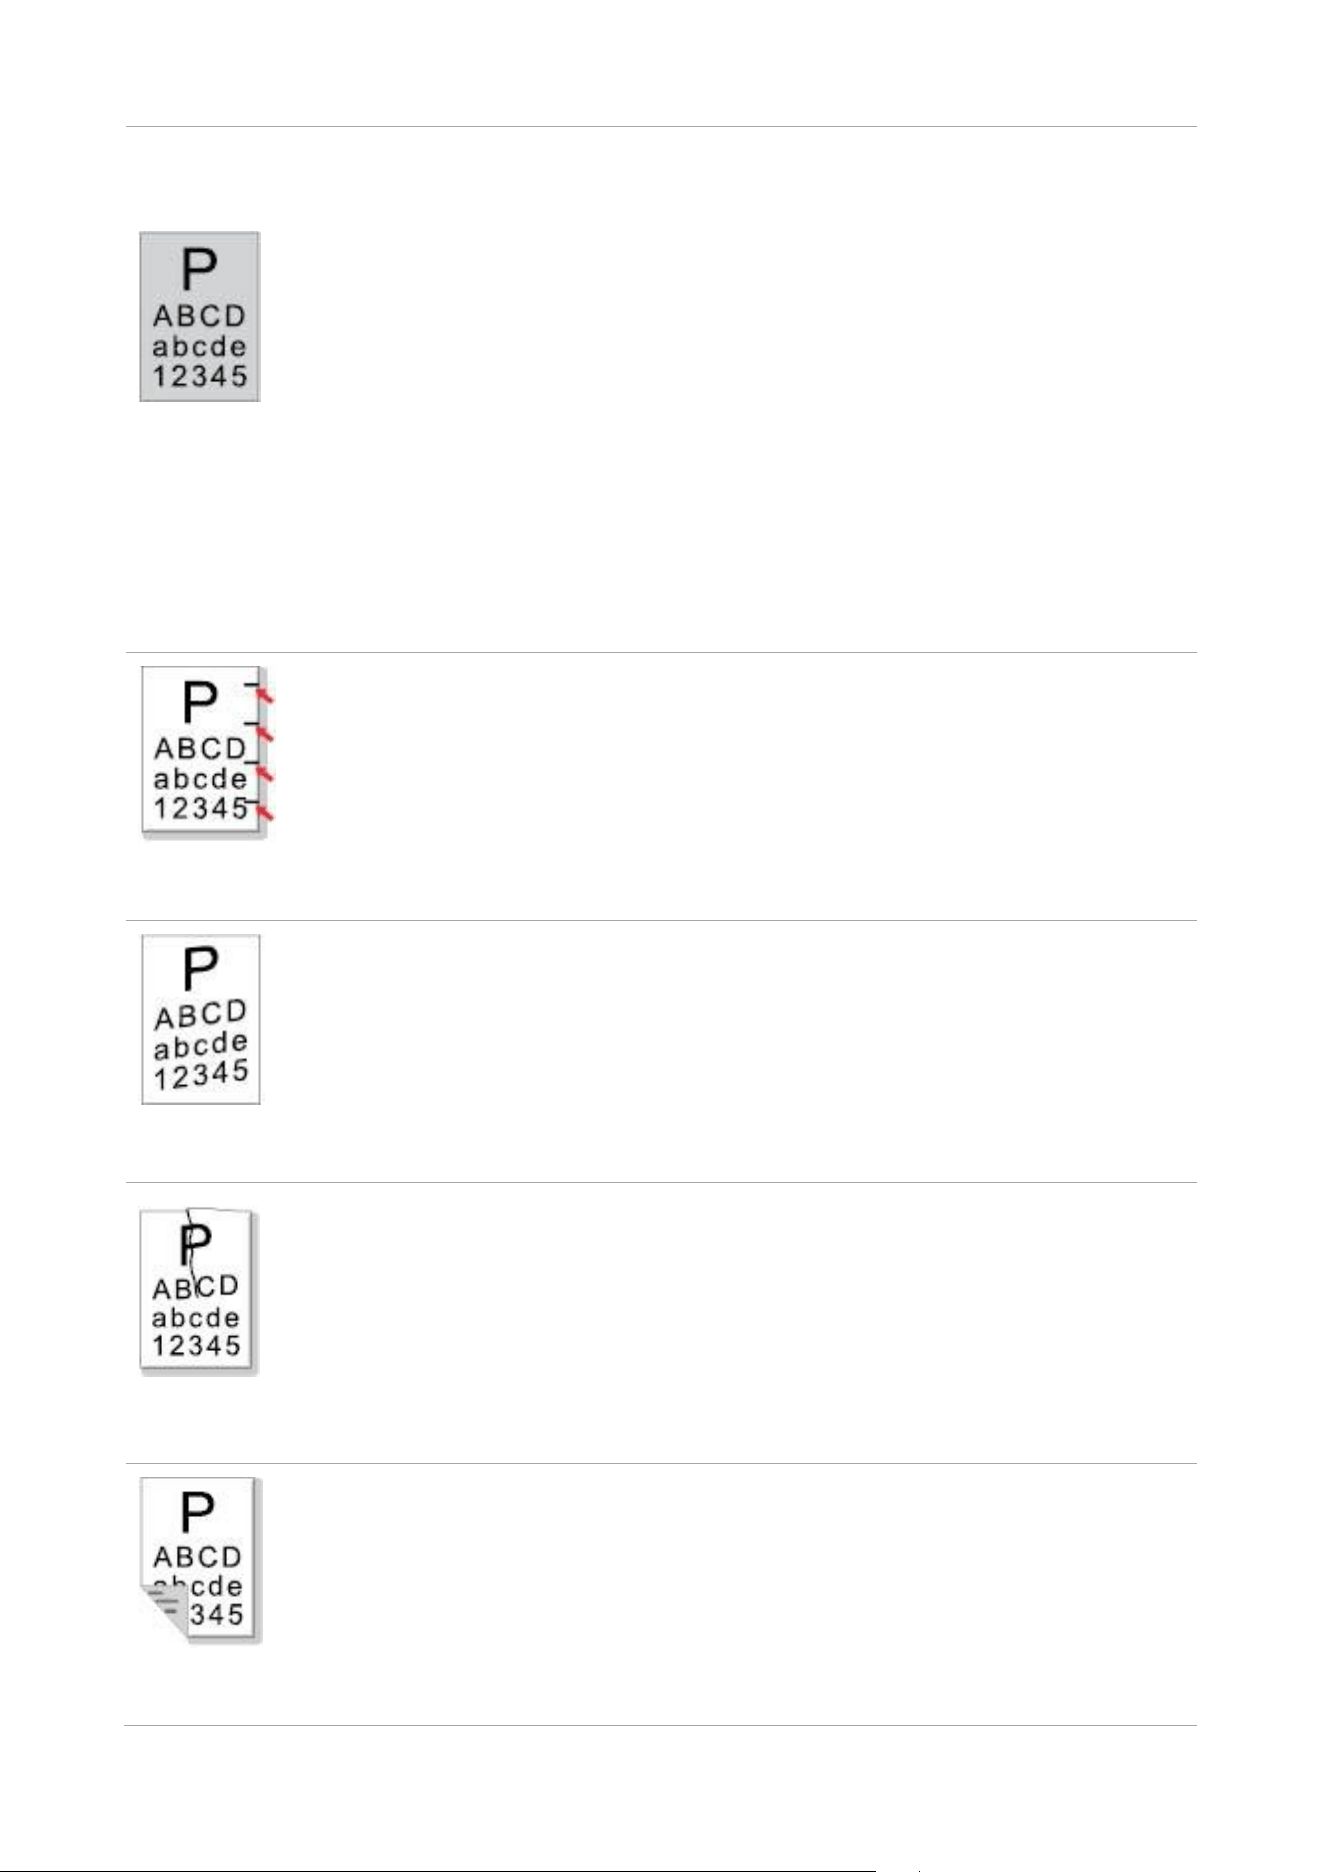
50
Black
background
(gray
background)
• The print media that does not meet
usage specification is used. For
example, the media is damp or too
rough.
• The laser toner cartridge is dirty.
• The internal part of the laser toner
cartridge is damaged.
• The feed channel is dirty.
• The transfer voltage inside the printer
is abnormal.
• Scanning exposure.
• If black background or gray
background appears when copying
and scanning, the platen glass may be
dirty.
• Please use the print media within the
specification range.
• Clean the laser toner cartridge or replace
it with a new one.
• Clean the feed channel inside the printer.
• Please close the cover on the manuscript,
and then carry out copying and scanning.
• Clean the platen glass.
Cyclical
traces appear
• The laser toner cartridge is dirty.
• The internal part of the laser toner
cartridge is damaged.
• The fuser component is damaged.
• Clean the laser toner cartridge or replace
it with a new one.
• Please contact Pantum Customer Service
to repair and replace the fuser component.
Skewed
pages
• The print media is loaded incorrectly.
• The feed channel of the printer is
dirty.
• Ensure correct loading the print media.
• Clean the feed channel inside the printer.
Wrinkled
paper
• The printer paper isn’t put properly.
• The print media does not meet the
usage specification.
• The feed channel inside the printer is
dirty.
• The fuser component is damaged.
• Make sure the print paper is placed
correctly.
• Please use the print media within the
specification range for printing.
• Clean the feed channel inside the printer.
• Please contact customer services
center to replace to a new fuser
assembly.
The back of
the printout is
• The laser toner cartridge is dirty.
• The transfer roller inside the printer
is dirty.
• The transfer voltage inside the printer
is abnormal.
• Clean the laser toner cartridge or replace
it with a new one.
• Clean the internal transfer components of
the printer.
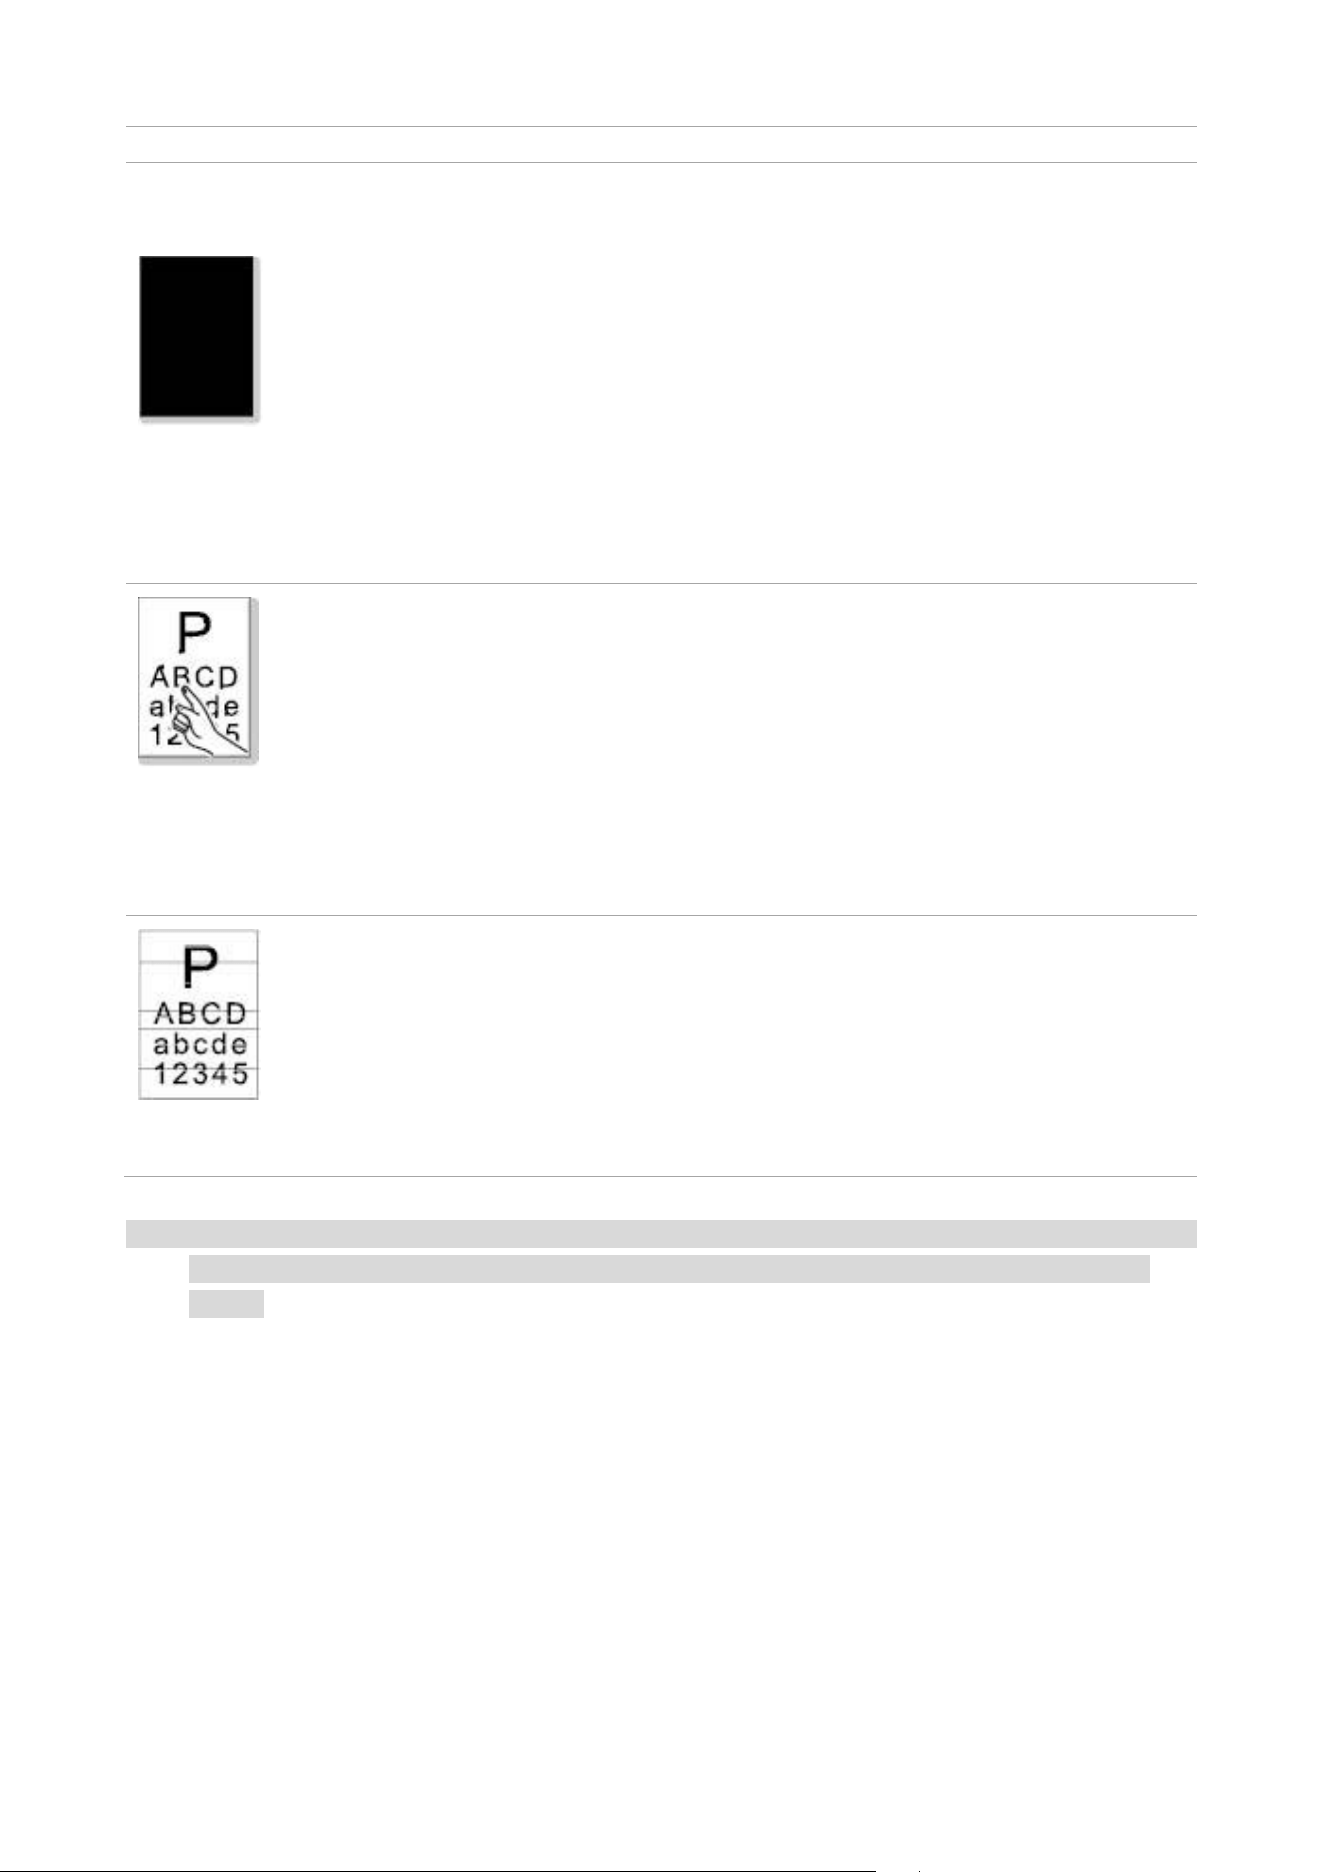
51
dirty
Whole page
dark
• The laser toner cartridge is installed
incorrectly.
• The internal part of the laser toner
cartridge is damaged.
• Abnormal charge inside the printer;
the laser toner cartridge is not
charged.
• If all-black image appear when
copying and scanning, maybe it is
scanning exposure, and the cover on
the manuscript is not properly closed.
• The scanner is damaged.
• Ensure to install the cartridge correctly.
• It is recommended to replace the original
laser carbon powder box.
• Please first close the cover on the
manuscript, and then carry out copying and
scanning.
The toner
does not
adhere to the
paper
• The print media that does not meet
usage specification, such as the
media is damp or too rough.
• The inside of the printer is dirty.
• The laser toner cartridge is damaged.
• The internal part of the printer is
damaged.
• Please use the print media within the
specification range.
• Clean the inside of the printer.
• It is recommended to replace the original
laser carbon powder box.
Horizontal
stripes
• The laser toner cartridge is
incorrectly installed.
• The laser toner cartridge might be
damaged.
• The internal part of the printer is
damaged.
• Ensure to install the cartridge correctly.
• It is recommended to replace the original
laser carbon powder box.
Note: • The faults above can be mitigated by cleaning or replacing the cartridge. If the problem persists,
please contact the customer service center. See the Three Guarantees certificate for contact
details.

52
Fax faults
Trouble Type
Fault phenomenon
Solution
Telephone
line or
connection
fault
The dialing tone
cannot be heard.
• If you cannot hear the dialing tone after picking up the receiver,
please check the connection of all telephone lines between the
fax and the wall-mounted socket.
• Use the telephone connecting another line to test the
wall-mounted socket; if there is no dialing tone, please check the
communication line.
The printer cannot
response in a fax
call automatically.
• Make sure it is not the "Telephone Mode" as the receiving
mode.
Fax receiving
fault
The fax cannot be
received
• Make sure the fax is set with the correct receiving mode.
• If the telephone line is interfered, please try to set it as VoIP in
compatibility.
The fax received is
somewhat blank or
of poor quality
• The fax sending faxes may have a fault.
• The telephone line may have a fault due to noise.
• Check the printer through copy.
• The toner cartridge comes to the end of its expected service
life. Please replace it.
The fax is well
received but
cannot be printed
• Check if the toner in cartridge has run low. Replace with a new
toner cartridge and then print.
• Find out the option of " Low in Toner, Continue to Print" among
receiving setting options and then set it as On.
An external call is
being handled.
• If the Telephone mode adopted, please press Startup and then
pick up the receiver immediately.
• If answering the call with the extension telephone, please input
the 3-digit fax receiving code (*90 by default). When the fax
begins to response, please hang up.
Fax sending
fault
The dialing fails to
be done
• Please check the connection of power cable.
• Please check the connection of telephone line.
• Change the (audio/pulse) settings. Please set in the fax sending
menu with the dialing way supported for telephone line.
The printer is poor
in transmitting files
• Make one copy of original to check if the fax scanner could
work normally.
• Transmit with a higher resolution.
A prompt of
"Communication
Failure" appears in
printing the fax
confirmation report
• The telephone line may suffer from temporary noise or
electrostatic interference. Please send the fax again.
• Please try to set as VoIP in compatibility and then send again.
If the problem still occurs, please check the telephone line.

53
13 Product Specifications
Note: • Specification values vary slightly from printers with different models with different
functions ,and product specifications vary from different countries and regions.
• These values are based on the initial data. For more information about the latest specifications,
please visit: www.pantum.com.
Overview of the Specifications
Product Size(W*D*H)
M6200/M6500 Series: 417mm*305mm*244mm
M6550/M6600 Series: 417mm*305mm*301mm
Product Weight
M6200/M6500 Series: 7.5kg (No wrappage, with random cartridges)
M6550/M6600 Series: 8.5kg (No wrappage, with random cartridges)
Print Environment
Preferred Temperature Range for Printing: 10-32°C
Preferred Moisture Range for Printing: 20% - 80%
Power Voltage
110V Model: AC100~127V, 50Hz/60Hz,6A
220V Model: AC220~240V, 50Hz/60Hz,3A
Noise(acoustic pressure
level)
Print/scan: ≤52dB(A)
Copy: ≤57dB(A)
Standby: ≤30dB(A)
Default automatic shutdown
time(for EU only)
4 hours
Power Consumption
Print: Average 370W, Maximum750W
Ready: ≤45W
Sleep: ≤4W
Shutdown: ≤0.5W
Network standby: Wi-Fi≤5W;Non-Wi-Fi≤2W
TEC: conforming to requirements of Chinese energy efficency rating
Operating System
Microsoft Windows Server2016/Server2019/Server2022
/xp/Win7/win8.1/Win10/win11(32/64Bit)
macOS 10.10~14.3
Linux: Ubuntu 16.04 (32/64Bit),Ubuntu18.04/20.04/22.04(64Bit)
iOS 13.0-17
Android 8.0-14
HarmonyOS 2.0-4.0

54
Communication interface
USB 2.0(High Speed)
IEEE802.3 10/100M Ethernet
IEEE802.11b/g/n (support WPS) Wi-Fi
Wi-Fi Frequency Band
2400MHz - 2483.5MHz
Maximum output power
(Declaration for EU
Compliance)
RF Output Power: ≤20dBm
Print Specifications
Print Speed
M6200/M6500 Series: (A4 20/22ppm)/(Letter 21/23ppm)
M6550/M6600 Series: (A4 22ppm)/(Letter 23ppm)
Print Time of First Page
≤7.8sec
Print Language
GDI
Copy Specifications
Copy Speed
22cpm (A4)/23cpm (Letter)
FCOT
Flatbed <10 sec
ADF <12 sec
Maximum Pages for
Successive Print
99 pages
Zoom Ratio
25%~400%
Other Copy Functions
ID copy, bill copy, multi-in-one copy, clone copy, Poster Copy, Collated
Copy, Watermark Copy
Scan Specifications
Scan Type
Flatbed+ADF
Maximum Scan Size
Flatbed: 216×297mm
ADF: 216×356 mm
Chromoscan
Yes
Scan Output Function
Scan to PC,E-mail, FTP

55
Fax specification
Fax Type
Black-and-white
Modem Speed
33.6Kbps
Fax Memory
650 pages
Encoding
MH/MR/MMR/JBIG
Compatibility
ITU-T sg3/ECM
Resolution
Standard, fine, super fine, picture
Other Fax Functions
Auto Fax Recognition , PPC-FAX (Send), Fax Filtering, Group Sending,
Fax Forwarding, Speed Dial, Group Dial, Delay Sending, Auto Redial,
Auto Receive, Auto Shrink, Mobile Fax
Environment
Not supported in the following environment: ADSL, ISDN

1

