Portable Power Station
User Manual
Model:
EB120
EB150
EB180
EB240

Contents
English................................01-10
Deutsch...............................11-20
日本語
.................................21-29
EN-01
Please read this manual before use and follow its guidance. Keep this manual for future
reference.
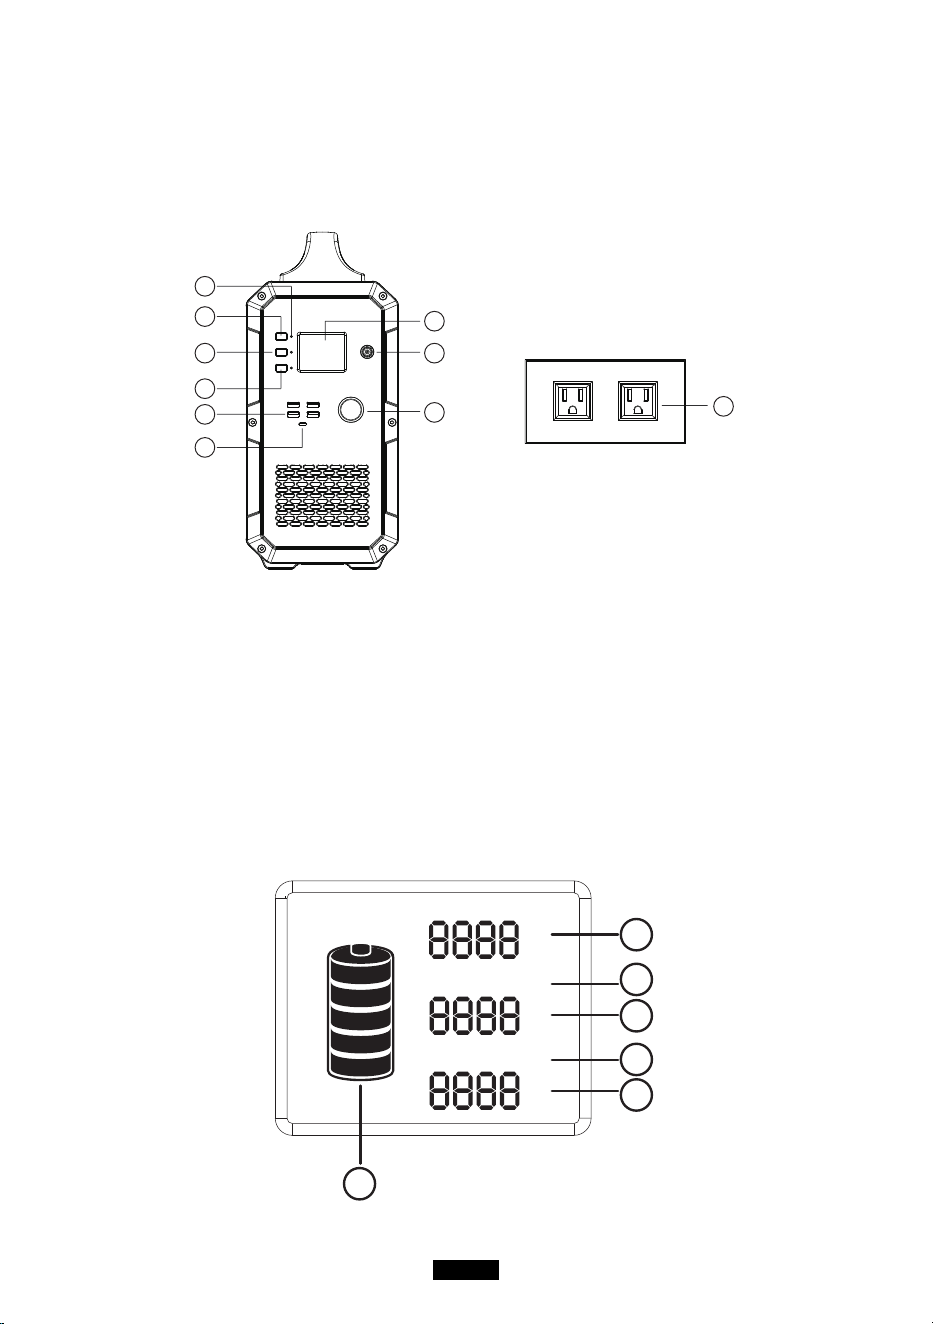
Product Overview
A
C
D
B
F
J
H
G
I
E
A. Master power button B. DC power button
C. AC power button D. LED indicator lamps
E. 5V-USB output ports F. Type-C PD output port
G. Display screen H. AC charger/PV input port
I. 12V cigarette lighter socket J. AC100-120V outlet US standard socket
LCD Display
INPUT
W
W
DC ON/OFF
W
AC ON/OFF
6
1
2
3
4
5

EN-02
1. Charging power 2. DC ON/OFF status
3. DC output power 4. AC ON/OFF status
5. AC output power 6. Battery status indicator
Note:
1. If the product malfunctions, error codes would be displayed on screen.
2. When product is powered on, but not in use, the product would turn off by itself after
60seconds of inactivity.
3. When the product is powered on and the AC/DC output is turned on, the backlight
would turn off by itself after a period of inactivity. To turn on the backlight again, press
any button.
Safety warning
1. please read all the safety warnings before use and keep the manual.warranty does
not cover damage caused by failure to follow instructions.
2. Please note the warning labels and operate accordingly.
3. Avoid exposing the product to rain or using the product in humid environment.
4. Do not install the product near heat sources, such as electric furnace and heaters.
5. Place and store the product in a well-ventilated place.
6. Wipe the product clean with a dry cloth.
7. Incaseofre,usedrypowderreextinguishersforthisproduct.donotusewaterre
extinguisher, which may cause electric shock.
8. Please do not alter or disassemble this product.
9. If the generator needs maintenance, please contact the local designated system
installation and maintenance personnel or contact seller
Storage and maintenance
1. operatingandstorageenvironmentmayinuenceproductlifeandthereliabilityof
performance. Thus, remember to:
(1)place the product in a dry and well- ventilated area with mild temperature (suitable
temperature:0
℃
-40
℃
, suitable relative humidity 10% ~ 90% )
(2)place the product in a safe area where it would not be hit or shaken.
(3)Keep the product away from corrosive and combustible material.
2. The product would turn off itself when the battery voltage is too low, if this happens,
you need to charge the battery within 2-3months.
3. If you are not going to use it for a long time, please charge it fully before storage and
then charge it at least once every month, store the product in a dry environment.
4. Please fully charge the product before storage and charge it at least once every 3 months.
EN-03
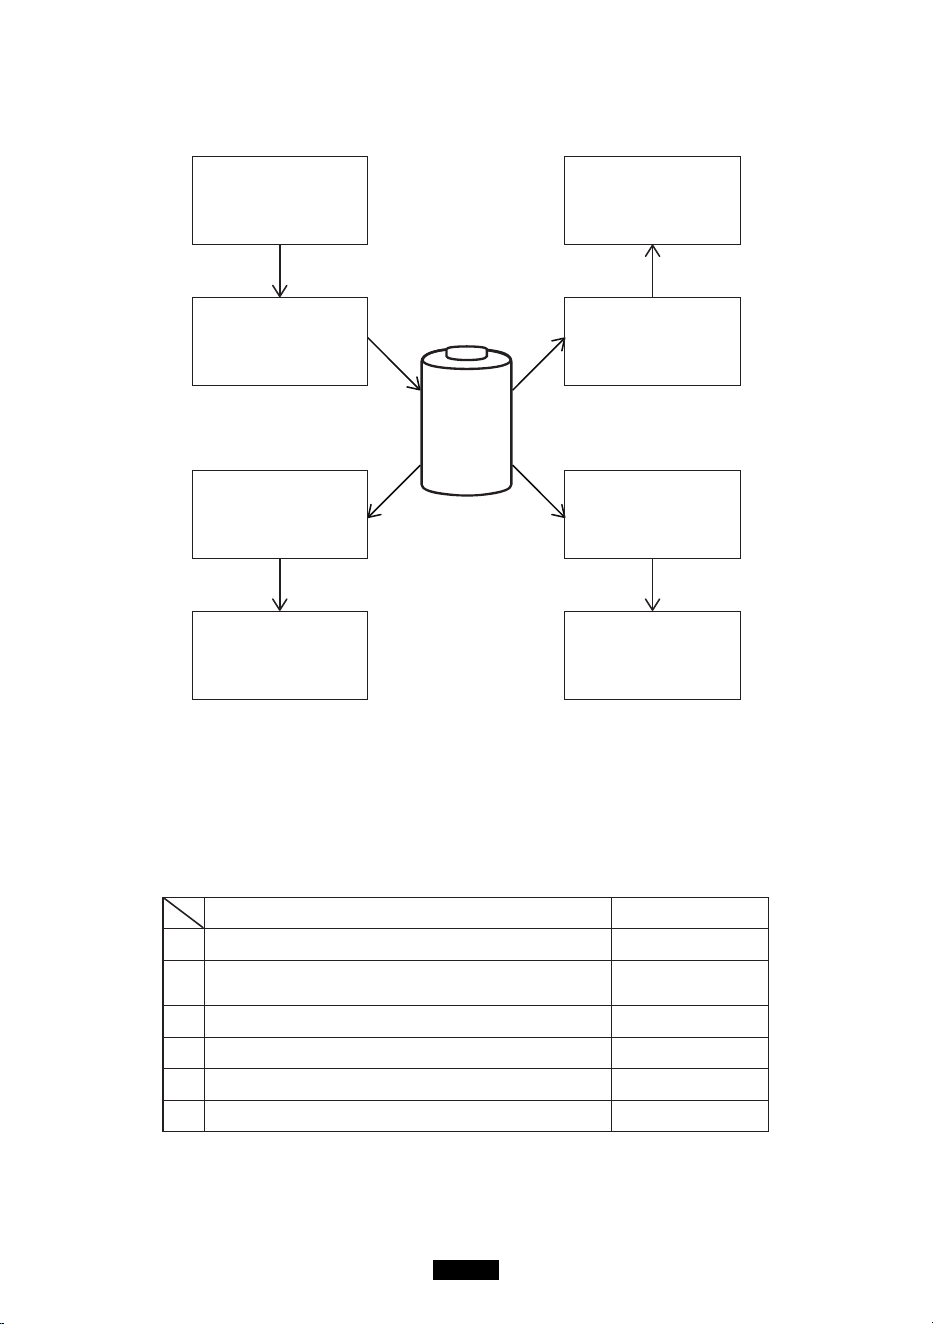
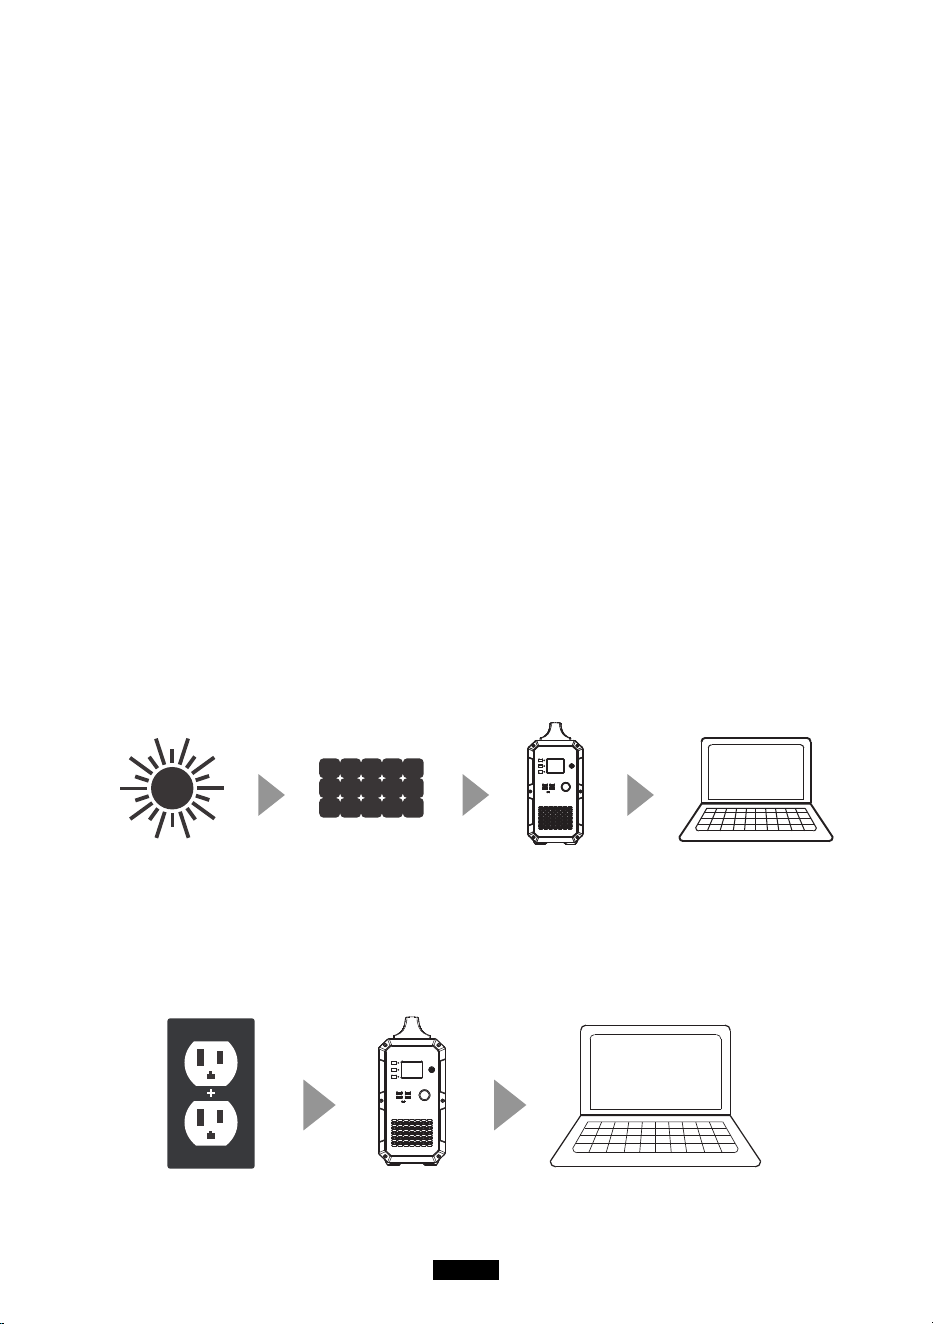
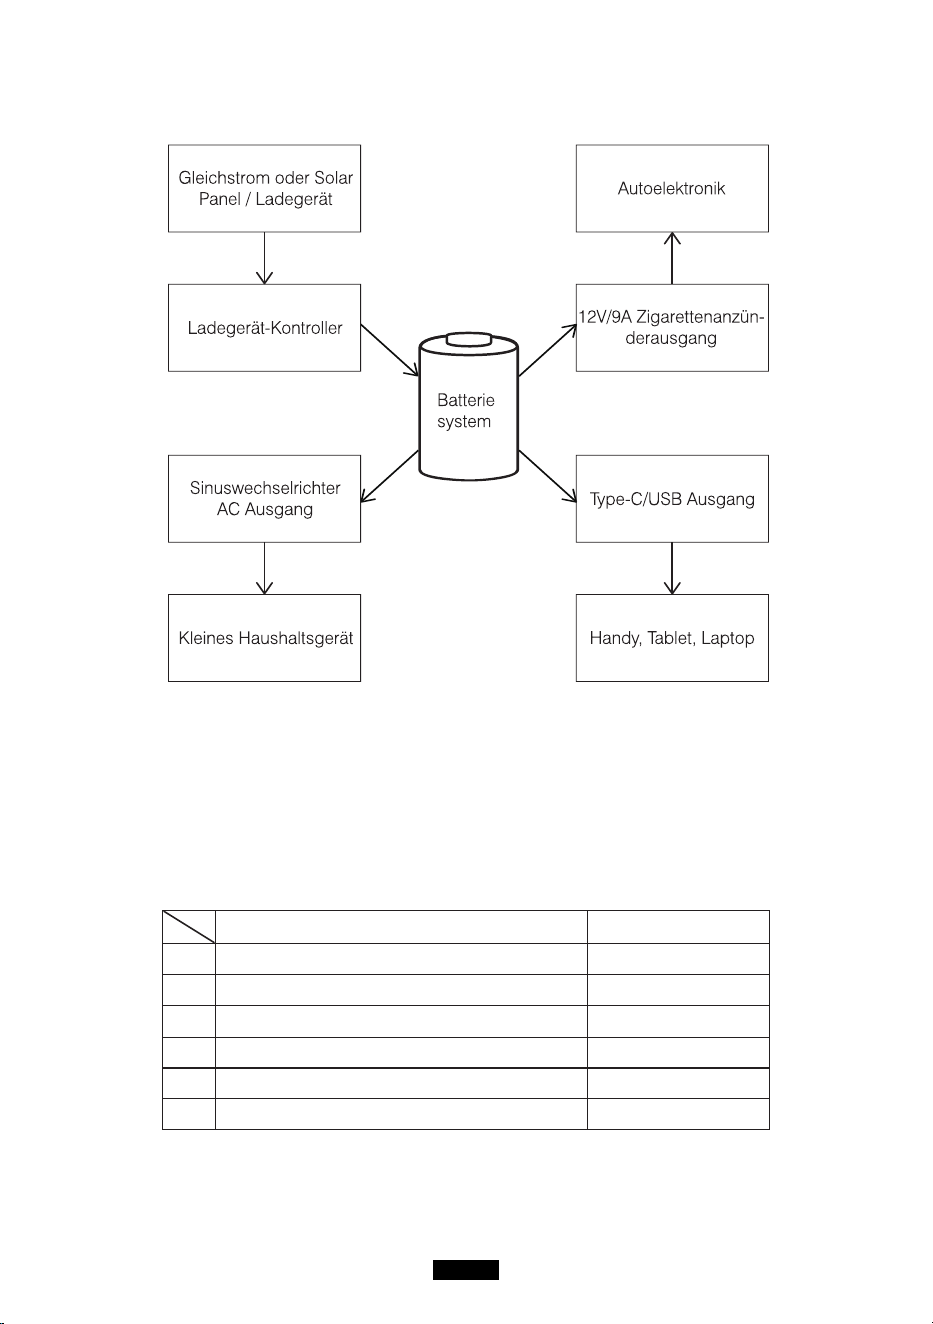
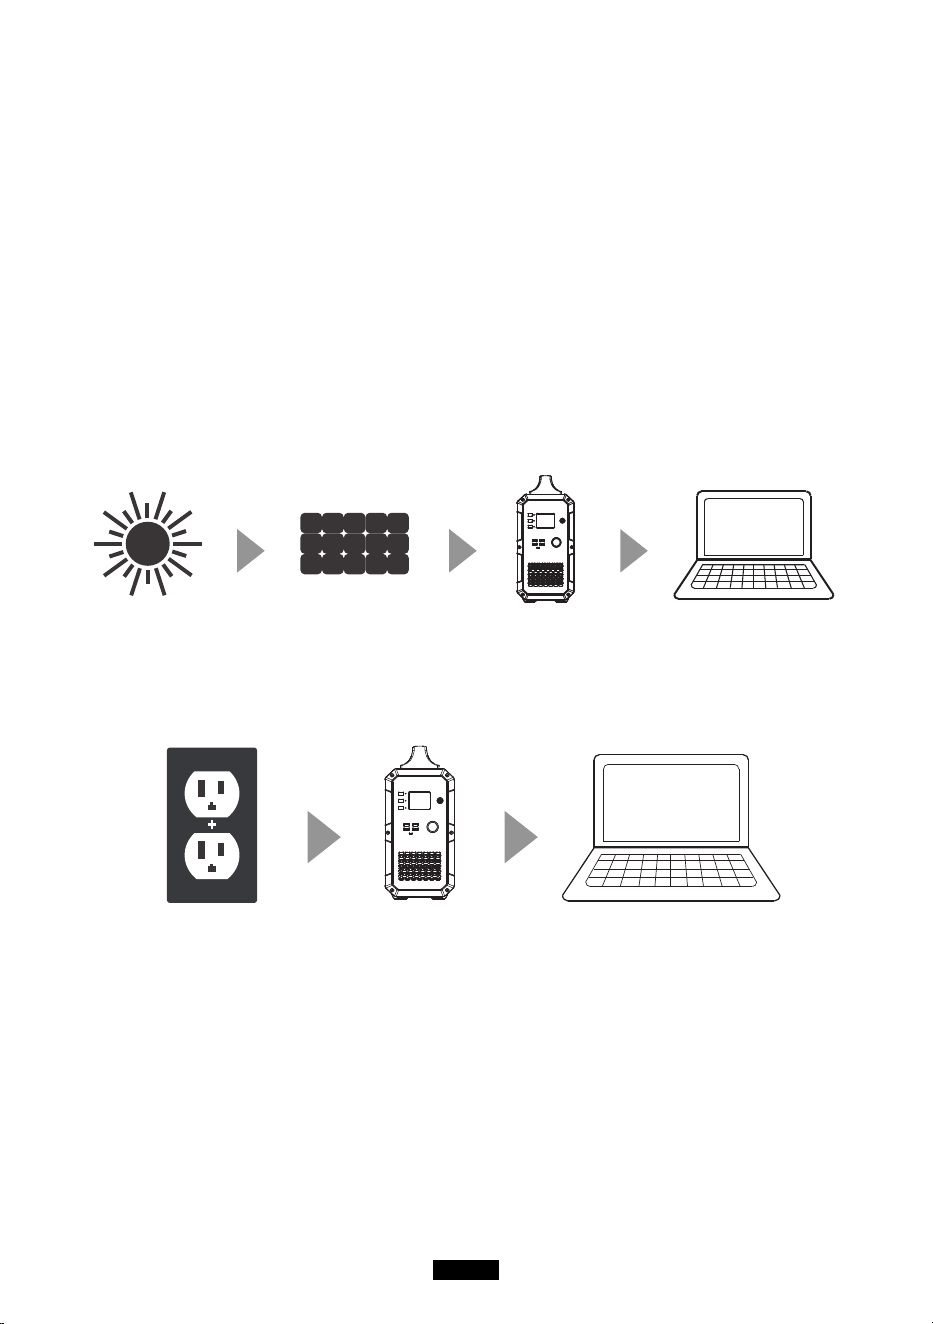
Off-grid power storage system
BMS
Battery
management
system
DC power or Solar
Panel /Charger
Car devices
12V/9A cigarette lighter
Type-C/USB output port
Mobilephones, tablets
Charge controller
Small appliances
Pure-sine-wave inverter
AC output controller
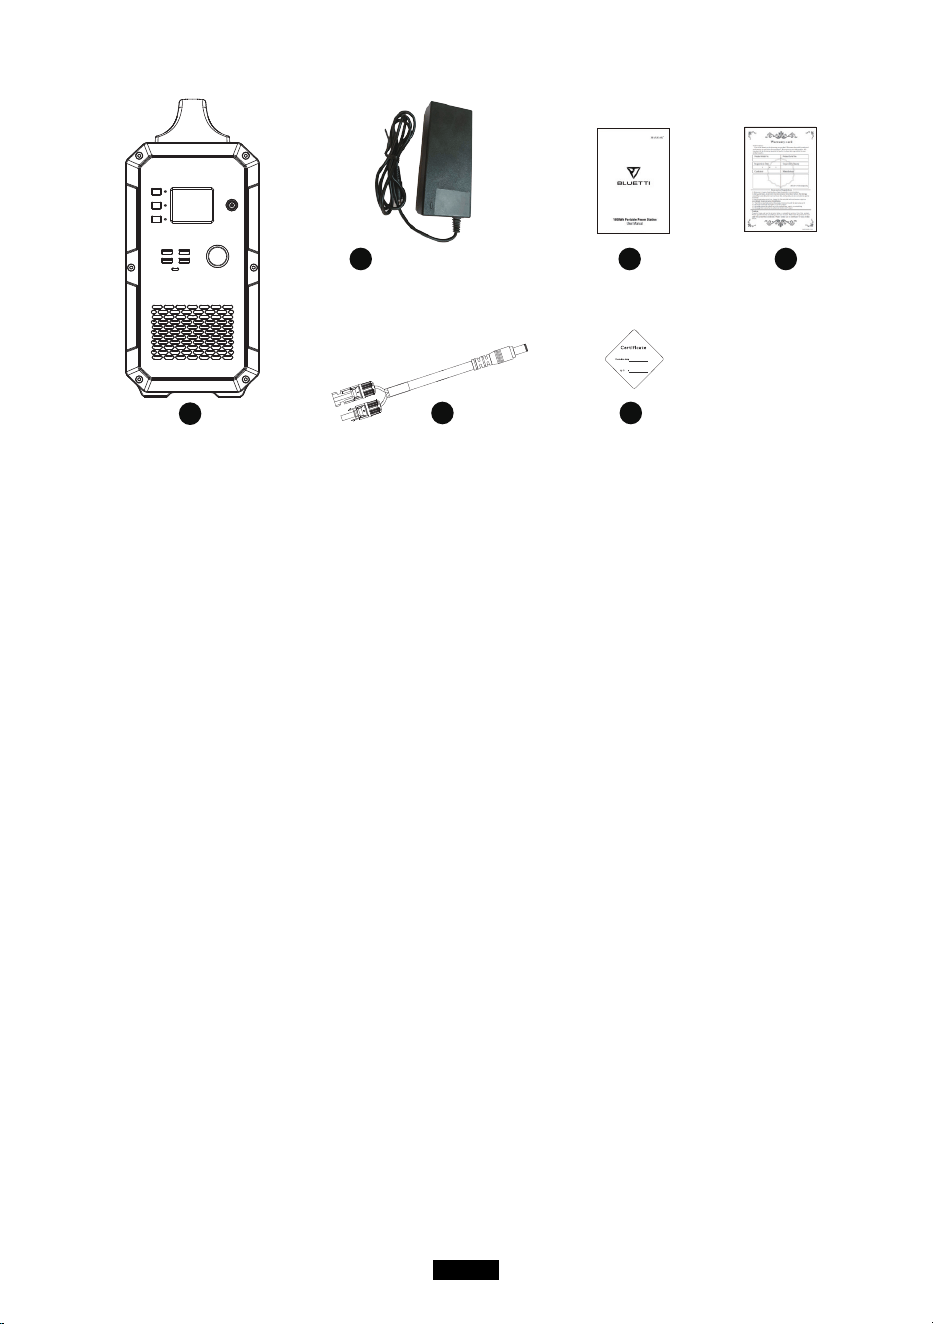
Unboxing
Before opening the parcel, please check whether if the parcel is damaged or not. If the
product is damaged during delivery or if any items went missing upon arrival, please
contact Seller customer service(service@kayomaxtar.com) to get it solved. You
should receive the following items:
Item Number of item
1 Portable solar power generator 1
2
AC wall charger
(Including AC input charging cable)
1
3 PV solar charge cable(7909 to MC4) 1
4 User manual 1
5 Warranty card 1
6 Certicateofqualication 1
EN-04
1
2 4 5
3 6
picture is only for reference,
pls take the product as the
standard
Operation guidance
Attention:
1.theoperatingenvironmentshouldmeetourrequirement.
2. Make sure that the air inlet/outlet is not blocked.
3. Please power off the product if you are not going to use it.
4. Please fully charge the product if you are going to idle for a long period.
How to use the product
Turn on/off the product
1. turn on the product: press and hold the master power button about 2 seconds to turn
on the product. The LED indicator light and the display screen will light up.
2. Turn off the product: press and hold the master power button about 2 seconds to turn
off the product. The display screen and the LED indicator light would turn off.
AC/DC output
Note: check to make sure the product is turned on. Otherwise, you can not turn on AC/
DC output.
1. Turn on AC/DC output: press and hold the AC/DC power button to turn on the product.
The corresponding LED indicator light would light up and the display screen would
show “AC ON/DC ON”.
2. Turn off AC/DC output: press and hold the AC/DC power button to turn off the product.
The LED indicator light would turn off and the display screen would show “AC OFF/
DC OFF”.
PV charge activation
Turn off generator, connect PV( or charger)to charge, activate PV charge function ,the
EN-05
rstcolumnonscreenwillbelitupandshowinputpower,atthistime,thegenerator
is in charging state, can not support AC and DC functions. If want to open AC and
DC functions, need to press master power button more than 1 second to turn on the
generator, screen will be all lit up after generator be turned on. After start-up, connect
PV(or charger) to start charging, screen shows input power wattage, at this time, can
open AC and DC functions.
Notice:
1. If Master Power Button is not turned on, AC button and DC button are in off status, no
AC output and DC output.
2. If Master Power Button is turned on, AC button and DC button are still in off status,
no AC output and DC output. Need to turn on AC power button and DC power button
separately.
How to charge the product
Charge with solar power
To charge the product, insert the solar charging cable or AC adapter into the input port
of the product. The display screen would light up and the charging power would be
displayed. But don’t care this the wrong way. The product will not turn on by itself when
being charged. If the product is previously turned off, it will remain turned off unless you
manually turn it on.
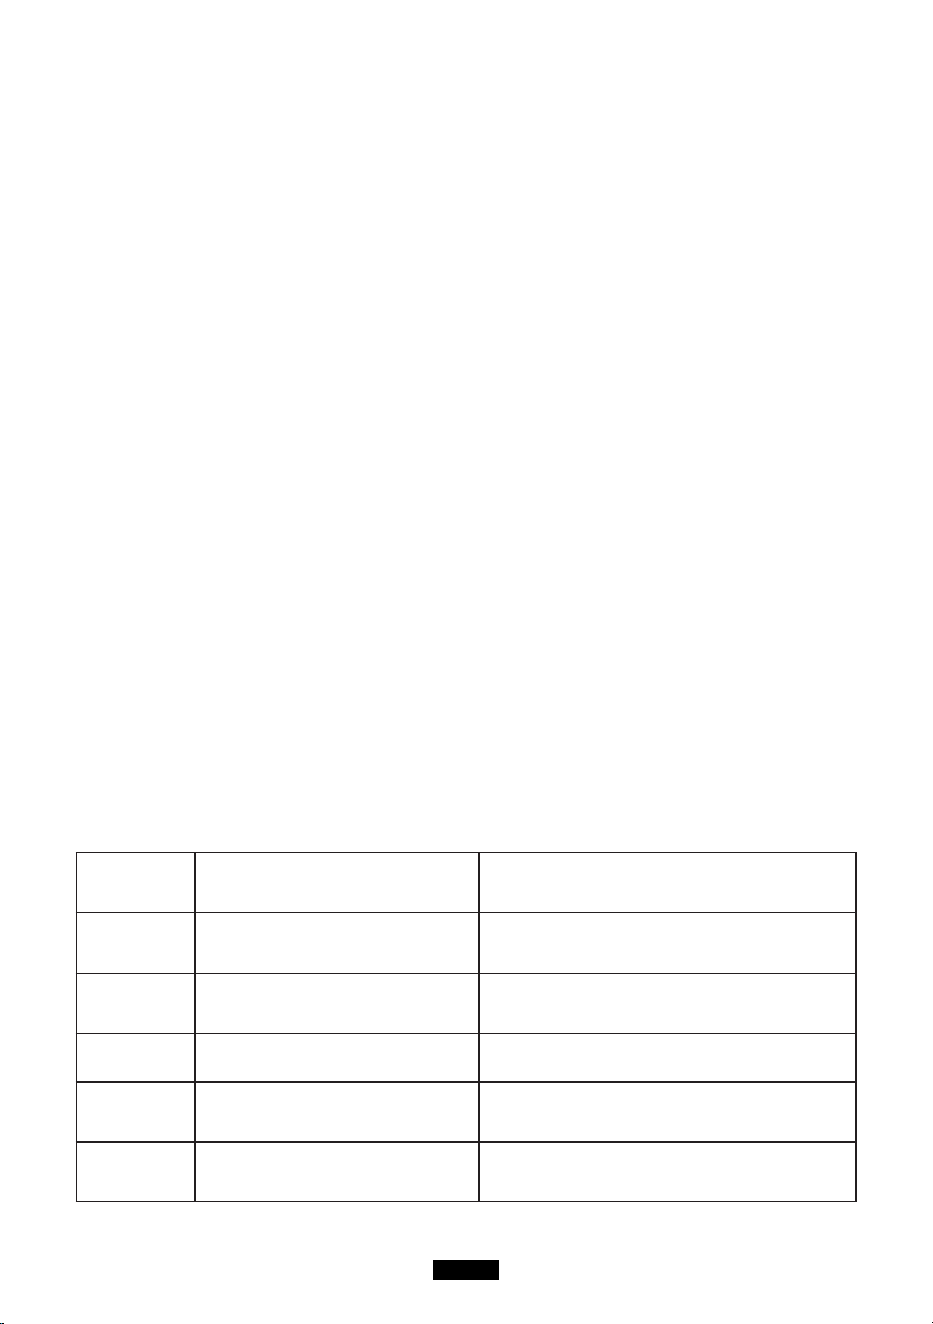
Charge with AC power
Insert one end of the adapter into wall outlet and insert the other end to the input port of
the product. Then, the product will be charged and you can monitor the battery status by
checking the battery icon on the LCD screen The product comes with a built-in advanced
control circuit. When the battery is fully charged, it will stop charging itself automatically.

EN-06
Cold Weather
Coldweathercaninuencebatterycapacity.Insub-zerotemperature(<0°C),youmay
be able to discharge the product, but you should not charge it. Otherwise, the battery of
the product would be greatly damaged and the capacity may not even be recovered.
Low temperature charging protection: When the product is charged at a temperature
below0°C,itwillshutoffandstopchargingitselfautomatically.Theproductwillreboot
andstartchargingitselfwhenthetemperaturerisetoabove10°C.
Low temperature discharging protection: If the product is discharged at a temperature
of-20°C,itwillturnoff.Theproductwillrebootandturnonoutputwhenthetemperature
risetoabove-10°C.
FAQ
Q1: How to check charging status?
The battery icon indicates the battery level of this product. The battery level is displayed
in5segments.Whenbatteryisbeingcharged,theiconwouldash.Whenthebatteryis
fullycharged,theiconwouldstopashingandall5segmentswillbelled.
Q2: Can this product be used to charge my electronic devices?
You need to check the power at each output port. For example, the power at AC output
port is provided by the built-in inverter of the product, whose maximum continuous
output power is 1000W. This means that it is only suitable for electronic device whose
requiredpowerisnomorethan1000W.
Intelligent Cooling Control
Cooling fan will start working automatically when the following conditions are met :
1. The load of inverter exceeds 400w.
2. The load of 12V cigarette lighter socket exceeds 80w.
3. The charging power of attached appliances exceeds 100W.
Besides, generator intelligent system will adjust the PV input or AC output
power based on the outer case temperature, to keep the outer case at a touchable
temperature.
Note: Do not use the machine when the cooling tan is broken.
Frequency Setting
When the product is powered on, turn on DC output and keep the AC output turned
off. Press and hold both DC button & AC button to enter setting mode Press AC power
buttontochooseinverterACoutputfrequency.PressandholdbothDCandACpower
buttontoexitfrequencysettingmodeRestartthemachine.

EN-07
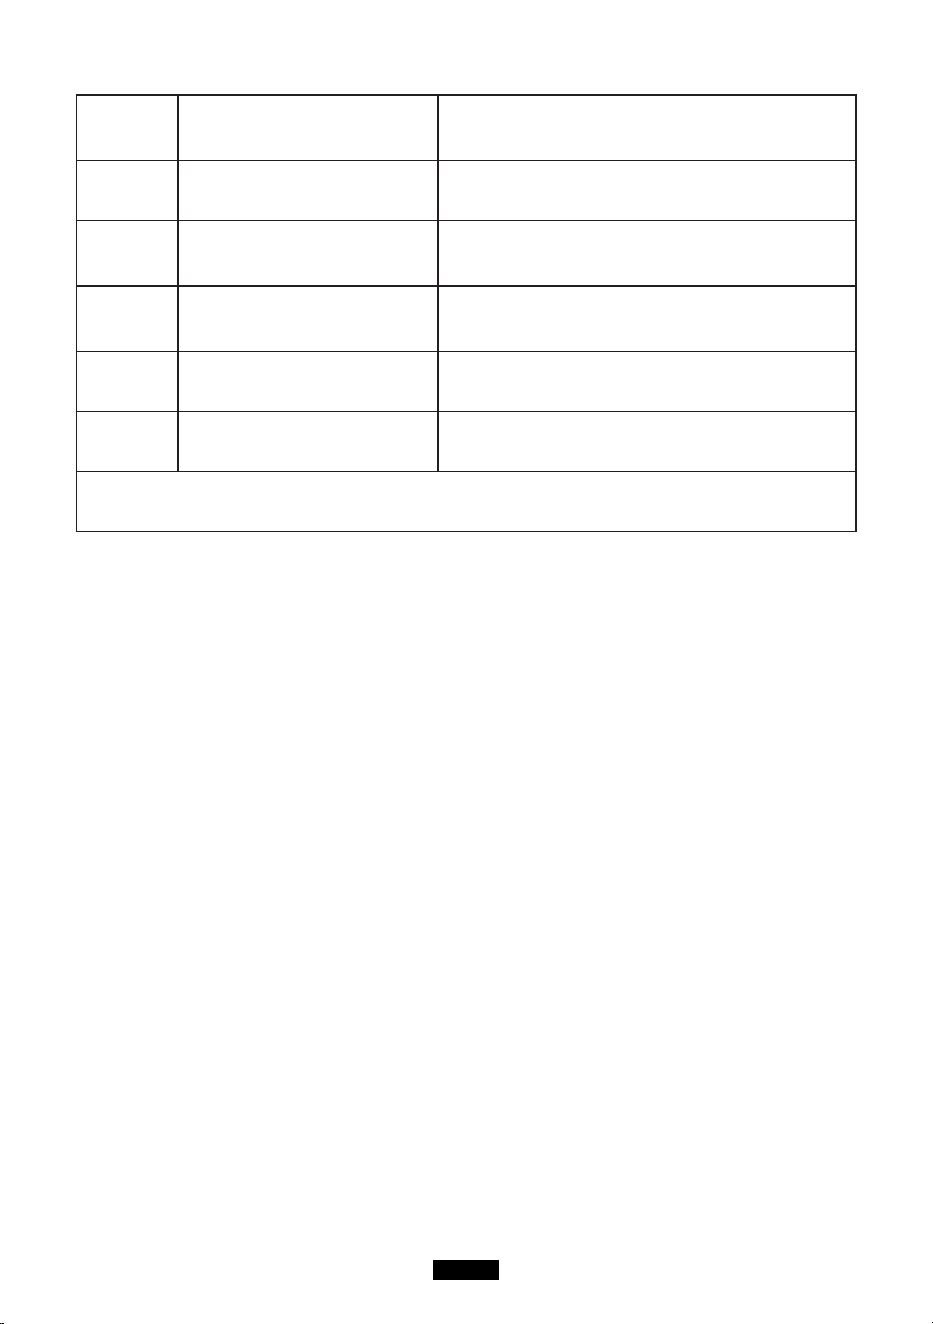
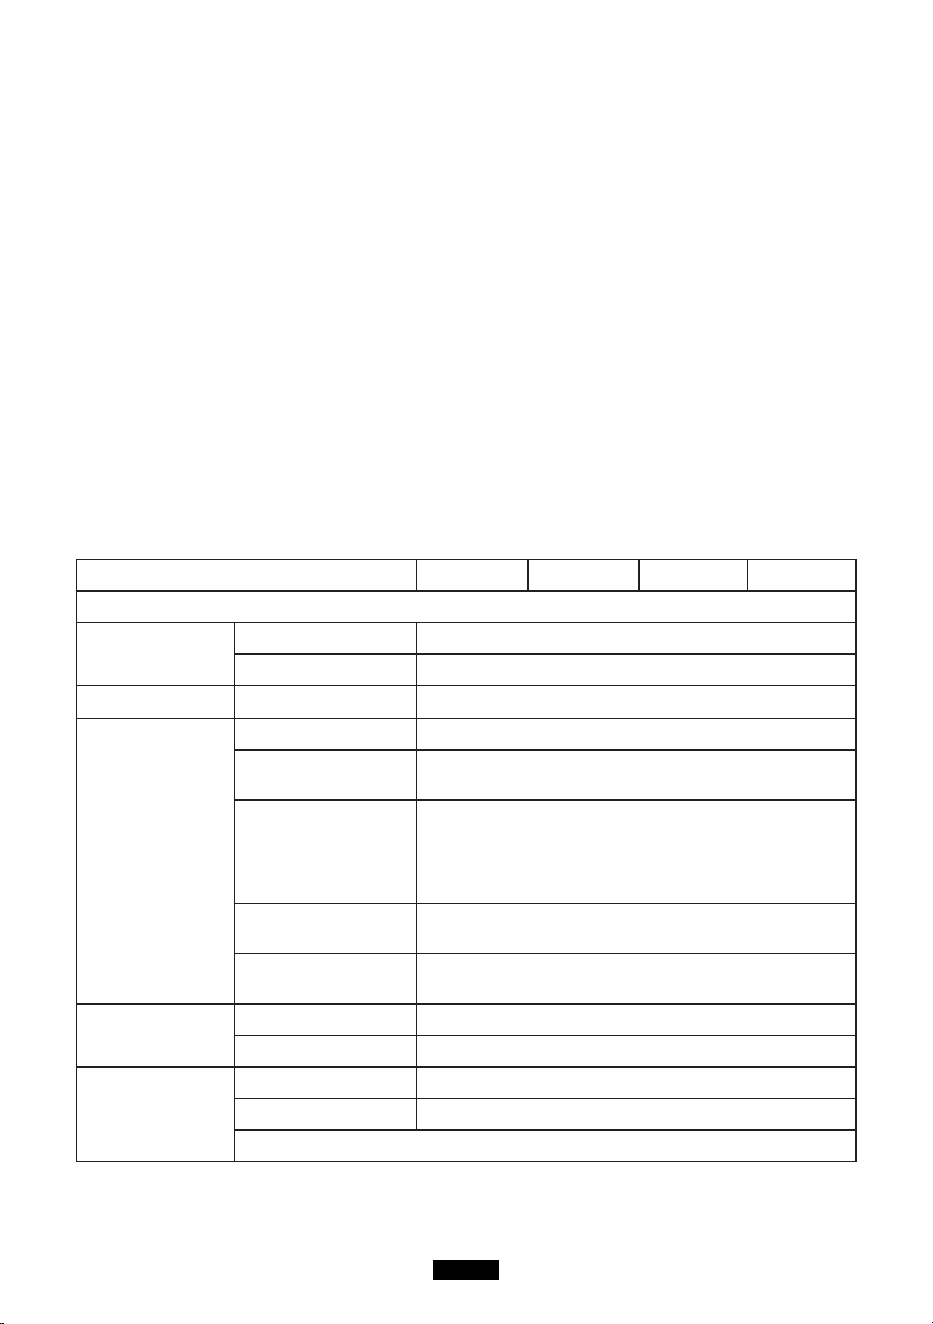
Trouble shooting and technical specification
Error Problem Solution
E001
Over-voltage protection
(battery pack)
Stop charging and start discharging.
E002
Under-voltage protection
(battery pack)
Pleasechargetheproductintime.Restartthe
machine once it is fully charged.
E003 Battery failure Restartthemachineandchargeit.
E004
Over-temperature protection
when dis- charging the
battery.
Wait for a while for it to cool down and then
restart the machine.
E005
Under-temperature
protection when dis-
charging the battery.
Wait for a while for it to heat up and then
restart the machine.
E006
Over-temperature protection
when charging the battery.
Wait for a while for it to cool down and then
restart the machine.
E007
Under-temperature
protection when charging
the battery.
Wait for a while for it to heat up and then
restart the machine.
E008
Under-voltage protection for
the 1st cell.
Please charge the product in time and re- start
it when fully charged.
E009
Under-voltage protection for
the 2nd cell.
Please charge the product in time and re- start
it when fully charged.
E010
Under-voltage protection for
the 3rd cell.
Please charge the product in time and re- start
it when fully charged.
E011
Under-voltage protection for
the 4th cell.
Please charge the product in time and re- start
it when fully charged.
E012
Busbar fault of inverter due
to under-volt- age.
Turn off and on the machine.
E013
Over-load protection of
inverter.
Check if the output port of inverter is over-
loaded. Turn off and on the AC output to
recover.
E014
Output port of inverter is
short-circuited.
Check if the output port of inverter is short-
circuited. Turn off and on the AC out- put to
recover.
E015
The heat sink of inverter is
overheated.
Wait for it to cool down and then restart the
machine.
E016
The temperature of the heat
sink is not detected.
Insert the NTC and restart the machine.
E017
Over-voltage protection (PV
input).
Disconnect the solar charging cable and then
restart the machine.
EN-08
E018
Over-voltage protection (PV
output)
Disconnect the solar charging cable, re- start
the machine and then re-insert the solar
charging cable.
E019
Over-temperature protection
of heat sink for PV module
The heat sink for PV module overheats. Wait
for it to cool down and then charge it.
E020
The temperature of the heat
sink for PV module is not
detected.
Restartthemachine.
E021
Charging protection of
battery protection board
Wait for the temperature to return to an
acceptable temperature and then start
charging.
E022 Battery protection
Disconnect the solar charging cable and
restart the machine.
E023
Over-power protection
(system)
Check if the total output power is overload- ed.
Restartthemachine.
If you have tried the methods mentioned above, but the problem still cannot be solved.
Contact seller customer service team.
ATTENTION!
Ifyoucannotndthesolutionforyourprobleminthechartabove,pleaseprovidethe
following information to our customer service team:
1. About the product
(1)Serial number
(2)Model
(3)Displayed information on the screen
(4)Description of your problem
(5)Does it happen before?
(6)In what circumstance does the problem occur?
2. About the solar panel (not included)
(1)Manufacturer and model of the solar panel
(2)Output voltage of the solar panel
(3)Output power of the solar panel
(4)MPPT output voltage of the solar panel
(5)MPPT output current of the solar panel
(6)The number of solar panels and how do you connect the panels
EN-09
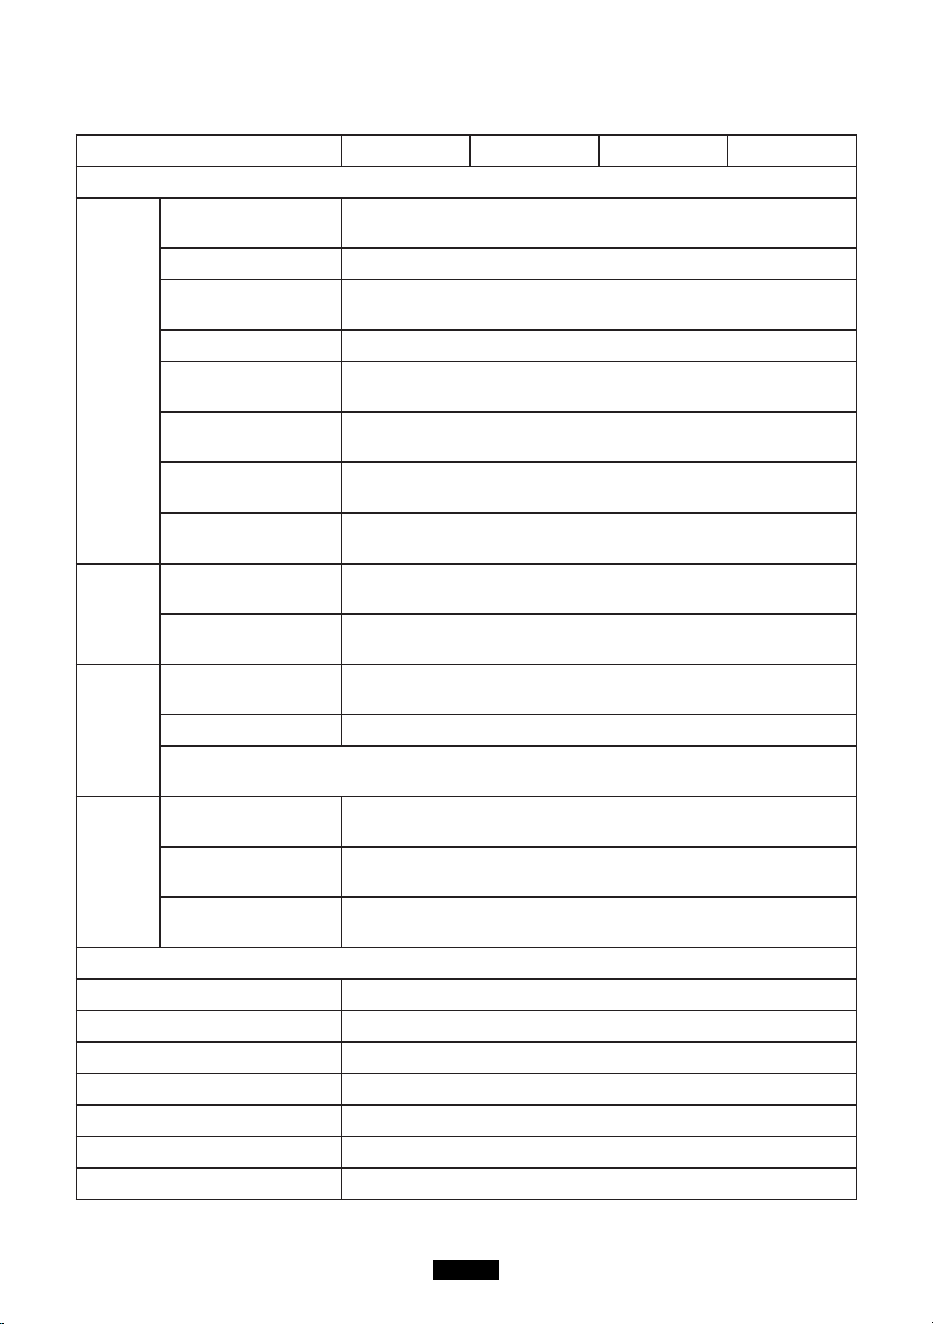
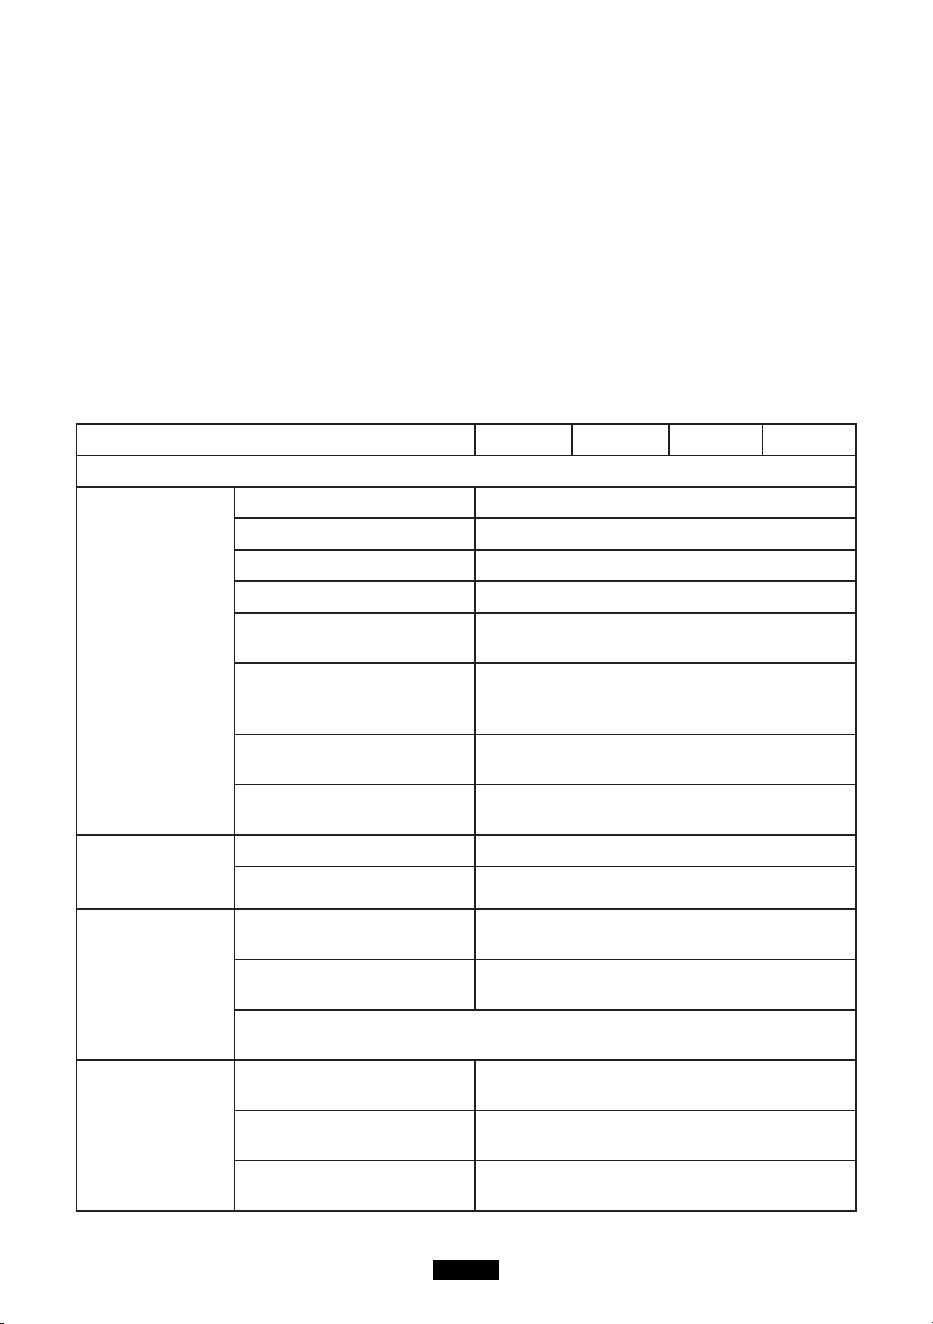
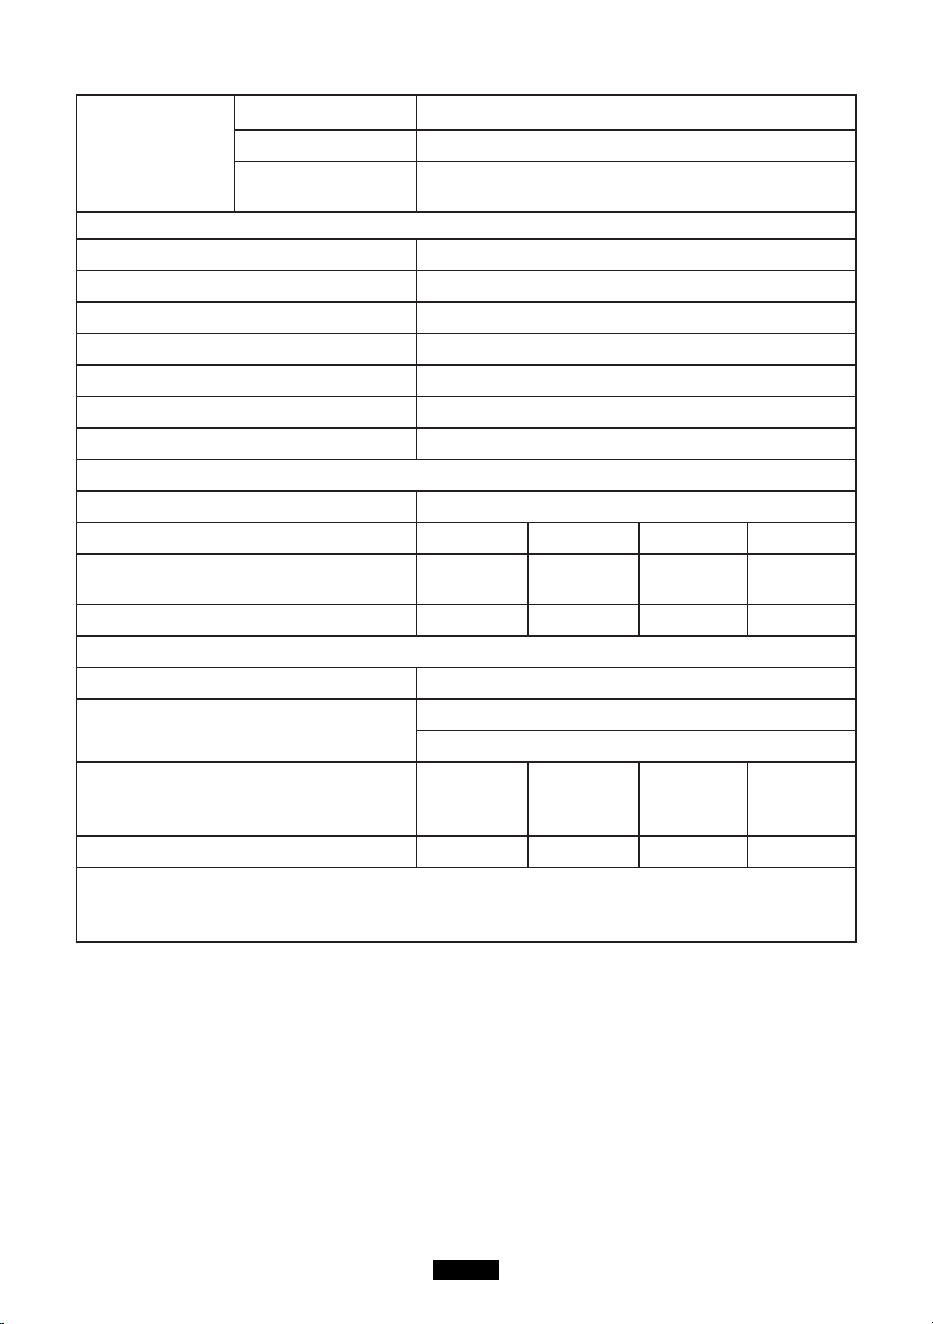
Specifications
Model EB120 EB150 EB180 EB240
Output Specications
Inverter
Output
Continuous Output
Volt- age
100-120Vac, 220-240Vac
RatedFrequency 50/60Hz
Continuous Output
Power
1000W
Power Factor 1
[email protected](under
nominalvoltage)
<5%
Over-load
protection
1000W≤Load<1200W@2Min;
1200W≤Load@1s;
Power Loss (No
Load & Turned-off)
<20W
MaxEfciency
(>70% Load)
88%(100-120Vac), 90%(220-240Vac)
12V/9A
Cigar
Light- er
Output
Continuous Output
Volt- age
12.2V(±1V)
Continuous Output
Cur- rent
9A
5V USB
Output
Output Voltage
Range
5V±0.3V
Max Output Current 3A
Note: The maximum output of a single USB port is 3A. The maximum output
of 2 USB ports is 3A((top and down).
Type-C
PD
Output
Supported Fast
Charge
PD Protocol
Output Voltage
Range
5-20V(±5%) (5V by default)
Continuous Output
Volt- age/Current
(5V/9V/12V/15V)3A(±0.3A), 20V/2.25A(±0.2A)
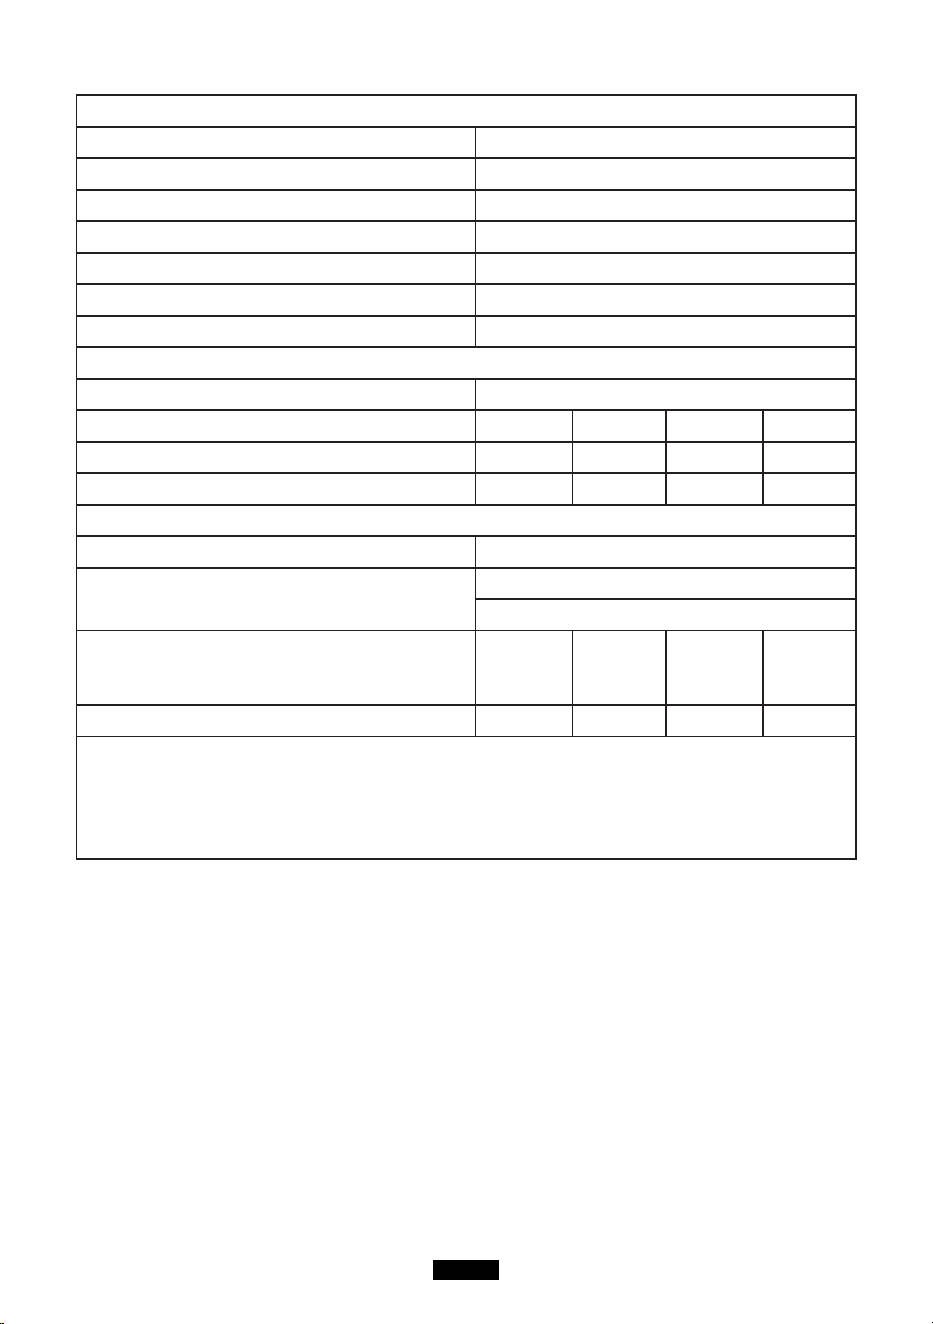
Input Specication
AC Adapter Charger 42V/200W
PV Max Input Power 500W
PVInputVoltageRange 16-60Vdc(OVP 73V±2V)
PV Max Input Cur- rent 10A
MPTTEfciency 99.5%
MaxEfciency >88%
Solar Charging Mode MPPT
EN-10
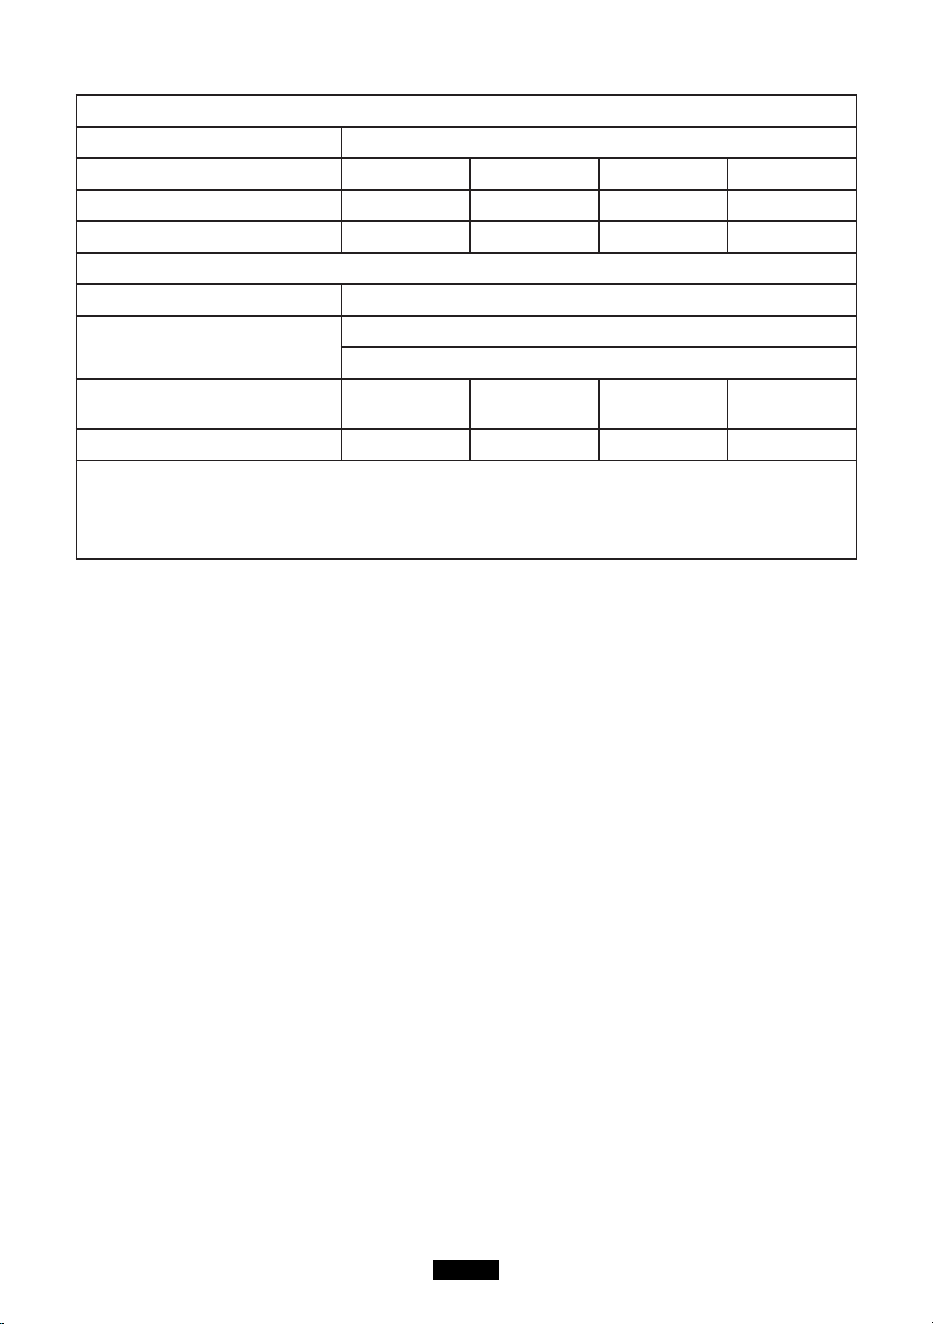
Battery
rated voltage 14.8Vdc
rated capacity 1200Wh 1500Wh 1800Wh 2400Wh
built-in battery cell Li-ion Li-ion Li-ion Li-ion
battery packing 4S30P 4S3P 4S45P 4S60P
Min Unit
IPRating IP 21
Operating Environ- ment
RelativeHumidity:10%-90%
OperatingTemperature:0-40°C
Dimensions
293.5*165.4*
364.7mm
371.5*165.4*
364.7mm
393.5*165.4*
364.7mm
493.5*165.4*
364.7mm
Net Weight 12.6 KG 17.2 KG 17 KG 22 KG
Note: When the total output power exceeds 1000W, the DC output will be directly shut
down. When the load is less than 30W, the output power would not be displayed. When
a high-power appliance is attached to the product, the displayed output power and the
actual output power could be different for up to 30W.
Warranty
Our company provides customers with warranty of 12 months from the date of purchase.
Contact us
Foranyinquiriesorcommentsconcerningourproducts,pleasecontactseller(service@
kayomaxtar.com) and we will respond as soon as possible.

DE-11
bittelesen Sie dieseBedienungsanleitungvor der Verwendung und befolgen Sie den
Anweisun-gen.BewahrenSiedieseBedienungsanleitungaufZukunftsbezug.
produktübersicht
A
C
D
B
F
J
H
G
I
E
A.HauptnetzschalterB.Gleichstromschalter
C.NetzschalterD.LEDAnzeigeleuchte
E. 5V USB Ausgangsanschluss F. Typ-C PD Ausgangsanschluss
G. Bildschirmanschluss H. ac adapter / pv - hafen
I.12VZigarettenanznderJ.Wechselstrom(AC)220-240VstandardSteckdose
LCD Anzeige
INPUT
W
W
DC ON/OFF
W
AC ON/OFF
6
1
2
3
4
5

DE-12
1. Ladeleistung 2. DC EIN / AUS-Status
3. DC Ausgangsleistung 4. AC EIN / AUS-Status
5.ACEingangsleistung6.Batteriestatusanzeige
Sicherheitswarnung
1. Bittelesen Sie vorGebrauch die Sicherheitswarnungenaufmerksamdurch und
bewahren Sie die Anleitung auf. Die GarantiedecktkeineSchäden ab, die
durchNichtbeachtung der Anweisungenentstandensind.
2. Bitte die Warnschilder und Bedienungentsprechendbeachten.
3.DasProduktkeinemdirektenSonnenlichtsetzen,RegenoderderVerwendungdes
Produkts in feuchterUmgebungaus.
4.DasProduktnichtinderNhevonWrmequellenwieElektrofenund
Heizgerteninstallieren.
5.DasProduktaneinemgutbelftetenOrtplatzierenundlagern.
6. Das ProduktmiteinemtrockenenTuchabwischen.
7.ImBrandfallPulverfeuerlscherfrdiesesProduktund
keinenWasserlscherverwenden,dadieseinenelektrischenSchlagverursachenkann.
8.BitteverndernoderzerlegenSiediesesProduktnicht.
9.WennderGeneratorgewartetwerdenmuss,wendenSiesichandasrtlich
angegebene Systeminstallations- und Wartungspersonal oder wenden Sie sich an
den Verkäufer.
Lagerung und Wartung
1. Die Betriebs- und Lagerungsumgebungkann die Lebensdauer des Produkts und die
ZuverlssigkeitderLeistungbeeinussen.
(1)DasProduktaneinemtrockenenundgutbelftetenOrtmitmilderTemperaturauf
(GeeigneteTemperatur:0°C-40°CGeeigneterelativeLuftfeuchtigkeit:10%-90%)
stellen.
(2)DasProduktaneinemsicherenOrtaufstellen,woesnichtgeschlagenodergeschttel
twerdenknnte.
(3)Das Produkt von korrosiven und brennbarenMaterialienfernhalten.
2.DasProduktschaltetsichaus,wenndieBatteriespannungzuniedrigist.IndiesemFall
mssenSiedenAkkuinnerhalbvon2-3Monate.
3. Wenn das Gerätlängere Zeit nichtverwendetwird, ladet man esvor der
LagerungvollstndigaufundesmindestenseinmalimMonatauaden.
DE-13
Off-Grid-Energiespeichersystem
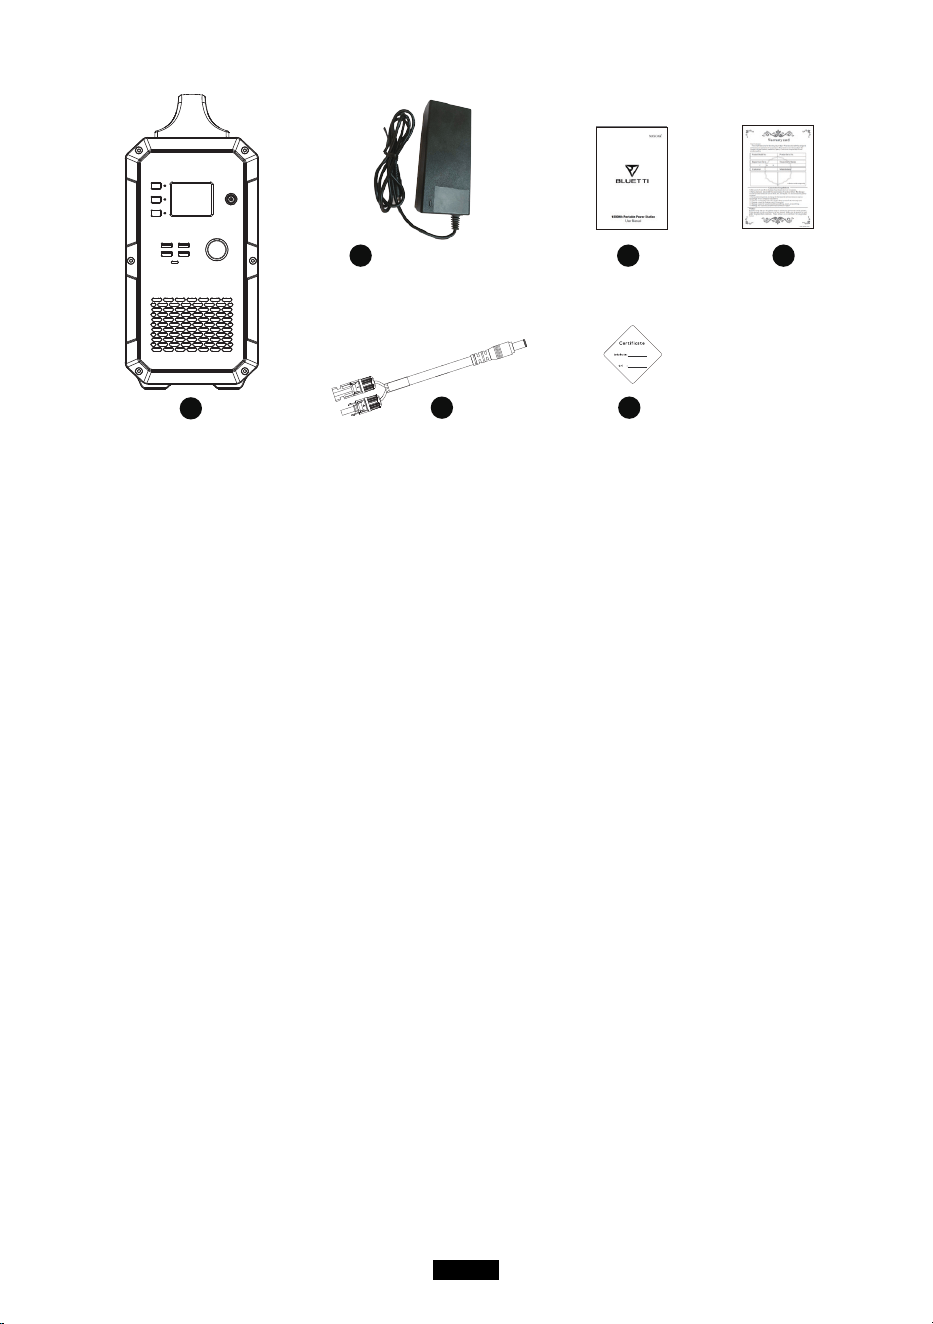
Auspacken
VordemffnendesPaketsprfen,obdasPaketbeschdigtistodernicht.Wenndas
Produktbei der LieferungbeschädigtwirdoderTeilebei der Ankunftverschwundensind,
wenden Sie sichbitte an den verkäuferKundendienst, indem Sie eine E-Mail an
service@kayomaxtar.com senden. Sie solltenfolgendeElementeerh- alten:
Artikel Anzahl des Artikels
1 TragbareKraftstation 1
2 AC Adapter (mit AC Ladekabel) 1
3 Solarladekabel (7909 bis MC4) 1
4 Benutzerhandbuch 1
5 garantie - karte 1
6 BescheinigungberdieQualikation 1
DE-14
1
2 4 5
3 6
Bild ist nur als Referenz.
Bedienungshinweise
Beachtung:
1.DieBetriebsumgebungsollteunsereAnforderungenerfllen.
2. Sicherstellen, dass der Lufteinlass / Luftauslassnichtblockiertist.
3. Bitte das Produktausschalten, wennesnichtverwendetwerden.
4.BittedasProduktvollstndigaufladen,wenneslngereZeitnichtbenutztwerden.
Verwendung des Produkts
Produktein- / ausschalten
1.DasProdukteinschalten:denHauptschaltergedrckthalten,umdas
Produkteinzuschalten.DieLED-An-zeigeundderBildschirmleuchtenauf.
2.DasProduktausschalten:denHauptschaltergedrckthalten,um
dasProduktauszuschalten.DerAnzeige-bildschirmunddieLED-
Anzeigeleuchtewrdenerlschen.
AC/DC Ausgang
Hinweis: sicherstellen, dass das Produkteingeschaltetist. Andernfallskann man
den AC / DC-Ausgangnichteinschalten.
1.AC/DC-Ausgangeinschalten:DieAC/DC-Tastegedrckthalten,umdas
Produkteinzuschalten.DieentsprechendeLED-Anzeigeleuchtetauf,undauf
demBildschirmwird“ACON”/“DCON”angezeigt.
2.AusschaltendesAC/DC-Ausgangs:HaltenSiedieAC/DC-Tastegedrckt,umdas
Produktauszuschalten.DieLED-AnzeigeerlischtundaufdemBildschirmerscheint'AC
OFF'/'DCOFF'.

DE-15
PV-Ladungsaktivierung
Generatorausschalten,PV(oderLadegert)zumAufladenanschließen,PV-
Ladefunktion aktivieren, die erste Spalte auf dem Bildschirm wird aufleuchten und
dieEingangsleistunganzeigen.ZudiesemZeitpunktbefindetsichderGeneratorim
LadezustandundkannACundnichtuntersttzenDC-Funktionen.WennSiedieAC-
undDC-Funktionenffnenmchten,mssenSiedenHauptschaltermehrals1Sekunde
langdrcken,umdenGeneratoreinzuschalten.DerBildschirmleuchtetnachdem
EinschaltendesGenerators.SchließenSienachdemStartdenPV(oderdasLadegert)
an,umdenLadevorgangzustarten.DerBildschirmzeigtdieEingangsleistunginWatt
an.ZudiesemZeitpunktknnendieAC-undDC-Funktionengeffnetwerden.
Beachtung:
1.WennderHauptnetzschalternichteingeschaltetist,sinddieAC-TasteunddieDC-
Taste ausgeschaltet, kein AC-Ausgang und kein DC-Ausgang.
2.WennderHauptnetzschaltereingeschaltetist,sinddieAC-TasteunddieDC-Taste
immernochausgeschaltet,keinAC-AusgangundkeinDC-Ausgang.Siemssenden
NetzschalterunddenGleichstromschalterseparateinschalten.
Wieladet man das Produkt auf
MitSolarstromaufladen
ZumLadendesProduktsdasSolarladekabelsteckenoderdasNetzteilinden
EingangsportdesProdukts.DerAnzeigebildschirmwrdeaufleuchtenunddie
Ladeleistungwrdeangezeigt.Aberdasnichtfalschneh-men.DasProduktlsstsichbeim
Ladennichtvonalleineeinschalten.WenndasProduktzuvorausgeschaltetwurde,
bleibtesausgeschaltet, sofern Sie esnichtmanuelleinschalten.
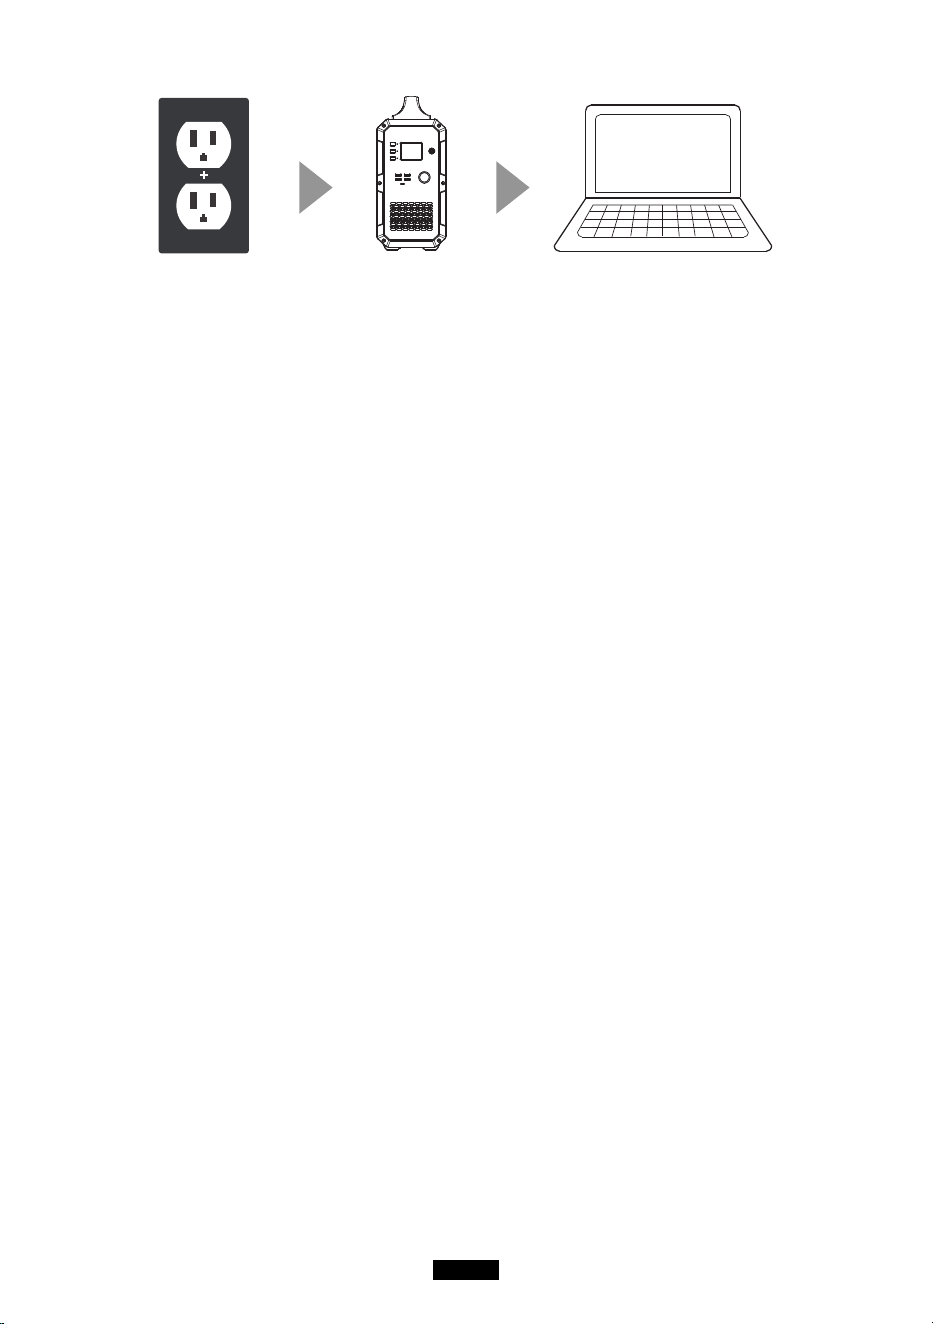
MitWechselstromauaden
Ein Ende des Adapters in die Wandsteckdosestecken und das andere Ende in
den Eingangsport des Pro- dukts. Das Produktwirddannaufgeladen und man
kandenAkkustatusberwachen,indemmandasAk-kusymbolaufdemLCD-
Bildschirmberprft.DasProduktwirdmiteinerintegriertenSteuerschaltunggeliefert.Wenn
der Akkuvollständigaufgeladenist, wird der Ladevorgangautomatischbeendet.
DE-16
Kaltes Wetter
KaltesWetterkanndieBatteriekapazittbeeinflussen.BeiMinustemperaturen(<0°C)
kannmandasProduktmglicherweiseentladen,essolltejedochnichtgeladenwerden.
AndernfallsknntederAkkudesProduktsstarkbeschdigtwerdenunddieKapazittwird
mglicherweisenichteinmalwiederhergestellt.
LadeschutzbeiniedrigerTemperatur:WenndasProduktbeieinerTemperaturunter0°C
geladen
wird, schaltetessichautomatisch ab und stoppt den Ladevorgang. Das
Produktwirdneugestartetundldtsichautomatischauf,wenndieTemperaturber10°C
steigt.
Tiefentladeschutz:WenndasProduktbeieinerTemperaturvon-20°Centladenwird,
wirdesausges- chaltet. Das Produktwirdneugestartet und aktiviert, wenn die
Temperaturber-10°Csteigt.
FAQ
F1: Wiekann man den Ladestatusüberprüfen?
DasAkkusymbolzeigtdenAkkustanddiesesProduktsan.DerAkkuladestandwird
in5Segmentenangezeigt.WennderAkkugeladenwird,blinktdasSymbol.Wenn
derAkkuvollstndigaufgeladenist,hrtdasSymbolaufzublinkenundalle5
Segmentewerdengefllt.
F2: Kann dieses Produktzum Laden meinerelektronischenGeräteverwendetwerd
en?
SiemssendieStromversorgunganjedemAusgangsportberprfen.Beispielsweisewird
die Stromver- sorgung am AC-Ausgangsportdurch den eingebautenWechselrichter des
Produktsbereitgestellt, dessenmaximaleDauerausgangsleistung 1000 W beträgt. Dies
bedeutet,dassesnurfrelektronischeGertegeeig-netist,derenerforderlicheLeistungnic
htmehrals 1000 W beträgt.
ntelligenteKühlungssteuerung
DerLfterluftautomatischan,wenndiefolgendenBedingungenerflltsind:

DE-17
1.DieBelastungdesWechselrichtersbersteigt400W.
2.DieBelastungdes12V-Zigarettenanznder-Steckersberschreitet80W.
3.DieLadeleistungderangeschlossenenGerteberschreitet100W.
Wenn die Gehäusetemperaturhochist, werden die PV Eingangsleistung und die
AC Eingangsleistungentsprechendangepasst, um sicherzustellen, dass das
Gehäusenichtzuheißwird.
Hinweis: DasGertnichtverwenden,wennderLfterdefektist.
Frequenzeinstellung
Wenn das Produkteingeschaltetist, den DC Ausgangeinschalten und den AC
Ausgangausgeschaltetlassen.DieDC-undAC-Taste1Sekundelanggedrckthalten,
umindenFrequenzeinstellmoduszugelangen.An-schließenddieAC-Tastedrcken,
umdieAusgangsfrequenzdesWechselrichtersauszuwhlen.DieDC-undAC-Taste
gedrckthalten,umdenFrequenzeinstellmoduszuverlassen.DieMaschineneustarten.
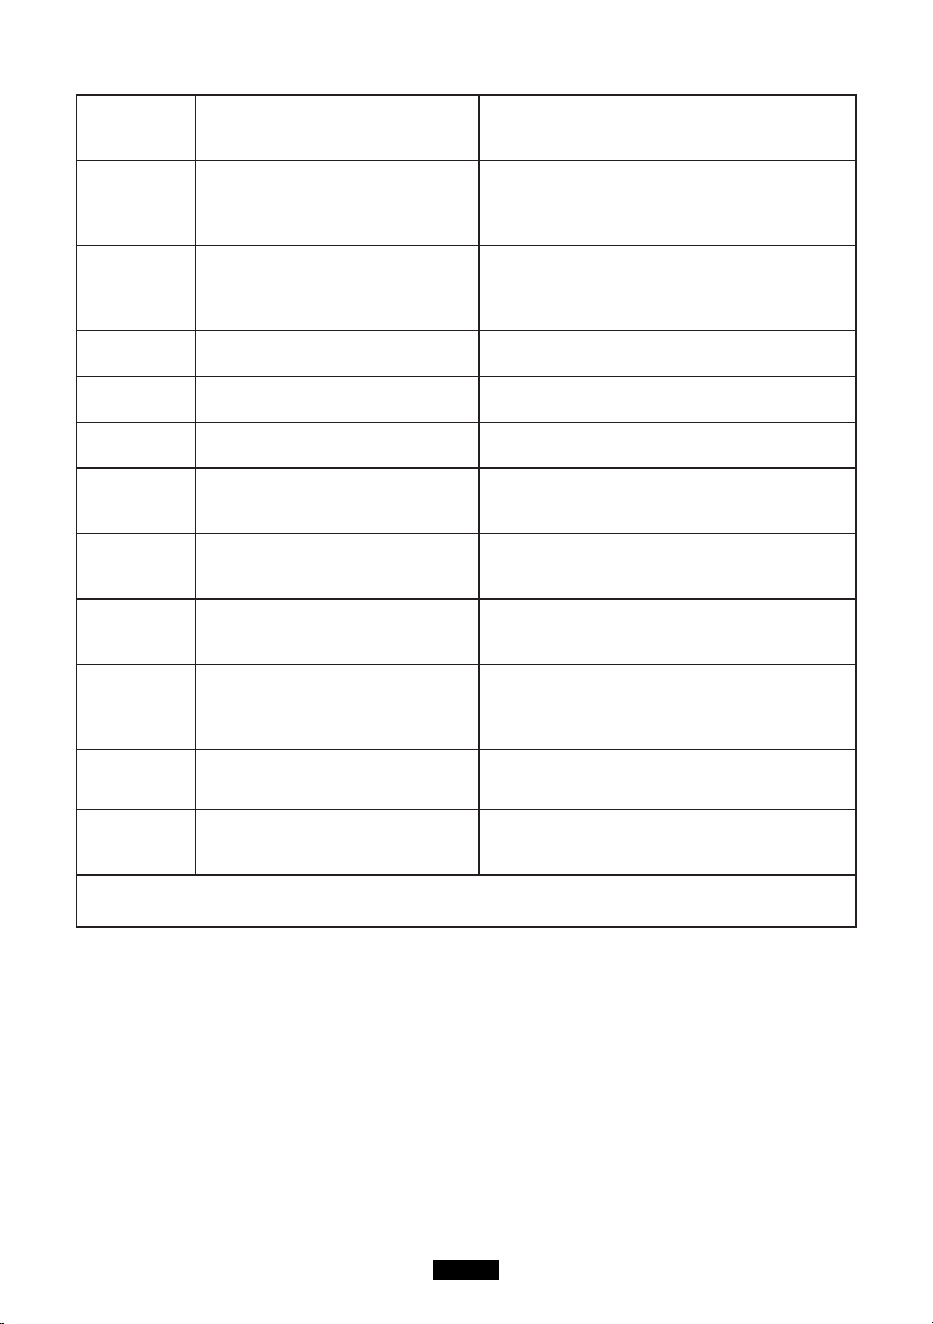
Fehlerbehebung
Fehlercode Problem Lösung
E001 berspannungsschutz(Akku)
Den Ladevorgangstoppen und mit der
Entla- dung beginnen.
E002 Unterspannungsschutz(Akku)
BittedasProduktrechtzeitigauaden.Das
Gerätneustarten, sobaldesvollständigaufg
eladenist.
E003 Batterieausfall DasGertneustartenundesauaden.
E004
bertemperaturschutzbeimEntl
aden der Batterie.
EineWeilewarten,bisesabgekhltist,und
die Maschineerneutstarten.
E005
Unter-Temperaturschutzbeim
Ent- laden der Batterie.
Eine Weilewarten, bissich das
Geräterwärmt hat, und die
Maschineerneutstarten.
E006
bertemperaturschutzbeim
Laden des Akkus.
EineWeilewarten,bisesabgekhltist,und
die Maschineerneutstarten.
E007
Untertemperaturschutzbeim
Laden des Akkus.
Eine Weilewarten, bissich das
Geräterwärmt hat, und die
Maschineerneutstarten.
E008
Unterspannungsschutzfrdie
1. Zelle.
DasProduktrechtzeitigauadenund
eserneutstarten, wennesvollständigaufgel
adenist.
E009
Unterspannungsschutzfrdie
2. Zelle.
DasProduktrechtzeitigaufstartenund
eserneutstarten, wennesvollständigaufgel
adenist.
E010
Unterspannungsschutzfrdie
3. Zelle.
DasProduktrechtzeitigauadenund
eserneutstarten, wennesvollständigaufgel
adenist.
E011
Unterspannungsschutzfrdie
4. Zelle.
DasProduktrechtzeitigauadenund
eserneutstarten, wennesvollständigaufgel
adenist.
DE-18
E012
Sammelschienenfehler des
Wechselrichtersaufgrund von
Un- terspannung.
Die Maschineausschalten und wiederein.
E013
berlastschutzdes
Wechselrichters.
Prfen,obderAusgangsportdes
Umrichtersberlastetist.DenAC-
Ausgangausschalten und wiederein, um
sichzuerholen.
E014
Ausgangsport des
Umrichtersistkurzgeschlossen.
Prfen,obderAusgangsportdes
Umrichterskurzgeschlossenist.DenAC-
Ausgangauss- chalten und wiederein, um
sichzuerholen.
E015
DerKhlkrperdes
Wechselrichtersistberhitzt.
Warten,bisesabgekhltist,unddie
Maschineerneutstarten.
E016
Die Temperatur des
Khlkrperswirdnichterfasst.
Den NTC einlegen und den Computer
neu start- en.
E017
berspannungsschutz(PVEin-
gang).
Das Solarladekabeltrennen und die
Maschineerneutstarten.
E018
berspannungsschutz(PV
Aus- gang)
Das Solarladekabeltrennen, die
Maschineerneutstarten und das
Solarladekabelerneuteinsetzen.
E019
bertemperaturschutzdes
KhlkrpersfrdasPV-Modul
DerKhlkrperfrdasPV-Modul
istzuheiß.Warten,bisesabgekhltist,und
esdann auf laden.
E020
Die Temperatur des
KhlkrpersfrdasPV-Modul
wirdnichterfasst.
Die Maschineneustarten.
E021
Ladeschutzder
Batterieschutzpla-tine
Warten, bis die
Temperaturwiedereineakzept-able
Temperaturerreicht hat, und den Ladevor-
gang starten.
E022 Batterie-Schutz
Das Solarladekabeltrennen und die
Maschineerneutstarten.
E023
berspannungsschutz
(System)
BitteprfenSie,obdieGesamta
usgangsleistungberlastetist.Die
Maschineneustarten.
Wenn Sie die obengenanntenMethodenausprobierthaben, das Problem
jedochnichtgelstwerdenkannWendenSiesichandasVerkuferKundendienstteam.
BEACHTUNG!
WennSieinderobigenTabellekeineLsungfrIhrProblemndenknnen,teilenSie
unseremKundendienst die folgendenInformationenmit:
1. Über das Produkt
(1)Ordnungsnummer
(2)Modell
(3)InformationenaufdemBildschirmanzeigen
(4)BeschreibungIhres Problems
DE-19
(5)passiert es schon mal?
(6)In welchem Fall tritt das Problem auf?
2. Über das Solarpanel (nichtenthalten)
(1)Hersteller und Modell des Solarmoduls
(2)Ausgangsspannung des Solarmoduls
(3)Ausgangsleistung des Solarmoduls
(4)MPPT Ausgangsspannung des Sonnenkollektors
(5)MPPT Ausgangsstrom des Sonnenkollektors
(6)DieAnzahlderSonnenkollektorenundwiewerdendiePlattenangeschlossen
Spezifikationen
Modell EB120 EB150 EB180 EB240
Ausgangspezikation
Inverterausgang
Dauerausgangsspannung 100-120Vac, 220-240Vac
Nennfrequenz 50/60Hz
Dauerausgangsleistung 1000W
Leistungsfaktor 1
THDV@0.7R
(unterNennspannung)
<5%
berspannungschutz
1000W≤Ladung<1200W@2Minuten;
1200W≤Ladung@1s;
Stromausfall (keine Last
und ausgeschaltet)
<20W
MaximalerWirkungsgrad
(> 70% Belastung)
88%(100-120Vac) , 90% (220-240Vac )
12V / 9A Zigaret-
tenanznderaus-
gang
Dauerausgangsspannung 12.2V (± 1V)
Dauerausgangsstrom 9A
5V USB-
Ausgang
Ausgangsspannungs-
bereich
5V± 0,3V
MaximalerAus-
gangsstrom
3A
Hinweis:DiemaximaleAusgangsleistungeineseinzelnenUSB-Ports
beträgt 3A. Die maximaleAusgabe von 2 USB-Ports beträgt 3A.
Typ-C PD-Aus-
gang eingeben
UntersttzteSchnellla-
dung
PD-Protokoll
Ausgangsspannungs-
bereich
5-20V(standardmßig5V)
Dauerausgangsspannung
/ Strom
(5V/9V/12V/15V)3A(±0.3A),
20V/2.25A(±0.2A)
DE-20
Eingabespezikation
NetzteilLade-gert 42V/200W
PV Max. Eingang- sleistung 500W
PV Ein- gangsspan- nungsbereich 16-60Vdc(OVP 73V±2V)
PV Max Ein- gangsstrom 10A
MPTT-Efzienz 99.5%
MaximaleEf-zienz > 88%
Solarlademodus MPPT
Batterie-Spezikation
Nennspannung 14.8Vdc
Nennleistung 1200Wh 1500Wh 1800Wh 2400Wh
Eingebaute Li-ion Li-ion Li-ion Li-ion
Batterieverpackung 4S30P 4S3P 4S45P 4S60P
Min Einheit
IP-Bewertung IP 21
Betriebsumge- bung
RelativeLuftfeuchtigkeit:10%-90%
Betriebstemperatur: 0-40
° C
IP-Bewertung
293.5*
165.4*
364.7mm
371.5*
165.4*
364.7mm
393.5*
165.4*
364.7mm
493.5*
165.4*
364.7mm
Nettogewicht 12.6 KG 17.2 KG 17 KG 22 KG
Hinweis:WenndieGesamtausgangsleistung1000Wbersteigt,wirdderDC-
Ausgangdirektabgeschaltet. Wenn die Last wenigerals 30 W beträgt, wird
dieAusgangsleistungnichtangezeigt.WenneinGertmithoherLeistungan
dasProduktangeschlossenwird,knnendieangezeigteAusgangsleistungunddietatsc
hlicheAusgangsleistungfrbiszu30Wabweichen.
Garantie
Wir bieten den Kunden eine Garantie von 12 Monaten ab Kaufdatum.
Kontaktieren Sie uns
FrAnfragenoderKommentarezuunserenProduktensendenSiebitteeineE-Mailan
service@kayomaxtar.com,undwirwerdenIhnensoschnellwiemglichantworten.

JP-21
ご使用前に必すこの取扱説明書をよくお読みいただき、正しくお使いください。なお、お読みになったあとは、
お使いになる方かいつでも見られるところに必す保管してください。
各部の名称
A
C
D
B
F
J
H
G
I
E
A. メイン電源ボタン B. DC 電源ボタン
C. AC 電源ボタン D. LED 表示ランプ
E. USB 5V 出力ポート F. Type-C PD 出力ポート
G. LCD ディスプレイ H. アダプター /PV 入力ポート
I. 12V シガーライター出力 J. AC(100-120V) 出力ポート
LCD ィスレイ
INPUT
W
W
DC ON/OFF
W
AC ON/OFF
6
1
2
3
4
5

JP-22
1. 入力電力表示 2. DC オン / オフ状態
3. DC 出力電力表示 4. AC オン / オフ状態
5. AC 出力電力表示 6. バッテリー残量
注:
1. 故障があった場合に、入力電力表示、DC出力電力表示、A C出力電力表示にエラーコードが
出る提示があります。
2. メイン電源ボタンを押す場合に、DC 電源ボタンと AC 電源ボタンとも押さない場合に、60 秒後、
本製品は自動的に電源 OFF します。
3. メイン電源ボタンを押してから、DC 電源ボタン或いは AC 電源ボタンを押す場合に、接続品がな
い時、本製品も自動的に電源 OFF します。
安全上のご注意
1. ご使用の前に「安全指導」をよくお読みください。 指示に従わなかった場合、 保証は無効になります。
製品の警告ラベルを確認してください。
2. 直射日光の当たる場所や雨や湿気の多い場所での使用は避けてください。
3. ラジエーター、オーブン、その他の熱源の近くには設置しないでください。
4. 本製品を平らで安定した場所に置きます。
5. 本製品が汚れた場合、乾いた布で拭いてください。
6. 本製品を分解、または改造しないでください。
7. 火から遠ざけてください。万が一火災が発生したら、本製品に粉末消火剤で消火してください。 水
系消火器を使用した場合は感電の恐れがあります。
保管とお手入れ
1. 使用及び保管環境は製品寿命、パフォーマンスと信頼性に影響を与える可能性がありますので、、
下記の注意事項をお守りください :
(1) 本製品は、換気の良い、乾燥していて穏やかな温度の場所で設置してください。 ( 適切な温
度範囲 : 0° C~ 40° C 適切な相対湿度 : 10% ~ 90%)
(2) ふづけられたり、振り動かされたりしない安全な場所で設置してください。
(3) 腐食性お及び可燃性物質から離れた場所で保管してください。
2. 電池残量が低下すると、本製品は自動的に電源オフになります。この場合、2-3 ヶ月以内に
電池を充電してください。
3. 長期間使用しない場合、保管前に本製品をフル充電し、その後最低でも月に 1 回充電してくだ
さい。本製品を乾燥している場所で保管してください。
JP-23
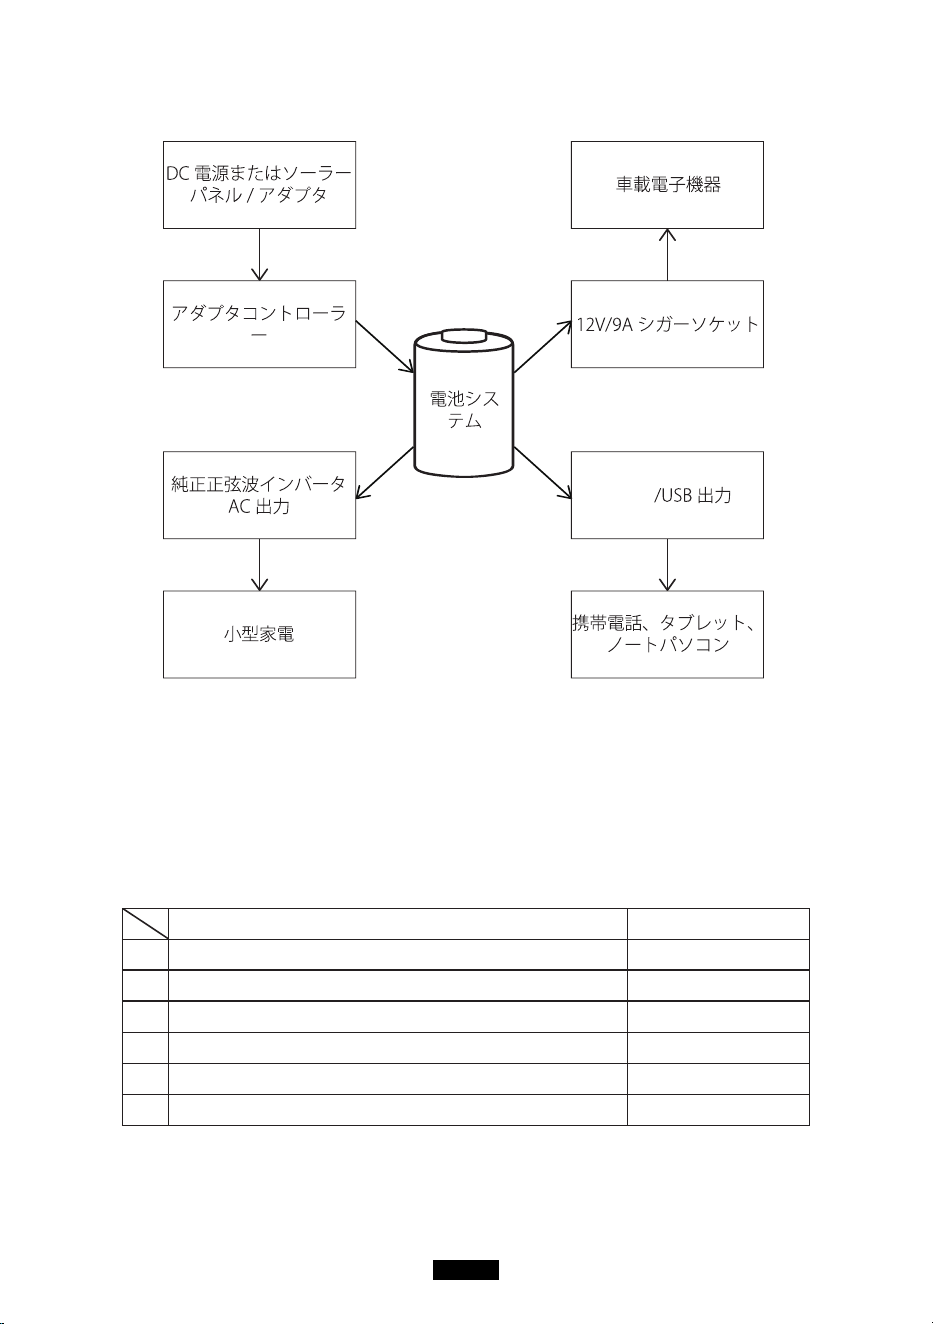
蓄電システム
Type-C
箱の開封
本製品を梱包開封する前、梱包に破損が無いことをご確認ください。梱包開封後、製品に外観
上破損が無いこと、または付属品が全て揃っていることをご確認ください。付属品は下記のリストの
内容です。付属品に漏れ、間違い等がある場合は、お買い上げ販売店または当社お客様センター
(service@kayomaxtar.com )にご連絡ください。
内容物 数量
1
ポータブル電源
1
2
AC 充電アダプター
1
3
ソーラーパネル充電ケーブル (MC4:7.9*0.7mm)
1
4
取扱説明書
1
5
サービスカード
1
6
合格証明書
1
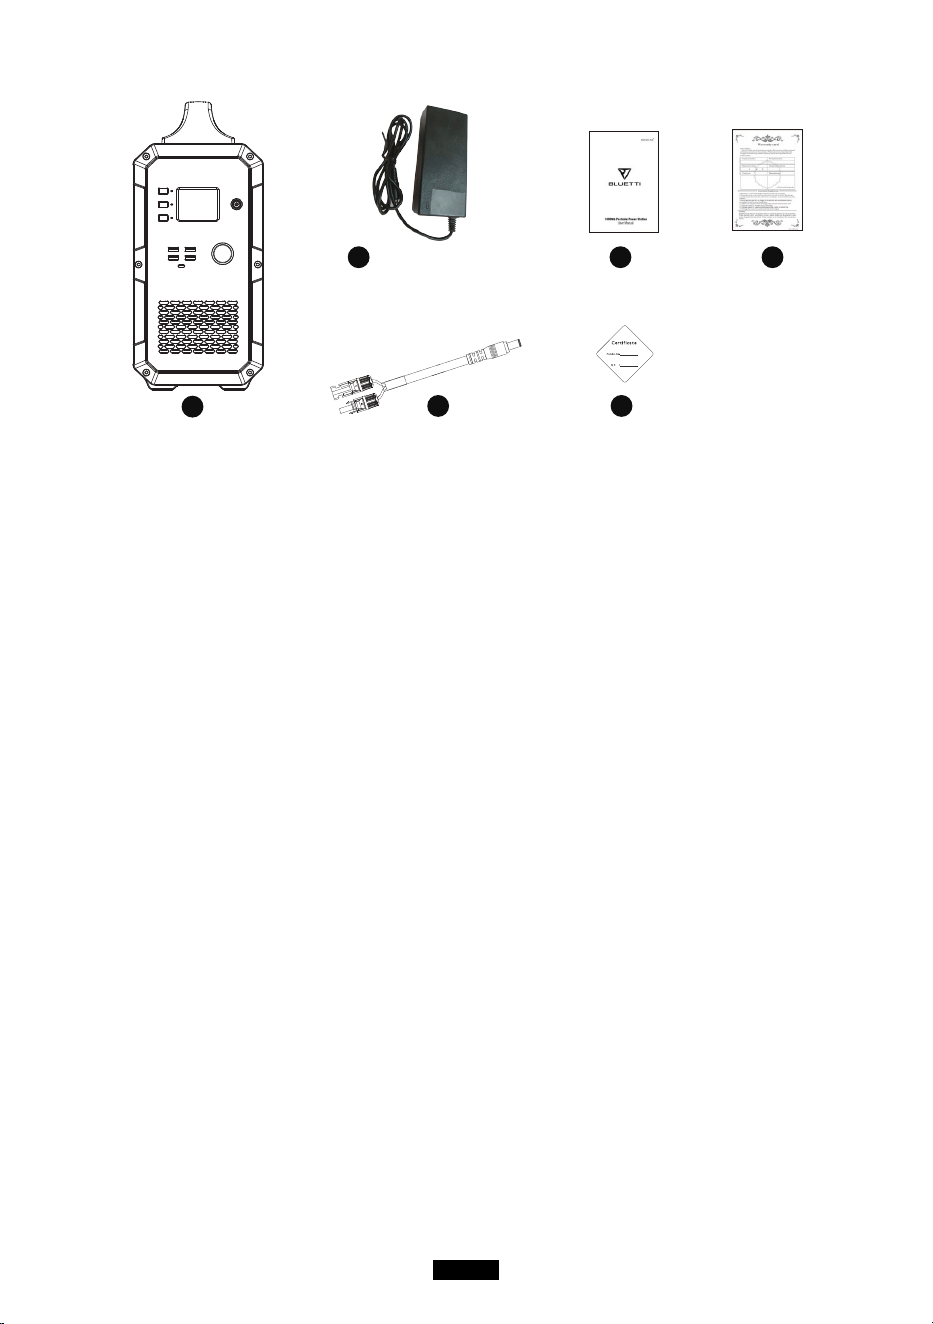
JP-24
1
2 4 5
3 6
写真は参考までに
実物を准にする
操作指示
注意事項 :
1. 動作環境は要件を満たすこと。
2. 空気の出入口が塞がれていないこと。
3. 使用しない場合は製品の電源を切ってください。
4. 長期間使用しない場合、保管前に本製品をフル充電してください。
製品の使い方
電源オン / オフ
電源オン : 電源ボタンを長押しすると、電源が入り、対応する表示ランプが点灯し、LCD 画面が点
灯します。
電源オフ : 電源ボタン長押しすると、製品と LCD 画面の電源が切れます、対応する表示ランプが消
灯します。
AC/DC 出力
注 : 本製品の電源が入っていることを確認してください。電源オフの場合、AC / DC 出力をオン
にすることはできません。
1. AC/DC 出力オン : AC/DC ボタンを長押しすると、AC/DC 出力がオンになり、対応する表示ラ
ンプが点灯し、LCD 画面に「AC ON」/「DC ON」と表示されます
2. AC/DC 出力オフ :AC/DC ボタンを長押しすると、AC/DC 出力がオンになり、対応する表示ラン
プが点灯し、LCD 画面に「AC O FF」/「DC O FF」と表示されます。
製品の充電方法について
メイン電源ボダンOFF の場合、本製品に充電する時、LCDディスプレイに入力だけの部分を点灯します、
JP-25
その時、入力電力表示があります。もし、本製品で他の製品に給電したい場合に、まず、メイン電源
ボダンを押してください、メイン電源ボダンを押したら、LCD ディスプレイに全体を点灯します。次、DC
電源ボタンか AC 電源ボタンかを押してください、その時、本製品から接続した製品に充電可能です。
ご注意:
1. メイン電源ボダン OFF の場合、AC 電源と DC 電源が OFF 状態になり、出力できません。
2. メイン電源ボダン ON の場合、AC 電源と DC 電源がONしないと、AC 電源と DC 電源も
OFF 状態になり、出力できません。もし、本製品で他の製品に給電したい場合に、DC 電源ボタ
ンか AC 電源ボタンかを押してください、その時、本製品から接続した製品に充電可能です。
ソーラーで充電する
ソーラーパネルまたは AC アダプターで製品の入力ポートに差し込んでから、製品自体への充電が開
始します。その時、ディスプレイが点灯し、充電電力が表示されます。製品自体への充電中に、他の
機器に給電したい時、手動的にメイン電源を入れる必要があります。
AC 電源で充電する
アダプターの一端を壁コンセントに、もう一端を本製品の入力ポートトに差し込みます。すると充電が
開始し、LCD 画面の電池アイコンから電池残量を確認できます。本製品には高度な制御回路が内
蔵され、フル充電になると自動で充電を終了します。
寒冷地での使用について
低温環境は電池容量に影響を与える可能性があります。氷点下 (<0° C) では、本製品を放電す
ることはできますが、充電しないでくださいた。低温環境で充電すると、電池は大いに損傷を受け、電
池容量が初期容量に回復できなくなります。
低温環境での充電保護 : 0° C 以下の環境で製品自体を充電すると、本製品は自動的にシャット
ダウンし、充電も停止されます。周囲温度が 10° C 以上になると、本製品は再起動して充電を再開
します。低温環境での放電保護 : -20° C 以下の環境で製品を放電させると、本製品は自動的に
シャットダウンします。周囲温度が -10° C 以上になると、本製品は再起動して放電を再開します。
JP-26
よくあるご質問
Q1: 充電状態を確認する方法は ?
電池アイコンは本製品の電池残量を示しています。電池残量は 5 段階で表示されます。充電中は、
アイコンが点滅します。フル充電になると、アイコンが点滅を止め、5 段階が全て点灯します。
Q2: 本製品で電子機器を充電できますか ?
まず、各出力ポートの出力電力を確認する必要があります。例えば、AC 出力ポートの電力は、本製
品の 内蔵インバータによって供給され、その最大連続出力電力は 1000W となります。これは、AC
出力ポート は消費電力が 1000W 以下の電子機器にのみ適していることを意味します
自動冷却
本製品に冷却ファンと冷却システムが搭載しておりますので、下記の場合に、本製品は自動的に冷
却できます :
1. AC 出力で、負荷が400W を超える
2. 12V 出力で、負荷が 80W を超える
3. 入力電力が 100W を超える
注 : 冷却ファンが故障しているときは、本機を使用しないでください。
周波数設定
製品の電源が入っている状態で、DC 出力をオンにし、AC 出力をオフのままにします。DC と AC 両
方の電源ボタンを 1 秒間押し続けると、周波数設定モードに入ります。その後、AC ボタンでインバー
タの出力周波数を選択できます。周波数設定モードを終了するには、DC と AC 両方の電源ボタンを
押し続けてくだ さい。設定完了後、本機を再起動してください。
よくある故障とその処置
エラーコード 問題 処置
E001 過電圧保護(バッテリーパック) 充電を停止して電池を放電させます
E002 低電圧保護(バッテリーパック)
直ちに製品自体を充電してください。充電が 完
了すると、本機を再起動してください。
E003 電池故障 本機を再起動して充電します。
E004 電池放電時の過熱保護 しばらく放置し、冷めてから再起動します。
E005 電池放電時の低温保護 しばらく放置し、暖まってから再起動します。

JP-27
E006 電池充電時の過熱保護 しばらく放置し、冷めてから再起動します。
E007 電池充電時の低温保護 しばらく放置し、暖まってから再起動します。
E008 1 番目セルの低電圧保護 直ちに充電し、フル充電になると再起動します。
E009 2 番目セルの低電圧保護 直ちに充電し、フル充電になると再起動します。
E010 3 番目セルの低電圧保護 直ちに充電し、フル充電になると再起動します。
E011 4 番目セルの低電圧保護 直ちに充電し、フル充電になると再起動します。
E012
低電圧によるインバータの母線故
障
本機の電源を切入します。
E013 インバータの過負荷保護
インバータの出力ポートが過負荷になっているが
確認してください。AC 出力を切入して復帰させ
ます。
E014
インバータの出力ポートが短絡して
いる
インバータの出力ポートが短絡しているか確認し
てください。AC 出力を切入して復帰させます。
E015
インバータのヒートシンクが過熱し て
いる
しばらく放置し、冷めてから再起動します。
E016 ヒートシンク温度未検出 NTC を挿入し再起動します
E017 過電圧保護 (PV 入力 )
ソーラー充電ケーブルを外してから、本機を再起
動します。
E018 過電圧保護 (PV 出力 )
ソーラー充電ケーブルを外し、本機を再起動 し
てから、ソーラー充電ケーブルを再挿入し ます。
E019
太陽電池モジュール用ヒートシンク
の過熱保護
太陽電池モジュール用ヒートシンクが過熱し て
います。しばらく放置し、冷めてから充電 します。
E020
太陽電池モジュール用ヒートシンク
温度未検出
本機を再起動します。
E021 電池保護板の充電保護
しばらく放置し、温度が許容温度に戻ってから
充電します。
E022 電池保護
ソーラー充電ケーブルを外してから、本機を
再起動します。
E023 過電力保護 ( システム )
総出力電力が過負荷になっているかを確認し、
本機を再起動します。
上記の処置をしても改善しない場合、カスタマーサービスチームまでにご連絡ください。
JP-28
ご注意 !
上の表で解決策が見つからない場合、次の情報を弊社のカスタマーサービスチームにご提供ください :
1. 製品について
(1) シリアル番号
(2) 型番
(3) ディスプレイに表示された情報
(4) 問題についての説明
(5) 以前に起こったことがある ?
(6) 問題がのような状況で発生した ?
2. ソーラーパネルについて ( 別売 ) - ソーラーパネルのメーカーと型番 - ソーラーパネルの出力電圧
(1) ソーラーパネルの出力電力
(2) ソーラーパネルの MPPT 出力電圧 - ソーラーパネルの MPPT 出力電流 - ソーラーパネルの
数量と接続仕様
製品仕様
型番号
EB120 EB150 EB180 EB240
出力仕様
連続出力電圧 100-120Vac, 220-240Vac
定格周波数 50/60Hz
連続出力電力 1000W
インバータ出力
力率 1
THDV@R ( 公称電
圧 )
<5%
過負荷保護
1000W ≤ 負荷 < 1200W@2 分 ;
1200W ≤ 負荷 @1 秒 ;
電力損失 ( 無負荷お
よびターンオフ )
<20W
最大効率 (> 70%
負荷 )
88% (100-120Vac), 90%(220-240Vac)
12V/9A シガーラ
イター出力
連続出力電圧 12.2V( ± 1V)
連続出力電流 9A
5V USB 出力
出力電圧範囲 5V ± 0,3V
最大出力電流 3A
注 : 単一 USB ポートとダブル USB ポートの最大出力は 3A です。
JP-29
Type-C PD 出力
急速充電 PD プロトコル
出力電圧範囲 5-20V
連続出力電圧 / 電
流
(5V/9V/12V/15V)3A , 20V/2.25A
入力仕様
AC アダプタ 42V/200W
PV 最大入力電力 500W
PV 入力電圧範囲
16-60Vdc(OVP 73V±2V)
PV 最大入力電流 10A
MPPT 効率 99.5%
最大効率 >88%
ソーラー充電モード MPPT
電池仕様
定格電圧
14.8Vdc
容量
1200Wh 1500Wh 1800Wh 2400Wh
内蔵バッテリー
Li-ion
Li-ion
battery cell
Li-ion Li-ion
バッテリーパキング
4S30P 4S3P 4S45P 4S60P
最小単位
IP 等級 IP 21
動作環境
相対湿度 : 10%-90%
動作温度 : 0-40° C
外形寸法
293.5*
165.4*
364.7mm
371.5*
165.4*
364.7mm
393.5*
165.4*
364.7mm
493.5*
165.4*
364.7mm
正味重量
12.6 KG 17.2 KG 17 KG 22 KG
注 : 総出力電力が 1000W を超えると、DC 出力は直接オフになります。負荷が 30W 未満の場合、
出力 電力は表示されません。高消費電力機器が本製品に接続されている場合、表示される出力
電力と実際の 出力電力の間に最大 30W の差がある可能性があります。
保証
当社は、購入日から 12 ヶ月の保証をお客様に提供します。
お問い合わせ
当社の製品に関するお問い合わせやご意見は、service@kayomaxtar.com まで電子メールで
お送りください。できるだけ早く対応いたします。
P/N:16.061.00223-01A0
FB public page:MaxoakDirect
Twitter:Maxoak_fans
Instagram:Maxoak.fans