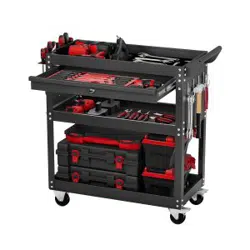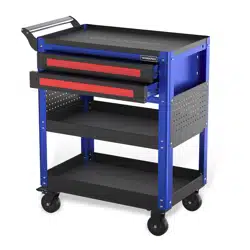

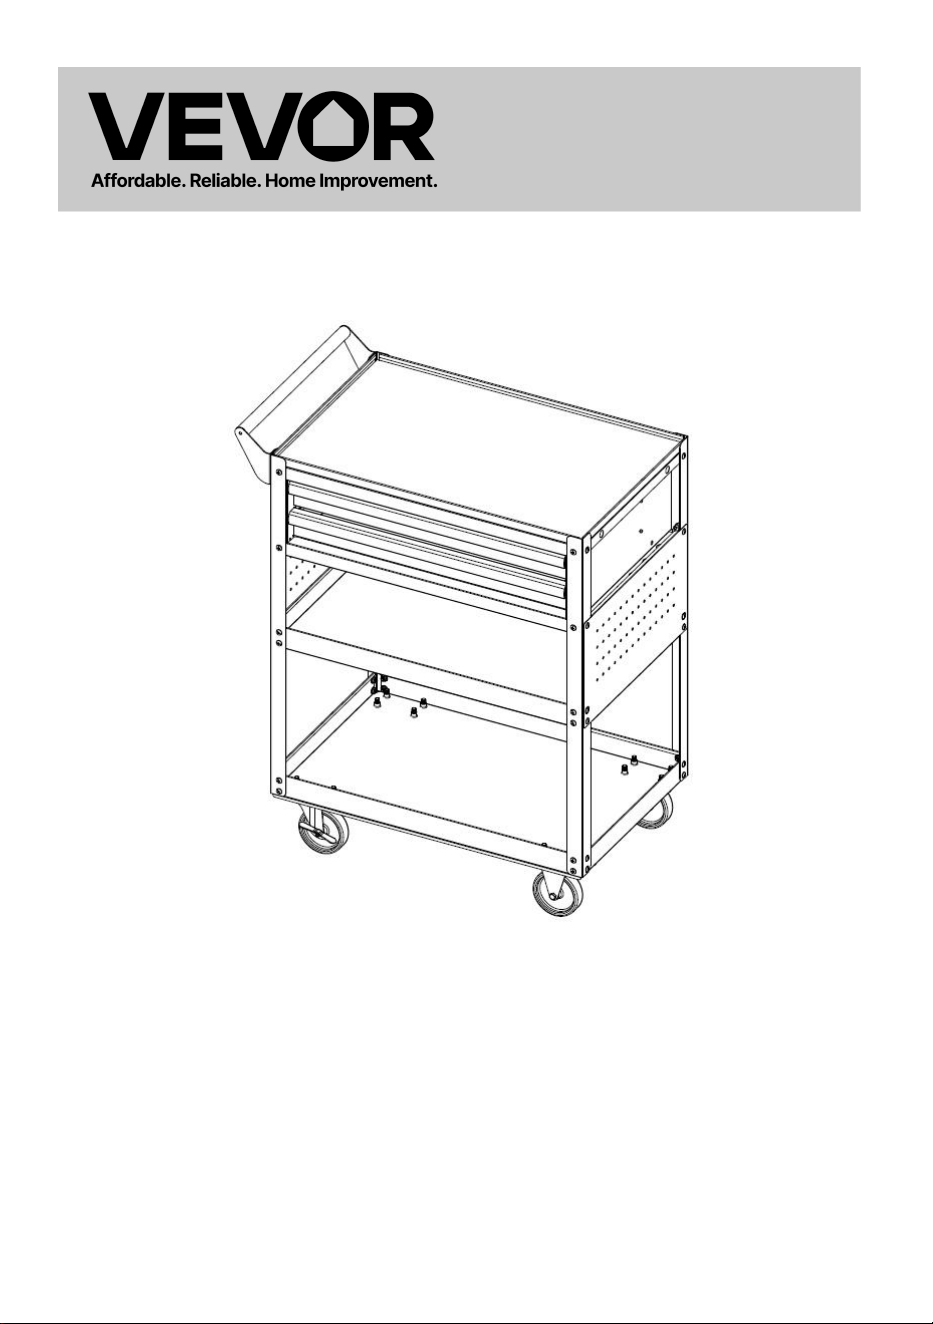
TOOL CART
MODEL: T271802
Technical Support and E-Warranty Certificate
www.vevor.com/support
- 1 -
MODEL: T271802
This is the original instruction, please read all manual instructions carefully
before operating. VEVOR reserves a clear interpretation of our user manual.
The appearance of the product shall be subject to the product you received.
Please forgive us that we won't inform you again if there are any technology
or software updates on our product.
TOOL CART

- 2 -
IMPORTANT SAFETY INSTRUCTIONS
Warning - To reduce the risk of injury, user must read
instructions manual carefully.
This symbol, placed before a safety comment, indicates a
kind of precaution, warning, or danger. Ignoring this warning
may lead to an accident. To reduce the risk of injury, fire, or
electrocution, please always follow the recommendations
shown below.
Warning- Be sure to wear gloves when using this product.
1) Keep this manual for the safety warnings and precautions. The manual
offers important information on how to assemble, use and maintain this
product.
2) Please handle metal edges carefully.
3) DO NOT stand on this product or use it as a ladder.
4) DO NOT alter this product in any manner that is not intended, as this
may cause product damage or personal injury.
5) Always assemble on an even surface.
6) The maximum loaded weight on the tool cart is no more than 400lbs,
evenly distributed.
7) Bind the goods with the cart tightly with the Tie-down strap before
moving.
ASSEMBLY PRECAUTIONS
1. Please assemble the product in strict accordance with the instructions.
Incorrect assembly could be hazardous.
2. Please wear safety goggles and work gloves properly during assembly.
3. Do not try to assemble the product when feeling tired or when under the
influence of alcohol, drugs or medication.
4. Load-bearing capacity and other product parameters are applied to the
properly and completely assembled product only.

- 3 -
5. A Philips screwdriver, an open end wrench 14# and a pair of gloves
may also be used (Not included in the carton).
USE PRECAUTIONS
1. This product is not a toy. Do not allow children to play with or get access
to this item.
2. Check carefully before use. Do not use if parts get loosened or
damaged.
3. Use on flat and hard surfaces only.
4. Do not exceed the listed load-bearing capacity. Tighten all the knobs
securely before placing weights on them. Be aware of the dynamic
load-bearing capacity! Sudden load changes may temporarily cause
excessive load, resulting in product failure.
SAVE THESE INSTRUCTIONS
PRODUCT PARAMETERS
MODEL
T271802
Product size
785*450*945 mm
Total load limit
400 lbs
- 4 -
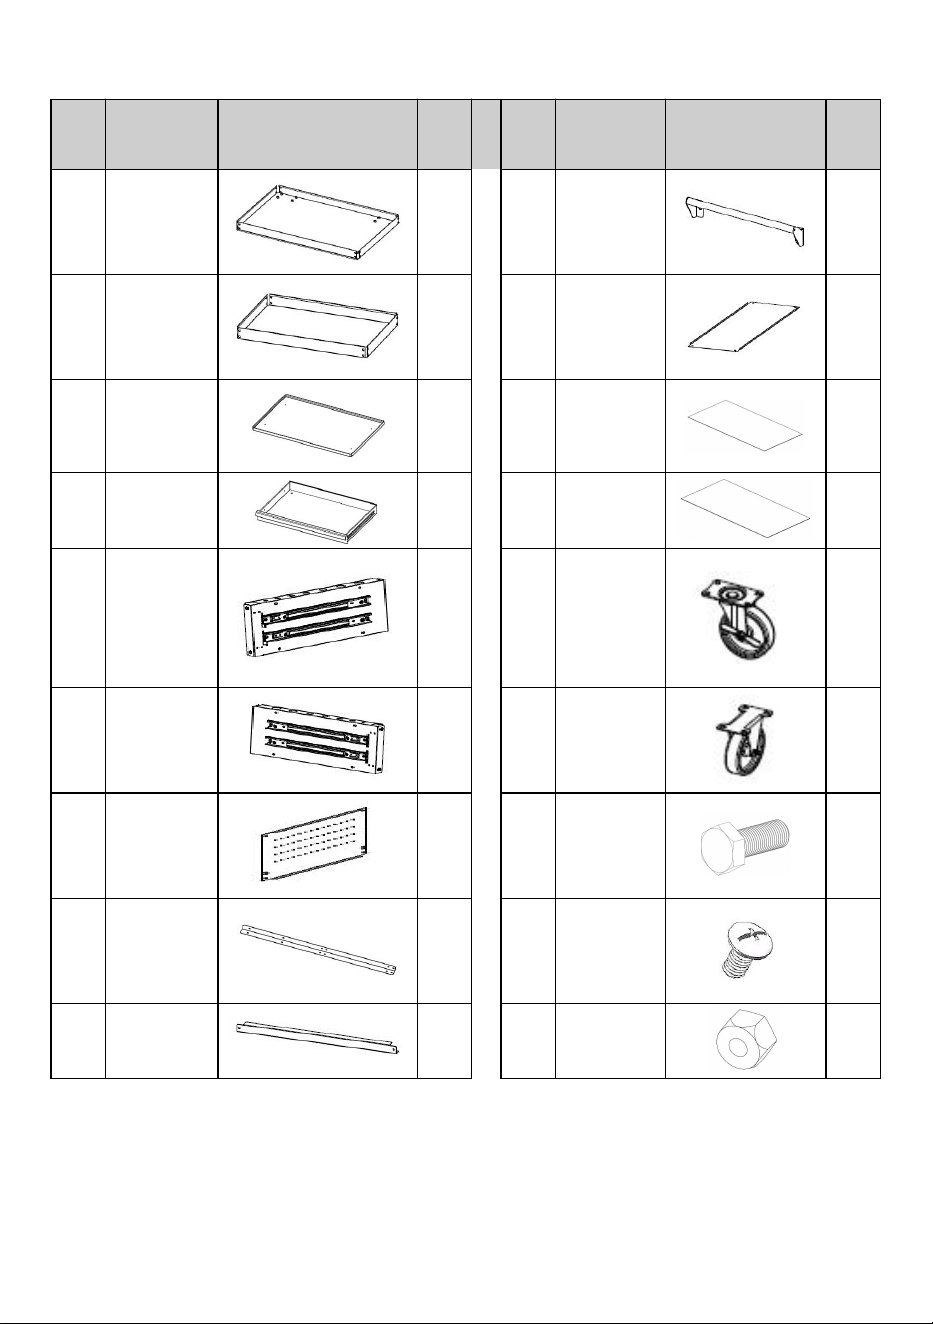
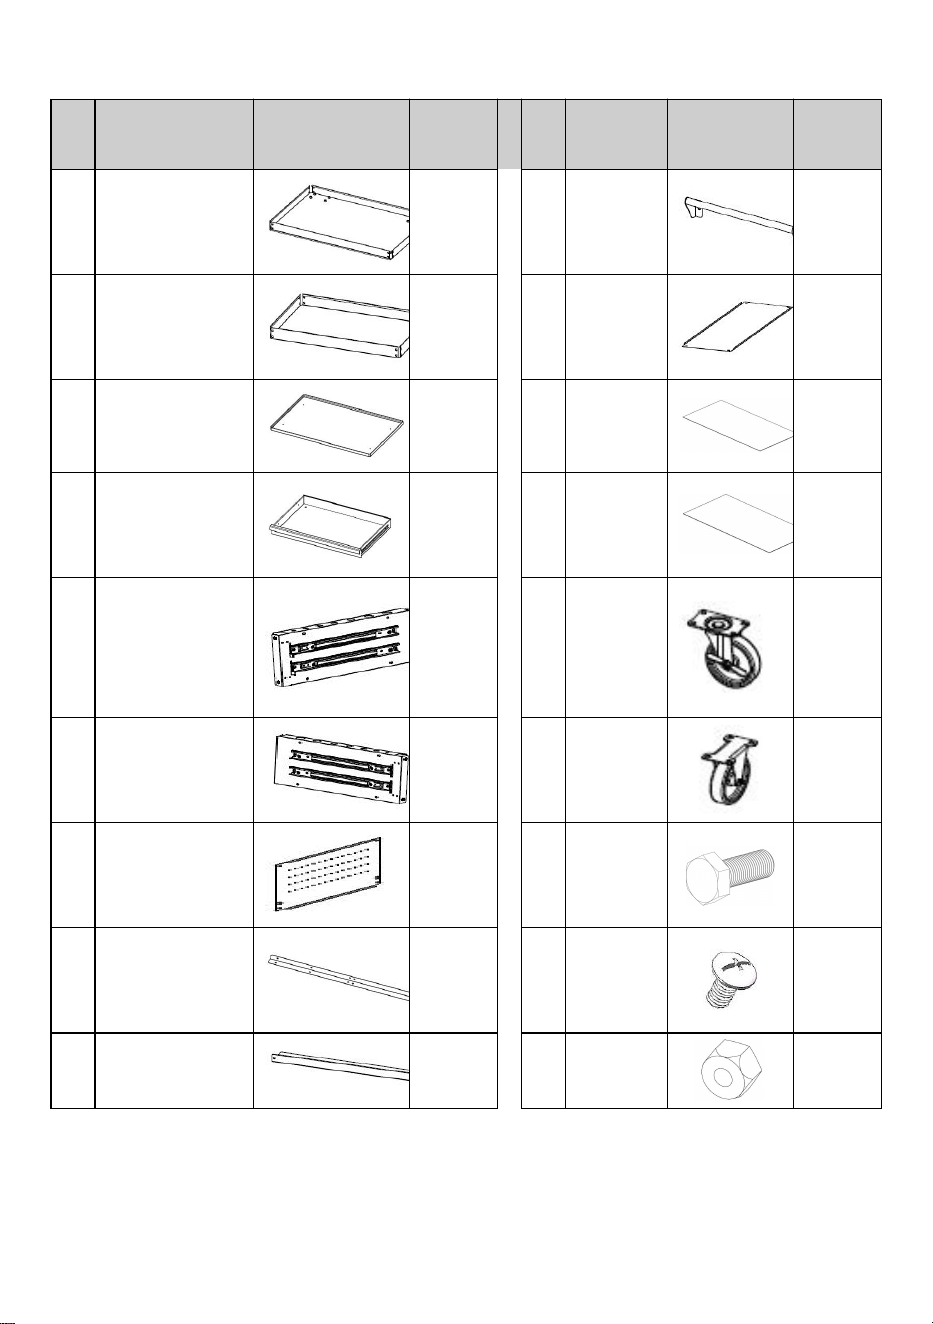
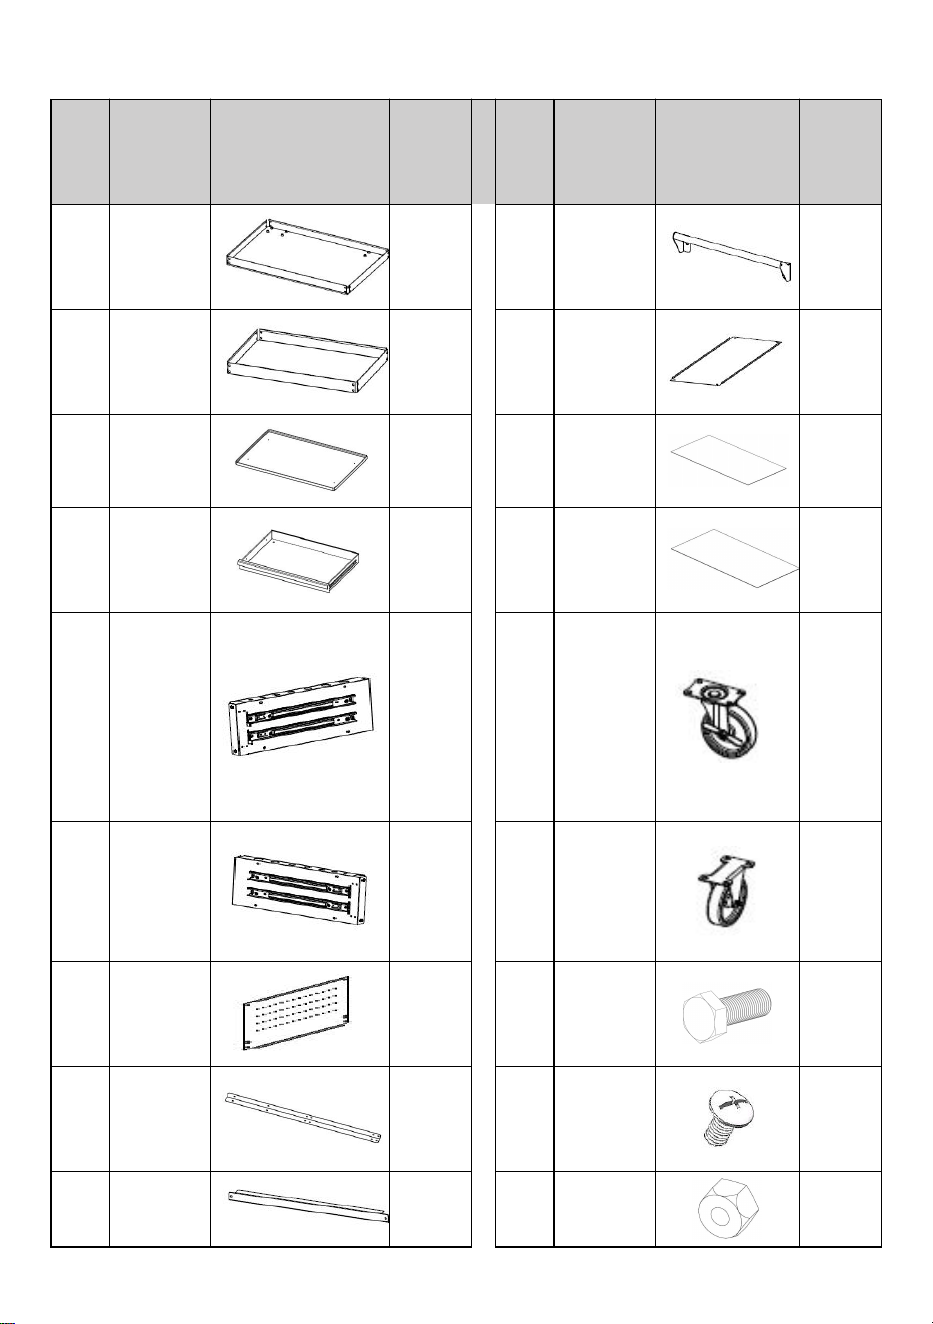
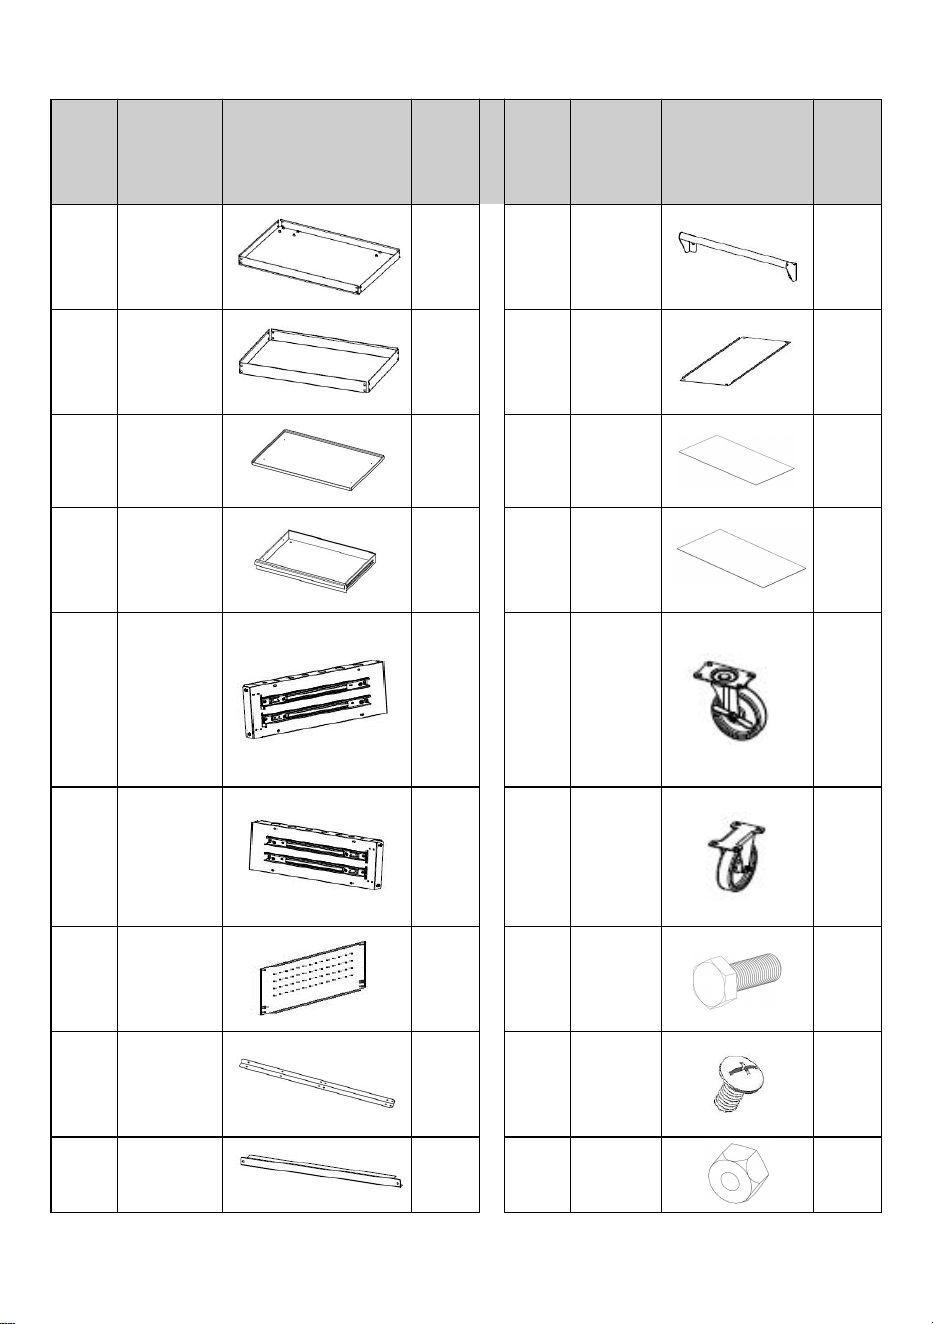
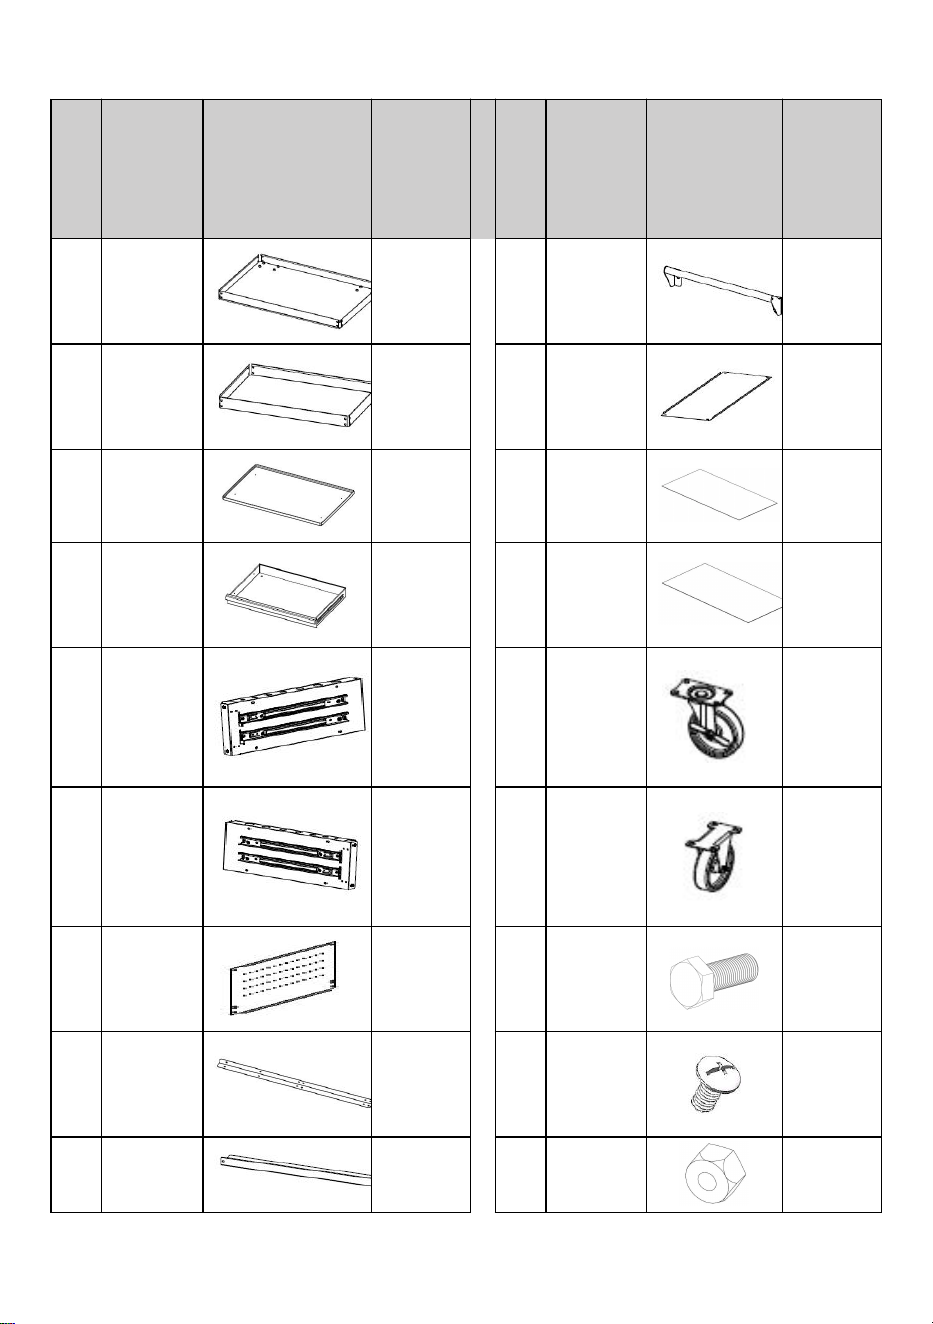
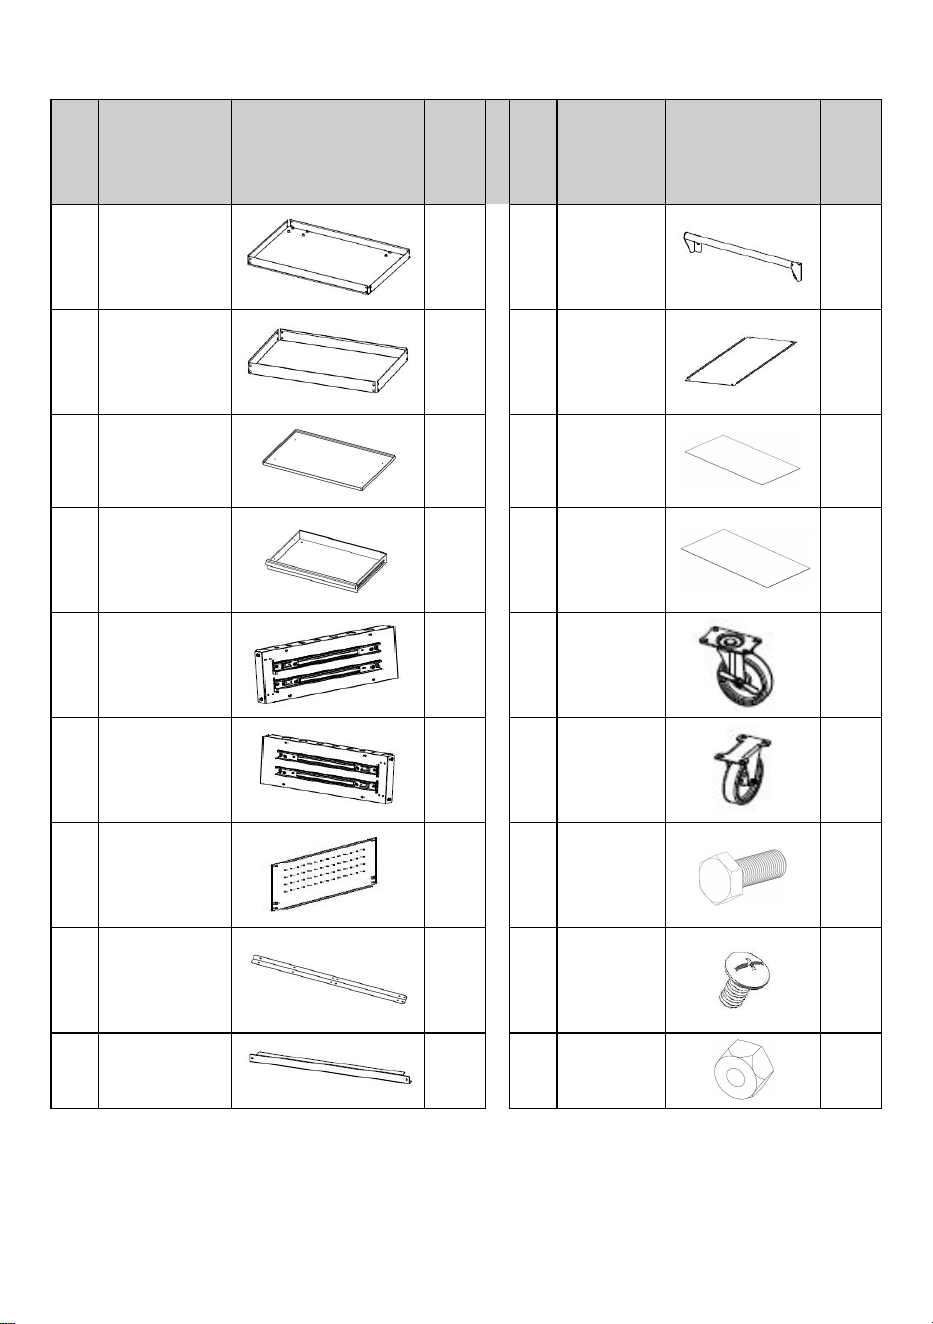
PART LIST
Part
Description
Picture
Part
Qty
Part
Description
Picture
Part
Qty
1
Bottom shelf
1
10
Handle
1
2
Middle shelf
1
11
Back board
1
3
Top shelf
1
12
Top EVA
1
4
Drawer
2
13
Drawer EVA
2
5
Left drawer
mounting
plate (with
lock)
1
14
Swivel
Caster with
Brake
2
6
Right drawer
mounting
plate
1
15
Rigid Caster
2
7
Pegboard
2
16
Bolt M8*20
16
8
Upright
4
17
Bolt M6*12
52
9
Beam
2
18
Nut M6
32
Attention:
For additional information regarding the parts listed below, please
refer to the sssembly diagram in this manual. Unwrap and separate all
parts in a clear work area.

- 5 -
ASSEMBLY STEP
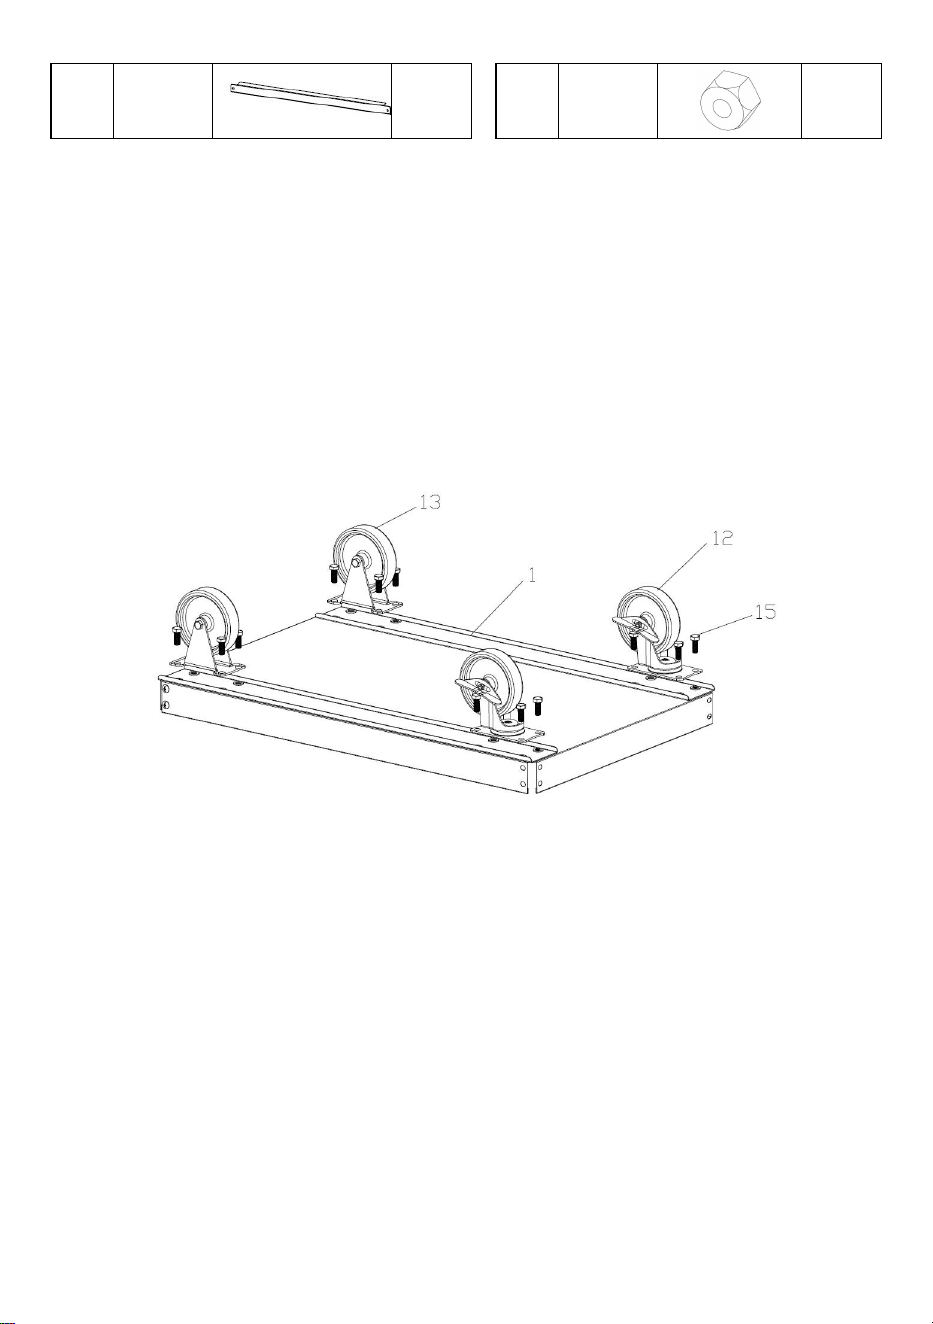
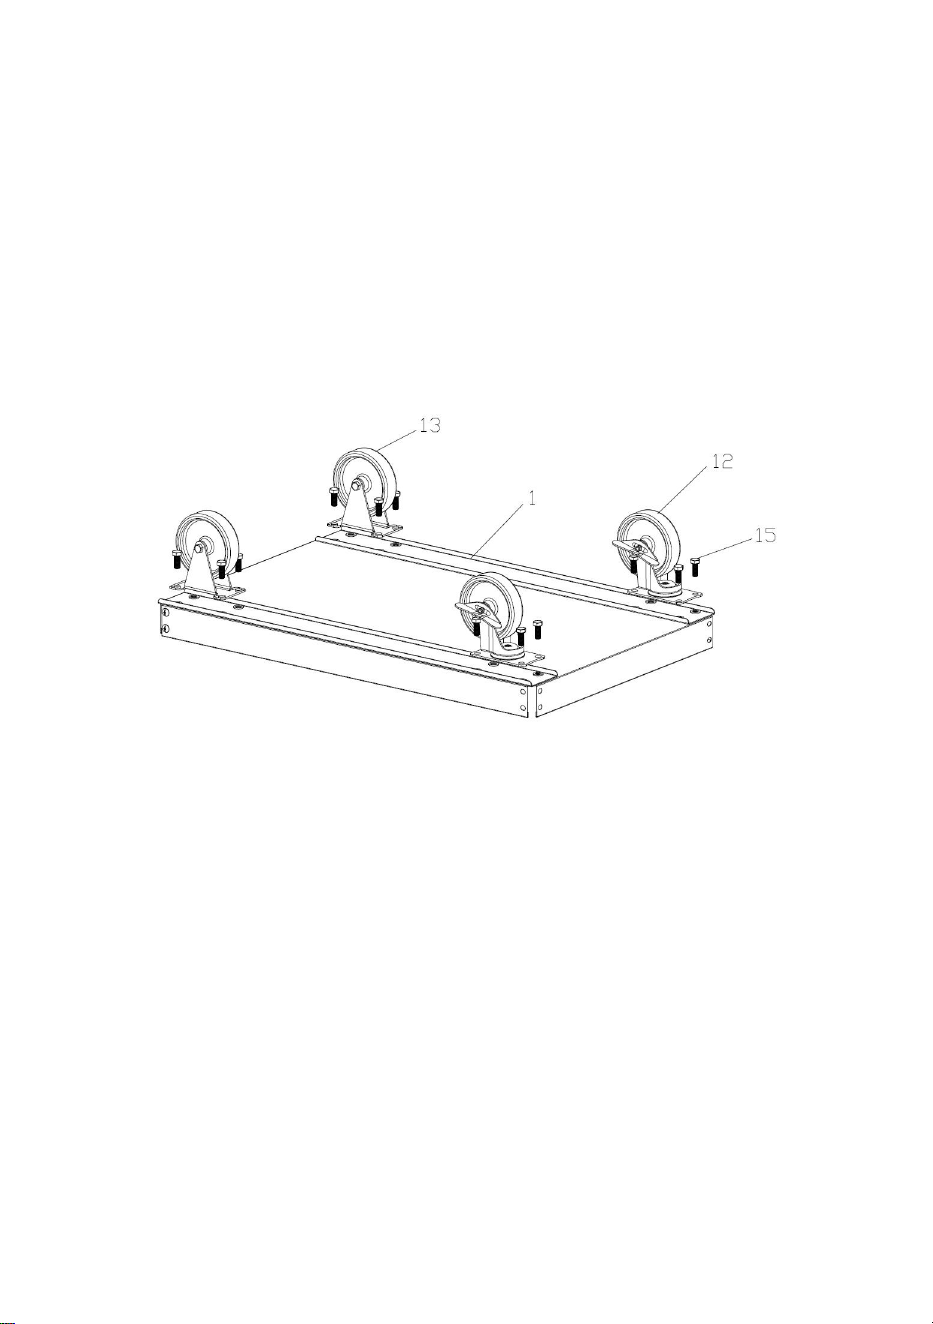
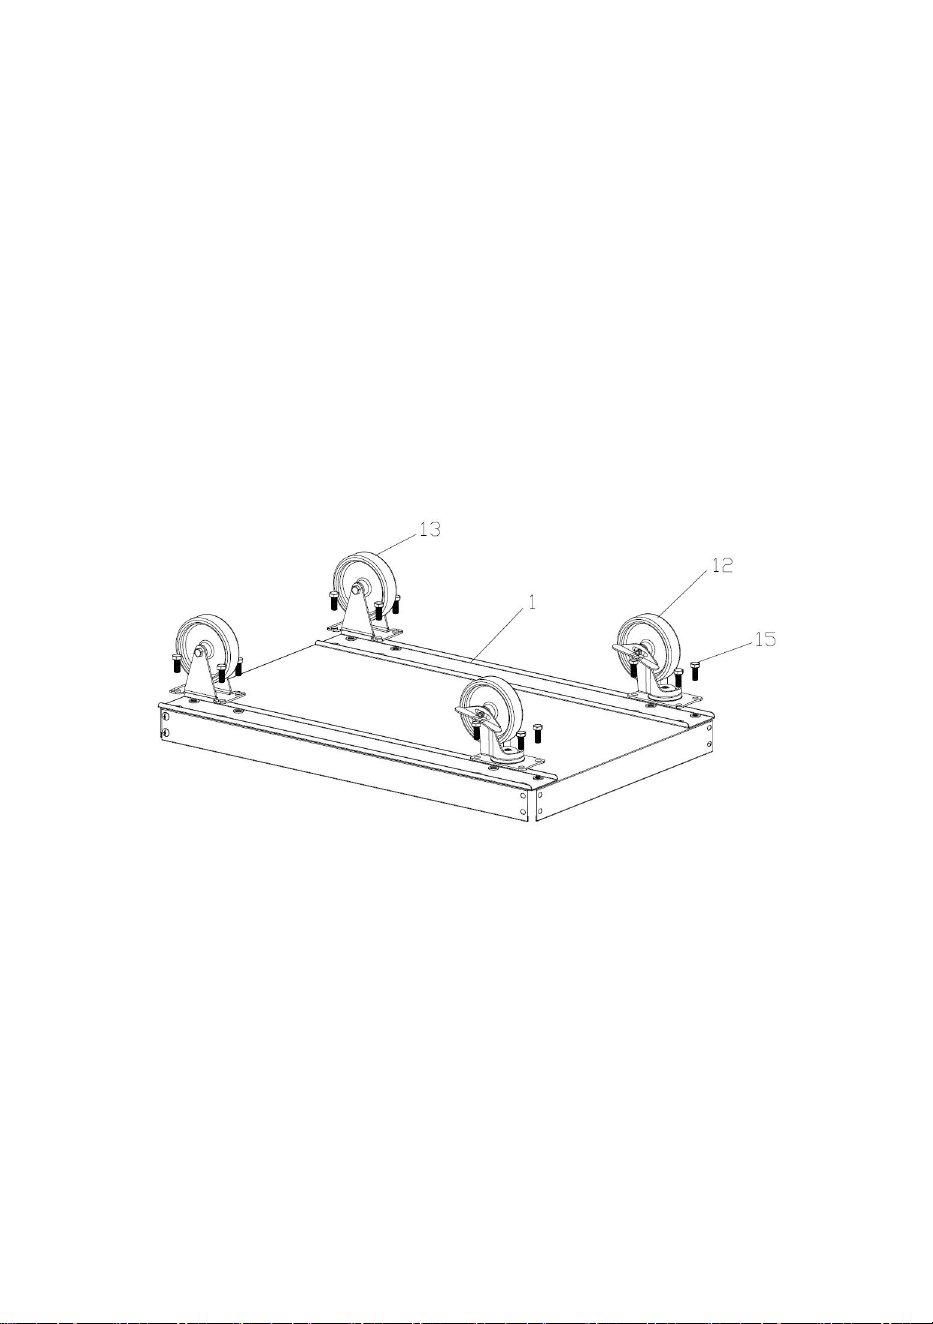
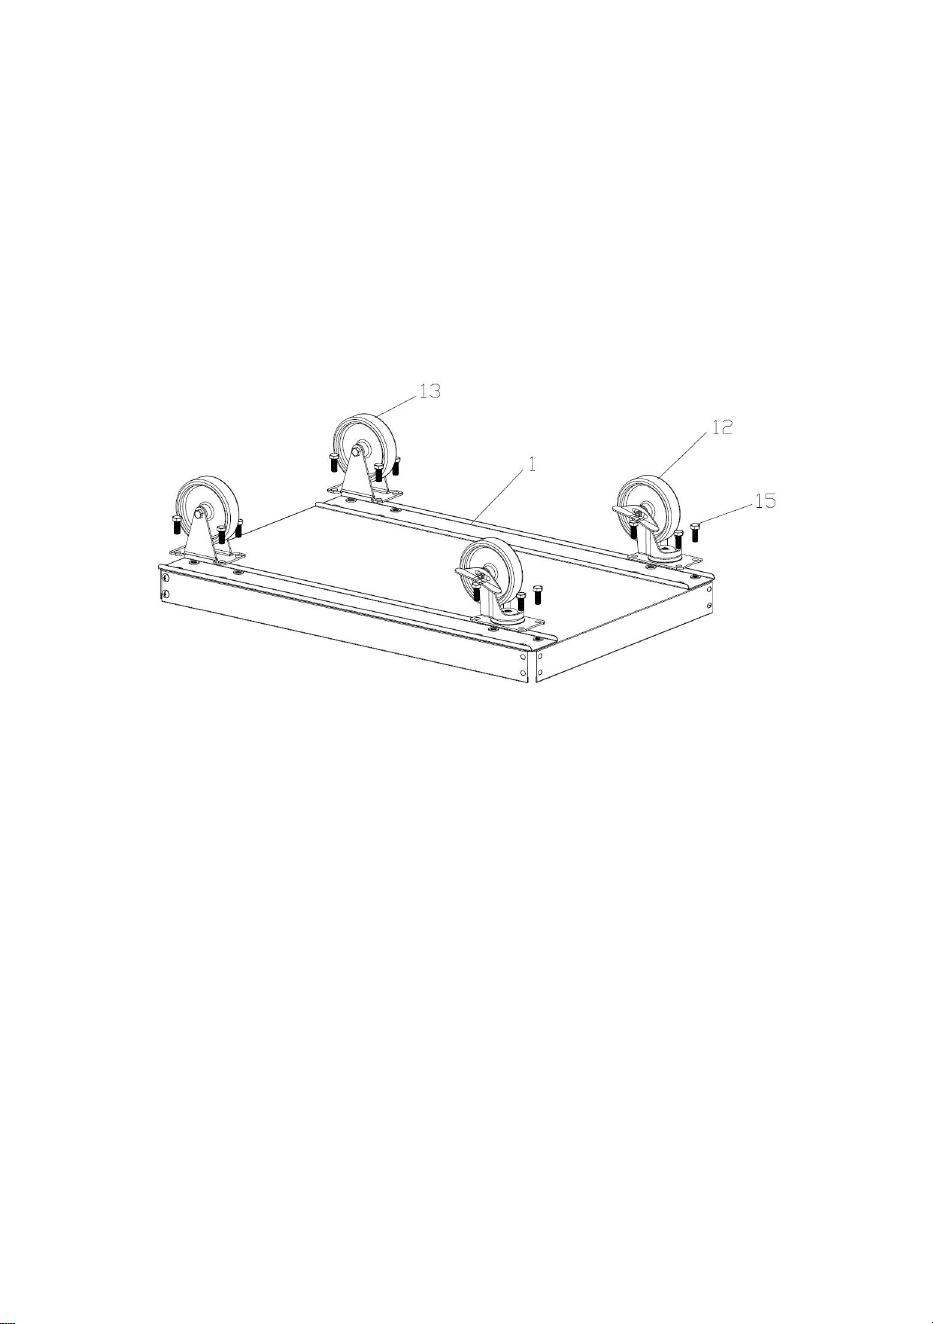
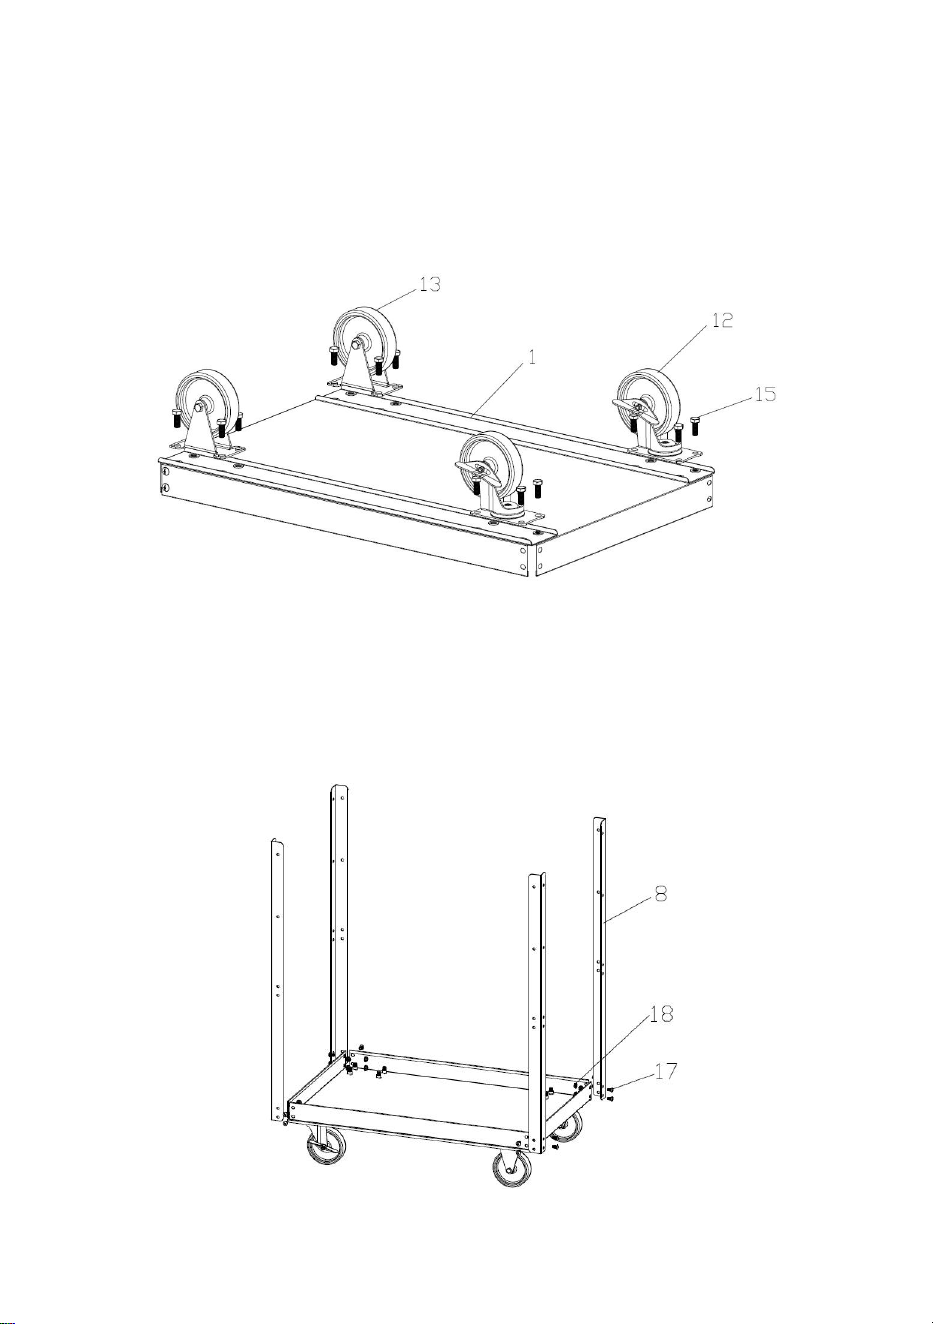
Step 1: Assembly the Casters.
1. Turn over the Bottom shelf 1#.
2. Assemble the Casters 12#&13# with Bolts 15# as shown.
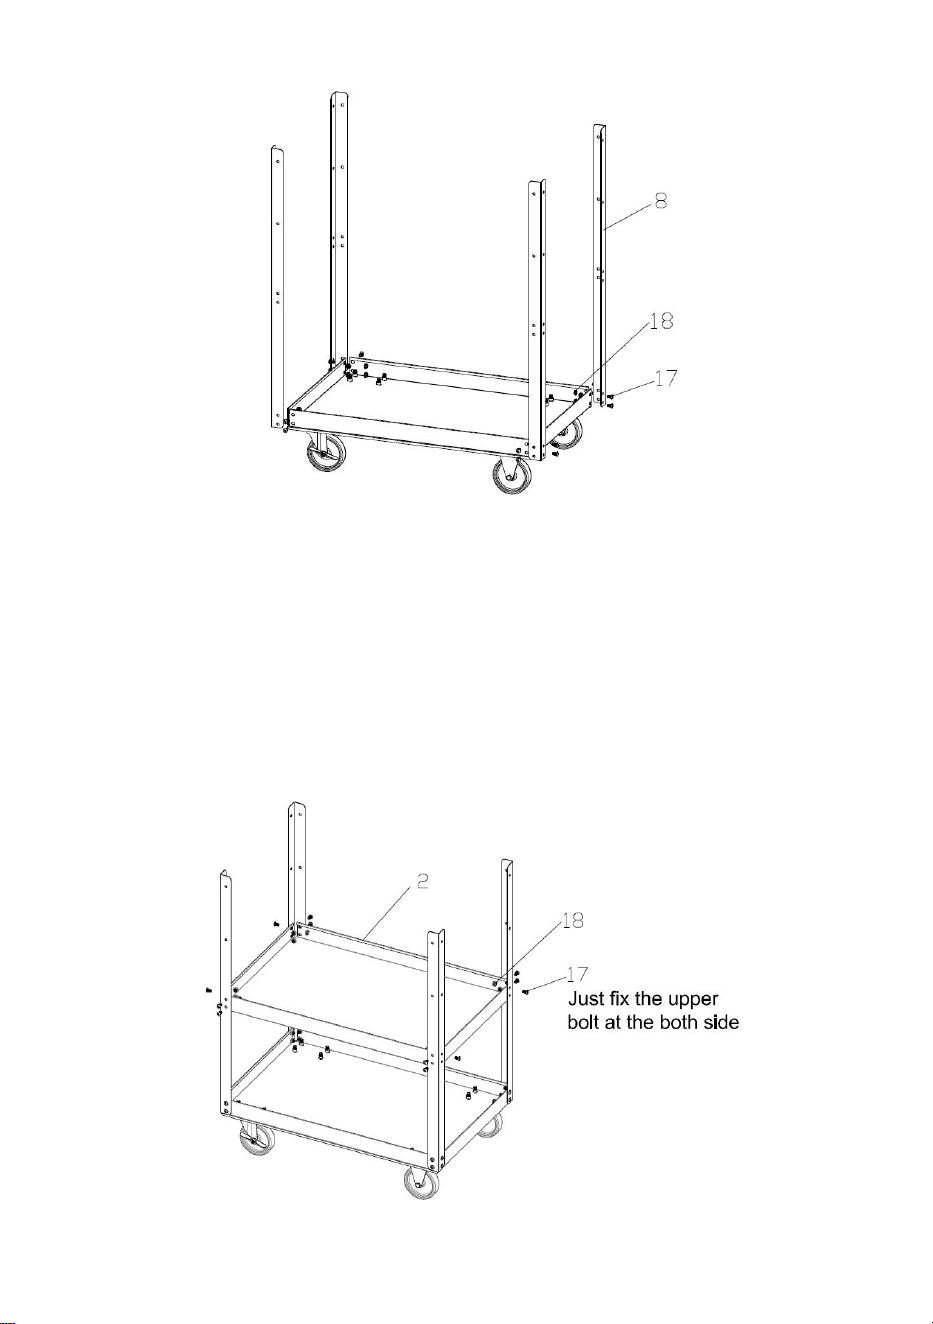
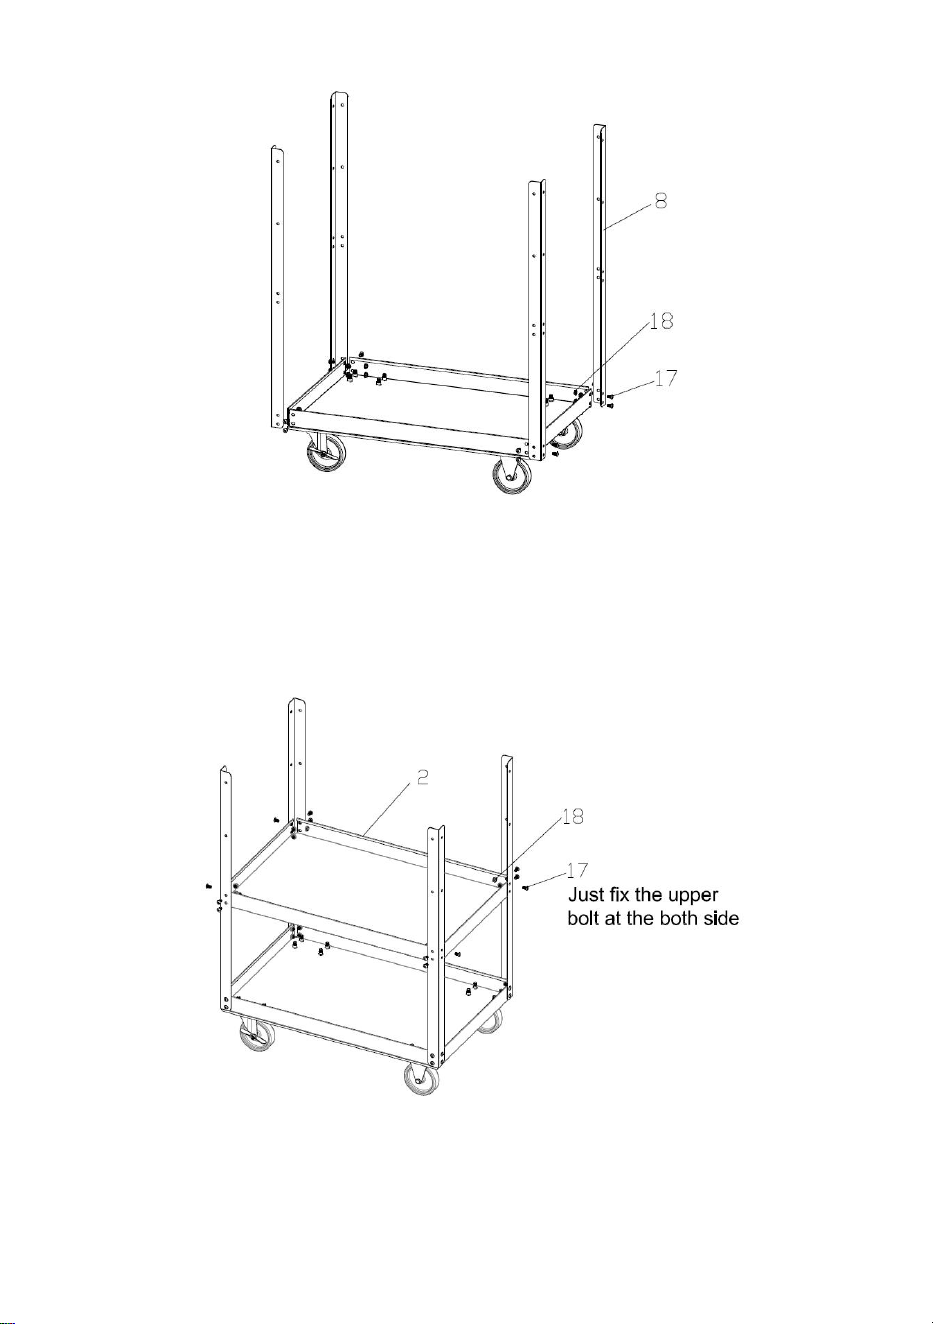
Step 2: Assembly the Upright 8#.
1. Turn over the Bottom shelf and put the Casters on the ground.
2. Assembly the Uprights 8# with Bolt 17# and Nut 18#, attention to the Uprights
direction, and don’t lock the bolt too tight.

- 6 -
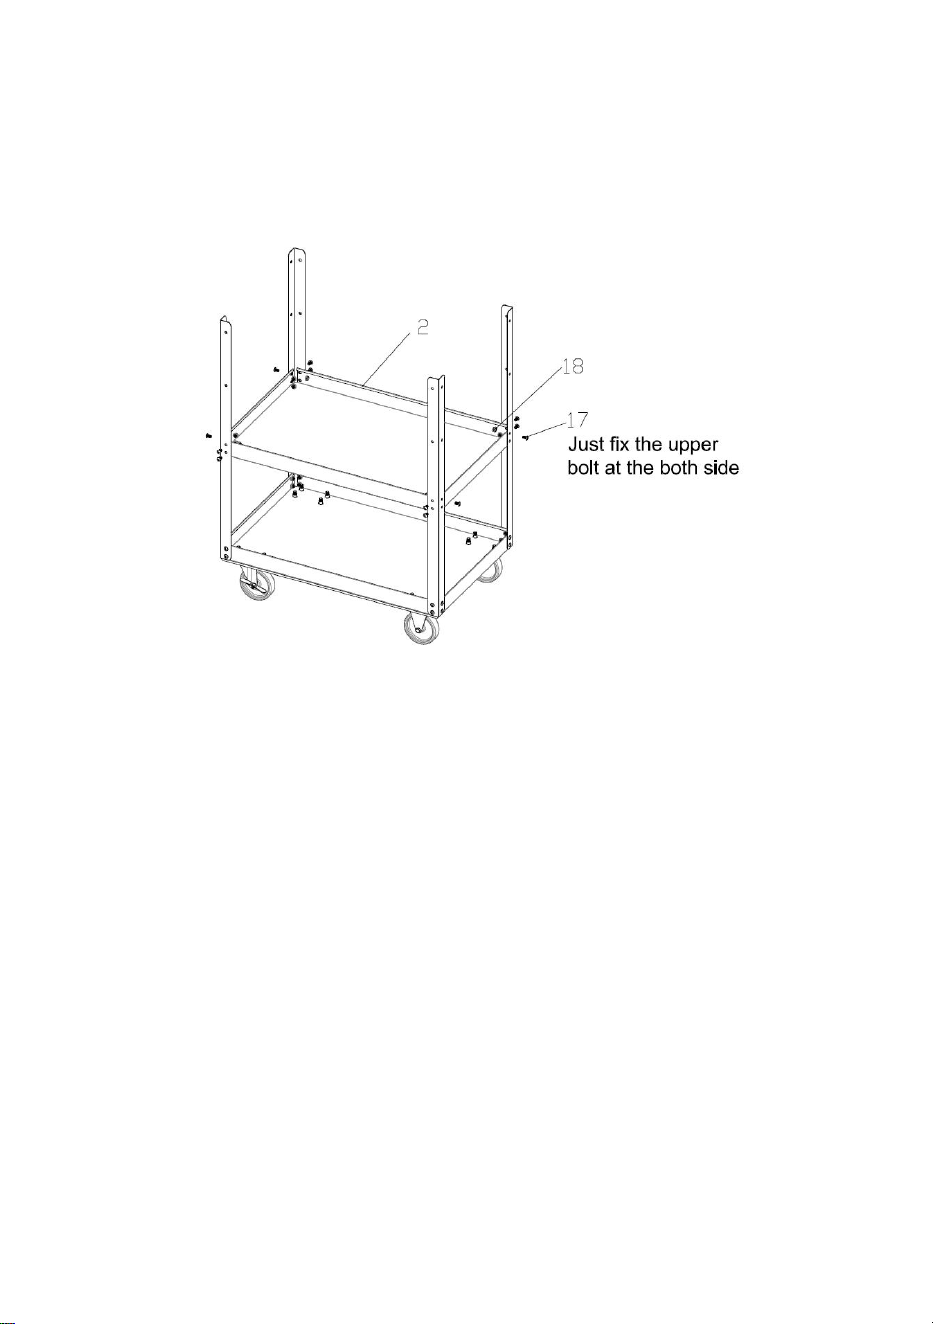
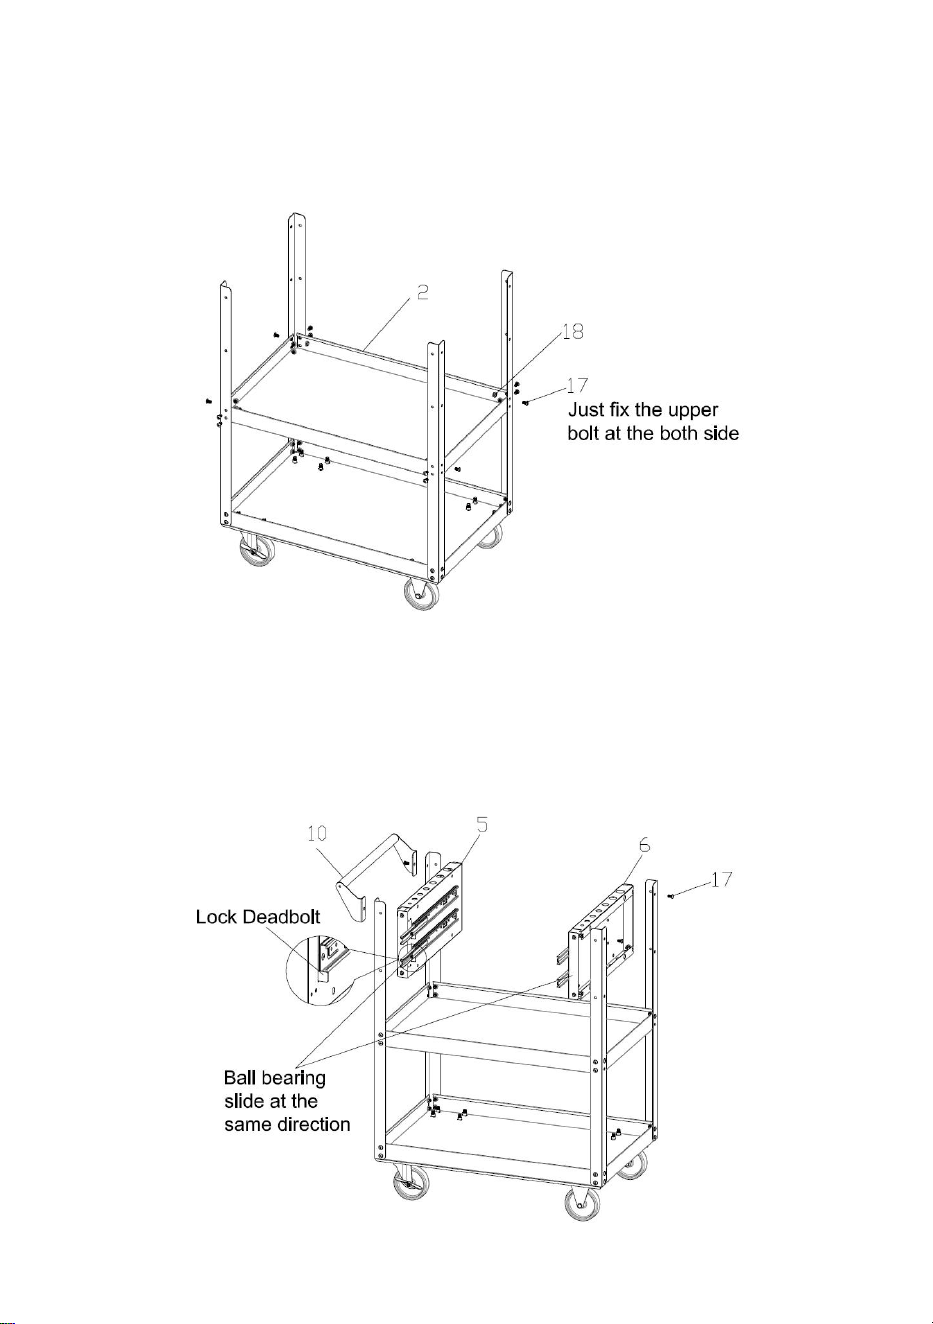
Step 3: Assembly the Middle shelf 2#.
1· Put the Middle shelf 2# as shown and fix with Bolt 17# and Nut 18#;
attention: just fix the upper bolts on the both sides first, and don’t lock the bolt too
tight.
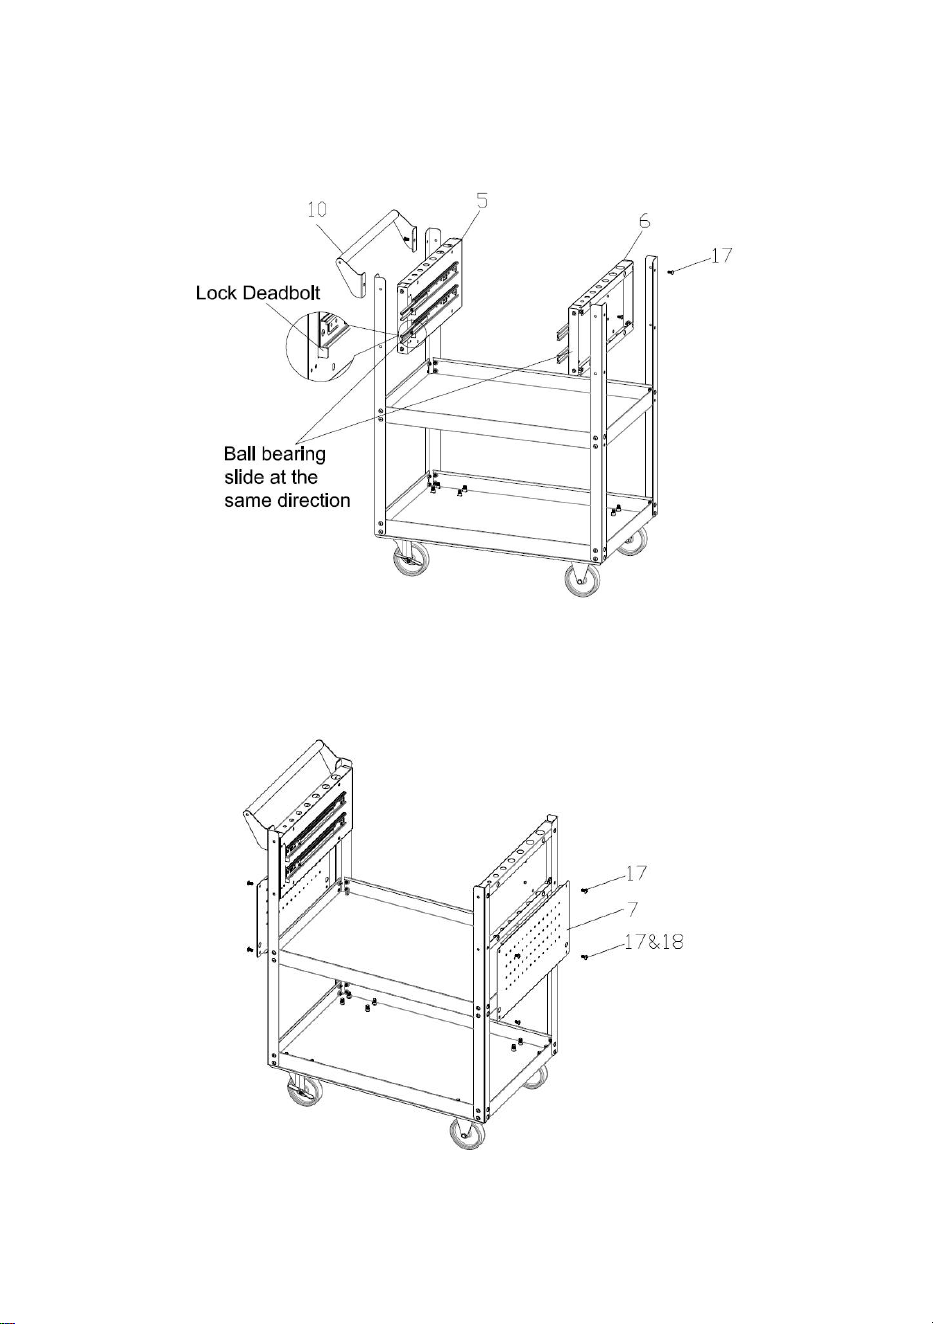
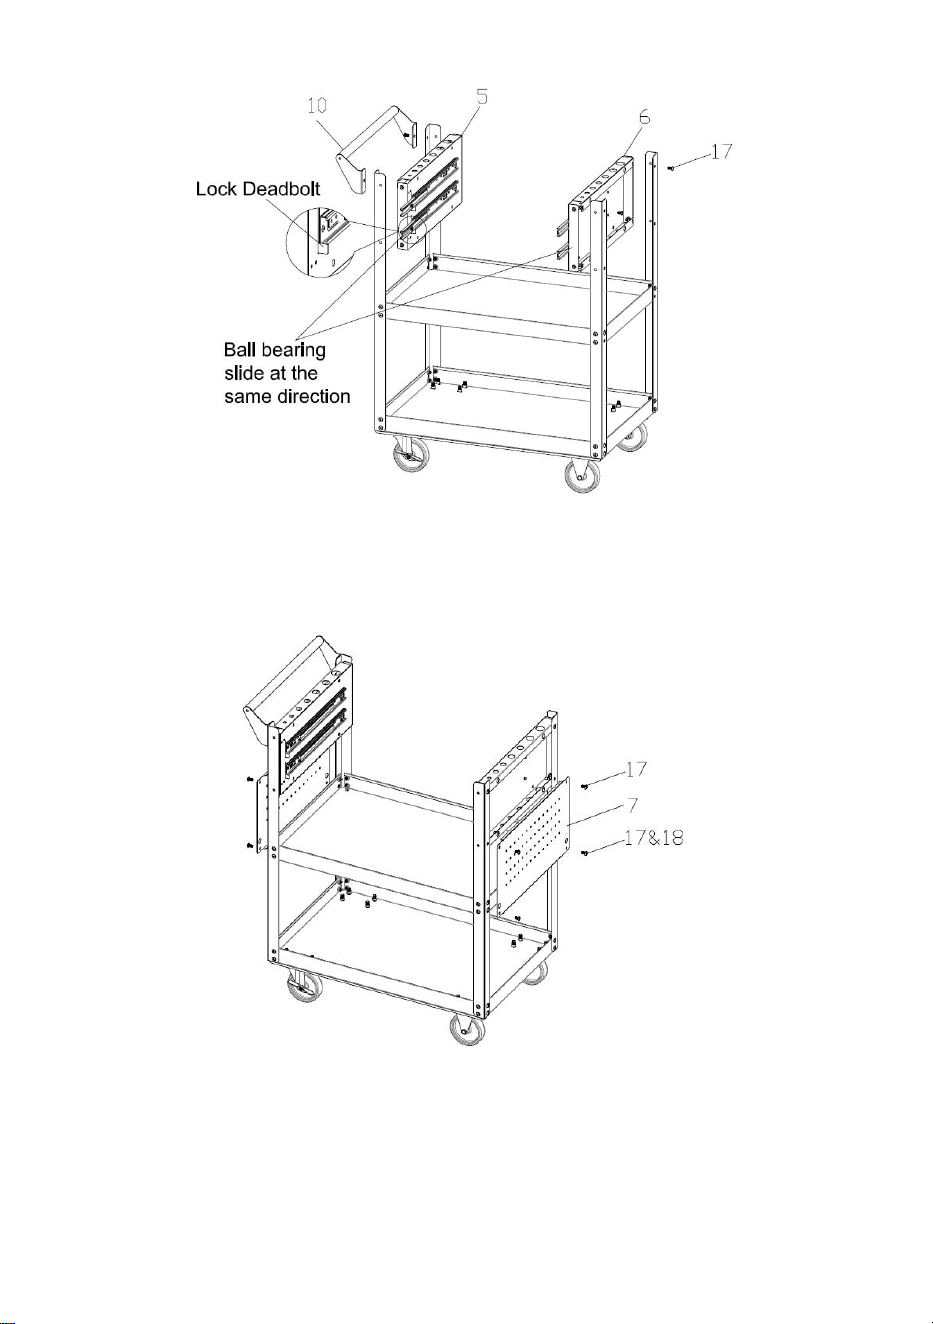
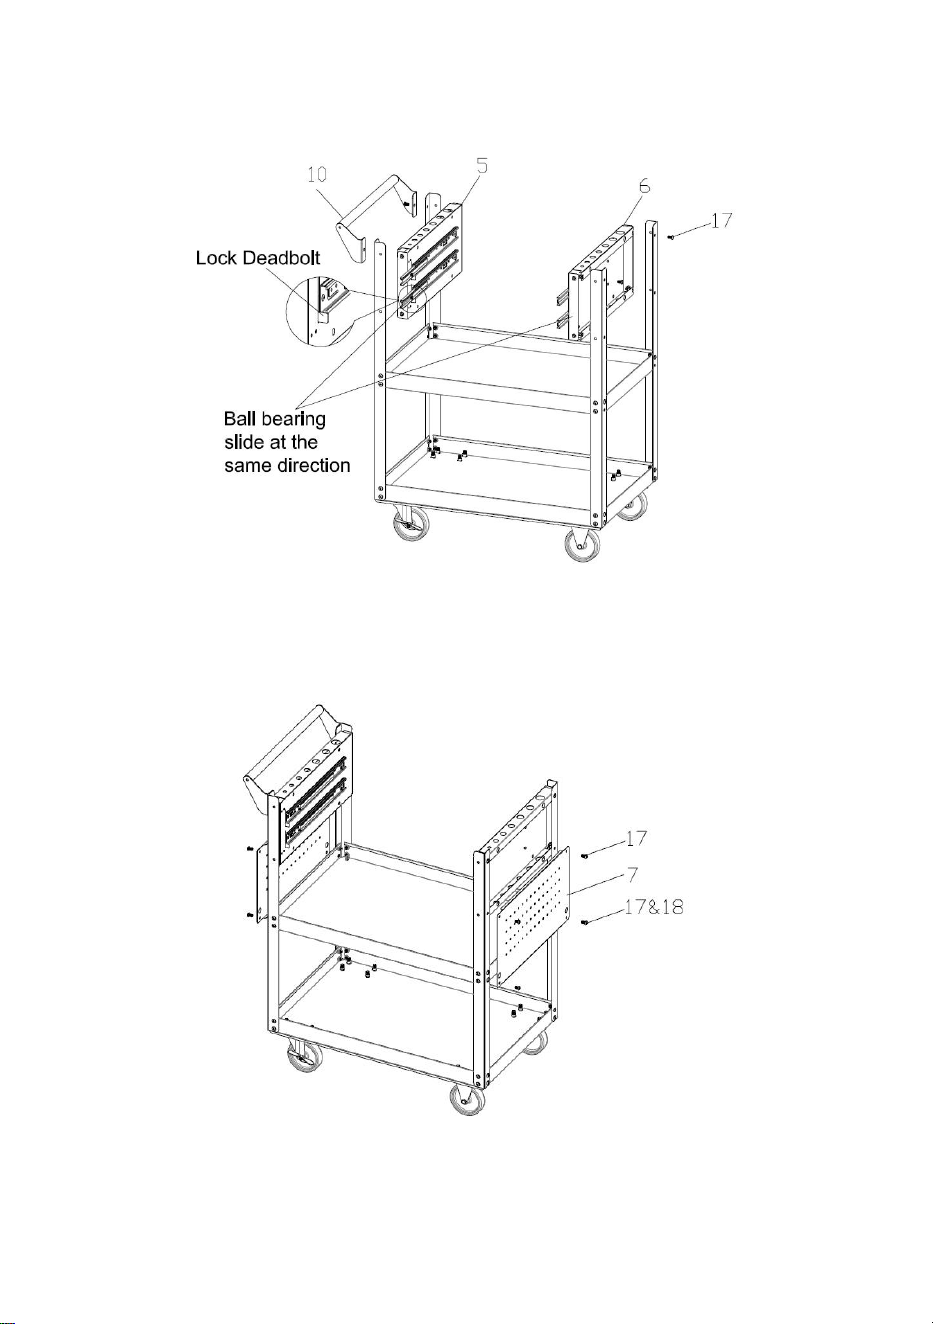
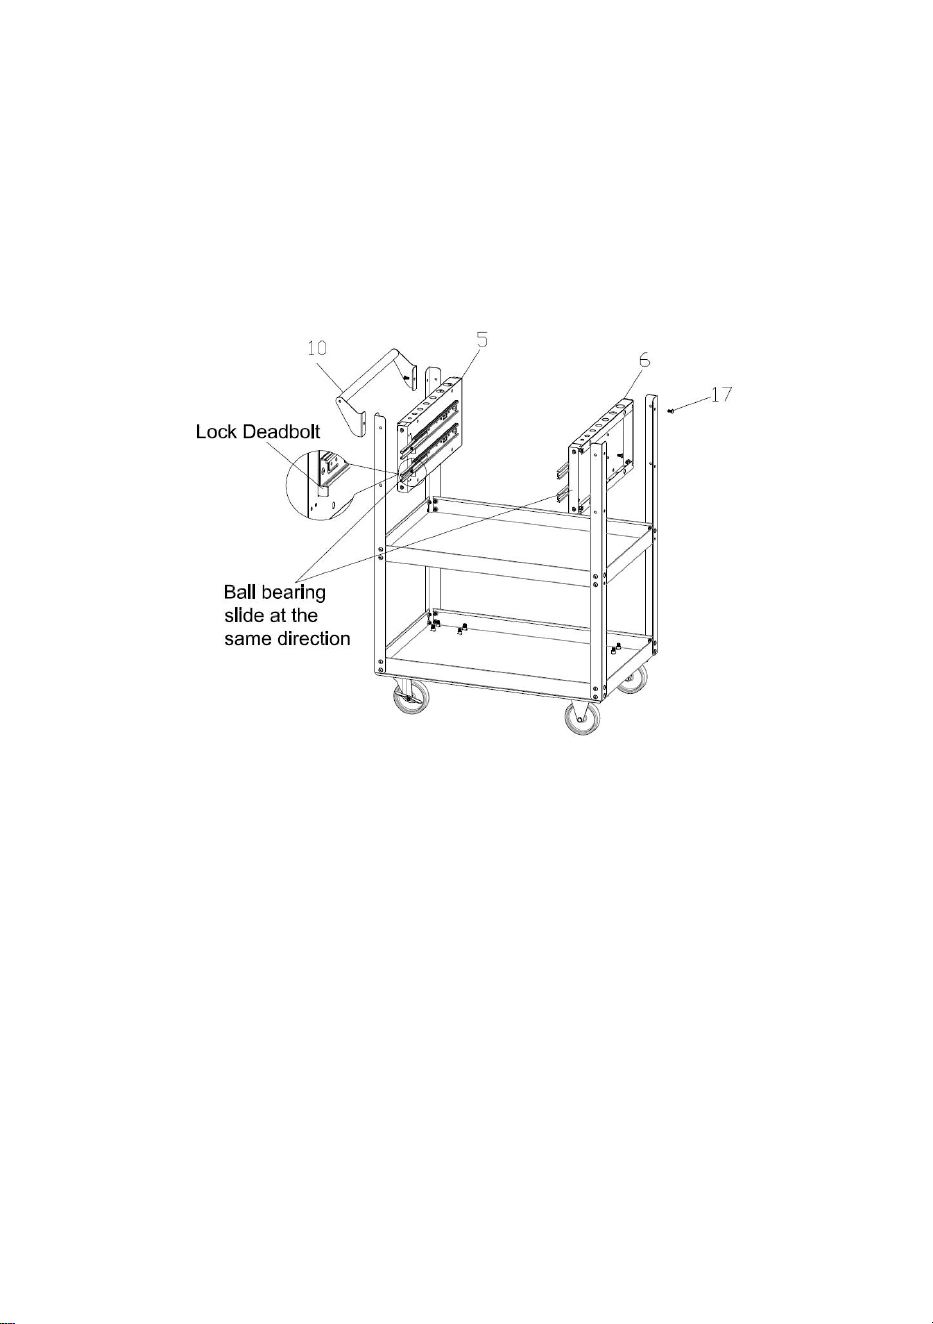
Step 4: Assembly the mounting plates 5#&6#, and Handle 10#.
1.
Assembly the Left drawer mounting plate 5#, Right mounting plate 6#
and Handle 10# with Bolt 17# as shown; attention the Left mounting plate has
a lock, and put the ball bearing slide in the same direction; just fix the upper
bolts first, and don’t lock the bolt too tight.

- 7 -
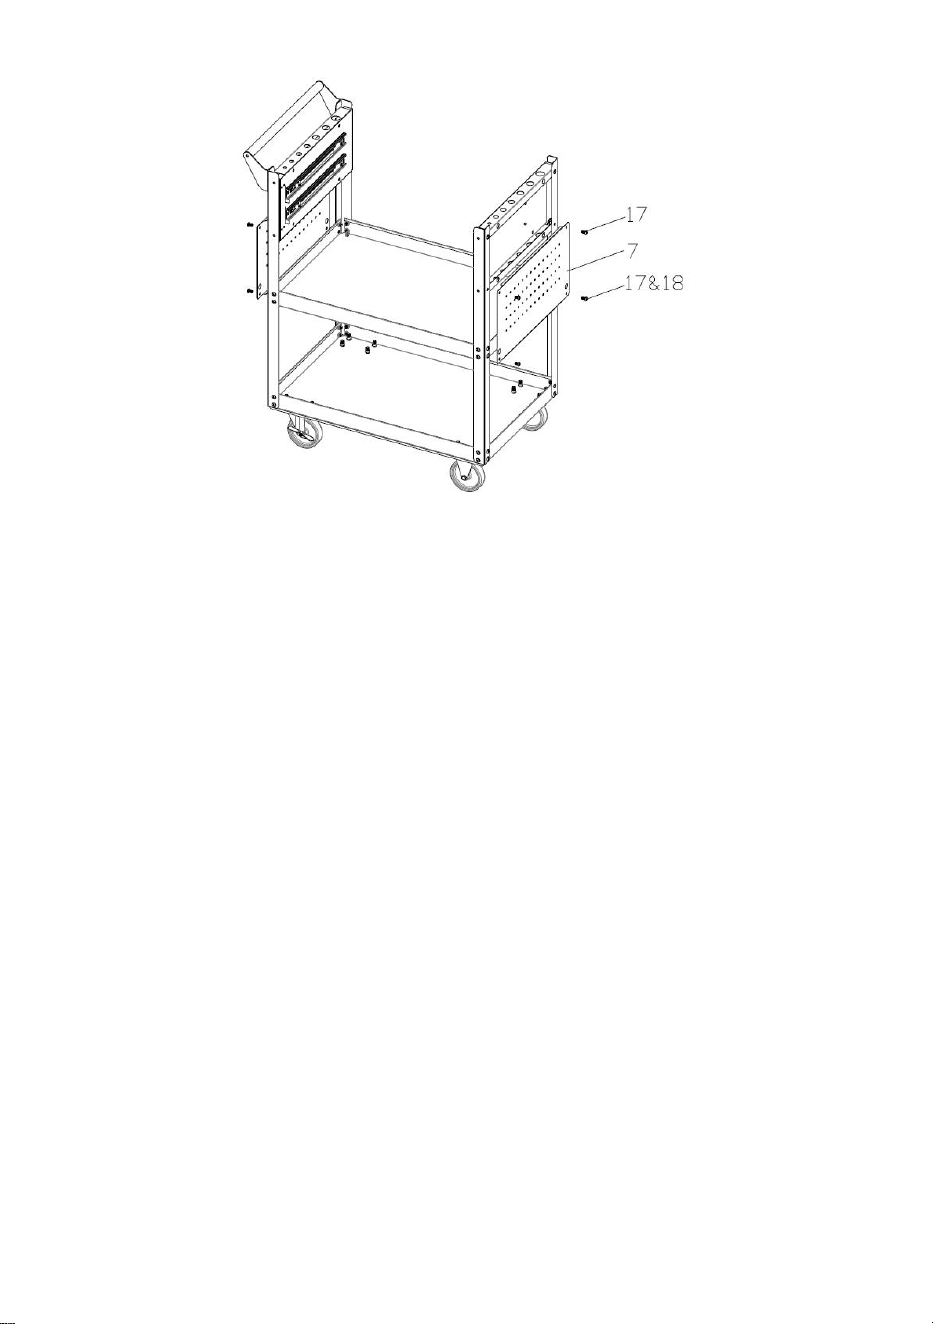
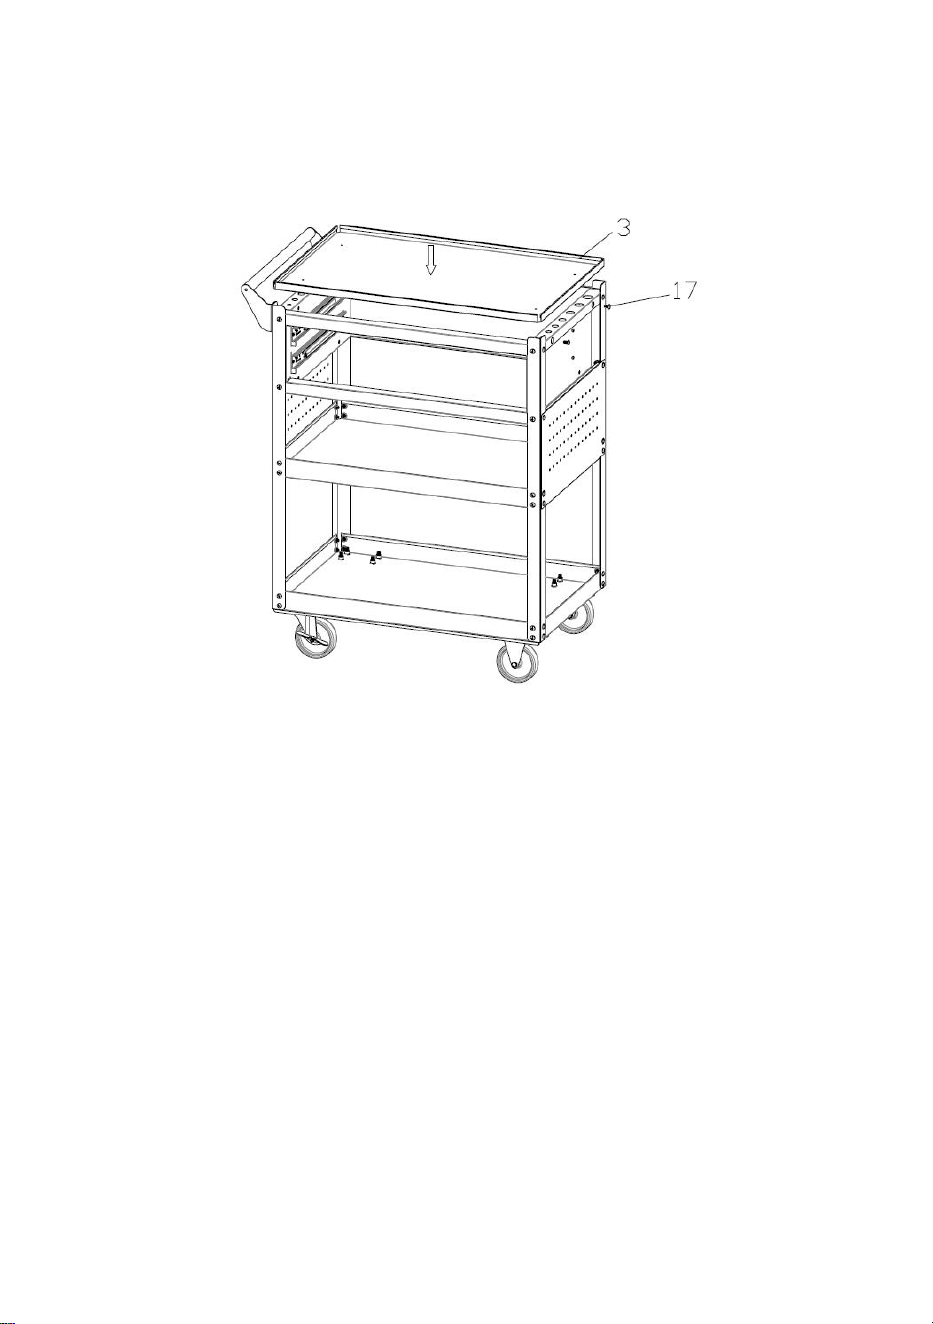
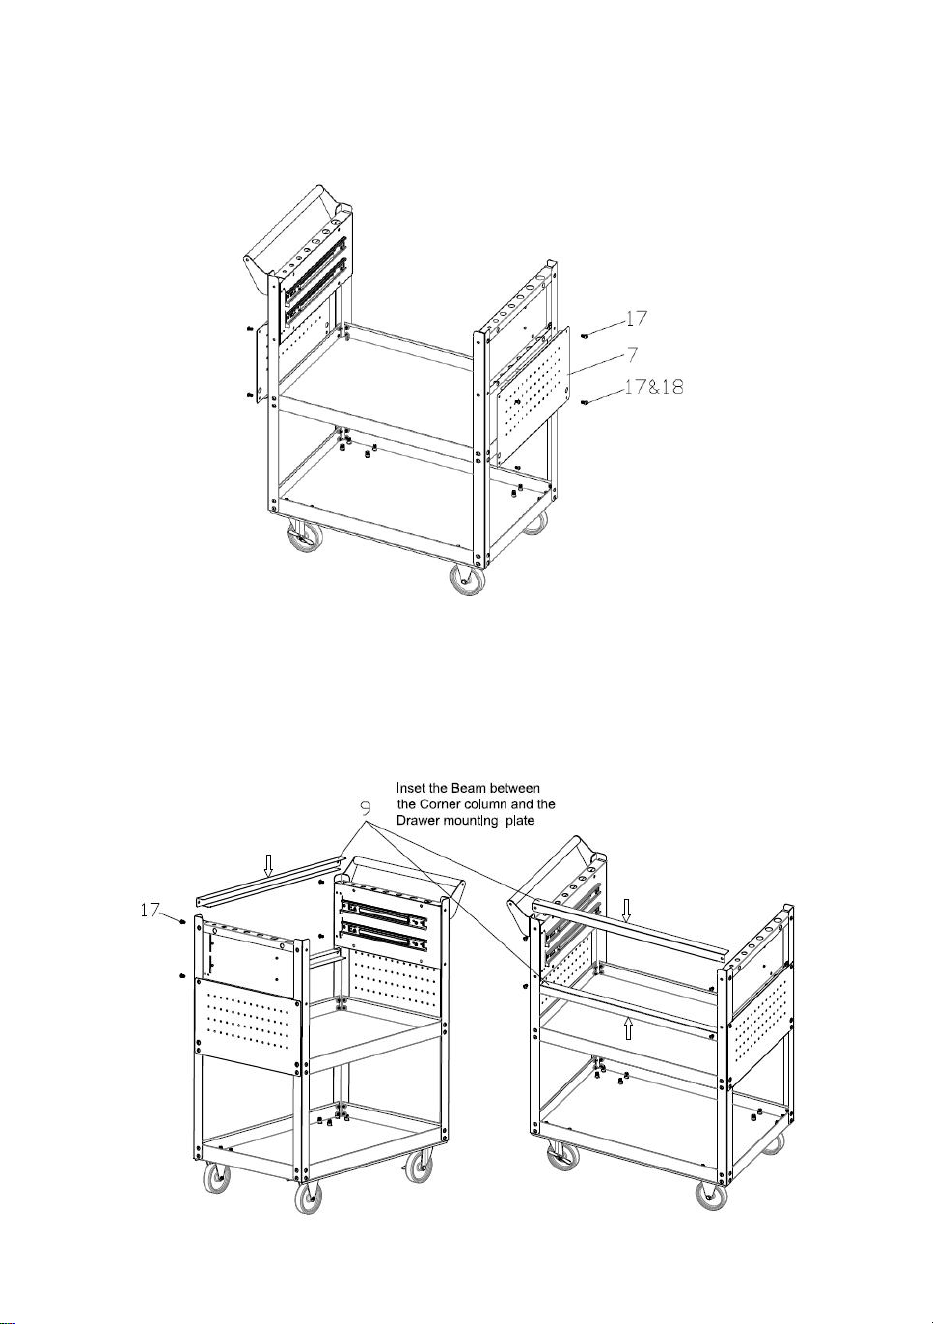
Step 5: Assembly the Pegboard 7# with bolt 17#.
2. 1. Put the Pegboard 7# as shown and fix with Bolt 17#, and don’t lock the bolt
too tight.
.
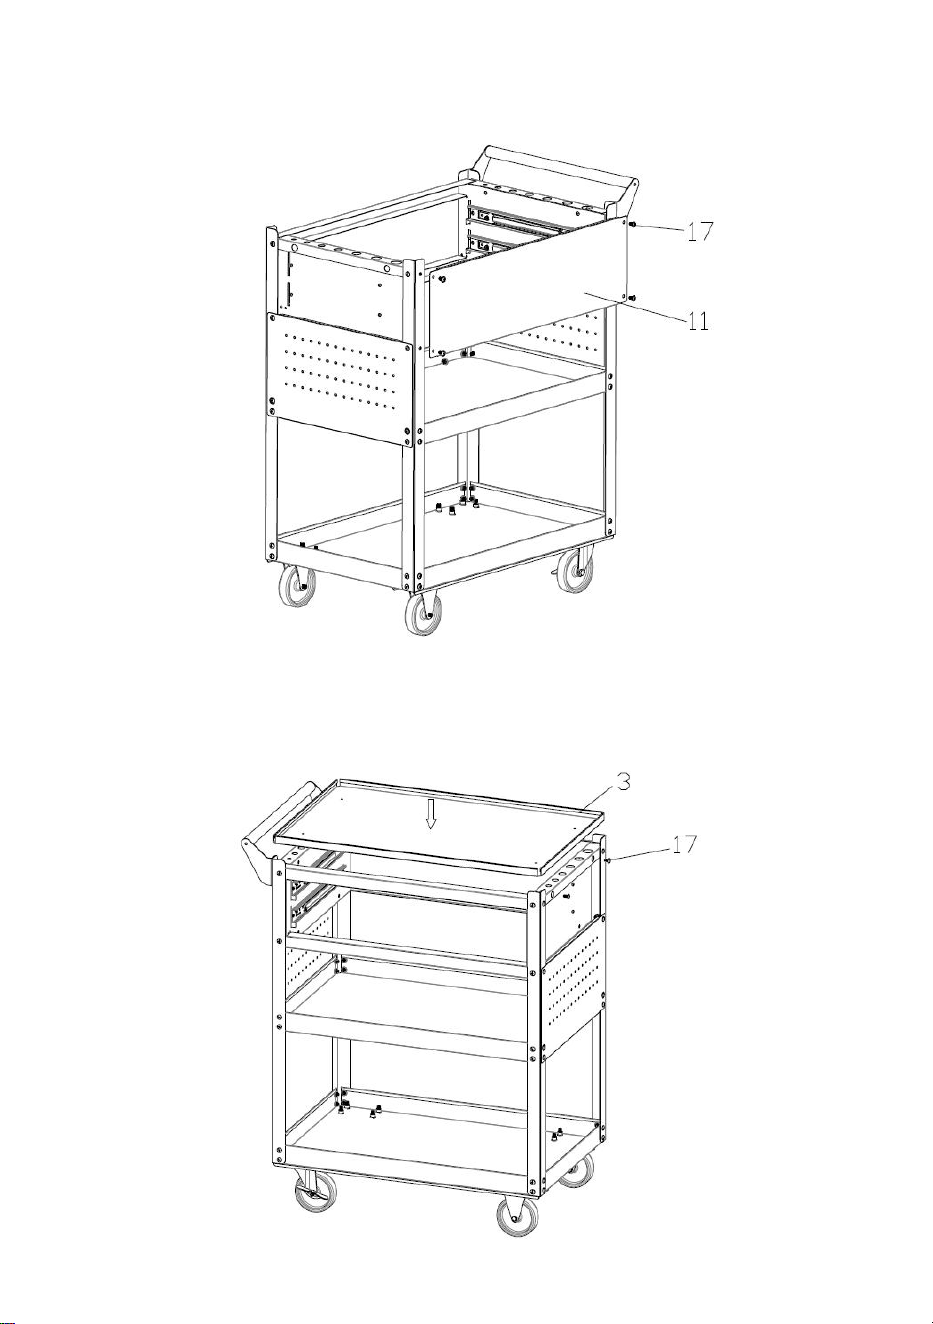
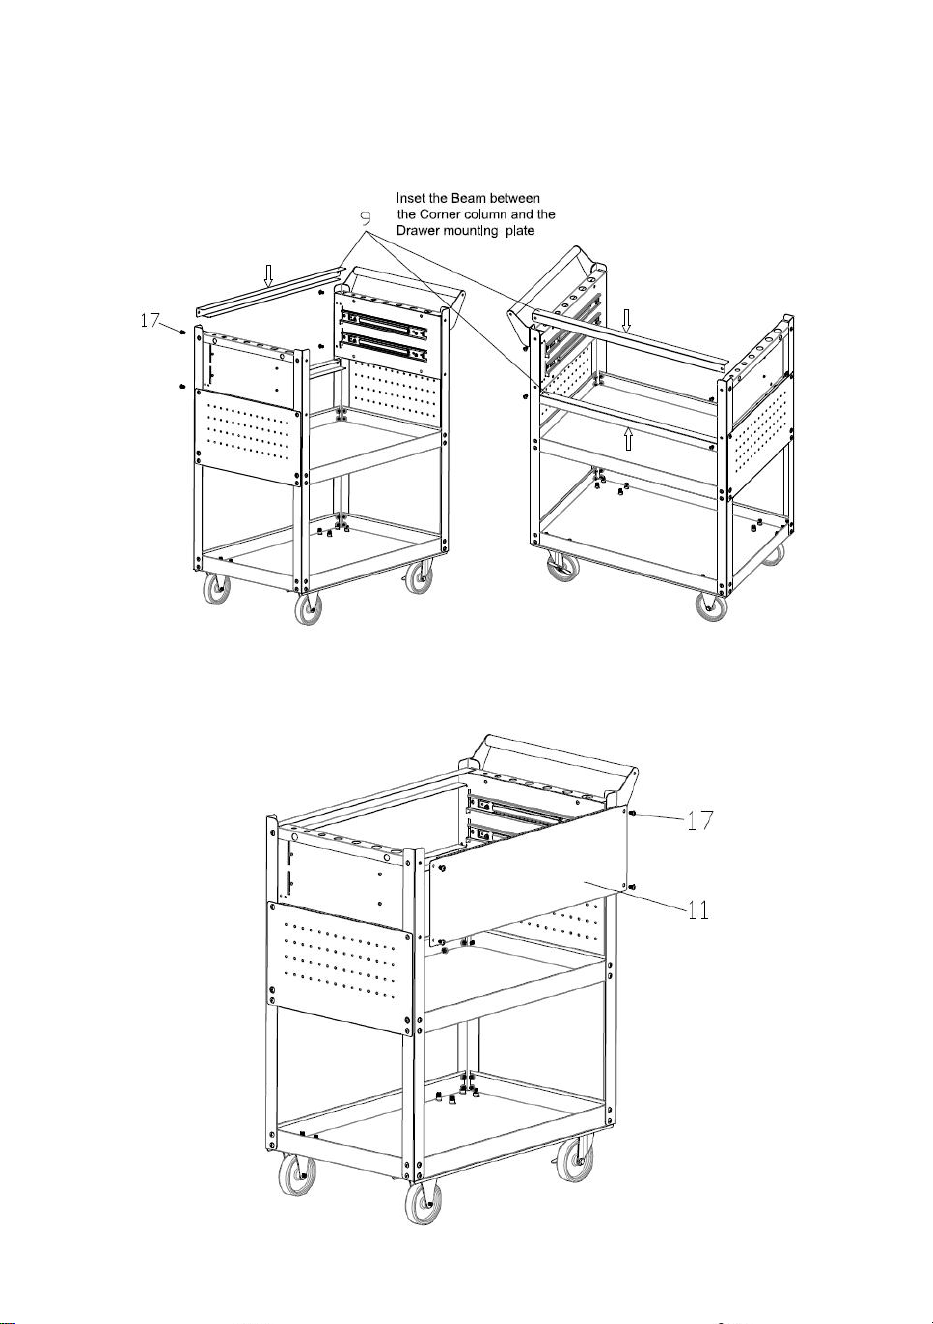
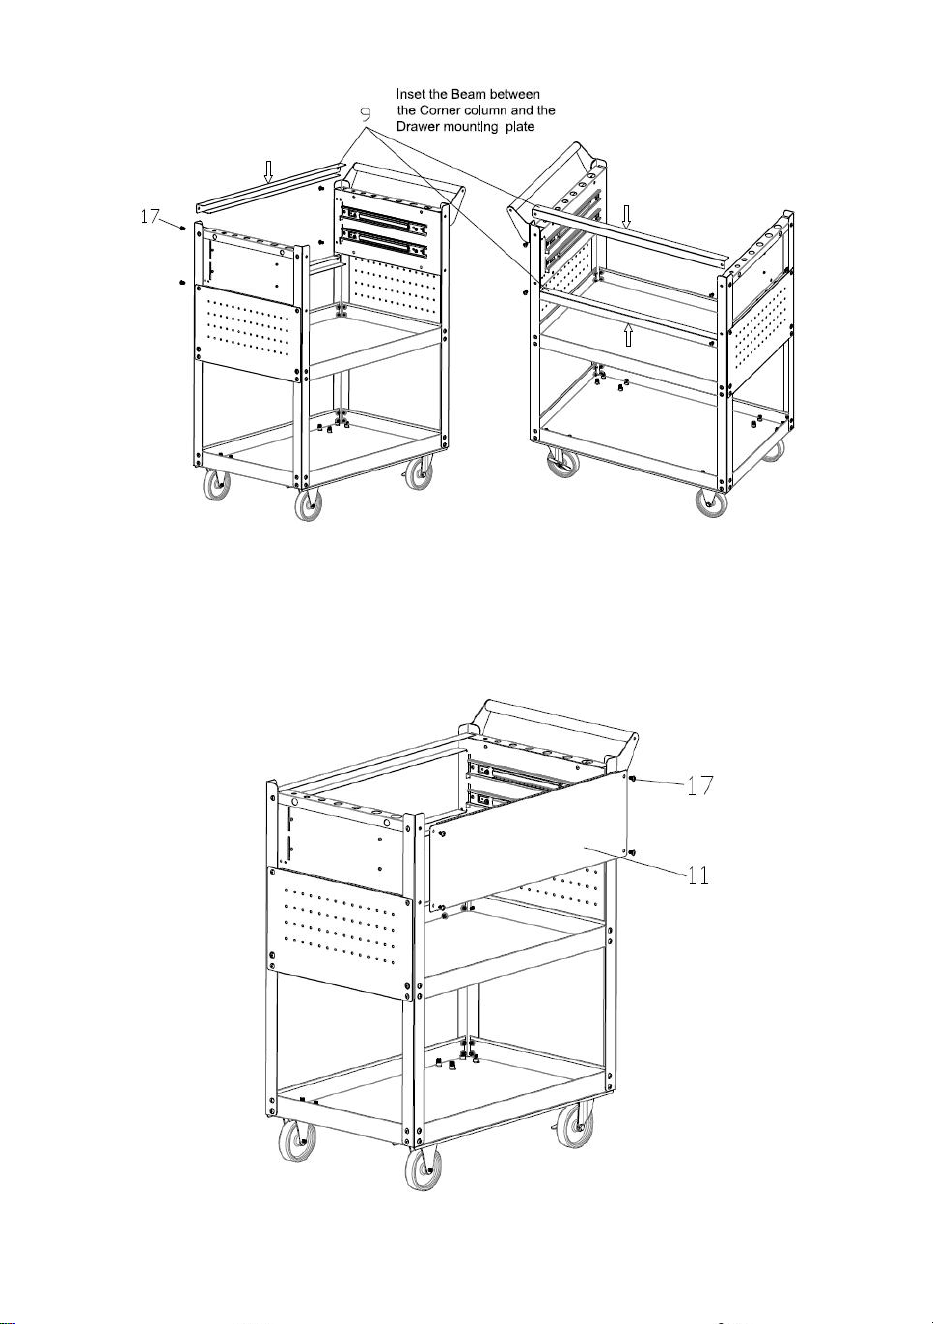
Step 6: Assembly the Beam 9# and Back board 11# with Bolt 17#.
1. Inset the Beam 9# between the Upright and the drawer mounting plate as
shown and fix with Bolt 17#, Attention to the ball bearing slide and the Top shelf’s
hole in the same direction.
- 8 -
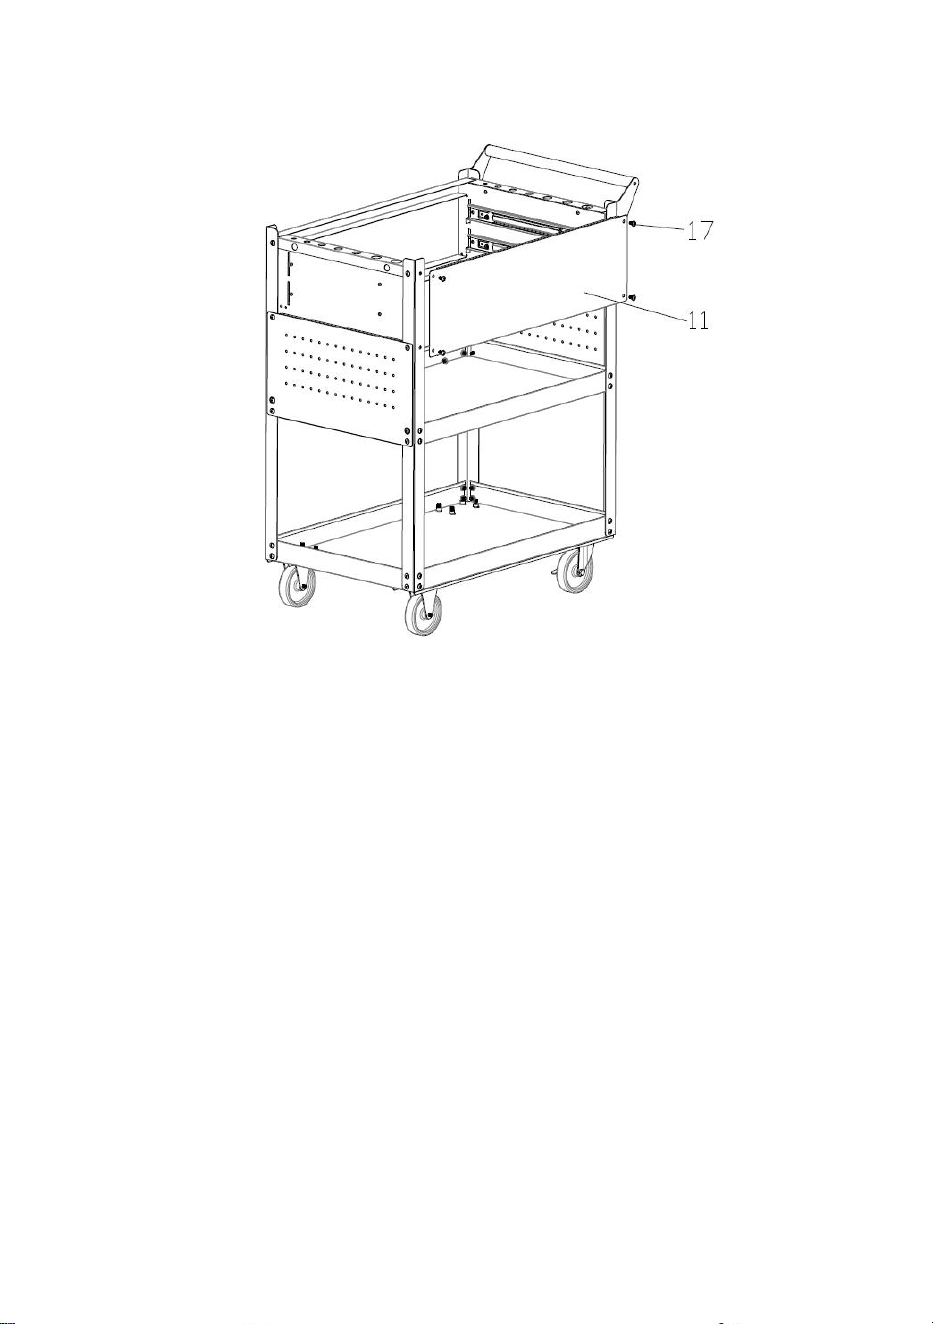
Step 7: Assembly the Back board 11#.
1. Put the Back board 11# as shown and fix with Bolt 17#.
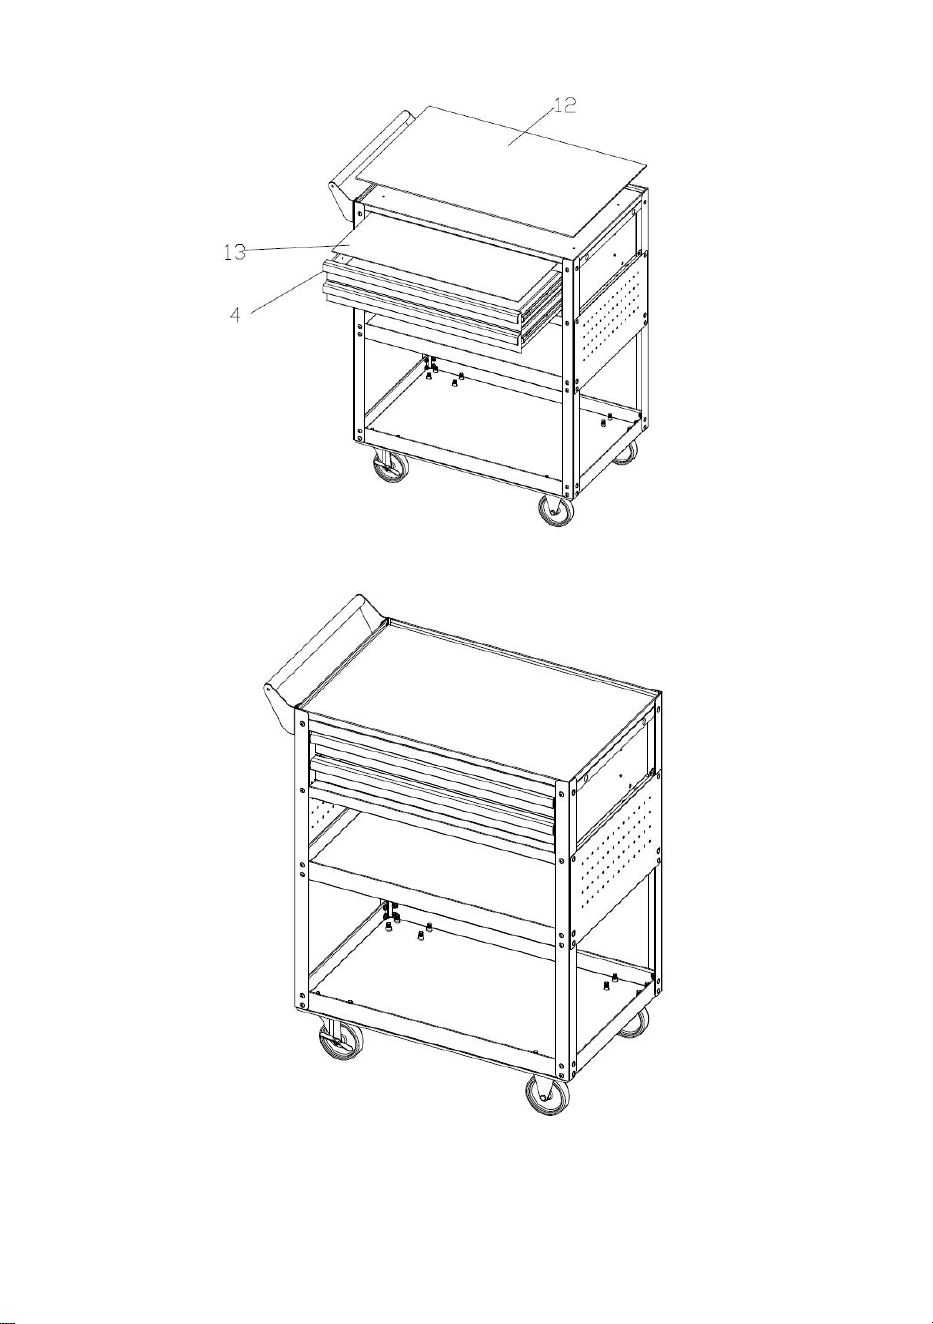
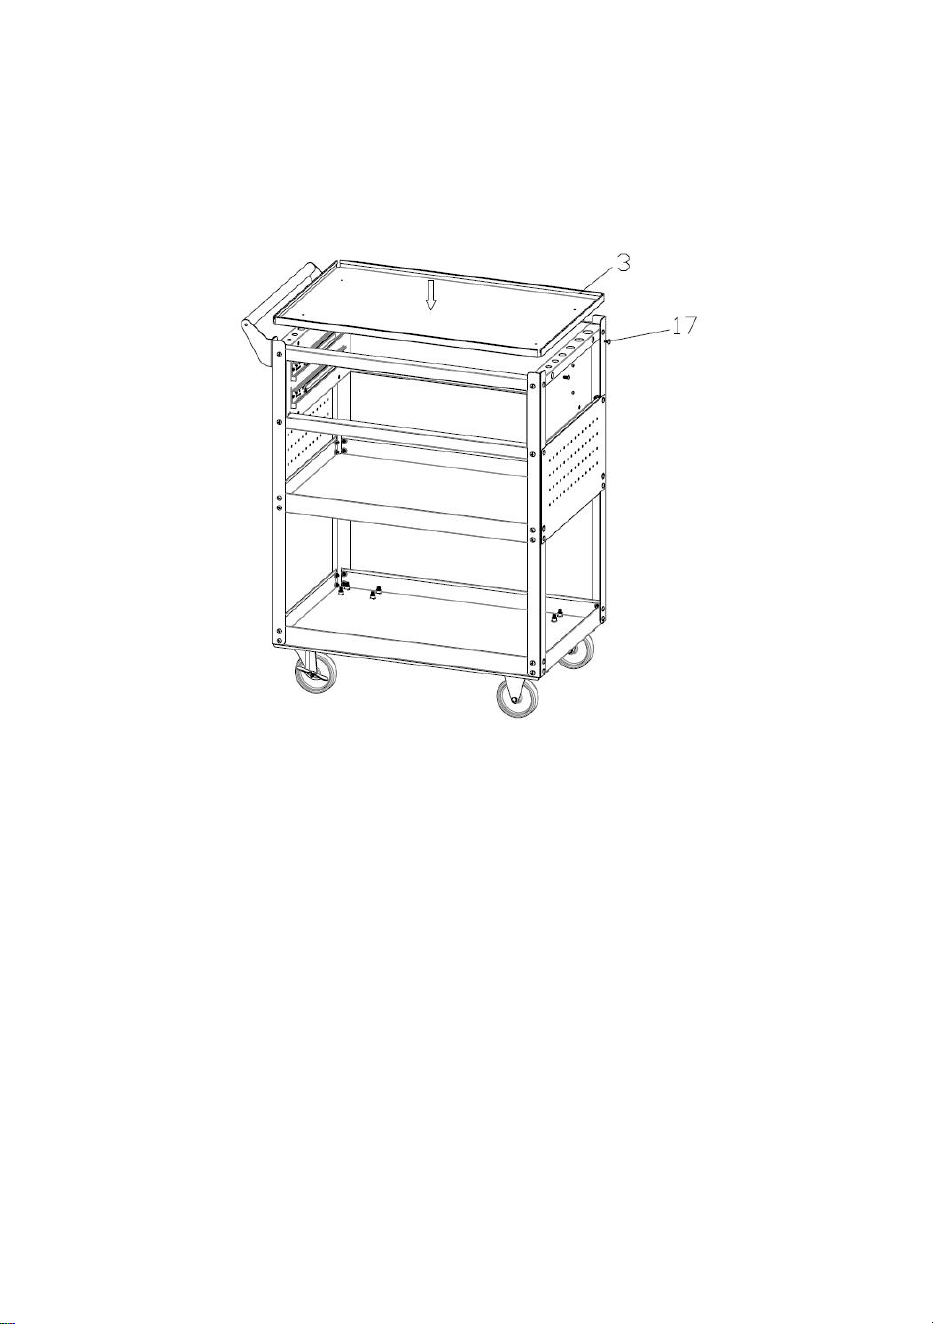
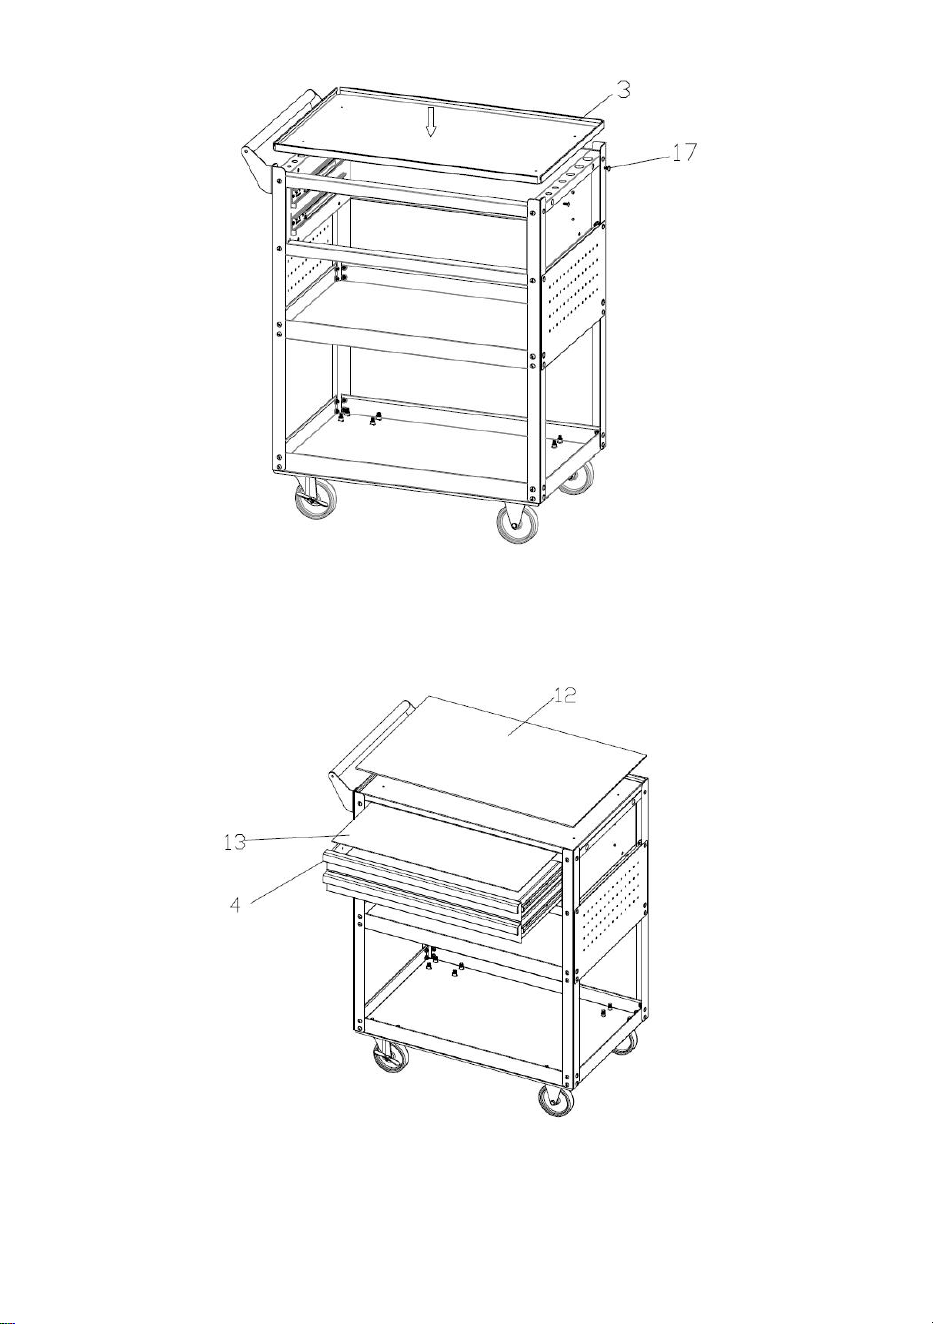
Step 8: Assembly the Top shelf 3#.
1. Put the Top shelf 3# as shown and fix with Bolt 17#, then fix all the bolts tight.
- 9 -
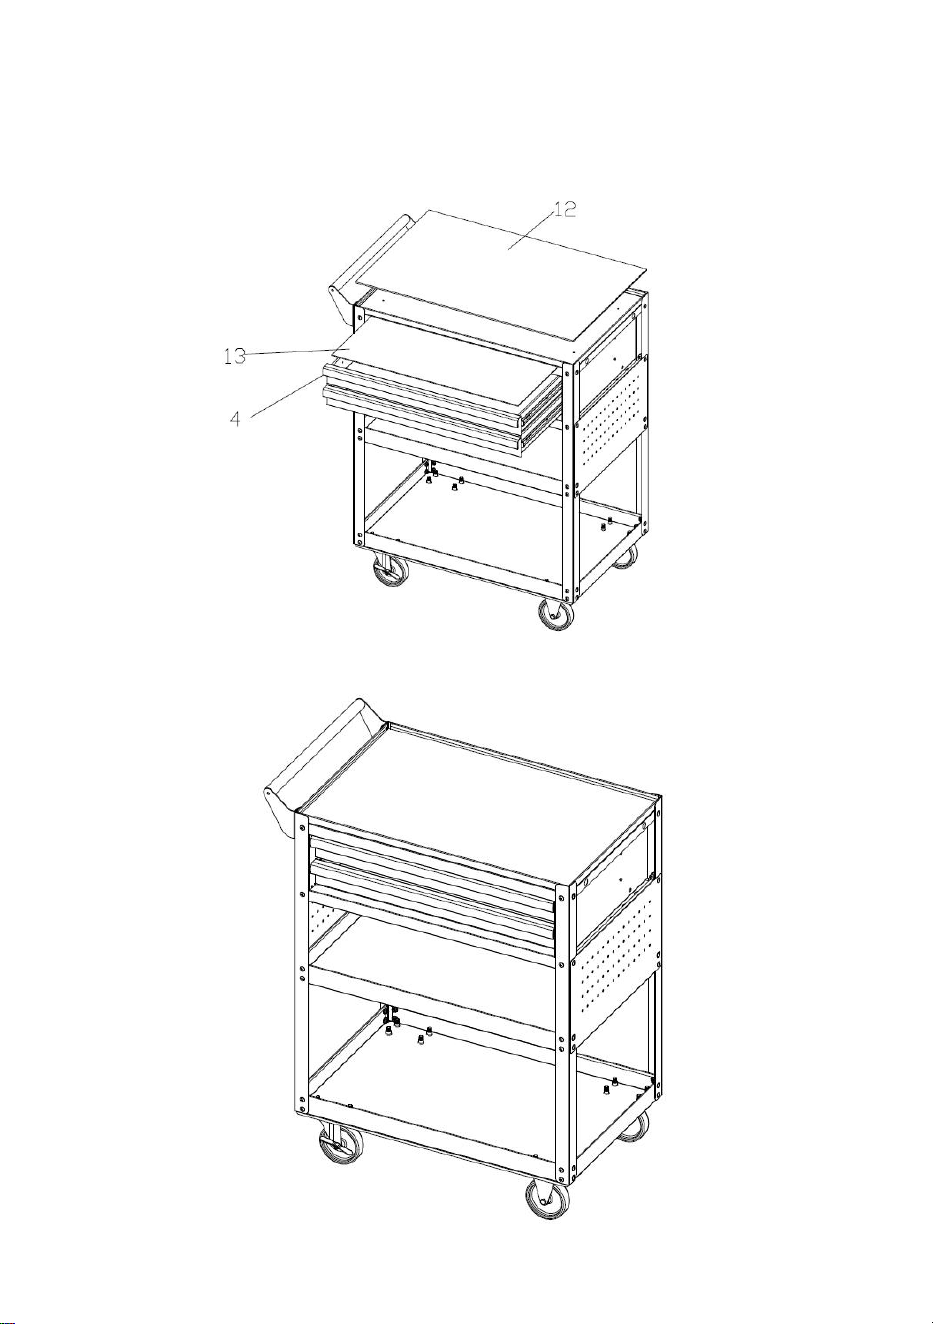
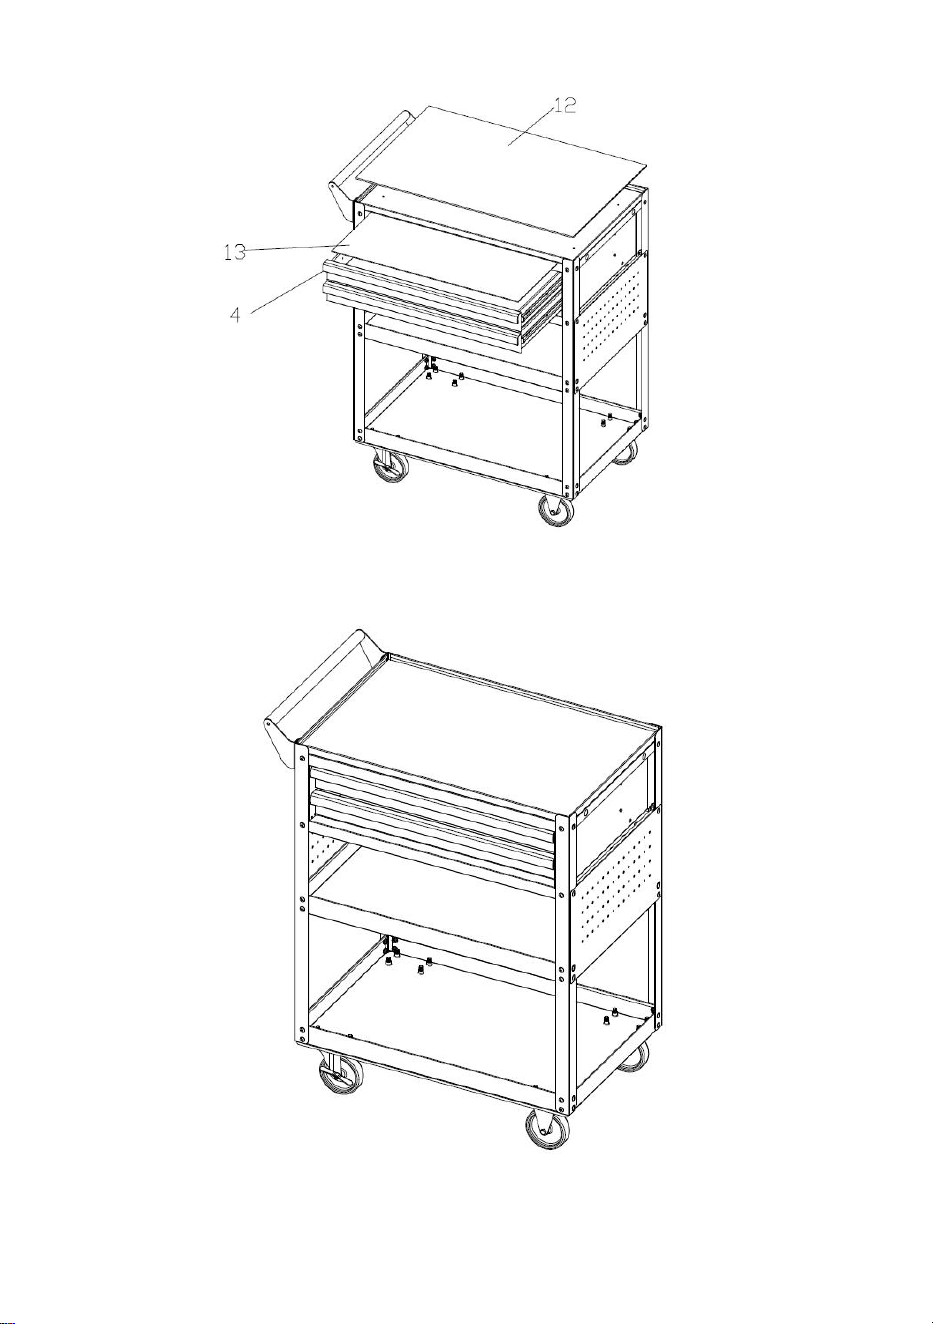
Step 9: Assembly the Drawer 4# and EVA.
1. Pull out the ball bearing slides and put the Drawer into it as shown, then put the
Top EVA 12# and Drawer EVA 13# in their place.
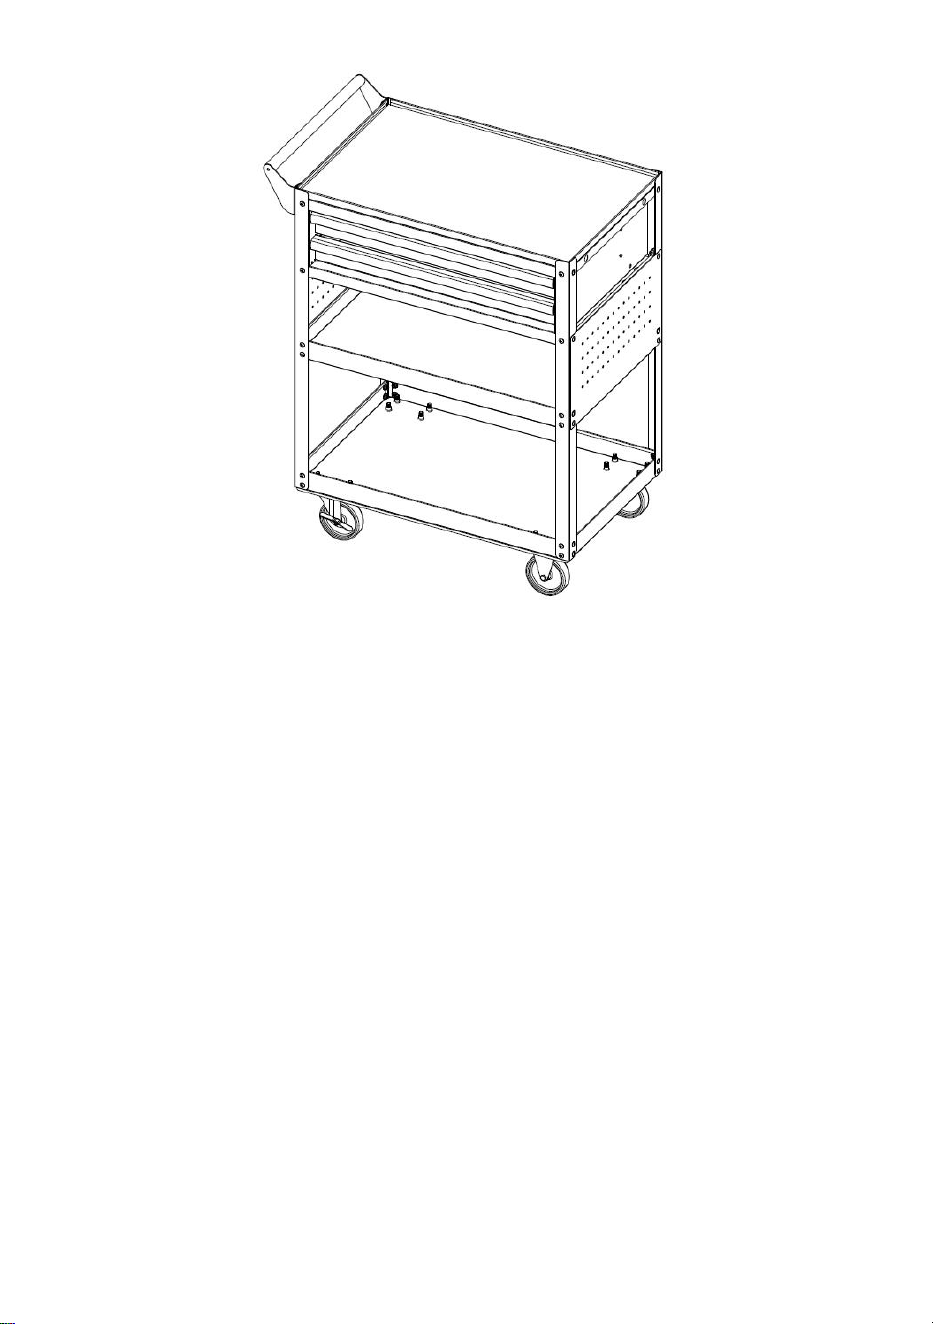
Step 10: Assembly complete.
- 10 -
Note: During installation, do not tighten the screws until all parts are
installed.
Manufacturer: Shanghaimuxinmuyeyouxiangongsi
Address: Shuangchenglu 803nong11hao1602A-1609shi, baoshanqu,
shanghai 200000 CN.
Imported to AUS: SIHAO PTY LTD. 1 ROKEVA STREETEASTWOOD
NSW 2122 Australia
Imported to USA: Sanven Technology Ltd. Suite 250, 9166 Anaheim
Place, Rancho Cucamonga, CA 91730
REP
UK
YH CONSULTING LIMITED. C/O YH Consulting
Limited Office 147, Centurion House, London
Road, Staines-upon-Thames, Surrey, TW18 4AX
REP
EC
E-CrossStu GmbH
Mainzer Landstr.69,
60329 Frankfurt am Main.

- 11 -
Technical Support and E-Warranty Certificate
www.vevor.com/support

- 12 -
CHARIOT À OUTILS
MODÈLE: T271802
Assistance technique et certificat de garantie électronique
www.vevor.com/support

- 1 -
MODÈLE : T271802
Il s'agit de la notice d'utilisation d'origine. Veuillez lire attentivement toutes
les instructions du manuel avant de l'utiliser. VEVOR se réserve le droit
d'interpréter clairement notre manuel d'utilisation. L'apparence du produit
dépend du produit que vous avez reçu. Veuillez nous excuser, nous ne vous
informerons plus si des mises à jour technologiques ou logicielles sont
disponibles sur notre produit.
TOOL CART

- 2 -
CONSIGNES DE SÉCURITÉ IMPORTANTES
Avertissement - Pour réduire le risque de blessure,
l'utilisateur doit lire attentivement le manuel d'instructions.
Ce symbole, placé avant un commentaire de sécurité,
indique un type de précaution, d'avertissement ou de
danger. Ignorer cet avertissement peut entraîner un
accident. Pour réduire le risque de blessure, d'incendie ou
d'électrocution, veuillez toujours suivre les recommandations
ci-dessous.
Avertissement – Assurez-vous de porter des gants lorsque
vous utilisez ce produit.
8) Conservez ce manuel pour connaître les avertissements et
précautions de sécurité. Le manuel fournit des informations importantes
sur la manière d'assembler, d'utiliser et d'entretenir ce produit.
9) Veuillez manipuler les bords métalliques avec précaution.
10) NE PAS monter sur ce produit ni l’utiliser comme échelle.
11) NE MODIFIEZ PAS ce produit d'une manière non prévue, car cela
pourrait endommager le produit ou provoquer des blessures corporelles.
12) Assemblez toujours sur une surface plane.
13) Le poids maximum chargé sur l' outil Le poids du chariot ne dépasse
pas 400 lb , réparti uniformément.
14) Attachez fermement les marchandises au chariot avec la sangle
d'arrimage avant de les déplacer.
PRÉCAUTIONS D'ASSEMBLAGE
6. Veuillez assembler le produit en respectant scrupuleusement les
instructions. Un assemblage incorrect peut être dangereux.
7. Veuillez porter des lunettes de sécurité et des gants de travail
correctement pendant l'assemblage.
8. N'essayez pas d'assembler le produit lorsque vous vous sentez fatigué
ou sous l'influence de l'alcool, de drogues ou de médicaments.

- 3 -
9. La capacité de charge et les autres paramètres du produit s'appliquent
uniquement au produit correctement et complètement assemblé.
10. Un tournevis cruciforme, une clé plate 1 4 # et une paire de gants
peuvent également être utilisés (non inclus dans le carton).
PRÉCAUTIONS D'EMPLOI
5. Ce produit n'est pas un jouet. Ne laissez pas les enfants jouer avec ou y
accéder.
6. Vérifiez soigneusement avant utilisation. Ne pas utiliser si des pièces
sont desserrées ou endommagées.
7. Utiliser uniquement sur des surfaces planes et dures.
8. Ne dépassez pas la capacité de charge indiquée. Serrez fermement
tous les boutons avant de placer des poids dessus. Soyez conscient de la
capacité de charge dynamique ! Des changements de charge soudains
peuvent temporairement provoquer une charge excessive, entraînant une
défaillance du produit.
CONSERVEZ CES INSTRUCTIONS
PARAMÈTRES DU PRODUIT
MODÈLE
T271802
Taille du produit
785*450*9 45 mm
Limite de charge totale
4 0 0 livres

- 4 -
LISTE DES PIÈCES
Parti
e
Descripti
on
Image
Quantit
é de
pièces
Parti
e
Descripti
on
Image
Quantit
é de
pièces
1
Étagère
inférieure
1
10
Poignée
1
2
Étagère
du milieu
1
11
Panneau
arrière
1
3
Étagère
supérieure
1
12
EVA de
qualité
supérieure
1
4
Tiroir
2
13
Tiroir EVA
2
5
Plaque de
montage
du tiroir
gauche
(avec
serrure)
1
14
Roulette
pivotante
avec frein
2
6
Plaque de
montage
du tiroir
droit
1
15
Roulette
rigide
2
7
Panneau
perforé
2
16
Boulon
M8*20
16
8
Droit
4
17
Boulon
M6*12
52
- 5 -
9
Faisceau
2
18
Écrou M6
32
Attention:
Pour plus d'informations sur les pièces répertoriées ci-dessous,
reportez-vous au schéma d'assemblage de ce manuel. Déballez et
séparez toutes les pièces dans une zone de travail dégagée.
ÉTAPE D'ASSEMBLAGE
Étape 1 : Assemblage des roulettes.
3. Retournez l' étagère inférieure 1# .
4. Assemblez les roulettes 12# et 13# avec des boulons 15# comme indiqué .
Étape 2 : Assemblage du montant 8# .
1. Retournez l’ étagère inférieure et placez les roulettes sur le sol.
2. Assemblez les montants 8# avec le boulon 17# et l'écrou 18#, faites attention
au sens des montants et ne serrez pas trop le boulon .

- 6 -
Étape 3 : Assemblage de l'étagère du milieu 2# .
1 · Placez l'étagère du milieu 2# comme indiqué et fixez-la avec le boulon
17# et l'écrou 18# ; attention : fixez d'abord simplement les boulons supérieurs des
deux côtés et ne serrez pas trop fort le boulon .
Étape 4 : Assemblez les plaques de montage 5 # et 6# et la poignée
10#.
3.
Assembler la plaque de montage du tiroir gauche 5#, la plaque de
montage droite 6# et poignée 10# avec boulon 17# comme indiqué ;
- 7 -
attention la plaque de montage gauche a un verrou et mettre la glissière à
billes dans la même direction ; fixez d'abord les boulons supérieurs et ne
serrez pas trop fort le boulon .
Étape 5 : Assemblez le panneau perforé 7# avec le boulon 17# .
4. 1. Placez le panneau perforé 7# comme indiqué et fixez-le avec le boulon 17#,
et ne serrez pas trop fort le boulon .
.
Étape 6 : Assemblez la poutre 9# et le panneau arrière 11# avec le
boulon 17# .

- 8 -
1. Insérez la poutre 9# entre le montant et la plaque de montage du tiroir comme
indiqué et fixez-la avec le boulon 17#, en faisant attention à la glissière à
roulement à billes et au trou de l' étagère supérieure dans la même direction.
Étape 7 : Assemblage du panneau arrière 11# .
1. Placez le panneau arrière 11# comme indiqué et fixez-le avec le boulon 17#.

- 9 -
Étape 8 : Assemblage de l
’
étagère supérieure 3# .
1. Placez l'étagère supérieure 3# comme indiqué et fixez-la avec le boulon 17#,
puis fixez fermement tous les boulons.
Étape 9 : Assemblage du tiroir 4# et de l'EVA .
1. Retirez les glissières à roulement à billes et placez le tiroir à l'intérieur comme
indiqué, puis placez le Top EVA 12# et le tiroir EVA 13# à leur place.
- 10 -
Étape 10 : Assemblage terminé .
Remarque : lors de l'installation, ne serrez pas les vis tant que toutes

- 11 -
les pièces ne sont pas installées .
Fabricant : Shanghaimuxinmuyeyouxiangongsi
Adresse : Shuangchenglu 803nong11hao1602A-1609shi, baoshanqu,
Shanghai 200 000 CN.
Importé en Australie : SIHAO PTY LTD. 1 ROKEVA
STREETEASTWOOD
NSW 2122 Australie
Importé aux États-Unis : Sanven Technology Ltd. Suite 250, 9166
Anaheim
Lieu, Rancho Cucamonga, CA 91730
REP
UK
YH CONSULTING LIMITED. C/O YH Consulting
Limited Office 147, Centurion House, London
Road, Staines-upon-Thames, Surrey, TW18 4AX
REP
EC
E-CrossStu GmbH
Mainzer Landstr.69,
60329 Frankfurt am Main.

- 12 -
Assistance technique et certificat de garantie électronique
www.vevor.com/support

- 13 -
WERKZEUGWAGEN
MODELL: T271802
Technischer Support und E-Garantie-Zertifikat
www.vevor.com/support

- 1 -
MODELL: T271802
Dies ist die Originalanleitung. Bitte lesen Sie alle Anweisungen sorgfältig
durch, bevor Sie das Gerät in Betrieb nehmen. VEVOR behält sich eine
klare Auslegung unserer Bedienungsanleitung vor. Das Erscheinungsbild
des Produkts richtet sich nach dem Produkt, das Sie erhalten haben. Bitte
verzeihen Sie uns, dass wir Sie nicht erneut informieren, wenn es
Technologie- oder Software-Updates für unser Produkt gibt .
TOOL CART

- 2 -
WICHTIGE SICHERHEITSHINWEISE
Warnung – Um das Verletzungsrisiko zu verringern, muss
der Benutzer die Bedienungsanleitung sorgfältig lesen.
Dieses Symbol vor einem Sicherheitshinweis weist auf eine
Vorsichtsmaßnahme, Warnung oder Gefahr hin. Das
Ignorieren dieser Warnung kann zu einem Unfall führen. Um
das Risiko von Verletzungen, Bränden oder Stromschlägen
zu verringern, befolgen Sie bitte immer die unten
aufgeführten Empfehlungen.
Achtung: Tragen Sie bei der Verwendung dieses Produkts
unbedingt Handschuhe.
15) Bewahren Sie dieses Handbuch wegen der Sicherheitswarnungen
und Vorsichtsmaßnahmen auf. Das Handbuch enthält wichtige
Informationen zur Montage, Verwendung und Wartung dieses Produkts.
16) Bitte gehen Sie vorsichtig mit Metallkanten um.
17) Stellen Sie sich NICHT auf dieses Produkt und verwenden Sie es
NICHT als Leiter.
18) Verändern Sie das Produkt NICHT in einer Weise, die nicht dafür
vorgesehen ist, da dies zu Produktschäden oder Verletzungen führen
kann.
19) Immer auf einer ebenen Fläche zusammenbauen.
20) Das maximal auf dem Werkzeug lastende Gewicht Der Wagen wiegt
bei gleichmäßiger Verteilung nicht mehr als 400 Pfund .
21) Befestigen Sie die Waren vor dem Transport mit dem Zurrgurt fest am
Wagen.
VORSICHTSMASSNAHMEN BEI DER MONTAGE
11. Bitte montieren Sie das Produkt streng gemäß der Anleitung. Eine
falsche Montage kann gefährlich sein.
12. Bitte tragen Sie während der Montage unbedingt eine Schutzbrille und
Arbeitshandschuhe.

- 3 -
13. Versuchen Sie nicht, das Produkt zusammenzubauen, wenn Sie müde
sind oder unter dem Einfluss von Alkohol, Drogen oder Medikamenten
stehen.
14. Die Tragfähigkeit und weitere Produktparameter gelten nur für das
ordnungsgemäß und vollständig montierte Produkt.
15. Ein Kreuzschlitzschraubendreher, ein Gabelschlüssel 1 4 # und ein
Paar Handschuhe können ebenfalls verwendet werden (nicht im Karton
enthalten).
VORSICHTSMASSNAHMEN BEIM GEBRAUCH
9. Dieses Produkt ist kein Spielzeug. Erlauben Sie Kindern nicht, mit
diesem Produkt zu spielen oder darauf zuzugreifen.
10. Vor Gebrauch sorgfältig prüfen. Nicht verwenden, wenn Teile gelöst
oder beschädigt sind.
11. Nur auf flachen und harten Oberflächen verwenden.
12. Die angegebene Tragfähigkeit darf nicht überschritten werden. Ziehen
Sie alle Knöpfe fest an, bevor Sie Gewichte darauf legen. Beachten Sie die
dynamische Tragfähigkeit! Plötzliche Laständerungen können
vorübergehend zu einer Überlastung führen und so zum Produktausfall
führen.
BEWAHREN SIE DIESE ANWEISUNGEN AUF
PRODUKTPARAMETER
MODELL
T271802
Produktgröße
785*450*9 45 mm
Gesamtbelastungsgrenze
4 0 0 Pfund

- 4 -
- 5 -
TEILELISTE
Te
il
Beschreibung
Bild
Teileme
nge
Te
il
Beschreib
ung
Bild
Teileme
nge
1
Unteres Regal
1
10
Handhabe
n
1
2
Mittleres Regal
1
11
Rückwand
1
3
Oberes Regal
1
12
Top EVA
1
4
Schublade
2
13
Schublade
EVA
2
5
Linke
Schubladenmontag
eplatte (mit
Schloss)
1
14
Lenkrolle
mit
Bremse
2
6
Rechte
Schubladenmontag
eplatte
1
15
Starre
Rolle
2
7
P egboard
2
16
Bolzen
M8*20
16
8
Aufrecht
4
17
Bolzen
M6*12
52
9
Strahl
2
18
Mutter M6
32
Aufmerksamkeit:
Weitere Informationen zu den unten aufgeführten Teilen finden Sie im
Montageplan in diesem Handbuch. Packen Sie alle Teile in einem freien
Arbeitsbereich aus und trennen Sie sie voneinander.

- 6 -
MONTAGESTRITT
Schritt 1: Montage der Rollen.
5. Drehen Sie das untere Regal 1# um.
6. Montieren Sie die Rollen 12# und 13# mit den Schrauben 15# wie gezeigt .
Schritt 2: Zusammenbau des Pfostens 8# .
1. Drehen Sie das untere Regal um und stellen Sie die Rollen auf den Boden.
2. Montieren Sie die Pfosten 8# mit der Schraube 17# und der Mutter 18#. Achten
Sie auf die Richtung der Pfosten und ziehen Sie die Schraube nicht zu fest an .
- 7 -
Schritt 3: Montieren Sie das mittlere Regal 2# .
1 · Legen Sie das mittlere Regal 2# wie gezeigt ein und befestigen Sie es
mit der Schraube 17# und der Mutter 18# ; Achtung : Befestigen Sie zuerst nur
die oberen Schrauben auf beiden Seiten und ziehen Sie die Schrauben nicht zu
fest an .
Schritt 4: Montieren Sie die Montageplatten 5 # und 6# und den Griff
10#.
5.
Montage der linken Schubladenmontageplatte 5#, der rechten
Montageplatte 6# und Griff 10# mit Schraube 17# wie gezeigt ; Achtung die
linke Montageplatte hat ein Schloss und setzen Sie den Kugellagerschlitten in
die gleiche Richtung ; ziehen Sie einfach zuerst die oberen Bolzen fest, und
ziehen Sie den Bolzen nicht zu fest an .
- 8 -
Schritt 5: Montieren Sie das Pegboard 7# mit der Schraube 17# .
6. 1. Platzieren Sie das Pegboard 7# wie gezeigt und befestigen Sie es mit der
Schraube 17#. Ziehen Sie die Schraube jedoch nicht zu fest an .
.
Schritt 6 : Montieren Sie den Balken 9# und die Rückwand 11# mit der
Schraube 17# .
1. Setzen Sie den Balken 9# wie gezeigt zwischen den Pfosten und die
Schubladenmontageplatte ein und befestigen Sie ihn mit der Schraube 17#.

- 9 -
Achten Sie darauf, dass die Kugellagerführung und das Loch des oberen Regals
in die gleiche Richtung zeigen.
Schritt 7 : Zusammenbau der Rückwand 11# .
1. Legen Sie die Rückwand 11# wie gezeigt ein und befestigen Sie sie mit der
Schraube 17#.

- 10 -
Schritt 8 : Montieren Sie das oberste Regal 3# .
1. Legen Sie das oberste Regal 3# wie gezeigt ein und befestigen Sie es mit der
Schraube 17#. Ziehen Sie anschließend alle Schrauben fest.
Schritt 9 : Schublade 4# und EVA zusammenbauen .
1. Ziehen Sie die Kugellagerschienen heraus und setzen Sie die Schublade wie
gezeigt ein. Setzen Sie dann das Top EVA 12# und das Schubladen-EVA 13# an
ihre Stelle.

- 11 -
Schritt 10 : Montage abgeschlossen .
Hinweis: Bei der Montage die Schrauben erst festziehen, wenn alle
- 12 -
Teile montiert sind .
Hersteller: Shanghaimuxinmuyeyouxiangongsi
Adresse: Shuangchenglu 803nong11hao1602A-1609shi, baoshanqu,
Shanghai, 200.000 CN.
Nach AUS importiert: SIHAO PTY LTD. 1 ROKEVA
STREETEASTWOOD
NSW 2122 Australien
Importiert in die USA: Sanven Technology Ltd. Suite 250, 9166 Anaheim
Ort, Rancho Cucamonga, CA 91730
REP
UK
YH CONSULTING LIMITED. C/O YH Consulting
Limited Office 147, Centurion House, London
Road, Staines-upon-Thames, Surrey, TW18 4AX
REP
EC
E-CrossStu GmbH
Mainzer Landstr.69,
60329 Frankfurt am Main.

- 13 -
Technischer Support und E-Garantie-Zertifikat
www.vevor.com/support

- 14 -
CARRELLO PORTAUTENSILI
MODELLO: T271802
Supporto tecnico e certificato di garanzia elettronica
www.vevor.com/support

- 1 -
MODELLO: T271802
Questa è l'istruzione originale, si prega di leggere attentamente tutte le
istruzioni del manuale prima di utilizzare. VEVOR si riserva una chiara
interpretazione del nostro manuale utente. L'aspetto del prodotto sarà
soggetto al prodotto ricevuto. Vi preghiamo di perdonarci se non vi
informeremo di nuovo se ci sono aggiornamenti tecnologici o software sul
nostro prodotto.
TOOL CART

- 2 -
IMPORTANTI ISTRUZIONI DI SICUREZZA
Attenzione - Per ridurre il rischio di lesioni, l'utente deve
leggere attentamente il manuale di istruzioni.
Questo simbolo, posto prima di un commento sulla
sicurezza, indica un tipo di precauzione, avviso o pericolo.
Ignorare questo avviso può causare un incidente. Per ridurre
il rischio di lesioni, incendi o folgorazione, seguire sempre le
raccomandazioni indicate di seguito.
Attenzione: assicurarsi di indossare guanti quando si utilizza
questo prodotto.
22) Conservare questo manuale per le avvertenze e le precauzioni di
sicurezza. Il manuale offre informazioni importanti su come assemblare,
utilizzare e manutenere questo prodotto.
23) Maneggiare con cura i bordi metallici.
24) NON salire sul prodotto né utilizzarlo come scala.
25) NON modificare questo prodotto in alcun modo diverso da quello
previsto, poiché ciò potrebbe danneggiare il prodotto o causare lesioni
personali.
26) Eseguire sempre il montaggio su una superficie piana.
27) Il peso massimo caricato sullo strumento il peso del carrello non
supera le 400 libbre , distribuite uniformemente.
28) Prima di spostare il carrello, legare saldamente la merce con la cinghia
di fissaggio.
PRECAUZIONI DI MONTAGGIO
16. Si prega di assemblare il prodotto seguendo scrupolosamente le
istruzioni. Un assemblaggio non corretto potrebbe essere pericoloso.
17. Si prega di indossare occhiali di sicurezza e guanti da lavoro durante il
montaggio.
18. Non provare a montare il prodotto quando ci si sente stanchi o sotto
l'effetto di alcol, droghe o farmaci.

- 3 -
19. La capacità di carico e gli altri parametri del prodotto si applicano solo
al prodotto correttamente e completamente assemblato.
20. un cacciavite a croce, una chiave inglese da 1,4 # e un paio di guanti
(non inclusi nella confezione).
PRECAUZIONI D'USO
13. Questo prodotto non è un giocattolo. Non permettere ai bambini di
giocare con questo articolo o di accedervi.
14. Controllare attentamente prima dell'uso. Non utilizzare se le parti si
allentano o si danneggiano.
15. Utilizzare solo su superfici piane e dure.
16. Non superare la capacità di carico indicata. Serrare saldamente tutte
le manopole prima di appoggiarci sopra i pesi. Siate consapevoli della
capacità di carico dinamica! Improvvisi cambiamenti di carico possono
causare temporaneamente un carico eccessivo, con conseguente guasto
del prodotto.
SALVA QUESTE ISTRUZIONI
PARAMETRI DEL PRODOTTO
MODELLO
T271802
Dimensioni del prodotto
785*450*9 45 mm
Limite di carico totale
4 0 0 libbre

- 4 -
ELENCO DEI PEZZI
Part
e
Descrizion
e
Immagine
Part
e
Qtà
Part
e
Descrizion
e
Immagine
Part
e
Qtà
1
Ripiano
inferiore
1
10
Maniglia
1
2
Ripiano
intermedio
1
11
Tavola
posteriore
1
3
Ripiano
superiore
1
12
EVA
superiore
1
4
Cassetto
2
13
Cassetto
EVA
2
5
Piastra di
montaggio
del cassetto
sinistro
(con
serratura)
1
14
Ruota
girevole
con freno
2
6
Piastra di
montaggio
del cassetto
destro
1
15
Rotella
rigida
2
7
Pannello
forato
2
16
Bullone
M8*20
16
8
Verticale
4
17
Bullone
M6*12
52
9
Trave
2
18
Dado M6
32
- 5 -
Attenzione:
Per ulteriori informazioni sulle parti elencate di seguito, fare
riferimento allo schema di montaggio in questo manuale. Disimballare e
separare tutte le parti in un'area di lavoro libera.
FASE DI MONTAGGIO
Fase 1: montaggio delle rotelle.
7. Capovolgere il ripiano inferiore 1# .
8. Montare le rotelle da 12# e 13# con bulloni da 15# come mostrato .
Fase 2: assemblaggio del montante 8# .
1. Capovolgere il ripiano inferiore e appoggiare le rotelle a terra.
2. Assemblare i montanti 8# con il bullone 17# e il dado 18#, prestando attenzione
alla direzione dei montanti e non serrare troppo il bullone .

- 6 -
Fase 3: Assemblaggio del ripiano centrale 2# .
1 · Posizionare il ripiano centrale 2# come mostrato e fissarlo con il bullone
17# e il dado 18# ; attenzione : fissare prima i bulloni superiori su entrambi i lati e
non stringere troppo il bullone .
Fase 4: assemblare le piastre di montaggio 5 # e 6# e la maniglia 10#.
7.
Assemblaggio della piastra di montaggio del cassetto sinistro 5#,
piastra di montaggio destra 6# e maniglia 10# con bullone 17# come
mostrato ; attenzione la piastra di montaggio sinistra ha s una serratura e
- 7 -
mettere la guida con cuscinetto a sfere nella stessa direzione ; prima fissa
semplicemente i bulloni superiori e non stringere troppo il bullone .
Fase 5: Assemblare il pannello forato da 7# con il bullone da 17# .
8. 1. Posizionare il pannello forato da 7# come mostrato e fissarlo con il bullone
da 17#, senza stringere troppo il bullone .
.
Fase 6 : Assemblare la trave da 9# e la tavola posteriore da 11# con il
bullone da 17# .
- 8 -
1. Inserire la trave da 9# tra il montante e la piastra di montaggio del cassetto
come mostrato e fissare con il bullone da 17#. Prestare attenzione alla guida con
cuscinetto a sfera e al foro del ripiano superiore nella stessa direzione.
Fase 7 : Assemblaggio del pannello posteriore 11# .
1. Posizionare la tavola posteriore 11# come mostrato e fissarla con il bullone 17#.

- 9 -
Fase 8 : Montaggio del ripiano superiore 3# .
1. Posizionare il ripiano superiore 3# come mostrato e fissarlo con il bullone 17#,
quindi serrare saldamente tutti i bulloni.
Fase 9 : Assemblaggio del cassetto 4# e dell'EVA .
1. Estrarre le guide con cuscinetti a sfera e inserire il cassetto come mostrato,
quindi posizionare al loro posto il Top EVA 12# e il cassetto EVA 13#.

- 10 -
Fase 10 : Assemblaggio completato .
Nota: durante l'installazione, non stringere le viti finché tutte le parti

- 11 -
non sono installate .
Produttore: Shanghaimuxinmuyeyouxiangongsi
Indirizzo: Shuangchenglu 803nong11hao1602A-1609shi, baoshanqu,
shanghai 200000 CN.
Importato in AUS: SIHAO PTY LTD. 1 ROKEVA STREETEASTWOOD
Nuovo Galles del Sud 2122 Australia
Importato negli USA: Sanven Technology Ltd. Suite 250, 9166 Anaheim
Luogo, Rancho Cucamonga, CA 91730
REP
UK
YH CONSULTING LIMITED. C/O YH Consulting
Limited Office 147, Centurion House, London
Road, Staines-upon-Thames, Surrey, TW18 4AX
REP
EC
E-CrossStu GmbH
Mainzer Landstr.69,
60329 Frankfurt am Main.

- 12 -
Supporto tecnico e certificato di garanzia elettronica
www.vevor.com/support

- 13 -
CARRITO DE HERRAMIENTAS
MODELO: T271802
Soporte técnico y certificado de garantía electrónica
www.vevor.com/support

- 1 -
MODELO: T271802
Estas son las instrucciones originales, lea atentamente todas las
instrucciones del manual antes de utilizar el producto. VEVOR se reserva
una interpretación clara de nuestro manual de usuario. La apariencia del
producto estará sujeta al producto que recibió. Perdónenos por no
informarle nuevamente si hay actualizaciones de tecnología o software en
nuestro producto.
TOOL CART
- 2 -
INSTRUCCIONES DE SEGURIDAD
IMPORTANTES
Advertencia: Para reducir el riesgo de lesiones, el usuario
debe leer atentamente el manual de instrucciones.
Este símbolo, colocado antes de un comentario de
seguridad, indica un tipo de precaución, advertencia o
peligro. Ignorar esta advertencia puede provocar un
accidente. Para reducir el riesgo de lesiones, incendios o
electrocución, siga siempre las recomendaciones que se
muestran a continuación.
Advertencia: Asegúrese de usar guantes al utilizar este
producto.
29) Conserve este manual para conocer las advertencias y precauciones
de seguridad. El manual ofrece información importante sobre cómo
ensamblar, usar y mantener este producto.
30) Manipule los bordes metálicos con cuidado.
31) NO se suba a este producto ni lo utilice como escalera.
32) NO altere este producto de ninguna manera que no sea la prevista, ya
que esto puede causar daños al producto o lesiones personales.
33) Monte siempre sobre una superficie nivelada.
34) El peso máximo cargado en la herramienta El peso del carrito no debe
ser superior a 400 libras , distribuidas uniformemente.
35) Ate firmemente la mercancía al carrito con la correa de amarre antes
de moverla.
PRECAUCIONES DE MONTAJE
21. Por favor, ensamble el producto siguiendo estrictamente las
instrucciones. Un montaje incorrecto podría resultar peligroso.
22. Utilice gafas de seguridad y guantes de trabajo adecuadamente
durante el montaje.

- 3 -
23. No intente ensamblar el producto si se siente cansado o bajo la
influencia de alcohol, drogas o medicamentos.
24. La capacidad de carga y otros parámetros del producto se aplican
únicamente al producto ensamblado de forma correcta y completa.
25. También se pueden utilizar un destornillador Philips, una llave de boca
abierta de 1/4 " y un par de guantes (no incluidos en la caja).
PRECAUCIONES DE USO
17. Este producto no es un juguete. No permita que los niños jueguen con
este artículo ni tengan acceso a él.
18. Verifique cuidadosamente antes de usar. No use el producto si las
piezas están sueltas o dañadas.
19. Úselo únicamente en superficies planas y duras.
20. No exceda la capacidad de carga indicada. Apriete bien todas las
perillas antes de colocar pesos sobre ellas. ¡Tenga en cuenta la capacidad
de carga dinámica! Los cambios repentinos de carga pueden provocar
temporalmente una carga excesiva, lo que provocaría una falla del
producto.
GUARDE ESTAS INSTRUCCIONES
PARÁMETROS DEL PRODUCTO
MODELO
T271802
Tamaño del producto
785*450*9 45 mm
Límite de carga total
4 0 0 libras
- 4 -
LISTA DE PIEZAS
Part
e
Descripci
ón
Imagen
Cantida
d de
piezas
Part
e
Descripci
ón
Imagen
Cantida
d de
piezas
1
Estante
inferior
1
10
Manejar
1
2
Estante del
medio
1
11
Tablero
trasero
1
3
Estante
superior
1
12
EVA
superior
1
4
Cajón
2
13
Cajón EVA
2
5
Placa de
montaje
del cajón
izquierdo
(con
cerradura)
1
14
Rueda
giratoria
con freno
2
6
Placa de
montaje
del cajón
derecho
1
15
Ruedas
rígidas
2
7
Tablero
perforado
2
16
Perno
M8*20
16
8
Vertical
4
17
Perno
M6*12
52
9
Haz
2
18
Tuerca M6
32
- 5 -
Atención:
Para obtener información adicional sobre las piezas que se enumeran
a continuación, consulte el diagrama de ensamblaje de este manual.
Desembale y separe todas las piezas en un área de trabajo despejada.
PASO DE MONTAJE
Paso 1: Ensamblar las ruedas.
9. Gire el estante inferior n.° 1 .
10. Ensamble las ruedas n. ° 12 y n.° 13 con pernos n . ° 15 como se
muestra .
Paso 2: Ensamblaje del montante vertical n.° 8 .
1. Gire el estante inferior y coloque las ruedas en el suelo.
2. Ensamble los montantes n.° 8 con el perno n.° 17 y la tuerca n.° 18, prestando
atención a la dirección de los montantes y no apriete demasiado el perno .
- 6 -
Paso 3: Ensamblar el estante central n.° 2 .
1 · Coloque el estante central n.
°
2 como se muestra y fíjelo con el perno
n.° 17 y la tuerca n.° 18 ; atención : primero fije solo los pernos superiores en
ambos lados y no bloquee el perno demasiado fuerte .
Paso 4: Ensamble las placas de montaje s 5# y 6#, y el mango 10#.
- 7 -
9. Ensamble la placa de montaje del cajón izquierdo n.° 5 y la placa de
montaje derecha n.° 6 y manija 10# con perno 17# como se muestra ;
atención la placa de montaje izquierda tiene una cerradura y poner la
corredera con cojinetes de bolas en la misma dirección ; simplemente fije
primero los pernos superiores y no bloquee el perno demasiado fuerte .
Paso 5: Ensamble el tablero perforado n.
°
7 con el perno n.
°
17 .
10. 1. Coloque el tablero perforado n.° 7 como se muestra y fíjelo con el perno n.°
17; no apriete demasiado el perno .
- 8 -
.
Paso 6 : Ensamble la viga n.
°
9 y la tabla posterior n.
°
11 con el perno
n.
°
17 .
1. Inserte la viga n.° 9 entre el montante y la placa de montaje del cajón como se
muestra y fíjela con el perno n.° 17. Preste atención a la corredera del cojinete de
bolas y al orificio del estante superior en la misma dirección.
- 9 -
Paso 7 : Ensamble la placa posterior n.
°
11 .
1. Coloque la tabla trasera n.° 11 como se muestra y fíjela con el perno n.° 17.
- 10 -
Paso 8 : Ensamble el estante superior n.
°
3 .
1. Coloque el estante superior n.° 3 como se muestra y fíjelo con el perno n.° 17,
luego ajuste todos los pernos firmemente.
Paso 9 : Ensamble el cajón n.
°
4 y EVA .
1. Saque las correderas con cojinetes de bolas y coloque el cajón en ellas como
se muestra, luego coloque el EVA superior n.° 12 y el EVA del cajón n.° 13 en su
lugar.

- 11 -
Paso 10 : Montaje completo .
Nota: Durante la instalación, no apriete los tornillos hasta que todas

- 12 -
las piezas estén instaladas .
Fabricante: Shanghaimuxinmuyeyouxiangongsi
Dirección: Shuangchenglu 803nong11hao1602A-1609shi, baoshanqu,
Shangai 200000 CN.
Importado a Australia: SIHAO PTY LTD. 1 ROKEVA
STREETEASTWOOD
Nueva Gales del Sur 2122 Australia
Importado a EE. UU.: Sanven Technology Ltd. Suite 250, 9166 Anaheim
Lugar, Rancho Cucamonga, CA 91730
REP
UK
YH CONSULTING LIMITED. C/O YH Consulting
Limited Office 147, Centurion House, London
Road, Staines-upon-Thames, Surrey, TW18 4AX
REP
EC
E-CrossStu GmbH
Mainzer Landstr.69,
60329 Frankfurt am Main.

- 13 -
Soporte técnico y certificado de garantía electrónica
www.vevor.com/support

- 14 -
WÓZEK NARZĘDZIOWY
MODEL: T271802
Wsparcie techniczne i certyfikat e-gwarancji
www.vevor.com/support

- 1 -
MODEL: T271802
To jest oryginalna instrukcja, przed użyciem należy uważnie przeczytać
wszystkie instrukcje. VEVOR zastrzega sobie jasną interpretację naszej
instrukcji obsługi. Wygląd produktu będzie zależał od produktu, który
otrzymałeś. Prosimy o wybaczenie, że nie poinformujemy Cię ponownie,
jeśli w naszym produkcie pojawią się jakiekolwiek aktualizacje
technologiczne lub oprogramowania.
TOOL CART
- 2 -
WAŻNE INSTRUKCJE BEZPIECZEŃSTWA
Ostrzeżenie - Aby zminimalizować ryzyko obrażeń,
użytkownik powinien uważnie przeczytać instrukcję obsługi.
Ten symbol, umieszczony przed komentarzem dotyczącym
bezpieczeństwa, wskazuje na rodzaj ostrożności,
ostrzeżenia lub niebezpieczeństwa. Zignorowanie tego
ostrzeżenia może doprowadzić do wypadku. Aby zmniejszyć
ryzyko obrażeń, pożaru lub porażenia prądem, zawsze
postępuj zgodnie z zaleceniami podanymi poniżej.
Ostrzeżenie: Podczas stosowania tego produktu należy
nosić rękawiczki.
36) Zachowaj tę instrukcję ze względu na ostrzeżenia i środki ostrożności
dotyczące bezpieczeństwa. Instrukcja zawiera ważne informacje na temat
montażu, użytkowania i konserwacji tego produktu.
37) Prosimy o ostrożne obchodzenie się z krawędziami metalowymi.
38) NIE stawaj na tym produkcie i NIE używaj go jako drabiny.
39) NIE modyfikuj tego produktu w żaden sposób niezgodny z
przeznaczeniem, gdyż może to spowodować uszkodzenie produktu lub
obrażenia ciała.
40) Zawsze montuj na równej powierzchni.
41) Maksymalny ciężar ładunku na narzędziu Waga wózka nie może
przekraczać 400 funtów , równomiernie rozłożona.
42) Przed przemieszczeniem należy mocno przymocować towary do
wózka za pomocą pasa mocującego.
ŚRODKI OSTROŻNOŚCI PODCZAS MONTAŻU
26. Proszę złożyć produkt ściśle według instrukcji. Nieprawidłowy montaż
może być niebezpieczny.
27. Podczas montażu należy prawidłowo założyć okulary ochronne i
rękawice robocze.

- 3 -
28. Nie należy podejmować prób montażu produktu, jeśli jesteś zmęczony
lub znajdujesz się pod wpływem alkoholu, narkotyków lub leków.
29. Nośność i inne parametry produktu odnoszą się wyłącznie do produktu
prawidłowo i kompletnie zmontowanego.
30. śrubokręta krzyżakowego, klucza płaskiego 1 4 # i pary rękawiczek
(nie są dołączone do opakowania).
ŚRODKI OSTROŻNOŚCI
21. Ten produkt nie jest zabawką. Nie pozwalaj dzieciom bawić się tym
przedmiotem ani mieć do niego dostępu.
22. Przed użyciem sprawdź dokładnie. Nie używaj, jeśli części się
poluzują lub ulegną uszkodzeniu.
23. Stosować wyłącznie na płaskich i twardych powierzchniach.
24. Nie przekraczaj podanej nośności. Mocno dokręć wszystkie pokrętła
przed umieszczeniem na nich ciężarków. Zwróć uwagę na dynamiczną
nośność! Nagłe zmiany obciążenia mogą tymczasowo spowodować
nadmierne obciążenie, co może doprowadzić do awarii produktu.
ZAPISZ TE INSTRUKCJE
PARAMETRY PRODUKTU
MODEL
T271802
Rozmiar produktu
785*450*9 45 mm
Całkowity limit obciążenia
4 0 0 funtów
- 4 -
LISTA CZĘŚCI
Częś
ć
Opis
Zdjęcie
Ilość
częśc
i
Częś
ć
Opis
Zdjęcie
Ilość
częśc
i
1
Dolna
półka
1
10
Uchwyt
1
2
Półka
środkowa
1
11
Tablica
tylna
1
3
Najwyższa
półka
1
12
Najlepsz
a EVA
1
4
Szuflada
2
13
Szuflada
EVA
2
5
Lewa płyta
montażowa
szuflady (z
zamkiem)
1
14
Kółko
obrotowe
z
hamulce
m
2
6
Płyta
montażowa
prawej
szuflady
1
15
Sztywne
kółka
2
7
tektura
perforowan
a
2
16
Śruba
M8*20
16
8
Pionowo
4
17
Śruba
M6*12
52
9
Belka
2
18
Nakrętka
M6
32
- 5 -
Uwaga:
Aby uzyskać dodatkowe informacje dotyczące części wymienionych
poniżej, zapoznaj się ze schematem montażu w tej instrukcji. Rozpakuj i
oddziel wszystkie części w czystym miejscu roboczym.
KROK MONTAŻU
Krok 1: Montaż kółek.
11. Odwróć dolną półkę 1# .
12. Złóż kółka 12# i 13# za pomocą śrub 15 #, jak pokazano .
Krok 2: Montaż słupka 8# .
1. Odwróć dolną półkę i połóż kółka na podłodze.
2. Złóż słupki 8# za pomocą śruby 17# i nakrętki 18#, zwracając uwagę na
kierunek słupków i nie dokręcając śruby zbyt mocno .

- 6 -
Krok 3: Złóż środkową półkę 2# .
1 · Umieść środkową półkę 2# jak pokazano i zamocuj za pomocą śruby 17#
i nakrętki 18# . Uwaga : najpierw przykręć górne śruby po obu stronach i nie
dokręcaj śruby zbyt mocno .
Krok 4: Zamontuj płytę montażową s 5# i 6# oraz uchwyt 10#.
11.
Złóż lewą płytę montażową szuflady 5#, prawą płytę montażową 6#
i
uchwyt 10# ze śrubą 17#, jak pokazano ; uwaga, lewa płyta montażowa ma

- 7 -
zamek i umieść prowadnicę łożyska kulkowego w tym samym kierunku ;
najpierw przykręć tylko górne śruby i nie dokręcaj śruby zbyt mocno .
Krok 5: Zamontuj płytę perforowaną 7# za pomocą śruby 17# .
12. 1. Umieść płytę perforowaną 7# jak pokazano i zamocuj ją śrubą 17#. Nie
dokręcaj śruby zbyt mocno .
.
Krok 6 : Złóż belkę 9# i płytę tylną 11# za pomocą śruby 17# .

- 8 -
1. Umieść belkę 9# pomiędzy słupkiem a płytą montażową szuflady, jak pokazano
na rysunku, i przymocuj ją śrubą 17#. Zwróć uwagę na to, aby prowadnica
kulkowa i otwór górnej półki znajdowały się w tym samym kierunku.
Krok 7 : Montaż tylnej płyty 11# .
1. Zamontuj tylną płytę 11# jak pokazano i przymocuj śrubą 17#.
- 9 -
Krok 8 : Montaż górnej półki 3# .
1. Zamontuj górną półkę 3# jak pokazano i zamocuj ją za pomocą śruby 17#, a
następnie mocno dokręć wszystkie śruby.
Krok 9 : Montaż szuflady 4# i pianki EVA .
1. Wyciągnij prowadnice kulkowe i włóż szufladę, jak pokazano na zdjęciu, a
następnie włóż na swoje miejsce górną część EVA 12# i szufladę EVA 13#.
- 10 -
Krok 10 : Montaż uko
ń
czony .

- 11 -
Uwaga: Podczas montażu nie dokręcaj śrub, dopóki wszystkie części
nie zostaną zamontowane .
Producent: Shanghaimuxinmuyeyouxiangongsi
Adres: Shuangchenglu 803nong11hao1602A-1609shi, baoshanqu,
Szanghaj 200000 CN.
Importowane do AUS: SIHAO PTY LTD. 1 ROKEVA
STREETEASTWOOD
NSW 2122 Australia
Importowane do USA: Sanven Technology Ltd. Suite 250, 9166 Anaheim
Miejsce, Rancho Cucamonga, CA 91730
REP
UK
YH CONSULTING LIMITED. C/O YH Consulting
Limited Office 147, Centurion House, London
Road, Staines-upon-Thames, Surrey, TW18 4AX
REP
EC
E-CrossStu GmbH
Mainzer Landstr.69,
60329 Frankfurt am Main.

- 12 -
Wsparcie techniczne i certyfikat e-gwarancji
www.vevor.com/support

- 13 -
GEREEDSCHAPSWAGEN
MODEL: T271802
Technische ondersteuning en e-garantiecertificaat
www.vevor.com/support

- 1 -
MODEL: T271802
Dit is de originele instructie, lees alle handleidingen zorgvuldig door voordat
u het product gebruikt. VEVOR behoudt zich een duidelijke interpretatie van
onze gebruikershandleiding voor. Het uiterlijk van het product is afhankelijk
van het product dat u hebt ontvangen. Vergeef ons dat we u niet opnieuw
zullen informeren als er technologie- of software-updates voor ons product
zijn .
TOOL CART

- 2 -
BELANGRIJKE VEILIGHEIDSINSTRUCTIES
Waarschuwing - Om het risico op letsel te verkleinen, dient
de gebruiker de gebruiksaanwijzing zorgvuldig te lezen.
Dit symbool, geplaatst voor een veiligheidsopmerking, geeft
een soort voorzorgsmaatregel, waarschuwing of gevaar aan.
Het negeren van deze waarschuwing kan leiden tot een
ongeluk. Om het risico op letsel, brand of elektrocutie te
verminderen, dient u altijd de onderstaande aanbevelingen
op te volgen.
Waarschuwing: Draag handschoenen wanneer u dit product
gebruikt.
43) Bewaar deze handleiding voor de veiligheidswaarschuwingen en
voorzorgsmaatregelen. De handleiding biedt belangrijke informatie over
hoe u dit product kunt monteren, gebruiken en onderhouden.
44) Ga voorzichtig om met metalen randen.
45) Ga NIET op dit product staan en gebruik het niet als ladder.
46) Wijzig dit product NIET op een manier die niet de bedoeling is, omdat
dit schade aan het product of persoonlijk letsel kan veroorzaken.
47) Monteer het geheel altijd op een vlakke ondergrond.
48) Het maximaal belastbare gewicht op het gereedschap c- kunst weegt
niet meer dan 400 lbs , gelijkmatig verdeeld.
49) Bind de goederen stevig vast met de spanband op de kar voordat u ze
verplaatst.
MONTAGEVOORZORGSMAATREGELEN
31. Monteer het product strikt volgens de instructies. Onjuiste montage
kan gevaarlijk zijn.
32. Draag tijdens de montage een veiligheidsbril en werkhandschoenen.
33. Probeer het product niet te monteren als u zich moe voelt of onder
invloed bent van alcohol, drugs of medicijnen.

- 3 -
34. Draagvermogen en andere productparameters worden uitsluitend
toegepast op het correct en volledig gemonteerde product.
35. een kruiskopschroevendraaier, een steeksleutel nr. 1 4 en een paar
handschoenen gebruiken (niet inbegrepen in de doos).
GEBRUIK VOORZORGSMAATREGELEN
25. Dit product is geen speelgoed. Laat kinderen niet met dit item spelen
of er toegang toe krijgen.
26. Controleer zorgvuldig voor gebruik. Niet gebruiken als onderdelen
losraken of beschadigd raken.
27. Alleen gebruiken op vlakke en harde oppervlakken.
28. Overschrijd de vermelde draagkracht niet. Draai alle knoppen stevig
vast voordat u er gewichten op plaatst. Wees u bewust van de dynamische
draagkracht! Plotselinge veranderingen in de belasting kunnen tijdelijk een
te hoge belasting veroorzaken, wat kan leiden tot productfalen.
BEWAAR DEZE INSTRUCTIES
PRODUCTPARAMETERS
MODEL
T271802
Productgrootte
785*450*9 45 mm
Totale belastinglimiet
4 0 0 pond
- 4 -
ONDERDELENLIJST
De
el
Beschrijvi
ng
Afbeelding
Onderdee
l
Hoeveelh
eid
De
el
Beschrijvi
ng
Afbeelding
Onderdee
l
Hoeveelh
eid
1
Onderste
plank
1
10
Hendel
1
2
Middelste
plank
1
11
Achterbord
1
3
Bovenste
plank
1
12
Bovenste
EVA
1
4
Lade
2
13
Lade EVA
2
5
Montagepl
aat
linkerlade
(met slot)
1
14
Zwenkwiel
met rem
2
6
Montagepl
aat
rechterlad
e
1
15
Stijve
zwenkwiel
en
2
7
Pegbord
2
16
Bout
M8*20
16
8
Rechtop
4
17
Bout
M6*12
52
9
Straal
2
18
Moer M6
32

- 5 -
Aandacht:
Voor aanvullende informatie over de hieronder vermelde onderdelen,
raadpleegt u het ssassemblagediagram in deze handleiding. Pak alle
onderdelen uit en scheid ze in een open werkgebied.
MONTAGESTAP
Stap 1: Monteer de wielen.
13. Draai de onderste plank 1# om .
14. Monteer de wielen 12# en 13# met bouten 15 # zoals afgebeeld .
Stap 2: Montage van de staander 8# .
1. Draai de onderste plank om en zet de wieltjes op de grond.
2. Monteer de staanders nr. 8 met bout nr. 17 en moer nr. 18. Let op de richting
van de staanders en draai de bout niet te strak vast .
- 6 -
Stap 3: Monteer de middelste plank 2# .
1 · Plaats de middelste plank nr. 2 zoals afgebeeld en bevestig deze met
bout nr. 17 en moer nr . 18. Let op : bevestig eerst de bovenste bouten aan
beide zijkanten en draai de bout niet te strak vast .
Stap 4: Monteer de montageplaten 5 #&6# en de handgreep 10#.
13.
Montage van de linker lade montageplaat 5#, rechter montageplaat 6#
en handvat 10# met bout 17# zoals afgebeeld ; let op de linker montageplaat

- 7 -
heeft een slot, en plaats de kogellagerslede in dezelfde richting ; draai eerst
de bovenste bouten vast en draai de bout niet te strak vast .
Stap 5: Monteer het Pegboard 7# met bout 17# .
14. 1. Plaats het Pegboard 7# zoals afgebeeld en bevestig het met bout 17#.
Draai de bout niet te strak vast .
.
Stap 6 : Monteer de balk nr. 9 en het achterbord nr. 11 met bout nr. 17 .

- 8 -
1. Plaats de balk 9# tussen de staander en de montageplaat van de lade zoals
afgebeeld en bevestig deze met bout 17#. Let op dat de kogellagers en het gat in
de bovenste plank in dezelfde richting zitten.
Stap 7 : Monteer het achterbord 11# .
1. Plaats het achterbord nr. 11 zoals afgebeeld en bevestig het met bout nr. 17.

- 9 -
Stap 8 : Monteer de bovenste plank 3# .
1. Plaats de bovenste plank 3# zoals afgebeeld en bevestig deze met bout 17#.
Draai vervolgens alle bouten goed vast.
Stap 9 : Monteer de lade 4# en EVA .
1. Trek de kogellagers eruit en plaats de lade erin zoals afgebeeld. Plaats
vervolgens de bovenste EVA 12# en lade EVA 13# op hun plaats.

- 10 -
Stap 10 : Montage voltooid .
Let op: Draai de schroeven tijdens de installatie pas vast als alle
- 11 -
onderdelen zijn gemonteerd .
Fabrikant: Shanghaimuxinmuyeyouxiangongsi
Adres: Shuangchenglu 803nong11hao1602A-1609shi, baoshanqu,
Sjanghai 200000 CN.
Geïmporteerd naar AUS: SIHAO PTY LTD. 1 ROKEVA
STREETEASTWOOD
NSW 2122 Australië
Geïmporteerd naar de VS: Sanven Technology Ltd. Suite 250, 9166
Anaheim
Plaats, Rancho Cucamonga, CA 91730
REP
UK
YH CONSULTING LIMITED. C/O YH Consulting
Limited Office 147, Centurion House, London
Road, Staines-upon-Thames, Surrey, TW18 4AX
REP
EC
E-CrossStu GmbH
Mainzer Landstr.69,
60329 Frankfurt am Main.

- 12 -
Technische ondersteuning en e-garantiecertificaat
www.vevor.com/support

- 13 -
VERKTYGSVAGN
MODELL: T271802
Teknisk support och e-garanticertifikat
www.vevor.com/support

- 1 -
MODELL: T271802
Detta är den ursprungliga instruktionen, läs alla instruktioner noggrant innan
du använder den. VEVOR reserverar sig för en tydlig tolkning av vår
användarmanual. Utseendet på produkten är beroende av den produkt du
fått. Ursäkta oss att vi inte kommer att informera dig igen om det finns någon
teknik eller mjukvaruuppdateringar på vår produkt.
TOOL CART

- 2 -
VIKTIGA SÄKERHETSINSTRUKTIONER
Varning - För att minska risken för skada måste användaren
läsa bruksanvisningen noggrant.
Denna symbol, placerad före en säkerhetskommentar,
indikerar en slags försiktighetsåtgärd, varning eller fara. Att
ignorera denna varning kan leda till en olycka. För att minska
risken för skada, brand eller elstöt, följ alltid
rekommendationerna nedan.
Varning- Var noga med att bära handskar när du använder
denna produkt.
50) Spara denna handbok för säkerhetsvarningar och
försiktighetsåtgärder. Manualen ger viktig information om hur man
monterar, använder och underhåller denna produkt.
51) Vänligen hantera metallkanter försiktigt.
52) STÅ INTE på denna produkt eller använd den som en stege.
53) Ändra INTE denna produkt på något sätt som inte är avsett, eftersom
detta kan orsaka produktskada eller personskada.
54) Montera alltid på en jämn yta.
55) Den maximala lastade vikten på verktyget c art väger inte mer än 400
lbs , jämnt fördelat.
56) Bind fast godset med vagnen tätt med bandet innan du flyttar.
FÖRSIKTIGHETSÅTGÄRDER FÖR MONTERING
36. Vänligen montera produkten i strikt enlighet med instruktionerna.
Felaktig montering kan vara farligt.
37. Vänligen använd skyddsglasögon och arbetshandskar ordentligt under
monteringen.
38. Försök inte att montera produkten när du känner dig trött eller när du
är påverkad av alkohol, droger eller medicin.
39. Bärförmåga och andra produktparametrar tillämpas endast på den
korrekt och färdigmonterade produkten.

- 3 -
40. En Philips-skruvmejsel, en skiftnyckel 1 4 # och ett par handskar kan
också användas (ingår ej i kartongen).
ANVÄND FÖRSIKTIGHETSÅTGÄRDER
29. Denna produkt är inte en leksak. Tillåt inte barn att leka med eller få
tillgång till detta föremål.
30. Kontrollera noga före användning. Använd inte om delar lossnar eller
skadas.
31. Använd endast på plana och hårda ytor.
32. Överskrid inte den angivna bärförmågan. Dra åt alla knoppar ordentligt
innan du lägger vikter på dem. Var medveten om den dynamiska
bärförmågan! Plötsliga belastningsändringar kan tillfälligt orsaka
överbelastning, vilket resulterar i produktfel.
SPARA DESSA INSTRUKTIONER
PRODUKTPARAMETRAR
MODELL
T271802
Produktstorlek
785*450*9 45 mm
Total lastgräns
4 0 0 lbs
- 4 -
DELLISTA
De
l
Beskrivning
Bild
Del
Anta
l
De
l
Beskrivnin
g
Bild
Del
Anta
l
1
Nedre hyllan
1
10
Hantera
1
2
Mellersta hylla
1
11
Baksida
1
3
Översta hyllan
1
12
Topp EVA
1
4
Låda
2
13
Låda EVA
2
5
Vänster lådans
monteringsplatt
a (med lås)
1
14
Svänghjul
med broms
2
6
Höger lådans
monteringsplatt
a
1
15
Styv hjul
2
7
P egboard
2
16
Bult M8*20
16
8
Upprätt
4
17
Bult M6*12
52
9
Balk
2
18
Mutter M6
32
Uppmärksamhet:
För ytterligare information om delarna listade nedan, se
sssmonteringsdiagrammet i denna manual. Packa upp och separera alla
delar på ett tydligt arbetsområde.
- 5 -
MONTERINGSTEG
Steg 1: Montera hjulen.
15. Vänd på den nedre hyllan 1# .
16. Sätt ihop hjulen 12#&13# med bultarna 15# enligt bilden .
Steg 2: Sätt ihop stolpen 8# .
1. Vänd på den nedre hyllan och ställ hjulen på marken.
2. Montera stolparna 8# med bult 17# och mutter 18#, observera stolparnas
riktning och lås inte bulten för hårt .
- 6 -
Steg 3: Montera den mittersta hyllan 2# .
1 · Sätt mittenhyllan 2# som bilden visar och fixera med bult 17# och mutter
18# ; observera : fäst bara de övre bultarna på båda sidorna först , och lås inte
bulten för hårt .
Steg 4: Montera monteringsplattan 5 #&6# och handtag 10#.
15.
Montera den vänstra lådans monteringsplatta 5#, höger
monteringsplatta 6# och handtag 10# med bult 17# enligt bilden ;
uppmärksamma den vänstra monteringsplattan ett lås, och sätt kullagret glida
i samma riktning ; Fixa bara de övre bultarna först och lås inte bulten för hårt .
- 7 -
Steg 5: Montera Pegboard 7# med bult 17# .
16. 1. Sätt Pegboard 7# som bilden visar och fixera med Bolt 17#, och lås inte
bulten för hårt .
.
Steg 6 : Montera Beam 9# och Backboard 11# med bult 17# .
1. Sätt in balken 9# mellan stolpen och lådans monteringsplatta enligt bilden och
fixera den med bult 17#, var uppmärksam på kullagrets släde och hålet på den
övre hyllan i samma riktning.
- 8 -
Steg 7 : Montera det bakre kortet 11# .
1. Sätt på bakplattan 11# som bilden visar och fixera med bult 17#.
Steg 8 : Montera den övre hyllan 3# .
1. Sätt översta hyllan 3# som bilden visar och fixera med bult 17# och skruva
sedan åt alla bultar.
- 9 -
Steg 9 : Montera lådan 4# och EVA .
1. Dra ut kullagersliden s och sätt in lådan i den som bilden visar, sätt sedan Top
EVA 12# och Drawer EVA 13# på deras plats.
Steg 10 : Monteringen är klar .
- 10 -
Obs: Dra inte åt skruvarna under installationen förrän alla delar är
installerade .
Tillverkare: Shanghaimuxinmuyeyouxiangongsi
Adress: Shuangchenglu 803nong11hao1602A-1609shi, baoshanqu,
shanghai 200 000 CN.
Importerad till AUS: SIHAO PTY LTD. 1 ROKEVA STREETEASTWOOD
NSW 2122 Australien
Importerad till USA: Sanven Technology Ltd. Suite 250, 9166 Anaheim
Place, Rancho Cucamonga, CA 91730

- 11 -
REP
UK
YH CONSULTING LIMITED. C/O YH Consulting
Limited Office 147, Centurion House, London
Road, Staines-upon-Thames, Surrey, TW18 4AX
REP
EC
E-CrossStu GmbH
Mainzer Landstr.69,
60329 Frankfurt am Main.

Teknisk support och e-garanticertifikat
www.vevor.com/support