
Technical Support and E-Warranty Certificate www.vevor.com/support
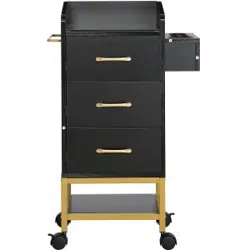
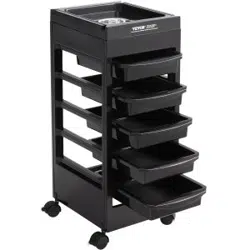
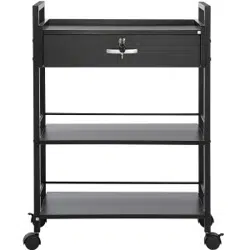
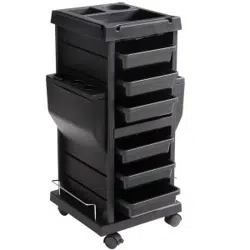
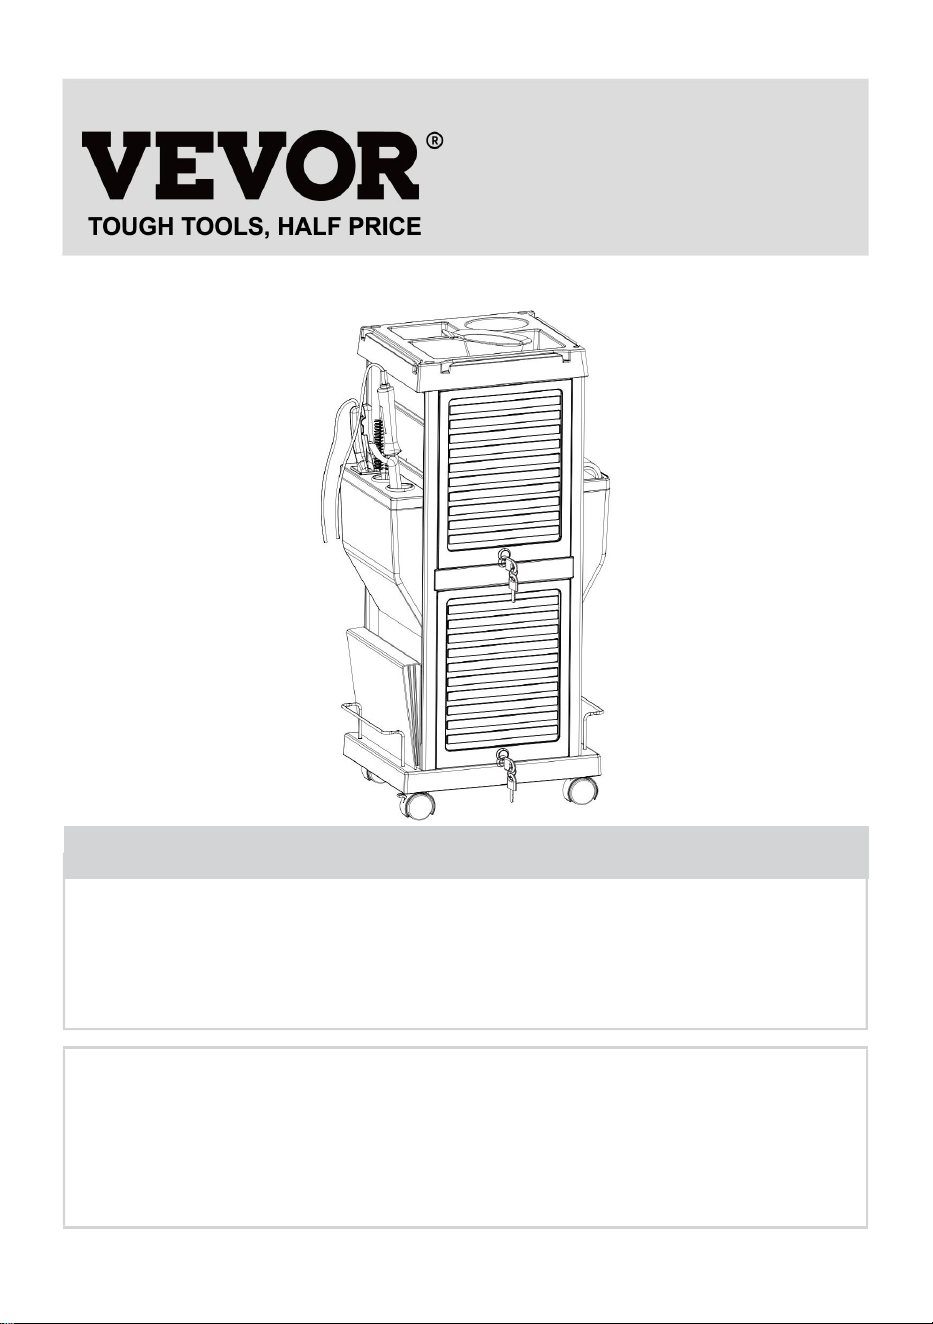
SALON CART
USER MANUAL
MODEL NO.: T-0100C
We continue to be committed to provide you tools with competitive price.
"Save Half", "Half Price" or any other similar expressions used by us only represents an
estimate of savings you might benefit from buying certain tools with us compared to the major
top brands and does not necessarily mean to cover all categories of tools offered by us. You
are kindly reminded to verify carefully when you are placing an order with us if you are
actually saving half in comparison with the top major brands.

- 1 -
MODEL NO.: T-100C
Have product questions? Need technical support? Please feel free to
contact us:
Technical Support and E-Warranty Certificate
www.vevor.com/support
NEED HELP? CONTACT US!
This is the original instruction, please read all manual instructions
carefully before operating. VEVOR reserves a clear interpretation of our
user manual. The appearance of the product shall be subject to the
product you received. Please forgive us that we won't inform you again if
there are any technology or software updates on our product.
Salon Cart

- 2 -
WARNING:
Please read this manual carefully before using the product. Failure to
do so may result in serious injury.
ASSEMBLY PRECAUTIONS
1. Assemble only according to these instructions. Improper assembly can
create hazards.
2. Wear ANSI-approved safety goggles and heavy-duty work gloves
during assembly.
3. Keep the assembly area clean and well-lit.
4. Keep bystanders out of the area during assembly.
5. Do not assemble when tired or when under the influence of alcohol,
drugs or medication.
6. The product capabilities apply to properly and completely assembled
products only.
7. Assemble on a flat, level, hard and smooth surface capable of safely
supporting the Salon Cart.
8. For additional information regarding the parts listed in the following
pages, please refer to the Assembly Diagram of this manual. Unwrap and
separate all parts in a clean work area.
SAVE THESE INSTRUCTIONS

- 3 -
USE PRECAUTIONS
TO PREVENT SERIOUS INJURY AND DEATH FROM TIPPING:
1. DO NOT SIT OR STAND ON THIS ITEM.
2. This product is not a toy Do not allow children to play with or near this
item.
3. Do not exceed weight capacities, Empty lab cart before moving.
4. Use only on a flat, level, hard and smooth surface capable of safely
supporting a fully loaded Salon Cart.
5. Use as intended only.
Inspect before every use; do not use if parts are loose or damaged.
TECHNICAL SPECIFICATIONS
Model
T-100C
Color
Black
Product Dimensions(LxWxH)
370*420*855 mm
Packing Size(LxWxH)
835*255*450mm
Net Weight (kg)
About 8.41kg
Gross Weight (kg)
About 10kg
*Products such as specifications, appearance, and design are
subject to modification without prior notice.
- 4 -
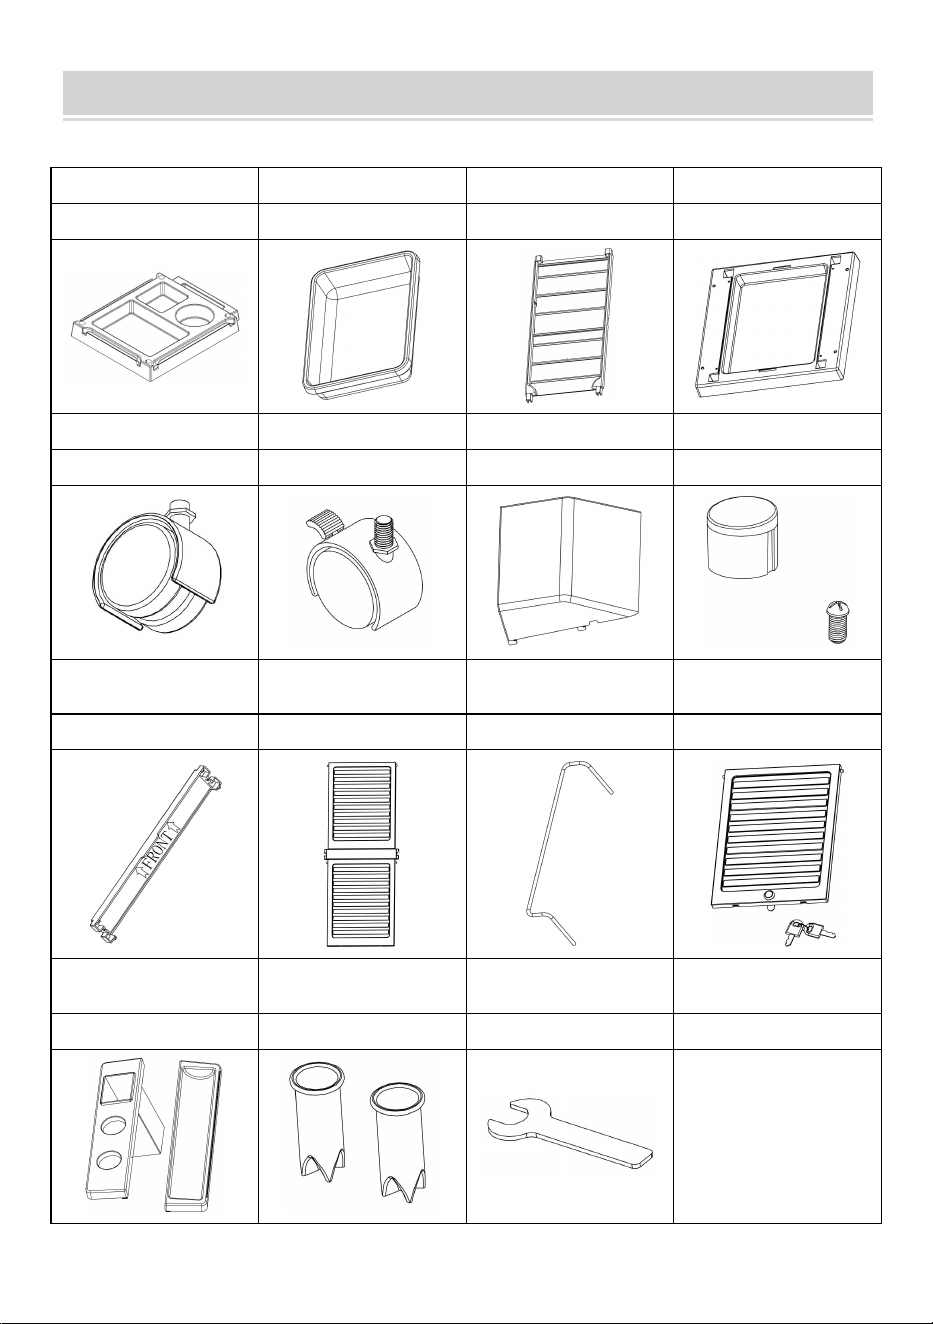
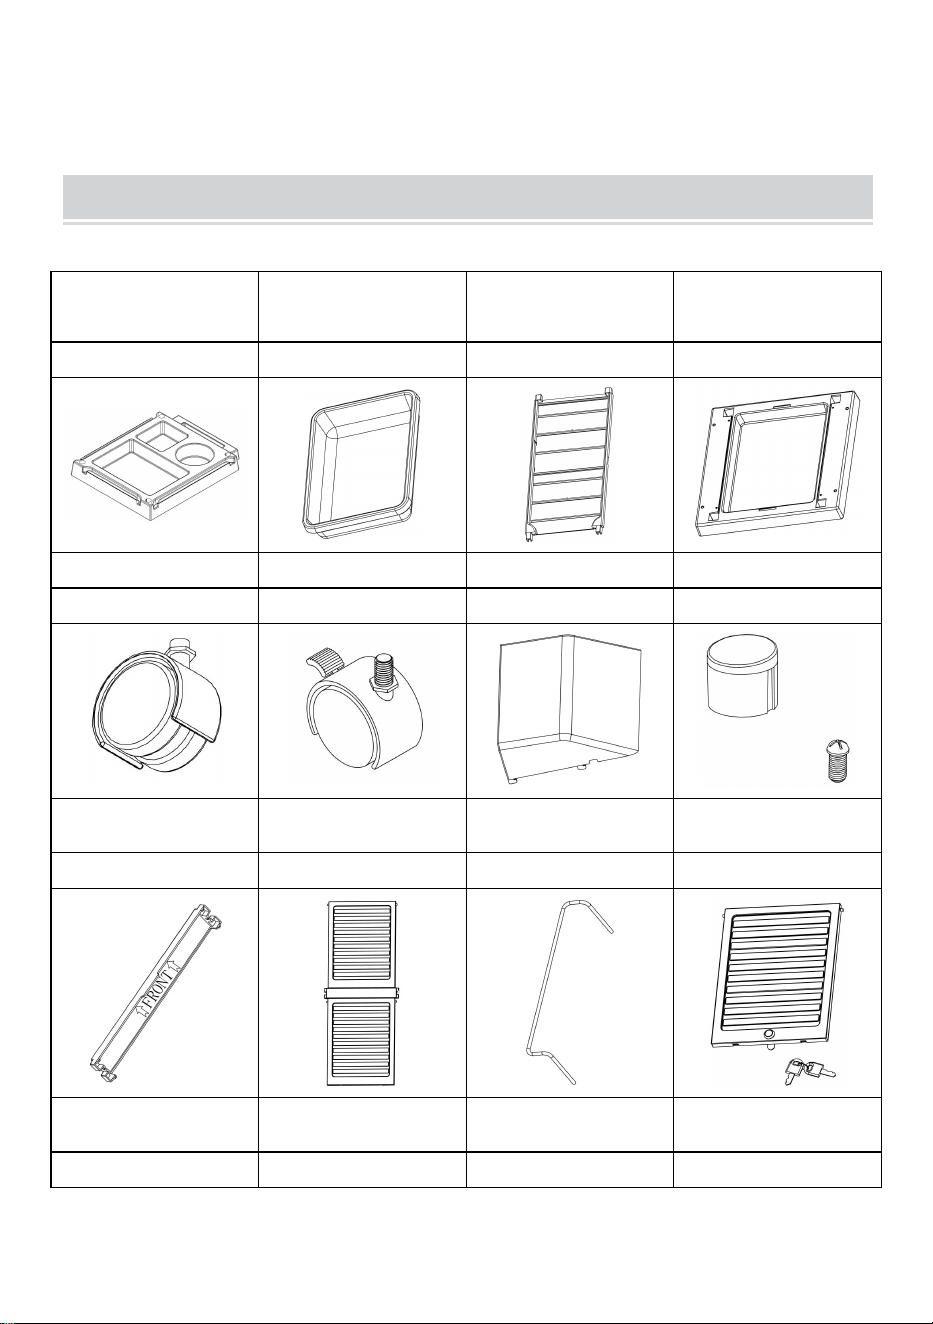
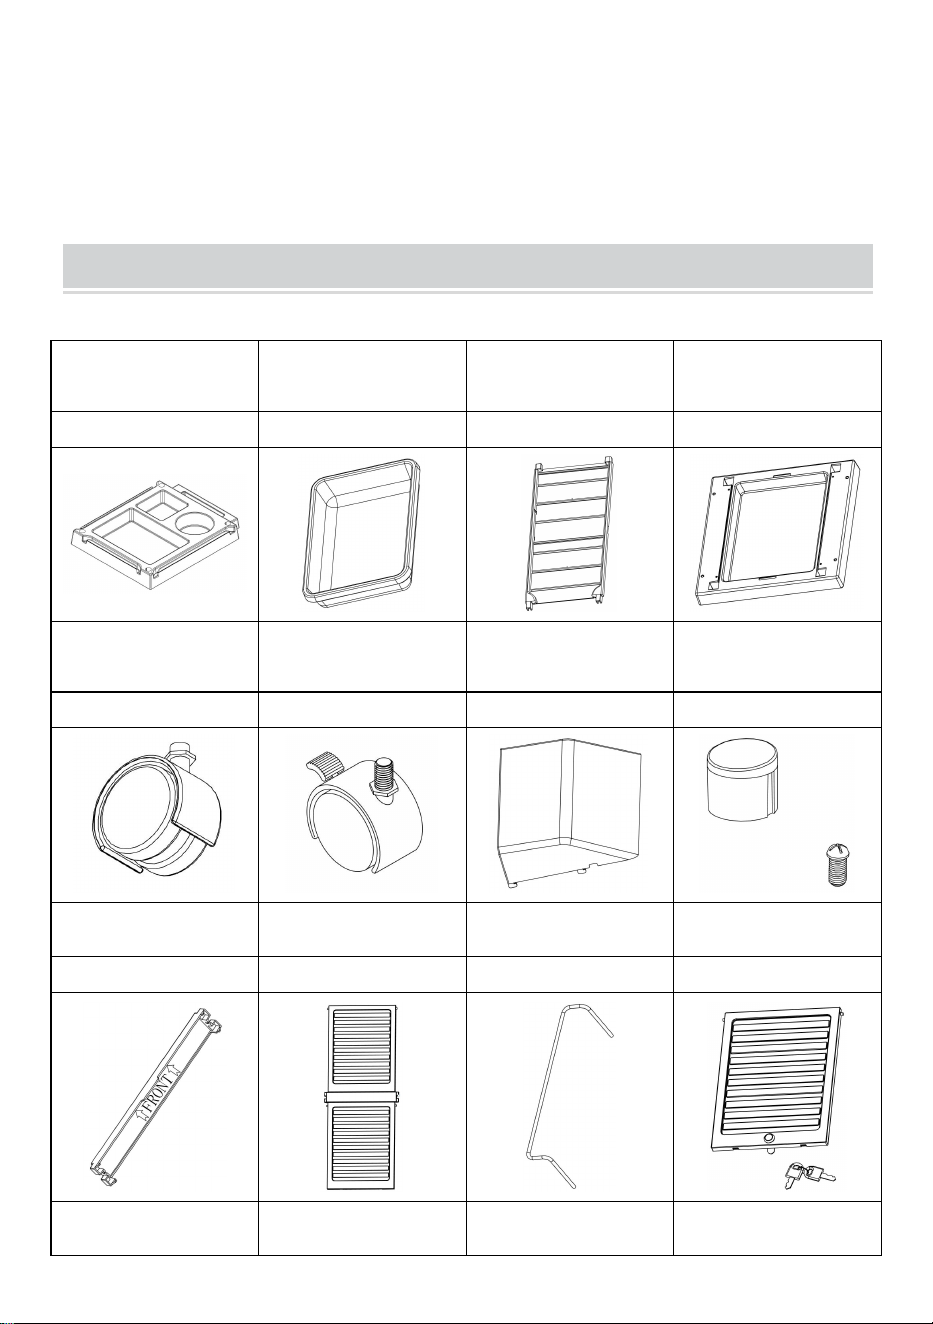
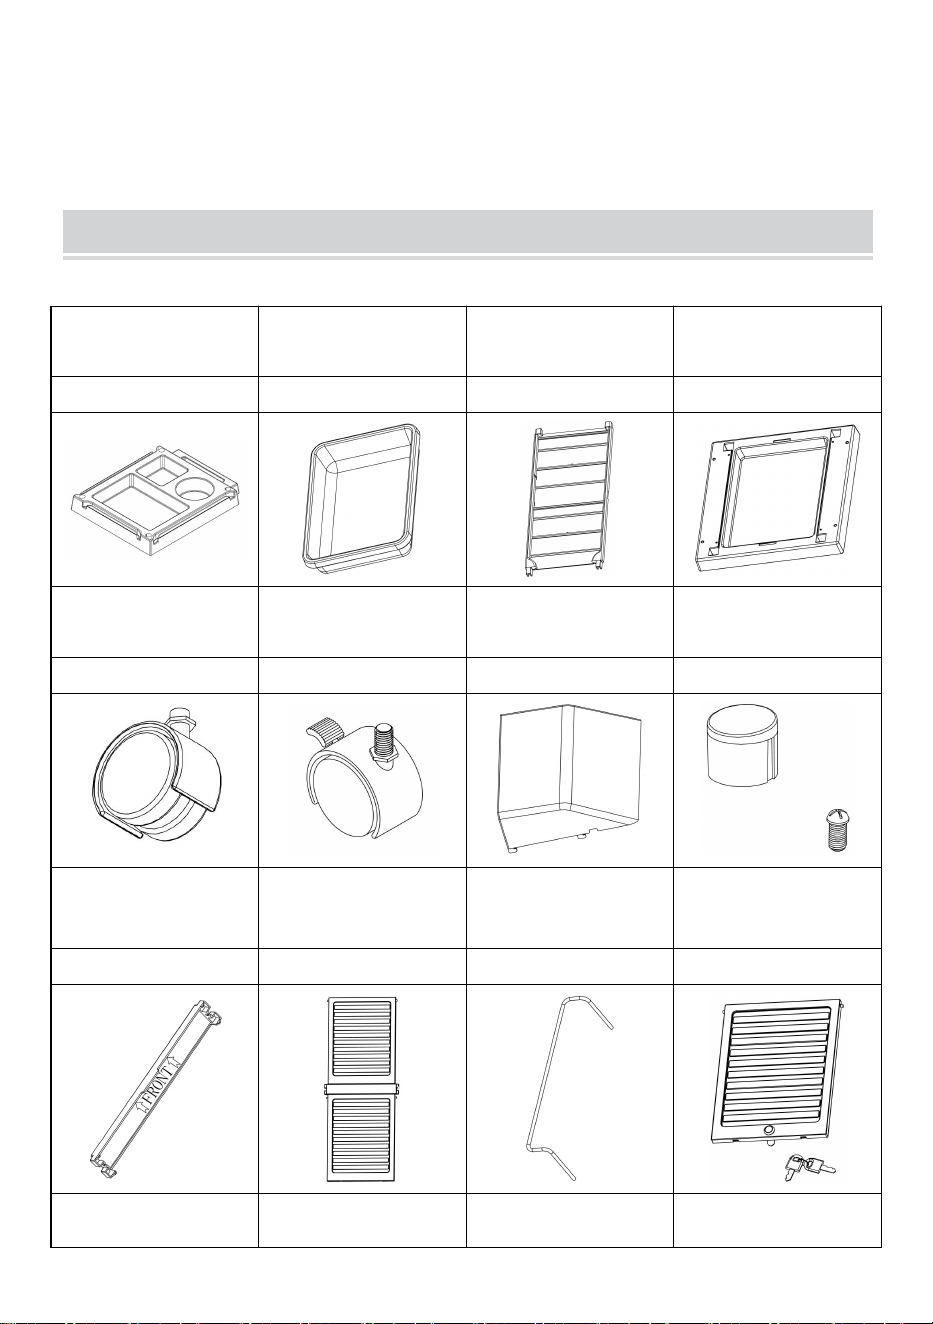
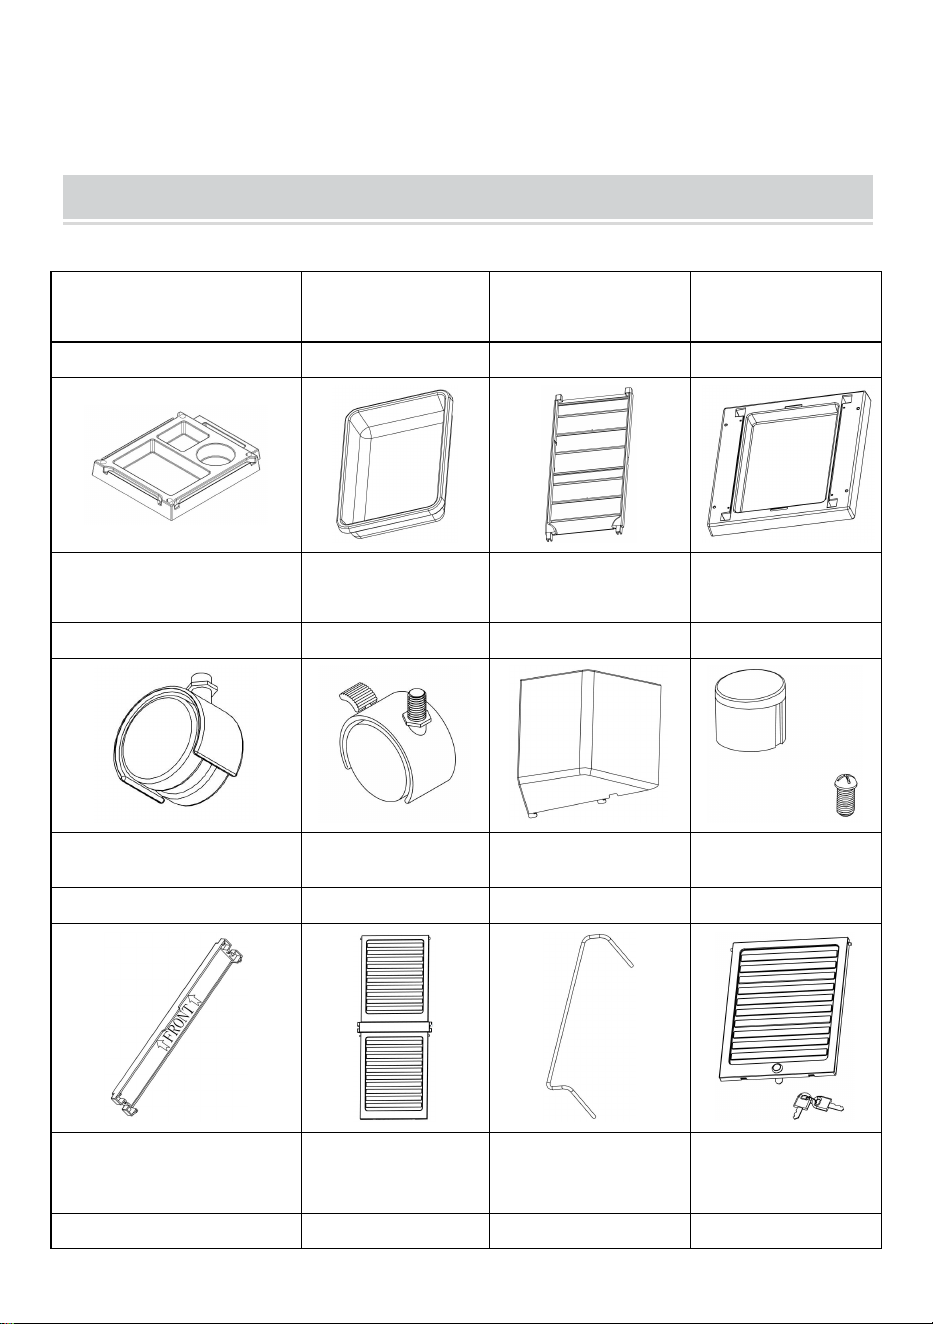
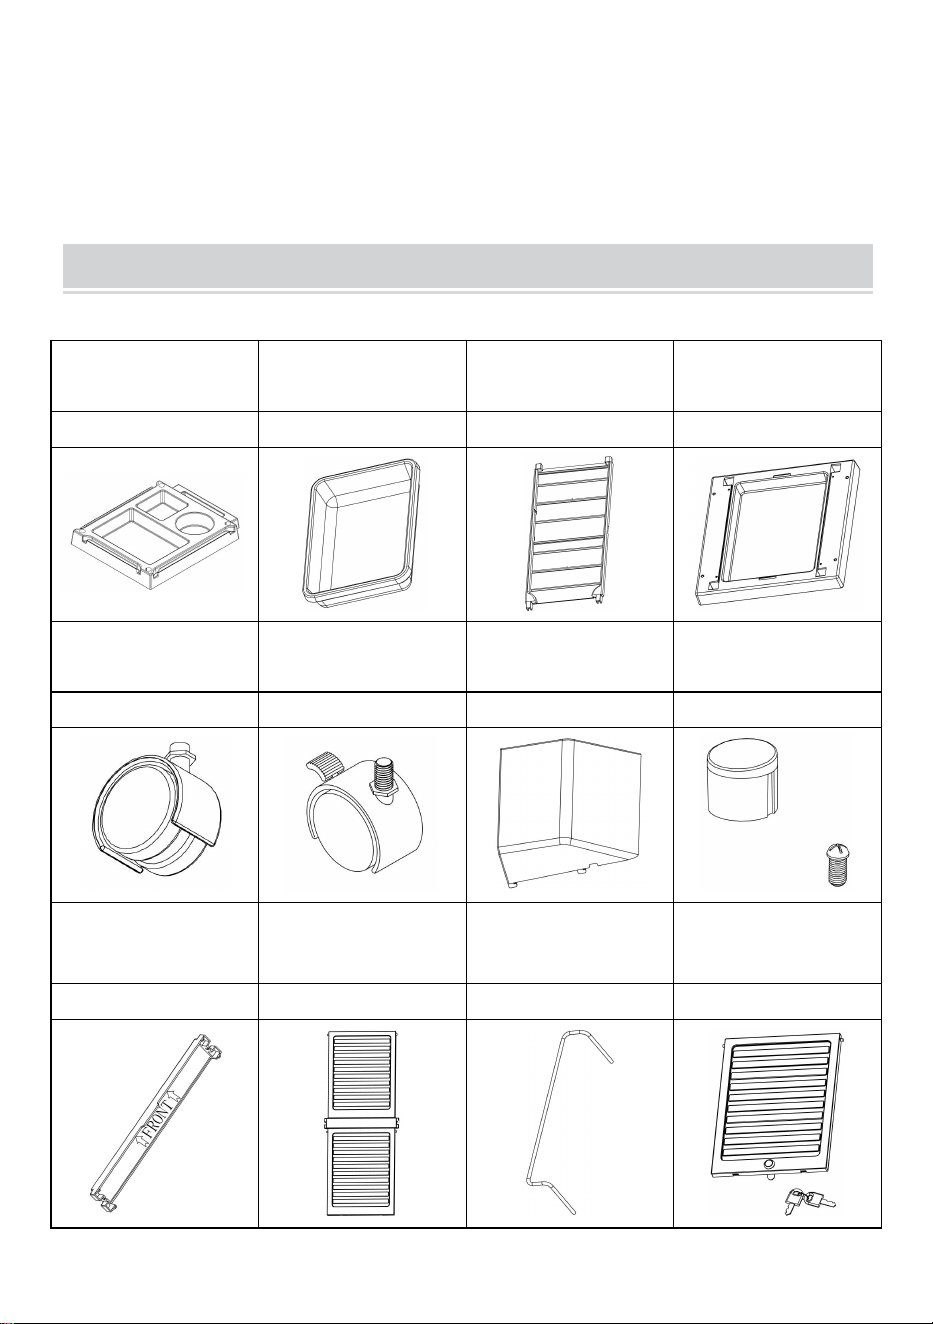
PACKAGE CONTENTS
A:Top tray
B:Removable tray
C:Side panel
D:Bottom tray
1PCS
6PCS
2PCS
1PCS
E:Wheel
F:Wheels with locks
G:Side compartment
H:Bolt and cap
2PCS
2PCS
2PCS
4SETS
I:Front connector
with screws
J:Back panel
K:Balusterade
L:Front door with
lock
1PCS
1SETS
2PCS
2PCS
M:Compartment
cover
N: Appliance
holders
O:Tool
1SETS
1SETS
1PCS
- 5 -
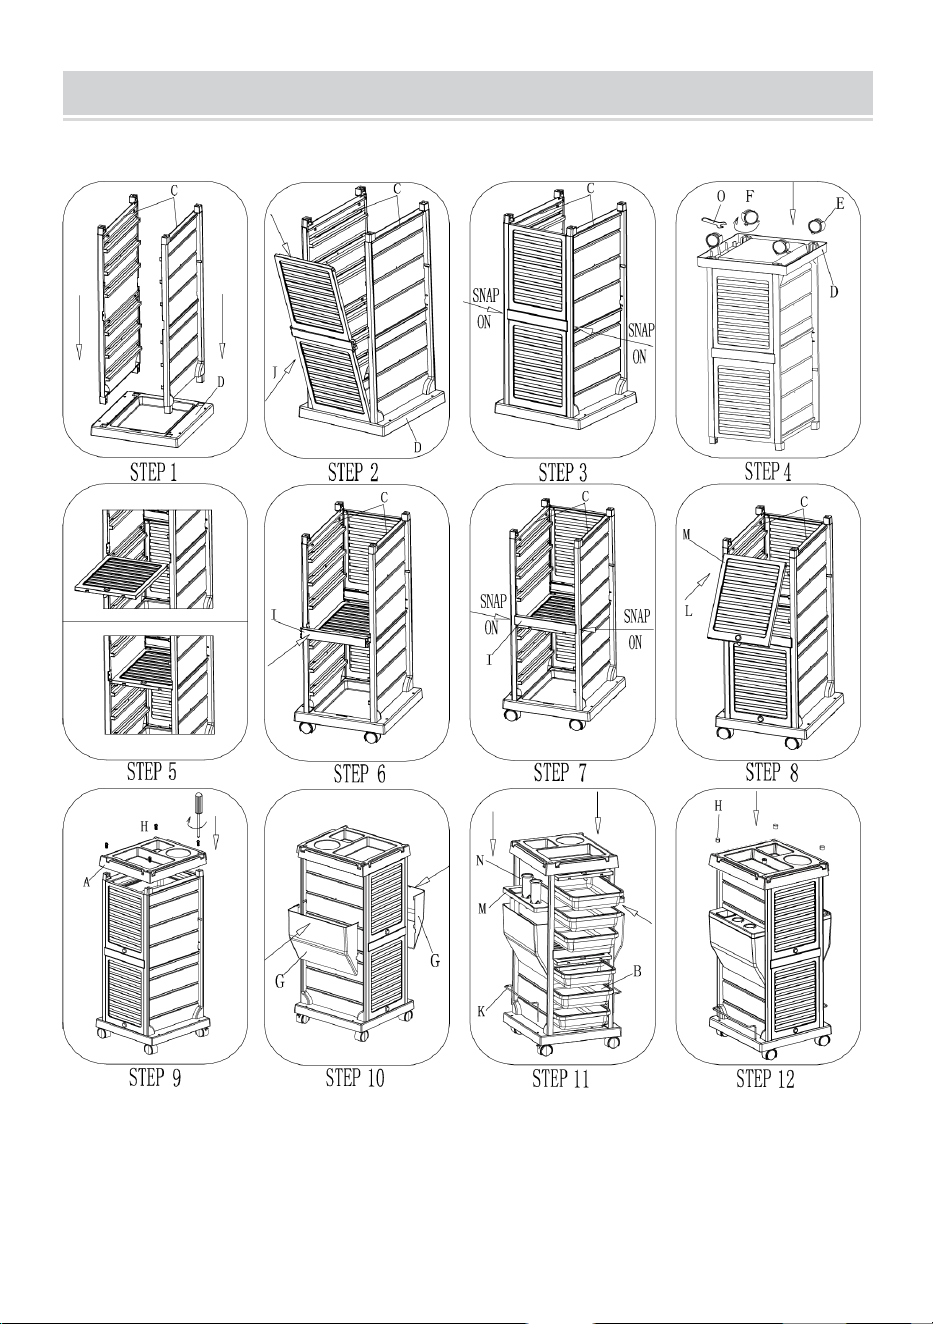
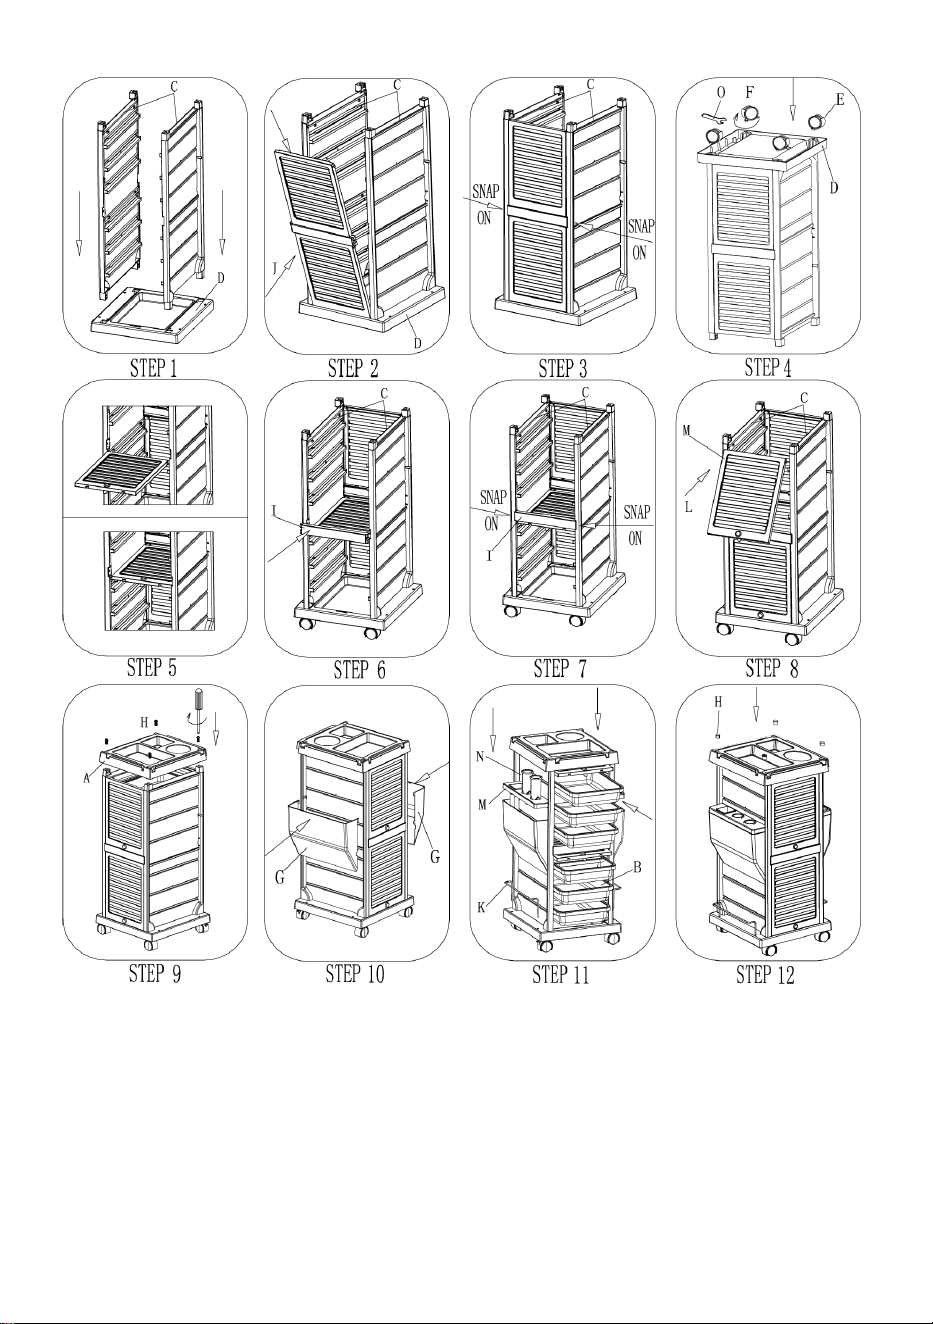
ASSEMBLY STEPS
STEP 1: Insert the 2 side panels(C) into the bottom tray(D),
STEP 2-3: Position the Back Panel(J) between the 2 Side Panels(C), and snap on
in the middle section of the side panels.

- 6 -
STEP 4: Screw the 4 Wheels(E&F) into the threads in the botom of the side panels,
and fasten with the tool(O). Make sure the wheels are securely fasten.
STEP 5: Insert one of the Front Doors(M) into the rails in the middle of the side
panels, and completely slide in.
STEP 6-7: Position the Front Connector(I) between middle section of the 2 Side
Panels(C), and snap on.
STEP 8: Insert another Front Door(M) in to the rails in the top of side panels.
STEP 9: Cover the Top Tray(A) onto the top of side panels, and fasten with the 4
bolts/enclosed).Please DO NOT cover the Screw Hole Caps(H) at this moment.
STEP 10: Attach the Side Compartments(G) to the side panels. Make sure all the 4
hooks were aligned correctly to the slots in the side panels.
STEP 11: Put the Compartment Covers(M) and the Appliance Holders(N) onto the
top of Side Compartments(G).Slide in the 4 Removable Trays(B), install the Blow
Dryer Holder(K) and 2 Balusters(L).
STEP 12: If the above steps were successfully done, put on the Screw Hole
Caps(H) into the 4 holes in the Top Tray.

- 7 -
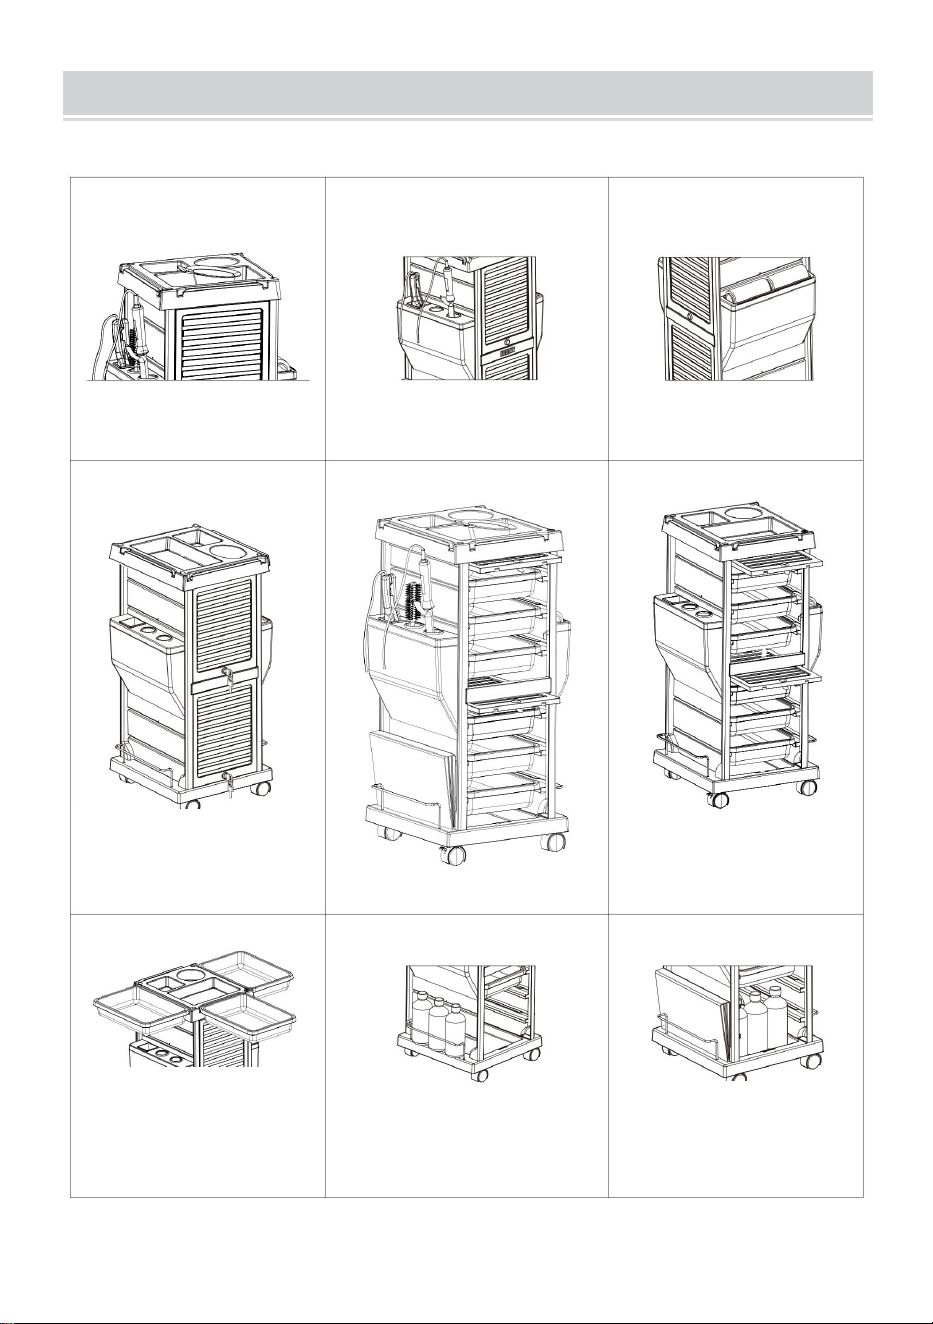
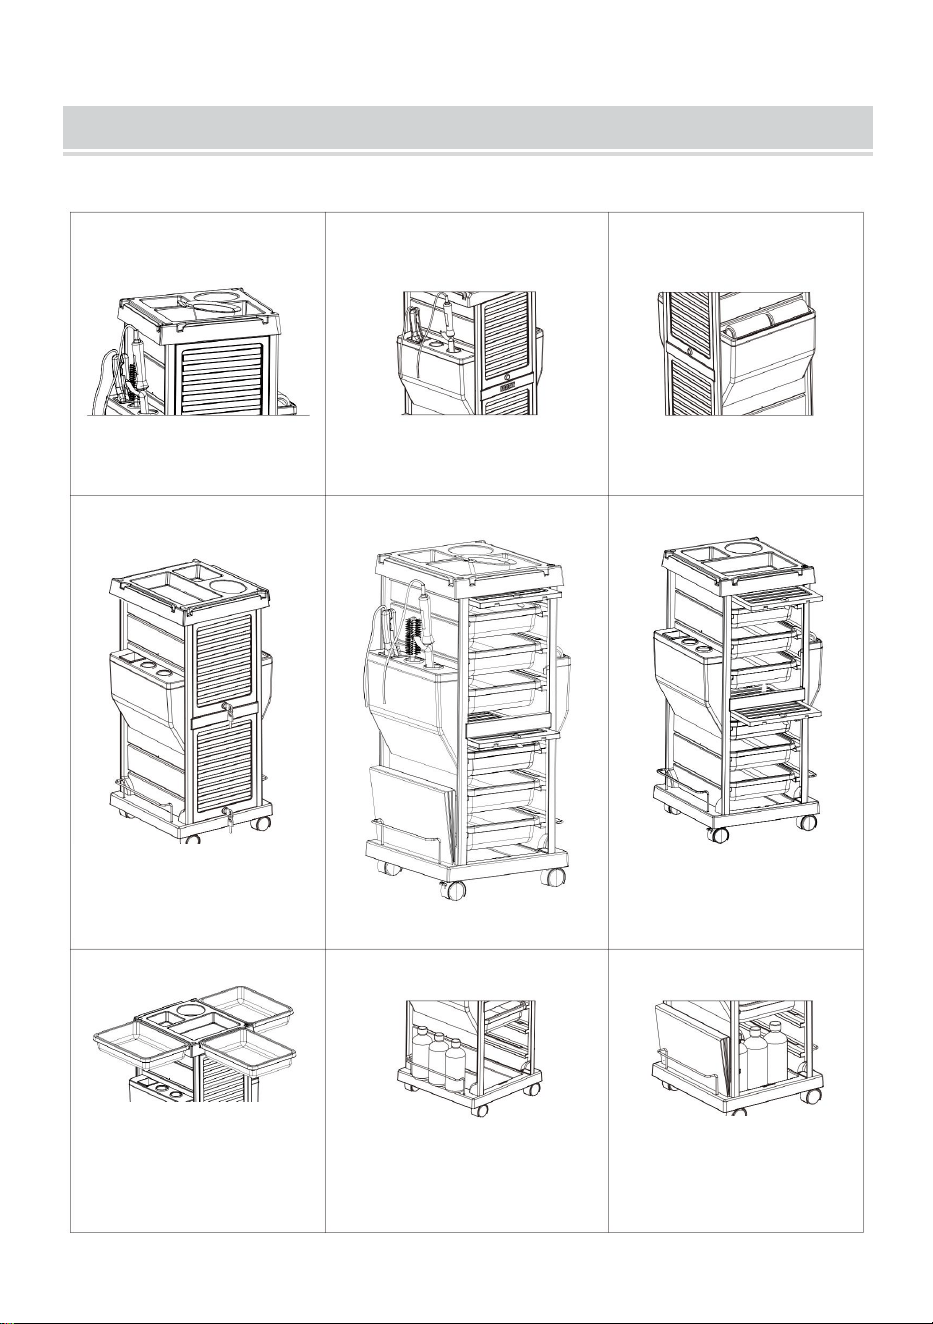
FEATURES
With 2 lockable doors
that really work.
Universal key for both
doors
With holders for various
hairdressing tools
With build-in metal
appliance holders
The door slips smoothly
into the cabinet and
"disappears”
With holder and saw
cutter for foil rollers
Removable trays can
be clipped to both sides
of the top, triple your
working space
Adequate space for large
bottles
Comfortably
accomodate your Color
Charts or Magazines

- 8 -
Manufacturer: Shanghaimuxinmuyeyouxiangongsi
Address: Baoshanqu Shuangchenglu 803long 11hao 1602A-1609shi
Shanghai
Imported to AUS: SIHAO PTY LTD. 1 ROKEVA STREETEASTWOOD
NSW 2122 Australia
Imported to USA: Sanven Technology Ltd.
Suite 250,9166 Anaheim Place, Rancho Cucamonga, CA 91730
Made In China
REP
EC
SHUNSHUN GmbH
Römeräcker 9 Z2021,76351
Linkenheim-Hochstetten,Germany
euvertreter@gmail.com
+49 1727041930
REP
UK
Pooledas Group Ltd
Unit 5 Albert Edward House, The
Pavilions Preston, United Kingdom
pooledas12[email protected]
Tel: 01772418127


Techniczny Certyfikat wsparcia i e-gwarancji www.vevor.com/support
WÓZEK SALONOWY
INSTRUKCJA OBSŁUGI _
MODEL NR.: T-0 100C
We continue to be committed to provide you tools with competitive price.
"Save Half", "Half Price" or any other similar expressions used by us only represents an
estimate of savings you might benefit from buying certain tools with us compared to the major
top brands and does not necessarily mean to cover all categories of tools offered by us. You
are kindly reminded to verify carefully when you are placing an order with us if you are
actually saving half in comparison with the top major brands.


- 1 -
NR MODELU: T-100C
Have product questions? Need technical support? Please feel free to
contact us:
Technical Support and E-Warranty Certificate
www.vevor.com/support
NEED HELP? CONTACT US!
This is the original instruction, please read all manual instructions
carefully before operating. VEVOR reserves a clear interpretation of our
user manual. The appearance of the product shall be subject to the
product you received. Please forgive us that we won't inform you again if
there are any technology or software updates on our product.
Salon Cart

- 2 -
OSTRZEŻENIE:
Przed użyciem produktu prosimy o dokładne zapoznanie się z
niniejszą instrukcją. Niezastosowanie się do tego może spowodować
poważne obrażenia.
ŚRODKI OSTROŻNOŚCI PRZY MONTAŻU
9. Montaż wyłącznie zgodnie z niniejszą instrukcją. Nieprawidłowy montaż
może stworzyć zagrożenie.
10. Podczas montażu należy nosić okulary ochronne i wytrzymałe
rękawice robocze zatwierdzone przez ANSI.
11. Utrzymuj miejsce zbiórki w czystości i dobrze oświetlone.
12. Podczas montażu trzymaj osoby postronne z dala od obszaru.
13. Nie należy montować, gdy jest się zmęczonym lub pod wpływem
alkoholu, narkotyków lub leków.
14. Możliwości produktu dotyczą wyłącznie produktów prawidłowo i
całkowicie zmontowanych.
15. Zmontuj na płaskiej, poziomej, twardej i gładkiej powierzchni, która
może bezpiecznie utrzymać wózek salonowy.
16. Dodatkowe informacje dotyczące części wymienionych na kolejnych
stronach można znaleźć w schemacie montażu w niniejszej instrukcji.
Rozpakuj i oddziel wszystkie części w czystym miejscu pracy.
ZACHOWAJ TE INSTRUKCJE

- 3 -
STOSOWAĆ ŚRODKI OSTROŻNOŚCI
ABY ZAPOBIEC POWAŻNYM OBRAŻeniom LUB ŚMIERCI W
PRZYPADKU WYWROTU:
6. NIE SIEDŹ ANI NIE STAJ NA TYM PRZEDMIOCIE.
7. Ten produkt nie jest zabawką. Nie pozwalaj dzieciom bawić się tym
przedmiotem lub w jego pobliżu.
8. Nie przekraczaj dopuszczalnej masy. Opróżnij wózek laboratoryjny
przed przeniesieniem.
9. Używaj wyłącznie na płaskiej, równej, twardej i gładkiej powierzchni,
która może bezpiecznie utrzymać w pełni załadowany wózek salonowy.
10. Używaj wyłącznie zgodnie z przeznaczeniem.
Sprawdź przed każdym użyciem; nie używać, jeśli części są luźne lub
uszkodzone.
TECHNICAL SPECIFICATIONS
Model
T -100C
Kolor
Czarny _
Wymiary produktu (DxSxW)
370*420*855mm
Rozmiar opakowania (DxSxW)
835*255* 450mm
Masa netto (kg)
Około 8,41 kg
Masa brutto (kg)
Około 10 kg
*Produkty takie jak dane techniczne, wygląd i konstrukcja mogą
podlegać modyfikacjom bez wcześniejszego powiadomienia.
- 4 -
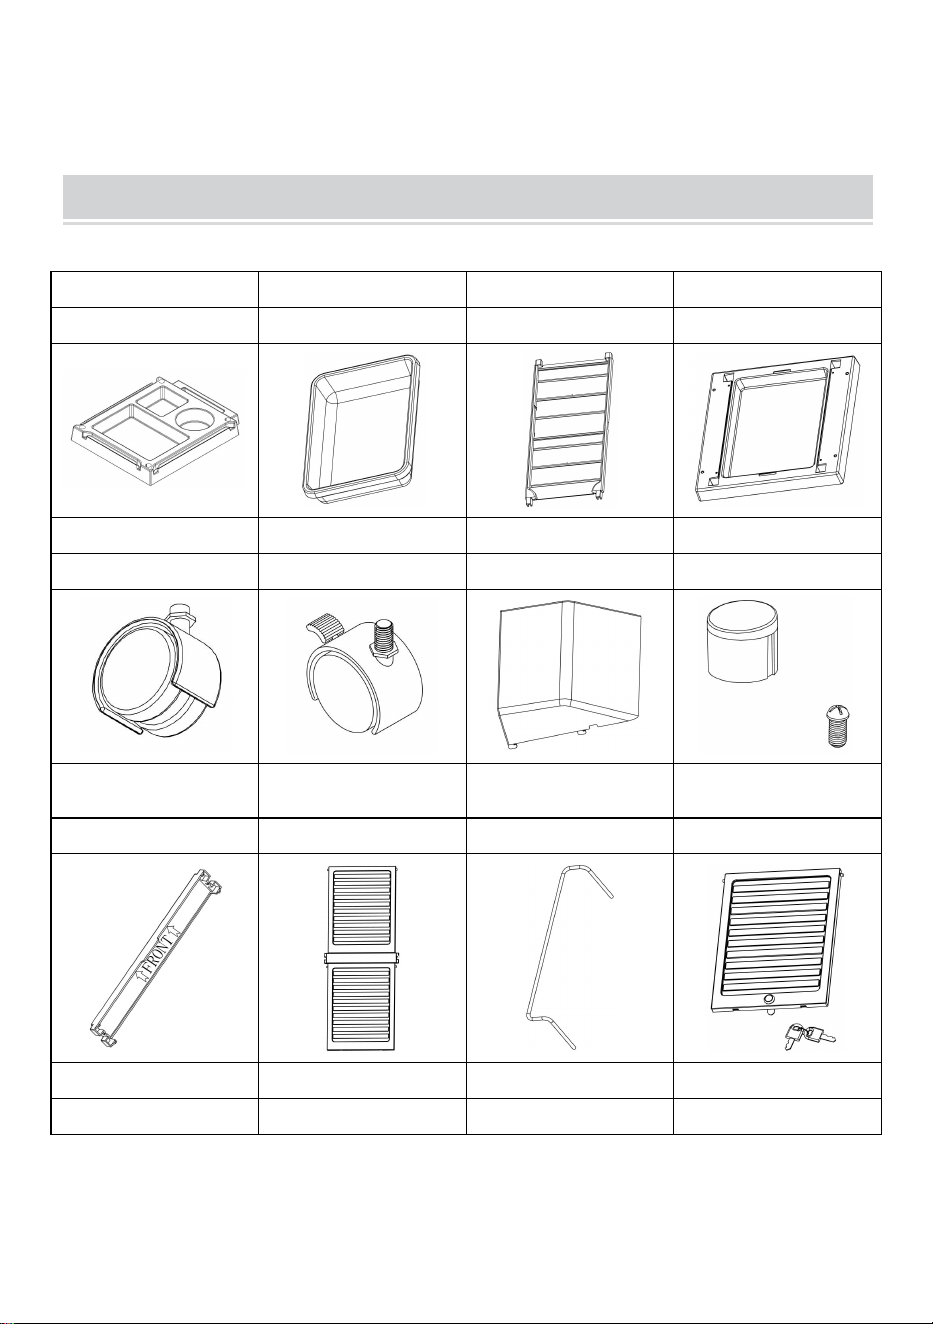
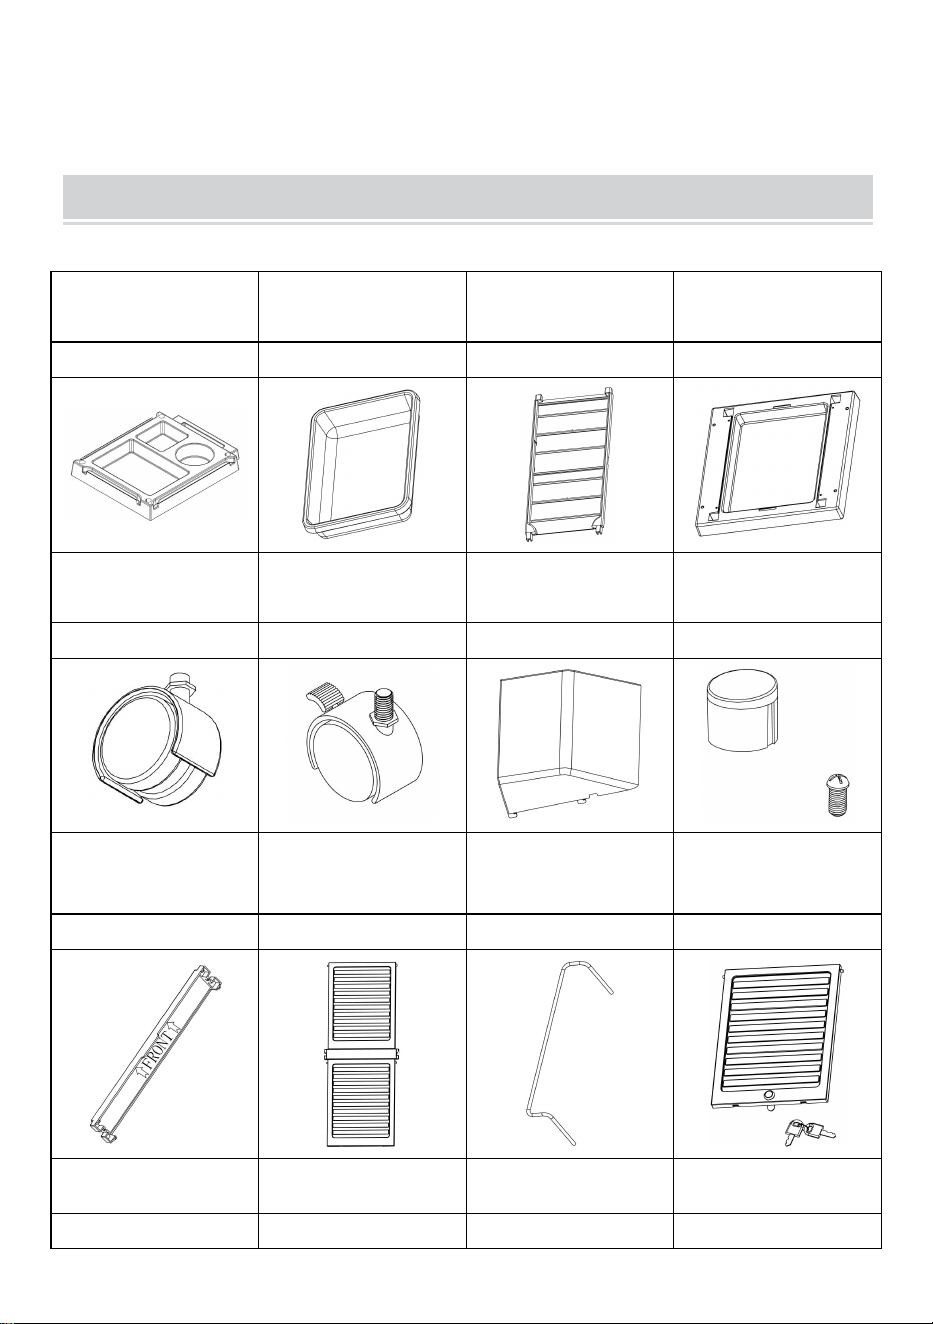
PACKAGE CONTENTS
Odp.: Górna taca
B: Wyjmowana
taca
C: Panel boczny
D: Dolna taca
1 szt. S
6szt
2szt
1 szt. S
E: Hej l
F: Koła z blokadami
G: Przedział boczny
H:Śruba i czapka
2szt
2szt
2szt
4ZESTAWY
I: Złącze przednie
ze śrubami
J: Panel tylny
K: Balustrada
L: Przód drzwi z
zamkiem
1 szt. S
1ZESTAWY
2szt
2szt
M: Pokrywa
przedziału
N: Uchwyty na
urządzenia
O: Narzędzie
1ZESTAWY
1ZESTAWY
1 szt

- 5 -
ASSEMBLY STEPS

- 6 -
KROK 1 : Włóż 2 panele boczne (C) do dolnej tacy (D),
KROK 2-3: Umieść panel tylny (J) pomiędzy 2 panelami bocznymi (C) i zatrzaśnij
w środkowej części paneli bocznych .
KROK 4: Wkręć 4 koła (E i F ) w gwinty w dolnej części paneli bocznych i
przymocuj za pomocą narzędzia ( O ). Upewnij się, że koła są dobrze
zamocowane.

- 7 -
KROK 5: Włóż jedne z drzwi przednich (M) w szyny pośrodku paneli bocznych i
wsuń je całkowicie.
KROK 6-7: Umieść złącze przednie ( I ) pomiędzy środkową częścią 2 paneli
bocznych (C) i zatrzaśnij .
KROK 8: Włóż kolejne drzwi przednie (M) do szyn w górnej części paneli
bocznych.
KROK 9: Przykryj górną tacę ( A) na górze paneli bocznych i przymocuj 4
śrubami/w zestawie). W tym momencie NIE zakrywaj zaślepek otworów na śruby
(H) .
KROK 10: Przymocuj przedziały boczne (G) do paneli bocznych. Upewnij się, że
wszystkie 4 haczyki zostały prawidłowo dopasowane do szczelin w panelach
bocznych.
11 : Załóż pokrywy przegród (M ) i uchwyty na urządzenia (N ) na górę przegród
bocznych (G). Wsuń 4 wyjmowane tace (B), zamontuj Uchwyt suszarki (K) i 2 tralki
(L).
KROK 12: Jeśli powyższe kroki zostały pomyślnie wykonane, załóż zaślepki na
śruby (H) w 4 otwory w górnej tacy.

- 8 -
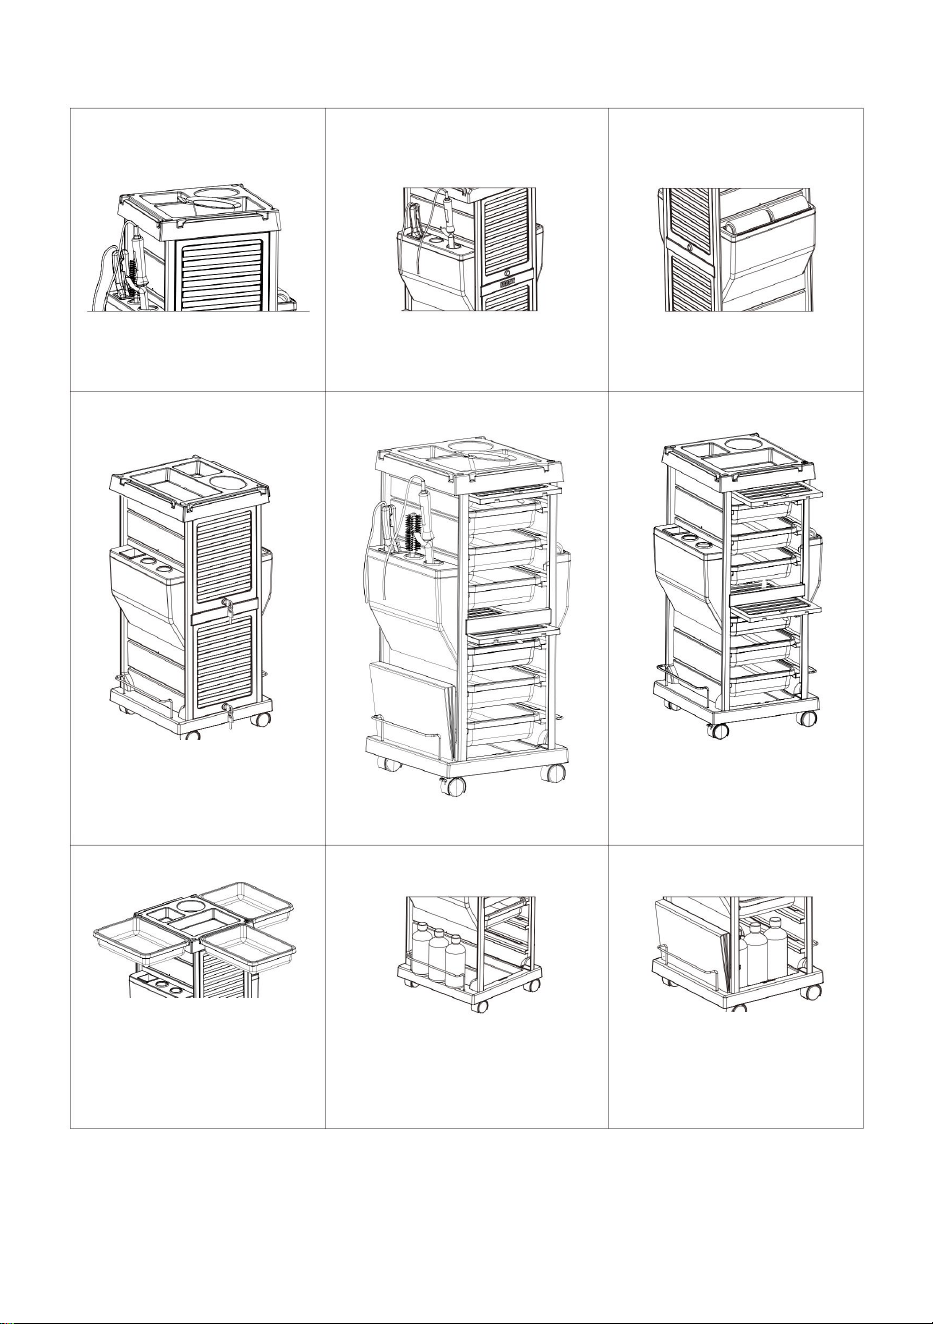
FEATURES
With 2 lockable doors
that really work.
Universal key for both
doors
With holders for various
hairdressing tools
With build-in metal
appliance holders
The door slips smoothly
into the cabinet and
"disappears”
With holder and saw
cutter for foil rollers
Removable trays can
be clipped to both sides
of the top, triple your
working space
Adequate space for large
bottles
Comfortably
accomodate your Color
Charts or Magazines

- 9 -
Producent: Shanghaimuxinmuyeyouxiangongsi
Adres: Baoshanqu Shuangchenglu 803long 11hao 1602A-1609shi
Szanghaj
Import do AUS: SIHAO PTY LTD . 1 ROKEVA STREETEASTWOOD
NSW 2122 Australia
Import do USA: Sanven Technology Ltd.
Apartament 250 , 9166 Anaheim Place, Rancho Cucamonga, Kalifornia
91730
Wyprodukowano w Chinach
REP
EC
SHUNSHUN GmbH
Römeräcker 9 Z2021,76351
Linkenheim-Hochstetten,Germany
euvertreter@gmail.com
+49 1727041930
REP
UK
Pooledas Group Ltd
Unit 5 Albert Edward House, The
Pavilions Preston, United Kingdom
pooledas12[email protected]
Tel: 01772418127


Technisch Support- und E-Garantie-Zertifikat www.vevor.com/support
SALONWAGEN
BENUTZERHANDBUCH _ _
MODELL NR.: T-0 100C
We continue to be committed to provide you tools with competitive price.
"Save Half", "Half Price" or any other similar expressions used by us only represents an
estimate of savings you might benefit from buying certain tools with us compared to the major
top brands and does not necessarily mean to cover all categories of tools offered by us. You
are kindly reminded to verify carefully when you are placing an order with us if you are
actually saving half in comparison with the top major brands.


- 1 -
MODELL-NR.: T-100C
Have product questions? Need technical support? Please feel free to
contact us:
Technical Support and E-Warranty Certificate
www.vevor.com/support
NEED HELP? CONTACT US!
This is the original instruction, please read all manual instructions
carefully before operating. VEVOR reserves a clear interpretation of our
user manual. The appearance of the product shall be subject to the
product you received. Please forgive us that we won't inform you again if
there are any technology or software updates on our product.
Salon Cart

- 2 -
WARNUNG:
Bitte lesen Sie dieses Handbuch sorgfältig durch, bevor Sie das
Produkt verwenden. Andernfalls kann es zu schweren Verletzungen
kommen.
VORSICHTSMASSNAHMEN BEI DER
MONTAGE
17. Montieren Sie es nur gemäß dieser Anleitung. Durch unsachgemäße
Montage können Gefahren entstehen.
18. Tragen Sie während der Montage eine ANSI-zugelassene Schutzbrille
und strapazierfähige Arbeitshandschuhe.
19. Halten Sie den Montagebereich sauber und gut beleuchtet.
20. Halten Sie Unbeteiligte während der Montage vom Bereich fern.
21. Nicht aufbauen, wenn Sie müde sind oder unter dem Einfluss von
Alkohol, Drogen oder Medikamenten stehen.
22. Die Produkteigenschaften gelten nur für ordnungsgemäß und
vollständig montierte Produkte.
23. Auf einer flachen, ebenen, harten und glatten Oberfläche montieren,
die den Salonwagen sicher tragen kann.
24. Weitere Informationen zu den auf den folgenden Seiten aufgeführten
Teilen finden Sie im Montagediagramm dieser Anleitung. Packen Sie alle
Teile aus und trennen Sie sie an einem sauberen Arbeitsplatz.
ANLEITUNG AUFBEWAHREN _

- 3 -
VORSICHTSMASSNAHMEN VERWENDEN
UM SCHWERE VERLETZUNGEN UND TOD DURCH UMKIPPEN ZU
VERMEIDEN:
11. SITZEN ODER STEHEN SIE NICHT AUF DIESEM ARTIKEL.
12. Dieses Produkt ist kein Spielzeug. Erlauben Sie Kindern nicht, mit
oder in der Nähe dieses Artikels zu spielen.
13. Überschreiten Sie nicht die Gewichtskapazität. Leeren Sie den
Laborwagen, bevor Sie ihn bewegen.
14. Nur auf einer flachen, ebenen, harten und glatten Oberfläche
verwenden, die einen voll beladenen Salonwagen sicher tragen kann.
15. Nur bestimmungsgemäß verwenden.
Vor jedem Gebrauch prüfen; Nicht verwenden, wenn Teile lose oder
beschädigt sind.
TECHNICAL SPECIFICATIONS
Modell
T- 100C
Farbe
Schwarz _
Produktabmessungen (LxBxH)
370*420*855 mm
Verpackungsgröße (LxBxH)
835*255*450 mm
Nettogewicht / kg)
Ungefähr 8,41 kg
Bruttogewicht (kg)
Etwa 10 kg
*Produkte wie Spezifikationen, Aussehen und Design können ohne
- 4 -
vorherige Ankündigung geändert werden.
PACKAGE CONTENTS
A: Oberes Fach
B: Abnehmbares
Fach
C:Seitenwand
D: Unteres Fach
1 STÜCK
6 Stück
2 STÜCK
1 STÜCK
E: Whee l
F: Räder mit
Schlössern
G:Seitenfach
H:Bolzen und
Deckel
2 STÜCK
2 STÜCK
2 STÜCK
4 SETS
I:Frontstecker
mit Schrauben
J:Rückwand
K: Balusterade
L: Vorne Tür mit
Schloss
1 STÜCK
1 SETS
2 STÜCK
2 STÜCK
M:
Fachabdeckung
N: Gerätehalter
O:Werkzeug

- 5 -
1 SETS
1 SETS
1 STÜCK
ASSEMBLY STEPS

- 6 -
SCHRITT 1 : Setzen Sie die beiden Seitenwände (C) in die untere Ablage (D) ein.
SCHRITT 2-3: Positionieren Sie die Rückwand (J) zwischen den beiden
Seitenwänden (C) und lassen Sie sie im Mittelteil der Seitenwände einrasten .
SCHRITT 4: Schrauben Sie die 4 Räder (E und F ) in die Gewinde an der
Unterseite der Seitenwände und befestigen Sie sie mit dem Werkzeug ( O ).
Stellen Sie sicher, dass die Räder sicher befestigt sind.

- 7 -
SCHRITT 5: Setzen Sie eine der Vordertüren (M) in die Schienen in der Mitte der
Seitenwände ein und schieben Sie sie vollständig hinein.
SCHRITT 6-7: Positionieren Sie den Frontstecker ( I ) zwischen dem Mittelteil der
beiden Seitenwände (C) und lassen Sie ihn einrasten .
SCHRITT 8: Setzen Sie eine weitere Vordertür (M) in die Schienen oben in den
Seitenwänden ein.
SCHRITT 9: Decken Sie die obere Ablage ( A) auf die Oberseite der Seitenwände
ab und befestigen Sie sie mit den 4 beiliegenden Schrauben. Bitte decken Sie die
Schraubenlochkappen (H) zu diesem Zeitpunkt NICHT ab .
SCHRITT 10: Befestigen Sie die Seitenfächer (G) an den Seitenwänden. Stellen
Sie sicher, dass alle 4 Haken richtig an den Schlitzen in den Seitenwänden
ausgerichtet sind.
SCHRITT 11: Setzen Sie die Fachabdeckungen (M ) und die Gerätehalter (N ) auf
die Oberseite der Seitenfächer (G). Schieben Sie die 4 herausnehmbaren Ablagen
(B) hinein und installieren Sie sie Föhnhalter (K) und 2 Baluster (L).
SCHRITT 12: Wenn die oben genannten Schritte erfolgreich durchgeführt wurden,
stecken Sie die Schraublochkappen (H) in die 4 Löcher in der oberen Ablage.

- 8 -
FEATURES
With 2 lockable doors
that really work.
Universal key for both
doors
With holders for various
hairdressing tools
With build-in metal
appliance holders
The door slips smoothly
into the cabinet and
"disappears”
With holder and saw
cutter for foil rollers
Removable trays can
be clipped to both sides
of the top, triple your
working space
Adequate space for large
bottles
Comfortably
accomodate your Color
Charts or Magazines

- 9 -
Hersteller: Shanghaimuxinmuyeyouxiangongsi
Adresse: Baoshanqu Shuangchenglu 803long 11hao 1602A-1609shi
Shanghai
Importiert nach AUS: SIHAO PTY LTD . 1 ROKEVA
STREETEASTWOOD NSW 2122 Australien
Importiert in die USA: Sanven Technology Ltd.
Suite 250 , 9166 Anaheim Place, Rancho Cucamonga, CA 91730
In China hergestellt
REP
EC
SHUNSHUN GmbH
Römeräcker 9 Z2021,76351
Linkenheim-Hochstetten,Germany
euvertreter@gmail.com
+49 1727041930
REP
UK
Pooledas Group Ltd
Unit 5 Albert Edward House, The
Pavilions Preston, United Kingdom
pooledas12[email protected]
Tel: 01772418127


Technique Assistance et certificat de garantie électronique
www.vevor.com/support
CHARIOT DE SALON
MANUEL DE L'UTILISATEUR
N° DE MODÈLE : T-0 100C
We continue to be committed to provide you tools with competitive price.
"Save Half", "Half Price" or any other similar expressions used by us only represents an
estimate of savings you might benefit from buying certain tools with us compared to the major
top brands and does not necessarily mean to cover all categories of tools offered by us. You
are kindly reminded to verify carefully when you are placing an order with us if you are
actually saving half in comparison with the top major brands.

- 1 -
Numéro de modèle : T-100C
Have product questions? Need technical support? Please feel free to
contact us:
Technical Support and E-Warranty Certificate
www.vevor.com/support
NEED HELP? CONTACT US!
This is the original instruction, please read all manual instructions
carefully before operating. VEVOR reserves a clear interpretation of our
user manual. The appearance of the product shall be subject to the
product you received. Please forgive us that we won't inform you again if
there are any technology or software updates on our product.
Salon Cart

- 2 -
AVERTISSEMENT:
Veuillez lire attentivement ce manuel avant d'utiliser le produit. Ne
pas le faire pourrait entraîner des blessures graves.
PRÉCAUTIONS DE MONTAGE
25. Assemblez uniquement selon ces instructions. Un assemblage
incorrect peut créer des dangers.
26. Portez des lunettes de sécurité approuvées par l'ANSI et des gants de
travail robustes pendant l'assemblage.
27. Gardez la zone de rassemblement propre et bien éclairée.
28. Gardez les spectateurs hors de la zone pendant l’assemblage.
29. Ne vous rassemblez pas lorsque vous êtes fatigué ou sous l’influence
de l’alcool, de drogues ou de médicaments.
30. Les capacités du produit s'appliquent uniquement aux produits
correctement et complètement assemblés.
31. Assemblez-le sur une surface plane, nivelée, dure et lisse, capable de
supporter le chariot de salon en toute sécurité.
32. Pour plus d'informations concernant les pièces répertoriées dans les
pages suivantes, veuillez vous référer au schéma d'assemblage de ce
manuel. Déballez et séparez toutes les pièces dans une zone de travail
propre.
CONSERVEZ CES INSTRUCTIONS

- 3 -
PRÉCAUTIONS D'UTILISATION
POUR ÉVITER DES BLESSURES GRAVES ET LA MORT PAR
BASCULEMENT :
16. NE PAS ÊTRE ASSIS OU DEBOUT SUR CET ARTICLE.
17. Ce produit n'est pas un jouet. Ne laissez pas les enfants jouer avec ou
à proximité de cet article.
18. Ne dépassez pas les capacités de poids. Videz le chariot de
laboratoire avant de le déplacer.
19. Utiliser uniquement sur une surface plane, nivelée, dure et lisse,
capable de supporter en toute sécurité un chariot de salon entièrement
chargé.
20. Utiliser uniquement comme prévu.
Inspectez avant chaque utilisation ; ne pas utiliser si les pièces sont
desserrées ou endommagées.
TECHNICAL SPECIFICATIONS
Modèle
T -100C
Couleur
Noir _
Dimensions du produit (LxlxH)
370*420*855 millimètres
Taille de l'emballage (LxlxH)
835*255*450 millimètres
Poids net / kg)
Environ 8,41kg _
Poids brut (kg)
Environ 10 kg
*Les produits tels que les spécifications, l'apparence et la conception
sont sujets à modification sans préavis.
- 4 -
PACKAGE CONTENTS
R : Plateau
supérieur
B : Plateau
amovible
C : panneau
latéral
D : bac inférieur
1 PCS
6 pièces
2 pièces
1 PCS
E:Roue l
F : Roues avec
verrous
G: Compartiment
latéral
H : Boulon et
casquette
2 pièces
2 pièces
2 pièces
4 ENSEMBLES
I : connecteur
avant
avec des vis
J : panneau
arrière
K : Balustrade
L:Avant porte
avec serrure
1 PCS
1SETS
2 pièces
2 pièces
M : couvercle du
compartiment
N : Supports pour
appareils
O:Outil

- 5 -
électroménagers
1SETS
1SETS
1 PCS
ASSEMBLY STEPS
- 6 -
ÉTAPE 1 : Insérez les 2 panneaux latéraux(C) dans le plateau inférieur(D),
ÉTAPE 2-3 : Positionnez le panneau arrière (J) entre les 2 panneaux latéraux (C)
et enclenchez-le dans la section centrale des panneaux latéraux .
ÉTAPE 4 : Vissez les 4 roues (E et F ) dans les filetages en bas des panneaux
latéraux et fixez avec l'outil ( O ). Assurez-vous que les roues sont solidement
fixées.

- 7 -
ÉTAPE 5 : Insérez l'une des portes avant (M) dans les rails au milieu des
panneaux latéraux et faites-la glisser complètement.
ÉTAPE 6-7 : Positionnez le connecteur avant ( I ) entre la section centrale des 2
panneaux latéraux (C) et enclenchez-le .
ÉTAPE 8 : Insérez une autre porte avant (M) dans les rails en haut des panneaux
latéraux.
ÉTAPE 9 : Couvrez le plateau supérieur ( A) sur le dessus des panneaux latéraux
et fixez-le avec les 4 boulons/fournis). Veuillez NE PAS couvrir les capuchons des
trous de vis (H) pour le moment .
ÉTAPE 10 : Fixez les compartiments latéraux (G) aux panneaux latéraux.
Assurez-vous que les 4 crochets sont correctement alignés sur les fentes des
panneaux latéraux.
ÉTAPE 11 : Placez les couvercles des compartiments (M ) et les supports
d'appareils (N ) sur le dessus des compartiments latéraux (G). Faites glisser les 4
plateaux amovibles (B), installez le Support pour sèche-cheveux (K) et 2 balustres
(L).
ÉTAPE 12 : Si les étapes ci-dessus ont été effectuées avec succès, placez les
capuchons de trou de vis (H) dans les 4 trous du plateau supérieur.

- 8 -
FEATURES

- 9 -
Fabricant : Shanghaimuxinmuyeyouxiangongsi
Adresse : Baoshanqu Shuangchenglu 803long 11hao 1602A-1609shi
Shanghai
With 2 lockable doors
that really work.
Universal key for both
doors
With holders for various
hairdressing tools
With build-in metal
appliance holders
The door slips smoothly
into the cabinet and
"disappears”
With holder and saw
cutter for foil rollers
Removable trays can
be clipped to both sides
of the top, triple your
working space
Adequate space for large
bottles
Comfortably
accomodate your Color
Charts or Magazines

- 10 -
Importé en Australie : SIHAO PTY LTD . 1 ROKEVA STREETASTWOOD
NSW 2122 Australie
Importé aux États-Unis : Sanven Technology Ltd.
Suite 250 , 9166 Anaheim Place, Rancho Cucamonga, CA 91730
Fabriqué en Chine
REP
EC
SHUNSHUN GmbH
Römeräcker 9 Z2021,76351
Linkenheim-Hochstetten,Germany
euvertreter@gmail.com
+49 1727041930
REP
UK
Pooledas Group Ltd
Unit 5 Albert Edward House, The
Pavilions Preston, United Kingdom
pooledas12[email protected]
Tel: 01772418127


Technisch Ondersteuning en e-garantiecertificaat www.vevor.com/support
SALONWAGEN
HANDLEIDING _ _
MODELNR.: T-0 100C
We continue to be committed to provide you tools with competitive price.
"Save Half", "Half Price" or any other similar expressions used by us only represents an
estimate of savings you might benefit from buying certain tools with us compared to the major
top brands and does not necessarily mean to cover all categories of tools offered by us. You
are kindly reminded to verify carefully when you are placing an order with us if you are
actually saving half in comparison with the top major brands.


- 1 -
MODELNR.: T-100C
Have product questions? Need technical support? Please feel free to
contact us:
Technical Support and E-Warranty Certificate
www.vevor.com/support
NEED HELP? CONTACT US!
This is the original instruction, please read all manual instructions
carefully before operating. VEVOR reserves a clear interpretation of our
user manual. The appearance of the product shall be subject to the
product you received. Please forgive us that we won't inform you again if
there are any technology or software updates on our product.
Salon Cart

- 2 -
WAARSCHUWING:
Lees deze handleiding zorgvuldig door voordat u het product
gebruikt. Als u dit niet doet, kan dit leiden tot ernstig letsel.
MONTAGEVOORZORGSMAATREGELEN
33. Monteer uitsluitend volgens deze instructies. Onjuiste montage kan
gevaren veroorzaken.
34. Draag tijdens de montage een ANSI-goedgekeurde veiligheidsbril en
stevige werkhandschoenen.
35. Houd de verzamelplaats schoon en goed verlicht.
36. Houd omstanders tijdens de montage uit de buurt.
37. Niet monteren als u moe bent of onder invloed bent van alcohol, drugs
of medicijnen.
38. De productmogelijkheden zijn alleen van toepassing op correct en
volledig gemonteerde producten.
39. Monteer op een vlakke, vlakke, harde en gladde ondergrond die de
Salonwagen veilig kan ondersteunen.
40. Voor aanvullende informatie over de onderdelen die op de volgende
pagina's worden vermeld, verwijzen wij u naar het montageschema van
deze handleiding. Pak alle onderdelen uit en scheid ze van elkaar op een
schone werkplek.
BEWAAR DEZE INSTRUCTIES

- 3 -
GEBRUIK VOORZORGSMAATREGELEN
OM ERNSTIG LETSEL EN DE DOOD DOOR KANTELEN TE
VOORKOMEN:
21. ZIT OF STA NIET OP DIT ITEM.
22. Dit product is geen speelgoed. Laat kinderen niet met of in de buurt
van dit artikel spelen.
23. Overschrijd het gewicht niet. Maak de laboratoriumwagen leeg voordat
u hem verplaatst.
24. Alleen gebruiken op een vlakke, vlakke, harde en gladde ondergrond
die een volledig beladen salonwagen veilig kan ondersteunen.
25. Alleen gebruiken zoals bedoeld.
Inspecteer vóór elk gebruik; niet gebruiken als onderdelen los of
beschadigd zijn.
TECHNICAL SPECIFICATIONS
Model
T- 100C
Kleur
B gebrek
Productafmetingen (LxBxH)
370*420*855 mm
Verpakkingsgrootte (LxBxH)
835*255*450 mm
Netto gewicht / kg)
Ongeveer 8,41kg _
Bruto gewicht (kg)
Ongeveer 10kg _
*Producten zoals specificaties, uiterlijk en ontwerp kunnen zonder
voorafgaande kennisgeving worden gewijzigd.
- 4 -
PACKAGE CONTENTS
A: Bovenste lade
B: Verwijderbare
lade
C: Zijpaneel
D: Onderbak
1 STUK
6 STUKS
2 STUKS
1 STUK
E:Wie l
F: Wielen met
sloten
G: Zijvak
H: Bout en dop
2 STUKS
2 STUKS
2 STUKS
4SETS
I: Frontconnector
met schroeven
J: Achterpaneel
K: Balustrade
L: Voorkant deur
met slot
1 STUK
1SETS
2 STUKS
2 STUKS
M:
Compartimentafdekkin
g
N:
Apparaathouder
s
O: Gereedschap
1SETS
1SETS
1 STUK

- 5 -
ASSEMBLY STEPS

- 6 -
STAP 1 : Plaats de 2 zijpanelen (C) in de onderste lade (D),
STAP 2-3: Plaats het achterpaneel (J) tussen de 2 zijpanelen (C) en klik het vast in
het middengedeelte van de zijpanelen .
STAP 4: Schroef de 4 wielen (E &F ) in de schroefdraad aan de onderkant van de
zijpanelen en zet ze vast met het gereedschap ( O ). Zorg ervoor dat de wielen
stevig vastzitten.

- 7 -
STAP 5: Steek een van de voordeuren (M) in de rails in het midden van de
zijpanelen en schuif deze volledig naar binnen.
STAP 6-7: Plaats de voorste connector ( I ) tussen het middengedeelte van de 2
zijpanelen (C) en klik deze vast .
STAP 8: Steek nog een voordeur (M) in de rails bovenaan de zijpanelen.
STAP 9: Bedek de bovenste lade ( A) op de bovenkant van de zijpanelen en zet
deze vast met de 4 bouten/meegeleverd). Bedek de schroefgatdoppen (H) op dit
moment NIET .
STAP 10: Bevestig de zijvakken (G) aan de zijpanelen. Zorg ervoor dat alle vier de
haken correct zijn uitgelijnd met de sleuven in de zijpanelen.
STAP 11: Plaats de compartimentafdekkingen (M ) en de apparaathouders (N ) op
de bovenkant van de zijcompartimenten (G). Schuif de 4 verwijderbare laden (B)
erin, installeer de Föhnhouder (K) en 2 balusters (L).
STAP 12: Als de bovenstaande stappen met succes zijn uitgevoerd, plaatst u de
schroefgatdoppen (H) in de 4 gaten in de bovenste lade.
- 8 -
FEATURES
With 2 lockable doors
that really work.
Universal key for both
doors
With holders for various
hairdressing tools
With build-in metal
appliance holders
The door slips smoothly
into the cabinet and
"disappears”
With holder and saw
cutter for foil rollers
Removable trays can
be clipped to both sides
of the top, triple your
working space
Adequate space for large
bottles
Comfortably
accomodate your Color
Charts or Magazines

- 9 -
Fabrikant: Shanghaimuxinmuyeyouxiangongsi
Adres: Baoshanqu Shuangchenglu 803long 11hao 1602A-1609shi
Shanghai
Geïmporteerd naar AUS: SIHAO PTY LTD . 1 ROKEVA
STREETEASTWOOD NSW 2122 Australië
Geïmporteerd naar de VS: Sanven Technology Ltd.
Suite 250 , 9166 Anaheim Place, Rancho Cucamonga, CA 91730
Gemaakt in China
REP
EC
SHUNSHUN GmbH
Römeräcker 9 Z2021,76351
Linkenheim-Hochstetten,Germany
euvertreter@gmail.com
+49 1727041930
REP
UK
Pooledas Group Ltd
Unit 5 Albert Edward House, The
Pavilions Preston, United Kingdom
pooledas12[email protected]
Tel: 01772418127


Teknisk Support och e-garanticertifikat www.vevor.com/support
SALONGSVAGN
ANVÄNDARMANUAL _ _
MODELL NR.: T-0 100C
We continue to be committed to provide you tools with competitive price.
"Save Half", "Half Price" or any other similar expressions used by us only represents an
estimate of savings you might benefit from buying certain tools with us compared to the major
top brands and does not necessarily mean to cover all categories of tools offered by us. You
are kindly reminded to verify carefully when you are placing an order with us if you are
actually saving half in comparison with the top major brands.


- 1 -
MODELLNR: T-100C
Have product questions? Need technical support? Please feel free to
contact us:
Technical Support and E-Warranty Certificate
www.vevor.com/support
NEED HELP? CONTACT US!
This is the original instruction, please read all manual instructions
carefully before operating. VEVOR reserves a clear interpretation of our
user manual. The appearance of the product shall be subject to the
product you received. Please forgive us that we won't inform you again if
there are any technology or software updates on our product.
Salon Cart

- 2 -
VARNING:
Läs denna bruksanvisning noggrant innan du använder produkten.
Underlåtenhet att göra det kan leda till allvarliga skador.
FÖRSIKTIGHETSÅTGÄRDER FÖR
MONTERING
41. Montera endast enligt dessa instruktioner. Felaktig montering kan
skapa faror.
42. Använd ANSI-godkända skyddsglasögon och kraftiga arbetshandskar
vid montering.
43. Håll monteringsområdet rent och väl upplyst.
44. Håll åskådare borta från området under monteringen.
45. Sätt dig inte ihop när du är trött eller påverkad av alkohol, droger eller
mediciner.
46. Produktegenskaperna gäller endast för korrekt och färdigmonterade
produkter.
47. Montera på en plan, jämn, hård och slät yta som säkert kan stödja
salongvagnen.
48. För ytterligare information om delarna som listas på följande sidor, se
monteringsdiagrammet i denna manual. Packa upp och separera alla delar
på ett rent arbetsområde.
SPARA DESSA E INSTRUKTIONER

- 3 -
ANVÄND FÖRSIKTIGHETSÅTGÄRDER
FÖR ATT FÖRHINDRA ALLVARLIGA SKADA OCH DÖDSFALL VID
VÄLLNING:
26. SIT ELLER STÅ INTE PÅ DETTA FÖREMÅL.
27. Denna produkt är inte en leksak. Tillåt inte barn att leka med eller i
närheten av detta föremål.
28. Överskrid inte viktkapaciteten, Töm labbvagnen innan du flyttar.
29. Använd endast på en plan, jämn, hård och slät yta som säkert kan
bära en fullastad salongsvagn.
30. Använd endast som avsett.
Inspektera före varje användning; Använd inte om delar är lösa eller
skadade.
TECHNICAL SPECIFICATIONS
Modell
T- 100C
Färg
B brist
Produktmått (LxBxH)
370*420*855 mm
Förpackningsstorlek (LxBxH)
835*255*450 mm
Nettovikt (kg)
Ca 8,41 kg
Bruttovikt (kg)
Ca 10 kg
*Produkter som specifikationer, utseende och design kan ändras
utan föregående meddelande.
- 4 -
PACKAGE CONTENTS
A: Övre fack
B: Avtagbar bricka
C:Sidopanel
D: Nedre fack
1 ST
6 st
2 st
1 ST
E:Whee l
F: Hjul med lås
G:Sidofack
H: Bolt och keps
2 st
2 st
2 st
4 SET
I: Främre kontakt
med skruvar
J: Bakpanel
K: Balusterade
L: Framsidan dörr
med lås
1 ST
1 SET
2 st
2 st
M: Fackskydd
N: Apparathållare
O: Verktyg
1 SET
1 SET
1 ST

- 5 -
ASSEMBLY STEPS

- 6 -
STEG 1 : Sätt in de två sidopanelerna (C) i det nedre facket (D),
STEG 2-3: Placera bakpanelen (J) mellan de två sidopanelerna (C) och snäpp fast
i mittsektionen av sidopanelerna .
STEG 4: Skruva fast de 4 hjulen (E &F ) i gängorna i botten av sidopanelerna och
fäst med verktyget ( O ). Se till att hjulen är ordentligt fastsatta.

- 7 -
STEG 5: Sätt in en av framdörrarna(M) i skenorna i mitten av sidopanelerna och
skjut in helt.
STEG 6-7: Placera den främre kontakten ( I ) mellan mittsektionen av de 2
sidopanelerna (C) och snäpp fast .
STEG 8: Sätt in ytterligare en främre dörr(M) i skenorna i toppen av sidopanelerna.
STEG 9: Täck toppbrickan ( A) på ovansidan av sidopanelerna och fäst med de 4
bultarna/bifogade). Täck INTE över skruvhålslocken(H) just nu .
STEG 10: Fäst sidofacken (G) på sidopanelerna. Se till att alla 4 krokarna var rätt
inriktade mot skårorna i sidopanelerna.
STEG 11: Sätt facklocken (M ) och apparathållarna (N ) på ovansidan av
sidofacken (G). Skjut in de 4 avtagbara brickorna (B) , installera Fönshållare (K)
och 2 balustrar (L).
STEG 12: Om ovanstående steg lyckades, sätt på skruvhålslocken(H) i de fyra
hålen i det övre facket.
FEATURES
- 8 -
Tillverkare: Shanghaimuxinmuyeyouxiangongsi
With 2 lockable doors
that really work.
Universal key for both
doors
With holders for various
hairdressing tools
With build-in metal
appliance holders
The door slips smoothly
into the cabinet and
"disappears”
With holder and saw
cutter for foil rollers
Removable trays can
be clipped to both sides
of the top, triple your
working space
Adequate space for large
bottles
Comfortably
accomodate your Color
Charts or Magazines

- 9 -
Adress: Baoshanqu Shuangchenglu 803long 11hao 1602A-1609shi
Shanghai
Importerad till AUS: SIHAO PTY LTD . 1 ROKEVA STREETEASTWOOD
NSW 2122 Australien
Importerad till USA: Sanven Technology Ltd.
Suite 250 , 9166 Anaheim Place, Rancho Cucamonga, CA 91730
Tillverkad i Kina
REP
EC
SHUNSHUN GmbH
Römeräcker 9 Z2021,76351
Linkenheim-Hochstetten,Germany
euvertreter@gmail.com
+49 1727041930
REP
UK
Pooledas Group Ltd
Unit 5 Albert Edward House, The
Pavilions Preston, United Kingdom
pooledas12[email protected]
Tel: 01772418127


Técnico Soporte y certificado de garantía electrónica www.vevor.com/support
CARRO DE SALÓN
MANUAL DE USUARIO
N º DE MODELO.: T-0 100C
We continue to be committed to provide you tools with competitive price.
"Save Half", "Half Price" or any other similar expressions used by us only represents an
estimate of savings you might benefit from buying certain tools with us compared to the major
top brands and does not necessarily mean to cover all categories of tools offered by us. You
are kindly reminded to verify carefully when you are placing an order with us if you are
actually saving half in comparison with the top major brands.


- 1 -
NÚMERO DE MODELO: T-100C
Have product questions? Need technical support? Please feel free to
contact us:
Technical Support and E-Warranty Certificate
www.vevor.com/support
NEED HELP? CONTACT US!
This is the original instruction, please read all manual instructions
carefully before operating. VEVOR reserves a clear interpretation of our
user manual. The appearance of the product shall be subject to the
product you received. Please forgive us that we won't inform you again if
there are any technology or software updates on our product.
Salon Cart

- 2 -
ADVERTENCIA:
Lea atentamente este manual antes de utilizar el producto. De lo
contrario, podrían producirse lesiones graves.
PRECAUCIONES DE MONTAJE
49. Ensamble únicamente de acuerdo con estas instrucciones. Un
montaje inadecuado puede crear peligros.
50. Use gafas de seguridad aprobadas por ANSI y guantes de trabajo
resistentes durante el montaje.
51. Mantenga el área de reunión limpia y bien iluminada.
52. Mantenga a los transeúntes fuera del área durante el montaje.
53. No se reúna cuando esté cansado o bajo la influencia de alcohol,
drogas o medicamentos.
54. Las capacidades del producto se aplican únicamente a productos
ensamblados de manera adecuada y completa.
55. Ensamble sobre una superficie plana, nivelada, dura y lisa capaz de
soportar de manera segura el carrito del salón.
56. Para obtener información adicional sobre las piezas enumeradas en
las siguientes páginas, consulte el diagrama de montaje de este manual.
Desenvuelva y separe todas las piezas en un área de trabajo limpia.
GUARDA ESTAS INSTRUCCIONES

- 3 -
PRECAUCIONES DE USO
PARA EVITAR LESIONES GRAVES Y LA MUERTE POR VUELCO:
31. NO SE SIENTE NI SE PARE SOBRE ESTE ARTÍCULO.
32. Este producto no es un juguete. No permita que los niños jueguen con
este artículo o cerca de él.
33. No exceda la capacidad de peso. Vacíe el carro del laboratorio antes
de moverlo.
34. Úselo únicamente sobre una superficie plana, nivelada, dura y lisa
capaz de soportar de manera segura un carrito de salón completamente
cargado.
35. Úselo únicamente según lo previsto.
Inspeccionar antes de cada uso; no lo utilice si las piezas están sueltas o
dañadas.
TECHNICAL SPECIFICATIONS
Modelo
T- 100C
Color
Negro _
Dimensiones del producto (largo x
ancho x alto)
370*420*855 milímetros
Tamaño del embalaje (largo x
ancho x alto)
835*255*450 milímetros
Peso neto / kg)
Alrededor de 8,41 kilos
Peso bruto (kg)
Unos 10 kilos
*Productos como especificaciones, apariencia y diseño están
- 4 -
sujetos a modificaciones sin previo aviso.
PACKAGE CONTENTS
R: bandeja
superior
B: bandeja
extraíble
C: panel lateral
D: bandeja inferior
PC 1
6 uds.
2 piezas
PC 1
E: Rueda l
F: Ruedas con
bloqueos
G: compartimento
lateral
H:Perno y gorra
2 piezas
2 piezas
2 piezas
4 juegos
Yo: conector
frontal
con tornillos
J: panel trasero
K: balaustrada
L:Frente puerta
con cerradura
PC 1
1 JUEGOS
2 piezas
2 piezas

- 5 -
M: tapa del
compartimento
N: Porta
electrodomésticos
O: herramienta
1 JUEGOS
1 JUEGOS
PC 1
ASSEMBLY STEPS

- 6 -
PASO 1 : Inserte los 2 paneles laterales (C) en la bandeja inferior (D),
PASO 2-3: Coloque el panel trasero (J) entre los 2 paneles laterales (C) y
colóquelo en la sección central de los paneles laterales .
PASO 4: Atornille las 4 ruedas (E y F ) en las roscas en la parte inferior de los
paneles laterales y fíjelas con la herramienta ( O ). Asegúrese de que las ruedas
estén bien sujetas.

- 7 -
PASO 5: Inserte una de las puertas delanteras (M) en los rieles en el medio de los
paneles laterales y deslícela completamente.
PASO 6-7: Coloque el conector frontal ( I ) entre la sección central de los 2
paneles laterales (C) y encájelo .
PASO 8: Inserte otra puerta frontal (M) en los rieles en la parte superior de los
paneles laterales.
PASO 9: Cubra la bandeja superior ( A) en la parte superior de los paneles
laterales y fíjela con los 4 pernos adjuntos). NO cubra las tapas de los orificios de
los tornillos (H) en este momento .
PASO 10: Fije los compartimentos laterales (G) a los paneles laterales. Asegúrese
de que los 4 ganchos estén alineados correctamente con las ranuras de los
paneles laterales.
PASO 11: Coloque las cubiertas de los compartimentos (M ) y los soportes para
electrodomésticos (N ) en la parte superior de los compartimentos laterales (G).
Deslice las 4 bandejas extraíbles (B), instale las Soporte para secador de pelo (K)
y 2 balaustres (L).
PASO 12: Si los pasos anteriores se realizaron correctamente, coloque las tapas
de los orificios para tornillos (H) en los 4 orificios de la bandeja superior.

- 8 -
FEATURES

- 9 -
Fabricante: Shanghaimuxinmuyeyouxiangongsi
Dirección: Baoshanqu Shuangchenglu 803long 11hao 1602A-1609shi
Shanghai
With 2 lockable doors
that really work.
Universal key for both
doors
With holders for various
hairdressing tools
With build-in metal
appliance holders
The door slips smoothly
into the cabinet and
"disappears”
With holder and saw
cutter for foil rollers
Removable trays can
be clipped to both sides
of the top, triple your
working space
Adequate space for large
bottles
Comfortably
accomodate your Color
Charts or Magazines

- 10 -
Importado a AUS: SIHAO PTY LTD . 1 ROKEVA STREET ASTWOOD
NSW 2122 Australia
Importado a EE. UU.: Sanven Technology Ltd.
Suite 250 , 9166 Anaheim Place, Rancho Cucamonga, CA 91730
Hecho en china
REP
EC
SHUNSHUN GmbH
Römeräcker 9 Z2021,76351
Linkenheim-Hochstetten,Germany
euvertreter@gmail.com
+49 1727041930
REP
UK
Pooledas Group Ltd
Unit 5 Albert Edward House, The
Pavilions Preston, United Kingdom
pooledas12[email protected]
Tel: 01772418127


Tecnico Supporto e certificato di garanzia elettronica www.vevor.com/support
CARRELLO DEL SALONE
MANUALE D' USO
MODELLO NUMERO.: T-0 100C
We continue to be committed to provide you tools with competitive price.
"Save Half", "Half Price" or any other similar expressions used by us only represents an
estimate of savings you might benefit from buying certain tools with us compared to the major
top brands and does not necessarily mean to cover all categories of tools offered by us. You
are kindly reminded to verify carefully when you are placing an order with us if you are
actually saving half in comparison with the top major brands.


- 1 -
MODELLO N.: T-100C
Have product questions? Need technical support? Please feel free to
contact us:
Technical Support and E-Warranty Certificate
www.vevor.com/support
NEED HELP? CONTACT US!
This is the original instruction, please read all manual instructions
carefully before operating. VEVOR reserves a clear interpretation of our
user manual. The appearance of the product shall be subject to the
product you received. Please forgive us that we won't inform you again if
there are any technology or software updates on our product.
Salon Cart

- 2 -
AVVERTIMENTO:
Si prega di leggere attentamente questo manuale prima di utilizzare il
prodotto. In caso contrario, si potrebbero causare lesioni gravi.
PRECAUZIONI DI MONTAGGIO
57. Assemblare solo secondo queste istruzioni. Un montaggio improprio
può creare pericoli.
58. Indossare occhiali di sicurezza approvati ANSI e guanti da lavoro
pesanti durante il montaggio.
59. Mantenere l'area di assemblaggio pulita e ben illuminata.
60. Tenere gli astanti lontani dall'area durante il montaggio.
61. Non montare in caso di stanchezza o sotto l'effetto di alcol, droghe o
farmaci.
62. Le funzionalità del prodotto si applicano solo ai prodotti correttamente
e completamente assemblati.
63. Montare su una superficie piana, livellata, dura e liscia in grado di
sostenere in sicurezza il carrello del salone.
64. Per ulteriori informazioni riguardanti le parti elencate nelle pagine
seguenti, fare riferimento allo Schema di Montaggio di questo manuale.
Scartare e separare tutte le parti in un'area di lavoro pulita.
CONSERVARE QUESTE ISTRUZIONI

- 3 -
USARE LE PRECAUZIONI
PER PREVENIRE LESIONI GRAVI E MORTE DOVUTE AL
RIBALTAMENTO:
36. NON SEDERSI O STARE IN PIEDI SU QUESTO ARTICOLO.
37. Questo prodotto non è un giocattolo. Non permettere ai bambini di
giocare con o vicino a questo articolo.
38. Non superare le capacità di peso. Svuotare il carrello da laboratorio
prima di spostarlo.
39. Utilizzare solo su una superficie piana, livellata, dura e liscia in grado
di sostenere in sicurezza un carrello del salone a pieno carico.
40. Utilizzare solo come previsto.
Ispezionare prima di ogni utilizzo; non utilizzare se le parti sono allentate o
danneggiate.
TECHNICAL SPECIFICATIONS
Modello
T -100C
Colore
Nero _
Dimensioni del prodotto (LxLxA)
370*420*855mm
Dimensioni imballo (LxLxA)
835*255* 450mm
Peso netto (kg)
Circa 8,41 kg
Peso lordo (kg)
Circa 10 kg
*Prodotti quali specifiche, aspetto e design sono soggetti a modifiche
senza preavviso.
- 4 -
PACKAGE CONTENTS
R: Vassoio
superiore
B: Vassoio
rimovibile
C: Pannello
laterale
D: Vassoio
inferiore
1 pezzo S
6 pezzi
2 pezzi
1 pezzo S
E:Ruota l
F: Ruote con
bloccaggio
G: Scomparto
laterale
H: Bullone e
berretto
2 pezzi
2 pezzi
2 pezzi
4SET
I:Connettore
frontale
con viti
J: Pannello
posteriore
K: Balaustrata
L: Davanti porta
con serratura
1 pezzo S
1SET
2 pezzi
2 pezzi
M:Coperchio del
vano
N: Porta
elettrodomestici
O: Strumento
1SET
1SET
1 pezzo

- 5 -
ASSEMBLY STEPS

- 6 -
FASE 1 : inserire i 2 pannelli laterali (C) nel vassoio inferiore (D),
FASE 2-3: Posizionare il pannello posteriore (J) tra i 2 pannelli laterali (C) e
agganciarlo nella sezione centrale dei pannelli laterali .
FASE 4: Avvitare le 4 ruote (E e F ) nelle filettature nella parte inferiore dei pannelli
laterali e fissarle con lo strumento ( O ). Assicurarsi che le ruote siano fissate
saldamente.

- 7 -
PASSO 5: Inserisci uno degli sportelli anteriori (M) nei binari al centro dei pannelli
laterali e inseriscilo completamente.
FASE 6-7: Posizionare il connettore anteriore ( I ) tra la sezione centrale dei 2
pannelli laterali (C) e agganciarlo .
FASE 8: inserire un'altra porta anteriore (M) nei binari nella parte superiore dei
pannelli laterali.
PASSO 9: Coprire il vassoio superiore ( A) sulla parte superiore dei pannelli laterali
e fissarlo con i 4 bulloni/inclusi). Si prega di NON coprire i tappi dei fori delle viti (H)
in questo momento .
FASE 10: Attaccare gli scomparti laterali (G) ai pannelli laterali. Assicurarsi che
tutti e 4 i ganci siano stati allineati correttamente alle fessure nei pannelli laterali.
FASE 11: Posizionare i coperchi degli scomparti (M ) e i supporti degli
elettrodomestici (N ) sulla parte superiore degli scomparti laterali (G). Far scorrere
i 4 vassoi rimovibili (B), installare i Supporto per asciugacapelli (K) e 2 colonnine
(L).
PASSO 12: Se i passaggi precedenti sono stati eseguiti correttamente, inserire i
tappi dei fori delle viti (H) nei 4 fori del vassoio superiore.
- 8 -
FEATURES
With 2 lockable doors
that really work.
Universal key for both
doors
With holders for various
hairdressing tools
With build-in metal
appliance holders
The door slips smoothly
into the cabinet and
"disappears”
With holder and saw
cutter for foil rollers
Removable trays can
be clipped to both sides
of the top, triple your
working space
Adequate space for large
bottles
Comfortably
accomodate your Color
Charts or Magazines

- 9 -
Produttore: Shanghaimuxinmuyeyouxiangongsi
Indirizzo: Baoshanqu Shuangchenglu 803long 11hao 1602A-1609shi
Shanghai
Importato in AUS: SIHAO PTY LTD . 1 ROKEVA STREETEASTWOOD
NSW 2122 Australia
Importato negli Stati Uniti: Sanven Technology Ltd.
Suite 250 , 9166 Anaheim Place, Rancho Cucamonga, CA 91730
Made in China
REP
EC
SHUNSHUN GmbH
Römeräcker 9 Z2021,76351
Linkenheim-Hochstetten,Germany
euvertreter@gmail.com
+49 1727041930
REP
UK
Pooledas Group Ltd
Unit 5 Albert Edward House, The
Pavilions Preston, United Kingdom
pooledas12[email protected]
Tel: 01772418127