Creative
Consumer
Products
FS87 Food Steamer
2 3
English Manual
Manuel d’utilisation en français
Gebrauchsanleitung auf Deutsch
Manual de Instrucciones en Español
Manuale D’istruzioni In Italiano
Instrukcja obsługi. Polski
4
12
20
28
36
44
Contents
4 5
English Manual
Safety Instructions
• This appliance is for indoor/household use only. Do not use outdoors.
• This appliance is not designed for commercial or industrial use;
• it is for household use only.
• This appliance is not intended for use by persons (including children) with reduced
physical, sensory or mental capabilities, or lack of experience and knowledge,
unless they have been given supervision or instruction concerning use of the
appliance by a person responsible for their safety.
• Children should be closely supervised at all times to ensure that they do not play with
the appliance.
• Only use the food steamer out of the reach of children because the milk may get very
hot.
• Do not operate this appliance if the power cable or plug is damaged. If either is
damaged, return it to Duronic for service or repair by a professional technician.
• Never try to replace the parts and/or repair the unit by yourself.
• Never open and repair the machine yourself. Do not modify the machine in any way
that is not described in the instructions for use. The machine contains live parts.
Repairs may only be carried out by Duronic,
• using original spare parts and accessories.
• Always operate the appliance on a dry, smooth, even and stable surface. Do not place
the unit on a hot surface.
• Do not operate the machine or handle the plug with wet hands.
• Do not let the power cable hang over the edge of table or counter.
Do not let the cable touch hot surfaces.
• Before you connect the appliance to the mains socket, make sure that the voltage
indicated on the rating label (located on the bottom) corresponds the voltage in your
home. If it does not, please contact the manufacturer immediately and do not use it.
This item has been made to correspond with standard UK voltage 220-240V.
• Before plugging in this appliance in,
• ensure that the mains power socket is properly grounded.
• If the circuit breaker activates for any reason, do not switch on the appliance.
• Do not put the power cable, plug or the body of appliance in or under water or any
other liquid.
• Do not place the food steamer on or near a hot gas or electric hob,
or in a heated oven.
• The appliance should be supervised whilst in use.
• Avoid moving the steamer when it is working. If it is necessary to move the appliance,
move it slowly and carefully as it will contain hot liquids and could cause scalding.
If the machine is operated with a defective or damaged mains cable,
there is a potential danger of fatal electric shock.
Never use a machine which is damaged or has a damaged mains cable.
6 7
• To avoid any risk of burning, please wear heatproof oven gloves or pot holders when
removing the hot lid and food baskets.
• Do not operate the food steamer without water in the container of the body. If it starts
to heat up without water
, or with not enough water, turn the machine off immediately
by turning the dial anticlockwise. Add the correct amount of water before switching
back on again.
• Do not ll up the appliance with cold water while it is still hot.
•
The sudden change in temperature might damage it.
• When the steamer is in use, or just after use, allow it to cool before opening the lid.
T
ake care as a large amount of steam may escape.
•
Please be aware, when some parts of the steamer body cool down and feel safe to
touch, the water in the body may still be hot.
•
Do not touch the sides of the baskets and trays after the machine
has been on as they will be hot to touch.
Use the handles on the sides and the handle on the lid to remove the parts you need.
• When using the steamer, please keep it far away from children. It is especially
important as the steamer is a tower of stacked trays, which get hot and full of boiling
steam whilst in use. If it is pulled or knocked over it could cause injury,
scalding or even electric shock.
Proper Use
Specications
This machine is designed and intended for private domestic use.
Instructions
It is used to steam and cook food in the containers provided.
Use for any other purpose will be deemed improper and will invalidate the warranty.
Duronic cannot accept any responsibility for the consequences of improper use.
People, including children, who do not have the physical, sensory or mental capabilities to
use the machine safely or are inexperienced or lack knowledge in how to use the machine
safely must be supervised by a responsible person when using it,
or must be instructed in how to use it correctly.
Make sure you read and are familiar with the guidance in this booklet which outlines
how to use your appliance correctly and safely.
Model Name Voltage Frequency Wattage
FS87 220-240V 50-60Hz 730-870W
Before First Use
• Carefully remove all parts of the FS87 steamer from the packaging.
Lay out the parts so that you can see clearly if any parts are missing or damaged.
• Use a damp cloth to wipe clean the water tank/body, then wipe dry with a dry cloth.
T
ake care to never immerse the body, power cable or plug in water or any other liquid.
• To avoid risk of electric shock, do not let moisture come into contact with the plug or
power cable at any time.
•
Wash all the baskets, food trays, drip tray and the lid in warm soapy water.
Dry thoroughly before use.
How to Use
1.
Place the body of the steamer onto a at,
stable surface near an easily accessible plug socket.
2.
Carefully ll the water tank up to the required level using a jug.
Using the water level window to guide you, do not overll the tank past the MAX mark,
or underll it below the MIN mark.
3.
Place the steam cap into the centre of the steamer,
and then place the drip tray on top.
4.
Next, add the baskets you need.
The baskets are numbered on the handles to make it easy to assemble correctly.
Place basket 1 onto the drip tray ensuring it is sitting in place properly.
5.
If you only have enough food to ll one basket, place the lid on top.
If you need to add more food, use basket on top of basket
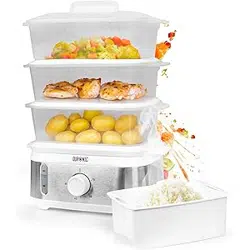
6. According to how much food you want to cook, stack the baskets as shown above and
place the lid on the top basket.
7.
Plug in the steamer and turn the machine on.
Rotate the timer dial clockwise to your desired time. If you are unsure how long to put
the timer for, skip ahead to the section titled ‘Cooking Guide’.
8. Once the timer has been set the steamer will start cooking.
9. If you need to stir the food halfway through cooking, lift the lid carefully to avoid any
steam that will billow out of the baskets.
10. If the water level gets too low during cooking, use a jug to slowly add warm/hot water
through the grooves/ the two handles on both sides of the body.
If you add cold water it will lower the temperature inside the steamer and so the food
will take longer to cook.
8 9
11. When the timer nishes the machine will sound an alarm to let you know it has
nished. It will automatically switch off and stop cooking.
12. Switch off the power and unplug the steamer.
13. Allow the hot machine to cool for a few seconds before opening.
14. Wearing oven gloves, carefully remove the lid by holding the handle, taking care to
avoid the hot steam escaping. Allow the steam to clear before removing the baskets.
15. Remove each basket one-by-one, ensuring you hold them by the handles and place
them down onto a heatproof surface.
Allow the steam to clear, then remove the baskets and serve the food.
16. After you have emptied the steamer, leave it to cool down thoroughly.
Once cooled, empty the water tank by pouring the remaining water and uids into the
sink. Wipe clean the inside of the tank, then wind the power cable around inside the
base for storage.
Useful Tips
• Steaming times stated in the Cooking Guide are only a guide.
Cooking times may vary depending on size of the food pieces, spacing of the food in
the steamer baskets, quantity of food, freshness of food and personal preference to
how well done you want something. As you become familiar with the steamer and the
way it works, simply adjust the cooking times as necessary.
• A single tray of food steams faster than with 2 or 3 bowls used at the same time.
Therefore, the more food you cook the longer you will need to cook it for.
• The smaller you cut the food, the quicker it will cook. Larger pieces of food will take
longer, so try to make sure all the different foods are made to be similar in size.
• Do not over-ll or crowd the food baskets or rice bowl.
Try to arrange food so that it is spread out and has space between the pieces to
allow for the maximum steam to reach the food.
• Fat will naturally drain away from meat and poultry whilst cooking.
However, for best results use small portions and trimming excess fat off beforehand.
• Always check food is piping hot and cooked through before serving.
If the food seems uncooked or needs more time,
simply put it back into the steamer and set the timer dial again to cook it for longer.
Cooking Guide
The cooking times below are to be used as a guide and should be adjusted according to
the size you have cut the food, the basket/tier they are on and your personal preference on
how you prefer your food to be.
Rice Tray For cooking rice and other grains
Basket 3 Ideal for vegetables and other foods
Basket 2 Ideal for vegetables and other foods
Basket 1 Ideal for meats and sh - any foods that may drip juices
Drip Tray Collection juices and fat from food
Food Weight Time
Chicken
2cm pieces
500g 20 min
Drumsticks
Whole
600g 40 min
Ribs
2cm Thickness
500g 20 min
Fish
Whole
500g 20 min
Slices of sh meat
2cm Thickness
300g 8 min
Broccoli
Small pieces
300g 13 min
Cabbage
Small pieces
300g 12 min
Potatoes
2cm thickness
300g 25 min
Sweet corn
Whole cobs
800g 45 min
Rice
Placed in rice tray
Rice 250g + water 300ml 30 min
10 11
Warranty
1 Year Guarantee from Shine-Mart Ltd, Trademark owners of Duronic Products.
NOTE: THESE STATEMENTS DO NOT AFFECT YOUR STATUTORY RIGHTS AS A
CONSUMER
This product has been manufactured under the strictest or quality control procedures, and
using the highest quality of materials, to ensure excellent performance and reliability. It will
give very good and long lasting service, provided it is properly used and maintained. The
product is guaranteed for 1 years from the date of original purchase. If any defect arises due
to a faulty materials or poor workmanship, the faulty product must be returned to the original
place of purchase. Refund or replacement is at the discretion of that company.
Duronic Products are offered with a 1 year guarantee under the following conditions:
1
. The product must be returned to the retailer with original proof of purchase.
2
. T
he product must be installed and used in accordance with the instruction
s
c
ontained in this operating manual.
3
. I
t must be used only for domestic purposes.
4
. I
t does not cover wear and tear, malicious damage, misuse, neglect
,
inexpert repairs or consumable parts.
5
. S
hine-Mart Ltd has no responsibilities for accidental or consequential loss or damage.
6
. S
hine-Mart Ltd are not liable to carry out any type of servicing work
,
u
nder the guarantee
7. Valid in the UK only
Imported by Shine-Mart Ltd, RM3 8SB
Information on waste Disposal for Consumers of
Electrical & Electronic Equipment.
This mark on a product and/or accompanying documents indicates that when it
is to be disposed of, it must be treated as Waste
Electrical & Electronic Equipment, (WEEE).
Any WEEE marked products must not be mixed with general household waste,
but kept separate for the treatment, recovery and recycling of the materials used.
For proper treatment, recovery and recycling; please take all WEEE marked
waste to your Local Authority Civic waste site,
where it will be accepted free of charge.
If customers dispose of Waste Electrical & Electronic Equipment correctly, they
will be helping to save valuable resources and preventing any potential negative
effects upon human health and the environment, of any hazardous materials that
the waste may contain.
Giving the baskets a deep clean
The stainless-steel bases of the 3 baskets can be removed for
cleaning.
To do this, simply push the tabs on the outside of the base
inwards and push the base out of the basket.
W
ash with warm soapy water and dry thoroughly.
To re-t the base, slot back into the basket and align the studs
and holes on the base and basket.
Gently push down on the base until the tabs fasten over the sides
of the basket.
Cleaning and Maintenance
• Before cleaning, always ensure that the steamer has been switched off and unplugged
from the mains socket.
•
Disassemble the unit by removing each basket, the drip tray, the steam cap and lid.
• W
ash all the baskets, food trays, drip tray and the lid in warm soapy water.
Dry thoroughly before storing away.
•
To clean the electric base, use a well-wrung damp cloth to carefully wipe over the
surface and inside the water tank.
Ensure you dry it thoroughly immediately afterwards.
NEVER IMMERSE
THE BODY, POWER CABLE OR PLUG IN WATER.
•
Do not use abrasive cleaning materials like scourers or scrubbing brushes on the
FS87 steamer or its parts.
•
Do not use abrasive chemical cleaners on the exterior or interior of the machine.
Only wash the tray
, lid and baskets with washing-up liquid and water.
•
Always store the machine and its parts in a safe place out of reach of children.
• Ensure the appliance is clean and thoroughly dry before storage.
12 13
Manuel d’utilisation en français
Instructions de sécurité
• Cet appareil est conçu pour être utilisé à l’intérieur. N’utilisez pas cet
appareil à l’extérieur.
• Cet appareil est conçu pour une utilisation domestique, ne pas utiliser cet
appareil à des fins commerciales.
• Cet appareil n’est pas conçu pour être utilisé par les personnes, y compris
les enfants, dont les capacités mentales, physiques ou sensorielles sont
limitées, à moins qu’elle ne soit sous la supervision de la personne
responsable de leur sécurité ou de la personne ayant l’expérience nécessaire
pour opérer cette machine en toute sécurité.
• Les enfants doivent rester sous stricte supervision pour s’assurer qu’ils ne
jouent pas avec l’appareil.
• Gardez l’appareil hors de portée des enfants, la vapeur peut atteindre une
température élevée.
• N’utilisez pas l’appareil si le câble d’alimentation est endommagé. Si un
élément venait à être endommagé, veuillez contacter Duronic ou un
technicien qualifié pour obtenir l’assistance nécessaire.
Utiliser l’appareil avec un câble d’alimentation endommagé pose un
risque d’électrocution. N’utilisez jamais un appareil si
l’alimentation est endommagée.
• N’essayez pas de remplacer ou réparer l’appareil par vous-même.
• Ne modifiez pas l’appareil et ne tentez pas de l’utiliser pour un autre usage que celui
décrit dans ce manuel. Toute réparation ou modification doit être effectuée par
Duronic ou un technicien qualifié.
• Utilisez toujours l’appareil sur une surface lisse, plate et stable. Ne placez pas
l’appareil sur une surface chaude.
• N’utilisez pas l’appareil avec des mains humides.
• Ne laissez pas le câble d’alimentation trainer.
• Ne laissez pas le câble d’alimentation toucher une quelconque source chaude.
• Avant de brancher l’appareil, assurez-vous que le voltage corresponde à celui-ci
utilisé dans votre maison. Cet appareil a été conçu pour être utilisé sur du 220-240V.
• Ne placez pas l’appareil ou l’alimentation dans l’eau ou tout autre liquide.
• Ne placez pas l’appareil près d’une source chauffante, tel qu’un autre cuiseur, une
plaque de cuisson ou un four.
• Cet appareil doit rester sous supervision durant son utilisation.
• Evitez de déplacer l’appareil durant son utilisation. S’il s’avérait nécessaire de
bouger l’appareil, veuillez le faire très doucement afin d’éviter toute éclaboussure
d’eau chaude.

14 15
Instructions
Avant la première utilisation
• Veuillez déballer tous les éléments et posez-les à plat pour vérifier leur intégrité.
• Utilisez un tissu humide pour nettoyer le réservoir d’eau puis séchez-le avec un tissu
sec. Veuillez vous assurer de ne jamais immerger la base ou l’alimentation dans l’eau
ou tout autre liquide.
• Pour éviter tout risque d’électrocution, veuillez vous assurer que la vapeur n’entre
pas en contact avec l’alimentation.
• Nettoyez tous les éléments dans de l’eau chaude en vous assurant de les sécher
soigneusement avant de les utiliser.
Utilisation du produit
1. Placez l’appareil sur une surface plate et stable à proximité d’une prise de
courant ;
2. Veuillez remplir attentivement le réservoir à eau. Utilisez le repère de niveau
d’eau pour vous aider. Ne remplissez pas le réservoir au-delà du repère
maximum ou en dessous du repère minimum.
3. Placez le chapeau ainsi que le bac récupérateur.
4. Ajoutez autant d’étagère que nécessaire, chaque étagère est numérotée pour
permettre un assemblage correct.
5. Placez le couvercle au-dessus de la dernière étagère placée.
6. Branchez l’appareil et allumez l’appareil en tournant le minuteur sur le temps
de cuisson souhaitée. Si vous n’êtes pas sûr de la durée à paramétrer, veuillez
consulter le guide de cuisson présent dans ce manuel.
7. Une fois le minuteur ajusté, l’appareil commencera la cuisson des ingrédients.
8. Si vous souhaitez mélanger le contenu durant la cuisson, soyez
particulièrement vigilent lorsque vous retirez le couvercle, une quantité
importante de vapeur s’échappera.
• Pour éviter tout risque de brulure, veuillez utiliser des maniques lorsque vous
manipulez chaque compartiment.
• N’utilisez pas l’appareil sans eau dans le réservoir. Veuillez arrêter l’appareil
immédiatement s’il est allumé et que le réservoir d’eau est vide ou sur le point d’être
vide. Ajoutez davantage d’eau avant d’allumer l’appareil à nouveau.
• Ne remplissez pas l’appareil avec de l’eau froide lorsque l’appareil est chaud. Tout
changement de température soudain pourrait endommager le produit.
• Juste après avoir utilisé l’appareil, retirez attentivement le couvercle, une quantité
importante de vapeur pourrait s’échapper.
• Veuillez faire attention au fait que même si certaines parois de l’appareil pourraient
paraitre froides, l’eau présente dans le réservoir pourrait encore être très chaude.
• Ne touchez pas les grilles en métal qui pourraient être très chaudes. Utilisez les
poignées intégrées sur chaque compartiment pour retirer et déplacer chaque élément.
• Lorsque vous utilisez l’appareil, veuillez le garder hors de portée des enfants. Si un
des éléments venait à tomber, cela pourrait provoquer des brulures et blessures
importantes, voire même présenter un risque d’électrocution.
Spécifications
FS87 220-240V 50-60Hz 730-870W
Modèle Voltage Fréquence Puissance
16 17
Les recommandations présentées ci-dessous ne sont données qu’à titre indicatif et
dépendent principalement de la taille des ingrédients, de la quantité ajoutée, du type de
cuisson souhaité, etc.
Guide de cuisson
Idéale pour les viandes et autres ingrédients qui perdraient de leur jus.
Bac
Etagère 3
Etagère 2
Etagère 1
Bac à jus
Convient à tout type d’ingrédient
Convient à tout type d’ingrédient
Pour riz, semoule, graines, etc
Permet de récupérer le jus et la graisse des viandes
Poids
Poulet 500g 20 min
600g 40 min
Côtes 500g 20 min
500g 20 min
300g 8 min
Brocoli
300g 13 min
300g 12 min
300g 25 min
Mais
800g 45 min
Riz
30 min
Nourriture Temps
250 gr de riz pour 300 ml
d’eau
Pillons de poulet
Poisson
Morceaux de poisson
Choux
Patates
Placé dans le bac
Entier
Epaisseur de 2 cm
Petits morceaux
Petits morceaux
Entier
Epaisseur de 2 cm
Entier
Morceaux de 2 cm
9. Si le niveau d’eau descend en dessous du repère minimum durant la cuisson,
ajoutez de l’eau chaude à travers les poignées présentes de chaque côté du produit.
Evitez de rajouter de l’eau froide, le changement de température peut endommager
l’appareil et affecter la cuisson puisque cela refroidira l’eau chaude.
10. Lorsque le minuteur arrive à son terme, une alarme sonore retentira pour avertir la
fin de la cuisson. L’appareil s’éteindra alors automatiquement.
11. Débranchez l’appareil et laissez-le refroidir.
12. Veuillez utiliser des maniques et retirer soigneusement le couvercle.
13. Une fois que la vapeur chaude s’est retirée, veuillez retirer chaque étagère en
vous assurant de les tenir grâce aux poignées présentes de chaque côté. Veuillez
vous assurer de placer chaque étagère sur une surface résistant à la chaleur.
14. Une fois l’appareil vidé, laissez chaque élément refroidir puis videz le réservoir
d’eau. Essuyez l’intérieur de l’appareil avec un tissu sec puis repliez le câble
d’alimentation.
Conseils d’utilisation
Epaisseur de 2 cm
Utiliser une seule étagère permet de cuire les ingrédients plus rapidement
qu’en utilisant deux ou trois étagères à la fois. La cuisson sera donc plus
rapide si une seule étagère est utilisée.
Plus les ingrédients sont coupés en petits morceaux, plus ils cuiront
rapidement. Les morceaux plus gros prendront plus de temps. Afin
d’homogénéiser la cuisson, veuillez vous assurer qu’il n’existe pas de trop
grosses différences.
Ne remplissez pas trop les étagères ou le bac. Veuillez au contraire arranger
les ingrédients afin qu’ils soient répandus afin d’optimiser la circulation de la
vapeur et par conséquent leur cuisson.
Les viandes perdront naturellement de la graisse durant leur cuisson. Pour
obtenir de meilleurs résultats, utilisez des morceaux plus petits et retirez les
morceaux de gras visibles.
Vérifiez que la cuisson soit bien achevée avant de retirer les ingrédients et
éviter ainsi de perdre la chaleur accumulée dans le cuiseur.
18 19
Nettoyage des étagères
La base en inox de chaque étagère peut être retirée pour la
profondeur.
Pour cela, appuyez simplement sur les ergots présents sur
l’extérieur de la surface. Les bases se détacheront de
l’intérieur.
Pour replacer les bases, assurez-vous d’aligner les ergots
correctement puis exercez une légère pression pour les
verrouiller.
Nettoyage et maintenance
• Avant de procéder au nettoyage, veuillez vous assurer que l’appareil soit éteint et
débranché.
• Désassemblez l’appareil en retirant chaque étagère, le bac récupérateur ainsi que
le couvercle.
• Nettoyez les étagères, le bac ainsi que le couvercle avec de l’eau savonneuse puis
séchez tous ces éléments soigneusement avant de les ranger.
• Pour nettoyer la base, veuillez utiliser un tissu humide pour nettoyer la surface
ainsi que le réservoir d’eau. Assurez-vous de séchez toutes les parois
immédiatement afin d’éviter tout résidu.
• N’immergez jamais la base ou l’alimentation dans de l’eau ou tout autre liquide.
• N’utilisez pas d’éponges abrasives pour nettoyer l’appareil ou l’un de ses
accessoires.
• Rangez toujours l’appareil dans un endroit hors de portée des enfants.
• Assurez-vous que l’appareil soit bien propre et sec avant de le ranger.
Garantie
Garantie et service après-vente
1 an de garantie de la part de Shine-Mart Ltd, propriétaire de la marque Duronic.
NOTE : CES DÉCLARATIONS N’AFFECTENT EN RIEN VOTRE DROIT STATUTAIRE EN
TANT QUE CONSOMMATEUR
Ce produit a été produit en suivant les procédures de contrôle de qualité les plus strictes en
utilisant des matériaux de qualité pour assurer une excellente durabilité et performance. Cet
appareil vous offrira de longues années de service tant que vous l'utilisez correctement et
suivez les instructions de maintenance présentées dans ce manuel. Ce produit est garanti
pour 1 an à partir de la date originelle d’achat. Si ce produit était endommagée en raison d’un
problème électrique ou d’une fabrication imparfaite,
le produit défectueux peut être remplacé au vendeur à la discrétion de la marque sous
conditions:
1. Le produit doit être retourné avec la preuve originale d’achat.
2. Le produit doit être installé et utilisé en accord avec les instructions contenues dans ce
manuel d’utilisation.
3. Le produit doit être réservé à un usage privé.
4. La garantie ne protège pas contre les dommages dus à l’usure normale, l’utilisation
malveillante, la mauvaise utilisation, la négligence, les réparations conduites par des
non-experts ainsi que les pièces consommables.
5. Shine-Mart Ltd ne porte pas de responsabilité pour tout dommage ou perte accidentel ou
conséquent
6. Shine-Mart Ltd se dégage de toute responsabilité en matière de réparation durant la
période de garantie.
causé par ce produit.
7. Valide dans toute l’Union Européenne.
Ce produit est fourni avec une prise européenne
Importé
par Shine-Mart Ltd, RM3 8SB.
Ce symbole apparaît sur le produit et/ou les documents accompagnant ce
produit pour indiquer que pour procéder à la destruction de ce produit, celui-ci
doit être traité comme un déchet électrique et électronique (WEEE).
Les
ménagers et doivent être séparés pour traitement et recyclage des composants.
produits marqués WEEE ne doivent être mélangés avec les déchets
An de traiter et recycler ce produit, veuillez déposer tous les composants
marqués WEEE au site de recyclage le plus proche où ce produit sera repris
gratuitement. Si les clients jettent les déchets électriques et électroniques
WEEE correctement, ce geste aidera la préservation de ressources précieuses
et prévient les potentiels effets négatifs que ces composants ou tout autre
composant dangereux ont sur la santé humaine et l’environnement.
Suivez-nous sur
www.duronic.com @duronic_france Duronic France @Duronic_France

20 21
Gebrauchsanleitung auf Deutsch
Sicherheitshinweise
• Dieses Gerät ist nur für den Gebrauch in Innenräumen / im Haushalt bestimmt. Nicht im
Freien benutzen.
• Dieses Gerät ist nicht für den gewerblichen oder industriellen Gebrauch bestimmt.
• Dieses Gerät ist nicht zur Verwendung durch Personen (einschließlich Kinder) mit
eingeschränkten körperlichen, sensorischen oder geistigen Fähigkeiten oder mangelnder
Erfahrung und mangelndem Wissen vorgesehen, es sei denn, sie wurden von einer für ihre
Sicherheit verantwortlichen Person beaufsichtigt oder in die Verwendung des Geräts
eingewiesen.
• Kinder sollten zu jeder Zeit beaufsichtigt werden, um sicherzustellen, dass sie nicht mit dem
Gerät spielen.
• Verwenden Sie den Dampfgarer nur außerhalb der Reichweite von Kindern, da der Dampf
sehr heiß werden kann.
• Betreiben Sie dieses Gerät nicht, wenn das Netzkabel oder der Stecker beschädigt sind.
Wenn einer der beiden Teile beschädigt ist, senden Sie ihn zur Wartung oder Reparatur
durch einen Fachmann an Duronic zurück. Versuchen Sie niemals, die Teile auszutauschen
und / oder das Gerät selbst zu reparieren.
Wird die Maschine mit einem defekten oder beschädigten Netzkabel betrieben, besteht
die Gefahr eines tödlichen Stromschlags. Verwenden Sie niemals ein
Gerät, das beschädigt ist oder ein beschädigtes Netzkabel hat.
• Öffnen und reparieren Sie die Maschine niemals selbst. Verändern Sie die Maschine auf
keine Weise, die nicht in der Gebrauchsanweisung beschrieben ist. Die Maschine enthält
unter Spannung stehende Teile. Reparaturen dürfen nur von Duronic mit
Originalersatzteilen und -zubehör durchgeführt werden.
• Betreiben Sie das Gerät immer auf einer trockenen, glatten, ebenen und stabilen
Oberfläche. Stellen Sie das Gerät nicht auf eine heiße Oberfläche.
• Betreiben Sie den Dampfgarer nicht und fassen Sie den Stecker nicht mit nassen Händen
an.
• Lassen Sie das Netzkabel nicht über die Kante des Tisches oder der Theke hängen.
Lassen Sie das Kabel keine heißen Oberflächen berühren.
• Vergewissern Sie sich, dass vor dem Anschließen des Geräts an die Netzsteckdose, die
auf dem Typenschild (unten) angegebene Spannung mit der Spannung in Ihrem Haus
übereinstimmt. Sollte dies nicht der Fall sein, wenden Sie sich bitte sofort an den Hersteller
und verwenden Sie das Gerät nicht. Dieser Artikel entspricht der Standardspannung von
220-240 V in Großbritannien.
• Vergewissern Sie sich vor dem Anschließen des Geräts, dass die Netzsteckdose
ordnungsgemäß geerdet ist.
• Wenn sich der Leistungsschalter aus irgendeinem Grund auslöst, schalten Sie das Gerät
nicht ein.
• Tauchen Sie das Netzkabel, den Stecker oder das Gehäuse des Geräts nicht in oder unter
Wasser sowie anderen Flüssigkeiten.
• Stellen Sie den Dampfgarer nicht auf oder in der Nähe eines heißen Gas- oder
Elektroherds oder in einen beheizten Ofen.
• Das Gerät sollte während des Gebrauchs überwacht werden.
• Bewegen Sie den Dampfgarer nicht, wenn er in Betrieb ist. Wenn das Gerät dennoch
bewegt werden muss, bewegen Sie es langsam und vorsichtig, da es heiße Flüssigkeiten
enthält und Verbrühungen verursachen kann.
22 23
Aufbau und Anwendung des FS87
Vor dem ersten Gebrauch
• Nehmen Sie alle Teile des FS87-Dampfgarers vorsichtig aus der Verpackung. Legen Sie
die Teile so aus, dass Sie deutlich sehen können, ob Teile fehlen oder beschädigt sind.
• Reinigen Sie den Wassertank / das Gehäuse (8) (12) mit einem feuchten Tuch und
wischen Sie es anschließend trocken. Tauchen Sie niemals das Gehäuse, das
Netzkabel oder den Stecker ins Wasser oder andere Flüssigkeiten.
• Um die Gefahr eines Stromschlags zu vermeiden, darf zu keinem Zeitpunkt Feuchtigkeit
mit dem Stecker oder dem Netzkabel in Kontakt kommen.
• Waschen Sie alle Dampfschalen, die Reisschale, Edelstahlböden und den Deckel in
warmem Seifenwasser. Vor Gebrauch gründlich abtrocknen.
Anwendung
1. Stellen Sie das Gehäuse des Dampfgarers (8) auf eine flache, stabile Oberfläche
in der Nähe einer leicht zugänglichen Steckdose.
2. An der Wasserstandsanzeige können Sie den Füllstand im Wasserbehälter ablesen.
Füllen Sie den Wasserbehälter bis zur MAX-Markierung ein, und beachten Sie, dass
das Wasser nie unter der MIN-Markierung liegt.
3. Setzen Sie den Dampfkopf (7) in die Mitte des Dampfgarers und setzen Sie dann
den Kondensat-Auffangbehälter (6) auf.
4. Stellen Sie anschließend die zu benötigenden Dampfschalen aufeinander. Die
Dampfschalen sind an den Griffen nummeriert, um die korrekte Montage zu
erleichtern. Stellen Sie die Dampfschale 1 (5) auf den Kondensat-Auffangbehälter
und achten Sie darauf, dass diese richtig sitzt.
5. Wenn Sie nur eine Dampfschale befüllen, dann setzen Sie auf diese den Deckel (1).
Wenn Sie mehr Lebensmittel hinzufügen möchten, verwenden Sie die Dampfschale
2 (4) über Dampfschale 1 (5) usw.
6. Stapeln Sie die Dampfschalen wie oben gezeigt, je nachdem, wie viel Essen Sie
kochen möchten, und setzen Sie den Deckel auf die oberste Dampfschale.
7. Stecken Sie den Dampfgarer in die Steckdose und schalten diesen ein. Drehen Sie
den Timer im Uhrzeigersinn auf die von Ihnen gewünschte Zeit. Wenn Sie nicht
sicher sind, wie lange der Timer laufen soll, dürfen wir Sie auf den Abschnitt
„Kochanleitung“ verweisen.
8. Sobald der Timer eingestellt wurde, beginnt das Gerät mit dem Garen.
9. Müssen Sie das Gargut zwischendurch umrühren, heben Sie den Deckel vorsichtig
an und achten Sie auf den Dampf, welcher aus den Dampfschalen quillt.
10. Achten Sie auf die Wasserstandanzeige. Wir empfehlen, Wasser bereits
nachzufüllen, wenn der Wasserstand die MIN-Markierung erreicht hat. Fügen Sie
langsam warmes/heißes Wasser in die Einfüllöffnungen auf den beiden Seiten des
Gehäuses (8). Wenn Sie kaltes Wasser hinzufügen, wird die
Temperatur im Dampfgarer gesenkt, sodass das Garen der
Speisen länger dauert
• Um Verbrennungsgefahr zu vermeiden, tragen Sie beim Entfernen des heißen Deckels
und der Lebensmittelkörbe hitzebeständige Ofenhandschuhe oder Topflappen.
• Betreiben Sie den Dampfgarer nicht ohne Wasser. Wenn sich das Gerät ohne oder mit
zu wenig Wasser erwärmt, schalten Sie es sofort aus, indem Sie den Drehknopf gegen
den Uhrzeigersinn drehen. Geben Sie die richtige Menge Wasser hinzu, bevor Sie
das Gerät wieder einschalten.
• Befüllen Sie das Gerät nicht mit kaltem Wasser, solange es noch heiß ist. Die plötzliche
Temperaturänderung kann zu Beschädigungen des Gerätes führen.
• Lassen Sie den Dampfgarer nach dem Gebrauch kurz abkühlen, bevor Sie den Deckel
öffnen. Seien Sie vorsichtig, da eine große Menge Dampf austreten kann.
• Bitte beachten Sie, dass das Wasser im Basisgerät noch heiß sein kann, obwohl einige
Teile des Dampfgarers abgekühlt sind oder sich kühl anfühlen.
• Berühren Sie die Dampfschalen nicht, nachdem die Maschine eingeschaltet wurde, da
diese heiß sind. Verwenden Sie die Griffe an den Seiten und den Griff am Deckel.
• Wenn Sie den Dampfgarer benutzen, halten Sie ihn bitte von Kindern fern. Dies ist
besonders wichtig, da der Dampfgarer ein Turm aus gestapelten Dampfschalen ist,
die während des Betriebs heiß und mit kochendem Dampf gefüllt werden. Wird das
Gerät gezogen oder umgeworfen, kann es zu Verletzungen, Verbrennungen oder
sogar Stromschlägen kommen.
Spezifikation
FS87 220-240V 50-60Hz 730-870W
Modell Name Stromspannung Frequenz Watt
24 25
Die folgenden Garzeiten sind Richtwerte und sollten je nach der Größe der
Nahrungsmittel, in welcher Dampfschale (unterste/mittlere/oberste) sich diese befinden,
sowie Ihren persönlichen Vorlieben angepasst werden.
Kochanleitung
Reisschale
Zum Kochen von Reis und anderen Getreidesorten
Dampfschale 3
Dampfschale 2
Dampfschale 1
Auffangschale
Ideal für Gemüse und kleine Lebensmittel
Ideal für Gemüse und kleine Lebensmittel
Ideal für Fleisch/Fisch/ Lebensmittel, die Fette und Säfte hinterlassen
Sammelt Säfte und Fett aus Lebensmitteln
Menge
500g 20 min
600g 40 min
500g 20 min
Fisch
im Stück
500g 20 min
300g 8 min
300g 13 min
300g 12 min
300g 25 min
800g 45 min
Rice 250g + Wasser 300ml 30 min
Nahrungsmittel Zeit
Hühnerbrust
2cm Dicke
Geflügel
im Stück
Ribs
2cm Dicke
Brockoli
Kleine Stücke
Kohl
kleine Stücke
Kartoffelscheiben
2cm Dicke
Maiskolben
Ganzer Kolben
Reis
In Reisschale gelegt
11. Nach Ablauf der eingestellten Zeit ertönt ein Signalton und das Gerät schaltet
automatisch ab.
12. Nach Beendigung der Zubereitung immer den Netzstecker aus der Steckdose
ziehen.
13. Lassen Sie das heiße Gerät vor dem Öffnen einige Sekunden abkühlen.
14. Beim Anfassen oder Entfernen von heißen Komponenten benutzen Sie
unbedingt Topflappen oder Kochhandschuhe, um sich nicht am heißen Dampf
zu verbrühen.
15. Nehmen Sie jede Dampfschale einzeln ab, indem Sie diese an den Griffen
halten und auf eine hitzebeständige Oberfläche legen.
16. Lassen Sie den Dampfgarer nach dem Entleeren gründlich abkühlen. Nach
dem Abkühlen leeren Sie den Kondensat-Auffangbehälter, indem Sie das
restliche Wasser und die Flüssigkeiten in die Spüle gießen. Wischen Sie das
Innere des Wassertanks sauber und wickeln Sie das Netzkabel zur
Aufbewahrung in der Basis um.
Nützliche Tipps
• Die im Garhandbuch angegebenen Garzeiten sind nur Richtwerte. Die Garzeiten können variieren, abhängig
von der Größe der Lebensmittelstücke, dem Abstand der Lebensmittel in den Dampfschalen, der Menge und
der Frische der Lebensmittel sowie der persönlichen Präferenz. Wenn Sie mit dem Dampfgarer und seiner
Funktionsweise vertraut sind, passen Sie die Garzeiten einfach nach Ihrem Bedarf an.
• Die Garzeit von nur einer Dampfschale erfolgt schneller als wenn zwei oder drei gleichzeitig verwendet
werden. Je mehr Essen Sie kochen, desto länger beträgt die Garzeit.
• Je kleiner Sie das Essen schneiden, desto schneller wird es gekocht. Größere Lebensmittel werden länger
dauern. Stellen Sie daher sicher, dass alle Lebensmittel gleich groß sind.
• Überfüllen Sie die Dampfschalen oder die Reisschüssel nicht. Versuchen Sie, die Speisen so anzuordnen,
dass sie ausgebreitet sind und zwischen den Stücken Platz haben, damit der Dampf die Speisen gut
erreichen kann.
• Fett fließt beim Kochen auf natürliche Weise von Fleisch und Geflügel ab. Für beste Ergebnisse sollten Sie
jedoch vorher kleine Portionen verwenden und überschüssiges Fett abschneiden.
• Überprüfen Sie vor dem Servieren immer, ob die Speisen heiß und gar sind. Scheint das Essen ungekocht
oder mehr Zeit zu benötigen, legen Sie es einfach wieder in den Dampfgarer und stellen Sie den Timer
erneut ein, um die Garzeit zu verlängern.
• Alle Dampfschalen haben Öffnungen am Boden, die beim Entfernen aus dem Dampfgarer tropfen können.
Stellen Sie ein sauberes Backblech oder eine Unterlage auf die Küchenoberfläche um die Dampfschalen dort
abzustellen. Versuchen Sie, den Deckel während des Garens nicht anzuheben, da jede Dampfentweichung
die Garzeit verlängert.
• Lebensmittel, die in der unteren Schüssel platziert werden, werden schneller gekocht als jene in der
oberen, was in der Regel einen Unterschied von 5-10 Minuten ausmacht. Dies ist ein weiterer Grund, warum
wir empfehlen, das Fleisch / Geflügel / Fisch in die unterste Schüssel zu legen, um sicherzustellen, dass
dieses gründlich gekocht werden.
Fischfilet
2cm Dicke
26 27
Shine-Mart Ltd, der Markeninhaber von Duronic Produkten, bietet 1 Jahr Gewährleistung.
HINWEIS: DIESE BEDINGUNGEN BEEINFLUSSEN IHRE GESETZLICHE RECHTE ALS
VERBRAUCHER NICHT
Dieses Produkt wurde unter strengen Qualitätskontrollen produziert und aus hochwertigen
Materialien hergestellt, um ausgezeichnete Leistung und Zuverlässigkeit zu gewährleisten.
Sofern das Produkt korrekt benutzt und gewartet wird, kann eine langlebige Lebensdauer
erwartet werden.
Das Produkt hat eine Gewährleistung von einem Jahr ab Kaufdatum. Beim Auftreten eines
Schadens, der von fehlerhalten Materialien oder Verarbeitung verursacht wurde, sollte das
defekte Produkt an den ursprünglichen Verkäufer zurückgegeben werden. Die Erstattung oder
Umtausch erfolgt nach Vorschriften des Unternehmens.
Duronic Produkte haben 1 Jahr Gewährleistung unter folgenden Bedingungen:
1. Das Produkt muss mit dem Kaufnachweis zurückgegeben werden.
2. Das Produkt muss unter den Anweisungen und Anleitungen installiert und benutzt worden
sein.
3. Es muss ausschließlich für den Hausgebrauch genutzt worden sein.
4. Natürliche Abnutzung oder Verschleiß, böswillige Beschädigung, Missbrauch,
Vernachlässigung und unsachgemäße Reparaturen sind von der Gewährleistung
ausgeschlossen.
5. Shine-Mart Ltd übernimmt keine Verantwortung für zufällige oder Folgeschäden.
6. Shine-Mart Ltd ist nicht für Wartungsarbeiten zuständig. Diese fallen nicht unter die
Gewährleistung.
7. Gültig in der EU
Dieses Produkt ist mit tted CE geprüfte Typ-F
Euro Stecker/BS Stecker ausgestattet
Von Shine-Mart Ltd, RM3 8SB importiert
Information über Abfalllagerung für Verbraucher von elektronischen Geräten.
Dieses Zeichen auf dem Produkt und/oder auf mitgelieferte Dokumenten
zeigt, dass, wenn eine Entsorgung erfolgt, das Gerät an einer Elektro- und
Elektronikgeräte-Abfall-Sammelstelle (WEEE) abgegeben werden muss.
Um eine weitere Behandlung und Weiterverarbeitung der Materialien zu
gewährleisten dürfen diese WEEE-markierten Produkte nicht mit dem
Hausmüll vermischt werden.
Für die korrekte Behandlung, Aufbereitung und Wiederverwendung geben Sie
alle WEEE-markierten Produkte zur kommunalen Abfallbeseitigungsanlage.
Dort können Sie diese kostenlos abgeben.
Wenn die Beseitigung von Elektro-und Elektronik-Altgeräten korrekt
durchgeführt wird, tragen Sie zur Gewinnung von wertvollen Ressourcen
bei, sowie einer möglichen Vermeidung von negativen Auswirkungen auf
Gesundheit und Umwelt.
Gewährleistung
Gründliche Reinigung der Dampfschalen:
Die Edelstahlböden der 3 Dampfschalen können zur Reinigung
abgenommen werden.
Drücken Sie dazu einfach die Laschen an der Außenseite der
Basis nach innen und schieben Sie die Basis aus der Dampfschale.
Mit warmem Seifenwasser waschen und gründlich trocknen.
Um die Böden wieder anzubringen, stecken Sie diese wieder in
die Dampfschalen und richten Sie die Stehbolzen und Löcher an
der Basis und an der Dampfschale aus. Drücken Sie vorsichtig
auf die Basis, bis die Laschen über den Seiten des Korbs einrasten.
Reinigung und Instandhaltung
• Vergewissern Sie sich vor dem Reinigen immer, dass der Dampfgarer ausgeschaltet
und vom Stromnetz getrennt ist.
• Nehmen Sie das Gerät auseinander, indem Sie jede Dampfschale, die Auffangschale,
den Dampfkopf und den Deckel entfernen.
• Waschen Sie alle Dampfschalen, die Reisschale, die Auffangschale und den Deckel in
warmem Seifenwasser. Vor dem Aufbewahren gründlich abtrocknen.
• Verwenden Sie zum Reinigen des Basisgerätes ein gut ausgewrungenes feuchtes
Tuch, um die Oberfläche und das Innere des Wassertanks sorgfältig abzuwischen.
Stellen Sie sicher, dass Sie es sofort danach gründlich trocknen. TAUCHEN SIE DIE
BASIS ODER DAS STROMKABEL NIEMALS INS WASSER.
• Verwenden Sie keine scheuernden Reinigungsmittel wie Scheuermittel oder Bürsten
für den FS87-Dampfgarer oder seine Teile.
• Verwenden Sie keine chemischen Scheuermittel um das Gerät zu reinigen. Waschen
Sie die Dampfschale, die Böden der Dampfschalen und den Deckel nur mit Spülmittel
und Wasser.
• Lagern Sie das Gerät und seine Teile immer an einem sicheren Ort und
außerhalb der Reichweite von Kindern.
• Vergewissern Sie sich vor der Lagerung, dass das Gerät sauber und
trocken ist.
28 29
Manual de instrucciones en español
Instrucciones
•
de seguridad
•
•
Utilice este aparato en un espacio interior/doméstico. No se recomienda su uso en el
exterior.
Este aparato no se ha creado con un fin comercial o industrial. Su uso es doméstico.
No se recomienda la operación de este aparato por personas adultas o niños con
capacidades físicas, sensoriales o mentales reducidas a menos que se encuentren bajo la
supervisión de una persona responsable de su seguridad.
No utilice la olla vaporera eléctrica cerca de los niños ya que corre el riesgo de que se
pongan en contacto con comida muy caliente.
Nunca utilice el aparato si el cable o la unidad no funcionan correctamente. Si la olla o el
cable se ha estropeado, devuélvalo al servicio de Duronic o póngase en contacto con un
técnico profesional para repararlo.
Mantenga este aparato fuera del alcance de los niños y asegúrese de que no juegan con
este.
•
No intente reemplazar alguna pieza o reparar el aparato usted mismo.
•
Nunca desmonte el aparato con el fin de arreglarlo usted. No realice
modificaciones que no se describan en el manual de instrucciones ya que el
aparato contiene piezas móviles. Duronic es el responsable de las reparaciones
puesto que se necesitan recambios y accesorios de la marca original.
•
Utilice el aparato sobre una superficie plana, estable y resistente al calor.
•
No conecte o desconecte el aparato de la corriente con las manos mojadas.
•
•
No deje que el cable de alimentación cuelgue sobre el borde de la mesa o encimera ni
que entre en contacto con superficies calientes.
•
Antes de enchufar este aparato, asegúrese de que la toma de corriente esté
correctamente conectada a tierra.
En el caso de que se active el interruptor del cuadro eléctrico de la casa, no encienda el
aparato.
No introduzca el aparato en agua u otros líquidos.
Antes de conectar el aparato a la toma de corriente, asegúrese de que el voltaje que se
indica en la etiqueta de clasificación energética (situada en la parte inferior) corresponde
al de su hogar. En caso de no ser así, póngase en contacto con el fabricante
inmediatamente y no lo utilice. Este producto se ha fabricado de acuerdo con el voltaje
estándar establecido en la Unión Europea (220-240V).
No coloque el producto cerca o encima de una fuente de calor.
No deje el aparato sin supervisión durante su uso.
Evite cambiar la olla de sitio mientras esté encendida. De ser necesario, hágalo despacio
y con cuidado de no quemarse con los líquidos que pueda contener.
•
•
Tenga en cuenta que si se usa la olla y algún cable está dañado,
corre el riesgo de sufrir una descarga eléctrica mortal.
Nunca use un aparato electrónico estropeado.
•
•
•
•
•
Lea este manual con atención y consérvelo para futuras consultas

30 31
•
Configuración
Antes del primer uso
Saque todas las partes de la vaporera FS87 del embalaje para comprobar que
estén todas en perfecto estado.
Utilice un paño húmedo para limpiar el depósito de agua/cuerpo(8)(12). Después,
séquelo con un paño. Nunca sumerja el cuerpo, el cable de alimentación o el
enchufe en agua u otro líquido.
Para evitar el riesgo de descargas eléctricas, no permita que la humedad entre en
contacto con el enchufe o el cable de alimentación en ningún momento.
Lave todas las canastas, bandejas de comida, bandeja antigoteo y la tapa en agua
tibia con jabón. Seque todo completamente antes de usar.
•
•
•
Funcionamiento
1. Coloque el cuerpo de la vaporera sobre una superficie plana y estable que esté
cerca de un enchufe.
2. Con ayuda de una jarra y mucho cuidado, llene el depósito del agua hasta el nivel
que precise. Guíese con el indicador del nivel de agua para no sobrepasarse (MAX) o
quedarse debajo del límite (MIN).
3. Coloque la cubierta del elemento calefactor en el centro de manera que proteja la
pieza. A continuación, ponga encima la bandeja antigoteo.
4. Añada las bandejas que necesite. Puede ver que están numeradas en sus asas
para que sea más fácil de montar. Coloque la bandeja 1 sobre la bandeja antigoteo
en primer lugar.
5. Si solo necesita una bandeja, tapela con la tapa. En caso de necesitar otra
bandeja, coloque la bandeja 2 sobre la bandeja 1.
6. Puede colocar las bandejas que necesite siempre que las ponga en el orden
correcto como se ha indicado anteriormente y no se olvide de poner la tapa en la
última bandeja que monte.
7. Enchufe la vaporera y enciéndala. Gire el temporizador y programe el tiempo que
desee. Si no sabe cuanto tiempo necesita, vaya a la sección «Guía de cocción».
•
•
•
No llene el depósito con agua fría si el aparato está caliente ya que un cambio
brusco de la temperatura puede estropearlo.
•
•
Si la olla vaporera está en uso, o justo después de usarla, déjela enfriar antes de
abrir la tapa. Tenga cuidado, ya que puede desprender una gran cantidad de vapor.
Tenga en cuenta que a pesar de que algunas partes de la vaporera se sientan frías,
el agua que contiene aún puede estar caliente.
.
•
No toque los lados de las cestas y bandejas si la olla se ha usado recientemente ya
que pueden estar calientes. Utilice las asas laterales y la de la tapa para retirar las
piezas que necesite.
•
Si va a usar la vaporera, por favor, manténgala alejada de los niños. Esta olla forma
un conjunto de bandejas apiladas que se calientan y generan vapor muy caliente. Si
se tira o se vuelca, podría provocar lesiones, quemaduras o incluso descargas
eléctricas.
Características
FS87 220-240V 50-60Hz 730-870W
Modelo Voltaje Frecuencia Vatios
Para evitar quemarse al retirar tapas o bandejas, se recomienda el uso de guantes
para horno o paños resistentes al calor.
No utilice la olla vaporera eléctrica si el depósito para el agua está vacío. Si el
aparato empieza a calentar sin tener suficiente agua, apáguelo inmediatamente
girando el interruptor en sentido contrario a las agujas del reloj. Añada la cantidad
correcta de agua antes de volver a encenderlo.
8. Tras haber programado el temporizador, la vaporera empezará a funcionar.
9. Si necesita remover la comida mientras se está cociendo, levante la tapa
con cuidado de que no se salga todo el vapor.
10. Si el nivel del agua baja demasiado durante la cocción, utilice una jarra para añadir
con cuidado agua caliente a través de las ranuras que hay en las dos asas a ambos
lados del cuerpo(8). Si añade agua fría, la temperatura del interior de la vaporera
bajará, por lo que la comida tardará más tiempo en hacerse
32 33
Guía
Los tiempos de cocción que se muestran a continuación se deben usar como referencia
y deben ir variando según el tamaño en el que se corte la comida, la bandeja o el nivel
en el que se encuentran y cómo le guste, personalmente, que se haga su comida.
de cocción
Recipiente arroz
Para cocinar arroz y otros cereales
Recipiente 1
Recipiente 3
Recipiente 2
Ideal para verduras y demás alimentos
Ideal para verduras y demás alimentos
Ideal para carne, pescado o cualquier comida jugosa
Recoge el jugo y la grasa que expulsa la comida
Cantidad
500g 20 min
600g 40 min
500g 20 min
Pescado
Pieza entera
500g 20 min
300g 8 min
300g 13 min
Cabbage
Small pieces
300g 12 min
300g 25 min
800g 45 min
30 min
Comida Tiempo
Pollo
Trozos de 2cm
Muslos
Pieza entera
Costillas
2cm de grosor
Filetes de carne/pescado
2cm de grosor
Brócoli
Trozos pequeños
Repollo
Trozos pequeños
Mazorca de maíz entera
Arroz
(en su recipiente)
250g de arroz +
300g de agua
11. Una alarma sonará para avisar de que el tiempo de cocción ha finalizado. La
vaporera se apagará de forma automática.
12. Apague el interruptor y desconecte el aparato.
13. Antes de abrirla, deje que la vaporera se enfríe un poco.
14. Con ayuda de unos guantes para horno, retire la tapa con cuidado de no
quemarse con el vapor que sale de dentro. Deje que el vapor se despeje antes de
retirar las bandejas.
15. Retire cada bandeja una a una. Asegúrese de cogerlas por las asas y ponerlas
en una superficie resistente al calor. Deje que el vapor desaparezca, retire las
bandejas y sirva la comida.
16. Tras vaciar la vaporera, déjela enfriar completamente. Una vez esté enfriada,
vacíe el depósito del agua y el resto de líquidos que haya. A continuación, limpie el
interior del depósito de agua. Por último, enrolle el cable de alimentación dentro de
la base para su almacenamiento.
Sugerencias
• El tiempo de cocción que se indica en la sección «Guía de cocción» es solo una
referencia. Este puede variar según el tamaño de las piezas de comida que se
introducen, el espacio que hay entre cada pieza de comida en las bandejas, la
cantidad y el buen estado de la comida y cómo de bien hecho se quiere. Según vaya
familiarizándose con la vaporera y su funcionamiento, irá ajustando los tiempos de
cocción.
• Una bandeja se cuece mas rápido que 2 o 3 bandejas a la vez. Por lo tanto, cuanta
más comida se quiera cocer, más tiempo se necesitará para que se haga.
• La comida se hará más rápido si se corta en trozos pequeños. Si la pieza es
grande, tardará más, por lo que se aconseja trocear la comida equitativamente.
• No añada comida en exceso a las bandejas ni al recipiente para el arroz. Trate de
distribuir la comida de manera que quede esparcida y haya espacio entre las piezas
para que así el vapor llegue a todas partes por igual.
• La grasa de las carnes rojas y las aves de corral se absorbe por sí misma mientras
se cuece. Sin embargo, si introduce la carne directamente sin la grasa, obtendrá
mejores resultados.
• Antes de servir, compruebe siempre que la comida se haya hecho bien y esté
caliente. Si cree que la comida no se ha hecho bien, póngala en la vaporera y
programe el temporizador de nuevo para dejarla cocer más.
• En el fondo de las bandejas hay agujeros, por lo que, al retirar las bandejas tras
haber usado la olla, puede que estas goteen. Se aconseja tener a mano una bandeja
de horno para poder la comida hecha.
• Se recomienda no levantar con frecuencia la tapa de las bandejas ya que cada vez
que se hace se libera vapor, por lo que el proceso de cocción se alarga.
• La comida se cocinará más rápido en la bandeja inferior que en la superior, lo que
suele marcar una diferencia de 5 a 10 minutos. Por este motivo, para asegurar una
buena cocción, se recomienda poner la carne y el pescado en la bandeja inferior.
Bandeja antigoteo
34 35
Este producto ha sido fabricado bajo los más estrictos controles de seguridad y utilizando
materiales de primera calidad para asegurar la conabilidad y un excelente rendimiento. Este
aparato le proporcionará un buen servicio y una larga duración, siempre y cuando se lleve a
cabo un uso y mantenimiento adecuados.
Este producto dispone de una garantía de 1 año desde la fecha de compra original. Si surge
cualquier defecto debido a un error/defecto de fábrica o mano de obra, entonces el producto
deberá ser devuelto al lugar de compra original. Reembolso o reemplazo a discreción del
vendedor.
Los productos Duronic cuentan con una garantía de 1 año bajo las siguientes condiciones:
1. El producto debe ser devuelto al vendedor junto con el comprobante de compra original.
2. El producto debe instalarse y utilizarse según las instrucciones
contenidas en este manual.
3. Este aparato está destinado únicamente para uso doméstico.
4. La garantía no cubre el desgaste, daños maliciosos, uso indebido, negligencias,
reparaciones inexpertas o partes consumibles.
5. Shine-Mart Ltd no se hace responsable de cualquier daño consecuente,
accidentes o pérdidas.
6. Shine-Mart Ltd no se hace responsable de cualquier tipo de
reparación durante el periodo de garantía.
7. Válido únicamente dentro de la UE.
Este producto está equipado con enchufe/fusible Europeo
Importado por Shine-Mart Ltd, RM3 8SB
Información sobre la eliminación de residuos para los consumidores
de equipos eléctricos y electrónicos:
Este símbolo representado sobre el producto y/o documentos adjuntos indica que
este aparato debe ser tratado como residuo eléctrico y/o electrónico (RAEE).
Cualquier producto con el símbolo RAEE no debe ser mezclado con los desechos
domésticos, sino separado para el tratamiento, recuperación y reciclaje
de los materiales utilizados.
Para un tratamiento, recuperación y reciclaje adecuados; por favor, deposite todos
los productos con símbolo RAEE en el punto limpio o centro de reciclaje de su
autoridad local, donde será aceptado de forma gratuita.
El desecar residuos eléctricos y electrónicos correctamente, ayuda a ahorrar
valiosos recursos y prevenir los efectos negativos sobre la salud humana y el medio
ambiente de materiales peligrosos que pueden
contener dichos residuos.
Garantía
Limpieza y mantenimiento
• Antes de limpiar la vaporera, asegúrese de que está apagada y desenchufada.
• Para desmontar la unidad, retire todos los recipientes, la bandeja antigoteo, la cubierta
del elemento calefactor y la tapa.
• Limpie todos los recipientes, la bandeja antigoteo y la tapa con agua tibia y jabón.
Seque todo completamente antes de guardarlo.
• Utilice un paño húmedo bien escurrido para limpiar la base eléctrica, la superficie y el
depósito para agua. Después, asegúrese de secarlo bien inmediatamente. NUNCA
SUMERJA EL CUERPO, EL CABLE DE ALIMENTACIÓN O EL ENCHUFE EN AGUA.
• No limpie la vaporera ni cualquiera de sus partes con estropajos abrasivos.
• No se recomienda el uso de productos de limpieza químicos abrasivos en el interior o
exterior de la vaporera. Utilice solo agua tibia con jabón para limpiar sus diferentes
partes.
• Asegúrese de guardar el aparato y sus partes en un lugar seguro fuera del alcance de
los niños.
• Antes de guardar el aparato, compruebe que esté limpio y completamente seco.
Cómo limpiar a fondo los recipientes
Se pueden extraer las bases de acero inoxidable de los 3 recipientes
para limpiarlos.
Para hacerlo, presione las pestañas que hay en la parte exterior de la
base para poder separarla del recipiente.
Lave la base con agua tibia y jabón. A continuación, séquela.
Para volver a colocar la base en su sitio, vuelva a encajarla en el
recipiente de manera que los agujeros de la base y el recipiente estén
alineados. Presione con cuidado la base hasta que las pestañas se fijen.

36 37
Manuale D’istruzioni In Italiano
Istruzioni di sicurezza
• Questo prodotto è solo per uso interno / domestico. Non usare all'aperto.
• Questo apparecchio non è progettato per uso commerciale o industriale; solo per uso
domestico.
• Questo apparecchio non è destinato all'uso da parte di persone (compresi i bambini)
con ridotte capacità fisiche, sensoriali o mentali, o mancanza di esperienza e
conoscenza, a meno che non siano stati supervisionati o istruiti sull'uso dell'apparecchio
da parte di una persona responsabile della loro sicurezza.
• I bambini devono essere strettamente sorvegliati in ogni momento per assicurarsi che
non giochino con l'apparecchio.
• Usare la vaporiera solo fuori dalla portata dei bambini perché liquidi e vapore potrebbe
diventare molto caldi.
• Non utilizzare questo apparecchio se il cavo di alimentazione o la spina sono
danneggiati. Se uno dei due è danneggiato, restituirlo a Duronic per assistenza o
riparazione da un tecnico professionista.
• Non cercare mai di sostituire pezzi e / o riparare l'unità da soli.
• Non aprire e riparare mai il prodotto da soli. Non modificare il prodotto in alcun modo che
non sia descritto nelle istruzioni per l'uso. Le riparazioni possono essere eseguite solo da
Duronic, utilizzando ricambi e accessori originali.
• Utilizzare sempre il prodotto su una superficie asciutta, liscia, uniforme e stabile. Non
posizionare l'unità su una superficie calda.
• Non utilizzare il prodotto o toccare la spina con le mani bagnate.
• Non lasciare che il cavo di alimentazione penda oltre il piano di lavoro. Non lasciare che il
cavo tocchi superfici calde.
• Prima di collegare l’unit alla presa di corrente, accertarsi che la potenziale elettrica indicata
sull'etichetta del prodotto (situata in basso) corrisponda alla tensione nella propria abitazione.
In caso contrario, contattare immediatamente il produttore e non utilizzarlo. Questo articolo è
stato realizzato per corrispondere allo standard in Italia di 220-240 V.
• Prima di collegare questo apparecchio, assicurarsi che la presa di alimentazione sia
correttamente collegata.
• Se il differenzale automatico si attiva per qualsiasi motivo, non accendere l'apparecchio.
• Non inserire il cavo di alimentazione, la spina o il corpo motore all'interno o sott'acqua o altri
liquidi.
• Non posizionare la vaporiera sopra o vicino a fornelli a gas o elettrici caldi o un forno
riscaldato.
• L'apparecchio deve essere supervisionato mentre è in uso.
• Evitare di spostare la vaporiera quando è in funzione. Se è necessario spostare
l'apparecchio, spostarlo lentamente e con attenzione poiché contiene liquidi bollenti e
potrebbe causare ustioni.
Se il prodotto viene utilizzata con un cavo di alimentazione danneggiato, c’è il
rischio potenziale di scosse elettrica mortali.
Non utilizzare mai un apparecchio con un cavo di alimentazione danneggiato.
38 39
Specificazioni
Primo utilizzo
• Rimuovere con attenzione tutte le parti della vaporiera FS87 dalla confezione. Disporre le
parti in modo da poter vedere chiaramente se alcune parti sono mancanti o danneggiate.
• Usare un panno umido per pulire il serbatoio / il corpo dell'acqua (8) (12), quindi asciugare
con un panno asciutto. Fare attenzione a non immergere mai il corpo macchina, il cavo di
alimentazione in acqua o altri liquidi.
• Per evitare il rischio di scosse elettriche, non lasciare che acqua entri in contatto con la
spina o il cavo di alimentazione in qualsiasi momento.
• Lavare tutti i vassoi, i vassoi per alimenti, la vaschetta antigoccia e il coperchio in acqua
calda saponata. Asciugare accuratamente prima dell'uso.
Utilizzo
1. Posizionare la vaporiera (8) su una superficie piana e stabile vicino a una presa
facilmente accessibile.
2. Riempire cautamente il serbatoio con acqua fino al livello richiesto usando una
brocca. Usando l’indicatore d’acqua (9), non riempire oltre il segno MAX, o sotto il
segno MIN.
3. Posizionare il riscaldatore (7) sull’elemento riscaldante, quindi posizionare il
vassoio antigoccia (6) sulla parte superiore.
4. Aggiungere i vassoi necessari. I vassoi sono numerati alle maniglie per facilitare
il montaggio corretto. Posizionare il vassoio 1 (5) sulla vaporiera assicurandosi che
sia posizionato correttamente.
5. Se si ha solo cibo a sufficienza per riempire un vassoio, posiziona il coperchio
(1) sopra il primo vassoio. Se è necessario aggiungere più cibo, utilizzare il
vassoio 2 (4) sul vassoio 1 (5).
6. In base alla quantità di cibo che si desidera cuocere, posizionare i vassoi come
mostrato sopra e posizionare il coperchio sul vassoio superiore.
7. Collegare la vaporiera alla presa di corrente e accendere la macchina.
Ruotare il quadrante del timer in senso orario.
8. Una volta impostato il timer, la vaporiera inizierà a cuocere.
9. Se è necessario mescolare il cibo a metà cottura, sollevare il coperchio con cura per
evitare il vapore che fuoriesce dai vassoi.
10. Se il livello dell'acqua diventa troppo basso durante la cottura, utilizzare una brocca per
aggiungere lentamente acqua calda attraverso le scanalature delle due maniglie su entrambi
i lati della vaporiera (8). Se si aggiunge acqua fredda, si abbassa la temperatura all'interno
della vaporiera e quindi il cibo impiegherà più tempo per cuocere.
• Non utilizzare la vaporiera senza acqua. Se inizia a riscaldarsi senza acqua o con
poca acqua, spegnere immediatamente la macchina ruotando la manopola in senso
antiorario. Aggiungere la giusta quantità di acqua prima di riaccenderla.
• Non riempire l'apparecchio con acqua fredda quando è ancora caldo. L'improvviso
cambiamento di temperatura potrebbe danneggiarlo.
• Quando in uso, o dopo l'uso, lasciarlo raffreddare la vaporiera prima di aprire il
coperchio. Fare attenzione poiché potrebbe fuoriuscire una grande quantità di
vapore.
• Si prega di notare che anche se la parte esterna della vaporiera si è raffreddata,
l'acqua all’interno potrebbe essere ancora calda.
• Non toccare i lati dei vassoi e dei vassoi. Utilizzare le maniglie sui lati e la maniglia
sul coperchio per rimuovere le parti necessarie.
Specificazioni
FS87 220-240V 50-60Hz 730-870W
VoltModello Frequenza
Watt
40 41
I tempi di cottura indicati di seguito sono una guida e devono essere regolati in base alle
dimensioni e alle preferenze personali.
Tempi di cottura
Vassoio
Vassoio 3
Vassoio 2
Vassoio 1
Antigoccia
riso
Per cucinare riso e altri cereali
Ideale per verdure e altri alimenti
Ideale per verdure e altri alimenti
Ideale per carne e pesce – tutti gli alimenti che potrebbero sgocciolare
Raccoglie succhi e grassi dal cibo
Peso
500g 20 min
600g 40 min
500g 20 min
Pesce
intero
500g 20 min
300g 8 min
300g 13 min
300g 12 min
300g 25 min
800g 45 min
Riso 250g + acqua 300ml 30 min
Alimenti Tempo di cottura
Pollo
2 cm spessore
Cosce di pollo
intera
Costolette
2 cm spessore
Fettina di pesce o carne
2 cm spessore
Broccoli
Piccoli pezzi
Cavolo
Piccoli pezzi
Patate
2 cm spessore
Mais
Intero
Riso
Da cuocere nel vassoio per riso
11. Al termine del timer, verrà emesso un segnale acustico.
12. Staccare la presa dopo ogni utilizzo.
13. Lasciare raffreddare la vaporiera per alcuni secondi prima di aprirla.
14. Indossando i guanti da forno, rimuovere con attenzione il coperchio afferrando la
maniglia, facendo attenzione ad evitare la fuoriuscita di vapore caldo. Lasciare
asciugare il vapore prima di rimuovere i vassoi.
15. Rimuovere ciascun cesto uno alla volta, assicurandosi di tenerli per le maniglie e
posizionarli su una superficie resistente al calore. Lasciare asciugare il vapore, quindi
rimuovere i vassoi e servire il cibo.
16. Dopo aver svuotato la vaporiera, lasciarla raffreddare completamente. Una volta
raffreddata, svuotare il serbatoio dell'acqua versando l'acqua e i liquidi restanti nel
lavandino. Pulire l'interno del serbatoio, quindi avvolgi il cavo di alimentazione alla base
per conservarlo.
Consigli utili
• I tempi di cottura possono variare a seconda del cibo, dello spazio nei vassoi, della
quantità di cibo, della freschezza del cibo e preferenze di cottura. Man mano che si
acquisisce familiarità con la vaporiera, è sufficiente regolare i tempi di cottura
secondo necessità.
• I tempi di cottura di un singolo vassoio saranno minori dei tempi di cottura con
diversi vassoi contemporaneamente. Pertanto, più cibo si cucina più tempo si dovrà
aspettare.
• Più piccolo si taglia il cibo, più velocemente si cuoce. I pezzi di cibo più grandi
richiederanno più tempo, quindi si consiglia di assicurarsi che tutti i diversi alimenti
siano tagliati a dimensioni simili.
• Non riempire eccessivamente i vassoi o il vassoio per il riso. Cerca di sistemare il
cibo in modo che sia distribuito bene e abbia spazio tra i pezzi per consentire al
vapore di raggiungere il cibo.
• Il grasso degli alimenti inizierà a sgocciolare durante la cottura. Per ottenere i
migliori risultati, consigliamo di tagliare il grasso in eccesso.
• Controllare sempre che il cibo sia ben cotto prima di servirlo. Se il cibo sembra
crudo o ha bisogno di più tempo, è sufficiente rimetterlo all’interno della vaporiera.
• Tutti i vassoi hanno fori di gocciolamento.
• Si consiglia di non sollevare il coperchio durante la cottura; ogni volta che si toglie il
coperchio, il vapore viene rilasciato e il cibo impiegherà più tempo a cucinare.
• Il cibo cucinerà più velocemente nel vassoio inferiore rispetto al vassoio superiore,
con una differenza di tempo di cottura di circa 5-10 minuti. Questo è un altro motivo
per cui raccomandiamo di cuocere carne / pollame / pesce nella ciotola inferiore per
garantire che cuoci correttamente.

42 43
Questo prodotto è garantito per una durata determinata con il distributore a partire dalla data
di acquisto contro ogni difetto derivante da difetti di fabbricazione o dei materiali. Questa
garanzia non copre difetti o danni derivanti da installazione impropria, uso improprio o usura
anomala del prodotto.
L’apparecchio deve essere restituito nella sua confezione originale e accompagnato dalla
ricevuta e deve essere stato utilizzato in modo corretto. È importante rispettare le istruzioni
per l’uso e le precauzioni di sicurezza indicate di seguito. Inoltre, non possiamo garantire
l’apparecchio se è stato modicato o riparato dall’acquirente o da terzi.
1 anno di garanzia da Shine-Mart Ltd, proprietari del marchio commerciale Duronic.
NOTA: QUESTE DICHIARAZIONI NON INFLUISCONO SUI DIRITTI LEGALI DEL
CONSUMATORE
Questo prodotto è stato realizzato con le rigorose procedure del controllo qualità, e
utilizzando materiali di altissima qualità, per garantire afdabilità e prestazioni eccellenti.
Vi regalerà un servizio ottimo e a lungo termine, purchè venga opportunamente usata e
mantenuta. Il prodotto è garantito per 1 anno dalla data di acquisto. Se sorge qualche difetto
a causa di materiali difettosi o scarsa manodopera, il prodotto difettoso dovrà essere restituito
al luogo originale di acquisto. Il rimborso o la sostituzione sono a discrezione dell’azienda. I
prodotti Duronic offrono 1 anno di garanzia alle seguenti condizioni:
1. Il prodotto deve essere restituito al rivenditore con la prova d’acquisto originale
2. Il prodotto deve essere installato e usato seguendo le istruzioni contenute nel manuale.
3. Il prodotto va utilizzato solo per scopi domestici. Non è da utilizzarsi per uso commerciale.
4. La garanzia non copre usura, danni volontari, abuso, negligenza, riparazioni
inesperte o consumo dei materiali.
5. Shine-Mart Ltd non è responsabile per Danni accidentali o consequenziali.
6. Shine-Mart Ltd non è tenuta a eseguire qualsiasi tipo di riparazione, ai sensi
della garanzia.
7. Termini validi in tutta l’unione europea *Ci riserviamo il diritto di modicare le sopracitate
condizioni Per parti di ricambio si prega di consultare il sito www.duronic.com
Corretto smaltimento del prodotto.
Qusto prodotto è inclusivo di spina certicata CE
importata da Shine-Mart Ltd, RM3 8SB
Questo segno su un prodotto o su documenti indica che quando deve essere
smaltito, deve essere trattato come i riuti elettrici ed elettronici (WEEE)
Tutti I prodotti marcati WEEE non devono essere buttati nei riuti domenistici
generici, ma separati per il trattamento, il recupero
e il riciclaggio dei materiali utilizzati.
Per un corretto trattamento, recupero e riciclaggio; si prega di portare tutti I
prodotti marcati WEEE al Vostro centro smaltimenti riuti autorizzato, dove
saranno accettati gratuitamente.
Se i consumatori sono propensi allo smaltimento corretto di riuti elettrici ed
elettronici, aiuteranno a salvare risorse importanti e a prevenire i potenziali
effetti negativi sulla salute umana e sull’ambiente di tutti i materiali pericolosi
che i riuti possono contenere.
Garanzia
Pulire a fondo i vassoi
La basi dei vassoi in acciaio inossidabile, possono essere
rimosse e pulite.
Per fare ciò, basta spingere le linguette all’esterno della base
verso l’interno e spingere la base fuori dal vassoio.
Lavare con acqua calda sapone e asciugare accuratamente.
Per rimontare la base, inserirla nuovamente nel vassoio e
allineare i perni e i fori e spingere delicatamente la base.
Pulizia e manutenzione
• Prima di pulire, assicurarsi sempre che la vaporiera sia spenta e scollegato dalla presa
di corrente.
• Smontare l'unità rimuovendo ciascun vassoio, il vassoio antigoccia e il coperchio.
• Lavare tutti i componenti in acqua calda saponata. Asciugare accuratamente prima di
riporlo.
• Per pulire la base, utilizzare un panno umido ben strizzato per pulire con cura la
superficie e all'interno del serbatoio dell'acqua. Assicurarsi di asciugarlo accuratamente
subito dopo. NON IMMERGETE MAI IL CORPO, IL CAVO DI ALIMENTAZIONE O LA
SPINA IN ACQUA.
• Non utilizzare detergenti abrasivi come spugne abrasive o spazzole di lavaggio sulla
vaporiera o sui componenti.
• Non utilizzare detergenti chimici abrasivi all'esterno o all'interno della vaporiera. Lavare
solo il vassoio, il coperchio e i vassoi con detersivo per piatti e acqua.
• Conservare sempre la vaporiera ed i componenti in un luogo sicuro fuori dalla portata di
bambini.
• Assicurarsi che l'apparecchio sia pulito e completamente asciutto prima di riporlo.
44 45
Instrukcja obsługi. Polski
Bezpieczeństwo użytkowania
•
Urządzenie przeznaczone jest do użytku domowego. Nie używaj na zewnątrz
pomieszczeń.
•
Urządzenie nie zostało zaprojektowane do użytku komercyjnego czy przemysłowego,
a jedynie do użytkowania w gospodarstwach domowych.
•
Urządzenie nie zostało zaprojektowane do użytku przez osoby (w tym dzieci) o
ograniczonych zdolnościach fizycznych, sensorycznych lub umysłowych, lub braku
doświadczenia i wiedzy, o ile nie otrzymali oni nadzoru lub instrukcji dotyczących
użytkowania urządzenia przez osobę odpowiedzialną za ich bezpieczeństwo.
•
Dzieci powinny znajdować się pod stałym nadzorem, aby nie bawiły się urządzeniem.
•
Używaj urządzenia poza zasięgiem dzieci, ponieważ zawartość znacznie się nagrzewa.
•
Nie używaj tego urządzenia, jeżeli przewód zasilający lub wtyczka są uszkodzone.
Skontaktuj się z Działem Obsługi Klienta Duronic, aby uzyskać stosowną pomoc w
przypadku uszkodzonego urządzenia.
•
Nigdy nie próbuj samodzielnie wymieniać lub naprawiać urządzenia.
•
Nigdy nie rozkręcaj i nie naprawiaj urządzenia samodzielnie. Nigdy nie modyfikuj
urządzenia w sposób jaki nie jest zgodny z instrukcją użytkowania. Urządzenie
zawiera części czynne. Naprawy mogą być wykonywane jedynie przez Duronic, przy
użyciu oryginalnych części zamiennych i akcesoriów.
•
Zawsze używaj urządzenia na suchej, gładkiej i stabilnej powierzchni. Nie umieszczaj
urządzenia na gorącej powierzchni.
•
Nie używaj urządzenia ani nie dotykaj wtyczki gdy masz mokre ręce.
•
Przewód zasilający nie powinien swobodnie zwisać z krawędzi stołu lub stykać się
z gorącymi powierzchniami.
•
Przed podłączeniem urządzenia do gniazdka upewnij się, czy napięcie domowej sieci
elektrycznej jest zgodne z napięciem oznaczonym na tabliczce znamionowej (na dole
urządzenia). Jeżeli dane te nie są zgodne, skontaktuj się z producentem i nie używaj
urządzenia. Urządzenie zostało zaprojektowane dla europejskiego standardu
220-240V.
•
Przed podłączeniem urządzenia do gniazda elektrycznego upewnij się, czy jest ono
prawidłowo uziemione.
•
Jeżeli z jakiegokolwiek powodu zostanie uruchomiony wyłącznik bezpieczeństwa, nie
włączaj ponownie urządzenia.
•
Nie zanurzaj urządzenia, przewodu w tym wtyczki, w wodzie lub innych płynach.
•
Nie umieszczaj urządzenia w pobliżu kuchenek lub piekarników gazowych lub
elektrycznych.
•
Nie pozostawiaj uruchomionego urządzenia bez nadzoru.
•
Unikaj przenoszenia uruchomionego urządzenia. Jeżeli zachodzi taka konieczność,
przenoś je powoli i ostrożnie, ponieważ zawiera gorące płyny oraz może wywołać
poparzenia.
Jeżeli urządzenie jest użytkowane z wadliwym lub uszkodzonym przewodem
zasilającym istnieje ryzyko śmiertelnego porażenia prądem. Nigdy nie używaj
urządzenia, gdy jest ono uszkodzone lub gdy przewód zasilający jest
uszkodzony.
46 47
Użytkowanie
Przed pierwszym użyciem
•
Ostrożnie wyjmij wszystkie części FS87 i usuń elementy opakowania. Rozłóż
wszystkie części, abyś mógł łatwo sprawdzić, czy urządzenie jest kompletne i
nieuszkodzone.
•
Przetrzyj pojemnik na wodę wraz z jednostką sterującą, a następnie przetrzyj do
sucha ściereczką. Zachowaj ostrożność, aby nie zanurzać jednostki sterującej,
przewodu zasilającego wraz z wtyczką w wodzie lub innych płynach.
•
Aby zapobiec ryzyku porażenia prądem, unikaj kontaktu wilgoci z wtyczką lub
przewodem zasilającym.
•
Wyczyść wszystkie pojemniki i tacki na żywność oraz tackę ściekową w wodzie z
płynem. Dokładnie osusz przed użyciem.
Jak używać?
1.
Umieść jednostkę sterującą na płaskiej, stabilnej powierzchni, blisko łatwodostępnego
gniazdka elektrycznego.
2.
Ostrożnie napełnij zbiornik na wodę do wymaganego poziomu używając dzbanka.
Wykorzystując okno ze wskaźnikiem napełnienia pojemnika zwróć uwagę, aby nie
przekroczyć poziomu MAX i
nie napełnić poniżej poziomu MIN.
3.
Umieść kapturek parowaru w centralnej części, a następnie zamontuj tackę ściekową
na górze.
4.
Następnie dodawaj wszystkie potrzebne pojemniki. Na uchwytach pojemników znajdują
się numery, które ułatwiają zamontowanie ich we właściwej kolejności. Umieść
pojemnik nr 1 nad tacką ściekową, upewniając się, czy jest prawidłowo zamontowany.
5.
Jeżeli jedynie jeden pojemnik wystarczy Ci do przygotowania posiłku nałóż pokrywkę.
Jeżeli potrzebujesz kolejnych poziomów dodaj pojemnik nr 2 na pojemniku nr 1.
6.
Zależnie od ilości jedzenia, jakie musisz przygotować, umieść pojemniki jak pokazano
powyżej i nałóż pokrywkę na górny pojemnik.
7.
Podłącz urządzenie do kontaktu i włącz urządzenie. Przekręć pokrętło zgodnie z
ruchem wskazówek zegara na wymagany czas. Jeżeli nie jesteś pewien, na jaki czas
ustawić programator, zapoznaj się z rozdziałem "Wskazówki gotowania".
8.
Z chwilą ustawienia programatora czasowego, parowar rozpocznie
gotowanie.
9.
Jeżeli w trakcie gotowania musisz odjąć część składników, ostrożnie ściągnij
pokrywkę, unikając gorącej pary wydostającej się z pojemników.
10.
Jeżeli poziom wody znacznie obniży się w trakcie gotowania, powoli dodaj ciepłą lub
gorącą wodę używając dzbanka. Wlej wodę w specjalne rynienki w bocznych
uchwytach obudowy. Dodanie zimnej wody obniży temperaturę wewnątrz parowaru i
wydłuży czas gotowania.
•
Aby uniknąć ryzyka oparzeń, załóż rękawice kuchenne, kiedy odkrywasz pokrywkę
lub ściągasz pojemniki.
•
Nie operuj urządzenia, gdy zabraknie wody w jednostce sterującej. Jeżeli w zbiorniku
nie ma wody lub jest jej niewystarczająca ilość, natychmiast wyłącz urządzenie
przekręcając zegar przeciwnie do ruchu wskazówek zegara. Uzupełnij wodę przed
ponownym uruchomieniem.
•
Nie uzupełniaj zbiornika zimną wodą, gdy urządzenie jest gorące. Nagła zmiana
temperatury może uszkodzić urządzenie.
•
Gdy parowar jest w trakcie użytkowania lub zaraz po, odstaw urządzenie do
schłodzenia przed otwarciem pokrywki. Zachowaj ostrożność, ponieważ znacząca
ilość gorącej pary może zostać uwolniona.
•
Miej świadomość, że nawet jeżeli niektóre elementy parowaru są chłodne to woda
znajdująca się odbudowie urządzenia nadal może być gorąca.
•
Nie dotykaj boków pojemników zaraz po włączeniu urządzenia, ponieważ mogą być
gorące. Użyj bocznych uchwytów pojemników lub górnego uchwytu pokrywki, aby
usunąć elementy.
•
Uruchomione rządzenie trzymaj poza zasięgiem dzieci. Jest to szczególnie istotne,
ponieważ parowar zbudowany jest z kilku poziomów pojemników, które wypełniają
się gorącą wodą w trakcie gotowania. Przypadkowo pociągnięty lub kopnięty może
wywołać poparzenia lub porażene prądem.
Dane techniczne
Model Napięcie Częstotliwość Moc
FS87
220-240 V 50-60 Hz 730-870 W
48 49
Wskazówki gotowania
Poniższe czasy gotowania są orientacyjne. Podczas gotowania posiłku, czas gotowania
należy dostosować do rozmiarów produktu, poziomu pojemnika i osobistych preferencji.
Pojemnik do ryżu
Do gotowania ryżu i innych ziarnistych produktów (np. kasz)
Pojemnik 3 Do gotowania warzyw i innych produktów
Pojemnik 2 Do gotowania warzyw i innych produktów
Pojemnik 1 Do gotowania mięs i ryb lub innych produktów, z których wycieka sok
Tacka ściekowa Zbiera wyciekający sok i tłuszcz
Produkt Waga Czas
Kurczak
2 cm kawałki
500 g
20 min
Nóżki
Całe
600 g
40 min
Żeberka
2 cm grubość
500 g
20 min
Ryba
Cała
500 g
20 min
Kawałki ryby
2 cm grubość
300 g
8 min
Brokuł
Podzielony na różyczki
300 g
13 min
Cukinia
Podzielona na małe kawałki
300 g
12 min
Ziemniaki
2 cm grubość
300 g
25 min
Kukurydza
Całe kolby
800 g
45 min
Ryż
W pojemniku do ryżu
Ryż 250 g + woda 300 ml
30 min
11.
Usłyszysz sygnał dźwiękowy, kiedy ustawiony czas dobiegnie końca. Urządzenie
automatycznie wyłączy się i przestanie gotować.
12.
Odłącz urządzenie od gniazdka sieciowego.
13.
Pozwól gorącemu urządzeniu schłodzić się przez kilka sekund przed otwarciem.
14.
Mając założone kuchenne rękawice ochronne, ostrożnie ściągnij pokrywkę trzymając
za uchwyt i zachowując szczególną ostrożność. Gorąca para może wydostawać się z
urządzenia. Poczekaj aż para wodna rozejdzie się przed ściągnięciem pojemników.
15.
Ściągaj kolejne pojemniki wykorzystując boczne uchwyty. Umieszczaj je na
żaroodpornej powierzchni. Poczekaj aż para wodna rozejdzie się, a następnie
ściągnij pojemnik i przełóż jedzenie.
16.
Po opróżnieniu parowaru, odstaw go do schłodzenia. Następnie opróżnij pojemnik z
wody i innych pozostałości przelewając ją bezpośrednio do zlewu.
Przydatne porady
•
Czas gotowania zawarty we "Wskazówkach gotowania" jest czasem orientacyjnym. Czas
gotowania zależy od rozmiaru produktów, przestrzeni na pojemniku, jakości i świeżości
produktów i indywidualnych preferencji przygotowania posiłku. Po zapoznaniu się z parowarem i
jego działaniem, dostosuj czas gotowania do swoich potrzeb.
•
Jeden pojemnik wypełniony jedzeniem będzie gotowy szybciej niż 2 lub 3 pojemniki gotowane
jednocześnie. Zatem im więcej produktów gotujesz tym dłużej zajmie ich ugotowanie.
•
Im mniejsze kawałki produktów, tym szybciej będą ugotowane. Większe fragmenty będą się
dłużej gotować, zatem upewnij się czy produkty są podzielone na podobne kawałki.
•
Nie przepełniaj pojemników. Zachowaj wolną przestrzeń pomiędzy kawałkami produktów, aby
maksymalna ilość pary wodnej otaczała jedzenie.
•
Wyciekanie tłuszczu z mięs i drobiu w trakcie gotowania jest naturalnym zjawiskiem. Jednakże,
aby osiągnąć lepsze rezultaty użyj małych porcji i odetnij nadmiar tłuszczu.
•
Zawsze upewnij się, czy jedzenie jest odpowiednio gorące i wystarczająco ugotowane do
podania. Jeżeli jedzenie jest niewystarczająco ugotowane, przełóż je ponownie do parowaru i
ustaw programator czasowy, aby dogotować produkty.
•
Wszystkie pojemniki mają w dnie otwory, z których może kapać przy przenoszeniu. Podłuż
blaszkę do pieczenia obok parowaru, abyś miał gdzie przełożyć pojemniki.
•
Postaraj się nie podnosić pokrywki w trakcie gotowania. Przy każdym podniesieniu pokrywki
gorąca para wodna jest uwalniana z urządzenia, co może wydłużyć czas gotowania produktów.
•
Produkty będą szybciej ugotowane w dolnym pojemniku niż górnym. Różnica ta może
wynosić 5-10 min. Dlatego też zalecamy umieszczanie mięsa, drobiu, ryb na dolnym
poziomie.
50 51
1 Rok Gwarancji rmy Shine-Mart LTD, marki handlowej Duronic Products.
UWAGA: ten dokument nie wpływa na twoje ustawowe prawo jako konsumenta.
Ten produkt został wykonany zgodnie z restrykcyjnymi normami kontroli i wyk orzystuje
najwyższej jakości materiały dla uzyskania doskonałej wydajności i niezawodności.
Długotrwałość produktu zostaje osiągnięta przez właściwe użytkowanie i konserwację.
Gwarancja obejmuje 1 rok od daty zamówienia. Jeżeli jakikolwiek defekt powstanie ze
względu na wadliwość materiału lub niewłaściwe wykonanie to uszkodzony produkt
musi
zo
stać dostarczony do miejsca, z którego został zamówiony. Zwrot pieniędzy lub
wymiana
pr
oduktu jest w gestii rmy.
Duronic Products oferuje jeden rok gwarancji na podstawie poniż szych warunków:
1. Produkt musi zostać zwrócony do sprzedawcy z oryginalnym dowodem zakupu.
2. Produkt był instalowany i użytkowany zgodnie z instrukcją obsługi.
3. Produkt użytkowany był wyłącznie w celach domowych.
4. Gwarancja nie obejmuje naturalnego zużycia się produktu, celowego uszkodzenia,
niewłaściwego użycia, zaniedbania, niewłaściwych napraw lub części eksploatacyjnych.
5. Shine-Mart Ltd. nie ponosi odpowiedzialności za przypadkowe albo celowe zgubienie
produktu lub jego uszkodzenie.
6. Firma Shine-Mart Ltd nie jest zobowiązana do przeprowadzania jakichkolwiek prac
serwisowych w ramach gwarancji.
7. Obowiązuje na obszarze Unii Europejskiej.
Informacja o odpadach i utylizacja dla użytkowników sprzętu elektrycznego i
elektronicznego.
Usuwanie wyeksploatowanych urządzeń elektrycznych i elektronicznych (dotyczy
krajów Unii Europejskiej i innych krajów europejskich z wydzielonymi systemami
zbierania odpadów). Ten symbol na produkcie lub jego opakowaniu oznacza, że
produkt nie powinien być zaliczany do odpadów domowych. Należy go przekazać
do odpowiedniego punktu, który zajmuje się zbieraniem i recyklingiem urządzeń
elektrycznych i elektronicznych. Prawidłowe usunięcie produktu zapobiegnie
potencjalnym negatywnym konsekwencjom dla środowiska naturalnego i zdrowia
ludzkiego, których przyczyną mogłoby być niewłaściwe usuwanie produktu.
Recykling materiałów pomaga w zachowaniu surowców naturalnych.
Ten produkt jest wyposażony we wbudowaną wtyczkę typu Euro-Plug / BS z
certykatem CE importowaną przez Shine-Mart Ltd, RM3 8SB
Warunki Gwarancji
Dokładne czyszczenie pojemników.
Tacki pojemników ze stali nierdzewnej mogą być wyjęte do
czyszczenia.
Aby je rozmontować, odchyl zaczepy po wewnętrznej stronie
pojemnika i odciągnij tackę.
Umyj w ciepłej wodzie z płynem i odstaw do osuszenia.
Aby ponownie zamontować podstawę w pojemniku wsuń z
powrotem do kosza i wyrównaj zaczepy i otwory w tacce i
pojemniku. Dociśnij tackę do zaczepów, aby je zablokować w
zatrzaskach.
Czyszczenie i pielęgnacja
•
Przed przystąpieniem do czyszczenia zawsze upewnij się, czy parowar jest wyłączony
i odłączony od zasilania.
•
Zdemontuj jednostkę usuwając poszczególne pojemniki, tackę ściekową, kapturek
parowaru oraz pokrywkę.
•
Umyj wszystkie pojemniki, tacki na żywność, tackę ściekową oraz pokrywkę w ciepłej
wodzie z płynem. Osusz przed przechowywaniem.
•
Do oczyszczenia jednostki sterującej, użyj dobrze wykręconej, wilgotnej ściereczki.
Przetrzyj także pojemnik na wodę. Upewnij się, że wytarłeś do sucha wszystkie
elementy. NIGDY NIE ZANURZAJ JEDNOSTKI STERUJĄCEJ, PRZWODU LUB
WTYCZKI W WODZIE LUB INNYCH PŁYNACH.
•
Nie używaj myjek ściernych lub innych szczotek na jednostce sterującej i
elementach FS87.
•
Nie używaj detergentów ściernych na zewnętrzne i wewnętrzne elementy urządzenia.
Jedynie tacki, pokrywka i pojemniki mogą być myte w wodzie z płynem.
•
Zawsze przechowuj urządzenie i jego elementy w bezpiecznym
miejscu poza zasięgiem dzieci.
•
Przed odstawieniem urządzenia do przechowywania upewnij się, że
jest czyste i suche