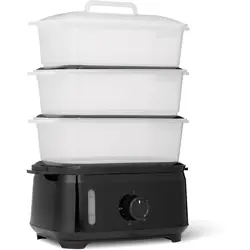
WITH A SMART SIDE
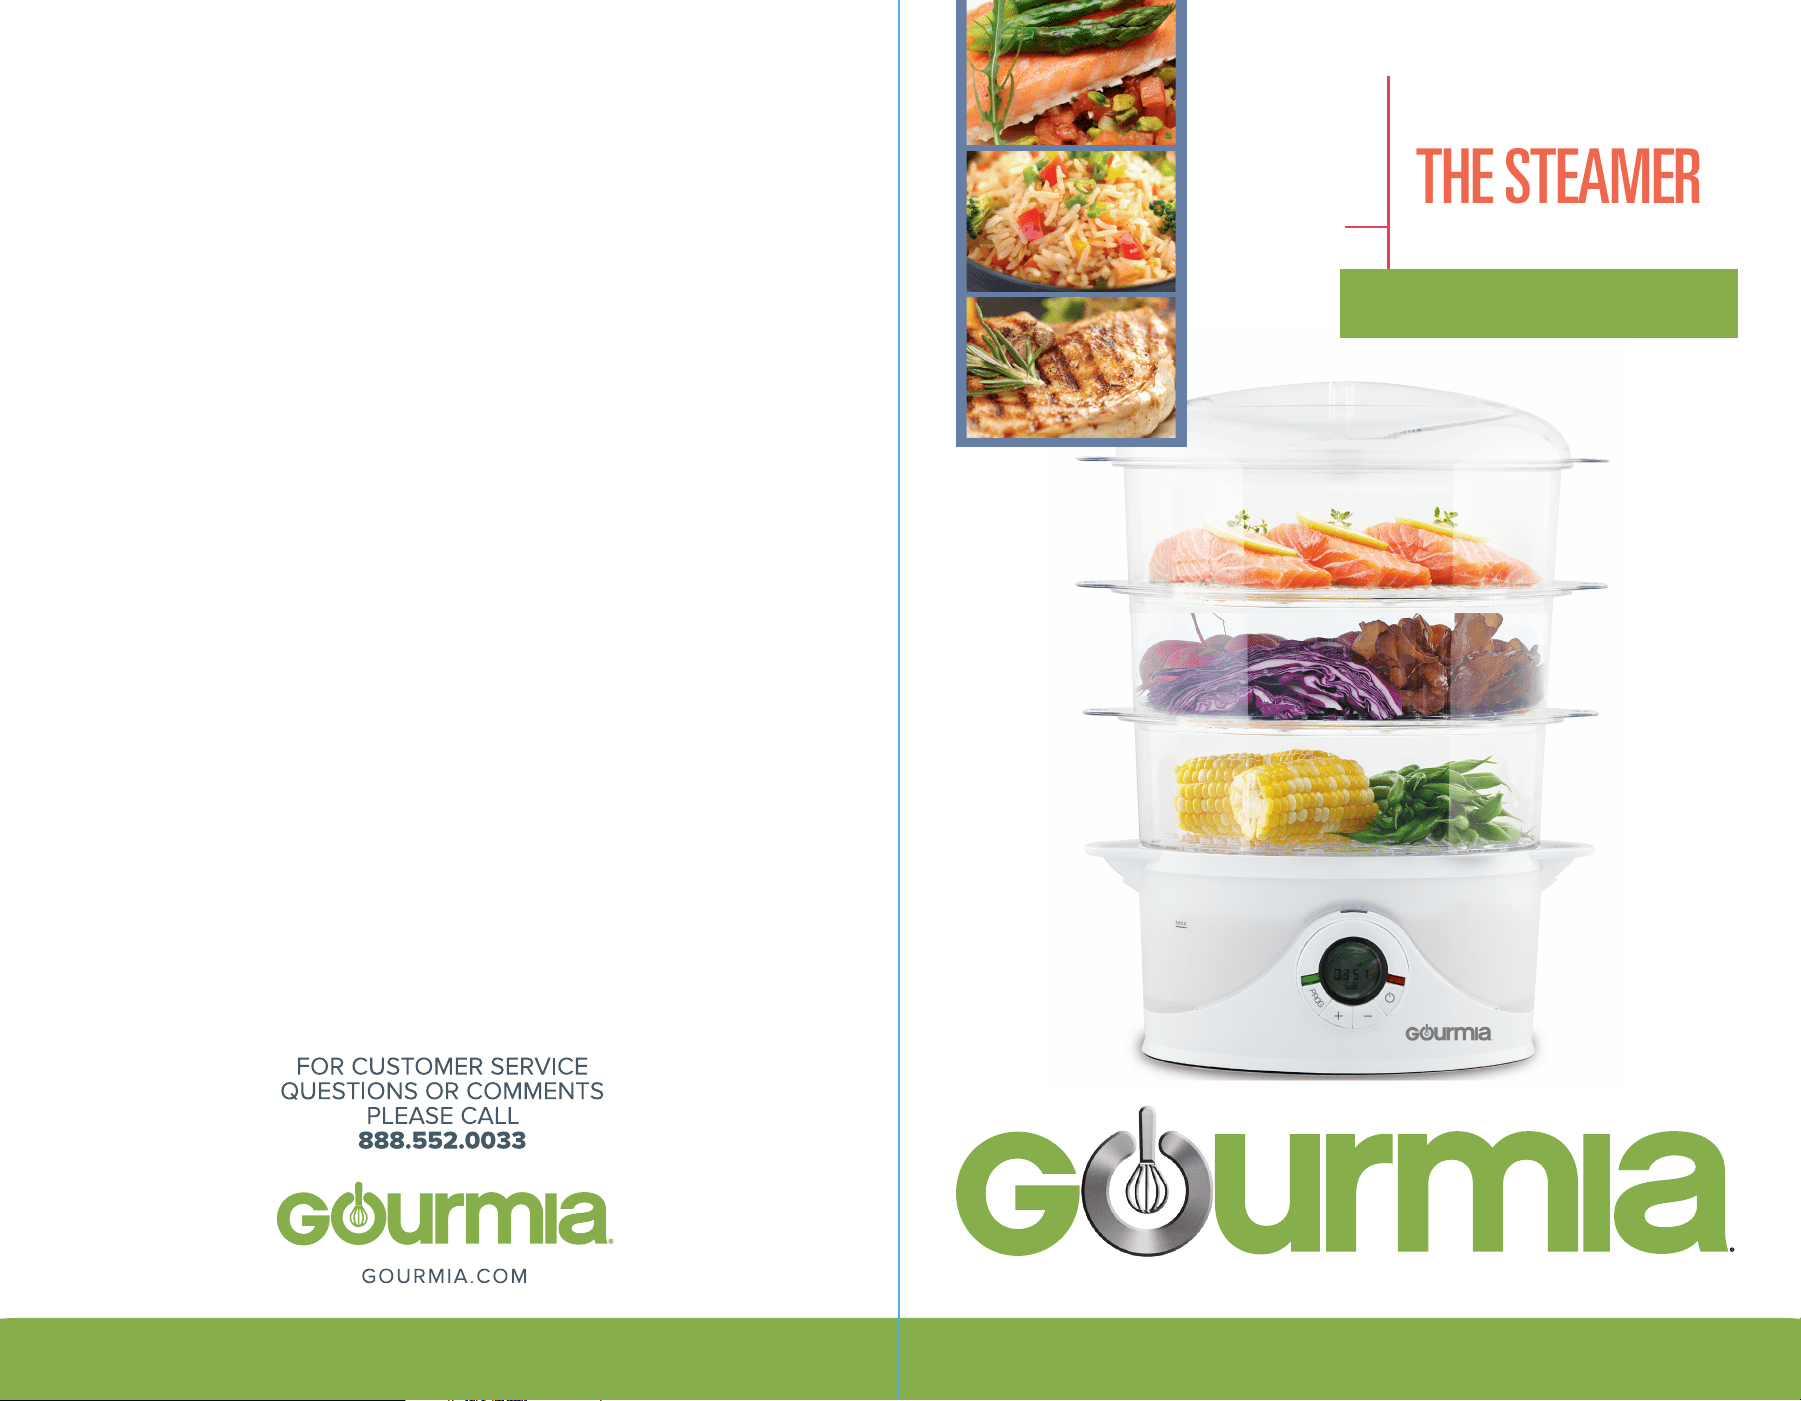
THE STEAMER
STEAMTOWER 300
9.5 QUART
MODEL#GFS-300
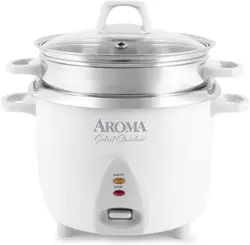
MODEL NUMBER: DY-SV200
POWER: 12
0V
; 50
HZ
USER
MANUAL
Safety Precautions 4
Product Specs 6
Using Your Device 7
Manufacturer’s Tips 8
Cleaning and Care 11
Storage and Disposal 12
Steaming Guide 12
Warranty Details 13
MODEL#GFS-300
WITH A SMART SIDE
THE STEAMER
STEAMTOWER 300

•
•
•
•
•
•
•
•
•
•
•
•
•
SAFETY PRECAUTIONS:
Disclaimer: Manual instructions should always be read and implemented prior to
product use. Manufacturer/ importer advisory board are not reliable for inadequate
use due to instruction manual negligence or failure to follow direction.
This product is intended for indoor household use only!
Children: Keep this device out of the reach of children or other disqualified
persons, since the misuse of contents and packaging materials may result in hazard
or death.
When using electrical appliances, basic safety precautions
should always be followed, including the following:
POWER CORD
A short power-supply cord is provided to reduce the hazards resulting from
entanglement or tripping over a long cord. An extension cord may be used with
care; however, be sure the marked electrical rating is equal to or greater than the
rating of this appliance. The extension cord should be positioned such that it does
not drape over the counter or tabletop where it can be pulled on by children or
tripped over. The electrical rating of this appliance is listed on the bottom panel of
the unit.
POLARIZED PLUG
This appliance has a polarized plug (one blade is wider than the other). As a safety
feature, this plug will fit in a polarized outlet only one way. If the plug does not fit
fully in the outlet, reverse the plug. If it still does not fit, contact a qualified electri-
cian.
Do not attempt to defeat this safety feature by modifying the plug in any way.
BEFORE FIRST USE
Carefully unpack the food steamer and remove all packaging materials. To remove
any dust that may have accumulated during packaging, wipe the base of the food
steamer with a clean, damp cloth. Rinse the water tank with warm water. Allow to
dry thoroughly. Wash the rice bowl, steaming baskets, lid, drip tray and steam ring
in warm, soapy water. Rinse and dry thoroughly. Do not use harsh detergents or
abrasive cleansers on any part of the food steamer.
Note: When you turn on your new food steamer for the first time, it may emit a slight
odor for approximately 10 minutes. This is normal for the first use. The odor is
harmless and should not recur after initial heating.
WARNING: Do not immerse the food steamer, cord or plug in water or any other
liquid.
Do not touch hot surfaces. Use potholders when removing cover or handling hot
containers to avoid steam burns.
To protect against electrical shock, do not immerse cord, plug or base unit in
water or other liquids.
Close supervision is necessary when any appliance is used by or near children.
Unplug from outlet when not in use and before cleaning. Allow to cool before
putting on or taking o parts.
Do not operate any appliance with a damaged cord or plug, or after the appli-
ance malfunctions or had been damaged in any manner. Return appliance to the
nearest authorized service centre for examination, repair or adjustment.
Do not use outdoors.
Do not let cord hang over edge of table or counter, or touch hot surfaces.
Do not place on or near a hot gas or electric burner, or in a heated oven.
Extreme caution must be used when moving an appliance containing hot food or
water or other hot liquids.
Do not use appliance for other than intended use.
Lift and open cover carefully to avoid scalding and allow water to drip into
steamer.
The use of accessory attachments not recommended by this appliance manufac-
turer may cause injuries.
4 5
To disconnect, turn any control to OFF, then remove plug from outlet.
Place the steamer on a flat, dry surface, such as a table or counter top. Ensure that
the steamer is clean and properly assembled before plugging into a 120V 60Hz AC
only outlet.
Never operate the steamer without sucient water in the water tank. We recom-
mend filling the steamer to the MAX level whenever you use it. This is approxi-
mately the amount of water required for 60 minutes of continuous use.
Important: If you attempt to operate the steamer without sucient water, or all of
the water is used during steaming, the food steamer will activate its boil-dry
safety feature. When there is insucient water in the steamer, a long beep will
sound and the steamer will turn itself o.
Warning: Never operate the steamer without the turbo steam ring in place.
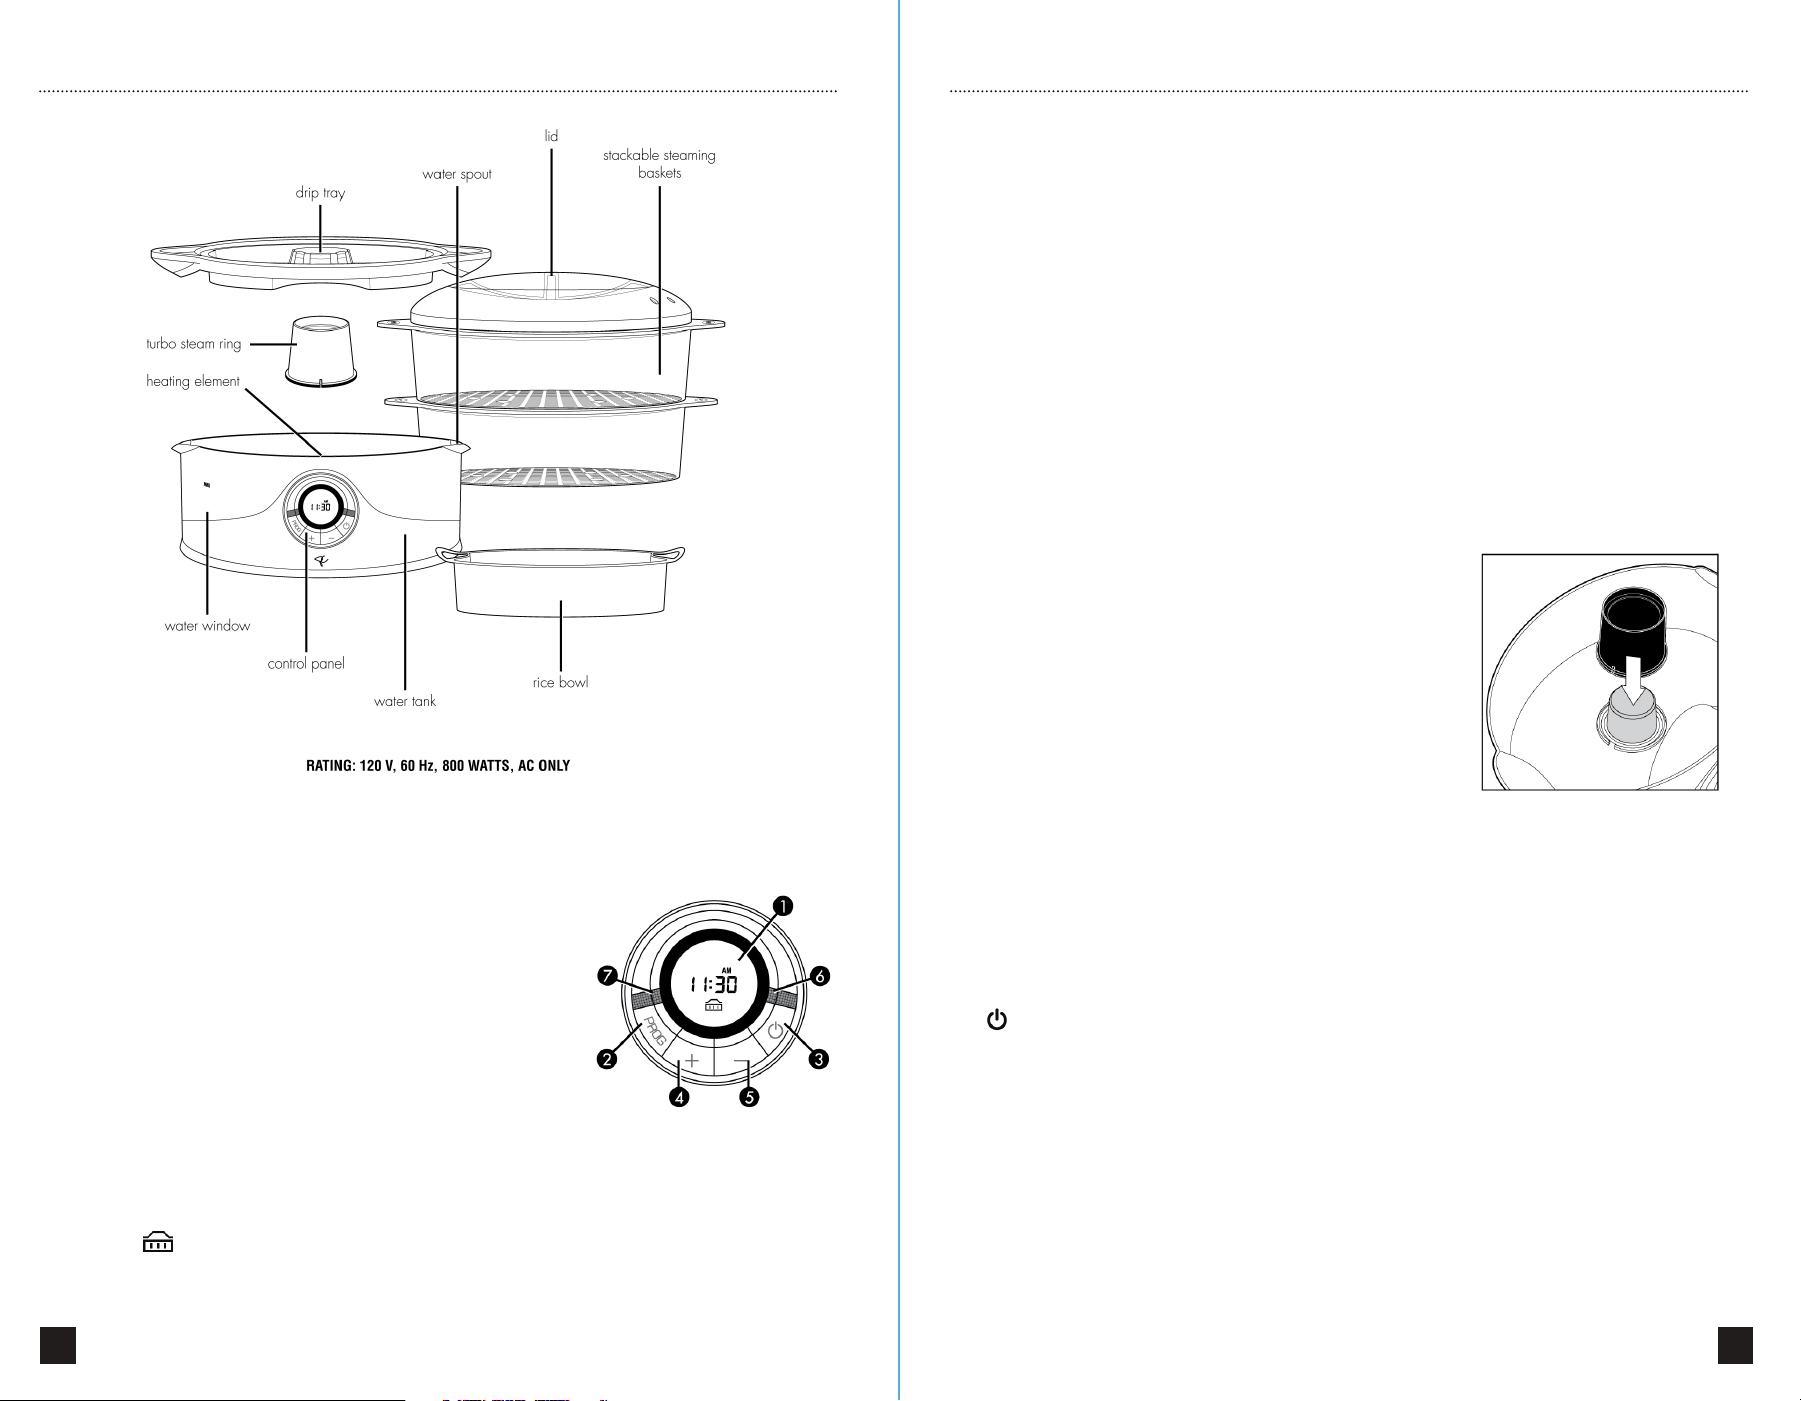
TURBO STEAM FUNCTION
that the larger end with the small water slit is facing down.
SETTING THE CLOCK
Your steamer is equipped with a 12 hour digital clock. When you plug the steamer
in, the digital display will read “00:00”. To set the clock, press the PROG button and
the button at the same time. When you release the buttons, the steamer will
beep, indicating that you may now set the clock. Press the UP (+) button to advance
the time in 10 minute increments. Press the DOWN (–) button to decrease the time
in 1 minute increments. You may press and hold the UP (+) or DOWN (–) buttons to
change the time more quickly. The “AM” and “PM” indicators will appear above the
time on the digital display. When the digital display shows the current time, press
the PROG button once to set the time. Your clock has now been set and will
continue to keep the correct time, even after the steamer has been shut o.
NOTE: Unplugging the steamer or a power failure will reset the clock. Repeat the
instructions above to reset the clock.
USING YOUR DEVICE
PRODUCT SPECS
GETTING TO KNOW YOUR FOOD STEAMER CONTROLS
1. Digital Display: displays current time when steamer
is O or in Keep Warm mode. Displays cooking time
countdown when steamer is in Steam mode.
2. PROG button: use to set and activate Preset
steaming cycles and cooking times.
3. POWER button: turns the steamer On and O.
4.
UP button: use to adjust the time in 10 minute
increments and cooking time in 5 minute increments.
5. DOWN button: use to adjust the time and cooking
time in one minute increments.
Your food steamer is specially designed with a turbo
steam function, which begins creating steam within
60 seconds. This turbo steam function allows your
food to begin cooking very soon after turning on the
steamer. The steamer is fitted with a removable turbo
steam ring. This ring must be correctly placed around
the heating element whenever the steamer is used.
The turbo steam ring allows only a small amount of
water to contact the heating element at one time,
thus allowing for a quicker production of steam.
Always ensure that the turbo steam ring is placed so
6 7
6. Power light (RED): illuminates when the steamer is in Steam mode.
7. Keep Warm light (GREEN): illuminates when the steamer is in Keep Warm
mode. The Keep Warm icon will also appear on the bottom of the digital
display.
STEAMING
Ensuring that the Turbo Steam Ring is in place around the heating element, large
side down, fill the water tank with clean, cold water to the MAX line.
in the lower steaming basket (basket 1) for best results.
4. When food and steaming baskets are in place, put the lid on the top basket.
5. Press the button. The red Power light will illuminate and the default Steam
setting of 45 minutes will initiate. To adjust the cooking time, simply press the UP (+)
button to increase the cooking time in 5 minute increments or the DOWN (–) button
to decrease the cooking time in 1 minute increments. For example, if you want to
set a cooking time of 52 minutes, you would press the UP (+) button twice to reach
a time of 55 minutes, and the DOWN (–) button three times to reach your desired
time of 52 minutes.
6. You may adjust the cooking time at any point during the Steam cycle by simply
pressing the UP (+) or DOWN (–) buttons.
7. If necessary, you may add water to the water tank at any time during the Steam
cycle by pouring water into one of the water spouts located on either side of the
steamer base.
8. At the end of the Steam cycle, the steamer will beep once and enter the Keep
Warm mode. This will be indicated by the green Keep Warm light and the icon
visible on the digital display. During the Keep Warm mode, the steamer will
cycle on and o to keep the food in the steaming baskets at serving temperature.
1. Important: Never use any liquid other than water in your steamer. Never add
anything to the water. Your steamer is designed for use with clean, cold water
only. The addition of any other substance to the water tank could result in damage
to the steamer or injury to yourself.
2. Insert the drip tray into the base of the
steamer, making sure that it is seated properly.
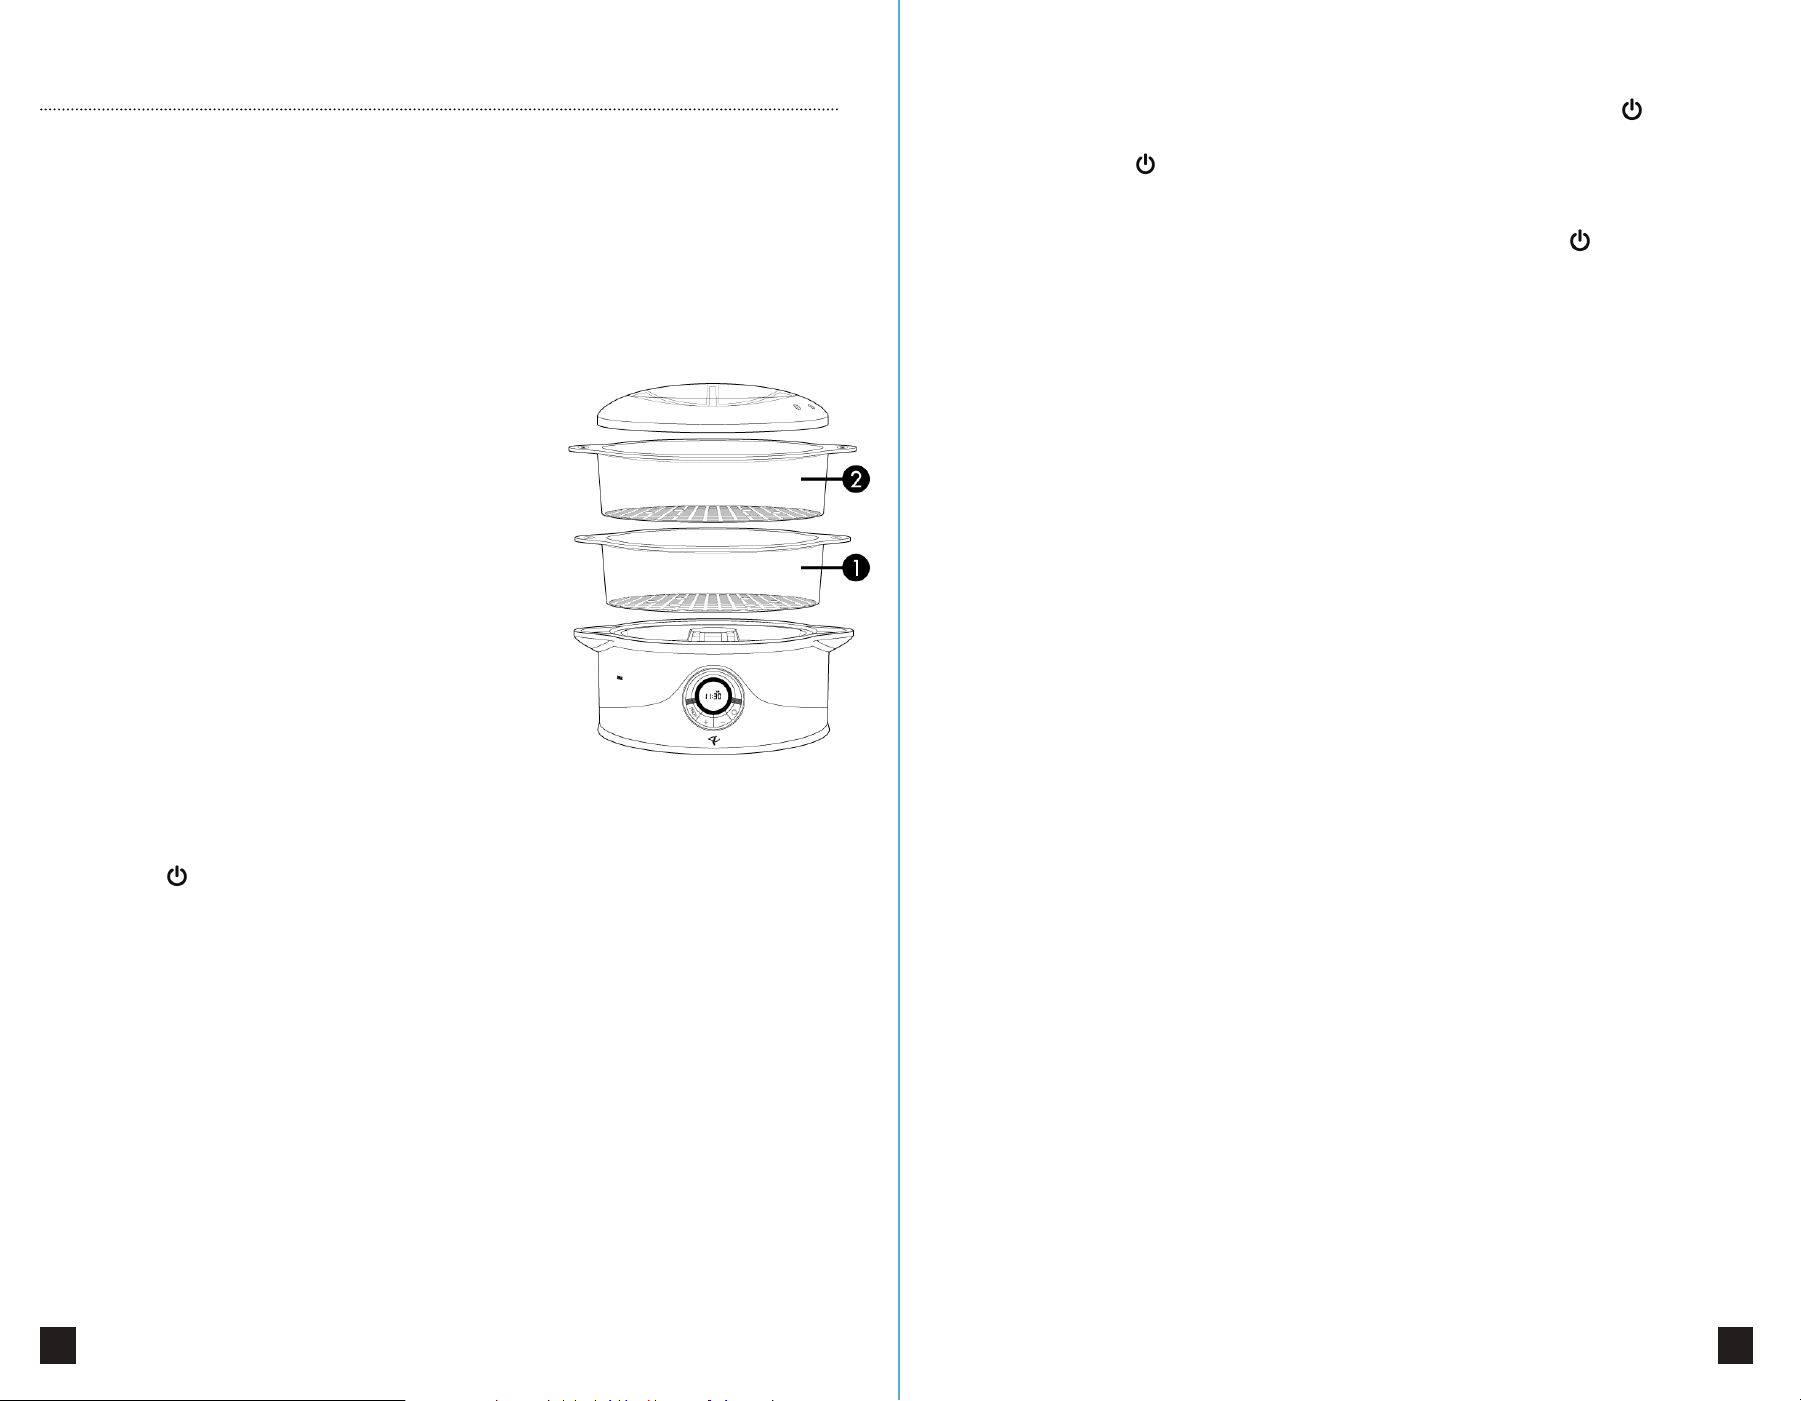
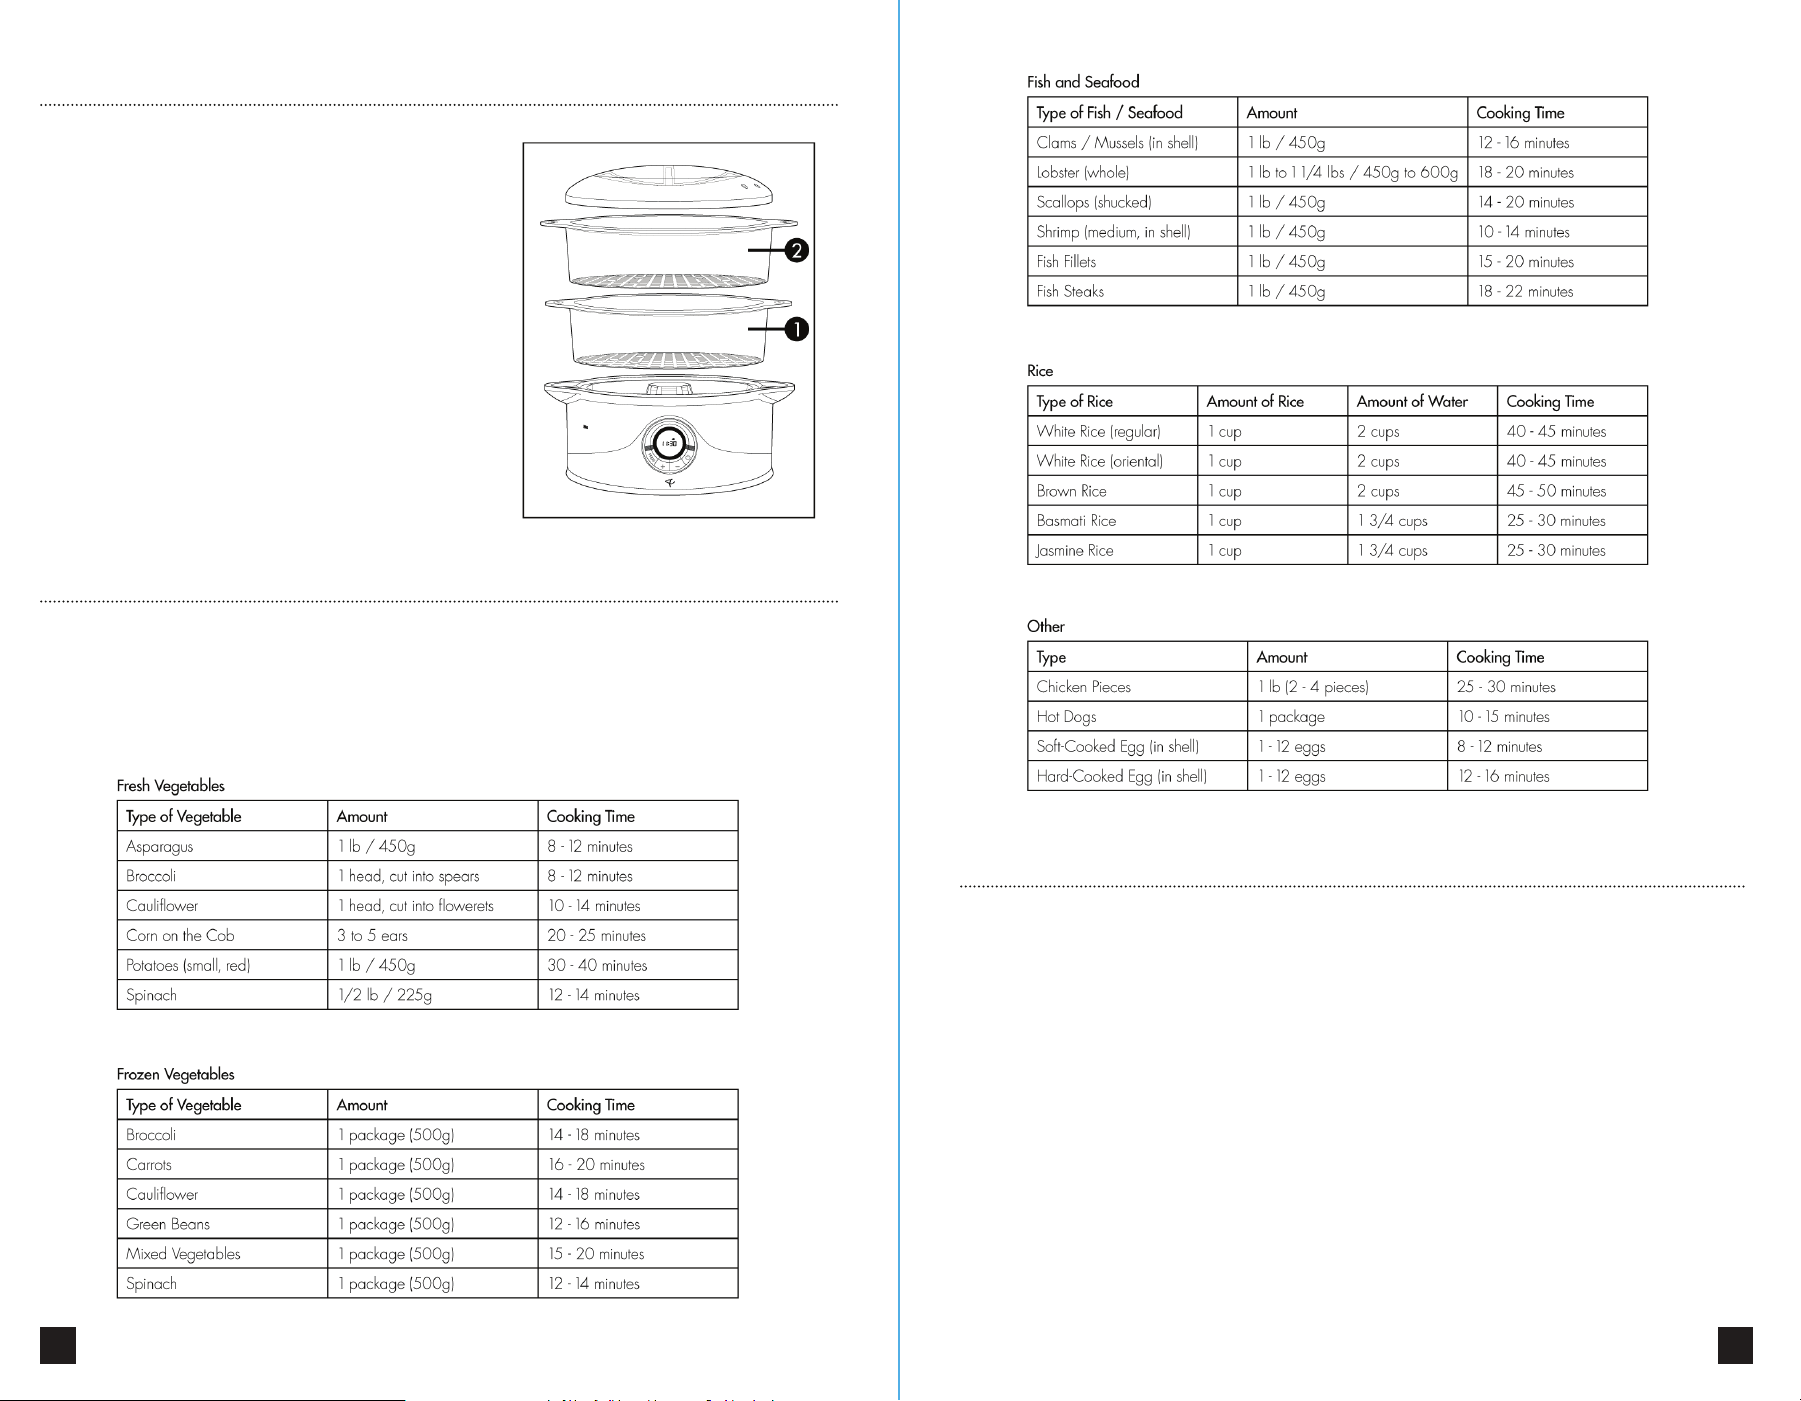
3. Place food to be cooked in steaming basket.
You may cook with up to 3 steaming baskets at
one time. When cooking with multiple baskets,
always stack baskets in numerical order
(basket 1, then basket 2, then basket 3).
The steaming basket numbers can be found on
the side handles. When cooking with only one
basket, always use basket 1.
NOTE: When cooking rice in your steamer,
always place the rice bowl in basket 1. In
general, the largest food, or the food with the
longest cooking time should always be placed
MANUFACTURER’S TIPS
GETTING TO KNOW YOUR FOOD STEAMER CONTROLS
8 9
To cancel the Keep Warm mode and to turn o the steamer, press the button.
9.
The Steam cycle can be cancelled and the steamer turned o at any time by
simply pressing the button.
Important:
Your steamer will not shut o automatically. You must turn o the
steamer after each use. To turn o the steamer, simply press the button once.
When the steamer is o, neither indicator light will be illuminated and the digital
display will show the current time.
STEAMING (Preset Mode)
For your convenience, your food steamer has a preset cooking function, which
allows you to set a time for your steamer to begin cooking.
1. In order to preset your food steamer to begin cooking at a later time, begin by
following steps 1 through 4 in the “Steaming (Normal Mode)” section.
2.
Check to ensure that the digital clock is set to the correct time. If the time is
incorrect, follow the instructions in the “Setting The Clock” section.
3.
Press the PROG button. “00:00” will flash on the digital display and “PROG” will
appear on the upper left corner of the display.
4.
Press the UP (+) button to advance the time in 10 minute increments. Press the
DOWN (–) button to decrease the time in 1 minute increments. You may press and
hold the UP (+) or DOWN (–) buttons to change the time more quickly. The “AM”
and “PM” indicators will appear above the time on the digital display.
5.
When the digital display shows your desired cooking start time, press the PROG
button once to set the time. The default cooking time of 45 minutes will now appear
on the digital display. To adjust the cooking time, simply press the UP (+) button to
increase the cooking time in 5 minute increments or the DOWN (–) button to
increase the cooking time in 1 minute increments.
6.
When the desired length of cooking time appears on the digital display, press the
PROG button to set it.
7.
The digital display will now display the current time and “PROG” will be in the
upper left corner of the screen, indicating that the preset cooking cycle is now
activated. Your food steamer is now waiting for the preset cooking time to be
reached.
8.
If you want to cancel your preset cooking cycle, simply press the PROG button
and “PROG” will disappear from the digital display. The preset cooking cycle has
now been cancelled.
9.
If you want to verify or change your settings, press the PROG button twice to
check the preset start time, a third time to check the length of cooking time, and a
fourth time to ensure that the
preset cooking cycle is activated. To change the preset start time or cooking time,
follow steps 3 through 7 as above.
10.
Once the preset cooking time is reached, the steamer will switch from Preset
Mode to Normal Mode. The red indicator light will illuminate, the digital display will
show the cooking time countdown, and the steamer will almost immediately begin
heating and creating steam.
11. At the end of the Steam cycle, the steamer will beep once and enter the Keep
Warm mode. This will be indicated by the green Keep Warm light and the icon
visible on the digital display. During the Keep Warm mode, the steamer will cycle on
and o to keep the food in the steaming baskets at serving temperature. To cancel
the Keep Warm mode and to turn o the steamer, press the button.
12. The steam cycle can be cancelled and the steamer turned o at any time by
simply pressing the button.
Important: Your steamer will not shut o automatically. You must turn o the
steamer after each use. To turn o the steamer, simply press the button once.
When the steamer is o, neither indicator light will be illuminated and the digital
display will show the current time.
COOKING RICE IN YOUR STEAMER
Included with your steamer is a specially designed rice bowl which allows you to
cook rice in your food steamer. When cooking rice in the steamer, the rice bowl
should always be placed in the lower steaming basket (basket 1).
Simply follow the directions on your rice package for the best rice to water ratio and
recommended cooking time. You can cook up to 1 cup of uncooked rice (approx. 4
servings) at a time in the rice bowl. Combine the water and rice in the rice bowl,
place the rice bowl in basket 1 and put the lid on. Your rice is now ready to be
cooked.
We recommend checking the rice at the minimum cooking time for doneness. Be
careful not to allow lid condensation to drip into the rice bowl when removing the
lid, as this will aect your cooking results. If the rice has not finished cooking to your
liking, stir, replace lid and allow it to continue cooking.
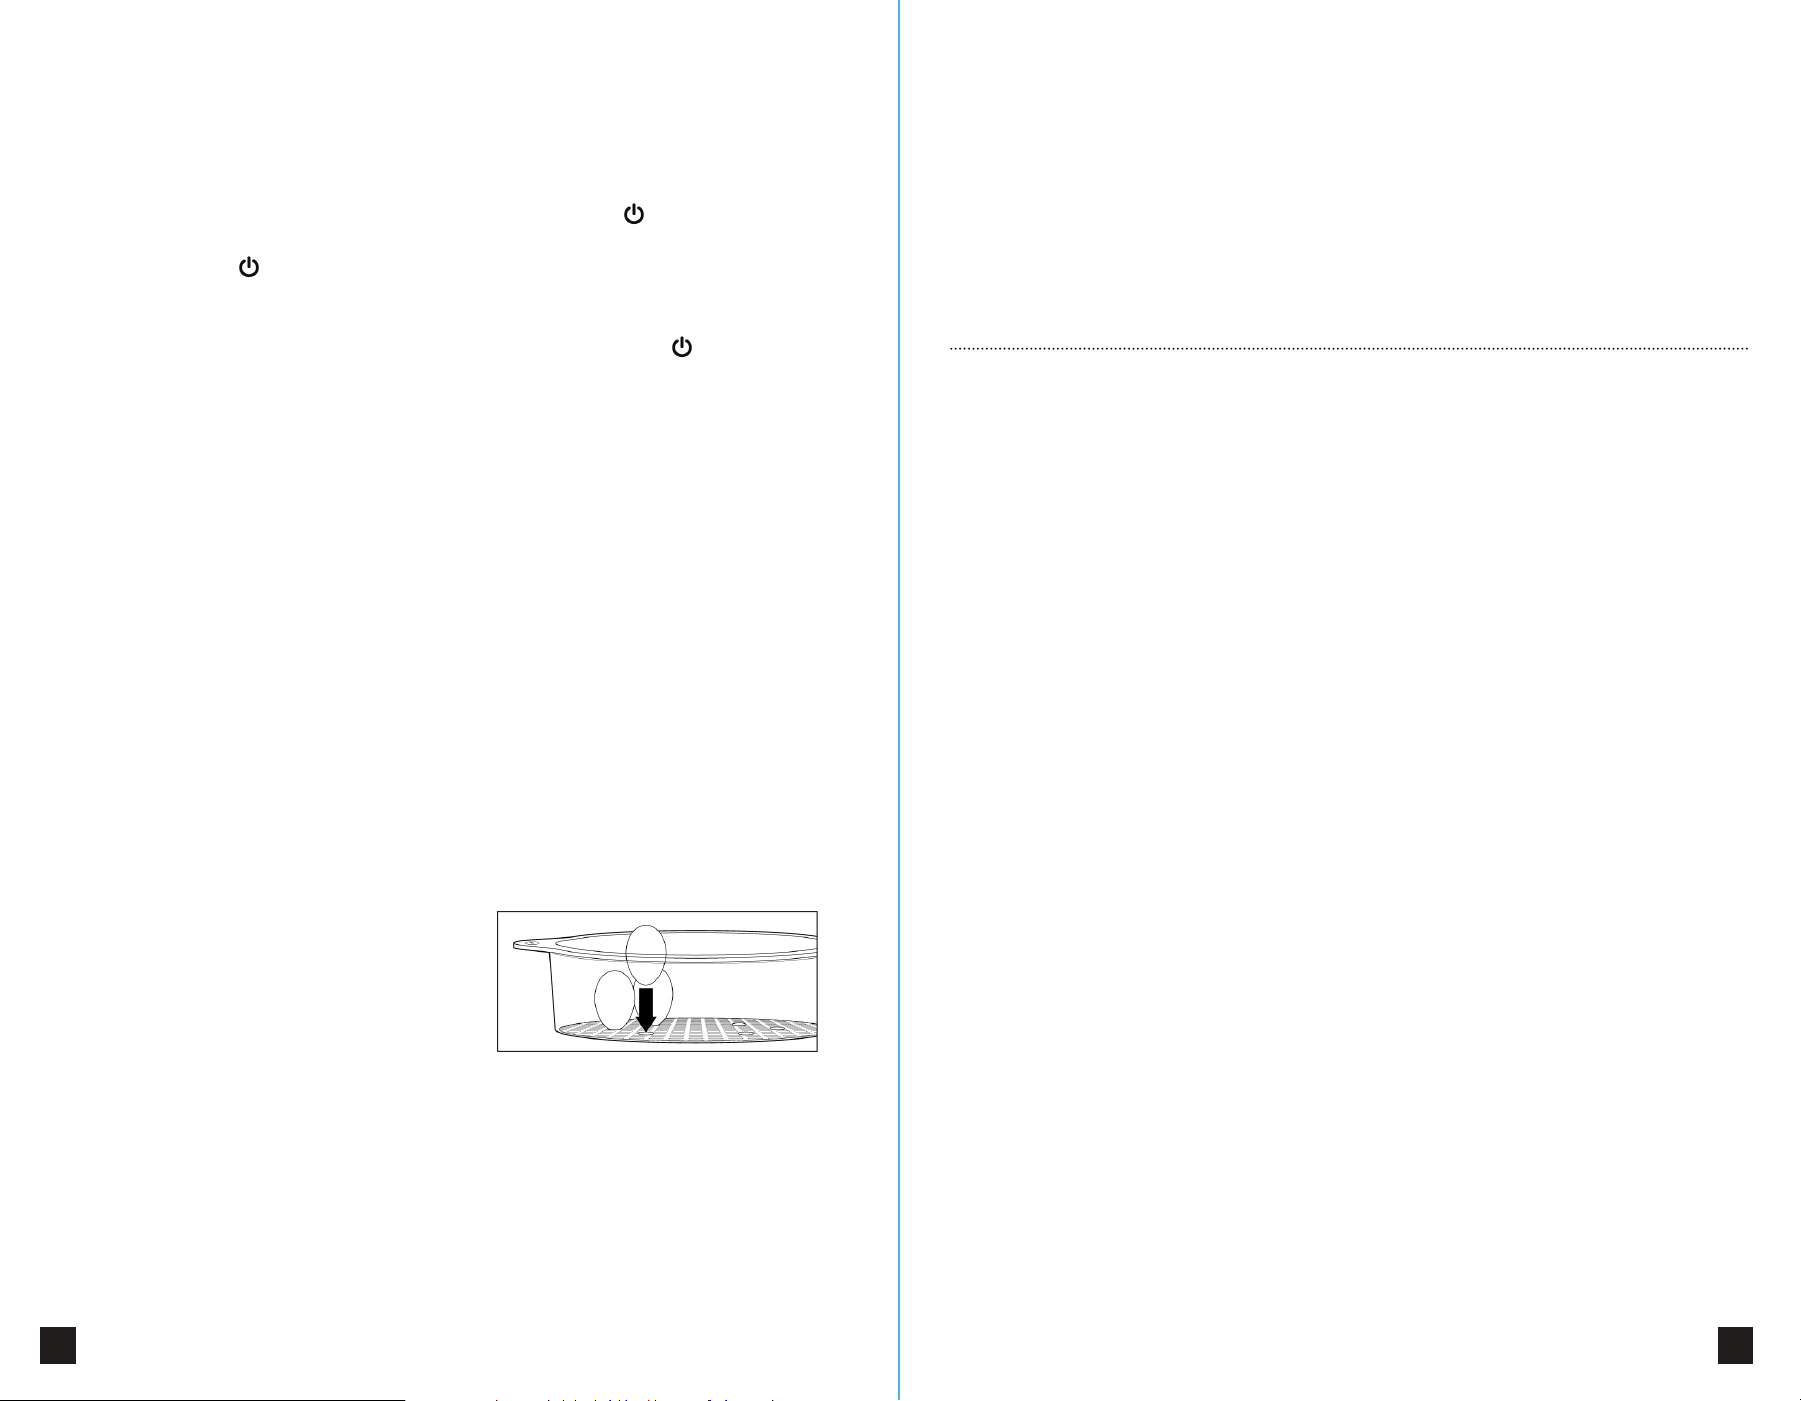
COOKING EGGS IN YOUR STEAMER
in the lower steaming basket (basket 1) for best results.
4. When food and steaming baskets are in place, put the lid on the top basket.
5. Press the button. The red Power light will illuminate and the default Steam
setting of 45 minutes will initiate. To adjust the cooking time, simply press the UP (+)
button to increase the cooking time in 5 minute increments or the DOWN (–) button
to decrease the cooking time in 1 minute increments. For example, if you want to
set a cooking time of 52 minutes, you would press the UP (+) button twice to reach
a time of 55 minutes, and the DOWN (–) button three times to reach your desired
time of 52 minutes.
6. You may adjust the cooking time at any point during the Steam cycle by simply
pressing the UP (+) or DOWN (–) buttons.
7. If necessary, you may add water to the water tank at any time during the Steam
cycle by pouring water into one of the water spouts located on either side of the
steamer base.
8. At the end of the Steam cycle, the steamer will beep once and enter the Keep
Warm mode. This will be indicated by the green Keep Warm light and the icon
visible on the digital display. During the Keep Warm mode, the steamer will
cycle on and o to keep the food in the steaming baskets at serving temperature.
2. Insert the drip tray into the base of the
steamer, making sure that it is seated properly.
3. Place food to be cooked in steaming basket.
You may cook with up to 2 steaming baskets at
one time. When cooking with multiple baskets,
always stack baskets in numerical order
(basket 1, followed by basket 2). The steaming
basket numbers can be found on the side
handles. When cooking with only one basket,
always use basket 1.
NOTE: When cooking rice in your steamer,
always place the rice bowl in basket 1. In
general, the largest food, or the food with the
longest cooking time should always be placed
CLEANING AND CARE
10 11
To cancel the Keep Warm mode and to turn o the steamer, press the button.
9. The Steam cycle can be cancelled and the steamer turned o at any time by
simply pressing the button.
Important: Your steamer will not shut o automatically. You must turn o the
steamer after each use. To turn o the steamer, simply press the button once.
When the steamer is o, neither indicator light will be illuminated and the digital
display will show the current time.
STEAMING (Preset Mode)
For your convenience, your food steamer has a preset cooking function, which
allows you to set a time for your steamer to begin cooking.
1. In order to preset your food steamer to begin cooking at a later time, begin by
following steps 1 through 4 in the “Steaming (Normal Mode)” section.
2. Check to ensure that the digital clock is set to the correct time. If the time is
incorrect, follow the instructions in the “Setting The Clock” section.
3. Press the PROG button. “00:00” will flash on the digital display and “PROG” will
appear on the upper left corner of the display.
4. Press the UP (+) button to advance the time in 10 minute increments. Press the
DOWN (–) button to decrease the time in 1 minute increments. You may press and
hold the UP (+) or DOWN (–) buttons to change the time more quickly. The “AM”
and “PM” indicators will appear above the time on the digital display.
5. When the digital display shows your desired cooking start time, press the PROG
button once to set the time. The default cooking time of 45 minutes will now appear
on the digital display. To adjust the cooking time, simply press the UP (+) button to
increase the cooking time in 5 minute increments or the DOWN (–) button to
increase the cooking time in 1 minute increments.
6. When the desired length of cooking time appears on the digital display, press the
PROG button to set it.
7. The digital display will now display the current time and “PROG” will be in the
upper left corner of the screen, indicating that the preset cooking cycle is now
activated. Your food steamer is now waiting for the preset cooking time to be
reached.
8. If you want to cancel your preset cooking cycle, simply press the PROG button
and “PROG” will disappear from the digital display. The preset cooking cycle has
now been cancelled.
9. If you want to verify or change your settings, press the PROG button twice to
check the preset start time, a third time to check the length of cooking time, and a
fourth time to ensure that the
preset cooking cycle is activated. To change the preset start time or cooking time,
follow steps 3 through 7 as above.
10. Once the preset cooking time is reached, the steamer will switch from Preset
Mode to Normal Mode. The red indicator light will illuminate, the digital display will
show the cooking time countdown, and the steamer will almost immediately begin
heating and creating steam.
11.
At the end of the Steam cycle, the steamer will beep once and enter the Keep
Warm mode. This will be indicated by the green Keep Warm light and the icon
visible on the digital display. During the Keep Warm mode, the steamer will cycle on
and o to keep the food in the steaming baskets at serving temperature. To cancel
the Keep Warm mode and to turn o the steamer, press the button.
12. The steam cycle can be cancelled and the steamer turned o at any time by
simply pressing the button.
Important:
Your steamer will not shut o automatically. You must turn o the
steamer after each use. To turn o the steamer, simply press the button once.
When the steamer is o, neither indicator light will be illuminated and the digital
display will show the current time.
COOKING RICE IN YOUR STEAMER
Included with your steamer is a specially designed rice bowl which allows you to
cook rice in your food steamer. When cooking rice in the steamer, the rice bowl
should always be placed in the lower steaming basket (basket 1).
Simply follow the directions on your rice package for the best rice to water ratio and
recommended cooking time. You can cook up to 1 cup of uncooked rice (approx. 4
servings) at a time in the rice bowl. Combine the water and rice in the rice bowl,
place the rice bowl in basket 1 and put the lid on. Your rice is now ready to be
cooked.
We recommend checking the rice at the minimum cooking time for doneness. Be
careful not to allow lid condensation to drip into the rice bowl when removing the
lid, as this will aect your cooking results. If the rice has not finished cooking to your
liking, stir, replace lid and allow it to continue cooking.
COOKING EGGS IN YOUR STEAMER
Each steaming basket has 6 egg holders
built into their base. To cook eggs in
the shell, simply place one egg, smaller
end down, into each holder. Refer to the
“Steaming Guide” for recommended cooking times.
REHEATING FOOD IN YOUR STEAMER
Your steamer can be used for reheating a variety of prepared foods and leftovers.
We recommend placing food to be reheated in the rice bowl and covering with
aluminum foil to prevent excess moisture. Most refrigerated leftovers will take
approximately 20 to 30 minutes to reheat in the steamer.
You may also reheat a variety of breads and other baked goods in the steamer.
When heating breads, you may do so directly in the steaming basket and do not
require a foil cover. Preheat the steamer, with steaming basket and lid in place, for
approximately 5 minutes, before adding your breads to be heated. Most breads will
take approximately 5 minutes to heat.
Note: Any cooking or heating times in this manual are just suggestions. You should
adjust times to meet your own requirements and preferences.
It is advised that you clean your food steamer and all of the used accessories after
each use. Ensure that the steamer is unplugged before cleaning.
Warning: Never clean the steamer while it is still plugged in.
Always empty the water tank and drip tray after each use. Special care should
always be taken when carrying any appliance containing hot water or any other hot
liquid. Carefully pour the water from the water tank using one of the water spouts
located on either side.
Important: Do not use harsh or abrasive cleansers on any part of the food steamer.
To clean the base of the steamer, rinse the water tank with clean, warm water and
wipe the exterior with a clean, damp cloth.
Important: Never immerse any part of the steamer base, cord or plug in water or
any other liquid.
Dry thoroughly and polish the exterior of the steamer with a soft, dry cloth. The
steaming baskets, rice bowl, drip tray, lid and turbo steam ring may be washed by
hand in warm, soapy water or placed on the top rack in the dishwasher. Dry
thoroughly before storing.
DESCALING YOUR FOOD STEAMER
Depending on the hardness of your water supply and how often you use the
steamer, a limescale deposit may form on the heating element. This will reduce the
steamer’s heating ability. We recommend descaling the heating element every 8
uses to minimize limescale build-up.
To descale the heating element, place the turbo steam ring around the heating
element upside down. The larger end should be facing upwards. Ensure that the
steamer is turned o and unplugged. Fill the water tank to the MAX level. Fill the
turbo ring with white vinegar to the same level. Leave overnight to descale. DO
NOT TURN THE STEAMER ON. The next morning, discard of the water and vinegar.
Wash the turbo ring in warm, soapy water and thoroughly rinse the water tank with
warm water.
WARRANTY DETAILS
This product is guaranteed under a one-year limited warranty period, applicable to
the original purchaser and not transferable to a third party user.
Repair or replacement of defective parts are at the seller's discretion. In the event
that repair isn't possible, the seller will replace the product/ part. If product repair/
replacement won’t suce, the seller has the option of refunding the cash value of
the product or component returned.
Product defects not covered under the warranty provisions include normal wear
and damage incurred from use or accidental negligence, misuse of instruction
specifications, or repair by unauthorized parties. The manufacturing company is not
liable for any incidental or consequential damages incurred by such circumstances.
STORAGE AND DISPOSAL
12 13
Always ensure your steamer is clean, dry and
cool before storing. Your steamer has been
designed with convenience and space-
saving in mind. The steaming baskets will
stack within each other for low profile
storage. On the handles of the steaming
baskets, you will find the numbers 1, 2 and 3.
When you are ready to store your steamer,
simply stack the baskets in reverse order.
Place basket 3 on the steamer base, then
place basket 2 inside basket 3, then 1 inside
basket 2. Place the rice bowl inside basket 1
and place the lid on top of basket 1. Your
steamer is now ready to store in a clean, dry
cupboard in its upright position.
STEAMING GUIDE
Here are some suggested cooking times for foods which are commonly steamed.
As with all cooking times provided in this manual, these are just suggestions and
you should adjust the times to match your own personal preferences, and larger or
smaller cooking amounts as you become more familiar with the appliance.