Este conmutador HDMI
®
de 4 puertos con control remoto le permite alternar
fácilmente entre diversos dispositivos HDMI
®
usando una sola entrada HDMI
®
desde su pantalla. Lea estas instrucciones completo antes de usar el conmutador.
Características
• Admite resolución UHD hasta 4K @ 60fps con HDR
• Admite video 3D
• Permite conectar hasta 3 dispositivos con HDMI
®
a un solo puerto HDMI
®
• Controlado de manera remota y manual
• Gracias a la función Plug-and-Play se instala en segundos
• Funciona con controles remotos universales con marca Philips
Contenido del paquete
Conmutador HDMI
®
4K de 4 puertos, Control remoto, Fuente de alimentación de
120 V de CA/CC, Manual del usuario
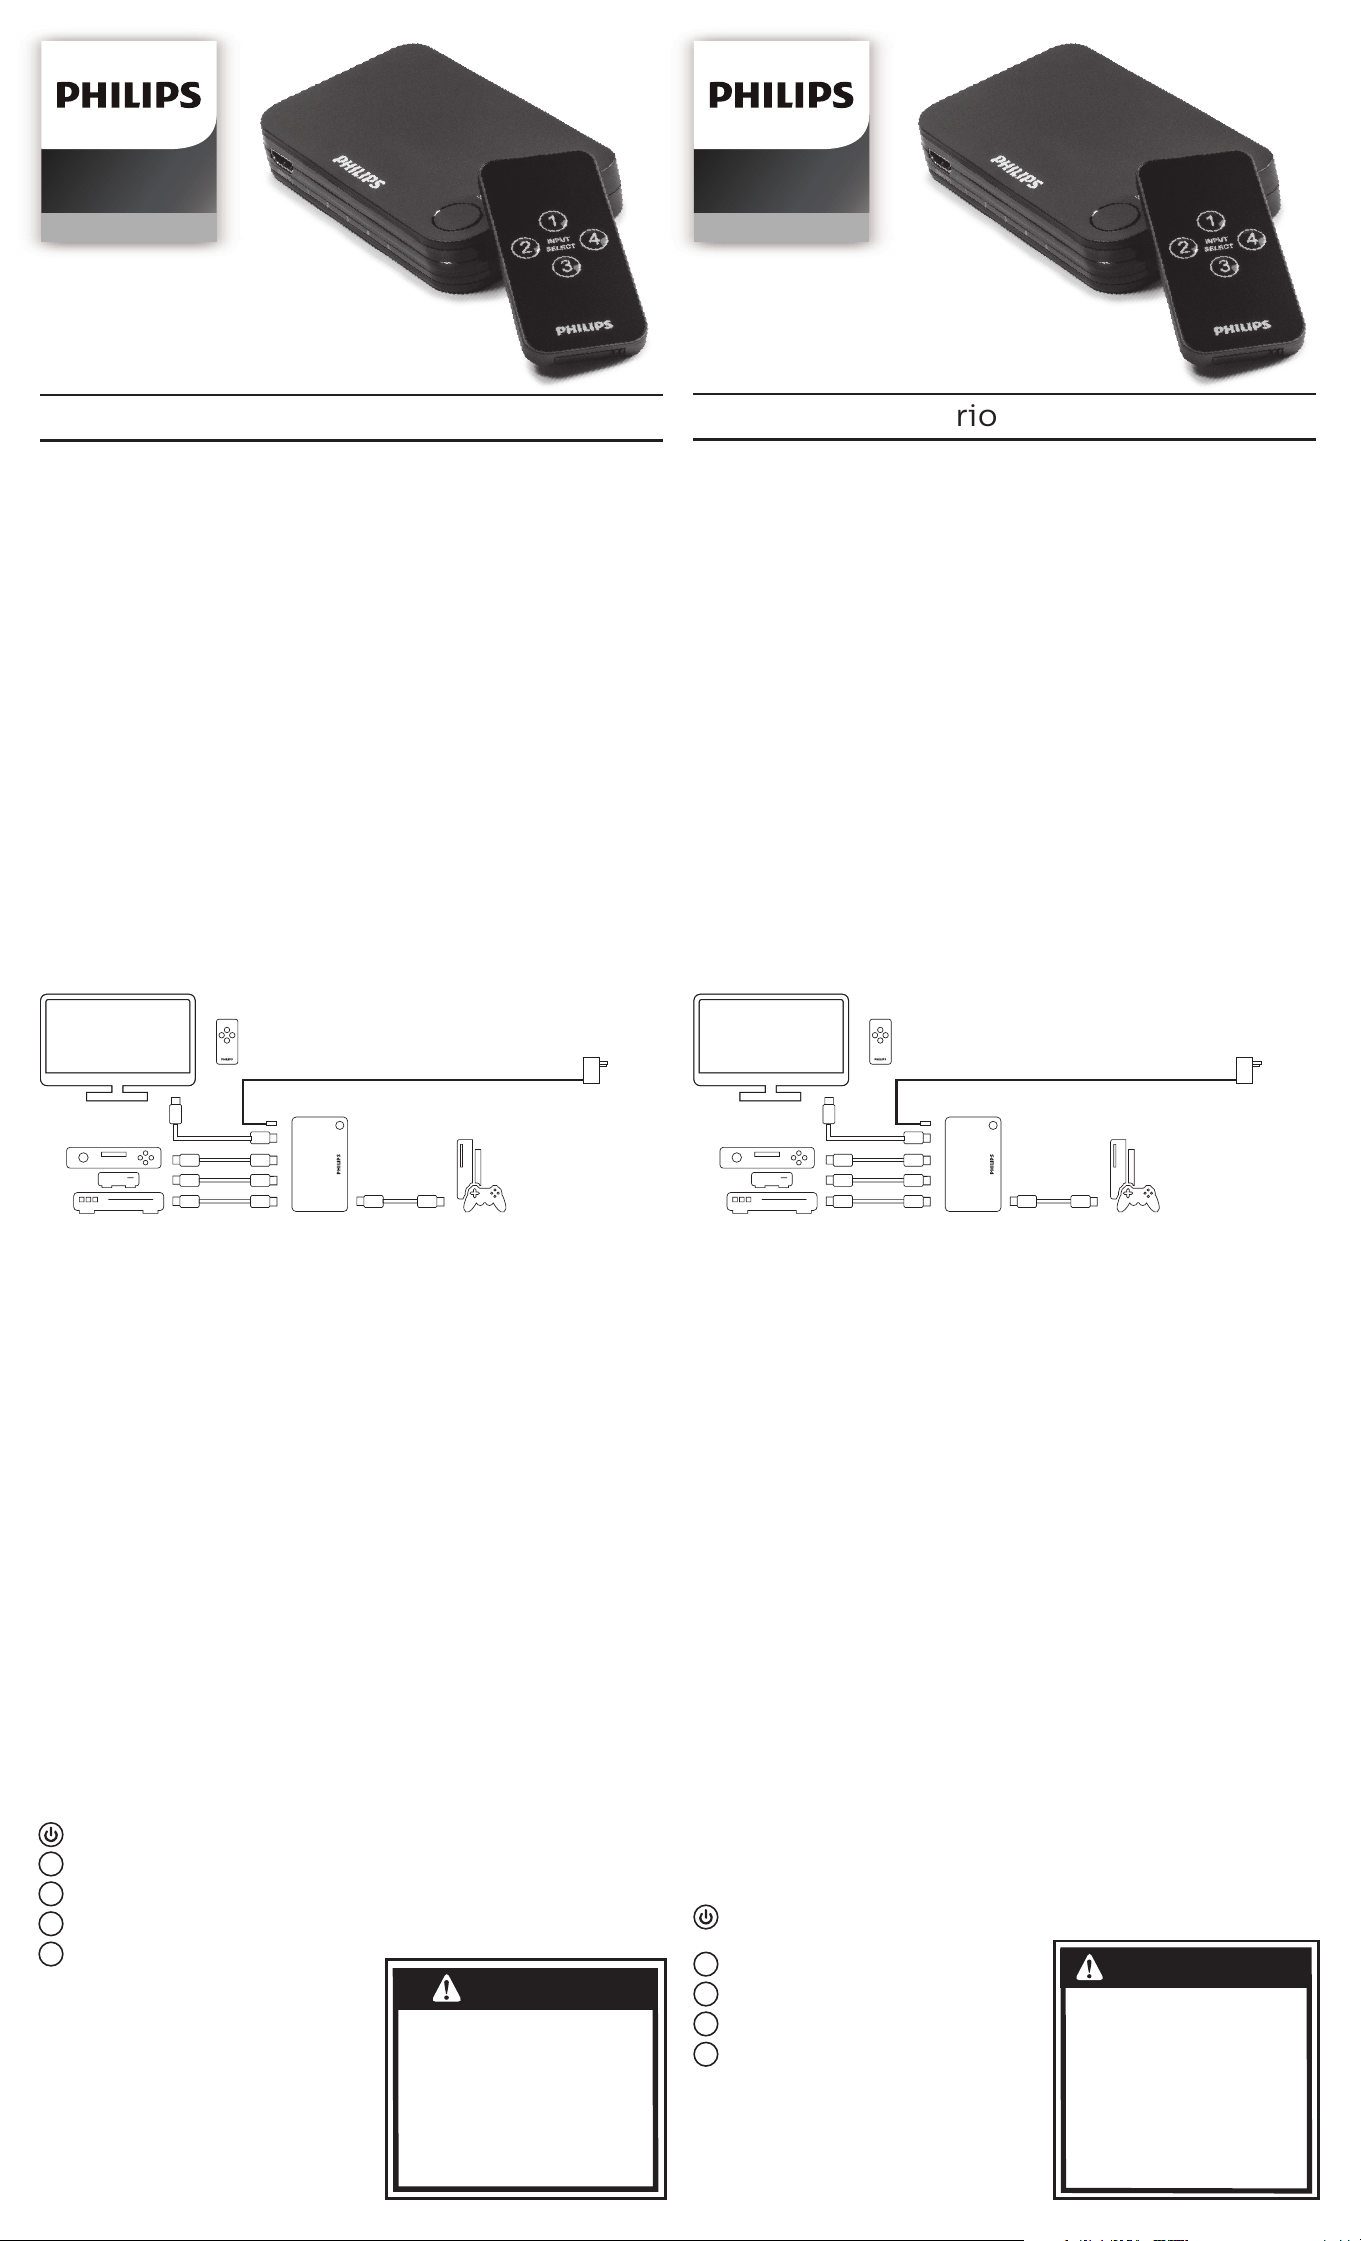
Conexión de dispositivos compatibles con HDMI
®
al
conmutador HDMI
®
de 4 puertos
1. Conecte un cable HDMI
®
de la entrada de televisión (TV) al puerto de salida
(Out) en la parte posterior del conmutador.
2. Conecte los cables HDMI
®
(no incluidos) de cada dispositivo HDMI
®
,
comenzando por el dispositivo de uso más frecuente en la entrada 1 (Input 1).
3. Conecte el enchufe de USB micro en la entrada de CC (DC) del conmutador.
4. Enchufe la fuente de alimentación de CA/CC en un tomacorriente que funcione.
Con el conmutador HDMI
®
de 4 puertos (en forma manual)
1. Encienda el televisor.
2. Encienda el dispositivo compatible con HDMI
®
que desea ver y que está
conectado al conmutador.
3. Oprima el botón de selección del conmutador HDMI
®
hasta que el dispositivo
aparezca en el televisor; se encenderá el LED para la entrada activa
correspondiente en el conmutador.
Con el conmutador HDMI
®
de 4 puertos
(mediante el control remoto)
1. Encienda el televisor.
2. Encienda el dispositivo de HDMI
®
que está conectado al conmutador.
3. Oprima el número de entrada (1, 2, 3 o 4) en el control remoto para seleccionar
la entrada a la que el dispositivo está conectado. Se encenderá el LED para la
entrada seleccionada y el dispositivo debería aparecer en el televisor.
Instalación/Reemplazo de la pila
1. Gire el control remoto y quite el tornillo que está en la parte inferior de este.
2. Deslice la bandeja portapila.
3. Coloque la pila de litio CR2025 (incluida) con la polaridad positiva (+)
orientada hacia arriba.
4. Deslice la bandeja portapila con la pila insertada en el control remoto.
5. Vuelva a colocar el tornillo en el control remoto.
Usando con un control remoto universal de marca Philips
Siga su manual de instrucciones para
programar un nuevo dispositivo.
Use el código 4091.
Funciones de las teclas del control remoto:
Tecla = enciende / apaga el interruptor
del conmutador
1
Tecla = Entrada 1
2
Tecla = Entrada 2
3
Tecla = Entrada 3
4
Tecla = Entrada 4
User manual
Manual de usuario
SWV9484B/27
Audio/Video
SWV9484B/27
Audio/Video
This 4-Port HDMI
®
Switch with remote allows you to easily switch between
multiple HDMI devices while using only one HDMI
®
input from your display.
Please review these instructions entirely before operating your switch.
Features
• Supports up to 4K UHD resolution @ 60fps with HDR
• Supports 3D video
• Connect up to 4 HDMI
®
-enabled devices to a single HDMI
®
port
• Remote and manually controlled
• Plug-and-play; installs in seconds
• Works with Philips-branded universal remote controls
Package Contents
4-Port HDMI
®
4K Switch, Remote Control, AC/DC 120V Power Adapter
and User Manual
Connecting Your HDMI
®
Enabled Devices to Your
4-Port HDMI
®
Switch
1. Connect an HDMI
®
cable from your TV input to the output on the back
of the switch.
2. Connect the HDMI
®
cables (not included) from each HDMI
®
device,
starting with the most utilized device on Input 1.
3. Connect the micro USB plug into the DC 5V input on the switch.
4. Plug the AC/DC power adapter into a working outlet.
Using Your 4-Port HDMI
®
Switch (Manually)
1. Power on your TV.
2. Power on your HDMI
®
-enabled device to be viewed that is connected
to the switch.
3. Press the Select button on the HDMI
®
switch until the device appears on your
TV; the LED will illuminate for the corresponding active input
on the switch.
Using Your 4-Port HDMI
®
Switch (Using the Remote)
1. Power on your TV.
2. Power on your HDMI
®
-enabled device that is connected to the switch.
3. Press the Input number (1, 2, 3 or 4) on the remote to select the input the
device is connected to. The LED will illuminate the input selected and the
device should be displaying on your TV.
Installing/Replacing Battery
1. Turn the remote over and remove the screw at the bottom of the remote.
2. Slide out the battery tray.
3. Install the CR2025 Lithium battery (included) with the positive (+) facing up.
4. Slide the battery tray with the battery back into the remote.
5. Reinstall the screw back into the remote.
Using with a Philips-branded Universal Remote Control
Follow your remote’s instructions to program a new device. Use code 4091.
Remote Key Functions:
Key = powers switch ON/OFF
1
Key = Input 1
2
Key = Input 2
3
Key = Input 3
4
Key = Input 4
WARNING
SWV9284B/27 v1
10/17
NOTE: Input 1 is the default
input when the switch is rst
powered on.
Use only the
power adapter
included with
this switch.
ADVERTENCIA
• LAS PILAS PUEDEN PERDER LÍQUIDOS
PERJUDICIALES O MATERIALES
INFLAMABLES, O EXPLOTAR Y
CAUSAR LESIONES Y DAÑOS EN LOS
PRODUCTOS
• NO COMBINE PILAS VIEJAS Y NUEVAS,
NI TIPOS DE PILAS DISTINTAS
• REEMPLACE TODAS LAS PILAS AL
MISMO TIEMPO
• REEMPLACE DE INMEDIATO LAS PILAS
TOTALMENTE DESCARGADAS
• QUITE LAS PILAS SI NO USARÁ EL
PRODUCTO DURANTE PERIODOS
PROLONGADOS
NOTA: Input 1 es la entrada
predeterminada cuando el conmutador
se enciende por primera vez.
Use solo el
adaptador de
alimentación
incluido
con este
conmutador.
• BATTERIES MAY LEAK HARMFUL LIQUIDS
OR IGNITABLE MATERIALS OR EXPLODE
CAUSING INJURY AND PRODUCT DAMAGE
• DO NOT MIX OLD AND NEW OR
OTHER BATTERY TYPES
REPLACE ALL BATTERIES AT THE
SAME TIME
• REPLACE FULLY DISCHARGED BATTERIES
IMMEDIATELY
• REMOVE BATTERIES IF PRODUCT IS TO
BE UNUSED FOR EXTENDED
PERIODS OF TIME

MADE IN CHINA
The Philips trademark and the Philips Shield Emblem are registered trademarks
of Koninklijke Philips N.V. used under license. This product has been
manufactured by Gibson Innovations Limited. It is distributed and warranted
by Jasco Products Company LLC, 10 E. Memorial Rd., Oklahoma City, OK 73114.
©2017 Gibson Innovations, all rights reserved.
This product comes with a limited-lifetime warranty.
Visit www.philips.com/support for warranty details.
Questions? Contact us at 1-844-816-0320 between 7:00AM—8:00PM CST.
HECHO EN CHINA
La marca Philips como el emblema de escudo Philips son marcas registradas
de Koninklijke Philips N.V. y son utilizadas bajo licencia. Este producto ha sido
fabricado por Gibson Innovations Limited. Este producto es distribuido y tiene
garantía de Jasco Products Company LLC, 10 E. Memorial Rd., Oklahoma City, OK
73114. ©2017 Gibson Innovations, todos los derechos reservados.
Este producto tiene una garantía limitada de por vida.
Visite www.philips.com/support para conocer los detalles de la garantía.
¿Tiene preguntas? Comuníquese al 1-844-816-0320 entre las 7:00 a. m. y las
8:00 p. m. CST (hora central estándar).
Troubleshooting:
1. LED is not illuminated on the switch:
• Make sure the AC/DC power supply is plugged into a working outlet
• If AC/DC power adapter is plugged into a surge protector, make sure the surge
protector is powered on
• Make sure the DC plug is plugged completely into the switch
(Input 1 should be illuminated)
• Unplug and plug the AC/DC power adapter and press the Power/Select Button
(Input 1 should be illuminated)
2. Has audio but no video:
• Make sure this is not a copied DVD movie, the enabled HDCP* protection will
block the copied DVD movie from playing
• Make sure the HDMI
®
cable is completely plugged into the DVD player
and the switch
• Make sure the HDMI
®
cable is completely plugged into the Out port of the
switch and into the TV’s HDMI
®
port
• Replace the HDMI
®
cable either from the DVD player to the switch or the HDMI
®
cable from the switch to the TV or replace both cables
3. Has video but no audio:
• Make sure the volume is turned up on the TV
• Make sure the MUTE function is turned o on the TV
• Replace the HDMI
®
cable either from the DVD Player to the switch or the
HDMI
®
cable from the switch to the TV or replace both cables
4. Remote control does not work:
• Make sure the battery is properly installed with (+) facing upward
• Replace battery
• Make sure all protective lm is removed from the remote and switch
• Make sure the remote is pointed at the front of the switch
• Make sure there are no obstructions between the remote and the switch
5. HDMI
®
Switch will not Operate Manually:
• Make sure the AC/DC power adapter is plugged into a working outlet
• Make sure the DC plug is plugged completely into the switch
• Use only the AC/DC power adapter that is included with the switch
• Unplug and plug the AC/DC power adapter from the
(Input 1 should be illuminated)
• If the AC/DC power adapter is plugged into a surge protector, make sure the
surge protector is powered on
* HDCP: High-bandwidth Digital Content Protection is a technology embraced by
the Motion Picture Association of America that eliminates the reproduction of
Copyrighted material.
FCC Statement
This device complies with part 15 of the FCC rules. Operation is subject to the
following two conditions: (1) this device may not cause harmful interference, and
(2) this device must accept any interference received, including interference that
may cause undesired operation.
FCC NOTE: The manufacturer is not responsible for any radio or TV interference
caused by unauthorized modications to this equipment. Such modications could
void the user’s authority to operate the equipment.
NOTE: This equipment has been tested and found to comply with the limits for
a Class B digital device, pursuant to Part 15 of the FCC Rules. These limits are
designed to provide reasonable protection against harmful interference in a
residential installation. This equipment generates, uses and can radiate radio
frequency energy and, if not installed and used in accordance with the instructions
may cause harmful interference to radio communications. However, there is
no guarantee that interference will not occur in a particular installation. If this
equipment does cause harmful interference to radio or television reception, which
can be determined by turning the equipment o and on, the user is encouraged to
try to correct the interference by one or more of the following measures:
• Reorient or relocate the receiving antenna.
• Increase the separation between the equipment and receiver.
• Connect the equipment into an outlet on a circuit dierent from that to which
the receiver is connected.
• Consult the dealer or an experienced radio/TV technician for help.
Resolución de problemas:
1. El LED del conmutador no se enciende:
• Asegúrese de que la fuente de alimentación de CA/CC esté enchufada en un
tomacorriente que funcione
• Si la fuente de alimentación de CA/CC está enchufada en un protector contra
sobretensiones, asegúrese de que este esté encendido
• Asegúrese de que el enchufe de CC esté bien enchufado en el conmutador
(la entrada 1 debería encenderse)
• Desenchufe y enchufe la fuente de alimentación de CA/CC
(la entrada 1 debería encenderse)
2. Se reproduce audio sin video:
• Asegúrese de que el DVD no sea un DVD copiado; la protección HDCP
habilitada bloqueará la reproducción del DVD copiado
• Asegúrese de que el cable HDMI
®
esté bien enchufado en el reproductor
de DVD y el conmutador
• Asegúrese de que el cable HDMI
®
esté bien enchufado en el puerto de salida
del conmutador y en el puerto HDMI
®
del televisor
• Reemplace el cable HDMI
®
del reproductor de DVD al conmutador o el cable
HDMI
®
del conmutador al televisor o reemplace ambos cables
3. Se reproduce video sin audio:
• Asegúrese de que el volumen del televisor esté activado
• Asegúrese de que la función de silencio (MUTE) del televisor esté desactivada
• Reemplace el cable HDMI
®
del reproductor de DVD al conmutador o el cable
HDMI
®
del conmutador al televisor o reemplace ambos cables
4. El control remoto no funciona:
• Asegúrese de que la pila esté correctamente instalada con la polaridad
positiva (+) orientada hacia arriba
• Reemplace la pila
• Asegúrese de haber quitado toda la película protectora del control
remoto y el conmutador
• Asegúrese de que el control remoto esté apuntando hacia el frente
del conmutador
• Asegúrese de que no haya obstrucciones entre el control remoto
y el conmutador
5. El conmutador HDMI
®
no funciona manualmente:
• Asegúrese de que la fuente de alimentación de CA/CC esté enchufada en un
tomacorriente que funcione
• Asegúrese de que el enchufe de CC esté bien enchufado en el conmutador
• Use solo la fuente de alimentación de CA/CC incluida con el conmutador
• Desenchufe y enchufe la fuente de alimentación de CA/CC del conmutador y
(la entrada 1 debería encenderse)
• Si la fuente de alimentación de CA/CC está enchufada en un protector contra
sobretensiones, asegúrese de que este esté encendido
* HDCP: la protección de contenido digital de elevado ancho de banda es una
tecnología aceptada por la Asociación Cinematográca de Estados Unidos que
elimina la reproducción de material protegido por derechos de autor.
Declaración de la Comisión Federal de Comunicaciones (FCC)
Este dispositivo cumple con la Parte 15 de las Reglas FCC. El funcionamiento está
sujeto a las siguientes dos condiciones: (1) este dispositivo no debe provocar
interferencia perjudicial, y (2) este dispositivo debe aceptar toda interferencia que
reciba, incluso la que pudiera causar un funcionamiento no deseado.
NOTA DE LA FCC: El fabricante no se hace responsable de ninguna interferencia
de radio o TV ocasionada por modicaciones no autorizadas efectuadas a este
equipo. Dichas modicaciones podrían anular la autoridad del usuario para
utilizar el equipo.
NOTA: este equipo ha sido probado y cumple con los límites para aparatos
digitales de Clase B, de conformidad con la Parte 15 de la normativa de la
FCC. Estos límites están diseñados para proveer protección razonable contra
interferencias perjudiciales en una instalación residencial. Este equipo genera,
usa y puede irradiar energía de radiofrecuencias y, si no se instala y usa según las
instrucciones, puede provocar interferencia perjudicial a las radiocomunicaciones.
No obstante, no hay garantías de que no ocurrirá interferencia en una instalación
en particular. Si este equipo provoca interferencia perjudicial a la recepción de
radio o televisión, lo que puede determinarse encendiendo y apagando el equipo,
se recomienda que el usuario intente corregir la interferencia por medio de la
implementación de una o más de las siguientes medidas:
• Reorientar o reubicar la antena receptora.
• Incrementar la separación entre el equipo y el receptor.
• Conectar el equipo a un tomacorriente de un circuito diferente del circuito
al que está conectado el receptor.
• Consultar al distribuidor o a un técnico con experiencia en radio/televisión
para solicitar asistencia.