F-DSB35HK(W)
使用說明書
電風扇


安全注意事項
產品簡介
安裝說明
使用說明
故障排除
清潔保養
目錄
01
...................................................................................................................................
04
05
07
............................................................................................................................................
............................................................................................................................................
............................................................................................................................................
............................................................................................................................................
............................................................................................................................................
10
10
產品參數
............................................................................................................................................
10
非常感謝您購買東芝電風扇。
• 為了正確、安全地使用本風扇,請在使用前仔細閲讀本用戶手冊,並充分理解其內容。
• 請妥善保管本用戶手冊, 以備於將來參考之用。
1
•
2
3
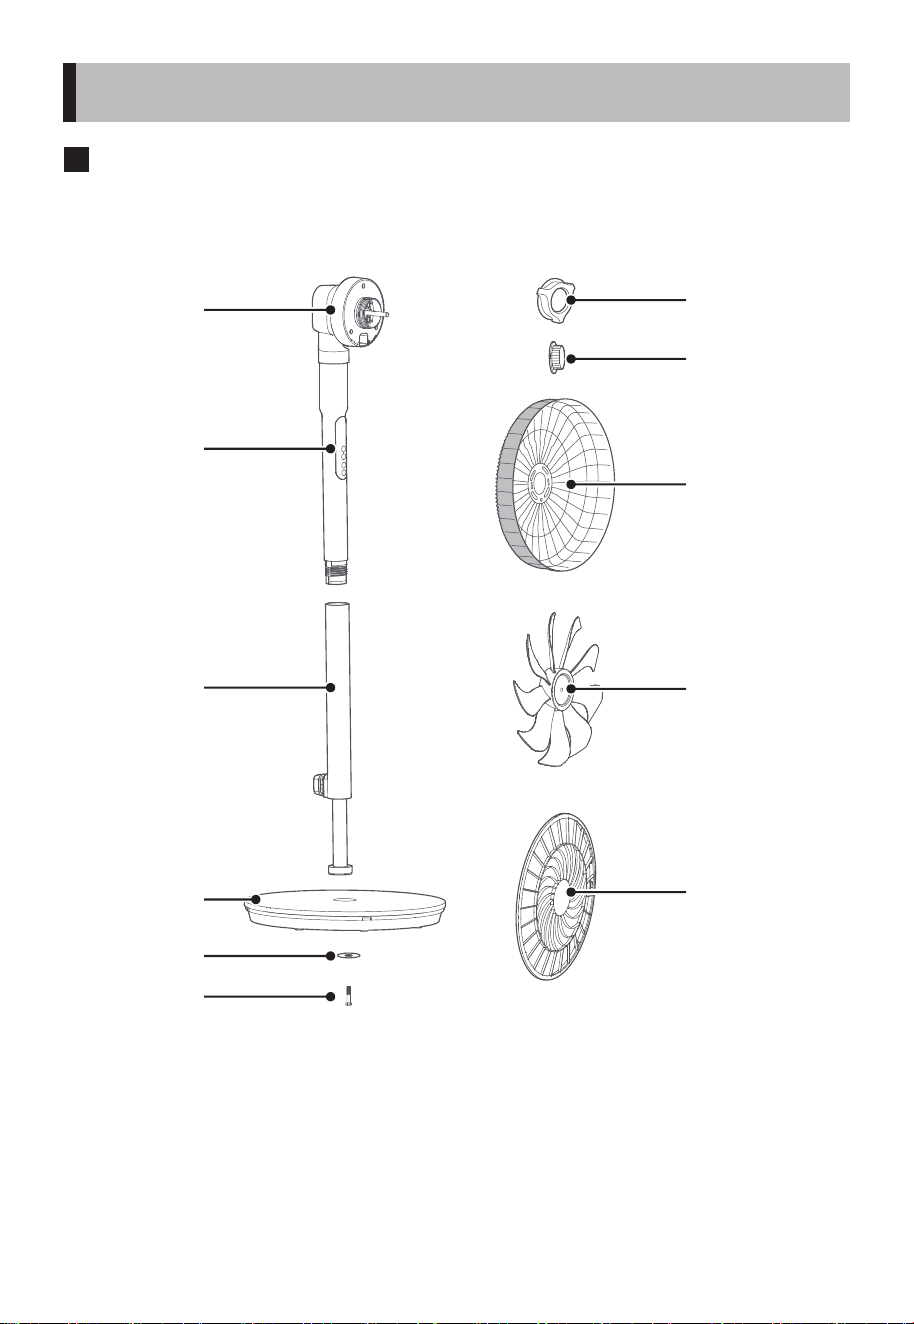
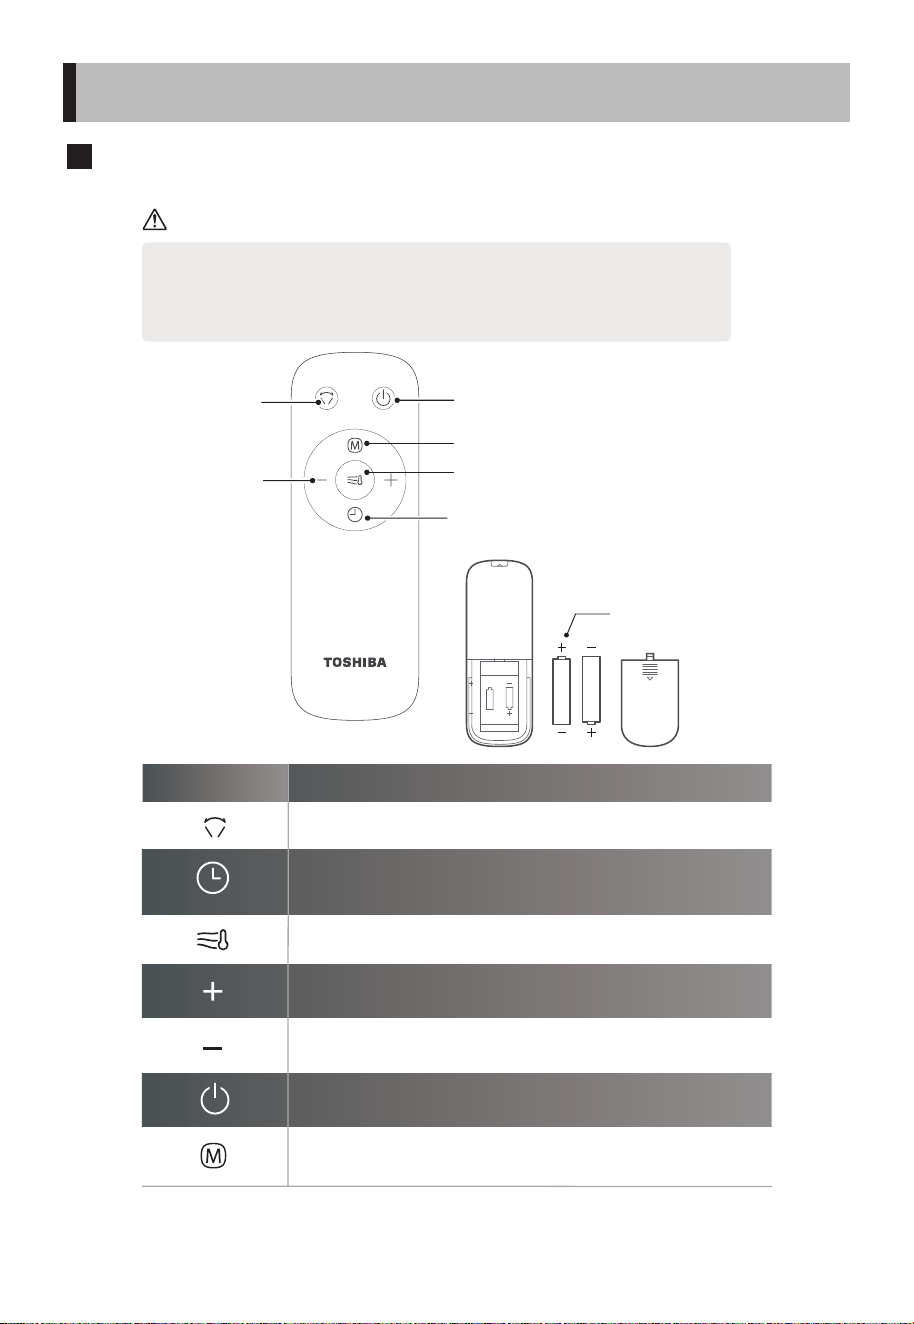
各部件名稱
電機
網罩索母
風葉索母
後網罩
風葉
前網罩
機身
立柱管
底盤
墊片
螺絲
產品簡介
4
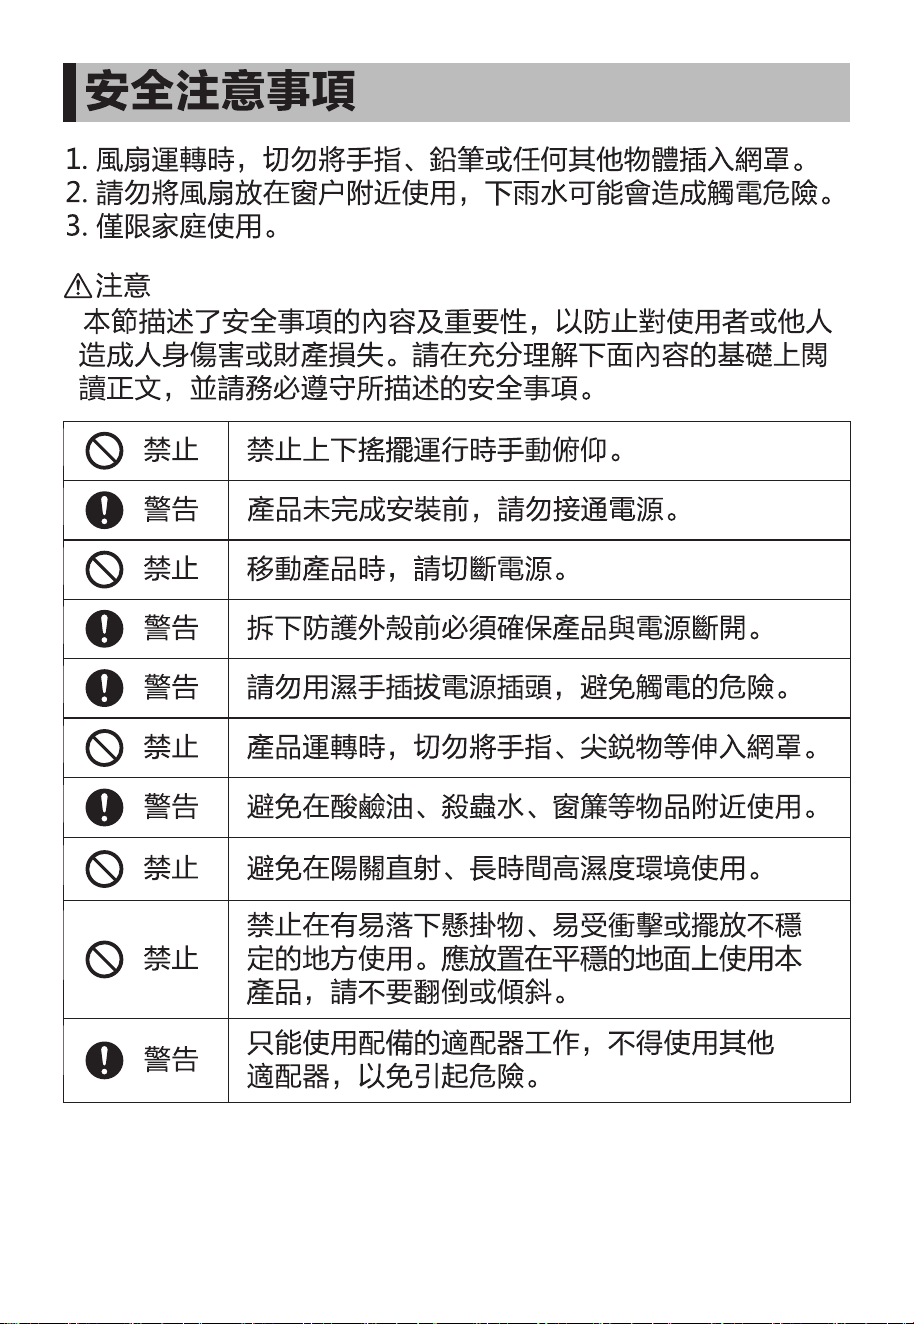
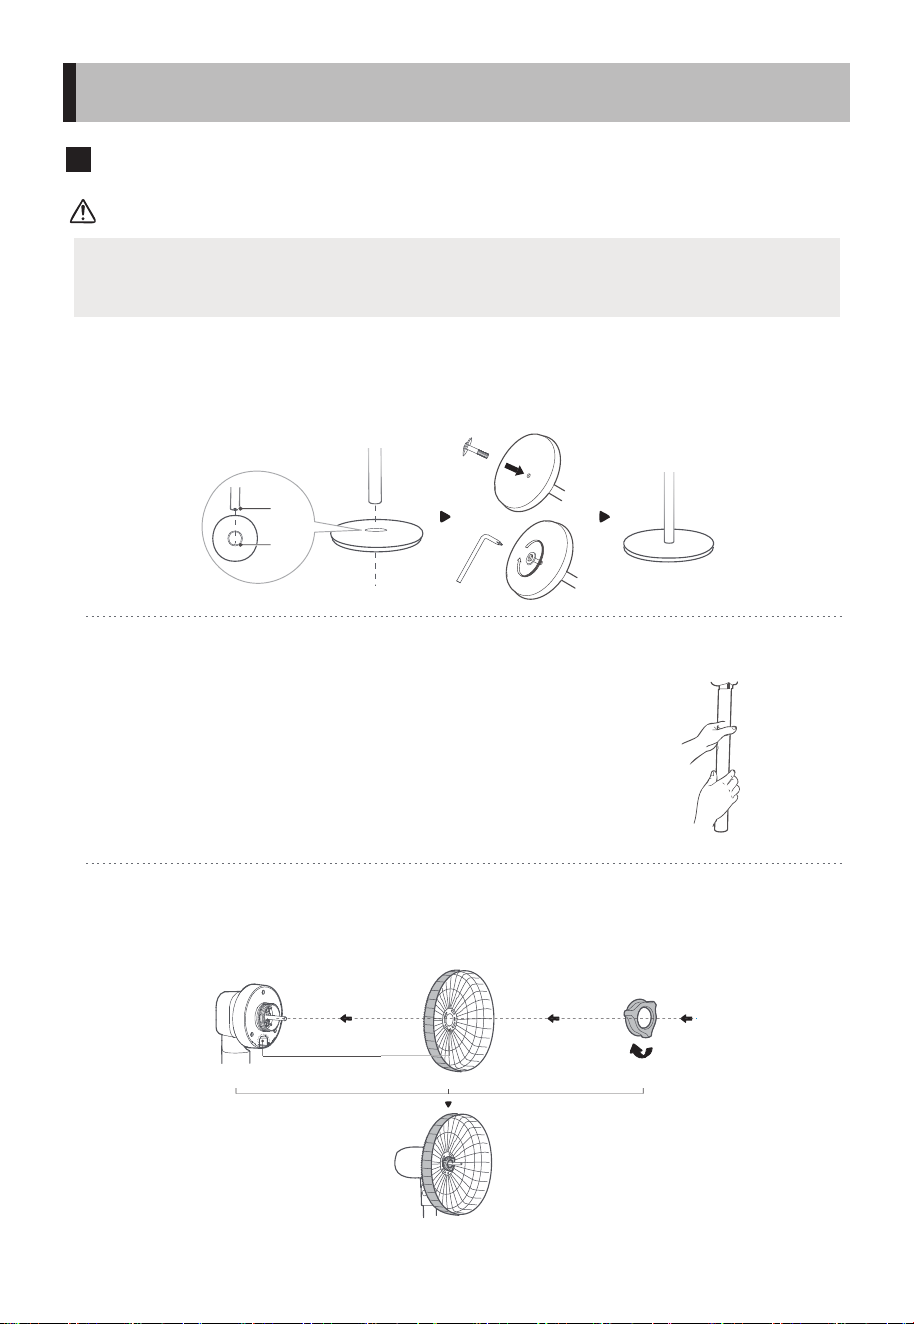
安裝準備
注意
安裝前,請先從機頭螺紋上逆時針旋轉網罩索母並將其取出。
底盤安裝
將立柱管和底盤對位卡穩,並用螺絲和墊片固定。
機身與立柱管安裝
先將機身與立柱管的孔位對準,然後順時針旋轉進行固
定。
後網罩安裝及鎖定
將機頭和後網罩對位,掛上並用網罩索母鎖定。
凹
凸
對位
凸對凹
順時針旋緊以固定後網罩
安裝說明
5
Pa!
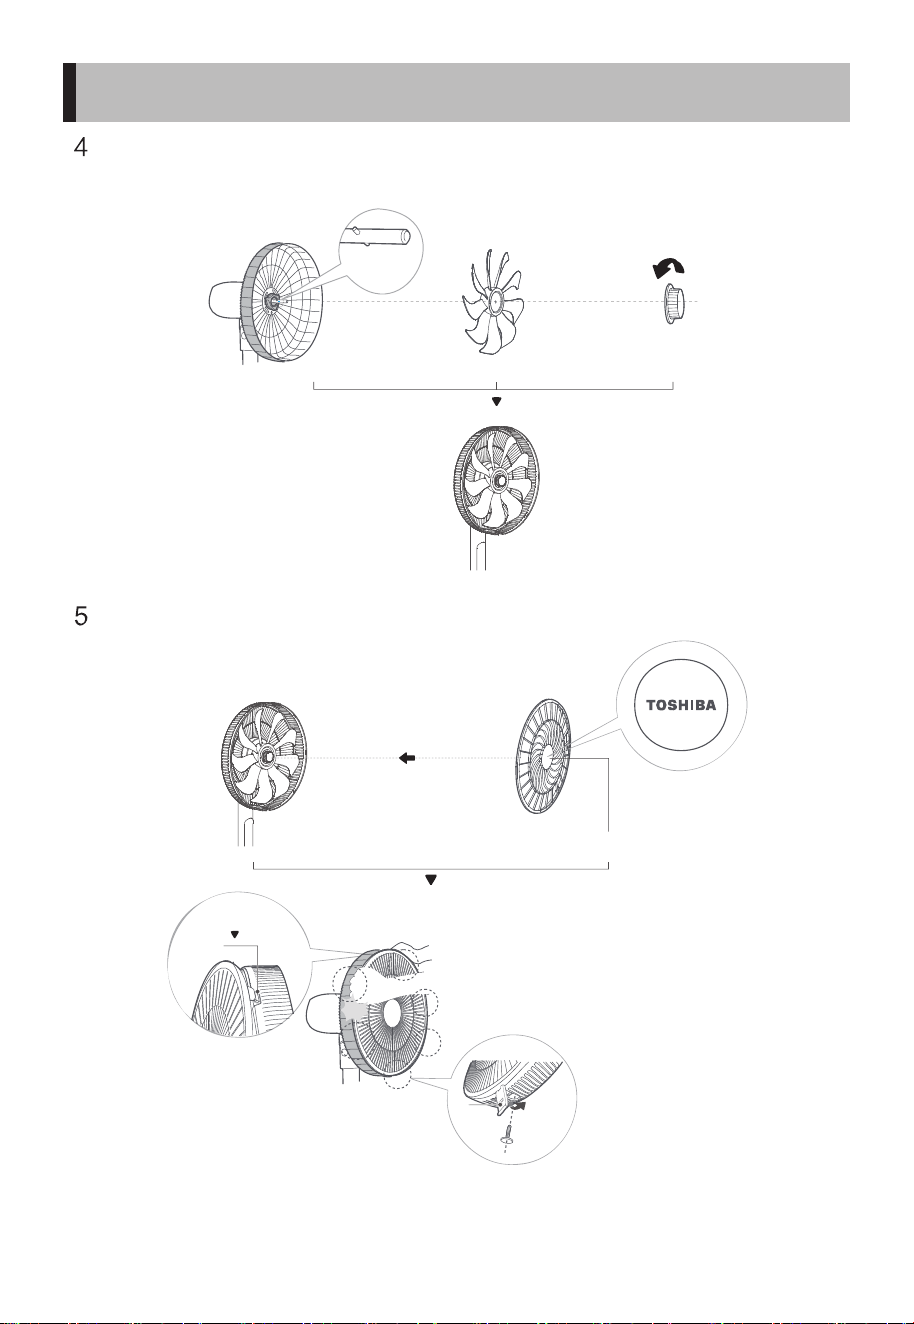
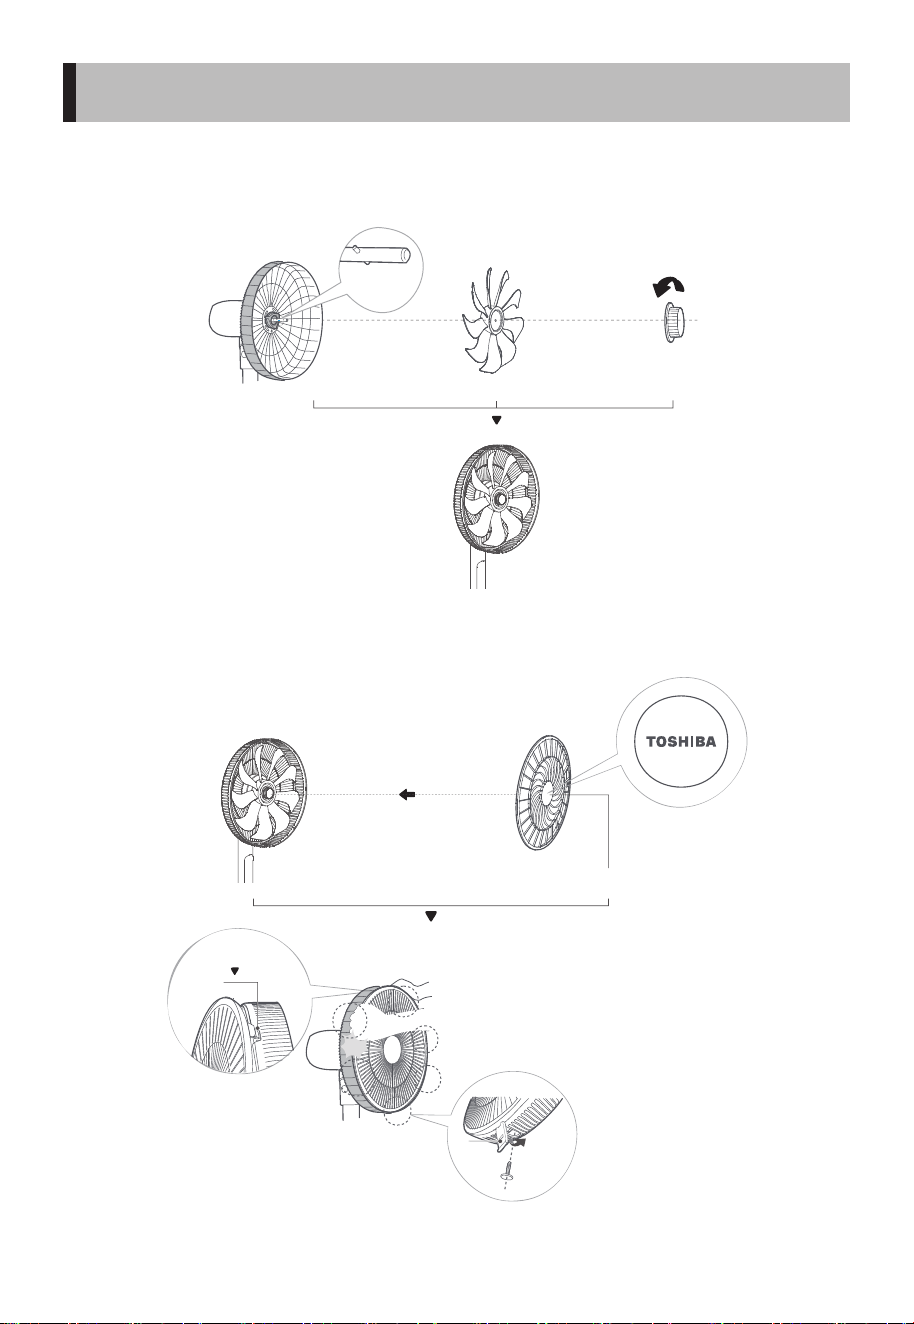
風葉安裝及鎖定
將風葉和電機軸對位並穿上, 再用風葉索母鎖定風葉。
前網罩安裝及固定
找准前網罩卡扣,東芝標誌擺正。
凸位對準
風葉凹位
逆時針旋緊
以鎖定風葉
東芝標誌擺正
前網罩卡穩後網
卡扣
雙手按順序按壓網罩,聽到“啪”一聲,
即安裝到位, 並固定螺絲。
自扣式安裝
網扣
安裝說明
6
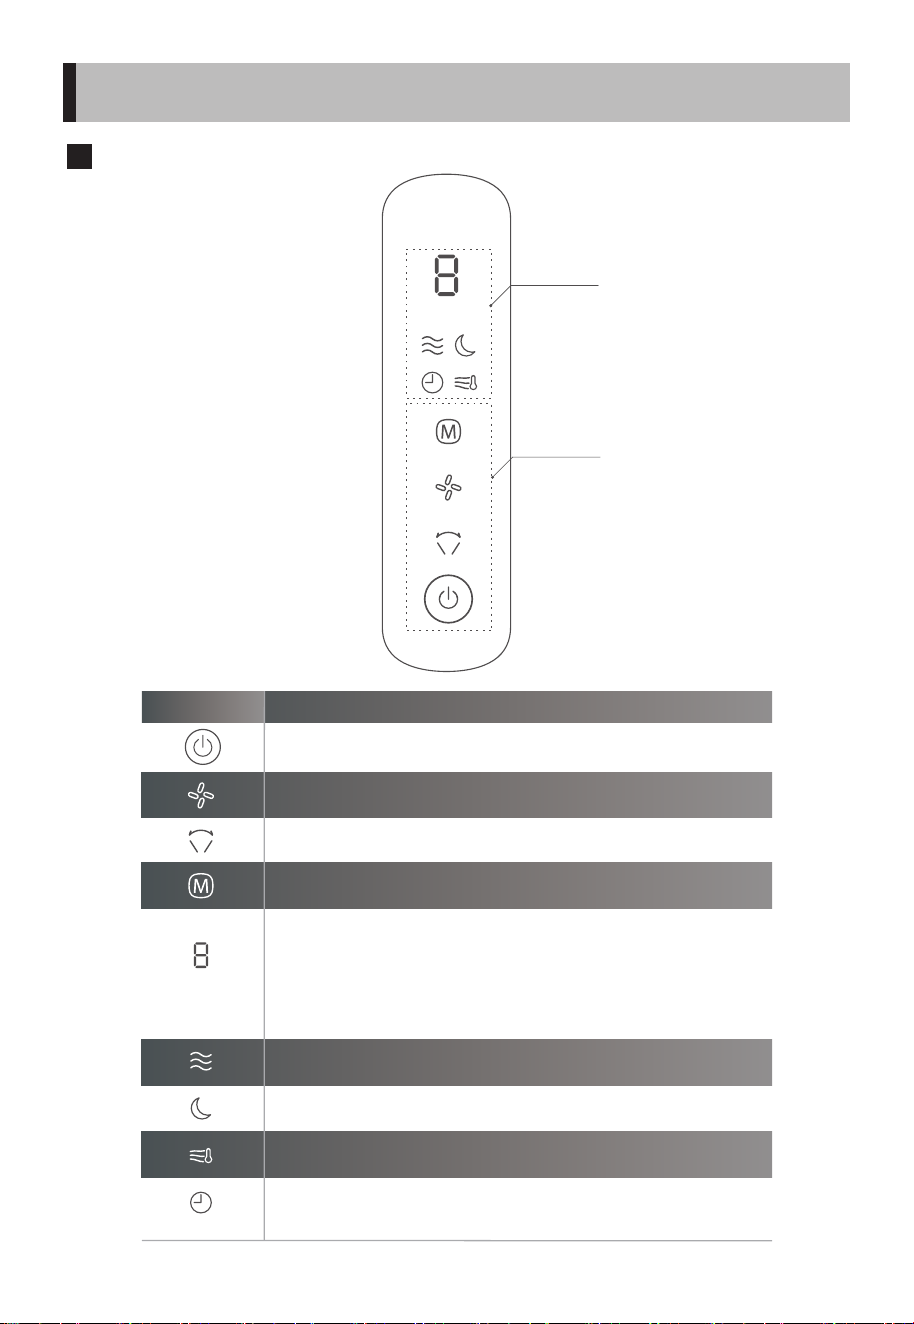
機身操作說明
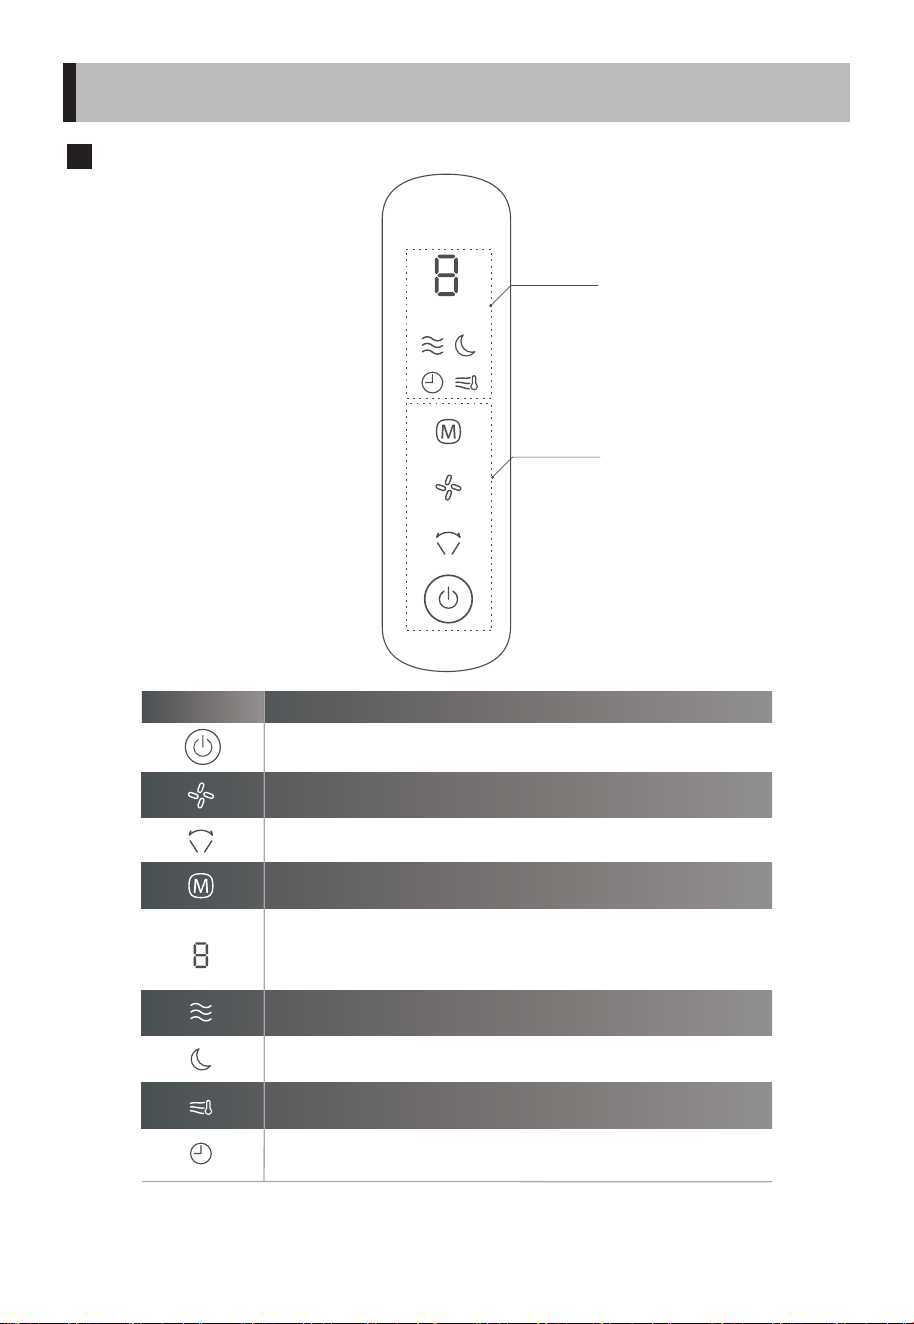
1. 關機狀態下短按,進入開機狀態。
2. 開機狀態下短按,進入關機狀態。
設定搖頭操作, 短按搖頭 一 (60°) → (停止) → 二 (90°) → (停止) → 三
(120°) → (停止) 循環。
1. 開機狀態下, 顯示當前風速; 搖頭設定下, 顯示搖頭檔位; 設定定時關機時, 顯示關
機時間。
2. 關機狀態下, 開啟預約開機功能時, 顯示開機時間。
3. 短路故障顯示E1; 溫度感測器故障顯示E2。
調節風速。
切換風類模式, 按正常風→ AI風→睡眠風 循環。
正常風顯示燈。
AI風顯示燈。
睡眠風顯示燈。
1. 關機狀態下,在預約開機狀態,此圖示點亮。
2. 開機狀態下,若開啟定時關機狀態,則此圖示點亮,否則熄滅。
功能 操作說明
顯示區
操作區
使用說明
7

機身操作說明
使用說明
※調節時請注意不要把手指夾到可動部分。
請先從插座拔下適配器插頭,切斷電源。
請一邊轉動高度調節杆,一邊拿著支柱進
行調節。
高度調節杆
(為了安全,操作力度
稍微變強了)。
調解時請注意不要把
手指夾到可動部分。
約
60°
約
60°
約
5°
約
90°
調節風向的時候
……
調節高度的時候
……
左右調節 上下調節
※
8

遙控器按鍵說明
1. 關機狀態下短按,進入開機狀態。
2. 開機狀態下短按,進入關機狀態。
設定搖頭操作, 短按搖頭 一 (60°) → (停止) → 二 (90°) → (停止)->三 (120°)
→ (停止) 循環。
1. 開機狀態下,短按開啟/關閉AI風。
2. 開啟後,風扇根據室溫自動改變風量。
1. 開機狀態下,短按減少風速檔位。
2. 在定時設定狀態,減小定時值。
1. 開機狀態下短按,設定定時關機狀態, 或者調節定時時間, 最高設定8小時。
2. 關機狀態下短按,設定預約開機狀態, 或者調節定時時間, 最高設定8小時。
1. 開機狀態下,短按增加風速檔位。
2. 在定時設定狀態,增加定時值。
切換風類模式, 按正常風→ AI風→睡眠風 循環。
開啟或停止
搖頭送風
開/關機
切換風類模式
電池
功能 操作說明
AAA
開啟/關閉AI風
設定定時關機/
預約開機
調整風速或
定時時間
遙控器在產品正面5米內,左右角度在30度範圍內正常使用。
電池中含有許多重金屬和酸堿等物質,威脅人類健康;
廢舊電池應分類回收。
使用說明
9
清潔保養
請勿自行修理電風扇。如果需要維修,請把它交給有資質的維修人員。
1. 在清潔和組裝之前,必須拔下風扇的電源線。
2. 為確保電機有充分的通風,請確保電機背面的通風孔沒有灰塵。請勿拆
卸風扇以清除灰塵。
3. 請用軟布蘸中性清潔劑擦拭外部部件。
4. 請勿使用任何有研磨性清潔劑或溶劑,以免刮傷表面。請勿使用以下任
何一種清潔劑:汽油、稀釋劑。
5. 請勿讓水或任何其他液體進入電機外殼或內部零件。
6. 塑膠部件應使用蘸有中性肥皂液的軟布清潔。用乾布徹底清除肥皂膜。
•
•
•
•
•
•
•
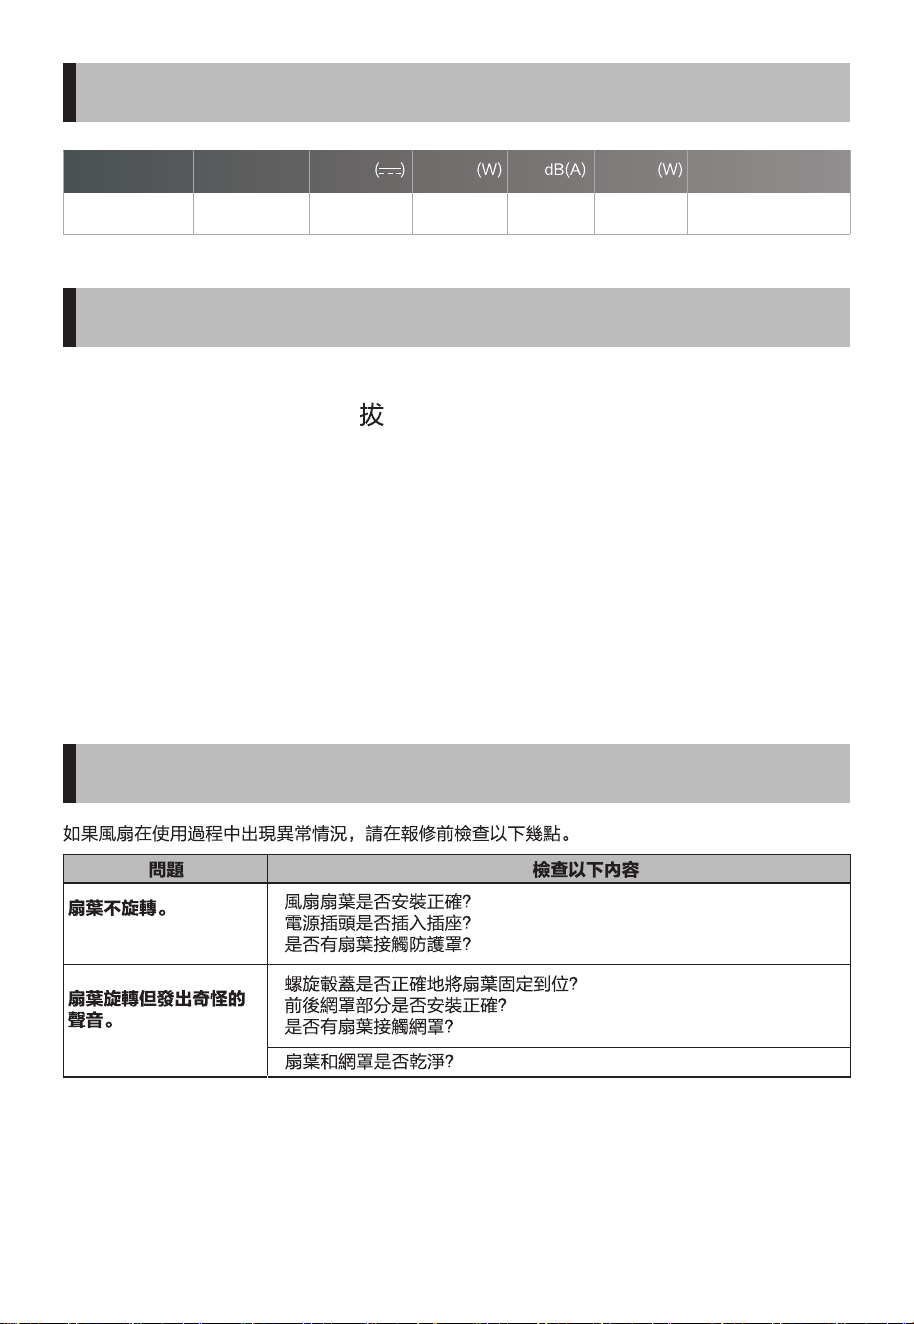
產品參數
故障排除
0.8
F-DSB35HK(W) 400x370x1080~1180
型號
100-240V~
50/60Hz 1.5A
輸入
24V
工作電壓
11
額定功率
55
噪音 待機功率
(mm)
產品尺寸
10


F-DSB35HK(W)
Stand fan
INSTRUCTION
MANUAL


CONTENTS
Thank you very much for purchasing Toshiba electric fan.
SAFETY INSTRUCTIONS ......................................................................................................................................01
PRODUCT INTRODUCTION................................................................................................................................04
INSTALLATION INSTRUCTION ..........................................................................................................................05
OPERATING INSTRUCTION ................................................................................................................................07
SPECIFICATIONS....................................................................................................................................................10
CLEANING ANDMAINTENANCE ......................................................................................................................10
TROUBLESHOOTING............................................................................................................................................10
• In order to use this fan correctly and safely, please carefully read this instruction manual
to fully understand the content before using it.
• Keep this owner’s manual in a handy place for future reference..
1
SAFETY INSTRUCTIONS
Safety precautions
Always follow these instructions!
This manual provides instructions that must be observed when using the fan
in order to prevent danger to the user, other persons, and property.
Read Rules for Safe Operation and Instructions Carefully.
If the supply cord is damaged, it must be replaced by manufacturer or its
service agent or a similarly qualied person in order to avoid a hazard.
To protect against the risk of electrical shock, do not immerse the unit,
cord or plugin water or other liquid.
This appliance is not intended for use by persons (including children)
with reduced physical, sensory or mental capabilities, or lack of experi-
ence and knowledge, unless they have been given supervision or
instruction concerning use of the appliance by a person responsible for
their safety. Children should be supervised to ensure that they do not
play with the appliance.
When the appliance is not in use and before cleaning, unplug the
appliance from the outlet.
Keep electrical appliances out of reach from Children or inrm persons.
Do not let them use the appliances without supervision.
Indoor use only.
CAUTION
WARNING
2
SAFETY INSTRUCTIONS
1. Never insert ngers, pencils, or any other object through the grille when
fan is running.
2. Do not place the fan near the window, or the rainy day may cause electric
shock.
3. Household use only.
• This section describes the content and importance of safety matters to
prevent personal injury or property damage to users or others. Please read
the text with a full understanding of the following content, and be sure to
abide by the safety precautions described.
NOTE
It is prohibited to tilt manually when horizontal oscillator is
activated.
Prohibited
Do not connect the power supply until the product is installed.
Warning
Make sure the product is disconnected from the power supply
before removing the protective casing.
Warning
Do not plug or unplug the power plug with wet hands to avoid
the risk of electric shock.
Warning
Avoid using it near acid-base oils, insecticides, curtains and
other items.
Warning
Only the matching adapter can be used. Do not use other
adapters so as to avoid danger.
Warning
Cut o the power supply before moving the product.
Warning
When the product is running, do not put your ngers or sharp
objects into the grille.
Warning
Avoid use in direct sunlight or high humidity environments for
long periods of time.
Warning
It is prohibited to use it in places where there are hanging
objects that are easy to fall, where it is susceptible to impacts,
or where the placement is unstable. The product should be
placed stably when using it, please do not tip over or tilt.
Warning
3
SAFETY INSTRUCTIONS
Matters that may cause minor injury or property damage
Before use, please check whether the voltage used is the same
as the voltage marked on the product.
Warning
When you leave the machine or when the machine is not in use,
turn o the power and unplug the power plug to avoid circuit
failure and accidents.
Warning
Before use, check whether the power cord and plug are
damaged. If the power cord is damaged, it must be replaced by
the manufacturer, its maintenance department or a specialist
from a similar department in order to avoid danger.
Warning

Parts name
4
PRODUCT INTRODUCTION
Motor
Grille lock nut
Blade lock nut
Rear grille
Blade
Front grille
Body
Pole
Base
Screw washer
Base screw
Preparation for installation
ATTENTION
5
INSTALLATION INSTRUCTION
Before installation, please rotate the grille lock nut counterclockwise
from the head thread and take it out.
1 Assembly of base
Align the pole and the base and secure them with base screw and screw
washer.
2 Assembly of body and pole
First align the holes of the body and the pole, and then
rotate clockwise to x them.
3 Assembly and lock of rear grille
Align the head and the rear grille, hang it up and lock it with the grille
lock nut.
Concave
Concave to Convex
Tighten clockwise to secure the rear grille
to
Convex
Pa!
6
INSTALLATION INSTRUCTION
4 Assembly and lock of blade
Align and thread the fan blade with the motor shaft, and
then lock the fan blade with the blade lock nut.
5 Assembly and lock of front grille
Locate the front grille buckle and align the Toshiba logo.
Align the convex
position with the
concave position
of the blade
Tighten
counterclockwise
to lock the blade
Place the Toshiba logo
properly
Self-clipping
installation
Buckle
Press the grille in order with both hands
until you hear a click sound, and secure
the screw.
The front
grille snaps
the rear
grille
Instructions for Operation of Body
7
OPERATING INSTRUCTION
Display area
Operation area
Function Operation instruction
Adjust wind speed.
To switch the wind mode, press to cycle among normal→ AI → sleep.
Normal mode indicator light
AI mode display light
1. In power o state, press it to enter the power on state.
2. In power on state, press it to enter the power o state.
To set the oscillator operation, press to cycle the oscillator among 一 (60°) →
(stop) → 二 (90°) → (stop) → 三 (120°) → (stop).
1. In power on state, the current wind speed is displayed; when the oscillator is set,
the oscillator grade is displayed; when the scheduled power o is set, the power
o time will be displayed.
2. In power o state, press it to enable the scheduled power on function, the power
on time will be displayed.
3. E1 displays when there is short circuit fault; E2 displays when there is temperature
sensor fault.
1. In power o state, this icon will light up when the scheduled power-on is enabled.
2. In power on state, this icon will light up when the scheduled power-o is enabled,
otherwise it will go out.
Sleep mode indicator light
※
※
8
Instructions for Operation of Body
OPERATING INSTRUCTION
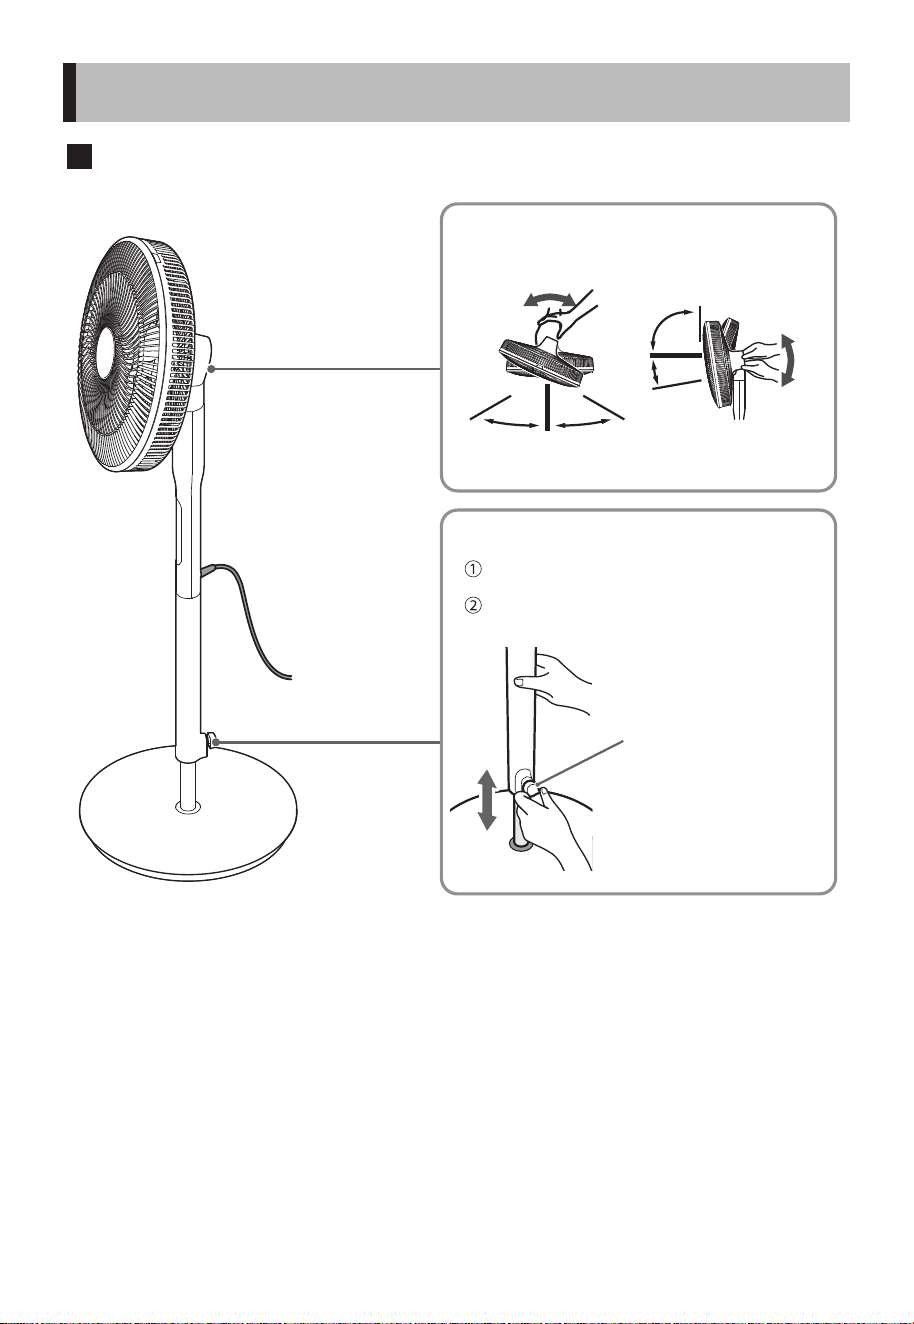
When adjusting the wind direction
When adjusting the height
Height adjustment lever
Please be careful not to get
your ngers caught in the
movable part when
adjusting.
Adjust left
and right
Adjust up and
down
About 60° About 60°
About
90°
About 5°
Please be careful not to get your ngers caught in
the movable part when adjusting.
Please unplug the adapter from the socket rst and
cut o the power supply.
Adjust the height adjustment lever while holding
the pole.
(For safety reasons, the operation
force has been slightly
strengthened.)
Instructions for Remote Control
9
Note
OPERATING INSTRUCTION
Function Operation instruction
1. In power on state, press it to set the scheduled power-o state, or adjust the
scheduled time, with a maximum setting of 8 hours.
2. In power o state, press it to set the scheduled power-on state, or adjust the
scheduled time, with a maximum setting of 8 hours.
1. In power on state, press it to increase the wind speed.
2. In timer setting state, increase the timing value.
1. In power o state, press it to enter the power-on state.
2. In power on state, press it to enter the power-o state.
To set the oscillator operation, press to cycle the oscillator among 一 (60°) →
(stop) → 二 (90°) → (stop) → 三 (120°) → (stop).
1. In power on state, press it to turn on/o the AI wind.
2. It will changes the wind speed according to the room temperature.
1. In power on state, press it to decrease the wind speed.
2. In timer setting state, reduce the timing value.
To switch the wind mode, cycle among normal→ AI →sleep.
• The remote control should be normally used within 5 meters of the front of
the product and 30° of the deviation angle.
• The battery contains many heavy metals, acids and bases, etc., which may
threaten human's health. Waste batteries should be recycled separately.
Horizontal
oscillation on/o
On/o
Switch wind mode
Activate/Deactivate AI wind
according to temp.
Timer on/o
Battery (AAA, 1.5V)
Press “+, -” to
set wind speed
or schedule
time
0.8
F-DSB35HK(W) 400x370x1080~1180
100-240V~
50/60Hz 1.5A
24V 11 55
10
SPECIFICATIONS
CLEANING ANDMAINTENANCE
TROUBLESHOOTING
The fan requires little maintenance. Do not try to repair it by yourself. Refer it
to qualified service personnel if service is needed.
1. Before cleaning and assembling, unplug the fan from the power supply.
2. To ensure adequate air circulation to the motor, keep vents at the rear of
the motor free of dust. Do not disassemble the fan to remove dust.
3. Please wipe the exterior parts with a soft cloth soaking a mild detergent.
4. Do not use any abrasive detergent or solvents to avoid scratching the
surface. Do not use any of the following as a cleaner: gasoline, thinner.
5. Do not allow water or any other liquid into the motor housing or interior
parts.
6. Plastic parts should be cleaned with a soft cloth moisten with mild soap.
Thoroughly remove soap with dry cloth.
In the case of any abnormality when using this fan, please check the following
points before requesting repair.
Model
Trouble
The blades do not rotate.
• Is the Fan blade installed properly?
• Is the power plug properly inserted into the outlet?
• Are any of the blades contacting guard?
• Is the spinner properly holding the blades in position?
• Are the front and rear guard sections properly mounted?
• Are any of the blades contacting guard?
• Are the blades and guard clean?
The blades spin but
make a strange sound.
Check the following
Rated input
Rated Voltage
Rated power (W) Noise dB(A)
Standby power
(W)
Unit Dimensions

# MatterDetails