
V1.0
redtigercam.com
The information in this manual is subject to change without notice.
F4 User Manual


1
Content
Notice . . . . . . . . . . . . . . . . . . . . . . . . . . . . . .
2
Product Specications . . . . . . . . . . . . . . . . . . . . .
3
Package Contents . . . . . . . . . . . . . . . . . . . . . . .
4
Appearance . . . . . . . . . . . . . . . . . . . . . . . . . . .
5
Touch Screen Function . . . . . . . . . . . . . . . . . . . .
6
Buttons and Functions . . . . . . . . . . . . . . . . . . . .
9
Voice Control Function . . . . . . . . . . . . . . . . . . .
11
Inversion Function . . . . . . . . . . . . . . . . . . . . . .
12
User Inteace Oveiew . . . . . . . . . . . . . . . . . . .
13
Function Oveiew . . . . . . . . . . . . . . . . . . . . . .
16
APP and Wi-Fi Function . . . . . . . . . . . . . . . . . . .
19
How to Play Using a Computer . . . . . . . . . . . . . . .
21
Installation . . . . . . . . . . . . . . . . . . . . . . . . . .
23
Troubleshooting . . . . . . . . . . . . . . . . . . . . . . .
26
Customer Seice Center . . . . . . . . . . . . . . . . . .
28

2
Notice
• Please read this manual carefully before operation and keep it
for future reference. It will be helpful should you encounter any
operational problems.
• Improper installation will void the manufacturer's warranty.
The installation instructions do not apply to all types of vehicles
and are written as guidelines to assist in installing the system.
• Consult with an experienced technician if you are not
comfoable installing the device on your own.
• Please make sure to read and understand local laws and
regulations regarding cameras and their use in a vehicle. Laws
may va by state.
• Do not obscure the view of the road ahead or obstruct the
deployment of any airbags in the event of an accident.
• When not in use, please disconnect the car adapter from both
the 12/24V DC outlet in your vehicle and the device itself.
• Only clean the device with a soft d cloth, for tough di, apply
some neutral detergent diluted in 5 to 6 pas water on a soft
cloth.
• Note that alcohol, thinner, benzene, etc
.
could cause damage to
the paint or coatings on the device.
• Avoid making contact with the lens as this may cause damage.
• The video recordings made by this device are intended for
personal use only.
• While driving, do not adjust the controls of your device, as
it may draw your attention from your surroundings.

3
Product Specications
Item Name F4 Dash Cam Video Format MP4
Screen Size 2.2" IPS Touch Screen Photo Format JPG
Recording
Resolution
Front 4K/25fps
Front 2.5K/60fps
Front 1080P/120fps
Input DC 12V/24V Output DC 5V-2.5A
Operating
Temperature
-4°F~158°F Lens F2.0
Memo Card 256GB
Warranty
Period
1 Year
Note:
If you have any problems during use, we will provide free device
replacement within 1 year of purchase, in addition to lifetime
technical suppo.
*The specic warranty period is subject to local laws.
Extended Warranty Seice:
You may also receive an additional 6 months of extended
warranty seice by registering your device on our website.
URL: https://www.redtigercam.com/pages/warranty-form
4
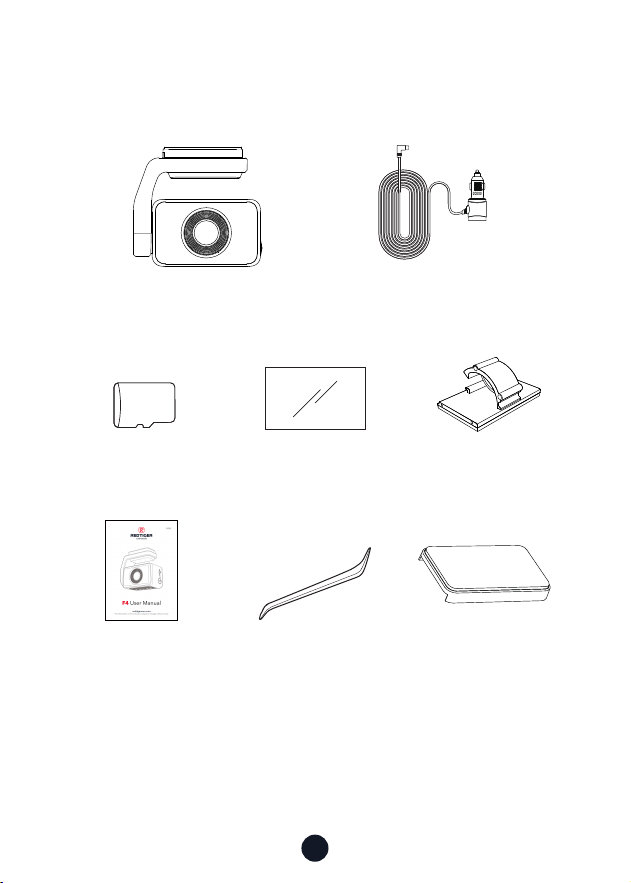
Package Contents
• F4 4K Dash cam
• User Manual • Tool
• Power Supply Cable
with Car Charger
• Electrostatic
Sticker *2
• 32GB Memo Card • Cable Clips*5
32GB
•3M Adhesive
Slipcover
3M
5
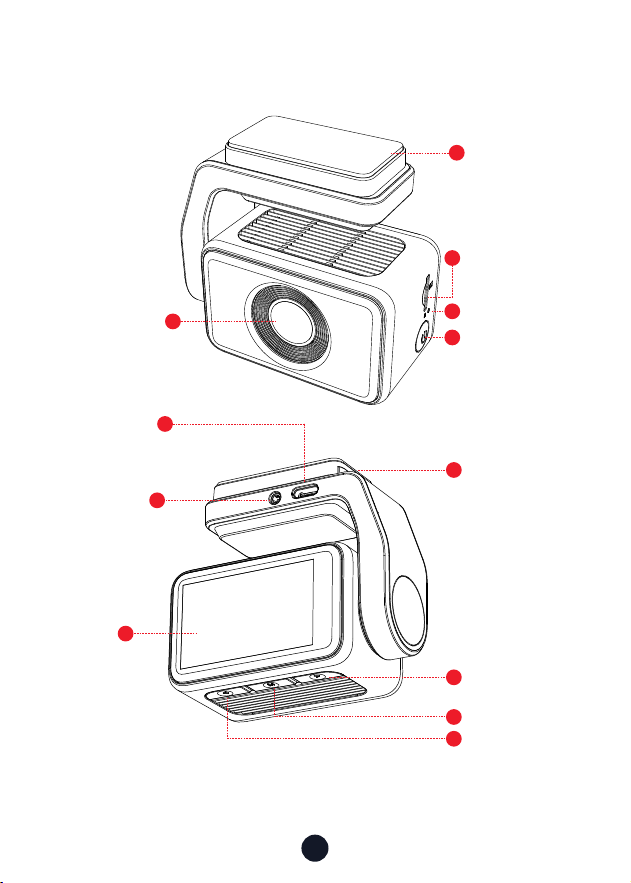
Appearance
1
2
7
8
3
10
9
11
12
5
4
Front camera
lens
3M Adhesive
Rear cam
slot
Screen
Memo Card
Slot
Right button
GPS Mount
Mode button
Left button
USB Type-C
Po
Power button
Reset button
6
6
Wed
2023/07/12
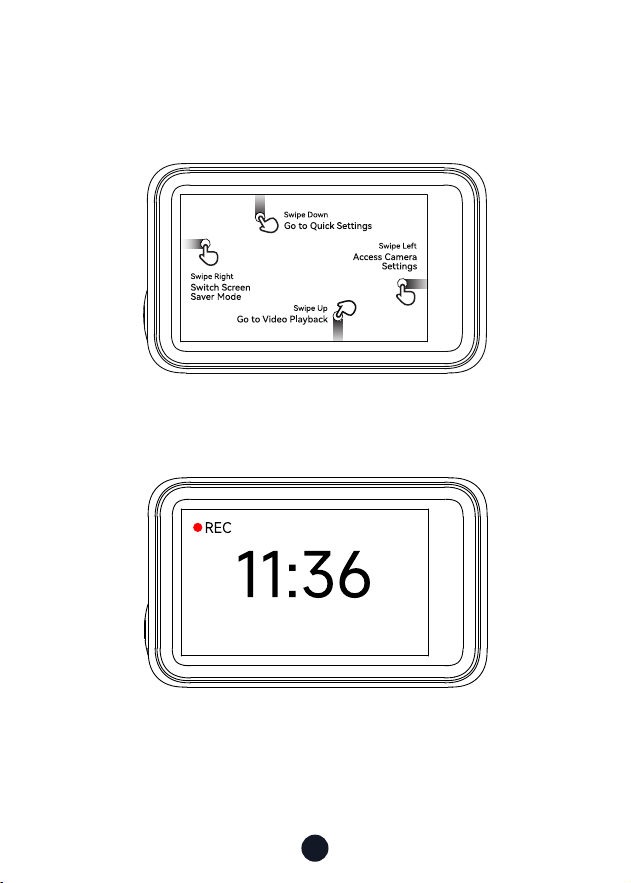
Touch Screen Function
• Screensaver Mode
Swipe the screen right to switch the screen to Front camera >
Screensaver.
7
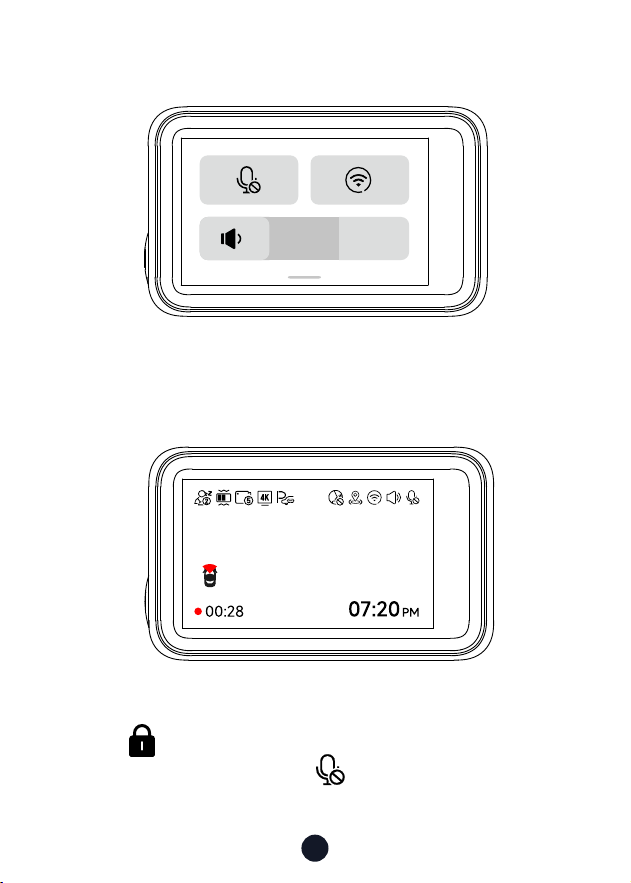
• Quick Setting Mode
• Video Mode
Swipe down to enter the quick setting mode you can conveniently
adjust the volume, turn on or o the recording and wi.
You can double-tap the screen to lock the currently recorded
video and a small white lock appears in the middle of the
screen .
You can manually click the icon at the top of the screen to
choose whether to record audio during video recording.
8
You can manually click the icon at the top of the screen to
choose whether to turn on Wi-Fi.
You can manually click the icon at the top of the screen to
choose whether to turn on the key sound.
You can manually click the icon at the top of the screen to
choose whether to turn on the Voice control
.
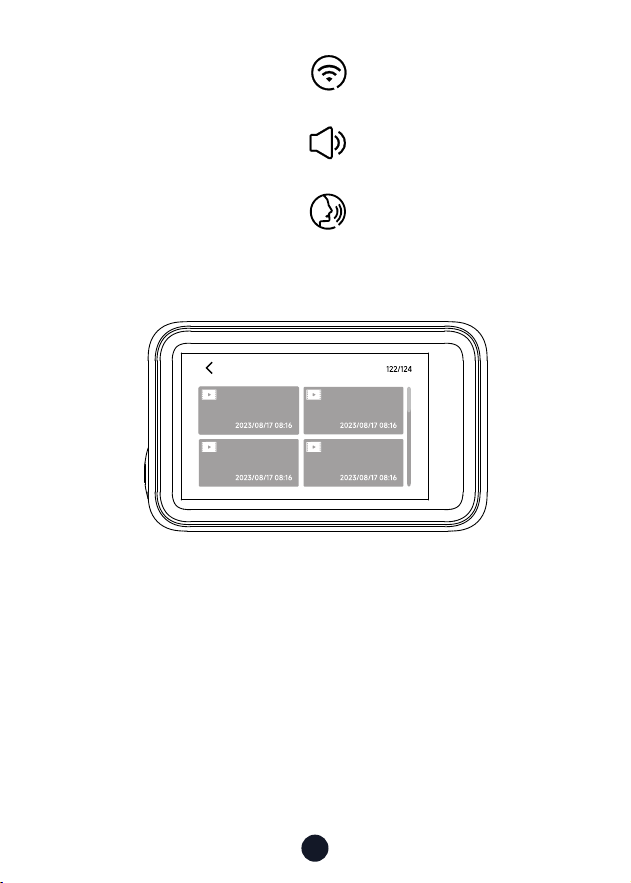
• Playback Mode
Swipe up the recording page to enter playback mode.
Swipe up on the playback inteace to turn pages.
You can click on any video to play it back.
F-cam video
9
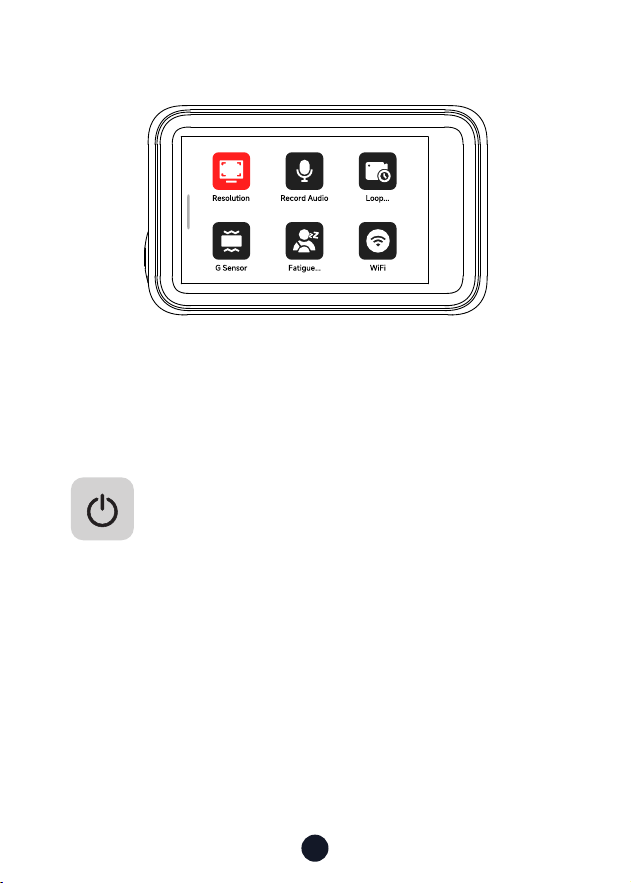
• Setting Mode
Swipe right on the recording page to enter setting mode.
Swipe up and down on the menu inteace to turn pages.
Click on any function icon to touch the screen.
Buttons and Functions
Power Button
Recording Mode:
• Sho press-to Switch screen
• Long press-to Turn o the Camera
Setup Mode:
• Sho press-to Return to the previous screen
Playback Mode:
• Sho press-to Return to the previous screen

10
Down Button
Recording Mode:
• Sho press-to Take a snapshot
• Long press-to Stop recording
Setup Mode:
• Sho press-to Select the next function
Playback Mode:
• Sho press-to Select the next le
Left Button
Recording Mode:
• Sho press-to Lock the recording le
• Long press-to Turn on or o Wi-Fi
Setup Mode:
• Sho press-to Select the previous function
Playback Mode:
• Sho press-to Select the previous le
Menu Button
Recording Mode:
• Sho press to Enter main menu
Setup Mode:
• Sho press-to Enter/Conrm specic settings
Playback Mode:
• Sho press-to Select and play the specic le
• Long press-to Delete/Lock/Unlock the specic le
(After selecting the video)
M
11
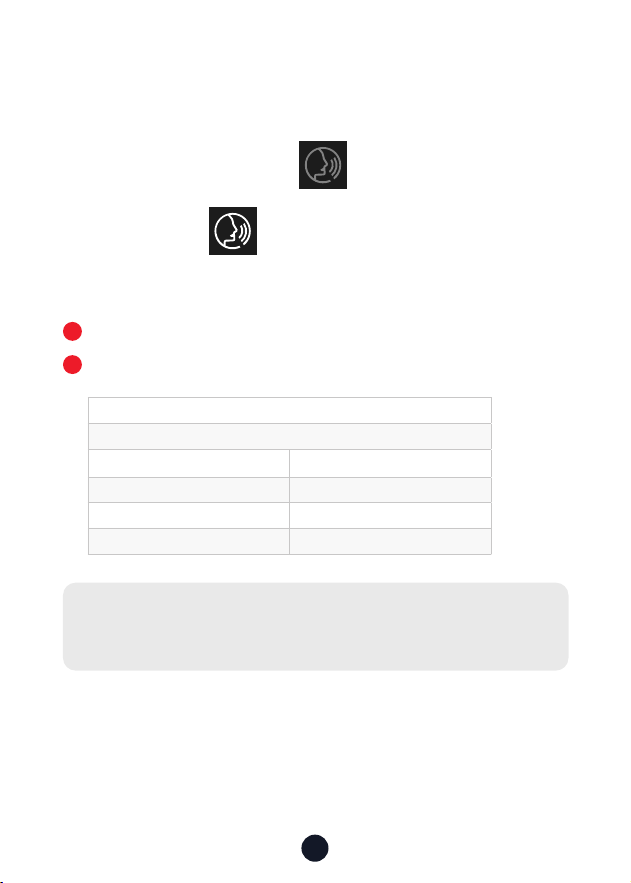
Voice Control Function
Fast control through simple voice commands
If the voice control icon is gray , it means the function is
being connected.
If the icon is white , it means the function can be used
normally.
You have two ways to enable this feature.
Tap on the icon to turn the feature on or o
.
Enter the setting mode-vioce control-on/o.
1
2
Note:
you can see the specic commands in setting-vioce control.
lock the video
take picture
open screen turn o display
turn on wi turn o wi
open recording turn o recording
show front camera show rear camera
12
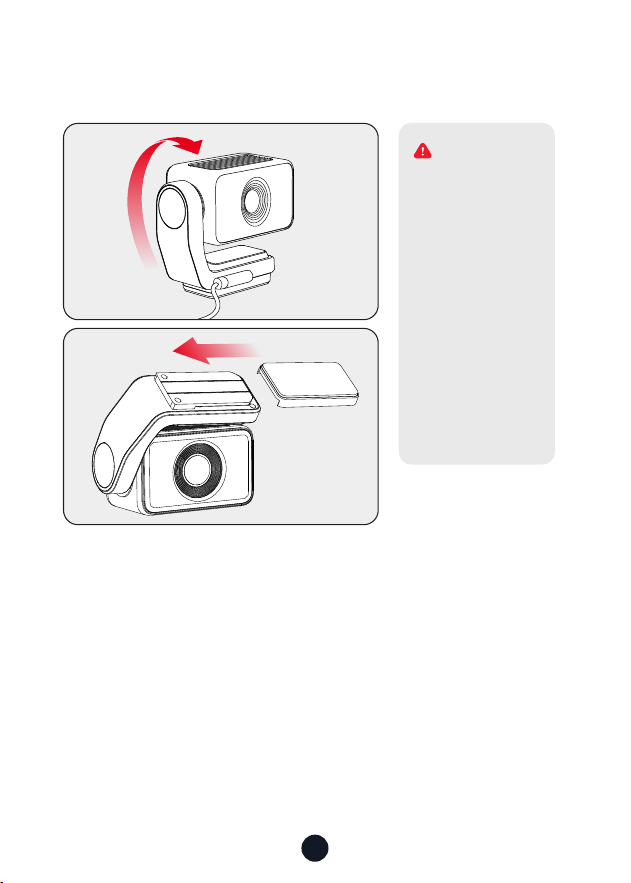
Inversion Function
It oer the ability to rotate 360°for exible mounting options to
ensure stability and prevent inteerence with the driver's view
while allowing for easy removal at any time.
1. GPS signal may
uctuate when
using the machine
upside down.
2. When rotated
180° upside down,
the buttons may
be dicult to
operate, please
t to use the
touch screen
function.
WARNING
13
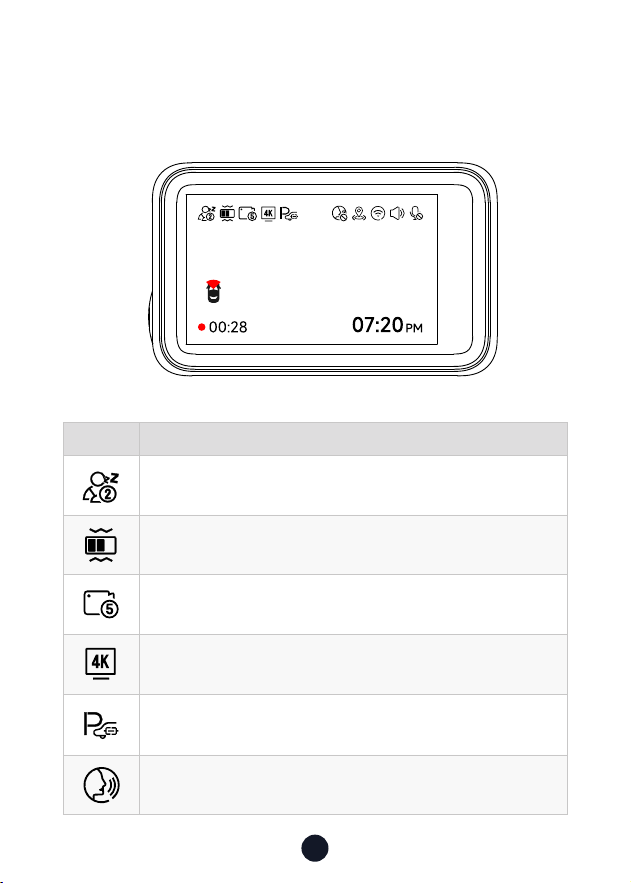
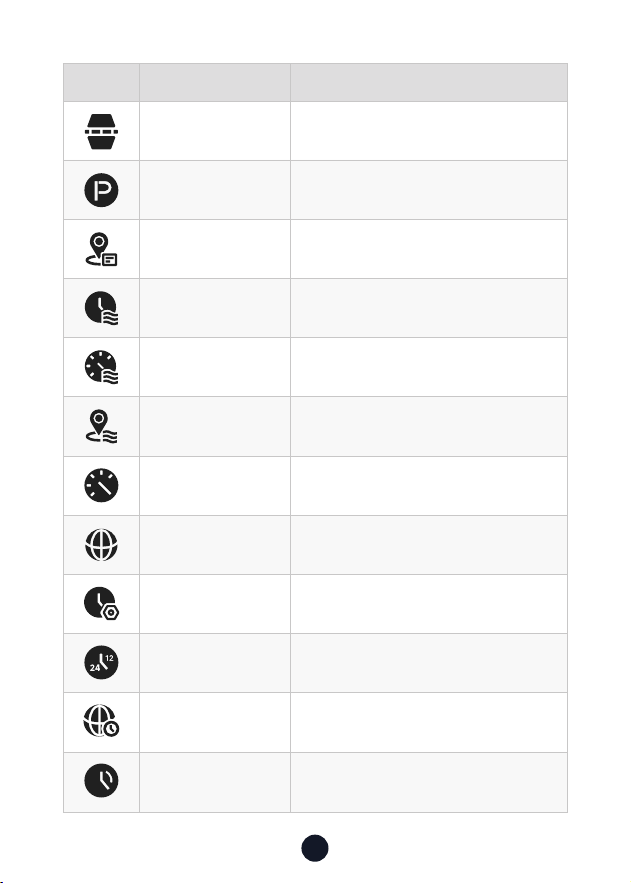
User Inteace Oveiew
• Recording Mode
Icon Description
Fatigue driving function is on
G-Sensor sensitivity
Loop recording in 1 min/3 mins/5 mins per le
Recording resolution
Whether to connect the hardwired kit and set up parking
monitoring
Voice control
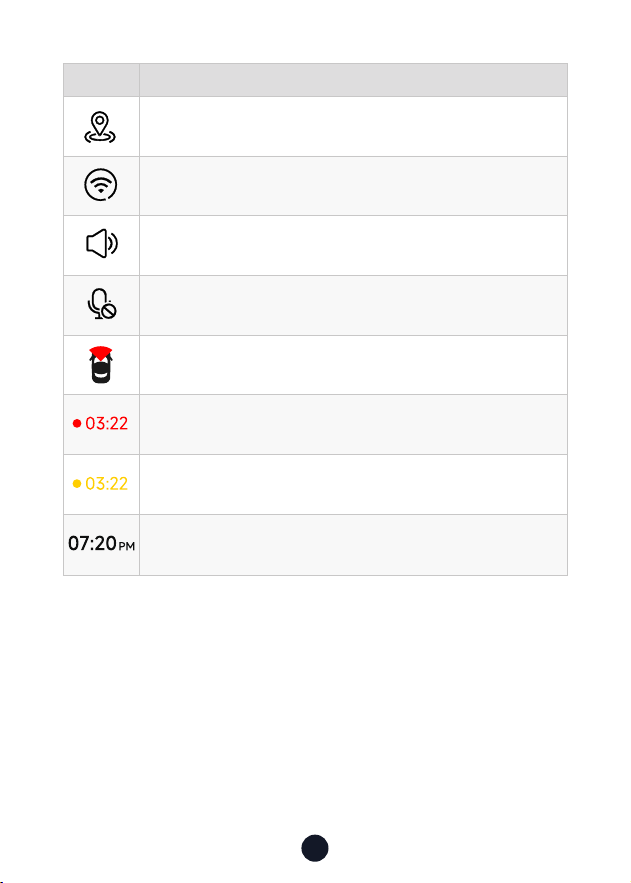
14
Icon Description
GPS status
Wi-Fi status
Camera system sound status
Voice recording statusd
Whether the rear camera is connected
Recording status and recording time
Emergency recording is on
Date and time of the camera
15
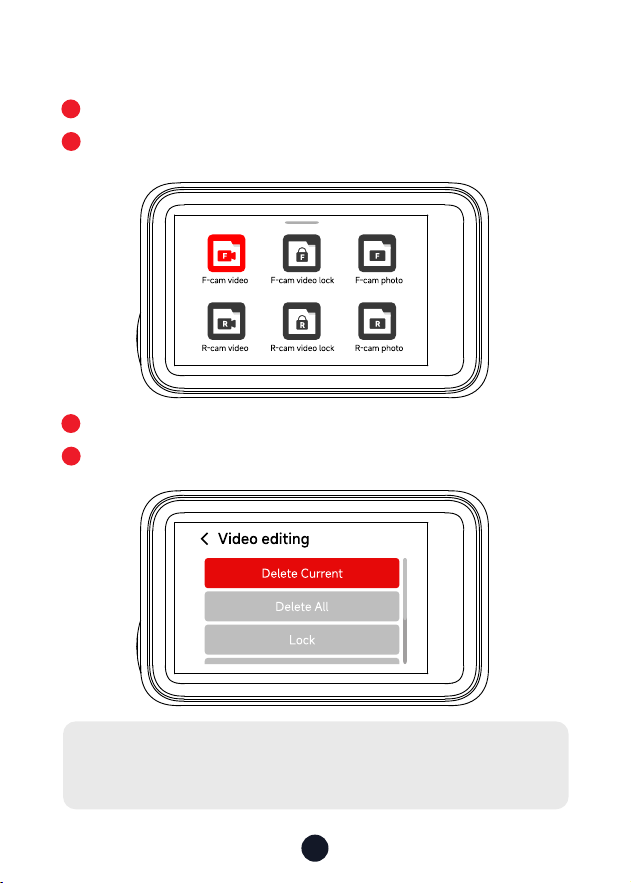
• Playback Mode
Swipe up the recording page to enter playback mode.
Press the Left or Right button to select the folder you want to
play, then press the M button to enter.
Press the M button to watch the recorded video.
Long press the M button for 3 seconds to edit your recorded
videos.
1
3
2
4
Note:
All of the above functions can be done via the touch screen
.
16
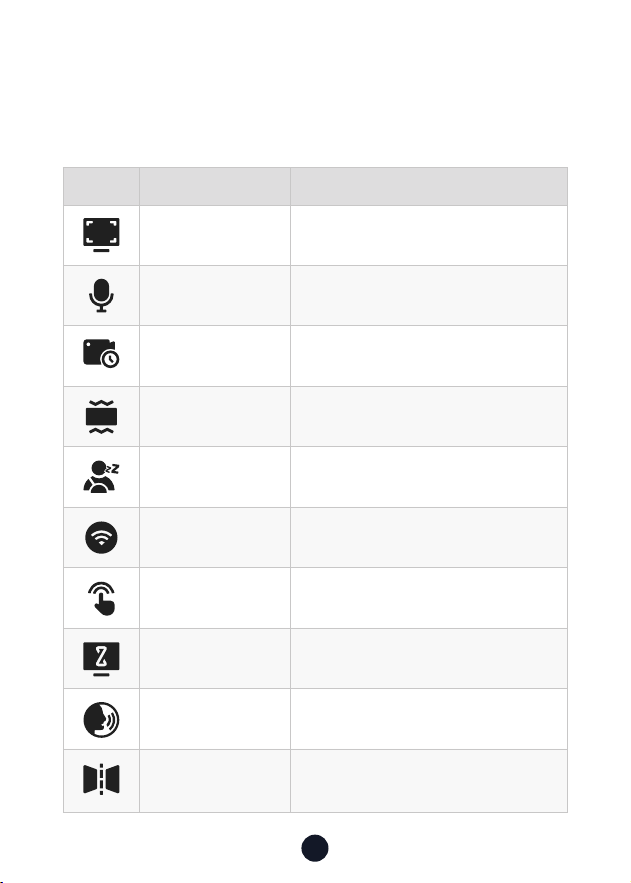
Icon Function Option/Description
Resolution
2160P @25fps/1440P @60fps/1080P
@120fps
Record Audio Sound Recording
Loop recording 1/3/5mins
G-sensor O/Low/Medium/High
Fatigue Driving
A Reminder Will be Made During
1h/2h/3h/4h/OFF
Wi-Fi ON/OFF
Click Tone ON/OFF
Screen Saver
OFF/10s/30s/2mins,
Screen goes o after the set time
Voice control ON/OFF/Voice Command
Mirror Flip
Veical Flip Your Rear View
*
Need to connect rear camera
Function Oveiew
Sho press the M button to enter the settings menu, where you
can adjust various functions and parameters of the camera.
17
Icon Function Option/Description
Rear Cam Flip
Veical Flip Your Rear View
*
Need to connect rear camera
Parking Mode Please connect the ACC hardwire kit
GPS Info Display GPS signal strength
Date Stamp ON/OFF
Speed Stamp ON/OFF
GPS Stamp ON/OFF
Speed Units KM/H / MPH
Language Choose Your Prefered Language
Clock Setting Update With GPS
Time style 12h/24h
Time Zone Choose Your Time Zone
DST Daylight Saving Time ON/OFF
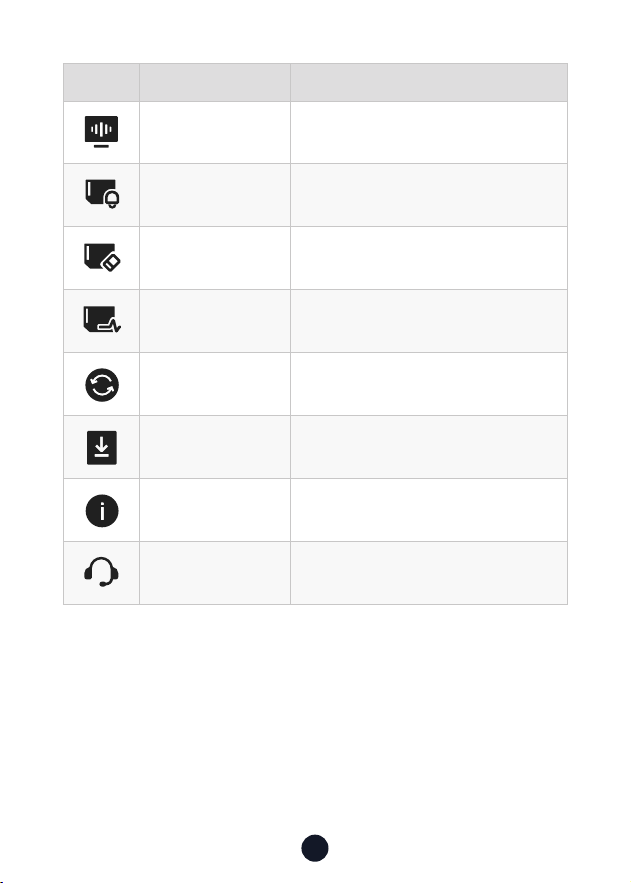
18
Icon Function Option/Description
Frequency 60Hz/50Hz
Format Reminder Reminder to Clear Data
Format Format SD card. All data will be deleted
Card Speed Card Speed Detection
Default Setting Reset All Settings
APP A QR Code for Redtiger app
Products Software Version
Help Center Scan the QR code to contact us
Note:
• In order to ensure a smooth user experience, it is suggested
that you format your memo card once a month.
• When you change the Click Tone setting to OFF, the staup and
shutdown sounds will also be turned o.
19
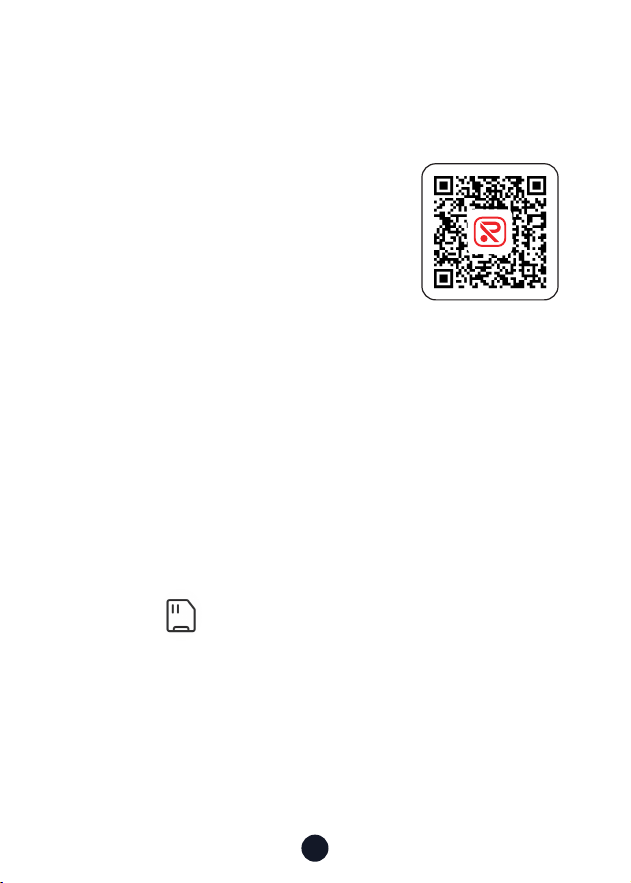
APP and Wi-Fi Function
• How to connect Wi-Fi?
1. Download the APP
You can download the APP from:
-- Ocial website: https://www.
redtigercam.com/pages/app
-- QR Code from your dash cam or on
the right side.
-- Apple APP Store or Google Play Store
search "Redtiger".
2. Turn on the Wi-Fi on the dash cam, the Wi-Fi and SSID and
password will appear on the screen.
3. Open Redtiger APP> jump to the Wi-Fi connection inteace
according to the steps> nd the Wi-Fi of the dash cam> enter
the password to connect.
(The default password is 12345678)
4. After successfully connecting to Wi-Fi, return to the APP to
use it.
• View/Download/Delete/Share Video
1. Click the on the main inteace to view video and
picture les.
2. Long press the video le and select it, then choose to
download or delete.
3. Return to the APP home page and select the Album> Open
and watch/share it.
20
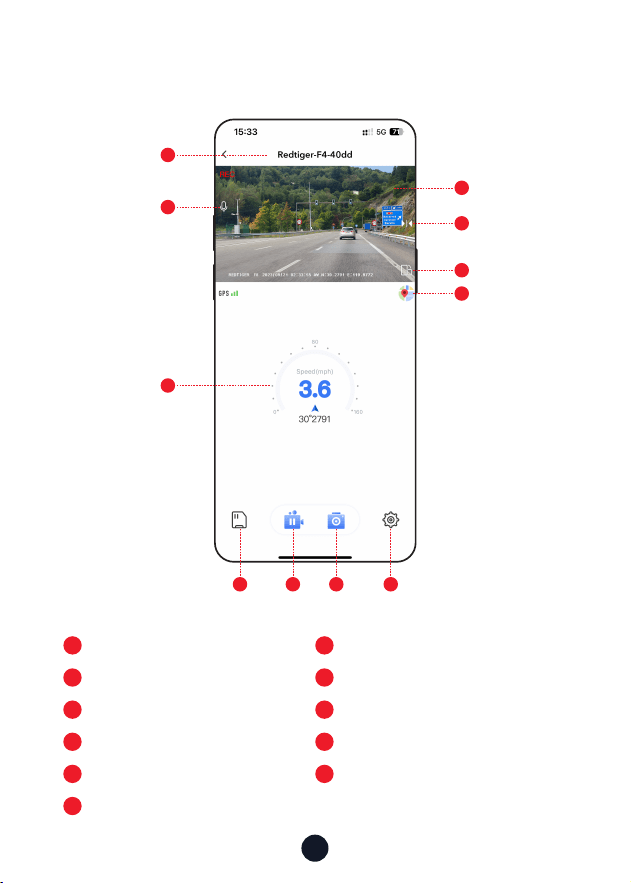
• App home
1
6
2
7
Native Wi-Fi Name
Rotate the video screen left and right
Turn on/o recorded sound
Map
8
3
9
Dash cam le
GPS information
Pause/sta recording
4
10
5
11
Video play window
Take pictures
Mirror Flip
Dash cam settings
1
2
5
4
6
7
3
8 9 10 11

21
• Over-The-Air Updates
Note: Please update the Redtiger App to the latest version to use
this function.
1. To peorm an over-the-air update, disconnect your phone
from the dash cam’s Wi-Fi network. Connect your phone to
LAN (not the dash cam’s Wi-Fi) for 5 seconds, then
disconnect. Reconnect to the dash cam’s Wi-Fi network.
2. Once Wi-Fi connection is successful, open the Redtiger App
to stausing it. If new software is detected, the App page will
indicate the availability of an update.
3. To peorm the update, click on “Upgrade Now”. The Redtiger
app will prompt you to download the update package.
4. Connect the dash cam to send the update package. Do not
power o the dash cam during the upgrade process. Once
the upgrade is completed, the app will display the upgrade
success message, and the dash cam will automatically resta.
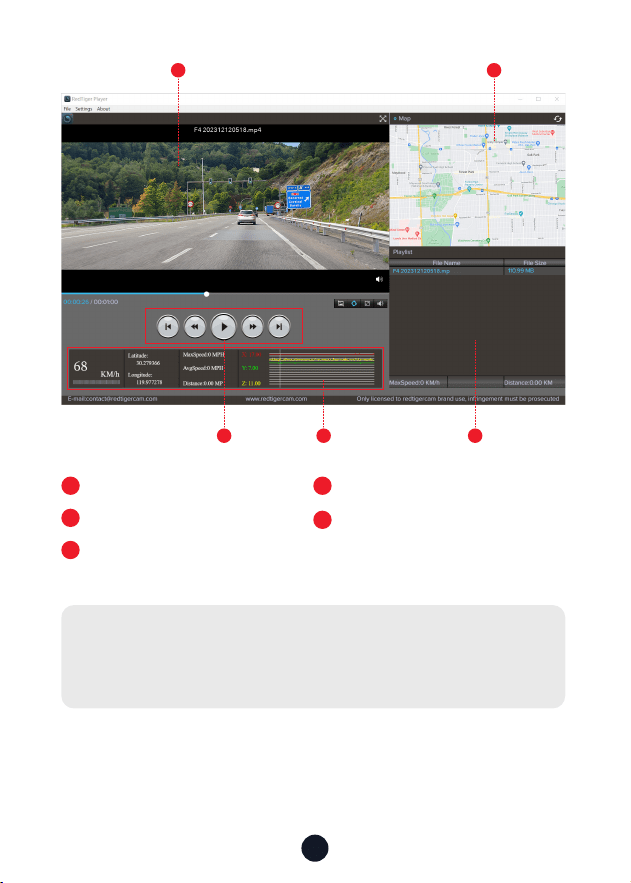
How to Play Using a Computer
We recommend using REDTIGER Player as the correct video player
to watch/play videos. It can also view Google Maps.
You can Download it for free on Mac or Windows from the
following link: https://www.redtigercam.com/pages/gps-player
You can choose dierent playback modes in Settings > Video
Playback Mode. You can set playback speed, language, map,
and various other functions.
22
1
3
5
1
3 54
2
1
Video play window (Front)
2
3
Map and track display
Play control panel
4
5
Speed and driving state indication
Play list
Note:
When you nd the desired video le, hold down the left mouse
button and drag and drop it onto the video player to play it.
23
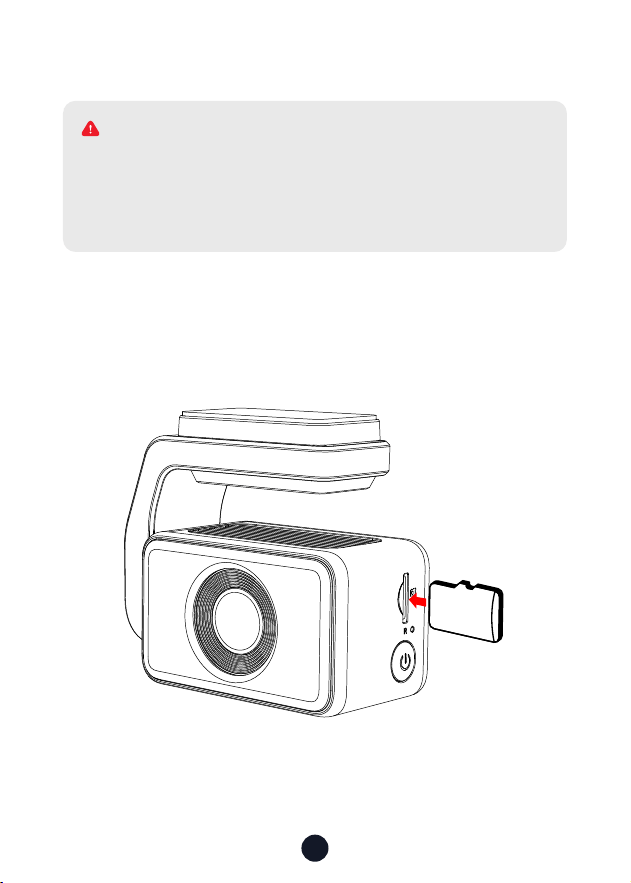
Installation
• Inse Memo Card
Inse the Memo Card into the dash cam, taking care that the
gold contacts are facing towards the screen of the dash cam.
Push the memo card until it clicks into the slot.
32
GB
Please make sure to connect all cameras and wires before
power on the cam screen, otherwise, the camera cannot work
properly. Please follow the instructions below for the rst-
time installation of the Redtiger dash cam.
WARNING
24
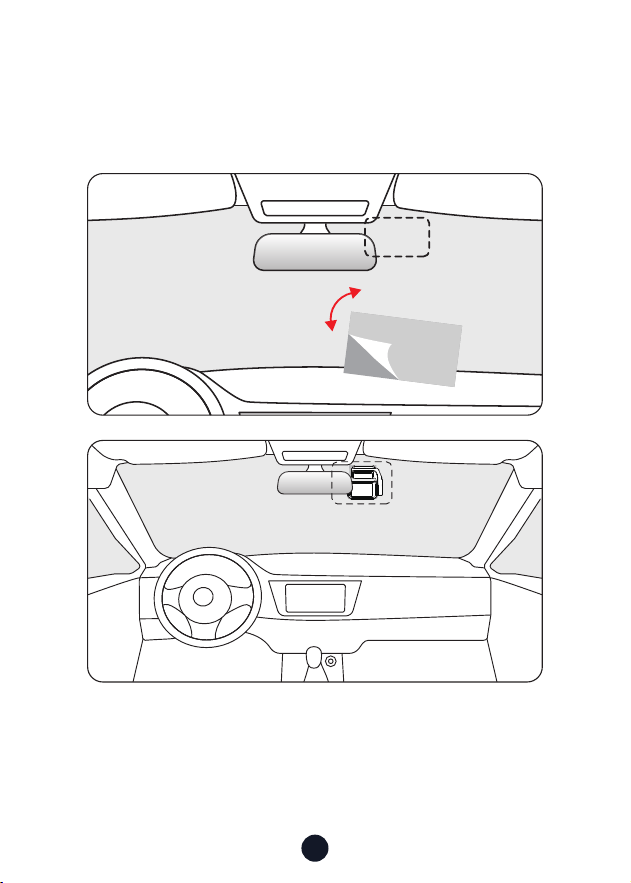
• Front camera installation
Peel o the electrostatic sticker on the cellophane and transfer
it to where you want to stick it. Attach the front camera to the
electrostatic sticker and press to make it rmer.
25
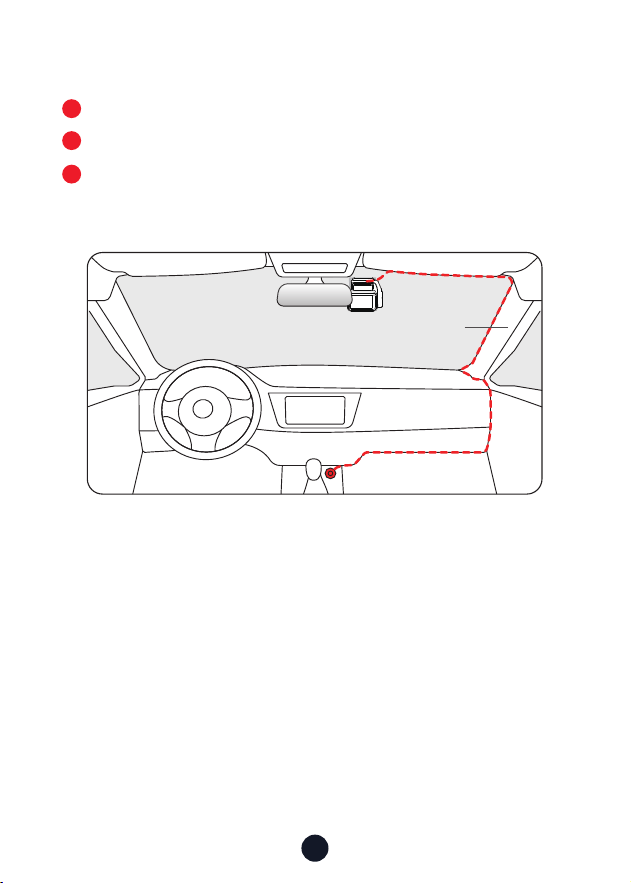
• Wire Layout In The Vehicle
The car charger is connected to the cigar socket.
Connect the other end of the car charger to the dash cam.
Use the crowbar to run the power cable along the front
windshield and the roof, and hide the cable down the A-pillar,
so as not to block the driver's sight and cause danger.
3
1
2
Pillar A

26
Trouble Shooting
•Why is there no GPS signal?
1. Clean and reconnect the probe on the main unit and bracket.
Check for any inteerence in your car, like metal lm on the
windshield, radio antenna, or radar detector.
2. Move your car to an open area.
3. If the GPS icon is , it means the GPS signal is good.
If the GPS icon is , it means that the GPS signal is being
received. If the GPS icon is , it means there is no GPS signal.
•How to turn o the on/o music of dash cam?
1. Click the system sound icon on the screen to turn o the
camera sound
.
2.Please go to Settings > Click Tone > O.
When the click tone is turned o, the power on and o music
will also be turned o.
•Why does my dash cam prompt card error or please format
Memo Card eve once in a while?
Please follow the steps below to check:
1. Please go to Settings > Format Reminder to check whether
the regular format reminder is enabled.
2. Format the Memo Card.
3. Restore facto settings and resta the dash cam.
4. Update the rmware.
•Dash cam repeated resta/no boot?
1. Make sure you are using the original car charger.
2. Unplug the Memo Card and car charger in turn, and
reinstall them. Check whether the sho circuit is caused by
accessories.

27
3. Reset the machine through the small hole at the bottom of
the driving recorder.
4. If none of the above can solve the problem, please t to
power on the USB cable to conrm whether the host can be
used normally.
5. Please go to the ocial website to update the rmware.
6. If it is not resolved, please contact your dedicated customer
seice for a replacement.
•Why "Mass storage" appears on the screen?
"Mass storage" happens when you use a USB cable with data
transfer mode causing the dash cam to enter transfer mode.
In this mode, data can only be transferred; no other functions
work. For best results, use the original car charger or a USB
cable without data transfer mode.
•Why can't I connect to Wi-Fi?
1. Check the working distance of Wi-Fi, about 15ft.
2. Check the SSID and password of the Wi-Fi, or whether there
are other devices connected to the Wi-Fi..
3. Turn o mobile data, security software, and VPN on your phone.
4. If the issue persists, please contact customer suppo for
assistance.
•Why is the time setting incorrect?
The dash cam features built-in GPS. It automatically adjusts
time based on your location and time zone, eliminating the
need for manual time changes. And you can adjust the time
through Settings > Time Zone/DST.
•Why is the screen ickering when updating rmware?
This is a normal phenomenon, it is expected to wait for about
20s, the rmware will be updated to normal use, you can check
whether to update to the latest version in the settings > product
.
28
Help Center WhatsApp
Redtiger
For more information:
After sales: help@redtigercam.com
Business Cooperation: contact@redtigercam.com
Customer Phone Seice: +1 888 966 8028 (US)
Customer Seice Center
If you have any problems using or installing the dash cam, please
contact us with any questions.


Check us out here.
Product and seice are the foundation of Redtiger.
www.redtigercam.com
Instagram: @redtiger_dashcam
Facebook: Redtiger Dash Cam