User manual
Contents
In the box
Download the MyDyson™ app
Getting started
The LCD Screen
Quick start
Regular maintenance:
Self-clean cycle
Washing the Dirty water tank
Washing the Debris tray
Washing the rollers
Washing the Debris brush bars
Washing the Clean water tank
Cleaning the Dock
Replacing the rollers
Replacing the Debris brush bars
Disassembling your machine
Looking after your machine
Dyson WashG1 Logo.
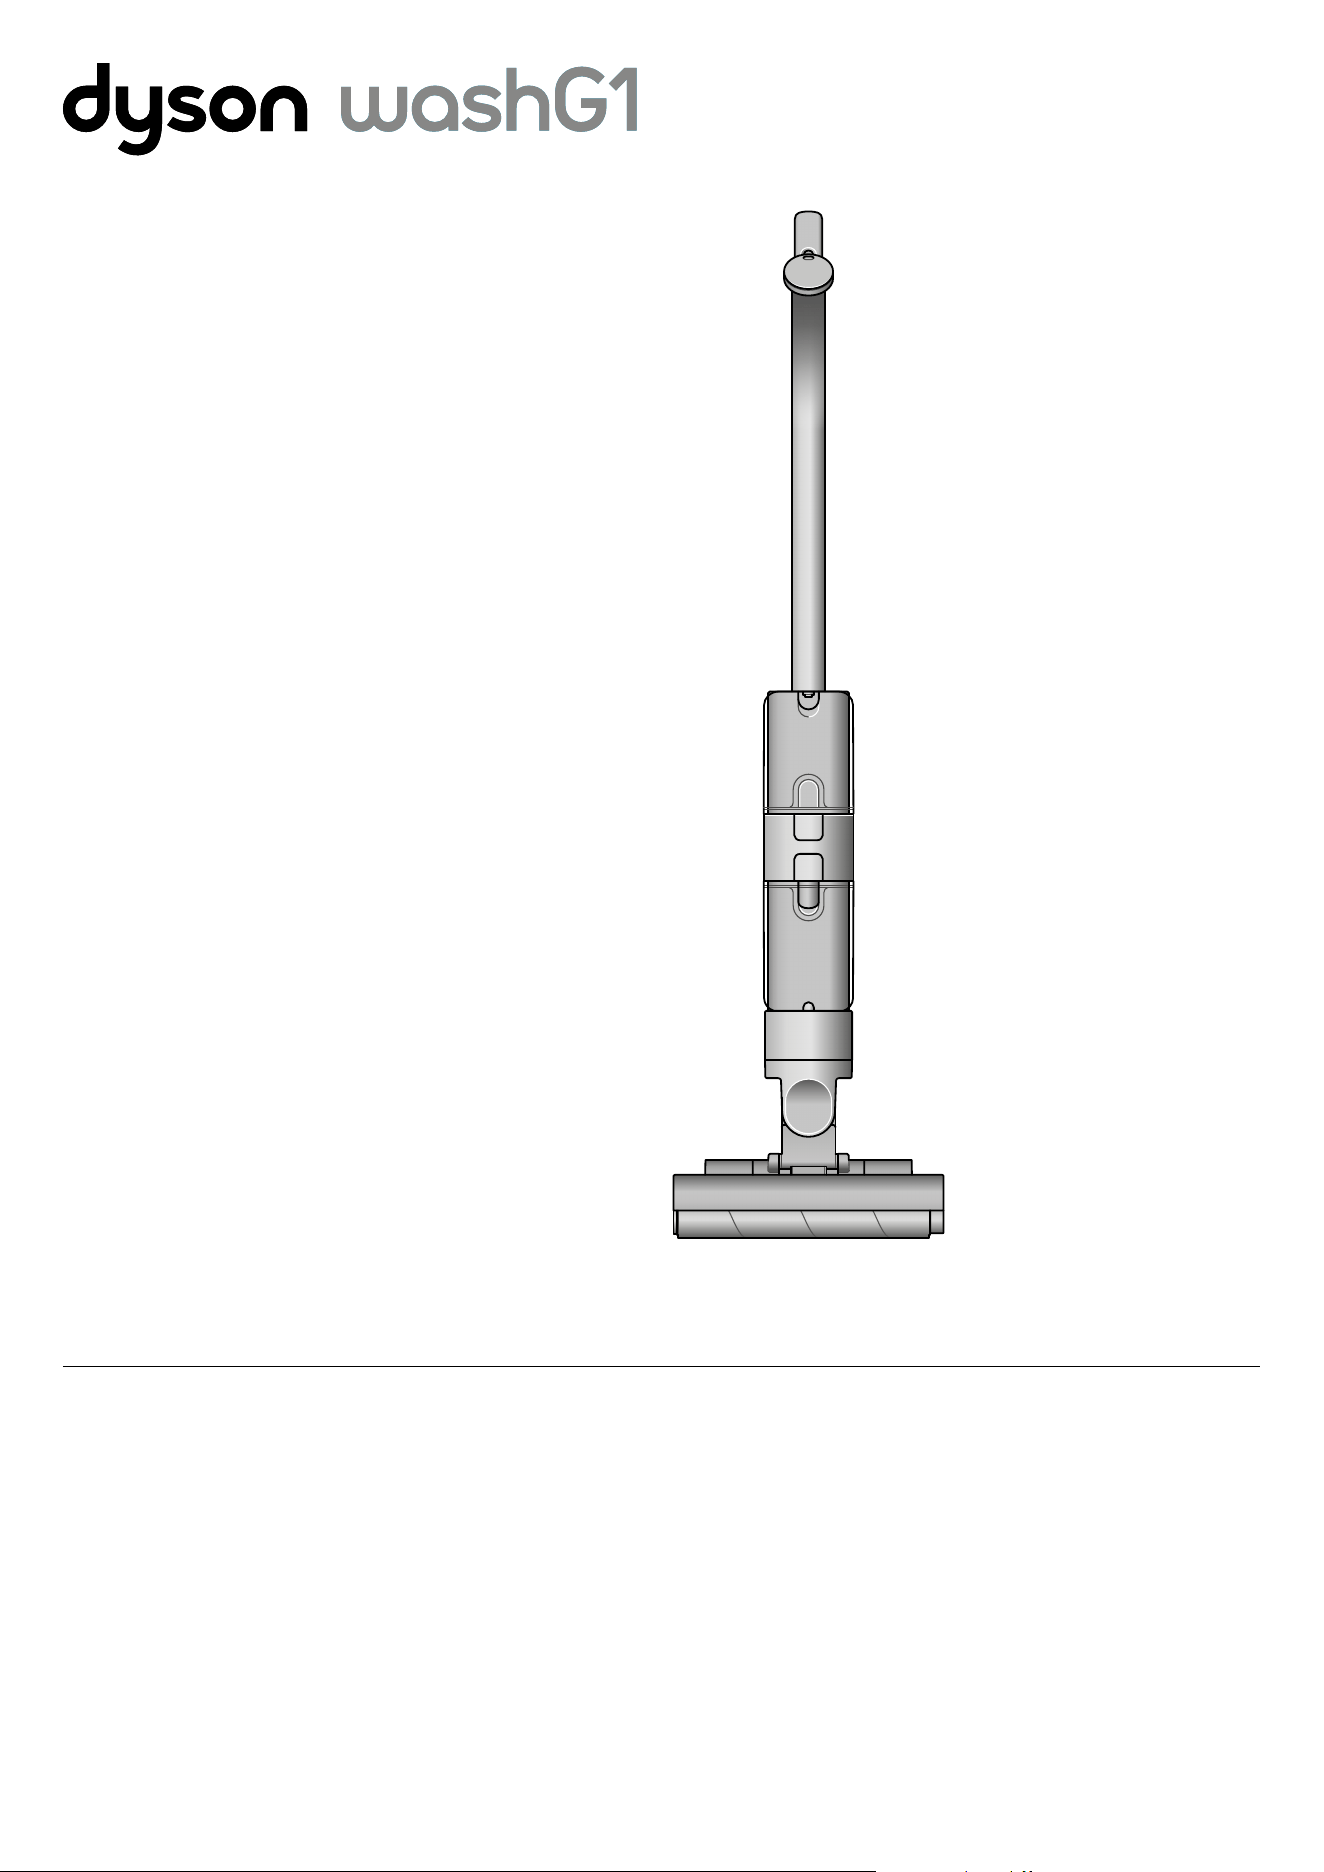
Dyson WashG1 machine
showing cleaner head.
In the box
Download the
MyDyson™ app
Download the MyDyson™ app from the App Store
or Google Play. Open the app and follow the on-
screen instructions to create a new account.
Apple and the Apple logo are trademarks of
Apple Inc., registered in the U.S. and other
countries. App Store is a service mark of Apple
Inc., registered in the U.S. and other countries.
Google Play and the Google Play logo are
trademarks of Google Inc.
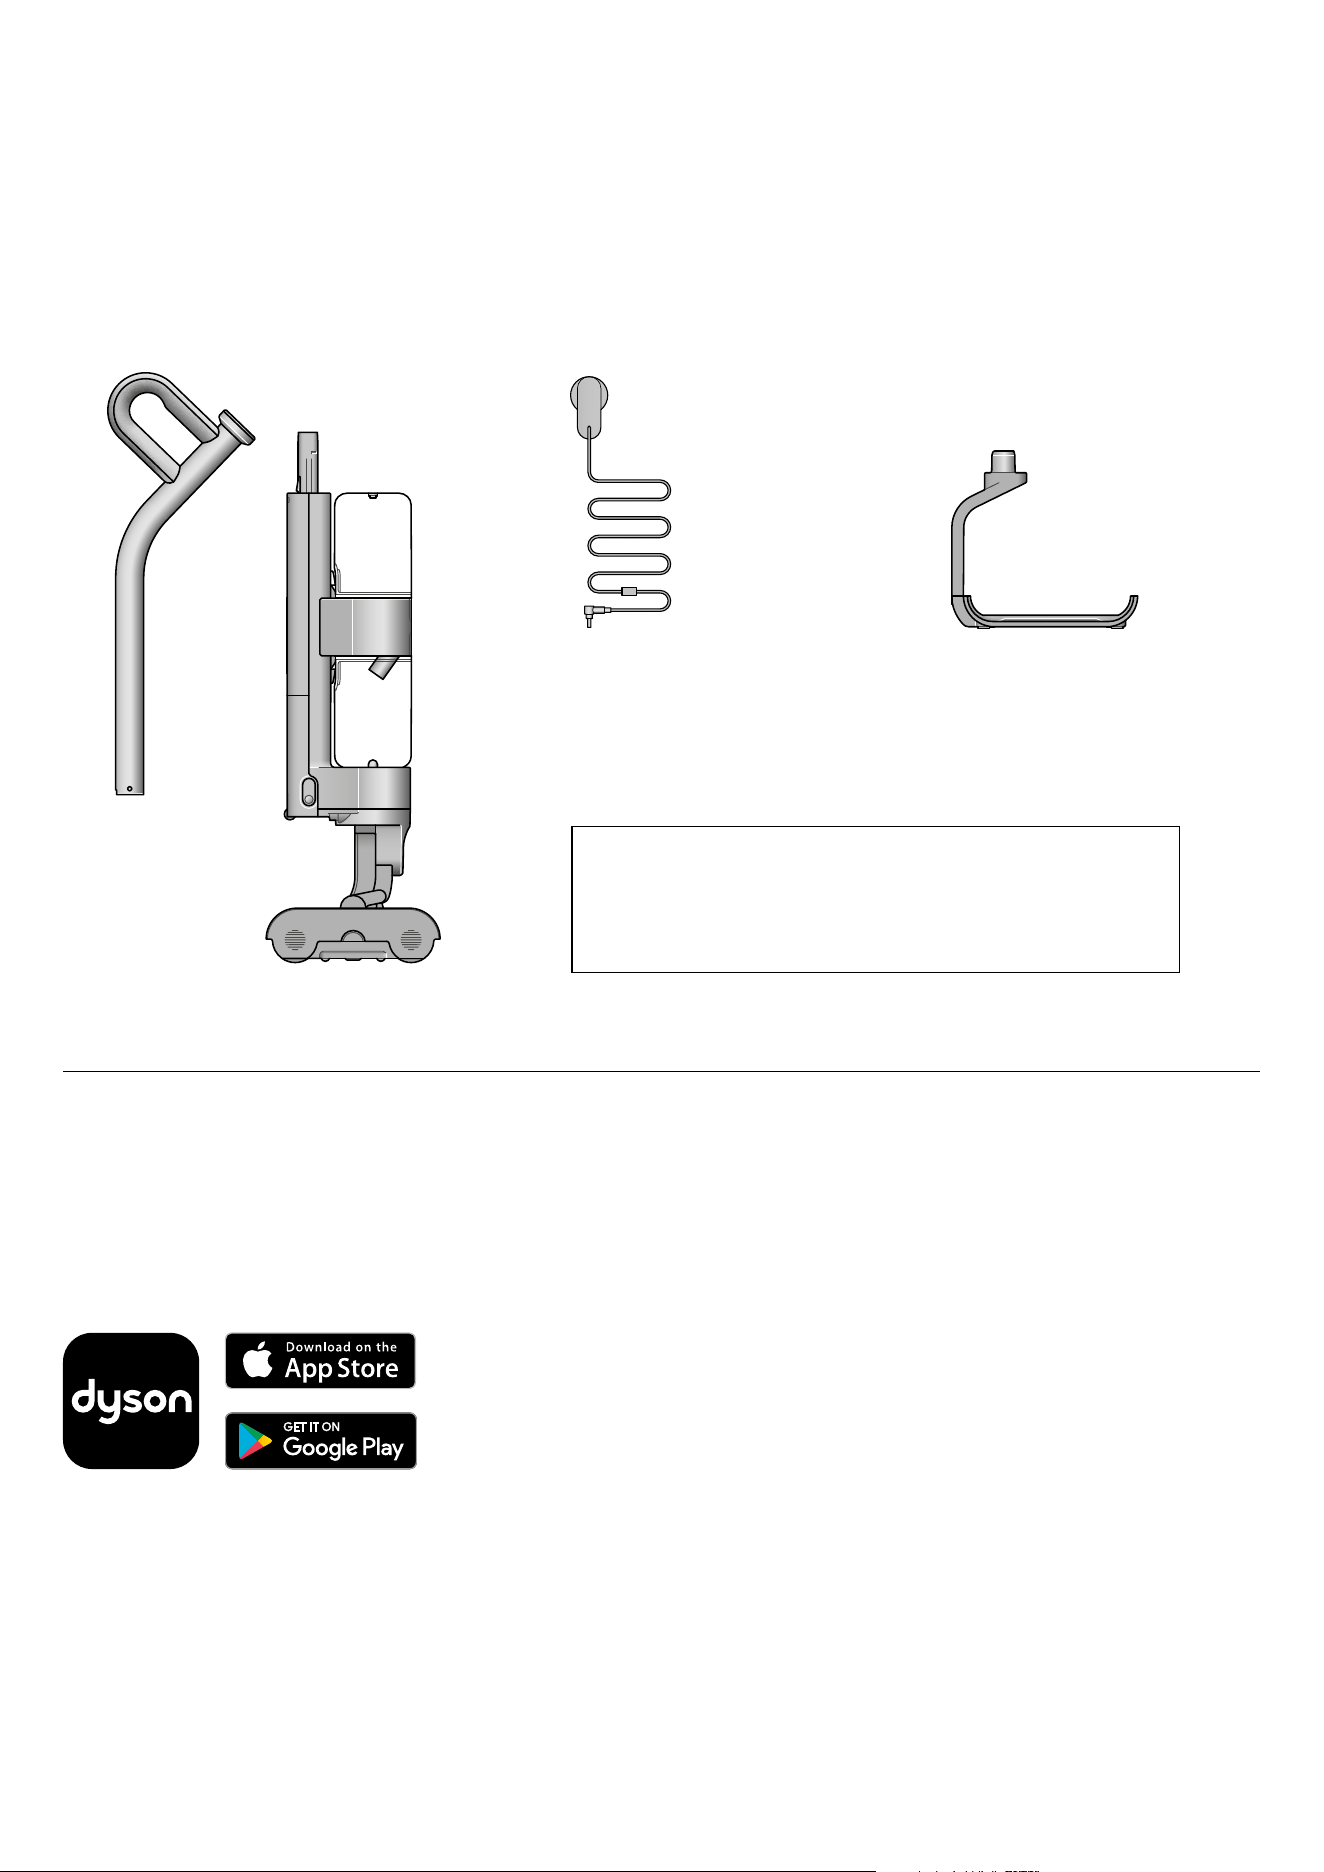
Charger
Your machine is boxed in two parts:
1. Machine body.
2. Handle.
Simply attach the handle to the main body.
Wet cleaner with click-in battery
One-piece charger with plug,
connector and cable. Charges your
machine with or without a dock.
Dyson WashG1™ wet cleaner charges
on the dock, ready for your next clean.
Charging dock
Handle
Machine body
Our recommendation
Keep the charging jacks (on the charger and charging dock) away from
conductive materials such as carbon fiber.
Disconnect the charger from the mains before cleaning.
Diagram of
machine charger.
Illustrations of the
Dyson WashG1 handle
and machine body.
Diagram of machine
charging dock.
Logos of Dyson, App store and Google Play.
Getting started
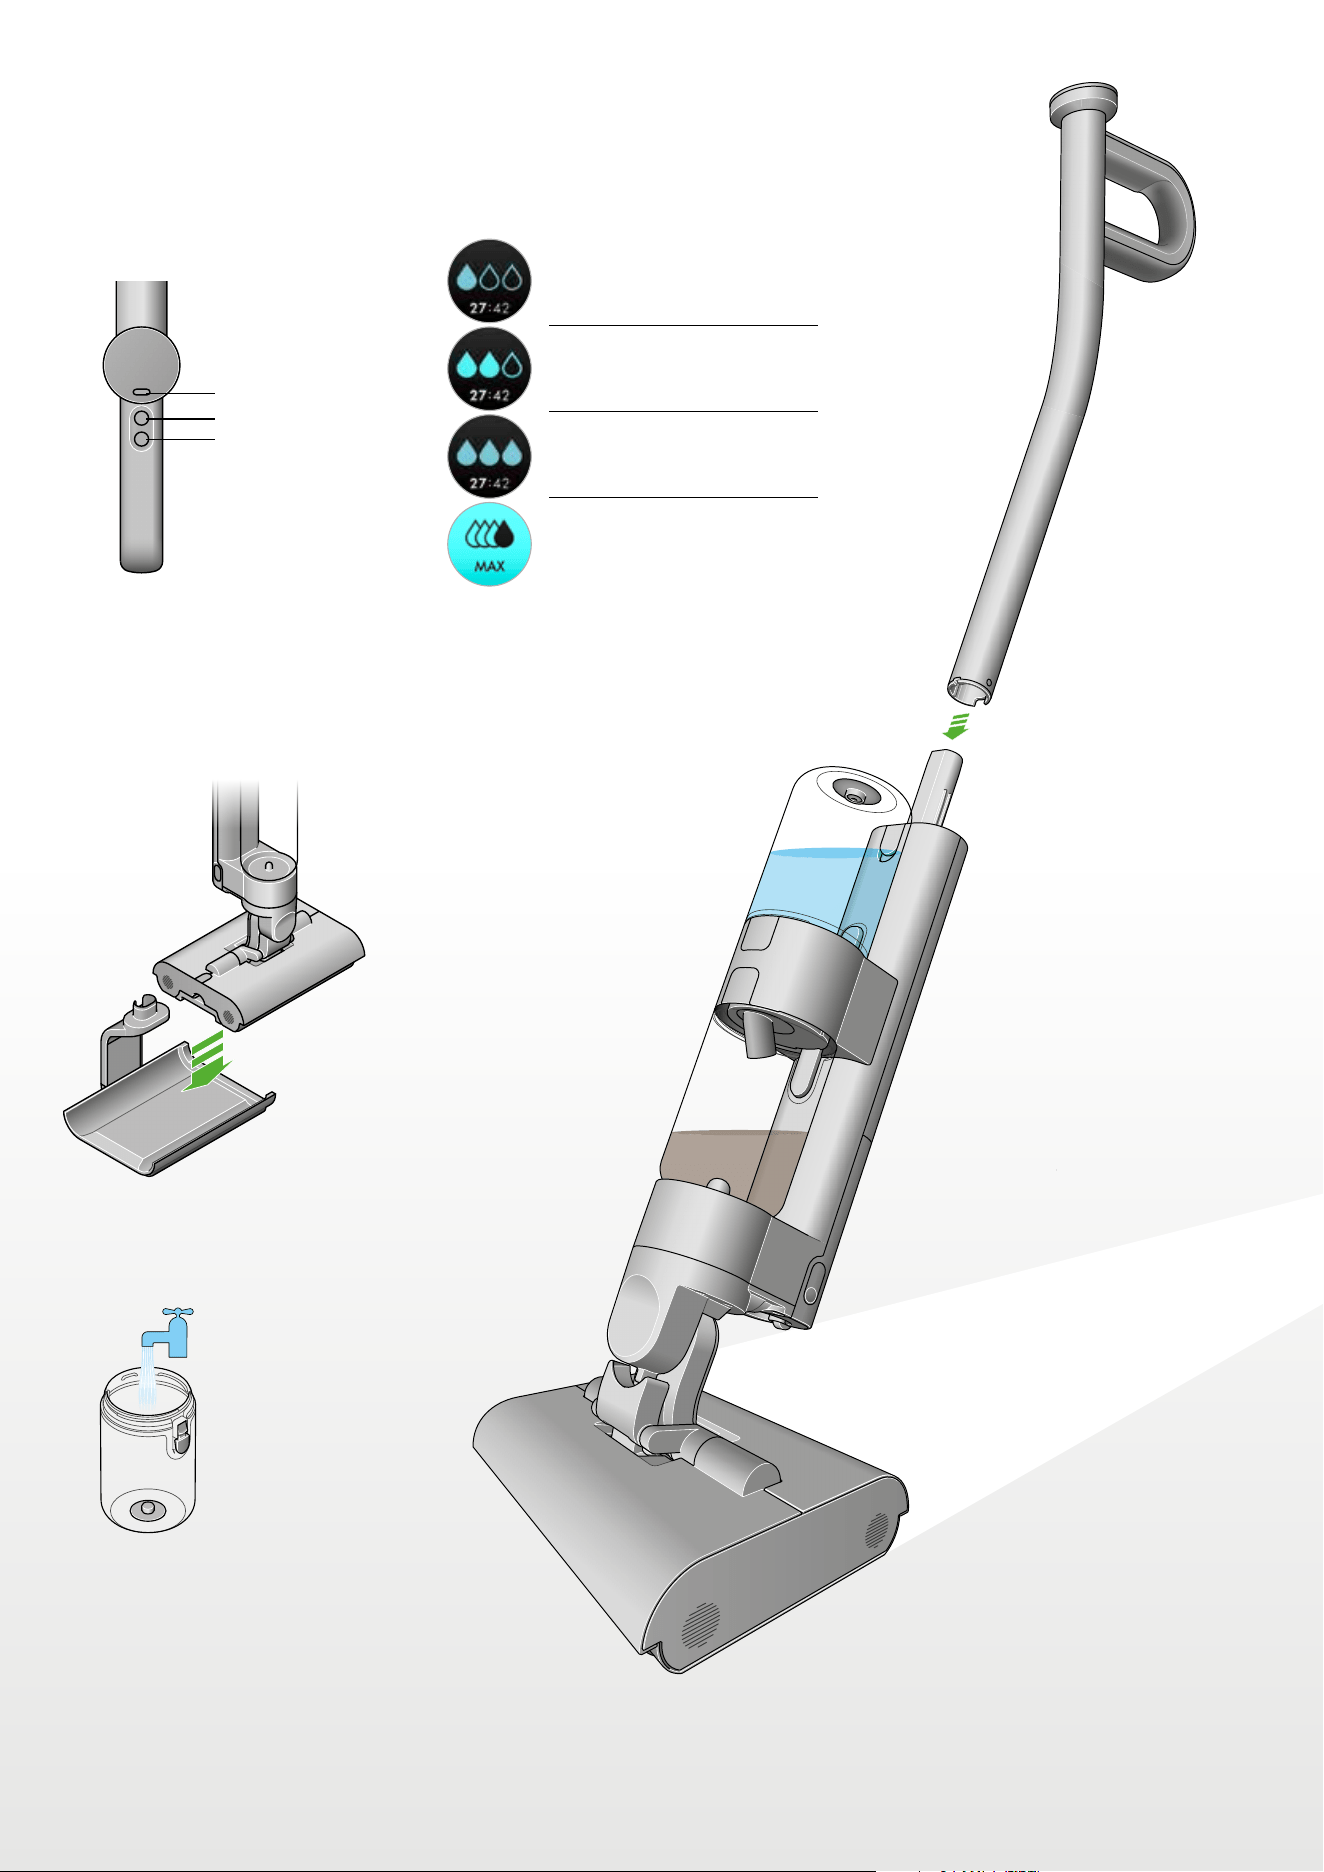
Get to know your machine controls
Hydration modes
Before use
Charge on dock
Click-in wand
Fill the clean water tank.
Mode select button
Power on/off button
Level 1:
Level 2:
Level 3:
MAX:
MAX button
Diagram indicating
mode, power and
max buttons.
Diagram indicating the hydration modes
1, 2, and 3, plus the MAX setting.
Diagram of the Dyson
WashG1 wet cleaner
being placed on the
charging dock.
Diagram with a green
arrow indicating how
to attach the click-in
wand to the main
body of the machine.
‘Illustration of the Clean
water tank being filled
under a tap.
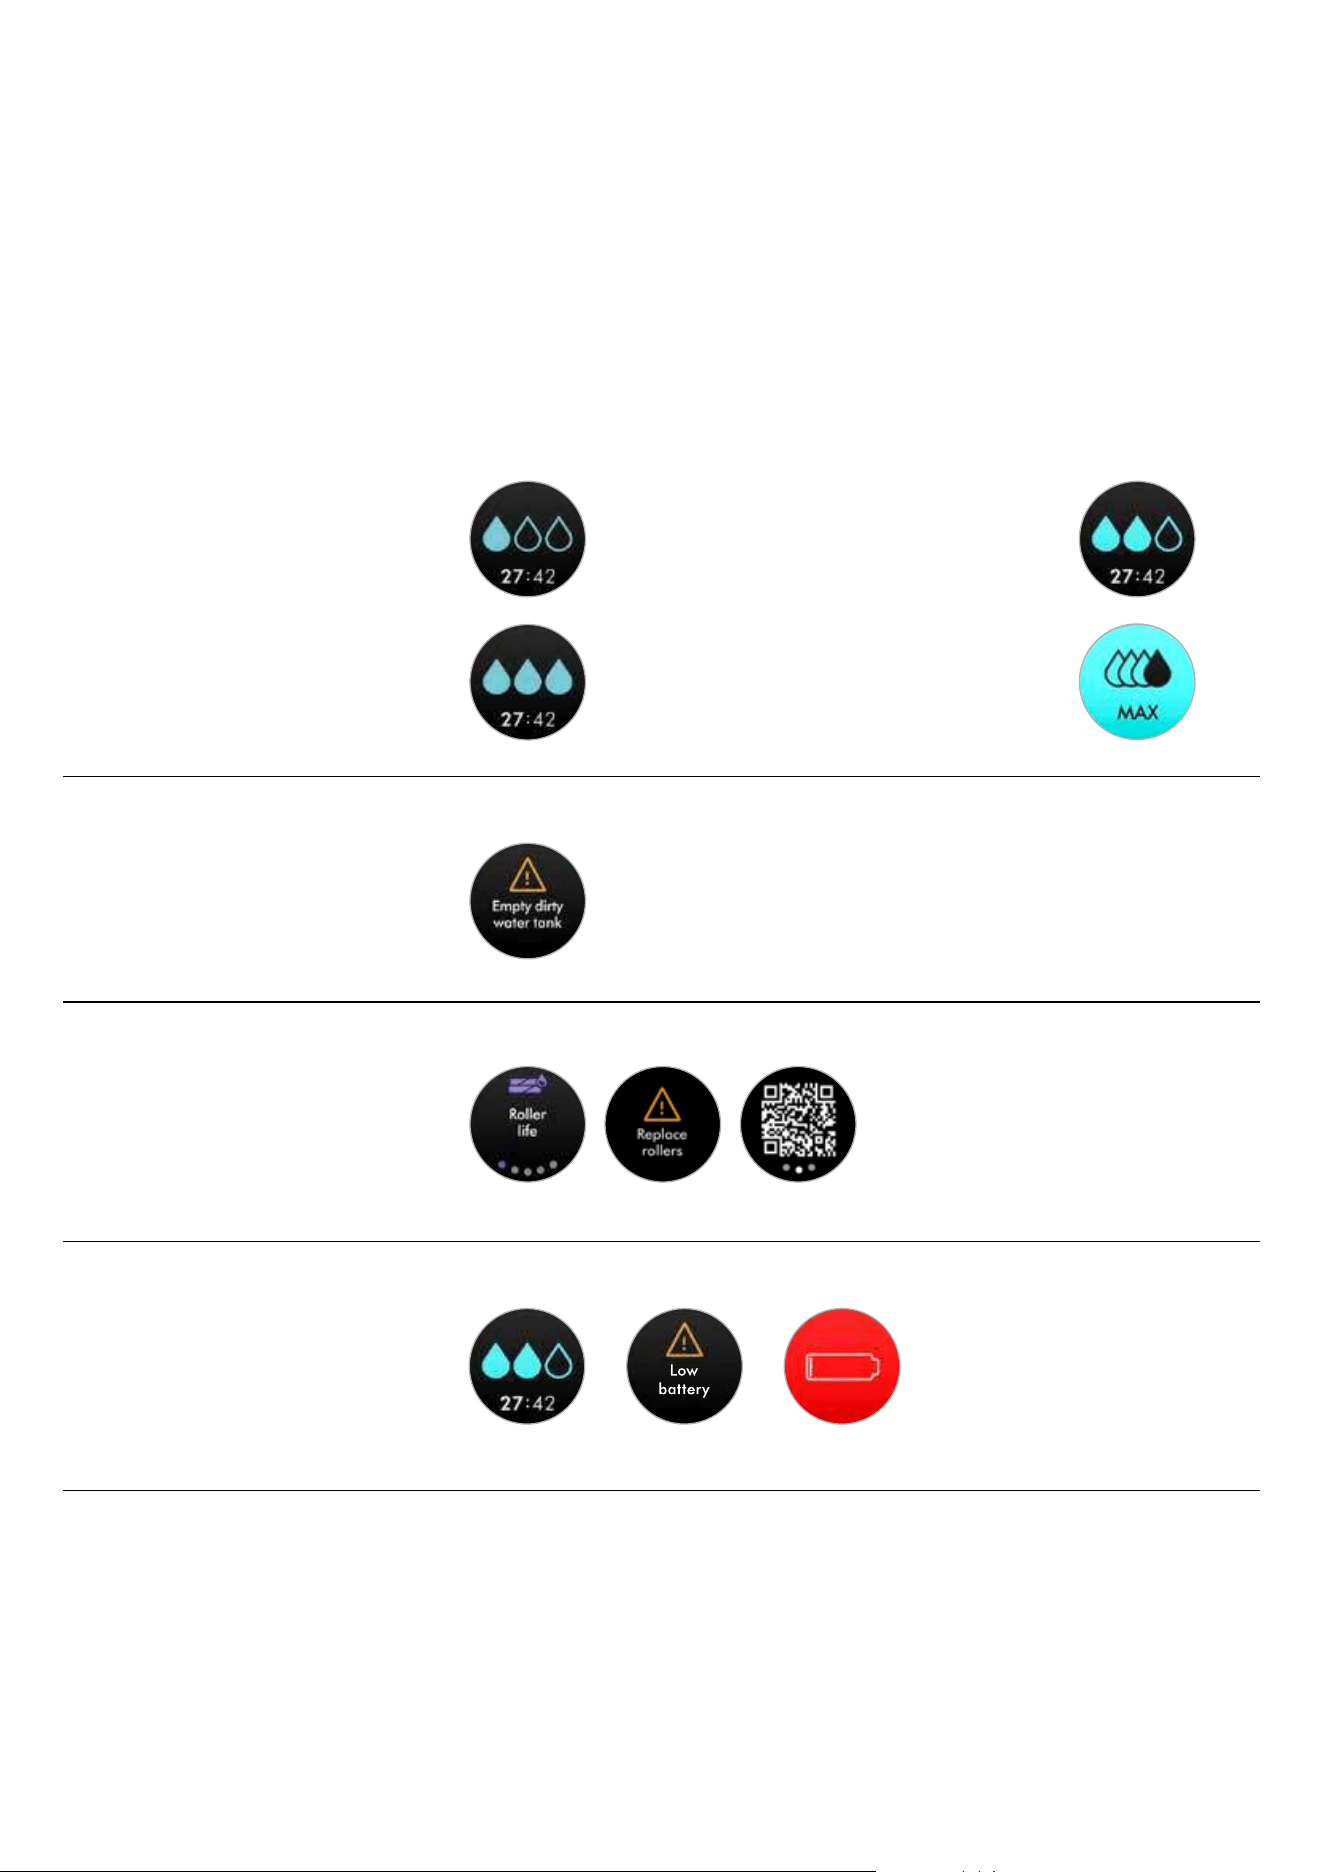
The LCD screen displays helpful performance information such
as the selected hydration mode, remaining run time and essential
maintenance alerts.
The LCD screen
Level 1
For debris, hair and light spills.
Cleaning
Level 2
For mealtime mess, spills and wet footprints.
Level 3
For sticky spills, muddy boot marks
and dried-on stains.
MAX
For extra hydration on stubborn stains.
Your Dyson WashG1™ wet cleaner
runs on a click-in battery with up to
35 minutes of run time. To extend
your cleaning time, you can order
an extra click-in battery at
www.dyson.com
Alerts
When your Dirty water tank is full, you will be
prompted with the alert: Empty dirty water tank.
Replacement rollers
We recommend replacing Dyson WashG1™ wet
cleaner rollers at around 6 months, depending
on usage. The machine will alert you when they
need to be changed – and display a QR code for
ordering replacements. When fitting new rollers,
reset the lifetime counter.
Runtime
The LCD screen constantly displays the machine’s
remaining run time underneath the water droplet
icon – so you’ll always know how much cleaning
time you have left.
Use the Mode button to select your hydration level. Press start to begin cleaning.
Choose the hydration mode to suit the task:
Water droplet icons indicate Dyson WashG1™ wet cleaner hydration modes: 1, 2 and 3.
Single water drop icon indicating
hydration level one.
Triple water drop icon indicating
hydration level three.
Double water drop icon indicating
hydration level two.
Black water drop icon on top of three
empty water drop icons indicating the
max hydration setting.
Exclamation mark inside
a triangle icon indicating
the alerts notification.
Roller replacement alerts
including a QR code
to scan and shop for
replacement rollers.
Run time alert indicating low
remaining run time and low battery.
Quick start
Remove the Clean water tank
Press the release button and lift the tank assembly away from
the machine. Remove the Clean water tank from the tank collar.
Fill the Clean water tank
Open the Clean water tank by twisting the lid counter-clockwise.
Fill with clean water to the MAX line on the side of the tank.*
Close and replace the Clean water tank
Close the lid. Replace the Clean water tank onto
the tank collar. Reconnect the tank assembly to the
*Use of detergent optional. Choose gentle, common household detergents. Avoid using bleach or high-foaming formulation.
Follow manufacturer’s guidance on the recommended dilution.
body of the machine.
Allow rollers to fully hydrate
On first use, the new rollers will take approximately
5 minutes to reach full and even hydration.
Two diagrams with
green arrows indicating
the direction of release
for the Clean water tank.
Diagram with green arrow
indicating the direction of
twisting to open the lid on
the Clean water tank and a
second showing the Clean
water tank being filled
under a tap.
Three sequential diagrams
demonstrating closing and
replacing the Clean water tank
back onto the machine.

Regular maintenance:
Self-clean cycle
Dyson WashG1™ wet cleaner self cleans on the dock while
charging. Place on the dock, and make sure the charger is
connected.
Using the menu button, scroll to Self clean using the blue
button and select start.
Dyson WashG1™ wet cleaner will now self-clean its entire
system, for 140 seconds, leaving it refreshed and ready for
your next clean.
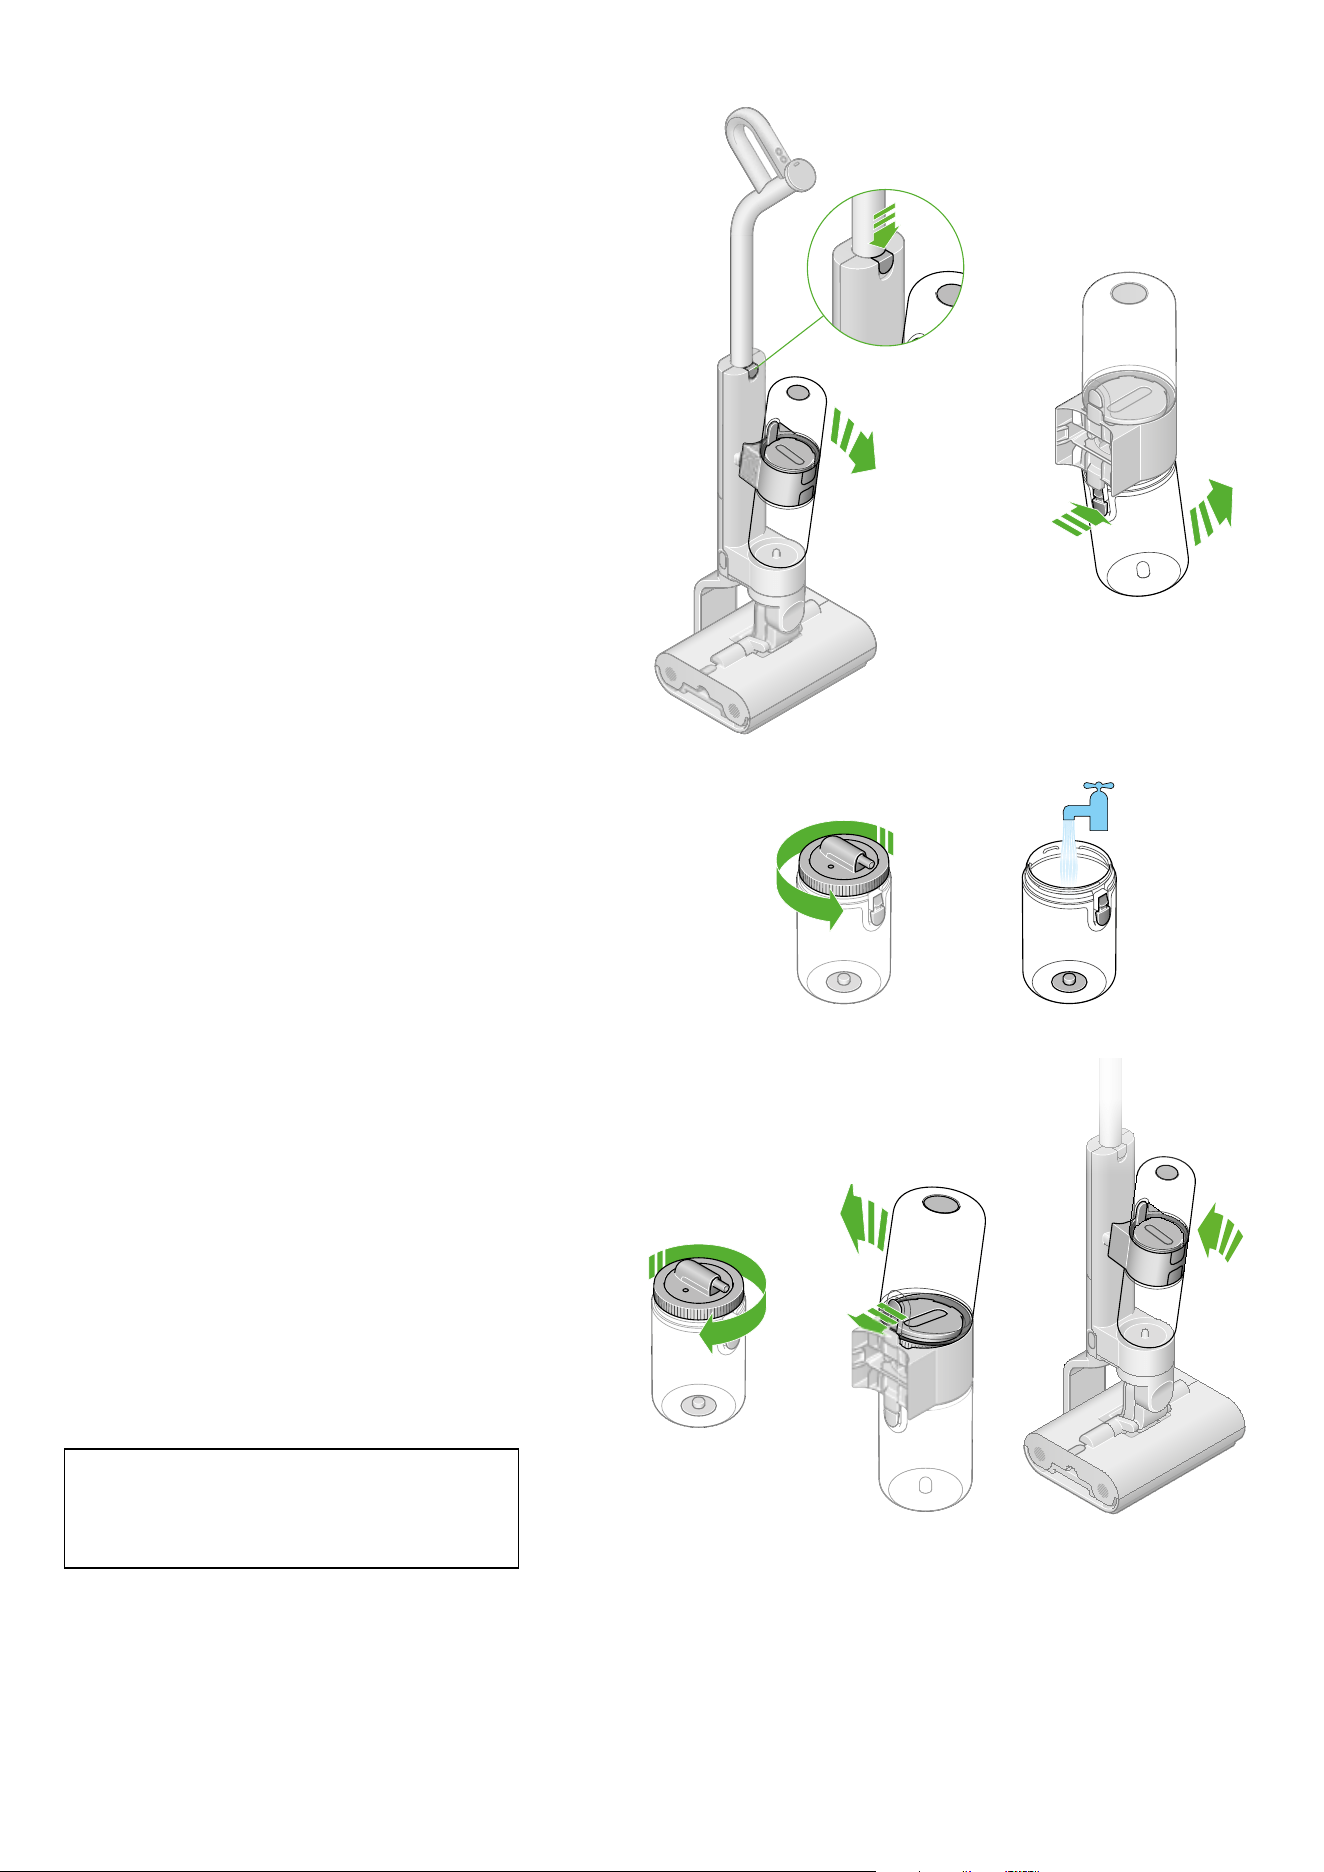
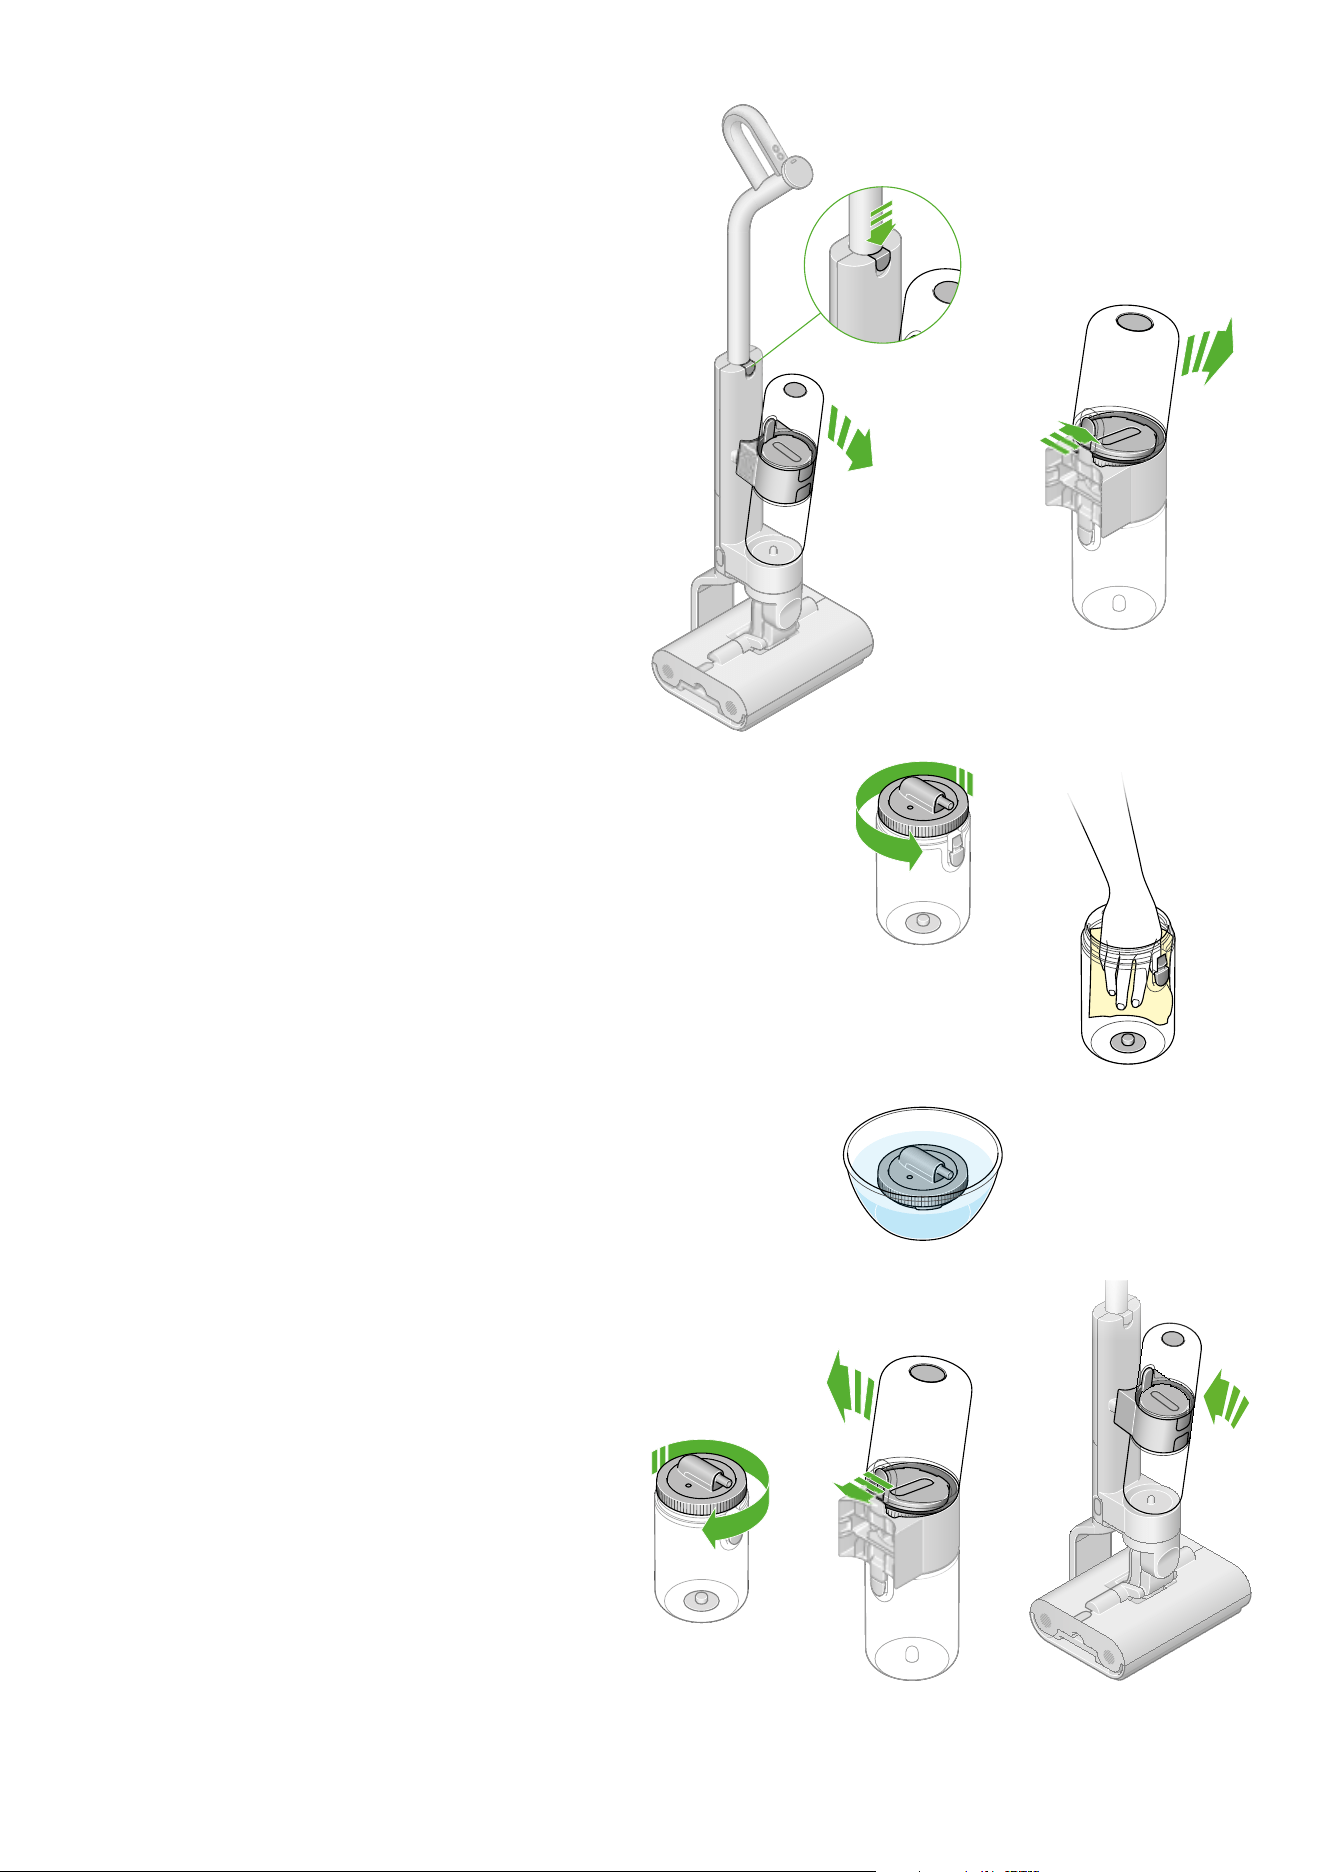
Washing the Dirty water tank
Remove the tank assembly
Press the release button to remove the tank assembly from the
product. Remove the Dirty water tank from the tank collar.
The menu button on
the LCD screen.
Diagram with green arrows
illustrating how to remove the
Dirty water tank.
Diagram of Dyson
WashG1 being place on
the charging dock prior to
self cleaning.
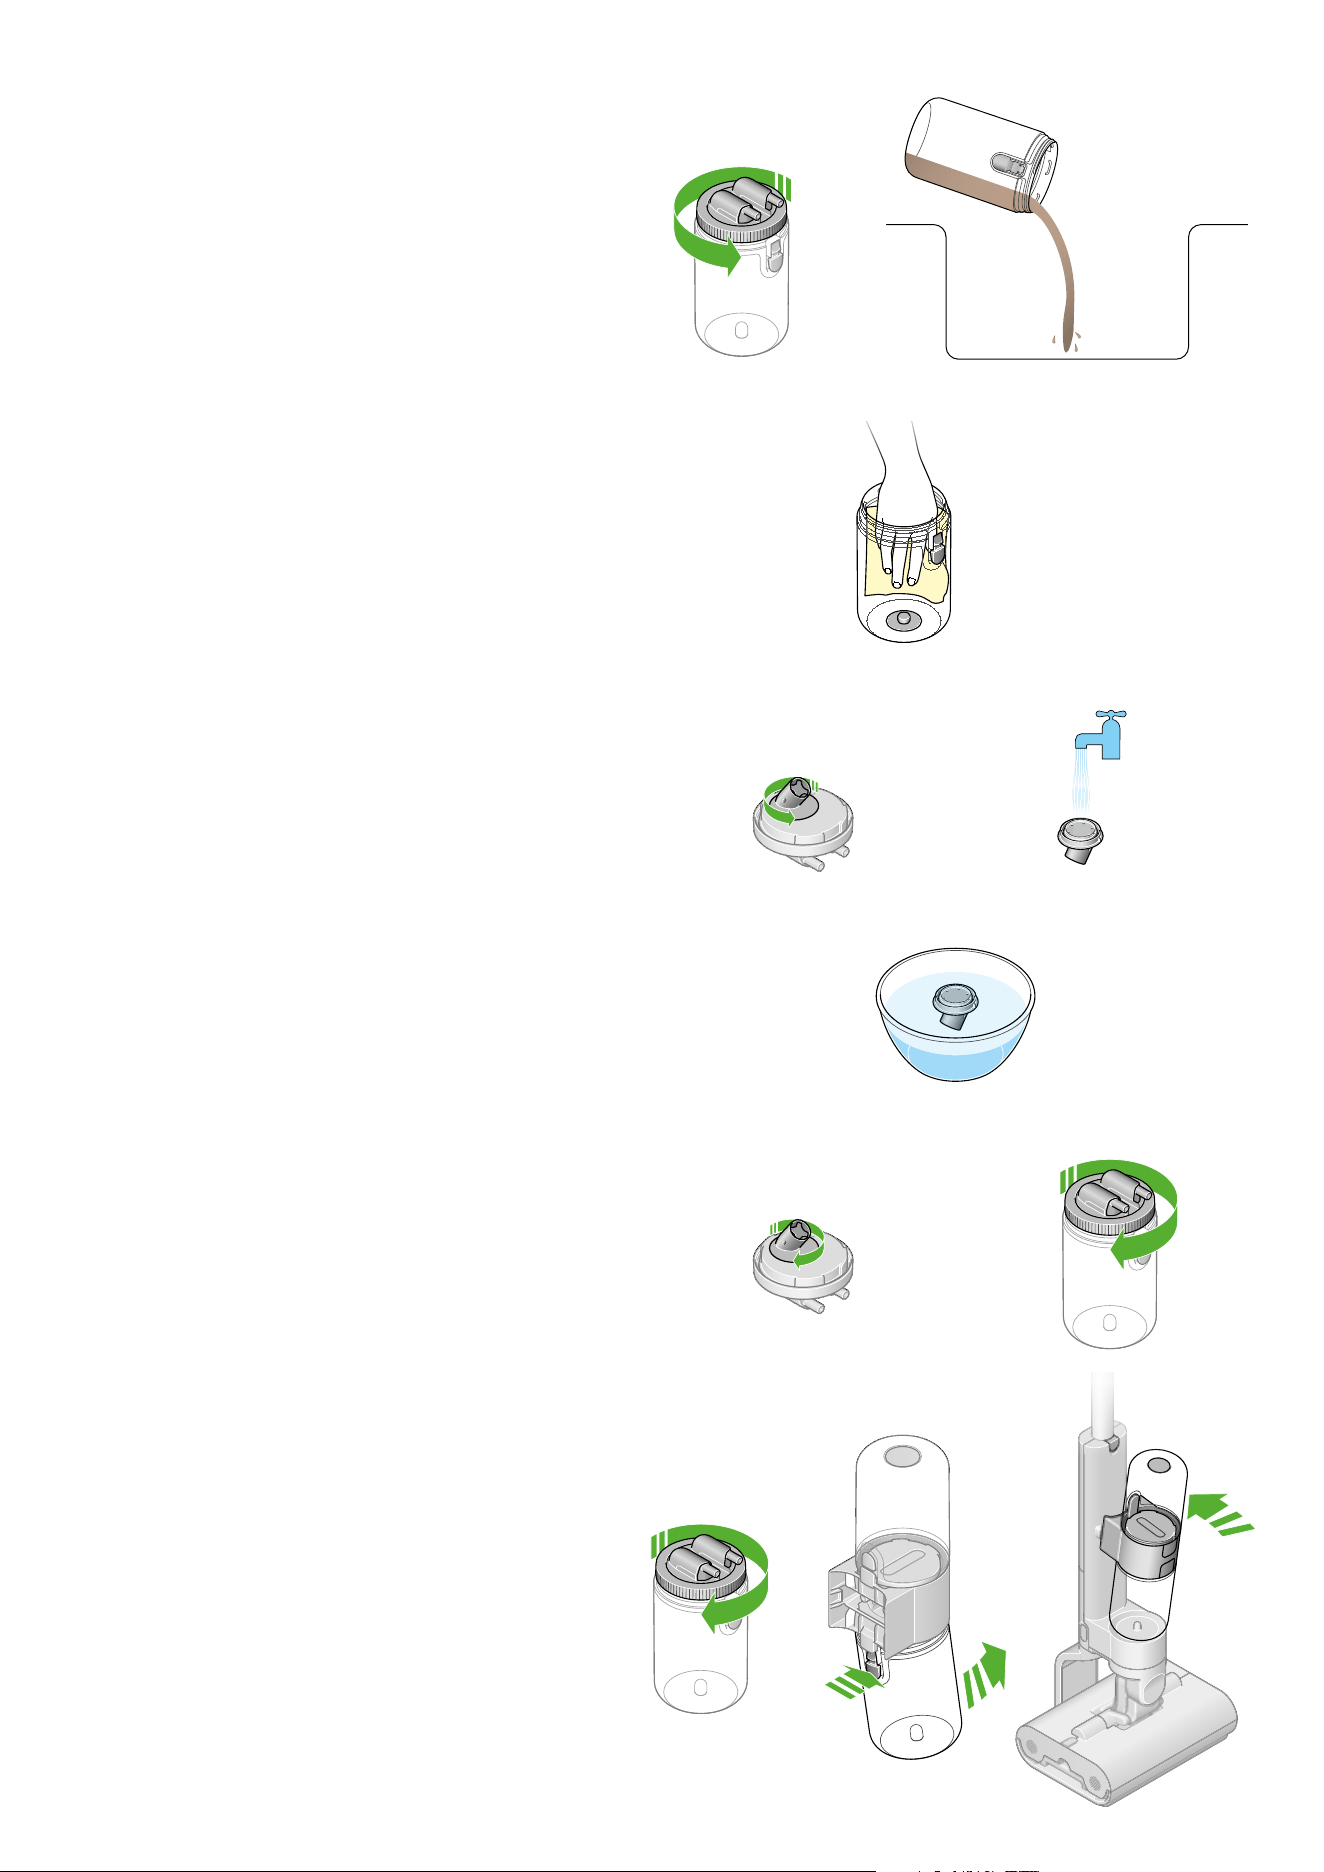
Clean the Float Assembly
Wash the Float Assembly in a sink, using warm water, detergent
and a cloth. Run clean water onto the Lid Assembly to remove
debris from the filter.
Soak filter every six months
We recommend cleaning the filter inside the Dirty water tank lid,
every six months, to remove limescale. To access the filter mesh,
open the lid Float Assembly a quarter turn. Soak the mesh in citric
acid/vinegar for one hour; this will counter limescale build up.
Replace the Float Assembly
Attach the Float Assembly to the Dirty water tank lid.
Replace the Dirty water tank
Turn the lid clockwise to close.
Reassemble the Dirty water tank
Reconnect the empty Dirty water tank
onto the body of the machine.
Open the Dirty water tank
Turn the lid counter-clockwise to open the Dirty water tank.
Empty the Dirty water into the sink.
Clean the Dirty water tank
Wash the Dirty water tank in a sink, using warm water,
detergent and a cloth.
Open the Float Assembly
Rotate and remove the Float Assembly from the Dirty water
tank lid.
Regular maintenance:
Diagram of a hand wiping
out the inside of the Dirty
water tank with a cloth.
The float assembly rotating.
The float assembly being
rinsed under a tap.
Two sequential diagrams demonstrating
opening the Dirty water tank lid and
pouring the contents into the sink.
Two sequential
diagrams showing
how to replace the
float assembly.
Soaking in vinegar
to counter limescale
build up.
Green arrows showing how to turn
the lid on the Dirty water tank.
Diagram showing how
to reassemble the Dirty
water tank.
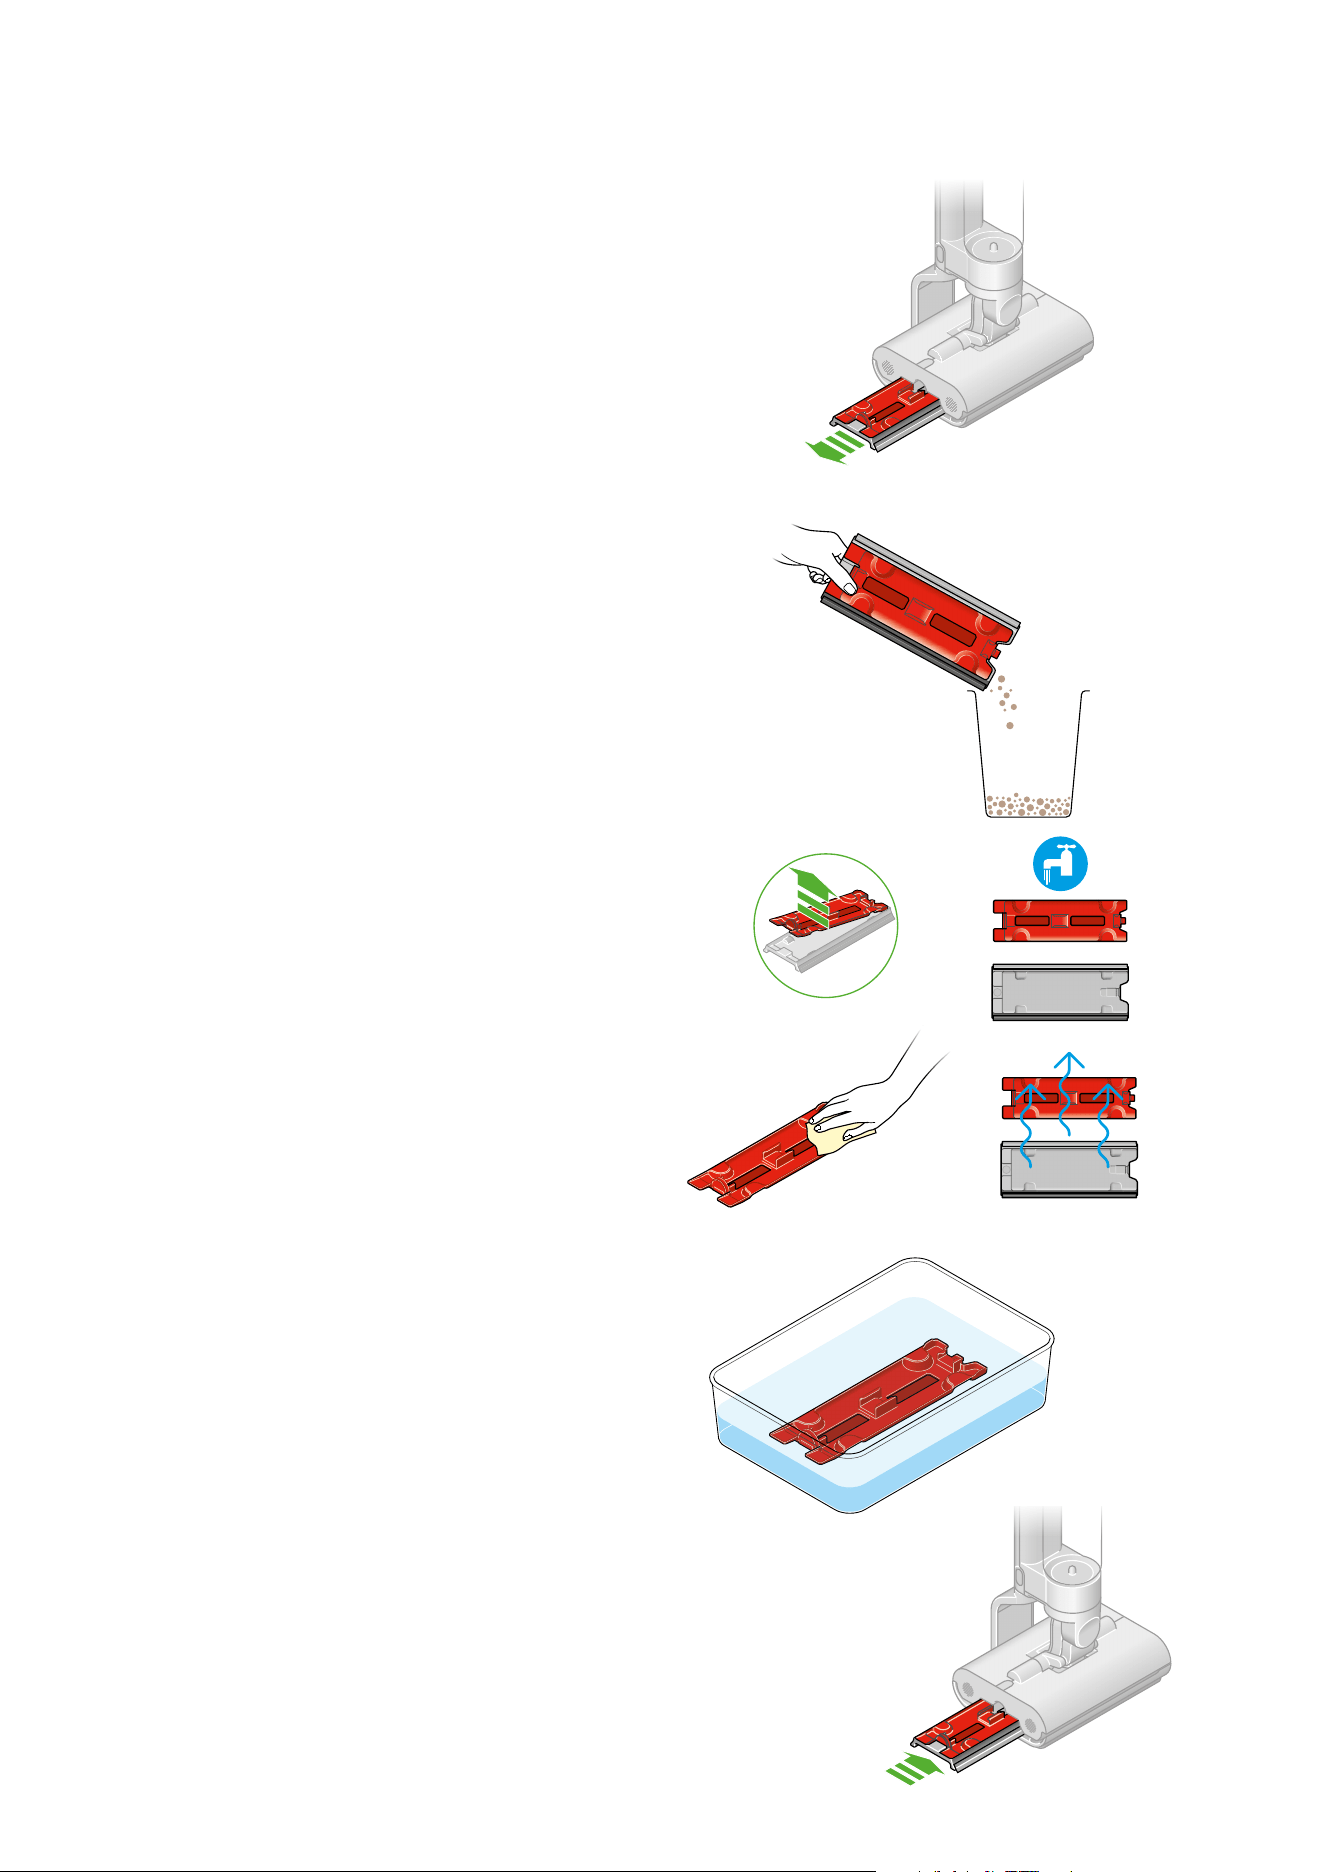
Washing the Debris tray
Remove the Debris tray
Slide the tray from the machine.
Empty the tray
Take the tray to the bin and dispose of the solid debris. Tap the
tray on the side of the bin to dislodge any remaining debris.
Remove and wash the tray
Rinse the tray in a sink. Remove the red filter material and
wash with a cloth, in warm water and detergent, to remove
any remaining dirt.
Soak filter every six months
We recommend cleaning the filter inside the Debris tray,
every six months, to remove limescale. Soak the mesh in citric
acid/vinegar for one hour; this will counter limescale build up.
Reassemble
Slide the tray back into the machine.
Regular maintenance:
The red inner part of the
Debris tray soaking in
citric acid or vinegar.
Diagram showing the
Debris tray being slid back
into the cleaner head.
Diagram with a green
arrow demonstrating
which way to pull the
Debris tray out from the
cleaner head.
Diagram of a user’s
hand emptying the
Debris tray into a bin.
Sequential diagrams demonstrating
how to remove and wash the outer
and inner parts of the Debris tray.
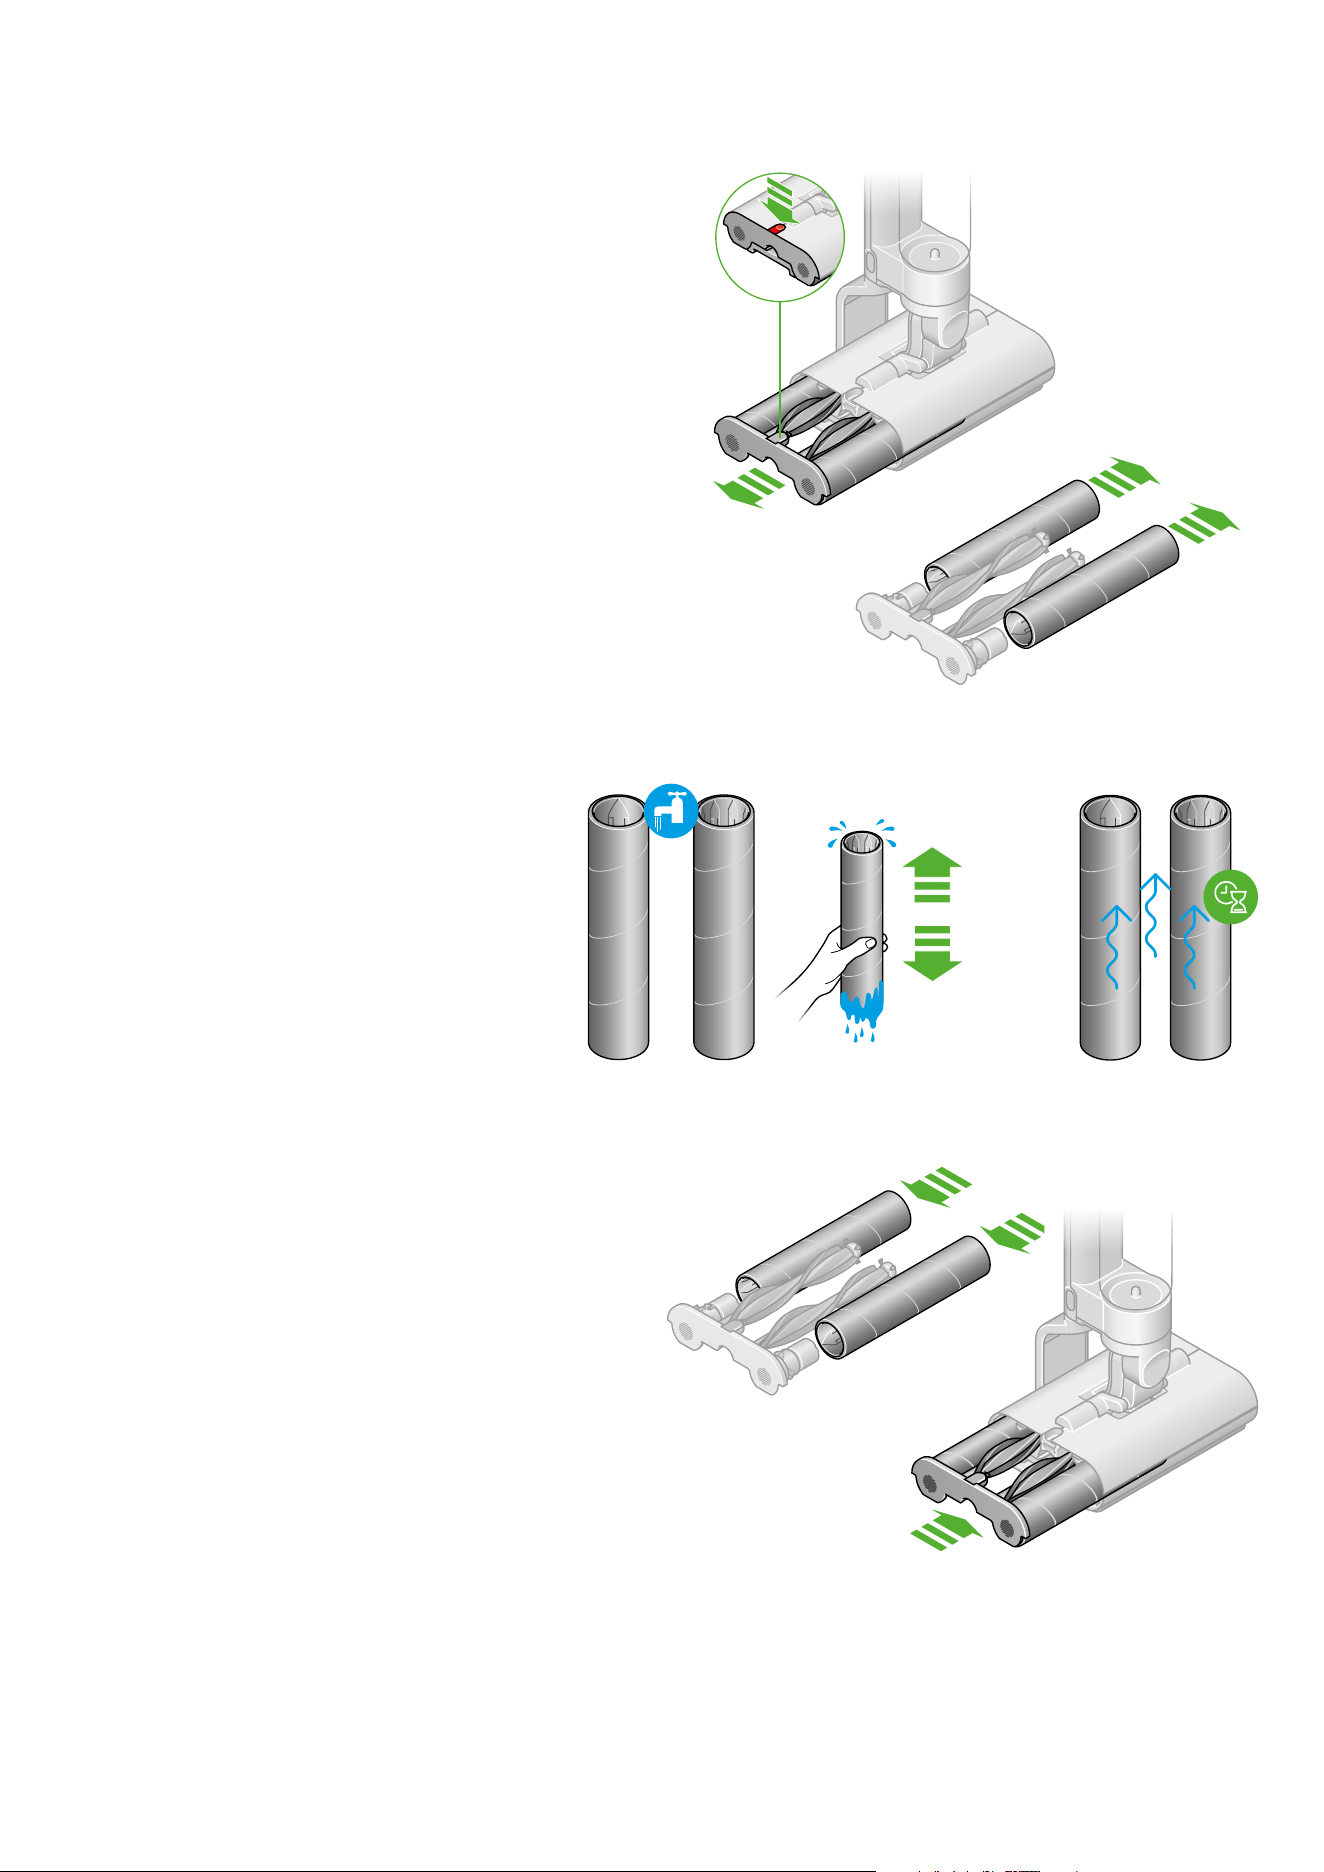
Wash the rollers
Wash the rollers in a sink, using warm water and detergent.
Squeeze rollers to remove excess water and leave to dry.
Replace the rollers to the end cap.
Reattach the rollers
Slide the rollers and Debris brush bar into the cleaner
head until the end cap clicks.
Washing the rollers
Remove the rollers
Press the red release catch to slide out the roller
assembly – and simply detach the rollers.
Regular maintenance:
Two sequential
diagrams with green
arrows demonstrating
how to remove the
roller assembly.
Two sequential diagrams
demonstrating how to
hand wash the rollers and
leave to dry thoroughly.
Two sequential diagrams
demonstrating how to
reattach the Debris
brush bar and return
it to the roller assembly
and machine.
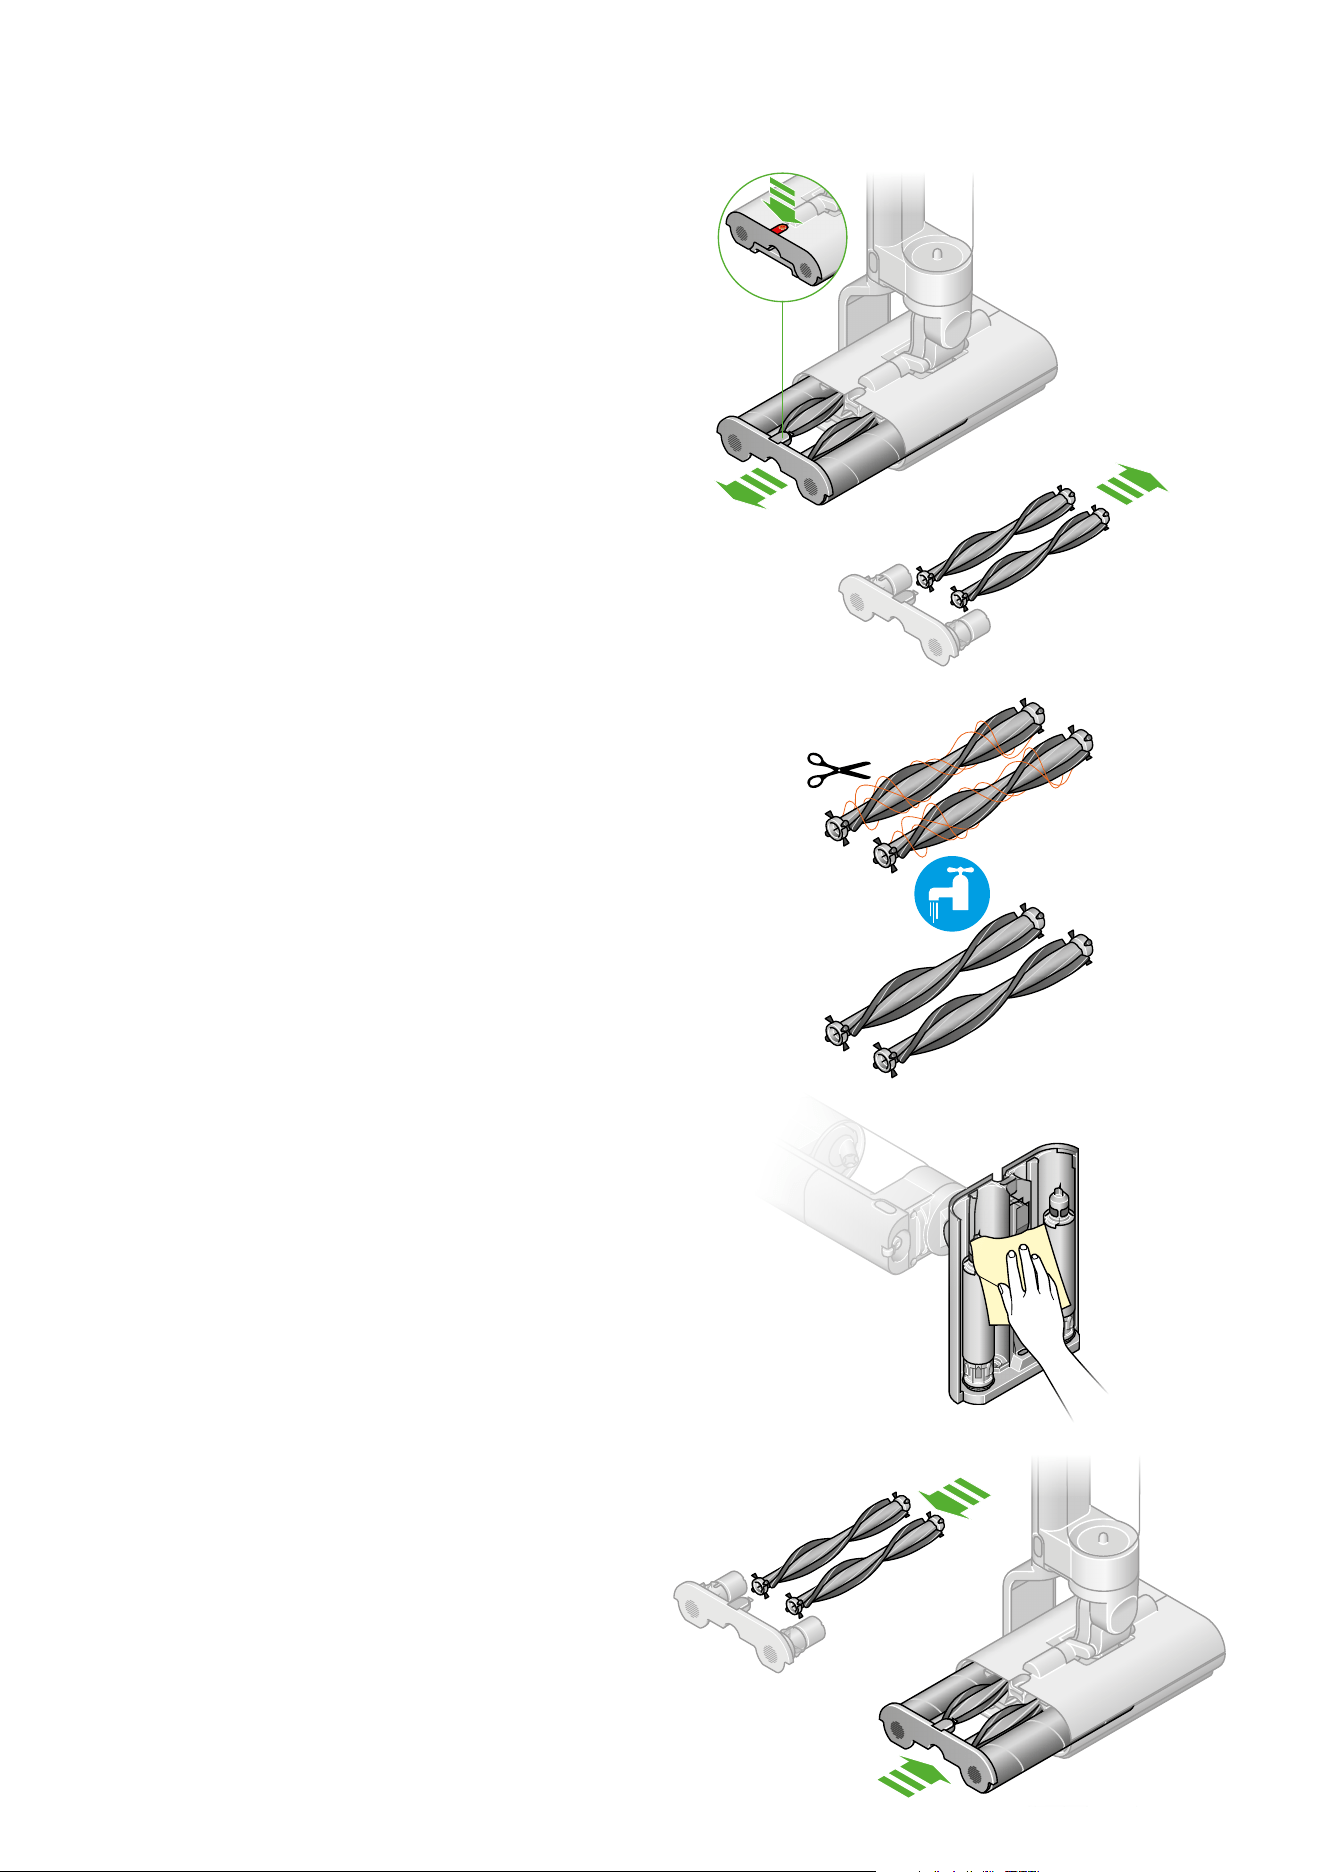
Washing the Debris brush bars
Remove the Debris brush bars
Pop out the end cap.
Remove the Debris brush bar from the end cap.
Remove debris
Use scissors to cut any hair wrapped around the Debris brush bar.
Wash the Debris brush bar
Wash the Debris brush bar in a sink, using a cloth,
warm water and detergent.
Reattach the Debris brush bar
Reattach the Debris brush bar to the end cap.
Slide the rollers and Debris brush bar into the cleaner
head until the end cap clicks.
Regular maintenance:
Wipe the underside of the cleaner head with a damp cloth
and detergent.
Green arrows showing
how to pop out the end
cap and remove the
Debris brush bar.
Diagram of scissors
cutting hair from the
Debris brush bar.
Diagram of wiping
the underside of the
cleaner head with a
damp cloth.
Diagram showing how to reattach
the Debris brush bar to the end cap
and slide the rollers and Debris
brush bar into the cleaner head.
Regular maintenance:
Washing the Clean water tank
Remove the tank assembly
Press the release button to remove the tank assembly from the
machine. Remove the Dirty water tank from the tank collar.
Open the Clean water tank
Turn the lid anti-clockwise to open the Clean water tank.
Clean the Clean water tank
Wash the Clean water tank in a sink, using warm water,
detergent and a cloth.
Soak filter every six months
We recommend cleaning the filter in the Clean water tank,
every six months, to remove limescale. Soak the mesh in citric
acid/vinegar for one hour; this will counter limescale build up.
Replace the Clean water tank
Close the lid of the Clean water tank by turning it clock wise.
Reassemble the Clean water tank
Reconnect the empty Clean water tank onto the body
of the machine.
Green arrows
showing how
to turn the lid
counter-clockwise
to open the Clean
water tank.
Diagram
demonstrating
the filter mesh
soaking in citric
acid or vinegar.
Diagram with green
arrows showing
how to turn the lid
of the Clean water
tank clockwise.
Diagram with green
arrows showing how to
reassemble the clean
water tank.
Diagram illustrating how to
press the release button to
remove the tank assembly
from the machine.
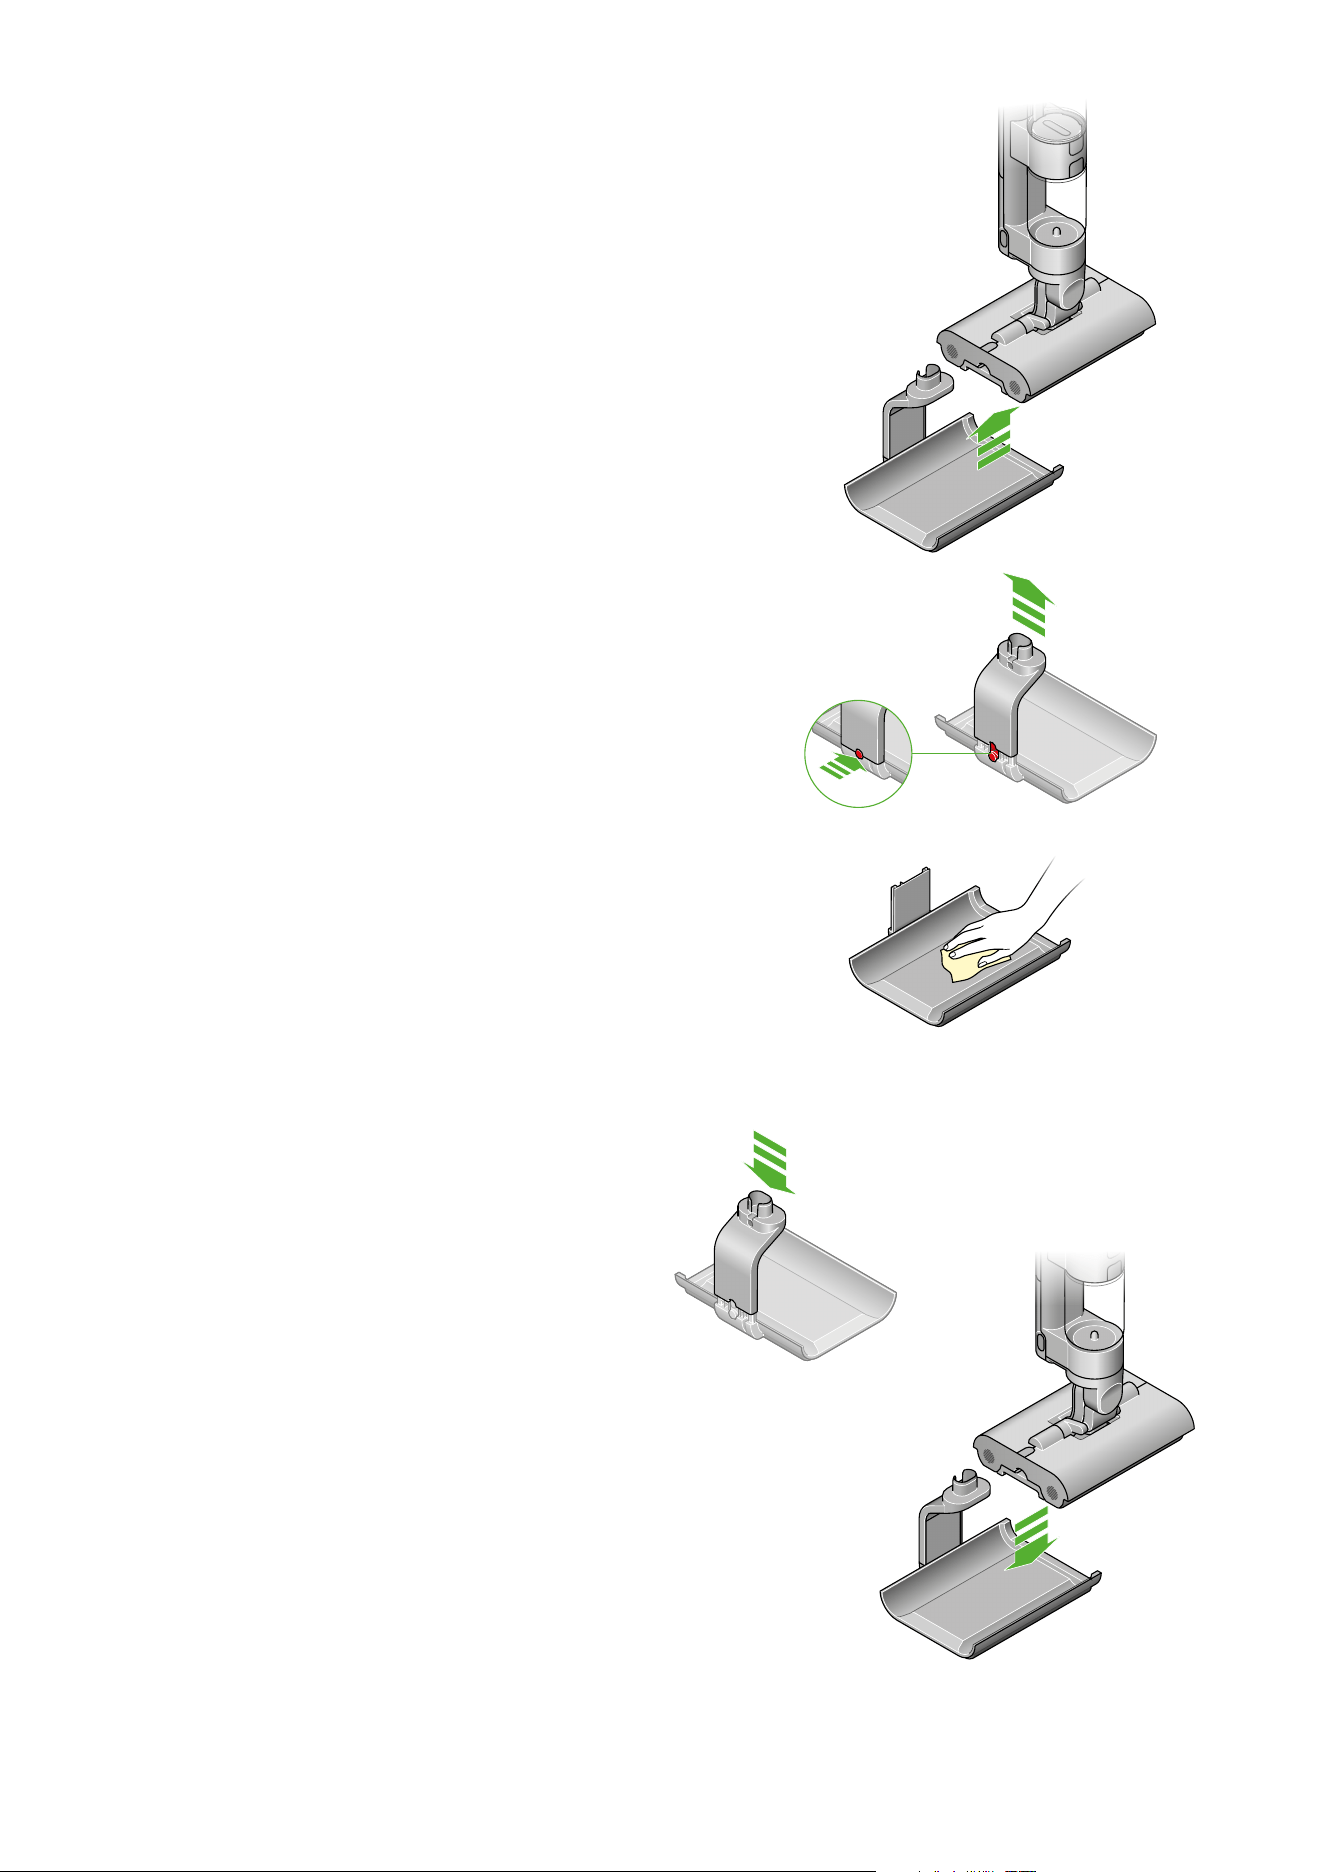
Cleaning the dock
Remove the machine from the Dock
Press the release button on the rear of the Dock and
lift off the charging post.
Regular maintenance:
Clean the Dock tray
Make sure the charger is disconnected from the mains before
cleaning. Wipe over with warm water, detergent and a cloth.
Replace the Dock tray
Replace the charging post onto the Dock.
Replace the machine on the Dock.
Illustration of the lifting the
charging post from the dock.
Green arrows highlighting the
charger disconnected from the
mains before cleaning.
Two sequential diagrams
showing how to replace the
charging post onto the dock.
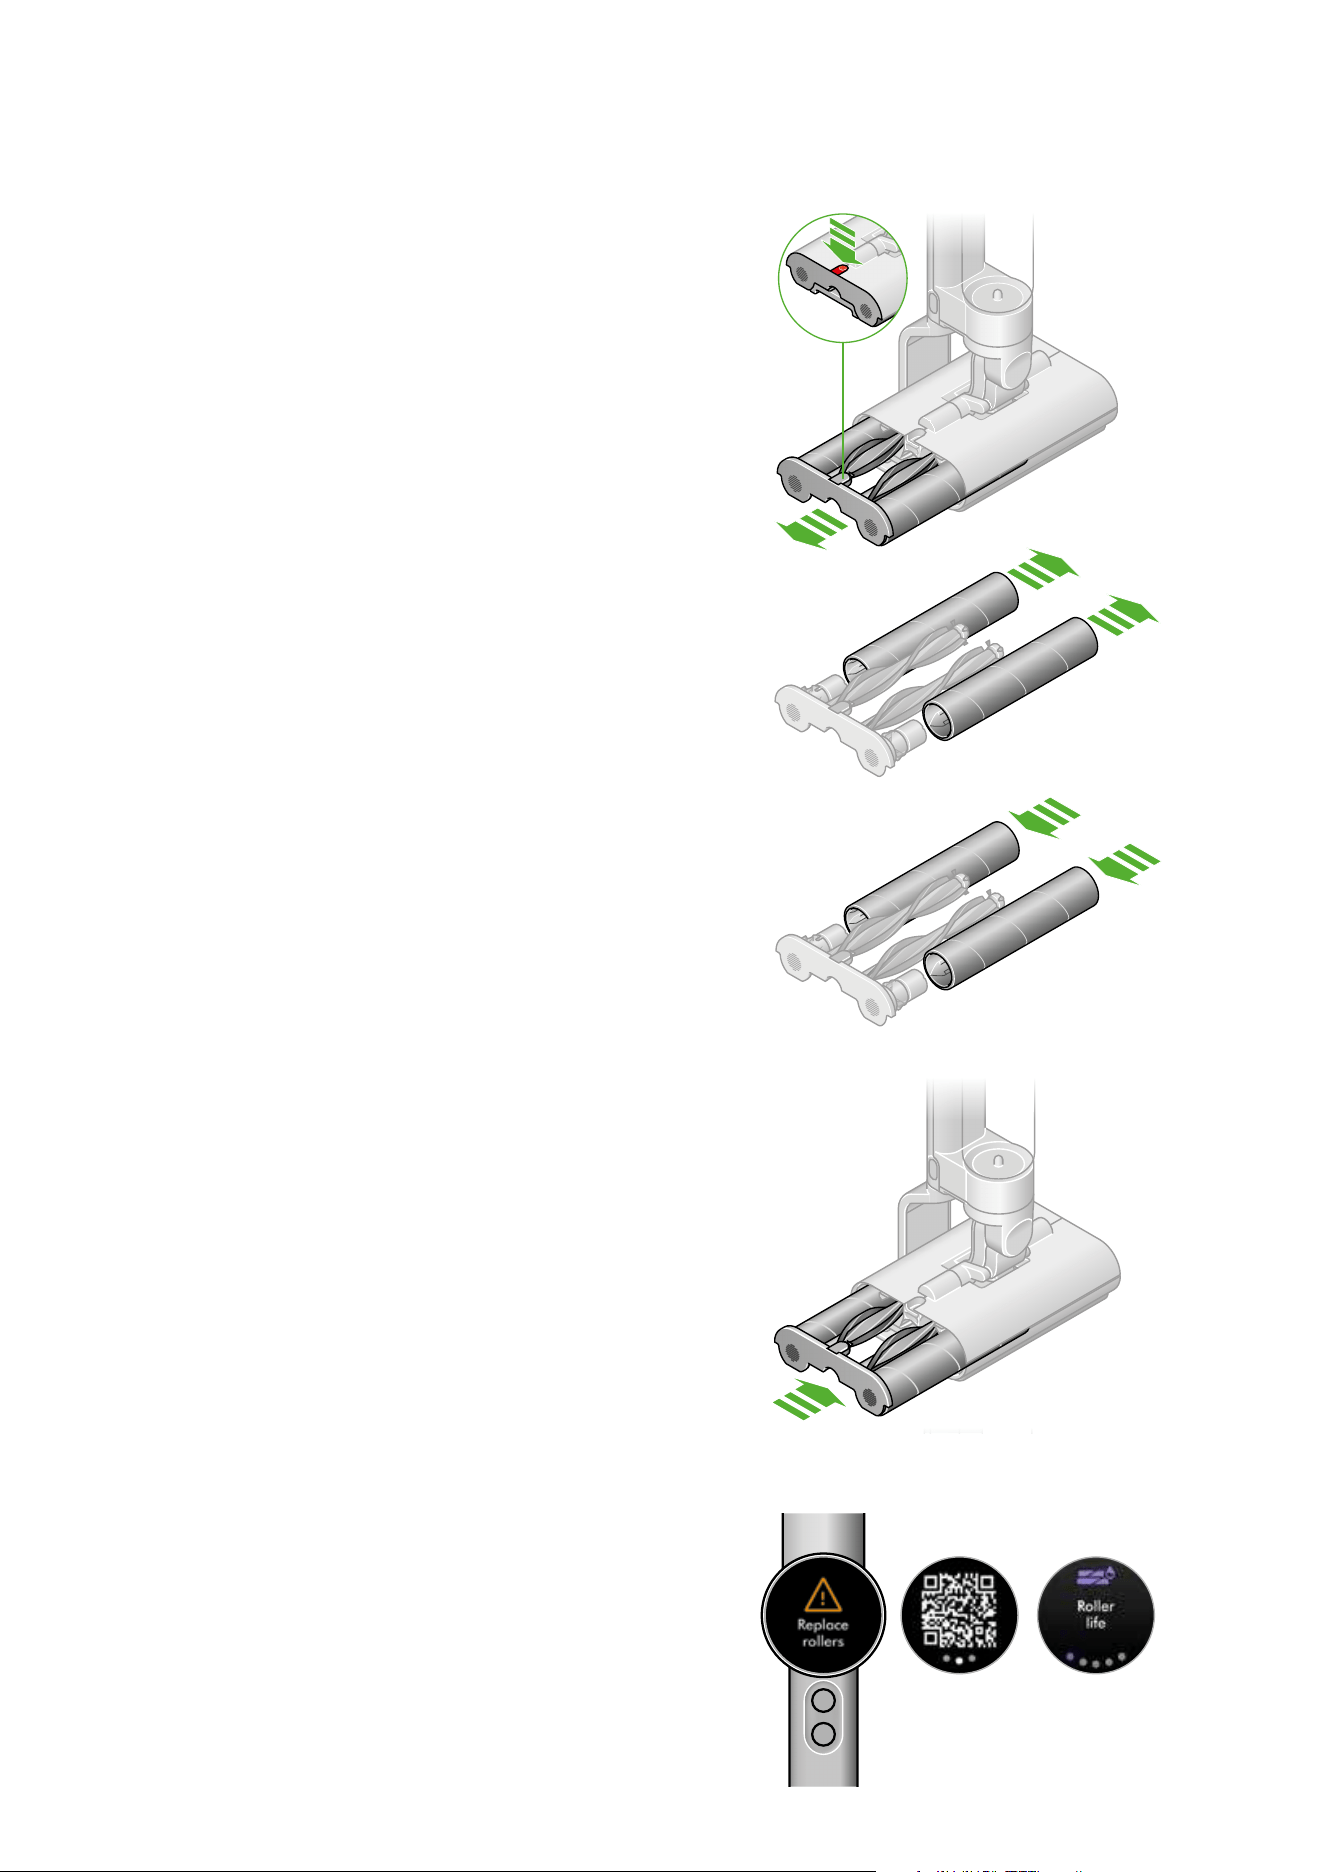
Replacing the rollers
Remove the rollers
Pull out the end cap with the roller and Debris brush bar.
Remove the rollers from the end cap.
Dispose of used rollers into your bin
Fit new rollers onto the end cap
Reattach the roller
Slide the roller and Debris brush bar into the cleaner head until
the end cap clicks.
Check the lifespan of your rollers
Your Dyson WashG1™ wet cleaner rollers have a lifespan of 25
hours. The machine will alert you when they need to be changed
– and display a QR code for ordering replacements.
Regular maintenance:
Diagram with an inset
demonstrating removing the
rollers from the end cap.
Diagram depicting new rollers
being fitted onto the end cap.
Diagram of the roller
assembly being reinserted
into the cleaner head.
A replace rollers alert on
the LCD display together
with a QR code and roller
life monitor screen.
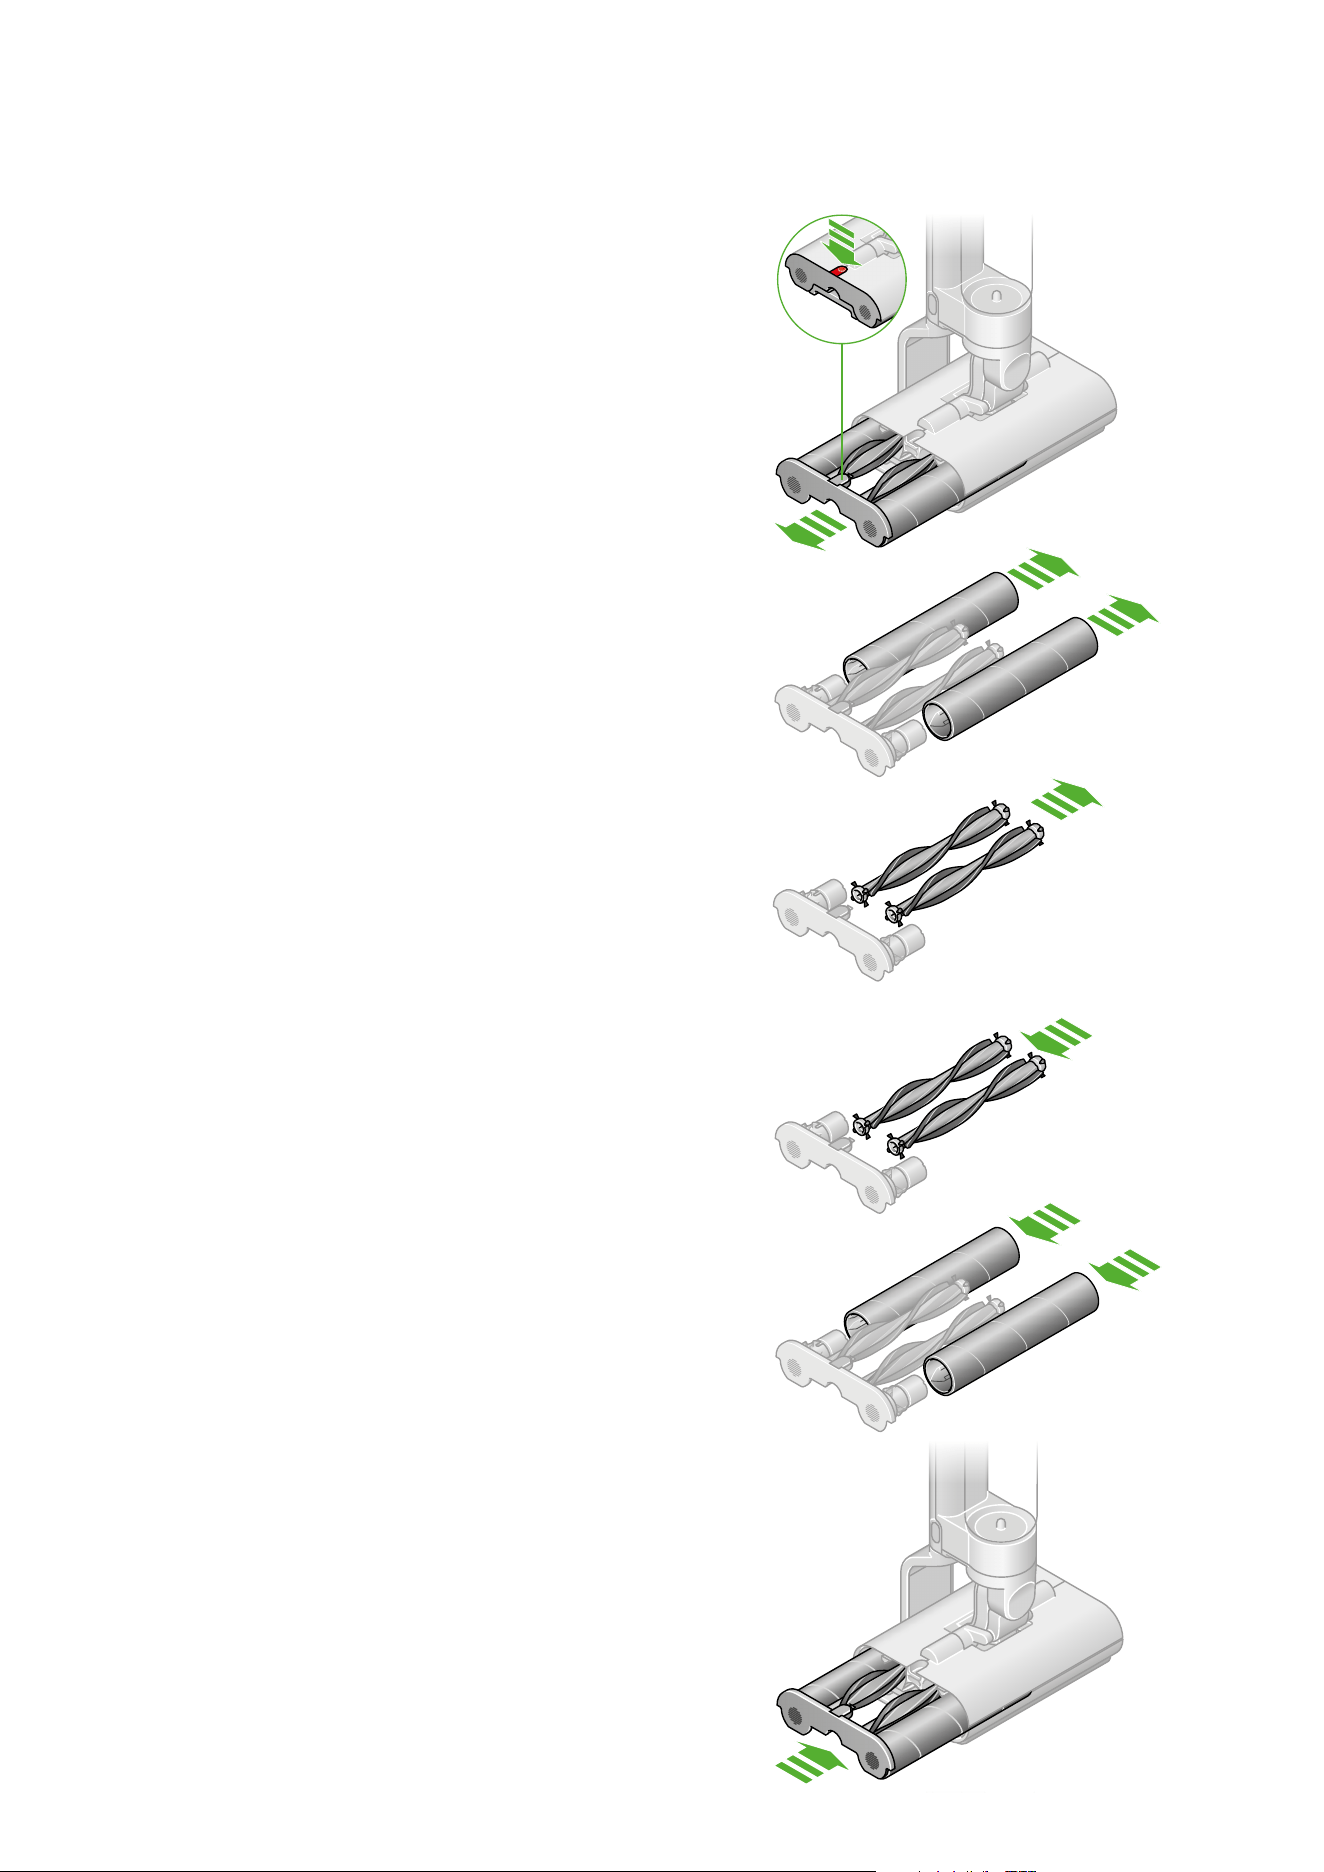
Replacing the Debris brush bars
Remove the rollers
Pull out the end cap with the roller and Debris brush bar.
Remove the from the end cap.
Fit new Debris brush bars onto the end cap
Reattach the rollers
Slide the Debris brush bars and rollers into the cleaner head
until the end cap clicks.
Regular maintenance:
Dispose of used Debris brush bars into your bin
Green arrows
showing how to pull
out the end cap.
Diagram of the Debris
brush bars being removed
before disposal.
Diagram of replacement
Debris brush bars being
fitted to the end cap.
Diagram with green arrows
showing how to slide the rollers
back into position.

Disassembling your machine
Should you need to store or repackage your machine, detach the
wand from the main body, as shown opposite.
Diagram indicating where to
separate the wand from the
body.

Looking after your machine
Day-to-day machine care
To get the best performance from your machine, it’s important to
clean it regularly.
If your machine is dusty, wipe with a damp lint-free cloth.
Empty both water tanks after each use, and wipe clean.
Empty the Debris tray into a bin, after every use, and rinse clean.
Battery health
For best performance and battery life, use MAX setting only
for spot cleaning tough stains.
Your battery is designed to charge on the dock, so return the
machine to the dock after use, to help maintain battery life.
Where to find your machine’s serial number
The serial number is printed on the main body of the machine,
behind the battery pack.
Use the serial number to register your machine.
For more information and support videos for your machine,
go online: www.dyson.com/support