

A5P | 01
2515367
Please read all instructions carefully before use and
retain for future reference.
CAUTION Do not immerse in water.
Protect your eyes.
Protect your ears.
Protect your hands.
Wear a dust mask.
Please read all instructions carefully before use and retain
for future reference.
INTENDED USE Only operate the power tool/machine
for its intended purpose and within the parameters
specied in this manual.
This power tool/machine is for domestic use only. This
power tool/machine is not intended for use by persons
with reduced physical, sensory or mental capabilities, or
lack of experience and knowledge, unless supervised or
given appropriate instruction concerning the product’s
use by a person responsible for their safety.
GENERAL PRECAUTION Do not allow to be used as a
toy. Children should be supervised to ensure they do not
play with the power tool/machine.
If the power tool/machine is not functioning properly,
has been dropped, damaged, left outdoors, or immersed
in liquid, do not use, contact DOMU Brands Customer
Services.
Do not use the power tool/machine if any parts appear to
be faulty, missing or damaged.
Ensure all parts are securely attached before use.
RISK OF PERSONAL INJURY Avoid body contact with
earthed or grounded surfaces such as pipes,radiators,
ranges and refrigerators. There is an increased risk of
electric shock if your body is earthed or grounded.
Prevent unintentional starting. Ensure the switch is in the
o position before connecting to the power source and/
or battery pack, picking up or carrying the tool. Carrying
power tools with your nger on the switch, or energising
power tools that are switched on, invites accidents.
Do not operate power tools in explosive atmospheres
such as in the presence of ammable liquids, gases or
dust. Power tools create sparks which may ignite the
dust or fumes.
Always wear eye protection. Any power tool can throw
foreign objects into your eyes and cause permanent
eye damage. Always wear safety goggles (not glasses)
that comply with ANSI safety standard Z87.1. Every day
glasses have only impact resistant lenses.
Do not expose power tools to rain or wet conditions.
Water entering the power tools will increase the risk of
electric shock.
Stay alert, watch what you are doing and use common
sense when operating a power tool/machine. Do not
use a power tool/machine while you are tired or under
the inuence of drugs, alcohol or medication. A moment
of inattention while operating power tool/machine may
result in serious personal injury.
Use personal protective equipment. Always wear eye
protection. Protective equipment such as dust mask,
non-skid safety shoes, hard hat, or hearing protection
used for appropriate conditions will reduce personal
injuries.
Prevent unintentional starting. Ensure the switch is in the
o-position before connecting to power source and/or
battery pack, picking up or carrying the tool.
Carrying power tool/machine with your nger on the
switch or energizing power tool/machine that have the
switch on invites accidents.
Remove any adjusting key or spanner before turning the
power tool/machine on. A spanner or a key left attached
to a rotating part of the power tool/machine may result in
personal injury.
Do not overreach. Keep proper footing and balance at

A5P | 01
all times. This enables better control of the power tool/
machine in unexpected situations.
Dress appropriately. Do not wear loose clothing or
jewellery.
Keep your hair, clothing and gloves away from moving
parts. Loose clothes, jewellery or long hair can be caught
in moving parts.
If devices are provided for the connection of dust
extraction and collection facilities, ensure these are
connected and properly used. Use of dust collection can
reduce dust-related hazards.
WORK AREA SAFETY Keep work area clean and well lit.
Cluttered or dark areas invite accidents.
Do not operate power tool/machine in explosive
atmospheres, such as in the presence of ammable
liquids, gases or dust.
Power tool/machine create sparks which may ignite the
dust or fumes.
Keep children and bystanders away while operating a
power tool/machine. Distractions can cause you to lose
control.
GENERAL POWER TOOL USE AND CARE Do not force
the power tool/machine. Use the correct power tool/
machine for your application. The correct power tool/
machine will do the job better and safer at the rate for
which it was designed.
Do not use the power tool/machine if the switch does not
turn it on and o. Any power tool/machine that cannot
be controlled with the switch is dangerous and must be
repaired.
Disconnect the plug from the power source and/or the
battery pack from the power tool/machine before making
any adjustments, changing accessories, or storing power
tool/machine tools. Such preventive safety measures
reduce the risk of starting the power tool/machine
accidentally.
Store idle power tool/machine out of the reach of children
and do not allow persons unfamiliar with the power tool/
machine or these instructions to operate the power tool/
machine.
Power tool/machines are dangerous in the hands of
untrained users.
Maintain power tool/machines. Check for misalignment
or binding of moving parts, breakage of parts and any
other condition that may aect the power tool/machines
operation. If damaged, have the power tool/machines
repaired before use. Many accidents are caused by
poorly maintained power tool/machines.
Keep cutting tools sharp and clean.
Properly maintained cutting tools with sharp cutting
edges are less likely to bind and are easier to control.
Use the power tool/machine accessories and tool bits in
accordance with these instructions, take into account the
working conditions and the work to be performed.
Use of the power tool/machine for operations dierent
from those intended could result in a hazardous situation.
CLEANING & MAINTENANCE Never soak or immerse
electrical components and or a component that has a
plug attached.
Disconnect the plug from the power source before
making any adjustments, changing accessories, or
storing. Such preventive safety measures reduce the risk
of starting the power tool accidentally.
Ensure the motor has fully stopped before cleaning,
clearing a blockage, checking, or carrying out any
maintenance on the tool.
Maintain your power tool. Check for misalignment or
binding of moving parts, breakage of parts and any other
condition that may aect the power tool’s operation. If
damaged, have the power tool repaired by a qualied
repair person before use. Many accidents are caused by
poorly maintained power tools.
Keep cutting tools sharp and clean. Properly maintained
cutting tools with sharp cutting edges are less likely to
bind and are easier to control.
Regularly check external nuts and xings to ensure
vibration caused by normal use has not begun to loosen
them.
Store idle power tools out of reach of children and do
not allow persons unfamiliar with the power tool or these
instructions to operate the Breaker.
Locate the power tool out of reach of children, in a dry,
locked unit.
Make sure that the cord is located so that it will not
be stepped on, tripped over, or otherwise subjected to
damage or stress.
Remove the plug from the mains socket / battery (where
applicable) before carrying out any adjustment or
maintenance.
Always store the power tool/machine in a dry place.
If the power cord is damaged, it must be replaced by a
qualied service technician.
Keep the ventilation slots and motor housing as free of
dirt and dust as possible (where applicable).
Clean the power tool/machine by rubbing it with a clean
cloth and blow it clean using low-pressure compressed
air is recommended.
Ensure you have all the pieces listed. If you are missing
any components, contact our customer services
department at [email protected] DO NOT proceed
with assembly if any components are missing.
LAWN TRIMMERS & LAWN EDGE TRIMMERS
Check for misalignment or binding of moving parts,
breakage of parts and any other condition that may aect
the power tool’s operation.
Keep cutting tools sharp and clean. Properly maintained
cutting tools with sharp cutting edges are less likely to
bind and are easier to control.
Hold power tool by insulated gripping surfaces, when
performing an operation where the cutting accessory
may contact hidden wiring or its own cord. Cutting
accessory contacting a “live” wire may make exposed
metal parts of the power tool “live” and could give the
operator an electric shock.
Keep hands away from cutting area. Never reach
underneath the workpiece for any reason. Do not insert
ngers or thumb into the vicinity of the blade and blade
release switch.
TECHNICAL SPECIFICATION
Rated Voltage 230V - 240V
Rated Power 1000W
Rated Frequency 50Hz
A5P | 01
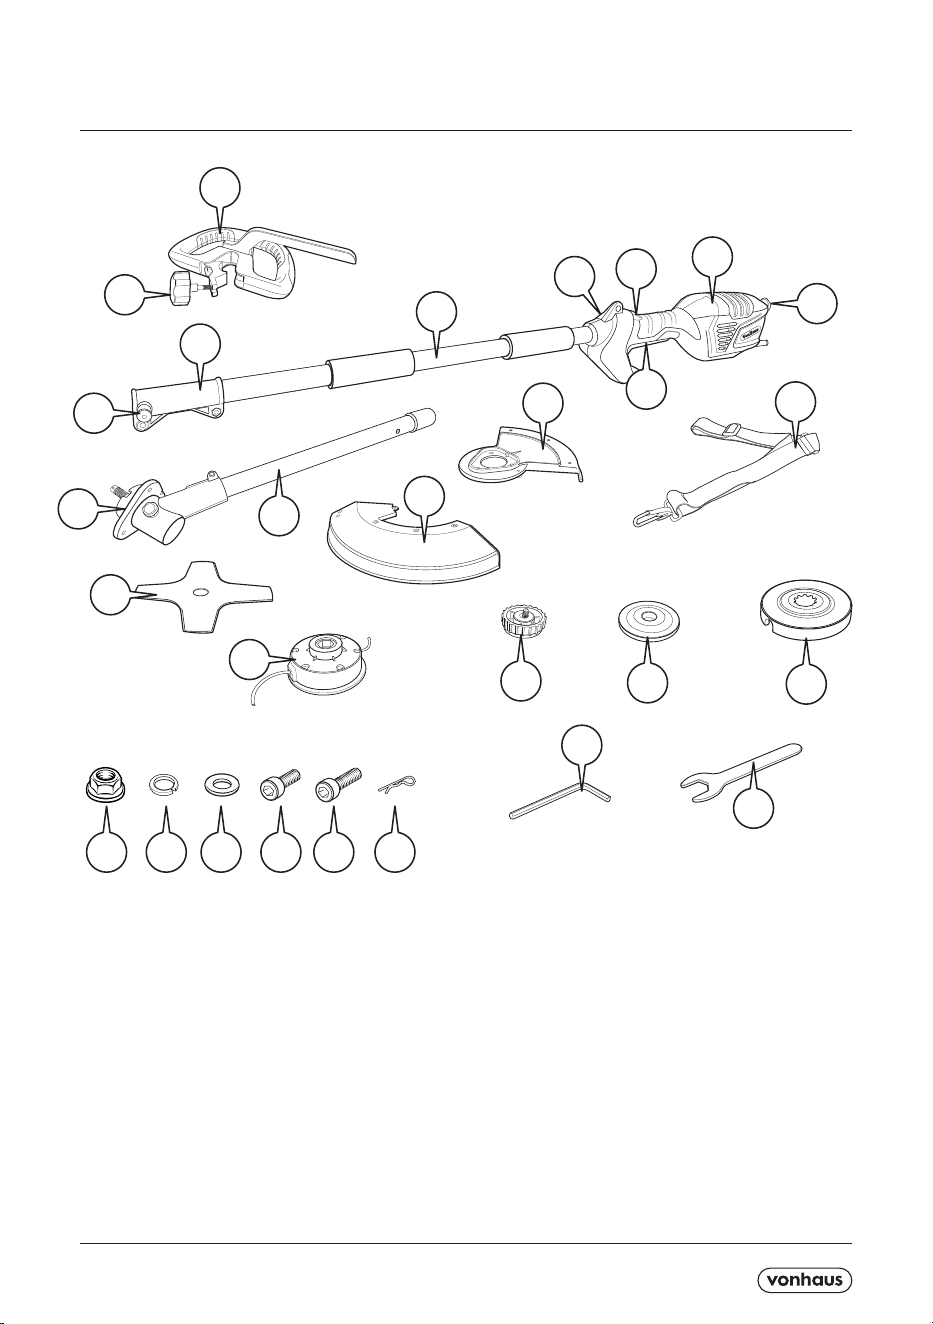
1. Auxiliary Handle/Secondary Handle .
2. Auxiliary Handle Locking Screw.
3. Spring Pin.
4. Locking Grip (not pictured).
5. Main Unit Pole.
6. Safety Switch.
7. ON/OFF Trigger.
8. Shoulder Strap Connection.
9. Shoulder Strap
10. Rear Grip.
11. Cable Hook
12. Gearbox.
13. Lower Pole.
14. Inner Mounting Plate.
15. Plastic Trimmer Guard.
16. Brush Cutter Disc.
17. Spool Assembly.
18. Spool Locking Nut (pre-assembled into 17).
19. Brush Cutter Locking Plate.
20. Coupling Plate.
21. Hex Nut x 1.
22. Spring Washer x 7
23. Washer x 7
24. Small Hex Bolt x 3.
25. Large Hex Bolt x 4.
26. Split Pin x 1.
27. Hex Key (stored on Auxiliary Handle)
28. Maintenance Tool.
COMPONENTS
1
4
5
6
10
14
15
18
21 22 23 24 25 26
19
20
13
9
27
28
11
7
8
3
2
12
16
17
A5P | 01
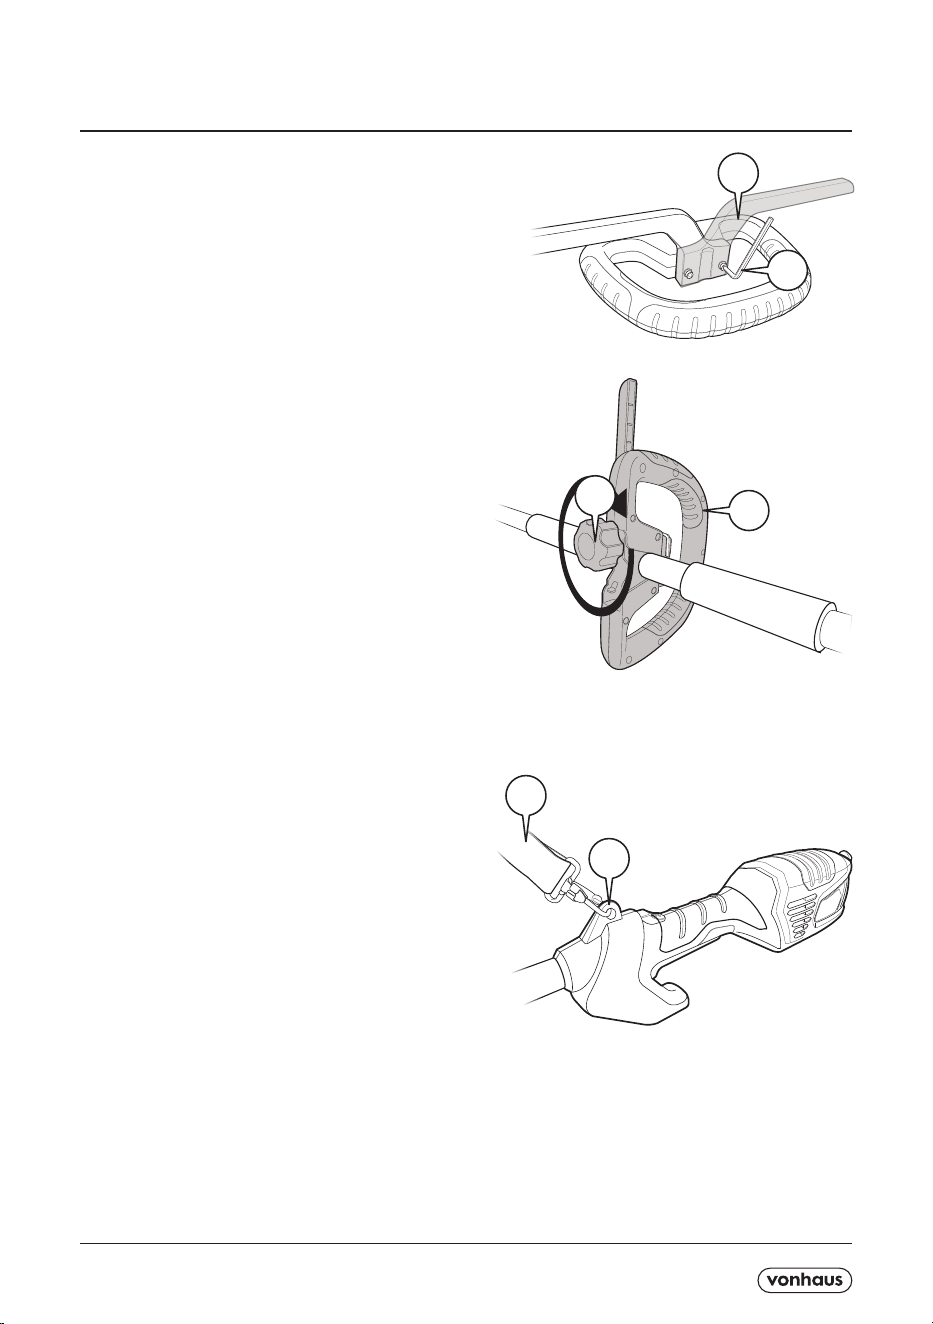
HANDLE / STRAP ASSEMBLY
Adjust the Secondary Handle (1) to the left or right
position using the Hex Key (27) supplied.
For added stability and manoeuvrability, we recommend
you always attach the Shoulder Strap (9) to the Shoulder
Strap Connector (8) located on the top of the Main Unit.
Adjust the length of the shoulder strap to obtain a
comfortable working position. A few practice swings
without starting the motor should be made to determine
correct balance.
Put the shoulder strap over your right shoulder. Carry
the tool motor unit at the right side of your body.
IMPORTANT: Never attach the strap diagonally across
your shoulder and your breast, but rather place it on one
of your shoulders. In this way you can remove the tool
quickly from your body in case of danger.
Position the Auxiliary Handle (1) to the Main Unit Pole
(5) between the 2 foam grips or where the appropriate
po sition is to obtain the best balance. Using the hinged
opening, close and secure the Auxiliary Handle (1) using
the Auxiliary Handle Locking Screw (2) as shown. Turn
clockwise to tighten.
IMPORTANT! Ensure the Auxiliary Handle (1) is
completely secure before initial use.
1
8
9
2
27
1
A5P | 01
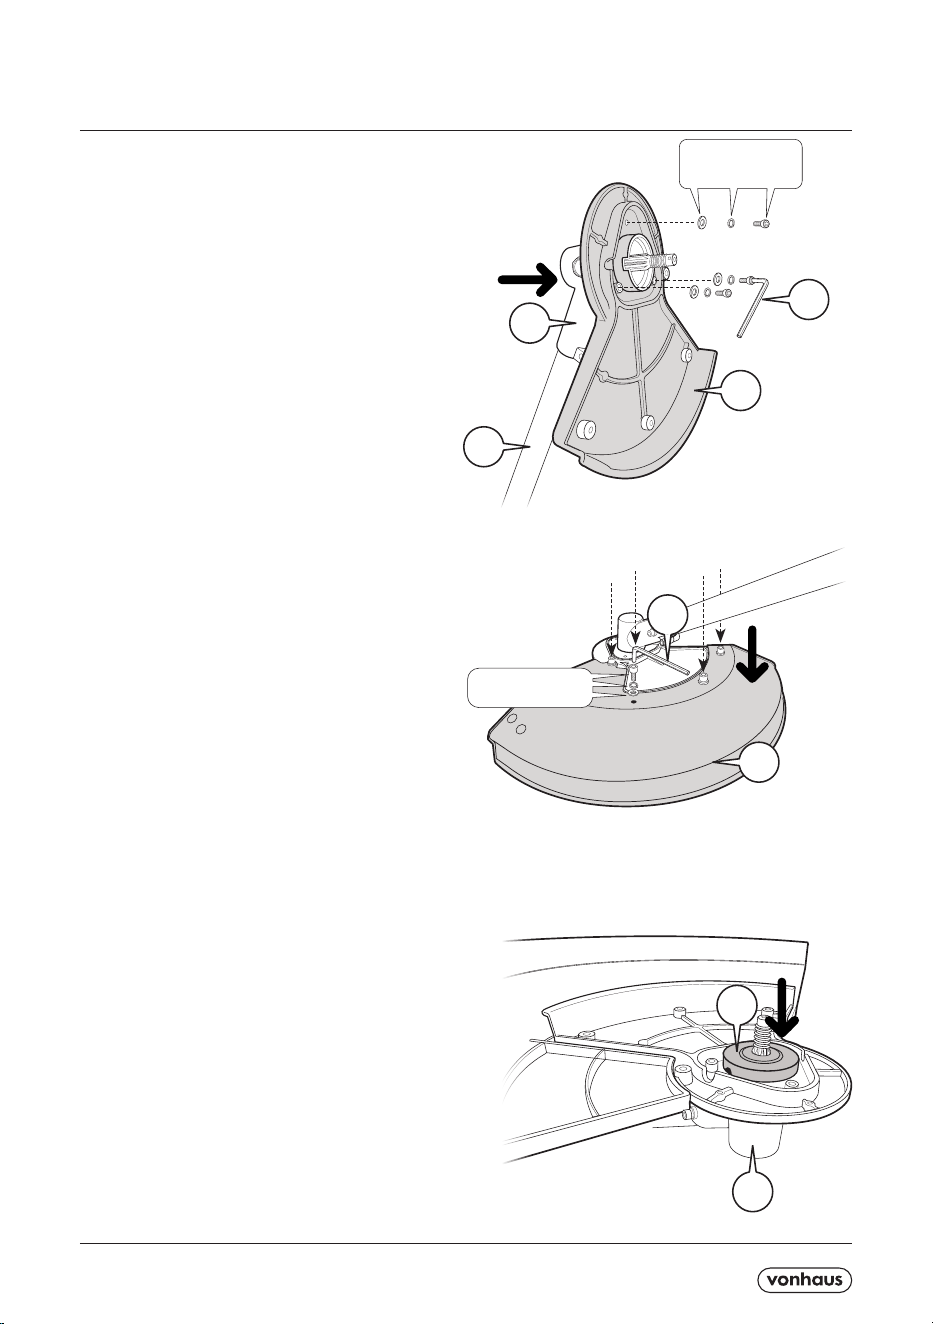
TRIMMER ASSEMBLY
Align the Gear Box (12) and Lower Pole (13) with the 3
holes on the Inner Mounting Plate (14).
Secure in place from the inside using 3 Small Hex Bolts
(24), 3 Washers (23) and 3 Spring Washers (22) in the
order shown on the right.
Tighten using the Hex Key (27) supplied.
To attach the Plastic Trimmer Guard (15) to the Inner
Mounting Plate (14), place the Guard on top an align
the 4 holes. Insert 4 x Large Hex Bolts (25) along with
the remaining Washers (23) and Spring Washers (22).
Securely tighten using the Hex Key (27) supplied.
When using the Trimmer attachments, the Coupling
Plate (20) must rst be added. Simply slide this over
the Gear Box (12) drive shaft as shown ensuring it locks
onto the splines of the Gearbox shaft.
13
12
27
23/22/24
14
15
14
20
12
23/22/24
A5P | 01
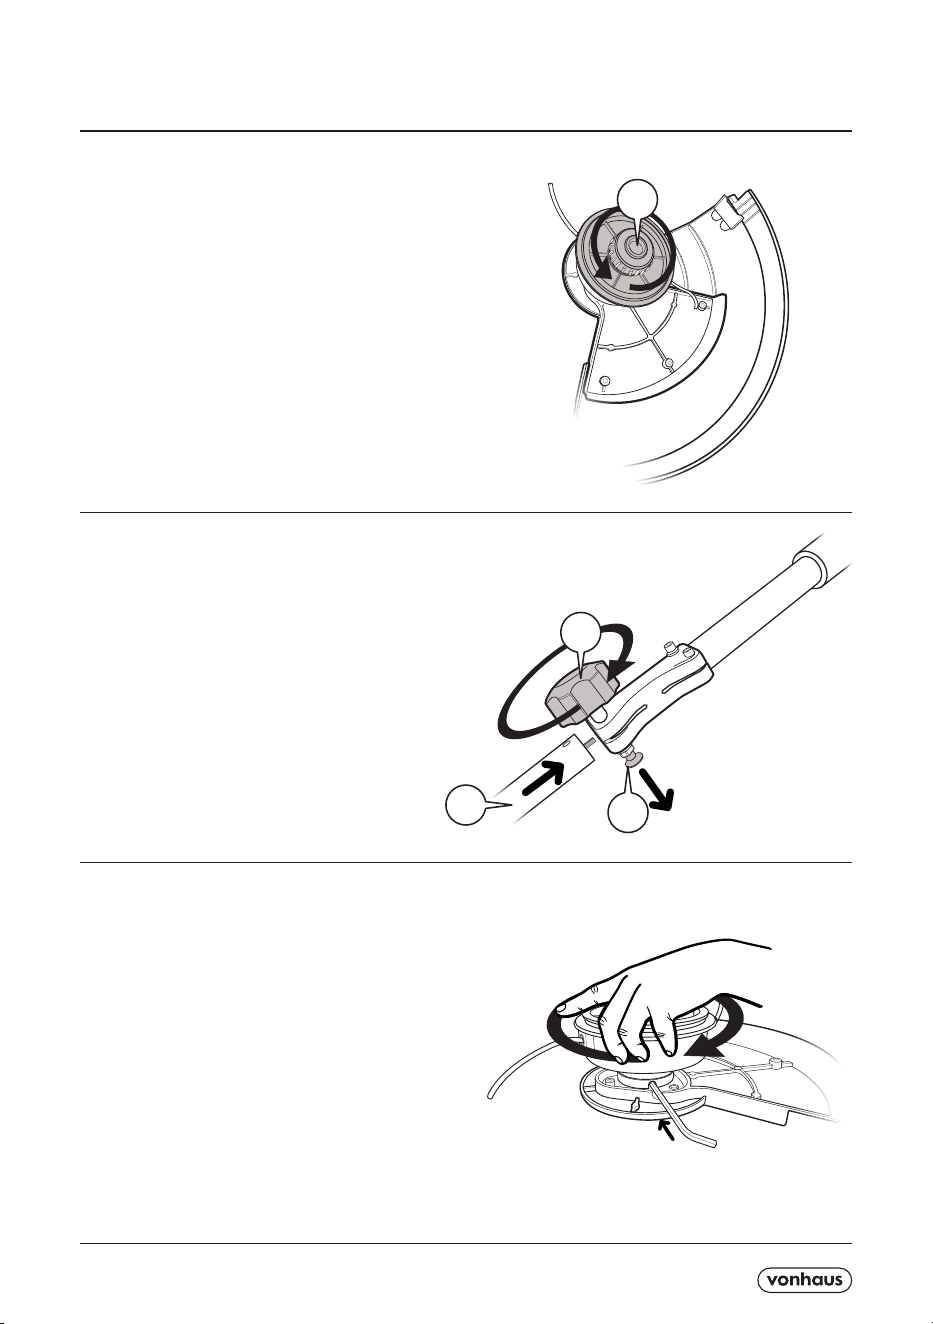
TRIMMER ASSEMBLY
With the Coupling Plate (20) in position, place the Spool
Assembly (17) over the drive shaft and turn counter-
clockwise to secure.
IMPORTANT! Ensure the Spool Assembly is completely
secure before initial use.
NOTE: To remove the Spool Assembly from the Gear
box for cleaning & maintenance, rst, turn the assembly
and align the hole with the groove on the Coupling Plate.
The Hex Key (27) supplied should then be inserted
before turning the Assembly clockwise to unscrew.
NOTE: The Gearbox shaft is a reverse thread. Counter-
clockwise to tighten, clockwise to loosen.
To insert the Lower Pole (13) into the Main Unit Pole
(5), simply pull back the Spring Pin (3), insert the Lower
Pole (13) and secure using the Locking Grip (4). Turn
clockwise to tighten.
17
4
3
13
A5P | 01
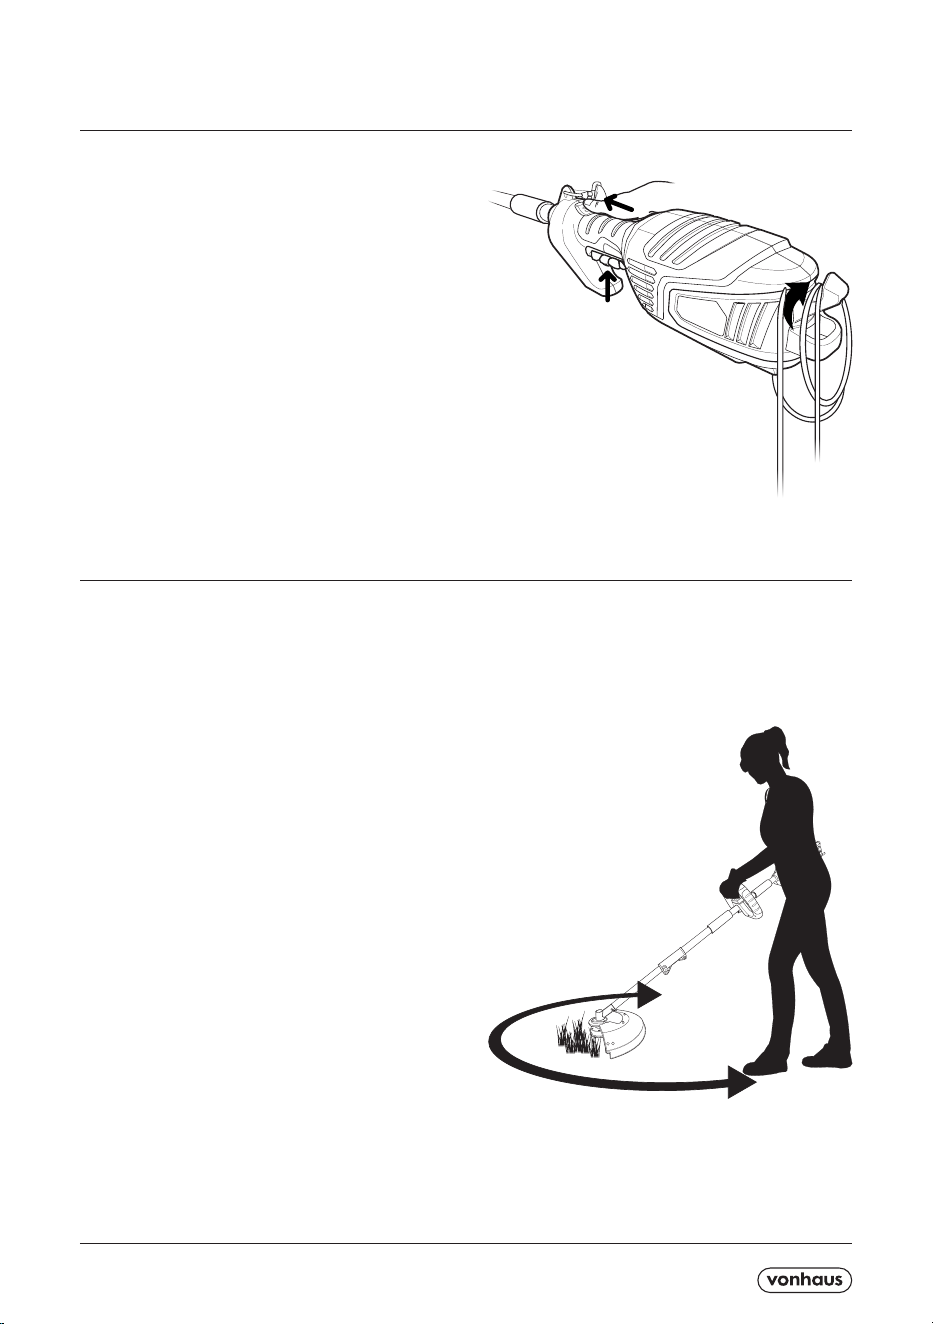
USEAGE
WORKING POSITION
POWER ON/OFF
To operate, press the Safety Switch (6) forwards whilst
at the same time pressing the ON/OFF Trigger (7).
Release the Safety Switch (6) once powered on.
NOTE: When the Trimmer starts up there may be some
kickback, always ensure you are stood rmly and have
a rm grip.
NOTE: Always ensure that the power cord is correctly
wrapped around the Cable Hook (11) before use as
illustrated.
NOTE! If you require more line, simply knock the head of the Trimmer on the oor. The Spool Locking Nut (18) doubles
as a manual feed mechanism.
WARNING! Ensure the area you are cutting is
completely free any stones or debris. These can cause
serious damage to the Garden Tool, the user and any
passers-by.
When operating the Trimmer, ensure you are holding the
equipment rmly in both hands, with one hand on the
rear handle and the other holding the Auxiliary Handle.
CAUTION: Never hold the Trimmer with one hand.
Holding the Auxiliary Handle/Secondary Handle (1),
slightly raise the Trimmer out in front of the body at an
inclined angle.
If cutting longer areas of grass, ensure you cut down in
stages to prevent any grass entangling around the Spool
Assembly (17).
CAUTION: Avoid lowering the Trimmer head too much
as coming into contact with the ground may loosen the
Spool Assembly (17).
Maintain proper footing and balance and be careful not
to overreach.
Always wear safety goggles, non-slip footwear and
gloves when using the Trimmer.
IMPORTANT: If poor cutting performance is
experienced or the Trimmer appears to be vibrating,
switch o and disconnect from the mains. This may
be an indication the Spool Assembly (17) needs to be
clean, adjusted or replaced.
A5P | 01
Detach the Spool Locking Nut (18) by twisting clockwise
to release. Once removed, lift the Spool Assembly (17)
o the Gear Box drive shaft.
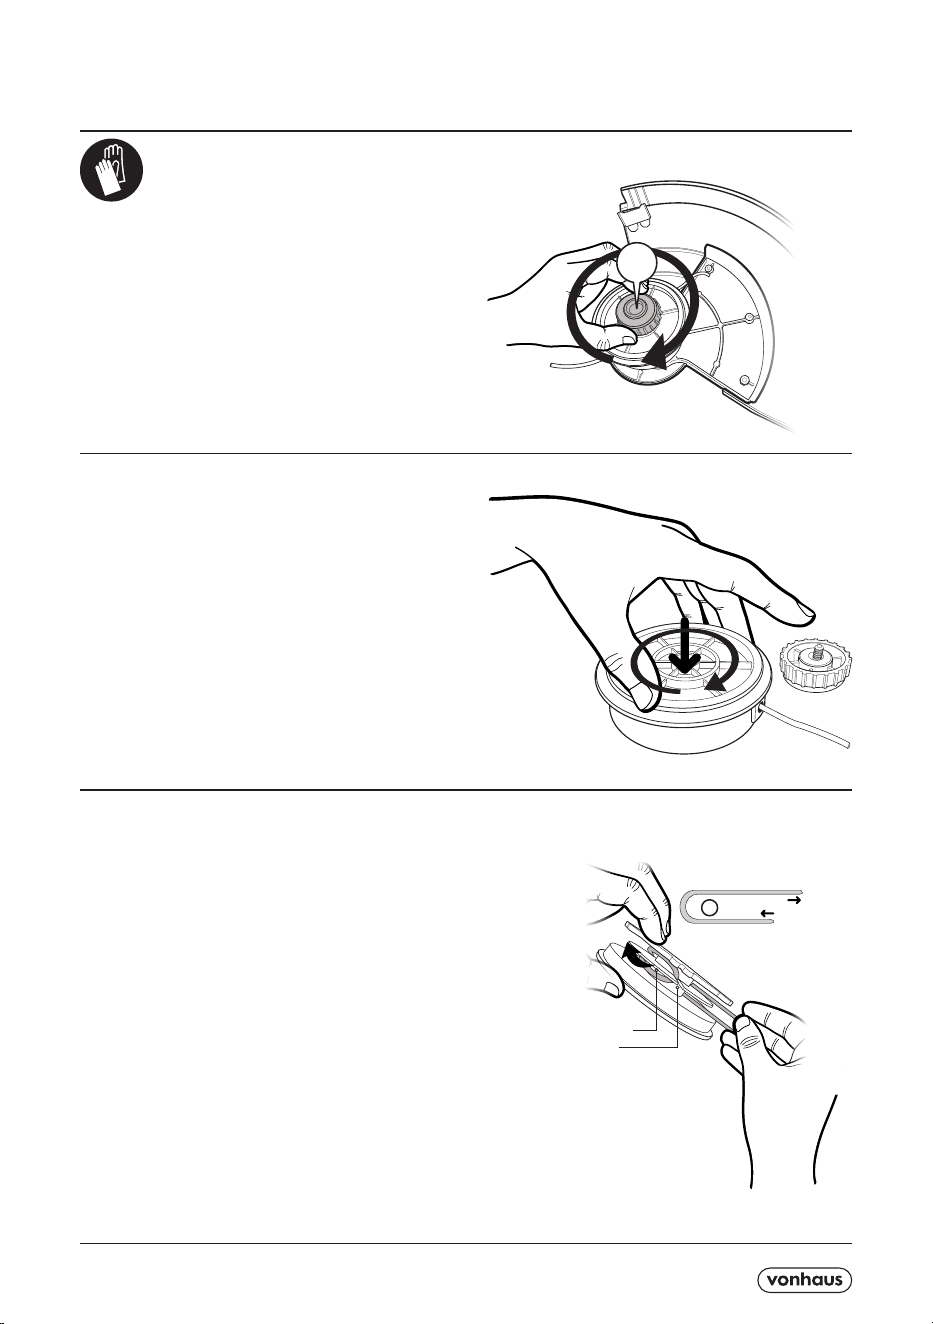
To access the Spool thread, gently push the cover down
and twist clockwise to unlock. Carefully lift out the Spool
carrier from the case and withdraw the Spool from
the eyelets either side. Wipe clean if necessary using
a damp cloth. Upon removal, you will notice a spring
beneath the carrier
IMPORTANT: Ensure the spring is kept in a safe place
during any maintenance.
To rectify an incorrectly wound line, fold the line in half,
making sure one end is slightly longer than the other.
At the fold, hook this onto the inner eyelet. Ensure that
both lines are now separated into each section as you
tightly wind it round following the indication marker on
the top, which is marked ‘wind cord’.
1
SECTION DIVIDER
INNER EYELET
REPLACING THE SPOOL
Protect your hands.
18
A5P | 01
REPLACING THE SPOOL
Once wound, hook one end into the outer eyelet (
g 2
)
and insert the other end through one of the eyelets on
the Spool Assembly (17).
(
g 3
). Unhook the end secured in (
g 2
) and insert
through the other eyelet on the Assembly.
NOTE: Ensure the spring from step 3 in replaced back
underneath the carrier before placing the carrier back
into the housing.
Replace the spool cover, rmly pushing down to click
back into place.
W
I
N
D
C
O
R
D
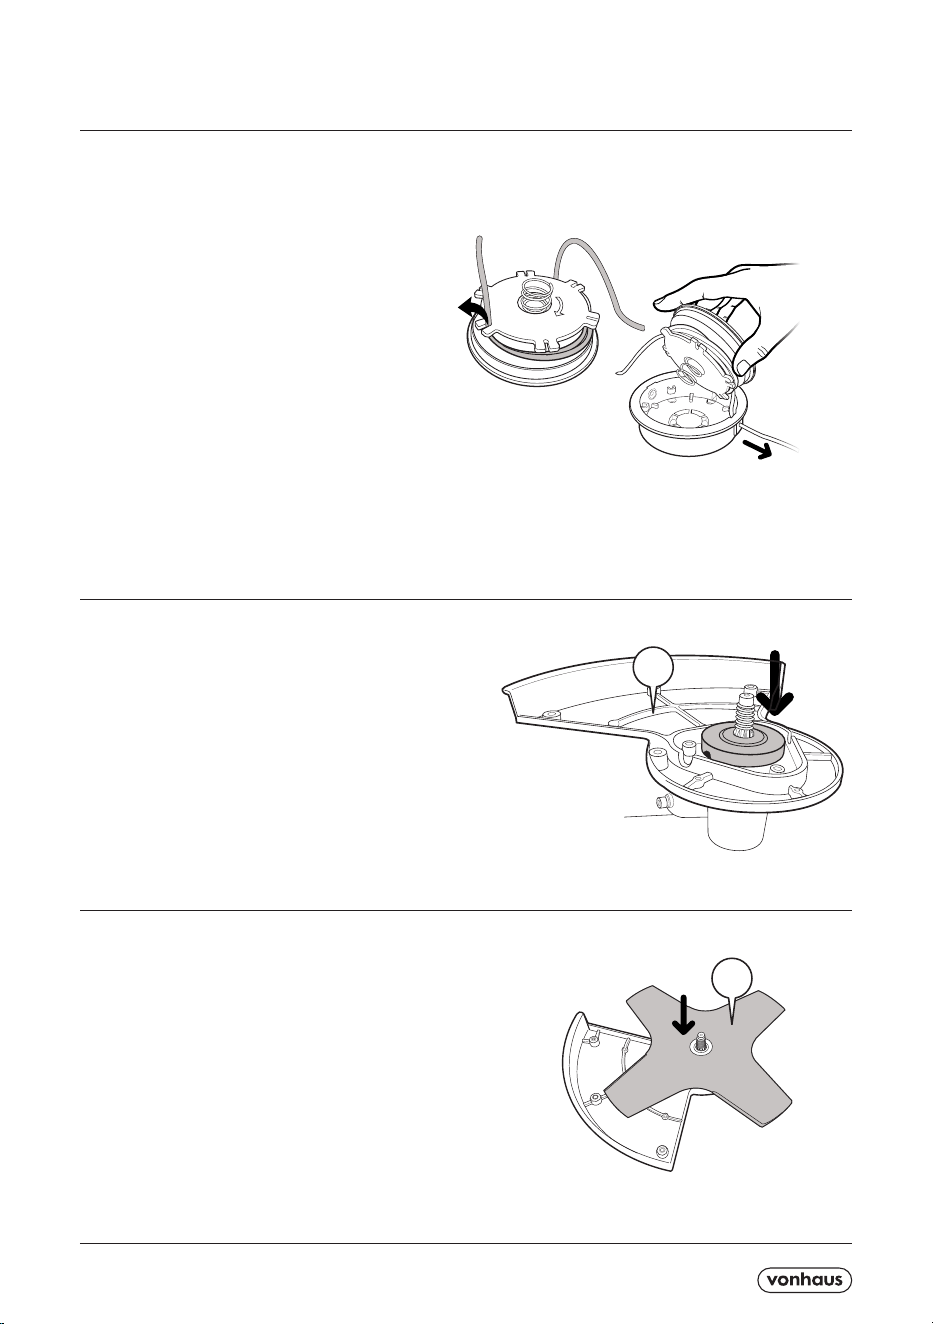
BRUSH CUTTER ASSEMBLY
Ensure the Plastic Trimmer Guard (15) has been
detached from the Inner Mounting Plate (14) before
using the Brush Cutter attachment.
When using the Brush Cutter attachment, the Coupling
Plate (20) must rst be added. Simply slide this over the
Gear Box (12) drive shaft as shown.
Place the Brush Cutter Disc (16) over the drive shaft so
it sits ush on top of the Coupling Plate (20).
NOTE: If the Spool Line is too long, it will automatically be cut down by the Small Blade attached to the plastic trimmer
guard once the tool is switched on.
14
Fig 2
Fig 3
16
A5P | 01
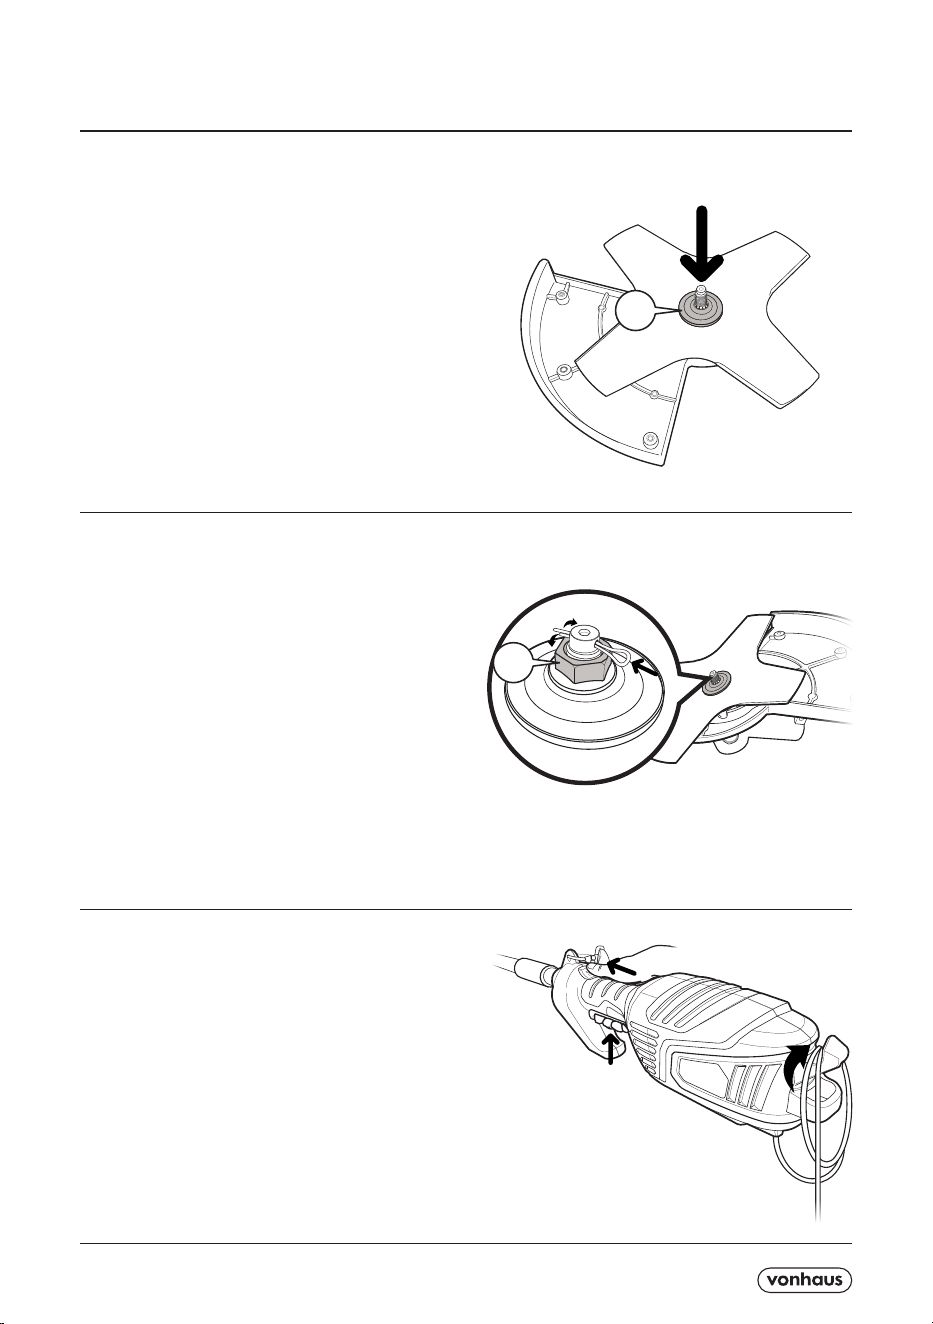
Secure all plates together using the Hex Nut (21)
supplied. Tighten using the Maintenance Tool (28).
Finally, insert the Split Pin (26) into the small hole of the
drive shaft and bend around the Nut.
Next, place the Brush Cutter Locking Plate (19) over the
drive shaft.
NOTE: Ensure the at side of this plate sits against the
Brush Cutter Disc (16).
BRUSH CUTTER ASSEMBLY
POWER ON/OFF
To operate, press the Safety Switch (6) forwards whilst
at the same time pressing the ON/OFF Trigger (7).
Release the Safety Switch (6) once powered on.
NOTE: When the Brush Cutter starts up there may be
some kickback, always ensure you are stood rmly and
have a rm grip.
NOTE: Always ensure that the power cord is correctly
wrapped around the Cable Hook (11) before use as
illustrated.
BRUSH CUTTER USEAGE
19
21
A5P | 01
BRUSH CUTTER ASSEMBLY
WARNING! Ensure the area you are cutting is
completely free any stones or debris. These can cause
serious damage to the Garden Tool, the user and any
passers-by.
Just like operating the Trimmer, ensure you are holding
the equipment rmly in both hands when using the
Brush Cutter attachment, with one hand on the rear
handle and the other holding the Auxiliary Handle.
CAUTION: Never hold the Trimmer with one hand.
Holding the Auxiliary Handle/Secondary Handle (1),
slightly raise the Brush Cutter Disc out in front of the
body at an inclined angle.
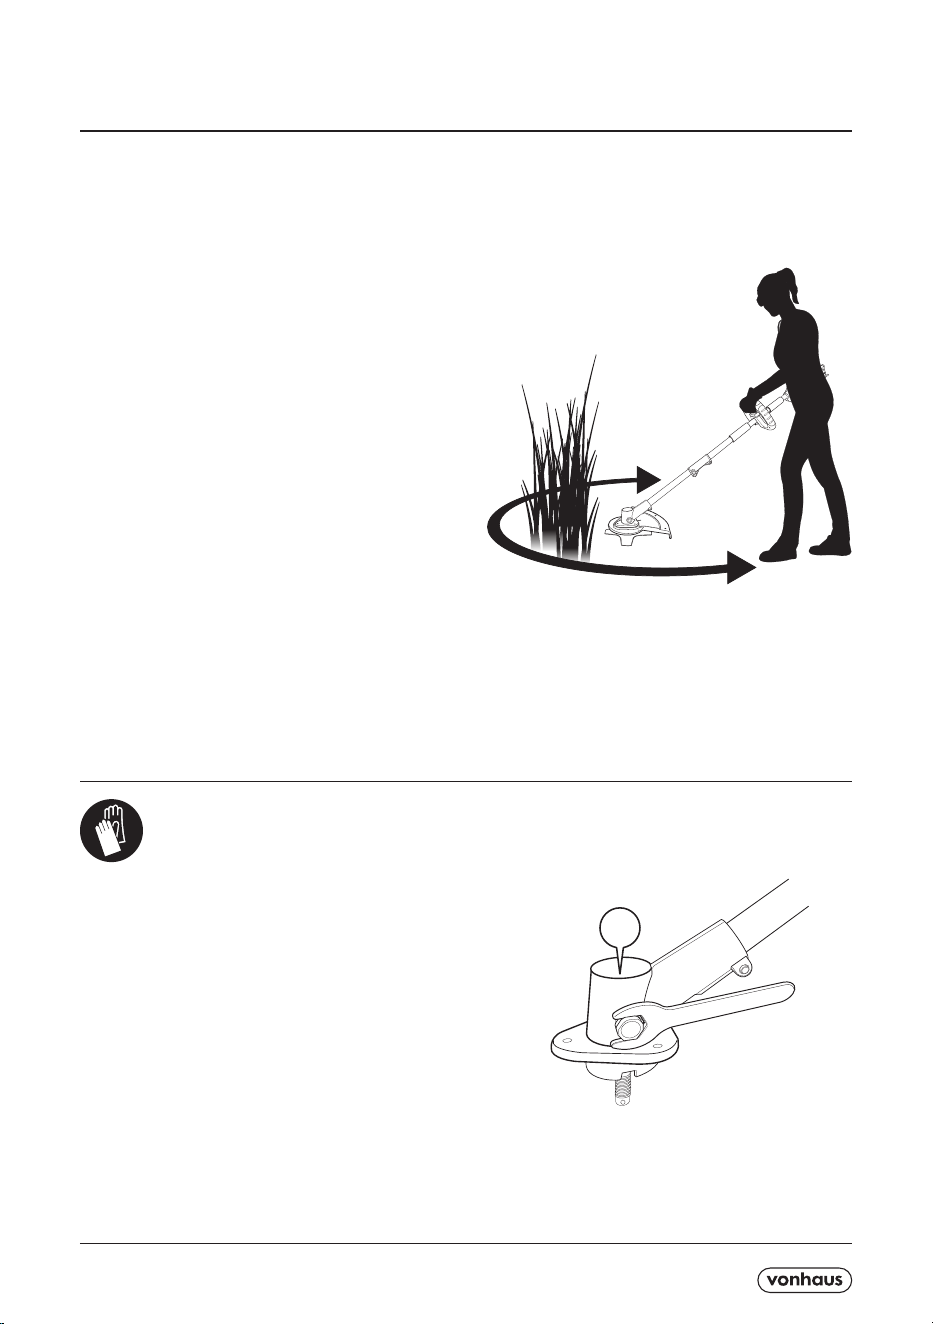
Cut tall section of grass in a broad sweeping motion
(right to left).
CAUTION: Do not use the Brush Cutter near fencing,
posts, buildings or other immovable objects.
CAUTION: Avoid lowering the Trimmer head too much
as coming into contact with the ground may damage the
Brush Cutter Disc (16).
Maintain proper footing and balance and be careful not
to overreach.
Always wear safety goggles, non-slip footwear and
rubber gloves when using the Trimmer.
IMPORTANT: If poor cutting performance is
experienced or the Brush Cutter appears to be vibrating,
switch o and disconnect from the mains. This may be
an indication that some grass has tangled around the
Disc or the Disc is not correctly balanced.
PART MAINTENANCE
FILLING WITH GREASE
The Gearbox (12) is lled with a multi-purpose grease.
It is recommended that you regularly check the quantity
and ll where necessary. Remove the bolt from the
side of the Gearbox (using the Maintenance Tool (28)
supplied) and ll appropriately.
Protect your hands.
12

A5P | 01
BRUSH CUTTER ASSEMBLY
CLEANING & MAINTENANCE
SHARPENING THE BRUSH CUTTER DISC
Never attempt to sharpen the Disc (16). The Brush
Cutter Disc is reversible, so should be turned over when
one side is blunt (see page 11 for tting).
The Disc must remain balanced when tted. An
unbalanced Disc will cause excessive vibration through
the tool.
IMPORTANT: Always check the Brush Cutter Disc (16)
before every use for any signs of damage. Never use
if damaged and replace immediately with an approved
replacement part.
NOTE: Disc bore size - 25.5mm.
Ensure all components are well lubricated before
usage.
Always keep the ventilation slots in the motor
housing clean and free from dust and dirt.
Never clean or spray a machine with water.
Ensure all components are well lubricated before usage.
Always keep the ventilation slots in the motor housing
clean and free from dust and dirt.
Never clean or spray a machine with water.

A5P | 01
PROBLEM SOLUTION
Tool does not power on
Ensure the tool is switched on and connected to mains
power.
Activate the ON/OFF Trigger Switch.
Check the fuse and replace if necessary.
Disc does not move
Driver gear may be broken. Contact DOMU Brands
Customer Services.
Poor cutting performance
Brush Cutter Disc may be damaged or blunt and will
need changing as outlined in the ‘Part Maintenance’
section.
Add more Spool line by gently knocking the head of the
Spool Assembly on the ground.
Remove and replace the Spool line.
Motor becomes hot
The tool has been heavily used.
Reduce the force applied to the tool. Do not exert extra
pressure, let the tool do the work.
Air vents have become blocked. Clean the air vents
using compressed air or a clean dry cloth.
Vibrating abnormaly
Brush Cutter Disc may be loose. Tighten the Hex Nut as
described on page 11.
Disc is not mounted correctly. Check the Disc and
replace if necessary.
Machine bearings may be worn. Contact DOMU Brands
Customer Services.
Spool assembly is dicult to rotate
A build up of grass may have tangled around the Spool
Assembly. Disconnect from the mains and remove any
blockages.
Spool line not releasing evenly Rewind the Spool line.
TROUBLESHOOTING

A5P | 01
DISPOSAL INFORMATION Please recycle where facil-
ities exist. Check with your local authority for recycling
advice.
CUSTOMER SERVICE If you are having diculty using
this product and require support, please contact sup-
WARRANTY To register your product and nd out if you
qualify for a free extended warranty please go to
www.vonhaus.com/warranty. Please retain a proof of
purchase receipt or statement as proof of the purchase
date. The warranty only applies if the product is used
solely in the manner indicated in the warnings page of
this manual, and all other instructions have been followed
accurately. Any abuse of the product or the manner in
which it is used will invalidate the warranty. Returned
goods will not be accepted unless re-packaged in its
original packaging and accompanied by a relevant and
completed returns form. This does not aect your stat-
utory rights. No rights are given under this warranty to a
person acquiring the appliance second-hand or for com-
mercial or communal use.
COPYRIGHT All material in this instruction manual are
copyrighted by DOMU Brands.Any unauthorised use
may violate worldwide copyright, trademark, and other
laws.
THANK YOU
Thank you for purchasing your product/appliance. Should
you require further assistance with your pur-chase, you
can contact us at
VonHaus is a registered trademark of DOMU Brands Ltd.
Made in China for DOMU Brands. Unit 30, Stakehill
Industrial Estate, Middleton, Manchester M24 2RW.
Authorised Representative: Authorised Representative
Service, 77 Camden Street Lower,Dublin, D02 XE80,
Ireland.
MERCI
Merci d’avoir acheté notre produit/appareil.
Si vous aviez besoin d’aide suite à votre achat, vous pou-
vez nous contacter a
VonHaus est une marque déposée de DOMU Brands Ltd.
Fabriqué en Chine pour DOMU Brands. Unit 30, Stakehill
Industrial Estate, Middleton, Manchester M24 2RW.
Authorised Representative: Authorised Representative
Service, 77 Camden Street Lower,Dublin, D02 XE80,
Ireland.
C
C
VIELEN DANK
Vielen Dank, dass Sie das Produkt/Gerät gekauft
haben. Sollten Sie weitere Unterstützung benötigen,e
können Sie uns ger
ne unter (email) kontaktieren.
VonHaus ist eine registrierte Handelsmarke von DOMU
Brands Ltd. Hergestellt in China für DOMU Brands. Unit
30, Stakehill Industrial Estate, Middleton, Manchester M24 2RW.
Authorised Representative: Authorised Representative Service, 77
Camden Street Lower,Dublin, D02 XE80, Ireland.re
GRACIAS
Gracias por comprar vuestro producto/aparato
Si requiere asistencia con vuestra compra, podeis con-
tactarnos a
VonHaus es una marca registrada de DOMU Brands Ltd.
Hecha en China para DOMU Brands. Unit 30, Stakehill
Industrial Estate, Middleton, Manchester M24 2RW.
Authorised Representative: Authorised Representative
Service, 77 Camden Street Lower,Dublin, D02 XE80,
Ireland.
GRAZIE
Grazie per aver acquistato il prodotto.
Per ulteriore assistenza sul tuo acquisto, puoi contattarci
all’indirizzo email
VonHaus è un marchio registrato di DOMU Brands Ltd.
Made in Cina per DOMU Brands. Unit 30, Stakehill
Industrial Estate, Middleton, Manchester M24 2RW.
Authorised Representative: Authorised Representative
Service, 77 Camden Street Lower,Dublin, D02 XE80,
Ireland.Ir
