Technical Support and E-Warranty Certificate
www.vevor.com/support
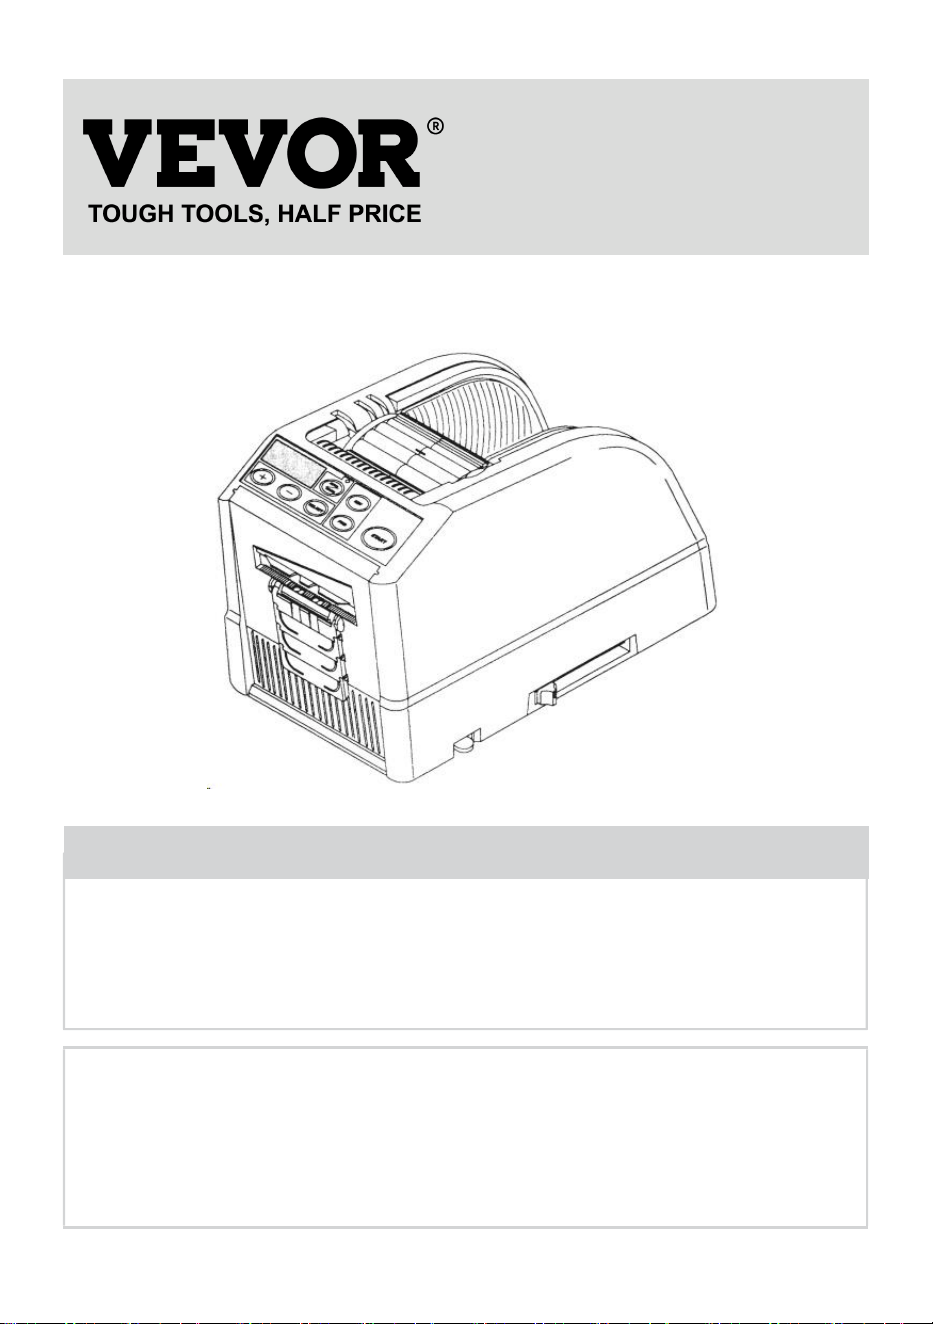
TAPE DISPENSER USER MANUAL
MODEL: AT-60
We continue to be committed to provide you tools with competitive price.
"Save Half", "Half Price" or any other similar expressions used by us only represents an
estimate of savings you might benefit from buying certain tools with us compared to the major
top brands and does not necessarily mean to cover all categories of tools offered by us. You
are kindly reminded to verify carefully when you are placing an order with us if you are
actually saving half in comparison with the top major brands.

- 1 -
MODEL: AT-60
Have product questions? Need technical support? Please feel free to
contact us:
Technical Support and E-Warranty Certificate
www.vevor.com/support
NEED HELP? CONTACT US!
This is the original instruction, please read all manual instructions
carefully before operating. VEVOR reserves a clear interpretation of our
user manual. The appearance of the product shall be subject to the
product you received. Please forgive us that we won't inform you again if
there are any technology or software updates on our product.
Tape Dispenser

- 2 -
1. Read carefully and understand all ASSEMBLY AND OPERATION
INSTRUCTIONS before operating.
2. Failure to follow the safety rules and other basic safety precautions may
result in serious personal injury.
GENERAL SAFETY RULES
The safety guidelines in this instruction Manual must be observed in order to
prevent damage to the machine or injury to the operator or other persons
The safety guidelines prescribed "Warning " and "Caution" describe possible injury
or damage that may be suffered from operating or maintaining the machine in a
manner other than as described in this instruction Manual.
Read and follow the safety precautions carefully before reading the Instruction
Manual.
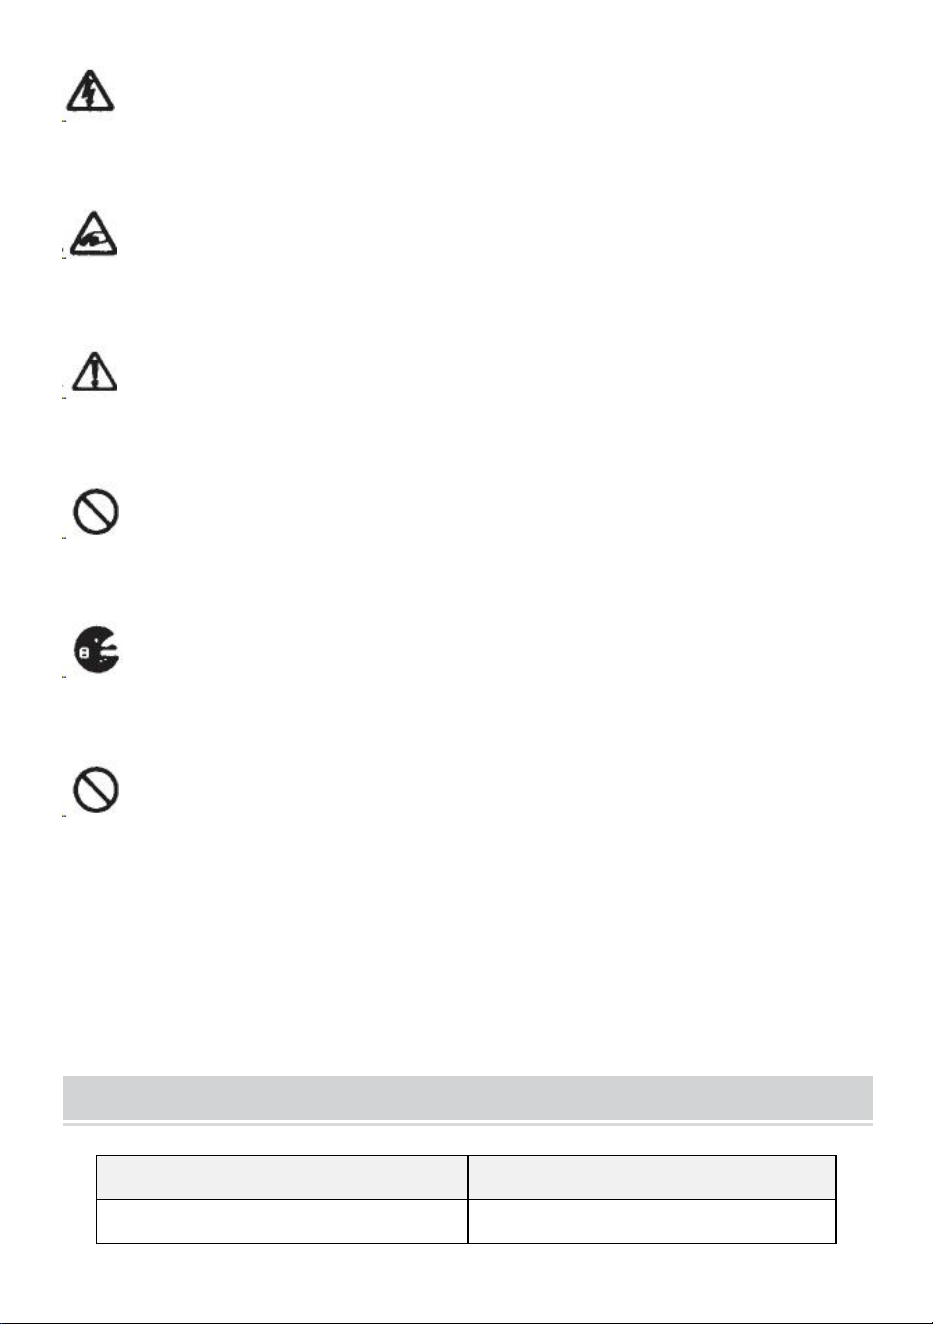
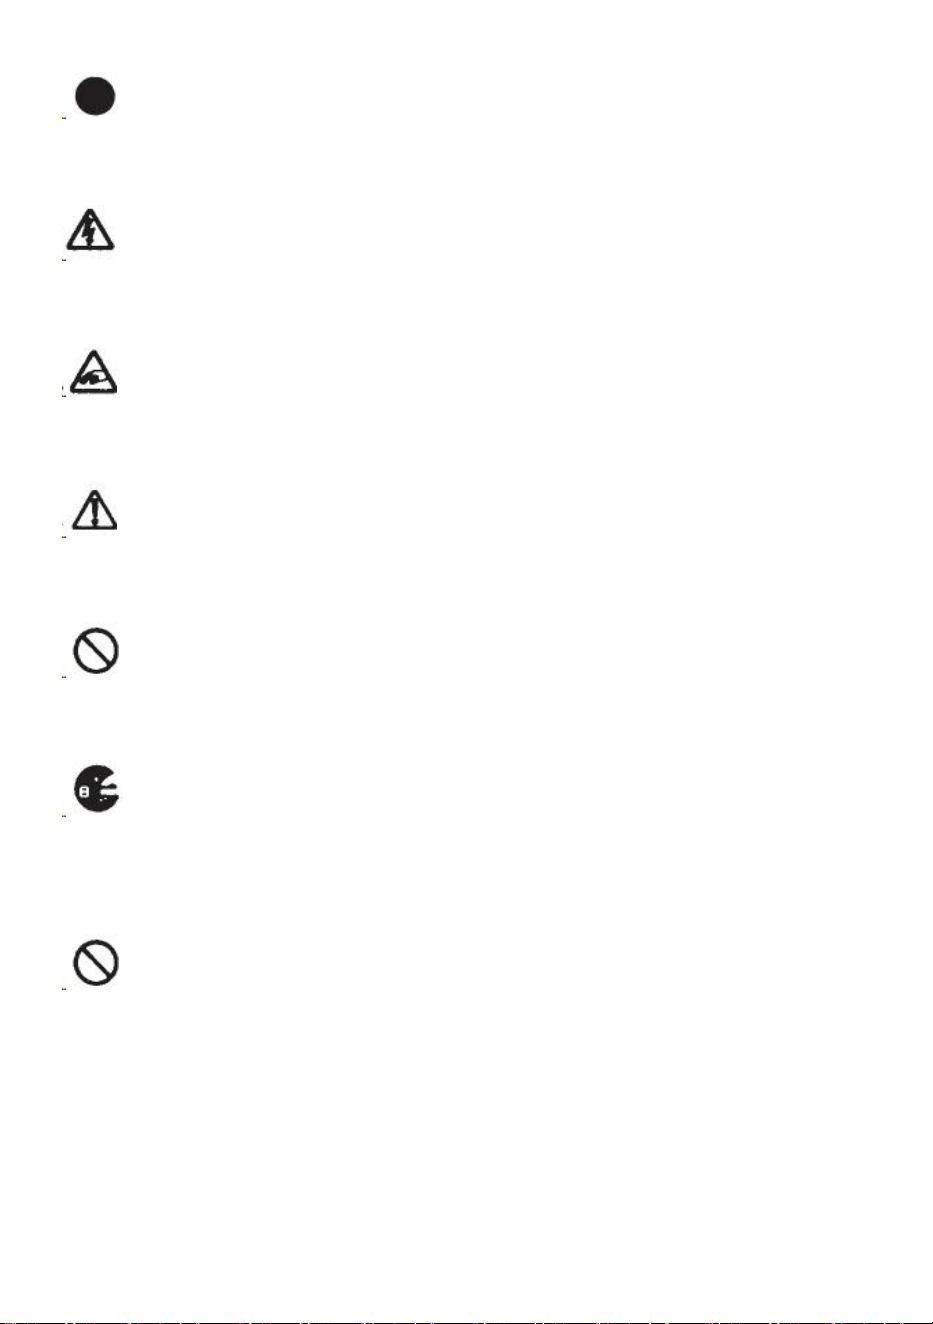
Warning
Indicates a potentially hazardous situation that, if not avoided, could result in death
or serious injury.
Caution
Indicate that mishandling may result in danger and that the operator is at risk of
injury, or the machine is at risk of damage.
Indicates Caution
A symbol within the triangle, or the description, will indicate a specific hazard
A Prohibited Action
A symbol within the circle, or the description, will indicate prohibited action.
A Required Action
A symbol within the circle, or the description, will indicate the required action.
Do not plug in, unplug the cord, or operate the machine with wet
hands.Failure to observe this may result in injury due to electric shock.
- 3 -
Never insert your finger, any other body part, or any foreign object into the
machine.Failure to observe this may result in injury.
Keep hair or loose clothing away from the machine while it is operating.
Failure to observe this may result in injury
This machine is intended for industrial use only. Do not allow untrained
operators or children to operate the machine.Failure to observe this may result in
injury.
Turn off the power switch and unplug the machine prior to replacing the
blade unit or performing any maintenance on the machine.Failure to observe this
may result in serious injury
Do not use this machine for anything other than its specified applications
Use of the machine for any unintended applications can cause injury to the
operator or failure of the machine.
SAVE THESE INSTRUCTIONS
MODEL AND PARAMETERS
Model
AT-60
Tape Width
6-60mm
Tape length
5-999mm
Outside Dia. of Roll
20~300mm
Body Material
Anti-Static ABS
Rating(s)
AC100V-240V 50-60Hz
Power(Max.)
24.6W
- 4 -
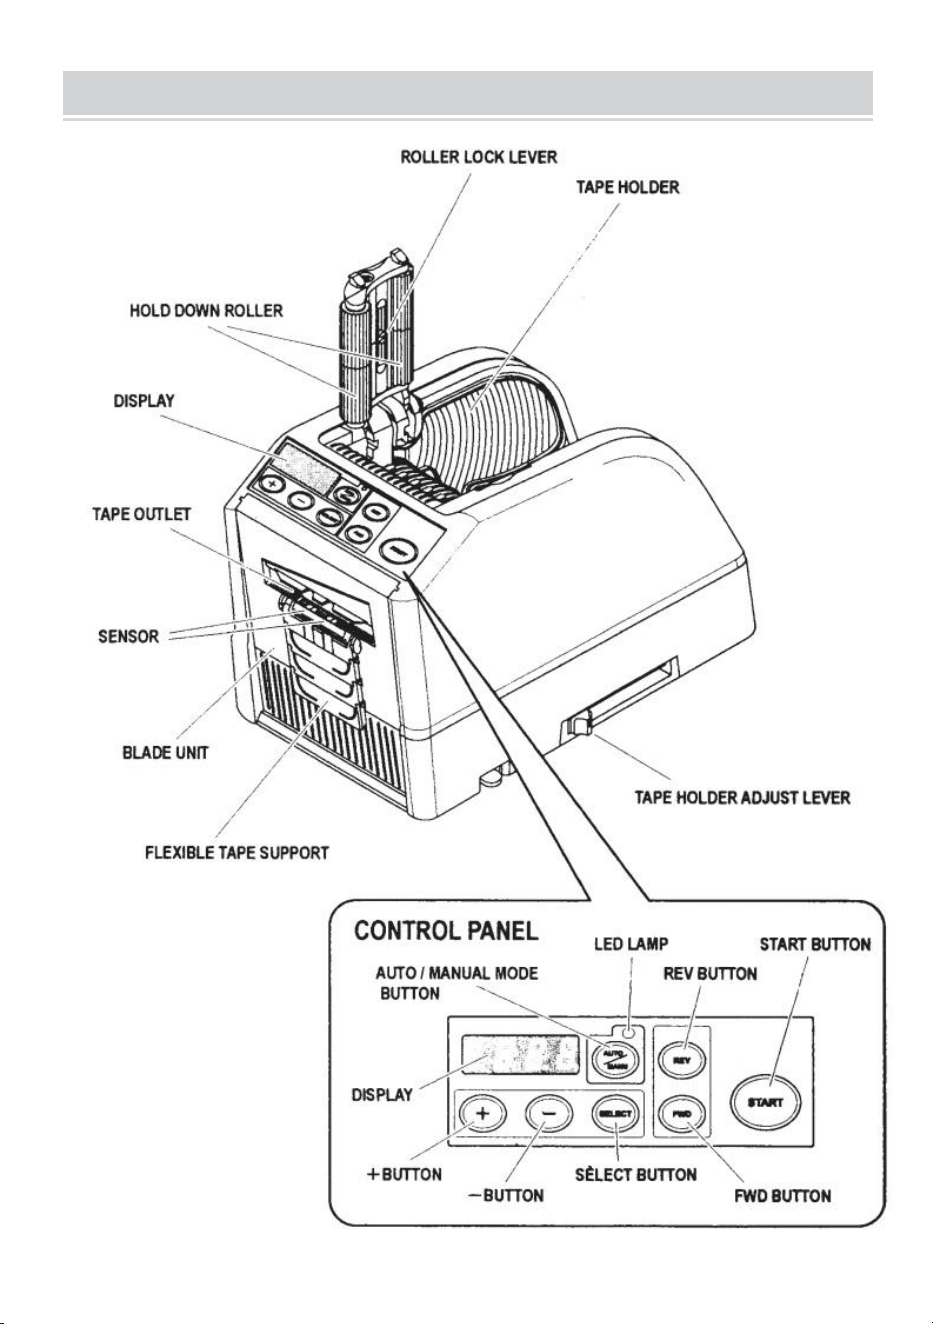
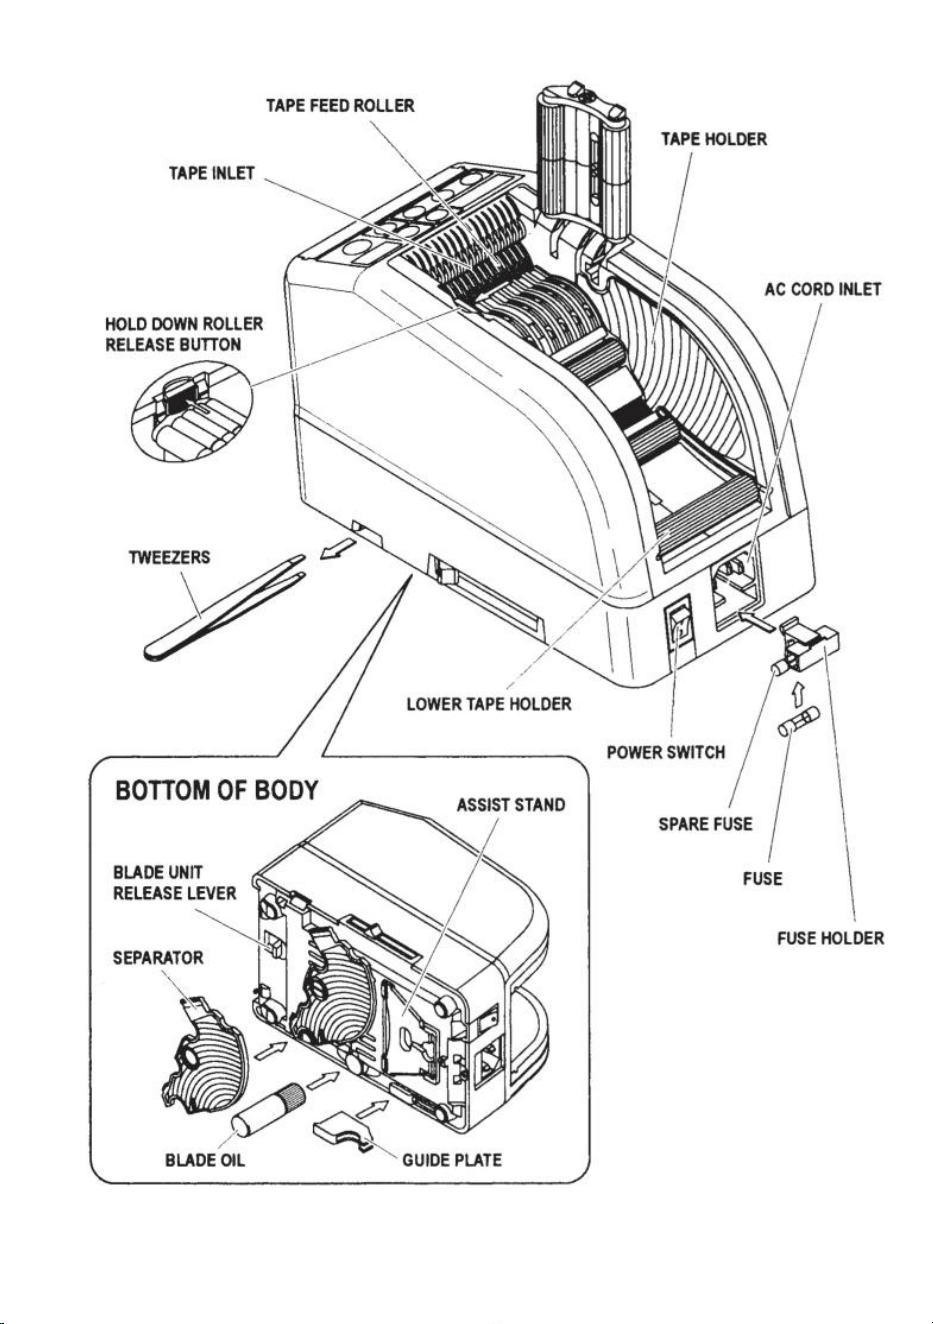
STRUCTURE DIAGRAM

- 5 -

- 6 -
OPERATING INSTRUCTIONS
Load the Tape
Plug in the AC CORD to the AC CORD INLET.
Make sure the POWER SWITCH is off, then plug it into an
appropriately grounded AC outlet.
Turn the POWER SWITCH on.
When the POWER SWITCH is turned on, a buzzer will have a
sound.
At this moment, the mode is set to MANUAL
Press the HOLD DOWN ROLLER RELEASE BUTTON
Place a roll of tape in the machine
Hold the tape by adjusting the TAPE HOLDERS
Adjust the TAPE HOLDERS to a proper width, slide the TAPE
HOLDERADJUST LEVER from the front to the rear of the machine
then close it.
The TAPE HOLDERS should hold the roll lightly in the center of the
cavity of the machine
This is very important because it keeps the tape in the center.
The tape passes over the SENSOR in front of the BLADE UNIT.
To support a larger roll of tape, pull the LOWER HOLDER out
Put the tape on the TAPE FEED ROLLER
Press the FWD BUTTON until the tape comes out from the TAPE
OUTLET!
When using a strong sticky adhesive tape, pull a little bit of tape out
in positioning into the TAPE INLET.
Press the FWD BUTTON continuously for a few seconds, and help
the tape position in the TAPE INLET.
After the tape is loaded and the TAPE HOLDERS are adjusted,
close the HOLD DOWN ROLLER UNIT.
Press the START BUTTON.
Remove the first piece of tape and discard it
When you take the roll of tape out from the machine, pull the tape
backward and press REV BUTTON.
- 7 -
NOTE:
Always use Tweezers to remove tape.
Whenever you set the tape, make sure that adhesive side of tape is
always faced down.
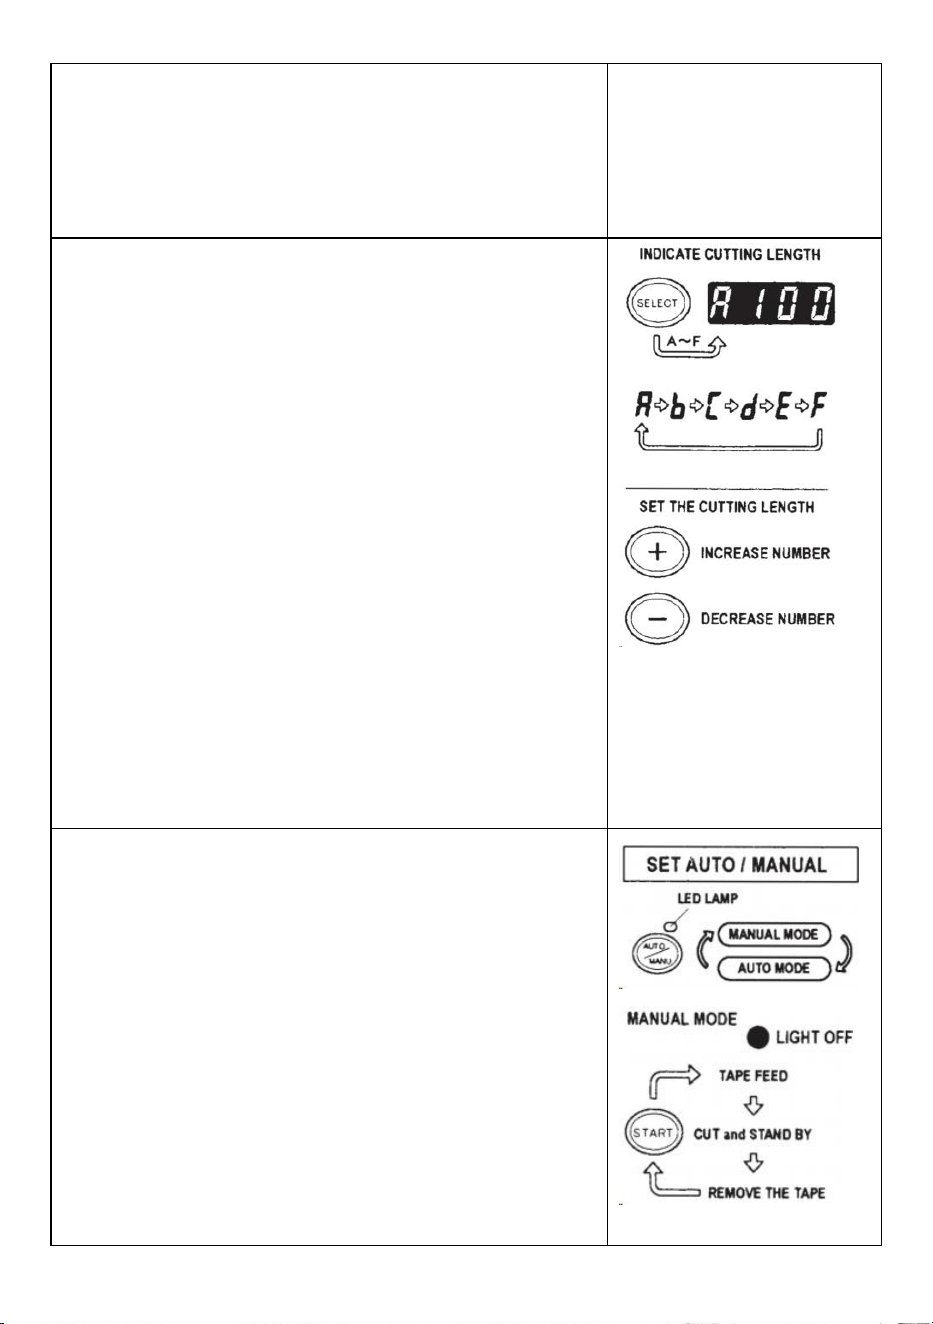
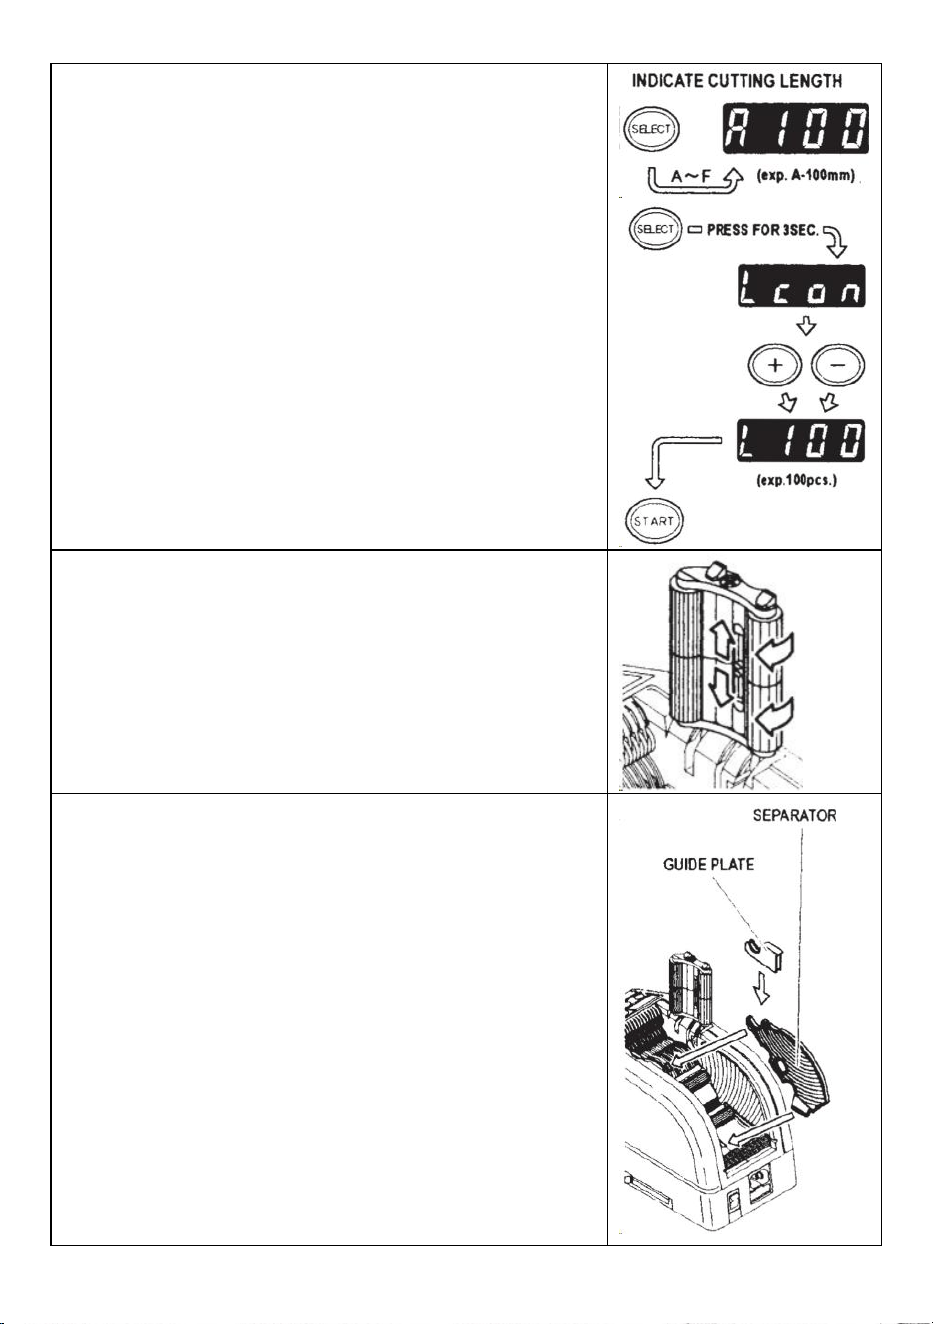
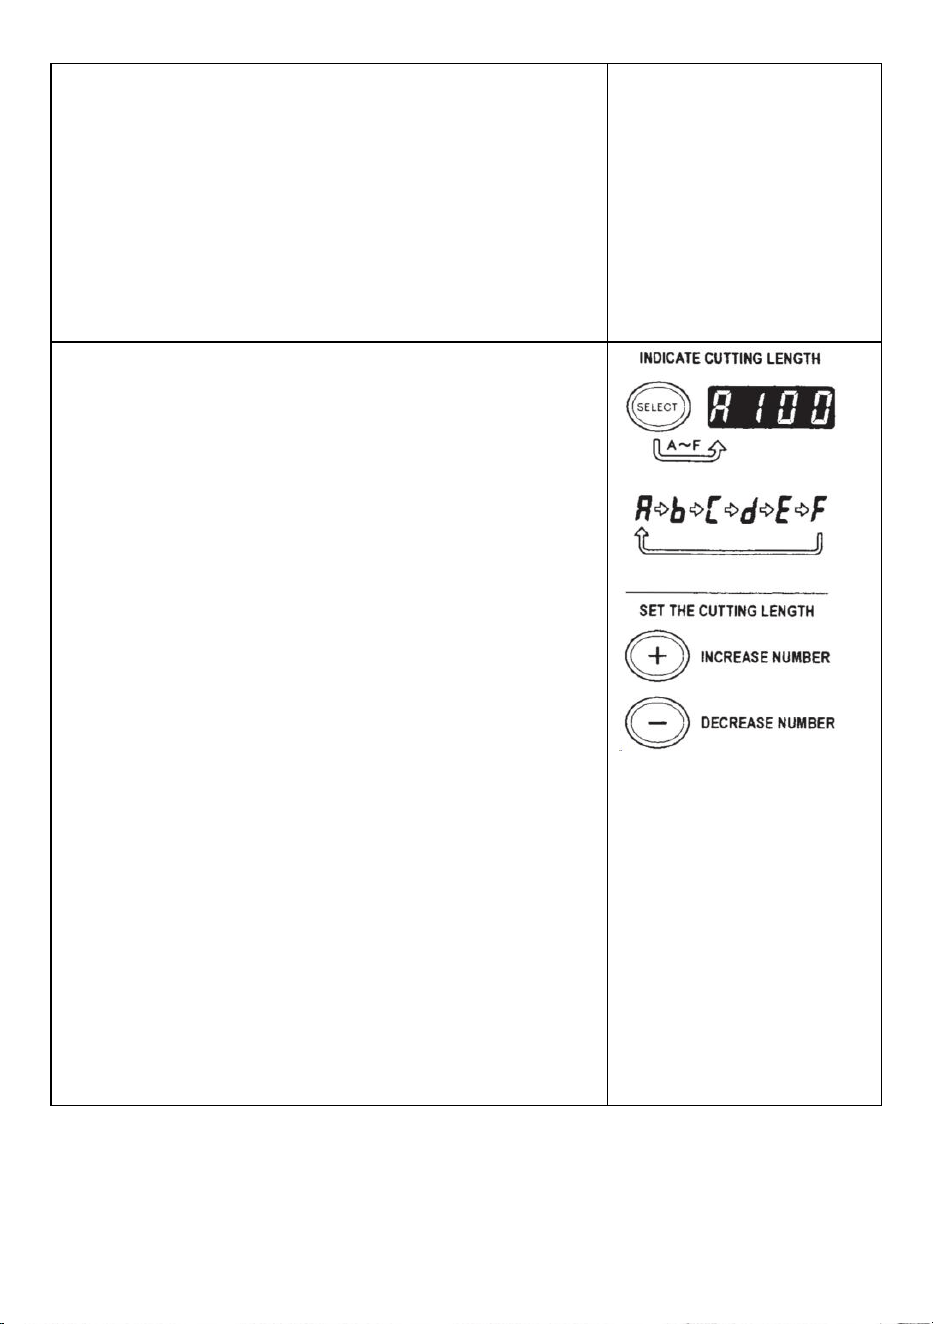
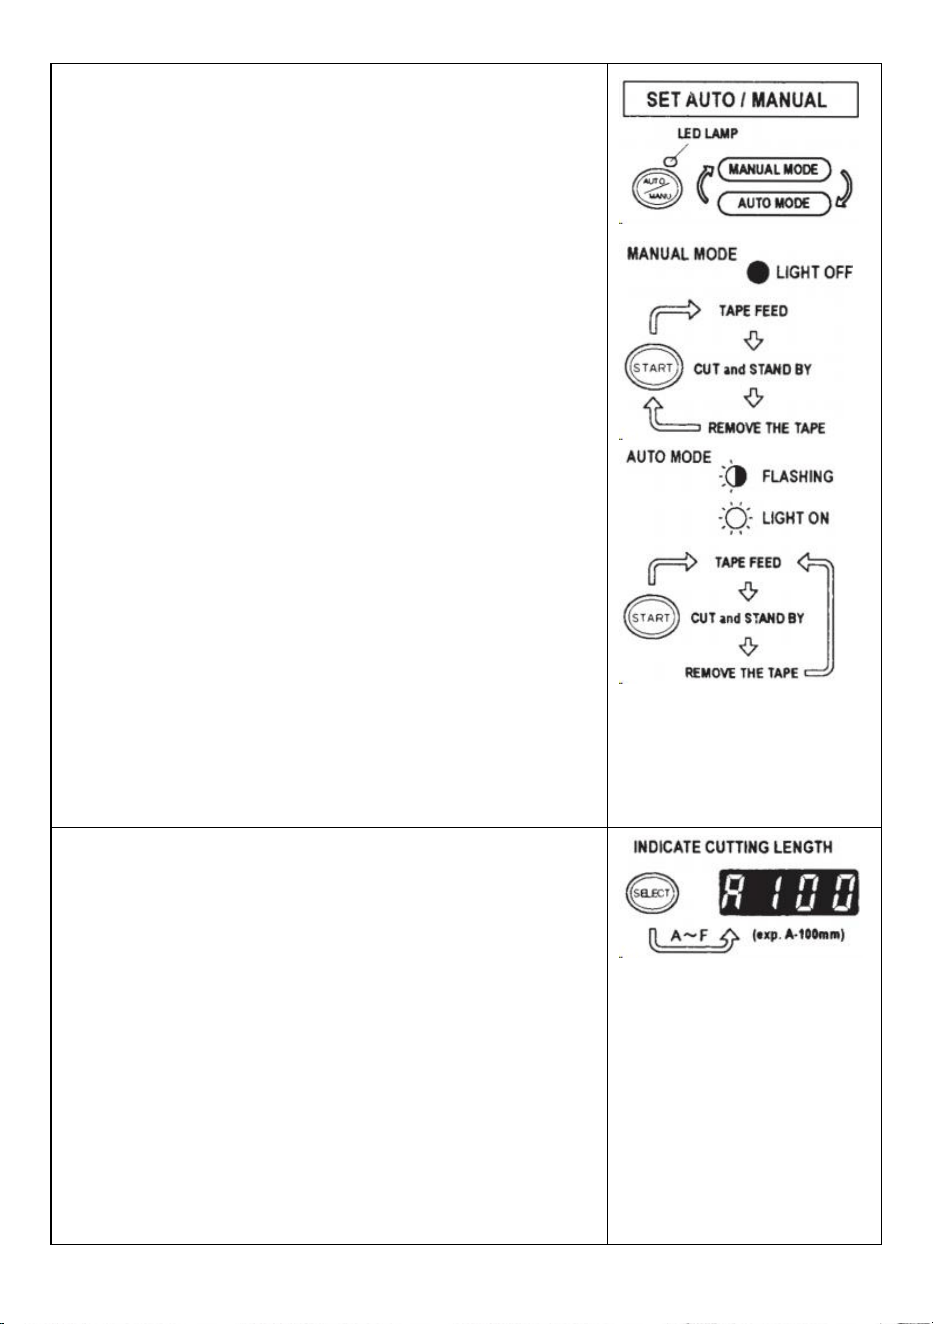
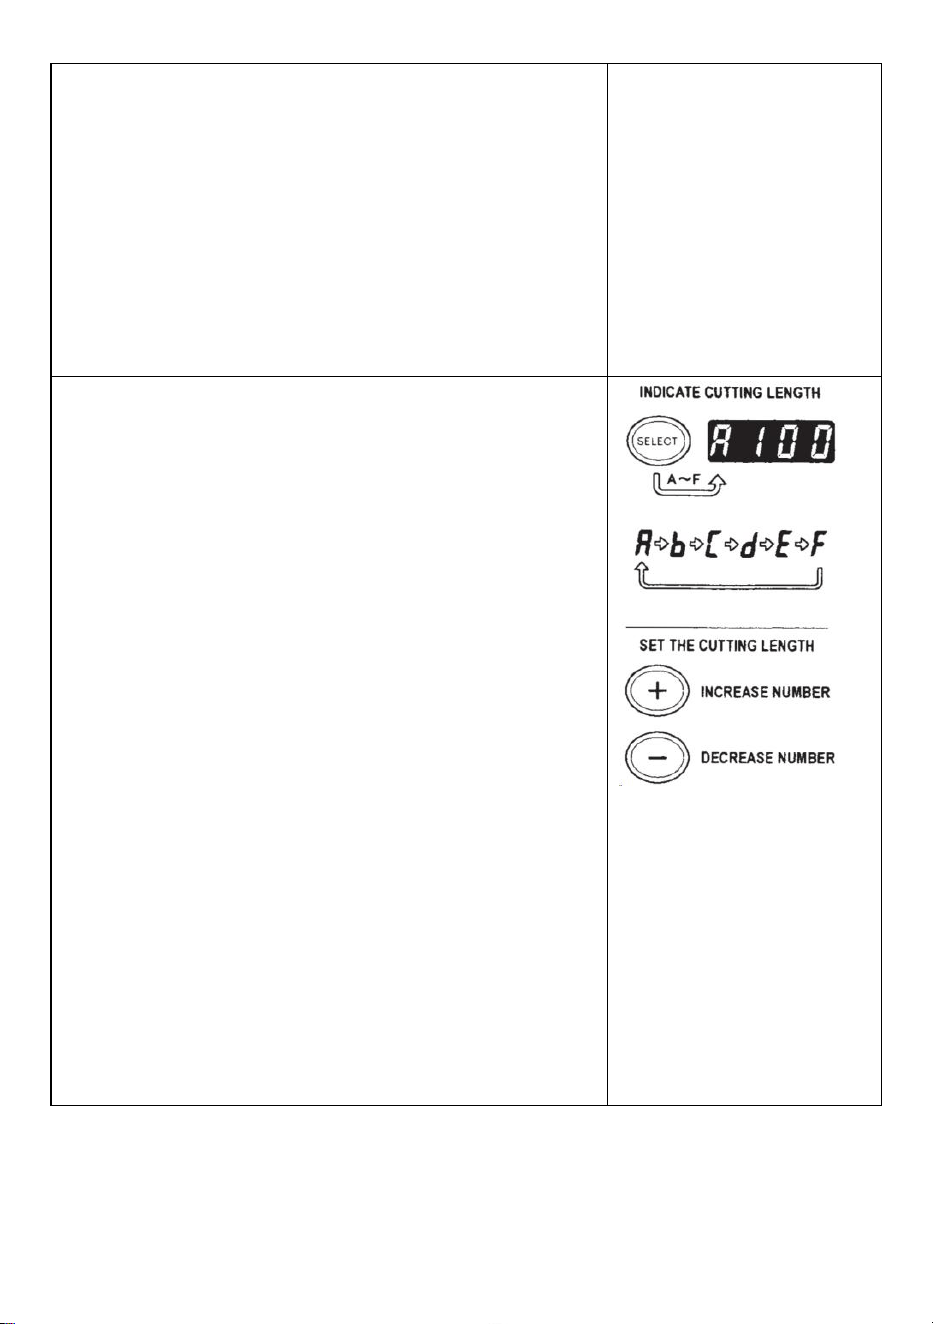
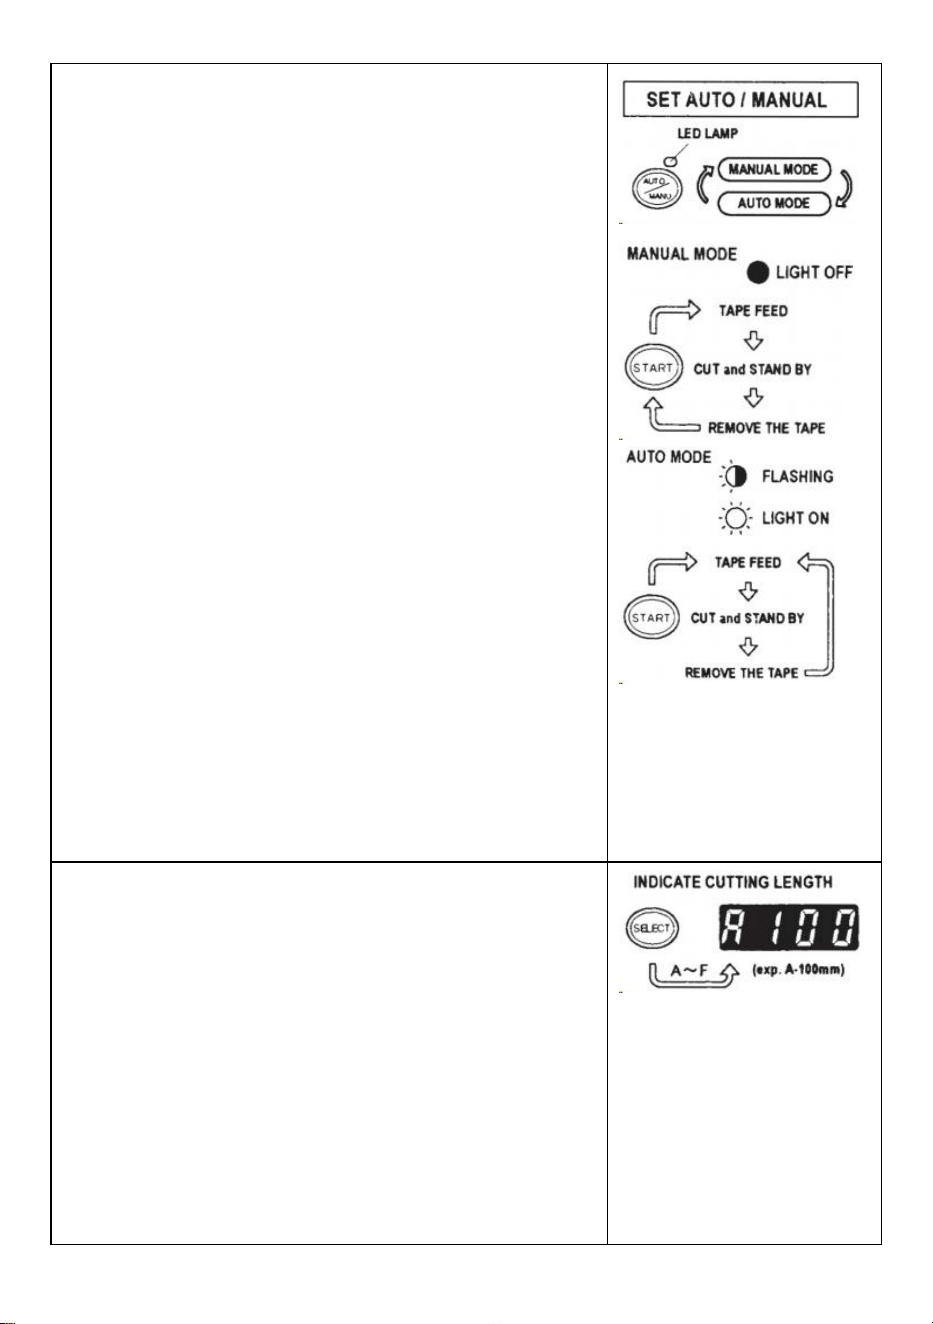
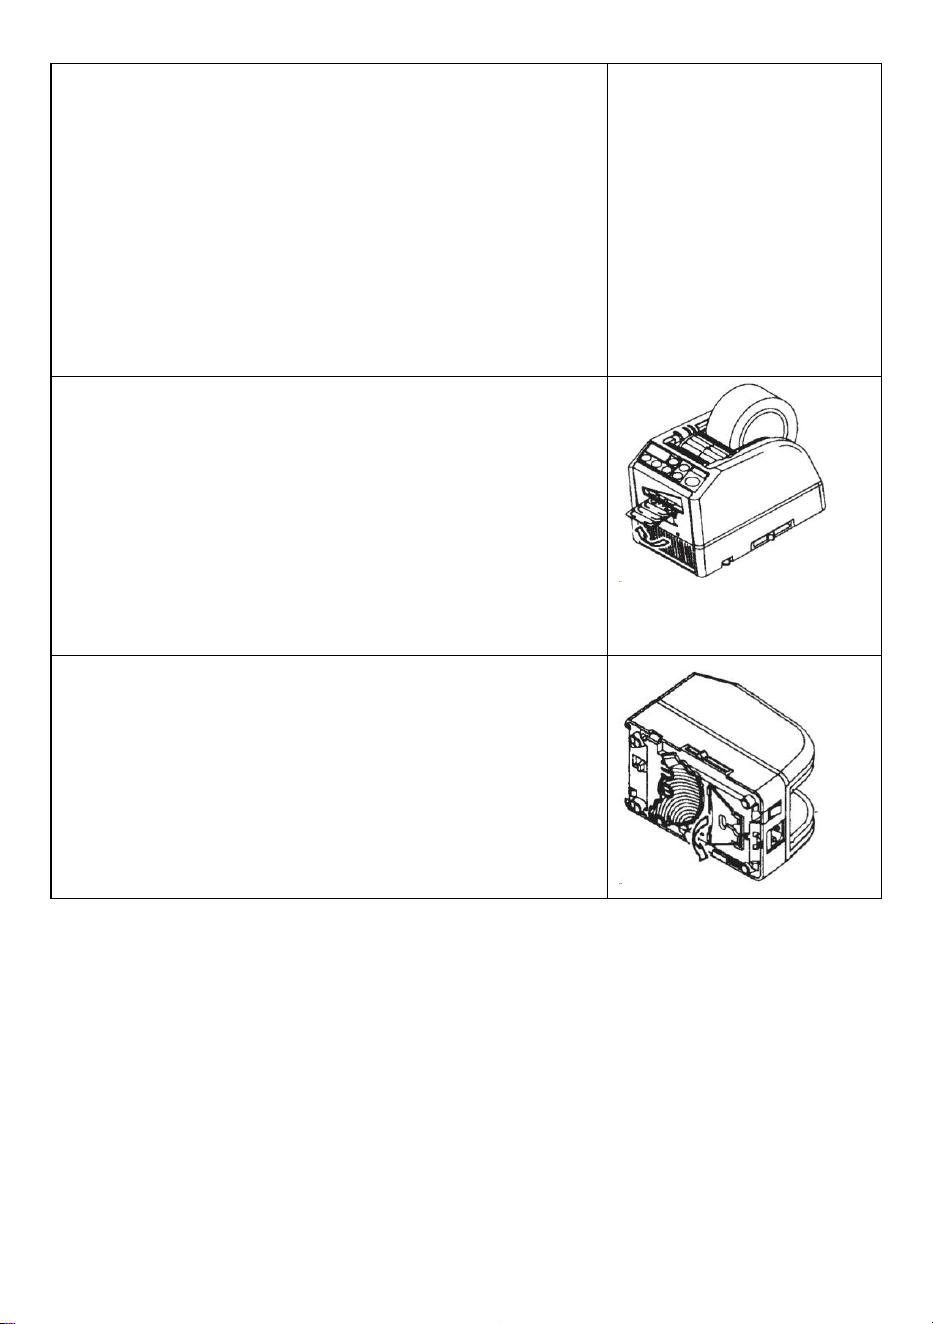
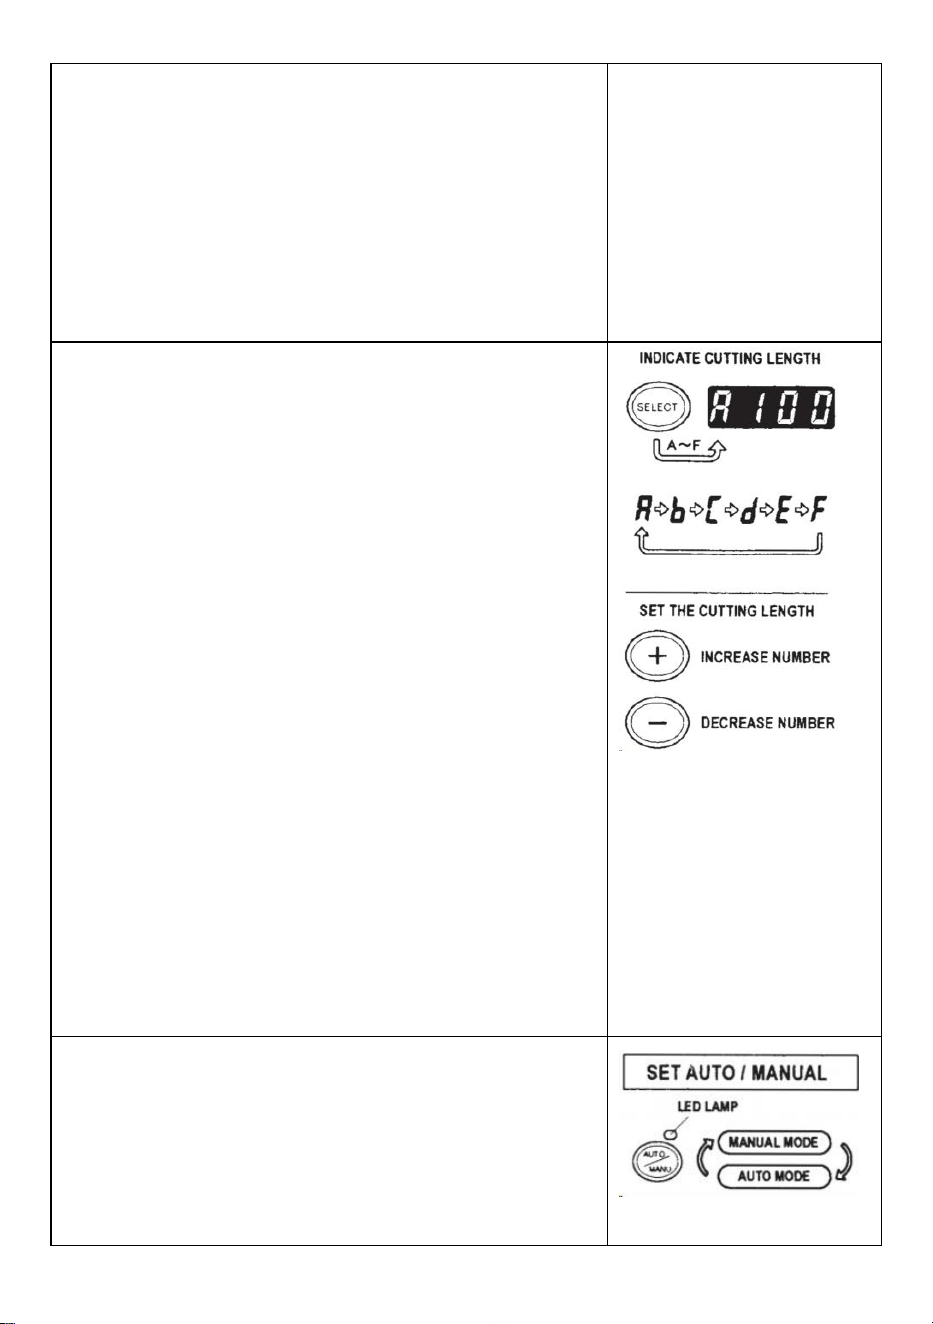
Set the Tape Length
Make sure that DISPLAY indicating <cutting length>
The cutting length is always indicated in some alphabets like
A,b,C,d,E,F
Set the cutting length.
Set your needed length by using +/- BUTTON.
The cutting length is adjustable between 5 mm to 999 mm.
You can set six different lengths by using SELECT BUTTON.
If you press +/- BUTTON for a short while, the length in changed
to 1 mm.
And if you press +/- BUTTON longer, it shows fast forward.
Caution
The actual length differs from the displayed length depending on
the type of the tape and its condition.
When cutting short length of tape, the length may not cut
consistently or tape is jammed.
Try several test cuts to ensure proper operation.
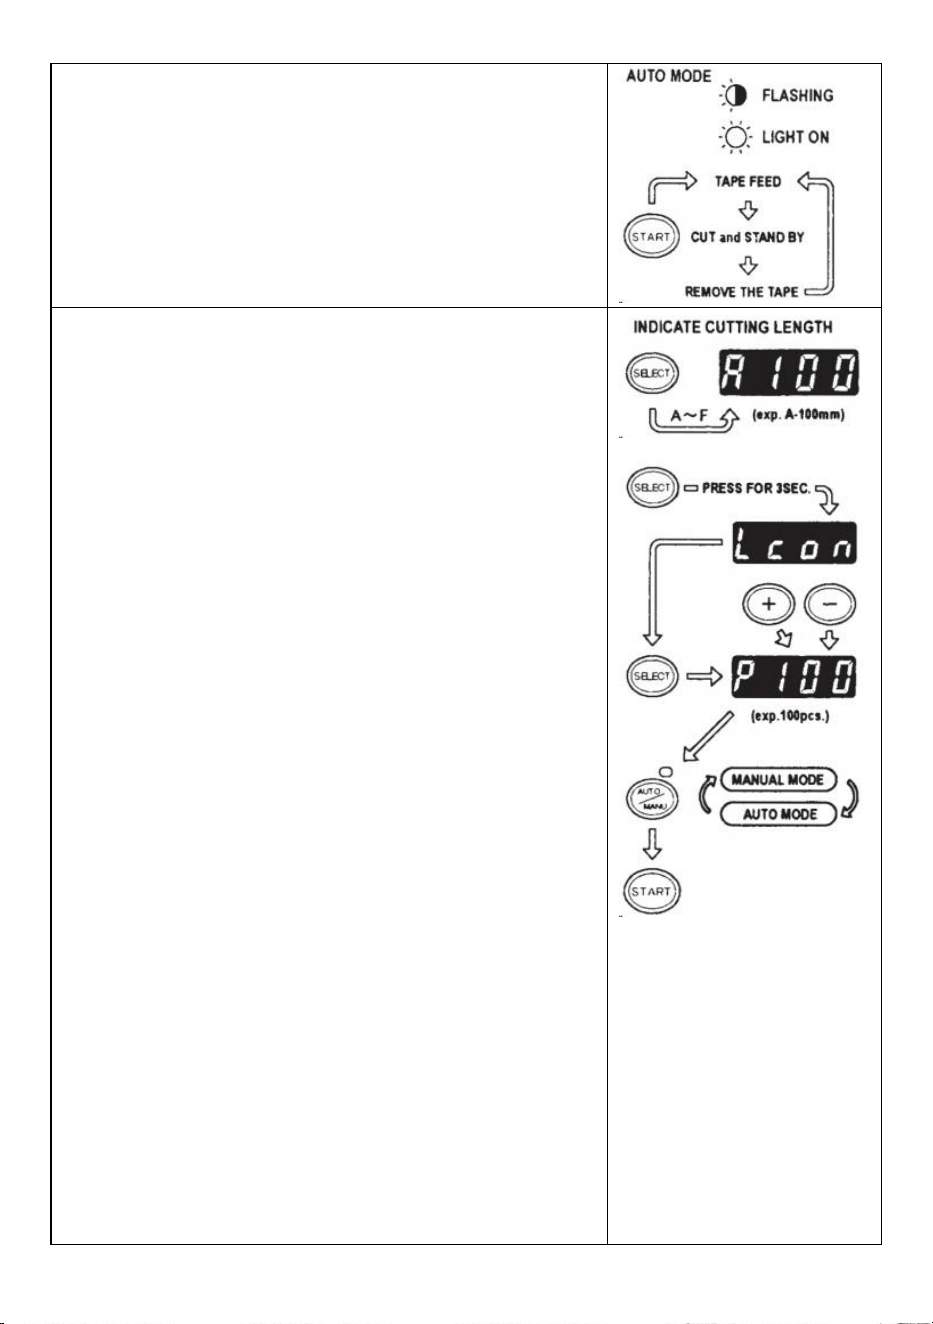
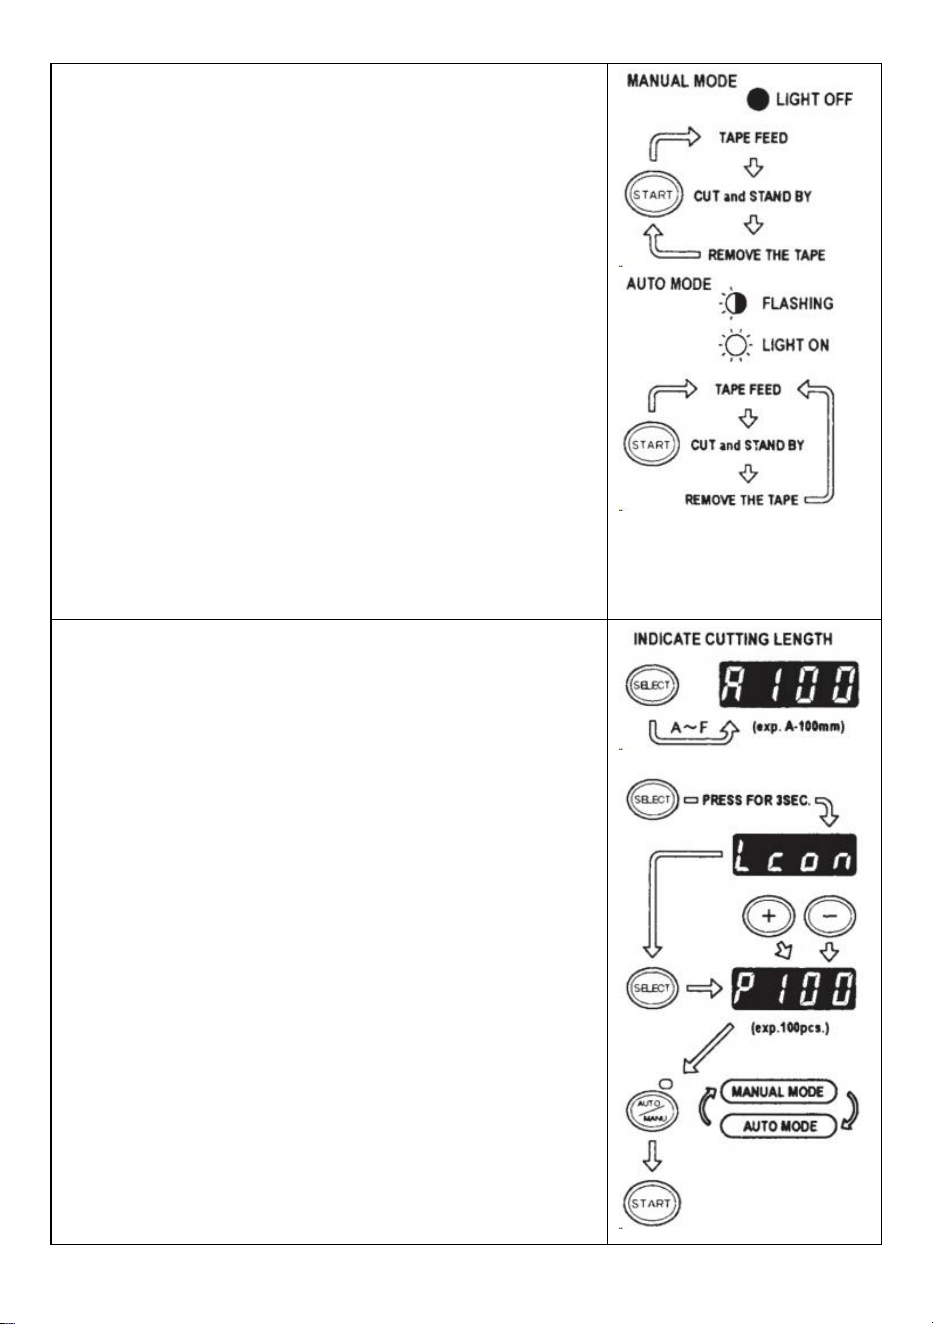
Mode Setting
1.Manual Mode
Make sure that blue LED LAMP is off.
When the LED LAMP is flashing or turned on, press
AUTO/MANUAL MODE and turn off the LED LAMP
Press the START BUTTON once, the machine will feed-in a piece
of tape then cut it out based on your set length.
To cut another piece, press START BUTTON again.
2.Auto Mode
Make sure that the LED LAMP is flashing.
When the LED Lamp's lights are off, press AUTO/MANUAL
BUTTON and let the LED LAMP flash.
- 8 -
Press the START BUTTON once, the machine will feed-in a piece
of tape then cut it out based on your set length.
When that piece of tape is removed, the machine will feed-in
another piece then cut it out.
The machine will feed-in and cut a new piece of tape once the
piece of tape is removed.
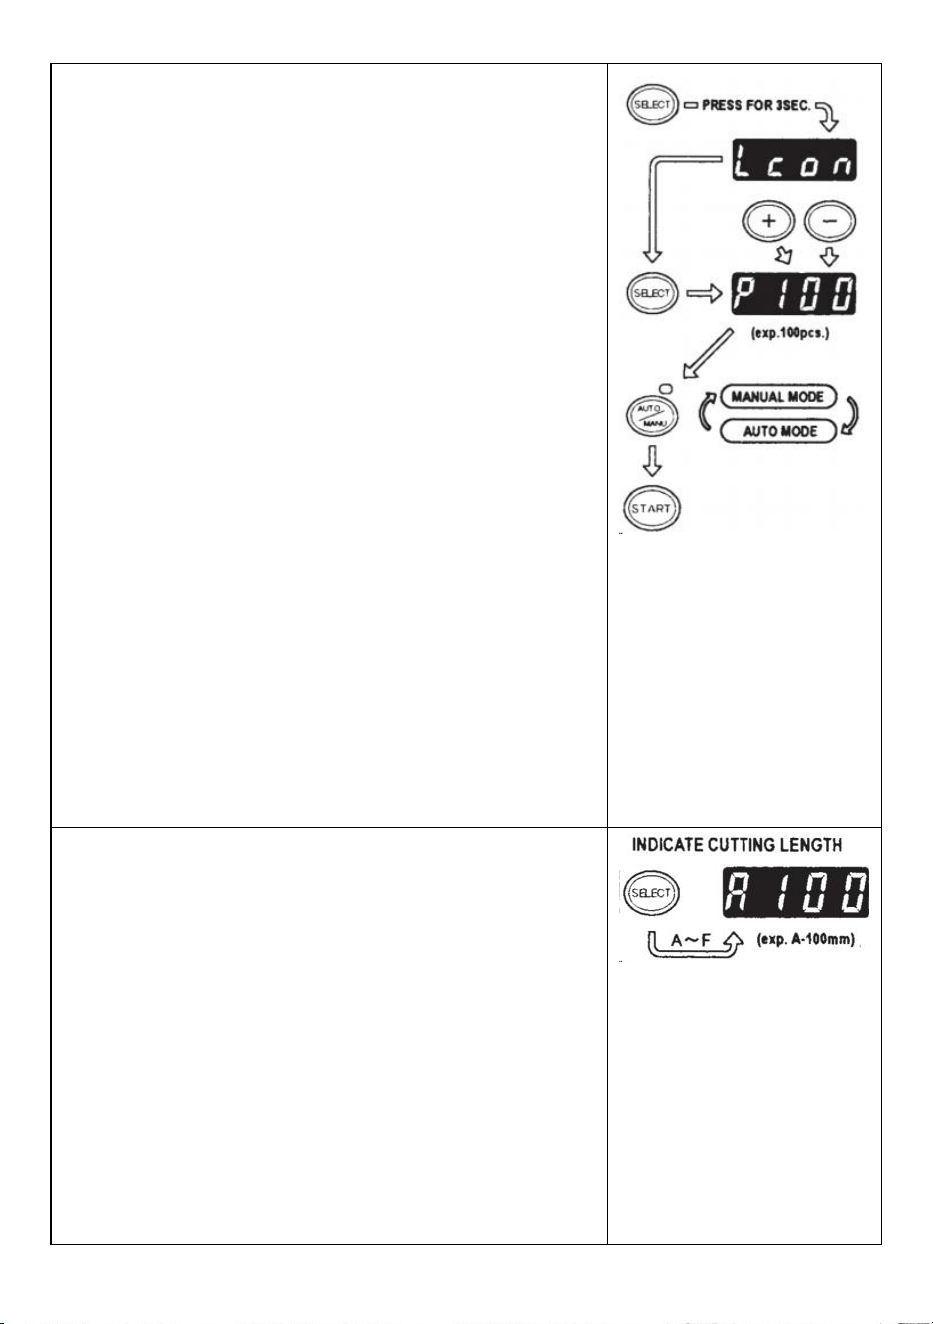
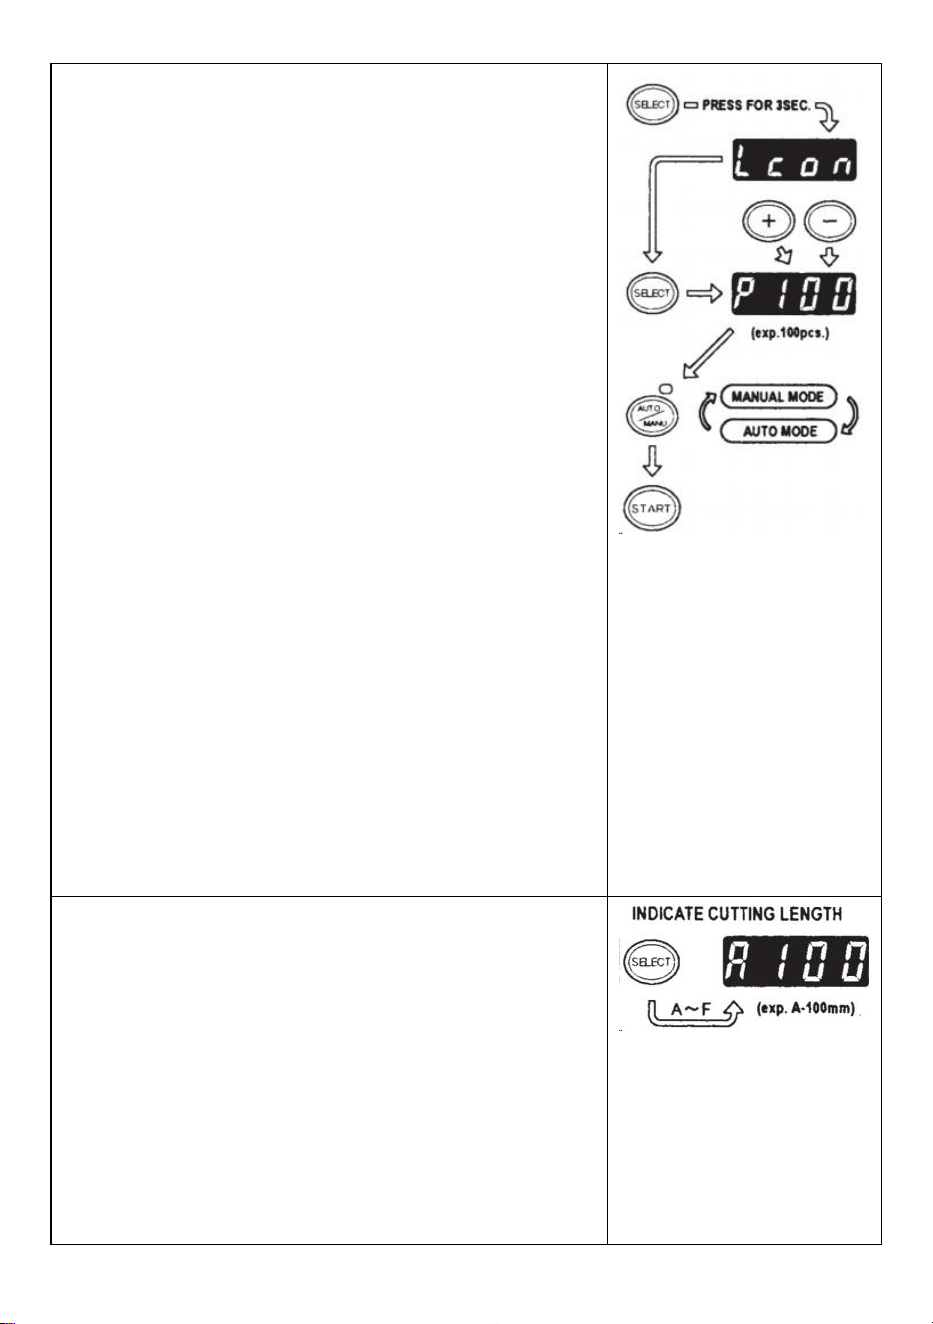
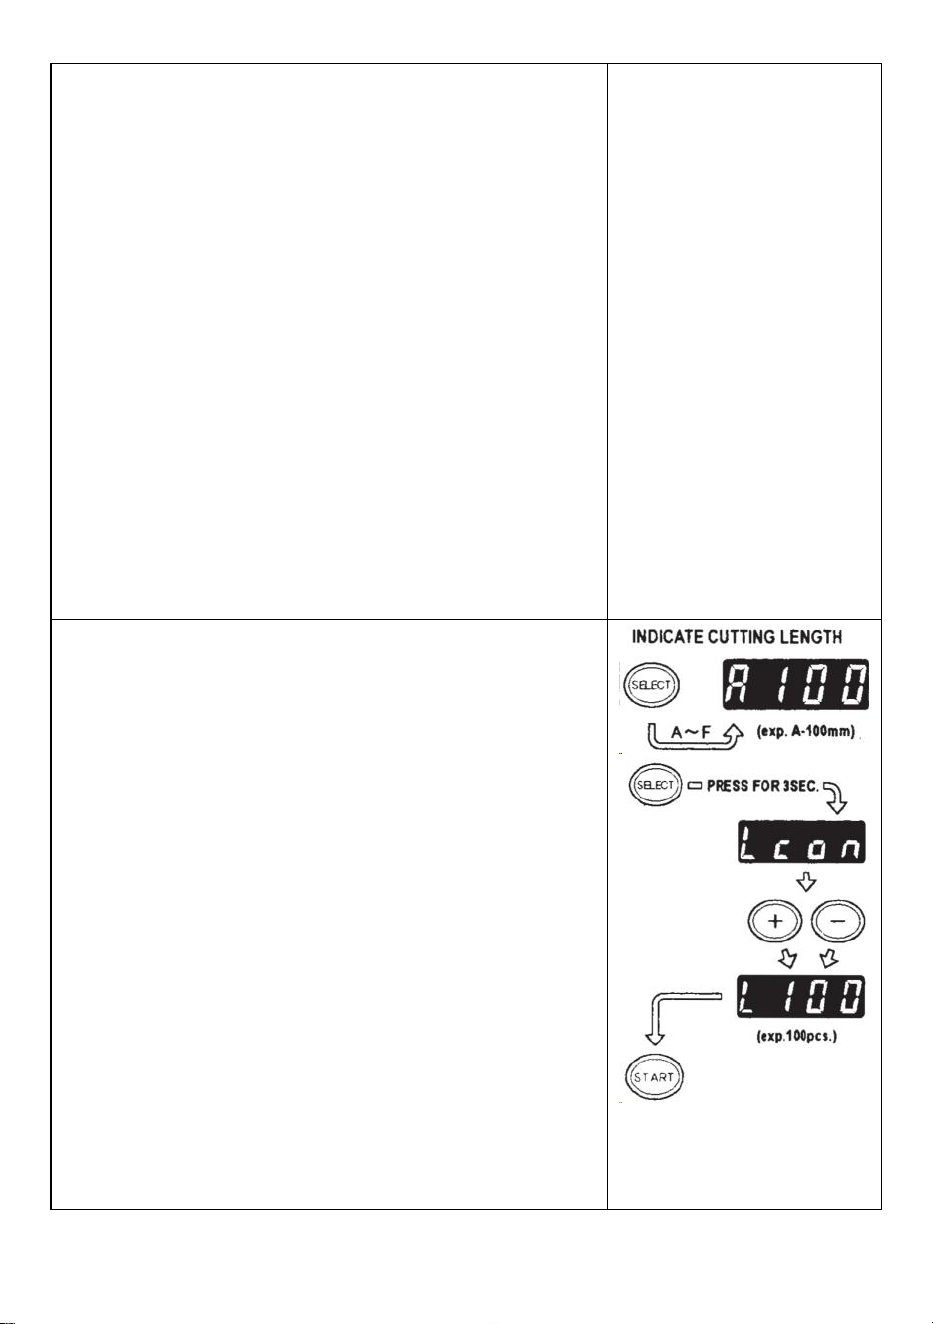
P-Mode (Preset Mode)
The machine is able to be programmed.A signal will be shown
based on your selected quantity of pieces and it will all cut
out.(Maximum 999 pieces.)
A buzzer will have a sound when the program is finished.
You can use the mode either MANUAL or AUTO
Press SELECT BUTTON to choose your needed length.
Press SELECT BUTTON for three seconds then it will indicate
"Lcon”
Press SELECT BUTTON again then it will indicate "p".
Use +/- BUTTON and set the needed quantity.
Choose AUTO or MANUAL by USING AUTO/MANUAL BUTTON.
When you press the START BUTTON, the machine will feed-in
and cut out a piece of tape for testing purpose
To operate the machine by using MANUAL MODE,press the
STARTBUTTON and feed-in a piece of tape after taking it out.
To operate the machine by using AUTO MODE, the machine will
feed-in a piece of tape automatically.
The signal shows numbers backwards when feeding-in another
piece of tape
When the DISPLAY indicates "0", the buzzer will have a sound.
The DISPLAY indicates the number of pieces that are preset.
Please wait until the buzzer stops.
If you take the tape out before the buzzer stops, the LED LAMP
will flash so you need to press the START SWITCH again.
If you try to change the mode (AUTO/MANUAL) when machine is
operating just press AUTO/MANUAL BUTTON.
- 9 -
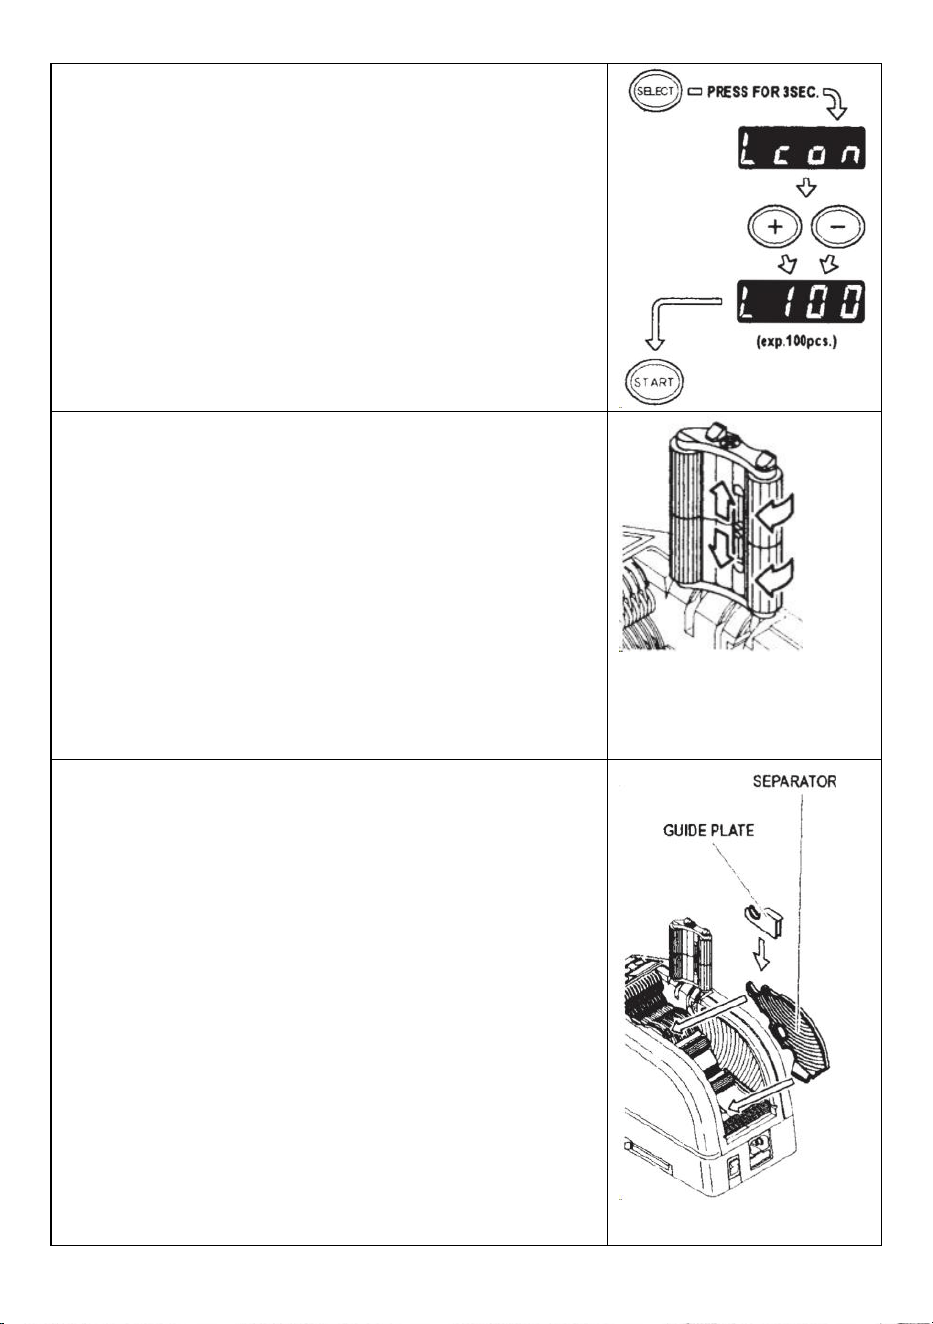
L-Mode (Loop Mode)
You can preset the quantity of pieces which will be cut out.
(Maximum 999 pieces)The machine will cut out the pieces based on
your selected quantities then it will stop.
Press the SELECT BUTTON and decide the length of tape
Press and hold SELECT BUTTON so that DISPLAY will indicate
"Lcon"
Set the number of pieces to be cut out by using +/- BUTTON
When you press the START BUTTON,DISPLAY indicates a signal
that shows numbers backwards and cutting continuously.
When the DISPLAY indicates "0", the buzzer will make a sound
then the machine is stopped.
To stop the machine while running under L-MODE, press the
STARTBUTTON.
How to Manage a Curling Tape
Press the HOLD DOWN ROLLER RELEASE BUTTON in order to
open the HOLD DOWN ROLLER UNIT
Extend the ROLLER LOCK LEVER so that the roller will not turn.
Close the HOLD DOWN ROLLER UNIT
With the rollers locked, the tension may cause the length to vary.
Cut several test pieces in order to adjust the length if needed.
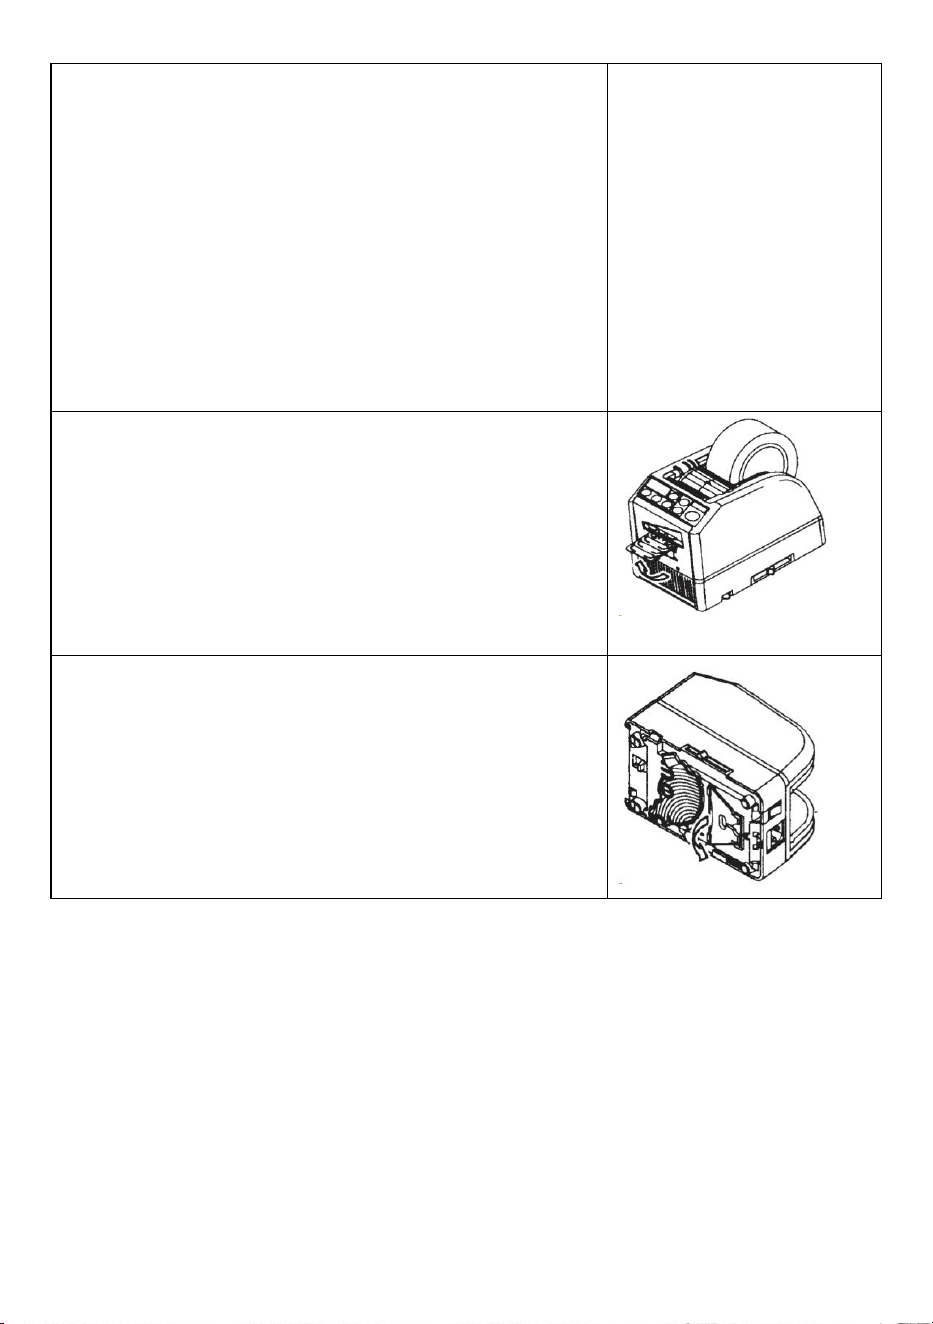
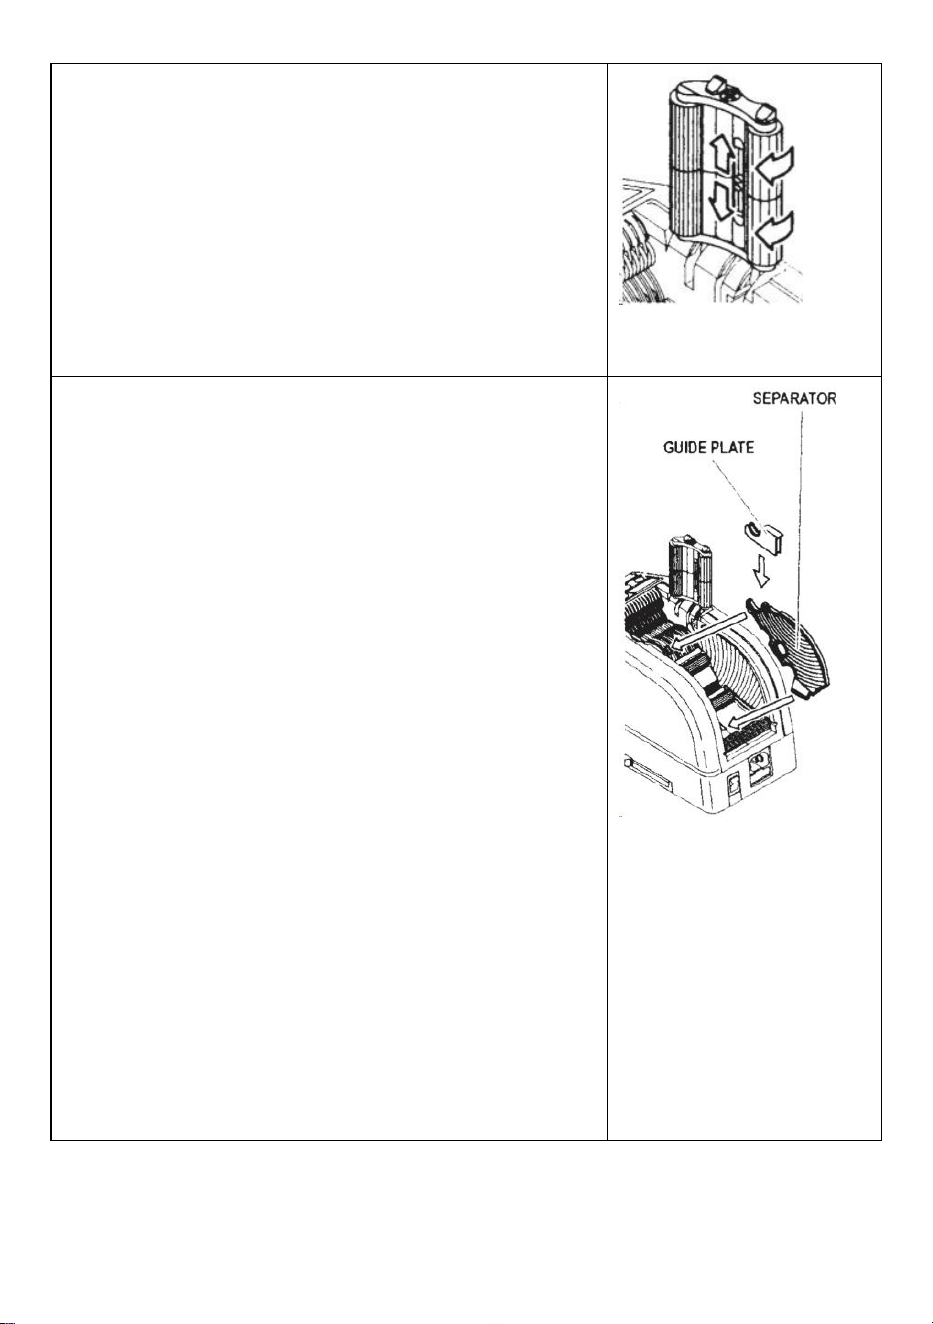
Use Narrow Tape /Use Two Rolls in a Same Time
If the tape is less than 15 mm in width or you want to dispense two
rolls at the same time, use the SEPARATOR.
Cut less than 10 mm width of tape, put the GUIDE PLATE on the
SEPARATOR
Remove the SEPARATOR from the bottom of body
Open the HOLD DOWN ROLLER UNIT
Insert the SEPARATOR into the body by slotting into the bottom of
the cavity
When you cut the tape less than 10 mm, put the GUIDE PLATE
onto the Separator.
Place one roll of the tape on either side by inserting a
SEPARATOR for loading tape
- 10 -
To hold the tape by adjusting TAPE HOLDERS,it is unnecessary
to push the SEPARATOR out of position
When dispensing two rolls of tapes at the same time, it is a must
to feed-in both of its lengths at the same time
Remove the first piece of tape
When the second piece of the tape is removed, both sides of the
tape are also dispensed.
Other Functions
FLEXIBLE TAPE SUPPORT
When you cut the tape longer or cut non-adhesive tape / film,use
FLEXIBLE TAPE SUPPORT in order to avoid the tape falling down.
ASSIST STAND
Based on the tape material or work-piece purpose, use the ASSIST
STAND to move the body of machine towards a lower level.
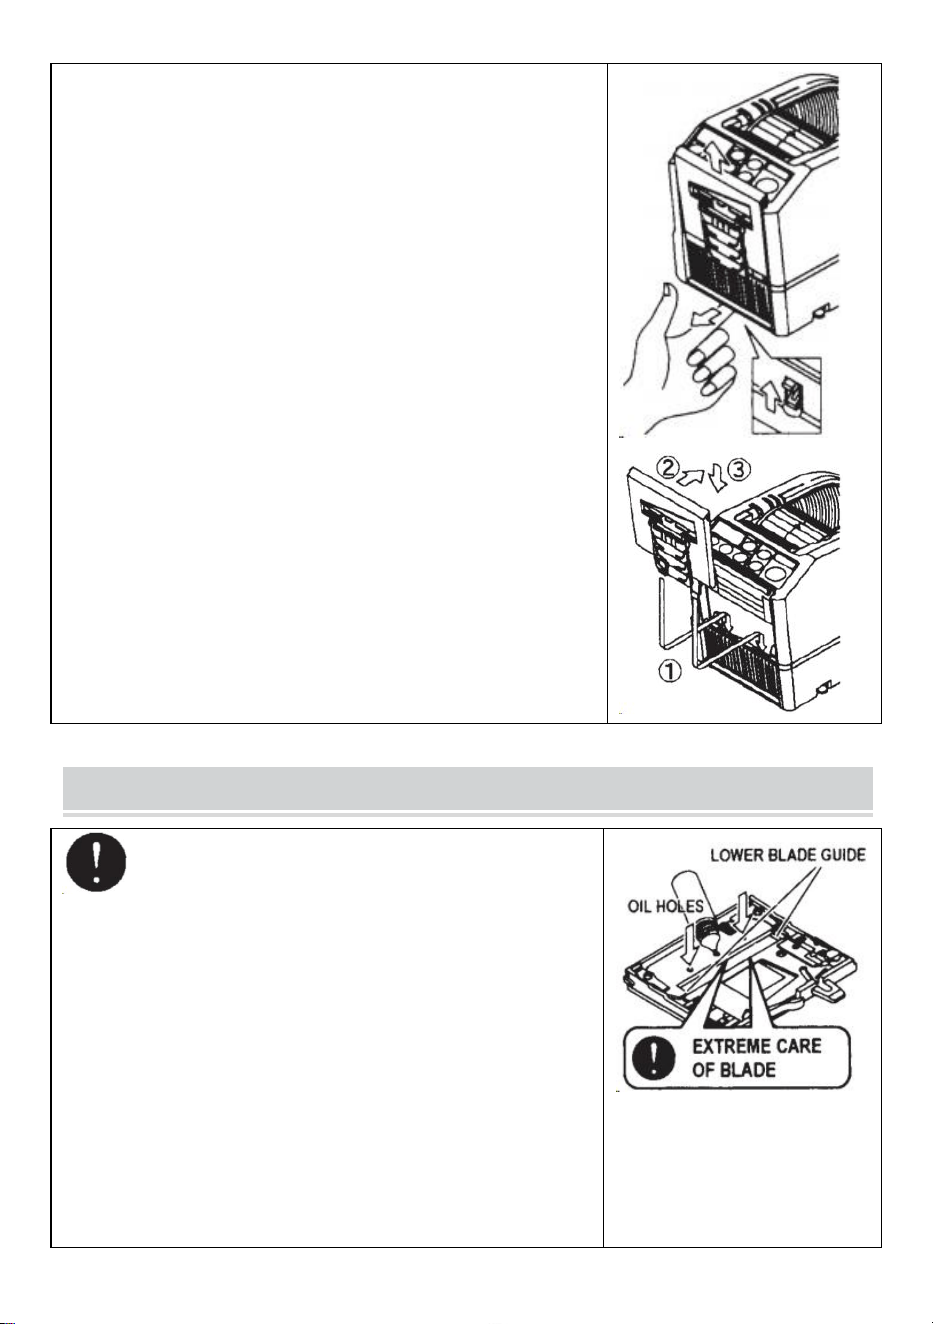
Replace the Blade Unit
Only Blade is not accepted to be replaced.
It needs to change with the whole Blade Unit.
Turn the POWER SWITCH off.
Remove the BLADE UNIT by releasing the 8LADE UNIT RELEASE
LEVER
Install the new BLADE UNIT into the body.
Push down on the housing firmly until it is locked.
Make sure that the lower blade is positioned properly, turn the
BLADEUNIT over and take a look at the bottom edge of the lower
blade.
- 11 -
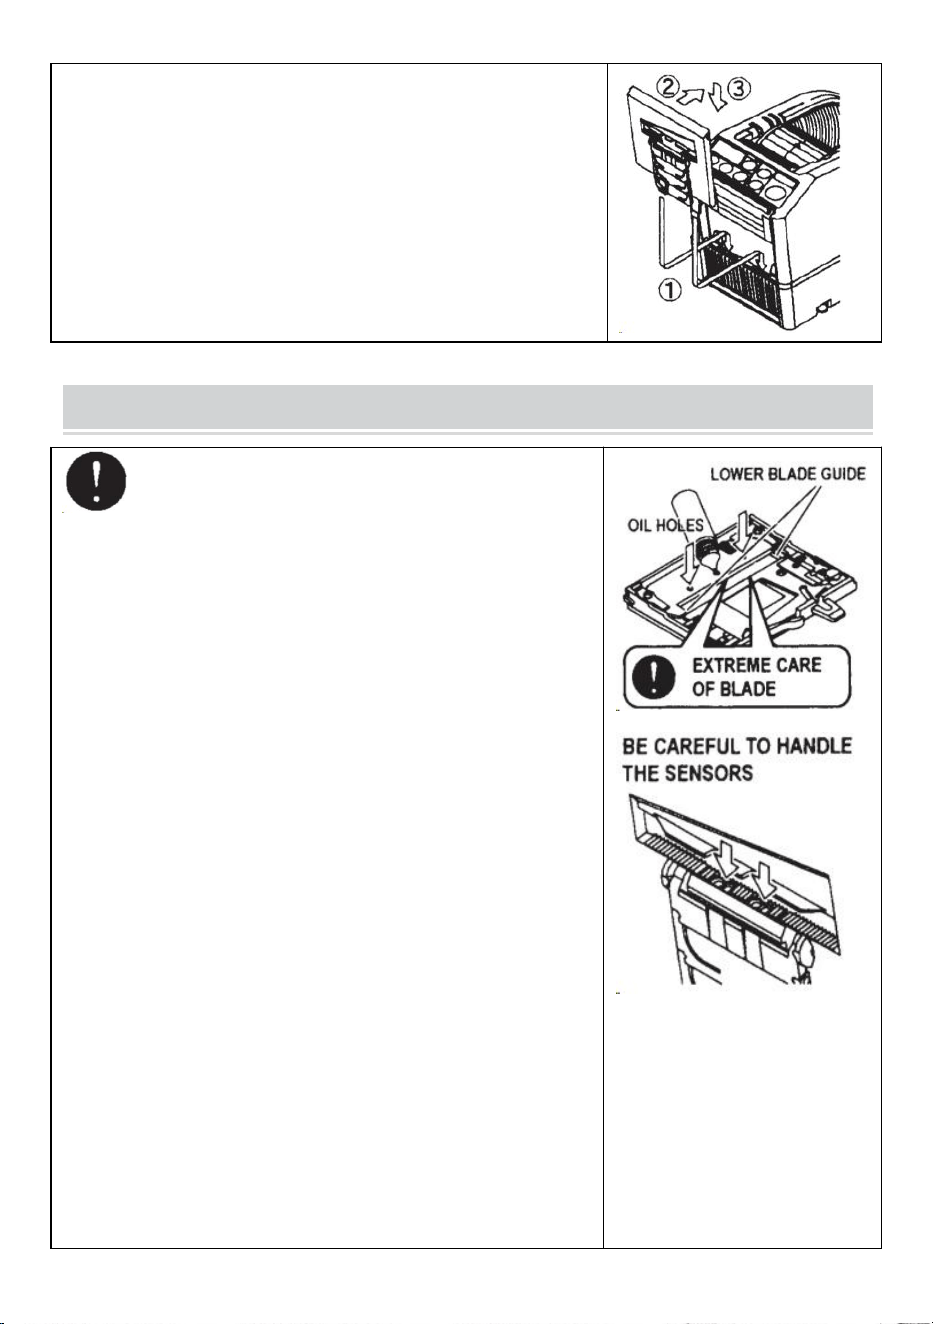
MAINTENANCE
Whenever you clean or replace the BLADE UNITdo not
touch the sharp edge of the blade.
Clean the Blade Unit
When cutting tapes with heavy adhesive, the residue will remain
on the blade gradually.
It is necessary to remove the BLADE UNIT for cleaning
Turn the POWER SWITCH off.
Remove the BLADE UNIT by releasing BLADE UNIT RELEASE
LEVER.
Put some alcohol on a clean dry cloth, or use a swab to remove
the residue
Replace the BLADE UNIT.
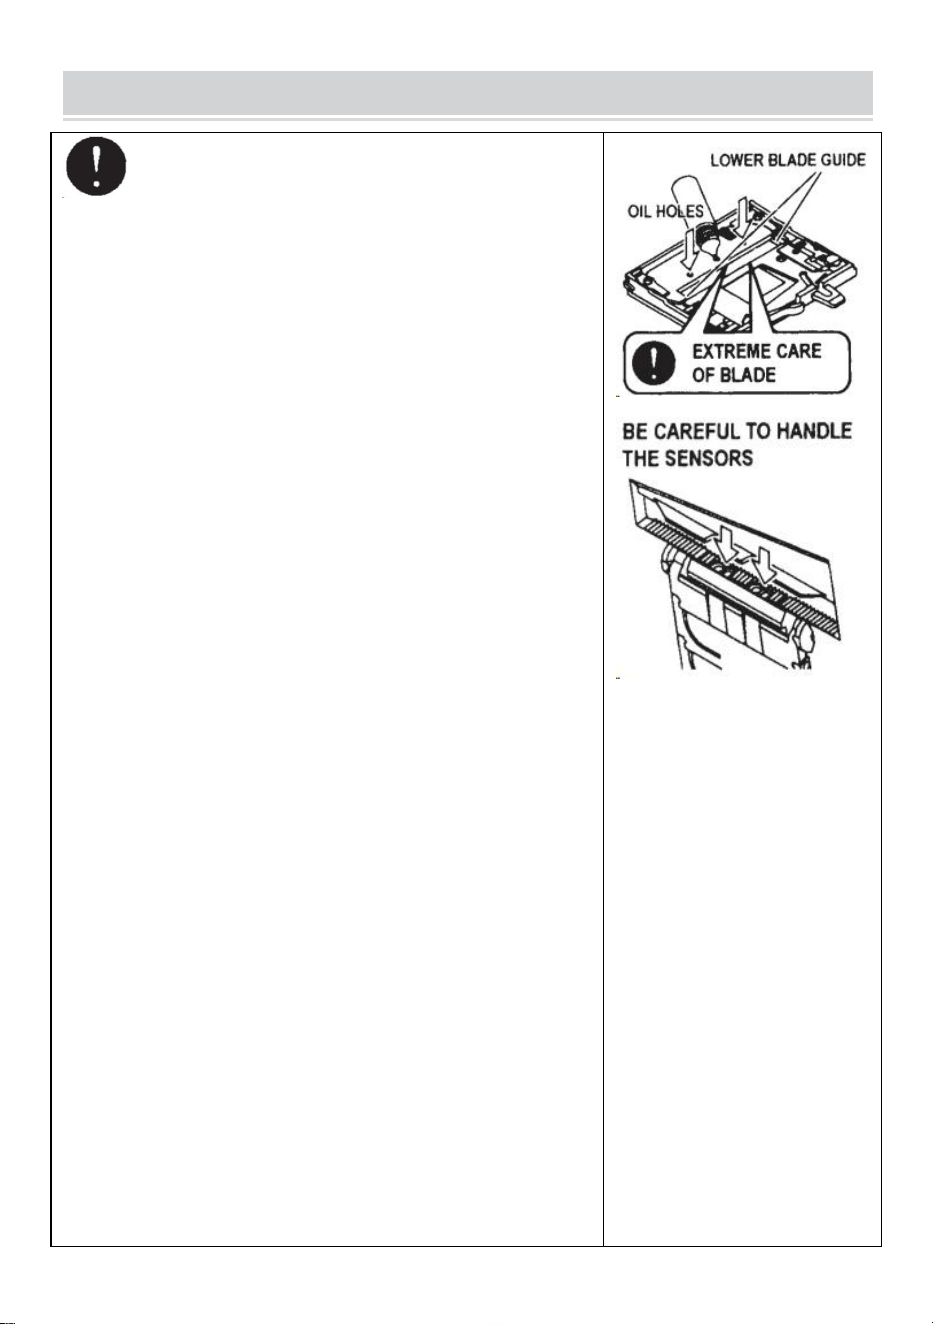
Lubricate the Blade
Lubricate the blade in order to prevent residue from sticking to
the blade.
Turn the POWER SWITCH off
Remove the BLADE UNIT from the body.
Locate three oil holes on the back side of the top blade.
Drip one drop of BLADE OIL into each hole.
Also lubricate LOWER BLADE GUIDE.
Do not lubricate over and over again.
Wipe the spare oil away by using cotton cloth.
- 12 -
Replace the BLADE UNIT into the body.
Turn the POWER SWITCH on.
Make several test cuts in order to make sure the tape will not fall
down from the TAPE OUTLET.
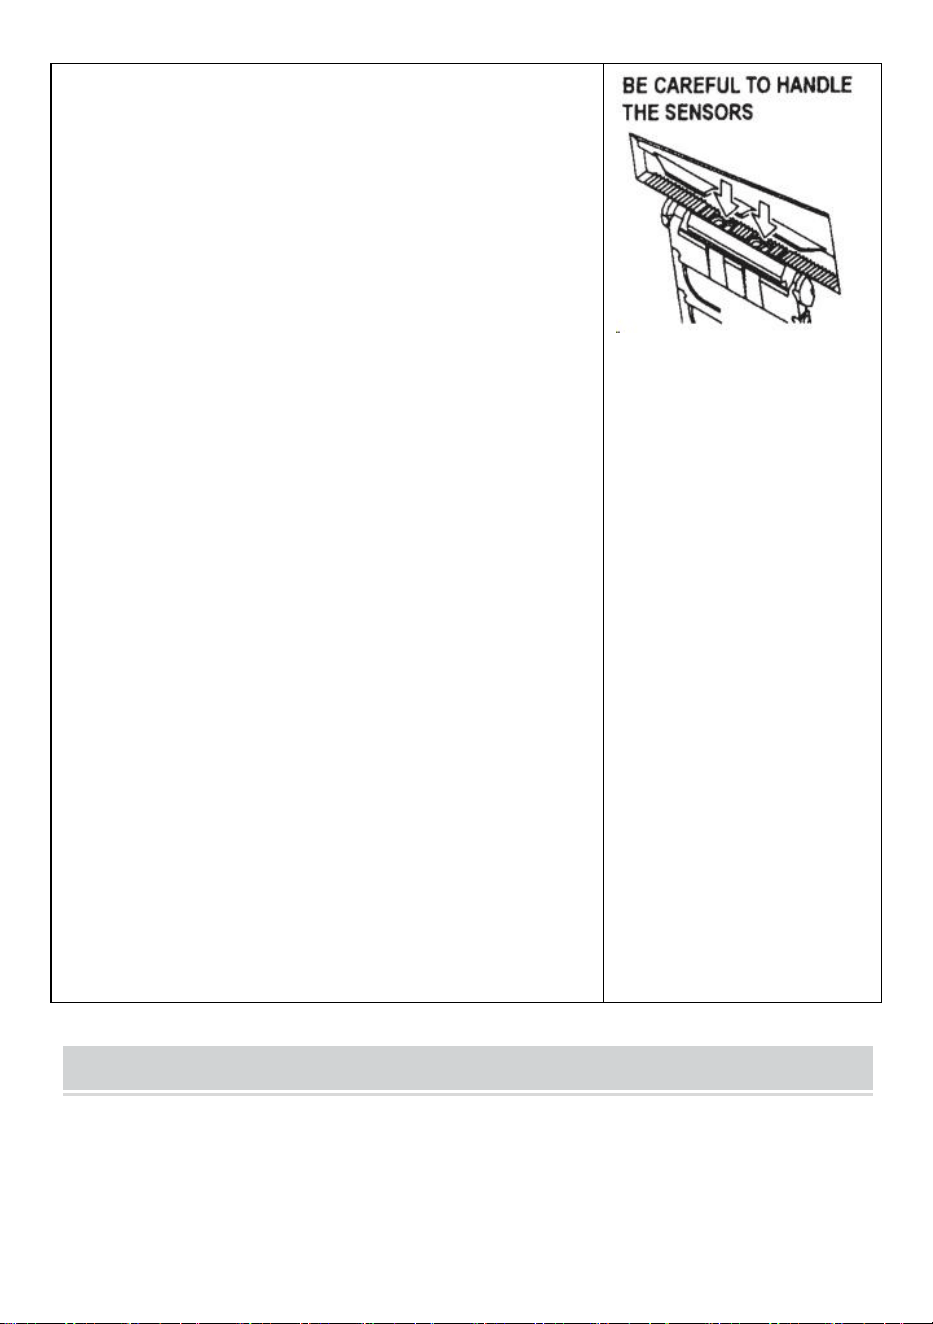
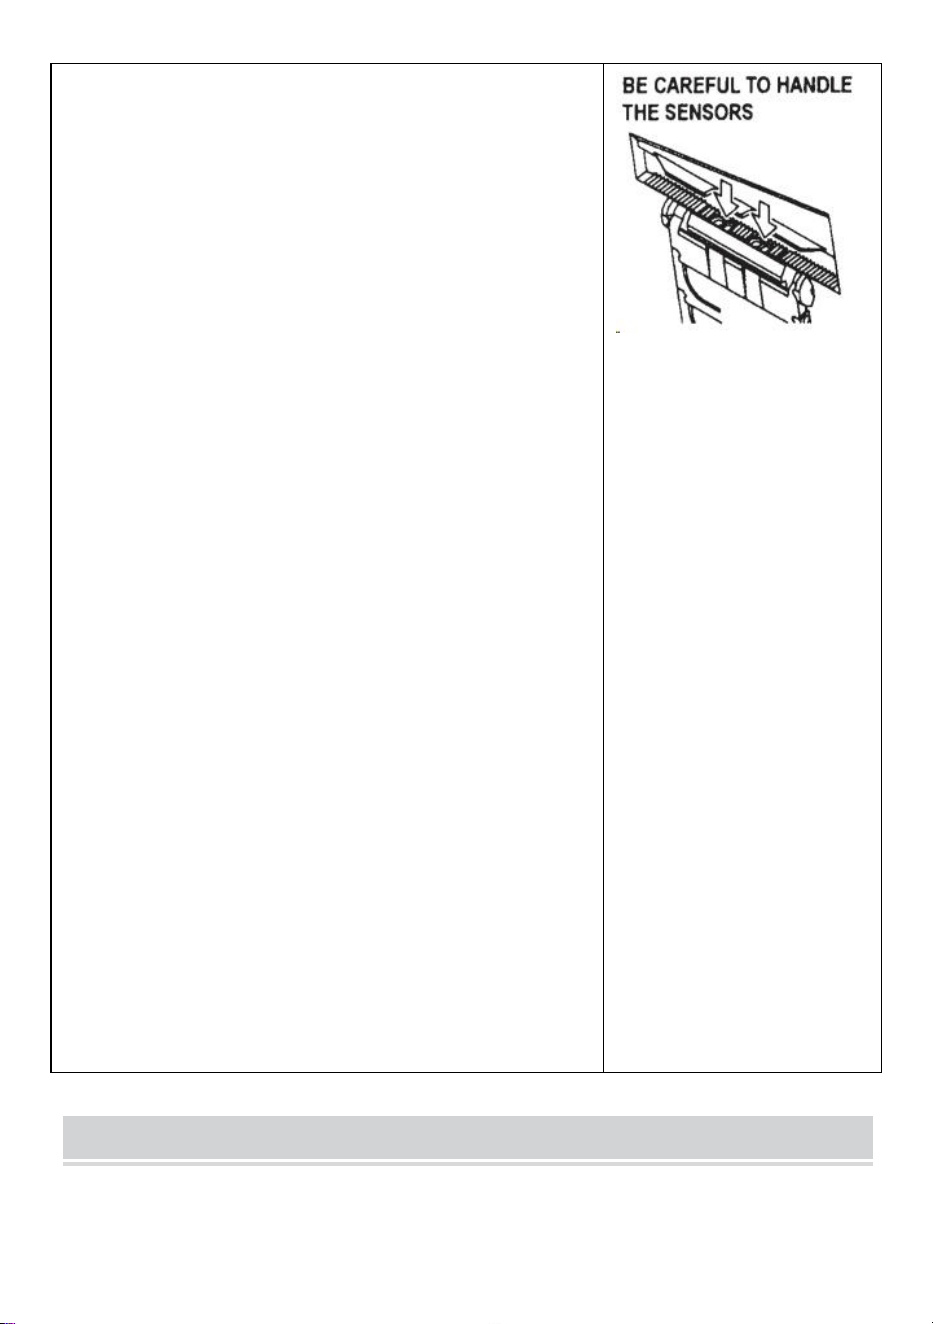
Clean the Sensors
There are two pairs of SENSORS below the TAPE OUTLET.if the
opening is covered by tape residue or debris, the SENSORS will
not detect the presence of tape.
Always keep clean around the SENSORS.
To protect the SENSOR, clean the openings after removing the
BLADE UNIT carefully.
Clean the Body
Put neutral detergent on a damp cloth to clean the body. Do not use
alcohol or solvent to clean the plastic parts.
Error Messages
The buzzer will have a sound then a message will flash and show
on the DISPLAY.
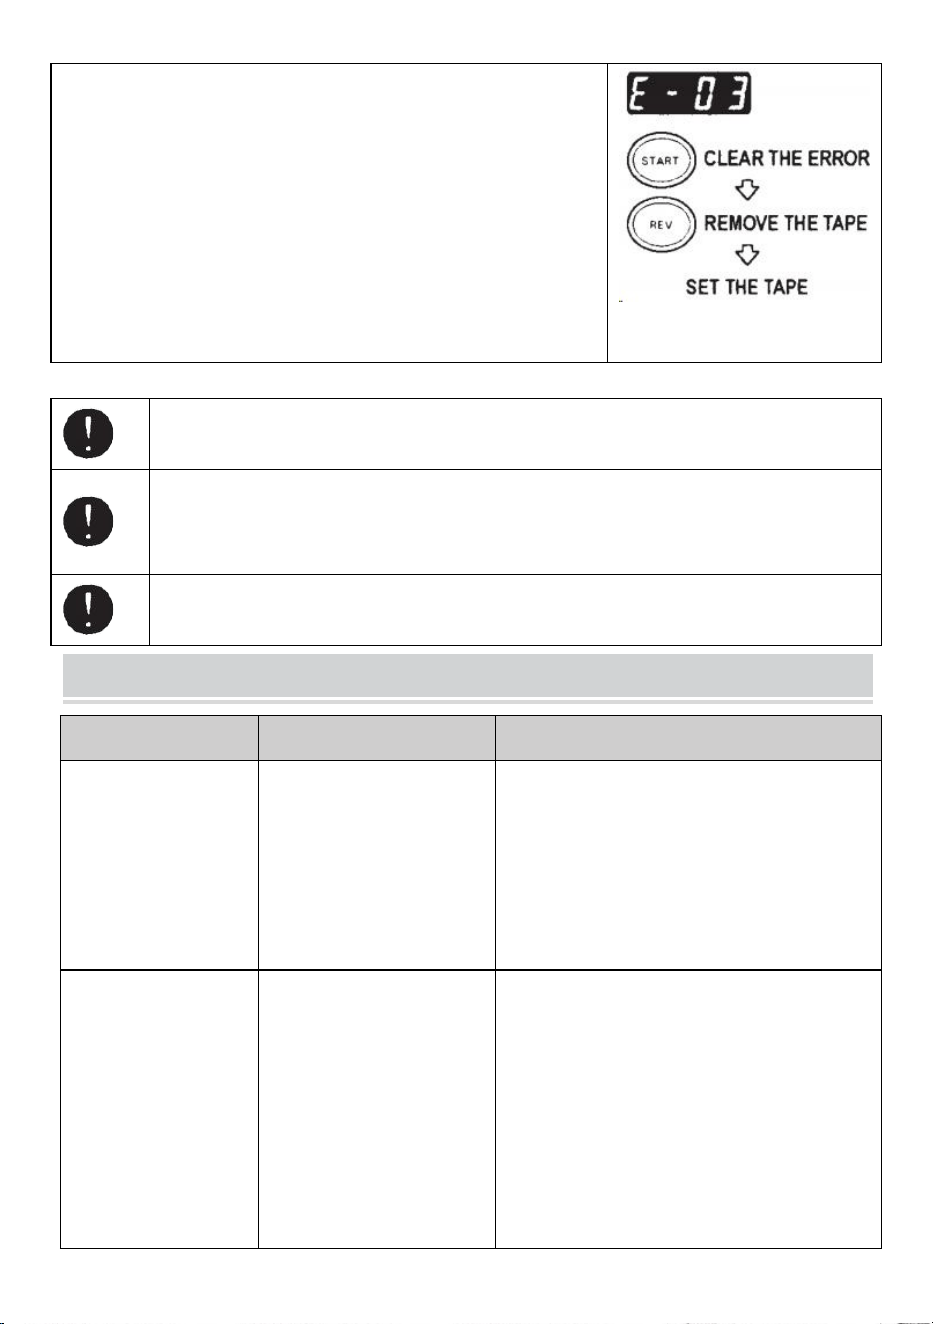
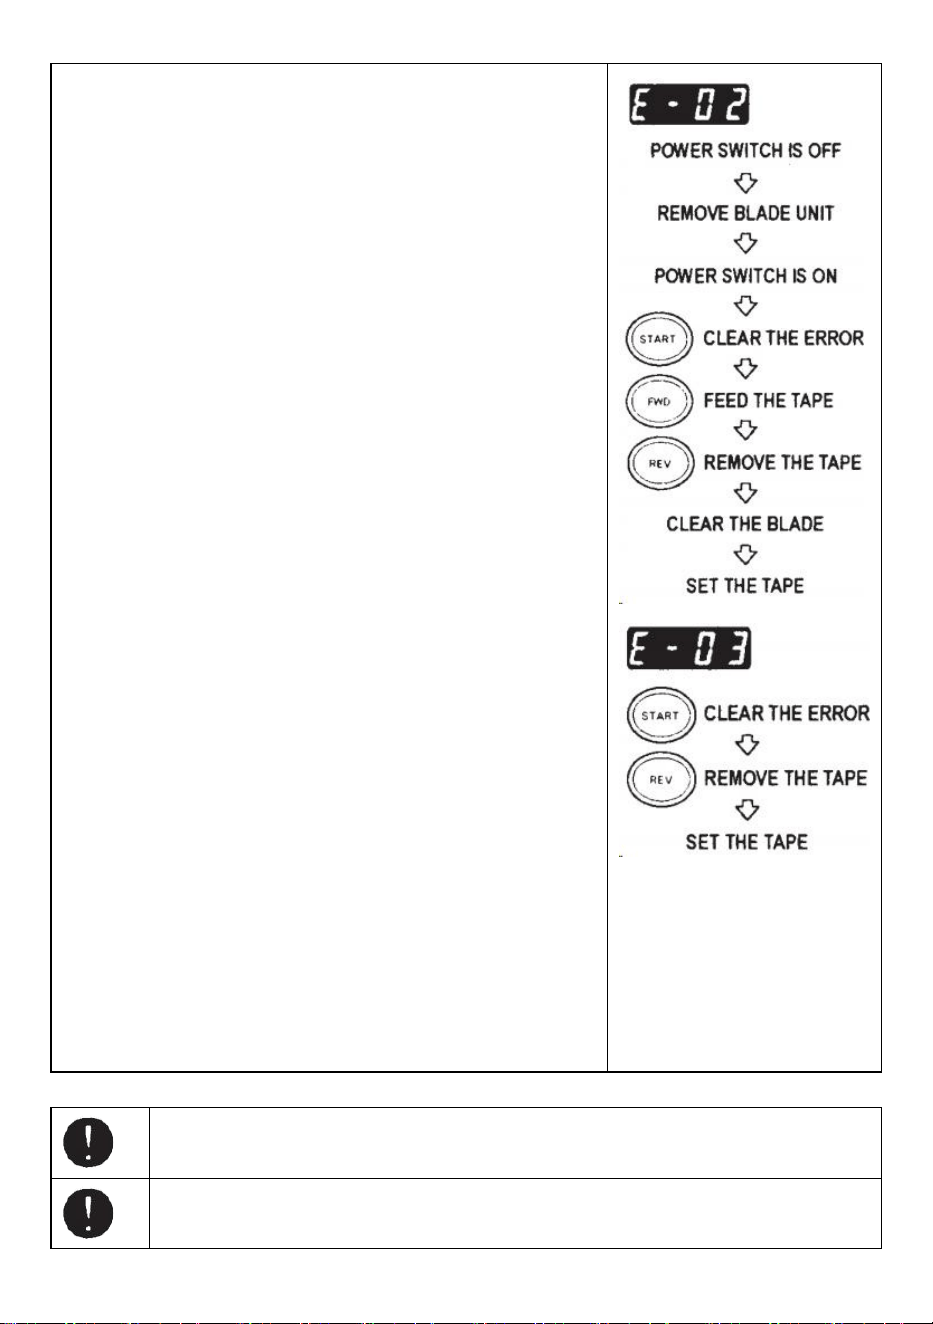
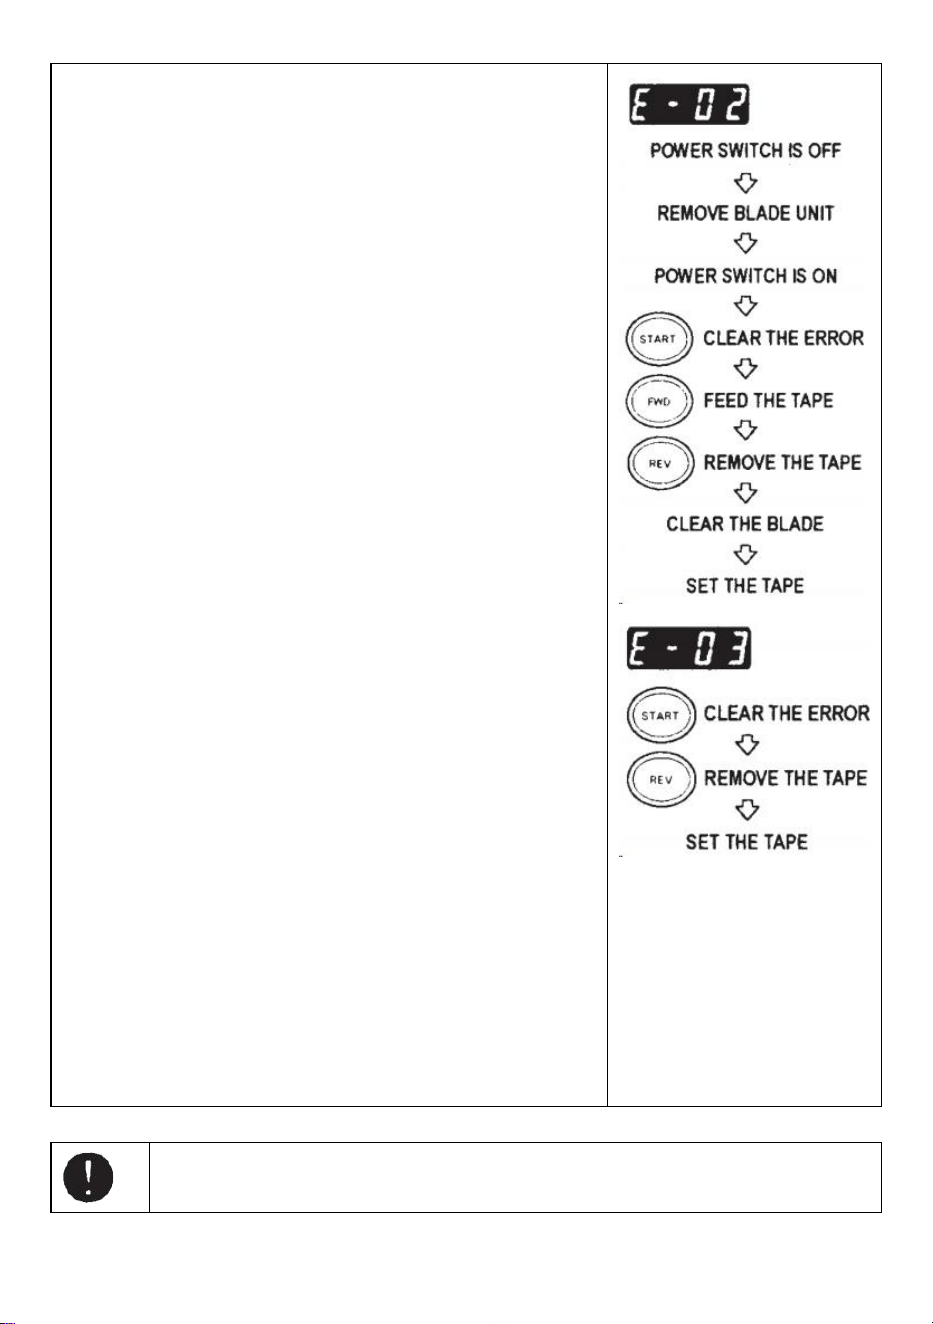
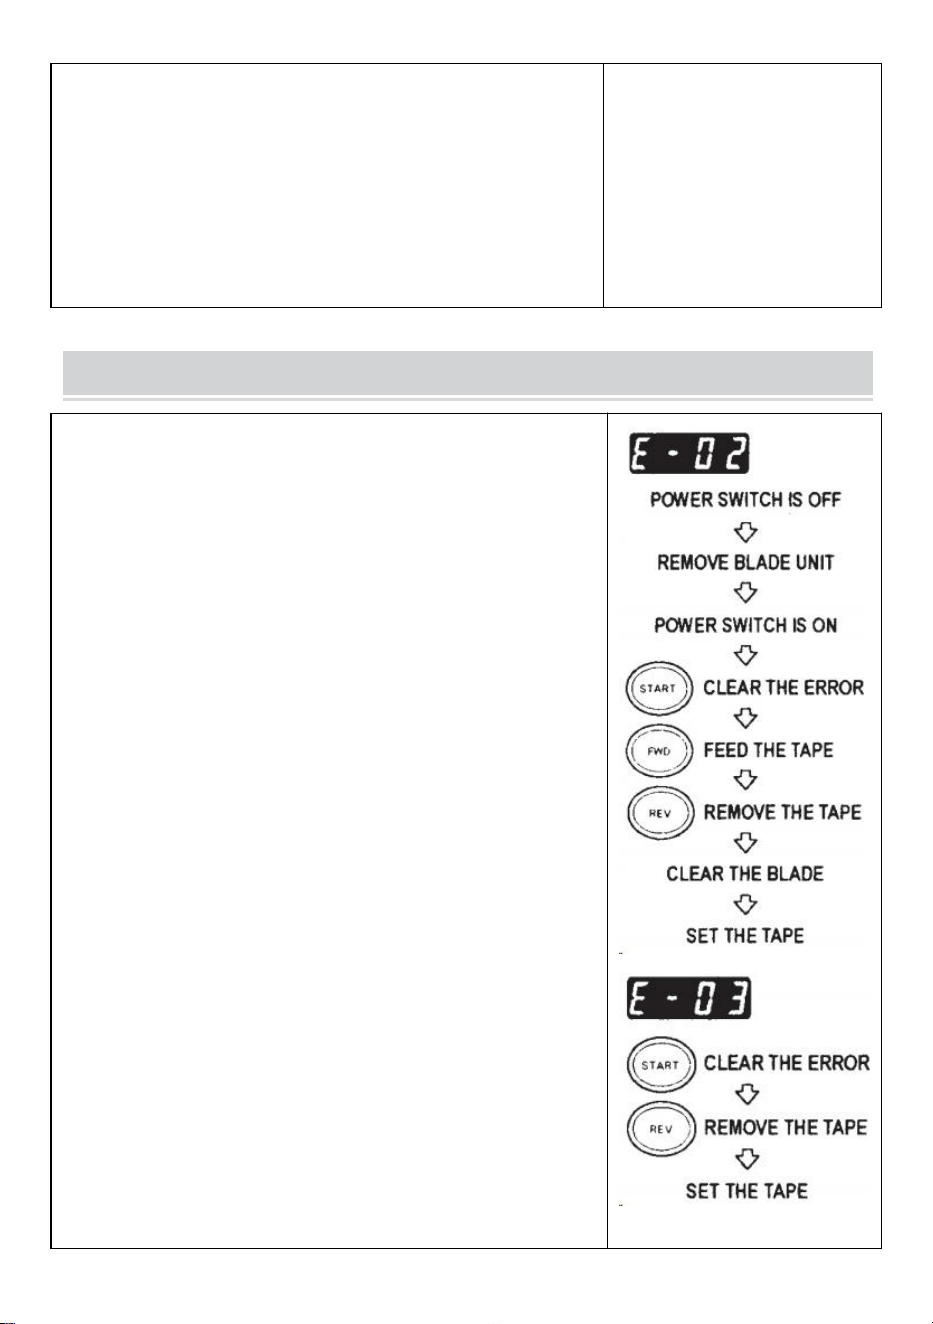
E-02 Blade is Out of Position
A signal shows that the blade is not installed well or machine stops
because of the thickness or hardness of the tape.
Turn the POWER SWITCH off.
Remove the BLADE UNIT by releasing the BLADE UNIT
RELEASINGLEVER then lift the assembly out of the body.
Turn the POWER SWITCH on.
Press the FWD BUTTON and feed -in the tape once, cut the tape
in between the TAPEOUTLET and the BLADE UNIT with
scissors.
Press the REV BUTTON to remove the tape
Clean the BLADE UNIT and lubricate the LOWER BLADE
GUIDE.
Check the lower blade position and replace the BLADE UNIT.
- 13 -
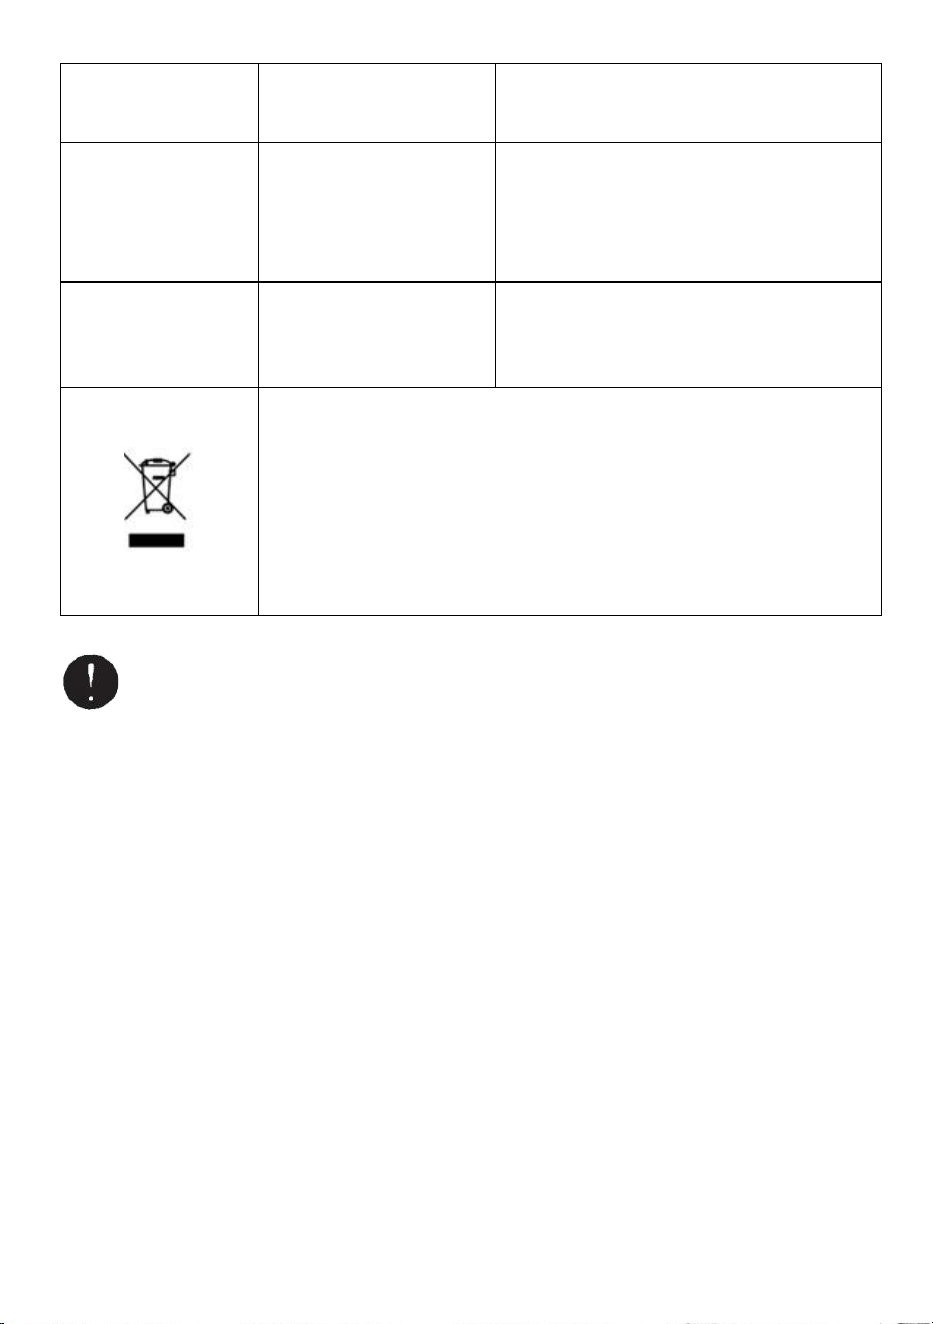
E-03 Motor is Stopped
Indicates that the motor is stopped because of overload.
Press the START BUTTON to clear the error message.
Press the REV BUTTON to remove the tape.
Turn the POWER SWITCH off.
Check the BLADE UNIT and TAPE OUTLET carefully.
Clear and take away the spare tape waste or sticky residue by
using TWEEZERS
Do not touch the Blade when you are correcting an error under POWER SWITCH is on.
Turn off the POWER SWITCH and stop using the machine.
If the machine cannot work normally after correcting the error.
It seems that nothing is wrong without any error messages.
Do not use the tape if static electricity generates over 1000V.
It may cause failure to the machine.
TROUBLESHOOTING
Problem
Possible Cause
Possible Solution
The POWER SMTCH
is on but the machine
cannot run.
The AC CORD is
loosened.
The FUSE has been
blown.
Check the AC CORD then plug in the outlet
firmly.
Replace the FUSE.
Stop using the machine immediately even
though the FUSE is blown again after being
replaced.
After removing a
piece of tape, the next
piece doesn't feed
under AUTO mode.
The mode is set to
MANUAL.
Some debris is covering
the SENSORS.
The tape can not go
through the SENSORS.
The tape has extremely
low reflectance.
Set the mode to AUTO.
Remove the debris.
Use SEPARATOR to narrow the tape less
than 15mm.
Do not bring strong illuminants close around
the SENSORS.
Some types of tape may not be used under
AUTO mode.
- 14 -
The BLADE can not
move smoothly.
The BLADE UNIT is not in
a proper position.
Check the BLADE UNIT and push down on
the housing firmly.
The length of the tape
is different from the
set length.
The adhesive of tape is too
strong.
The elasticity of tape is too
strong.
Correct the setting after cutting several test
pieces
Tape curls
excessively.
The machine is not
grounded.The ROLLER
LOCK is disengaged
Check ground on cord.
Engage the ROLLER LOCK to apply tension.
This product is subject to the provision of European Directive 2012/19/EC.
The symbol showing a wheelie bin crossed through indicates that the
product requires separate refuse collection in the European Union. This
applies to the product and all accessories marked with this symbol. Products
marked as such may not be discarded with normal domestic waste, but must
be taken to a collection point for recycling electrical and electronic devices.
If the machine still can not operate properly, stop using the machine immediately and
contact vendor for repair authorization.
Warranty
We warrant to the original purchaser of the product that it will be free from defects in material or
workmanship for as long as the original purchaser owns the product, when given normal wear and
proper usage.
The spare parts such as Cutting Blades, Rollers, are not covered under the warranty period as they are
considered as "wear parts"This warranty is only valid if the product:
Was not damaged while being installed.
Was operated in accordance with product's specifications,instructions and any technical support
directions.
Was not modified or damaged by tempering, user error, accident.disaster,abuse,misuse,power supply,
power application,alternation, repair, modification, a fix or replacement by someone other than the
original product.

Manufacturer: Shanghaimuxinmuyeyouxiangongsi
Address: Baoshanqu Shuangchenglu 803long 11hao 1602A-1609shi Shanghai
EC REP: SHUNSHUN GmbH.
Römeräcker 9 Z2021,76351 Linkenheim-Hochstetten, Germany
UK REP: Pooledas Group Ltd.
Unit 5 Albert Edward House, The Pavilions Preston, United Kingdom
Imported to AUS: SIHAO PTY LTD.
1 ROKEVA STREETEASTWOOD NSW 2122 Australia
Imported to USA: Sanven Technology Ltd.
Suite 250, 9166 Anaheim Place, Rancho Cucamonga, CA 91730
Made In China
Technical Support and E-Warranty Certificate
www.vevor.com/support

Assistance technique et certificat de garantie électronique
www.vevor.com/support
MANUEL D'UTILISATION DU DISTRIBUTEUR
DE RUBAN ADHÉSIF
MODÈLE : AT-60
We continue to be committed to provide you tools with competitive price.
"Save Half", "Half Price" or any other similar expressions used by us only represents an
estimate of savings you might benefit from buying certain tools with us compared to the major
top brands and does not necessarily mean to cover all categories of tools offered by us. You
are kindly reminded to verify carefully when you are placing an order with us if you are
actually saving half in comparison with the top major brands.

- 1 -
MODÈLE : AT-60
Have product questions? Need technical support? Please feel free to
contact us:
Technical Support and E-Warranty Certificate
www.vevor.com/support
NEED HELP? CONTACT US!
This is the original instruction, please read all manual instructions
carefully before operating. VEVOR reserves a clear interpretation of our
user manual. The appearance of the product shall be subject to the
product you received. Please forgive us that we won't inform you again if
there are any technology or software updates on our product.
Tape Dispenser
- 2 -
3. Lisez attentivement et comprenez toutes les INSTRUCTIONS
D'ASSEMBLAGE ET D'UTILISATION avant d'utiliser l'appareil.
4. Le non-respect des règles de sécurité et des autres précautions de
sécurité de base peut entraîner des blessures graves.
GENERAL SAFETY RULES
Les consignes de sécurité contenues dans ce manuel d'instructions doivent être
respectées afin d'éviter tout dommage à la machine ou toute blessure de
l'opérateur ou d'autres personnes
Les consignes de sécurité prescrites « Avertissement » et « Attention » décrivent
blessures ou dommages possibles pouvant être subis lors du fonctionnement ou
entretenir la machine d'une manière autre que celle décrite dans ce Manuel
d'instructions.
Lisez et suivez attentivement les précautions de sécurité avant de lire le Manuel
d'instructions.
Avertissement _ _
Indique une situation potentiellement dangereuse qui, sinon évité, pourrait
entraîner la mort ou des blessures graves.
Prudence
Indiquer qu'une mauvaise manipulation peut entraîner un danger et que
l'opérateur court un risque de blessure ou que la machine est au risque de
dommages.
Indique une attention
Un symbole dans le triangle, ou la description, indiquera un danger spécifique
Une action interdite
Un symbole dans le cercle, ou la description, indiquera action interdite.
Une action requise
Un symbole dans le cercle, ou la description, indiquera l'action requise.
- 3 -
Ne branchez pas, ne débranchez pas le cordon et ne faites pas fonctionner
la machine avec des mains. Le non-respect de cette consigne peut entraîner des
blessures dues à un choc électrique.
N'insérez jamais votre doigt, aucune autre partie du corps ou tout corps
étranger objet dans la machine. Le non-respect de cette consigne peut entraîner
des blessures.
Gardez les cheveux ou les vêtements amples loin de la machine pendant
qu'elle est en fonctionnement.
Le non-respect de cela peut entraîner des blessures
Cette machine est destinée uniquement à un usage industriel . Ne laissez
pas des opérateurs non formés ou des enfants utiliser la machine. Le non-respect
de cette consigne peut entraîner des blessures .
Éteignez l'interrupteur d'alimentation et débranchez la machine avant de la
remplacer. l'unité de lames ou effectuer tout entretien sur la machine. Le
non-respect de cela peut entraîner des blessures graves
N'utilisez pas cette machine à des fins autres que celles spécifiées
applications
L'utilisation de la machine pour des applications involontaires peut provoquer des
blessures à l'opérateur ou à une panne de la machine.
CONSERVEZ CES INSTRUCTIONS
MODEL AND PARAMETERS
Modèle
AT-60
Largeur du ruban
6-60mm

- 4 -
Longueur du ruban
5-999mm
En dehors de Dia. de rouleau
20~300mm
Matériau du corps
ABS antistatique
Notation(s)
AC100V-240V 50-60Hz
Puissance (Max.)
24,6 W
STRUCTURE DIAGRAM

- 5 -
- 6 -

- 7 -
OPERATING INSTRUCTIONS
Charger la bande
Branchez le CORDON AC à l'ENTRÉE DU CORDON AC .
Assurez-vous que l'INTERRUPTEUR D'ALIMENTATION est
éteint , puis branchez-le dans une prise appropriée. prise
secteur mise à la terre .
Allumez l’ INTERRUPTEUR D’ALIMENTATION .
Lorsque l' INTERRUPTEUR D'ALIMENTATION est allumé, un
buzzer émet un son.
A ce moment, le mode est réglé sur MANUEL
Appuyez sur le bouton de déverrouillage du rouleau de maintien
Placez un rouleau de ruban adhésif dans la machine
Tenez le ruban en ajustant les SUPPORTS DE RUBAN
Ajustez les PORTE-Ruban à une largeur appropriée, faites glisser
le LEVIER DE RÉGLAGE DU PORTE-Ruban de l'avant vers
l'arrière de la machine puis fermez-le.
Les PORTE-Ruban doivent maintenir légèrement le rouleau au
centre de la cavité. de la machine
Ceci est très important car cela maintient la bande au centre.
La bande passe sur le CAPTEUR devant l'UNITÉ LAME.
Pour supporter un plus grand rouleau de ruban adhésif, retirez le
SUPPORT INFÉRIEUR
Placez le ruban adhésif sur le ROULEAU D'ALIMENTATION DE
BANDE
Appuyez sur le BOUTON FWD jusqu'à ce que la cassette sorte
de la TAPE OUTLET !
Lorsque vous utilisez un ruban adhésif très collant, retirez un peu de
ruban adhésif positionnement dans l'entrée TAPE INLET.
Appuyez continuellement sur le BOUTON FWD pendant quelques
secondes et aidez la position de la bande dans l'ENTRÉE TAPE.
Une fois la cassette chargée et les SUPPORTS DE RUBAN
ajustés, fermez le MAINTENEZ L'UNITÉ À ROULEAU.
Appuyez sur le BOUTON DE DÉMARRAGE.
- 8 -
Retirez le premier morceau de ruban adhésif et jetez-le
Lorsque vous retirez le rouleau de ruban adhésif de la machine,
tirez-le vers l'arrière et appuyez sur le bouton REV .
NOTE:
Utilisez toujours une pince à épiler pour retirer le ruban adhésif .
Chaque fois que vous réglez la bande, assurez-vous que Le côté
adhésif du ruban est toujours orienté vers le bas .
Définir la longueur de la bande
Assurez-vous que l'AFFICHAGE indiquant <longueur de coupe>
La longueur de coupe est toujours indiquée dans certains
alphabets comme A,b,C,d,E,F
Réglez la longueur de coupe.
Définissez la longueur dont vous avez besoin en utilisant le
BOUTON +/-.
La longueur de coupe est réglable entre 5 mm et 999 mm.
Vous pouvez définir six longueurs différentes en utilisant le
BOUTON SÉLECTIONNER.
Si vous appuyez brièvement sur le bouton +/- , la longueur passe
à 1 mm.
Et si vous appuyez plus longtemps sur le bouton +/-, l' avance
rapide s'affiche .
Prudence
La longueur réelle diffère de la longueur affichée en fonction du
type de la bande et de son état.
Lors de la coupe d'une courte longueur de ruban, la longueur
peut ne pas être coupée de manière uniforme. ou la bande est
coincée.
Essayez plusieurs tests de coupe pour vous assurer du bon
fonctionnement.
- 9 -
Réglage des modes
1. Mode manuel
Assurez-vous que la LAMPE LED bleue est éteinte.
Lorsque la LAMPE LED clignote ou est allumée, appuyez sur
AUTO/MANUEL MODE et éteignez la LAMPE LED
Appuyez une fois sur le BOUTON DE DÉMARRAGE, la machine
insérera un morceau de ruban adhésif puis découpez-le en
fonction de la longueur définie.
Pour couper un autre morceau, appuyez à nouveau sur le
BOUTON DE DÉMARRAGE.
2.Mode automatique
Assurez-vous que la LAMPE LED clignote.
de la lampe LED sont éteintes, appuyez sur le bouton
AUTO/MANUEL et laissez la LAMPE LED clignoter .
Appuyez une fois sur le BOUTON DE DÉMARRAGE, la machine
insérera un morceau de ruban adhésif puis découpez-le en
fonction de la longueur définie.
Lorsque ce morceau de ruban adhésif est retiré, la machine en
insère un autre morceau puis découpez-le.
La machine alimentera et coupera un nouveau morceau de ruban
adhésif une fois que le morceau de la bande est retirée .
Mode P (mode prédéfini)
La machine peut être programmée. Un signal s'affichera en fonction
de la quantité de pièces sélectionnée et tout sera affiché. découpé.
(Maximum 999 pièces.)
Un buzzer retentira lorsque le programme sera terminé.
Vous pouvez utiliser le mode MANUEL ou AUTO
Appuyez sur le bouton de sélection pour choisir la longueur dont
vous avez besoin.
Appuyez sur le bouton SELECT pendant trois secondes, puis il
indiquera « Lcon »
Appuyez à nouveau sur le bouton de sélection, il indiquera « p ».
Utilisez le BOUTON +/- et définissez la quantité nécessaire .
- 10 -
Choisissez AUTO ou MANUEL en UTILISANT LE BOUTON
AUTO/MANUEL.
Lorsque vous appuyez sur le BOUTON DE DÉMARRAGE, la
machine alimente et découpe un morceau de ruban adhésif à
des fins de test
Pour faire fonctionner la machine en utilisant le MODE MANUEL,
appuyez sur le BOUTON DEMARRAGE et introduisez un morceau
de ruban adhésif après l'avoir retiré .
Pour faire fonctionner la machine en utilisant le MODE AUTO, la
machine alimentera un morceau de ruban adhésif
automatiquement.
Le signal affiche les chiffres à l'envers lors de l'introduction d'un
autre morceau de ruban adhésif
Lorsque l'ÉCRAN indique "0", le buzzer émettra un son.
L'AFFICHAGE indique le nombre de pièces préréglées .
Veuillez attendre que le buzzer s'arrête.
Si vous retirez la bande avant que le buzzer ne s'arrête, la
LAMPE LED clignotera vous devez donc appuyer à nouveau sur le
COMMUTATEUR DE DÉMARRAGE.
Si vous essayez de changer de mode (AUTO/MANUEL) lorsque
la machine fonctionne appuyez simplement sur le bouton
AUTO/MANUEL.
Mode L (mode boucle)
Vous pouvez prédéfinir la quantité de pièces qui seront découpées.
(Maximum 999 pièces) La machine découpera les pièces en
fonction des quantités sélectionnées, puis elle s'arrêtera .
Appuyez sur le bouton SELECT et décidez de la longueur de la
bande.
Appuyez et maintenez le bouton de sélection pour que l'écran
indique "Lcon".
Réglez le nombre de pièces à découper à l'aide du BOUTON +/-
Lorsque vous appuyez sur le BOUTON DE DÉMARRAGE,
L'AFFICHAGE indique un signal qui montre chiffres à l’envers
et coupe continue.
- 11 -
Lorsque l'AFFICHEUR indique "0", le buzzer émettra un son puis
le la machine est arrêtée.
Pour arrêter la machine pendant qu'elle fonctionne en L-MODE,
appuyez sur le BOUTON DEMARRAGE.
Comment gérer une bande de curling
Appuyez sur le bouton de déverrouillage du rouleau de maintien
pour ouvrir l'unité de rouleau de maintien.
Étendez le LEVIER DE VERROUILLAGE DU ROULEAU afin que
le rouleau ne tourne pas.
Fermez l'UNITÉ À ROULEAU DE MAINTIEN
Avec les rouleaux verrouillés, la tension peut faire varier la
longueur .
Coupez plusieurs éprouvettes afin d'ajuster la longueur si
nécessaire.
Utilisez du ruban adhésif étroit/utilisez deux rouleaux en même
temps
Si le ruban a une largeur inférieure à 15 mm ou si vous souhaitez
distribuer deux rouleaux en même temps, utilisez le
SÉPARATEUR .
Coupez moins de 10 mm de largeur de ruban, placez la PLAQUE
DE GUIDAGE sur le SÉPARATEUR
Retirez le SÉPARATEUR du bas du corps
Ouvrez l'UNITÉ DE ROULEAU DE MAINTIEN
Insérez le SÉPARATEUR dans le corps en l'insérant dans le fond
de la cavité
Lorsque vous coupez le ruban à moins de 10 mm, placez la
PLAQUE DE GUIDAGE sur le séparateur.
Placez un rouleau de ruban de chaque côté en insérant un
- 12 -
SÉPARATEUR pour charger le ruban.
Pour maintenir le ruban en ajustant les SUPPORTS DE RUBAN,
il n'est pas nécessaire de pousser le SÉPARATEUR hors de
sa position.
Lors de la distribution de deux rouleaux de rubans en même
temps, il est indispensable d'introduire ses deux longueurs s en
même temps
Retirez le premier morceau de ruban adhésif
Lorsque le deuxième morceau de ruban est retiré, les deux côtés
du ruban sont également distribués.
Autres fonctions
RUBAN SOUPLE SOUTIEN
Quand tu coupes le ruban Ruban/film non adhésif plus long ou
coupé, utilisez un SUPPORT DE RUBAN FLEXIBLE afin d'éviter la
bande tomber . _ _
SUPPORT D'ASSISTANCE
Basé sur le matériau du ruban ou pour la pièce à usiner, utilisez le
SUPPORT D'ASSISTANCE pour déplacer le corps de la machine
vers un niveau inférieur.

- 13 -
Remplacer l'unité de lame
Seul Blade ne peut pas être remplacé.
Cela doit changer avec l’ensemble de l’unité Blade.
Éteignez l'INTERRUPTEUR D'ALIMENTATION.
Retirez l'UNITÉ DE LAME en relâchant le LEVIER DE
DÉGAGEMENT DE L'UNITÉ 8LADE
Installez la nouvelle UNITÉ DE LAME dans le corps .
Appuyez fermement sur le boîtier jusqu'à ce qu'il soit verrouillé .
Assurez-vous que la lame inférieure est correctement
positionnée, retournez le BLADEUNIT et jetez un œil au bord
inférieur de la lame inférieure.
MAINTENANCE
Chaque fois que vous nettoyez ou remplacez l'UNITÉ
DE LAME, ne touchez pas le bord tranchant de la lame.
Nettoyer l'unité de lame
Lorsque vous coupez des rubans avec un adhésif épais, les
résidus resteront progressivement sur la lame.
Il est nécessaire de retirer l'UNITÉ DE LAME pour le nettoyage
Éteignez l'INTERRUPTEUR D'ALIMENTATION.
Retirez l'UNITÉ DE LAME en relâchant le LEVIER DE
DÉGAGEMENT DE L'UNITÉ DE LAME.
Mettez un peu d'alcool sur un chiffon propre et sec ou utilisez un
tampon pour enlever les résidus.
- 14 -
Remplacez l'UNITÉ DE LAME.
Lubrifier la lame
Lubrifiez la lame afin d'éviter que des résidus n'adhèrent à la
lame.
Éteignez l'INTERRUPTEUR D'ALIMENTATION
Retirez l'UNITÉ DE LAME du corps.
Localisez trois trous d'huile à l'arrière de la lame supérieure.
Versez une goutte d’HUILE DE LAME dans chaque trou.
Lubrifiez également le GUIDE DE LAME INFÉRIEUR.
Ne lubrifiez pas encore et encore.
Essuyez l'huile de rechange à l'aide d'un chiffon en coton.
Remplacez l'UNITÉ DE LAME dans le corps.
Allumez l’INTERRUPTEUR D’ALIMENTATION.
Faites plusieurs tests de coupe afin de vous assurer que le ruban
ne tombera pas du TAPE. SORTIE.
Nettoyer les capteurs
Il y a deux paires de CAPTEURS sous la SORTIE DU RUBAN. Si
l'ouverture est couverte par des résidus de ruban adhésif ou des
débris, les CAPTEURS ne détecte pas la présence de ruban
adhésif.
Gardez toujours propre autour des CAPTEURS.
Pour protéger le CAPTEUR, nettoyez les ouvertures après avoir
soigneusement retiré l'UNITÉ DE LAME.
Nettoyer le corps
Mettez du détergent neutre sur un chiffon humide pour nettoyer la
carrosserie . N'utilisez pas d'alcool ou de solvant pour nettoyer les
pièces en plastique.
Error Messages
- 15 -
Le buzzer émettra un son puis un message clignotera et s'affichera
sur l'ÉCRAN.
E-02 La lame est mal positionnée
Un signal indique que la lame n'est pas bien installée ou que la
machine s'arrête en raison de l'épaisseur ou de la dureté du ruban.
Éteignez l' INTERRUPTEUR D'ALIMENTATION .
Retirez l'UNITÉ DE LAME en relâchant le LEVIER DE
DÉGAGEMENT DE L'UNITÉ DE LAME, puis soulevez
l'ensemble hors du corps.
Allumez l’ INTERRUPTEUR D’ALIMENTATION .
Appuyez sur le BOUTON FWD et introduisez le ruban une fois,
coupez le ruban entre le TAPEOUTLET et l'UNITÉ DE LAME
avec des ciseaux .
Appuyez sur le bouton REV pour retirer la bande
Nettoyez l'UNITÉ DE LAME et lubrifiez le GUIDE DE LAME
INFÉRIEUR.
Vérifiez la position inférieure de la lame et remplacez l'UNITÉ DE
LA LAME.
E-03 Le moteur est arrêté
Indique que le moteur est arrêté en raison d'une surcharge.
Appuyez sur le BOUTON DÉMARRER pour effacer le message
d'erreur.
Appuyez sur le bouton REV pour retirer la bande.
Éteignez l' INTERRUPTEUR D'ALIMENTATION .
Vérifiez soigneusement l'UNITÉ DE LAME et la SORTIE DU
RUBAN.
Éliminez et enlevez les déchets de ruban adhésif ou les résidus
collants à l'aide d'une PINCE À ÉPILER
Ne touchez pas la lame lorsque vous corrigez une erreur lorsque l'INTERRUPTEUR
D'ALIMENTATION est allumé.
Éteignez l' INTERRUPTEUR D'ALIMENTATION et arrêtez d'utiliser la machine.
Si la machine ne peut pas fonctionner normalement après avoir corrigé l'erreur.
- 16 -
Il semble que tout va bien sans aucun message d'erreur.
N'utilisez pas le ruban si l'électricité statique génère plus de 1 000 V.
Cela pourrait provoquer une panne de la machine.
TROUBLESHOOTING
Problème
Cause possible
Solution possible
Le POWER SMTCH
est allumé mais la
machine ne peut pas
fonctionner.
Le CORDON AC est
desserré .
Le FUSIBLE a sauté.
Vérifiez le cordon d'alimentation puis
branchez fermement la prise .
Remplacez le FUSIBLE .
Arrêtez immédiatement d'utiliser la machine
même si le FUSIBLE saute à nouveau après
avoir été remplacé .
Après avoir retiré un
morceau de bande, le
morceau suivant ne
s'alimente pas en
mode AUTO mode.
Le mode est réglé sur
MANUEL.
Certains débris recouvrent
le CAPTEURS .
La bande ne peut pas
passer par le CAPTEURS .
La bande a un niveau
extrêmement faible
réflectance.
Réglez le mode sur AUTO .
Retirez les débris.
Utilisez SEPARATOR pour rétrécir le ruban de
moins de 15mm .
N'approchez pas de sources lumineuses
puissantes à proximité du CAPTEURS .
Certains types de cassettes ne peuvent pas
être utilisés en mode AUTO. mode.
La LAME ne peut pas
bouger doucement.
L'UNITÉ DE LAME n'est
pas dans un bon position.
Vérifiez l'UNITÉ DE LAME et appuyez sur le
logement fermement.
La longueur de la
bande est différente
de la longueur
réglée .
L'adhésif du ruban adhésif
est trop fort.
L'élasticité du ruban est
trop forte.
Corriger le réglage après avoir découpé
plusieurs éprouvettes
Le ruban s'enroule
excessivement.
La machine n'est pas
reliée à la terre. Le
ROLLER LOCK est
désengagé.
Vérifiez la masse sur le cordon.
Engagez le ROLLER LOCK pour appliquer
une tension.

- 17 -
Ce produit est soumis aux dispositions de la directive européenne
2012/19/CE. Le symbole représentant une poubelle barrée indique que le
produit nécessite une collecte sélective des déchets dans l'Union
européenne. Ceci s'applique au produit et à tous les accessoires marqués
de ce symbole. Les produits marqués comme tels ne peuvent pas être jetés
avec les ordures ménagères normales, mais doivent être déposés dans un
point de collecte pour le recyclage des appareils électriques et
électroniques.
Si la machine ne peut toujours pas fonctionner correctement, arrêtez de l'utiliser
immédiatement et contactez le fournisseur pour obtenir une autorisation de
réparation.
garantie
Nous garantissons à l'acheteur original du produit qu'il sera exempt de défauts de matériaux ou de
fabrication aussi longtemps que l'original l'acheteur est propriétaire du produit, sous réserve d'une
usure normale et d'un usage.
Les pièces détachées telles que les lames de coupe, les rouleaux, ne sont pas couvertes pendant la
période de garantie car elles sont considérées comme des « pièces d'usure ». Cette garantie n'est
valable que si le produit :
N'a pas été endommagé lors de l'installation.
A été utilisé conformément aux spécifications, aux instructions et aux instructions d'assistance
technique du produit .
N'a pas été modifié ou endommagé par une trempe, une erreur de l'utilisateur, un accident, un désastre,
un abus, une mauvaise utilisation, une alimentation électrique, une application d'alimentation, une
alternance, une réparation, une modification, une réparation ou un remplacement par quelqu'un. autre
que le produit original.

Fabricant : Shanghaimuxinmuyeyouxiangongsi
Adresse : Baoshanqu Shuangchenglu 803long 11hao 1602A-1609shi Shanghai
REPRÉSENTANT CE : SHUNSHUN GmbH .
Römeräcker 9 Z2021,76351 Linkenheim-Hochstetten, Allemagne
REPRÉSENTANT DU ROYAUME-UNI : Pooledas Group Ltd.
Unité 5 Albert Edward House, The Pavilions Preston, Royaume-Uni
Importé en Australie : SIHAO PTY LTD.
1 ROKEVA STREETASTWOOD NSW 2122 Australie
Importé aux États-Unis : Sanven Technology Ltd.
Bureau 250, 9166 Anaheim Place, Rancho Cucamonga, CA 91730
Fabriqué en Chine
Technique Assistance et certificat de garantie électronique
www.vevor.com/support

Zertifikat für technischen Support und E-Garantie
www.vevor.com/support
BENUTZERHANDBUCH FÜR DEN
KLEBEBANDABROLLER
MODELL: AT-60
We continue to be committed to provide you tools with competitive price.
"Save Half", "Half Price" or any other similar expressions used by us only represents an
estimate of savings you might benefit from buying certain tools with us compared to the major
top brands and does not necessarily mean to cover all categories of tools offered by us. You
are kindly reminded to verify carefully when you are placing an order with us if you are
actually saving half in comparison with the top major brands.
- 1 -
MODELL: AT-60
Have product questions? Need technical support? Please feel free to
contact us:
Technical Support and E-Warranty Certificate
www.vevor.com/support
NEED HELP? CONTACT US!
This is the original instruction, please read all manual instructions
carefully before operating. VEVOR reserves a clear interpretation of our
user manual. The appearance of the product shall be subject to the
product you received. Please forgive us that we won't inform you again if
there are any technology or software updates on our product.
Tape Dispenser
- 2 -
5. Lesen Sie alle MONTAGE- UND BETRIEBSANWEISUNGEN
sorgfältig durch und verstehen Sie sie , bevor Sie das Gerät in Betrieb
nehmen.
6. Die Nichtbeachtung der Sicherheitsregeln und anderer grundlegender
Sicherheitsvorkehrungen kann zu schweren Verletzungen führen.
GENERAL SAFETY RULES
Die Sicherheitshinweise in dieser Bedienungsanleitung sind unbedingt zu
beachten um Schäden an der Maschine oder Verletzungen des Bedieners zu
vermeiden bzw andere Personen
Die Sicherheitshinweise beschreiben „Warnung“ und „ Vorsicht “. mögliche
Verletzungen oder Schäden, die durch den Betrieb oder entstehen können Warten
Sie die Maschine nicht auf andere Weise als hier beschrieben
Bedienungsanleitung.
Lesen und befolgen Sie die Sicherheitshinweise sorgfältig, bevor Sie das lesen
Bedienungsanleitung.
Warnung _ _
Weist auf eine potenziell gefährliche Situation hin , wenn nicht vermieden, könnte
zum Tod oder zu schweren Verletzungen führen.
Vorsicht
Weisen Sie darauf hin, dass unsachgemäße Handhabung zu Gefahren führen
kann Es besteht Verletzungsgefahr für den Bediener oder die Maschine Gefahr
einer Beschädigung.
Zeigt Vorsicht an
Ein Symbol innerhalb des Dreiecks oder die Beschreibung weisen darauf hin eine
besondere Gefahr
Eine verbotene Aktion
Ein Symbol innerhalb des Kreises oder die Beschreibung weisen darauf hin
verbotene Handlung.
- 3 -
Eine erforderliche Aktion
Ein Symbol innerhalb des Kreises oder die Beschreibung weisen darauf hin die
erforderliche Aktion.
Schließen Sie das Gerät nicht an, ziehen Sie es nicht ab und betreiben Sie
die Maschine nicht in nassem Zustand Hände. Bei Nichtbeachtung kann es zu
Verletzungen durch Stromschlag kommen.
Führen Sie niemals Ihren Finger, andere Körperteile oder Fremdkörper ein
Gegenstände in die Maschine stecken. Nichtbeachtung kann zu Verletzungen
führen.
Halten Sie Haare oder lose Kleidung von der Maschine fern, während diese
in Betrieb ist Betriebs.
Bei Nichtbeachtung kann es zu Verletzungen kommen
Diese Maschine ist ausschließlich für den industriellen Einsatz bestimmt .
Erlauben Sie nicht, dass ungeschulte Bediener oder Kinder die Maschine
bedienen. Bei Nichtbeachtung kann es zu Verletzungen kommen .
Schalten Sie den Netzschalter aus und ziehen Sie den Netzstecker, bevor
Sie das Gerät austauschen der Messereinheit oder bei der Durchführung von
Wartungsarbeiten an der Maschine. Bei Nichtbeachtung kann es zu schweren
Verletzungen kommen
Benutzen Sie dieses Gerät nicht für andere als die vorgesehenen Zwecke
Anwendungen
Die Verwendung der Maschine für unbeabsichtigte Zwecke kann zu Verletzungen
führen für den Bediener oder Ausfall der Maschine.
ANLEITUNG AUFBEWAHREN
- 4 -
MODEL AND PARAMETERS
Modell
AT-60
Bandbreite
6-60mm
Bandlänge
5–999 mm
Außendurchm. von Roll
20~300mm
Körpermaterial
Antistatisches ABS
Bewertung(en)
AC100V-240V 50-60Hz
Leistung max.)
24,6 W
STRUCTURE DIAGRAM

- 5 -

- 6 -

- 7 -
OPERATING INSTRUCTIONS
Laden Sie das Band
Stecken Sie das AC-KABEL in den AC-KABEL-EINGANG .
Stellen Sie sicher, dass der Netzschalter ausgeschaltet ist , und
schließen Sie ihn dann an eine geeignete Steckdose an
geerdete Wechselstromsteckdose .
Schalten Sie den Netzschalter ein.
Wenn der POWER- SCHALTER eingeschaltet wird, ertönt ein
Summer .
Zu diesem Zeitpunkt ist der Modus auf MANUAL eingestellt
Drücken Sie die Taste zum Freigeben der Niederhalterolle
Legen Sie eine Rolle Klebeband in die Maschine
Halten Sie das Band fest, indem Sie die BANDHALTER verstellen
Stellen Sie die BANDHALTER auf die richtige Breite ein, schieben
Sie den BANDHALTER-EINSTELLHEBEL von der Vorderseite zur
Rückseite der Maschine und schließen Sie ihn dann.
Die BANDHALTER sollten die Rolle leicht in der Mitte des
Hohlraums halten der Maschine
Dies ist sehr wichtig, da es das Band in der Mitte hält.
Das Band läuft über den SENSOR vor der BLADE UNIT.
Um eine größere Klebebandrolle zu tragen, ziehen Sie den
UNTEREN HALTER heraus
Legen Sie das Band auf die Bandvorschubrolle
Drücken Sie die VORWÄRTS-TASTE, bis das Band aus dem
TAPE OUTLET herauskommt!
Wenn Sie ein stark klebendes Klebeband verwenden, ziehen Sie
ein wenig Klebeband heraus Positionierung im TAPE INLET.
Drücken Sie die VORWÄRTS-TASTE einige Sekunden lang
ununterbrochen und helfen Sie dabei, das Band im BANDEINLAUF
zu positionieren.
Nachdem das Band eingelegt und die BANDHALTER eingestellt
sind, schließen Sie die ROLLENEINHEIT HALTEN.
Drücken Sie die START-TASTE.
- 8 -
Entfernen Sie das erste Stück Klebeband und entsorgen Sie es
Wenn Sie die Klebebandrolle aus der Maschine nehmen, ziehen
Sie am Klebeband zurück und drücken Sie die REV-TASTE .
NOTIZ:
Verwenden Sie zum Entfernen des Klebebands immer eine
Pinzette .
Stellen Sie dies immer sicher, wenn Sie das Band einlegen Die
Klebeseite des Klebebands zeigt immer nach unten .
Stellen Sie die Bandlänge ein
Stellen Sie sicher, dass das DISPLAY <Schnittlänge> anzeigt
Die Schnittlänge wird immer in einigen Alphabeten wie
A,b,C,d,E,F angegeben
Stellen Sie die Schnittlänge ein.
Stellen Sie die benötigte Länge mit der +/- TASTE ein.
Die Schnittlänge ist zwischen 5 mm und 999 mm einstellbar.
Mit der AUSWAHLTASTE können Sie sechs verschiedene
Längen einstellen .
Durch kurzes Drücken der +/- TASTE ändert sich die Länge auf 1
mm.
Und wenn Sie die Taste +/- länger drücken, wird der
Schnellvorlauf angezeigt .
Vorsicht
Die tatsächliche Länge weicht je nach Typ von der angezeigten
Länge ab des Bandes und seines Zustands.
Beim Schneiden kurzer Bandlängen kann es sein, dass die Länge
nicht gleichmäßig abgeschnitten wird oder es ist ein Bandstau
aufgetreten.
Führen Sie mehrere Testschnitte durch, um sicherzustellen , dass
das Gerät ordnungsgemäß funktioniert.
- 9 -
Modus-Einstellung
1.Manueller Modus
Stellen Sie sicher, dass die blaue LED-LAMPE aus ist.
Wenn die LED-LAMPE blinkt oder eingeschaltet ist, drücken Sie
AUTO/MANUAL MODE und schalten Sie die LED-LAMPE aus
Drücken Sie einmal die START-TASTE, die Maschine führt ein
Stück Klebeband ein Schneiden Sie es dann entsprechend
der eingestellten Länge aus.
Um ein weiteres Stück zu schneiden, drücken Sie erneut die
START-TASTE.
2.Auto-Modus
Stellen Sie sicher, dass die LED-LAMPE blinkt.
Wenn die Lichter der LED- Lampe ausgeschaltet sind, drücken
Sie die AUTO/MANUELL-TASTE und lassen Sie die LED-LAMPE
blinken .
Drücken Sie einmal die START-TASTE, die Maschine führt ein
Stück Klebeband ein Schneiden Sie es dann entsprechend
der eingestellten Länge aus.
Wenn dieses Stück Klebeband entfernt wird, führt die Maschine
ein weiteres Stück ein Stück und schneide es dann aus.
Sobald das Stück fertig ist, führt die Maschine ein neues Stück
Klebeband ein und schneidet es ab Klebeband wird entfernt .
P-Modus (Preset-Modus)
Die Maschine ist programmierbar. Abhängig von der von Ihnen
gewählten Stückzahl wird ein Signal angezeigt und schon
funktioniert alles ausschneiden. (Maximal 999 Stück.)
Wenn das Programm beendet ist, ertönt ein Summer .
Sie können den Modus entweder MANUAL oder AUTO verwenden
Drücken Sie die AUSWAHLTASTE, um die gewünschte Länge
auszuwählen .
Drücken Sie die AUSWAHLTASTE drei Sekunden lang, dann wird
„Lcon“ angezeigt.
Drücken Sie die AUSWAHLTASTE erneut, dann wird
- 10 -
„p“ angezeigt.
Benutzen Sie die +/- TASTE und stellen Sie die benötigte Menge
ein .
Wählen Sie AUTO oder MANUELL, indem Sie die
AUTO/MANUELL-TASTE VERWENDEN.
Wenn Sie die START-TASTE drücken, führt die Maschine den
Einzug und die Abschaltung durch ein Stück Klebeband zum
Testen
Um die Maschine im MANUELLEN MODUS zu betreiben,
drücken Sie die STARTTASTE und führen Sie ein Stück Klebeband
ein, nachdem Sie es herausgenommen haben .
Um die Maschine im AUTO-MODUS zu betreiben, führt die
Maschine a ein Stück Klebeband automatisch.
Das Signal zeigt die Zahlen rückwärts an, wenn ein weiteres
Stück Band eingezogen wird
Wenn das DISPLAY „0“ anzeigt, ertönt der Summer .
Das DISPLAY zeigt die Anzahl der voreingestellten Stücke an .
Bitte warten Sie, bis der Summer verstummt.
Wenn Sie das Band herausnehmen, bevor der Summer stoppt,
blinkt die LED - LAMPE Daher müssen Sie den START-SCHALTER
erneut drücken.
Wenn Sie versuchen, den Modus (AUTO/MANUELL) zu ändern,
während die Maschine in Betrieb ist Drücken Sie einfach die
AUTO/MANUELL-TASTE.
L-Modus (Loop-Modus)
Sie können die Anzahl der auszuschneidenden Stücke
voreinstellen. (Maximal 999 Stück) Die Maschine schneidet die
Stücke entsprechend der von Ihnen ausgewählten Menge aus
Werde stoppen .
Drücken Sie die AUSWAHLTASTE und legen Sie die Länge des
Bandes fest
Halten Sie die AUSWAHLTASTE gedrückt, sodass auf dem
DISPLAY „Lcon“ angezeigt wird .
Stellen Sie die Anzahl der auszuschneidenden Teile mit der +/-

- 11 -
TASTE ein
Wenn Sie die START-TASTE drücken, zeigt DISPLAY ein Signal
an , das angezeigt wird Zahlen rückwärts und kontinuierlich
schneiden.
Wenn das DISPLAY „0“ anzeigt, ertönt der Summer Maschine
steht still.
Um die Maschine während des Betriebs im L-MODUS
anzuhalten, drücken Sie die STARTTASTE.
So verwalten Sie ein Lockenband
Drücken Sie die HALTERROLLEN-ENTRIEGELUNGSTASTE,
um die HALTERROLLENEINHEIT zu öffnen
Ziehen Sie den ROLLENVERRIEGELUNGSHEBEL heraus,
damit sich die Walze nicht dreht.
Schließen Sie die Niederhalterolleneinheit
Bei arretierten Rollen kann es aufgrund der Spannung zu
Längenschwankungen kommen .
Schneiden Sie mehrere Teststücke ab, um die Länge bei Bedarf
anzupassen.
Verwenden Sie schmales Klebeband/verwenden Sie zwei
Rollen gleichzeitig
Wenn das Band weniger als 15 mm breit ist oder Sie zwei Rollen
gleichzeitig spenden möchten, verwenden Sie den SEPARATOR .
Schneiden Sie weniger als 10 mm Klebeband ab und setzen Sie die
FÜHRUNGSPLATTE auf den SEPARATOR
Entfernen Sie den SEPARATOR von der Unterseite des
Gehäuses
Öffnen Sie die Niederhalterolleneinheit
Setzen Sie den SEPARATOR in das Gehäuse ein, indem Sie ihn
in den Boden des Hohlraums einführen
Wenn Sie das Band weniger als 10 mm abschneiden, setzen Sie
die FÜHRUNGSPLATTE auf den Trenner.
Platzieren Sie eine Bandrolle auf beiden Seiten, indem Sie einen
- 12 -
SEPARATOR zum Einlegen des Bandes einsetzen
Um das Band durch Einstellen der BANDHALTER zu halten, ist
es nicht erforderlich, den SEPARATOR aus seiner Position zu
drücken
Beim gleichzeitigen Abspenden von zwei Klebebandrollen ist die
Zuführung unbedingt erforderlich beide seiner Länge s gleichzeitig _
Entfernen Sie das erste Stück Klebeband
Wenn das zweite Stück Klebeband entfernt wird, werden auch
beide Seiten des Klebebands ausgegeben.
Andere Funktionen
FLEXIBLES BAND UNTERSTÜTZUNG
Wenn Sie das Band durchschneiden Verlängern oder schneiden Sie
nicht klebendes Klebeband/Folie, verwenden Sie FLEXIBLE
BANDUNTERSTÜTZUNG um das Band zu vermeiden runterfallen .
_ _
Standhilfe
Basierend auf dem Bandmaterial oder Werkstückzweck ,
Verwendung Verwenden Sie den ASSIST STAND , um das
Maschinengehäuse zu bewegen in Richtung einer niedrigeren
Ebene.
- 13 -
Ersetzen Sie die Klingeneinheit
Nur die Klinge kann nicht ersetzt werden.
Es muss sich bei der gesamten Blade-Einheit ändern.
Schalten Sie den Netzschalter aus.
Entfernen Sie die KLINGENEINHEIT, indem Sie den
8-SCHNEIDER-ENTRIEGELUNGSHEBEL lösen
Installieren Sie die neue KLINGENEINHEIT im Gehäuse .
Drücken Sie das Gehäuse fest nach unten, bis es einrastet .
Stellen Sie sicher, dass das Untermesser richtig positioniert ist,
drehen Sie die BLADEUNIT um und werfen Sie einen Blick auf die
Unterkante des Untermessers.
MAINTENANCE
Berühren Sie beim Reinigen oder Austauschen der
KLINGENEINHEIT nicht die scharfe Kante der Klinge.
Reinigen Sie die Klingeneinheit
Beim Schneiden von Bändern mit starkem Klebstoff bleiben die
Rückstände nach und nach auf der Klinge zurück.
Zur Reinigung muss die KLINGENEINHEIT abgenommen
werden
Schalten Sie den Netzschalter aus.
Entfernen Sie die KLINGENEINHEIT, indem Sie den
ENTRIEGELUNGSHEBEL DER KLINGENEINHEIT
loslassen.
- 14 -
Geben Sie etwas Alkohol auf ein sauberes, trockenes Tuch oder
entfernen Sie die Rückstände mit einem Tupfer
Tauschen Sie die KLINGENEINHEIT aus.
Schmieren Sie die Klinge
Schmieren Sie die Klinge, um zu verhindern, dass Rückstände
an der Klinge haften bleiben.
Schalten Sie den Netzschalter aus
Entfernen Sie die KLINGENEINHEIT vom Gehäuse.
Suchen Sie drei Öllöcher auf der Rückseite des Obermessers.
Tropfen Sie einen Tropfen KLINGENÖL in jedes Loch.
Schmieren Sie auch die UNTERE MESSERFÜHRUNG.
Nicht immer wieder schmieren.
Wischen Sie das überschüssige Öl mit einem Baumwolltuch ab.
Setzen Sie die KLINGENEINHEIT wieder in das Gehäuse ein.
Schalten Sie den Netzschalter ein.
Führen Sie mehrere Probeschnitte durch, um sicherzustellen,
dass das Band nicht vom Band herunterfällt AUSLAUF.
Reinigen Sie die Sensoren
Unter dem BANDAUSLASS befinden sich zwei Paar SENSOREN.
Wenn die Öffnung durch Klebebandreste oder Schmutz bedeckt ist,
werden die SENSOREN dies tun Das Vorhandensein von Band
wird nicht erkannt.
Halten Sie die Umgebung der SENSOREN stets sauber.
Um den SENSOR zu schützen, reinigen Sie die Öffnungen nach
dem Entfernen der KLINGENEINHEIT sorgfältig.
Reinigen Sie den Körper
Geben Sie zur Reinigung des Gehäuses ein neutrales
Reinigungsmittel auf ein feuchtes Tuch . Verwenden Sie zum
Reinigen der Kunststoffteile keinen Alkohol oder Lösungsmittel.
Error Messages
- 15 -
Der Summer ertönt , dann blinkt eine Meldung und wird auf dem
DISPLAY angezeigt.
E-02 Klinge ist nicht in der richtigen Position
Ein Signal zeigt an, dass das Messer nicht richtig installiert ist oder
die Maschine aufgrund der Dicke oder Härte des Bandes stoppt.
Schalten Sie den Netzschalter aus .
Entfernen Sie die KLINGENEINHEIT, indem Sie den
KLINGENEINHEIT-ENTRIEGELUNGSHEBEL lösen und
dann die Baugruppe aus dem Gehäuse heben.
Schalten Sie den Netzschalter ein.
Drücken Sie die VORWÄRTS-TASTE und führen Sie das Band
einmal ein. Schneiden Sie das Band zwischen dem
TAPEOUTLET und der KLINGENEINHEIT mit einer Schere
ab .
Drücken Sie die REV-TASTE, um das Band zu entfernen
Reinigen Sie die KLINGENEINHEIT und schmieren Sie die
UNTERE KLINGENFÜHRUNG.
Überprüfen Sie die Position des unteren Messers und tauschen
Sie die KLINGENEINHEIT aus.
E-03 Motor ist gestoppt
Zeigt an, dass der Motor wegen Überlastung gestoppt wurde.
Drücken Sie die START-TASTE, um die Fehlermeldung zu
löschen.
Drücken Sie die REV-TASTE, um das Band zu entfernen.
Schalten Sie den Netzschalter aus .
Überprüfen Sie die KLINGENEINHEIT und den BANDAUSLASS
sorgfältig.
Entfernen Sie überschüssiges Klebeband oder klebrige
Rückstände mit einer PINZETTE
Berühren Sie die Klinge nicht, wenn Sie einen Fehler beheben, während der
POWER-SCHALTER eingeschaltet ist.
- 16 -
Netzschalter aus und verwenden Sie die Maschine nicht mehr.
Wenn die Maschine nach Behebung des Fehlers nicht normal funktionieren kann.
Es scheint, dass ohne Fehlermeldungen nichts falsch ist .
Verwenden Sie das Band nicht, wenn statische Elektrizität über 1000 V erzeugt wird.
Dies kann zu einem Ausfall der Maschine führen.
TROUBLESHOOTING
Problem
Mögliche Ursache
Mögliche Lösung
Der POWER SMTCH
ist eingeschaltet, aber
die Maschine kann
nicht laufen.
Das Netzkabel ist gelöst .
Die SICHERUNG ist
durchgebrannt.
Überprüfen Sie dann das AC-KABEL Stecken
Sie den Stecker fest in die Steckdose .
Tauschen Sie die SICHERUNG aus .
Benutzen Sie die Maschine jedoch sofort
nicht mehr Die SICHERUNG ist nach dem
Austausch erneut durchgebrannt .
Nach dem Entfernen
eines Stücks Band,
das nächste Stück
wird nicht unter AUTO
zugeführt Modus.
Der Modus ist auf
MANUAL eingestellt.
Einige Trümmer bedecken
das SENSOREN .
Das Band kann nicht
durchgehen SENSOREN .
Das Band hat extrem
wenig Gewicht
Reflexionsgrad.
Stellen Sie den Modus auf AUTO ein .
Entfernen Sie die Rückstände.
Verwenden Sie SEPARATOR, um das Band
weniger zu verengen 15mm .
Bringen Sie keine starken Leuchtmittel in die
Nähe des Geräts SENSOREN .
Einige Bandtypen können unter AUTO
möglicherweise nicht verwendet werden
Modus.
Die KLINGE kann
sich nicht bewegen
glatt.
Die KLINGENEINHEIT ist
nicht ordnungsgemäß
Position.
Überprüfen Sie die KLINGENEINHEIT und
drücken Sie sie nach unten Gehäuse fest.
Die Länge des
Bandes beträgt von
der eingestellten
Länge abweichen .
Der Kleber des
Klebebandes ist zu stark.
Die Elastizität des
Klebebandes ist zu stark.
Korrigieren Sie die Einstellung, nachdem Sie
mehrere Probestücke geschnitten haben
Das Band wellt sich
übermäßig.
Die Maschine ist nicht
geerdet. Die
ROLLENVERRIEGELUNG
Überprüfen Sie die Erdung des Kabels.
Aktivieren Sie die ROLLENVERRIEGELUNG,
um Spannung auszuüben.
- 17 -
ist deaktiviert
Dieses Produkt unterliegt den Bestimmungen der europäischen Richtlinie
2012/19/EG. Das Symbol einer durchgestrichenen Mülltonne weist darauf
hin, dass das Produkt in der Europäischen Union einer getrennten
Müllsammlung bedarf. Dies gilt für das Produkt und alle Zubehörteile, die mit
diesem Symbol gekennzeichnet sind. Als solche gekennzeichnete Produkte
dürfen nicht über den normalen Hausmüll entsorgt werden, sondern müssen
an einer Sammelstelle für das Recycling von Elektro- und Elektronikgeräten
abgegeben werden.
Wenn die Maschine immer noch nicht ordnungsgemäß funktioniert, verwenden Sie sie
nicht mehr umgehend reparieren lassen und den Händler kontaktieren, um eine
Reparaturgenehmigung zu erhalten.
Garantie
Wir garantieren dem Erstkäufer des Produkts, dass es für die Dauer des Originalprodukts frei von
Material- oder Verarbeitungsfehlern ist Der Käufer ist Eigentümer des Produkts, wenn es normal
getragen und ordnungsgemäß ist Verwendung.
Ersatzteile wie Schneidmesser und Rollen sind nicht abgedeckt unterliegen der Garantiezeit, da sie als
„Verschleißteile“ gelten. Diese Garantie gilt nur, wenn das Produkt:
Wurde beim Einbau nicht beschädigt.
Wurde gemäß den Produktspezifikationen , Anweisungen und etwaigen Anweisungen des technischen
Supports betrieben.
Wurde nicht durch Tempern, Benutzerfehler, Unfall, Katastrophe, Missbrauch, unsachgemäße
Verwendung, Stromversorgung, Stromanwendung, Umbau, Reparatur, Modifizierung, Reparatur oder
Austausch durch jemanden verändert oder beschädigt anders als das Originalprodukt.

Hersteller: Shanghaimuxinmuyeyouxiangongsi
Adresse: Baoshanqu Shuangchenglu 803long 11hao 1602A-1609shi Shanghai
EK-VERTRETER: SHUNSHUN GmbH .
Römeräcker 9 Z2021,76351 Linkenheim-Hochstetten, Deutschland
Britischer Vertreter: Pooledas Group Ltd.
Einheit 5 Albert Edward House, The Pavilions Preston, Vereinigtes Königreich
Importiert nach AUS: SIHAO PTY LTD.
1 ROKEVA STREETEASTWOOD NSW 2122 Australien
Importiert in die USA: Sanven Technology Ltd.
Suite 250, 9166 Anaheim Place, Rancho Cucamonga, CA 91730
In China hergestellt
Technisch Support- und E-Garantiezertifikat
www.vevor.com/support

Supporto tecnico e certificato di garanzia elettronica
www.vevor.com/support
MANUALE UTENTE DEL DISTRIBUTORE DI
NASTRO
MODELLO: AT-60
We continue to be committed to provide you tools with competitive price.
"Save Half", "Half Price" or any other similar expressions used by us only represents an
estimate of savings you might benefit from buying certain tools with us compared to the major
top brands and does not necessarily mean to cover all categories of tools offered by us. You
are kindly reminded to verify carefully when you are placing an order with us if you are
actually saving half in comparison with the top major brands.

- 1 -
MODELLO: AT-60
Have product questions? Need technical support? Please feel free to
contact us:
Technical Support and E-Warranty Certificate
www.vevor.com/support
NEED HELP? CONTACT US!
This is the original instruction, please read all manual instructions
carefully before operating. VEVOR reserves a clear interpretation of our
user manual. The appearance of the product shall be subject to the
product you received. Please forgive us that we won't inform you again if
there are any technology or software updates on our product.
Tape Dispenser

- 2 -
7. Leggere attentamente e comprendere tutte le ISTRUZIONI DI
MONTAGGIO E FUNZIONAMENTO prima dell'uso.
8. La mancata osservanza delle norme di sicurezza e di altre precauzioni
di sicurezza di base può provocare gravi lesioni personali.
GENERAL SAFETY RULES
È necessario osservare le linee guida di sicurezza contenute nel presente
Manuale di istruzioni per evitare danni alla macchina o lesioni all’operatore o altre
persone
Le linee guida di sicurezza prescritte "Avvertenza" e " Attenzione " descrivono
possibili lesioni o danni che potrebbero verificarsi durante il funzionamento o
effettuare la manutenzione della macchina in modo diverso da quanto descritto in
questo documento manuale di istruzioni.
Leggere e seguire attentamente le precauzioni di sicurezza prima di leggere il
Manuale di istruzioni.
Avvertimento _ _
Indica una situazione potenzialmente pericolosa che, in caso contrario evitato,
potrebbe provocare morte o lesioni gravi.
Attenzione
Indicare che una manipolazione errata può comportare pericolo e che l'operatore
è a rischio di lesioni o che la macchina lo è a rischio di danni.
Indica attenzione
Un simbolo all'interno del triangolo, o la descrizione, lo indicherà un pericolo
specifico
Un'azione vietata
Un simbolo all'interno del cerchio, o la descrizione, lo indicherà azione proibita.
Un'azione necessaria
Un simbolo all'interno del cerchio, o la descrizione, lo indicherà l'azione richiesta.

- 3 -
Non collegare, scollegare il cavo o utilizzare la macchina quando è bagnata
mani. La mancata osservanza di questa prescrizione può provocare lesioni dovute
a scosse elettriche.
Non inserire mai il dito, qualsiasi altra parte del corpo o qualsiasi oggetto
estraneo oggetti nella macchina. La mancata osservanza di questa avvertenza
può provocare lesioni.
Tenere i capelli o gli indumenti larghi lontano dalla macchina mentre è in
funzione operativo.
La mancata osservanza di ciò può provocare lesioni
Questa macchina è destinata esclusivamente all'uso industriale . Non
consentire a operatori non addestrati o bambini di utilizzare la macchina. La
mancata osservanza di ciò può provocare lesioni .
Spegnere l'interruttore di alimentazione e scollegare la macchina prima di
sostituirla l'unità lame o l'esecuzione di qualsiasi manutenzione sulla macchina. La
mancata osservanza di ciò può provocare lesioni gravi
Non utilizzare questa macchina per scopi diversi da quelli specificati
applicazioni
L'uso della macchina per applicazioni non previste può causare lesioni
all'operatore o guasto della macchina.
CONSERVA QUESTE ISTRUZIONI
MODEL AND PARAMETERS
Modello
AT-60
Larghezza del nastro
6-60 mm

- 4 -
Lunghezza del nastro
5-999 mm
Diametro esterno di Rotolo
20~300 mm
Materiale corporeo
ABS antistatico
Giudizi)
AC100V-240V 50-60Hz
Potenza (massima)
24,6 W
STRUCTURE DIAGRAM

- 5 -

- 6 -

- 7 -
OPERATING INSTRUCTIONS
Caricare il nastro
Collegare il CAVO CA all'INGRESSO CAVO CAVO .
Assicurarsi che l'INTERRUTTORE DI ACCENSIONE sia spento ,
quindi collegarlo in modo appropriato presa CA con messa a
terra .
Accendere l' INTERRUTTORE DI ACCENSIONE .
Quando l' INTERRUTTORE DI ACCENSIONE è acceso, verrà
emesso un segnale acustico.
In questo momento la modalità è impostata su MANUALE
Premere il PULSANTE DI RILASCIO DEL RULLO PREMUTO
Inserire un rotolo di nastro nella macchina
Tenere il nastro regolando i SUPPORTI DEL NASTRO
Regolare i SUPPORTI DEL NASTRO alla larghezza adeguata, far
scorrere la LEVA DI REGOLAZIONE DEL SUPPORTO DEL
NASTRO dalla parte anteriore a quella posteriore della macchina ,
quindi chiuderla.
I SUPPORTI DEL NASTRO dovrebbero trattenere leggermente il
rotolo al centro della cavità della macchina
Questo è molto importante perché mantiene il nastro al centro.
Il nastro passa sopra il SENSORE davanti all'UNITÀ LAMA.
Per supportare un rotolo di nastro più grande, estrarre il
SUPPORTO INFERIORE
Mettere il nastro sul RULLO DI ALIMENTAZIONE DEL NASTRO
Premere il PULSANTE FWD finché il nastro non fuoriesce dal
TAPE OUTLET!
Quando si utilizza un nastro adesivo molto adesivo, estrarre un po'
di nastro posizionamento nel TAPE INLET.
Premere continuamente il PULSANTE FWD per alcuni secondi e
aiutare il nastro a posizionarsi nell'INGRESSO NASTRO.
Dopo aver caricato il nastro e regolato il SUPPORTO NASTRO,
chiudere il TENERE PREMUTO L'UNITÀ RULLO.
Premere il PULSANTE AVVIO.
- 8 -
Rimuovere il primo pezzo di nastro e scartarlo
Quando si estrae il rotolo di nastro dalla macchina, tirare il nastro
indietro e premere il PULSANTE REV .
NOTA:
Utilizzare sempre le pinzette per rimuovere il nastro .
Ogni volta che inserisci il nastro, assicurati di farlo il lato adesivo del
nastro sia sempre rivolto verso il basso .
Imposta la lunghezza del nastro
Assicurarsi che il DISPLAY indichi <lunghezza di taglio>
La lunghezza di taglio è sempre indicata in alcuni alfabeti come
A,b,C,d,E,F
Impostare la lunghezza di taglio.
Imposta la lunghezza necessaria utilizzando il PULSANTE +/-.
La lunghezza di taglio è regolabile tra 5 mm e 999 mm.
È possibile impostare sei diverse lunghezze utilizzando il
PULSANTE SELEZIONE.
Se si preme brevemente il PULSANTE +/- , la lunghezza cambia
in 1 mm.
E se si preme il PULSANTE +/- più a lungo, viene visualizzato
l'avanzamento veloce .
Attenzione
La lunghezza effettiva differisce da quella visualizzata a seconda
del tipo del nastro e le sue condizioni.
Quando si taglia un tratto corto di nastro, la lunghezza potrebbe
non essere tagliata in modo uniforme oppure il nastro è inceppato.
Provare diversi tagli di prova per garantire il corretto
funzionamento.
Impostazione della modalità
1.Modalità manuale
Assicurarsi che la LAMPADA LED blu sia spenta.
Quando la LAMPADA LED lampeggia o è accesa, premere
AUTO/MANUAL MODE e spegnere la LAMPADA LED
Premere una volta il PULSANTE START, la macchina inserirà un
- 9 -
pezzo di nastro quindi ritaglialo in base alla lunghezza
impostata.
Per tagliare un altro pezzo, premere nuovamente il PULSANTE
START.
2.Modalità automatica
Assicurarsi che la LAMPADA LED stia lampeggiando.
della lampada LED sono spente, premere il PULSANTE
AUTO/MANUALE e lasciare che la LAMPADA LED lampeggi .
Premere una volta il PULSANTE START, la macchina inserirà un
pezzo di nastro quindi ritaglialo in base alla lunghezza
impostata.
Quando quel pezzo di nastro viene rimosso, la macchina ne
inserirà un altro pezzo e poi ritagliarlo.
La macchina inserirà e taglierà un nuovo pezzo di nastro una
volta terminato il pezzo il nastro viene rimosso .
Modalità P (modalità preimpostata)
La macchina può essere programmata. Verrà mostrato un segnale
in base alla quantità di pezzi selezionata e tutto sarà fatto
ritagliare.(Massimo 999 pezzi.)
Al termine del programma verrà emesso un segnale acustico.
È possibile utilizzare la modalità MANUALE o AUTOMATICA
Premere il PULSANTE SELEZIONE per scegliere la lunghezza
necessaria.
Premere il PULSANTE SELEZIONE per tre secondi, quindi
indicherà "Lcon"
Premere nuovamente il PULSANTE SELEZIONE quindi indicherà
"p".
Utilizzare il PULSANTE +/- e impostare la quantità necessaria .
Scegliere AUTO o MANUALE UTILIZZANDO IL PULSANTE
AUTO/MANUALE.
Quando si preme il PULSANTE START, la macchina inserirà e
taglierà un pezzo di nastro adesivo a scopo di test
Per utilizzare la macchina utilizzando la MODALITÀ MANUALE,
- 10 -
premere il PULSANTE START e inserire un pezzo di nastro dopo
averlo estratto .
Per utilizzare la macchina utilizzando la MODALITÀ
AUTOMATICA, la macchina immetterà a pezzo di nastro
automaticamente.
Il segnale mostra i numeri al contrario quando si inserisce un altro
pezzo di nastro
Quando il DISPLAY indica "0", il cicalino emetterà un suono.
Il DISPLAY indica il numero di pezzi preimpostati .
Si prega di attendere finché il cicalino non si ferma.
Se si toglie il nastro prima che il cicalino si fermi, la LAMPADA
LED lampeggerà quindi è necessario premere nuovamente
l'INTERRUTTORE DI AVVIO.
Se si tenta di modificare la modalità (AUTO/MANUALE) mentre la
macchina è in funzione basta premere il PULSANTE
AUTO/MANUALE.
Modalità L (modalità loop)
È possibile preimpostare la quantità di pezzi che verranno ritagliati.
(Massimo 999 pezzi) La macchina taglierà i pezzi in base alle
quantità selezionate, quindi smetterò .
Premere il PULSANTE SELEZIONE e decidere la lunghezza del
nastro
Tenere premuto il PULSANTE SELEZIONE in modo che il
DISPLAY indichi "Lcon"
Impostare il numero di pezzi da ritagliare utilizzando il
PULSANTE +/-
Quando si preme il PULSANTE START, DISPLAY indica un
segnale che mostra numeri all'indietro e tagliandoli
continuamente.
Quando il DISPLAY indica "0", il cicalino emetterà un suono,
quindi il la macchina è ferma.
Per arrestare la macchina mentre funziona in L-MODE, premere il
PULSANTE START.
- 11 -
Come gestire un nastro arricciato
Premere il PULSANTE DI RILASCIO DEL RULLO DI TENUTA
per aprire l'UNITÀ DEL RULLO DI TENUTA
Estendere la LEVA DI BLOCCAGGIO DEL RULLO in modo che il
rullo non giri.
Chiudere l'UNITÀ RULLO DI TENUTA
Con i rulli bloccati, la tensione può far variare la lunghezza .
Tagliare diversi pezzi di prova per regolare la lunghezza, se
necessario.
Usa nastro stretto/Usa due rotoli contemporaneamente
Se il nastro ha una larghezza inferiore a 15 mm o si desidera
erogare due rotoli contemporaneamente, utilizzare il
SEPARATORE .
Tagliare meno di 10 mm di larghezza del nastro, posizionare la
PIASTRA GUIDA sul SEPARATORE
Rimuovere il SEPARATORE dal fondo del corpo
Aprire l'UNITÀ RULLO DI TENUTA
Inserire il SEPARATORE nel corpo incastrandolo sul fondo della
cavità
Quando tagli il nastro a meno di 10 mm, posiziona la PIASTRA
GUIDA sul separatore.
Posizionare un rotolo di nastro su entrambi i lati inserendo un
SEPARATORE per caricare il nastro
Per trattenere il nastro regolando i SUPPORTI NASTRO, non è
necessario spingere il SEPARATORE fuori posizione
Quando si distribuiscono due rotoli di nastri
contemporaneamente , è obbligatorio alimentarli entrambe le sue
lunghezze s allo stesso tempo
Rimuovere il primo pezzo di nastro
Quando viene rimosso il secondo pezzo di nastro, vengono
erogati anche entrambi i lati del nastro .

- 12 -
Altre funzioni
NASTRO FLESSIBILE SUPPORTO
Quando tagli il nastro nastro/pellicola non adesivo più lungo o
tagliato, utilizzare il SUPPORTO NASTRO FLESSIBILE per evitare
il nastro cadere . _ _
SUPPORTO DI ASSISTENZA
In base al materiale del nastro o scopo del pezzo , uso il
CAVALLETTO ASSIST per spostare il corpo della macchina verso
un livello inferiore.
Sostituire l'unità lame
Solo la lama non può essere sostituita.
Deve cambiare con l'intera Blade Unit.
Spegnere l'INTERRUTTORE DI ACCENSIONE.
Rimuovere l'UNITÀ LAMA rilasciando la LEVA DI RILASCIO
DELL'UNITÀ 8LADE
Installare la nuova UNITÀ LAMA nel corpo .
Spingere verso il basso l'alloggiamento con decisione finché non si
blocca .
Assicurarsi che la lama inferiore sia posizionata correttamente,
capovolgere BLADEUNIT e dare un'occhiata al bordo inferiore della
lama inferiore.
- 13 -
MAINTENANCE
Ogni volta che si pulisce o si sostituisce l'UNITÀ
LAMA, non toccare il bordo affilato della lama.
Pulire l'unità lama
Quando si tagliano nastri con adesivo pesante, i residui
rimarranno gradualmente sulla lama.
È necessario rimuovere l'UNITÀ LAMA per la pulizia
Spegnere l'INTERRUTTORE DI ACCENSIONE.
Rimuovere l'UNITÀ LAMA rilasciando la LEVA DI RILASCIO
DELL'UNITÀ LAMA.
Metti un po' di alcol su un panno pulito e asciutto o usa un
bastoncino per rimuovere i residui
Sostituire l'UNITÀ LAMA.
Lubrificare la lama
Lubrificare la lama per evitare che residui si attacchino alla
lama.
Spegnere l'INTERRUTTORE DI ACCENSIONE
Rimuovere l'UNITÀ LAMA dal corpo.
Individuare tre fori per l'olio sul lato posteriore della lama
superiore.
Gocciolare una goccia di BLADE OIL in ciascun foro.
Lubrificare anche la GUIDA DELLA LAMA INFERIORE.
Non lubrificare più e più volte.
Rimuovere l'olio di riserva utilizzando un panno di cotone.
Sostituire l'UNITÀ LAMA nel corpo.
Accendere l'INTERRUTTORE DI ACCENSIONE.
Effettuare diversi tagli di prova per assicurarsi che il nastro non
cada dal NASTRO PRESA.
Pulire i sensori
Ci sono due coppie di SENSORI sotto l'USCITA DEL NASTRO. Se
l'apertura è coperta da residui di nastro o detriti, i SENSORI non
rilevare la presenza del nastro.
- 14 -
Mantenere sempre pulita la zona attorno ai SENSORI.
Per proteggere il SENSORE, pulire con attenzione le aperture dopo
aver rimosso il GRUPPO LAMA.
Pulisci il corpo
Metti un detergente neutro su un panno umido per pulire la
carrozzeria . Non utilizzare alcool o solventi per pulire le parti in
plastica.
Error Messages
Il cicalino emetterà un suono, quindi un messaggio lampeggerà e
verrà visualizzato sul DISPLAY.
E-02 La lama è fuori posizione
Un segnale indica che la lama non è installata bene oppure la
macchina si ferma a causa dello spessore o della durezza del
nastro.
Spegnere l' INTERRUTTORE DI ACCENSIONE .
Rimuovere l'UNITÀ LAMA rilasciando la LEVA DI RILASCIO
DELL'UNITÀ LAMA, quindi sollevare il gruppo fuori dal corpo.
Accendere l' INTERRUTTORE DI ACCENSIONE .
Premere il PULSANTE FWD e inserire il nastro una volta, tagliare
il nastro tra l'USCITA DEL NASTRO e l'UNITÀ LAMA con le
forbici .
Premere il PULSANTE REV per rimuovere il nastro
Pulire l'UNITÀ LAMA e lubrificare la GUIDA LAMA INFERIORE.
Controllare la posizione della lama inferiore e sostituire l'UNITÀ
LAMA.
E-03 Il motore è fermo
Indica che il motore è fermo a causa di sovraccarico.
Premere il PULSANTE START per eliminare il messaggio di
errore.
Premere il PULSANTE REV per rimuovere il nastro.
Spegnere l' INTERRUTTORE DI ACCENSIONE .

- 15 -
Controllare attentamente l'UNITÀ LAMA e l'USCITA DEL
NASTRO.
Eliminare e rimuovere gli scarti di nastro di riserva o i residui
appiccicosi utilizzando le PINZETTE
Non toccare la lama mentre si sta correggendo un errore sotto l'INTERRUTTORE DI
ALIMENTAZIONE acceso.
Spegnere l' INTERRUTTORE DI ACCENSIONE e smettere di utilizzare la macchina.
Se la macchina non può funzionare normalmente dopo aver corretto l'errore.
Sembra che non ci sia nulla di sbagliato senza messaggi di errore.
Non utilizzare il nastro se l'elettricità statica genera più di 1000 V.
Potrebbe causare guasti alla macchina.
TROUBLESHOOTING
Problema
Causa possibile
Possibile soluzione
Il POWER SMTCH lo
è acceso ma la
macchina non può
funzionare.
Il CAVO CA è allentato .
Il FUSIBILE è saltato.
Allora controlla il CAVO AC collegare
saldamente la presa .
Sostituire il FUSIBILE .
Smettere di usare la macchina
immediatamente, anche se il FUSIBILE è
nuovamente bruciato dopo essere stato
sostituito .
Dopo aver rimosso un
pezzo di nastro, il
pezzo successivo non
viene alimentato in
AUTO modalità.
La modalità è impostata su
MANUALE.
Alcuni detriti stanno
coprendo il SENSORI .
Il nastro non può passare
attraverso SENSORI .
Il nastro ha un livello
Impostare la modalità su AUTO .
Rimuovere i detriti.
Utilizzare SEPARATOR per restringere il
nastro meno di 15 mm .
Non avvicinare forti illuminanti al SENSORI .
Alcuni tipi di nastro potrebbero non essere
utilizzati in modalità AUTO modalità.
- 16 -
estremamente basso
riflettenza.
La LAMA non può
muoversi senza
intoppi.
L'UNITÀ LAMA non è in
posizione corretta
posizione.
Controllare l'UNITÀ LAMA e spingerla verso il
basso alloggiamento saldamente.
La lunghezza del
nastro è diversa dalla
lunghezza impostata .
L'adesivo del nastro è
troppo forte.
L'elasticità del nastro è
troppo forte.
Correggere l'impostazione dopo aver tagliato
diversi pezzi di prova
Il nastro si arriccia
eccessivamente.
La macchina non è
collegata a terra. Il
BLOCCO RULLO è
disinserito
Controllare la massa del cavo.
Attivare il BLOCCO RULLO per applicare
tensione.
Questo prodotto è soggetto alle disposizioni della Direttiva Europea
2012/19/CE. Il simbolo del bidone della spazzatura barrato indica che
nell'Unione Europea il prodotto richiede la raccolta differenziata dei rifiuti.
Ciò vale per il prodotto e tutti gli accessori contrassegnati da questo simbolo.
I prodotti contrassegnati come tali non possono essere smaltiti con i normali
rifiuti domestici, ma devono essere portati in un punto di raccolta per il
riciclaggio di dispositivi elettrici ed elettronici.
Se la macchina continua a non funzionare correttamente, smettere di usarla
immediatamente e contattare il fornitore per l'autorizzazione alla riparazione.
Garanzia
Garantiamo all'acquirente originale del prodotto che sarà esente da difetti di materiale o di lavorazione
per tutta la durata dell'originale l'acquirente possiede il prodotto, se usurato in modo normale e corretto
utilizzo.
I pezzi di ricambio come Lame da taglio, Rulli, non sono coperti rientrano nel periodo di garanzia in
quanto sono considerati "parti soggette ad usura". Questa garanzia è valida solo se il prodotto:
Non è stato danneggiato durante l'installazione.
È stato utilizzato in conformità con le specifiche del prodotto , le istruzioni e le indicazioni del supporto
tecnico.
Non è stato modificato o danneggiato da manomissione, errore dell'utente, incidente, disastro, abuso,

- 17 -
uso improprio, alimentazione, applicazione di alimentazione, alternanza, riparazione, modifica,
correzione o sostituzione da parte di qualcuno diverso dal prodotto originale.

Produttore: Shanghaimuxinmuyeyouxiangongsi
Indirizzo: Baoshanqu Shuangchenglu 803long 11hao 1602A-1609shi Shanghai
RAPPRESENTANTE CE: SHUNSHUN GmbH .
Römeräcker 9 Z2021,76351 Linkenheim-Hochstetten, Germania
REP. DEL REGNO UNITO: Pooledas Group Ltd.
Unità 5 Albert Edward House, The Pavilions Preston, Regno Unito
Importato in AUS: SIHAO PTY LTD.
1 ROKEVA STREETEASTWOOD NSW 2122 Australia
Importato negli Stati Uniti: Sanven Technology Ltd.
Suite 250, 9166 Anaheim Place, Rancho Cucamonga, CA 91730
Made in China
Tecnico Supporto e certificato di garanzia elettronica
www.vevor.com/support

Soporte técnico y certificado de garantía electrónica
www.vevor.com/support
MANUAL DEL USUARIO DEL DISPENSADOR
DE CINTA
MODELO: AT-60
We continue to be committed to provide you tools with competitive price.
"Save Half", "Half Price" or any other similar expressions used by us only represents an
estimate of savings you might benefit from buying certain tools with us compared to the major
top brands and does not necessarily mean to cover all categories of tools offered by us. You
are kindly reminded to verify carefully when you are placing an order with us if you are
actually saving half in comparison with the top major brands.
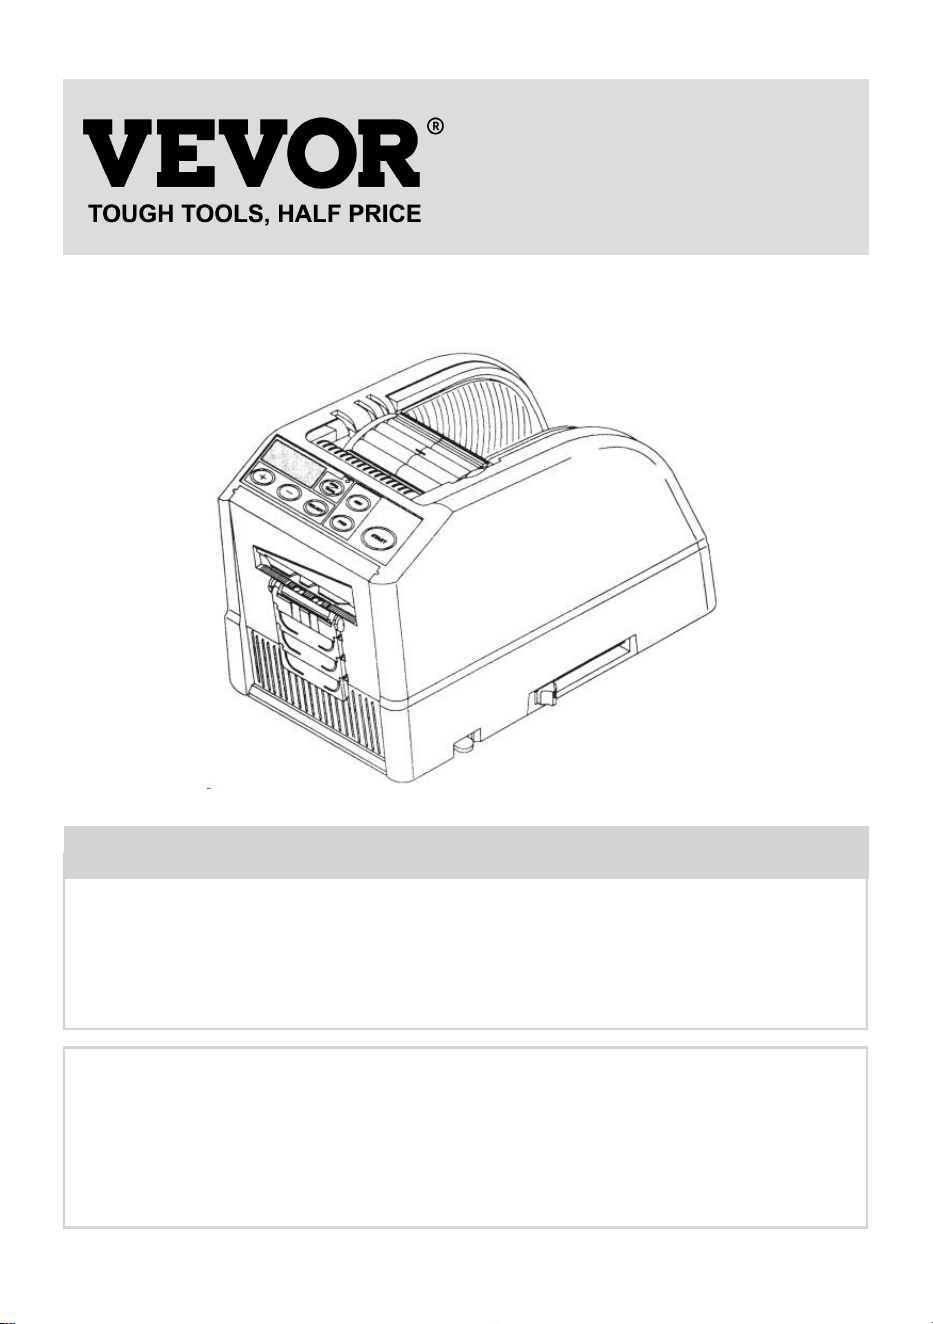
- 1 -
MODELO: AT-60
Have product questions? Need technical support? Please feel free to
contact us:
Technical Support and E-Warranty Certificate
www.vevor.com/support
NEED HELP? CONTACT US!
This is the original instruction, please read all manual instructions
carefully before operating. VEVOR reserves a clear interpretation of our
user manual. The appearance of the product shall be subject to the
product you received. Please forgive us that we won't inform you again if
there are any technology or software updates on our product.
Tape Dispenser

- 2 -
9. Lea atentamente y comprenda todas las INSTRUCCIONES DE
MONTAJE Y OPERACIÓN antes de operar.
10. El incumplimiento de las reglas de seguridad y otras precauciones
básicas de seguridad puede provocar lesiones personales graves.
GENERAL SAFETY RULES
Las pautas de seguridad de este manual de instrucciones deben observarse en fin
de evitar daños a la máquina o lesiones al operador o Otras personas
Las pautas de seguridad prescritas "Advertencia" y " Precaución " describen
posibles lesiones o daños que puedan sufrirse al operar o mantener la máquina
de una manera distinta a la descrita en este manual de instrucciones.
Lea y siga atentamente las precauciones de seguridad antes de leer el Manual de
instrucciones.
Advertencia _ _
Indica una situación potencialmente peligrosa que, si no evitado, podría provocar
la muerte o lesiones graves.
Precaución
Indique que un mal manejo puede resultar en peligro y que el operador corre
riesgo de sufrir lesiones o que la máquina está en riesgo de sufrir daños.
Indica precaución
Un símbolo dentro del triángulo, o la descripción, indicará un peligro específico
Una acción prohibida
Un símbolo dentro del círculo, o la descripción, indicará acción prohibida.
Una acción requerida
Un símbolo dentro del círculo, o la descripción, indicará la acción requerida.
No enchufe, desenchufe el cable ni opere la máquina con productos
mojados. manos. Si no se observa esto, se pueden producir lesiones debido a una
- 3 -
descarga eléctrica.
Nunca introduzca el dedo, ninguna otra parte del cuerpo ni ningún objeto
extraño objeto en la máquina. De lo contrario, podrían producirse lesiones.
Mantenga el cabello o la ropa suelta alejados de la máquina mientras esté
operando.
No observar esto puede resultar en lesiones.
Esta máquina está destinada únicamente a uso industrial . No permita que
operadores no capacitados o niños operen la máquina. El incumplimiento de esto
puede provocar lesiones .
Apague el interruptor de encendido y desenchufe la máquina antes de
reemplazarla. la unidad de cuchillas o realizar cualquier mantenimiento en la
máquina. No seguir esto puede resultar en lesiones graves.
No utilice esta máquina para nada que no sea el especificado. aplicaciones
El uso de la máquina para cualquier aplicación no deseada puede causar lesiones.
al operador o fallo de la máquina.
GUARDA ESTAS INSTRUCCIONES
MODEL AND PARAMETERS
Modelo
AT-60
Ancho de la cinta
6-60 mm
Longitud de la cinta
5-999 mm
Diámetro exterior. de rollo
20~300 mm
Cuerpo material
ABS antiestático
Calificación(es)
CA 100 V-240 V 50-60 Hz.

- 4 -
Potencia (máx.)
24,6W
STRUCTURE DIAGRAM
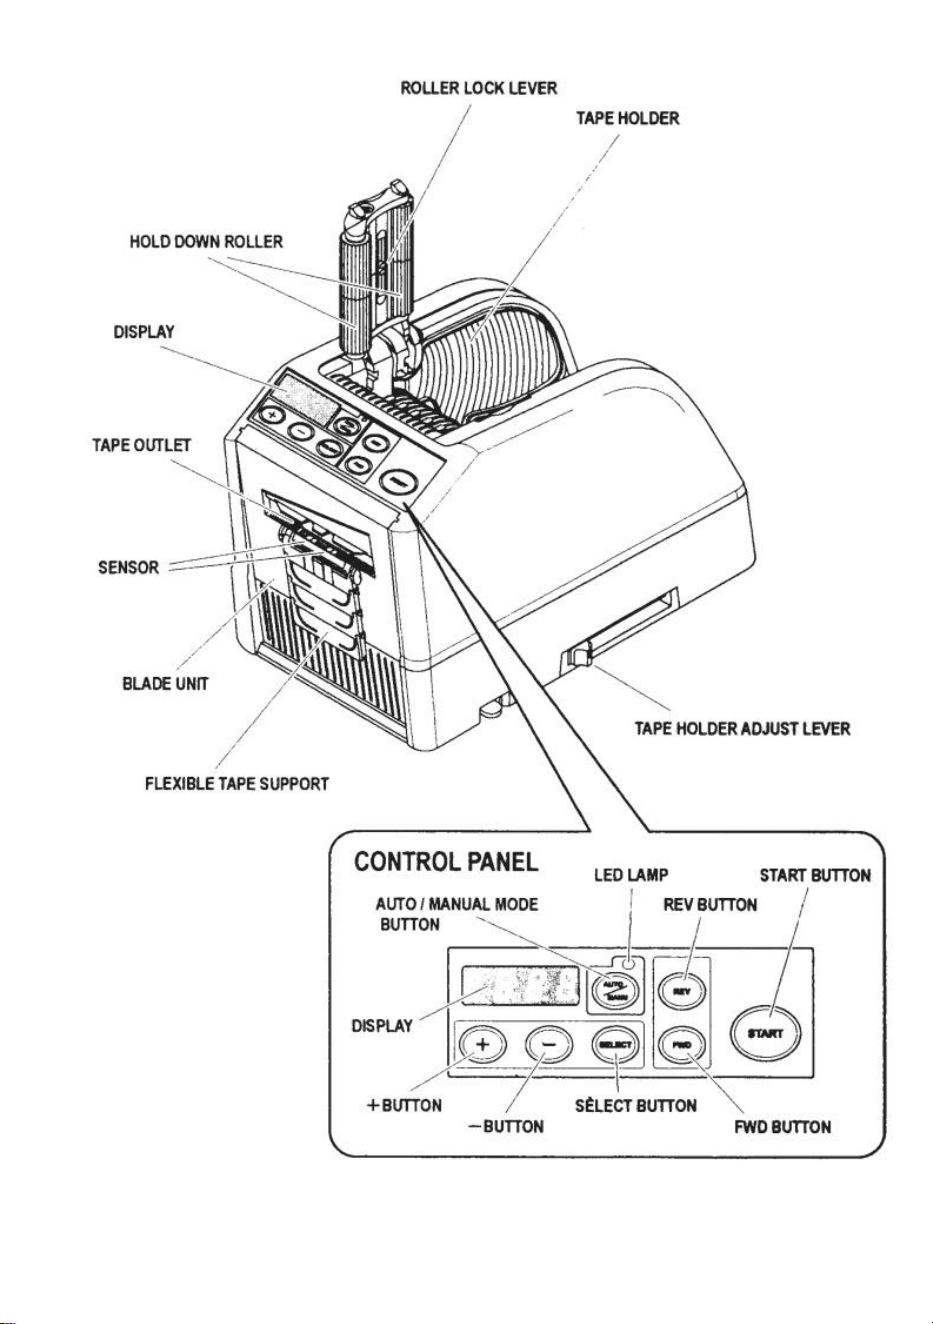
- 5 -

- 6 -

- 7 -
OPERATING INSTRUCTIONS
Cargue la cinta
Conecte el CABLE DE CA a la ENTRADA DEL CABLE DE CA.
Asegúrese de que el INTERRUPTOR DE ENERGÍA esté
apagado y luego conéctelo a una toma adecuada.
tomacorriente de CA con conexión a tierra .
Pon el interruptor de encendido .
Cuando se enciende el INTERRUPTOR DE ENCENDIDO, sonará
un timbre.
En este momento, el modo está configurado en MANUAL.
Presione el BOTÓN DE LIBERACIÓN DEL RODILLO
PRESIONADO
Coloque un rollo de cinta en la máquina.
Sostenga la cinta ajustando los SOPORTES DE CINTA
Ajuste los SOPORTES DE CINTA a un ancho adecuado, deslice la
PALANCA DE AJUSTE DEL SOPORTE DE CINTA desde el frente
hacia la parte trasera de la máquina y luego ciérrela.
Los SOPORTES DE CINTA deben sujetar el rollo ligeramente en el
centro de la cavidad. de la máquina
Esto es muy importante porque mantiene la cinta en el centro.
La cinta pasa sobre el SENSOR frente a la UNIDAD DE HOJA.
Para soportar un rollo de cinta más grande, extraiga el SOPORTE
INFERIOR.
Coloque la cinta en el RODILLO DE ALIMENTACIÓN DE CINTA.
¡Presione el BOTÓN FWD hasta que la cinta salga por la SALIDA
DE CINTA!
Cuando utilice una cinta adhesiva fuerte y pegajosa, retire un poco
de cinta posicionamiento en la ENTRADA DE CINTA.
Presione el BOTÓN FWD continuamente durante unos segundos y
ayude a la cinta a posicionarse en la ENTRADA DE CINTA.
Después de cargar la cinta y ajustar los SOPORTES DE CINTA,
cierre el SUJETE LA UNIDAD DE RODILLOS.
Presione el BOTÓN INICIO.
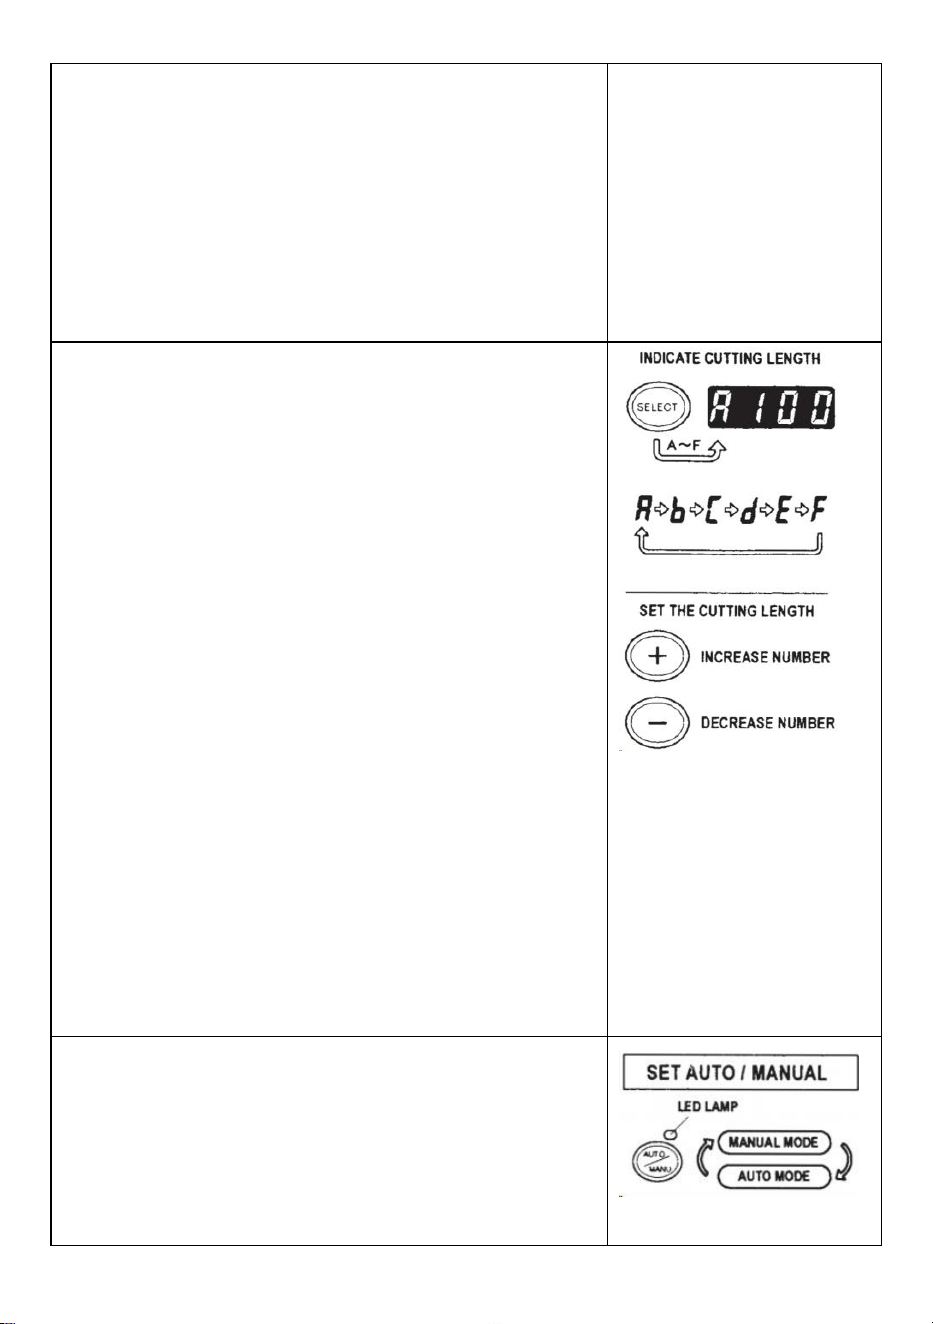
- 8 -
Retire el primer trozo de cinta y deséchelo.
Cuando saque el rollo de cinta de la máquina, tire de la cinta
hacia atrás y presione el BOTÓN REV .
NOTA:
Utilice siempre pinzas para quitar la cinta .
Siempre que coloque la cinta, asegúrese de que El lado adhesivo
de la cinta siempre está hacia abajo .
Establecer la longitud de la cinta
Asegúrese de que la PANTALLA indique <longitud de corte>
La longitud de corte siempre se indica en algunos alfabetos como
A,b,C,d,E,F
Establezca la longitud de corte.
Establezca la longitud necesaria utilizando el BOTÓN +/-.
La longitud de corte es ajustable entre 5 mm y 999 mm.
Puede establecer seis longitudes diferentes usando el BOTÓN
DE SELECCIÓN.
Si presiona el BOTÓN +/- por un momento, la longitud cambiará
a 1 mm.
Y si presiona el BOTÓN +/- por más tiempo, se muestra avance
rápido .
Precaución
La longitud real difiere de la longitud mostrada dependiendo del
tipo de la cinta y su estado.
Al cortar un trozo corto de cinta, es posible que el largo no se
corte de manera consistente o la cinta está atascada.
Pruebe varios cortes de prueba para garantizar un
funcionamiento adecuado.
Configuración de modo
1.Modo manual
Asegúrese de que la LÁMPARA LED azul esté apagada.
Cuando la LÁMPARA LED esté parpadeando o encendida,
presione AUTO/MANUAL MODE y apague la LÁMPARA LED
Presione el BOTÓN INICIO una vez, la máquina introducirá un
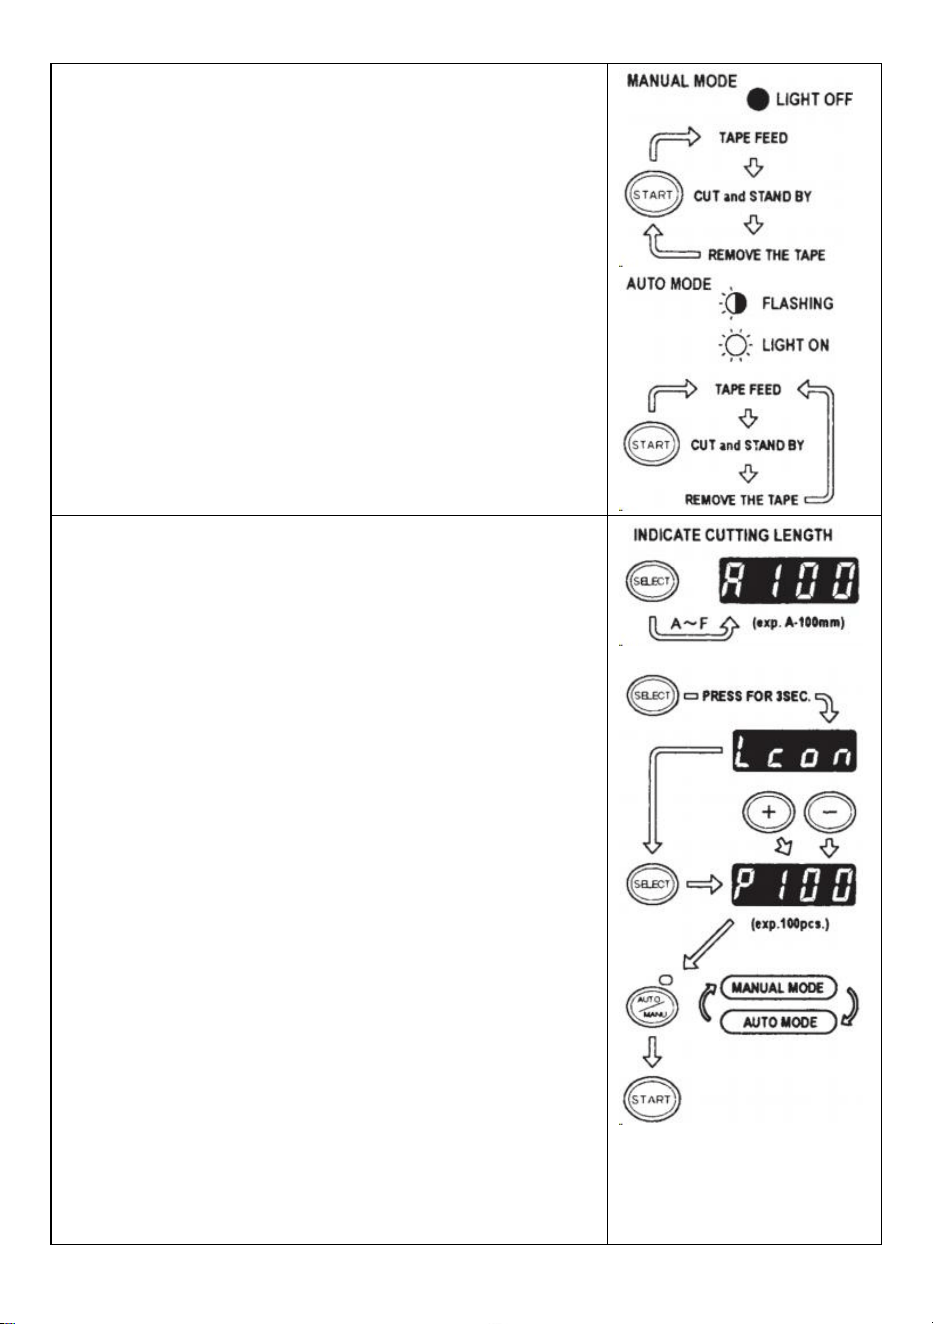
- 9 -
trozo de cinta luego recórtalo según la longitud establecida.
Para cortar otra pieza, presione nuevamente el BOTÓN INICIO.
2.Modo automático
Asegúrese de que la LÁMPARA LED esté parpadeando.
Cuando las luces de la lámpara LED estén apagadas, presione
el BOTÓN AUTO/MANUAL y deje que la LÁMPARA LED parpadee .
Presione el BOTÓN INICIO una vez, la máquina introducirá un
trozo de cinta luego recórtalo según la longitud establecida.
Cuando se retira ese trozo de cinta, la máquina introducirá otro
pieza y luego recórtela.
La máquina alimentará y cortará un nuevo trozo de cinta una vez
que el trozo de se retira la cinta .
Modo P (modo preestablecido)
La máquina se puede programar. Se mostrará una señal según la
cantidad de piezas seleccionada y todo cortado.(Máximo 999
piezas.)
Sonará un timbre cuando finalice el programa.
Puede utilizar el modo MANUAL o AUTO
Presione el BOTÓN SELECCIONAR para elegir la longitud
necesaria.
Presione el BOTÓN SELECCIONAR durante tres segundos y
luego indicará "Lcon”
Presione el BOTÓN SELECCIONAR nuevamente y luego
indicará "p".
Utilice el BOTÓN +/- y establezca la cantidad necesaria .
Elija AUTO o MANUAL UTILIZANDO EL BOTÓN
AUTO/MANUAL.
Cuando presiona el BOTÓN DE INICIO, la máquina alimentará y
cortará un trozo de cinta para fines de prueba
Para operar la máquina usando el MODO MANUAL, presione el
BOTÓN DE INICIO e introduzca un trozo de cinta después de
sacarlo .
Para operar la máquina usando el MODO AUTOMÁTICO, la
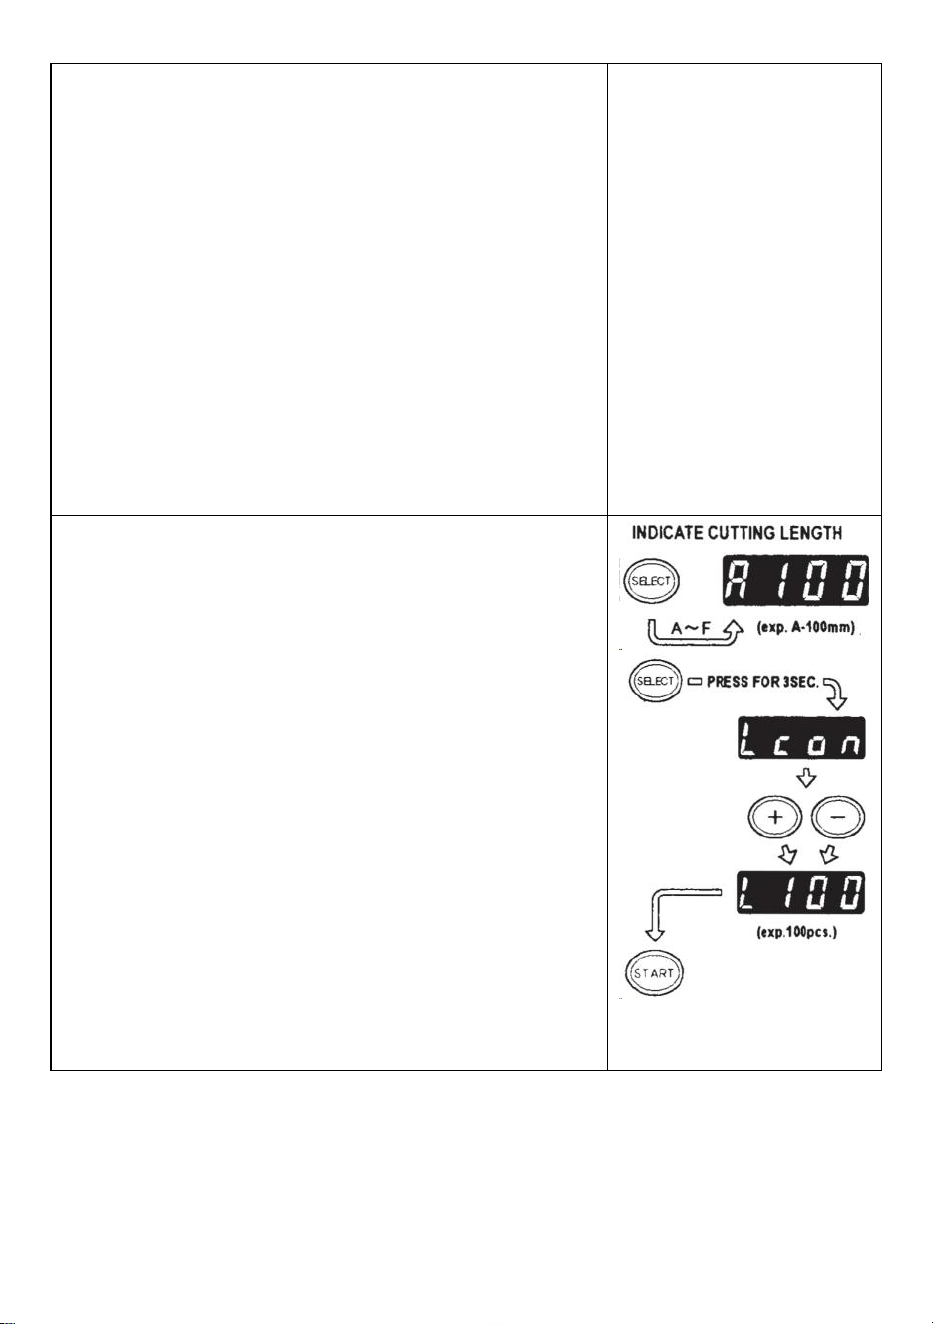
- 10 -
máquina alimentará una trozo de cinta automáticamente.
La señal muestra números al revés cuando se introduce otro
trozo de cinta.
Cuando la PANTALLA indique "0", sonará el timbre.
El DISPLAY indica el número de piezas que están
preestablecidas.
Espere hasta que se detenga el timbre.
Si saca la cinta antes de que se detenga el timbre, la LÁMPARA
LED parpadeará por lo que deberá presionar el INTERRUPTOR DE
INICIO nuevamente.
Si intenta cambiar el modo (AUTO/MANUAL) cuando la máquina
está funcionando simplemente presione el BOTÓN
AUTO/MANUAL.
Modo L (modo bucle)
Puede preestablecer la cantidad de piezas que se cortarán.
(Máximo 999 piezas) La máquina cortará las piezas según las
cantidades seleccionadas y luego se detendrá .
Presione el BOTÓN SELECCIONAR y decida la longitud de la
cinta.
Mantenga presionado el BOTÓN SELECCIONAR para que la
PANTALLA indique "Lcon"
Establezca el número de piezas a cortar usando el BOTÓN +/-
Cuando presiona el BOTÓN INICIO, la PANTALLA indica una
señal que muestra números al revés y cortando
continuamente.
Cuando la PANTALLA indique "0", el timbre emitirá un sonido y
luego el la máquina está parada.
Para detener la máquina mientras está funcionando en MODO L,
presione el BOTÓN DE INICIO.
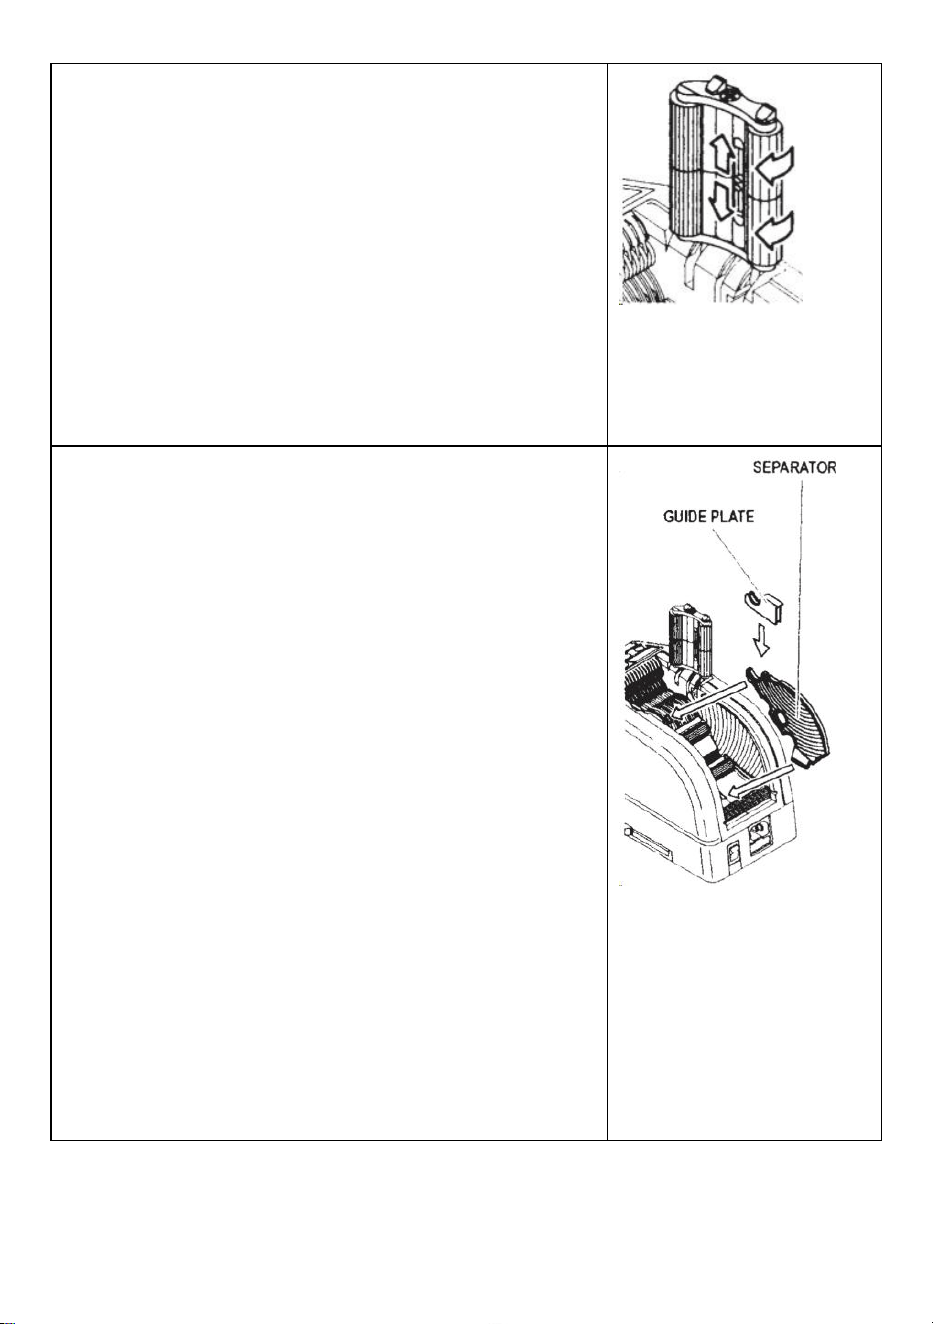
- 11 -
Cómo manejar una cinta rizadora
Presione el BOTÓN DE LIBERACIÓN DEL RODILLO DE
SUJECIÓN para abrir la UNIDAD DEL RODILLO DE
SUJECIÓN
Extienda la PALANCA DE BLOQUEO DEL RODILLO para que el
rodillo no gire.
Cierre la UNIDAD DEL RODILLO DE SUJECIÓN
Con los rodillos bloqueados, la tensión puede hacer que la
longitud varíe .
Corte varias piezas de prueba para ajustar la longitud si es
necesario.
Use cinta estrecha/use dos rollos al mismo tiempo
Si la cinta tiene menos de 15 mm de ancho o desea dispensar dos
rollos al mismo tiempo, utilice el SEPARADOR .
Corte menos de 10 mm de ancho de cinta, coloque la PLACA GUÍA
en el SEPARADOR
Retire el SEPARADOR de la parte inferior del cuerpo.
Abra la UNIDAD DEL RODILLO DE SUJECIÓN
Inserte el SEPARADOR en el cuerpo encajándolo en la parte
inferior de la cavidad.
Cuando corte la cinta menos de 10 mm, coloque la PLACA GUÍA
sobre el Separador.
Coloque un rollo de cinta a cada lado insertando un
SEPARADOR para cargar la cinta.
Para sujetar la cinta ajustando los SOPORTES DE CINTA, no es
necesario empujar el SEPARADOR fuera de su posición.
Al dispensar dos rollos de cinta al mismo tiempo, es
imprescindible introducir ambos de su longitud s al mismo tiempo
Retire el primer trozo de cinta.
Cuando se retira el segundo trozo de cinta, también se dispensan
ambos lados de la cinta .

- 12 -
Otras funciones
CINTA FLEXIBLE APOYO
Cuando cortas la cinta Cinta/película no adhesiva más larga o
cortada, utilice SOPORTE DE CINTA FLEXIBLE para evitar la cinta
cayendo . _ _
SOPORTE DE ASISTENCIA
Basado en el material de la cinta. o propósito de la pieza de
trabajo , uso el SOPORTE DE ASISTENCIA para mover el cuerpo
de la máquina hacia un nivel inferior.
Reemplace la unidad de cuchillas
Sólo Blade no se acepta para ser reemplazado.
Necesita cambiarse con toda la unidad Blade.
Apague el INTERRUPTOR DE ENCENDIDO.
Retire la UNIDAD DE CUCHILLAS soltando la PALANCA DE
LIBERACIÓN DE LA UNIDAD 8LADE.
Instale la nueva UNIDAD DE HOJAS en el cuerpo .
Empuje hacia abajo la carcasa firmemente hasta que quede
bloqueada .
Asegúrese de que la hoja inferior esté colocada correctamente,
dé la vuelta a la BLADEUNIT y observe el borde inferior de la hoja
inferior.

- 13 -
MAINTENANCE
Siempre que limpie o reemplace la UNIDAD DE
CUCHILLA, no toque el borde afilado de la cuchilla.
Limpiar la unidad de cuchillas
Al cortar cintas con adhesivo pesado, los residuos permanecerán
en la hoja gradualmente.
Es necesario retirar la UNIDAD DE CUCHILLAS para su
limpieza.
Apague el INTERRUPTOR DE ENCENDIDO.
Retire la UNIDAD DE CUCHILLAS soltando la PALANCA DE
LIBERACIÓN DE LA UNIDAD DE CUCHILLAS.
Coloque un poco de alcohol en un paño limpio y seco o use un
hisopo para eliminar el residuo.
Reemplace la UNIDAD DE CUCHILLAS.
Lubricar la hoja
Lubrique la hoja para evitar que se peguen residuos a la hoja.
Apague el INTERRUPTOR DE ENCENDIDO
Retire la UNIDAD DE CUCHILLAS del cuerpo.
Localice tres orificios de aceite en la parte posterior de la hoja
superior.
Vierta una gota de ACEITE PARA HOJAS en cada orificio.
Lubrique también la GUÍA INFERIOR DE LA HOJA.
No lubrique una y otra vez.
Limpie el aceite sobrante con un paño de algodón.
Vuelva a colocar la UNIDAD DE CUCHILLAS en el cuerpo.
Pon el interruptor de encendido.
Haga varios cortes de prueba para asegurarse de que la cinta no
se caiga de la CINTA. SALIDA.
Limpiar los sensores
Hay dos pares de SENSORES debajo de la SALIDA DE CINTA. Si
la abertura está cubierta por residuos o residuos de cinta, los
SENSORES No detecta la presencia de cinta.

- 14 -
Mantenga siempre limpio alrededor de los SENSORES.
Para proteger el SENSOR, limpie cuidadosamente las aberturas
después de retirar la UNIDAD DE HOJA.
Limpiar el cuerpo
Ponga detergente neutro en un paño húmedo para limpiar el
cuerpo . No utilice alcohol ni disolventes para limpiar las piezas de
plástico.
Error Messages
El timbre emitirá un sonido y luego un mensaje parpadeará y se
mostrará en la PANTALLA.
E-02 La hoja está fuera de posición
Una señal indica que la cuchilla no está bien instalada o que la
máquina se detiene debido al grosor o dureza de la cinta.
Apague el INTERRUPTOR DE ENCENDIDO .
Retire la UNIDAD DE CUCHILLAS soltando la PALANCA DE
LIBERACIÓN DE LA UNIDAD DE CUCHILLAS y luego
levante el conjunto para sacarlo del cuerpo.
Pon el interruptor de encendido .
Presione el BOTÓN FWD e introduzca la cinta una vez, corte la
cinta entre la SALIDA DE CINTA y la UNIDAD DE
CUCHILLAS con unas tijeras .
Presione el BOTÓN REV para quitar la cinta.
Limpie la UNIDAD DE LA HOJA y lubrique la GUÍA INFERIOR DE
LA HOJA.
Verifique la posición de la hoja inferior y reemplace la UNIDAD
DE LA CUCHILLA.
E-03 El motor está parado
Indica que el motor está parado por sobrecarga.
Presione el BOTÓN INICIO para borrar el mensaje de error.
Presione el BOTÓN REV para quitar la cinta.
el INTERRUPTOR DE ENCENDIDO .
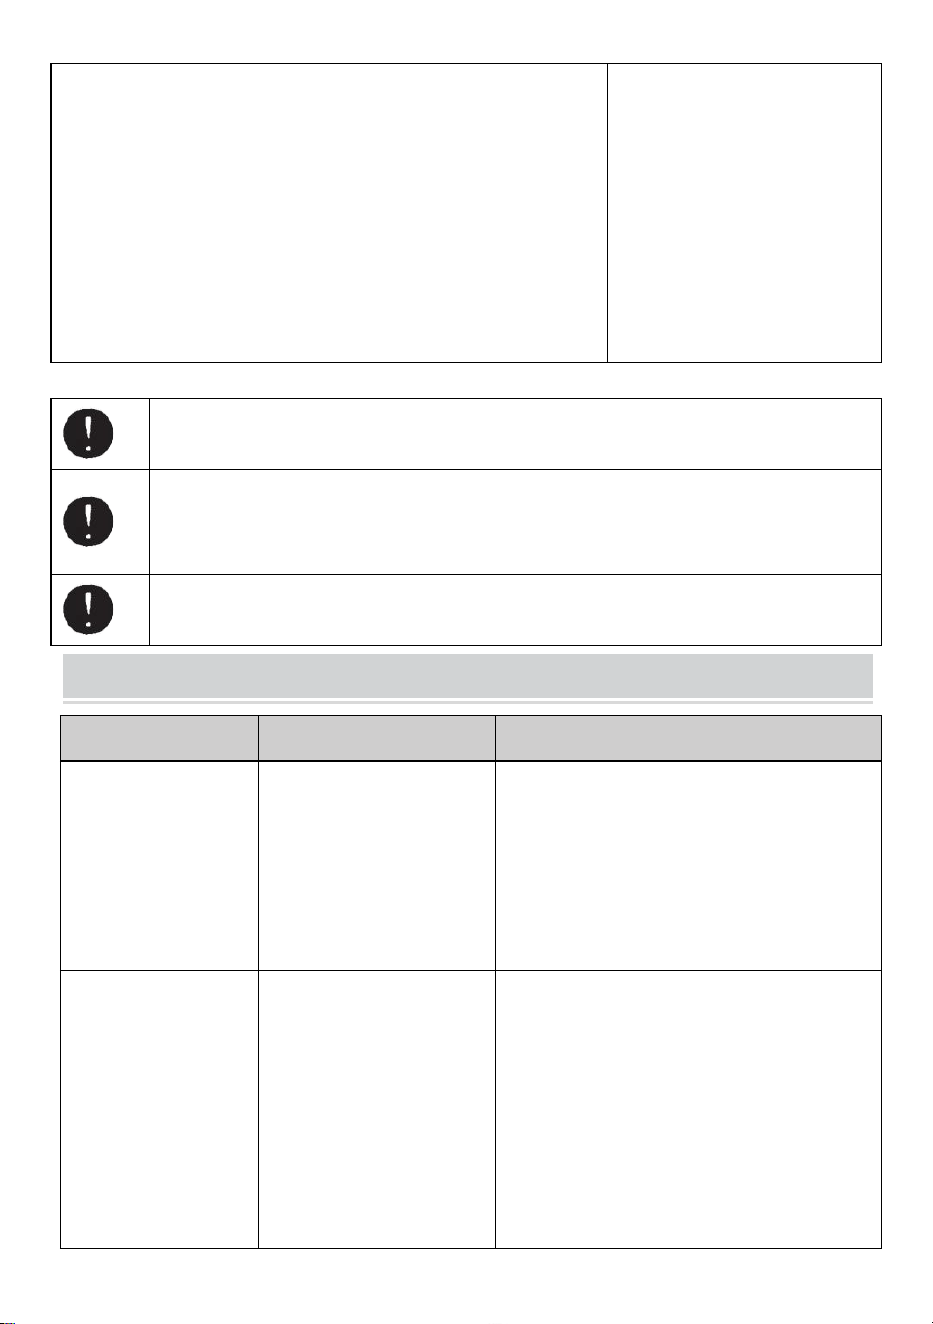
- 15 -
Revise cuidadosamente la UNIDAD DE CUCHILLAS y la SALIDA
DE CINTA.
Limpie y retire los restos de cinta sobrante o los residuos
pegajosos utilizando PINZAS
No toque la cuchilla cuando esté corrigiendo un error cuando el INTERRUPTOR DE
ENCENDIDO está activado.
Apague el INTERRUPTOR DE ENCENDIDO y deje de usar la máquina.
Si la máquina no puede funcionar normalmente después de corregir el error.
Parece que no pasa nada sin ningún mensaje de error.
No utilice la cinta si la electricidad estática genera más de 1000 V.
Puede provocar fallos en la máquina.
TROUBLESHOOTING
Problema
Causa posible
Solución posible
El POWER SMTCH
es encendido pero la
máquina no puede
funcionar.
El CABLE DE CA está
aflojado .
Se ha quemado el
FUSIBLE.
Verifique el CABLE DE CA y luego Enchufe el
tomacorriente firmemente .
Reemplace el FUSIBLE .
Deje de utilizar la máquina inmediatamente
aunque El FUSIBLE se vuelve a quemar
después de ser reemplazado .
Después de retirar un
trozo de cinta, la
siguiente pieza no
avanza en AUTO
modo.
El modo está configurado
en MANUAL.
Algunos escombros están
cubriendo el SENSORES .
La cinta no puede pasar a
través del SENSORES .
La cinta tiene un nivel
extremadamente bajo.
Establezca el modo en AUTO .
Retire los escombros.
Utilice SEPARADOR para estrechar la cinta
menos de 15 mm .
No acerque iluminaciones potentes alrededor
del SENSORES .
Es posible que algunos tipos de cinta no se
utilicen en modo AUTO. modo.
- 16 -
reflectancia.
La HOJA no se puede
mover suavemente.
La UNIDAD DE
CUCHILLAS no está en
buenas condiciones.
posición.
Verifique la UNIDAD DE CUCHILLAS y
presione hacia abajo la vivienda firmemente.
La longitud de la cinta
es diferente de la
longitud establecida .
El adhesivo de la cinta es
demasiado fuerte.
La elasticidad de la cinta
es demasiado fuerte.
Corrija el ajuste después de cortar varias
piezas de prueba .
La cinta se curva
excesivamente.
La máquina no está
conectada a tierra. El
ROLLER LOCK está
desactivado.
Verifique la tierra en el cable.
Engrane el ROLLER LOCK para aplicar
tensión.
Este producto está sujeto a las disposiciones de la Directiva Europea
2012/19/CE. El símbolo que muestra un contenedor con ruedas tachado
indica que el producto requiere recogida selectiva de basura en la Unión
Europea. Esto se aplica al producto y a todos los accesorios marcados con
este símbolo. Los productos marcados como tales no podrán desecharse
junto con la basura doméstica normal, sino que deberán llevarse a un punto
de recogida para el reciclaje de aparatos eléctricos y electrónicos.
Si la máquina aún no puede funcionar correctamente, deje de usarla. inmediatamente
y comuníquese con el proveedor para obtener autorización de reparación.
Garantía
Garantizamos al comprador original del producto que estará libre de defectos de material o mano de
obra mientras el producto original El comprador es propietario del producto, siempre que se le dé un
uso normal y sea adecuado. uso.
Los repuestos como Cuchillas de Corte, Rodillos, no están cubiertos. dentro del período de garantía ya
que se consideran "piezas de desgaste". Esta garantía sólo es válida si el producto:
No sufrió daños durante la instalación.
Fue operado de acuerdo con las especificaciones, instrucciones y direcciones de soporte técnico del
producto .

- 17 -
No fue modificado ni dañado por templado, error del usuario, accidente, desastre, abuso, mal uso,
fuente de alimentación, aplicación de energía, alternancia, reparación, modificación, reparación o
reemplazo por parte de alguien. distinto del producto original.

Fabricante: Shanghaimuxinmuyeyouxiangongsi
Dirección: Baoshanqu Shuangchenglu 803long 11hao 1602A-1609shi Shanghai
REPRESENTANTE CE: SHUNSHUN GmbH .
Römeräcker 9 Z2021,76351 Linkenheim-Hochstetten, Alemania
REPRESENTANTE DEL REINO UNIDO: Pooledas Group Ltd.
Unidad 5 Albert Edward House, The Pavilions Preston, Reino Unido
Importado a AUS: SIHAO PTY LTD.
1 ROKEVA STREET ASTWOOD NSW 2122 Australia
Importado a EE. UU.: Sanven Technology Ltd.
Suite 250, 9166 Anaheim Place, Rancho Cucamonga, CA 91730
Hecho en china
Técnico Certificado de soporte y garantía electrónica
www.vevor.com/support

Wsparcie techniczne i certyfikat e-gwarancji
www.vevor.com/support
INSTRUKCJA OBSŁUGI DOZOWNIKA TAŚMY
MODEL: AT-60
We continue to be committed to provide you tools with competitive price.
"Save Half", "Half Price" or any other similar expressions used by us only represents an
estimate of savings you might benefit from buying certain tools with us compared to the major
top brands and does not necessarily mean to cover all categories of tools offered by us. You
are kindly reminded to verify carefully when you are placing an order with us if you are
actually saving half in comparison with the top major brands.

- 1 -
MODEL: AT-60
Have product questions? Need technical support? Please feel free to
contact us:
Technical Support and E-Warranty Certificate
www.vevor.com/support
NEED HELP? CONTACT US!
This is the original instruction, please read all manual instructions
carefully before operating. VEVOR reserves a clear interpretation of our
user manual. The appearance of the product shall be subject to the
product you received. Please forgive us that we won't inform you again if
there are any technology or software updates on our product.
Tape Dispenser
- 2 -
11. przeczytaj uważnie i zrozum całą INSTRUKCJĘ MONTAŻU I
OBSŁUGI .
12. Nieprzestrzeganie zasad bezpieczeństwa i innych podstawowych
środków ostrożności może skutkować poważnymi obrażeniami ciała.
GENERAL SAFETY RULES
Należy przestrzegać wskazówek bezpieczeństwa zawartych w niniejszej instrukcji
obsługi aby zapobiec uszkodzeniu maszyny lub obrażeniom operatora lub inne
osoby
Wytyczne dotyczące bezpieczeństwa opisane są w „Ostrzeżenie” i „ Uwaga ”.
możliwe obrażenia lub szkody, które mogą zostać poniesione w wyniku obsługi lub
konserwację maszyny w sposób inny niż opisany w tym dokumencie instrukcja
obsługi.
Przed zapoznaniem się z niniejszą instrukcją należy uważnie przeczytać i
przestrzegać środków ostrożności Instrukcja obsługi.
Ostrzeżenie _ _
Wskazuje potencjalnie niebezpieczną sytuację , która w przeciwnym razie uniknąć,
mógłby spowodować śmierć lub poważne obrażenia.
Ostrożność
Wskazuje, że niewłaściwe obchodzenie się może spowodować zagrożenie i że
operator lub maszyna są narażeni na ryzyko obrażeń na ryzyko uszkodzenia.
Oznacza ostrożność
Wskaże to symbol w trójkącie lub opis konkretne zagrożenie
Zakazane działanie
Wskaże to symbol w okręgu lub opis zabronione działanie.
Wymagane działanie
Wskaże to symbol w okręgu lub opis wymagane działanie.
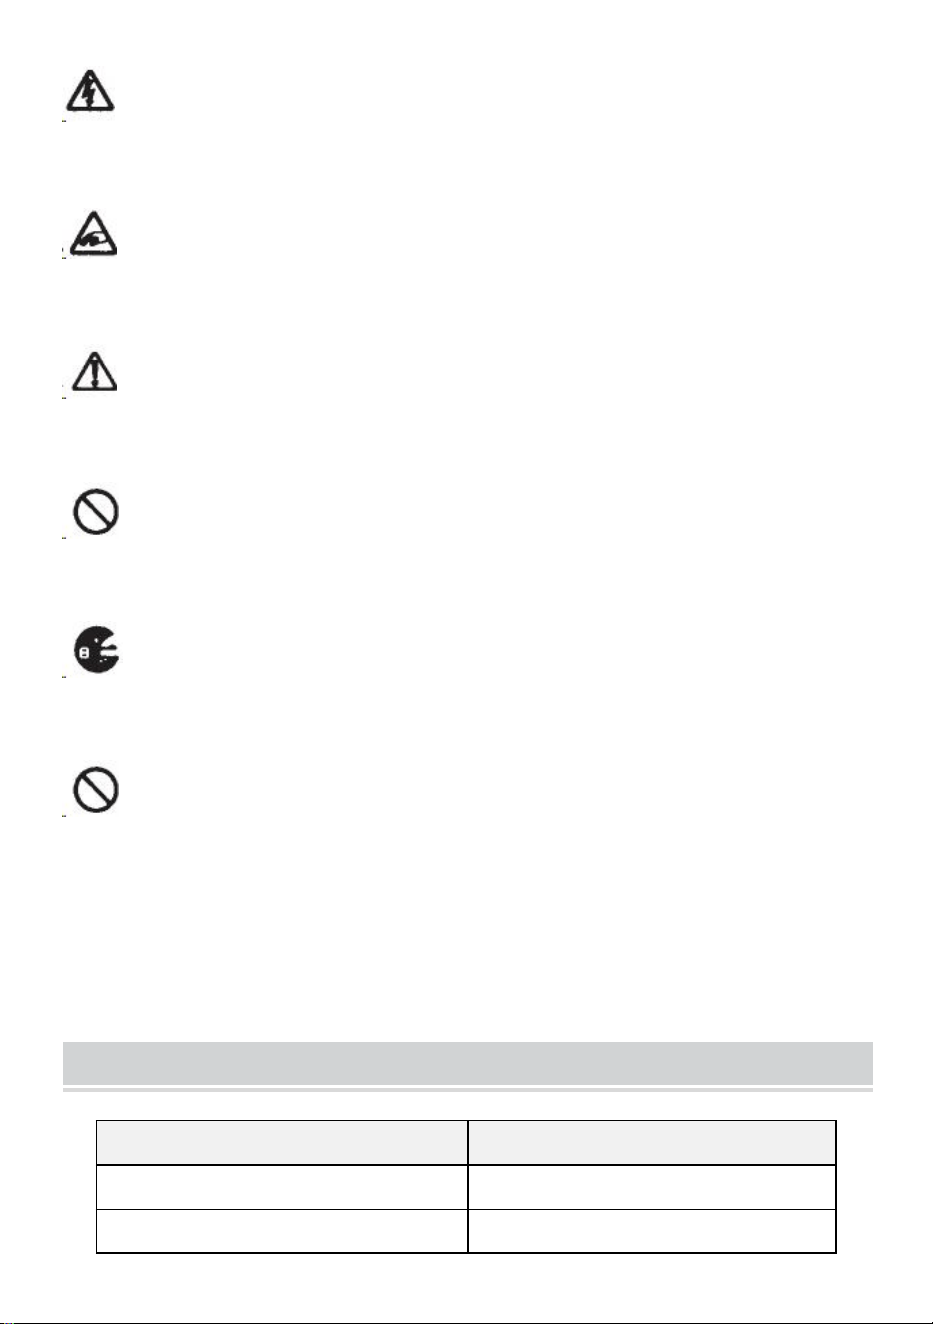
- 3 -
Nie podłączaj, nie odłączaj przewodu ani nie obsługuj urządzenia, gdy jest
mokre rękami. Niezastosowanie się do tego może spowodować obrażenia w
wyniku porażenia prądem.
Nigdy nie wkładaj palca, żadnej innej części ciała ani żadnych ciał obcych
przedmiot do maszyny. Niezastosowanie się do tego może spowodować
obrażenia.
Trzymaj włosy i luźne ubrania z dala od urządzenia, gdy jest ono włączone
operacyjny.
Niezastosowanie się do tego może skutkować obrażeniami
Niniejsza maszyna jest przeznaczona wyłącznie do użytku przemysłowego .
Nie pozwalaj nieprzeszkolonym operatorom ani dzieciom obsługiwać maszynę.
Niezastosowanie się do tego może spowodować obrażenia .
Przed wymianą wyłącz urządzenie i odłącz zasilanie zespołu ostrzy lub
przeprowadzania jakiejkolwiek konserwacji maszyny. Niezastosowanie się do tego
może spowodować poważne obrażenia
Nie używaj tego urządzenia do celów innych niż określone Aplikacje
Używanie maszyny do jakichkolwiek niezamierzonych celów może spowodować
obrażenia dla operatora lub awarię maszyny.
ZACHOWAJ TE INSTRUKCJE
MODEL AND PARAMETERS
Model
AT-60
Szerokość taśmy
6-60 mm
Długość taśmy
5-999 mm

- 4 -
Średnica zewnętrzna z Rolki
20 ~ 300 mm
Materiał korpusu
Antystatyczny ABS
Ocena(y)
AC 100 V-240 V 50-60 Hz
Moc (maks.)
24,6 W
STRUCTURE DIAGRAM

- 5 -

- 6 -
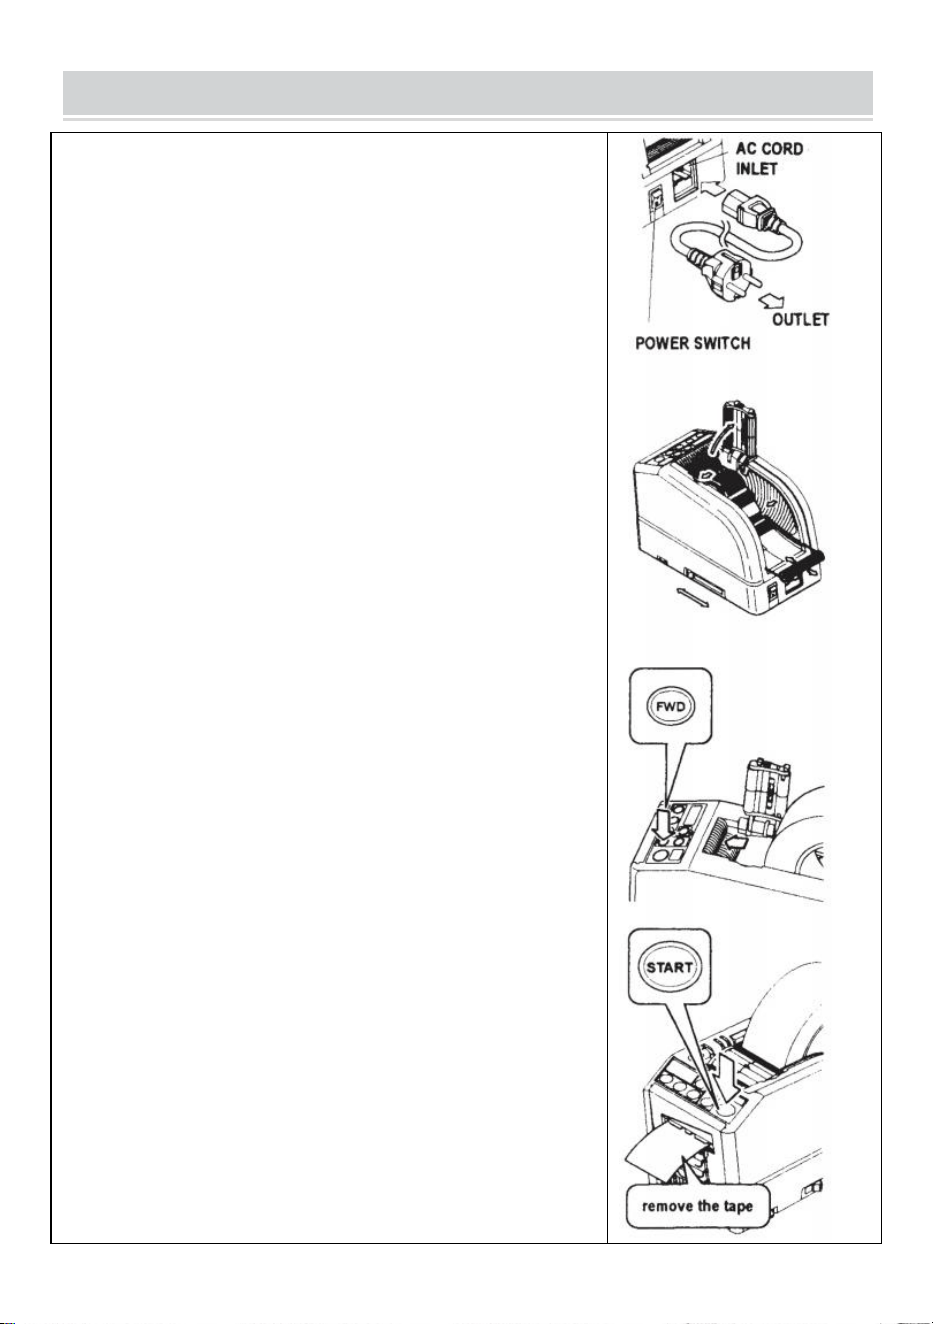
- 7 -
OPERATING INSTRUCTIONS
Załaduj taśmę
Podłącz KABEL AC do WLOTU KABLA AC .
Upewnij się, że PRZEŁĄCZNIK ZASILANIA jest wyłączony , a
następnie podłącz go do odpowiedniego gniazda uziemione
gniazdko prądu przemiennego .
PRZEŁĄCZNIK ZASILANIA .
Po włączeniu PRZEŁĄCZNIKA ZASILANIA rozlegnie się sygnał
dźwiękowy.
W tym momencie tryb jest ustawiony na RĘCZNY
Naciśnij PRZYCISK ZWALNIAJĄCY ROLKĘ
Umieść rolkę taśmy w urządzeniu
Przytrzymaj taśmę regulując UCHWYTY TAŚMY
Ustaw UCHWYTY TAŚMY na odpowiednią szerokość, przesuń
DŹWIGnię REGULACJI UCHWYTU TAŚMY od przodu do tyłu
maszyny, a następnie zamknij ją.
UCHWYTY TAŚMY powinny lekko przytrzymywać rolkę na środku
wnęki maszyny
Jest to bardzo ważne, ponieważ utrzymuje taśmę na środku.
Taśma przechodzi przez CZUJNIK przed MODUŁEM OSTRZY.
Aby utrzymać większą rolkę taśmy, wyciągnij DOLNY UCHWYT
Umieść taśmę na ROLCE PODAJNIKA TAŚMY
Naciśnij PRZYCISK FWD, aż taśma wyjdzie z WYJŚCIA TAŚMY!
Jeśli używasz mocnej taśmy klejącej, wyciągnij trochę taśmy
umiejscowienie we WLOTIE TAŚMY.
Naciskaj PRZYCISK FWD w sposób ciągły przez kilka sekund i
pomóż ustawić taśmę w TAPE INLET.
Po załadowaniu taśmy i wyregulowaniu UCHWYTÓW TAŚMY
zamknij PRZYTRZYMAJ JEDNOSTKĘ ROLKĄ.
Naciśnij PRZYCISK START.
Usuń pierwszy kawałek taśmy i wyrzuć go
Po wyjęciu rolki taśmy z urządzenia pociągnij taśmę do tyłu i
naciśnij PRZYCISK REV .
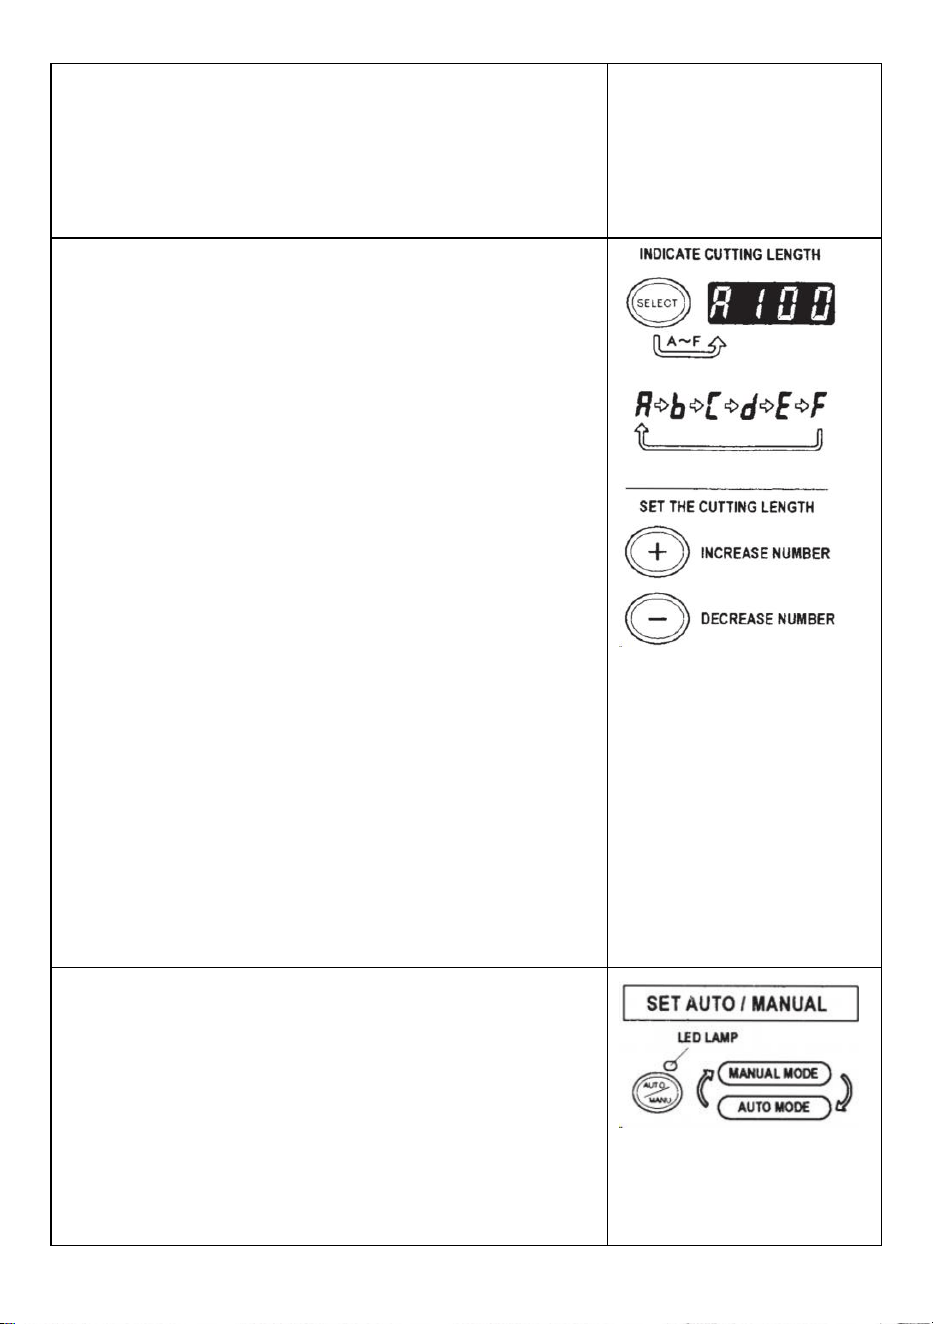
- 8 -
NOTATKA:
Do usuwania taśmy zawsze używaj pęsety .
Za każdym razem, gdy ustawiasz taśmę, upewnij się, że
Samoprzylepna strona taśmy jest zawsze skierowana w dół .
Ustaw długość taśmy
Upewnij się, że WYŚWIETLACZ wskazuje <długość cięcia>
Długość cięcia jest zawsze podana w niektórych alfabetach, np.
A, b, C, d, E, F
Ustaw długość cięcia.
Ustaw potrzebną długość za pomocą przycisku +/-.
Długość cięcia można regulować w zakresie od 5 mm do 999
mm.
Za pomocą PRZYCISKA WYBORU można ustawić sześć
różnych długości .
Krótkie naciśnięcie przycisku +/- powoduje zmianę długości na 1
mm.
A jeśli naciśniesz dłużej PRZYCISK +/-, wyświetli się szybkie
przewijanie do przodu .
Ostrożność
Rzeczywista długość różni się od długości wyświetlanej w
zależności od typu taśmy i jej stanu.
Podczas cięcia krótkiej taśmy długość może nie być
równomiernie przycinana lub taśma się zacięła.
Wypróbuj kilka cięć testowych, aby upewnić się, że działa
prawidłowo.
Ustawienie trybu
1.Tryb ręczny
Upewnij się, że niebieska LAMPA LED jest wyłączona.
Gdy LAMPA LED miga lub jest włączona, naciśnij przycisk
AUTO/MANUAL MODE i wyłącz LAMPĘ LED
Naciśnij jeden raz PRZYCISK START, maszyna poda kawałek
taśmy następnie wytnij go na podstawie ustawionej długości.
Aby wyciąć kolejny kawałek, naciśnij ponownie PRZYCISK

- 9 -
START.
2.Tryb automatyczny
Upewnij się, że LAMPA LED miga.
lampka LED jest wyłączona, naciśnij PRZYCISK
AUTO/RĘCZNY i pozwól, aby LAMPA LED migała .
Naciśnij jeden raz PRZYCISK START, maszyna poda kawałek
taśmy następnie wytnij go na podstawie ustawionej długości.
Po usunięciu tego kawałka taśmy maszyna poda następny
kawałek, a następnie go wytnij.
Maszyna poda i odetnie nowy kawałek taśmy po jej usunięciu
taśma jest usuwana .
Tryb P (tryb wstępnie ustawiony)
Maszynę można zaprogramować. Zostanie wyświetlony sygnał w
oparciu o wybraną przez Ciebie liczbę sztuk i wszystko będzie
gotowe wycięte.(Maksymalnie 999 sztuk.)
Po zakończeniu programu rozlegnie się sygnał dźwiękowy.
Można używać trybu MANUAL lub AUTO
Naciśnij PRZYCISK WYBORU, aby wybrać potrzebną długość .
Naciśnij PRZYCISK WYBORU na trzy sekundy, po czym
wyświetli się „Lcon”
Naciśnij ponownie PRZYCISK WYBORU, wyświetli się „p”.
Użyj PRZYCISKÓW +/- i ustaw potrzebną ilość .
Wybierz opcję AUTO lub RĘCZNY za pomocą przycisku
AUTO/RĘCZNY.
Po naciśnięciu przycisku START maszyna będzie podawać i
wycinać kawałek taśmy do celów testowych
wyjęciu podać kawałek taśmy .
Aby obsługiwać maszynę w TRYBIE AUTO, maszyna będzie
podawać: kawałek taśmy automatycznie.
Przy podaniu kolejnego kawałka taśmy sygnał pokazuje cyfry
odwrotnie
Gdy WYŚWIETLACZ wskaże „0”, rozlegnie się sygnał
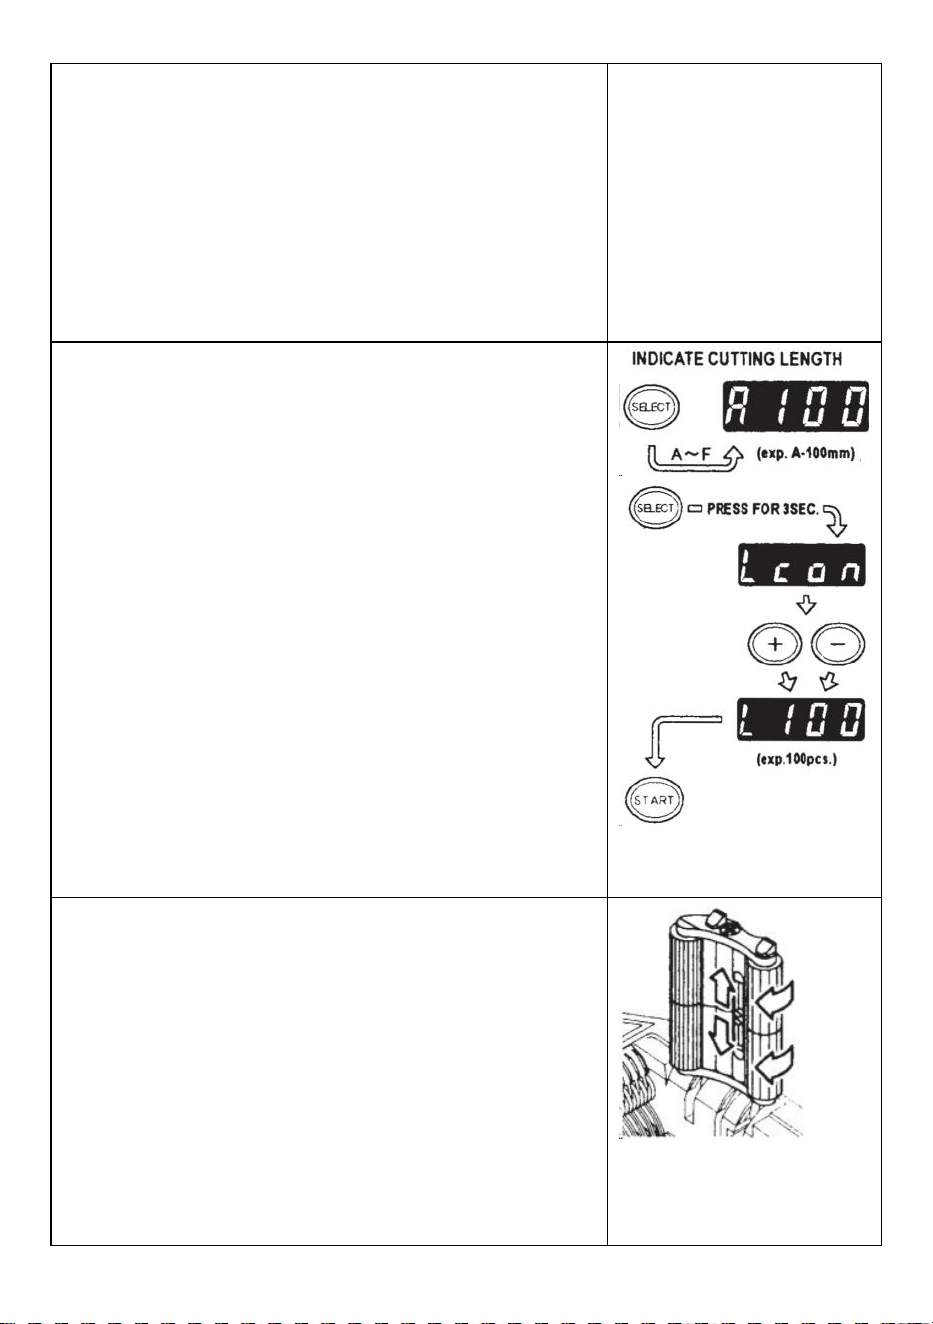
- 10 -
dźwiękowy .
WYŚWIETLACZ wskazuje liczbę wstępnie ustawionych sztuk .
Proszę poczekać, aż brzęczyk przestanie działać.
Jeśli wyjmiesz taśmę zanim ucichnie brzęczyk, LAMPA LED
zacznie migać więc musisz ponownie nacisnąć PRZEŁĄCZNIK
START.
Jeśli spróbujesz zmienić tryb (AUTO/RĘCZNY), gdy maszyna
pracuje wystarczy nacisnąć przycisk AUTO/RĘCZNY.
Tryb L (tryb pętli)
Można ustawić ilość sztuk, które zostaną wycięte. (Maksymalnie
999 sztuk) Następnie maszyna wytnie elementy w oparciu o
wybrane przez Ciebie ilości przestanie .
Naciśnij PRZYCISK WYBORU i wybierz długość taśmy
Naciśnij i przytrzymaj PRZYCISK WYBORU, aż na
WYŚWIETLACZU pojawi się „Lcon”
Za pomocą PRZYCISKÓW +/- ustaw liczbę sztuk do wycięcia
Po naciśnięciu przycisku START WYŚWIETLACZ wskazuje
sygnał , który się wyświetla numery wstecz i cięcia w sposób
ciągły.
Gdy WYŚWIETLACZ wskaże „0”, rozlegnie się sygnał
dźwiękowy, a następnie rozlegnie się sygnał dźwiękowy maszyna
jest zatrzymana.
Aby zatrzymać maszynę pracującą w trybie L-MODE, naciśnij
PRZYCISK START.
Jak zarządzać zwijającą się taśmą
Naciśnij PRZYCISK ZWOLNIENIA ROLKI PRZYTRZYMAJĄCEJ,
aby otworzyć ZESPÓŁ ROLKI PRZYTRZYMAJĄCEJ
Wysuń DŹWIGnię BLOKUJĄCĄ ROLKĘ tak, aby rolka się nie
obracała.
Zamknij ZESPÓŁ ROLKI PRZYTRZYMAJĄCEJ
Przy zablokowanych rolkach naprężenie może powodować
zmianę długości .
Wytnij kilka próbek testowych, aby w razie potrzeby dopasować
długość.

- 11 -
Użyj wąskiej taśmy/użyj dwóch rolek jednocześnie
Jeśli szerokość taśmy jest mniejsza niż 15 mm lub chcesz dozować
dwie rolki jednocześnie, użyj SEPARATORA .
Odetnij taśmę o szerokości mniejszej niż 10 mm, nałóż PŁYTĘ
PROWADZĄCĄ na SEPARATOR
Usuń SEPARATOR z dolnej części korpusu
Otwórz ZESPÓŁ ROLKI PRZYTRZYMAJĄCEJ
Włóż SEPARATOR do korpusu, wcinając się w dno wnęki
Jeśli przetniesz taśmę na mniej niż 10 mm, nałóż PŁYTĘ
PROWADZĄCĄ na separator.
Umieść jedną rolkę taśmy po obu stronach, wkładając
SEPARATOR do ładowania taśmy
Aby przytrzymać taśmę poprzez regulację UCHWYTÓW TAŚMY,
nie ma potrzeby przesuwania SEPARATORA z pozycji
jednoczesnego wydawania dwóch rolek taśm konieczne jest ich
podanie obie jego długości s w tym samym czasie
Usuń pierwszy kawałek taśmy
Po usunięciu drugiego kawałka taśmy wydawane są również obie
strony taśmy .
Inne funkcje
TAŚMA ELASTYCZNA WSPARCIE
Kiedy przetniesz taśmę dłuższą lub wytnij nieprzylepną taśmę/folię,
użyj ELASTYCZNEGO PODPORA TAŚMY aby uniknąć taśmy
spadanie w dół .
STANOWISKO POMOCY
Na podstawie materiału taśmy lub przedmiot obrabiany , użyj
PODSTAWA WSPOMAGAJĄCA do przesuwania korpusu maszyny
w stronę niższego poziomu.
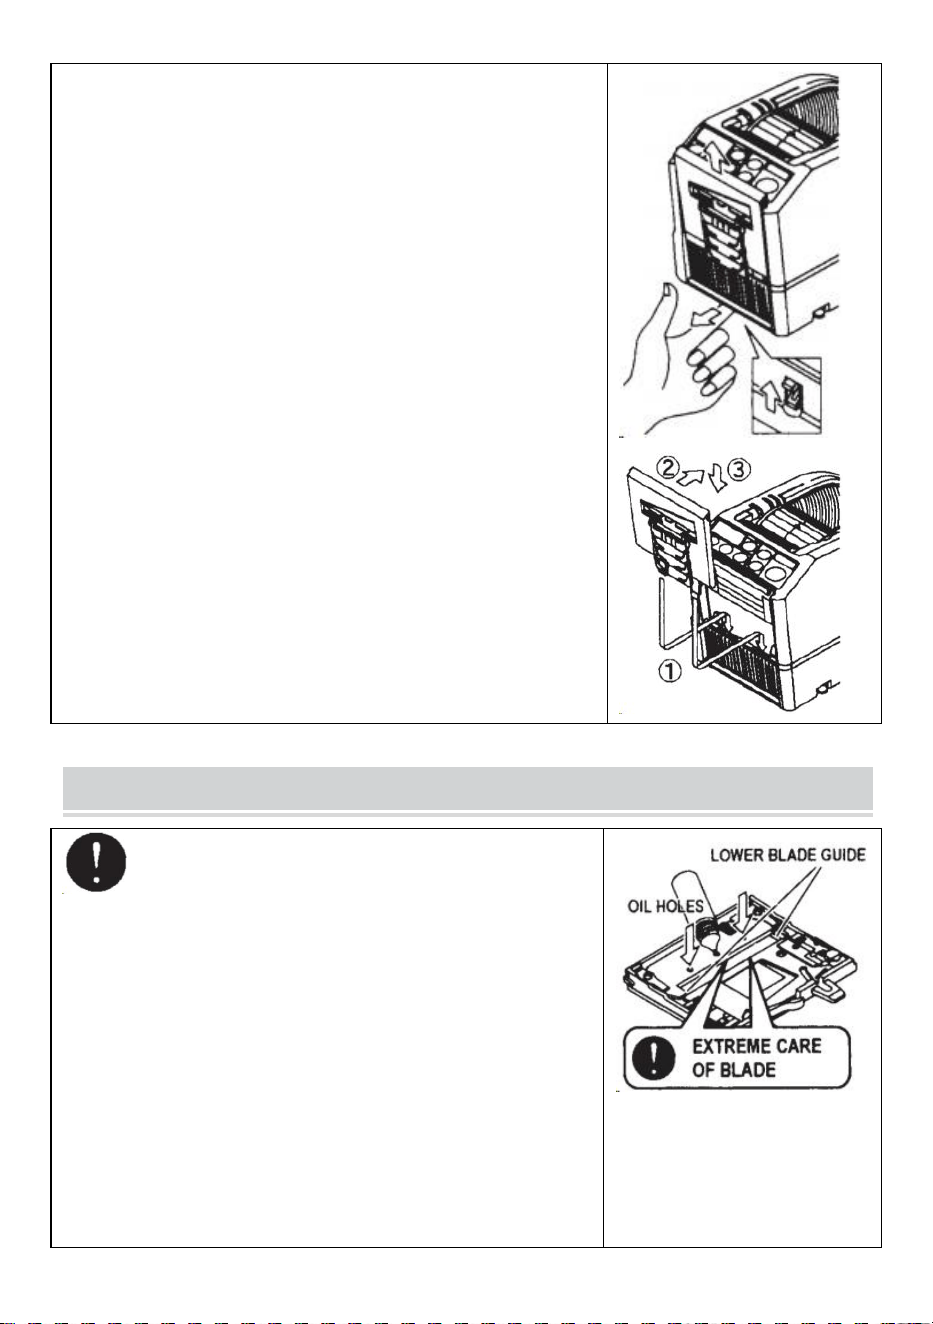
- 12 -
Wymień moduł ostrzy
Tylko ostrze nie podlega wymianie.
Należy to zmienić wraz z całym zespołem ostrzy.
Wyłącz PRZEŁĄCZNIK ZASILANIA.
Zdejmij ZESPÓŁ OSTRZY, zwalniając DŹWIGnię Zwalniającą 8
JEDNOSTKI ŁADOWANIA
Zamontuj nowy MODUŁ OSTRZY w korpusie .
Mocno dociśnij obudowę, aż zostanie zablokowana .
Upewnij się, że dolne ostrze jest prawidłowo ustawione, odwróć
BLADEUNIT i przyjrzyj się dolnej krawędzi dolnego ostrza.
MAINTENANCE
Za każdym razem, gdy czyścisz lub wymieniasz
ZESPÓŁ OSTRZY, nie dotykaj ostrej krawędzi ostrza.
Wyczyść moduł ostrzy
Podczas cięcia taśm z mocnym klejem pozostałości stopniowo
pozostaną na ostrzu.
Do czyszczenia należy wyjąć ZESPÓŁ OSTRZY
Wyłącz PRZEŁĄCZNIK ZASILANIA.
Wyjmij ZESPÓŁ OSTRZA, zwalniając DŹWIGNIE
ZWALNIAJĄCĄ ZESPÓŁ OSTRZA.
Nałóż odrobinę alkoholu na czystą, suchą szmatkę lub użyj
wacika, aby usunąć pozostałości
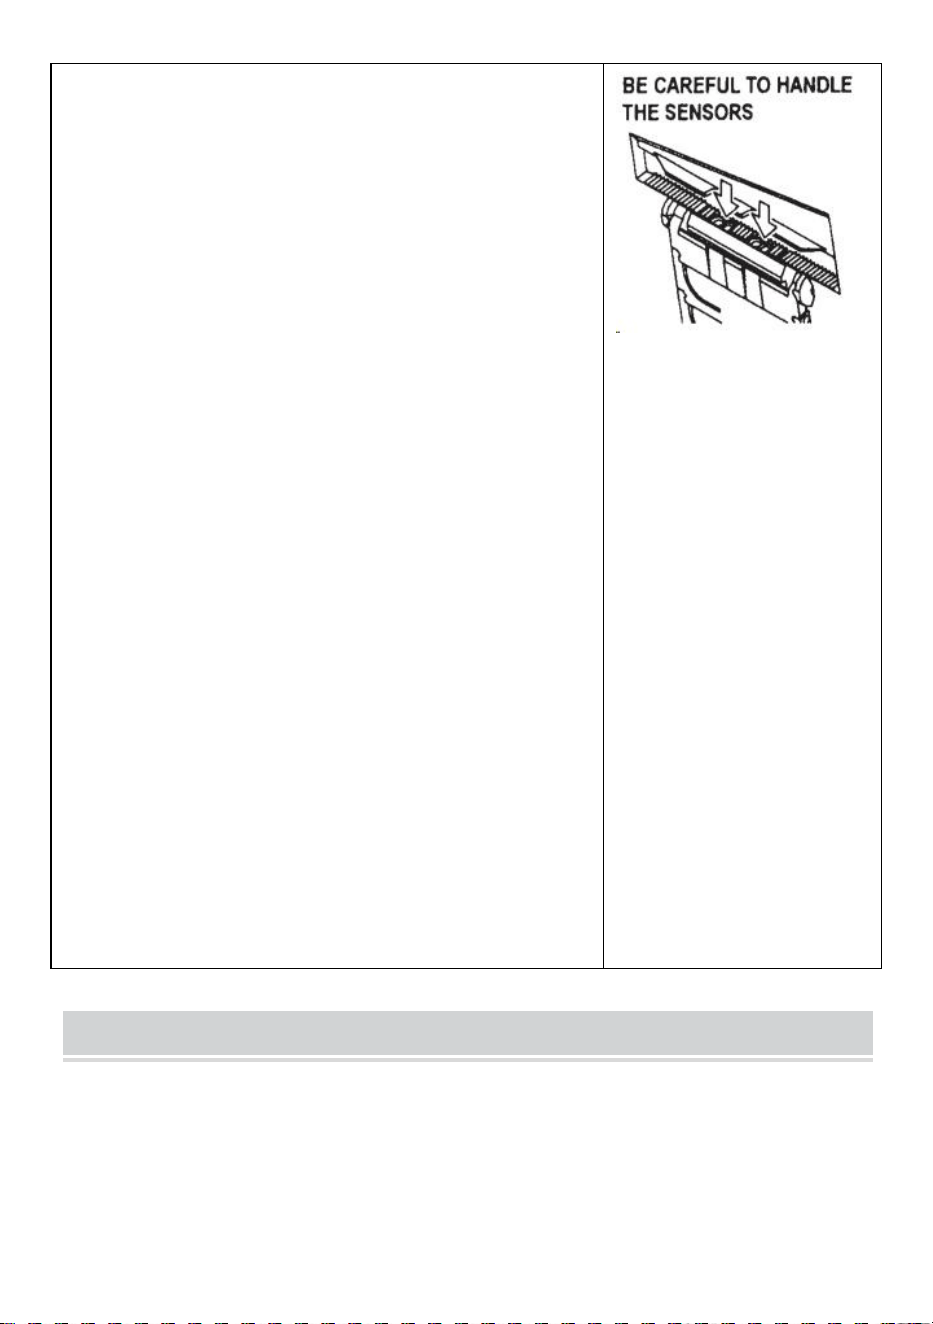
- 13 -
Wymień ZESPÓŁ OSTRZY.
Nasmaruj ostrze
Nasmaruj ostrze, aby zapobiec przyklejaniu się pozostałości
do ostrza.
Wyłącz PRZEŁĄCZNIK ZASILANIA
Wyjmij ZESPÓŁ OSTRZY z korpusu.
Zlokalizuj trzy otwory olejowe z tyłu górnego ostrza.
Wpuść jedną kroplę OLEJU DO OSTRZY do każdego otworu.
Nasmaruj także DOLNĄ PROWADNICĘ OSTRZY.
Nie smaruj wielokrotnie.
Wytrzyj pozostały olej bawełnianą szmatką.
Włóż ZESPÓŁ OSTRZY do korpusu.
Włącz PRZEŁĄCZNIK ZASILANIA.
Wykonaj kilka próbnych cięć, aby upewnić się, że taśma nie
spadnie z TAŚMY WYLOT.
Wyczyść czujniki
Poniżej WYJŚCIA TAŚMY znajdują się dwie pary CZUJNIKÓW.
Jeśli otwór jest zakryty resztkami taśmy lub zanieczyszczeniami,
CZUJNIKI nie wykrywa obecności taśmy .
Zawsze utrzymuj czystość wokół CZUJNIKÓW.
Aby chronić CZUJNIK, po wyjęciu MODUŁU OSTRZY należy
dokładnie oczyścić otwory.
Oczyść Ciało
Na wilgotną szmatkę nałóż neutralny detergent i wyczyść
obudowę . Do czyszczenia części plastikowych nie używaj alkoholu
ani rozpuszczalników.
Error Messages
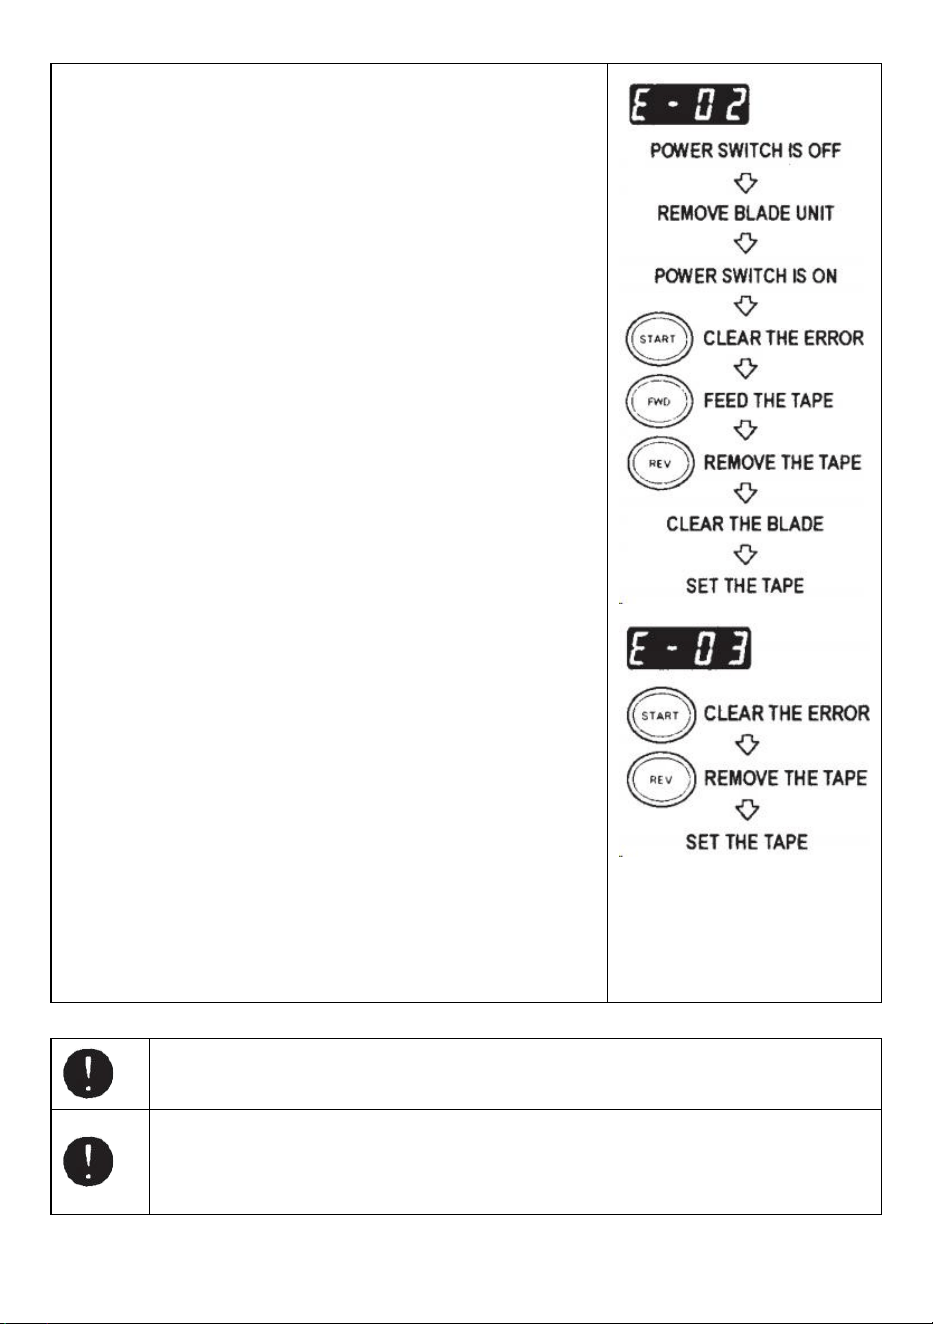
- 14 -
Rozlegnie się sygnał dźwiękowy, po czym komunikat zacznie migać
i pojawi się na WYŚWIETLACZU.
E-02 Ostrze jest w niewłaściwym położeniu
Sygnał wskazuje, że ostrze nie jest dobrze zamontowane lub
maszyna zatrzymuje się ze względu na grubość lub twardość
taśmy.
Wyłącz PRZEŁĄCZNIK ZASILANIA .
Zdemontuj ZESPÓŁ OSTRZY, zwalniając DŹWIGNIE
Zwalniające ZESPÓŁ OSTRZY, a następnie wyjmij zespół z
korpusu.
PRZEŁĄCZNIK ZASILANIA .
Naciśnij PRZYCISK FWD i wprowadź taśmę jeden raz, przetnij
taśmę nożyczkami pomiędzy WYJŚCIEM TAŚMY a
MODUŁEM OSTRZY .
Naciśnij PRZYCISK REV, aby usunąć taśmę
Wyczyść ZESPÓŁ OSTRZY i nasmaruj DOLNĄ PROWADNICĘ
OSTRZY.
Sprawdź położenie dolnego ostrza i wymień ZESPÓŁ OSTRZY.
E-03 Silnik jest zatrzymany
Wskazuje, że silnik został zatrzymany z powodu przeciążenia.
Naciśnij PRZYCISK START, aby usunąć komunikat o błędzie.
Naciśnij PRZYCISK REV, aby usunąć taśmę.
PRZEŁĄCZNIK ZASILANIA .
Sprawdź dokładnie MODUŁ OSTRZY i WYLOT TAŚMY.
Wyczyść i usuń resztki taśmy lub lepkie pozostałości za pomocą
pęsety
Nie dotykaj ostrza podczas poprawiania błędu, gdy PRZEŁĄCZNIK ZASILANIA jest
włączony.
Wyłącz PRZEŁĄCZNIK ZASILANIA i przestań używać urządzenia.
Jeżeli po naprawieniu błędu urządzenie nie może normalnie pracować.
Wygląda na to, że nic nie jest nie tak bez komunikatów o błędach.
- 15 -
Nie używaj taśmy, jeśli elektryczność statyczna generuje napięcie powyżej 1000 V.
Może to spowodować awarię maszyny.
TROUBLESHOOTING
Problem
Możliwa przyczyna
Możliwe rozwiązanie
POWER SMTCH jest
świeci, ale maszyna
nie może działać.
PRZEWÓD AC jest
poluzowany .
BEZPIECZNIK został
przepalony.
Następnie sprawdź KABEL AC podłącz
dobrze do gniazdka l .
Wymienić BEZPIECZNIK .
Mimo to natychmiast przestań używać
urządzenia BEZPIECZNIK przepala się
ponownie po wymianie .
Po usunięciu kawałka
taśmy, następny
kawałek nie jest
podawany w trybie
AUTO tryb.
Tryb jest ustawiony na
RĘCZNY.
Niektóre śmieci pokrywają
CZUJNIKI .
Taśma nie może przejść
przez CZUJNIKI .
Taśma ma wyjątkowo niski
poziom odbicie.
Ustaw tryb na AUTO .
Usuń gruz.
Użyj SEPARATORA, aby zawęzić taśmę
mniej niż 15mm .
Nie zbliżaj się do silnych źródeł światła
CZUJNIKI .
Niektórych typów taśm nie można używać w
trybie AUTO tryb.
OSTRZE nie może
się poruszać płynnie.
JEDNOSTKA OSTRZY nie
jest w odpowiednim
położeniu pozycja.
Sprawdź ZESPÓŁ OSTRZY i naciśnij na
mocno osadzić.
Długość taśmy
wynosi różni się od
ustawionej długości .
Klej taśmy jest zbyt mocny.
Elastyczność taśmy jest
zbyt duża.
Skoryguj ustawienie po wycięciu kilku próbek
testowych
Taśma nadmiernie się
zwija.
Maszyna nie jest
uziemiona. ROLLER
LOCK jest wyłączony
Sprawdź masę na przewodzie.
Włączyć ROLLER LOCK, aby zastosować
napięcie.

- 16 -
Ten produkt podlega przepisom Dyrektywy Europejskiej 2012/19/EC.
Symbol przekreślonego kosza na śmieci oznacza, że produkt wymaga
selektywnej zbiórki śmieci na terenie Unii Europejskiej. Dotyczy to produktu i
wszystkich akcesoriów oznaczonych tym symbolem. Produktów
oznaczonych jako takie nie można wyrzucać razem ze zwykłymi odpadami
domowymi, lecz należy je oddać do punktu zbiórki w celu recyklingu urządze
ń elektrycznych i elektronicznych.
Jeśli maszyna w dalszym ciągu nie działa prawidłowo, przestań jej używać
natychmiast i skontaktuj się ze sprzedawcą w celu uzyskania autoryzacji naprawy.
Gwarancja
Gwarantujemy pierwotnemu nabywcy produktu, że będzie on wolny od wad materiałowych i
wykonawczych tak długo, jak oryginał kupujący jest właścicielem produktu pod warunkiem normalnego
i prawidłowego zużycia stosowanie.
Części zamienne, takie jak ostrza tnące i rolki, nie są objęte gwarancją w okresie gwarancyjnym,
ponieważ są one uważane za „części eksploatacyjne”. Niniejsza gwarancja obowiązuje tylko wtedy,
gdy produkt:
Nie uległy zniszczeniu podczas montażu.
Urządzenie było obsługiwane zgodnie ze specyfikacjami produktu , instrukcjami i wszelkimi
wskazówkami dotyczącymi pomocy technicznej.
Nie został zmodyfikowany ani uszkodzony w wyniku odpuszczania, błędu użytkownika,
wypadku.katastrofy, nadużycia, niewłaściwego użycia, zasilania, zastosowania zasilania, zmiany,
naprawy, modyfikacji, naprawy lub wymiany przez kogoś inny niż produkt oryginalny.

Producent: Shanghaimuxinmuyeyouxiangongsi
Adres: Baoshanqu Shuangchenglu 803long 11hao 1602A-1609shi Szanghaj
Przedstawiciel WE: SHUNSHUN GmbH .
Römeräcker 9 Z2021,76351 Linkenheim-Hochstetten, Niemcy
REPUBLIKA WIELKIEJ BRYTANII: Pooledas Group Ltd.
Jednostka 5 Albert Edward House, The Pavilions Preston, Wielka Brytania
Tel: 01[email protected]
Import do AUS: SIHAO PTY LTD.
1 ROKEVA STREETEASTWOOD NSW 2122 Australia
Import do USA: Sanven Technology Ltd.
Apartament 250, 9166 Anaheim Place, Rancho Cucamonga, Kalifornia 91730
Wyprodukowano w Chinach
Techniczny Certyfikat wsparcia i e-gwarancji
www.vevor.com/support

Technische ondersteuning en e-garantiecertificaat
www.vevor.com/support
GEBRUIKERSHANDLEIDING TAPEDISPENSER
MODEL: AT-60
We continue to be committed to provide you tools with competitive price.
"Save Half", "Half Price" or any other similar expressions used by us only represents an
estimate of savings you might benefit from buying certain tools with us compared to the major
top brands and does not necessarily mean to cover all categories of tools offered by us. You
are kindly reminded to verify carefully when you are placing an order with us if you are
actually saving half in comparison with the top major brands.

- 1 -
MODEL: AT-60
Have product questions? Need technical support? Please feel free to
contact us:
Technical Support and E-Warranty Certificate
www.vevor.com/support
NEED HELP? CONTACT US!
This is the original instruction, please read all manual instructions
carefully before operating. VEVOR reserves a clear interpretation of our
user manual. The appearance of the product shall be subject to the
product you received. Please forgive us that we won't inform you again if
there are any technology or software updates on our product.
Tape Dispenser
- 2 -
13. Lees zorgvuldig alle MONTAGE- EN BEDIENINGSINSTRUCTIES
voordat u ermee aan de slag gaat.
14. Het niet naleven van de veiligheidsregels en andere elementaire
veiligheidsmaatregelen kan leiden tot ernstig persoonlijk letsel.
GENERAL SAFETY RULES
De veiligheidsrichtlijnen in deze gebruiksaanwijzing moeten in acht worden
genomen om schade aan de machine of letsel bij de bediener of andere personen
voorgeschreven veiligheidsrichtlijnen "Waarschuwing" en " Let op " beschrijven
mogelijk letsel of schade die kan worden geleden door het bedienen of het
onderhouden van de machine op een andere wijze dan hierin beschreven
handleiding.
Lees en volg de veiligheidsmaatregelen zorgvuldig voordat u de Handleiding.
Waarschuwing _ _
Geeft een mogelijk gevaarlijke situatie aan , als dit niet het geval is vermeden, kon
resulteren in de dood of ernstig letsel.
Voorzichtigheid
Geef aan dat verkeerd gebruik tot gevaar kan leiden dat de bediener of de
machine risico loopt op letsel met risico op schade.
Geeft voorzichtigheid aan
Een symbool in de driehoek, of de beschrijving, geeft dit aan een specifiek gevaar
Een verboden actie
Een symbool binnen de cirkel, of de beschrijving, geeft dit aan verboden actie.
Een vereiste actie
Een symbool binnen de cirkel, of de beschrijving, geeft dit aan de vereiste actie.
Sluit de stekker niet aan, trek de stekker niet uit het stopcontact en gebruik
de machine niet als deze nat is Als u dit niet in acht neemt, kan dit leiden tot letsel
- 3 -
als gevolg van een elektrische schok.
Steek nooit uw vinger, een ander lichaamsdeel of een ander vreemd
voorwerp erin voorwerp in de machine terechtkomen. Als u dit niet in acht neemt,
kan dit tot letsel leiden.
Houd haar en losse kleding uit de buurt van de machine terwijl deze in
werking is operationeel.
Als u dit niet in acht neemt, kan dit tot letsel leiden
Deze machine is uitsluitend bedoeld voor industrieel gebruik . Laat
ongetrainde operators of kinderen de machine niet bedienen. Als u dit niet in acht
neemt, kan dit tot letsel leiden .
Schakel de stroomschakelaar uit en koppel de machine los voordat u deze
vervangt het verwijderen van de messeneenheid of het uitvoeren van enig
onderhoud aan de machine. Als u dit niet in acht neemt, kan dit leiden tot ernstig
letsel
Gebruik deze machine niet voor iets anders dan aangegeven toepassingen
Gebruik van de machine voor onbedoelde toepassingen kan letsel veroorzaken
aan de bediener of het falen van de machine.
BEWAAR DEZE INSTRUCTIES
MODEL AND PARAMETERS
Model
AT-60
Bandbreedte
6-60 mm
Lengte van de tape
5-999 mm
Buiten Dia. van Rol
20~300mm

- 4 -
Lichaams materiaal
Antistatisch ABS
Waarderingen)
AC100V-240V 50-60Hz
Vermogen (max.)
24,6 W
STRUCTURE DIAGRAM

- 5 -

- 6 -

- 7 -
OPERATING INSTRUCTIONS
Laad de tape
Sluit het AC CORD aan op de AC CORD INLET .
Zorg ervoor dat de AAN/UIT-SCHAKELAAR is uitgeschakeld en
sluit deze vervolgens aan op een geschikt stopcontact geaard
stopcontact .
Zet de AAN/UIT- SCHAKELAAR aan.
Wanneer de POWER SWITCH is ingeschakeld, klinkt er een
zoemer .
Op dit moment is de modus ingesteld op MANUAL
Druk op de ROLLERONTLADINGKNOP HOUDEN
Plaats een rol tape in de machine
Houd de tape vast door de TAPE-HOUDERS te verstellen
Stel de TAPEHOUDERS af op de juiste breedte, schuif de
TAPEHOUDERAANPASSINGSHENDEL van de voorkant naar de
achterkant van de machine en sluit deze vervolgens.
De TAPEHOUDERS moeten de rol lichtjes in het midden van de
holte houden van de machine
Dit is erg belangrijk omdat het de tape in het midden houdt.
De tape gaat over de SENSOR vóór de BLADE UNIT.
Om een grotere rol tape te ondersteunen, trekt u de ONDERSTE
HOUDER naar buiten
Plaats de tape op de TAPE FEED ROLLER
Druk op de FWD-KNOP totdat de band uit de TAPE OUTLET
komt!
Wanneer u sterk plakband gebruikt, trekt u een klein stukje tape
naar binnen plaatsing in de TAPE INLET.
Houd de FWD-KNOP een paar seconden lang ingedrukt en help de
band in de TAPE INLET te positioneren.
Nadat de tape is geplaatst en de TAPE-HOUDERS zijn afgesteld,
sluit u de HOUD DE ROLLEREENHEID NEER.
Druk op de STARTKNOP.
Verwijder het eerste stuk tape en gooi het weg
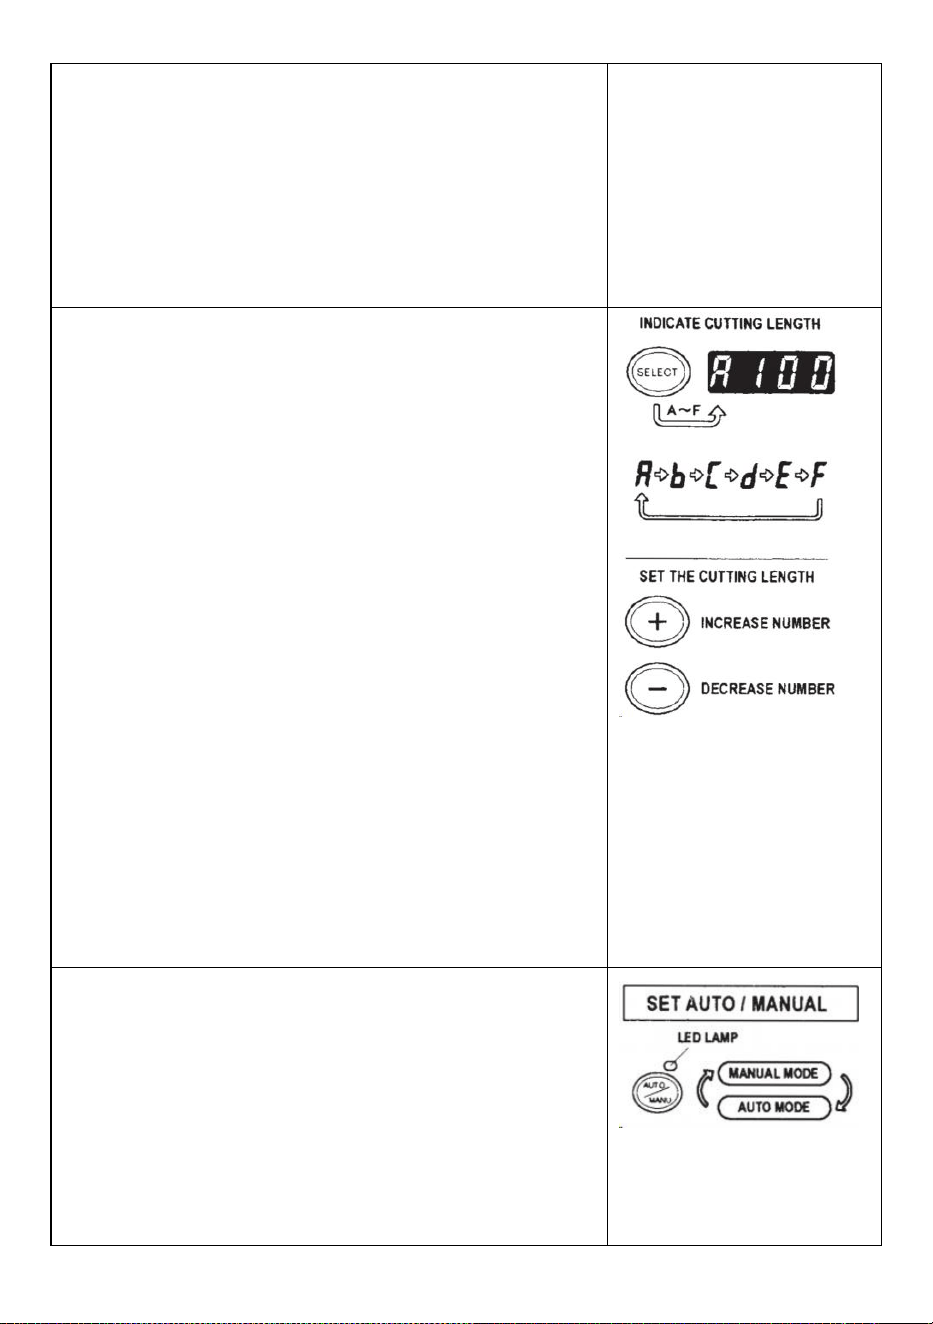
- 8 -
Wanneer u de rol tape uit de machine haalt, trekt u aan de tape
achteruit en druk op de REV-KNOP .
OPMERKING:
Gebruik altijd een pincet om tape te verwijderen .
Wanneer u de band plaatst, zorg er dan voor dat u dat doet De
kleefzijde van de tape is altijd naar beneden gericht .
Stel de bandlengte in
Zorg ervoor dat DISPLAY <snijlengte> aangeeft
De snijlengte wordt altijd aangegeven in bepaalde alfabetten,
zoals A,b,C,d,E,F
Stel de snijlengte in.
Stel de gewenste lengte in met behulp van de +/- KNOP.
De snijlengte is instelbaar tussen 5 mm en 999 mm.
U kunt zes verschillende lengtes instellen met behulp van de
SELECTEERKNOP.
Als u de +/- KNOP kort indrukt , verandert de lengte in 1 mm.
En als u de +/- KNOP langer indrukt, wordt snel vooruitspoelen
weergegeven .
Voorzichtigheid
Afhankelijk van het type wijkt de werkelijke lengte af van de
weergegeven lengte van de tape en de staat ervan.
Bij het afsnijden van korte stukken tape is het mogelijk dat de
lengte niet consistent wordt afgesneden of de tape is vastgelopen.
Probeer verschillende proefsneden om zeker te zijn van een
goede werking.
Modusinstelling
1. Handmatige modus
Zorg ervoor dat de blauwe LED-LAMP uit is.
Wanneer de LED-LAMP knippert of is ingeschakeld, drukt u op
AUTO/MANUAL MODE en schakel de LED-LAMP uit
Druk één keer op de STARTKNOP, de machine voert een stukje
tape in knip het vervolgens uit op basis van de door u
ingestelde lengte.
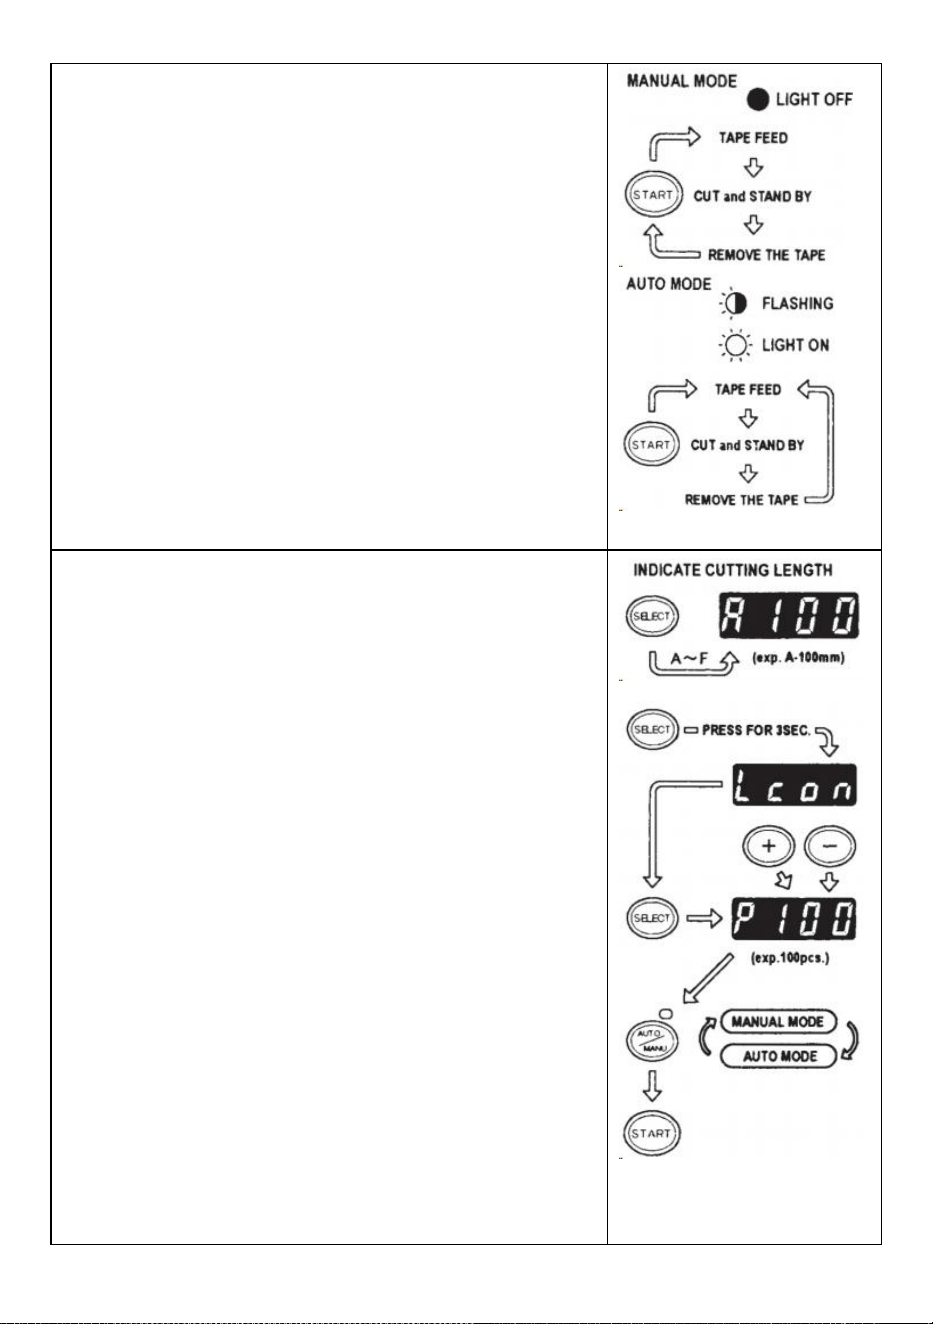
- 9 -
Om nog een stuk te snijden, drukt u nogmaals op de
STARTKNOP.
2. Automatische modus
Zorg ervoor dat de LED-LAMP knippert.
Als de lampjes van de LED-lamp uit zijn, drukt u op de
AUTO/MANUAL-KNOP en laat de LED-LAMP knipperen .
Druk één keer op de STARTKNOP, de machine voert een stukje
tape in knip het vervolgens uit op basis van de door u
ingestelde lengte.
Wanneer dat stuk tape wordt verwijderd, voert de machine een
ander stuk tape in stuk en knip het vervolgens uit.
De machine zal een nieuw stuk tape invoeren en afsnijden zodra
het stuk is verwijderd plakband wordt verwijderd .
P-modus (vooraf ingestelde modus)
De machine kan worden geprogrammeerd. Er wordt een signaal
weergegeven op basis van het door u geselecteerde aantal stuks
en alles gebeurt uitgesneden. (Maximaal 999 stuks.)
Er klinkt een zoemer als het programma is afgelopen.
U kunt de modus MANUAL of AUTO gebruiken
Druk op de SELECTEERKNOP om de gewenste lengte te
kiezen .
Druk drie seconden op de SELECTEERKNOP. Er verschijnt dan
"Lcon”
Druk nogmaals op de SELECTEERKNOP. Er verschijnt dan "p".
Gebruik de +/- KNOP en stel de benodigde hoeveelheid in .
Kies AUTO of MANUAL met behulp van de
AUTO/MANUAL-KNOP.
Wanneer u op de STARTKNOP drukt, zal de machine in- en
uitschakelen een stukje tape voor testdoeleinden
Om de machine te bedienen met behulp van de HANDMATIGE
MODUS, drukt u op de START-KNOP en voert u een stuk tape in
nadat u het eruit hebt gehaald .
Om de machine te bedienen via AUTOMODUS, zal de machine
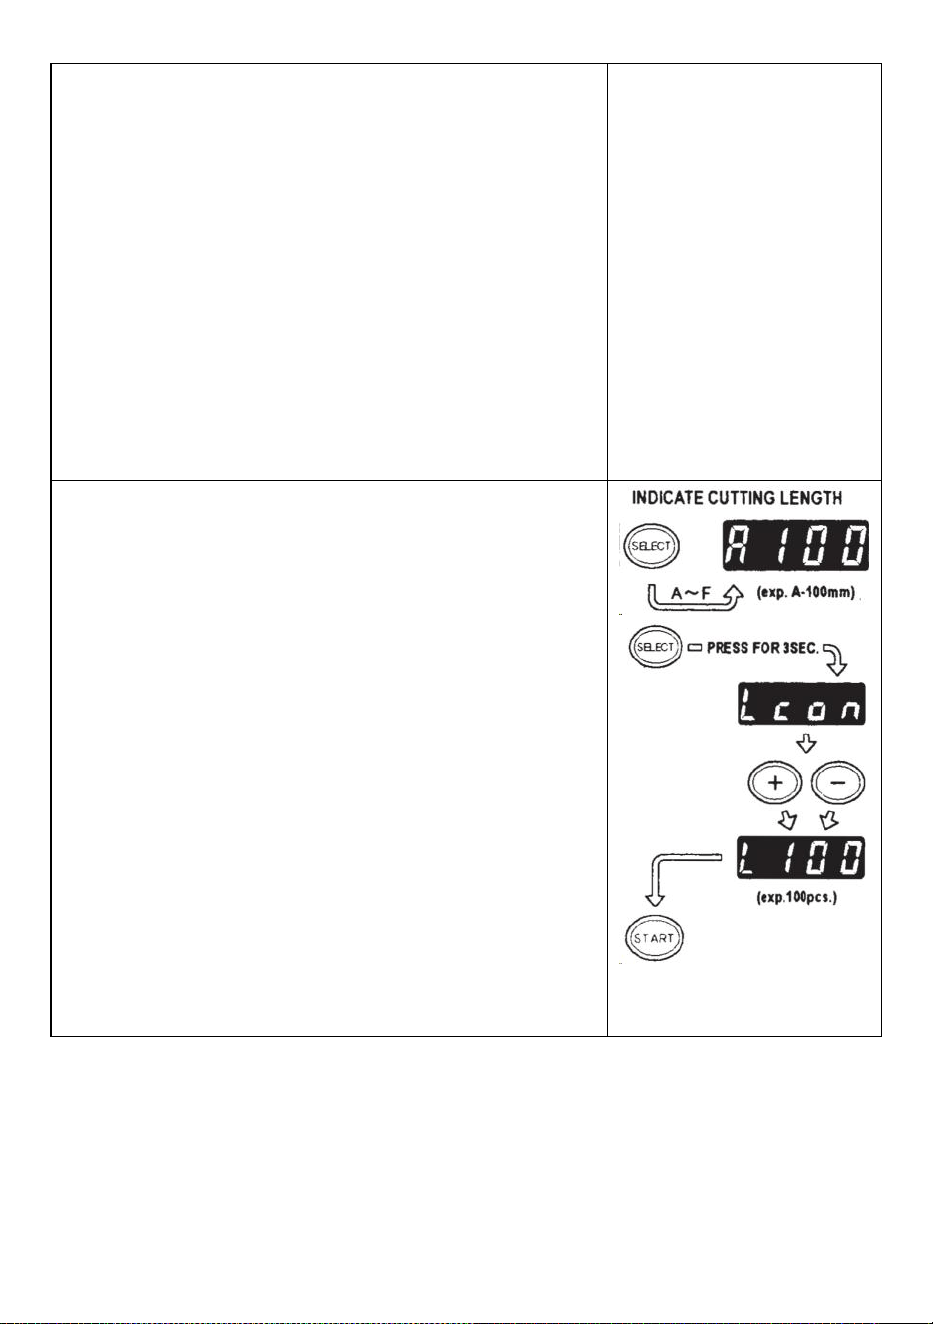
- 10 -
een invoer invoeren stukje tape automatisch.
Het signaal toont cijfers achterstevoren bij het invoeren van een
ander stukje tape
Wanneer het DISPLAY "0" weergeeft, zal de zoemer klinken .
Het DISPLAY geeft het aantal vooraf ingestelde stukken aan .
Wacht tot de zoemer stopt.
Als u de band eruit haalt voordat de zoemer stopt, gaat het LED-
LAMP knipperen u moet dus opnieuw op de STARTSCHAKELAAR
drukken.
Als u de modus (AUTO/MANUAL) probeert te wijzigen terwijl de
machine in werking is druk gewoon op de
AUTO/MANUAL-KNOP.
L-modus (loopmodus)
U kunt vooraf instellen hoeveel stukken er worden uitgesneden.
(Maximaal 999 stuks) De machine zal de stukken uitsnijden op
basis van de door u geselecteerde hoeveelheden en vervolgens
uitsnijden zal stoppen .
Druk op de SELECTEERKNOP en bepaal de lengte van de band
Houd de SELECTEERKNOP ingedrukt zodat het DISPLAY
"Lcon" weergeeft
Stel het aantal uit te snijden stukken in met behulp van de +/-
KNOP
Wanneer u op de STARTKNOP drukt, geeft het DISPLAY een
signaal weer nummers achteruit en continu snijden.
Wanneer het DISPLAY "0" weergeeft, zal de zoemer een geluid
maken, waarna de zoemer klinkt machine is gestopt.
Om de machine te stoppen terwijl deze in L-MODE draait, drukt u
op de STARTKNOP.
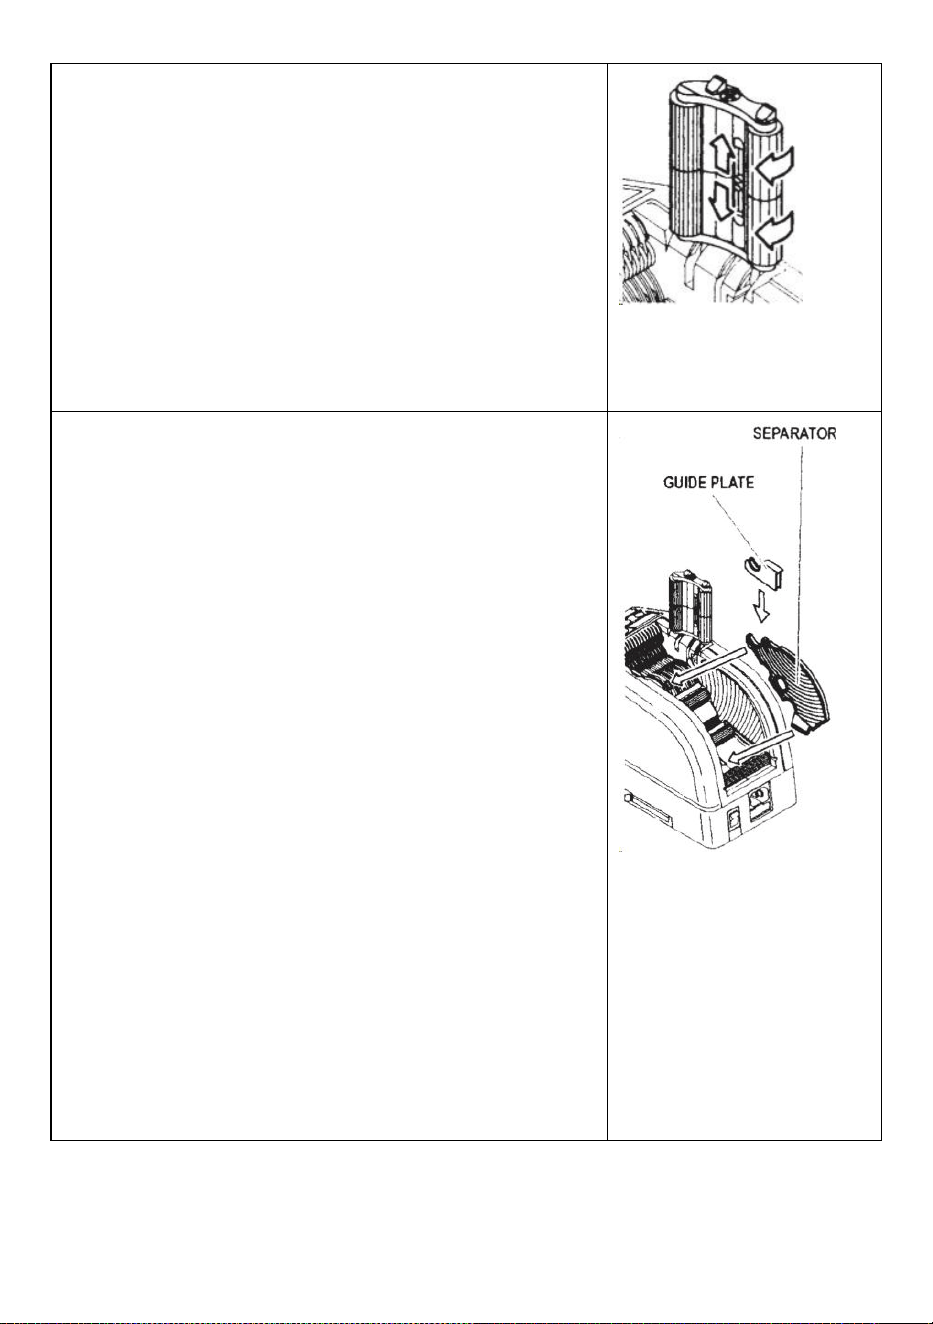
- 11 -
Hoe u een curlingtape beheert
Druk op de HOLD DOWN ROLLER RELEASE-KNOP om de
HOLD DOWN ROLLER-EENHEID te openen
Verleng de ROLLERVERGRENDELINGSHENDEL zodat de wals
niet kan draaien.
Sluit de HOLD DOWN ROLLER-EENHEID
Als de rollen vergrendeld zijn, kan de spanning er voor zorgen dat
de lengte varieert .
Knip meerdere proefstukken uit om indien nodig de lengte aan te
passen.
Gebruik smalle tape/gebruik twee rollen tegelijk
Als de tape minder dan 15 mm breed is of als u twee rollen tegelijk
wilt afgeven, gebruik dan de SEPARATOR .
Knip minder dan 10 mm tape af, plaats de GELEIDERPLAAT op de
SCHEIDER
Verwijder de SCHEIDER van de onderkant van de behuizing
Open de HOLD DOWN ROLLER-EENHEID
Steek de SEPARATOR in het lichaam door deze in de bodem van
de holte te steken
Wanneer u de tape minder dan 10 mm afsnijdt, plaatst u de
GELEIDERPLAAT op de afscheider.
Plaats één rol tape aan weerszijden door een SEPARATOR te
plaatsen voor het plaatsen van tape
Om de tape vast te houden door de TAPE HOUDERS aan te
passen, is het niet nodig om de SEPARATOR uit positie te
duwen
Bij gelijktijdige afgifte van twee rollen tape is invoer noodzakelijk
beide van zijn lengte s tegelijkertijd _
Verwijder het eerste stuk tape
Wanneer het tweede stuk tape wordt verwijderd, worden beide
zijden van de tape ook afgegeven.
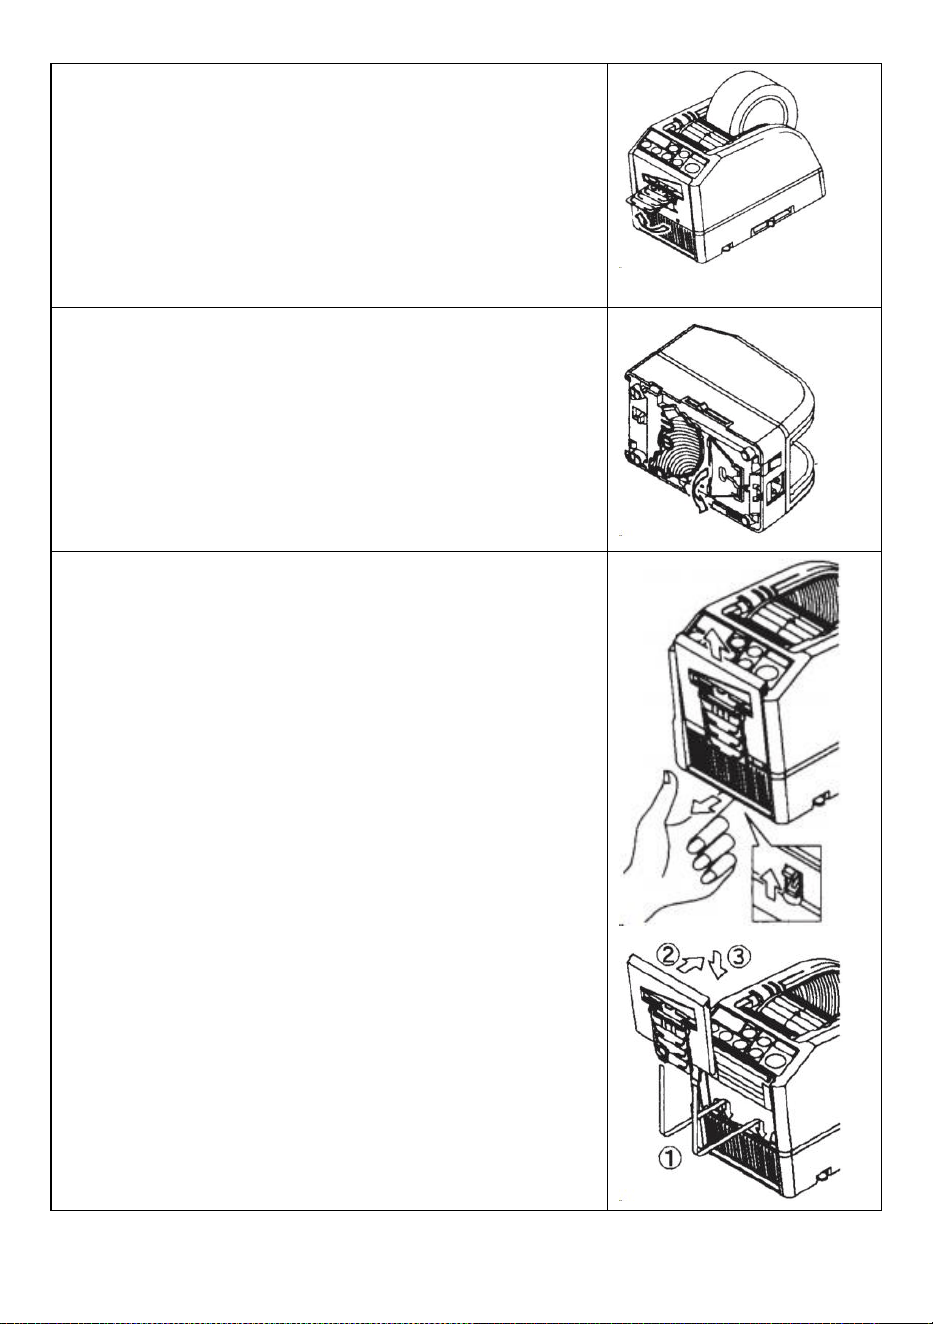
- 12 -
Andere functies
FLEXIBELE BAND STEUN
Wanneer je de tape doorsnijdt langer of snijd niet-klevende tape /
film, gebruik FLEXIBELE TAPE-ONDERSTEUNING om de tape te
vermijden neervallen . _ _
HULP STAND
Gebaseerd op het tapemateriaal of werkstukdoel , gebruik de
ASSIST STAND om de machine te verplaatsen naar een lager
niveau.
Vervang de meseenheid
Alleen Blade mag niet worden vervangen.
Het moet veranderen met de hele Blade Unit.
Zet de AAN/UIT-SCHAKELAAR uit.
Verwijder de BLADE-EENHEID door de
ONTGRENDELINGSHENDEL van de 8LADE-EENHEID los te laten
Installeer de nieuwe BLADE-EENHEID in de behuizing .
Druk de behuizing stevig naar beneden totdat deze vergrendeld is .
Zorg ervoor dat het ondermes goed is gepositioneerd, draai de
BLADEUNIT om en kijk naar de onderkant van het ondermes.
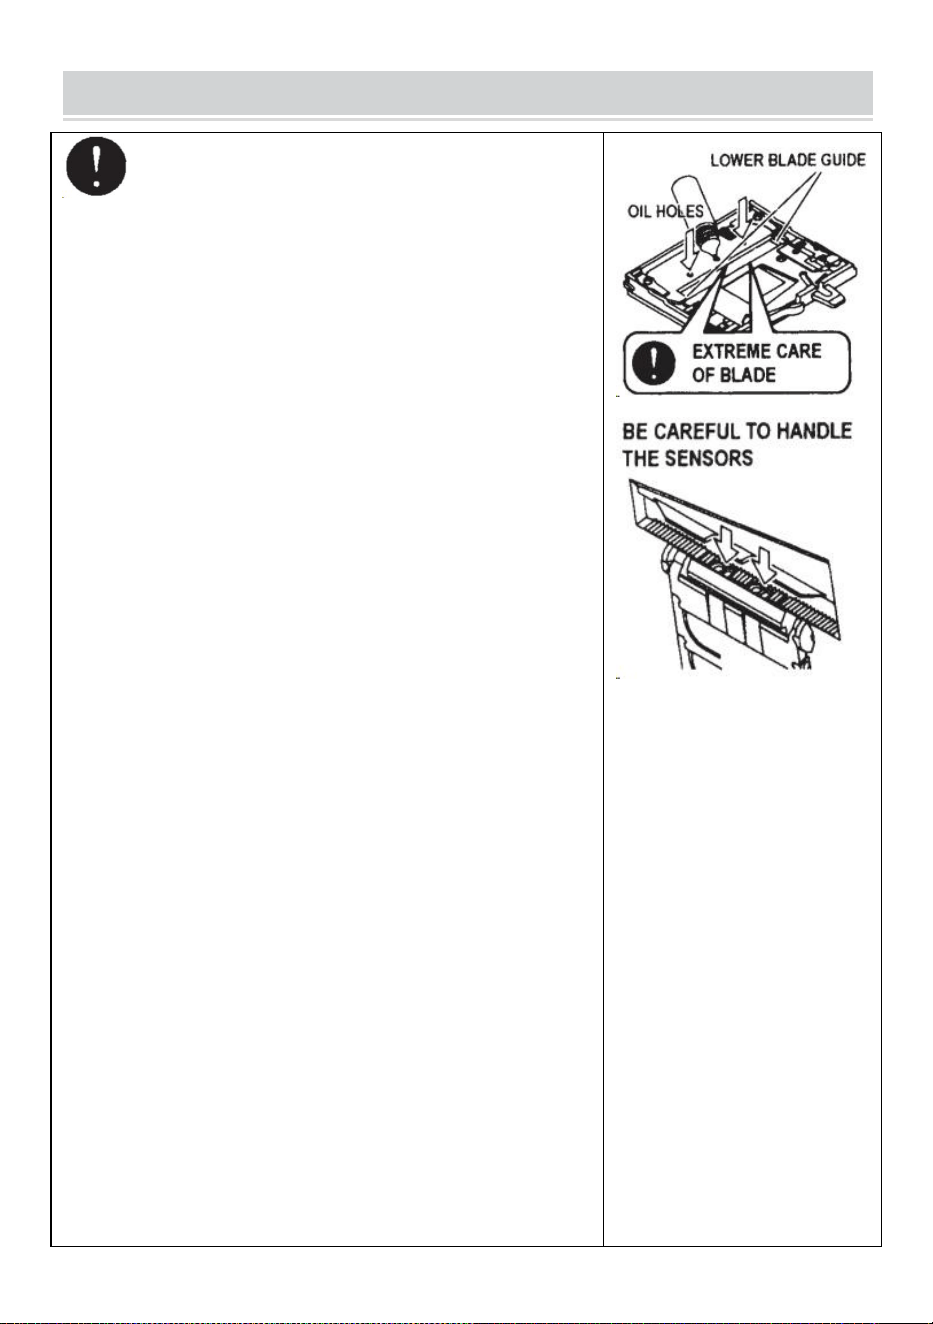
- 13 -
MAINTENANCE
Wanneer u de BLADE-EENHEID reinigt of vervangt,
raak dan de scherpe rand van het mes niet aan.
Reinig de meseenheid
Bij het snijden van tapes met zware lijm zullen de resten
geleidelijk op het mes achterblijven.
Het is noodzakelijk om de MESEENHEID te verwijderen om
deze schoon te maken
Zet de AAN/UIT-SCHAKELAAR uit.
Verwijder de BLADEENHEID door de ONTSLAGHENDEL VAN
DE BLADEENHEID los te laten.
Doe wat alcohol op een schone, droge doek of gebruik een
wattenstaafje om de resten te verwijderen
Vervang de MESEENHEID.
Smeer het mes
Smeer het mes om te voorkomen dat er resten aan het mes
blijven kleven .
Zet de AAN/UIT-SCHAKELAAR uit
Verwijder de BLADE-EENHEID van het lichaam.
Zoek drie oliegaten aan de achterkant van het bovenste mes.
Druppel één druppel BLADE OIL in elk gaatje.
Smeer ook de ONDERSTE MESGELEIDER.
Smeer niet steeds opnieuw.
Veeg de reserveolie weg met een katoenen doek.
Plaats de BLADE-EENHEID terug in het lichaam.
Zet de AAN/UIT-SCHAKELAAR aan.
Maak een aantal testsneden om er zeker van te zijn dat de tape
niet van de TAPE valt UITLAAT.
Maak de sensoren schoon
Er bevinden zich twee paar SENSOREN onder de
TAPE-UITGANG. Als de opening bedekt is met taperesten of vuil,
zullen de SENSOREN de aanwezigheid van tape niet detecteren .

- 14 -
Houd de omgeving van de SENSOREN altijd schoon.
Om de SENSOR te beschermen, reinigt u de openingen zorgvuldig
nadat u de MESEENHEID hebt verwijderd .
Reinig het lichaam
Doe een neutraal schoonmaakmiddel op een vochtige doek om de
behuizing schoon te maken . Gebruik geen alcohol of
oplosmiddelen om de plastic onderdelen schoon te maken.
Error Messages
De zoemer klinkt en er knippert een bericht op het DISPLAY.
E-02 Mes is niet op zijn plaats
Een signaal geeft aan dat het mes niet goed is geïnstalleerd of dat
de machine stopt vanwege de dikte of hardheid van de tape.
Zet de AAN/UIT- SCHAKELAAR uit .
Verwijder de BLADEENHEID door de LOSKOPPELHENDEL VAN
DE BLADEENHEID los te laten en til vervolgens het geheel
uit de behuizing.
Zet de AAN/UIT- SCHAKELAAR aan.
Druk op de FWD-KNOP en voer de tape één keer in. Knip de tape
met een schaar door tussen de TAPE-OUTLET en de
BLADE-EENHEID .
Druk op de REV-KNOP om de tape te verwijderen
Reinig de MESEENHEID en smeer de ONDERSTE
MESGELEIDER.
Controleer de positie van het onderste mes en vervang de
MESEENHEID.
E-03 Motor is gestopt
Geeft aan dat de motor is gestopt vanwege overbelasting.
Druk op de STARTKNOP om de foutmelding te wissen.
Druk op de REV-KNOP om de tape te verwijderen.
Zet de AAN/UIT- SCHAKELAAR uit.
Controleer de BLADE-EENHEID en TAPE-UITGANG zorgvuldig.

- 15 -
Verwijder het overtollige tape-afval of de plakkerige resten met
behulp van een TWEEZERS
Raak het mes niet aan wanneer u een fout corrigeert terwijl de AAN/UIT-SCHAKELAAR is
ingeschakeld.
SCHAKELAAR uit en stop met het gebruik van de machine.
Als de machine niet normaal kan werken nadat de fout is gecorrigeerd.
Het lijkt erop dat er niets aan de hand is zonder foutmeldingen.
Gebruik de tape niet als de statische elektriciteit meer dan 1000 V genereert.
Dit kan storingen in de machine veroorzaken.
TROUBLESHOOTING
Probleem
Mogelijke oorzaak
Mogelijke oplossing
De POWER SMTCH
is ingeschakeld, maar
de machine kan niet
werken.
Het AC-SNOER is
losgemaakt .
De ZEKERING is
doorgebrand.
Controleer vervolgens het AC-snoer steek de
stekker stevig in het stopcontact .
Vervang de ZEKERING .
Stop echter onmiddellijk met het gebruik van
de machine de ZEKERING is na vervanging
opnieuw doorgebrand .
Na het verwijderen
van een stukje tape,
wordt het volgende
stuk niet doorgevoerd
onder AUTO modus.
De modus is ingesteld op
HANDMATIG.
Er zit wat vuil op de bodem
SENSOREN .
De tape kan niet door de
SENSOREN .
De tape heeft extreem lage
reflectie.
Stel de modus in op AUTO .
Verwijder het vuil.
Gebruik SEPARATOR om de tape minder dan
smal te maken 15 mm .
Breng geen sterke lichtbronnen in de buurt
van de lamp SENSOREN .
Sommige soorten tape kunnen mogelijk niet
worden gebruikt onder AUTO modus.
- 16 -
Het MES kan niet
bewegen soepel.
De BLADE UNIT bevindt
zich niet in de juiste staat
positie.
Controleer de MESEENHEID en druk op de
behuizing stevig.
De lengte van de tape
bedraagt afwijkend
van de ingestelde
lengte .
De lijm van tape is te sterk.
De elasticiteit van tape is
te sterk.
Cor re ecteer de instelling na het snijden van
meerdere proefstukken
Tape krult overmatig.
De machine is niet geaard.
De ROLLER LOCK is
uitgeschakeld
Controleer de massa op het snoer.
Schakel het ROLLER LOCK in om spanning
uit te oefenen.
Dit product valt onder de bepalingen van de Europese richtlijn 2012/19/EG.
Het symbool met een doorgestreepte afvalcontainer geeft aan dat het
product in de Europese Unie een aparte afvalinzameling vereist. Dit geldt
voor het product en alle accessoires die met dit symbool zijn gemarkeerd.
Producten die als zodanig zijn gemarkeerd, mogen niet bij het normale
huisvuil worden weggegooid, maar moeten worden ingeleverd bij een
inzamelpunt voor recycling van elektrische en elektronische apparaten.
Als de machine nog steeds niet goed werkt, stop dan met het gebruik van de machine
onmiddellijk en neem contact op met de leverancier voor toestemming voor reparatie.
Garantie
Wij garanderen de oorspronkelijke koper van het product dat het vrij zal zijn van defecten in materiaal
of vakmanschap zolang het origineel de koper is eigenaar van het product, bij normale slijtage gebruik.
De reserveonderdelen zoals snijmessen en rollen vallen niet onder de dekking onder de
garantieperiode omdat ze worden beschouwd als "slijtonderdelen". Deze garantie is alleen geldig als
het product:
Werd niet beschadigd tijdens de installatie.
Werd gebruikt in overeenstemming met de productspecificaties , instructies en eventuele technische
ondersteuningsrichtlijnen.
Is niet gewijzigd of beschadigd door ontlaten, gebruikersfouten, ongelukken, rampen, misbruik,
misbruik, stroomvoorziening, stroomvoorziening, afwisseling, reparatie, wijziging, een reparatie of
vervanging door iemand anders dan het originele product.

Fabrikant: Shanghaimuxinmuyeyouxiangongsi
Adres: Baoshanqu Shuangchenglu 803long 11hao 1602A-1609shi Shanghai
EG-REP: SHUNSHUN GmbH .
Römeräcker 9 Z2021,76351 Linkenheim-Hochstetten, Duitsland
VK REP: Pooledas Group Ltd.
Eenheid 5 Albert Edward House, The Pavilions Preston, Verenigd Koninkrijk
Geïmporteerd naar AUS: SIHAO PTY LTD.
1 ROKEVA STREETEASTWOOD NSW 2122 Australië
Geïmporteerd naar de VS: Sanven Technology Ltd.
Suite 250, 9166 Anaheim Place, Rancho Cucamonga, CA 91730
Gemaakt in China
Technisch Ondersteuning en e-garantiecertificaat
www.vevor.com/support

Teknisk support och e-garanticertifikat
www.vevor.com/support
ANVÄNDARMANUAL FÖR TEJPDISPENSER
MODELL: AT-60
We continue to be committed to provide you tools with competitive price.
"Save Half", "Half Price" or any other similar expressions used by us only represents an
estimate of savings you might benefit from buying certain tools with us compared to the major
top brands and does not necessarily mean to cover all categories of tools offered by us. You
are kindly reminded to verify carefully when you are placing an order with us if you are
actually saving half in comparison with the top major brands.

- 1 -
MODELL: AT-60
Have product questions? Need technical support? Please feel free to
contact us:
Technical Support and E-Warranty Certificate
www.vevor.com/support
NEED HELP? CONTACT US!
This is the original instruction, please read all manual instructions
carefully before operating. VEVOR reserves a clear interpretation of our
user manual. The appearance of the product shall be subject to the
product you received. Please forgive us that we won't inform you again if
there are any technology or software updates on our product.
Tape Dispenser
- 2 -
15. Läs noga och förstå alla MONTERINGS- OCH
DRIFTINSTRUKTIONER innan användning.
16. Underlåtenhet att följa säkerhetsreglerna och andra grundläggande
säkerhetsåtgärder kan leda till allvarliga personskador.
GENERAL SAFETY RULES
Säkerhetsanvisningarna i denna bruksanvisning måste följas i för att förhindra
skador på maskinen eller skada på operatören eller andra personer
Säkerhetsriktlinjerna som föreskrivs "Varning" och " Försiktighet " beskriver möjlig
skada eller skada som kan uppstå vid drift eller underhåll av maskinen på annat
sätt än vad som beskrivs i detta bruksanvisning.
Läs och följ säkerhetsföreskrifterna noggrant innan du läser Instruktionsmanual.
War n ing
Indikerar en potentiellt farlig situation som, om inte undvikit, kunde leda till dödsfall
eller allvarlig skada.
Varning
Ange att felaktig hantering kan leda till fara och att operatören riskerar att skadas,
eller maskinen är det med risk för skada.
Indikerar försiktighet
En symbol i triangeln, eller beskrivningen, kommer att indikera en specifik fara
En förbjuden åtgärd
En symbol i cirkeln, eller beskrivningen, kommer att indikera förbjudna åtgärder.
En nödvändig åtgärd
En symbol i cirkeln, eller beskrivningen, kommer att indikera den nödvändiga
åtgärden.
Anslut inte, dra inte ur sladden och använd inte maskinen med vått händer.
Underlåtenhet att följa detta kan leda till skada på grund av elektrisk stöt.
- 3 -
Stick aldrig in fingret, någon annan kroppsdel eller något främmande föremål
i maskinen. Underlåtenhet att följa detta kan leda till skada.
Håll hår eller löst sittande kläder borta från maskinen medan den är fungerar.
Underlåtenhet att följa detta kan leda till skada
Denna maskin är endast avsedd för industriellt bruk . Låt inte otränade
operatörer eller barn använda maskinen. Underlåtenhet att följa detta kan leda till
skada .
Stäng av strömbrytaren och koppla ur maskinen innan du byter ut den
knivenheten eller utföra något underhåll på maskinen. Underlåtenhet att följa detta
kan leda till allvarliga skador
Använd inte den här maskinen till något annat än vad som anges
applikationer
Användning av maskinen för oavsiktliga tillämpningar kan orsaka skador till
operatören eller fel på maskinen.
SPARA DESSA INSTRUKTIONER
MODEL AND PARAMETERS
Modell
AT-60
Tejpbredd
6-60 mm
Tejplängd
5-999 mm
Utanför Dia. av Roll
20~300 mm
Kroppsmaterial
Antistatisk ABS
Betyg(er)
AC100V-240V 50-60Hz
Effekt (max.)
24,6W

- 4 -
STRUCTURE DIAGRAM

- 5 -

- 6 -

- 7 -
OPERATING INSTRUCTIONS
Ladda bandet
Anslut AC CORD till AC CORD INLET .
Se till att strömbrytaren är avstängd och anslut den sedan till en
lämplig jordat AC-uttag .
på strömbrytaren .
När POWER SWITCH är påslagen hörs en summer .
För närvarande är läget inställt på MANUELL
Tryck på HOLD DOWN ROLLER RELEASE-KNAPPEN
Placera en tejprulle i maskinen
Håll i bandet genom att justera TEJPHÅLLARE
Justera TEJPHÅLLARE till rätt bredd, skjut
TEJPHÅLLAREJUSTERINGSSPAKKEN från framsidan till
baksidan av maskinen och stäng den sedan.
TEJPHÅLLARE ska hålla rullen lätt i mitten av kaviteten av
maskinen
Detta är mycket viktigt eftersom det håller tejpen i mitten.
Tejpen passerar över SENSORn framför BLADENHETEN.
För att stödja en större tejprulle, dra ut den NEDRE HÅLLARE
Sätt tejpen på TEJPMATNINGSRULLEN
Tryck på FWD-KNAPPEN tills tejpen kommer ut från TAPE
OUTLET!
När du använder en stark klibbig tejp, dra ut lite tejp placeras i TAPE
INLET.
Tryck på FWD-KNAPPEN kontinuerligt i några sekunder och hjälp
bandet att placeras i TAPE INLET.
När bandet är isatt och TEJPHÅLLARE har justerats, stäng HÅLL
NER RULSENHET.
Tryck på START-KNAPPEN.
Ta bort den första tejpbiten och kassera den
När du tar ut tejprullen från maskinen, dra i tejpen bakåt och tryck
på REV-KNAPPEN .
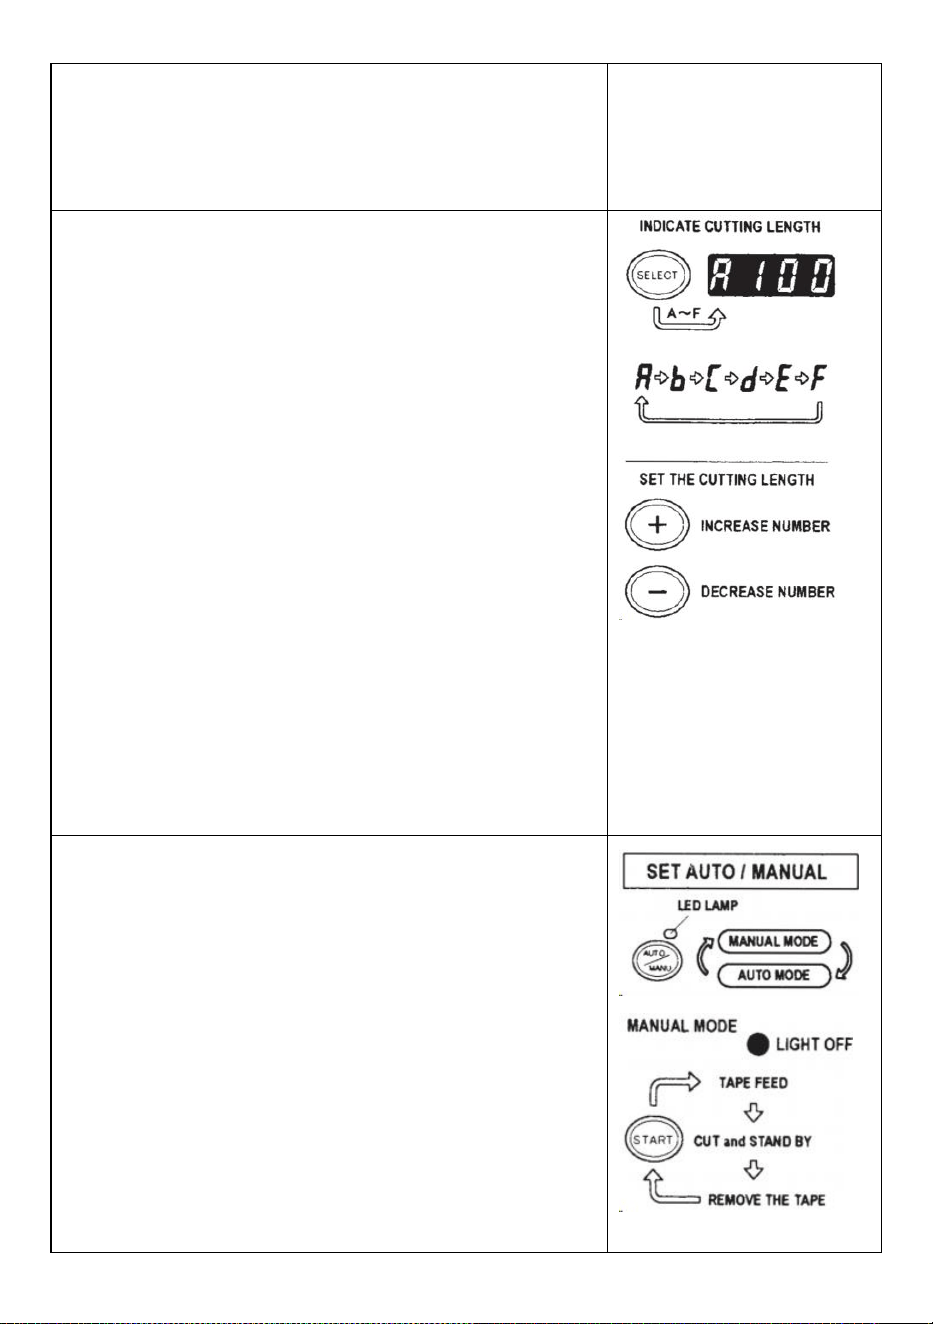
- 8 -
NOTERA:
Använd alltid en pincett för att ta bort tejpen .
när du ställer in bandet den självhäftande sidan av tejpen är alltid
vänd nedåt .
Ställ in bandlängden
Se till att DISPLAY indikerar <klipplängd>
Klipplängden anges alltid i vissa alfabet som A,b,C,d,E,F
Ställ in klipplängden.
Ställ in önskad längd med +/- KNAPPEN.
Klipplängden är justerbar mellan 5 mm till 999 mm.
Du kan ställa in sex olika längder genom att använda
VÄLJKNAPPEN.
Om du trycker på +/- KNAPPEN en kort stund ändras längden till
1 mm.
Och om du trycker på +/- KNAPPEN längre, visar i t
snabbspolning framåt .
Varning
Den faktiska längden skiljer sig från den visade längden beroende
på typ av bandet och dess skick.
När du klipper kort längd av tejpen kanske längden inte klipper
konsekvent eller tejpen har fastnat.
Prova flera testsnitt för att säkerställa korrekt funktion.
Lägesinställning
1. Manuellt läge
Se till att den blå LED-LAMPAN är släckt.
När LED-lampan blinkar eller tänds, tryck på AUTO/MANUAL
MODE och stäng av LED-LAMPAN
Tryck en gång på START-KNAPPEN, maskinen matar in en bit
tejp klipp sedan ut den baserat på din inställda längd.
Tryck på STARTKNAPPEN igen för att klippa en bit till.
2. Autoläge
Se till att LED-LAMPAN blinkar.
När LED- lampans lampor är släckta, tryck på AUTO/MANUELL
KNAPP och låt LED-lampan blinka .

- 9 -
Tryck en gång på START-KNAPPEN, maskinen matar in en bit
tejp klipp sedan ut den baserat på din inställda längd.
När den tejpbiten tas bort matar maskinen in en annan bit och
skär sedan ut den.
Maskinen matar in och klipper en ny tejpbit när biten av tejpen tas
bort .
P-läge (förinställt läge)
Maskinen kan programmeras. En signal kommer att visas baserat
på ditt valda antal bitar och allt utskuren.(Max 999 stycken.)
En summer kommer att höra när programmet är klart.
Du kan använda läget antingen MANUELL eller AUTO
Tryck på VÄLJ-KNAPPEN för att välja önskad längd .
Tryck på VÄLJ-KNAPPEN i tre sekunder så kommer det att
indikera "Lcon"
Tryck på VÄLJKNAPPEN igen så kommer det att indikera "p".
Använd +/- KNAPPEN och ställ in önskad mängd .
Välj AUTO eller MANUELL genom att ANVÄNDA
AUTO/MANUELL KNAPP.
När du trycker på STARTKNAPPEN matar maskinen in och skär
ut en bit tejp för teständamål
För att använda maskinen genom att använda MANUELLT LÄGE,
tryck på STARTKNAPPEN och mata in en bit tejp efter att du tagit ut
den.
För att manövrera maskinen med AUTO-LÄGE, matar maskinen
in en en tejpbit automatiskt.
Signalen visar siffror bakåt när en annan tejpbit matas in
När DISPLAY anger "0" kommer summern att höra .
DISPLAY anger antalet stycken som är förinställda.
Vänta tills summern slutar.
Om du tar ut bandet innan summern slutar, kommer
LED-LAMPAN att blinka så du måste trycka på STARTKNAPPEN
igen.
Om du försöker ändra läget (AUTO/MANUELL) när maskinen är
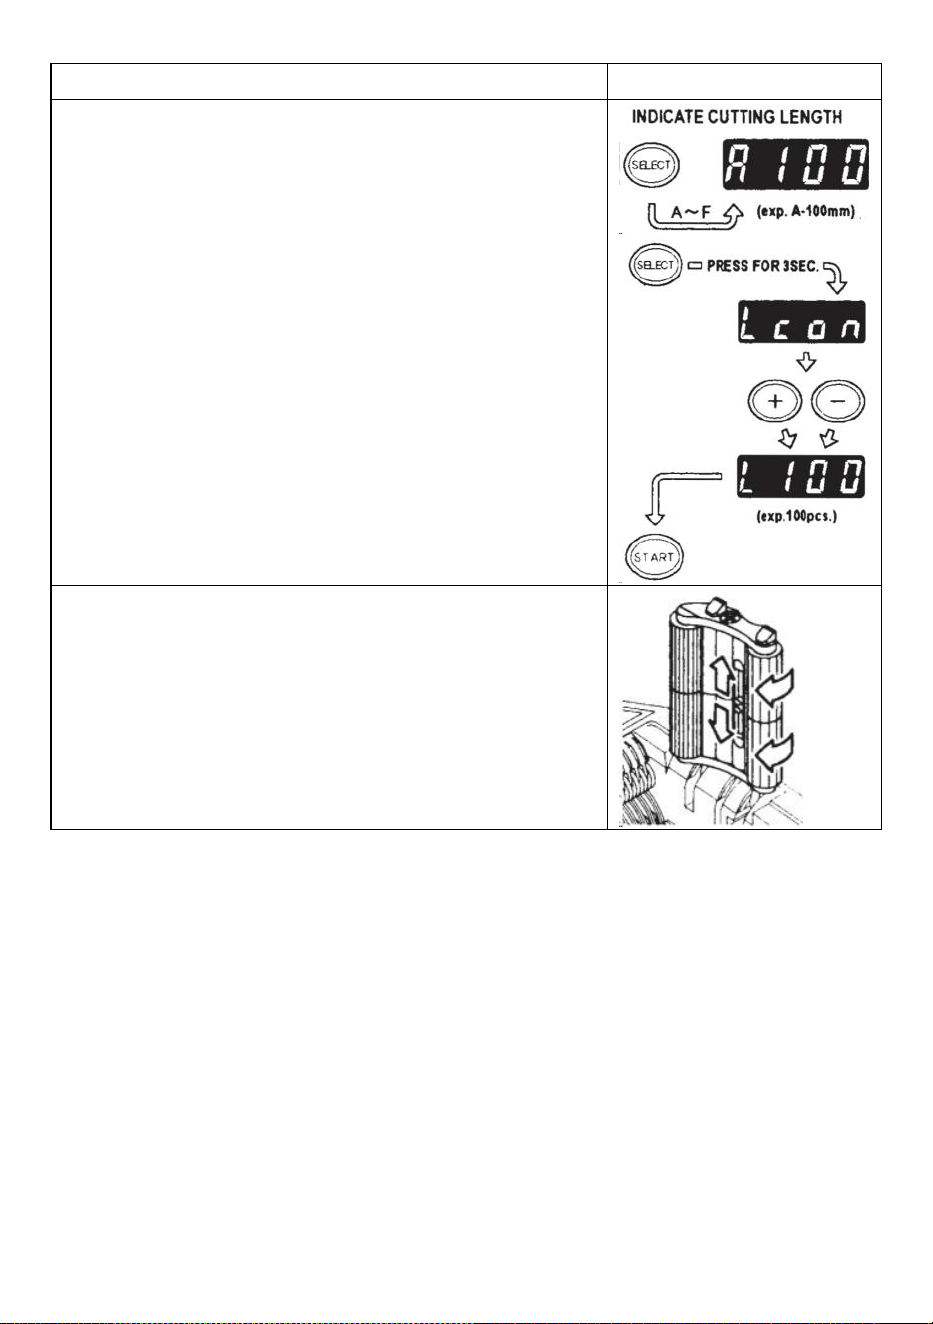
- 10 -
igång tryck bara på AUTO/MANUELL KNAPP.
L-läge (loopläge)
Du kan förinställa antalet stycken som ska skäras ut. (Max 999
stycken) Maskinen skär ut bitarna baserat på dina valda kvantiteter
och sedan ska sluta .
Tryck på VÄLJ-KNAPPEN och bestäm längden på tejpen
Tryck och håll ned VÄLJKNAPPEN så att DISPLAY visar "Lcon"
Ställ in antalet bitar som ska skäras ut med +/- KNAPPEN
När du trycker på START-KNAPPEN indikerar DISPLAY en signal
som visas siffror baklänges och skära kontinuerligt.
När DISPLAY anger "0", kommer summern att avge ett ljud sedan
maskinen är stoppad.
För att stoppa maskinen medan den körs under L-LÄGE, tryck på
STARTKNAPPEN.
Hur man hanterar en curlingtejp
Tryck på HOLD DOWN ROLLER RELEASE-KNAPPEN för att
öppna HOLD DOWN ROLLER UNIT
Dra ut RULLERLÅSSPAKKEN så att rullen inte roterar.
Stäng HOLD DOWN ROLLER UNIT
Med rullarna låsta kan spänningen göra att längden varierar .
Klipp flera provbitar för att justera längden vid behov.
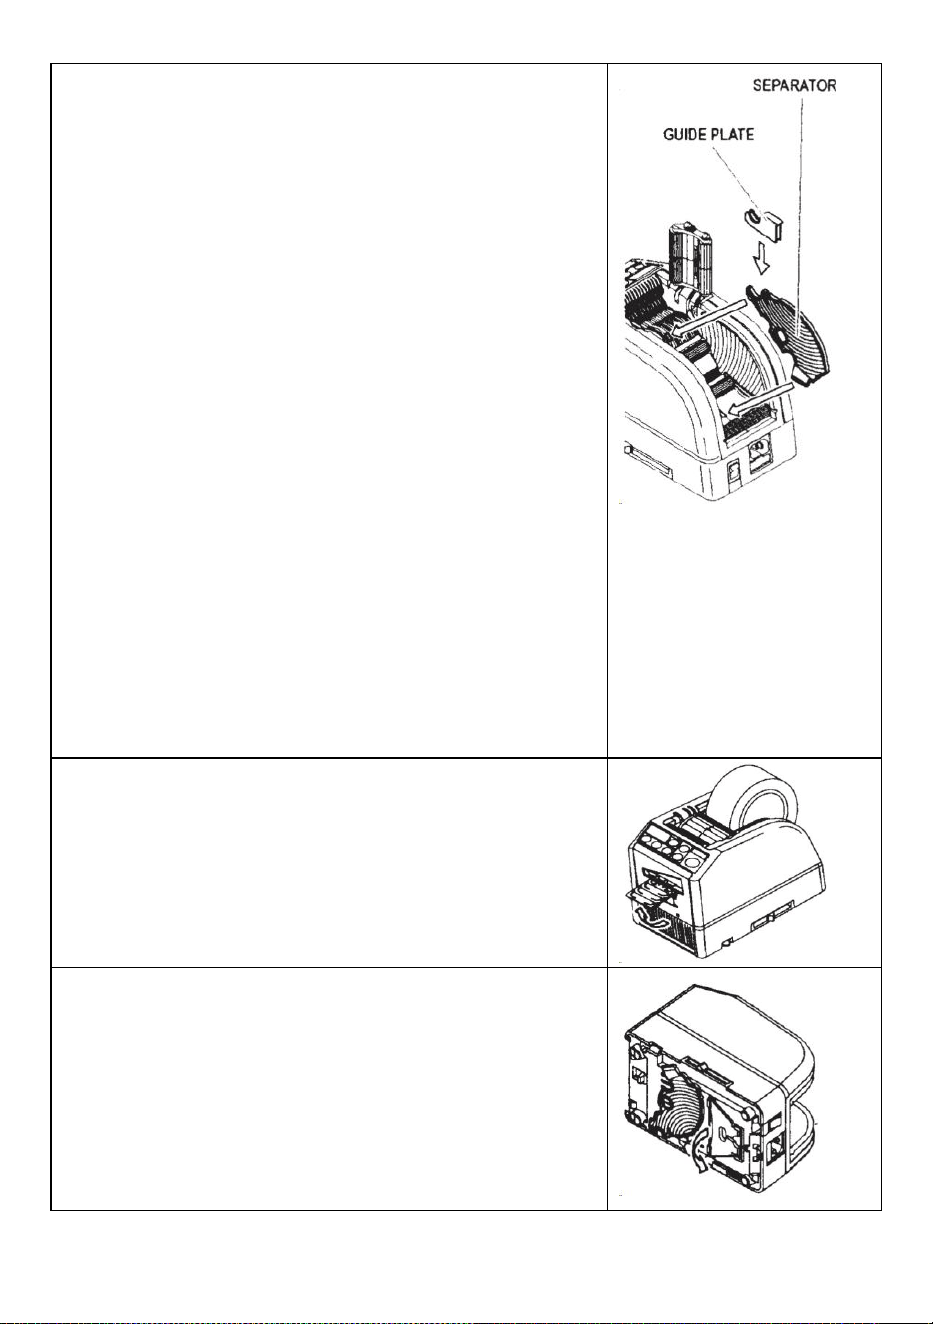
- 11 -
Använd smal tejp/Använd två rullar samtidigt
Om tejpen är mindre än 15 mm bred eller om du vill dispensera två
rullar samtidigt, använd SEPARATOR .
Klipp mindre än 10 mm bredd på tejpen, sätt GUIDE PLAYEN på
SEPARATÖREN
Ta bort SEPARATÖREN från undersidan av kroppen
Öppna HOLD DOWN ROLLER UNIT
Sätt in SEPARATORn i kroppen genom att sätta in den i botten av
håligheten
När du klipper av tejpen mindre än 10 mm, sätt GUIDE PLATE på
separatorn.
Placera en rulle av tejpen på vardera sidan genom att sätta in en
SEPARATÖR för att ladda tejpen
För att hålla bandet genom att justera TEJPHÅLLARE, är det
onödigt att trycka AVSKÄRREN ur position
Vid utmatning av två rullar med tejp samtidigt är det ett måste att
mata in båda av dess längd s på samma gång
Ta bort den första tejpbiten
När den andra biten av tejpen tas bort, matas även båda sidor av
tejpen ut.
Andra funktioner
FLEXIBEL TEJP STÖD
När du klipper tejpen längre eller klipp av icke-häftande tejp/film,
använd FLEXIBLE TEJPSTÖD för att undvika tejpen ramlar ner . _
HJÄLPSTÄLL
Baserat på tejpmaterialet eller arbetsstyckets syfte, användning
hjälpstativet för att flytta maskinens kropp mot en lägre nivå.

- 12 -
Byt ut knivenheten
Endast Blade accepteras inte att bytas ut.
Det måste ändras med hela bladenheten.
Stäng av POWER SWITCH.
Ta bort BLADENHETEN genom att släppa 8LADE ENHETENS
LÄSNINGSSPAK
Installera den nya BLADENHETEN i kroppen .
Tryck ned höljet ordentligt tills det låses .
Se till att det nedre bladet är korrekt placerat, vänd på
BLADENHETEN och titta på den nedre kanten på det nedre bladet.
MAINTENANCE
När du rengör eller byter ut BLADENHETEN, rör inte
den vassa kanten på bladet.
Rengör knivenheten
Vid skärning av tejper med kraftigt lim kommer resterna gradvis
att sitta kvar på bladet.
Det är nödvändigt att ta bort BLADENHETEN för rengöring
Stäng av POWER SWITCH.
Ta bort BLADENHETEN genom att släppa BLADENHETENS
UTSLÄPPSSPAK.
Lägg lite alkohol på en ren, torr trasa, eller använd en pinne för
att ta bort resterna
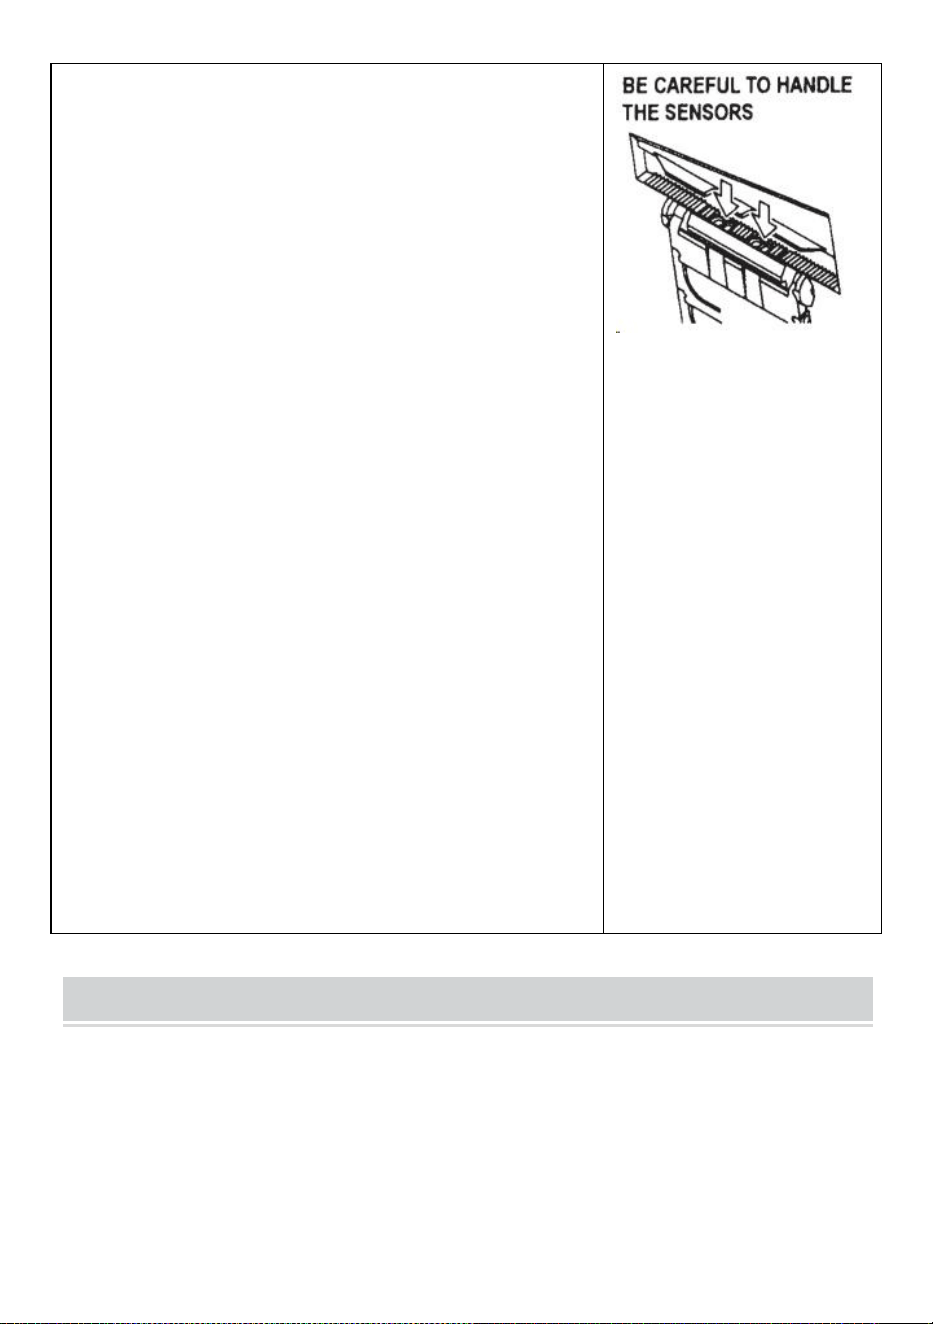
- 13 -
Byt ut BLADENHETEN.
Smörj bladet
Smörj bladet för att förhindra att rester fastnar på bladet.
Stäng av POWER SWITCH
Ta bort BLADENHETEN från kroppen.
Leta reda på tre oljehål på baksidan av det övre bladet.
Droppa en droppe BLADOLJA i varje hål.
Smörj även NEDRE BLADGUIDE.
Smörj inte om och om igen.
Torka bort reservoljan med en bomullstrasa.
Sätt tillbaka BLADENHETEN i kroppen.
Slå på strömbrytaren.
Gör flera provskärningar för att säkerställa att tejpen inte faller
ner från TEJPEN UTLOPP.
Rengör sensorerna
Det finns två par SENSORER under TEJPUTTAGET. Om
öppningen är täckt av tejprester eller skräp kommer SENSORerna
att inte upptäcka förekomsten av tejp.
Håll alltid rent runt SENSORerna.
För att skydda SENSORn, rengör öppningarna efter att du har tagit
bort BLADENHETEN försiktigt.
Rengör kroppen
Lägg neutralt rengöringsmedel på en fuktig trasa för att rengöra
kroppen . Använd inte alkohol eller lösningsmedel för att rengöra
plastdelarna.
Error Messages
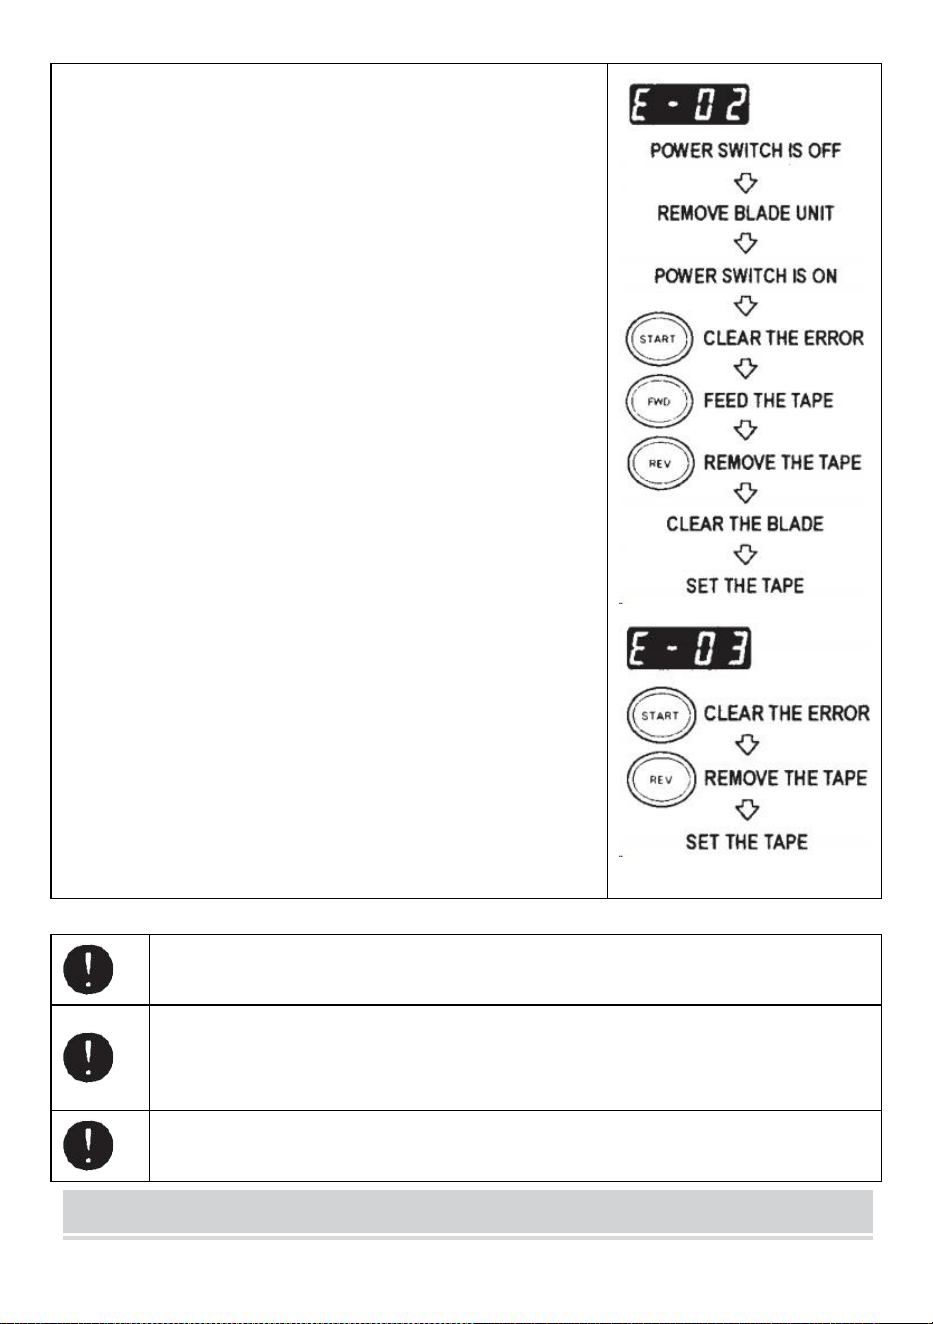
- 14 -
Summern kommer att höra ett ljud, sedan blinkar ett meddelande
och visas på DISPLAYEN.
E-02 Bladet är ur position
En signal visar att bladet inte är väl installerat eller att maskinen
stannar på grund av tejpens tjocklek eller hårdhet.
av strömbrytaren .
Ta bort BLADENHETEN genom att släppa BLADENHETENS
RELEASINGLEVER och lyft sedan ut enheten ur kroppen.
på strömbrytaren .
Tryck på FWD-KNAPPEN och mata in tejpen en gång, klipp in
tejpen mellan TAPEOUTLET och BLADENHETEN med en
sax .
Tryck på REV-KNAPPEN för att ta bort tejpen
Rengör BLADENHETEN och smörj den UNDRE BLADGUIDE.
Kontrollera det nedre bladets position och byt ut BLADENHETEN.
E-03 Motorn är stoppad
Indikerar att motorn är stoppad på grund av överbelastning.
Tryck på STARTKNAPPEN för att ta bort felmeddelandet.
Tryck på REV-KNAPPEN för att ta bort tejpen.
av POWER SWITCH .
Kontrollera noggrant BLADENHETEN och TEJPUTTAGET.
Rensa och ta bort rester av tejpavfall eller klibbiga rester med hjälp
av pincett
Rör inte vid bladet när du korrigerar ett fel när POWER SWITCH är på.
Stäng av strömbrytaren och sluta använda maskinen.
Om maskinen inte kan fungera normalt efter att ha åtgärdat felet.
Det verkar som att inget är fel utan några felmeddelanden.
Använd inte bandet om statisk elektricitet genererar över 1000V.
Det kan orsaka fel på maskinen.
TROUBLESHOOTING
- 15 -
Problem
Möjlig orsak
Möjlig lösning
POWER SMTCH är
på men maskinen kan
inte köras.
AC CORD är lossad .
SÄKRINGEN har gått.
Kontrollera nätsladden då koppla in uttaget
fast l y .
Byt SÄKRING .
Sluta omedelbart att använda maskinen
SÄKRINGEN har gått igen efter att ha bytts
ut .
Efter att ha tagit bort
en bit av tejp, nästa
bit matas inte under
AUTO läge.
Läget är inställt på
MANUELL.
En del skräp täcker
SENSORER .
Bandet kan inte gå igenom
SENSORER .
Tejpen har extremt låg
reflektans.
Ställ in läget på AUTO .
Ta bort skräpet.
Använd SEPARATOR för att smalna av
bandet mindre än 15 mm .
För inte starka ljuskällor nära runt
SENSORER .
Vissa typer av band kanske inte används
under AUTO läge.
BLADET kan inte röra
sig mjukt.
BLADENHETEN är inte i
korrekt placera.
Kontrollera BLADENHETEN och tryck nedåt
på bostäder fast.
Längden på tejpen är
skiljer sig från den
inställda l ength.
Limmet på tejpen är för
starkt.
Tejpens elasticitet är för
stark.
Korrigera inställningen efter att ha kapat flera
provbitar
Tejpa lockar
överdrivet.
Maskinen är inte jordad.
RULSLÅSET är urkopplat
Kontrollera jord på sladden.
Aktivera ROLLER LOCK för att applicera
spänning.
Denna produkt omfattas av bestämmelserna i det europeiska direktivet
2012/19/EC. Symbolen som visar en soptunna korsad anger att produkten
kräver separat sophämtning i EU. Detta gäller för produkten och alla tillbehör
märkta med denna symbol. Produkter märkta som sådana får inte kasseras
tillsammans med vanligt hushållsavfall, utan måste lämnas till en
insamlingsplats för återvinning av elektriska och elektroniska apparater.
Om maskinen fortfarande inte kan fungera korrekt, sluta använda maskinen
omedelbart och kontakta säljaren för reparationstillstånd.

- 16 -
Garanti
Vi garanterar den ursprungliga köparen av produkten att den kommer att vara fri från defekter i material
eller tillverkning så länge som originalet köparen äger produkten, när den ges normalt slitage och
korrekt användande.
Reservdelarna som skärblad, rullar täcks inte under garantiperioden eftersom de anses vara "slitdelar"
Denna garanti gäller endast om produkten:
Blev inte skadad under installationen.
Användes i enlighet med produktens specifikationer, instruktioner och eventuella tekniska
supportanvisningar.
Modifierades eller skadades inte av anlöpning, användarfel, olycka. katastrof, missbruk, missbruk,
strömförsörjning, strömtillämpning, växling, reparation, modifiering, en fix eller utbyte av någon annat
än originalprodukten.

Tillverkare: Shanghaimuxinmuyeyouxiangongsi
Adress: Baoshanqu Shuangchenglu 803long 11hao 1602A-1609shi Shanghai
EC REP: SHUNSHUN GmbH .
Römeräcker 9 Z2021,76351 Linkenheim-Hochstetten, Tyskland
UK REP: Pooledas Group Ltd.
Enhet 5 Albert Edward House, The Pavilions Preston, Storbritannien
Importerad till AUS: SIHAO PTY LTD.
1 ROKEVA STREETEASTWOOD NSW 2122 Australien
Importerad till USA: Sanven Technology Ltd.
Suite 250, 9166 Anaheim Place, Rancho Cucamonga, CA 91730
Tillverkad i Kina
Teknisk Support och e-garanticertifikat
www.vevor.com/support