
User Manual
iFLYTEK AINOTE Air2

3
63
185
124
English/English
Japan/日本語
Traditional Chinese/繁體中文
Simplified Chinese/简体中文
Chapter 1 Quick Start
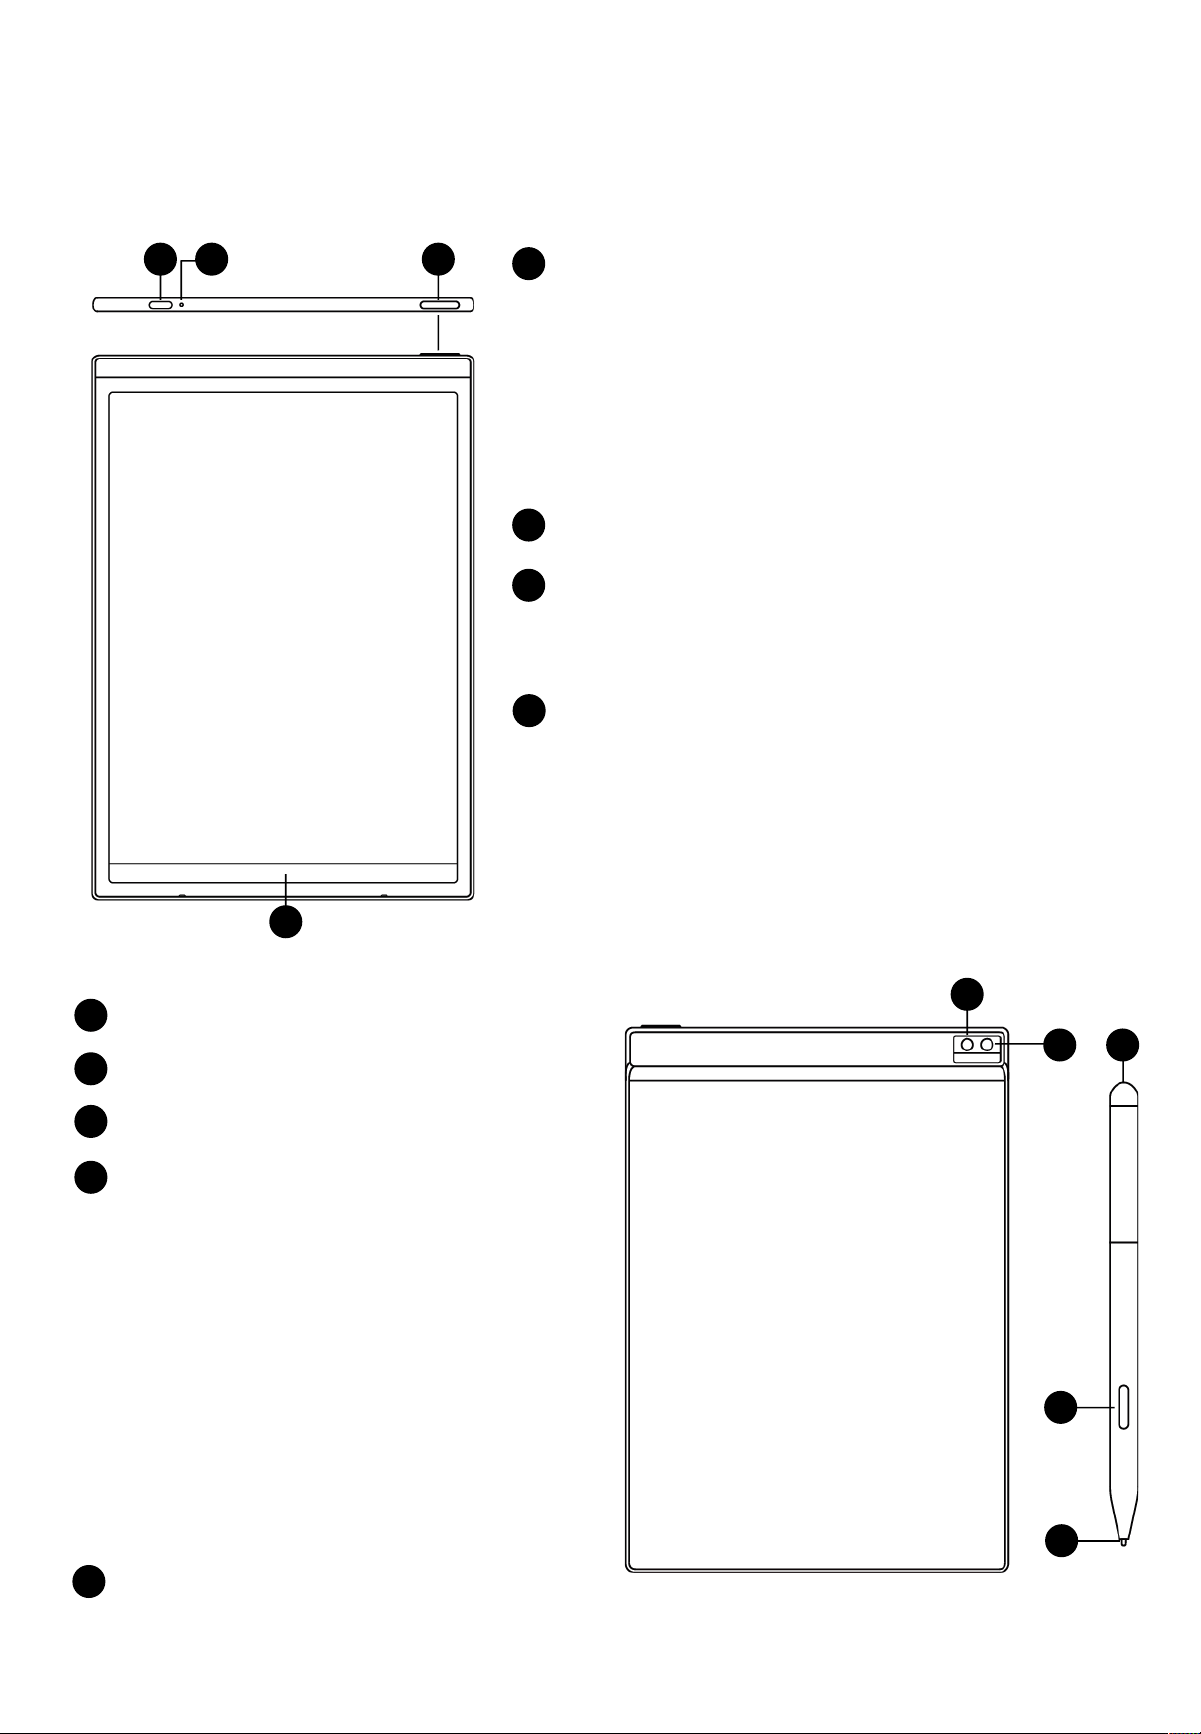
1.1 Hardware Overview
12
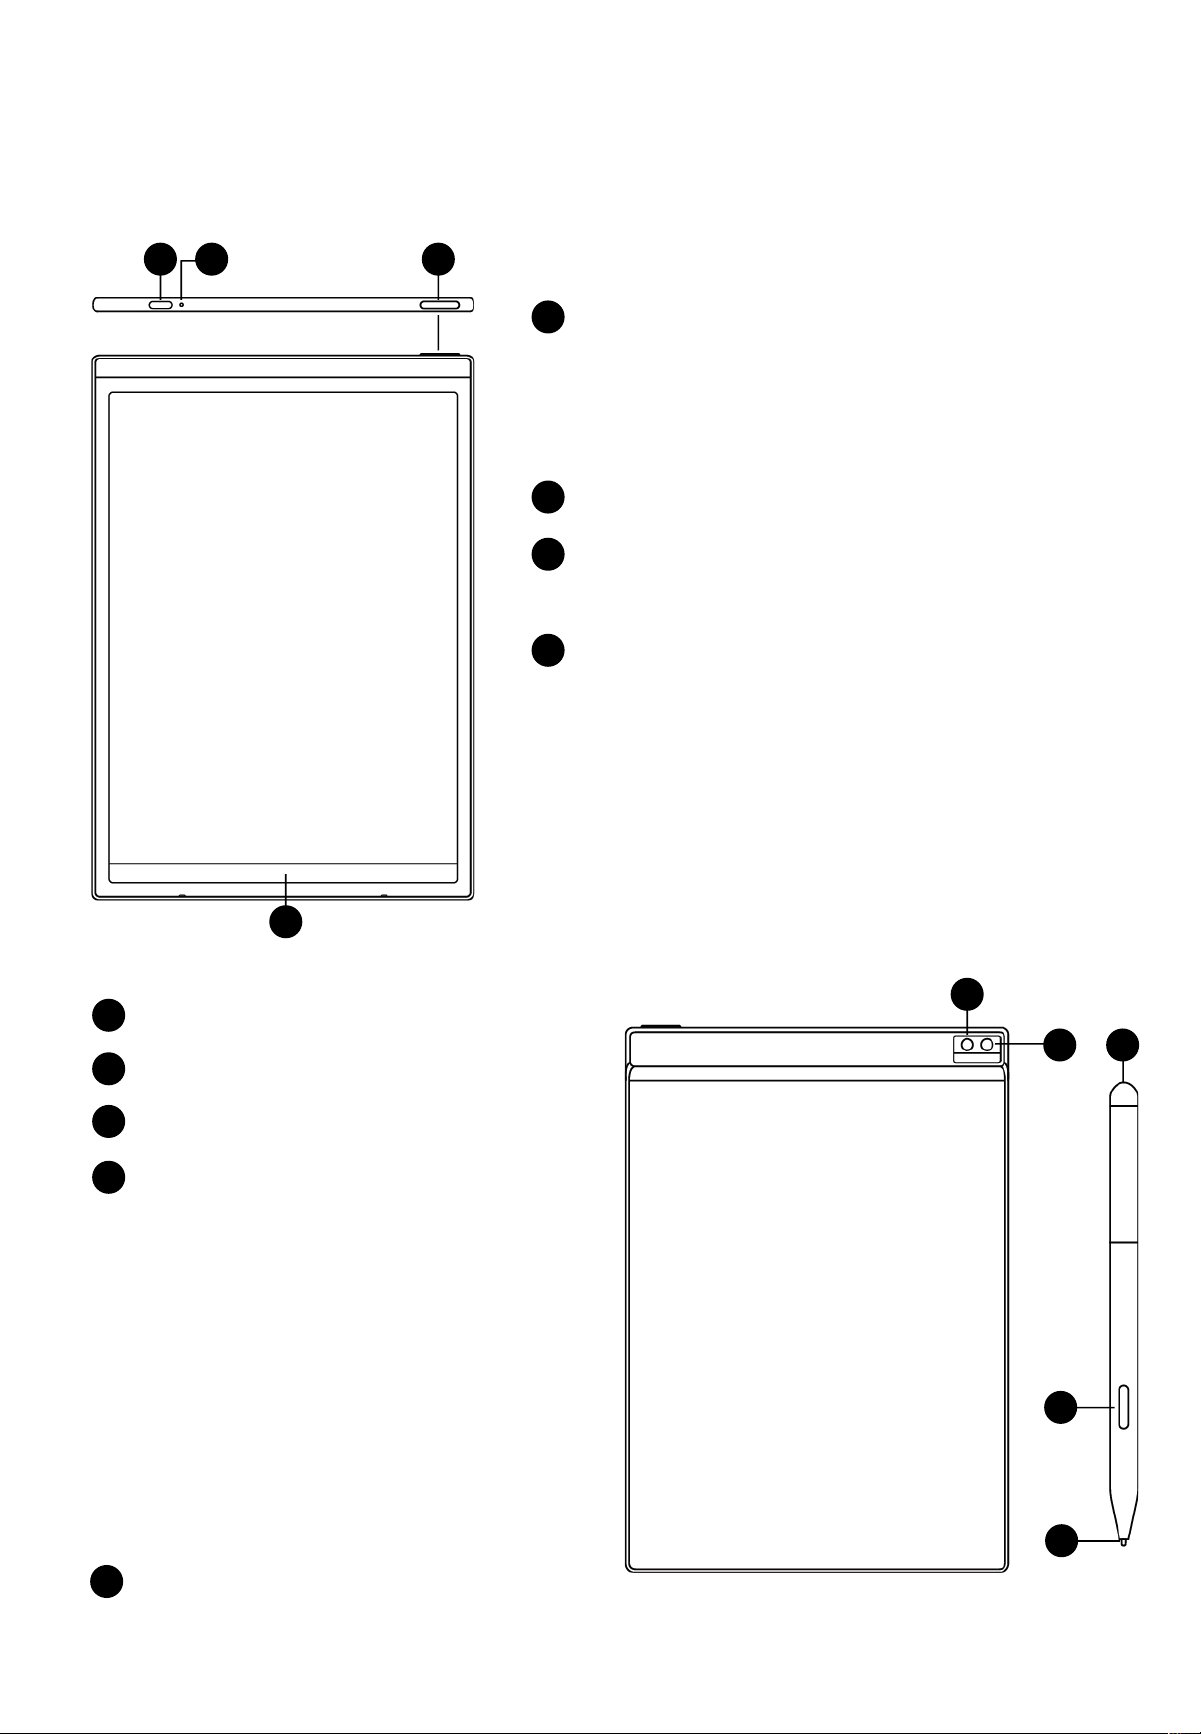
1
Power Button
• Power On: Press and hold this button for 3 seconds to
power on the device.
• Power Off/Restart: Press and hold this button for 3
seconds to power off or restart the device
• Tips: Holding the power button for 8 seconds will
force the device to shut down.
2
USB Type-C
3
3
Charging Indicator Light
• While charging, the indicator light shows red when the
battery is low and green when fully charged.
4
4
‘Quick Bar’
• Swipe up from the bottom left corner to open the
“Open Chat” interface for conversation.
• Swipe up from the center to enter quick reading mode.
• Swipe left from the bottom right corner to quickly
create a note.
5
Rear Camera
6
5
6
Flashlight
7
8
9
7
Eraser
8
Custom Button
9
Pen Tip
Replaceable: You can purchase replacement tips and swap them as needed.
• Smart Pen (default)
Press to select and support features like selection,
adding to notes, and drawing shapes.
• Ruler
Press and slide to create a straight line.
• Lasso Erase
Press to select handwritten content and quickly
erase it.
• Disable
Disable this button to avoid accidental touch.
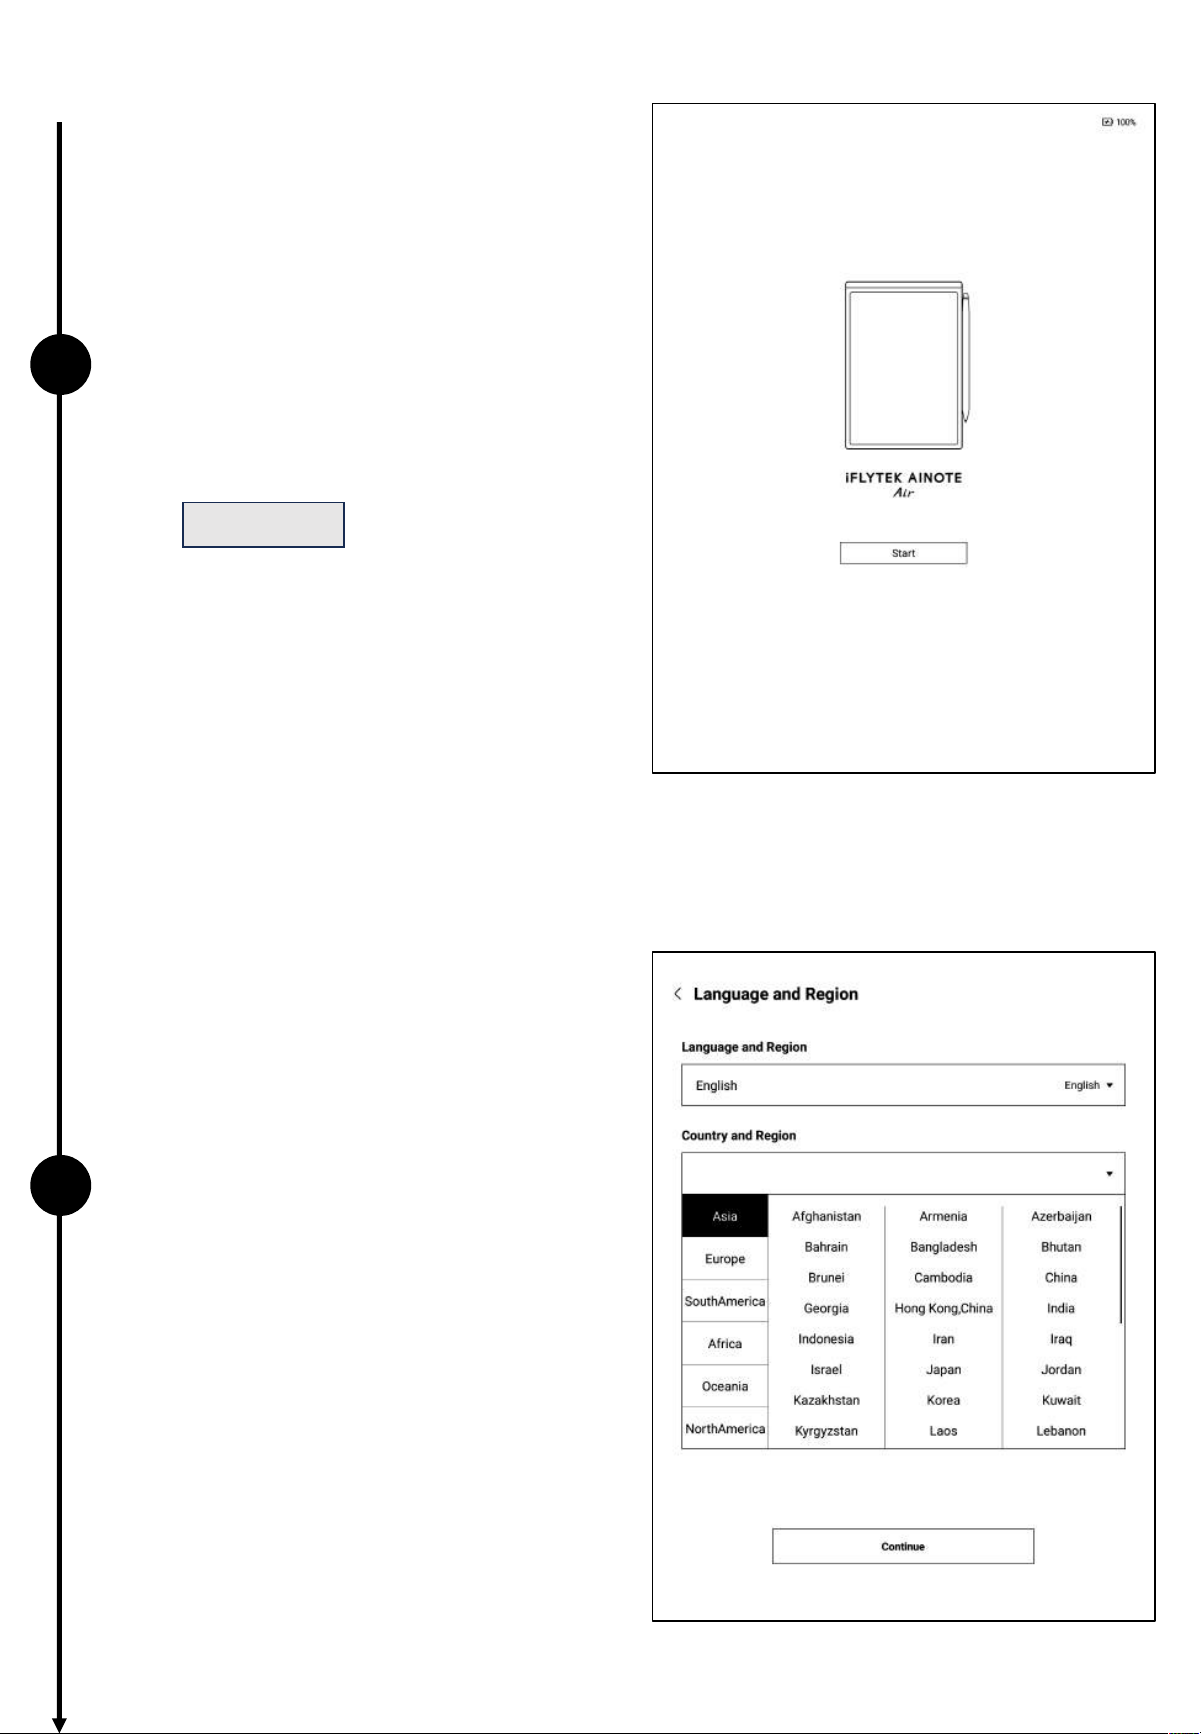
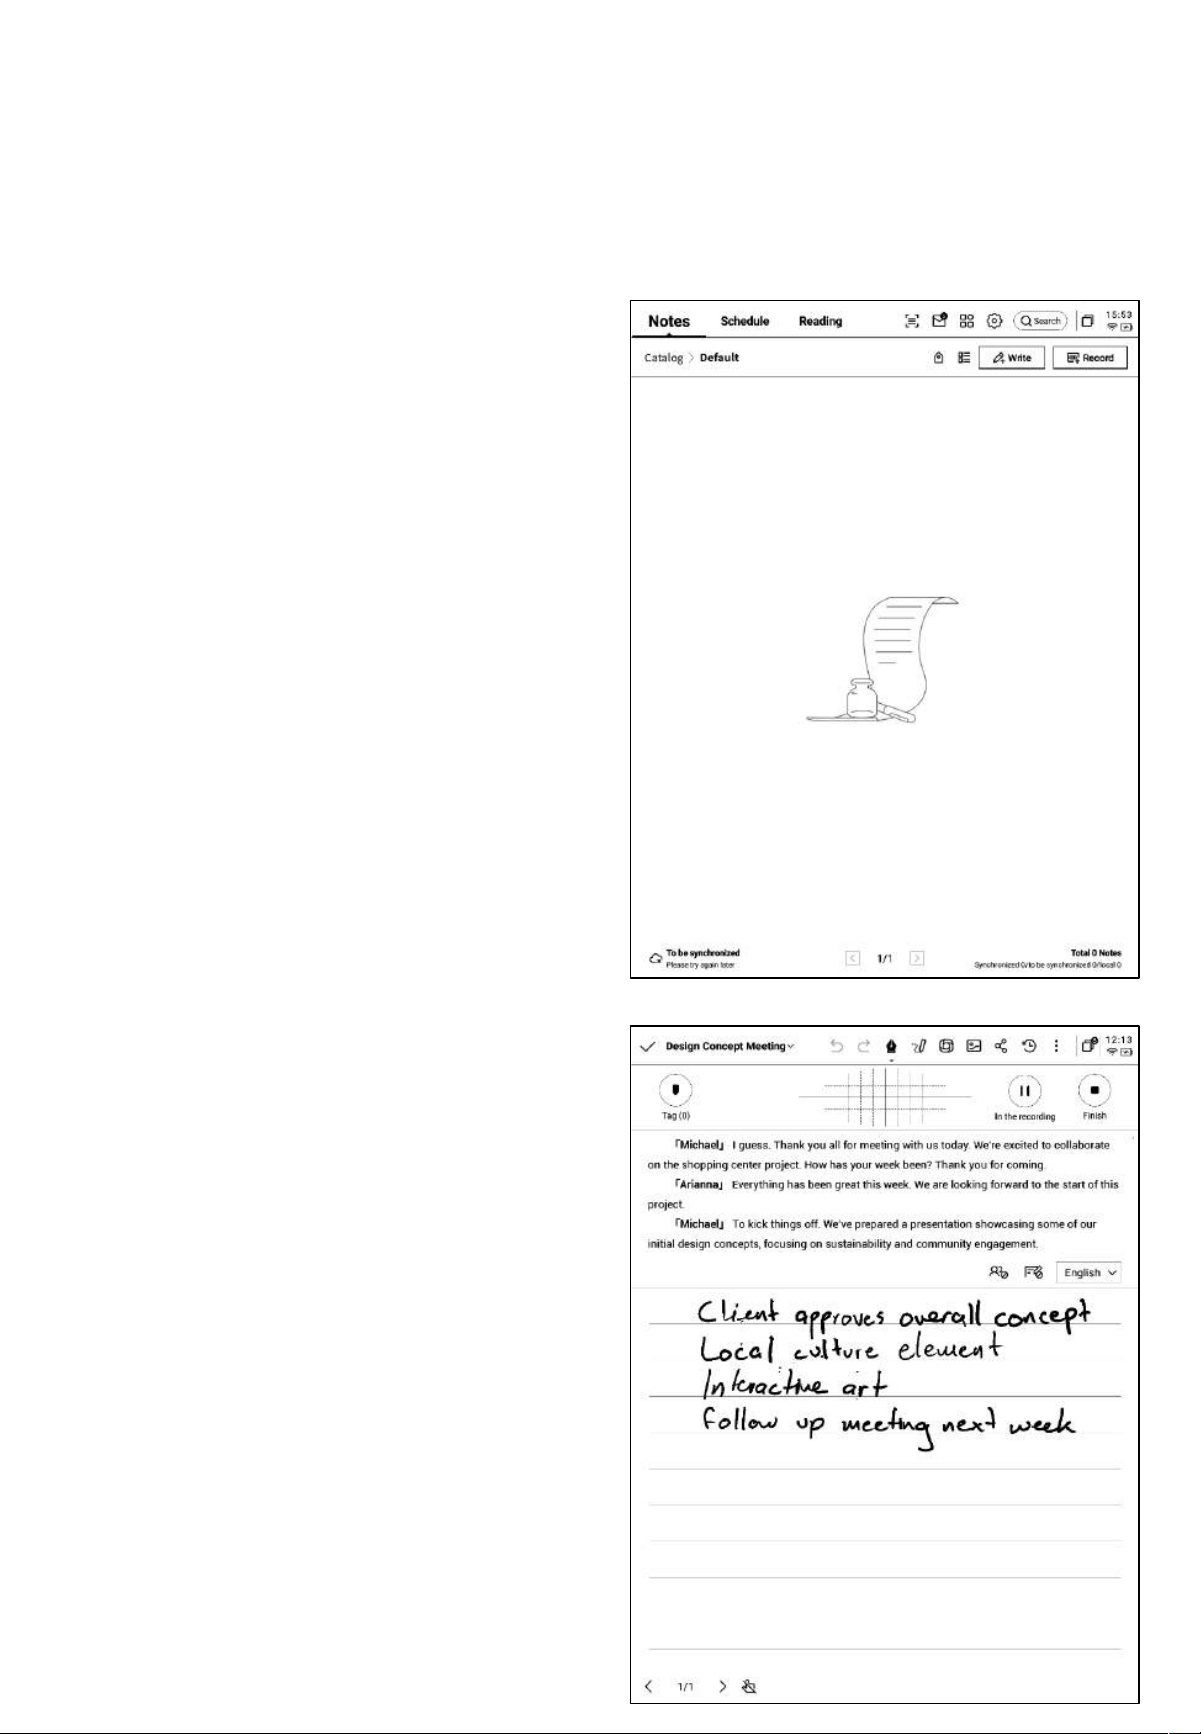
1.2 Device Activation
1
2
ü Press and hold the power button
• The first boot may take longer, please be
patient.
ü Select the system language
• Please select the region carefully, as
changing the region may cause issues with
server connectivity. Different servers may
not sync data between regions.
Click
start
to begin activation.
ü Select your region
• For Asia and Oceania, the server is located
in Singapore.
• For North America, South America,
Europe, and Africa, the server is located in
Luxembourg.
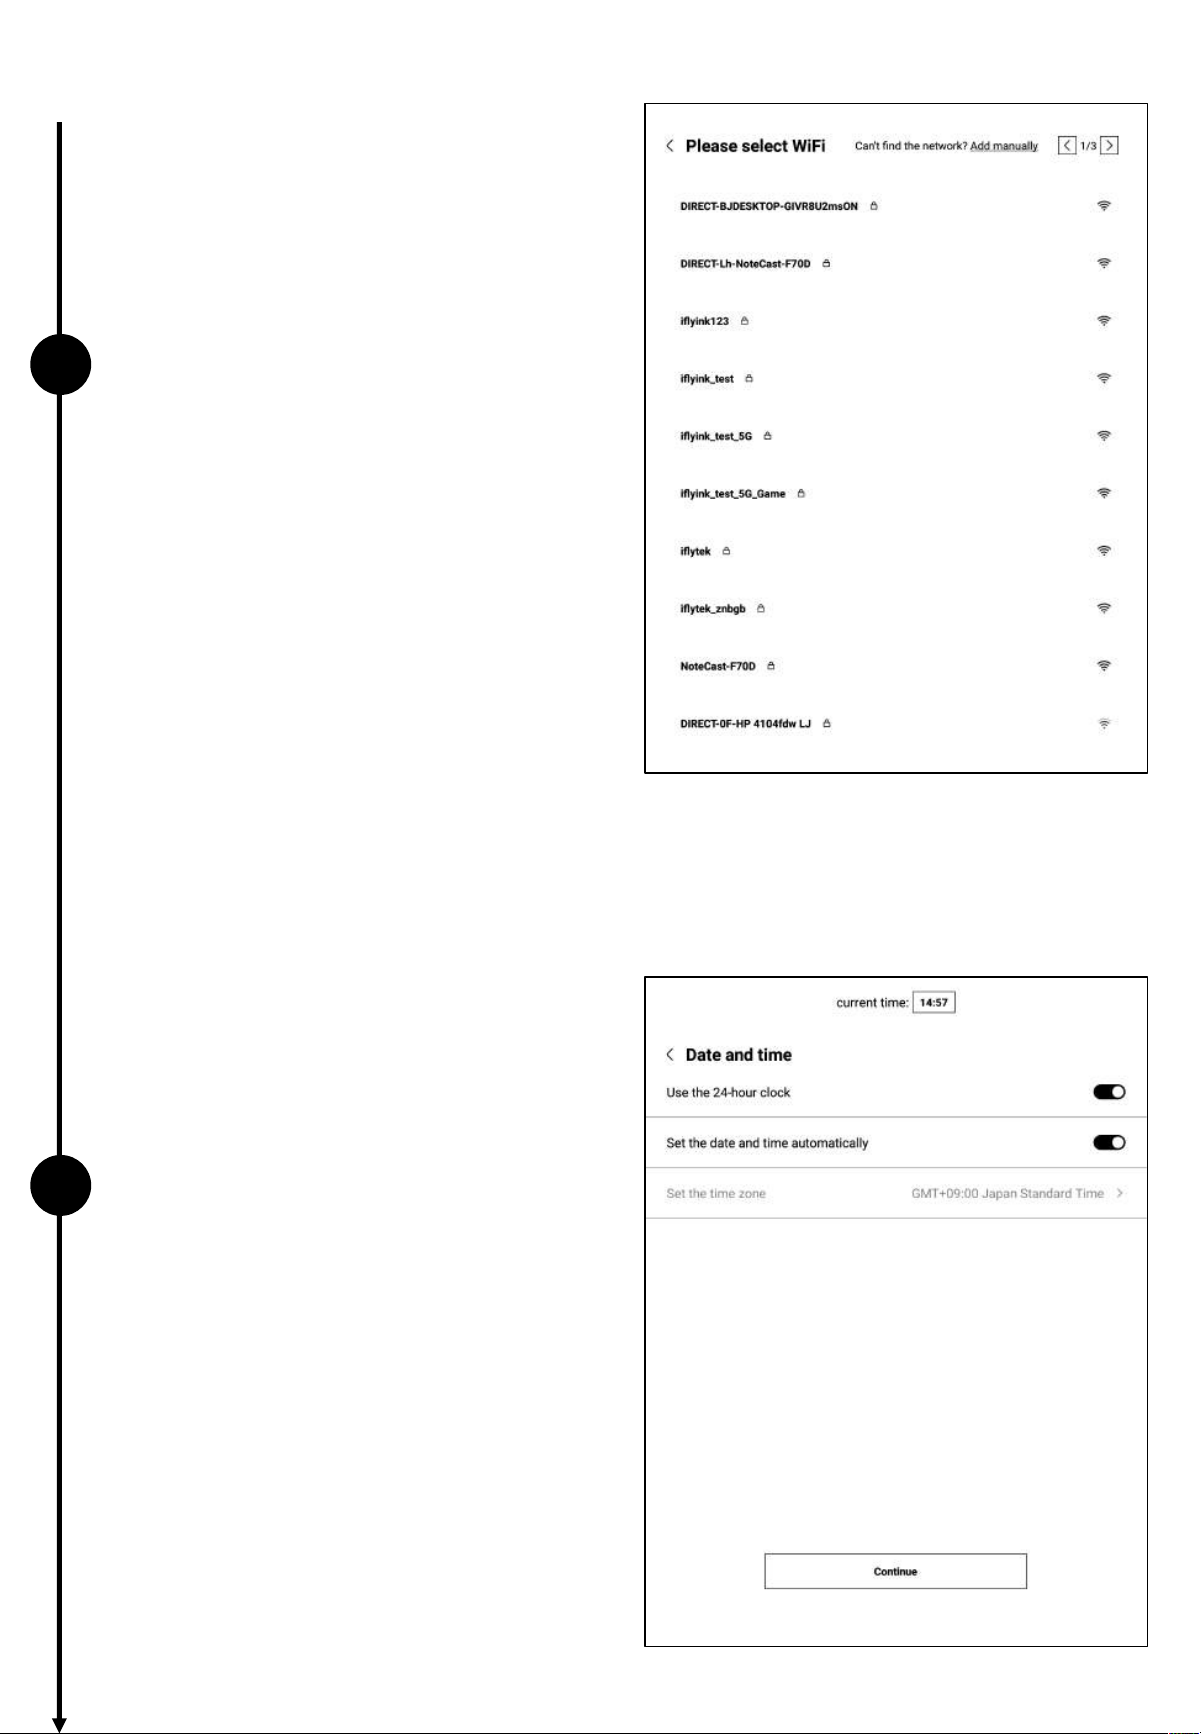
1.2 Device Activation
3
4
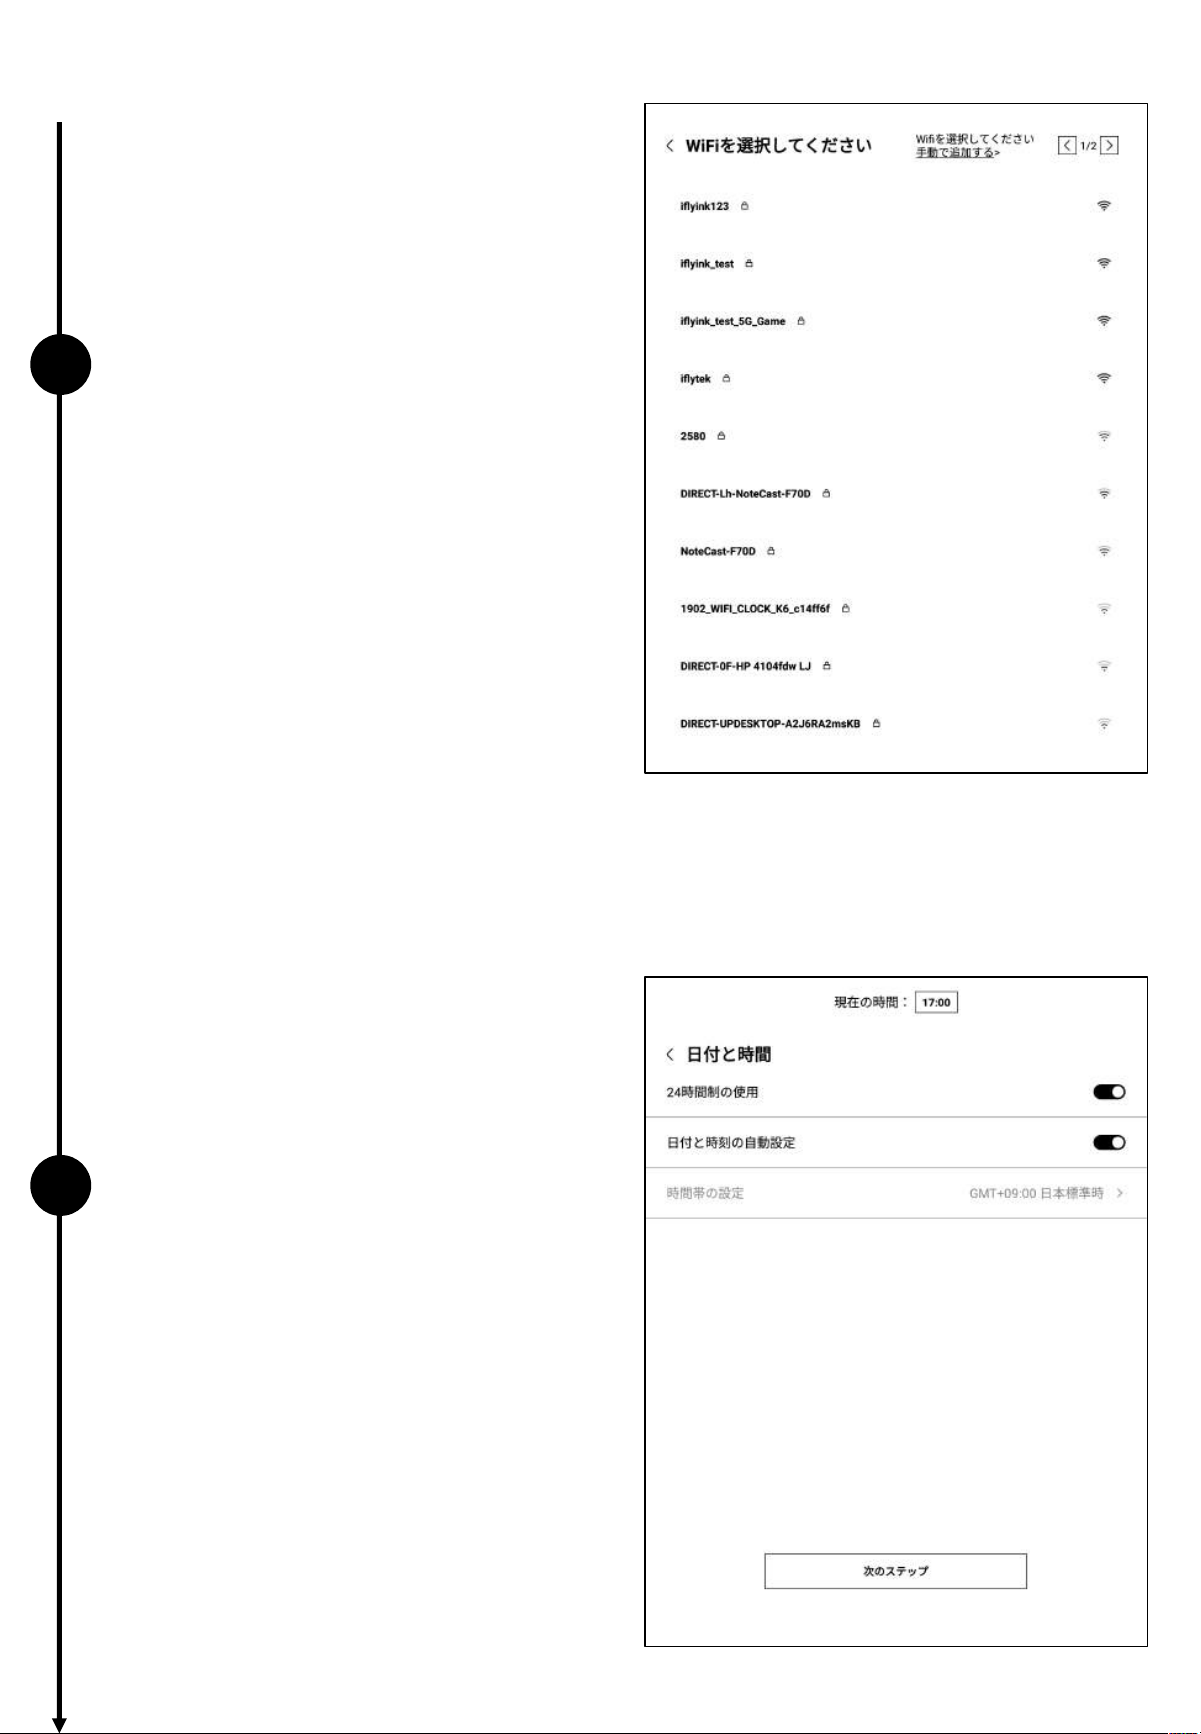
ü Wi-Fi Connection
• Supports manual addition of Wi-Fi
networks.
ü Time Zone and Date/Time
• Supports different time display formats.
• Default option: Automatically detect time
zone, manual setting also supported.
1.2 Device Activation
5
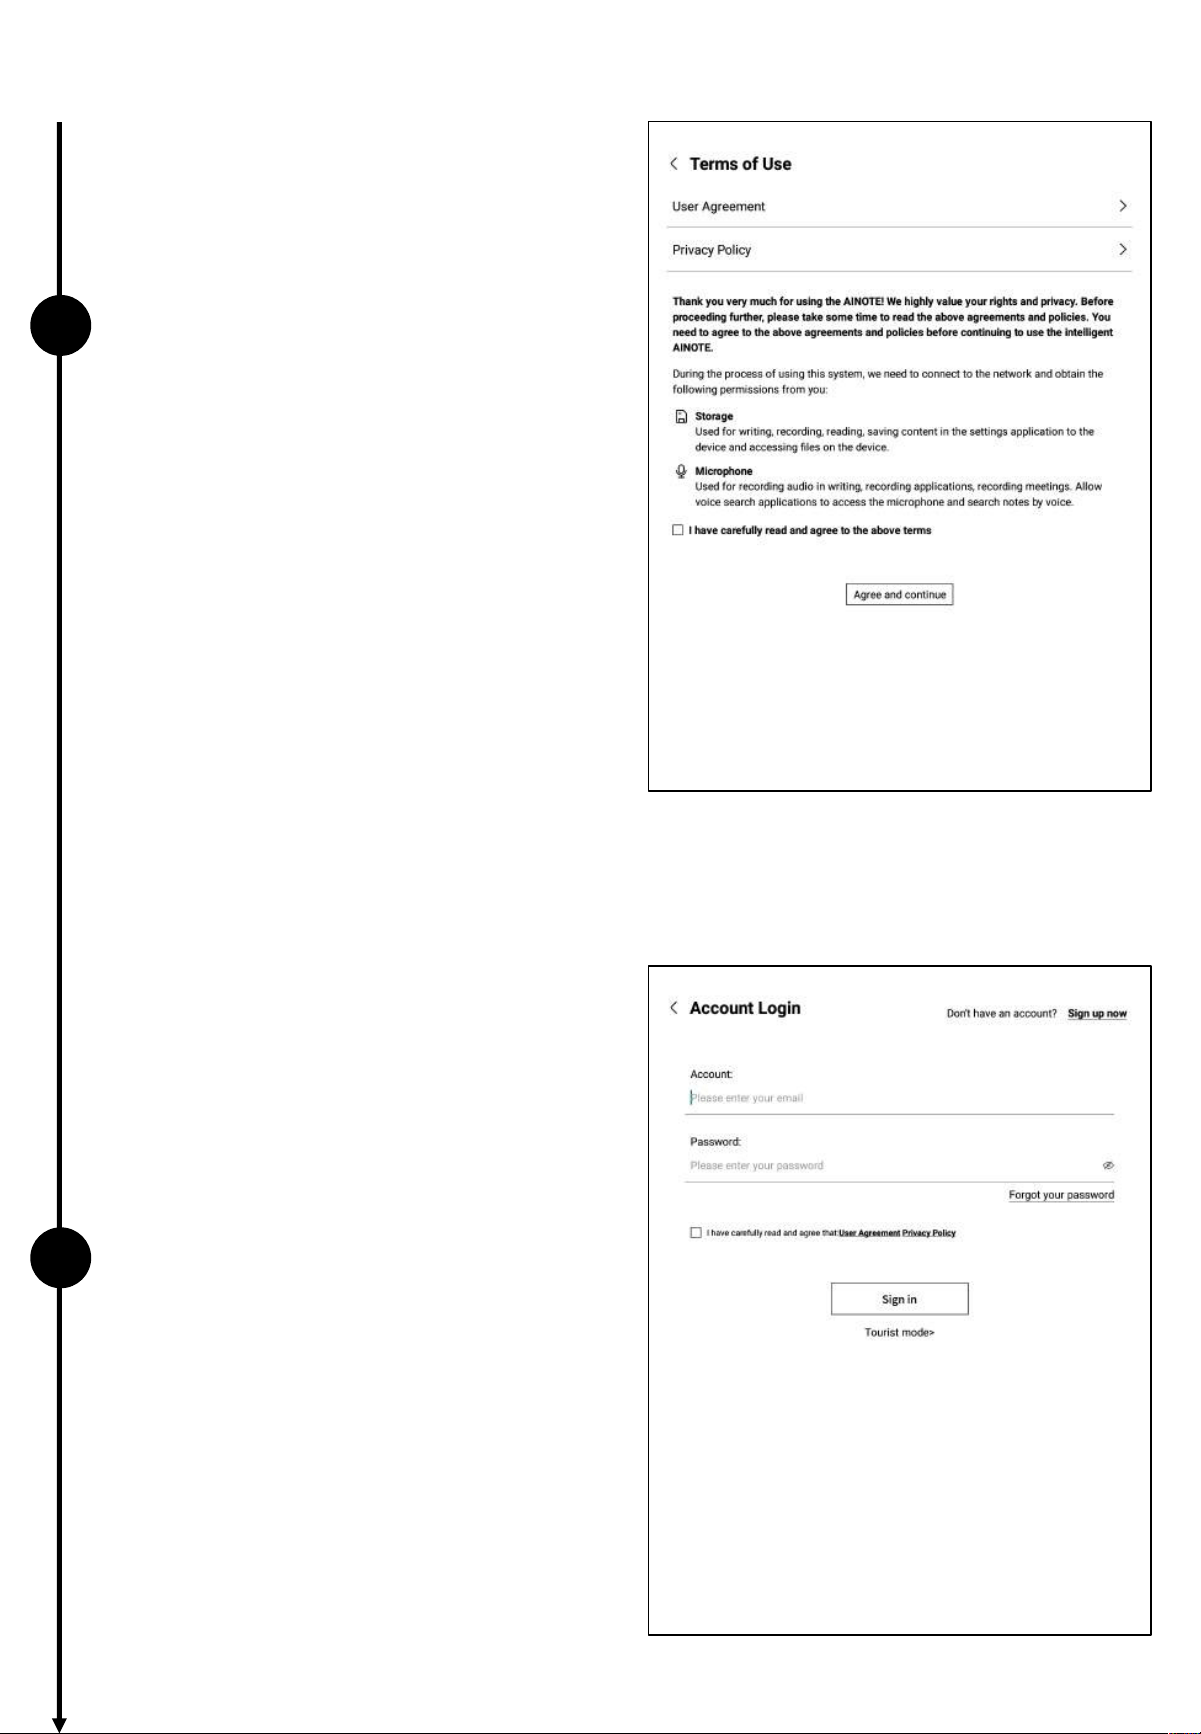
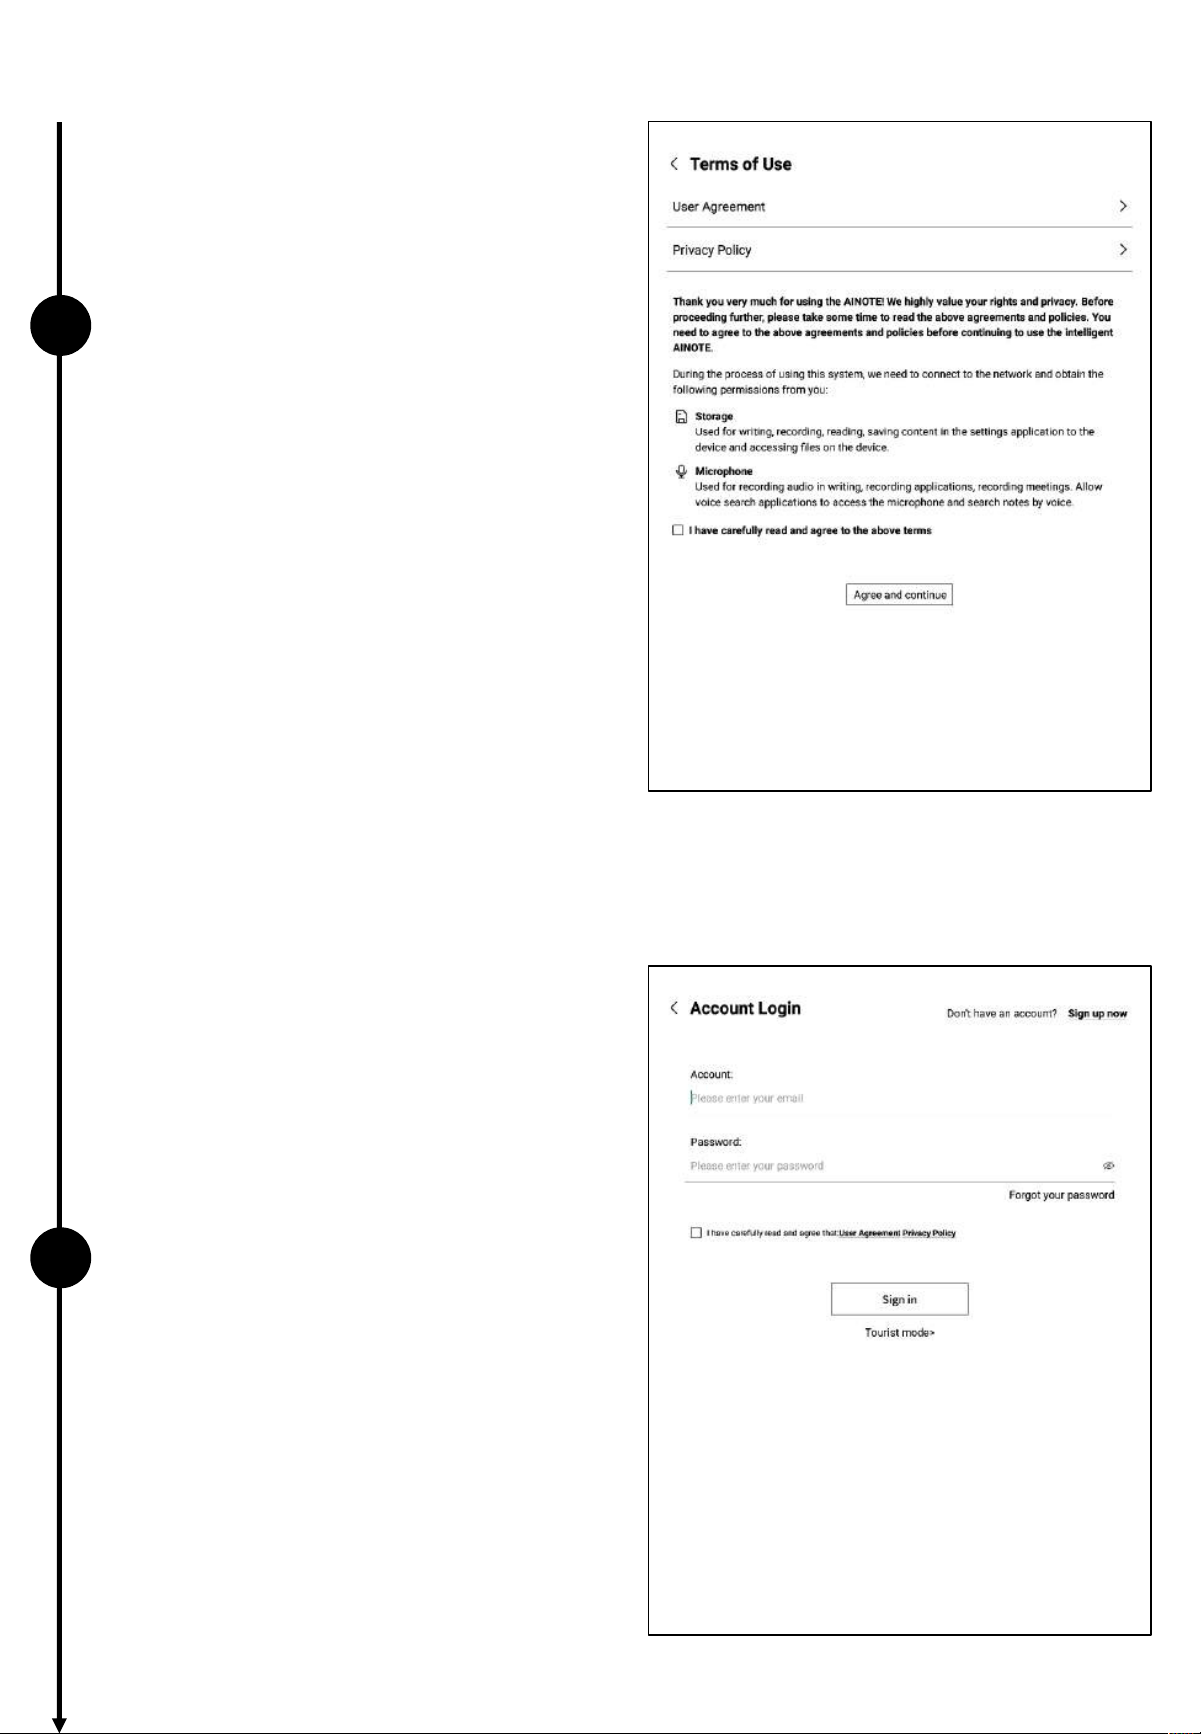
ü Privacy and User Agreement
• Please carefully review the office's privacy
policy and user agreement. After agreeing, you
can proceed to the next step.
6
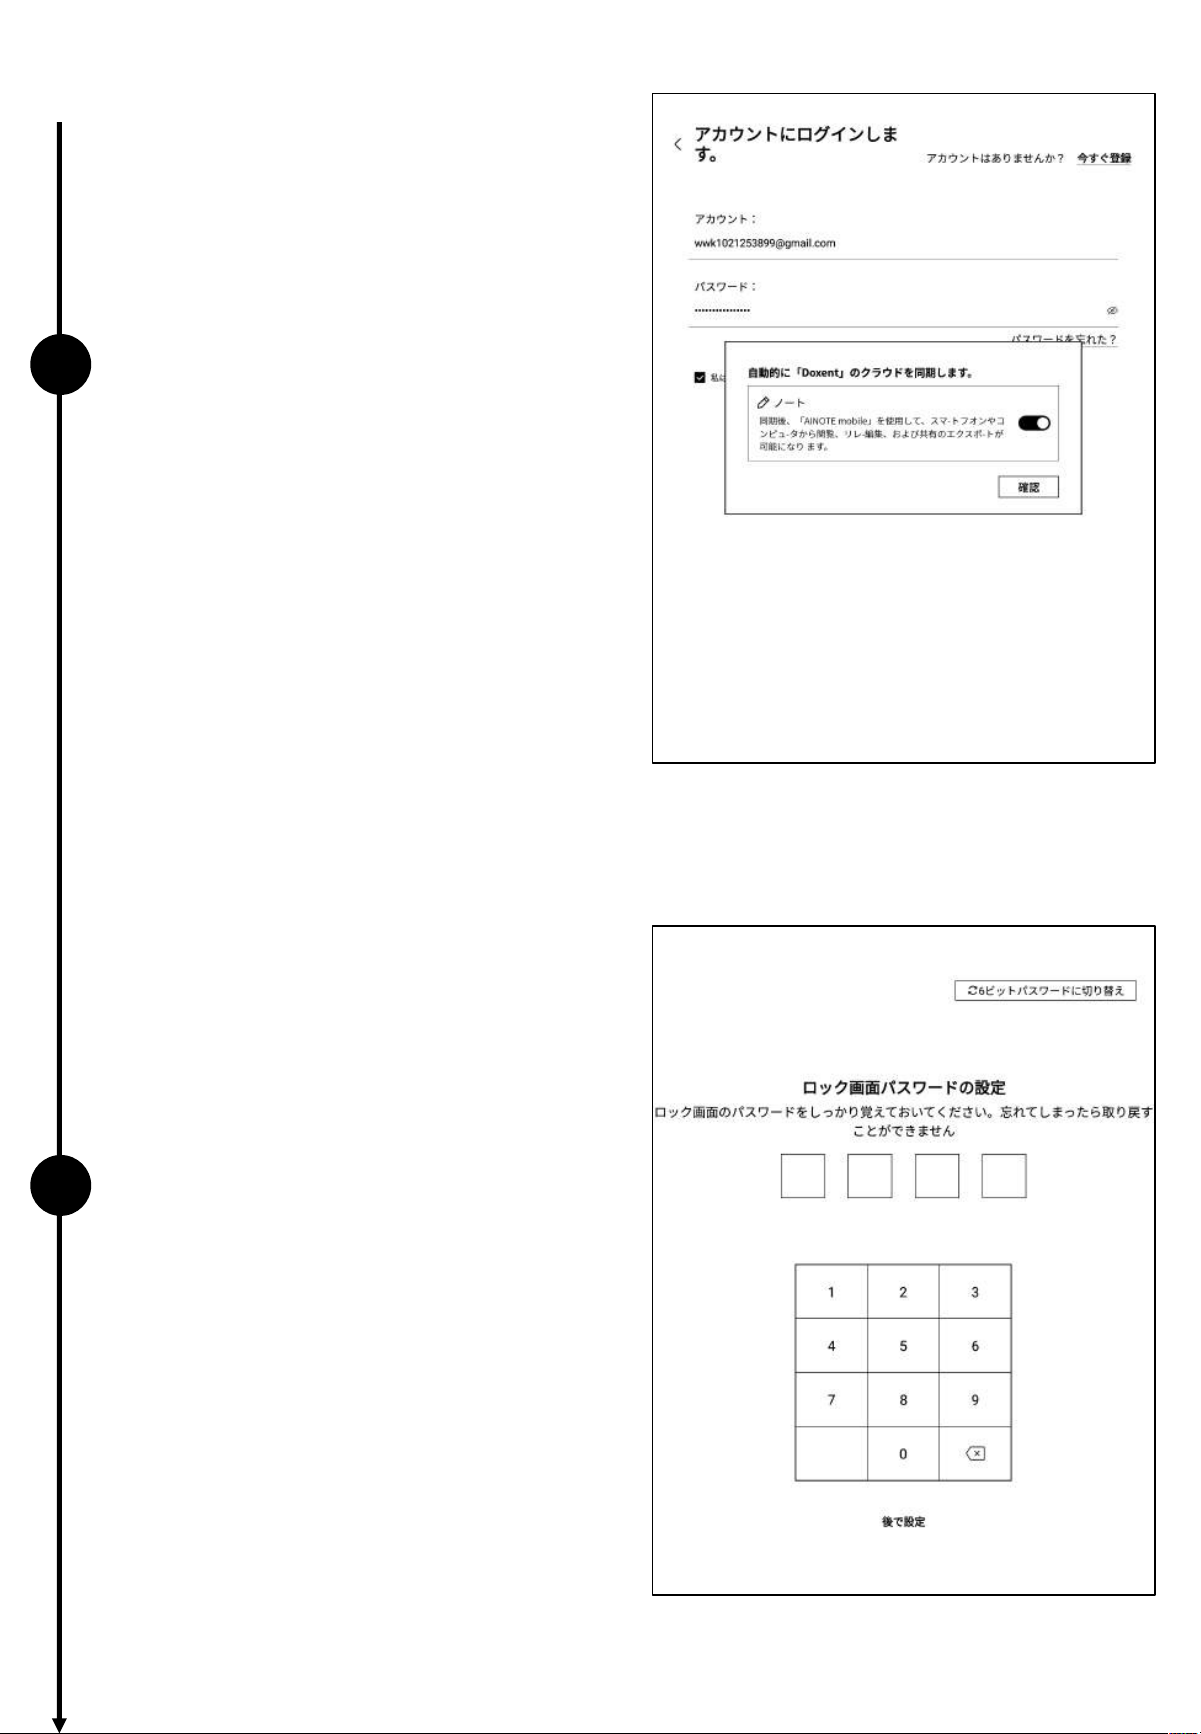
ü Account Registration
• Supports email registration: Complete the
registration by entering the verification code
and password received via email.
ü Account Login
• Enter your email and password to log in.
ü Tourist Mode
• In tourist mode, you can access most of the
basic functions of the office software. This
mode supports a full experience of all features,
except those requiring an account.
1.2 Device Activation
6
7
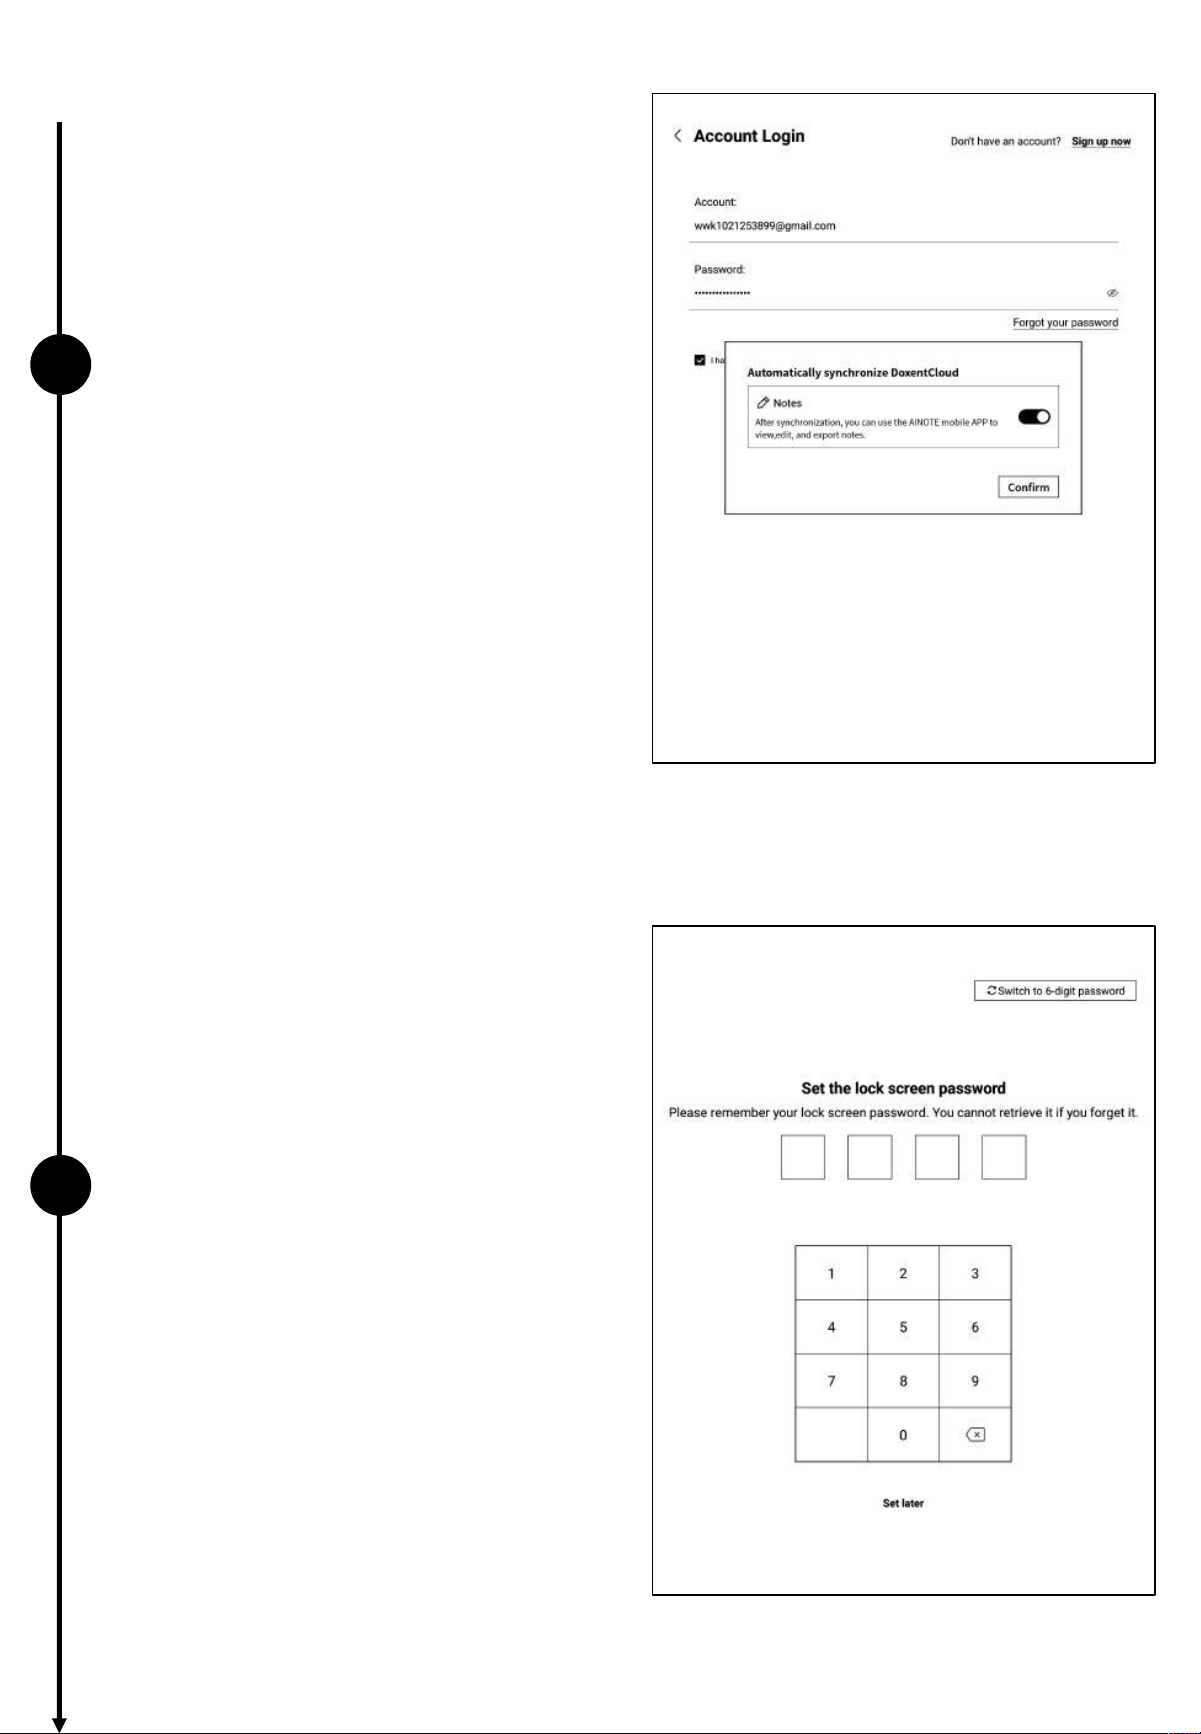
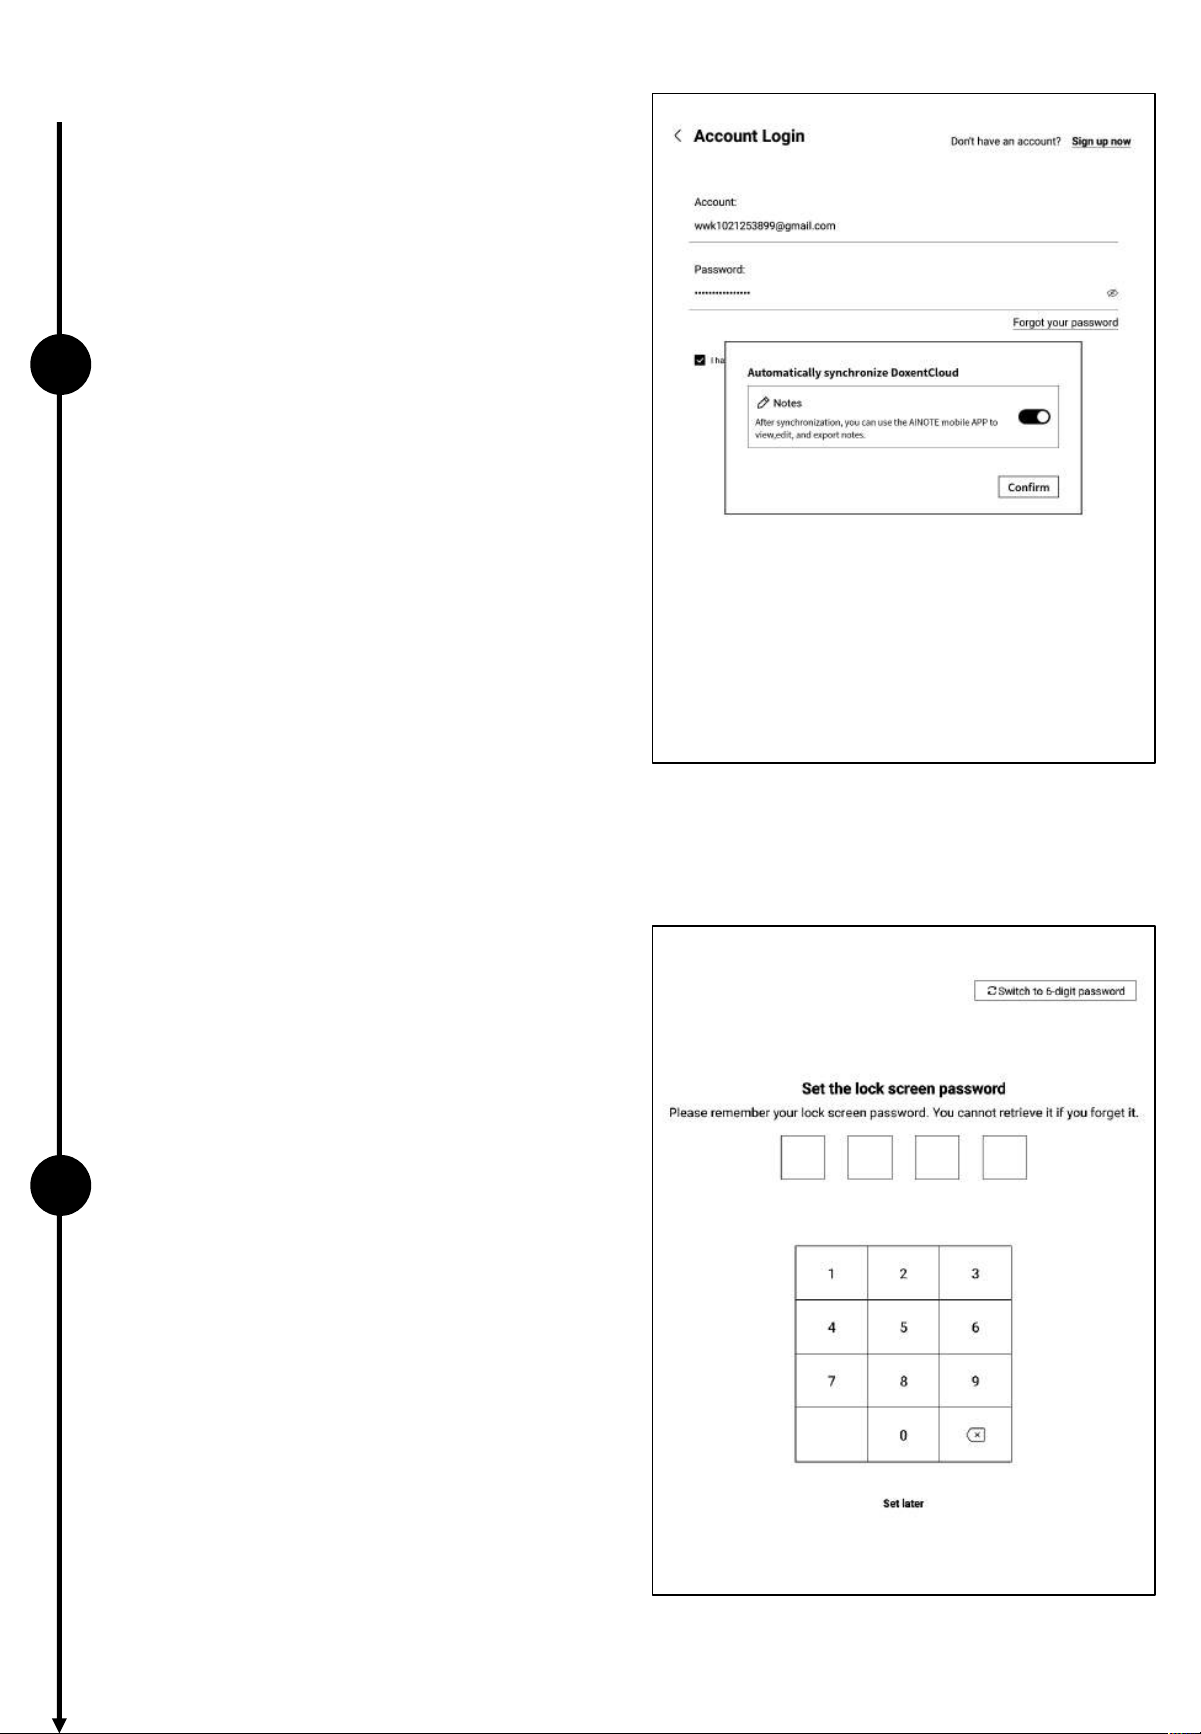
ü Note Synchronization
• After successfully logging in, the note
synchronization function will be enabled
by default. Notes created on the device
will be automatically uploaded to cloud
storage after syncing.
• Supports disabling automatic
synchronization, in which case all notes
will be saved locally.
ü Lock Screen Password Setup
• Supports setting a 6-digit password.
• If the lock screen password is forgotten, it
can be retrieved via email verification.
1.2 Device Activation
7
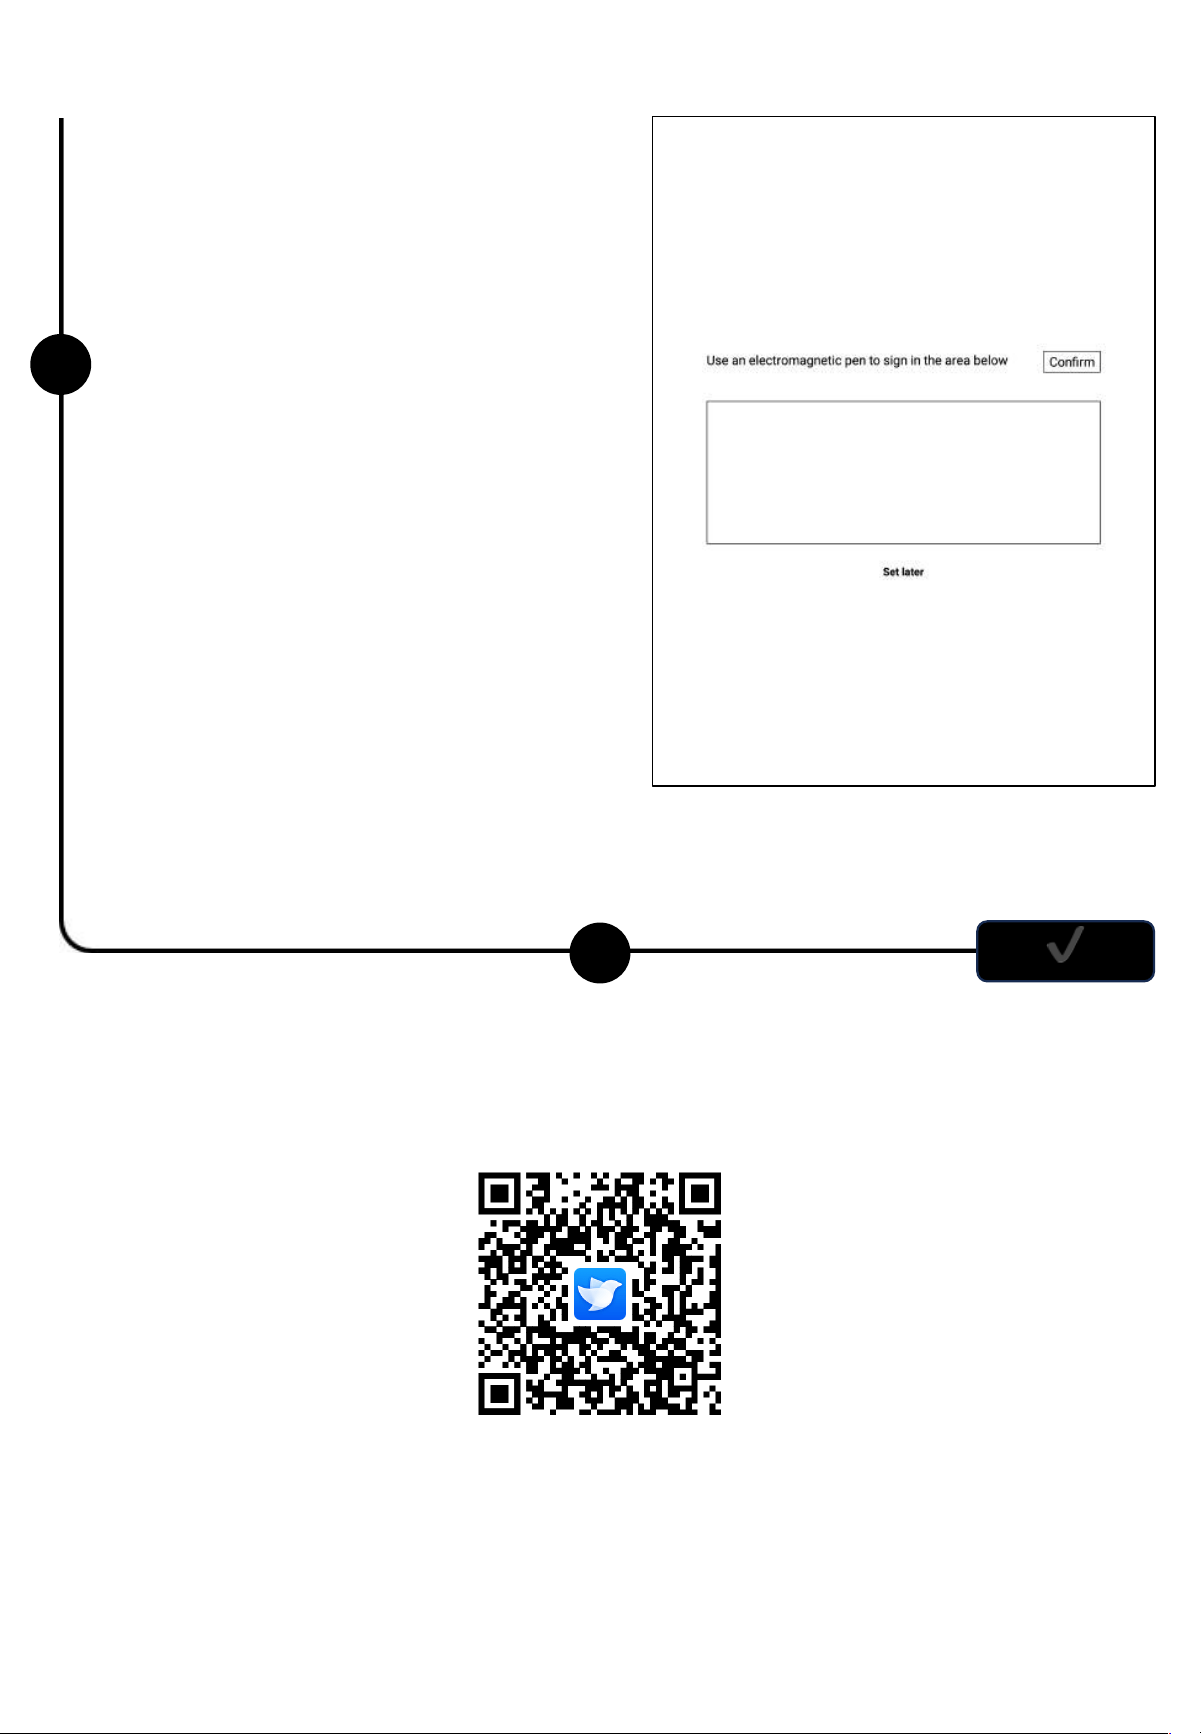
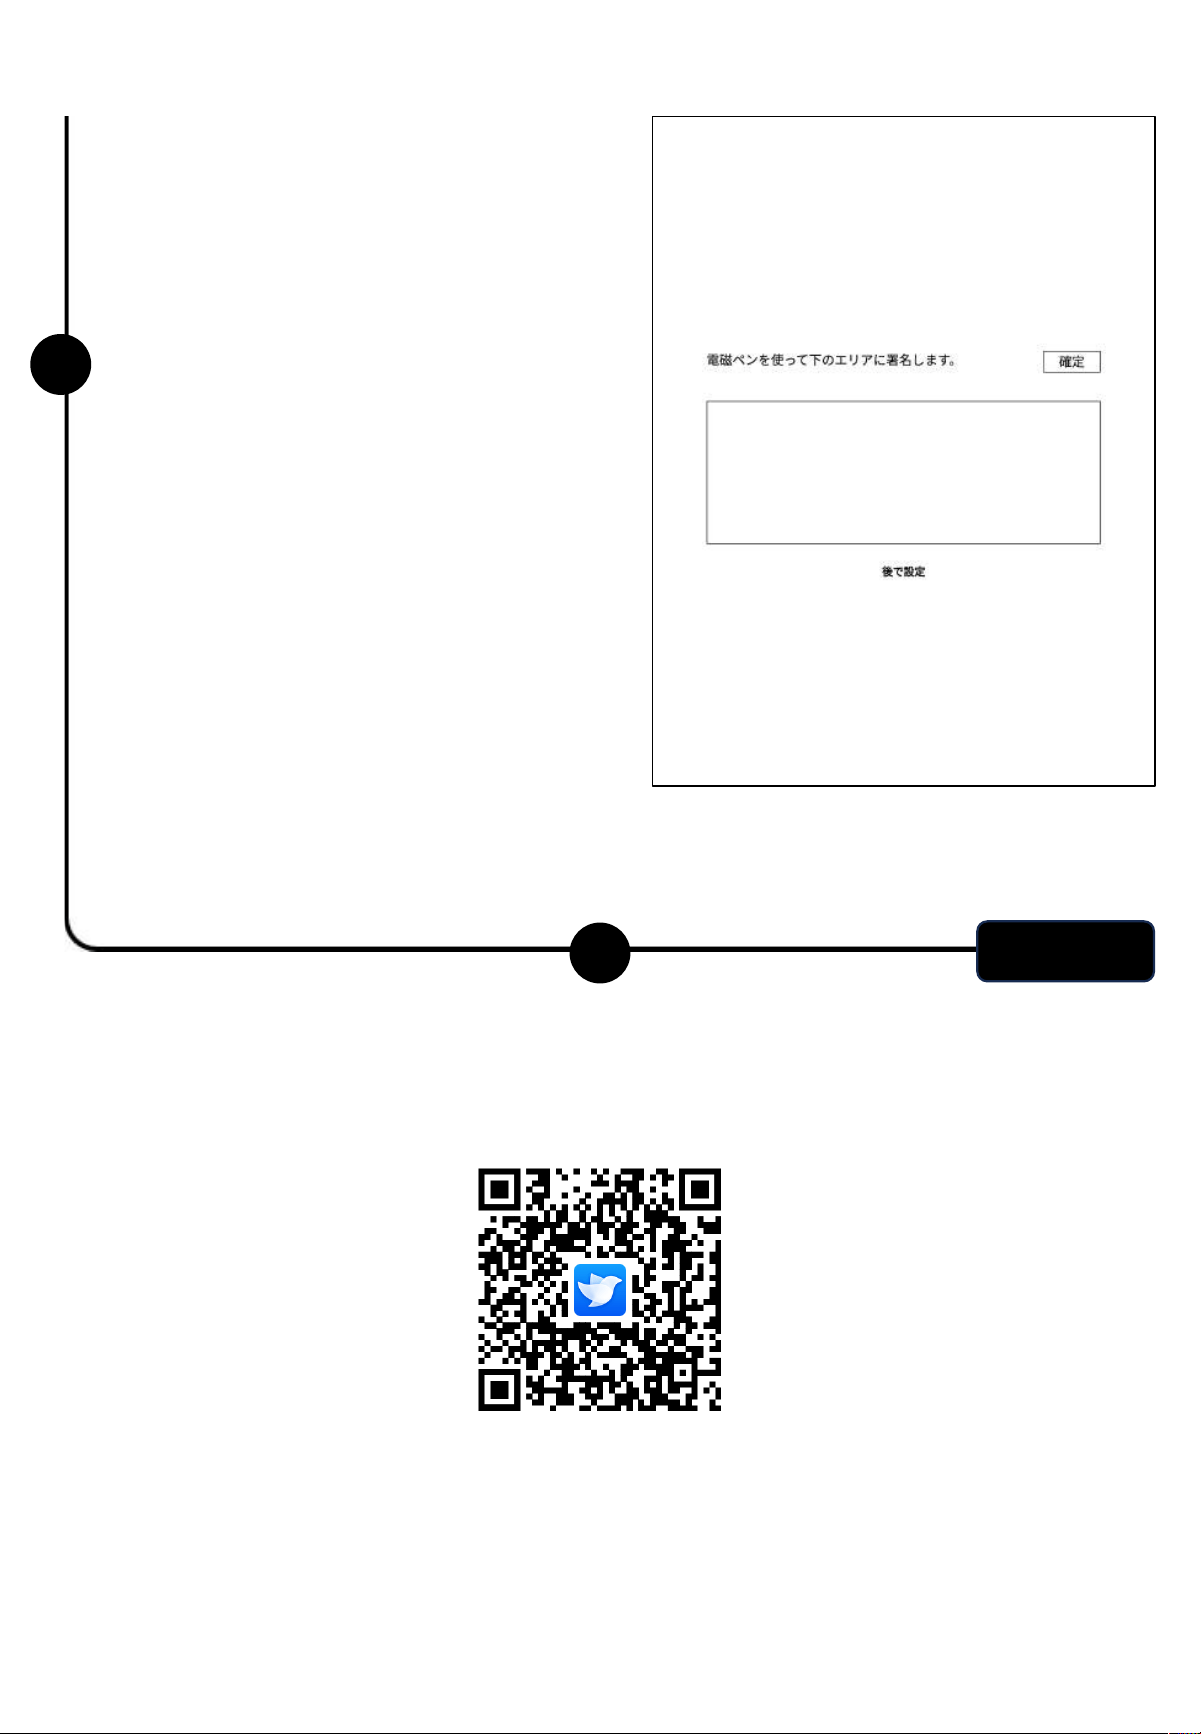
ü Signature Setup
• Supports using the electromagnetic pen to sign
in the signature box. The signature will
continuously be displayed on the lock screen.
ü Activation Complete!
*You can scan the QR code below to download the [AINOTE mobile]
app.
• The signature can also be edited in the device
settings module.
8
✔
The [AINOTE mobile] app is a companion app for this device. It supports multi-
device synchronization for note viewing and allows editing and sharing of notes on
the app, making note management more efficient.
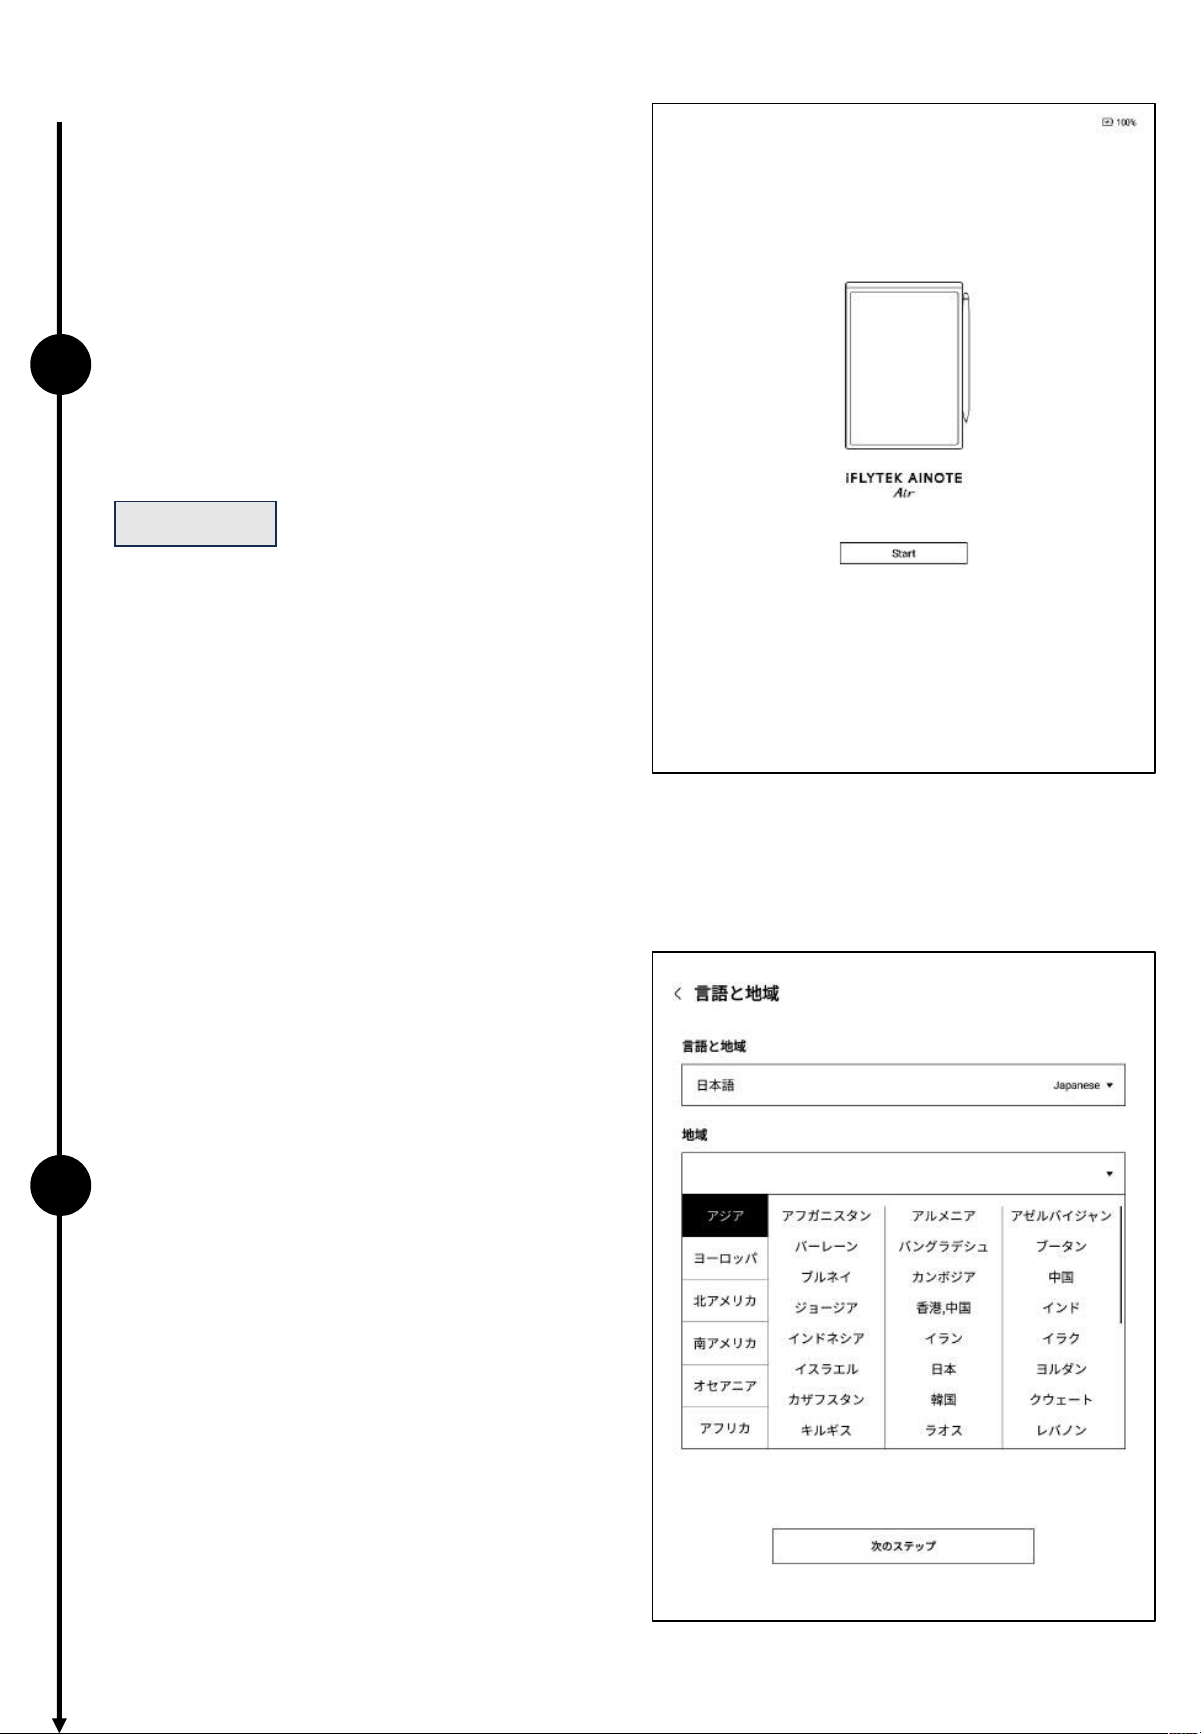
1.3 Quick operation
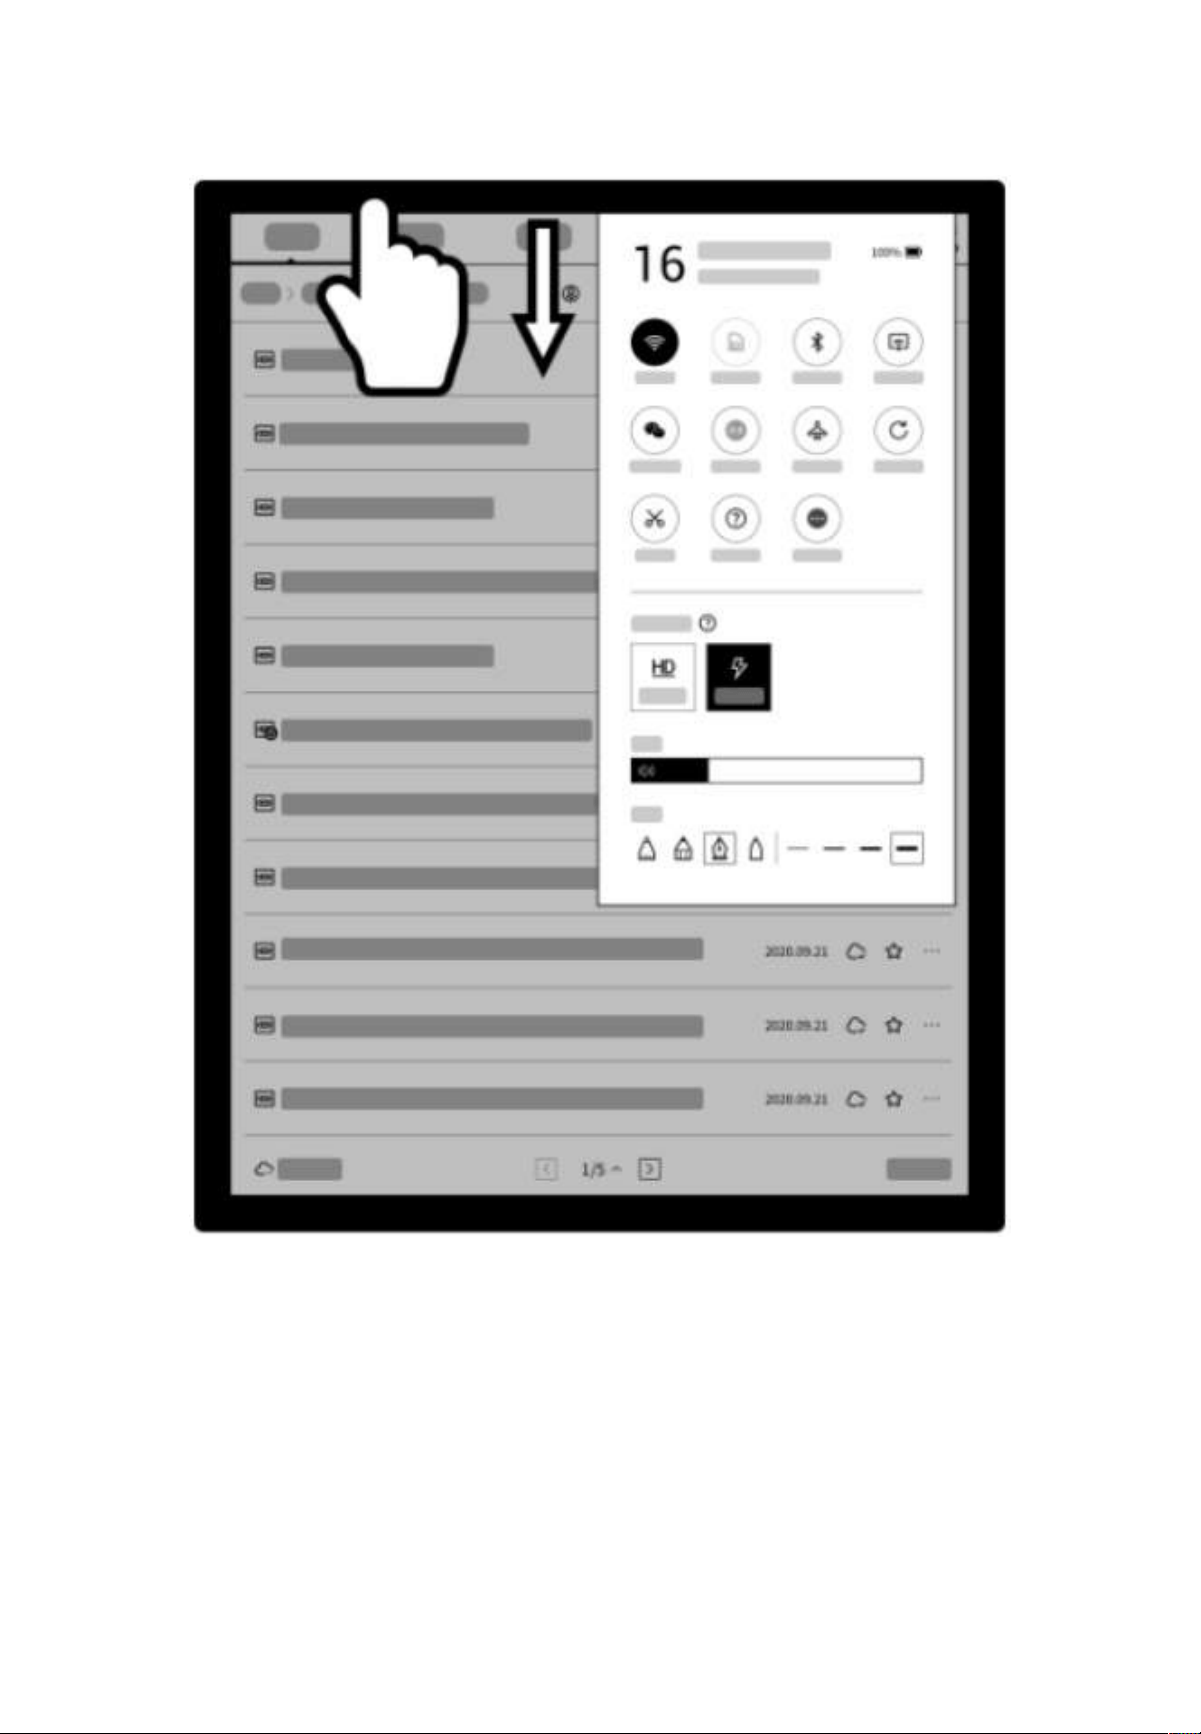
Quickly control the overall situation
Quickly turn on WiFi, change sound levels, pen shapes, and more. To
open Control Center, swipe down from the top, or tap Status info on
the status bar in the upper-right corner.

1.3 Quick operation
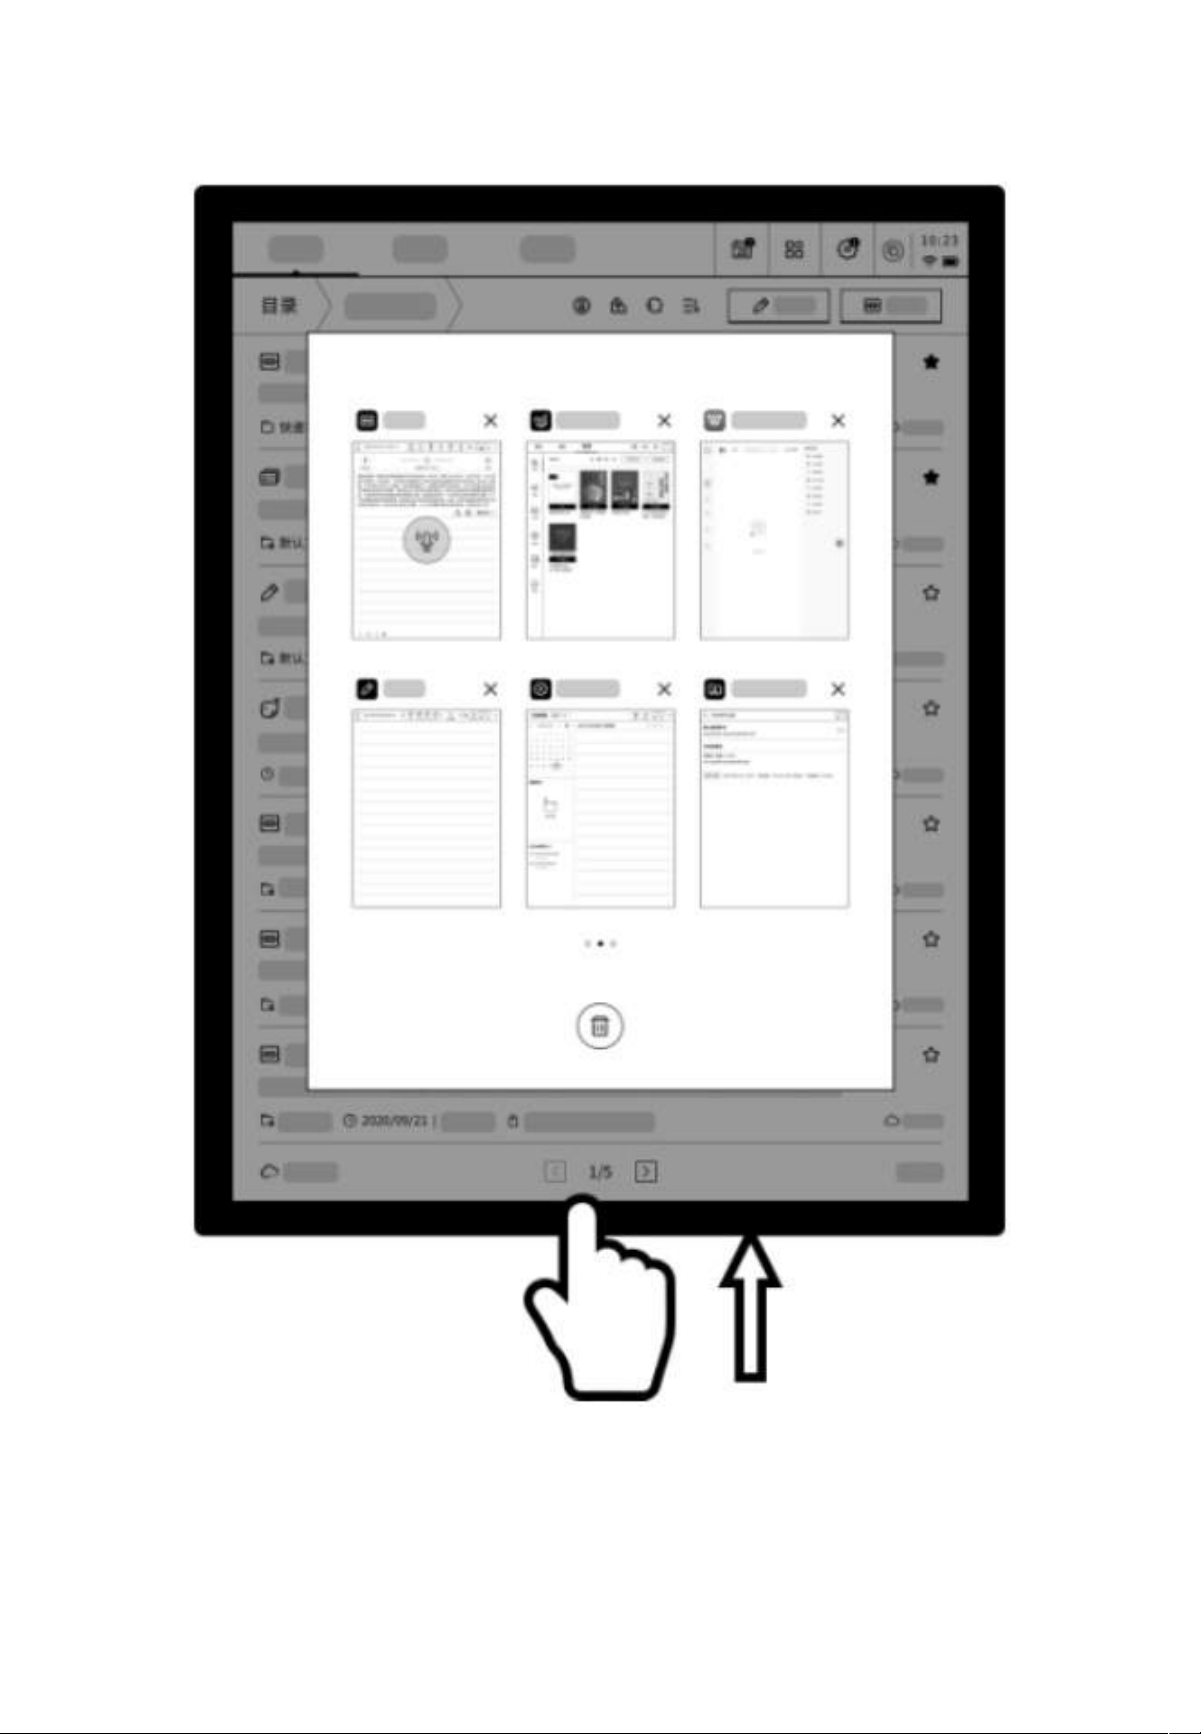
To return to a recent task, swipe up from the bottom and tap to open
the task, or tap Open in the status bar in the upper right corner.
Convenient switching between tasks

1.3 Quick operation
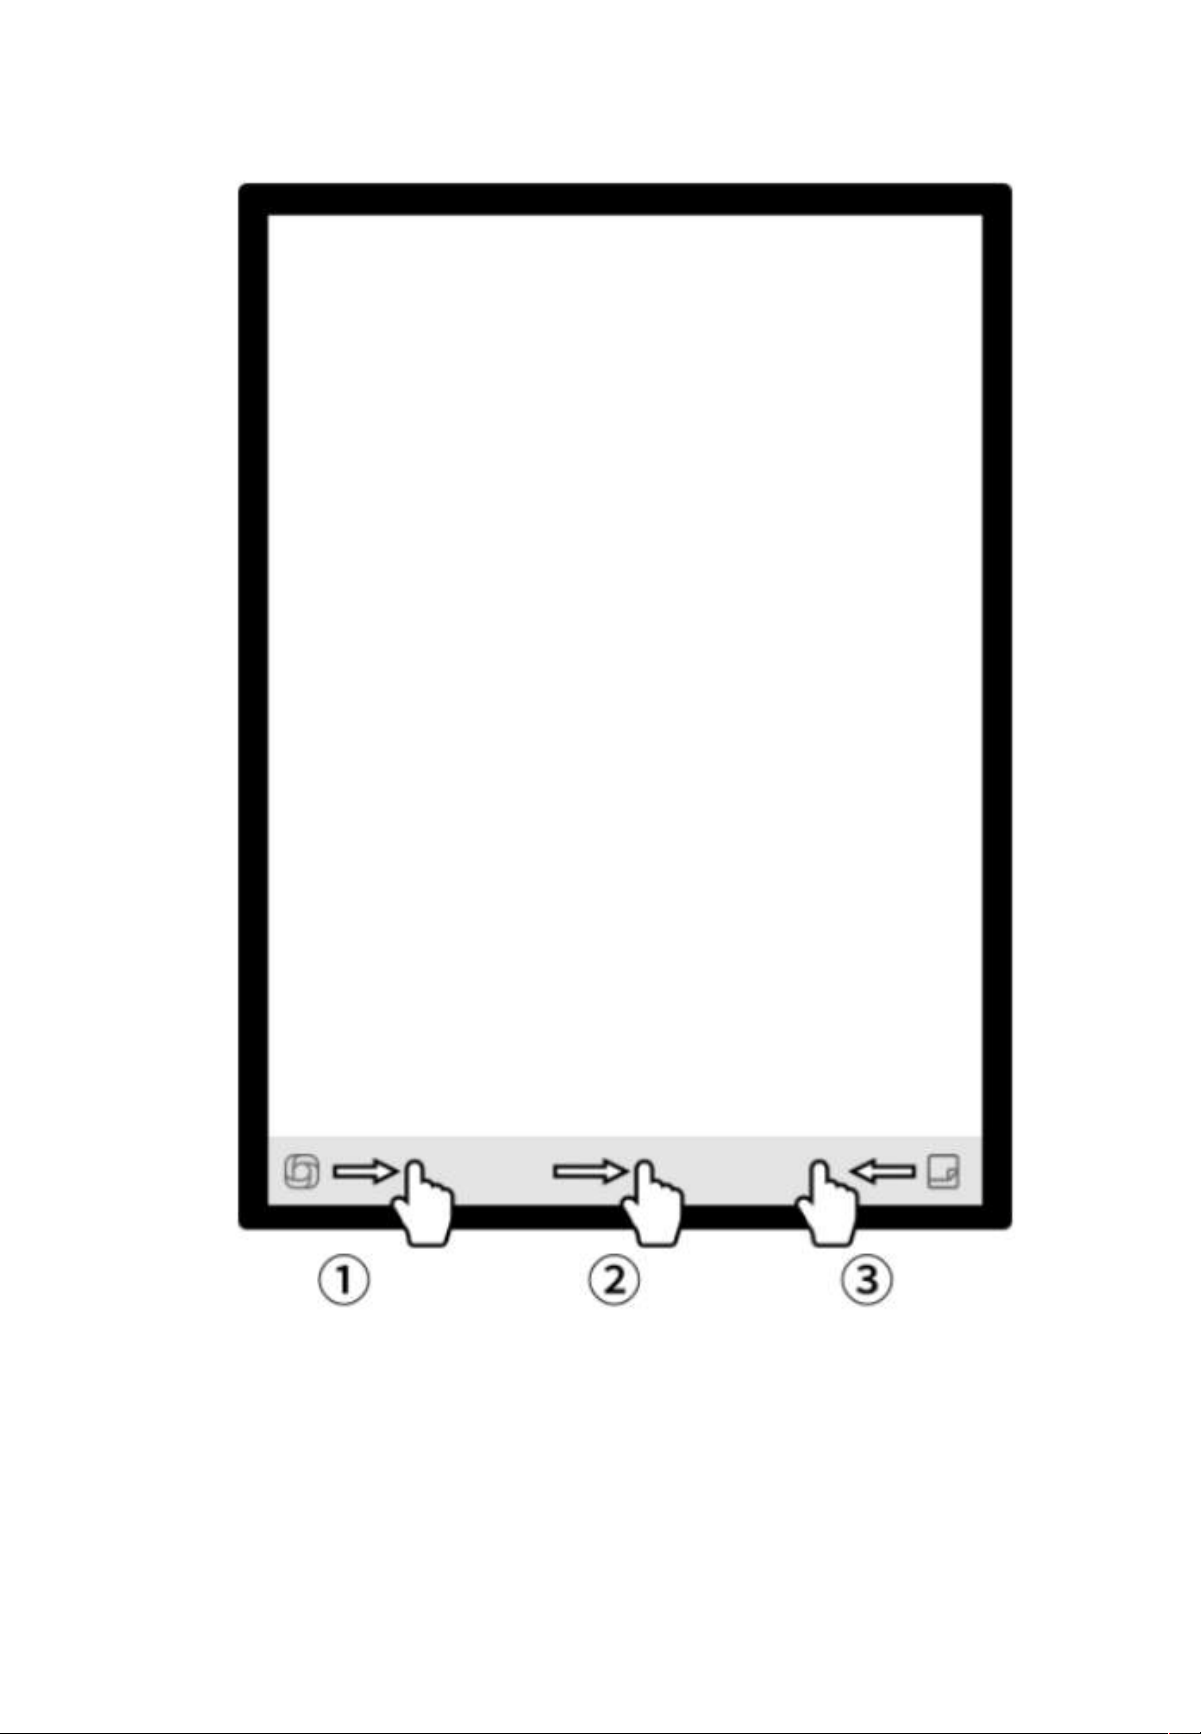
❶ Swipe to quickly open the OpenChat interface for chatting
❷ Enter the fast flipping mode and control the fipping speed by sliding
❸ Quickly open Quick Notes for handwriting
How to use the "Quick Bar"?
2.1 Writing
• While writing, you can use the electromagnetic
pen for freehand writing or drawing, making it
ideal for meeting notes, creative brainstorming,
and personal learning.
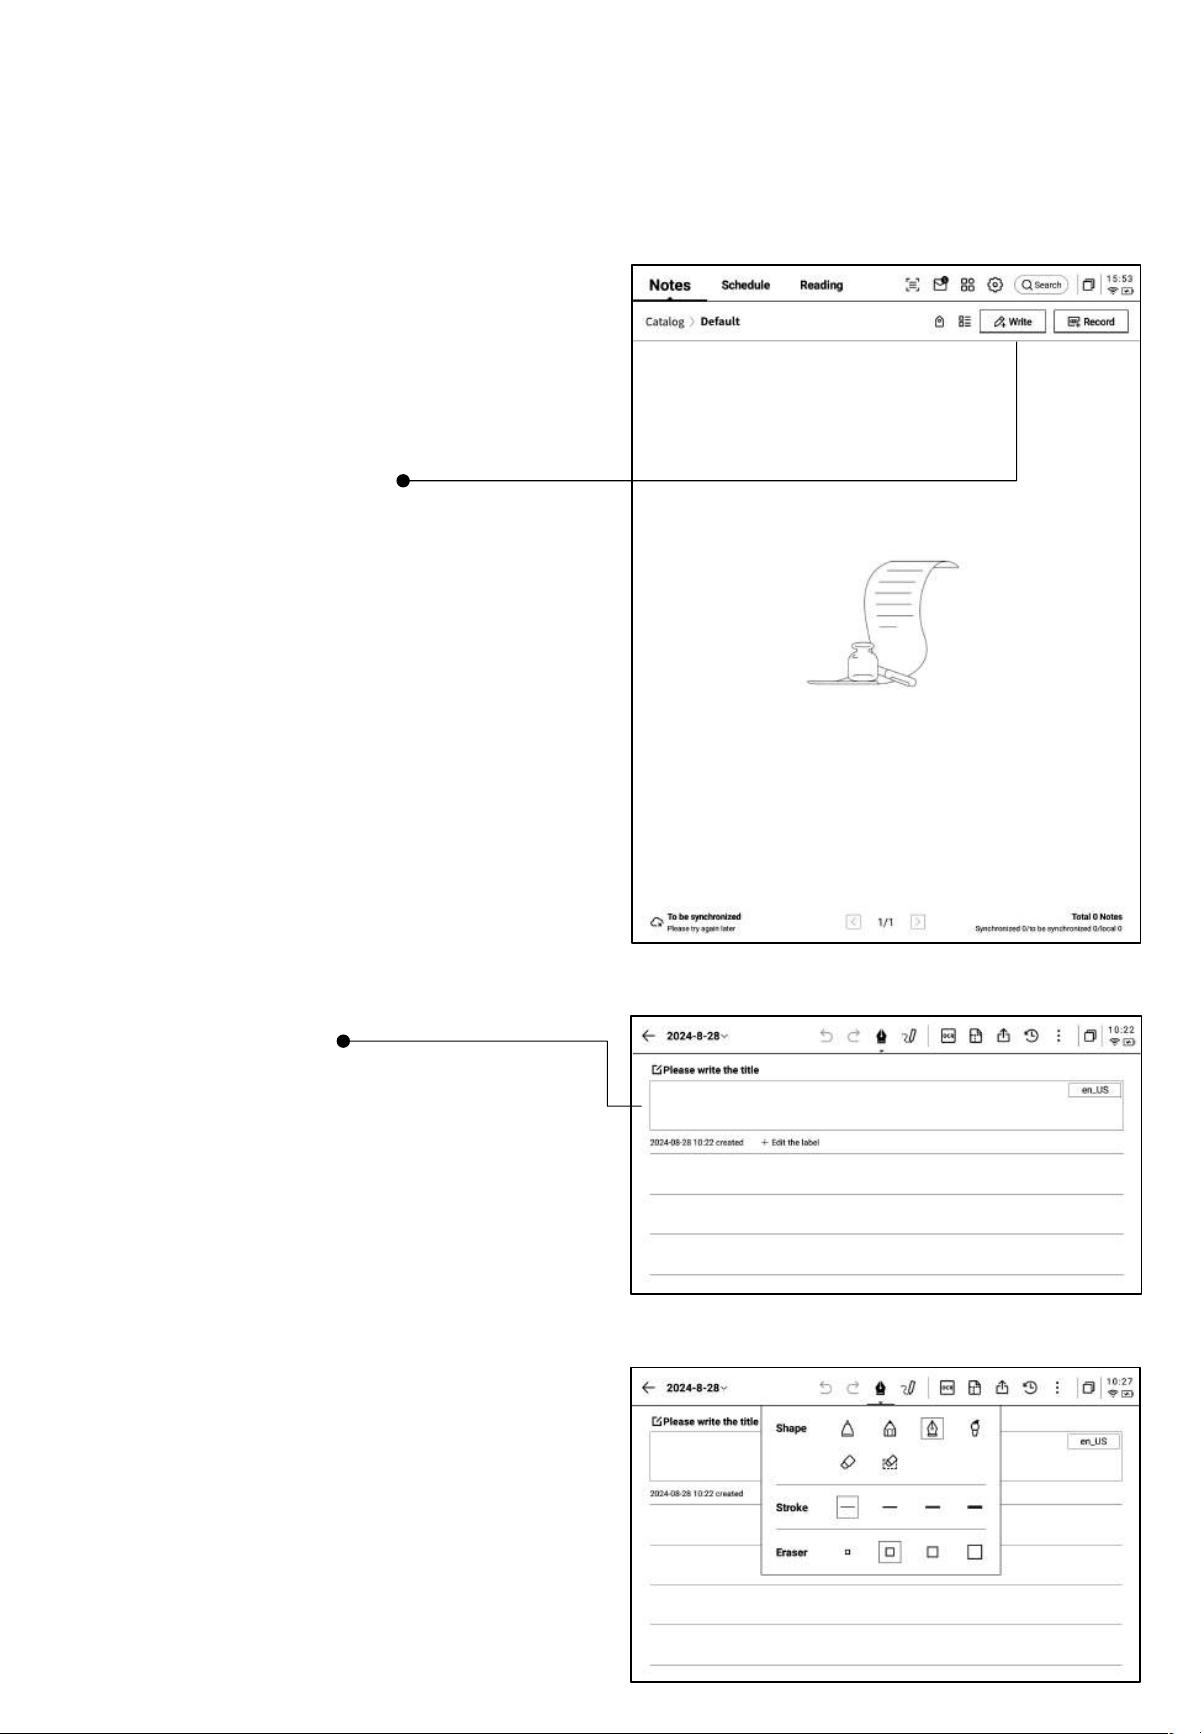
2.1.1 Create a New Note
• You can use the electromagnetic pen to write in
the title box. The handwritten content will be
automatically converted to printed text as the title.
2.1.2 Title the Note
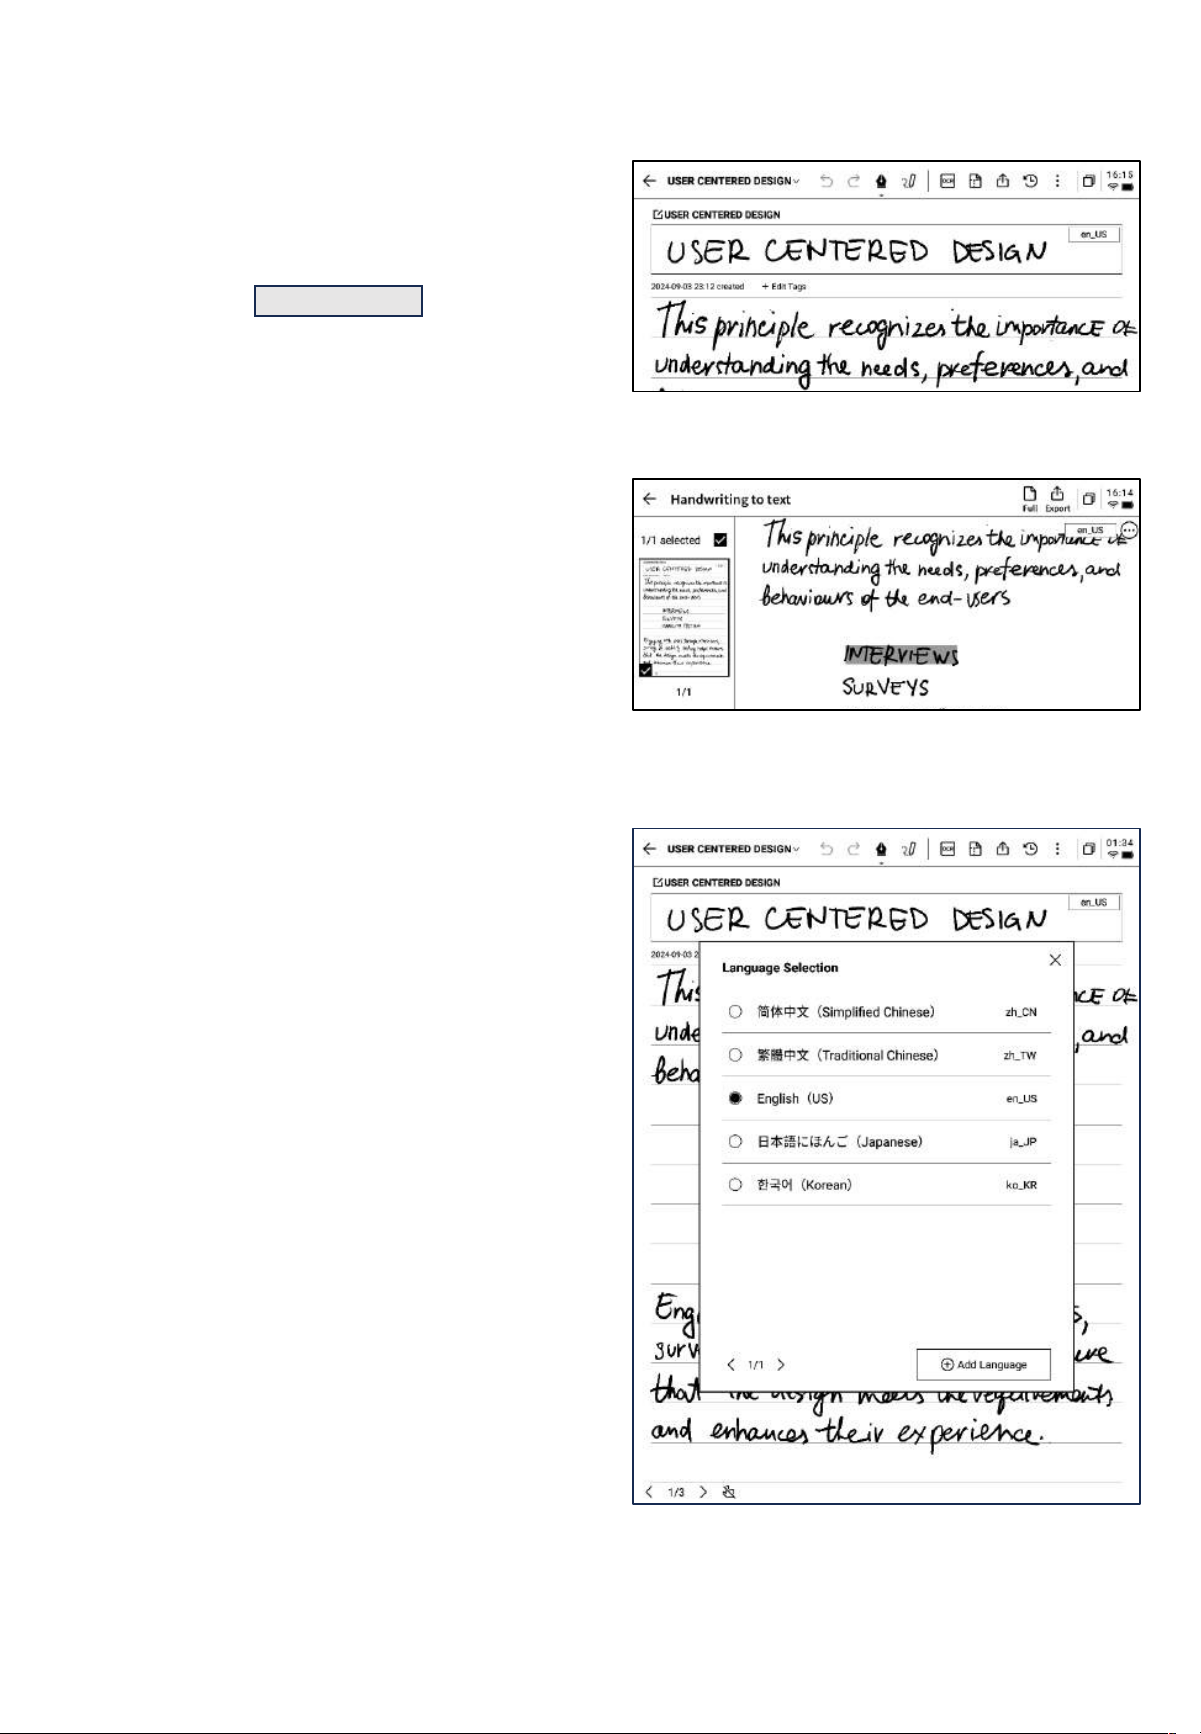
• The handwriting recognition supports custom
language selection. Click the language button in
the upper right corner to enter the language
selection interface, where you can add or select
the desired language for recognition. This feature
supports multiple languages.
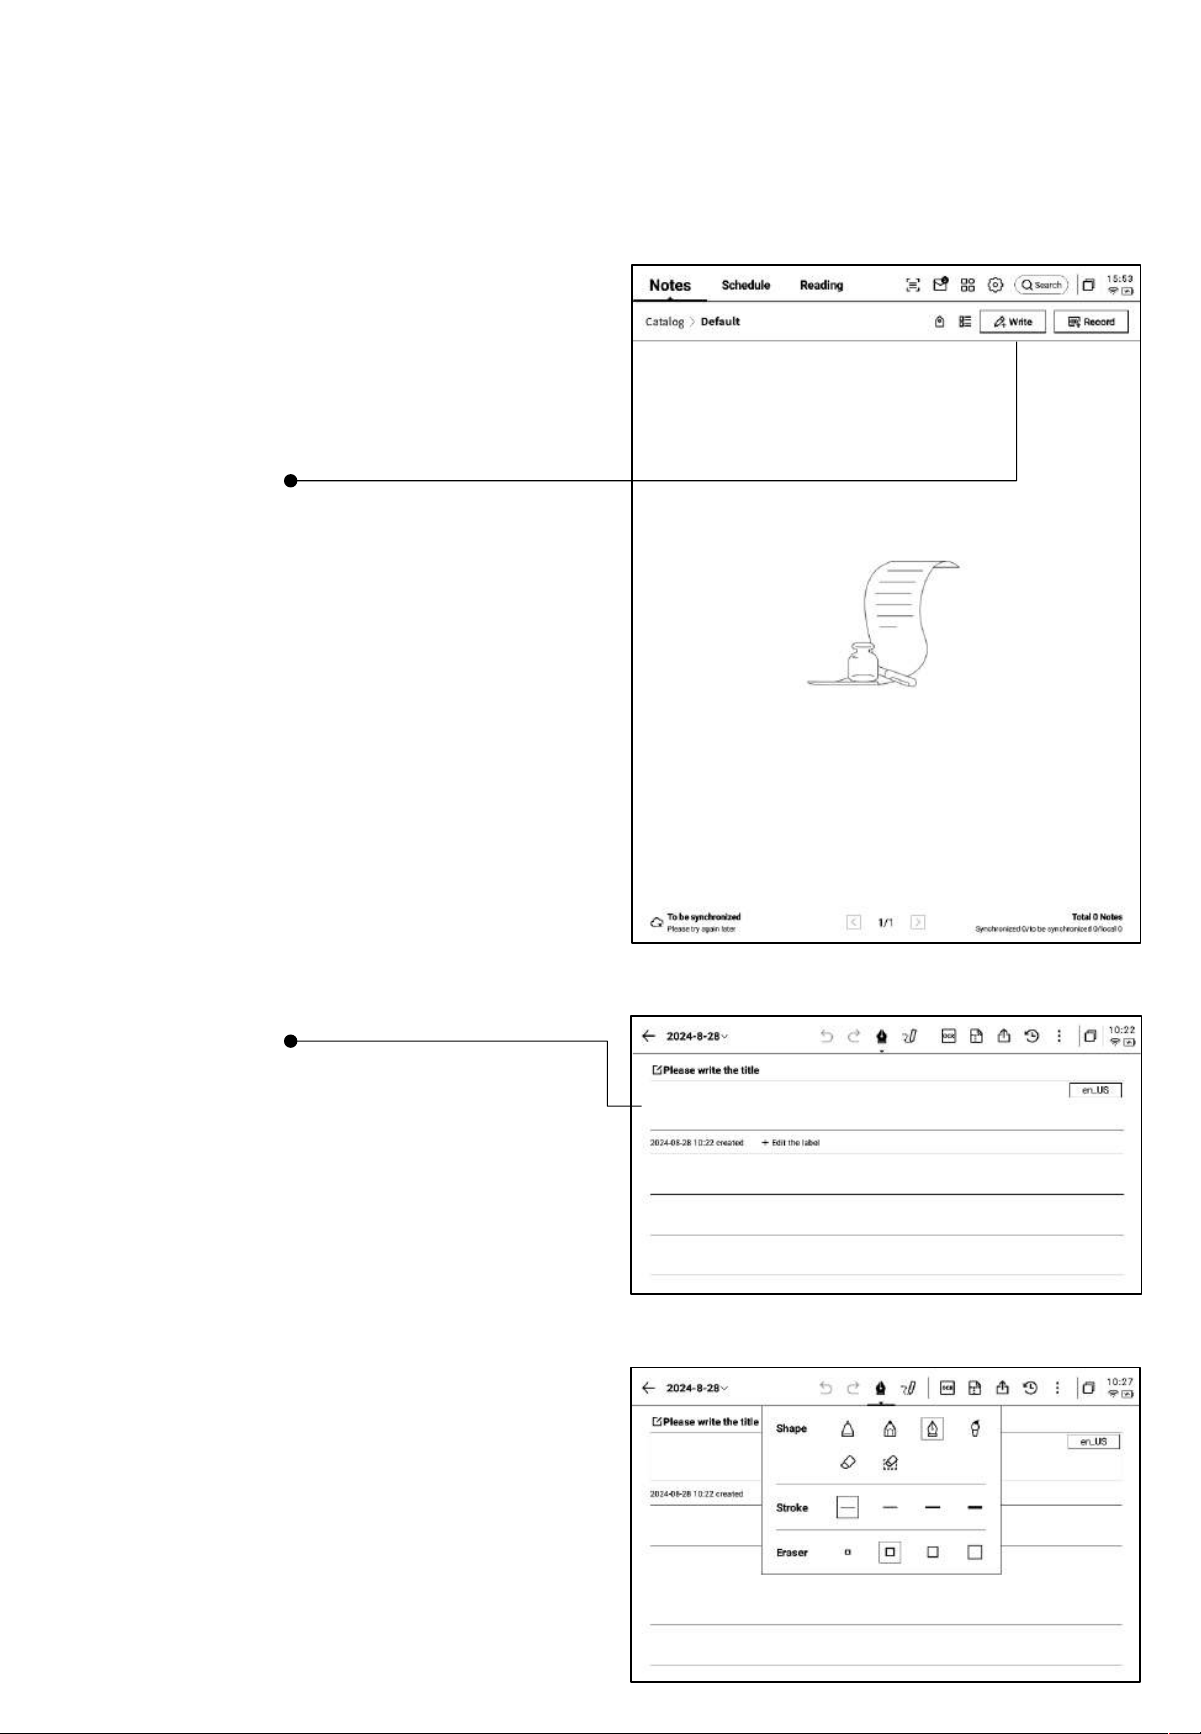
2.1.3 Pen Tool Options
• Click the pen icon to switch between the pen,
brush, and eraser functions.
• On the notes page, click the [Write] button to
create a new note.
Chapter 2 Notes
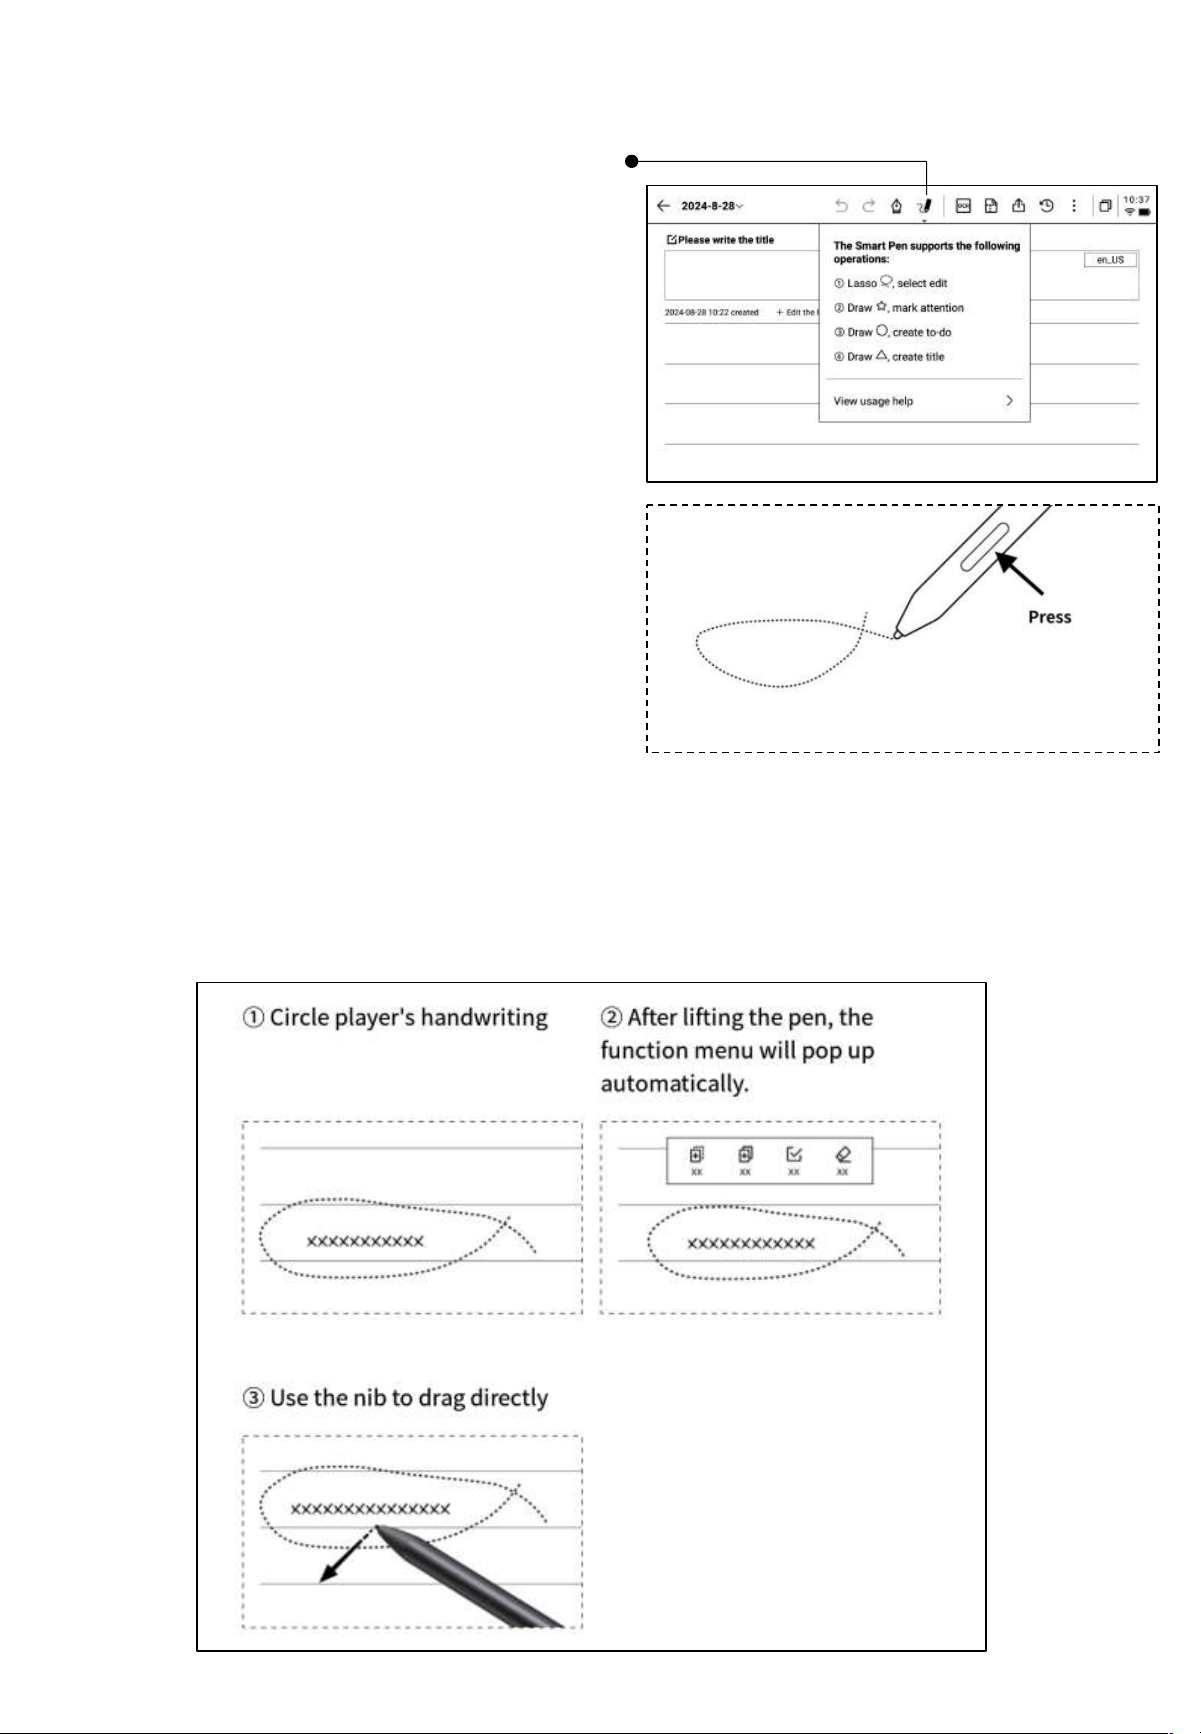
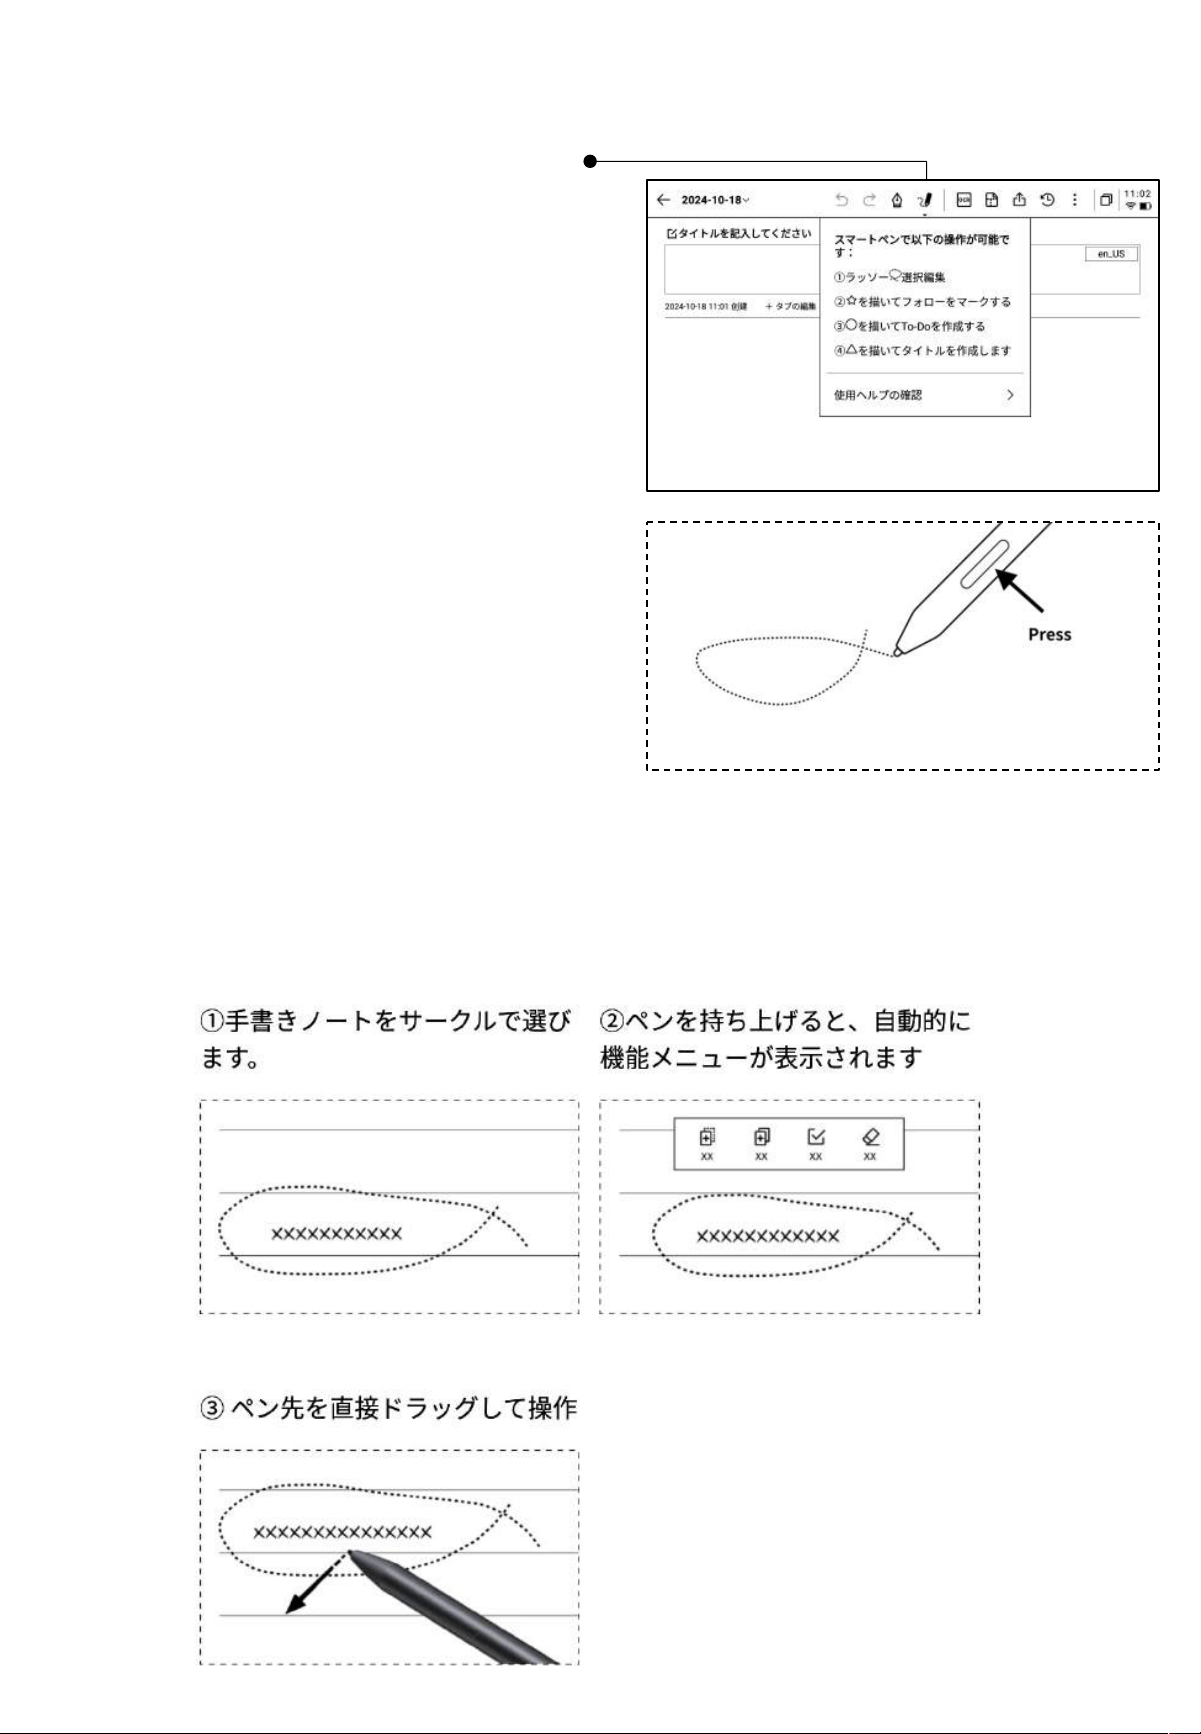
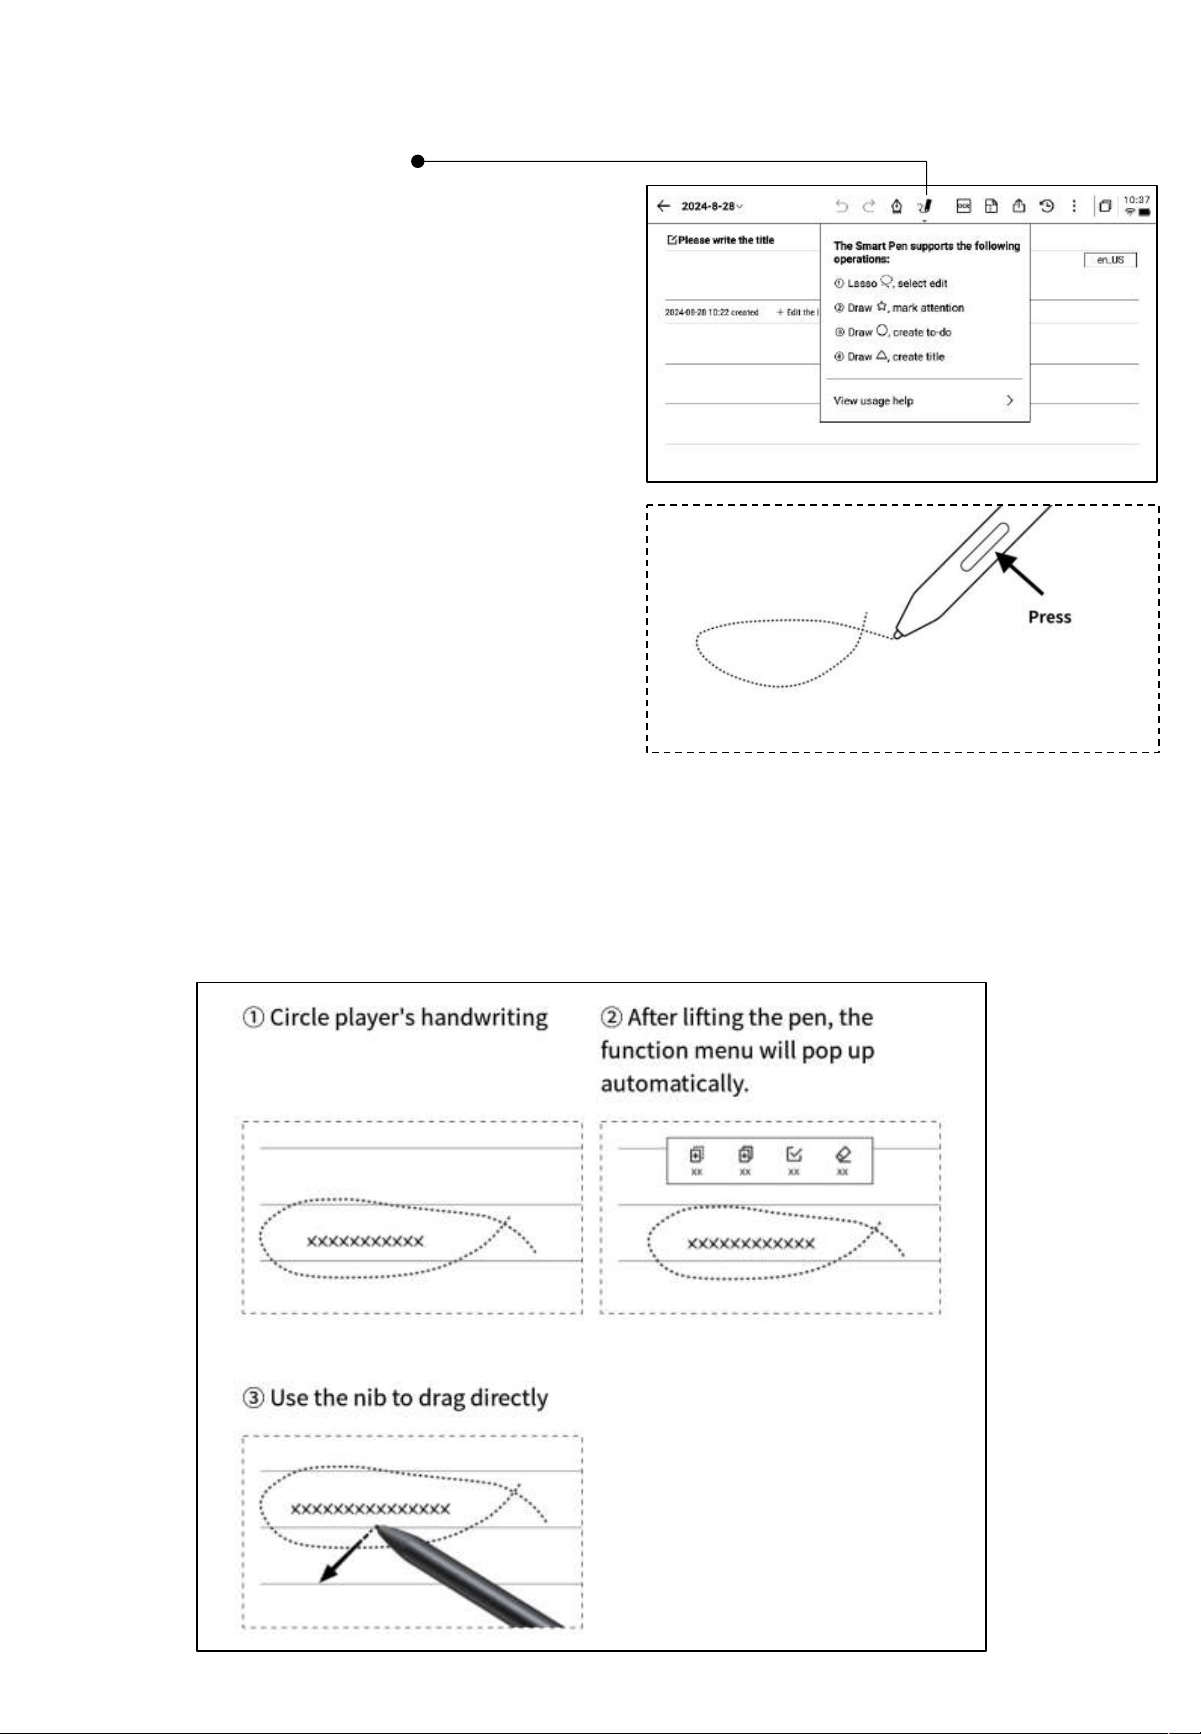
2.1.4 How to Switch to the Smart Pen
• Click the smart pen button to switch.
• Click the smart pen again to open the
operation guide.
• Supports viewing detailed operation
instructions.
Tips:
• Use the keys on the body of the
electromagnetic pen to quickly switch to
the smart pen
• If you want to switch to the smart pen,
besides clicking the smart pen at the top,
you can also press and hold the button on
the electromagnetic pen.
2.1.5 Smart Pen Features
Feature 1: Lasso
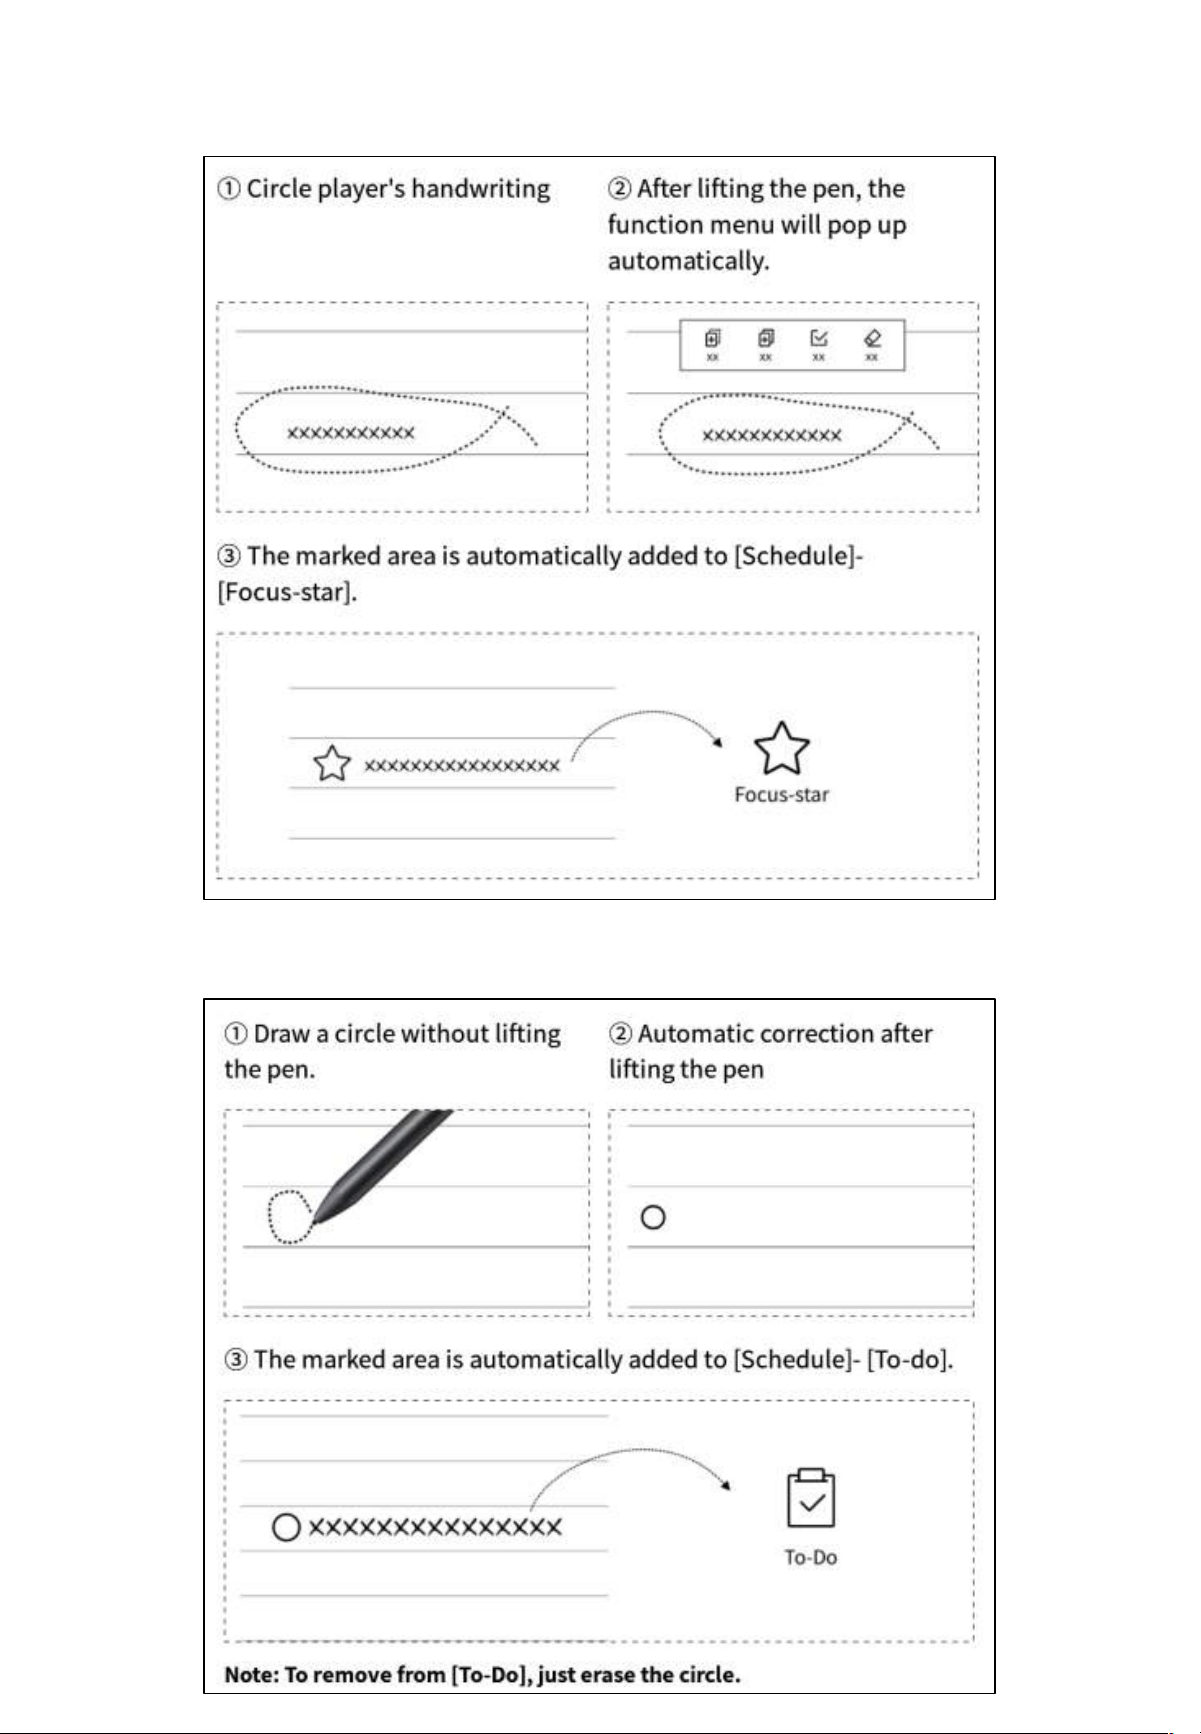
Feature 3: To-Do
Feature 2: Focus-star
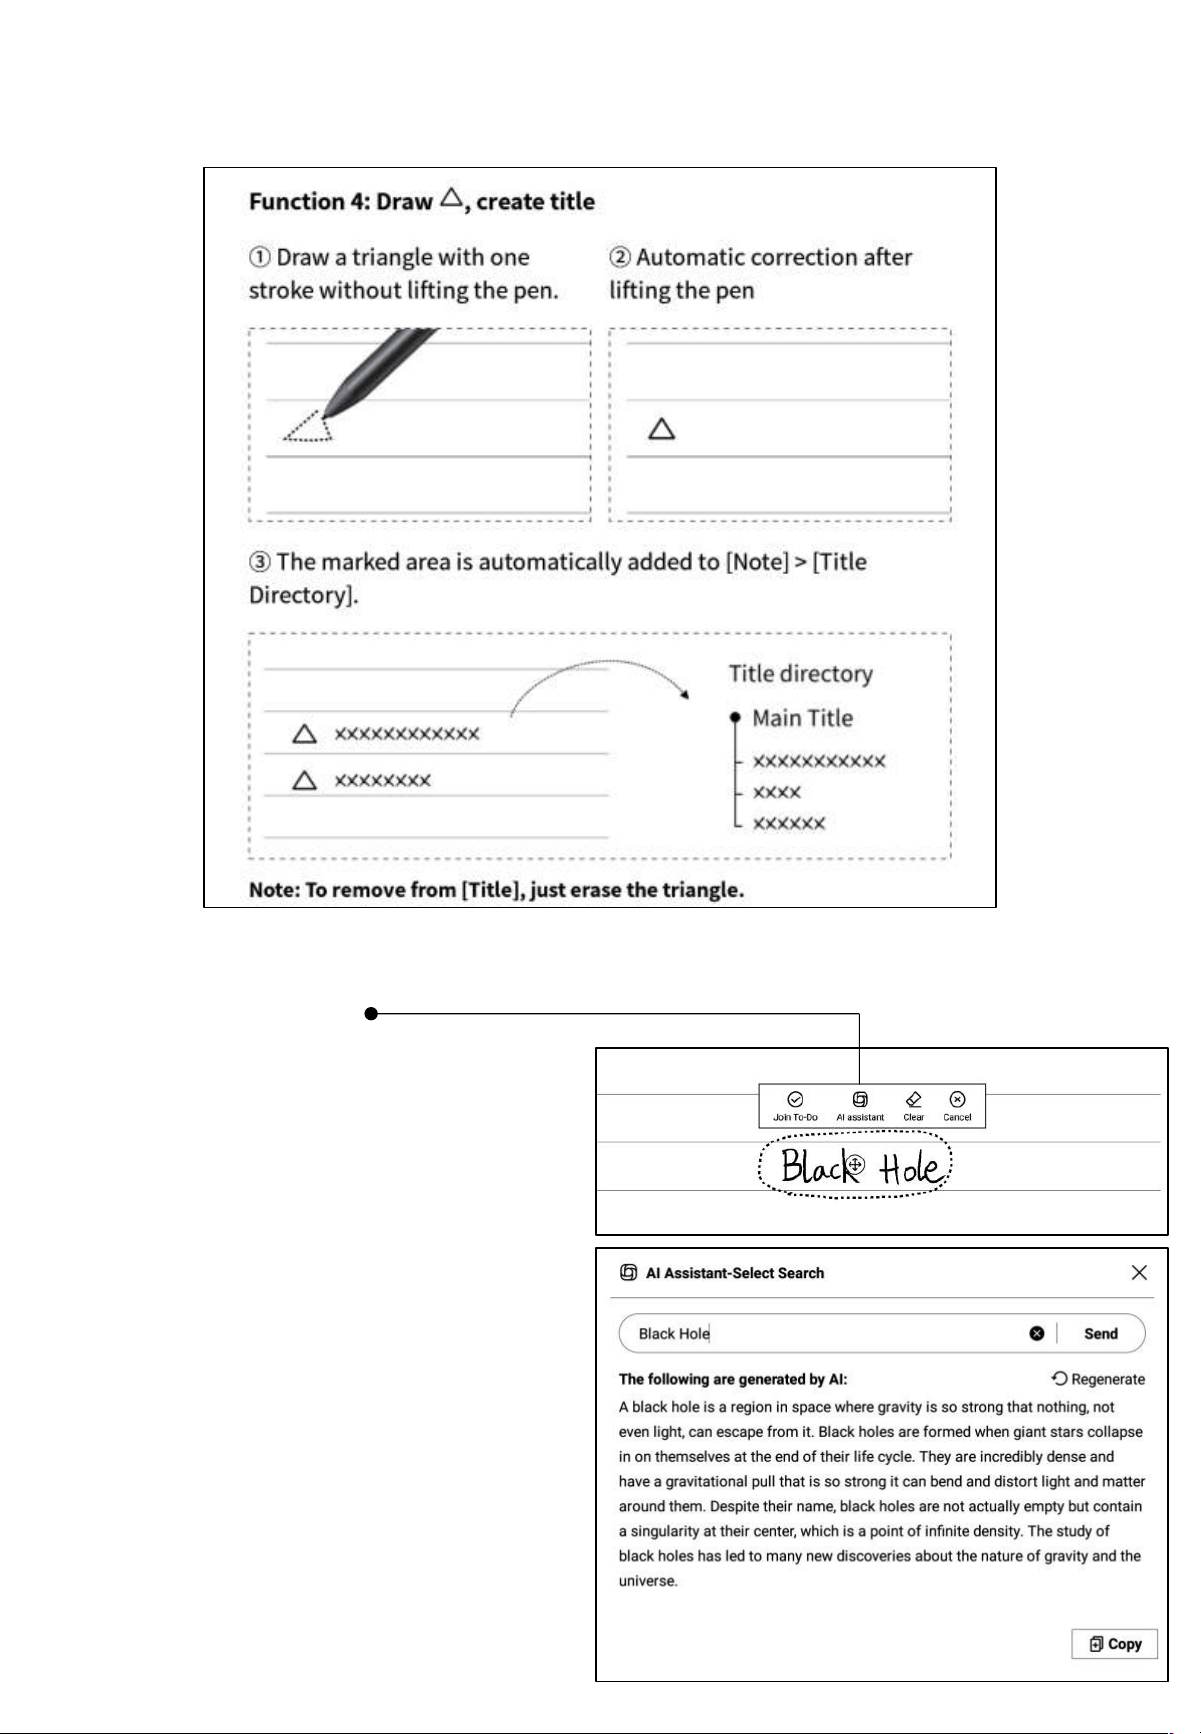
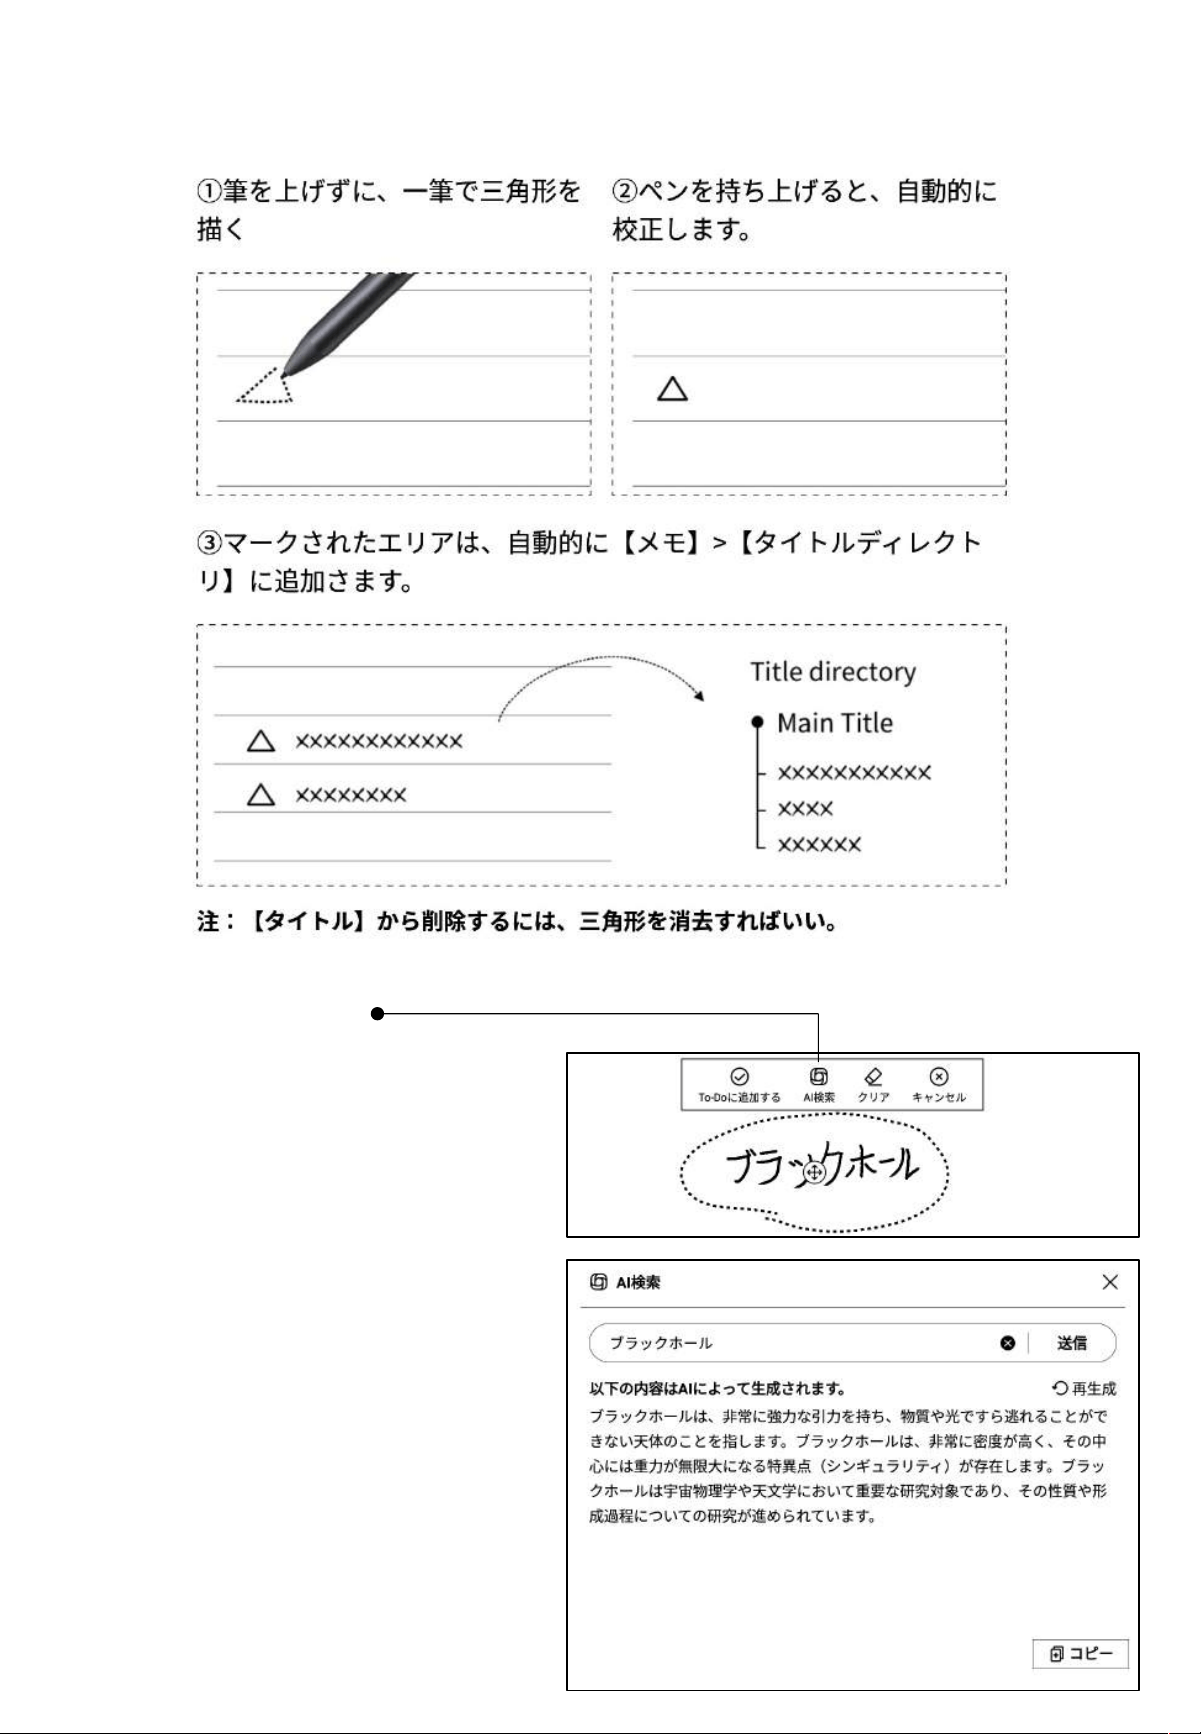
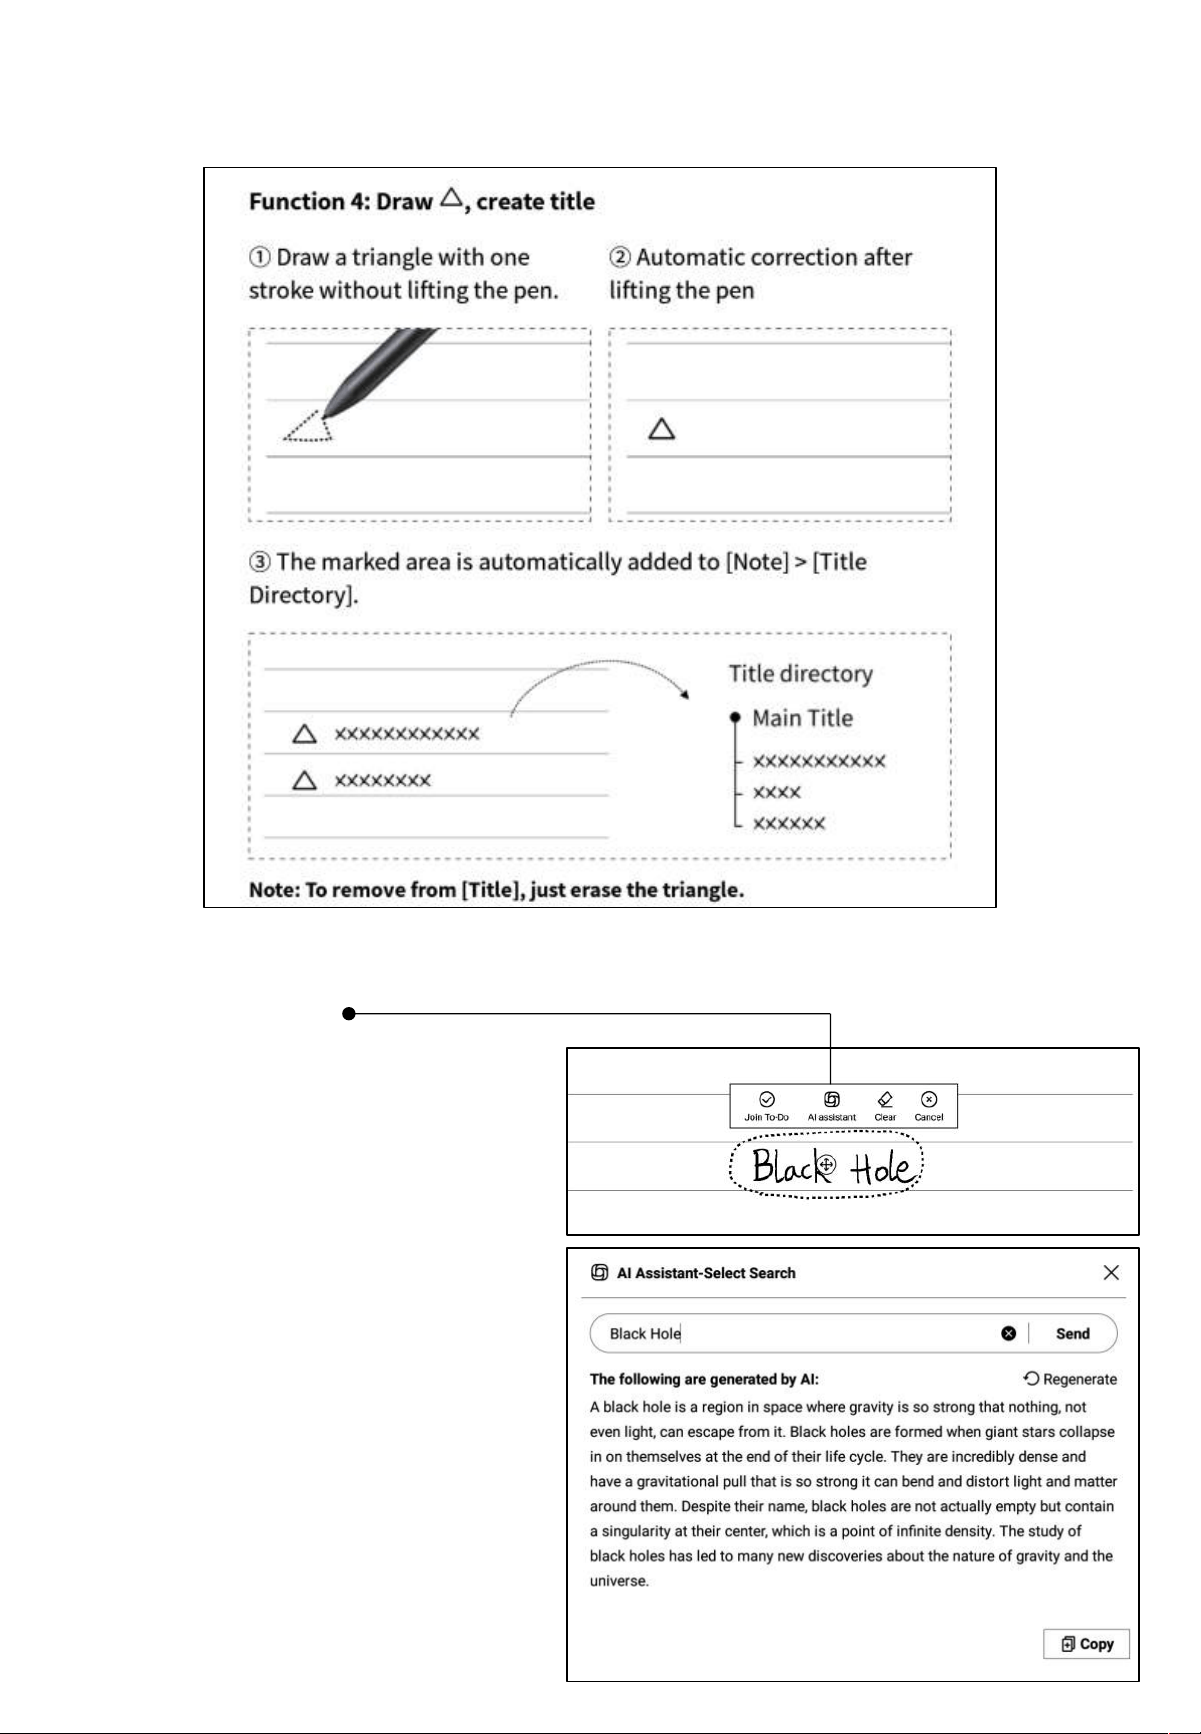
Feature 4: Add Title
2.1.6 Lasso Search
• After circling the handwritten content
with the smart pen, you can click the
assistant button to perform a search.
The device will recognize the
handwritten content within the circled
area and convert it into text for
searching.
• Note: You need to configure your
personal OpenAI API Key in the
settings interface to use this feature.
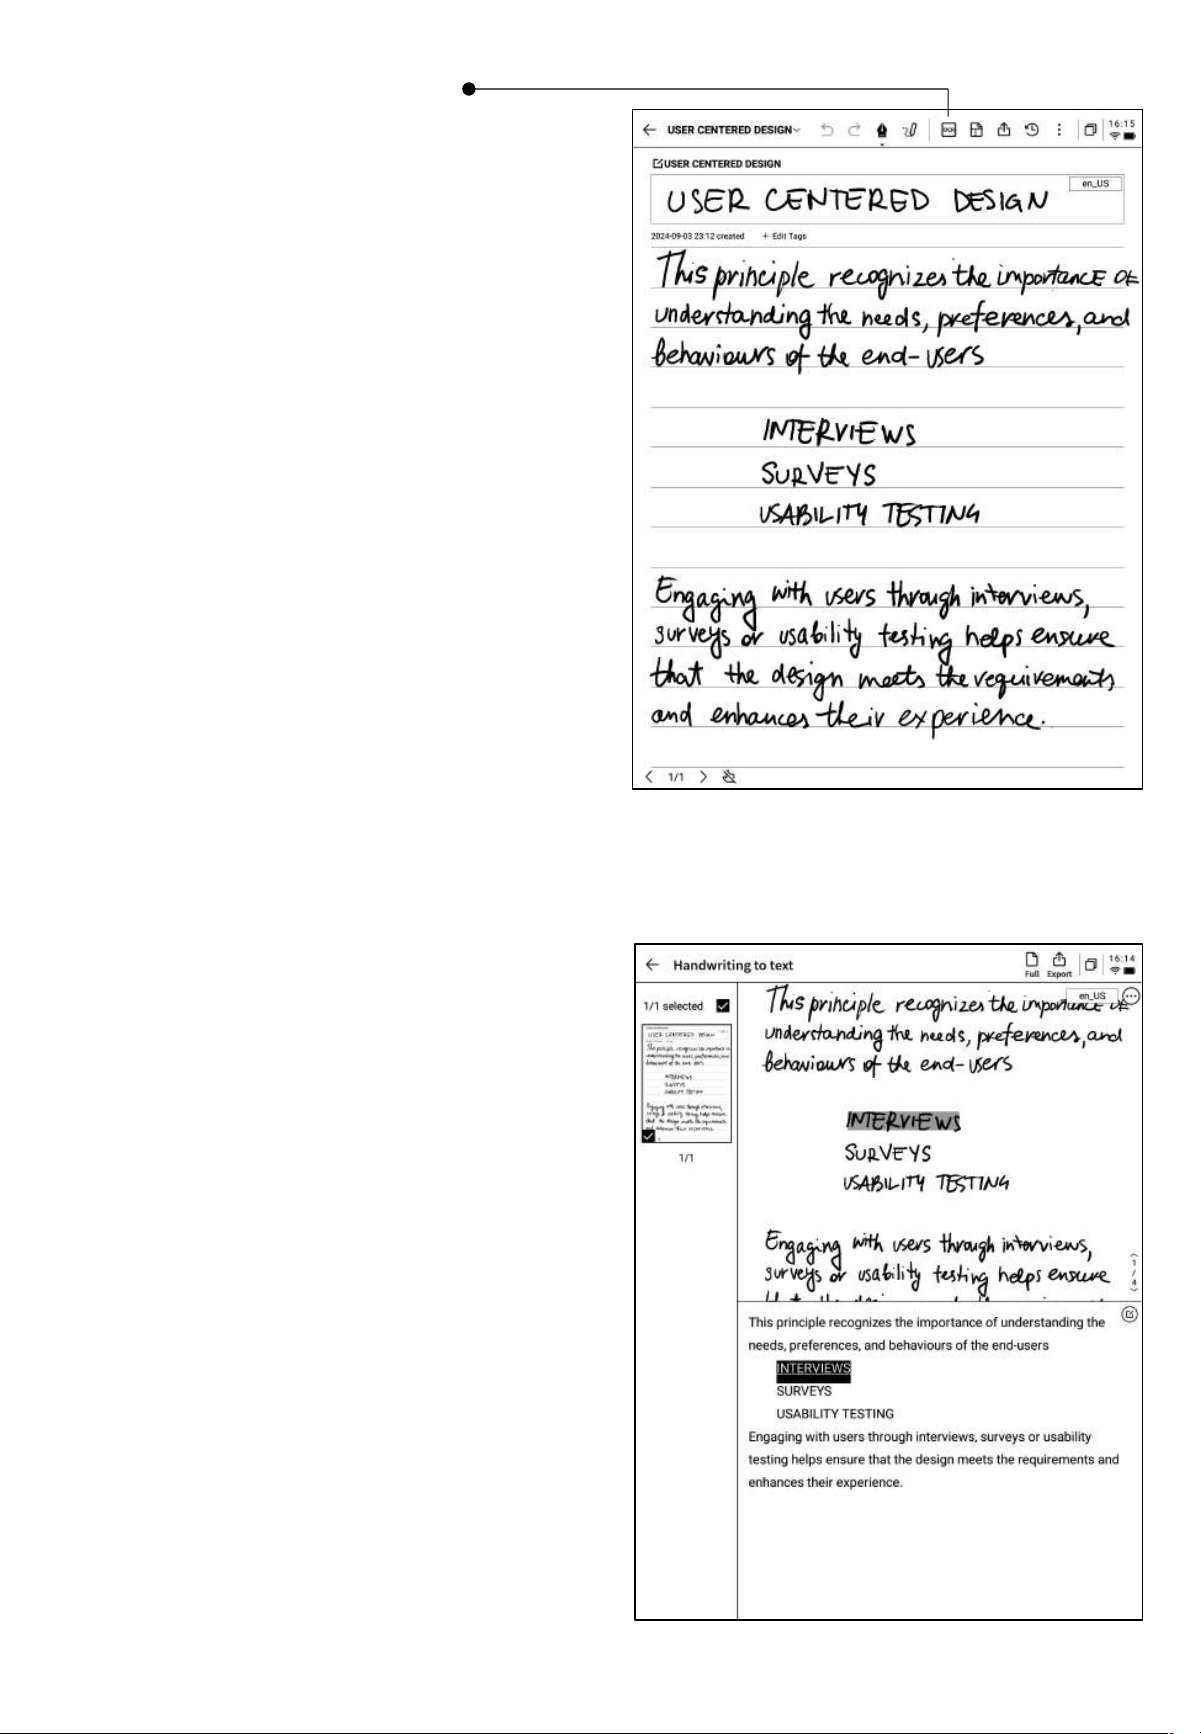
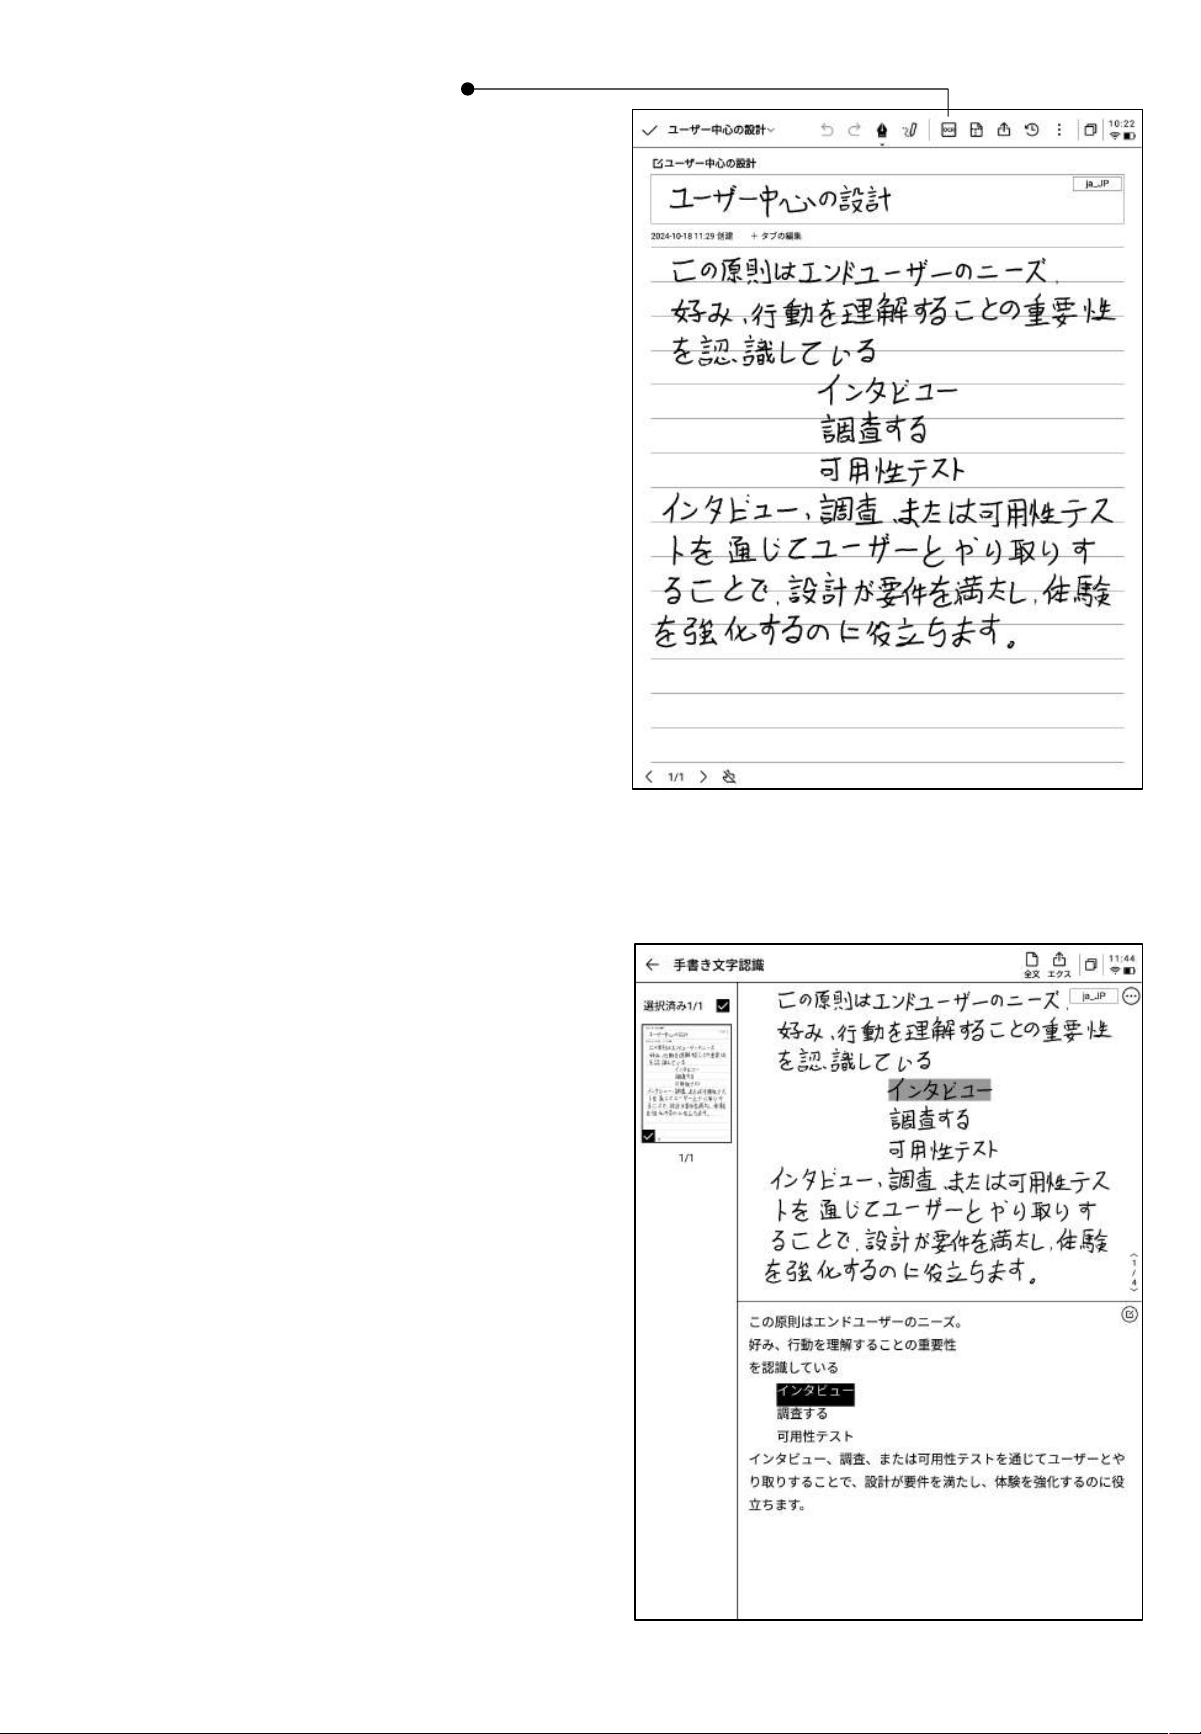
2.1.7 Handwriting to Text
• Provides the ability to convert handwritten
notes into text. Click the button to generate
the text, and the handwritten content will
be recognized based on the selected
language.
• All recognition is done locally, without the
need for an internet connection.
• The upper part displays the handwritten
content, and the lower part shows the
converted text. You can click to view the
corresponding relationship.
• Supports clicking [Full Text] at the top to
view the complete converted text.
• Supports clicking [Export] at the top to
export and share the converted text.

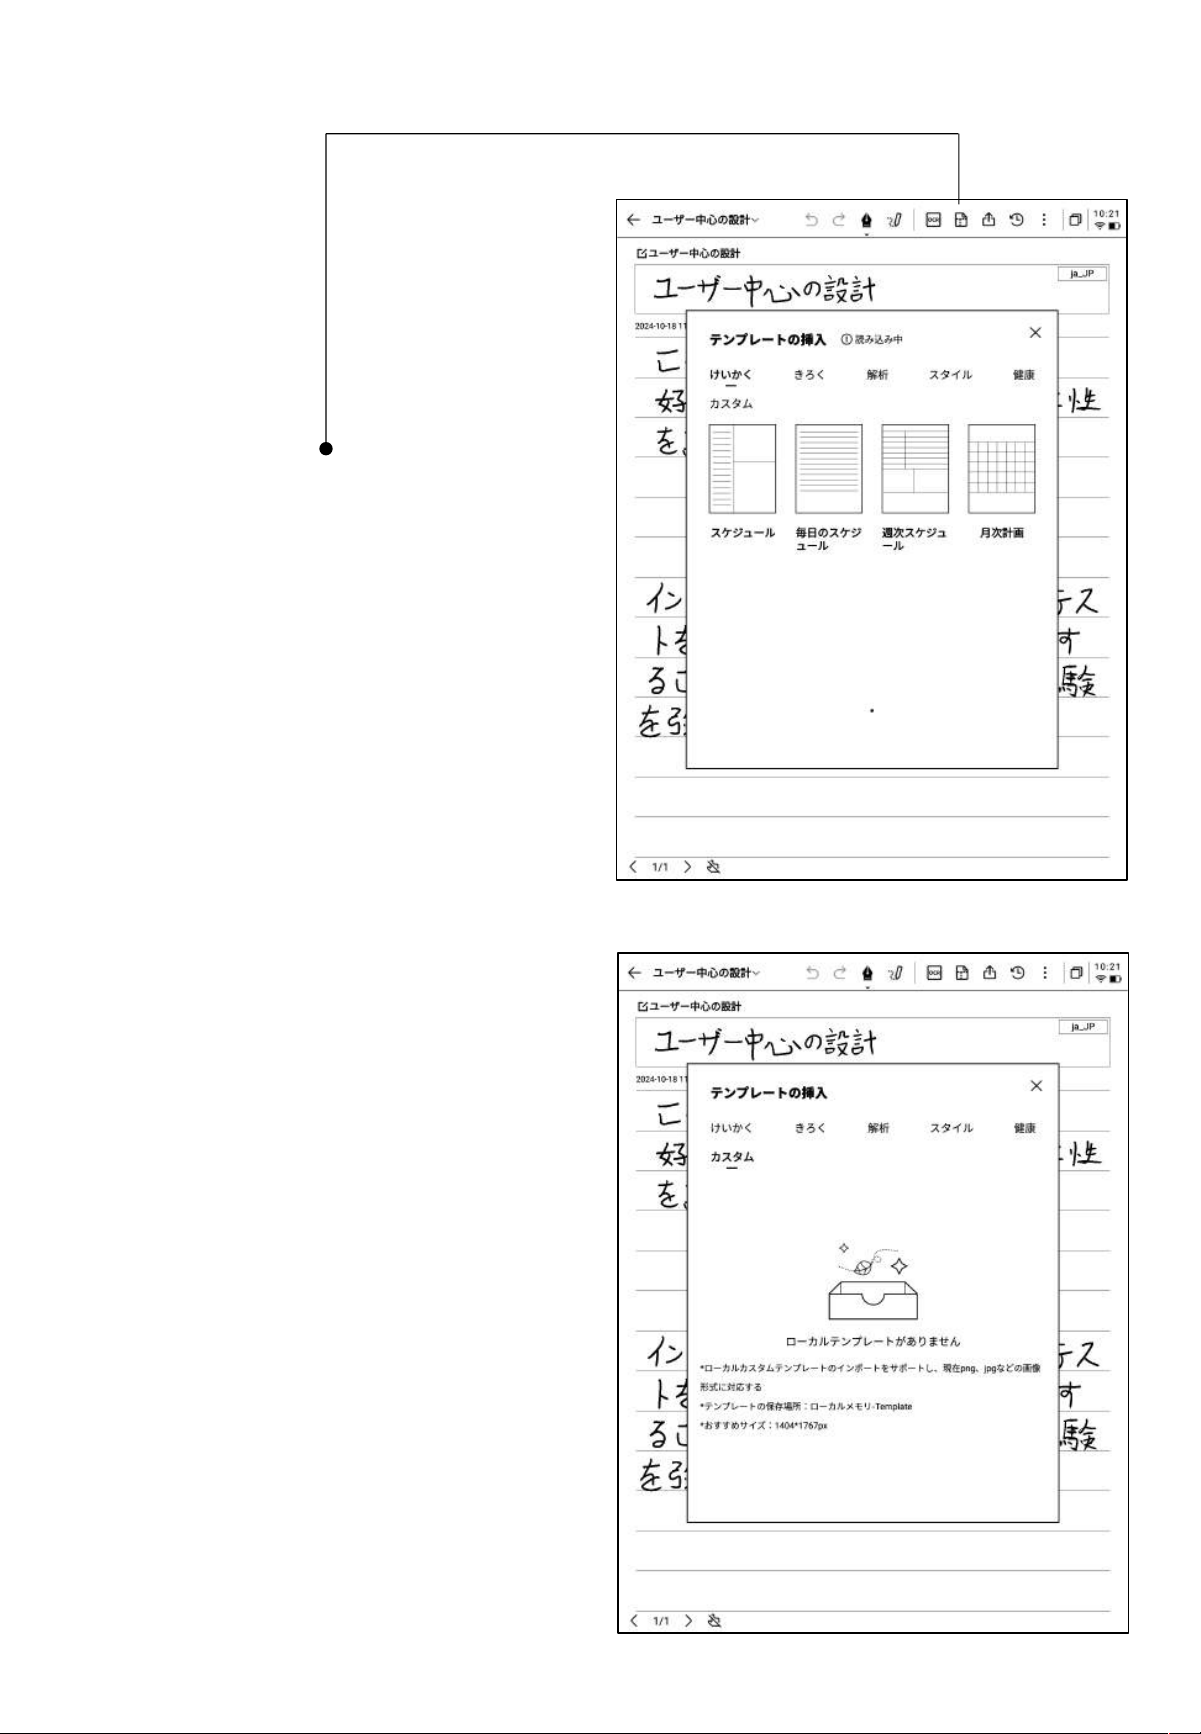
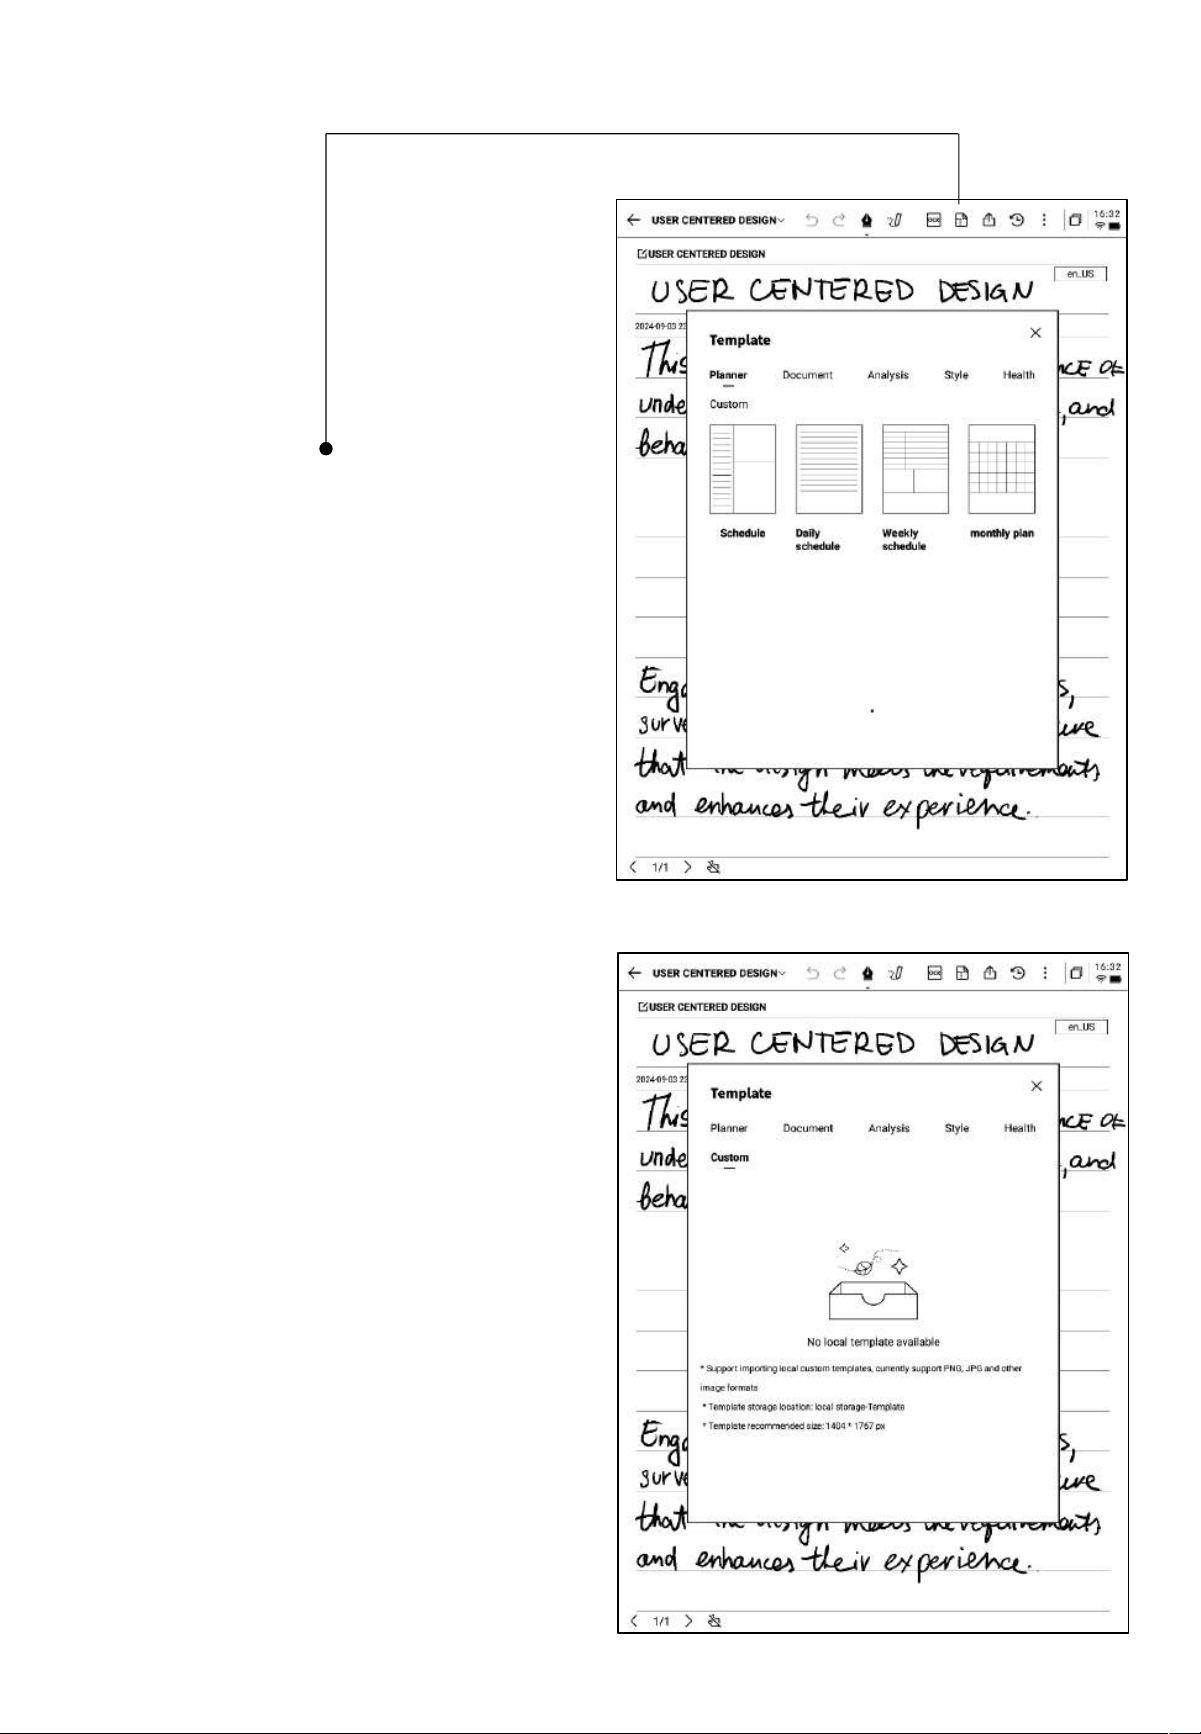
2.1.8 Writing Templates
• Click the template button to select a
template.
• Click on the template image to insert the
selected template on the next page of the
current document.
• Although only one page is inserted, you
can quickly choose to insert this template
when flipping through pages.
• Supports inserting custom templates.
• By connecting the device to a computer via
a data cable, you can transfer pre-prepared
template images into the [Template] folder
and then select and use them.

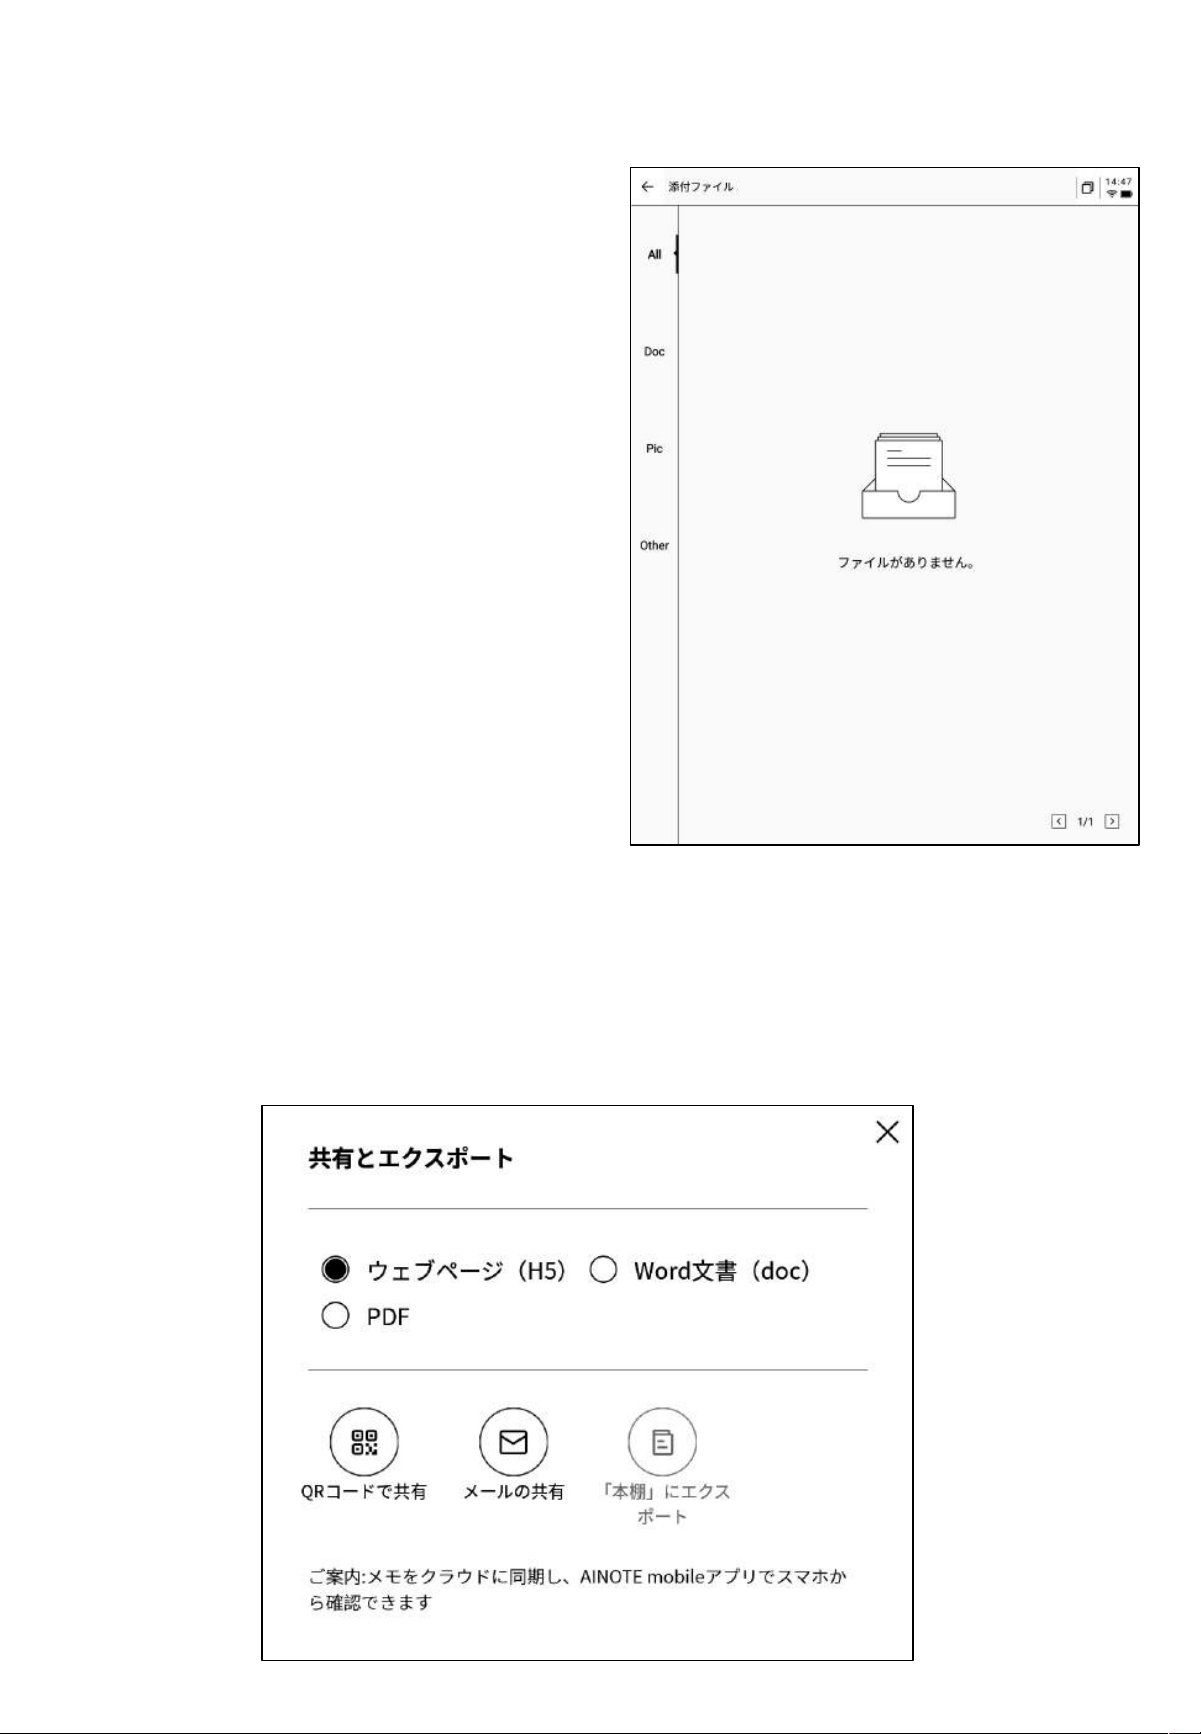
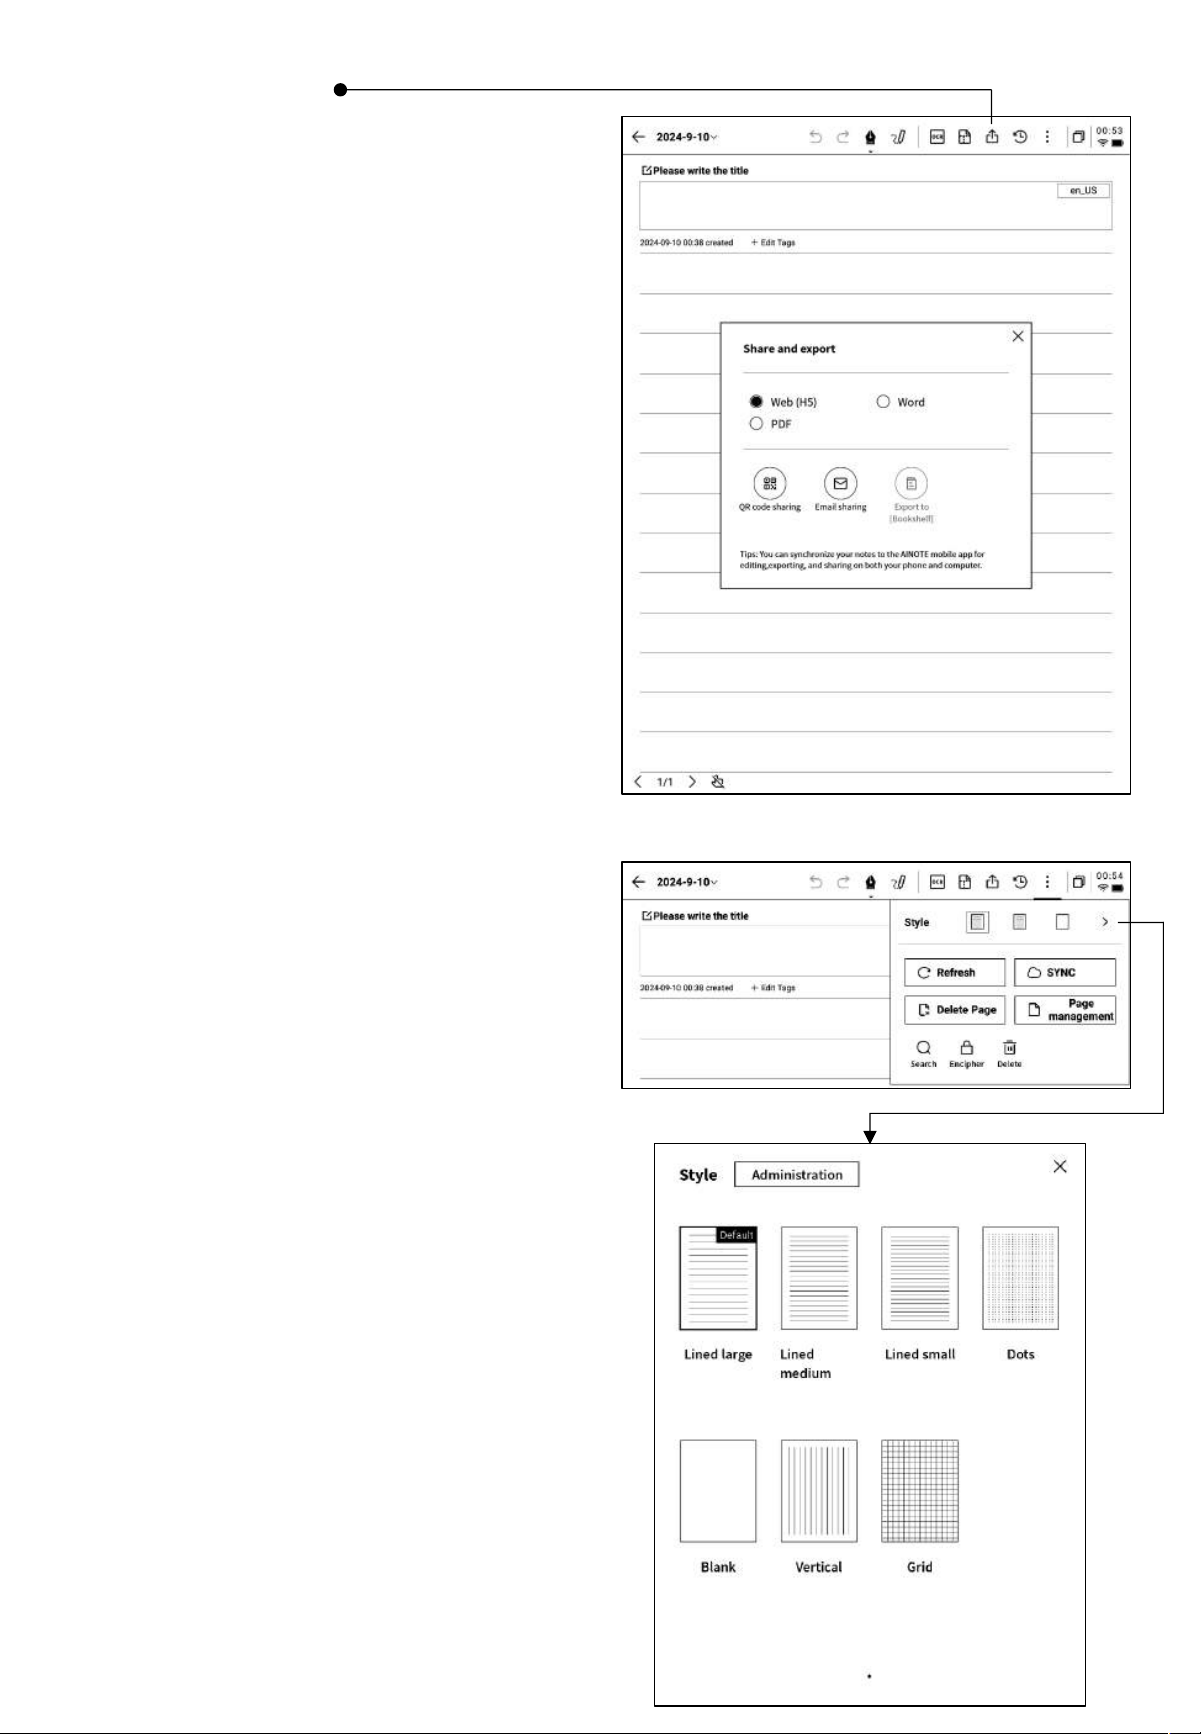
2.1.9 Note Sharing
• Provides three types of sharing: web, Word,
and PDF.
• You can share via QR code, email, or
export to a bookshelf.
2.1.10 Background Settings
Q: What is the difference between
background and template?
• Click the "More" button to access the
background settings interface.
• Click the back arrow to view more detailed
settings options.
• Provides a variety of background styles,
such as lined paper, grid paper, blank paper,
dot paper, and square paper.
• Supports setting a default background.
A: When setting a background, all newly
created pages in the current notebook will have
the default background. You can also set a
specific background as the default, so that
when you create a new note, the default
background will be applied. In contrast,
templates are single-page inserts and can
include multiple template styles within one
note.
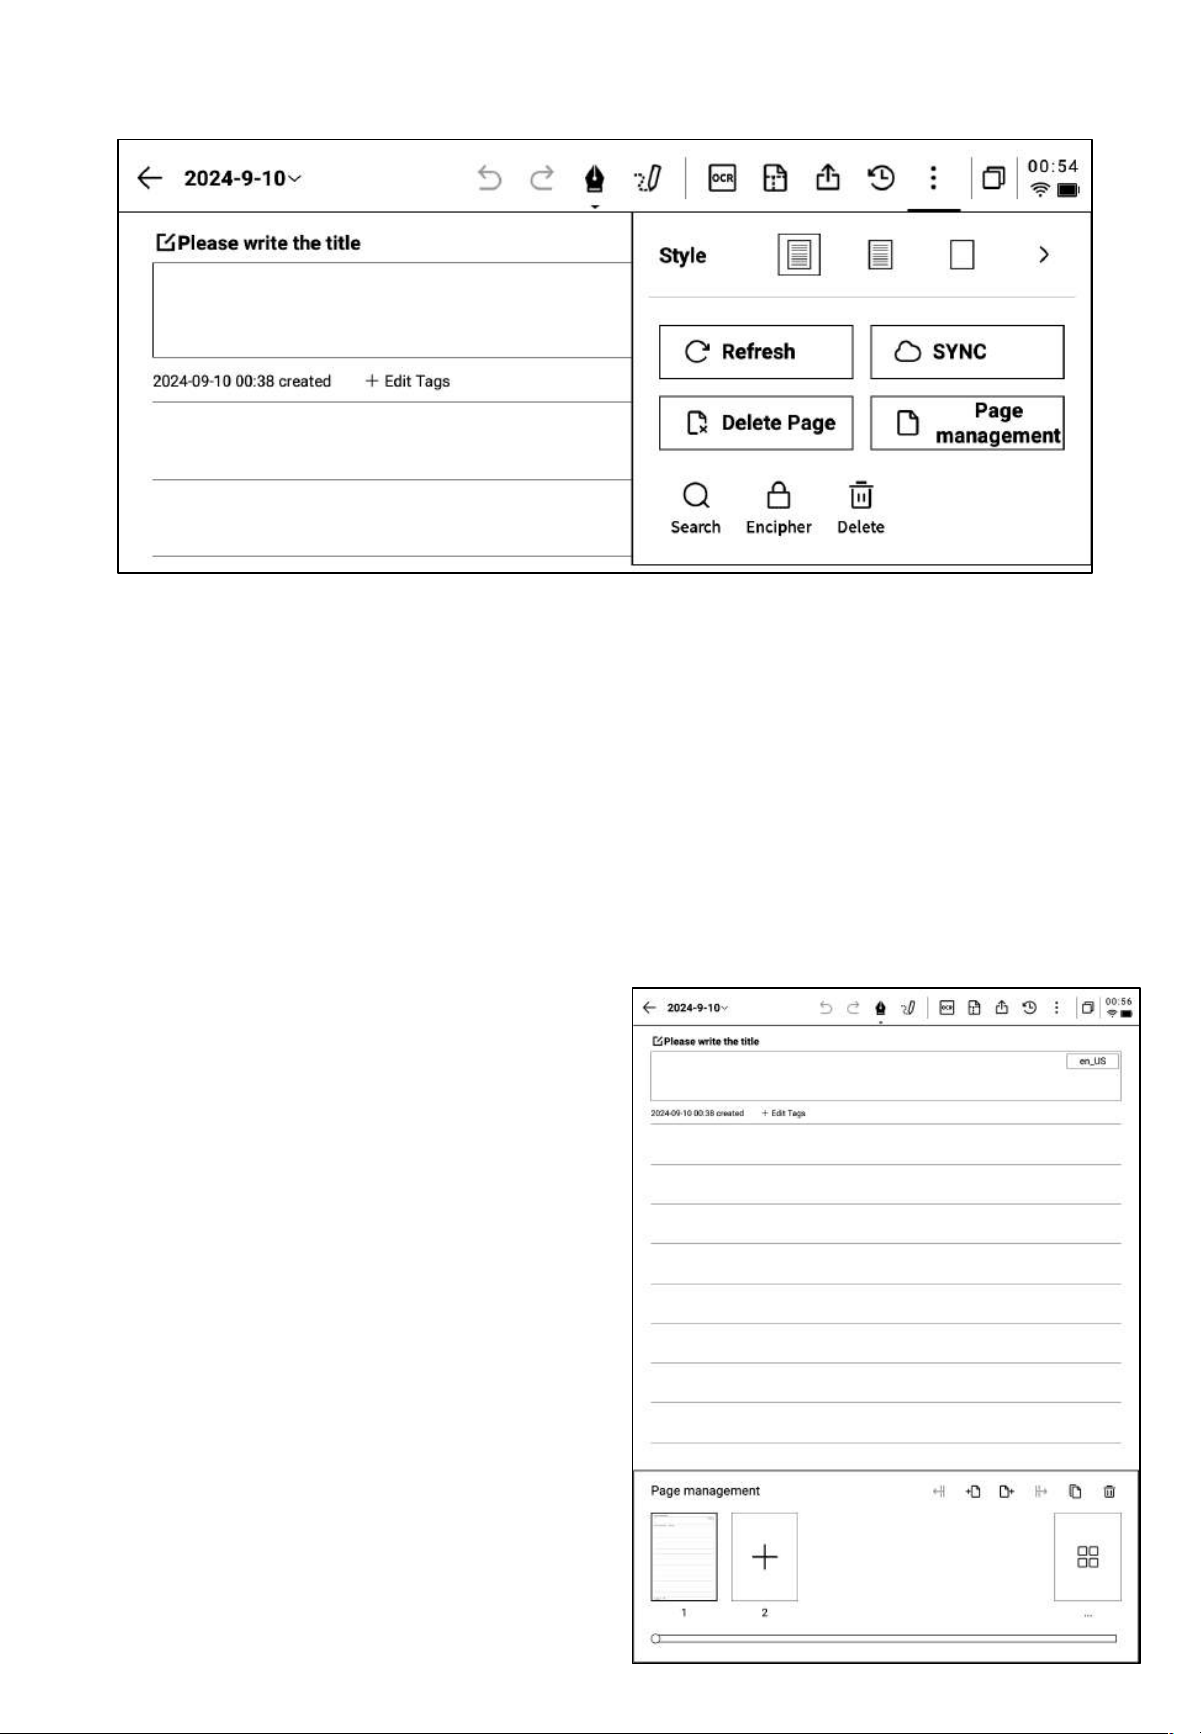
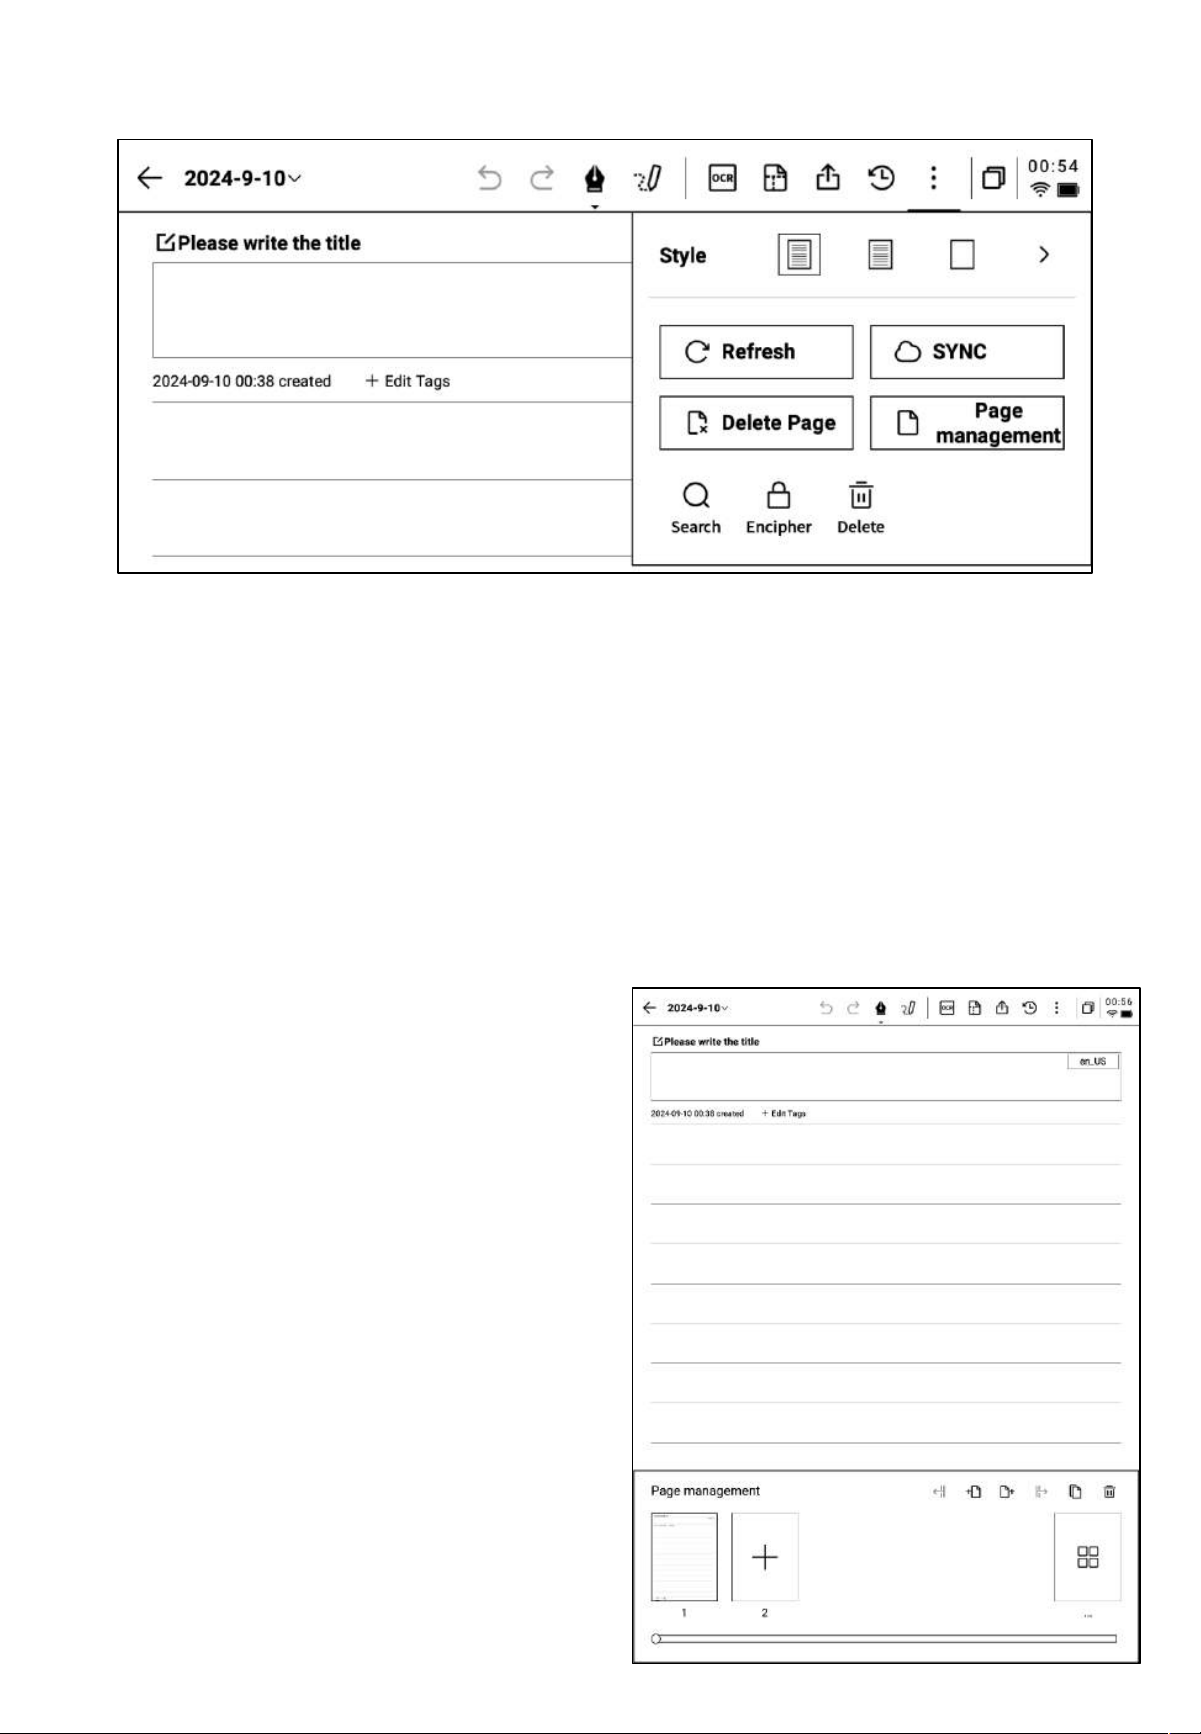
2.1.11 More Applications
• Page Refresh: Supports refreshing the current page. Due to the characteristics of the e-ink
screen, ghosting may occur after prolonged use, and refreshing can clear this.
• Note Synchronization: Supports synchronizing this notebook to the cloud for viewing and
editing with the [AINOTE mobile] app.
• Delete Current Page: Deletes only the currently displayed page.
• Page Management: Enters the page management interface for the current notebook.
• Search: Supports searching handwritten content within this notebook.
• Encryption: Adds a password to this notebook. A password will be required for future access
to the notebook.
• Delete: Deletes all content in this notebook.
2.1.12 Page Management
• Click [More] > [Page Management] to
enter the page management interface.
• Clicking the page number in the bottom-
left corner also allows access to the page
management interface.
• Supports various operations on pages, such
as adding, copying, pasting, and moving.
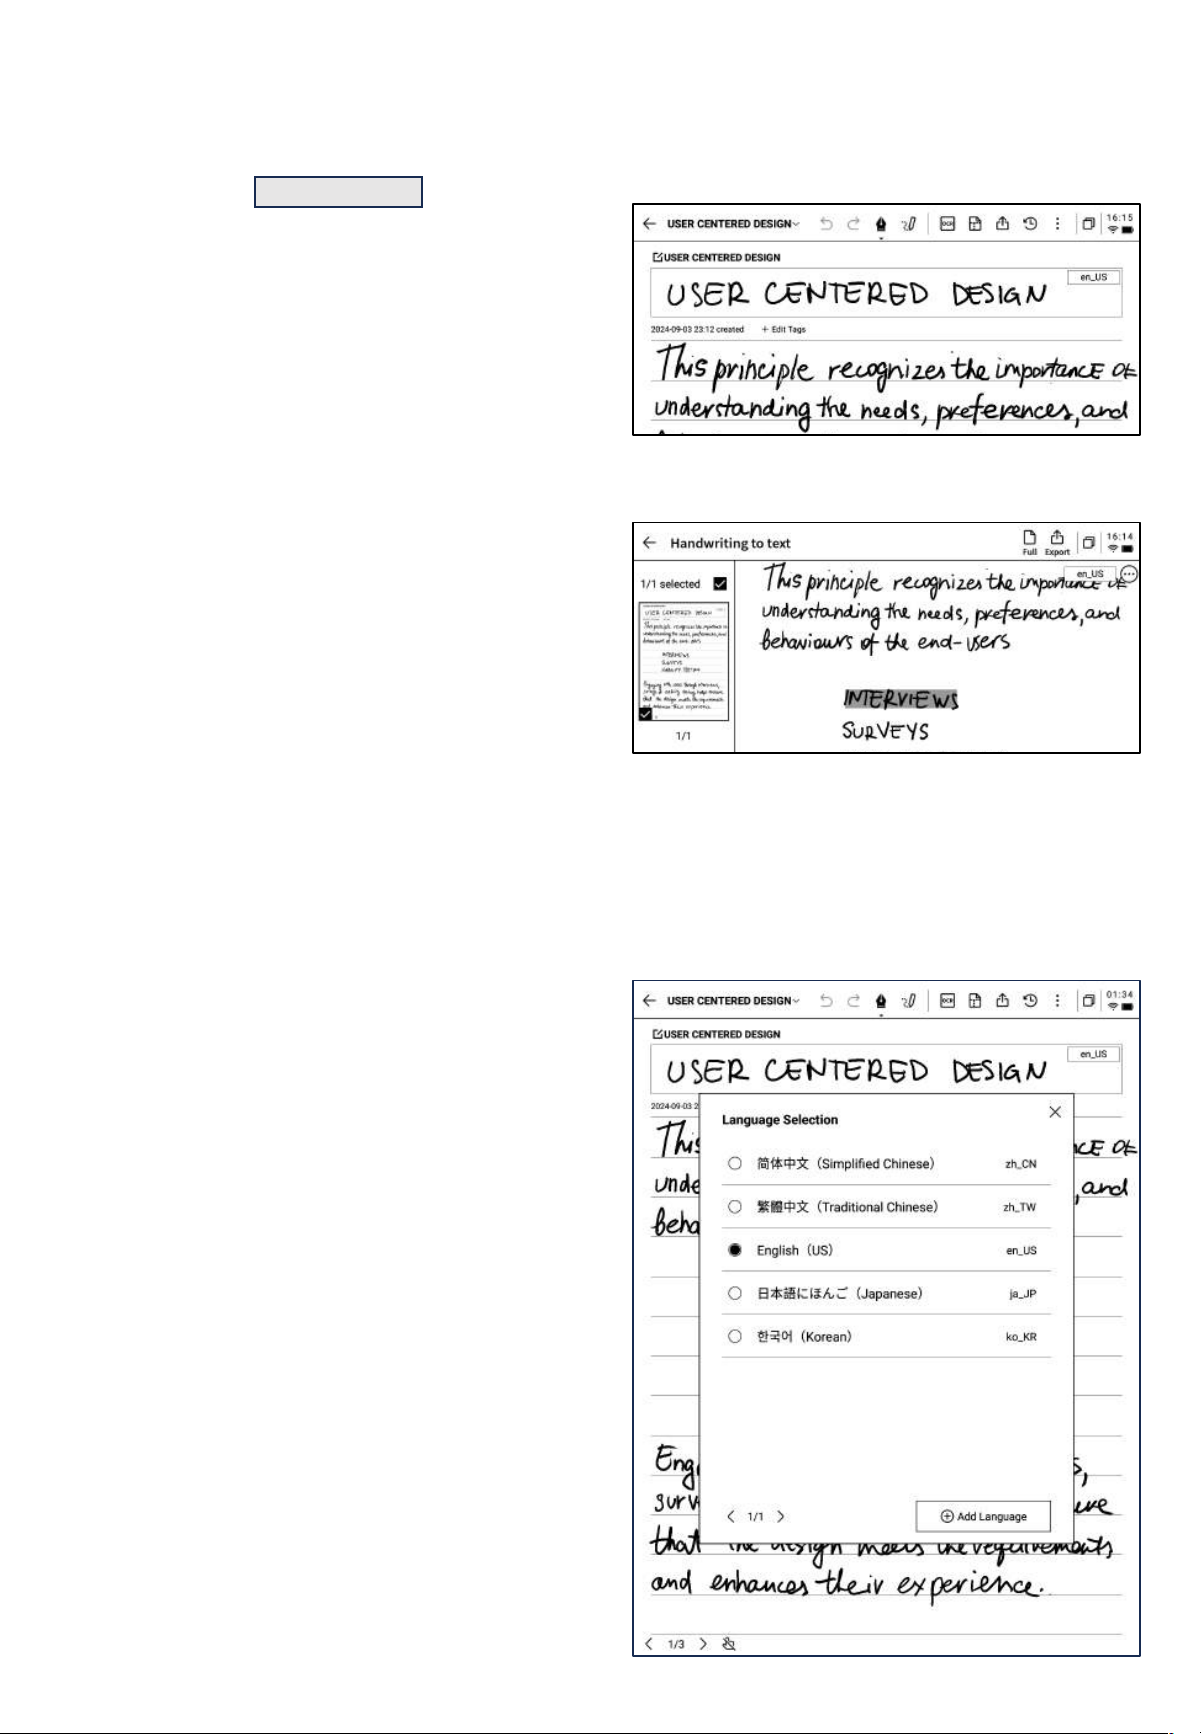
2.1.12 Handwriting Recognition Language Management
En_US
• Click the language button in the upper right
corner of the handwritten text area or the
converted text to switch the handwriting
recognition language.
• By default, the system language is selected,
but you can switch to other supported
languages.
• Once switched, all recognition will be
updated to the selected language.
• After switching, already recognized content
will not be re-processed unless changes are
made to the handwritten content, at which
point the new language will be applied for
re-recognition.
• Five preset languages are available for
selection.
• Supports adding more languages, which
require downloading the recognition
package from the internet.
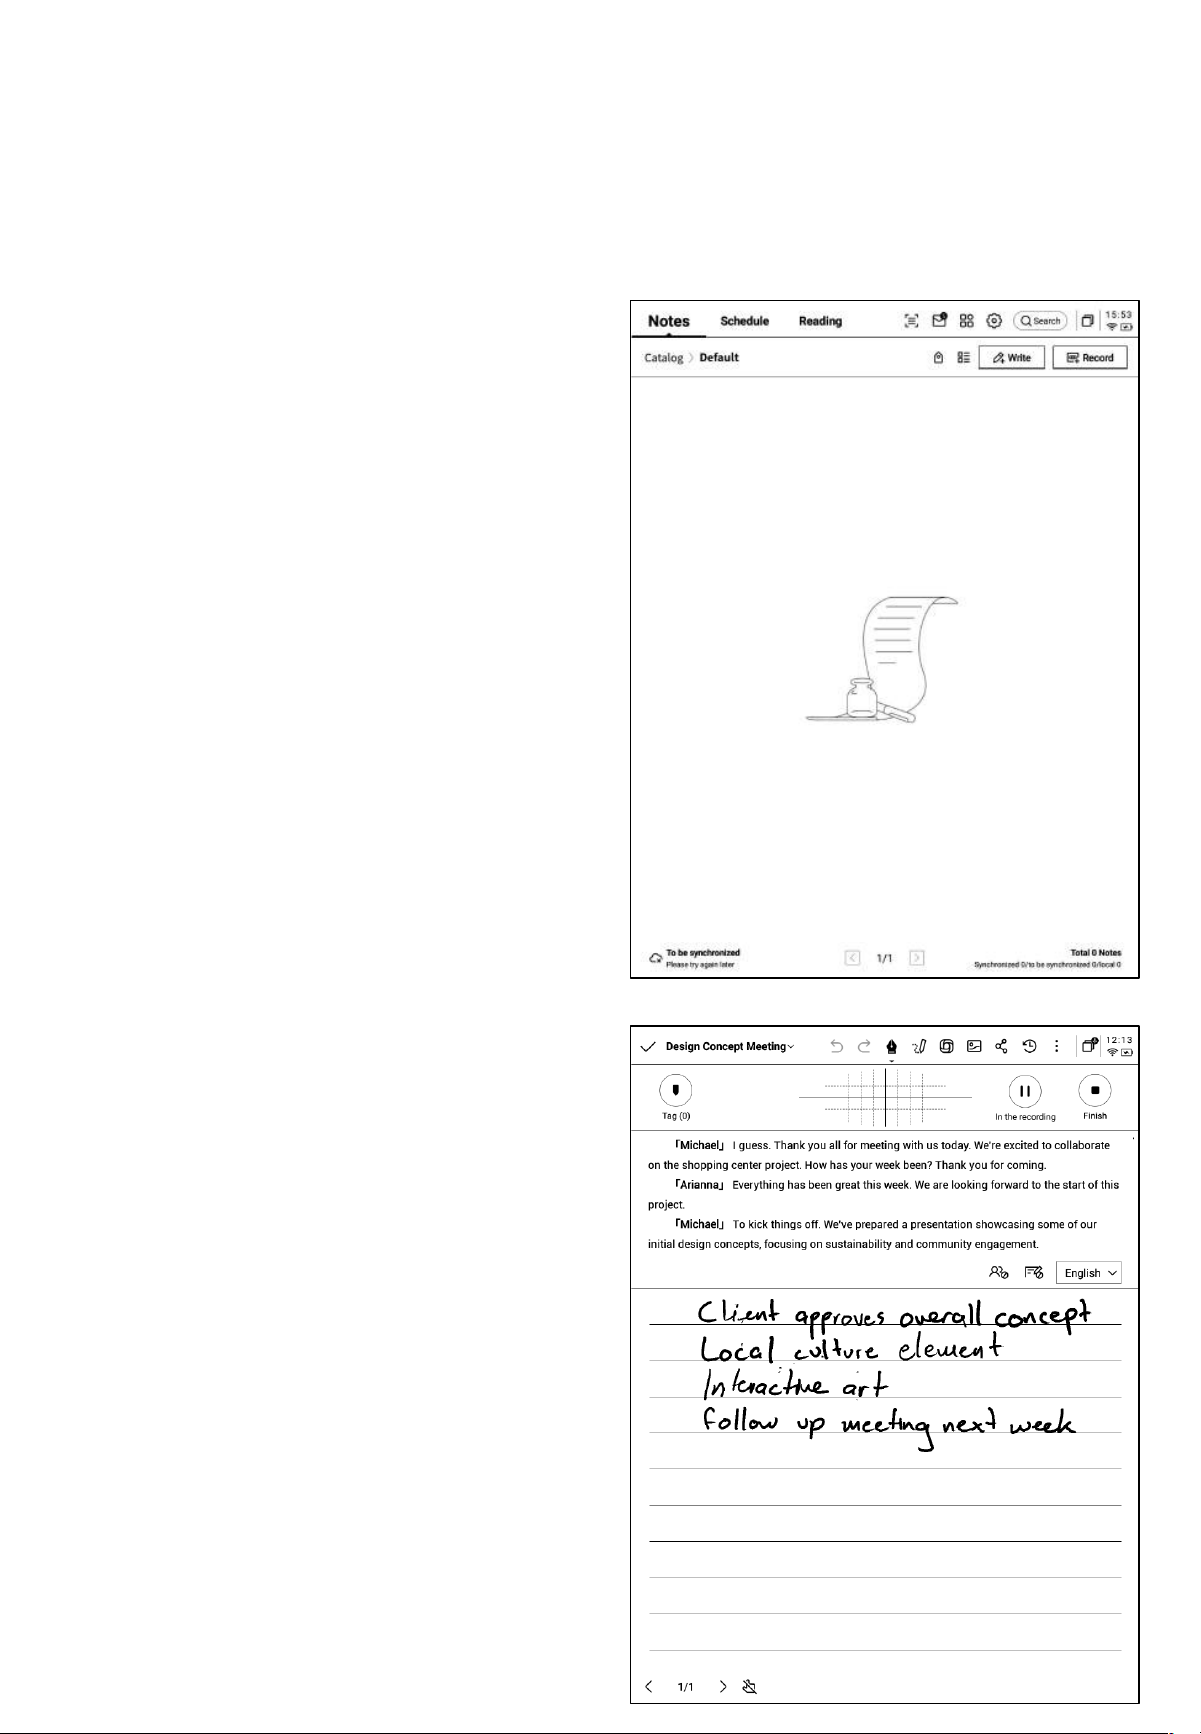
2.2 Record
2.2.1 Create a New Record
Recording is a new way of taking meeting notes, supporting real-time speech-to-text
transcription. While recording audio, it also supports handwritten notes, ensuring a complete
record of meeting information, making it easier to review later.
• On the notes page, click the [Record]
button to create a new recording.
• After creating a new recording, you will
enter the speech-to-text transcription
interface.
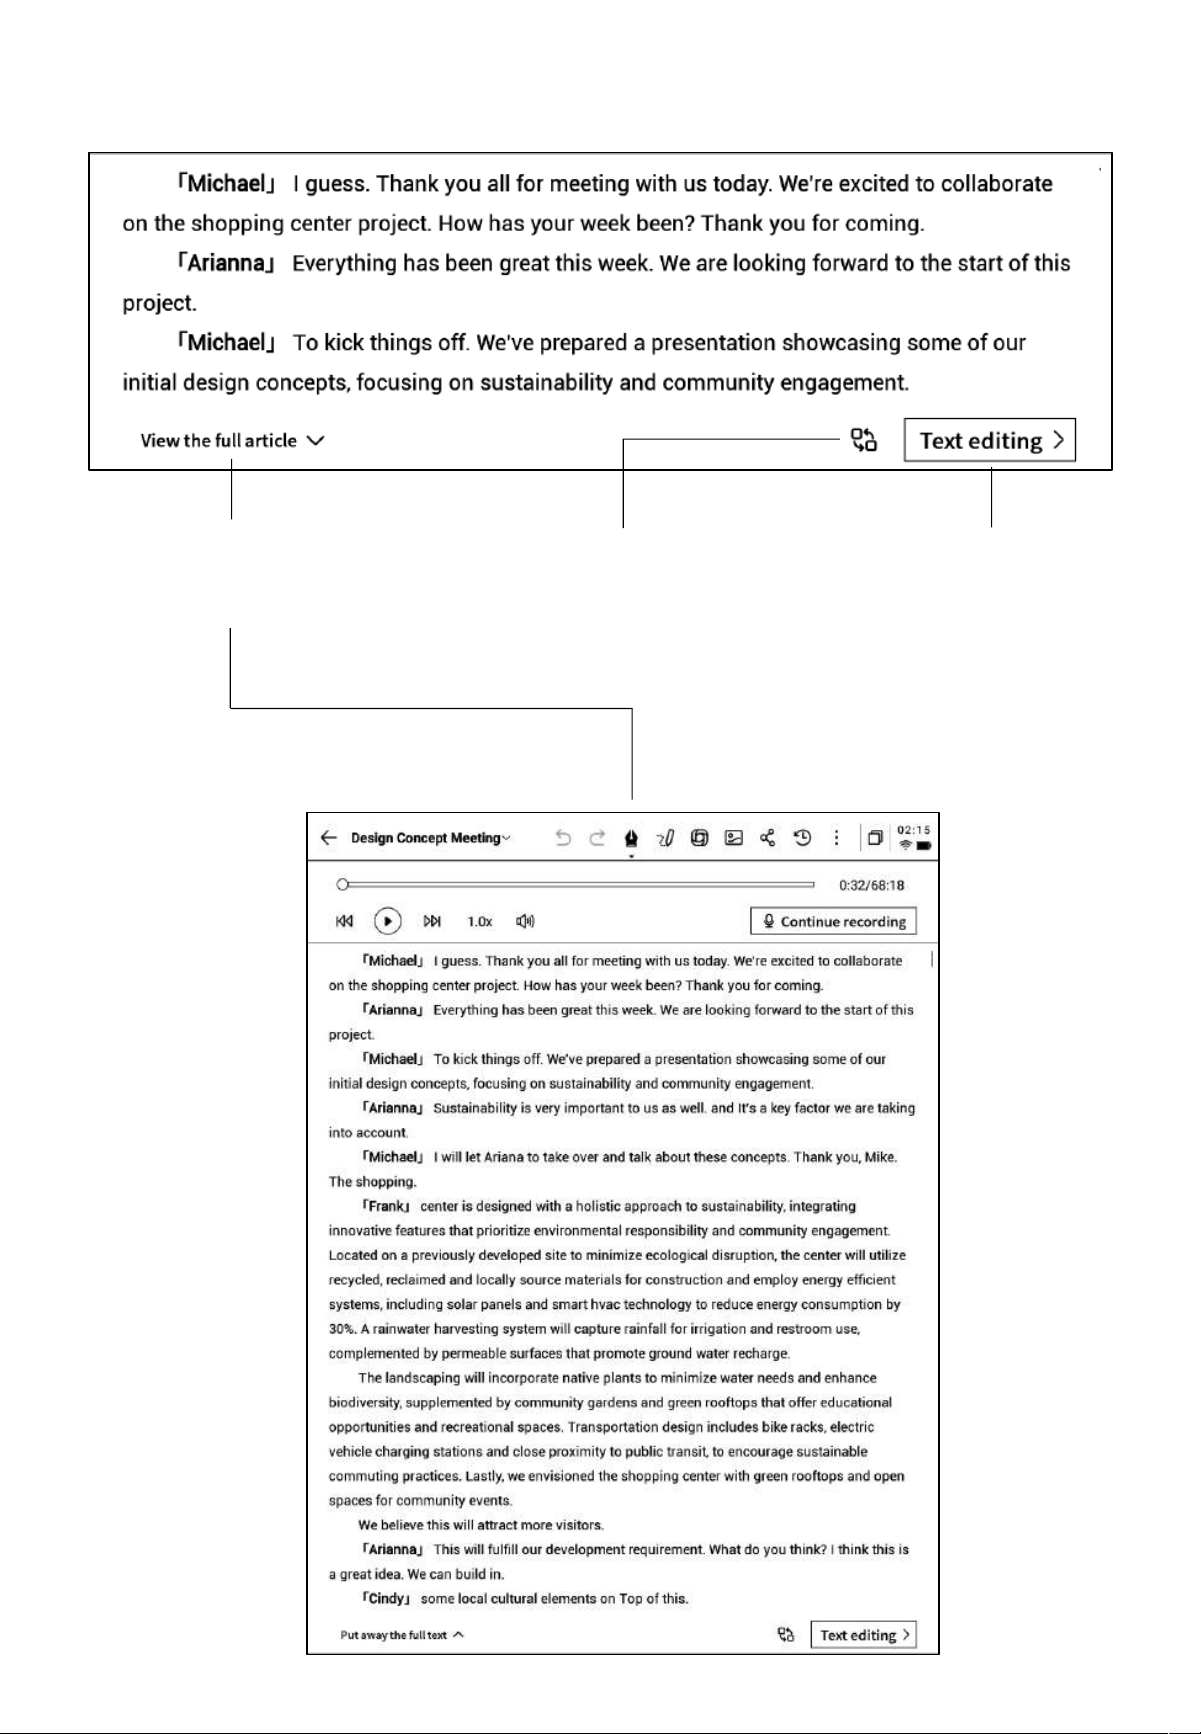
• The recording is divided into three sections:
audio area, speech-to-text area, and
handwriting area.
2.2.2 Components of a Record
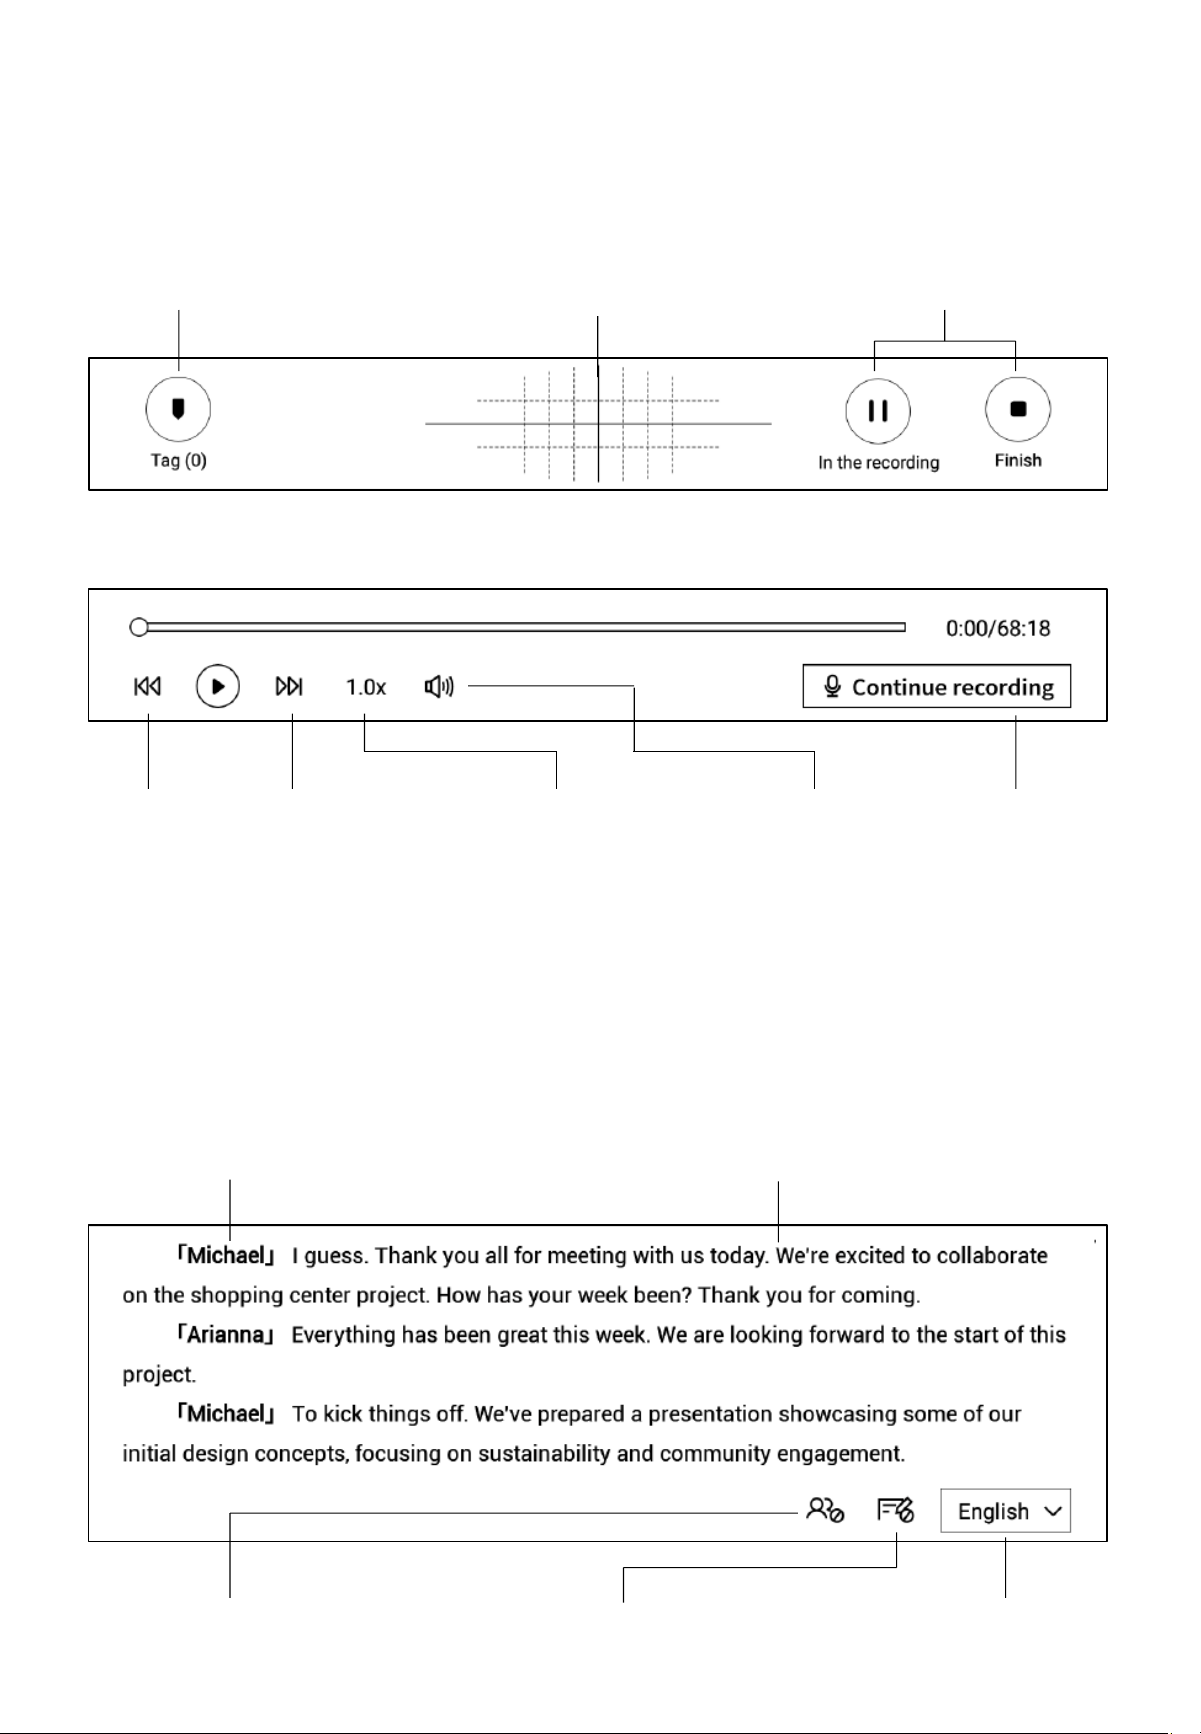
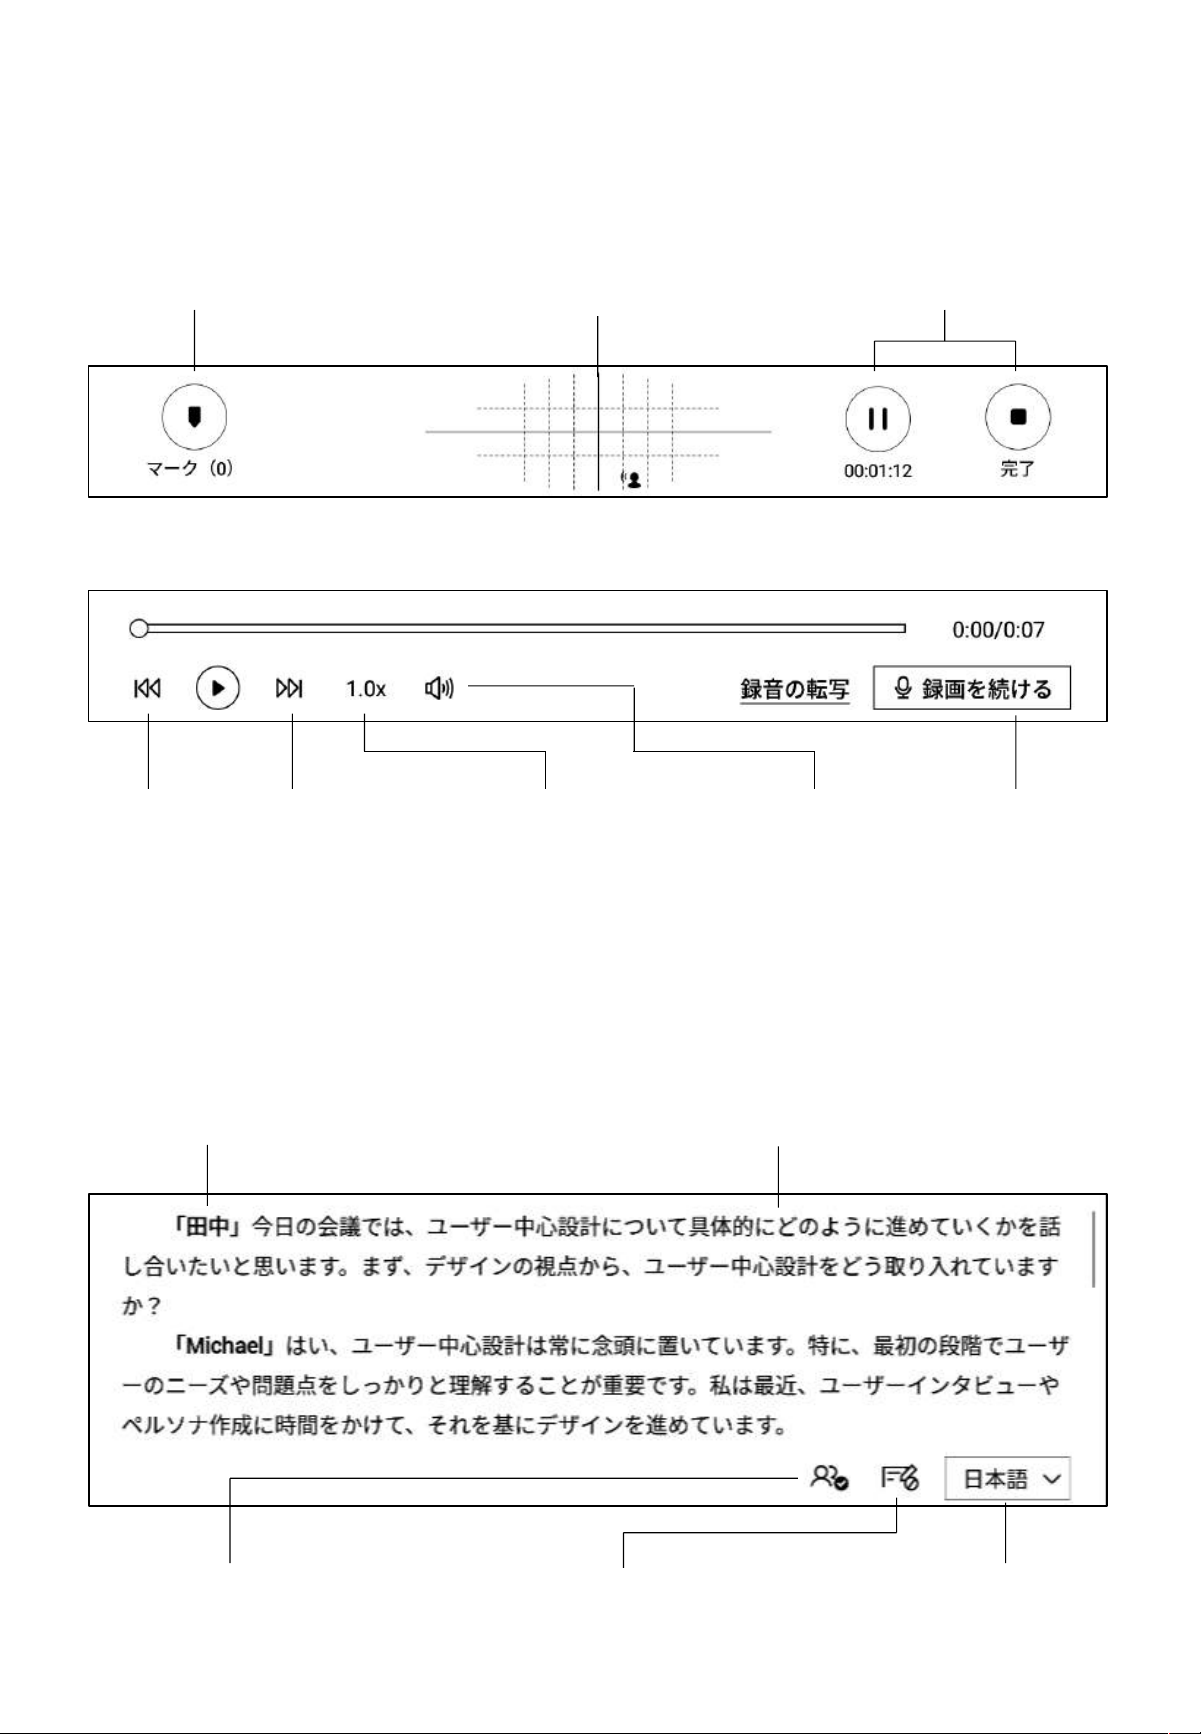
2.2.3 Audio Area
Tag: During the meeting,
tags can be added to
highlight key points for
later reference.
Radar: Displays the position of
the speaker in real-time during
the meeting, helping to identify
the speaker's section.
Pause: Pauses the recording
Finish: Completes the recording
Previous/Next Sentence:
Allows quick navigation to
the previous or next
sentence to listen to the
recording.
Playback Speed: Supports
adjusting playback speed,
with options ranging from
0.5x to 2.5x speed.
Volume: Supports
adjusting the playback
volume.
Continue Recording:
Supports resuming the
recording.
Ø Recording Completed
Ø During Recording
2.2.4 Voice-to-Text Area
Voice-to-Text: Transcribes the audio in real-
time during the meeting and displays it as
text.
Speaker Information: Identifies different speakers
based on voice characteristics and allows name
modifications by clicking on the speaker's name.
Enable/Disable Speaker
Recognition: Supports turning
speaker recognition on or off.
Enable/Disable Focus Mode:
Supports background transcription,
without displaying real-time
transcription results.
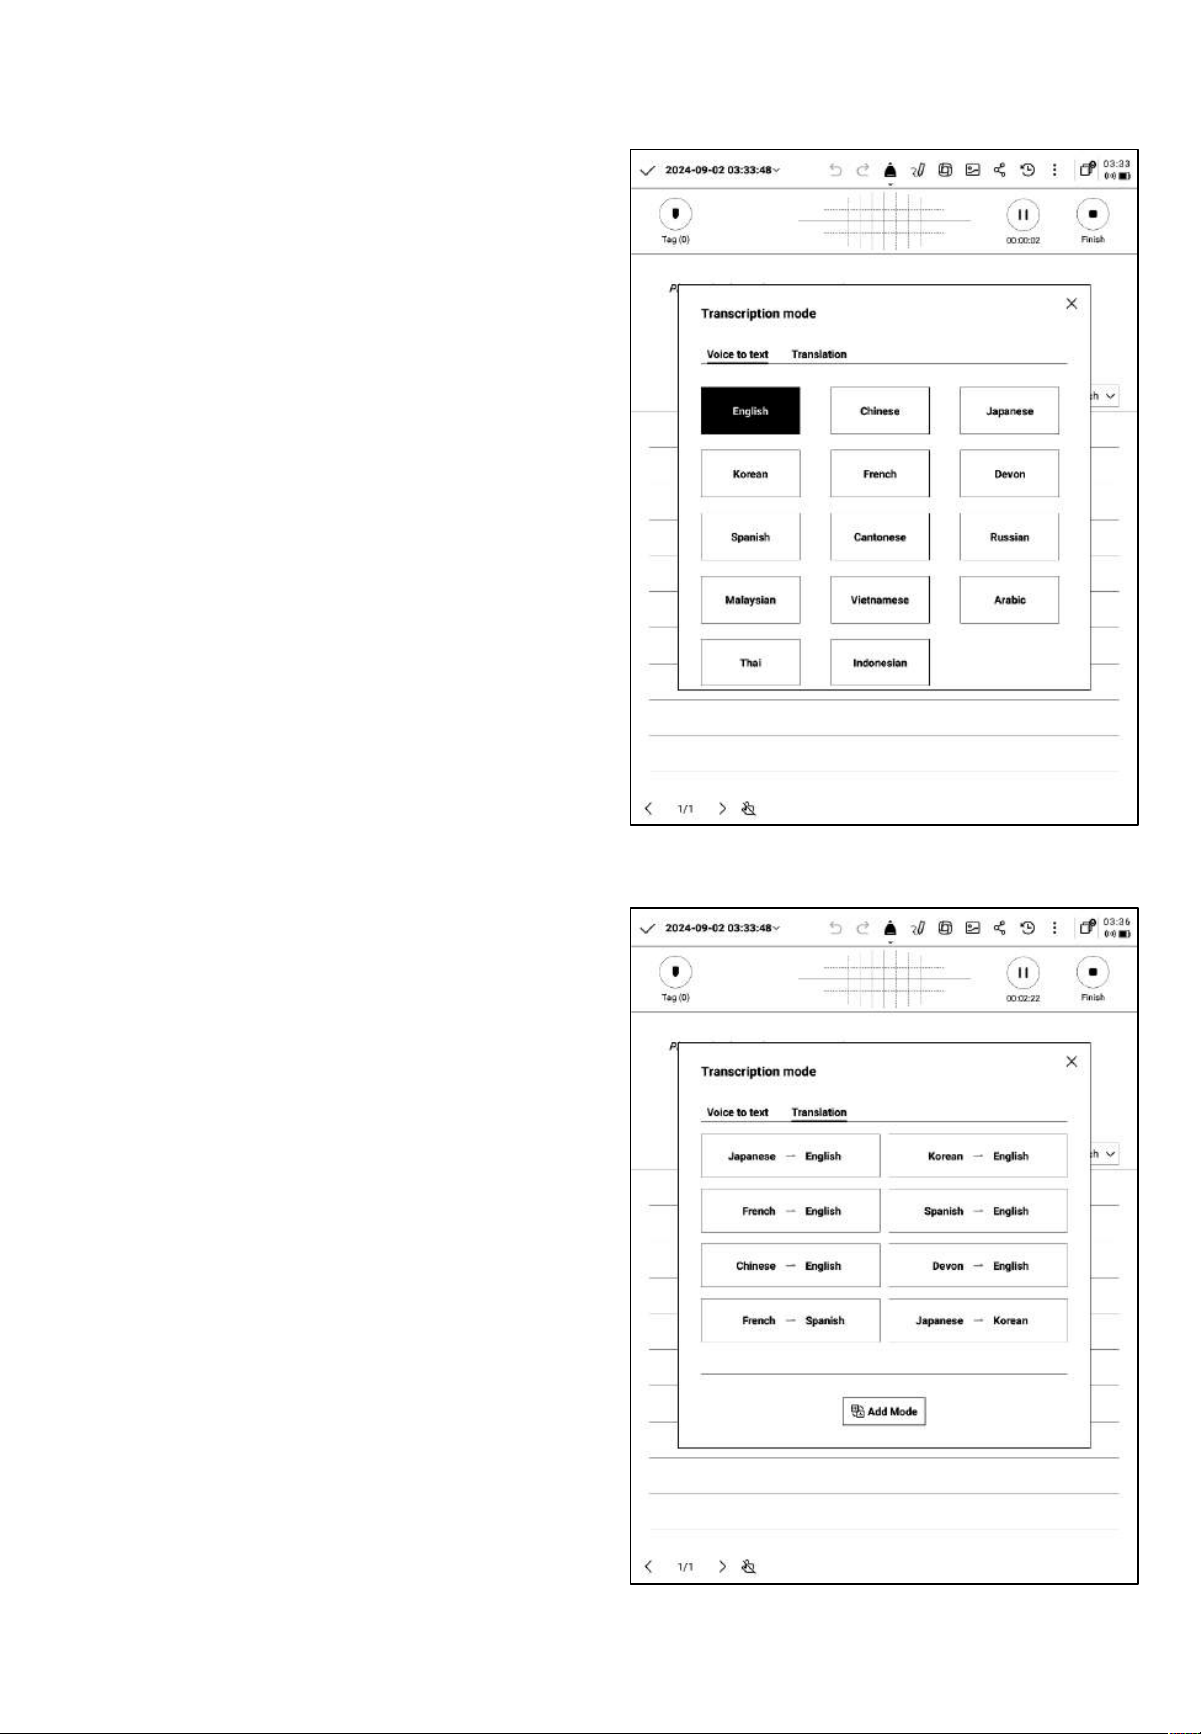
Language and Mode Selection:
Supports multiple languages and
translation modes. (See section
2.2.5 for details.)
Ø During Recording

Ø Recording Completed
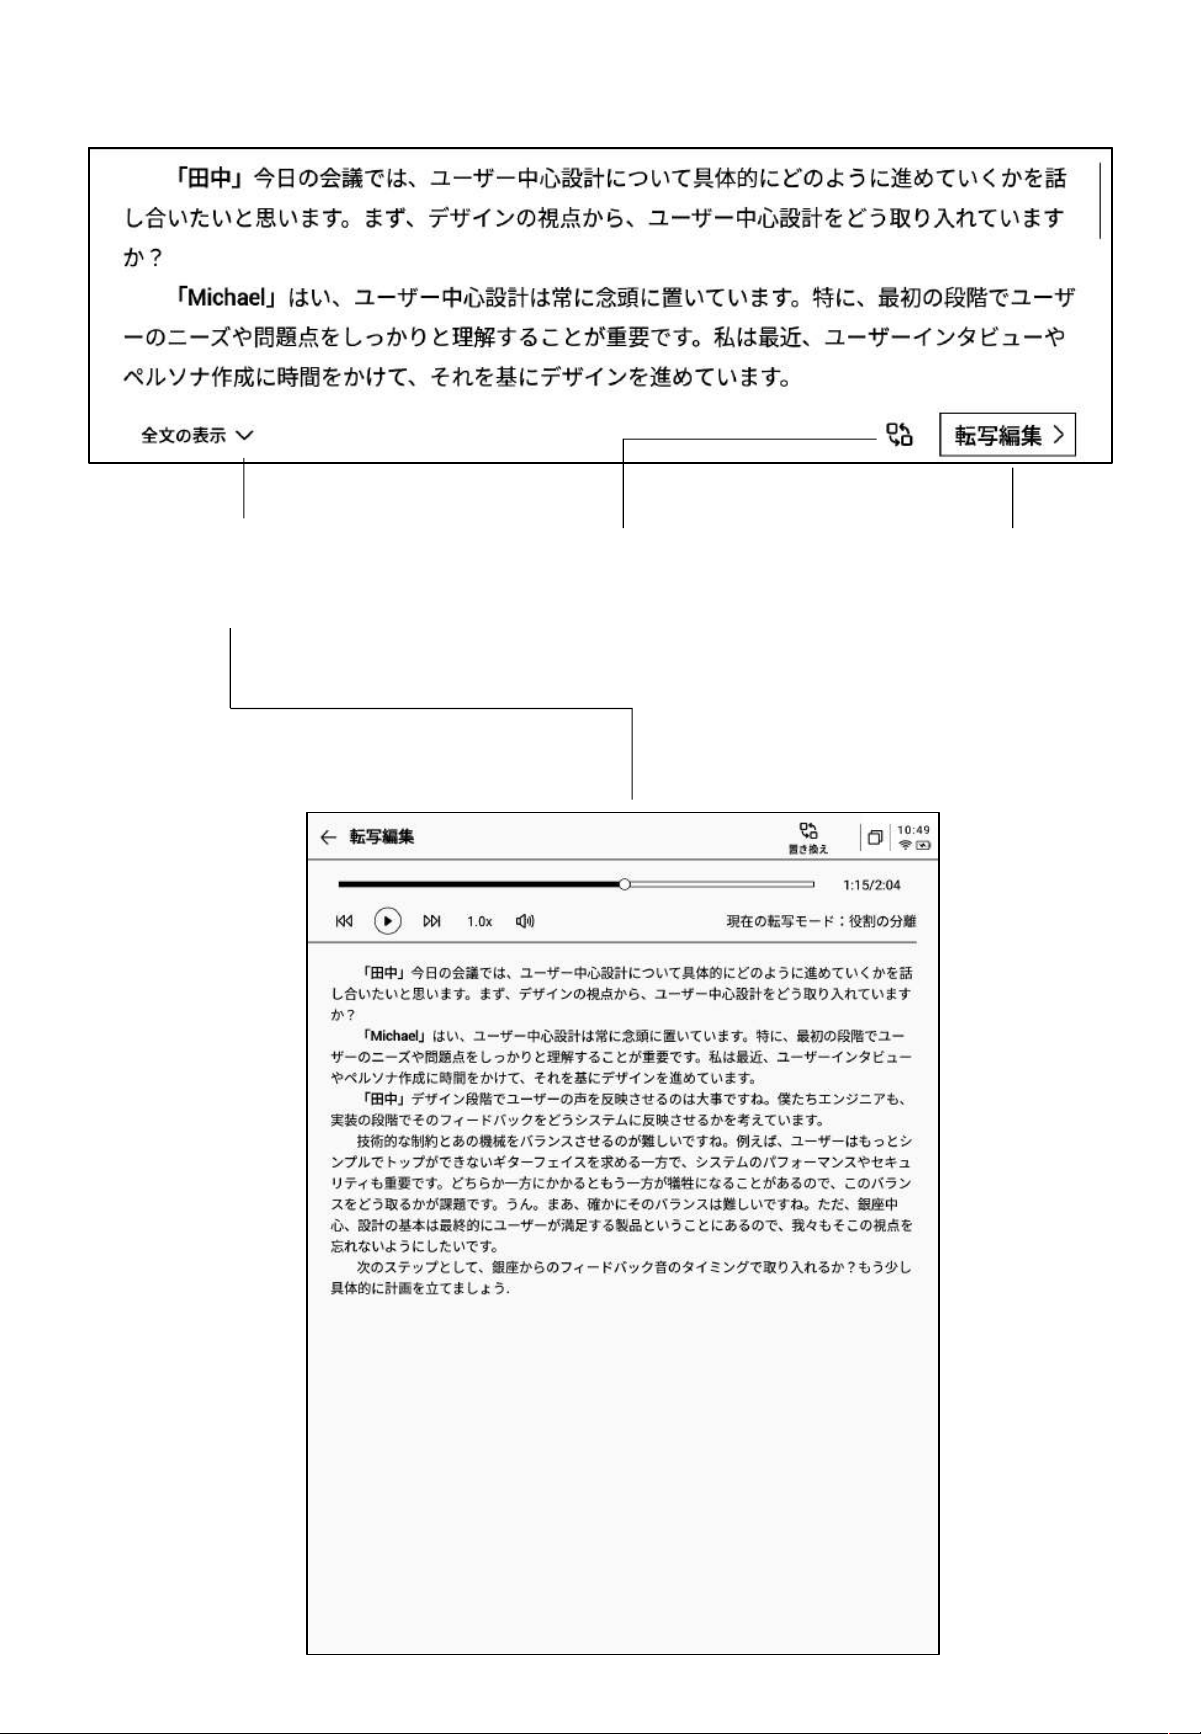
View Full Text: Supports
expanding to view the entire
text content
Replace: Supports finding
and replacing content
within the text.
Text Editing: Supports
manual editing of the
text content
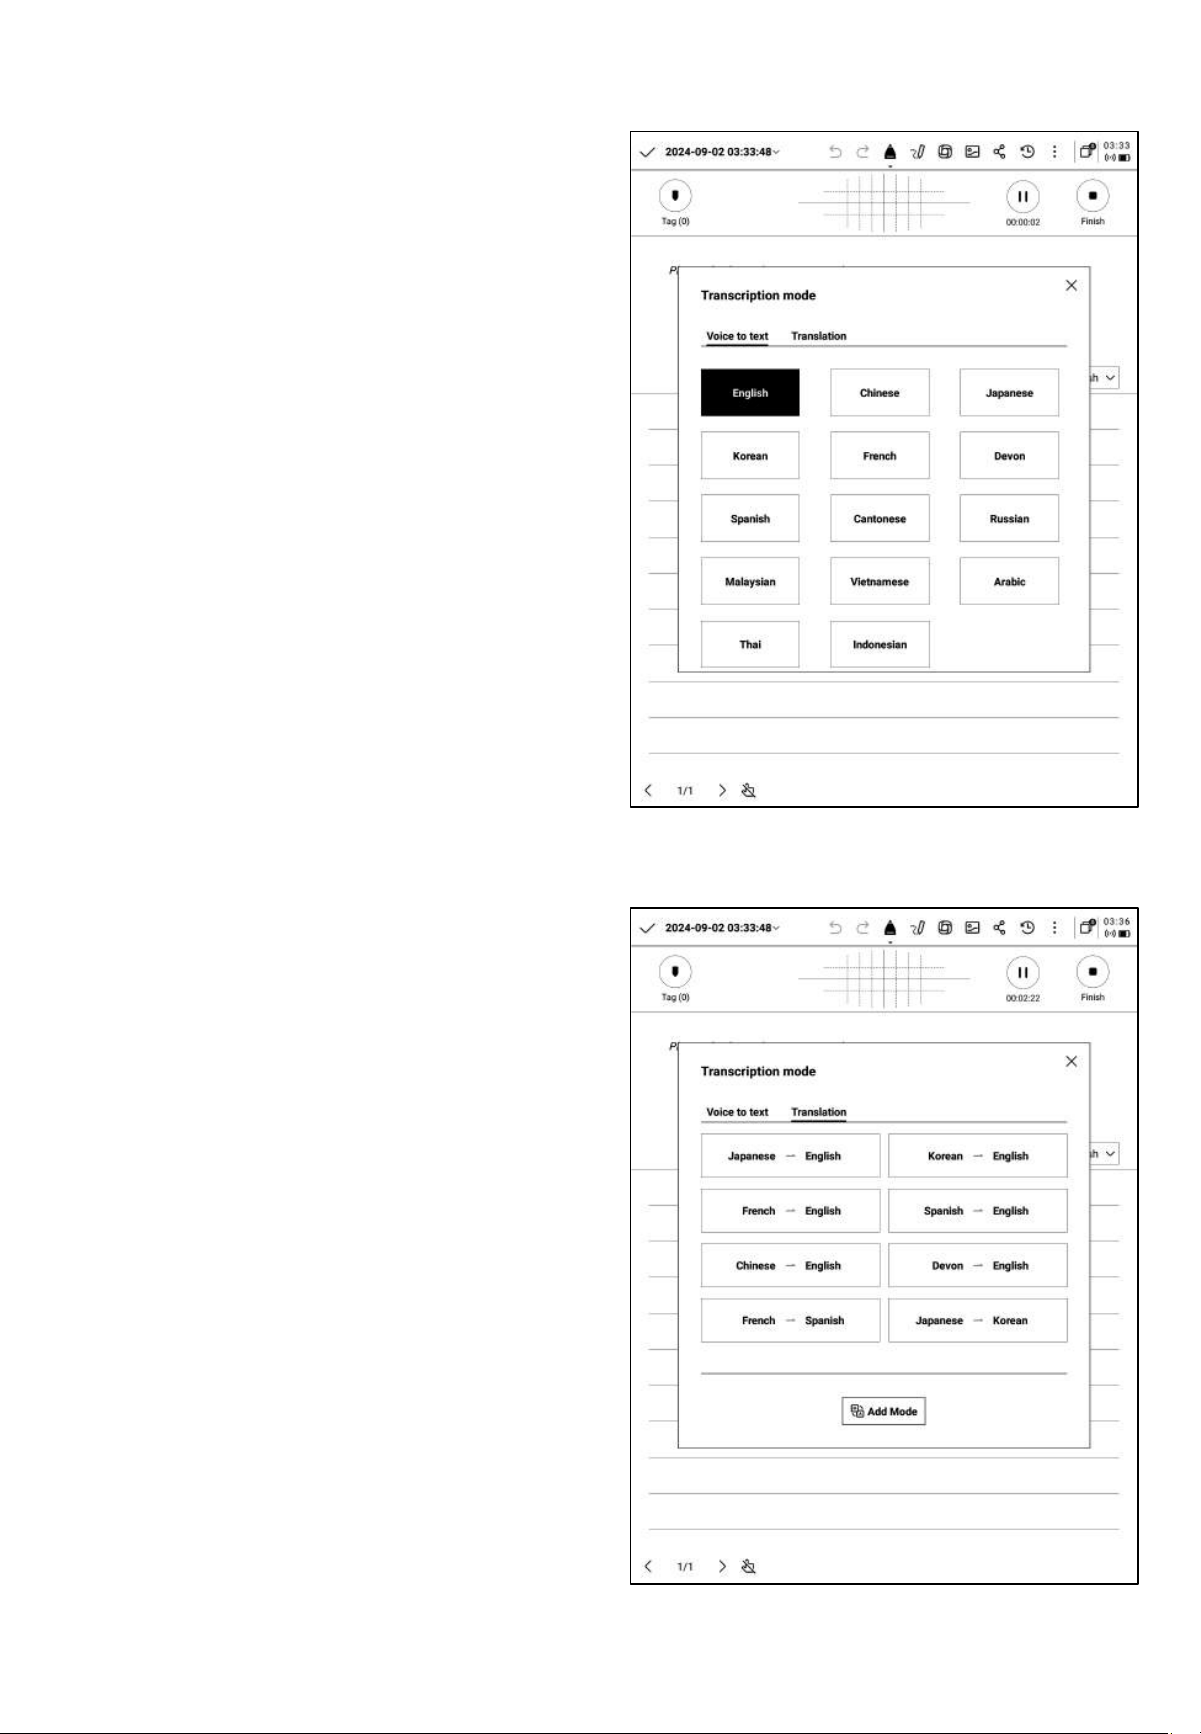
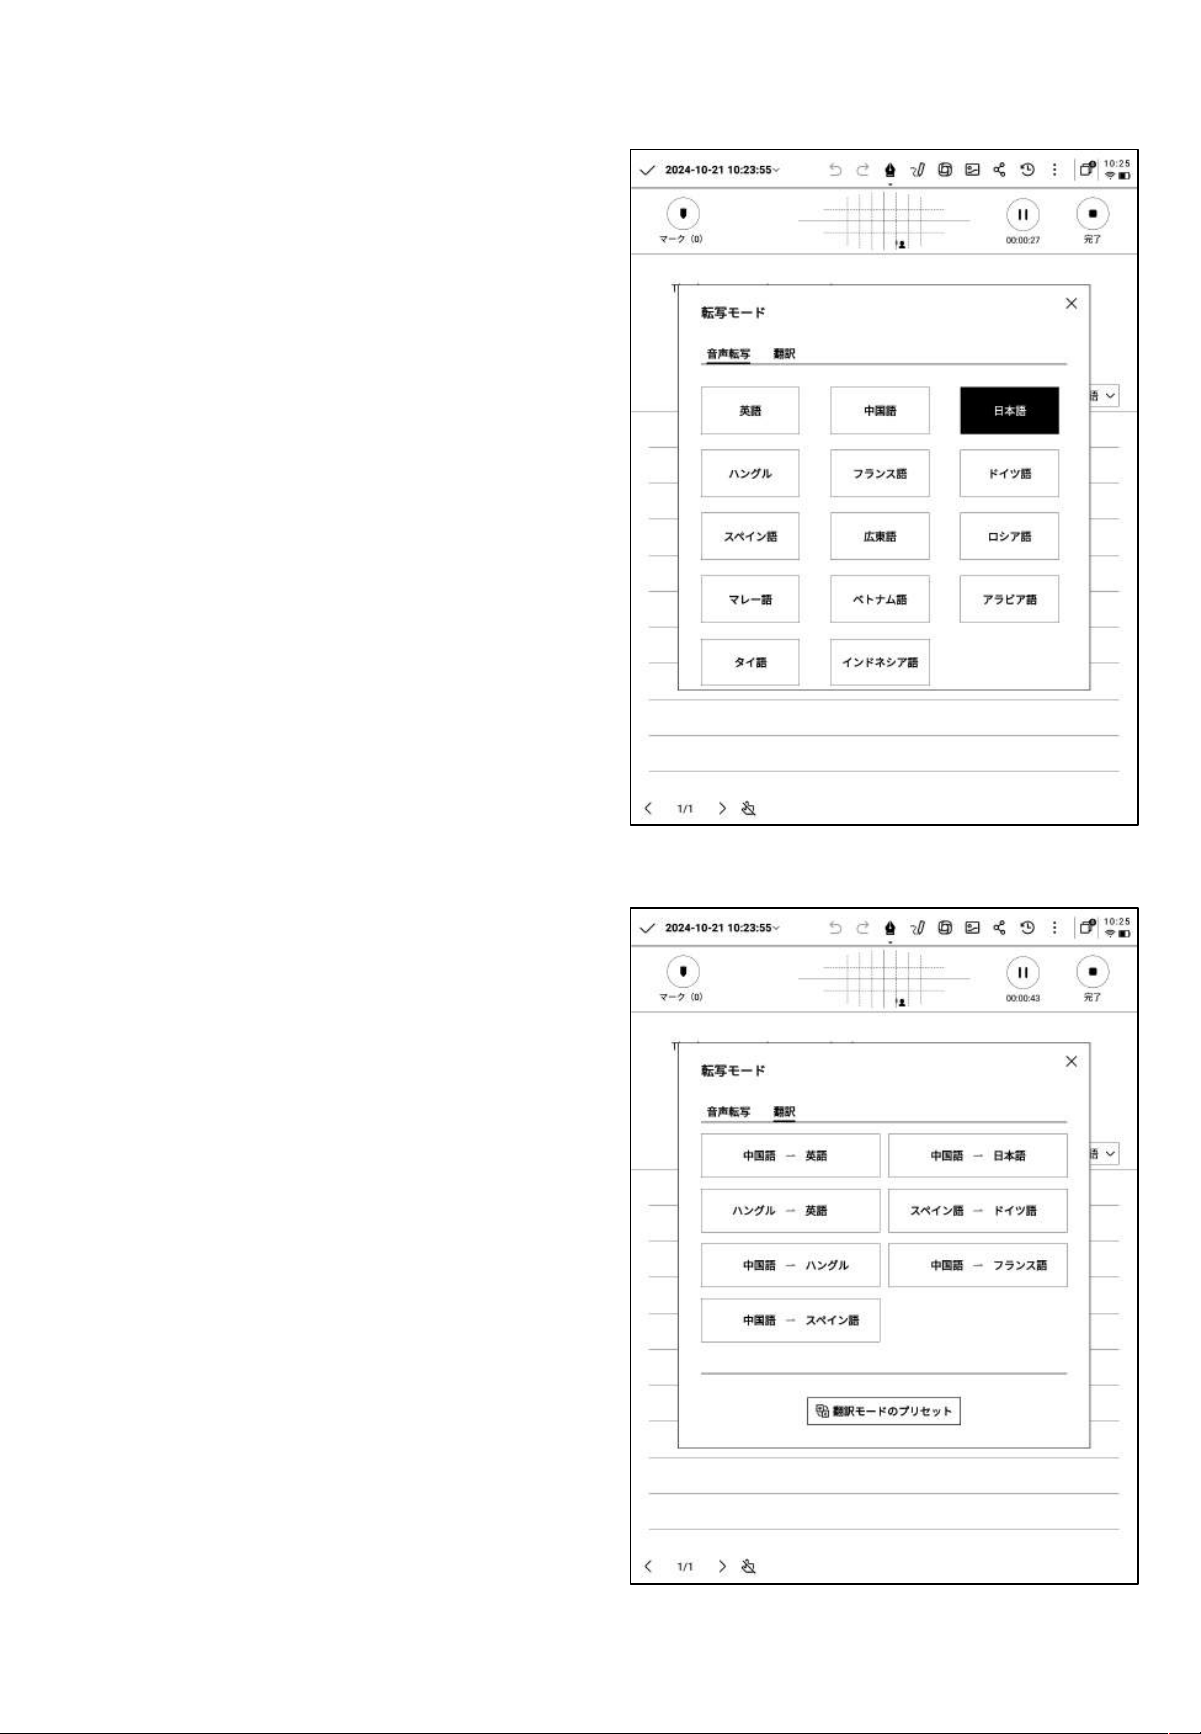
2.2.5 Language and Mode Selection
Voice-to-Text
• Supports various languages for
transcription. The available capabilities
depend on the region.
• For users in Asia and Oceania, 14
languages are supported for Voice-to-text
conversion: Chinese, English, Japanese,
Korean, French, German, Spanish, Cantonese,
Russian, Malay, Vietnamese, Portuguese, Thai,
and Indonesian.
• For users in North America, South
America, Europe, and Africa, 8 languages
are supported for Vo i c e -to-text conversion:
Chinese, English, Spanish, Japanese, Korean,
French, German, and Spanish.
Multilingual Translation
• Supports translation between various
languages, and preset translation modes are
available for immediate use.
• The available capabilities depend on the
region.
• For users in Asia and Oceania, 7 languages
are supported for translation: Chinese,
English, Japanese, Korean, French, German, and
Spanish.
• For users in North America, South America,
Europe, and Africa, 8 languages are
supported for translation: Chinese, English,
Spanish, Japanese, Korean, French, German, and
Spanish.
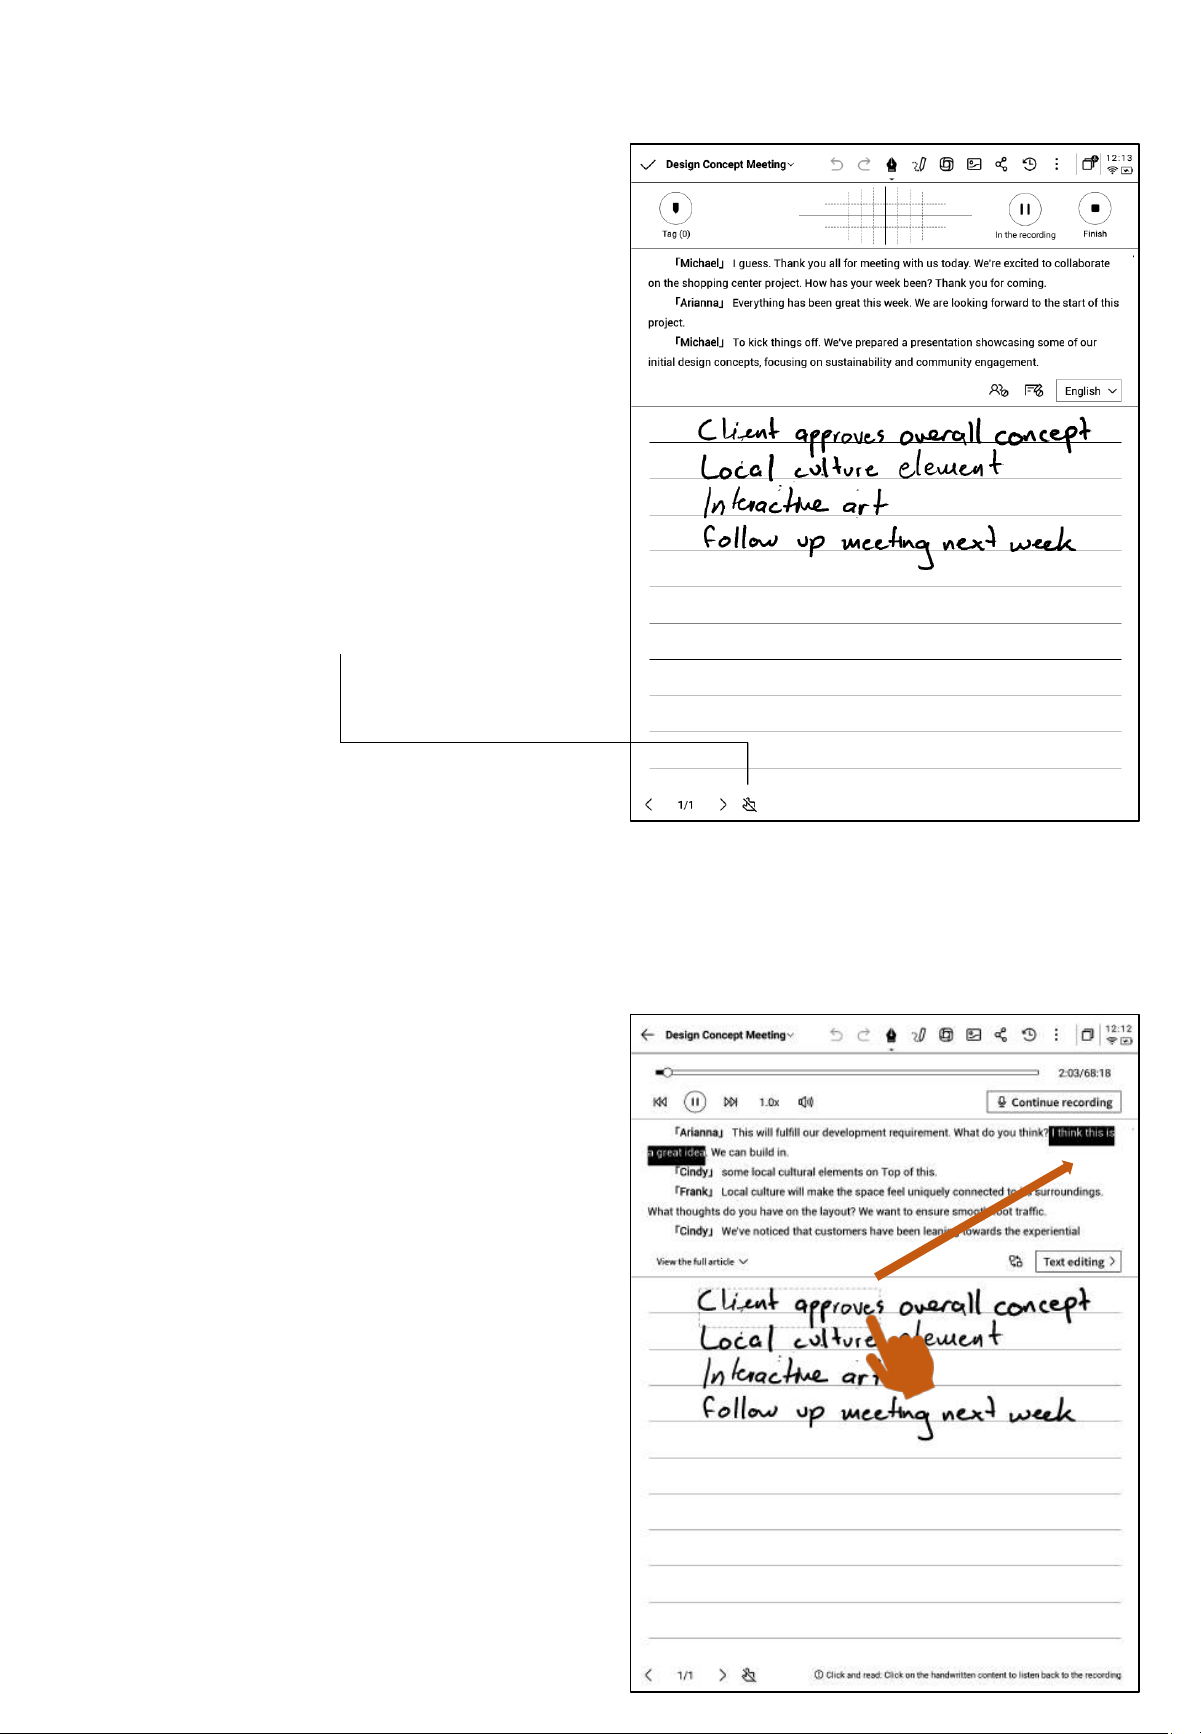
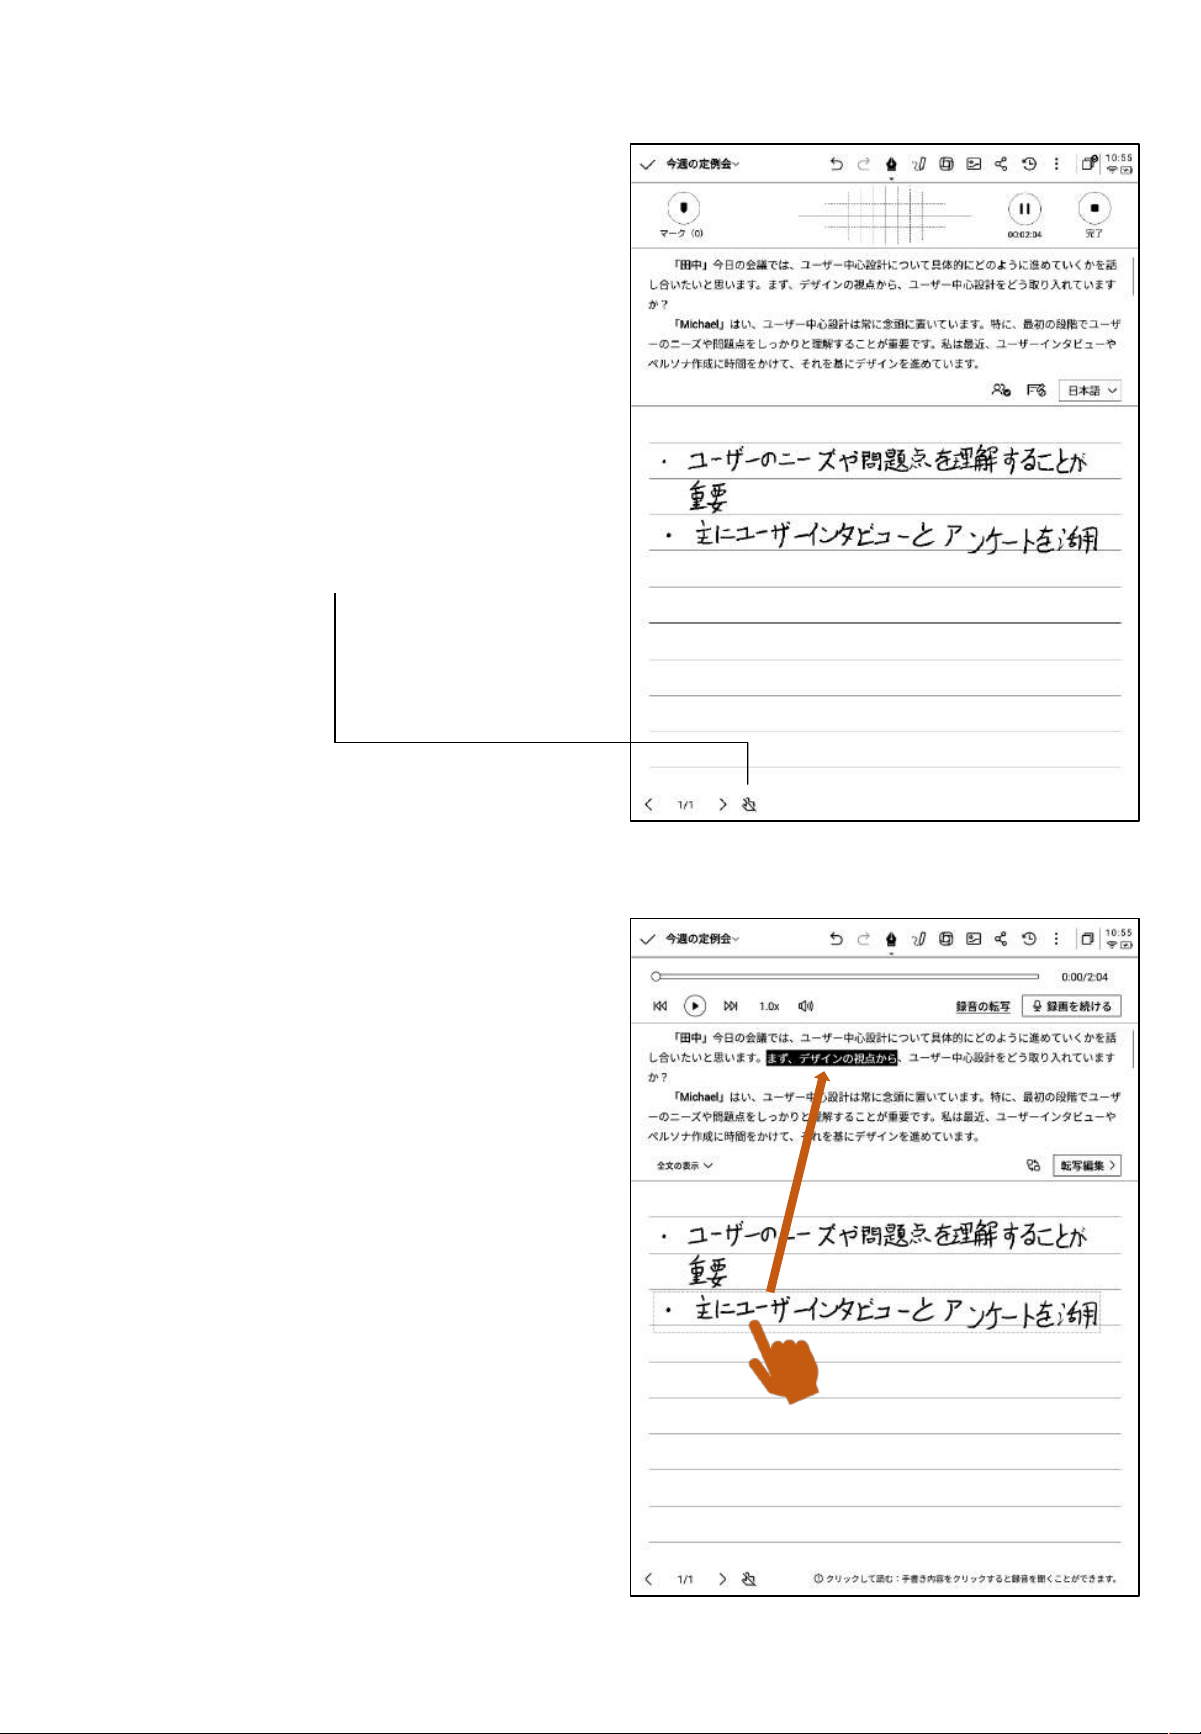
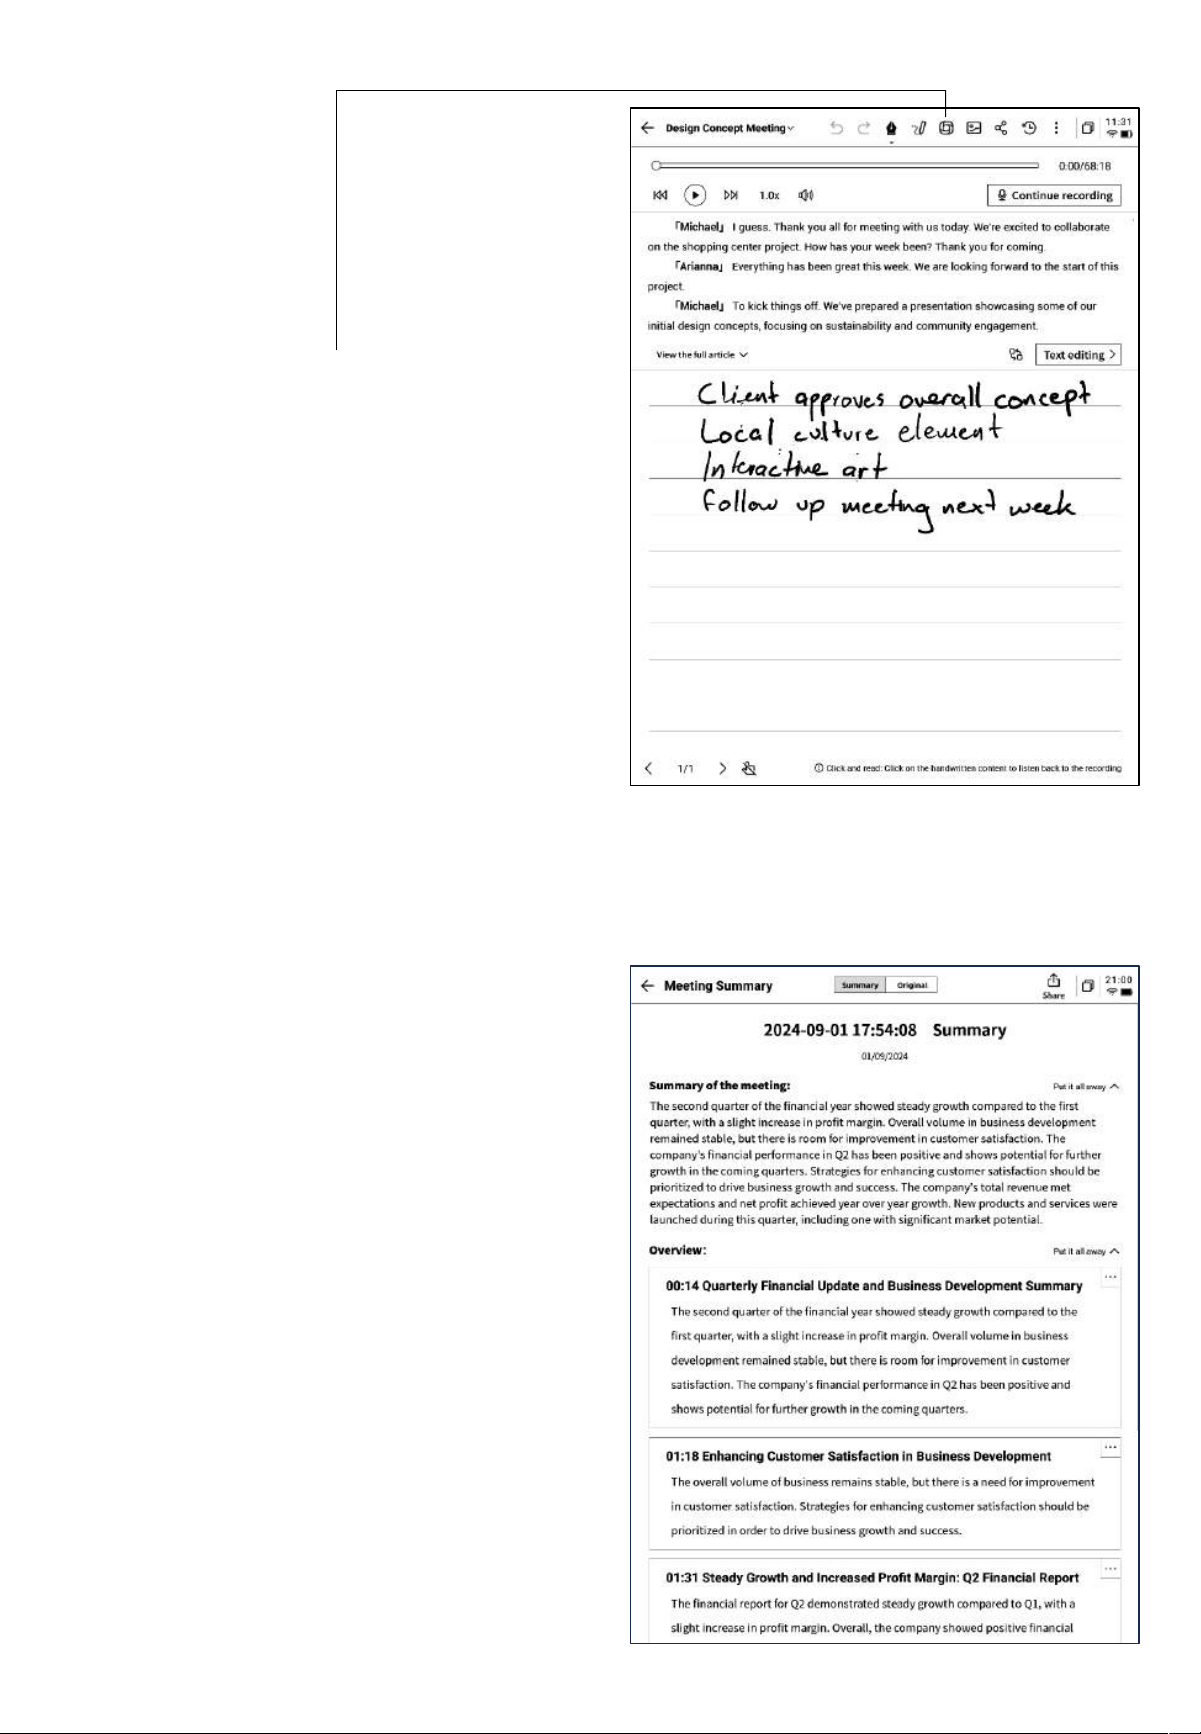
2.2.6 Handwriting Area
• The handwriting area supports freehand
note-taking using the electromagnetic pen.
• Similar to writing, it supports the use of
smart pen features.
• If accidental page flipping occurs
frequently while writing, you can click the
touch-disable button to turn off gesture
operations.
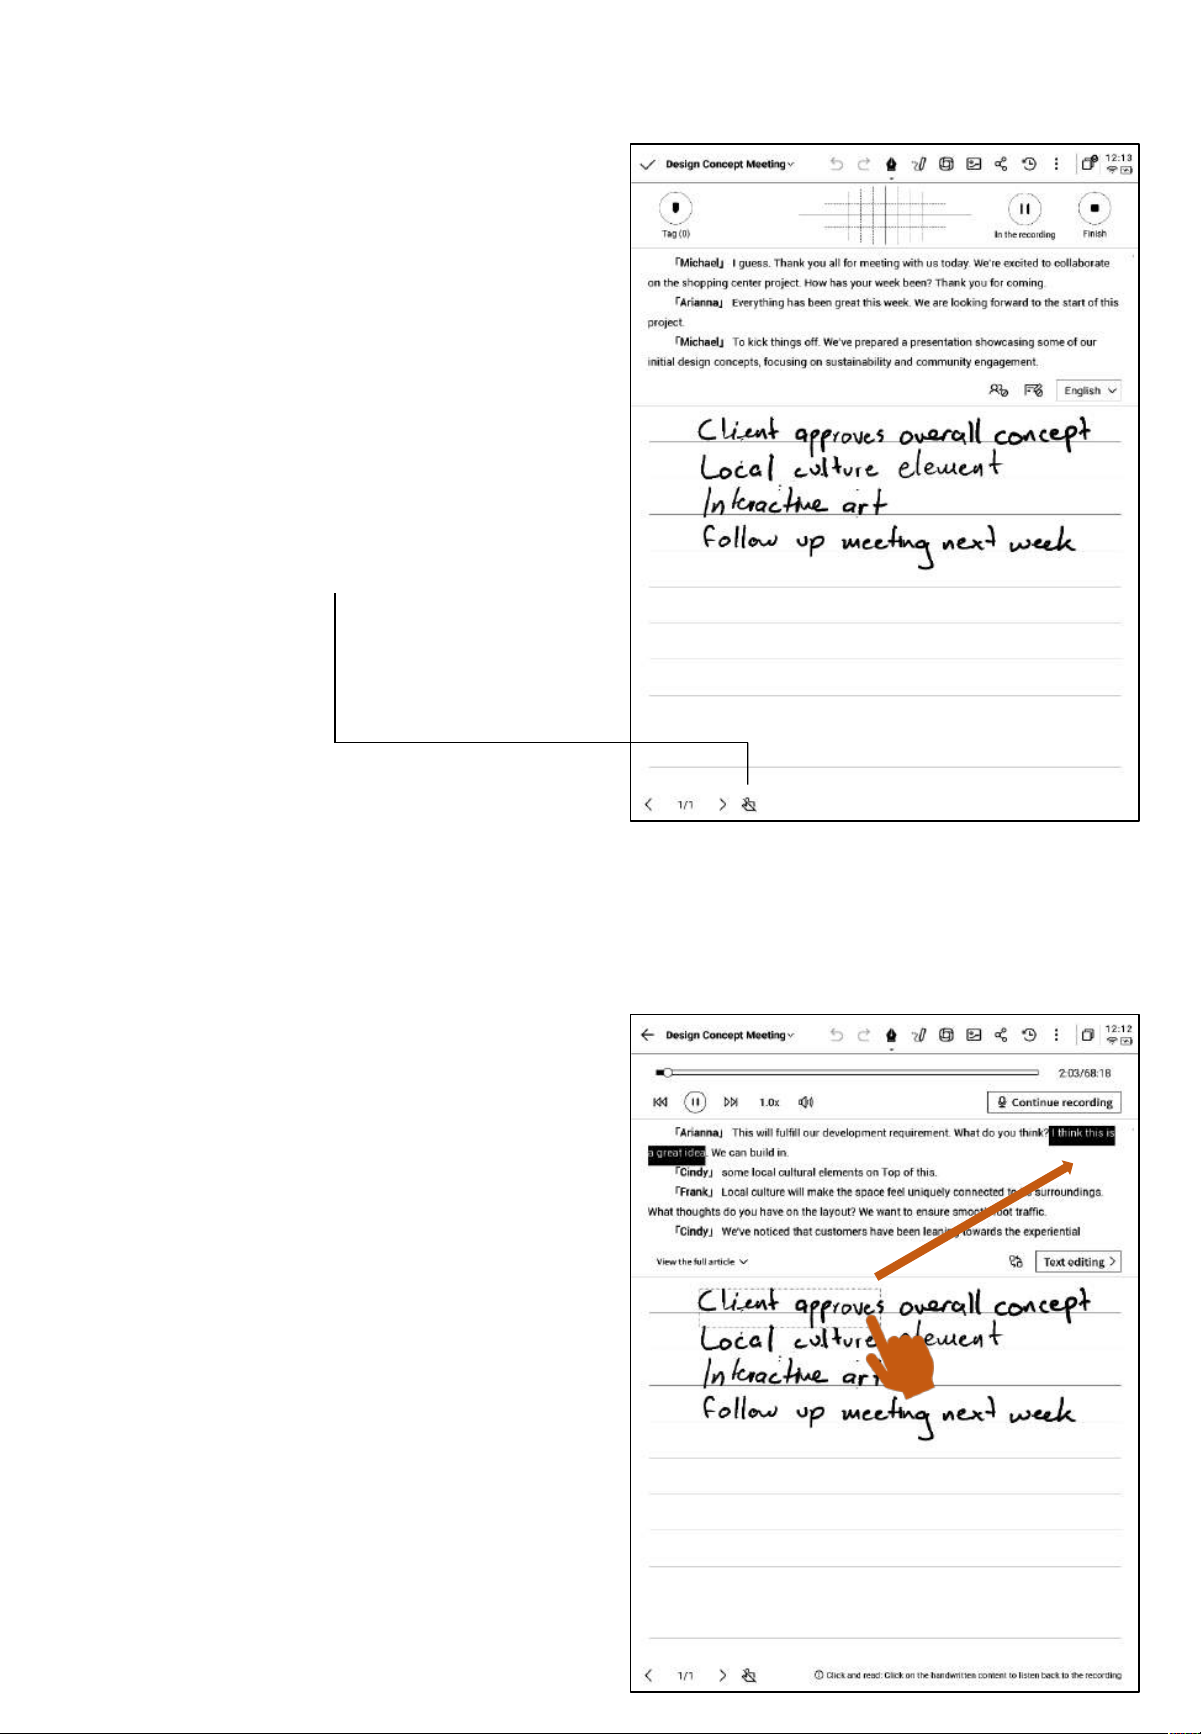
2.2.7 Instant Playback, Quick Review
• After the meeting ends, you can click on
the handwritten content to quickly locate
and play the corresponding audio segment,
allowing for easy review of meeting
content.
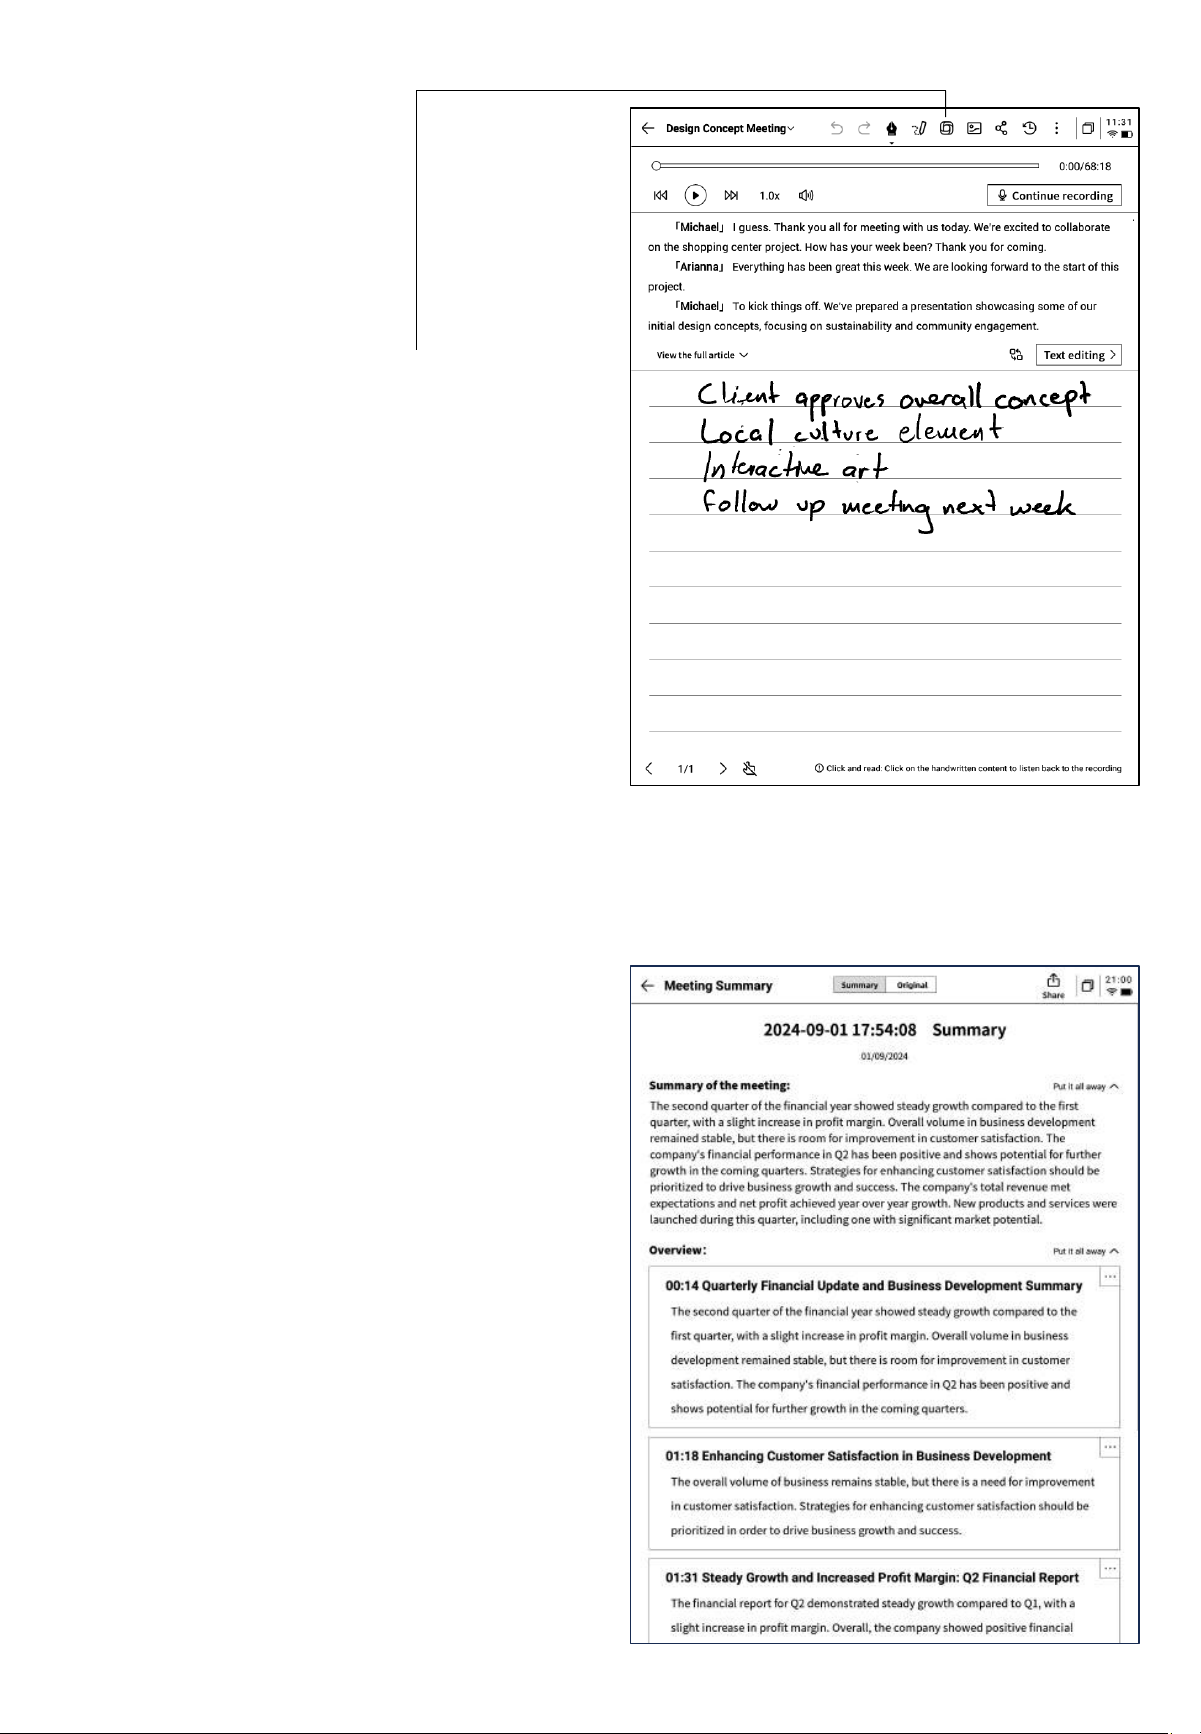
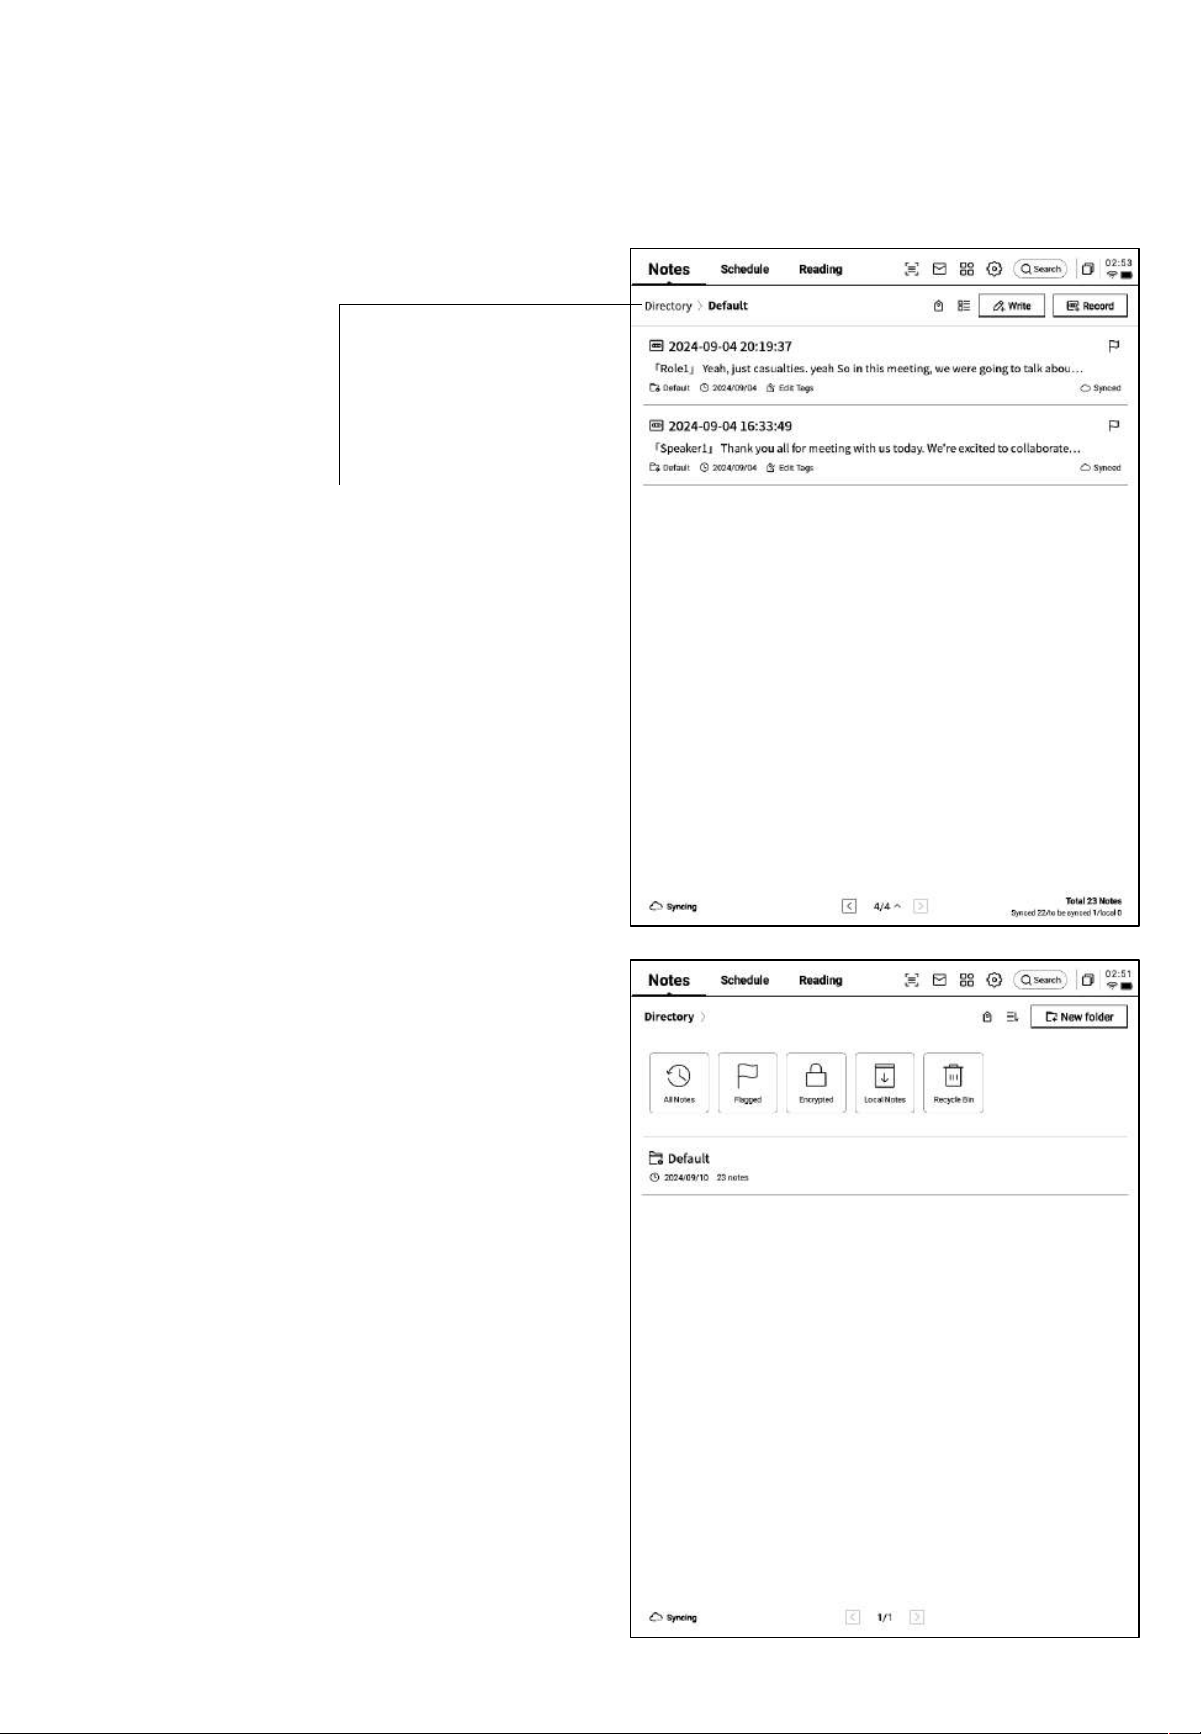
2.2.8 Meeting Summary
• After the meeting ends, click the meeting
summary button to automatically generate
a summary based on the text content.
• This feature requires setting up and
configuring your personal OpenAI API
Key in the settings interface.
• Provides a summary and full transcript of
the meeting, with support for exporting and
sharing.
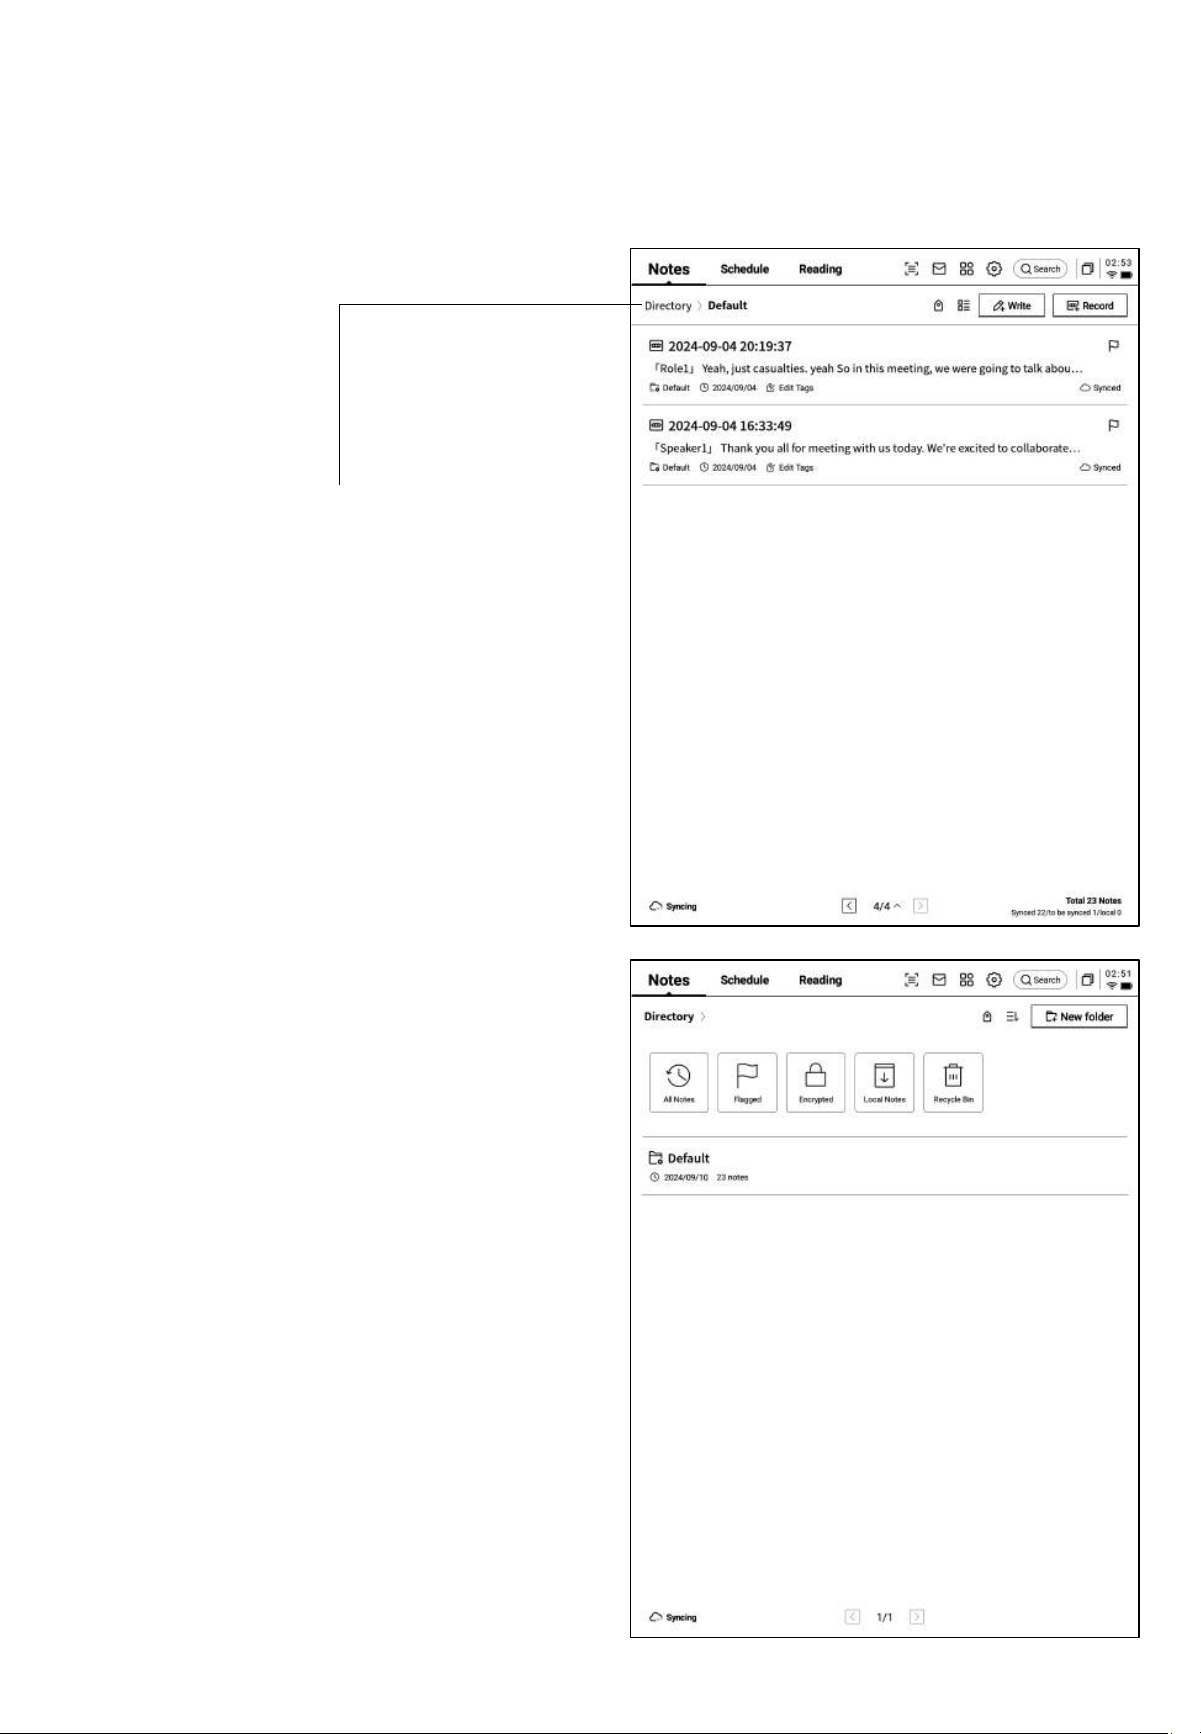
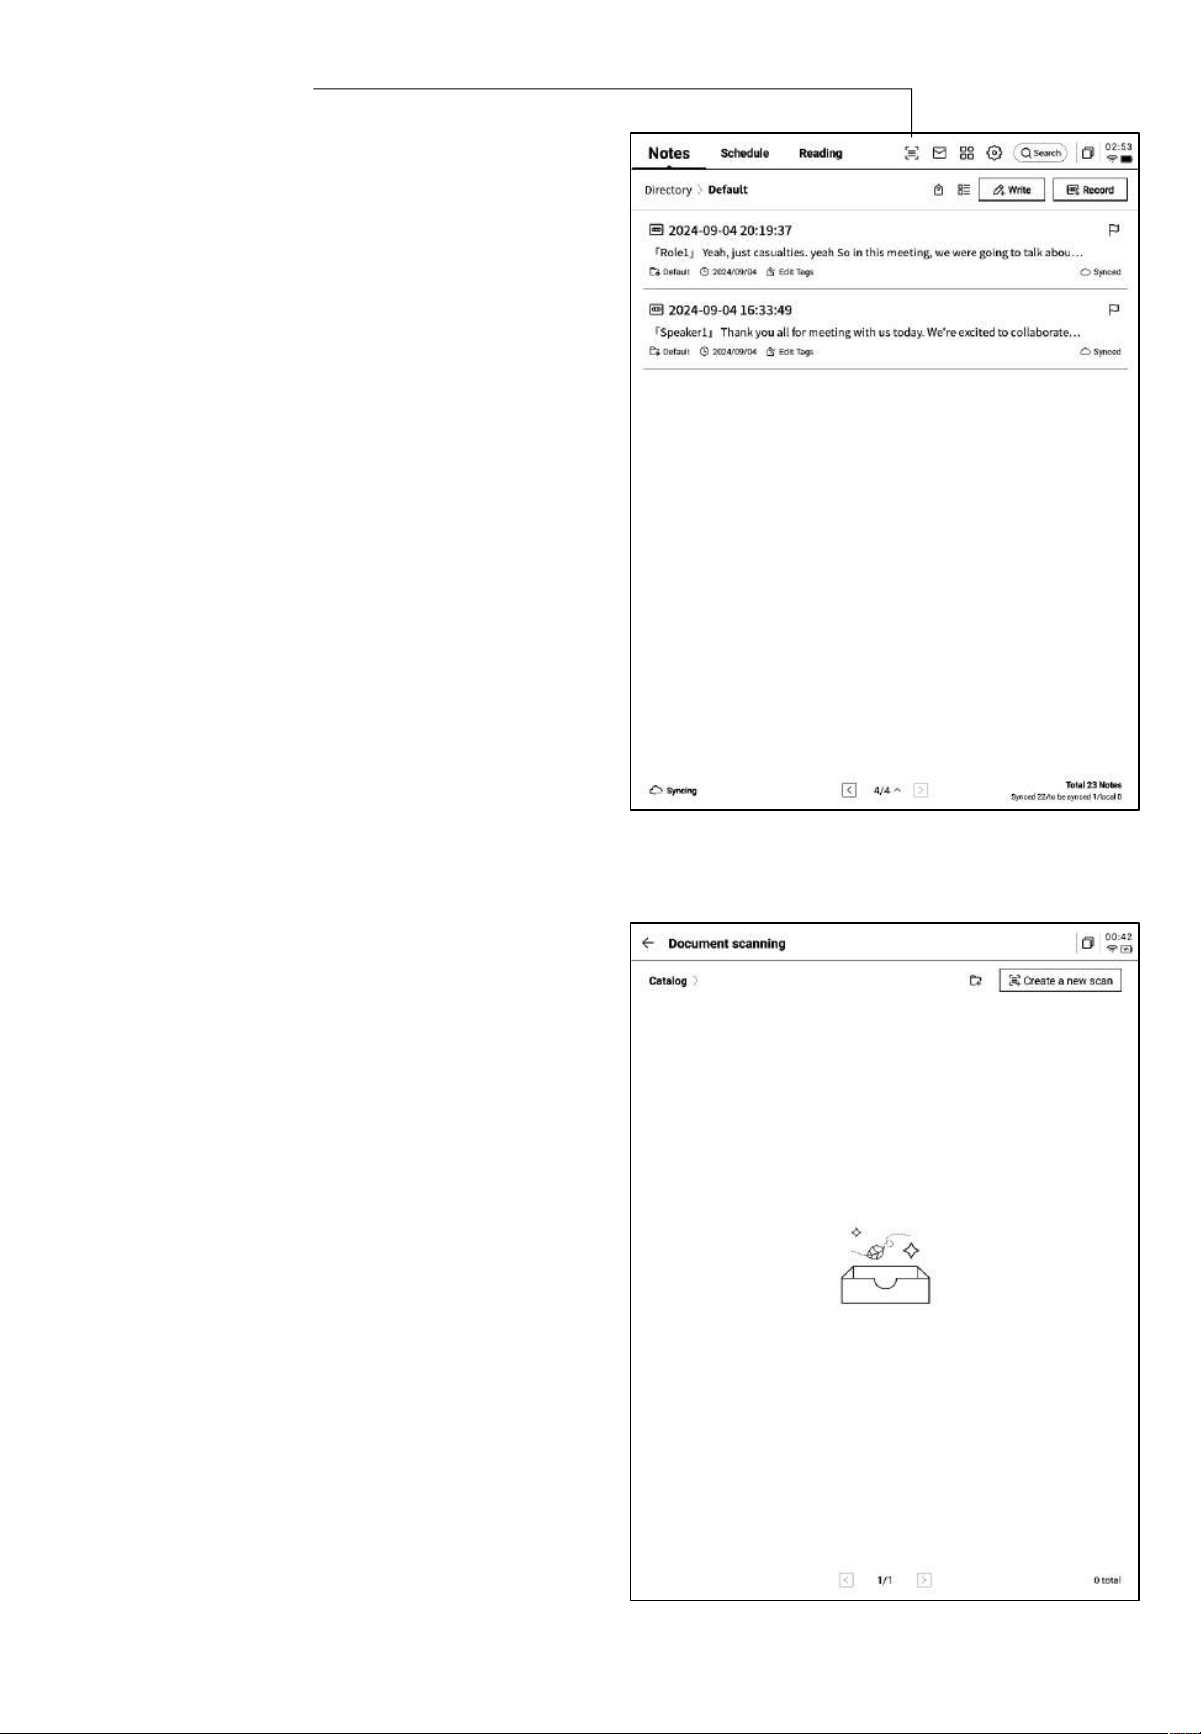
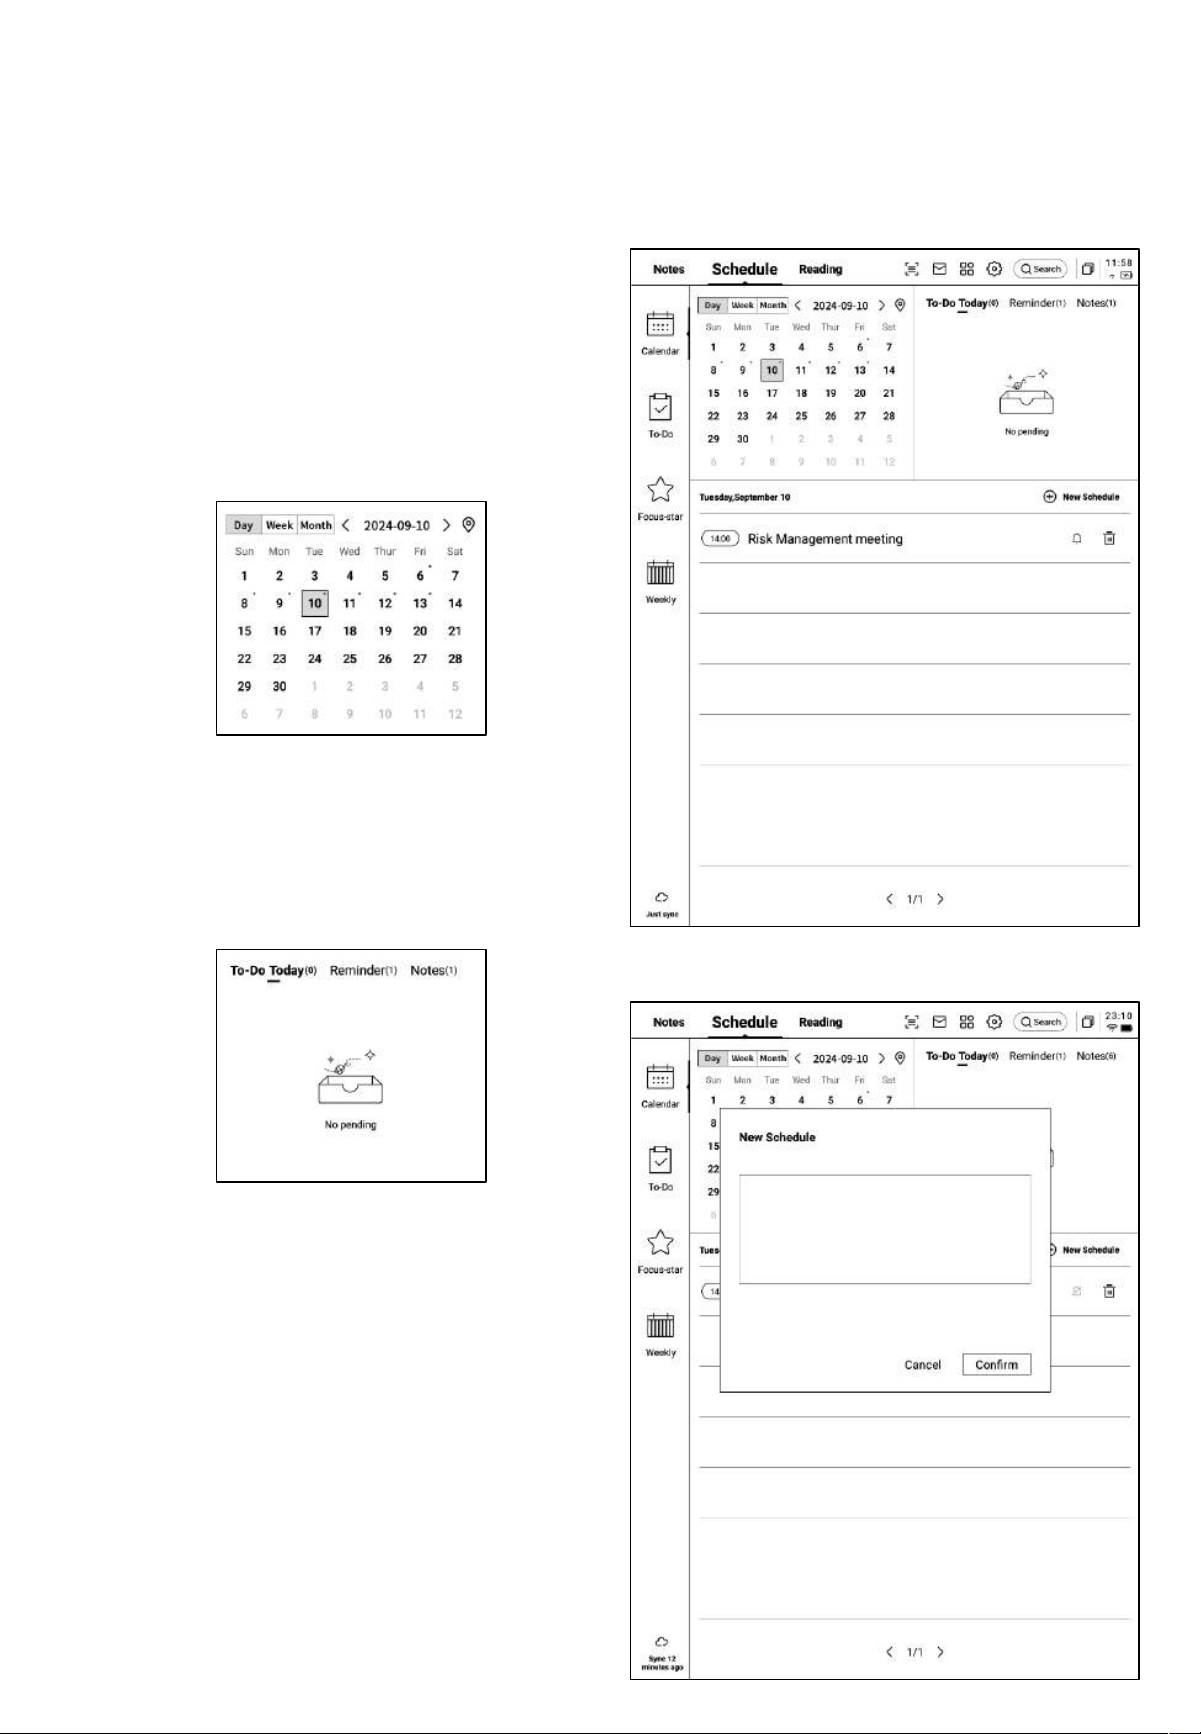
2.3 Note Management
• The created notes and recordings are saved
locally and can be viewed at any time by
clicking on them.
• Clicking on the directory allows you to
view all file information.
• A default folder is provided, where all
unorganized notes are stored. This default
folder cannot be deleted.
• Offers various categorization methods,
including all notes, flagged notes,
encrypted notes, local notes (not synced to
the cloud), and deleted notes.
• Supports the creation and management of
files and folders.
2.3.1 File and Folder Management
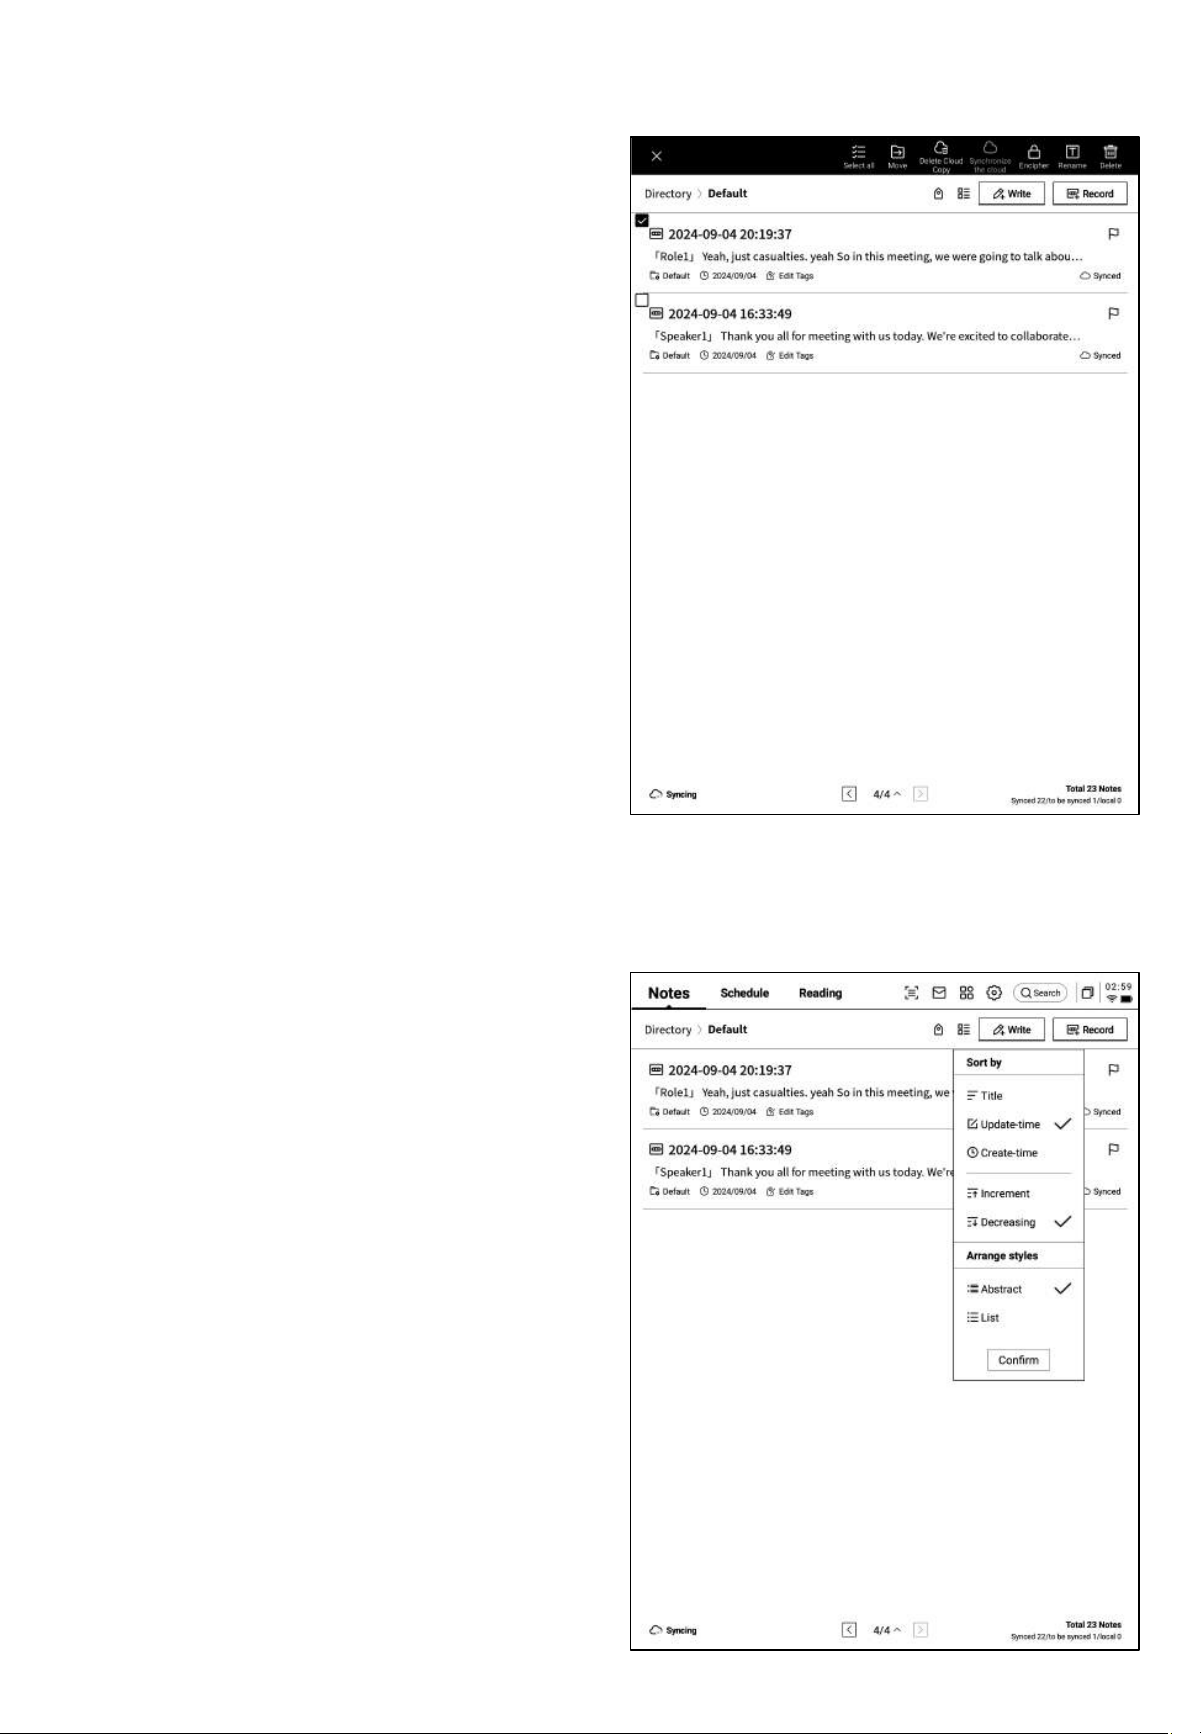
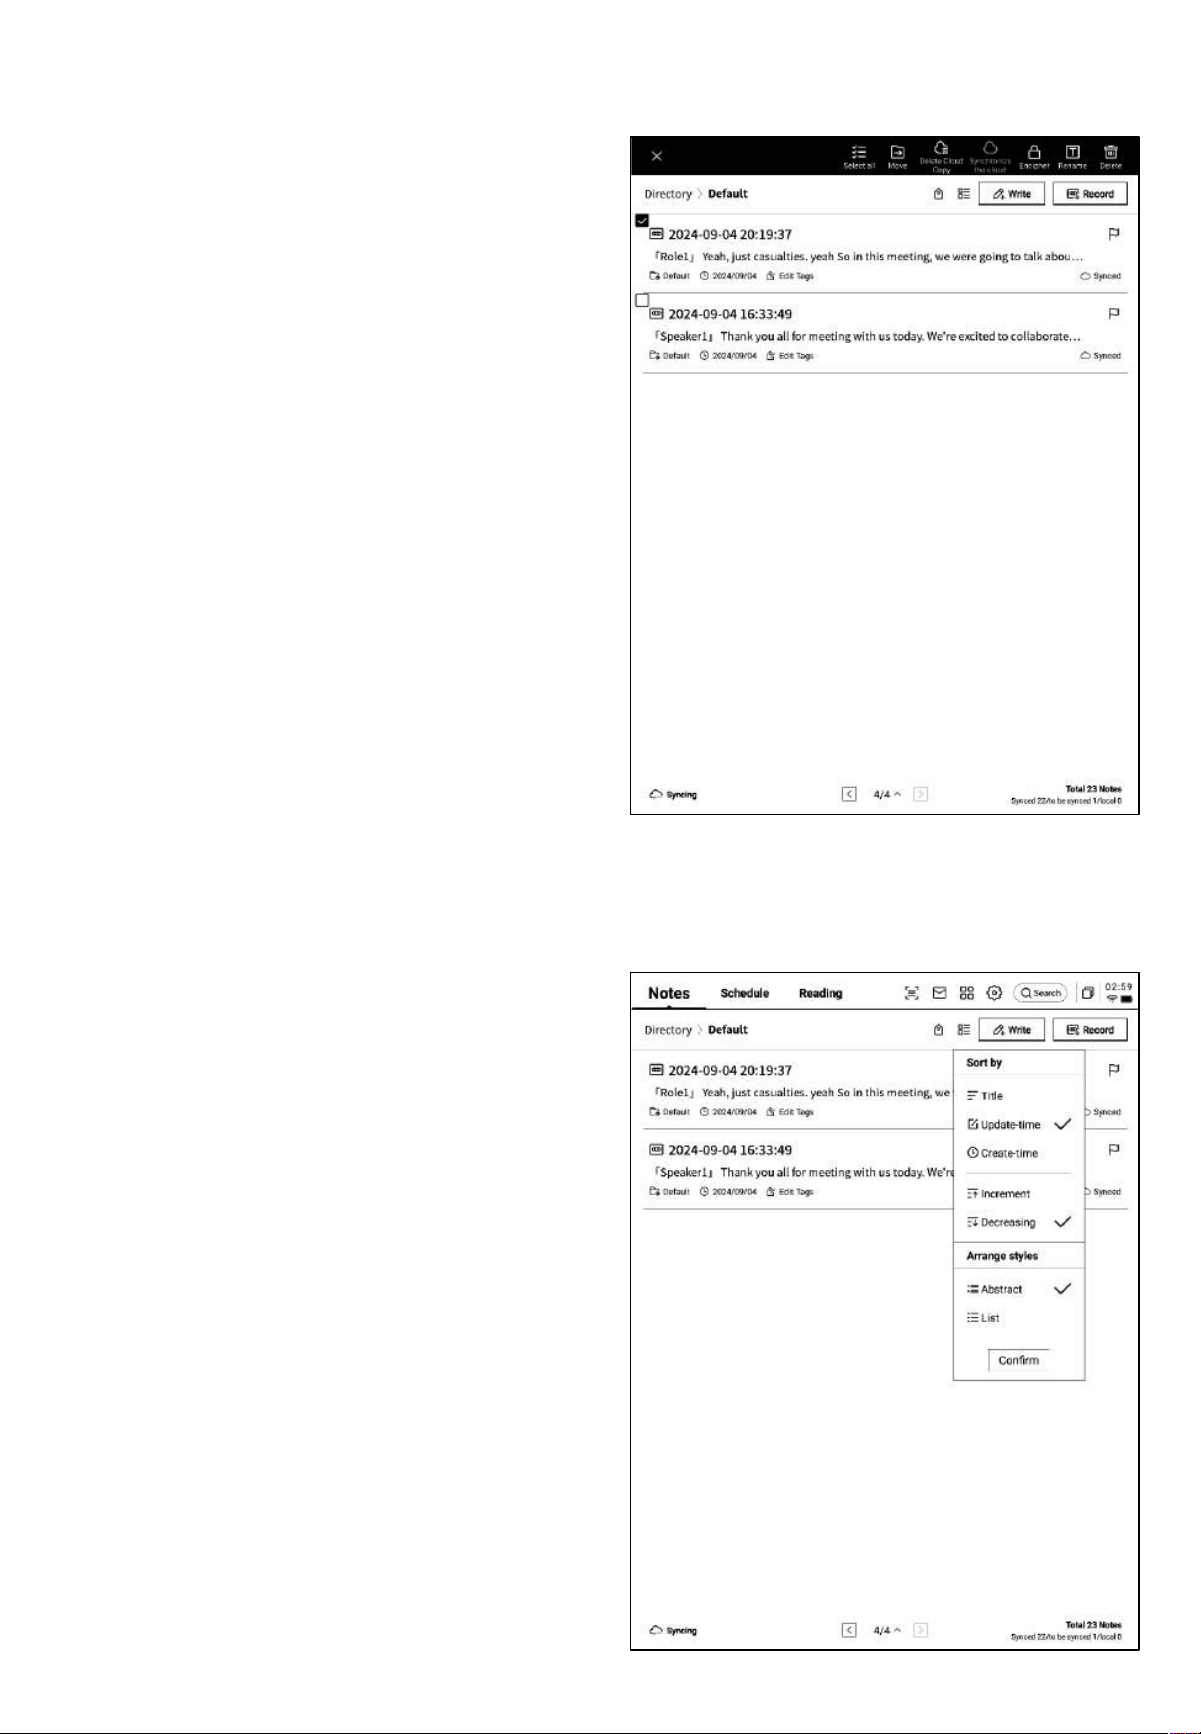
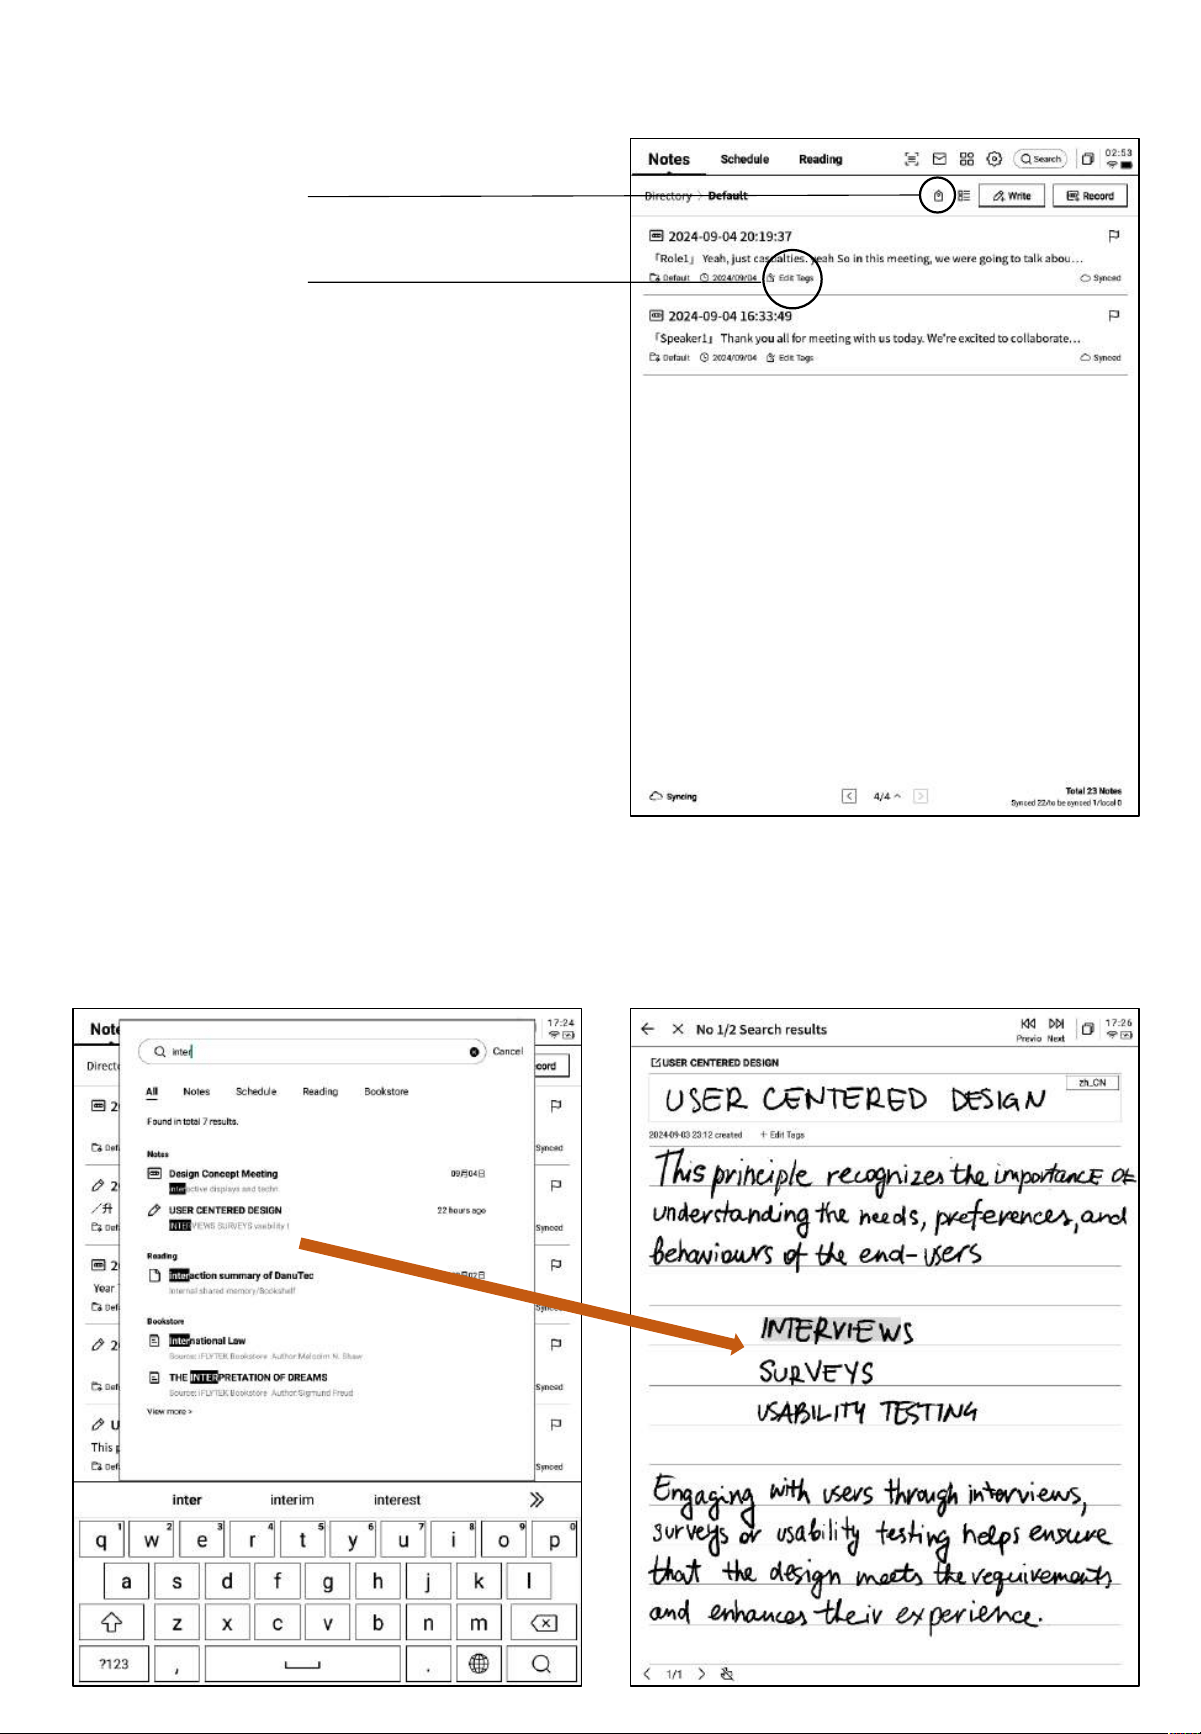
2.3.2 Note Management
• Long-press a note to support actions such
as moving, uploading, encrypting,
renaming, and deleting.
• Click the sort button to choose between
various sorting methods.
• Offers abstract and list views for displaying
notes, depending on whether a summary is
displayed.
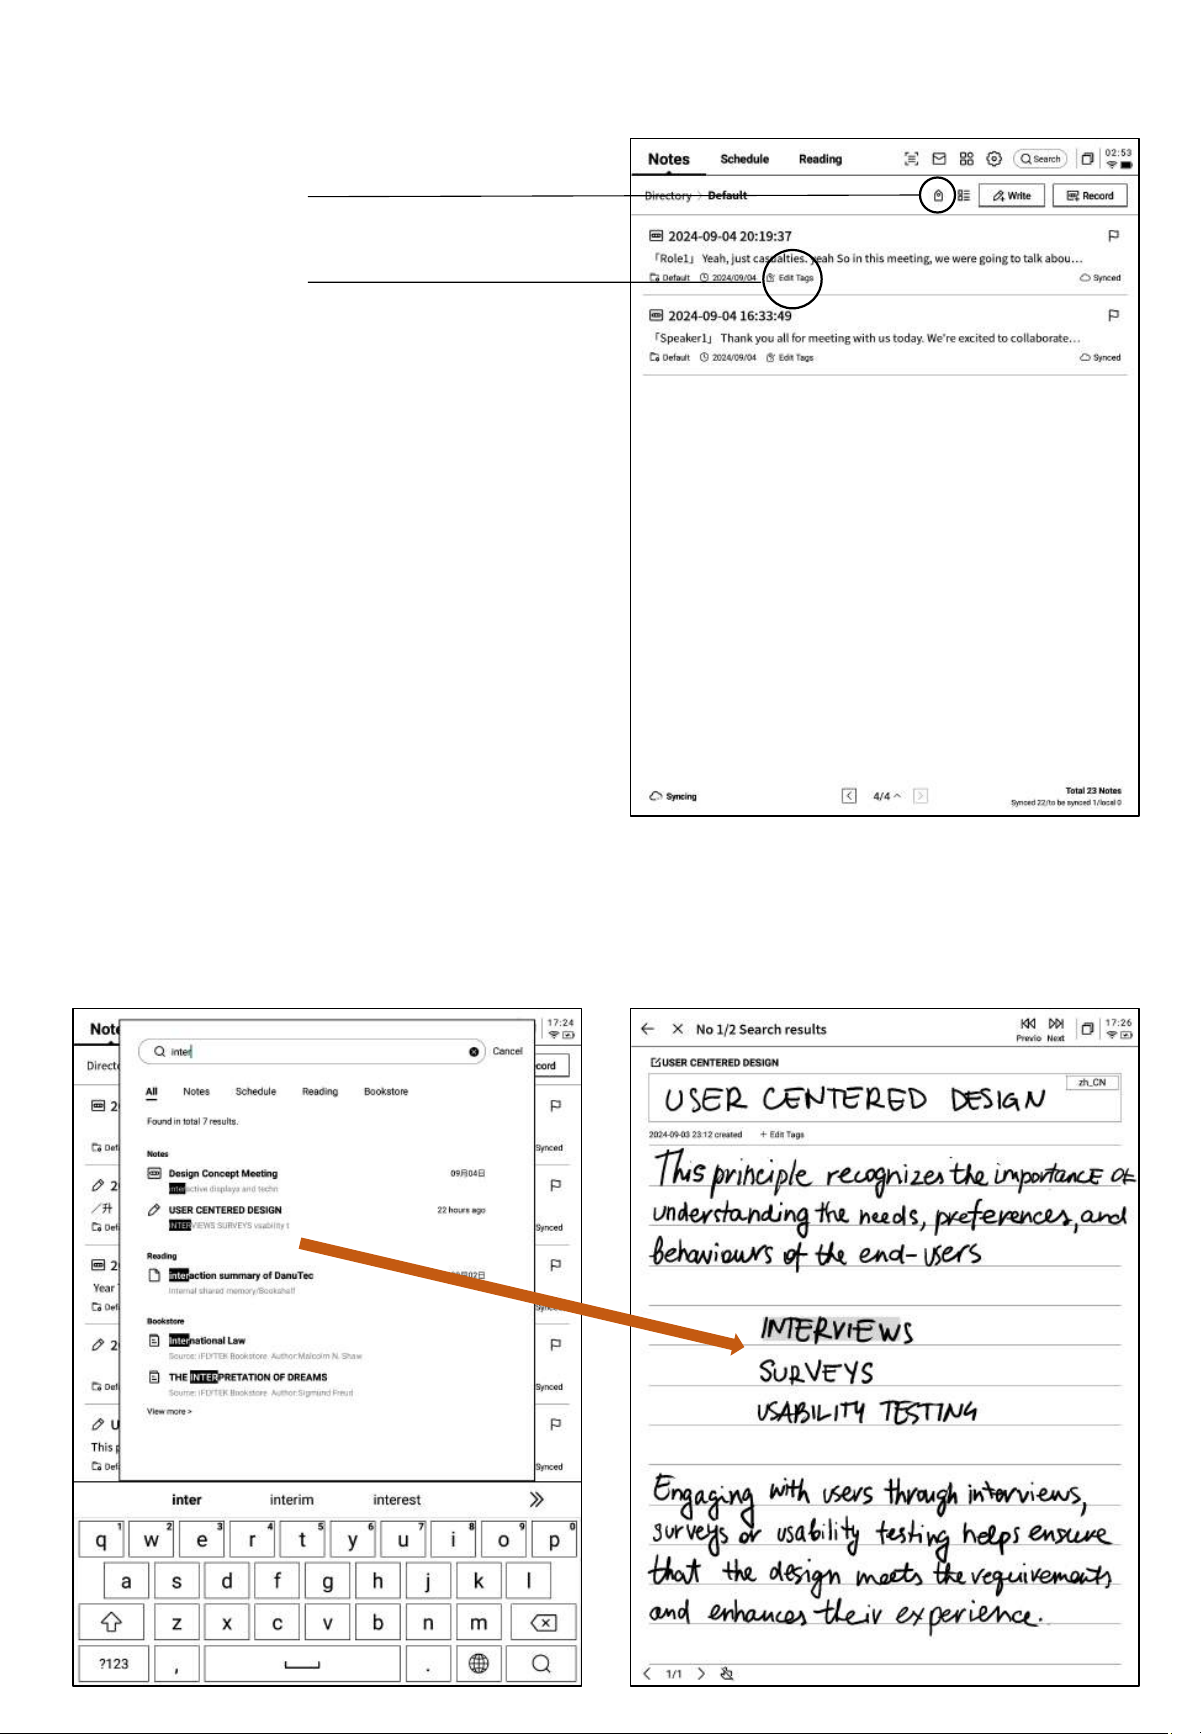
2.3.3 Tag Management
Manage All Tags
Manage Note Tags
Manage All Tags:
• Supports adding, deleting, and modifying
tag content, as well as filtering notes by
tags.
Manage Note Tags
• Supports adding and deleting tags for the
current note. These operations can also be
performed within the note itself.
2.3.4 Global Search
Supports searching handwritten content, speech-to-text content, and allows for quick jumps
with highlighted search results.
Chapter 3: Schedule
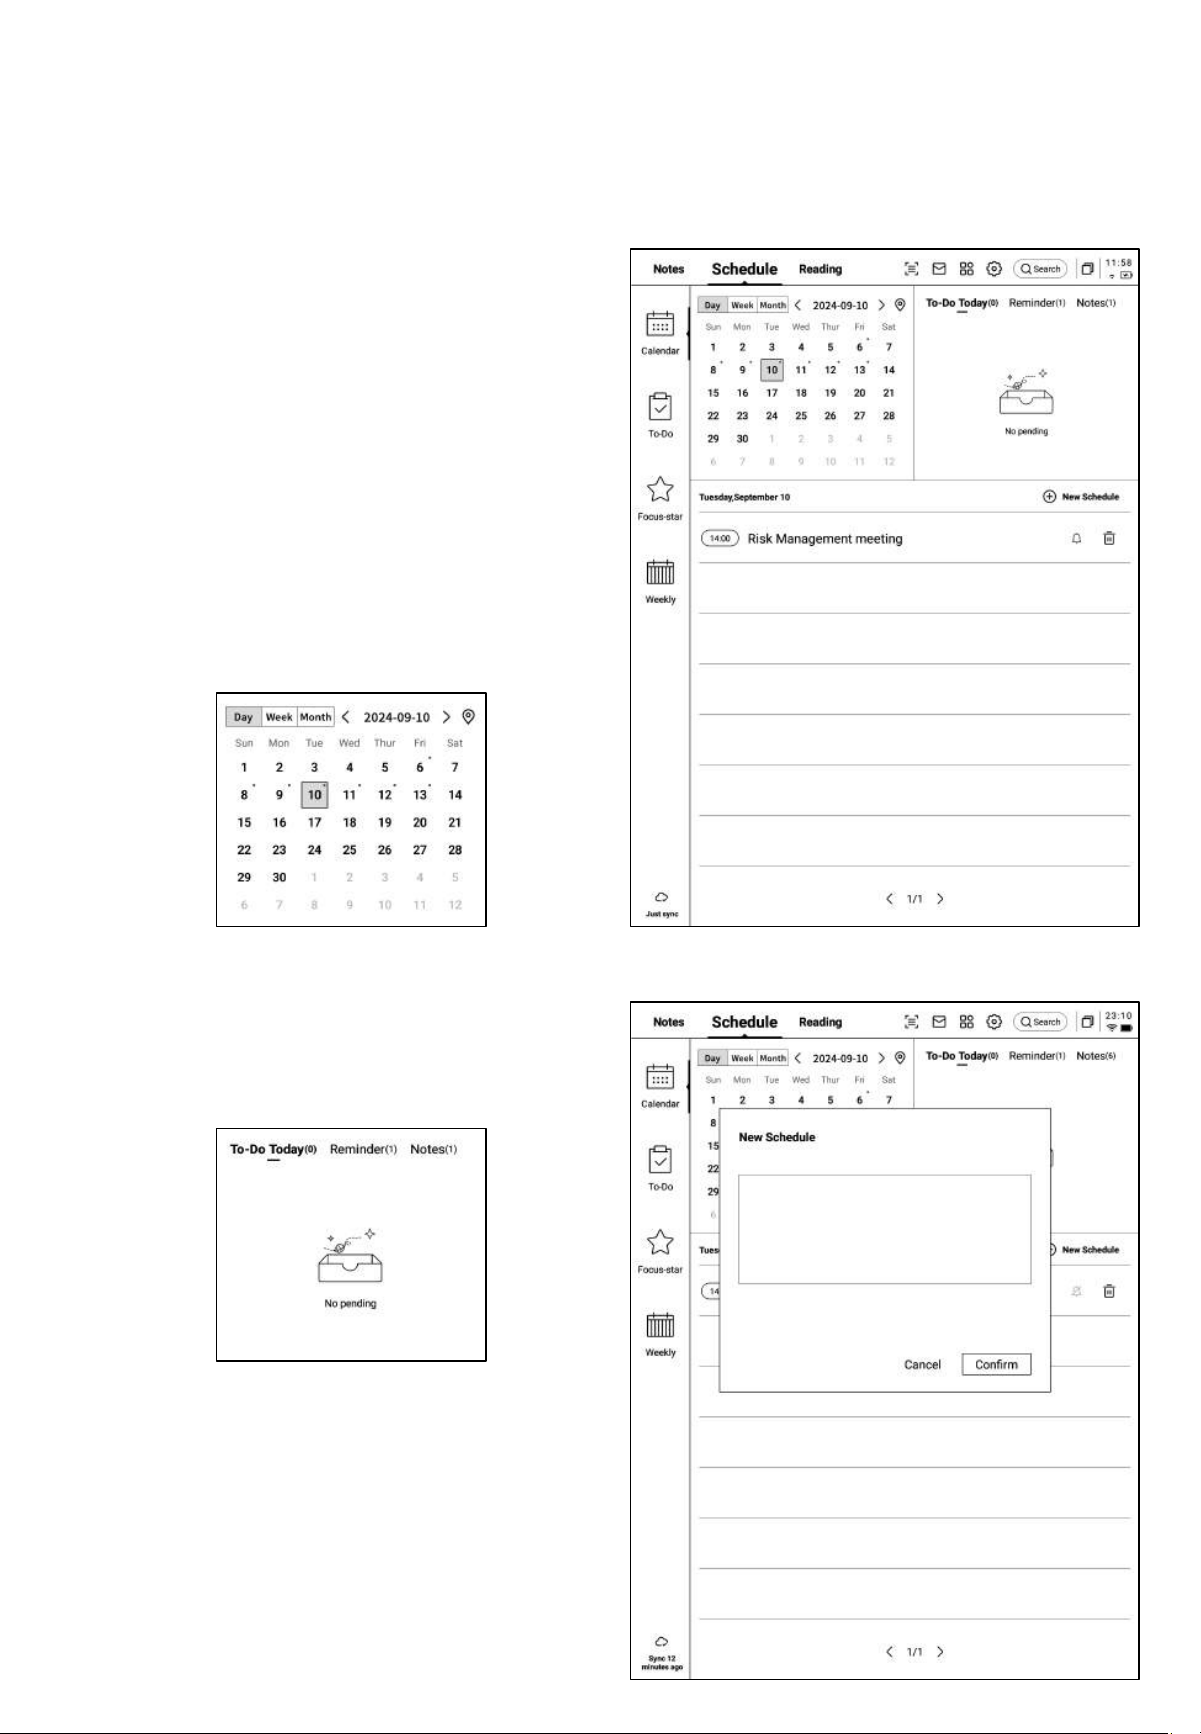
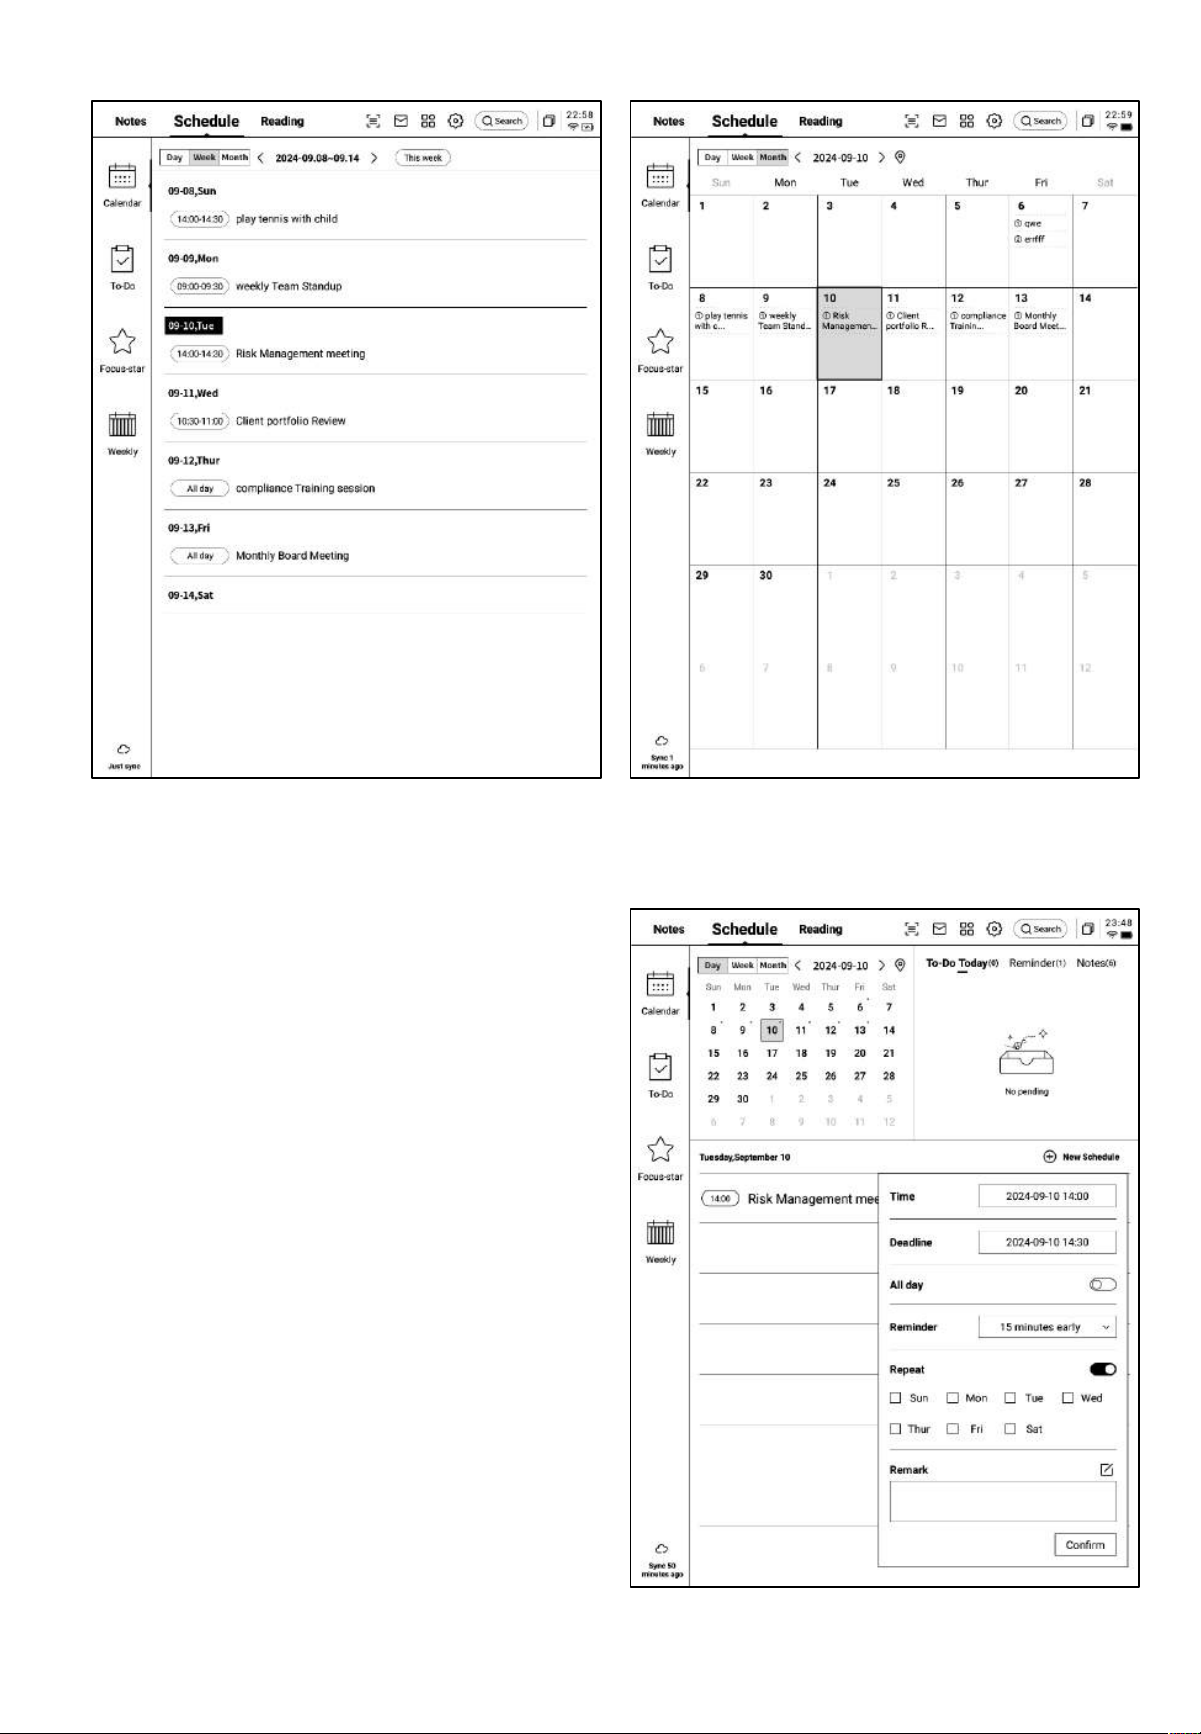
3.1 Calendar and Schedule
3.1.1 Calendar Display
• Displays current month’s calendar
information, supporting navigation
between months.
• By default, it shows the current day's
schedule information and supports
clicking on dates to switch and view
schedules for other times.
• Provides day, week, and month views.
3.1.2 Current Day Task Display
• Displays today's pending tasks, reminders
for today, and any notes created today.
3.1.3 Schedule Creation and Display
• Supports the creation of new schedules by
entering schedule details. If the schedule
content includes time information, it will
automatically extract and use it as the
schedule start time.
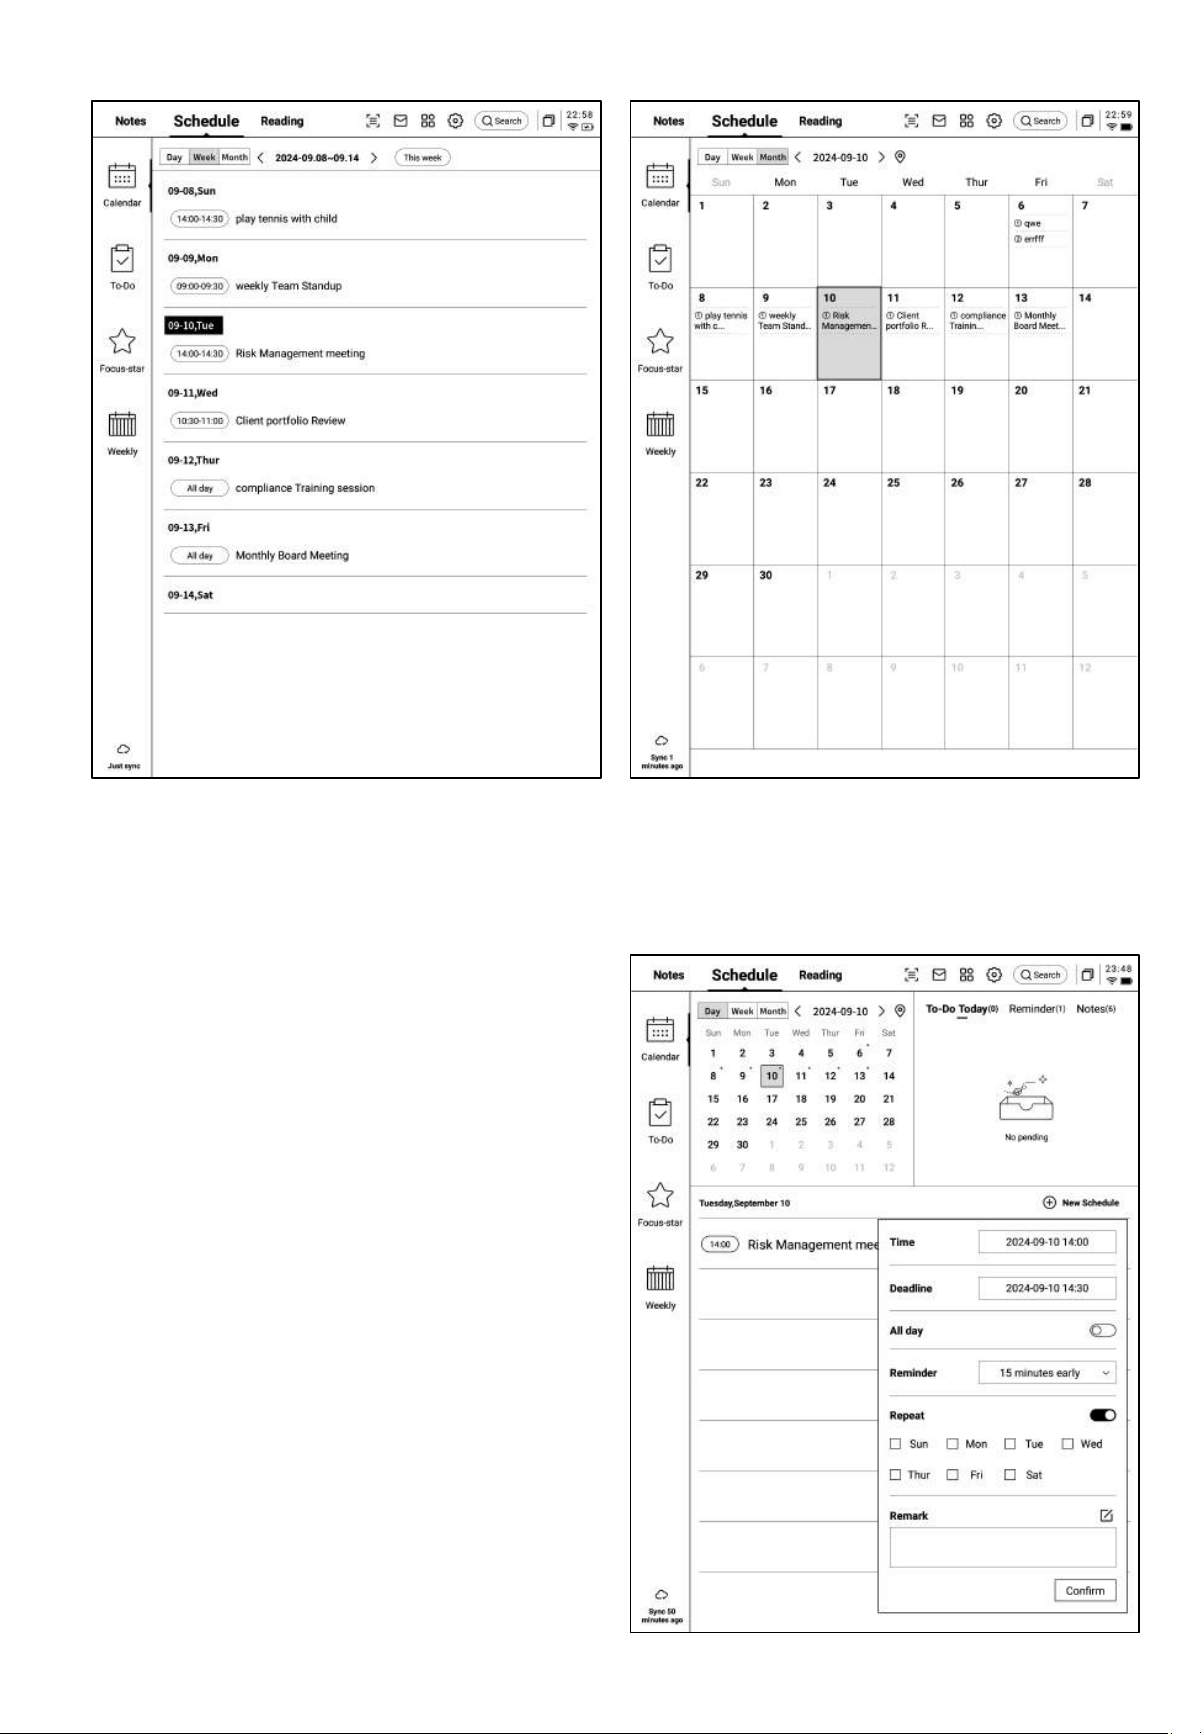
Ø Week View Ø Month View
3.1.4 Schedule Information Editing
• By clicking the button at the end of the
schedule, you can edit schedule
information.
• Supports setting the schedule's start time,
end time, reminders, recurrence, and
additional notes.

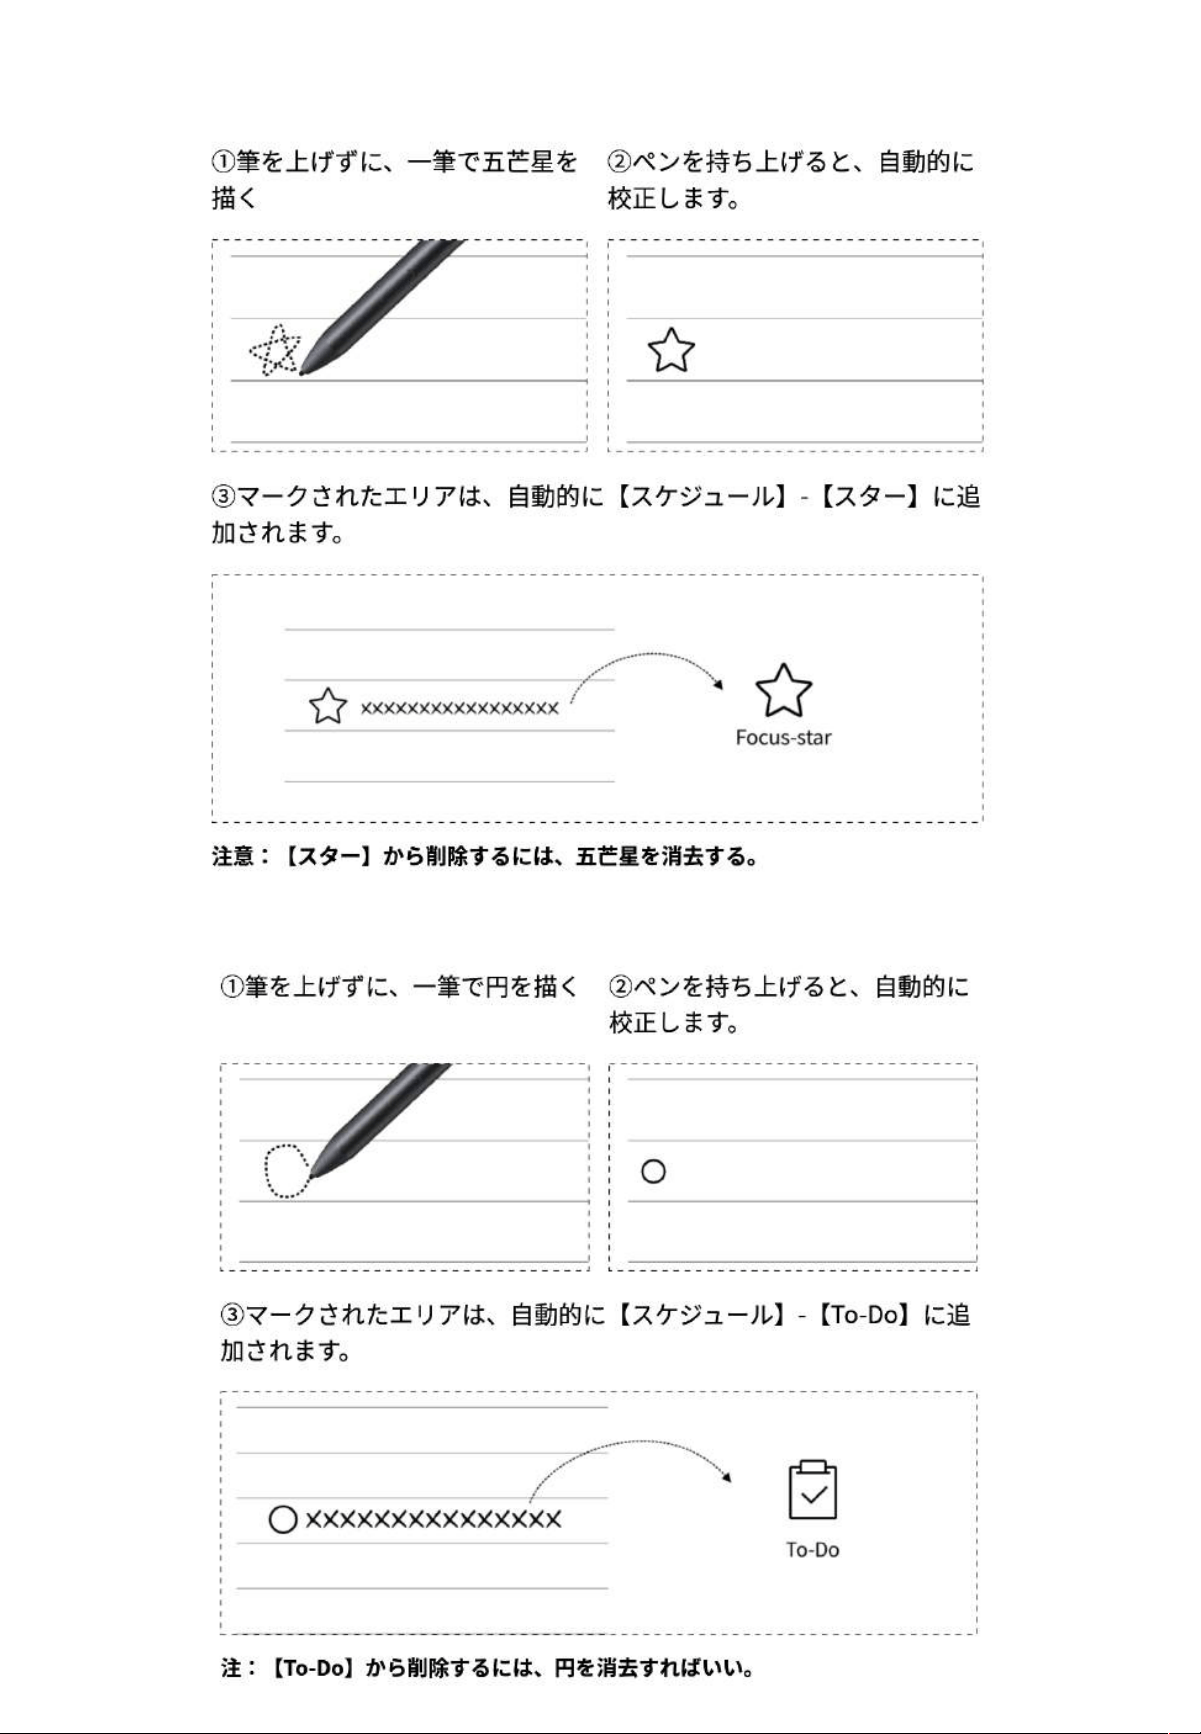
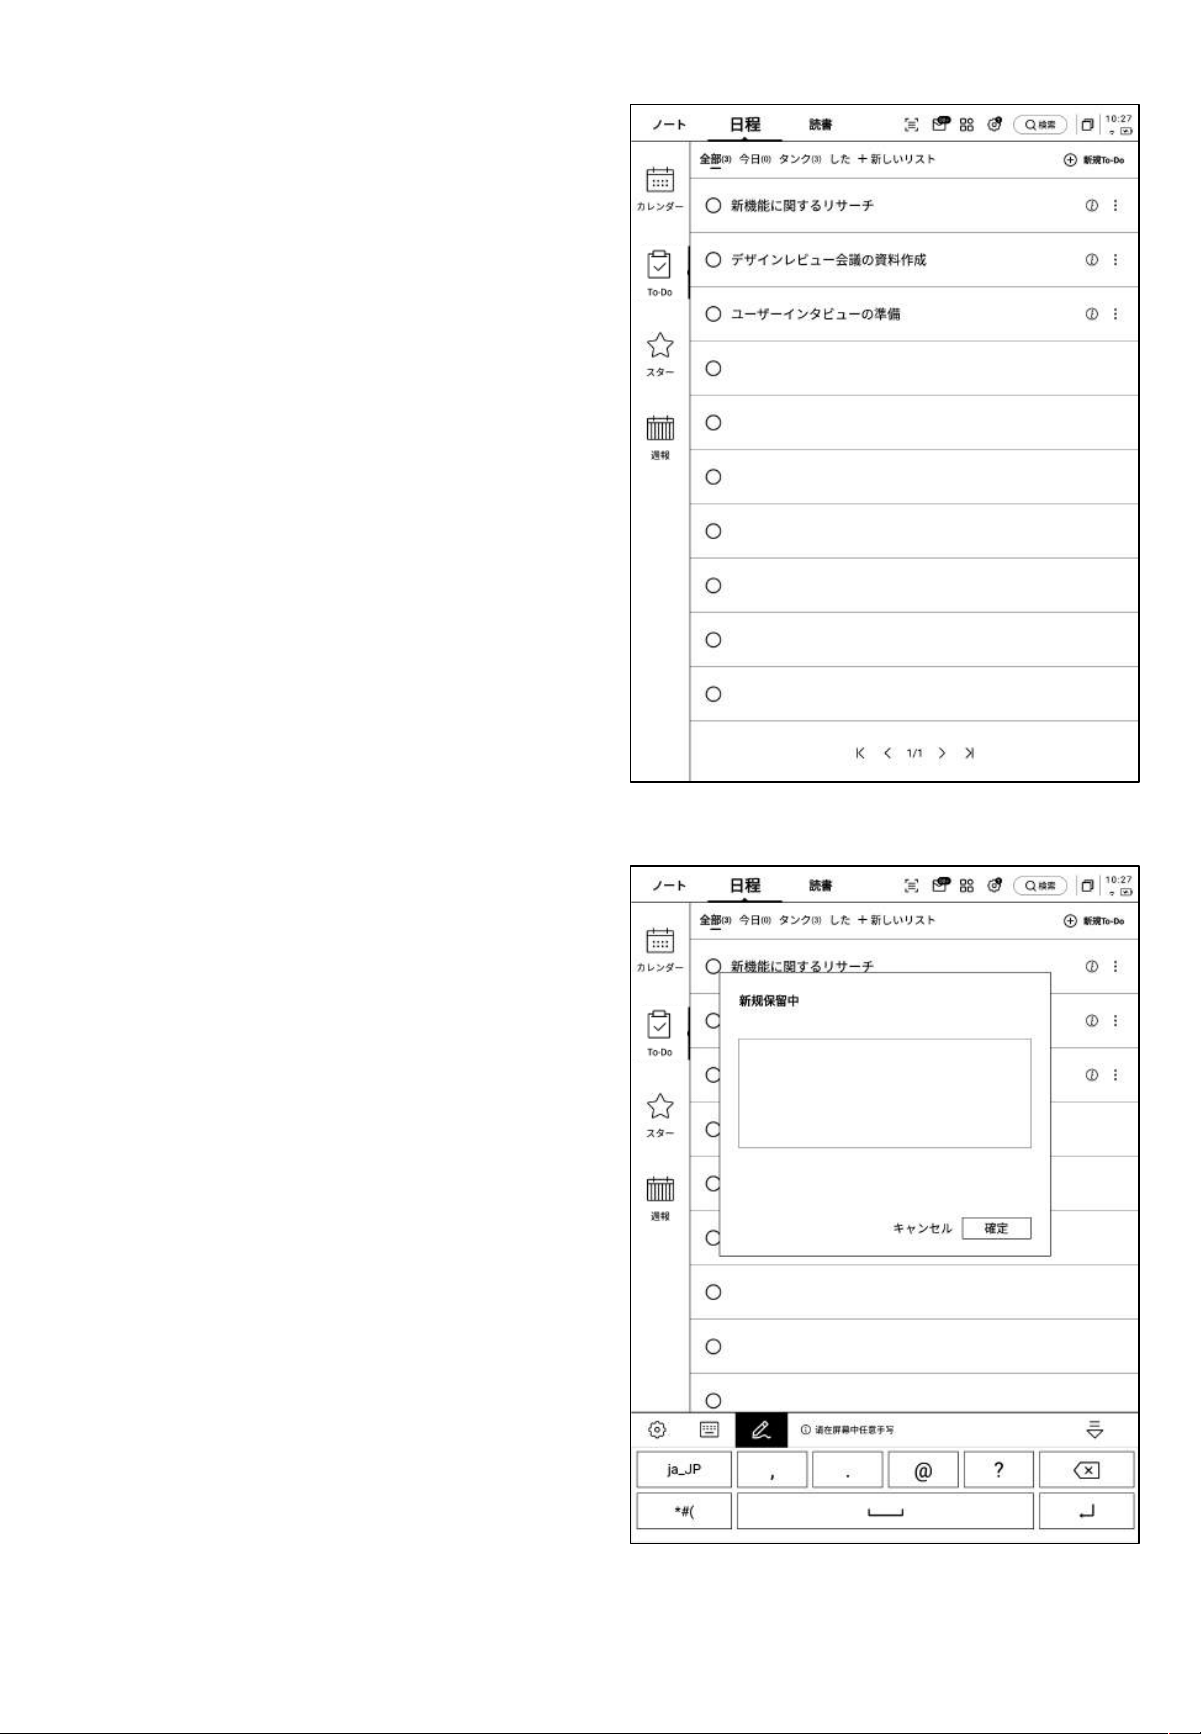
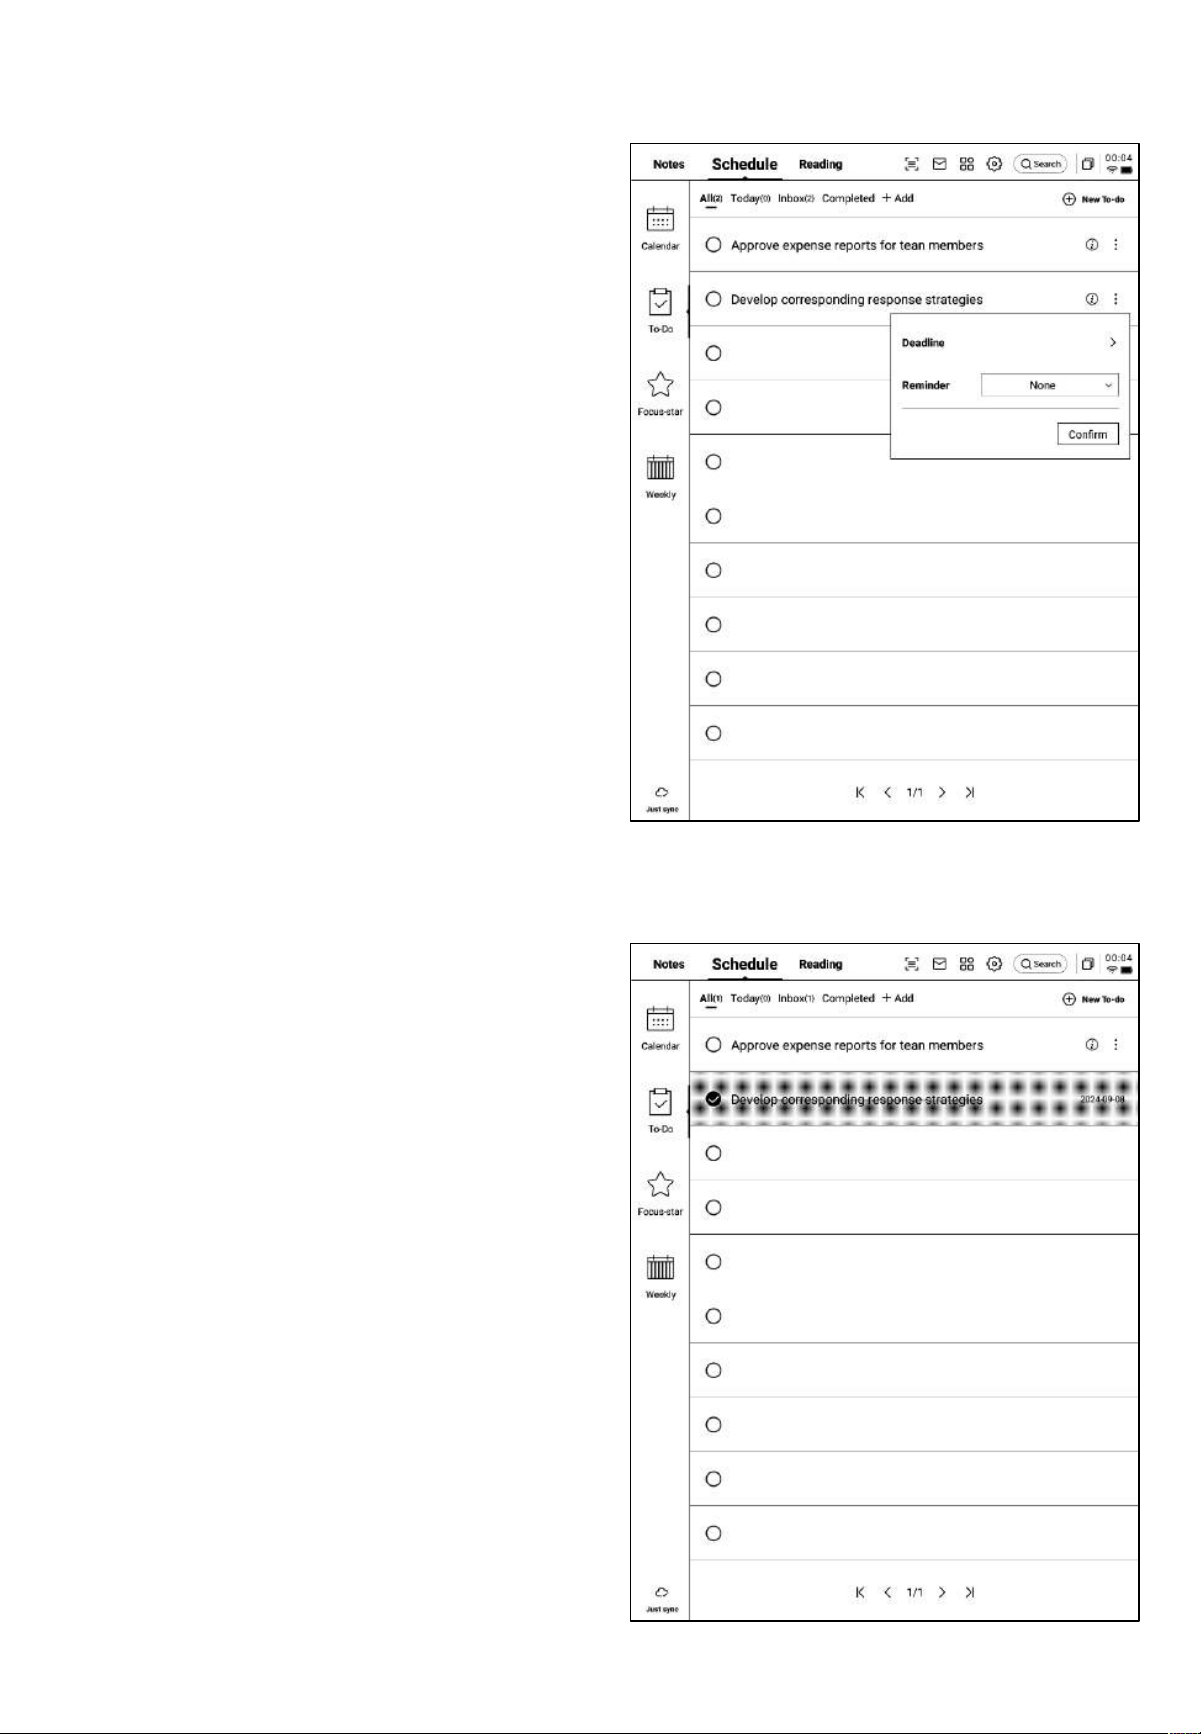
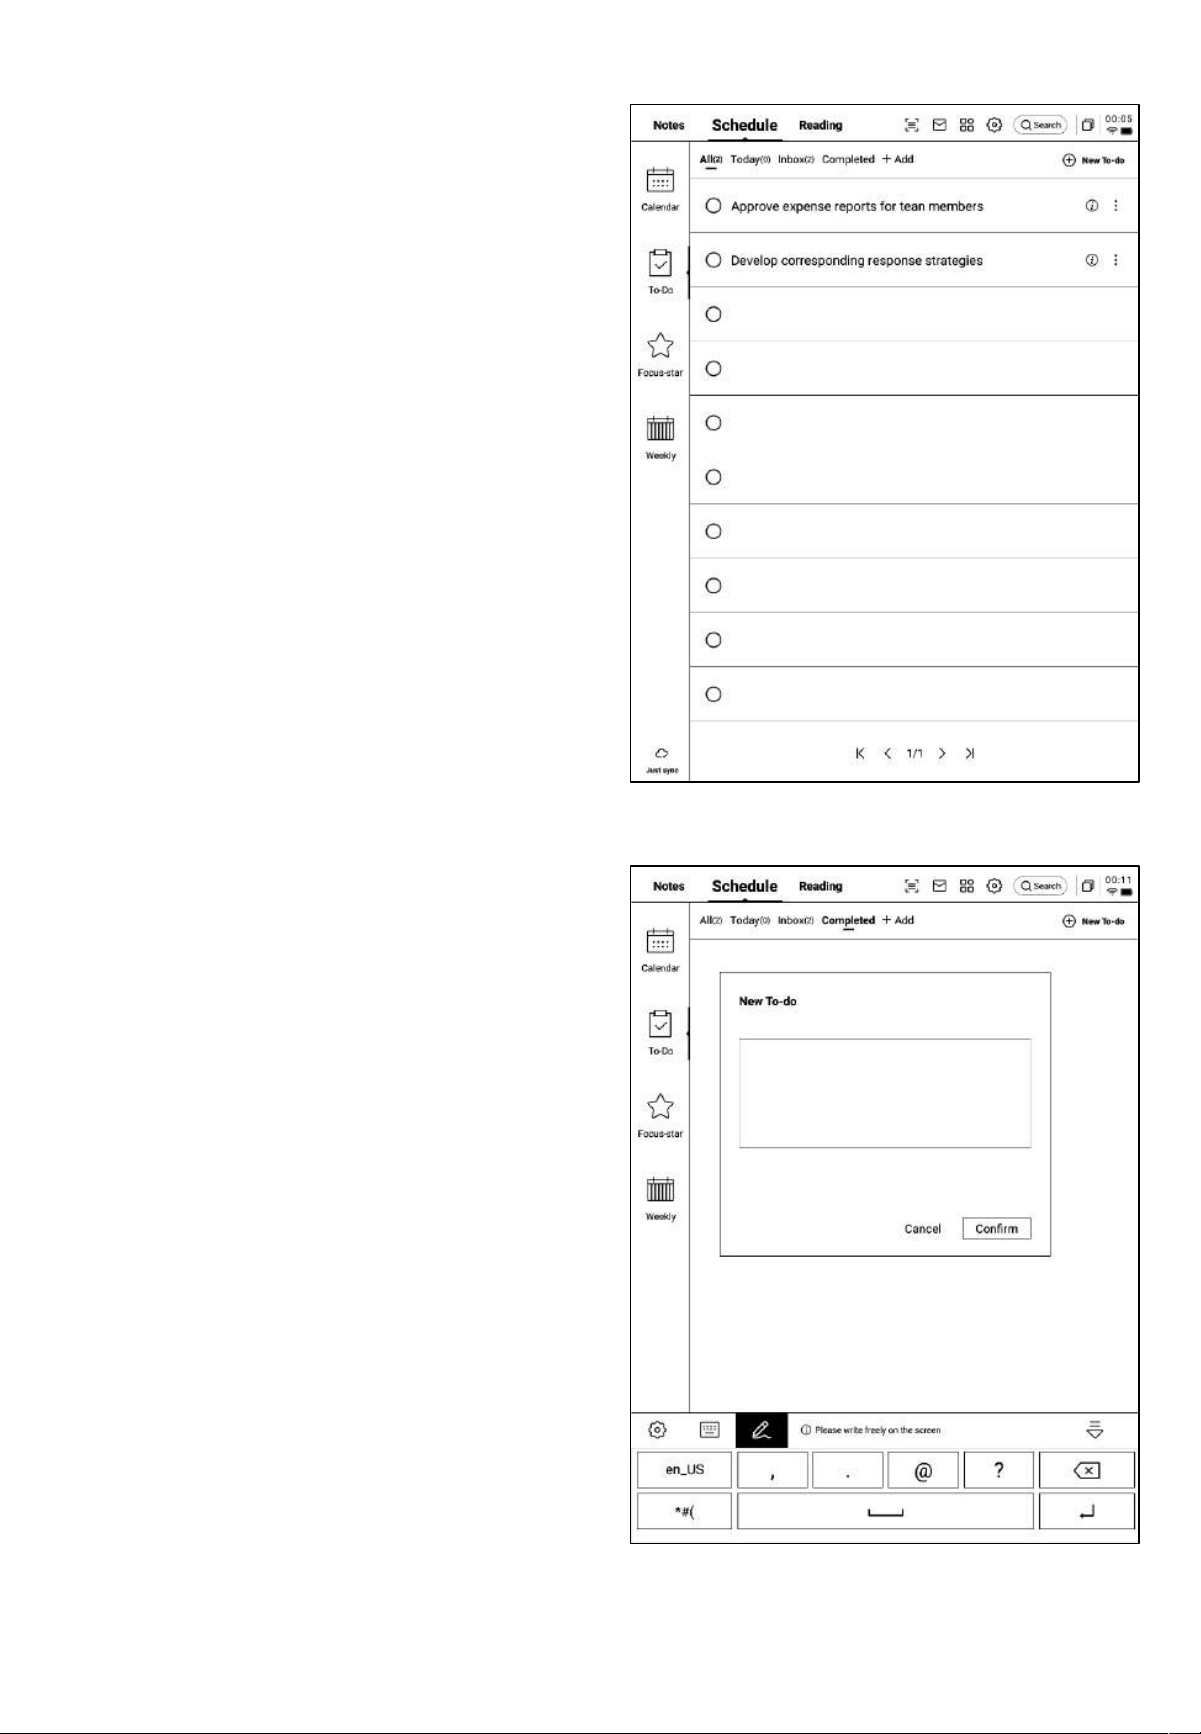
3.2 To-Do Tasks
• Supports creating and managing to-do
tasks.
Method for Creating To-Do Tasks
• Click "New To-do" to create a new to-do
task.
• Using the [Stylus Pen], create graphic
annotations within the note, which will
be automatically collected.
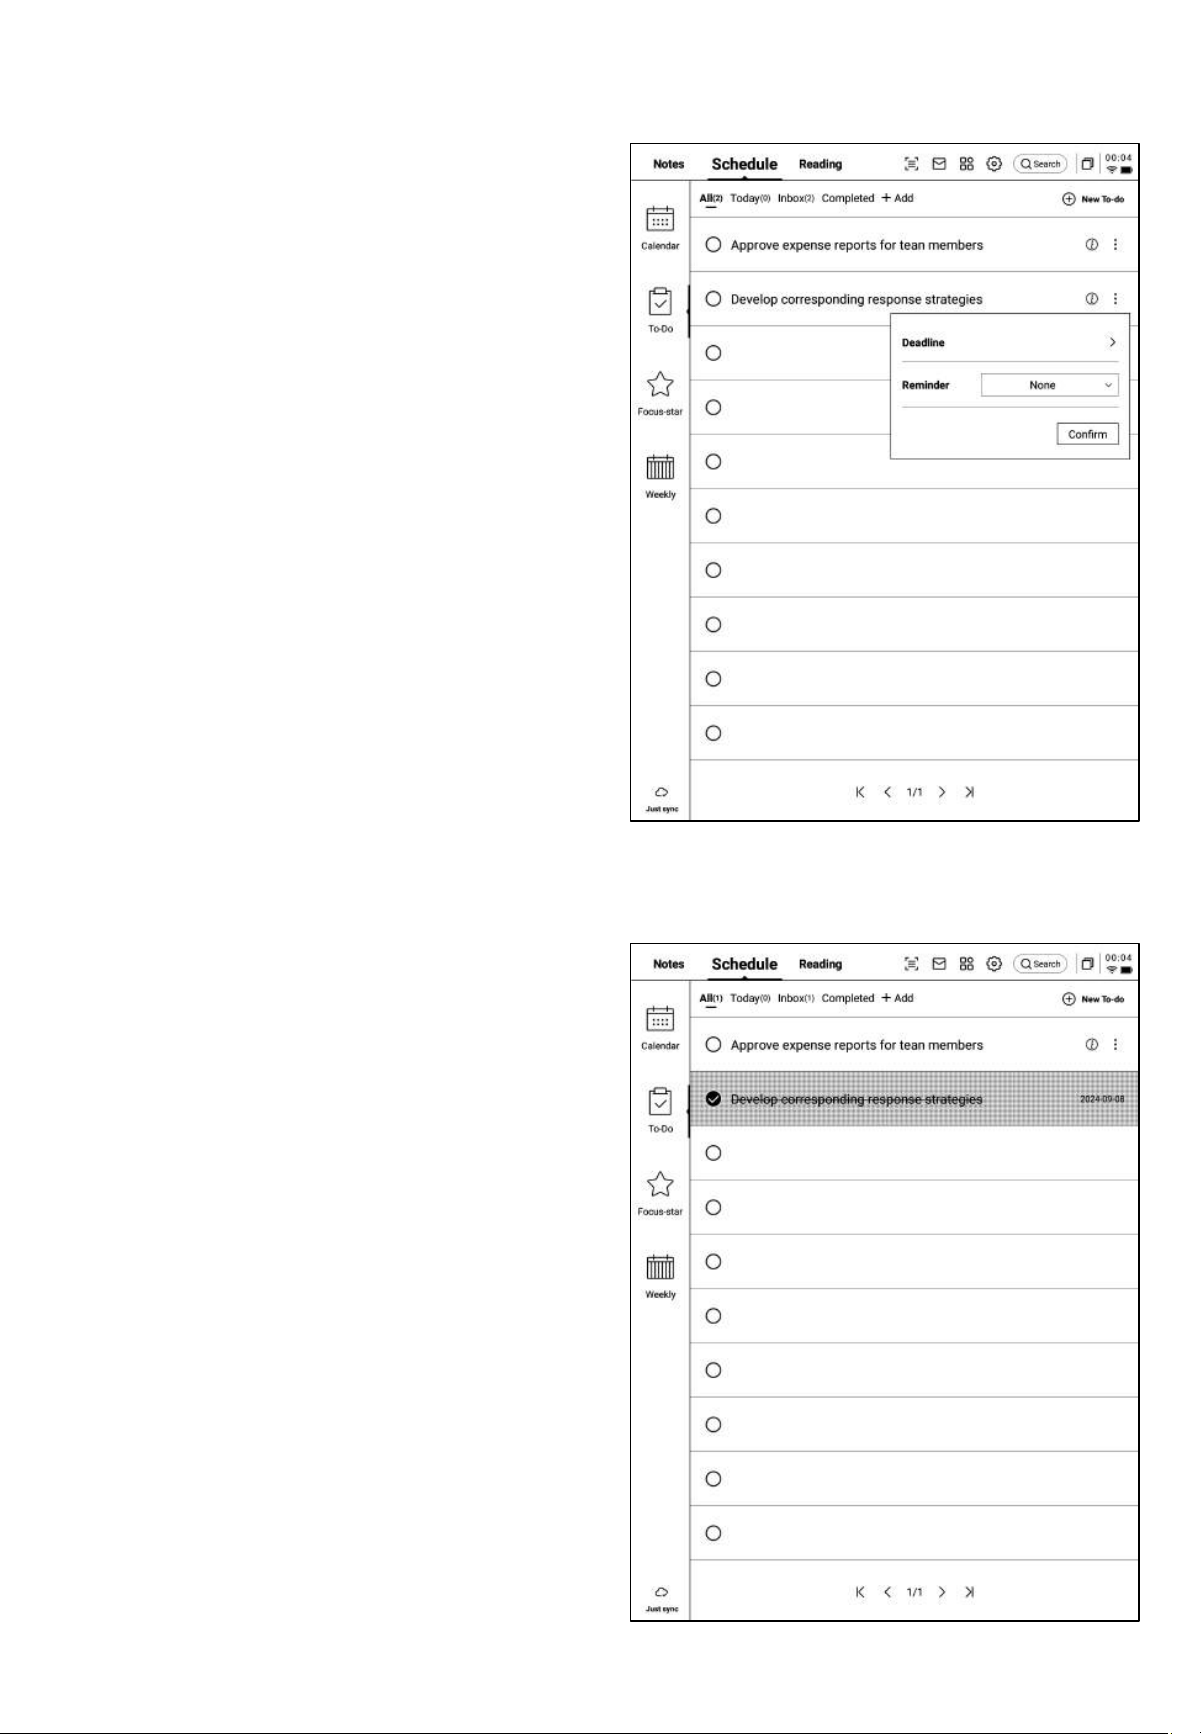
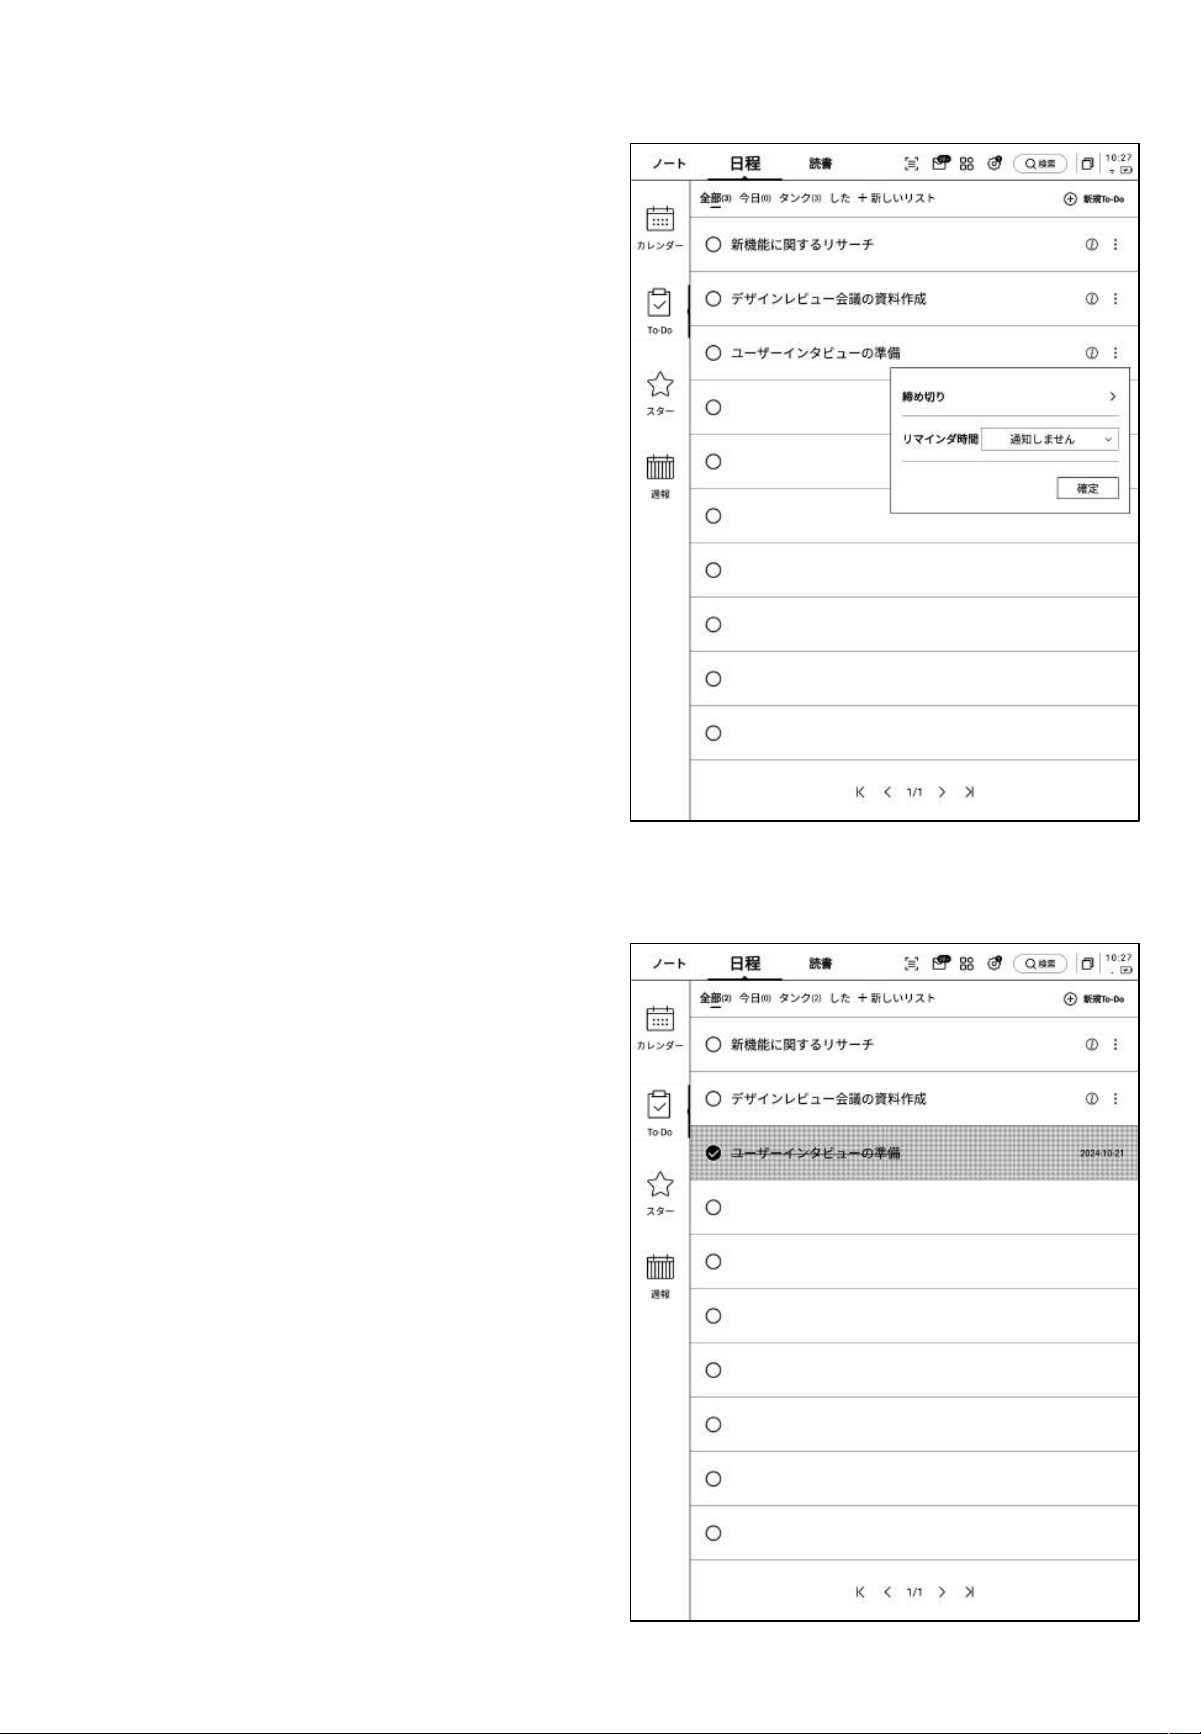
• Click the button behind "To-do" to set
the task's deadline and reminders.
• Supports task prioritization, moving, and
deleting.
• By clicking the checkbox in front of "To-
do," the task will be marked as
completed. Upon page refresh, it will
automatically move to the completed
task list.

3.3 Focus Star
How to Create Focus Star?
• While writing or taking notes, you can
use the stylus to draw a pentagon symbol
in front of important items. The content
within the pentagon will be automatically
collected and displayed.
What is Focus Star?
• During the process of daily note-taking,
when encountering important items, you
may mark them. However, marked
content needs to be organized later and
can be easily overlooked. The function of
Focus Star is to automatically collect
marked content in daily notes and present
it centrally.
• Supports clicking on the content to jump
directly to the corresponding note.
• Allows Focus Star content to be set as
continuous attention, added to To-Do,
edited, or deleted.

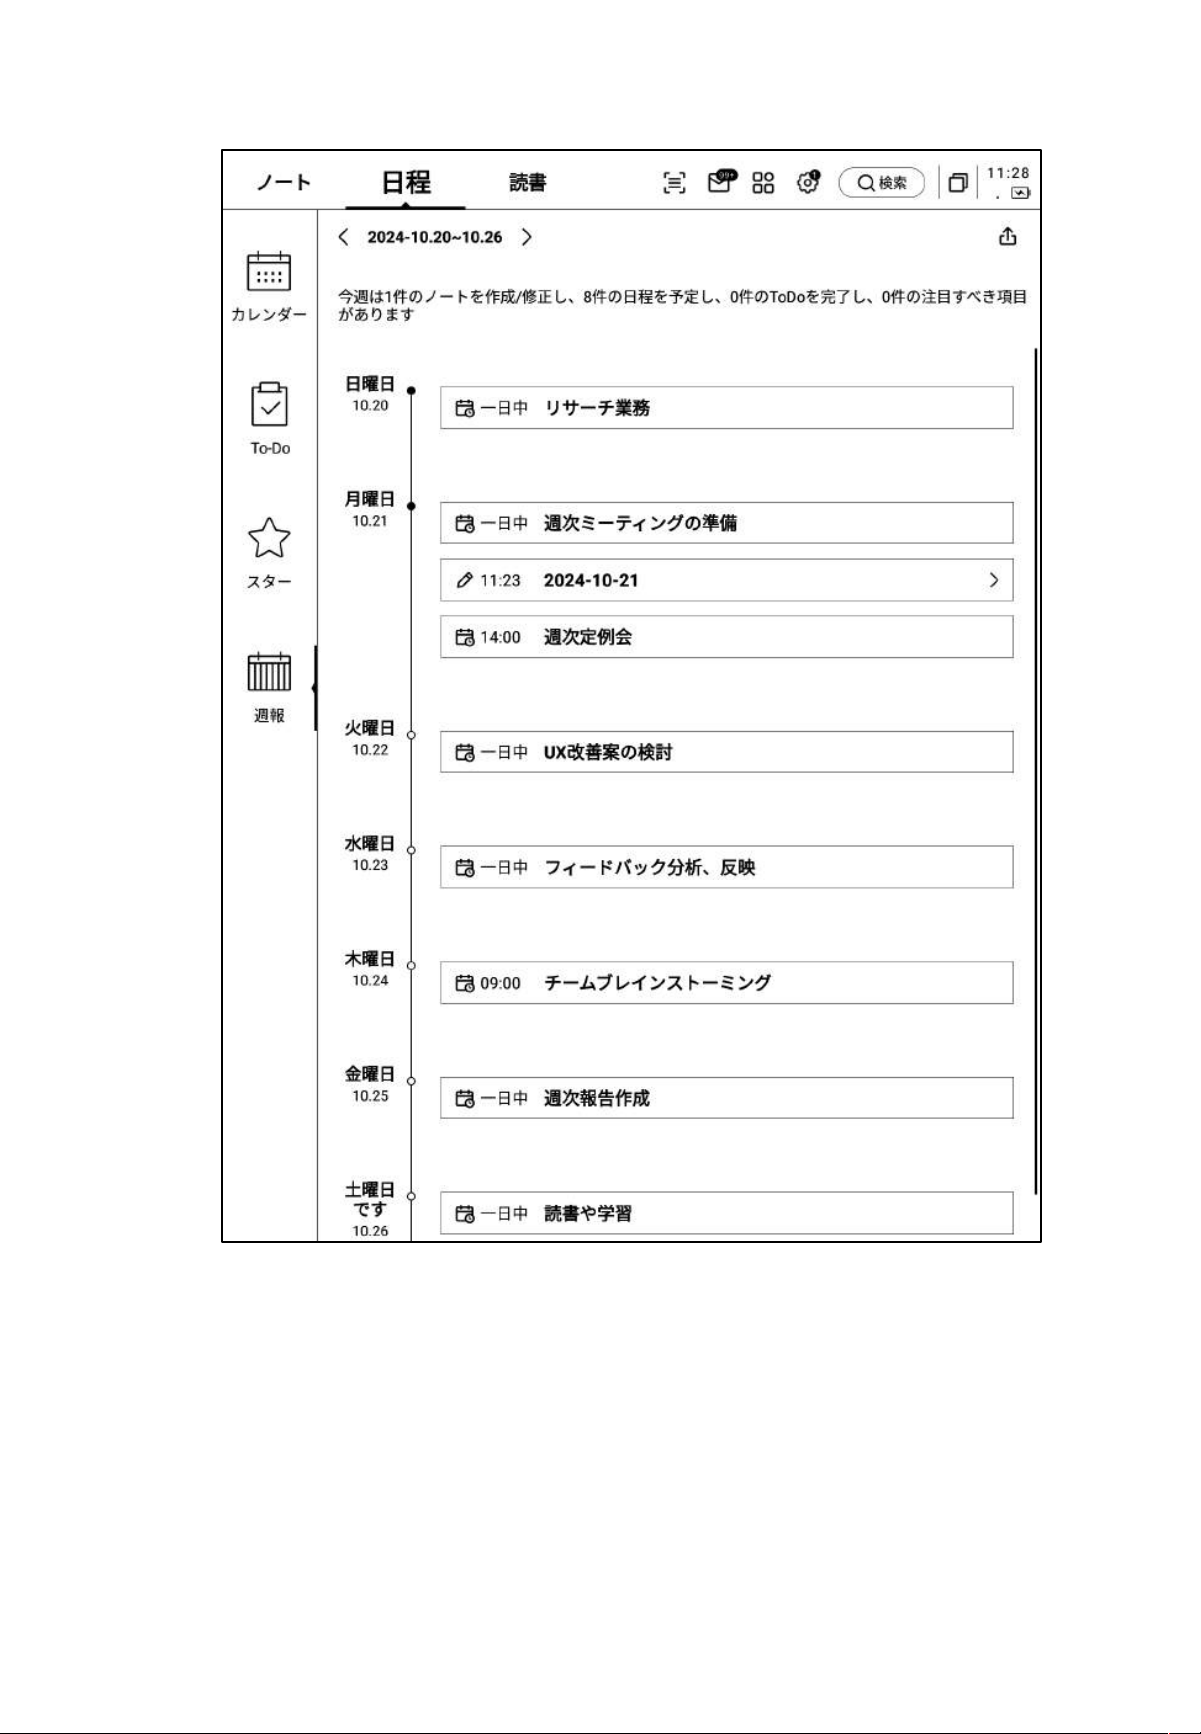
3.4 Weekly Review
• Displays all schedules, completed tasks, meeting information for the week, and allows a
quick review of all activities from the past week.
• Supports exporting.
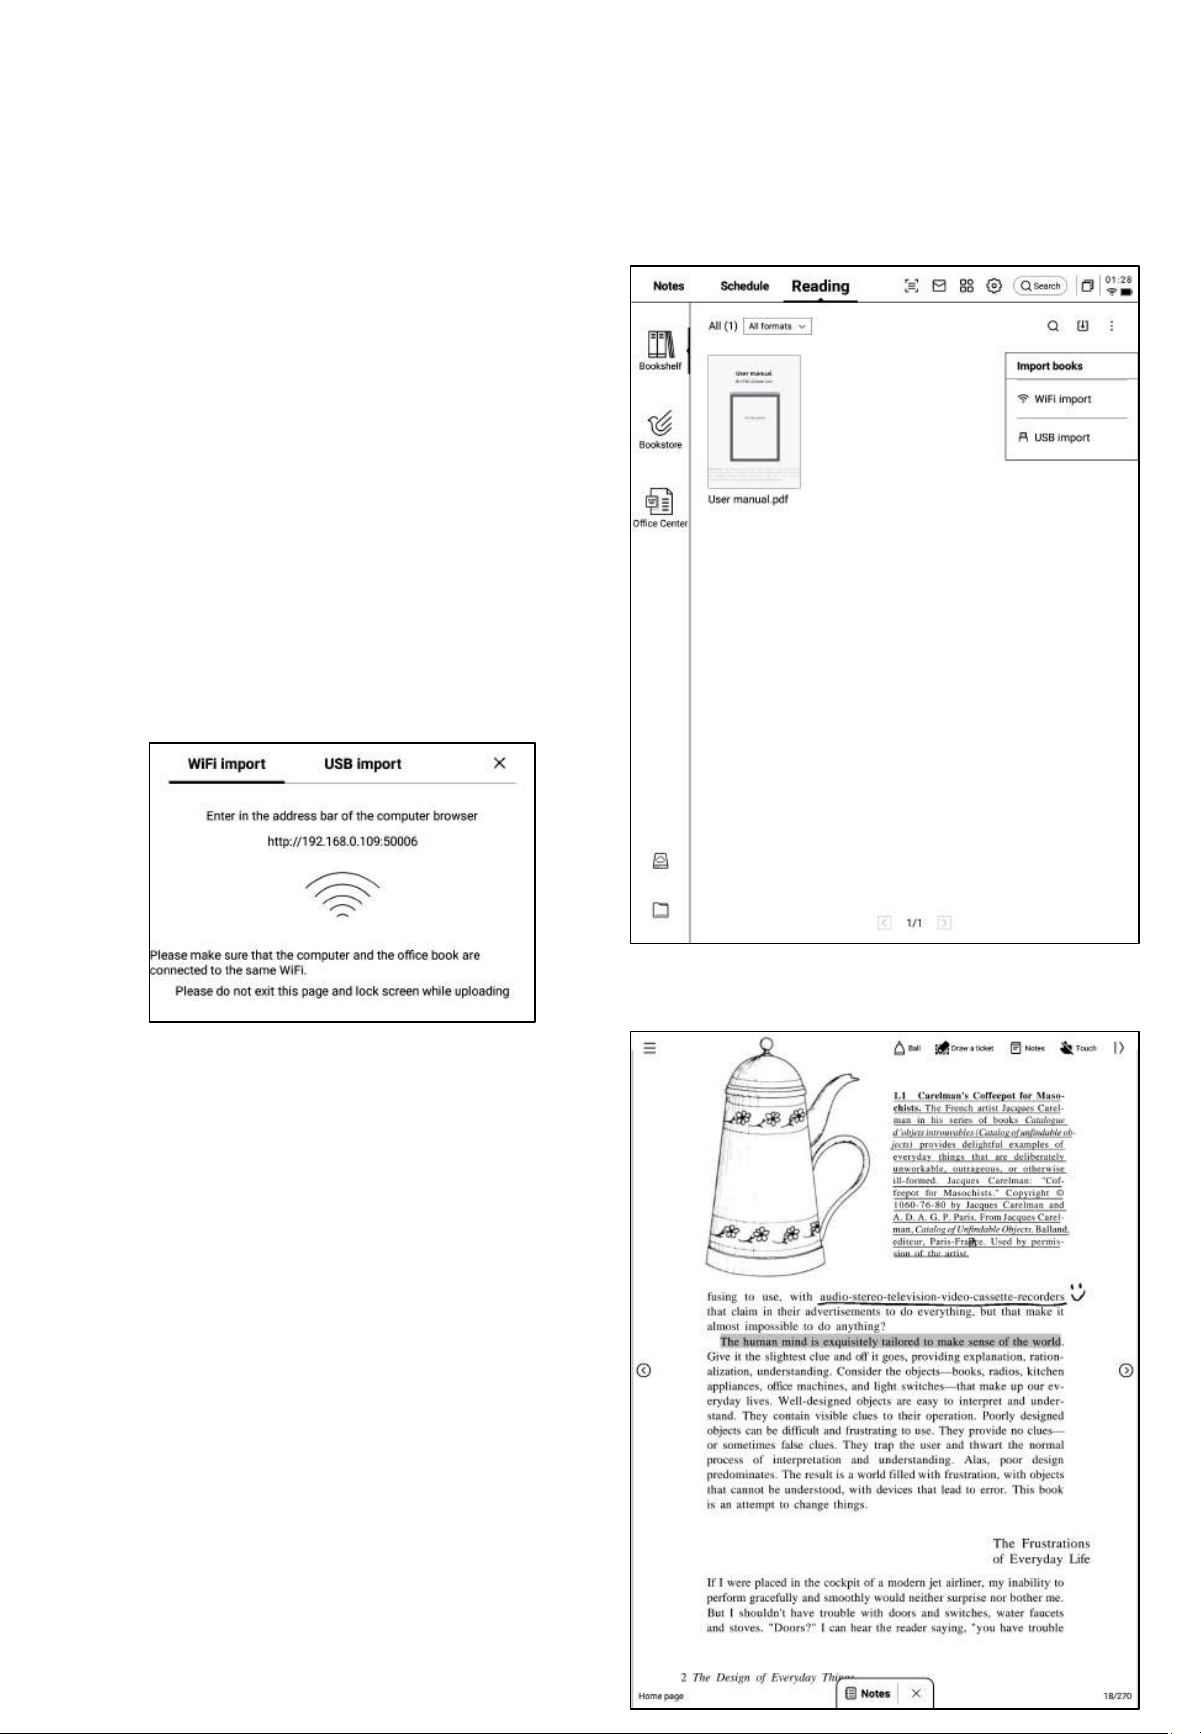
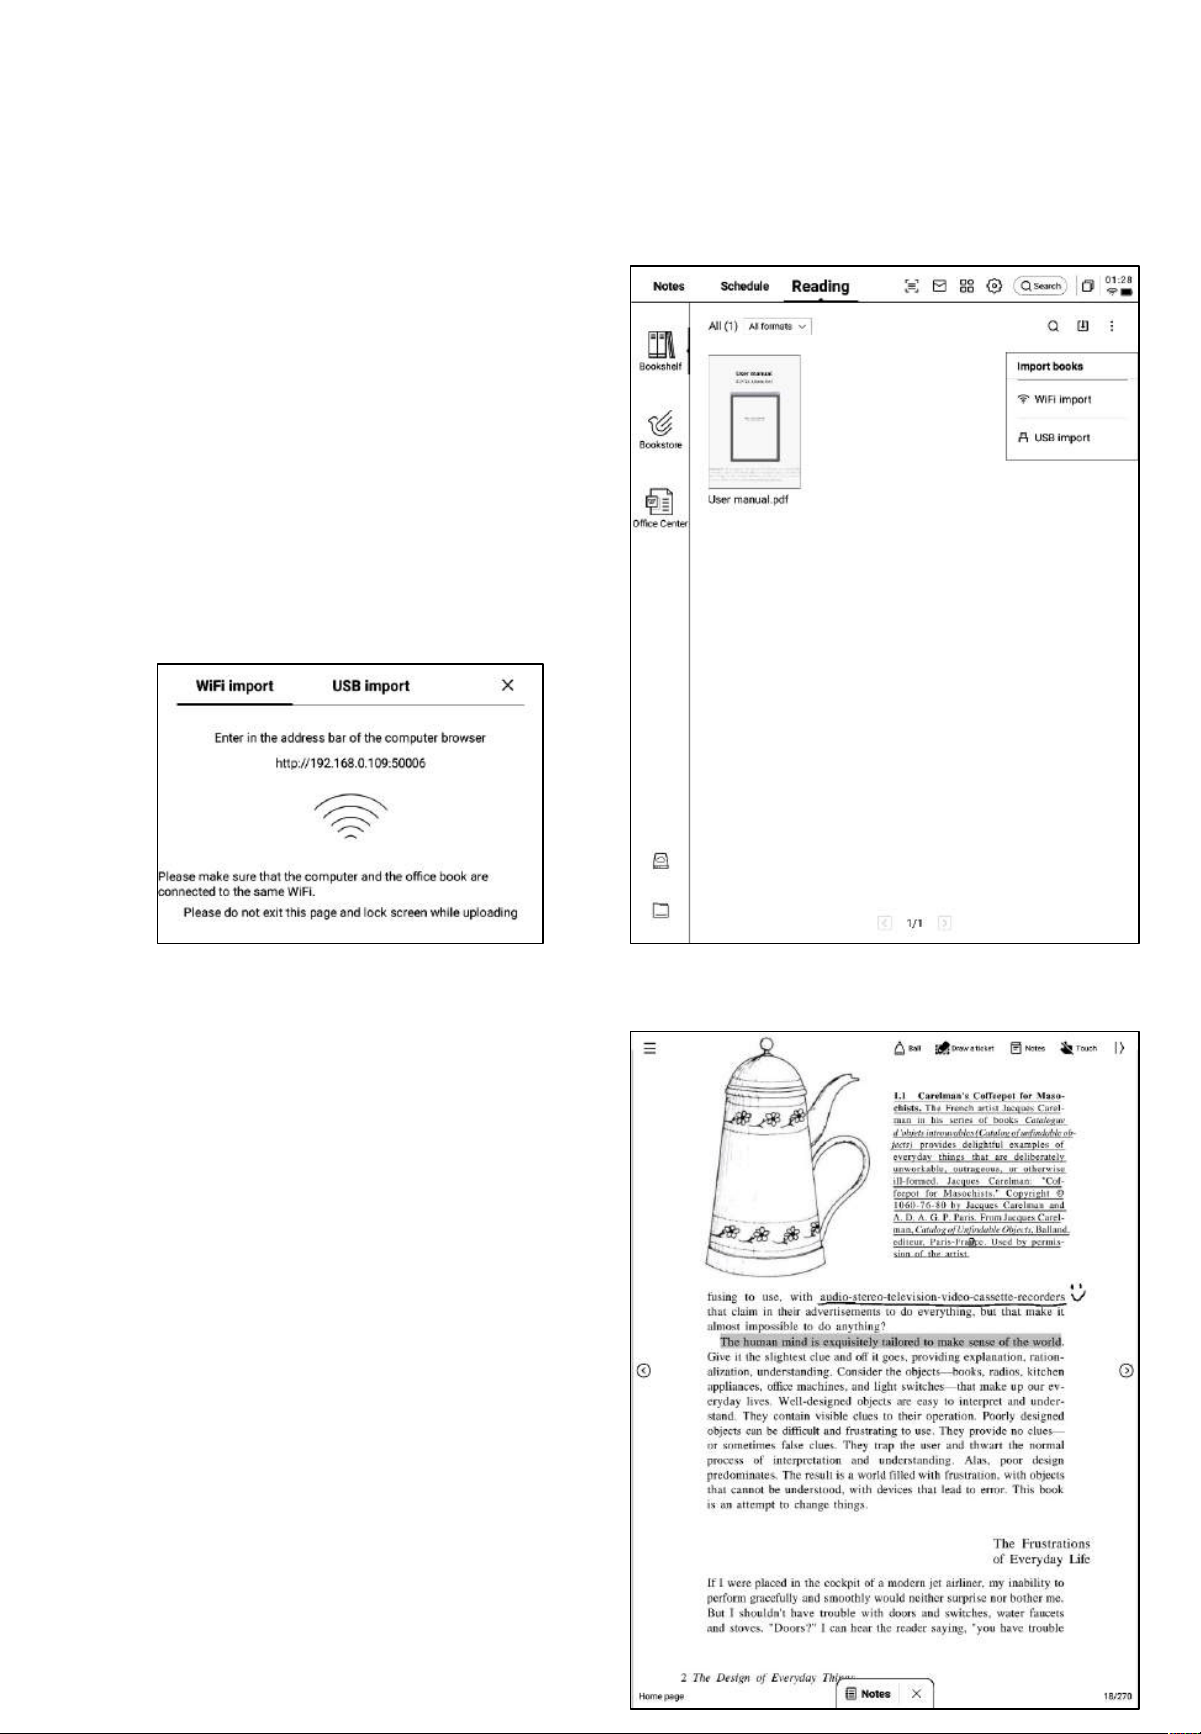
Chapter 4: Reading
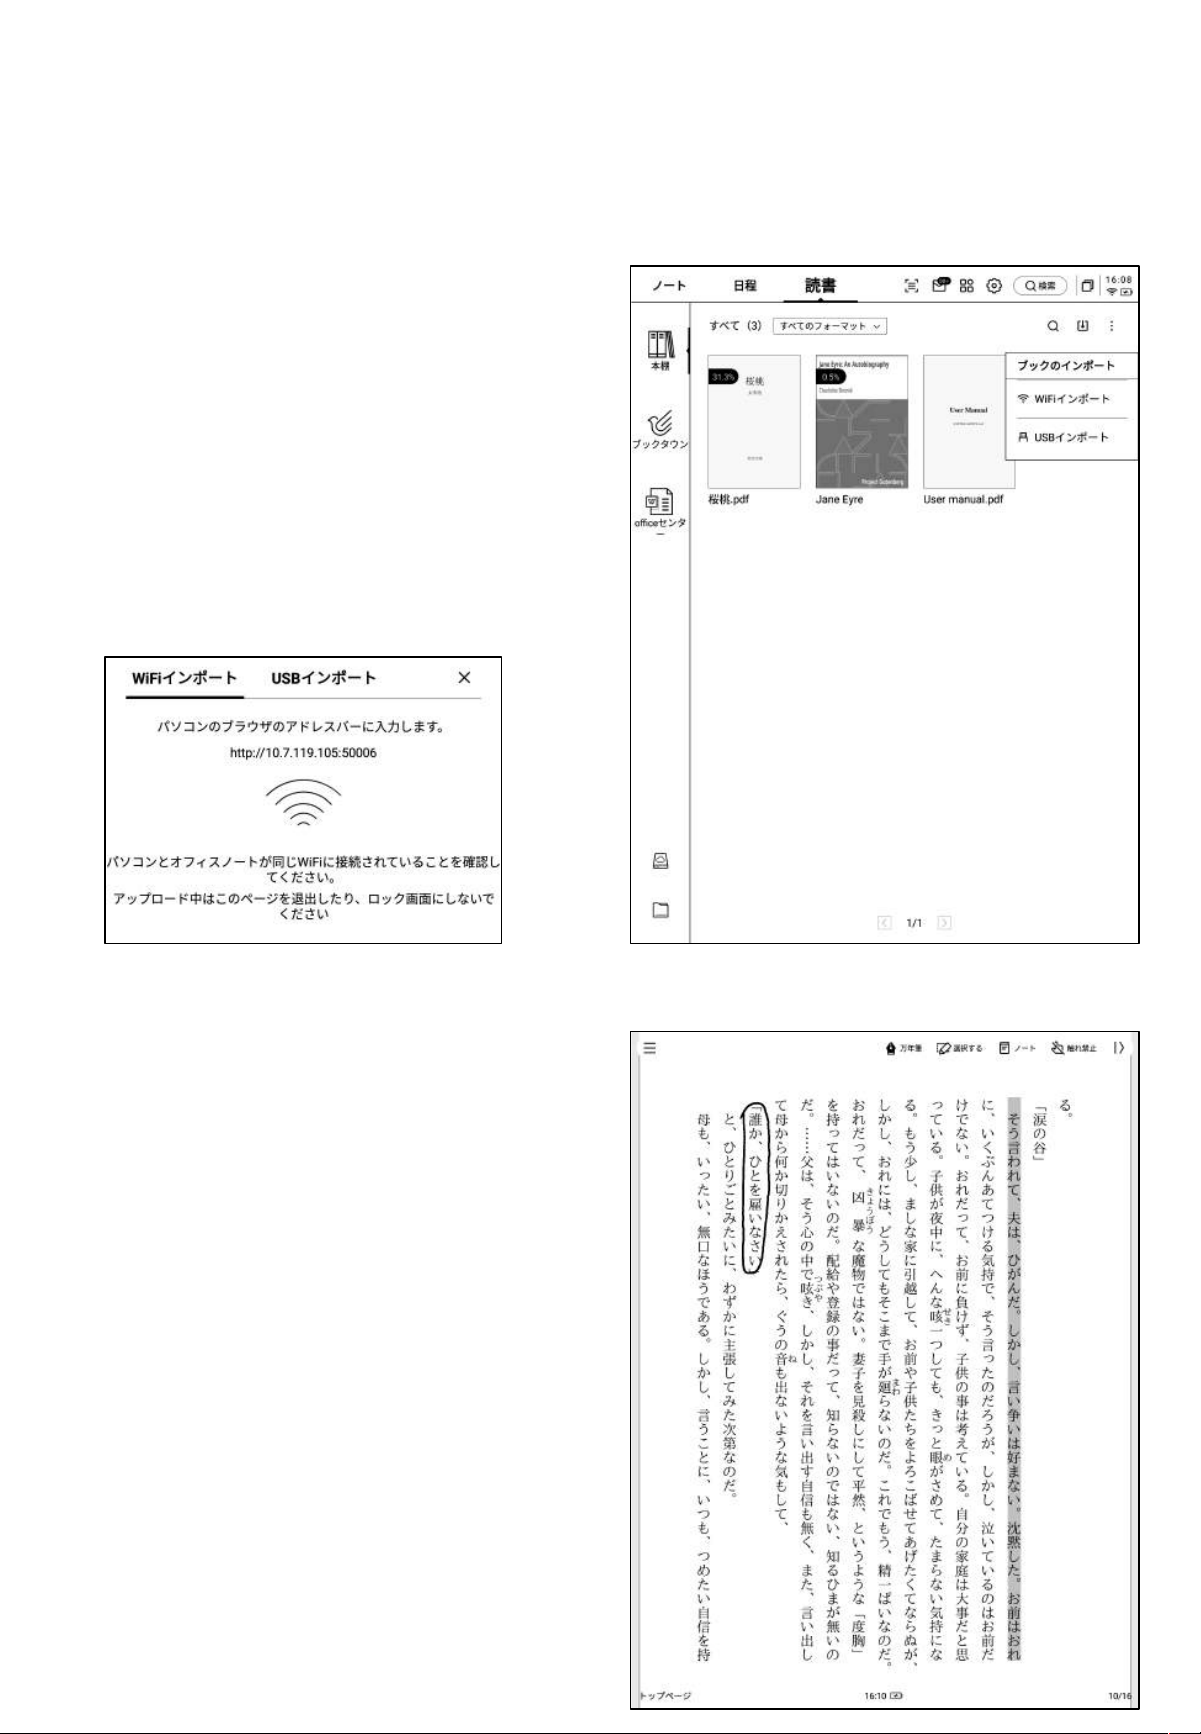
4.1 Book Import
• Supports reading book formats such as:
PDF, EPUB, MOBI, TXT, AZW.
• Supports using a USB connection to
connect the device to a computer and
transfer eBooks to the "Bookshelf" folder.
*Note: Currently, classification within the
"Bookshelf" folder is not supported.
• Supports importing via Wi-Fi transfer;
click to view detailed operation steps.
4.2 PDF Reading
• During reading, supports using the stylus
for annotations.
• Supports switching to horizontal mode, and
by circling content in the book, the content
will be automatically selected.
• Supports highlighting, excerpting,
searching, and copying of selected content.
• Supports creating reading notes.
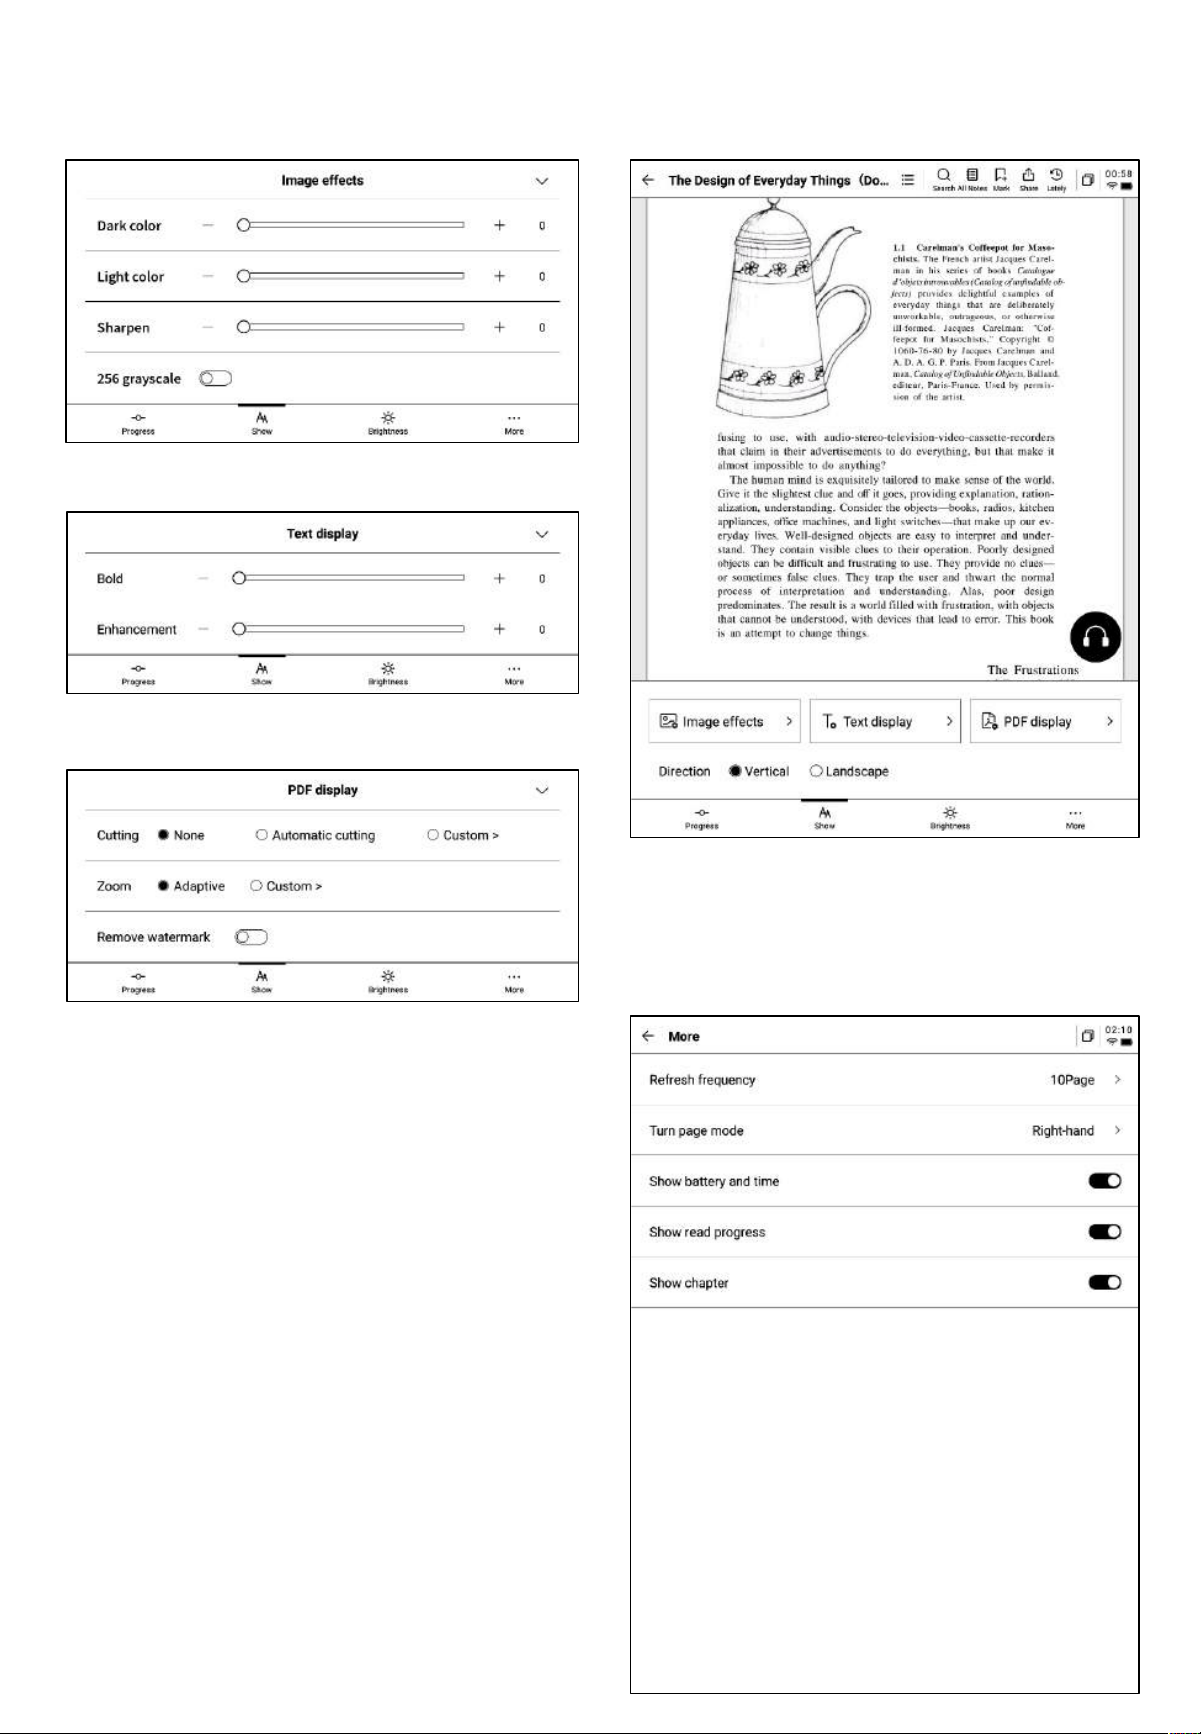
4.2.1 Basic Operations for Reading
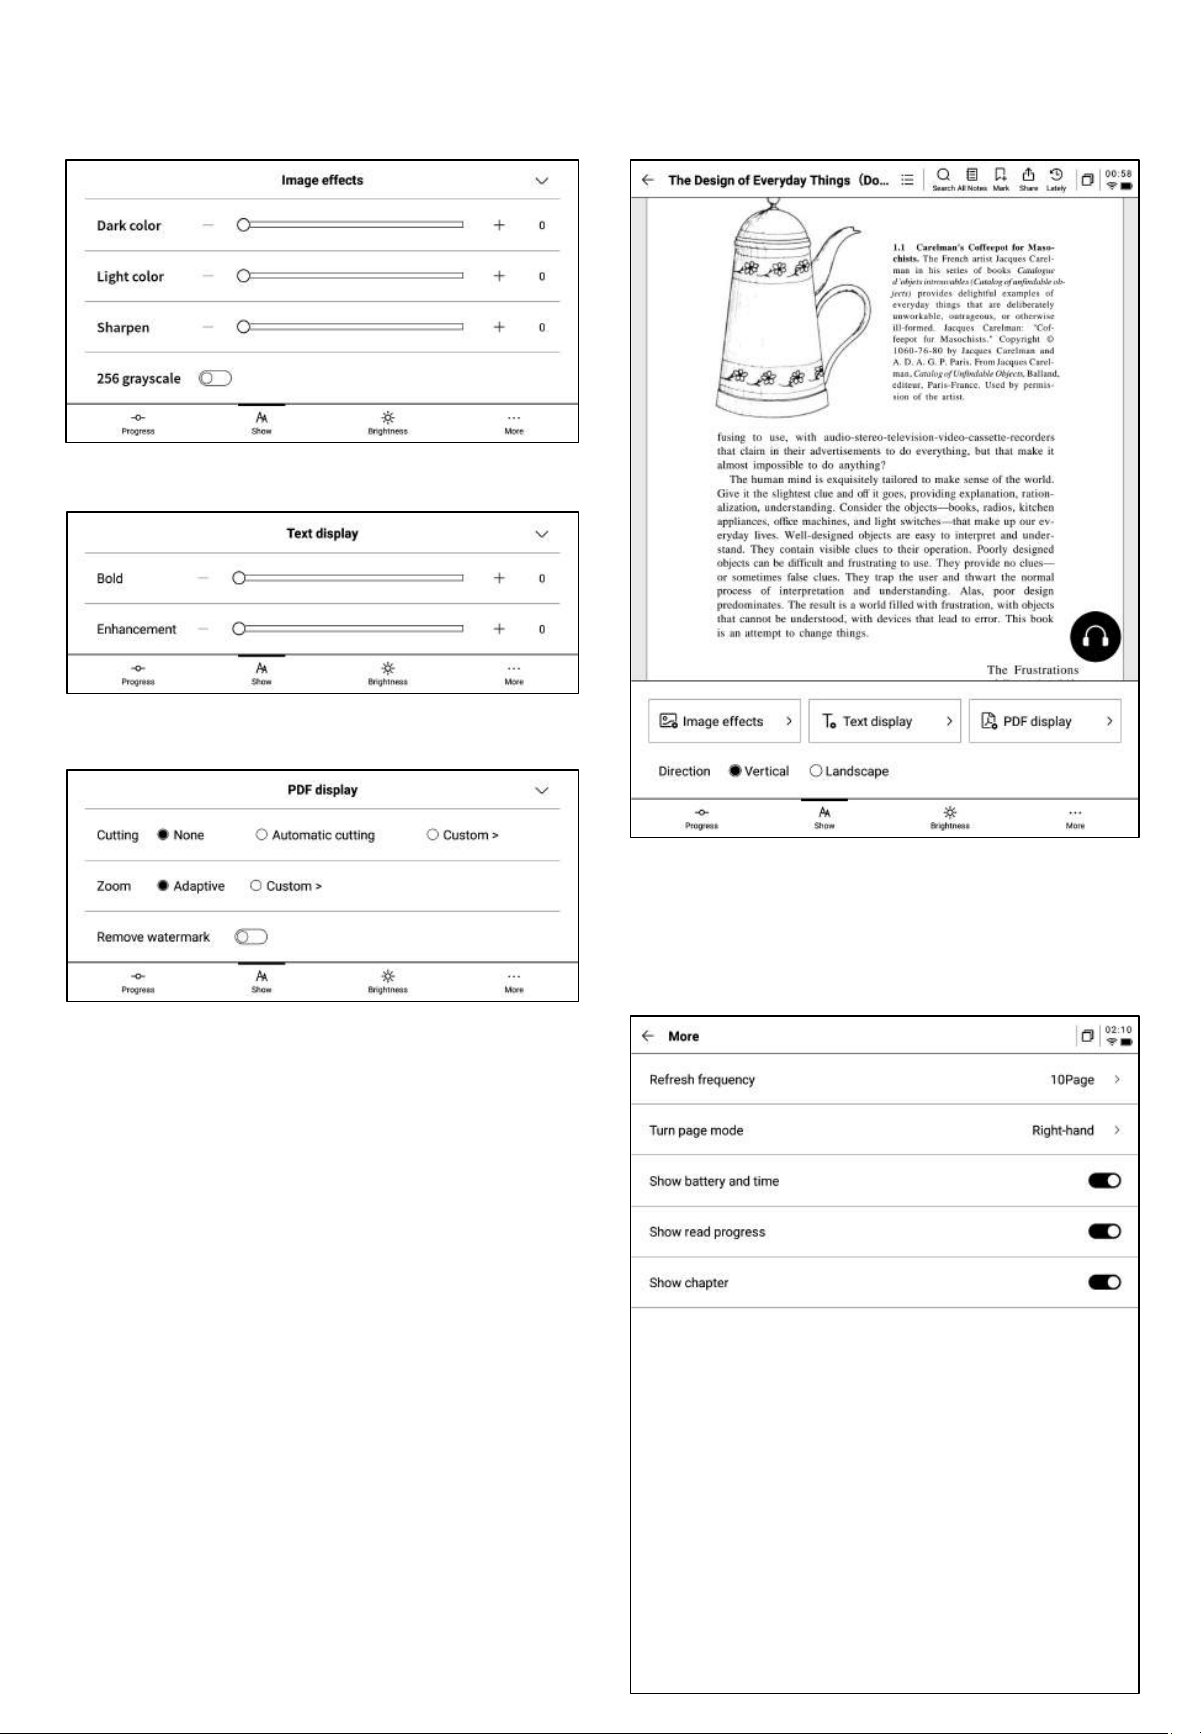
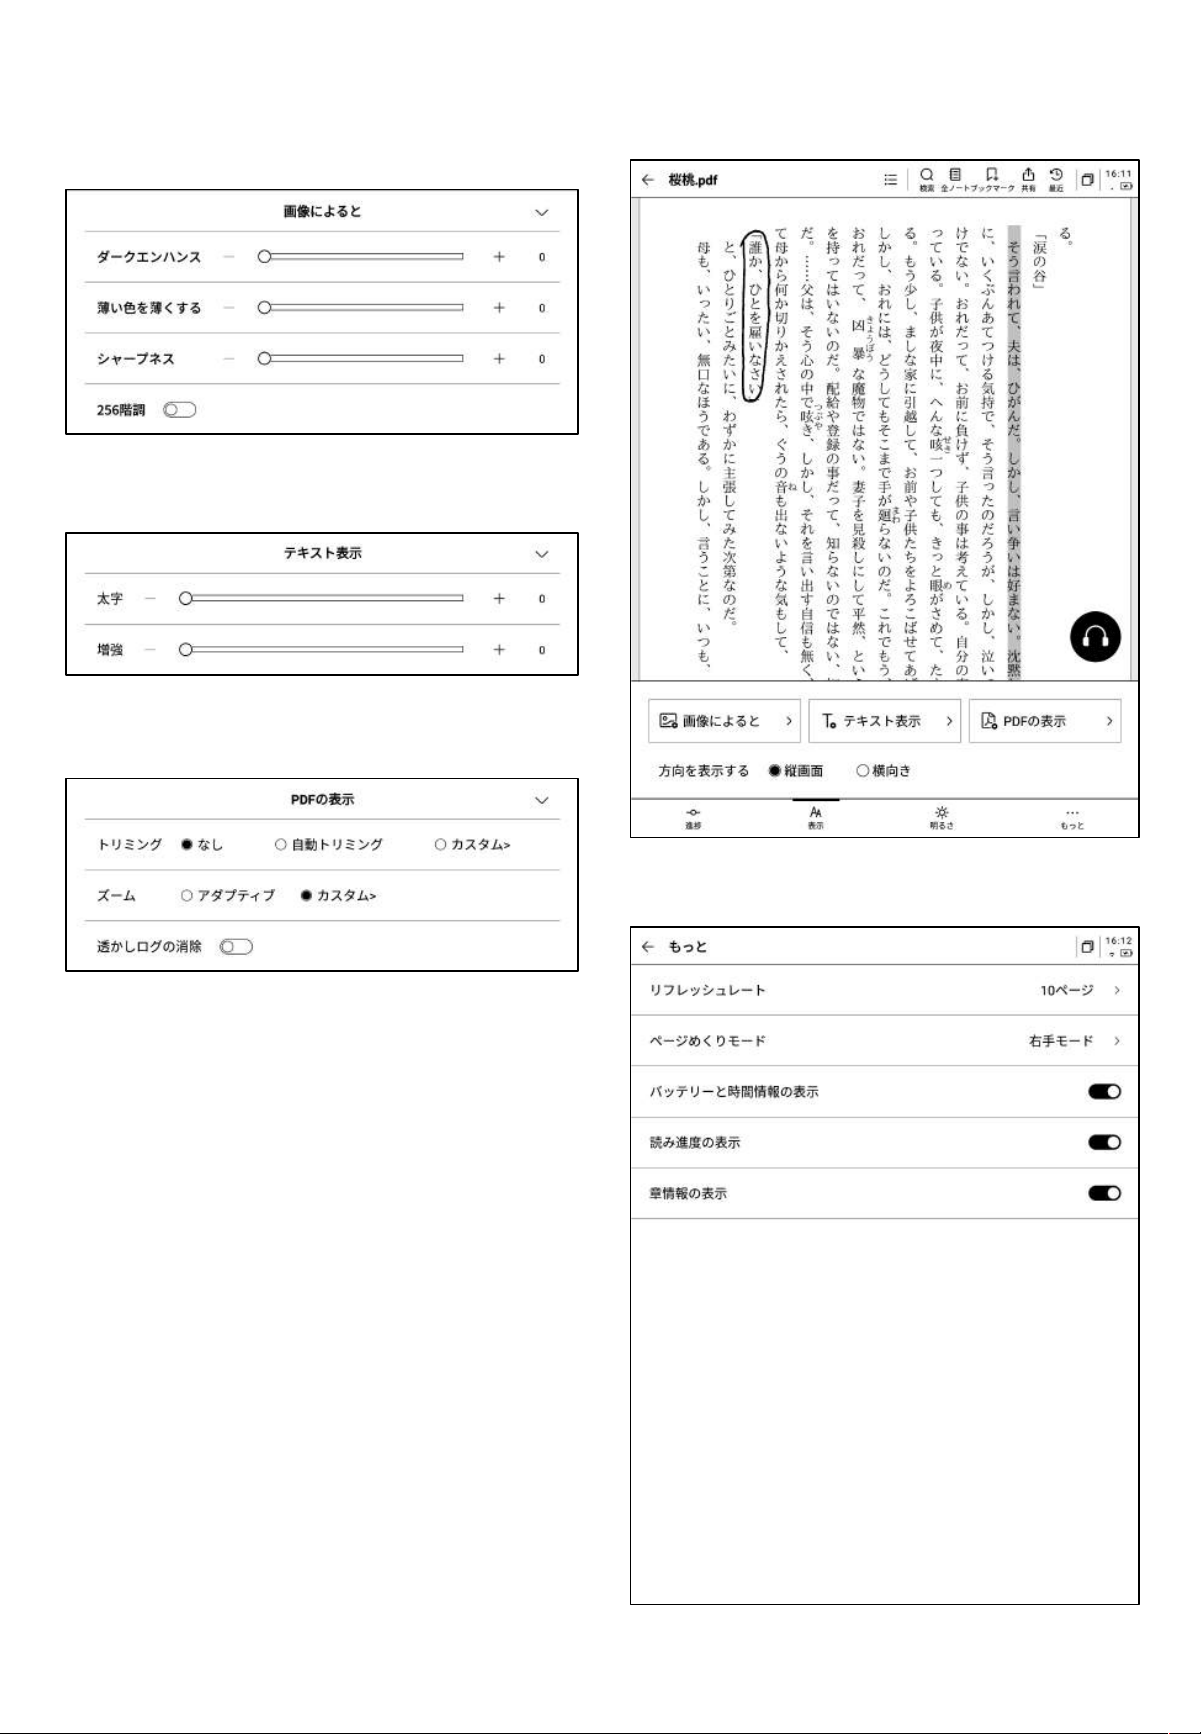
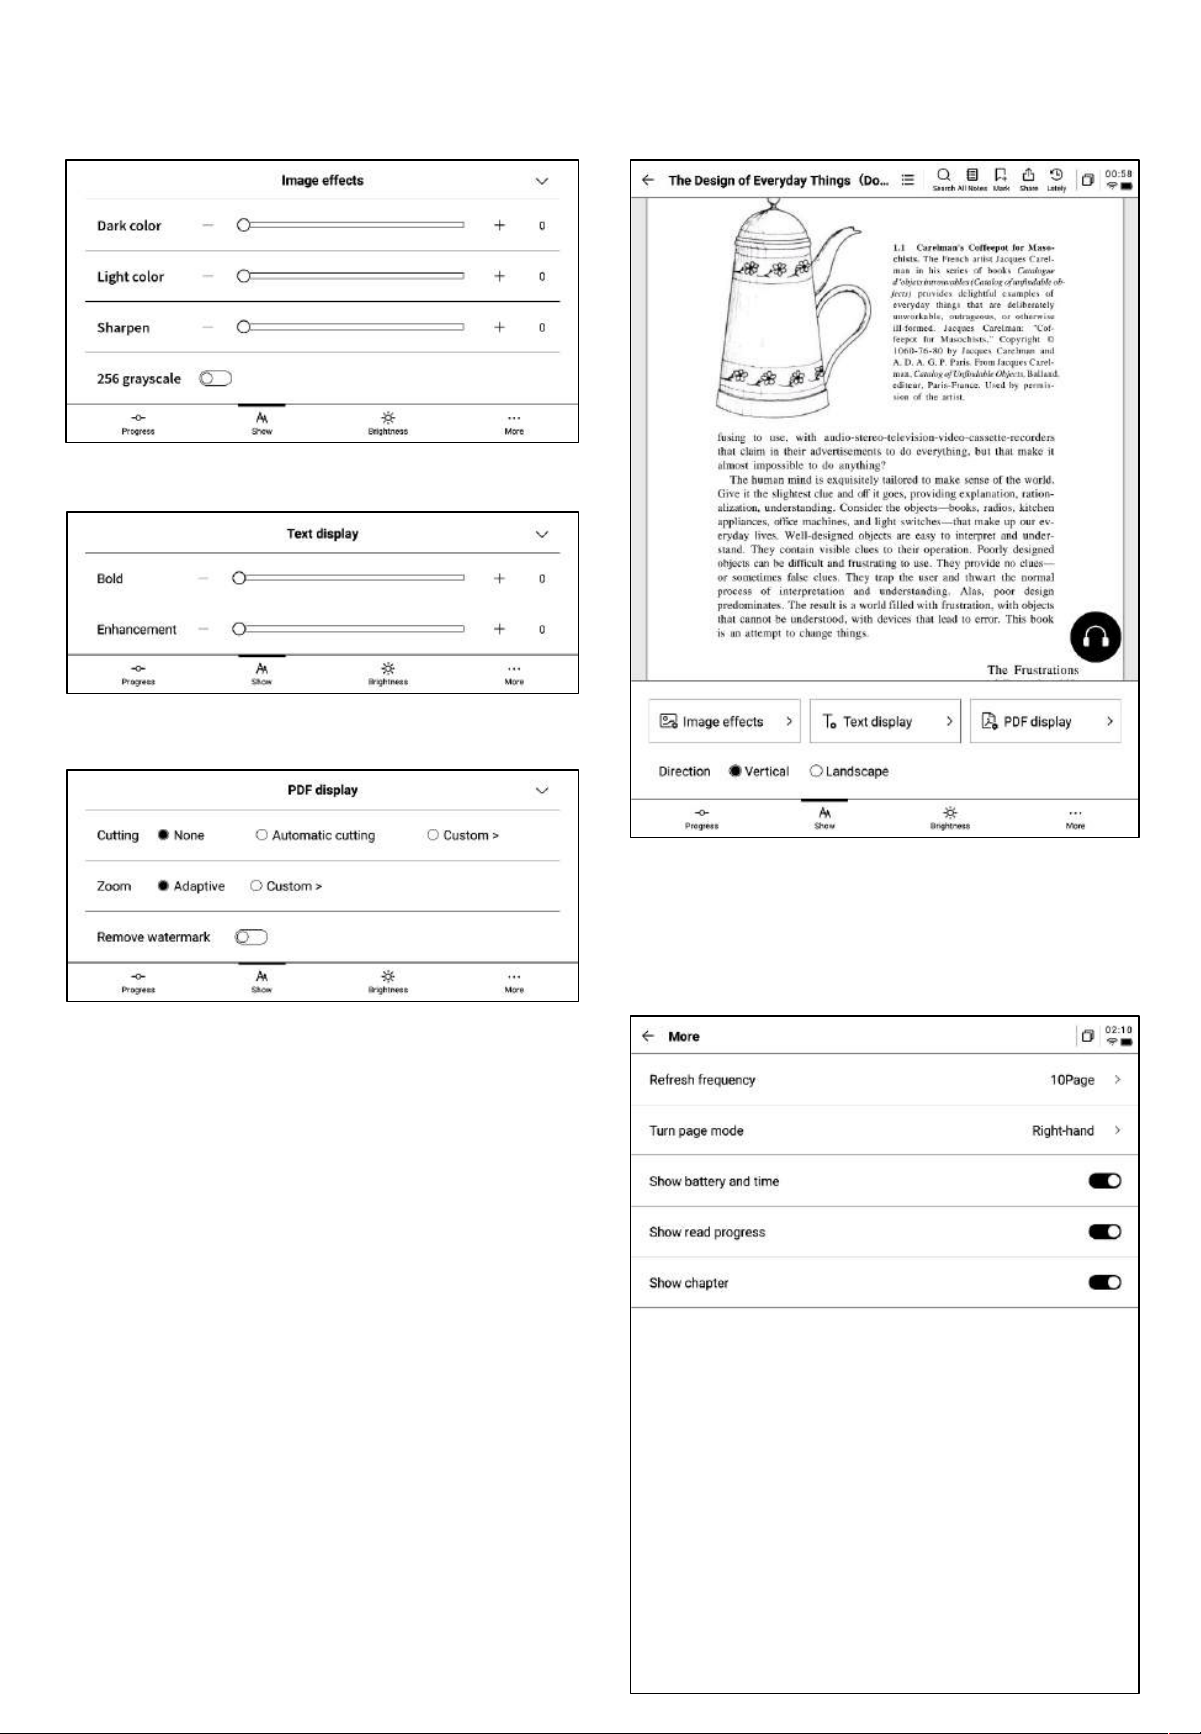
4.2.2 PDF Reading Settings
Ø Image Settings
Ø Text Settings
Ø PDF Display Settings
• In addition to the above settings,
brightness adjustment is also supported.
• In the “More” settings, page refresh rate,
page-turning mode, and display options
such as battery, time, and progress can be
configured.
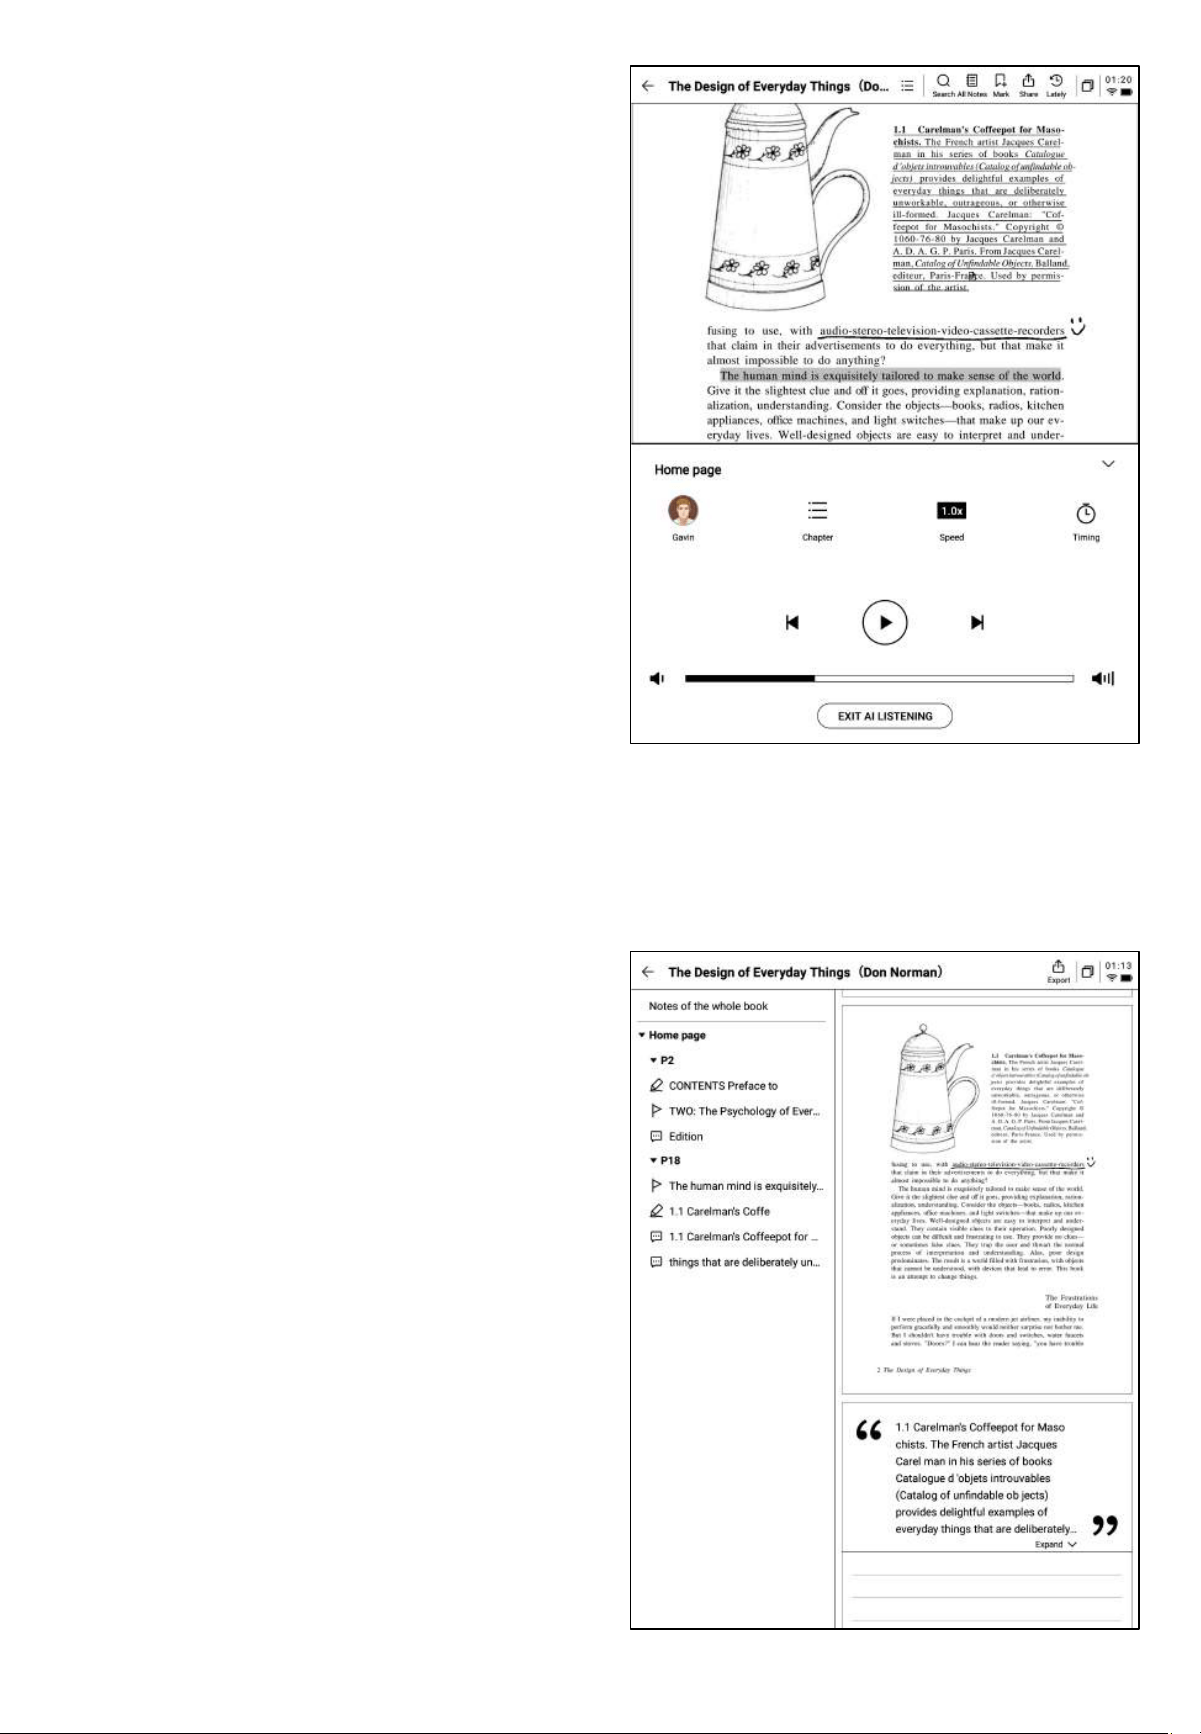
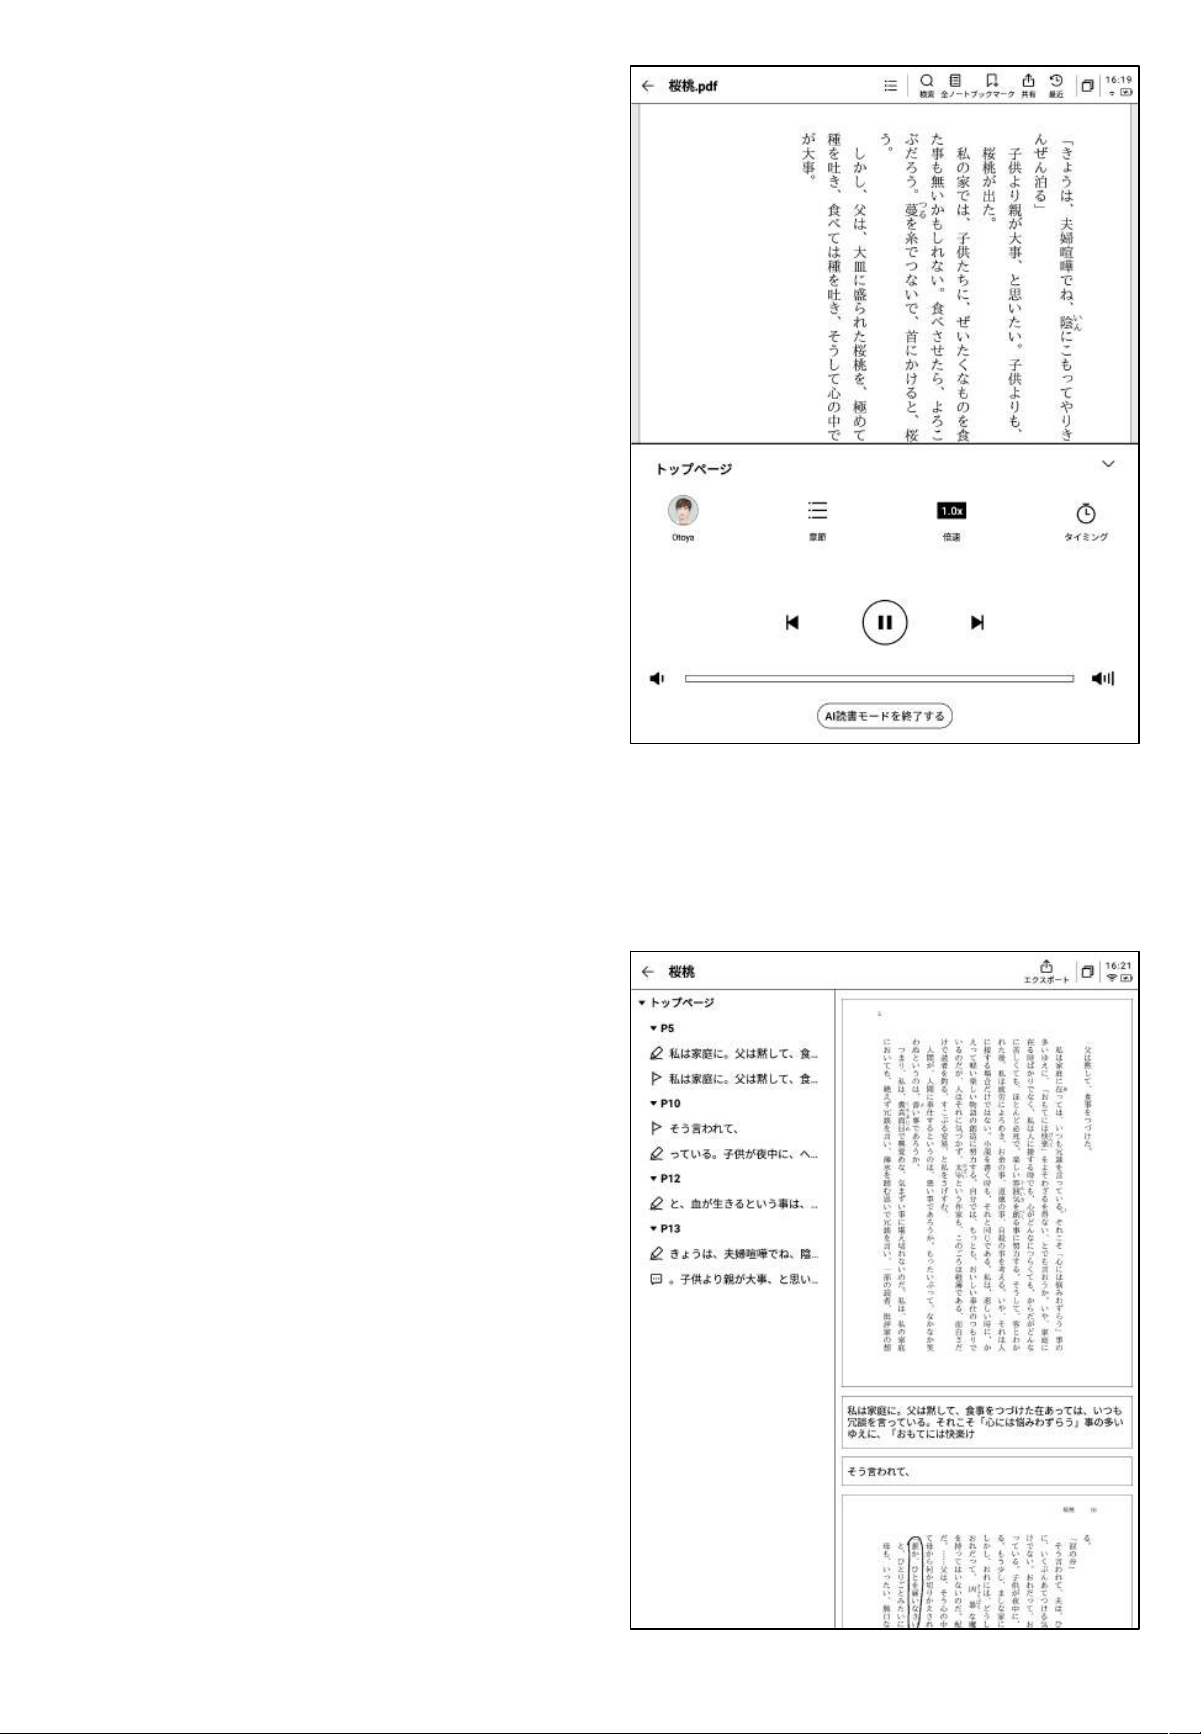
4.2.3 Audiobooks
• Supports audiobooks for languages such as
Chinese, English, Japanese, and Korean,
with online streaming available.
• Currently, audiobook features are only
supported for text-based PDFs. Scanned
PDFs do not support audiobook
functionalities.
• During audiobook playback, users can
select chapters, adjust playback speed, and
set timers.
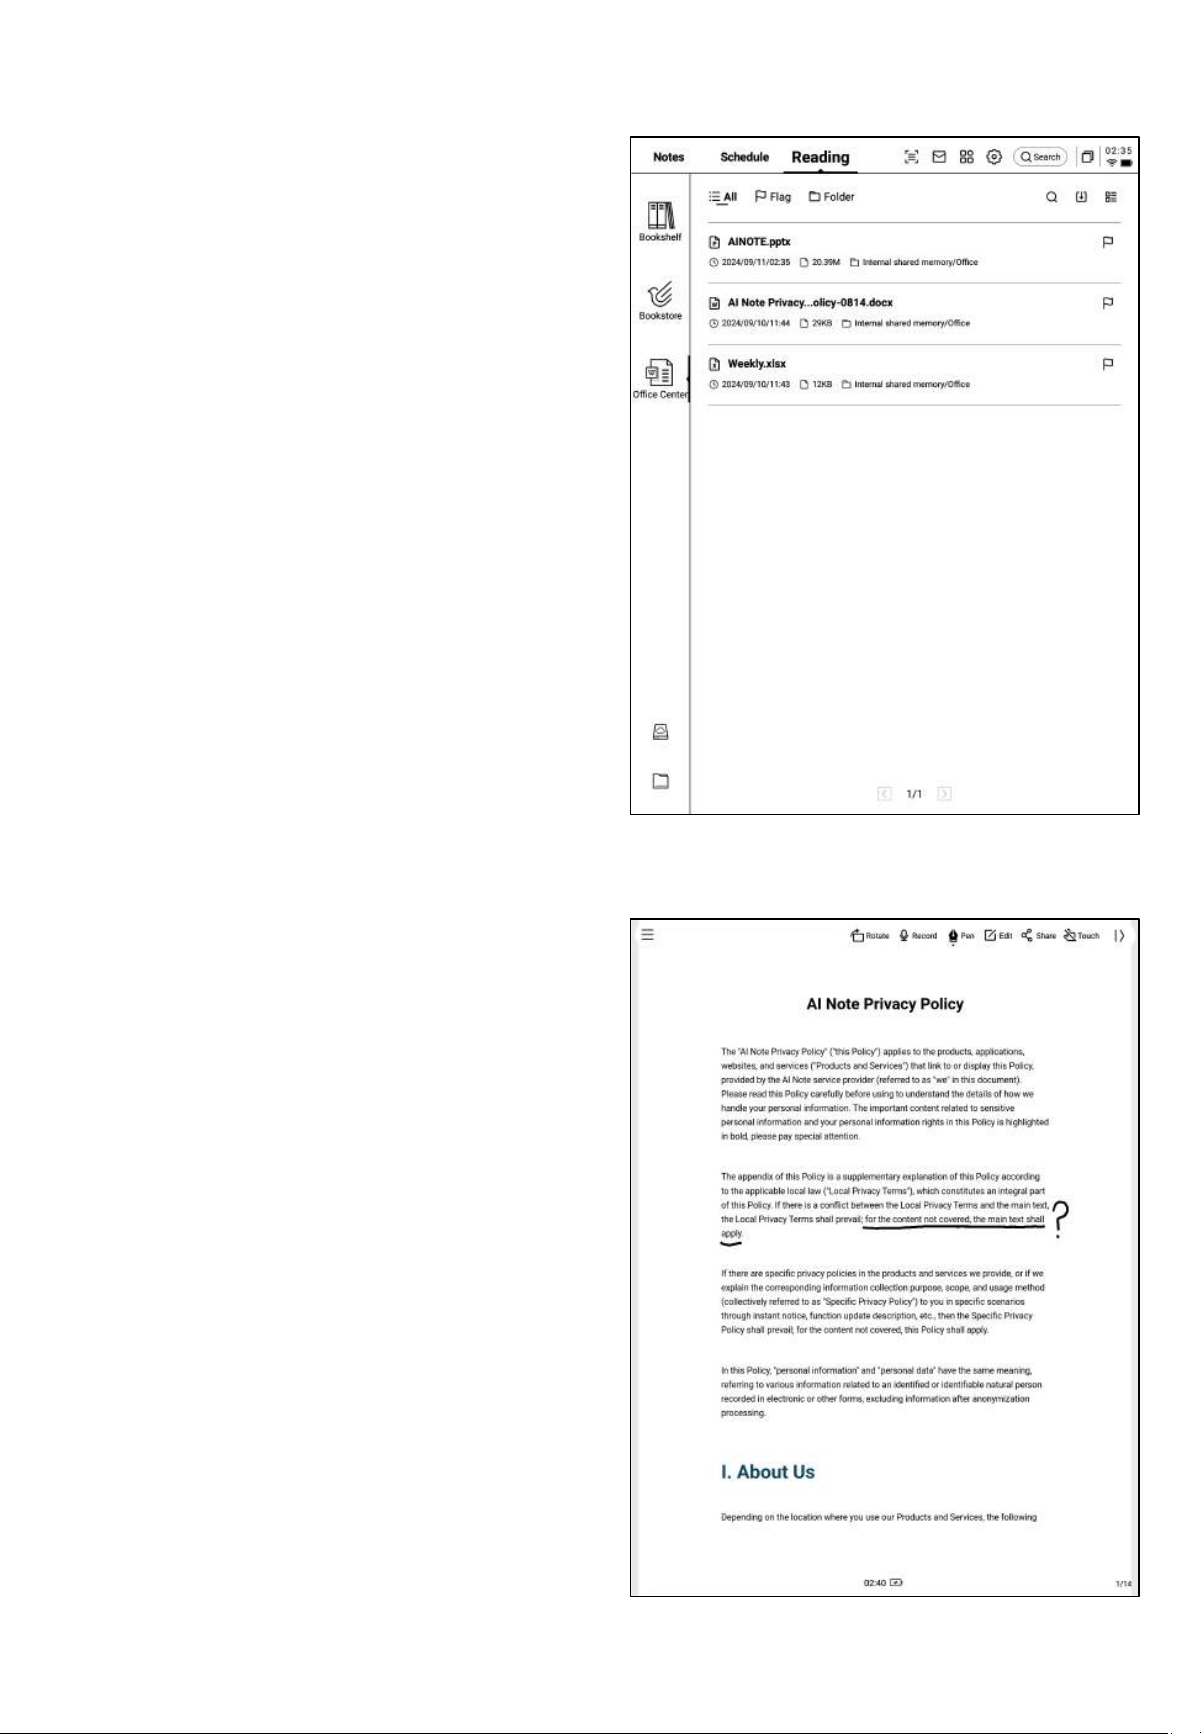
4.2.4 Reading Notes
• During the reading process, users can
create handwritten annotations, highlights,
excerpts, and notes, which will be
collected into a unified reading note.
• Reading notes can be browsed in sequence
according to book chapters.
• Supports exporting to Word/PDF formats.

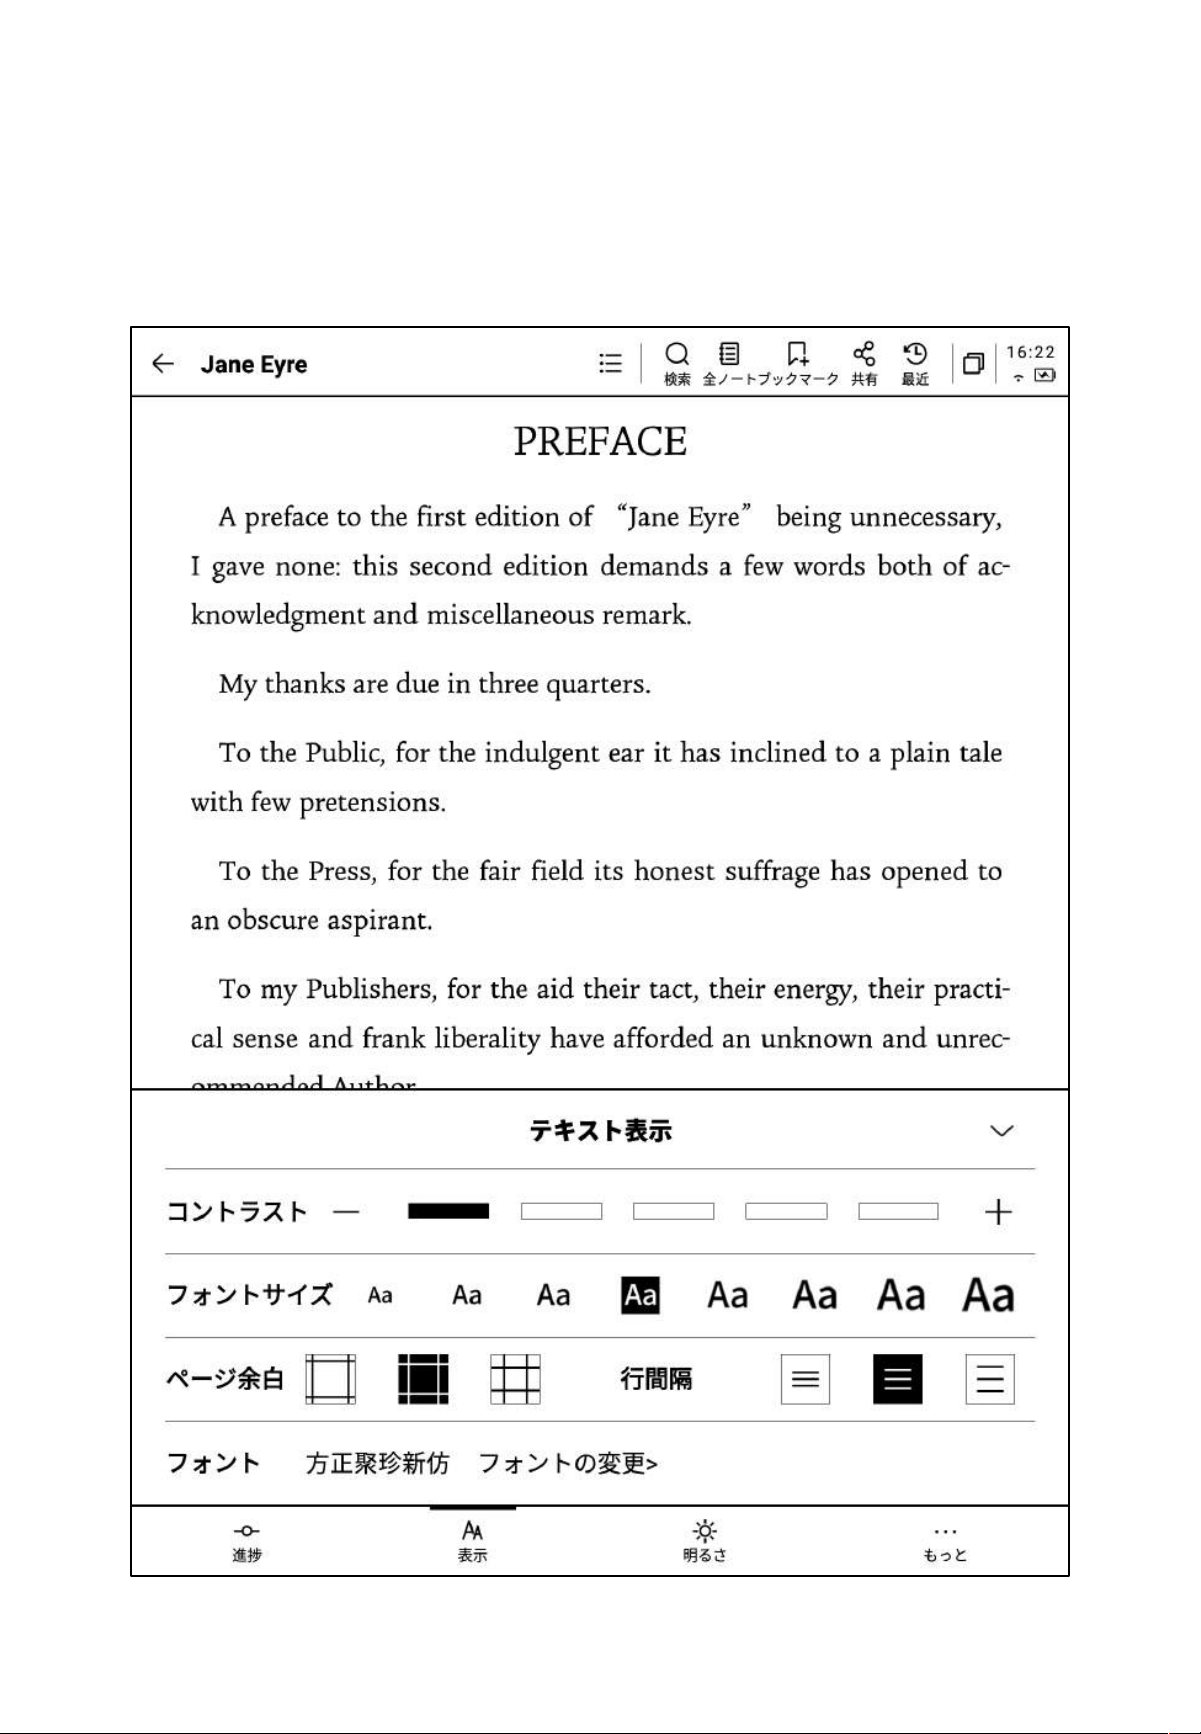
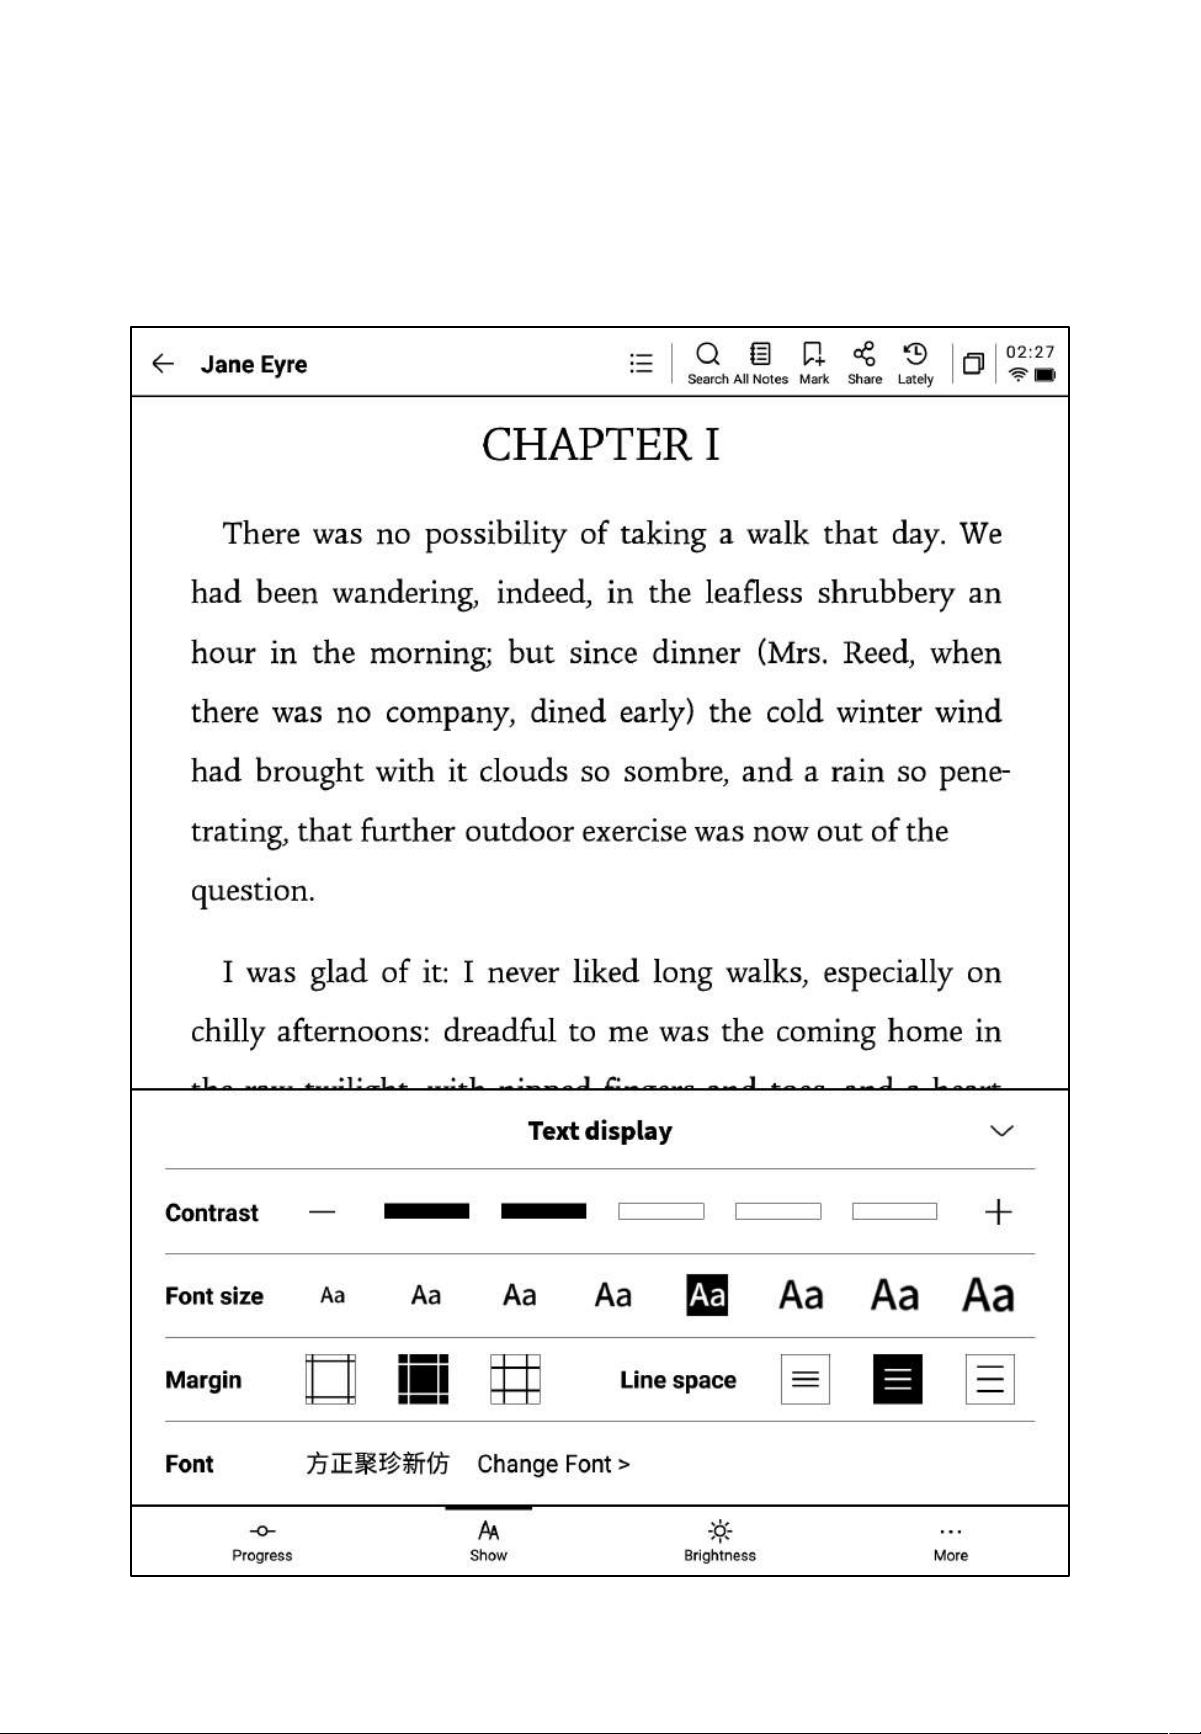
4.3 Reading Other Book Formats
The basic reading operations are consistent with PDF reading. The difference lies in the
reading settings, where other formats of eBooks support adjusting text size, contrast, margins,
line spacing, and font type.

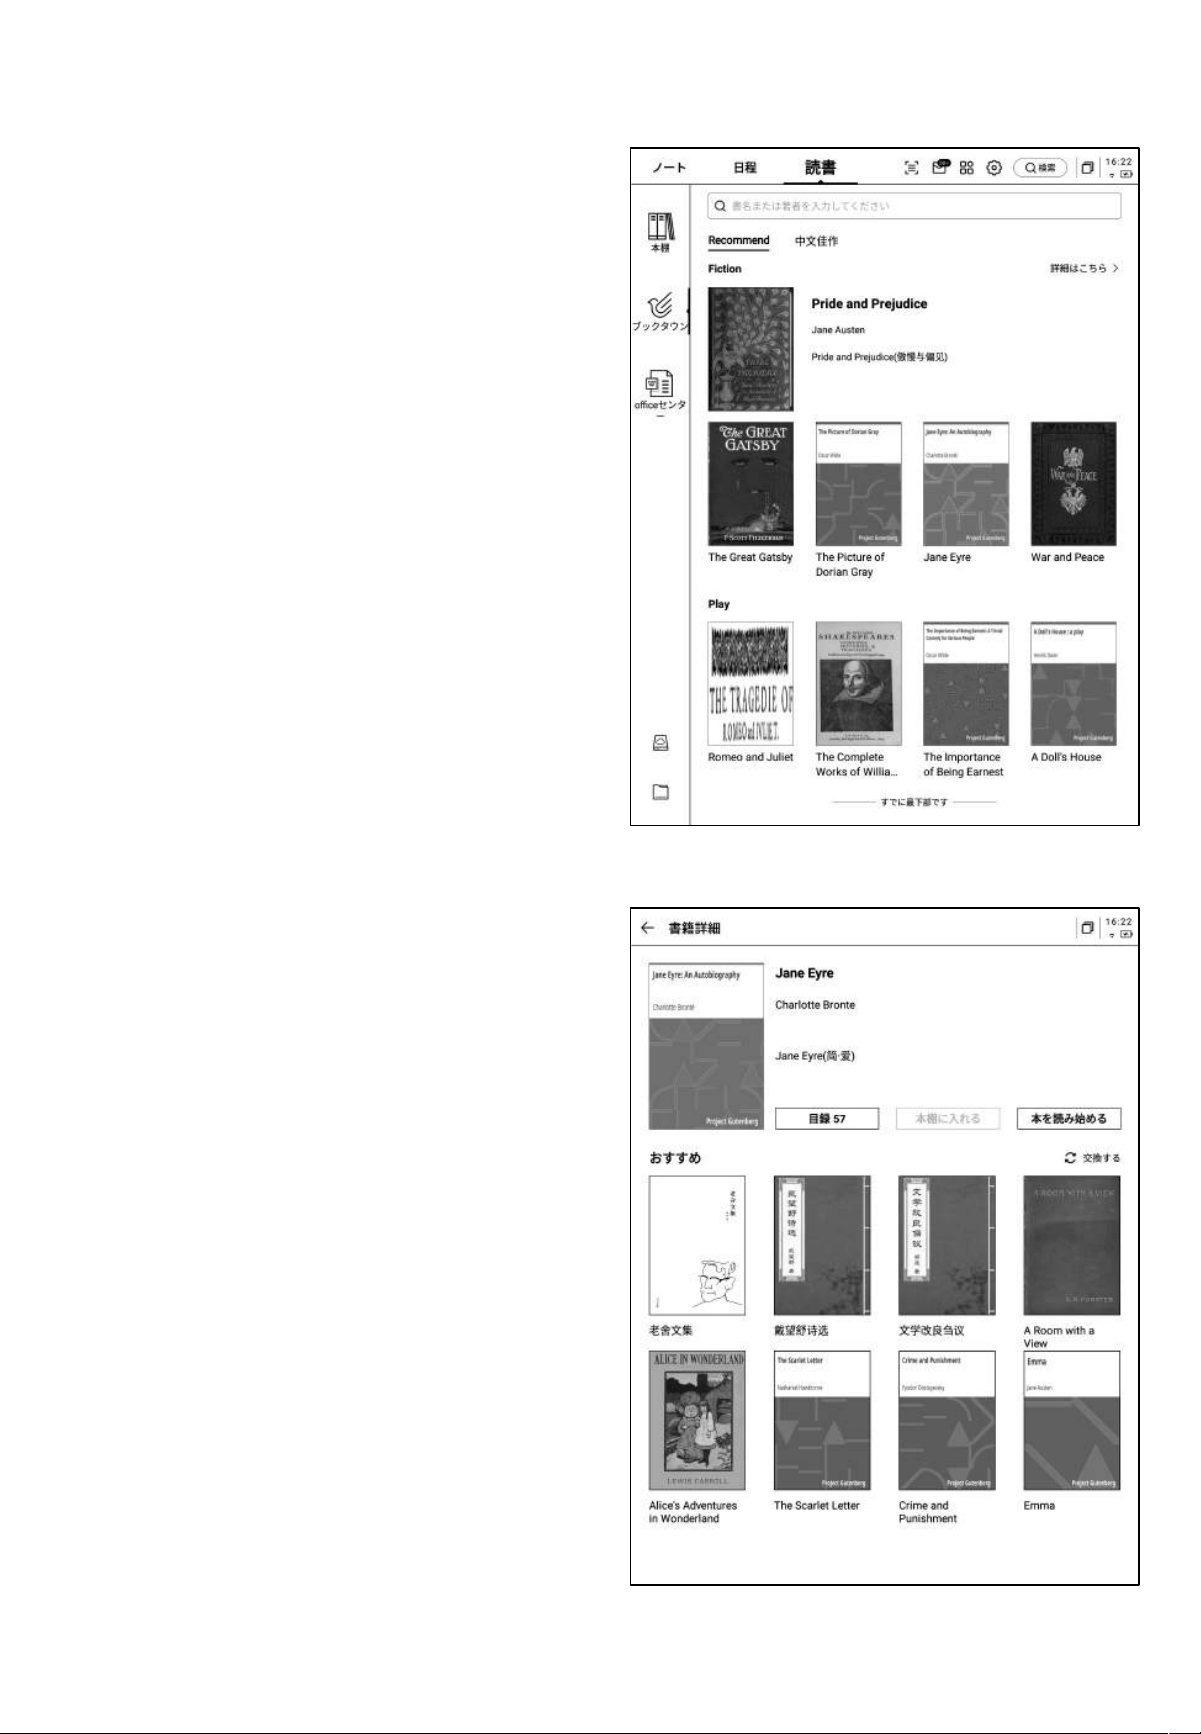
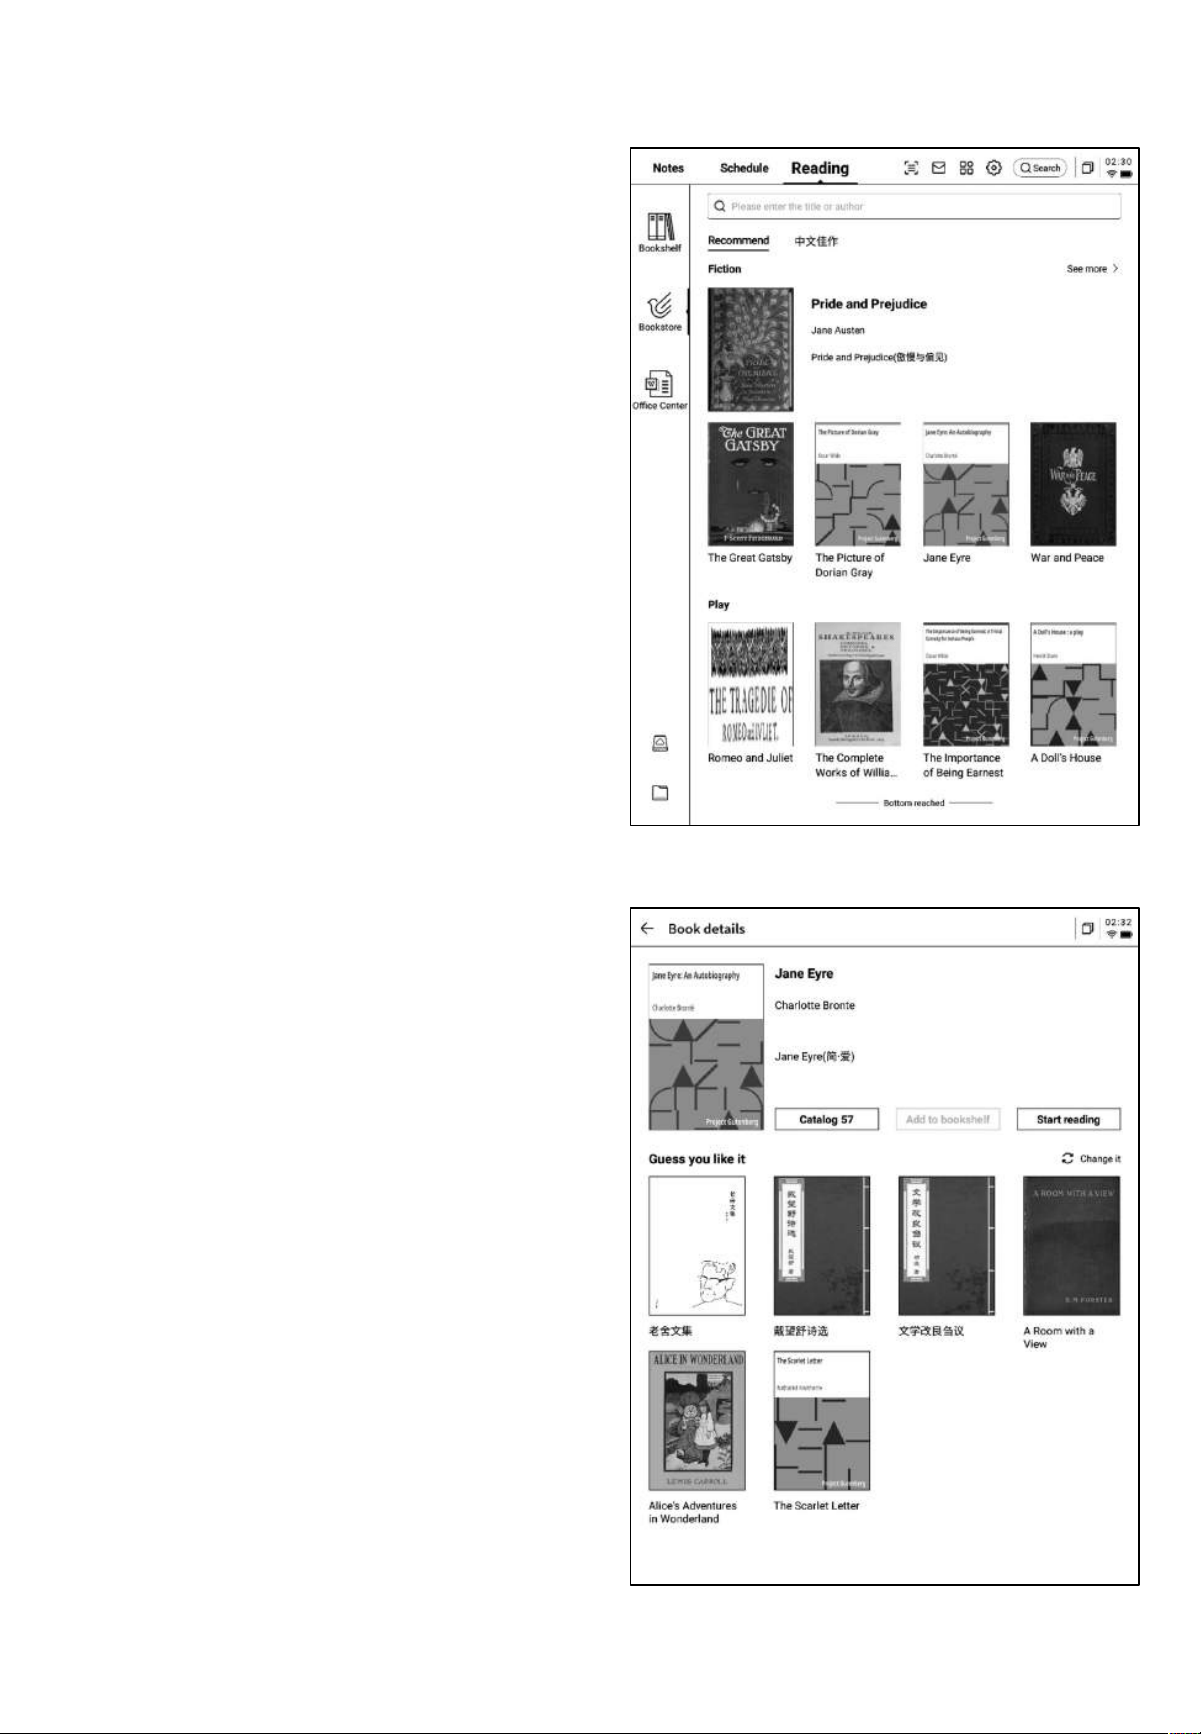
4.4 Bookstore
• The current bookstore supports the
downloading of some reading resources.
Click the cover to enter the book details
page.
• Supports browsing the book catalog,
adding books to the bookshelf, and starting
reading.
• The books in the bookstore are currently
free to download and read.
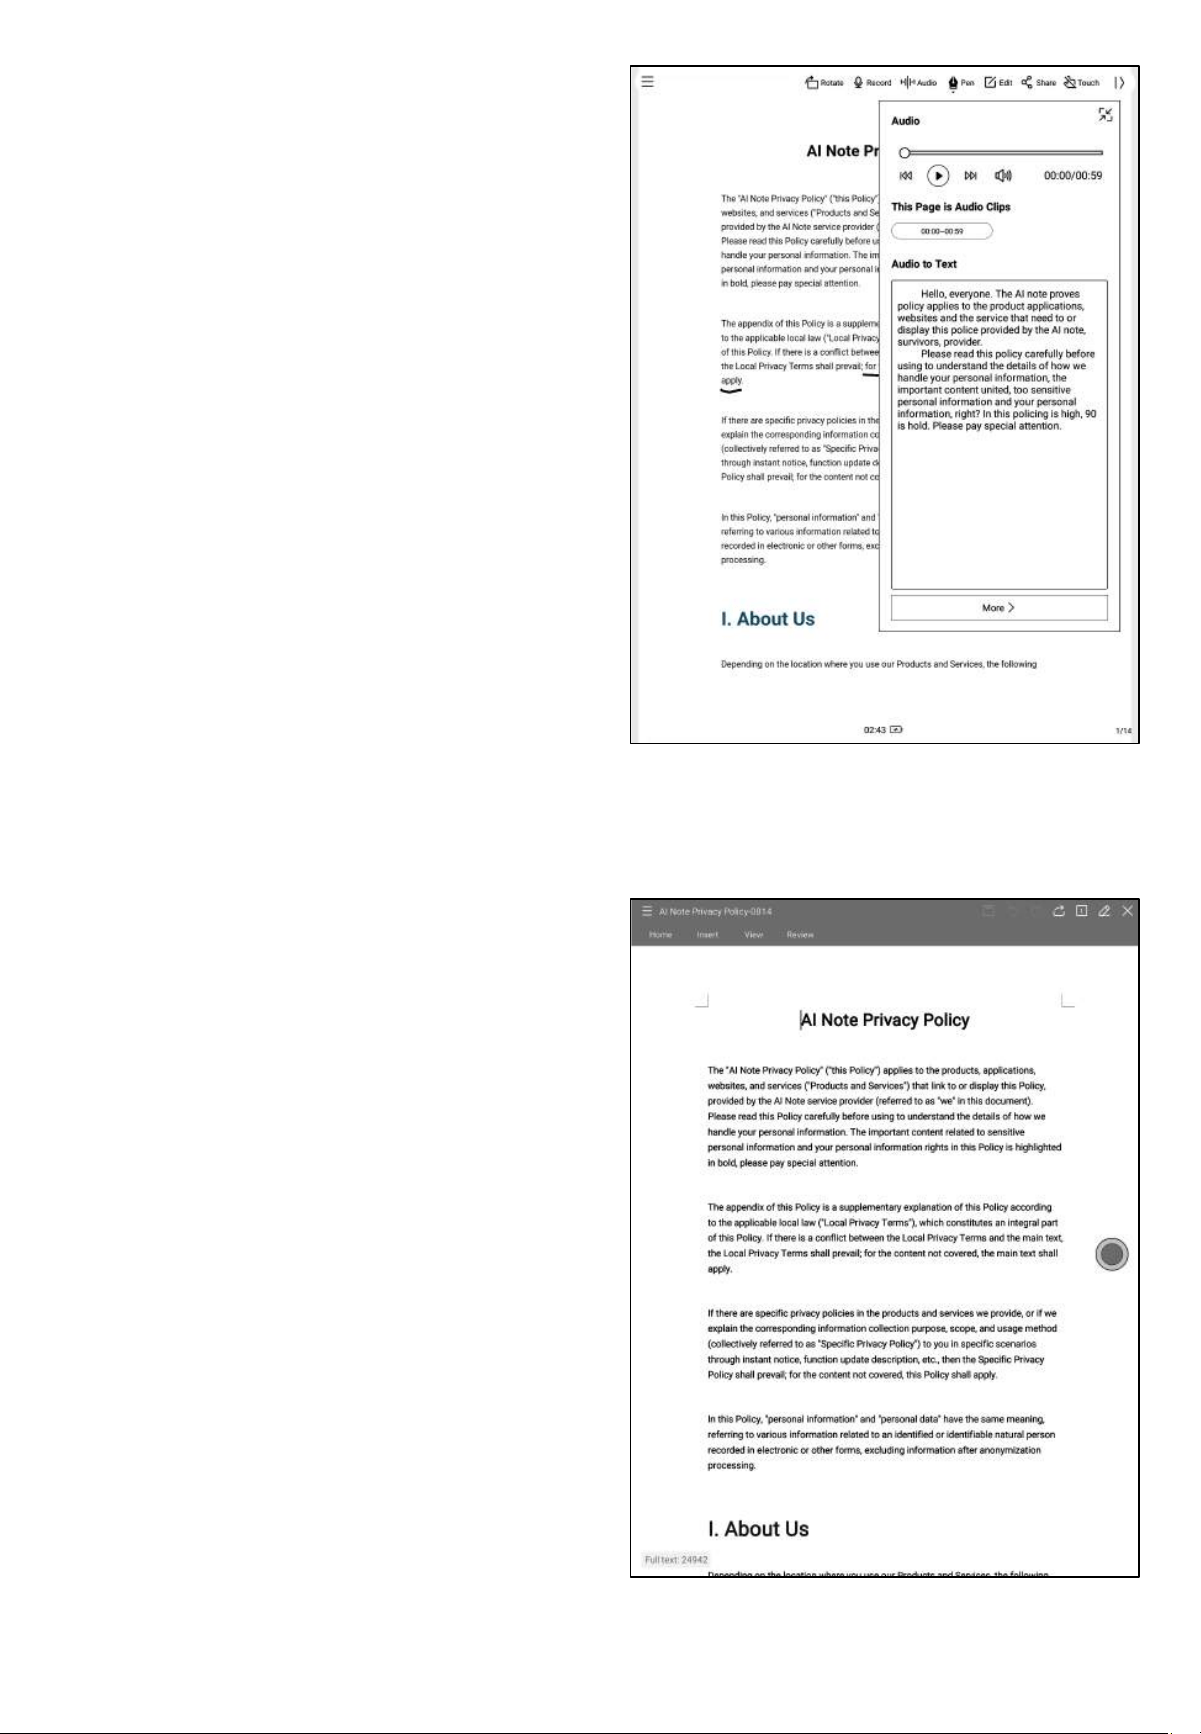
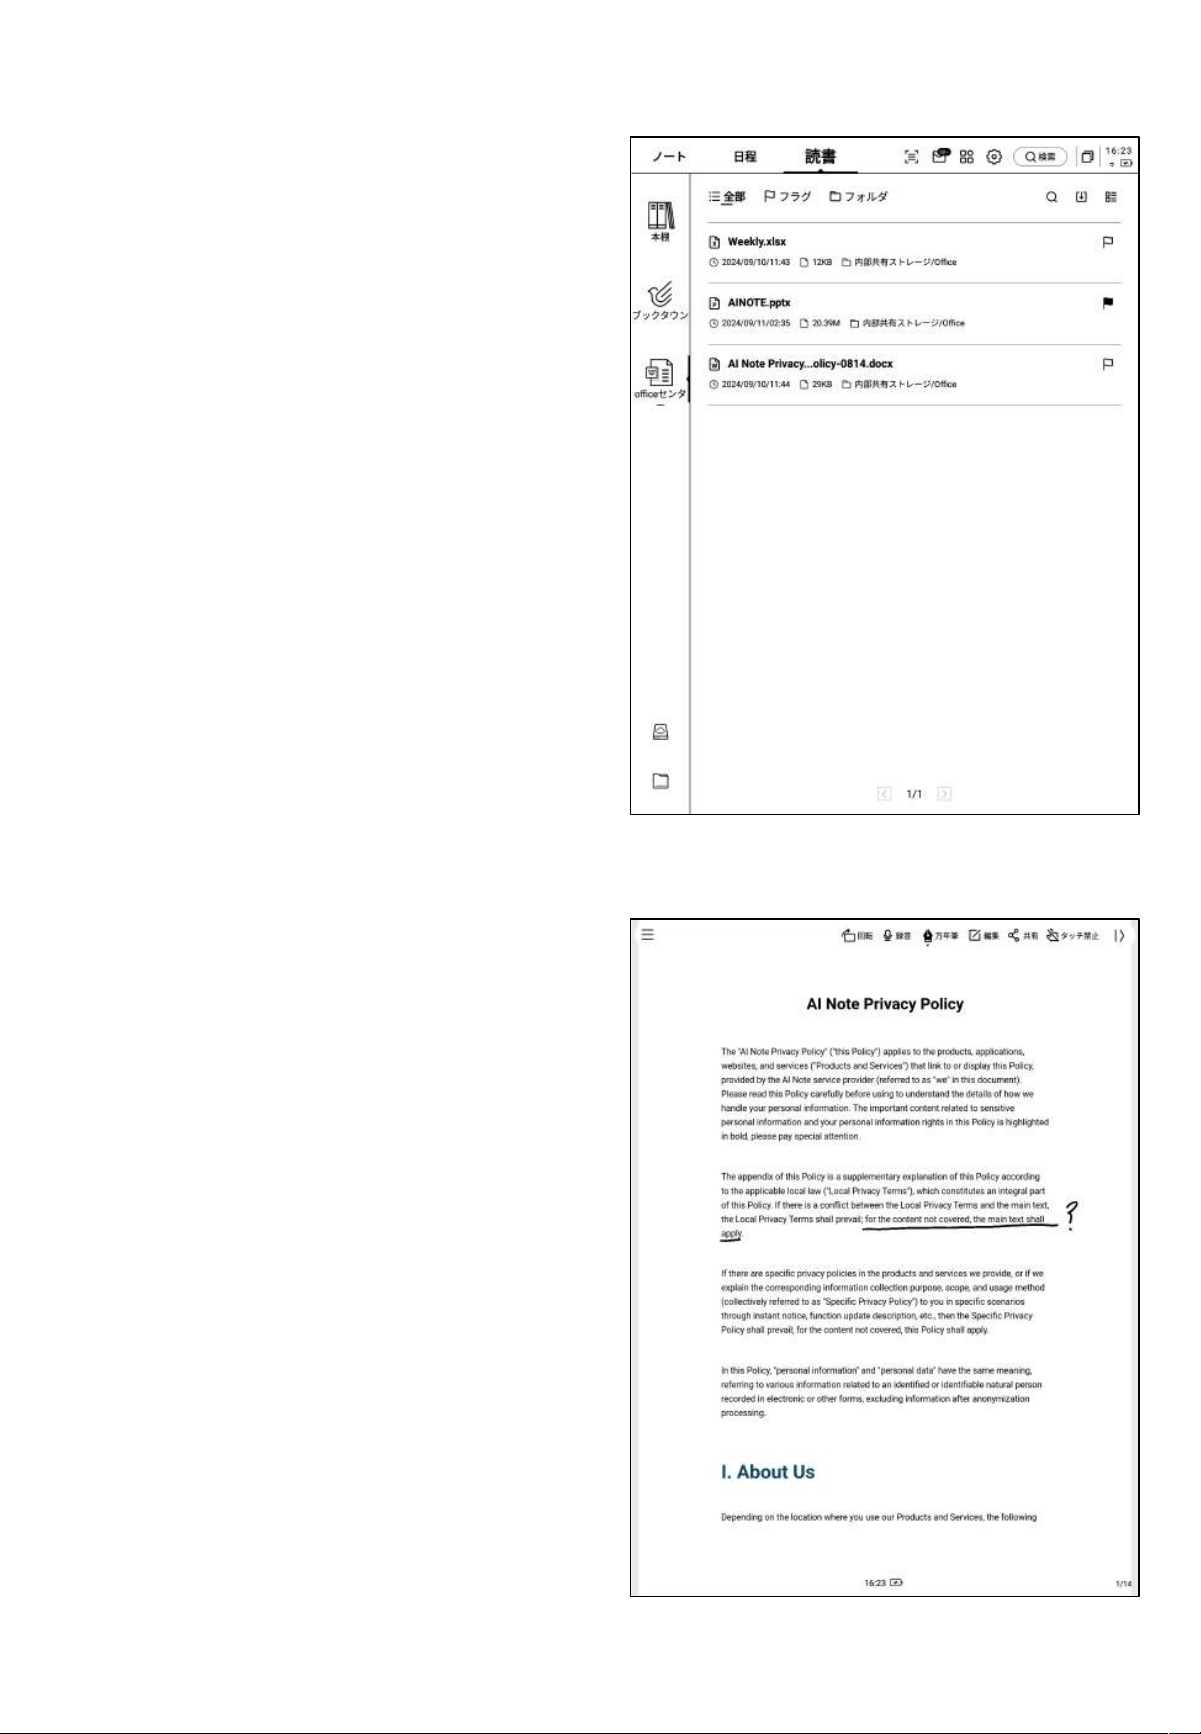
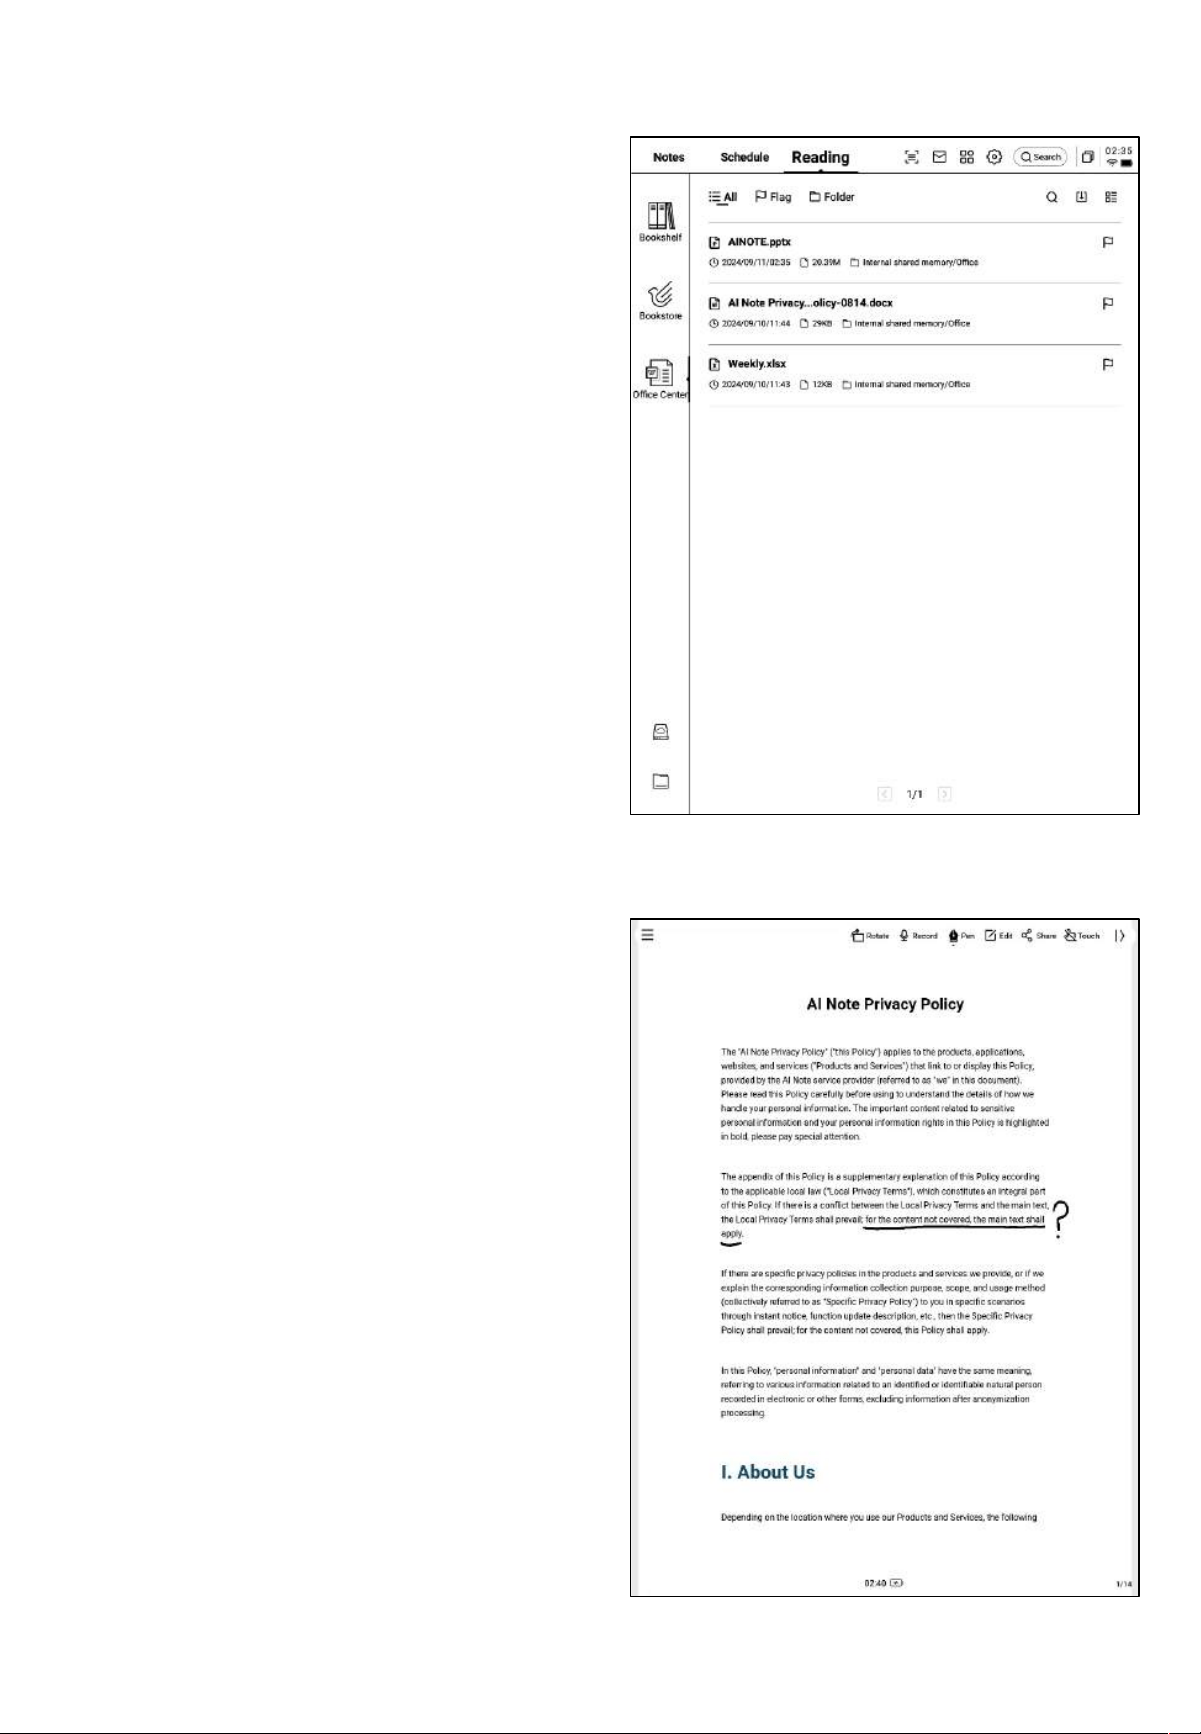
4.5 Office Center
• Supports the viewing and editing of Word,
PPT, and Excel office format documents.
Ø Import Methods
• Supports using a USB connection to
connect the device to a computer and
transfer documents to the "Office" folder.
*Note: Currently, classification within the
"Office" folder is not supported.
• Supports importing via Wi-Fi transfer;
click to view detailed operation steps
Ø Supported Formats
4.5.1 Supported Formats and Import Methods
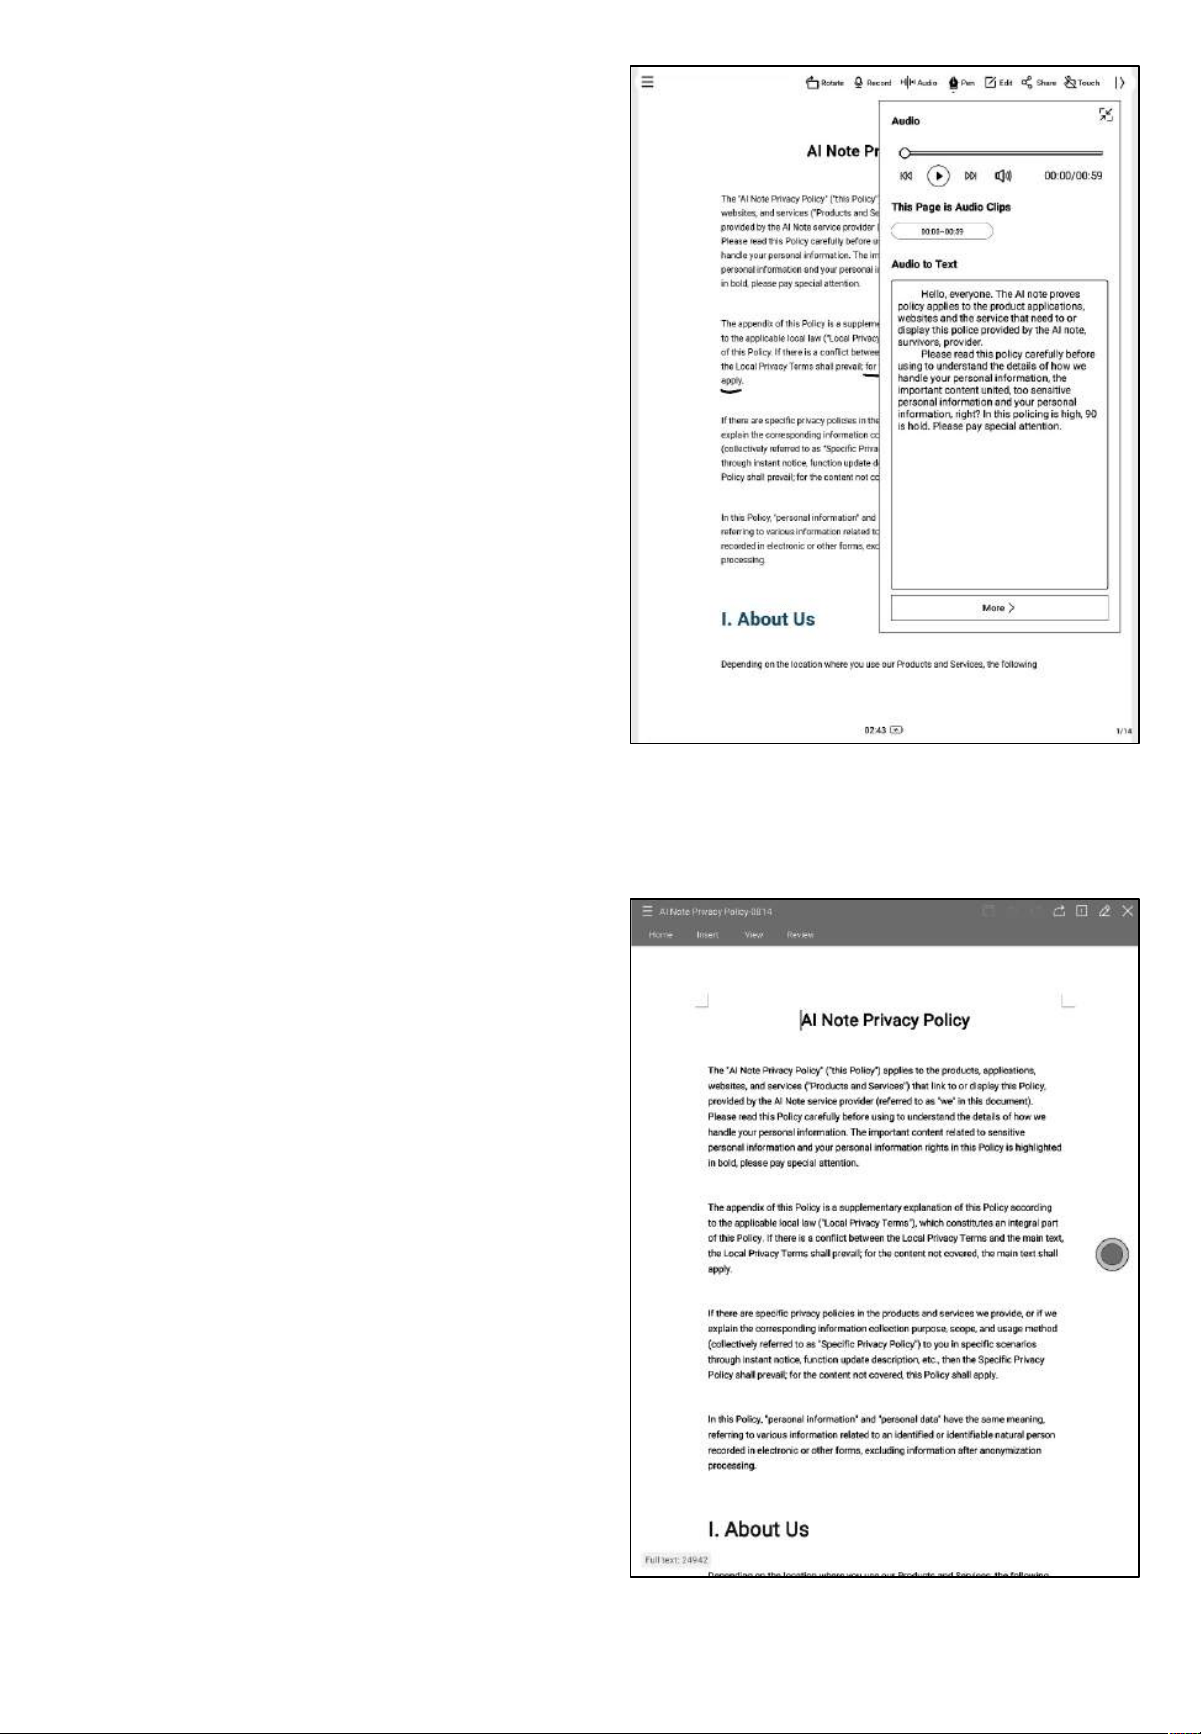
4.5.2 Word Document Preview and Editing
• Enter the Word document preview
interface to view and flip through pages,
and also supports using the stylus for
handwritten annotations.
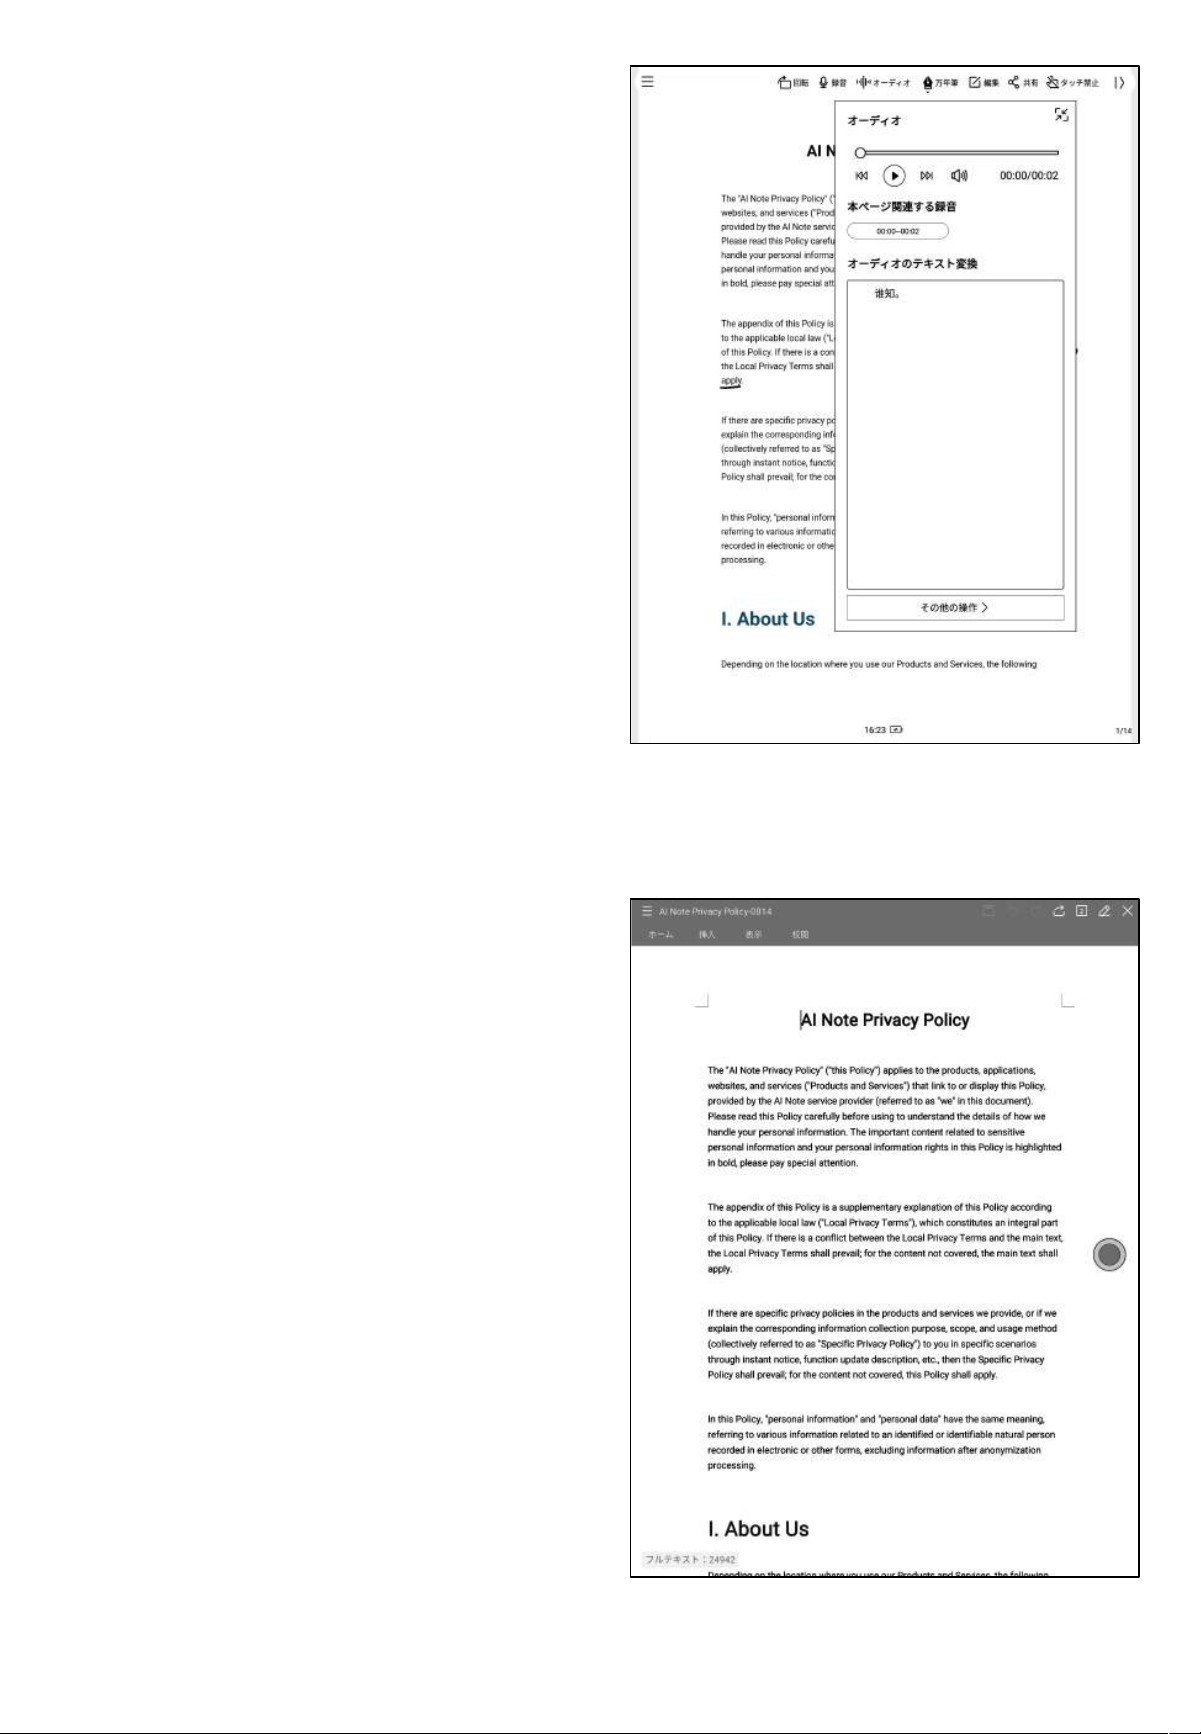
• Supports recording audio while reading by
clicking the recording button.
• After recording, you can view the
recorded content and convert the audio
into text.
• The font of the converted text will be
consistent with the current system font.
• Click the edit button, and the system will
use the WPS Office application to open
the document. Once opened, you can
proceed with editing the document.

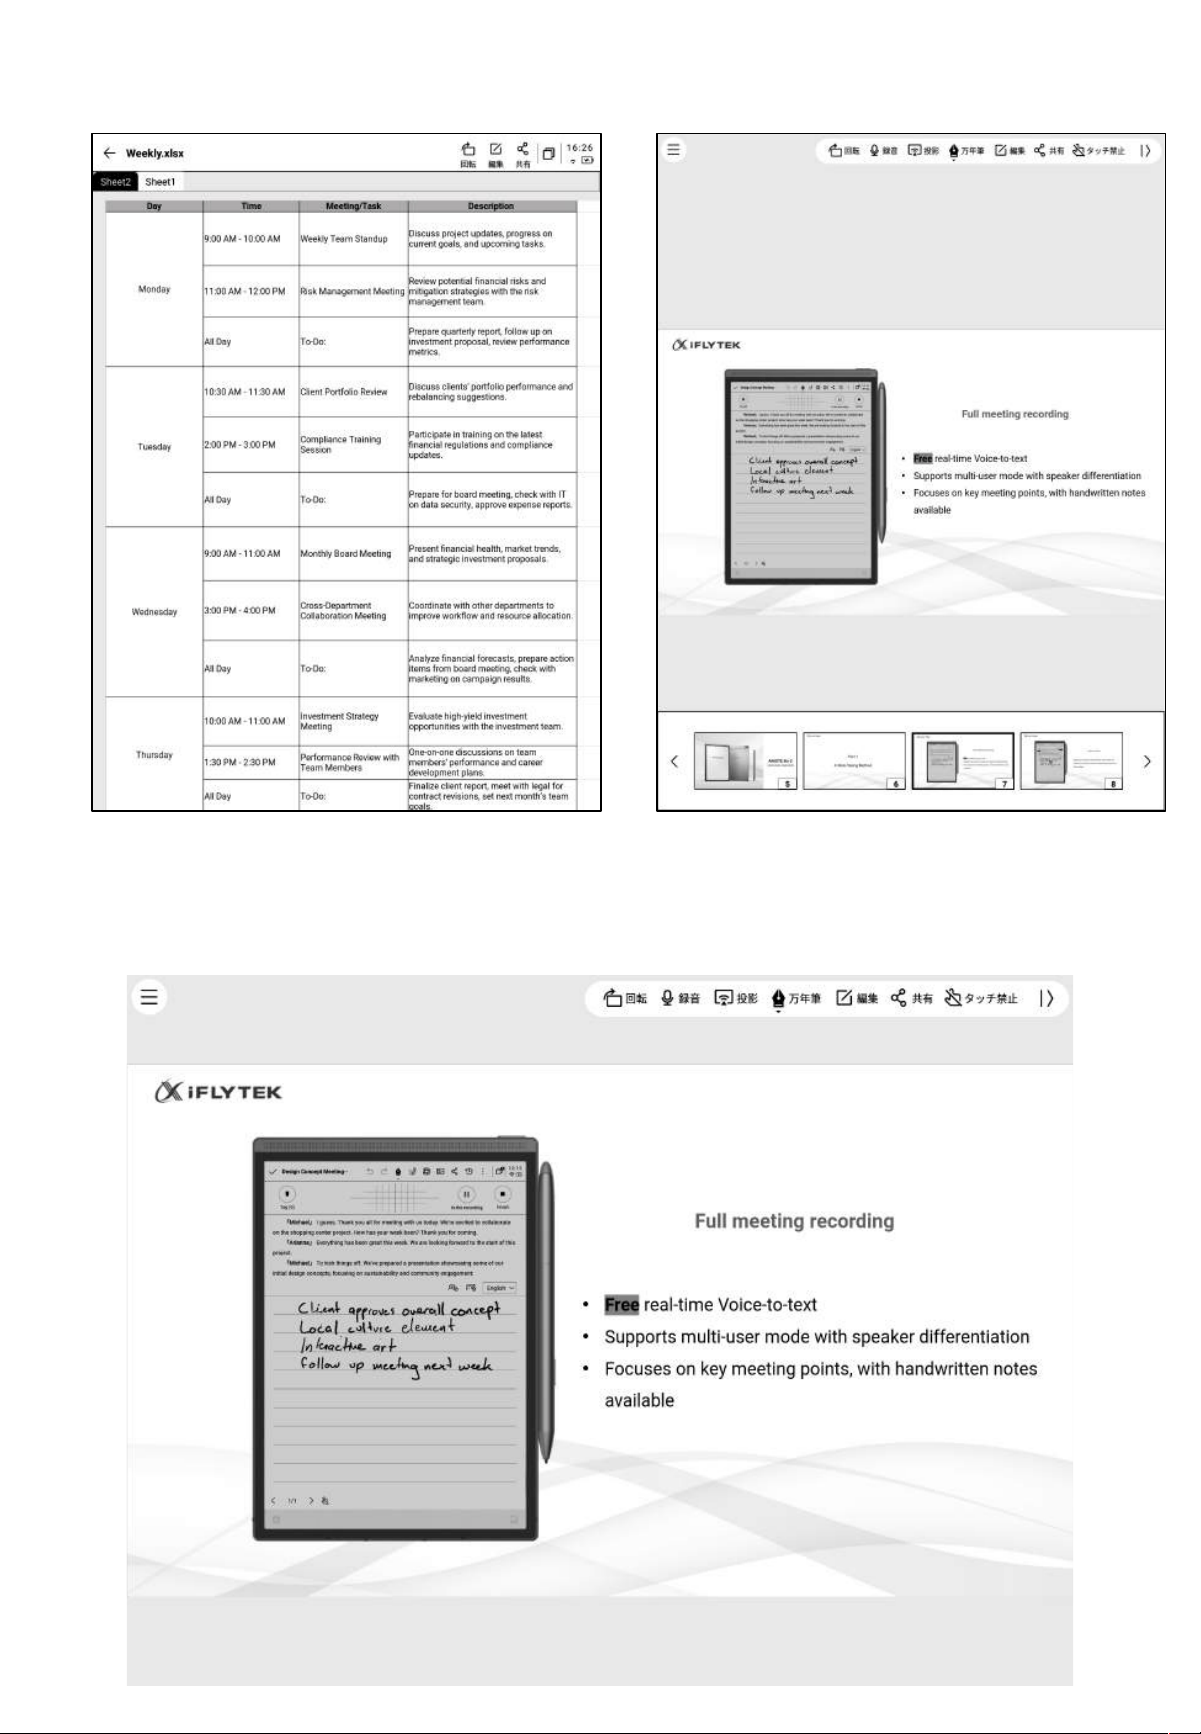
4.5.3 Preview and Edit of Excel & PPT Documents
Tips: Using the horizontal screen mode for PPT documents provides better effects.

4.6 Cloud Drive
• Supports the login and use of OneDrive.
• Example: For OneDrive, follow the
prompts in the login interface to complete
the sign-in process.
• Supports viewing documents stored in the
cloud and downloading or viewing
supported file formats.

Chapter 5: Other Features
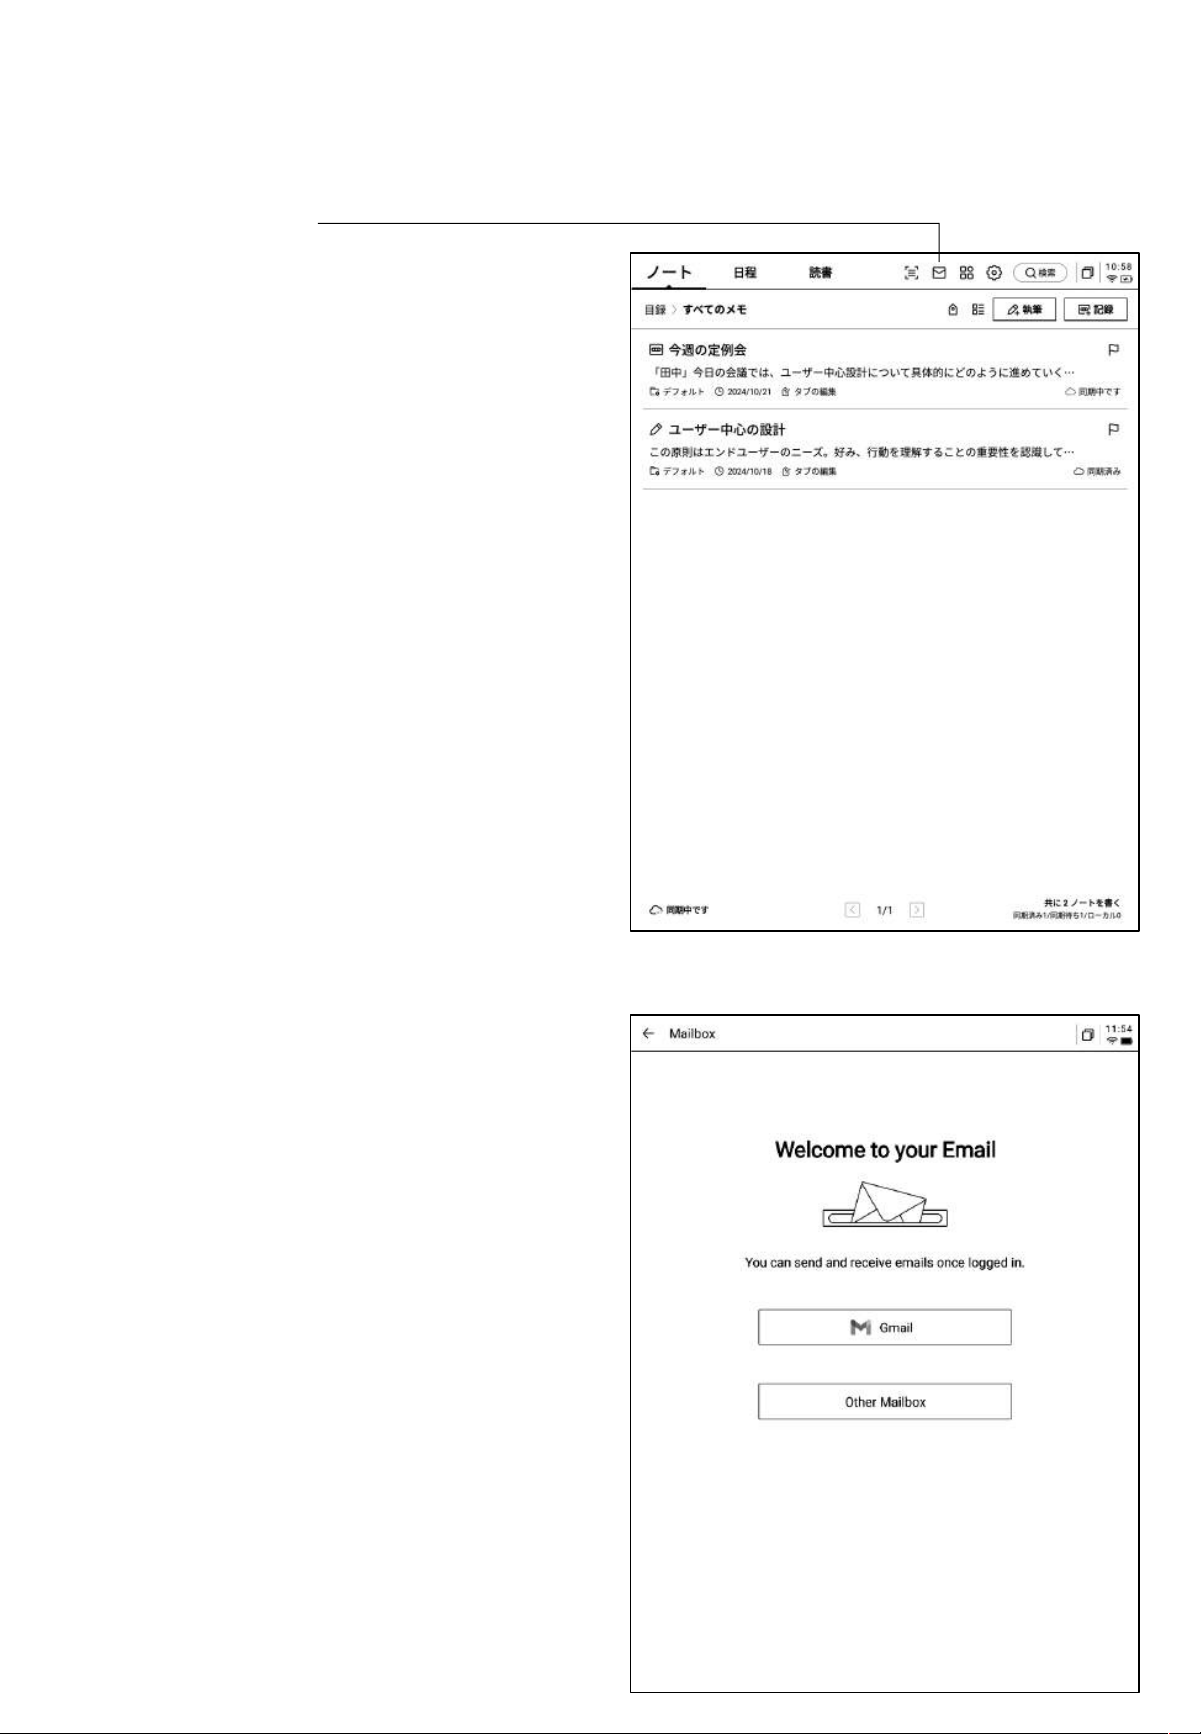
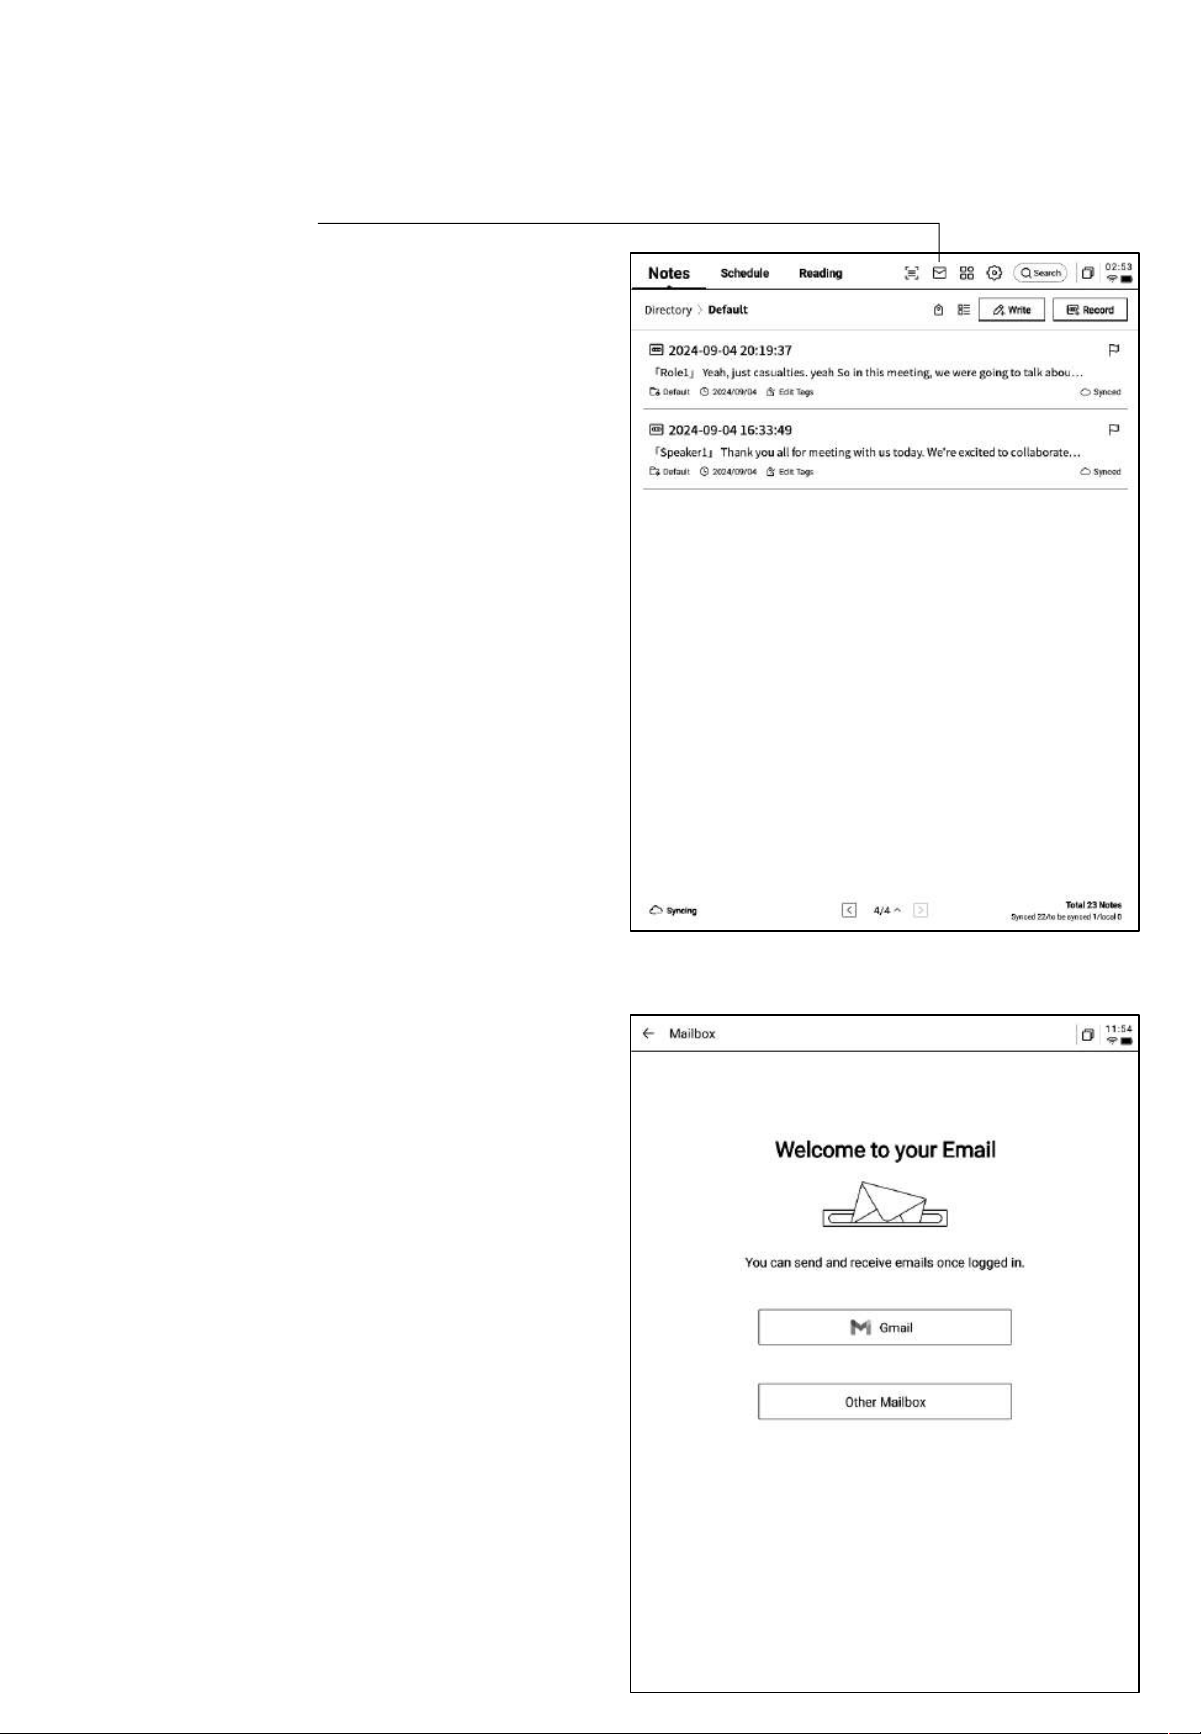
5.1 Email
• In the top-right corner of the home page,
there is an entry for the mailbox. Click it
to enter the email interface.
• Upon first entering the email interface,
you need to select your email type.
Currently, all mainstream email protocols
are supported.
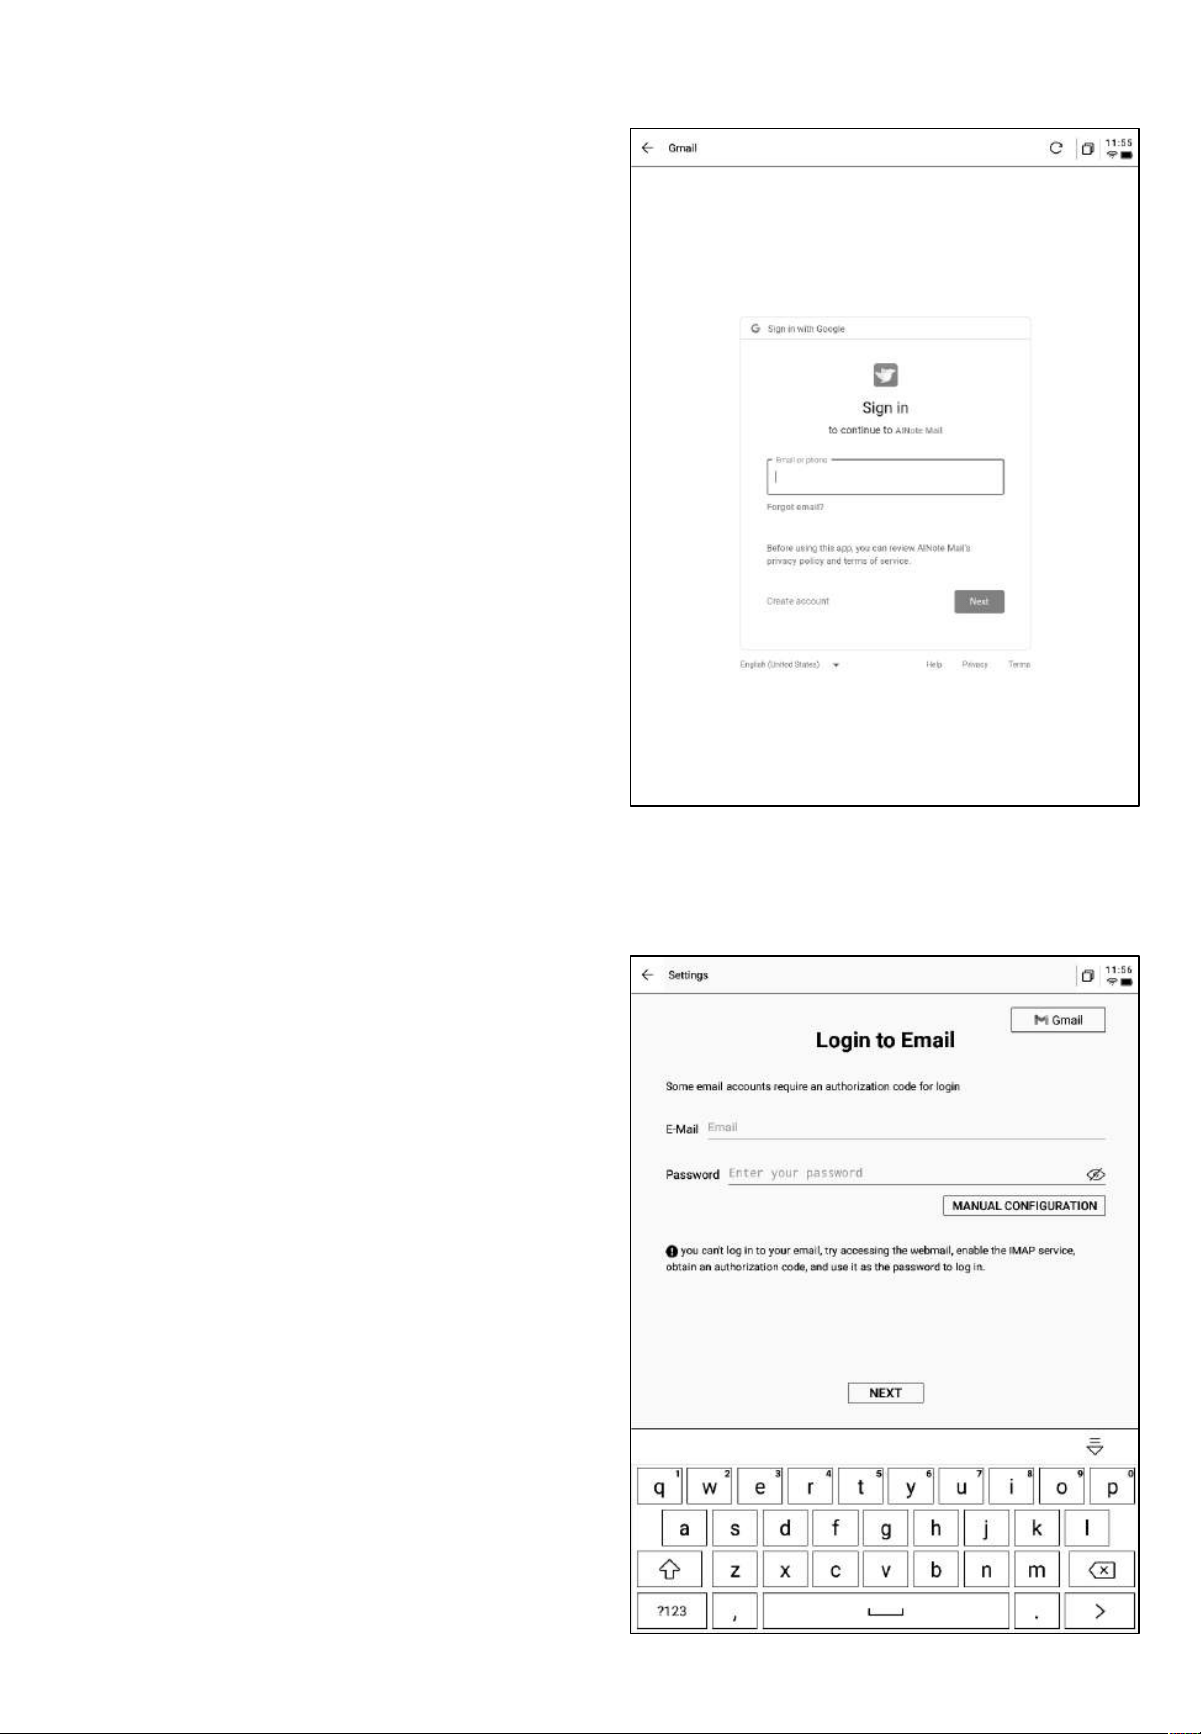
• You can click the Gmail button to log into
your Gmail account or select "Other
Mailbox" for other email providers.
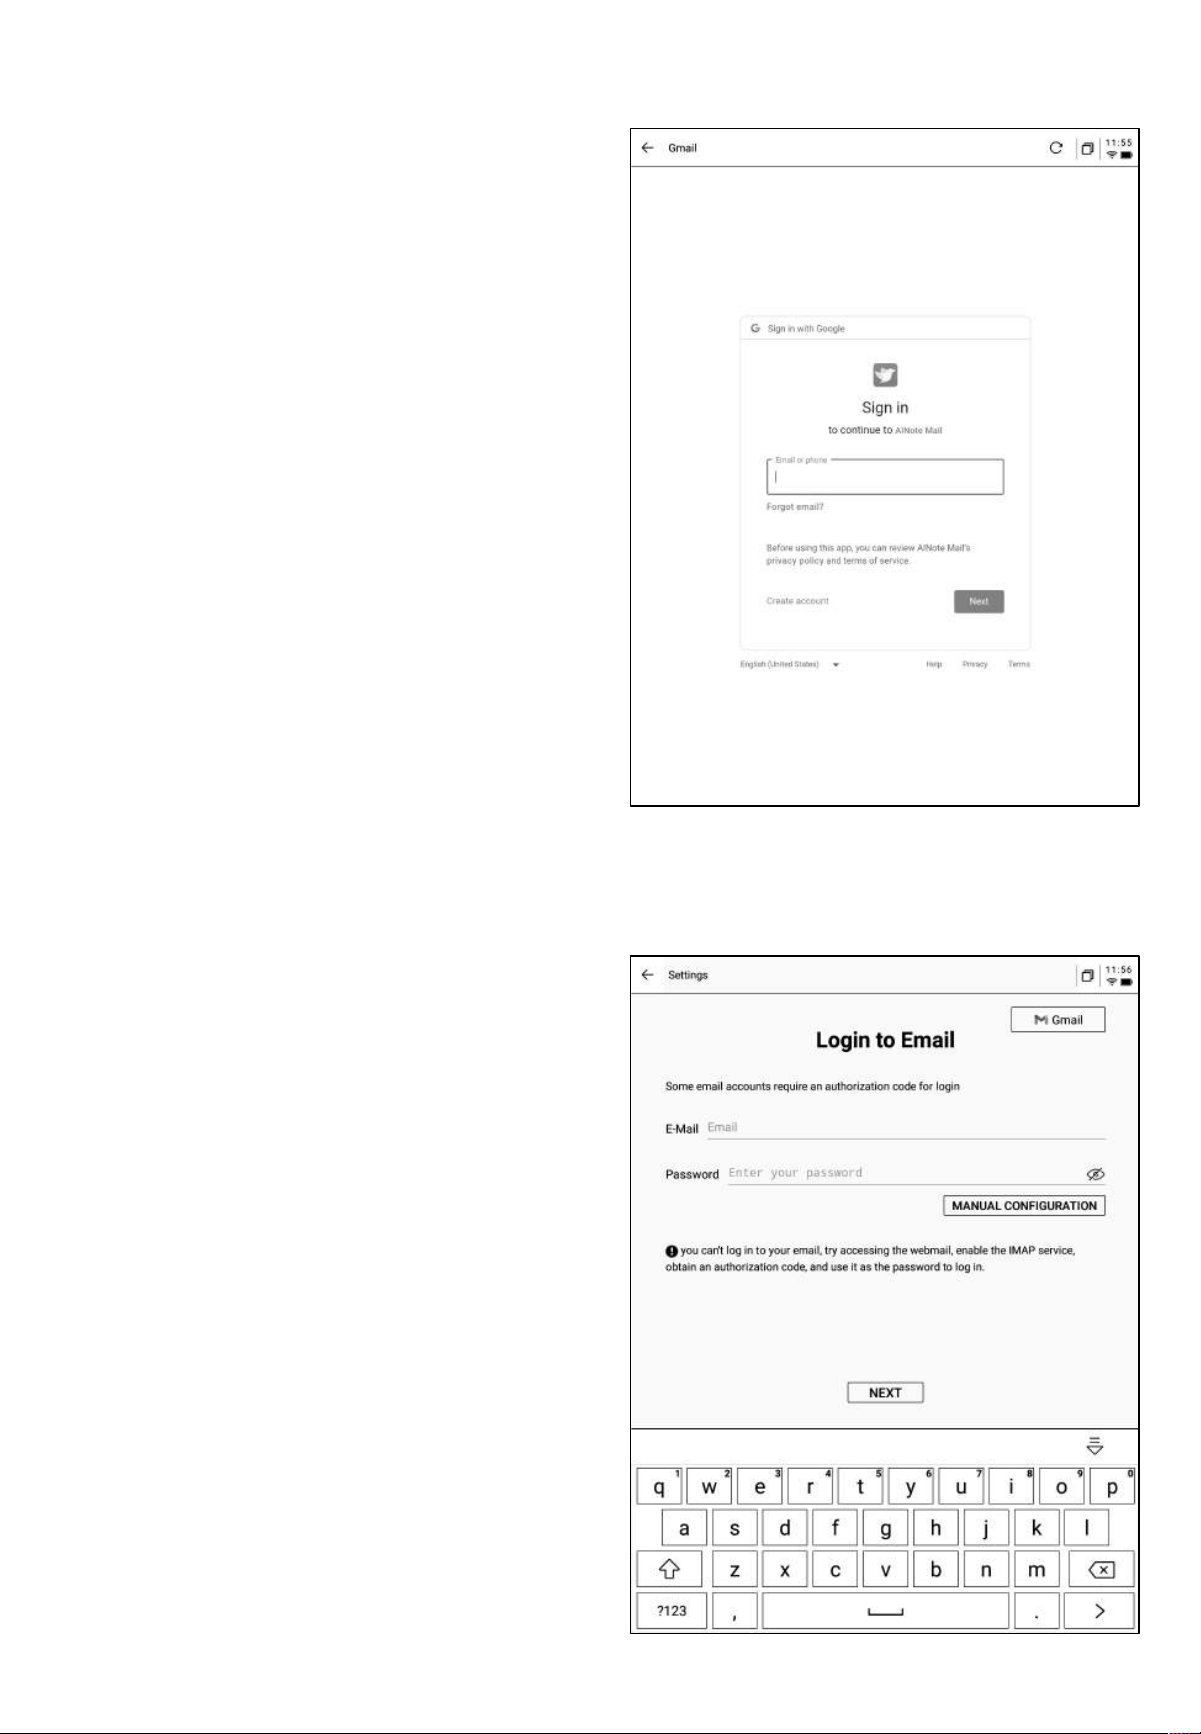
• Gmail
The Gmail login interface is provided by
Gmail, where you need to input your email
account and password. During the login
process, Gmail's verification process will be
required. Follow the steps to complete the
login.
• Other Mailboxes
The login interface supports entering the email
address and password. Typically, the password
is an authorization code. The steps are as
follows::
❶Go to the email web interface, find account
settings, and locate the authorization code
settings.
❷ The system will generate an authorization
code used for third-party applications. The
authorization code is usually complex.
❸ After obtaining the authorization code, use it
as the password to log into the email account.
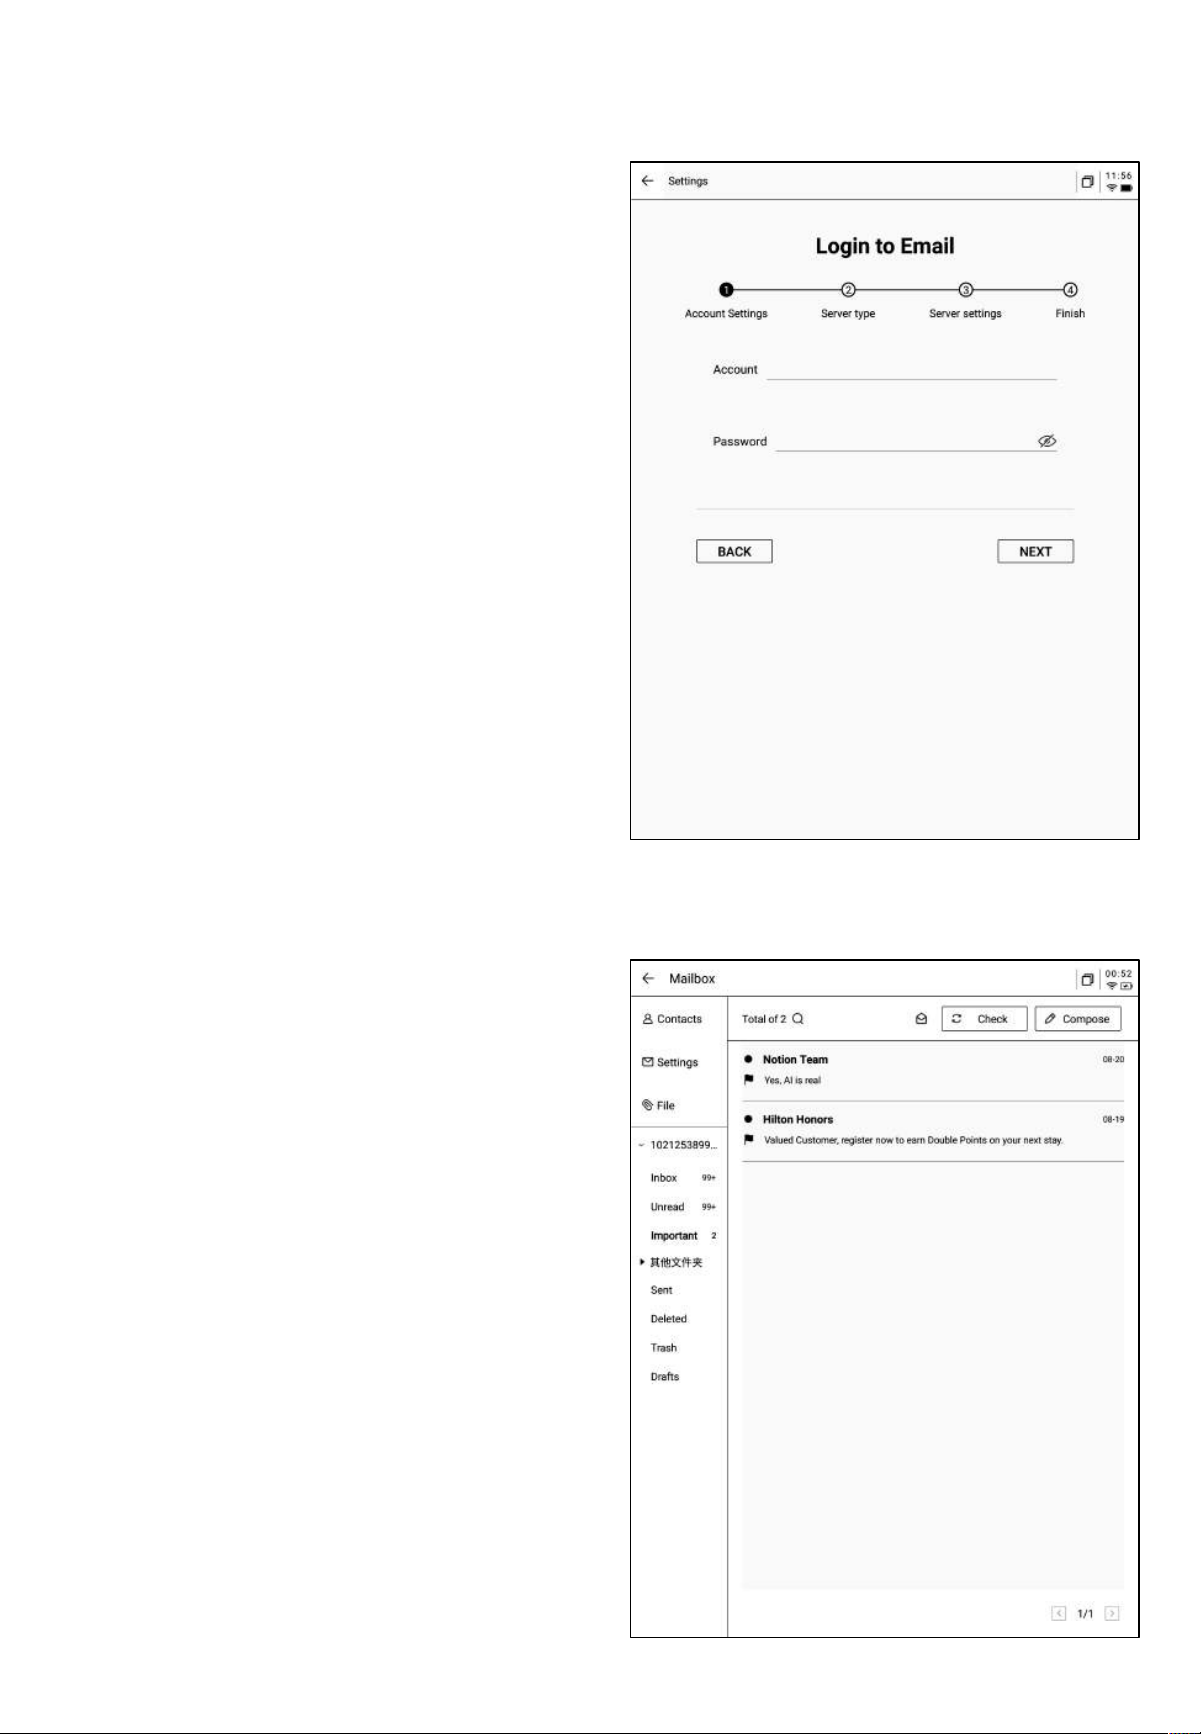
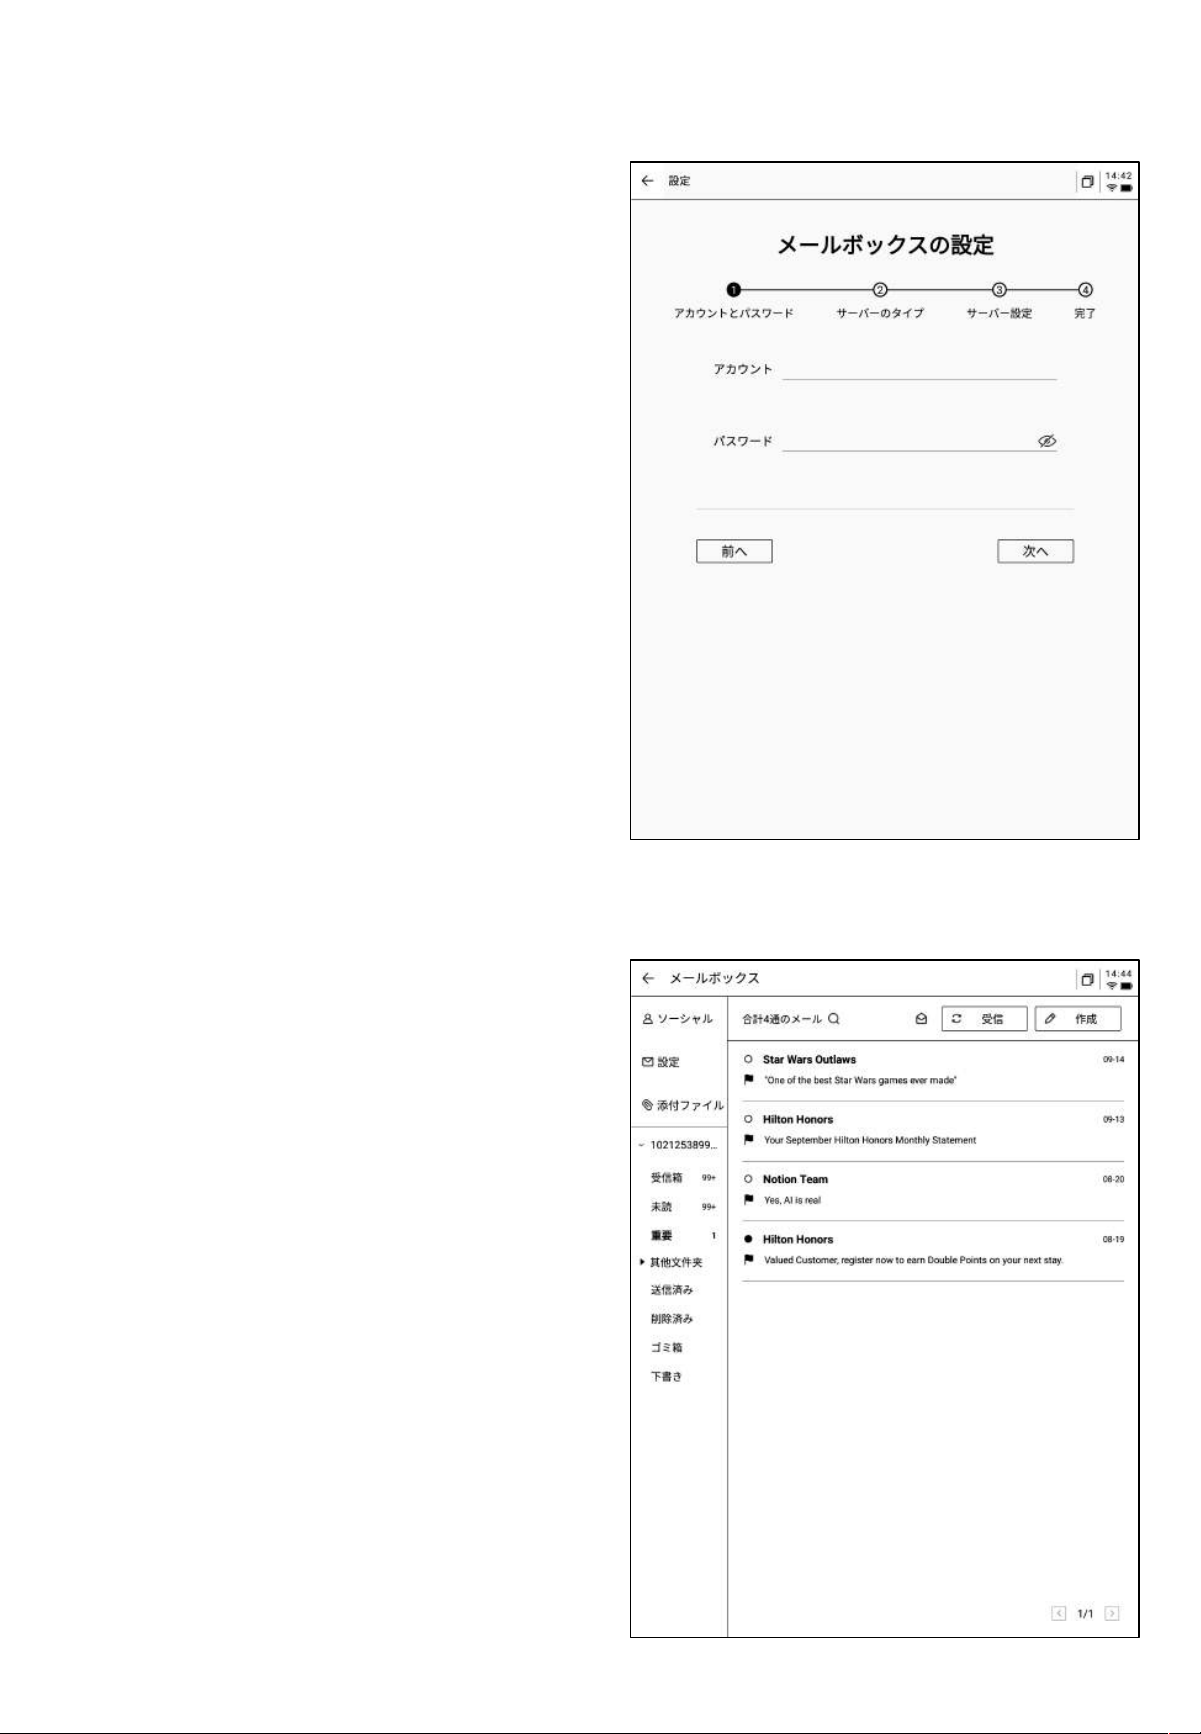
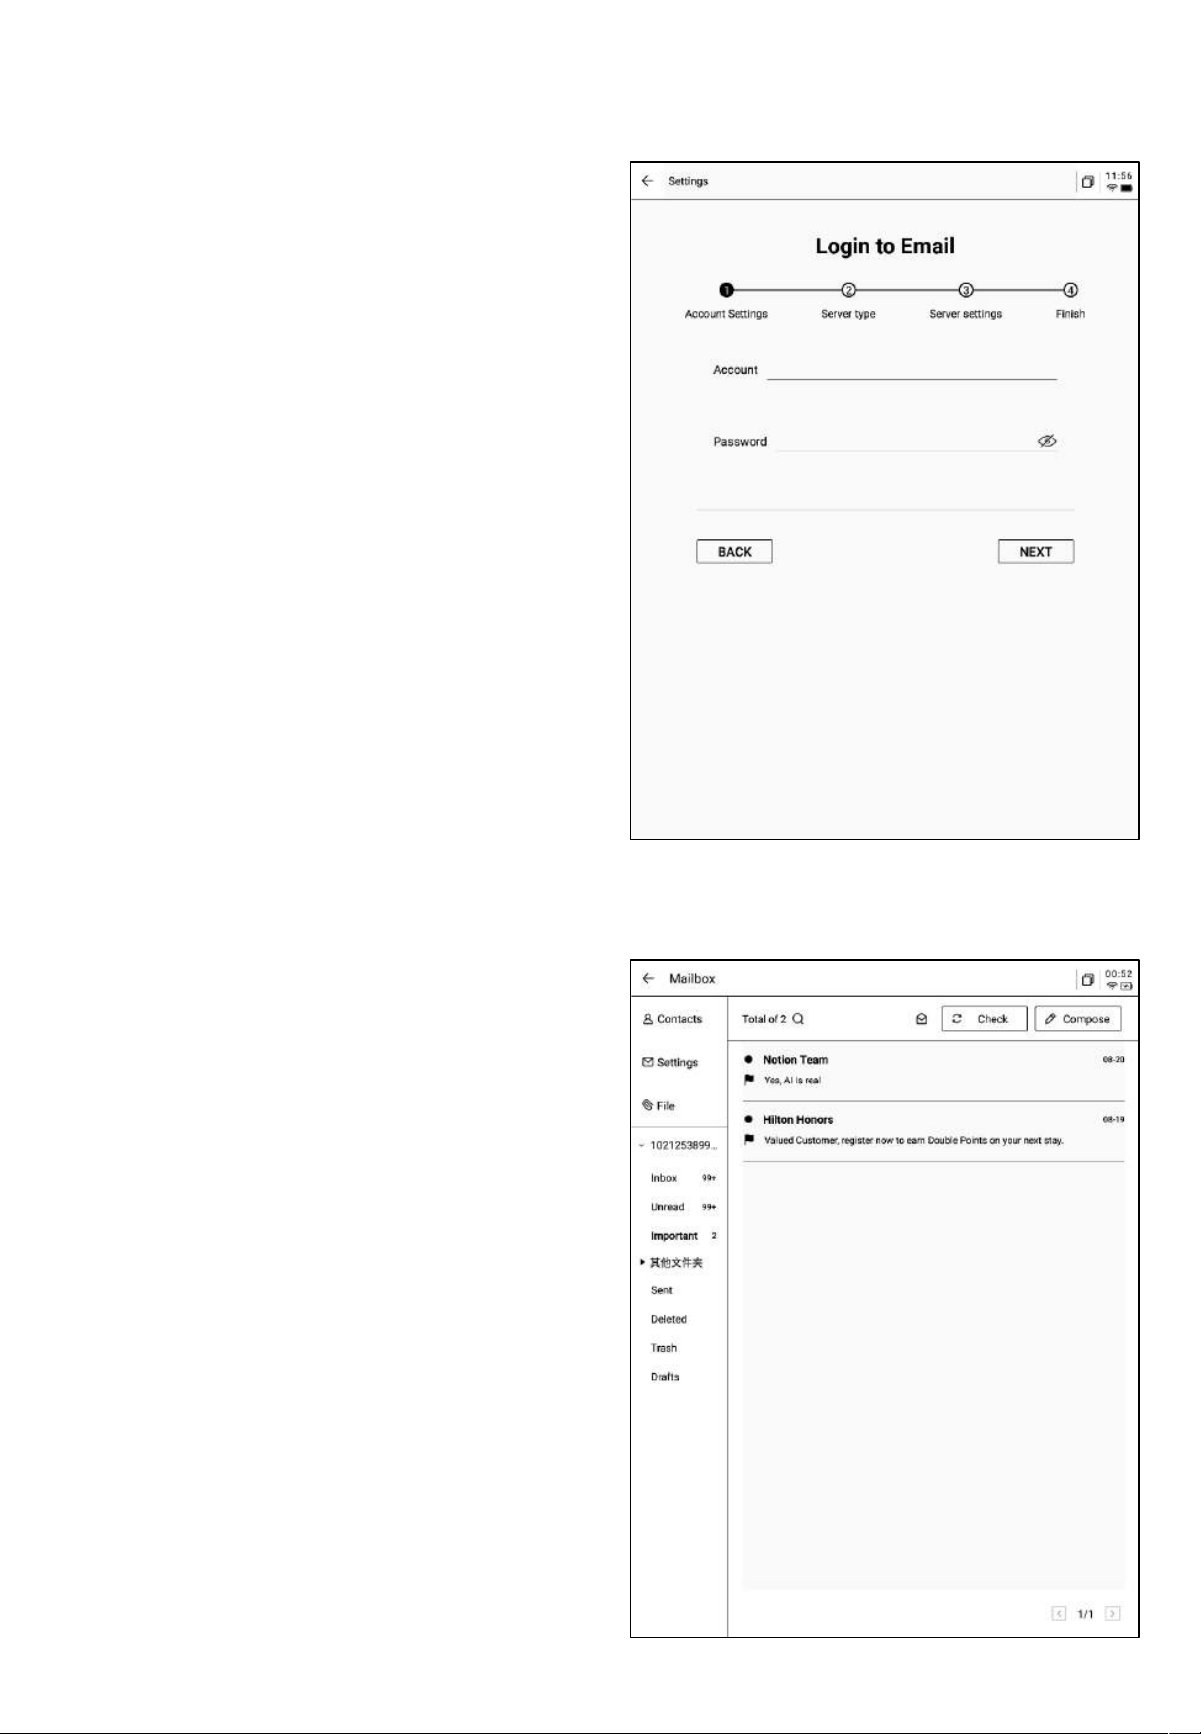
• Supports manual configuration of server
information, requiring 4-5 steps. This
feature is mainly used for enterprise email
accounts.
• You will need to configure the account,
password, and the email
sending/receiving server information.
Follow the steps to complete the login.
• If you are still unable to log in, please
contact:
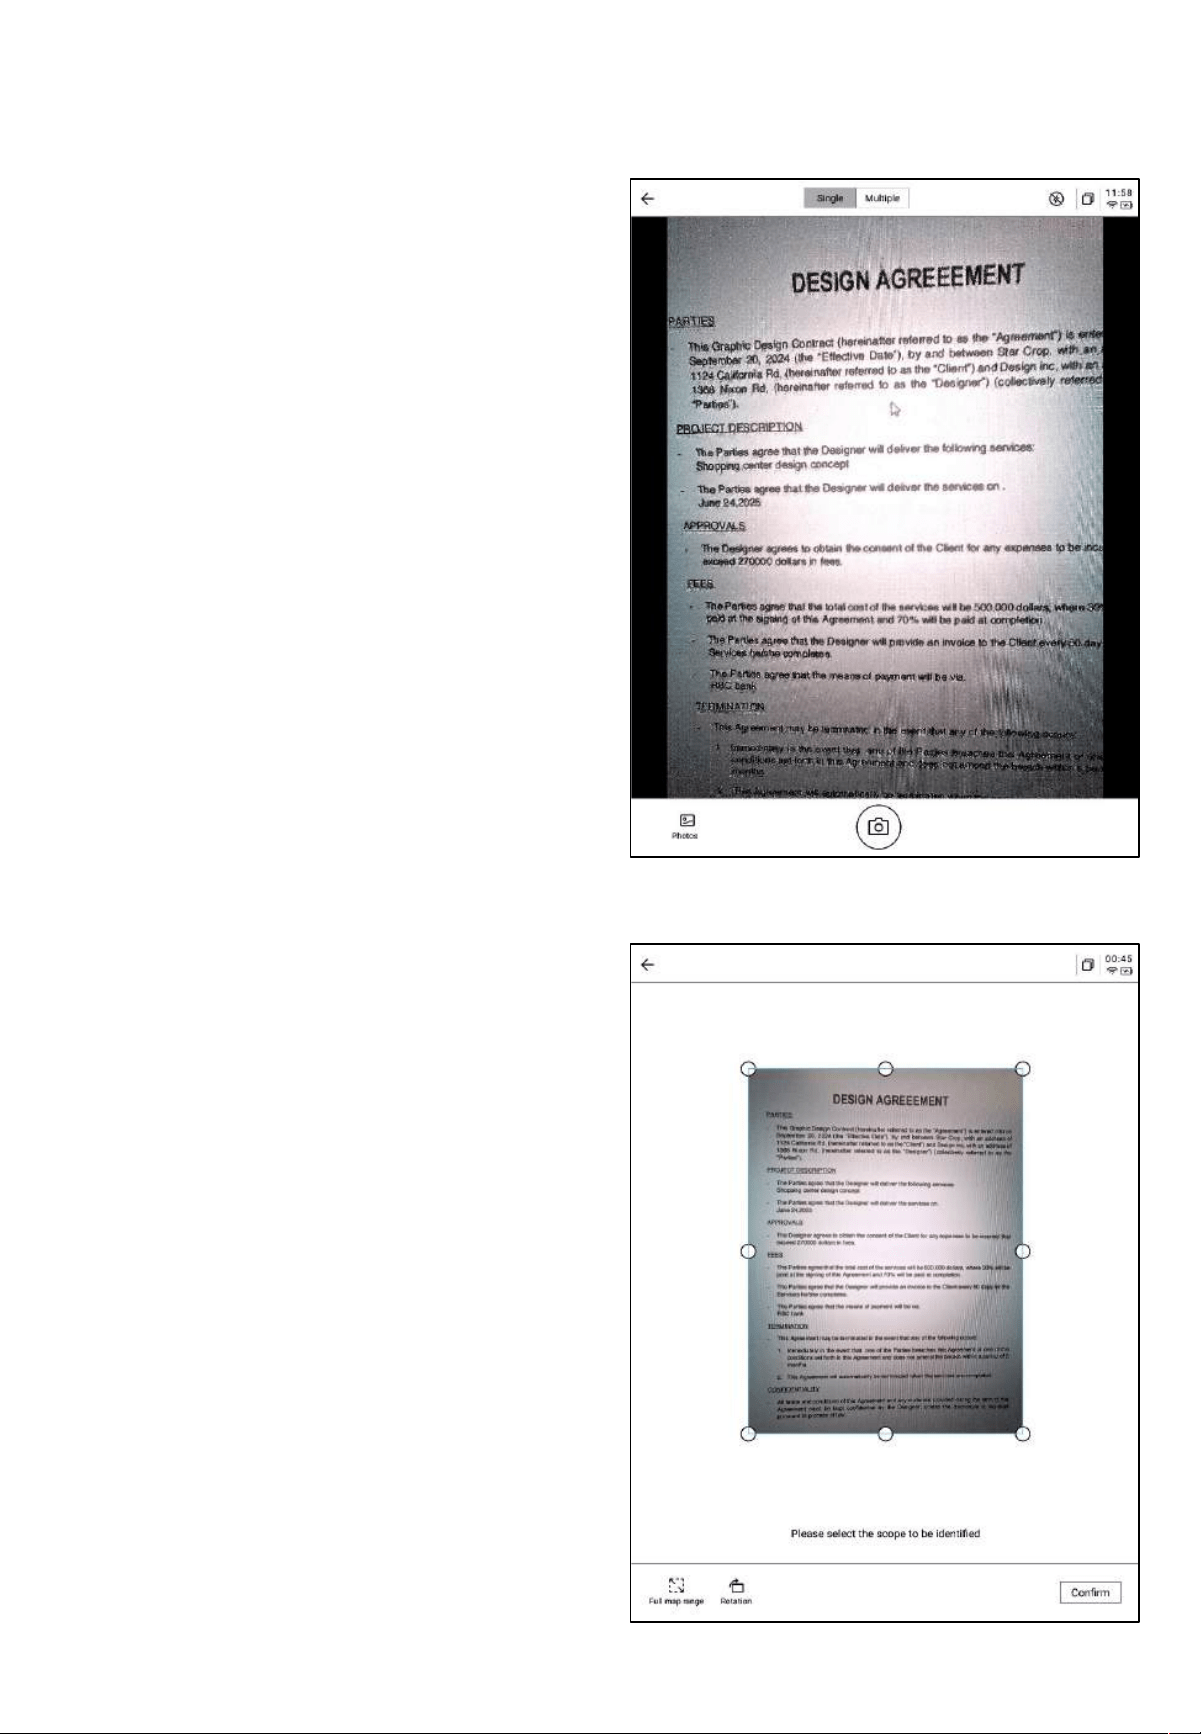
• Once logged in, you can view received
emails.
• Supports clicking the toolbar on the left to
check the inbox, outbox, drafts, trash, and
other folders.

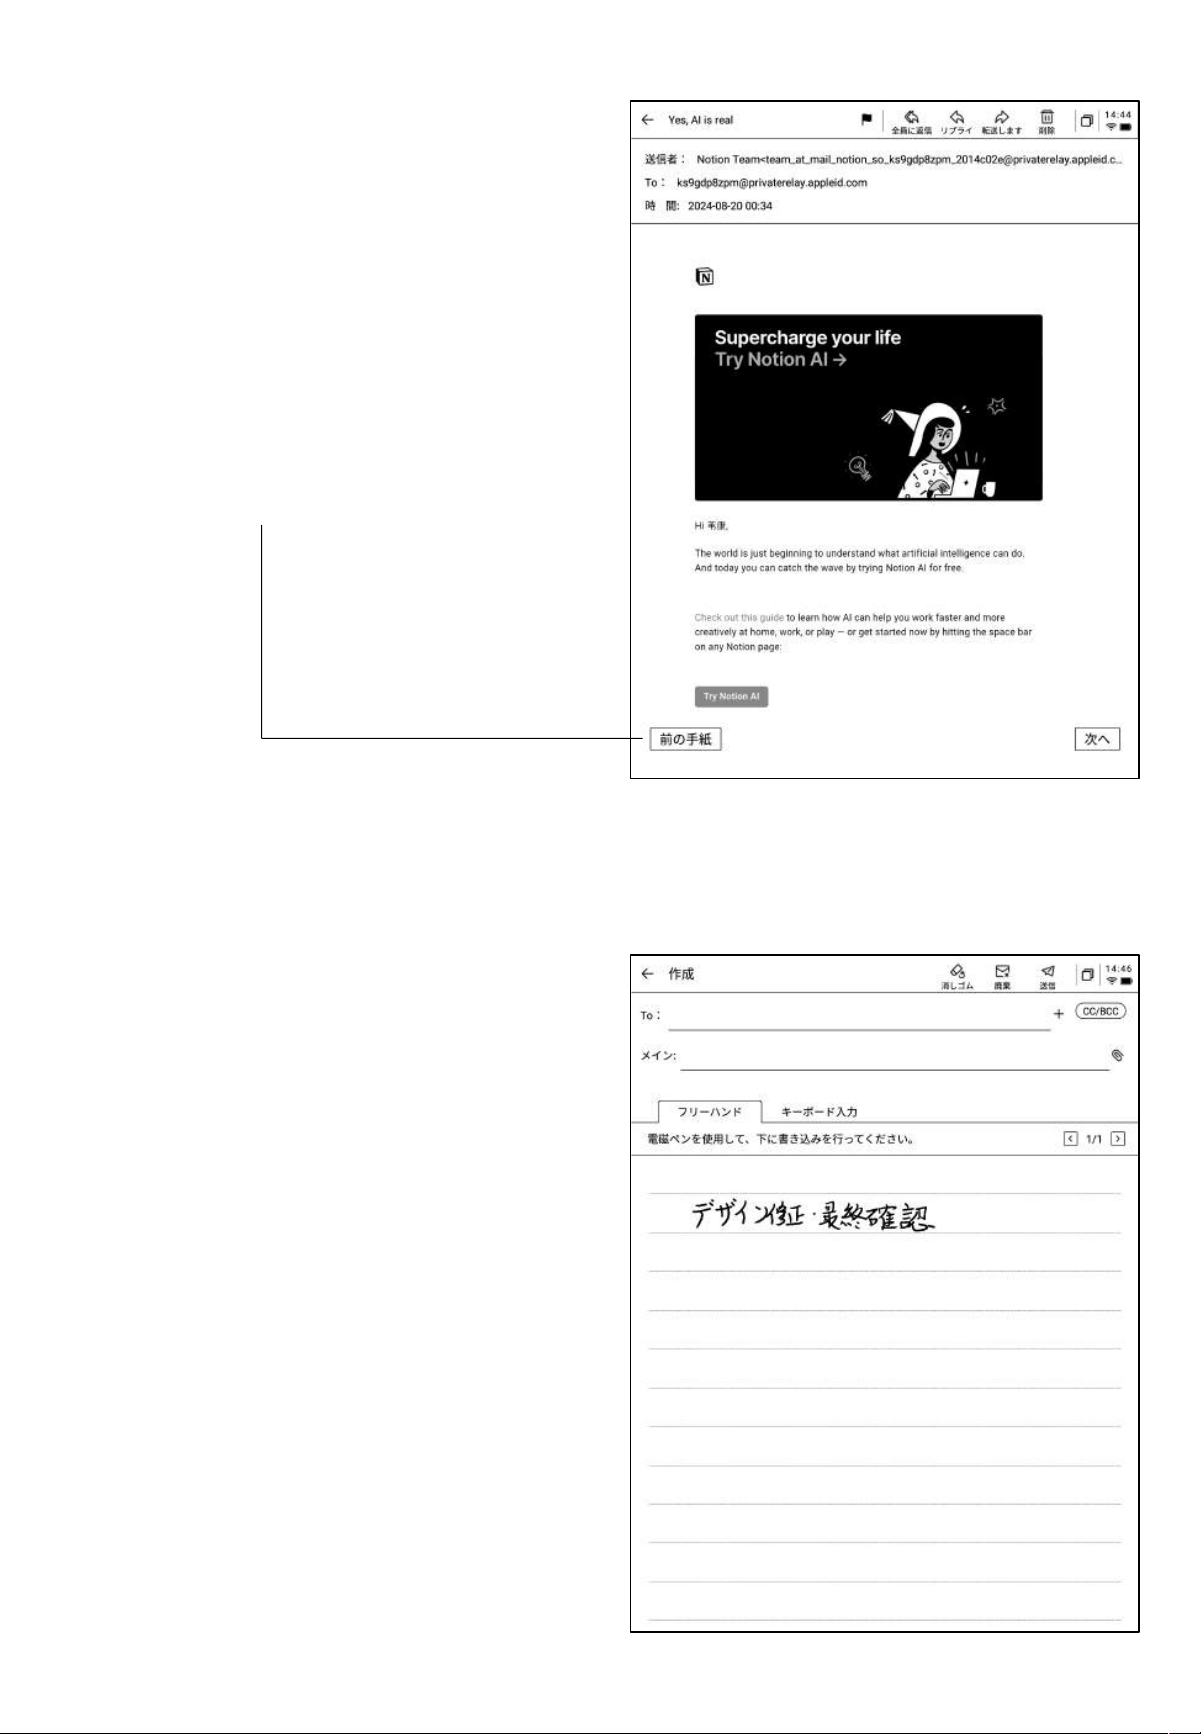
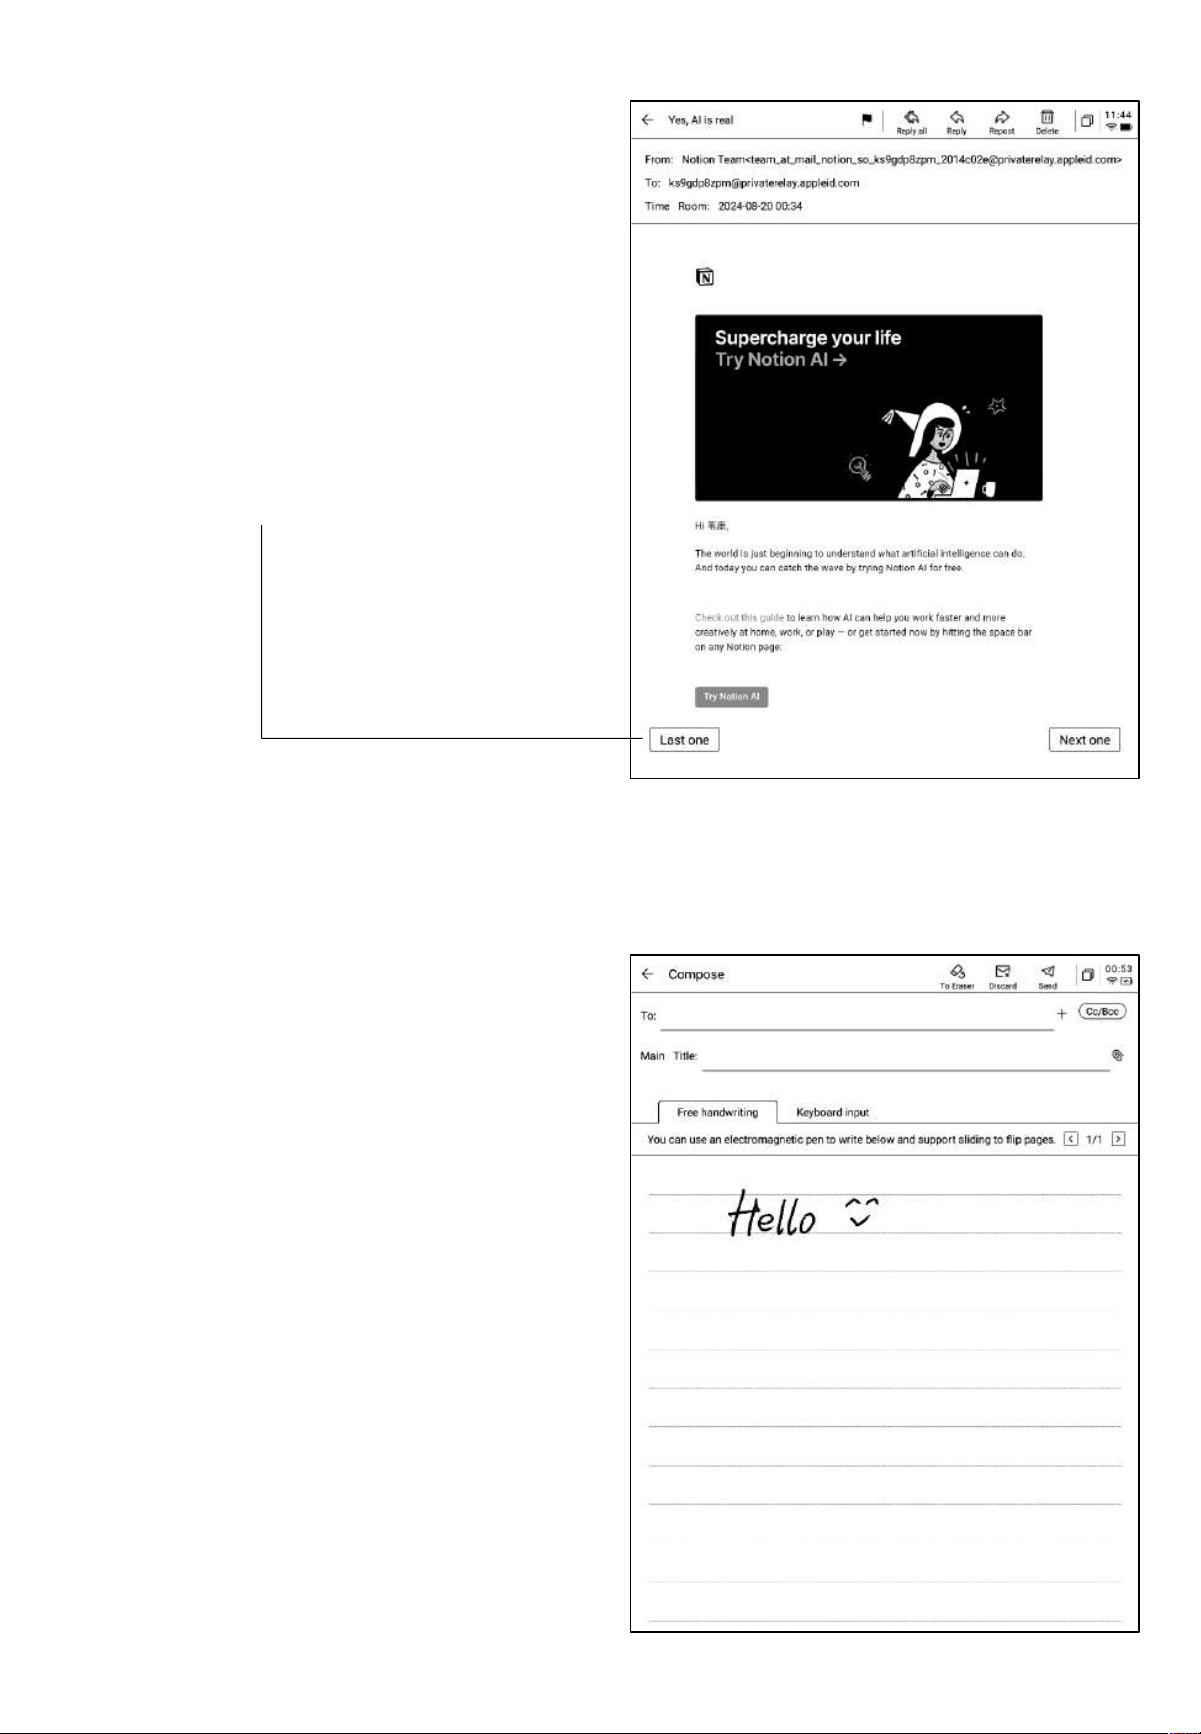
Supports two ways to compose an email:
❶Handwriting: Use the stylus to handwrite
in the empty space below. Once finished, the
handwritten content can be directly sent as
the email body, and the recipient will receive
the handwritten content.
❷Keyboard Input: Use the keyboard to
input content. *Note: If you switch to the
keyboard while in the handwriting area, the
handwritten content will be automatically
cleared.
• Click on the email to view details.
• Supports basic operations such as replying,
forwarding, and deleting.
• Supports switching between emails in the
email interface.
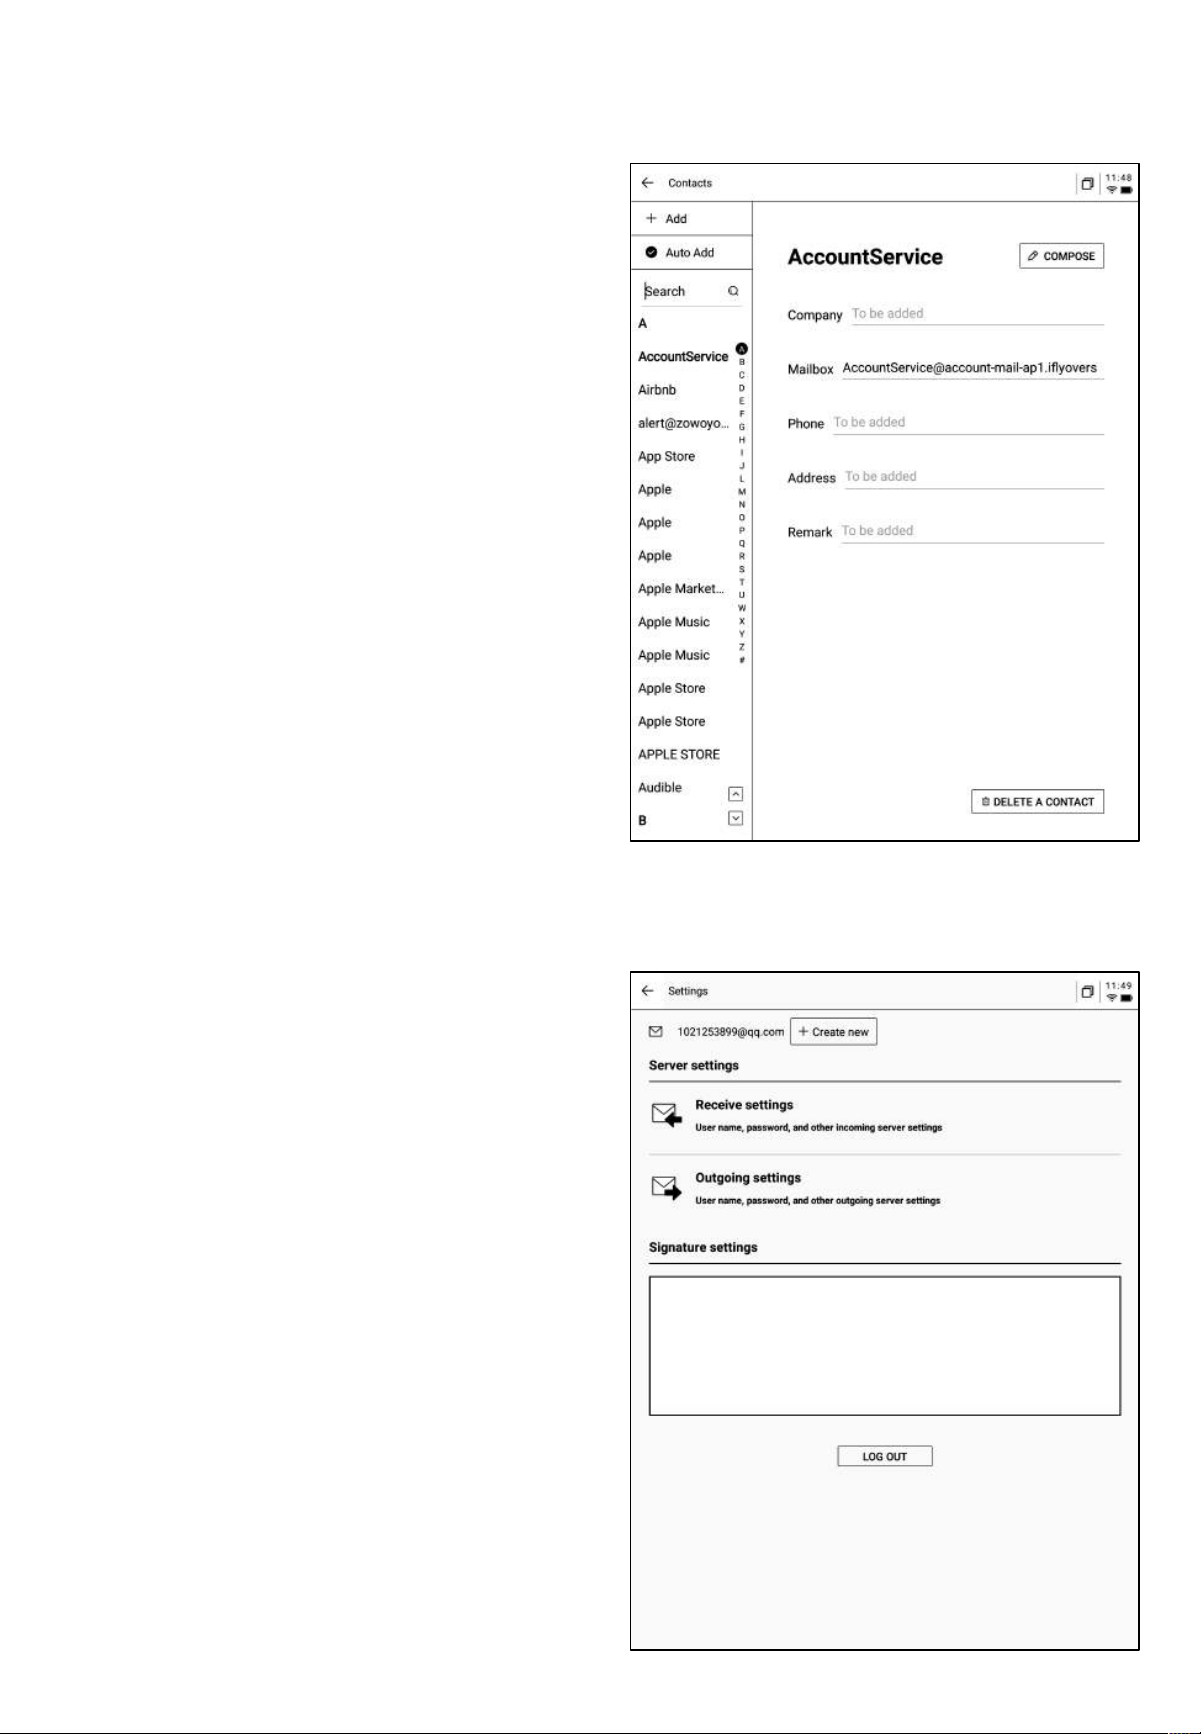
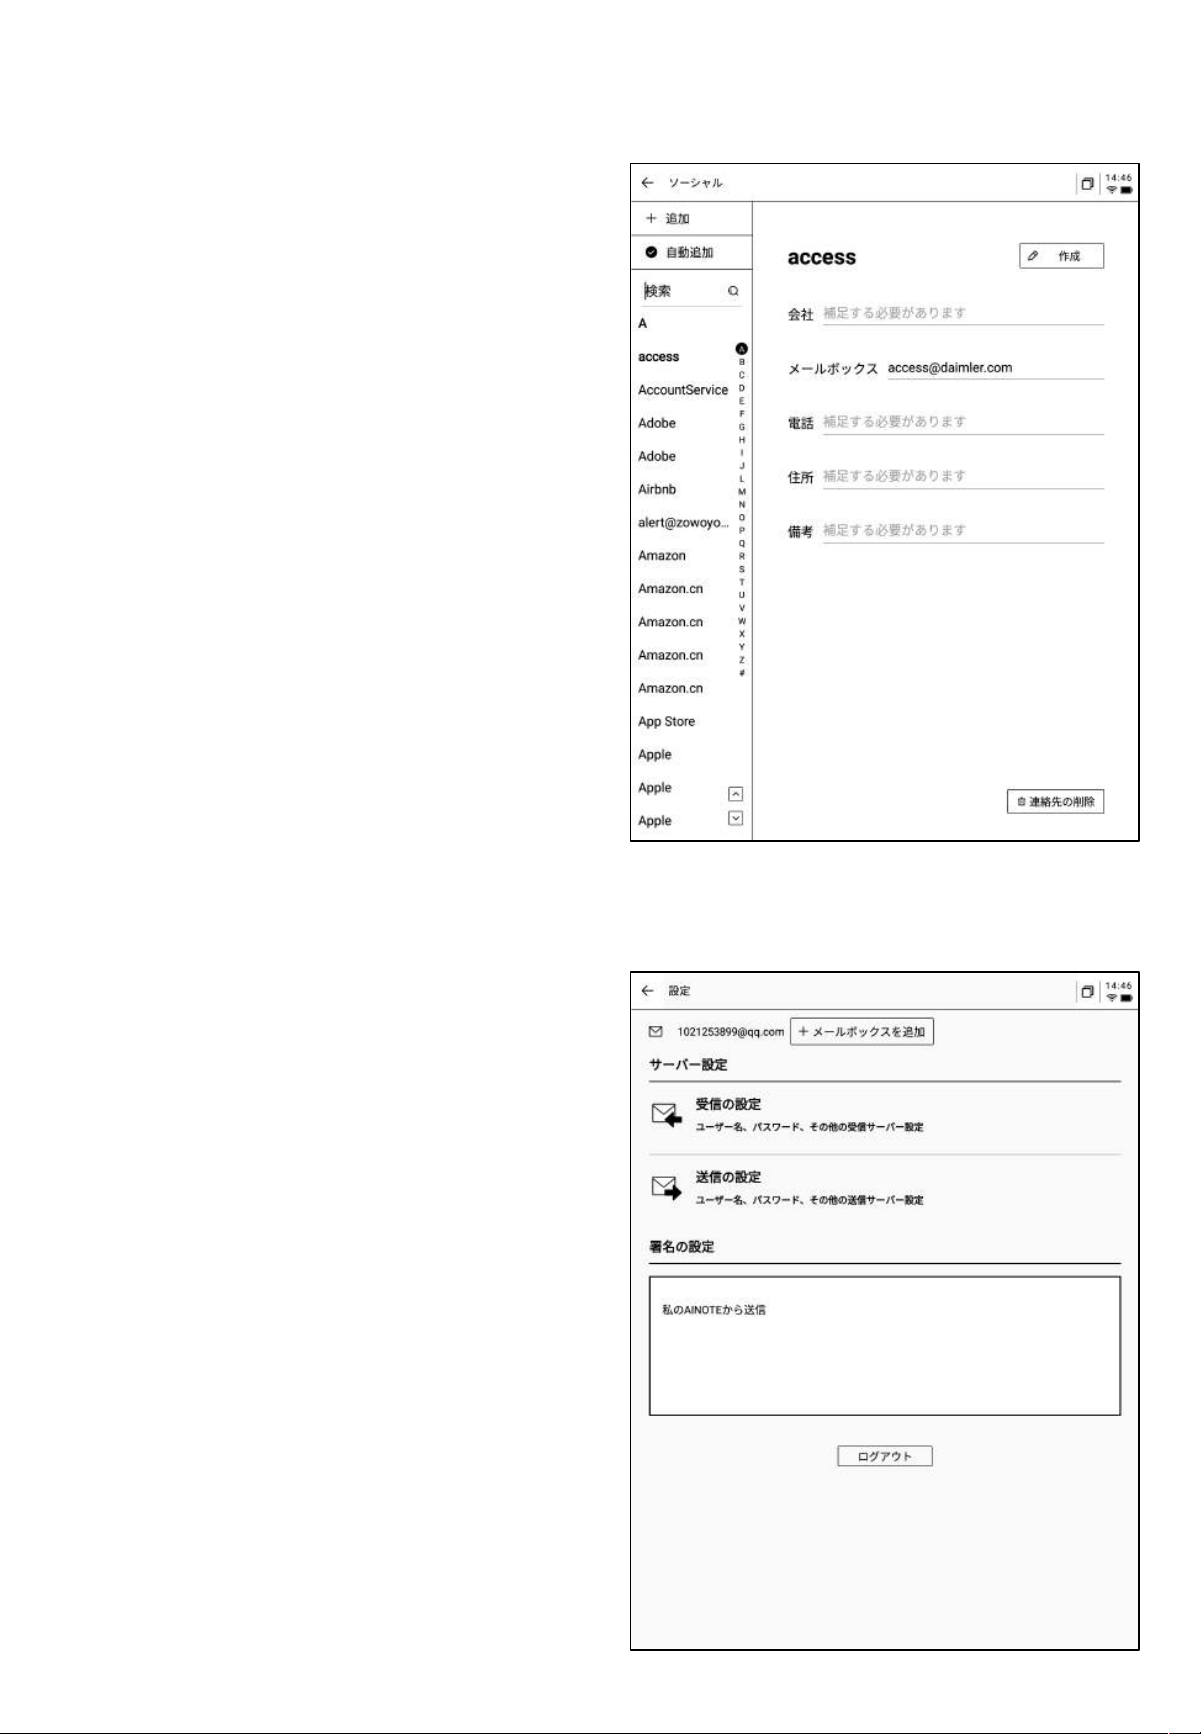
• Supports managing the mailbox's contact
list and adding new contacts by clicking
the add button.
• Supports automatically recording contact
information from received emails.
• Supports configuring the current
mailbox's sending and receiving servers.
• Supports logging into multiple email
accounts for viewing.
• Supports logging out from the current
account.
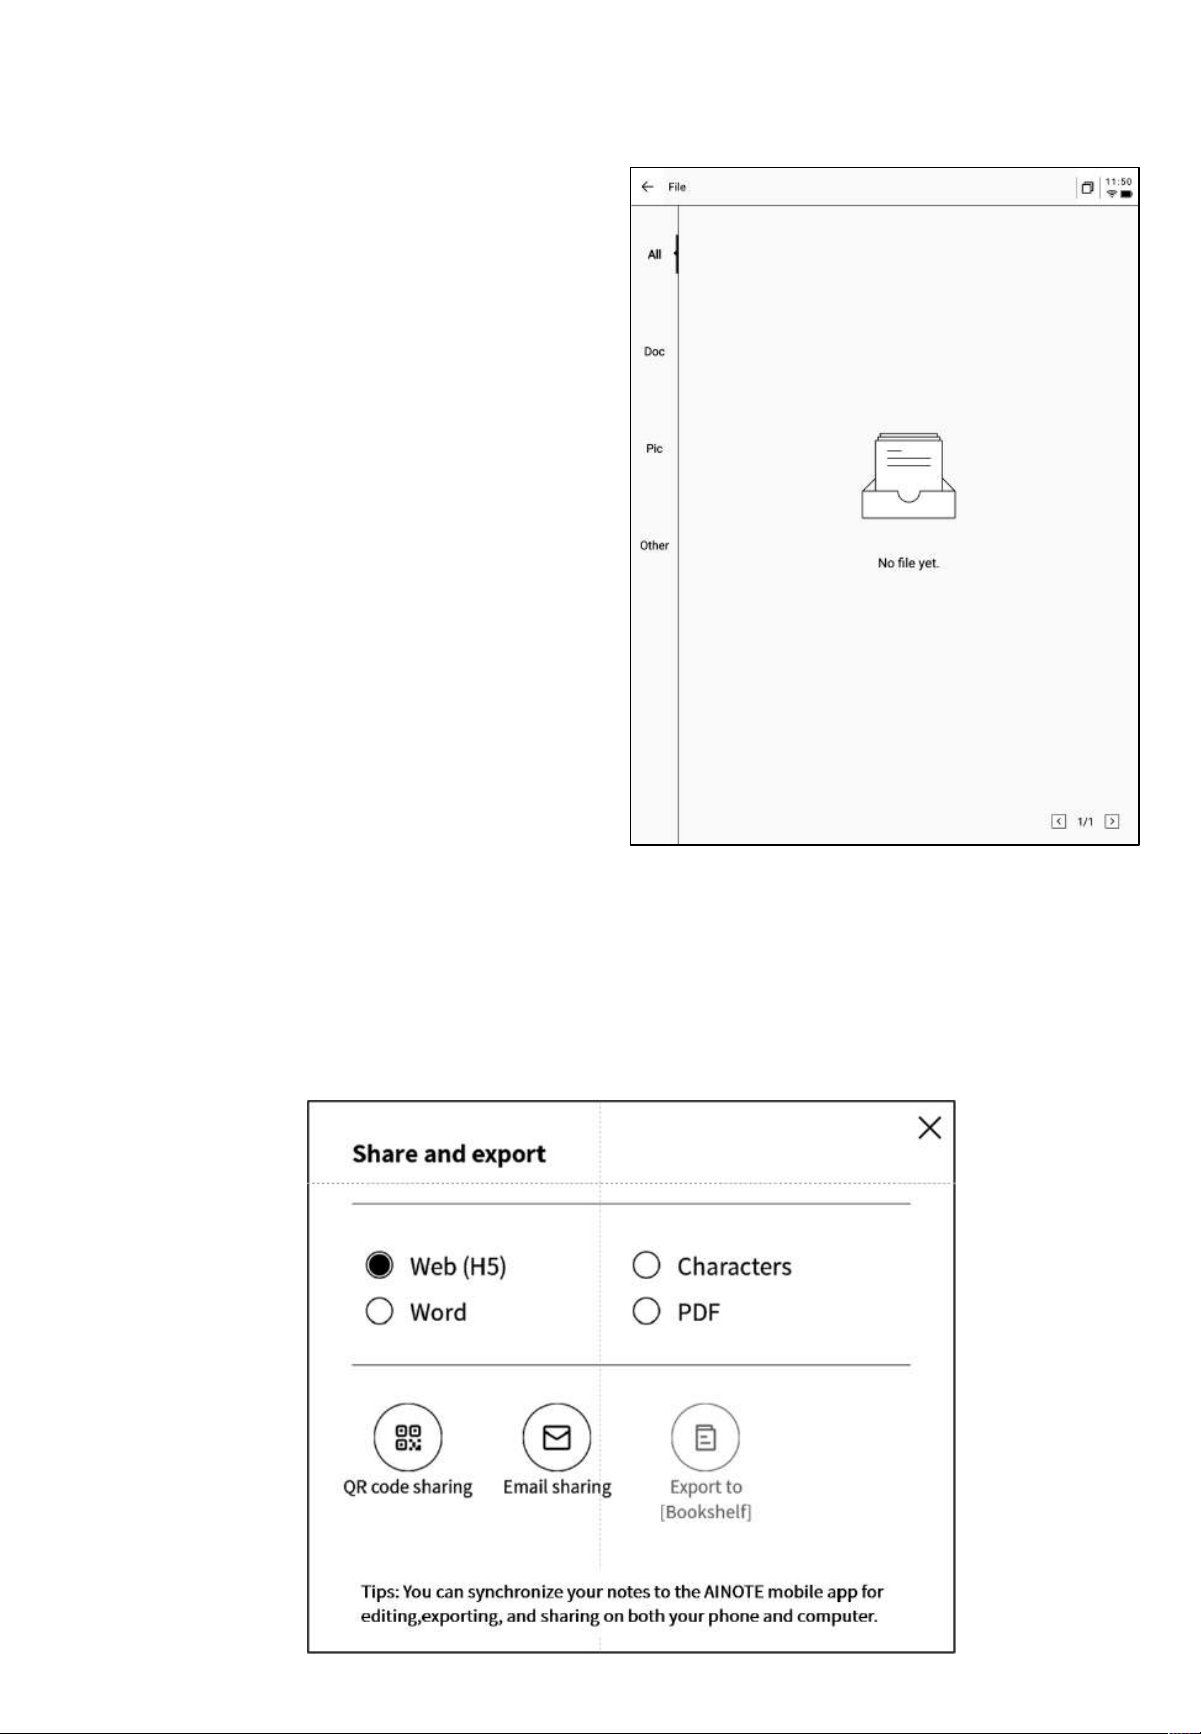
• When viewing an email, you can
download document attachments and open
them once downloaded.
• All email attachments can be viewed in a
unified interface.
Tips:All sharing methods support sharing via email. You need to be logged into your email
account to use this feature.
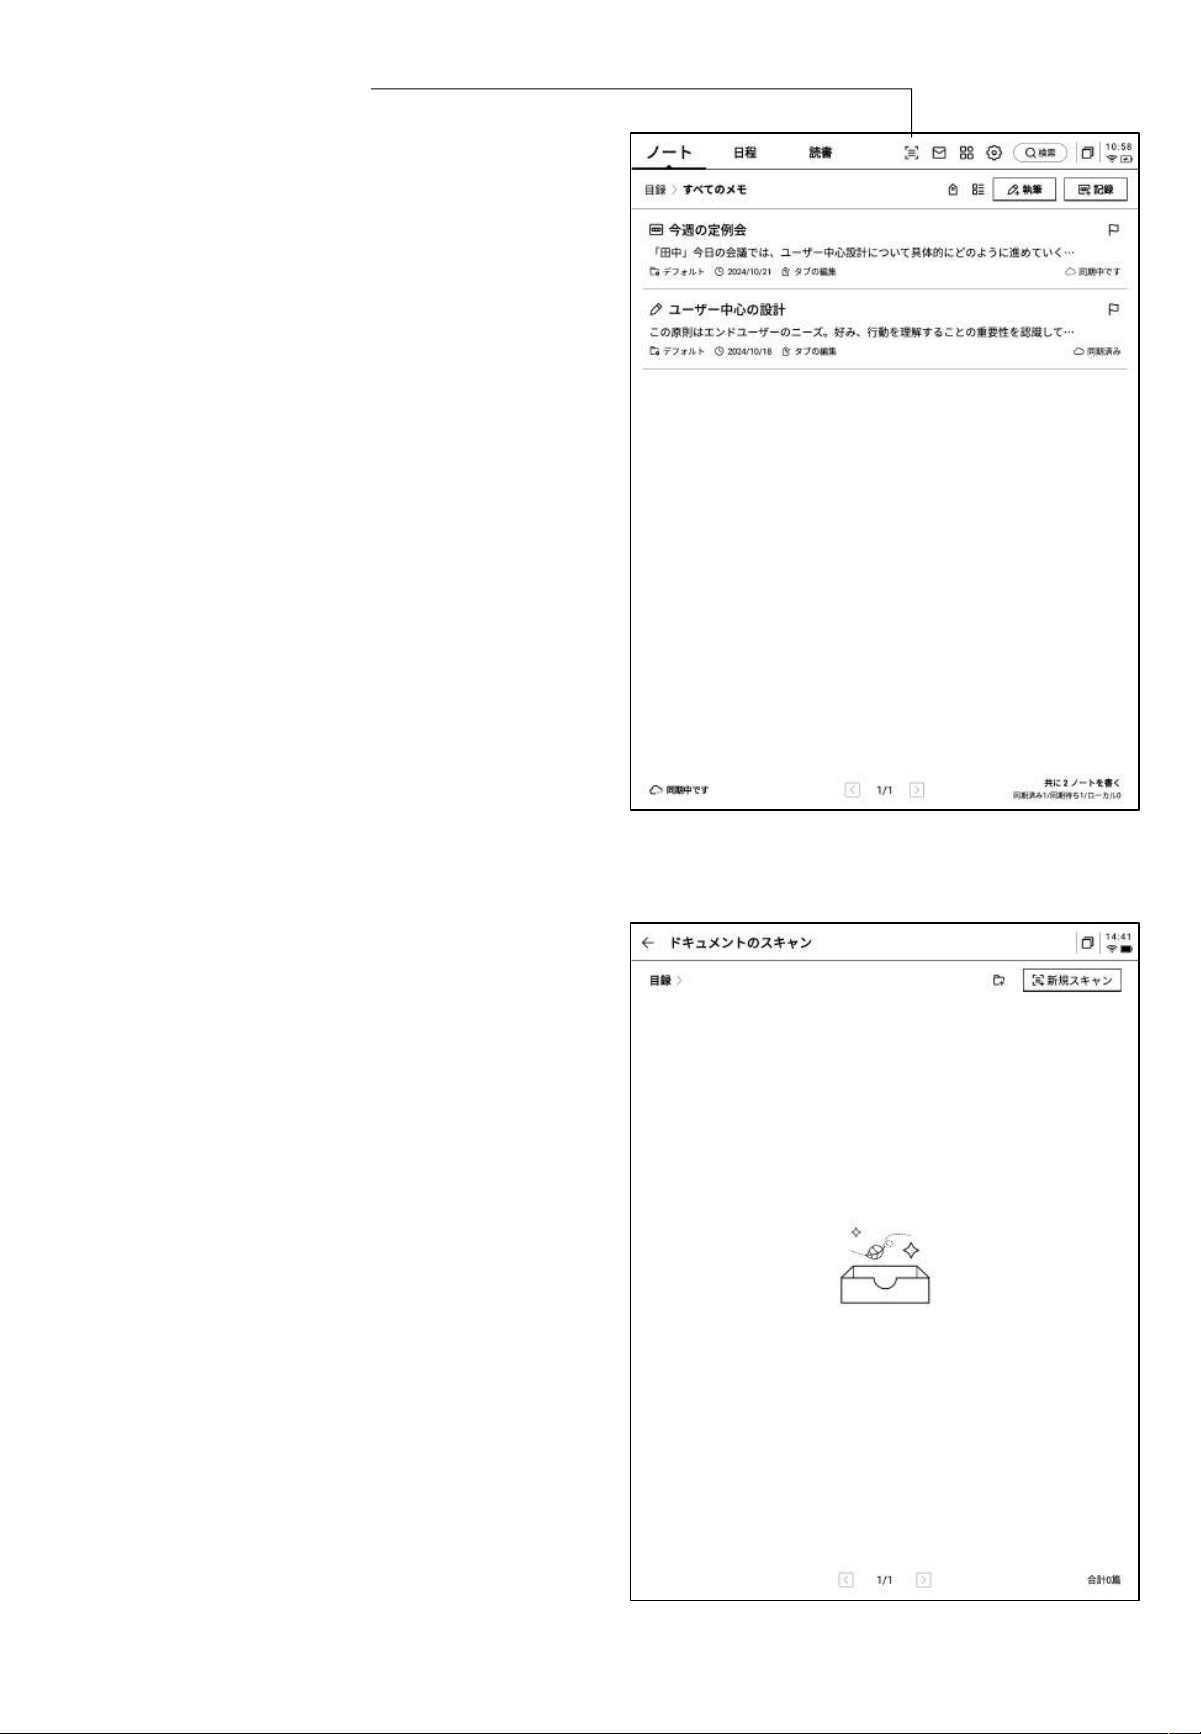
5.2 Scanning Function
• The device currently offers a 500 MP
camera for scanning paper documents.
The scanned documents will be saved on
the device and can be viewed at any time.
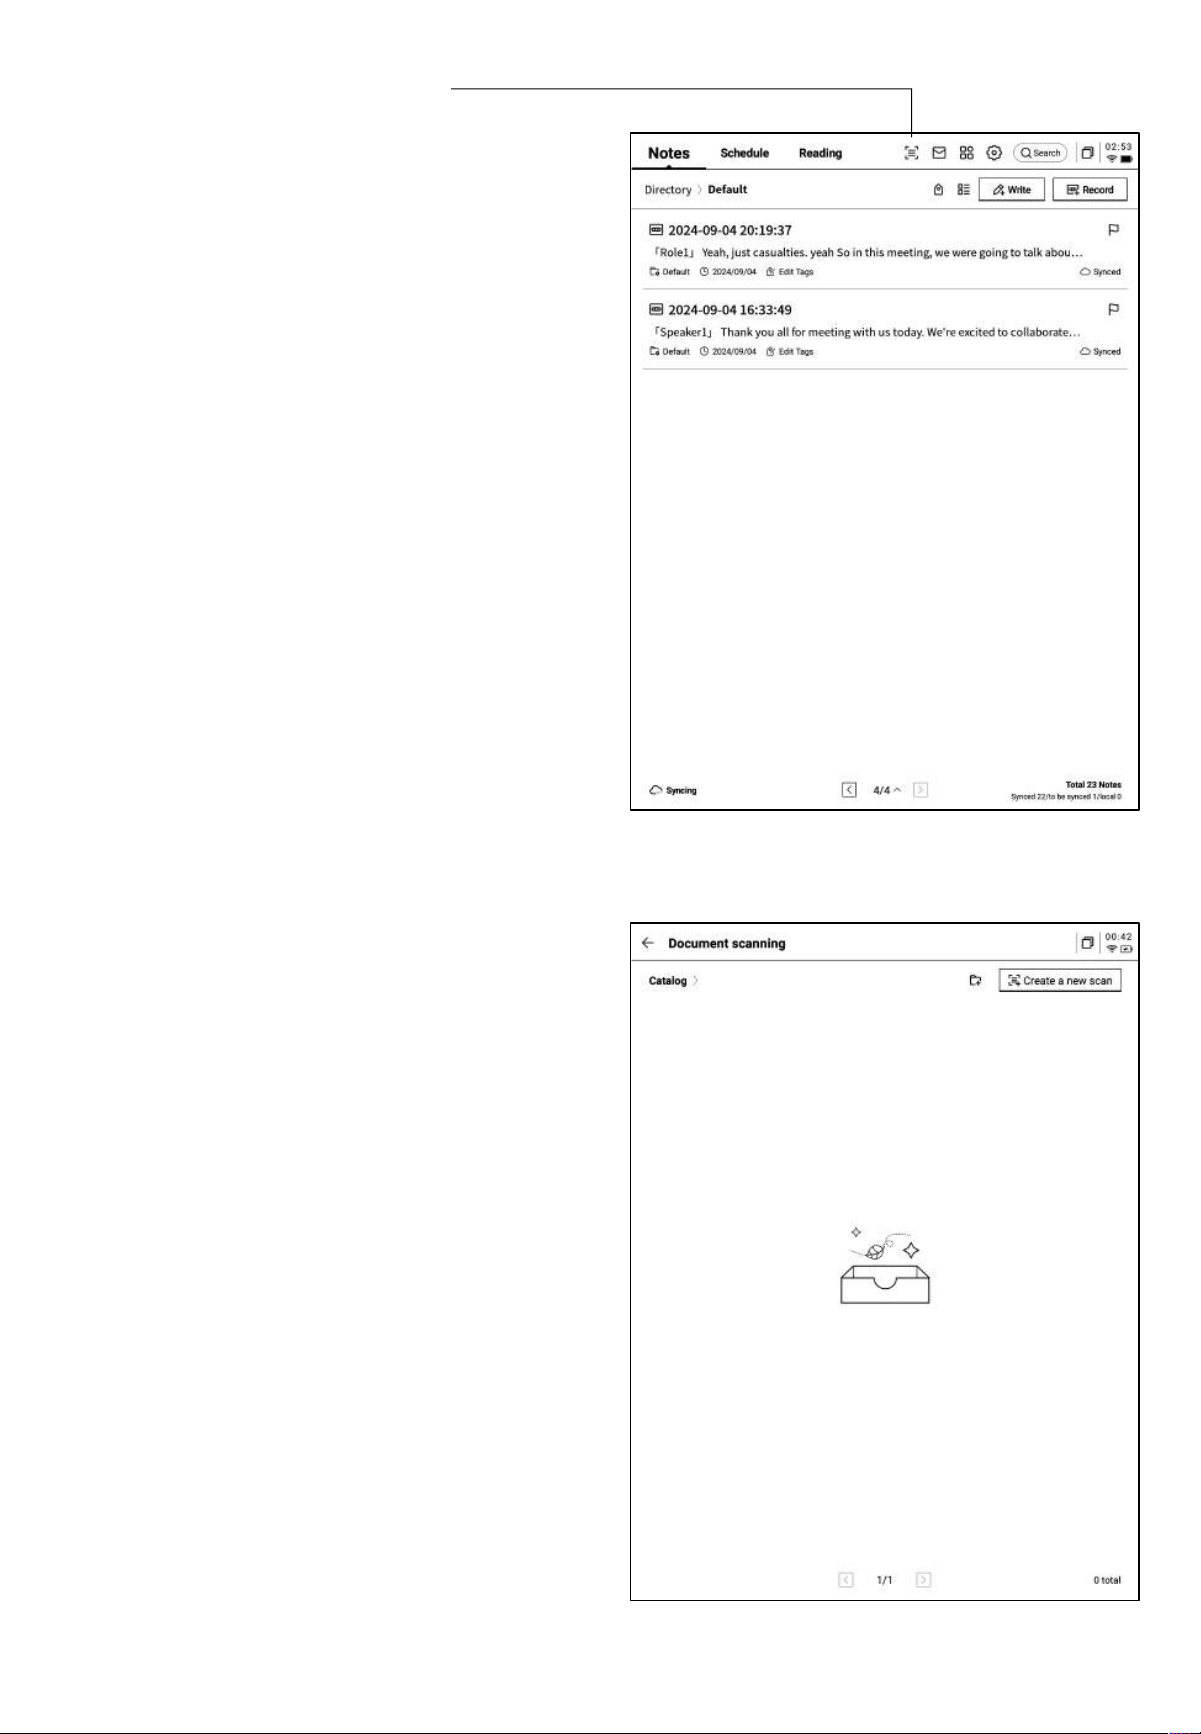
• Click the "Scan" button in the top-right
corner of the home page to enter the
scanning interface.
• Upon entering the scanning interface for
the first time, click the new scan button in
the top-right corner to create a new
scanned document.
• This page also supports the management
of scanned documents.
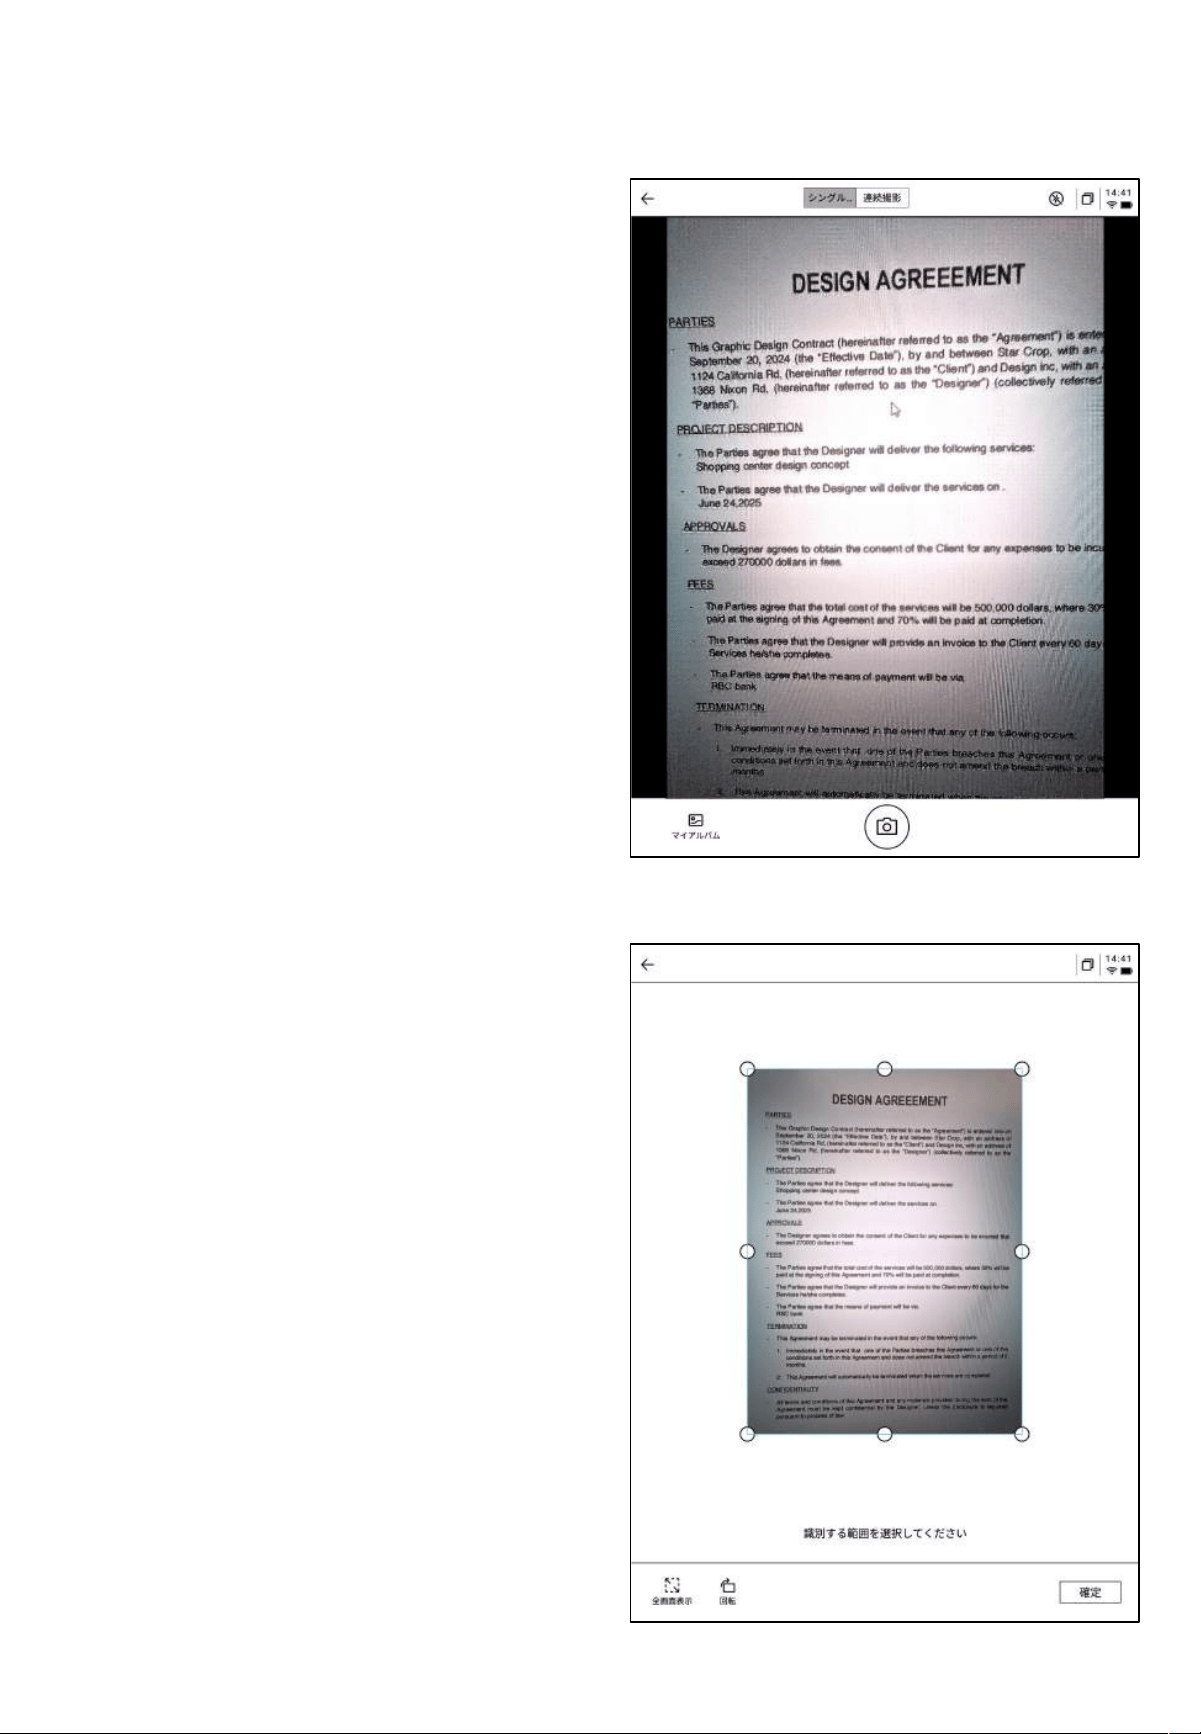
• After capturing, you can select the area
for processing by dragging the corners of
the image.
• Supports rotating the image.
• Click "Confirm" to process the image.
• Click the new scan button to enter the
scanning interface.
• Click the bottom-left corner to access the
photo album and select images for
processing.
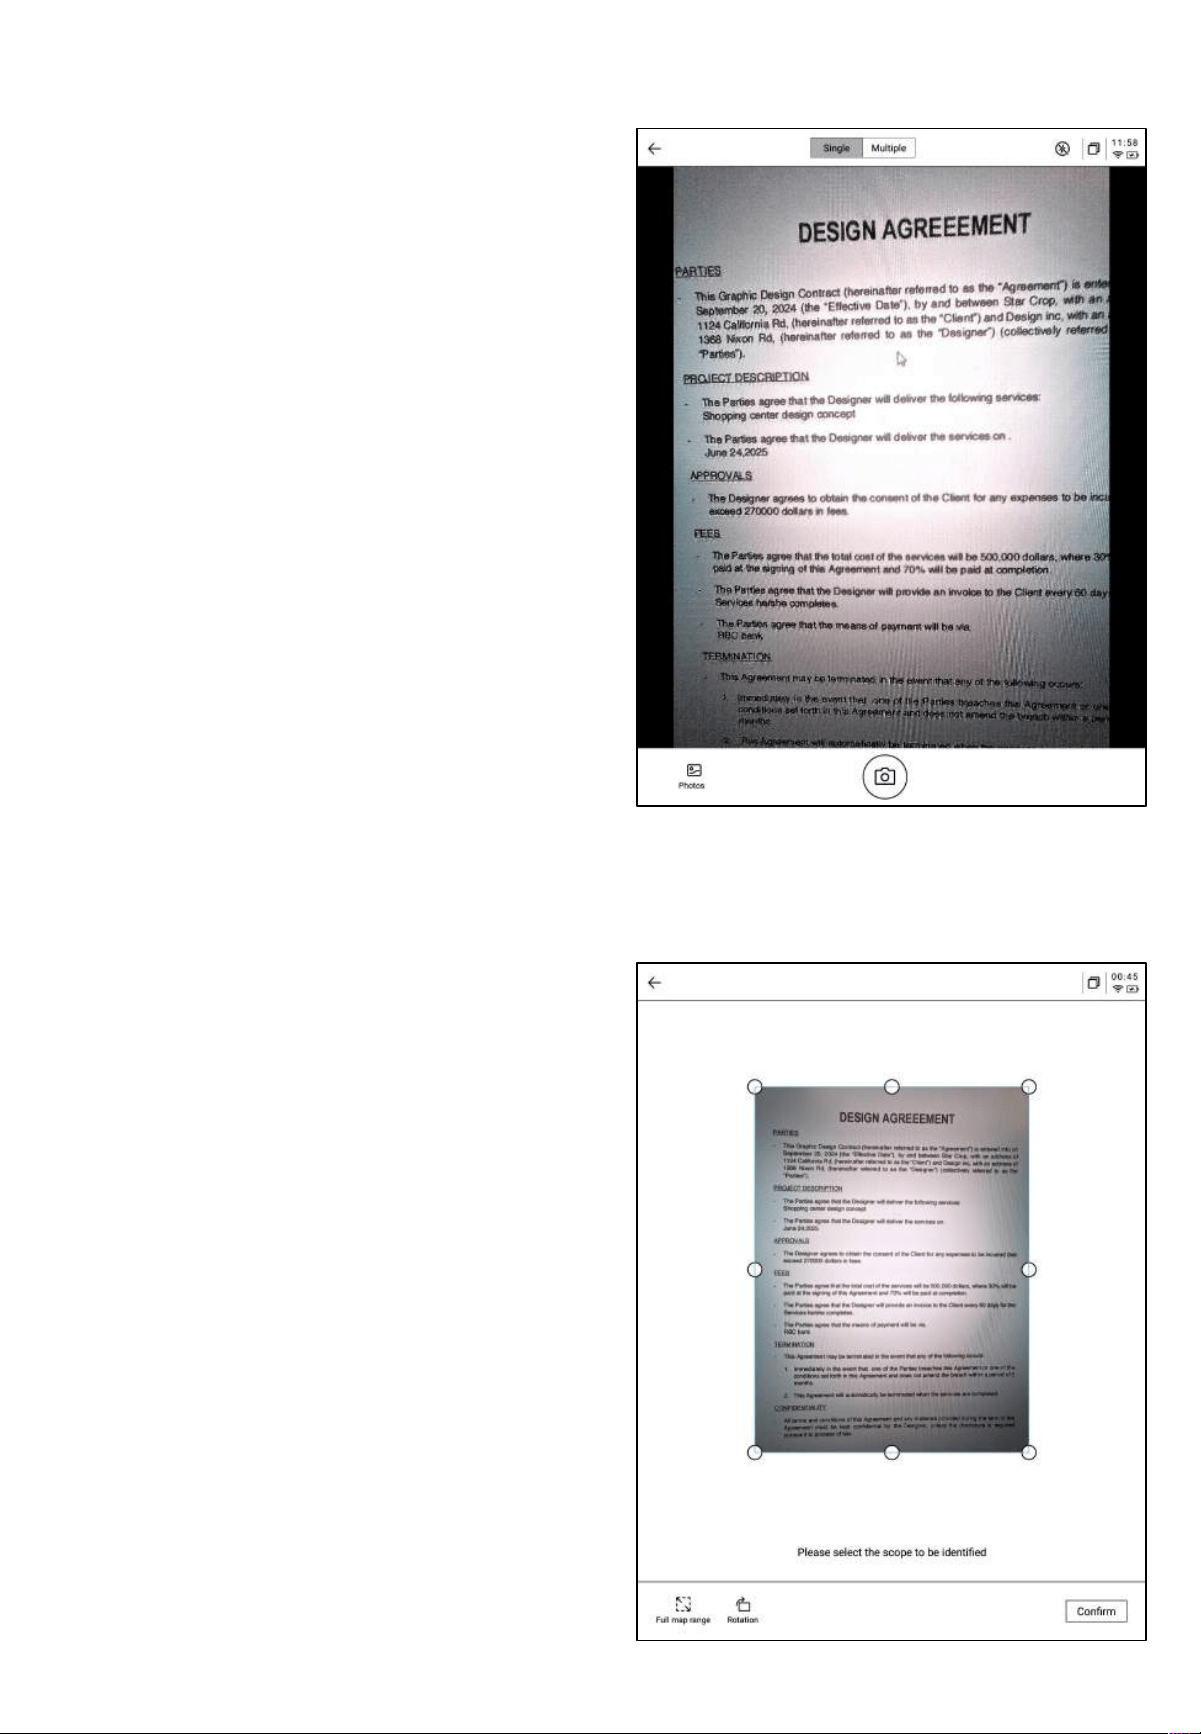
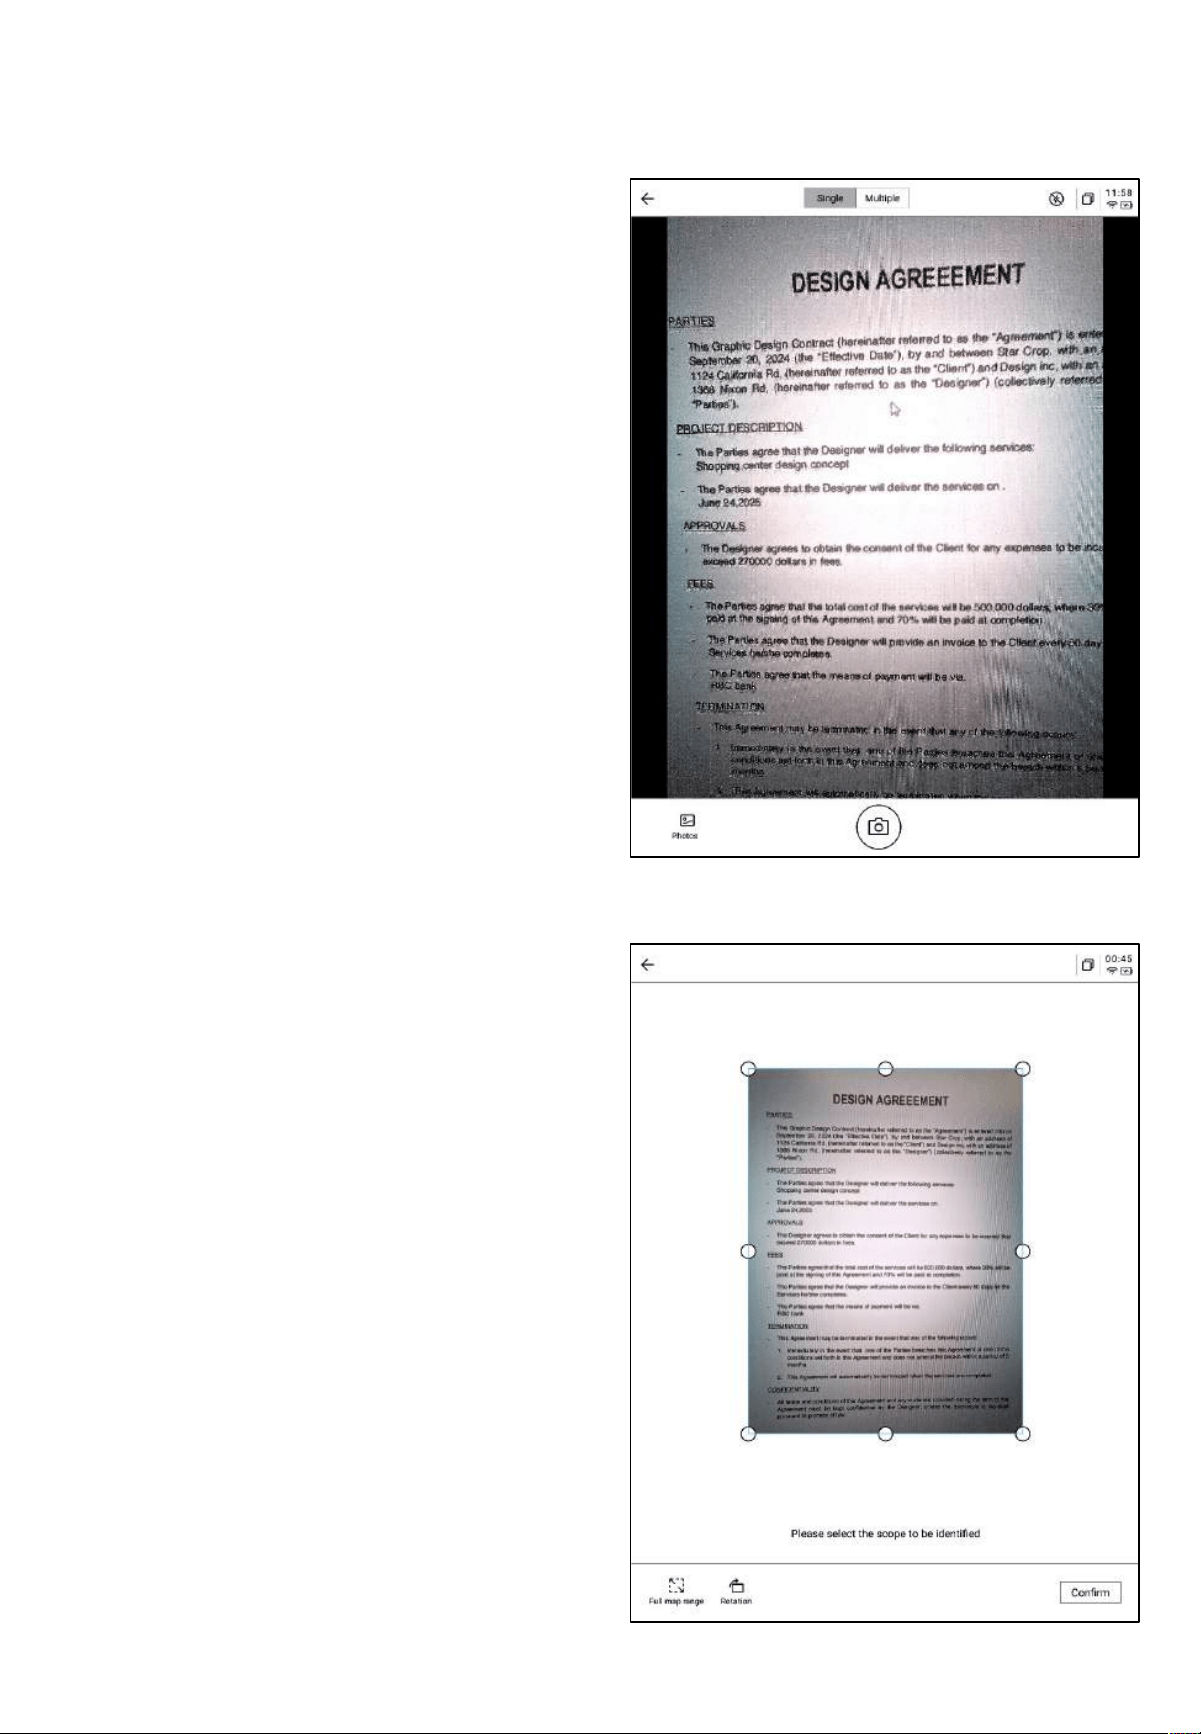
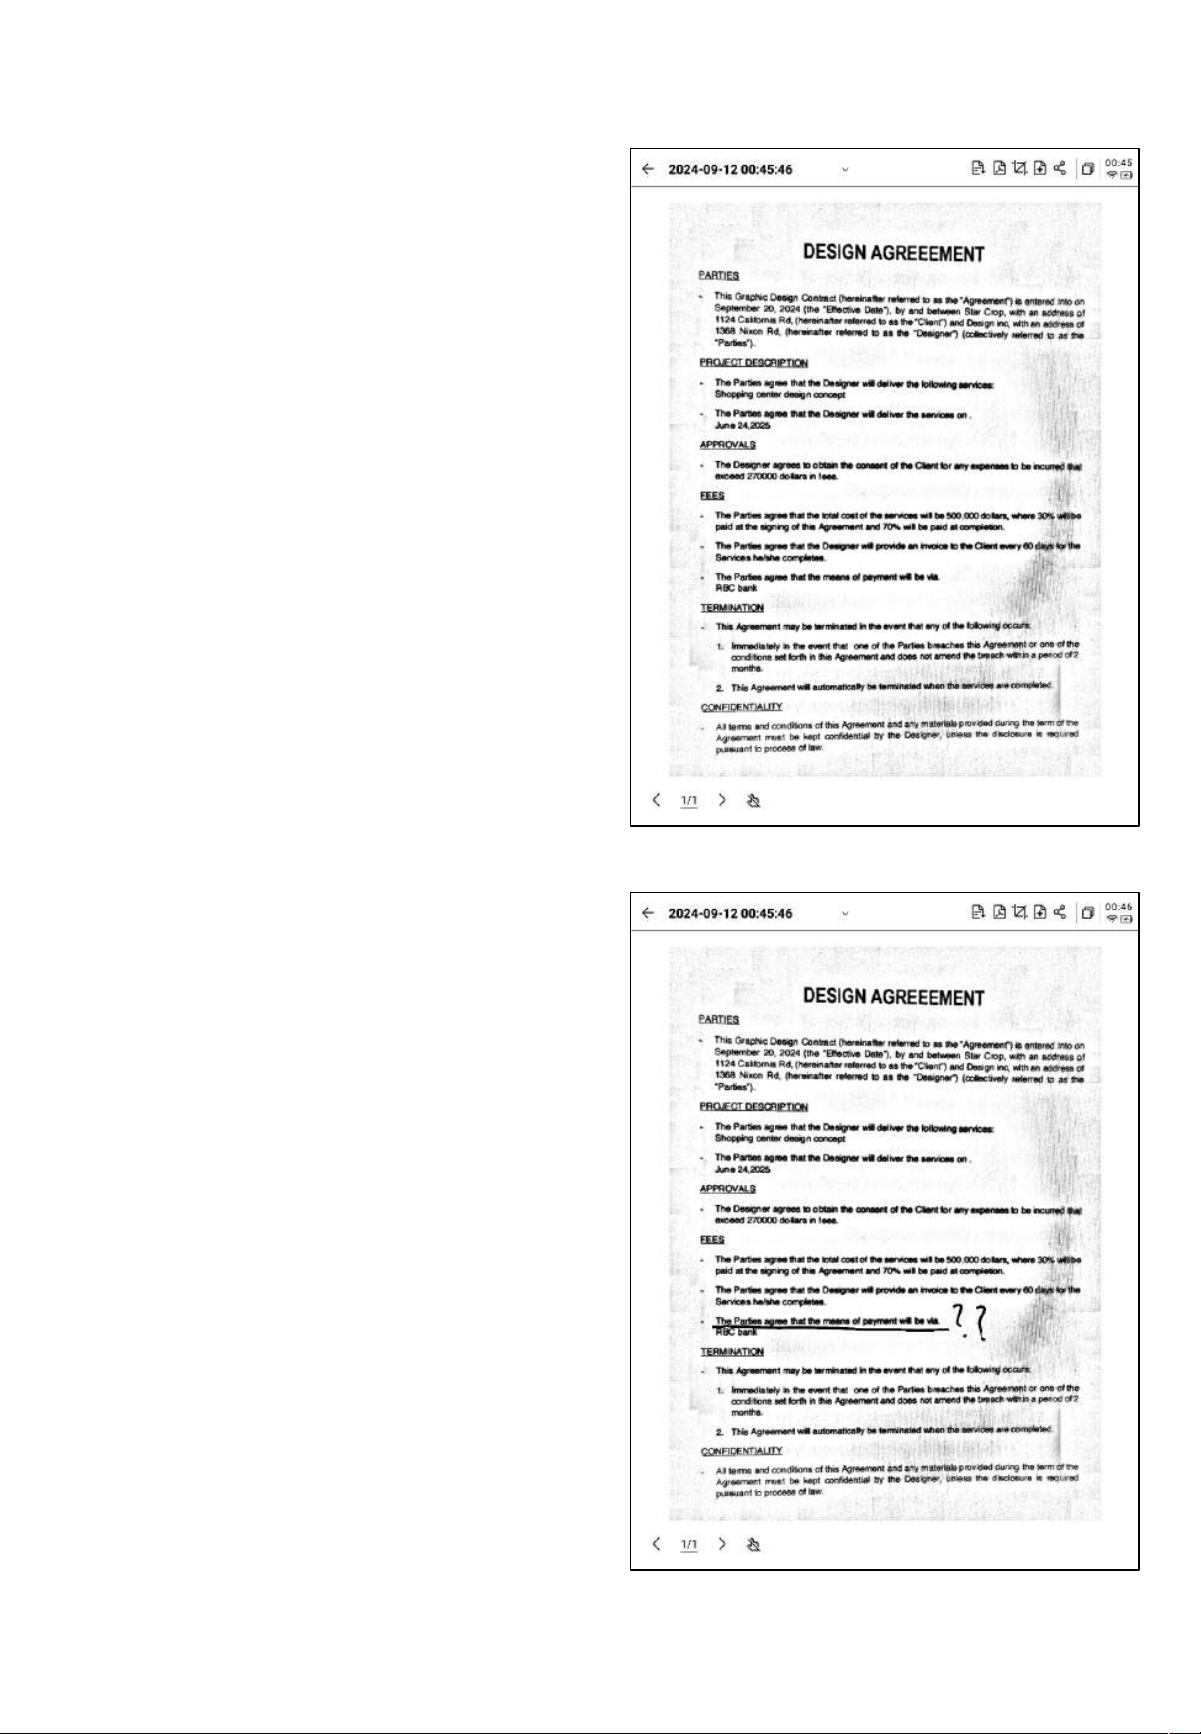
• Two shooting modes are available: single-
page mode and multi-page mode. In
single-page mode, each photo is processed
individually, while multi-page mode
allows you to take multiple photos for
unified processing.
• Click the capture button to complete the
scan.
• *Note: Due to the slow refresh rate of the
e-ink screen, if there is motion during the
scan, the capture might not be clear. Try
to keep the device steady during the scan.
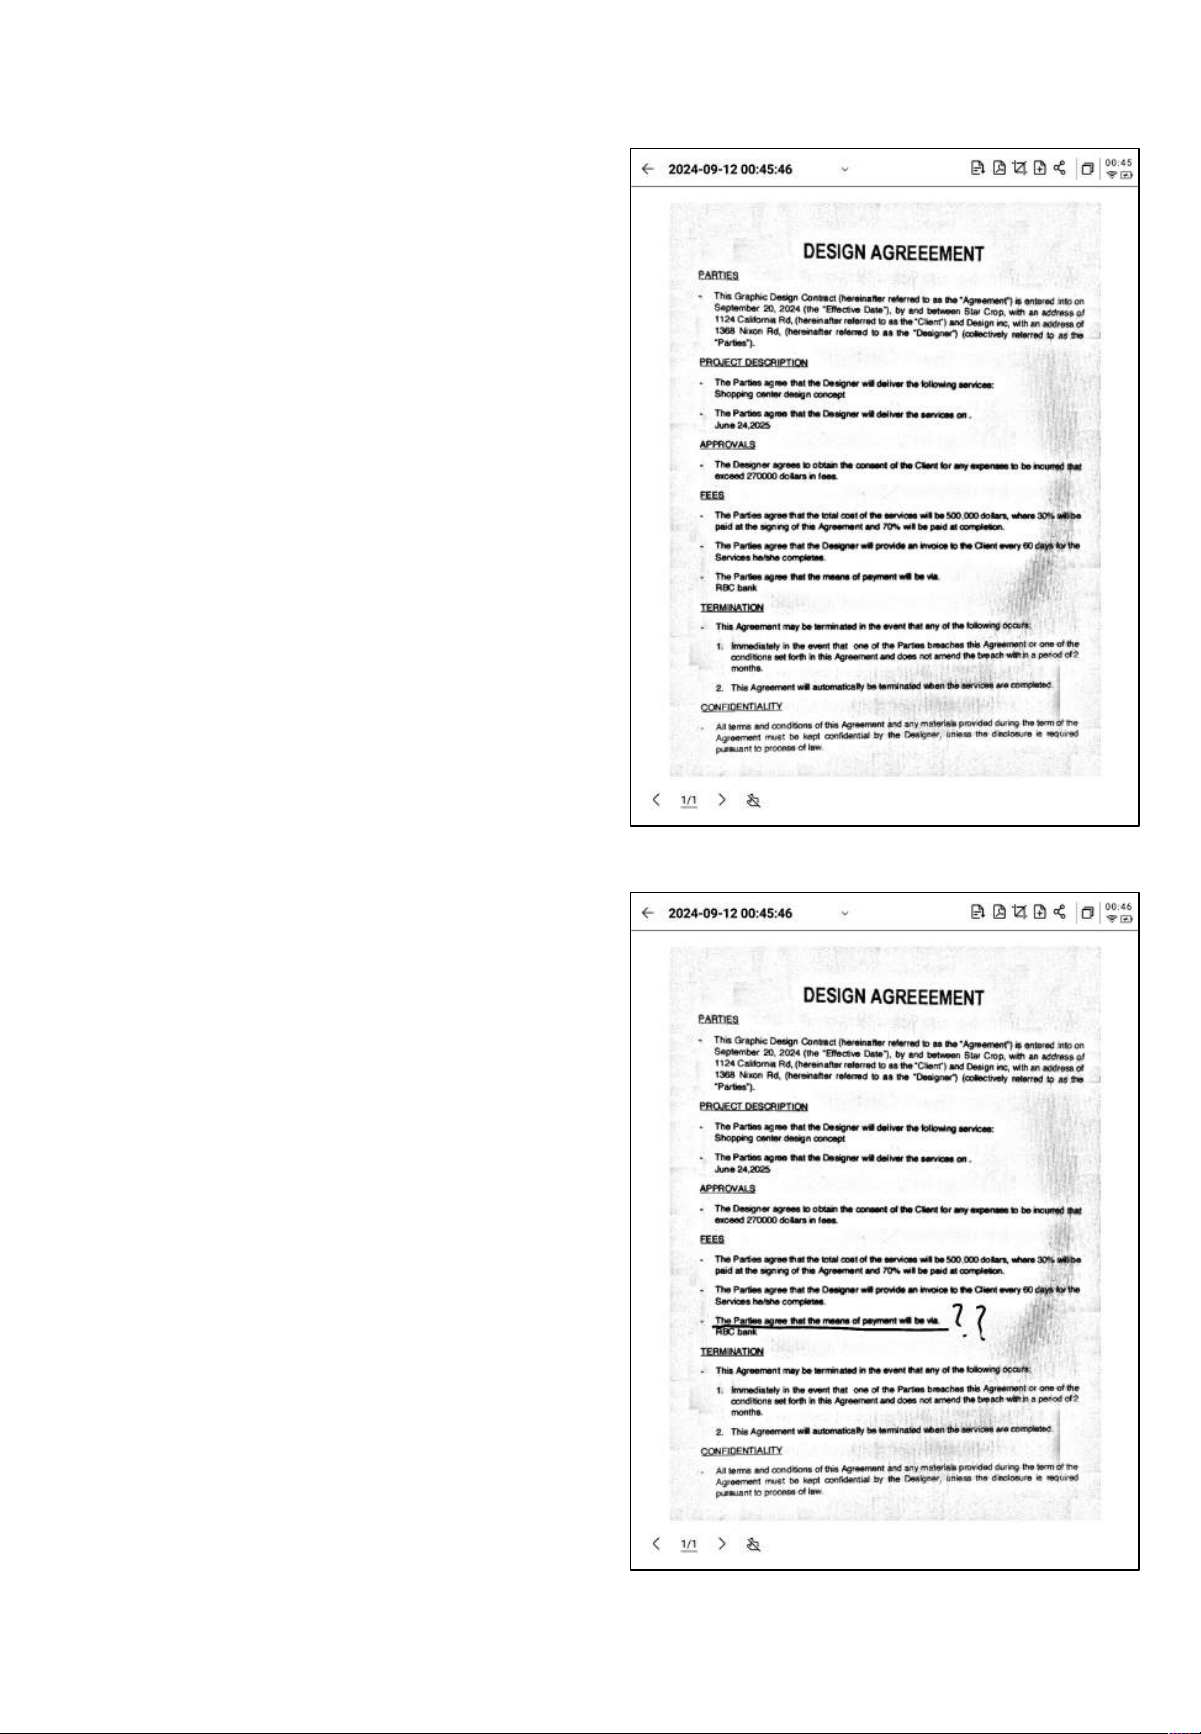
• The stylus can be used to write freely on
the scanned page.
• After processing, the result can be viewed.
• The processed content can be exported as
notes and viewed in the note list.
• Supports exporting to PDF, which can be
viewed in the bookshelf.
• Supports re-selecting the area for
processing.

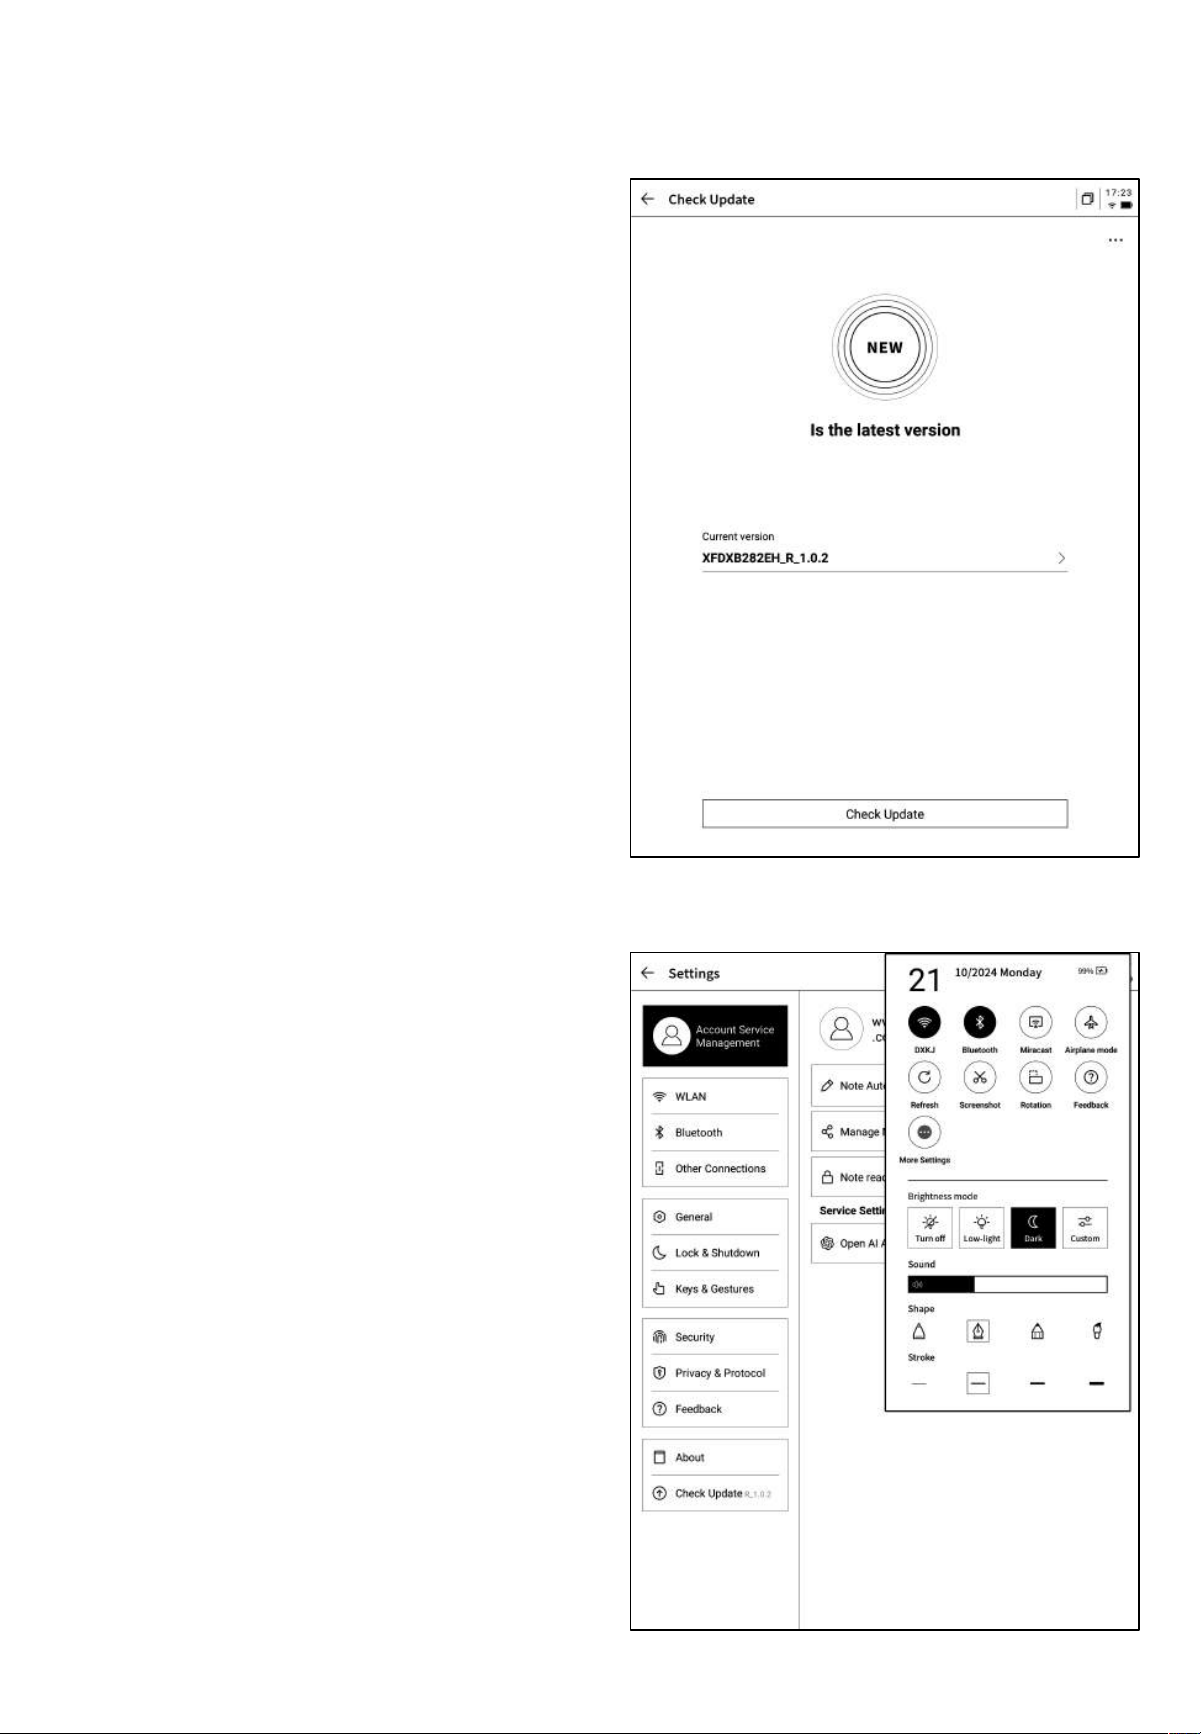
Chapter 6: Settings
• Click the settings button in the upper-right
corner to enter the settings interface.
• In the dropdown menu, you can perform
simple settings operations or click "More
Settings" to enter the detailed settings
interface.
• Account Center:Supports managing
basic account information.
• Note Synchronization:Once enabled,
notes will automatically synchronize after
being completed.
• Sharing Management:View the notes
you have shared and manage closing
sharing sessions.
• Note Viewing Password:Supports setting
a password to protect notes. Once set, the
password is required to view the notes.
• OpenAI API Key Settings:Supports
verifying your personal OpenAI API key.
Once successfully verified, you can access
large language model functionalities.
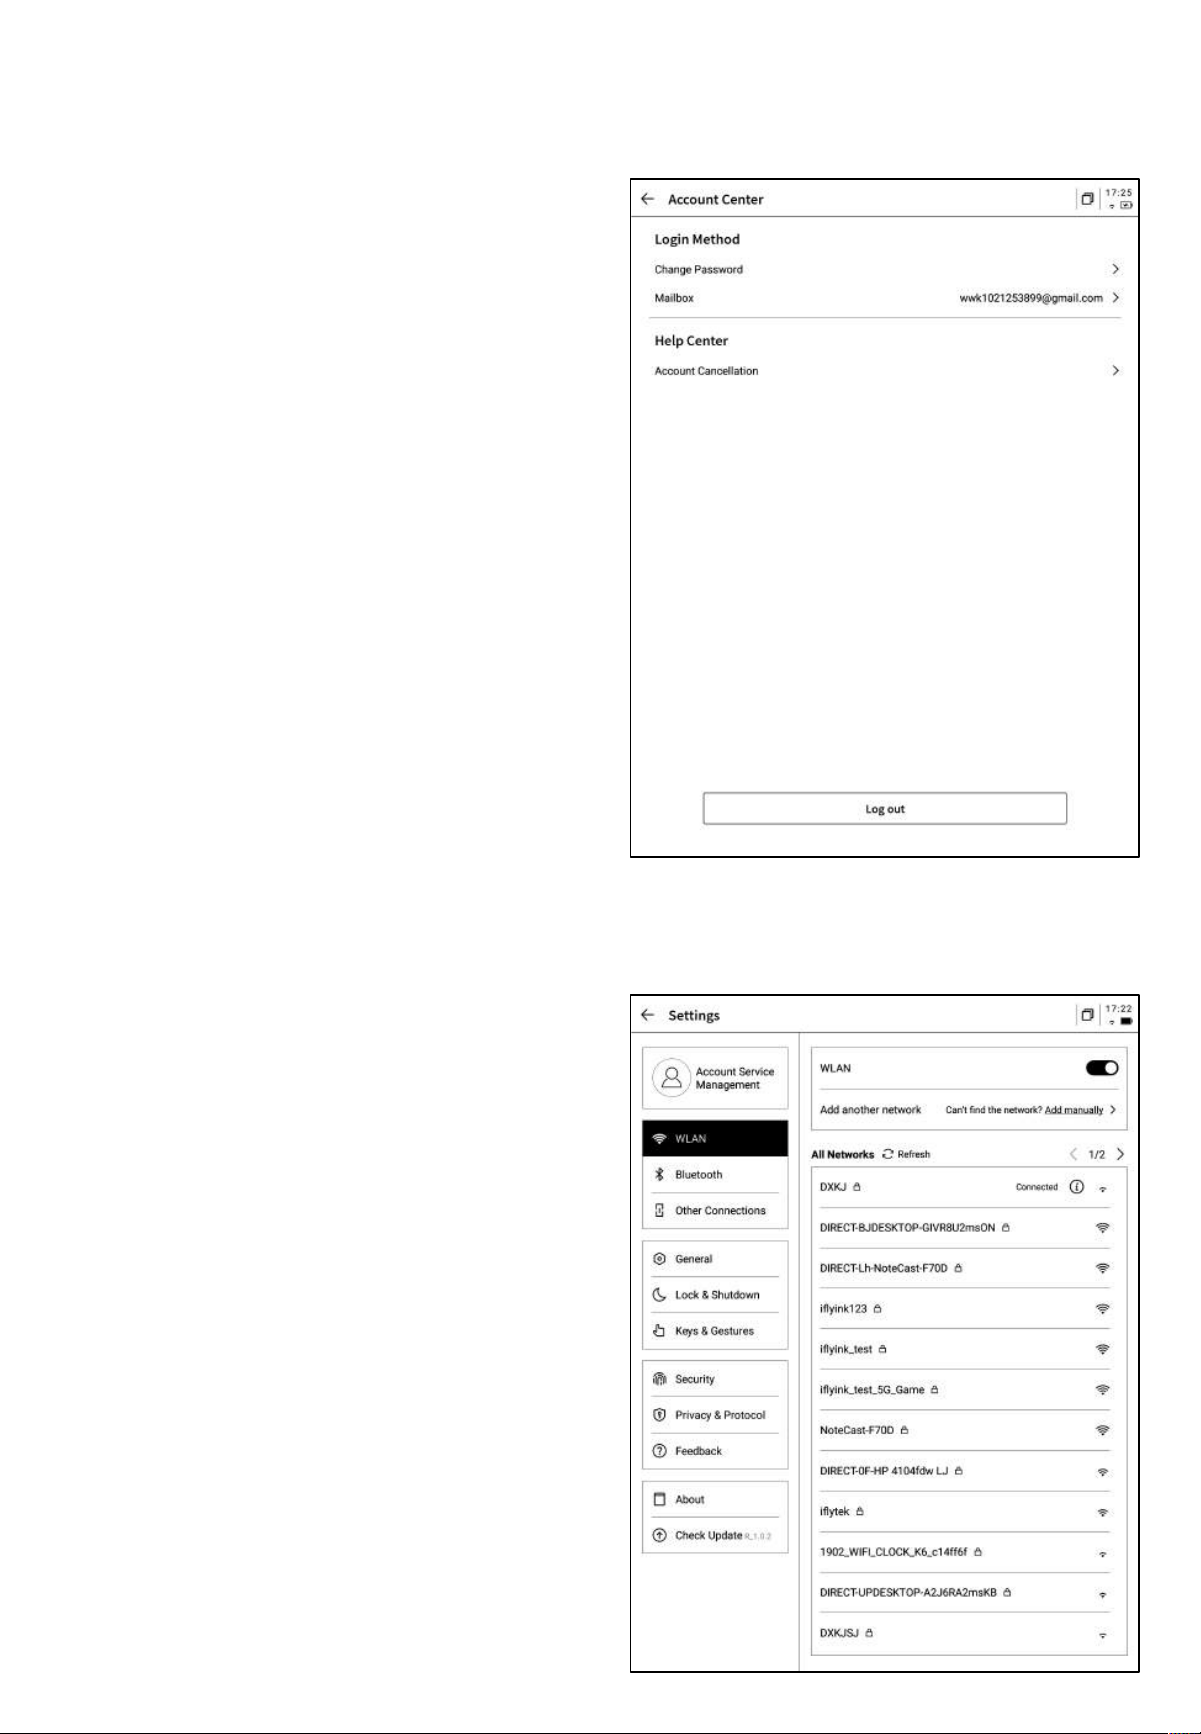
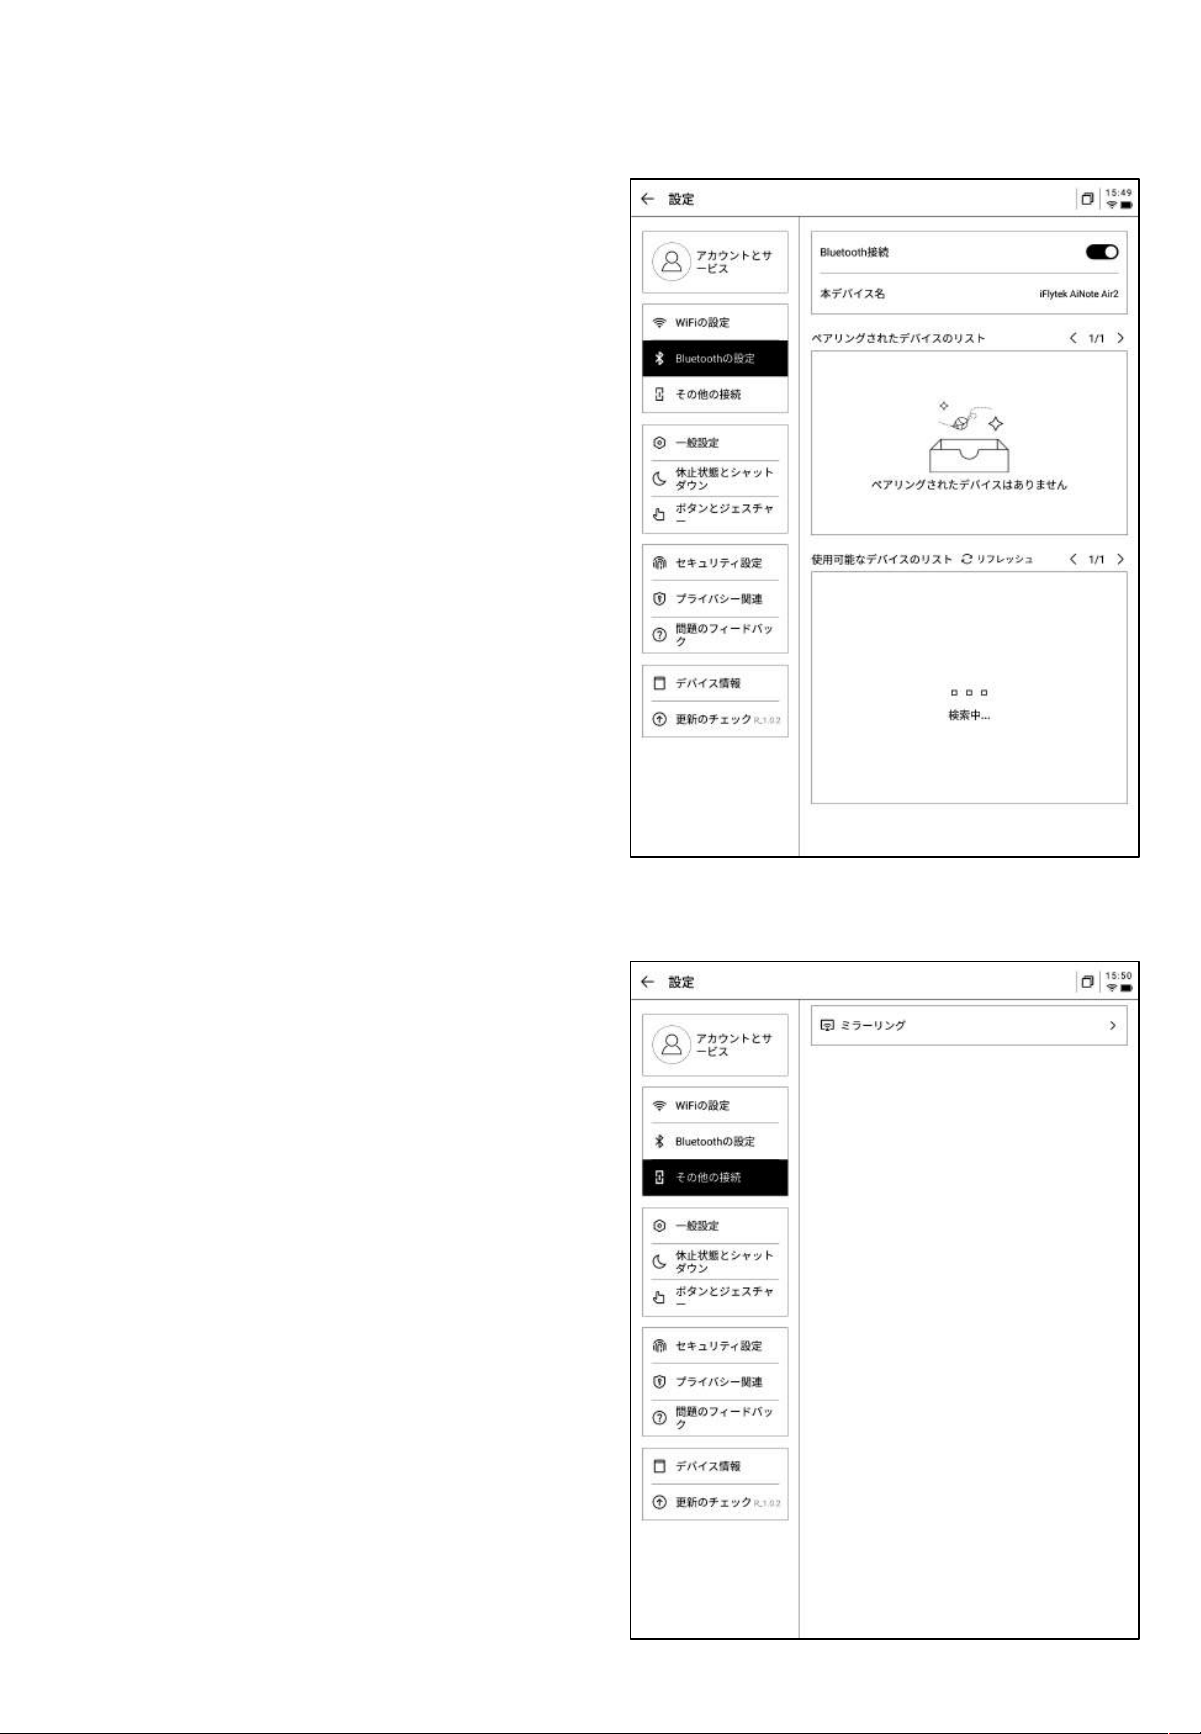
• Wi-Fi Connection: Supports viewing
nearby Wi-Fi information and connecting
with one click.
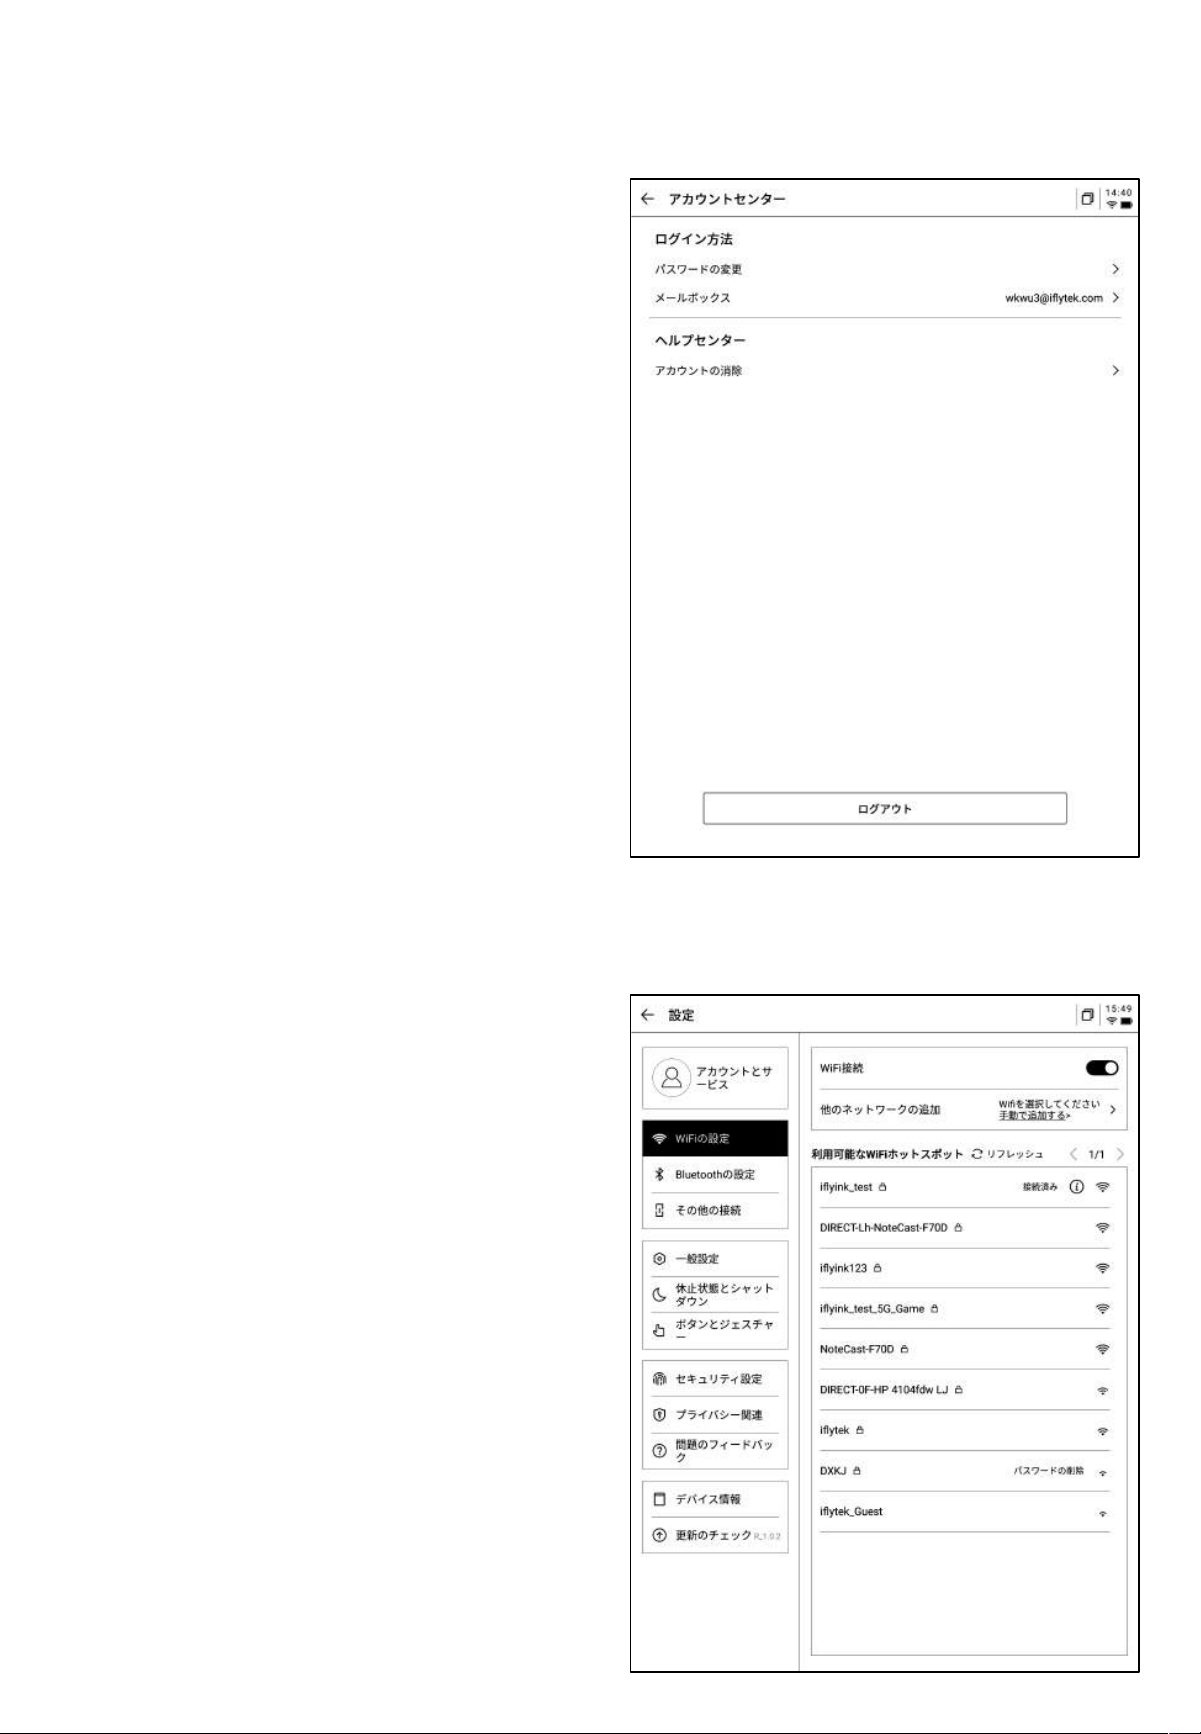
• Account Center: Supports modifying the
verified email address, resetting the
account, and logging out of the current
account.
• After logging out, you will not be able to
view the notes created under the current
account.
• Deleting the account will remove all data
under the current account, so please
proceed with caution.

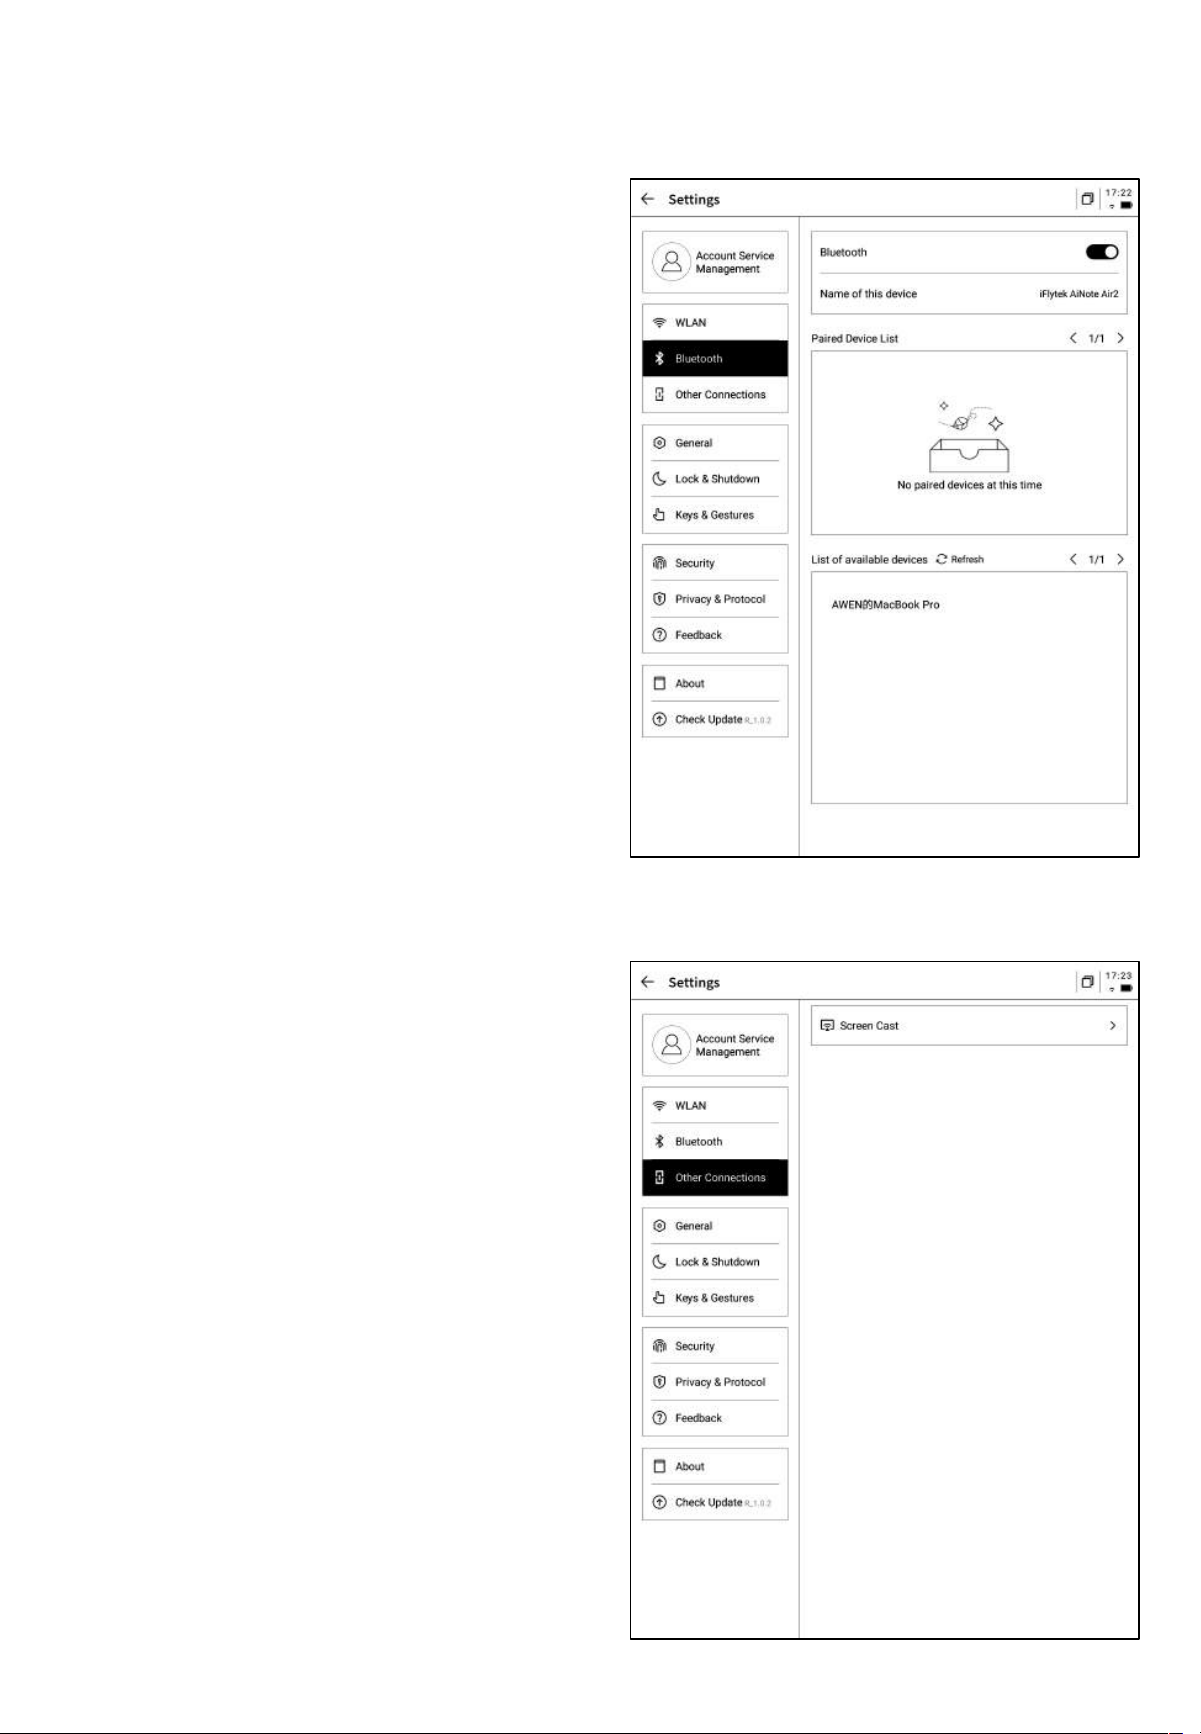
• Bluetooth Settings: Supports connecting
Bluetooth devices such as headphones,
speakers, and keyboards.
• Projection Tools: Supports downloading the
PC projection tool from the official website.
Once downloaded and ensuring the device
and PC are on the same network, you can
proceed with screen projection.
• Download link:
https://a2sgp-www-ap1.iflyoversea.com
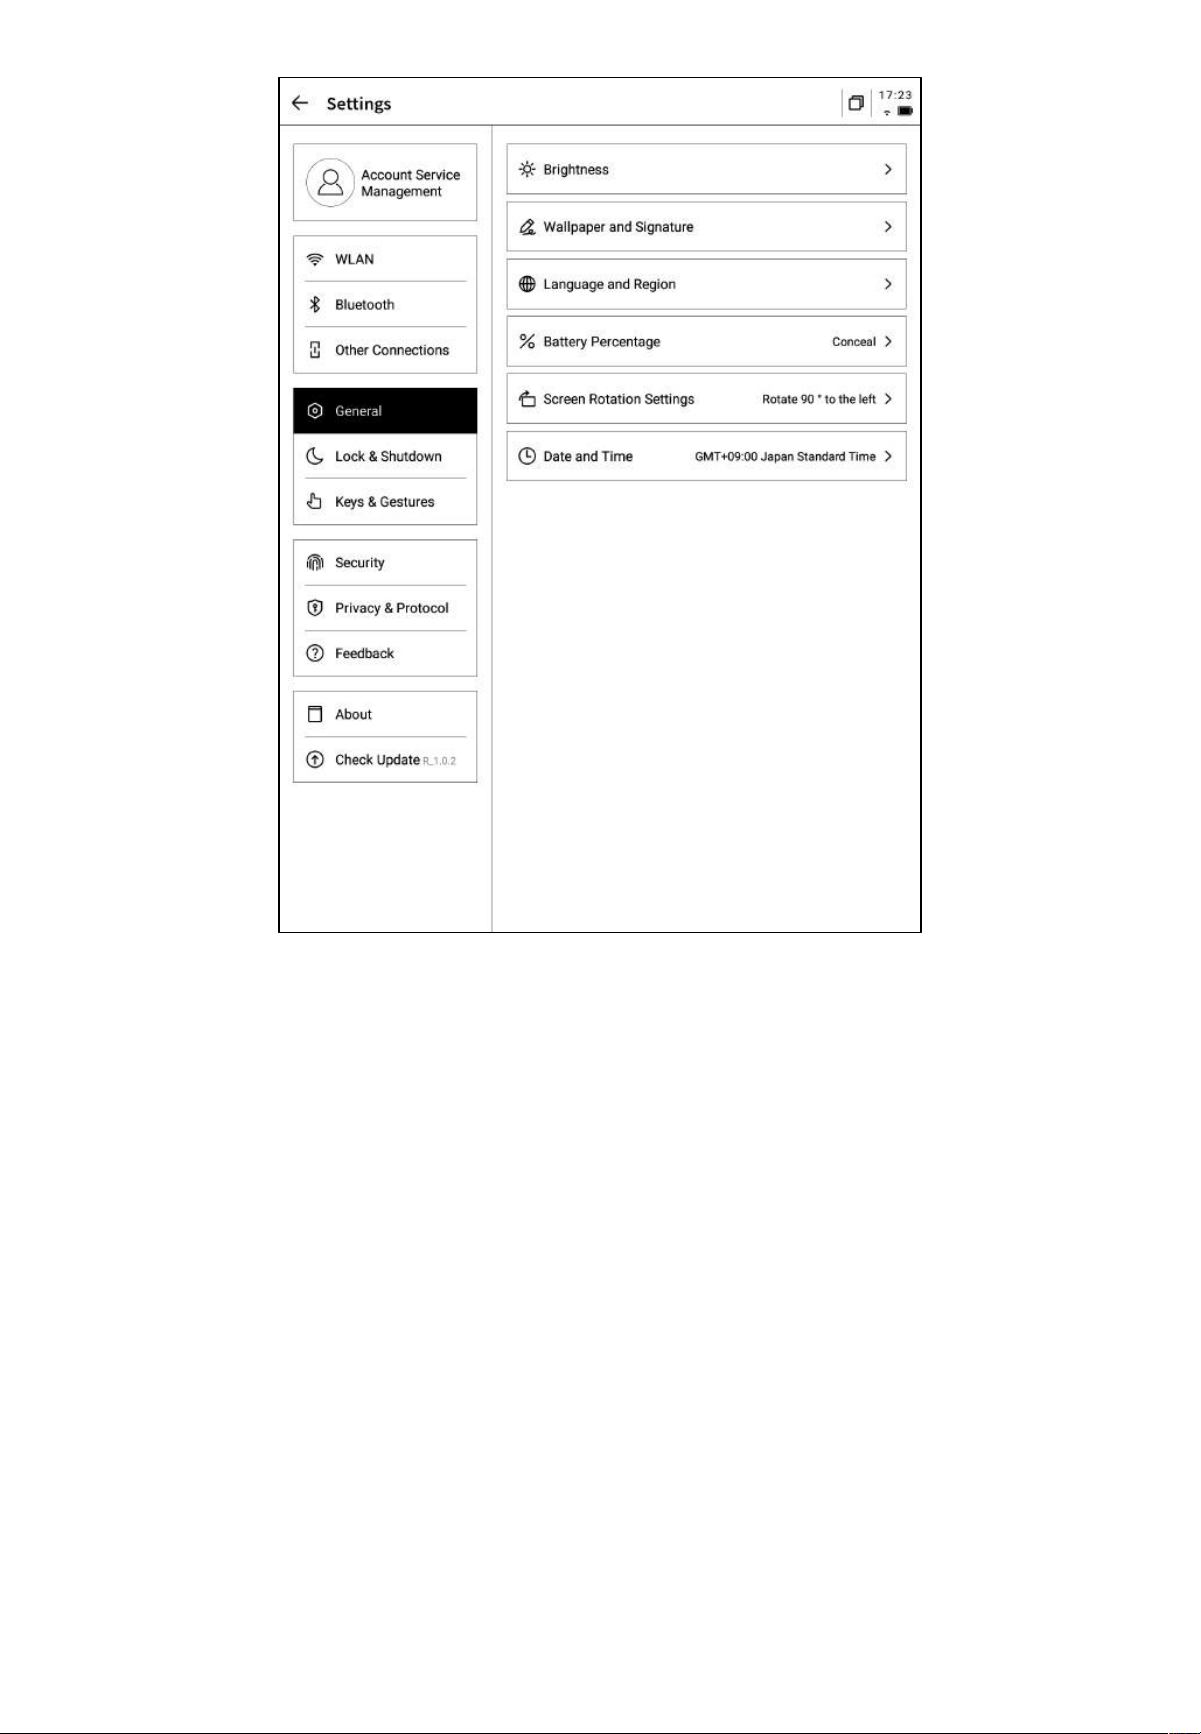
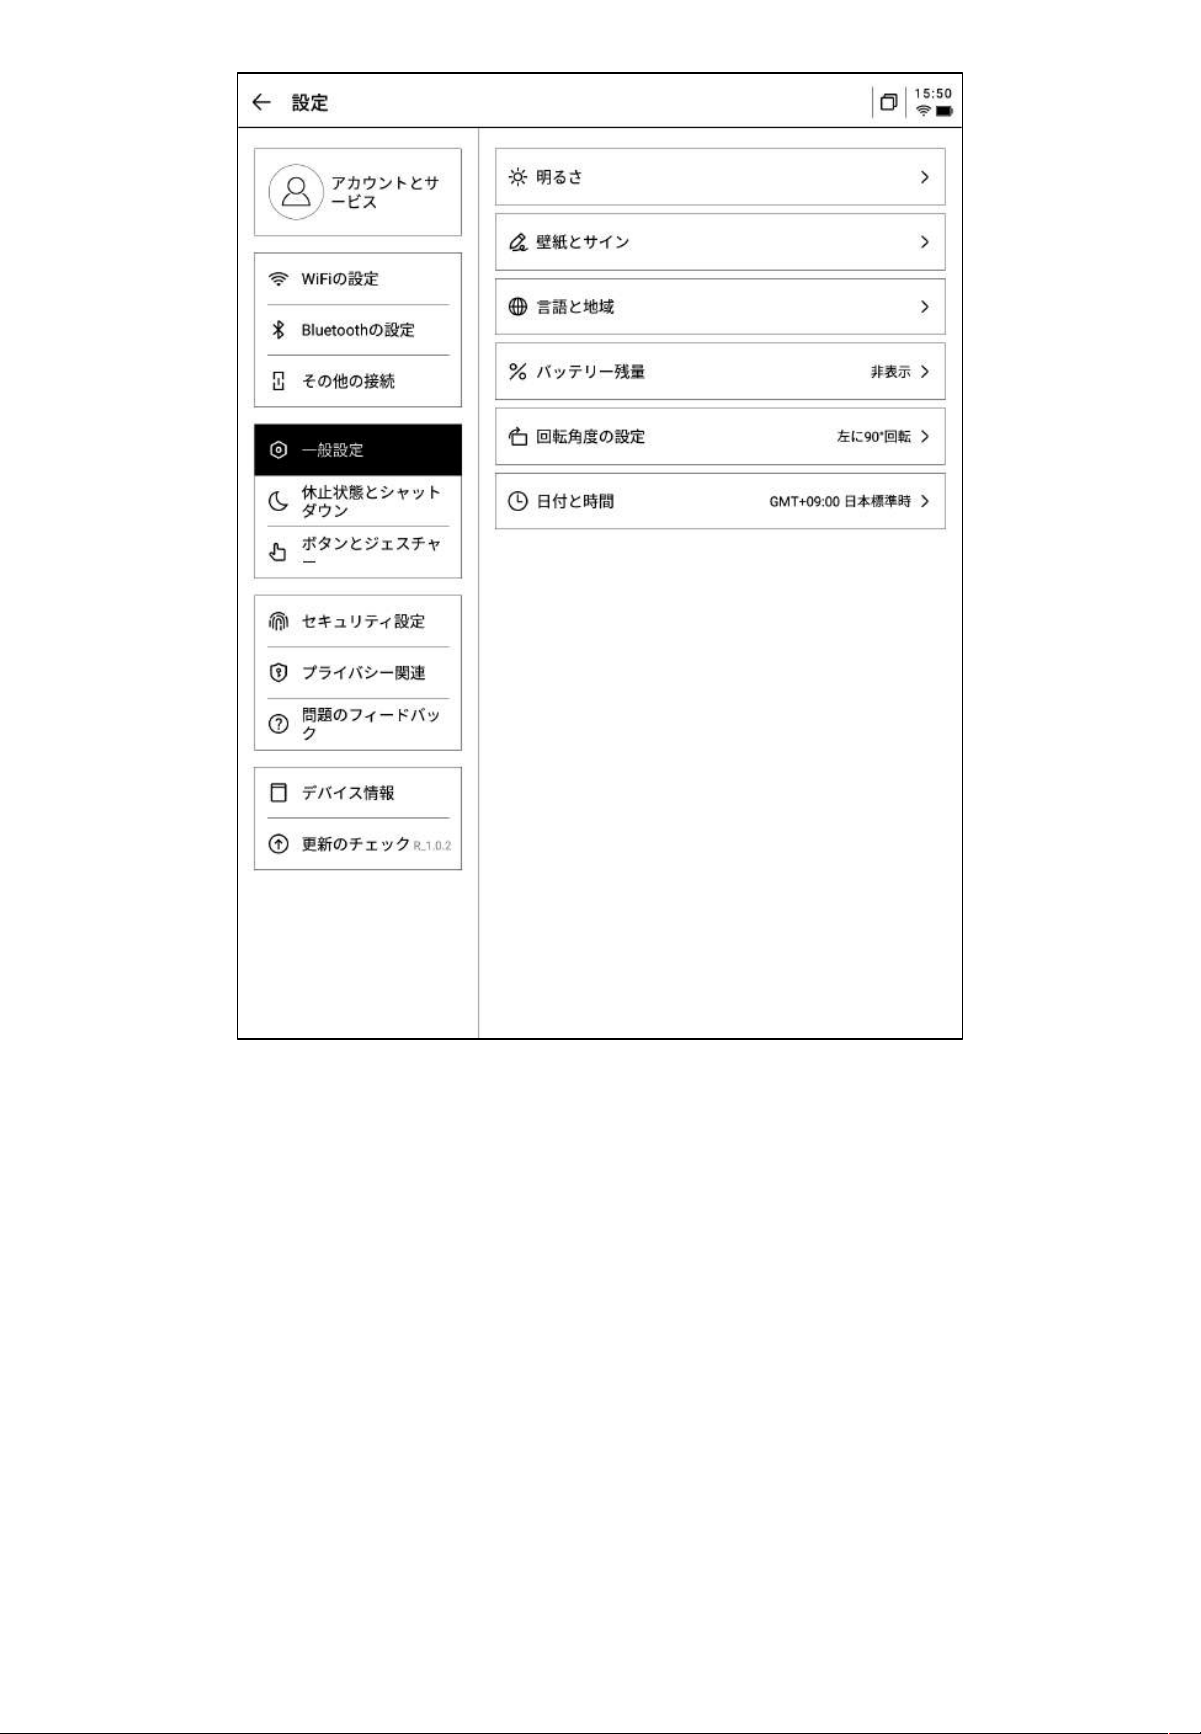
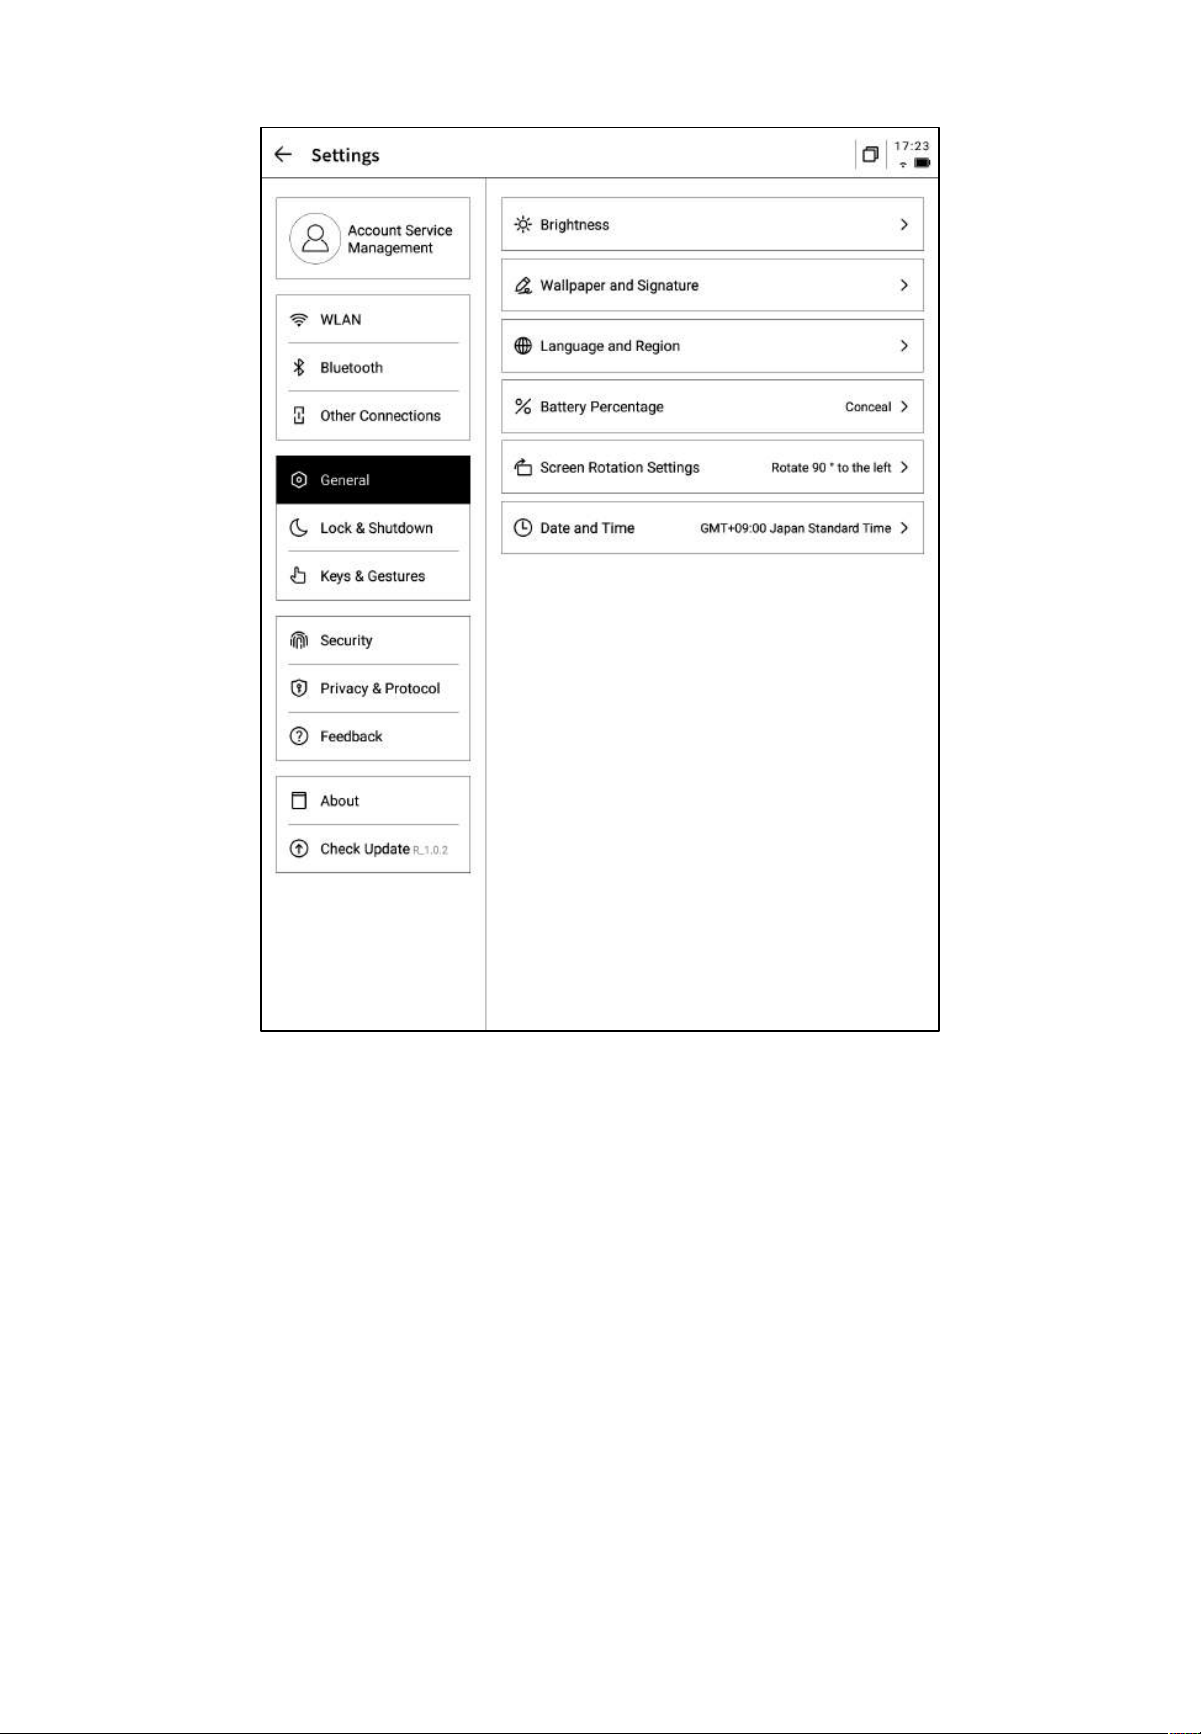
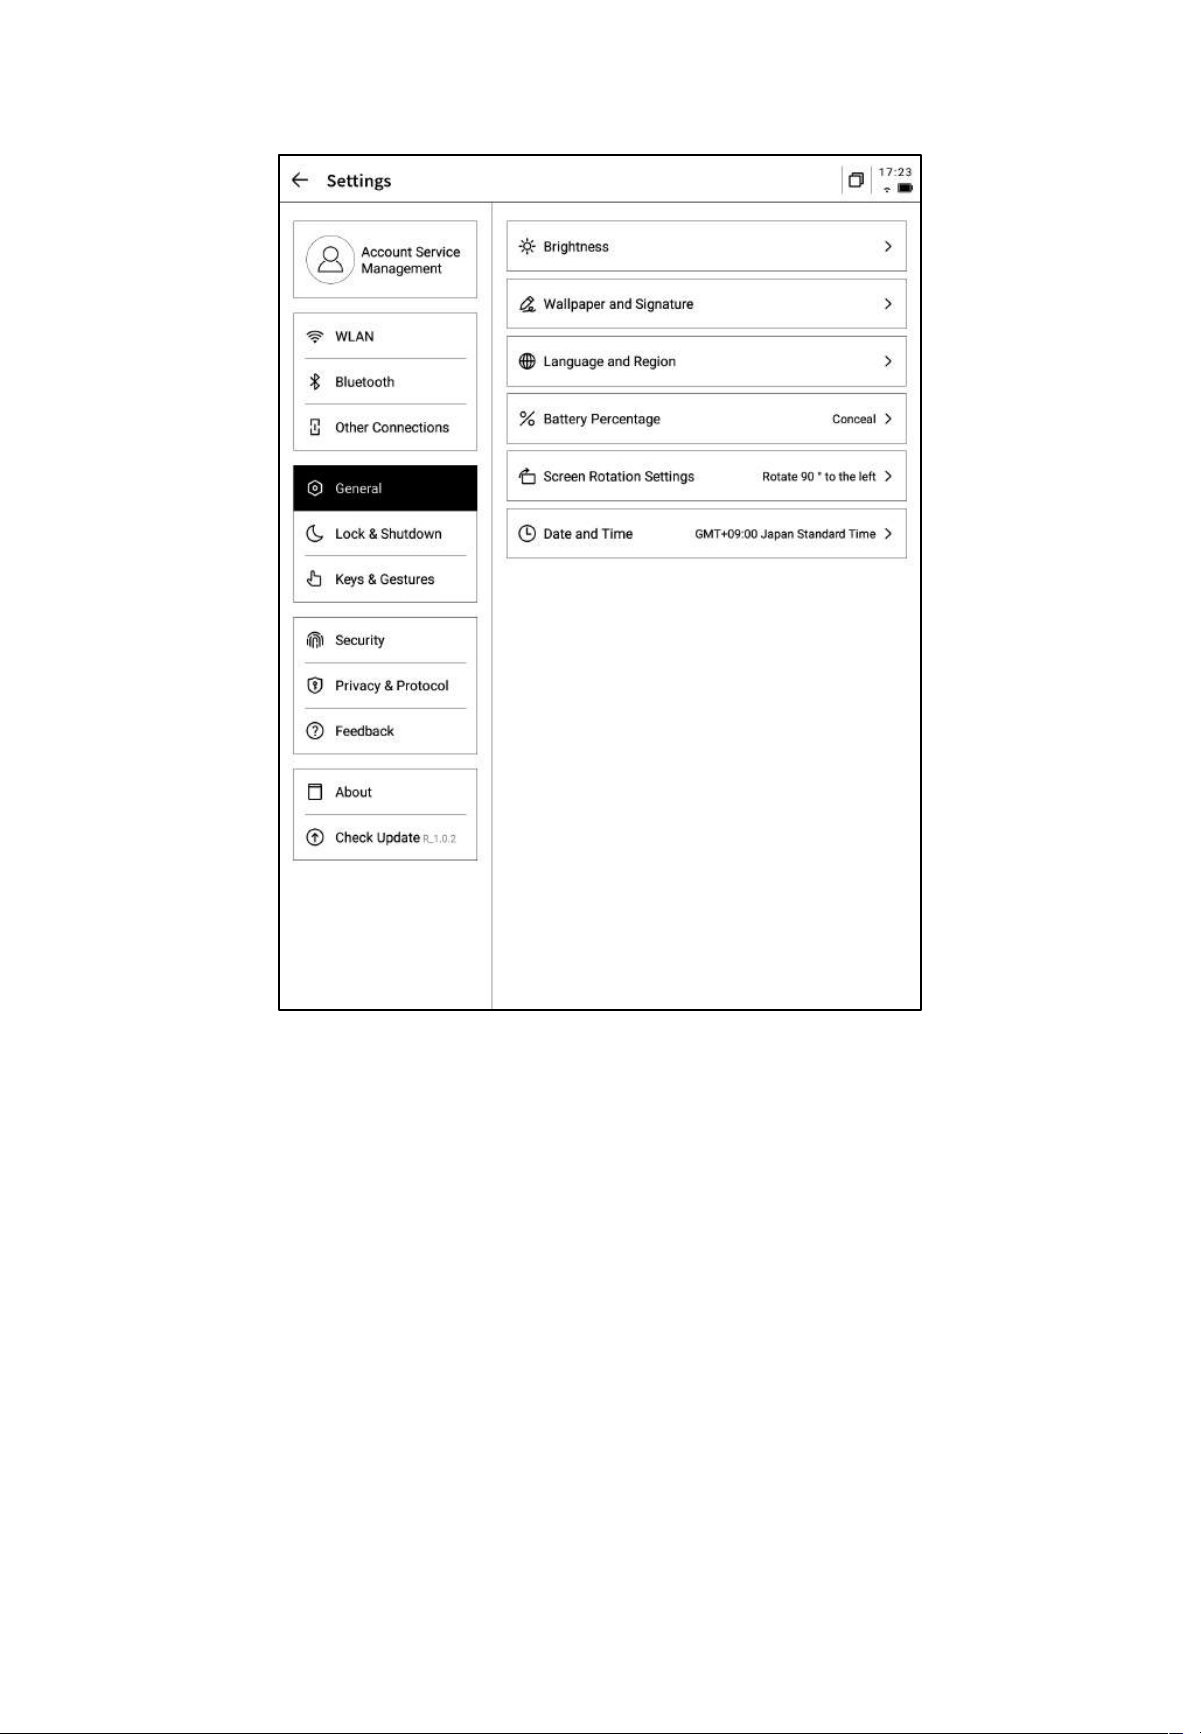
• Date and Time:
Supports automatic configuration of date and time information, allowing selection of the
relevant time zone.
• Brightness Settings:
Supports adjusting the brightness for reading lights on the device, including support for both
cool and warm reading lights.
• Wallpaper and Signature Settings:
Allows changing wallpapers and signatures.
• Language and Region:
Supports switching system languages and regions
*Changing t he region may lead to server changes, please choose care fully.
• Battery Display:
Supports displaying detailed battery information on the device.
• Rotation Settings:
Allows setting the default screen rotation direction.

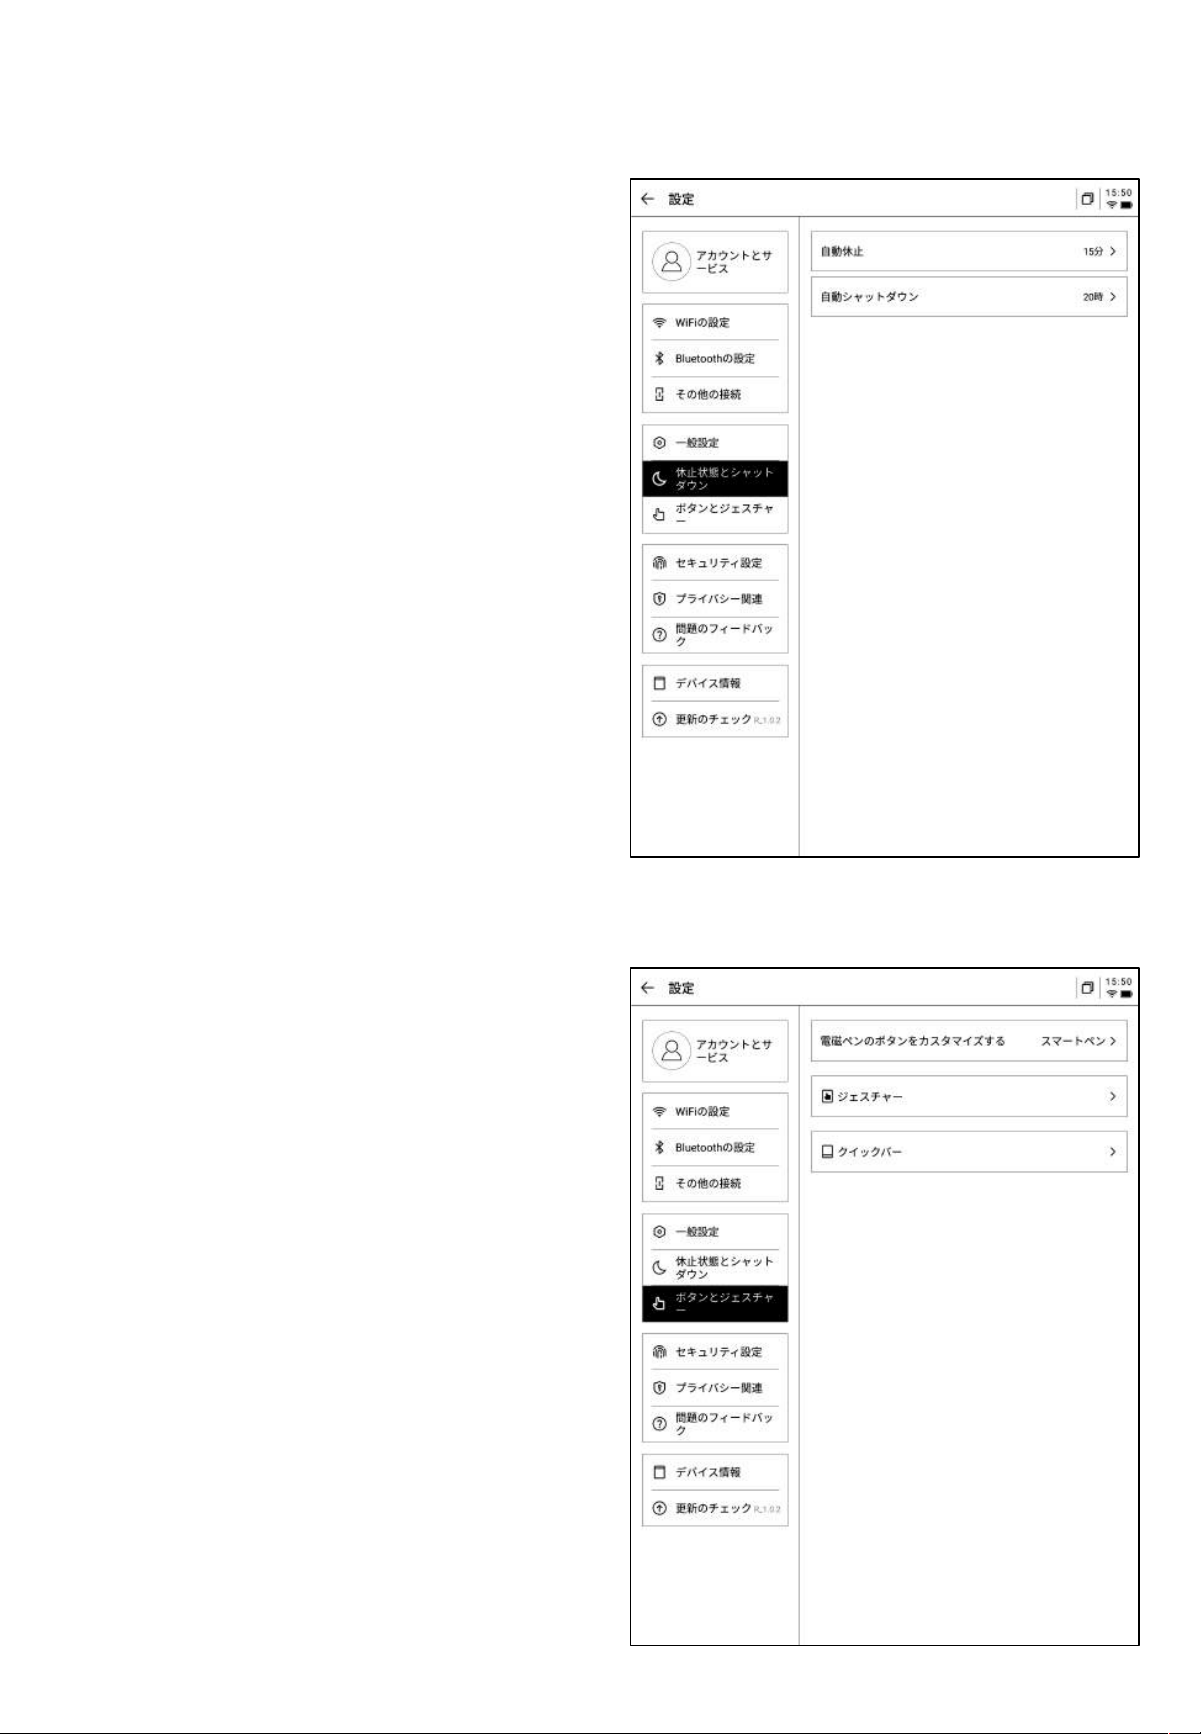
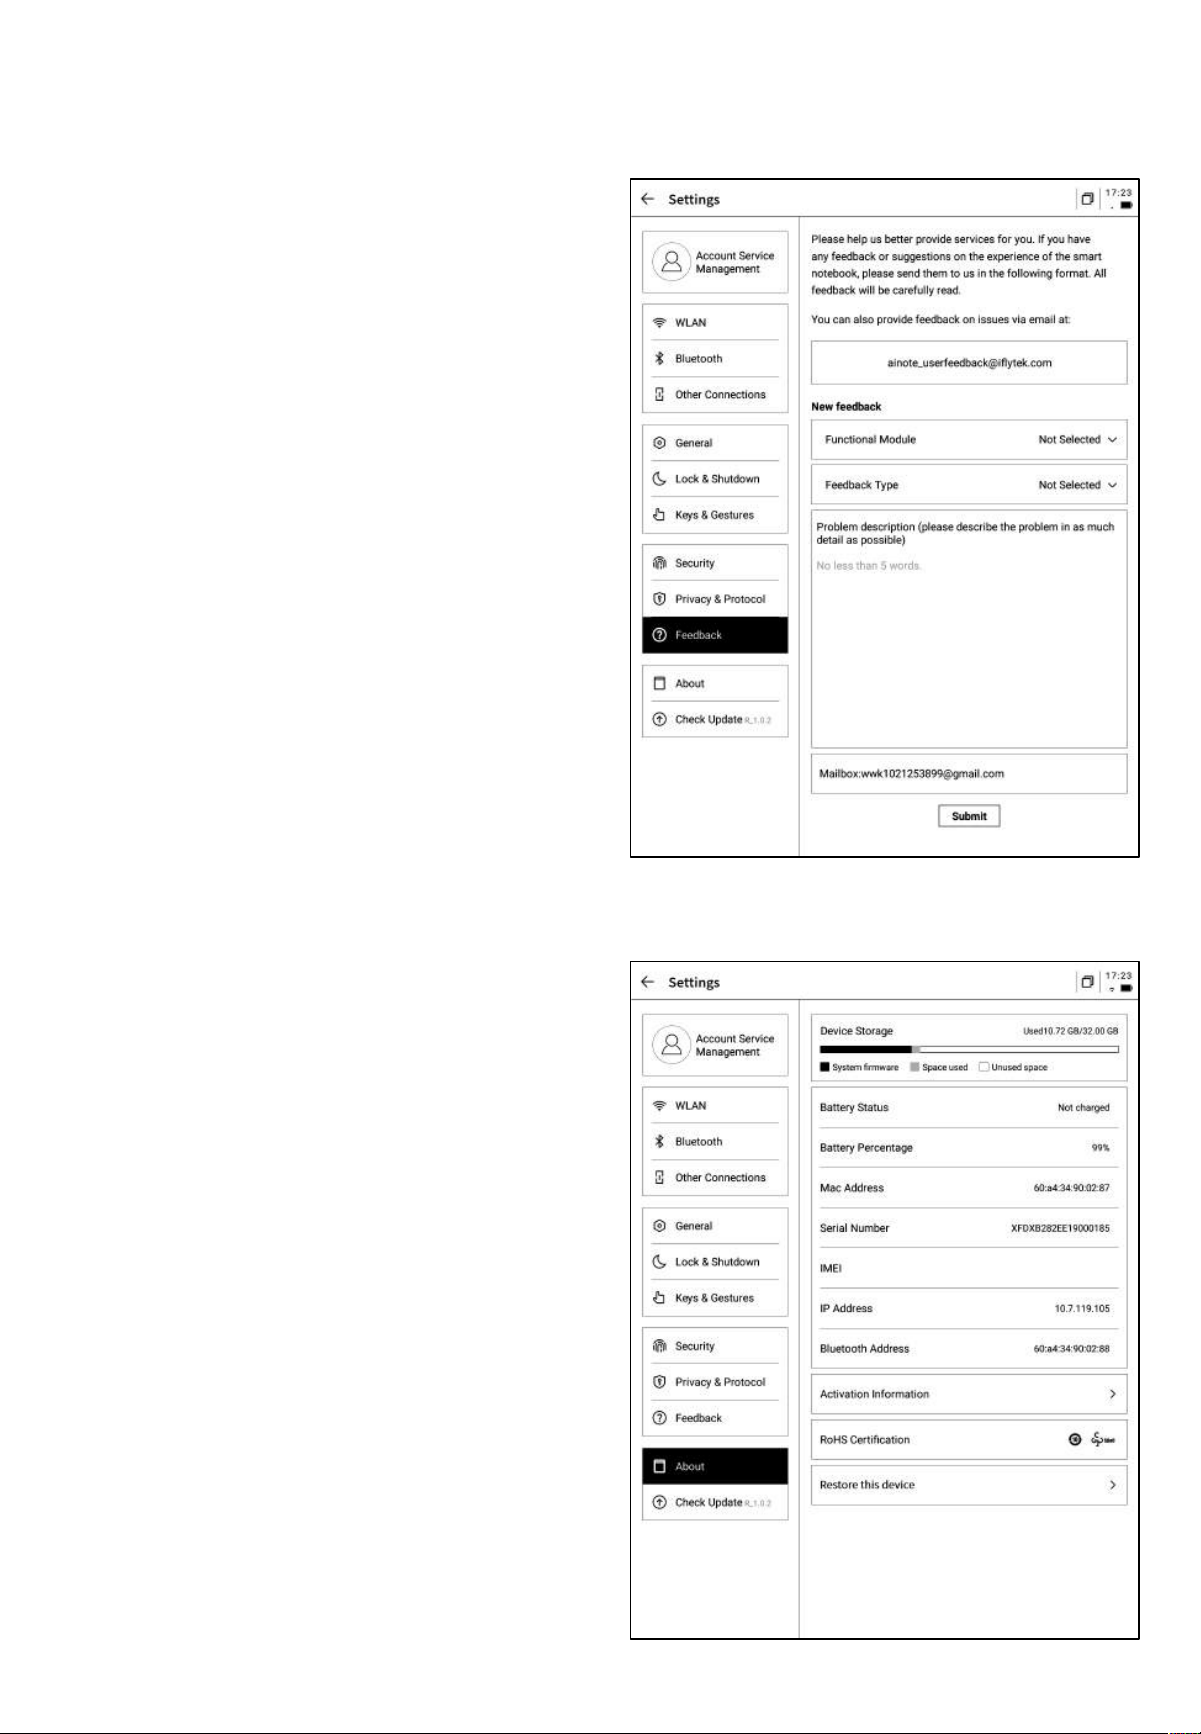
• Custom Pen Button Settings
Supports custom functions for the pen,
including line drawing, selecting options,
activating stylus, and closing functions.
• Gesture Settings
Customize gesture operations, including
closing functions.
• Quick Bar Settings
Supports gesture shortcuts and closing
functions.
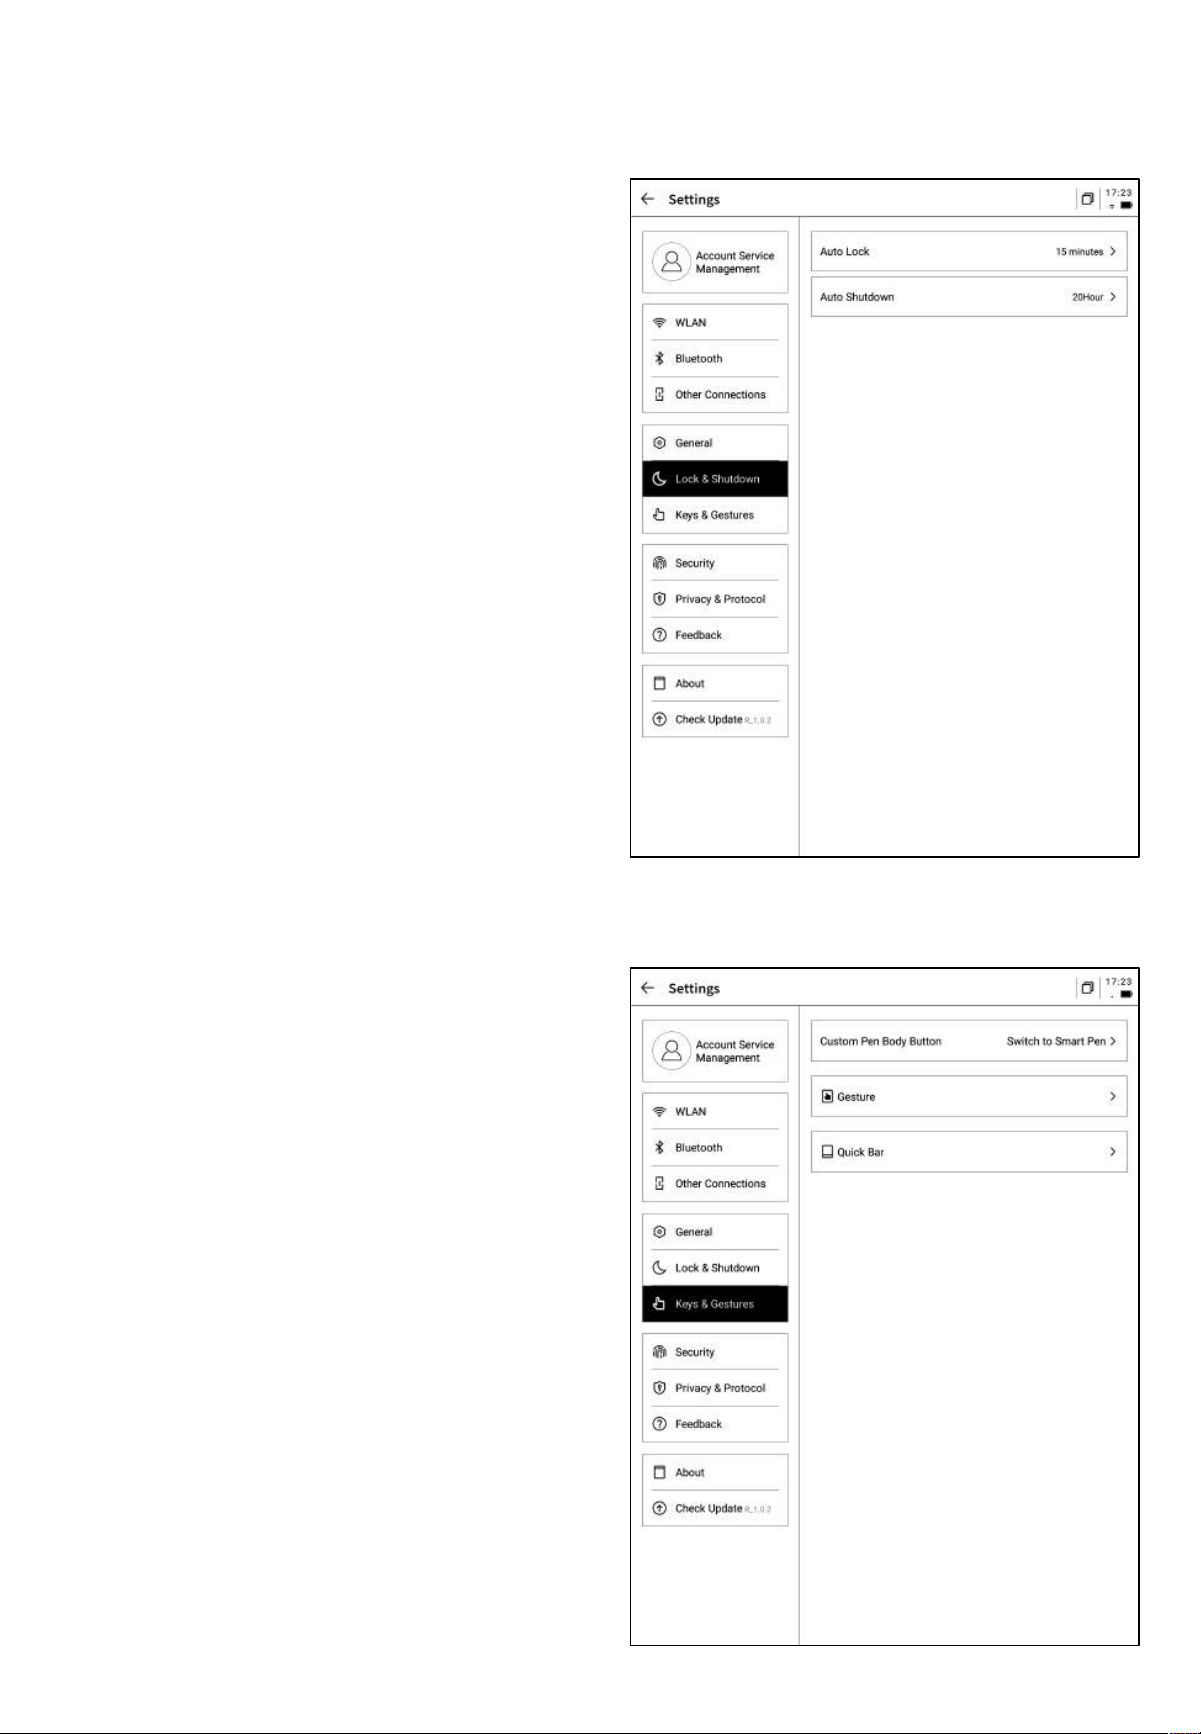
• Sleep Time Settings
• Shutdown Time Settings
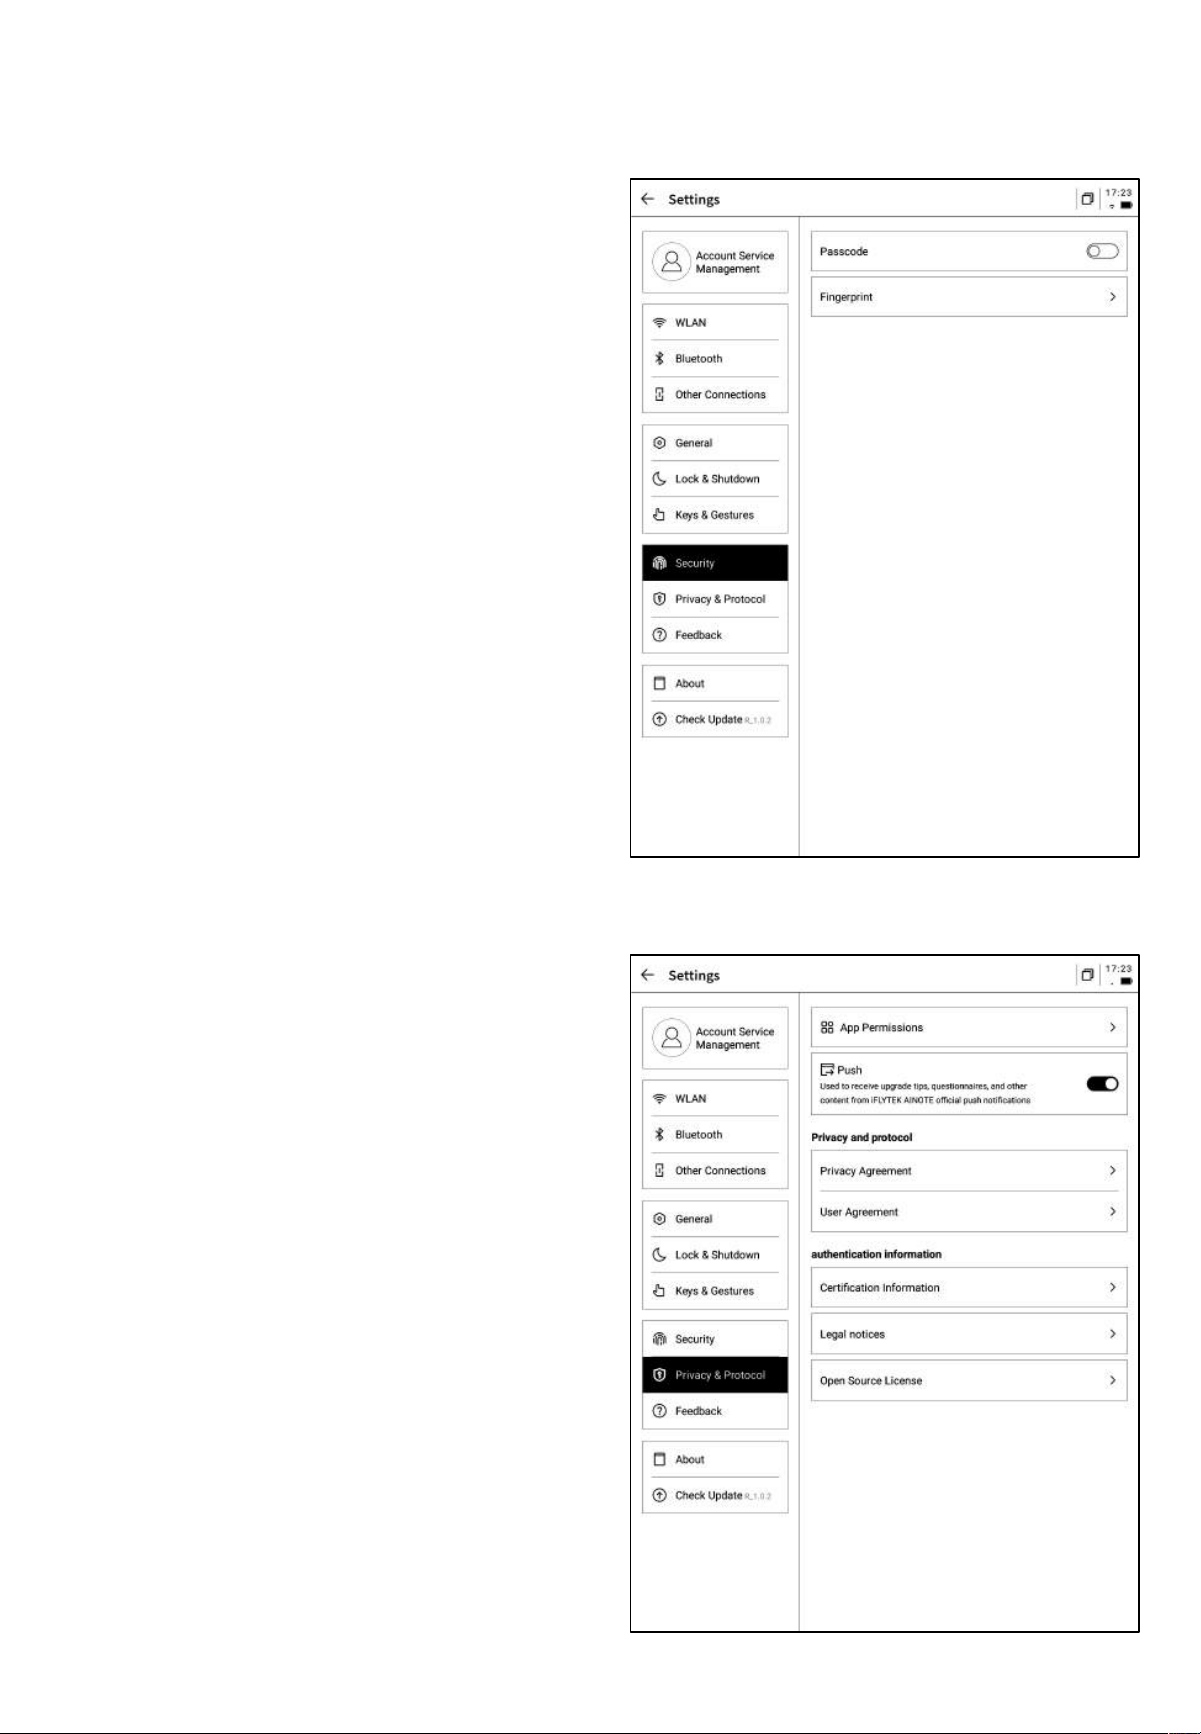
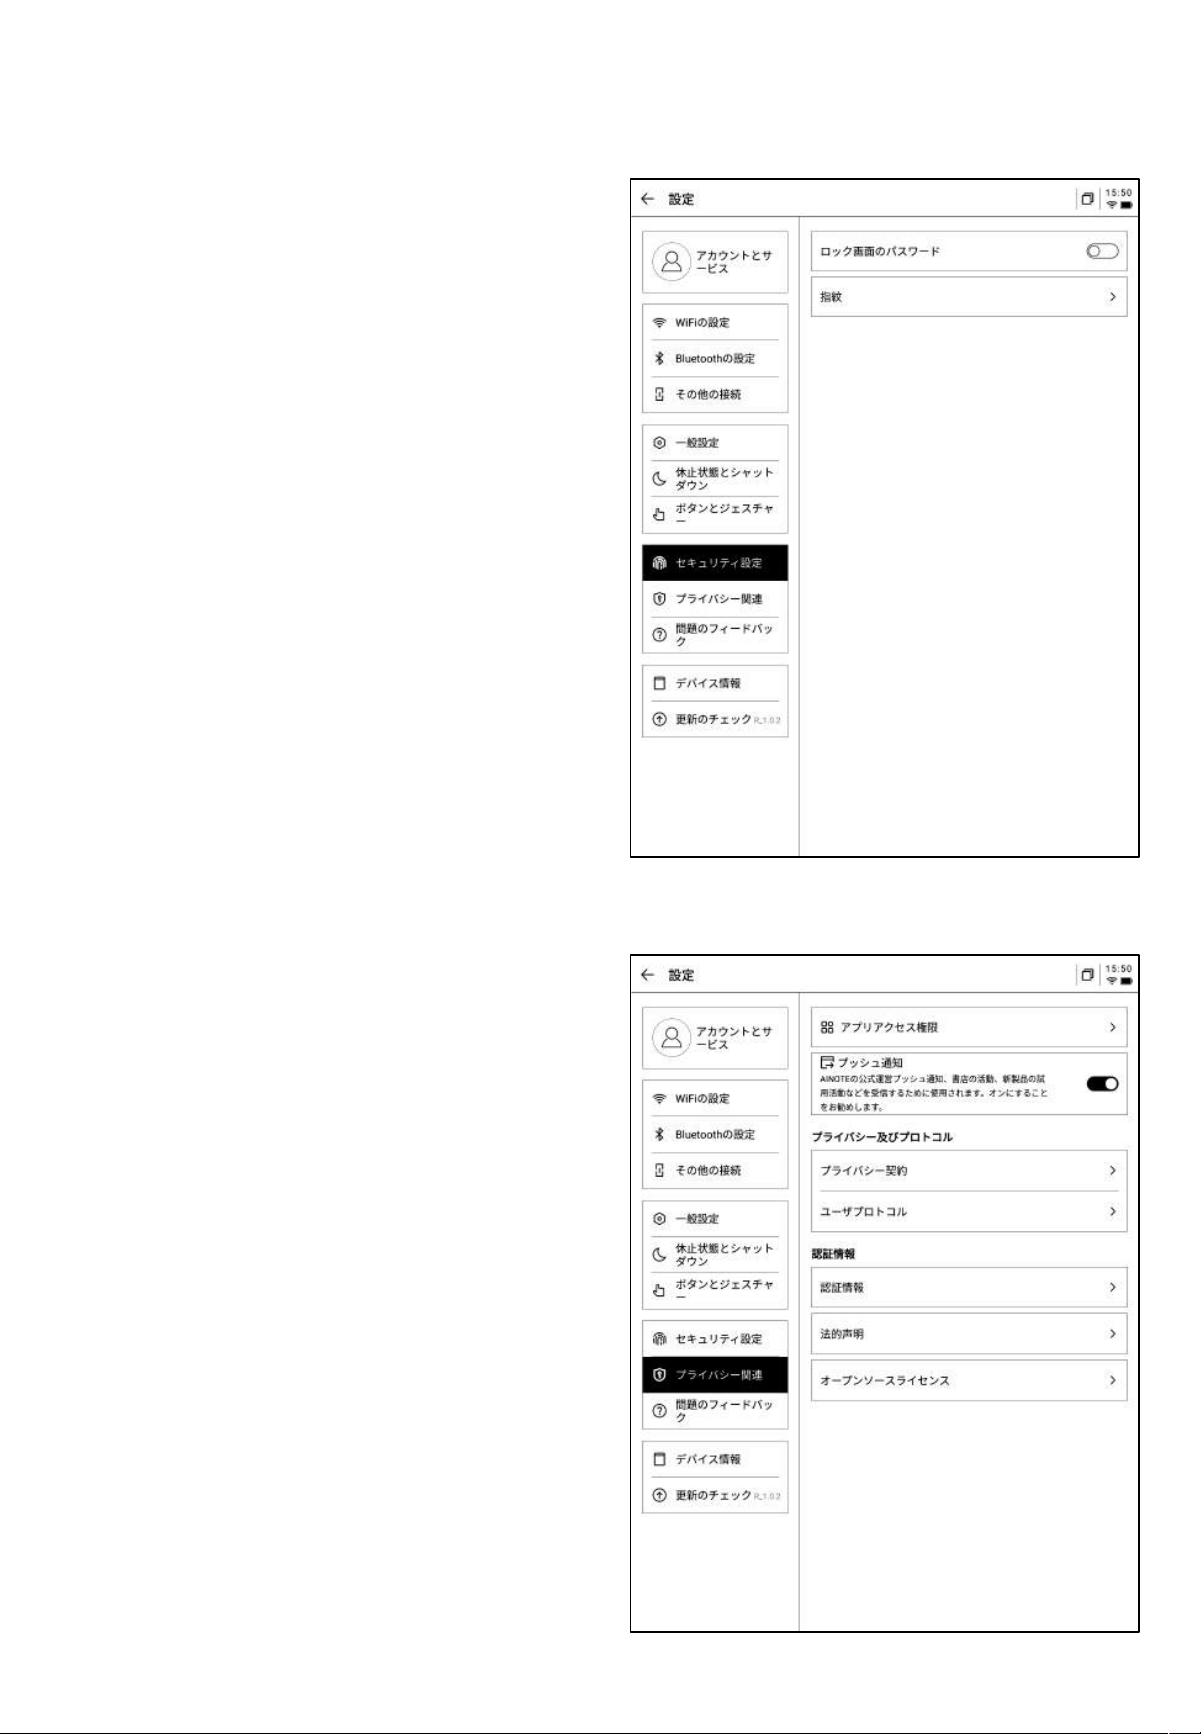
Supports viewing device-related privacy
policies, user agreements, legal notices, and
other document information.
Supports setting screen lock passcodes and
fingerprint information.

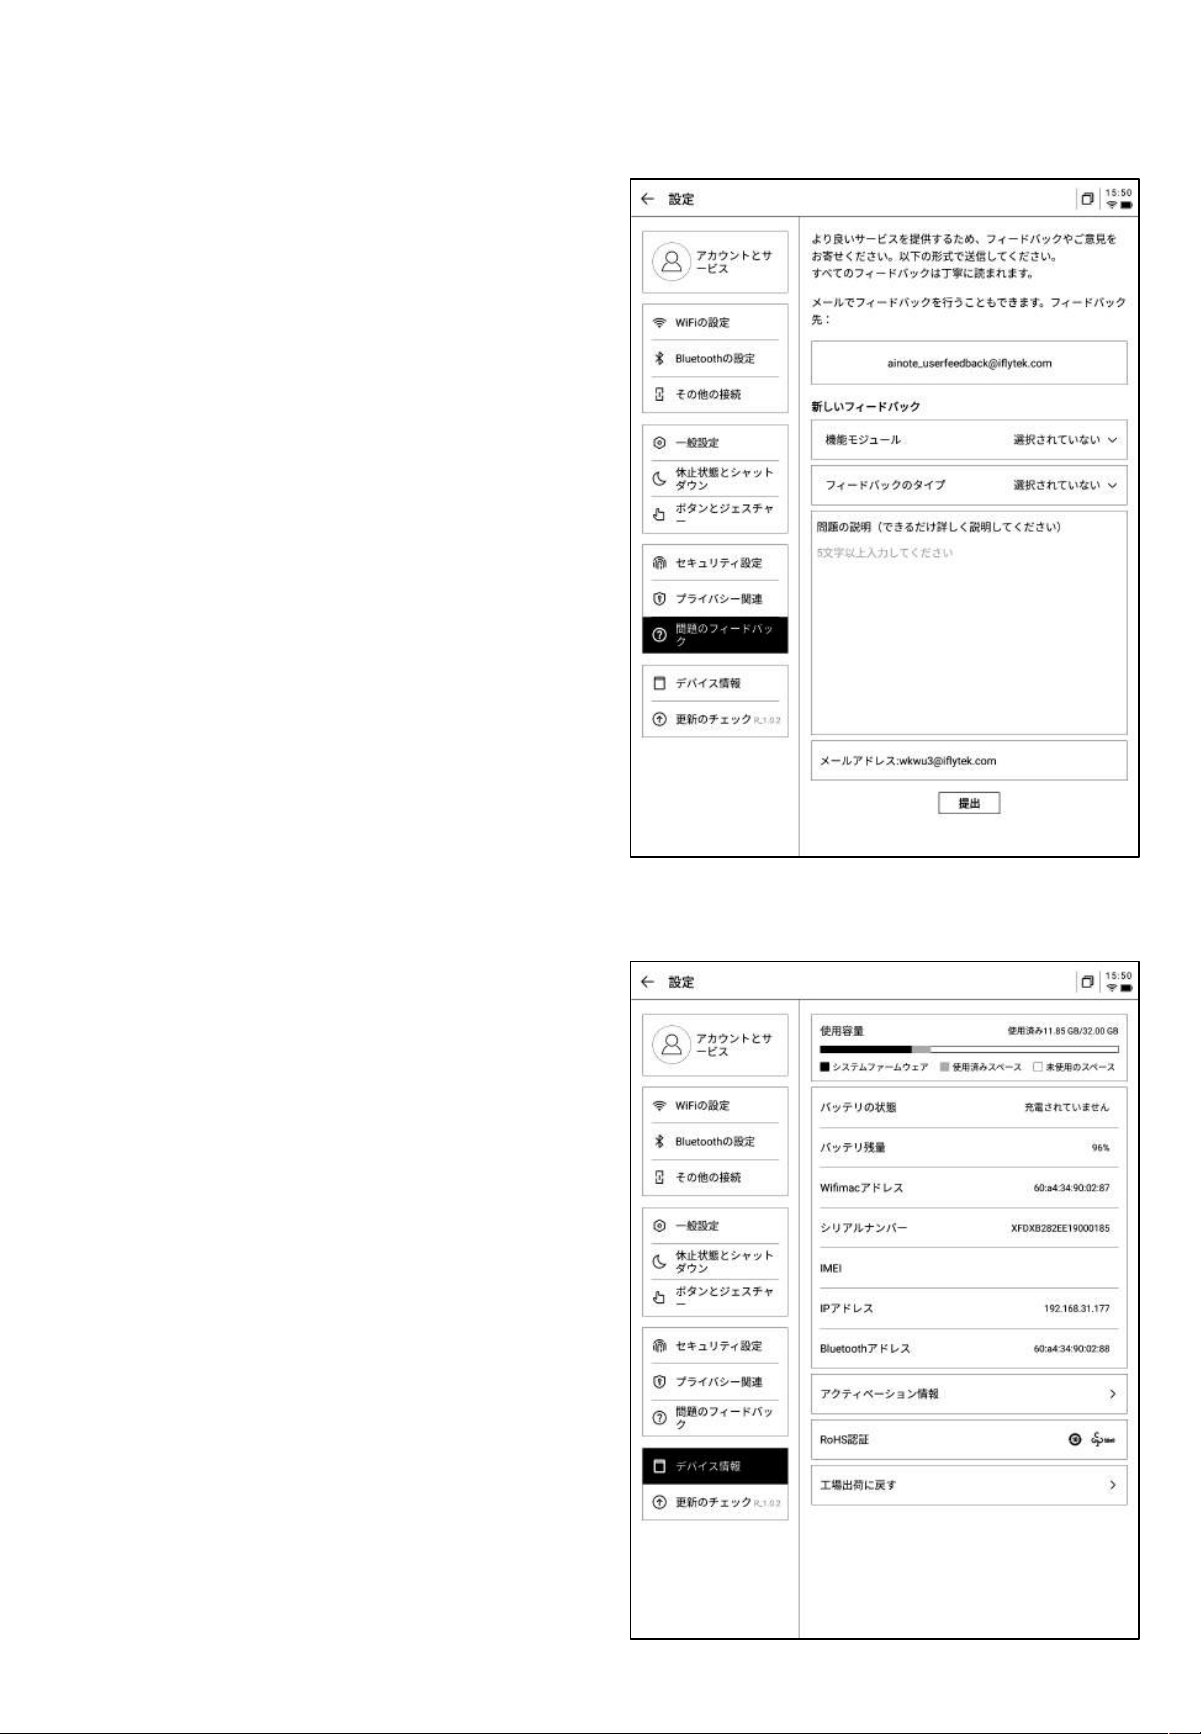
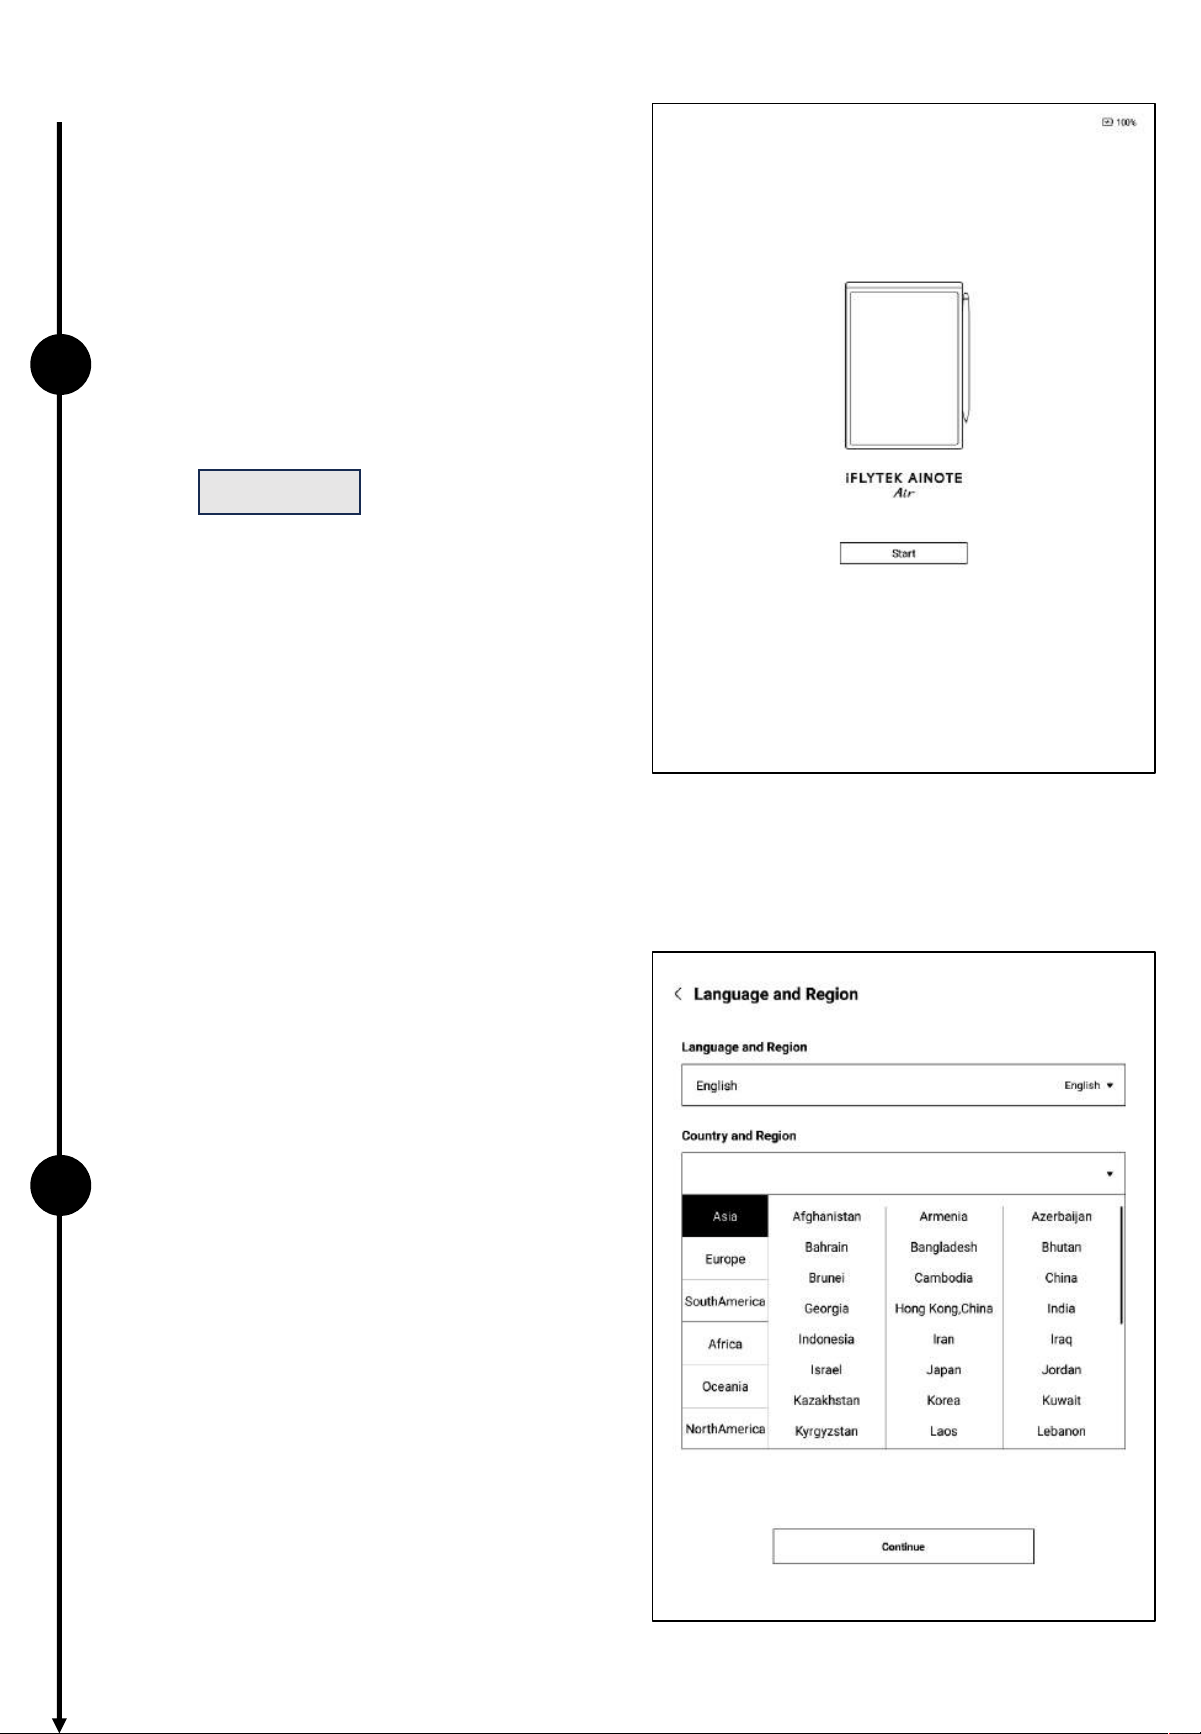
• Supports viewing basic device
information, including memory, serial
number (SN), IP address, etc.
• Supports providing feedback on any
issues encountered during device usage.
We will respond and address them
promptly.
• Supports feedback via the provided
email address.
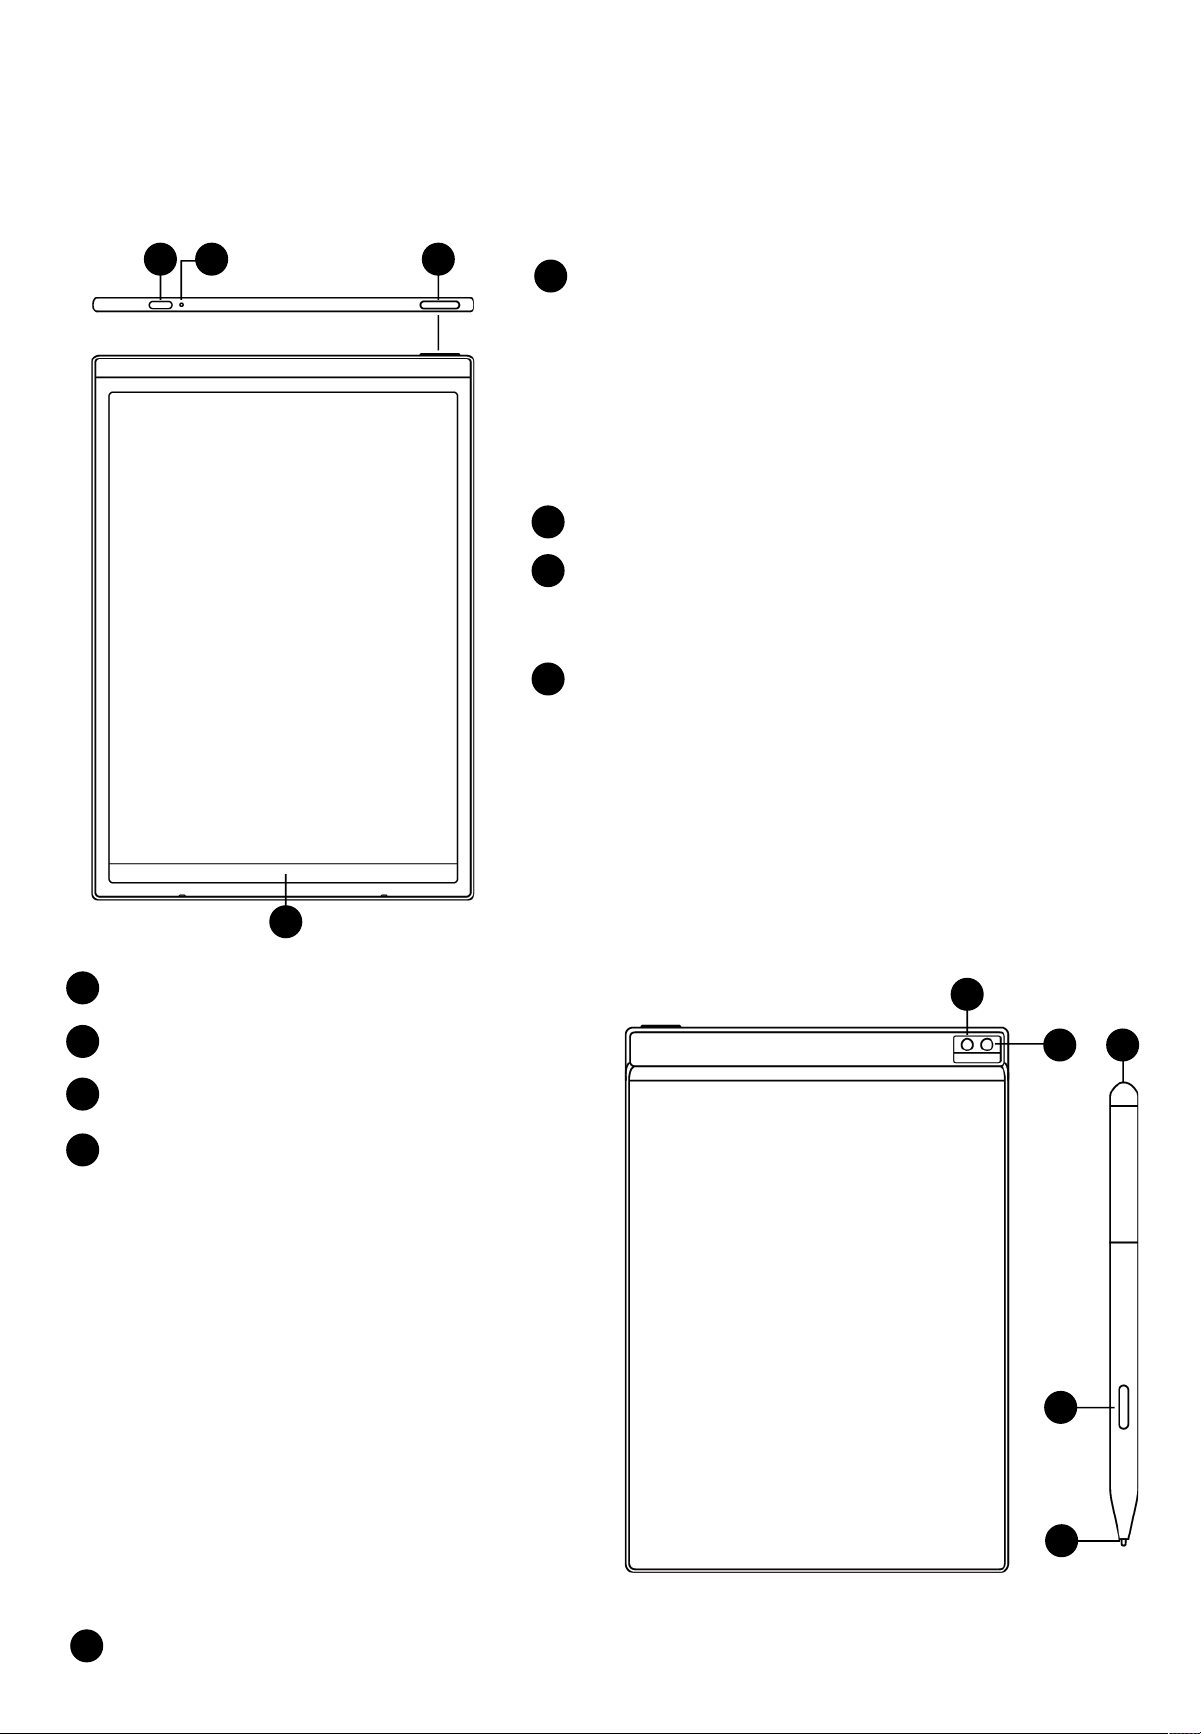
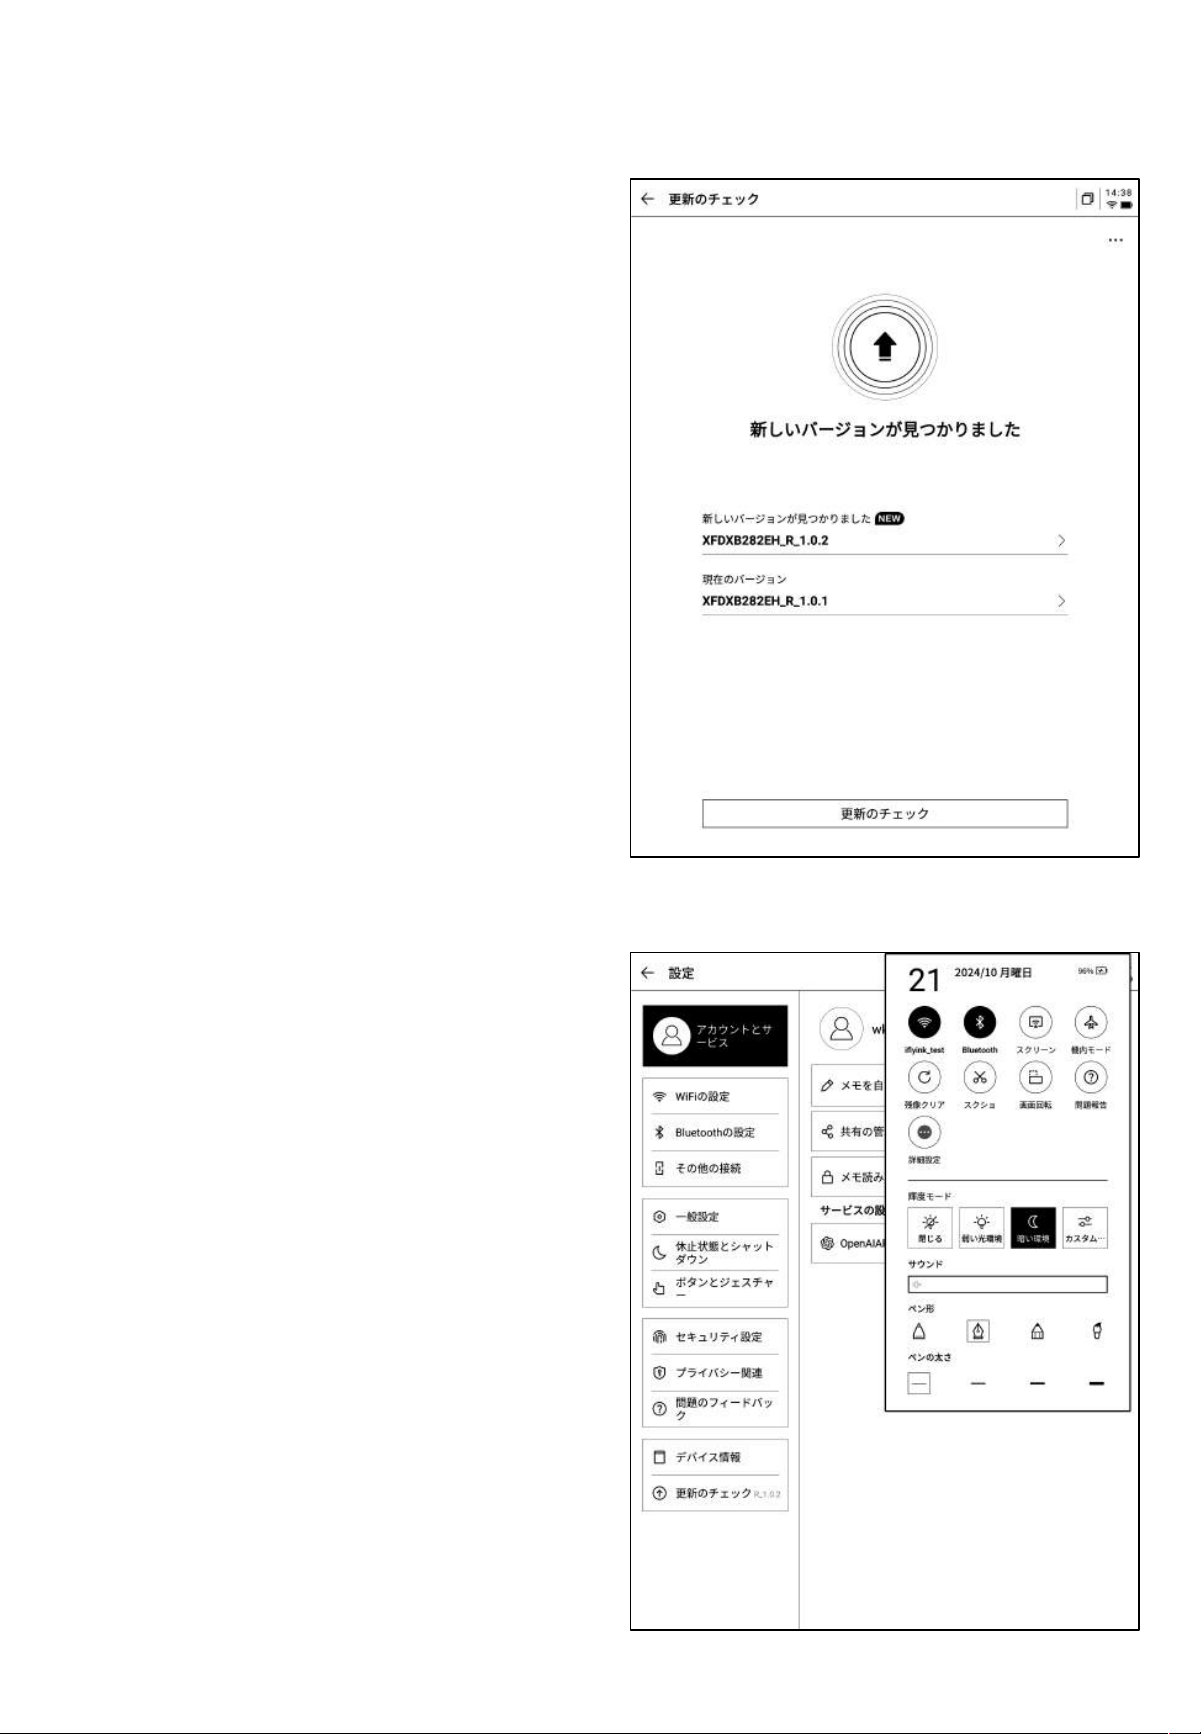
• Supports checking for firmware update
information. We will periodically push
device updates.
• The pull-down menu also provides a
convenient control center where basic
operations can be performed.

The above is the user manual for the AINOTE. If you encounter any
other issues during use, feel free to contact us at:
The accompanying app [AINOTE mobile] is an essential application,
currently available only on mobile. PC download and usage will be
supported in the future. You can download it using the following
method:

ユーザーマニュアル
iFLYTEK AINOTE Air2
第
1
章 クイックスタ ート
1.1 ハードウェアの紹介
12
1
電源ボタン
電源オン:
このキーを3秒間長押しすると本体が起動します。
シャットダウン/再起動:
このキーを3秒間長押しすると、画面に
シャットダウン/再起動ダイアログが表示されます。
*
注意
:電源ボタンを8秒間長押しすると、強制的にシャットダウ
ンすることが できます。
2
USB Type-C
3
3
充電インジケータランプ
*充電中は、充電インジケータランプが点灯し、赤色は充電中、緑
色は充電完了を示します。
4
4
アクティブバー
*左下のアイコンを押したまま右にスワイプすると、【Open Chat】
画面が開き、質問することができます。
*中央の領域を押したまま右にスワイプすると、クイックページ繰
りードに 入りま す。ることが できま す。
*右下のボタンを押したまま左にスワイプすると、メモをクイック作
成できます。
5
リアカメラ
6
5
6
フラッシュライト
7
8
9
7
消しゴム
8
カスタムボタン
9
ペン芯
*リフィル を購入 するこ とで交 換でき ます。
-
【スマートペン(デフォルト)】
押しながらペンをスライドすることで範囲選択、ToD o追加、
図形のマークを行います。
-
【直線】
押しながらペンをスライドすることで直線を描きます。
-
【範囲選択消去】
押しながら手書き内容を選択することで、手書き内容を消
去します。
-
【機能オフ】
誤接触による作動を防ぐために、ボタン機能をオフにしま
す。
1.2 本体の起動
1
2
ü 電源ボタンを長押しして電源を入れ
ると、起動プロセスに入ります。
*初めて電源を入れる際は、起動時間が長くなること
がありますので、しばらくお待ちください。
ü システム言語を選択する
*利用する地域を正しく選択してください。地域を切り
替えるとサーバーの切り替えが発生し、異なるサー
バー間でデータが一時的に相互通信できない場合が
あります。
start
をタッチすると起動します 。
ü 地域を選択する
*アジア、オセアニア地域のサーバーはシンガポール
に設置されています。
*北米、南米、ヨーロッパ、アフリカ地域のサーバーは
フランクフルトに 設置 されてい ます。
1.2 本体の起動
3
4
ü Wi-Fiに接続する
*WIFIは手動追加に対応しています。
ü タイムゾーンと時刻
*時刻表示方法の設定に対応しています。
*デフォルトでは自動的にタイム ゾーンを判断するよ
うに選択 されていますが 、手動設定も可 能です。

1.2 本体の起動
5
ü プライバシーポリシーと同意
*本機のプライバシーポリシーとユーザー合意事
項をよく確認の上、同意した後に次のステップに
進むことができます。
6
ü アカウント登録
*メール を使用したア カウント登録に対応 しています。
取得したメールに記載された確認コードとパスワード
を入力すると登 録が完了 します。
ü アカウントログイン
*メール アドレスとパスワードを入力 するとログインで
きます。
ü ゲストモード
*ゲストモードでは、本機の基本機 能の大部分を利
用できますが、使用中にアカウントにログインするこ
とですべての機 能が使えるようになります。
1.2 本体の起動
6
7
ü ノートの自動同期
*ログ インに成功 すると、デフォル トでノートの同 期機
能が自動的にオンになり、ネットワーク接続が完了す
るとノートが 自動的 にクラウド にアップロー ドされ、保
存されます。
*自動同期をオフにすることもでき、その場合はすべ
てのノートがローカルに保 存されます。
ü 画面ロックのパスワード設定
*6桁のパスワードを設定できます。
*ロック画面 のパ スワードを忘 れた 場合、メール 認証 を
通じてパスワードを回復することができます。
1.2 本体の起動
7
ü 署名の設定
*スタイラスペ ンを使用してボックス内に書き込むこと
ができます。書き込んだ内容はロック画面で継続的に
表示されます。
ü 起動が完了しました!
*下のQRコードをスキャンすると、アプ リ「AINOTE mobile」
をダウンロードできます 。
*署名はデバイス設定の中でも編集できます。
8
✔
「AINOTE mobile」アプリは本機の付属アプリで、ノートの同期とマルチ
デバイスでの閲覧をサポートします。また、「読写客」アプリでのノートの
編集と共有が可能で、より効率的なノート管理ができます。

1.3 クイック操作
クイック全体コントロールバー
デバイスの右上から下に向かって スワイプするとプルダウンメニューリ
ストが開き、WiFi、画面投影、音量、バックライトなどの機能設定ができ
ます。

1.3 クイック操作
画面の下から上にスワイプするとマルチタスク画面が開き、アプリ間
のクイック切り替えやバックグ ラウンドアプリの終了ができます。
マルチタスクの切り替え

1.3 クイック操作
❶ オープンチャット画面が開き、大規模AIモデルとの対話が行えます。
❷ 閲覧モードなど複数ページの画面においてクイックページめくりモード に
入ります。ページ繰りの速度はスワイプの速度に依存します。
❸クイックメモをすばやく開き、手書きの記録を 残すことができます。
アクティブバーの使 い方

2.1 ノート作成
*スタイラスペ ンを使用して自由に筆記 や描画ができ、
会議の記録や、インスピレーション創作のメモ、個人
学習などに役立ちます。
2.1.1 新規作成
-スタイラスペ ンを使ってタイトルボックス内に手書 き
入力できます。手書きの内容は自動的に印刷体の文
字に変換され、タイトルとなります。
2.1.2 タイトルの記入
-手書き認識言語はカスタム選択が可能です。右上の
言語ミニボタンをクリックすると言語選択画面に入り、
認識したい言語情報を追加/選択でき、設定は全体
に適用されます。
2.1.3 ペン形状の選択
-ペン形状ボタンをクリックすると、ペンの形状や太さの
変更に加え、消しゴムなどの機能への切り替えができ
ます。
-ノート画 面で「作成」ボタンをクリックすると、新しい
ノートが作成 されます。
第
2
章 ノート
2.1.4 スマートペンの切り 替え方法
-スマートペンボ タンをクリックすると、切り替えが完了し
ます。
-スマートペンボ タンを再度クリックすると、操作ガ イドを
表示します。
-詳細な操作ガイドを見ることができます。
*
ヒント ペン本体のボタンを押して範囲選択すると、そ
のままスマー トペンモードに入ることができます。
-スマートペンを使用 したい場合 は、上部ツールバーのス
マートペンアイコンをクリックして切り替える以外に、ペン
本体のボタンを直接押して使用することもできます。ペン
本体のボタンは他の機能にカスタマイズすることも可能
です。
2.1.5 スマートペンは以下の機能が含む
機能1:なげなわ
機能3:ToDo
機能2:フォーカススター
機能4:タイトル追加
2.1.6 範囲選択検索
-スマートペンを使って手書きの内容を範囲選
択した後、AIアシスタントをクリックすることで
検索ができます。デバイスは選択範囲内の手
書き内容を自動的に認識し、テキストに変換
して検索を行います。
*この機能を使用する場合、設定画面で個人
のOpenAI APIキーを設定する必要がありま
す。
2.1.7 手書きのテキスト化
-ボタンをクリックすると手書き文字をテキストに変換し
ます。手書きの内容 は選択した言語 に基づいて認 識さ
れます。
*すべての認 識はローカルで行うため、ネットワーク接
続の必要はありません。
-上部に手書きの内容が表示され、下部にテキスト変
換内容が表示され、クリックすることにより対応関係を
確認できます。
-上部の【全文】をクリックすると、全文のテキスト変換
内容を確認できます。
-上部の【エクスポート】をクリックすると、テキスト変換
内容をエクスポート、共有できます。
2.1.8 筆記テンプレート
-テンプレートボタンをクリックすると、テンプレートを
選択できます。
-テンプレートアイコンをクリックすると、選択したテ
ンプレートを次 ページ に挿入 します。
-ページは1枚のみ挿入できますが、ページをめくる
際にはこのテンプレートのクイック挿入を選択する
ことができます 。
-カスタマイズしたテ ンプレートスタイルを挿入するこ
ともできます。
-データケーブル を使用してデバイスをコンピュータ
に接続し、事前に準備したテンプレートのアイコンを
【Templ ate】フォルダに 転 送 す るこ と で、 選 択 、使 用
できるようになります。
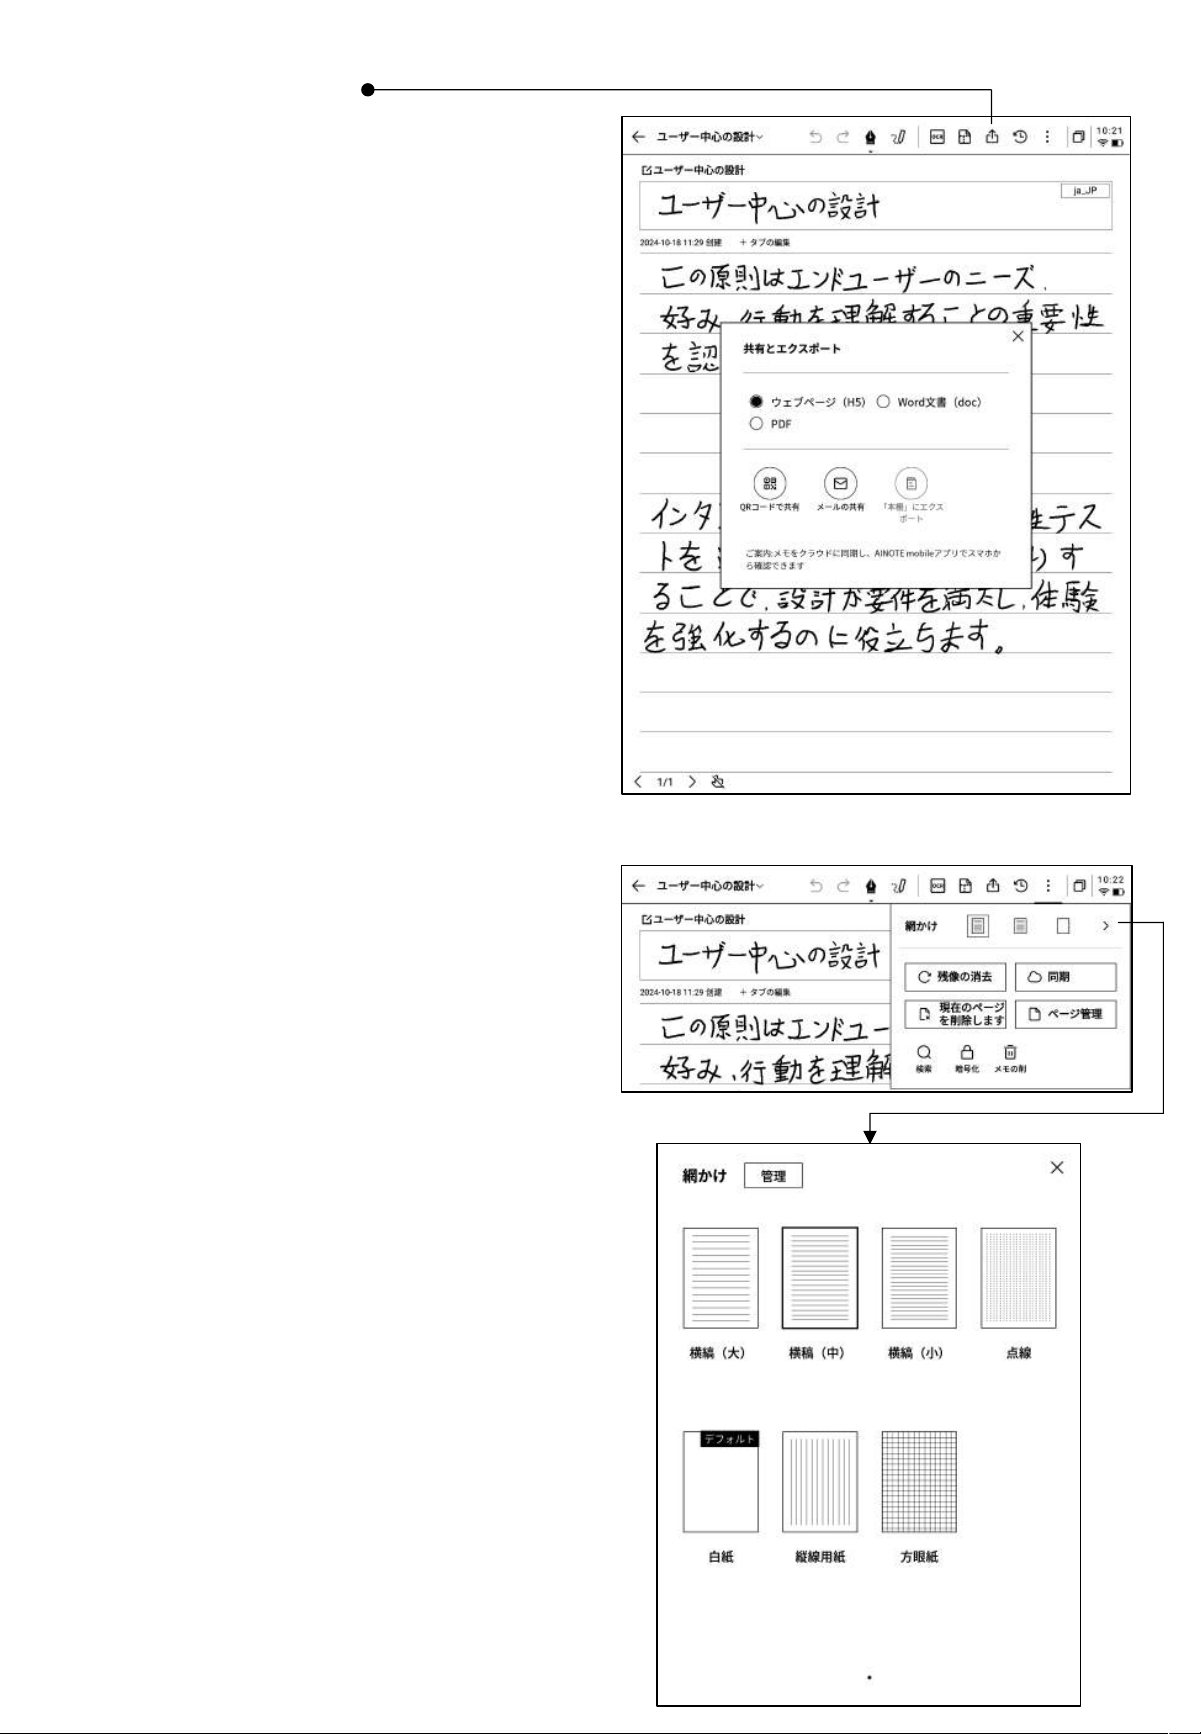
2.1.9 ノートの共有
-ウェブページ、word、PDFの3種類のファイルが共
有できます。
-QRコード、メール、書棚 へのエ クスポートの3つの
方法で共有できます。
2.1.10 スタイル設定
Q スタイルとテンプレートの違いは何ですか?
-「そ の 他 」ボ タ ン をク リック す ると 、ス タ イル 設 定画面
が表示されます。
-後方の矢印をクリックすると、詳細設定画面が表示
されます。
-横罫線、縦罫線、無地、ドット、方眼紙など、さまざま
な背景パター ンが選択できます。
-特定の背景パターンをデフォルトとして設定可能で
す。
A スタイルを設定すると、現在のノートにおいてデフォルトで
新しく作成された用紙は全て同じスタイルになります。特定の
スタイルをデフォルトとして設定することができ、次回新しい筆
記を行う際に、デフォルトのスタイルにて作成されます。一方、
本機ではテンプレートは個別に挿入され、1つの筆記に複数種
類のテンプレートを含めることができます。
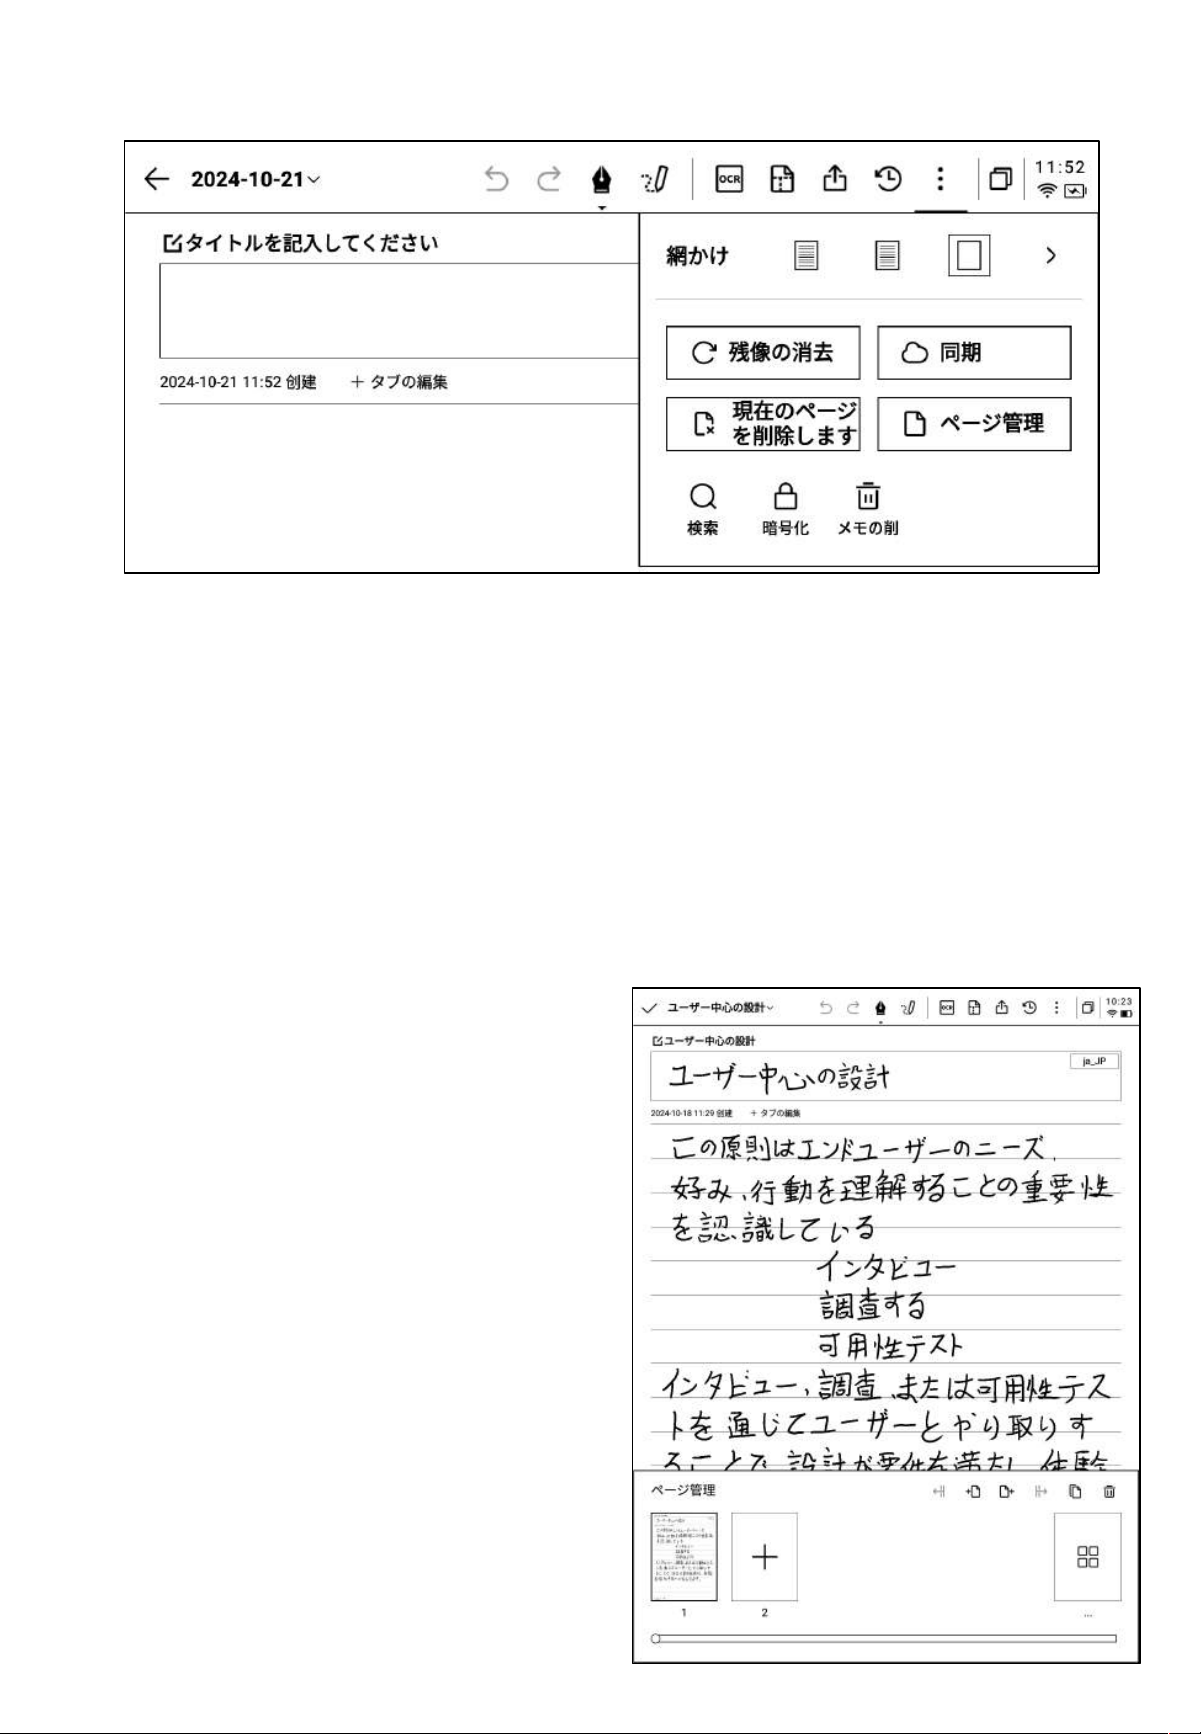
2.1.11 その他のアプリケーション
-ページの更新:現在のページを更新します。電子ペーパーの特性により長時間使用すると残像が出現しやすくなります
が、更新することでクリアできます。
-ノート同期:現在のノートをクラウドに同期し、「AINOTE mobile」アプリを使って閲覧、編集することができます。
-現在ページの削除:現在表示されているページのみを削除します。
-ページ管理:現在のノートのページ管理画面に入ります。
-検索:現在のノート内にある手書き内容の検索ができます。
-暗号化:現在のノートを暗号化します。以後、このノートを閲覧する際にはパスワードを入力する必要があります。
-削除:現在のノートの全内容を削除します。
2.1.12 ページ管理
-【そ の 他 】-【ペ ージ 管理】をク リック す ると 、ペ ー ジ 管 理
画面に入ります。
-左下のページ番号をクリックしても、ページ管理画面
に入ることができます。
-ページの追加、コピー、ペースト、移動などのさまざま
な操作ができます。
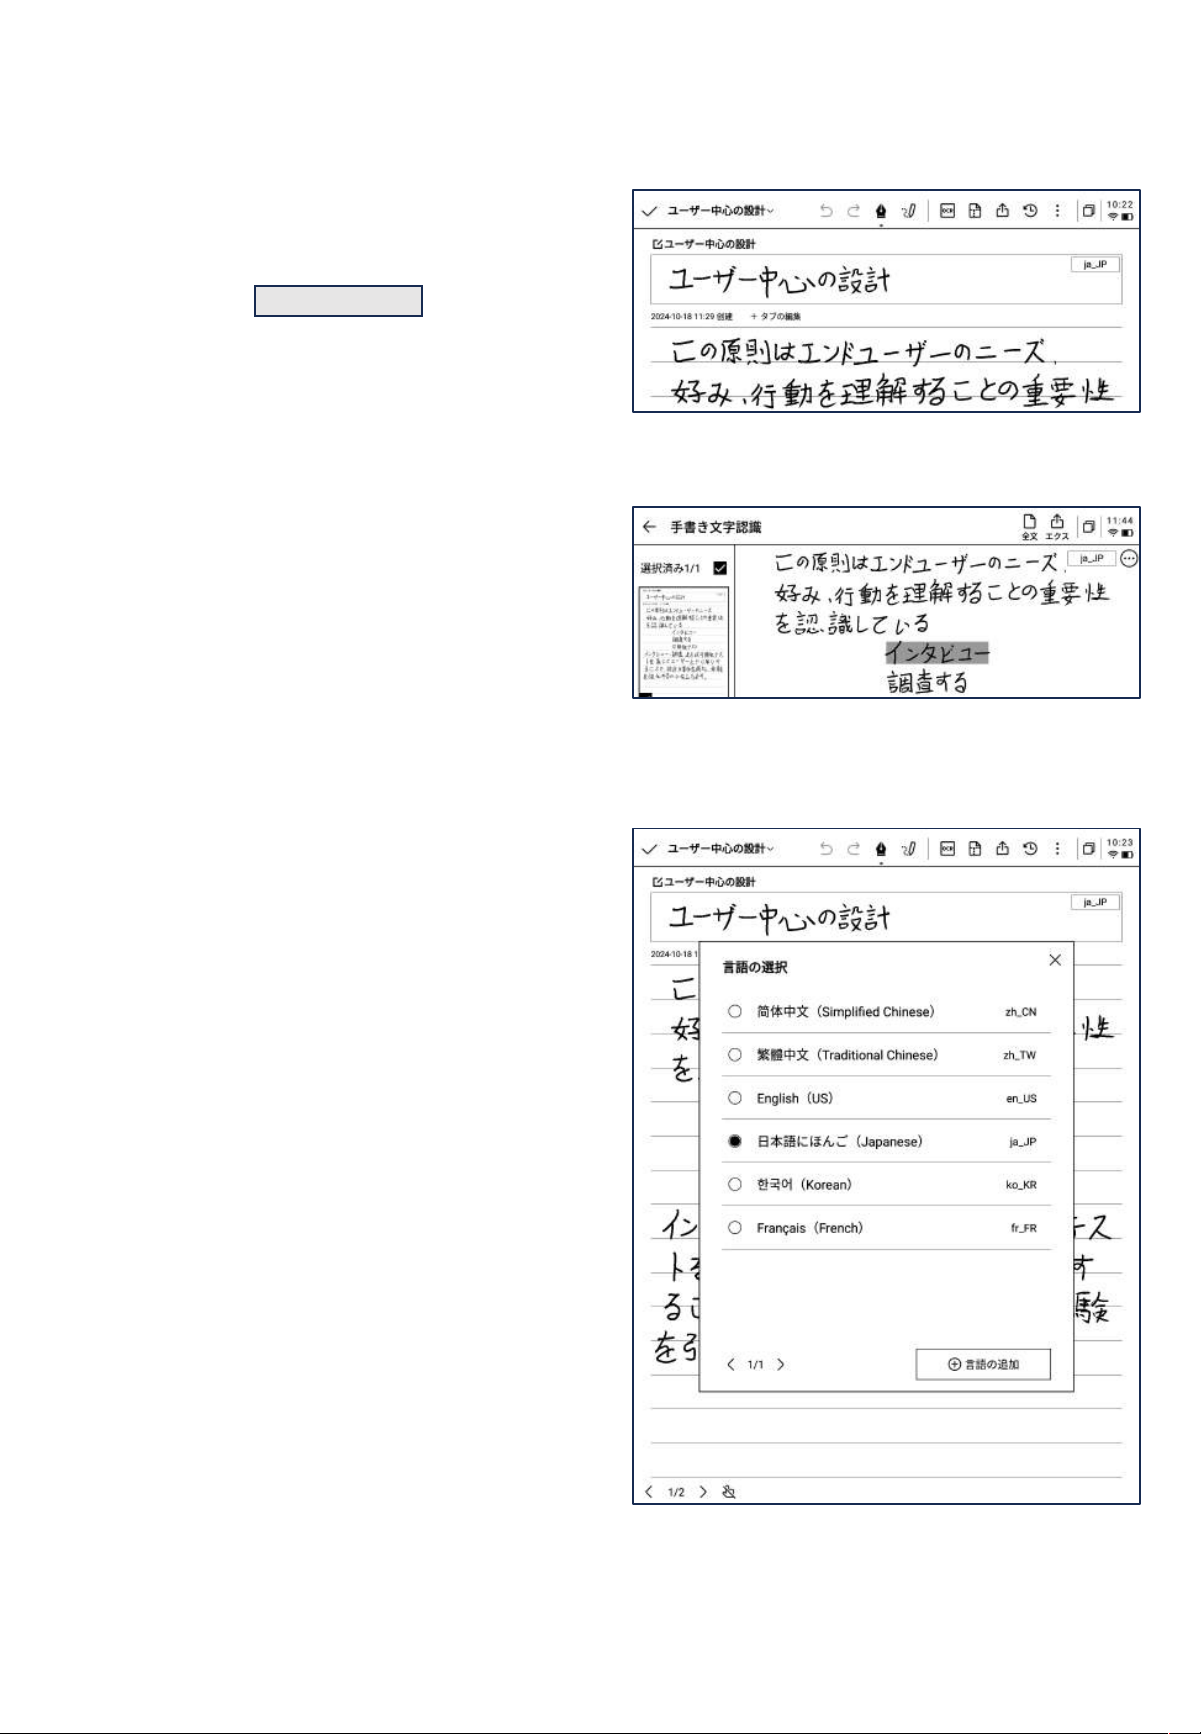
2.1.12 手書き認識言語の管理
En_US
-タイトルの 手書きエリア右上と、テキスト変換 エリアの
右上にある言語ボタンをクリックすると、手書き言語の
切り替えができます。
-デフォルトではシステム言 語に基づいて選択されてお
り、他の 言語 に切 り替える ことが できます 。
*一度切り替えると、全体が切り替わります。
*切り替え完了後も、すでに認識が完了した内容につ
いては再認識や変更を行いません。ただし、手書きの
内容が変更されると、新しく選択した言語にて自動で
再認識します。
-5つの言語がプリセットされています。
-インターネットで認識パッケージをダウンロードすると、
さらに多くの言語を追加できます。
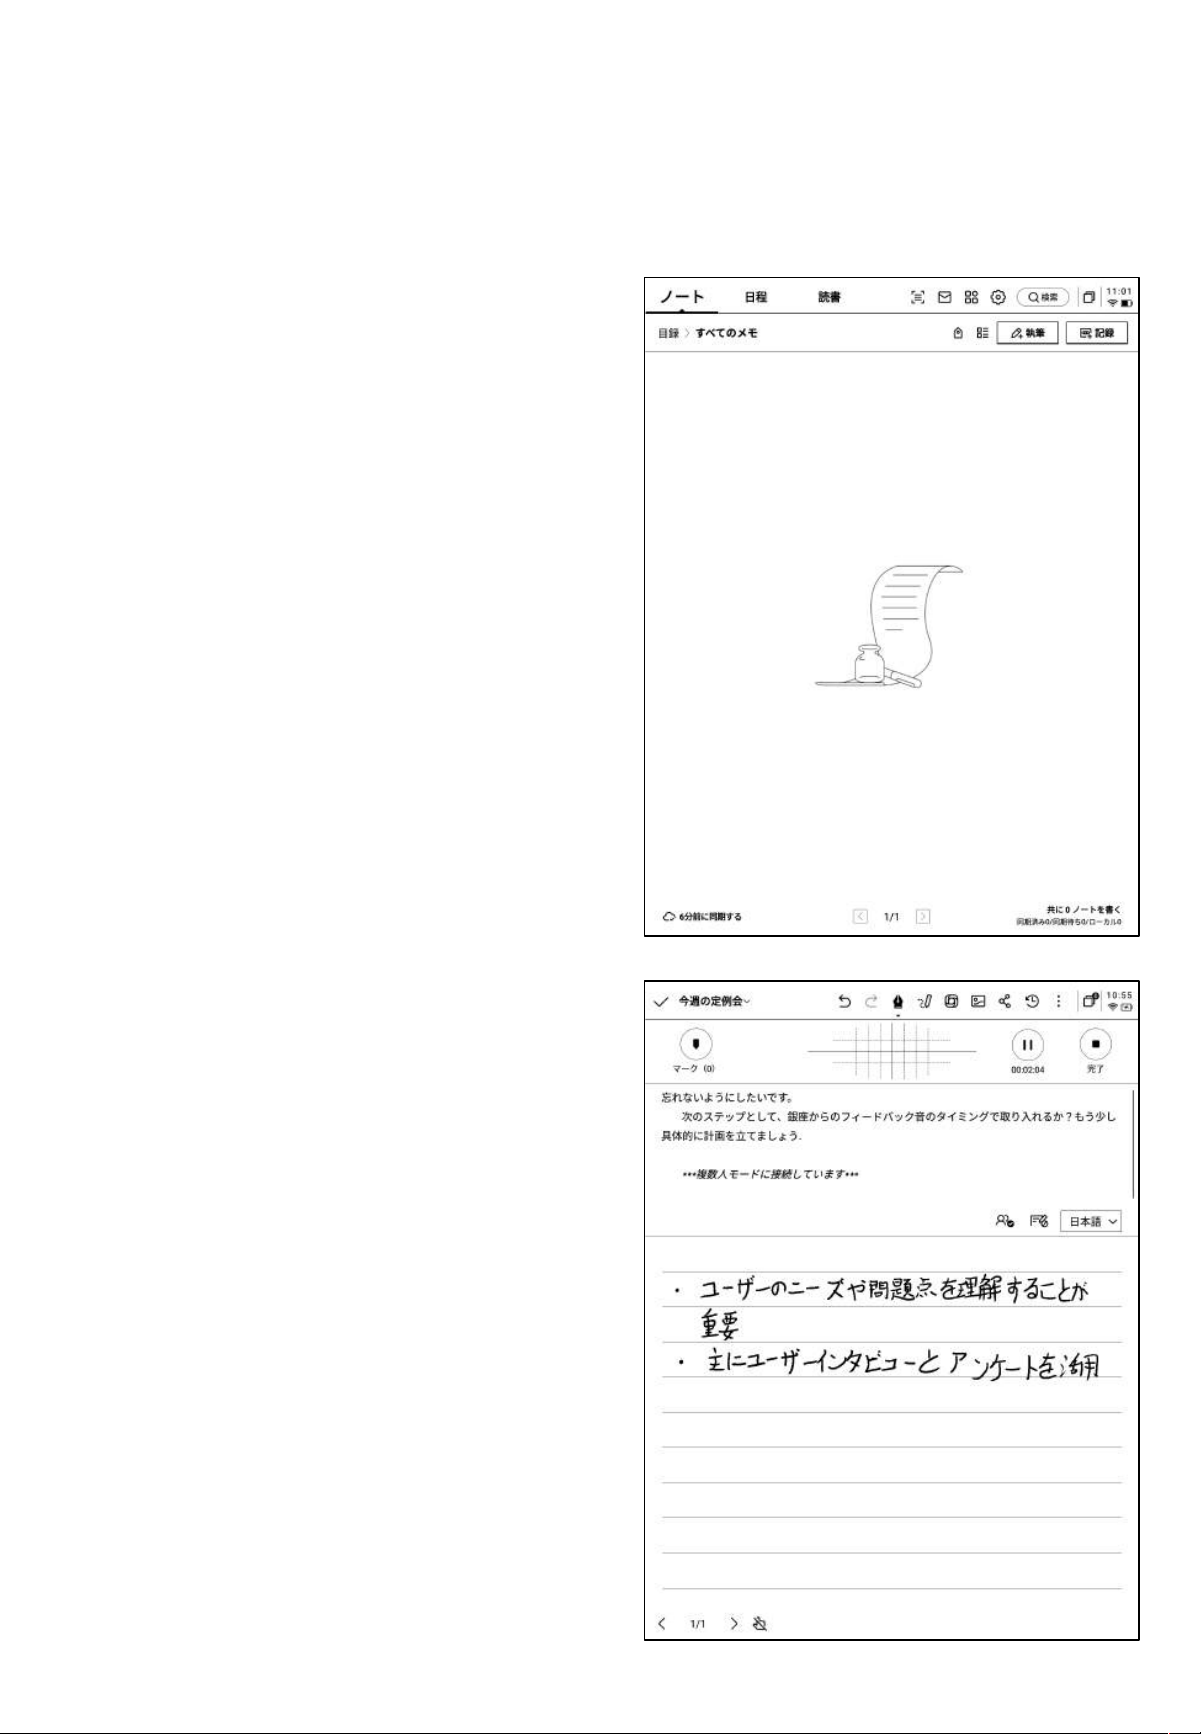
2.2 記録
2.2.1 新しい記録の作成
記録は新しい会議記録の方法であり、音声をリアルタ イム でテキストに変換できます。また、
音声の記録と同時に、手書き記録にも対応しており、会議情報のの完全な記録によって会議
後の振り返りがより便利になります。
-ノートペ ージで、【記録】ボタンをクリックすると新規作
成が完了します。
-新しい記録の作成が完成すると、録音テキスト変換
画面に入ります。
2.2.2 記録の構成
-記録は録音エリア、録音テキスト変換エリア、手書き
エリアの3つに分かれています。
2.2.3 録音エリア
タグ:会議中、重要な内容にタグ
を付けることで、会議後に直接頭
出しすることができます。
レーダー:会議中、リアルタイムで
話者の位置を表示し、話者の区
別をサポートします。
一時停止:録音を一時停
止します。
完了:録音を完了します。
前の文/次の文:前の文/
次の文にすばやく切り替え
て、録音を再生することが
できます。
倍速:録音再生速度を、0.5
倍から2.5倍まで調整するこ
とができます。
音量:録音再生
の音量を調整し
ます。
録音を続く:録音
を続けます。
Ø 録音完了
Ø 録音中
2.2.4 録音テキスト変換エリア
録音テキスト変換:会議中、音声をテキスト
に変換し、リアルタイム表示します。
話者情報:各話者の声紋の違いに基づいて話者を
区別します。クリックすることで名前を変更できます。
話者識別のオン/オフ:話
者識別機能のオン/オフが
できます。
フォーカスモードのオン/オフ:音声テキス
ト変換をバックグラウンドで実施し、音声テ
キスト変換結果をリアルタイムで表示しませ
ん。
言語とモードの選択:多言語の
認識と相互翻訳をサポートして
います。詳細は2.2.5をご参照く
ださい。
Ø 録音中
Ø 録音完了
すべて表示:すべてのテキスト
内容を開いて表示します。
置換:テキストの内容について検索
、置換することができます。
テキスト編集:テキストの内容
を手動で編集します。
2.2.5 言語とモードの選択
音声テキスト変換
-さまざまな言 語の選択が可 能です。地域によって異
なる機能を提供します 。
*ジア、オセアニア地域のユーザーは、14言語の音声
テキスト変換が利用できます(中国語、英語、日本語、
韓国語、フランス語、ドイツ語、スペイン語、広東語、ロ
シア語、マレーシア語、ベトナム語、アラビア語、タイ語、
インドネシア語)。
*北米、南米、ヨーロッパ、アフリカ地域のユーザーは、
8言語の音声テ キスト変換が利用できます(中国語、
英語、ハンガリー語、日本語、韓国語、フランス語、ド
イツ語、スペイン語)。
多言語翻訳
-多言語の相互翻訳機能をサポートしており、プリセッ
ト翻訳モ ードによりクリックするだけ で使用で きます。
-地域によって異なる機能を提供します。
*アジア、オセアニア地域のユーザーは、7言語の相互
翻訳機能が利用できます(中国語、英語、日本語、韓
国語、フランス語、ドイツ語、スペイン語)。
*北米、南米、ヨーロッパ、アフリカ地域のユーザーは、
8言語の相互翻訳機能が利用できます(中国語、英語、
ハンガリー語、日本語、韓国語、フランス語、ドイツ語、
スペイン語)。
2.2.6 手書きエリア
-手書きエリアでは、スタイラスペンを使って自由に手
書き記録を行うことができます。
*筆記モードと同様、スマートペン機能を使うことができ
ます。
-筆記中に頻繁に誤ってページをめくってしまう場合は、
タッチ禁止ボタンをクリックすることでジェスチャー操作
を無効に することができます。
2.2.7 記録終了後のクイック閲覧
-会議終了後、手書きの内容をクリックすると、手書き
内容に対応する録音部分を速やかに移動し、会議の
内容をスピーディーに振り返ることができます。
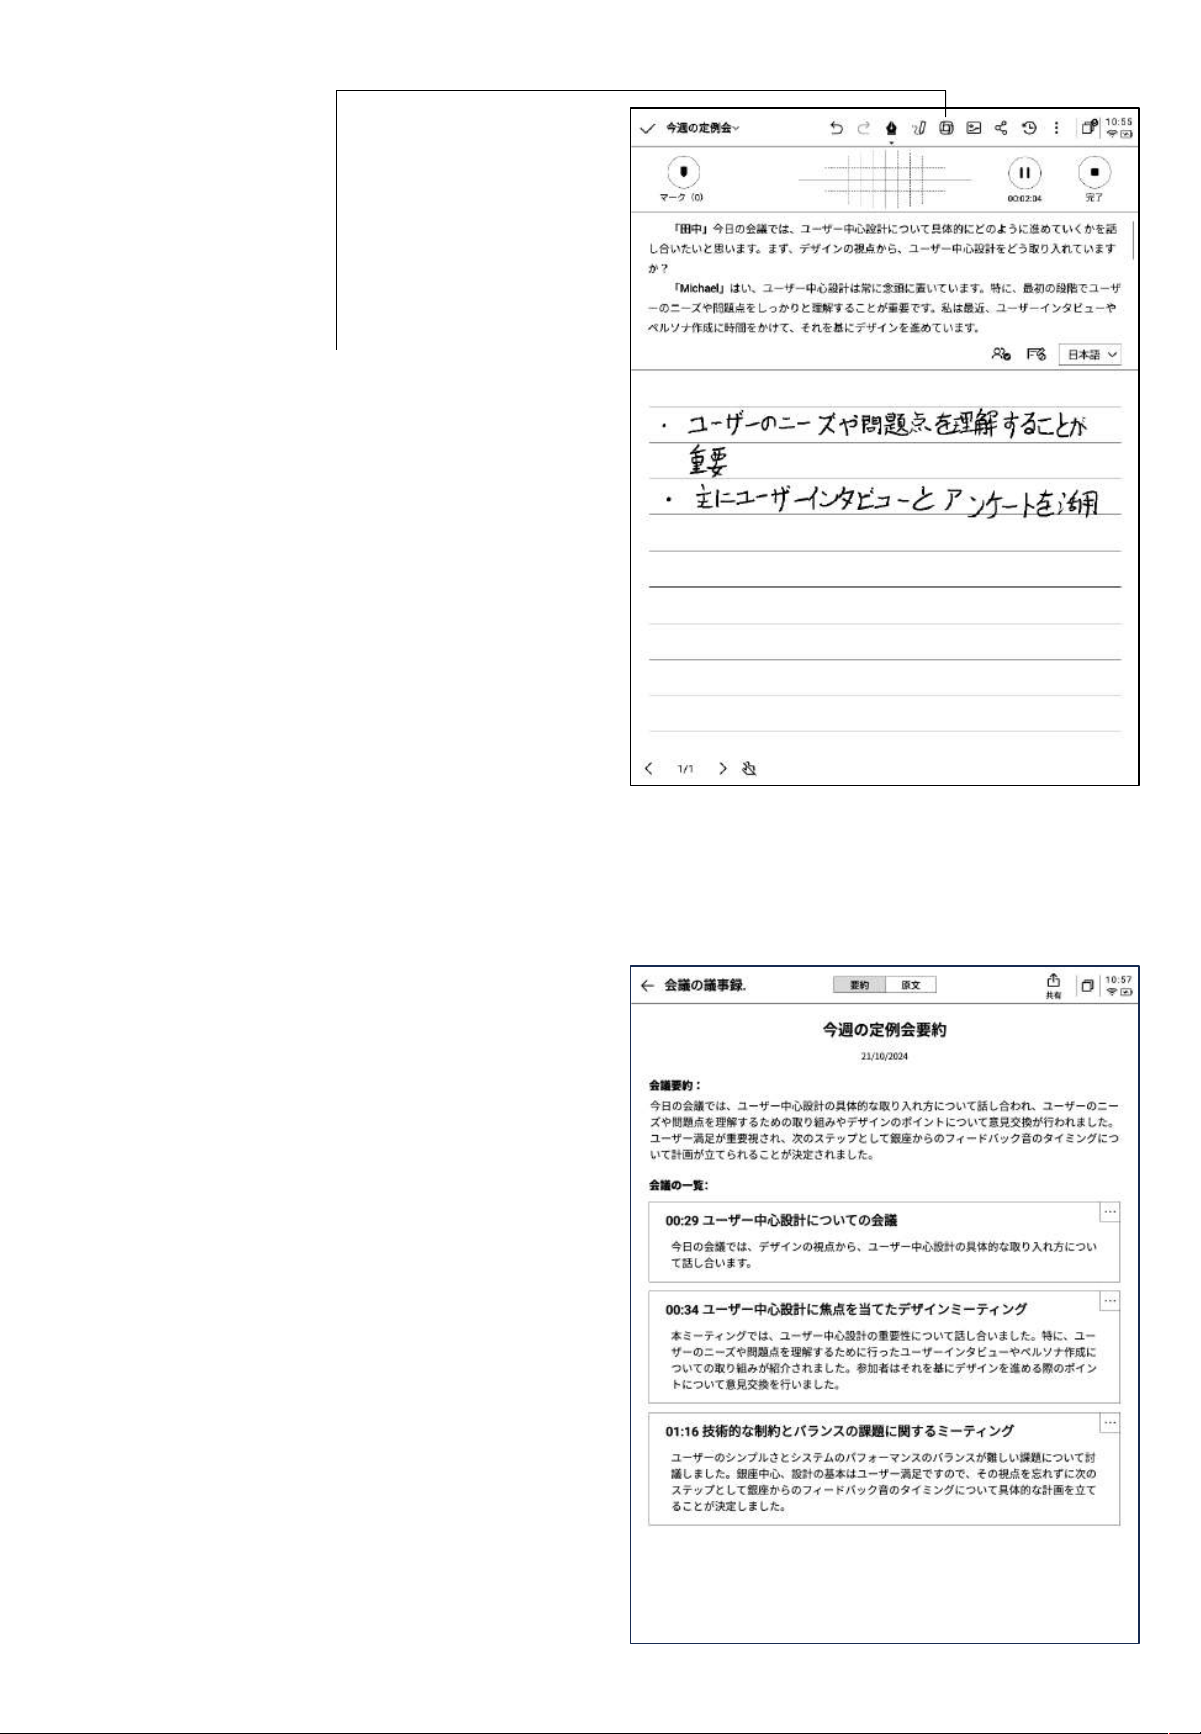
2.2.8 会議のまとめ
-会議終了後、会議のまとめボタンをクリックすると、テ
キストの内容に基づい て要約を行います。
*この 機能を使用 する場合、設定 画面で個 人の
OpenAI APIキーを設定する必要があります。
-会議のまとめと、会議の全内容表示の2つの内容を
提供します。
-エクスポートと共有が可能です。

2.3 ノート管理
-作成した筆記と記録はすべてローカルに保存され、
いつでもクリックして表示できます。
-ディレクトリをクリックすると、すべてのフォルダ情報を
表示できます。
-デフォルトフォルダが用意されてお り、すべての所
有者のないノートはデフォルトフォルダに保存されま
す。このフォルダは削除 できません。
-すべての ノート、フラグ付きノート、暗号化ノート、
ローカル ノート(クラウドに同 期され ていない )、削除
済みノートを含む、さまざまな分類が可能です。
-フォル ダとグ ループ を作成 してノー トの管理 を行う こ
とができます。
2.3.1 フォルダ管理
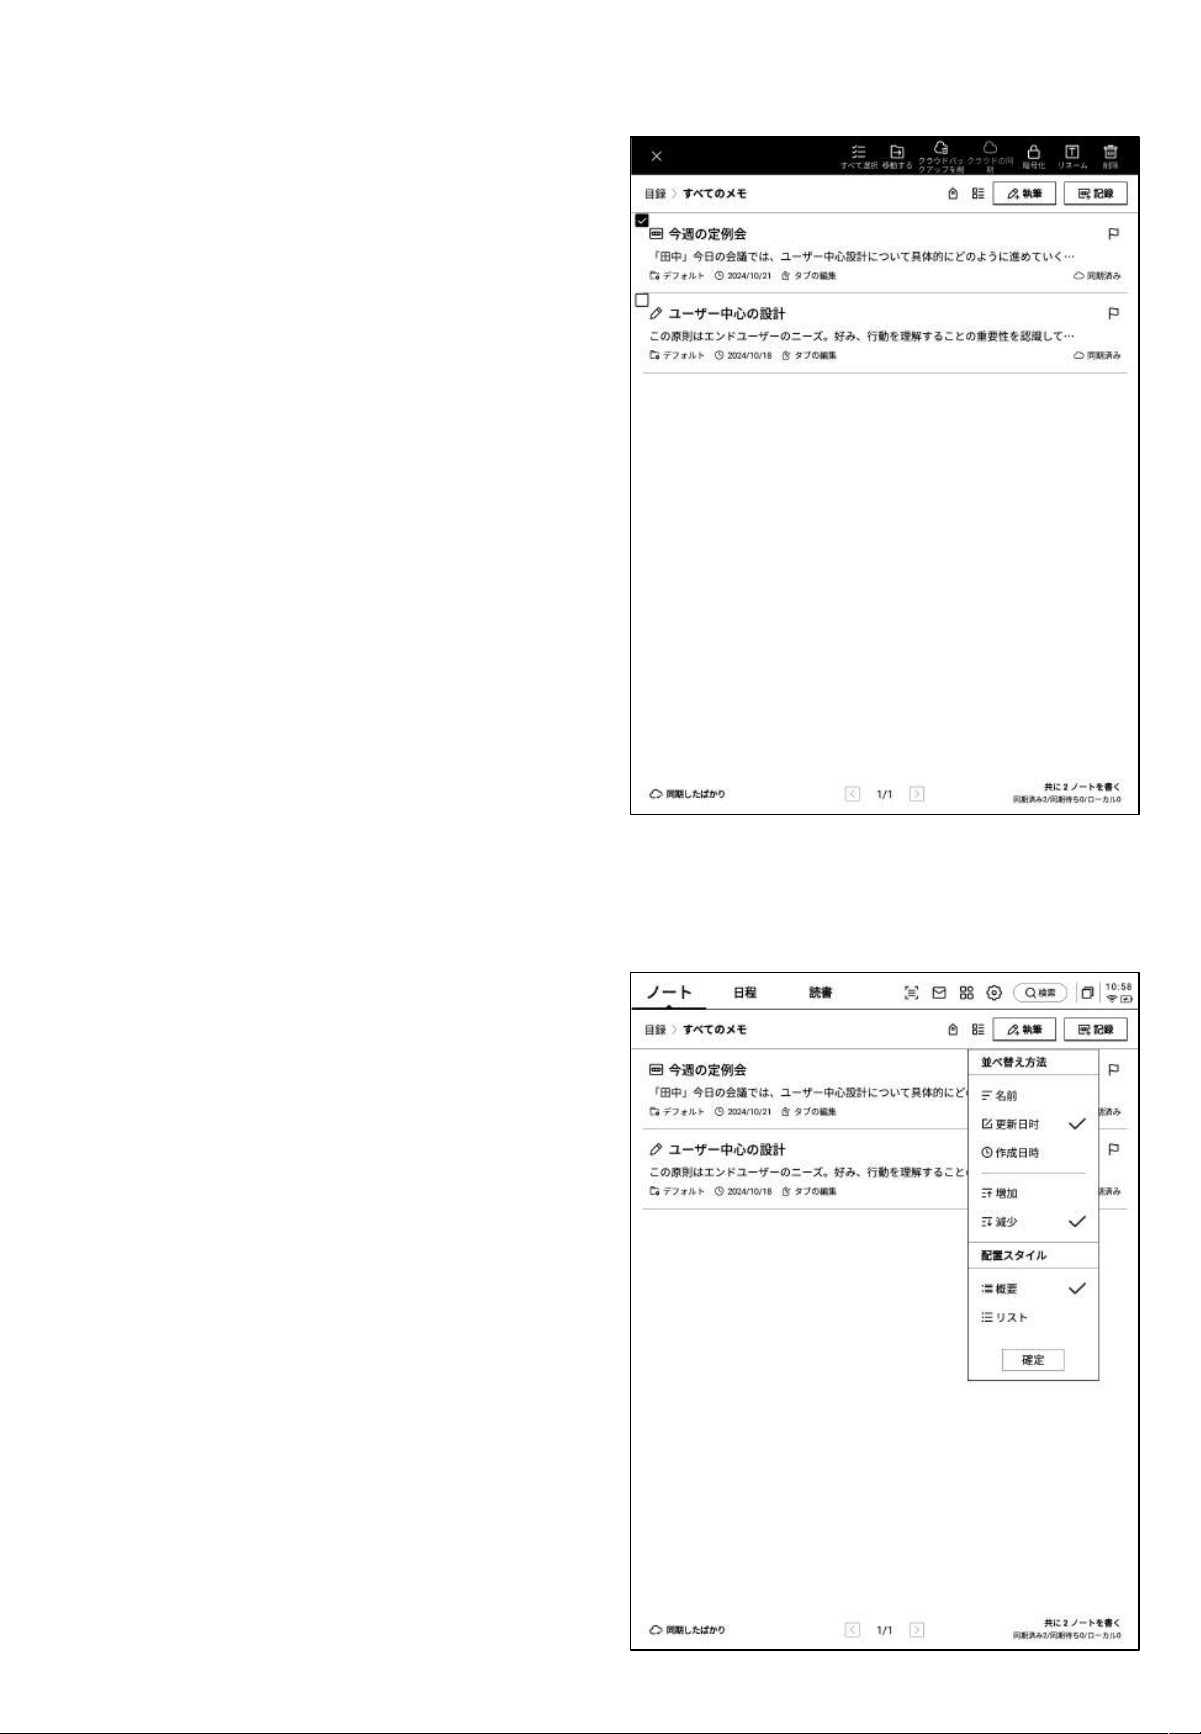
2.3.2 ノート管理
-ノートを長 押しすると、移動、アップロード、暗号化 、名
前の変更、削除などの操作が行えます。
-ソー トボタンをクリックすると 、各種の ソートが行 えま
す。
-要約形式とリスト形式の2種類のノート表示形式をサ
ポートしています。両者の違いはノート要約内容表示
の有無です。

2.3.3 タグ管理
すべてのタグ管理
ノートのタグ管 理
すべてのタグ管理
-タグ内 容の追加、削除、変更 ができます。
-タグに 基づいてノートのフィルタリングができます。
ノートのタグ管 理
-現在のノートにタグを追加したり、タグを削除したりで
きます。
-ノート内 でもこの操作を行 うことができます。
2.3.4 グローバル検索
-手書きや音声変換テキストの内容を検索し、スピーディーなジャンプと、検索した内容のハイライト表示が可能
です。
第
3
章 スケジュール
3.1 カレンダーとスケジュール
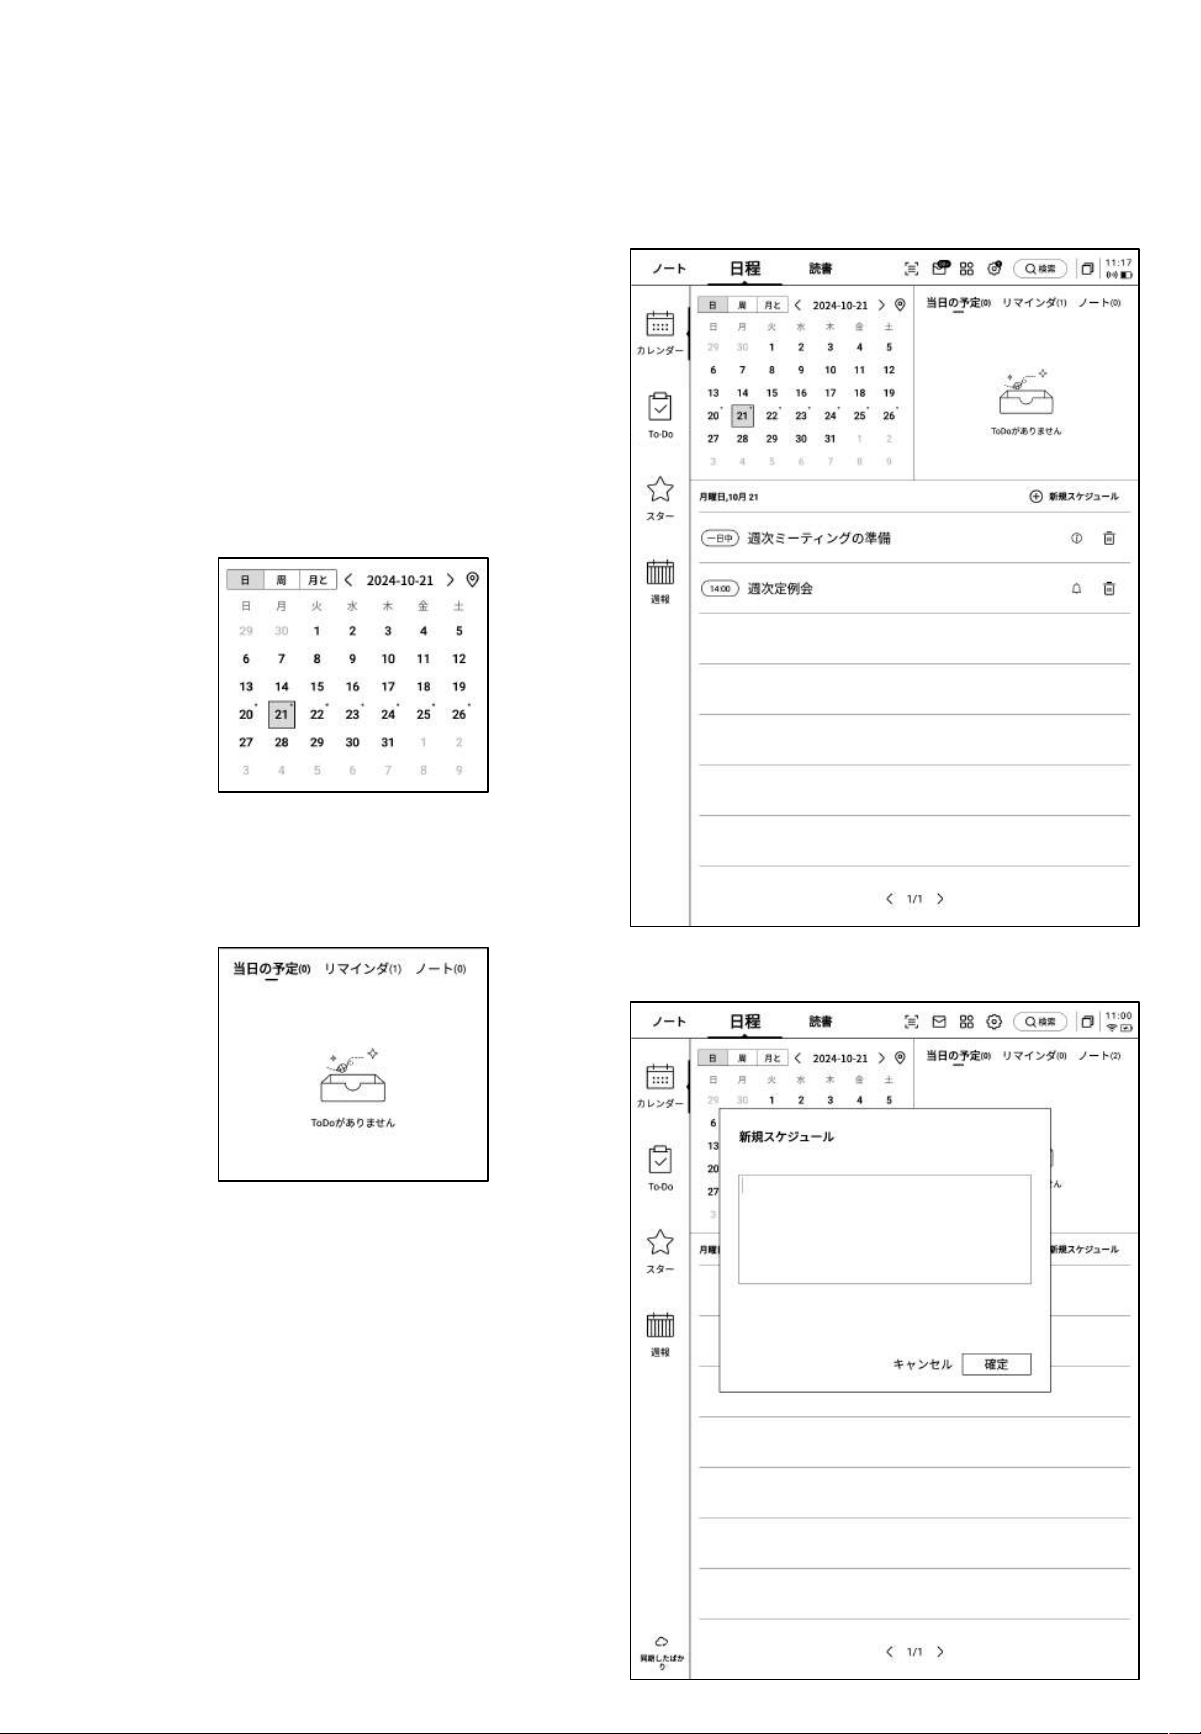
3.1.1 カレンダーの表示
-当月のカレンダー情報を表示します。年と月の切り替
えが可能です 。
-デフォルトでは当日のスケジ ュール情報を表示し、日
付をクリックすると他の時期のスケジュールを確認す
ることがで きます。
-日、週、月の3つのビューが可能です。
3.1.2 当日タスクの表示
-今日のToD oリスト、今 日の リマイ ンダー 、今日作 成 し
たメモの内容を表示します。
3.1.3 スケジュールの作成 と表示
-スケジ ュール新規作成 をクリックしてスケジュール内
容を入力することができます。スケジュール本文に時
間情報が含まれている場合、この情報を自動で読み
取り、スケジュールの開始時間とすることができます。
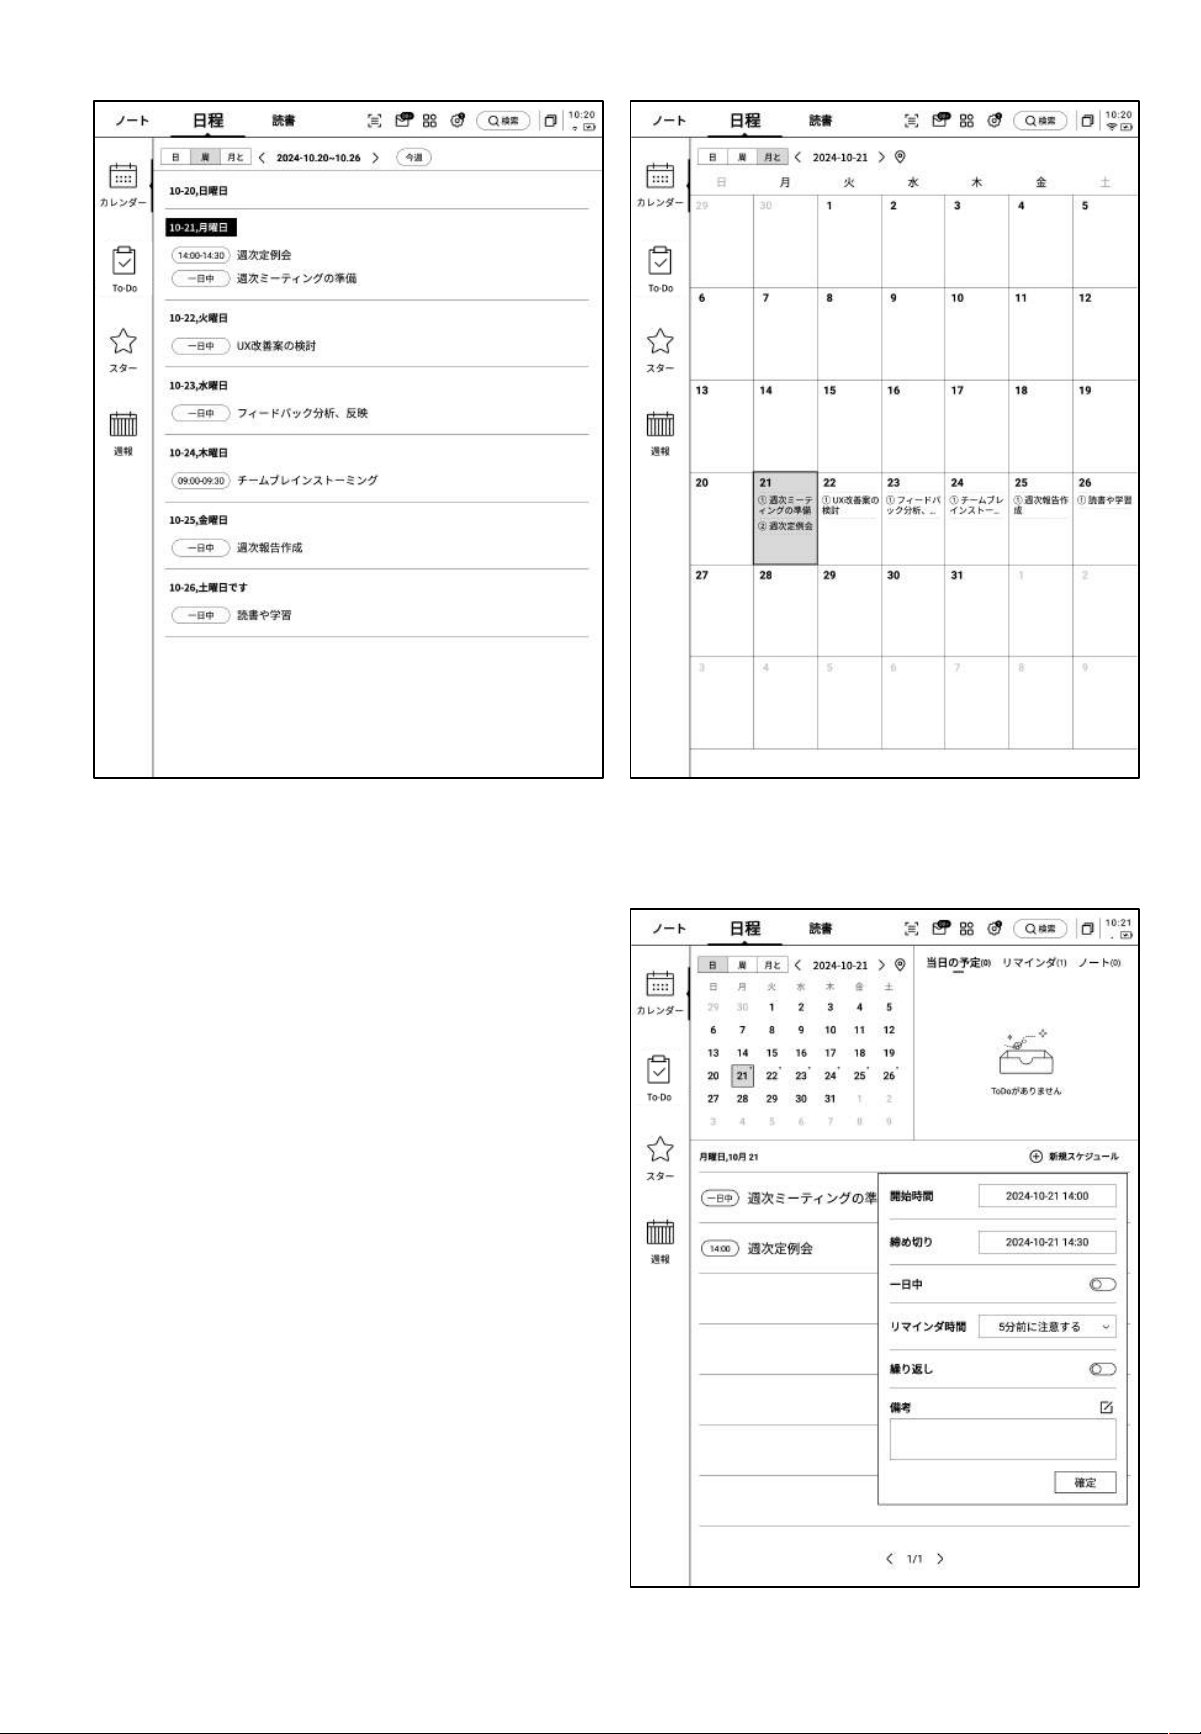
Ø 週間ビュー Ø 月間ビュー
3.1.4 スケジュール情報の編集
-スケジ ュール後方のボ タンをクリックすると、スケ
ジュール情報の編集ができます。
-スケジ ュールの開始時 間、終了時間、リマインド時
間、スケジュールの繰り返し設定、備考情報を設定
することができます。
3.2 ToDoリスト
-ToD o項目の作成、管理ができます。
ToDo項目の作成方法
-新規作成をクリックして、新しいTo Do 項目を作成しま
す。
-【ス マ ート ペ ン 】ア イコ ン を使 っ て ノー ト にグ ラ フ ィック
マークを付けたり、自動収集 したりできます。
-【ToDo】の 後 方 ボ タ ンを クリ ックす る と、 締 切 時 間 や リ
マインド時間の設 定が可能です。
-ToD oのピン留め、移動、削除などが行えます。
-【ToDo】前 方 の チ ェ ックボ ッ クス を クリッ クす ると 、完
了タスクとして設定できます。ページ を更新すると、こ
の項目は自動的に完了リストに移動して表示されま
す。

3.3 フォーカススター
フォーカス スターの 作成方 法
-筆記または記録の途中でスマートペンを使用し
て、重要な事項の 前に星印を描きます。星印が
ある行の内容が自動的に収集され、表示されま
す。
フォーカス スターとは
-日常の記録中で重要な事項があった場合に
マークを付けますが、マーク内容は 会議後にす
ぐに整 理しない と紛 失しや すくなります。フォー カ
ススター機能では 、日常の記 録中にマークした
内容を自動的に収集し、集中表示することがで
きます。
-内容をクリックすると対応するノートに直接ジャ
ンプすること ができます 。
-フォー カススター の内 容につ いて、継 続フォロー、
ToDoに追加、編集、削除などのさまざまな操作
を行うことができま す。
3.4 週報
-1週間のすべてのスケジュール、完了したタスク、参加した会議情報を表示し、今週のすべての事項を
スピーディーに振り返ることができます。
-週報はエクスポートすることができます。
第
4
章 閲覧
4.1 書籍のインポート
-サポートされている書籍フォーマットはpdf、epub、
mobi、txt、azwです。
-USBインターフェースを使用してデバイスとコンピュー
タを接続し、電子書籍 を【Bookshelf】フォル ダ に 移 動
することができます。
*注意 現時点では【Bookshelf】フォル ダ 内 で の グ
ループ化はサポートされていません。
-WiFiによる転送方式をサポートしており、クリックする
と詳細な操作 方法を確認できます。
4.2 PDF書籍の閲覧
-閲覧中はスタイラスペンを使用して注釈を付けるこ
とができます
-ペンを選択モードに切り替えると、書籍の内容を範
囲選択することができます。
-選択した内容のハイライト、抜粋、検索、コピーなど
の操作が可能です。
-読書ノートを作成できます。
4.2.1 閲覧の基本操作
4.2.2 PDF閲覧設定
Ø 画像設定
Ø テキスト設定
Ø テキスト設定
-上記のページ設定に加えて、明るさ設定も可能です。
-その他の設定では、ページの更新頻度、ページめく
りモー ド、表示 効果 などの 詳細 設 定が 可能 です。
4.2.3 オーディオブックを聞く
-中国語、英語、日本語、韓国語の電子書籍に対
して、オーディオブック機能が提供され ており、イ
ンターネットに 接続す るだけ でオンライン再 生で
きます。
注意:現時点ではテキスト形式のPDFのみサポ
ートしており、スキャン版のPDFは一部の機能操
作に対応していません。
-オーディオブックを再生中は、章の選択、速度
の調整、タイマー設定などの操作が可能です。
4.2.3 読書ノート
-会議中に行われた手書きの注釈、ハイライト、
抜粋、メモなどの内容はすべて統一して収集さ
れ、完全な読書ノートが生成されます。
-読書ノートは書籍の章に従って順番に閲覧でき
ます。
-Word/PDF形式でのエクスポートをサポートし
ています。
4.3 その他のフォーマ ッ トの書籍閲覧
-基本的な閲覧操作はPDFの閲覧と同じですが、PDF以外の電子書籍はフォントサイズ、コント
ラスト、余白、行間、フォントなどを調整 することができます。
4.4 ブックスト ア
-現時点で、ブックストアは一部の閲覧リソースの
ダウンロードに対応しています。
表紙をクリックすると、書籍の詳細ページに移動
します。
-目次の表示、ブックシェルフへの追加、閲覧開
始などの操作が可能です。
*現時点で、ブックストア内の書籍はすべて無料
になっており、自由にダウンロードして読むことが
できます。
4.5 Officeセンター
-Word、PPT、Excelの3つのOffice形式ドキュメント
の表示と編集をサポートしています。
Ø インポート方法
-USBインターフェースを使用してデバイスとコン
ピュータを接 続し、ファイル を【Office】フォ ル ダ に 移 動
することができます。
*注意 現時点では【Office】フォル ダ 内 で の グ ル ー プ
化はサポートされていません。
-WiFiによる転送方式をサポートしており、クリックす
ると詳細 な操作 方法を確 認できま す。
Ø サポートされているフォーマット
4.5.1 フォーマットとインポート
4.5.2 Word文書のプレビューと編集
-Word文書のプレビュー画面に入ると、閲覧とペー
ジめくりが可能です。また、手書きペンを使用して注
釈を付けることができます。
-閲覧中に録音ボタンをクリックすると録音が可能で
す。
-録音終了後、録音内容と録音変換テキスト内容を見
ることがで きます。
*録音テキスト変換モードのフォントは、現在設定され
ているシステム フォントとなります。
-編集ボタンをクリックすると、システムがWPS
Officeアプリケーションを使用してファイルを開き、
ファイルの 編集 操作を 行うことが できます 。
4.5.3 Excel&PPTドキュメントのプレビューと編集
ヒント PPTドキュメントは横向きで使 用すると、より良い効果 が得られます。

4.6 クラウドストレージ
-OneDriveのクラウドストレージのログインと使用に対応しています。
-ログ イン画面の 指示 に従ってログ インを完了 します(写
真はOneDriveドライブの例)。
-クラウ ドストレージ のファイル 内容 を閲覧 したり、ダ ウン
ロードして表 示した りできます。
*デバイスがサ ポートするフォーマットのみを表示すること
ができます。
第
5
章 その他の機能
5.1 メール機能
-トップペ ージの 右上に メールボックスの 入口が あり、
クリックするとメー ル画面 に入 ります。
-初めてメールボックス画面に入る際は、個人のメー
ルボックスタイプを選択する必要があります。現在、
すべての主要なメールボックスプロトコルをサポート
しています。
-Gmailメールボックスをクリックすると、直接Gmail
メールボックスのログイン画 面に入ることができます。
-他のタイプのメールボックスは、下部の「その他の
メールボックス」をクリックしてログインします。

-【Gmail】ログ イ ン画 面 は Gmailによるもので、個人
のメールアカウントとパスワードを入力する必要が
あります。また、ログイン途中でGmailによる認証プ
ロセスを行 う必要が あります。
-プロセスに従って進めることで、ログインが完了し
ます。
-【そ の 他 の メ ー ル ボ ック ス】ロ グ イ ン画 面 で は 、メ ー ル
アカウントとパスワードを入力します。一般的に、パス
ワードは認証コードです。具体的な手順は次のとおり
です。
❶メールボックスのページでアカウント設定の中から
認証コード設定を探します。
❷一般的には、サードパーティアプリケーションにロ
グインする際に用いる認証コードが提供されます。直
接生成が可能で、認証コードは通常複雑なものに
なっています。
❸認証コードを取得した後、認証コードをパスワード
としてメールにログインします。
-サーバー情報の手動設定が可能です。この機能に
は4〜5ステップが必 要で、主に一部企業 のメール
ボックスのログインに用います。
-アカウントのパスワード情報、受信&送信サーバー
を設定する必 要があり、手順に 従って関連情 報を入
力するとログインが完了します。
-ログ インできない 場合は 、以下の メールに お問い 合
わせください。
ainote_userfeedb[email protected]
-ログ インが完了 すると、受信 したメー ル情報 を確認
できます。
-左側のツールバーをクリックすると、受信トレイ、送
信トレイ、下書きトレイ、ゴミ箱などの内容を確認する
ことができます 。
-2種類のメール作成方法をサポートしています。
❶手書き スタイラスペンを使用して下 の空白部分
にメールを手書きすることができます。手書きが完
了したらそのまま送信でき、受信者は手書きの内容
をそのまま 見ることができます。
❷キーボード キーボードを使ってテキストを入力し
ます。
*手書きエリアに内容がある場合、キーボードモード
に切り替えると、手書き内容が自動的にクリアされま
す。
-メール をクリックすると詳細を表示 できます。
-返信、転送、削除などの基本操作ができます。
-メール 画面でのメール 間の切り替えが 可能です。
-メール ボックスのアドレス帳が管理 でき、新規追加
ボタンをクリックすると追加することができます。
-
やり取りのあるメールアドレスの連絡先情報を自動
で収集します。
-現在のメールボックスの送受信サーバー設定ができ
ます。
-
複数のメールボックスにログインして表示すること
ができます。
-
現在のアカウントをログアウトします。
-メール を確認する際、メール内の 添付文書 ファイル
をダウンロードし、完了 すると開いて確 認できます。
-
すべてのメール添付ファイルがまとめて表示されま
す。
注意:すべての共有方法において、メールによる共有形式が利用できます。事前にメールアカウント
にログインする必要があり、ログインする とメールを使用して内容を共有できます 。
5.2 スキャン機能
-本機には500MPのカメラが搭載されており、紙文書
のスキャンに用いることができます。スキャンした
ファイルは 本機 に保存 でき、いつ でも閲覧 できます 。
- トップペ ージの右 上にあ る【スキャン】ボタンをクリッ
クすると、スキ ャン画面に 入ります 。
-スキャン画面に 初めて入る際は、右上 の新規作成
ボタンをクリックして新しいスキャン文書を作成する
必要があります。
-この ページでは 、スキャンした文書 の管理もできま
す。
-撮影後、処理が必要な範囲を選択し、画像内の原
点をドラッグして移動できます。
-画像の向きを回転できます。
-「確 認 」を クリ ックす る と 、画 像 処 理 が 行 え ま す。
-「新 規 作 成 」を クリ ック する と 、撮 影 画 面 に 入 りま す 。
-左下のアルバムをクリックすると、ギャラリーアルバ
ム内の画像を選択して処理できます。
-上方には、1枚撮影するとすぐに処理する単ページ
モード、複数の画像を撮影して一括処理する複数
ページモードの2モードが用意されています。
-撮影ボタンをクリックすると、撮影が完了します。
*電子インク画面の更新速度が低いため、撮影中に
揺れが大きいと鮮明に撮影できません。撮影時はで
きるだけ安 定を保つ必要 があります。

-ページ上でスタイラスペンを使用して自由に書き込
むことができます。
-処理が完了すると、処理結果が表示されます。
-この コンテンツをノートにエクスポ ートします。エク
スポート後はノートリストで表示できます。
-PDFにエクスポートして、ブックシェルフで確認でき
ます。
-処理範囲の再選択が可能です。

第
6
章 設定
-右上の設定ボタンをクリックすると、設定画面に入
ります。
-プルダ ウンメニューでは、簡単な設定操作を行うこ
とができます。また、その他の設 定をクリックして設
定画面に入ることもできます。
-
アカウントセンター
-アカウントの基本情報管理ができます。
-
ノートの同 期
有効にすると、完成したノートを自動的に同期します。
-
共有管理
共有したノートの内容を確認したり、共有をあらかじ
めオフにしたりすることができます。
-
ノート閲覧 パ ス ワード
ノート閲覧パ スワードの設 定と管理が できます。設
定するとノートが暗号化され、閲覧するにはパス
ワードの入力が必要になります。
-OpenAI API
キー設定
個人のOpenAI APIキーを入力して認証が成功する
と、大規模AIモデルの機能を使用することができま
す。
-WiFi
接続
現在近くにあるWiFi情報を表示し、クリックすると
接続できます。
-アカウントセンターでは、認証用のメールアドレス
の変更や、アカウントの削除、現在のアカウントか
らのログ アウトが 可能 です。
-アカウントをログアウトすると、現在のアカウント
で作成した ノートの内容を表示できなくなります。
-アカウントを削除すると、現在のアカウントに関連
するすべてのデータ情報が削除 されますので、慎
重に操作してください。
-Bluetooth
設定
イヤホン、スピーカー、キーボードなどのデバイス
をBluetooth接続できます。
-
画面投影ツール
公式サイトから投影ツールをPCにダウンロードすると、
本機とPCが同じネットワーク環境にあればリアルタイ
ムで投影を行うことができます。
ダウンロード
URL
https:// a2sgp-www-ap1.iflyoversea.com
-
日付と時刻
手動で時間情報を設定し、タイムゾーンを選択することができます。
-
明るさ設定
デバイスの読書灯の 明るさを冷色、暖色の2種類から設定できます。
-
壁紙と署名の設定
壁紙と署名の変更ができます。
-
言語と地域
システム言語と地域が変更できます。
*注意 地域を変更するとサーバーの変更が生じる可能性があるため、慎重に選択してください。
-
バッテリー残量表示
-バッテリー残量をパーセント表示します。
-
回転設定
デバイスのデフォルトの回転方向が 設定できます。
-
ペン本体ボタンのカスタム設定
直線を描く、選択して消去する、スマートペン、閉じる
などの機能 をサポートしています。
-ジェスチャー設定
ジェスチャー操作や終了操作をカスタマイズできます。
-アクティブバー設定
アクティブバーのチュートリアルと終了操作ができます。
-
スリープ時間の設定
-
シャットダウン時間の設定
本機のプライバシーポリシー、ユーザー合意事項、法
的関連情報などの文書を表示します。
ロック画面パ スワード と指紋情 報の 設定が できます。
メモリやシリアル ナンバー、IPアドレスなど本機の基本
情報を表示します。
-デバイス使用 中に発生した問題をフィードバックし、迅
速に対応および応答します。
-提供されたメールアドレス情報を通じて問題のフィー
ドバックを行います 。
-ファーム ウェア の更 新情報 を確認 できます 。デバイス
の更新情報は不定期にプッシュ送信します。
-プルダ ウンメニューでも非常に便利なコントロールセ
ンターが 用意され ており、一部 の基 本操作 ができます 。

本製品の使用に関する説明は以上です。 使用中に説明書に記載されてい
ない問題が発生した場合は、いつでもお問い合わせください。
【
AINOTE mobile
】アプリは非常に重要なアプ リであり、 現在はモバイル端
末のみをサポートしています が、将来は
PC
端末でのダウンロードと使用も
サポート予定です。ア プリは以下の
QR
コードからダウン ロード できます 。

用戶使用手冊
iFLYTEK AINOTE Air2
第一章 快速開始
1.1 硬體介紹
12
1
電源鍵
開機:長按此鍵3秒即可啟動智慧辦公本。
關機/重啟:長按此鍵3秒,螢幕顯示關機/重啟對話方塊
*注意:長按電源開關鍵8秒,可強制關機。
2
USB Type-C
3
3
充電指示燈
*充電時,充電指示燈點亮,紅色表示未充滿,綠色表示已充滿
4
4
靈動條
*按住左下角圖示向右滑動,打開【Open Chat】介面進行問
答
*按住中間區域向右滑動,支援進入快速翻頁模式
*按住右下角按鈕向左滑動,快速創建便簽
5
後置攝像頭
6
5
6
閃光燈
7
8
9
7
橡皮擦
8
自訂按鈕
9
筆芯
*可購買替換裝更換
-【靈動筆(默認)】
按壓滑動支援圈選、加入待辦,圖形標記
-【直線】
按壓滑動支援畫一條直線
-【圈選擦除】
按壓圈選手寫內容,即可清除手寫內容
-【關閉】
關閉按鈕功能,防誤觸

1.2 設備啟動
1
2
ü 長按電源鍵開機後,進入啟動流程
*首次開機,啟動時間會較長,請稍等
ü 選擇系統語言
*請慎重選擇使用地區,切換地區可能會導致伺
服器的切換,不同伺服器之間資料暫不互通
點擊
start
開始啟動
ü 選擇使用地區
*亞洲、大洋洲地區伺服器部署在新加坡
*北美洲、南美洲、歐洲、非洲地區伺服器部署在
法蘭克福

1.2 設備啟動
3
4
ü WIFI連接
*支持進行WIFI的手動添加
ü 時區與時間
*支援時間展示方式
*默認選擇自動判斷時區,支持手動設置
1.2 設備啟動
5
ü 隱私與協議
*請仔細查看辦公本的隱私政策與使用者協議,
同意後可進入下一步
6
ü 帳號註冊
*支持使用郵箱進行帳號的註冊,添加獲取的郵
箱驗證碼及密碼即可完成註冊
ü 帳號登錄
*填入郵箱及密碼即可進行登錄
ü 遊客模式
*遊客模式,支援使用辦公本大部分基礎功能,
過程中支援登錄帳號體驗全部功能
1.2 設備啟動
6
7
ü 筆記自動同步
*登錄成功,預設自動開啟筆記同步功能,筆記
聯網創建完畢後,會自動上傳至雲端保存
*支援關閉自動同步,所有筆記保存在本地
ü 鎖屏密碼設置
*支援設置6位元數密碼
*鎖屏密碼如果忘記,可以通過郵箱驗證的方式
找回密碼

1.2 設備啟動
7
ü 簽名設置
*支持使用電磁筆在書寫框中進行書寫,書寫內
容會持續展示在鎖屏頁面上
ü 啟動完成!
*可以掃描下方二維碼,下載AINOTE mobile
APP
*簽名同樣可以在設備設置模組中進行編輯
8
✔
AINOTE mobile APP是辦公本的配套APP,支援筆記的同步與多端查
看,支援在讀寫客APP端進行筆記的編輯與分享,筆記管理更高效

1.3 快捷操作
快捷全域控制欄
從設備右上⻆向下滑動,可以快速打開下拉式功能表,進⾏WiFi、
投屏、⾳量、背光等功能設置
1.3 快捷操作
從螢幕下⽅向上滑動,打開多⼯介⾯,⽀援快速在應⽤間進⾏切
換,關閉應⽤後臺
多⼯切換
1.3 快捷操作
❶ 打開開放式問答介⾯,⽀援與⼤模型進⾏問答
❷ 在閱讀等多⾴⾯介⾯,進⼊快速翻⾴模式,翻⾴速度取決於⼿指
滑動的速度
❸快速打開快捷便簽,⽀援⼿寫記錄
如何使⽤靈動條?
2.1 寫作
*在寫作中,可以使用電磁筆進行隨意的書寫、
繪畫,多應用於會議記錄、靈感創作、個人學習
2.1.1 新建寫作
-可以使用電磁筆在標題框中進行手寫,手寫內
容會被自動轉為印刷體文字作為標題
2.1.2 標題書寫
-手寫辨識語種支持自訂選擇,點擊右上角語種
縮小按鈕,即可進入語種選擇介面,添加/選擇
需要識別的語種資訊,全域適用
2.1.3 筆形選擇
-點擊筆形按鈕,即可進行筆形、筆粗、橡皮等
功能切換
-在筆記頁面,點擊【寫作】按鈕即可完成新建
第二章 筆記
2.1.4 怎麼切換靈動筆
-點擊靈動筆按鈕,即可完成切換
-再次點擊靈動筆,即可彈出操作指引
-支援查看詳細操作指引
*提示:按壓筆身按鈕進行圈選,可以快速進入靈動筆
模式
-如果想要使用靈動筆,除了通過點擊上方工具列的靈
動筆圖示進行切換外, 還可以直接按壓筆身按鈕進行使
用,筆身按鈕還支援自訂成其他能力
2.1.5 靈動筆提供了以下能力
功能1:套索

功能3:待辦
功能2:關注星
功能4:添加標題
2.1.6 圈選查詢
-使用靈動筆圈選手寫內容後,支援點
擊AI助手進行查詢,設備會自動識別
圈選範圍內的手寫內容,並轉化為文本
進行查詢
*需要在設置介面,配置您個人的
OpenAI API Key進行使用

2.1.7 手寫轉文字
-提供手寫轉文字的能力,點擊按鈕即可生成,
手寫內容會根據所選擇的語言來進行識別
*所有識別均為本地識別,無需聯網
-上方展示手寫內容,下方展示轉文本的內容,
支援點擊查看對應關係
-支持點擊上方【全文】查看全文轉文字內容
-支持點擊上方【匯出】匯出與分享轉文本內容
2.1.8 寫作模版
-點擊模版按鈕,即可選擇模版
-點擊範本圖片,即可在當前頁面的下一頁插入
所選擇的範本
-雖然只插入了一頁,但是當你翻頁的時候,可
以選擇快捷插入這個範本
-支援插入自訂的範本樣式
-使用資料線講設備與電腦進行連接,將提前準
備的範本圖片提前傳輸至【Template】檔夾,即
可進行選擇使用
2.1.9 筆記分享
-提供網頁、word、pdf三種分享類型
-可以通過二維碼、郵件、匯出至書架三種方式
進行分享
2.1.10 網底設置
Q:網底與範本的區別是什麼?
-點擊更多按鈕,即可看到網底設置介面
-點擊後方的箭頭,可以查看詳細設置介面
-提供了橫紋紙、豎紋紙、空白紙、點狀紙、方
格紙等多種網底選擇
-支援設置某個網底為默認
A:設置網底後,當前筆記所有預設新建的紙張均為該網
底,可以將某一個網底設置為默認,則下次新建一篇新的
寫作時,會使用默認的網底進行創建;而本設備中,範本
是單獨插入的,支持一篇寫作中包含多種範本的樣式
2.1.11 更多應用
-頁面刷新:支持刷新當前頁面,由於墨水屏螢幕特性,長時間使用容易出現殘影,刷新可以清除
-筆記同步:支持將本篇筆記同步至雲端,使用【AINOTE mobile】APP進行查看與編輯
-刪除當前頁面:僅刪除當前所展示的頁面
-頁面管理:進入本篇筆記的頁面管理介面
-搜索:支援搜索本篇筆記內部的手寫內容
-加密:針對本篇筆記進行密碼加密,後續進入筆記查看,需要輸入密碼
-刪除:刪除本篇筆記全部內容
2.1.12 頁面管理
-點擊【更多】-【頁面管理】支援進入頁面管理
介面
-點擊左下角頁碼數位,也支援進入頁面管理介
面
-支援對頁面進行新增、複製、粘貼、移動等多
種操作
2.1.12 手寫辨識語種管理
En_US
-點擊標題手寫區域右上角及手寫轉文字右上角
的語種按鈕,即可進行手寫語種的切換
-預設根據系統語言進行選擇,支援切換至其他
語種
*一旦切換,則全域進行切換
*切換完成,對於已經識別完成的內容,不會進
行重新識別與變更,但是當手寫內容發生變化時,
會自動按照新的語種進行重新識別
-預置五個語種進行選擇
-支援添加更多語種,需要聯網進行識別包的下
載

2.2 記錄
2.2.1 新建記錄
記錄是一種全新的會議記錄方式,支援即時的語音轉文字,語音記錄的同時,還支
援手寫記錄,保證了會議資訊的全量記錄,會後回顧更加方便
-在筆記頁面,點擊【記錄】按鈕即可完成新建
-新建記錄完成,即可進入錄音轉寫介面
2.2.2 記錄的組成
-記錄由三個部分組成,分別為錄音區域、錄音
轉文字區域、手寫區域

2.2.3 錄音區域
標記:會議過程中,針對
重點內容進行標記,會後
可以直接定位
雷達:會議過程中,即時
展示說話人所處的方位,
輔助說話人的區分
暫停:暫停錄音
完成:完成錄音
上一句/下一句:支持快
速切換至上一句/下一句,
進行錄音的回聽
倍速:支援調整錄音播放
的速度,支援0.5x-2.5x
的速度調整
音量:支援調整
錄音播放的音量
繼續錄音:支持
繼續錄音
Ø 錄音完
成
Ø 錄音中
2.2.4 錄音轉文字區域
錄音轉文字:會議過程中,針對會議音
訊進行轉文字,並即時進行展示
說話人資訊:針對不同說話人的聲紋區別,進
行說話人的區分,支持點擊進行名字的修改
開啟/關閉說話人識別:支持
開啟/關閉說話人的識別功能
開啟/關閉專注模式:支持語
音轉文字的後臺進行,不即
時展示語音轉文字的結果
語種及模式選擇:支持
多種語種識別及互譯,
詳見2.2.5
Ø 錄音中

Ø 錄音完
成
查看全部:支援展開查看全
部文本內容
替換:支持針對文本中的內
容進行查找與替換
文本編輯:支持對文字
內容進行手動編輯
2.2.5 語種及模式選擇
語音轉文字
-支援多種語言的選擇,根據所處地區的不同,
會提供不同的能力
*亞洲、大洋洲地區使用者支援14個語種的語音
轉文字能力(中文、英文、日文、韓文、法語、
德語、西班牙語、粵語、俄語、馬來西亞語、越
南語、阿拉伯語、泰語、印尼語)
*北美洲、南美洲、歐洲、非洲地區使用者支援8
個語種的語音轉文字能力(中文、英文、匈牙利
語、日語、韓語、法語、德語、西班牙語)
多語種翻譯
-支援多種語言的互譯功能,支援預設翻譯模式,
點擊即可進行使用
-根據所處地區的不同,會提供不同的能力
*亞洲、大洋洲地區使用者支援7個語種的互譯功
能(中文、英文、日語、韓語、法語、德語、西
班牙語)
*北美洲、南美洲、歐洲、非洲地區使用者支援8
個語種的互譯功能(中文、英文、匈牙利語、日
語、韓語、法語、德語、西班牙語)
2.2.6 手寫區域
-手寫區域支援使用電磁筆進行隨意的手寫記錄
*與寫作相同,支援靈動筆功能的使用
-如書寫過程中,頻繁出現誤觸翻頁的情況,則
可以點擊禁觸按鈕,關閉手勢操作
2.2.7 即點即讀,快速回溯
-會議結束後,點擊手寫內容,可以快速定位到
手寫內容所對應的錄音片段,快速回顧會議內容

2.2.8 會議總結
-會議結束後,點擊會議總結按鈕,即可根據文
本內容進行總結
*該能力需要在設置介面,配置您個人的OpenAI
API Key進行使用
-提供會議總結,會議全覽兩部分內容
-支持匯出與分享

2.3 筆記管理
-創建的寫作及記錄均會保存在本地,隨時點擊
即可查看
-點擊目錄,即可查看所有檔夾資訊
-提供預設檔夾,所有無主的筆記均會存放在預
設檔夾,該檔夾不可被刪除
-提供多種分類方式,包含全部筆記、旗標筆記、
加密筆記、本地筆記(未同步至雲端)、已刪除
-支援創建檔夾及檔組進行筆記的管理
2.3.1 檔夾管理
2.3.2 筆記管理
-長按筆記,支援移動、上傳、加密、重命名、
刪除等操作
-點擊排序按鈕,支援多種排序方式
-提供摘要式、清單式兩種筆記展現形式,區別
在於是否展示筆記的摘要內容
2.3.3 標籤管理
全部標籤管理
筆記標籤管理
全部標籤管理
-支援增加、刪除、修改標籤內容
-支援根據標籤篩選筆記
筆記標籤管理
-支援為當前筆記增加、刪除標籤
-筆記內部也可進行該操作
2.3.4 全域搜索
-支援搜索手寫內容、語音轉文字內容,支援快速跳轉,高亮顯示搜索的內容

第三章 日程
3.1 日曆與日程
3.1.1 日曆展示
-展示當月日曆資訊,支援切換年份與月份
-預設展示當天日程資訊,支援點擊日期進行切
換,查看其他時間的日程
-提供日、周、月三種視圖
3.1.2當日任務展示
-展示今日待辦事項、今日需要提醒的事項、今
日創建的筆記內容
3.1.3 日程的創建與展示
-支援點擊新建日程,輸入日程內容,其中,日
程正文如果包含時間資訊,會自動提取時間資訊,
作為日程的開始時間
Ø 周視圖 Ø 月視圖
3.1.4 日程資訊編輯
-點擊日程後方的按鈕,即可進行日程資訊的
編輯
-支持設置日程開始時間、結束時間、提醒時
間、日程重複設置、備註資訊

3.2 待辦事項
-支援創建、管理待辦事項
待辦事項的創建方式
-點擊新建,新建一個待辦事項
-通過【靈動筆】在筆記記錄中進行圖形標記,
自動收集
-點擊【待辦】後方的按鈕,支援設置待辦的
截止時間、提醒時間
-支持對待辦進行置頂、移動、刪除等操作
-點擊【待辦】前方的勾選框,可以將待辦設
置為已辦,刷新頁面後,該條會自動移入已辦
列表中展示

3.3 關注星
關注星的創建方式?
-在寫作或者記錄過程中,可以使用靈動筆,
在重要事項前,畫一個五角星,五角星所在行
的內容會被自動收集,並展示
什麼是關注星?
-日常記錄過程中,遇到重要事項時,會進行
標記,但是標記的內容需要會後及時整理,不
然容易丟失,所以關注星的功能就是自動收集
日常記錄過程中標記的內容,進行集中展示
-支援點擊內容直接跳轉至對應筆記
-支援將關注星內容設置為持續關注、加入待
辦、編輯、刪除等多種操作

3.4 週報
-支持展示一周所有的日程、已辦事項、參加的會議資訊,快速回顧本周所有事項
-支持匯出
第四章 閱讀
4.1 書籍的導入
-支持閱讀的書籍格式有:pdf、epub、mobi、
txt,azw,
-支援使用USB介面連接設備與電腦端,將電
子書移動到【Bookshelf】檔夾
*注意:暫時不支援在【Bookshelf】檔夾中進
行分組
-支援使用WiFi傳輸的方式進行導入,點擊可
查看詳細操作方式
4.2 PDF書籍閱讀
-閱讀過程中支持使用電磁筆進行批註
-支援將筆切換為選中模式,圈畫書籍內容即
可進行選中
-支援對選中的內容進行高亮、摘錄、搜索、
複製等操作
-支援創建讀書筆記
4.2.1 閱讀的基本操作
4.2.2 PDF閱讀設置
Ø 圖片設置
Ø 文本設置
Ø 文本設置
-除了上述頁面設置外,同時還支持亮度設置
-在更多設置中,提供了頁面刷新頻率、翻頁
模式、展示效果等細節設置

4.2.3 聽書
-針對中文、英語、日語、韓語語種的電子書
提供了聽書功能,聯網即可線上播放
注意:目前僅支援文字格式的PDF,掃描版本
的PDF不支援聽書等部分功能操作
-聽書過程中,可進行章節選擇、語速調整、
定時等操作
4.2.4 讀書筆記
-會議過程中進行的手寫批註、高亮顯示、摘
錄、筆記等內容均會統一收集,生成一個完整
的讀書筆記
-讀書筆記可以按照書本章節進行順序查閱
-支持匯出成word/pdf格式

4.3 其他格式書籍閱讀
-閱讀的基本操作與PDF閱讀一致,區別在於閱讀設置方面,其他格式電子書支援調整字體
的大小、對比度、頁邊距、行間距、字體等
4.4 書城
-當前書城支援部分閱讀資源的下載
點擊封面即可進入書籍詳情頁
-支援查看書籍的目錄、加入書架、開始閱讀
等操作
*當前書城中的書籍均為免費書籍,支持自由
下載閱讀

4.5 Office中心
-支持word、ppt、excel三種office格式文檔
的查看與編輯
Ø 導入方式
-支援使用USB介面連接設備與電腦端,將文
檔移動到【Office】檔夾
*注意:暫時不支援在【 Office 】檔夾中進行
分組
-支援使用WiFi傳輸的方式進行導入,點擊可
查看詳細操作方式
Ø 支援的格式
4.5.1 格式與導入
4.5.2 Word文檔的預覽與編輯
-首先進入word文檔預覽介面,支援查看與翻
頁,同時支持使用手寫筆進行批註
-支援在閱讀過程中,點擊錄音按鈕進行錄音
-錄音結束後,支援查看錄音內容及錄音轉文字
內容
*錄音轉文字的模式與當前系統字體一致
-點擊編輯按鈕,系統會使用WPS Office應用進
行文檔的打開,打開後,支持對文檔進行編輯
操作

4.5.3 Excel&PPT文檔的預覽與編輯
Tips:PPT文檔橫屏使用,效果更好哦

4.6 網盤
-支持One Drive網盤的登錄與使用
-以OneDrive為例,按照登錄介面要求,完成登錄
-支援查看網盤中的文檔內容,並支援下載與查看
*僅支援查看設備所支援的格式

第五章 其他功
能
5.1 郵箱功能
-在首頁的右上方,提供了郵箱的入口,點擊即
可進入郵箱介面
-首次進入郵箱介面,需要選擇您的個人郵箱類
型,目前支援所有主流的郵箱協定
-支持點擊Gmail郵箱直接進入Gmail郵箱的登
錄介面
-其他郵箱類型可以點擊下方其他郵箱進行登錄
-【Gmail】登錄介面由Gmail提供,需要輸入
您個人的郵箱帳戶及密碼,並且在登錄過程中,
需要進行由Gmail提供的驗證流程
-按照流程走完登錄流程即可完成登錄
-【其他郵箱】登錄介面,支援輸入郵箱的帳號及
密碼,一般來說,密碼為授權碼,具體步驟如下:
❶在郵箱網頁端找到帳號設置,找到授權碼設置
❷一般會提供登錄三方應用時所用到的授權碼,
直接生成即可,授權碼一般較為複雜
❸拿到授權碼後,再使用授權碼作為密碼進行郵
箱登錄

-支援手動配置伺服器資訊,共需要4-5步,該
功能主要應用於部分企業郵箱的登錄
-需要配置帳號密碼資訊、收件&發件伺服器配
置,按照步驟填寫相關資訊即可完成登錄
-如仍然無法登陸,可以聯繫我們:
ainote_userfeedback@iflytek.com
-登錄完成,即可查看收到的郵件資訊
-支持點擊左側工具列,進行郵件的收件箱、寄
件匣、草稿箱、垃圾箱等內容的查看
-支援兩種郵件的創建方式:
❶手寫。支持使用電磁筆在下方空白處進行郵
件的手寫,手寫完成支援直接將手寫內容進行
發送,別人查看可以直接看到您的手寫內容
❷鍵盤。支援使用鍵盤輸出文本內容
*如手寫區域存在內容,切換至鍵盤模式,會自
動清空手寫內容
-點擊郵件即可查看詳情
-支持回復、轉發、刪除等基本操作
-支援在郵件介面進行郵件間的切換

-支持管理郵箱的通訊錄,支援點擊新增按鈕進
行新增
-支援自動收錄往來郵箱的連絡人資訊
-支援設置當前郵箱的收發件伺服器
-支持登錄多個郵箱進行查看
-支持退出當前帳號的登錄

-郵件查看時,支持下載郵件中的文檔附件,下
載完成即可打開查看
-所有郵件附件支援統一查看
注意:所有分享方式中,均提供了郵件分享的方式,需要提前登錄您的郵箱帳號,即可使用郵件
進行內容的分享
5.2 掃描功能
-設備端目前提供了500MP的攝像頭,用於紙質
文檔的掃描,將掃描完成的文檔保存在設備端,
隨時進行查看
-點擊首頁右上角的【掃描】按鈕即可進入掃描
介面
-首次進入掃描介面,需要點擊右上角的新建按
鈕新建一個全新的掃描文檔
-該頁面同時還支援進行掃描文檔的管理
-拍攝完成,支援對需要處理的範圍進行選擇,
拖動圖片中的原點即可進行拖動
-支援旋轉圖片的方向
-點擊確認,即可進行圖片處理
-點擊新建後即可進入拍攝介面
-點擊左下角相冊,即可選擇圖庫相冊內的圖片
進行處理
-上方提供兩種拍攝模式,第一種是單頁模式,
拍攝一張則立即進行處理,第二種是多頁模式,
支援拍攝多張圖片進行統一處理。
-點擊拍攝按鈕即可完成拍攝
*由於墨水屏的刷新速度較低,拍攝過程中,晃
動過大則無法拍攝清晰,需要盡可能保持拍攝
的穩定

-支援使用電磁筆在頁面上進行隨意的書寫
-處理完成,即可看到處理的結果
-支援將該內容匯出至筆記,匯出後即可在筆記
清單進行查看
-支持匯出成PDF,可以在書架中進行查看
-支援重新選擇處理的範圍

第六章 設置
-點擊右上方設置按鈕,即可進入設置介面
-在下拉式功能表中,可以進行簡單的設置操作,
也可以點擊更多設置進入設置介面
-帳號中心
支援帳號的基本資訊管理
-筆記同步
開啟後,筆記完成後會自動同步
-分享管理
查看分享的筆記內容,支援提前關閉分享
-筆記查看密碼
支援設置並管理筆記查看密碼,設置完成後,
對筆記進行加密,則需要輸入密碼才可進行查
看
-OpenAI API Key設置
支持填入個人的OpenAI API Key進行驗證,驗
證成功後,即可調用大模型能力

-WiFi連接
支持查看當前附近的WiFi資訊,點擊即可連接
-帳號中心中,支持修改驗證的郵箱,支持對帳
號進行註銷操作,支持退出當前帳號登錄
-帳號退出後,則無法查看當前帳號下所創建的
筆記內容
-帳號註銷後,則會刪除當前帳號下的所有資料
資訊,請謹慎操作!

-藍牙設置
支援通過藍牙連接耳機、音響及鍵盤等設備
-投屏工具
支持在官網下載PC端投屏工具,下載完成保證設備
與PC端在同一個網路環境下,即可進行即時投屏
下載地址:
https://a2sgp-www-ap1.iflyoversea.com
-日期與時間
支援手動配置時間資訊,選擇所在時區
-亮度設置
支援進行設備閱讀燈的亮度設置,支持冷暖雙色閱讀燈
-壁紙與簽名設置
支持更換壁紙與簽名
-語言及地區
支援更換系統語言及地區
*注意:地區更換可能導致伺服器的更換,請慎重選擇
-電量顯示
支援設置顯示電量百分比資訊
-旋轉設置
支援設置設備預設的旋轉方向
-筆身按鈕自訂配置
支援設置畫直線、圈選擦除、靈動筆、關閉等功能
-手勢設置
自訂手勢操作,支援關閉
-靈動條設置
靈動條教學,支持關閉
-休眠時間設置
-關機時間設置

支援查看設備的隱私政策、使用者協定、法律相關
等檔資訊
支援設置鎖屏密碼及指紋資訊
支援查看設備的基本資訊,包含記憶體、SN、IP地
址等
-支援回饋使用設備過程中出現的問題,我們會及時
處理與回復
-支援通過提供的郵箱資訊進行問題回饋

-支援檢查固件更新資訊,我們會不定時推送設備更
新,
-下拉式功能表中也提供了非常便捷的控制中心,可
以完成一些基礎的操作

以上就是智慧辦公本的使用說明,如果使用過程中遇到其他問題,可以
隨時聯繫我們:
ainote_userfeedback@iflytek.com
配套應用【AINOTE mobile】是一個非常重要的應用,目前僅支持
APP端,後續會支持PC端的下載與使用,可以通過以下方式進行下載:

用户使用手册
iFLYTEK AINOTE Air2

第一章 快速开始
1.1 硬件介绍
12
1
电源键
开机:长按此键3秒即可启动智能办公本。
关机/重启:长按此键3秒,屏幕显示关机/重启对话框
*注意:长按电源开关键8秒,可强制关机。
2
USB Type-C
3
3
充电指示灯
*充电时,充电指示灯点亮,红色表示未充满,绿色表示已充满
4
4
灵动条
*按住左下角图示向右滑动,打开【Open Chat】接口进行问
答
*按住中间区域向右滑动,支持进入快速翻页模式
*按住右下角按钮向左滑动,快速创建便签
5
后置摄像头
6
5
6
闪光灯
7
8
9
7
橡皮擦
8
自定义按钮
9
笔芯
*可购买替换装更换
-【灵动笔(默认)】
按压滑动支持圈选、加入待办,图形标记
-【直线】
按压滑动支持画一条直线
-【圈选擦除】
按压圈选手写内容,即可清除手写内容
-【关闭】
关闭按钮功能,防误触
1.2 设备启动
1
2
ü 长按电源键开机后,进入启动流程
*首次开机,启动时间会较长,请稍等
ü 选择系统语言
*请慎重选择使用地区,切换地区可能会导致服
务器的切换,不同服务器之间数据暂不互通
点击
start
开始启动
ü 选择使用地区
*亚洲、大洋洲地区服务器部署在新加坡
*北美洲、南美洲、欧洲、非洲地区服务器部署在
法兰克福

1.2 设备启动
3
4
ü WIFI连接
*支持进行WIFI的手动添加
ü 时区与时间
*支持时间展示方式
*默认选择自动判断时区,支持手动设置

1.2 设备启动
5
ü 隐私与协议
*请仔细查看办公本的隐私政策与用户协议,同
意后可进入下一步
6
ü 账号注册
*支持使用邮箱进行账号的注册,添加获取的邮
箱验证码及密码即可完成注册
ü 账号登录
*填入邮箱及密码即可进行登录
ü 游客模式
*游客模式,支持使用办公本大部分基础功能,
过程中支持登录账号体验全部功能

1.2 设备启动
6
7
ü 笔记自动同步
*登录成功,默认自动开启笔记同步功能,笔记
联网创建完毕后,会自动上传至云端保存
*支持关闭自动同步,所有笔记保存在本地
ü 锁屏密码设置
*支援设置6位数密码
*锁屏密码如果忘记,可以通过邮箱验证的方式
找回密码

1.2 设备启动
7
ü 签名设置
*支持使用电磁笔在书写框中进行书写,书写内
容会持续展示在锁屏页面上
ü 启动完成!
*可以扫描下方二维码,下载AINOTE mobile
APP
*签名同样可以在设备设置模块中进行编辑
8
✔
AINOTE mobile APP是办公本的配套APP,支持笔记的同步与多端查看,
支持在读写客APP端进行笔记的编辑与分享,笔记管理更高效

1.3 快捷操作
快捷全局控制栏
从设备右上⻆向下滑动,可以快速打开下拉菜单,进⾏WiFi、投屏、
⾳量、背光等功能设置

1.3 快捷操作
从屏幕下⽅向上滑动,打开多任务界⾯,⽀持快速在应⽤间进⾏
切换,关闭应⽤后台
多任务切换

1.3 快捷操作
❶ 打开开放式问答接⼝,⽀持与⼤模型进⾏问答
❷ 在阅读等多⻚⾯接⼝,进⼊快速翻⻚模式,翻⻚速度取决于⼿指
滑动的速度
❸快速打开快捷便签,⽀持⼿写记录
如何使⽤灵动条?

2.1 写作
*在写作中,可以使用电磁笔进行随意的书写、
绘画,多应用于会议记录、灵感创作、个人学习
2.1.1 新建写作
-可以使用电磁笔在标题框中进行手写,手写内
容会被自动转为印刷体文字作为标题
2.1.2 标题书写
-手写识别语种支持自定义选择,点击右上角语
种缩小按钮,即可进入语种选择接口,添加/选
择需要识别的语种信息,全局适用
2.1.3 笔形选择
-点击笔形按钮,即可进行笔形、笔粗、橡皮等
功能切换
-在笔记页面,点击【写作】按钮即可完成新建
第二章 笔记

2.1.4 怎么切换灵动笔
-点击灵动笔按钮,即可完成切换
-再次点击灵动笔,即可弹出操作指引
-支持查看详细操作指引
*提示:按压笔身按钮进行圈选,可以快速进入灵动笔
模式
-如果想要使用灵动笔,除了通过点击上方工具栏的灵
动笔图示进行切换外, 还可以直接按压笔身按钮进行使
用,笔身按钮还支持自定义成其他能力
2.1.5 灵动笔提供了以下能力
功能1:套索

功能3:待办
功能2:关注星

功能4:添加标题
2.1.6 圈选查询
-使用灵动笔圈选手写内容后,支持点
击AI助手进行查询,设备会自动识别
圈选范围内的手写内容,并转化为文本
进行查询
*需要在设置接口,配置您个人的
OpenAI API Key进行使用

2.1.7 手写转文字
-提供手写转文字的能力,点击按钮即可生成,
手写内容会根据所选择的语言来进行识别
*所有识别均为本地识别,无需联网
-上方展示手写内容,下方展示转文本的内容,
支持点击查看对应关系
-支持点击上方【全文】查看全文转文字内容
-支持点击上方【汇出】汇出与分享转文本内容

2.1.8 写作模版
-点击模版按钮,即可选择模版
-点击模板图片,即可在当前页面的下一页插入
所选择的模板
-虽然只插入了一页,但是当你翻页的时候,可
以选择快捷插入这个模板
-支持插入自定义的模板样式
-使用数据线讲设备与计算机进行连接,将提前
准备的模板图片提前传输至【Template】档夹,
即可进行选择使用

2.1.9 笔记分享
-提供网页、word、pdf三种分享类型
-可以通过二维码、邮件、汇出至书架三种方式
进行分享
2.1.10 底纹设置
Q:底纹与范本的区别是什么?
-点击更多按钮,即可看到底纹设置接口
-点击后方的箭头,可以查看详细设置接口
-提供了横纹纸、竖纹纸、空白纸、点状纸、方
格纸等多种底纹选择
-支援设置某个底纹为默认
A:设置底纹后,当前笔记所有默认新建的纸张均为该底
纹,可以将某一个底纹设置为默认,则下次新建一篇新的
写作时,会使用默认的底纹进行创建;而本设备中,范本
是单独插入的,支持一篇写作中包含多种模板的样式

2.1.11 更多应用
-页面刷新:支持刷新当前页面,由于墨水屏屏幕特性,长时间使用容易出现残影,刷新可以清除
-笔记同步:支持将本篇笔记同步至云端,使用【AINOTE mobile】APP进行查看与编辑
-删除当前页面:仅删除当前所展示的页面
-页面管理:进入本篇笔记的页面管理接口
-搜索:支持搜索本篇笔记内部的手写内容
-加密:针对本篇笔记进行密码加密,后续进入笔记查看,需要输入密码
-删除:删除本篇笔记全部内容
2.1.12 页面管理
-点击【更多】-【页面管理】支持进入页面管理
接口
-点击左下角页码数字,也支持进入页面管理接
口
-支持对页面进行新增、复制、粘贴、移动等多
种操作

2.1.12 手写识别语种管理
En_US
-点击标题手写区域右上角及手写转文字右上角
的语种按钮,即可进行手写语种的切换
-默认根据系统语言进行选择,支持切换至其他
语种
*一旦切换,则全局进行切换
*切换完成,对于已经识别完成的内容,不会进
行重新识别与变更,但是当手写内容发生变化时,
会自动按照新的语种进行重新识别
-预置五个语种进行选择
-支持添加更多语种,需要联网进行识别包的下
载
2.2 记录
2.2.1 新建记录
记录是一种全新的会议记录方式,支持实时的语音转文字,语音记录的同时,还支
持手写记录,保证了会议信息的全量记录,会后回顾更加方便
-在笔记页面,点击【记录】按钮即可完成新建
-新建记录完成,即可进入录音转写接口
2.2.2 记录的组成
-记录由三个部分组成,分别为录音区域、录音
转文字区域、手写区域

2.2.3 录音区域
标记:会议过程中,针对
重点内容进行标记,会后
可以直接定位
雷达:会议过程中,实时
展示说话人所处的方位,
辅助说话人的区分
暂停:暂停录音
完成:完成录音
上一句/下一句:支持快
速切换至上一句/下一句,
进行录音的回听
倍速:支持调整录音播放
的速度,支持0.5x-2.5x
的速度调整
音量:支持调整
录音播放的音量
继续录音:支持
继续录音
Ø 录音完
成
Ø 录音中
2.2.4 录音转文字区域
录音转文字:会议过程中,针对会议音
频进行转文字,并实时进行展示
说话人信息:针对不同说话人的声纹区别,进
行说话人的区分,支持点击进行名字的修改
开启/关闭说话人识别:支持
开启/关闭说话人的识别功能
开启/关闭专注模式:支持语
音转文字的后台进行,不实
时展示语音转文字的结果
语种及模式选择:支持
多种语种识别及互译,
详见2.2.5
Ø 录音中
Ø 录音完
成
查看全部:支持展开查看全
部文本内容
替换:支持针对文本中的内
容进行查找与替换
文本编辑:支持对文字
内容进行手动编辑

2.2.5 语种及模式选择
语音转文字
-支持多种语言的选择,根据所处地区的不同,
会提供不同的能力
*亚洲、大洋洲地区使用者支持14个语种的语音
转文字能力(中文、英文、日文、韩文、法语、
德语、西班牙语、粤语、俄语、马来西亚语、越
南语、阿拉伯语、泰语、印度尼西亚语)
*北美洲、南美洲、欧洲、非洲地区使用者支持8
个语种的语音转文字能力(中文、英文、匈牙利
语、日语、韩语、法语、德语、西班牙语)
多语种翻译
-支持多种语言的互译功能,支持默认翻译模式,
点击即可进行使用
-根据所处地区的不同,会提供不同的能力
*亚洲、大洋洲地区使用者支持7个语种的互译功
能(中文、英文、日语、韩语、法语、德语、西
班牙语)
*北美洲、南美洲、欧洲、非洲地区使用者支持8
个语种的互译功能(中文、英文、匈牙利语、日
语、韩语、法语、德语、西班牙语)

2.2.6 手写区域
-手写区域支持使用电磁笔进行随意的手写记录
*与写作相同,支持灵动笔功能的使用
-如书写过程中,频繁出现误触翻页的情况,则
可以点击禁触按钮,关闭手势操作
2.2.7 即点即读,快速回溯
-会议结束后,点击手写内容,可以快速定位到
手写内容所对应的录音片段,快速回顾会议内容
2.2.8 会议总结
-会议结束后,点击会议总结按钮,即可根据文
本内容进行总结
*该能力需要在设置接口,配置您个人的OpenAI
API Key进行使用
-提供会议总结,会议全览两部分内容
-支持汇出与分享
2.3 笔记管理
-创建的写作及记录均会保存在本地,随时点击
即可查看
-点击目录,即可查看所有文件夹信息
-提供默认文件夹,所有无主的笔记均会存放在
默认档夹,该档夹不可被删除
-提供多种分类方式,包含全部笔记、旗标笔记、
加密笔记、本地笔记(未同步至云端)、已删除
-支持创建文件夹及文件组进行笔记的管理
2.3.1 档夹管理

2.3.2 笔记管理
-长按笔记,支持移动、上传、加密、重命名、
删除等操作
-点击排序按钮,支持多种排序方式
-提供摘要式、列表式两种笔记展现形式,区别
在于是否展示笔记的摘要内容

2.3.3 标签管理
全部标签管理
笔记卷标管理
全部标签管理
-支持增加、删除、修改标签内容
-支持根据卷标筛选笔记
笔记卷标管理
-支持为当前笔记增加、删除卷标
-笔记内部也可进行该操作
2.3.4 全局搜索
-支持搜索手写内容、语音转文字内容,支持快速跳转,高亮显示搜索的内容
第三章 日程
3.1 日历与日程
3.1.1 日历展示
-展示当月日历信息,支持切换年份与月份
-默认展示当天日程信息,支持点击日期进行切
换,查看其他时间的日程
-提供日、周、月三种视图
3.1.2当日任务展示
-展示今日待办事项、今日需要提醒的事项、今
日创建的笔记内容
3.1.3 日程的创建与展示
-支持点击新建日程,输入日程内容,其中,日
程正文如果包含时间信息,会自动提取时间信息,
作为日程的开始时间

Ø 周视图 Ø 月视图
3.1.4 日程信息编辑
-点击日程后方的按钮,即可进行日程信息的
编辑
-支持设置日程开始时间、结束时间、提醒时
间、日程重复设置、备注信息
3.2 待办事项
-支持创建、管理待办事项
待办事项的创建方式
-点击新建,新建一个待办事项
-通过【灵动笔】在笔记记录中进行图形标记,
自动收集

-点击【待办】后方的按钮,支持设置待办的
截止时间、提醒时间
-支持对待办进行置顶、移动、删除等操作
-点击【待办】前方的勾选框,可以将待办设
置为已办,刷新页面后,该条会自动移入已办
列表中展示

3.3 关注星
关注星的创建方式?
-在写作或者记录过程中,可以使用灵动笔,
在重要事项前,画一个五角星,五角星所在行
的内容会被自动收集,并展示
什么是关注星?
-日常记录过程中,遇到重要事项时,会进行
标记,但是标记的内容需要会后及时整理,不
然容易丢失,所以关注星的功能就是自动收集
日常记录过程中标记的内容,进行集中展示
-支持点击内容直接跳转至对应笔记
-支持将关注星内容设置为持续关注、加入待
办、编辑、删除等多种操作

3.4 周报
-支持展示一周所有的日程、已办事项、参加的会议信息,快速回顾本周所有事项
-支持汇出

第四章 阅读
4.1 书籍的导入
-支持阅读的书籍格式有:pdf、epub、mobi、
txt,azw,
-支持使用USB接口连接设备与计算机端,将
电子书移动到【Bookshelf】档夹
*注意:暂时不支持在【Bookshelf】档夹中进
行分组
-支持使用WiFi传输的方式进行导入,点击可
查看详细操作方式
4.2 PDF书籍阅读
-阅读过程中支持使用电磁笔进行批注
-支持将笔切换为选中模式,圈画书籍内容即
可进行选中
-支持对选中的内容进行高亮、摘录、搜索、
复制等操作
-支持创建读书笔记
4.2.1 阅读的基本操作
4.2.2 PDF阅读设置
Ø 图片设置
Ø 文本设置
Ø 文本设置
-除了上述页面设置外,同时还支持亮度设置
-在更多设置中,提供了页面刷新频率、翻页
模式、展示效果等细节设置

4.2.3 听书
-针对中文、英语、日语、韩语语种的电子书
提供了听书功能,联网即可在线播放
注意:目前仅支持文字格式的PDF,扫描版本
的PDF不支持听书等部分功能操作
-听书过程中,可进行章节选择、语速调整、
定时等操作
4.2.4 读书笔记
-会议过程中进行的手写批注、高亮显示、摘
录、笔记等内容均会统一收集,生成一个完整
的读书笔记
-读书笔记可以按照书本章节进行顺序查阅
-支持汇出成word/pdf格式
4.3 其他格式书籍阅读
-阅读的基本操作与PDF阅读一致,区别在于阅读设置方面,其他格式电子书支持调整字体
的大小、对比度、页边距、行间距、字体等

4.4 书城
-当前书城支持部分阅读资源的下载
点击封面即可进入书籍详情页
-支持查看书籍的目录、加入书架、开始阅读
等操作
*当前书城中的书籍均为免费书籍,支持自由
下载阅读
4.5 Office中心
-支持word、ppt、excel三种office格式文档
的查看与编辑
Ø 导入方式
-支持使用USB接口连接设备与计算机端,将
文文件移动到【Office】档夹
*注意:暂时不支持在【 Office 】档夹中进行
分组
-支持使用WiFi传输的方式进行导入,点击可
查看详细操作方式
Ø 支持的格式
4.5.1 格式与导入
4.5.2 Word文档的预览与编辑
-首先进入word文文件预览接口,支持查看与
翻页,同时支持使用手写笔进行批注

-支持在阅读过程中,点击录音按钮进行录音
-录音结束后,支持查看录音内容及录音转文字
内容
*录音转文字的模式与当前系统字体一致
-点击编辑按钮,系统会使用WPS Office应用进
行文档的打开,打开后,支持对文档进行编辑
操作

4.5.3 Excel&PPT文档的预览与编辑
Tips:PPT文档横屏使用,效果更好哦

4.6 网盘
-支持One Drive网盘的登录与使用
-以OneDrive为例,按照登录接口要求,完成登录
-支持查看网盘中的文档内容,并支持下载与查看
*仅支持查看设备所支持的格式
第五章 其他功
能
5.1 邮箱功能
-在首页的右上方,提供了邮箱的入口,点击即
可进入邮箱接口
-首次进入邮箱接口,需要选择您的个人邮箱类
型,目前支持所有主流的邮箱协议
-支持点击Gmail邮箱直接进入Gmail邮箱的登
录界面
-其他邮箱类型可以点击下方其他邮箱进行登录

-【Gmail】登录界面由Gmail提供,需要输入
您个人的邮箱帐户及密码,并且在登录过程中,
需要进行由Gmail提供的验证流程
-按照流程走完登录流程即可完成登录
-【其他邮箱】登录接口,支持输入邮箱的账号及
密码,一般来说,密码为授权码,具体步骤如下:
❶在邮箱网页端找到账号设置,找到授权码设置
❷一般会提供登录三方应用时所用到的授权码,
直接生成即可,授权码一般较为复杂
❸拿到授权码后,再用户许可证码作为密码进行
邮箱登录
-支持手动配置服务器信息,共需要4-5步,该
功能主要应用于部分企业邮箱的登录
-需要配置账号密码信息、收件&发件服务器配
置,按照步骤填写相关信息即可完成登录
-如仍然无法登陆,可以联系我们:
ainote_userfeedback@iflytek.com
-登录完成,即可查看收到的邮件信息
-支持点击左侧工具栏,进行邮件的收件箱、发
件箱、草稿箱、垃圾箱等内容的查看

-支持两种邮件的创建方式:
❶手写。支持使用电磁笔在下方空白处进行邮
件的手写,手写完成支持直接将手写内容进行
发送,别人查看可以直接看到您的手写内容
❷键盘。支持使用键盘输出文本内容
*如手写区域存在内容,切换至键盘模式,会自
动清空手写内容
-点击邮件即可查看详情
-支持回复、转发、删除等基本操作
-支持在邮件接口进行邮件间的切换

-支持管理邮箱的通讯簿,支持点击新增按钮进
行新增
-支持自动收录往来邮箱的联系人信息
-支持设置当前邮箱的收发件服务器
-支持登录多个邮箱进行查看
-支持退出当前账号的登录

-邮件查看时,支持下载邮件中的文文件附件,
下载完成即可打开查看
-所有邮件附件支持统一查看
注意:所有分享方式中,均提供了邮件分享的方式,需要提前登录您的邮箱账号,即可使用邮件
进行内容的分享

5.2 扫描功能
-设备端目前提供了500MP的摄像头,用于纸质
文文件的扫描,将扫描完成的文文件保存在设
备端,随时进行查看
-点击首页右上角的【扫描】按钮即可进入扫描
接口
-首次进入扫描接口,需要点击右上角的新建按
钮新建一个全新的扫描文文件
-该页面同时还支持进行扫描文文件的管理
-拍摄完成,支持对需要处理的范围进行选择,
拖动图片中的原点即可进行拖动
-支持旋转图片的方向
-点击确认,即可进行图片处理
-点击新建后即可进入拍摄接口
-点击左下角相册,即可选择图库相册内的图片
进行处理
-上方提供两种拍摄模式,第一种是单页模式,
拍摄一张则立即进行处理,第二种是多页模式,
支持拍摄多张图片进行统一处理。
-点击拍摄按钮即可完成拍摄
*由于墨水屏的刷新速度较低,拍摄过程中,晃
动过大则无法拍摄清晰,需要尽可能保持拍摄
的稳定
-支持使用电磁笔在页面上进行随意的书写
-处理完成,即可看到处理的结果
-支持将该内容导出至笔记,导出后即可在笔记
列表进行查看
-支持汇出成PDF,可以在书架中进行查看
-支持重新选择处理的范围

第六章 设置
-点击右上方设置按钮,即可进入设置接口
-在下拉菜单中,可以进行简单的设置操作,也
可以点击更多设置进入设置接口
-账号中心
支持账号的基本信息管理
-笔记同步
开启后,笔记完成后会自动同步
-分享管理
查看分享的笔记内容,支持提前关闭分享
-笔记查看密码
支持设置并管理笔记查看密码,设置完成后,
对笔记进行加密,则需要输入密码才可进行查
看
-OpenAI API Key设置
支持填入个人的OpenAI API Key进行验证,验
证成功后,即可调用大模型能力

-WiFi连接
支持查看当前附近的WiFi信息,点击即可连接
-账号中心中,支持修改验证的邮箱,支持对账
号进行注销操作,支持退出当前账号登录
-账号退出后,则无法查看当前账号下所创建的
笔记内容
-账号注销后,则会删除当前账号下的所有数据
信息,请谨慎操作!
-蓝牙设置
支持通过蓝牙连接耳机、音响及键盘等设备
-投屏工具
支持在官网下载PC端投屏工具,下载完成保证设备
与PC端在同一个网络环境下,即可进行实时投屏
下载地址:
https://a2sgp-www-ap1.iflyoversea.com
-日期与时间
支持手动配置时间信息,选择所在时区
-亮度设置
支持进行设备阅读灯的亮度设置,支持冷暖双色阅读灯
-壁纸与签名设置
支持更换壁纸与签名
-语言及地区
支持更换系统语言及地区
*注意:地区更换可能导致服务器的更换,请慎重选择
-电量显示
支持设置显示电量百分比信息
-旋转设置
支持设置设备预设的旋转方向

-笔身按钮自定义配置
支持设置画直线、圈选擦除、灵动笔、关闭等功能
-手势设置
自定义手势操作,支持关闭
-灵动条设置
灵动条教学,支持关闭
-休眠时间设置
-关机时间设置

支持查看设备的隐私政策、使用者协议、法律相关
等文件信息
支持设置锁屏密码及指纹信息

支持查看设备的基本信息,包含内存、SN、IP地址
等
-支持回馈使用设备过程中出现的问题,我们会及时
处理与回复
-支持通过提供的邮箱信息进行问题回馈

-支持检查固件更新信息,我们会不定时推送设备更
新,
-下拉菜单中也提供了非常便捷的控制中心,可以完
成一些基础的操作

以上就是智能办公本的使用说明,如果使用过程中遇到其他问题,可以
随时联系我们:
ainote_userfeedback@iflytek.com
配套应用【AINOTE mobile】是一个非常重要的应用,目前仅支持
APP端,后续会支持PC端的下载与使用,可以通过以下方式进行下载:
