Machine Translated by Google

P.21
P.13
P.381
P.277
P.259
P.91
P.49
P.2
P.347
P.131
ÿ .22 before driving ÿ .37
for your child's safety
ÿ First of all, .278
ÿ Car interior.6
ÿ Seat belt.26 ÿ Anti -theft
function.48
ÿ Airbag .29
ÿ Key 92 ÿ
Handle adjustment 106 ÿ
Opening and closing the fuel supply port 118
ÿ How to deal with emergencies.284
ÿ Characteristics of Nissan e- POWER.14
ÿ Locking and unlocking
doors.96 ÿ Mirror
adjustment.107 ÿ Air conditioner operation.121
ÿ Before maintenance.348 ÿ
Cleaning and maintenance.366
ÿ For safe use .17
ÿ Instruments.50 _
ÿ Seat adjustment .101 ÿ
Window glass opening and
closing .116 ÿ Audio .127
ÿ Tools/ jacks.349 ÿ Service
data.375
ÿ .20 for a good relationship with Nissan e-
POWER
ÿ Meter brightness adjustment.90
ÿ Indoor lighting .260
ÿ Storage equipment .262
ÿ Warning light•Indication light.55
ÿ Starting .132 ÿ
Driving support function .161
ÿ Other interior equipment .265
ÿ Inspection and maintenance .353
ÿ Advanced Drive Assist Display .60
ÿ Driving.137 ÿ
Camera system.245 _
ÿ Appearance front .2
ÿ Driver's seat area .8
ÿ Turn on the lamp, use the wiper.149
ÿ Exterior rear .4
ÿ Instrument panel .10
Illustration table of contents
Troubleshooting
maintenance
Interior equipment
Operation of each part
for safe driving
How to read the meter
index
how to drive
About Nissan e-POWER
table of contents
Machine Translated by Google

Illustration Contents
2
appearance front
ZEA0454X
Machine Translated by Google
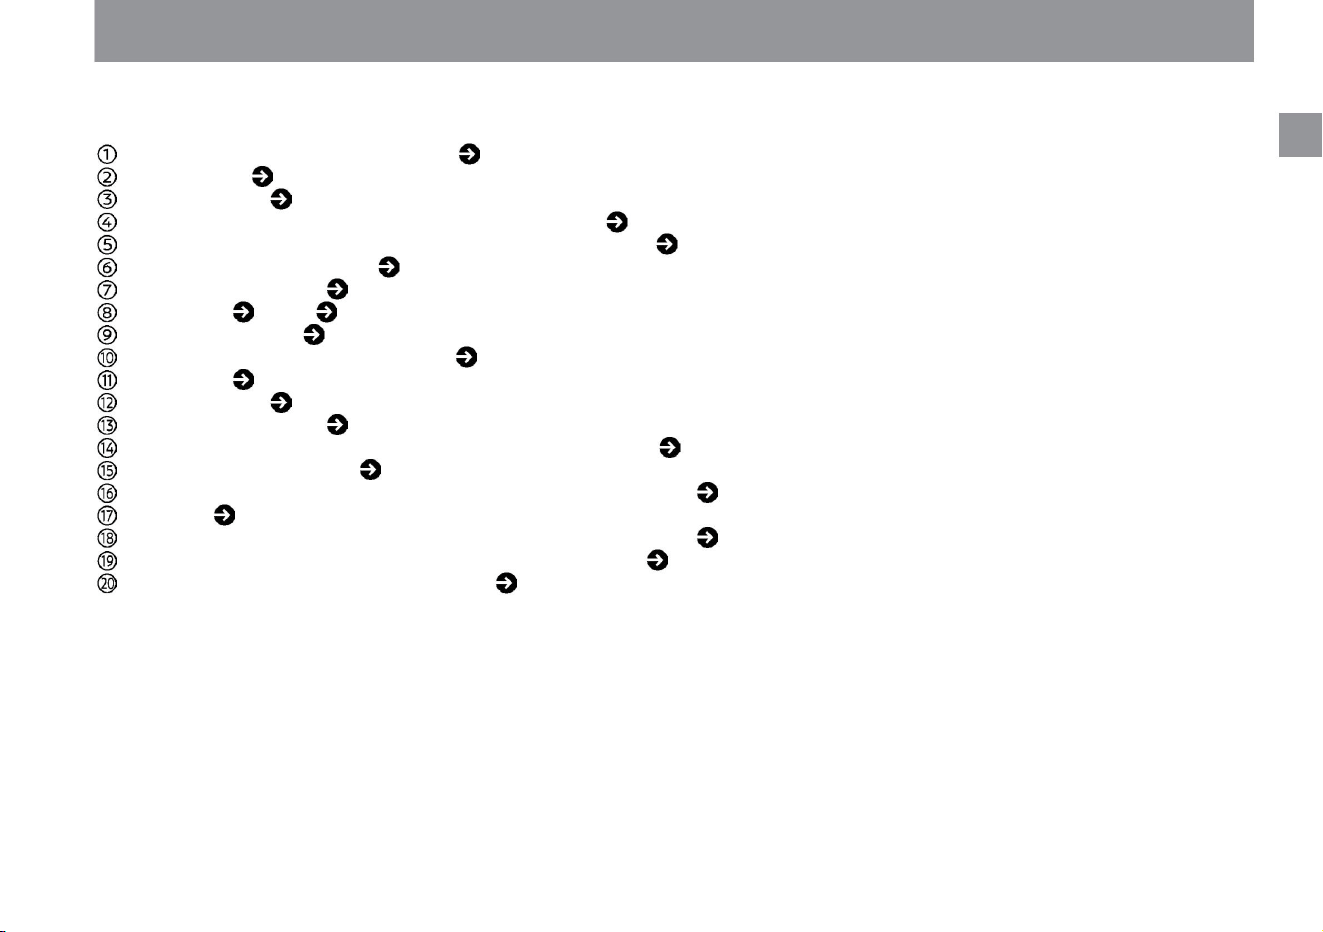
Multi-sensing front camera ( P.370) Wiper
( P.361) Hood
( P.354) Headlamp
(headlight) (Vehicle with LED headlamp) ( P.149) Direction
indicator and emergency flashing indicator (LED Vehicles with
headlamps) ( P.156) Front view
camera ( P.371) Front radar
( P.369) Sonar ( P.87,
P.372) Fog lamps ( P.157)
Side lights (LED headlamps) equipped)
( P.149) Tires
( P.357) Door mirrors
( P.114) Power windows
( P.116) Directional indicators and emergency flashing indicators
(side) (mirror type) ( P.156) Side
view camera ( P.371) Turn Signal/Emergency Flashing Indicator (Side)
(Fender Type)
( P.156) Door ( P.96) Turn Signal/Emergency Flashing Indicator (Vehicles
with Halogen Headlamps) ( P.156 ) Headlamps (headlights)
(vehicles with halogen headlamps) ( P.149) Side lights (vehicles with halogen headlamps) ( P.149)
Illustration Contents
appearance front
$/$: Different equipment depending on vehicle model, options, etc.
3
Machine Translated by Google
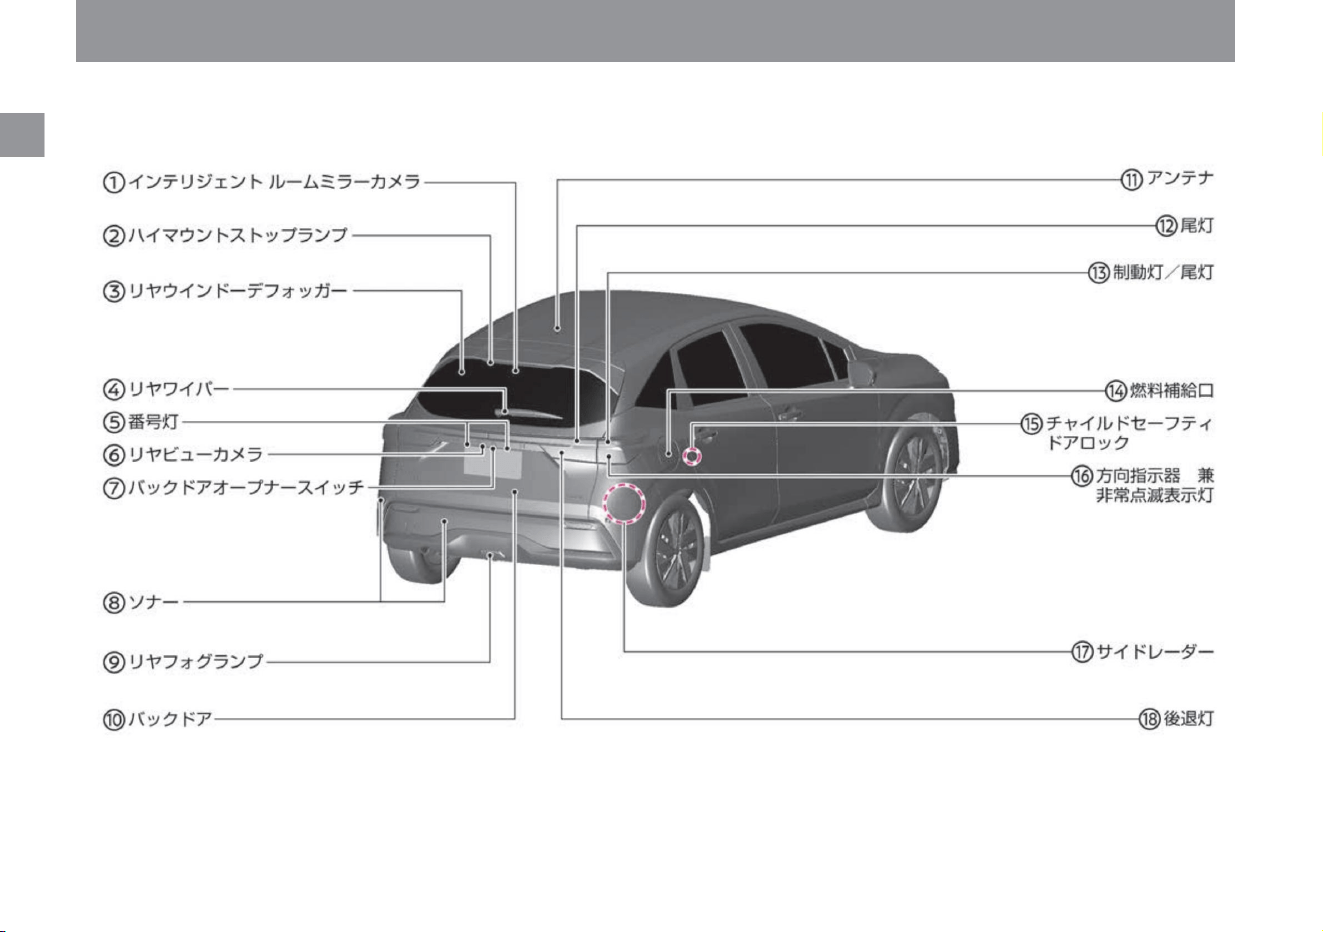
Illustration Contents
4
Appearance rear
ZEA0455X
Machine Translated by Google
Intelligent rearview camera ÿ ( P.373) High mount
stop lamp ( P.340) Rear window
defogger ( P.330) Rear wiper ( P.159)
Number light ( P.149)
Rear view camera
ÿ ( P.371 ) Back door opener
switch ( P.99) Sonar ( P.87, P.372) Rear
fog lamp ( P.157) Back door
( P.99) Antenna ( P.366) Tail
light ( P.340) Brake
light/Tail light
( P.340) Fuel
supply port ( P.118)
Child safety door lock
( P.98) Directional indicator and emergency
flashing indicator ( P.156) Side radar
( P.369) Reversing light
( P.340)
Illustration Contents
Appearance rear
$/$: Different equipment depending on vehicle model, options, etc.
5
Machine Translated by Google
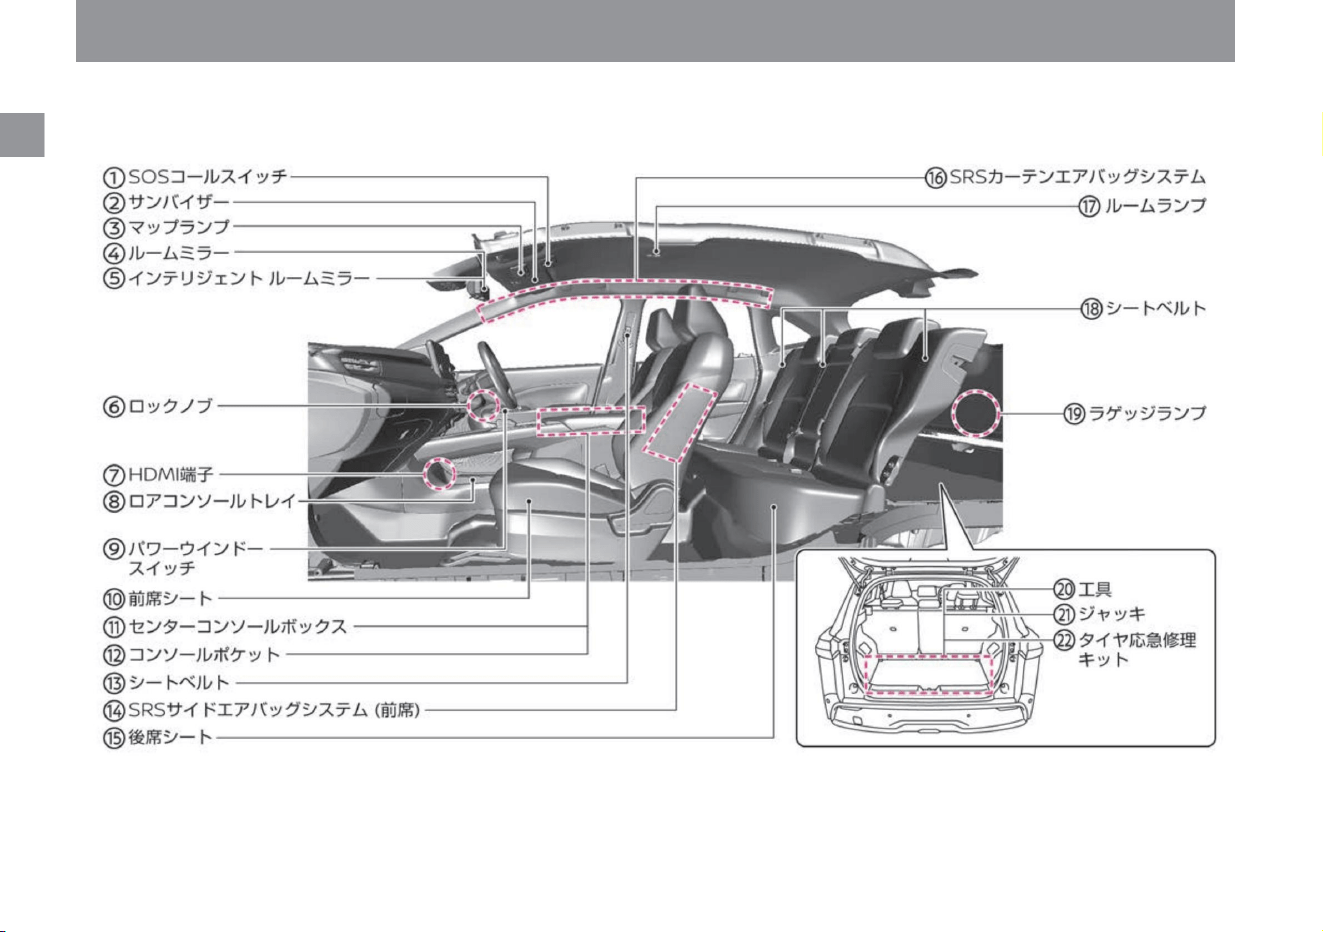
Illustration Contents
6
car interior
ZEA0630X
Machine Translated by Google
SOS call switch ÿ ( P.265) Sun
visor ( P.274) Map lamp
( P.260) Rearview mirror
ÿ ( P.107) Intelligent
rearview mirror ÿ ( P.108) Lock knob ( P.98)
HDMI terminal ÿ
( Separate volume*)
Lower console tray ( P.262)
Power window switch ( P.116) Front
seat ( P.101) Center
console box ( P.262) Console pocket
( P.263) Seat belt ( P.26) SRS
side Airbag system
(front seats) ( P.33) Rear seats ( P.103) SRS
curtain airbag system
( P.34) Room lamps ( P.260) Seat belts
( P.26) Luggage lamps
( P.260 ) Tool ÿ ( P.349)
Jack ÿ ( P.349) Tire
emergency repair
kit ( P.284) * Please
read the navigation system
instruction manual.
Illustration Contents
car interior
$/$: Different equipment depending on vehicle model, options, etc.
7
Machine Translated by Google

Illustration Contents
8
Around the driver's seat
ZEA0631X
Machine Translated by Google
Wiper/washer switch ( P.158) Emergency
flashing indicator switch
Wireless charger ( P.272)
Power switch ( P.132)
Select lever ( P.137)
Electric parking brake switch ( P.139) Auto
brake hold switch ( P.142) EV mode switch
( P.165, P.166) Drive mode selector
( P.162) Steering switch (left) -
Advanced drive assist
display ( P.60) - Audio ( P.128) - Navigation System ÿ
(separate volume*) Light
switch ( P.149) Turn indicator switch
( P.156) Fog lamp switch
ÿ ( P.157) Rear fog lamp switch
ÿ ( P.157) Meter ( P.50) Cup holder
( P. 263) Steering switch (right) -
ProPilot ÿ ( P.176)
- Audio ÿ ( P.128) -
Navigation system ÿ
(separate volume*) * Please
read the navigation
system instruction manual.
Illustration Contents
Around the driver's seat
$/$: Different equipment depending on vehicle model, options, etc.
9
Machine Translated by Google
Illustration Contents
10
instrument panel
ZEA0632X
Machine Translated by Google

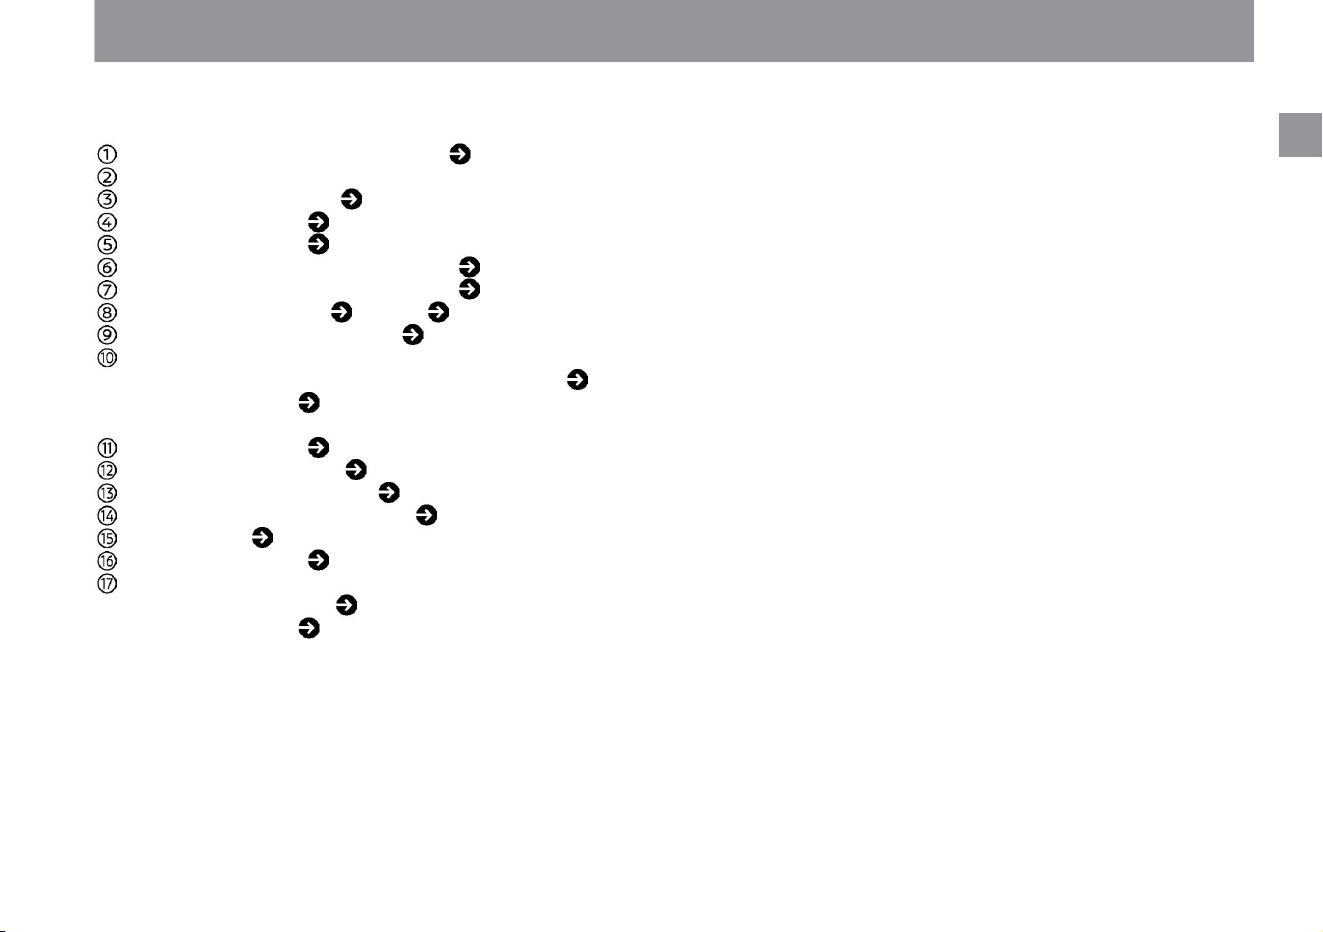
Navigation system ÿ (separate
volume*) Passenger seat SRS airbag
system ( P.31) Heated seat switch ÿ
( P.269) Auto air conditioner
( P.121) Flare
( P.279) Glove box ( P.262)
USB power socket ÿ ( P.271, separate
volume*) Wireless charger indicator ÿ ( P.272)
Rear window defogger switch ( P.330) Power
socket ( P.270)
Illumination control switch ( P.90) Trip switch
( P.90) 51) Driver's seat SRS airbag
system ( P.31) Steering heater switch ÿ
( P.269) Safety shield switch (without
ProPILOT) - Intelligent BSI (rear side collision
prevention support system) ( P.217) - Intelligent LI (Lane Departure
Prevention Assistance System) ( P.226) Steering Assist Switch
(Vehicles with ProPILOT) ( P.175) Headlamp Levelizer
Switch ÿ ( P.156) ETC Unitÿ (Separate Volume*)
Bonnet Opener ( P.175)
354) Fuel filler lid opener ( P.119)
SRS knee airbag system (driver's seat) ( P.35)
Handle position adjustment lever ( P.106) *
Please read the navigation system
instruction manual.
Illustration Contents
instrument panel
$/$: Different equipment depending on vehicle model, options, etc.
11
Machine Translated by Google

MEMO
12
Illustration Contents
Machine Translated by Google
Features of Nissan e-POWER
For safe use
Nissan
To get along well with Nissan e-POWER
and is
e-POWER
About Nissan e-POWER
About high voltage parts
Precautions to be taken when Notebook e-POWER is in an accident
P.20
P.18
P.17
What kind of car is Note e-POWER?
Tips for improving fuel efficiency
P.18
Notes on handling Note e-POWER
P.14
13
Machine Translated by Google
What kind of car is Note e-POWER?
Nissan
and is
ZEB0016X
14
Features of Nissan e-POWER
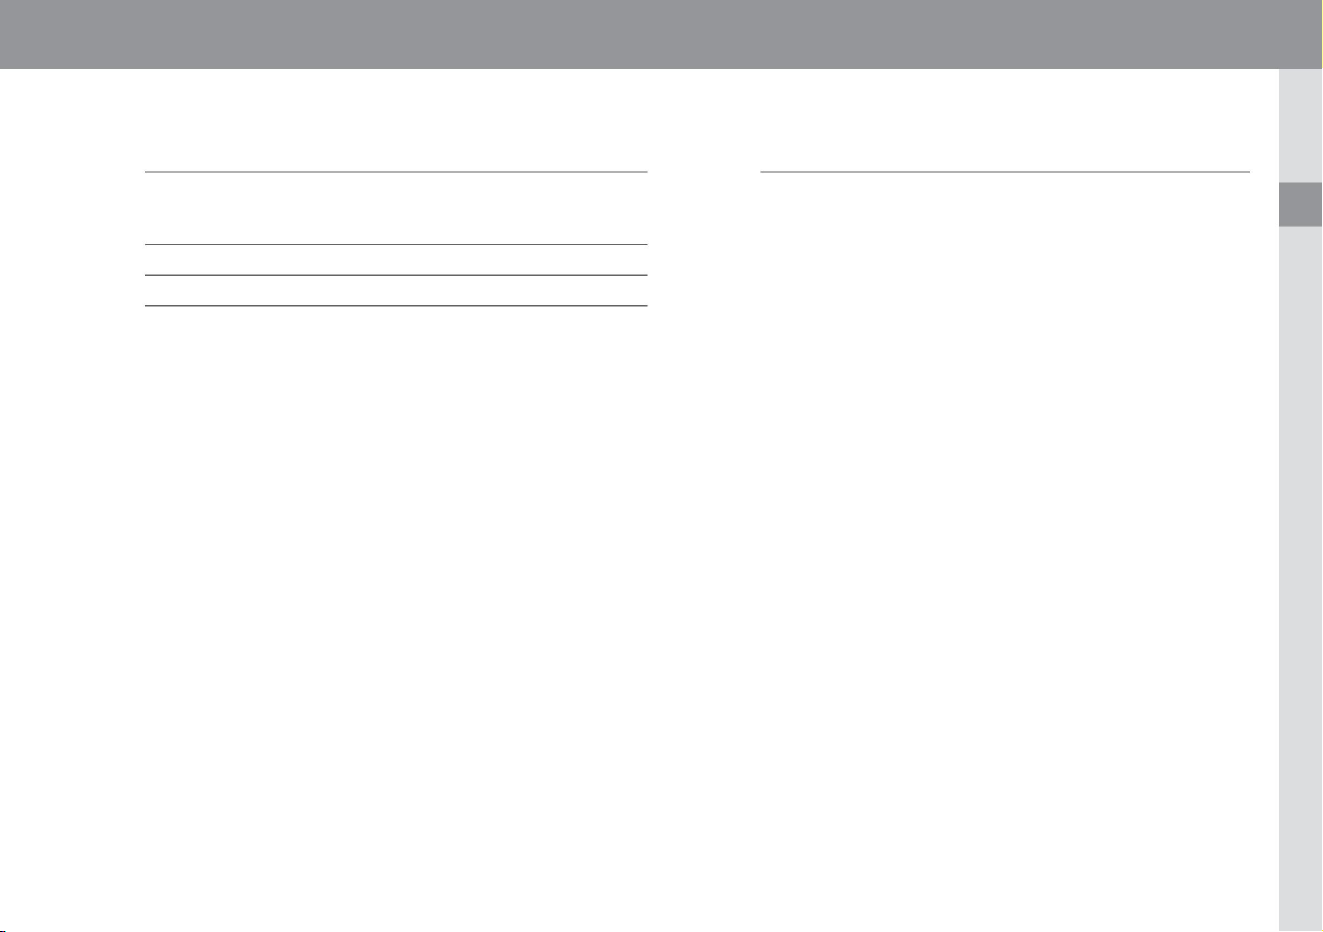
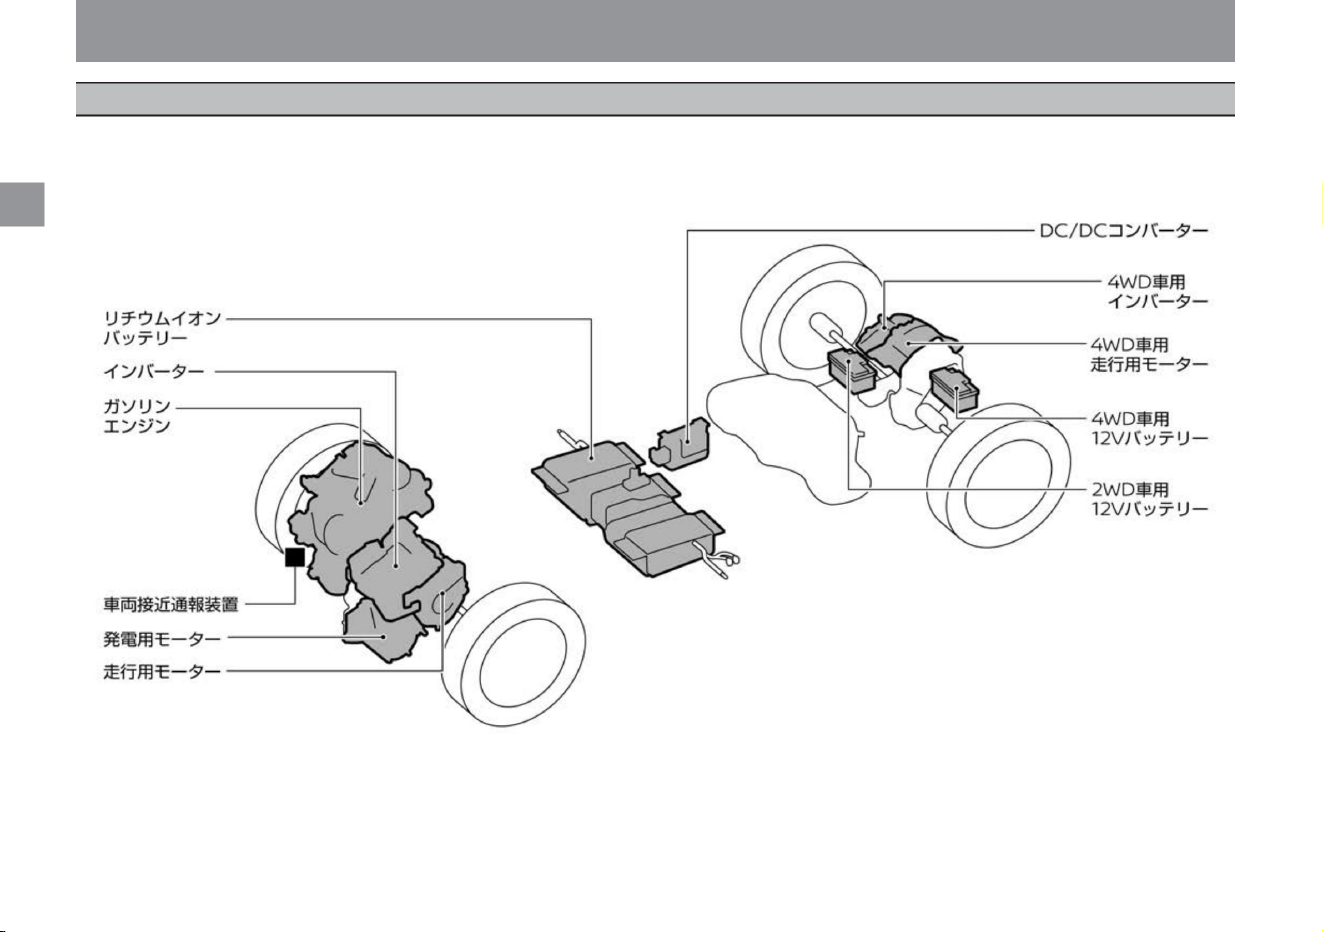
Note e-POWER generates electricity by running a power generation motor with a gasoline engine, and stores that electricity in a lithium-ion battery or
supplies it directly to the driving motor. And it is a car that drives the driving motor with those electric power.
e-POWER
Machine Translated by Google
running motor
Lithium Ion Battery
15
Vehicle proximity notification device
regenerative braking
when the engine runs
Knowledge • Regenerative braking may be
less effective on long downhills when
the lithium-ion battery is fully charged,
when the temperature is low, or when
the road surface is slippery. Also, when
using tires other than the specified size
or depending on the condition of the
tires, the regenerative brake may not
operate properly.
power generation motor
e-POWER
$/$: Different equipment depending on vehicle model, options, etc.
Features of Nissan e-POWER
Electricity stored in a lithium-ion battery or electricity generated
by an engine and a generator motor is used to generate power
to move the tires instead of the engine.
In the e-POWER system, the engine may start in the following
situations. When the lithium-ion battery is low (for
power generation)
It stores the power generated by the power generation motor
and the regenerated power of the traction motor, and supplies
power to the traction motor when driving.
When the lithium-ion battery runs low, the engine starts and
charges the battery automatically, eliminating the need for
external charging like in electric vehicles. However, if the
vehicle is left unattended for
a long period of time, the battery will gradually discharge, so
drive it for about 30 minutes at least once every two to three
months. (The lithium-ion battery may be damaged and become
unusable.) In the unlikely event that the lithium-ion battery is
dead and the e-POWER system cannot be started,
please contact your Nissan dealer.
It generates electricity by the power of the gasoline engine.
eye)
• When the accelerator pedal is strongly depressed (to
generate
electricity) • When the brake pedal is depressed (to generate
negative pressure for the brake booster) • When
traveling on a long downhill (to generate deceleration) • When
the heater is turned on
(to raise the engine water temperature, which is the heat
source) When the engine is
cold (to warm up)
How to use the charge mode (P.165) When the
defroster switch on the windshield is turned on
When opening the hood while the e-POWER system is running
(to prevent accidents during maintenance)
This vehicle is very quiet when running, and it is difficult for
passers-by to notice the approach of the vehicle, so an alarm
device is installed. An alarm sounds when you are slowing
down at intersections, etc.
Vehicle approaching alarm system (P.171)
Regenerative braking is the use of the traction motor instead
of engine braking in gasoline engine vehicles to slow down the
vehicle. Since electricity is generated when the vehicle is
decelerating, the electricity generated can be used to charge
the lithium-ion battery, improving fuel efficiency without wasting
energy.
•During charge mode (for power generation)
Nissan
and is
Machine Translated by Google
Sounds and vibrations unique to the e-POWER system
Knowledge
16
e-POWER
Features of Nissan e-POWER
After starting the e-POWER system, the following
peculiar sounds and vibrations may occur, but this is
not a malfunction. •Motor
noise from the engine room •Sounds and
vibrations caused by starting and stopping the
engine •Operating sounds and motor sounds when
the accelerator pedal is released or the brake is
applied
•Engine sound during sudden
acceleration •Fan operation sound from near the bottom of the
console and
under the front seats •Sound to notify pedestrians of an
approaching vehicle Approaching Vehicle Alert System (P.171)
• Compared to conventional gasoline engine
vehicles, the engine speed during idling is
set higher. This is due to charging the lithium-
ion battery even while idling, and is not a
malfunction.
Nissan
and is
Machine Translated by Google
For safe use
e-POWER
ZEB0017X
Nissan
and is
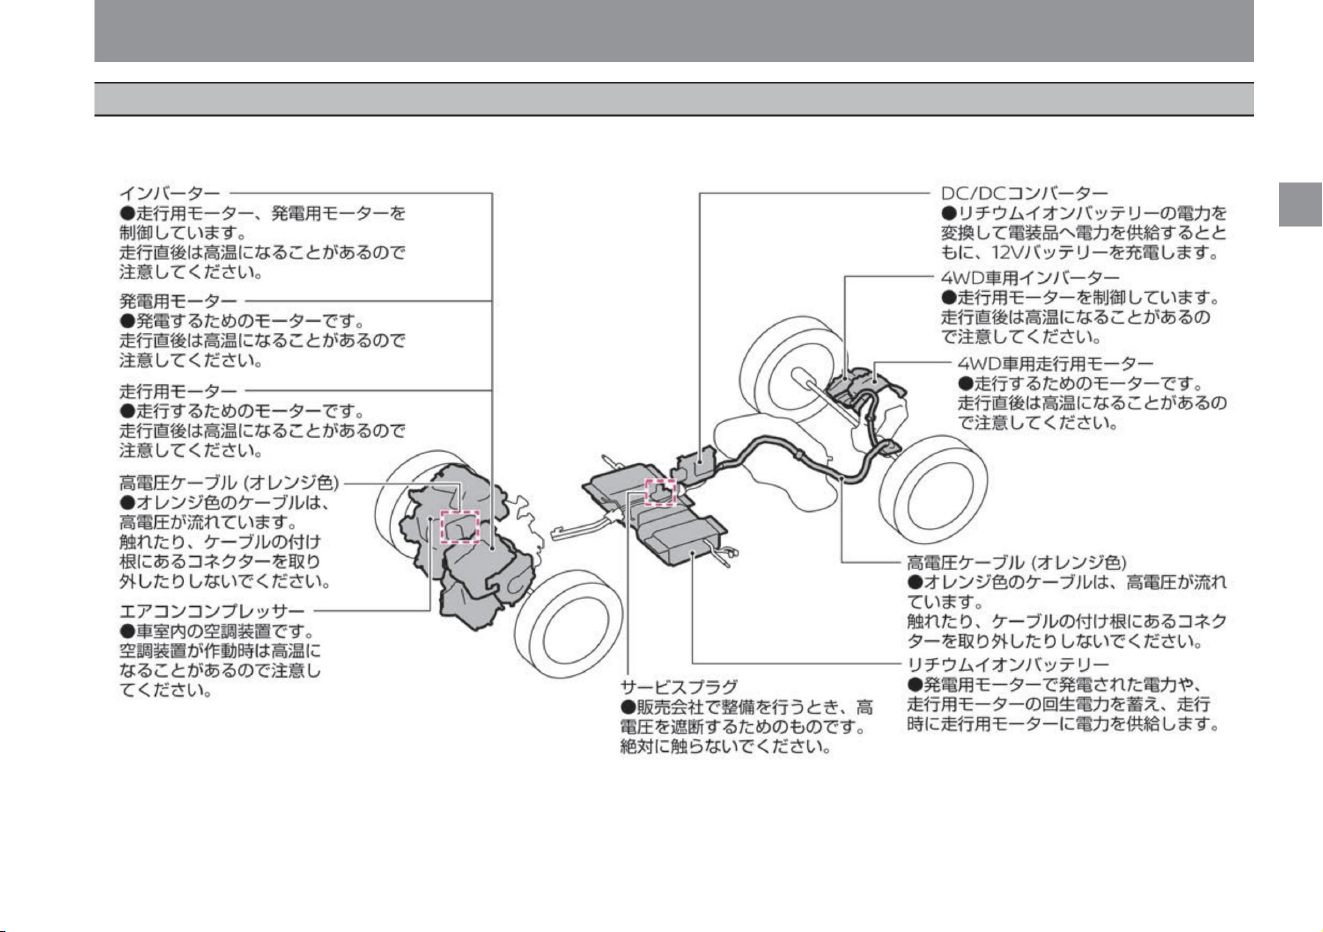
The e-POWER system uses the following high voltage components: Labels are attached to the main high-voltage parts, so please follow the instructions on the
label.
17
About high voltage parts
$/$: Different equipment depending on vehicle model, options, etc.
Machine Translated by Google
For safe use
In the event of an accident, be sure to observe
the following.
caveat
To handle the e-POWER system properly, be
sure to observe the following.
caveat
Notice
18
ZEB0013X
Precautions for handling Note
e-POWER
Precautions to be taken when the
Notebook e-POWER is in an accident
e-POWER
stomach. Since the lithium-ion battery is
located under the front seat, please be
careful not to place a heavy object on it or
step on it.
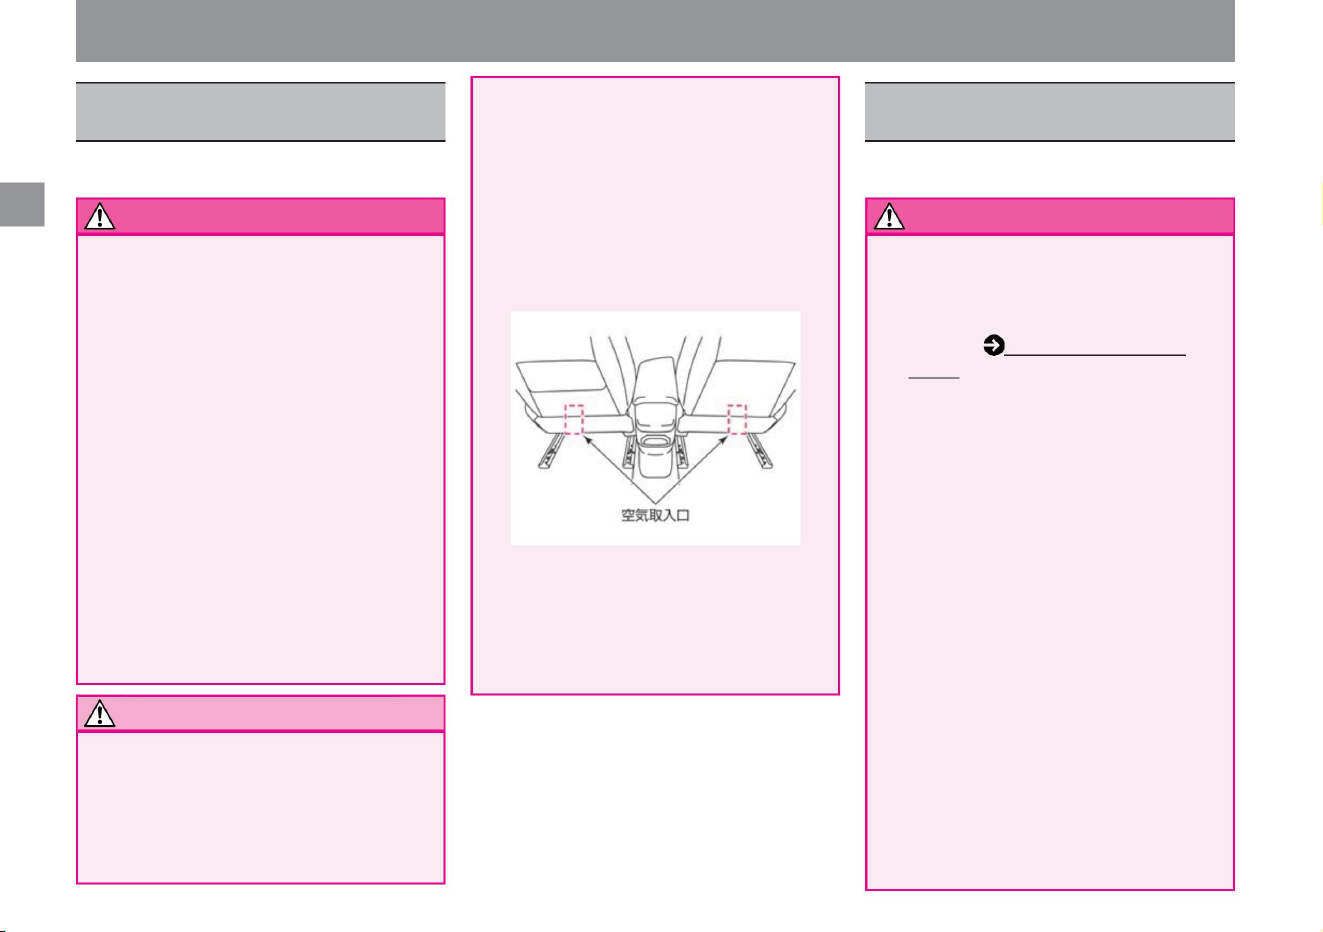
There is an air intake for cooling the lithium-
ion battery under the front seat. Do not block
the intake with
luggage or clothing, as this may lead to
reduced performance or vehicle failure. Also,
be careful not to allow liquids, sand, or other
foreign objects to enter. In the unlikely
event that a large amount of liquid is spilled
around the lithium-ion battery, immediately
contact a Nissan dealer.
(P.17). • If the lithium-ion battery
leaks, contact a Nissan dealer immediately. A
fire may occur. • Never touch liquid leaking
inside or outside the vehicle.
In the unlikely event that liquid leaking
from the lithium-ion battery gets on your skin or
clothes, wash it off with
clean water such as tap water and
immediately consult a doctor.
• Do not place heavy objects under the front seat.
• Do not touch high-voltage parts.
Do not touch high voltage cables, connectors,
or high voltage parts (running motor, lithium-
ion battery, etc.), as DC high voltage of up
to approximately 350V is used. An electric
shock can cause serious and life-threatening
injuries. Be sure to follow the instructions on
the label affixed inside the engine
compartment of your vehicle.
• If the underfloor receives a strong impact while
driving, stop the vehicle in a safe place and
check for damage.
If you find damage under the floor, do not
touch it and contact a Nissan dealer as soon
as possible. • If a
lithium-ion battery or high-voltage component
catches fire, move away from the vehicle as
soon as possible. Always use an
electrical fire extinguisher (type ABC, BC or
C) to extinguish a fire.
• Do not splash water on the lithium-ion battery.
Do not
place objects that may spill water, such as
open buckets or water tanks, in the passenger
compartment or luggage compartment.
Water splashing on the lithium-ion battery
may cause malfunction.
• Never touch exposed high-voltage parts and
high-voltage cables. High Voltage Parts and
High Voltage Cable Locations in About High
Voltage Parts
• Be careful of high
temperatures. The inside of the engine
compartment may be hot immediately after
driving. Be sure to follow the instructions on
the label affixed inside the engine
compartment. • Do not block the cooling air intake.
Nissan
and is
Machine Translated by Google
• In the event of a collision or if there is an
abnormality in the e-POWER system, the
high voltage system may turn off and the
drivable indicator light may turn off. This is
intended to minimize the risk of injury or
accidents and is not an anomaly.
Please use caution . Extinguishing with
water is possible only when a large
amount of water can be discharged from
a fire hydrant. Improper firefighting
is dangerous and should never be attempted.
• If the vehicle is damaged in an accident
and you cannot confirm that it is safe,
move away from the vehicle and contact
a Nissan dealer. When contacting a
Nissan dealer, please state that you
have the e-POWER system (not a gasoline
engine vehicle). • If you need to repair
with sheet metal or painting, be sure to
contact a Nissan dealer. If the vehicle
body is severely damaged or deformed,
there is a risk of electric leakage or electric
shock depending on the state of damage.
Never touch the high-voltage parts
(lithium-ion battery, etc.) and the wiring
(orange)
that connects them. • Do not drive with
the lamp damaged in an accident. If water gets inside, it may cause smoke and fire.
Knowledge
19
advice
e-POWER
$/$: Different equipment depending on vehicle model, options, etc.
• When you need to tow, lift the front wheels or 4
wheels for 2WD vehicles and 4 wheels for
4WD vehicles to tow. If the front wheels are
on the ground while towing, the traction
motor will generate electricity, which may
damage the vehicle. Towing (P.280)
For safe use
Nissan
and is
Machine Translated by Google
To get along well with Nissan e-POWER
Fuel efficiency is greatly affected by road conditions, weather and
temperature, number of passengers,
and other factors. If you pay attention to the following points and reduce
power consumption, fuel efficiency will improve.
e-POWER
stomach.
ÿ Driving in ECO mode or SPORT mode
ÿ Set the temperature of the air conditioner moderately,
and turn it off frequently if it is not necessary.
ÿ Do not use the defroster more than necessary.
and is
Nissan
be.
ÿ When it is cold, use the heated seats ÿ and steering
wheel heater ÿ instead of the air conditioner .
ÿ Start and accelerate smoothly.
ÿ Maintain a sufficient following distance and avoid unnecessary
deceleration as much as possible.
ÿ Don't drive too fast on highways.
when driving
20
before going out
consumes a lot of power.
Tire Inspection Items (P.357)
Knowledge
•By using the heated seats and steering heater instead of
using the air conditioner, the frequency of engine
operation can be reduced and fuel efficiency improved.
Heated seatÿ
(P.269) Steering heaterÿ (P.269)
•By avoiding unnecessary deceleration, power consumption
for re-acceleration can be suppressed.
increase.
Get the correct tire pressure.
•When using the ECO mode or SPORT mode, the
deceleration force of the regenerative braking increases
when the accelerator pedal is released, and more
energy can be recovered during deceleration. • ECO
mode is the
most fuel-efficient mode.
•Sudden start and sudden acceleration will consume more
power and reduce fuel consumption. •By
accelerating while checking the power consumption status
with the power meter ( P.61), you can accelerate with
reduced power consumption.
•Excessive speed wastes power.
Choose routes that consume less power. •Power
consumption increases when traveling uphill. Selecting a
route with few uphills will reduce power consumption.
Do not leave unnecessary luggage
on board. •Electric power consumption can
be reduced by reducing luggage and reducing vehicle
weight.
• If the tire pressure is low, more
•Once the windows are fogged up, switching to another
air outlet will reduce the frequency of engine operation
and improve fuel efficiency.
Fuel consumption improves in order of ECO mode/
SPORT mode/NORMAL mode. e-Pedal Step
(P.161)
•Excess power consumption by the air conditioner can be
suppressed.
Compared to SPORT mode, the frequency of engine operation
is suppressed and fuel efficiency is improved.
•When using the heater, lowering the set temperature to
24°C or less will improve fuel
efficiency. • ECO mode is better than NORMAL mode,
Tips for improving fuel efficiency
• If the fuel efficiency deteriorates significantly, the
following may be the cause. –There are
many uphills in the terrain of the driving route –
Continuing to drive at high speed such as on a
highway
–Frequent sudden starts, sudden accelerations,
and sudden braking
Machine Translated by Google
21
Airbag
For safe driving
before driving
Anti-theft function
Seat belt
For your child's safety
SRS knee airbag system (driver's seat)
About seat belts 3-point
seat belts
Be careful when driving
P.22
P.26
Seat belt precautions
Precautions for those using a cardiac pacemaker, etc.
P.23
P.27
P.29
P.25
P.28
SRS airbag
P.31
P.37
P.38
SRS airbag system (front seat)
P.33
Be careful when carrying a child
P.48
SRS side airbag system (front seat)
P.34
child seat
P.35
SRS curtain airbag system
Immobilizer (anti-theft device)
Preparation before driving
for a safe drive
Machine Translated by Google
• Always adjust the steering wheel, seat, and
mirrors before riding.
Adjusting while driving may lead to an
unexpected accident. • After
adjusting the steering wheel and seat, make
sure they are securely fixed. If it is not
fixed,
the driving posture may suddenly change,
which may lead to an unexpected
accident. • Do
not put cushions or other objects between
the backrest
and the back. The driving posture
becomes unstable, which may lead to an unexpected accident.
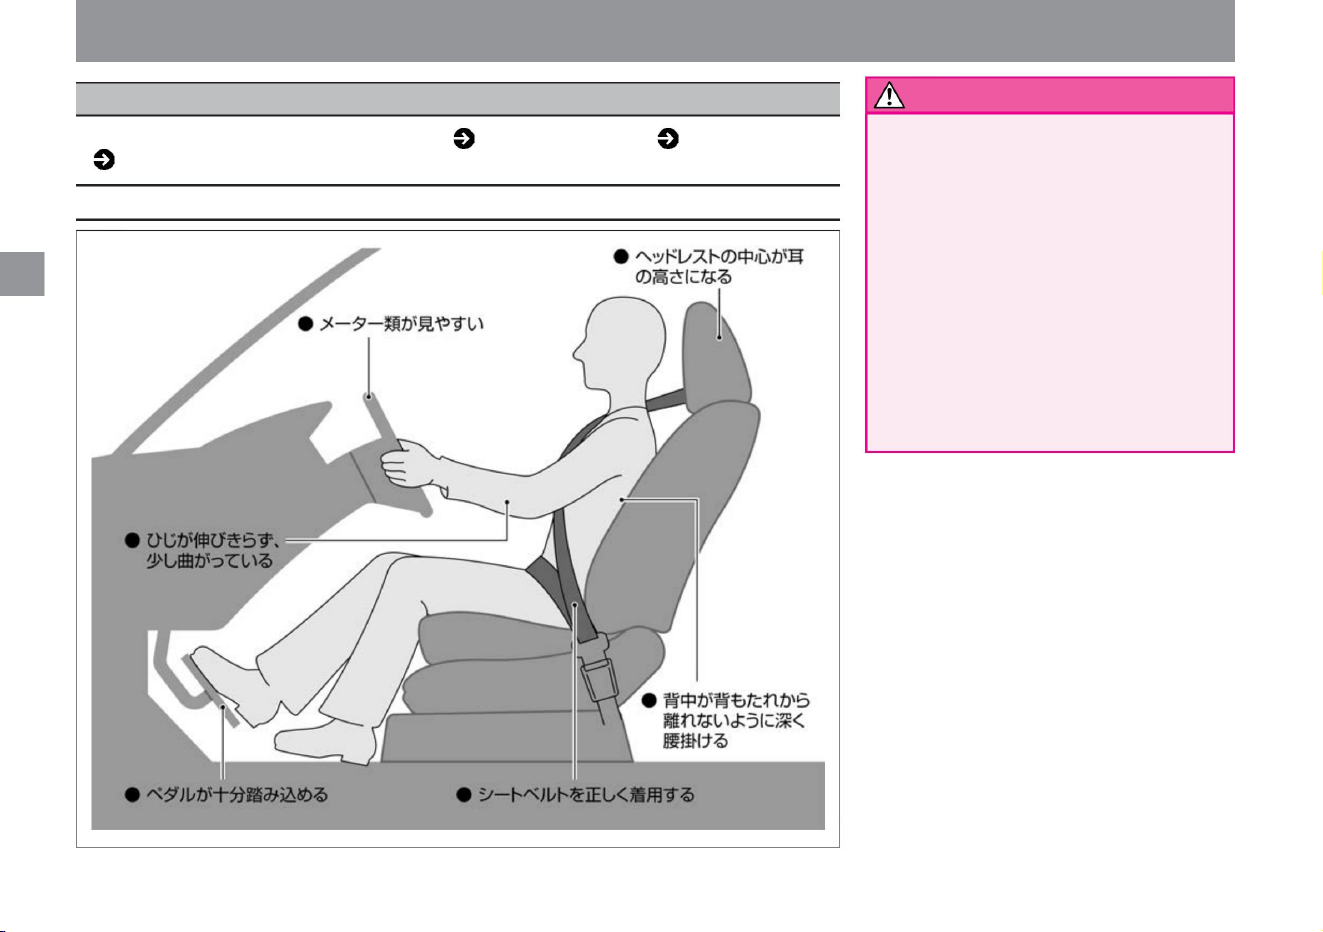
Correct driving posture
22
warn
The steering wheel ( P.106), seat ( P.101), mirror
( P.107) and wear your seat belt.
For safe driving
Preparation before driving
before driving
MED0001X
Machine Translated by Google
please. Seatbelt
(P.26) •When carrying a
small child, please use an appropriate child seat. Child
seat (P.38)
Adjust it to a position where you can recognize it.
• After adjusting the seat and steering wheel, adjust the
mirror. Adjust the door mirrors and rearview mirrorÿ so
that you can clearly see behind you . Door mirror
(P.114) Rearview mirror (P.107)
Pay close attention to exhaust gas
• Exhaust gas contains carbon monoxide, which is
colorless, odorless and harmful. Breathing carbon
monoxide can cause carbon monoxide poisoning,
which can lead to serious health problems or
even death. • Do not leave the e-POWER
system running for a long time under the following
conditions . Exhaust gas may accumulate
around the vehicle or enter the vehicle interior.
Vehicles equipped with an intelligent rearview
mirror Vehicles equipped with an intelligent rearview mirror
can be reliably positioned to the rear when the intelligent
rearview mirror is turned off (rearview mirror mode).
• If there are holes or cracks in the exhaust pipe, or if
there is an abnormality in the exhaust sound, have
the vehicle inspected by
a Nissan dealer. Exhaust gas may enter the cabin,
which is dangerous.
Do not leave people or pets in the vehicle
• Do not leave children, people requiring nursing
care, or pets in the vehicle. Under
the scorching sun, the inside of the vehicle
becomes hot, which can be life-threatening
and dangerous. Be careful with the connector for
connecting the diagnosis machine • Do not attach any
retrofitted items to the connector for connecting
the diagnosis machine . Doing so may lead to
unexpected troubles, such as a dead 12V battery
or the warning light turning on. Do not load
containers or spray cans containing fuel • Do not
load spray
cans containing gasoline or combustible gas. It is
dangerous because it may
catch fire or explode. Be careful with fire • Do
not leave a gas lighter with
an exposed operating part in a glove box or other
small container, or drop it in the floor or between
seats. If you push in luggage or move the seat,
the ignition button on the lighter may
be pressed and gas may blow out, resulting in a
fire. Also, storing the lighter immediately after
using it may cause a fire.
•Be sure to wear the seat belt correctly before driving.
tree
before driving
– If you park or stop in a place covered with snow
– When parking or stopping in snow
– When parking or stopping in a garage, indoors,
or in a poorly ventilated area surrounded
by walls, etc. – When taking a nap or parking
for a long time – When the exhaust pipe may be
corroded or damaged.
When – When the exhaust port of another
vehicle is nearby • Before driving, make sure that the
back door is securely closed. Exhaust
gas may enter while driving. • If you feel that the
exhaust gas
has entered the cabin, open the window and ventilate
the room sufficiently.
$/$: Different equipment depending on vehicle model, options, etc.
For safe driving
mirror adjustment
23
warn
wearing a seat belt
Be careful when driving
Intelligent rearview mirrorÿ (P.108)
Machine Translated by Google

Do not attach accessories to the window • Do
not
attach accessories to the window. They can
block
your vision, and the suction cups can act
as lenses and cause fires.
Do not
modify • Do not connect electrical equipment or
ground wires directly to the terminals of the
12V battery. The 12V battery may go up. •
Installing
parts other than those Nissan Motor has notified
to the Ministry of Land, Infrastructure,
Transport and Tourism may
constitute illegal modifications.
Installing a wireless transmitter • Installing a
wireless transmitter in your vehicle may
affect the electrical system. Be sure to
consult a NISSAN dealer about measures
to prevent adverse effects and installation
methods. Upon customer request, Nissan
dealers can provide detailed information on
radio transmitter installation (frequency
band, power level, antenna position,
installation conditions).
When the SRS airbag is activated, the
accessory may fly out and cause an
unexpected accident such as injury. Do
not
modify • Do
not install non-conforming mufflers on the
market or use parts that are not suitable
for the performance and functions of the
vehicle other than genuine Nissan parts.
Doing so may not only prevent the product
from functioning properly, but
may also lead to unexpected accidents such
as malfunction and fire. • Be sure to
consult a NISSAN dealer when installing
electrical components. Improper installation
or incorrect wiring may
lead to unexpected accidents such as
malfunction and fire. • If the steering wheel
is removed or replaced improperly , the
SRS airbag may not operate properly or
may operate unexpectedly, resulting in an unexpected injury.
Do not drive with the vehicle broken
or damaged. • If the exhaust noise becomes
louder, have it inspected by
a Nissan dealer. The exhaust pipe may be
corroded or damaged by road interference.
Also, if you continue to drive with a hole in
the exhaust pipe, high temperature exhaust
gas may leak and enter the vehicle
interior, leading to a fire. • Do not drive
with the lamp damaged in an accident. If water
gets inside,
it may cause smoke and fire. Do not take
a nap while the e-POWER system
is operating • In the unlikely event that the
shift position
is other than , the vehicle may start suddenly
and lead to an unexpected accident. Also,
unintentionally operating the select lever
or stepping on the accelerator pedal may
lead to an unexpected accident or fire due
to overheating of the engine.
warn
advice
24
Notice
• After using the ashtray, make sure
matches and cigarettes are
extinguished, and
be sure to close the lid. Do not put
flammable items such as waste paper. There is a risk of fire.
before driving
For safe driving
Machine Translated by Google
For safe driving
before driving
25
If you use a cardiac pacemaker, etc., please
be aware of the following.
caveat
$/$: Different equipment depending on vehicle model, options, etc.
Precautions for users of
cardiac pacemakers, etc.
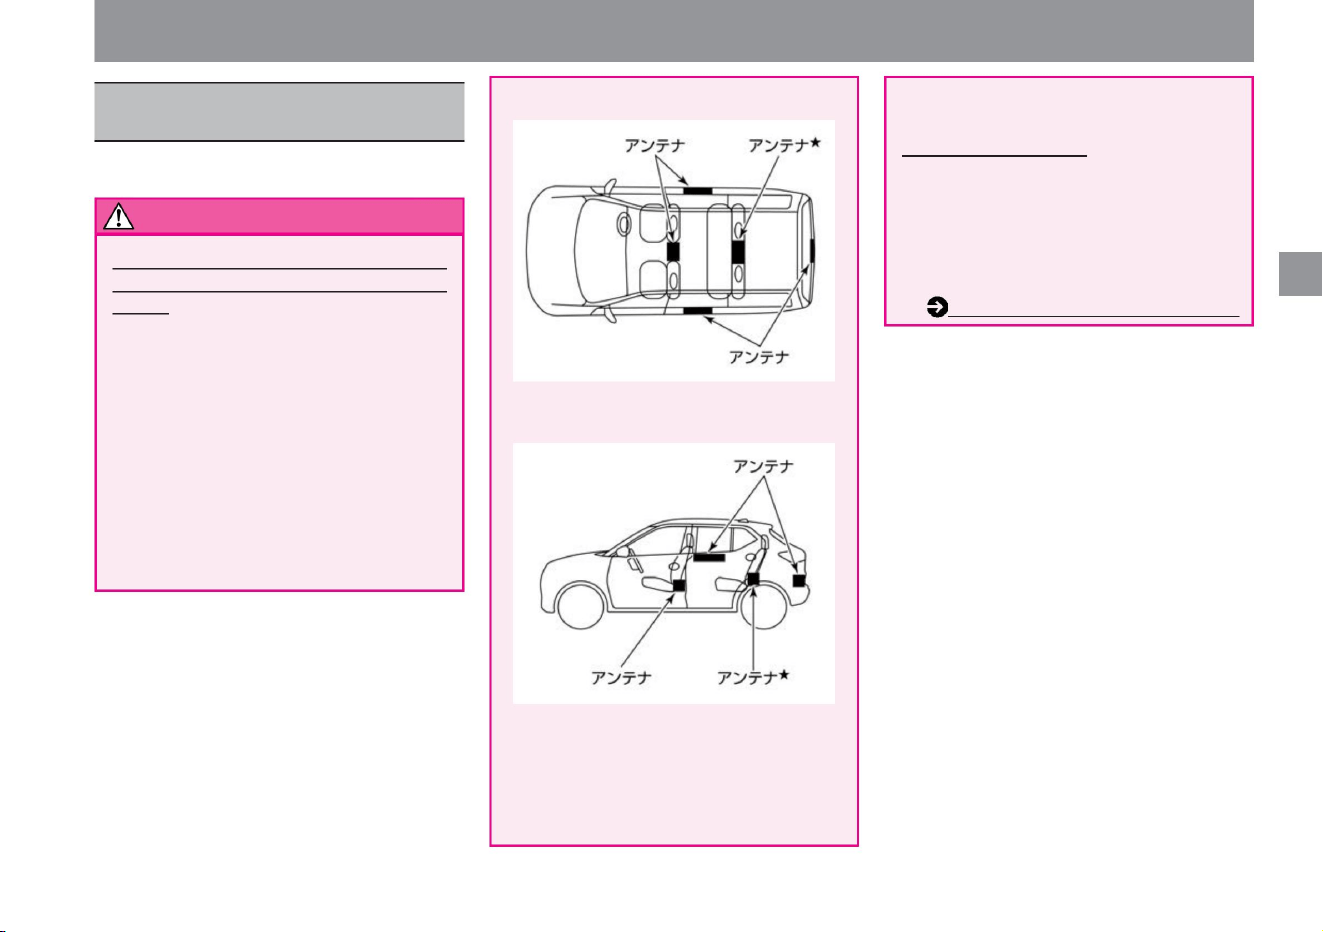
Radio waves from the key may affect the
operation of medical electrical equipment.
• If you are using medical electrical equipment
other than an implanted cardiac pacemaker
or an implanted cardioverter-defibrillator (ICD),
check with the manufacturer of the medical
electrical equipment before use .
About the key (intelligent key/remote control
entry system) If you are using an implanted
cardiac
pacemaker or implanted cardioverter-defibrillator
(ICD) , keep the implanted part within a range
of about 22 cm or less from the antenna. can't
When opening and closing the door and back
door,
operating the switch ÿ on the door handle ,
and starting the e-POWER system, radio
waves from the key may affect the operation
of an implanted cardiac pacemaker or an
implanted cardioverter-defibrillator (ICD). I
have.
About SOS Callÿ • Since
SOS Call uses a wireless communication function,
if you use a cardiac pacemaker or other
electrical medical equipment, contact the
relevant medical electrical equipment
manufacturer or distributor by radio wave. be
sure to check the impact of Advanced
Automatic Accident Reporting Systemÿ (P.265)
ZED0119X
ZED0120X
Machine Translated by Google
For safe driving
Seat belt
• Do not drive when the SRS airbag warning light in
the meter is lit. The pretensioner does not
operate
for about 7 seconds after the power switch is
turned on because a system check is performed.
Be sure to turn off the SRS airbag warning light
before driving.
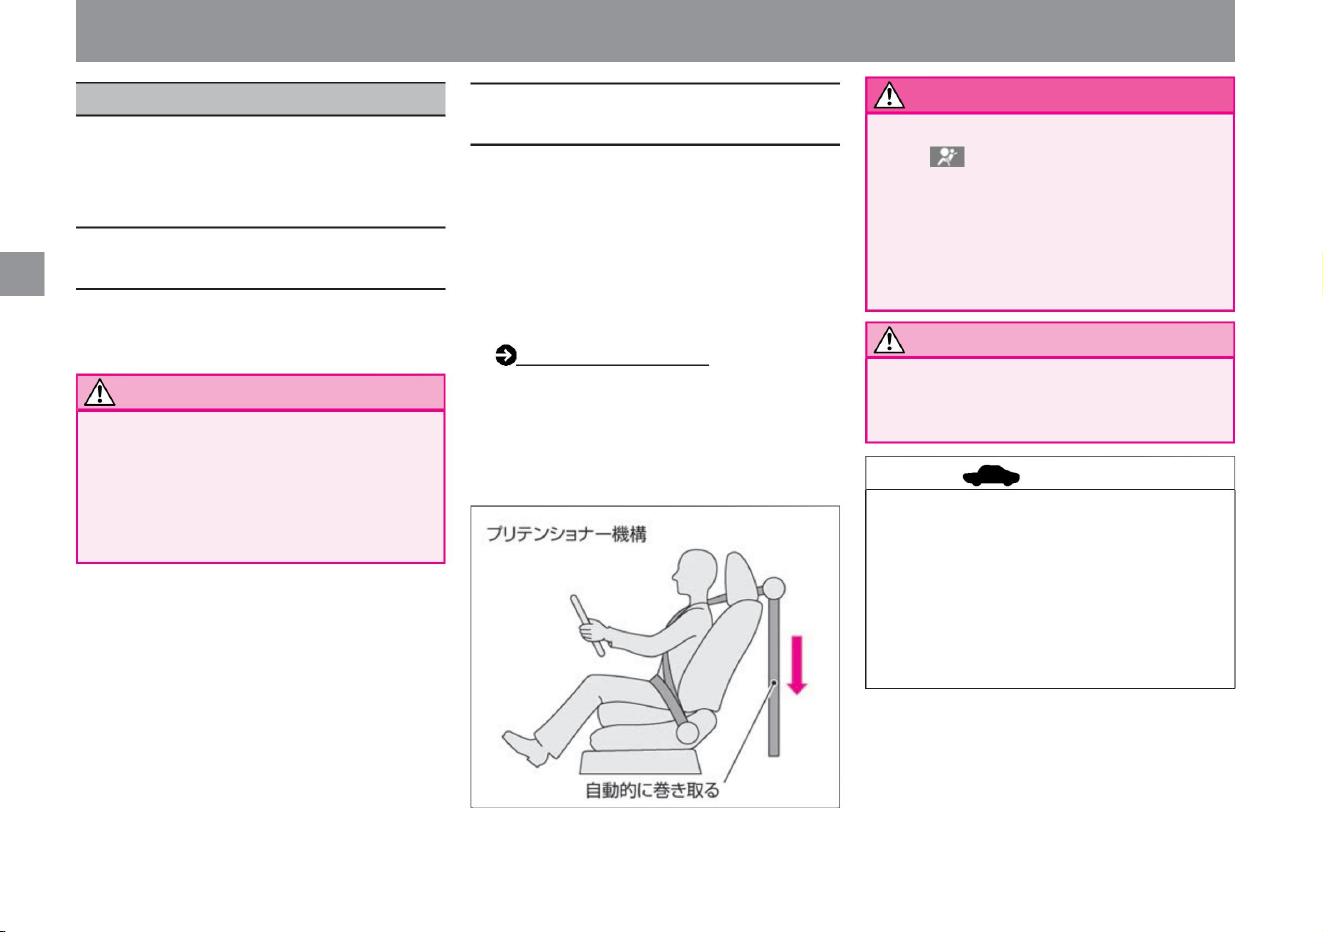
SRS Airbag (P.29) • The
driver's seat and front passenger's seat are equipped
with a double pretensioner mechanism. When the
vehicle receives a strong impact from the front, the
seat belt is rolled up from the shoulders and at the
same time from the waist, improving occupant
restraint performance.
A seat belt is a safety device that secures the
body by securing it to the seat. Always
wear your seat belt correctly when driving.
• Depending on the strength of the impact, it may
operate simultaneously with the SRS airbag system
(front seat), or only the pretensioner may operate.
• In the event of a strong impact from the front of the
vehicle, such as a head-on collision, the seat belt is
instantly retracted to improve occupant restraint
performance.
• Be sure to consult a Nissan dealer when scrapping
the vehicle or disposing of pretensioner seat
belts.
• When the pretensioner is activated, it makes a
noise and emits white smoke, but it is not a fire.
• Once
activated, the pretensioner cannot be reused. In the
event of a collision, be sure to have the system
inspected by a Nissan dealer, and replace it if it
has already been activated.
• Do not repair the parts or wiring of the pretensioner
seat belt, or use an electric tester to diagnose
the circuit of the pretensioner system. It may
work incorrectly or not work properly.
About seat belts with ELR
(emergency fixing)
About the pretensioner seat belt
• It expands and contracts according to the movement of the
body, and if it receives a strong impact such as a collision,
the belt will lock and fix the
body. Note
Notice
26
warn
advice
MED0003X
About seat belts
Machine Translated by Google
For safe driving
Seat belt
• Adjust the height of the anchor so that
the belt is securely attached to the
shoulder. Also, make sure the
anchors are
securely fixed. In the unlikely event
that the belt comes off your shoulder,
the seat belt will not be fully effective
and may lead to
serious injury. • When using the seat belt
for the center seat of the rear seat,
use the one with the "CEN TER" on
the
buckle. Failure to wear the seat belt
correctly may result in serious injury
in the event of an accident.
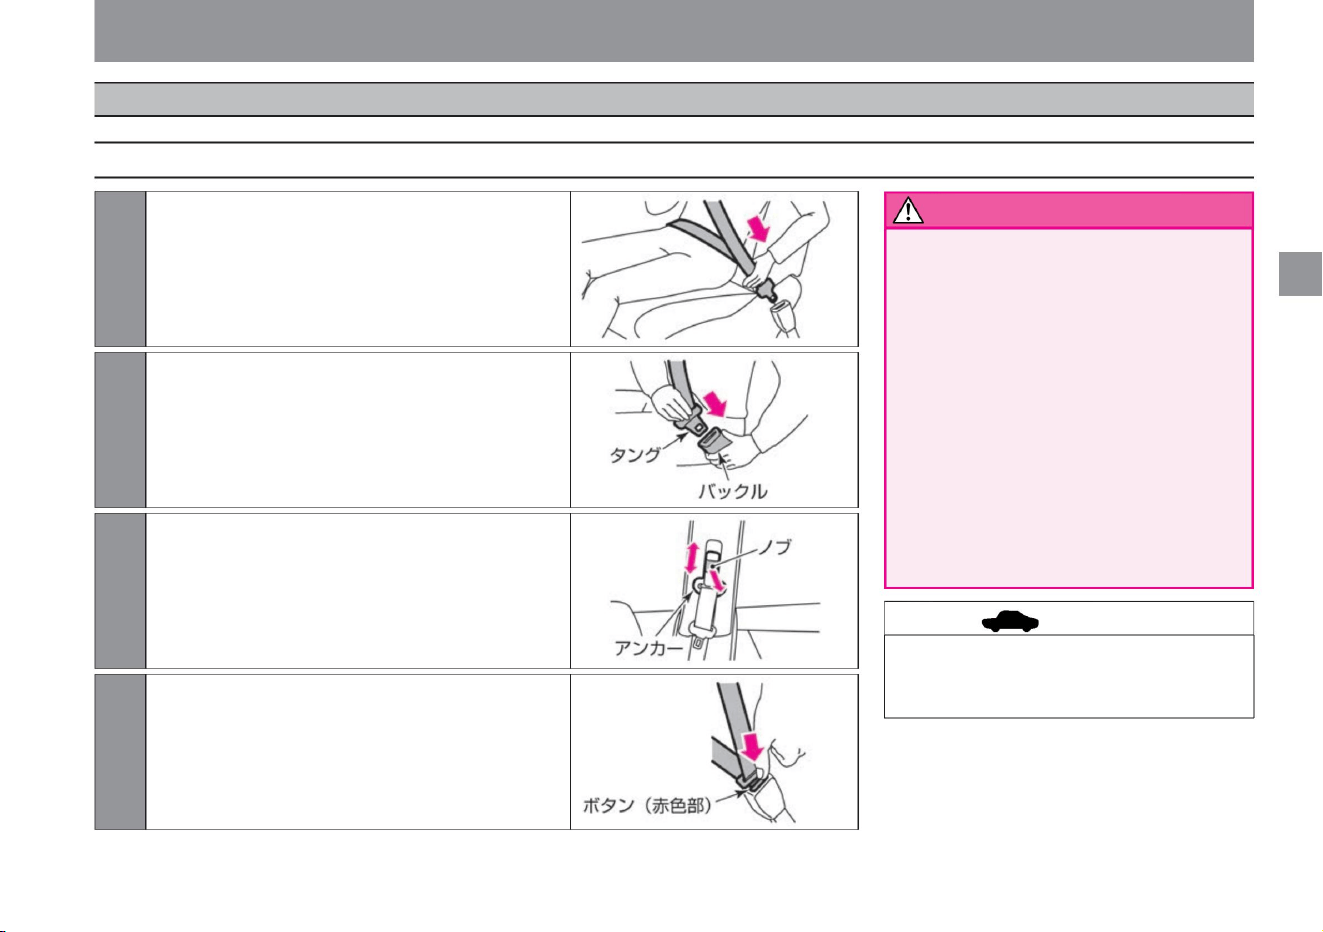
2Make sure that the belt is not twisted, and insert the tongue
into the buckle until it clicks.
4 To remove the buckle, press the button (red part) on the
buckle, hold the tongue and slowly return it.
3 Adjust the height of the anchor position. (Front seats only)
Raise and
lower the anchor part while pulling the knob, adjust
the position so that the belt is securely hooked on the
shoulder, and then release your hand. After releasing
your hand, move it until it clicks into place.
1 Sit on the seat in the correct posture, hold the tongue and
slowly pull out the belt. Place the belt
as low as possible on your hipbone and make sure it
fits snugly.
• If the belt is locked and cannot be pulled
out, pull the belt strongly, loosen it,
and then slowly pull it out again.
advice
27
warn
How to wear a seat belt
MED0006X
MED0004X
MED0005X
MED0045X
3-point seat belt
$/$: Different equipment depending on vehicle model, options, etc.
Machine Translated by Google
• Never use organic solvents such as benzene
or gasoline to clean seat belts. The
performance of the belt may deteriorate,
and the seat belt may not perform its
function sufficiently. Clean the seat belt
with a neutral detergent or lukewarm water
and dry it before use.
Do not adjust it so that it floats above
your body. If there is slack in the belt, it
may not be fully effective. • Do not drive
with the seat back resting down.
If the seat belt does not work effectively, your
body
may get caught under the seat belt in the
event of a collision, etc., and you may be
seriously injured by the belt. • Do not put
any foreign objects into the
buckle or take-up device. If the seat belt does
not function
properly, it may lead to serious injury in an
emergency. • Even if you are pregnant or
have a medical
condition, wear a seatbelt just in case. However,
since there is a risk of local strong pressure,
please consult a doctor and check the
precautions. If you are pregnant, wear the
waist belt as low as possible, away from
your abdomen. Make sure that the shoulder
belt passes over your shoulders and hangs
on your chest, avoiding your abdomen. •
Make sure your child wears a seat belt. If
you hold the child on your lap, you
may not be able to support the child in the
event of a
collision, etc., and the child may be
seriously injured. Do not let the seat belt
hit your neck or face
Be sure to protect the
Improperly wearing seat belts can lead to
serious injury in the event of an accident.
– The driver should be
in the correct driving position and the
passenger should be in the correct
sitting
position. – Do not use one belt for more
than one person.
– Do not wear the belt twisted. If the belt is
twisted, the width of the belt becomes
narrower, and in the event of an accident,
the impact force cannot be distributed,
and strong force may be applied
locally. – The lap belt should be worn snugly
as low as possible on the hipbone. If the
belt is misaligned from your hipbone, it
can put a lot of pressure on your lower
back. – Make
sure that the shoulder belt does not pass
under your armpits, but on your
shoulders. If it doesn't rest on your
shoulders enough, it may not
restrain your upper body. – Do not intentionally hang on the belt with a clip or the like.
• Everyone wears a seat belt before running.
Failure to
do so may result in serious life-threatening
injuries in the event of an accident or
sudden braking. • When wearing a seat
belt,
Use a child seat for small children who
cannot fit properly. Child Seats (P.38) • For
seat
belts that have been
impacted or damaged in an accident, ask a
Nissan dealer to inspect them. A seat belt
that has been subjected to
a strong impact, or a seat belt that has
been damaged or torn, may not function
properly.
Seat belt precautions
For safe driving
Notice
28
warn
Seat belt
Machine Translated by Google
ZED0149X
Knowledge • Because SRS airbags inflate at
high speed with high-temperature gas,
depending on the accident conditions,
you may suffer abrasions,
bruises, or burns. • When the SRS airbag
inflates, it makes an operating sound and
emits white smoke, but it is not a fire.
Also, the generated gas may cause
choking, but it is not toxic. • SRS is an
abbreviation for “Supplemental Restraint
System” and means a supplementary restraint system for seat belts.
• When scrapping the vehicle or disposing of
the SRS airbag, be sure to consult with a
Nissan dealer.
• SRS airbags cannot be reused once inflated.
Have it replaced at a Nissan dealer.
$/$: Different equipment depending on vehicle model, options, etc.
Airbag
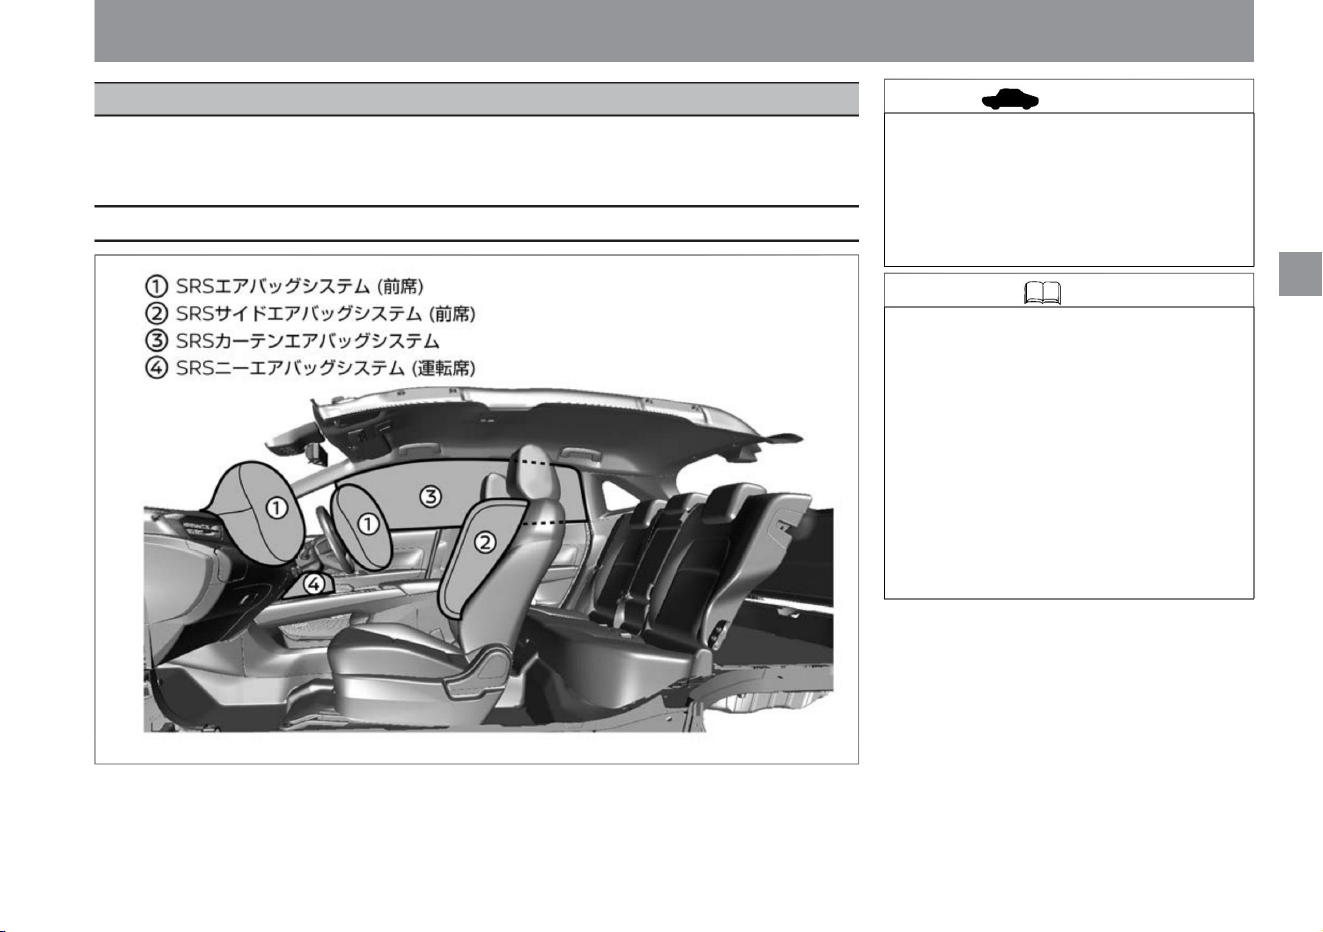
SRS airbags inflate when the occupants receive a strong impact that could cause serious injury, and mitigate
the impact on the
occupants. Be sure to wear your seatbelt as it increases safety when used in conjunction with a seatbelt.
SRS airbag
For safe driving
29
advice
Types of SRS airbags
Machine Translated by Google
30
warn
warn
Precautions for SRS airbags
Knowledge
SRS airbag activation
don't run when
When the SRS airbag deploys, a strong impact
may result in death or serious injury. If you
have no choice but to install it on the front
passenger seat, lower the seat as far back as
possible and always install it facing forward.
Child seat (P.38)
The emergency flashing indicator light automatically
flashes when the SRS airbag is triggered by an impact.
When you press the emergency flashing indicator
light switch, it will turn off, but in order to prevent
secondary disasters, we recommend that you do not
turn off the light until safety is ensured. Also, it may
not flash depending on the magnitude of the impact.
When the SRS airbag warning light does not
light up for about 7 seconds (when it remains
off)
SRS side airbags and SRS curtain airbags
operate without an occupant present.
The SRS airbag can operate when the power switch
is ON. After the power
switch is turned on, the SRS airbag warning light in
the meter lights up for about 7 seconds and a system
check is performed, so the SRS airbags will not
operate. Wait until the warning light has turned off
before driving.
The SRS airbag is a device that assists the
seat belt. The SRS airbag alone cannot
prevent the body from jumping out. Also, the
SRS airbag may not be effective. • Do not
install a child seat facing backwards on the
front passenger seat.
SRS airbags are activated in the event of a frontal or
side collision. However, the system may not work if
the impact is absorbed or dispersed by the vehicle
body and the damage to the vehicle is severe but the
impact to the occupants is not severe.
MED0037X
ZED0102X
Airbag
• Wear the seatbelt correctly in the correct posture.
– Immediately after turning on the power switch,
• Passenger SRS airbag, passenger side
• Be sure to observe the following.
• If the SRS airbag warning light is in the following
– When the SRS airbag warning light continues to
illuminate,
the SRS airbags may not operate properly, leading
to serious injury. Please consult your Nissan dealer.
For safe driving
Machine Translated by Google
ZED0101X
SRS airbag system (front seat)
Airbag
$/$: Different equipment depending on vehicle model, options, etc.
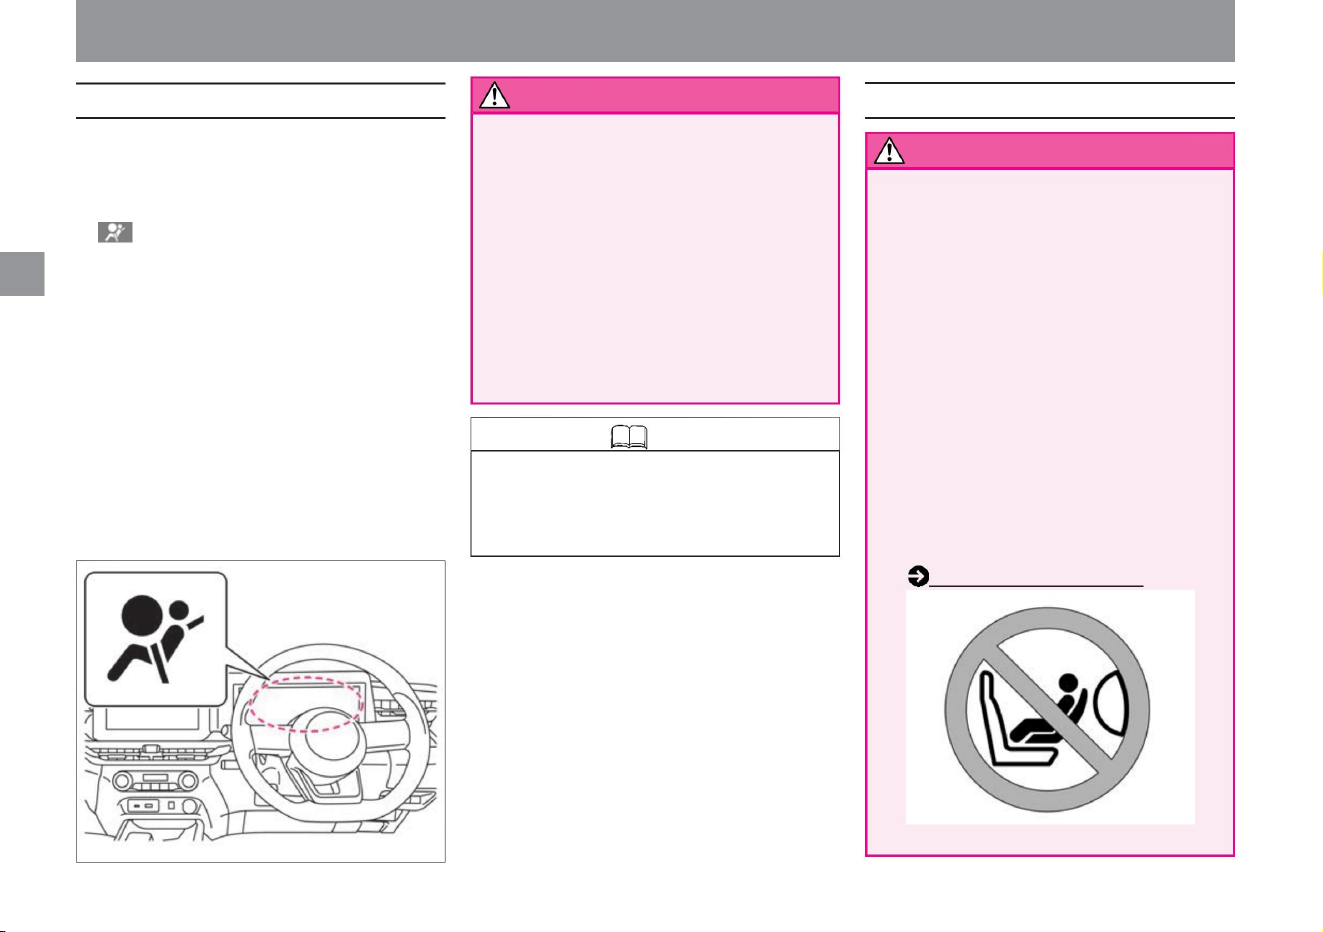
When the vehicle receives a strong impact from the
front, the SRS airbags inflate instantly to reduce the
impact on the occupant's head.
When the SRS airbag activates
WARNING SRS airbags may malfunction
or malfunction, resulting in serious injury.
31
storage site
Please read ( P.31) for the storage
location of the SRS airbag (front seat).
Please read ( P.34) for the storage
location of the SRS curtain airbag.
Doing so may cause burns due to high
temperatures.
• If residue (dregs) from SRS airbag
deployment adheres to your eyes or
skin, wash it away with water as
soon as possible. In rare cases, people
with sensitive skin may experience skin irritation.
It is activated when the following impacts are strong. •
When the vehicle collides head-on with a thick concrete-like
wall at a speed of 25 km/h or more • When
the vehicle receives a strong impact (same as above) from a
direction within 30° from the front left or right of the vehicle.
– Do not subject the SRS airbag
compartment to excessive
impact. – Do not use an electrical tester
to diagnose the SRS airbag circuit or
modify the circuit. – When
installing aero parts or modifying the
suspension, please consult a NISSAN
dealer. Improper modification will
result in failure to detect impacts
correctly. • When the SRS airbag
is activated, do not touch the airbag until
30 minutes have passed.
The driver's seat SRS airbag is stored in the
steering wheel.
The passenger side SRS airbag is stored in
the passenger side instrument panel.
– Consult a NISSAN dealer when
servicing the SRS airbag compartment.
Also, if the SRS airbag compartment
is scratched or cracked, do not
continue to use it and have it replaced
by a Nissan dealer.
Please read ( P.33) for the storage
location of the SRS side airbag (front
seat).
Please read ( P.35) for the storage
location of the SRS knee airbag
(driver's seat).
For safe driving
Machine Translated by Google
advice
Precautions for SRS airbag system
(front seat)
warn
When the SRS airbag does not operate
When the SRS airbag is difficult to operate
32
It may not work properly when the SRS airbag is
activated, leading to serious injury.
It may not work if the following impacts are weak. • When
you collide with a
parked car of the same class at a speed of approximately
50 km/h or less • When you collide
head-on with a telephone pole or other object that does
not break at the time of collision at a
speed of approximately 30 km/h or less • Crawling under
the bed of a
truck, etc. When you collide with a guardrail from diagonally in front
It may also operate when the lower part of the vehicle
receives a strong impact such as the following. (When the
damage to the vehicle is minor, but the impact on the
occupants is strong.) • When colliding with a
curb at high speed • When falling into a
deep hole or ditch • When jumping and hitting the ground
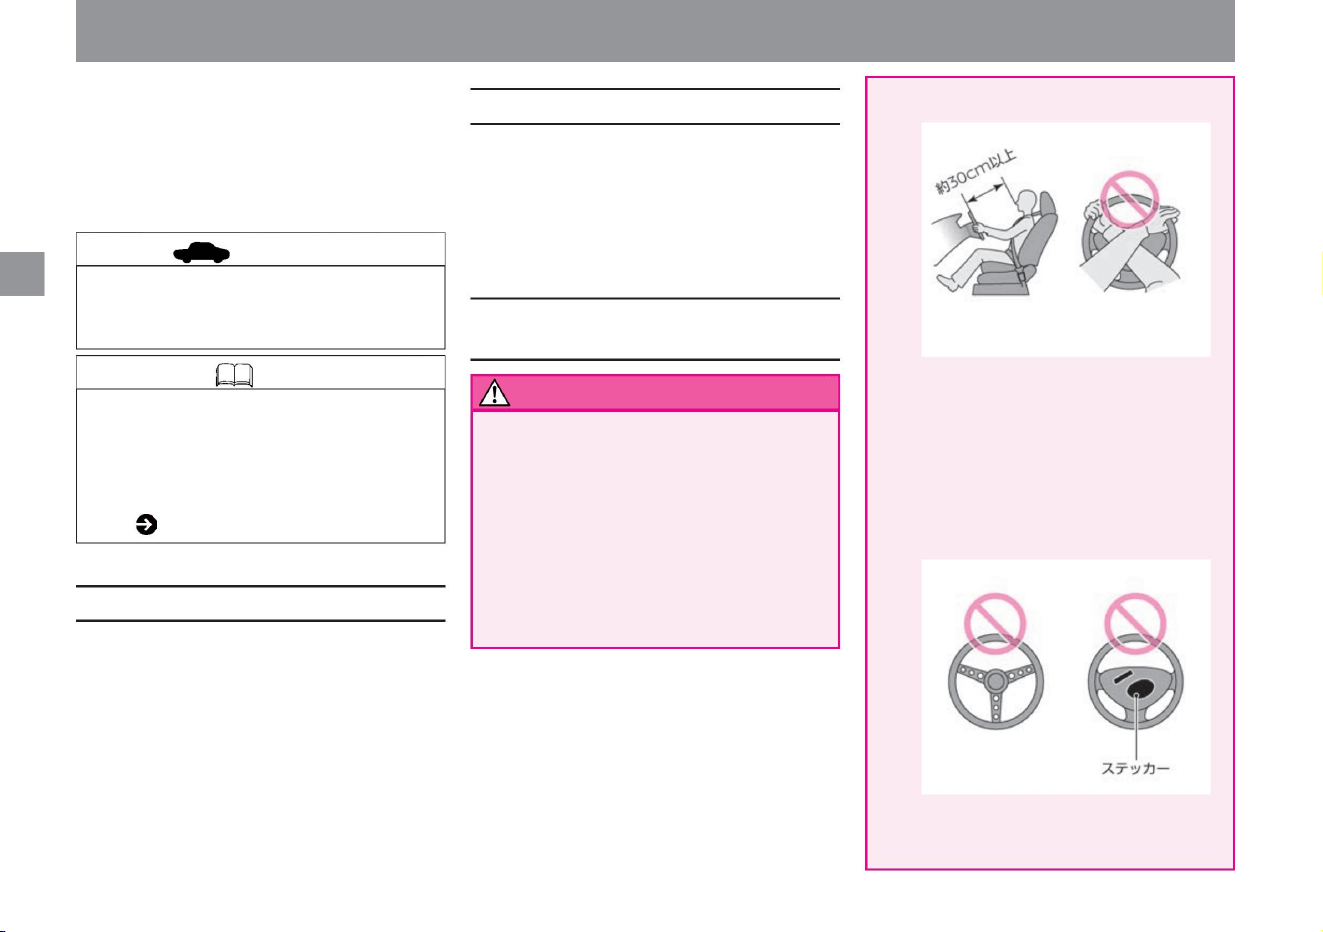
• Keep your body away from the driver's seat SRS
airbag compartment. Also, do not operate the
steering wheel on the inside.
Keep your face as far away from the handle as
possible (approximately 30 cm or more), and do
not bring your hands, face, or chest unnecessarily
close to the handle, such as by leaning on the
handle. A strong impact may occur when the
SRS airbag is activated, resulting in serious injury.
when
• Replace with an inappropriate handle,
Once the SRS airbag is activated, it will not activate even
if there is a collision. Also, it does not work in the following
cases. • When the vehicle
is hit from the side or from behind • When the
vehicle rolls over or capsizes
Do not put a sticker on the SRS airbag
compartment.
• The windshield may break due to the impact of the
activation of the passenger side SRS airbag.
Knowledge • Since the SRS airbags for the driver's
and passenger's seats deflate immediately after
being inflated, they do not interfere with
your vision. • When the airbag is activated, the
Advanced Accident Automatic Notification System
( P.265) is activated automatically.
• Do not attach accessories to the windshield.
MED0156X
MED0157X
For safe driving
Airbag
Machine Translated by Google
For safe driving
Airbag
ZED0104X
ZED0103X
MED0158X
storage site
33
warn
$/$: Different equipment depending on vehicle model, options, etc.
SRS side airbag system (front seat)
There is a risk of serious injury when the SRS
airbag is activated. If you have no
choice but to install it on the front passenger
seat, lower the seat as far back as possible and
always install it facing forward. Be sure to attach
a seat that can only be used facing backwards,
such as a child seat for infants, to the rear seat.
• Make sure the child seat is securely
fastened before driving. Please follow the instruction
manual attached to the child seat for the
fixing method and handling method.
WARNING There is a risk of serious injury when
the SRS airbag deploys. • Do not put
your body close to the SRS airbag storage area on
the front passenger seat. Also, keep children
away.
• Do not get close to the SRS side airbag storage
area. Do not
lean against the side (outside) of the backrest
of the front seat, such as leaning against the
door. In particular, do not allow children to put
their arms out the window or the back of the front seat.
• Do not affix stickers, etc., to the SRS airbag
compartment or its surroundings. Also, do not
place accessories or air fresheners.
A strong impact may occur when the SRS
airbag is deployed, resulting in serious injury.
The SRS side airbags are stored on the side (outside)
of the seat backrests for both the driver and front
passenger seats.
Do not place your hands or feet on the SRS
airbag compartment, or bring your face or chest
unnecessarily close to it. Also, do not let the
child stand in front of the SRS airbag
compartment or hold the child on your lap, but
place the child in the rear seat.
• Attach the child seat to the rear seat.
There is a risk of serious injury when the SRS
airbag is activated.
When the vehicle receives a strong impact from the
side, the SRS side airbag on the impacted side instantly
inflates to reduce the impact on the occupants, mainly
the chest.
Machine Translated by Google
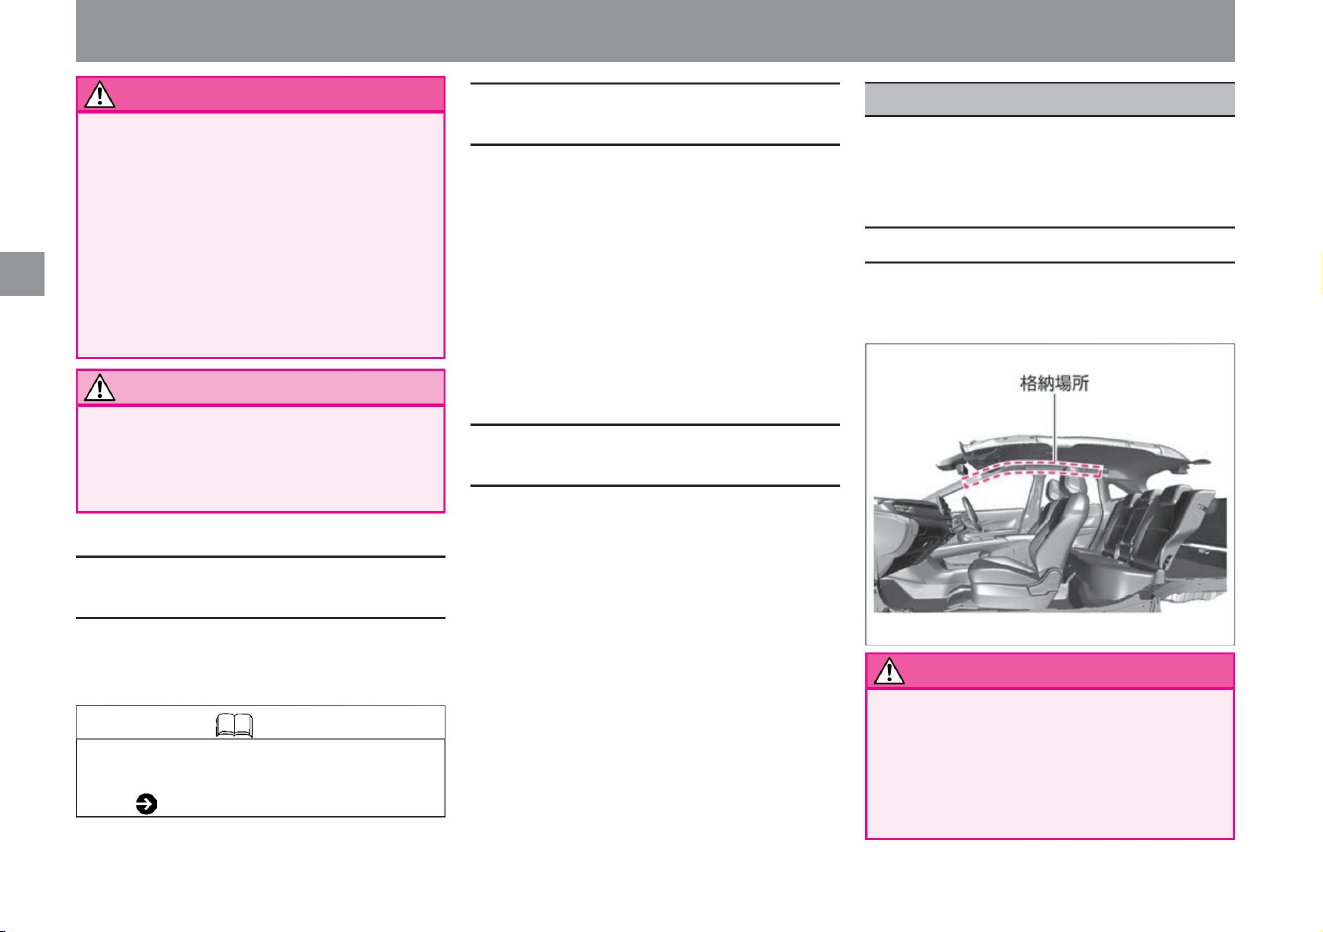
When the vehicle receives a strong impact from the
side, the SRS curtain airbag on the impacted side
instantly inflates, mitigating the impact mainly on the
occupants' heads.
When the SRS side airbags are difficult to
deploy
storage site
When the SRS side airbag does not operate
warn
When the SRS side airbag is activated
34
Notice
Knowledge
ZED0117X
For safe driving
The SRS side airbag may malfunction.
• When the airbag is activated, the Advanced
Accident Automatic Notification System ( P.265)
is activated automatically.
Be
careful not to carry a warning saliva. Serious
injury may occur in the event of an accident. •
Do not place umbrellas or bags
near the SRS side airbag storage area in the
front seat .
Once the SRS airbag is activated, it will not activate
even if there is a collision. Also, it does not work in the
following cases. • When
you collide head-on with a stopped or running car •
When you are hit from behind
• Use a seat cover that does not cover the backrest
of the front seat.
• Do not get close to the SRS curtain airbag storage
area. Serious
injury may occur in the event of an accident. •
SRS around the
center pillar (lock pillar), roof side, etc.
It may not work if the following impacts are weak. •
When a motorcycle
collides with the side from an oblique direction •
When a motorcycle collides with the side from the
side • When it collides with the engine compartment
(luggage room)
• When it rolls over or
overturns • When it collides diagonally
from the front • A utility pole when you collide
The SRS side airbag may not operate properly.
It is activated when the following impacts are strong.
When a general passenger car hits the side from the
side at a speed of 25 km/h or more
• Do not close the door so strongly that the glass
breaks.
The SRS curtain airbags are stored in the ceiling on the
window side for both the driver's seat and the passenger's
seat.
Airbag
SRS curtain airbag system
Machine Translated by Google
SRS knee airbag system (driver's seat)
$/$: Different equipment depending on vehicle model, options, etc.
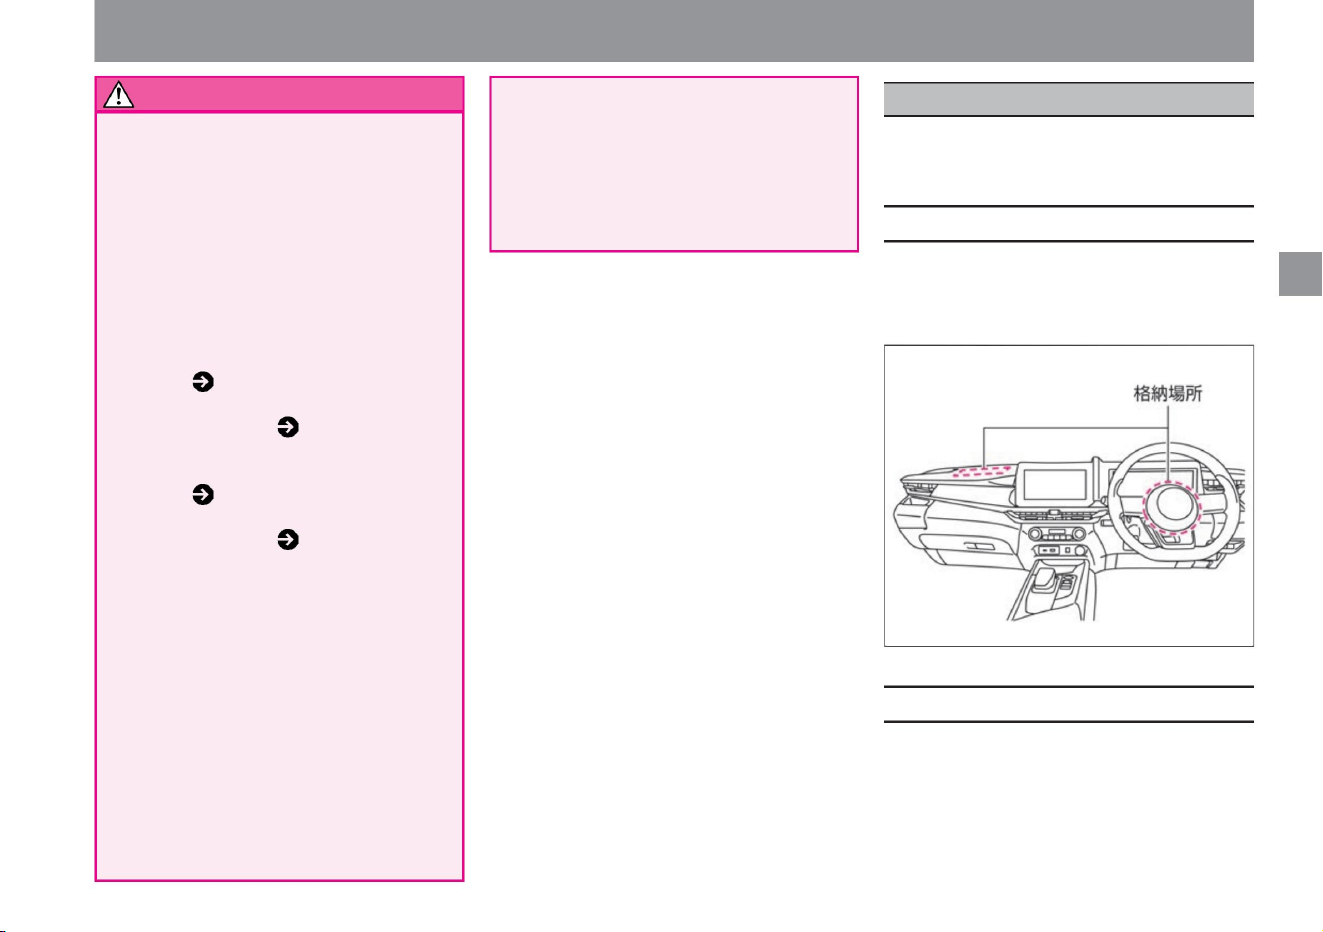
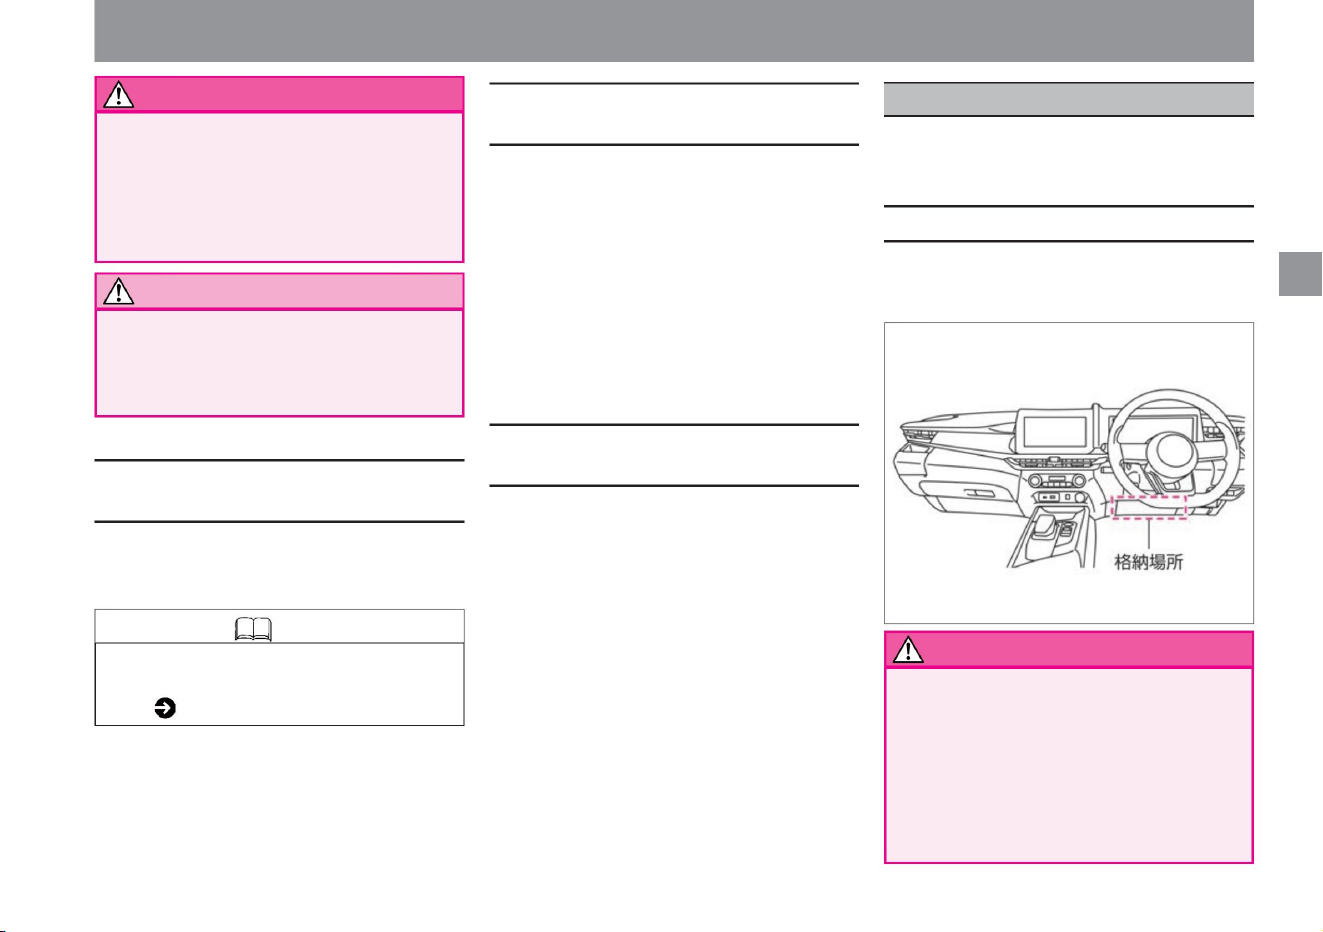
When the vehicle receives a strong impact from the
front, the SRS knee airbag instantly inflates to reduce
the impact on the driver's lower extremities.
Airbag
When the SRS curtain airbag operates
When the SRS curtain airbag is difficult to
operate
warn
WARNING Do not install any accessories
or hangers near the curtain airbag
compartment.
When the SRS curtain airbag does not operate
storage site
35
Notice
For safe driving
It may not work if the following impacts are weak. •
When a motorcycle
collides with the side from an oblique direction •
When a motorcycle collides with the side from the
side • When it collides with the engine compartment
(luggage room)
• When it rolls over or
overturns • When it collides diagonally
from the front •A utility pole when you collide
The SRS curtain airbag may malfunction.
Close the door so hard that the glass breaks.
Once the SRS airbag is activated, it will not activate
even if there is a collision. Also, it does not work in the
following cases. • When
you collide head-on with a stopped or running car •
When you are hit from behind
• When the airbag is activated, the Advanced
Accident Automatic Notification System ( P.265)
is activated automatically.
There is a risk of serious injury when the SRS
curtain airbag deploys.
The SRS knee airbag is housed in the instrument panel
below the steering wheel.
It is activated when the following impacts are strong.
• Knowledge when a general passenger car hits the
side from the side at a speed of 25km/
h or more
do not have.
• Do not get close to the SRS knee airbag storage
area.
Serious injury may occur in the event of an
accident. • Do not
affix stickers, etc. to the SRS knee airbag
compartment or its surroundings. Also, do not
attach any accessories.
ZED0105X
Machine Translated by Google
When the SRS knee airbag does not operate
Knowledge
WARNING There is a risk of serious
injury when the SRS knee airbag is activated.
When the SRS knee airbag activates
When the SRS knee airbag is difficult to
deploy
36
• When the vehicle collides head-on at a speed of approximately 30
km/h or less with a utility pole or other object that
cannot be broken at the time of the collision • When the vehicle crawls
under the bed of
a truck, etc. • When the vehicle collides with a guardrail from
diagonally forward.
It is activated when the following impacts are strong.
• When the vehicle collides head-on with a thick concrete-
like wall at a speed of 25 km/h or more
• When the vehicle receives a strong impact (same as
above) from a direction within 30° from the
front left or right of the vehicle It may also operate when
receiving a strong impact. (When the damage to the
vehicle is minor, but the impact on the occupants is
strong.) • When colliding with a curb at high
speed • When falling into a deep hole or
ditch • When jumping and hitting the ground
It may not work if the following impacts are weak. When
you collide with a
stopped car of the same class at a speed of approximately
50 km/h or less
Once the SRS airbag is activated, it will not activate even
if there is a collision. Also, it does not work in the following
cases. • When the vehicle
is hit from the side or from behind • When the
vehicle rolls over or capsizes
• When the airbag is activated, the Advanced Accident
Automatic Notification System ( P.265) is
activated automatically.
Airbag
For safe driving
Machine Translated by Google
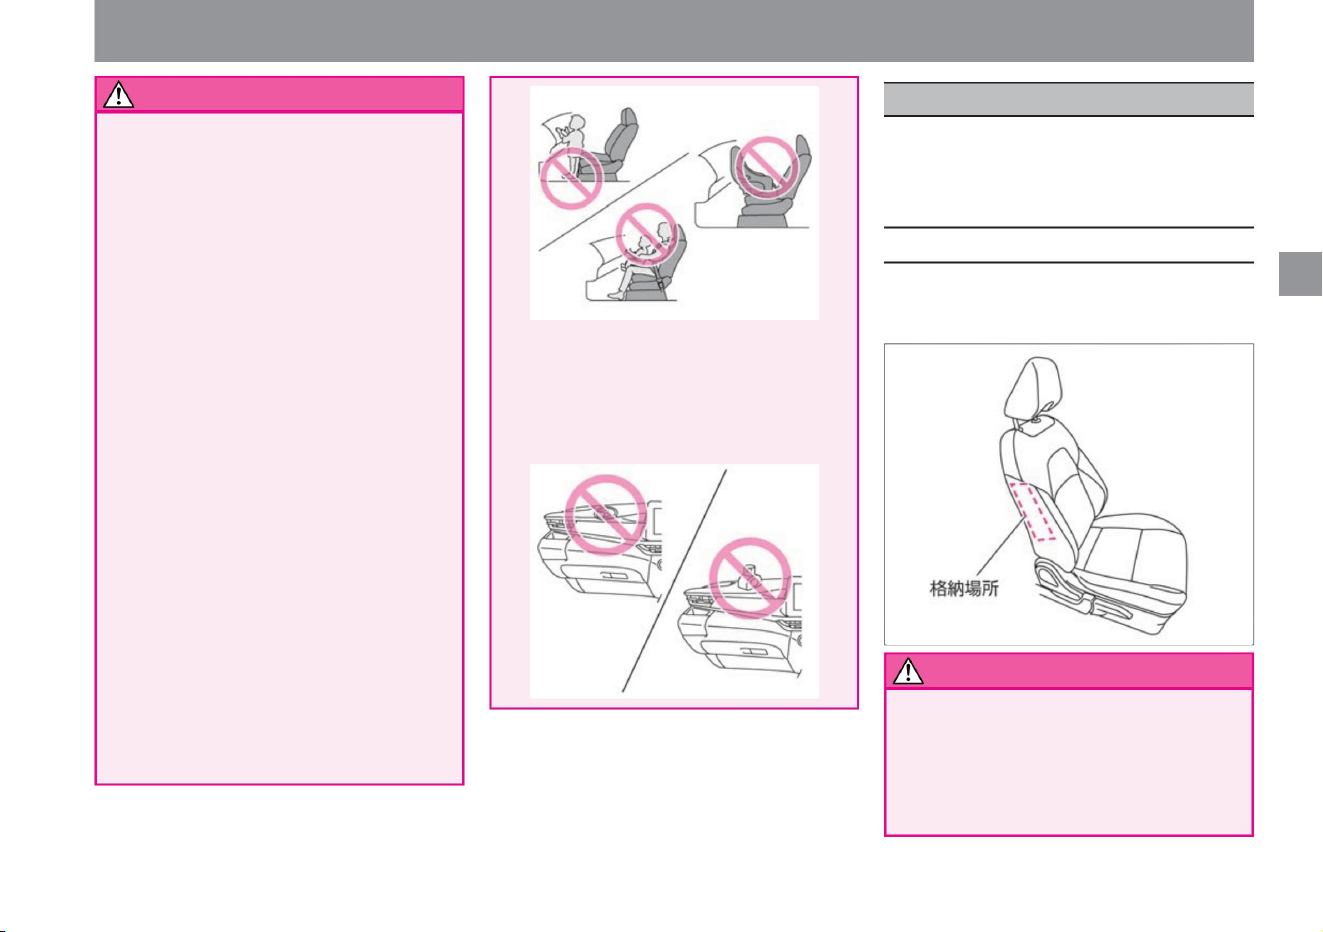
• Even when the child seat is not in use,
it should be firmly fixed to the seat or
stowed in the luggage compartment.
Leaving it
inside the vehicle may lead to an
unexpected accident during sudden
braking. Place the child
in the rear seat • Avoid placing
the child in the front passenger seat.
For safe driving
Have your child wear a seatbelt • Be sure to
have your child wear a seatbelt as well. If you hold
the child on
your lap, you may not be able to support the
child in the event of a collision, etc., and the
child may be seriously injured.
• Do not allow children to open and close doors
and windows. Hands, necks,
feet, etc., may be pinched when opening and
closing, resulting in serious injury. • Use the
child safety
door lock ( P.98) and power window lock switch
( P.116) to prevent children from operating
it. Do not put your hands or face out of the
window • Make sure that children do not stick
their arms
or face out. During sudden
braking, the vehicle may collide with the window
frame or
other obstacles outside the vehicle, resulting
in serious injury.
(P.27)
Use a child seat for small children • Use a child
seat for small
children who cannot wear the seat belt properly
because the seat belt hits their neck or face.
Child seat (P.38) Install the child seat in the
rear seat
• Install the child seat in the
rear seat and check that it is securely fixed
before
driving. Please follow the instruction manual
attached to the child seat for the fixing
method and handling method.
• Do not install a child seat facing backwards
on the front passenger seat.
Do not leave children alone in the vehicle
• When leaving the vehicle, be sure to unload the
child together.
Under the scorching sun, the inside of the
vehicle becomes hot, which can be life-
threatening and dangerous. • Children's mischief
can lead to unexpected accidents such as
starting a car or causing a fire.
How to wear a seat belt
For your child's safety
Be careful when carrying a child
MED0037X
Please be aware of the following when carrying
your child:
Children may be distracted by their behavior,
or they may interfere with safe driving by
playing with switches and levers. Also, if
you are close to the storage area of the
passenger side SRS airbag, you may receive
a strong impact in the event that the SRS
airbag deploys in an accident, etc., which
may lead to serious injury.
Adults operate doors, windows, etc.
If the SRS airbag deploys, a strong impact
may result in death or serious injury.
may be connected. If you have no choice but
to install it on the front passenger seat, lower
the seat as far back as possible and be sure
to install it facing forward.
$/$: Different equipment depending on vehicle model, options, etc.
warn
37
Machine Translated by Google
warn
Child seat
38
Knowledge
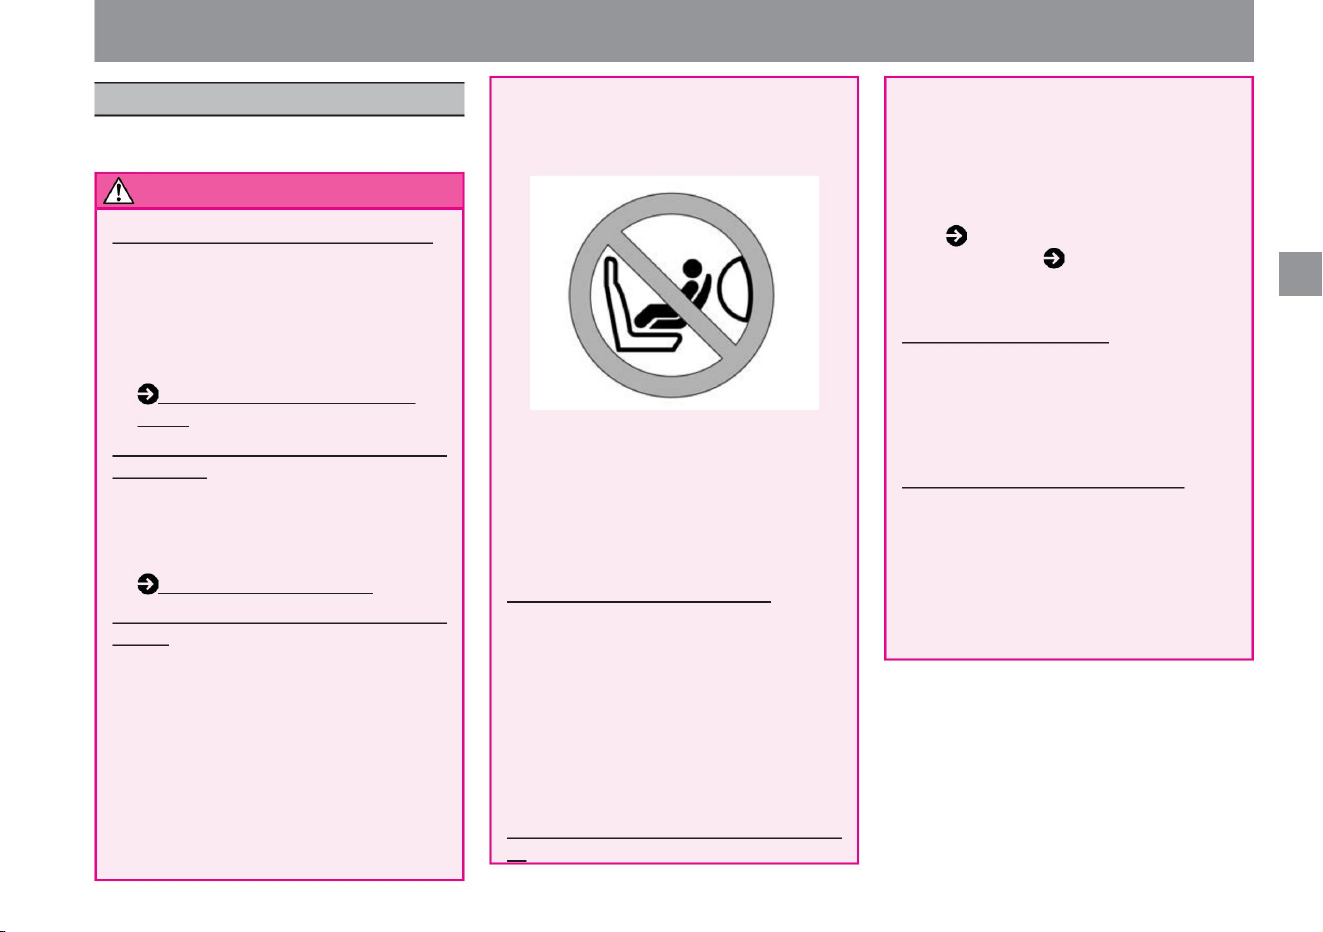
When the SRS airbag deploys, you may
receive a strong impact, which may result in
death or serious injury. If you have no choice
but to install it on the front passenger seat,
lower the seat as far back as possible and
be sure to install it facing forward.
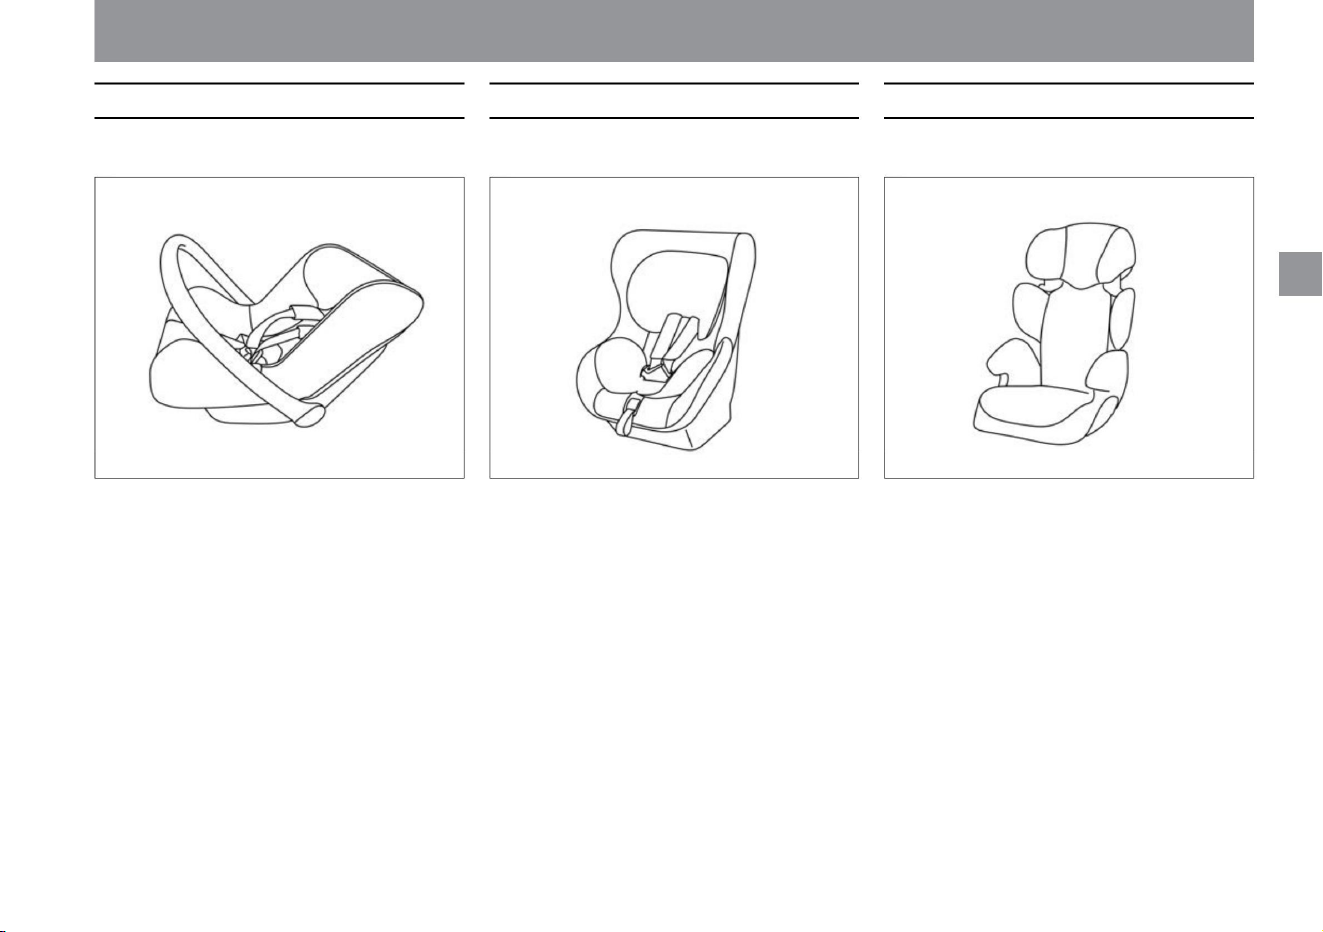
• There are three types of child seats: infant child
seats, child seats, and junior child seats.
Please select an appropriate child seat
according to your child's age and build. •
Follow the instruction manual supplied with
the child seat for how to secure and handle the
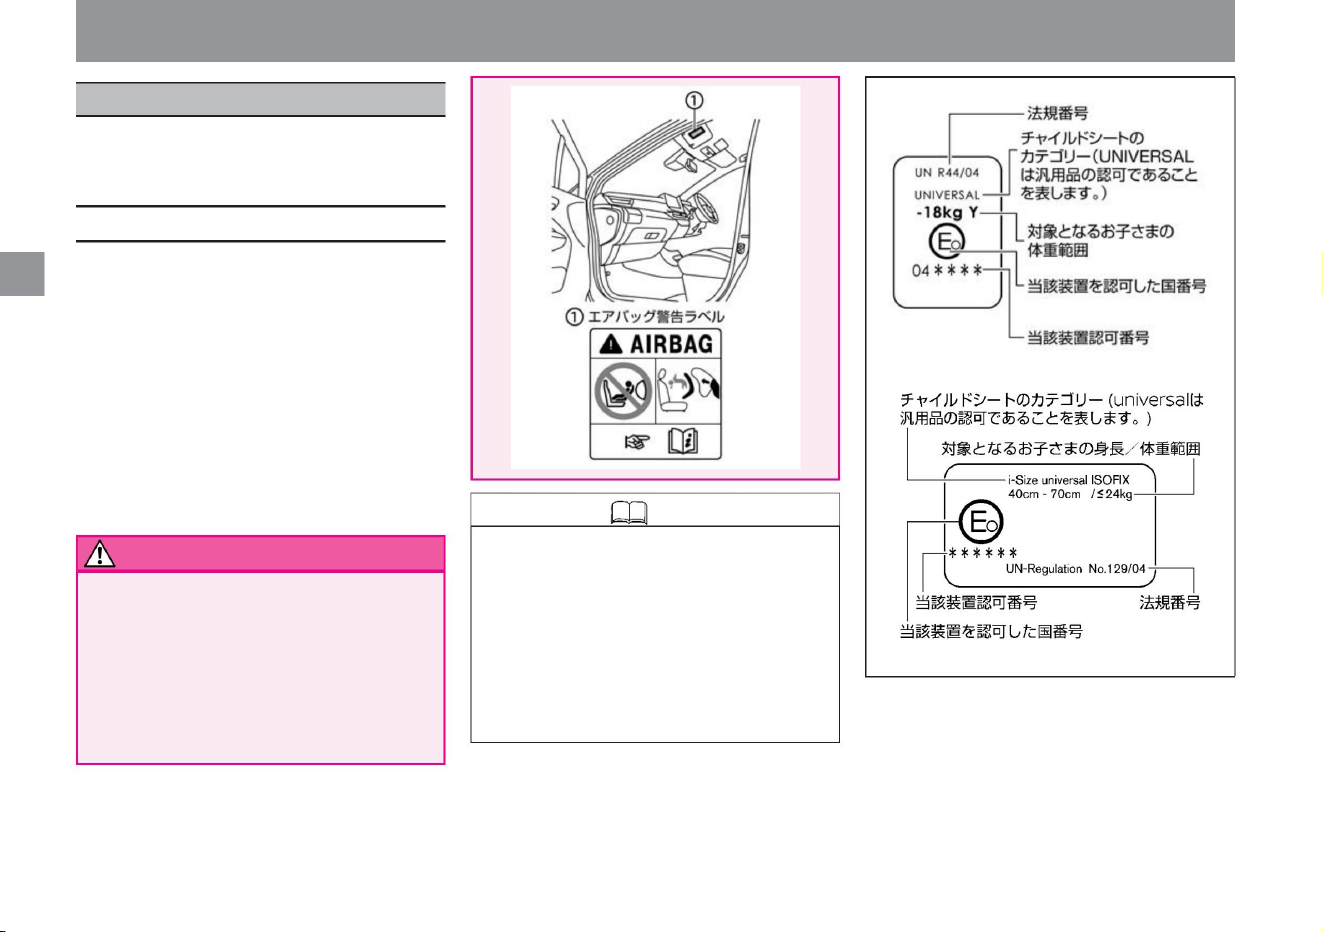
child seat. • This vehicle is equipped as
standard with ISO FIX mounting
devices for i-Size child seats that conform to UN
R44 or R129 standards.
• Infant child seats, child seats, and junior child
seats are collectively called child seats. •
UN R44 or R129 is the international law
on child
safety seats. Universal child restraint systems
that comply with UN R44 or R129
standards carry the approval mark.
• Do not install a child seat facing backwards
on the front passenger seat.
For your child's safety
child seat
For safe driving
Select a child restraint system that is appropriate for
your child's age and size and install it properly in
your vehicle.
MED0026X
ZED0106X
ZED0015X
Machine Translated by Google
MED0027X MED0028X MED0029X
child seat
baby car seat
junior child seat
39
$/$: Different equipment depending on vehicle model, options, etc.
Corresponds to Group 0, 0+ of UN R44 standard . Corresponds to Group 0+, I of UN R44 standard. Corresponds to Groups II and III of the UN R44
standard.
For your child's safety
For safe driving
Machine Translated by Google

For safe driving
ÿ Child seats compatible with i-Size and
ISO FIX
ÿ Child seat with seat belt attachment
How to choose a child seat
40
The vehicle can be fitted with belt-mounted
child seats as well as i-Size and ISO FIX
child seats. i-Size and ISO FIX child seats
are fastened without the use of seat belts
and are easy to install.
Secure the child seat using the seat belt.
How to install
a child seat with seat belt attachment
(P.45)
Secure with the ISO FIX compatible mounting
device for i-Size child seats attached to the
rear seat. How to attach i-Size and ISO FIX
compatible child seats (P.46)
For your child's safety
Machine Translated by Google
For safe driving
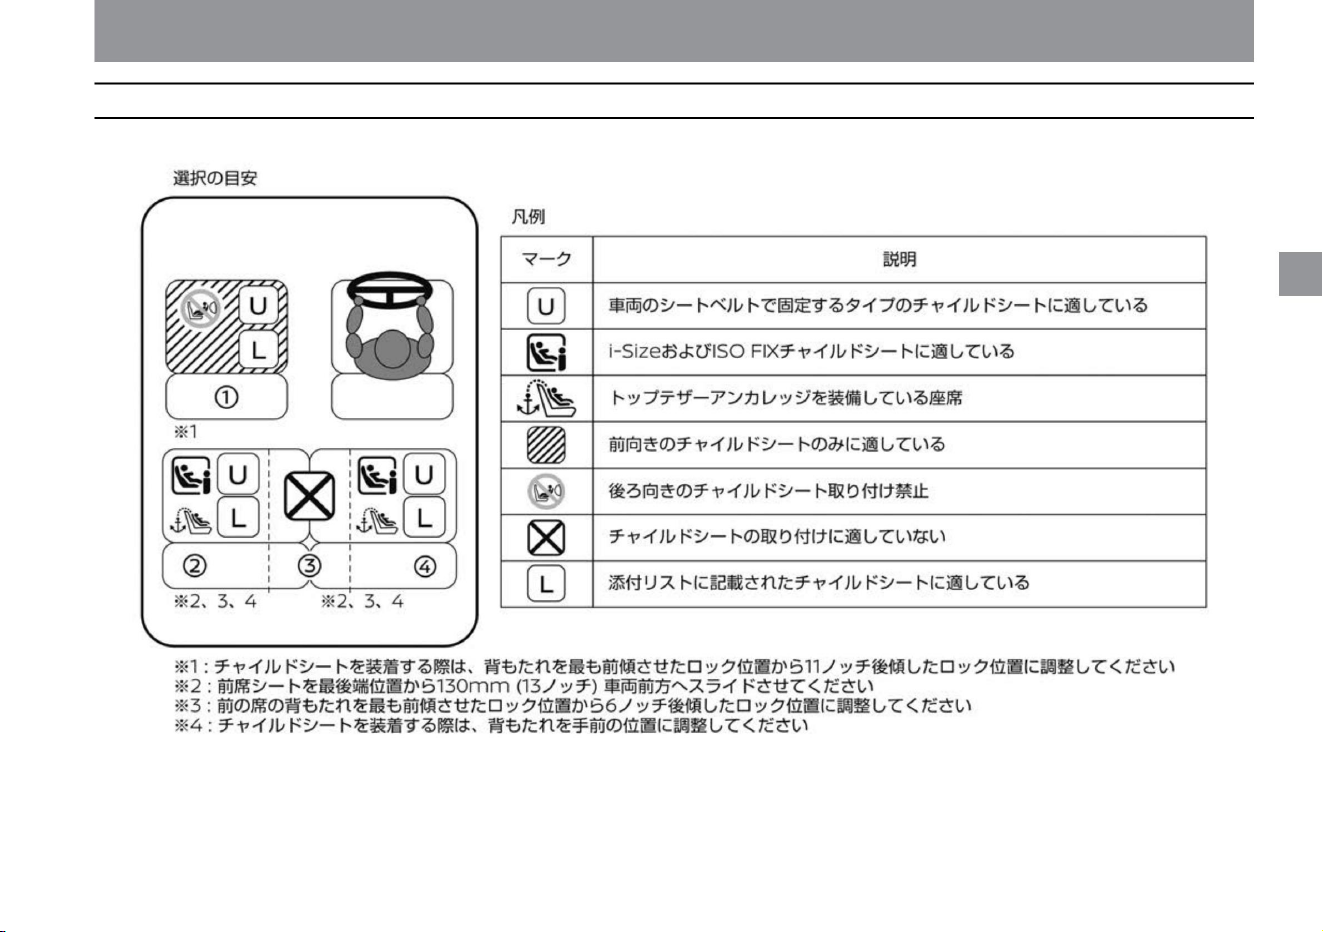
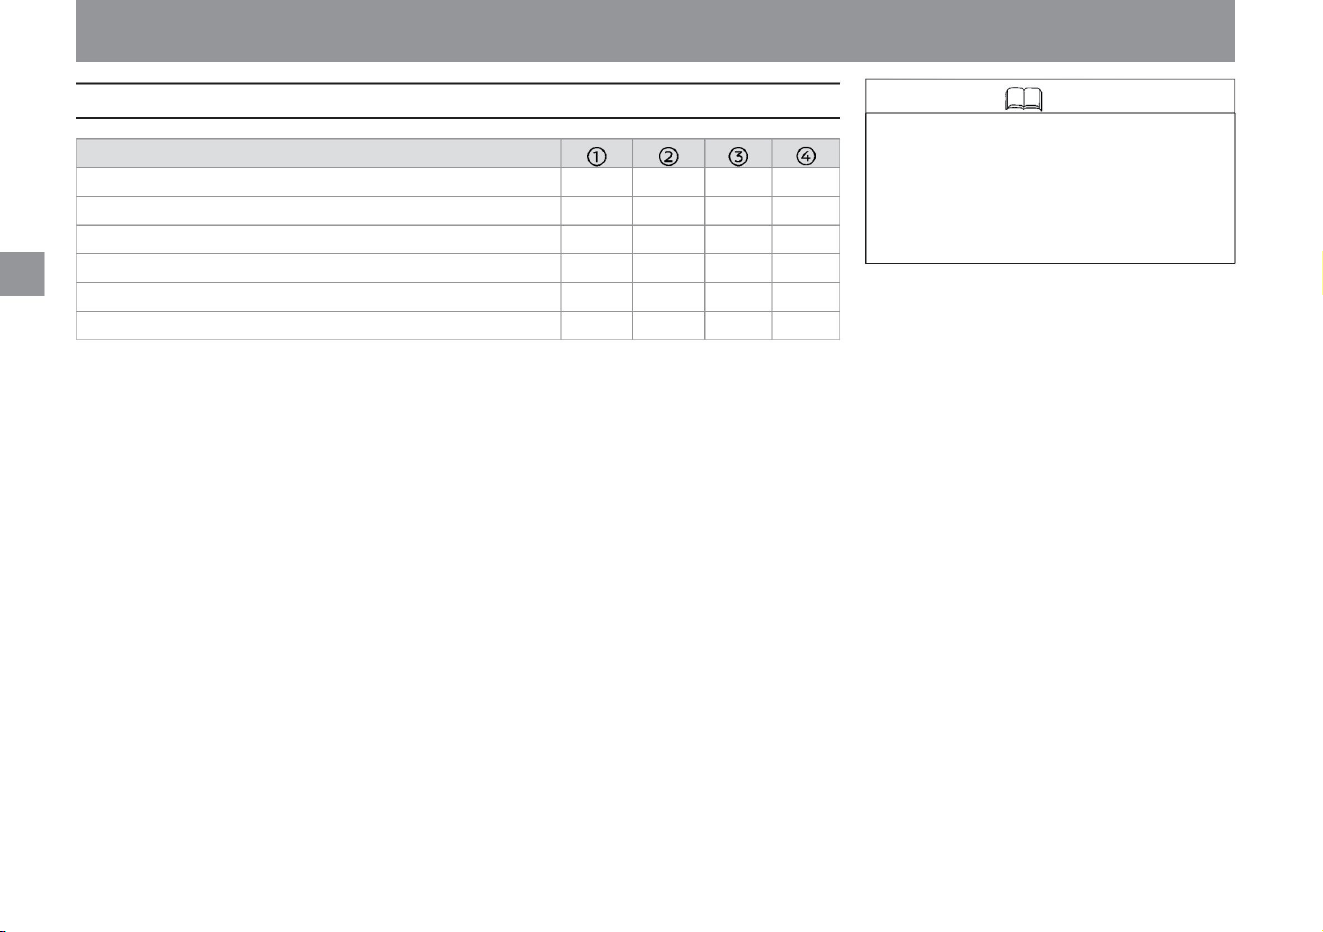
Child seats that can be used
41
$/$: Different equipment depending on vehicle model, options, etc.
The child seat that can be used differs depending on the installation position of the child seat.
For your child's safety
ZED0112X
Machine Translated by Google
-
-
R3
-
F3
Seat position number
Seating position suitable for universal belt system (•/X) i-Size seating
position (•/X) Seating position suitable
for lateral restraint (L1/L2) Suitable maximum rearward restraint (R1/R2/
R2X/ R3) Largest suitable forward fixing (F2/F2X/F3) Largest suitable booster fixing
(B2/B3)
-
ÿ ÿ X ÿ
B3
R3
X ÿ X ÿ
F3
-
B3
-
- -
-
More information about child restraint manufacturers
Knowledge
42
-
• If you already have an ISO FIX child
seat, please check that it complies
with UN R44 or R129 standards before
use. For more information, refer to the
operating instructions supplied with
the child restraint system.
For your child's safety
For safe driving
Machine Translated by Google

$/$: Different equipment depending on vehicle model, options, etc.
ÿ Recommended child seat
This is a child seat recommended by Nissan. For details, please consult your Nissan dealer.
For safe driving
-
CRS
Fixture
Category
-
-
G
-
-
- -
0-2 years old
-
ISO/L1
-
-
-
-
-
D
<13kg <85cm
-
X ÿ X ÿ
i-Size
backward
ISO
ISO/R1
-
-
-
-
-
-
ISO/L2
-
-
-
-
X ÿ X ÿ
Carry Cot
ISO FIX
Belted child restraint system
ISO/R2
C
-
-
-
FIX
AND
Height
(approximate)
-
0
ISO/R1
Recommended child seat
-
-
-
-
-
-
CRS
mass category
0-9 months <10kg <70cm 15 months
-
-
-
-
ISO/R2X
-
forward &
backward
0+
-
CRS
size category
AND
Age
(approximate)
ISO FIX compatible baby seat
(rearward facing)
-
ISO FIX baby seat (rearward
facing) Child safety seat
(rearward facing)
-
-
-
-
-
ISO FIX
-
F
-
-
X ÿ X ÿ
-
ISO FIX fixed child seat
ISO/R3
belt&
-
Weight
(approximate)
AND
X ÿ X ÿ
Child safety seat with ISO FIX
(rear facing)
-
ISO/R1
seat position
-
For your child's safety
43
Machine Translated by Google

44
Weight
(approximate)
-
-
ISO/R2
ISO/F3
-
-
-
-
-
ISO FIX fixed child seat
ISO/F2
ÿ
ÿ ÿ
-
9 months - 4
years
*: Remove the headrest.
-
size
category
-
FIX
-
-
-
100-
-
Recommended child seat
-
Child restraint system with
ISO FIX (forward facing) Child
restraint system
(forward facing)
-
9-18kg
B
Junior safety seat (forward
facing)
-
CRS
i-Size
70-
-
Child safety seat with ISO
FIX (forward facing)
150cm
CRS
ISO/R2X
Height
(approximate)
A
-
ÿ ÿ X ÿ
seat position
-
-
ÿ ÿ
-
-
ISO FIX
-
C
forward &
backward
-
100cm
X ÿ X ÿ
X
-
belt&
ISO/R3
Fixture
category
-
-
4-12 years old 15-36kg
-
ÿ
ÿ
B1 ISO/F2X
Age
(approximate)
-
-
-
-
-
-
Belted child restraint system
ÿ ÿ X ÿ
ISO FIX
-
CRS
mass category
D
-
ÿÿÿ -
-
ISO
-
-
-
For safe driving
For your child's safety
Machine Translated by Google
• Confirm that the child seat is securely
fixed. If it is not securely
fixed, the child seat may fly out in the
event of sudden braking or a collision,
resulting in serious injury. Always
install according to the instructions
supplied with the child seat.
warn
45
How to install a child seat with a seat belt attachment
For safe driving
ZED0107X
ZED0108X
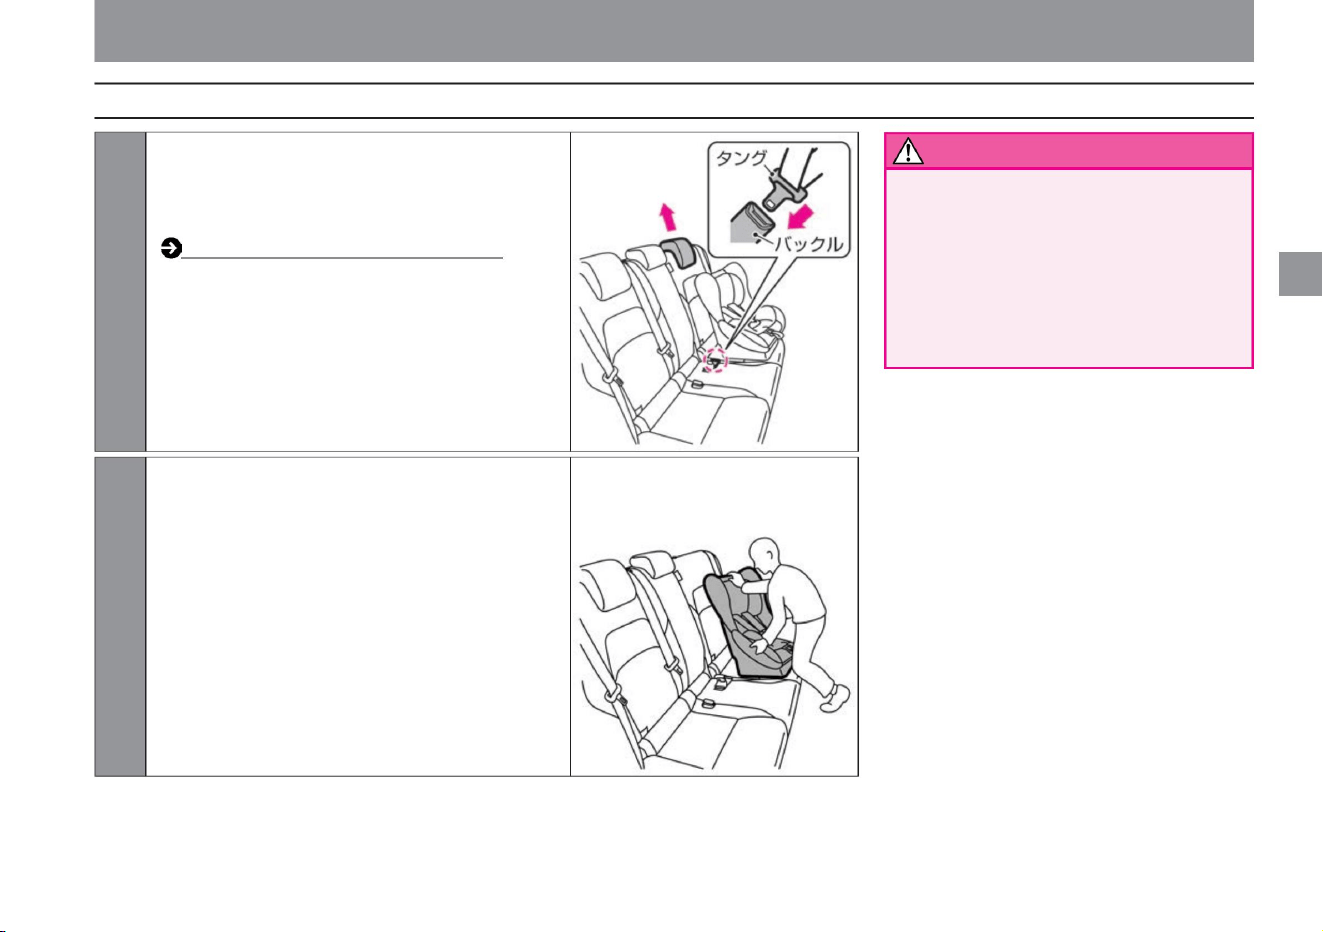
1 Remove the head restraint (if the child restraint
cannot be installed correctly due to interference
between the head restraint and child restraint)
and place the child
restraint on the seat. How to adjust
the headrest (P.102) Pass the seat belt
through the child seat and insert the tongue
into the buckle until it clicks.
2 Secure according to the instructions supplied with
the child seat.
Rock the child seat back and forth and side to
side to ensure it is securely fastened.
For your child's safety
$/$: Different equipment depending on vehicle model, options, etc.
Machine Translated by Google
• When installing a child seat, make sure
that there are no foreign objects
around the anchorage and that the
seat belt is not caught. If
the child seat is not securely fixed,
the child seat may fly out in the event
of sudden braking or a collision,
resulting in serious injury.
• Remove the rear seat head restraints
when installing i-Size and ISO FIX
child seats. (If the child seat cannot
be attached correctly due to
interference between the headrest
and the child seat) •
Check that the child seat is securely
fixed. If it is not securely
fixed, the child seat may fly out in the
event of sudden braking or a collision,
resulting in serious injury. Always
install according to the instructions
supplied with the child seat.
warn
Knowledge
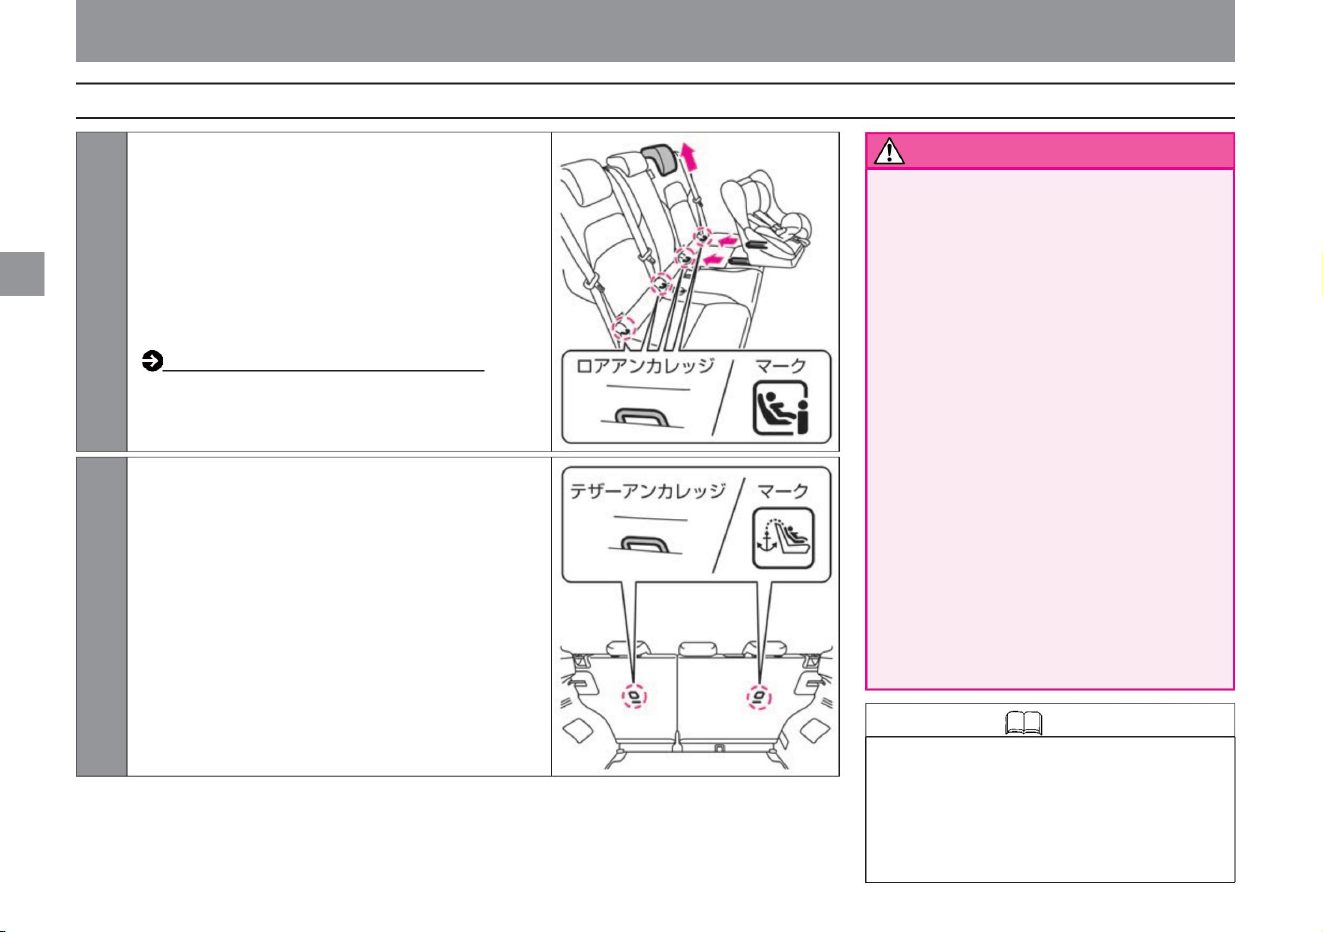
How to install i-Size and ISO FIX compatible child seats
46
• There are two types of ISO FIX compatible
attachment devices for i-Size child seats: lower
anchorages and tether anchorages. The lower
anchorages are located under the marks on the
left and right backrests of the rear seats, and the
tether anchorages are located behind the backrests.
ZED0110X
ZED0109X
2 The tether anchorage is located behind the rear seat
backrest. Secure
the hook to the tether anchorage and tighten the tether
belt. Rock the child seat
back and forth and side to side to ensure it is securely
fastened.
1 The ISO FIX lower anchorages for i-Size child seats are
located under the marks on the left and right backrests
of the rear seats.
Remove the head restraint (if the child restraint cannot
be installed correctly due to interference between the
head restraint and the child restraint system), place the
child restraint system on the seat and secure it to the
lower anchorage according to the instructions supplied
with the child
restraint system. How to adjust the headrest (P.102)
For your child's safety
for a safe drive
Machine Translated by Google
$/$: Different equipment depending on vehicle model, options, etc.
Knowledge
47
• When installing a seat cover, use one
with slits.
For your child's safety
For safe driving
Machine Translated by Google
This is a system that prohibits starting with
anything other than a pre-registered key
(intelligent key/remote control entry system)
in order to increase the vehicle's defense
against theft.
• The signal registered to the key
(intelligent key/remote control entry
system) differs for each key.
Immobilizer (anti-theft device)
48
Knowledge
About the immobilizer (anti-theft device)
Anti-theft function
For safe driving
Machine Translated by Google
ÿ
ÿ
Warning lights•Indication lights
Advanced drive assist display
Meters and gauges
Adjusting the brightness of the meter
How to see
me
rice paddy
Other display functions
P.55
meter
P.56
Warning light display position
illumination control
P.58
P.51
P.50
P.59
What is Advanced Drive Assist Display? P.60
P.61
Warning
light Display position of indicator light
Indicating light
Vehicle information screen
P.69
P.90
P.83
Various setting screens
P.87
Driving support function screen
Name of each part
How to read the meter
49
Machine Translated by Google
me
rice paddy
How
to
see
Name of each part
ZEA0462X
50
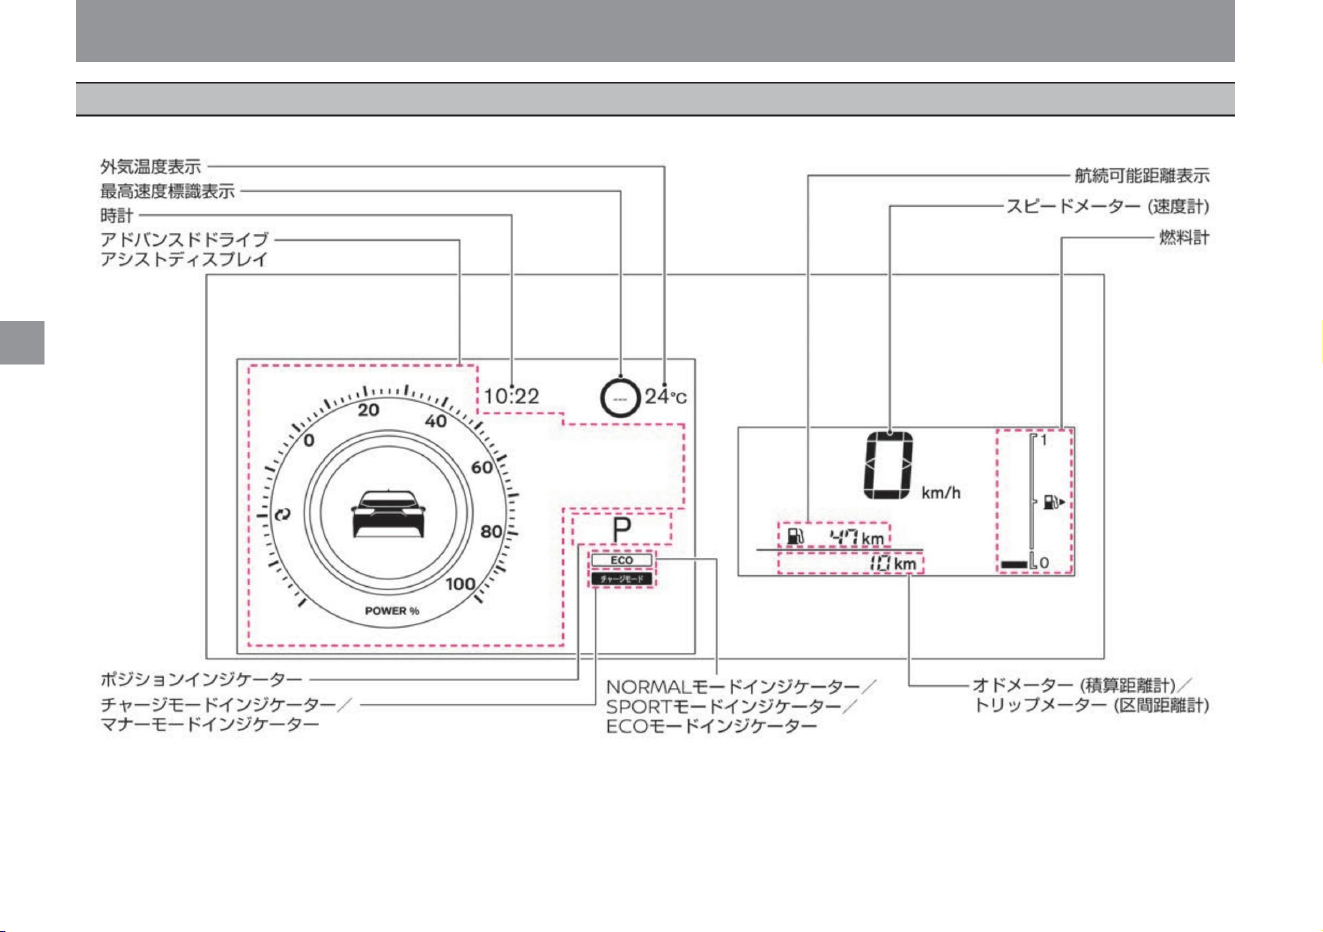
When the power switch is turned on, the instruments are displayed.
Meters and gauges
ÿ
ÿ
Machine Translated by Google
Meters include speedometers, position
indicators, etc. Appears when the power
switch is turned on.
ÿ
ÿ
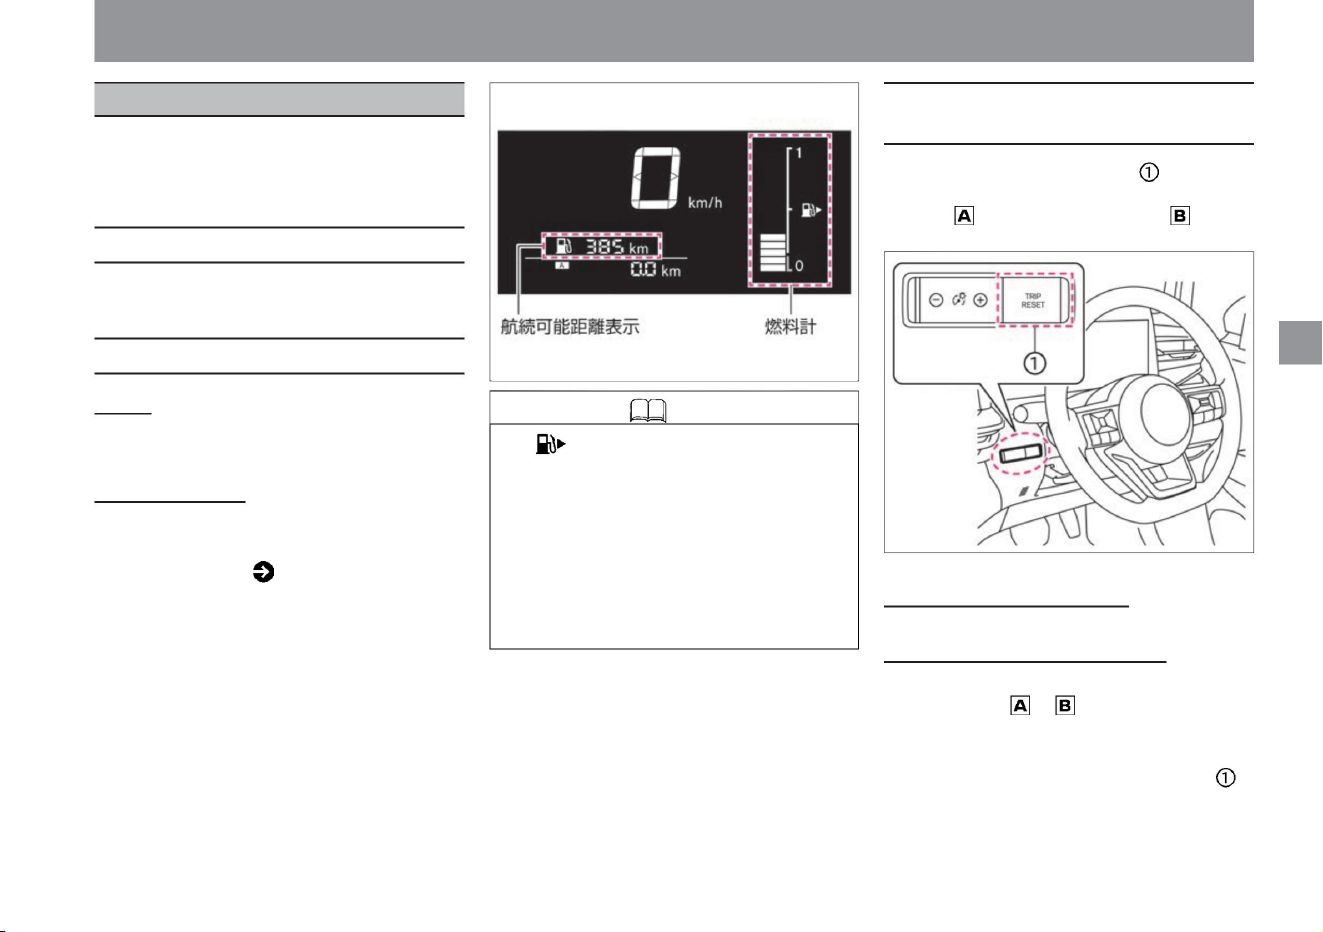
• Displays the remaining amount of
fuel. • The capacity of the fuel tank is about 36ÿ.
The • arrow indicates that the refueling port is
on the right side of the vehicle.
• On slopes, curves, etc., the fuel in the tank
moves, so it may not be displayed correctly.
Be sure to refuel early when fuel is running
low. • When refueling less than 10ÿ, the
cruising range
may not be updated.
• If you do not refuel even after the remaining fuel
warning ( P.315) is displayed, “---” will be
displayed.
• Each time the trip selector switch is pressed,
the display switches in the following order:
odometer - trip meter - trip meter - odometer.
Meters and gauges
$/$: Different equipment depending on vehicle model, options, etc.
Displays running speed.
fuel gauge
Display of cruising
distance • Displays the cruising distance based on the current
fuel level and average fuel consumption.
Odometer (Total distance meter) • Total
mileage is displayed in km. Trip meter (distance
distance meter) • Displays the distance
traveled since the reset in km. and can be used separately. •
When resetting, display the one you want to reset to 0,
and press the trip switch
for 1 second or more.
meter
ZEE0413X
ZEE0409X
Fuel gauge/distance display
51
Knowledge
Odometer (total rangefinder)/trip meter
(distance rangefinder)
Speedometer (speedometer)
me
rice paddy
How
to
see
Machine Translated by Google

How
to
see
rice paddy
me
position indicator
NORMAL mode indicator
Knowledge • When the 12V battery is
removed, the memory of and of the trip
meter is erased and returns to 0.
52
advice
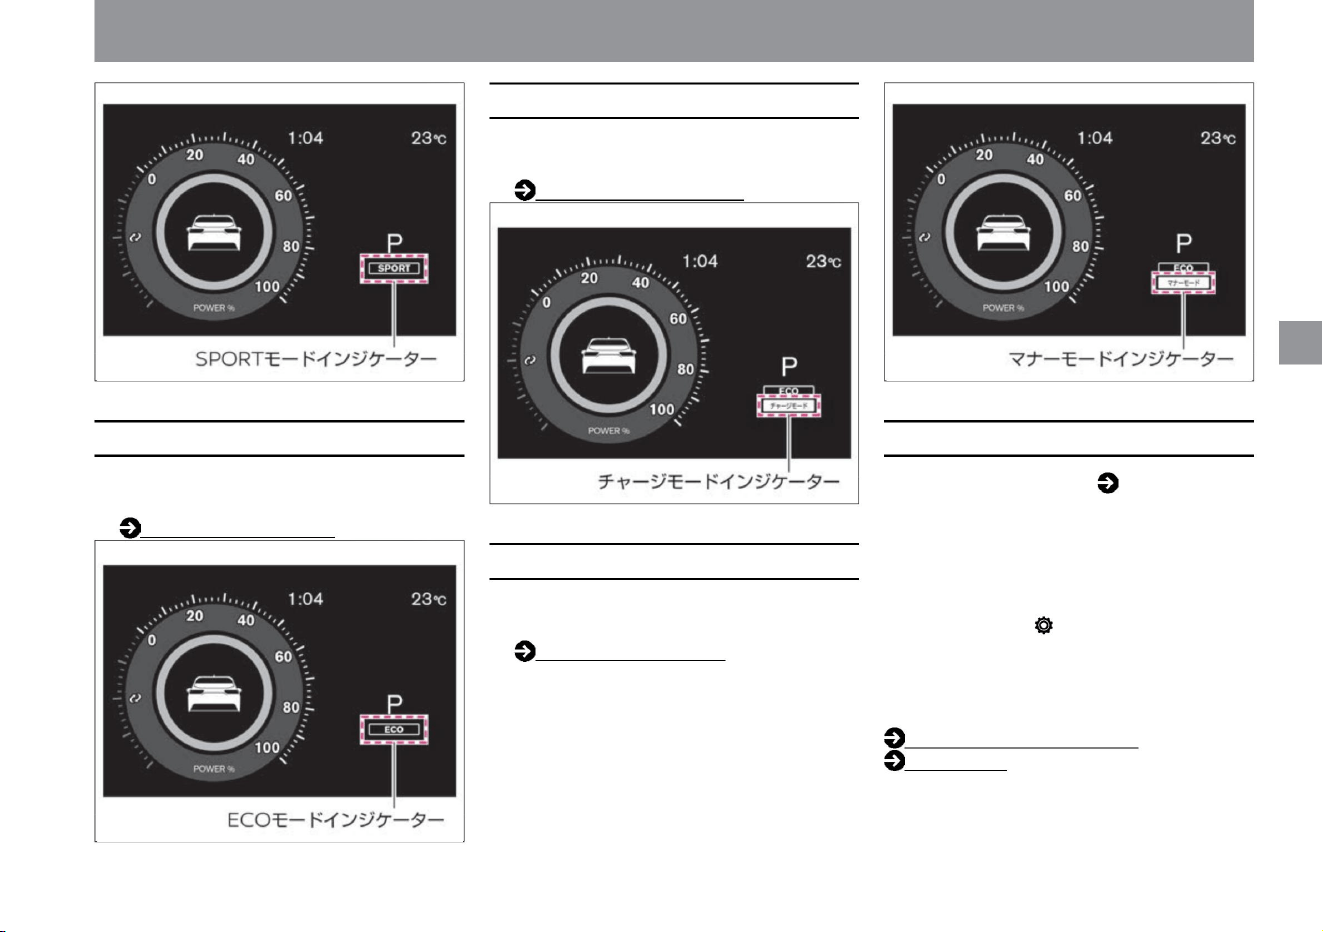
SPORT mode indicator
ÿ
ÿ
• Lights up when the drive mode is set to
NORMAL
mode. e-Pedal Step (P.161)
• Do not keep holding the select lever in
any position other than the center
position. Continuing to drive with the
position deviated may cause
malfunction. In addition, the position
indicator blinks if it deviates from the
proper position.
• Lights up when the drive mode is set to
SPORT
mode. e-Pedal Step (P.161)
• Displays the shift position.
Meters and gauges
ZEE0411X
ZEE0410X
ZEE0446X
Machine Translated by Google
For more information on settings, read
Clock. How to switch screens
(P.60) Clock (P.75)
Charge mode (P.165)
ZEE0438X
ZEE0412X
ZEE0436X
ZEE0437X
Meters and gauges
me
How
to
see
rice paddy
Manner mode indicator
charge mode indicator
ECO mode indicator
clock
53
ÿ
ÿ
• Lights up when the charge mode is turned on
with the EV mode switch.
• Display the time. ( P.50) • Vehicles
equipped with a manufacturer's option
navigation system are linked to the
navigation system's clock, and the time is
automatically
adjusted. • You can adjust the time by selecting
"Settings", "Clock", and "Clock Settings" on
the Advanced Drive Assist Display.
• Lights up when the manner mode is turned
on with the EV mode
switch. Manner mode (P.166)
• Lights up when drive mode is set to ECO
mode. e-
Pedal Step (P.161)
$/$: Different equipment depending on vehicle model, options, etc.
Machine Translated by Google
You can switch between ON and OFF.
For details on the settings, please read How
to switch screens ( P.60), ( P.70).
For advanced drive assist display, please
read ( P.60).
Outside temperature display
54
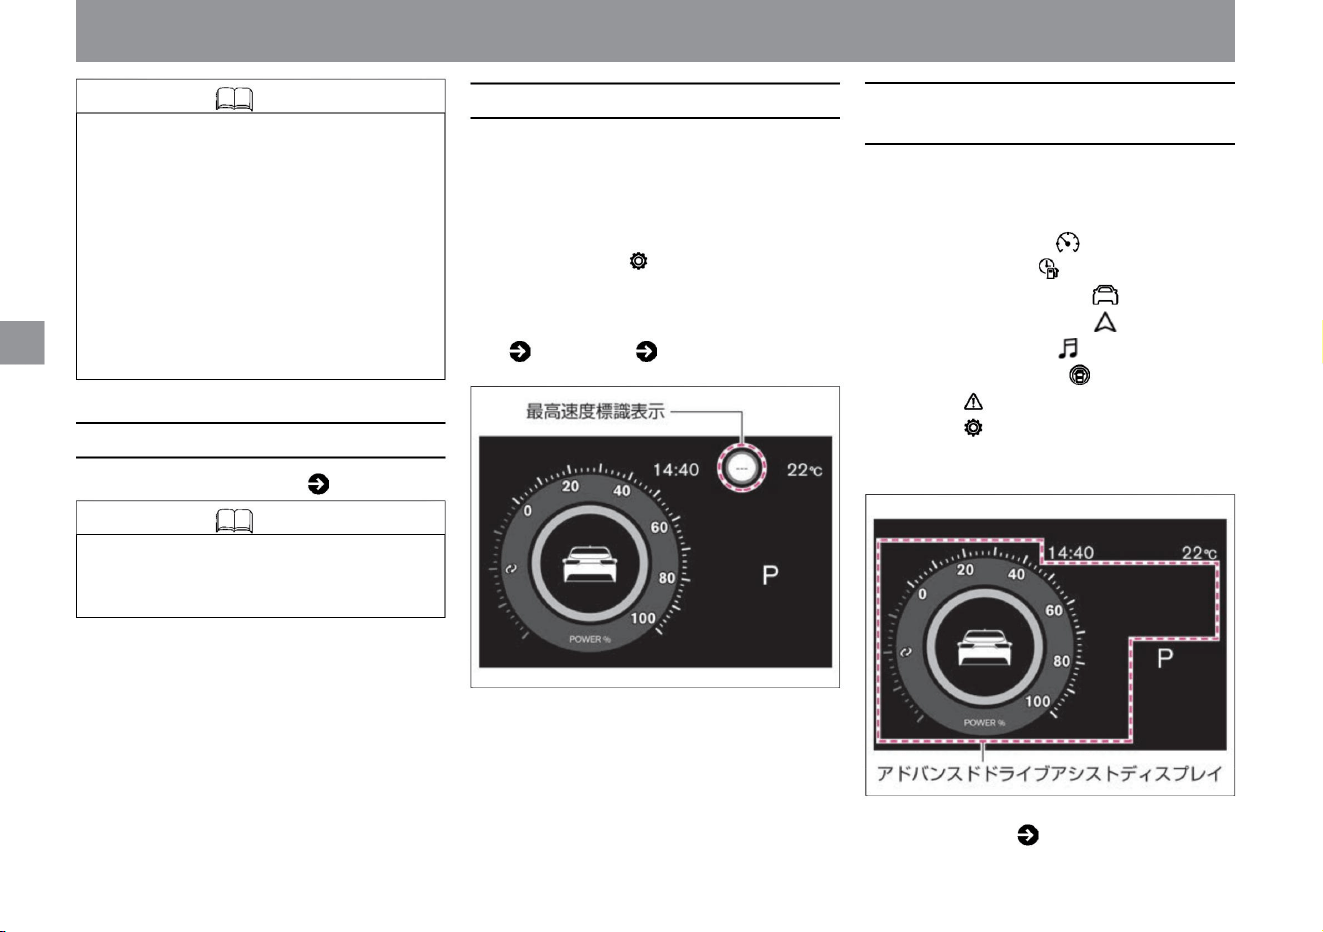
maximum speed indication
Knowledge
• Displays the outside temperature. ( P.50)
Knowledge
Advanced drive assist display
me
rice paddy
How
to
see
ÿ
ÿ
• If the 12V battery is removed from the clock
of the vehicle without manufacturer's
optional navigation system, the memory
will be erased. After connecting the 12V
battery, adjust to the correct
time. The clock on vehicles equipped with
a manufacturer's option navigation system
will automatically adjust after driving for
a while after connecting
the 12V battery. • You can select 12-hour
display or 24-hour display for the time display.
• Because the temperature of the outside air temperature
sensor mounting part is displayed, it may differ from the
actual outside temperature.
• The Advanced Drive Assist Display allows you
to view and set the operating status of various
functions. –Power meter –Eco group –
Energy monitor –
Navigation
information ÿ –Audio
information ÿ –Driving assistance
group –Warnings –Settings
–Driving assistance
function
screen –
Other display functions
• The multi-sensing front camera above the
windshield detects speed limit signs and
displays them on the Advanced Drive Assist
Display. If you select "Settings",
"Driving assistance", and "Speed sign display" on
the advanced drive assist display, the function
will be displayed .
Meters and gauges
ZEE0414X
ZEE0415X
Machine Translated by Google

How
to
see
me
rice paddy
ÿ
ÿ
Warning lights•Indication lights
ZEA0463X
Warning light display position
$/$: Different equipment depending on vehicle model, options, etc.
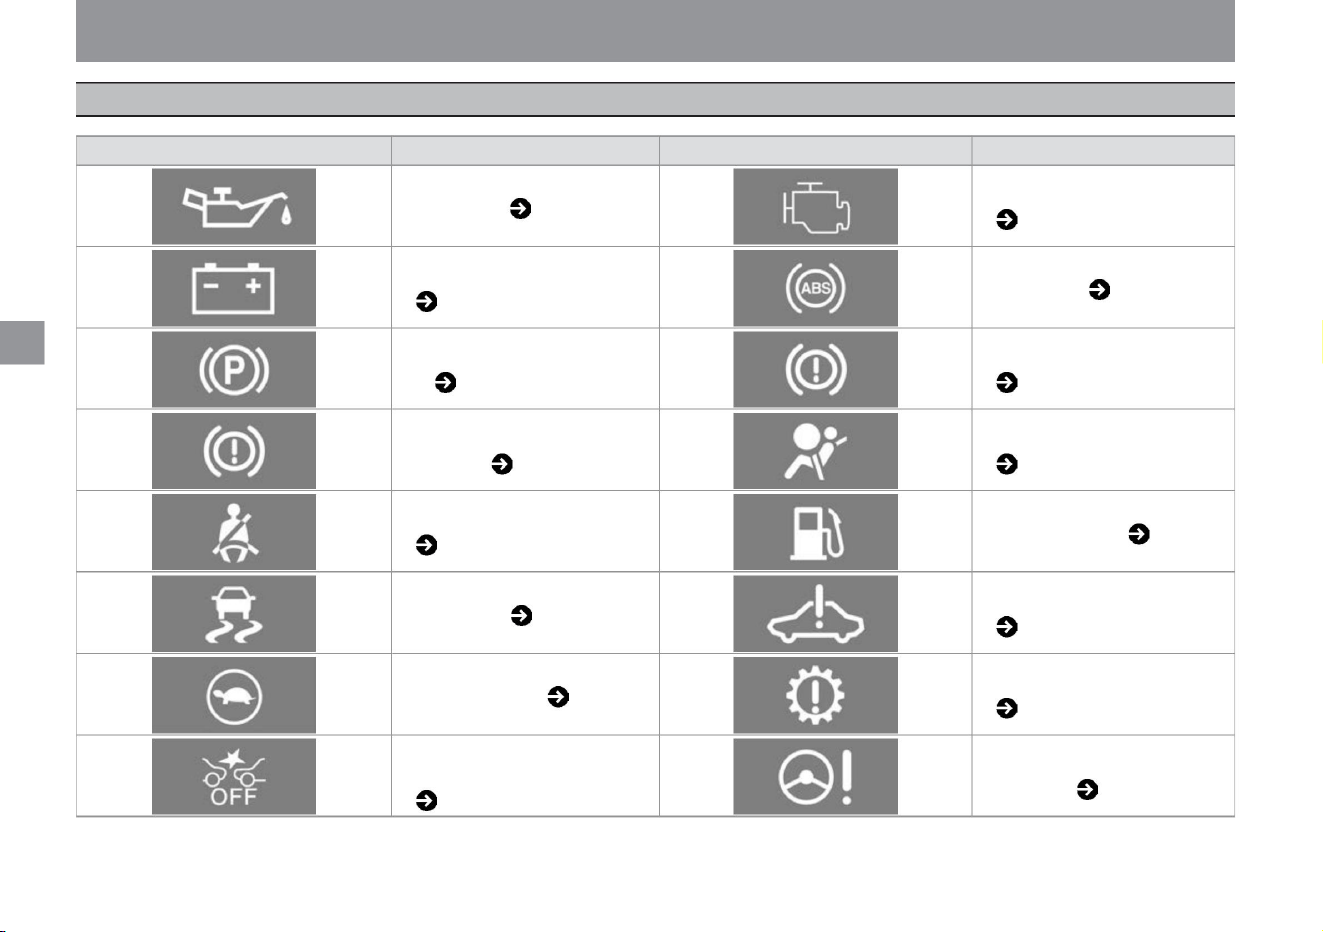
The following illustration shows all warning lights for illustration. Normally, only the corresponding warning light lights up or flashes when an event that should be warned
occurs.
55
Machine Translated by Google
MEE0274X
KVH0135X
KVH0130X KVH0133X
MEE0279X
KVH0131X
KVH0139X
MEE0202X
KVH0136X
KVH0137X
KVH0129X
ZEE0470X
MEE0203X
KVH0131X
KVH0134X
MEE0011X
warning light
ÿ
ÿ
56
Electric parking brake warning light
( P.304)
Oil pressure warning light ( P.302)
ABS warning light ( P.303)
warning light
Brake system warning light (yellow
display) ( P.304)
name
e-POWER system warning light ( P.306)
warning light
Brake warning light (red display)
( P.304)
Electric shift warning light ( P.307)
Malfunction Warning Light (MIL)
(P.303)
SRS Airbag Warning Light ( P.305)
EPS (electric power steering) warning
light ( P.309)
Intelligent emergency brake warning
light ( P.308)
VDC warning light ( P.306)
Seat belt warning light ( P.305)
Remaining fuel warning light ( P.306)
Output limit indicator ( P.307)
12V charging warning light ( P.303)
name
Warning lights•Indication lights
me
rice paddy
How
to
see
Machine Translated by Google
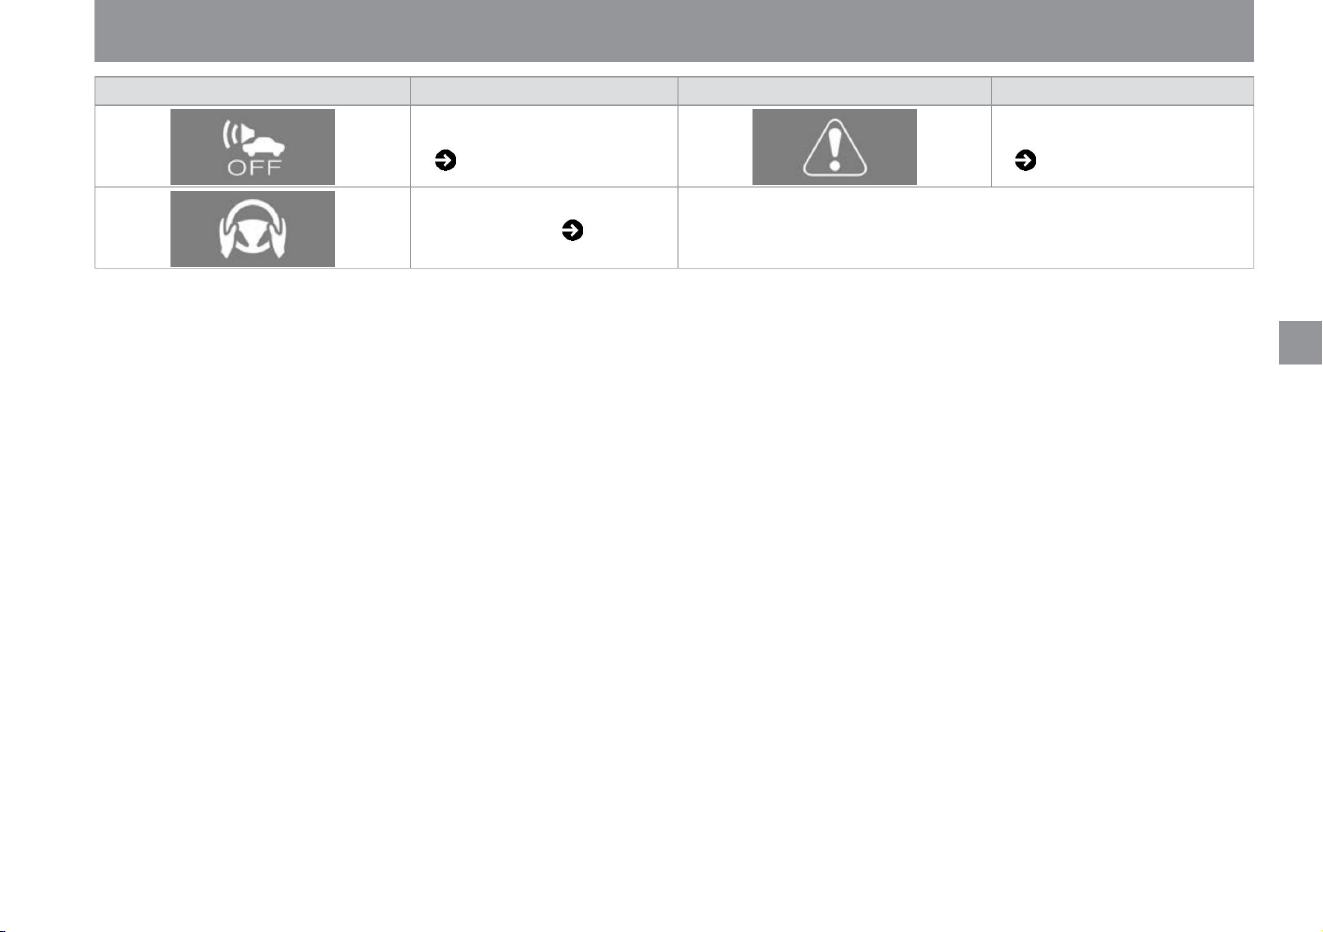
ÿ
ÿ
warning light
Vehicle proximity notification system
warning light ( P.309)
name
name
No hands warning light ( P.310)
Master warning ( P.309)
warning light
57
$/$: Different equipment depending on vehicle model, options, etc.
KVH0128X KVH0143X
ZEE0416X
Warning lights•Indication lights
rice paddy
How
to
see
me
Machine Translated by Google
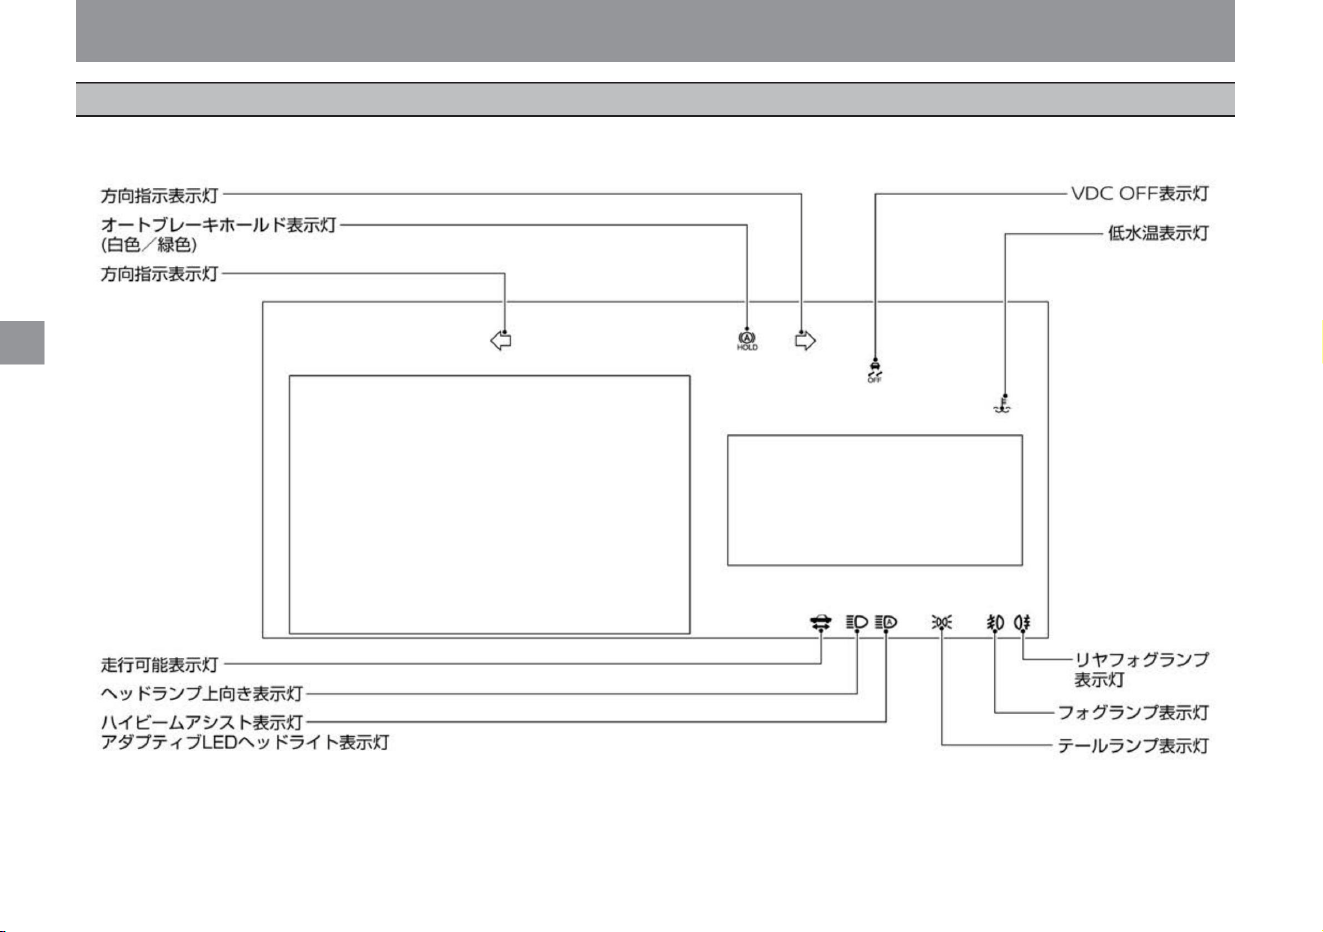
Indicator position
How
to
see
me
rice paddy
ZEA0464X
58
Warning lights•Indication lights
The following illustration shows all indicator lights for explanation. Normally, when an event occurs, only the corresponding indicator lights up or flashes.
ÿ
ÿ
Machine Translated by Google

59
MEE0197X
KVH0120X KVH0119X
KVH0117X
MEE0197X
KVH0118X
KVH0121X
MEE0316X
KVH0121X
KVH0125X
KVH0122X
KVH0126X
Warning lights•Indication lights
me
How
to
see
rice paddy
Indicating light
ÿ
ÿ
name
car with halogen headlamp
Tail lamp indicator light ( P.310)
Indicating light
Rear fog light indicator
( P.311)
name
Auto brake hold indicator light (green)
( P.311)
Headlamp upward indicator light ( P.310)
Fog lamp indicator ( P.310)
VDC OFF indicator light ( P.311)
Adaptive LED Headlight Indicator Light
( P.311)
Walking may indicate lights (P.312)
High beam assist indicator light ( P.311)
Low water temperature indication light ( P.312)
Direction indicator light ( P.310)
Car with LED headlamp
Auto brake hold indicator light (white)
( P.311)
Indicating light
$/$: Different equipment depending on vehicle model, options, etc.
Machine Translated by Google
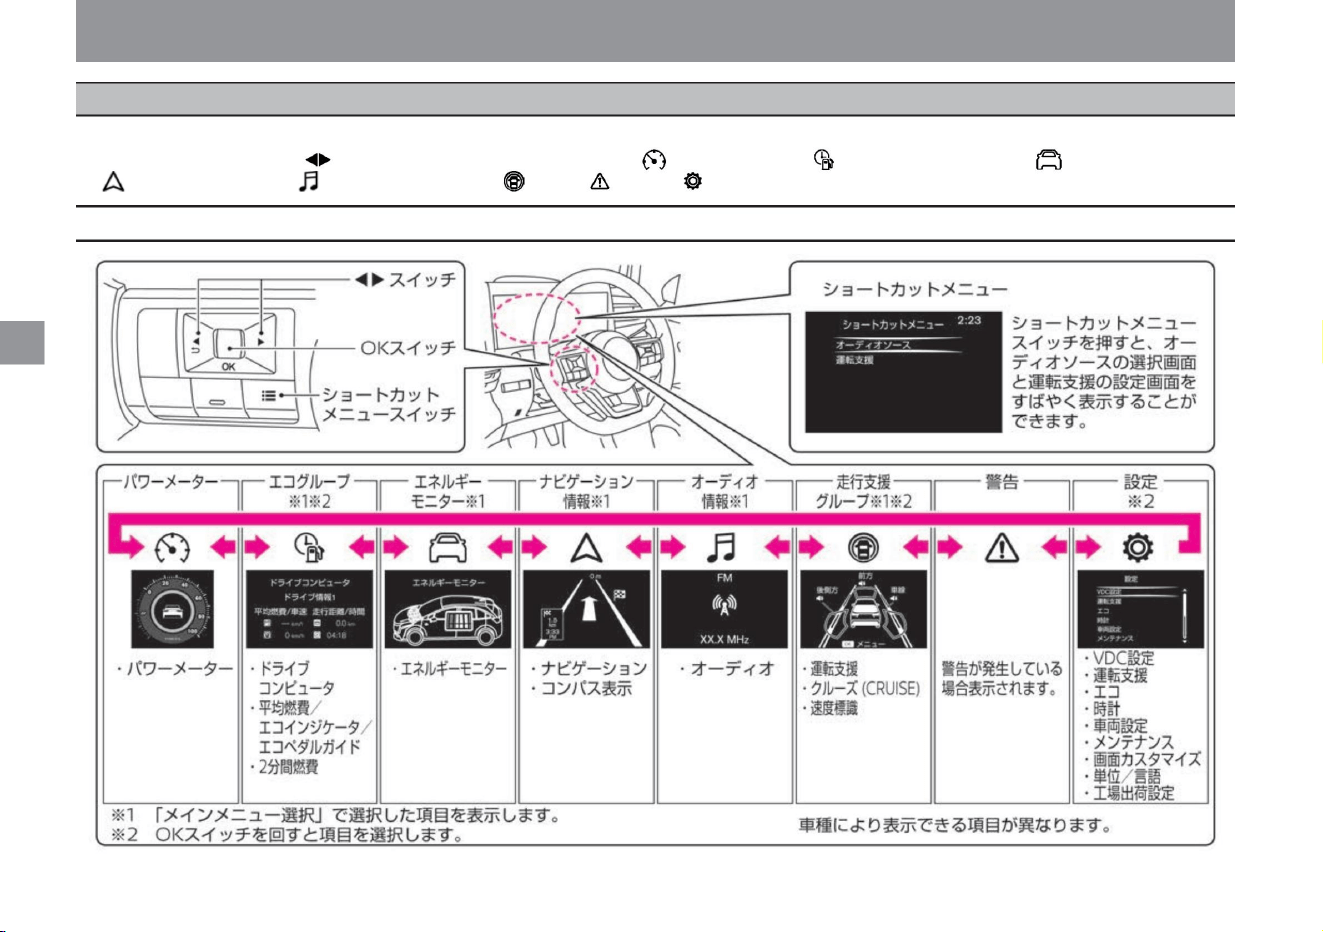
What is Advanced Drive Assist Display?
me
rice paddy
How
to
see
ÿ
ÿ
ZEE0772X
Advanced drive assist display
The Advanced Drive Assistance Display allows you to view and set the operating status of various functions. When the power switch is ON,
pressing the switch on the left side of the steering wheel switches the display items in the following order: power meter , eco group , energy
monitor , navigation informationÿ, audio information ÿ, driving assistance group , warning , setting .
How to switch screens
60
Machine Translated by Google
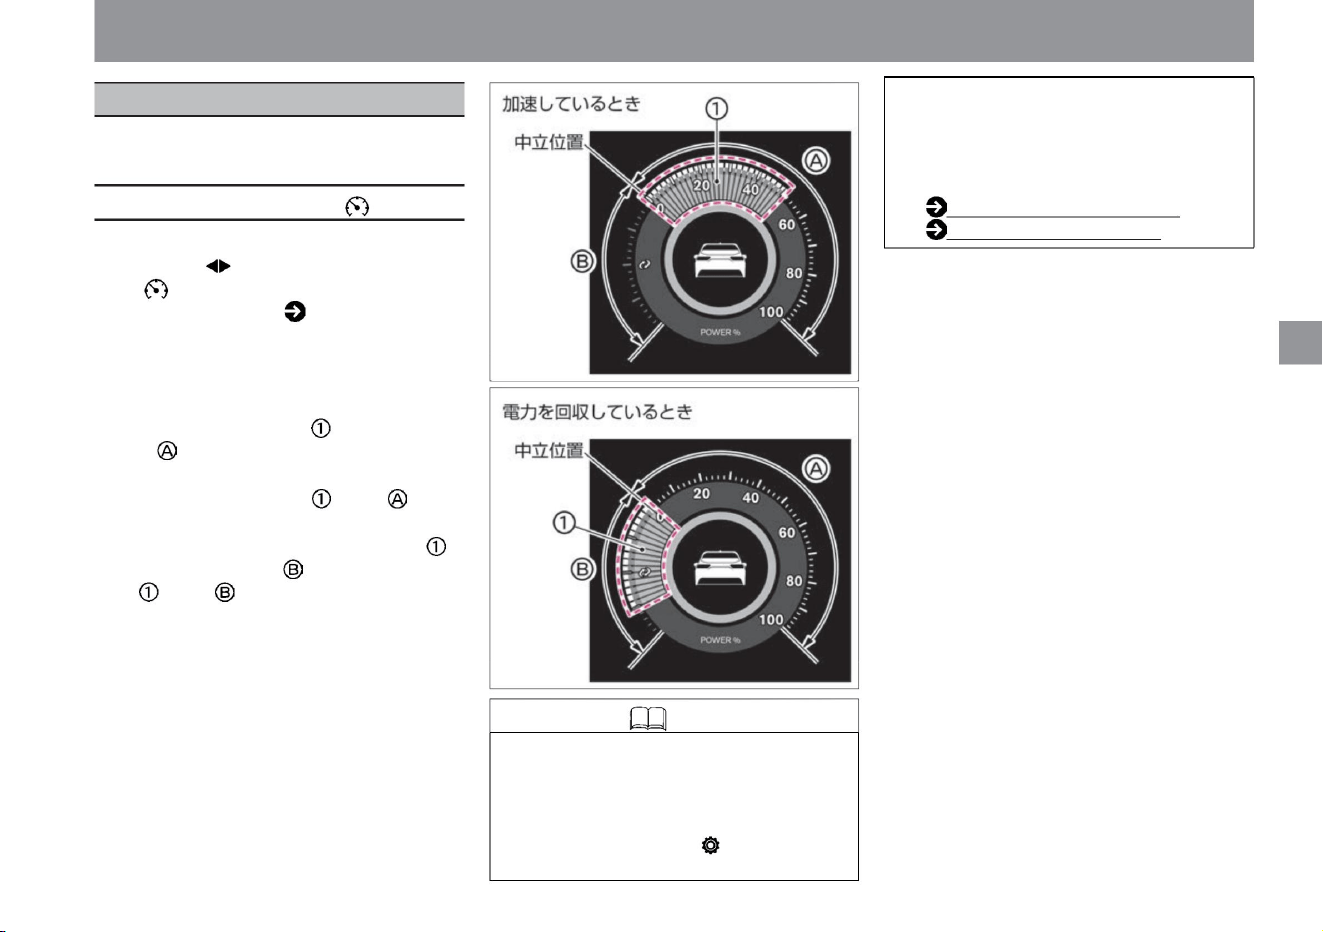
Various vehicle information can be displayed and
various settings can be made.
ÿ
ÿ
61
power meter
Knowledge
Advanced drive assist display
$/$: Different equipment depending on vehicle model, options, etc.
Vehicle information screen
ZEE0425X
ZEE0424X
• When the brake lamp is lit, the brake lamp
in the power meter is also lit.
When the power switch is ON, select the power
meter with the switch on the steering switch.
Please read ( P.60) how to use the steering
switch. Displays the output (acceleration force)
and
regeneration amount (recovery amount of
electric power) while
driving. • When driving at a constant speed or
accelerating, the gauge will be displayed
on the right side of the neutral position.
• On Advanced Drive Assist Display, select
"Settings", "Screen Customization",
"Power Meter Vehicle
• When you are consuming more power, such
as during sudden acceleration, the gauge
will increase
to the right. • When recovering power, the
gauge increases from the neutral position
to the left. As the gauge increases to the
left, more power is being harvested.
Screen switching (P.60)
Screen customization (P.78)
If you select "Display both", you can
switch between displaying and hiding
the vehicle display in the
power meter. For more information on
settings, read Screen Customization.
me
rice paddy
How
to
see
Machine Translated by Google
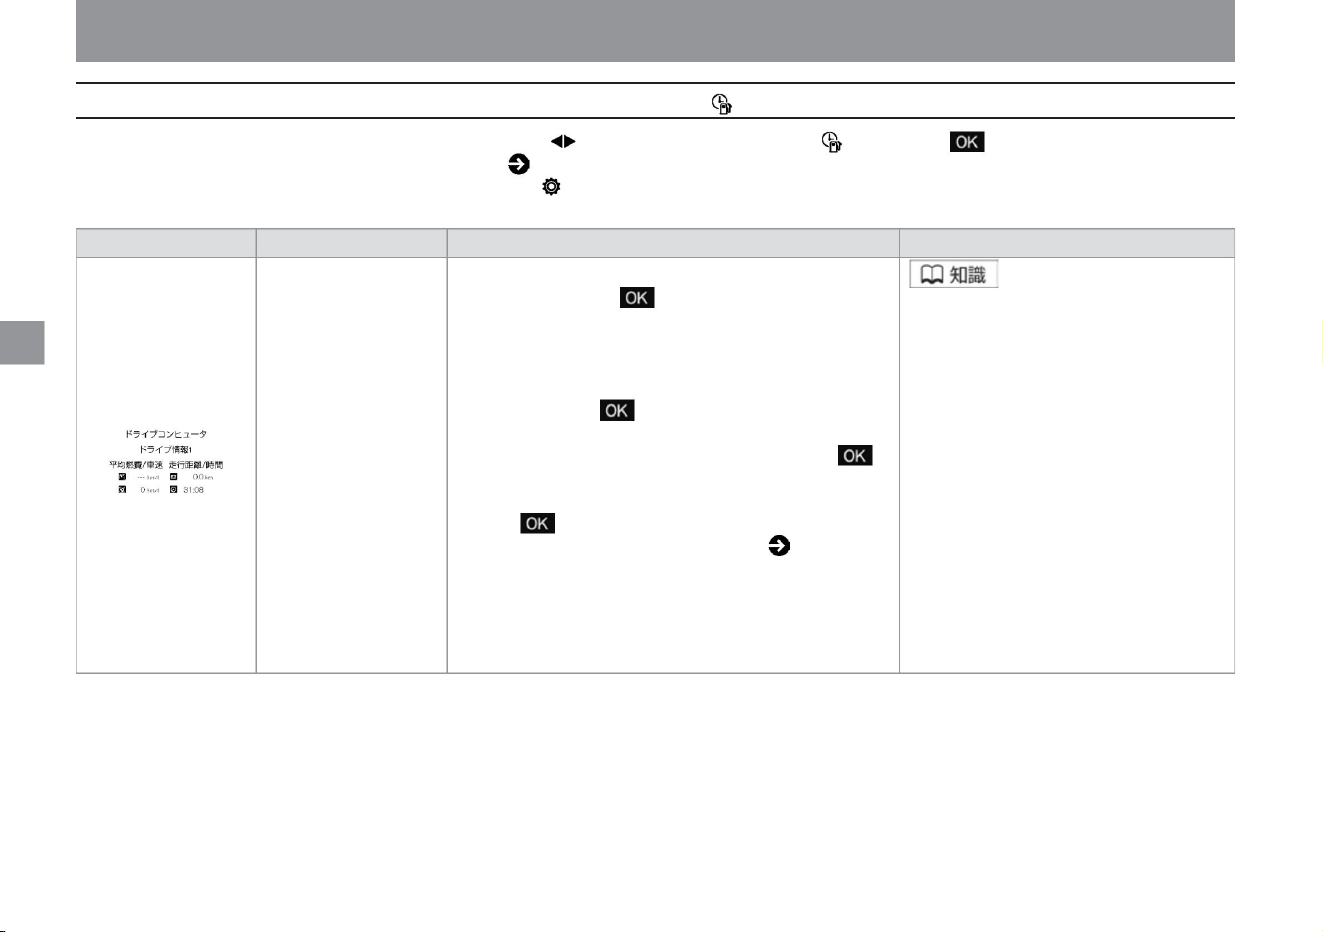
62
eco group
ÿ
ÿ
ZEE0430X
Advanced drive assist display
project
Detailed explanation
screen display
drive computer
• Drive computer items – average fuel
consumption –
average vehicle
speed – distance
traveled – travel time
Overview • Displays the drive computer. When the switch on the
steering switch is pressed, the screen switches in the order of drive
information 1, drive information 2, and drive information after
refueling. To reset drive information
1 and drive information 2, press and hold the steering switch while
the screen you want to reset is displayed. Then select the item to
reset from the "Reset" menu and press the steering switch again.
The reset screen will be displayed, so select "Yes" and press the
steering switch again to reset. For information on how to switch
screens, please read ( P.60). Also, drive information 2 will be reset
if the power switch is turned off for 30 minutes or longer. After
refueling drive information is reset every time you refuel.
When the power switch is ON, select the ECO group with the switch on the steering switch, and turn the switch to change the item. Please read ( P.60) how to use the steering switch.
Displayed when selected in "Settings" - "Screen Customization" - "Select Main Menu" on the Advanced Drive
Assist Display.
How
to
see
rice paddy
me
Machine Translated by Google
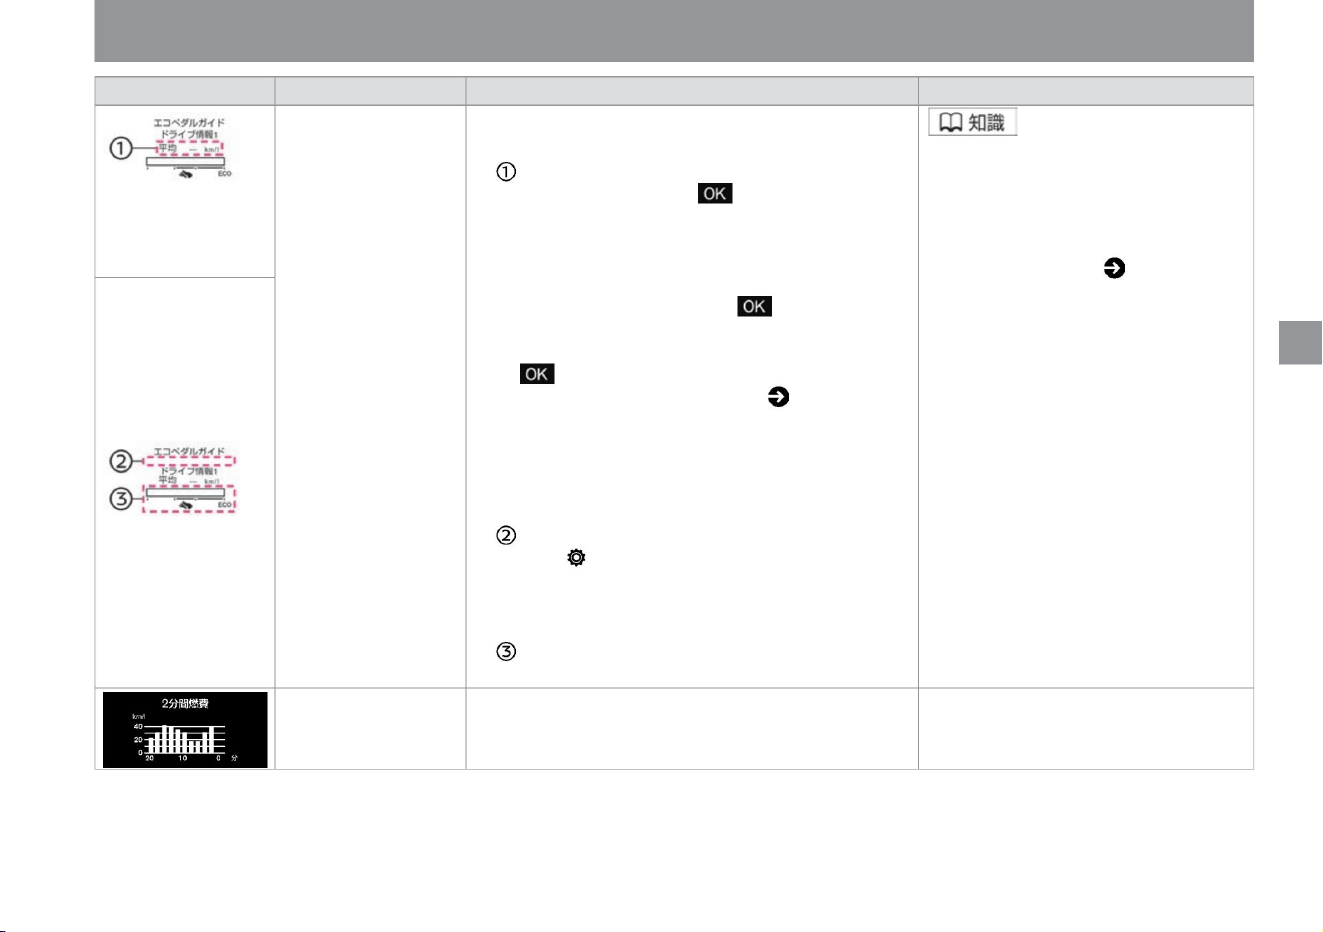
-
vinegar.
Detailed explanation
• The average fuel consumption after resetting is displayed. When you press the
steering switch switch, the screen switches in the order of drive information 1,
drive information 2, and drive information after refueling • Average fuel
consumption is updated every 30 seconds. increase. To reset the average
fuel consumption of drive information 1 and drive
information 2, press and hold the steering
switch while the screen you want to reset is displayed. Since the reset screen
is displayed, select "Yes" and press the steering switch again to reset. For
information on how to switch screens, please read ( P.60). Also, drive information
2 will be reset if the power switch is turned off for 30 minutes or longer. After
refueling drive information is reset every time you refuel. When "Settings",
"Eco", "Eco Information Settings", and "Eco Indicator" are set to ON on the
Advanced Drive Assist Display, the ECO indicator will light in 3 stages according
to the accelerator
pedal operation . . • While driving, the degree of depression of the accelerator
pedal is displayed. • Displays the average fuel consumption
every 2 minutes as a bar graph up to 20 minutes ago.
Average Fuel Economy/Eco
Indicator/Eco Pedal Guide
screen display
2 minute fuel consumption
project
• For details, please read P.64.
• The average fuel consumption is displayed as “---” after
replacing the 12V battery or resetting.
Overview • Displayed when the drive mode is ECO mode.
ZEE0473X
ZEE0447X
ZEE1143X
$/$: Different equipment depending on vehicle model, options, etc.
63
Advanced drive assist display
me
rice paddy
How
to
see
ÿ
ÿ
Machine Translated by Google
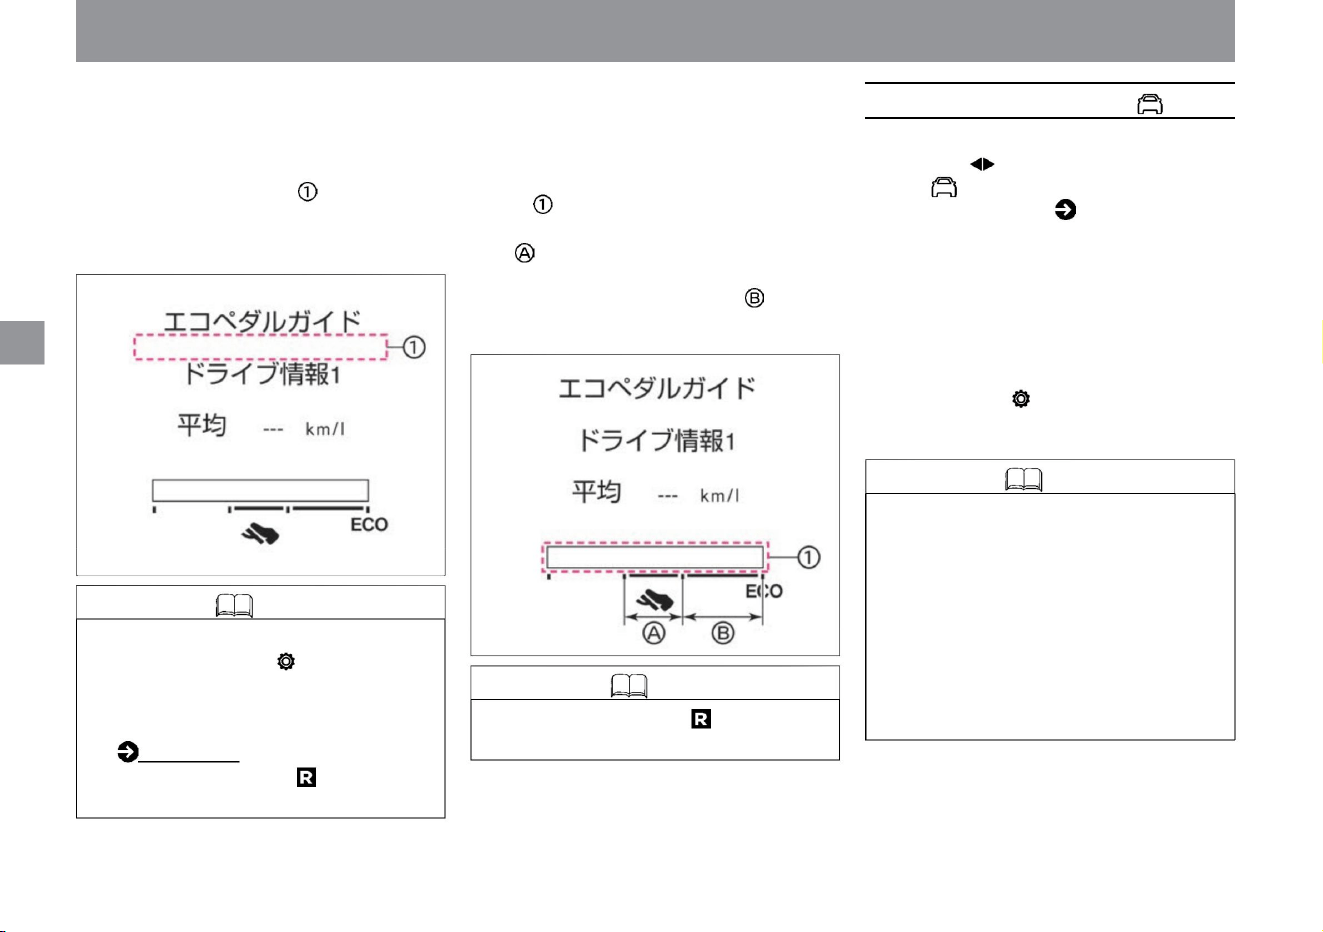
ÿ Eco pedal guide
me
rice paddy
How to see
ÿ Eco indicator
• When driving with the Eco Pedal Guide
displayed on the Advanced Drive Assist
Display, the Eco Indicator lights up in 3
stages according to the accelerator pedal
operation. • The more eco-driving you do, the
wider the lighting range.
• With the e-POWER system, the engine
may run even if no power is generated.
The arrow is not displayed when the
power is not
generated. • When the brake lights are lit,
the brake lights in the energy monitor
are also lit.
• Not displayed when the shift position is .
• When driving with the Eco Pedal Guide
displayed on the Advanced Drive Assist
Display, the degree of depression of the
accelerator pedal is displayed in .
• By adjusting the degree of depression of the accelerator
pedal so that it falls within the eco-driving range, fuel
efficiency can be improved.
Adjusting the degree of depression of the accelerator
pedal within the range of will lead to further improvement
of fuel efficiency.
ÿ
ÿ
ZEG1123X
ZEG1124X
Advanced drive assist display
Knowledge
Knowledge
64
energy monitor
Knowledge • Arrows from the engine indicate
the flow of the energy generated by the
engine.
When the power switch is ON, select the
energy monitor with the switch on the
steering switch. Please read ( P.60) how to
use the steering switch. • Shows energy
flow
between engine, lithium-ion battery and
tires. • The screen may differ from the
actual
display.
increase.
• On the advanced drive assist display,
select "Settings", "Eco", "Eco
information settings", and "Eco
indicator" to switch ON/OFF of the
eco indicator. ECO (P.74) • It
does not
light up when the shift position is .
•Displayed when selected in "Settings",
"Screen Customization", "Select Main
Menu" on Advanced Drive Assist Display.
Machine Translated by Google
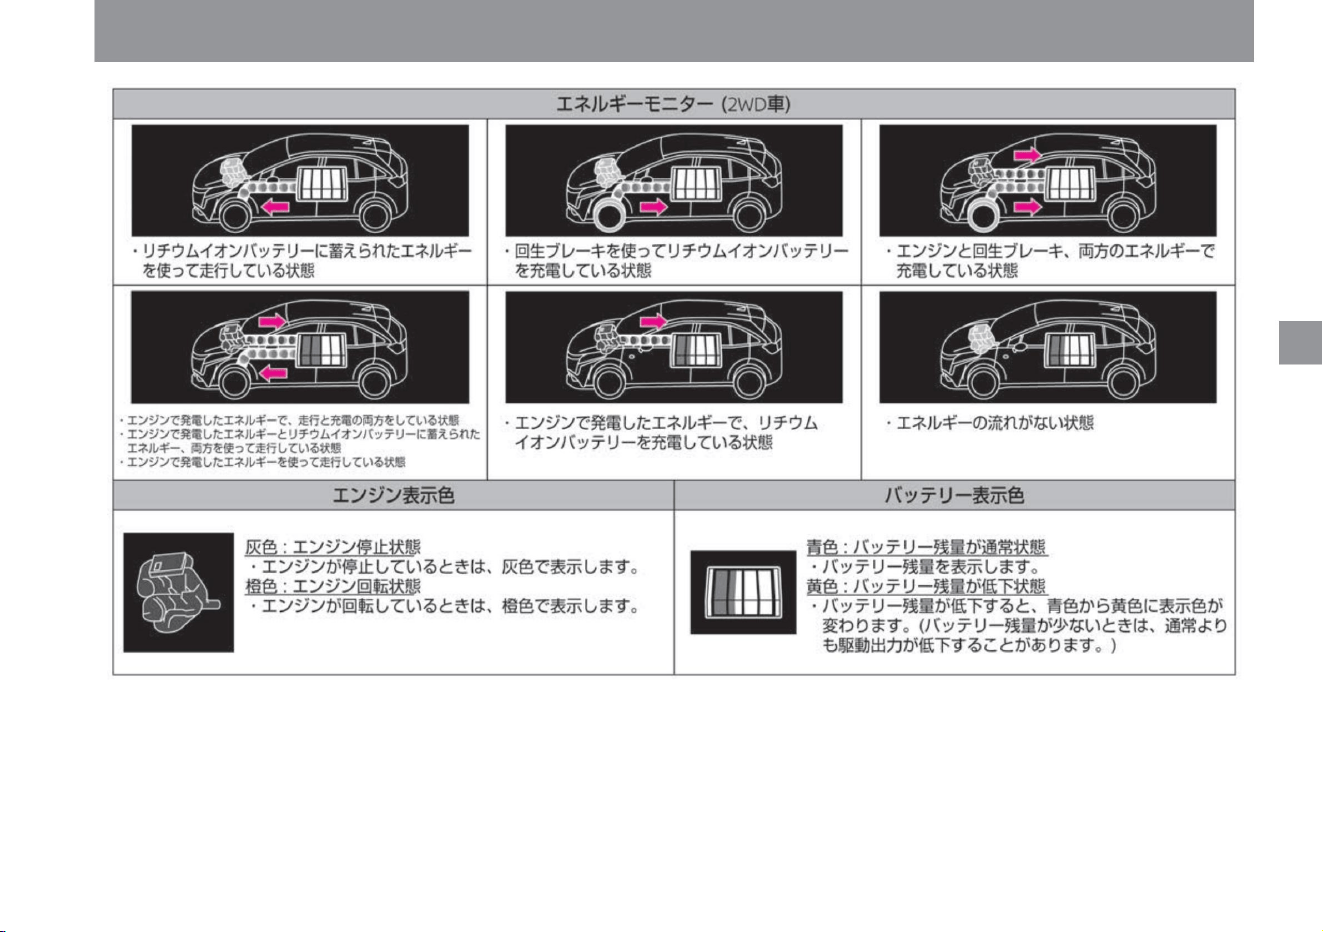
me
rice paddy
How
to
see
ZEE0595X
65
Advanced drive assist display
ÿ
ÿ
$/$: Different equipment depending on vehicle model, options, etc.
Machine Translated by Google
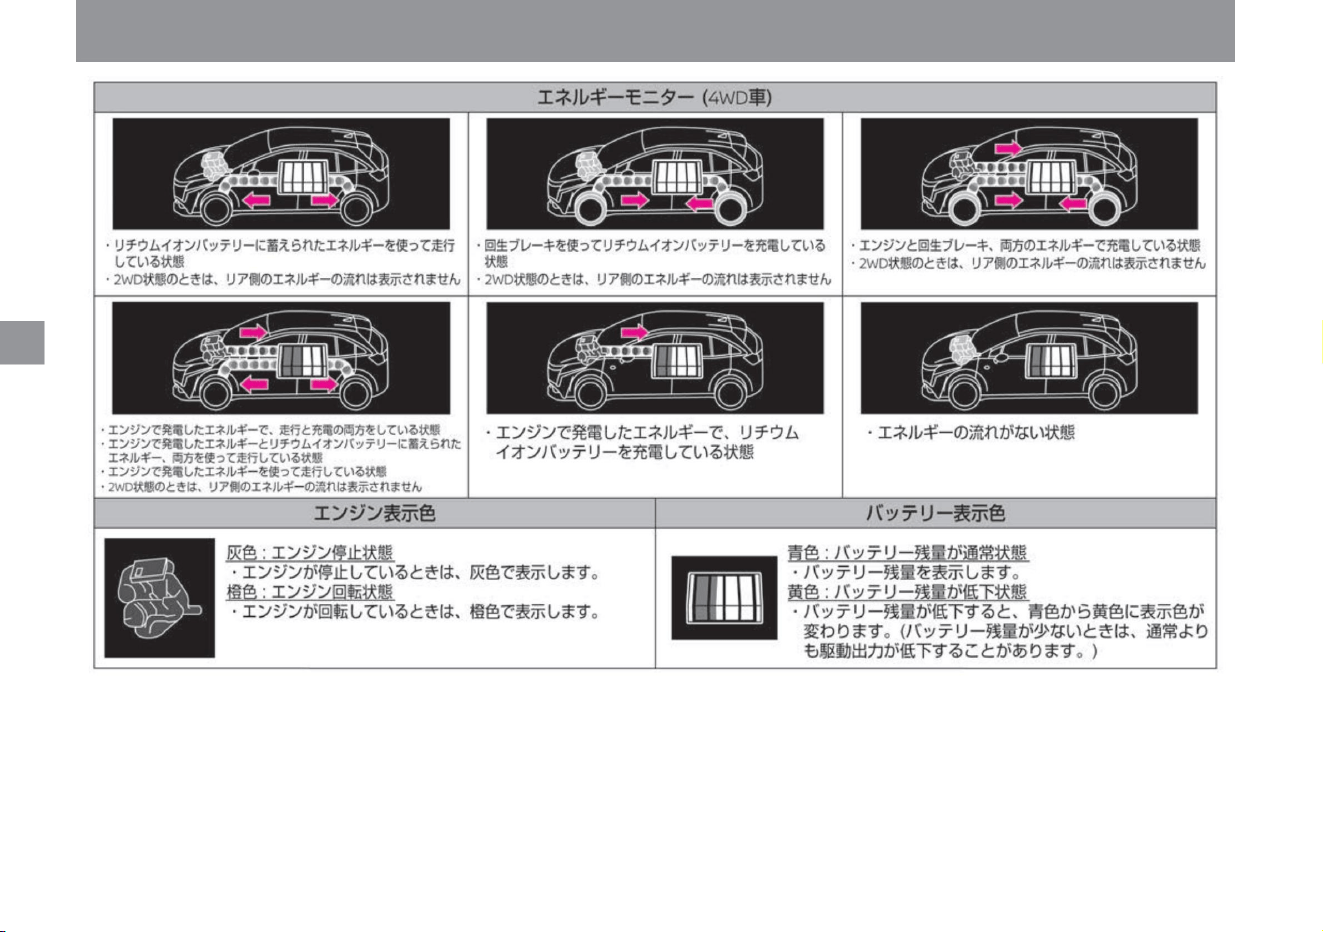
rice paddy
me
How to see
ZEE0596X
ÿ
ÿ
Advanced drive assist display
66
Machine Translated by Google
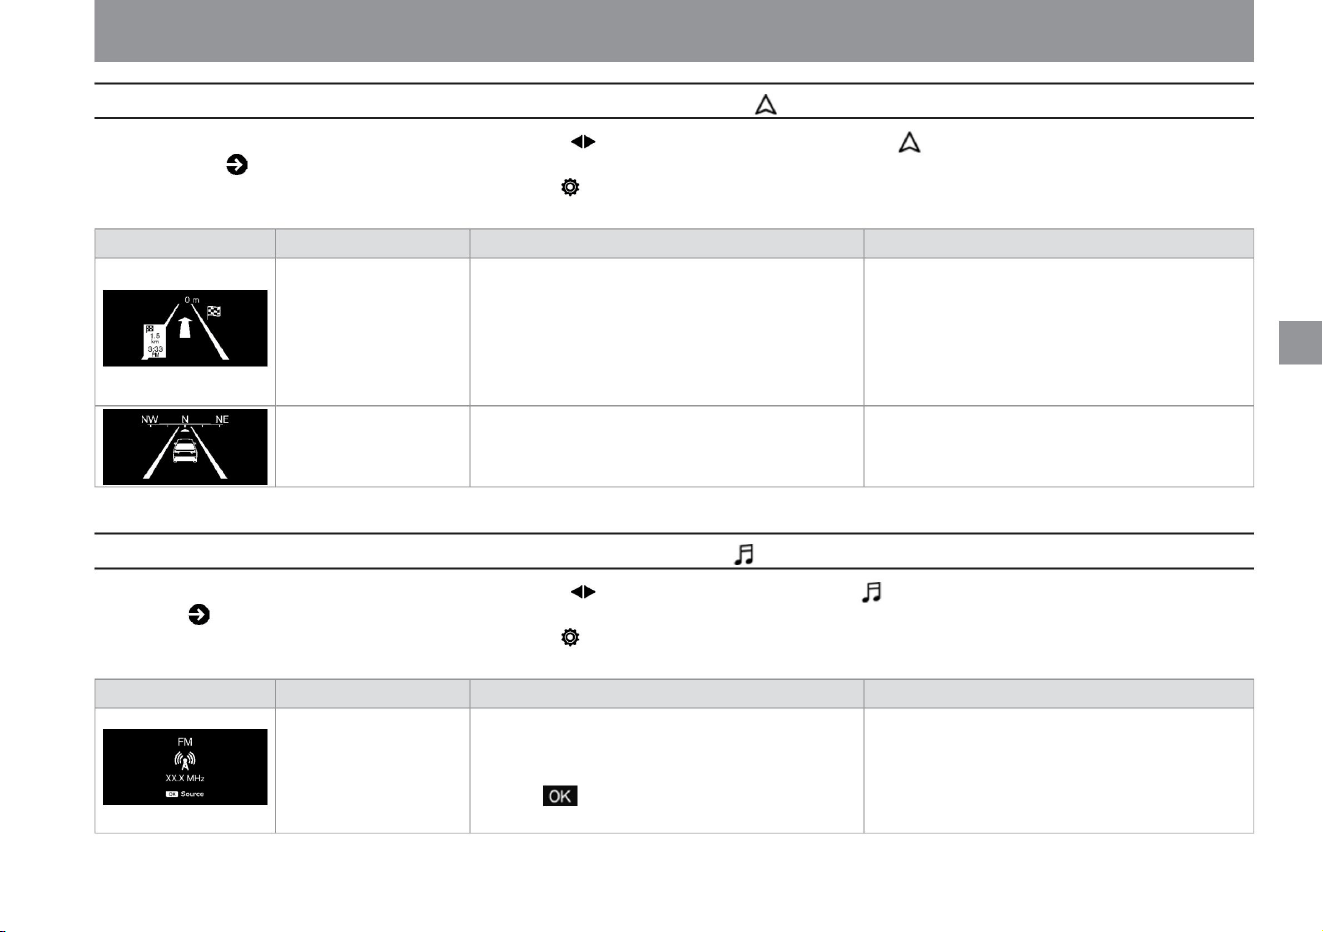
Advanced drive assist display
ZEE0460X
ZEE0461X
ZEE0459X
Detailed
description • For audio handling, please read the separate
navigation system instruction manual.
When the power switch is ON, select the navigation information with the switch on the steering switch. Please read how to use the steering switch ( P.60). Displayed when selected
in "Settings" - "Screen Customization" - "Select Main
Menu" on the Advanced Drive Assist Display.
• Display the compass (direction of travel of the vehicle).
• When this screen is displayed, you can switch the type
of audio by pressing the switch on the steering switch.
Detailed
explanation • For the handling of the navigation system,
which is a manufacturer's option, please read the
separate navigation system instruction manual.
vinegar.
Overview • When the destination is set with the navigation
system (manufacturer's option), the distance to the
next right or left turning point is displayed in conjunction
with the navigation system. • It is
not displayed when no destination is set.
screen display
compass display
project
-
screen display
navigation
project
Overview • Displays information about the audio currently in use.
When the power switch is ON, select the audio information with the switch on the steering switch. Please read ( P.60) how to use the steering switch. Displayed when selected in
"Settings" - "Screen Customization" - "Select Main
Menu" on the Advanced Drive Assist Display.
vinegar.
audio
$/$: Different equipment depending on vehicle model, options, etc.
67
Navigation information
audio information
ÿ
ÿ
ÿ
ÿ
rice paddy
me
How
to
see
Machine Translated by Google
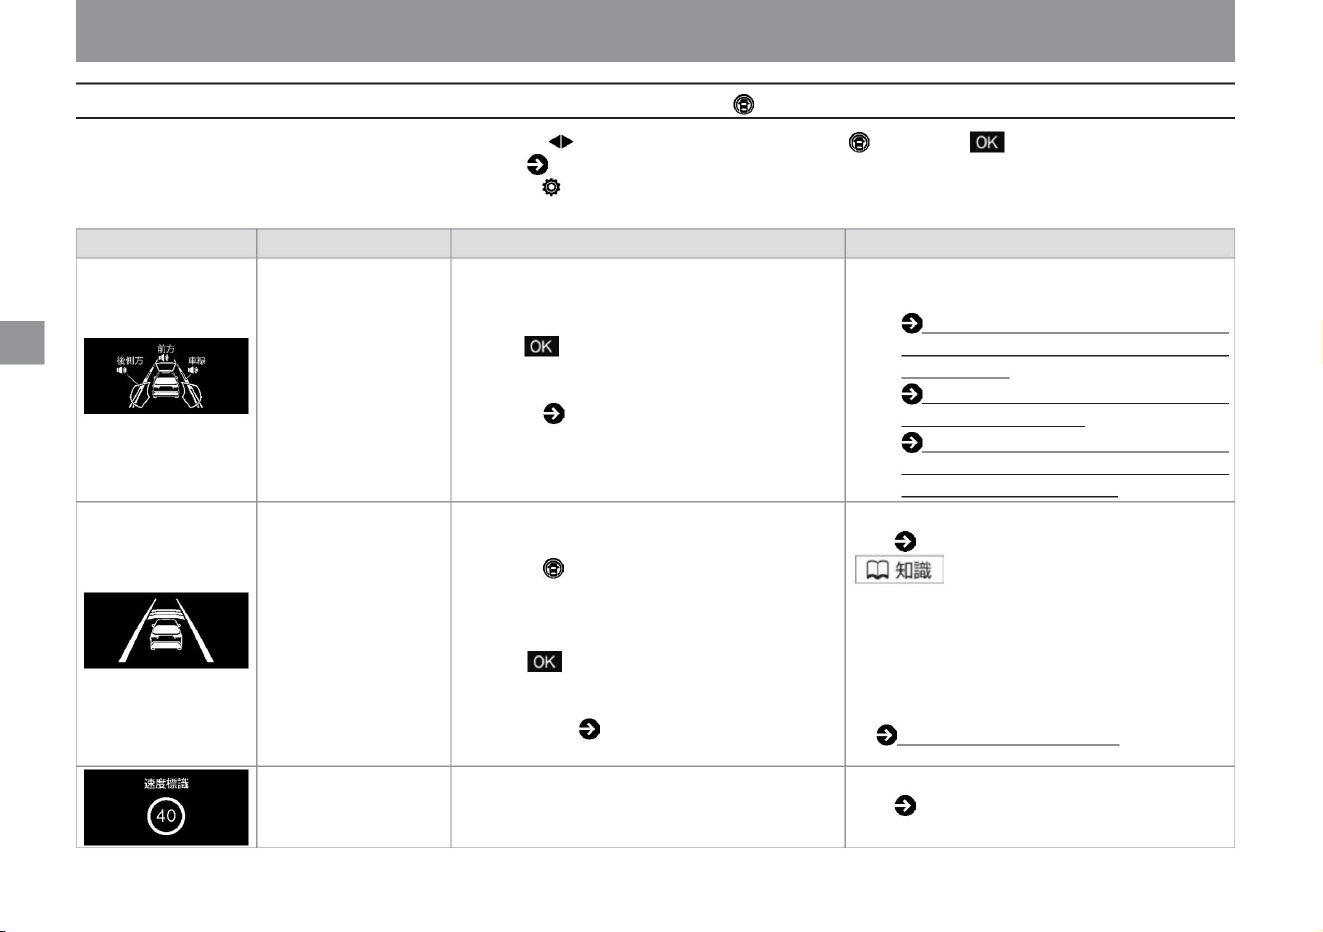
driving support group
68
ZEE0431X
ZEE0432X
ZEE0462X
ÿ
ÿ
Advanced drive assist display
driving assistance
Please read ( P.175).
screen display
• Displays the operating status of ProPILOT. •
When you press the ProPilot switch on the
steering switch, the driving support screen will
be displayed and after a few seconds it will
switch
to the cruise screen. • While this screen is
displayed, if you press the steering switch
switch, you can display the menu screen of the steering
wheel support lot with the steering wheel
support switch, and switch ON/OFF of the steering
wheel. can be set. For more information.
Please read
the relevant items in the driving support ( P.70)
ProPilotÿ (P.175).
Detailed
explanation • For details, please read the explanation of
each driving support system.
Sea brake (P.201)
Overview Displays the ON/OFF status of the driving support system.
• When the brake lamp is lit, the brake lamp in
the meter will also be lit.
– LDW (Lane Departure Warning) / Intelligent
LI (Lane Departure Prevention Support
System)
(P.226) – Intelligent Emergen
cruise
• Pressing the steering switch while this screen is
displayed displays the driving support system
menu screen, allowing you to set ON/OFF for
each system. For details, please read the
relevant items in Driving Support ( P.70).
– BSW (rear side vehicle detection warning) /
intelligent BSI (rear side collision prevention
support system) ÿ (P.217)
ÿCRUISEÿÿ
project
• Displays the detection status of the speed limit sign. • For maximum speed sign detection,
increase.
Please read ( P.241).
• For ProPILOT,
speed sign
When the power switch is ON, select the driving support group with the switch on the steering switch, and turn the switch to switch items. Please read
( P.60) how to use the steering switch. Displayed when selected in "Settings" - "Screen
Customization" - "Select Main Menu" on the Advanced Drive Assist Display.
me
rice paddy
How
to
see
Machine Translated by Google
Advanced drive assist display
me
rice paddy
How
to
see
ÿ
ÿ
$/$: Different equipment depending on vehicle model, options, etc.
About warning
• When an abnormality is detected, the master warning lights up and the warning is displayed on the Advanced Drive Assist
Display. Press the switch to temporarily turn off the warning.
You can set the following functions on the various
setting screens. Select the setting with the switch on the steering switch and turn the switch to select. You can decide by pressing the switch.
Setting example 1 (Screen customization)
(P.80) Setting example 2 (Oil/Oil filter) (P.81)
• When a warning is displayed, take appropriate measures immediately. Failure to do so may result in malfunction or unexpected accident.
How to check
If an abnormality is detected, select the warning with the switch on the steering switch while the power switch is ON, and you can check the warning
that the abnormality is
detected. Please refer to ( P.312) for the warning message display screen.
Please read ( P.60) how to use the steering switch.
You can set the driving support system ON/OFF, adjust the clock, set the alarm, etc. Please read ( P.60) how to use the steering switch.
warn
Settings (various setting screens)
69
Various setting screens
Machine Translated by Google
How to see
rice paddy
ÿ Select setting
with the switch on the VDC setting steering switch, and turn the switch to select. You can decide by pressing the switch.
me
ÿ Select the
setting with the switch of the driving assistance steering switch, and turn the switch to select. You can decide by pressing the switch.
70
Advanced drive assist display
• Set ON/OFF of steering support. ProPILOTÿ (P.175) • Sets
LDW (Lane Departure Warning) ON/
OFF.
Lane Departure Prevention Supportÿ
How to stop VDC (page 169)
Rear side supportÿ
LDW (Lane Departure Warning)/Intelligent LI (Lane Departure
Prevention Assistance System) (P.226) • Set ON/OFF
of Intelligent LI (Lane Departure Prevention Assistance System).
project
LDW (Lane Departure Warning)/Intelligent LI (Lane Departure
Prevention Support System) (P.226) • Sets ON/OFF of
BSW (Rear side vehicle detection warning).
Rear side vehicle detection alarm
system
increase.
Item 1
Handle supportÿ
Set ON/OFF.
BSW (rear side vehicle detection alarm) / intelligent BSI (rear side
collision prevention support system)ÿ ( P.217) Intelligent BSI (rear side
collision prevention support)
item 2
Rear flank conflict prevention support
side support
function
BSW (rear side vehicle detection warning) / Intelligent BSI (rear side
collision prevention support system)ÿ (P.217)
lane departure warning
Function • Sets ON/OFF of the VDC function.
ÿ
ÿ
Machine Translated by Google
Sign detection support
• Set the speed limit sign detection ON/OFF. Traffic sign
detection function (P.241)
Speed limit supportÿ
Functions • Set ON/OFF for Intelligent Emergency Brake, Misapplication
Collision Prevention Assist, and Intelligent FCW (Forward Collision
Prediction Warning). Intelligent Emergency Brake (P.201) Misapplication
Collision Prevention Assist (P.207) Intelligent FCW (Forward
Collision
Prediction Warning) (P.231)
• Set ON (manual/automatic) or OFF for the function that reflects the speed
detected by the traffic sign detection function to the set vehicle speed
of ProPILOT.
Regarding the speed limit support functionÿ (P.182)
OFF
Item 1
Emergency brake
Manual
automatic
• Set ON/OFF of ProPILOT's route deceleration support function. About
the route
deceleration support functionÿ (P.184)
Speed limit support setting --km/h
item 2
• Select the offset speed when reflecting the speed detected by the traffic
sign detection function to the speed setting of ProPILOT. – You can set
the speed
in the range -10km/h to +10km/h. Regarding the speed limit support
functionÿ
(P.182) • Set ON/OFF for no entry sign detection/
stop sign detection. Traffic sign detection function (P.241)
Route deceleration supportÿ
Speed sign indicates
71
$/$: Different equipment depending on vehicle model, options, etc.
Advanced drive assist display
rice paddy
me
How
to
see
ÿ
ÿ
Machine Translated by Google
Please refer to ( P.252). Sonar function
(P.87)
• Set ON/OFF of RCTA (vehicle detection alarm when reversing).
item 2
increase.
• Set ON/OFF for moving object detection. About
the moving object detection function (P.251)
• Set the interrupt display ON/OFF when approaching an obstacle.
Sonar function
(P.87) • Set front sonar
ON/OFF. Sonar function (P.87) • Set the rear sonar ON/
OFF. Sonar function
(P.87)
Moving object detectionÿ
RCTA (reversing vehicle detection alarm) ÿ (P.235)
sonar auto display
Wobbling alarm
forward sonar
• Set intelligent DA (sway alarm) ON/OFF. Intelligent DA (sway alarm)
(P.239)
rear sonar
sonar volume
• Select the volume (warning sound (buzzer)) from large, medium,
and small. Sonar function
(P.87)
Sonar detection distance
Vehicle detection alarm when reversingÿ
function
• Select the sensor detection distance from far, medium, and near.
You can change the maximum distance to obstacles to 110%
(far), 100% (medium), and 90%
(near). The maximum distance to an obstacle when medium is selected is
Item 1
Parking assistance
72
Advanced drive assist display
me
rice paddy
How
to
see
ÿ
ÿ
Machine Translated by Google
trace control
Turn the switch to change minutes and press the switch
to confirm. –You can set up to
360 minutes. –The set time changes
in 30 minute increments. (Press the switch to
return to the screen before setting.) Select "Yes" to reset the
running time.
• Set ON/OFF of the intelligent trace control (cornering stability
improvement system) function. Intelligent trace control (code
Function • Notifies you that you have run continuously for the set time.
reset
Set the display ON/OFF.
Item 1
Running time
Nulling Stability Improvement System) (P.170)
freeze attention
item 2
chassis control
Freezing warning displayed when the outside temperature drops below 3°C
vinegar.
---min/---min
rice paddy
me
How
to
see
73
Advanced drive assist display
ÿ
ÿ
$/$: Different equipment depending on vehicle model, options, etc.
Machine Translated by Google
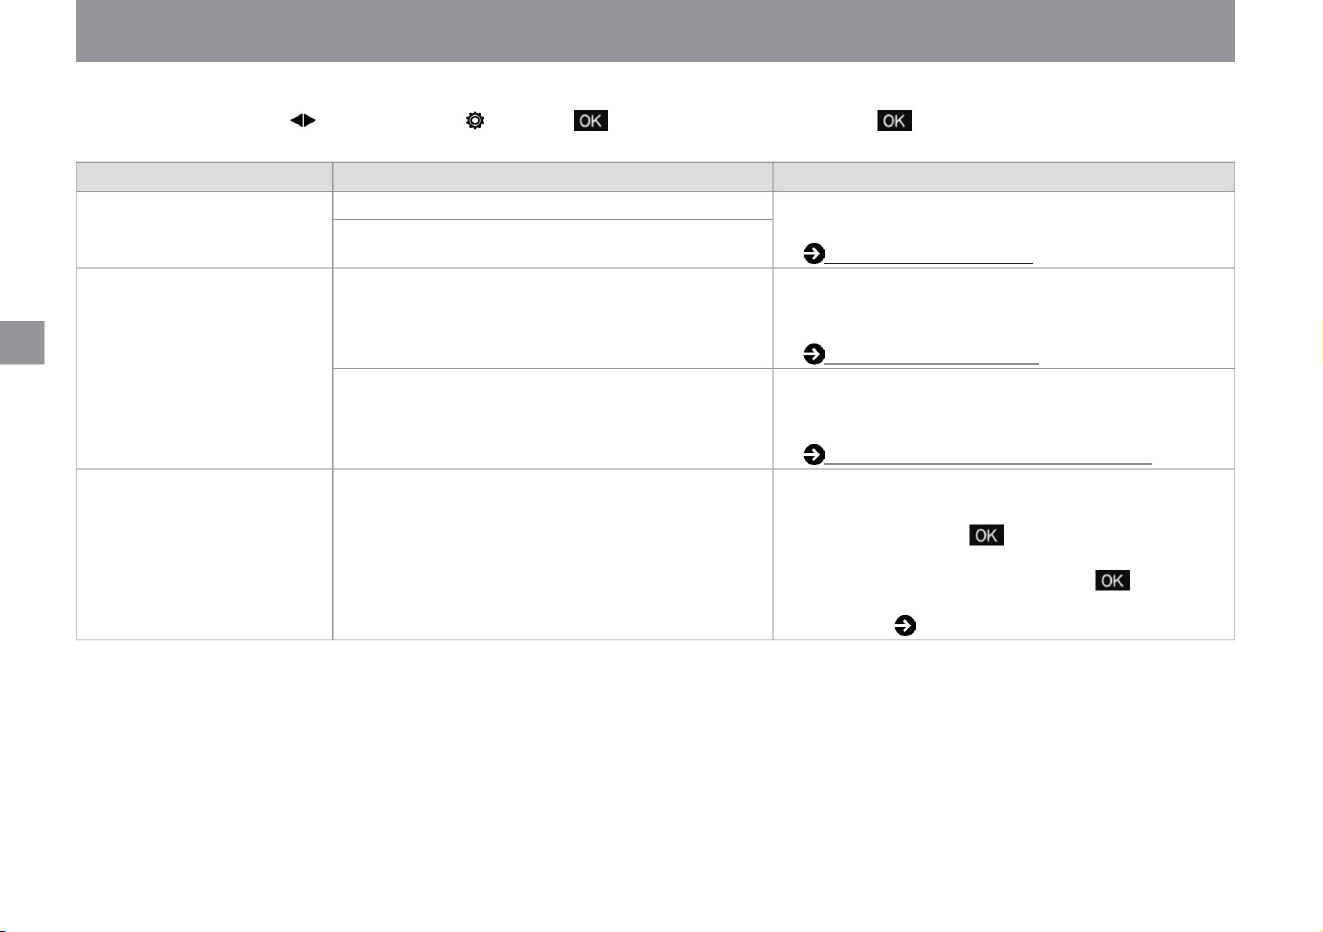
How to see
ÿ Eco
me
rice paddy
74
Advanced drive assist display
reset
When set to OFF, the eco indicator will not be displayed.
Eco
Indicator (P.64) • Set ON/
OFF for Eco Drive Report.
Item
2 Cruise control ÿ Air
conditioning
Select the setting with the switch on the steering switch and turn the switch to select. You can decide by pressing the switch. It cannot be operated while
driving.
eco drive report
eco indicator
Fuel economy history reset
Item
1 ECO mode setting
When set to OFF, the eco-driving report will not be
displayed. Eco-
drive report (P.88) • Displays the fuel
consumption history screen. • To
reset, press the steering switch while this screen is displayed.
Since the reset screen is displayed, select "Yes" and
press the steering switch again to reset. 2 minute fuel
consumption ( P.63)
eco information setting
Set OFF. ECO mode
setting (P.162) • Set ON/
OFF of ECO indicator.
Function • Turns on the function that prioritizes fuel efficiency when using ECO mode
ÿ
ÿ
Machine Translated by Google
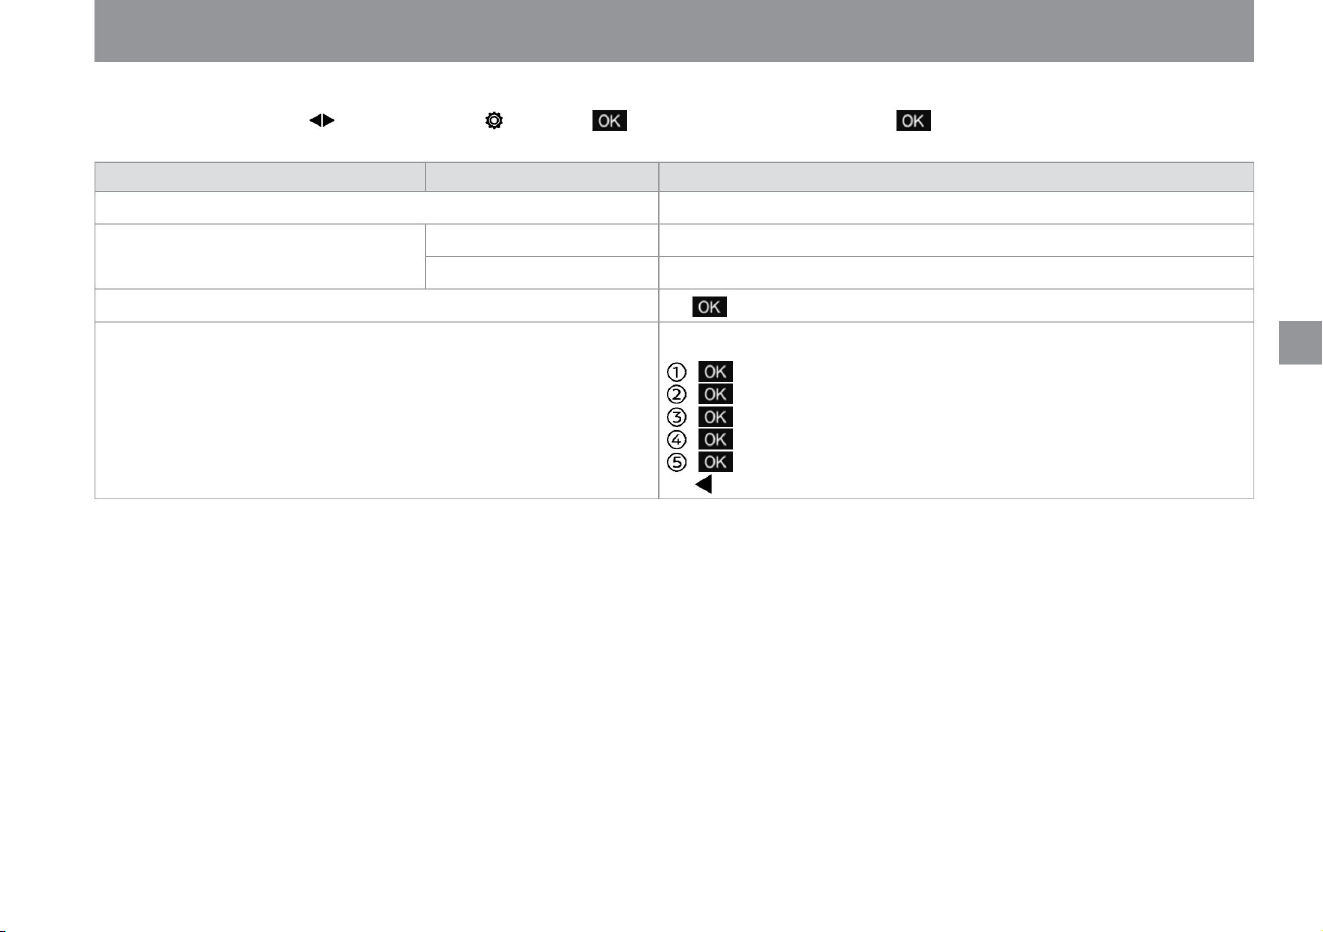
rice paddy
How to see
ÿ Select
setting with the switch on the clock steering wheel switch, and turn the switch to select. You can decide by pressing the switch. It cannot be operated while driving.
me
75
$/$: Different equipment depending on vehicle model, options, etc.
Advanced drive assist display
clock setting
automatic
Press the switch to switch to the "hour" adjustment screen. Rotate the
switch to adjust the hour. Press the switch to switch to
the minute adjustment screen. Rotate the switch to adjust the minute.
Press the switch to set the time. (Press the switch to
return to the previous adjustment screen.)
• Press the switch to switch between 12-hour display and 24-hour display.
manual
Function • Set ON/OFF of the clock display.
adjust the clock.
• Set the time automatically using information from GPS.
Display
ÿ Clock setting mode ÿ
time display
• Set the time manually from "Clock settings".
item 2item 1
ÿ
ÿ
Machine Translated by Google
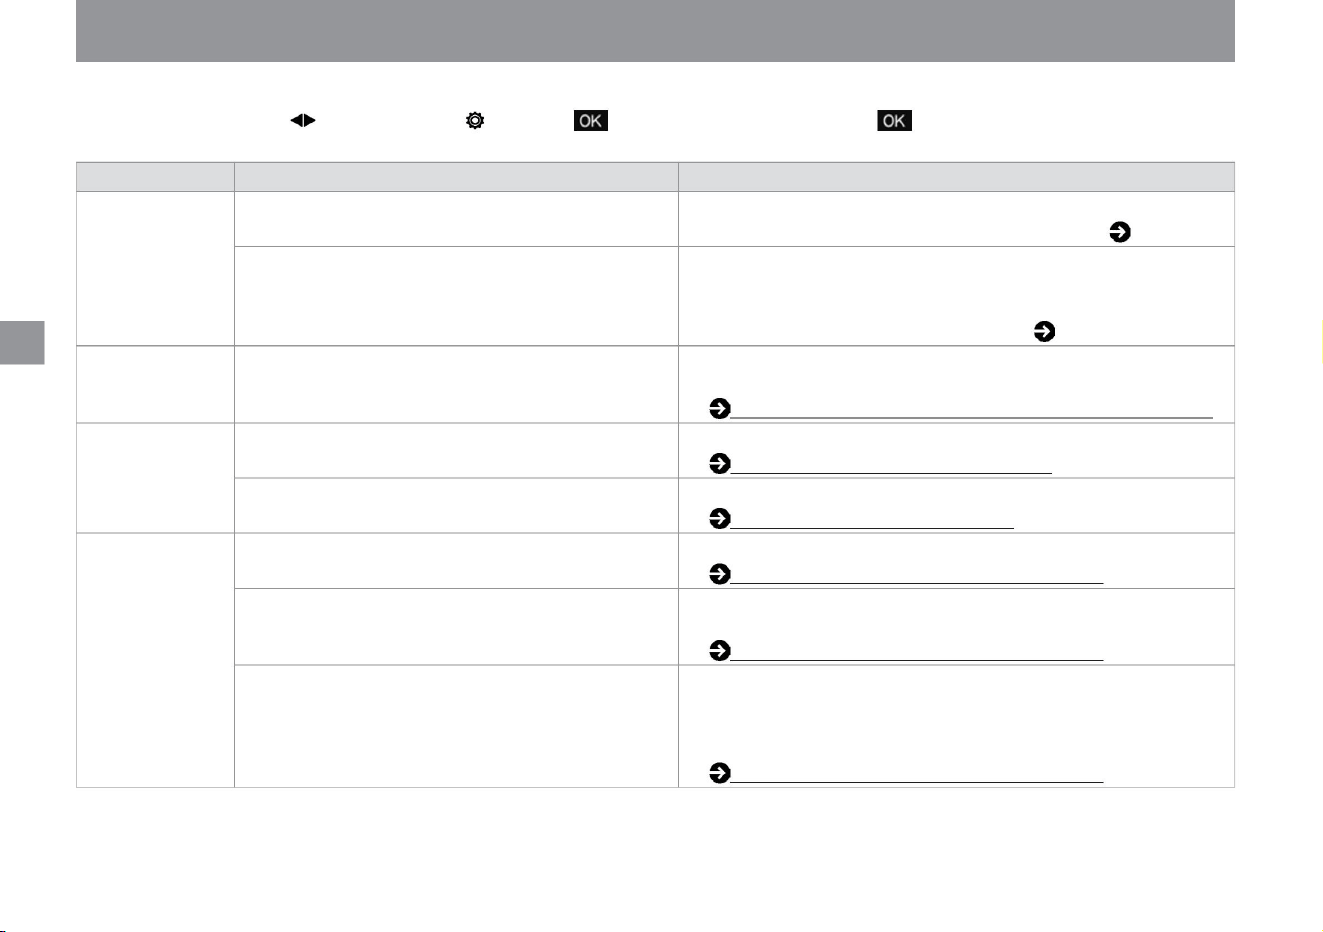
me
How to see
ÿ Select setting
with the switch on the vehicle setting steering switch, and turn the switch to select. You can decide by pressing the switch. It cannot be operated while driving.
rice paddy
76
Advanced drive assist display
drip wipe
function
set. How to
lock/unlock with the door handle switch ÿ (P.96) • Set the vehicle
speed interlocking function ON/OFF.
Door mirror ÿ Automatic open/close OFF
Welcome light function (with farewell function) ( P.156) Select the
lighting timing of the intelligent auto light system (front wiper interlocking,
twilight detection "Omoiyari Light" function) from earlier, earlier, normal,
or later . To do.
How to use the front wiper (P.158) • Set
drip wiping ON/OFF. How to use the washer (P.159) •
The door lock interlock storage function
is turned off.
• Set ON/OFF of the welcome light function.
Regarding the door lock interlocking storage functionÿ (P.115)
How to use AUTO (Automatically turn on/off) ( P.150)
Power ON interlock
Auto light sensitivity adjustment
wiper
• The door lock interlock storage function is turned ON. The door mirrors are
set to open when the power switch is turned on. Regarding
the door lock interlocking storage functionÿ (P.115)
door unlock interlock
rock
Vehicle speed interlock
• The door lock interlock storage function is turned ON. When unlocked
with the remote control or the switch on the door handle, the door
mirrors are set to open. The door mirrors also open when the power
switch is turned on.
Regarding the door lock interlocking storage functionÿ (P.115)
key entry
• Set the ON/OFF of the locking/unlocking function with the switch on the door handle.
Item 1 Item 2 Lights/Lighting Welcome headlights
ÿ
ÿ
Machine Translated by Google
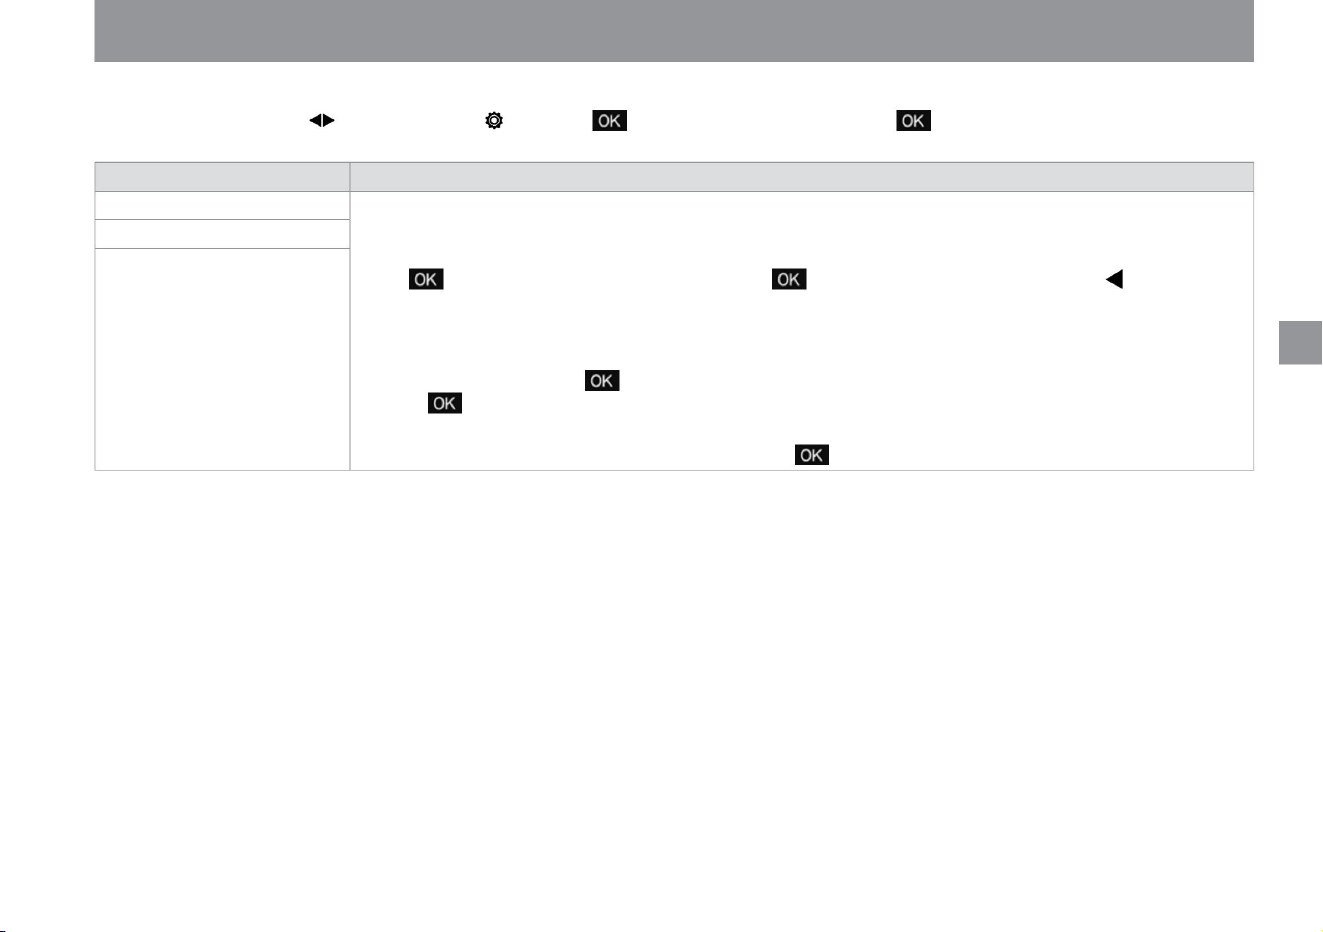
me
ÿ Maintenance
rice paddy
How to see
$/$: Different equipment depending on vehicle model, options, etc.
77
Advanced drive assist display
– You can set the distance from 500km to 30,000km. –The set
distance changes in increments of 500km. –Select
Reset and press the switch to display the reset screen. Select "Yes" and
–To stop, set the distance display to “–––” and press the switch to confirm.
Select the setting with the switch on the steering switch and turn the switch to select. You can decide by pressing the switch. It cannot be operated while
driving.
You can reset the distance traveled by pressing the degree switch.
project
• You can stop the function.
Oil/oil filter • [Maintenance] allows you to set the distance until the next maintenance. When the set value is exceeded, the display indicates that the
maintenance distance has been reached. (For the replacement distance of regular replacement parts, please read
the
separate Maintenance Tire Nonce Note.) User – Turn the switch to
change
the distance, and press the switch to set. (Press the switch to return to the screen before setting.)
function
ÿ
ÿ
Machine Translated by Google
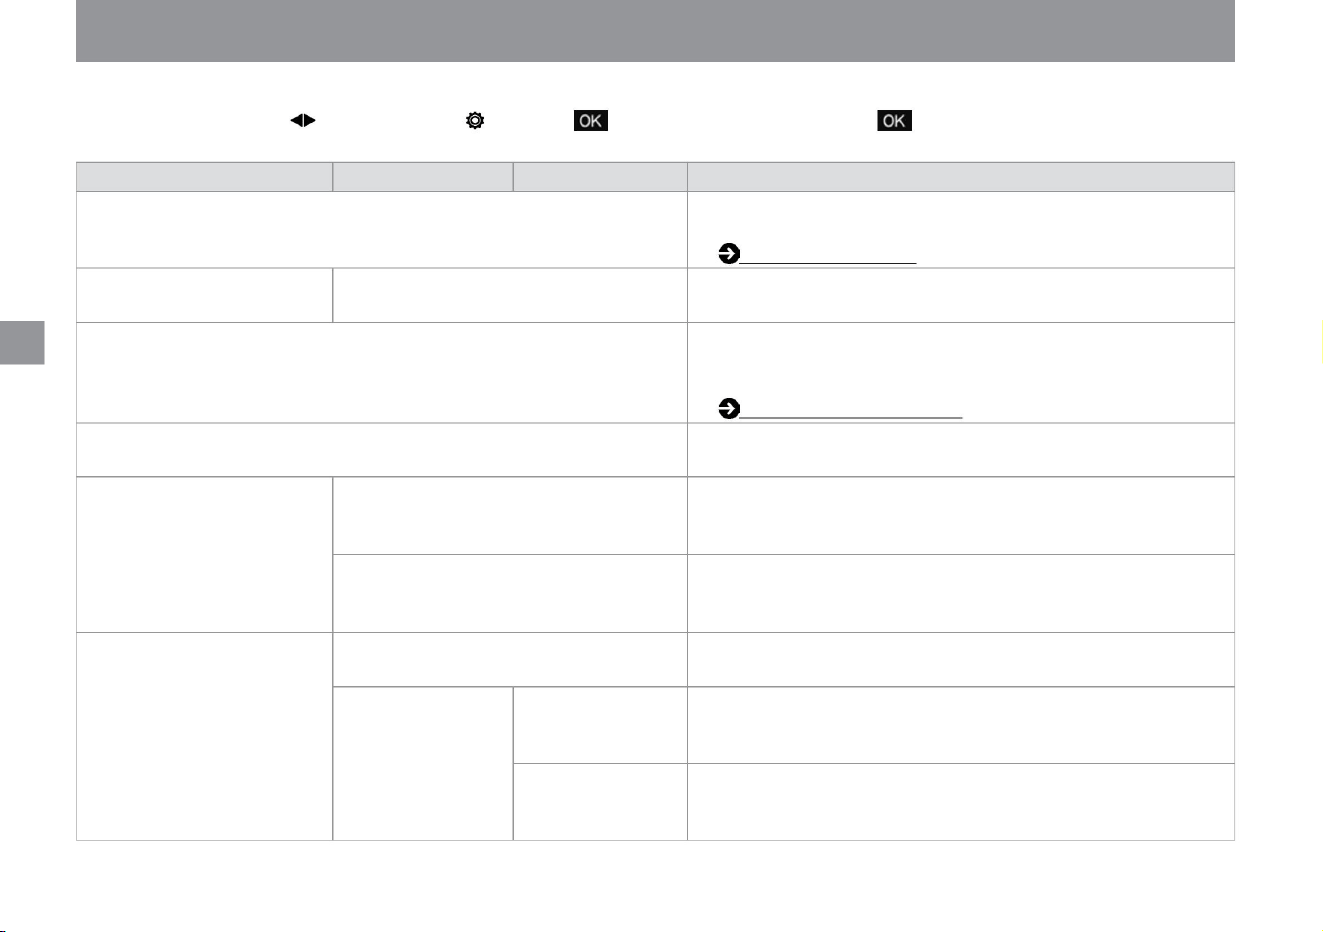
How to see
ÿ Select setting with the screen
customization steering switch, and turn the switch to select. You can decide by pressing the switch. It cannot be operated while driving.
me
rice paddy
78
Advanced drive assist display
Automatic interrupt setting
animation
Item
1 Main menu selection
• Set the ON/OFF of the display effects.
• When turning the wiper switch to activate the rear wiper, set ON/OFF
for the function that pops up the switch position in the meter.
item 3item 2
When set to OFF, the animation when the e-POWER system starts
is turned OFF.
vinegar. Vehicle information
screen (P.61) • Set ON/OFF for the function that notifies you with a pop-up in
the meter when approaching the next right or left turn while driving.
power meter vehicle display
sound
• Set ON/OFF of the cruise screen switching.
When set to OFF, the sound when the e-POWER system starts and
stops is turned off. • Set ON/
OFF for the function that pops up the switch position in the meter when
the light switch is turned. • Set ON/OFF for the function that
pops up the switch position in the meter when the wiper switch is moved
to operate the front wipers.
• Set the ON/OFF of the display effects.
When set to ON, the screen will switch to the cruise screen when
the ProPilot system is turned on. ProPILOTÿ
(P.175) • Set whether to
show or hide the vehicle display on the power meter screen.
Operation Guidance Light Mode Guidance
vinegar.
Navigation settingsÿ
wiper
meter production
front
Cruise screen switchingÿ
rear
Function • You can select the items you want to display on the vehicle information screen.
ÿ
ÿ
Machine Translated by Google
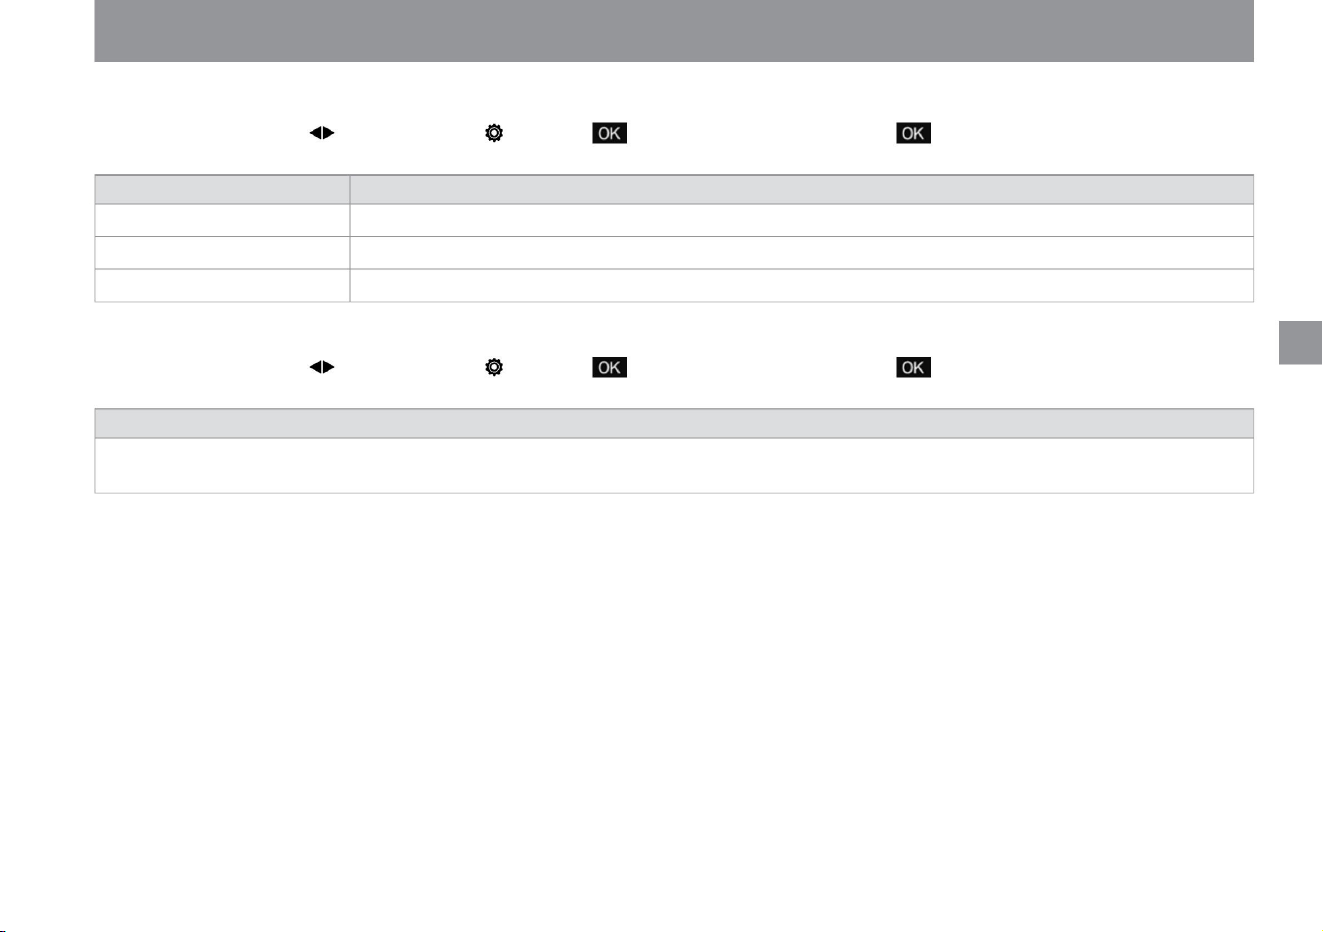
How to see
ÿ Select the setting with
the switch on the steering switch, and turn the switch to select. You can decide by pressing the switch. It cannot be operated while driving.
ÿ Use the unit/
language steering switch to select Settings and turn the switch to select. You can decide by pressing the switch. It cannot be operated while driving.
rice paddy
me
$/$: Different equipment depending on vehicle model, options, etc.
79
Advanced drive assist display
You can reset to factory settings. • Select "Yes" to initialize various settings.
language
• Switch the display language to Japanese or English.
Distance/fuel consumption
Temperature
function
project
• Switch the display unit of distance and fuel consumption to km, km/l or km, l/100km. • Switch the temperature unit between
°C and °F.
function
ÿ
ÿ
Machine Translated by Google
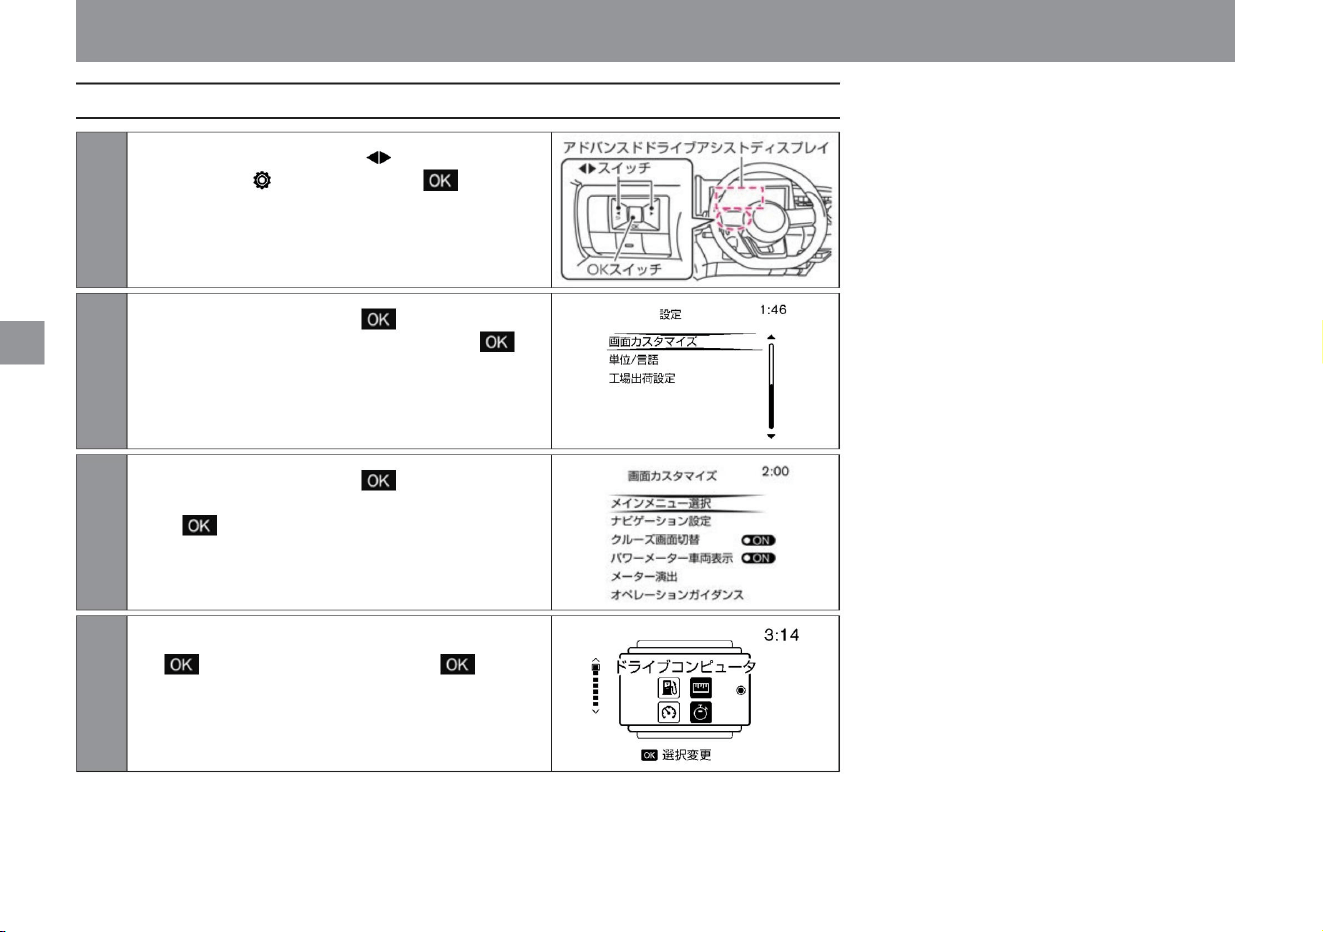
Setting example 1 (screen customization)
80
rice paddy
me
How
to
see
ÿ
ÿ
Rotate the switch to select and press the
switch to select it, and you can display it.
Advanced drive assist display
2Rotate the steering wheel switch to select
[Screen Customization] and press the
switch to confirm.
1 Press the steering switch several times to
display the [Settings] screen and press
the switch.
4 Select the item you want to display by pressing the steering switch.
3Rotate the steering wheel switch to select
[Select main menu] and press the switch
to confirm.
ZEE0417X
ZEE0427X
ZEE0468X
ZEE0598X
Machine Translated by Google
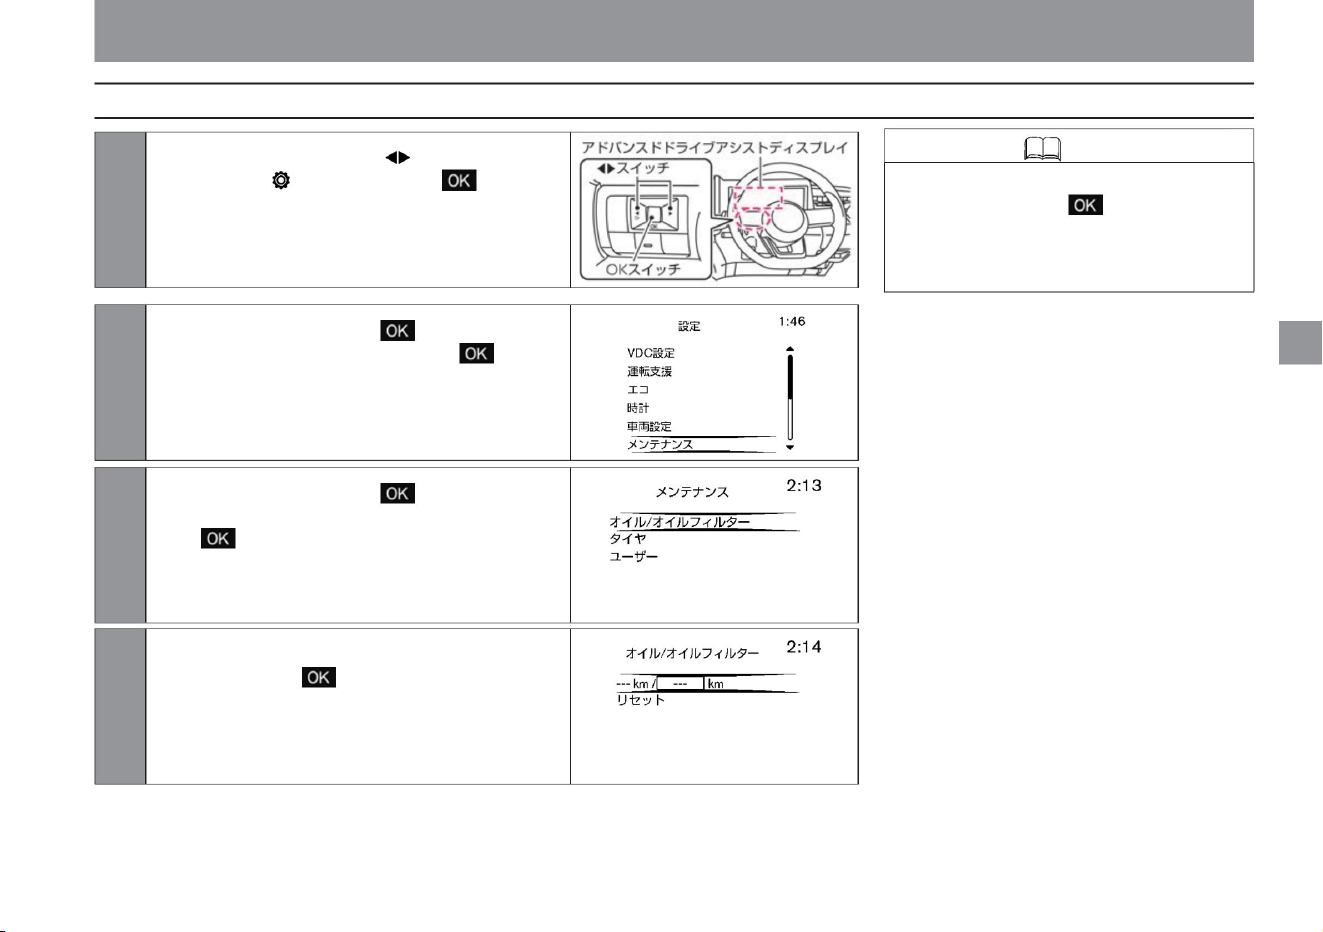
Advanced drive assist display
ZEE0418X
ZEE0419X
ZEE0420X
ZEE0468X
to select [Maintenance] and press the switch
to confirm.
• You can reset the distance traveled by
selecting reset in step 4 and pressing
the switch on the steering switch.
(Display to the left of “---km /---km”)
$/$: Different equipment depending on vehicle model, options, etc.
2Turn the switch on the steering switch
1 Press the steering switch several times to
display the [Settings] screen and press
the switch.
3Rotate the switch on the steering switch to
select [Oil/oil filter] and press the switch
to confirm.
4 On the [Oil/Oil Filter] screen, press the switch on the
steering switch to advance to the next
maintenance distance setting screen. (Display
on the right side of “---km/---km”) *The
distance on the left side of “---km/---km” displays
the distance traveled after setting.
ÿ
ÿ
Setting example 2 (oil/oil filter)
Knowledge
81
How
to
see
me
rice paddy
Machine Translated by Google
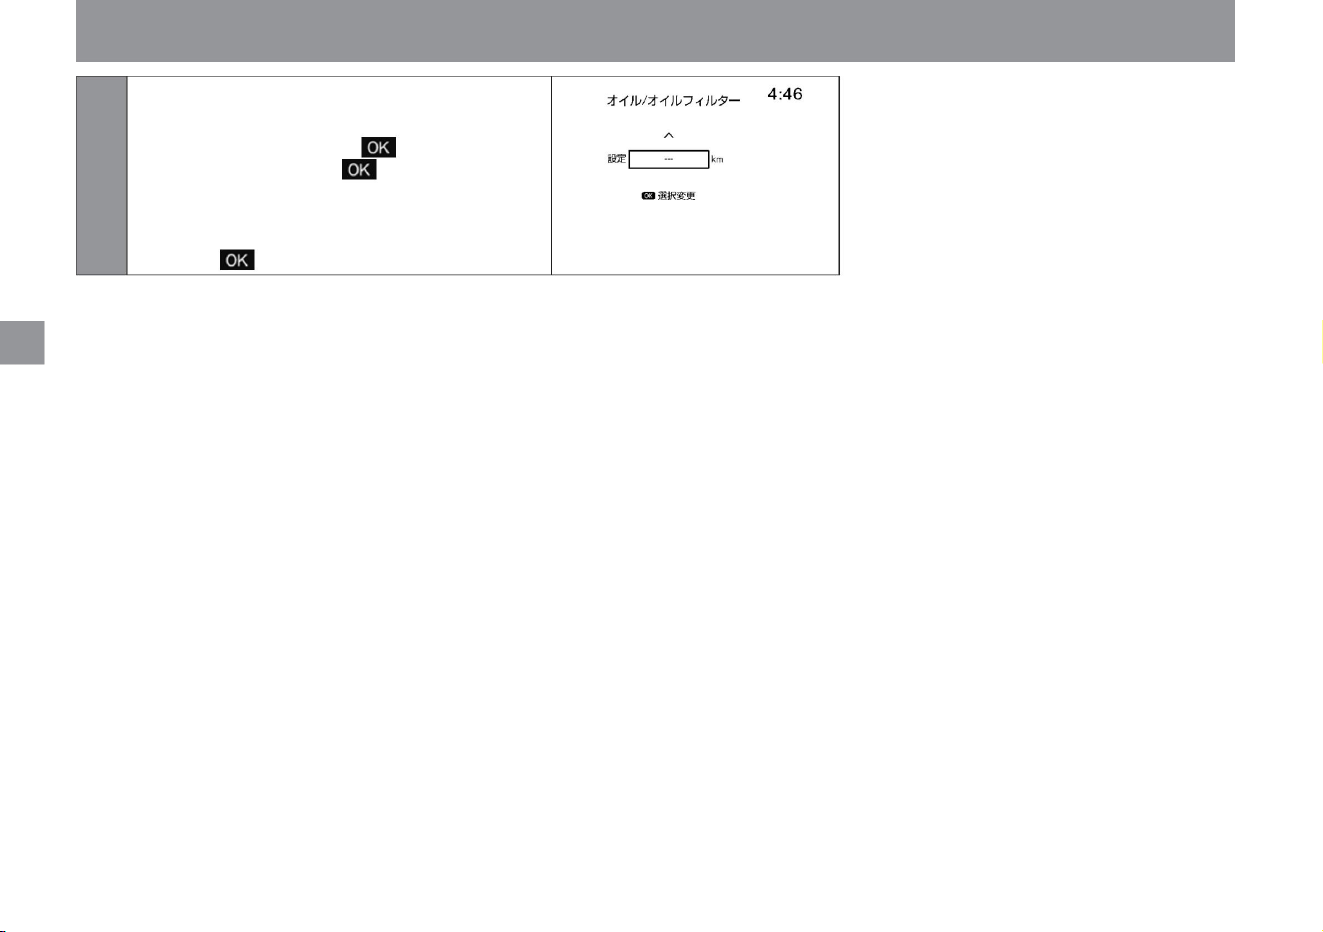
5You can set the distance for the next
maintenance. (Step 4 "---km/---km"
right side display) Turn the steering switch
to change the distance, and press the
switch to
confirm. The set distance changes in
units of 500km. * To stop the function,
adjust the distance display to "---" and press the switch to confirm.
ZEE0421X
82
Advanced drive assist display
How
to
see
rice paddy
me
ÿ
ÿ
Machine Translated by Google
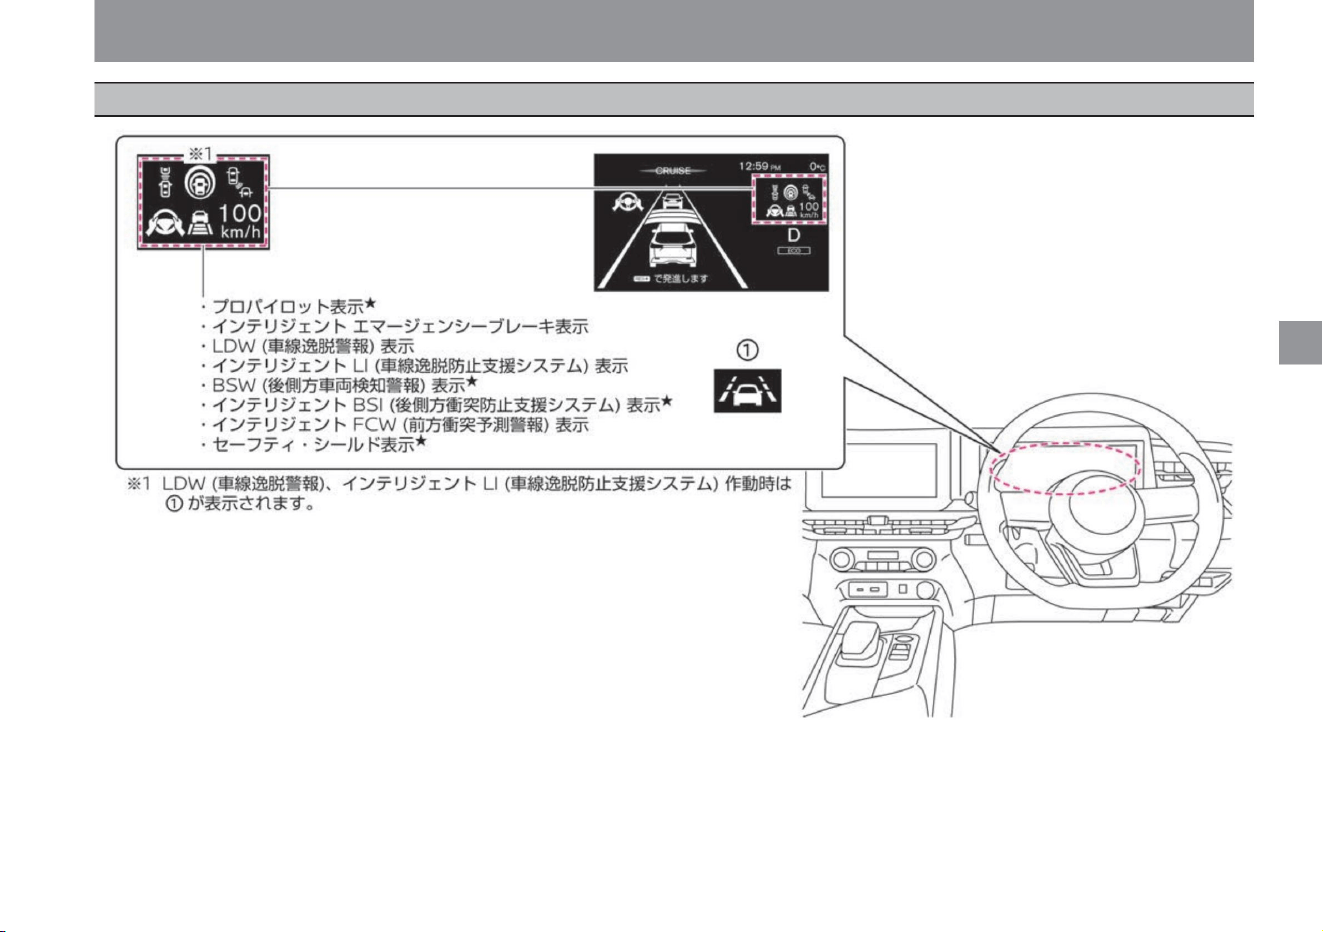
Driving support function screen
ÿ
ÿ
$/$: Different equipment depending on vehicle model, options, etc.
83
Advanced drive assist display
me
rice paddy
How
to
see
ZEE1078X
Machine Translated by Google
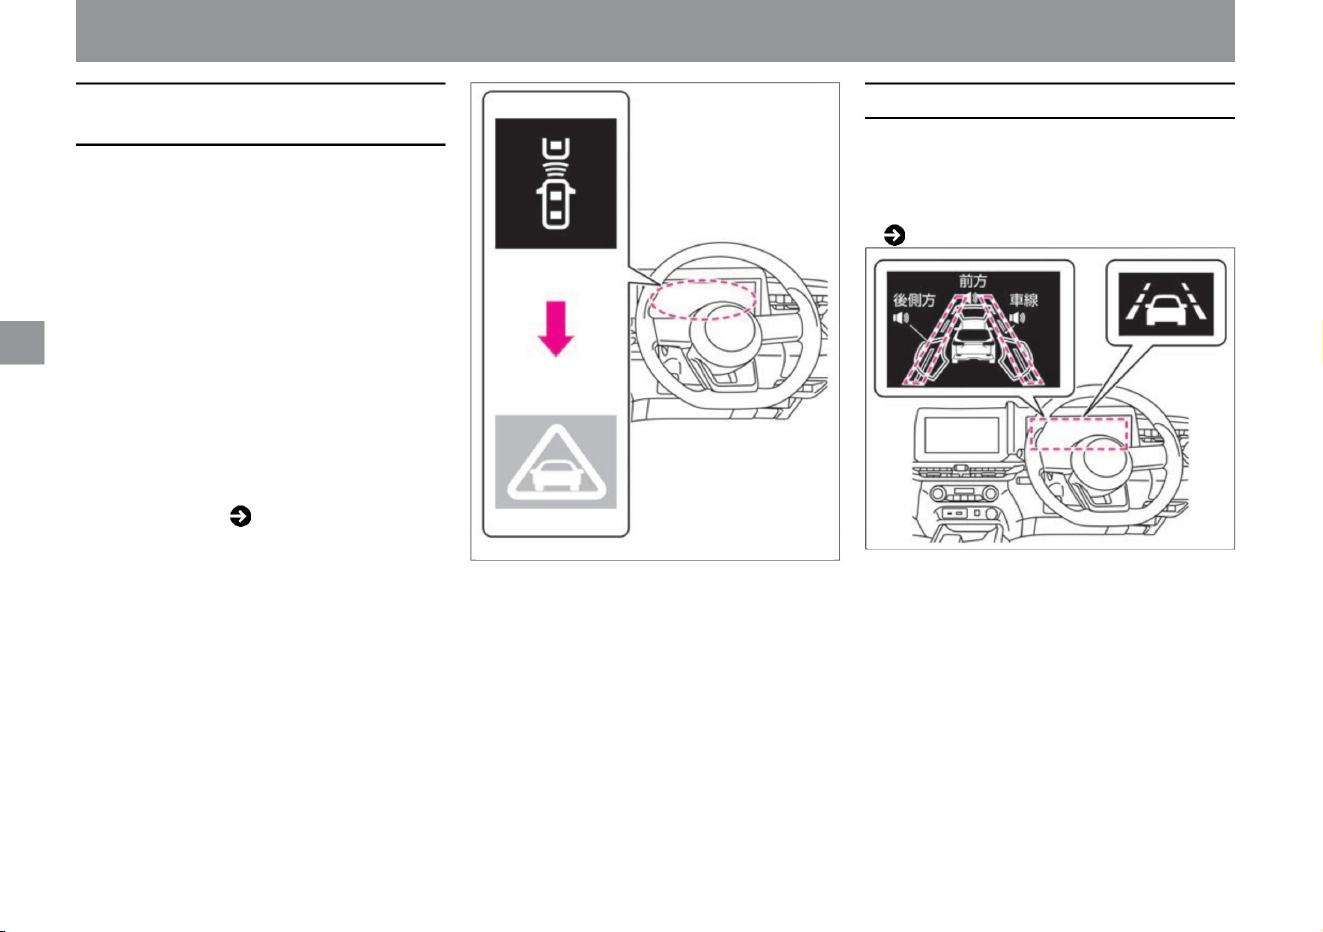
Intelligent emergency brake display
84
LDW (lane departure warning) display
Please read ( P.201) for Intelligent
Emergency Brake.
Please read ( P.226).
For LDW (Lane Departure Warning),
ÿ
ÿ
ZEE1137X
ZEE0422X
Advanced drive assist display
• When the danger of collision increases, the
brakes are applied strongly just before the
collision.
• When the vehicle is judged to be approaching
the right or left lane marker, it flashes in
orange.
• When it is determined that there is a risk of
collision, an alarm (buzzer) sounds and the
intelligent emergency brake display (approach
warning display) in the meter flashes orange.
• When the
driver's collision avoidance operation is
inadequate and the risk of collision increases,
the intelligent emergency brake display in the
meter changes to a red emergency warning
display, and the brakes are lightly applied
along with an audible alarm (buzzer). .
How
to
see
me
rice paddy
Machine Translated by Google
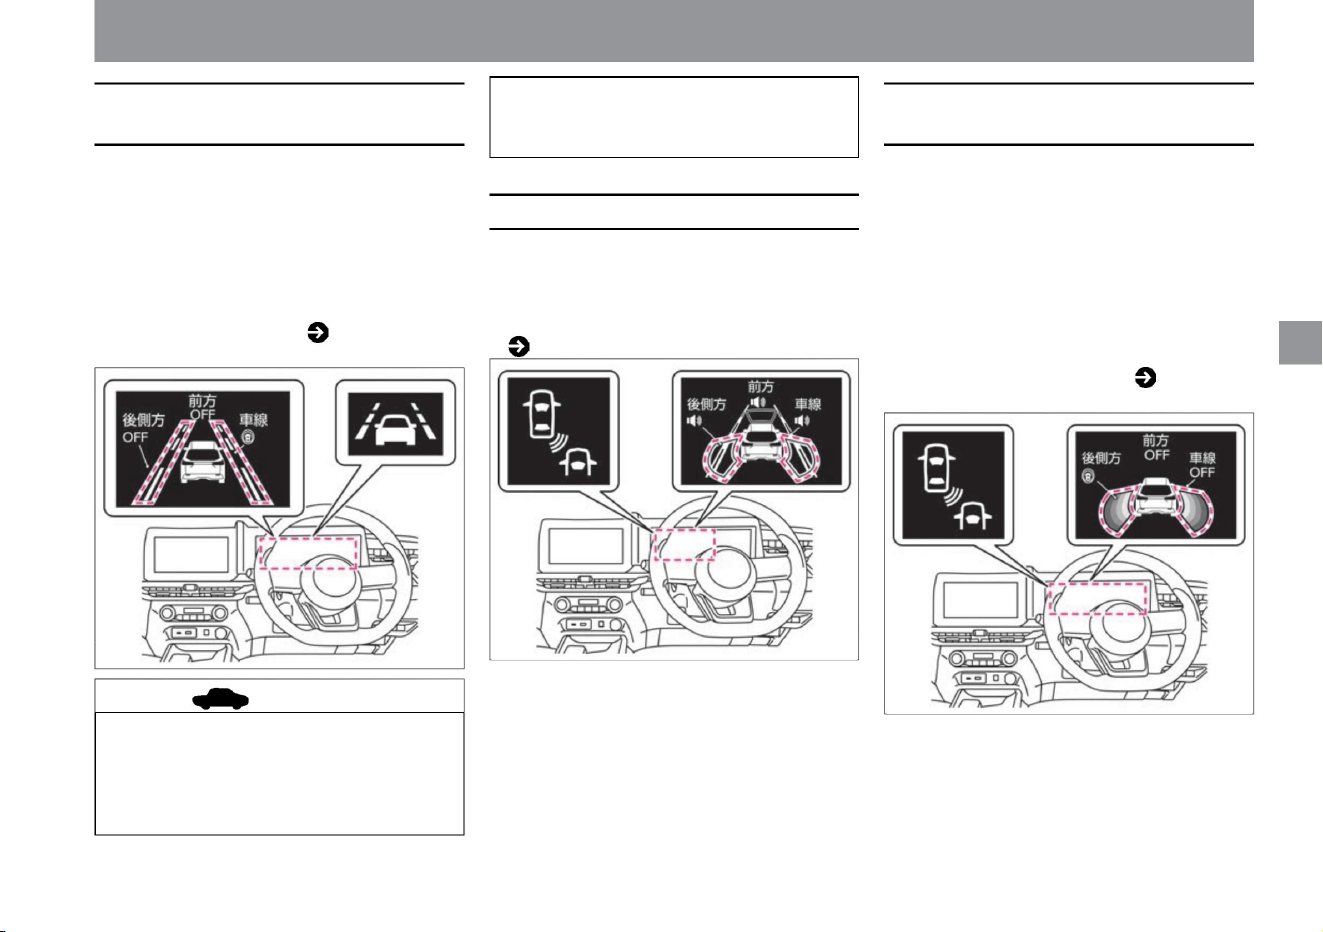
It is possible that there is a problem with the
system. There is no problem with normal driving,
but please have it inspected by a NISSAN dealer.
• While detecting a vehicle in the next lane, it flashes
if the direction indicator is operated in the
direction of detection.
Please read ( P.217) for Intelligent BSI (Rear Side
Collision Prevention Support System).
• When the display turns orange, stop the vehicle
in a safe place, stop the e-POWER system
once, and then restart it. If the orange
color continues to light even after the e-
POWER system restarts, the system
For BSW (rear side vehicle detection alarm),
Please read ( P.217).
• While detecting a vehicle in the next lane, it flashes
if the direction indicator is operated in the
direction of
detection. • If there is a problem with the Intelligent
BSI (Rear Side Collision Prevention Assistance
System), the indicator on the Advanced Drive
Assist Display will light orange.
• When the vehicle is judged to be approaching the
right or left lane marker, it flashes in orange. • If
there is an
abnormality in the intelligent LI (Lane Departure
Prevention Assist System), it lights orange.
Please read
( P.226) about Intelligent LI (Lane Departure
Prevention Support System).
ZEE1139X
ZEE0435X
ZEE1141X
ÿ
ÿ
$/$: Different equipment depending on vehicle model, options, etc.
Advanced drive assist display
85
BSW (rear side vehicle detection warning) displayÿ
Intelligent BSI (rear and side collision
prevention support system) displayÿ
advice
Intelligent LI (Lane Departure Prevention
Assistance System) display
me
rice paddy
How
to
see
Machine Translated by Google
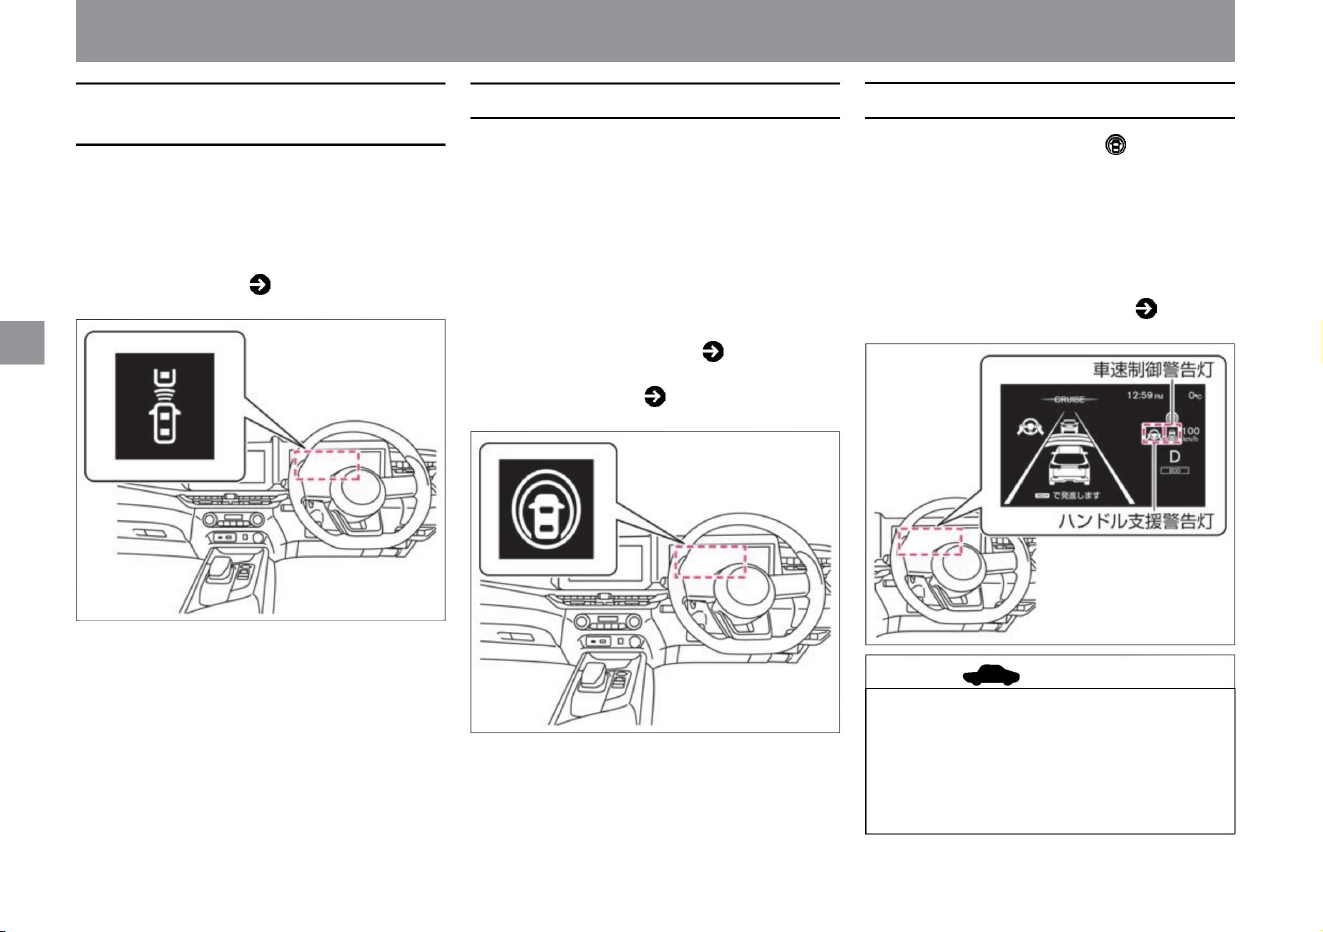
advice
86
Intelligent FCW (Forward Collision
Warning) display
Safety shield displayÿ
ProPilot displayÿ
• If it determines that the vehicle needs to be
evasive, it flashes orange and sounds an
alarm (buzzer) to alert the driver.
• If there is a problem with the ProPILOT, the
steering assist warning light and vehicle
speed control warning
light will illuminate orange. Please read
( P.175) about ProPILOT.
• When the warning light turns orange,
stop the vehicle in a safe place, stop
the e-POWER system once, and then
restart it. If the
orange color continues to light even
after the e-POWER system restarts, the system
• When Intelligent BSI (rear side collision
prevention support system) or Intelligent
LI (lane departure prevention support
system) is ON on the Advanced Drive
Assist Display, it is displayed when the
safety shield switch is pressed. •
Displayed in white when the system is turned on.
• Displayed when the ProPilot switch is
turned ON. •
Displays the operating status of ProPILOT.
ÿ
ÿ
ZEE0515X
ZEE0428X
ZEE0467X
Advanced drive assist display
vinegar.
vinegar.
Please read ( P.217) for Intelligent BSI (Rear Side
Collision Prevention Assist System) and ( P.226) for
Intelligent LI (Lane Departure Prevention Assist System).
For Intelligent FCW (Forward Collision Prediction
Warning), please read ( P.231).
How
to
see
me
rice paddy
Machine Translated by Google

me
How
to
see
rice paddy
• However, in the following cases, the pause will be canceled.
Alarm sound (buzzer)
Green beep, beep, beep... Yellow beep
beep beep... Red beep
increase. –When the shift position is set to ,
• The sonar function works in the following cases. –
When the shift position is set to – When an obstacle
is detected with the shift position set to or (approximately
10 km/h or less)
It is possible that
the advisor is malfunctioning. There is no problem
with normal driving, but please have it inspected by
a NISSAN dealer.
tree
– While sonar is displayed, you can temporarily deactivate
the sonar function by pressing the switch on the
steering switch, or by turning the switch.
Knowledge • By selecting "Settings", "Driving assistance",
and "Parking assistance" on the Advanced Drive
Assist Display, you can make various settings for
the sonar function. For more information on
settings, read Driving Assistance. How to switch
screens (P.60) Driving
assistance (P.70) For how to read the
sonar display, see
– When traveling at approximately 12km/h or
more • For sonar, please read ( P.372).
Express color
• When the vehicle approaches an obstacle, the sonar display
color on the meter display switches from green to yellow
to red, and an alarm (buzzer) sounds.
Please read ( P.252). • When the sonar
detects an obstacle, the sonar screen will be interrupted.
Interrupt display can be turned off. Driving support
(P.70)
ÿ
ÿ
Advanced drive assist display
The distance between the vehicle and
obstacles can be displayed on the Advanced
Drive Assist Display.
$/$: Different equipment depending on vehicle model, options, etc.
Other display functions
ZEE0463X
sonar function
87
Machine Translated by Google
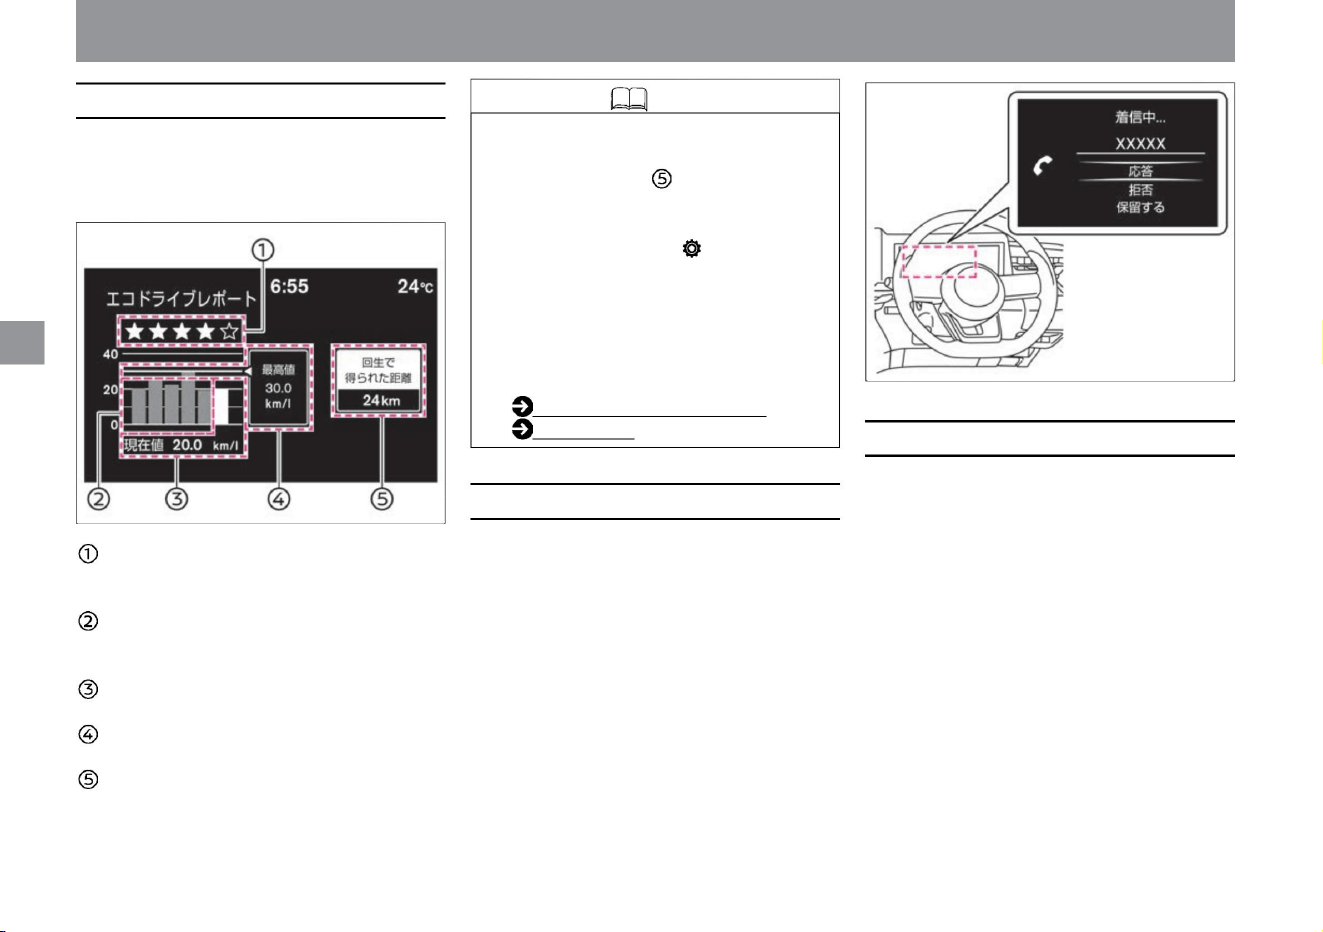
About the eco-driving report
Call indicationÿ
Incoming call indicatorÿ
Knowledge
88
When the power switch is turned off, the eco-driving report screen
is displayed. Results such as the current
evaluation are displayed when the vehicle has been driven for
about 10 minutes or more.
Evaluation of
this time The more eco-driving, the more ÿ. History
Displays the average fuel consumption for the past 5
times.
Current value Displays the current average
fuel
consumption. Highest value Shows the best fuel
economy in the
past. Amount of regenerated power Displays the
amount of power regenerated in the current run in terms of distance.
rice paddy
How
to
see
me
ÿ
ÿ
Advanced drive assist display
• If most of the route traveled is downhill,
the amount of regeneration is large,
and the distance obtained by
regeneration may exceed
the traveled distance. • By selecting
"Settings", "Eco", "Eco Information
Settings", and "Eco Driving Report"
on the Advanced Drive Assist Display,
you can switch between showing/
hiding the "Eco Driving
Report". For more information on
settings,
please read Eco. How to
switch screens (P.60) ECO (P.74)
• Appears when a call is made while a
mobile phone is connected
hands-free. For hands-free phone,
please read the separate navigation
system instruction manual.
• Appears when a call is received while a
mobile phone is connected
hands-free. For hands-free phone,
please read the separate navigation
system instruction manual.
ZEE0464X
ZEG1072X
Machine Translated by Google

ZEE0465X ZEE0466X
ÿ
ÿ
• Voice operation is displayed on the
Advanced Drive Assist Display when voice
operation is performed with the navigation
system
(manufacturer's option). For voice
operation, please read the separate
navigation system instruction manual.
$/$: Different equipment depending on vehicle model, options, etc.
Advanced drive assist display
How
to
see
rice paddy
me
Voice operation displayÿ
89
Machine Translated by Google
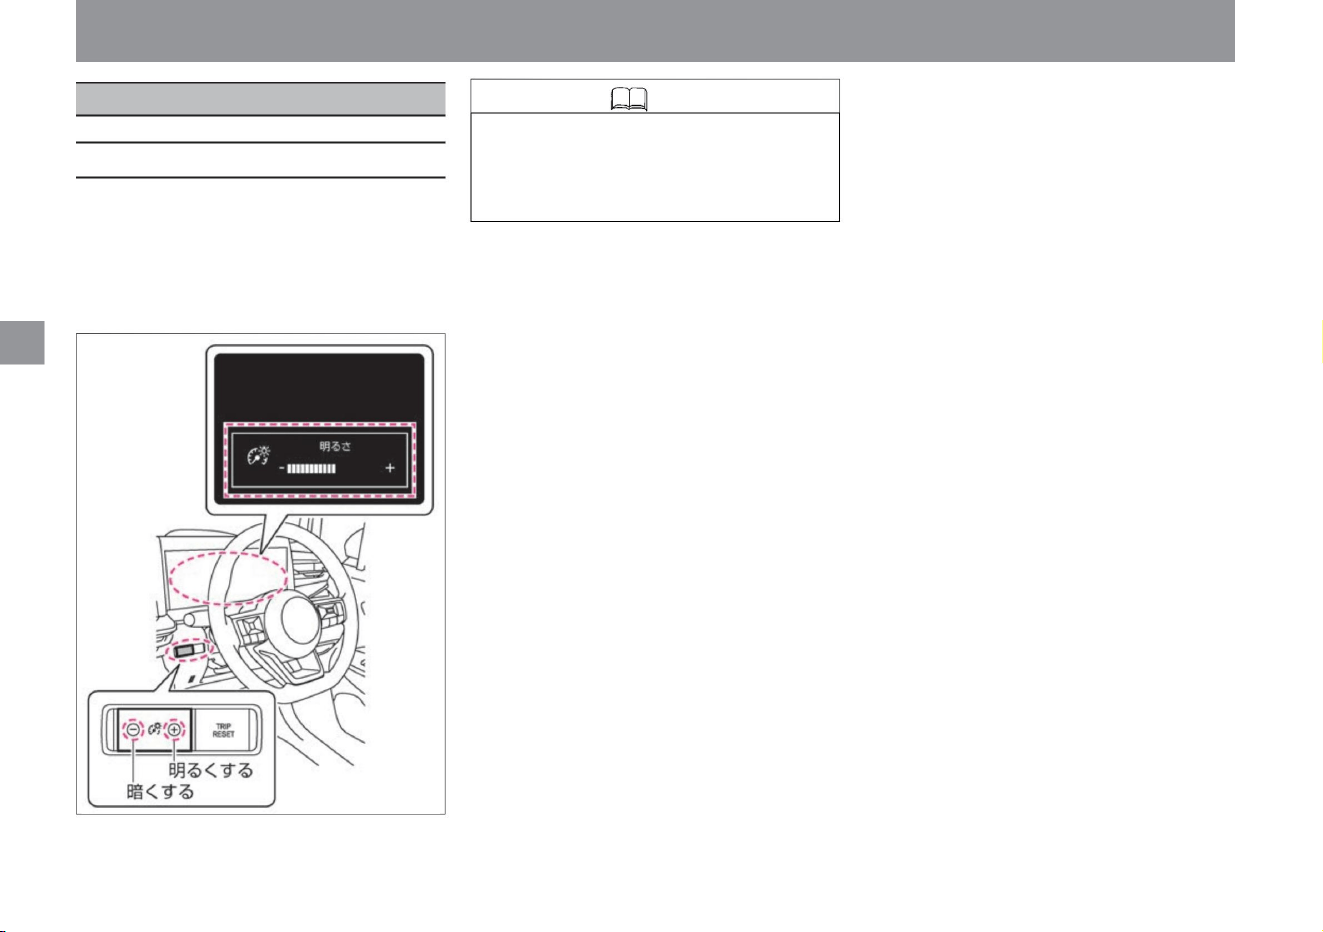
ZEE0423X
• When the brightness level reaches the maximum
or minimum, a sound will be
heard. • If the 12V battery is removed, the adjusted
memory will be erased.
Adjusting the brightness of the meter
When the power switch is ON, you can
adjust the brightness of
the meter illumination. • Press
the switch to adjust. • The brightness level
display is displayed on the Advanced
Drive Assist Display.
rice paddy
How
to
see
me
illumination control
ÿ
ÿ
How to adjust the brightness of the meter
Knowledge
90
Machine Translated by Google
Operation of each part
Air conditioner operation
opening and closing window glass
mirror adjustment
seat adjustment
Key
locking and unlocking doors
handle adjustment
Opening and closing the refueling port
audio
Operation of each part
P.103
P.108
auto air conditioner
front seat
P.118
fuel supply port
Rearview mirrorÿ
Intelligent rearview mirrorÿ
back door
P.127
P.96
power window
P.106
P.125
door mirror
handle
P.121
rear seat
P.114
air outlet
P.128
P.101
P.107
How to use the audio
Steering switchÿ
door
Key (intelligent key/remote control entry system) Notes on
key (intelligent key/
remote control entry system)
P.99
P.93
P.116
P.124
P.92
Be careful when using the air conditioner
91
Machine Translated by Google
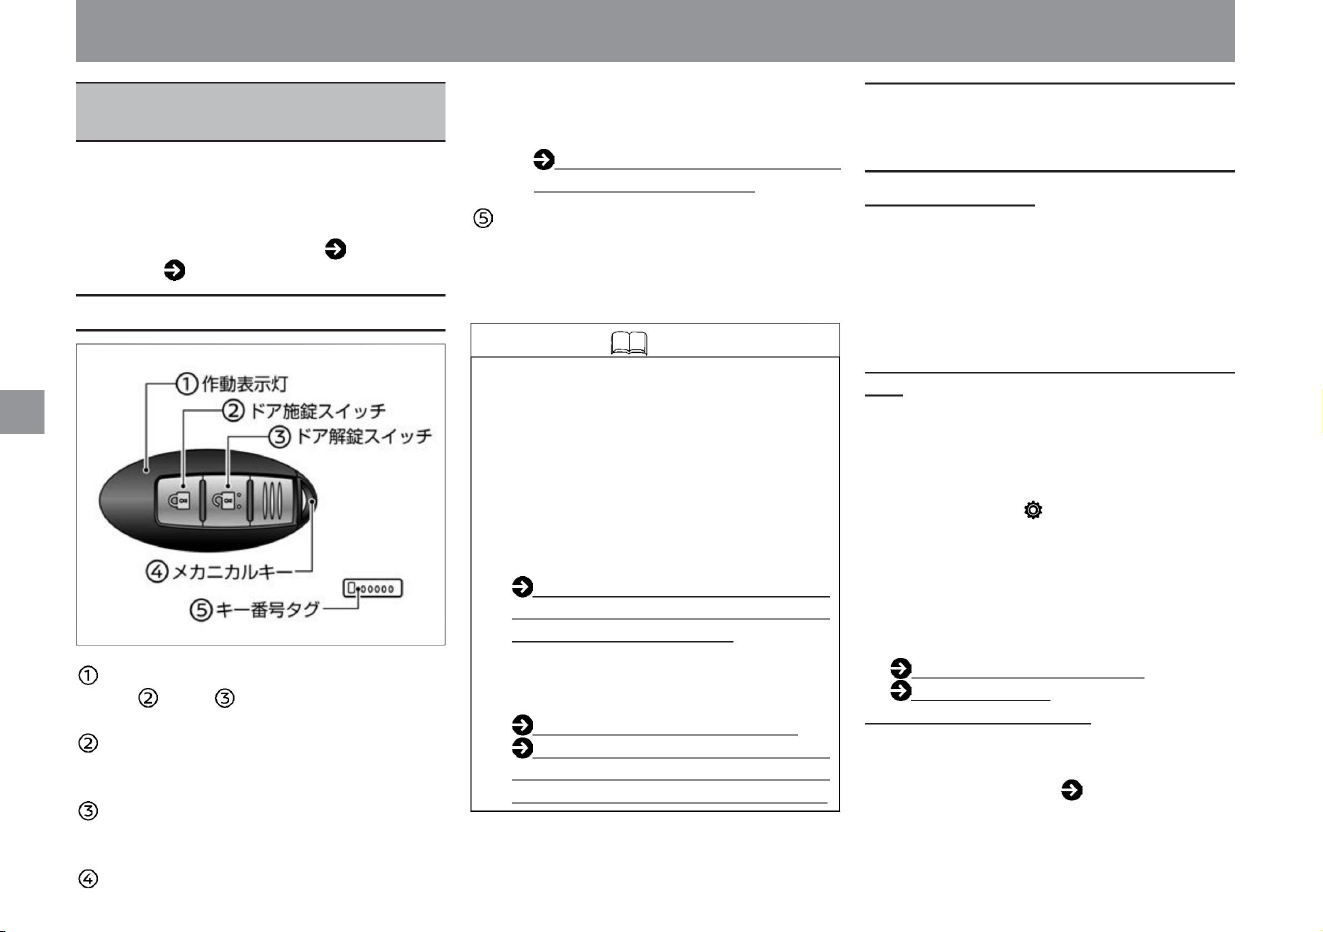
Answerback function
Key number
tag If the key is lost, a spare key can be
made at a Nissan dealer using the key
number, so please keep it in a safe place.
The door can be locked/unlocked when the
key battery runs out or when the 12V
battery runs out. How to open
the door with the built-in key (mechanical
key) (P.294)
• When the door is locked or unlocked, a buzzer
and emergency flashing indicator light will be
activated to confirm the operation.
(Once when locking, twice when unlocking) You
can stop the buzzer of the answer back function.
Please
consult your Nissan dealer. Welcome light function
(with farewell function) • When the door is locked/
unlocked, the vehicle width light, tail light, and
number light
will light up. (Approx. 10 seconds when locked,
approx. 30 seconds when unlocked) Select
"Settings", "Vehicle Settings", "Lights/Lighting",
"Welcome Headlights" on the Advanced Drive
Assist Display to activate the welcome light
function ( (with farewell
function) can be changed. For more information
on settings,
read Vehicle Settings. How to
switch screens
(P.60) Vehicle settings (P.76)
Key-linked interior lighting system • When the doors
are unlocked, the interior lighting (excluding
the luggage lamp) will turn on for about 20
seconds. For details, please refer to Interior lighting ( P.260).
• Two keys are included. • Up to
4 keys can be used in the same vehicle. For
information on how to purchase and start
using the product, please contact a NISSAN
dealer. • If the
operation indicator does not flash, the battery
may be exhausted. If the battery runs out,
replace it with a new battery. Key (Intelligent
Key/
Remote Control Entry System) Battery
Replacement (P.364) • Even if the key
battery is dead, you can still
lock/unlock the doors or start the e-POWER
system. When the door does not open
(P.294) When the key
(intelligent key/remote control entry
system) does not start (P.296)
The operation
indicator light flashes when the or switch
is
pressed. Door lock
switch Press the switch to lock all doors.
Door
unlock switch Press
the switch to unlock all doors. Built-in key
(mechanical key)
Key (intelligent key/remote
control entry system)
Operation of each part
ZEF0318X
Key
The e-POWER system can be started simply by
carrying a key. In addition, vehicles with door
handle switches can be locked and unlocked
simply by carrying a
key. Please read ( P.96) for how to lock and
unlock the door, and ( P.132) for the starting operation.
Part names and functions
92
Functions related to the key (intelligent key/
remote control entry system)
Knowledge
Machine Translated by Google
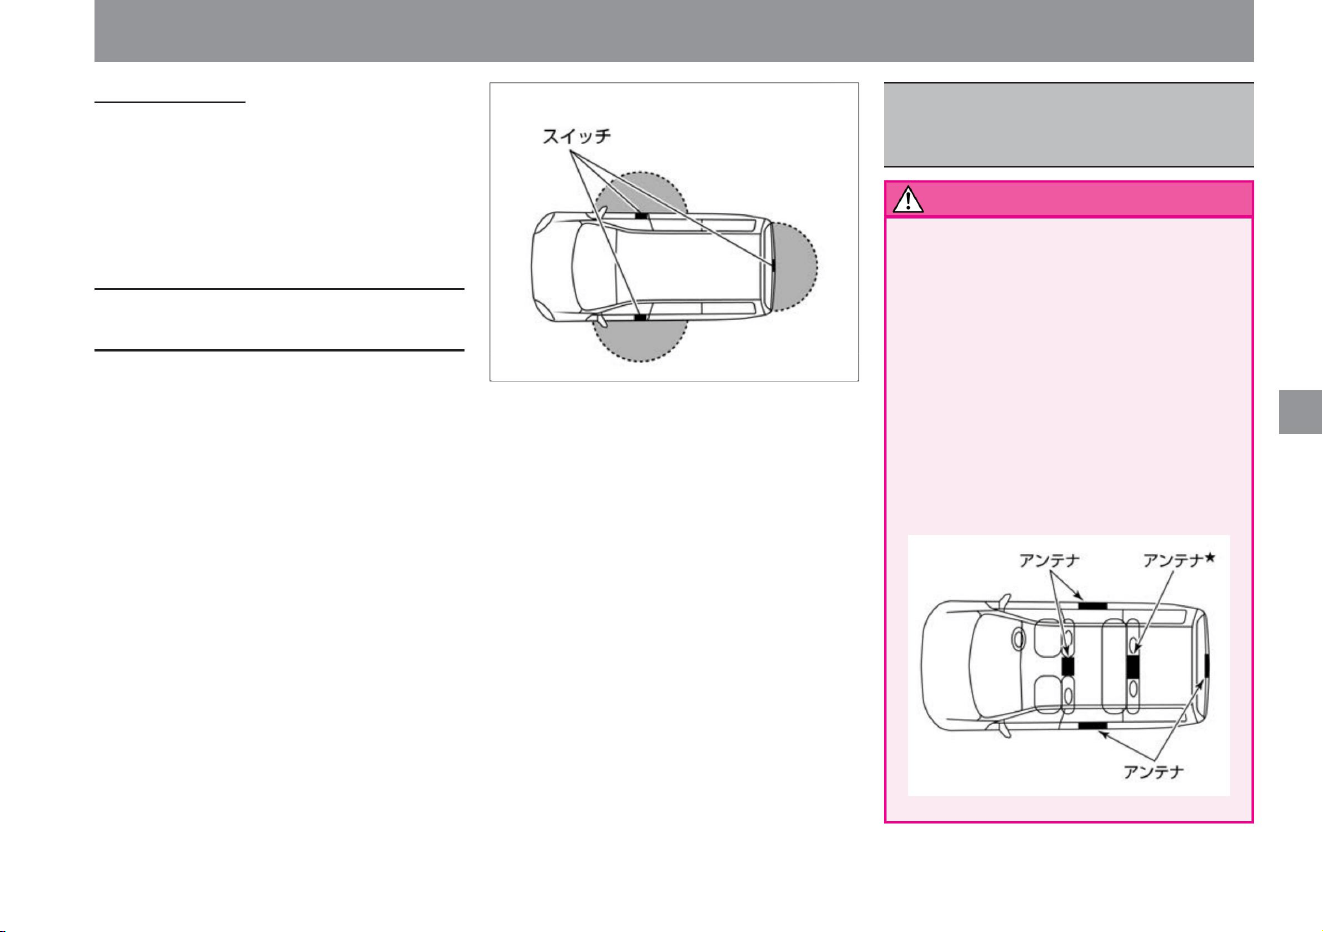
(If you press the unlock switch again before
it is locked, it will be locked after about 30
seconds from that point.)
• If you have an implanted cardiac pacemaker
or an implanted cardioverter-defibrillator
(ICD) , do not place the device within a
range of 22 cm or less from the antenna.
When
opening and closing the door and back
door, operating the switch ÿ on the door
handle , and starting the e-POWER
system, radio waves from the key may
affect the operation of an implanted
cardiac pacemaker or an implanted
cardioverter-defibrillator (ICD). I have.
Auto-lock function •
If you do not open any door within about 30
seconds after pressing the unlock switch, all
doors will be locked to prevent theft.
The operating range is within about 80 cm around
the switch on each door handle. Since the
operating range is spherical around the switch on
each door handle, it may not operate near the
ground or in high
places. If the key is within the operating range,
anyone other than the person carrying the key
can press the switch on the door handle
to lock or unlock the door. • After pressing the
switch on the door handle to lock the door,
check that the door is securely
locked. • If you pull the door handle and then
press the switch on the door handle, the door
will unlock but will
not open. • When leaving the vehicle, be sure to
turn off the power switch and lock the vehicle
to prevent theft and accidents.
93
warn
Door locking/unlocking operation range
(vehicles with door handle switch)
ZED0119X
MEF0161X
Operation of each part
Key
Notes on Keys (Intelligent
Key/Remote Control Entry
System)
$/$: Different equipment depending on vehicle model, options, etc.
Machine Translated by Google
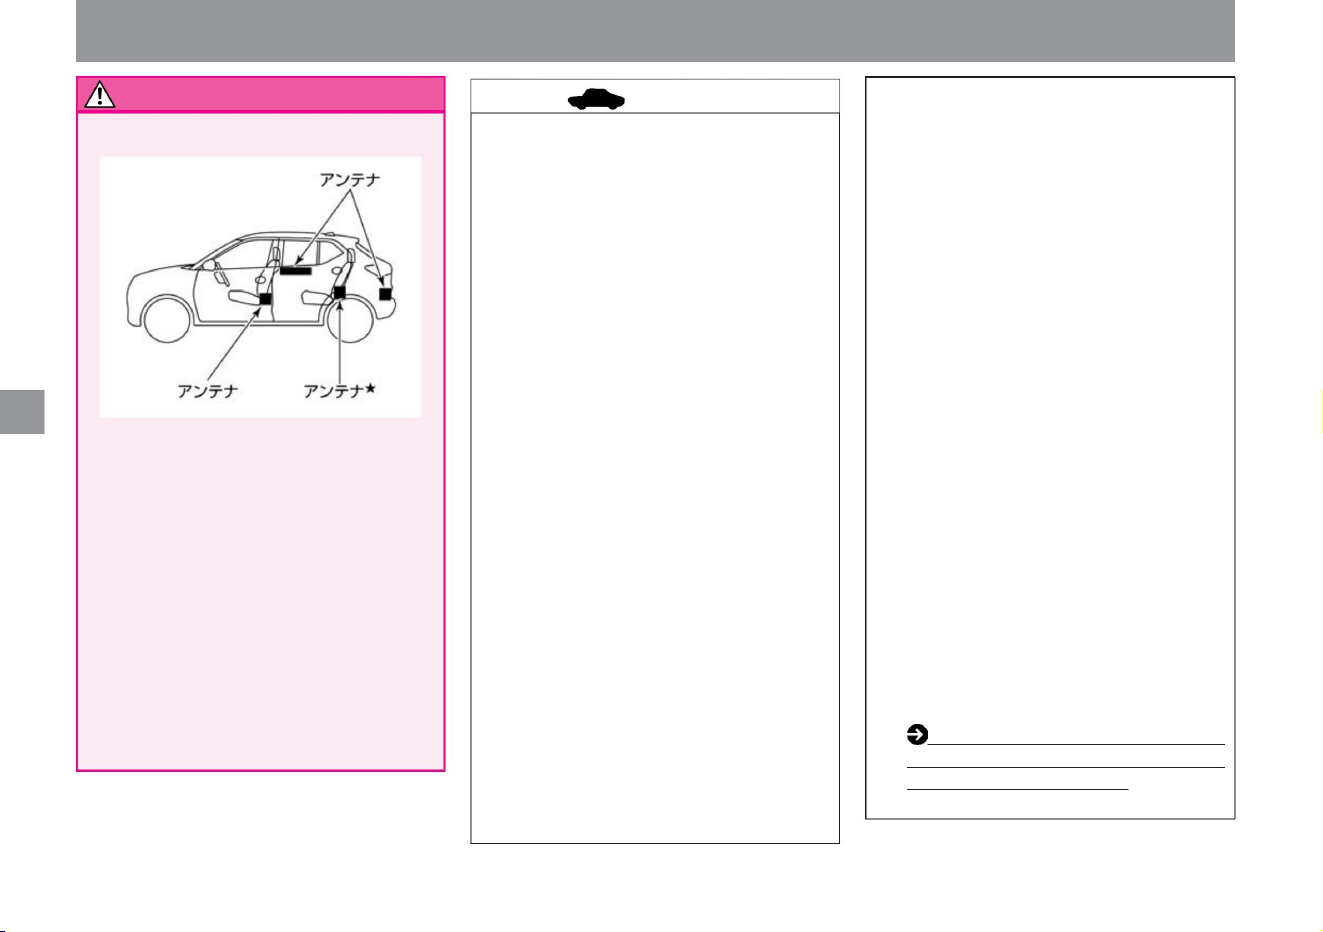
advice
94
warn
• If you lose the key, immediately contact a Nissan
dealer to prevent theft. • The key uses weak
radio waves. In the
following operating environments, the door handle
switchÿ and key switch may not operate properly
due to functional failure. – When there is a TV
tower, power plant, broadcasting station, or
other facility that emits strong radio
waves – When you are carrying a wireless
communication device such as a radio or
mobile phone with you
stomach.
• If you are using medical electrical equipment other
than an implanted cardiac pacemaker or an
implanted cardioverter-defibrillator (ICD), check
with the manufacturer of the medical electrical
equipment before use . Radio
waves from the key may affect the operation of
medical electrical equipment. • Press
the key switch in the aircraft
(Because of performance
deterioration) • The key complies with the Radio
Law. Be sure to observe the following. –Do not
disassemble except when replacing the battery
(Using a disassembled or modified product
is prohibited by law.) –Use only in Japan .
The key is always received for
communication with the vehicle. Since it is in
operation, it is constantly draining the battery.
Battery life is about 2 years, depending on
usage conditions. If the battery runs out, replace
it with a new battery. Key (intelligent key/remote
control entry
system) battery replacement (P.364) When
the key battery is exhausted or
do not
have. If the switch is pressed, radio waves will
be emitted, which may interfere with aircraft
operations. When storing the product in a bag,
etc., make sure that the switch is not pressed
by luggage, etc.
ZED0120X
Operation of each part
Key
– When the key is in contact with or covered
by a metal object – When
operating a radio remote control switch nearby
– When the key is
placed near a computer or other electrical
appliance
• The driver must carry the key with him/her.
– When parking in a coin-operated parking lot
(due to the influence of radio waves for
vehicle
detection) – When using an intrusion alarm
system nearby
– When the temperature is extremely low (battery
• Always carry the key with the built-in key
(mechanical key) installed. • Do not put the
key in
the door pocket. It may be damaged by the impact
when closing the door. In addition, objects
put together in the door pocket may be hit by
the impact of closing the door, and the switch
may turn on by itself, locking the key inside
the vehicle. • The key may not work properly
on the top of the instrument panel, near the
door pocket,
inside the glove box, or on the floor, or the key
may be locked inside the vehicle if it can be
locked from outside.
Machine Translated by Google
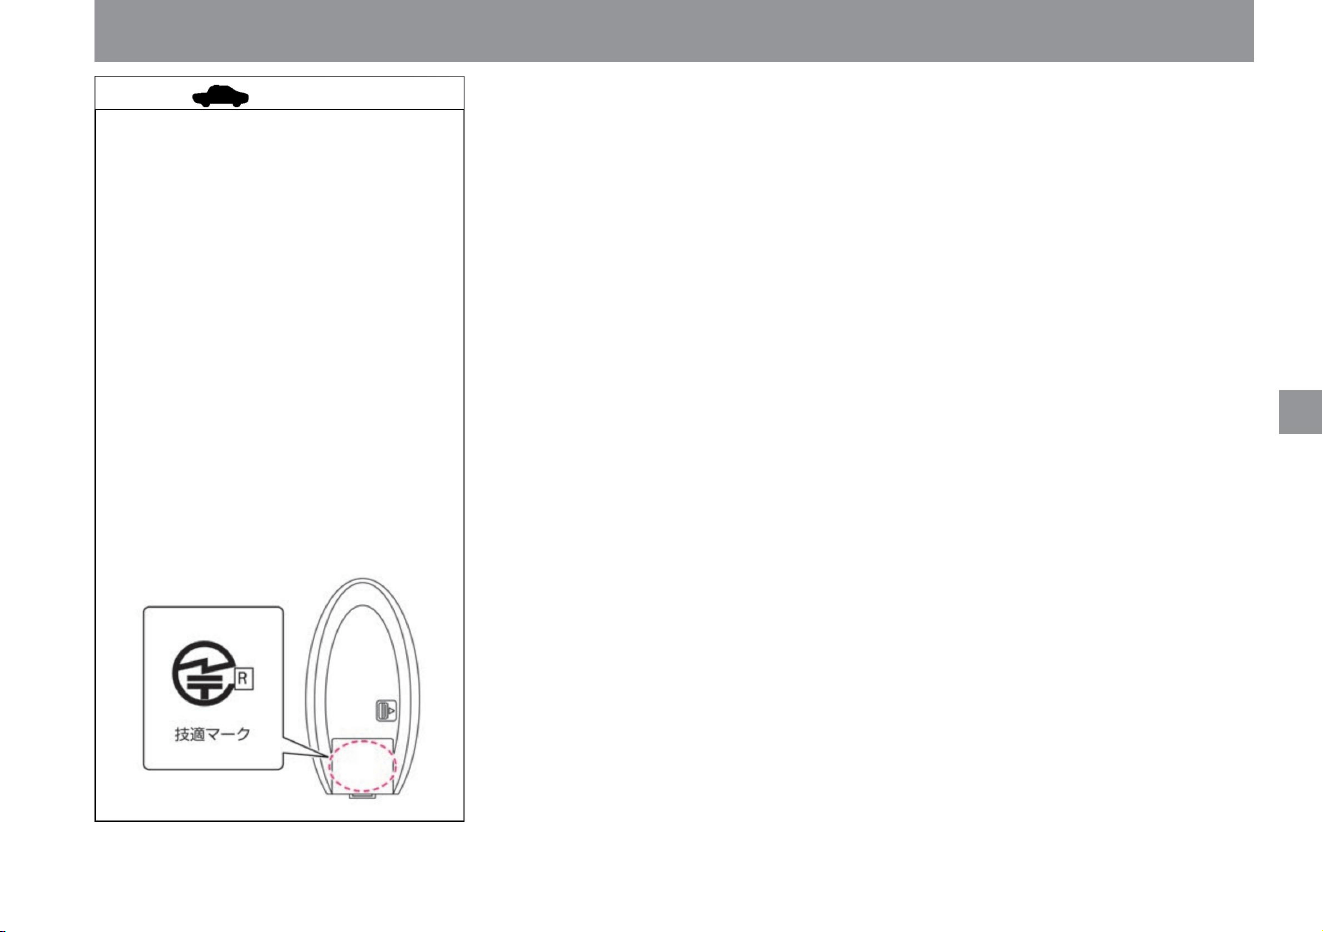
MEF0501X
95
$/$: Different equipment depending on vehicle model, options, etc.
Key
Advice In
locations with strong radio waves or
noise, the operating range may become
narrower or may not
work. • The key is a precision instrument with
a built-in transmitter. Observe the following
to prevent failure. – Do
not leave in a place where it will be
exposed to high
temperatures for a long time – Do not
disassemble – Do not
forcefully bend, drop,
or subject it to strong impact – Do
not let it get wet – Do not put it in an
ultrasonic
cleaner Do not put it on – Do not place it
near magnetic devices such as
TVs and audio equipment • You can check the
certification technical conformity mark on the back of the key.
Operation of each part
Machine Translated by Google
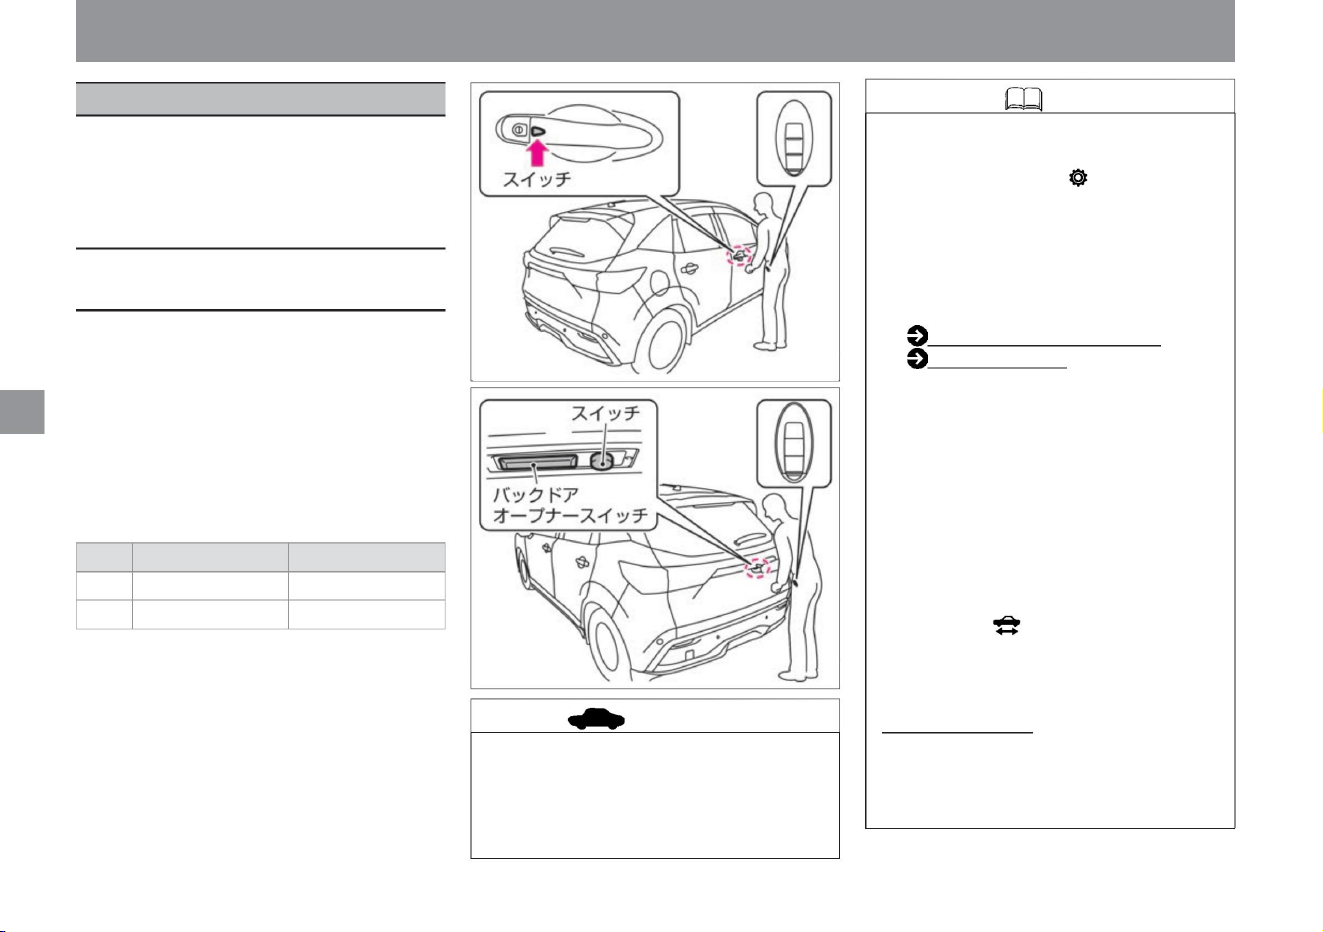
For cars with door handle switches, select
"Settings", "Vehicle settings", "Lock",
and "Key entry" on the Advanced Drive
Assist Display to lock/unlock with the
door handle switch. You can switch
ON/OFF of the lock function. For more
information on settings, please read
Vehicle Settings. How to switch screens
(P.60) Vehicle
settings (P.76) • It does not
work in the
following cases.
• When you carry the key (intelligent key) and
press the switch on the driver's seat, front
passenger door or back door, all doors
will be locked/
unlocked. • It works when the key (intelligent
key) is within 80 cm of each switch. •
When the
door is locked or unlocked, the buzzer and
emergency flashing indicator light operate as follows.
– e-POWER system is working
• It may not work if you are too close to the
vehicle. • If you operate the
door handle suddenly, the door handle will
be pulled and you may not be able to
lock the door.
Auto-lock function •
This function automatically locks the door to prevent
theft. If you press the switch ÿ on the door
handle to unlock it, all doors will be locked again
if you do not open the door for about 30 seconds.
ZEF0273X
ZEF0272X
locking and unlocking doors
When
– When the door is not completely closed (half door) –
When the key
(intelligent key) is out of the locking/unlocking operating
range – When the key (intelligent key) battery is
dead Power switch is ON If the switch ÿ on the door handle
is pressed to lock the door when
the vehicle is ready to drive (when the ready-to-drive indicator
light is off) , the door will be locked and the power switch
will be turned OFF (ACC state).
Buzzer sound Emergency flashing indicator
light Locking
beep blinking once Unlocking beep
blinking twice
The doors are locked/unlocked using the
door handle switchÿ or the key ( intelligent
key/remote control entry system) switch.
After locking, be sure to confirm that the
door is locked.
Operation of each part
door
Knowledge
96
advice
How to lock/ unlock with the switch
on the door handle
Machine Translated by Google
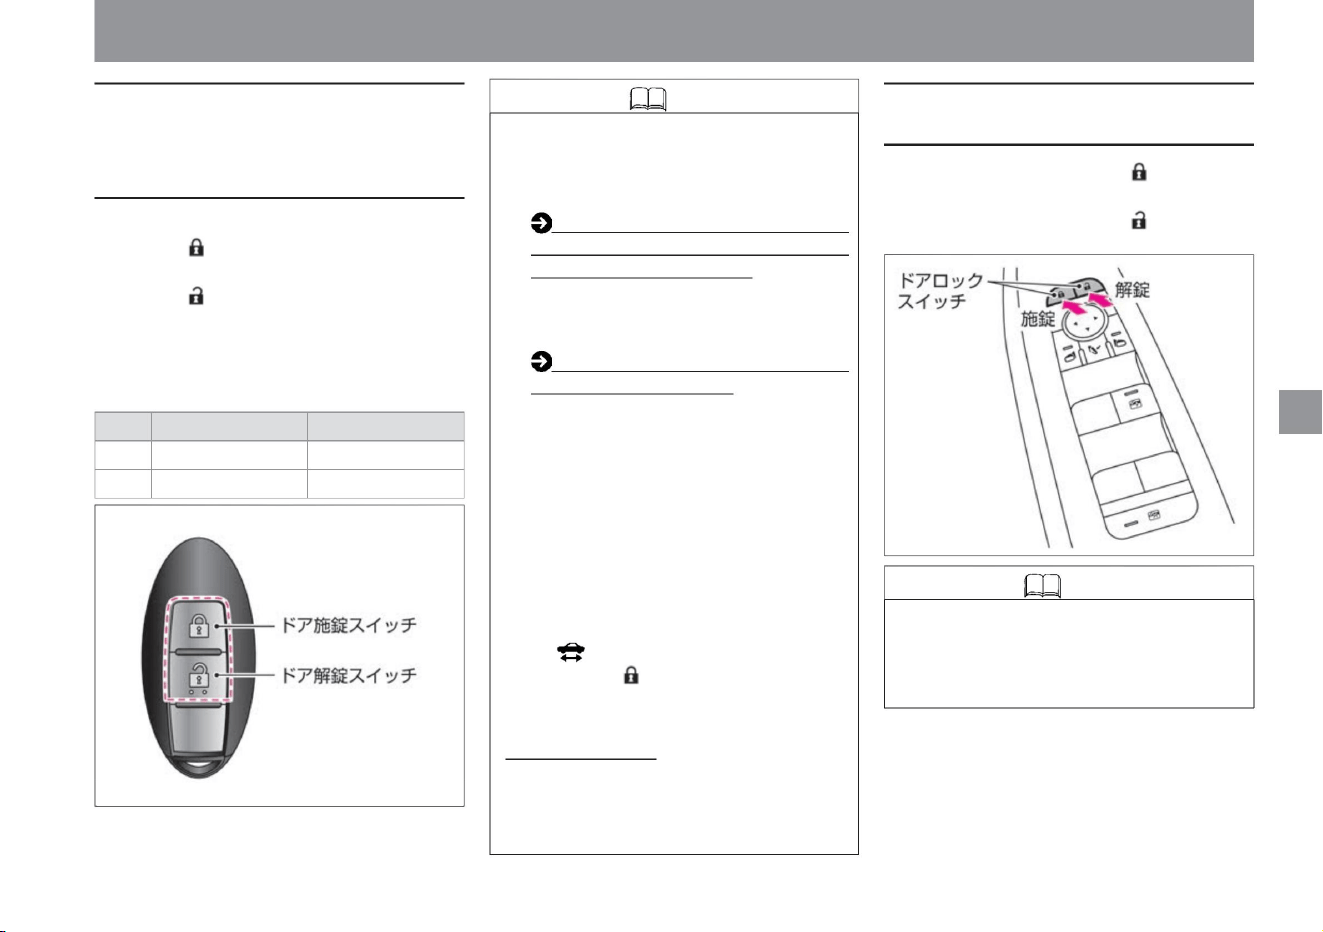
Knowledge
Knowledge
How to lock/unlock with the key (intelligent
key/remote control entry system) switch
97
How to lock/unlock with the door lock switch
How to open the door with the
built-in key (mechanical
key) (P.294) • In the following cases,
pressing the key switch
will not work. – e-POWER system is working
When
Buzzer sound Emergency flashing indicator
light Locking
beep blinking once Unlocking beep
blinking twice
Auto-lock function •
This function automatically locks the door to prevent
theft. If you press the door unlock switch to
unlock the door, all the doors will be locked again
if you do not open the door for about 30 seconds.
press the switch. • The
operating range is about 1m from the vehicle.
• When the doors are locked or unlocked, the buzzer
and emergency flashing indicator light will operate
as follows.
switch.
ZEF0274X
ZEF0317X
$/$: Different equipment depending on vehicle model, options, etc.
locking and unlocking doors
• To lock, press the door lock switch on the
locking side.
• When unlocking, use the door lock on the unlocking side.
• Press the door lock switch to lock all doors.
• When unlocking all
doors, use the door unlocking
– When the door is not completely
closed
(half door) (can
only be unlocked) – When
you are too far away from the
car – When the battery in the key is dead
Power switch is ON ( driving ready
indicator light is off) ), pressing the
door lock switch will lock the door and
turn the power switch OFF (ACC state).
• If the key switch does not work, the
battery may be exhausted or
malfunction. Please consult your
Nissan
dealer. Replacing the key
(intelligent key/remote control entry
system) battery (P.364) If
the key battery is dead and you cannot
lock/unlock, you can lock/unlock with
the built-in key (mechanical key). increase.
• Pressing the door lock switch locks or
unlocks all doors. • When
the door is open, it cannot be locked with
the door lock switch.
Operation of each part
Machine Translated by Google
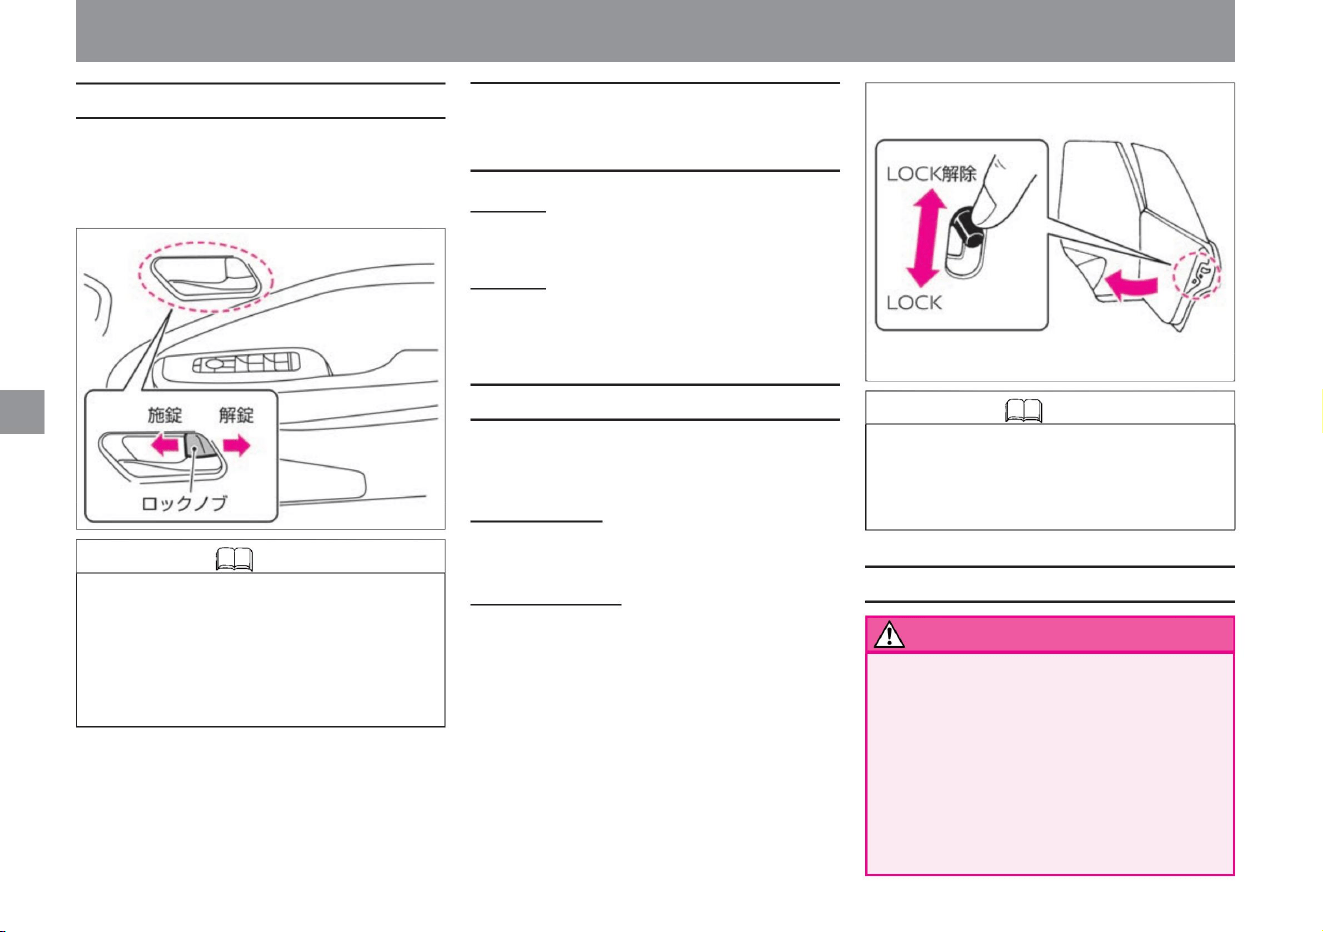
child safety door lock
How to lock/unlock with the lock knob
Knowledge
Door notes
How to lock without using a key
(intelligent key/remote control
entry system)
warn
98
Knowledge
The rear door can be locked to prevent
children sitting in the rear seat from opening
it by
mistake. to lock
Front
door • Push in the lock knob and pull the
door handle to close the
door.
Rear seat door • Push in the lock knob
and close the door.
or unlock.
Operation of each part
locking and unlocking doors
• Do not allow children to open and close the
door. Hands, necks, feet, etc. may be
pinched, resulting in serious injury. •
Before opening the door, check the safety of
your
surroundings. There is a risk of hitting a
following vehicle or a passerby. Be
especially careful when
opening when the wind is strong. • Be sure to close the door before driving.
• The driver's door can be opened by pulling the
door handle even when it is locked. At that
time, all doors unlock at the same time.
• Set the lock lever on the rear door to the LOCK
position and close the door.
to open the door
• When locking, push the lock knob of the door to
be locked toward the lock side. •
To unlock, pull the lock knob of the door to unlock.
- All doors are locked with the lock knob on the driver's seat
• When opening the door from inside the vehicle,
make sure that the door lock knob is
unlocked, lower the window glass, put your
hand out and pull the outside door handle.
• When the door is unlocked, pull the door handle
from outside.
ZEF0316X
ZEF0275X
Machine Translated by Google
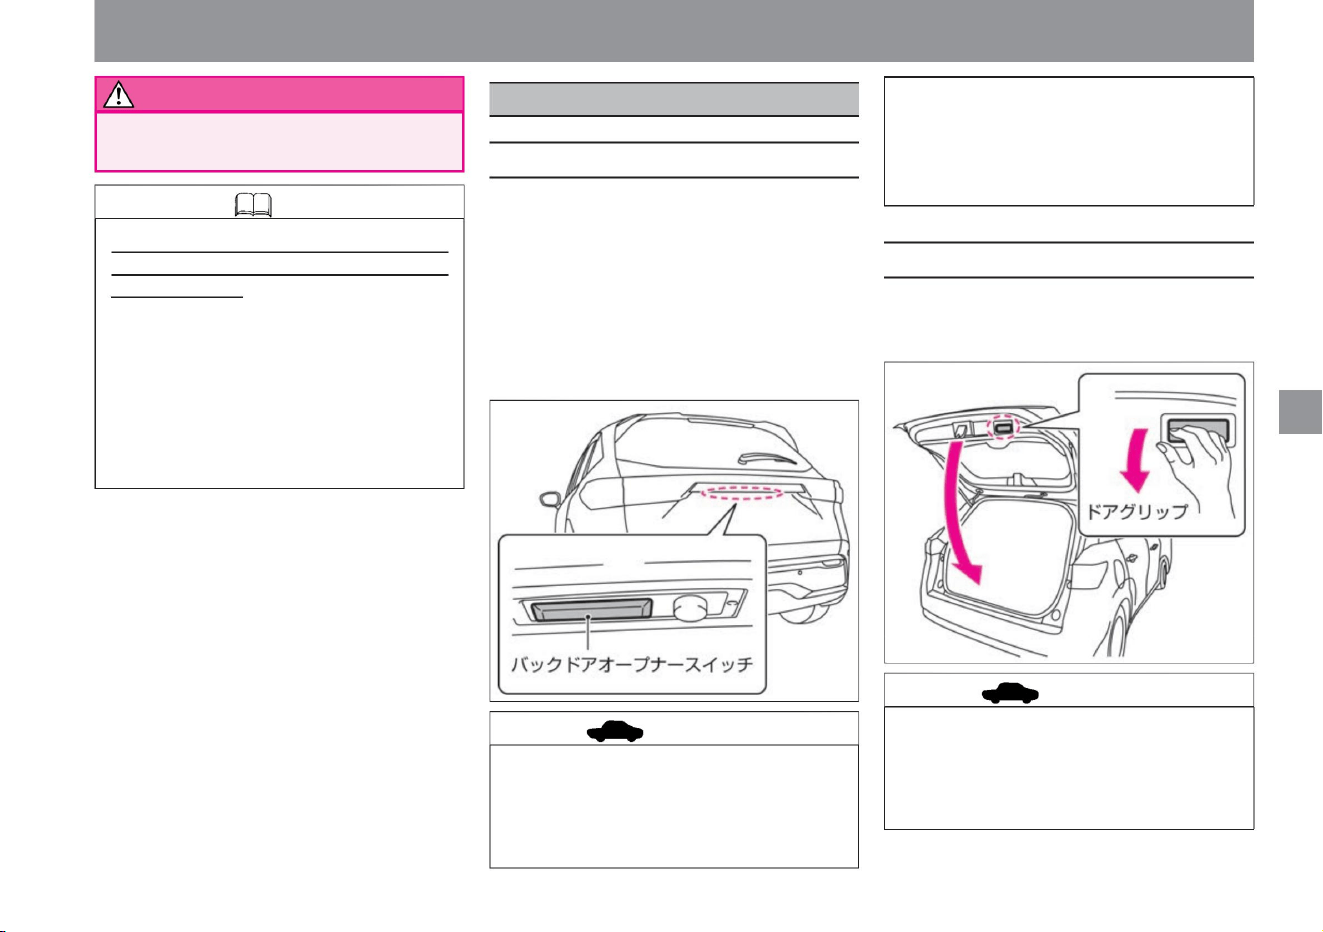
• Do not lock or unlock the door with the
key (intelligent key/remote control
entry system) switch while pressing
the back door opener switch. Failure
to do so may cause malfunction.
back door
locking and unlocking doors
Operation of each part
$/$: Different equipment depending on vehicle model, options, etc.
advice
How to close the back door
WARNING The door may suddenly open
during driving, leading to an unexpected accident.
How to open the back door
Knowledge
advice
99
ZEF0276X
ZEF0277X
• If the gas stay cannot be fully opened
without a hand, the holding force of the
gas stay may be weakened. Please have
it inspected at your local Nissan dealer
as soon as possible.
• When closing the back door, do not let any
foreign object get caught in the striker.
The striker or back door lock may be
damaged and the back door may not
close.
Key (intelligent key/remote control entry
system) containment prevention function •
This function
prevents the key (intelligent key/remote
control entry system) from being left in
the vehicle and locked. When the door is
closed or locked, the buzzer notifies you
if the key is left inside the vehicle, or
automatically unlocks all the doors.
• When the back door is locked, carry the key
(intelligent key/remote control entry system)
with you and press the back door opener
switch to lift the back door. (All doors are
unlocked at the same time.)
• Holding the door grip, lower the back door
and push it until it locks securely.
• When the back door is unlocked, press the
back door opener switch and lift the back
door.
Machine Translated by Google
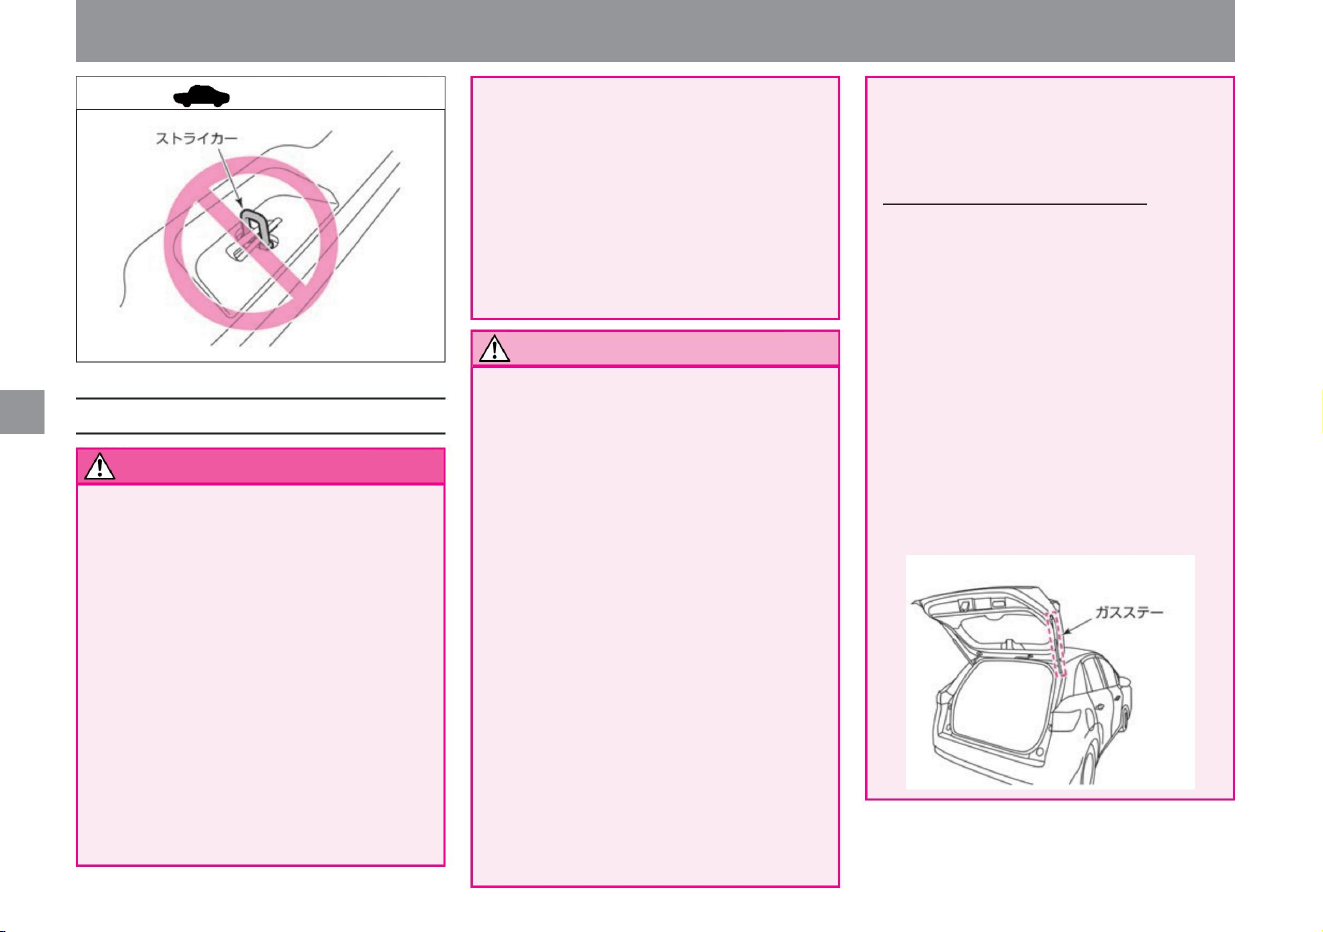
A note about backdoors
Notice
warn
advice
100
• Do not close the back door while touching the
back door or the vehicle body.
Hands may be caught and injured. • When
closing
the back door, do not put your hands on the edge
of the back door or its surroundings. Hands
may be caught and injured. Be sure to push
it from the outside to close it. • Before
opening
the back door, remove snow, ice, dust, and other
heavy objects from the back door. If you open
the back door with
a heavy object attached, the weight may
cause it to close suddenly. • When opening
the back
door, be sure to open it fully. If you stop it in the
middle, it
may close suddenly. • Be especially careful
when
opening the back door when the wind is strong.
• Do not allow children to open and close the back
door.
Hands, necks, feet, etc. may be pinched,
resulting in serious injury.
–Do not allow foreign objects such as pieces
of vinyl, stickers, or adhesives to adhere
to
the rod • Do not close the back door or hang from
it while holding the gas stay. Your hand
or arm may be caught and you may be injured
unexpectedly.
• Before opening the rear door, check the safety
of your surroundings.
There is a risk of hitting a following vehicle or
a passerby. Be especially careful when
opening when the wind
is strong. • Be sure to close the back door before driving.
MEF0535X
ZEF0278X
Operation of each part
locking and unlocking doors
Serious injury may result, for example,
when the brakes are applied
suddenly. • Before driving, make sure that
the back door is securely
closed. Driving with the back door open
may allow exhaust gas to enter the
vehicle interior and cause carbon
monoxide poisoning. Breathing carbon
monoxide can lead to unconsciousness
and an accident, which can result in death or serious injury.
Fanned by the wind, it may close
suddenly. • Be careful not to get your hands
caught when closing the back
door. About the back door gas
stay • The back door gas stay is installed to
support the weight of the back door.
Observe the following to prevent damage
or malfunction of the gas stay. – Do not
put
your hand or string on the gas stay, or
apply force in the lateral direction.
get
The back door may suddenly open while
driving, resulting in an unexpected
accident. • Do not drive with people in the
luggage compartment.
Machine Translated by Google
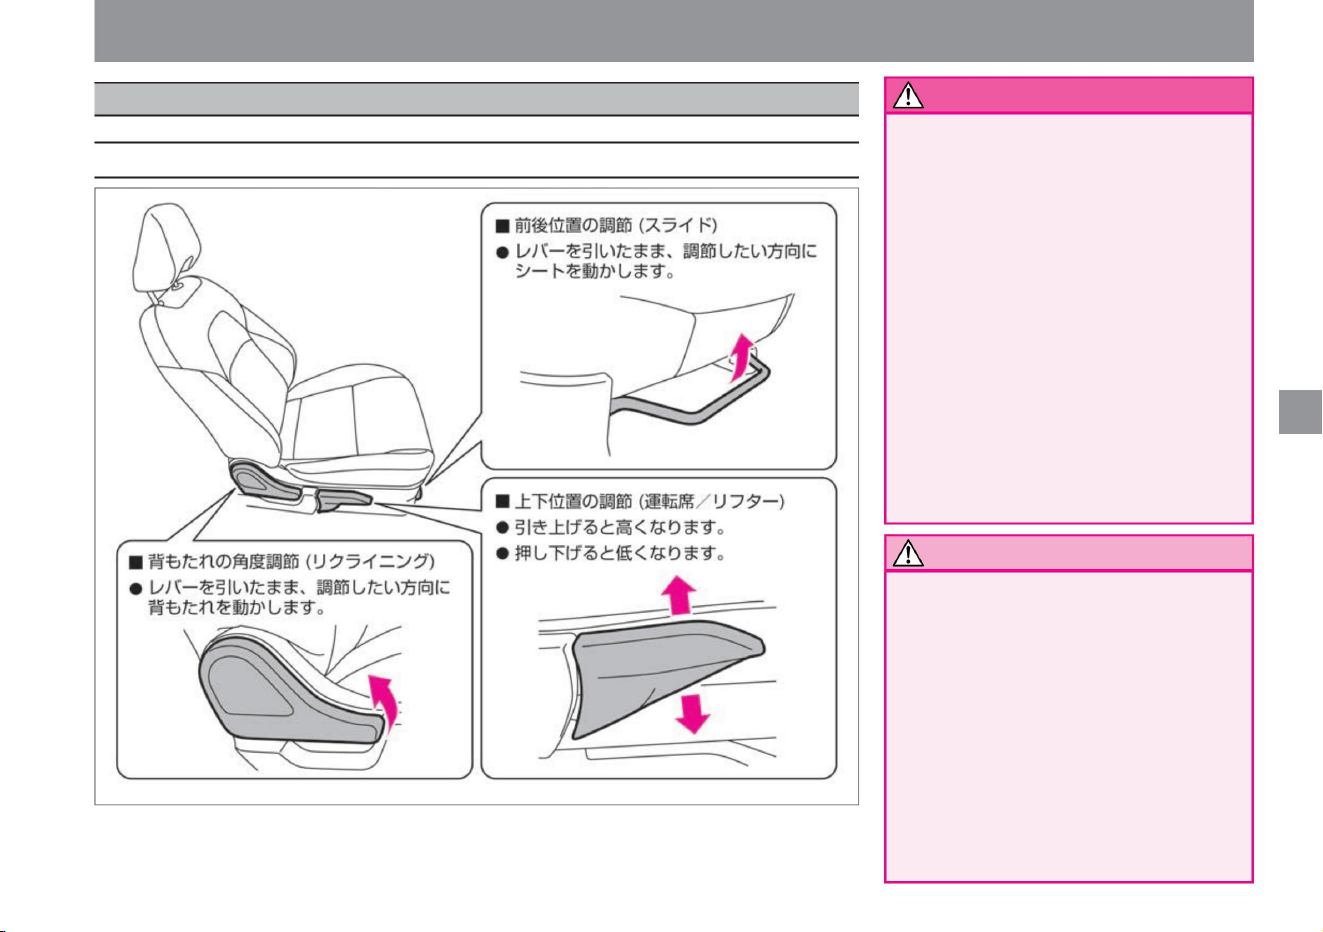
Adjusting while driving may lead to an
unexpected accident. • After
adjusting the seat, make sure it is securely
fixed. If it is not fixed, the
driving posture may suddenly change,
which may lead to an unexpected
accident. • Do
not drive with the backrest lowered more
than
necessary. If the seat belt does not
work effectively, you may be seriously
injured in a collision. •
Do not put cushions or other objects
between the
backrest and the back. The driving
posture becomes unstable, which may lead to an unexpected accident.
ZEF0716X
front seat
seat adjustment
$/$: Different equipment depending on vehicle model, options, etc.
Operation of each part
Notice
101
How to adjust the seat
warn
• When adjusting the seat, keep hands and
feet away from moving parts. There is
a risk of being pinched and injured. •
When adjusting the angle of the backrest,
adjust while supporting the backrest.
It may hit your face or body and cause an
unexpected injury. • Be
careful when putting your hand under the seat.
When
cleaning the passenger compartment or
picking up items that have been dropped
under the seat, the seat rails or seat
frame may hit and injure you.
• Be sure to adjust the seat before riding.
Machine Translated by Google
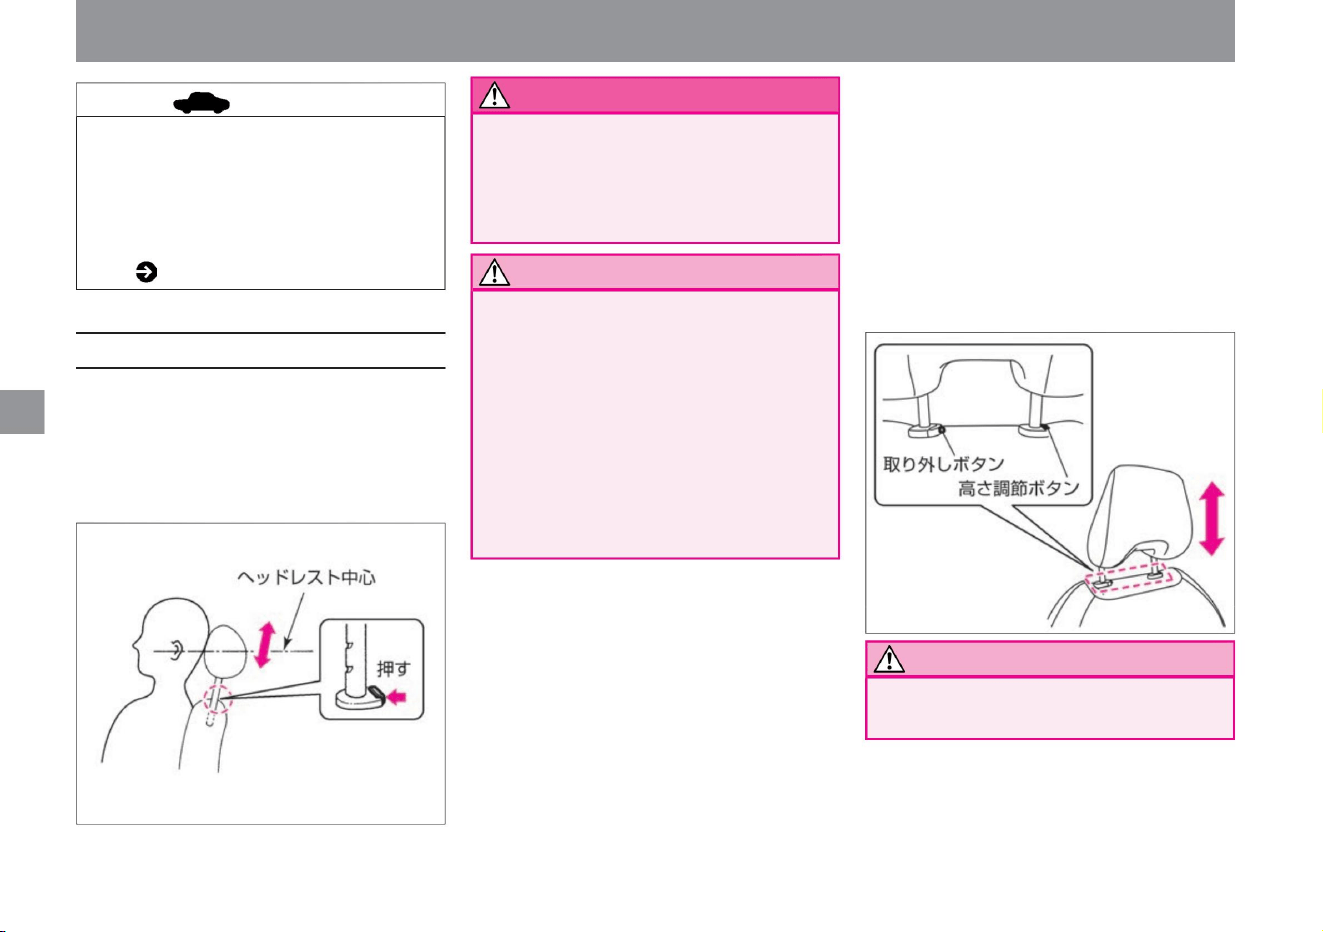
warn
How to adjust the headrest
advice
Notice
Notice
102
ÿ P.305ÿ
stomach. In the event of an accident, it may
become impossible to prevent an impact to
the head, leading to serious injury.
Adjust the position so that the center of the headrest
is at the height of
your ears. • To raise the height, pull up the headrest.
• When
lowering, lower the headrest while pressing the
button.
ZEF0309X
MEF0018X
seat adjustment
• Do not drive with the headrest removed.
• If you put a child or a small person in the
front passenger seat or use a cushion,
the seat belt reminder may not work
properly. seat belt reminder
• When removing, pull the headrest up to
the highest level, then pull it up further
while pressing the height adjustment
button. The release button pops out, so
pull up the headrest while pressing the
release button.
• When installing the headrest, be sure to place
it in the front or back direction.
In the event of an accident, the head restraint
may not be fully effective and may result in
an unexpected injury.
• After installing the headrest, lift the
headrest and check that it does not
slip out. In the event
of an accident, the head restraint may
not be fully effective and may result
in an unexpected injury.
• Do not use with the release button
sticking out.
• When installing, align the headrest with
the installation hole and push it down until
it stops.
ÿ How to remove and attach the headrest
Operation of each part
Machine Translated by Google
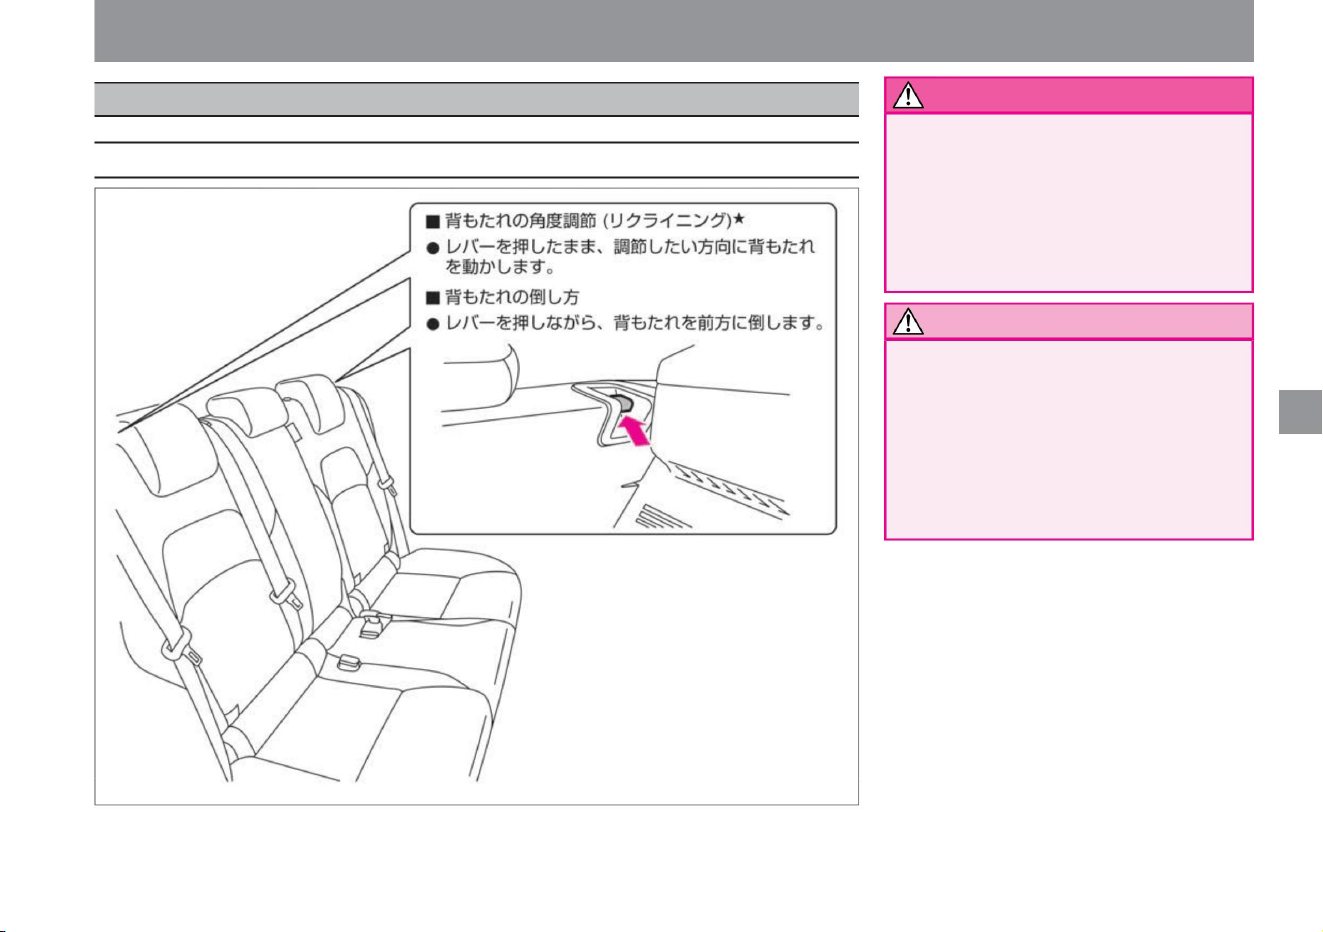
rear seat
seat adjustment
ZEF0280X
Operation of each part
Adjusting while driving may lead to
an unexpected accident. •
After adjusting the seat, make sure it is
securely fixed. If it is not
fixed, it may lead to an unexpected
accident.
• Be sure to adjust the seat before riding.
• When adjusting the seat, keep hands and
feet away from moving parts. There is
a risk of being pinched and injured.
• When adjusting the angle of the backrest,
adjust while supporting the backrest.
It may hit your face or body and cause an
unexpected injury.
$/$: Different equipment depending on vehicle model, options, etc.
warn
103
Notice
How to adjust the seat
Machine Translated by Google
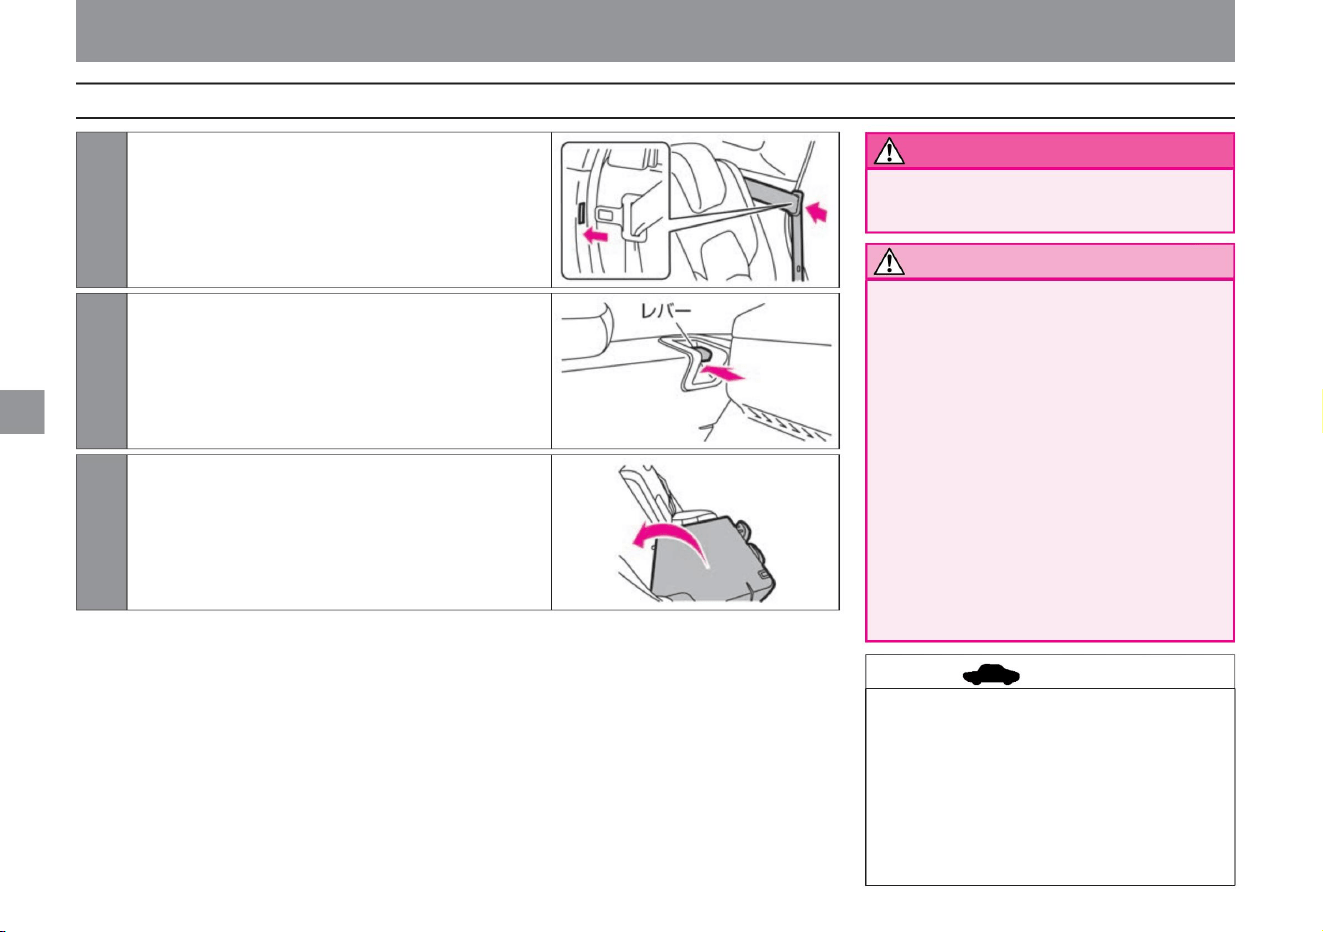
3 To put it back, raise the backrest and push it backward with
your hand to lock it.
2Push the backrest forward while pressing the lever that you
want to fold.
be.
1 Secure the left and right seat belts in the rear seats by inserting
the tongues of the seat belts into the holes for inserting
the seat belts on the sides of the rear seats.
ZEF0281X
ZEF0283X
ZEF0282X
seat adjustment
• When raising the backrest, hold the backrest
with your hand and return it slowly.
If you return it suddenly, it may hit your
face or body and cause an unexpected
injury.
• Be sure to use the seat in a fixed position.
• When raising the backrest, make sure that
the seat belt is not pinched by the backrest.
If it is caught, the
seat belt cannot be worn correctly.
• When the seat is folded, do not step on the
folded backrest. Doing so may
damage the seat or cause an unexpected
injury by falling over.
• If you fold the seat while objects or drinks are
left on the seat, you may damage the
objects or stain the interior of the vehicle.
Be very careful when folding the
seat. • Be careful not to damage the seat belt
when loading luggage in the luggage
compartment. • The seat is folded
when it hits the front seat.
Operation of each part
Notice
advice
104
warn
How to fold the seat
Machine Translated by Google
$/$: Different equipment depending on vehicle model, options, etc.
seat adjustment
If it does not, retract the headrest or
adjust the front seat position fore and
aft.
• Use the headrest with it raised from the
retracted position to the locked
position. – To raise, simply pull up on the
head restraint. –
When lowering, lower it while pressing
the button.
• The headrests of the rear seats cannot
fully demonstrate their functions in the
stowed state. Raise it to the locking
position and check that it is securely
fixed.
• If you can see the red part of the lever
when you put the backrest back, the
seat is not locked properly.
• When removing, pull up the headrest while
pressing the button. • When
installing, insert the headrest while pressing
the button.
Operation of each part
ÿ How to remove and attach the headrest
105
How to use the headrest
advice
advice
Machine Translated by Google
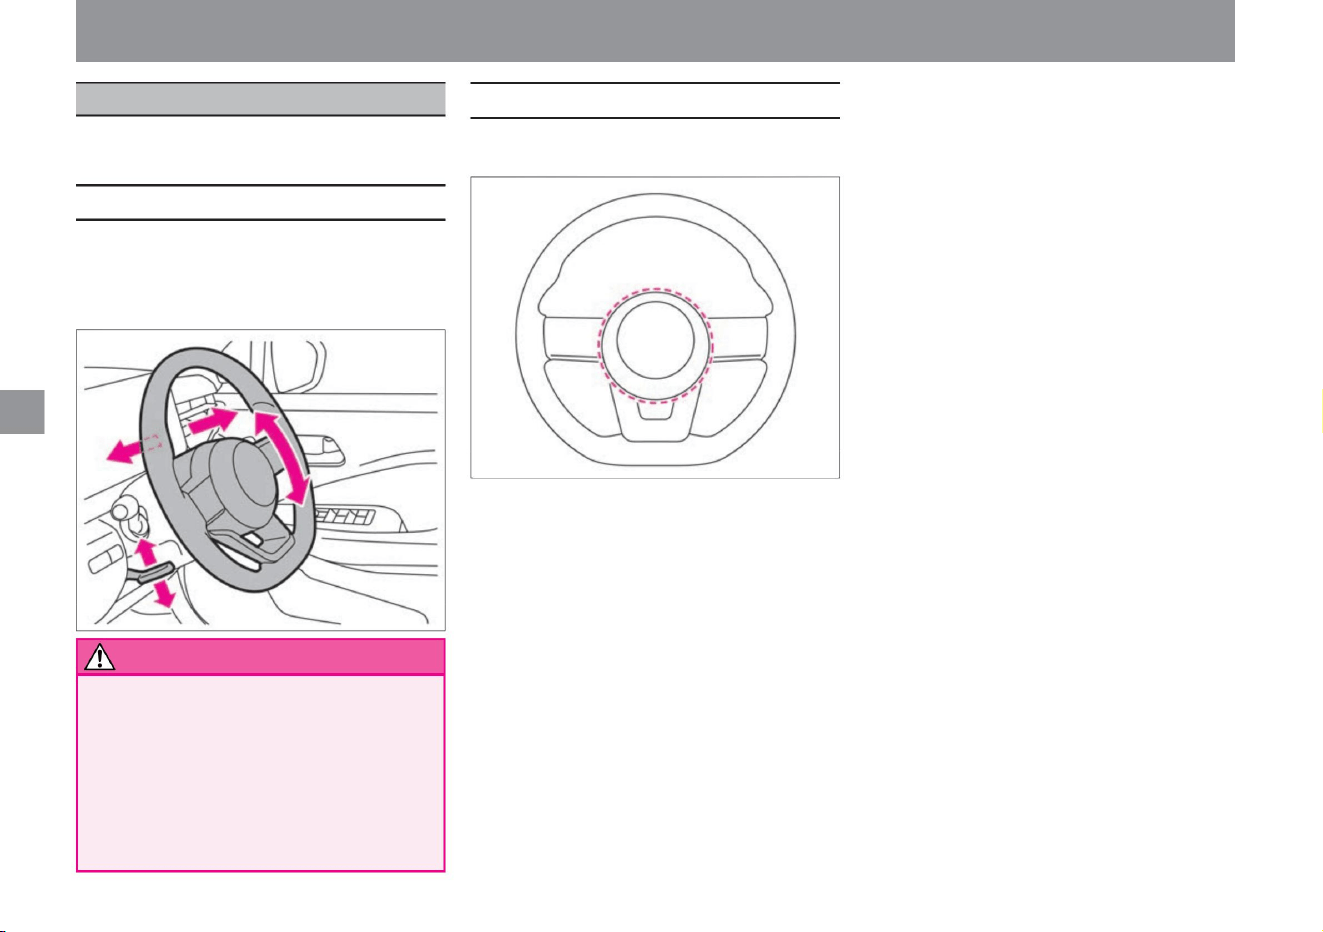
Adjust the position of the steering wheel so that you can
comfortably hold the steering wheel in an appropriate driving posture.
ZEF0284X
ZEF0285X
handle adjustment
How to adjust the handle position
106
how to sound the horn
warn
Press the pad surface in the center of the handle to
sound the horn.
• Push down the lever on the lower left of the handle to
move the handle back and forth and up
and down. • Stop at an appropriate position and pull up
the lever to fix it.
• Always adjust the steering wheel before riding.
Adjusting while driving may lead to an
unexpected accident. • After
adjusting, check that it is securely fixed. If the
steering wheel
position is not fixed, the driving posture may
suddenly change, which may lead to an
unexpected accident.
Operation of each part
handle
Machine Translated by Google
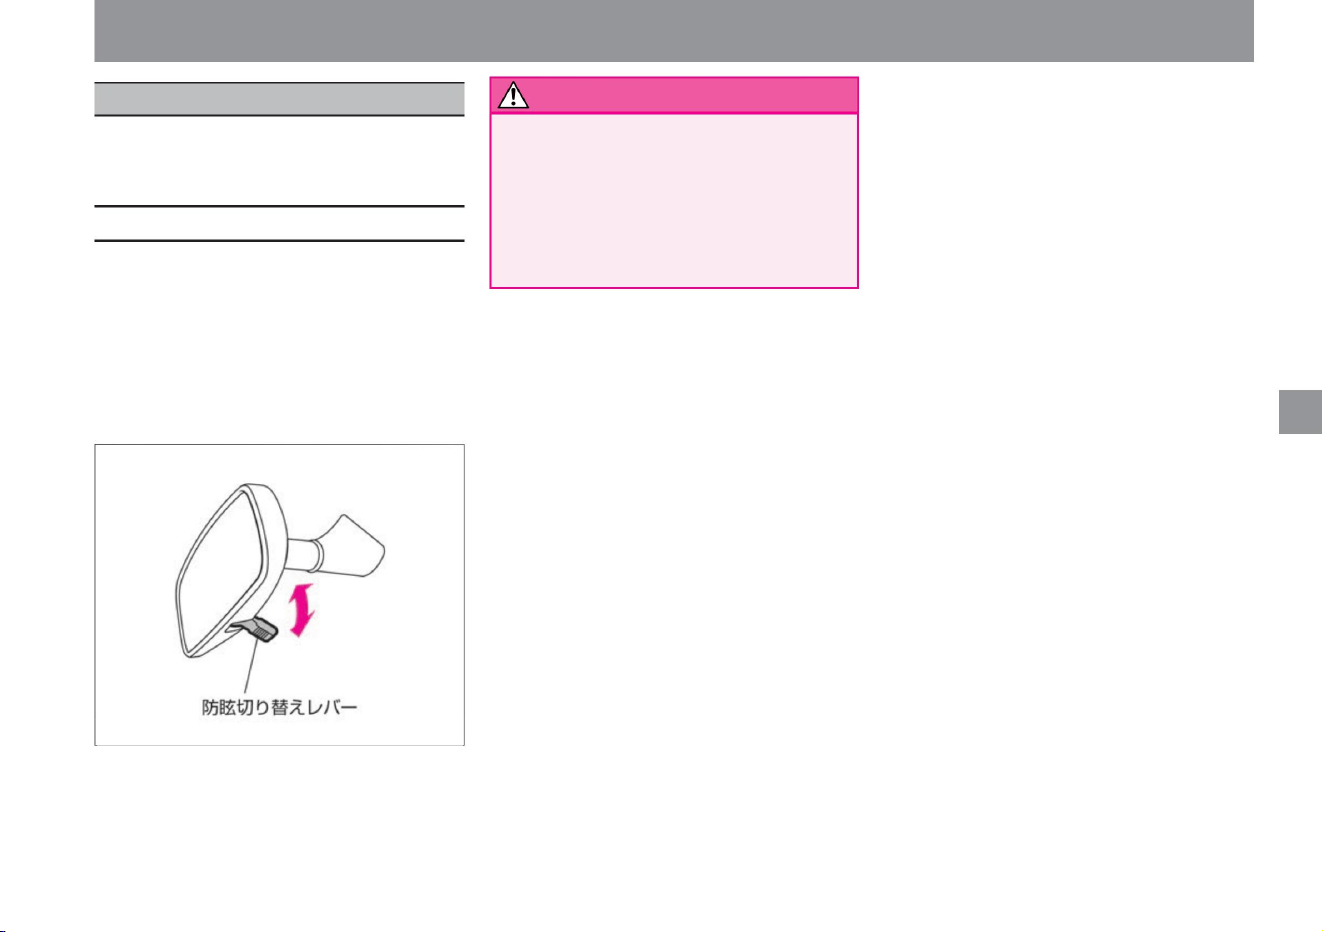
• When the headlights of the vehicles behind you are
dazzling, such as at night, pull the anti-glare switching
lever toward you to reduce the
reflection. • Return the anti-glare switching lever to its
original position during normal driving, such as during
the daytime.
• Hold the mirror body and adjust the angle appropriately.
• Make sure to adjust the mirrors before driving. Also,
switch to anti-glare only when necessary.
Adjusting the mirror
while driving or switching to the anti-glare mode
unnecessarily may lead to carelessness in front
and an unexpected accident.
mirror adjustment
Adjust the rearview mirror after sitting in the correct
driving position so that you can see behind you
sufficiently.
position.
warn
How to adjust the rearview mirror
107
$/$: Different equipment depending on vehicle model, options, etc.
ZEF0261X
Operation of each part
Room mirrorÿ
Machine Translated by Google
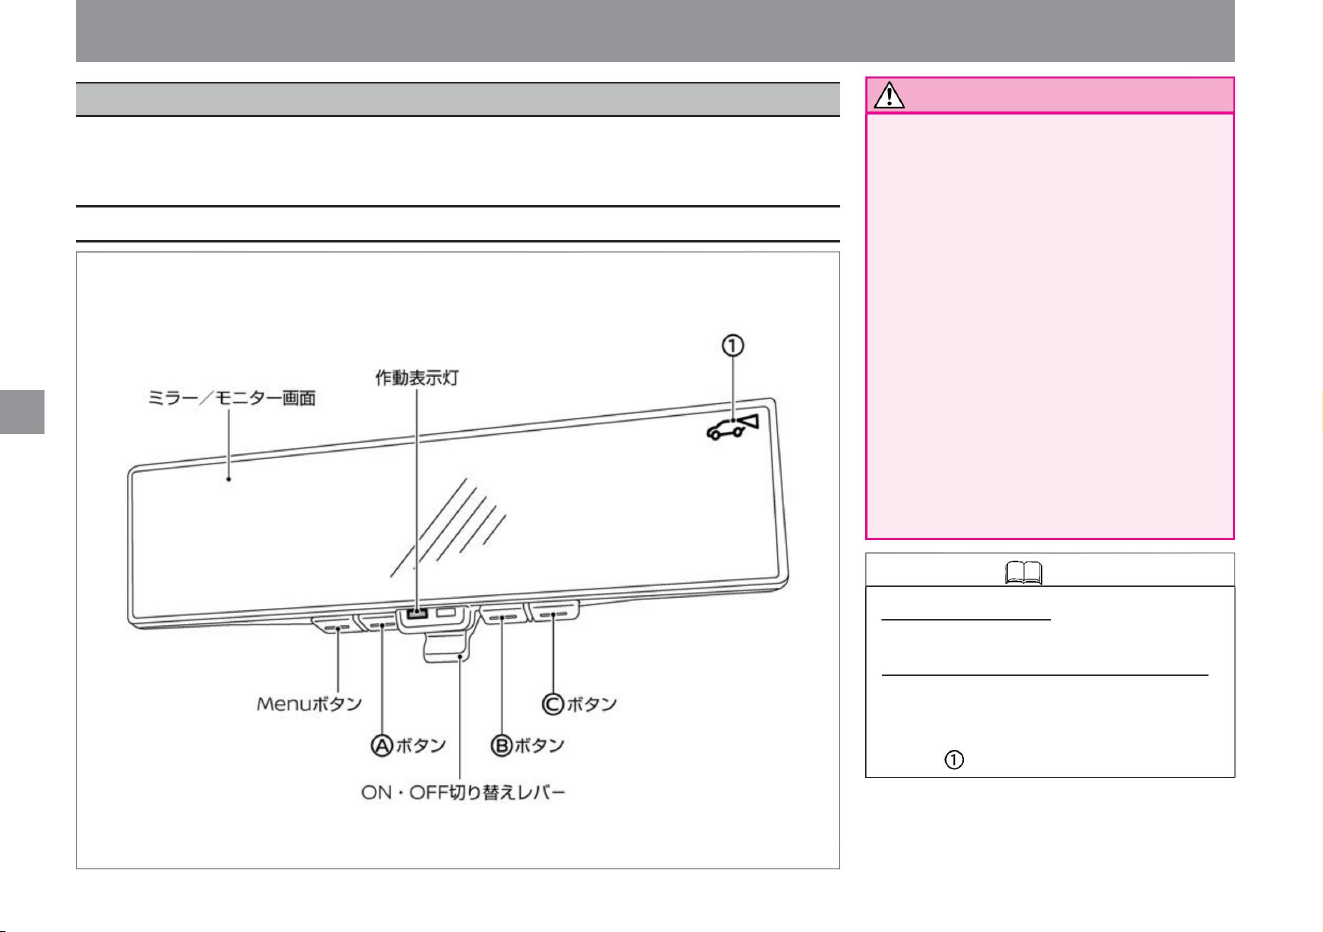
• Before driving, be sure to adjust the rearview
mirror.
Set the rearview mirror mode (mirror
state), sit in the driver's seat in the correct
posture, and adjust the position so that
you can clearly see behind you. If you start
driving without making adjustments, it may
be difficult to see the monitor due to the
reflection of the mirror when the intelligent
rearview mirror mode (monitor display
state) is selected. • When the operation
indicator light turns off in the intelligent
rearview mirror mode, switch to the
rearview mirror
mode immediately. If the intelligent rearview
mirror mode is turned on again and the
light does not turn on, there may be a
problem with the system. Please consult your NISSAN dealer.
mirror adjustment
You can switch between the mirror state and the monitor display state with the ON/OFF switching lever.
Maintains a clear view behind the rearview mirror, which is often blocked by passengers, headrests, cargo, etc.
Regardless of the situation inside the vehicle, the image from the camera behind the vehicle is projected onto the rearview mirror.
Room mirror mode
• Use as a mirror. Intelligent
room mirror mode • Use as a monitor.
(In intelligent rearview mirror
mode, the operation indicator lights
and is displayed.)
108
Notice
How to use the intelligent rearview mirror
Knowledge
ZEF0194X
Operation of each part
Intelligent room mirrorÿ
Machine Translated by Google
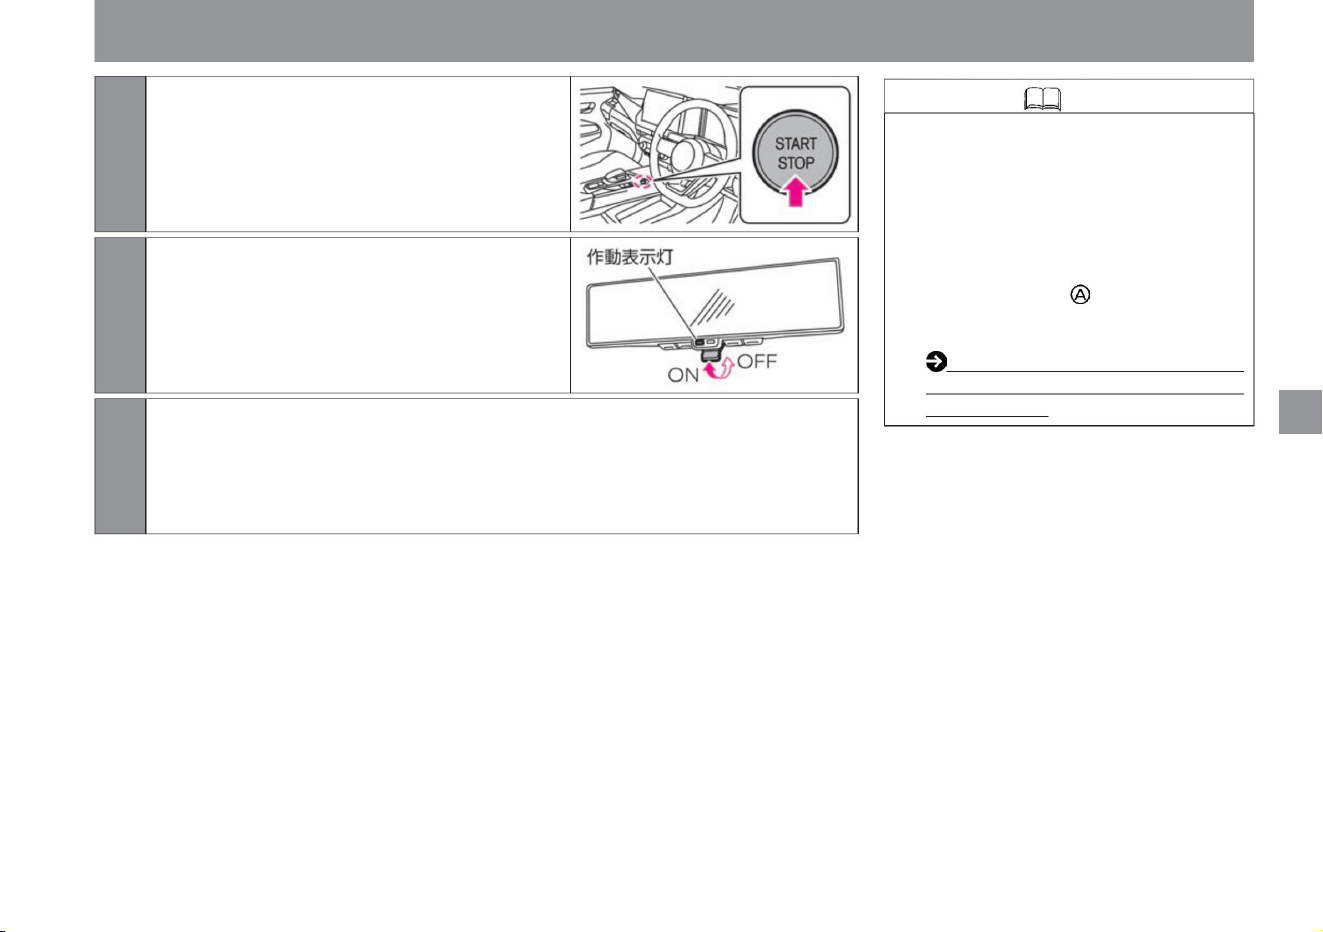
Knowledge
109
Operation of each part
mirror adjustment
image is displayed.
When the ON/OFF switching lever of the intelligent rearview mirror is tilted toward the front
of the vehicle, the monitor screen turns off and can be used as rearview mirror mode.
• If it is difficult to see due to the brightness of
the surroundings or if you feel that the
light is bright, turn off the intelligent
rearview mirror mode and use the rearview
mirror
mode. • On vehicles not equipped with a
manufacturer's option navigation system,
pressing the button while the power
switch is on displays the Intelligent Around
View Monitor screen. Intelligent
Around View Monitor (with moving
object detection function) (P.245)
ZEF0286X
ZEF0226X
$/$: Different equipment depending on vehicle model, options, etc.
1Turn on the power switch.
2Pull forward the ON/OFF switching lever of the
intelligent rearview mirror. (The
operation indicator lights up.)
3 Switches to intelligent rearview mirror mode and displays the image behind the vehicle on the monitor.
Machine Translated by Google
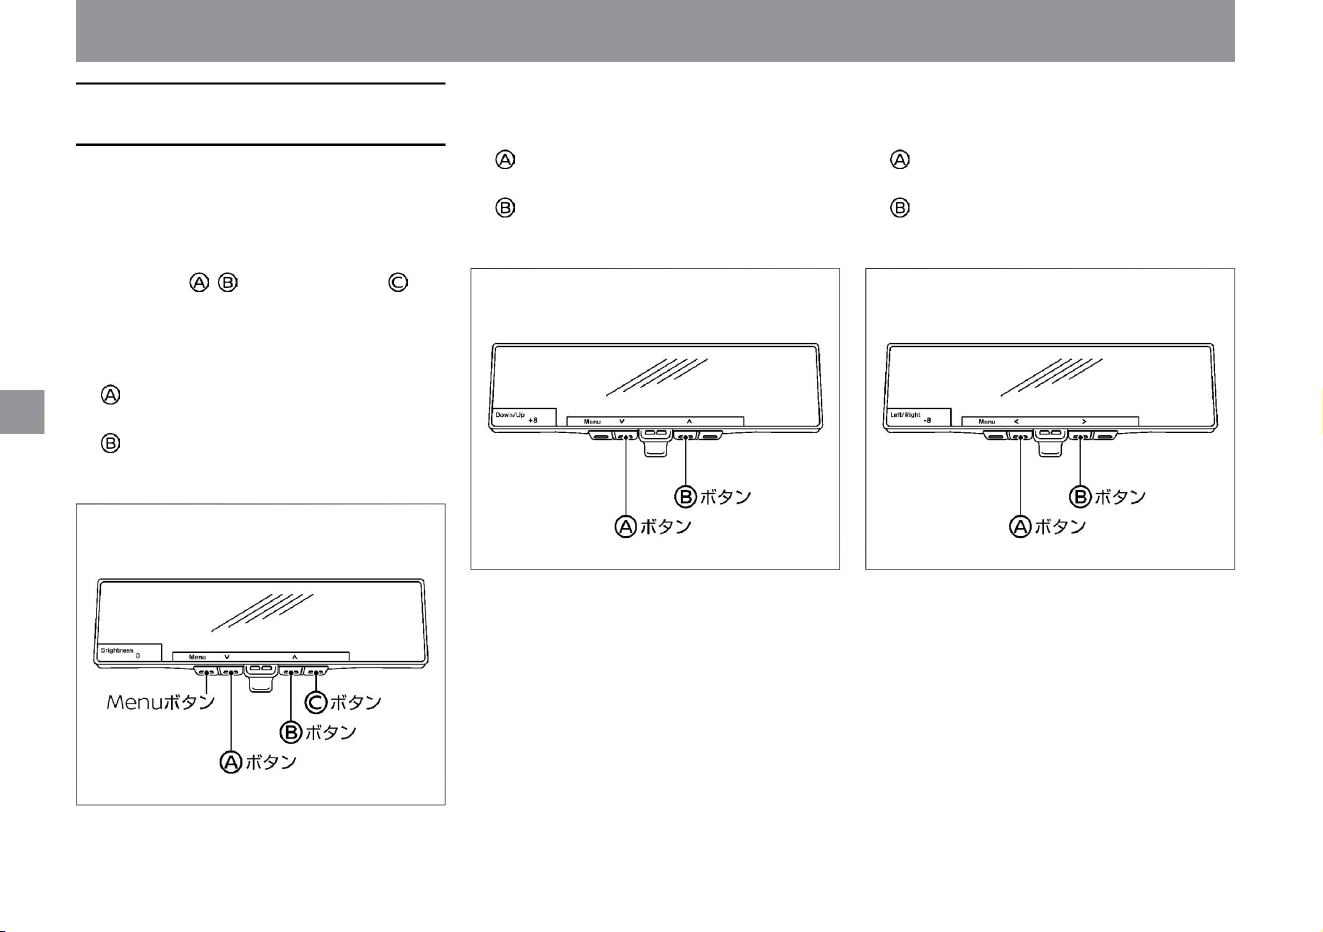
vinegar.
• Press the button to move the image up.
• Press the button to brighten the screen.
vinegar.
• Adjustment range: -8 (down direction) ~ +8 (up direction)
vinegar.
Adjustable range: -8 (dark) to +8 (bright)
vinegar.
ÿ Left/Right Adjusts the left/right
position of the monitor image. • Press the button to move
the image to the left.
• Press the button to move the image to the right.
vinegar.
In intelligent rearview mirror mode, you can make various
adjustments to the monitor image when the intelligent around
view monitor screenÿ is not displayed.
Adjust the vertical position of the monitor image. • Press
the button to move the image down.
• Adjustment range: -8 (left) ~ +8 (right)
Press the Menu button to display the items that can be adjusted.
ÿ Use the button to select and use the button to determine the
item to be adjusted.
ÿ Brightness Adjusts the brightness
of the monitor image. • Press the button to dim the
screen.
vinegar.
mirror adjustment
ÿ Down/Up
Operation of each part
ZEF0196X ZEF0197X
ZEF0195X
Intelligent rearview mirror image adjustment
110
Machine Translated by Google
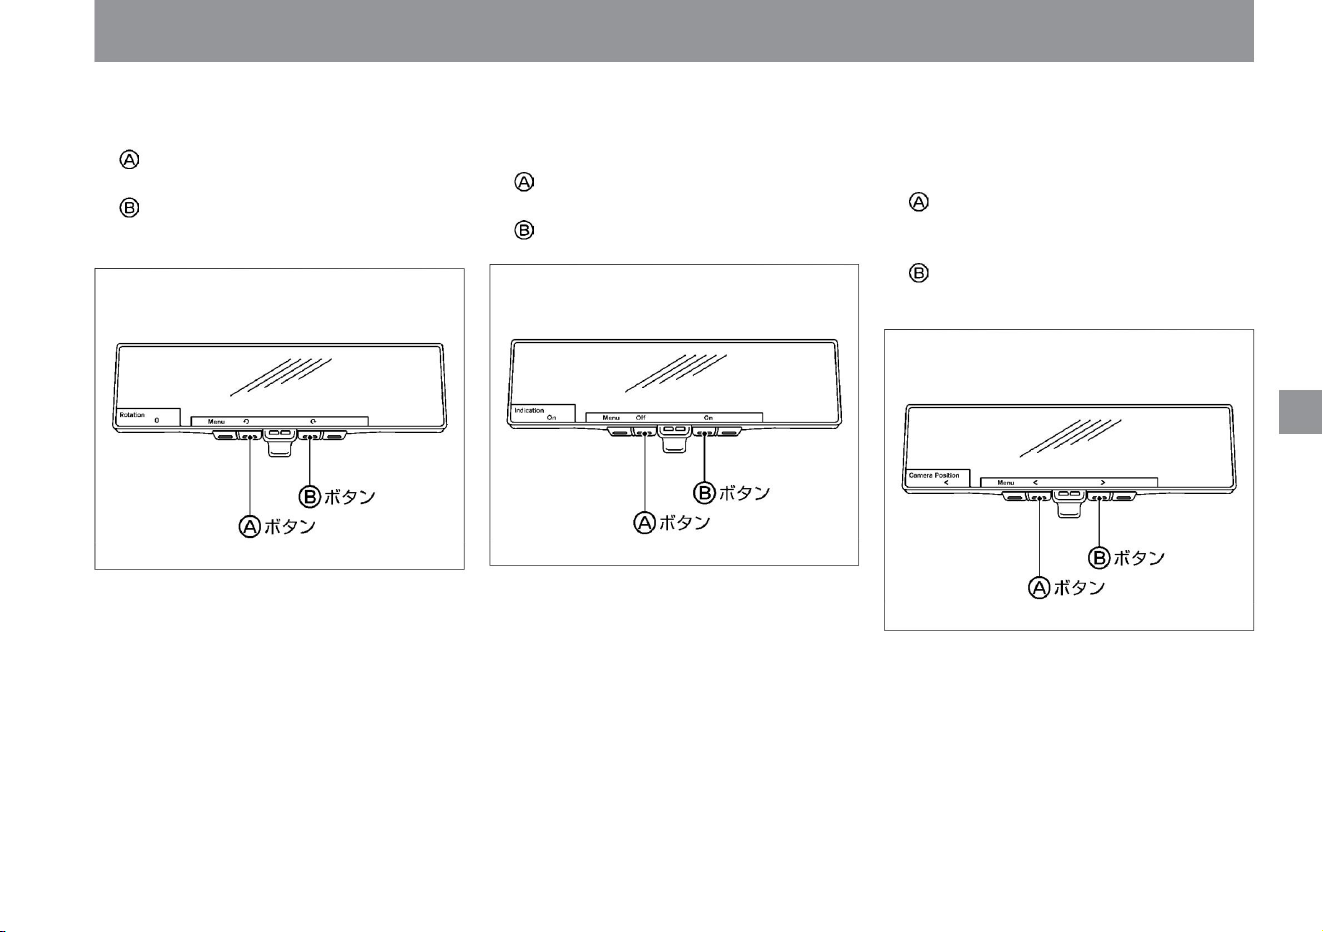
Switches the display position of the intelligent around view
monitor screen. • Press the button to display the
Intelligent Around View Monitor screen on the left side of the
mirror.
• Adjustment range: -8 (counterclockwise) to +8 (clockwise)
vinegar.
• Press the button to display the Intelligent Around View Monitor
screen on the right side of the mirror.
• Press the button to rotate the image to the right.
vinegar.
Sets whether to show or hide the monitor character display. •
Press the button to hide the monitor character display. • Press
the button to display the
monitor character display.
Adjusts the rotation of the monitor image position. • Press
the button to rotate the image to the left.
ZEF0200X
ZEF0199X
ZEF0198X
mirror adjustment
111
$/$: Different equipment depending on vehicle model, options, etc.
ÿ Indicationÿ Rotation ÿ Camera Position ÿ
Operation of each part
Machine Translated by Google
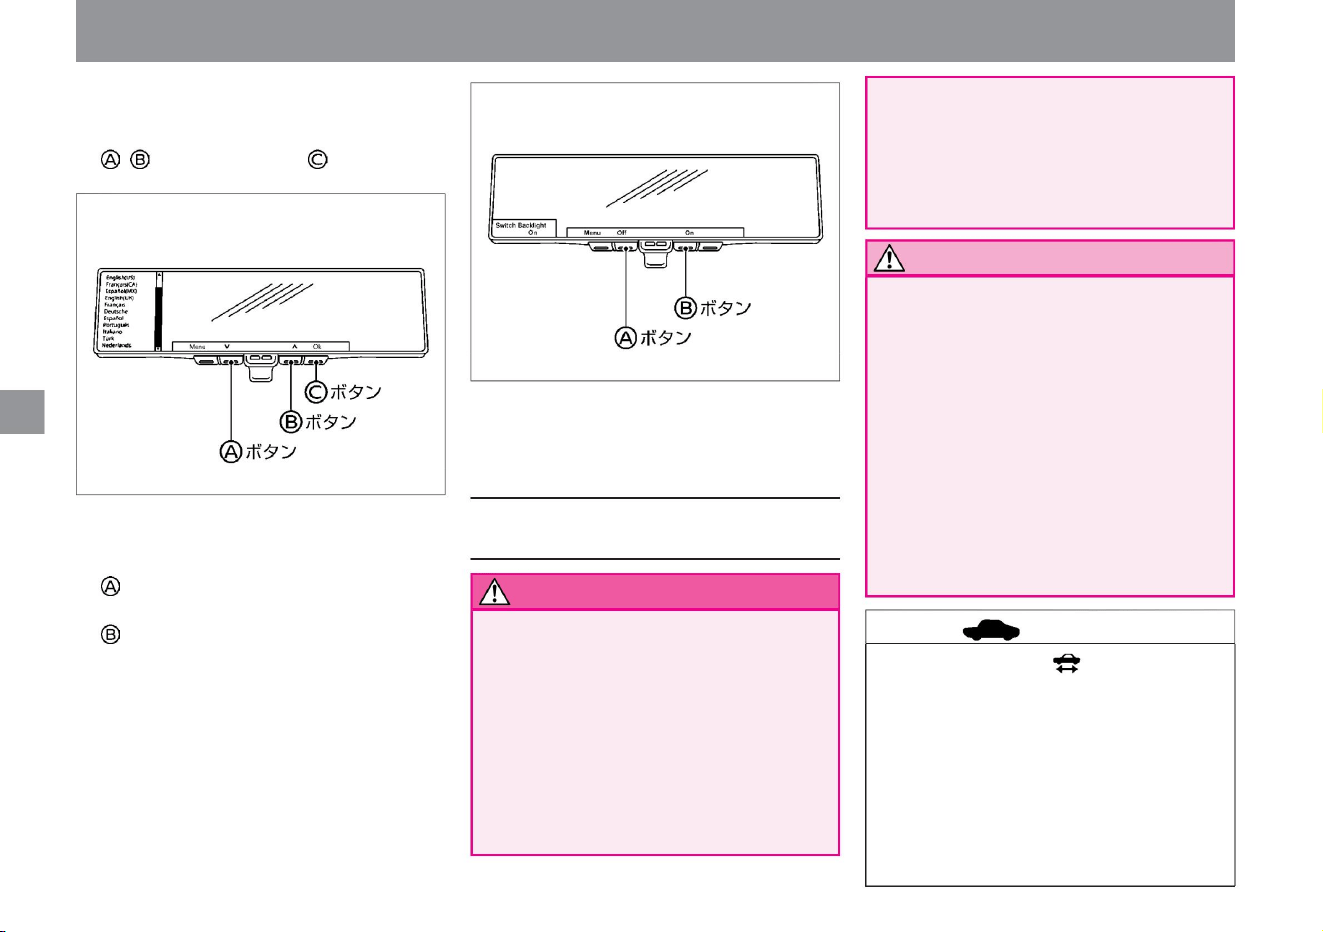
ZEF0201X
ZEF0227X
Operation of each part
mirror adjustment
advice
112
Precautions when using the
intelligent rearview mirror
warn
Notice
• Check the blind spot range in advance.
ÿ License Displays license
information.
Intelligent rearview mirrors have blind
spots. Do not rely too much on the system
and drive safely. • Do not disassemble
or modify the mirror, camera, or wiring. If you
notice a strange odor or
smoke, stop using it immediately and
contact a NISSAN dealer.
If you operate it while driving, it may lead
to an unexpected accident due to
carelessness
ahead. • Keep fire such as cigarettes away
from the mirror, camera, and
wiring. It may cause damage or vehicle fire.
• If a strong light source such as the sun or
the headlights of a vehicle behind the
camera enters the camera, streaks of light
may appear on the monitor of the intelligent
rearview mirror or a bright light source
may spread over the monitor. In that case,
please return to rearview mirror mode if
necessary.
• Using the intelligent rearview mirror for a long
time while the drivable indicator light is off
may cause the 12V battery to run out. • Do
not install the radio
antenna near the intelligent rearview mirror.
Radio waves from wireless devices may
cause disturbances in the intelligent
rearview mirror image. • Do not push the
button too hard or
ÿ Language Switches the
displayed language. • Select with
the ÿ button and confirm with the button.
ÿ Switch Backlight Sets ON/OFF of the
illumination of the switch. • Press the button
to turn off the lighting of the switch. • Press the
button to turn on
the lighting of the switch.
• Do not operate while driving.
• Do not stare at the monitor.
– It may lead to an unexpected accident
due to carelessness ahead.
– Passengers staring at it may cause car
sickness.
Machine Translated by Google
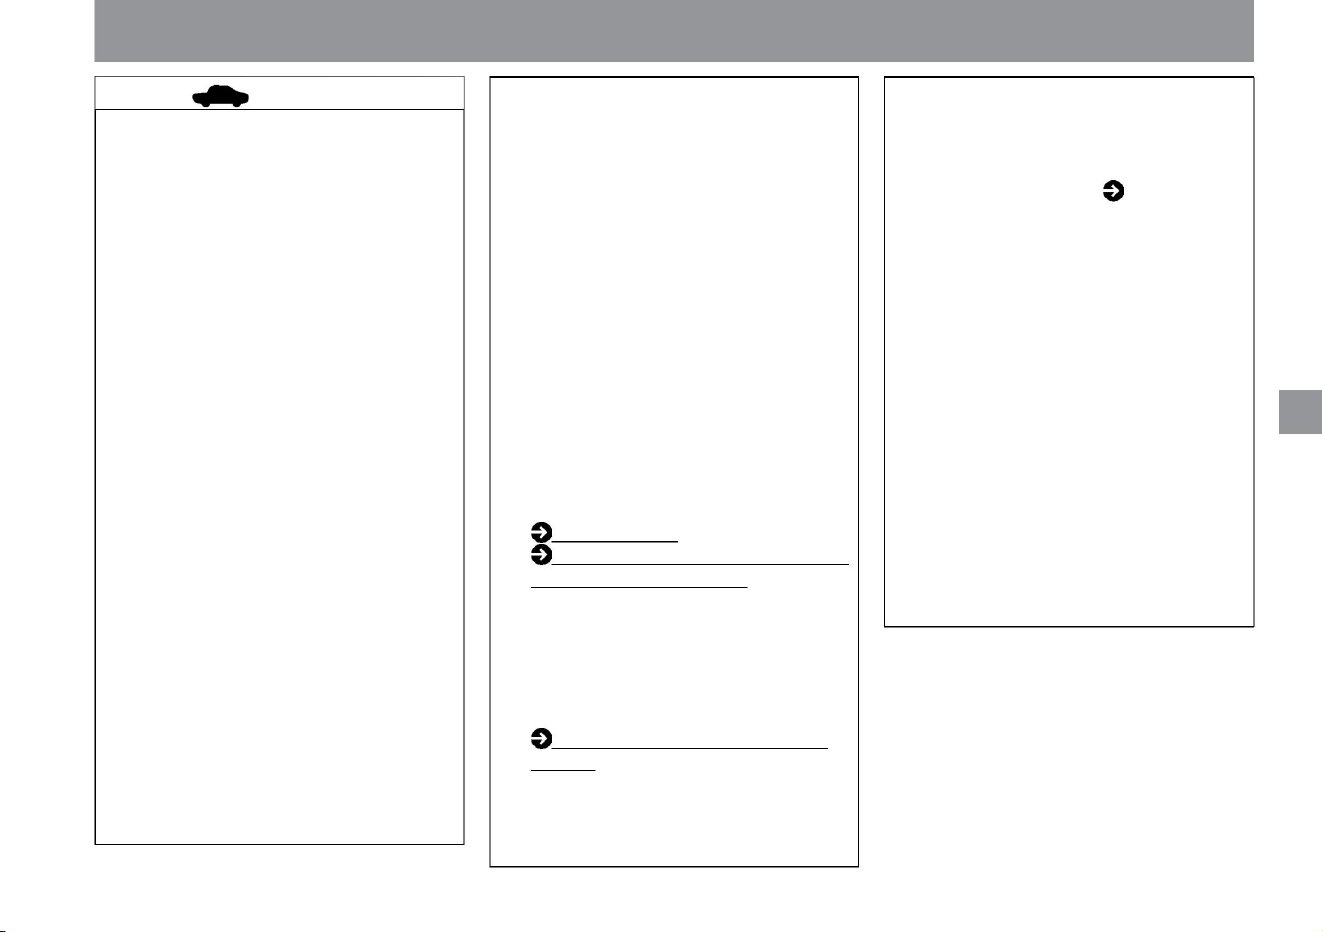
Operation of each part
mirror adjustment
• While using the rear wiper, the screen
may appear to flicker when the rear
wiper passes in front of the camera, but
this is not a malfunction. • If the
camera image is not clear, clean the back
door glass in front of the intelligent
rearview mirror camera. If the camera
image is still unclear even after cleaning,
there may be an oil film on the glass
surface. Clean it using an oil film
remover. Exterior Rear (P.4)
Cleaning
Intelligent Rearview Mirror ÿ (P.373)
• If the back door glass is
fogged up, use the rear window defogger to
remove the fog on the back door glass.
Use the rearview mirror mode until the
fog is completely removed. How to
remove fog from the rear window
• The screen may flicker when part of the
lighting using the LED light source is
reflected, but this is not a
malfunction. • The screen may flicker due
to diffuse reflection in the external
environment,
but this is not a malfunction. • The monitor
display may not be able to follow fast
movements,
but this is not a malfunction. • The rear view
is different from the rearview mirror. Do
not overestimate the function of the
intelligent rearview mirror, and try to
drive responsibly by checking directly behind you.
(P.330)
• The intelligent rearview mirror monitor
may become hot, but it is not a
malfunction.
too much, your eyes may get tired while
driving. Please adjust the brightness
appropriately. • Use the rear wiper together
in rainy weather. If the camera image is
unclear even when using the rear wiper,
check the deterioration of the rear wiper
rubber.
• Adjust the brightness of the monitor to avoid excessive brightness.
• Use the rearview mirror mode (mirror
state) when the monitor is difficult to
see due to external light.
• It may be difficult to recognize the color of
distant objects or when it is dark, but
this is not
a malfunction. • Please read ( P.373) for
maintenance of the intelligent rearview
mirror. •
Depending on your physical condition, it
may take some time for the Intelligent
Rearview Mirror Mode image to come
into focus.
Forcibly operating may cause a
malfunction. Also, the mirror body may
fall. • Do not rotate the
mirror more than 20 degrees vertically or
30 degrees horizontally. Wiring may be
broken. • Do not give a
strong impact to the mirror body. It will be
the cause of the failure. • Do not
apply excessive force to the camera or
camera cover attached to the rear of
the vehicle. The camera may come off
or become damaged.
• Do not block the front of the intelligent
rearview mirror. You may not be able to
adjust the brightness of the monitor or
switch the camera image. • In
intelligent rearview mirror mode, if the
intelligent rearview mirror becomes hot,
the brightness may decrease or the
image may not be displayed. • When
the
intelligent rearview mirror is in low
temperature, the camera image may
be delayed.
$/$: Different equipment depending on vehicle model, options, etc.
113
advice
Machine Translated by Google
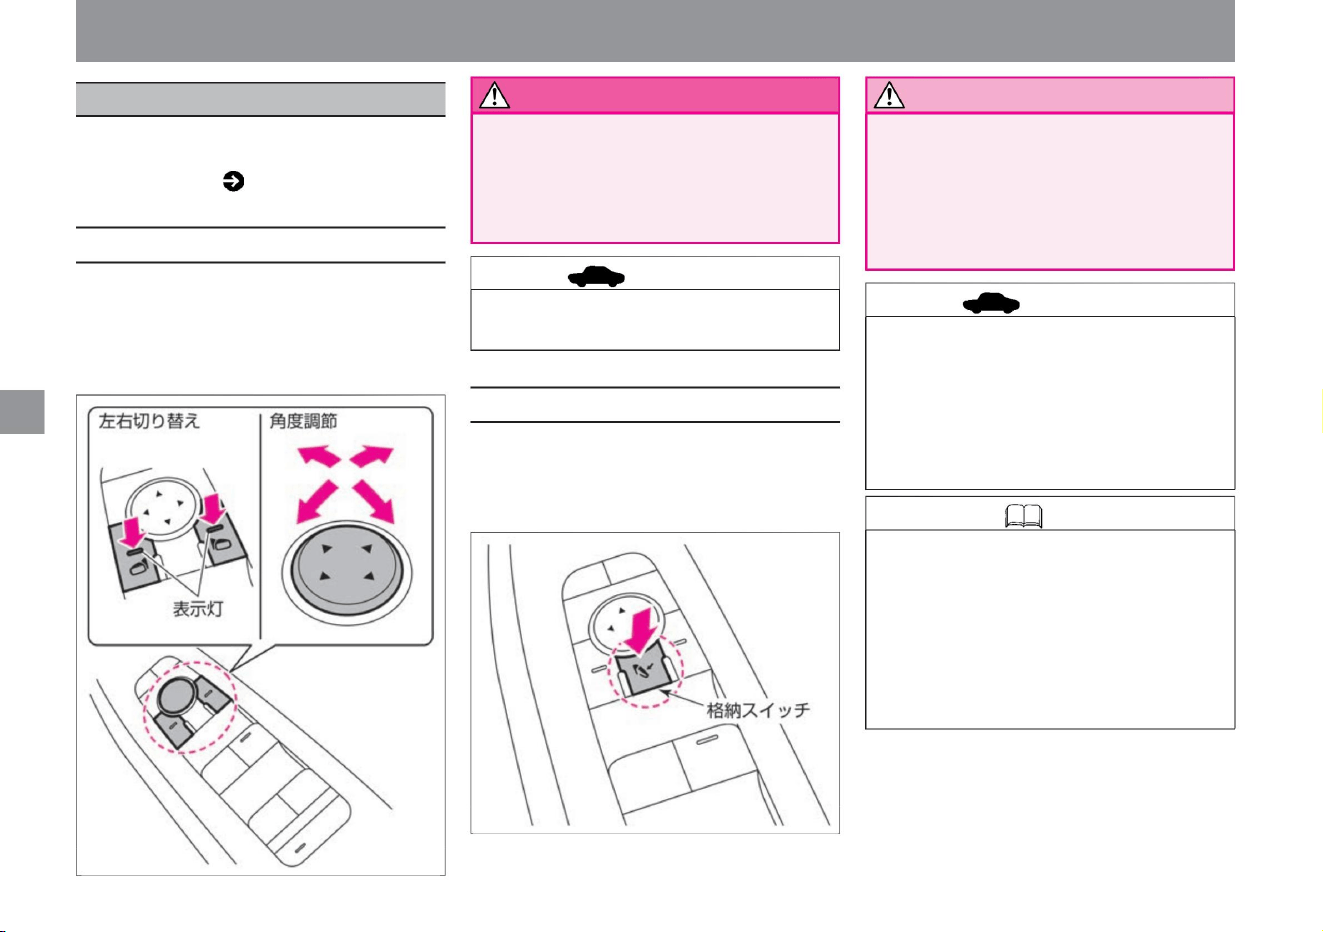
• Please note that the mirror image may appear farther
than it actually is.
• If you operate the switch continuously, it may stop in
the middle, but it is not a malfunction. Please try
again later. • If the mirror is opened and closed
manually, the mirror may
move depending on the position of the storage switch
when the power switch is turned on.
• Press the left/right switch on the mirror you want to
adjust. (The switch
indicator lights up.) • Press the
angle adjustment switch forward, backward, left and
right to adjust the angle of the mirror surface.
• Be sure to adjust the mirrors before driving. • Do not touch the mirror while it is moving. Hands
may
be caught or the mirror may malfunction. • Do
not drive with the
mirrors retracted. It's dangerous because you
can't check backwards.
• Do not open and close the mirror manually. If you
open and close it manually, the mirror may fall
forward or backward from the specified position
while driving, making it impossible to check the
rear. If you accidentally open and close it
manually, please open and close it with the
switch before driving.
• Press the switch to retract the left and right mirrors. •
Press
the switch again to return to the original position.
cormorant. Adjusting the mirrors while
driving can lead to carelessness and
an unexpected accident.
mirror adjustment
Can be operated when the power switch is
ON or OFF and in ACC state. For ACC
status, please read Auto ACC function ( P.136).
door mirror
Operation of each part
How to store the door mirrors
warn
How to adjust the angle of the door mirrors
Knowledge
advice
114
advice
Notice
ZEF0295X
ZEF0296X
Machine Translated by Google
The mirror can be stored in conjunction with the
door lock. • The
left and right mirrors retract when locked with the
remote control or the door handle switch ÿ. •
When the
power switch is turned on, the left and right
mirrors open. (On
the Advanced Drive Assist Display, you can
change the setting so that the left and right
mirrors open when the door is unlocked using
the remote control or the switch ÿ on the door handle.)
• If the rear window defogger switch ( P.330) is
pressed while the drivable indicator light is
on, the heater built into the door mirror will
operate to remove frost and fog.
• When the door mirror retract switch is pressed
and the mirror is retracted, the door lock
interlock retract function does not
work. • By selecting "Settings", "Vehicle
settings", and "Door mirrors" on the
Advanced Drive Assist Display, you can
change the settings for the door lock
interlocking retraction function.
For more information on settings, please
read Vehicle
Settings. How to switch
screens (P.60) Vehicle settings (P.76)
$/$: Different equipment depending on vehicle model, options, etc.
mirror adjustment
Operation of each part
How to use the door mirror heaterAbout the door lock interlocking retraction functionÿ
Knowledge
115
Machine Translated by Google
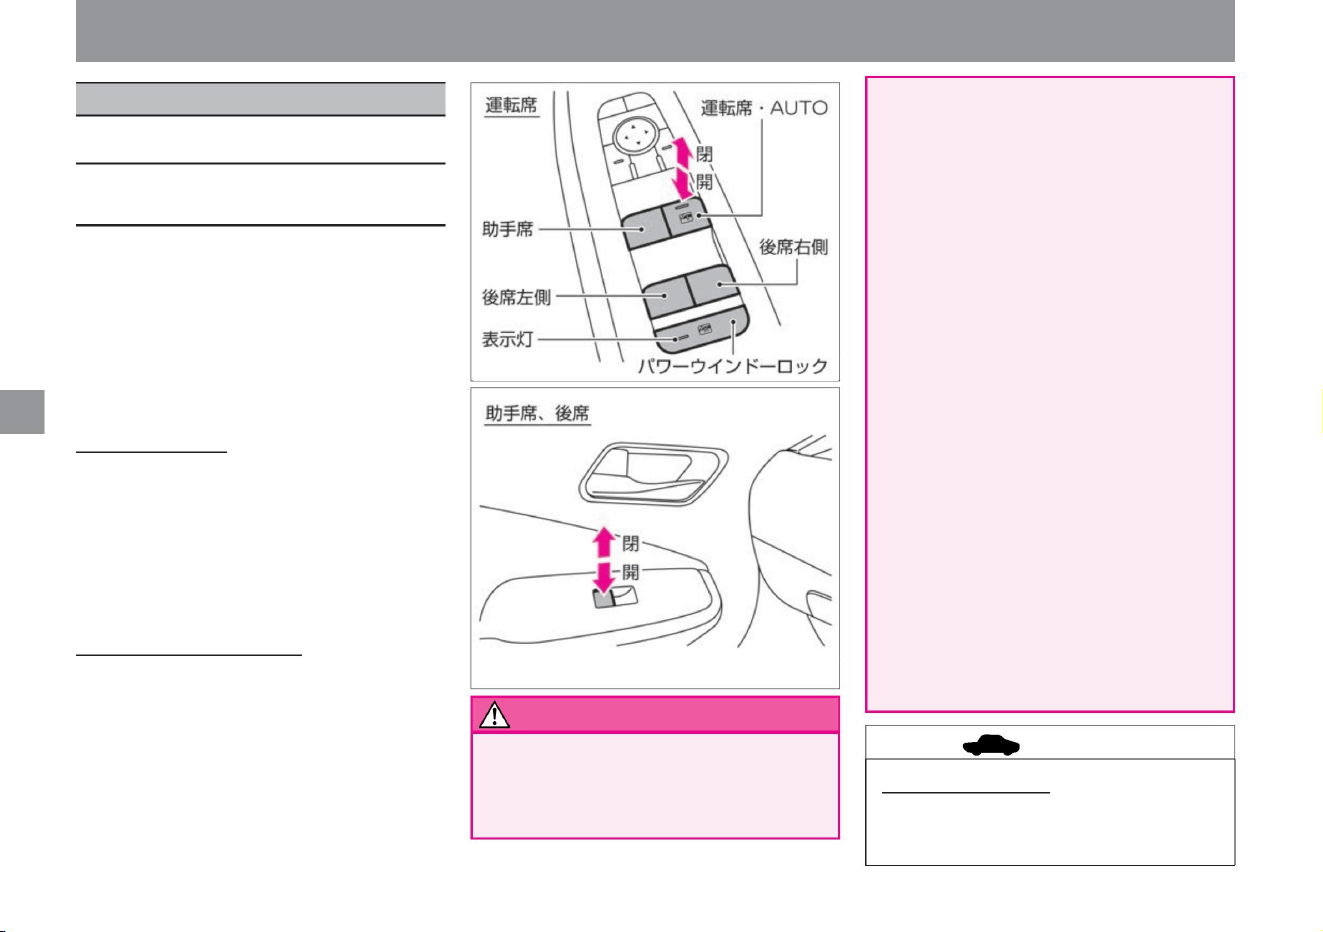
• Because the driver is responsible for opening and closing all
windows, including those operated by passengers, the
following must be observed. – Do not
put your face, arms, or other objects outside the vehicle while driving.
Operation of each part
• If you want to stop in the middle, lightly push the
switch to the opposite side or pull it up. To lock
the opening/closing operation
You can prevent children from accidentally opening/
closing the window
glass. • If you press the power window lock switch,
you will not be able to open or close the windows
other than the driver's seat. (The switch indicator
lights up.)
• Press the switch again to unlock. (The indicator
light of the switch turns off.)
please don't It may hit objects outside the
vehicle or cause serious injury during
sudden braking. – When opening and
closing the window glass, do not stick your
hand or face out of the window or
intentionally activate the anti-pinch
mechanism. If your hands, face, arms, etc.
are caught or caught in the window glass,
it may lead to serious injury. – Do not let
children operate the power
windows. Press the power window lock switch
as serious injury may result. – When
opening and closing the window glass, call
out to your child and make sure that their
hands and arms are not near
the window glass before operating. – When
leaving the vehicle, turn off the power
switch and do not leave the key (Intelligent
Key/Remote Control Entry
System) and children in the vehicle. Incorrect
operation such as mischief may lead to
an unexpected accident.
opening and closing window glass
You can open and close the window glass of each seat with the switch
on the driver's seat. You can open and close the window glass of your
own seat with the switch on the front passenger seat and the switch on
the rear seat. •
If you press the switch lightly, it will open only while you are pressing
it. • When the
switch is lightly pulled up, it closes only while the switch is pulled up.
To open and close automatically The
window glass in the driver's
seat can be opened and closed automatically with a single touch. •
Press the
switch strongly to fully open. • If the switch is pulled up
strongly, it will be fully closed.
vinegar.
Operation mechanism after key
OFF • The window glass in the driver's seat can be opened and
closed for about 45 seconds even after the power switch is
turned OFF. just
power window
How to open and close the power
window
advice
116
warn
Can be operated when the power switch is ON.
ZEF0298X
ZEF0297X
Machine Translated by Google
• If the system does not operate properly even after initial
settings, have it inspected by a NISSAN dealer as soon as
possible.
However, if the driver's door or front passenger's door
is opened during that approximately 45 seconds, the
windows cannot be opened or closed.
•If a foreign object is caught between the vehicle body and the
windowpane when the windowpane is closed, the
windowpane stops rising and automatically opens
slightly. •Depending on the environment and driving conditions,
the anti-pinch mechanism may be activated if an impact or
load similar to that of a foreign object is applied to the
window glass.
•The anti-pinch mechanism is released in the following cases
and returns to normal operation. – After a
certain amount of time (approximately 10
seconds) – Fully closing the window glass
•Close the door when performing initial settings. If the one-touch
opening and closing of
the window glass, the anti-pinch mechanism, or the operation
mechanism after key OFF does not operate normally, perform
the following operations to initialize them. Turn on the power
switch. Keep
pulling the switch on the driver's seat to fully
close the driver's window, then release the switch. *1
Hold the switch on the driver's seat for more than 5
seconds. *2 Hold down the switch on the
driver's seat to fully open the driver's window, then
release the
switch. Press and hold the driver's switch for at least
5 seconds. *2 Continue to pull the driver's seat switch
until the driver's seat window glass
is fully closed. Automatically open and close the
driver's window
glass and check that it operates normally. *1: If the
window glass stops before it is fully closed,
release the switch and pull the switch again to fully
close. *2: If you keep pulling or pressing the switch
for about 5 seconds or more, the driver's side window will move
again.
•If the anti-pinch mechanism has been activated due to a
malfunction, etc., and you cannot close the window glass,
follow the steps below to release the anti-pinch mechanism
and close the window glass.
• Before closing the windows, make sure that the hands
and faces of the passengers are not out of
the windows. When the anti-pinch mechanism is
released, the automatic opening operation and anti-
pinch mechanism will not operate. Closing the
windows without checking may result in serious injury.
opening and closing window glass
Operation of each part
$/$: Different equipment depending on vehicle model, options, etc.
117
When it doesn't work properly
advice
Pull up on the switch until the anti-
pinch mechanism
activates. Repeat step two
times. Pull and hold the switch to close
the
window glass. caveat
Anti-pinch mechanism
Machine Translated by Google
refueling
advice
Knowledge
118
•The capacity of the fuel tank is about 36ÿ.
engine type
HR12DE
Specified
fuel Unleaded regular
gasoline
Opening and closing the refueling port
The fuel filler opening is located at the rear of the vehicle on the driver's
side.
• When fuel is running low, a warning will
appear on the Advanced Drive Assist
Display. Warning
message ( P.315)
• Do not refill fuel other than specified.
Operation of each part
fuel supply port
Machine Translated by Google
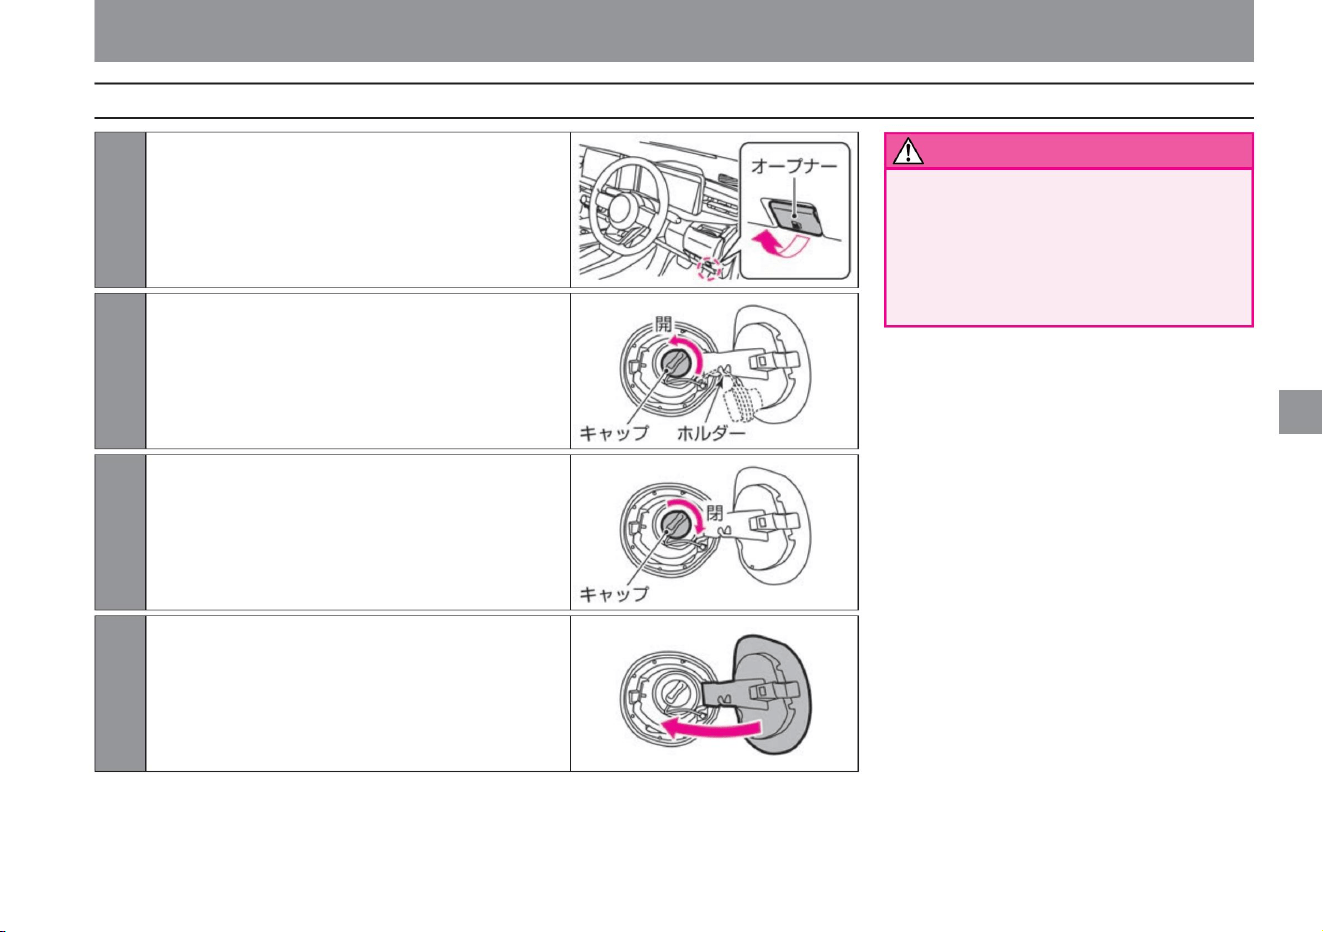
• Securely close the cap. If it is not
closed, fuel may leak while driving, which
may lead to a fire.
• Do not use caps other than genuine Nissan
products.
When refilling, hook the string of the cap to the holder
on the back of the lid.
ZEF0299X
ZEF0300X
ZEF0301X
ZEF0302X
Opening and closing the refueling port
3 To close, turn the cap to the right
until it clicks.
4 Close the lid.
2 Open the cap by slowly turning it to the left.
1Pull the opener at the bottom right of the driver's seat to
open the lid.
Operation of each part
$/$: Different equipment depending on vehicle model, options, etc.
warn
119
How to refuel
Machine Translated by Google

Follow the precautions
Do not splice. If you
add fuel, the fuel may overflow and cause a
fire.
be.
be.
If the refueling nozzle is inserted shallowly, the
automatic stop of refueling will be delayed, which
may cause fuel to boil over and cause a fire. •
After the automatic stop of the refueling nozzle, do not refuel.
Opening and closing the refueling port
• Posted in the gas station
– Shut off the e-POWER system –
Close the doors and windows
of the vehicle – Do not bring flames such
as cigarettes close – Do not
inhale vaporized fuel Before refueling, touch a
metal part to remove static electricity
from your body do. Sparks from electrical
discharge may cause burns or ignite fuel. •
Do
the replenishment work by yourself.
If you return to the vehicle interior during
work or touch charged people or objects,
you may be charged again.
• When opening the cap, turn it slowly to reduce
the pressure in the fuel tank before removing
it. If you
open it suddenly, fuel may blow back from
the filling port. • Firmly insert
the refueling nozzle into the refueling port.
• Be sure to observe the following when refueling.
Operation of each part
Precautions when refueling
warn
120
Machine Translated by Google
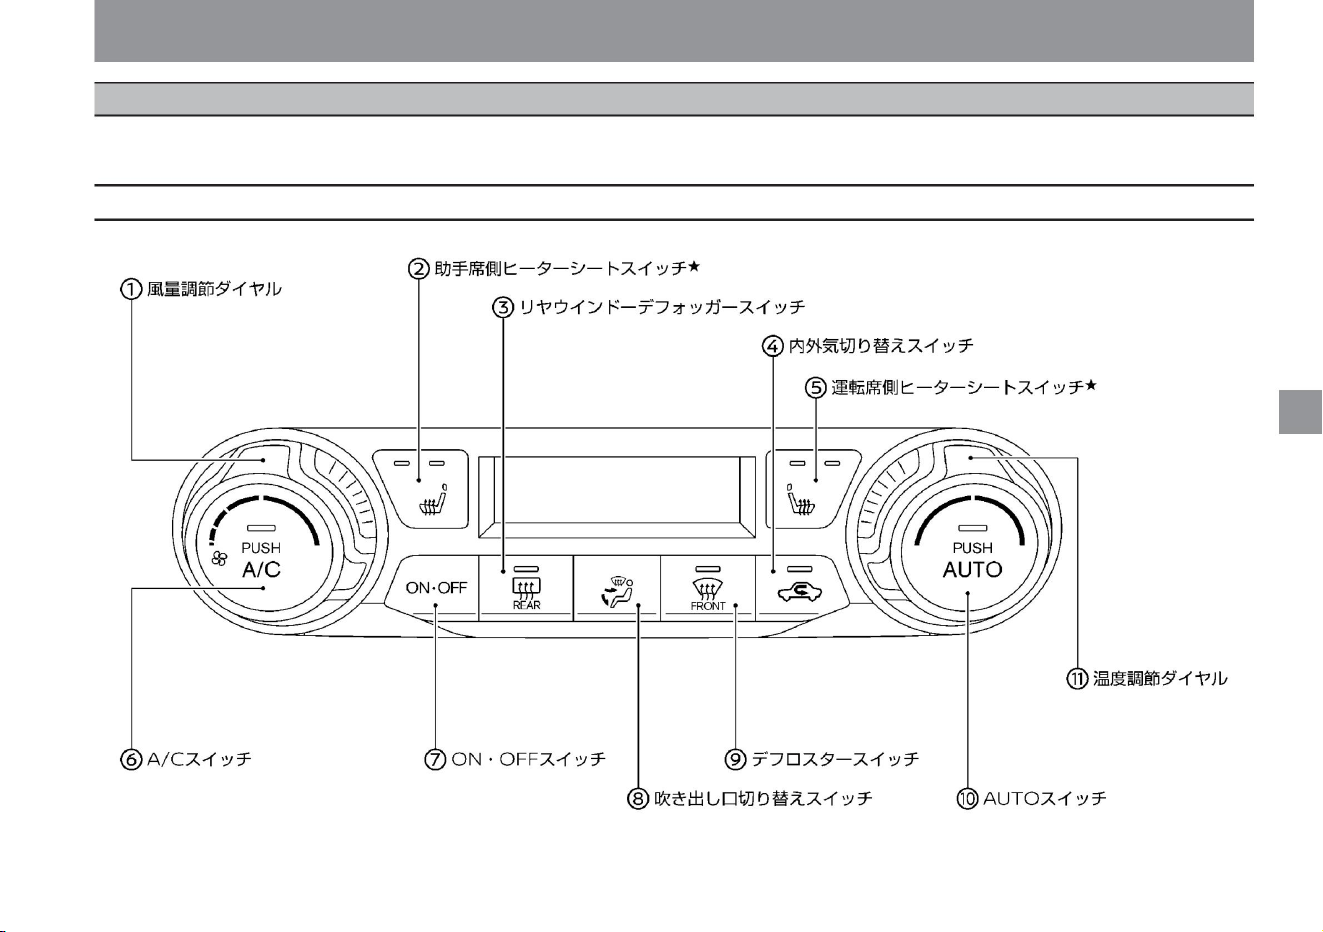
121
Name and function of each switch
ZEF0207X
Air conditioner operation
Automatically controls the air outlet temperature, air outlet, and air volume to maintain the set temperature. You can also switch to automatic control by setting inside air circulation/outside air introduction
to automatic control mode.
Operation of each part
$/$: Different equipment depending on vehicle model, options, etc.
auto air conditioner
Machine Translated by Google
Knowledge
122
Operation of each part
Air conditioner operation
AUTO switch
Switches to automatic control. The set temperature is maintained by automatically controlling the switching
of the air outlet temperature, air outlet,
and air volume.
Temperature control dial Rotate the dial to change the set temperature. (Lo 18.0°C to Hi 32.0°C)
• If you turn the temperature control dial to switch the
set temperature to Hi, the mode switches to a
mode that gives priority to heating by controlling
the engine so that the vehicle interior warms up
quickly.
ON/OFF switch
Switches the auto air conditioner ON/OFF. Air outlet
selector switch ( P.124) Switches the air outlet.
Defroster switch ( P.330) Removes
fog on the windshield.
Air volume adjustment
dial Turn the dial to switch the air volume.
Passenger seat heater seat switch ÿ ( P.269) Each time
the switch is pressed, it switches in the order of Hi, Lo, OFF, and Hi. Rear window
defogger switch ( P.330) Removes fog on the back door glass. In
addition, on vehicles with door mirror heaters, the heater built into the door mirror operates to remove frost
and fog. Internal/external air selector switch Each time the switch is pressed,
internal air circulation and
external air introduction are switched. (The indicator light on the switch lights up when the inside air is
circulating.) Driver's seat heated seat switch ÿ
( P.269) Each time the switch is pressed, it switches in the
order of Hi, Lo, OFF, and Hi.
A/C switch
Switches the cooling/dehumidifying function ON/OFF.
Machine Translated by Google
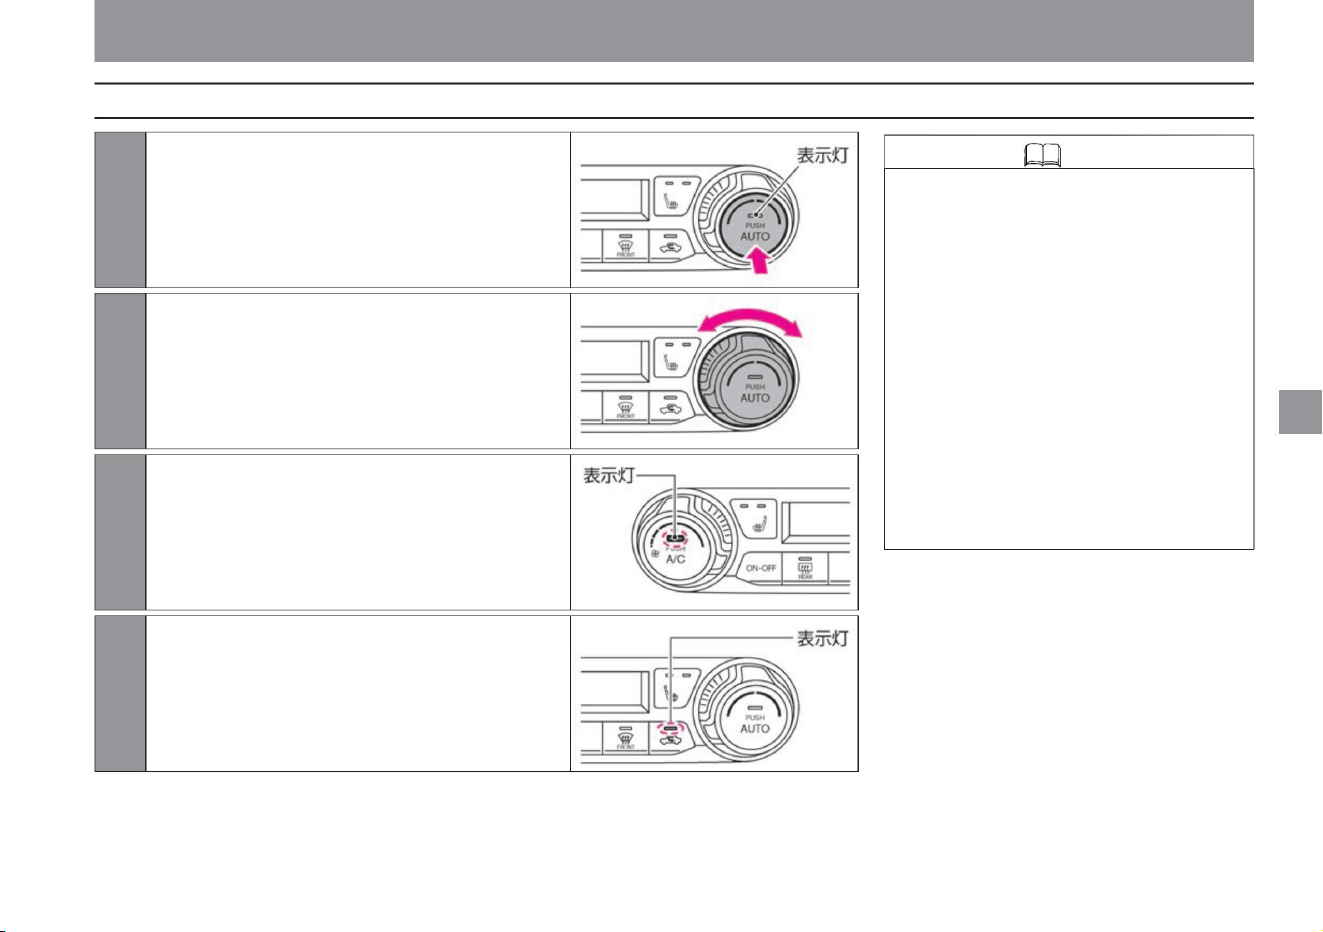
vinegar. When the indicator light on the switch flashes, it switches to
automatic control mode.
When the A/C switch is lit: Cooling/dehumidifying function ON
To do. Turn
clockwise: Increase the set temperature Turn
counterclockwise: Decrease the set temperature
Press the A/C switch. (Switch indicator lights up)
• If the air volume is adjusted or the air outlet is switched during
auto operation, the AUTO switch indicator will turn off, but
functions other than the operated function will continue
to be automatically controlled. Also, if you press the inside/
outside air selector switch while
inside air circulation/outside air introduction is in automatic
control mode, it will switch to manual mode. (If the
indicator light on the switch is lit, the inside air is circulating,
and if it is not lit, the outside air is being introduced.) If
you turn the power switch off and then turn it on again,
depending on the conditions of the air conditioner,
Inside air circulation/outside air introduction may be in automatic
control mode.
ZEF0210X
ZEF0208X
ZEF0250X
ZEF0209X
Air conditioner operation
2Turn the temperature control dial to adjust the set temperature.
3 When the A/C switch indicator light is off,
1 Press the AUTO switch. (Switch
indicator lights up)
4Press and hold the inside/outside air selector switch for about 2 seconds.
Operation of each part
$/$: Different equipment depending on vehicle model, options, etc.
Knowledge
123
How to use in auto mode
Machine Translated by Google
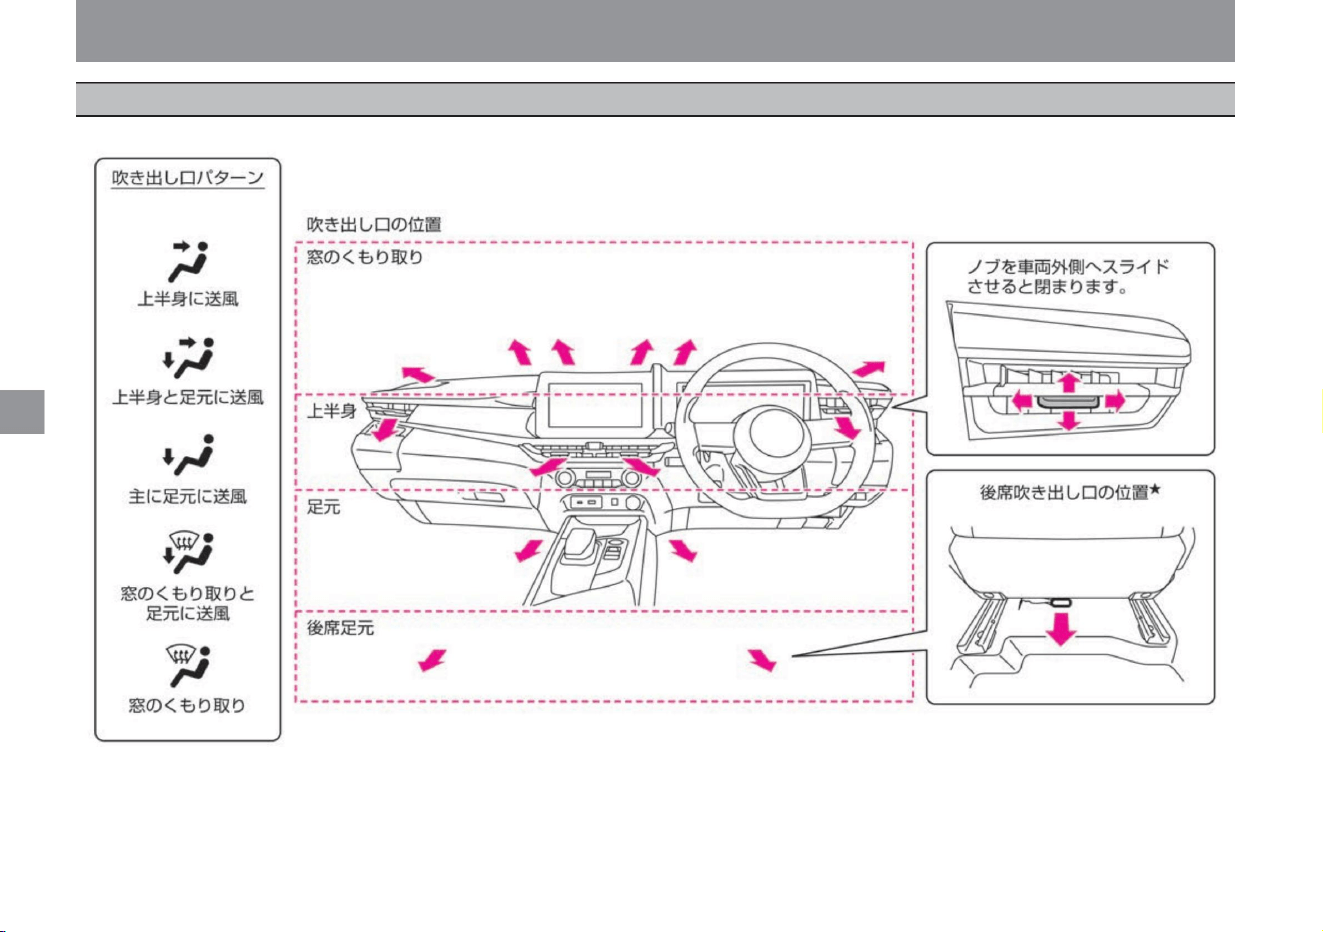
Operation of each part
124
Air conditioner operation
Each time you press the outlet selector switch or defroster switch, the outlet switches.
ZEF0303X
air outlet
Machine Translated by Google
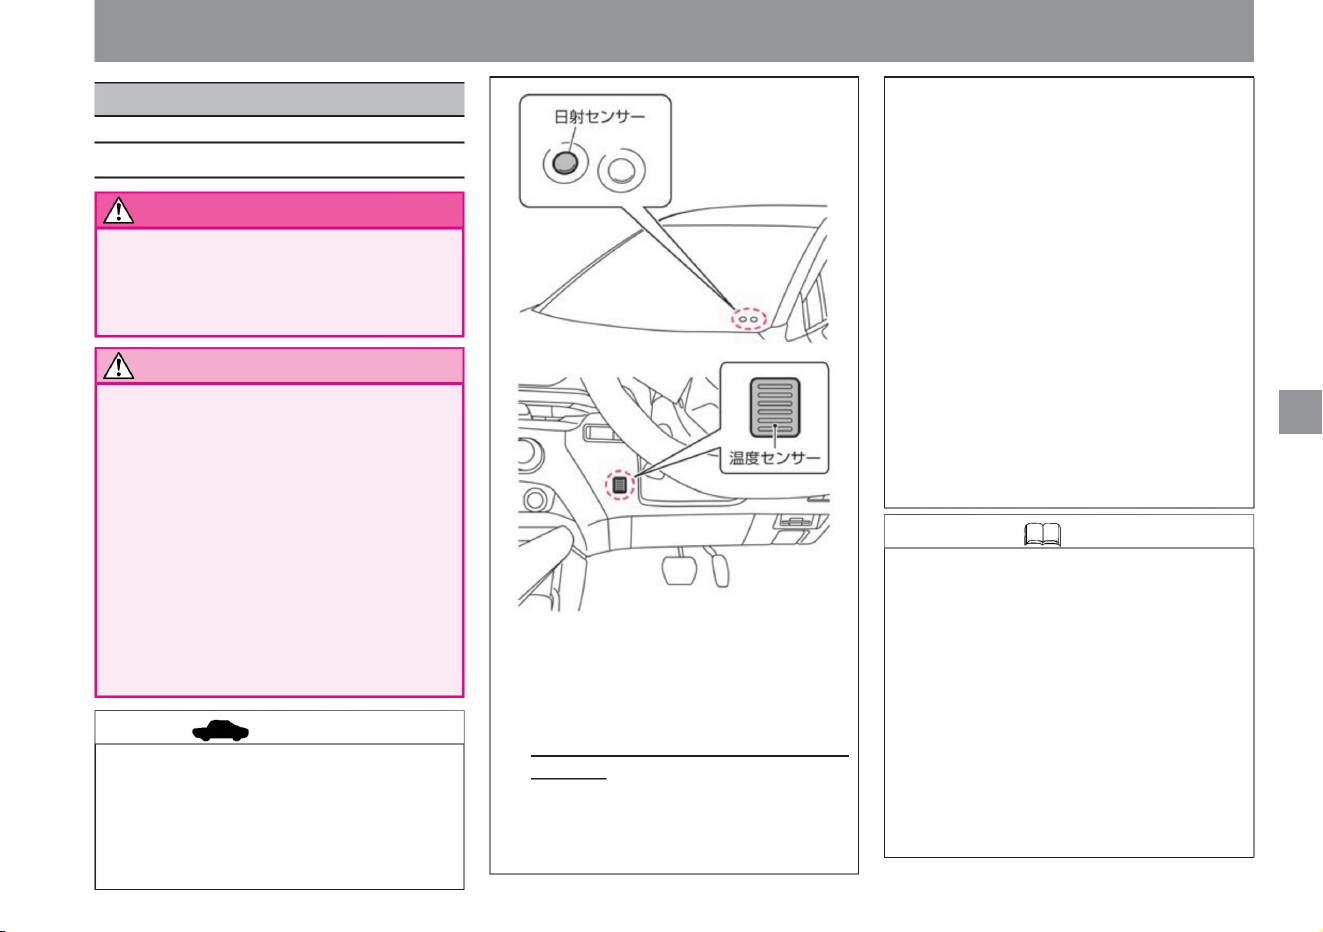
• Be sure to use HFO-1234yf as the air conditioner
gas. • For air
conditioner repair and maintenance, contact a
NISSAN dealer.
• When the outside air temperature is high, such as
in the summer, the air conditioning may not be
as effective if it is fixed to outside air introduction.
In that case, temporarily switch to shy air
circulation.
• During cooling, mist may appear to come out of
the air outlet, but this is caused by sudden
cooling of moist air and is not a malfunction. •
When the outside temperature drops to near
0°C, the air
conditioner may not operate even if the A/C switch
is lit. • When the air conditioner is on or
immediately after it is turned off, you
may hear a clicking, hissing, or thumping sound, but
this is not a malfunction.
• The automatic temperature control of the
automatic air conditioner is performed by a
solar radiation sensor and a temperature
sensor. Do not block the sensor or spray
cleaner on it. The sensor will become less
sensitive and will not work properly.
$/$: Different equipment depending on vehicle model, options, etc.
• Turn on the A/C switch from time to time so that
the oil circulation of the air conditioner does not
run out. Also, if the outside temperature drops
to near 0°C, the air conditioner may not work,
so please go on a warm day.
• Do not use for a long time with shy air circulation.
Operation of each part
Air conditioner operation
Notes on air conditioners
125
warn
Notice
Knowledge
advice
• Do not expose the body to the blowing air
continuously
for a long time. Drivers should be
especially careful not to expose people with
sensitive skin, infants, the sick, the elderly,
or those with physical disabilities to the
wind for a long time. Doing so may cause
low-temperature
burns or unexpected injury. • Do not lower the
set temperature of the air conditioner while
the
defroster switch is on . Condensation may
form on the outside of the windshield and impair your vision.
• Equipped with a clean filter to collect dust,
pollen, dust, etc. Replace the clean filter
regularly to maintain dust collection
performance. Replacement period: Every
year or every 12,000 km
of driving • Even if the clean filter has not
reached
the replacement period, replace it if the amount
of blown air is extremely reduced or if the
window glass becomes easily fogged.
Temporarily use it, as the window glass
tends to fog up, impairing your vision and
making it dangerous.
stomach. For installation or replacement,
please consult a Nissan dealer.
ZEF0307X
ZEF0304X
Be careful when using the air conditioner
Machine Translated by Google
Air conditioner operation
• In order to reduce the odor when the air conditioner is
operating, it is recommended that outside air is
introduced when parking the vehicle.
• If the temperature of the blown air is low immediately
after starting, the amount of blown air to the feet
will decrease. •
Water may drip under the vehicle during or after the air
conditioner is running.
• When the outside temperature is low, the amount of
air from the front defroster increases according to
the outside
temperature. About the smell of the
air conditioner • Because various smells in the air are
mixed in the air conditioner, you may feel the smell
from the blown air.
Operation of each part
Knowledge
126
Machine Translated by Google
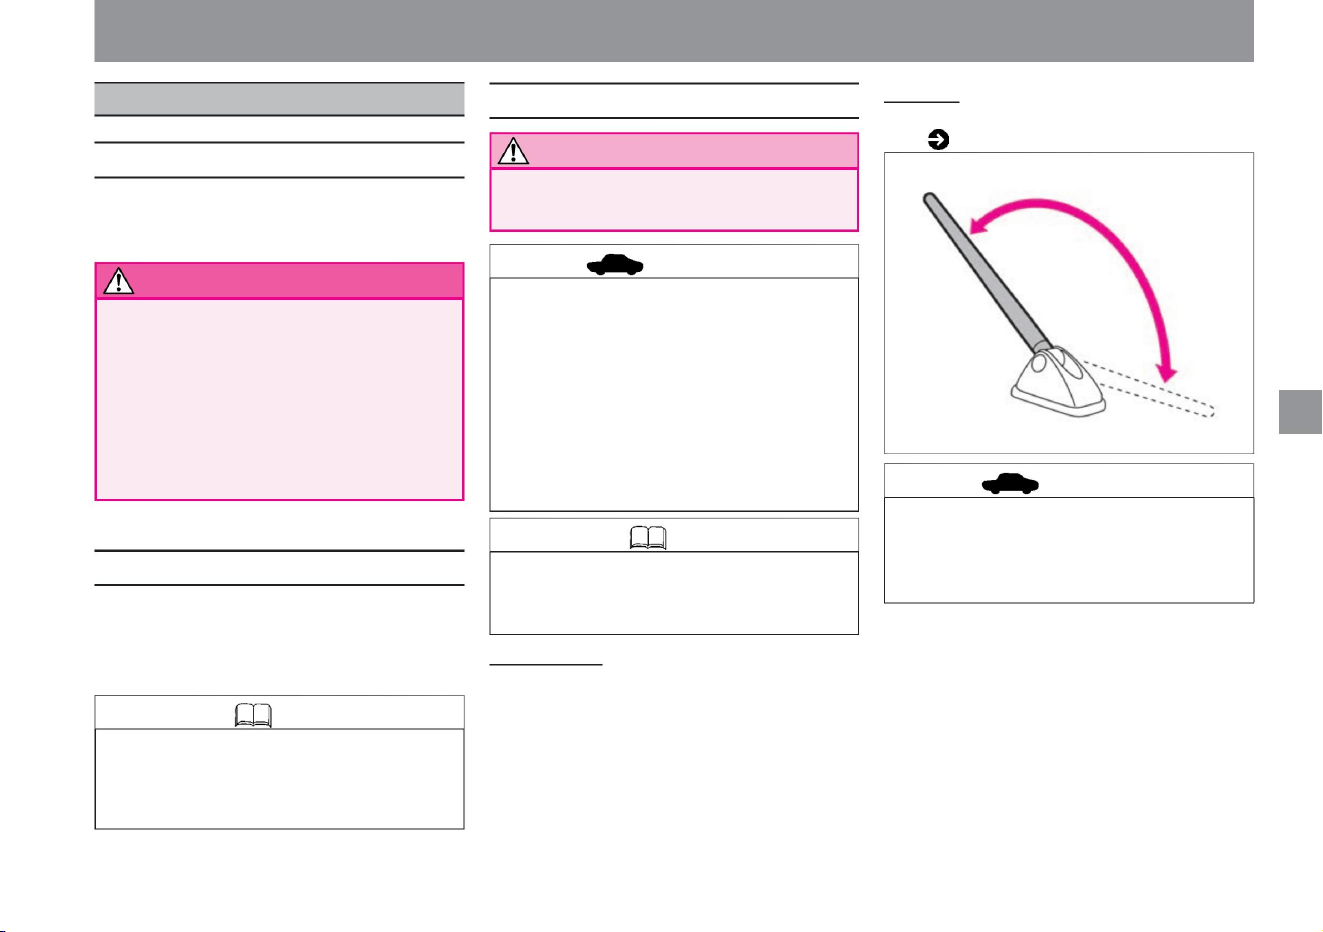
Knowledge
Notice
advice
warn
For safe driving
About radio reception
127
• Radio reception may not be able to maintain the
best reception due to fluctuations in radio waves
caused by moving vehicles, and the effects of
obstacles, trains, and traffic lights.
knowledge
advice
About the roof antenna
ZEF0045X
audio
How to use audio
• When listening to audio, if you use a mobile phone
or wireless device inside or near a car, noise
may be heard.
vinegar.
• Confirm the safety of your surroundings before
adjusting or attaching/detaching the antenna.
• Do not leave the FOMA terminal folded down in
places other than where the antenna may hit
it. It may hit the vehicle body and damage the
painted surface.
• Hold the base of the antenna and move it.
• When adjusting or removing the antenna, hold the
base of the antenna. • Be sure to remove the
antenna in the
following cases. Doing so may damage it. – When
using a car wash – When putting on the body
cover – When parking
for a long time during
snowfall
• While driving, please listen at a volume that allows you to hear
sounds outside the vehicle.
• In places where the antenna hits the antenna,
such as a garage with a low roof or a multi-
storey car park, tilt the antenna down.
• Never operate the audio system while driving.
There is
a risk of inadvertent forward movement. • Do
not
turn up the volume. If it is too
large, the situation outside the vehicle cannot
be seen, which may cause an unexpected
accident.
How to
remove For information on how to remove the antenna ,
How to adjust •
The angle of the antenna can be adjusted steplessly.
Please read ( P.366).
Operation of each part
$/$: Different equipment depending on vehicle model, options, etc.
Machine Translated by Google
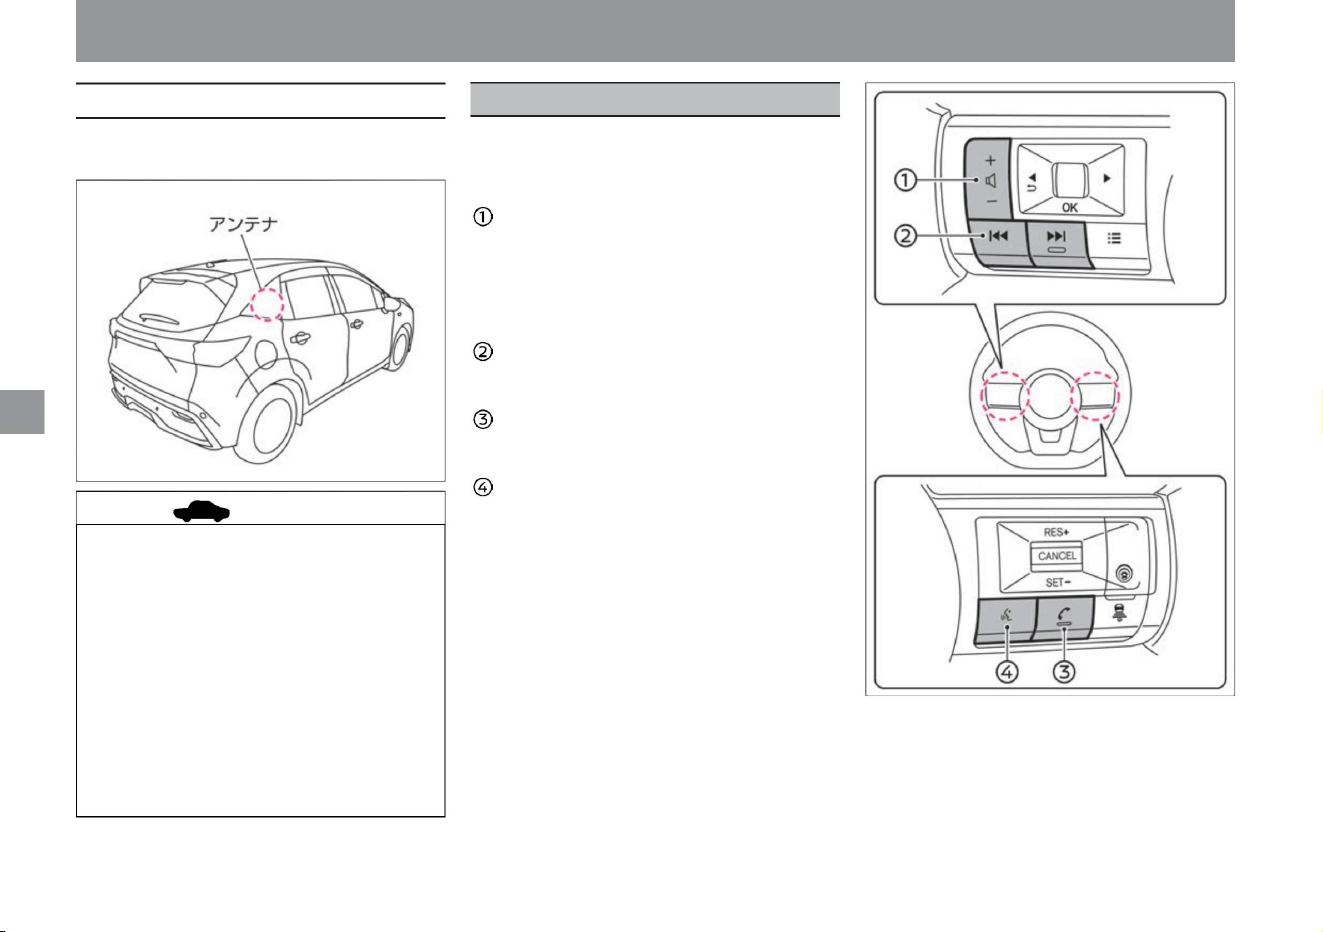
steering switchÿ
audio
Operation of each part
You can operate the manufacturer's option
navigation system or Nissan's original
navigation system.
Volume switch (+/-) You
can adjust the volume.
+: Increase volume
-: Decrease volume
Press and hold to continuously increase or
decrease volume.
Song selection/channel
selection switch Switch songs, broadcasting
stations, etc. Call start/end
switch Press while receiving a call to
answer the call. Press during a call
to hang up. Voice
operation switch Switch to the voice operation screen.
128
About the glass antennaÿ
advice
• Do not attach mirror-type films or metal
objects (commercially available
antennas, etc.) to the rear side glass.
Receiving sensitivity may decrease
and noise may enter. • When
cleaning the inside of the rear side glass,
wipe gently along the antenna wire
with a soft cloth moistened with water
so as not to cut the antenna wire.
• The antenna wire is inside the rear side
glass.
• Take care not to damage the antenna
wire with baggage.
ZEF0308X
ZEF0306X
Machine Translated by Google
• For handling, please also read the
navigation system instruction manual
(separate volume). •
We do not guarantee the operation of
navigation systems other than genuine
Nissan products.
Operation of each part
audio
Knowledge
129
$/$: Different equipment depending on vehicle model, options, etc.
Machine Translated by Google

MEMO
130
Operation of each part
Machine Translated by Google
how to drive
P.149
hill start assist
LDW (Lane Departure Warning) / Intelligent LI (Lane
Departure Prevention Support System)
select lever
P.157
P.207
silent mode
P.173
P.142
take off
ABS (anti-lock braking system)
Intelligent Around
View Monitor (with moving object detection function) P.245 Intelligent
Around View Monitor Notes
RCTA (vehicle detection alarm when
reversing) Intelligent DA (sway alarm) Sign
detection function
Driving support
system ProPILOT
Intelligent emergency braking Collision prevention
assist
P.167
P.156
P.201
P.254
P.171
P.165
P.235
How to handle a 4WD (four-wheel drive) vehicle
Intelligent FCW (Forward Collision Prediction Warning)
P.136
P.167
light switch
P.217
P.175
Auto ACC function
P.170
Headlamp levelizer switch (vehicles with
halogen headlamps)
P.161
P.171
P.231
P.139
auto brake hold
P.241
P.132
P.167
wiper/washer switch
P.147
chassis control
P.226
Vehicle proximity notification device
e-Pedal Step
charge mode
electric parking brake
P.158
P.137
emergency stop signal
P.166
P.239
fog lamp switch
Stop/Parking
P.145
VDC (Vehicle Dynamics Control)
BSW (rear side vehicle detection warning) / intelligent BSI (rear
side collision prevention support system)ÿ
power switch
P.168
131
camera system
How to drive
to start
turn on the lights, use the wipers
Driving support function
drive
Machine Translated by Google
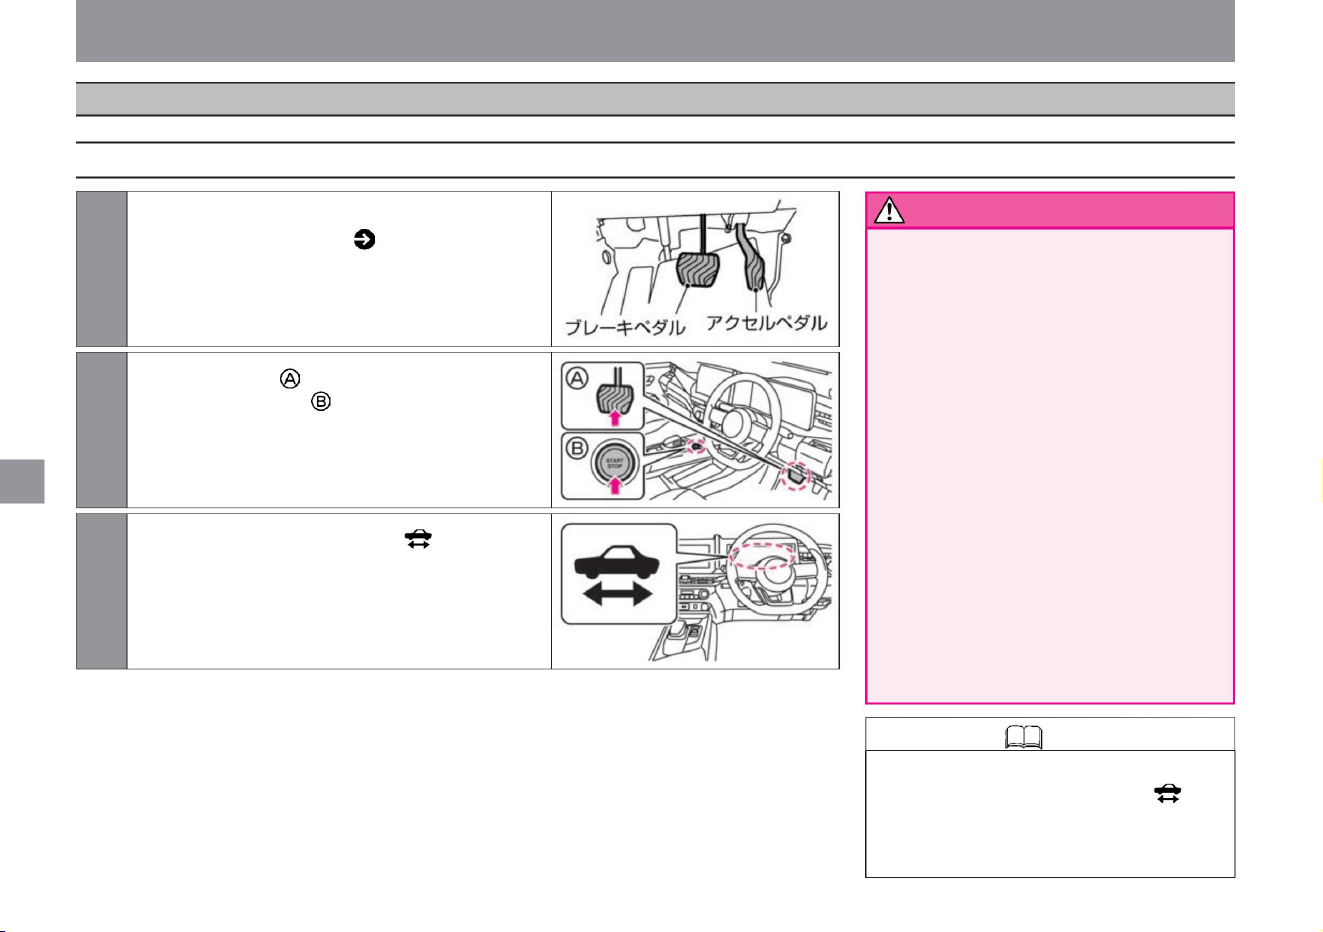
power switch
How to drive
132
warn
Knowledge • Depending on the state of the
vehicle, the engine may run after the power
switch is pressed before the indicator light
changes from blinking to
lighting. The remaining amount of the lithium-ion battery is
How to start the e-POWER system
to start
• Check the pedal position before starting
the e-POWER system.
Stepping on the wrong pedal can lead
to an unexpected accident. Alternately
step on the accelerator and brake
pedals with your right foot and
remember their positions. • Do not warm
up or leave the e-POWER system
running for a long time in a
poorly ventilated place . Exhaust gas
that accumulates around the vehicle
or enters the vehicle interior may cause
carbon monoxide poisoning. Breathing
carbon monoxide can lead to
unconsciousness and an accident,
which can result in death
or serious injury. • Always sit in the driver's
seat when starting the
e-POWER system. If you do it from
other than the driver's seat, it may lead to an unexpected accident.
ZEG0947X
MEG0229X
ZEG0948X
2Press the power switch once while depressing the brake
pedal firmly.
3The drivable indicator light in the meter lights up and
the vehicle is ready to run.
1Check the positions of the accelerator pedal and brake
pedal, and adjust the steering wheel, seat, and
mirrors so that you can take the correct driving
posture ( P.22).
Machine Translated by Google
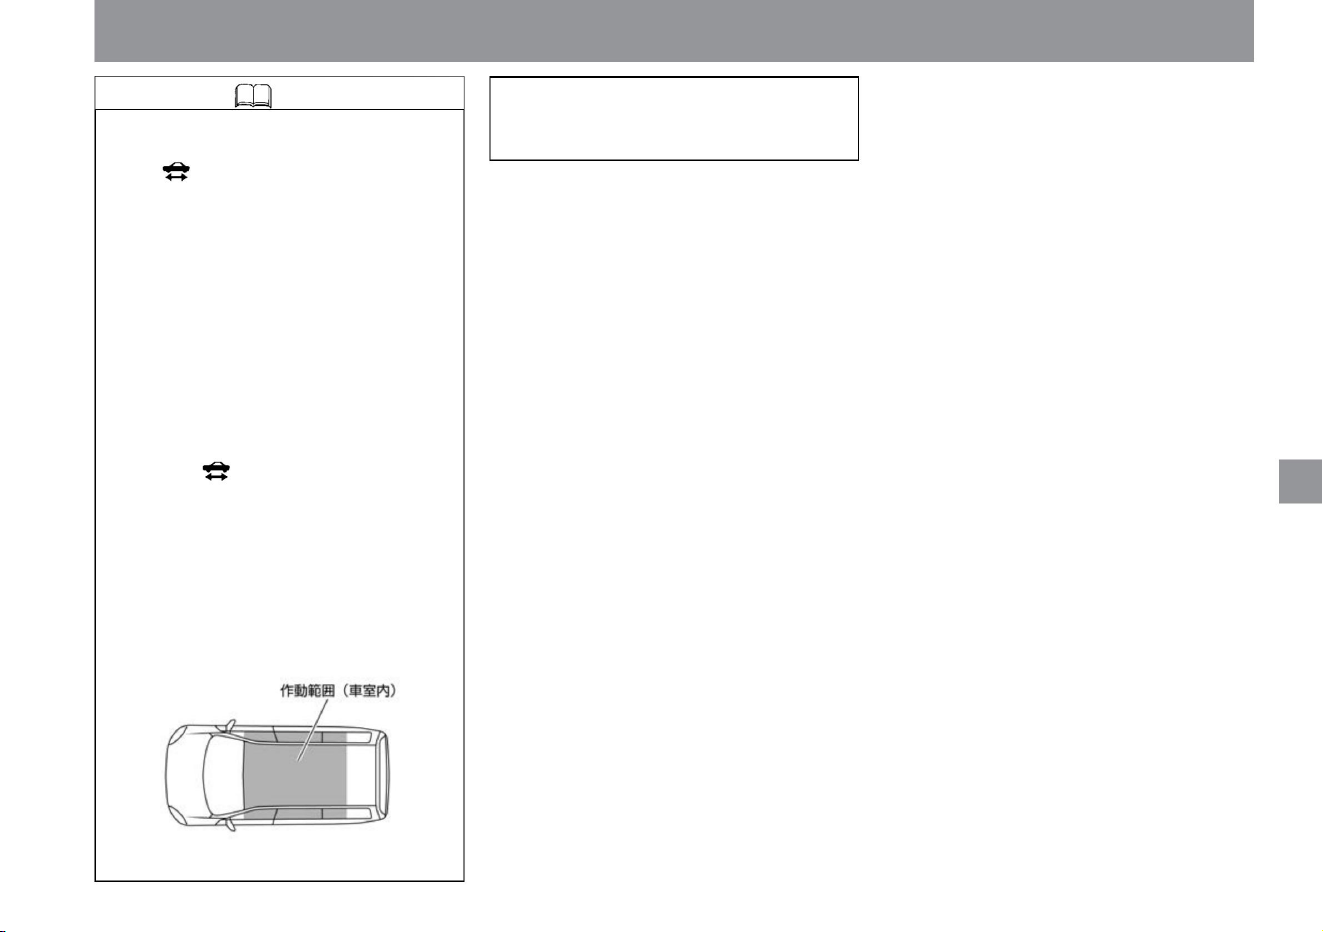
Knowledge
133
MEG0044X
• If the e-POWER system cannot be
started, turn off the power switch, wait
at least 5 seconds, and then restart.
to start
It may take several minutes for the
ready-to-drive indicator light to change
from flashing to lit after the power
switch is pressed. During that time,
the energy monitor will not be
displayed.
• When you step on and release the
brake pedal, you may hear a clicking
sound, but this is not a malfunction.
• The brake pedal may be stiff due to
pedal operation before starting the
system. In this case, if the pedal is
lightly depressed, the pedal depression
operation will not be detected and the
ready-to-run indicator light will not
light, so depress the brake pedal
harder than
usual. • The e-POWER system can be
started when the key (intelligent key/
remote control entry system) is within
the operating range (vehicle interior).
How to drive
$/$: Different equipment depending on vehicle model, options, etc.
Machine Translated by Google
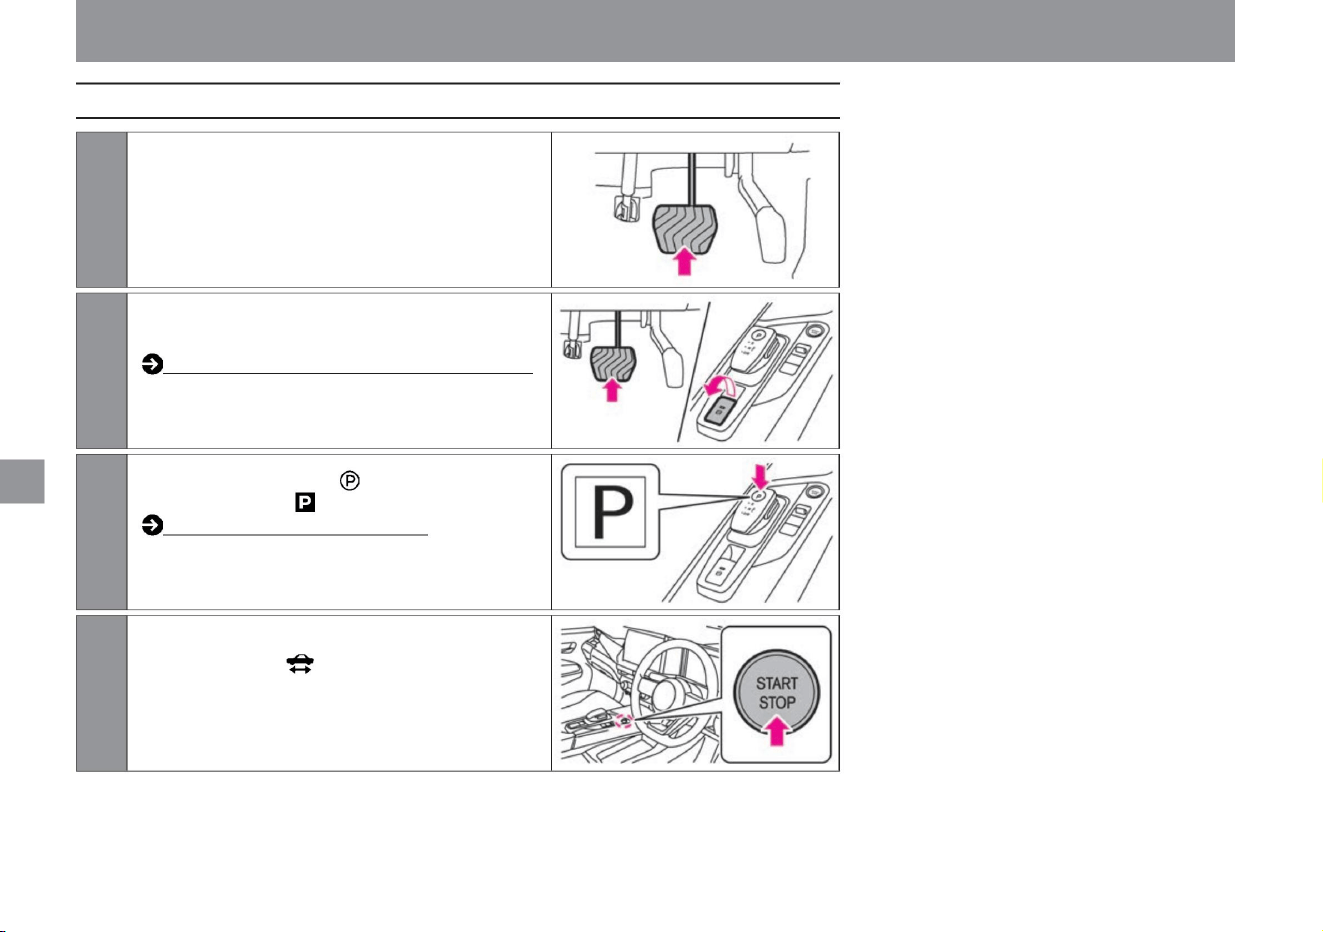
134
How to stop the e-POWER system
3Press the switch on the select lever to
4Press the power switch. After
confirming that the ready-to-drive indicator light is
extinguished, slowly release your foot from the brake
pedal.
2While depressing the brake pedal, the parking brake
1Press the brake pedal to bring the vehicle to a complete stop.
to start
ZEF0286X
ZEG0950X
ZEG0949X
MEG0206X
How to drive
Let
apply the rake.
How to apply the electric parking brake (P.139)
Switch the soft position to . Select
lever operation (P.137)
Machine Translated by Google
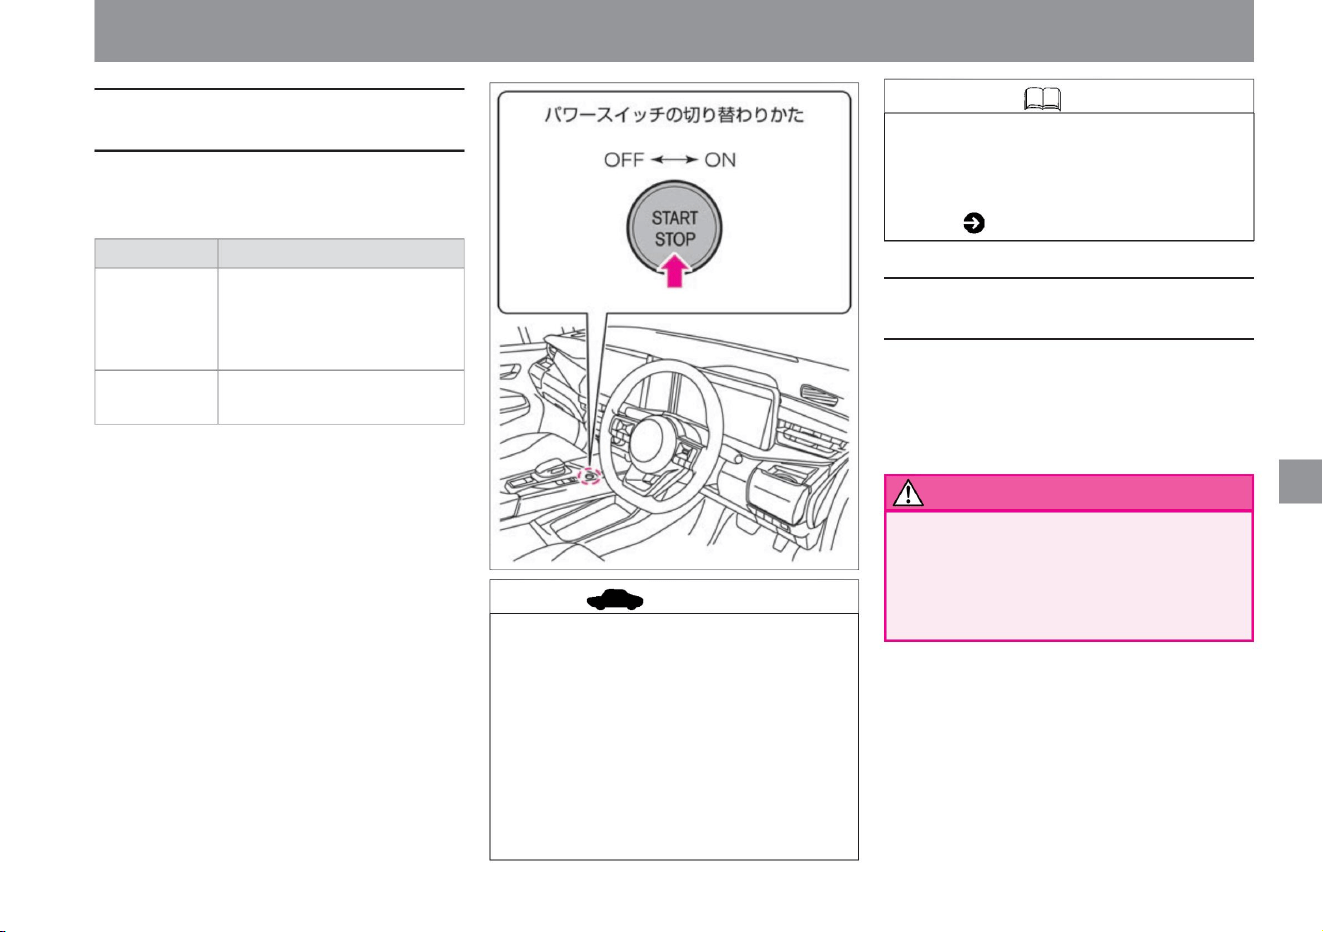
135
Knowledge
How to make an emergency stop for the e-
POWER system
advice
How to switch modes with the power
switch
ZEG0942X
ON
For ACC status, please read Auto ACC function
( P.136).
• When carrying the key (intelligent key/remote control
entry system), the following operations are performed.
– Pressing the power switch without depressing
the brake pedal will change the mode. – Pressing the
power switch while depressing the brake pedal
activates
the e-POWER system. – If the power switch is
pressed while the e-POWER system is starting,
the e-POWER system
will stop.
OFF
•
Position where door mirrors can be
used (in ACC state) • Position
where the e-POWER system is
stopped •
Position where all electrical
components can be used
• When performing an emergency stop, as much as possible
Do it after slowing down.
After an emergency stop, braking becomes less
effective, making it difficult to control the vehicle.
To forcibly stop the e-POWER system while driving, such
as in an emergency, perform one of the following
operations. • Press the power
switch three times quickly. • Press and hold the
power switch for 2 seconds or longer. caveat
mode
• In order to prevent the 12V battery from being
discharged, use electrical equipment with the e-
POWER system started. If you have to use it, do
not use it for a long time or use multiple electrical
components at the same time. • The power
switch will automatically turn off after about 10 minutes
with the following conditions met.
If you press the power switch without stepping on the
brake pedal, the mode will change as follows.
– When the power switch is ON – When
the vehicle is stopped
Electrical components such as door mirrors can
be used in the ACC state.
• Even if the power switch is in the OFF position,
to start
How to drive
$/$: Different equipment depending on vehicle model, options, etc.
Machine Translated by Google
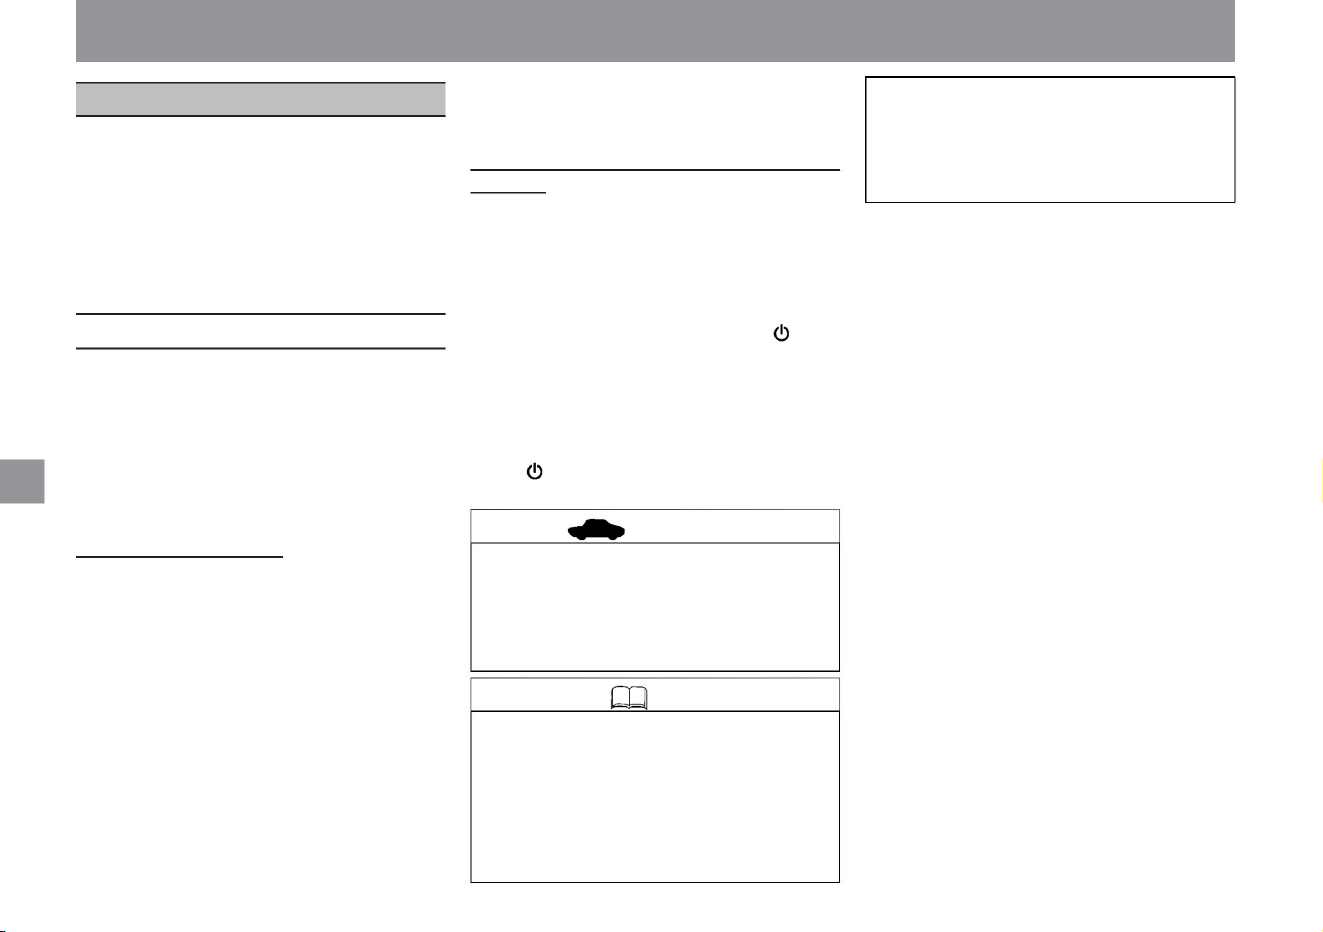
Auto ACC function
• When the dealer option navigation system is
installed, the navigation system will also
be turned off when the power switch is
turned off. • The ACC state can
be extended up to 30 minutes by operating
the manufacturer's option navigation
system. extension
Electrical components such as door
mirrors can also be used if lengthened.
(The ACC state cannot be extended with
electrical equipment other than the
manufacturer's optional navigation system.)
vinegar. –For vehicles not equipped with a
manufacturer’s option navigation system, after
approximately 11 minutes have
passed in the ACC state –For vehicles equipped with
a manufacturer’s option navigation system, after
approximately 11 minutes have passed without
performing navigation
operations while in the ACC state – e- After stopping
the POWER system, press the remote control (key (intelligent key/remote key)
• In the following cases, it automatically switches to the ACC state.
• To prevent a dead 12V battery, use electrical
equipment (such as the navigation system ÿ and
power socket) with the e-POWER system on.
increase. – When the door is unlocked using the remote
control (key (intelligent key/remote control entry
system)) function – When the power switch is
turned off
To stop the ACC state In the following cases, the
ACC state stops completely.
When about 1 minute has passed after locking
with the motor control entry system)) function
Vehicles with a
manufacturer's option navigation system •The navigation
system
continues to operate even after the e-POWER system is
turned off. • After the power switch is turned
off, the screen of the navigation system will turn off and
operation will stop in about 10 minutes. • Even if the
screen turns off, you
can use the navigation system again for about 10 minutes
by pressing within about 1 minute. • When the driver's
door is opened, the screen of the
navigation system turns off and operation stops. Even if
the screen turns off, you can use the navigation system
again by pressing within about 1 minute. advice
to start
About the auto ACC function
136
Knowledge
Even when the power switch is off, under certain
conditions, this function automatically switches to a
state (ACC state) in which electrical components such
as the navigation systemÿ and door mirrors can be
used. The navigation systemÿ, door mirrors, etc. can
be used even after the e-POWER system is stopped or
before the power switch is turned on .
How to drive
Machine Translated by Google
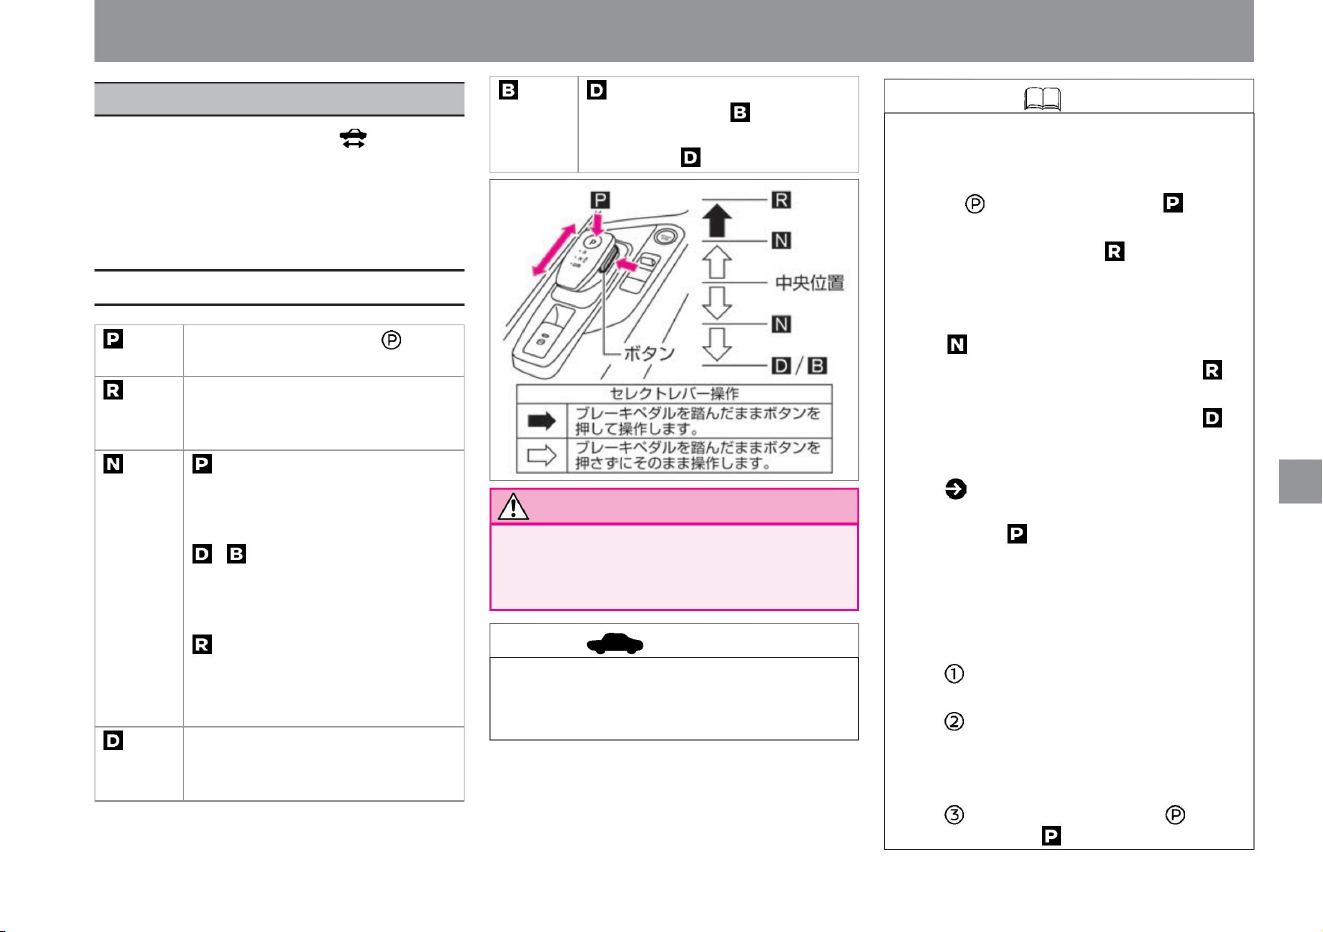
ZEG1326X
drive
When the ready-to-drive indicator light in the
instrument cluster is illuminated, all shift
positions can be
selected. After operating the select lever, be
sure to confirm that it has been switched to
the desired shift position.
Operation of the select lever
advice
Knowledge
137
Notice
$/$: Different equipment depending on vehicle model, options, etc.
– Press the switch on the selector lever to
switch to .
• When the select lever is not in the center,
pressing the switch will not switch to . •
Buzzer sounds
when the shift position is switched to .
• Do not hang anything on the select lever.
–Switching the shift position to when
reversing •
This vehicle has an auto-P function
• The following operations are considered
invalid, the buzzer sounds and the shift
position switches to . –
Switching the shift position to when moving
forward
The vehicle may start suddenly and cause
an accident.
When , slide two steps to the
rear of the vehicle to switch to .
Slide it two steps again to return
to .
( P.138), but if the electronically
controlled shift fails, even if you try to turn
the power switch off when the shift
position is other than , the buzzer sounds
and the power switch cannot be turned
off. If you
cannot turn off the power switch, do the
following. – Stop the vehicle and apply
the parking brake. – Switch the power
switch to
ON by pressing the power switch while
depressing the brake pedal.
Press the switch on the select
lever. While
depressing the brake pedal, press
the button and slide it two steps
toward the front of the
vehicle. In the case of , while
depressing the brake pedal, slide it
one step forward or backward of
the vehicle and hold it for a
while. ÿ In the case of , while
depressing the brake pedal, slide it
forward one step and hold it for a
while. ,
slide the brake pedal one step
toward the rear of the vehicle while
depressing the brake pedal and
hold
it for a while. While depressing
the brake pedal, slide it two steps
to the rear of the vehicle.
• Do not keep holding the select lever in any
position other than the center position. Doing
so may cause malfunction.
• The select lever will return to the center
position when released.
How to drive
select lever
Machine Translated by Google
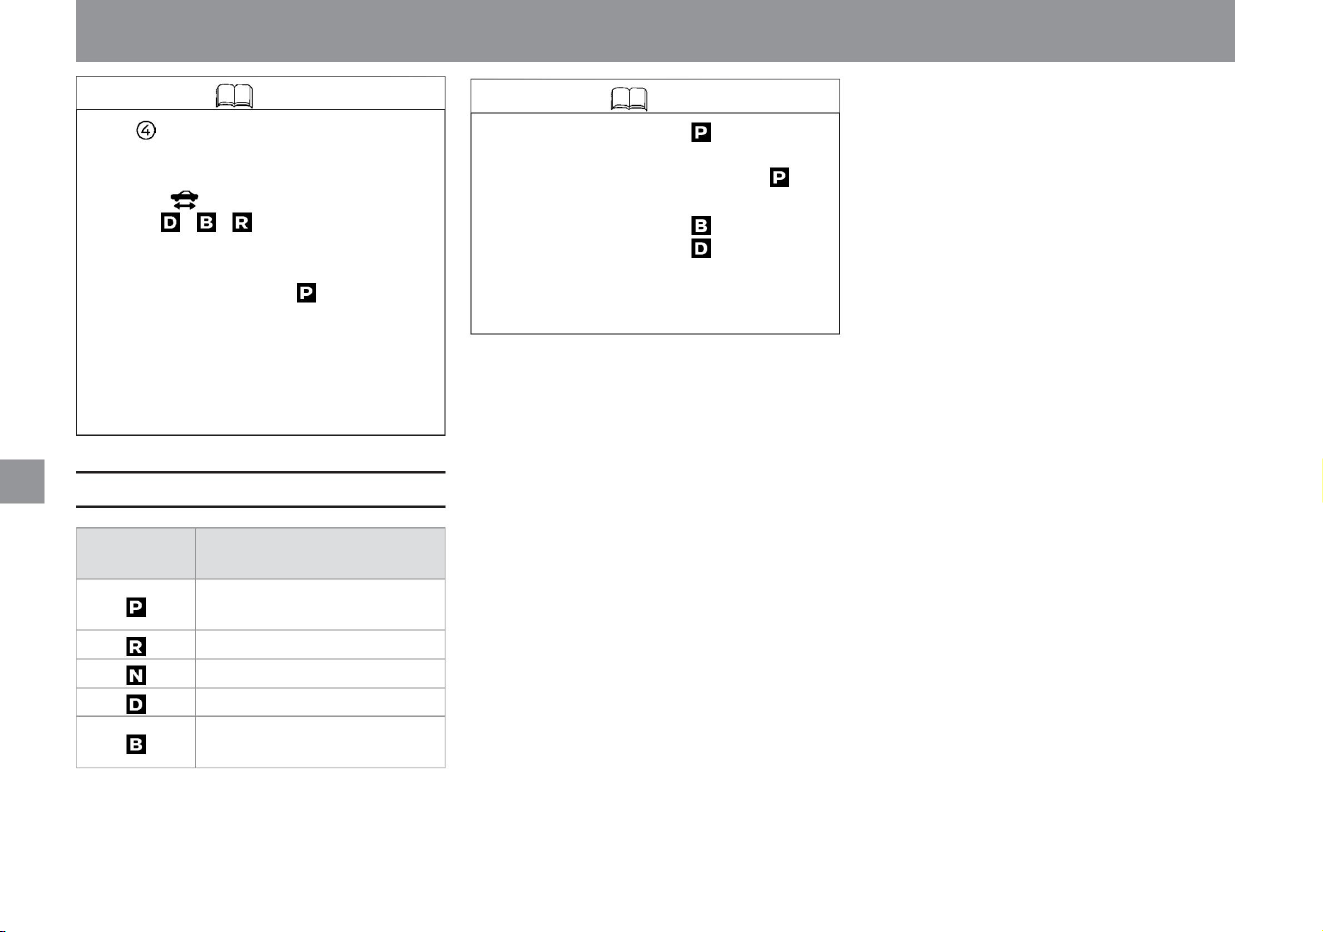
Knowledge
Function of each shift position
Knowledge
138
– When the driver's seat belt is unfastened
– When the driver's door is opened
– in SPORT or ECO mode
– Press the power switch to toggle it to
OFF. • Even if
the power switch is ON, you cannot switch
to ÿÿ when the ready-to-drive indicator
light is
not lit.
• When the following conditions overlap,
the shift position may automatically
switch to .
• If the power switch is turned off without
switching the shift position to , the
shift position will automatically switch
to . (Auto-P function) • When
the shift position is , the deceleration force
is increased, so the engine operates
more frequently than when it is . Also,
the engine speed may increase.
drive
How to drive
Work
when parked
Shift
position
When parking and starting the e-
POWER system When
reversing When
power is not transmitted
When driving normally
When strong regenerative braking is
required, such as when going downhill
Machine Translated by Google
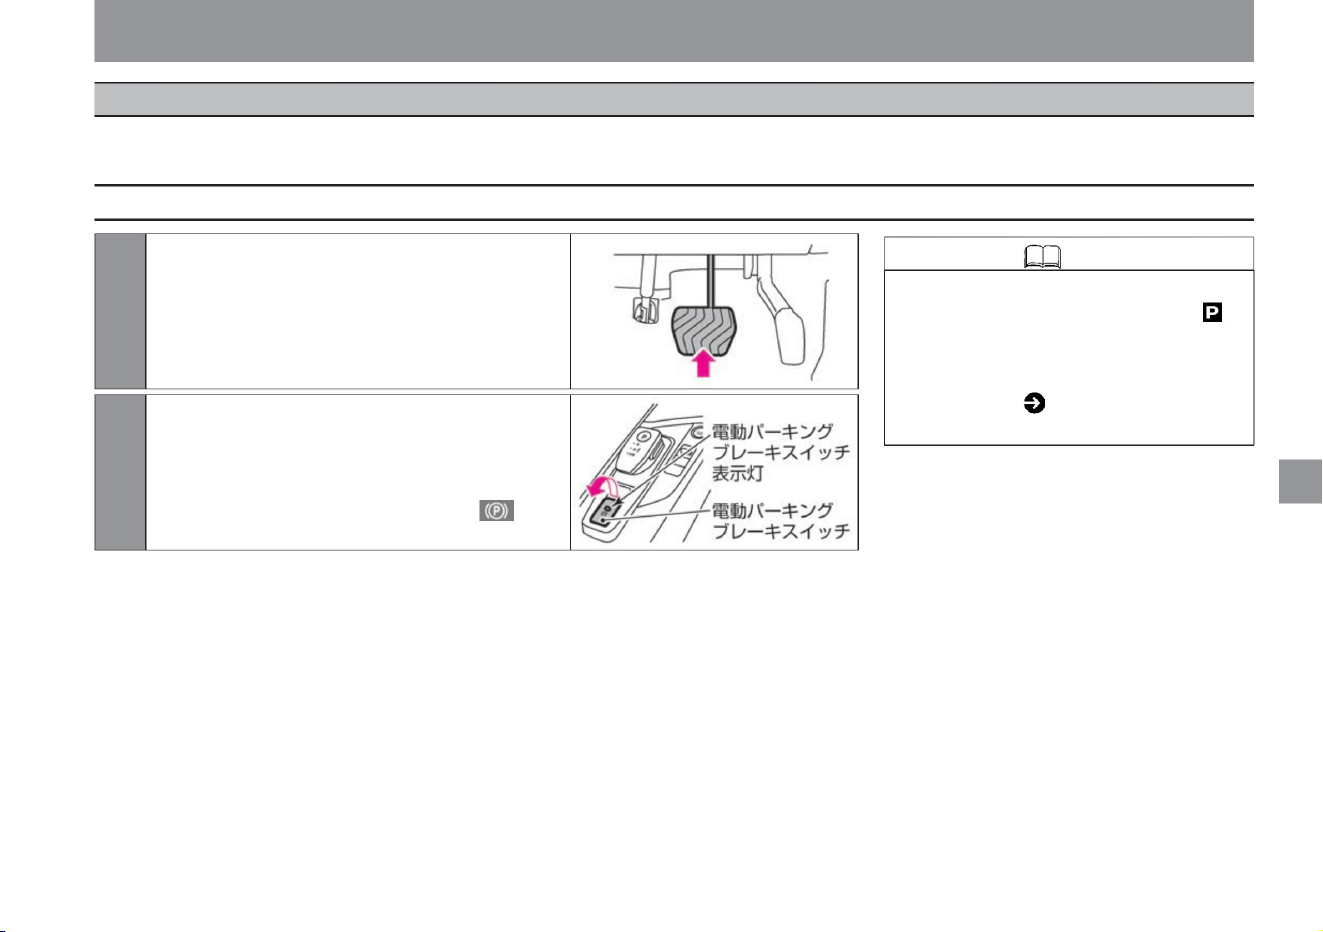
1 Firmly depress the brake pedal.
2Pull up the electric parking brake switch
drive
$/$: Different equipment depending on vehicle model, options, etc.
• If the shift position is set to while the auto
brake hold is operating, the parking brake
will be applied. In addition, please read
( P.142)
for the auto brake hold.
increase. When the switch is pulled up, the indicator
light of the electric parking brake switch lights up,
and the electric parking brake warning light in the
meter lights up about 2 seconds later.
139
How to apply the electric parking brake
Knowledge
MEG0206X
ZEG0951X
This brake is used when the vehicle is stopped or parked. Applying the parking brake locks the rear wheels. It is operated by the electric parking brake
switch.
How to drive
electric parking brake
Machine Translated by Google
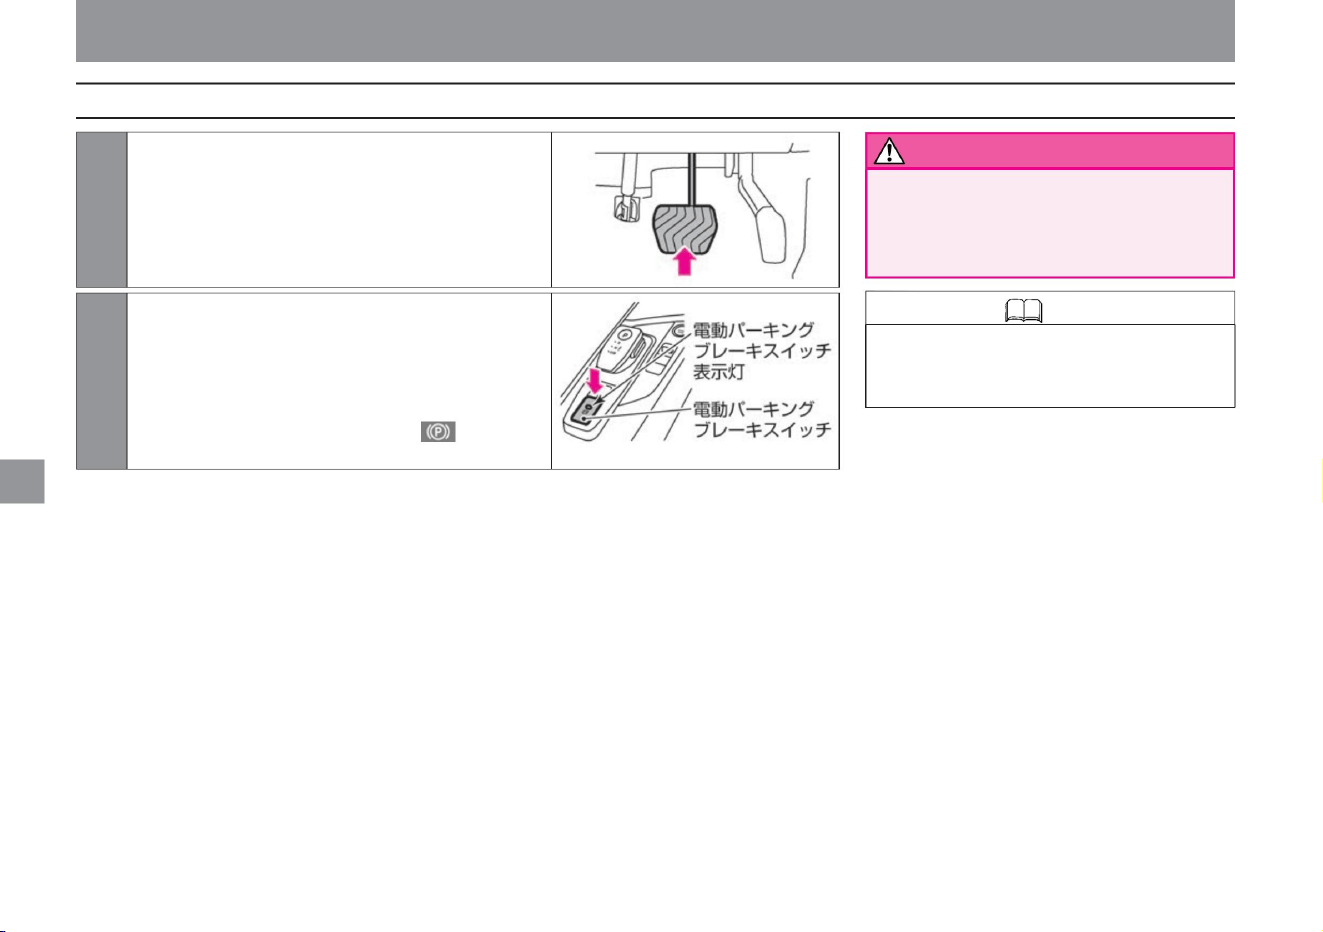
140
Knowledge • The electric parking brake
can be released only when the power
switch is ON.
warn
How to release the electric parking brake
ZEG0952X
MEG0206X
Operate the electric parking brake
drive
How to drive
2 Push down the electric parking brake switch
increase. When the switch is pushed down, the
indicator light of the electric parking brake switch
goes out, and when the electric parking brake is
released, the electric parking brake warning light in
the meter goes out.
Do not drive while
standing still. Failure to do so may result
in brake failure and an accident.
1 Firmly depress the brake pedal.
Machine Translated by Google
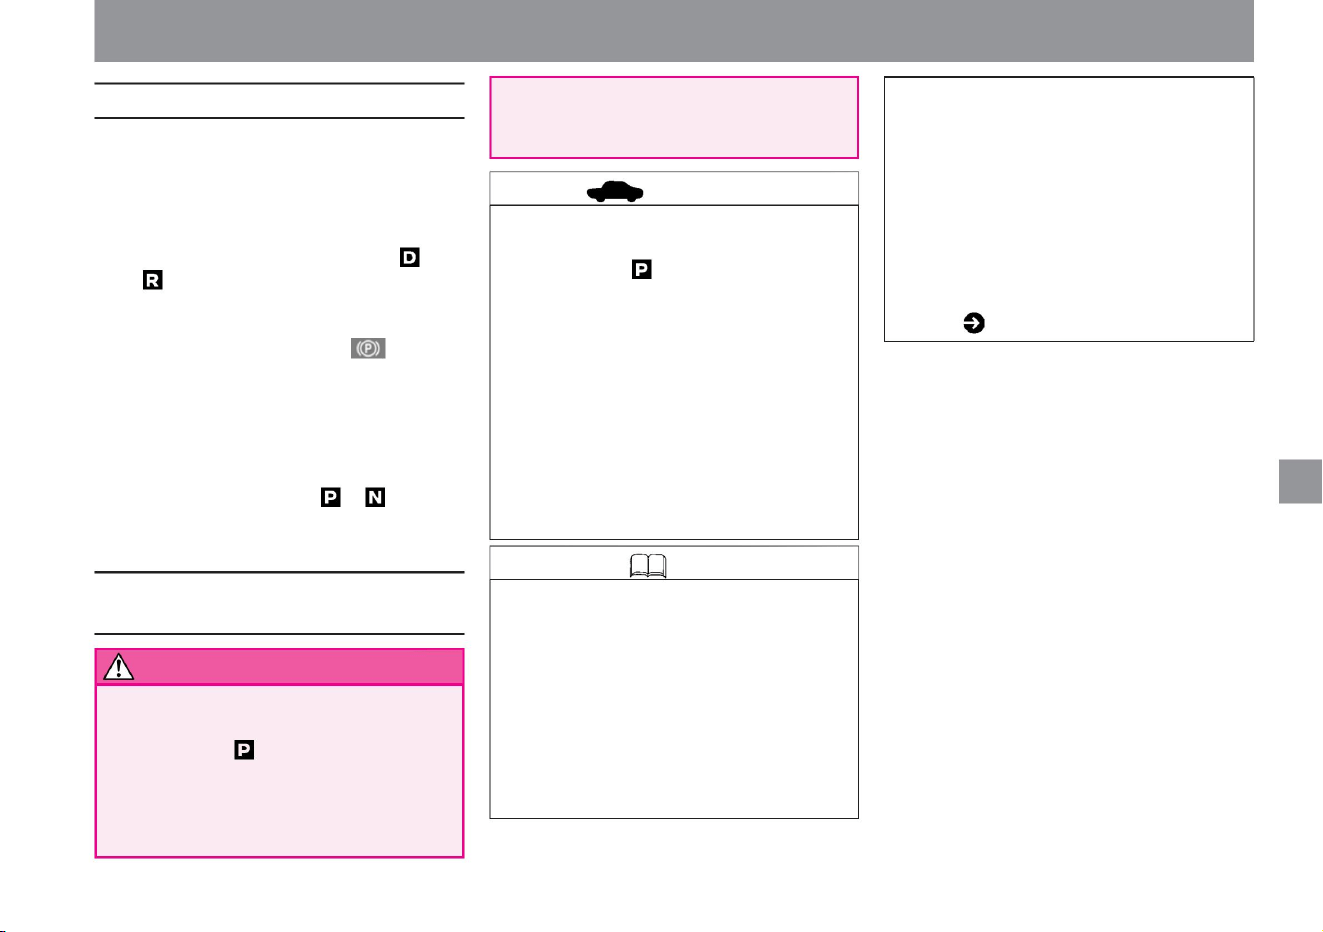
Knowledge
warn
Notes on the electric parking brake
How to cancel automatically
advice
141
$/$: Different equipment depending on vehicle model, options, etc.
• When you apply or release the electric
parking brake, you may hear an
operating sound (whining, gurgling)
from the rear of the vehicle, but this
is not a malfunction.
• When parking in cold weather, place
the shift position in the position without
applying the electric parking brake,
and chock the front and rear wheels
appropriately while releasing the
electric parking brake. If the electric
parking brake is applied in cold
weather, the parking brake may freeze
and cannot
be released. • If the electric parking brake
cannot be released due to a dead
12V battery or malfunction, contact a
Nissan dealer or a road service such
as JAF.
• If you need to apply the electric parking
brake in an emergency while driving,
keep pulling up the electric parking
brake switch. A buzzer sounds and
the electric parking brake
• When leaving the vehicle, apply the
electric parking brake and then switch
the shift position to position. • Do
not repeatedly apply and release the
electric parking brake in a short
period of
time. Motorized to prevent system overheating
The parking brake may not work. Try
again after about 1 minute has passed.
• Automatic release of the parking brake
must meet the following conditions. –
The driver's door is closed –
The e-POWER system is activated –
If the shift position is other than ,
It takes a key. Release the switch to
disengage the electric parking brake.
• If you pull
the electric parking brake switch while
the power switch is OFF or in the
ACC state, the indicator light of the
electric parking brake switch may stay
lit for a while.
tree
The parking brake can be released without
operating the electric parking brake switch.
It is convenient
for starting in traffic jams and
uphill. • With the electric parking brake
applied, shift the shift position to or and
depress the accelerator pedal slowly.
The parking
brake is released and the electric parking
brake warning light goes out.
For ACC status, please read Auto
ACC function ( P.136).
drive
How to drive
Machine Translated by Google
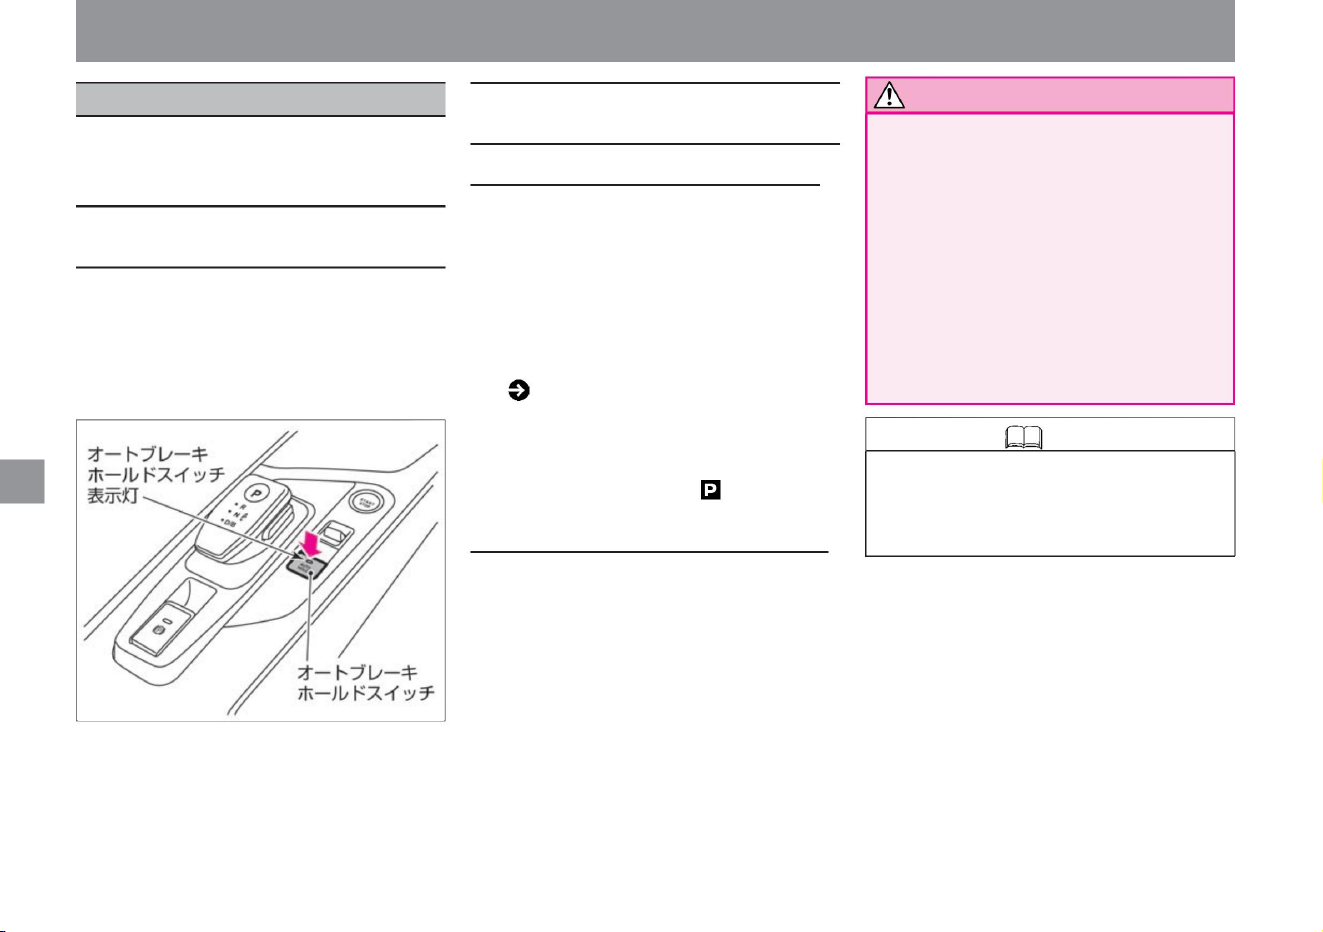
( P.311) –
The driver's seat belt is worn – The
electric parking brake is released – The
shift
position is out of position
Turning off the auto brake hold function
When the auto brake hold function is ON,
pressing the auto brake hold switch turns
off the switch indicator light and turns off
the auto brake hold function. To turn
off the auto brake hold while braking force
is maintained, press the auto brake hold
switch while depressing the brake pedal.
Ru
Turning on the auto brake hold function
•Turn on the power switch, press the auto
brake hold switch, and the switch indicator
light of the auto brake hold switch will
light up. • Only
when the following conditions are met, the
auto brake hold function turns on the auto
brake hold indicator light (white) in the
meter and enters the standby state.
• When the brake force is maintained by
the auto brake hold function, when
turning off the auto brake hold
function, depress the brake pedal
firmly. The brakes
will be released and the vehicle will
start moving, which may lead to an
unexpected accident. • If the brake hold
does not start even after the vehicle
stops, depress the brake pedal until
the auto brake hold indicator light (green) lights up.
drive
How to drive
The auto brake hold function is a function that maintains the braking
force while the vehicle is stopped, such as when waiting for a traffic
light.
• The auto brake hold function is a function that
maintains the braking force when the
vehicle is stopped by the driver's
brake operation. If you step on the accelerator
pedal while braking force is maintained, the
brakes will be released and you can start.
Knowledge • The ON/OFF setting of the
auto brake hold function is maintained
even if the power switch is turned OFF
until the setting is changed again.
About the auto brake hold function
Operation of the auto brake hold function
142
Notice
ZEG0962X
auto brake hold
Machine Translated by Google

ÿ When the
shift position to start is in a position other than or
and the accelerator pedal is depressed while
braking force is maintained, the maintained
braking force is released and the vehicle
starts moving. When the holding of the braking
force is released, the auto brake hold indicator
light in the meter lights up in white and returns to
the standby state.
• On slopes, it is necessary to strongly depress
the brake pedal until the auto brake hold
starts to operate.
( P.306), brake system warning light
(yellow display) ( P.304),
electric parking brake warning light
( P.304), or master warning
( P.309) lights up and the "chassis control
display" warning message ( P.316) is
displayed on the Advanced Drive Assist
Display, the auto brake hold function will
not operate. • When the brake force is
maintained, the
vehicle is kept stationary, so the operation
noise may be generated, but this is not a
malfunction.
• In the following cases, there may be a problem
with the system. Have it checked by a
NISSAN dealer immediately.
• Do not use on steep slopes or slippery roads.
Even
if the auto brake hold function is working,
the vehicle may start moving. • If the
vehicle
cannot be stopped even if the auto brake hold
function is activated, use the brakes to
stop the vehicle. If the vehicle moves due
to an external
factor while the brake force is maintained,
an audible warning may sound and a
warning message may be displayed on
the Advanced Drive Assist Display.
Warning message
( P.315) Auto brake hold in the
following cases
Turn off the function.
– When using a car wash –
When being towed by a vehicle
• In the following cases, shift the shift position
to the position and check that the parking
brake is applied securely. –
When parking –
When people get on
and off – When loading and unloading luggage
The vehicle may move unexpectedly
and cause serious injury or an
accident. • VDC warning light in the meter
When the auto brake hold
function, which maintains braking force, is in
standby mode (the auto brake hold indicator
light in the meter lights up white), depress the
brake pedal to stop the vehicle, and the auto
brake hold function will apply the braking force.
Retained. When the
brake force is maintained, the auto brake hold
indicator light in the meter lights green. ( P.311)
– When a warning message appears on the
Advanced Drive Assistance Display –
When the auto
brake hold switch is pressed but the indicator
light of the switch does not light
• When the auto brake hold function is ON and
the braking force is maintained, the parking
brake will be applied and the braking force
will be released in the following situations.
warn
Precautions when using the auto
brake hold function
143
How to use the auto brake hold
function
Knowledge
advice
Knowledge
drive
$/$: Different equipment depending on vehicle model, options, etc.
How to drive
Machine Translated by Google
Knowledge
144
– shift position to position
– When the electric parking brake
switch is pulled up
– When the brake force is maintained by the
auto brake hold function for 3 minutes or
more –
When the driver's seat belt is unfastened
– When the driver's door is
opened – When the power switch is turned
off – When the auto brake hold function unsuitable for
drive
How to drive
When
when something goes wrong
Machine Translated by Google

How to release the electric parking brake
• When starting, do not operate the select
lever while stepping on the accelerator
pedal.
It may start suddenly and lead to a serious
accident. • When
the vehicle is stopped and the shift position
is in a position other than , firmly
depress the brake pedal. The
vehicle may start moving due to the
creep phenomenon, which may lead to an accident.
• If you press the accelerator pedal with the
electric parking brake applied and the
driver's door open, the electric parking
brake may not be released and the
electric parking brake may malfunction.
(P.140)
Knowledge • Hill start assist ( P.171) operates
when starting on a steep uphill slope. •
Hill start
assist may not work on gentle slopes.
drive
ZEF0286X
ZEG0953X
ZEG0954X
ZEG0698X
2While firmly stepping on the brake pedal with your
right foot, slide the select lever two steps toward
the rear of the vehicle to switch the shift position
to . Select lever operation (P.137)
1Press the power switch while depressing the brake
pedal to start the e-POWER system. How to
start the e-POWER system (P.132)
3 Release the parking brake while keeping your right
foot firmly on the brake pedal.
4 Gradually loosen the brake pedal and slowly depress
the accelerator pedal to start.
$/$: Different equipment depending on vehicle model, options, etc.
How to start
145
advice
warn
How to drive
take off
Machine Translated by Google
Knowledge automatically works to prevent the
vehicle from reversing, and controls the vehicle so
that it does not reverse beyond a certain speed.
How to run
advice
146
Knowledge
warn
• Do not intentionally reverse the vehicle on an
uphill with the shift position set to or , and do
not intentionally move the vehicle forward on
a downhill with the shift position set to . It may
lead to vehicle damage.
Use the foot brake and regenerative brake when going downhill
Use a rake. If you
keep depressing the brake pedal, the brake
The rake may overheat and become
ineffective, which is dangerous. Please use
regenerative braking according to the
gradient of the slope. • Do not put the shift position
in while
driving. Since the regenerative brake does
not operate, it may lead to an unexpected
accident. • If the effectiveness of the regenerative
braking becomes weak, depress the brake
pedal to decelerate.
•Drive with the shift position in .
• Do not drive through deep puddles such as
flooded roads. It may lead to engine damage
or vehicle failure.
• Do not use the creep phenomenon to stop the
vehicle on an uphill slope, or stop the vehicle
while depressing the accelerator pedal. It
may lead to vehicle damage.
• When the lithium-ion battery is fully charged, the
power generated by regeneration is consumed
by operating the engine with the power
generation motor. At that time, the engine
noise may become louder, but it is not
abnormal.
•Accelerate and decelerate by operating the
accelerator and brake pedals.
•When you want to accelerate suddenly at the
entrance of a highway, etc., fully depress the
accelerator
pedal. •When driving downhill, regenerative braking
is also used. The effect of regenerative braking is
stronger when the shift position is set to , and
when the drive mode ( P.161) is set to SPORT
mode or ECO mode rather than NORMAL. If you
are going too fast, depress the brake pedal to
slow down if necessary. •Regenerative braking
may
become less effective on long downhills when the
lithium-ion battery is fully charged, when the
temperature is low, or when the road surface is
slippery.
• When parking on a slope, step on the brakes to
stop the vehicle. If you continue
to stop the vehicle only by operating the
accelerator pedal without stepping on the
brake, the driving motor may overheat.
When stopping the vehicle, take your foot off
the accelerator pedal and step on the brake pedal.
• If you press the switch on the select lever while
driving, the operation will be invalid. (The
buzzer sounds and the shift position before
operation is maintained.)
drive
How to drive
Machine Translated by Google
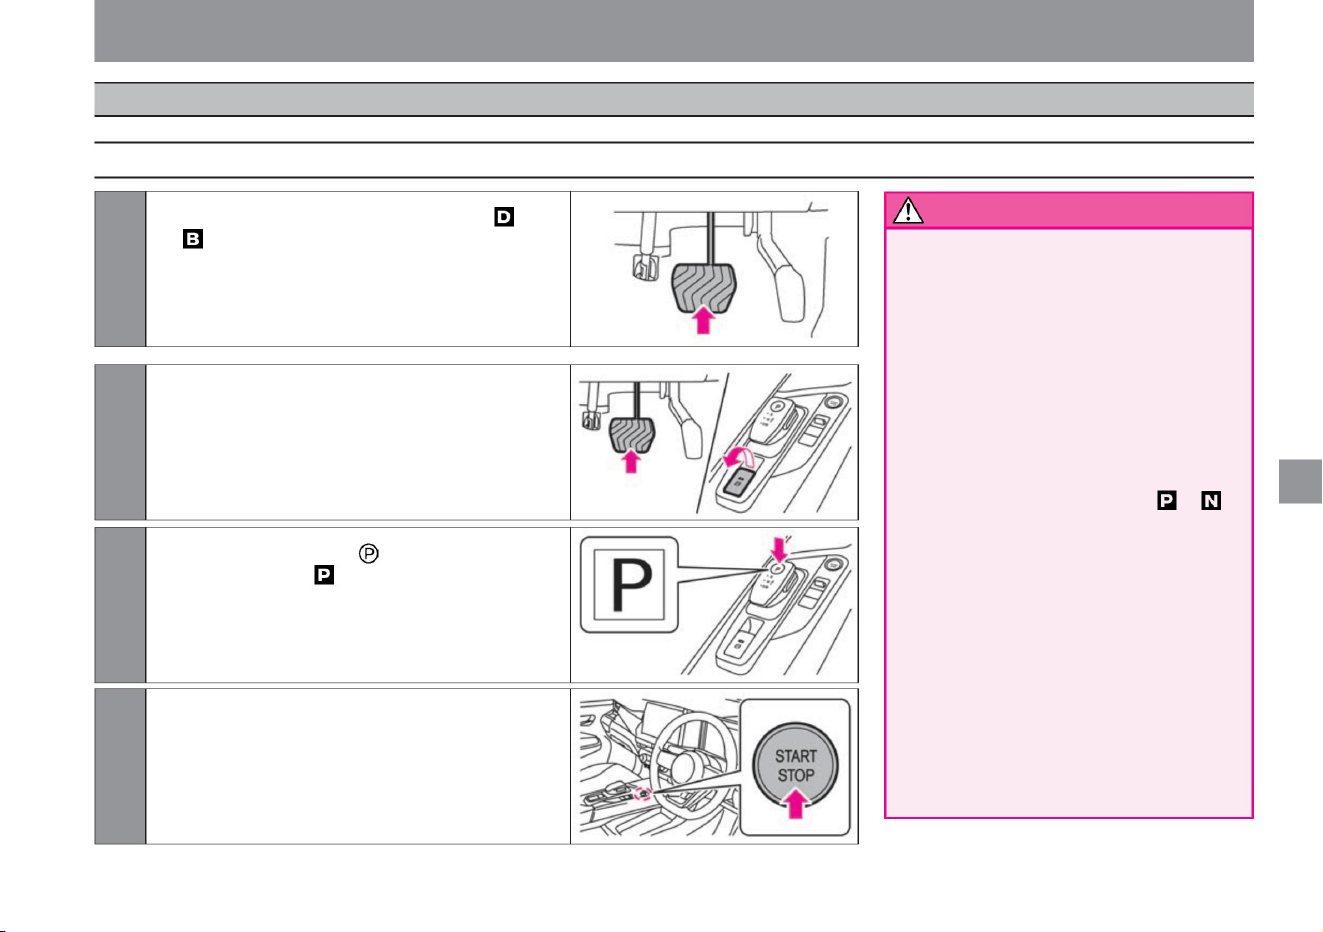
• Be careful of gas lighters when parking.
Do not
leave a gas lighter with an exposed
operating part in a glove compartment
or other small container, or drop it
between floors or seats. When you
push in luggage or move the seat,
gas may blow out and cause a fire.
• Do not idling while the vehicle is
stopped. If the shift position is
in any position other than , the vehicle
may start suddenly and lead to an
unexpected accident. When
restarting after stopping, visually
check the position of the shift position.
• Do
not leave the e-POWER system running
in a poorly ventilated area . If
the exhaust gas stays around the
vehicle or enters the vehicle interior,
there is a risk of carbon monoxide
poisoning. Breathing carbon monoxide
can lead to unconsciousness and an
accident, which can result in death or serious injury.
drive
$/$: Different equipment depending on vehicle model, options, etc.
2 When parking the vehicle, apply the parking
brake while depressing the brake pedal.
3Press the switch on the select lever to switch
the shift position to .
1 When stopping, keep the shift position in or ,
and firmly depress the brake pedal.
4Press the power switch once to stop the e-
POWER system.
How to drive
147
How to stop/park
warn
ZEG0949X
MEG0206X
ZEG0950X
ZEF0286X
Stop/Parking
Machine Translated by Google
148
warn
advice
Notice
Knowledge
How to drive
• Do not park on or near flammable materials
such as dry grass, paper, wood, and oil.
Exhaust pipes and exhaust gas are very hot
and may catch fire, which is dangerous.
• If you leave your vehicle parked for a long period
of time, be aware that small animals may
build a nest and lead to an unexpected fire.
drive
• When parking in the hot sun, do not leave
lighters, cans of carbonated drinks,
sunglasses, cameras, etc. inside the
vehicle. The inside of the vehicle may
become hot and explode or deform.
• In places where the roof antennaÿ may hit ,
such as a garage with a low roof or a
multistory parking lot, tilt the antenna down.
• Before leaving the car, be sure to shift to the
shift position and turn off the e-POWER
system . If the shift
position is set to anything other than , while
the e-POWER system is operating, the
vehicle may start moving due to a creep
phenomenon, or if the accelerator pedal is
depressed by mistake, the vehicle may start
suddenly, resulting in an unexpected accident.
Machine Translated by Google
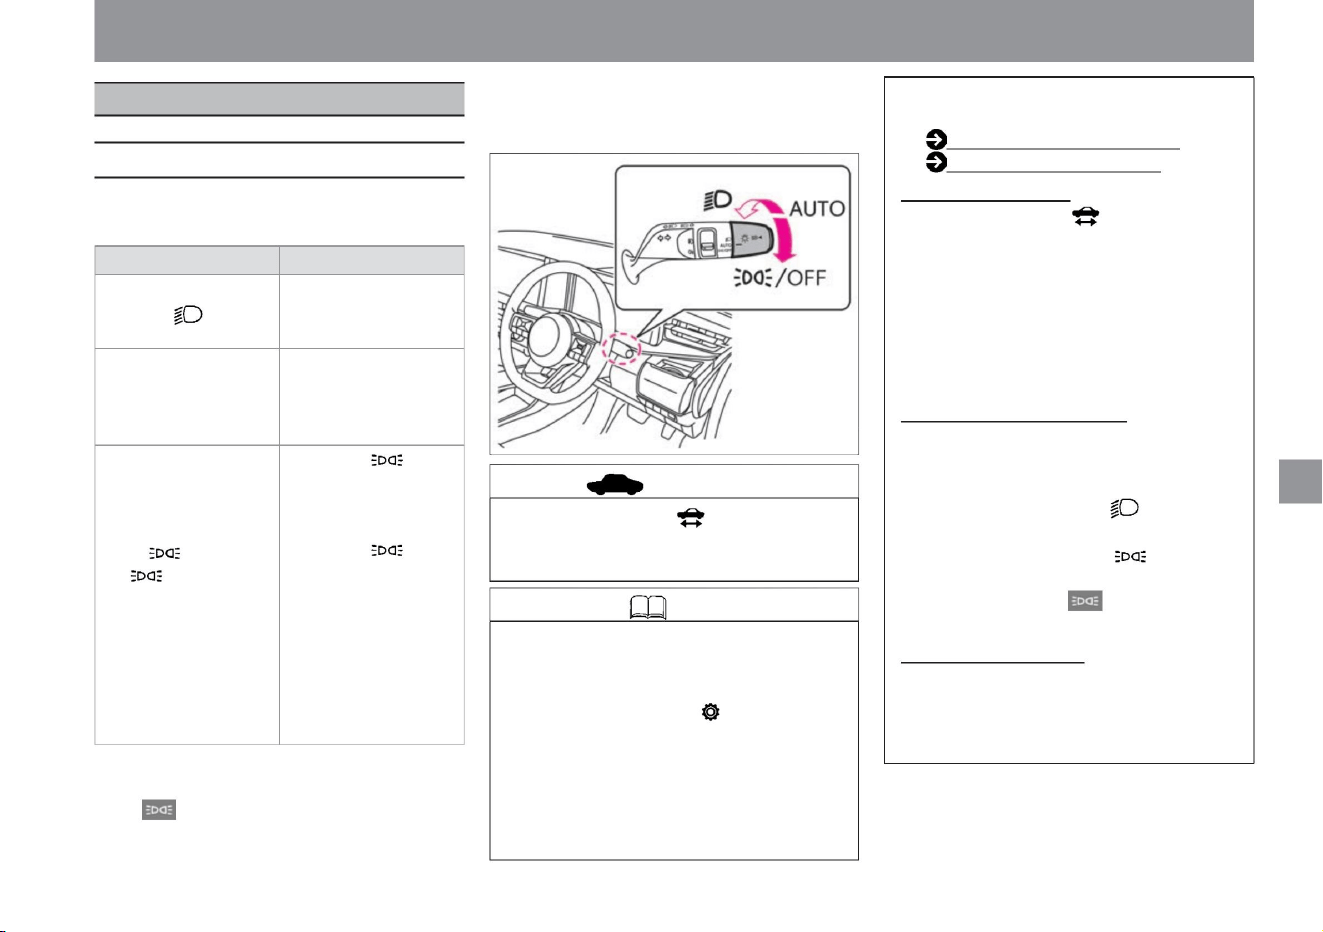
light switch
How to drive
149
advice
Knowledge
How to use the light switch
turn on the lights, use the wipers
$/$: Different equipment depending on vehicle model, options, etc.
ZEG1473X
• Do not leave the indicator light on for a long
time after it is off. The 12V battery may be
discharged.
Battery saver • If the
power switch is turned off while the indicator
light is on, the lamp will turn off to prevent
the 12V battery from being discharged.
The lamp will light up again the next time
you perform the following operation. – Turn
on the power
switch – Operate the light switch
/OFF
(Even if it is turned to the /
OFF position, it will
automatically return to the
AUTO position when released.)
Warning for forgetting to turn
off the headlamp • When the driver's door is
opened while the power switch is in a
position other than
ON, the buzzer sounds in the following
cases.
– When the light switch is in the position –
When the light switch is turned to the /
OFF position and the tail lamp indicator
lamp
in the meter is illuminated
This system adjusts the irradiation direction
when the vehicle posture changes due to
differences in the amount of light.
• Turn the switch to turn on/off the light as follows.
when.
If you select "Settings", "Screen Customization",
"Operation Guidance", or "Light Mode
Guidance" on the Advanced Drive Assist
Display, you can turn ON/OFF the functions
displayed on the meter when the light
switch is turned . You can switch OFF.
• When the width light, tail light, and number light
are on, the tail lamp indicator light in the meter
lights up.
Switch position Lamps that light up Headlamps,
width lights, taillights, and
number lights light up. The
headlamps,
width lights, taillights, and
number lights turn on/off
automatically. If you turn it
to
the /OFF position when the
car is stopped, only the side
lights, taillights and number
lights will light up. Turning
the switch to the /OFF
position while the vehicle is
stopped and holding it there
for at least 1 second will
turn
off all lamps. When you
start driving, the lamp will
automatically turn on/off
depending on the brightness of the surroundings.
• Usually use the AUTO position.
For more information on settings, read
Screen Customization.
AUTO
• Turn the light switch to display the light mode
guidance on the advanced drive assist display.
Screen switching (P.60)
Screen customization (P.78)
Machine Translated by Google
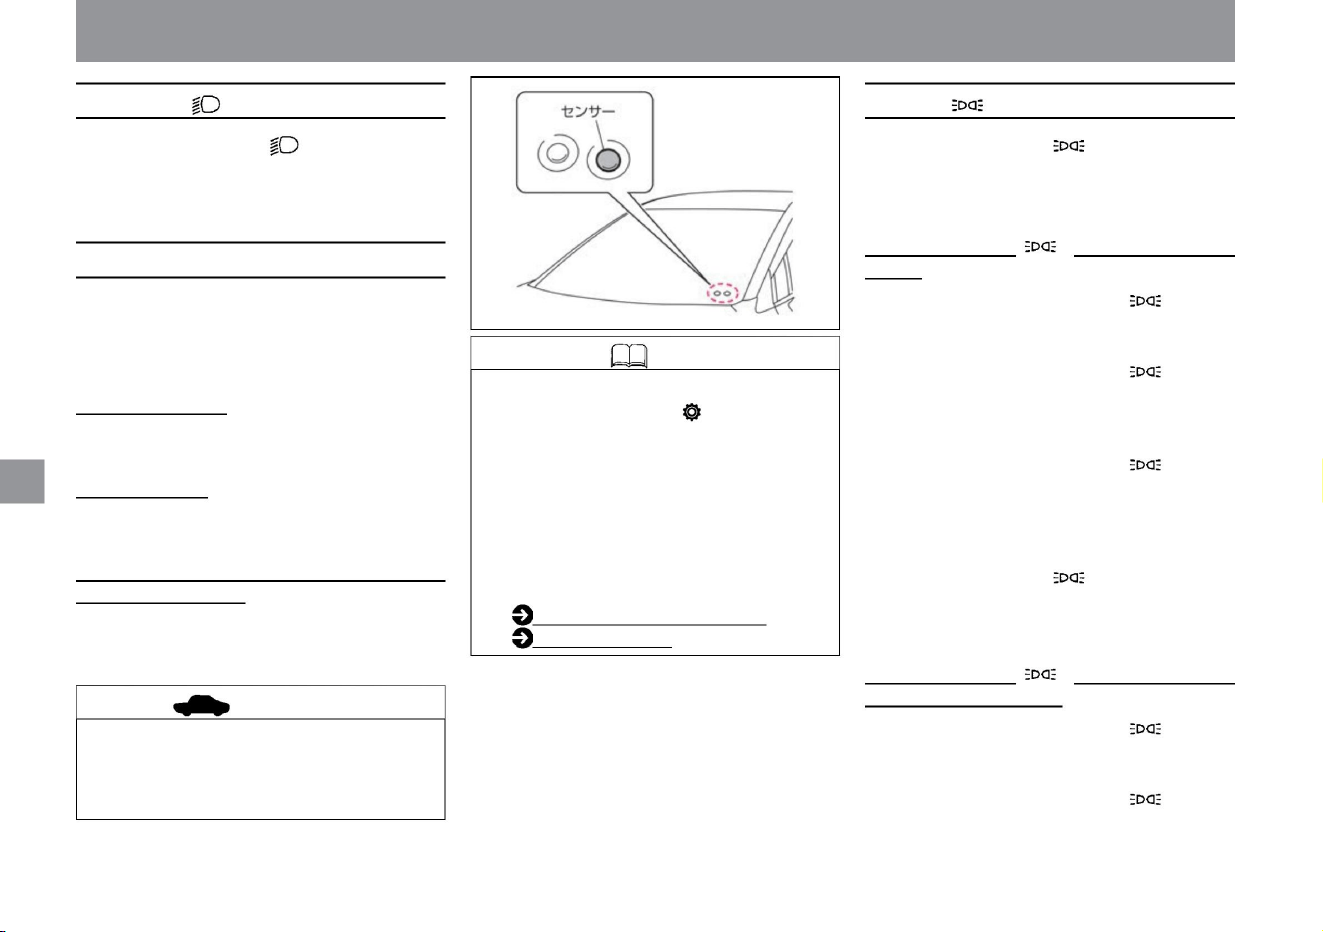
How to use
How to use AUTO (Automatically turn on/off)
How to use /OFF
advice
150
Knowledge
How to drive
• When the light switch is turned to the /OFF position while
the vehicle is stopped, only the side lights, tail lights, and
number lights will light
up. • Even if you turn the light switch to the /OFF position
when the vehicle is stopped, the headlamps will
automatically turn on according to the brightness of the
surroundings and the
operation of the wipers. • If you turn the light switch to the /
OFF position while driving, only the side lights, taillights,
and number lights will turn on when the surroundings are
bright. If the surroundings are dark, or if the wipers are on
and the headlights are on, turning the light switch to
the /OFF position will not turn off the headlights that are
on. (The lights can be turned off only when the vehicle is
stopped.)
• When the power switch is OFF, the light goes out.
• When the light switch is set to the position, the headlamps,
width lights, taillights, and number lights will light up.
• When the power switch is ON, it operates as follows. When
the surroundings
are bright
• Do not place objects on the sensor or spray glass cleaner
on it. The sensor will become less sensitive and will
not work properly.
• The headlamps, width lights, taillights, and number lights will
turn off while the vehicle is stopped or running.
When the surroundings
are dark • The headlamps, vehicle width lights, taillights, and
number lights automatically light up both when the
vehicle is stopped and when it is running. Front wiper
interlocking, twilight detection
"Omoiyari Light" function • Lamps are automatically turned on
at dusk when many pedestrian accidents occur and when
wipers are used in rainy weather.
turn on the lights, use the wipers
ZEG0963X
Selecting "Settings", "Vehicle Settings", "Lights/Lighting",
and "Auto Light Sensitivity Adjustment" on the
Advanced Drive Assist Display enables the
Intelligent Auto Light System (front wiper
interlocking, twilight detection "Omoiyari Light") .
function) can be adjusted. For more information
on settings, please read Vehicle Settings. How to
switch screens (P.60)
Vehicle settings (P.76)
vinegar.
• Even if the light switch is turned to the /OFF position, it
will automatically return to the AUTO position when the
switch is
released. • The lighting status of the lamp is as
follows. When the light switch is turned to the /OFF position
When the light switch is turned to the /OFF position and
held for 1 second or longer • If
the light switch is turned to the /OFF position and held for 1
second or longer while the vehicle is stopped, all lamps
will turn off. • Even if you
turn the light switch to the /OFF position when the vehicle
is stopped and hold it for more than 1 second,
Machine Translated by Google
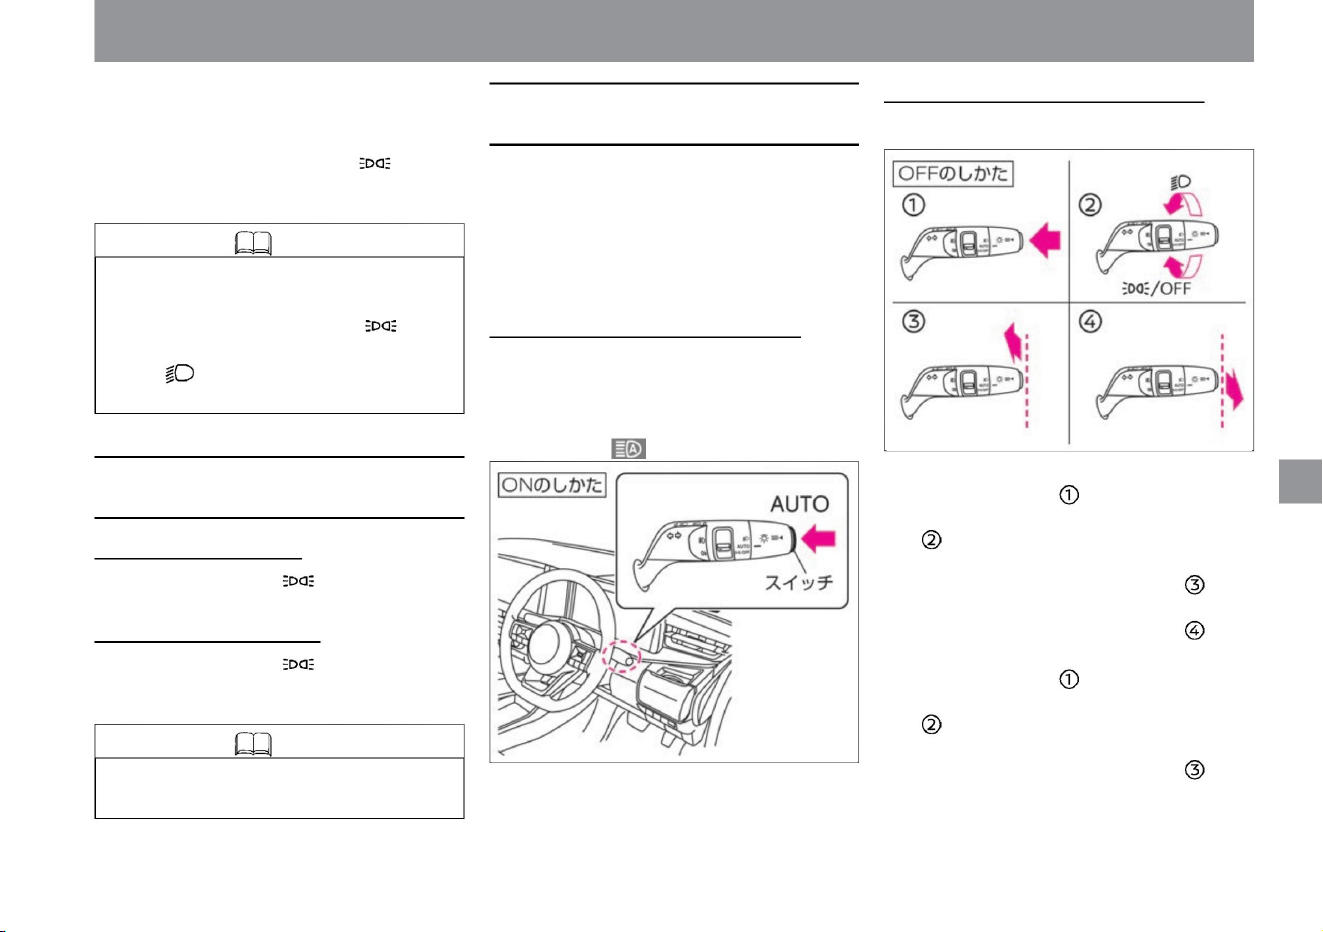
• When using high beam
ÿ Push the switch… ÿ
Move the light switch to a position other than AUTO
ÿ
Push the light switch toward the front of the
vehicle (switches to high beam) ÿ Pull
the light switch toward the rear of the
vehicle (switches to low beam) … When
using low beam ÿ Push
the switch … ÿ Move the
light switch to a position other than AUTO … ÿ Push
the
light switch toward the front of the vehicle
(switches to high beam) …
• The following operations will return the light to
AUTO (automatically turn
on/off). – turn the light switch back to the /OFF
position –
position and then to the AUTO position
How to turn off the headlamp
How to turn off high beam assist High beam
assist will turn off when you do one of the following:
Switches between high beam (upward) and low
beam (downward) according to the preceding or
oncoming vehicle and the
brightness of the surroundings. While driving at
approximately 25km/h or more, the headlamps are
switched on, and at approximately 15km/h or less,
they switch to low beam
(downward). How to turn on the high beam
assist • When the light switch is in the AUTO position
and the headlamps are on, pressing the switch
turns on the high beam assist. (The high beam
assist indicator light in the meter lights up.)
• Turn the light switch to the /OFF position to turn off
the headlamp. How to turn off all lamps •
Turn the light switch to the /OFF
position and hold it for 1 second or more to turn off
all the lamps.
Then, when the surroundings are dark or when
the wipers are operating, the headlamps, side
lights, taillights, and number lights will light
up. • Even if you turn the light switch to the /OFF
position and hold it for more than 1 second while
driving, the lamp that is on cannot be turned off.
How to drive
ZEG1475X
ZEG1474X
turn on the lights, use the wipers
$/$: Different equipment depending on vehicle model, options, etc.
• The headlamps that turn on automatically
cannot be turned off while driving.
Knowledge
Knowledge
How to turn off the automatic lighting lamp (when the
vehicle is stopped)
High beam assist (vehicles with halogen headlamps)
151
Machine Translated by Google
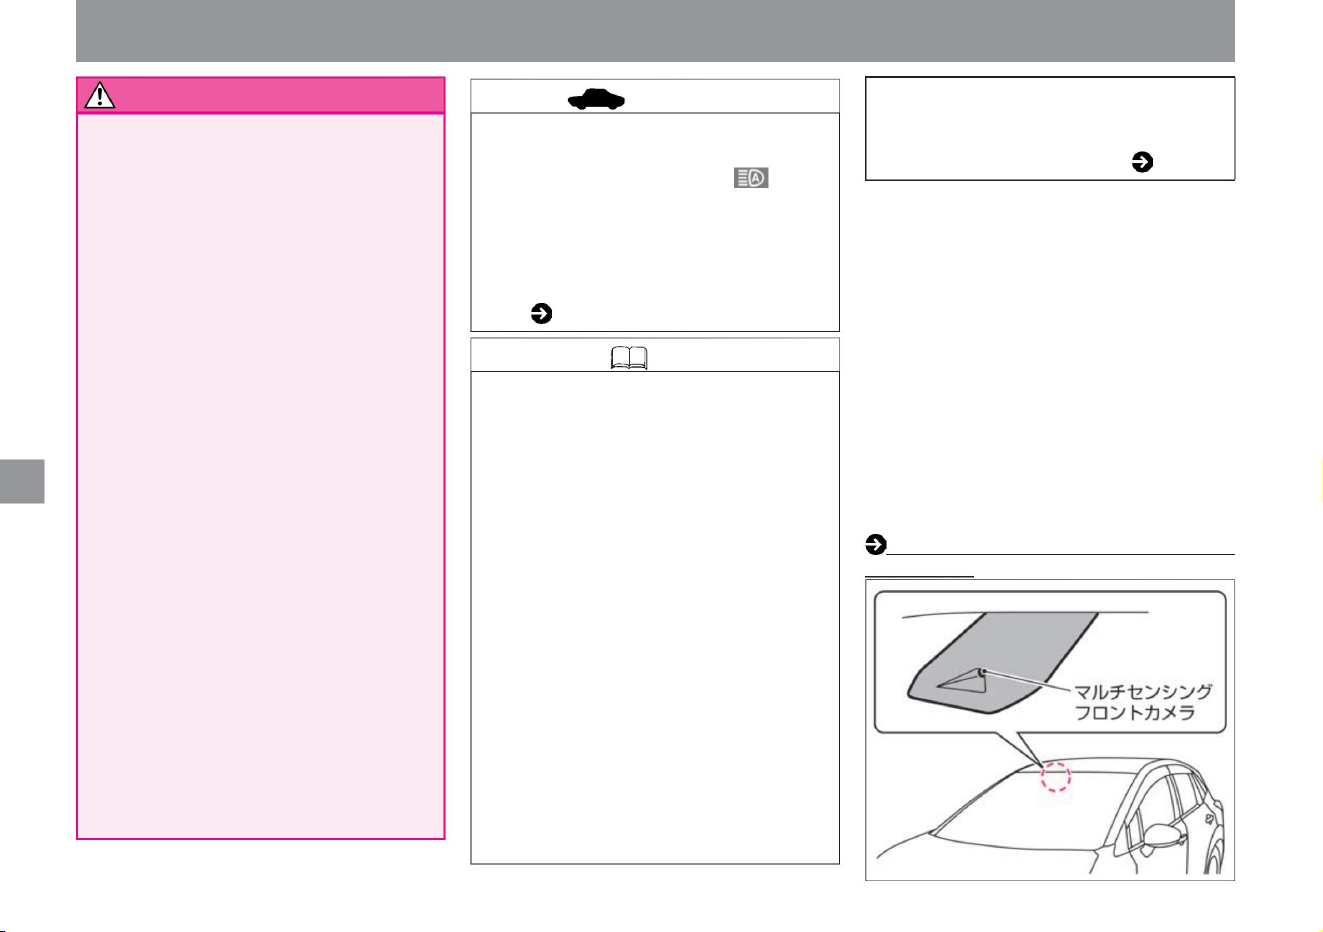
advice
warn
152
stay
ÿ About the multi-sensing front camera
How to drive
There is a camera on the top of the windshield that senses
the surroundings. Observe the following
to ensure that the high beam assist operates correctly. • If the
windshield becomes dirty, clean it.
When
– When there is a highly reflective object in front of you,
such as a mirror or a sign.
when.
Knowledge • When the high beam assist is ON and the
low beam is on, pull the light switch to the rear of the
vehicle for passing. (High beam assist stays ON)
• Whether the light switch is pushed forward or
pulled backward, it automatically returns to the neutral
position when released. • The timing of switching
between upward and downward
directions may change due to the following reasons. –
Brightness of the lamps of the oncoming or preceding
vehicle – Direction or
movement of the oncoming or preceding vehicle –
Only one side of the oncoming or preceding vehicle
lamp is lit – Oncoming or preceding vehicle is a
motorcycle – Road conditions
(curves) (e.g., slope, road surface conditions,
etc.) – Number of passengers and amount of luggage
– When the reflection from the rear of the preceding vehicle,
such as a trailer or container, is strong
– The headlights of the oncoming vehicle are damaged or
• Do not attach accessories or stickers around the camera. •
Do not touch the camera lens.
The headlamp upward indicator light may illuminate.
(Because part of the high beam is lit) Headlamp
upward indicator light ( P.310)
when it's dirty
– When the vehicle is tilted due to a puncture, towing,
etc.
tree
– When the headlights of oncoming vehicles are dirty
or the optical axis is misaligned – When
the brightness changes rapidly – When driving on
bumpy
or undulating roads – When driving on curvy roads
running
• Don't put too much trust in the
system. Always check your surroundings and
manually switch between up and down if necessary.
• In the following
cases, the high beam assist may not work properly, so
manually switch between upward and downward as
necessary. – When the weather is bad (rain, fog,
snow, strong wind, etc.) –
When there are light sources similar to headlamps or
taillights
– When the oncoming or preceding vehicle has no
lights
• If the high beam assist does not work properly or if the
high beam assist indicator does not light up on the
meter while it is working, the high beam assist may
be out of order. Have it inspected by a NISSAN
dealer. High beam assist indicator light ( P.311)
stomach.
• Do not subject the camera and its surroundings to strong
impacts. Handling the
multi-sensing front camera (P.370)
turn on the lights, use the wipers
ZEG0956X
Machine Translated by Google
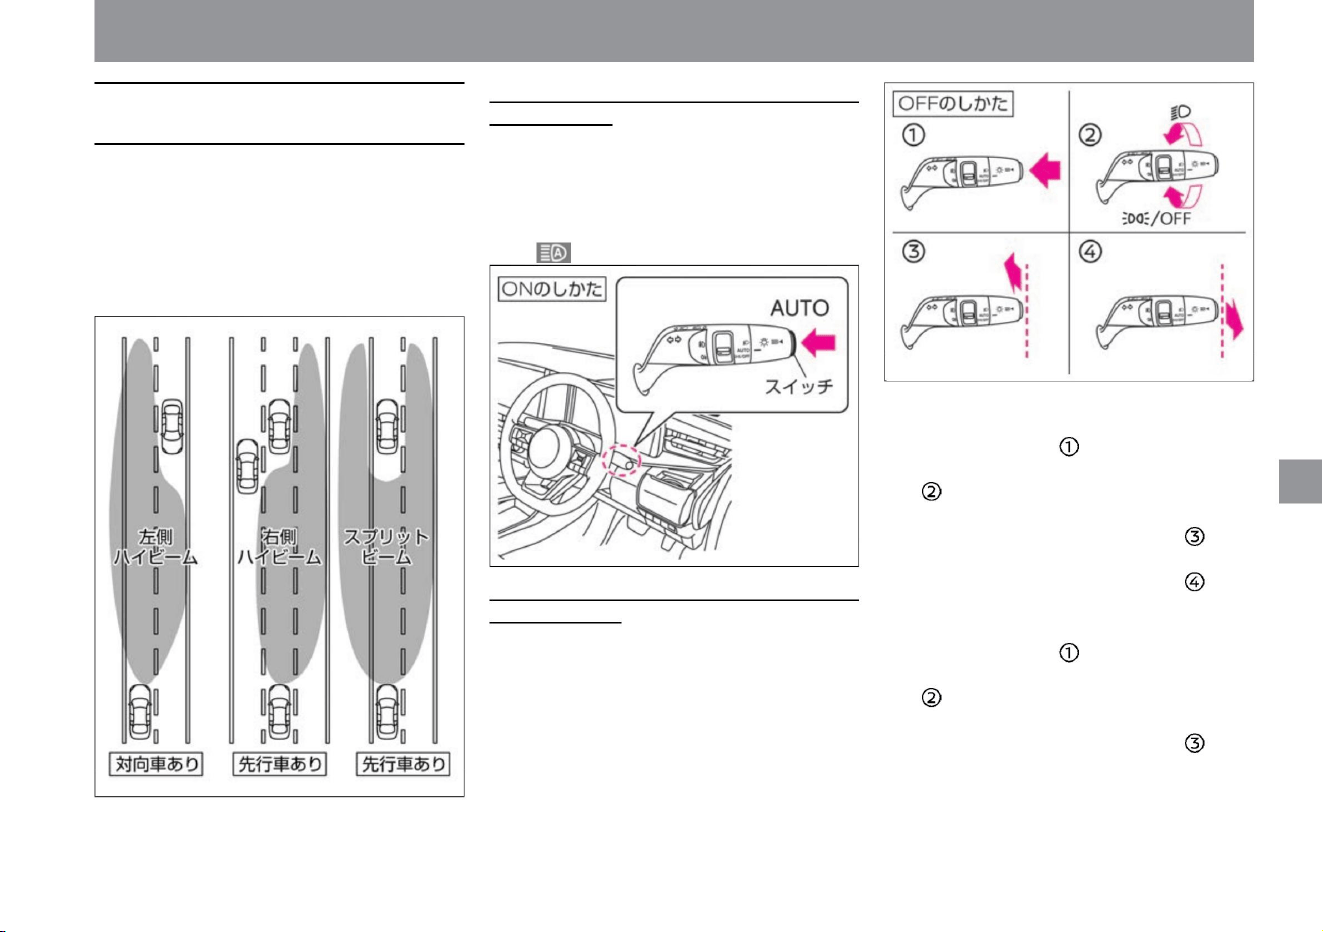
Automatically switches the irradiation range of
the high beam (upward) so as not to irradiate
preceding
and oncoming vehicles. While driving at
approximately 25km/h or more, the headlamps
are switched on, and at approximately 15km/h or
less, they switch to low beam (downward).
-Adaptive LED headlight system
is not in control ÿ Push
the switch... ÿ Move
the light switch to a position other than AUTO...
ÿ
Push the light switch toward the front of
the vehicle (switches to high beam)...
• When the adaptive LED headlight system is in
control - Push
the switch... - Move the
light switch to a position other than AUTO... -
Push
the light switch forward (switches to high
beam)... - Move the light switch to the
rear of the vehicle. Pull (switches to low
beam)…
How to turn on the adaptive LED headlight
system • When
the light switch is in the AUTO position and the
headlamps are on, pressing the switch turns
on the adaptive LED headlight system. (The
adaptive LED headlight indicator light in the
meter lights up.)
How to turn off the adaptive LED headlight
system The
adaptive LED headlight system can be turned off
by doing one of the following:
How to drive
ZEG1474X
ZEG0330X
ZEG1475X
turn on the lights, use the wipers
$/$: Different equipment depending on vehicle model, options, etc.
Adaptive LED headlight system (vehicles
with LED headlamps)
153
Machine Translated by Google
warn
advice
154
How to drive
ÿ About the multi-sensing front camera
stay
– Highly reflective objects such as mirrors and signs
– When the headlights of oncoming vehicles
are damaged, dirty, or misaligned – When
the light
is not bright enough or large enough, such as
when riding a bicycle or motorcycle –
Pedestrians and other objects that do not emit light
Knowledge • When the adaptive LED headlight
system is ON and low beam is on, pull the
light switch to the rear of the vehicle to pass.
(The adaptive LED
headlight system remains ON.) • Whether
the light switch is
pushed toward the front of the vehicle or pulled
toward the rear of the vehicle, it automatically
returns to the neutral position when released.
• The switching timing of the irradiation range may
change due to the following reasons. – Bright
lights of
oncoming or preceding vehicles
• Do not attach accessories or stickers around the
camera. • Do not touch the camera lens.
– When there are continuous rapid changes in
brightness – When driving on bumpy or
undulating roads
– Driving on a curvy road
• If the adaptive LED headlight system does not
operate properly, or if the adaptive LED
headlight indicator lamp does not light up in
the meter while it is operating, there is a
possibility that the adaptive LED headlight
system is out of order. Have it inspected by a
NISSAN dealer. Adaptive LED Headlight
Indicator Light ( P.311)
– When there is strong reflection from the rear of the
preceding vehicle, such as a
trailer or container – When the vehicle is tilted due to
a puncture or towing
turn on the lights, use the wipers
– The direction or movement of the oncoming
vehicle or vehicle ahead – Only one lamp of the
oncoming vehicle or vehicle
ahead is lit – The oncoming vehicle or vehicle
ahead is a two-wheeled vehicle – Road conditions
(curves,
slopes, road conditions, etc. ) The number of
people and the amount of luggage in the vehicle • The
headlamp upward indicator light may also turn on
when detecting an oncoming vehicle or preceding
vehicle and switching the irradiation range. (Because
part of the high beam is lit)
Headlamp upward indicator light ( P.310)
• Don't put too much trust in the
system. Always check your surroundings and
manually switch between up and down if necessary.
• In the following
cases, the adaptive LED headlight system may not work
properly, so manually switch between upward and
downward as necessary. – When the weather is bad
(rain, fog, snow, etc.) – When it is not dark enough,
such as
early morning or dusk – When the windshield in
front of the camera is cloudy or dirty When you are
turning – when
there is a light source similar to a headlamp or tail light
– when the oncoming or preceding vehicle is unlit.
stomach.
when.
tree
Lusa
When
tree
There is a camera on the top of the windshield that senses
the surroundings. To ensure proper
operation of the adaptive LED headlight system, please
observe the following: • If the windshield becomes dirty, clean
it.
is in front of
Machine Translated by Google
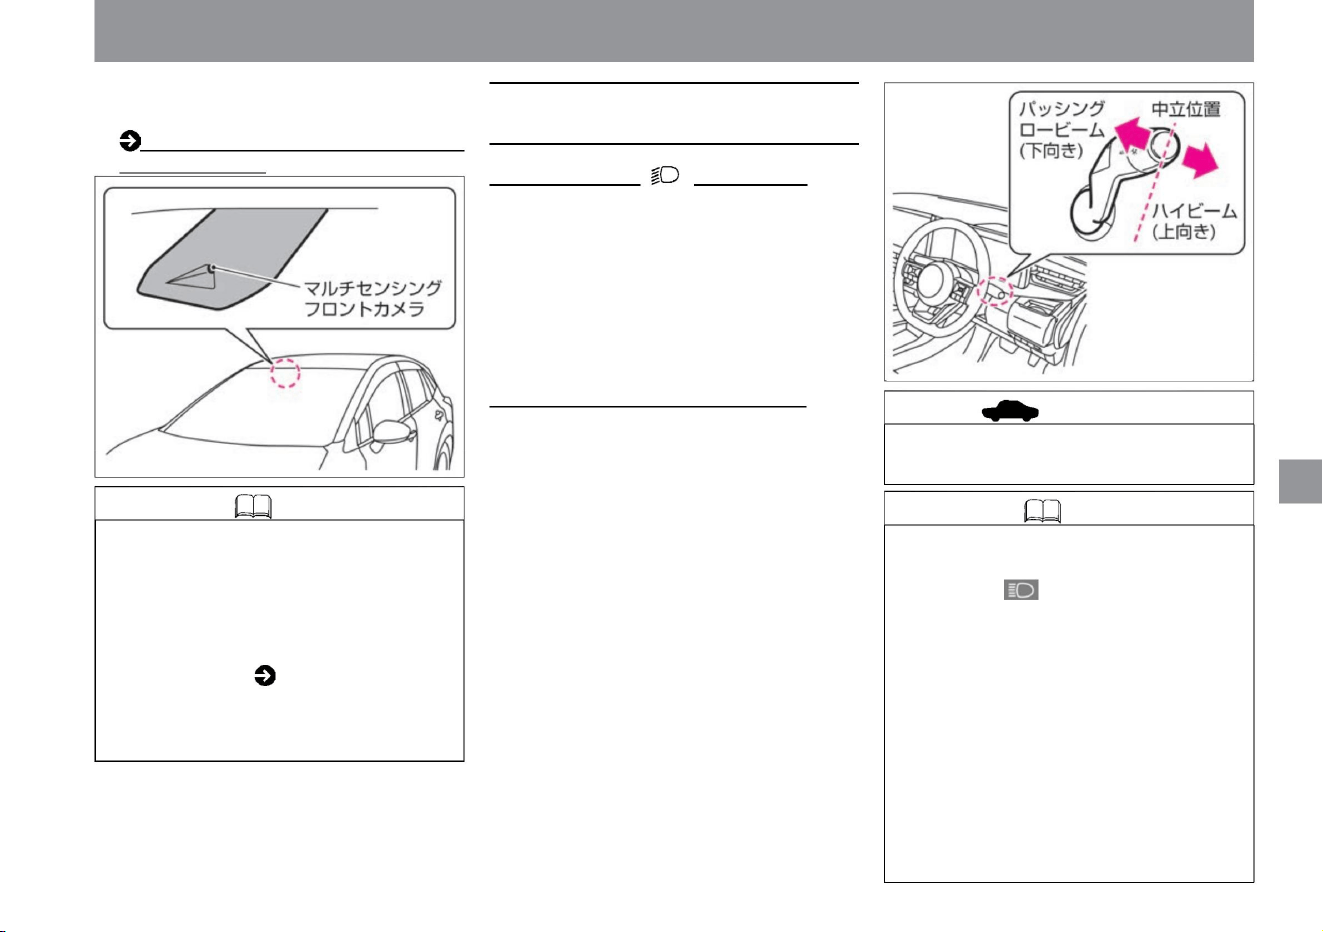
• If the front windshield is dirty, the front of the
multi-sensing front camera is blocked by an
obstacle, or the camera cannot capture an
image of the front, a “headlamp warning”
warning message ( P.316) may appear.
Remove any obstacles in front of the
camera and clean any dirt.
• To return to low beam, move the light switch to
the front or rear of the vehicle.
• Do not subject the camera and its surroundings
to strong impacts.
Handling the multi-sensing front camera
(P.370)
• While switching to high beam, the headlamp
upward indicator lamp in the meter lights
up. • When the high beam assist
or adaptive LED headlight system is on, push
the light switch toward the front of the
vehicle to switch to high beam. • The inner
surfaces of the lenses of headlamps, brake
lights,
etc. may become cloudy temporarily due to
driving in the rain or washing the car, but
this is not a malfunction.
• When passing, pull the light switch to the rear of
the vehicle. If you want to pass from the high
beam state, pull the light switch to the rear of
the vehicle twice.
• When there is an oncoming vehicle or when driving
in an urban area, turn it downward.
• Even if the light switch is pushed forward or
pulled backward, it automatically returns to
the neutral position when released.
• Push the light switch to the front of the vehicle to
switch to high beam. Move the light switch to
the front or rear of the vehicle to return to low
beams. • When passing, pull the light
switch to the rear of the vehicle. If you want to pass
from the high beam state, pull the light switch
to the rear of the vehicle twice.
How to drive
When the light switch is in the position
When the light switch is in the AUTO
position • When the headlamps are on,
pushing the light switch toward the front of
the vehicle switches to high beam.
turn on the lights, use the wipers
ZEG0957X
ZEG0956X
$/$: Different equipment depending on vehicle model, options, etc.
How to switch to high beam (upward)
Knowledge
advice
Knowledge
155
Machine Translated by Google
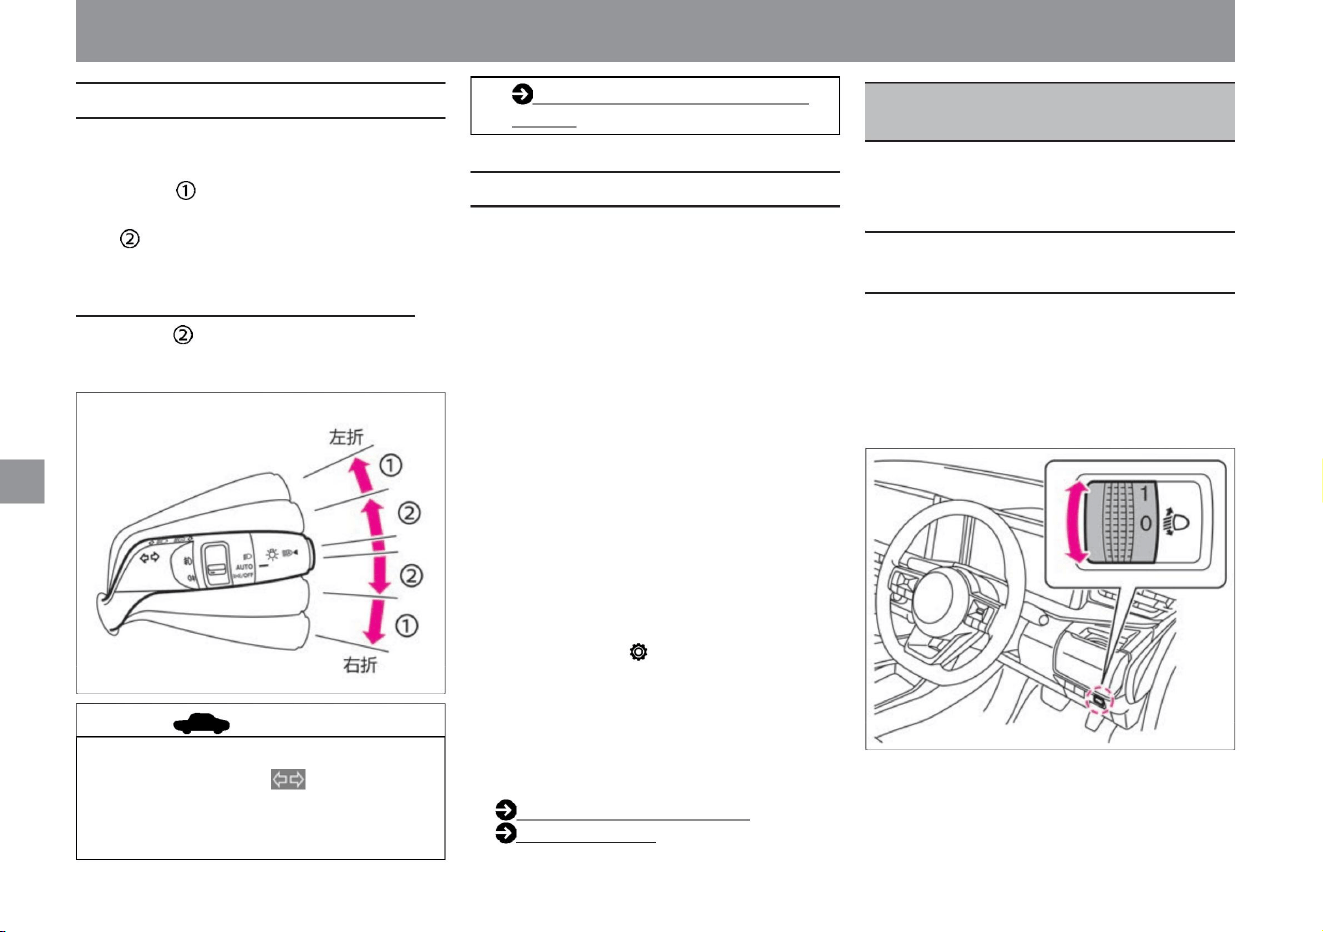
Adjust by turning the dial when the headlamp is downward. •
Normally, use the dial at
the 0 position.
• When the blinking speed of the direction indicator lamp and
the direction indicator lamp in the meter becomes
faster, there is a possibility that the bulb of the direction
indicator lamp has run out. Please replace the bulb.
When the light bulb burns out (P.340)
Can be used when the power switch is ON. • When
turning right or left, move the light switch to the position. • When
changing lanes, move the light switch to the
position and lightly press it. The direction indicators will flash
while the switch is held. About the comfort flasher function
When the switch is pressed up or down to the position and
then quickly released,
it flashes three times and turns off.
vinegar.
• When the door is locked/unlocked, the vehicle width light,
tail light, and number light will light up. (Approx. 10 seconds
when locked,
approx. 30 seconds when unlocked) Select "Settings", "Vehicle
Settings", "Lights/Lighting", "Welcome Headlights" on the
Advanced Drive Assist Display to activate the welcome
light function ( (with farewell function) can be changed. For
more information on settings, read Vehicle Settings. How
to switch screens (P.60) Vehicle
settings (P.76)
– When the light switch is turned on, the lighting time is
extended by about 30 seconds each time the light
switch is pulled to the rear of the vehicle, and can be
extended up to about 2 minutes.
• The more you turn the dial toward a larger number, the more
the direction of illumination will be downward.
• When you get out of the car in a dark place, such as at night,
the headlamps will illuminate the surroundings if you
perform the following operations. –
When the power switch is not ON, pulling the light switch
once to the rear of the vehicle will turn the headlights
on for about 30 seconds and then turn them off.
ZEG1478X
ZEG0959X
How to use the direction indicator
156
advice
How to use the headlamp
levelizer switch
About other functions
turn on the lights, use the wipers
Adjust the lighting direction (optical axis) of the headlamp.
Please adjust according to the number of passengers
and the weight of luggage.
ÿ Welcome light function (with fare well
function)
How to drive
Headlamp levelizer switch
(vehicles with halogen headlamps)
Machine Translated by Google
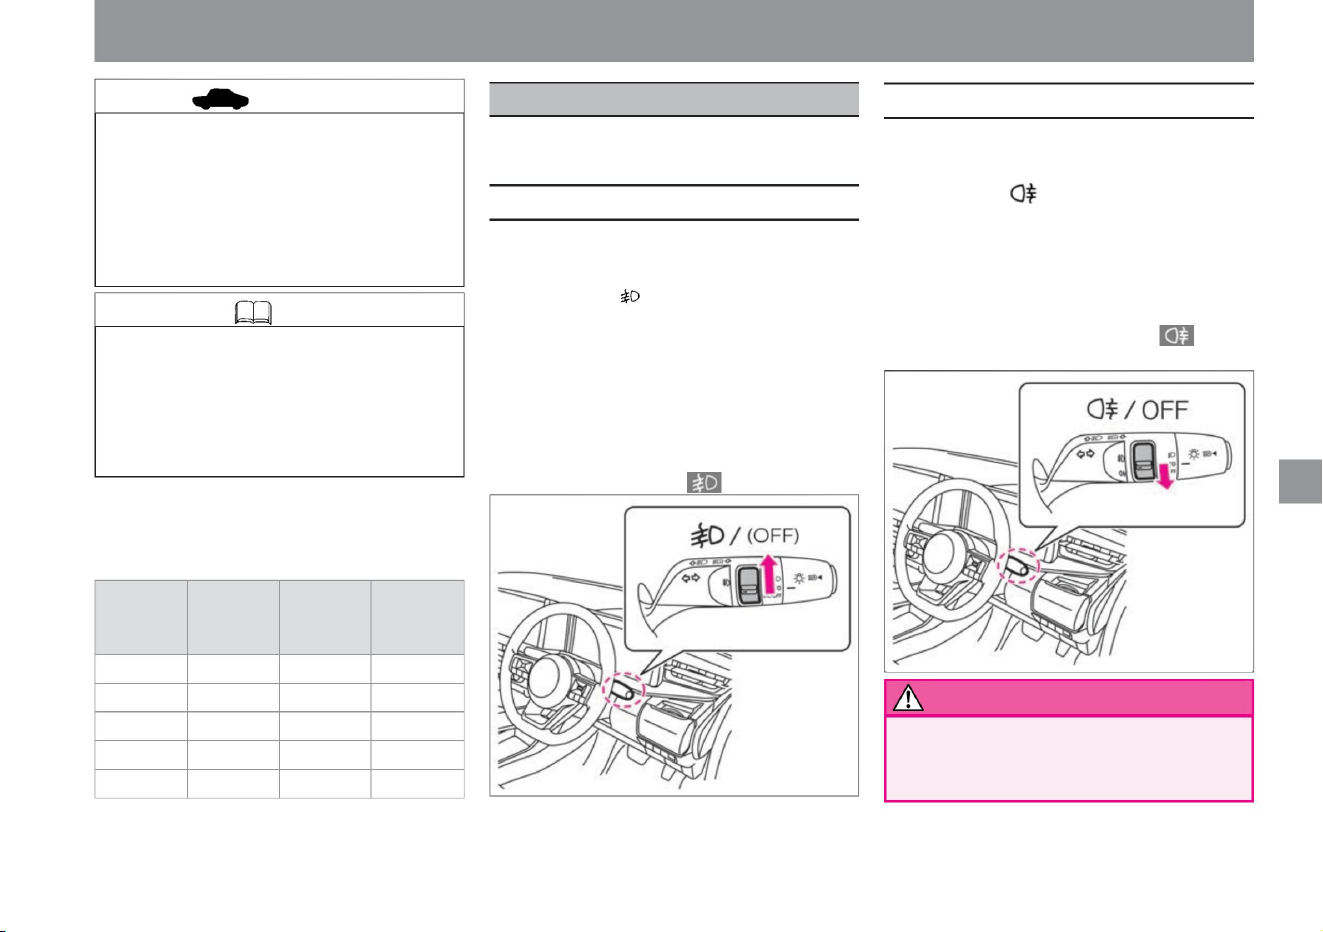
How to drive
turn on the lights, use the wipers
• Do not use in fine
weather. It may impair the visibility of
following vehicles.
• To turn off the light, return the switch to its
original position. (For vehicles with rear fog
lamps, operate
again.) • When the fog lamps are on, the fog
lamp indicator lights up.
• Set the switch to the position.
• Can be used when headlamps or side lights
are on. • Set the switch
to the position.
• When the rear fog lamp is on, the rear fog
lamp indicator lamp lights up.
• Vehicles with LED headlamps are equipped with an
auto-levelizer function that automatically adjusts the
lighting direction when the headlamps turn downward
and the vehicle orientation changes due to
differences in the number of passengers and the
amount of luggage.
2
ÿ Guideline for dial position Select the dial
position according to the number of passengers and the amount of luggage,
using the following table as a guide.
(When you release the switch, it automatically returns to the neutral
position.) To turn off the light,
operate the switch again.
2
Luggage
Compartment
Loaded Weight
0 Unloaded 0-2 Unloaded 3
Unloaded 3 Full 0 Full
(Vehicles with rear fog lamps automatically return to the neutral position
when the switch is released.)
switch position
3
1
Number of front
seat occupants
increase.
2
2
When the headlamps illuminate the upper side due to differences in the
number of passengers or the amount of luggage, or when illuminating
the mirrors of vehicles traveling in front or the windshields of oncoming
vehicles on mountain roads with many ups and downs, adjust the
lighting direction . Please adjust downwards.
Number of rear
seat occupants
2
• Can be used when headlamps or fog lamps ÿ are on.
0
1
ZEG1477X
ZEG1476X
Knowledge
How to use fog lights
advice
How to use the rear fog lamp
warn
157
1
Use as a headlamp or taillight when visibility
is poor due to rain, fog, or snow.
$/$: Different equipment depending on vehicle model, options, etc.
fog lamp switch
Machine Translated by Google
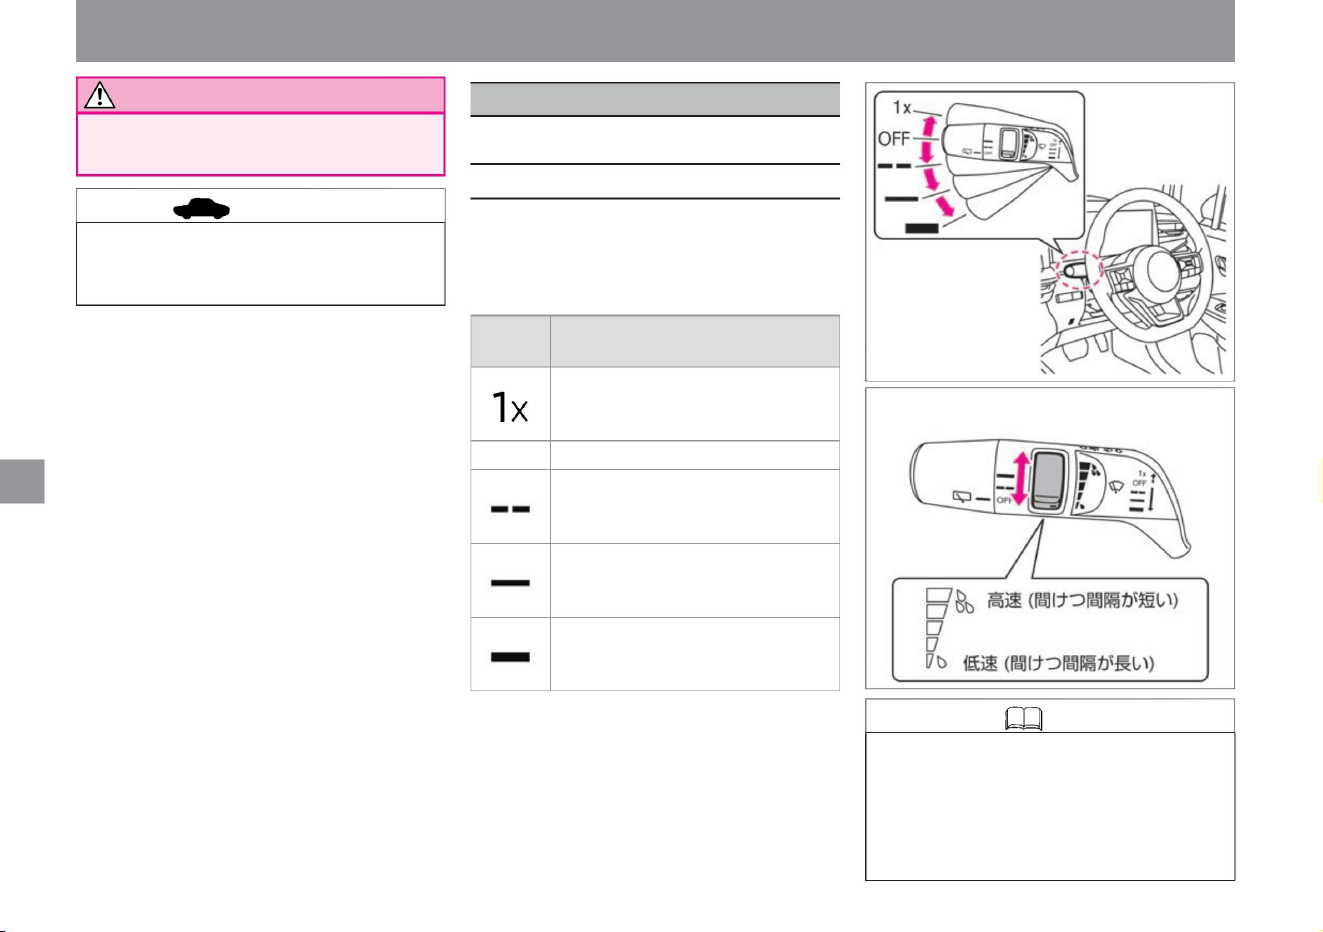
How to drive
advice
Notice
How to use the front wiper
Knowledge
158
turn on the lights, use the wipers
• When the switch is moved, the following operations are performed.
• The intermittent operation interval is a vehicle
speed sensing type that shortens as
the vehicle speed increases. • The intelligent auto
light system (linked to the front wipers and
equipped with a “compassionate light” function
that detects twilight) has a light switch in the AUTO position.
• When the switch is operated, the switch position is
displayed on the meter.
• Use the rear fog lamp when visibility is poor due
to fog, rain, or snow.
• During snowfall, snow may pile up, so please
remove the snow from the rear fog lamp
frequently.
OFF Stops.
It works continuously at high speed.
Operates while the switch is held up. It
will
return to OFF when released.
It works intermittently.
Turn the switch to adjust the wiper interval
time.
switch
position
actuation
increase.
It works continuously at low speed.
wiper/washer switch
ZEG0964X
ZEG0965X
Can be used when the power switch is ON.
Machine Translated by Google
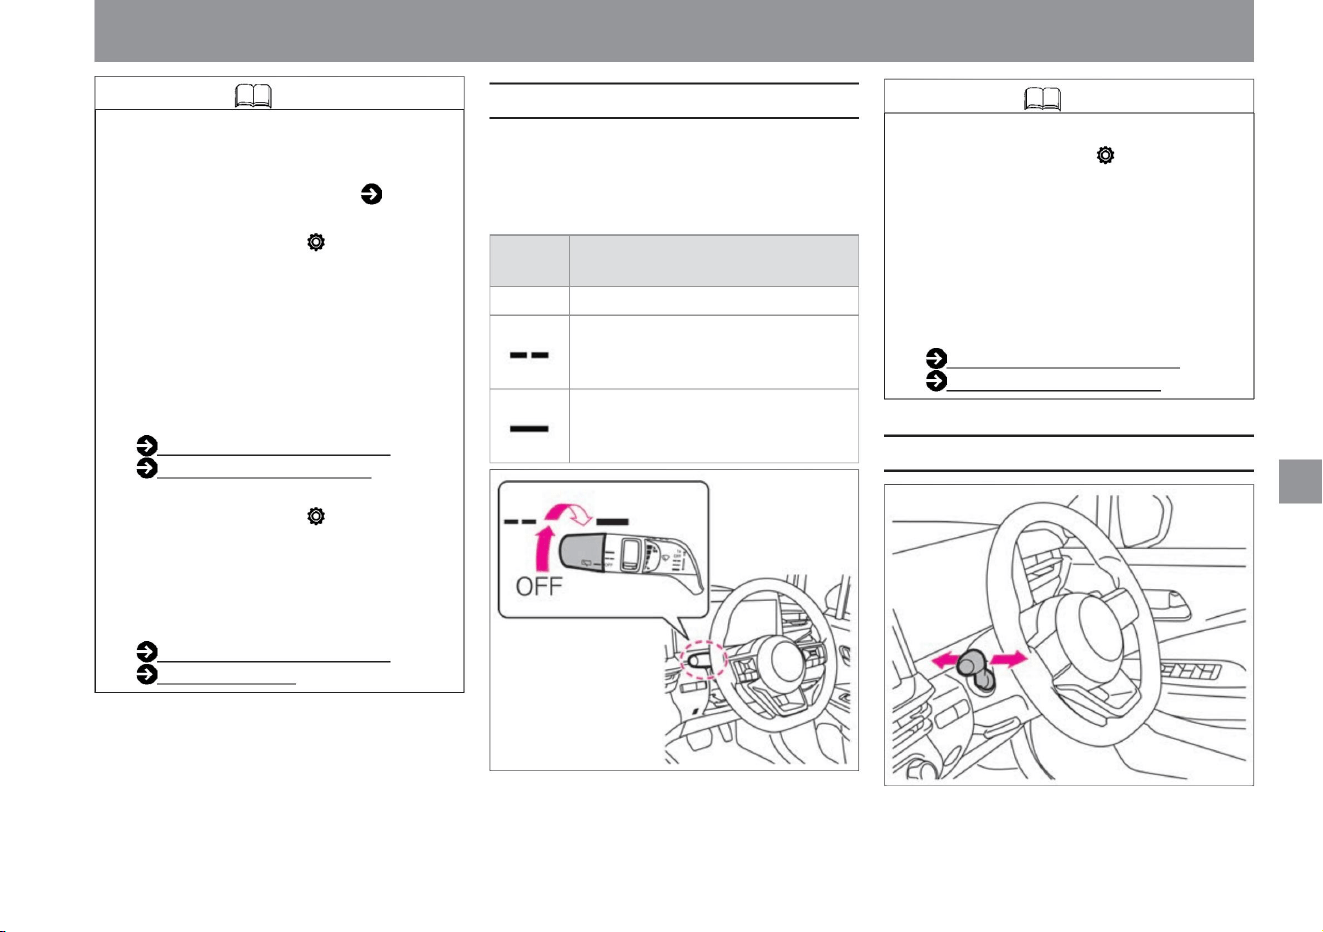
How to drive
How to use the rear wiper
159
Knowledge
How to use the washer
ZEG0966X
ZEG0967X
vinegar.
It works intermittently.
If the
wipers are activated several times while the car
is in the off position, the lamp will come on
regardless of the
brightness outside the car . How to use the
light switch ( P.149) If you select "Settings", "Screen
Customization", "Operation Guidance", "Wiper",
"Front" on the Advanced Drive Assist Display,
the wiper switch will move. You can switch ON/
OFF of the function displayed on the meter
when For more information on settings, read
Screen Customization.
switch
position
Screen switching (P.60) Screen
customization (P.78)
• When the switch is operated, it switches to the meter.
OFF Stops.
How to switch screens (P.60)
Customizing screens (P.78) If
you select "Settings", "Vehicle settings", "Wiper",
"Vehicle speed interlocking" on the Advanced
Drive Assist Display, the vehicle speed
interlocking function will be activated. You can
switch between ON and OFF. For more
information on settings, please read Vehicle
Settings. How to
switch screens (P.60) Vehicle
settings (P.76)
It works continuously at low speed.
position is displayed.
actuation
• Turning the switch operates as follows.
Select "Settings", "Customize Screen", "Operation
Guidance", "Wiper", "Rear" on the Advanced
Drive Assist Display to turn on the function that
is displayed on the meter when the wiper
switch is moved . ÿ You can switch OFF. For
more information on settings, read Screen
Customization.
turn on the lights, use the wipers
$/$: Different equipment depending on vehicle model, options, etc.
Machine Translated by Google
160
Precautions when using the wiper
washer
Knowledge
advice
warn
rear washer
Front washer • Pull the
switch toward you to spray the washer fluid. • While
the switch is pulled,
the washer fluid is sprayed and the wipers continue
to operate. When the lever is released, the
wipers operate several times and then stop.
When the window glass is dry ,
• Washer fluid is sprayed when the switch is
pushed to the front of the vehicle.
• Raise the wiper arms when it is likely to snow
or when it is snowing. Snow may accumulate
on the wipers and damage them. • While
the wipers are operating, if
snow or other obstacles prevent the wipers from
operating, the wipers may stop operating to
protect the motor. In that case, turn off the
switch, remove the obstacle, wait until the
motor cools down (about 1 minute), and
then operate the switch again. The wipers
will start working. • Do not operate the wiper
when the wiper rubber is stuck to the glass
due to freezing. The wipers may be
damaged or the motor may fail.
Spray the washer fluid before using the
wiper. Using the wiper when the glass is dry
may damage the glass and the blade
(rubber part). • If the washer fluid does not
come out, do not operate
it continuously for more than 30 seconds. Doing
so may cause the motor to malfunction. • If
the washer fluid does not come out even
after
replenishing the washer fluid, contact a Nissan
dealer.
• While the switch is pressed, the washer fluid is
sprayed and the wipers continue to operate.
When the lever is released, the wipers operate
several times and then stop.
• After operating the washer switch, the wiper
operates once about 3 seconds later to
wipe off the washer fluid remaining on the
glass. ( Drip wiping function) If you select
"Settings",
"Vehicle settings", "Wiper", and "Drip wiping" on
the Advanced Drive Assist Display, you can
switch the drip wiping function ON/OFF.
can. For more information on settings,
please read Vehicle Settings. How to switch
screens (P.60)
Vehicle settings (P.76)
• In cold weather, heat the glass with a heater
before spraying the washer fluid. Also, the
washer fluid should be diluted according to
the outside temperature. In cold
weather, the washer fluid sprayed on the
windshield may freeze, obstruct your vision,
and lead to an unexpected accident.
How to drive
turn on the lights, use the wipers
Machine Translated by Google
$/$: Different equipment depending on vehicle model, options, etc.
The e-POWER system has three drive modes. Please use properly according to the purpose.
Driving support function
• In SPORT mode and ECO mode, there is no
function to keep the vehicle stopped by
decelerating with the accelerator pedal off,
so be sure to depress the brake pedal when
stopping.
• In SPORT mode and ECO mode, in order to
increase the efficiency of regenerative
braking ( P.15), when the accelerator pedal
is released while driving, the degree of
deceleration is as if stronger engine braking
is being applied than in NORMAL mode.
becomes
stronger. • In SPORT mode and ECO mode,
even if you decelerate without stepping on
the brake, the brake lights will turn on
according to the degree of deceleration.
• Strengthen the regenerative braking when the accelerator
pedal is off to recover a
large amount of energy • Easy speed adjustment is
possible only by operating the accelerator pedal A mode in
which you can enjoy almost the same driving as a gasoline
engine vehicle Acceleration Accelerator pedal feels like a gasoline engine car
mode
performance
*: ECO mode is recommended for normal driving, and SPORT mode is recommended for both light acceleration
and ECO.
ECO
Deceleration at OFF
feature
SPORT
A mode that achieves both EV-likeness and
fuel economy. • Emphasizes the motor characteristics and
achieves high response to accelerator
pedal operation instantly . Speed can be easily adjusted with .Mode
that emphasizes fuel
consumption Gentle acceleration to reduce wasteful energy
consumption
e-Pedal Stepÿ
NORMAL
advice
Knowledge
161
Functions of each mode
How to drive
e-Pedal Step
Machine Translated by Google
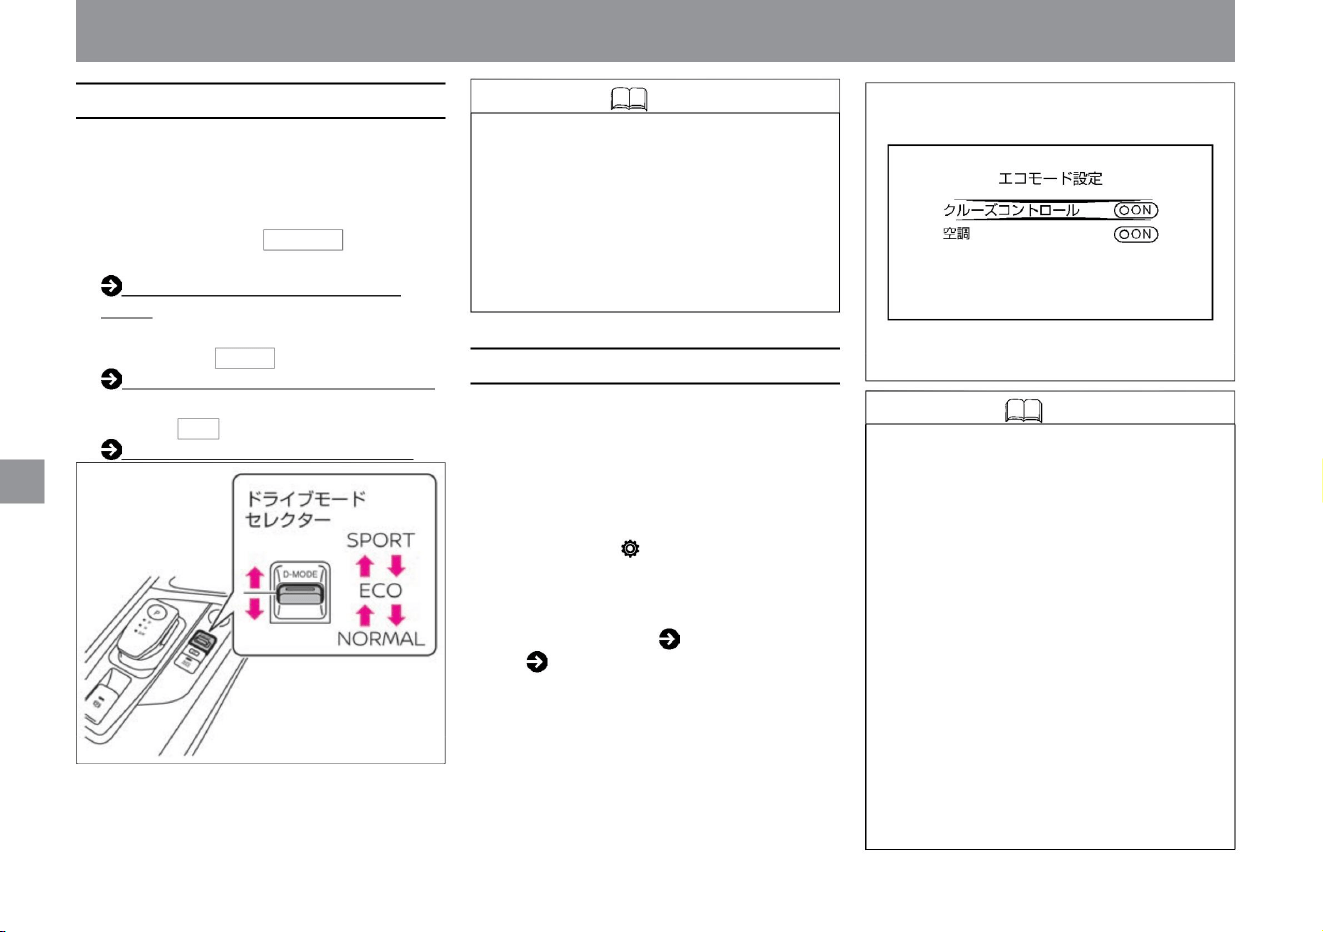
(P.52)
• The eco mode setting is a function that switches
the intelligent cruise controlÿ and air conditioning
function to the setting that emphasizes fuel
efficiency. Customization is possible when the
drive mode is ECO mode.
• When the power switch is ON, push the drive
mode selector toward the front or rear of the
vehicle to switch modes. • The
NORMAL mode indicator NORMAL lights when in
NORMAL mode .
Knowledge • When "Cruise Control "ÿ is turned
ON (priority on fuel efficiency) in the eco
mode setting , the acceleration of Intelligent
Cruise Controlÿ will be gentler than when
it is OFF, thereby improving fuel efficiency.
• When
the air conditioning is turned ON (priority on
fuel efficiency) in the eco mode setting, the
cooling effect is weakened compared to
when it is OFF,
thereby improving fuel efficiency. • Eco mode
setting is maintained even if the power
switch is turned off until the setting is
changed again.
SPORT mode indicator (P.52) • The ECO
mode indicator ECO lights when in ECO mode .
• When in SPORT mode, the SPORT mode
indicator SPORT lights up.
ECO mode indicator (P.53)
NORMAL mode indicator
How to switch modes
162
Knowledge
eco mode setting
ZEG0968X
ZEG0979X
• By selecting "Settings", "Eco", and "Eco
Mode Settings" on the Advanced Drive
Assist Display, you can switch between
ON and OFF for the fuel efficiency function
in ECO mode. How
to switch screens ( P.60) ECO
( P.74)
• If a system error occurs while SPORT
mode or ECO mode is selected,
deceleration will be weaker than
usual. If necessary, depress the brake
pedal to slow down.
• The mode setting switches to ECO mode
each time the e-POWER system is
started.
• In the following cases, the air conditioning function takes
precedence even if the "air conditioning" is set to
ON (prioritizes fuel consumption) in the eco mode
setting.
Driving support function
How to drive
Machine Translated by Google
When ( P.121) is turned ON
Knowledge
163
$/$: Different equipment depending on vehicle model, options, etc.
– When the temperature setting of the air
conditioner is set to LO (setting from
18°C to HI gives
priority to fuel efficiency) – Defroster switch
Driving support function
How to drive
Machine Translated by Google
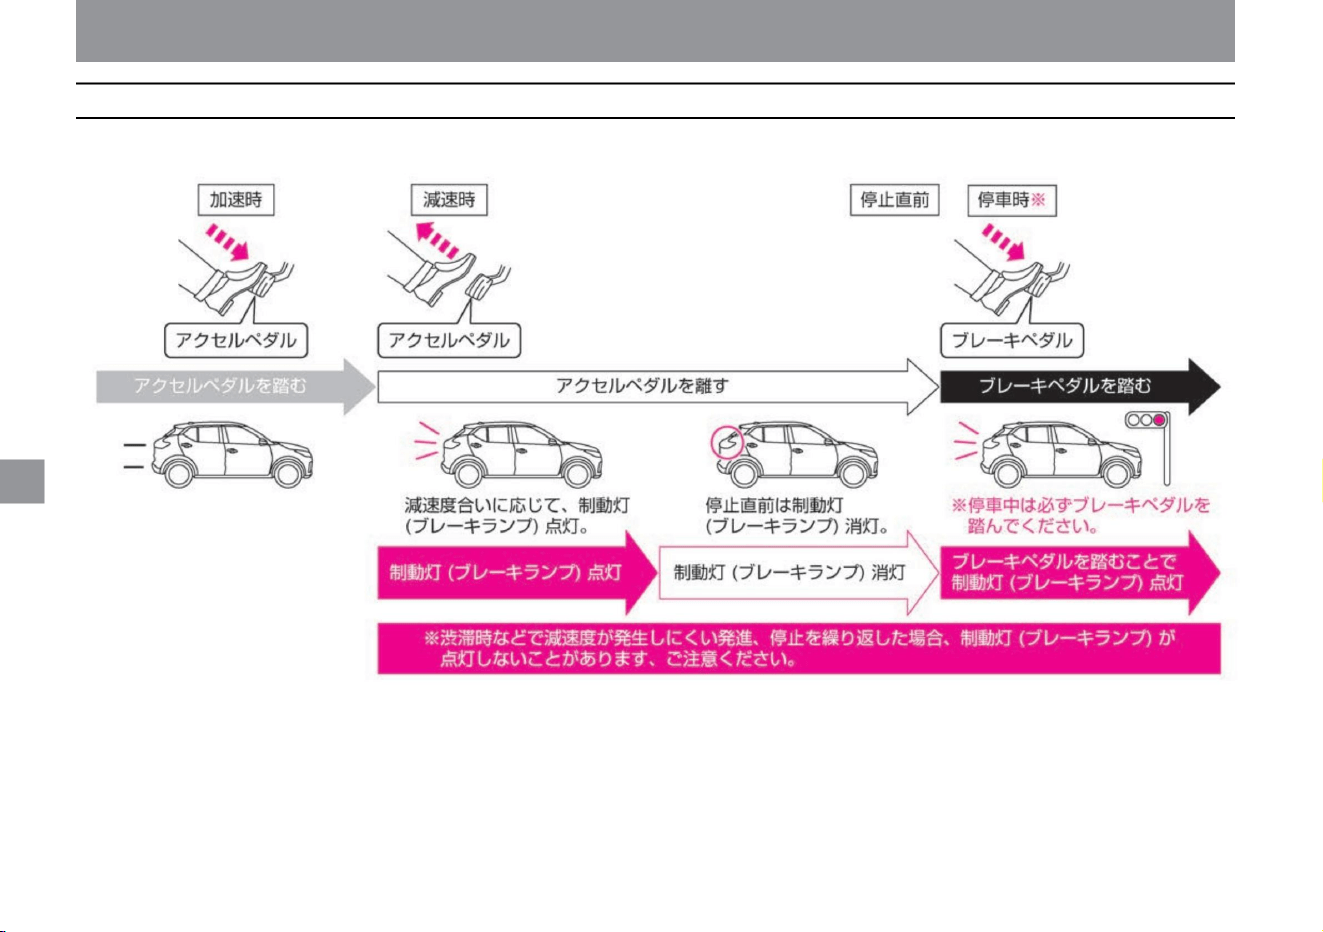
How to drive
164
About brake lights in SPORT mode and ECO mode
When the accelerator pedal is released, the brake lights turn on according to the degree of deceleration that occurs, and turn off just before the vehicle stops.
When the vehicle is stopped, pressing the brake pedal turns on the brake lights.
Driving support function
ZEG0720X
Machine Translated by Google
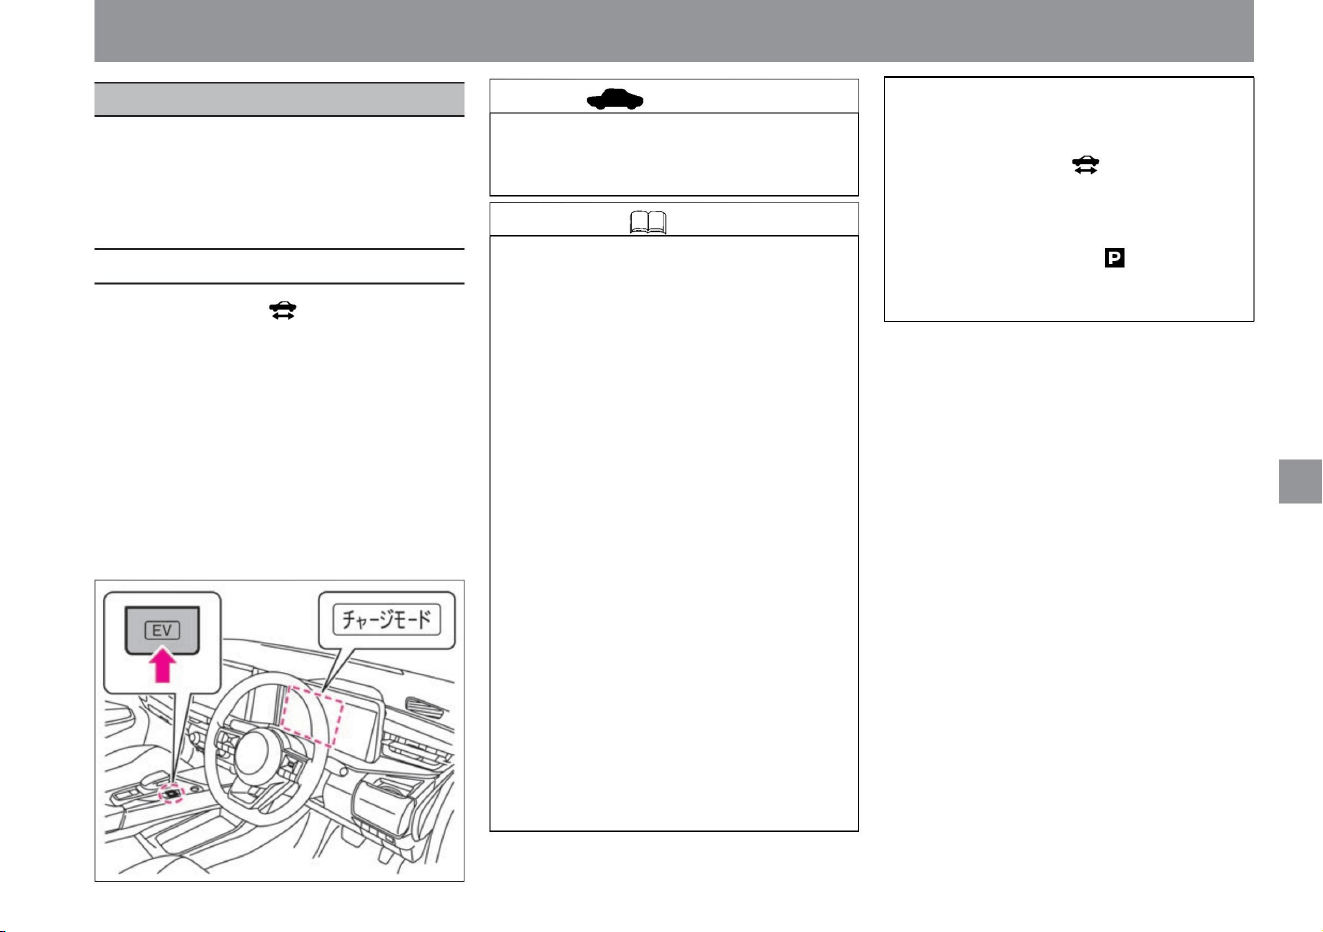
ZEG0969X
Knowledge
165
How to use charge mode
advice
$/$: Different equipment depending on vehicle model, options, etc.
Driving support function
Holding down the EV mode switch will force
the engine to start and charge the lithium-ion
battery. This mode charges the lithium-ion
battery in advance when you want to extend
the driving distance in silent mode.
charge mode
How to drive
• While the ready-to-drive indicator light is on,
each time you press and hold the EV mode
switch, the charge mode switches between
ON and
OFF. • Charge mode can be used when the
drive mode is SPORT mode or ECO mode.
• Press and
hold the EV mode switch while in silent mode
to switch to charge mode. • When ON, the
charge
mode indicator lights up in the meter.
vinegar. For detailed ordinances on
idling stop, please check with the
relevant local government.
• When the system malfunctions, the
charge mode is automatically canceled.
• Using the charge mode will cause the engine to
generate electricity, resulting in poor fuel
consumption.
• When the outside temperature is low, you
may not be able to use the charge
mode. • When the outside temperature is
low, it may take longer
to charge the battery. If you use the charge
mode while the vehicle is parked and
the engine starts, you may be subject
to penalties for violating the idling stop ordinance.
• In charge mode, the lithium-ion battery is
charged until it is almost fully charged.
Also, the engine may not start even
when the charge mode is in operation. •
Charging time
may be longer depending on the system
status. • Even in the charge
mode, charging may not be possible when
the driving load is high, such as during
sudden acceleration or when
going uphill. • Even in charge mode, power
generation may stop temporarily to
protect the lithium-ion battery.
• If you open the hood while the ready-to-
drive indicator light is on, the charge
mode cannot be used or the charge
mode will be canceled. • If the
accelerator is operated when the shift
position is , the charge mode will be
canceled.
Machine Translated by Google
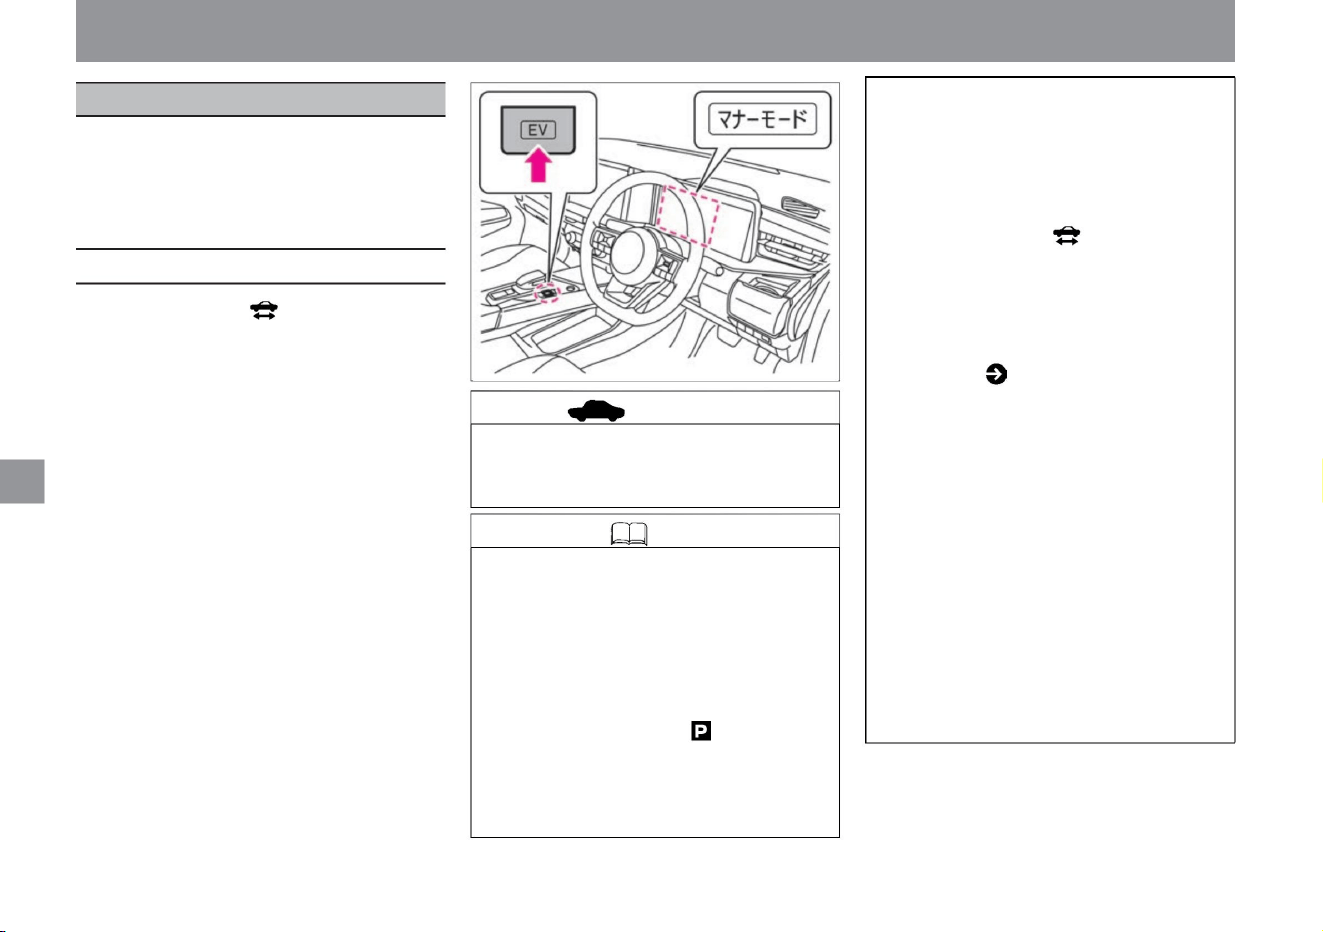
By pressing the EV mode switch, you can drive with the
engine starting suppressed as much as possible. This
mode is used when you want to drive quietly, such as in
a residential area early in the morning or late at night, as
it runs on the power of the lithium-ion battery only.
silent mode
Knowledge
166
advice
How to use silent mode
ZEG0970X
• If you step on the accelerator strongly, such as
when accelerating suddenly or going uphill,
the engine will start and the manner
mode will be canceled. • If you open the hood
while the ready-to-drive indicator light is on,
the engine will start forcibly and you will not
be able to use the manner mode, or the
manner mode will be cancelled.
• When turned ON, the manner mode indicator
lights up in the meter. • If you turn
on the charge mode and increase the remaining
lithium-ion battery capacity, the distance you
can travel on battery power alone will be longer.
• When the
outside temperature is low, the engine may start,
but if you turn on the manner mode before the
engine starts, the engine start will be suppressed
and you can run on battery power only.
• When the system determines that warming up
is necessary, the engine is started and silent
mode is canceled.
• When the brake is applied, the engine will start
temporarily according to the judgment of the
system. The manner mode will not be
canceled.
• If you switch the drive mode to NORMAL mode
while the manner mode is active, the
manner mode will be canceled. • If the
accelerator is operated when the shift position
is , the engine will start and the manner
mode will be canceled. Regenerative
braking on long downhills increases the
remaining lithium-ion battery capacity .
• Each time the EV mode switch is pressed while
the ready-to-drive indicator light is on, the
manner mode switches between ON and OFF.
• When the system malfunctions, the manner
mode is automatically canceled.
When the battery is fully charged, silent
mode is canceled to protect the lithium-ion
battery.
• Manner mode may not be available when the
outside temperature is low. • When
the lithium-ion battery is low, the manner mode
cannot be used or is canceled.
• If you press the defroster switch ( P.330) on
the windshield, the engine will start to warm
up and you will not be able to use the
manner mode or the manner mode will be
canceled. • When the system
determines that forced charging is necessary, it
cancels silent mode and starts the engine.
• Manner mode can be used when the drive mode
is SPORT mode or ECO mode. • If you press
the EV mode
switch while in charge mode, it will switch to silent
mode.
Driving support function
How to drive
Machine Translated by Google
• It is not for off-road (rough terrain) driving or
rally driving. Be sure to observe the following
when riding. – Do not drive in
water such as a river – Do not
drive continuously in sandy or muddy areas
where the tires are likely to spin
• Activates when the brake is applied suddenly while
driving at a speed of 60km/h
or more. • The operation will stop in the
following cases. – When you take your foot off
the brake pedal – When the sudden braking stops
even if you step on the brake pedal
– When the wheels are floating in the air
due to derailment, etc., do not let
them spin unnecessarily . Operate the steering
wheel, accelerator, brake pedal, etc.
carefully to ensure safe driving.
• When you turn on the power switch or when
you take off for the first time after starting
the e POWER system, you may hear a
sound from the engine room. .
• ABS warning light in the meter (
• A 4WD vehicle does not have a shorter
braking distance than a 2WD vehicle.
P.303) is lit, the emergency stop signal
may not work.
Please note that ABS does not operate at low speeds to ensure
that the vehicle comes to a stop. Although it depends on the road
surface conditions, it does not operate at speeds of approximately
10 km/h or less.
It is important to drive safely so as not to fall
into a situation where you have to step on
the brakes suddenly. In the unlikely event of
a dangerous situation,
do the following: • If you feel that you are in
danger, depress the brake pedal without
hesitation. • When the ABS operates,
vibrations are transmitted to the brake
pedal and an operating sound can be
heard. This is due to normal ABS
operation. Keep
depressing the brake pedal. • When avoiding
obstacles, operate the steering wheel
while stepping on the brake pedal.
Driving support function
ABS (anti-lock braking system)
The emergency stop signal flashes the brake lights to warn
the rear of the vehicle of sudden braking in order to reduce
the possibility of a rear-end collision with a following vehicle
when the brakes are applied suddenly.
4WD vehicles have excellent driving performance on
slippery roads, but they are not perfect.
ABS is a system that prevents the tires from locking during
sudden braking or braking on slippery road surfaces,
improving vehicle stability and making it easier to avoid
obstacles by steering.
Fully understand the handling methods specific to 4WD
vehicles, and drive correctly.
How to drive
emergency stop signal
$/$: Different equipment depending on vehicle model, options, etc.
Knowledge
About Emergency Stop Signal
About ABS
167
when running
Knowledge
How to handle a 4WD (four-wheel drive) vehicle
Machine Translated by Google
ABS detects the rotational speed of each
wheel with a sensor. If the size is not
specified, the ABS will not operate properly,
which may lead to an unexpected accident.
• In the following cases, the VDC warning light in the
meter may turn on and the system may not
operate properly. – When the
suspension, tires, brakes, steering-related parts,
etc. are replaced with non-genuine parts, or
modified – When the suspension, tires,
brakes,
or other related parts are worn or deteriorated
significantly VDC Winter tires and tire chains
should be installed on snowy roads, even
if the vehicle is equipped with a vehicle.
ABS is a system that assists the driver's braking
operation. As with any vehicle without ABS,
slow down before corners. Please operate early
and drive safely. • On bumpy roads, gravel
roads, snow-covered roads, etc., keep your
speed down
and maintain a sufficient distance between vehicles.
vinegar.
(TCS): This function improves driving force and
steering operability by suppressing the output of
the drive motor when the drive wheels spin on
slippery roads. –Brake LSD function: When a
drive wheel
spins on a slippery road surface, this function
secures driving force for the other wheel by
braking the spinning drive wheel.
• When replacing tires, be sure to install tires of the
specified size on all four wheels.
ABS is a device to ensure vehicle stability and
steering performance during braking, and does
not necessarily shorten the braking distance.
On bumpy roads, gravel roads, snowy roads,
etc., the braking distance may be longer than a
car without ABS. When driving on such roads,
especially slow down and keep a sufficient
following distance.
Driving support function
VDC (Vehicle Dynamics Control)
VDC is a system that improves vehicle stability while driving
by suppressing skidding and spinning of the drive wheels.
About the function of VDC
168
Knowledge • During VDC operation, the brake
operation may generate noise and vibration,
but it is not abnormal.
warn
About the operation of VDC
– ABS function: ABS (P.167)
warning
How to drive
– VDC function: A function that improves
vehicle stability while driving by using a
sensor to determine if the
vehicle is skidding while driving. – Traction control function
• VDC Activation and
Warning Light – The VDC warning light in the
meter will flash when VDC is activated.
• Reduce your speed on slippery roads and
before curves.
This device is intended to improve the
running stability of the vehicle and is not
intended to prevent accidents. There is a
limit to how much VDC can operate, so be
sure to slow down and drive safely,
especially on slippery roads and before curves.
– The VDC warning light also flashes when
only the traction control function (TCS) is
active. When the VDC warning light flashes,
the vehicle is in a slippery state, so please
drive very carefully. • In the following cases,
the VDC warning
light may turn on.
• The VDC system has the following functions.
• Slow down sufficiently before a curve.
Machine Translated by Google
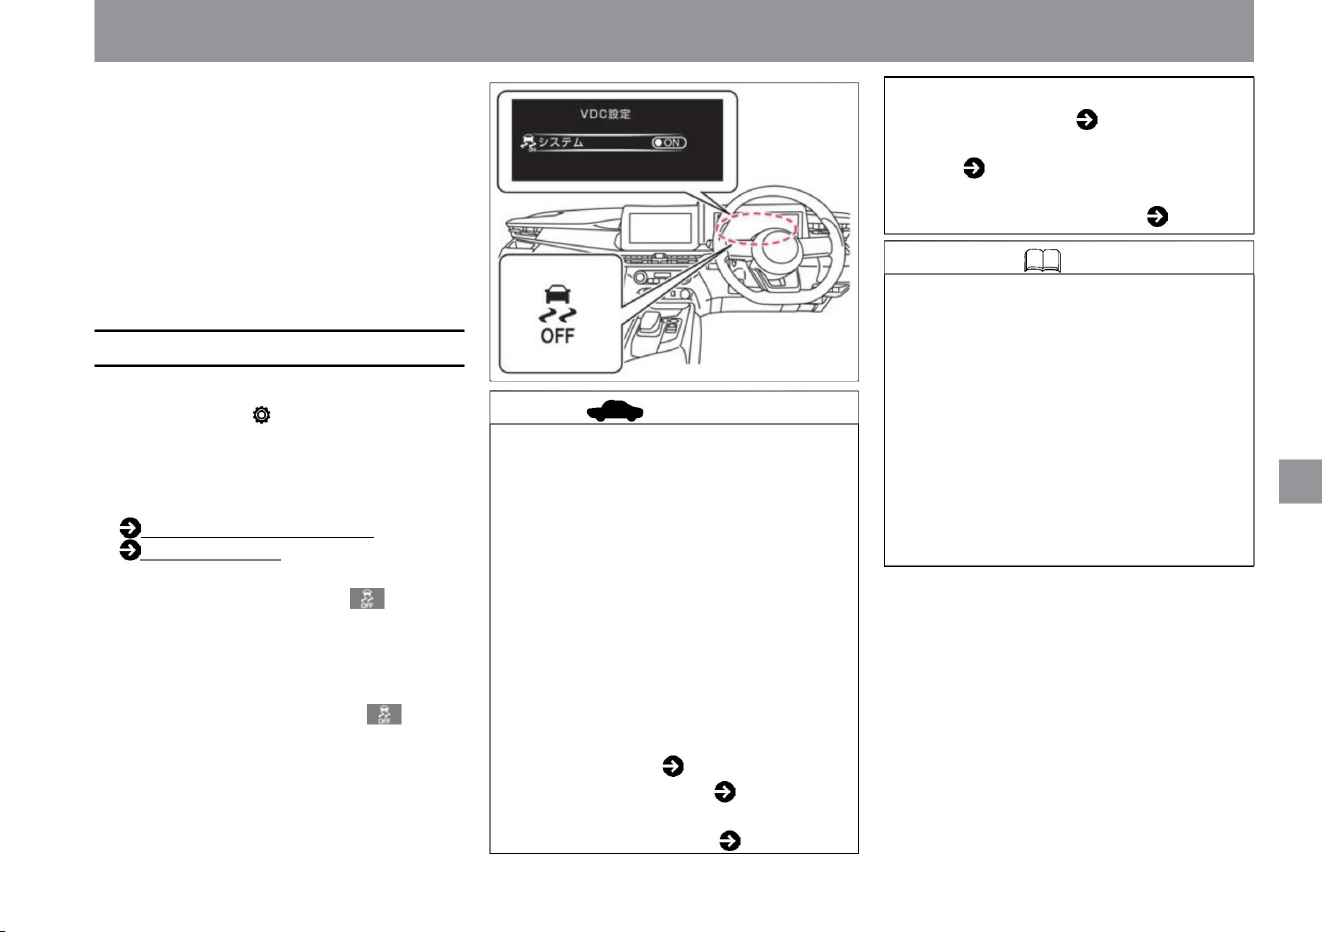
How to drive
VDC will be ON. • When
the VDC is activated, slight vibration and noise
will occur in the vehicle body and pedals
when starting or accelerating, but this is
not a
malfunction. • When the power switch is turned on,
VDC setting
(P.70) • When the VDC function is switched to
OFF, VDC stops and the VDC OFF indicator
light lights up.
and Once the power switch is turned off and
the e-POWER system is started again, the
VDC warning light will turn off. – When
the car is on a turntable or moving object such
as at the entrance of a parking lot.
• When the VDC is activated, it detects
slippage when escaping from muddy or
snowy roads, so even if you step on the
accelerator pedal, the tire rotation speed
may not increase. Stop the VDC in the
Advanced Drive Assist Display when you
want to increase tire speed. • When the
VDC function is turned off, all VDC
functions and the following functions stop.
(Excluding ABS and brake LSD functions)
–Intelligent Trace Control (Cornering
Stability Improvement System) ( P.170) –
ProPILOT ( P.175) –Intelligent LI (Lane
Departure Prevention
Assist System) ( P.226 )
• To use (ON) VDC again, switch the VDC
function to ON again on the Advanced Drive
Assist Display. The VDC OFF indicator light
goes out and VDC turns ON.
At the first start after starting the e-POWER
system, you may hear a sound from inside
the engine room, but it is a sound that is
checking the operation of the system and
is not abnormal.
Selecting "Settings", "VDC Settings", "System"
on the Advanced Drive Assist Display displays
the VDC function .
– Intelligent Emergency Brake ( P.201) –
Misapplication Collision
Prevention Assist ( P.207) – Intelligent BSI
(Rear Side
Collision Prevention Support System)
( P.218)
– When driving on a special, extremely slanted
road surface (such as a bank found on a
circuit).
• Every time you turn on the power switch,
You can switch between ON and OFF. For
configuration details, read VDC configuration.
How to switch
screens (P.60)
ZEG0971X
advice
How to stop VDC
169
Knowledge
Driving support function
$/$: Different equipment depending on vehicle model, options, etc.
Machine Translated by Google

(When VDC is turned off, the Intelligent
Trace Control (cornering stability
improvement system) stops completely.)
•When the system is activated,
you may feel vibration or hear a sound in the
brake pedal. There is, but it is the operation
sound of the system and it is not abnormal.
Also, you may feel a sense of deceleration,
but this is not a malfunction. Select
"Settings", "Driving assistance",
"Chassis control", and "Trace control" on the
advanced drive assist display to turn ON/
OFF the intelligent trace control (cornering
stability improvement system) function .
You can switch.
For more information on settings, read
Driving Assistance.
Driving support (P.70)
• Do not rely too much on the Intelligent Trace
Control (cornering stability improvement
system) function. Intelligent Trace
Control (cornering stability improvement
system) is not effective in all driving
environments, so please do not overestimate
its function and drive safely.
• Even if the intelligent trace control (cornering
stability improvement system) is turned off,
it may operate during sudden steering. •
When VDC is turned off, Intelligent Trace
Control
(cornering stability improvement system) is also
turned off.
Detects the driver's steering, accelerator, and
brake operations, and controls the brakes on each
wheel based on that information to smoothen the
vehicle's behavior and improve responsiveness
for cornering with a sense of stability. It will
come true. caveat
chassis control
Knowledge
advice
Intelligent Trace Control
(cornering stability improvement
system)
170
How to drive
It may not work properly. If a warning is
displayed, have the vehicle inspected by
a NISSAN dealer. Warning
message ( P.316)
• When the Advanced Drive Assist Display
shows the warning “Chassis control
system malfunction, see instruction
manual”, the function is disabled due to malfunction.
Driving support function
Chassis control includes Intelligent Trace
Control (Cornering Stability Improvement
System).
Machine Translated by Google
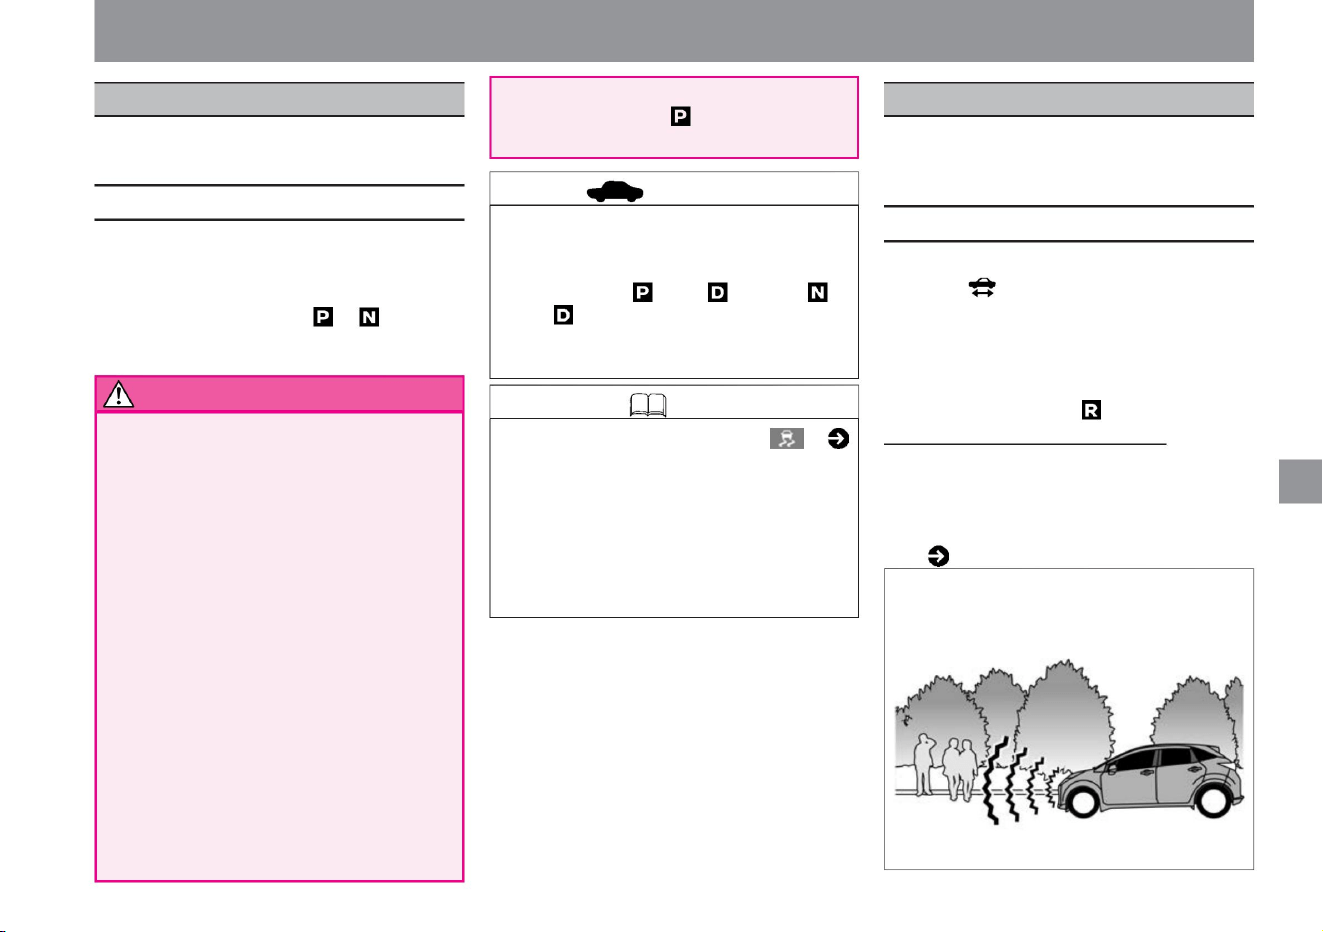
Hill Start Assist is a system that assists starting on an
uphill slope.
The approaching vehicle notification system is a system that alerts
pedestrians by sound when a vehicle is approaching while the vehicle is
traveling at low speed.
$/$: Different equipment depending on vehicle model, options, etc.
About Hill Start Assist
Knowledge
About the vehicle proximity notification system
advice
171
Driving support function
hill start assist
Vehicle proximity notification device
How to drive
• When the shift position is , about the
failure of the vehicle approaching notification
system • If there is a problem with the system, the vehicle
approaching notification system warning light in the
meter lights up. Vehicle proximity notification system
warning light ( P.309)
• While the Hill Start Assist is operating, the
brake pedal response may change, and
noise and vibration may occur, but this is
not a malfunction.
• When starting on an uphill slope, it prevents the
vehicle from backing up while shifting from
the brake pedal to the accelerator
pedal. • When the shift position is other than ,
the brake force is maintained for about 2
seconds when the brake pedal is
released. caveat
• VDC warning light in the meter (
The vehicle approaching alarm system operates in the
following cases when the travel-ready indicator light in the
meter is lit. • When
the vehicle speed is 30km/h or less when starting
• When the vehicle speed is 25km/h or less when decelerating
will be When parking, be sure to put the
shift position in and apply the parking
brake.
Don't use a strike. It
may lead to an unexpected accident. •
When
stopping, keep depressing the brake pedal.
This device
maintains the braking force for about 2
seconds when you take your foot off the
brake pedal, but then the braking force is released.
• Do not overestimate the Hill Start Assist
function.
The vehicle may skid and reverse on icy
roads or muddy slopes. Please pay
particular attention to safe driving. On a
gentle slope,
the hill start assist may not operate and
the vehicle may go backwards. In that
case, step on the brake pedal or apply the
parking brake. • Hill start assist for parking
on slopes
tree
• Immediately after operating the select lever,
depress the brake and wait about one
second before starting. Hill start assist
may not operate immediately after shifting
the shift position from to or from .
P.306) lights up, it does not work.
ZEG0972X
Machine Translated by Google
warn
172
Knowledge
tree
• If you can't hear the vehicle approaching alarm
system, have it checked at a Nissan dealer.
If you can't hear the approaching vehicle alarm,
stop in a safe and quiet place and see if you can
hear it. While firmly depressing the brake pedal,
set the shift position to , open the window and
check if you can hear the sound. If you cannot
hear the sound from the front of the vehicle,
have it checked by a NISSAN dealer.
• When the following conditions are met, the
approaching vehicle alarm system is activated to
prevent the driver from forgetting to turn off the
power switch.
–When the driver's door, front passenger's door,
or rear door is open • If you
want to increase the volume of the approaching
vehicle alarm system, please consult your Nissan
dealer. It cannot be muted.
– When the shift position is – When the
ready-to-drive indicator light is on – When the
driver's
seat belt is not fastened
Driving support function
how to drive
Machine Translated by Google
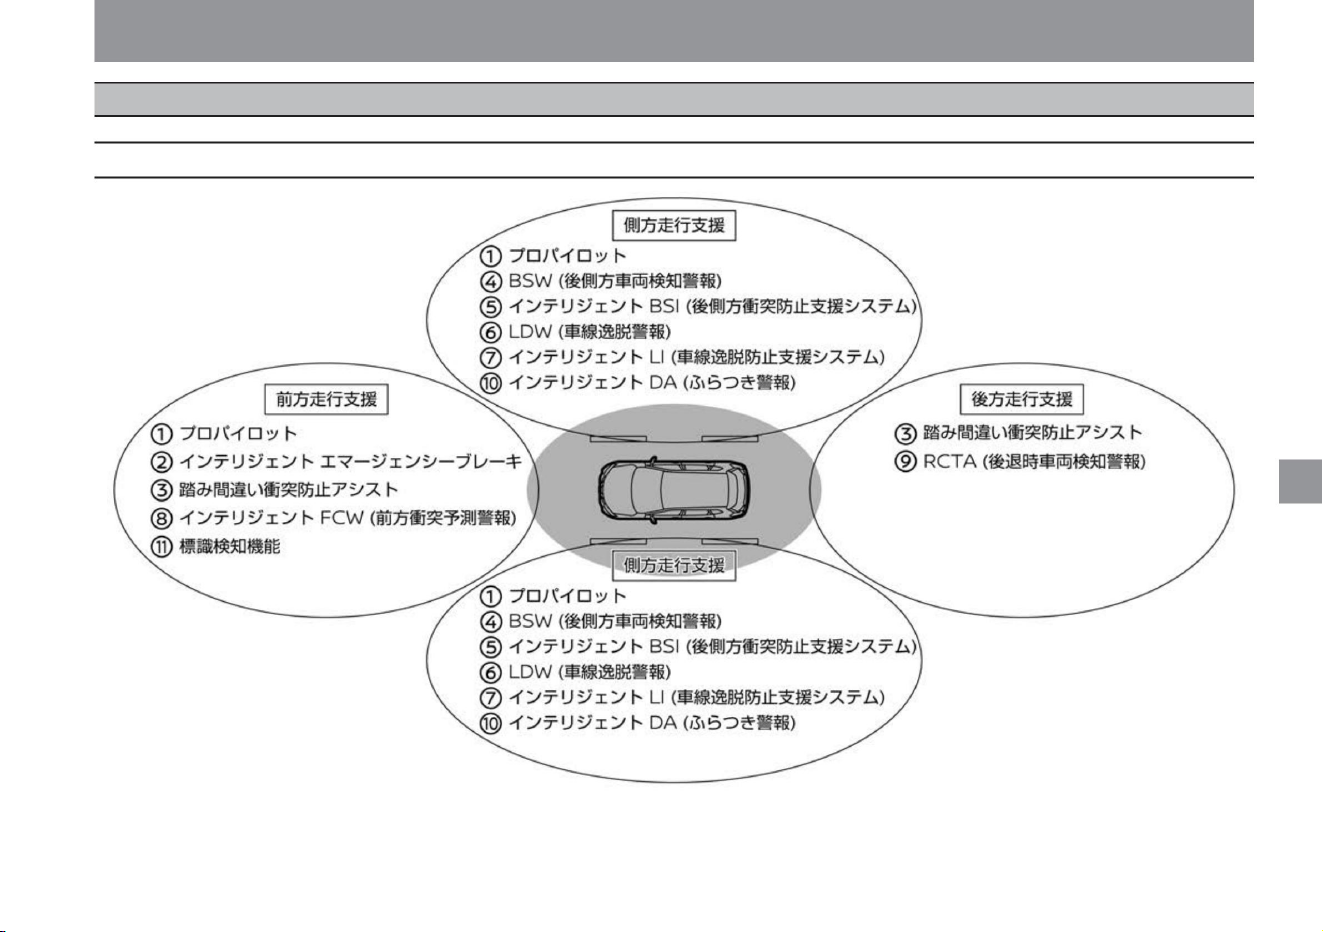
How to drive
driving support system
$/$: Different equipment depending on vehicle model, options, etc.
Driving support system
173
Driving support function
ZEG2042X
Machine Translated by Google

How to drive
ProPILOTÿ While
driving, the distance between the vehicle and the vehicle ahead is controlled, and if the vehicle ahead is stopped, the vehicle stops and maintains that state.
It also reduces the burden of driving by controlling the steering wheel so that the
vehicle runs within the driving lane. ( P.175) Intelligent
Emergency Braking When there is a risk of a collision with a vehicle, pedestrians, or a bicycle with people on board, the system uses an alarm and brakes to
assist the driver in
avoiding a collision. ( P.201)
Misapplication Collision Prevention Assist If there are obstacles such as walls, vehicles, or pedestrians (only when moving forward) in the direction of travel,
and if the accelerator pedal and brake pedal are depressed incorrectly or the brake operation is delayed. , provides audible and visual warnings,
and helps prevent excessive
acceleration and collisions with obstacles. ( P.207) BSW (rear side vehicle detection warning) ÿ When changing lanes,
alerts the driver if there is a vehicle in the next lane. ( P.217) Intelligent
BSI (Rear Side Collision Prevention Support System) If the driver starts changing lanes when there is a vehicle in the next lane, the system will warn the
driver and push the vehicle back into the original lane. to
assist you in avoiding
contact with adjacent vehicles. ( P.217) LDW (Lane Departure Warning) When the driver is about to unintentionally
deviate from the driving lane, an alert is issued to warn the
driver. ( P.226) Intelligent LI (Lane Departure Prevention Assist System) When the driver is about to unintentionally deviate from
the driving lane, the system assists the driver to return
to the lane. ( P.226) Intelligent FCW (Forward Collision Prediction Warning) Detects a vehicle two vehicles ahead of you and alerts the driver if it determines
that your vehicle needs to take
avoidance maneuvers due to sudden
deceleration, etc. ( P.226) call attention to ( P.231) RCTA (reversing vehicle detection alarm) ÿ If there is a risk of collision with a vehicle
crossing behind you when reversing, an alarm
will warn you. ( P.235) Intelligent DA (Staggering Alarm) When it is determined that the driver's attention is declining due to steering wheel
operation, the
driver is urged to take a rest with a sound and display. ( P.239) Traffic sign detection function This function notifies the driver by displaying information on no
entry signs, stop signs, and speed limit signs detected while driving on the Advanced Drive Assist Display. ( P.241)
174
Driving support function
Machine Translated by Google
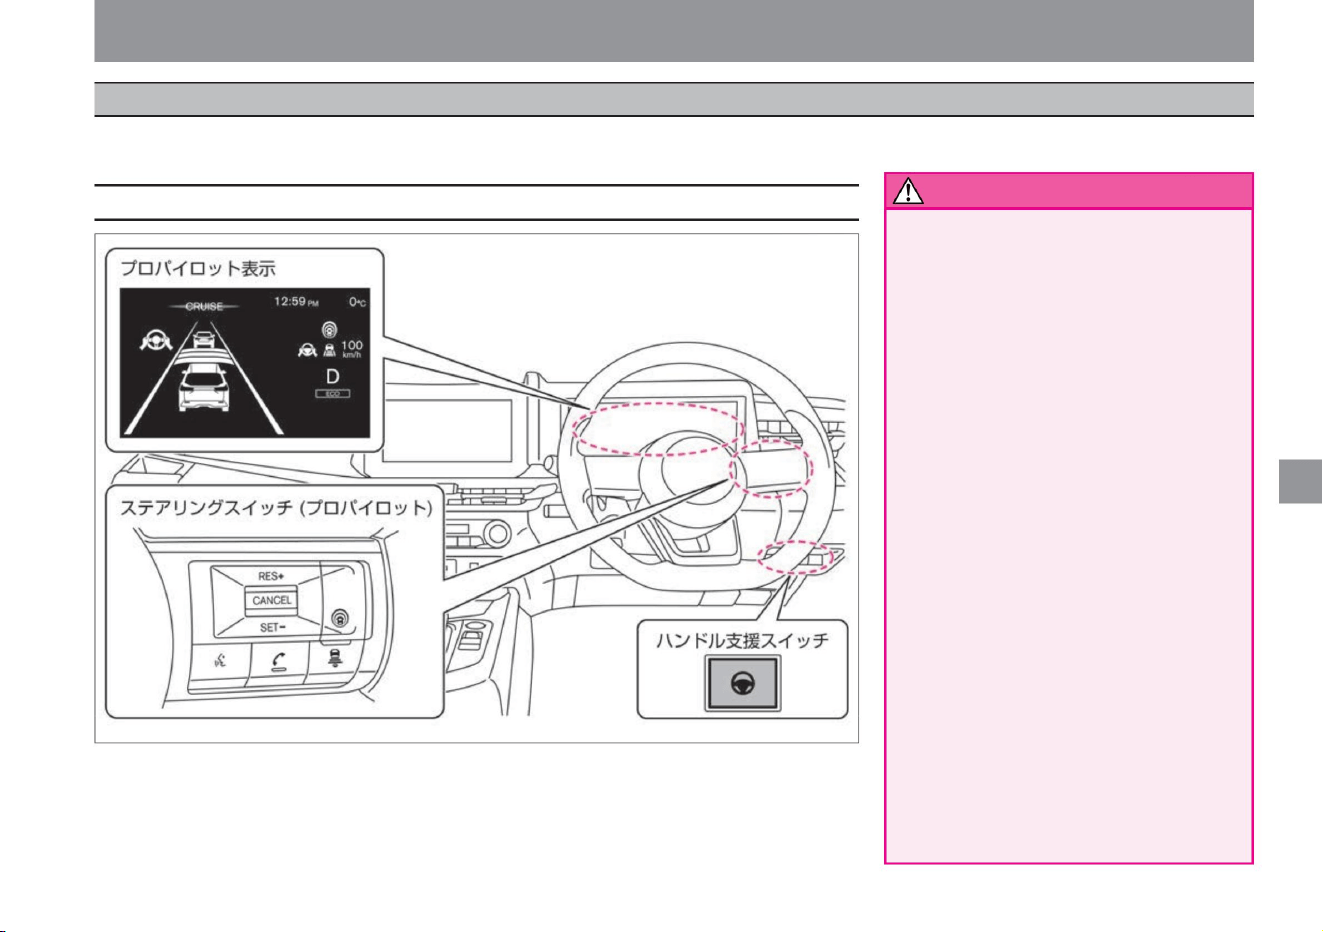
How to drive
ProPILOT assists the driver in driving in the center of the lane while maintaining a distance between the vehicle and the vehicle ahead according to the vehicle speed, up to the vehicle speed set by
the driver.
ZEG2043X
Driving support function
warn
System-related displays and switches
175
• Do not use on expressways or motorways.
• Because ProPILOT's performance is limited,
do not rely solely on the system for driving,
and always try to drive safely. When
suddenly cutting in front of your vehicle,
when the vehicle in front brakes suddenly,
when driving on a sharp curve, or in bad
weather, you may not be able to decelerate
or control the steering properly and approach
the vehicle in front, or the lane marker may
turn off. may approach Always try to drive
safely by operating the accelerator, brakes,
and steering wheel yourself according to
the distance to the vehicle ahead, your
vehicle's position in the lane, and the
surrounding conditions. A lane marker is a
line drawn on
the right or left side of the driving lane. • Hands-free driving is not possible.
$/$: Different equipment depending on vehicle model, options, etc.
professional pilot
Always hold the steering wheel and
drive safely. • Does not
react to stopped vehicles.
be.
The ProPILOT is designed for use on
highways and motorways on straight
lines and gentle curves. Do not use
on general roads as it may lead to
unexpected accidents.
Machine Translated by Google
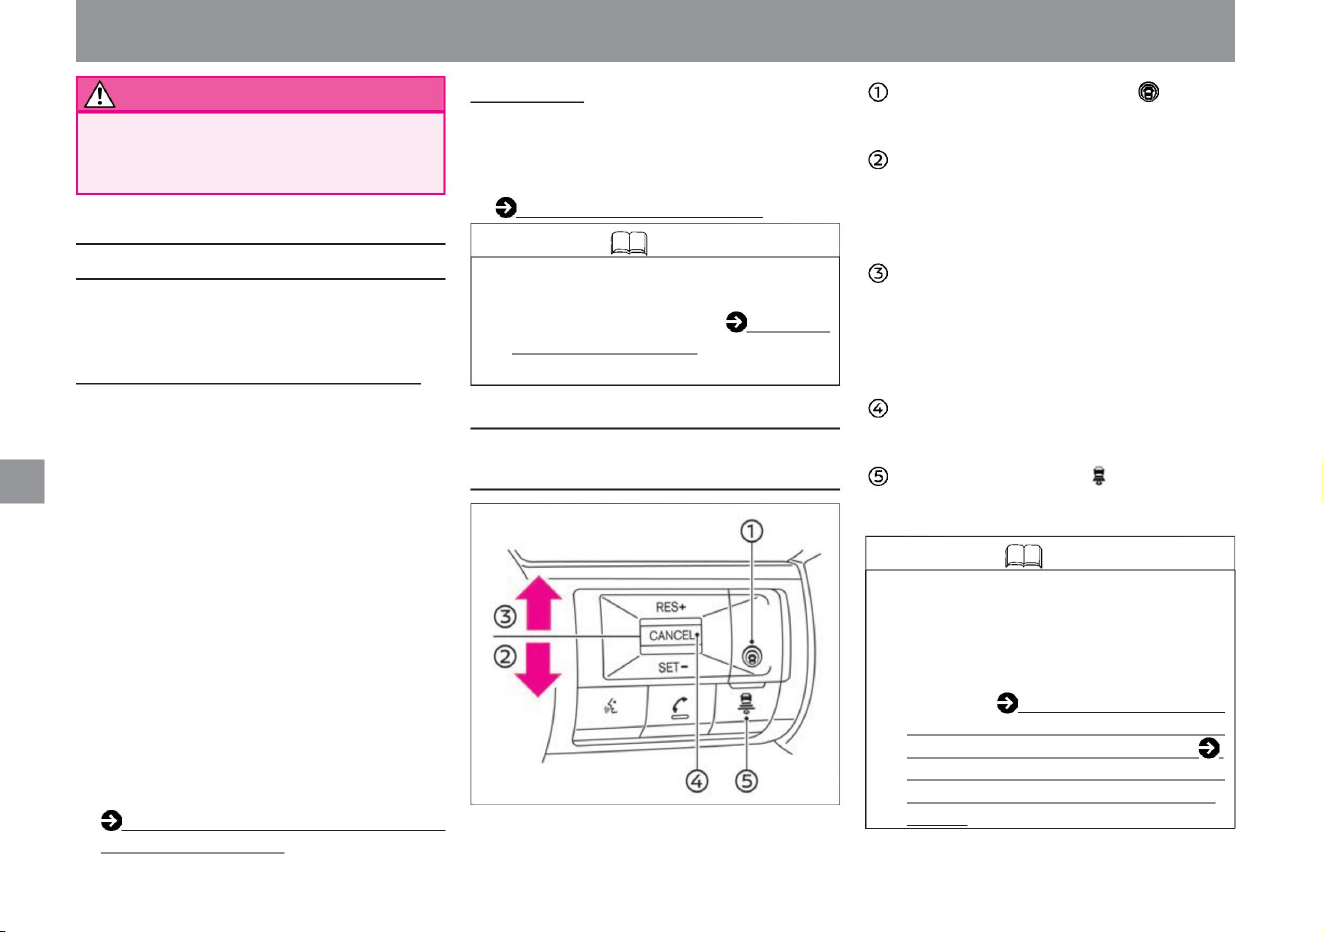
Steering switch (ProPILOT)
Knowledge
About ProPILOT
176
RES+ operation (upper
push) - After disengaging ProPilot, it is
possible to start again at the speed set before
disengagement. - You can increase the set
speed.
It will
not slow down for vehicles that are stopped at
a warning toll booth or at the end of a traffic
jam. Please be careful.
Steering
Assistance • The steering is controlled so that the vehicle
runs near the center of the lane, assisting the driver in
handling the steering wheel. (It can be operated when
there is a vehicle in front at about 50km/h or
less.) Operation of steering wheel
support (P.190) Knowledge
• The ProPILOT system has the following functions.
ProPilot Switch - Turns
ProPILOT on and off.
• Regarding the constant speed control function that
allows you to drive at a constant speed without
stepping on the accelerator pedal, please read
About the constant speed control function
(P.197).
SET-operation (downward
push) ProPILOT can be started at the vehicle
speed when pushing in the -SET-
direction. - You can lower the set speed.
CANCEL switch -
You can cancel ProPilot. Distance setting
switch -You can switch
the distance setting between three levels:
"Long", "Medium", and "Short".
Intelligent cruise control • When the vehicle ahead
is detected, the vehicle distance is controlled to keep
the distance between the vehicles according to the
vehicle speed, up to the vehicle speed set by the
driver (approximately 30km/h or more).
• When the preceding vehicle stops, your vehicle will
stop following the preceding vehicle. Once
stopped, Intelligent Cruise Control remains stopped.
• When the vehicle ahead starts
moving, press the cancel switch on the steering switch
in the RES + direction or depress the accelerator
pedal to release the stopped state and resume
follow-up driving using intelligent cruise control. • If
the vehicle ahead is not detected, the vehicle will
run at the vehicle
speed set by the driver. (Cannot be used when there
is no vehicle in front at speeds of approximately 30
km/h or less.) Intelligent cruise control operation
(P.180)
• When ProPILOT is turned on, Intelligent BSI
(Rear Side Collision Prevention Assist
System) and Intelligent LI (Lane Departure
Prevention Assist System) are also turned
on at the same time.
For details, see BSW (rear side vehicle
detection alarm) / intelligent BSI (rear side
collision prevention support system) ÿ (P.217)
Please read LDW (Lane Departure
Warning) / Intelligent LI (Lane Departure
Prevention Support System) (P.226).
How to drive
Driving support function
ZEG0975X
Machine Translated by Google
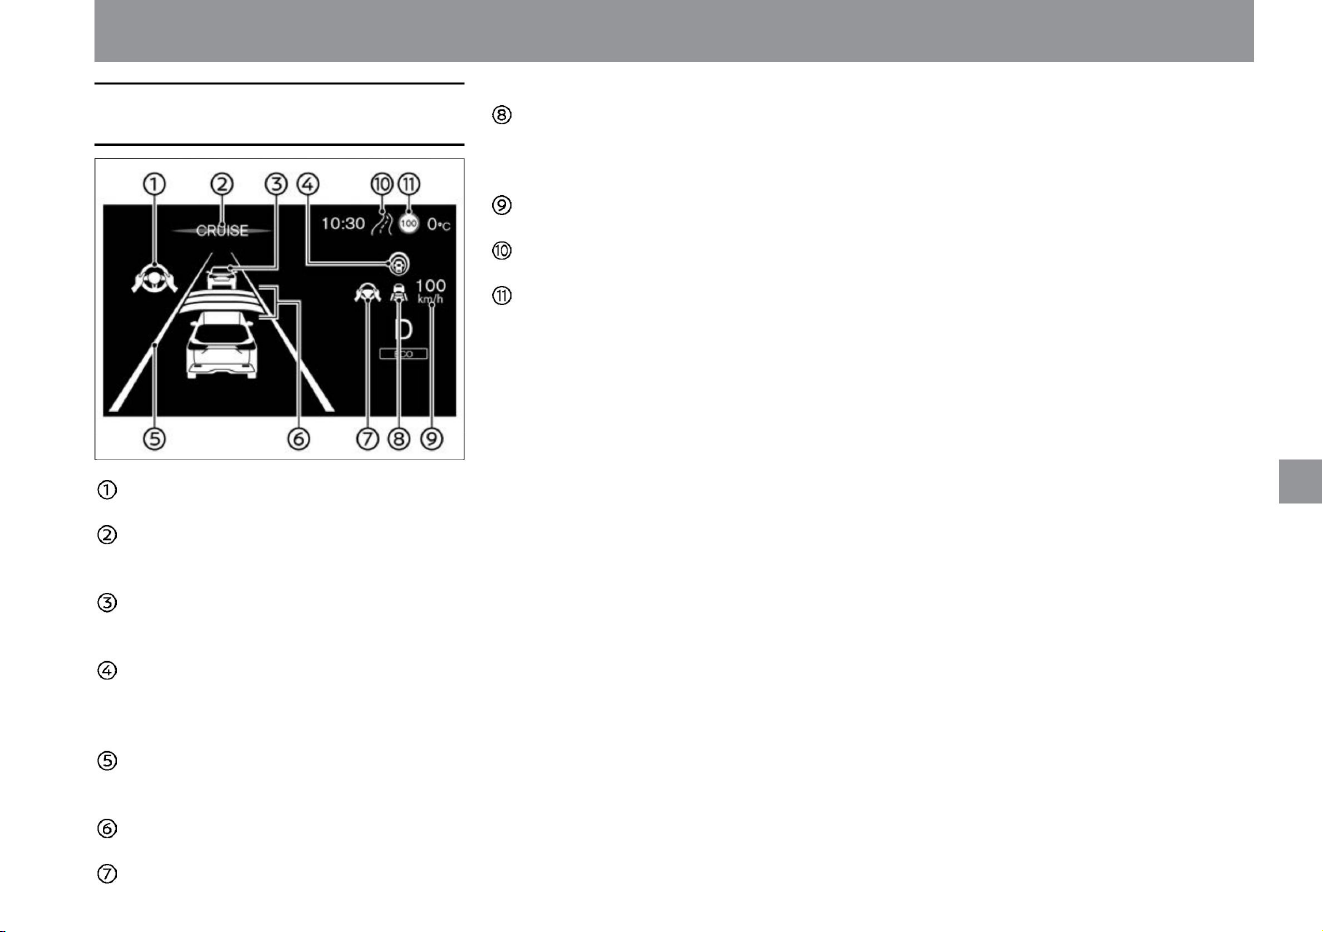
Advanced drive assist display
177
- Lights green during steering support Vehicle
speed control operation light/warning
light - During constant distance control: Lights
green - During constant speed control: Leading vehicle icon
is
hidden Set vehicle
speed display - Set vehicle
speed is displayed Route
deceleration support display ÿ - Display when the route
deceleration support function
is activated Maximum speed sign display - Display the
speed sign
detected by the sign detection function - Display the operation support for the driver
Steering wheel assist operation
indicator - Lights green when steering assist is in
use ProPILOT operation indicator -
Lights blue when ProPILOT is in operation Leading vehicle
detection indicator -
Leading vehicle detected: displayed -
Leading vehicle not detected: not displayed
ProPILOT operating light - Pro-
PILOT ON: Lights white - Pro-PILOT operation starts:
Lights blue Lane detection display - Lane detection: Lights
green
- Lane detection not:
Lights gray Vehicle distance setting display -
Displays the setting status of the distance
Steering wheel assist
operation light / Warning light $ / $: Equipment
that differs depending on vehicle model, options,
etc.
How to drive
ZEG1119X
Driving support function
Machine Translated by Google
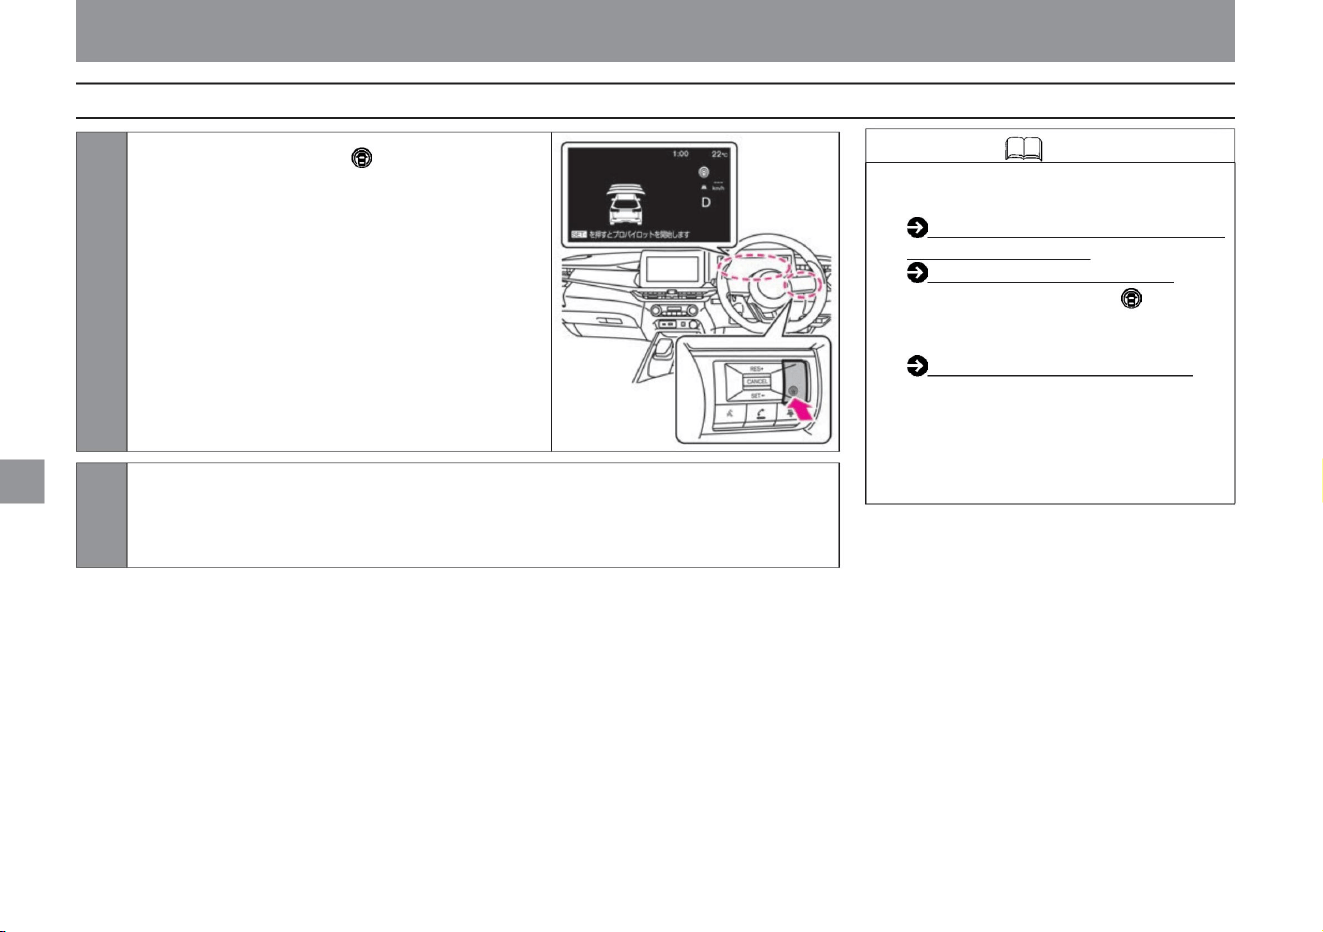
• ProPILOT has the following functions.
Intelligent cruise control activation
(P.180) Steering wheel
assistance activation (P.190) •
Press and hold the ProPilot switch for about
1.5 seconds to switch to the constant
speed control
function. About the constant
speed control function (P.197) • The distance
setting is maintained until the setting is
changed again even if
the e-POWER system is stopped. • When
the e-POWER system is stopped, ProPILOT is turned off.
Knowledge
178
How to use ProPilot
ZEG1294X
How to drive
2 Accelerate or decelerate to the speed you want to set.
1Press the ProPilot switch. ÿ ProPILOT
is turned on. ÿThe Advanced
Drive Assist Display shows the status of
ProPILOT.
Driving support function
Machine Translated by Google
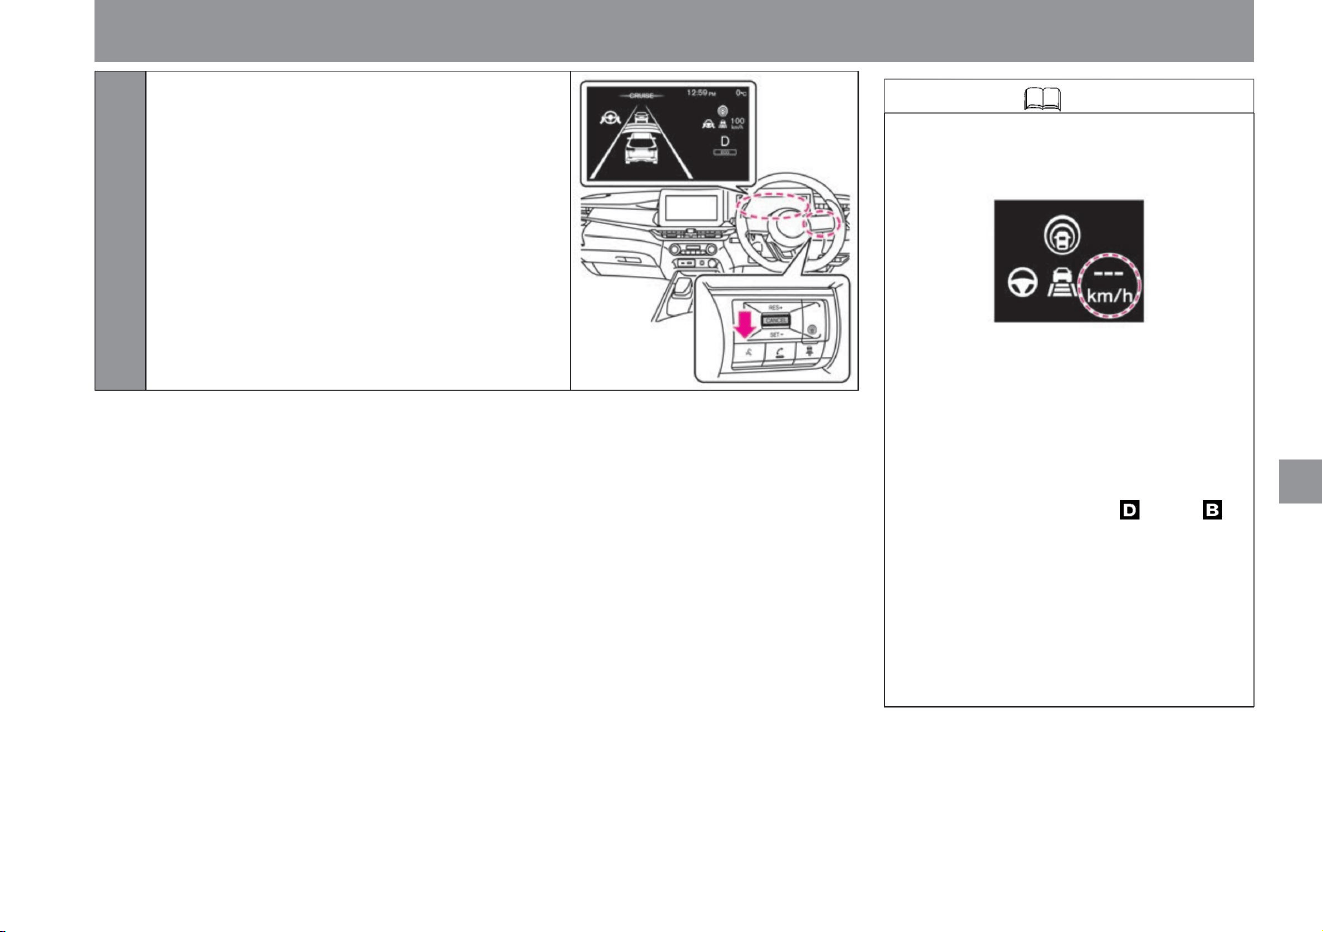
Knowledge
179
$/$: Different equipment depending on vehicle model, options, etc.
Driving support function
ZEG1295X
3 Push in the SET- direction. ÿ
The speed when the switch is pressed becomes the
set speed, and ProPILOT control starts. (If the
switch is pressed while a vehicle ahead is being
detected at a vehicle speed of approximately 30 km/h
or less, the set speed will
be 30 km/h.) The ProPilot operation light and ProPILOT
operation indicator will light up in blue.
ZEG0978X
– When VDC is turned off
• ProPILOT control cannot be started in the
following cases. (The set vehicle speed
display flashes for about 2 seconds.)
– When VDC/TCS is activated
– When the tires spin
–When the driver's seat, front passenger
seat, rear seat, or back door is open
–When the
driver 's seat belt is not fastened –When
the
vehicle speed is below approximately
30 km/h and a preceding vehicle
is detected - When the shift position is
other
than or - When the electric parking brake
is applied -
When the brake is applied
How to drive
Machine Translated by Google
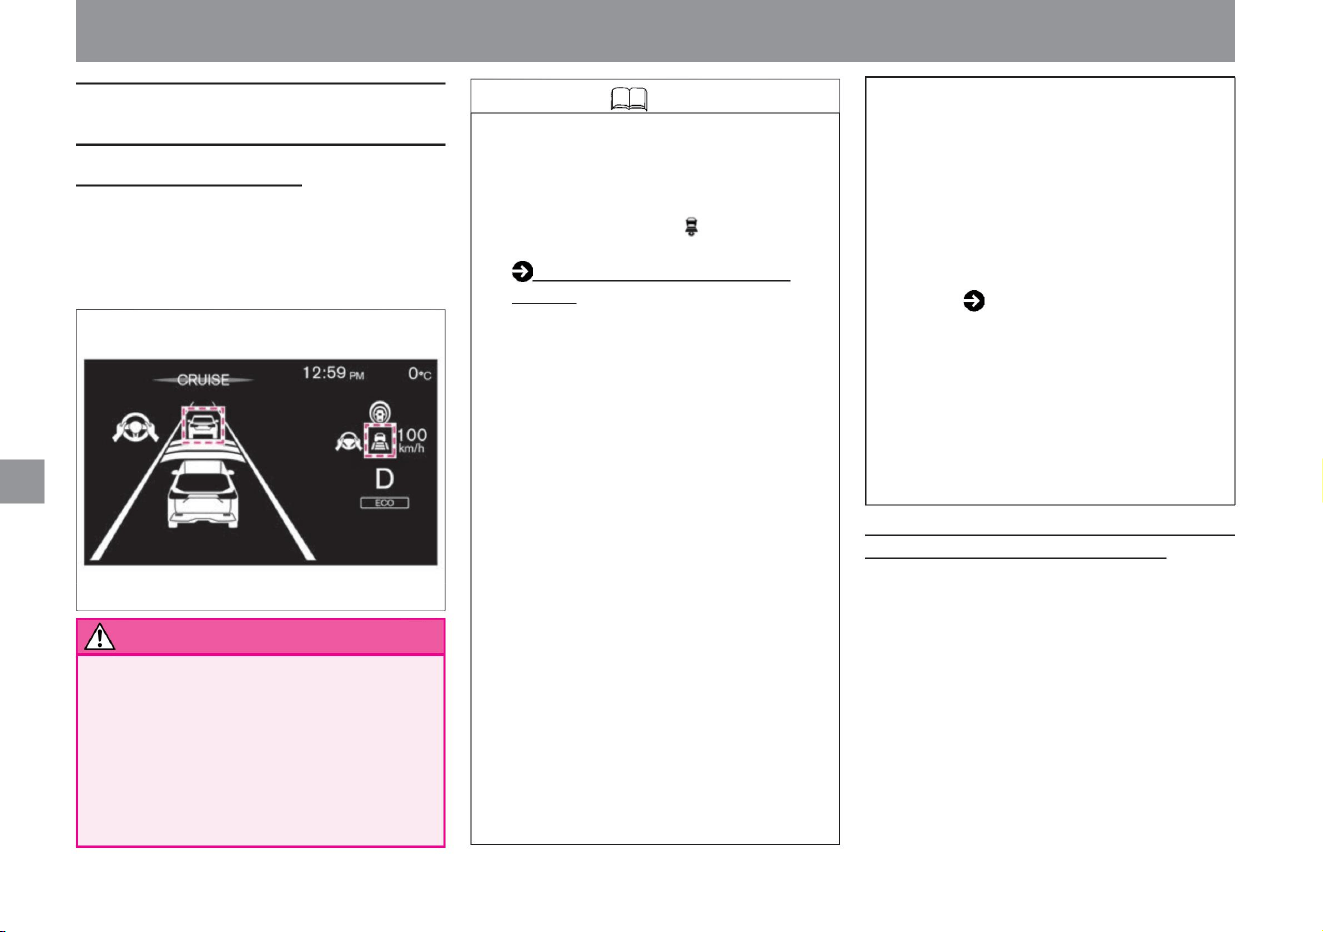
(P.186) •
When the brakes are activated by the control of the
intelligent cruise control, the brake lights of your
vehicle will light up.
• Drivers pay attention to their surroundings and
operate the brake pedal as necessary. After
stopping with the vehicle speed/vehicle distance
control function, if a vehicle cuts in ahead, it
cannot be detected depending on the position
and orientation of the vehicle. There is a risk of.
• Pressing in the RES+ direction while the vehicle is in
the stopped state will put the vehicle in the start
standby state for about 3 seconds. ( The vehicle
stop holding state
is released.) About 3 minutes after the vehicle is
stopped by Intelligent Cruise Control, the electric
parking brake is activated with a release sound,
and Intelligent Cruise Control is released. .
When detecting a preceding vehicle
How to change the following distance setting
When the vehicle ahead stops (vehicles equipped with a
manufacturer's optional navigation system) •
When the vehicle ahead stops while driving with intelligent
cruise control, your vehicle will stop following the
vehicle ahead. Once stopped, Intelligent Cruise Control
will remain stopped. (While the vehicle remains
stationary, the message “We will follow the vehicle
ahead” will be displayed, and the preceding vehicle
detection indicator and vehicle speed control light
will flash.) Limited to expressways and motorways.
When the
preceding vehicle stops while driving on a road marked
with
warn
Activating Intelligent Cruise Control
Knowledge
180
ZEG1134X
• When your vehicle is stopped by intelligent
cruise control, pay attention to your
surroundings until you maintain the stopped
state. • Vehicle
distance can be set with the distance setting
switch .
• Under the following conditions, the message
“Start with RES+” will be displayed and the
vehicle will remain stopped. (vehicles with a
manufacturer's optional navigation system)
–
When stopped for more than 30 seconds
• When the brake is activated, it may make a
sound, but it is not a malfunction.
– When the manufacturer's option navigation
system and front camera determine that
the navigation road type does not match
the road type on which the vehicle is
traveling.
• With the vehicle speed set by the driver (approximately 30km/h or more)
as the upper limit, the vehicle is driven by controlling the distance
between vehicles according to the vehicle speed. The preceding
vehicle detection indicator lights up, and the vehicle speed control
operation light lights up with the constant distance control indicator (green).
– When an obstacle is detected in front by
sonar or the front camera – When
a vehicle is detected – When a
pedestrian is detected –
When a traffic light is detected
– When the brake is applied –
When a road with narrow lane width is
detected – When the sonar is not working
properly ( P.317)
– When the location detection of the
manufacturer's option navigation system
cannot be performed correctly
Driving support function
How to drive
Machine Translated by Google
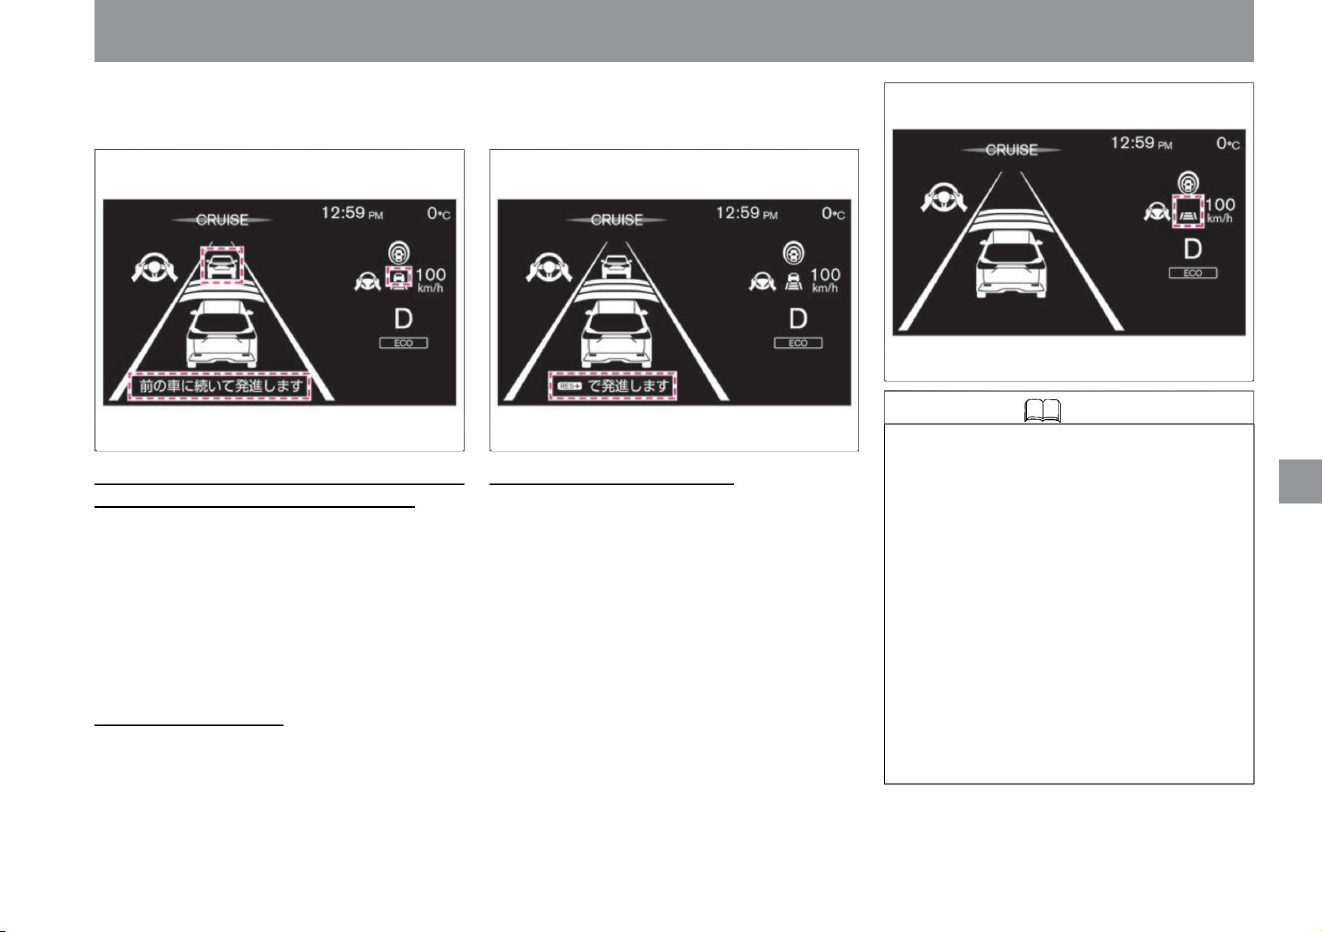
Knowledge
181
When the preceding vehicle stops (vehicles not equipped with a
manufacturer's optional navigation system) • When
the preceding vehicle stops while driving with intelligent cruise
control, your vehicle will stop following the preceding vehicle.
Once stopped, Intelligent Cruise Control will remain stopped.
(When the vehicle is kept stopped, the display will indicate
"Press RES+ to start.") When the vehicle in front starts
moving When the vehicle ahead starts moving while the
vehicle is kept stopped by Intelligent Cruise Control is
stopped
by pushing in the RES+ direction
or depressing the accelerator pedal.
, your vehicle will stop following the preceding vehicle. After
that, when the preceding vehicle starts moving within about 30
seconds, the follow-up run is resumed.
• The vehicle will accelerate up to the set vehicle speed by
controlling the function, but if you want to accelerate
quickly, press the accelerator pedal to accelerate. •
When a vehicle
ahead is not detected and the vehicle speed drops below
approximately 25km/h, Intelligent Cruise Control is
deactivated. • When driving on limited roads such as
highways and
motorways, Intelligent Cruise Control will be canceled if the
vehicle ahead is no longer detected while the vehicle
is held stationary. (vehicles equipped with a
manufacturer's optional navigation system)
When the vehicle ahead is not detected •
The vehicle travels at a constant speed set by the driver. The
preceding vehicle detection indicator turns off, and the
preceding vehicle icon on the vehicle speed control operation
light disappears.
It will be canceled and the follow-up run by intelligent cruise
control will start again.
How to drive
$/$: Different equipment depending on vehicle model, options, etc.
ZEG1136XZEG1135X
ZEG0981X
Driving support function
Machine Translated by Google
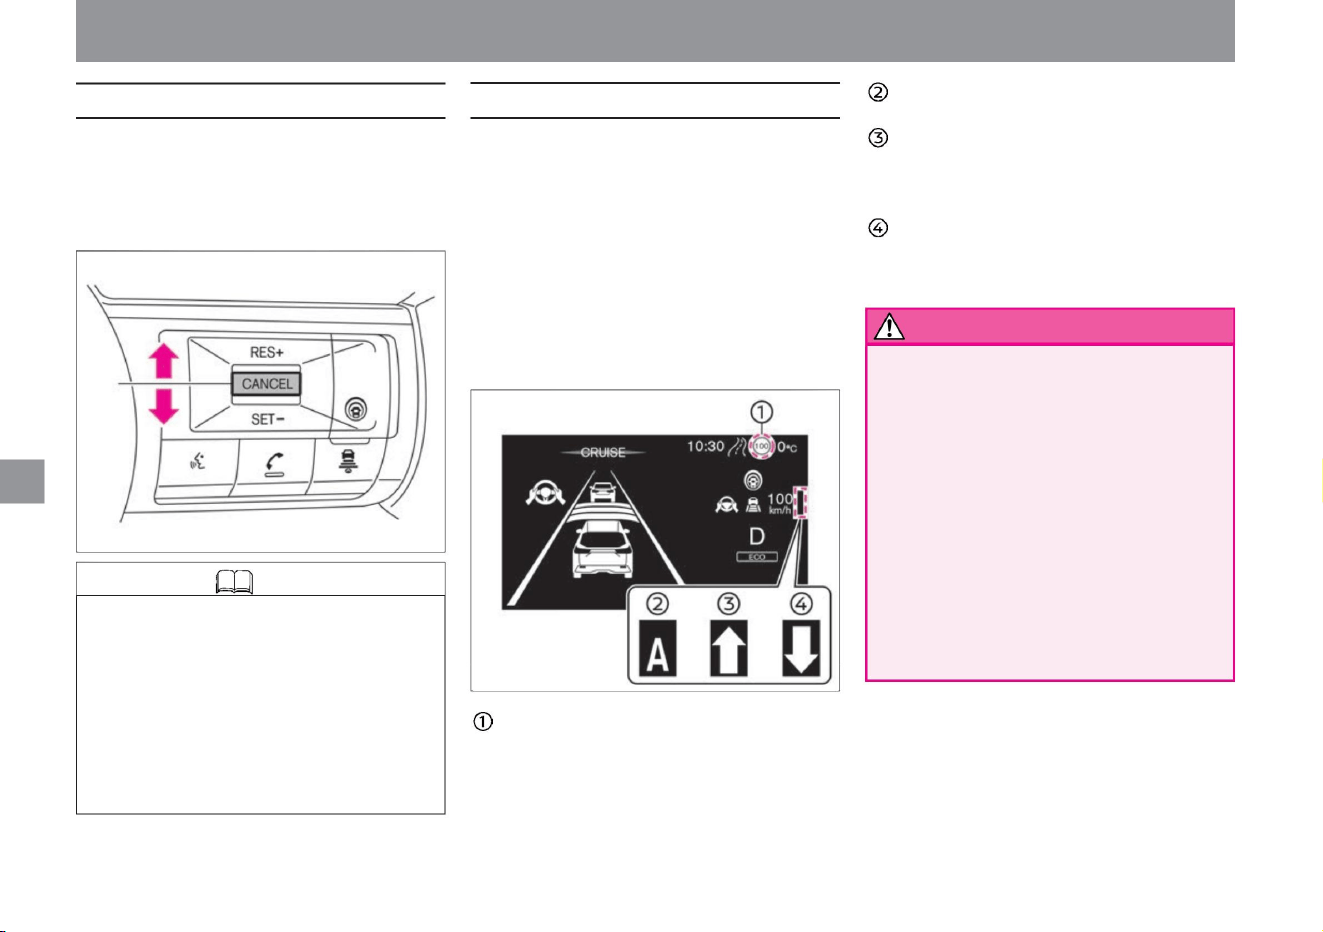
How to drive
Knowledge
A: Indicates the operating status of auto mode
(automatic). ::
If the manual mode (manual) is ON and the
detected maximum speed sign is higher than
the current running speed, ":" will be
displayed. ;: If the manual
mode (manual) is ON and the detected
maximum speed sign is lower than the current
running speed, ";" will be displayed. caveat
About the speed limit support functionÿ
182
How to change the set vehicle speed
ZEG1120X
ZEG0982X
– When the speed limit support function is set to "Manual"
or "Automatic" on the Advanced Drive Assist Display
With the sign detection function, when a new speed limit sign
is detected, the new speed can be automatically or manually
reflected in the set vehicle speed. • The operation will start in
the
following cases. –When the detected speed
limit is 30km/h or more,
• Drivers are responsible for observing traffic laws and
driving at a safe speed. Drivers should check
the speed limit of the road on which they are driving,
set the vehicle speed appropriately, and drive safely.
• There is a limit to the performance of the speed
limit support function. Temporary speed limit signs may not
be detected
due to construction work or bad weather, or speed
limit signs on roads parallel to the road you are
traveling on may be detected incorrectly. Drivers
should always check their surroundings and set an
appropriate speed.
tree
The set vehicle speed can be changed in 5km/h increments.
• If you want to increase the set vehicle speed, push in the
direction of
RES+. • When you want to lower the set vehicle speed, push
in the direction of SET-.
Sign detection function (red frame): Displays the
maximum speed sign detected by the sign detection
function. Reflected
speed limit sign (green frame): When the newly
detected speed limit sign can be reflected in the set
vehicle speed, the frame of the speed limit sign
display is displayed in green.
Driving support function
• During distance control, the vehicle speed is controlled
according to the preceding vehicle, so pushing in
the RES+ direction to increase the set vehicle speed
will not accelerate. At this time, the set vehicle speed
is functionally changed, so when the preceding
vehicle is no longer detected, the vehicle accelerates
to the set vehicle speed. Change the set vehicle
speed while checking the set vehicle speed display
on the Advanced Drive Assist Display.
Machine Translated by Google
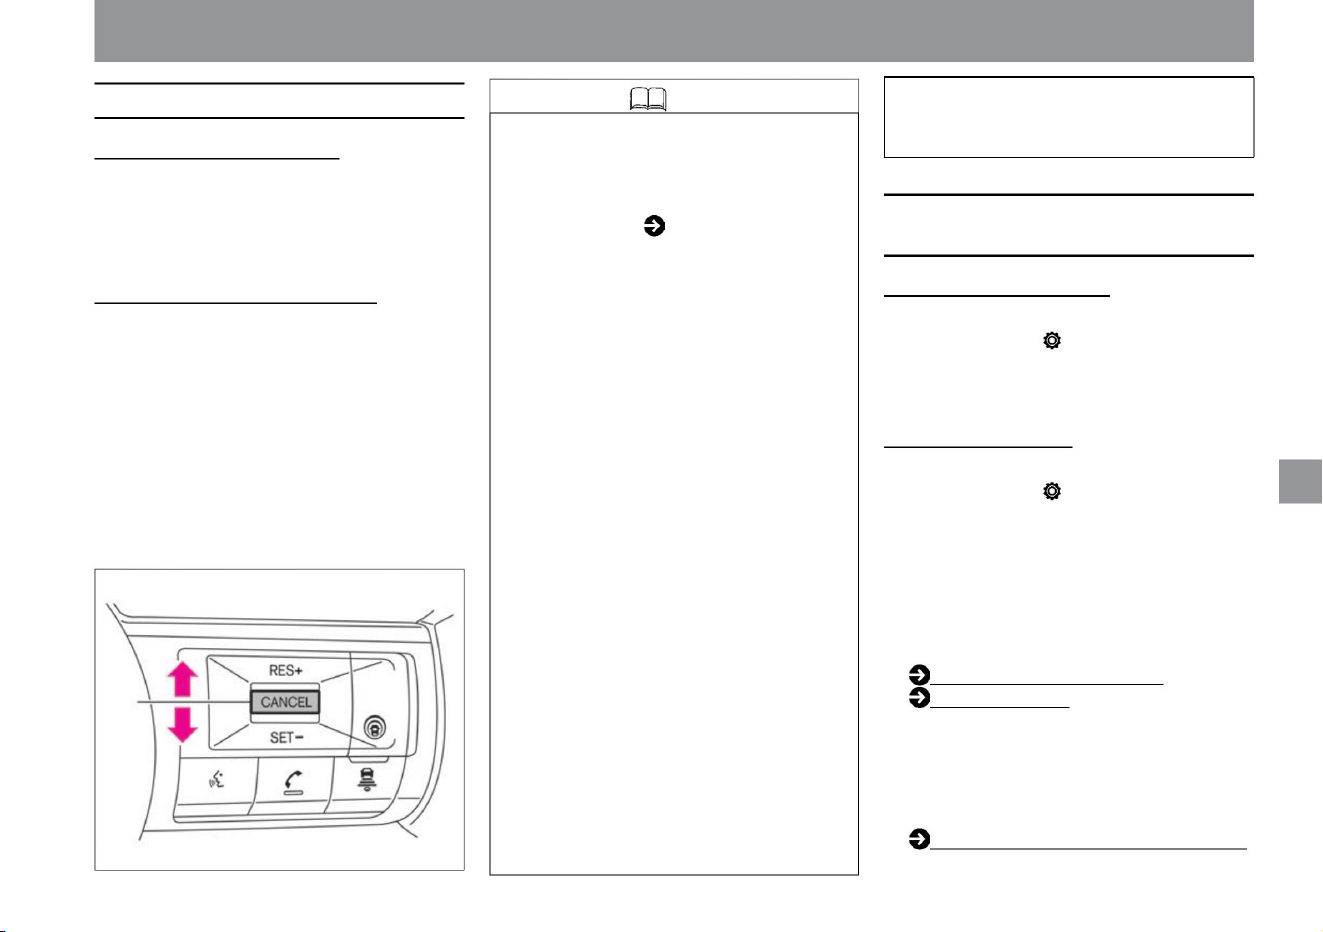
• In the following cases, even if the traffic sign detection
function detects a speed limit sign, it may not be
reflected in the set vehicle speed. – When the
traffic sign detection function is not working properly
( P.241) – When the system
is set to OFF
–When the manufacturer's option navigation system
and front camera determine that the navigation
road type and the road type you are driving on
do not match Push in the RES+ direction and the
road sign detection function
detects the set vehicle speed . than speed
Please select "OFF". For more information on settings,
read Driving Assistance. How to switch screens (P.60)
Driving assistance (P.70) • Select the
offset speed when
reflecting the speed detected by the traffic sign detection
function to the set vehicle speed of ProPILOT. – within
the range of -10km/h to +10km/h
– When speed limit signs are displayed on both lanes
of a side road parallel to your vehicle’s route, and
each detects a different speed limit – Driving on
a road under
construction or a road with lane restrictions and when
You can set the speed.
Regarding the speed limit support functionÿ (P.182)
• When driving on limited roads such as highways and
motorways, the speed at which the new maximum speed
sign is detected is reflected in the set vehicle speed.
When manual mode (manual) is selected •
Press in the RES+ or SET- direction to reflect the newly
detected maximum speed sign. • If the RES+ direction
or SET- direction
is not pressed, the speed sign assistance display (:;) will turn
off after about 10 seconds. (Pressing in the opposite
direction of the
displayed arrow, RES+/SET-, will immediately turn off
the speed sign support display (:;).) The speed limit
support function will be activated
when no speed sign is detected . does not work.
When auto mode (automatic) is selected
tree
After setting a high speed, it will not take effect if it
does not exceed the set speed even if it detects a
new speed limit sign.
– When the position detection of the manufacturer
option navigation system cannot be performed
correctly –
When driving on a road that is not on the map of the
manufacturer option navigation system – When
approaching the exit
of a highway or a motorway – Your vehicle When
there is a line that runs parallel
to another line (interchanges, service areas, parking
areas, etc.)
Manual mode (manual) If you select
"Settings" - "Driving assistance" - "Speed limit assistance" -
"Manual" on the advanced drive assist display, you can
set the speed limit assistance function to manual mode
(manual) . . Auto mode (automatic) • By selecting
"Settings" - "Driving assistance" -
"Speed limit assistance" -
"Auto" on the advanced drive assist display, the speed limit
assistance function can be set to auto mode (automatic).
• When stopping the operation of the system,
183
Operation of the speed limit support functionÿ
Knowledge
How to turn ON/OFF the speed limit support functionÿ
How to drive
$/$: Different equipment depending on vehicle model, options, etc.
Driving support function
ZEG0982X
Machine Translated by Google
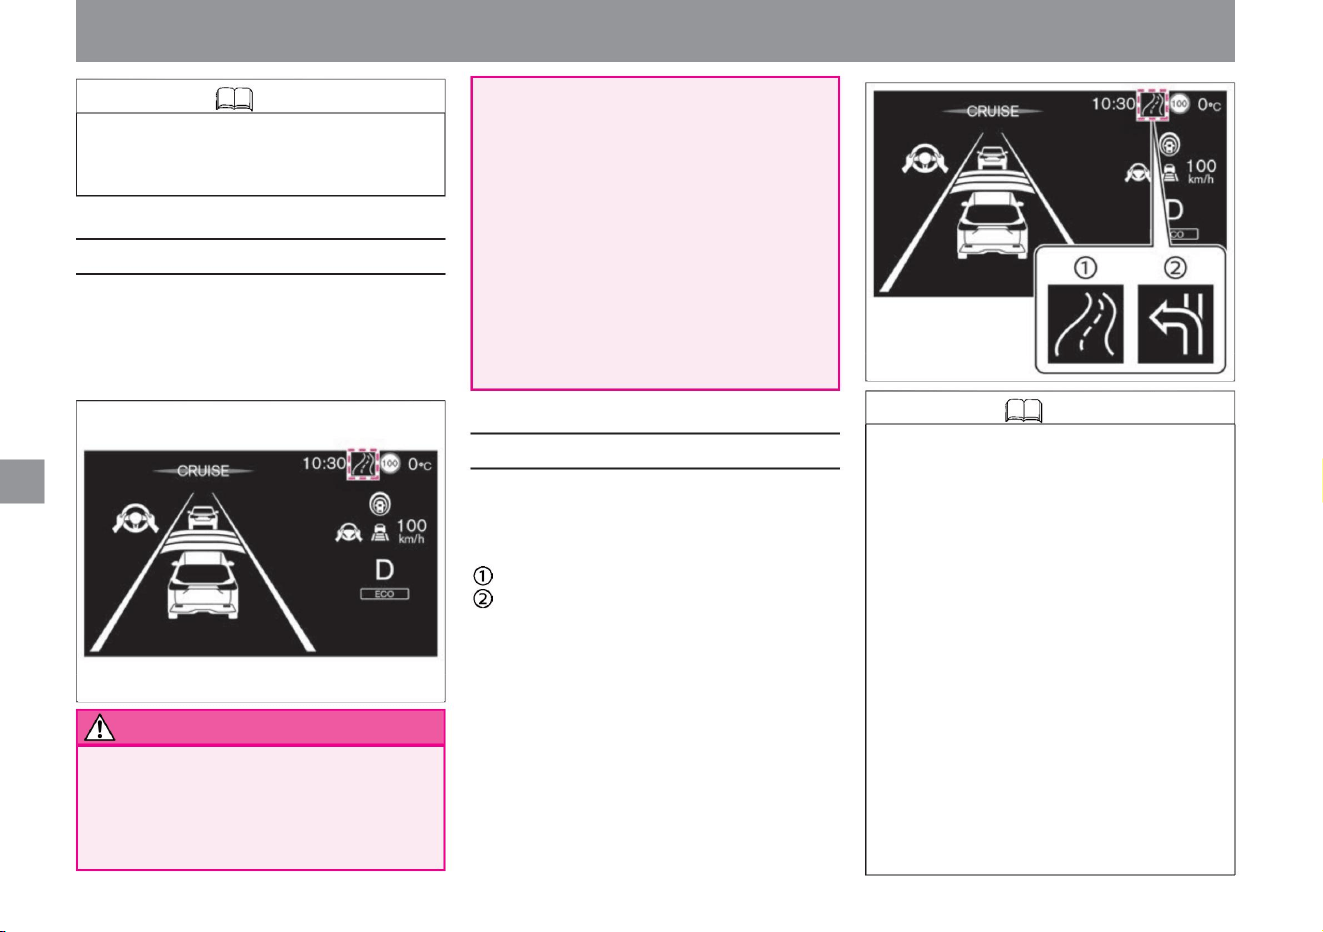
While driving on limited roads such as highways
and expressways, the vehicle speed is adjusted
according to road shapes such as curves and
exits using map data from the manufacturer's
option navigation system.
Curve
Expressway exit
(limited roads such as expressways
and motorways)
Knowledge
184
warn
Knowledge
Operation of the route deceleration support functionÿ
About route deceleration support functionÿ
ZEG1121X
ZEG1122X
• In the following situations, the route deceleration
support function may not work properly.
Depending
on the road surface and traffic environment,
depress the accelerator pedal or brake pedal to
accelerate or decelerate appropriately according
to the surrounding conditions. –
When the map data of the manufacturer’s option
navigation system is not up-to-date or
unavailable –When the route recommended
by the manufacturer’s option navigation system
is not being driven
• Drivers are responsible for observing traffic laws
and driving at a safe speed. Drivers
should check the speed limit of the road on
which they are driving, set the vehicle speed
appropriately, and drive safely.
• There is a limit to the performance of the route
deceleration
support function. The route deceleration
assistance function does not operate in all
driving situations, traffic environments, weather
and road conditions. Drivers should operate the
accelerator, brakes, and steering wheel by
themselves according to the
surrounding conditions, and always try to drive
safely. • The route deceleration support function
is not a function
that stops driving by braking the vehicle. When
deceleration is necessary, the driver must apply the brakes appropriately.
• The route deceleration support function is displayed
when the system is activated on a curve or at the
exit of a highway.
– When the manufacturer option navigation
system is searching for a new route – When
the position
detection of the manufacturer option navigation
system cannot be performed correctly
• The setting of speed limit support is maintained
even if the e-POWER system is restarted.
Driving support function
How to drive
Machine Translated by Google
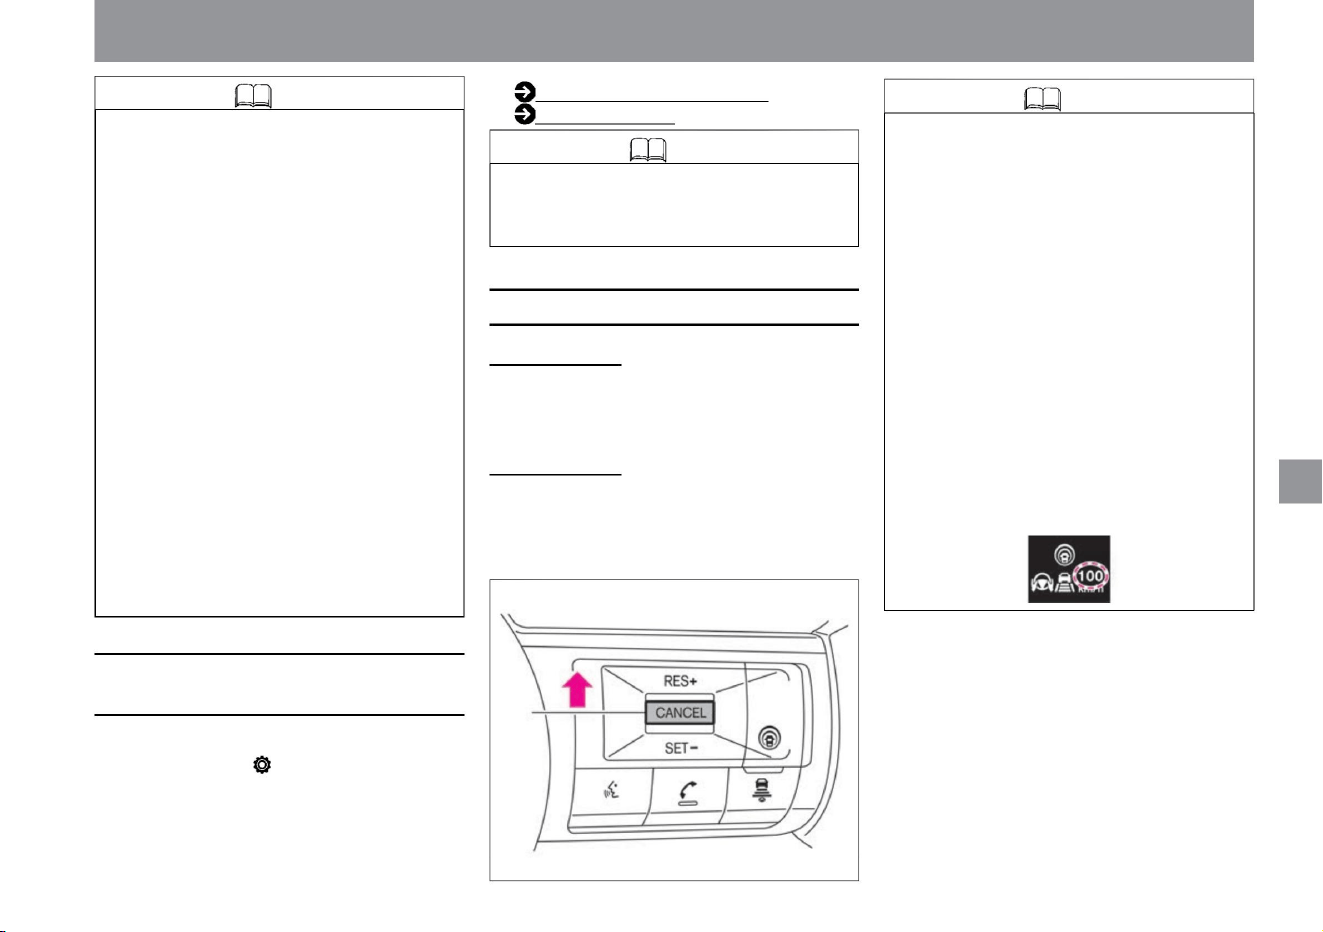
ZEG1131X
ZEG0983X
Knowledge
How to turn on/off the route deceleration support
functionÿ
Knowledge
When you want to temporarily accelerate or decelerate
185
How to switch screens (P.60) Driving
support (P.70)
knowledge
When you want to
accelerate • Press the accelerator pedal to accelerate.
• When the accelerator pedal is released, the original
control state is
restored. When you
want to decelerate • Press the brake pedal to decelerate
(release control).
• Press in the RES+ direction if you want to reset the
set speed before canceling.
– When driving on a road that is not on the map
of the manufacturer’s option navigation
system – When
driving on a road under construction or on a road
with lane restrictions when
driving – in bad weather (rain, fog, snow, high
winds, etc.) or when driving on poor road
conditions.
• While depressing the accelerator pedal, neither
brake control nor approach warning by intelligent
cruise control is performed.
• By selecting "Settings", "Driving assistance", and
"Route deceleration assistance" on the advanced
drive assist display, you can switch the route
deceleration assistance function ON/OFF. For
more information on
settings, read Driving Assistance. $/$: Different
equipment
depending on vehicle model, options, etc.
–When the manufacturer's option navigation
system and front camera determine that the
navigation road type and the road type you
are driving on do not match If you are
stepping on the accelerator,
the route deceleration support function will not be
performed . . • The system may not operate
depending on the settings of ProPILOT's vehicle
speed/vehicle distance control function and the
detection status of the preceding vehicle.
• Normally, the vehicle accelerates and decelerates
according to the speed of the preceding vehicle
during distance control. However, when you
need to accelerate to change lanes, when the
vehicle in front suddenly decelerates, or when
another vehicle cuts in and you are about to
approach the vehicle in front, do not depress
the accelerator or brake pedal. Accelerate or
decelerate appropriately
according to the surrounding conditions. If the actual
speed becomes higher than the set speed due
to acceleration by depressing the accelerator
pedal, or lowering the set speed by the SET-
operation (press down), the set speed display will blink . .
• The setting of the route deceleration support
function is maintained even if the e-POWER
system is restarted.
Driving support function
How to drive
Machine Translated by Google
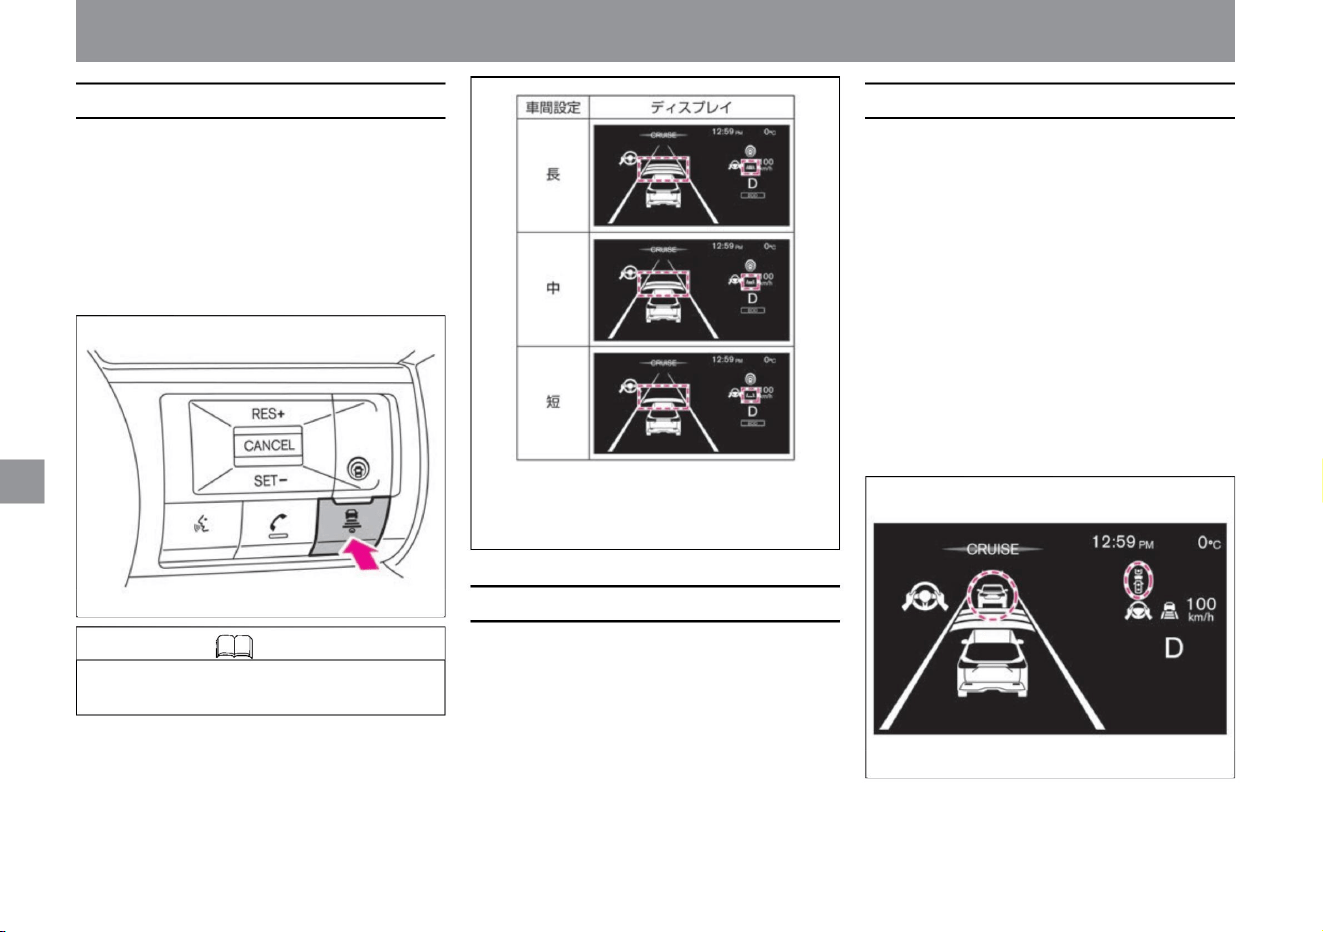
How to drive
proximity alert
186
How to change the following distance setting
interrupt detection
Knowledge
• The distance setting is maintained until the setting is
changed even if the e-POWER system is stopped.
When the vehicle approaches the vehicle ahead and it is
determined that the distance between the vehicles is
not sufficient, the buzzer sounds "beep, beep, beep,
beep..." and the preceding vehicle detection display and
approach warning display on the Advanced Drive Assist
Display flash . increase.
If the vehicle ahead decelerates rapidly during distance
control, or if the vehicle approaches the vehicle in front
without sufficient deceleration due to an interruption by
another vehicle, etc., the buzzer and advanced drive
assist display will sound as follows . is displayed to alert
the driver. In this case, step on the brakes to slow down
and maintain an appropriate following distance.
• When another vehicle cuts in near your vehicle, the driver
will be notified by a "ping" sound and the preceding
vehicle detection indicator flashing.
• The distance between vehicles varies depending on the vehicle speed,
and the higher the speed, the longer the distance.
You can choose the following distance from the preceding
vehicle according to traffic conditions. The vehicle distance
setting can be switched during intelligent cruise control control
or in the set standby state. • Each time the distance setting
switch is pressed,
it switches in the order of “Long”, “Medium”, “Short”, and
“Long”.
Driving support function
ZEG0984X
ZEG1296X
ZEG1297X
Machine Translated by Google
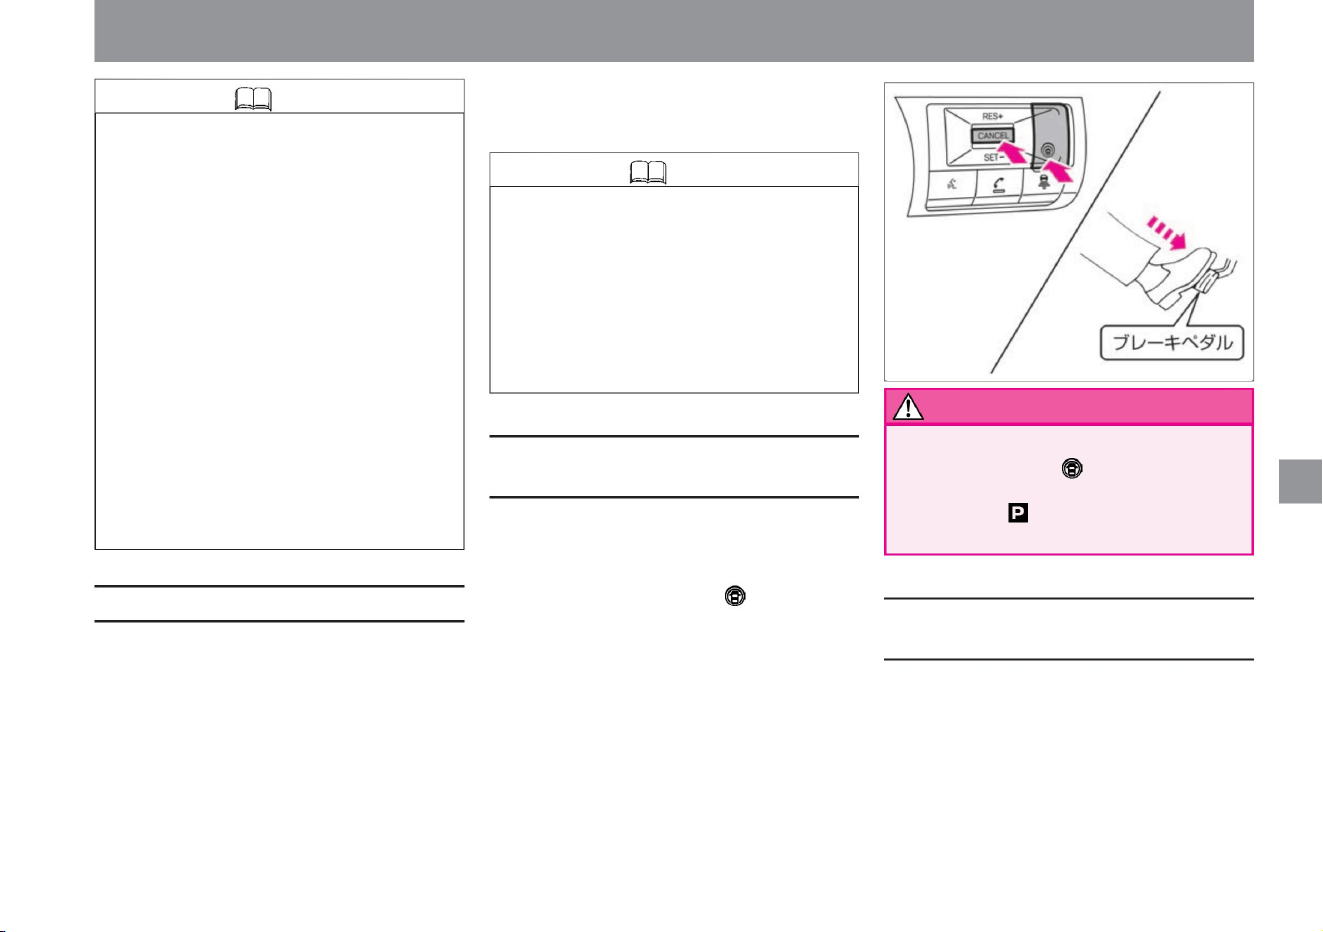
How to drive
HOW TO CANCEL INTELLIGENT CRUISE CONTROL
Automatic disengagement of Intelligent Cruise
Control
187
Knowledge
warn
Overtaking acceleration function
Knowledge
$/$: Different equipment depending on vehicle model, options, etc.
• Even if the distance between vehicles is short, the
proximity alarm may not work in the following
cases. – When the relative speed to the preceding
vehicle is small (when running at almost the
same speed)
Intelligent cruise control is canceled by one of the following
operations. • Press the CANCEL switch • Press
the professional pilot switch • Press
the brake pedal (Except when the vehicle is held
stationary by intelligent cruise
control)
– Another vehicle cuts in at close range
When
• Approaching warning does not work for vehicles
stopped at a tollgate or at the end of a traffic jam.
• When the set vehicle speed is 70km/h or more and the
vehicle in front is under intelligent cruise control control
and the vehicle speed is lower than the set vehicle
speed, the vehicle accelerates and prepares to
overtake the vehicle in front by operating
the direction indicator to turn right. • When the driver
operates the steering wheel and changes lanes to
overtake, if a preceding vehicle is detected, the
following distance is maintained according to the vehicle speed set by the driver.
–When the preceding vehicle is faster than your vehicle
(When the distance between vehicles gradually
increases)
• When leaving the vehicle, be sure to press the
ProPILOT switch to turn the PROPILOT OFF,
shift the shift position to the ON position, and
stop the e-POWER system .
I'm going to go and run. If the vehicle ahead is not
detected, the vehicle will run at the vehicle speed set
by the driver.
–If you unlock the driver's seat belt
• In the following cases, intelligent cruise control will be
canceled with a cancellation sound. – When the driver,
front
passenger, rear seat, or back door is opened.
tree
• Do not use Intelligent Cruise Control in situations
where approach warnings are activated frequently.
• When the direction indicator is operated to the right turn side
and the vehicle is accelerating, if the distance to the
vehicle ahead becomes too close, the acceleration
will stop and the distance between the vehicles will
return to the set distance. • The overtaking acceleration
function will be
canceled in the following cases. –
When you step on the brake – When you press the CANCEL switch
Driving support function
ZEG0986X
Machine Translated by Google
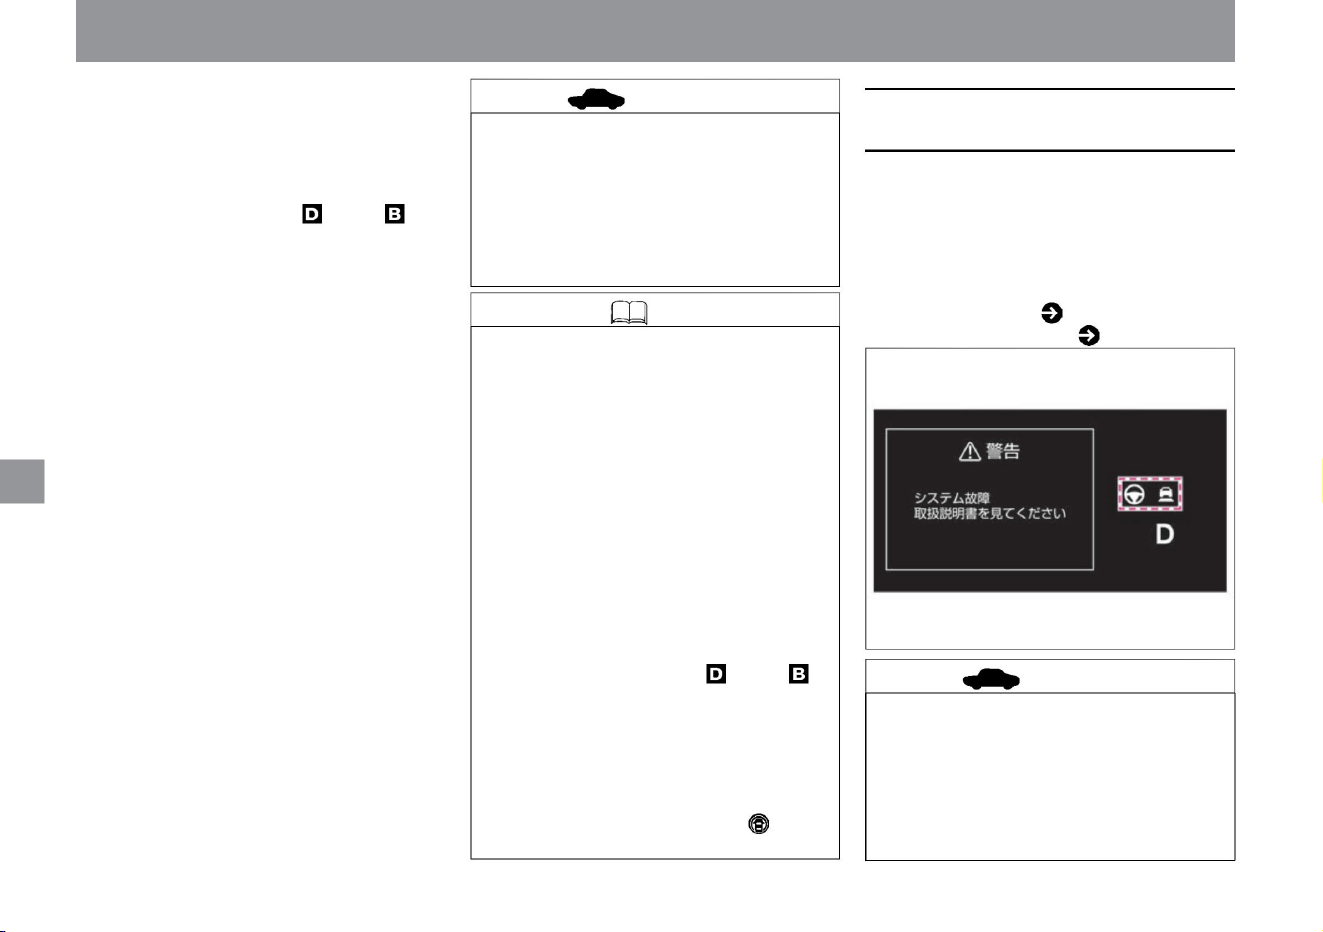
tree
tree
When
Knowledge
advice
advice
Malfunction of Intelligent Cruise
Control
188
ZEG1170X
• When the warning light comes on, stop the vehicle in
a safe place, stop the e-POWER system once,
and then restart it. If the warning light continues
to illuminate even after performing the above
operations, there may be a problem with the
system. There is no problem with normal driving,
but please have it inspected by a NISSAN dealer.
– When the electric parking brake is applied
• If there is a problem with the system, a warning sound
(buzzer) will sound, the vehicle speed control
warning light (orange) and the steering assist
warning light (orange) will light up in the advanced
drive assist display, a warning message will be
displayed, and the system will malfunction.
stops. Vehicle speed control
warning light ( P.177) Steering assistance warning light ( P.177)
– When VDC/TCS is activated
– When the tires spin
• In the following cases, an alarm sounds and
the message “The front radar and its
surroundings are dirty. –When the radar
sensor is
dirty and it becomes difficult to detect the
vehicle ahead If you want to
restart the system, stop the vehicle in
a safe place, stop the e-POWER system
temporarily, and check the radar sensor
and its surroundings. Remove dirt, etc.,
restart the system, and turn the system
on again. – When the
radar sensor cannot accurately detect the
vehicle ahead due to the shape of the
road or surrounding structures (e.g. long
bridges, snowfields,
beside long walls, etc.). Please turn on
the system again from .
– When about 3 minutes have passed
since the vehicle was stopped by
Intelligent Cruise
Control – When the shift position is
changed to or
• While the vehicle is held stationary by
intelligent cruise control, the electric
parking brake is activated when
intelligent cruise control is released
under the following conditions. – When
the driver, front
passenger, rear seat, or back door is
opened – When the driver's seat belt
is released
– When the vehicle speed drops below
approximately 25 km/h without
detecting a preceding vehicle – When
approximately 3 minutes have passed since
the vehicle
stopped by intelligent cruise control – When the
shift position is changed to or other than
– When VDC is turned off
– When there is a problem with Intelligent
Cruise Control
• When the driver's door is opened while the
vehicle is kept stopped by Intelligent
Cruise Control, if the electric parking
brake does not operate properly, a
warning message will be displayed
saying "Please depress the brake
pedal." .
– When VDC is turned off
– when the CANCEL switch is
pressed – when the PROPILOT switch is
pressed
Driving support function
How to drive
Machine Translated by Google
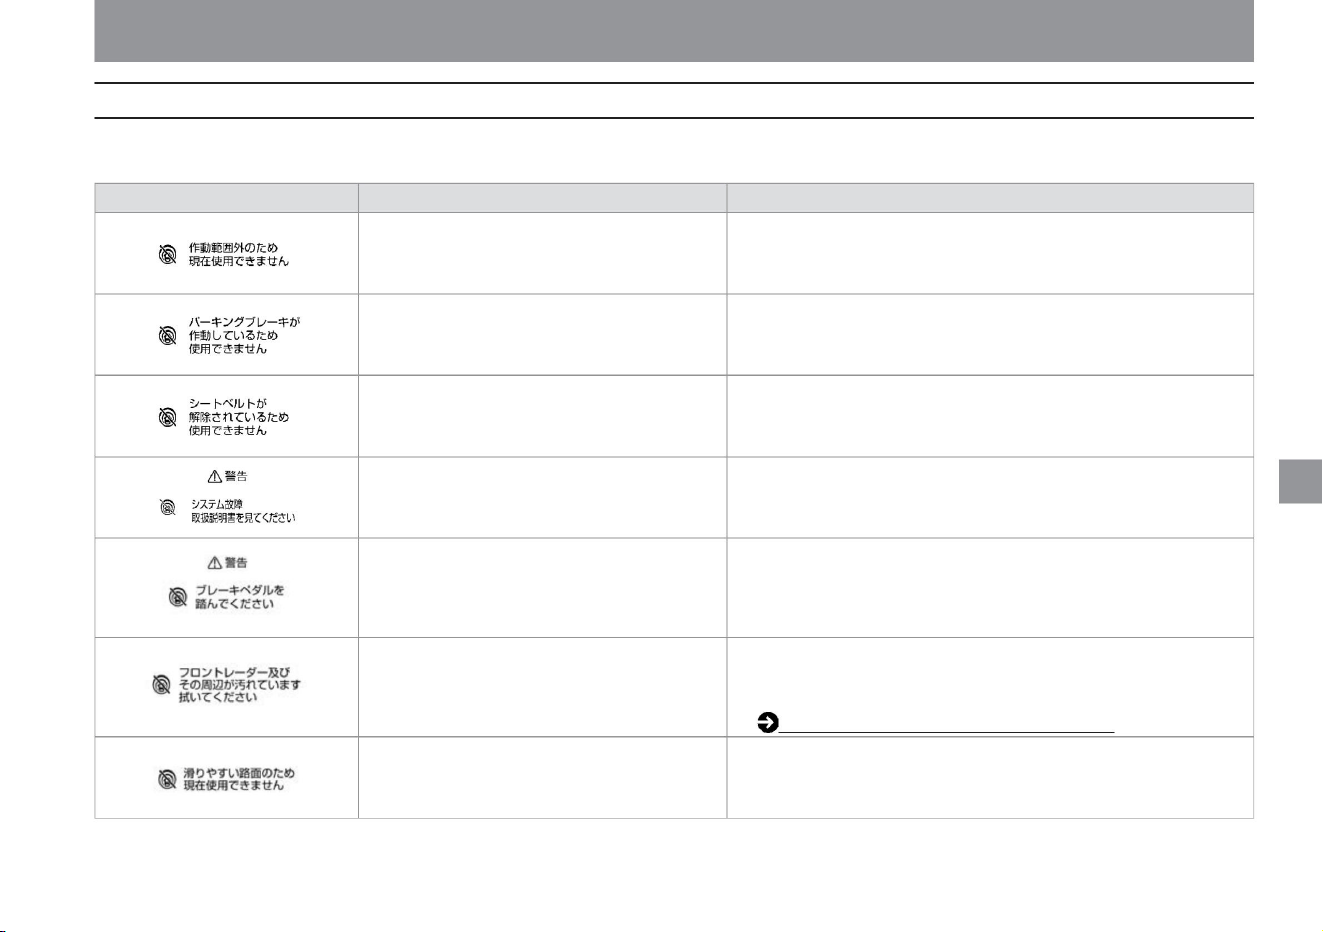
How to drive
ProPilot (Intelligent Cruise Control) warning message
189
$/$: Different equipment depending on vehicle model, options, etc.
• Intelligent cruise control cannot be used when the driver's seat belt
is unfastened.
• When VDC is turned off
If the electric parking brake is activated
When the driver's door is opened while the
vehicle is stopped by intelligent cruise
control, but the electric parking brake does
not operate normally .
tree
If a warning message is displayed, follow the "Description/Remedy" below. The display in the meter differs depending on the grade, options, etc.
When snow, ice, mud, etc. adhere to the radar
sensor installed in the front of the vehicle.
• When VDC/TCS is activated •
When tire spinning is detected
warning sign Condition to display
When the driver's seat belt is unfastened
Explanation/
Remedy • When VDC is OFF, intelligent cruise control cannot be
used.
• Please step on the brake as soon as possible.
• Intelligent cruise control cannot be used when the electric parking
brake is activated.
• Stop the vehicle in a safe place, stop the e-POWER system, restart
it, and turn it on again.
• Stop the vehicle in a safe place, turn off the e-POWER system,
remove dirt from the radar sensor and its surroundings, and restart
the e-POWER system. Handling of Radar Sensorÿ
(P.369) • Intelligent cruise control cannot be
used when VDC/TCS is activated or when the tires are spinning.
• System failure
Driving support function
ZEG1299X
ZEG1300X
ZEG0820X
ZEG0821X
ZEG0819X
ZEG0822X
ZEG1298X
Machine Translated by Google
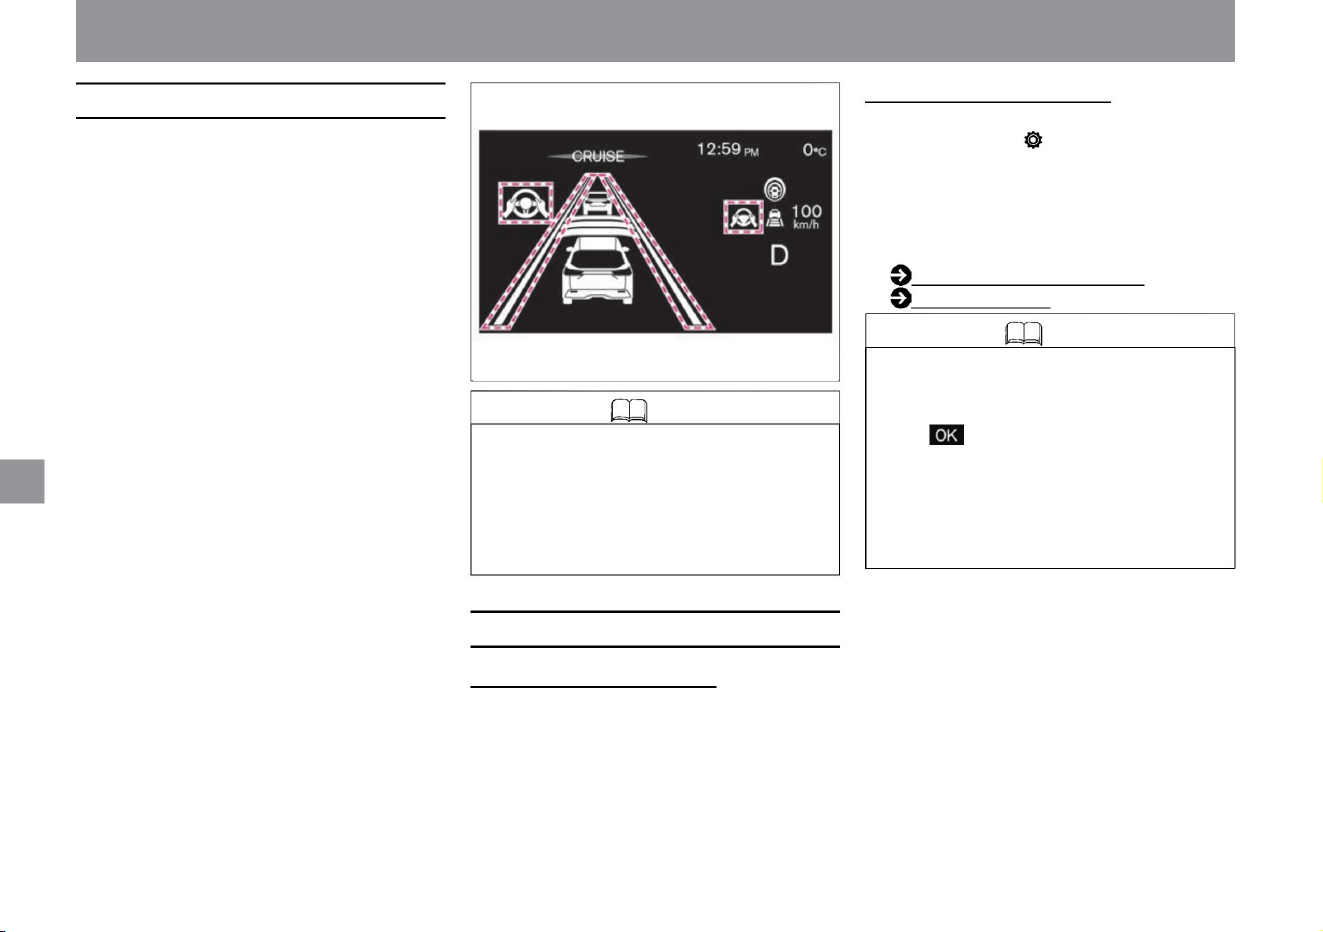
How to turn the steering wheel support ON/OFF
Knowledge
Activation of handle assistance
190
The steering is controlled so that the vehicle runs near
the center of the lane, and the driver's steering operation
is
assisted. • Handle support can be activated when the
following conditions are met. –
When intelligent cruise control is starting – When
detecting lane markers on both sides Lane
markers are lines drawn on the right or left side of
the
driving lane. – When the vehicle speed is
approx. 50 km/h or more – When the vehicle
speed is
approx. 50 km/h or less, when the
preceding vehicle is detected – When the driver
holds the steering
wheel When the indicator is not working – the
wipers are not working at high speed
• Each time you press the steering assist switch, you
can switch ON/OFF of the steering assist.
• When the steering assist is activated, the buzzer
sounds and the steering assist operation light,
steering assist operation display, and lane detection
display turn green.
ON/OFF setting on the meter • You
can switch ON/OFF of the steering assist by selecting
"Settings", "Driving assistance", and "Steering
assistance" on the Advanced Drive Assist display.
For more information on settings, read Driving
Assistance. How to switch screens (P.60) Driving
support (P.70)
Knowledge
• When it is determined that the vehicle is
approaching a lane marker on the right or left
side of the driving lane during steering
assistance, the intelligent LI (Lane Departure
Prevention Assistance System) display flashes
in orange along with an audible warning.
• When the vehicle information screen of the
advanced drive assist display is the cruise
screen, press the switch on the steering wheel
to display the steering assist setting screen. •
The steering wheel support ON/OFF
setting will remain in that state until the setting is
changed again even if the e-POWER system is
stopped.
ON/OFF setting with switch
tree
How to drive
ZEG0987X
Driving support function
Machine Translated by Google
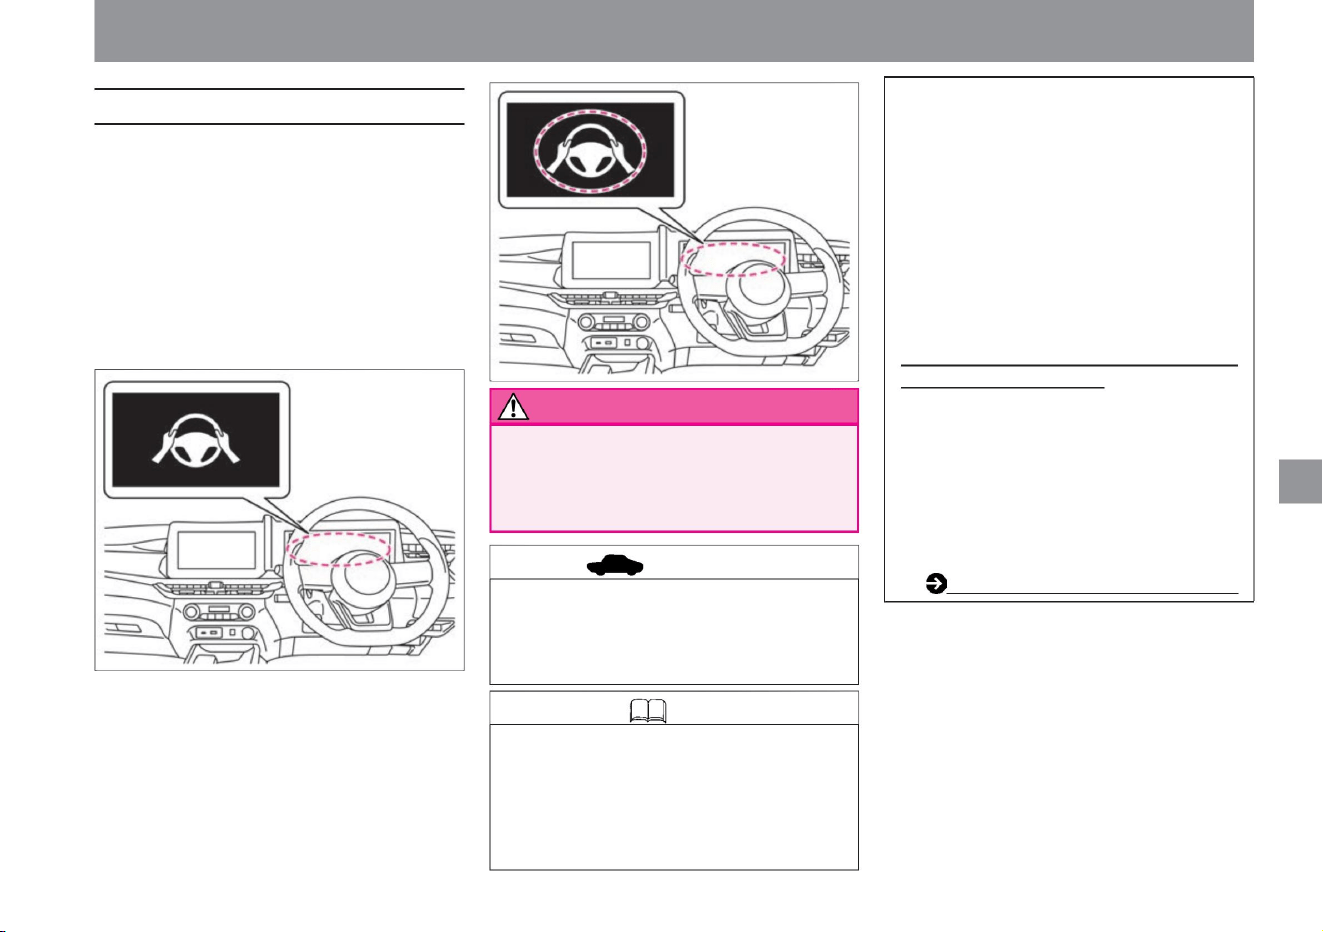
Knowledge
191
warn
advice
About the no-holds-barred warning
How to drive
Driving support function
ZEG0989X
ZEG0988X
• When the emergency alarm sounds and your vehicle slows
down, the emergency flashing lights automatically activate
when the vehicle speed drops below approximately 65 km/
h. When the steering wheel is operated, the emergency
flashing light will automatically turn off.
• After bringing the vehicle to an emergency stop,
connect to the operator of the SOS call service,
and the operator will request assistance from
public institutions (police, fire department,
medical institution).
• Hands-free operation is not possible.
• If the driver's steering wheel operation is not
detected, an emergency alarm sounds and
"Decelerate" is displayed on the Advanced
Drive Assist Display, and the vehicle is
decelerated and brought to an emergency stop.
• If you are driving with your hand lightly on the
steering wheel, the steering wheel operation
may not be detected and the hands-off warning
may be displayed.
• If the driver does not hold or operate the steering
wheel, the hands-free warning light in the meter
lights up and a hands-free warning is displayed on
the Advanced Drive Assist Display. • If the driver's
operation of the steering wheel is
not detected even though the hands-free warning is
displayed, the hands-free warning light and hands-
free warning flash along with a warning sound, and
the steering assist function is canceled.
If the hands-free warning cancels the steering wheel
assist, when the driver operates the steering
wheel again, the hands-free warning will turn off,
and you can resume the steering wheel assist
by releasing and resetting the ProPILOT, or by
pressing the steering wheel assist switch . .
(A contract for the NissanConnect service
is required to use the SOS call system.)
Advanced
automatic accident notification systemÿ (P.265)
$/$: Different equipment depending on vehicle model, options, etc.
ProPILOT emergency stop support system
(with SOS call function)ÿ
yeah. Always hold the steering wheel
and drive safely.
Machine Translated by Google
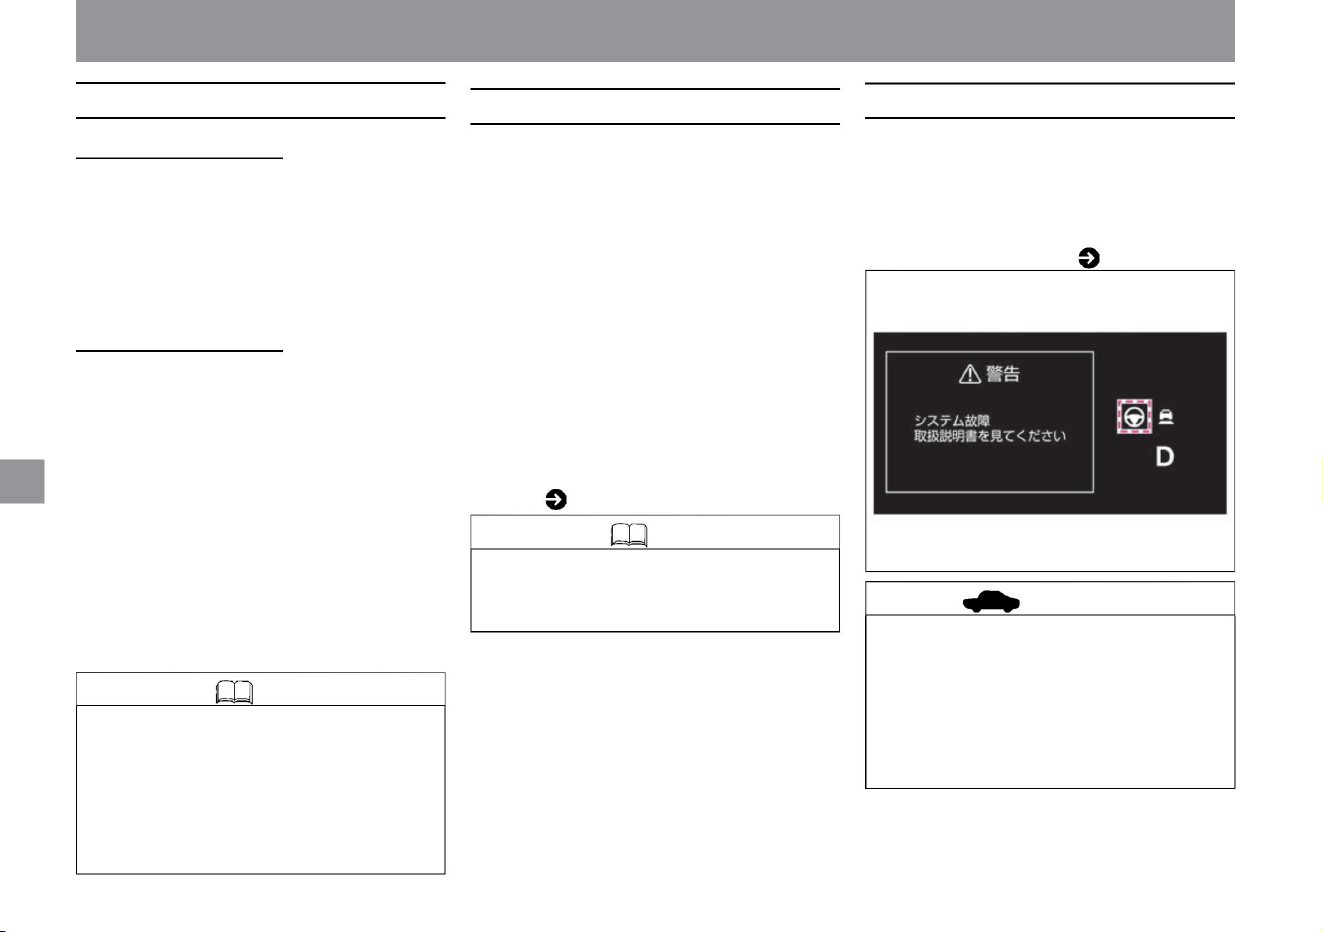
ZEG2113X
Regarding failure of the steering support function
Knowledge • Steering control with steering wheel
assistance can be modified at any time by the
driver's steering wheel operation.
advice
Automatic release of steering assistance
Knowledge
192
Temporarily waiting for handle assistance
• While traveling on limited roads such as highways
and expressways, if the vehicle speed is less
than 50km/h and the preceding vehicle is no
longer detected, and if the white lines on both
sides are detected, steering assistance will
continue. There are cases. (vehicles equipped
with a manufacturer's optional navigation system)
• When the warning light comes on, stop the vehicle in
a safe place, stop the e-POWER system once,
and then restart it. If the warning light continues
to illuminate even after performing the above
operations, there may be a problem with the
system. There is no problem with normal driving,
but please have it inspected by a NISSAN dealer.
• The steering assist operation light, steering assist operation display,
and lane detection display are grayed out.
• In the following cases, a warning message will be displayed along
with a warning sound (buzzer), and the steering support function
will be canceled. – When the wipers
are operated at high speed – When the lane marker
cannot be detected correctly for a long time, such as when there
is something that looks like a lane marker in the driving lane
(snow ruts, rainy days, etc.) Reflected light, forgotten lane
markers, etc.) – Rain, snow, fog, or frozen, dirty windshield
in front of the camera obscures the camera's view ProPILOT
(steering wheel assist) warning
message ( 193)
Temporary standby by the system • In
the following cases, the buzzer will sound and the steering assist
function will be in a temporary standby state. (It resumes
operation when the operating conditions are met again.) –
When the lanes on both sides are no longer detected –When
the vehicle speed is approximately 50 km/h or less, the vehicle ahead is detected.
When the alarm stops • When
the temperature of the camera and its surroundings is high, a warning
message will be displayed along with an alarm sound (buzzer),
and the steering assist function will enter a temporary standby
state. (When the operating conditions are met again, the operation
will resume.) • The steering wheel assist operating light,
steering wheel assist operating display, and lane detection display
will turn gray.
• When the direction indicator is activated, the steering support
function will be in a temporary standby state. (The operation
resumes when the operating conditions are met again.)
• If there is a problem with the system, a warning sound (buzzer) will
sound, the steering assist warning light (orange) will light up on
the Advanced Drive Assist Display, a warning message will be
displayed, and the system will stop. Steering wheel assist warning
light ( P.177)
Temporary standby due to driving operation
Driving support function
How to drive
Machine Translated by Google
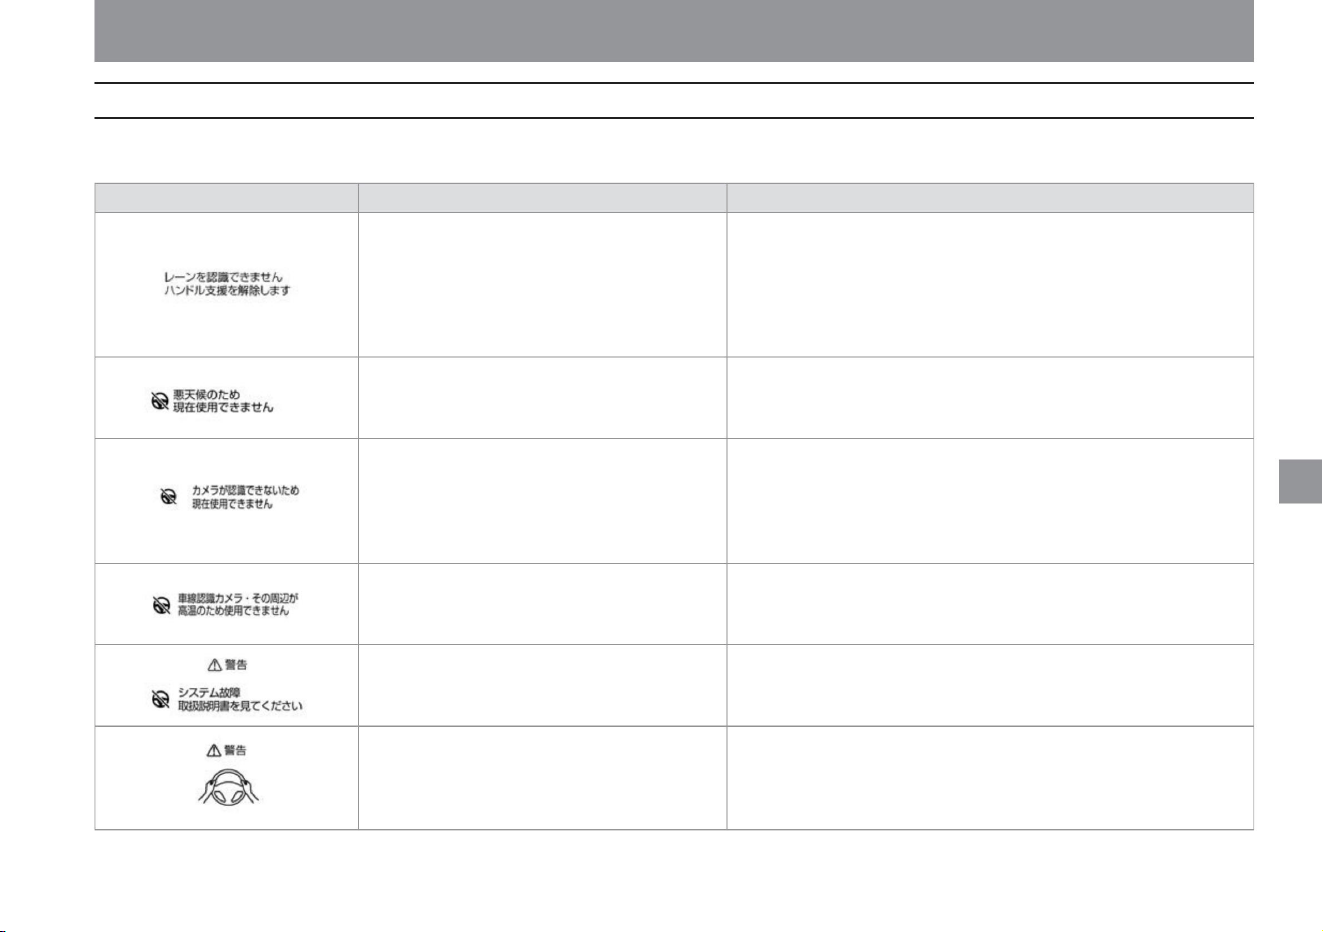
How to drive
ProPilot (steering wheel assistance) warning message
193
$/$: Different equipment depending on vehicle model, options, etc.
Disengage and re-engage ProPILOT on a road with a clearly marked car.
• ProPILOT can be used when the indoor temperature drops.
When the wiper is operated at high speed
• Please cancel the high-speed operation of the wiper. Then set the ProPilot
again or press the steering assist switch.
• Appears when you are not holding the steering
wheel or operating the steering wheel. – Warn
by
display (red).
• The temperature around the camera is high.
to come.
If a warning message is displayed, follow the "Description/Remedy" below. The display in the meter differs depending on the grade, options, etc.
When
warning sign
• When the situation improves, ProPILOT can be used.
Display conditions
When the lane marker cannot be detected correctly
for a long time, such as when there is
something that looks like a lane marker in the
driving lane (snow ruts, reflection of surrounding
light on a rainy day, forgetting to turn off the
light, etc.) lane markers, etc.)
increase.
Explanation/Remedy
When the field of vision of the camera is obscured
by rain, snow, fog, or frozen or dirty windshield
in front of the camera.
• When you want to use the steering assist function again,
• If the warning message continues to appear, stop the vehicle in a safe
place, stop the e POWER system temporarily, and clean the windshield in
front of the camera.
• Stop the vehicle in a safe place, stop the e-POWER system, restart it, and
turn it on again.
• Operate by holding the handle as soon as possible. • The
warning goes off when the driver's steering operation is detected.
• System failure
Driving support function
ZEG0524X
ZEE0275X
MEE0305X
ZEG1302X
MEE0304X
ZEG1301X
Machine Translated by Google

ZEG1083X
ZEG1084X
Display conditions
• Displays when the driver does not operate the steering
wheel after the warning by display. – Step-by-
step warning with sound, visual (red) and short brake
control. • Displayed when the driver does not
operate the steering wheel after the warning. – The
vehicle slows down and comes to an emergency
stop with an emergency alarm sound.
Explanation/Remedy
• Please operate the product by holding the handle as soon as possible.
• The warning goes off when the driver's steering operation is detected.
• Operate by holding the handle as soon as possible. • When the
driver's steering wheel operation is detected, the warning goes off and the ProPilot is
released.
warning sign
194
How to drive
Driving support function
Machine Translated by Google

How to drive
Notes on ProPILOT
195
warn
$/$: Different equipment depending on vehicle model, options, etc.
• ProPILOT is not intended to assist driving operations
such as distracted driving or distracted driving.
Always try to drive safely by operating the
accelerator, brakes, and steering wheel according
to the distance to the vehicle ahead, your
position in the lane, and the surrounding
conditions.
– When the tires of the vehicle in front are in
shadow and difficult to see due to the strong
light ahead.
–When a narrow vehicle such as a motorcycle is
running in front • ProPILOT does
not work properly in the following situations. Do not
use ProPilot. – When the tire pressure is not
correct – Worn tires, emergency tires
such as spare tires, genuine Nissan parts or
purchased from a Nissan dealer
• There is a limit to the performance of the ProPILOT.
Do not use ProPILOT in the following situations
as it may lead to an unexpected accident. –
Sharp turns and winding roads
noodle
Since ProPILOT is designed for use on
straight roads and gently curved roads, it
may lead to unexpected accidents such as
being unable to maintain the center of the
lane. – Steep slope The vehicle cannot be
held stationary, and
the vehicle may start to move, resulting in an
unexpected accident. – There is a risk of
exceeding the set
vehicle speed on
a steep downhill . Also, if there is a vehicle
ahead, the brakes may overheat and not
be able to slow down sufficiently. – Slippery
roads such as icy roads and snow-
covered roads
Your tires may spin and you may lose control
of your vehicle. – Traffic conditions
where it is difficult to maintain a distance between
vehicles due to frequent
acceleration and deceleration Delayed
braking may shorten the distance between
vehicles, which may lead to
an unexpected accident. – Road structures
(walls, guardrails, poles, curbs, etc.) and lane
markers are extremely close to
each other. Do not use ProPILOT in the
following situations, as it may not be
possible to accurately detect the distance to the
vehicle ahead, or the lane markers may not be
detected, resulting in improper control and an
unexpected accident . please – When visibility is
poor due to bad weather (rain, snow, fog, wind
dust, sand dust, blizzard, etc.) – When water,
snow,
sand, etc. is being blown up by a vehicle in front
or oncoming traffic – Front in front of the
camera When the glass is dirty, oily, water
droplets, ice, snow, etc. – When the windshield
in front of the
camera is cloudy – When the camera is exposed
to strong light from the front (sunlight, high
beams of oncoming
vehicles, etc.) When
– When the headlamps are not turned on, such
as at night or in a tunnel, or when the
headlamp lenses are extremely dirty – When
the tail lamps of
the vehicle ahead are not turned on, such as at
night or in a tunnel - When there is a sudden
change
in brightness, such as when entering or exiting
a building or in the shade - When there are
lane restrictions or temporary lane markers due to
construction work - When driving
on an uneven road surface such as an unpaved
road - When driving
on a steep incline When driving on a road with
repeated slopes and
downhills – When snow, ice, mud, etc. adhere to
the area around the radar sensor –
When being affected by surrounding radio wave
sources such as broadcasting stations
Driving support function
Machine Translated by Google
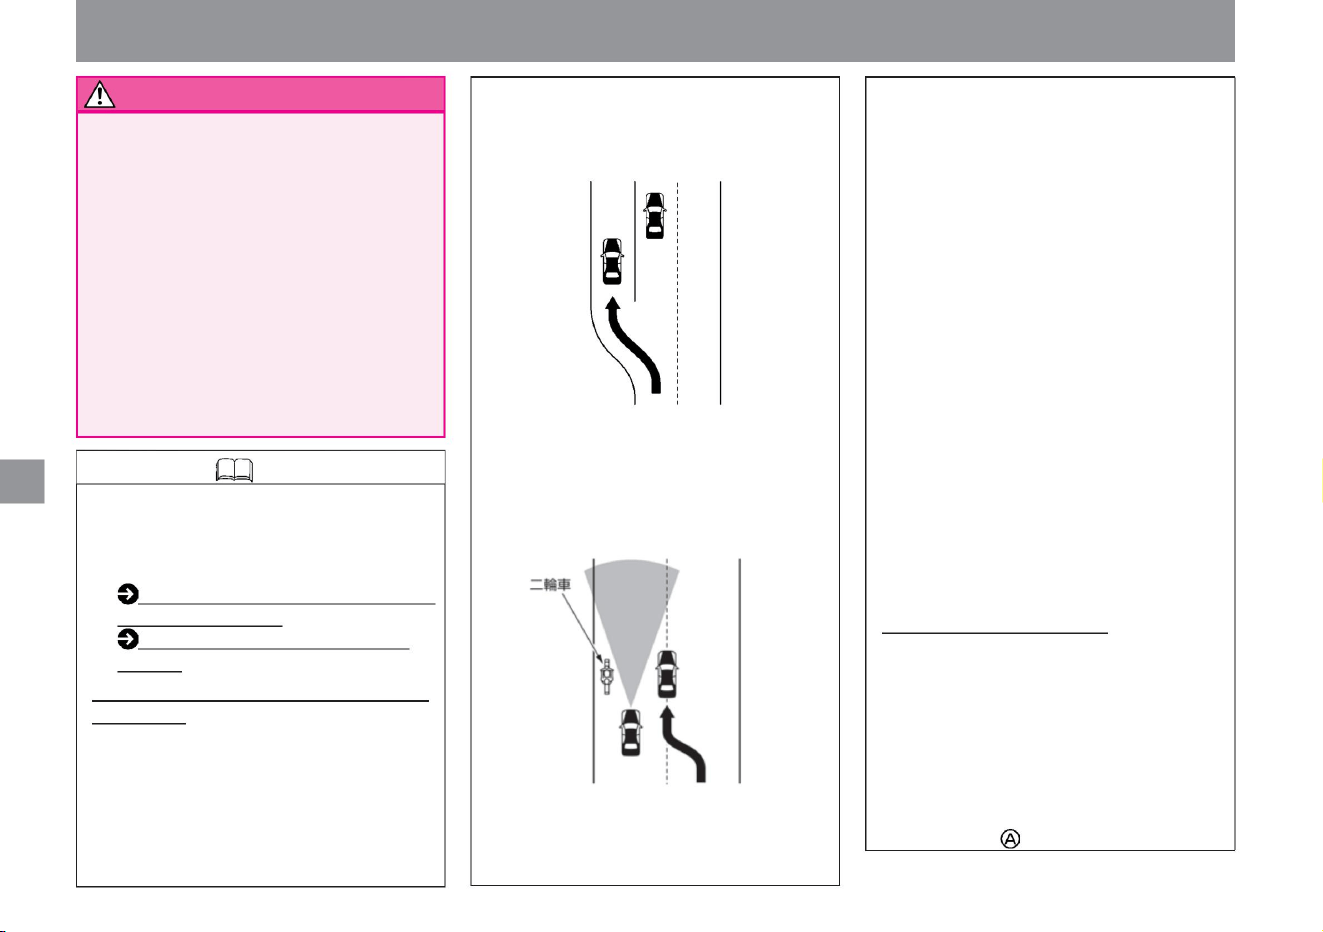
ZEG1303X
KVH0111X
Knowledge
196
How to drive
When changing lanes, etc., the vehicle will not be
detected in the lane ahead and the vehicle will
accelerate to the set vehicle speed, which may
lead to an unexpected accident.
Driving support function
– When an object that obstructs the view of
the camera is attached
• Although it has a function to determine if the
radar sensor is dirty, it is not perfect.
Depending
on the situation, the radar sensor may become dirty.
When
using non- warned tires or when using
tire chains – when using non-original
brake or
suspension parts
Since the detection area of the radar sensor is narrow at short
distances, it may not be possible to detect a two-wheeled
vehicle running on the edge of your lane, or the detection
of a preceding vehicle that cuts in close to you may be
delayed, making it difficult to maintain an appropriate
inter-vehicle distance . may not be preserved.
Handling of the multi-sensing front
camera (P.370)
Handling of the radar sensor (P.369)
Intelligent
cruise control When entering ( exiting from the
main line) an
interchange, service area, parking area, etc. on
a highway, etc. If you are following a
preceding vehicle traveling at a slower speed
than the set vehicle speed due to intelligent
cruise control on the main line, your vehicle
or the preceding vehicle
It may not be possible to judge even if the
Also, it may not be possible to make a
judgment if snow or ice adheres. In such
situations, proper operation may not be
possible, so always drive carefully ahead.
Also, keep the radar sensor and its
surroundings clean at all times. Intelligent
Cruise Control will be canceled if it is
determined to be dirty. The shape of the road
(curved roads, entrances and exits of curves,
roads where the
lane width is narrowed due to lane restrictions or
construction) and the conditions of the
vehicle (steering wheel operation, position in
the lane, driving due to an accident or
breakdown) . (e.g., the vehicle is unstable),
it may temporarily become impossible to
detect the vehicle ahead, detect and control
vehicles in the next lane or surrounding
objects, or activate an alarm. . In addition, it
may be
temporarily unable to detect the preceding
vehicle and approach the preceding
vehicle. About the steering
assist function • In the following situations, lane
markers may not be detected correctly, and
appropriate steering control may not be
possible. – When the lane markers are faded,
dirty, or otherwise unclear – When the
lane markers are similar to the color of the
road surface and are
difficult to see – When the lane markers are
drawn in multiple layers
– When carrying an extremely heavy load
– When towing • Because
of external noise, the warning sound (buzzer)
may not be heard.
• Clean the windshield in front of the camera, the
radar sensor, and the surrounding area to
ensure proper ProPILOT operation.
Machine Translated by Google
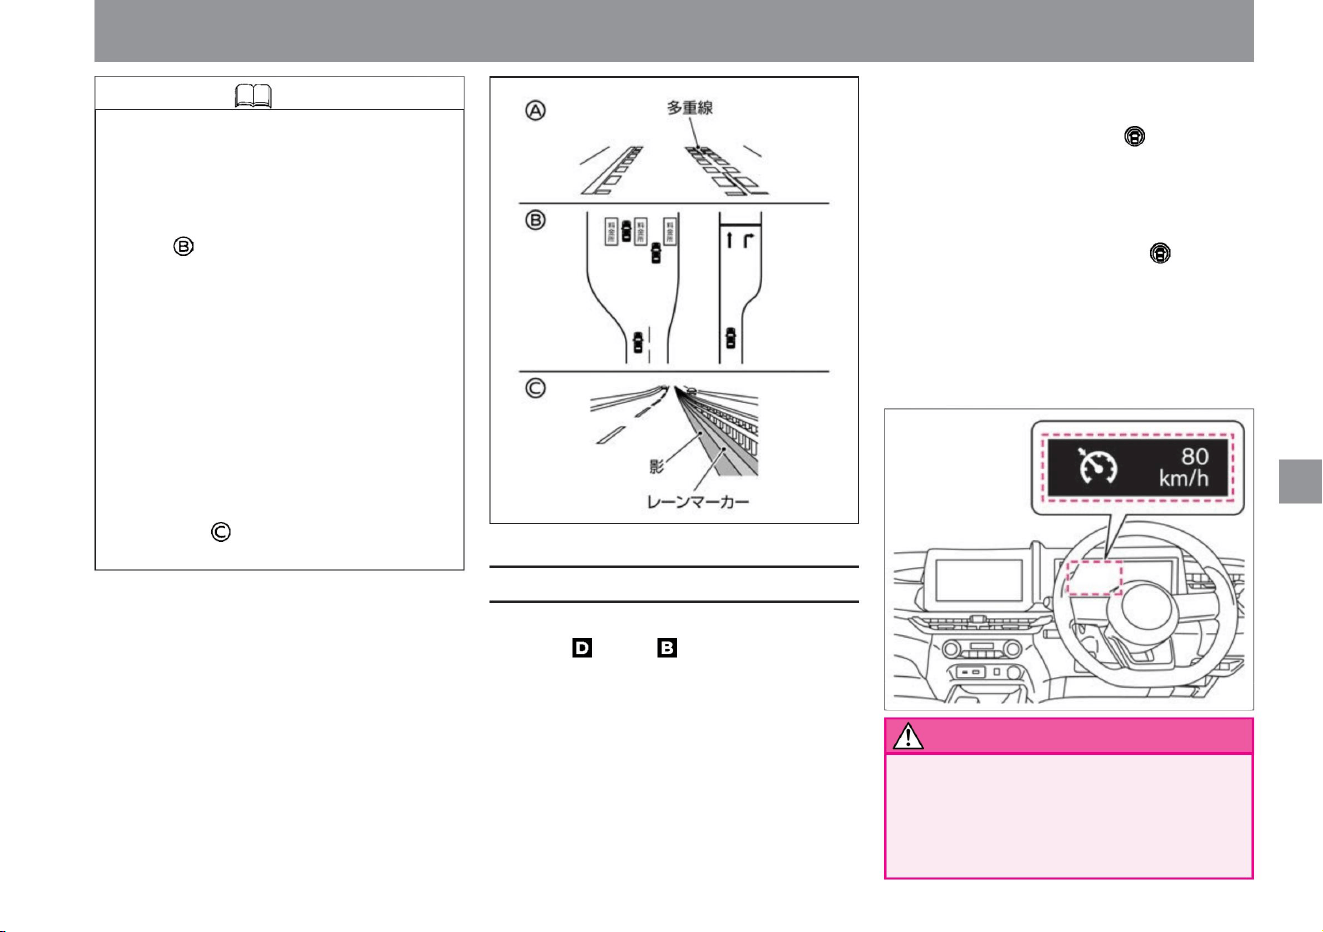
• Lights up when the ProPilot switch is turned ON, and
indicates the operating status of the system in
color. When set, the set speed is displayed. –
White :
Appears
when the ProPilot switch is pressed for more
than 1.5 seconds and the system is turned on.
– Green:
Appears
when the vehicle speed is set. –
Orange (warning light): indicates
a system failure.
– When driving on a road surface that is shaded
by road structures, roadside trees, buildings,
etc. –
When driving on a merging or diverging road.
– When the erased lane markers are still faintly
left – When there are no
lane markers at a tollgate or in front of an
intersection, or when the lane markers have
changed significantly
• When using the constant speed control function, keep a sufficient
following distance. Since vehicle-
to-vehicle distance control is not performed during constant
speed control, neither brake operation nor warning is
performed. distance from the preceding vehicle, surrounding conditions
Constant speed control function
197
Knowledge
warn
ZEG1149X
ZEE0439X
$/$: Different equipment depending on vehicle model, options, etc.
How to drive
ÿ Constant speed control function display
Driving support function
With the constant speed control function,
when the shift position is or , you can drive
at a constant speed without stepping on the
accelerator pedal. (No steering support or
distance control is performed.) Any speed
can be set above approximately 30km/h.
– when the lane width is extremely
narrow, wide or changing –
when driving on roads with no stopping
or no entry areas – when driving
on wet or puddled road surfaces –
When driving on roads with
multiple lane markers in one lane, such
as during construction
Machine Translated by Google
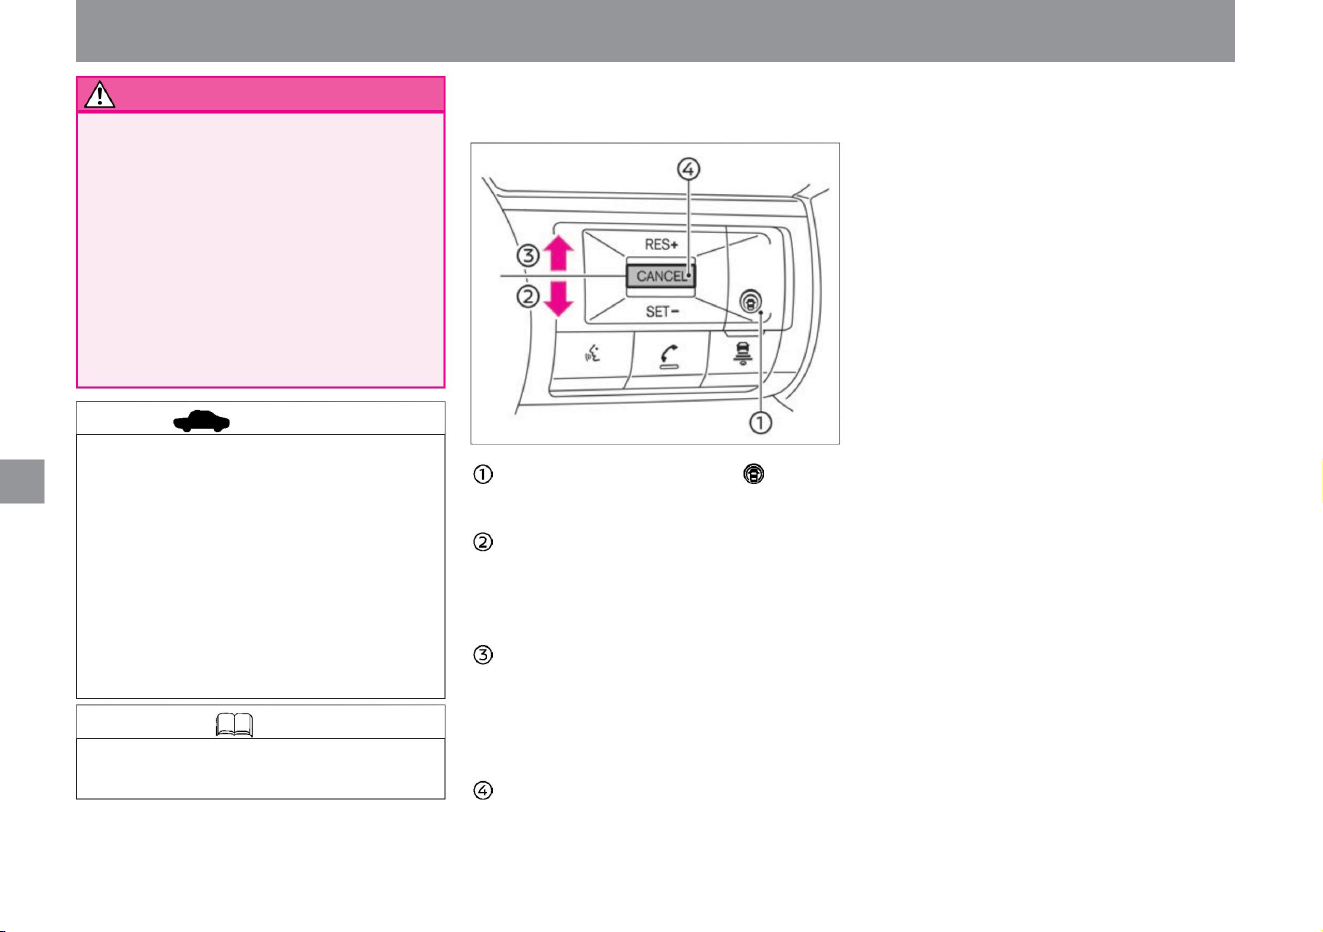
ZEG0990X
advice
198
Knowledge
ÿ Steering switch (constant speed controller
able)
How to drive
Driving support function
Surface – steep downhill
road
Pro-PILOT switch — You can turn ON/
OFF the constant speed control function.
Depending on the warning situation, step on the brake
pedal to slow down, etc. to secure a distance between
vehicles and drive safely. • Do not use the constant
speed control function in the following situations, as it may lead
to an unexpected accident. – Roads with heavy traffic or
sharp turns
CANCEL switch —You
can cancel the constant speed control function.
• When using the constant speed control function, the steering
wheel is not supported.
SET-operation (downward
push) — You can set the constant speed control function
at the vehicle speed when the switch is pushed.
— You can lower the set vehicle speed.
RES+ operation (push up) —
After canceling the constant speed control function, you
can reset the vehicle speed to the setting before
canceling.
— You can increase the set speed.
– Slippery roads such as icy roads and snow-covered roads
• When the constant speed control function display turns orange,
stop the vehicle in a safe place, stop the e-POWER system,
restart it, and set the constant speed control function again.
If the e-POWER system cannot be set even after the
system is restarted, or if the constant speed control function
display continues to light orange, the system may be
malfunctioning. Although it does not affect normal driving,
please have it inspected by a NISSAN dealer.
Machine Translated by Google
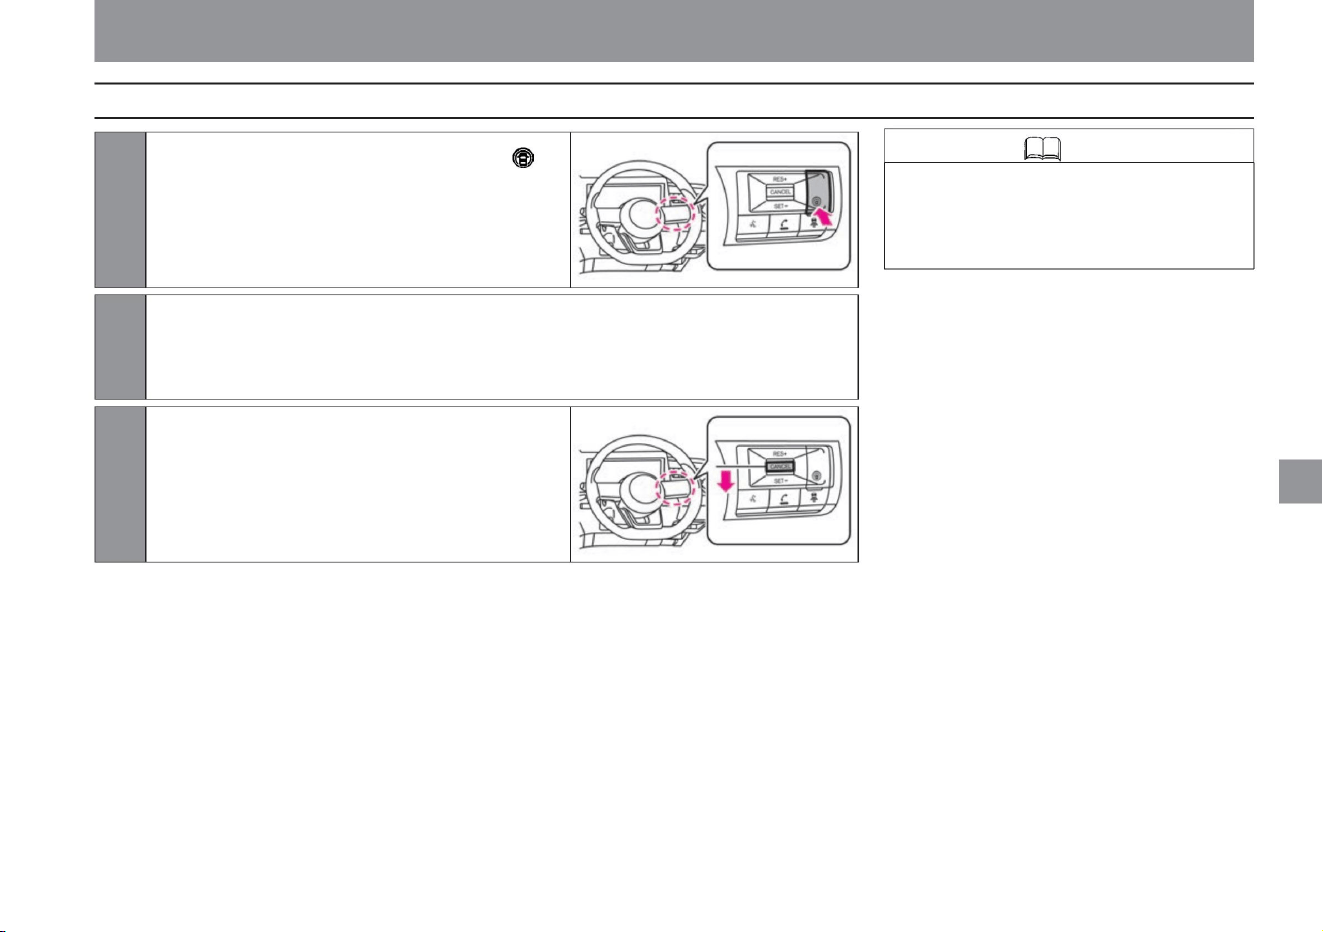
Starts constant speed running at the vehicle speed when pushed in the
SET- direction.
• If you want to accelerate while driving at a constant speed,
depress the accelerator pedal. When the accelerator
pedal is released after accelerating, the vehicle speed
will gradually return to the set speed.
Knowledge
How to drive at constant speed
199
ZEG0992X
ZEG0991X
How to drive
3 Push in the SET- direction.
2 Accelerate or decelerate to the speed you want to set.
1Press the ProPilot switch on the handle for 1.5 seconds
or more to turn on the constant speed control function
(standby state).
The constant speed control function display lights up
on the advanced drive assist display.
Driving support function
$/$: Different equipment depending on vehicle model, options, etc.
Machine Translated by Google
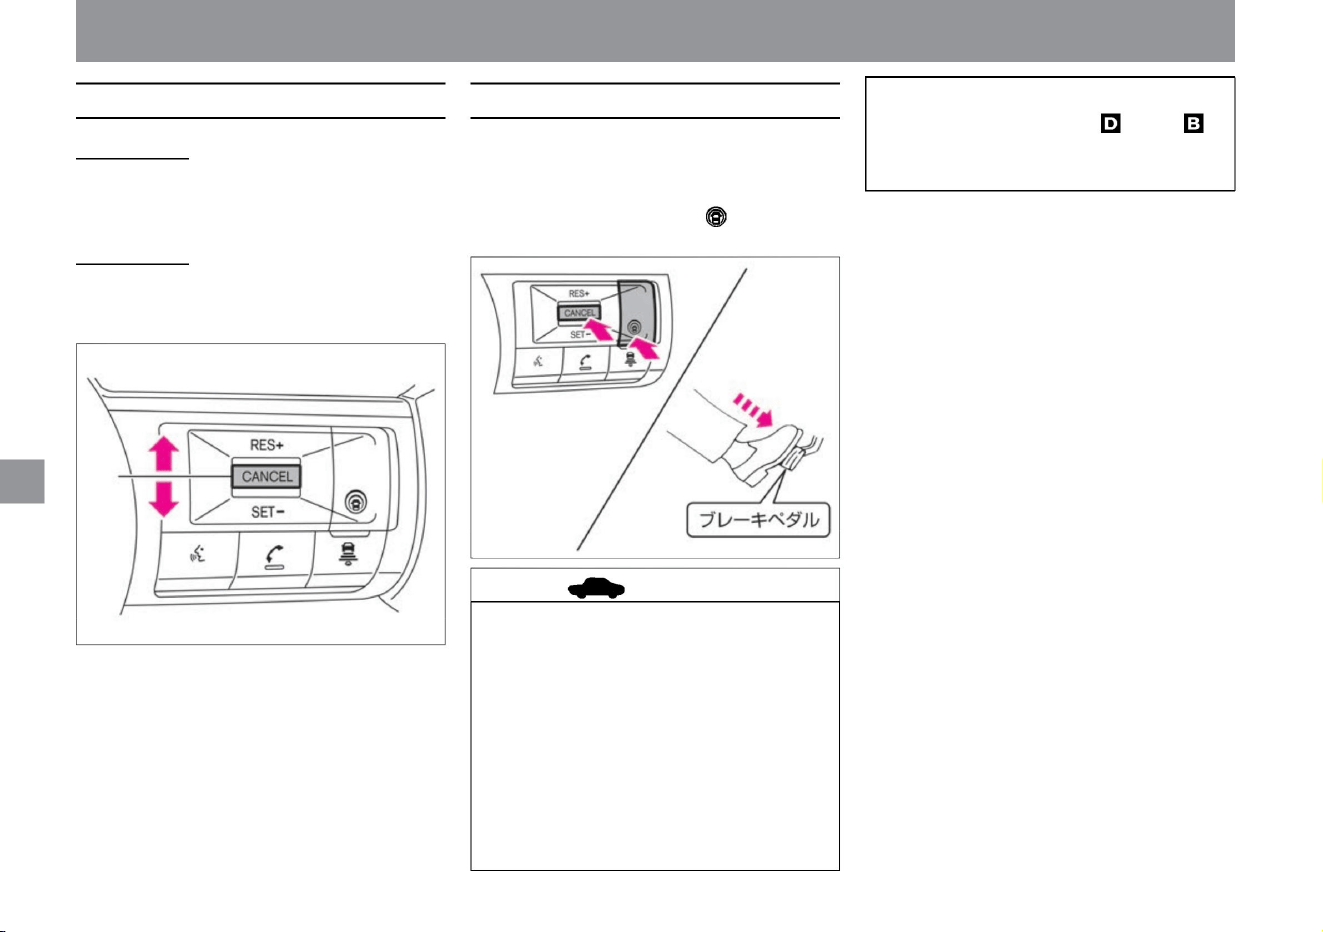
How to cancel constant speed operationHow to change the set vehicle speed
200
advice
ZEG0982X
ZEG0986X
speed up
• Press and hold in the RES+ direction while traveling at a constant
speed to accelerate. Release your hand at the speed you want
to set.
Decrease speed •
Press and hold in the SET- direction while traveling at a constant
speed to decelerate. Release your hand at the speed you want
to set.
• When released by pressing the CANCEL switch
or by depressing the brake pedal, the system
enters the set standby state. If you want to
reset the set vehicle speed before canceling,
press in the RES+ direction. (It can be
returned when the vehicle speed is about 30
km/h or more.)
– When the tires spin – When
the shift position is set to anything other than or
Constant speed running will be canceled when the
following operations are performed.
• Press the CANCEL switch • Press the
ProPilot switch • Press the brake pedal
–When there is an abnormality in the system
• In the following cases, control will be canceled
with a beep sound. – When the
speed is about 25km/h or less – When VDC/
TCS is activated
Driving support function
How to drive
Machine Translated by Google
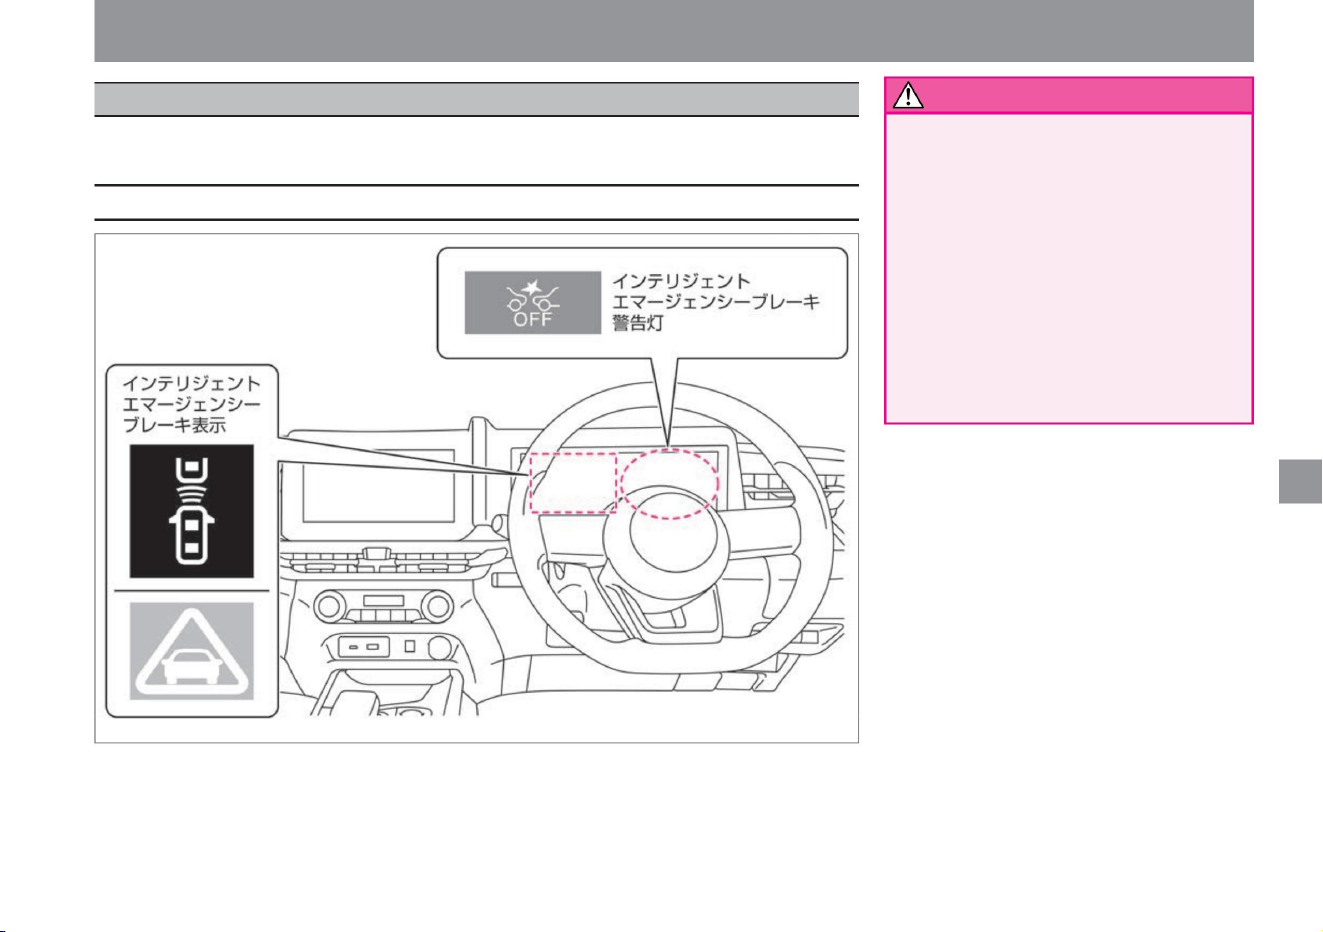
Intelligent emergency braking
How to drive
201
Display related to the system
warn
ZEG0993X
• Due to the limitations of functions, do
not overestimate and
drive safely. Intelligent Emergency
Braking is intended to assist in
avoidance maneuvers or to reduce
damage or injury in a collision with a
vehicle, pedestrian or occupied
bicycle in front. It doesn't work in all
situations.
Be sure to check the safety of your
surroundings, maintain a sufficient
following distance from the vehicle in
front, and drive safely.
$/$: Different equipment depending on vehicle model, options, etc.
Driving support function
Intelligent Emergency Braking assists the driver in avoiding a collision by alerting and braking
when there is a risk of collision with a vehicle, pedestrian, or occupied bicycle in front.
Machine Translated by Google
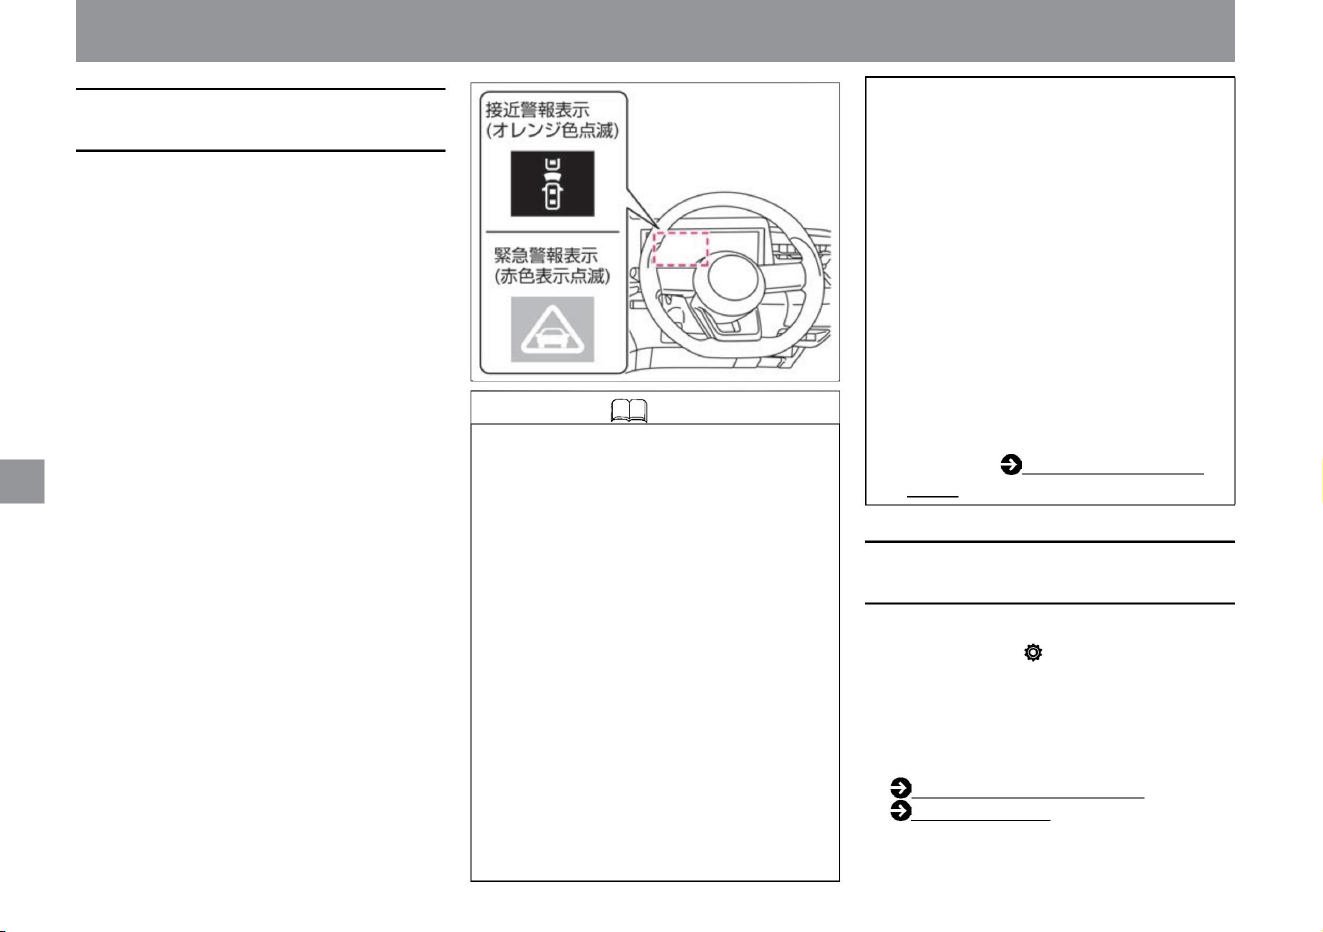
How to drive
Driving support function
When
when it doesn't work.
• When the system is braking, the brake
light will turn on. • When you
step on the brake pedal while the brake
is being applied by the system, the
response of the brake pedal may
change, or you may hear a sound
or vibrate, but this is not a
malfunction. You can also increase
the braking force by
adding pedaling force. • If you switch
the advanced drive assist display
to "driving assistance" or " cruise
"ÿ, you can check the operation
status of the intelligent emergency
brake in the advanced drive assist
display. For
details, see How to switch screens.
If the driver's actions to avoid a collision are inadequate
and the danger of a collision increases, the
Intelligent Emergency Braking display on the
Advanced Drive Assist Display will change to a
red emergency warning display, and an audible
alarm (buzzer) will be heard and the brakes will
be applied lightly . will take.
How to switch screens (P.60)
Driving assistance (P.70)
(P.60).
About Intelligent Emergency
Braking
How to stop Intelligent Emergency
Braking
202
ZEG0994X
• The difference in speed between the vehicle ahead and your vehicle is small.
– When the steering wheel is turned sharply or
quickly –
When it is determined that there is no danger
of colliding with a vehicle, pedestrian, or
bicycle with people on board
When the system brakes the vehicle to a stop , the
brake is released about 2 seconds after the
vehicle comes to a stop. • When the driver
is operating the steering wheel, accelerator, or
brakes, the intelligent emergency brake may
be delayed or may not operate.
• Starts at a vehicle speed of approximately
5km/h. It operates in the range of about 10km/h to 80km/
h for pedestrians and bicycles with people on board. (It
does not work for stopped vehicles at vehicle speeds
of approximately 100 km/h or more.)
• Multi-sensing The front camera on the upper part of
the windshield and the radar sensor on the front
of the vehicle detect vehicles, pedestrians, and
bicycles in front.
• When the danger of collision increases, the brakes
are applied strongly just before the collision.
Knowledge • In the following cases, the brake
operation by the system will
be released. – The accelerator pedal is strongly depressed
• By selecting "Settings", "Driving assistance", and
"Emergency brake" on the advanced drive assist
display, you can switch ON/OFF of the intelligent
emergency brake. For more information on
settings, please read Driving Assistance.
• When it determines that there is a risk of a collision,
an alarm (buzzer) sounds and the intelligent
emergency brake display (approach warning
display) on the Advanced Drive Assist Display
flashes in orange.
Machine Translated by Google
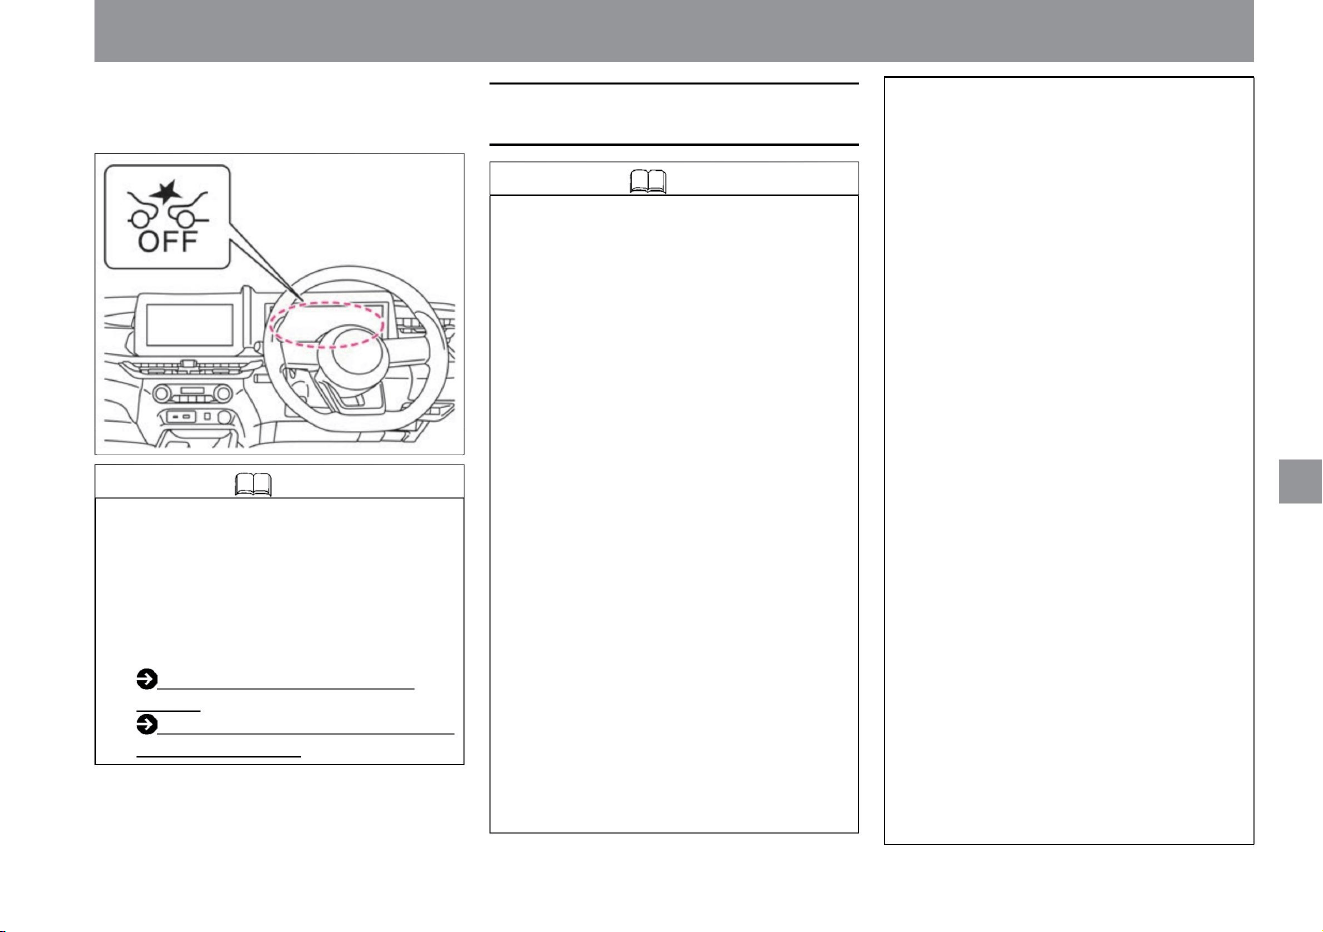
• When the function is turned off, the system will stop.
(Intelligent emergency brake warning light lights
up)
• It turns ON when the e-POWER system is
restarted. • When
the Intelligent Emergency Brake is turned off, the
Misapplication Collision Prevention Assist and
Intelligent FCW (Forward Collision Prediction
Warning) are also turned off. Misapplication
Collision Prevention Assist
(P.207) Intelligent FCW (Forward
Collision
Prediction Warning) (P.231)
– When the headlamps are not turned on, such
as at night or in a tunnel, or when the
headlamp lenses are extremely dirty – When
the tail lamps of
the vehicle ahead are not turned on, such as at
night or in a tunnel When there is a sudden
change
in brightness, such as at the doorway of the
–Vehicles whose tires are difficult to see due to the
shape of the bumper, etc.
– When the windshield in front of the camera is
fogged up – When
there is strong light from the front (sunlight, high
beams of oncoming vehicles, etc. ) when it's
hard
– when driving on a curve – when
driving on a gradient
There is an oil film, water droplets, ice,
snow, etc., or the wiper is left unwiped.
– When driving on an uneven road surface such
as an unpaved
road – When pedestrians are carrying large
luggage or wearing the same color as the
background, etc.
–When the sunlight from the vehicle in front is
strongly reflected –
The position and movement of the object change significantly
• The following obstacles are not detected. –
Short people such as children, animals
–Oncoming
vehicles –Road structures (obstacles other than
vehicles and pedestrians such as guardrails
and poles, and bicycles with
people on them) The system recognizes the rear
end of the vehicle Therefore, vehicles such as
the following examples may not be detected or
may not be detected.
–Vehicles with protruding hoods and obscured
rear end shapes
–Vehicles passing across the front –
Vehicles stopped at an angle or facing forward
In the
following cases, vehicles, pedestrians, or people in
front of you may get into the vehicle . bicycle
may not be detected. – When
visibility is poor due to bad weather (rain, snow,
fog, wind dust, sand dust, blizzard, etc.)
– When water, snow, sand, etc. is being blown
up by a vehicle in front or oncoming traffic –
Front in front of
the camera dirt on the glass
How to drive
ZEG1133X
Driving support function
$/$: Different equipment depending on vehicle model, options, etc.
Knowledge
Notes on Intelligent Emergency Braking
Knowledge
203
Machine Translated by Google

Driving support function
How to drive
–When there is water vapor or smoke
between the
object and your vehicle • The system may not
work for the following
objects. – Pedestrians and bicycles with
people on them moving
quickly – Pedestrians and bicycles
approaching from opposite sides –
Pedestrians in dark places such as at
night or in tunnels – Vehicles
with low vehicle height – Vehicles with
extremely
low or extremely high
minimum ground clearance (height from
the ground to the vehicle body) –
Vehicles with special shapes Vehicles (tank
trucks, sidecars, etc.) –
Vehicles that cut in at a close distance in
front –Pedestrians and bicycles that jump
out at a close
distance in front –Vehicles, pedestrians,
and people that are laterally displaced
from the front of
your vehicle – Vehicles with small rear end
area (empty
trucks, etc.) – Vehicles with long rear tires
to the
rear end of the vehicle – Vehicles
other than four-wheeled vehicles
(motorcycles, etc. ) protruding vehicle
• In the following cases, the system may not
function properly. – When driving on
slippery roads
when overlapping
– When pushing shopping carts, strollers,
bicycles, etc.
case
tree
• In the following cases, objects that may
collide may not be detected correctly. –
Multiple objects are
close to each other
– When there is a vehicle near the front of
the target motorcycle or low vehicle
– When the outside temperature is low or
when the brakes are cold, such as
when the vehicle has just started driving
When
you know (your vehicle's lane change/
left/right turn, vehicle ahead turning right/
left/sudden steering,
sudden acceleration/
deceleration, etc.) – About 15 seconds
after starting – When the view of the
camera is obstructed (windshield
dirt, oil film, insect stains, wiper blade)
– When the camera is facing the wrong
way – When snow, ice, mud,
etc. adhere to the area around the radar
sensor – When a
narrow vehicle such as a motorcycle is
traveling in front of you – a
child’s bicycle, a bicycle with large loads, a
bicycle with two or more passengers,
or a bicycle with a special shape
Bicycles (vehicles with child seats,
tandem bicycles,
etc.) • The system may not operate correctly if
the shape of the target object cannot be
detected correctly under the
following circumstances. – When the object
is similar in color
to the background and indistinguishable –
When the object is near road markings
(crosswalks,
speed limit signs, etc. on the road) – When
the object is near a puddle on the road
surface
( Surrounding scenery reflected in a puddle, etc. )
tree
– When the brakes are less effective due
to wetness, such as after driving in a
puddle or after washing
the car – When the braking performance
cannot be fully demonstrated
due to long-term parking, etc. – Worn tires
or under-inflated tires , emergency tires
such as spare tires, Nissan genuine products or
• The alarm (buzzer) may not be heard due to
external noise.
– When driving on a sloped road surface
204
Machine Translated by Google
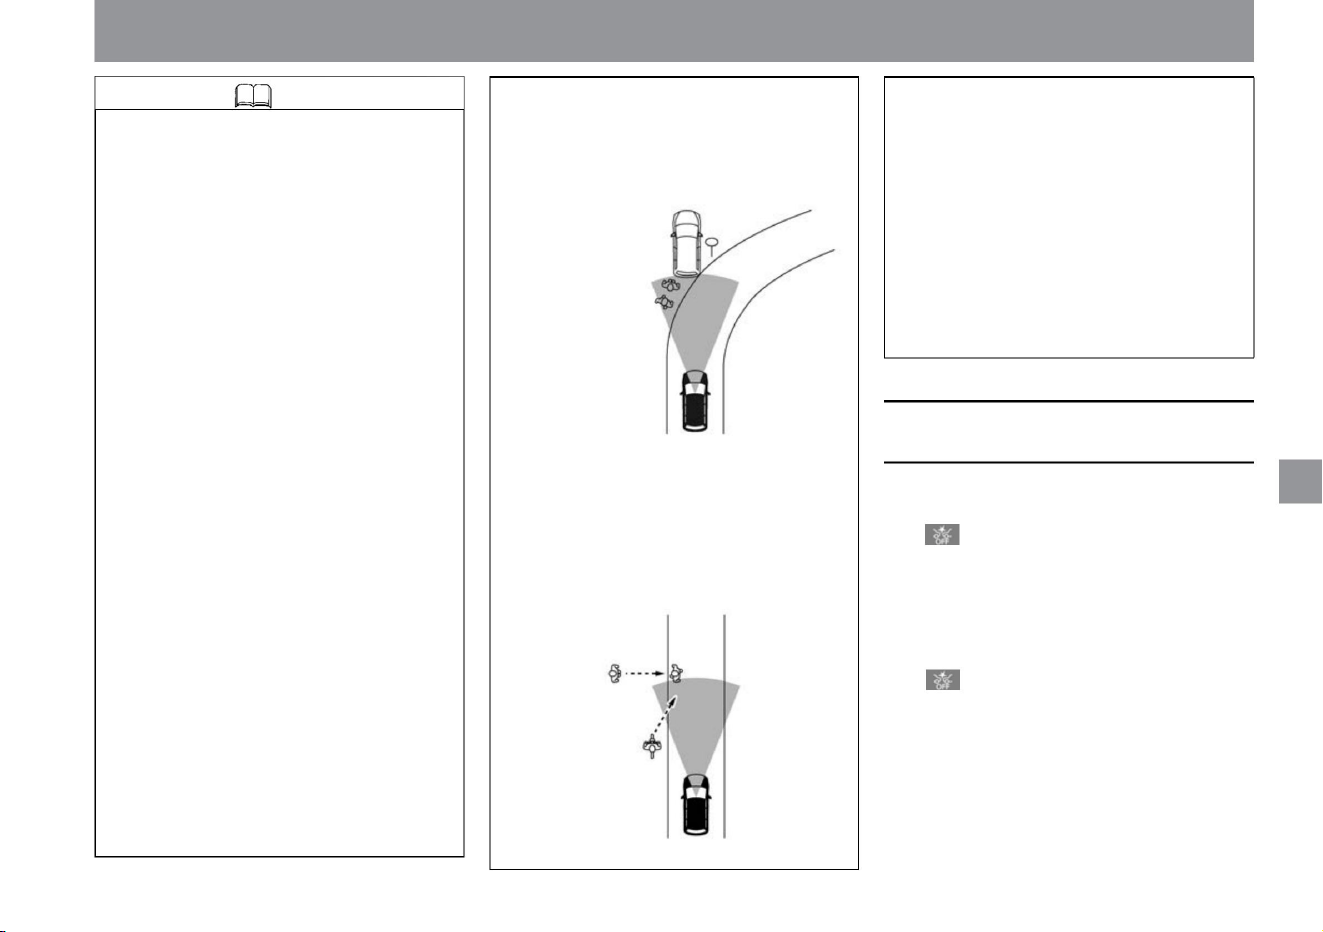
How to drive
Driving support function
–Bicycles with pedestrians or people riding on narrow
alleyways –To avoid obstacles on the shoulder
of the road, temporarily stray into the lane in front of
the vehicle or approach pedestrians or people.
the bicycle ridden by
– Objects on the road surface (tracks, gratings, steel
plates,
etc.) – Objects in the parking lot (beams,
etc.) – Objects in or adjacent to the lane (pedestrians,
vehicles, etc.) – In or adjacent
lanes Objects approaching (pedestrians, vehicles,
etc.) – Pedestrians approaching from opposite
direction
when the temperature rises
•In the following cases, the intelligent emergency brake
warning light in the meter lights up and the operation
stops. – When the intelligent emergency brake
setting is turned off – When the VDC is turned off In the
following cases, the intelligent emergency
brake warning light in the instrument
panel will flash slowly and the system will stop operating
temporarily. – When it is determined that the front view
of the camera is blocked by dirt on the windshield, etc. –
When the camera cannot recognize
the front due to strong light from the front – When the
camera is parked in the hot sun, etc.
degree)
– When the vehicle is tilted (when an extremely
heavy load is loaded in the rear seat or luggage
compartment)
Shadows , patterns, or paint on the road surface or wall
(faint road markings, special road markings
consisting of Chinese characters, (including patterns
reflected on wet road surfaces, ruts, and light
reflections), road structures ahead (tunnels,
viaducts, traffic signs, reflectors installed on the
sides of vehicles (reflectors), reflective sheets,
guardrails, etc.) When the shape composed of
objects such as curved mirrors, telephone poles
and wires, billboards, etc. resembles the contour
characteristics of vehicles, pedestrians and bicycles,
and the size and position of vehicle taillights, the
system can may move. • The system may continue
to operate on the vehicle in
front of you while turning right or left. • When approaching
and overtaking the vehicle in front, the
system may be activated. • Depending on the shape of
the road (curved road, curve entrance/exit,
winding road, lane restrictions, construction work, etc.),
the system may temporarily activate the oncoming
vehicle in front of the vehicle.
Knowledge is when using tires other than those
purchased at a Nissan dealer or when using tire
chains – when using non-genuine brake
parts and suspension parts
• The system may be activated by reacting to the
following objects. – Roadside objects
(road signs, guardrails, pedestrians, bicycles, bicycles
with people on board, vehicles, etc.)
ZEG0279X
ZEG1127X
$/$: Different equipment depending on vehicle model, options, etc.
205
When Intelligent Emergency Braking
stops working
Machine Translated by Google
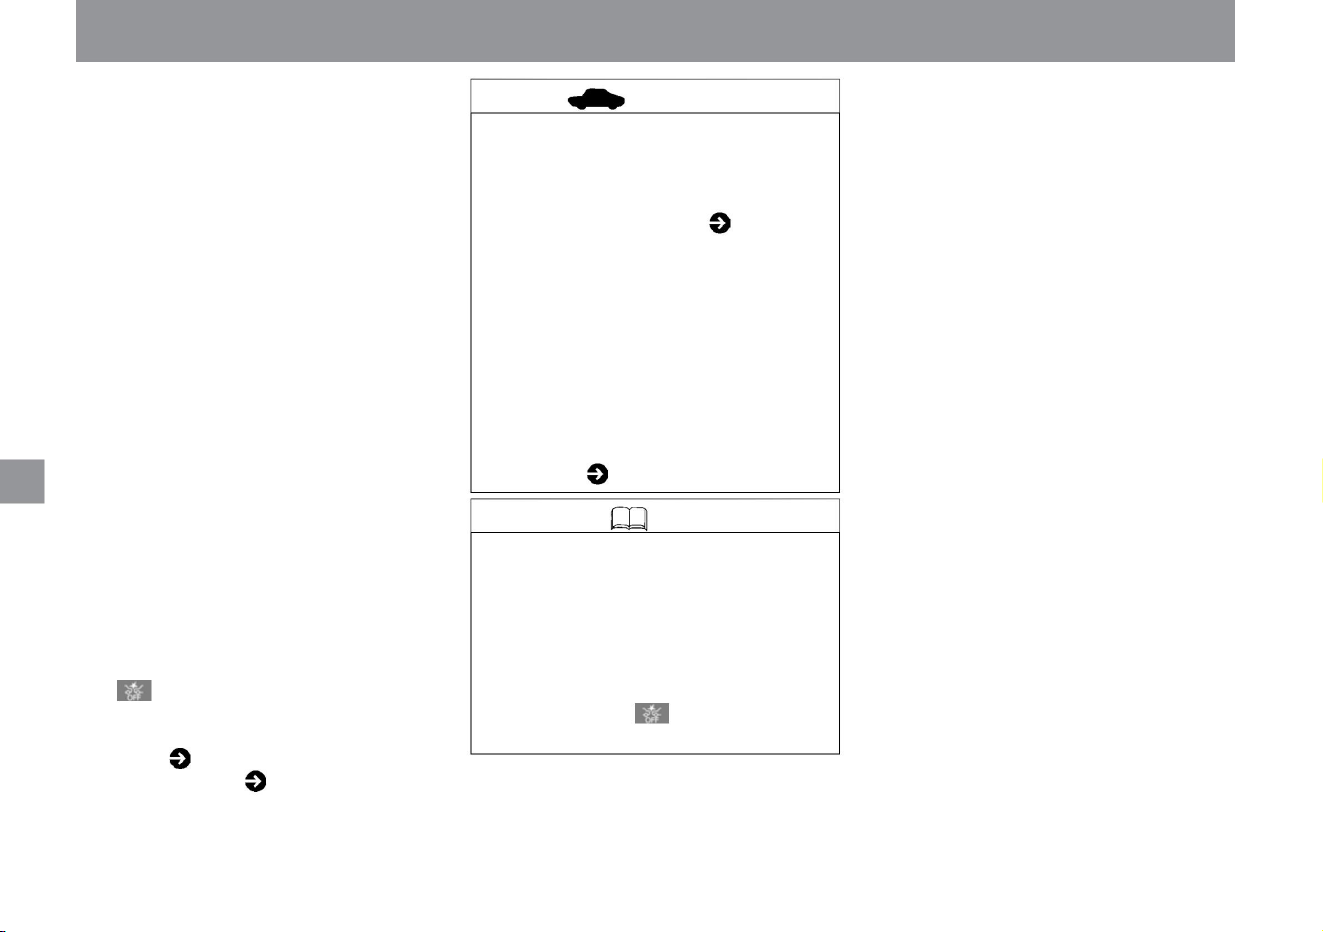
Driving support function
advice
Knowledge
206
How to drive
–If it is affected by surrounding radio sources
The system will automatically resume operation
when the conditions under which it was
stopped
have improved. – When there is snow, ice, mud,
etc. around the radar sensor installed in the
front of the vehicle.
When the above warning is displayed, stop the
vehicle in a safe place and turn off the e-
POWER system. Then, remove dirt from the
radar sensor and its surroundings, and restart
the e-POWER system. –When the radar
sensor
cannot accurately detect the preceding vehicle
due to the shape of the road or surrounding
structures (e.g. long
bridges, snowfields, beside long walls, etc.)
The system automatically resumes operation
after leaving the above conditions.
To do. • If there is a problem with the system, the
Intelligent Emergency Brake Warning Light in the
meter lights up along with a warning sound (buzzer),
a warning is displayed in the Advanced Drive Assist
Display, and the system stops. Warning light
( P.308) Warning message ( P.317)
• Keep the windshield in front of the camera clean
at all times for proper system operation. For
handling of the multi-sensing front camera,
please read ( P.370). • When the warning light
comes on, stop the vehicle in a safe place,
stop the e-POWER
system once, and then restart it. If the warning light
continues to illuminate even after performing
the above operations, there may be a system
malfunction. There is no problem with normal
driving, but please have it inspected by a
Nissan dealer. Warning light ( P.308)
(It will resume operation when the room
temperature drops.)
• When VDC is turned off, only the meter display
and alarm sound (buzzer) operate. • When the
field of
view of the camera becomes pitch black due to
driving without turning on the lights at night,
the intelligent emergency brake warning light
in the meter may flash.
Machine Translated by Google
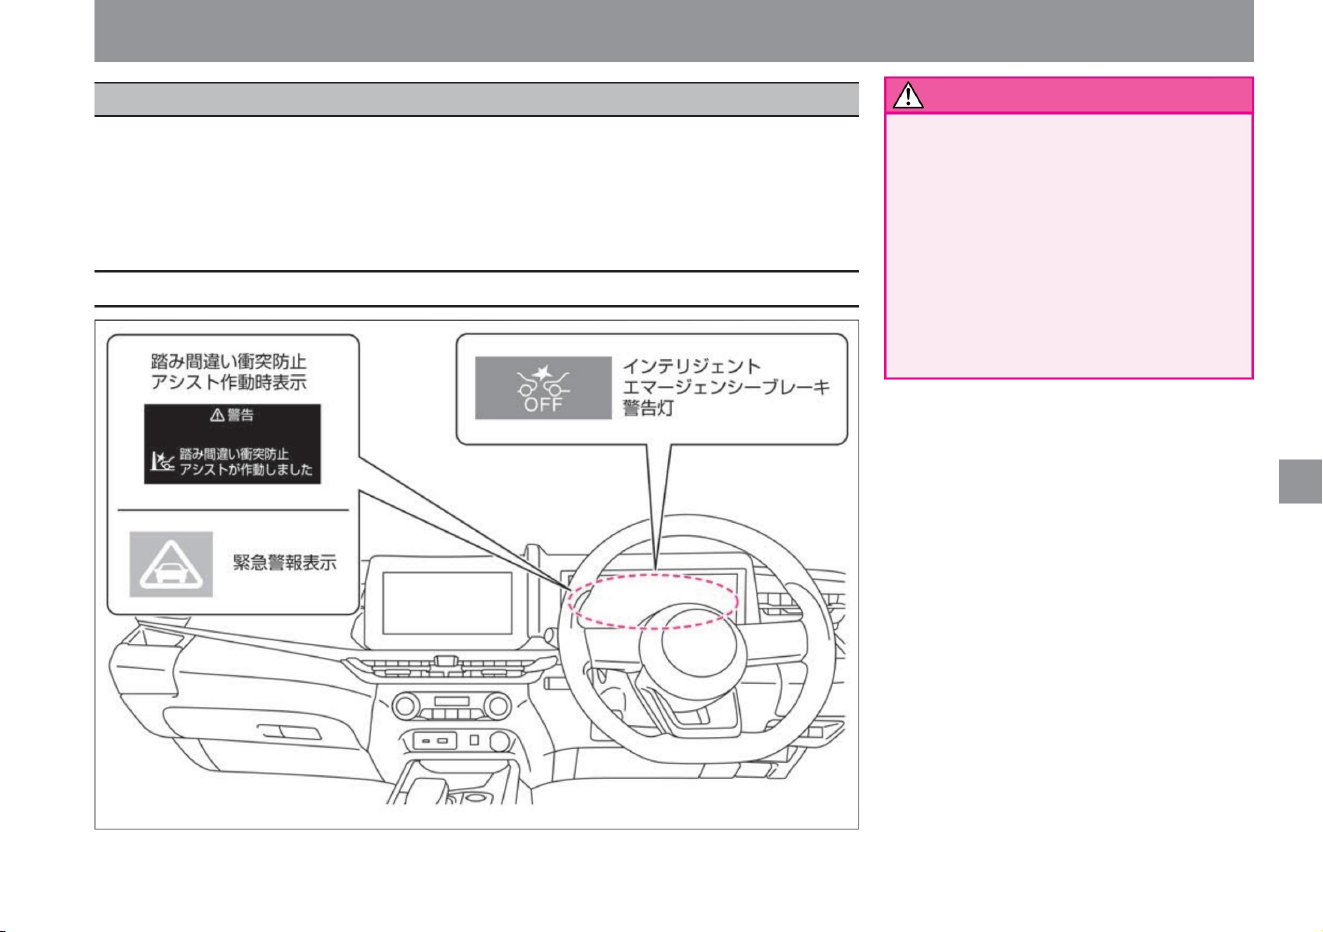
Misapplication Collision Prevention Assist works when the accelerator pedal and the brake pedal are depressed by mistake
at low speeds such as when parking in a place where there are obstacles such as walls, vehicles or pedestrians (only when
moving forward) in the direction of travel. , or audible and visual warnings to the driver when
braking is delayed. Furthermore, by controlling the e-POWER system and brakes, it helps prevent excessive acceleration
and collisions with obstacles.
Collision Prevention Assist for Pedal Misapplication
How to drive
warn
Display related to the system
207
ZEG0996X
• Due to the limitations of functions, do
not overestimate and
drive safely. Misapplication Collision
Prevention Assist is a supplementary
function designed to reduce runaway
and collision accidents caused by
misapplication of the accelerator and
brake pedals. Not effective in all
situations. Drivers should check the
safety of their surroundings and
always drive carefully.
$/$: Different equipment depending on vehicle model, options, etc.
Driving support function
Machine Translated by Google
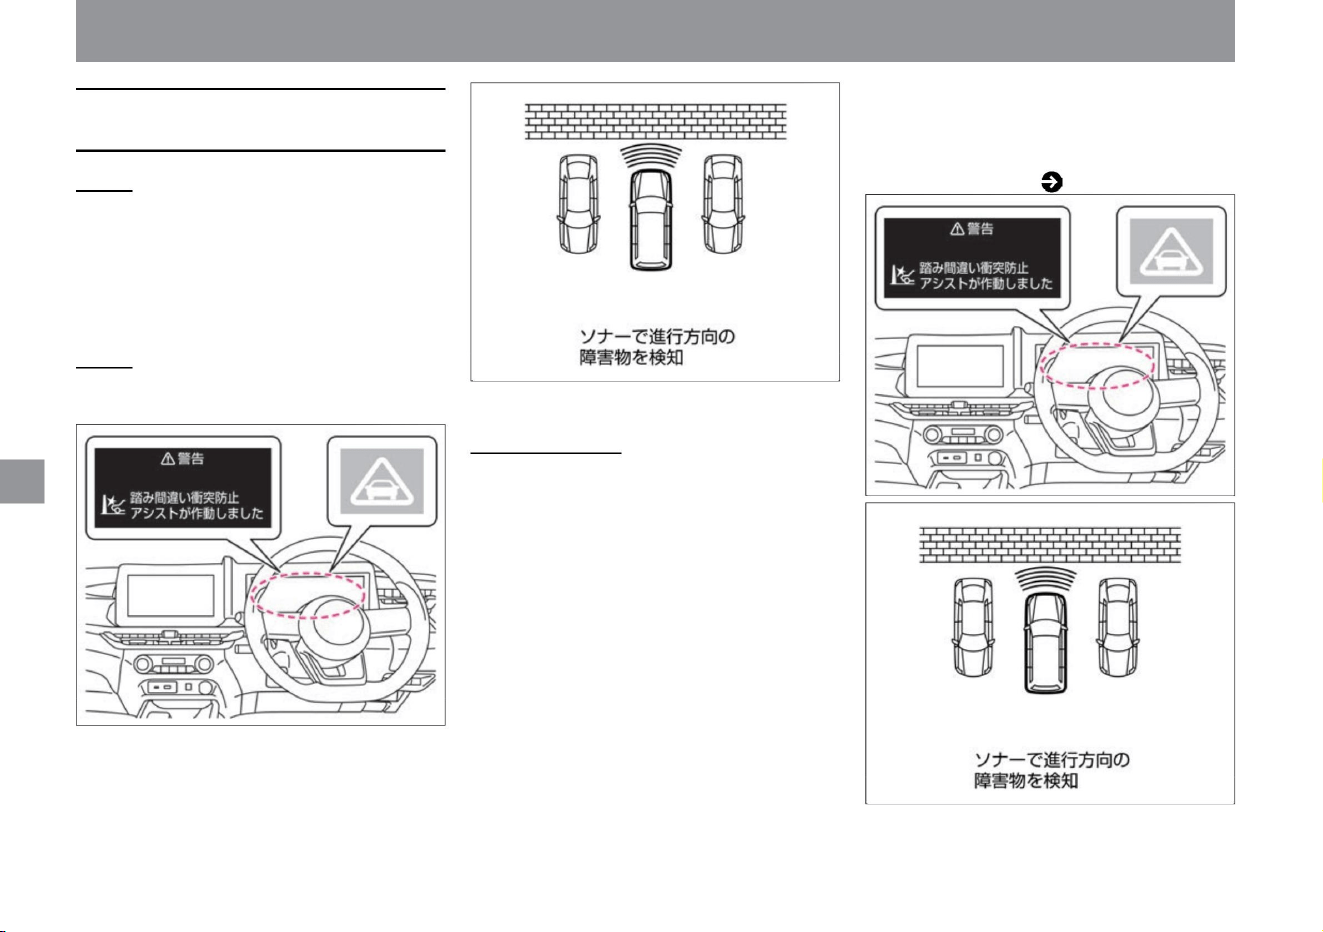
The misapplication collision prevention assist has two functions.
Low-speed
acceleration suppression
function If the system detects obstacles such as vehicles,
pedestrians, walls, etc. in the direction of travel while moving
forward (including when the vehicle is stopped), if the system
judges that the accelerator pedal has been depressed
more than necessary, the acceleration will be about 6 It
suppresses the increase in vehicle speed by suppressing
acceleration for a
second or applying a weak brake. When reversing (including
when the vehicle is stopped), if an obstacle such as a wall
is detected in the direction of travel, if the system judges
that the accelerator pedal has been depressed more than
necessary, acceleration will be suppressed for approximately
6 seconds, or weak braking will be applied. It suppresses
the increase in vehicle speed by applying • For vehicles and
pedestrians, the system operates within a
vehicle speed range of approximately 0 to 25 km/h. • For
obstacles such as walls, it operates within
the vehicle speed range of about 0 to 15 km/h. • When the low-speed acceleration suppression function is activated
When
moving forward • The multi-sensing front camera
at the top of the windshield detects vehicles
and pedestrians
ahead. • The sonar attached to the front bumper
detects obstacles in the direction of travel.
Backing up
alerts the driver with an audible alarm (buzzer)
and an emergency alert display, and with a
visual indication on the Advanced Drive Assist
Display. Warning
message ( P.316)
- The sonar attached to the rear bumper detects
obstacles in the direction of travel.
How to drive
About Pedal Misapplication Collision Prevention
Assist
208
Driving support function
MEG0102X
ZEG1017X
ZEG1017X
MEG0102X
Machine Translated by Google
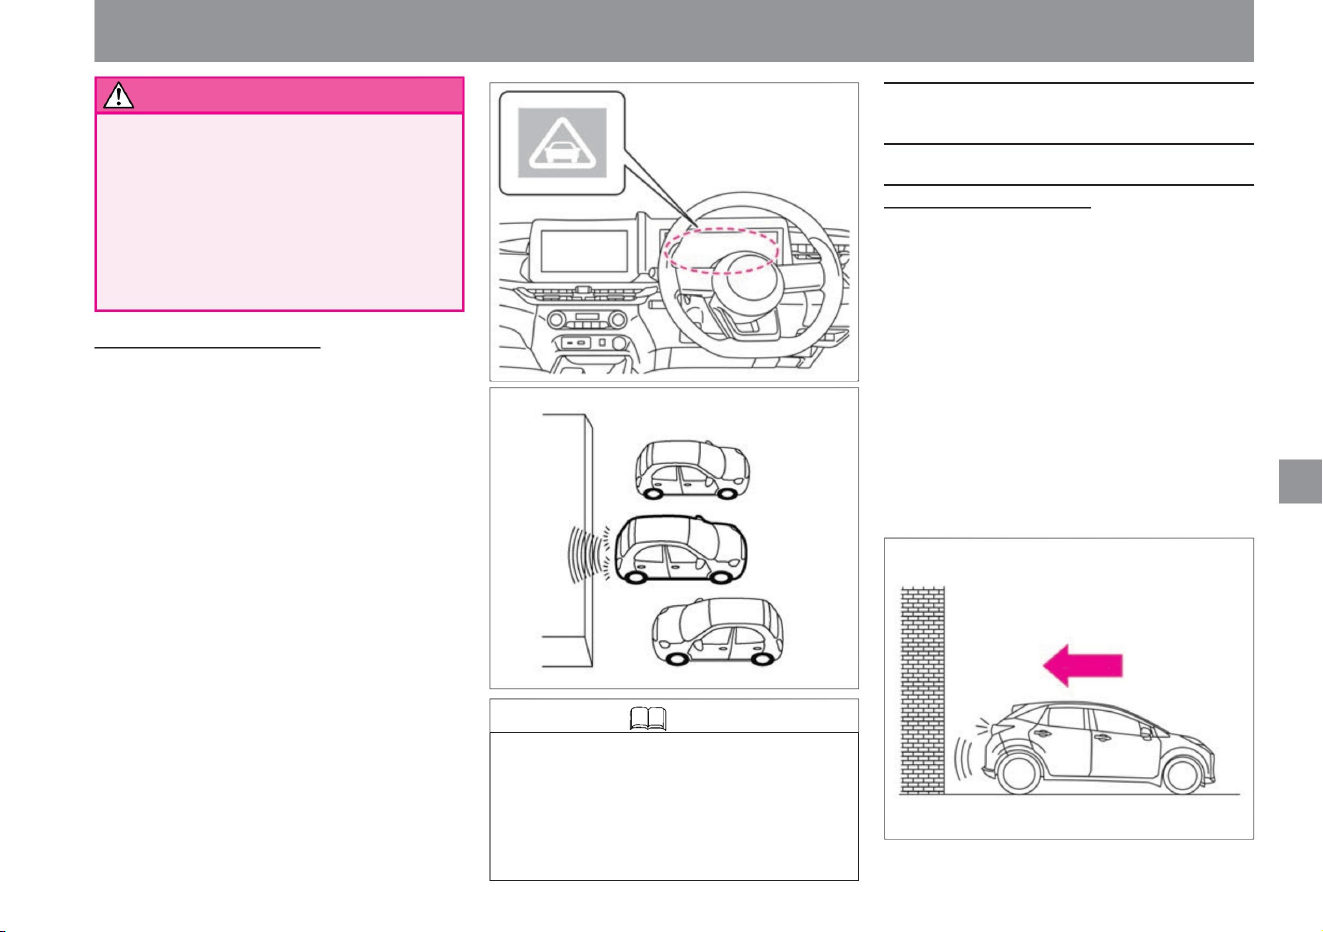
When the low-speed collision mitigation
brake operates/does not
warn
209
Knowledge
How to drive
• The low-speed collision mitigation brake function
operates at vehicle speeds between 2 and
15 km/h. • When the low-speed collision mitigation brake
function is activated, the driver is warned by a warning
sound (buzzer) and an emergency warning display.
• While moving forward or backward, if the system detects
an obstacle in the direction of travel and determines
that there is a risk of collision, it controls the output of
the e-POWER system and applies the brakes to avoid
a collision or reduce damage. I will
• When the low-speed collision mitigation brake
function is activated, the brake light will
turn on. • When the low-speed collision mitigation
brake function is operating, you may hear an
operating sound, but it is not a malfunction.
• Do not step on the accelerator pedal intentionally.
Driving support function
MEG0342X
ZEG0998X
ZEG0995X
$/$: Different equipment depending on vehicle model, options, etc.
stomach. The low speed acceleration suppression
function does not work when the accelerator pedal
is depressed slowly and deeply. Do not depress
the accelerator pedal intentionally. The vehicle
may move suddenly and lead to an unexpected
accident.
When the car is about to collide with a wall, etc. in a parking
lot without a car stop In the
unlikely event that the driver's brake operation is delayed
and the system determines that there is a risk of collision
with a wall, a warning sound (buzzer) is emitted. and an
emergency warning display will be displayed and the brakes
will be applied to avoid or mitigate
the impact. • After the brake control has been activated, it
will not activate when approaching the same obstacle
again. • The system is intended to assist at low speeds,
such as moving the vehicle while stepping on the brake
pedal (operation in a parking lot). If the accelerator
pedal is depressed to move forward or backward, the
operation may be delayed and may not function properly.
Low-speed collision mitigation braking function
Machine Translated by Google

• If the vehicle is driven forward or backward toward
the same obstacle without changing the shift
position after the brake control has been
activated, the brake control will not be
activated. • When the accelerator pedal is depressed,
the operation may be delayed.
• When other vehicles are laterally shifted from your
vehicle, the system may not operate or its
operation may be delayed.
• If you approach an obstacle at an angle, it may
not work.
When parallel parking
When the shift position is changed from to or from
to , an obstacle in the direction of travel is detected
each time the selector lever is operated repeatedly,
and brake control is activated.
• It may not work for narrow obstacles.
• While reversing, it does not work against obstacles
in front. Similarly, it will not work against rear
obstacles while moving forward.
210
MEG0107X
MEG0110X
MEG0109X
MEG0111X
MEG0108X
Driving support function
How to drive
Machine Translated by Google
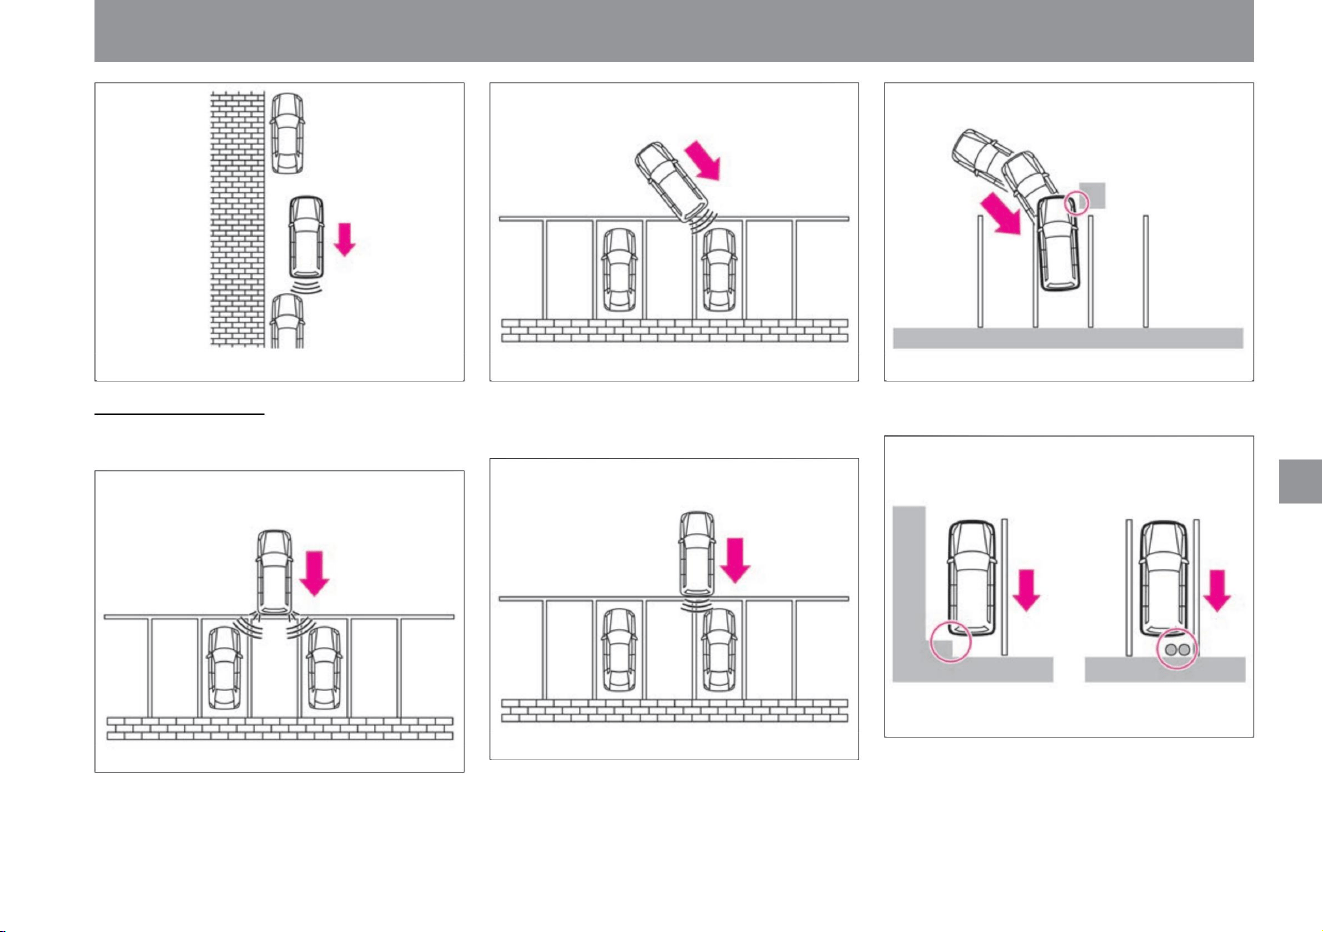
MEG0114X
MEG0117X MEG0112X
MEG0118X
MEG0116X
MEG0115X
$/$: Different equipment depending on vehicle model, options, etc.
• When other vehicles are laterally shifted from your
vehicle, the system may not operate or its
operation may be delayed.
• It does not operate against obstacles such as
pillars and pipes protruding from the wall.
• It may activate when entering a narrow space.
• It does not work when approaching the corner of
another vehicle.
• While reversing, it does not work against obstacles
in front. Similarly, it will not work against rear
obstacles while moving forward.
Driving support function
How to drive
211
When parallel parking
Machine Translated by Google

212
Knowledge
Precautions regarding Pedal Misapplication
Collision Prevention Assist
warn
How to stop the misapplication collision prevention
assist
How to drive
If you select "Settings", "Driving assistance",
and "Emergency braking" on the advanced
drive assist display, the misapplication
collision prevention assist will be activated .
• Does not work for low obstacles
• It turns ON when the e-POWER system
is restarted.
• The misapplication collision prevention
assist setting is linked to the intelligent
emergency brake and intelligent FCW
(forward collision prediction warning)
settings.
Driving support function
ZEG1128X
ZEG1129X
ZEG1133X
You can switch between ON and OFF.
For more information on settings, read
Driving
Assistance. How to switch
screens (P.60)
Driving assistance (P.70) • When the function
is turned off, the system stops. (Intelligent
emergency brake warning light lights up)
• In the following cases, the system may
operate unexpectedly , leading to an
unexpected accident . – When towing
– When loading on a
trailer, etc. – When
using the chassis dynamo for
inspection, etc. – When using non-
genuine
suspension parts (It may not be
detected.) • Sonar
does not detect the following
obstacles. – Short obstacles –
Narrow
obstacles
Machine Translated by Google

warn
213
$/$: Different equipment depending on vehicle model, options, etc.
–When there is a loud noise in the surroundings –There
is something in the surroundings that emits ultrasonic waves
–When the surface of the obstacle is diagonal to
the front or rear of the vehicle
• Sonar may detect it in the following cases. – When
the surrounding area
is overgrown with grass – When there are
walls near the sides of the vehicle – When
there are bumps or protrusions on the road
surface – When driving under hanging flags,
vinyl curtains, etc.
– If there is a mass of snow around the vehicle,
– when driving on a curve – when
driving on a gradient
– Obstacles that are high off the ground
– When water, snow, sand, etc. is being blown
up by a vehicle in front or oncoming traffic –
When dirt, oil
film, water droplets, ice, snow, etc. adhere to the
windshield in front of the camera – Camera
When the windshield
in front of you is foggy – When there is strong
light from the front
(sunlight, high beams of oncoming vehicles, etc.)
– When the tires of the vehicle ahead are
shaded
and difficult to see due to the strong light ahead
–Sponge - like objects, snow, or other objects
with soft surfaces that easily absorb sound
waves
–When there is a loud noise in the surroundings –There
is something in the surroundings that emits ultrasonic waves
– When there is something that generates
ultrasonic waves nearby, such as a vehicle
sensitive sensor
or another vehicle’s sonar – When there is a
loud noise nearby such as another vehicle’s
horn,
motorcycle exhaust sound, or construction work
When there is
an overhanging object • The multi-sensing front
camera does not detect the following
obstacles. – Short people such as children, animals, and
– When the headlamps are not turned on, such
as at night or in a tunnel, or when the
headlamp lenses are extremely dirty – When
the tail lamps of
the vehicle ahead are not turned on, such as at
night or in a tunnel When there is a sudden
change
in brightness, such as at the doorway of the
• Sonar does not detect when:
–Vehicles with protruding hood and unclear rear
end shape –
Vehicles passing across the front –
Vehicles stopped at an angle or facing forward
The
multi-sensing front camera detects vehicles and
pedestrians in front in the following cases.
There are things you can't do. – When
visibility is poor due to bad weather (rain, snow,
fog, wind dust, sand dust, blizzard, etc.)
– When driving on an uneven road surface such
as an unpaved road
– When pedestrians are carrying large luggage
or wearing the same color as the background,
etc.
– Do not use thin obstacles such as wires, wire netting, or ropes.
Driving support function
How to drive
Obstacles – Obstacles very close to the bumper –
Obstacles suddenly appearing in the direction of
travel • Sonar may not detect or delay the operation of the
following obstacles.
vehicle that is difficult to see
When
when attached
tree
When
thing
Turning
vehicle – oncoming
vehicle – road structure (obstacles other than vehicles and
pedestrians, such as guardrails and poles) Since
the multi-sensing front camera recognizes the rear end of the
vehicle, it does not detect vehicles such as the following
examples. may not be detected. – Due to the shape of the
bumper, etc., the tire
there is something wrong. –
rain, snow, ice, dirt, etc. to sonar
Machine Translated by Google
advice
Notice
214
warn
How to drive
• When stopping the vehicle, the driver must step
on the brake pedal. When the low-
speed collision mitigation brake function is
activated after the low-speed acceleration
suppression function is activated, the brakes
are released about 2 seconds after the
vehicle stops and the vehicle starts moving. • The
alarm (buzzer) may not be heard due to
external noise.
• When approaching an obstacle with the
accelerator pedal depressed, the operation
may be delayed.
–When there is water vapor or smoke between
the object and
your vehicle • For the following objects, the multi-
sensing front camera may not detect the
shape of the object correctly and the system
may not operate.
• Brake control operates only for a short time.
Make sure the driver depresses the brake
pedal.
– Pedestrians in dark places such as at night
or in tunnels
– Vehicles with low
vehicle height – Vehicles with extremely low
or extremely high minimum ground
clearance (height from the ground to the
vehicle body) – Vehicles
with special shapes (tank trucks) –Vehicles
cutting in at a close distance in front –
Pedestrians jumping out at a close distance in
front –Vehicles or
pedestrians that are laterally displaced from
the front of
the vehicle –Vehicles with a small rear end
area
( Empty truck, etc.) – Vehicles with a
long rear tire to the rear end of the vehicle –
Vehicles
other than four-wheel vehicles (motorcycles, etc. )
In such cases, objects that may collide may
not be detected correctly. – When multiple
objects are close to
each other – When a vehicle is near the front
of the target motorcycle or low vehicle
• In the following cases, the system may not
operate properly or its functions may not be
fully demonstrated. – in bad
weather (rain, fog, snow, etc.) – when driving
on steep slopes
• The alarm (buzzer) may not be heard due to
external noise.
Driving support function
– When sunlight, etc., is strongly reflected from
the vehicle ahead –
When the position or movement of an object
changes significantly Deceleration, etc.) –
Approximately 15 seconds after starting –
When the view of the camera
is obstructed (dirt on the
windshield, oil film, insect dirt, wiper blade) – When
the direction of the camera is wrong Multi-
sensing front camera may not be able to
detect the shape of the object correctly and
the system may not operate under the surrounding
conditions such as the example below. – When
the object is similar in color to the background
and indistinguishable – When the object is
near road markings (crosswalks, speed limit signs,
etc. on the road) –
When the object is near a puddle on the road
surface ( Surrounding scenery reflected in a
puddle, etc. )
About the low-speed collision mitigation brake
function • Apply the brakes quickly without waiting for
the system to operate.
Depending on the vehicle condition, driving
conditions, traffic environment, weather, road
surface conditions, etc., it may not operate or may
not demonstrate its original performance.
when overlapping
tree
Low-speed collision mitigation braking function
Machine Translated by Google
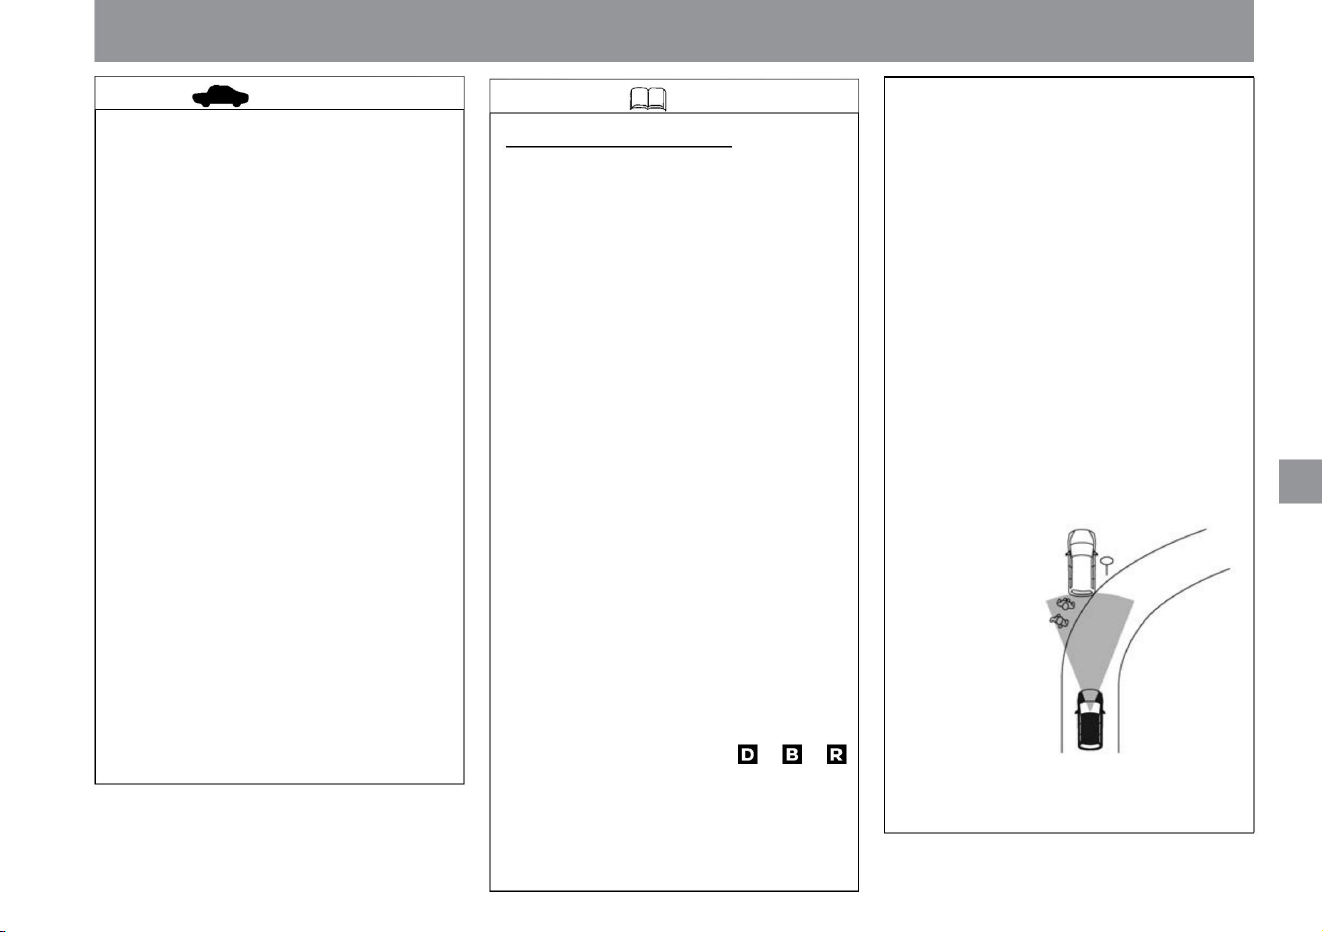
Knowledge
advice
215
ZEG0279X
• Operates for vehicles and pedestrians ahead that
may be in danger of collision detected by the
multi-sensing front camera. • The low-speed
acceleration suppression function is canceled when
the driver releases the accelerator pedal. •
If you continue to depress the accelerator pedal, it
will be released after about 6 seconds from the
start of
operation. • The low-speed acceleration suppression
function may be temporarily activated when
overtaking a vehicle in front of you in a traffic
jam. • When starting following the vehicle in front of
you from a short distance, such as waiting at a
traffic light or turning right, if you depress the
accelerator pedal quickly and deeply, the low-
speed acceleration suppression function
may temporarily activate. • It does
not work in the following cases. – When the
vehicle speed is about 15 km/h or more
(about 25 km/h
or more for vehicles and pedestrians in front) –
When the brake pedal is depressed
– When the
shift position is other than , – Traction control function
–Worn tires, tires with insufficient air pressure ,
emergency tires such as spare tires,
genuine Nissan products or purchased from a
Nissan dealer. When using anything other
than tires, or when tire chains are attached –
when the vehicle is tilted (with extremely
heavy loads in the rear seats or luggage
compartment) Against moving objects If
you press the wrong button, Collision Prevention
Assist will not work. (excluding vehicles ahead
and pedestrians)
– When the tires are spinning Patterns
or paint on the road surface or walls (or
(TCS) is activated
About the low-speed acceleration
suppression function • It works for large obstacles
such as walls and vehicles detected by sonar.
Obstacles below the width of the vehicle are not
detected.
– When the vehicle posture is changing, such as
when stepping over a step – When
driving on a slippery road surface
tree
ÿ
– After driving through puddles or washing the
car, the brakes are wet and the effectiveness
of the brakes is reduced.
– When turning the steering wheel with a large
turn –
When the outside temperature is low or when the
brakes are cold, such as just after starting
driving – When the brakes are overheated and
the braking effectiveness is reduced
– When a pedestrian approaches the lane in front
of your vehicle
(including faded road markings and special road
markings composed of Chinese characters),
road structures ahead (tunnels, viaducts, traffic
signs, reflectors installed on the sides of vehicles
(reflectors), reflective sheets, guardrails),
etc. If the shape composed of the object is
similar to the outline characteristics of the vehicle
or pedestrian, or the size and position of the tail
lamp of the vehicle, the multi-sensing front
camera cannot detect the shape of the object
correctly and the system will not be able to detect
the shape. It may work. • The
system may activate when a person riding a bicycle
is detected as a pedestrian. • The system may
be activated
by reacting to the following objects. – Roadside
objects (road signs, guardrails,
pedestrians, vehicles, etc.)
Driving support function
How to drive
$/$: Different equipment depending on vehicle model, options, etc.
Machine Translated by Google
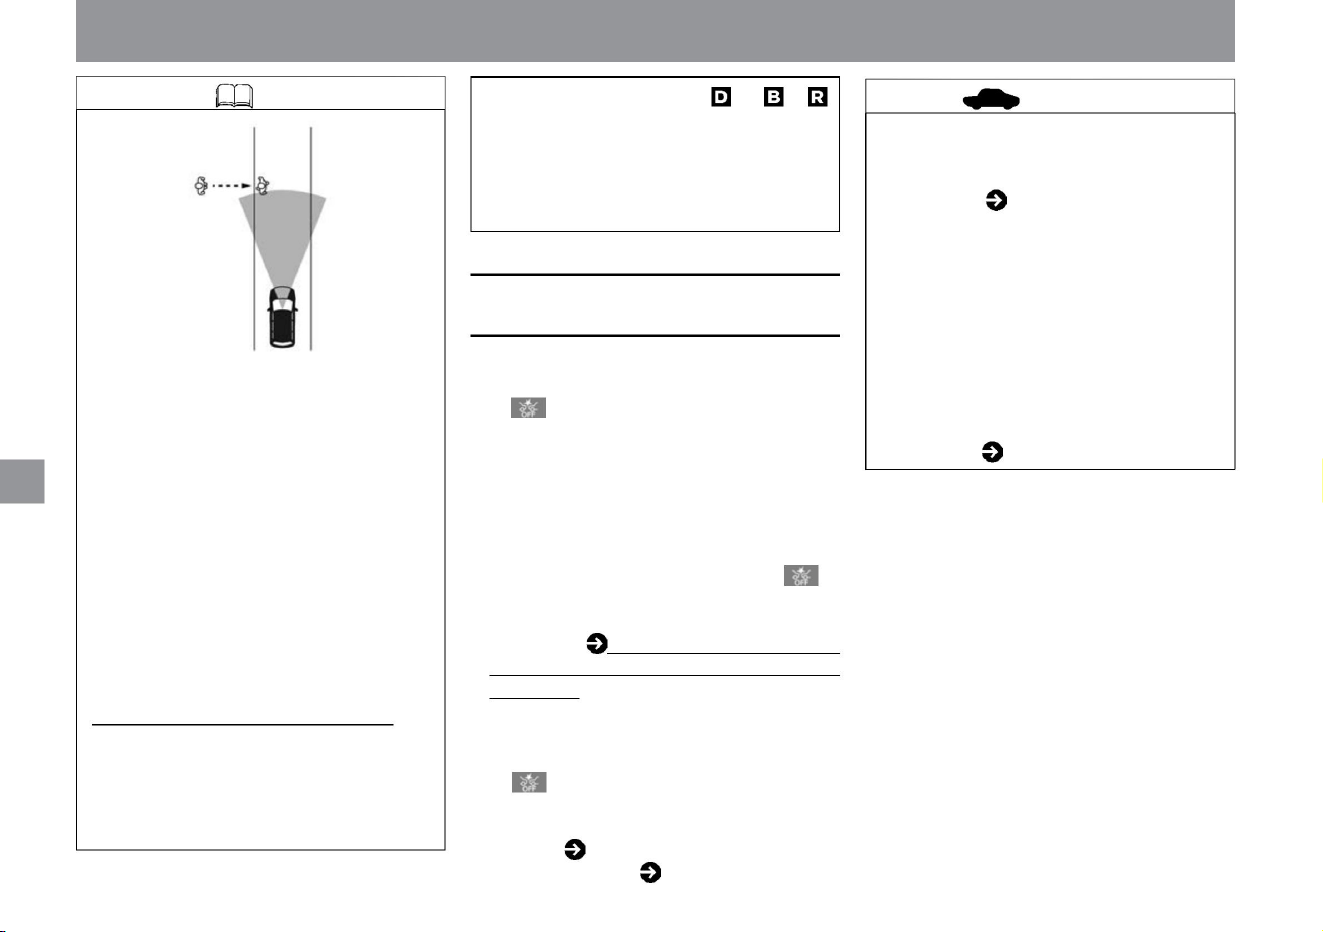
•In the following cases, the intelligent emergency brake warning
light in the meter lights up and the operation stops. –When
the intelligent emergency brake is turned off –When
the VDC is turned off If the intelligent emergency brake is
temporarily unable to operate, the intelligent
emergency brake warning light in
the meter flashes slowly and the pedal is depressed. Mistaken
Collision Avoidance Assist will also temporarily stop working.
For more information, please read When the Intelligent
Emergency Braking stops working (P.205). • If there is a
problem with the system, the Intelligent Emergency Brake
Warning Light in the meter lights up along with a warning
sound (buzzer), a warning is displayed in the Advanced
Drive Assist Display, and the system stops. Warning light
( P.308) Warning message ( P.317)
ÿ
About the low-speed collision mitigation brake
function • After the brake control is activated, it will not
activate even if you approach the same obstacle
again. • It does not work in the following
cases. – Vehicle speed is less than approximately 2 km/h, or approximately
15km/h or more
How to drive
Driving support function
• When the warning light comes on, stop the
vehicle in a safe place, stop the e-POWER
system once, and then restart it. If the
warning light continues to illuminate even
after performing the above operations,
there may be a system malfunction. There
is no problem with normal driving, but
please have it
inspected by a Nissan dealer. Warning light ( P.308)
• Keep the sonar clean for proper system
operation. Please read ( P.372) for handling
the sonar.
–When the shift position is other
than ,
– Objects above the road (low bridges, road
signs, etc.)
– Objects on the road surface (tracks, grids,
iron
plates, etc.) – Objects in the parking
lot (beams, etc.) – Objects in the driving lane
or adjacent lanes (Pedestrians,
vehicles, etc.) – Objects approaching in or
adjacent lane (pedestrians, vehicles, etc.)
–
Pedestrians approaching
opposite – Objects in the roadway (adjacent trees, etc.)
• It does not work against obstacles behind the
vehicle when moving forward. Similarly, when
reversing, it will not work on obstacles in front
of the vehicle.
MEG0754X
Knowledge
When the operation of the misapplication
collision prevention assist stops
216
advice
Machine Translated by Google
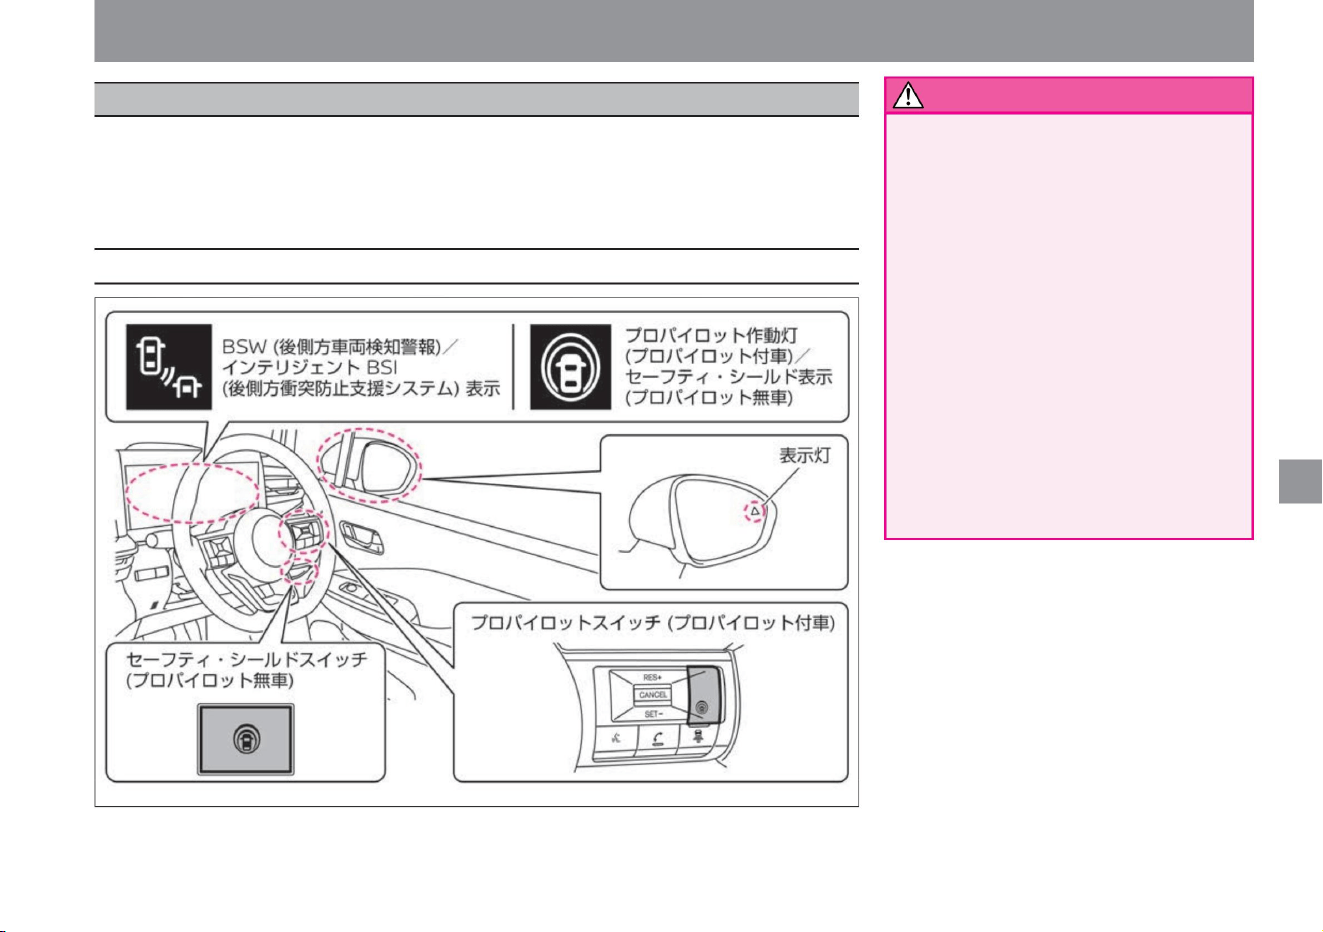
• Due to the limitations of functions, do not
overestimate and drive safely.
Driving support function
BSW (Behind Vehicle Detection Warning) warns the driver when changing lanes if there is a vehicle in the
next lane. When the driver
starts to change lanes when there is a vehicle in the next lane, the intelligent BSI (Bear Side Collision
Prevention Assistance System) generates a force to return the vehicle to the original lane along with an
alarm. Assists in avoiding contact with the vehicle.
BSW (Rear Side Vehicle Detection
Warning) and Intelligent BSI (Rear Side
Collision Avoidance Assistance System)
are not functions that substitute for the
detection of the surroundings in the door
mirrors or prevent contact with vehicles or
obstacles. . When changing lanes, always
check to the side and rear of the vehicle
with the door mirrors and rearview mirrors,
without
relying on functions for confirmation. • Because
radar sensors and cameras have limitations,
do
not overestimate their capabilities. The
system may not work properly due to road
conditions, weather, traffic conditions, etc.
217
warn
System-related displays and switches
$/$: Different equipment depending on vehicle model, options, etc.
ZEG2044X
How to drive
BSW (rear side vehicle detection warning) / Intelligent BSI (rear side collision prevention support system)ÿ
Machine Translated by Google
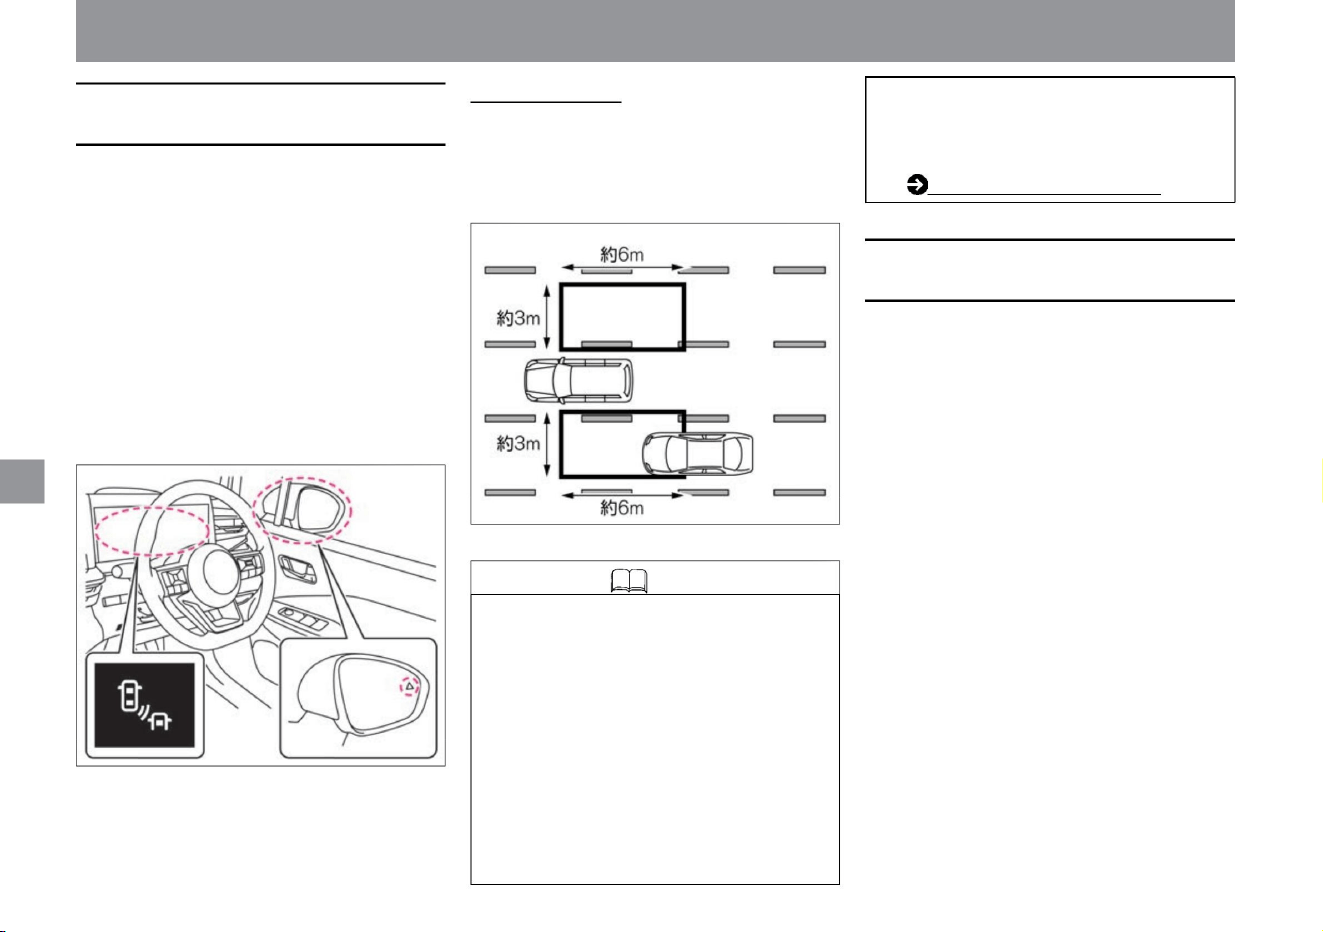
The BSW (rear side vehicle detection alarm) display
and the indicator light on the door mirror surface
flash.
About the detection
range • The radar sensor detects vehicles within the
detection range on the left and right of your
vehicle. • The detection range is about 6m behind the
vehicle's door mirror and about 3m laterally from
the side of the vehicle.
• When the power switch is turned on, the indicator
light on the door mirror surface lights up and
turns off after a
few seconds. • The brightness of the indicator light
on the door mirror mirror changes depending
on the
brightness around the vehicle. • If the radar sensor
detects a vehicle in the next lane while the turn
signal is on, the indicator light will flash but no
sound will be heard. • Switch the
Advanced Drive Assist Display to “Driving Assistance”
, you can check the operating status of BSW
(rear side vehicle detection alarm) in the
advanced drive assist display. How to switch
screens (P.60)
• The radar sensor at the rear of the vehicle detects
vehicles in the next lane. •
Operates at vehicle speeds of approximately
30km/h or more. • When a vehicle in the next lane is
detected by the radar sensor, the indicator light on
the detected side of the door mirror
lights up. • When a vehicle in the next lane is detected,
if the direction indicator is activated in the direction
of the detected vehicle, a warning sound (buzzer)
will sound and the Advanced Drive Assist Display will appear.
• The radar sensor at the rear of the vehicle detects
vehicles in the next lane. It also uses a camera
mounted above the rear-view mirror to detect lane
markers for the lane in which the vehicle is traveling.
• While traveling
at approximately 60km/h or more, if your vehicle
approaches the lane marker on the side of the
vehicle that is detecting a vehicle in the next lane,
an audible alarm (buzzer) will sound and the
Intelligent BSI in the Advanced Drive Assist Display
will sound. The (rear side collision prevention
support system) display and the indicator light on
the door mirror flash. At the same time, it controls
the brakes and generates control force for a short
time in the direction to return the vehicle to the
original lane, prompting the operation
to return the vehicle to the original lane. A lane marker
is a line drawn on the right or left side of a lane.
How to drive
ZEG1000X
MEG0134X
Driving support function
About BSW (rear side vehicle detection
alarm)
Intelligent BSI (Rear Side Collision
Prevention Support System)
218
Knowledge
Machine Translated by Google
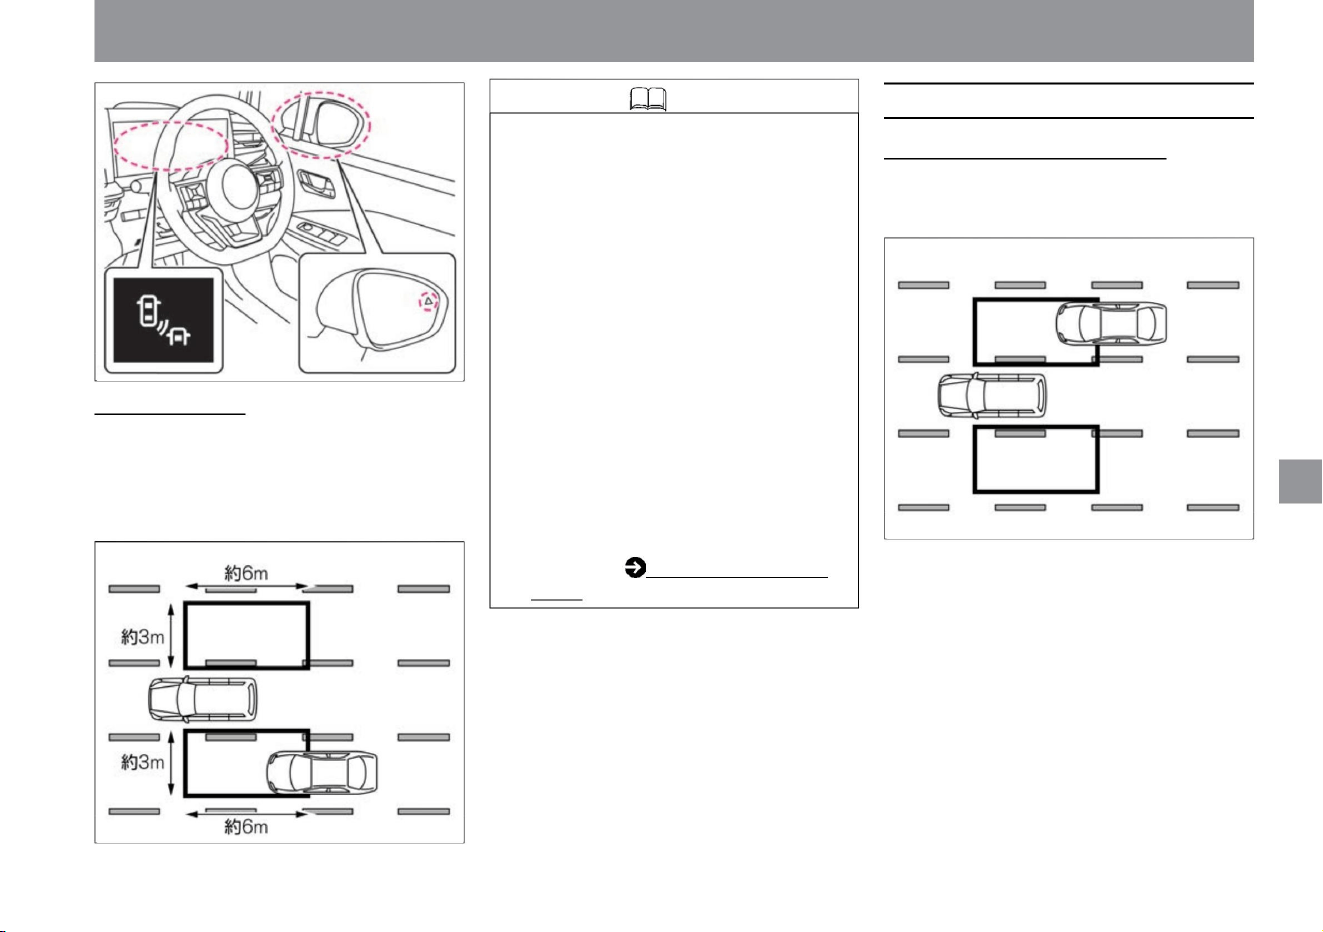
Knowledge
219
When it works/when it doesn't
How to drive
• When your vehicle approaches a lane
marker with the indicator light on, both
the warning and brake control are
activated.
However, when the vehicle enters the
detection range after the vehicle
crosses the lane marker, the warning
and brake
control are not activated. • Intelligent BSI
(Rear Side Collision Prevention
Assistance System) operates before
Intelligent LI (Lane Departure
Prevention Assistance System). • When
the Advanced Drive Assist Display is
switched to "Driving Assist", the
operating status of the Intelligent BSI
(Rear Side Collision Prevention
Support System) can be checked in
the Advanced Drive Assist Display. For details, see How to switch screens.
• If a vehicle is approaching from behind, the
indicator light on the door mirror will light up
when the vehicle enters the detection range.
• The radar sensor detects vehicles within the detection
range on the left and right sides of the vehicle. •
The detection range is about 6m behind the vehicle's
door mirror and about 3m laterally from the side of
the vehicle.
(P.60).
When a vehicle is approaching from behind
• When a vehicle is being detected, if the
direction indicator is activated in the direction
where the vehicle is being detected, a
warning sound (buzzer) sounds and BSW
(rear side vehicle detection warning)/
intelligent The BSI (rear side collision
prevention support system) display and the
indicator light in the door mirror flash.
About detection range
Driving support function
MEG0122X
MEG0134X
ZEG1000X
$/$: Different equipment depending on vehicle model, options, etc.
Machine Translated by Google
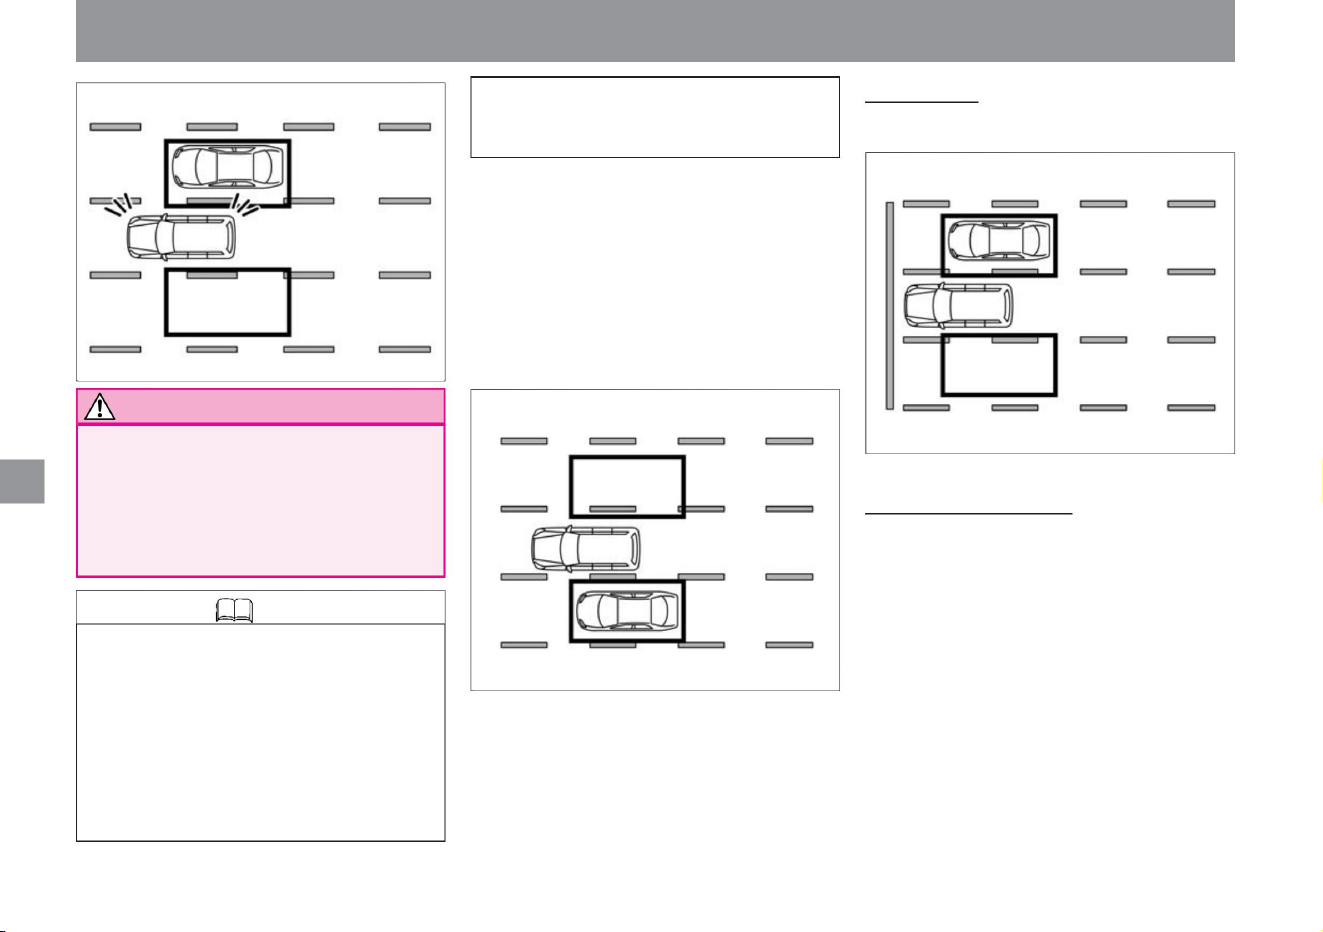
When a vehicle enters the detection range
from the
The BSW (rear side vehicle detection warning)/
intelligent BSI (rear side collision prevention
support system) display and the indicator light on
the door mirror flash. At the same time, it briefly
controls the brakes to assist the vehicle in returning
to the center of the lane.
• When changing lanes, be sure to use the door
mirrors and rearview mirrors to check the
safety of your surroundings.
It may not be possible to detect a vehicle that
is approaching at an extremely faster speed
than your vehicle.
When overtaking another vehicle
• When overtaking another vehicle, if the vehicle being
overtaken stays within the detection range for 2 seconds
or longer, the indicator light on the door mirror lights up.
• When a vehicle is detected and you approach the
lane marker on the detecting side, a warning sound
(buzzer) will sound and the Advanced Drive Assist
Display will turn off.
When starting •
Vehicles that remain within the detection range from
a stop may not be detected.
When a vehicle enters the detection range after
activating the direction indicator, BSW (rear
side vehicle detection warning)/intelligent BSI
(rear side collision prevention support
system) of the advanced drive assist display
The display and the indicator light on the door
mirror flash, but the alarm (buzzer) does not
sound. • When the vehicle intersects
with the lane marker,
How to drive
Knowledge
220
Notice
Driving support function
MEG0123X
ZEG0387X
ZEG0386X
Machine Translated by Google
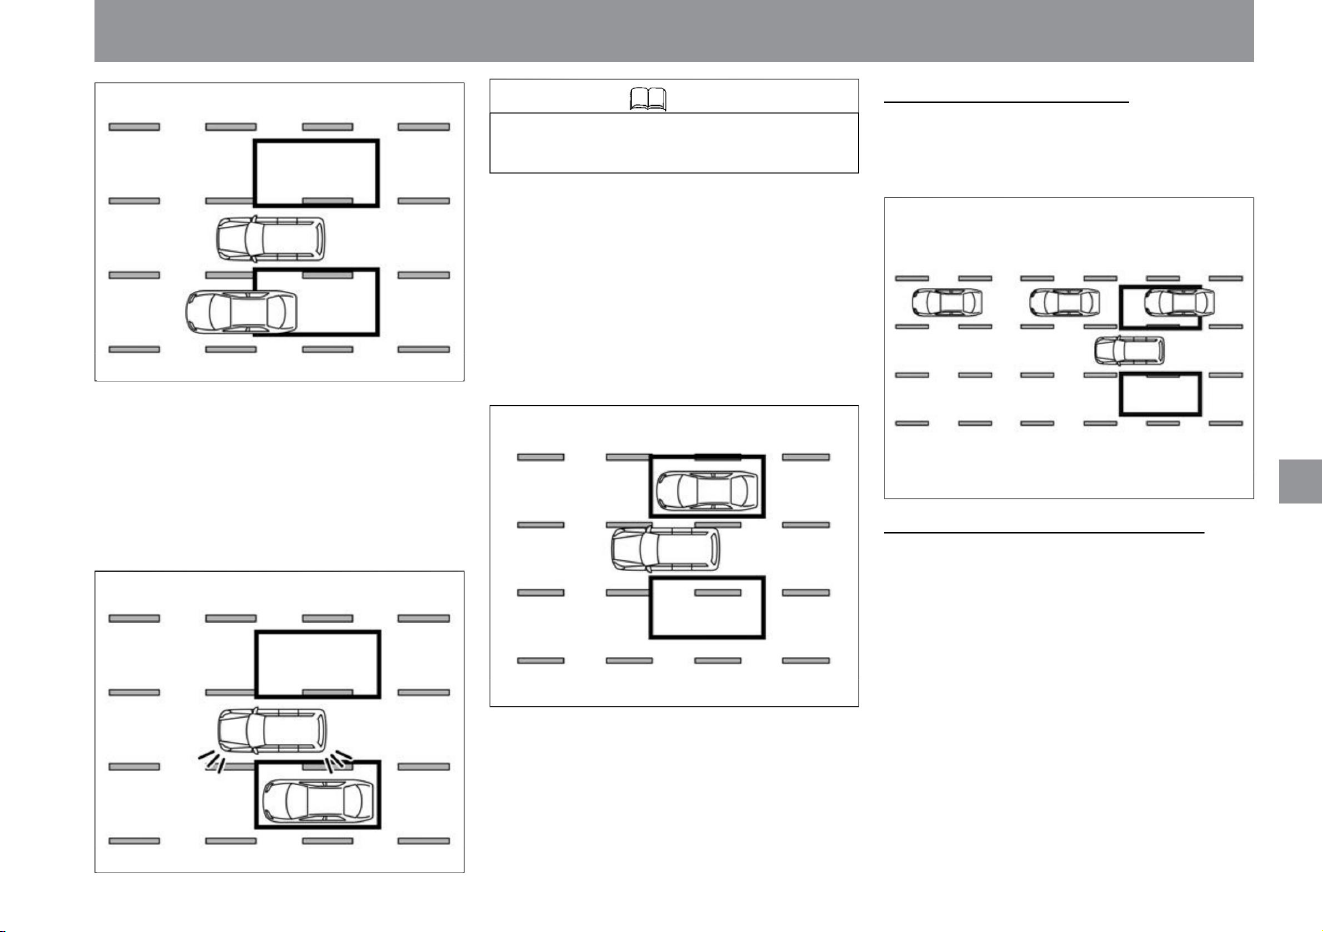
• When a vehicle is detected and you approach the lane
marker on the detecting side, a warning sound
(buzzer) will sound and the Advanced Drive Assist
Display will turn off.
• When a vehicle is detected and the indicator light is on,
if the direction indicator is operated in the direction
where the vehicle is detected, a warning sound
(buzzer) sounds and the advanced drive assist
display BSW (rear side direction indicator) is
activated. vehicle detection alarm)/intelligent BSI
(rear side collision prevention support system) display
and the indicator light on the door mirror surface flash.
When a vehicle is approaching from another lane
• When a vehicle is approaching due to a lane change,
etc., the indicator light on the door mirror lights up
when it enters the detection range.
The BSW (rear side vehicle detection warning)/
intelligent BSI (rear side collision prevention support
system) display and the indicator light on the door
mirror flash. At the
same time, it briefly controls the brakes to assist the
vehicle in returning to the center of the lane.
• The system does not detect when you quickly
overtake a slow vehicle.
When being overtaken by other
vehicles • When being overtaken by multiple vehicles in
succession, if the distance between the vehicles to
be overtaken is short, vehicles other than the first
vehicle may not be detected.
How to drive
ZEG0388X
MEG0526X
MEG0125X
MEG0124X
Driving support function
$/$: Different equipment depending on vehicle model, options, etc.
Knowledge
221
Machine Translated by Google
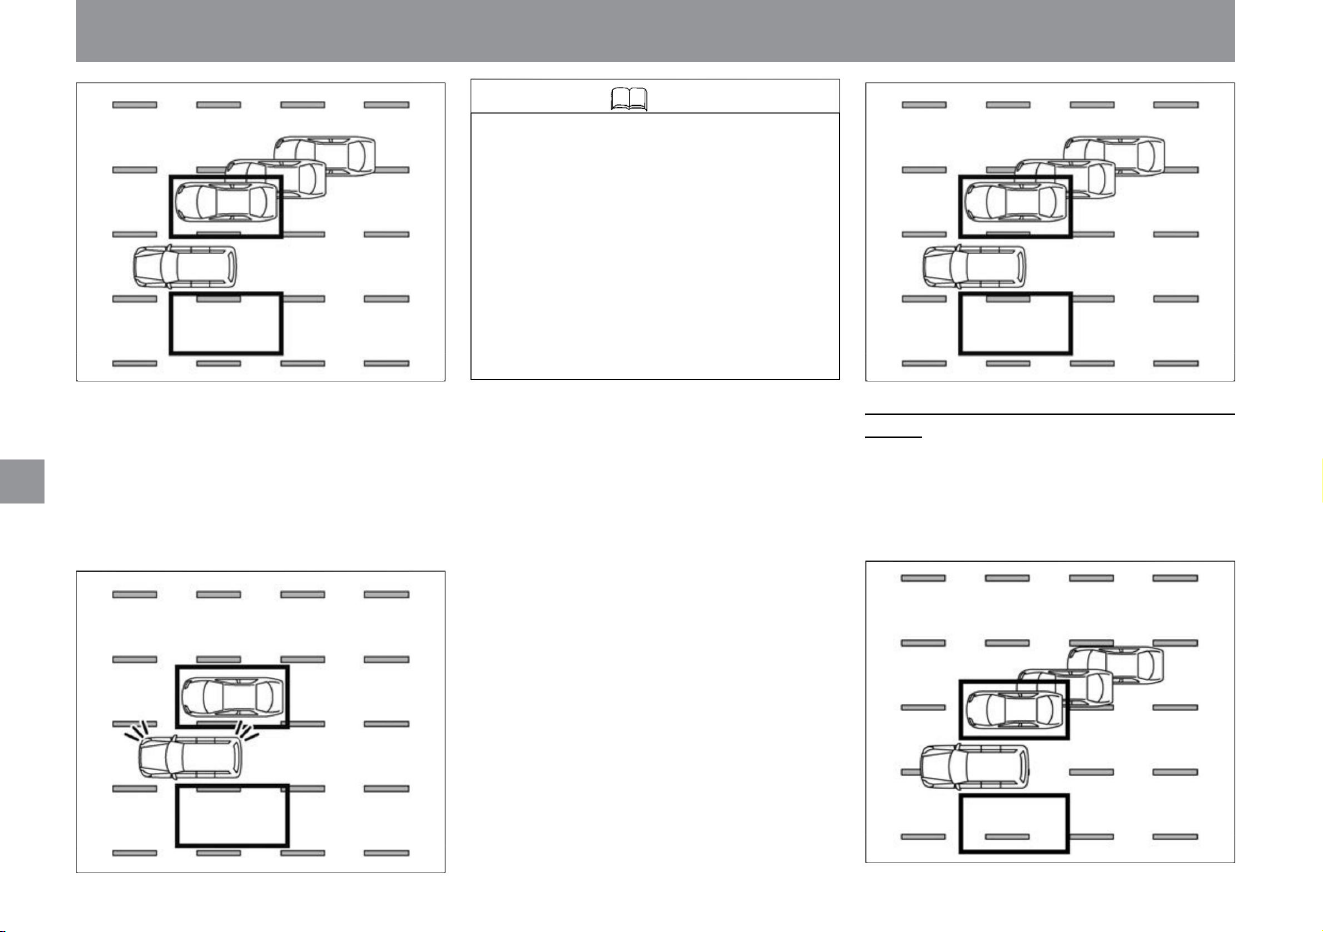
Knowledge
222
MEG0527X
ZEG0390X
MEG0528X
MEG0527X
• When a vehicle is detected and you approach the
lane marker on the detecting side, a warning sound
(buzzer) will sound and the Advanced Drive Assist
Display will turn off.
• When a vehicle is being detected, if the direction
indicator is activated in the direction where the
vehicle is being detected, a warning sound
(buzzer) sounds and BSW (rear side vehicle
detection warning)/intelligent The BSI (rear side
collision prevention support system) display and
the indicator light on the side of the door mirror
flash.
• Intelligent BSI (Rear Side Collision Prevention
Support System) does not operate even if a vehicle
enters the detection range.
In this case, only the BSW (rear side vehicle
detection warning) is activated.
Driving support function
How to drive
• If a vehicle traveling at almost the same speed as
your vehicle changes lanes, it may not be
detected. When a vehicle
enters the detection range after activating the
direction indicator, the advanced drive assist
display's BSW (rear side vehicle detection
warning)/intelligent BSI (rear side collision
prevention support system ) ) and the indicator
lamp on the door mirror flash, but the alarm
(buzzer) does not sound.
The BSW (rear side vehicle detection warning)/
intelligent BSI (rear side collision prevention
support system) display and the indicator light on
the door mirror
flash. At the same time, it briefly controls the
brakes to assist the vehicle in returning to the center of the lane.
When your vehicle is driving over a lane marker
Machine Translated by Google
warn
Precautions regarding BSW (rear side
vehicle detection warning) / intelligent BSI
(rear side collision avoidance support system)
Knowledge
223
How to use BSW (rear side vehicle detection
alarm)/Intelligent BSI (rear side collision
prevention support system)
$/$: Different equipment depending on vehicle model, options, etc.
– When using worn tires, under-inflated
tires, spare tires, tire chains, or tires
other than genuine Nissan tires or
tires purchased from a Nissan dealer.
– When non-genuine steering parts, brake
parts, or suspension parts are used •
The following vehicles cannot
be detected accurately, and the system may
not operate properly.
–Roads under construction or roads with lane restrictions
– When sharp curves, steep uphills and
downhills are repeated
• When the e-POWER system is stopped,
Intelligent BSI (Rear Side Collision
Prevention Support System) is
turned off. • The Advanced Drive Assist Display
ON/OFF setting will be maintained until the
setting is changed even if the e-POWER
system is stopped.
– When driving on a road with narrow lanes
When you press the ProPILOT switch (vehicles
with ProPILOT) or the safety shield switch
(vehicles without ProPILOT), the Intelligent
LI (Lane Departure Prevention Assistance
System) is activated .
Driving support function
How to drive
Intelligent BSI (Rear Side Collision Prevention Support
System)
BSW (Rear and Side Vehicle Detection
Alarm) Selecting "Settings", "Driving Assist", "Rear and Side
Vehicle Detection Alarm" on the Advanced Drive Assist
Display activates BSW (Rear and Side Vehicle Detection
Alarm). You can switch ON/OFF of the vehicle detection
alarm function. For more information on settings, read
Driving Assistance.
How to switch screens (P.60) Driving assistance (P.70)
tree
When "Settings", "Driving assistance", "Rear side assistance",
and "Rear side collision prevention assistance" are set to
ON on the Advanced Drive Assist Display, press the Pro
Pilot switch for vehicles with Pro Pilot. and the ProPILOT
operation light will illuminate, and on vehicles without
ProPILOT, pressing the safety shield switch will illuminate
the safety shield display and turn the system ON. For
more information on settings, read Driving Assistance.
How to switch screens (P.60) Driving assistance (P.70)
• Do not use Intelligent BSI (Rear Side Collision
Prevention Support System) in the following
situations as it may lead to an unexpected accident .
– In bad weather (rain, snow, fog, etc.) – When
driving
on slippery roads such as icy roads or snow-
covered roads
You can switch between ON and OFF at the same
time. If you
turn it off in "Settings" - "Driving assistance" - "Rear side
assistance" - "Rear side collision prevention
assistance" on the Advanced Drive Assist Display,
intelligent BSI (rear side collision prevention
assistance system) will be activated . ) can be turned
off.
when driving on the road
Machine Translated by Google
Knowledge
advice
warn
224
Notice
How to drive
The radar sensor can detect the following obstacles
– When driving on a road where erased lane
markers are still visible – When there
are shadows, snow, puddles, ruts, road joints, linear
– When driving on a road with lane divergence
or merging – When the vehicle is not driving in
a straight line with the lane marker When the
distance between vehicles is short and the
detection range
of the multi-sensing front camera is obstructed –
When rain,
snow, dirt, etc. is adhering to the windshield – When
the brightness of the headlamps is
insufficient due to dirt, etc. When the optical axis of
the headlamp is not adjusted properly
– When driving on roads with extremely wide lanes
– When visibility
is poor due to bad weather (rain, snow, fog, etc.) –
When water,
snow, sand, etc. When mud adheres to the area
around the radar
sensor • In the following situations, the lane markers
may not be detected accurately and
may not operate properly. – Hard-to-detect lane markers
(obscure lane markers, yellow lane markers,
uncommon
–Short vehicles and narrow vehicles such as
motorcycles –Stay
in detection range even when stationary
Both
When
–Vehicles moving to the side of your vehicle at
almost the same speed when merging or
changing lanes • In the following situations, it may not
be possible to detect vehicles in the next lane.
– When exposed to strong light (sunlight, etc.) –
When
there is a sudden change in brightness (such as
when entering or exiting a tunnel)
– when Intelligent Emergency Braking is activated
Doesn't detect objects. –
Pedestrians, cyclists, animals, etc. –
Oncoming traffic
• The alarm (buzzer) may not be heard due to external
noise.
– When receiving strong light from the front
(sunlight, etc.) –
When there is a sudden change in brightness (such
as when entering or exiting a tunnel)
– Approaching from behind at high speed
• When driving on a road with extremely wide lanes, it
may not be possible to detect vehicles in the next
lane. Also, when driving on a road with extremely
narrow lanes, it may detect vehicles in two lanes
next to it.
vehicle
– A car overtaken by your vehicle at high speed
When driving on roads with lane markers, lane
markers hidden by puddles, dirt, snow, etc. –
driving on roads with sharp curves
yeah. – When the brake pedal is depressed –
When the steering wheel is operated quickly –
When the intelligent cruise control ÿ approach
warning is sounding
• The radar sensor is designed not to detect stationary
obstacles, but in some situations it may detect
guardrails, walls, plants, parked vehicles, etc. • Do
not perform brake control in the following cases.
vehicle
Driving support function
Machine Translated by Google
When the operation of BSW (rear side vehicle
detection alarm) stops
Knowledge
When Intelligent BSI (Rear Side Collision
Prevention Assistance System) stops
working
advice
225
• If the area around the radar sensor is
dirty, stop the vehicle in a safe place,
remove the dirt around the radar
sensor, and then restart the e POWER
system. For handling the radar sensor,
please read ( P.369).
– When driving at high speed on a curved
road • When
the driver depresses the accelerator pedal
while the brake is being controlled, the
brake control is stopped.
– Activating emergency flashing lights
– When ABS or VDC (not including the
traction control function (TCS)) is
activated To
reactivate the system, once the conditions
have improved when disengaged, press the
ProPILOT switch (vehicles with ProPILOT) or
safety shield switch
• When a warning is displayed on the
Advanced Drive Assist Display, stop the
vehicle in a safe place, stop the e-
POWER system once, and then restart
it. If the message
continues to appear even after restarting
the e-POWER system, there may be a
problem with the system. There is no
problem with normal driving, but please
have it inspected by a Nissan dealer.
Driving support function
How to drive
$/$: Different equipment depending on vehicle model, options, etc.
is attached •If there is
a problem with the system, a warning will be
displayed on the Advanced Drive Assist Display
and the system will stop. Warning
message ( P.317)
When
•In the following cases, the Advanced Drive Assist
Display will display a warning "Cannot be used
at this time because it is out of the operating
range" along with a buzzer sound, and the
operation will be canceled.
– When the VDC is turned off
In the following cases, the Advanced Drive Assist
Display will display a warning “cannot be used
at this time due to slippery road surface” along
with a buzzer sound, and the operation will be
canceled. .
(no ProPILOT vehicle) and turn the Intelligent BSI
(Rear Side Collision Prevention Assistance System)
ON again. •When the multi-sensing front
camera becomes hot, such as when the vehicle is
parked in the hot sun, a warning will be displayed
on the Advanced Drive Assist Display along with
a buzzer, and the operation will be canceled. If
you want to reactivate the system, wait until the
room temperature has cooled before turning
the system on again.
tree
•In the following cases, the Advanced Drive Assist
display will display a warning that says, "The
side radar and its surroundings are dirty. Please
wipe them down." – When the radar sensor is
dirty – Rain, snow,
ice, etc. on the radar sensor
•In the following cases, the Advanced Drive Assist
Display will display a warning “The side radar
and its surroundings are dirty. – If the area
around the side radar is dirty
– When there is rain, snow, ice, etc. around the
side radar If there is a
problem with the system, an alarm (buzzer) sounds
and a warning message appears on the Advanced
Drive Assist Display, and intelligent BSI (rear anti-
collision support system) indicator lights up in
orange and operation stops.
Machine Translated by Google
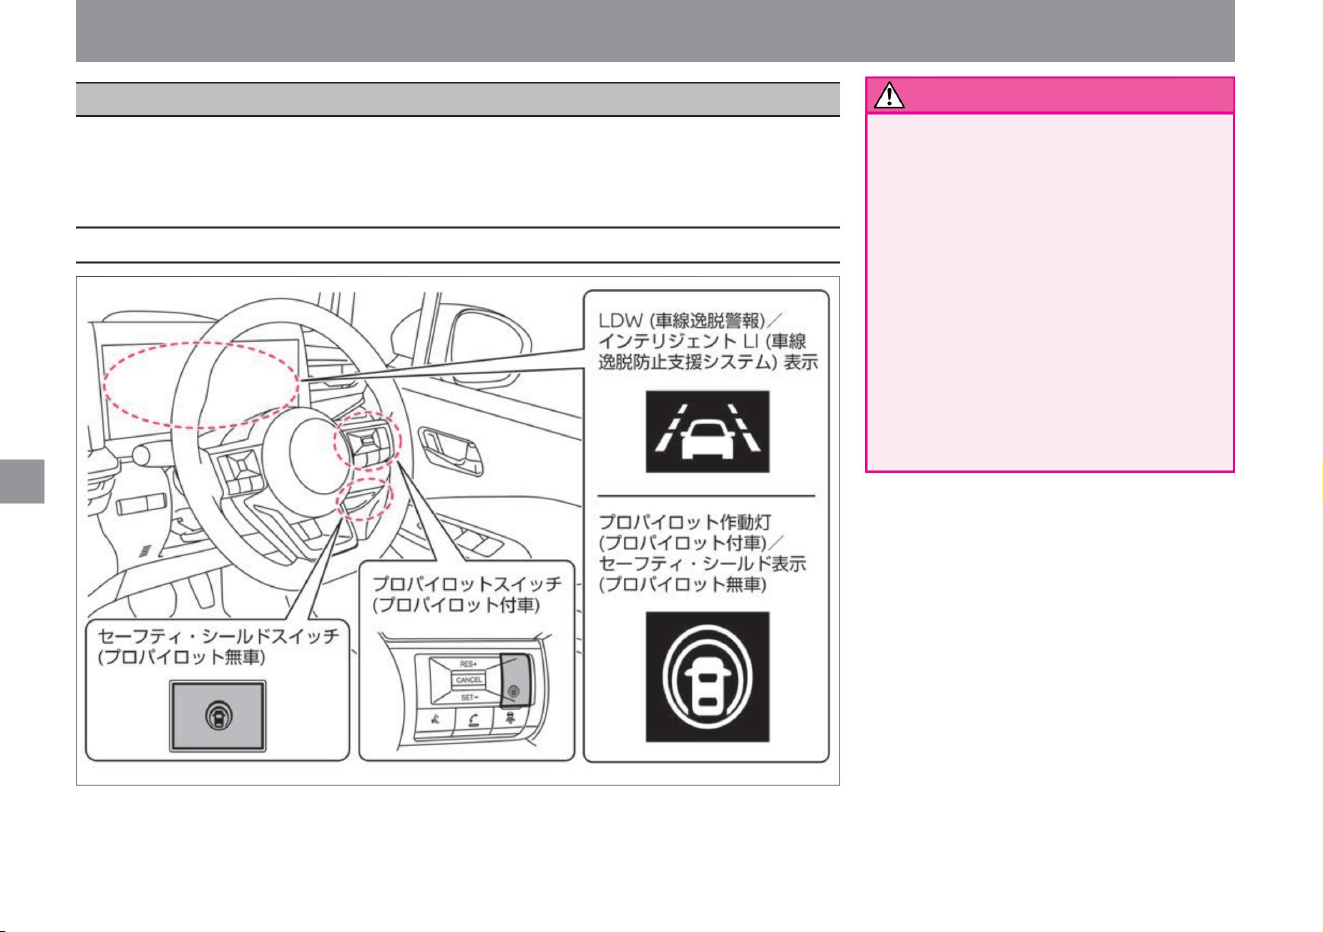
Driving support function
LDW (Lane Departure Warning)/Intelligent
LI (Lane Departure Prevention Assistance
System) does not avoid dangers caused
by careless driving such as distracted
driving and poor visibility such as rain
and fog. Operate the steering wheel
according to the surrounding conditions
and always try to drive
safely. • Because cameras have limitations,
do not
overestimate their capabilities. The
system may not work properly due to
road conditions, weather, traffic conditions, etc.
LDW (Lane Departure Warning) alerts the driver when the driver is about to unintentionally deviate from
the driving
lane. Intelligent LI (Lane Departure Prevention Assist System) assists the driver to return to the lane when
the driver is about to unintentionally stray from the driving lane.
• Due to the limitations of functions, do not
overestimate and drive safely.
warn
System-related displays and switches
226
ZEG2045X
LDW (Lane Departure Warning) / Intelligent LI (Lane Departure Prevention Support System)
How to drive
Machine Translated by Google
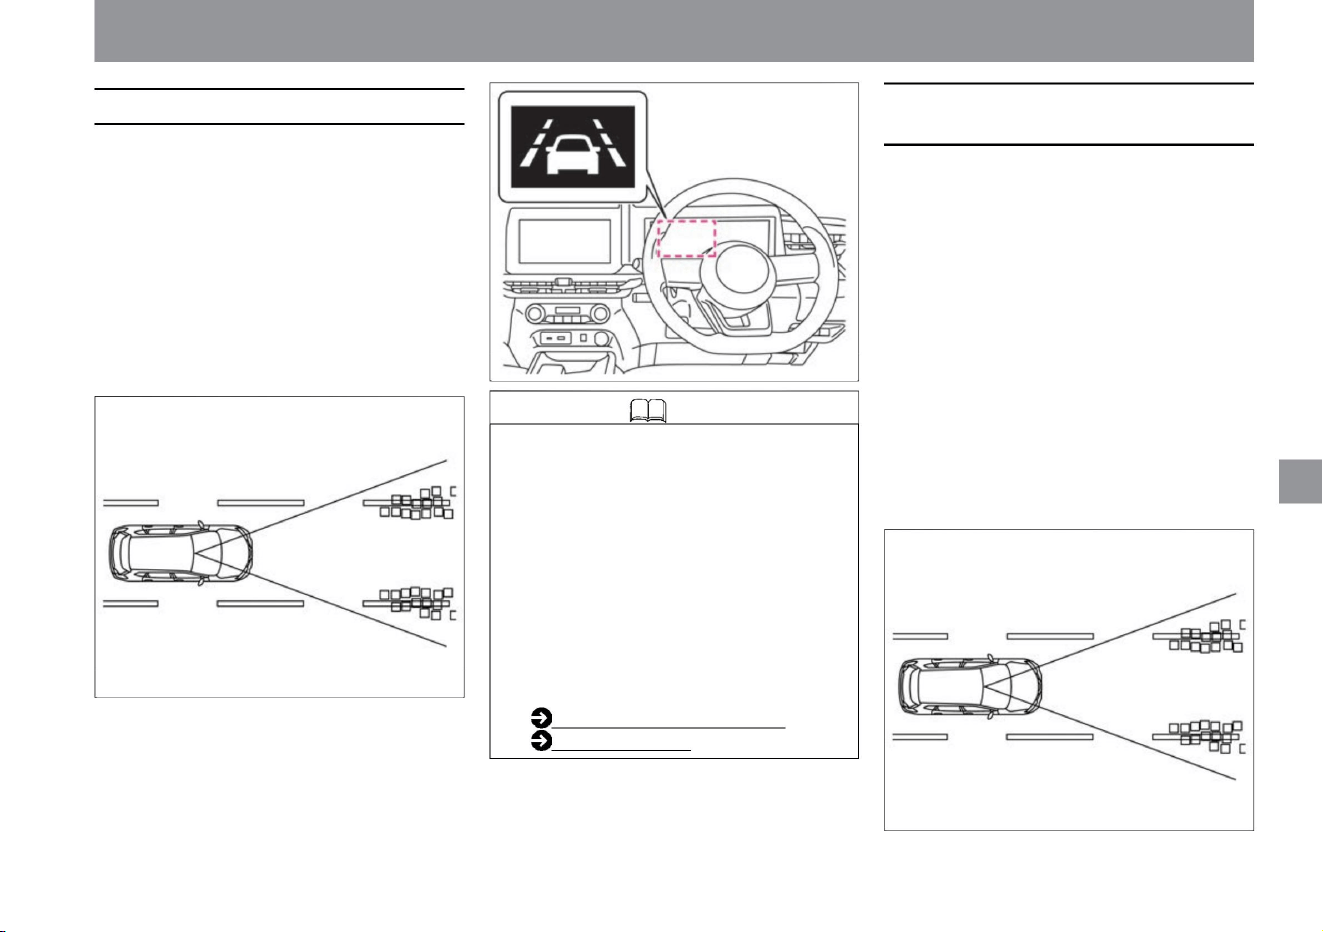
Intelligent LI (Lane Departure Prevention
Support System)
About LDW (Lane Departure Warning)
227
Knowledge
ZEG1002X
MEG0094X
MEG0094X
• Multi-sensing front camera at the top of the windshield
detects the lane marker of the driving lane. •
Operates at vehicle speeds
of approximately 60km/h or more. • When it is
determined that the vehicle is approaching a lane marker
on the right or left side of the driving lane, the LDW
(Lane Departure Warning) display in the meter
flashes orange along with an audible warning.
A lane marker is a line drawn on the right or left side
of the driving lane.
• Multi-sensing front camera at the top of the windshield
detects the lane marker of the driving lane. • It works
when the vehicle speed is
about 60km/h or more. • When it is determined
that the vehicle is approaching a lane marker on the right
or left side of the driving lane, the intelligent LI (Lane
Departure Prevention Assistance System) display in
the meter flashes orange along with an audible
warning. At the same time, the
brakes are controlled for a short period of time, and
a control force is generated for a short period of time
in the direction of returning the vehicle to the lane,
prompting the operation of returning the vehicle to
the lane. A lane marker is a line drawn on the right
or left side of the driving lane.
Driving support function
$/$: Different equipment depending on vehicle model, options, etc.
How to drive
• If the direction indicator is in the direction
the vehicle is moving, no warning will be
given. (The warning will not be issued
for about 2 seconds after the direction
indicator is turned off.) •When the Advanced
Drive Assist Display is switched to
"Driving Assistance" and " Cruise "ÿ,
LDW (Lane Departure Warning) will be
activated. The operating status can be
checked in the Advanced Drive
Assist Display. Read more about driving
assistance. How to switch
screens (P.60) Driving assistance (P.70)
Machine Translated by Google
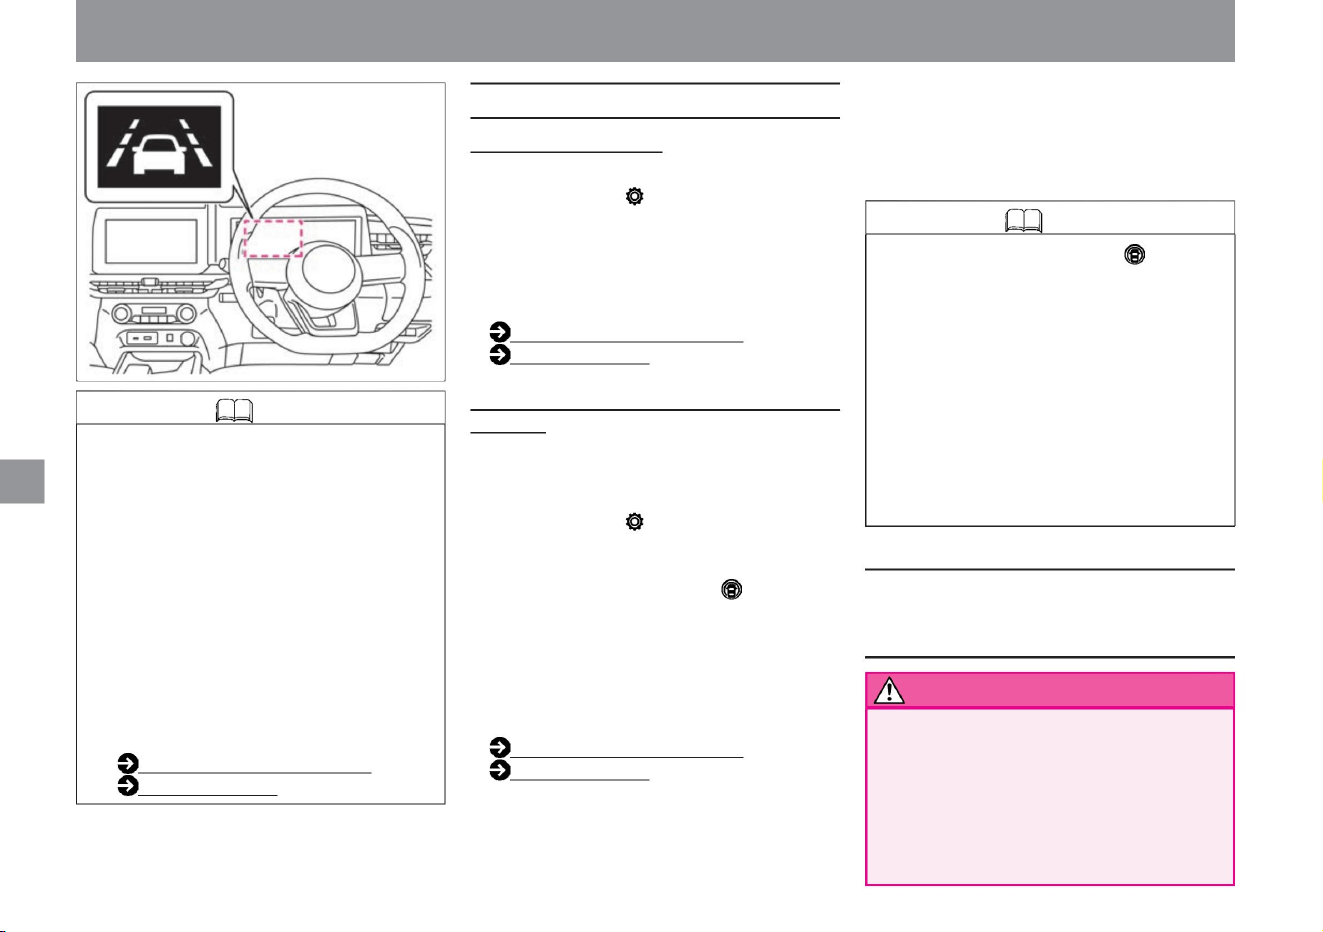
LDW (Lane Departure
Warning) If you select "Settings", "Driving Assistance",
"Side Assistance", and "Lane Departure Warning"
on the Advanced Drive Assist Display, the LDW
(Lane Departure Warning) function will be activated.
Intelligent LI (Lane Departure Prevention Assistance
System)
( Vehicles with Intelligent BSI (Rear Side Collision
Prevention Assistance
System)) On the Advanced Drive Assist Display,
select “Settings”, “Driving Assist”, “Side Assist”,
“Lane Departure When the ProPILOT switch is
turned ON, the ProPILOT operating light will light
up when the ProPILOT switch is pressed, and the
safety shield display will light up when the safety
shield switch is pressed on a vehicle without the
PROPILOT. to turn on the system. For more
information on settings, read Driving
Assistance. How to switch screens (P.60) Driving
assistance
(P.70)
You can switch between ON and OFF. For
more information on settings, read Driving
Assistance.
How to switch screens (P.60)
Driving assistance (P.70)
• Pressing the ProPILOT switch (vehicles with
ProPILOT) or the safety shield switch
(vehicles without ProPILOT) activates the
intelligent BSI (rear side collision prevention
support system)ÿ.
• Do not use Intelligent LI (Lane Departure
Prevention Support System) in the following
situations as it may lead to an unexpected
accident . – In bad weather (rain, snow,
fog, etc.) – Slippery roads such as icy roads
or snow-covered roads
(Without Intelligent BSI (Rear Side Collision
Prevention Support
System)) •When the safety shield switch is pressed,
the system turns on and the safety shield display
lights up.
• If the direction indicator is used in the direction
the vehicle is moving, neither an alarm nor
brake control will be performed. (It does not
operate for about 2 seconds after the turn
signal is
turned off.) When the Advanced Drive Assist
Display is switched to "Driving Assistance"
and " Cruise "ÿ, Intelligent LI (Lane Departure
Prevention Assistance System) is activated.
can be checked in the Advanced Drive Assist
Display. Read more about driving assistance.
How to switch screens
(P.60) Driving assistance (P.70)
You can switch between ON and OFF at the
same time.
• Settings are retained even after restarting the e-
POWER system. • When
the e-POWER system is stopped, Intelligent LI
(Lane Departure Prevention Assist System)
is turned off.
when driving on a surface
ZEG1002X
Driving support function
How to drive
Knowledge
ON/OFF method
Knowledge
Notes on LDW (Lane Departure Warning)/
Intelligent LI (Lane Departure Prevention
Assistance System)
228
warn
Machine Translated by Google
229
advice
warn
•If there is an abnormality in the system, a
warning will be displayed on the Advanced
Drive Assist Display and the system
will stop. Warning
( P.317) Advice
when it stops working
• The alarm (buzzer) may not be heard
due to outside noise.
• In the following situations, lane markers may
not be detected accurately and may not
operate properly. – When driving
on roads with hard-to-detect lane markers
(obscure lane markers, yellow lane
markers, uncommon lane markers, lane
markers hidden by puddles, dirt, snow,
etc.) – Sharp curves drive on the road
–Roads under construction or roads with lane restrictions
– When using worn tires, under-inflated
tires, spare tires, tire chains, or tires
other than genuine Nissan tires or
tires purchased from a Nissan dealer.
– When driving on a road with erased lane
markers still visible – Shadows,
snow, puddles, ruts, road junctions, linear
repairs on the road
– When driving on a road with narrow lanes
– When using non-genuine steering parts,
brake parts, or suspension parts
– When receiving strong light from the front
(sunlight, etc.) –
When there is a sudden change in brightness
(such as when entering or exiting a tunnel)
• Keep the windshield in front of the camera
clean at all times for proper system
operation. For handling of the multi-sensing
front camera, please read ( P.370). • When
a warning is displayed on the Advanced
Drive Assist
Display, stop the vehicle in a safe place, stop
the e-POWER system once, and then
restart it. If the warning continues to appear
even after restarting the e-POWER system,
there may be a
system malfunction. It does not affect
normal driving, but please have it inspected
by a Nissan dealer.
– Sharp curves, steep uphills/downhills
Driving support function
How to drive
$/$: Different equipment depending on vehicle model, options, etc.
When there are marks, etc. (These things may be
detected as lane markers and an alarm may be
issued.) -When driving on a road with
lane divergence or merging. – When the distance to the
vehicle in
front is too short to block the detection range of the
camera – When there is rain, snow, dirt, etc.
on the windshield – When the headlights are not bright
enough due to dirt, etc. or when the optical
axis of the headlamp is not adjusted properly.
•If the camera gets too hot, such as when the camera is parked
in the hot sun, a warning will appear on the Advanced Drive
Assist Display and the operation will stop temporarily. (It will
resume operation when the room temperature drops.)
when driving on the road
tree
LDW (Lane Departure Warning)
when repeated
When
Machine Translated by Google
•When the multi-sensing front camera becomes hot,
such as when the vehicle is parked in the hot sun,
a warning will be displayed on the Advanced Drive
Assist Display along with a buzzer, and the
operation will be canceled. If you want to reactivate
the system, wait until the room temperature has
cooled before turning the system on again.
– When VDC is turned off •In
the following cases, the Advanced Drive Assistance
Display will display a warning “Cannot be used
due to slippery road surface” along with a buzzer
sound, and the operation will be canceled.
is displayed, the intelligent LI (Lane Departure
Prevention Assist System) indicator lights orange
and operation stops.
•If there is a problem with the system, a warning
message ( 230) will appear on the Advanced Drive
Assist Display along with an audible alarm (buzzer).
Intelligent LI (Lane Departure Prevention Assistance
System)
•In the following cases, the Advanced Drive
Assistance Display will display a warning "Cannot
be used at this time because it is out of operating
range" along with a buzzer sound, and the
operation will be canceled. increase.
– When ABS or VDC (not including traction
control function (TCS)) is activated To
reactivate the
system, once the conditions have improved when
disengaged, press the ProPILOT switch (vehicles
with ProPILOT) or Turn off the safety shield switch
(for vehicles without ProPILOT) and turn on the
intelligent LI (lane departure prevention support
system) again.
• Keep the windshield in front of the camera clean
at all times for proper system operation. For
handling of the multi-sensing front camera,
please read ( P.370). • When a warning
appears on the Advanced Drive Assist
Display, stop in a
safe place, stop the e-POWER system, and then
restart it. e-POWER system If the warning
continues to appear after restarting, the
system may be malfunctioning. There is no
problem with normal driving, but please have
it inspected by a NISSAN dealer.
How to drive
Driving support function
advice
Machine Translated by Google
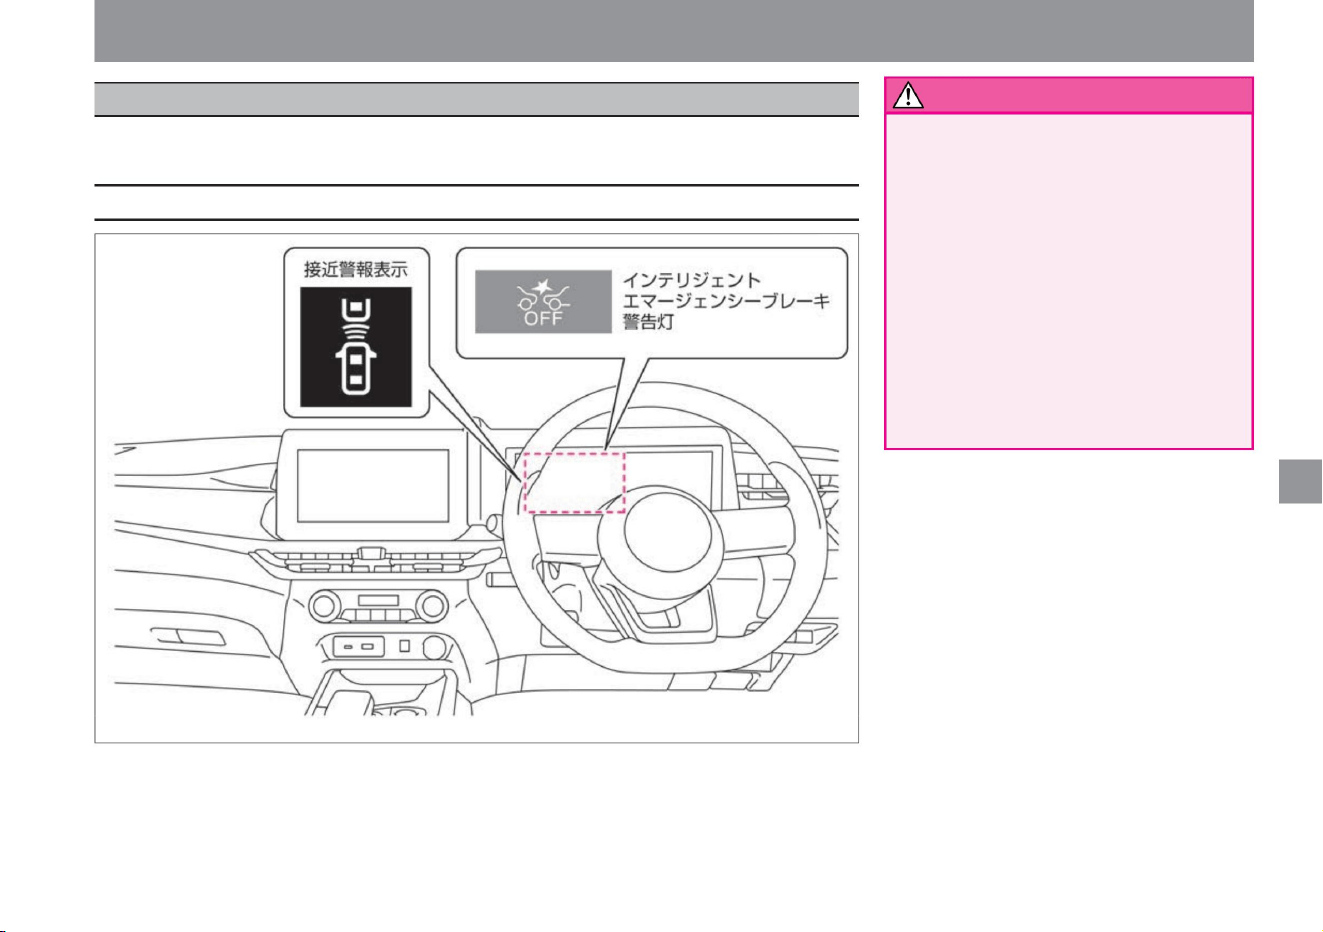
Driving support function
• Intelligent FCW (Forward Collision Warning)
warns the driver when it detects sudden
deceleration of the vehicle two ahead ,
but it does not have a collision avoidance
function. • Intelligent FCW
(Forward Collision Prediction Warning) is not
intended to avoid dangers caused by
careless driving such as distracted
driving or poor visibility due to rain or
fog. Depending on
the distance between the vehicle ahead
and the surrounding conditions, depress
the brake pedal to decelerate, etc. to
secure a distance between the vehicles and drive safely.
The system detects two vehicles ahead and alerts the driver with an
alert if it determines that the vehicle needs to take evasive maneuvers due to sudden deceleration, etc.
$/$: Different equipment depending on vehicle model, options, etc.
warn
Display about the system
231
ZEG1003X
Intelligent FCW (Forward Collision Prediction Warning)
How to drive
Machine Translated by Google

Knowledge • When you switch the intelligent
emergency brake ON/OFF, the
intelligent FCW (Forward Collision
Prediction Warning) and the
misapplication collision prevention
assist are also turned ON/OFF in
conjunction. Intelligent
Emergency Brake (P.201)
Misapplication Collision Prevention Assist (P.207)
Intelligent FCW (Forward Collision
Prediction Warning)
warn
Intelligent FCW (Forward Collision
Warning) Precautions
232
How to drive
• The following obstacles are not detected.
• Measures the distance to two vehicles in front using a
radar sensor attached to the front of the vehicle. •
When the system
determines that it is necessary to take evasive maneuvers,
the Advanced Drive Assist Display's approach warning
display flashes orange and sounds an alarm (buzzer)
to alert the driver.
• Intelligent FCW (Forward Collision Prediction Warning)
operates at vehicle speeds of approximately 5km/h or
higher.
– Pedestrians, cyclists, animals, on the road
Driving support function
VJE0231X
ZEE0429X
Falling obstacles –
Oncoming
vehicles – Vehicles passing across in front •
In the following cases, it may not be possible to detect a
vehicle two ahead in front. – When visibility is poor
due
to bad weather (rain, snow, fog, etc.) – When water,
snow, sand,
etc. is being blown up by a vehicle in front or oncoming
traffic – When snow, ice, mud, etc. is around the
radar sensor –
When being affected by surrounding radio sources
such as broadcasting stations – When
driving in a tunnel – When the vehicle ahead is towing
When
Machine Translated by Google
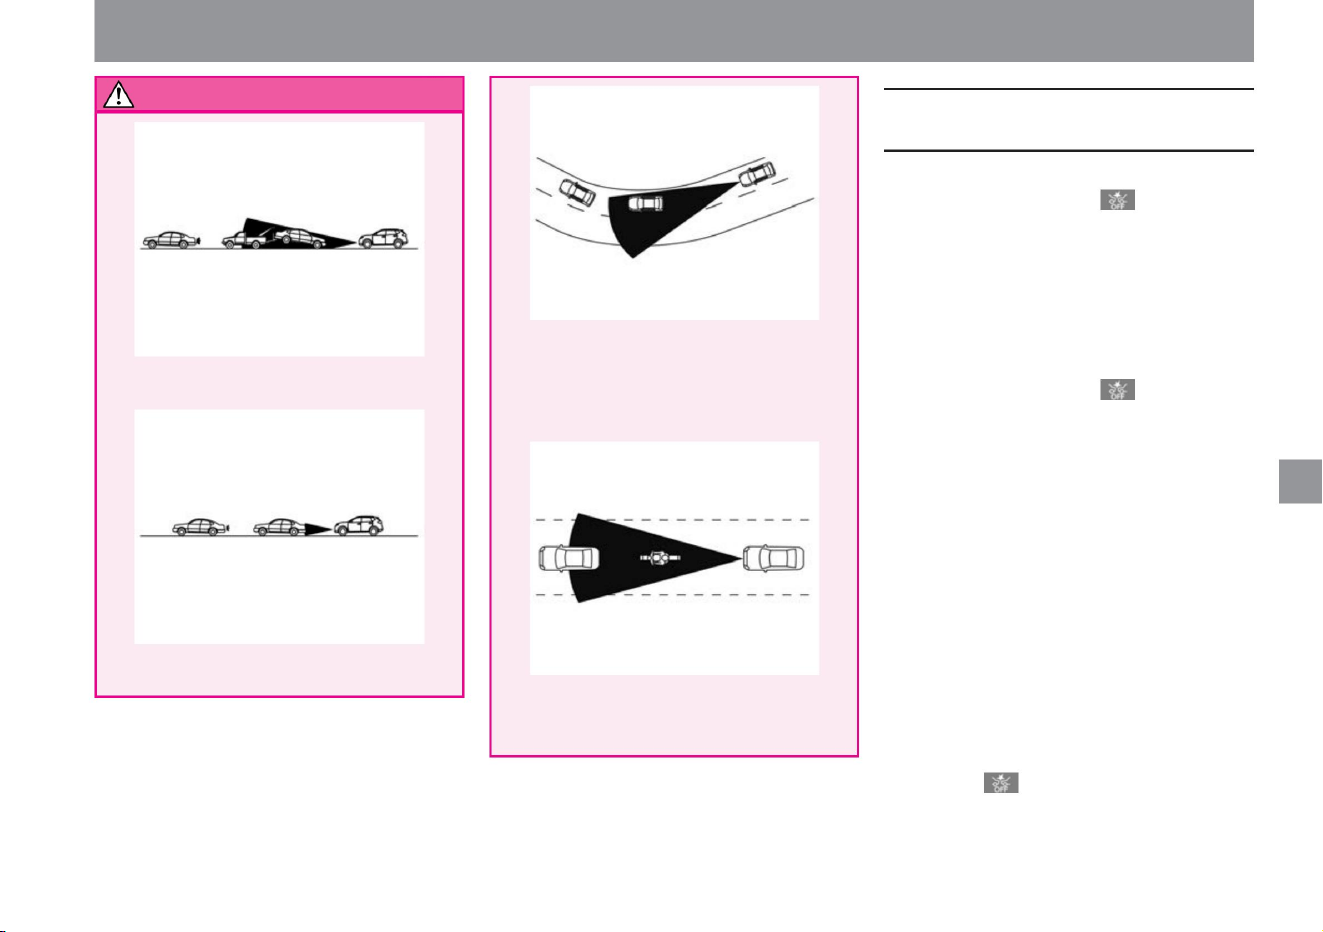
warn
When Intelligent FCW (Forward
Collision Warning) stops working
233
How to drive
ZEG0607X
VJE0234X
ZEG0608X
VJE0226X
Driving support function
– When driving on a sharp curve or
where there is a change in grade
–The distance to the vehicle ahead is extremely close.
• The alarm (buzzer) may not be heard due
to external noise.
$/$: Different equipment depending on vehicle model, options, etc.
When
The system will resume operation when the conditions
under which it was stopped have
improved. When the above warning is displayed, stop the
vehicle in a safe place, stop the e-POWER system once,
remove dirt from the radar sensor and its surroundings,
and restart the e-POWER system. . In the following cases,
the intelligent emergency brake warning
light will turn on along with a warning sound (buzzer), and the
advanced drive assist display will display the warning
"system failure, see instruction manual" and the system
will stop. To do.
• When the vehicle in front is a narrow vehicle such as a
motorcycle, the vehicle in front cannot be detected
and the intelligent FCW (Forward Collision Prediction
Warning) may not issue a warning.
tree
•In the following cases, the intelligent emergency brake
warning light will turn on and the operation will stop. –
When the Intelligent
Emergency Brake is set to OFF – When the Intelligent
Emergency Brake stops operating due to an
abnormality In the following cases, the Intelligent
Emergency Brake Warning Light will flash slowly and
the
system will stop operating temporarily. increase. – When
there is snow, ice, mud , etc. around the radar sensor
installed in the front of the vehicle
Machine Translated by Google
• If the intelligent emergency brake cannot be
turned on or the warning light lights up, stop
the vehicle in a safe place, stop the e-
POWER system, and then restart it. If the
warning light continues to illuminate even
after performing the above operations, there
may be a system malfunction. There is no
problem with normal driving, but please have
it inspected by a Nissan dealer. Warning
light ( P.308)
– When there is an abnormality in the intelligent
FCW (Forward Collision
Prediction Warning) When the above warning is
displayed, stop the vehicle in a safe place, stop
the e-POWER system once, and then restart it.
• If the area around the radar sensor is dirty, stop
the vehicle in a safe place, remove the dirt
around the radar sensor, and then restart
the e-POWER system. For handling the
radar sensor,
Please read ( P.369).
Driving support function
How to drive
234
advice
Machine Translated by Google

Driving support function
• Due to the limitations of functions, do not
overestimate and drive safely.
RCTA (reversing vehicle detection alarm)
is not a function that checks the
surroundings for the driver or prevents the
vehicle from coming into contact with
obstacles. When backing out of a parking
space, always check the safety of your
surroundings without relying on the functions.
$/$: Different equipment depending on vehicle model, options, etc.
warn
Display related to the system
235
ZEG0943X
How to drive
RCTA (vehicle detection alarm when reversing)ÿ
RCTA (Reversing Vehicle Detection Alert) warns you with an alert when you are in danger of colliding with a
vehicle crossing behind you when reversing.
Machine Translated by Google
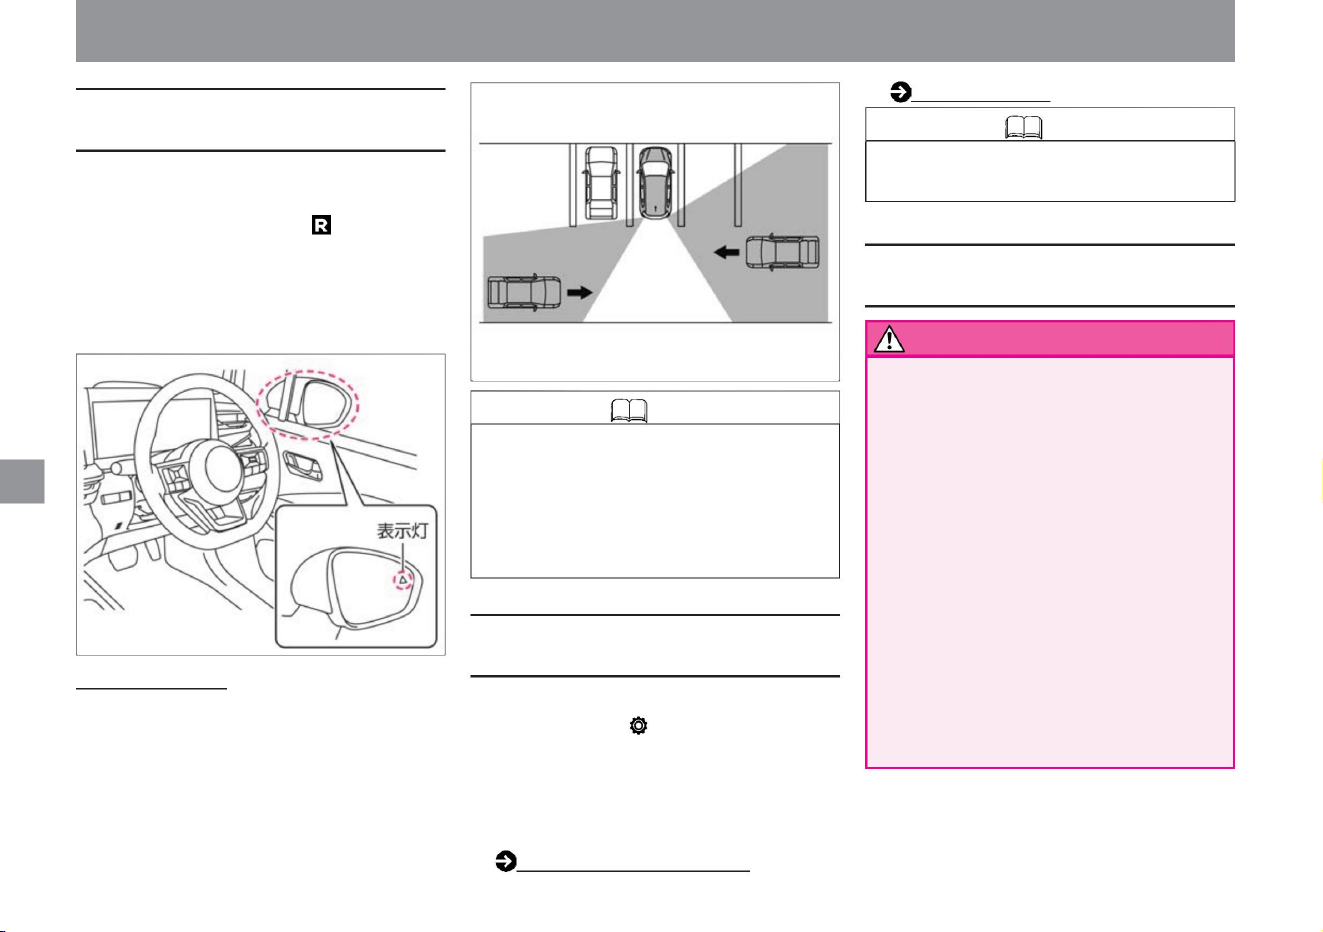
• When the power switch is turned on, the indicator light
on the door mirror surface lights up and turns off
after a few seconds.
• The brightness of the indicator light on the door mirror
mirror changes depending on the brightness around
the vehicle.
RCTA (reversing vehicle detection alarm) function
– Pedestrians, cyclists, animals, etc. –
Passing at a speed of about 30 km/h or more
You can switch between ON and OFF. For more
information on settings, read Driving Assistance. How to
switch screens
(P.60)
• In the following situations, the radar sensor may not be
able to detect an approaching vehicle. –When a
vehicle parked next to
you blocks the detection area of the radar sensor.
About the detection
range • The radar sensor detects vehicles approaching from
about 20m away.
• Settings are retained even after restarting the e-POWER
system.
If you select "Settings", "Driving assistance", and "Reversing
vehicle detection alarm" on the advanced drive assist
display ,
• A radar sensor at the rear of the vehicle detects vehicles
crossing behind it. • It works when the shift position
is and the vehicle speed is about 8km/h or less. • When the
radar sensor detects a vehicle crossing
behind you, an alarm (buzzer) sounds and the indicator light
on the side of the door mirror on the detected side
flashes.
vehicle
Driving support (P.70)
• Before backing up, be sure to visually check your
surroundings. Radar sensors detect approaching
(moving) vehicles. The following items may not be
detected.
–Vehicles passing at a speed of approximately 8 km/h or less
Both
How to drive
Knowledge
How to use RCTA (reversing vehicle detection
alarm)
236
About RCTA (reversing vehicle detection alarm)
Precautions for RCTA (reversing vehicle
detection alarm)
warn
Knowledge
Driving support function
ZEG1005X
MEG0537X
Machine Translated by Google
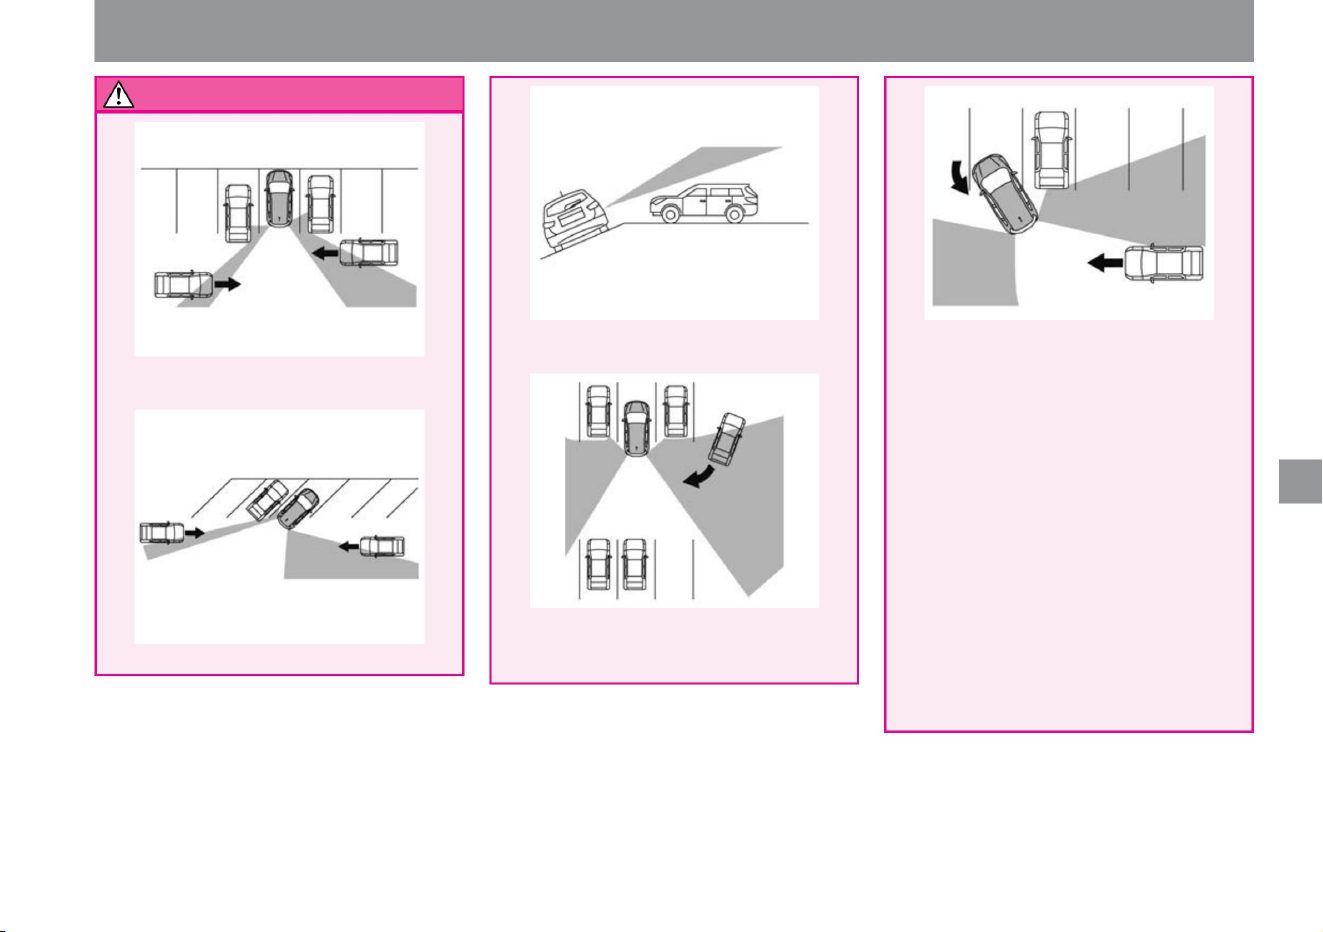
warn
237
How to drive
MEG0541X
MEG0540X
MEG0552X
MEG0539X
MEG0542X
Driving support function
• Do not use the system in the following
cases, as it may lead to unexpected
accidents. – When visibility
is poor due to bad weather (rain,
snow, fog,
etc.) – When water, snow, sand, etc.
is being
blown up – When snow, ice, mud,
etc. is adhering to the vicinity
of the radar sensor Radar The sensor is
designed not to detect stationary
obstacles, but in some situations it
may detect guardrails, walls, parked
vehicles, etc. • The alarm
(buzzer) may not be heard due to
external noise.
$/$: Different equipment depending on vehicle model, options, etc.
– When a vehicle is approaching behind your
vehicle while turning around
–When the direction of the approaching vehicle
is the same or close to the direction of your
vehicle
– When parked on sloping ground
–When the vehicle is parked in a parking lot with
diagonal parking lines
Machine Translated by Google
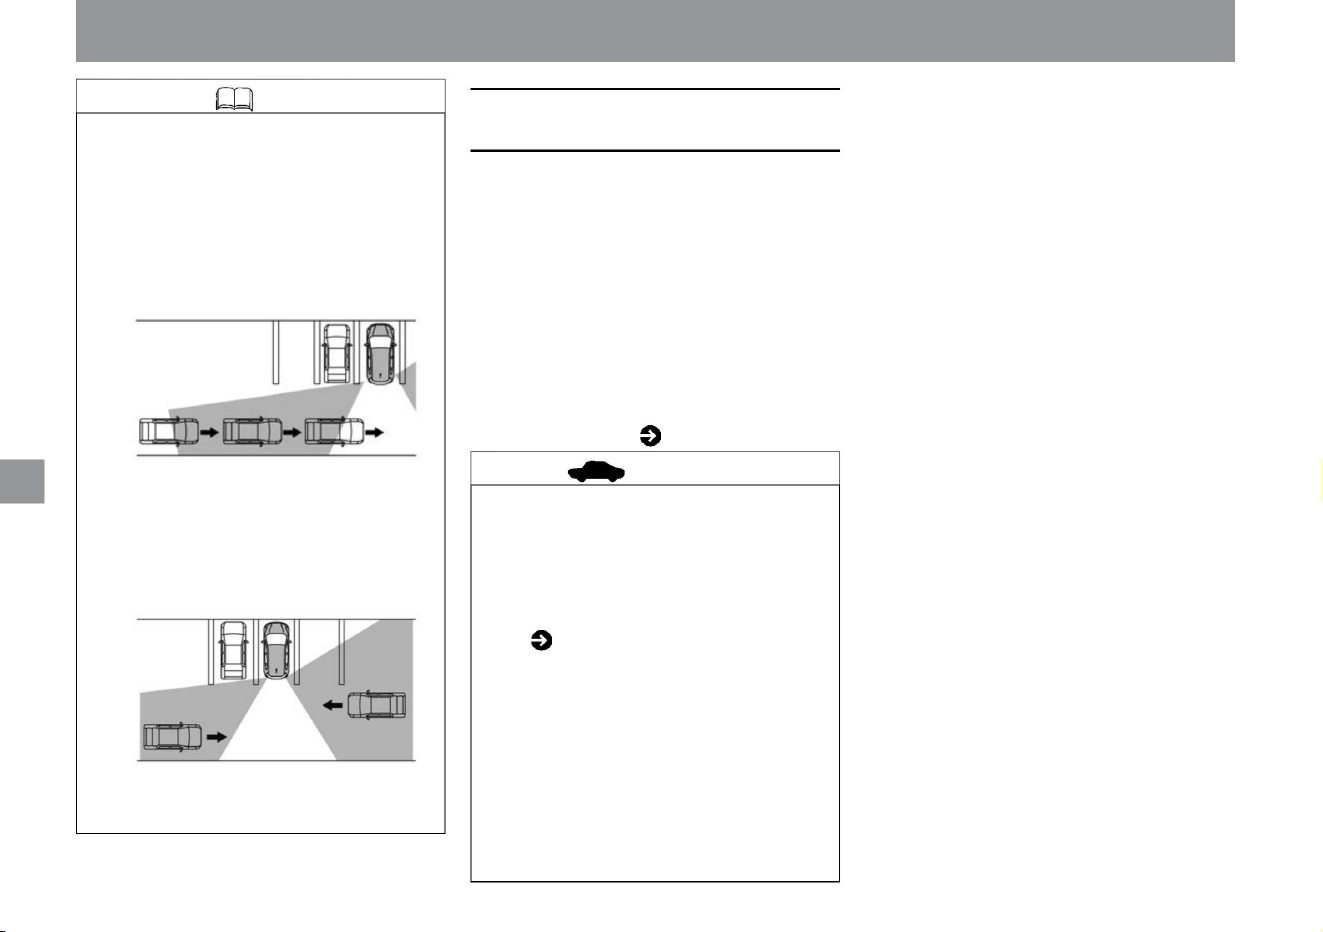
When the operation of RCTA (reversing vehicle
detection alarm) stops
238
Knowledge
How to drive
• If the area around the radar sensor is dirty,
stop the vehicle in a safe place, remove the
dirt around the radar sensor, and then
restart the e-POWER system. For handling
the radar sensor,
• If multiple vehicles pass behind you in
succession, or if a vehicle is approaching
from the opposite direction of the first
detected vehicle, the alarm may not work for
the second and subsequent vehicles.
Driving support function
MEG0537X
MEG0556X
Please read ( P.369). • When a
warning is displayed on the Advanced
Drive Assist Display, stop the vehicle
in a safe place, stop the e-POWER
system once, and then restart it. If the
message
continues to appear even after restarting
the e-POWER system, there may be a
problem with the system. There is no
problem with normal driving, but please
have it inspected by a Nissan dealer.
•In the following cases, the Advanced Drive
Assist display will display a warning that
says, "The side radar and its surroundings
are dirty. Please wipe them down." – When
the radar sensor
is dirty – Rain, snow, ice, etc. on the
radar sensor
is attached •If there
is a problem with the system, a warning will
be displayed on the Advanced Drive Assist
Display and the system will stop.
Warning message ( P.317)
Advice
Machine Translated by Google
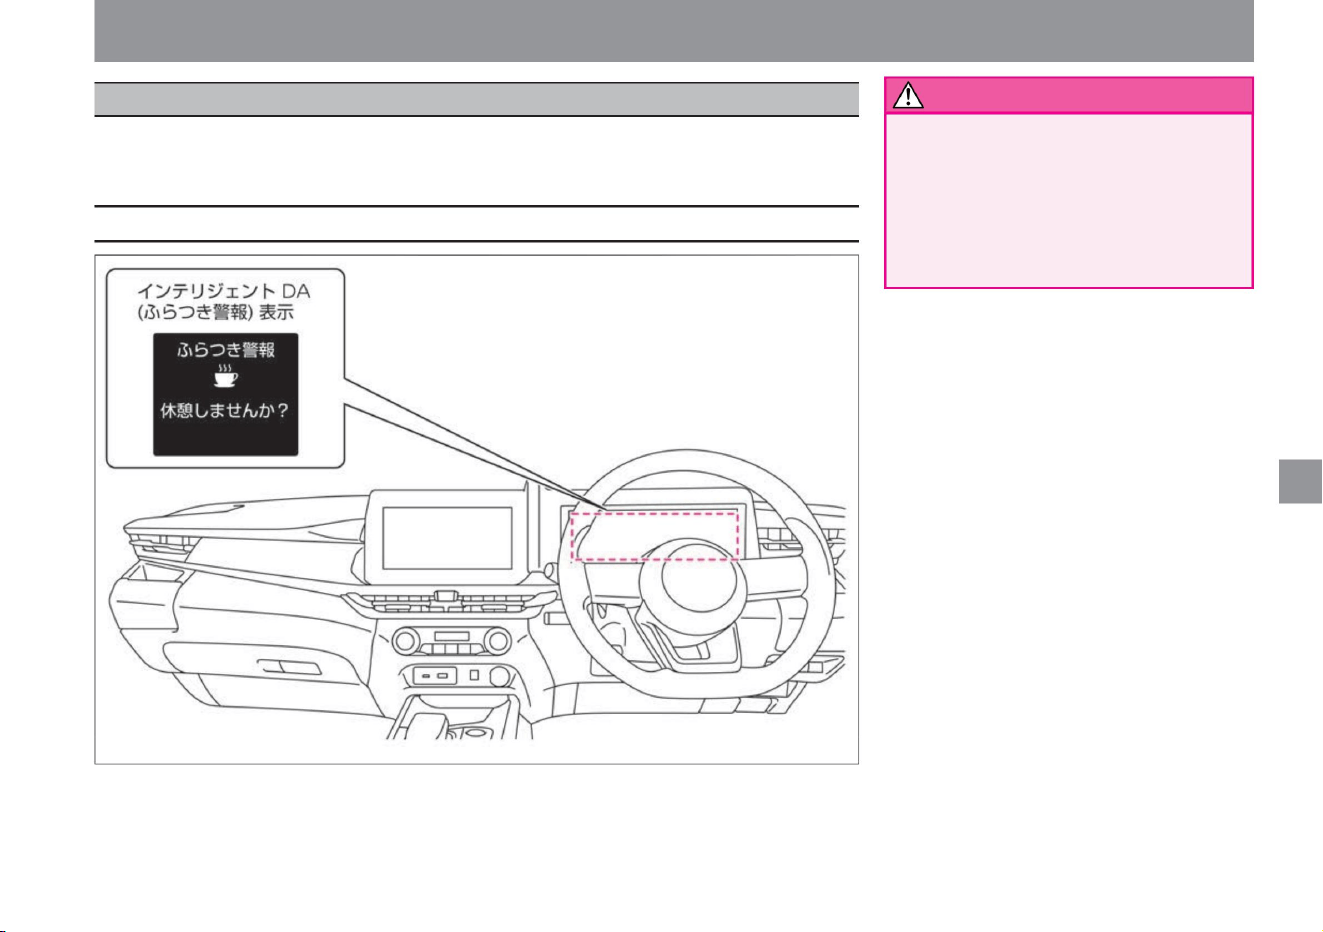
Driving support function
When Intelligent DA (Stabilization Warning) judges that the driver's attention has decreased due to steering
wheel operation, it prompts the driver to take a break with the display and sound of the Advanced Drive
Assist Display.
• Due to the limitations of functions, do
not overestimate and
drive safely. This system is not
intended to assist driving when
fatigued. Driving while tired can lead
to a serious accident, so take a
sufficient rest before driving and try to drive safely.
$/$: Different equipment depending on vehicle model, options, etc.
warn
Display related to the system
239
ZEG2114X
Intelligent DA (sway alarm)
How to drive
Machine Translated by Google
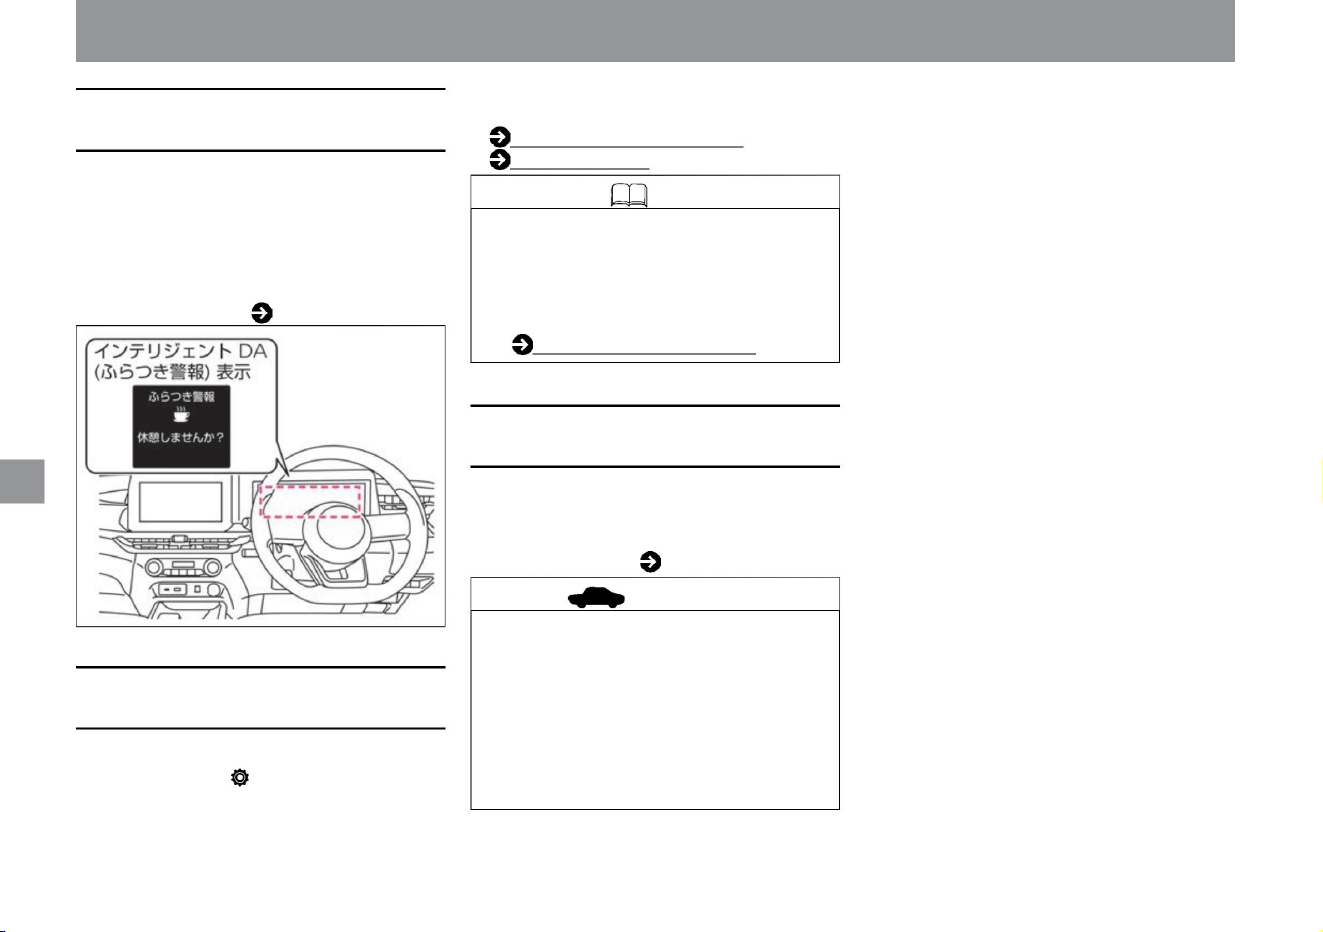
• When the driver is driving at a speed of
approximately 60km/h or more and the driver's
attention is judged to be declining due to
steering wheel operation, a warning sound
(buzzer) and the message "Would you like to
take a break?" Display a warning
message. Warning message ( P.318)
For more information on settings, read Driving
Assistance.
How to switch screens (P.60)
Driving assistance (P.70)
If you select "Settings", "Driving assistance", and
"Stabilization alarm" on the advanced drive assist
display, the intelligent DA (stabilization alarm)
function will be activated.
You can switch between ON and OFF.
• Settings are retained even after restarting the
e-POWER system. •
While ProPILOT is operating, the intelligent DA
(sway alarm) system is turned off. ProPilotÿ
(P.175)
• Stop the vehicle in a safe place, stop the e-
POWER system once, and then restart it. •
If the
message is still displayed after restarting, the
system may be malfunctioning. There is no
problem with normal driving, but please have
it inspected by a NISSAN dealer.
•If there is an abnormality in the system, a warning
will be displayed on the Advanced Drive Assist
Display and operation will stop.
Warning message ( P.317)
How to drive
When Intelligent DA (Stabilization
Alarm) stops working
Intelligent DA (Stabilization
Alarm)
advice
Knowledge
How to stop intelligent DA (sway
alarm)
240
Driving support function
ZEG2116X
Machine Translated by Google
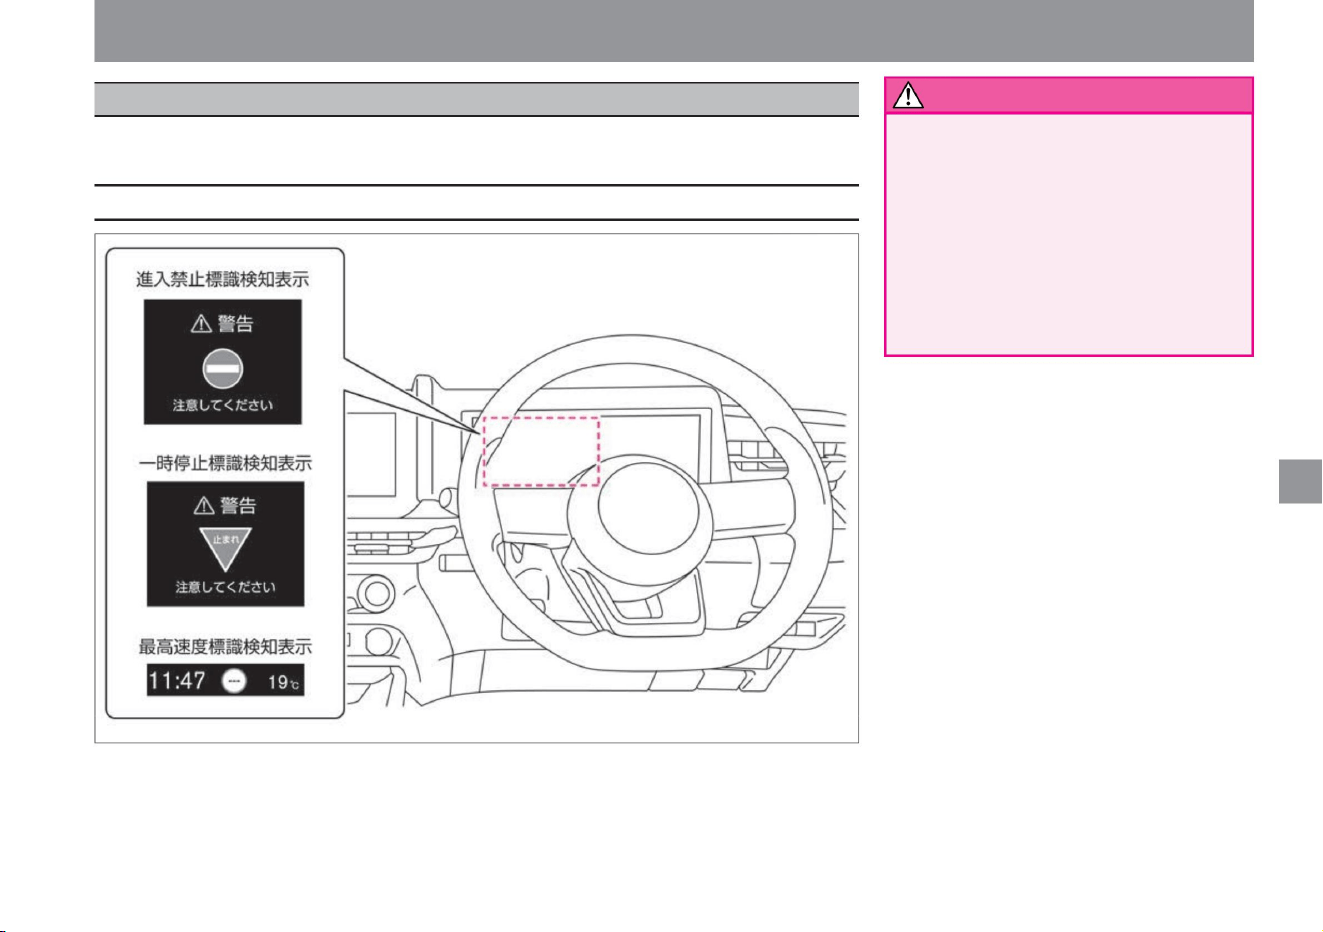
Driving support function
A multi-sensing front camera located above the windshield detects traffic signs and displays
them on the Advanced Drive Assist Display.
• While driving, it is the responsibility of the driver
to check the
actual signs. The traffic sign detection function
is a function that supports the
safe driving of the driver. There is a limit to the
sign detection function, and depending on the
situation, the sign may not be detected or may
be displayed differently from
the actual sign. It is the driver's responsibility
to check the actual signs when driving.
$/$: Different equipment depending on vehicle model, options, etc.
Sign detection function
ZEG1008X
warn
Display related to the system
241
How to drive
Machine Translated by Google
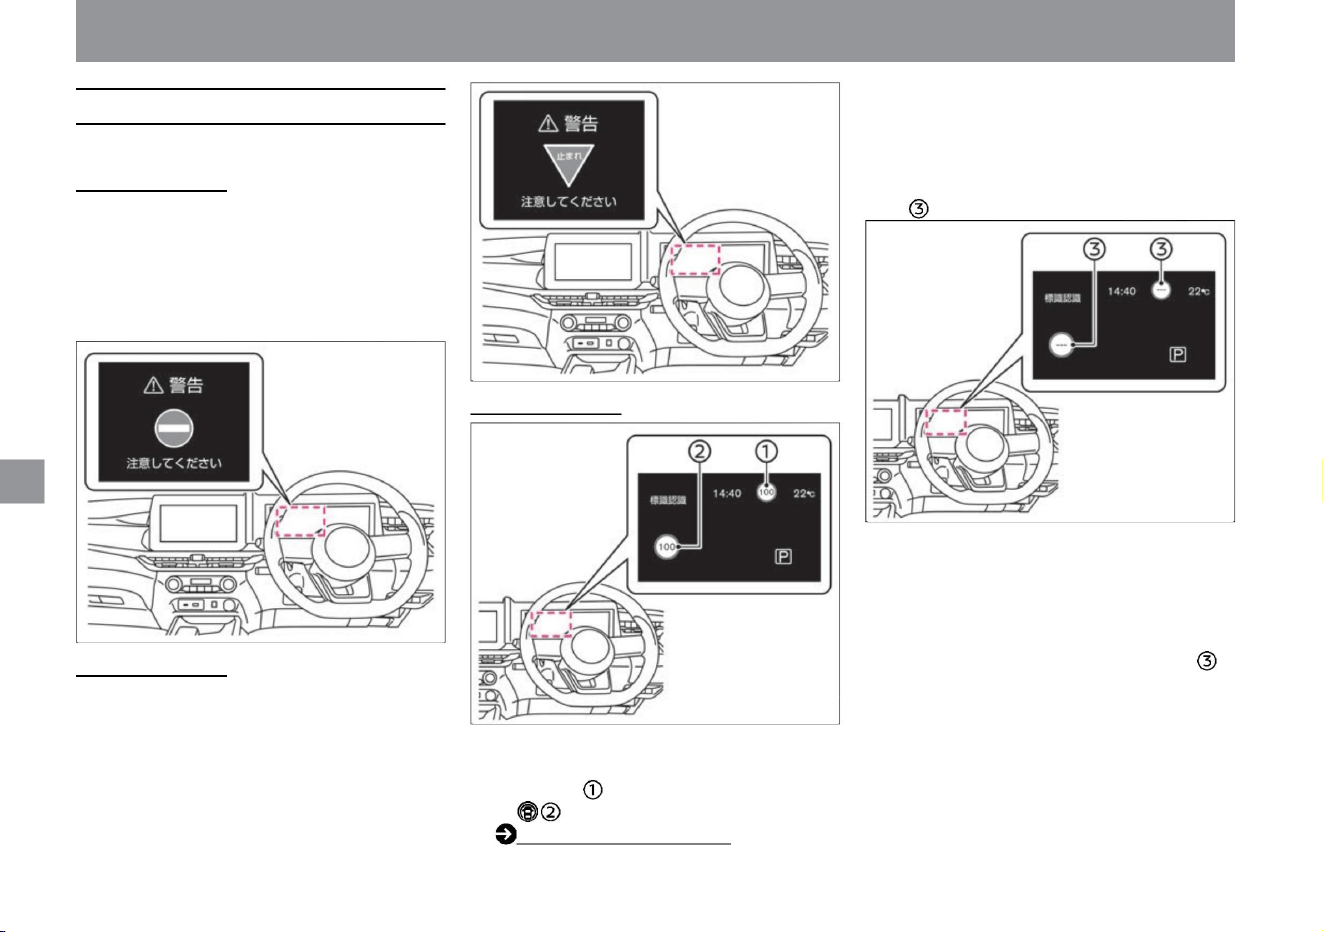
About the traffic sign detection function
242
How to drive
• The traffic sign detection function has the following
functions. No entry sign
detection • Detects a no entry sign in front of the vehicle
and displays a warning on the Advanced Drive Assist
Display if there is a possibility of entering a one-way
street.
• When the maximum speed sign ahead is detected, it will
be displayed on the Advanced Drive Assist Display ,
and the Driving Assistance Group .
• In the following cases, the display of the speed limit sign
will change. –
Maximum speed different from displayed maximum speed
• If the vehicle passes a no entry sign, a warning sound will
sound.
– When a speed limit sign is detected and the vehicle
travels a certain distance after passing that sign –
When the
system determines that the route has changed due to
a right or left turn, etc. Detects a speed limit
sign will be displayed if it is not possible.
Driving support function
ZEG1009X
ZEG1010X
ZEG1012X
ZEG1011X
is displayed.
Driving Support Group (P.68)
Stop sign detection
• If a stop sign ahead is detected, it will be displayed
on the Advanced Drive Assist Display.
When a sign is detected
In the following cases, stop displaying the speed limit sign
Speed limit sign detection
Machine Translated by Google
• By selecting "Settings", "Driving assistance", and
"Speed sign display" on the advanced drive assist
display, you can switch ON/OFF of the maximum
speed sign detection function. For more information
on settings, read
Driving Assistance. How to switch screens (P.60)
Driving
assistance (P.70)
– When the windshield in front of the camera is
foggy – When the
camera is exposed to strong light from the front
(sunlight, high beams from oncoming
vehicles,
etc.) – When the vehicle is exposed to strong
light reflected from the vehicle ahead
(sunlight, etc.) – When there is a sudden
change in brightness, such as when
entering or exiting a tunnel or in the shade –
When visibility is poor due to bad weather
(rain, snow, fog, wind dust, sand dust, blizzard,
etc. ) , snow, sand, etc. – when driving on a
grade change
– When the direction of the camera is
shifted – Signs are not detected for about 15
seconds after starting
• By selecting "Settings", "Driving assistance", and "Sign
detection assistance" on the Advanced Drive Assist
Display, you can switch ON/OFF of the no entry
sign/stop sign detection function. For more
information on settings, read Driving
Assistance. How to switch screens (P.60) Driving
support (P.70)
Knowledge
• In the following cases, signs cannot be detected
properly, and signs that differ from the actual
regulations are displayed, or signs are displayed
even though there are no applicable signs.
• Sign detection may be delayed or may not be
possible in the following cases. – When the
headlamp is not turned on, such as at night or in
a tunnel, or when the headlamp lens is
extremely dirty – Dirt, oil film, water droplets,
ice, snow, insect
stains, etc. When the view of the camera is
obstructed by adhesion
– When driving on an uneven road surface such
as an unpaved road
• Either setting will be retained even if the e-POWER
system is restarted.
$/$: Different equipment depending on vehicle model, options, etc.
–When your view is blocked by a car
running
next to you –When the sign is at the
corner
or at the end of a curve –When the
surroundings of the sign are
complicated and it is difficult to
recognize the sign –When the
sign is far away from your vehicle
Occasion
– When the light from your vehicle’s
headlamps cannot reach
the sign at night – When the sign is
faded or
bent When the sign is covered with
mud, snow, or frost –
When the sign is obscured by trees,
dirt, etc. too
small or too low – signs too low or too
high –
signs too bright or too dark
Driving support function
How to drive
warn
How to stop a no entry sign/stop sign
detection
Precautions regarding the sign detection function
243
How to stop speed limit sign detection
Machine Translated by Google
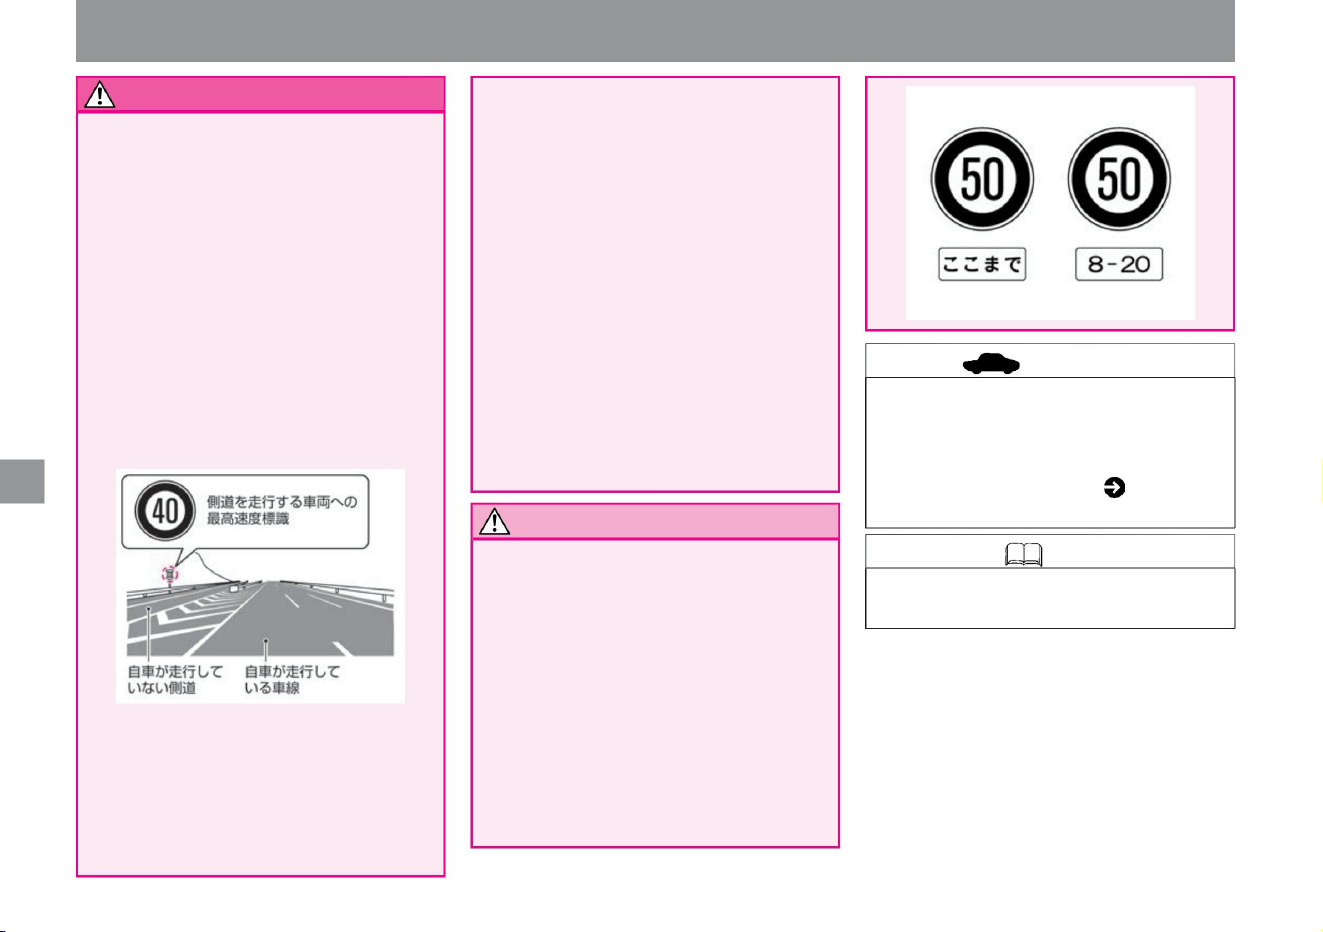
Notice
244
advice
Knowledge
MEG0749X
MEG0751X
– When there are signs in areas where traffic
is restricted
due to construction, etc. – When the map
data of the manufacturer’s option
navigation systemÿ is not up to date or
cannot be used –When the route
recommended by the manufacturer’s
option navigation systemÿ is not being driven
• Keep the windshield in front of the camera
clean at all times for proper system
operation. For handling of the multi-
sensing front camera, please read ( P.370).
I have
to warn you . (For speed limit signs, numbers
higher or lower than the actual maximum
speed may be displayed.) – Signs whose
numbers are difficult to
recognize (numbers are disappearing, etc.) –
Subject to detection If there
are signs similar in color or shape to the
surrounding area (similar signs, electronic
bulletin boards, signboards, flags,
structures, etc.) –
Although the signs are not for your vehicle's
route, they are for your vehicle's route. If
it is nearby and the sign faces your
vehicle's route (such as a stop sign or
speed limit sign on a side road that diverges from the main road)
–When the manufacturer option navigation
systemÿ is searching for a new route –
When the
position detection of the manufacturer
option navigation system ÿ cannot be
performed
correctly When
• The sign detection function is a function
that supports the safe
driving of the driver. There is a limit to
the sign detection function, and depending
on the situation, the sign may not be
detected or the
display may differ from the actual sign. It
is the driver's responsibility to
check the actual signs when driving. •
Auxiliary signs near the sign are not
detected, so the display may differ from
the actual regulations. It is always the
driver's responsibility to check the actual signs.
– Electronic signs with low contrast
– Electronic signs whose numbers are
difficult to recognize (signs placed far
away,
signs with three digits, etc. ) ) when
Driving support function
• The alarm (buzzer) may not be heard
due to outside noise.
How to drive
Machine Translated by Google
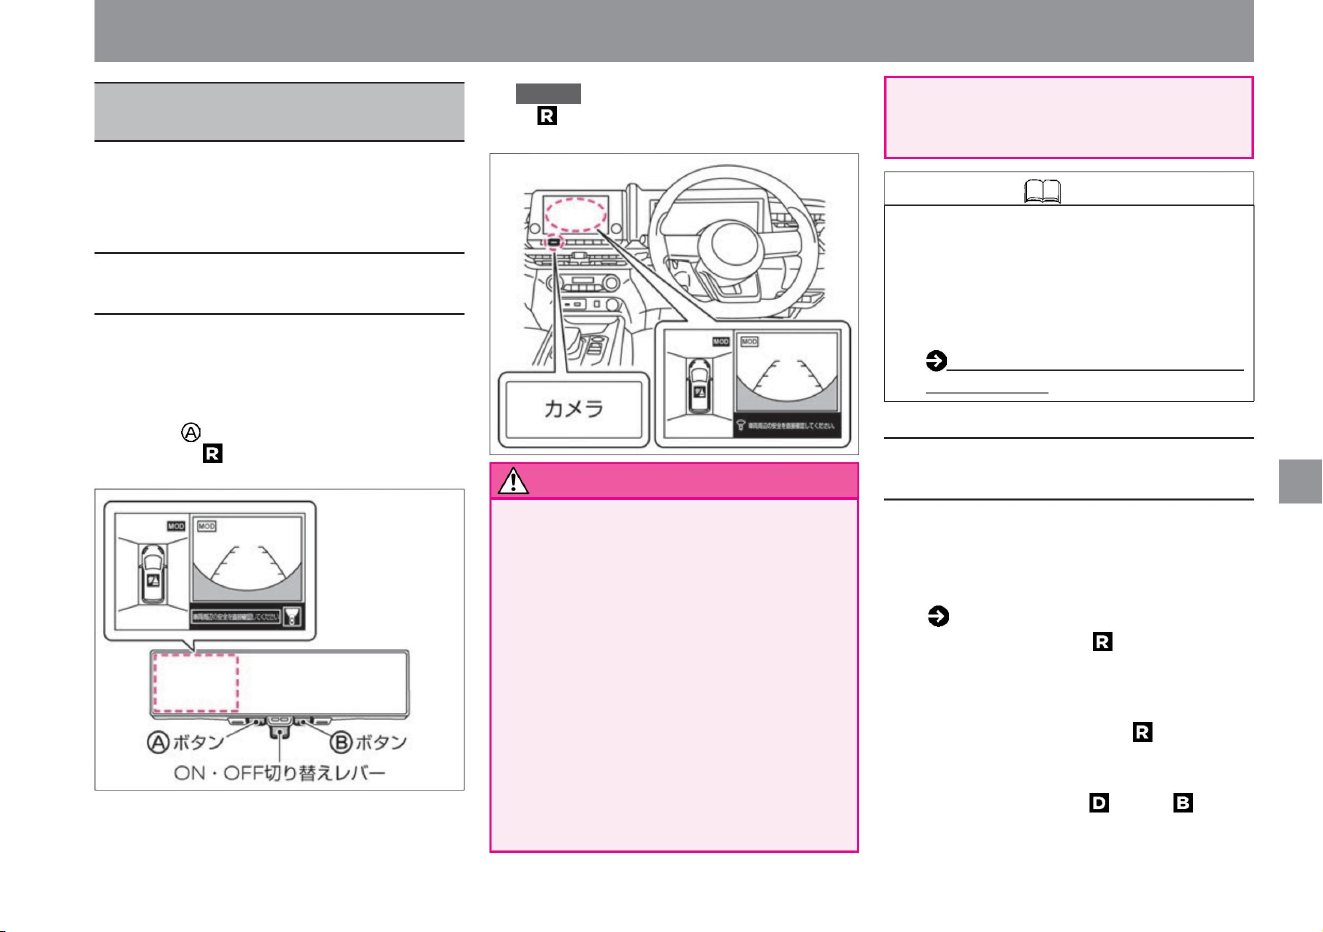
The distance to obstacles displayed
on the Intelligent Around View Monitor
may differ from the actual distance.
ZEG0764X
ZEG1032X
camera system
Intelligent Around View Monitor
(with moving object detection function)ÿ
$/$: Different equipment depending on vehicle model, options, etc.
245
About the Intelligent Around-View
Monitor
warn
Knowledge
How to use the Intelligent Around View
Monitor
How to drive
• Vehicles not equipped with a
manufacturer's option navigation
system can switch the position of the
intelligent around view monitor screen
by setting the intelligent rearview mirror.
• Do not overestimate the capabilities of the
Intelligent Around View Monitor.
The Intelligent Around View Monitor is a
system that assists in checking obstacles.
When operating your vehicle, directly
check the safety of your surroundings
with your mirrors or your eyes. In particular,
the four corners of the vehicle are blind
spots where obstacles are not visible in
the top view, front view, and rear view.
Be sure to look through the window and
confirm safety before operating the
vehicle. Always move
your vehicle at low speed. • Be careful not to
misunderstand the actual distance.
( P.108) •
When the shift position is set to , the Intelligent
Around View Monitor turns on and displays
the top view (left side screen)/rear view
(right side screen). When the shift position
is changed from to any other position, the
Intelligent Around View Monitor is turned
off. When the shift position is or ,
when the sonar detects an obstacle, the
intelligent around view monitor turns on
and the top view (left side) is displayed .
• Vehicles not equipped with a manufacturer's
option navigation system can be used
when the intelligent rearview mirror is in
intelligent rearview mirror mode.
• For vehicles equipped with a manufacturer's
option navigation system, when the power
switch is ON, the navigation system
Camera Position ÿ (P.111)
• For vehicles not equipped with a
manufacturer's option navigation system,
when the power switch is ON, pull the ON/
OFF switching lever of the intelligent
rearview mirror toward you and press the
button or shift the shift position to display
on the intelligent rearview mirror. .
The Intelligent Around View Monitor assists
the driver when parking into a parking space
or parallel parking by displaying the position of
the vehicle.
Displayed on the navigation system
when the camera is pressed or the shift
position is set to .
Machine Translated by Google
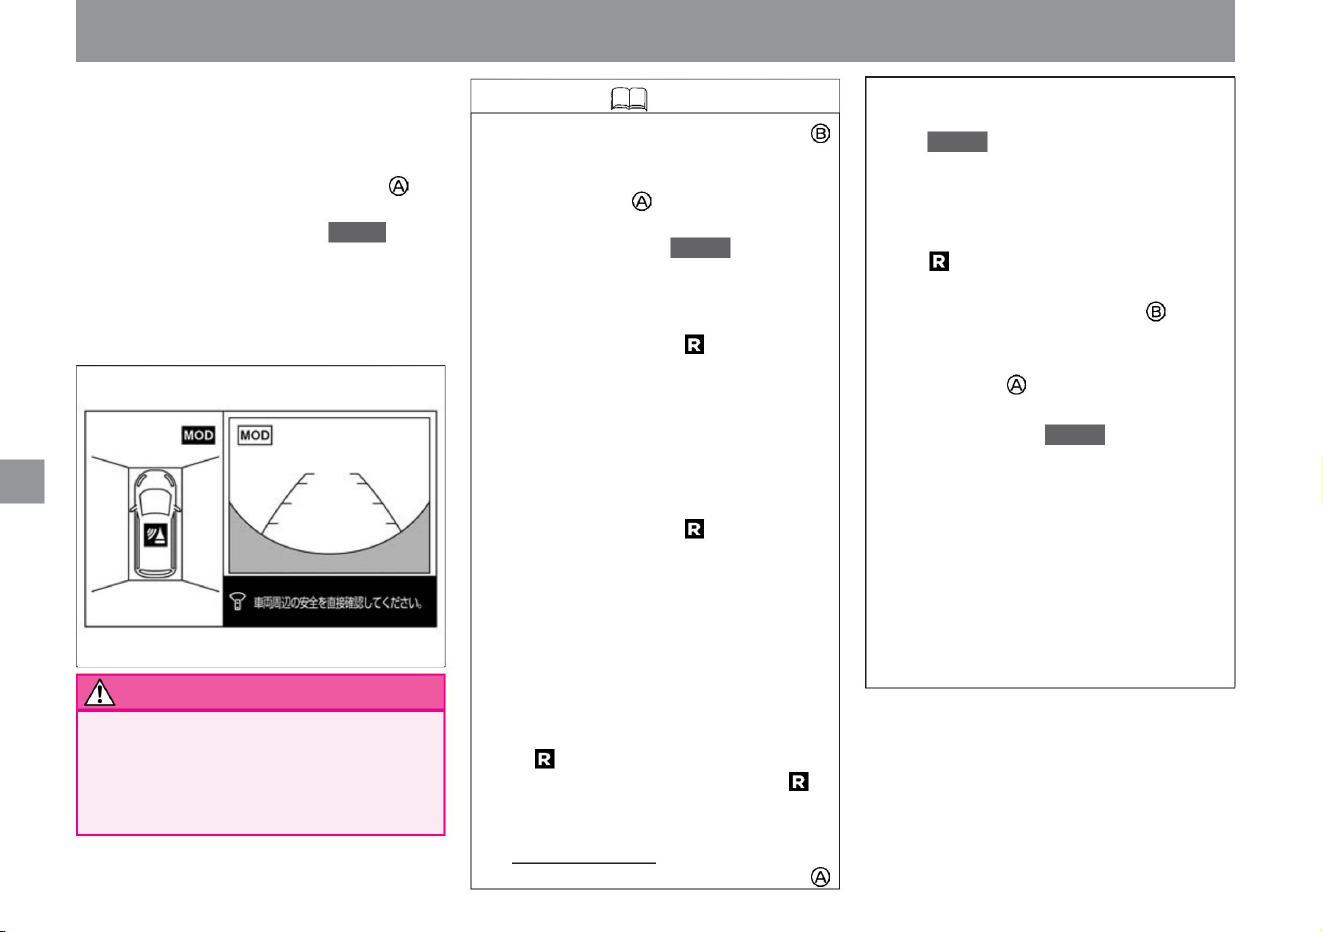
This function turns off the Intelligent
Around View Monitor display about 3
minutes after pressing the button
(vehicles without a manufacturer's
option navigation system) or the
camera (vehicles with a manufacturer's
option navigation system). Operates
when the shift position is other than .
(However, when the timer is running,
press the intelligent rearview mirror
button (button when the intelligent
around view monitor is displayed on
the right side) (vehicles without
manufacturer's option navigation
system) or camera (with manufacturer's
option navigation system) . (vehicle),
or when the sonar or moving object
detection function is activated, the
timer will be reset.) For
vehicles not equipped with a manufacturer
's option navigation system, move the
ON/OFF switching lever of the
intelligent rearview mirror to the front
of the vehicle. Tilt to the side to turn
off the Intelligent Around View Monitor.
• Intelligent rearview mirror
screen)/front view (right screen). Intelligent
Around View Monitor turns off when no
obstacles are detected.
Top view (left screen)/Front view
(right screen) Side
blind view (left screen)/Front view
(right screen) Intelligent around
view monitor OFF Shift when the
front view is
displayed on the right screen When the
position is turned to switch to the rear
view. When the shift position is
changed from to any other position, it
switches to the front view again. • 3-
minute timer function
Intelligent rearview
mirror
You can switch screens by pressing
the button (the button when the
Intelligent Around View Monitor is
displayed on the right side) (vehicles
not equipped with a manufacturer's
optional navigation system) or the
camera ( vehicles equipped with a
manufacturer's
optional navigation system). –
When the selector lever is in , Top
view (left screen)/
Rear view (right screen) ?Side
blind view (left screen) /Rear
view (right screen) ?
Rear view (full screen) ?Intelligent
around view monitor
OFF –Select lever is other than . When
When you press the button on the intelligent
rearview mirror (vehicles not equipped
with the manufacturer's optional navigation
system) or the camera (vehicles equipped
with the manufacturer 's optional
navigation system), the intelligent
around view monitor turns on, and the
top view (left screen)/front view ( right screen).
• Do not use with the door mirrors
retracted. I can't project the proper
range. Also, when using it, make sure
that the back door is securely closed.
How to drive
Knowledge
warn
246
camera system
ZEG1076X
Machine Translated by Google
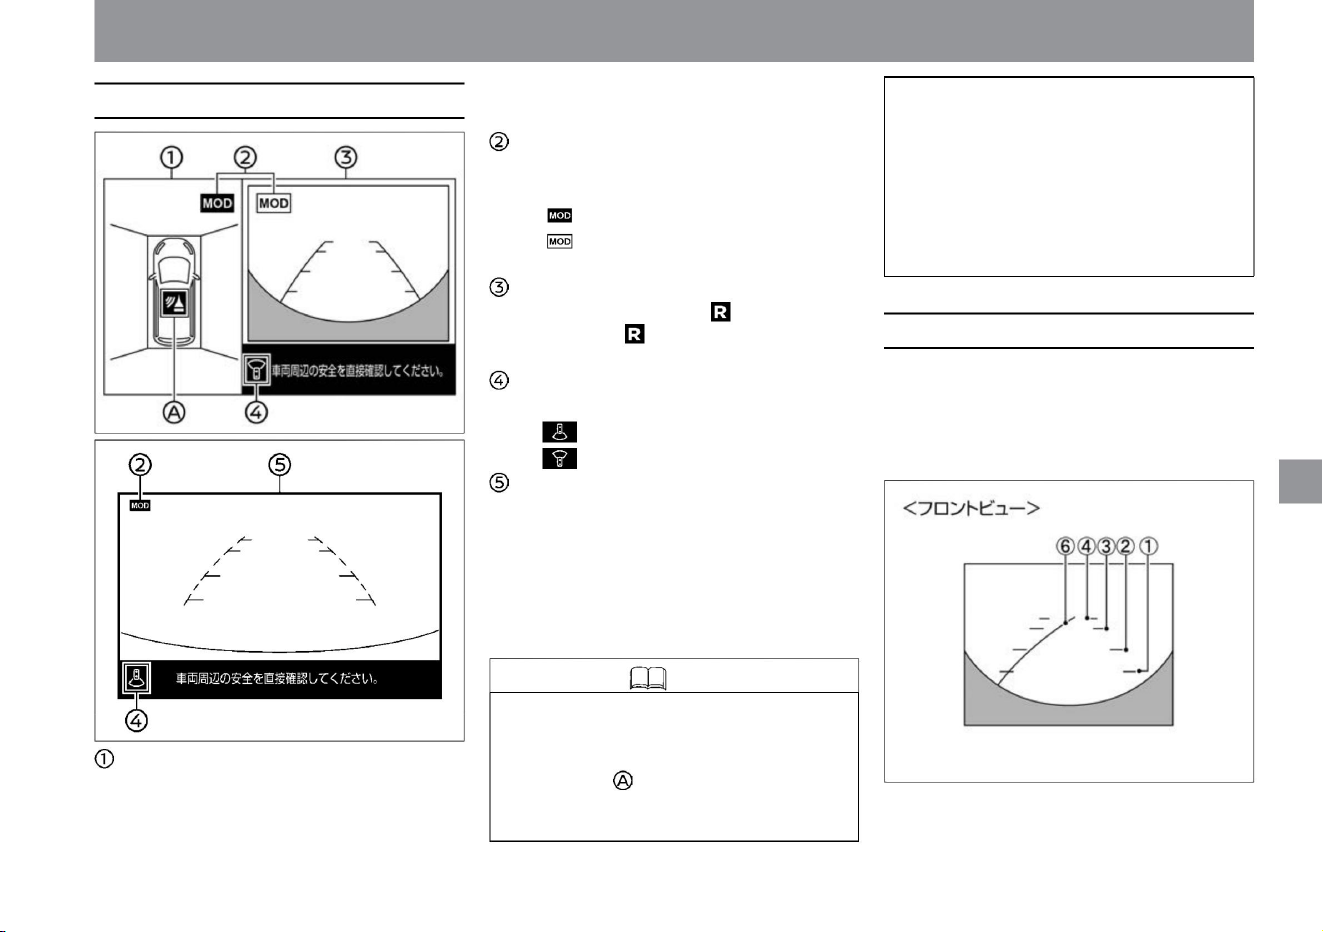
Screen display types
How to read the screen
Knowledge
247
ZEG1077X
ZEG1132X
MEG0146X
• Top view or side blinds
• Displays images of the front and rear of the
vehicle on the right side of the Intelligent
Around View Monitor.
• When the Intelligent Around View Monitor
is displayed for the first time after the
power switch is turned on, the sonar
operation status is indicated by the icon
color and blinking (for about 3
seconds). – Blinking Red: Sonar ON
– Blinking in gray: Sonar OFF (Blinks
immediately after sonar is turned off.) •
The
moving object detection function operates only
within the area shown in the displayed view.
For example, when the moving object
detection function is activated in the rear
view, moving objects in front of the vehicle are not detected.
camera system
How to drive
ÿ Front view/rear view
$/$: Different equipment depending on vehicle model, options, etc.
Show the view. Moving
object detection function operation status
icon • Indicates in which view the moving object
detection function is
activated. – : The moving object detection function
is activated – : The moving object detection function is not activated
left screen
Right side
screen • Displays the rear view when the shift position
is , and displays the front view when the shift
position is other than .
Direction indicator icon
• Indicates the direction of the right screen. – : Rear
view display – : Front view
display Full screen display rear view
screen • The image behind the
vehicle is displayed in full screen width.
*: This display is for vehicles with a manufacturer's
option navigation system. The display differs depending
on the grade, options, etc.
Machine Translated by Google
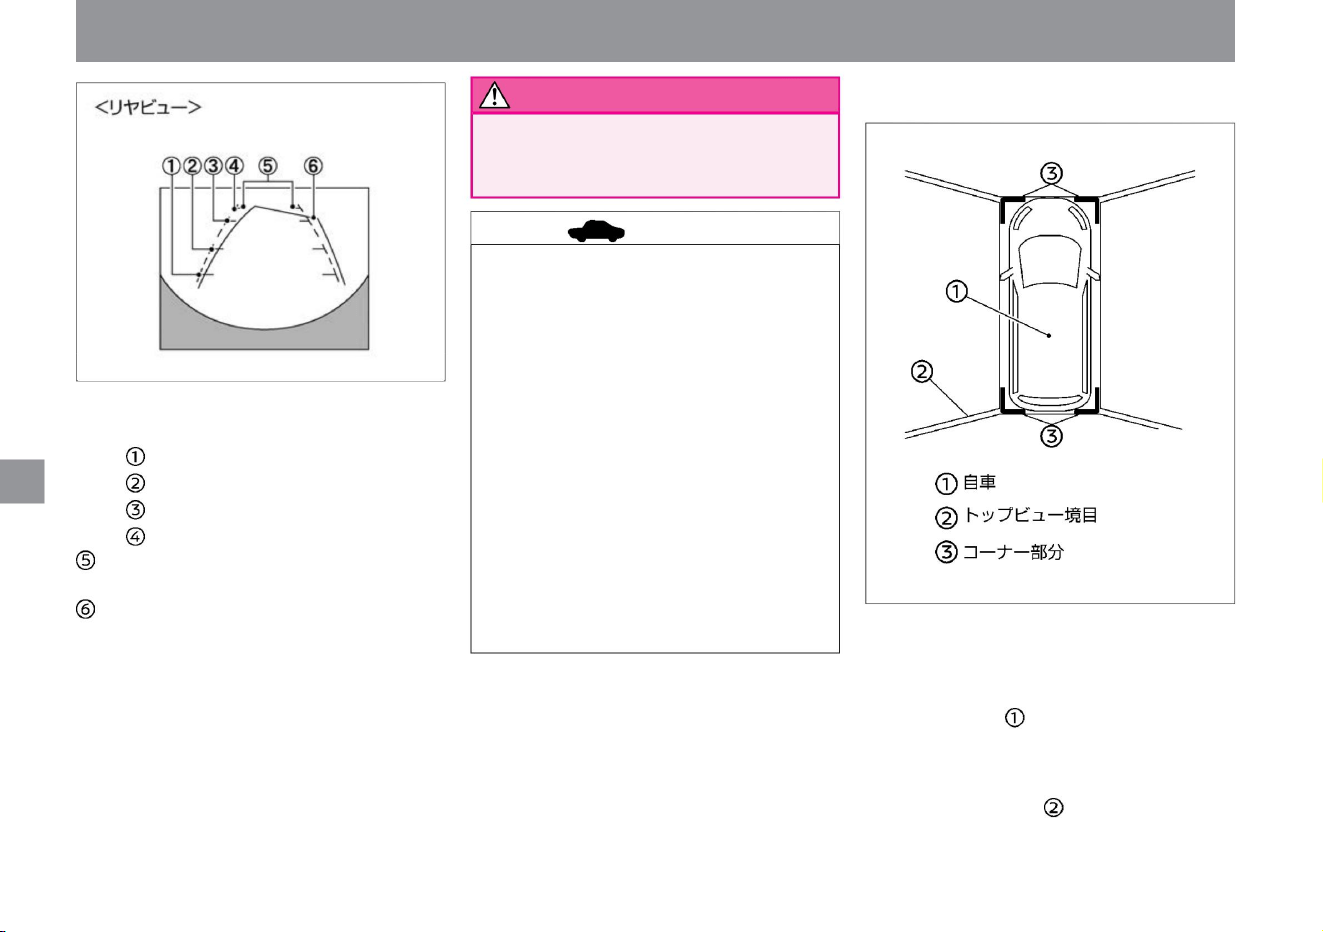
advice
248
warn
MEG0147X
ZEG0679X
How to drive
ÿ Top view
camera system
Estimated distance
line • Displays the approximate distance from the vehicle.
– Red: approx. 0.5m –
Yellow: approx. 1m –
Green: approx. 2m –
Green: approx .
Estimated route •
Displays the estimated route when
driving.
Estimated course lines are displayed when you turn the
steering wheel. The predicted course line moves
according to the angle at which the steering wheel
is turned, and disappears when the steering wheel
is in the neutral position.
• When the power switch is turned on and the top view
is displayed for the first time, the top view border
• The distance to obstacles displayed in the rear
view may differ from the actual distance.
• When the front view is displayed, if you turn the
steering wheel within the range of about 90
degrees from the neutral position, the expected
course line will be displayed on the left and right.
If you turn the steering wheel more than about
90 degrees, the predicted course line is
displayed only in
the direction opposite to the direction you turned the
steering wheel. • The image on the rear view
monitor is horizontally reversed in the
same way as the rearview mirror or door mirror. • On
snowy or slippery roads, the expected route may
differ
from the actual route. • Because the rear view
camera is installed in a position that is offset
from the center of the width of the vehicle, the
rear view display appears slightly shifted to the right.
• The front view disappears when the vehicle speed
exceeds approximately 10km/h.
• The left screen of the Intelligent Around View Monitor
displays an image that makes it easy to see the
position of the vehicle and the approach course to
the parking space, as if the vehicle is viewed from
above. • The vehicle icon indicates the position of your
vehicle. The distance to obstacles displayed in the
top view may differ from the actual distance. Areas
that cannot be captured by the camera Top view
borders are displayed in black.
Machine Translated by Google
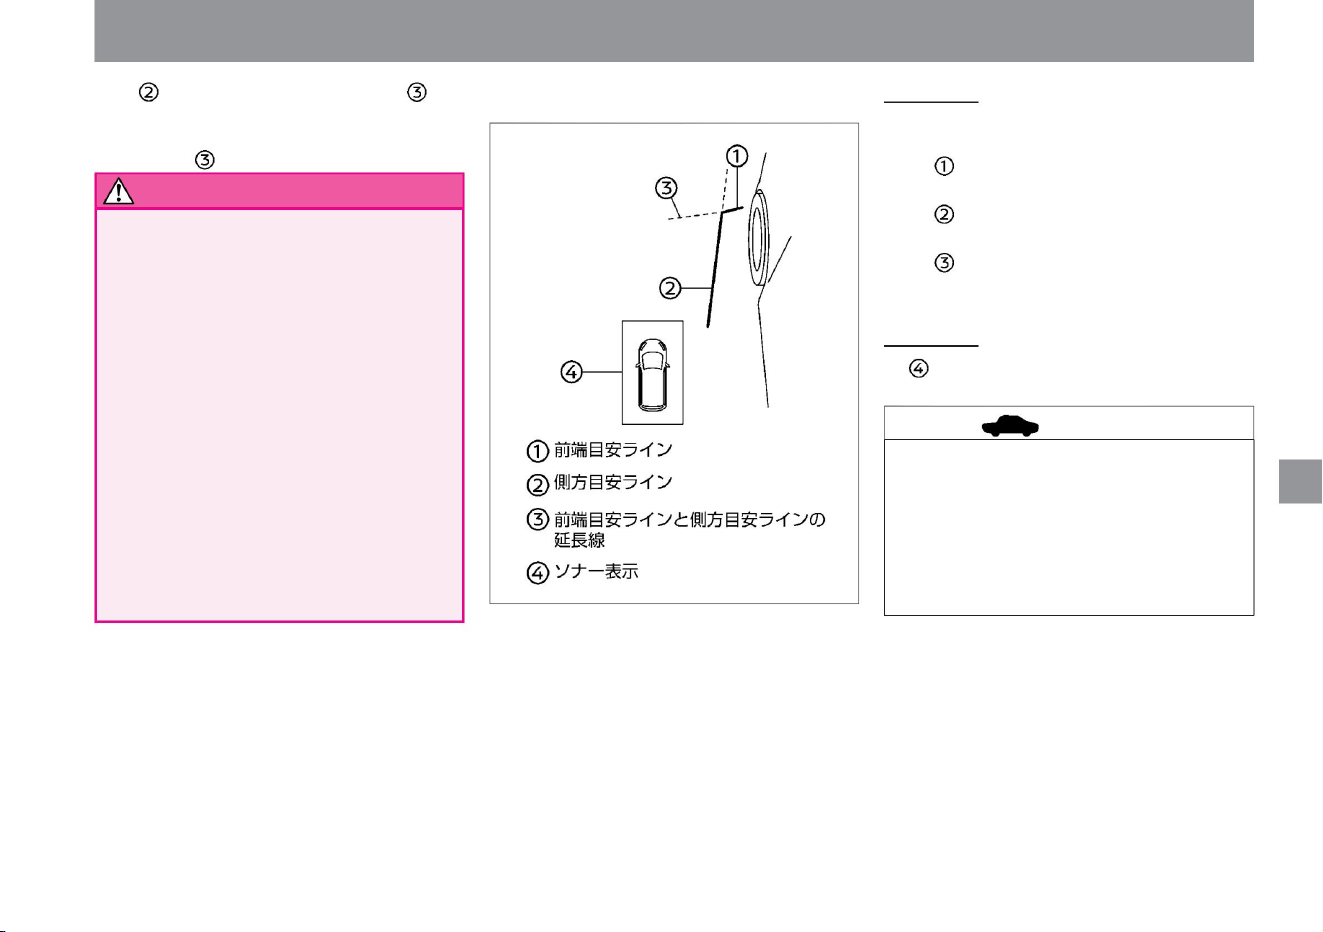
Sonar display
• The sonar display is displayed when the sonar detects
an obstacle.
• The direction indicator light may overlap with the
side reference line, but this is not a malfunction.
• While the
side blind view is displayed, if the speed exceeds
approximately 10km/h, part of the screen will
turn gray, but this is not a malfunction.
• The area in front of the left front wheel of the vehicle
is displayed on the left screen of the Intelligent
Around View Monitor. It is convenient for parking
on the side of the road.
Indicates a guideline for placement.
• The top view image may shift when the position of
the camera changes.
–The side reference line indicates the width of the
vehicle including the door mirrors. –
The extension lines of the front end guide line and
the side guide line are indicated by green
dashed lines.
• Lines on the road may appear out of alignment or
bent at the seams of the image. The deviation
increases with distance from the vehicle.
Eyes and non-imaged corners are highlighted in
yellow for about 3 seconds. When the sonar is off,
the corners that are not captured are shown in red.
• Because the simulated images are processed by
combining the images from the door mirrors,
front and rear cameras, the top view shows
obstacles farther than they actually are. • Tall
obstacles such as enclosures
and vehicles may be misaligned or not displayed at
the seams of the image. • Obstacles above the
height of the camera
is not displayed.
Reference line •
The monitor displays reference lines indicating the width of the vehicle
and the front wheels of the vehicle. –The
front edge reference line is the position at the front of the vehicle.
ZEG0680X
warn
249
advice
camera system
$/$: Different equipment depending on vehicle model, options, etc.
How to drive
ÿ Side blind view
Machine Translated by Google
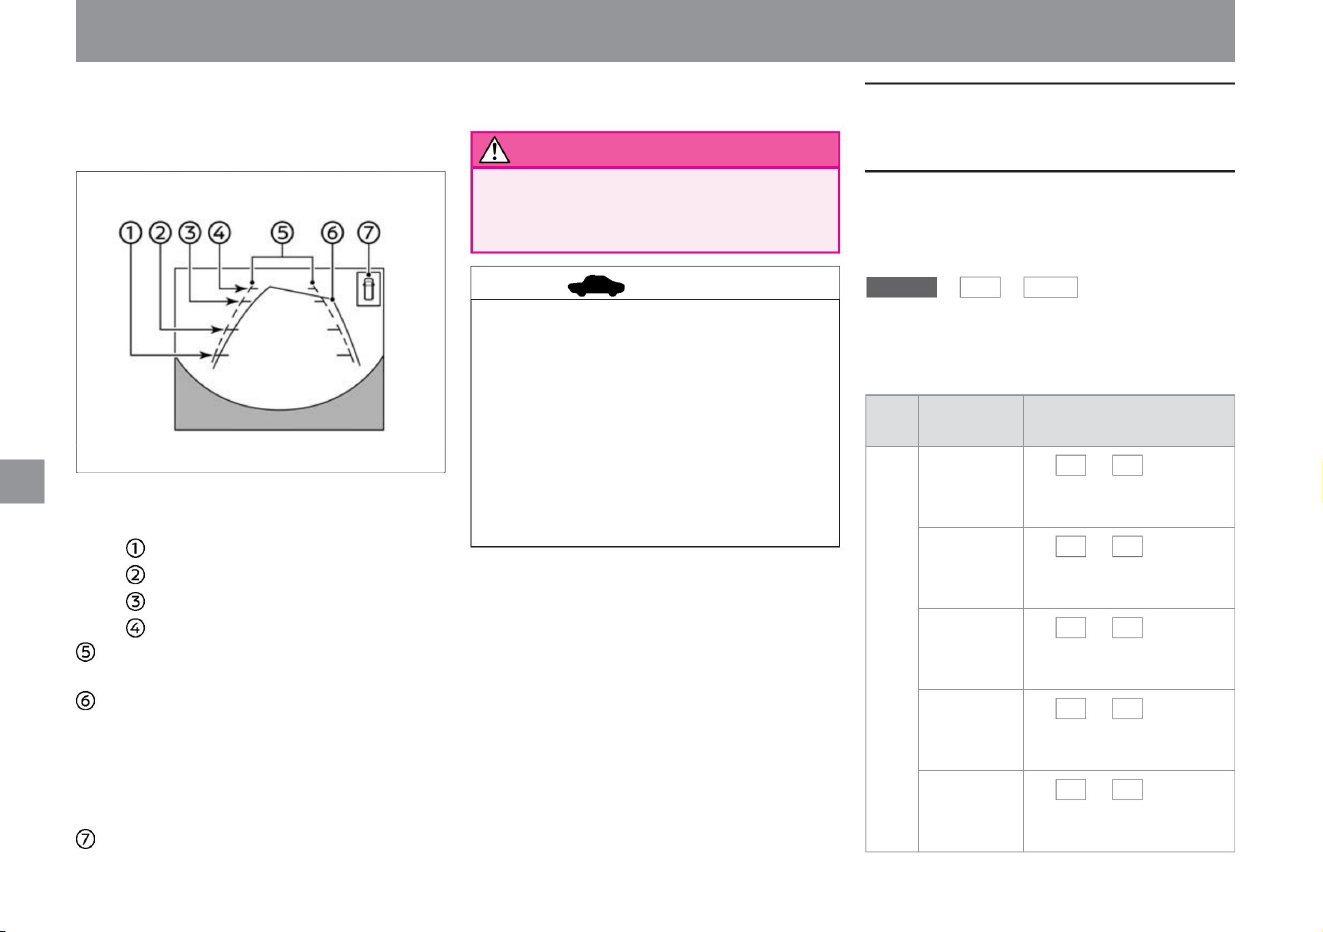
• The distance to obstacles displayed in the rear view
may differ from the actual distance.
• Displays when the sonar detects an obstacle.
– Red: approx. 0.5m –
Yellow: approx. 1m –
Green: approx. 2m –
Green: approx .
Estimated route •
Indicates the expected route during
operation.
Predicted course lines are displayed when you turn the
steering wheel. The predicted course line moves
according to the angle at which the steering wheel is
turned, and disappears when the steering wheel is in the
neutral position. sonar display
• The image behind the vehicle is displayed on the full width
of the screen.
• The image on the rear view monitor is horizontally
reversed in the same way as the rearview mirror or
door mirror. • On snowy or slippery roads,
the expected route may differ from the actual route. •
Because the rear view camera is installed in a
position
that is offset from the center of the width of the vehicle,
the rear view display appears slightly shifted to the
right.
Touch - •
+ , to
adjust the contrast.
Hue •
Touch + and - to adjust the hue.
Color density •
Touch + and - to adjust color
density.
advice
250
How to adjust the image quality (vehicles
equipped with a manufacturer's option
navigation system)
camera system
project
Estimated distance
line • Displays the approximate distance from the vehicle.
item 2
Black level • Touch + and - to adjust the black
level.
function
vinegar. caveat
Contrast
Image
quality Brightness • Touch + and - to adjust the
brightness.
1
You can adjust the image quality of the intelligent around
view monitor screen by performing the following operations
on the navigation system. For information on how to operate
the
menu , settings , and camera
navigation system, please read the chapter “Confirmations
and settings before use” in the separate navigation system
instruction manual.
ZEG0112X
How to drive
ÿ Rear view (full screen display)
Machine Translated by Google
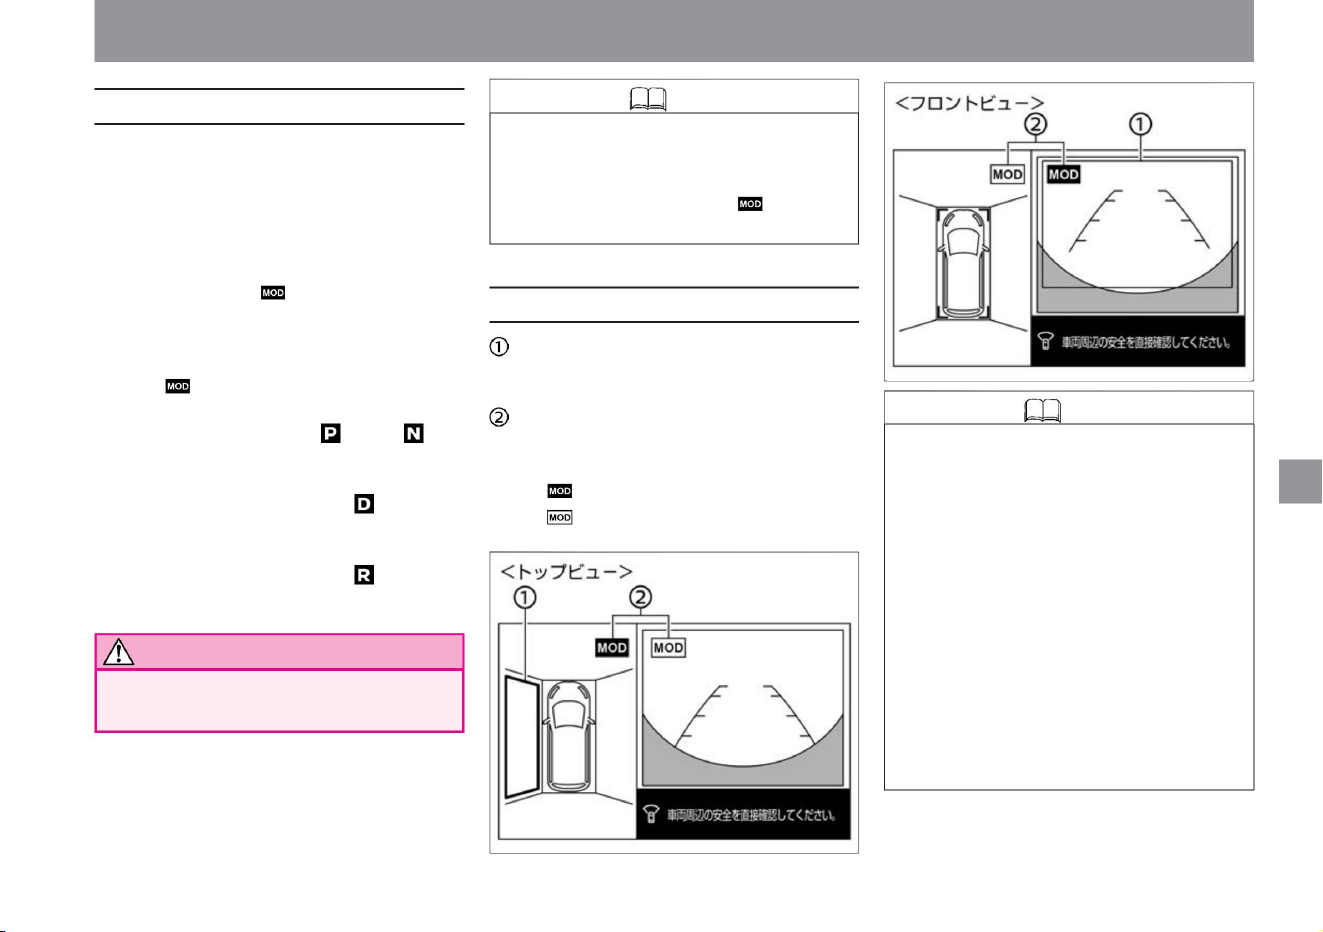
VAT1078X
ZEG1079X
camera system
• When operating a vehicle, directly check the safety of
your surroundings with your mirrors or with your eyes.
How to drive
yeah
Moving object detection
display • When a moving object is detected by the moving object detection
function, you will be notified by a yellow frame.
Moving object detection function operation status icon • The
icon on the screen that activates the moving object detection function is
displayed in blue. – : The moving object detection
function is activated – : The moving object detection function is not
activated
$/$: Different equipment depending on vehicle model, options, etc.
• This function supports safety confirmation by notifying the driver
of moving objects around the vehicle when entering the
garage or starting from a parking lot.
• The moving object detection function does not work in the
following cases.
• When the sonar buzzer sounds, the moving object detection
function buzzer does not sound. • Since the side
blind view does not have a moving object detection function,
the icon is not displayed.
• When there is a moving object around the vehicle, you will be
notified by a sound and a yellow frame. • If
there is a mark on the top view, a yellow frame will be displayed
in the area (front, back, left, and right) where a moving object
is detected. • Under the
following conditions, the moving object detection function
operates on the screen where is displayed. – Operates on
the top
view side when the shift position is or when the vehicle is
stopped. – Operates in the front view when the shift
position is and the
vehicle speed is less than 8km/h.
– When the vehicle speed or shift position is outside the
operating conditions of the moving object detection
function
– When the top view moving object detection function is
operating and one of the doors is open – When the
rear view moving
object detection function is operating and backing up
When the door is open • Moving object detection
function by top view If the electric retractable mirror is
operating while the function is in operation, false
detection may occur.
–Displayed in the rear view when the shift position is and the
vehicle speed is about 8km/h or less. Note
Moving object detection function
251
How to read the screen
Knowledge
Knowledge
Machine Translated by Google
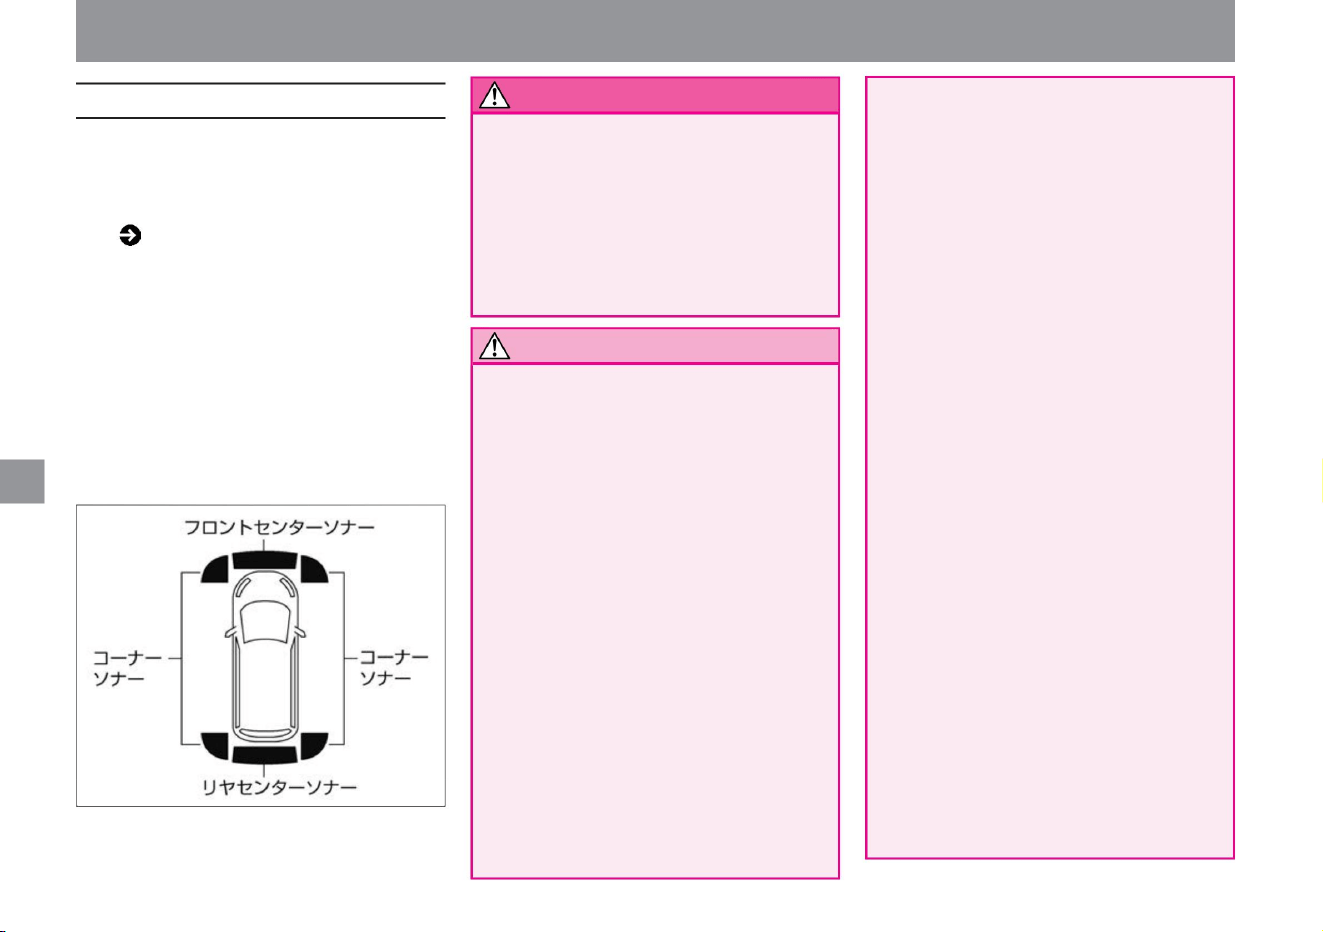
tree
Obstacles – Obstacles very close to
the sonar – Obstacles that suddenly
appear in the direction of travel • The following
obstacles may not be detected or may
be delayed in operation. –Obstacles that are
high above the ground –Obstacles that have soft
surfaces such as sponges and snow that
easily absorb sound waves
when attached
yeah. –Short obstacles
–Narrow obstacles –
Thin obstacles such as wire, wire netting, and rope
( P.108) •
When the intelligent around view monitor (with moving
object detection function) is displayed and the sonar
detects a stationary obstacle while driving, the sonar
display and buzzer will notify you. • The sonar
display is displayed
on the top view, side blind view or rear view (full screen
display) screen. • After an obstacle is detected, it
takes some time for the sonar
display and buzzer to sound.
MEF0395X
camera system
• Vehicles not equipped with a manufacturer's option
navigation system can be used when the intelligent
rearview mirror is in intelligent rearview mirror
mode.
• Sonar may not detect or may not detect correctly
in the following cases. – rain, snow, ice, dirt,
etc. to sonar
– When the surface of the obstacle is oblique
to the front or rear of the
vehicle – When the surrounding area is
overgrown with grass – When there is a
wall near the side of the vehicle – When
there are steps or protrusions on the road
surface When driving under flags,
vinyl curtains, etc. – If there is a mass of snow around the vehicle,
• Sonar may not be able to detect objects
depending on surrounding conditions such as
temperature, weather, and road surface
conditions, as well as the size and shape of
obstacles. Also, objects that tend to absorb
sound waves may not be detected by sonar.
Always check your surroundings
before driving. • It does not operate on the following obstacles.
• If there is a dent in the bumper, the distance
cannot be measured accurately and it may
not work properly. •
Maintain proper tire pressure. It may cause
malfunction. • When non-genuine parts
are installed, it may not work properly.
– When there is a loud noise in the
surroundings – When there are objects that
generate ultrasonic waves nearby, such as
vehicle sensors, horns, sonar of other
vehicles, or the
exhaust sound of
motorcycles – In hot weather or when it is cold
– When the surface is uniform Obstacles
that are not safe
(when multiple obstacles are stacked to form an
uneven shape) • The alarm (buzzer) may not
be heard due to external noise.
• When the sonar section is frozen, an abnormal
display may appear, and the sonar may not
detect objects such as walls. (When the ice
melts, it will return to normal.) • Sonar is
attached to the front and rear bumpers.
How to drive
About the sonar function
Notice
252
warn
Machine Translated by Google
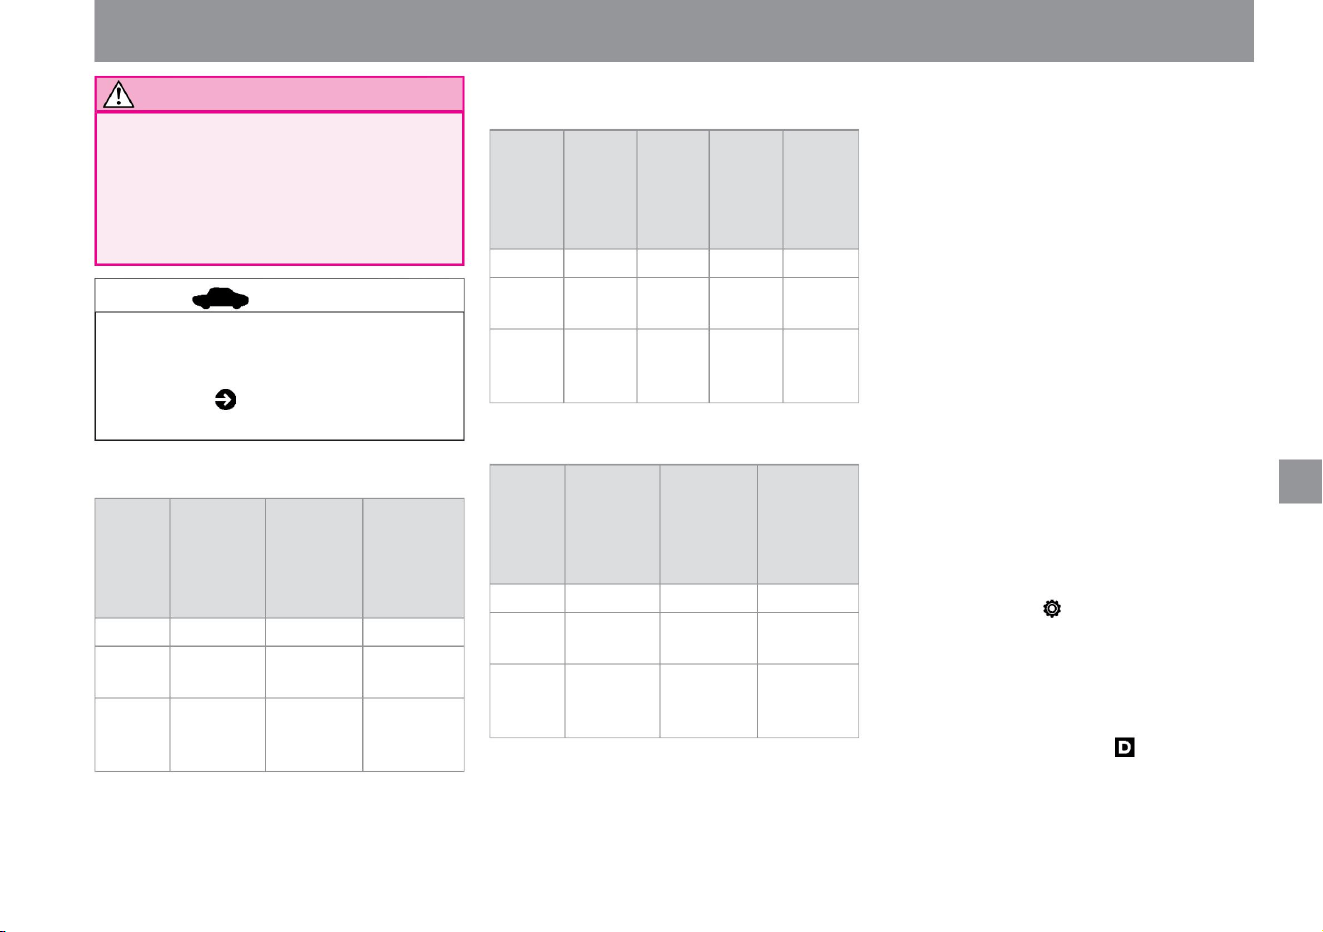
100ÿ
Pea
Distance
to
obstacles (reference)
Display
color Green Display flashing speed
70ÿ
Below
30cm
30cm
red
yellow
Below
30cm
60ÿ
late early lighting
50ÿ
• Keep the sonar clean for proper system operation.
Please read ( P.372) for handling the sonar.
Beep Beep
Beep…
Beep,
beep,
beep...
Beep Beep
Beep…
buzzer
sound
vinegar. Do not attach stickers or accessories
to the bumper.
50cm
Beep
Beep Beep...
70cm
50ÿ
none
30cm
yellow
• The color of the sonar display changes from green to
yellow to red as you get closer to the obstacle. The
distance to the obstacle differs depending on the sonar
display color and the distance reference line.
ÿ Buzzer • The
interval between intermittent sounds becomes shorter as
the distance to the obstacle approaches. If the display is
red, the sound will be continuous. • If
the distance to the obstacle increases, the intermittent sound
will disappear and only the sonar display will
appear. • If the distance to the obstacle does not change for
about 3 seconds, the intermittent sound will disappear
and only
the sonar display will be displayed. • When detected by the
front sonar, the sound is low, and when detected by the
back sonar, the sound is high-pitched.
late early lighting
Pea
Below
30cm
Beep,
beep,
beep...
• By selecting "Settings", "Driving assistance", and
"Parking assistance" on the Advanced Drive
Assist Display, you can set ON/OFF of each
sonar function.
late late early lighting
Distance
to
obstacles (reference)
Display
color Green Display flashing speed
red
70ÿ
buzzer
sound
• Maintain proper tire pressure. Doing so may
cause false alarms or erroneous operations.
• When an obstacle is detected in front of the vehicle
when the shift position is in and the vehicle speed
is approximately 10km/h or less and the camera
is not displayed, the Intelligent Around View
Monitor screen is automatically displayed.
50cm
Beep,
beep,
beep...
70cm
buzzer
sound
Distance
to
obstacles (reference)
Display color Green Green Yellow Red Display
blinking
speed
150ÿ
Pea
30cm
$/$: Different equipment depending on vehicle model, options, etc.
camera system
ÿ Corner sonar
ÿ Front center sonar
able
ÿ Sonar display color
How to drive
ÿ Sonar function OFF
ÿ Rear center sonar
ÿ Automatic display of camera screen by sonar
253
advice
Notice
Machine Translated by Google
Intelligent Around View
Monitorÿ Precautions
warn
advice
254
camera system
How to drive
ÿ When the sonar system stops working
• When the obstacle disappears, the Intelligent
Around View Monitor turns off automatically.
• Cameras are installed in the center of the
front grill, door mirrors, and above the
rear license plate. Do not attach anything
to the camera that may interfere with its
operation. If you install an illuminated
license plate or license plate rim, part of
the front view and rear view monitor
images may not be displayed. • Use the
distance reference line and
vehicle width reference line as a guide on
paved flat roads. The distance displayed
on the screen is a guideline, and the
distance between your vehicle and the
obstacles displayed may differ from the
actual distance.
It looks like it's in the middle of nowhere.
Use a mirror or visually determine the
correct distance. • The
display lines in the front view and rear view
may appear different from the actual
distance to obstacles depending on the
road surface conditions. Familiarize
yourself with the features.
• If there is an abnormality in the system, a
warning will be displayed in the Advanced
Drive Assist Display and the system will
stop. Sonar system error warning ( P.317)
• If the camera gets dirty, rain, or snow, the
image quality may deteriorate. Please
clean the camera. Handling the front/side
view camera ÿ (P.371) Handling the rear
view cameraÿ (P.371) • Do
not use alcohol, benzene, thinner,
etc. to
clean the camera. Doing so may cause
discoloration. Wipe off with a cloth
moistened with diluted neutral detergent,
and then wipe with a dry cloth. • Be careful
not to scratch the camera as it may
adversely
affect the image on the monitor. • Do not use
wax on the camera. Wipe off the wax with
a clean cloth
moistened with diluted neutral detergent.
• The reference line and estimated course
line may differ from the actual distance
due to the number of passengers, fuel
capacity, and other factors.
Please use it as a guide. • If tires are replaced
with tires of a different size, the expected
course line and top view may be
displayed incorrectly. • Obstacles displayed
on the monitor appear farther away when
driving uphill. On downhills, obstacles
appearing on the monitor are closer than they actually are.
Machine Translated by Google

Misaligned display –
Brightness of each camera image is different
When the shift position is other than , press the
button on the intelligent rearview mirror
(vehicles without manufacturer's option navigation
system) or the camera (vehicles with
manufacturer's option navigation system) to
display the intelligent around view monitor, then
turn on the sonar or If the moving object detection
function is not activated and no operation is
performed for about 3 minutes, the Intelligent
Around View Monitor display will turn off. (3-
minute timer function) • The display of the image
may be delayed after the screen is switched. The
image may be temporarily
distorted until the Intelligent Around View Monitor is
fully displayed. • When the outside air temperature
is extremely high or low, the image may be poor,
but this is not a malfunction. • If you expose the
camera directly to strong light, the image
quality may deteriorate, but this is not a malfunction.
$/$: Different equipment depending on vehicle model, options, etc.
camera system
• The image may flicker under fluorescent
lighting, but this is not a malfunction. •
Intelligent Around
View The color of the image on the monitor
may look slightly different from the actual
color.
• Because images from four cameras are
processed and displayed, top view
images may appear as follows. –Three-
dimensional
objects appear to be collapsing
–Vehicles that are higher than the road
surface appear farther than
they really are
• Certain areas are not shown on the camera.
In the front or rear view, the underside of
the bumper or parts of the ground may not
be visible. In the top view, objects near the
boundary of the range projected by the
camera and objects higher than the road
surface may not be displayed.
• The image is poorly reflected in dark places
or at night, and colors may look different,
but this is not a malfunction. •
There may be a difference in the sharpness
of images from each camera in the top
view.
• Due to the characteristics of the camera lens, the
distance on the screen may appear different
from the actual distance, and the object may
appear deformed. The vehicle width reference
line and expected course line are wider than the
actual vehicle width and course.
How to drive
ZEG1013X
255
Knowledge
Projected range
Machine Translated by Google
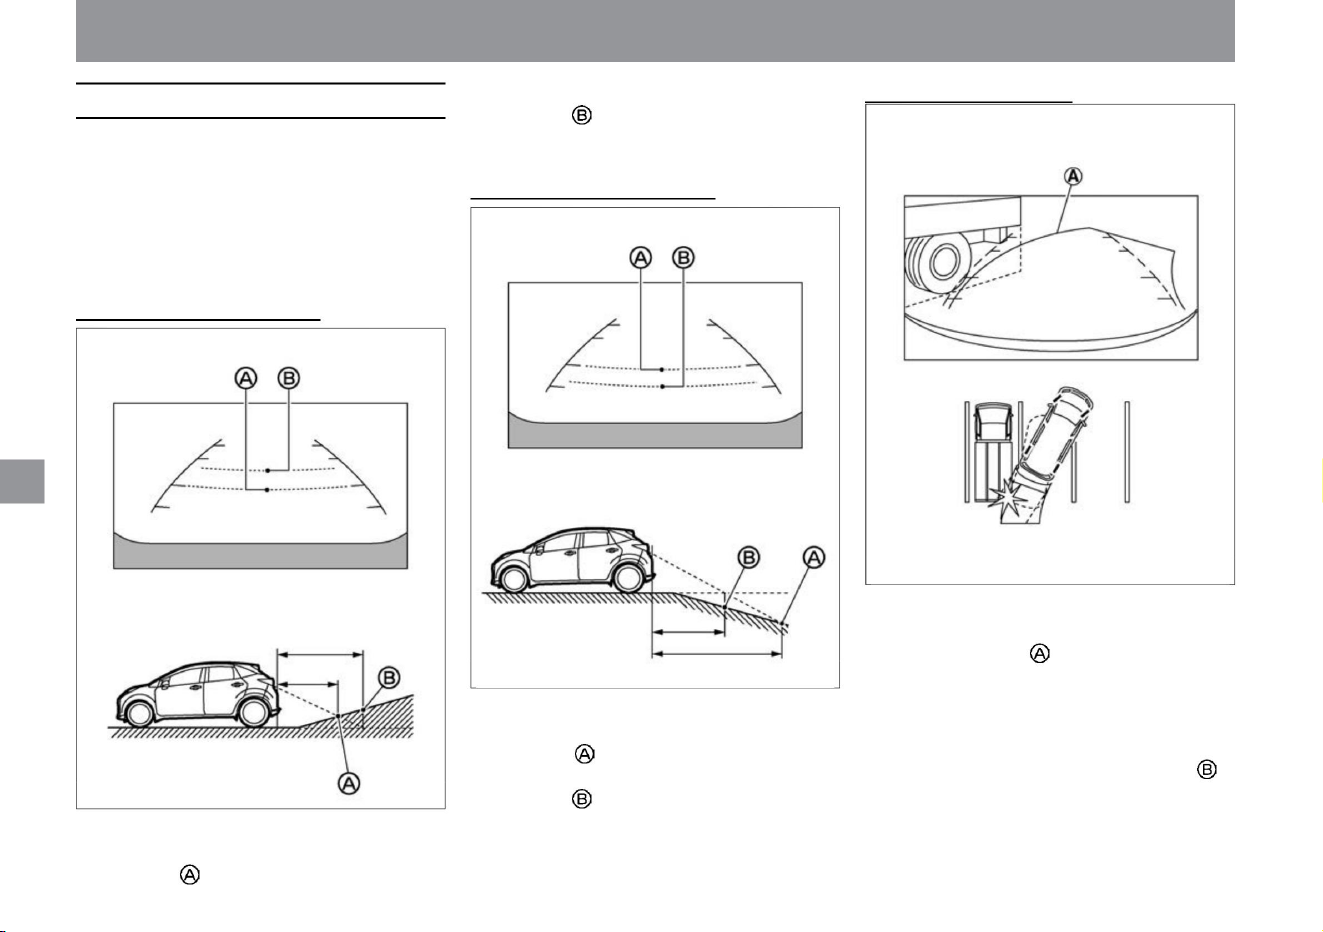
MEG0159X
ZEG1015X
ZEG1014X
camera system
When a three-dimensional object is nearby
However, what is actually at a distance of 1m is the
position. When there are obstacles on an uphill, the
obstacles appear farther away than they really are.
When there is a steep
downhill behind you
• If there is a three-dimensional object nearby, the displayed
distance may differ from the actual distance. •
Example 1: Predicted course line does not touch the body
of the displayed truck. However, if the body of the truck
overhangs the actual path, it may hit you. • Example 2:
In the top view shown, there appears to be a small
distance
between your car and the truck body. but,
• Use the distance reference line and vehicle width reference
line displayed in the front view and rear view as a
guide on paved flat roads. The distance displayed on
the screen is only a guideline, and the distance between
your vehicle and the obstacles displayed may differ
from the actual distance.
When there is a steep uphill behind you
• The distance guideline and vehicle width guideline are
displayed behind the actual distance. For example,
even though the distance to the location is shown as
1m, the location is actually 1m away. When there are
obstacles on the downhill, the obstacles appear closer
than they actually are.
• The distance guideline and vehicle width guideline are
displayed in front of the actual distance. For example,
the distance to position is displayed as 1m.
How to drive
256
Error between image and actual road surface
Machine Translated by Google
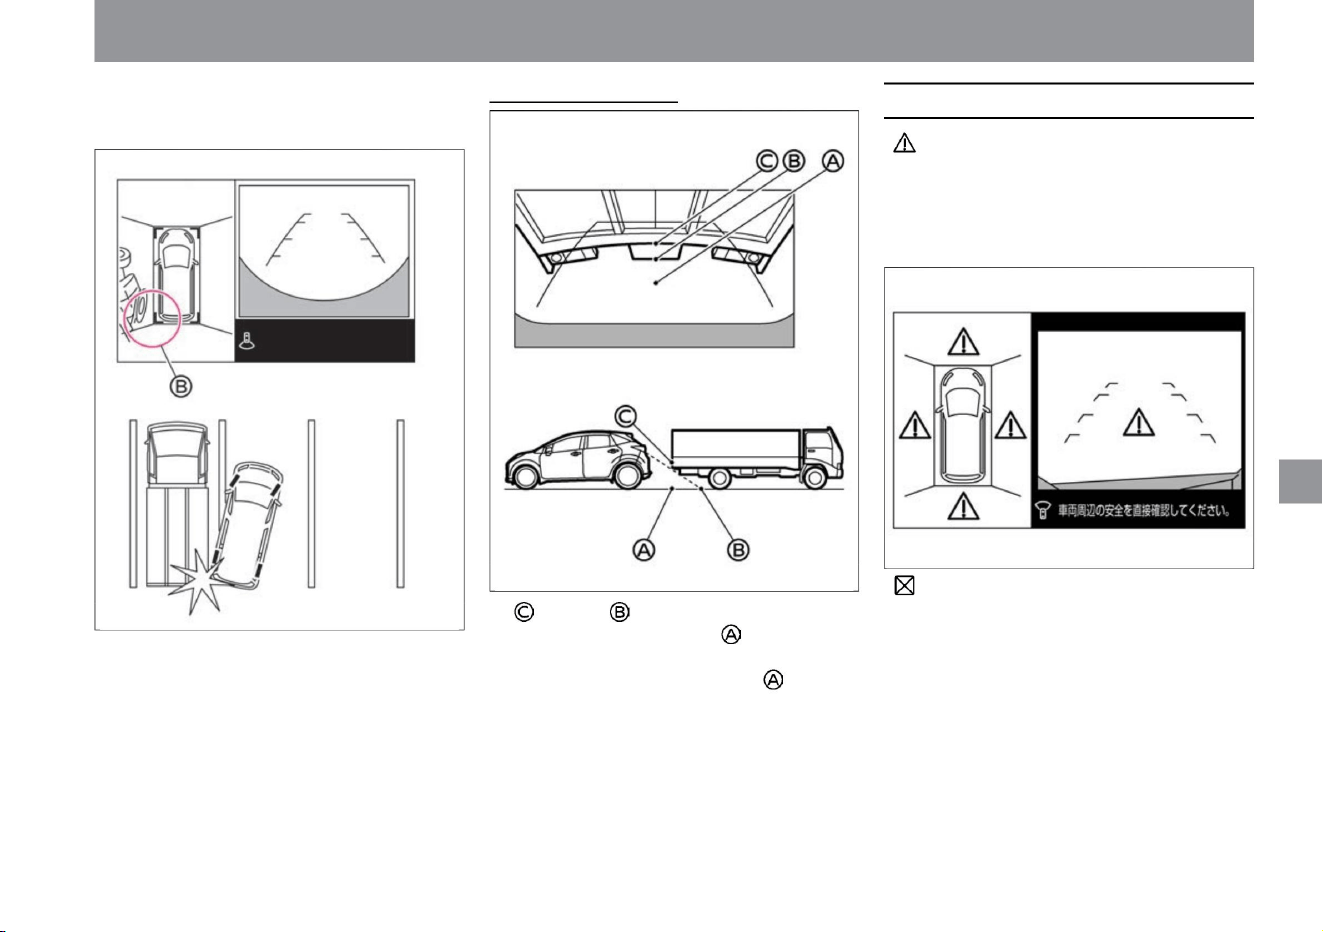
How to drive
ZEG1081X
ZEG1016X
ZEG1080X
camera system
Error display on screen
257
$/$: Different equipment depending on vehicle model, options, etc.
When approaching a three-dimensional object
If the icon appears on the screen, there
may be a problem with the Intelligent Around
View Monitor (with moving object detection
function). There is no problem with normal
driving, but please have it inspected by a
NISSAN dealer.
The actual distance is less than shown and
you may hit the truck body.
If the icon appears on the screen, the
camera image may be temporarily affected by
surrounding electronic devices. If it appears
frequently, have it checked by a NISSAN dealer.
The position of • appears to be farther than the
position of , but it is actually the same
distance as the position of . If the body of
the truck overhangs the actual course, it
may collide with you if it is lowered to the position of .
Machine Translated by Google
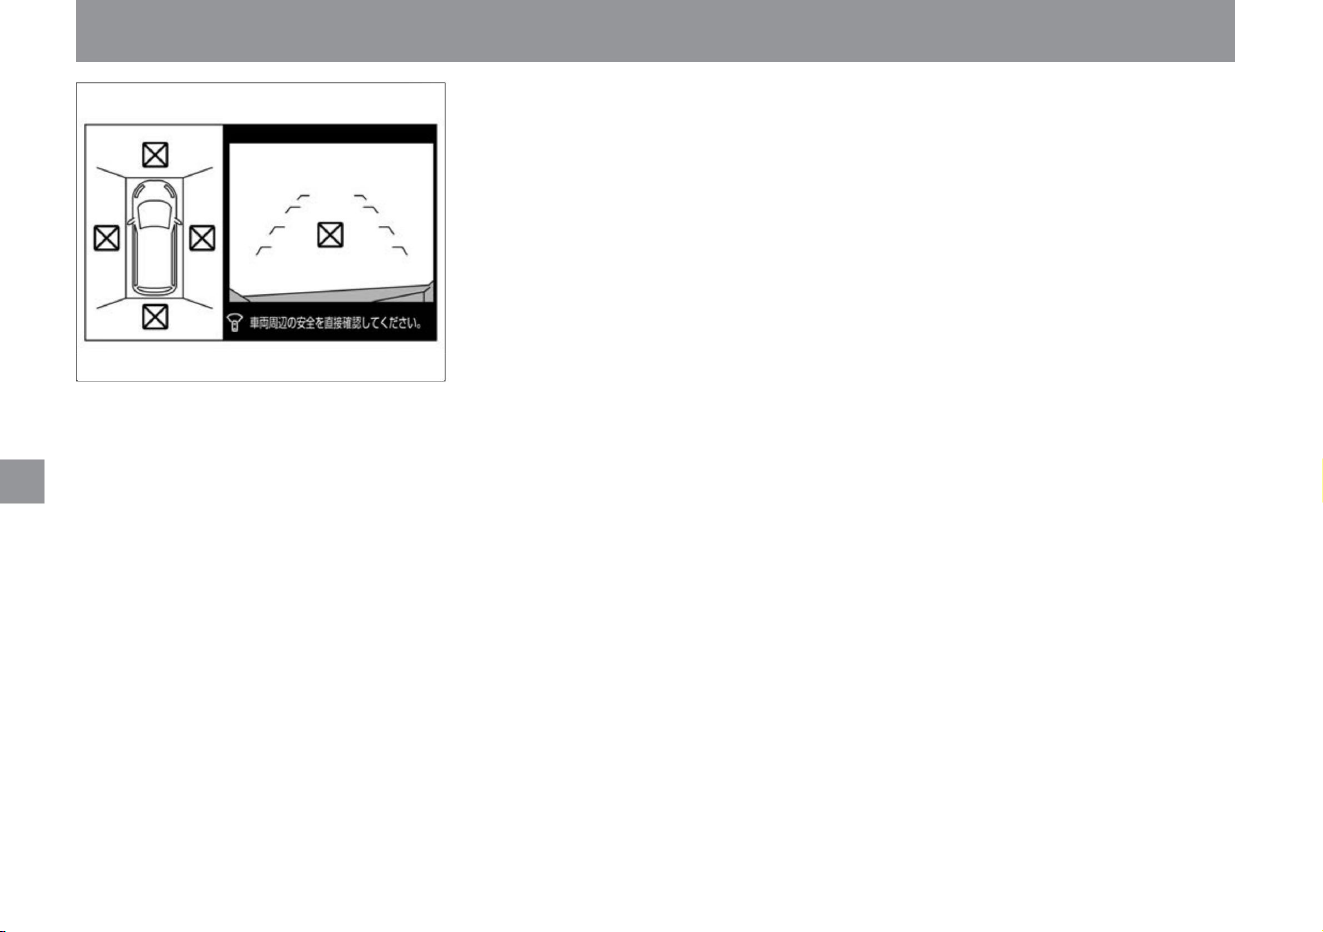
258
camera system
How to drive
ZEG1082X
Machine Translated by Google
Interior equipment
Advanced automatic accident
notification system ÿ Steering
heater ÿ Heated
seat ÿ Power socket
center console box
glove box
P.265
P.262
P.260
P.275
console pocket
P.270
P.262
P.263
lower console tray
P.269
P.269
P.272
P.262
Sun visor/vanity mirror
cup holder/bottle holder
P.271
P.263
Map lamp/Room lamp/Luggage lamp
USB power socket ÿ
wireless charger ÿ
floor carpet
P.273
P.274
ticket holder
259
Other room equipmentinterior lighting
indoor equipment
storage equipment
Machine Translated by Google
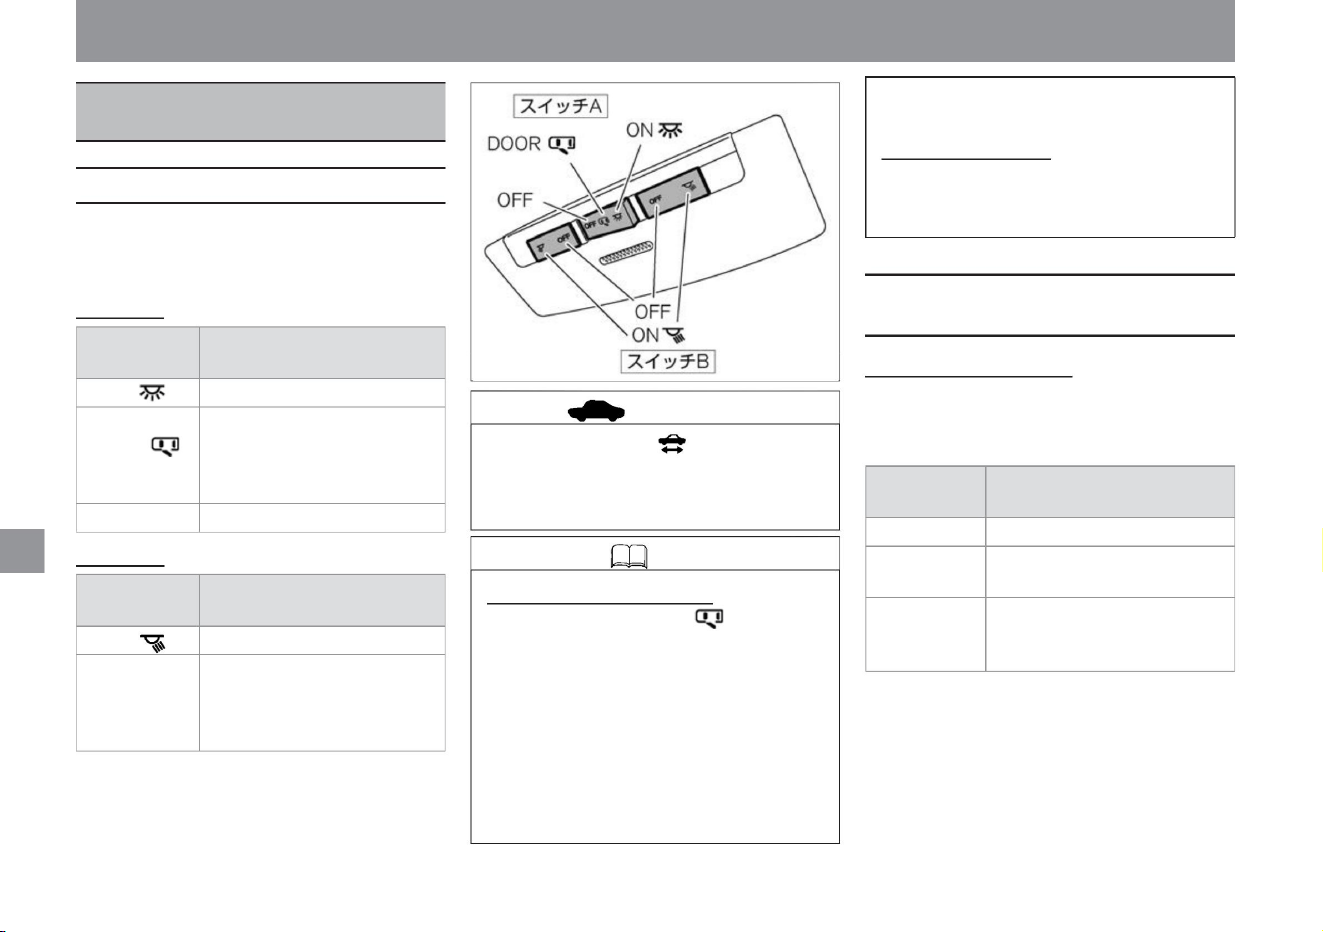
OFF (neutral)
Always on
When switch A is in neutral, the light
turns on when the door (except the
back door) is opened and turns off
when the door is closed.
ON Always on Off
The light turns on when a door (except
the back door) is opened and turns off
when the door is closed.
Switch B
ON
ON
switch
position
OFF OFF
Steady on
When the switch is in the neutral
position, the light turns on when a door
(except the back door) is opened
and turns off when the door is closed.
How to use the room lamp
switch
position
How to turn on/off
DOOR
How to turn on/off
OFF
(horizontal)
How to turn on/off
Switch position
DOOR
(neutral)
vinegar.
Key-linked interior lighting system •
When switch A is in the DOOR position, the lights will
turn on under the following conditions.
– About 20 seconds after turning off the power switch
– About 20
seconds after unlocking the doors (excluding the back
door) when the power switch is turned off – About
20 seconds after
unlocking the doors (excluding the back door) when
the power switch is off 20 seconds after closing
MEH0090X
interior lighting
• The room lamp is located in the center of the ceiling.
• It lights up and goes out as follows.
Switch A
–When the door (except the back door) is open
Battery Saver
• To prevent the 12V
battery from being discharged, the map lamp will
turn off after 10 minutes or more.
• The map lamp is located in the center of the front
seat ceiling.
• Do not leave the map lamp on for a long time
when the ready-to-drive indicator lamp is off.
There is a risk that the 12V battery will rise.
• It lights up and goes out as follows.
advice
260
How to use the map lamp
How to use the room lamp / About
the luggage lamp
Knowledge
indoor equipment
Map lamp/Room lamp/
Luggage lamp
Machine Translated by Google
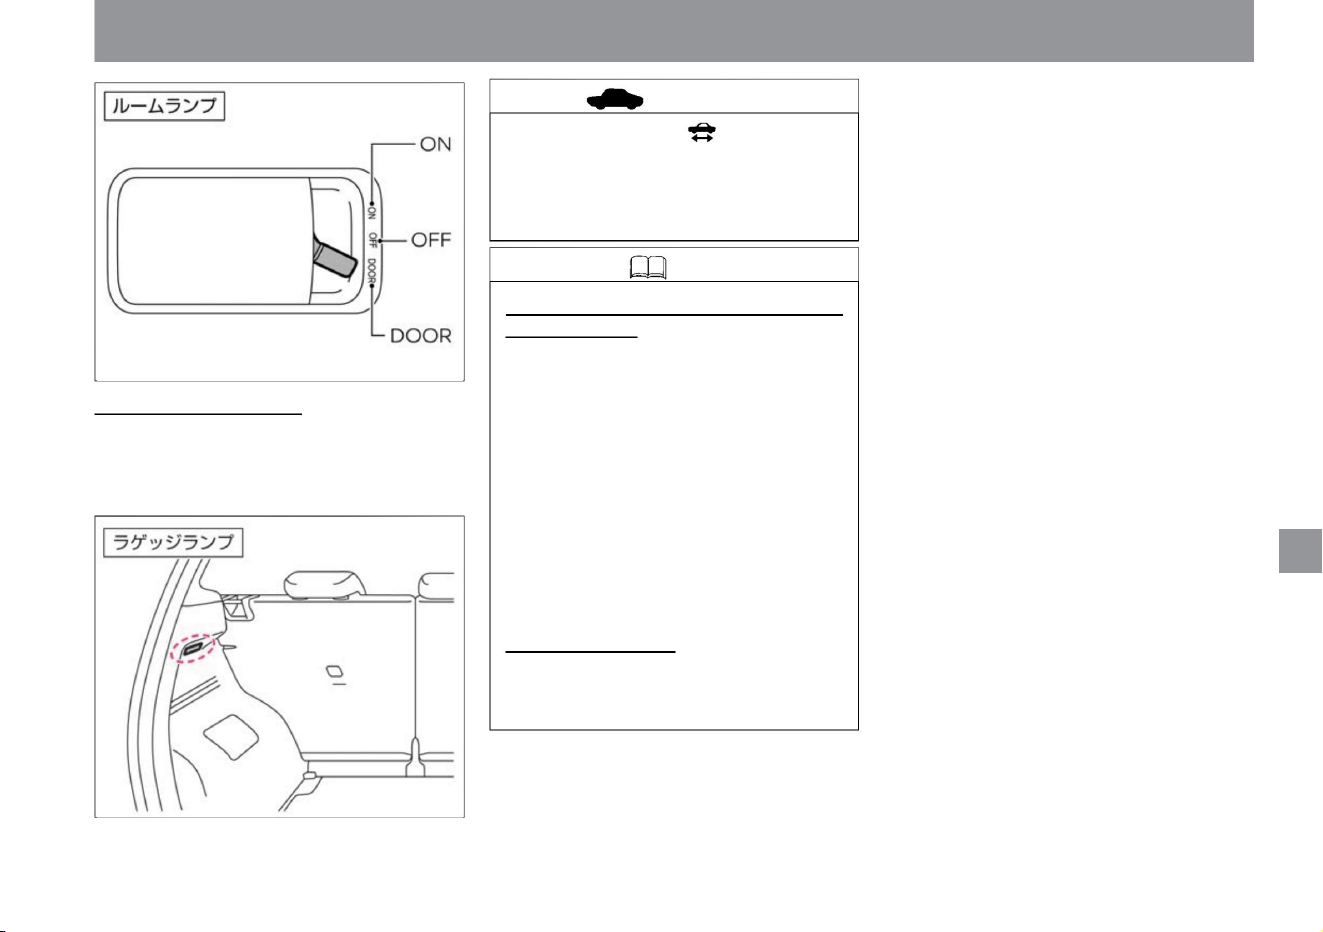
About the luggage lamp The
luggage lamp is located on the left side of the luggage
compartment.
• The lights automatically turn on when the back door is
opened and turn off when the back door is closed.
The 12V battery may go up.
Key-linked interior lighting system (excluding
luggage lamps)
• When the interior lamp switch is in the DOOR
position, it will light under the following
conditions.
indoor equipment
interior lighting
• Do not leave the room lamp and luggage lamp
on for a long time when the ready-to-drive
indicator lamp is off.
– About 20 seconds after turning off the power
switch –
About 20 seconds after unlocking the doors
when the power switch is turned
off – About 20 seconds after closing the doors
(excluding the back door) when the power
switch is turned
off Approximately 20 seconds – when the doors
(excluding
the back door) are open
Battery saver • To prevent the 12V battery from
being discharged, the room lamp and luggage
lamp will turn off after 10 minutes or more of lighting.
ZEH0169X
ZEH0124X
$/$: Different equipment depending on vehicle model, options, etc.
Knowledge
advice
261
Machine Translated by Google
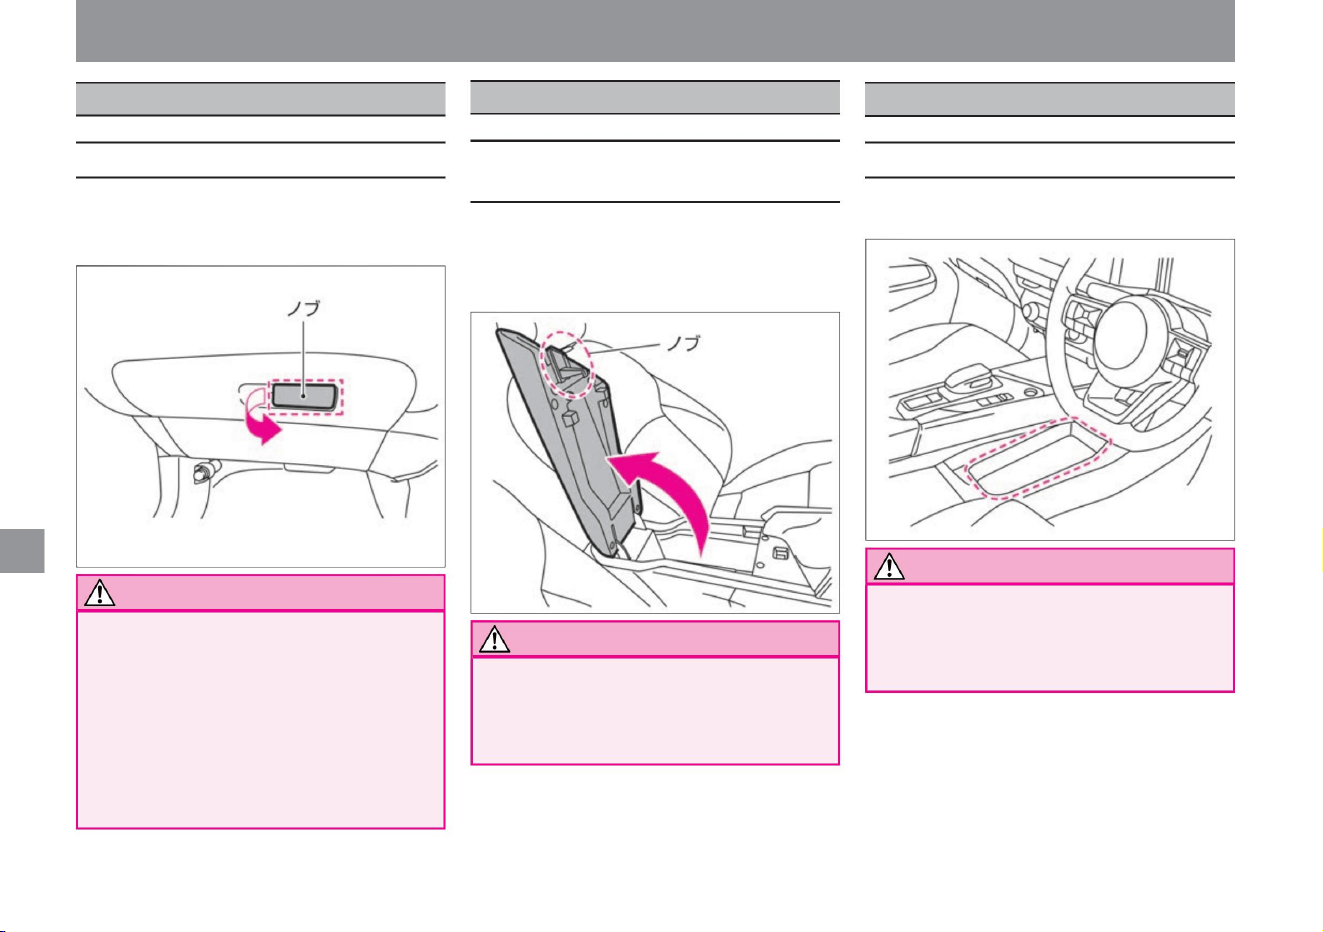
glove box
center console box
lower console tray
ZEH0126X
ZEH0127X
ZEH0139X
Notice
How to use the center console box
Notice
Notice
262
About the lower console tray
How to use the glove box
storage equipment
be.
There is a risk of hitting the body when
the lid is fully opened.
indoor equipment
• To open, pull the knob and lift the lid. • When
closing, push the
lid until it locks.
• Do not place anything that may fly out into the
lower console tray. Objects may
fly out in the event of sudden braking or a
collision, resulting in an unexpected injury.
• Do not drive with the glove box open. There
is a risk
that the stored items may pop out while
you are driving, or the open lid may hit
your body, resulting in an
unexpected injury. • When opening the lid, open it slowly.
• To open, pull the knob toward you. • When
closing, push the lid until it locks.
• The lower console tray is located at the bottom
of the center console.
• Do not leave the center console box open.
Unexpected injury
may occur when the lid is opened.
Machine Translated by Google
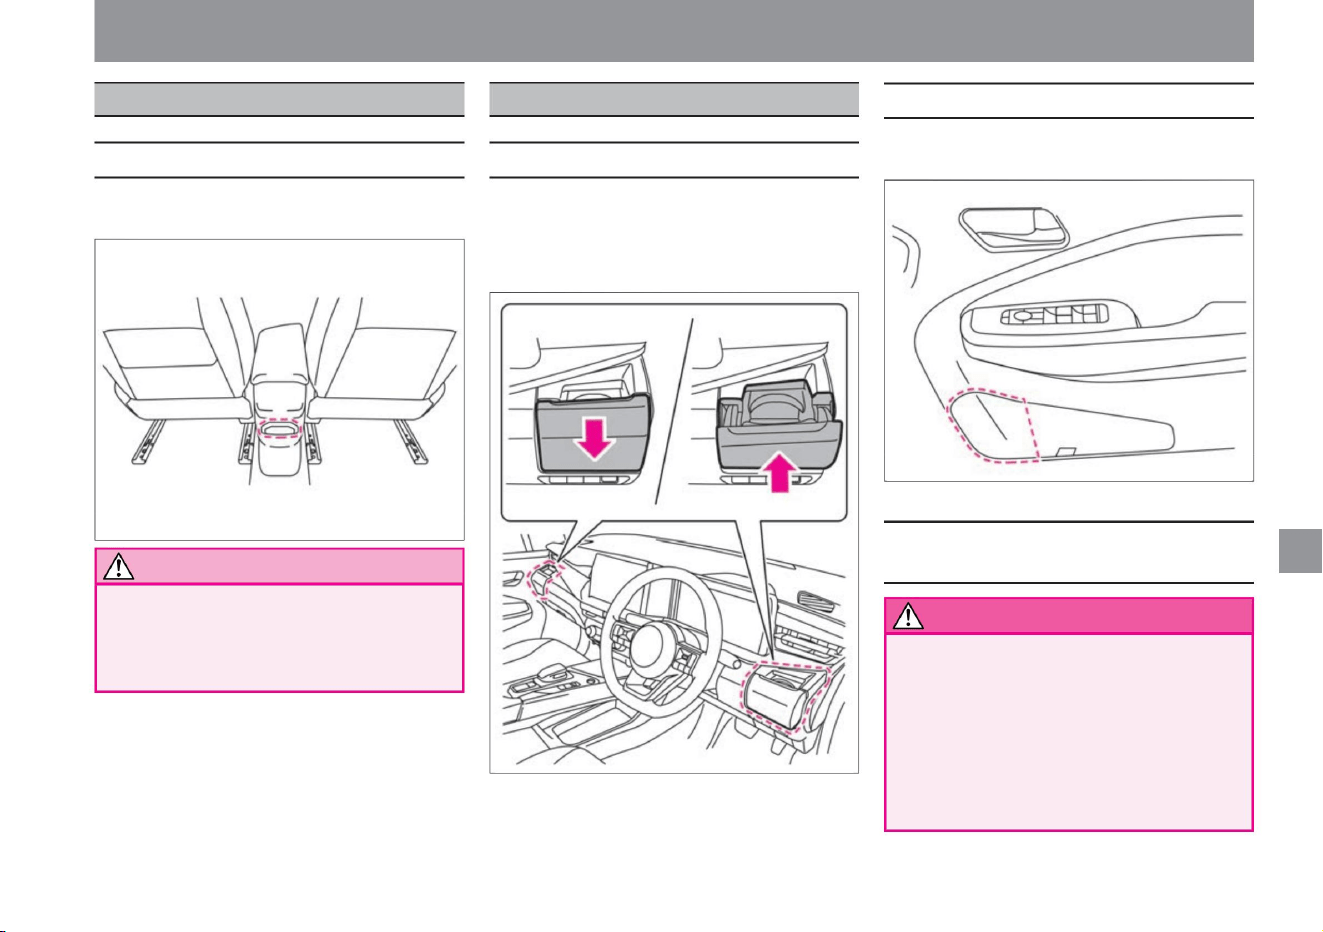
storage equipment
• Bottle holders are located in the door pockets of the
front and rear seats.
• There are two parts on the instrument panel.
Do not put hard objects such as bottles .
• Do not put anything that might fall out into the
console pocket. Objects may fly
out in the event of sudden braking or a collision,
resulting in an unexpected injury.
• The console pocket is located at the rear of the center
console.
• Do not put in or take out a drink while driving.
increase. • Pull out to use. • Push
back when storing.
In the event of an accident such as a
side collision, serious injury may result.
$/$: Different equipment depending on vehicle model, options, etc.
cup holder/bottle holder
If you take a drink in and out while driving, you will be
careless ahead and it may lead to an unexpected
accident. While driving, please put in and take out a
drink while the vehicle is stopped such as waiting at a traffic light.
About the bottle holder
About the cup holder
Notes on cup holder/bottle holder
Notice
263
warn
About the console pocket
indoor equipment
console pocket
ZEH0128X
ZEH0129X
ZEH0140X
Machine Translated by Google
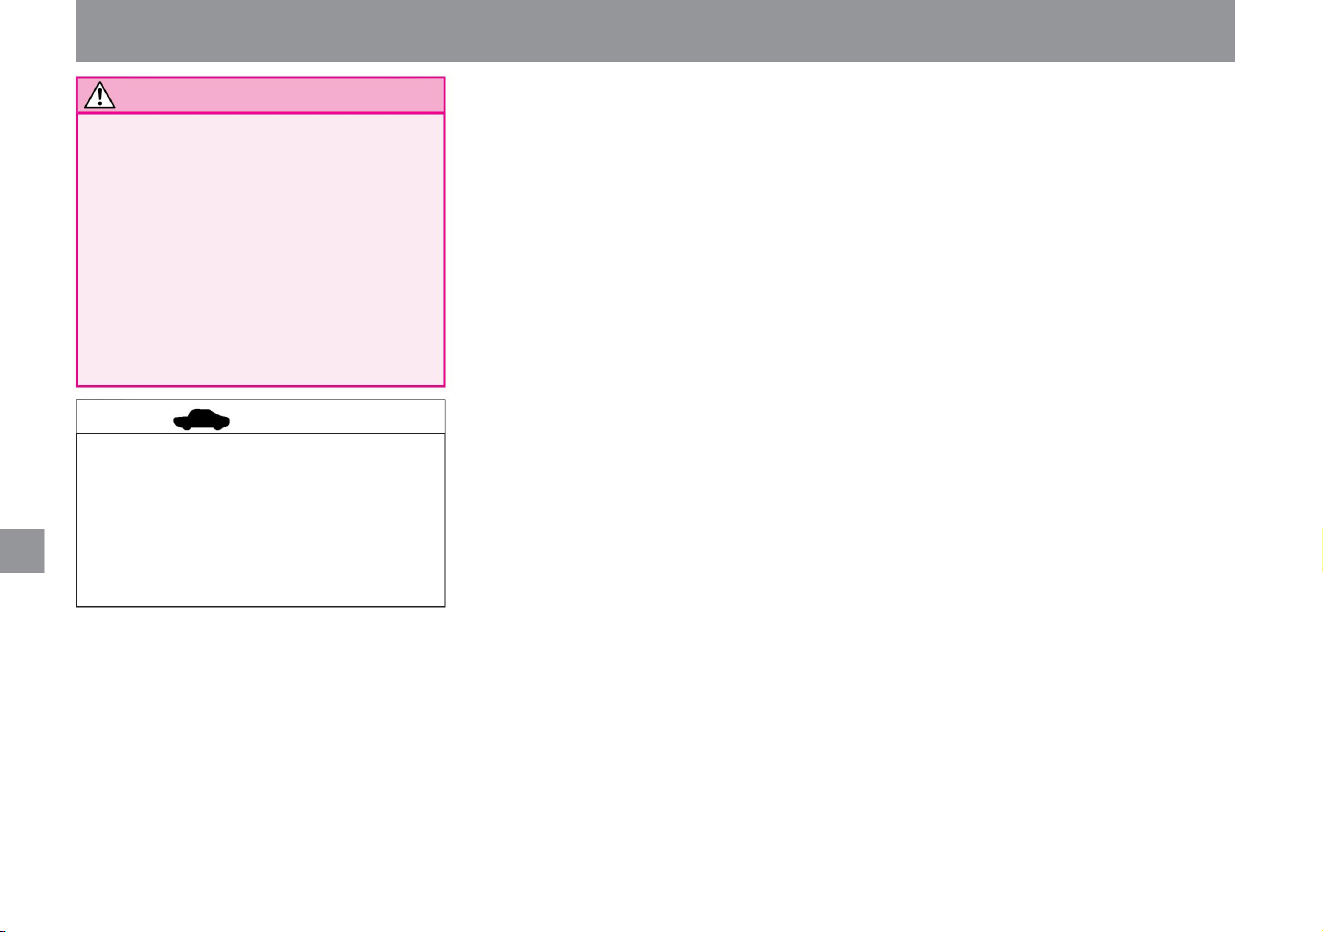
Advice • If
you place a full drink or liquid container
in the cup holder, it may spill or leak
while driving and damage the
vehicle's electronic equipment. Do
not place full containers.
264
Notice
• Do not place hot drinks
on the product. Hot beverages
placed in cup holders may spill or
splatter while driving, causing burns
to occupants.
• Be careful not to spill your drink.
storage equipment
indoor equipment
Depending on the shape of the drink
container, it may not be securely
fixed. • Do not spill drinks on the switches or
screens inside the vehicle.
Failure to do so may result in malfunction or fire.
Machine Translated by Google
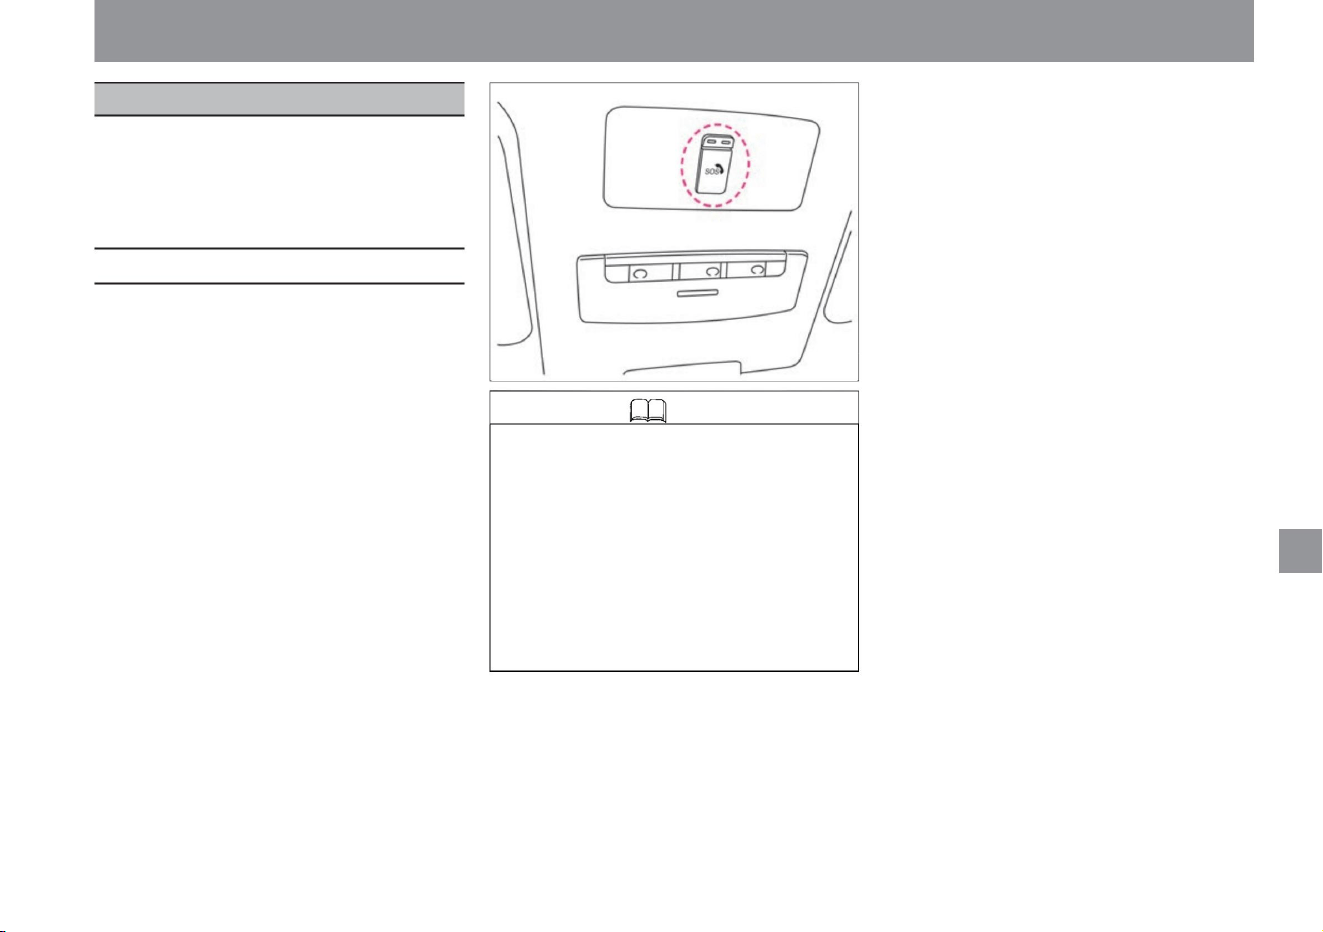
Advanced Automatic Accident Reporting System
265
Knowledge
Other room equipment
$/$: Different equipment depending on vehicle model, options, etc.
• When the power switch is on, you can start
an SOS call by pressing the SOS call switch.
• In the
event of an accident (when deploying SRS
airbags, SRS side airbags, SRS curtain
airbags, and SRS knee airbags), an SOS
call will automatically start. •
The SOS call switch is located near the map
lamp. • The
ProPILOT emergency stop support system
(with SOS call function) automatically
initiates an SOS call in the event of an
emergency stop.
• SOS Call is a service that assists in
contacting police, fire departments and
medical institutions in emergencies
such as sudden illness, crime and
accidents. • The SOS call service is
provided
by Japan Emergency Call Service. • You
cannot use the SOS call unless you
apply for service at a Nissan dealer and
complete the initial settings on the vehicle side.
You can start an SOS call by pressing the SOS
call switch. Also, in the event of an accident
(when deploying SRS airbags, SRS side
airbags, SRS curtain airbags, and SRS knee
airbags), an SOS call will automatically start.
indoor equipment
ZEH0093X
Advanced automatic accident notification systemÿ
Machine Translated by Google
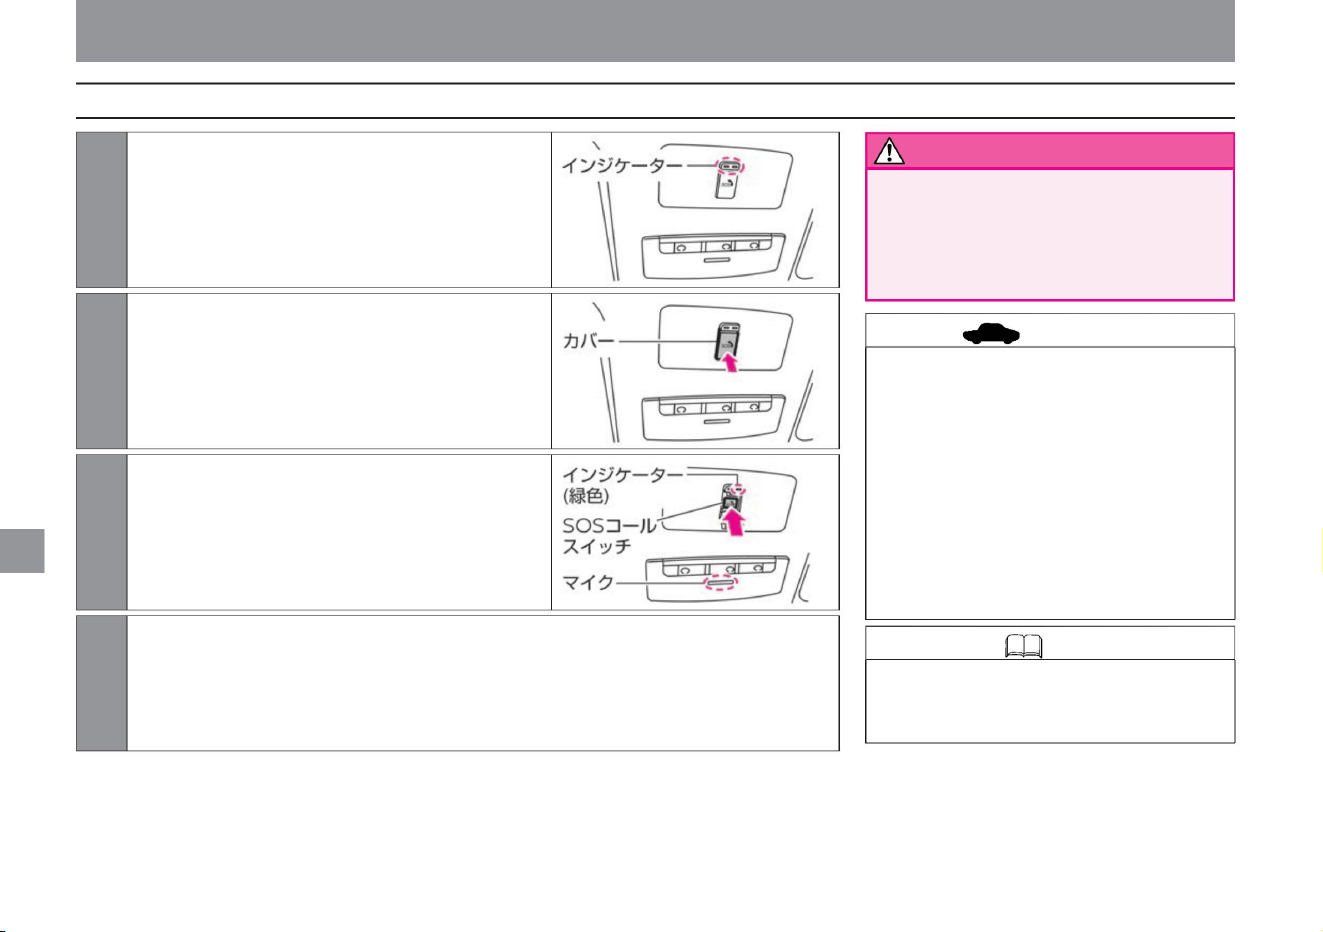
warn
advice
How to use the advanced automatic accident notification system
Knowledge • During a call with an SOS call
service operator or public institution, the
call cannot be ended from the vehicle side.
266
ZEH0094X
ZEH0096X
ZEH0095X
4 Talk to the operator of the SOS call service. Depending on the situation,
you may receive a return call from the operator or an incoming call from a public institution (police, fire
department, medical institution). When receiving an incoming call, the voice connection is
automatically established. After the call is over, put the cover back on and push until it locks.
1Turn on the power switch.
3 Press the SOS call switch for about 1 second.
2 Press the cover of the SOS call switch to open it.
Other room equipment
indoor equipment
The SOS call switch indicator lights up in both red and
green, and after about 5 seconds, only the green light
continues to light.
A flashing green indicator will connect you to the operator.
• In the following cases, immediately have the
vehicle inspected by a NISSAN
dealer. – When both the red and green
indicators do not light even when the power
switch is turned on –
When about 5 seconds after both the red and
green indicators light up, only the red
indicator lights up Indicators If both
the red and green lights are off, move the car to a
place with a better signal environment.
• Stop the vehicle in a safe place before pressing
the SOS call switch. If the driver tries
to press the switch while driving, it may lead
to an unexpected accident.
vinegar.
Machine Translated by Google
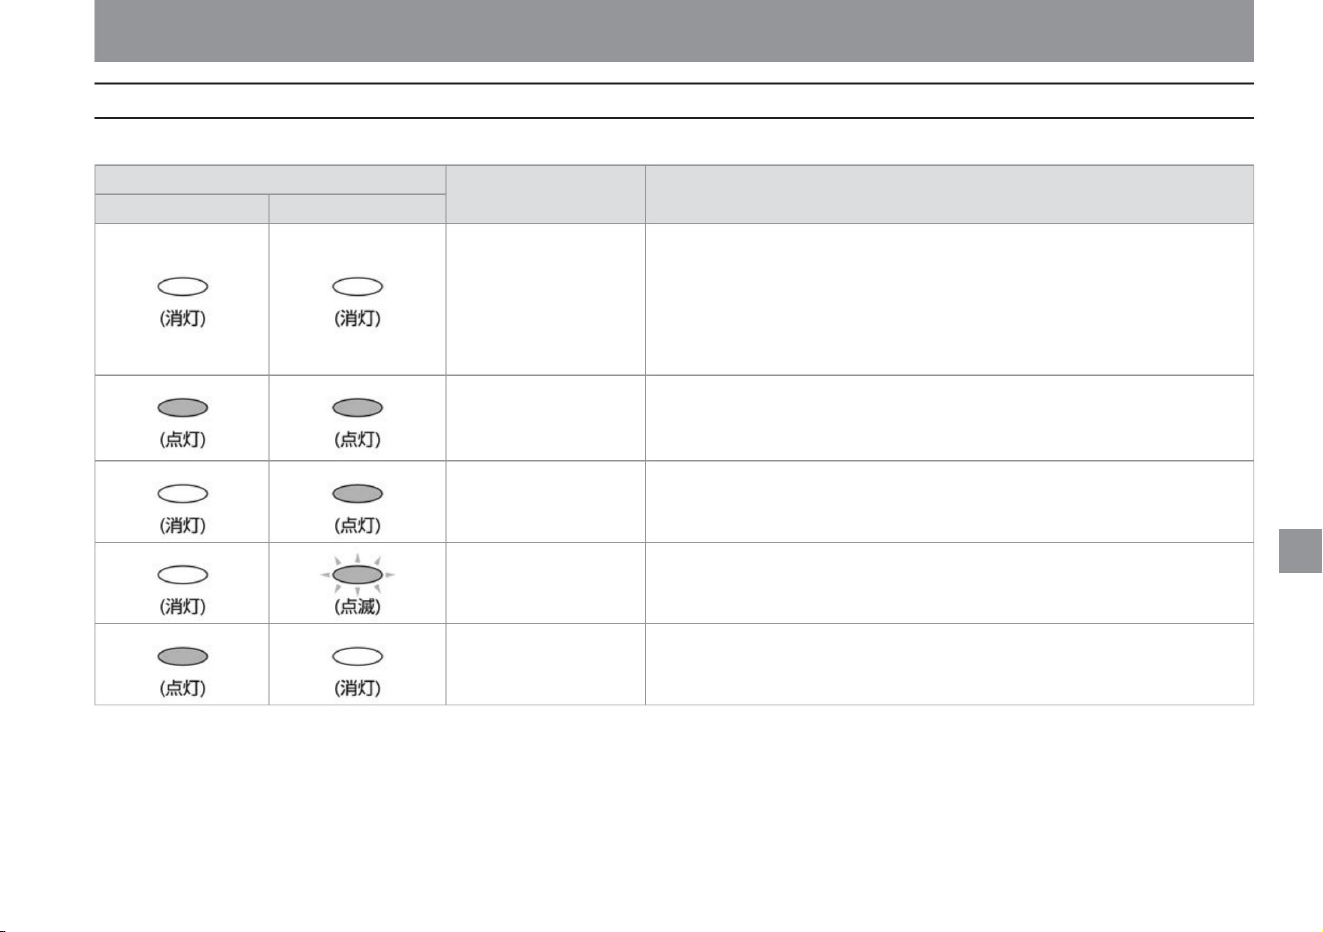
About the SOS call switch indicator
267
indoor equipment
• The SOS call switch has an indicator that shows the system status.
• The system is off. • Turn on the
power switch to turn on the power. If the red and green indicators do not illuminate
even when the power switch is turned on, have the vehicle inspected by a
NISSAN dealer.
• The radio wave environment is poor and SOS calls cannot be started. ring the car
• The service cannot be provided normally due to system failure or no SOS call
service contract. Promptly confirm the expiration date of the service contract and
have the vehicle inspected by a Nissan dealer.
Other room equipment
ZEH0067X
ZEH0068X
ZEH0068X
ZEH0067X
ZEH0067X
ZEH0068X ZEH0068X
ZEH0067X
ZEH0067X
ZEH0069X
$/$: Different equipment depending on vehicle model, options, etc.
Please move it to a better location. • Informs
that the system has been turned on. • When the
system is turned on, it lights up for about 5 seconds. • If
the initial settings are not completed, the light will continue to light.
System ON notification
system state
Using SOS call • You are on a call with an operator.
Explanation/Remedy
Indicator lighting pattern Red Green
system error
SOS call service No
contract
Ready to start SOS call • You can start an SOS call.
System off Out
of service area
Machine Translated by Google
• If you are giving up your vehicle while under contract
for the SOS call service, be sure to contact the
NissanConnect Customer Center to cancel the
contract.
NissanConnect Customer Center:
• The advanced automatic accident notification system
• If only the red indicator of the SOS call switch lights
up, there is something wrong with the system or
the service contract has expired. Please check
the expiration date of the contract and have the
vehicle inspected at a Nissan dealer as soon as
possible. • Do not stop the e-POWER
system while using the SOS call after confirming safety
as it may cause the 12V battery to run out. •
Speak into the microphone on the map lamp
during a call. • The advanced
automatic accident notification system uses the same
data network as mobile phones. Out-of-
service areas (in tunnels, ground
Only available in • The
advanced automatic accident notification system can
be used by applying for the Nissan sanConnect
service. • You can initiate an SOS
call even when the red indicator of the SOS call switch
is lit. However, depending on the abnormality that
has occurred, it may not be possible to perform
voice calls or guidance for emergency vehicles
normally. Have the vehicle inspected by a Nissan
dealer as soon as possible. • You cannot cancel
the call after starting the SOS call. Do not press
the SOS call
switch except in emergencies such as pranks or
checking functions. • The SOS call uses the in-
vehicle communication device, so it can be used
without the customer's mobile phone. • You
cannot change the volume of the voice during a call. •
If you do not wish to continue using the SOS Call
Service after the expiration of
your contract, please complete the cancellation
procedures at a Nissan dealer.
You can turn off the lighting of the SOS call switch
indicator. • This system implements open source
software. For licensing information, see the
following website:
0120-981-523
parking lots, etc.) or places where radio waves
are difficult to reach (mountainous areas). •
Ambulance
vehicles are identified at the scene based on vehicle
location, vehicle type, body color, and registration
number. If the car has been repainted so much
that the original color is no longer visible, the
arrival of the ambulance may be delayed. • A
contract for the
NissanConnect service is required before using the
system. • Initial settings are required on the
vehicle side before using the system. After signing a
service contract, complete the initial settings at a
Nissan dealer. • If you change your vehicle's
registration
number, be sure to contact the NissanConnect
Customer Center. When using the SOS call, if
the car number registered as a member does not
match the actual car number, the arrival of
emergency personnel may be delayed.
• Stop the vehicle in a safe place before pressing
the SOS call switch. If the driver tries to
press the switch while driving, it may lead to an
unexpected accident. • Since SOS calls use
wireless communication
functions, if you use a cardiac pacemaker or other
electrical medical equipment, be sure to contact
the relevant medical electrical equipment
manufacturer or distributor regarding the effects
of radio waves. confirm.
Reception hours 9:00 to 17:00 (excluding year-end and New Year holidays)
indoor equipment
Other room equipment
Precautions regarding the advanced automatic accident
notification system
warn
advice
268
Knowledge
Machine Translated by Google
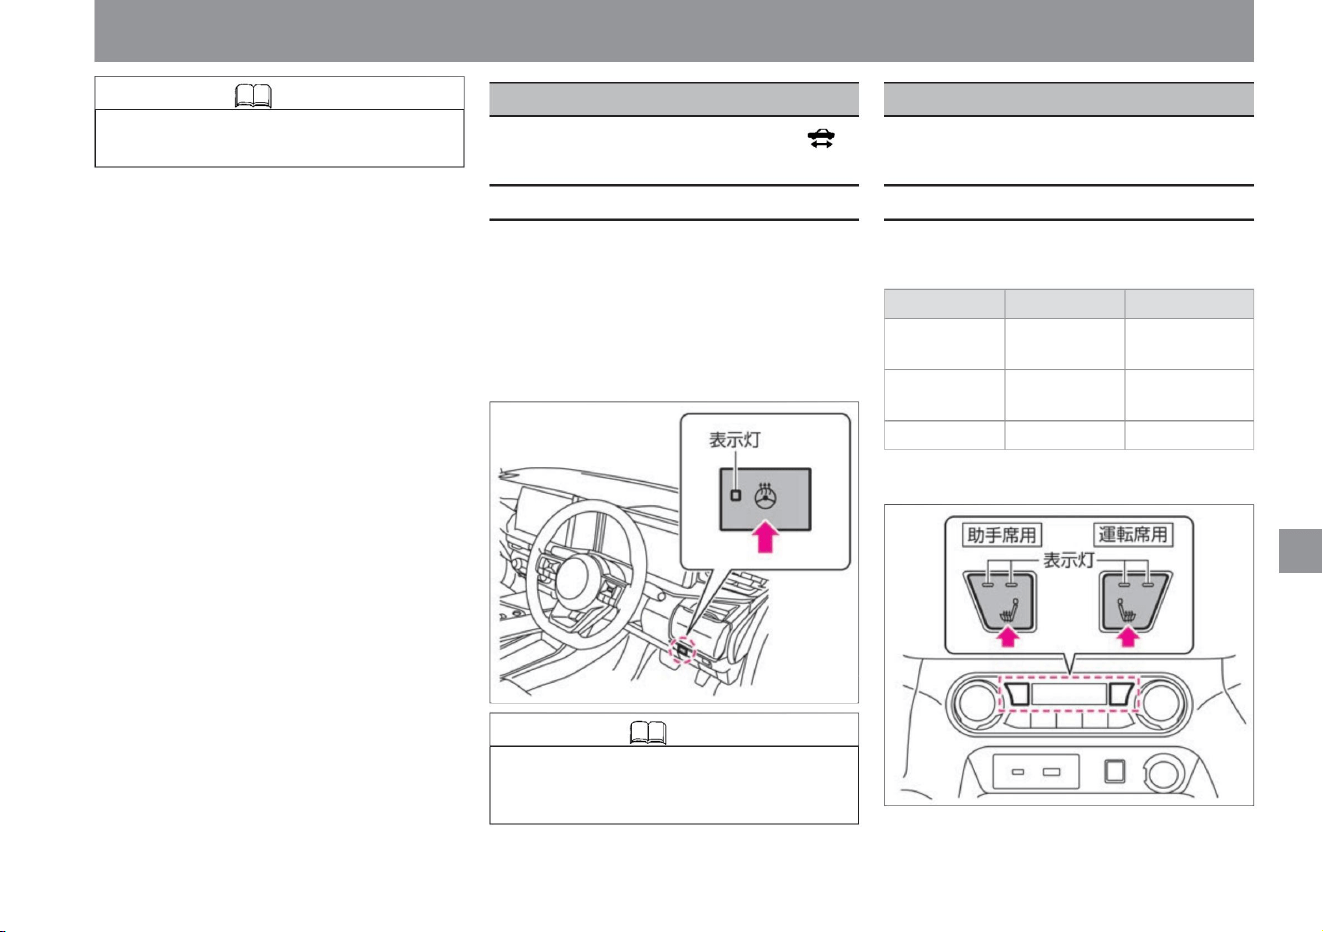
• Press the switch to activate. (Switch
indicator lights up)
two lights
http://opensourceautomotive. com/IC/
tZ7T3eE6AiV4/
Lights
out • Each time the switch is pressed, it switches in the
order of Hi, Lo, OFF, and Hi.
Mode indicator
OFF
When you want to keep
warm
When you want to warm
up quickly
Hi
• When the switch is pressed, it operates for about 30 minutes.
(The indicator light on the switch lights
up.) • During operation, the surface temperature of the handle
is kept above approximately 20°C. •
If the switch is pressed during operation, the operation will stop.
1 lit
increase.
(The indicator light of the switch turns off.)
Work
OFF
It
Other room equipment
$/$: Different equipment depending on vehicle model, options, etc.
Warm up the handle. Can be used when the
ready-to-run indicator light is on.
Warm the front seats. Can be used when the
power switch is ON.
ZEH0131X
ZEH0130X
heater seat
Steering heaterÿ
indoor equipment
How to use the heater sheet
269
Knowledge
How to use the steering heater
Knowledge • When the temperature of the steering
wheel is about 20°C or higher, the steering heater
will not operate even if you press the switch.
Machine Translated by Google
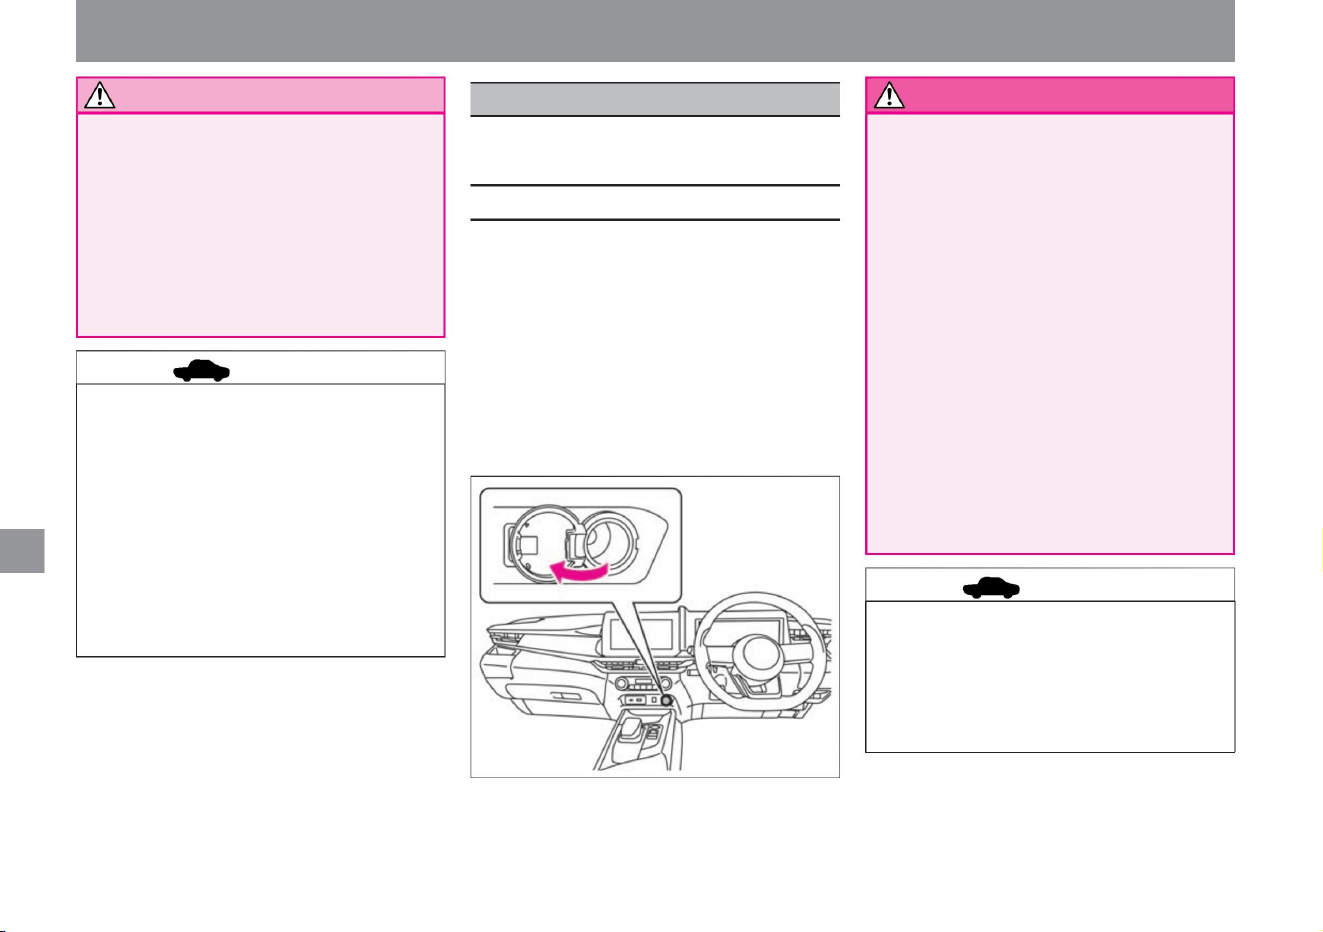
Ru
Other room equipment
indoor equipment
Used to power car accessories. Can be used
when the power switch is ON.
• The power socket is located on the instrument
panel. •
Open the lid to use. • Close
the lid when not in use. • The capacity is
12V (volt), 10A (ampere), and 120W (watt). •
When inserting or removing
the mating plug, turn off the power switch or
turn off the power of the device.
–Insert the mating plug all the way into
the socket –Be
careful with sockets and plugs during and
after use –Do
not insert a cigarette lighter into the
socket –
Do not splash water on the socket or put
your finger or metal objects into it not
• Do not put fur or a cushion on the seat, or
use a seat cover, as it may overheat. •
Do not use thinner, benzine,
alcohol or other organic solvents to clean the
seat. • If you spill water, etc., wipe it off
immediately with a dry cloth. • To
prevent the 12V battery from being
discharged, use the e-POWER
system with it started.
• Observe the following when using the
power
socket. Improper use of the power socket
can not only blow the vehicle's fuse,
but in the worst case, can cause vehicle
fire and burns. –
Do not use multiple wires with double
sockets
– Use power consumption of 120 W or less
• Do not use continuously for a long time.
Doing so may cause low-temperature burns. In
particular, please be careful if you have sensitive
skin, infants, the sick, the elderly, the physically
handicapped, those taking medicine that causes
drowsiness, or those who are heavily
intoxicated or fatigued. • Do not place hard, heavy or
protruding objects on the seat, and do not pierce
the seat with sharp objects such as pins or needles.
ZEH0132X
power socket
• Use the e-POWER system with the
system started to prevent the 12V
battery from being discharged. Also,
do not use it for a long time and do
not use the air conditioner, headlamp,
rear window defogger, etc. at the same time.
advice
advice
270
Notice
How to use the power socket
warn
Machine Translated by Google
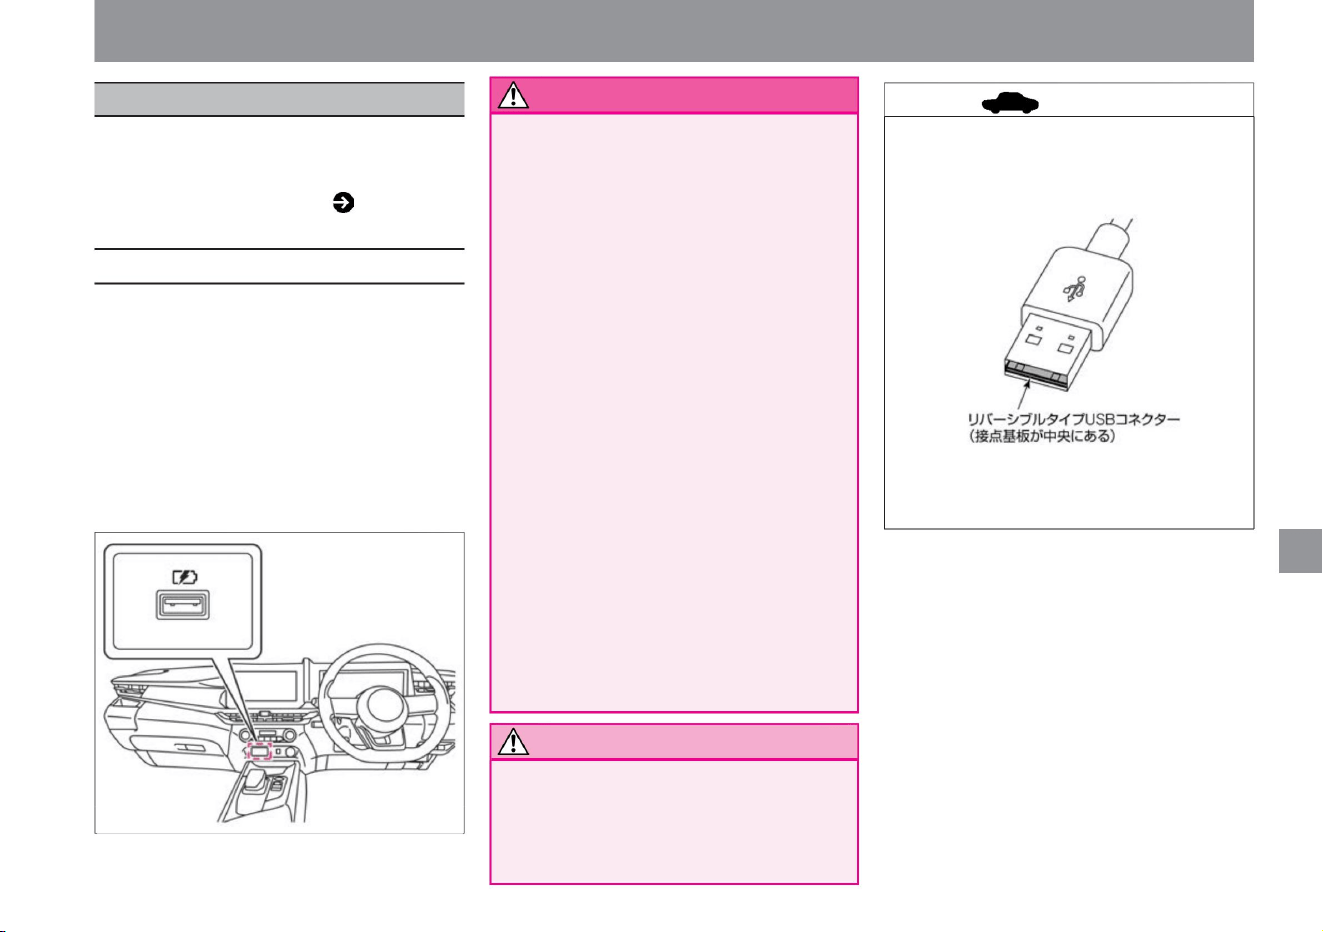
• For the USB power socket of a vehicle equipped
with a manufacturer's option navigation system,
please read the separate navigation system
instruction manual.
–Insert the cable firmly all the way.
• To prevent the 12V battery from being
discharged, use the e-POWER system with
it started.
– Do not splash water on the socket or insert your
finger or metal objects into it –
Pay attention to the orientation of the socket and
do not forcefully connect or disconnect
• Double-sided insertion (reversible) compatible
• Affix the mobile device or connection cable in
a place where it will not interfere with
driving. It
may interfere with driving and lead to an
unexpected accident.
• Do not place mobile devices or connection
cables where they may interfere with the
activation of the SRS airbag.
Other room equipment
The USB power socket is only for charging
mobile devices, etc. Can be used when the
power switch is ON or OFF (ACC state). For
ACC status, please read Auto ACC function
( P.136).
Do not use a USB cable as it may
damage the internal terminals of the
USB power socket.
Improper use of the USB power
socket can not only blow the vehicle
fuse, but in the worst case, can lead
to vehicle fire and burns. – Do
not use an adapter with multiple USB
power sockets to charge many
mobile devices at once – Use one
that consumes 12W or less
A convenient USB power socket is provided
for charging mobile devices. •
The USB power socket is located on the
instrument panel.
• Capacity is 5V (volt), 2.4A (ampere), 12W
(watt).
Ru
SRS airbags may not operate properly
or the mobile device may be thrown
when the SRS airbags are deployed,
resulting in death or serious injury. •
Observe the following
when using the USB power socket.
Ru
Notice
271
advice
How to use the USB power socket
warn
$/$: Different equipment depending on vehicle model, options, etc.
indoor equipment
MEH0127X
ZEH0133X
USB power socketÿ
Machine Translated by Google
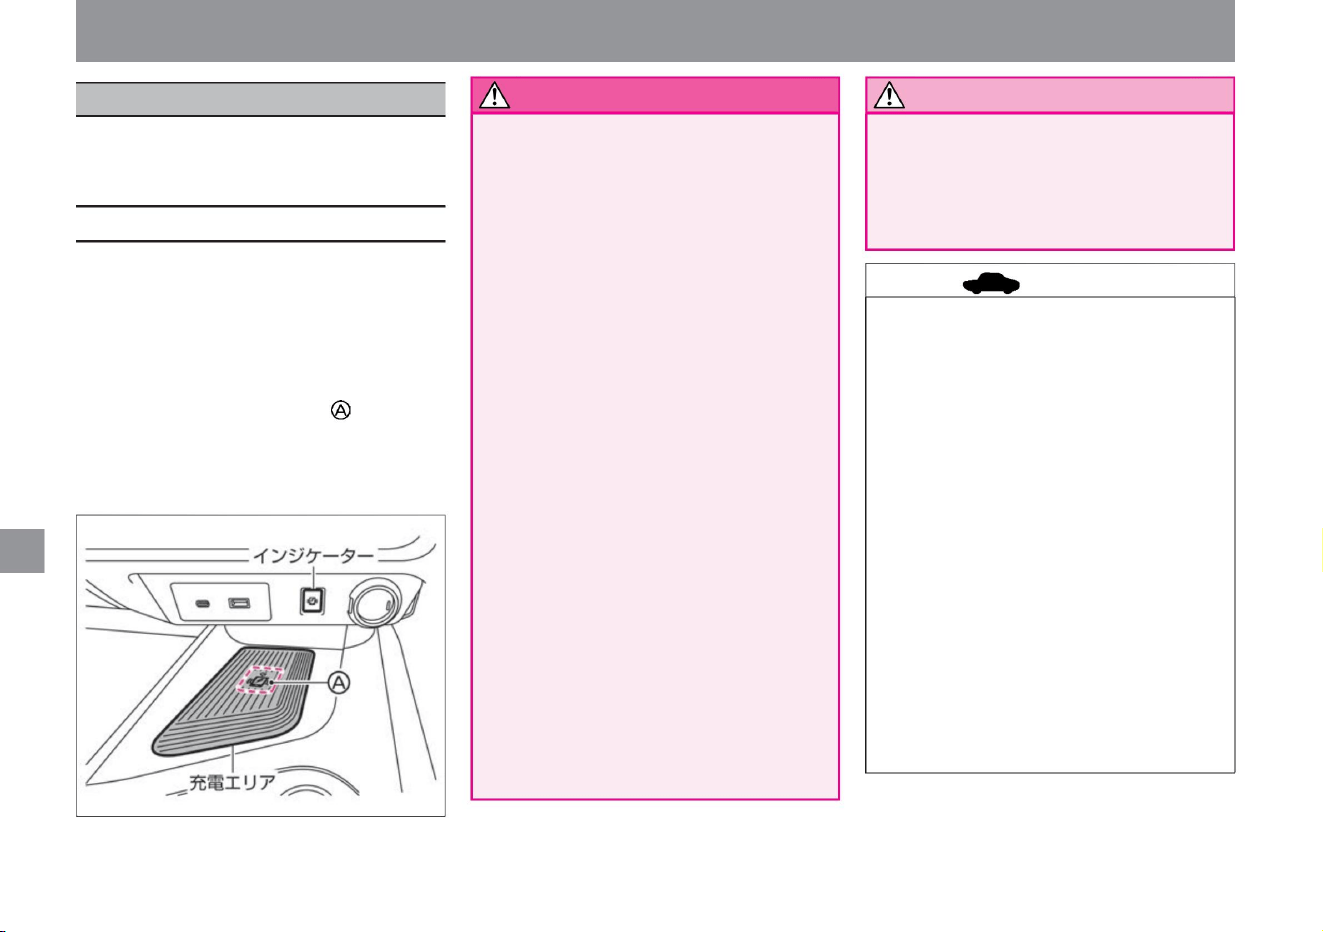
• Wireless charger is located in the center
console. •
Charging starts when the smartphone is
placed in the
charging area. (The indicator lights
orange.) • When placing the smartphone,
place it so that the power receiving part of
the smartphone is on top of the Qi logo.
• Do not use when the charging area is
dusty or dirty. • Do
not hit the surface of the charging
area. • Do not use grease, oil or alcohol to
clean the charging area.
• Some smartphone cases and accessories
may affect charging, so remove them
before charging. • Turn off the
smartphone's vibration
function before charging.
• Do not place magnetic cards or credit
cards between the charging area and
the smartphone. Card data may be
damaged.
• The temperature of the smartphone or
wireless charger may rise during
charging, and charging may stop due
to the protection function of the
smartphone or wireless charger, but
this is not a malfunction. Allow the
smartphone or wireless charger to cool
before resuming charging.
• When charging is complete, the indicator
lights green. (Operation is not guaranteed
for all models.)
• Between the charging area and the smartphone
Other room equipment
The wireless charger is only for charging Qi-
enabled smartphones. Can be used when the
power switch is ON.
Do not place metal
objects. It may lead to vehicle fire or
burns. If you
are using an implanted cardiac pacemaker,
an implanted cardioverter-defibrillator
(ICD), or other electrical medical
equipment, check with the manufacturer
of the medical electrical equipment
before use . do. Radio waves from
wireless chargers may affect the
operation of medical electrical equipment.
• Do not
cover the smartphone with cloth while
it is charging.
It may lead to vehicle fire or burns. • Do not
charge
the smartphone when it is wet. Failure
to do
so may result in malfunction, fire or electric
shock. • Do not place metal objects,
keys (intelligent key/remote control
entry system), memory drives,
etc. in the charging area. • Be careful not
to spill liquids such as water
or drinks on the charging area. Failure
to do so may result in malfunction, fire or electric shock.
Notice
How to use the wireless charger
272
advice
warn
ZEH0134X
indoor equipment
Wireless chargerÿ
Machine Translated by Google

Before driving, with the power switch in the OFF position and the
shift position in , fully depress each pedal to make sure that it does
not interfere with the floor carpet. • Do not drop the spark of a
cigarette on the floor carpet.
stomach
do not have
Other room equipment
indoor equipment
This car (model year) has a dedicated floor
carpet. Please fix it firmly on the floor and use
it correctly.
• Floor has fixing clips for genuine Nissan
floor carpet. • Spread the floor
carpet according to the shape of the floor,
and fix it securely by inserting the pin of
the fixing clip into the
mounting hole. • The shape of fixing clips/
pins and the quantity set for each seat
differ depending on the car model. For
details on fixing methods, contact a NISSAN dealer.
–Use a floor carpet exclusively for the
driver’s
seat –Do not turn the floor carpet
upside down or use it inside out
• Regularly check that the floor carpet is
properly fixed before driving, and be
sure to confirm. • Make sure
there is no problem with driving.
– Do you want to lay the floor carpets on top of each other?
• Firmly fix the floor carpet for this car
(model year) on the floor and use it
correctly. If the floor
carpet slips and interferes with the
pedals, it may lead to serious injury,
such as unexpected speed or braking
difficulty. • Observe the following when
laying
the floor carpet in the driver's seat. –Do
not use floor carpets
from other models or different years,
even if they are genuine Nissan
products –
Cover the pedals with floor carpets
• If a malfunction occurs or charging stops,
the indicator will flash orange for 8
seconds and then turn off. • The
charging position may differ depending on
the smartphone. • If
radio wave interference occurs during
charging, charging stops. When
charging stops, place the smartphone
so that the power receiving part is on
top of the Qi
logo. • Charging may stop while the key
(intelligent key/remote control entry
system) and the vehicle are
communicating, but this is not a
malfunction. • When
the USB cable is connected to the
smartphone, the indicator may light or
flash orange, but charging will not
start. • Depending on the type of
smartphone, the indicator may remain
orange even after charging is complete.
$/$: Different equipment depending on vehicle model, options, etc.
floor carpet
MEH0015X
Knowledge
273
warn
Fixing method
Machine Translated by Google
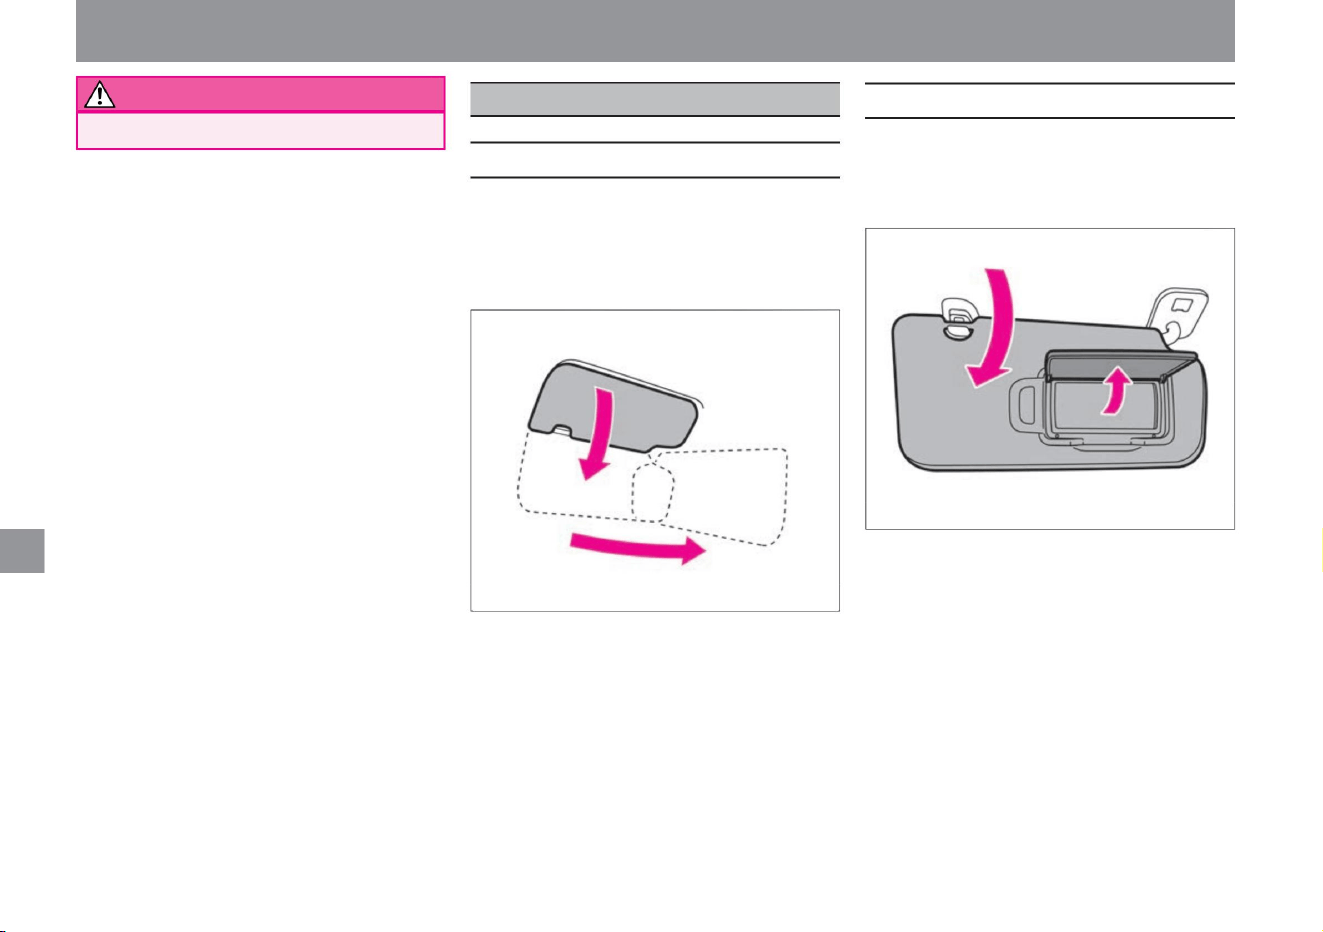
How to use the sun visor
WARNING Risk of fire.
274
How to use the vanity mirror
ZEH0135X
MEH0062X
• There is a vanity mirror (mirror) on the back
of the sun visor. •
Lower the sun visor and open the cover to use.
• When you want to block the sun from the
front, lower it
and use it. • To block sunlight from the side,
lower it, remove it from the hook, and lay it
on its side.
Other room equipment
indoor equipment
Sun visor/vanity mirror
Machine Translated by Google
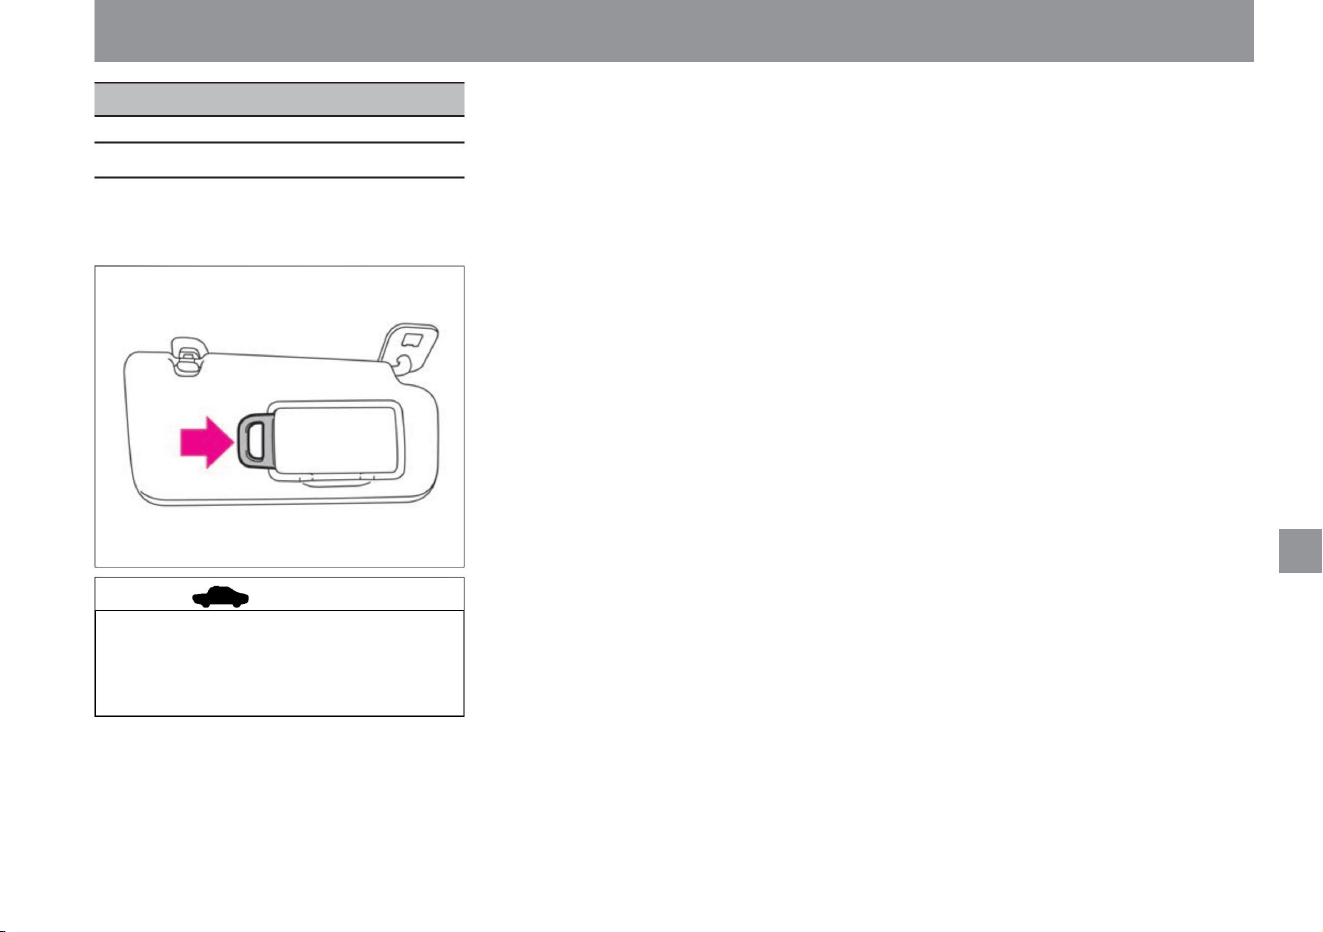
ticket holder
ZEH0136X
275
advice
How to use the ticket holder
Other room equipment
$/$: Different equipment depending on vehicle model, options, etc.
indoor equipment
• The sun visor has a ticket holder. •
Slide
the card and insert it.
• When parking in the hot sun, the inside
of the vehicle will become extremely
hot, so do not leave the card inserted.
The card may be deformed.
Machine Translated by Google

indoor equipment
MEMO
276
Machine Translated by Google

First of all
What to do in an emergency
Troubleshooting
If you cannot start with the key (intelligent key/remote control
entry system)
About towing
P.296
P.334
When the alarm sounds (buzzer) When
the window glass becomes fogged
P.336
When stuck in snow or mud
P.278
P.302
When you get a flat
tire When the door won't open
P.312
When the output limit indicator lights
When the light bulb burns out
When submerged
When the indicator light comes on
Troubleshooting
P.284
P.330
flare
P.294
P.279
P.302
P.332
P.340
When a warning message is displayed
P.297
P.335
when overheating
P.280
P.310
When the 12V battery is dead
When the fuse blows
P.329
When the warning light comes on
Troubleshooting
277
Machine Translated by Google
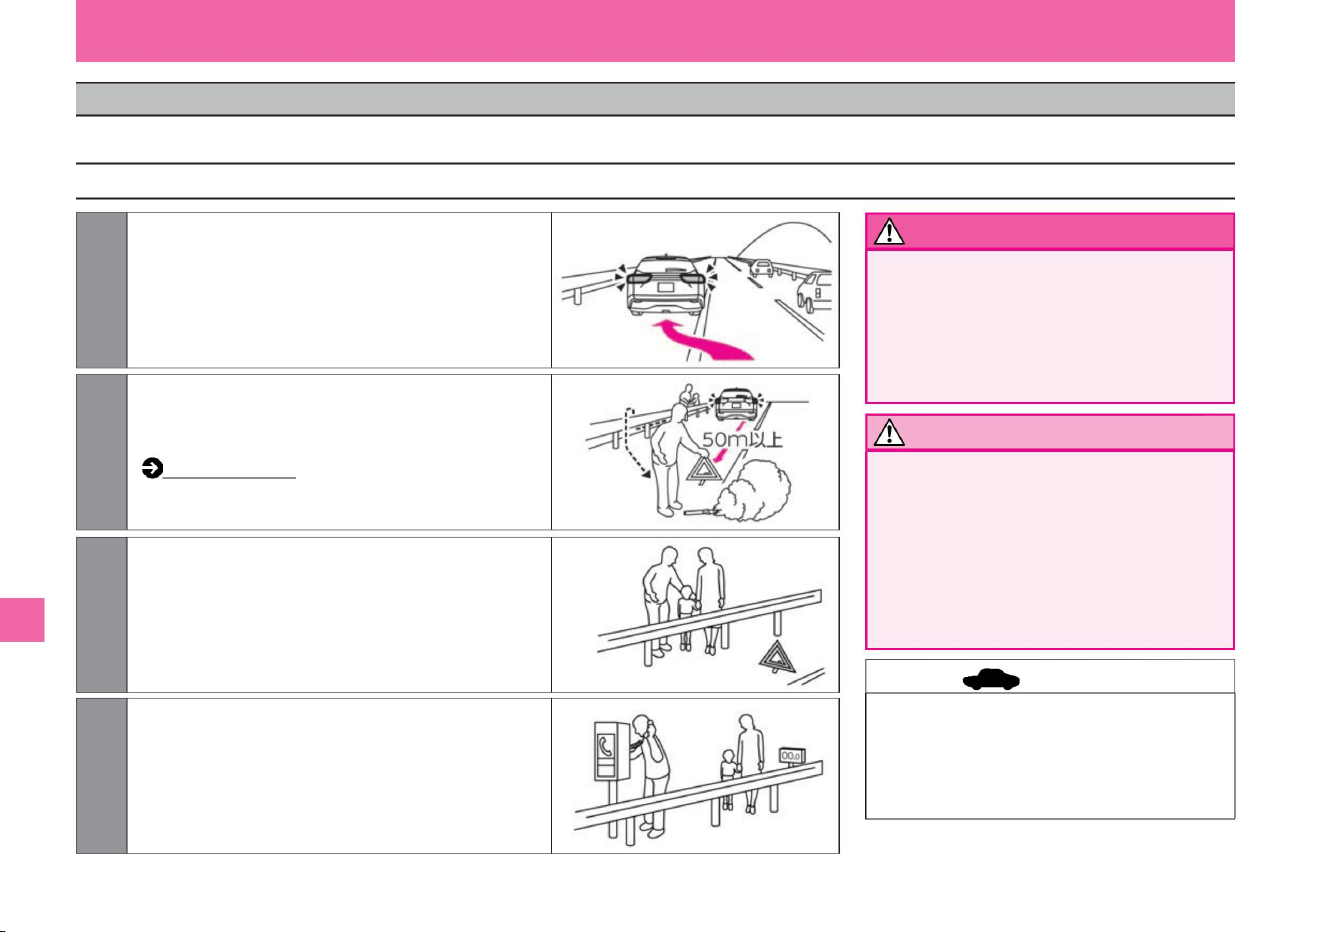
• Drive carefully when the e-POWER system is
stopped. If the e-POWER
system is stopped due to a malfunction, the
brakes and electric power steering will not
function properly, and the effectiveness of the
brakes will be extremely poor, and the
operating force of the steering wheel will
become heavy, so please drive carefully. please give me.
• On expressways and motorways, the
display of stop sign boards (stop sign
lights) is obligatory by law.
• Emergency telephones are installed
every 1 km on expressways.
• Do not use flares in tunnels.
First of all
2Have passengers evacuate to the outside of the guardrail, etc., and place a
flare and stop indicator plate (stop indicator light) at least 50m behind
the vehicle. Flare (P.279)
vinegar. When evacuating, be careful not to get caught in a rear-end
collision with a stopped vehicle.
4Use the emergency phone or mobile phone to request assistance.
1 While alerting the following vehicles of the danger with the emergency
flashing indicator lights, pull as close to the shoulder of the
road as possible and stop. If there is no road shoulder, the vehicle will
run on its own as far as possible.
3The driver should also evacuate to the outside of the guardrail.
vinegar.
stomach. The smoke may impair visibility, obstruct other
vehicles, and lead to an accident. In this case, use the
emergency flashing indicator light.
Notice
advice
warn
278
How to deal with trouble
Troubleshooting
If your vehicle breaks down, follow the steps below.
MEI0004X
ZEI0355X
MEI0003X
ZEI0356X
Troubleshooting
Machine Translated by Google
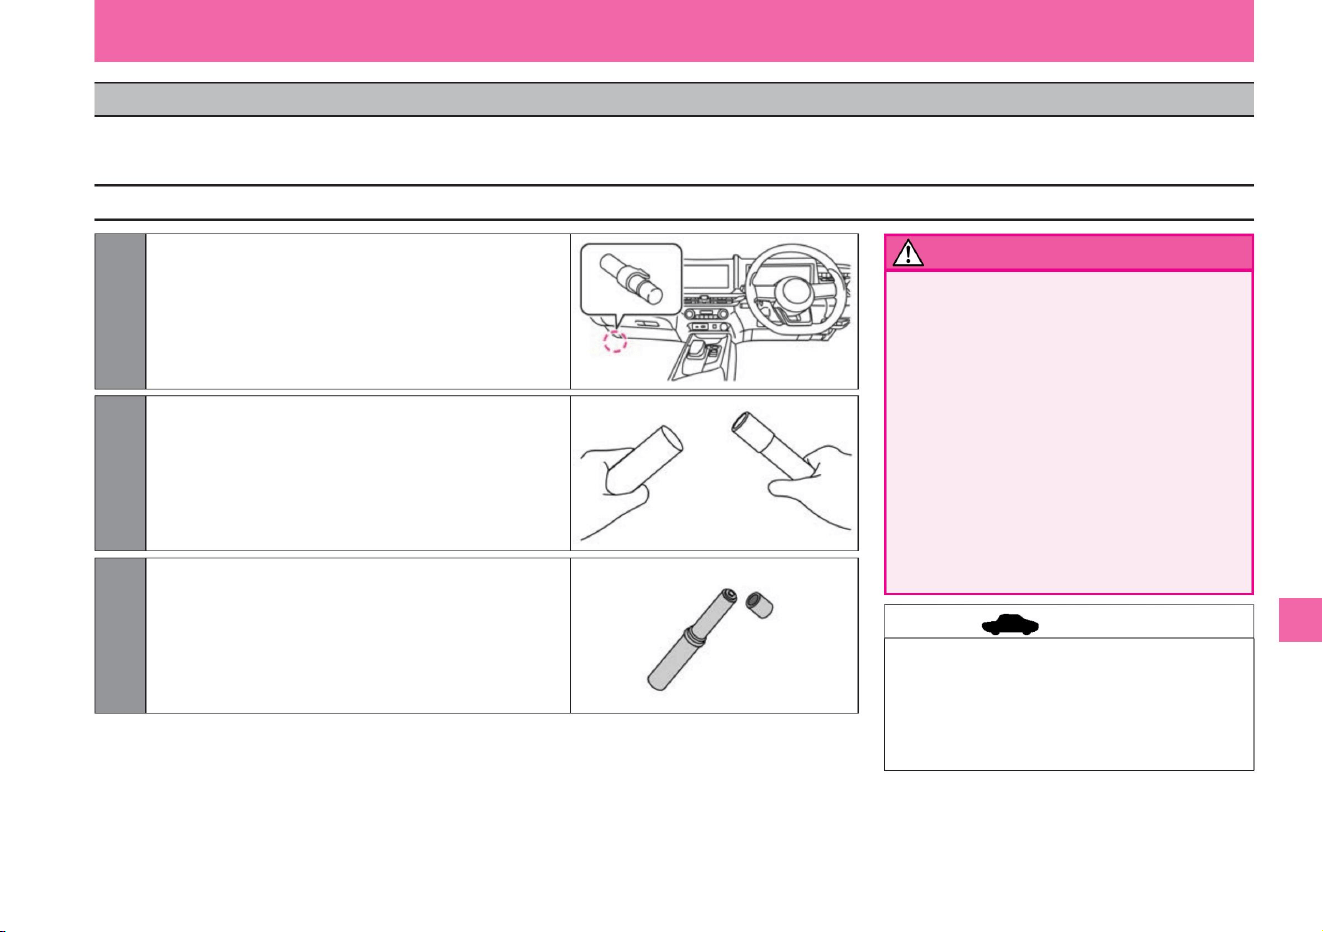
2 Twist and pull out the main unit from the case, then insert the main
unit upside down.
3 Remove the cap from the tip and rub the tip of the flare with the
powder from the case to ignite.
1Remove the flare from the holder at the foot of the passenger seat.
First of all
• Keep out of reach of children. It is
dangerous because there is a risk of fire due to
mischief. • Do
not use near flammable materials. Doing
so may catch fire. • Always ignite
the battery outside the vehicle, and do not bring it
close to your face or body
after it has been ignited. Doing so may result in burns.
• Do not use in tunnels. The smoke may
impair visibility, obstruct other vehicles, and lead
to an accident. In this case, use the emergency
flashing indicator light.
vinegar.
• Be sure to check the instructions and precautions
written on the flare in advance. • Flares have
an expiration date. Please purchase from your Nissan
dealer before the expiration date.
279
How to use the flare
warn
advice
It is used to warn others of the danger in the event of an emergency stop due to a breakdown or accident on a highway or at a railroad crossing. Flame time is about 5 minutes. Use it together with the
emergency flashing indicator light.
$/$: Different equipment depending on vehicle model, options, etc.
MEI0007X
ZEI0357X
MEI0006X
flare
Troubleshooting
Machine Translated by Google

• When towing a 2WD vehicle with the
front wheels lifted, turn off the power
switch .
VDC may activate and apply the
brakes.
This vehicle cannot tow another vehicle.
The hook on the back (rear hook) (2WD
vehicles) or the tow hook mounting hole
(4WD vehicles) is for fixing only when
transporting by ship or
trailer. Never use it for securing the vehicle
when towing.
First of all
ZEI0430X
ZEI0411X
ZEI0359X
If towing is required, ask a Nissan dealer or
road service such as JAF. If towing is
unavoidable, do so only for short distances as
much as possible.
• This vehicle cannot switch the shift position
from to when the power switch is off due to
the auto P function ( P.138). Therefore, if the
power switch cannot be turned off due to a
dead 12V battery, etc., you cannot tow the
vehicle with all four wheels on the ground. •
When you have the vehicle towed by 4-
wheel ground contact, please only move the
vehicle at a speed of 30km/h or less and for
as short a distance as possible.
• Do not use the towing hook to tow another
vehicle.
• If the vehicle does not move or makes unusual
noises, do not tow it and contact a Nissan
dealer. • When
transporting a vehicle, lift the front wheels or four
wheels of a 2WD vehicle, and lift the four
wheels of
a 4WD vehicle. • If you have no choice but to tow
the vehicle with all four wheels on the ground,
put the shift position in the position.
• Use a soft tow rope as much as possible, and
be careful not to damage the bumper. • Be
careful of the brake
lights of the vehicle in front so that the rope does
not become slack while towing.
Notice
280
Precautions when towing
About the rear hook
Troubleshooting
About towing
Machine Translated by Google
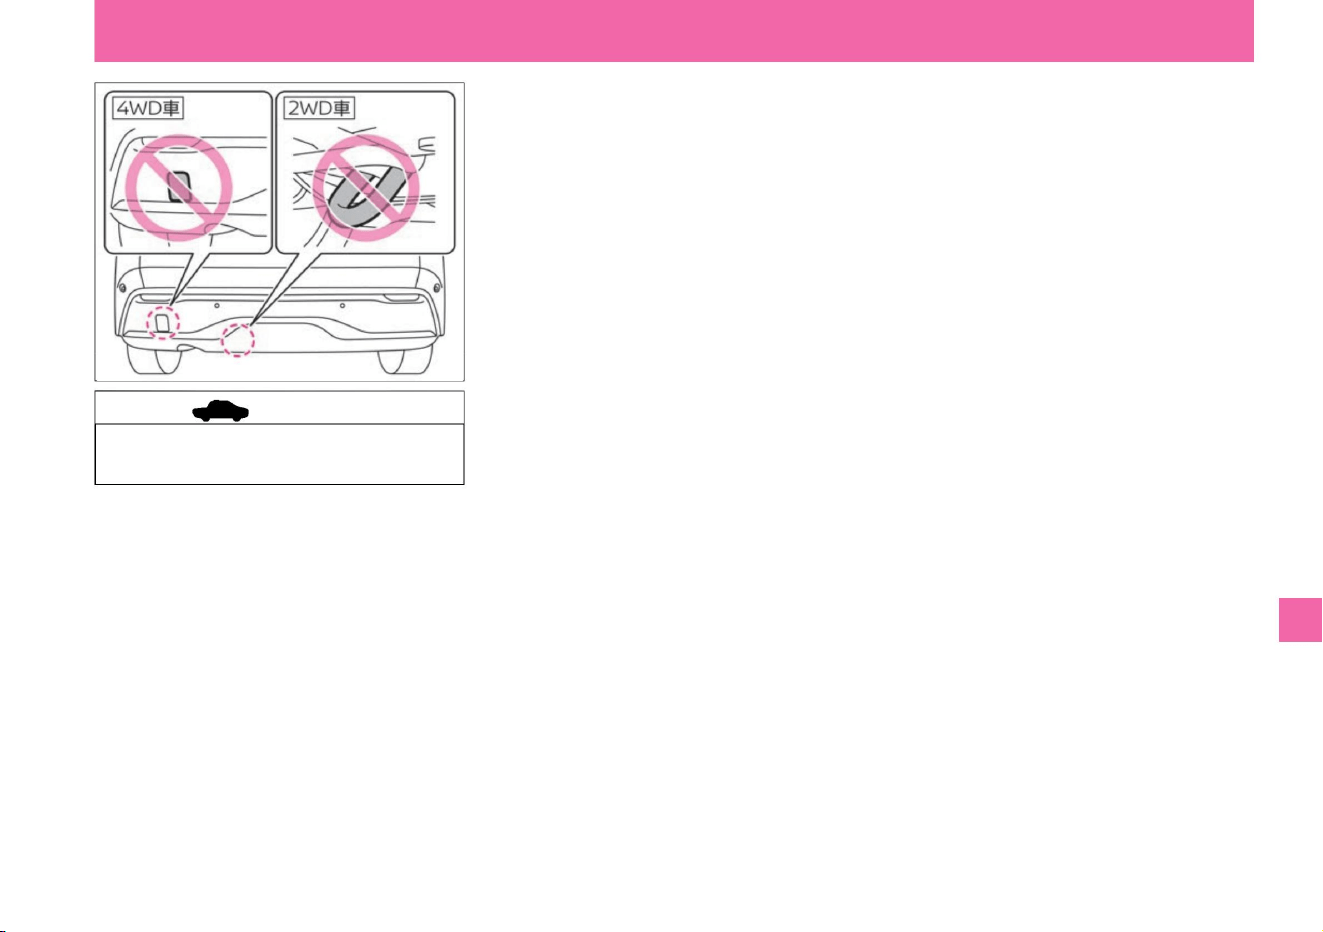
ZEI0437X
Troubleshooting
281
advice
First of all
$/$: Different equipment depending on vehicle model, options, etc.
• Using it for towing may damage the
vehicle.
Machine Translated by Google
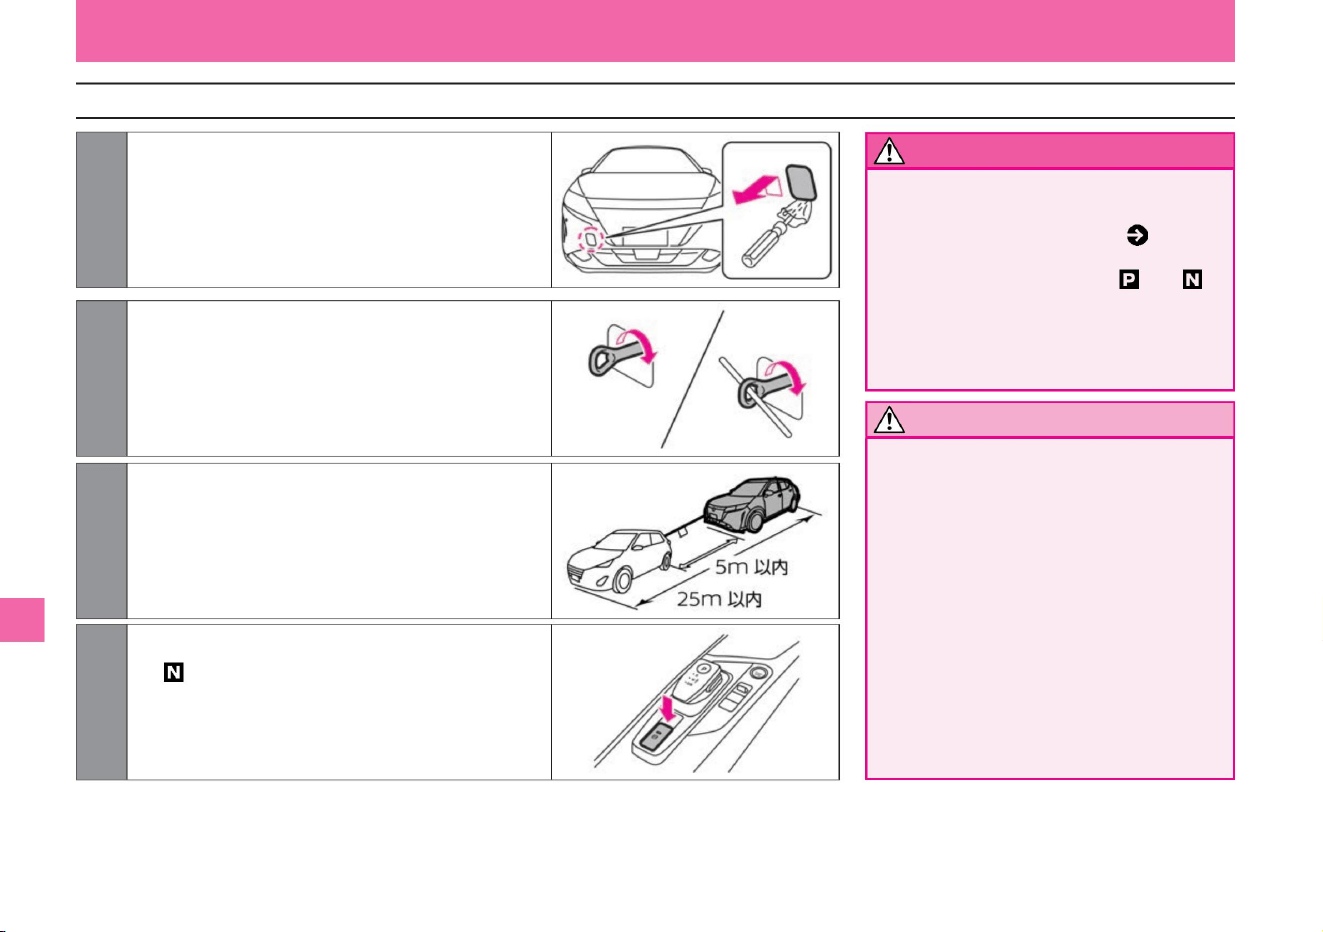
When you have no choice but to be towed with 4 wheels on the ground
Notice
282
warn
ZEI0361X
ZEI0362X
ZEI0408X
ZEI0363X
4 Start the e-POWER system, shift the shift position to , and
release the parking brake.
3 Hang the rope on the towing hook of your vehicle and other
vehicles, and attach a white cloth of 30cm x 30cm or
more to the center
of the rope. When hanging the rope, hang it horizontally
on the same side as much as possible.
1 Cover your tool with a thin tip with a piece of cloth, insert it
into the groove of the front bumper cover, and remove
the cover.
2 Attach the tow hook using a hard metal stick or similar.
First of all
Troubleshooting
The brakes may overheat and
become ineffective, leading to an
accident. When towing in such
places, ask a tow truck to pull it.
• Do not tow on a long downhill.
• Do not turn off the power switch when
towing with four wheels on the
ground . Due to the auto P function
(P.138) on this vehicle, the shift position
cannot be changed from to when the
power switch is off. Also, do not turn off
the power switch while towing. It is
dangerous because you will not be able
to operate the steering wheel.
Never use. The
hook part may be damaged.
• If the e-POWER system is stopped, the
brakes and electric power steering
booster will not work, so be careful as
the effectiveness of the brakes will be
extremely poor and the steering force
will become
heavy. • Hooks other than those specified for towing hooks
Machine Translated by Google
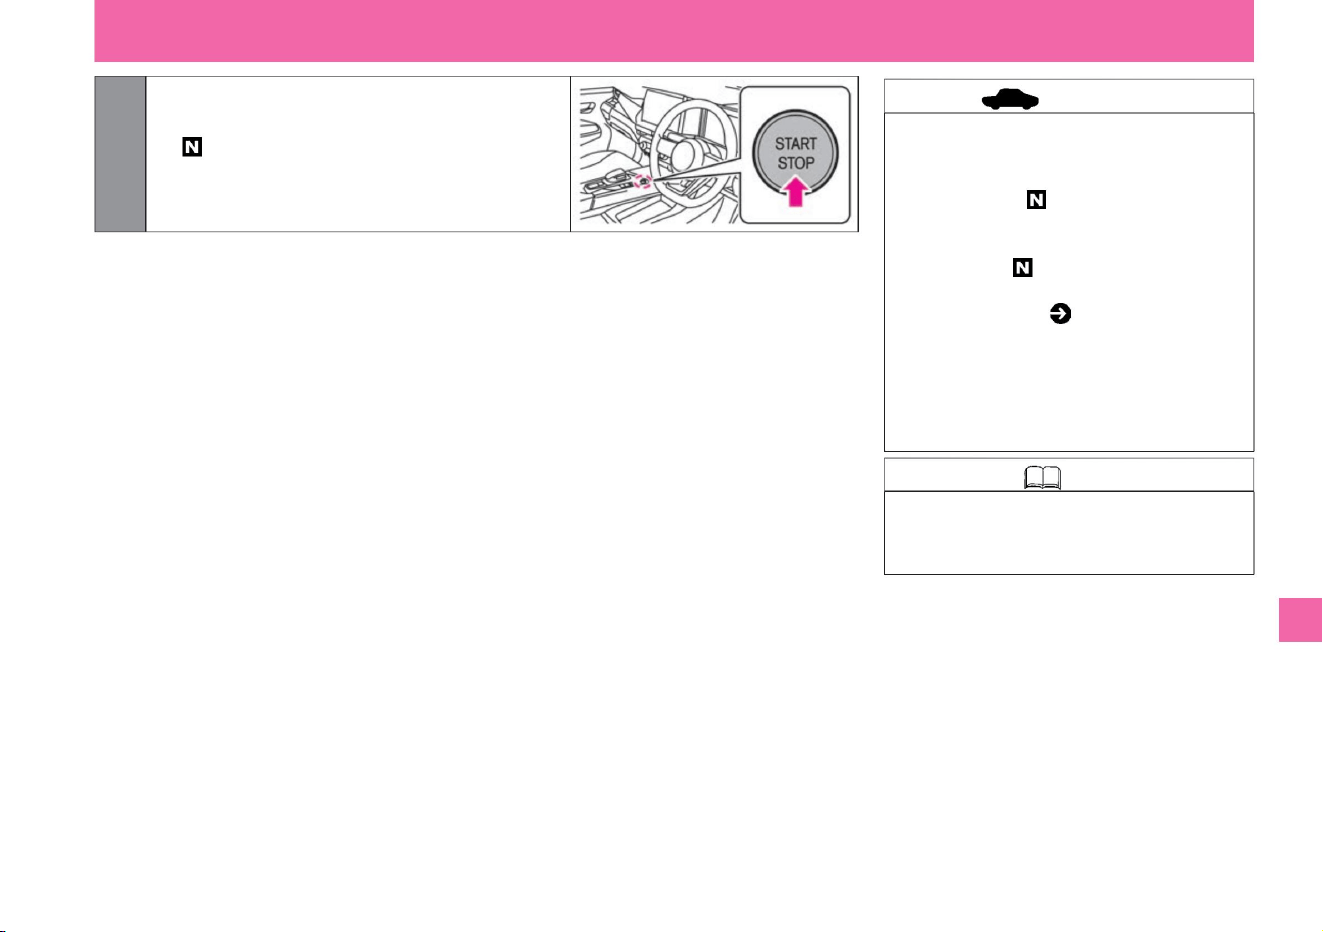
advice
283
Knowledge
ZEF0286X
5 If the e-POWER system cannot be
started, turn on the power switch and
shift the shift position to .
First of all
$/$: Different equipment depending on vehicle model, options, etc.
Troubleshooting
• When towing with all four wheels on the
ground, start the e-POWER system
or turn the power switch ON and shift
the shift position to . When the power
switch is OFF, the auto-P function
cannot switch the shift position to , so
the vehicle cannot be towed. Auto-P
function ( P.138) • Be careful of
the brake lights of the car
in front so that the rope does not become
slack while towing. • Do not use the
towing
hook to tow another vehicle.
• After towing, remove the towing hook
by reversing the installation procedure.
Machine Translated by Google
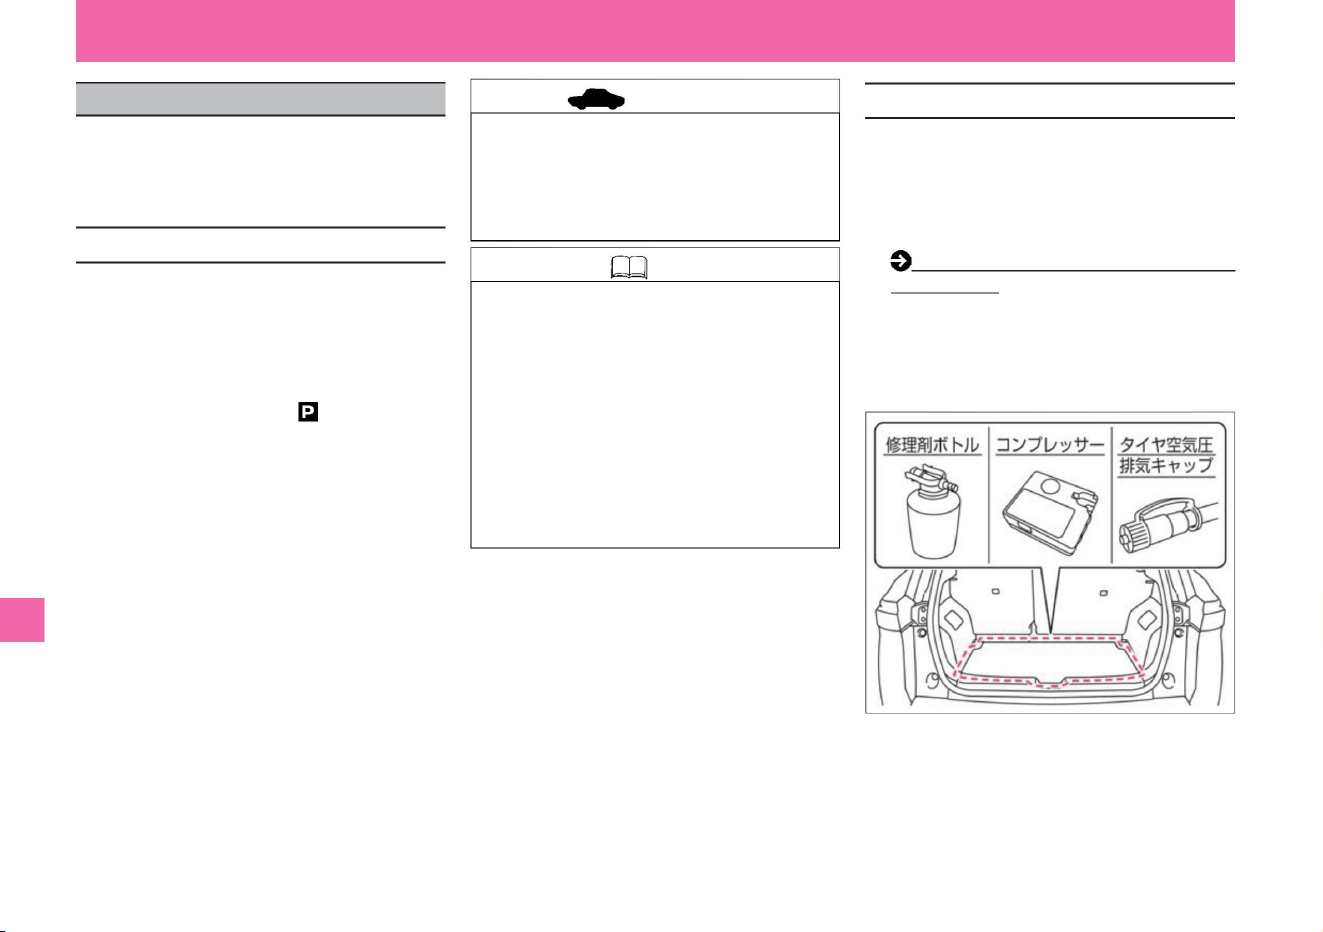
When you get a puncture
This vehicle does not come standard with a
spare tire and jack. When a
tire is punctured, emergency repairs can be
made with an emergency tire repair kit.
tree
*: Depending on the car model, the contents and part shape
of the tire emergency repair kit differ.
When
–
Apply the parking brake – Set the shift
position to – Turn the power switch OFF –
Flash the emergency flashing indicator • In
the following cases, emergency tire repair
kits cannot be used. Contact your Nissan dealer or JAF. – A
cut or puncture wound of about 4 mm or more
What to do in an emergency
• Be prepared for the following when performing
emergency
repairs. –Move the vehicle to a hard, flat surface
– When the wheel is damaged –
When two or more tires are punctured – When
the repair agent has expired
• If there are nails or screws stuck in the tire,
removing them will make the puncture hole
bigger and make it easier for air to leak out.
• Minor punctures on the tire tread (tread) can be
repaired with an emergency tire repair kit. • The
tire emergency
repair kit is stored in the luggage compartment.
Storage location for tools
and emergency tire repair kits (P.349) •This
product is
intended for emergency repairs, so it cannot be
driven for a long time after repairs. After
repairing, have the vehicle inspected,
permanently repaired, or replaced by a NISSAN
dealer or a specialized repair shop as soon as possible.
– when the tire sidewall is damaged – when
driven almost deflated – when the tire is
detached from the wheel
• It is recommended that tires that have been
treated with the repair agent from the tire
emergency repair kit be replaced with new
tires. As for tire replacement, consult a
professional repairer. If the tire is severely
damaged, replace it. If repair is possible,
repair it. • Wheels can be
reused by wiping off the repair agent, but please
replace the tire valves with new ones.
ZEI0762X
About tire emergency repair kit
Before emergency repair
advice
Knowledge
284
Troubleshooting
Machine Translated by Google
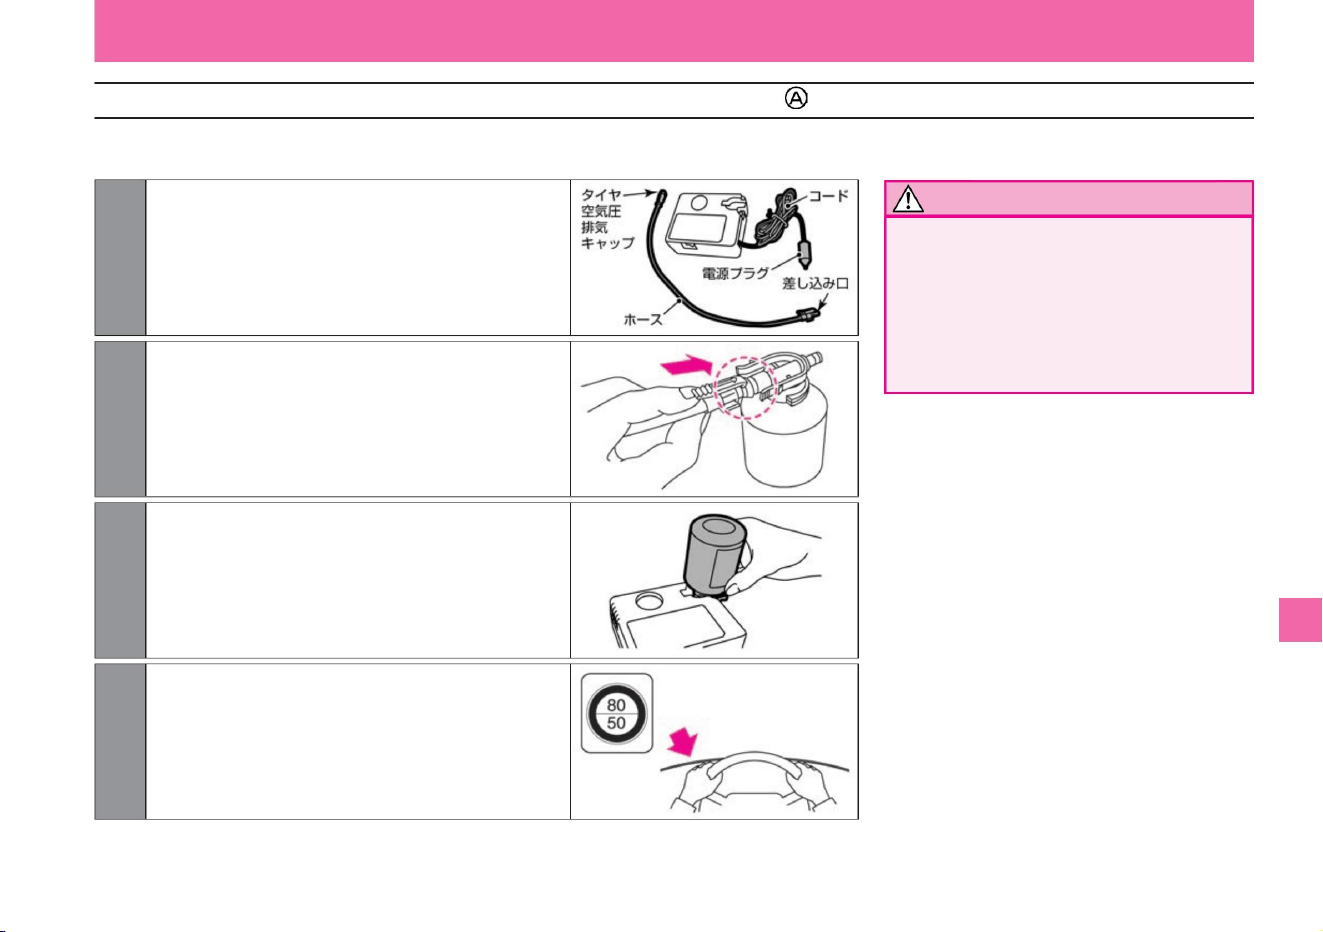
Notice
Emergency repair method (type )
285
$/$: Different equipment depending on vehicle model, options, etc.
ÿ Preparing the compressor
Troubleshooting
What to do in an emergency
• Do not put a speed limit sticker on the center pad of the
steering wheel.
vinegar.
The SRS airbag may not operate properly and may
lead to serious injury. Also, do not stick it where you
cannot see the warning light or speedometer.
Stick it in a place where the person can see it easily.
ZEI0365X
ZEI0351X
ZEI0349X
ZEI0350X
4 Remove the speed limit seal on the sealant bottle and
2 Connect the hose spigot firmly to the sealant bottle.
3 Secure the sealant bottle to the compressor.
1 Remove the hose and power plug from the
compressor.
(The hose is stored behind the compressor.)
Machine Translated by Google
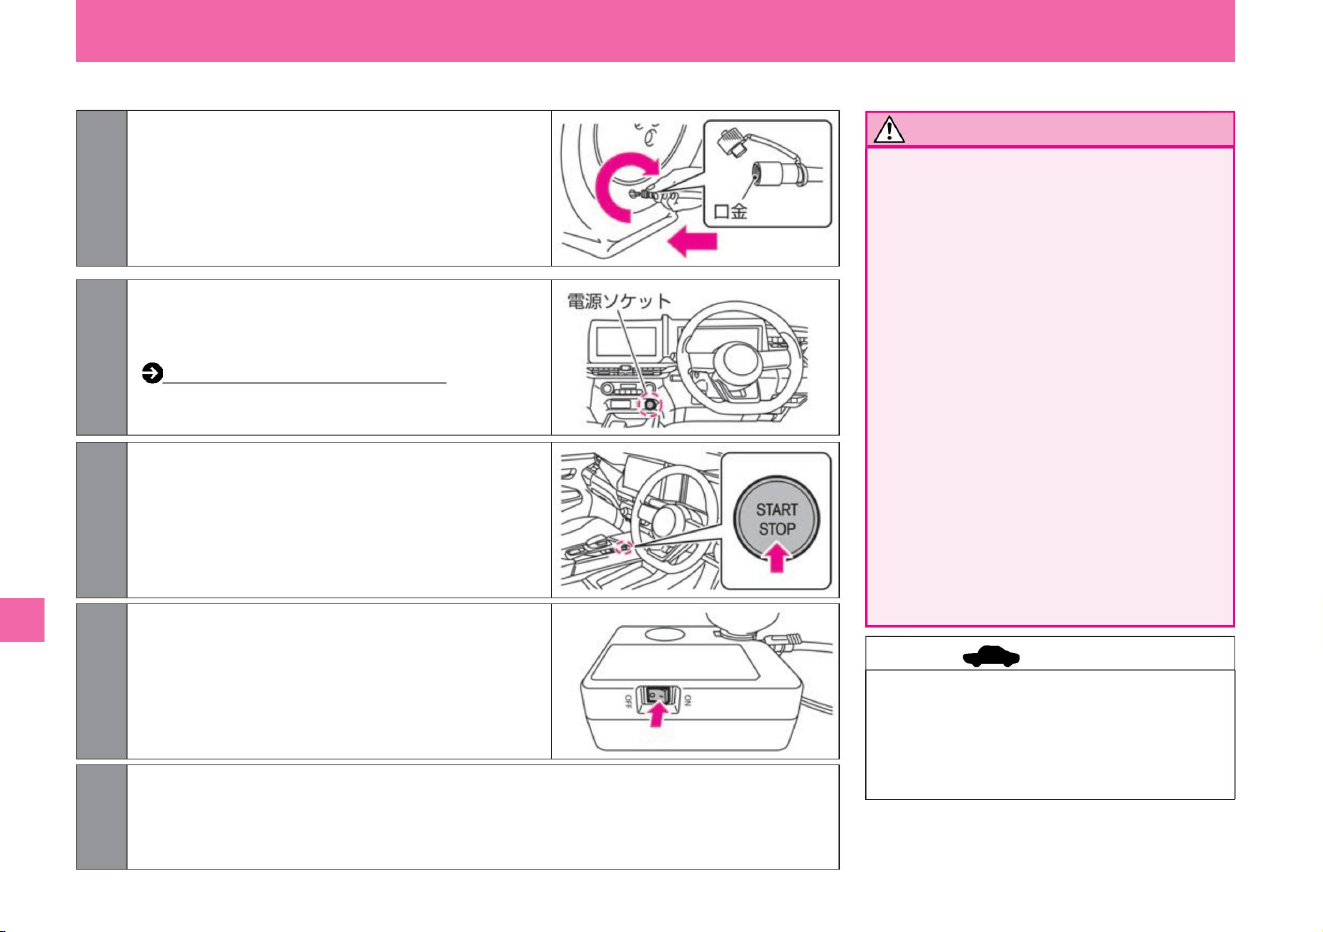
ÿ Air injection
Troubleshooting
Notice
advice
286
What to do in an emergency
• Firmly connect the hose and tire valve.
Insufficient
connections may result in air leakage
or splashing of sealant. • Stay away
from
the tire being repaired while the emergency
repair kit is in operation as there is a
danger of bursting.
• If the tire is cracked or deformed,
immediately turn off the compressor
switch (“*” position) and stop repairing.
Since the repair agent
is injected through the tire valve, the
pressure may reach 600kPa, but it is
not abnormal. Normally, it will go down
in about 30 seconds.
• After inflating, the hose cap may become
hot, so be careful not to burn yourself.
• Do not operate the compressor continuously
for more than 15 minutes as it may lead
to malfunction if used for a long time.
Repair is not possible if the tire pressure
cannot be increased.
ZEF0286X
ZEI0352X
ZEI0366X
ZEI0353X
1 Remove the tire pressure exhaust cap on the hose.
Remove the
cap from the punctured tire valve and screw the
hose fitting firmly onto the punctured tire valve.
2Make sure that the compressor switch is OFF ("*"
position), and insert the power plug into the power
socket inside the vehicle. How to use
the power socket (P.270)
3 Turn on the power switch.
4Turn on the compressor switch (position "ÿ") and inflate
the tires to the specified air pressure. At this time,
stop the compressor temporarily and measure with
an air pressure gauge so that the actual air pressure
can be measured.
5 When the air pressure reaches the specified level, turn off the compressor switch ("*" position)
and remove the power plug from the power socket.
Machine Translated by Google
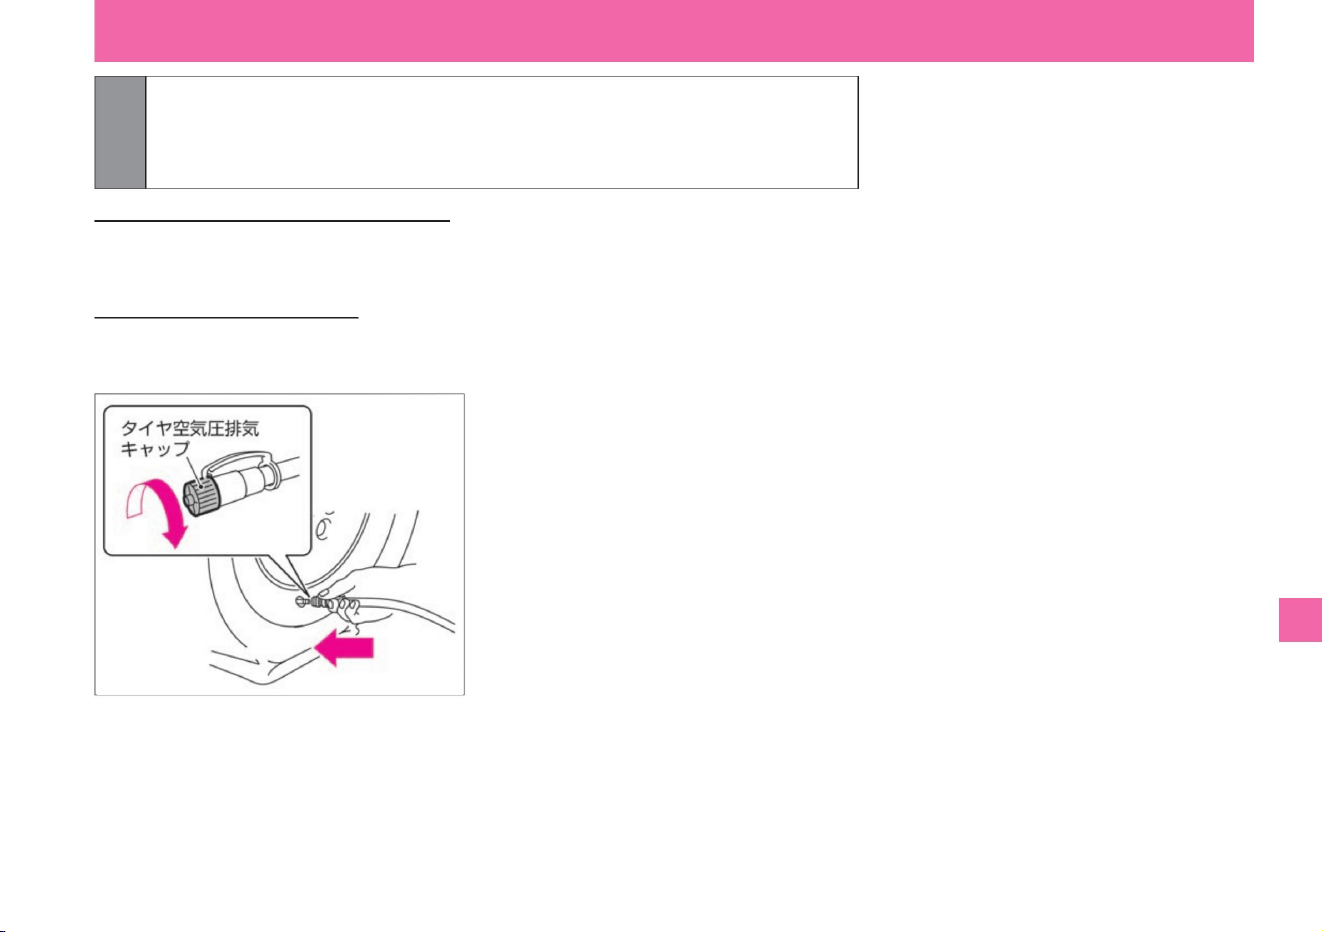
6 Quickly remove the hose from the tire valve and remove the cap from the tire valve.
$/$: Different equipment depending on vehicle model, options, etc.
If you cannot pressurize to 180kPa
within 10 minutes If you cannot pressurize to 180kPa within 10 minutes, your tires may
be severely damaged. In this case, this repair kit cannot be used for emergency repairs.
Contact your Nissan dealer or
JAF. If you overinflate Remove
the hose from the tire valve. Screw the tire air pressure release cap onto the end of the
hose, press the protrusion of the tire air pressure release cap against the tire valve, and
release the air.
attach it.
Install the tire pressure exhaust cap on the removed hose.
What to do in an emergency
ZEI0354X
287
Troubleshooting
Machine Translated by Google
ÿ Inspection run
Troubleshooting
advice
288
Notice
What to do in an emergency
If the pressure is less
than 130kPa, this repair kit cannot be used for emergency repairs. Stop driving and contact a Nissan dealer or
road service such as JAF. If the air pressure is
130kPa or more and less than the specified
air pressure Turn on the compressor switch (at the "ÿ" position) to increase the air pressure to the specified air
pressure, and perform inspection driving. If the air pressure falls below the specified air pressure even after
repeating the above work, emergency repair using this repair kit is not possible. Stop driving and contact a
Nissan dealer or road service such as JAF.
List of JAF offices: Please read the separate Maintenance Note "Service Network". In the case of the specified
air
pressure, the
temporary repair is completed. Promptly drive carefully to a Nissan dealer or professional repairer.
("*" position) and measure with an air pressure gauge.
• Permanent repair may not be possible after
emergency repair because the puncture hole
cannot be found. If you continue driving,
check the air pressure frequently. If the air
pressure drops frequently, have it checked by
a NISSAN dealer or repair shop. • The repair
agent cannot be reused. Please purchase a
new repair agent
after use. For details, please consult your Nissan
dealer.
• When driving, drive slowly and carefully,
especially when making curves and turning.
1 Start running immediately and run for about 3 km. Drive carefully at
speeds below 80 km/h.
2 After driving, measure the tire pressure again. Compressor switched off
Machine Translated by Google

Emergency repair method (type )
289
Notice
$/$: Different equipment depending on vehicle model, options, etc.
Troubleshooting
ÿ Preparing the compressor
What to do in an emergency
• Do not put a speed limit sticker on the
center pad of the steering wheel.
The SRS airbag may not operate
properly and may lead to serious injury.
Also, do not stick it where you cannot
see the warning light or speedometer.
ZEI0755X
ZEI0757X
ZEI0754X
ZEI0756X
2 Remove the hose and power plug from the compressor.
3 Remove the bottle holder cap from the compressor.
1 Peel off the compressor speed limit sticker and stick
it where the driver can see it.
4 Remove the cap of the repair agent bottle and attach
it to the bottle holder with the inner lid
attached. (If you screw it into the bottle holder,
the inner lid will break. Turn the repair agent
bottle until it stops.)
Machine Translated by Google
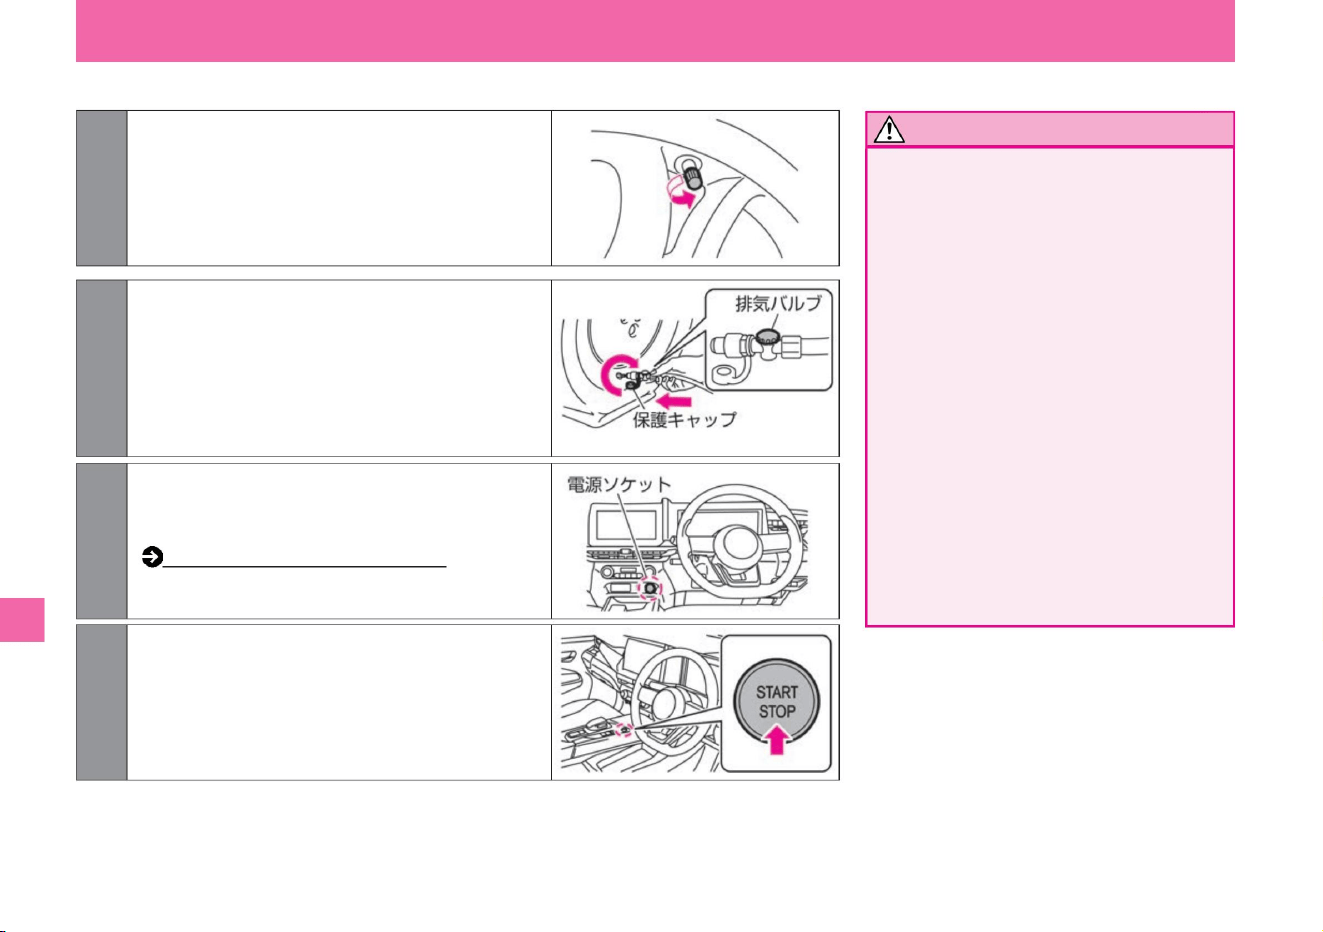
ÿ Air injection
Troubleshooting
Notice
290
What to do in an emergency
• After inflating, the hose cap may become
hot, so be careful not to burn yourself.
• If the tire is cracked or deformed,
immediately turn off the compressor
switch (“*” position) and stop repairing.
Since the repair agent
is injected through the tire valve, the
pressure may reach 600kPa, but it is
not abnormal. Normally, it will go down
in about 30 seconds.
• Firmly connect the hose and tire valve.
Insufficient
connections may result in air leakage
or splashing of sealant. • Stay away
from
the tire being repaired while the emergency
repair kit is in operation as there is a
danger of bursting.
MEI0020X
ZEI0758X
ZEF0286X
ZEI0366X
2 Remove the protective cap from the end of the
hose and screw the hose (turn the exhaust
valve clockwise to ensure it is closed) tightly
onto the punctured tire valve. *: Repair agent
may
splatter when the protective cap is removed.
1 Remove the cap from the punctured tire valve.
3Make sure that the compressor switch is OFF ("*"
position), and insert the power plug into the
power socket inside the vehicle.
How to use the power socket (P.270)
4Turn on the power switch.
Machine Translated by Google
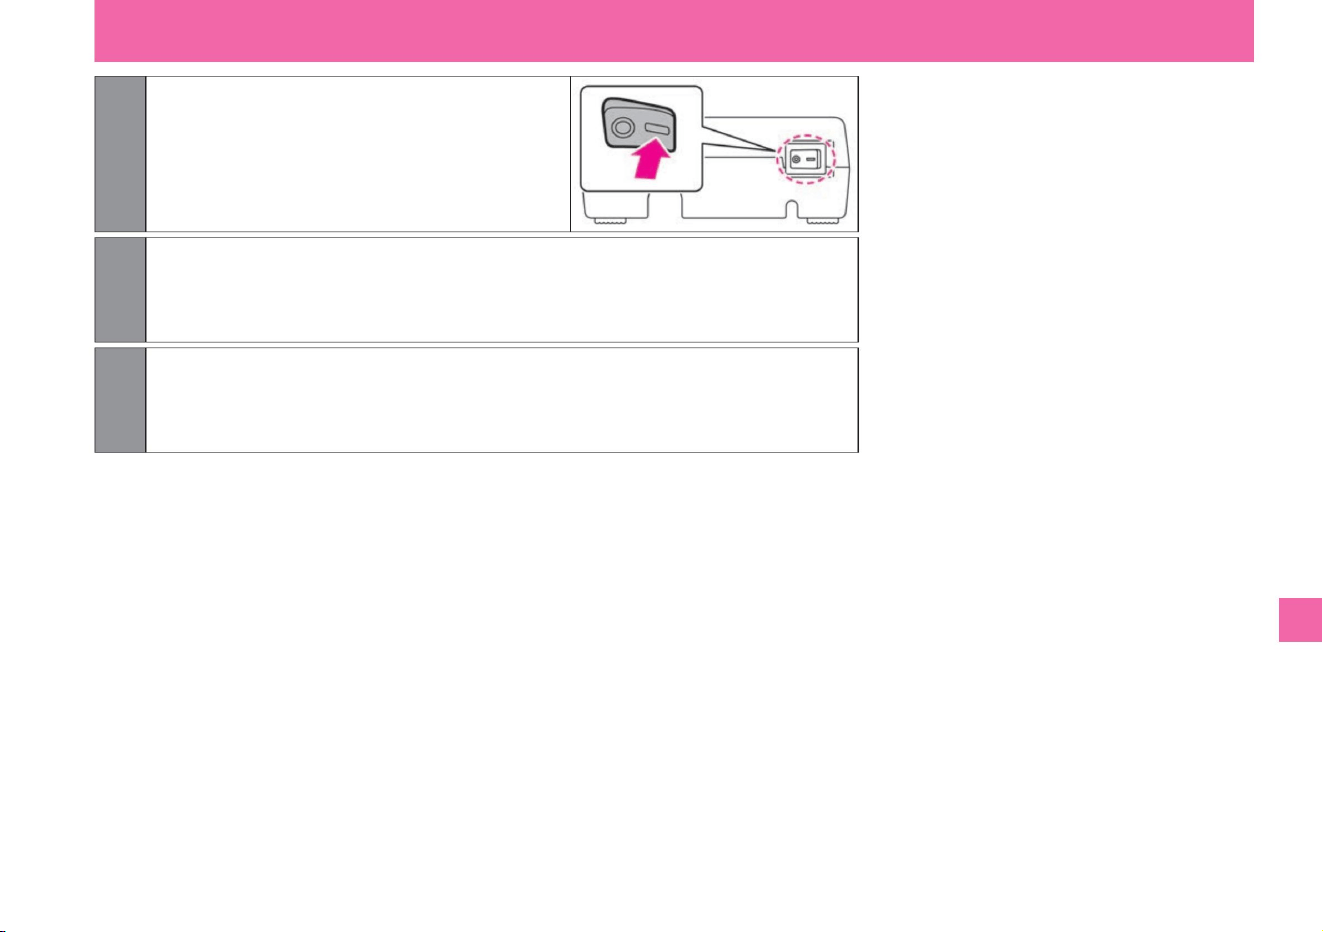
6 When the specified air pressure or 180kPa or higher is achieved, turn the compressor
switch to OFF ("*" position) and remove the power plug from the power socket.
7 Quickly remove the hose from the tire valve. Place the protective cap on the hose and the
cap on the tire valve.
5Turn on the compressor switch (“-” position) and inflate
the tires to the specified air pressure or 180kPa
or more. At this time, stop the
compressor temporarily and measure with a
pressure gauge so that the actual air pressure
can be measured.
$/$: Different equipment depending on vehicle model, options, etc.
Troubleshooting
What to do in an emergency
291
ZEI0759X
Machine Translated by Google
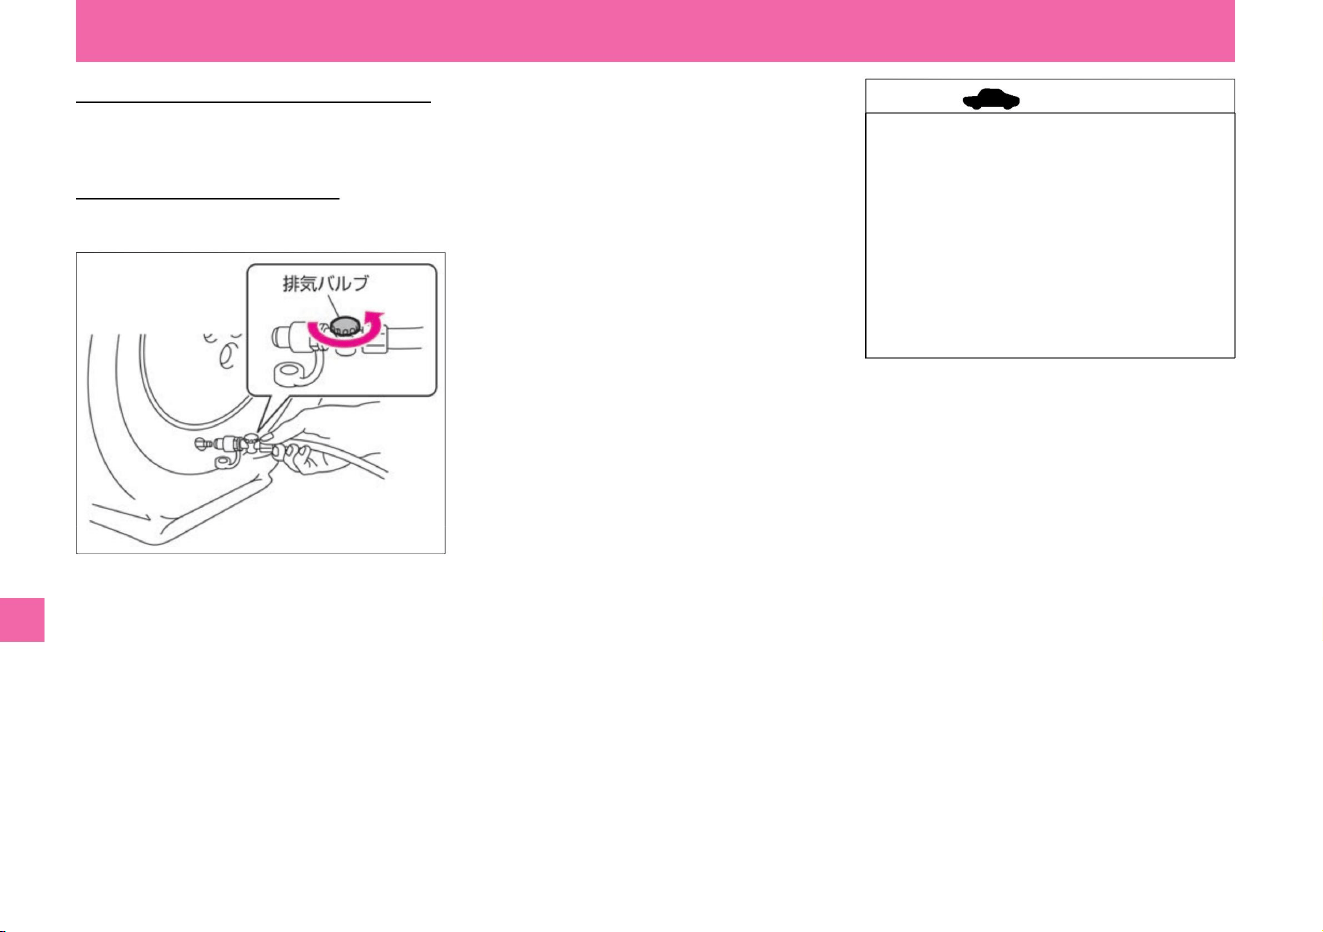
If you cannot pressurize to 180kPa
within 10 minutes If you cannot pressurize to 180kPa within 10 minutes, your tires may be
severely damaged. In this case, this repair kit cannot be used for emergency repairs.
Contact your Nissan dealer or
JAF. If you overinflate With the
hose attached to the tire valve, turn the exhaust valve counterclockwise to deflate.
• Do not operate the compressor
continuously for more than 10 minutes
as it may lead to malfunction if used
for a long time. Repair is not possible
if the tire pressure cannot be
increased. • Do not remove the sealant
bottle from the bottle holder of the
compressor. Doing so may cause
liquid remaining in the bottle to spill.
Troubleshooting
ZEI0760X
What to do in an emergency
advice
292
Machine Translated by Google
Troubleshooting
ÿ Inspection run
293
Notice
advice
What to do in an emergency
• Permanent repair may not be possible after
emergency repair because the puncture hole
cannot be found. If you continue driving,
check the air pressure frequently. If the air
pressure drops frequently, have it checked
by a NISSAN dealer or repair shop. • The
repair agent and hose cannot be reused.
Please purchase
new sealant and hose after use. For details,
please consult your Nissan dealer.
List of JAF offices: Please read the separate Maintenance Note "Service Network". In the case of the specified
air
pressure, the
temporary repair is complete. Promptly drive carefully to a Nissan dealer or professional repairer.
(where the "*" is). Remove the protective cap from
the end of the hose, attach the hose to the tire valve and check the tire pressure with the pressure
gauge supplied with the compressor. *: When the protective cap is removed, the repair
agent may splatter.
If the pressure is less
than 130kPa, this repair kit cannot be used for emergency repairs. Stop driving and contact a Nissan dealer
or road service such as JAF. If the air pressure
is 130kPa or more and less than the
specified air pressure Turn on the compressor switch (“-” position) to increase the air pressure to the specified
air pressure and perform inspection driving. If the air pressure falls below the specified air pressure even
after repeating the above work, emergency repair using this repair kit is not possible. Stop driving and contact
a Nissan dealer or road service such as JAF.
• When driving, drive slowly and carefully,
especially when making curves and turning.
$/$: Different equipment depending on vehicle model, options, etc.
1 Start driving immediately and drive for 10 minutes or about 3km to spread the
repair agent inside the tire. Drive carefully at speeds below 80km/h.
2 After driving, measure the tire pressure again. Compressor switched off
Machine Translated by Google
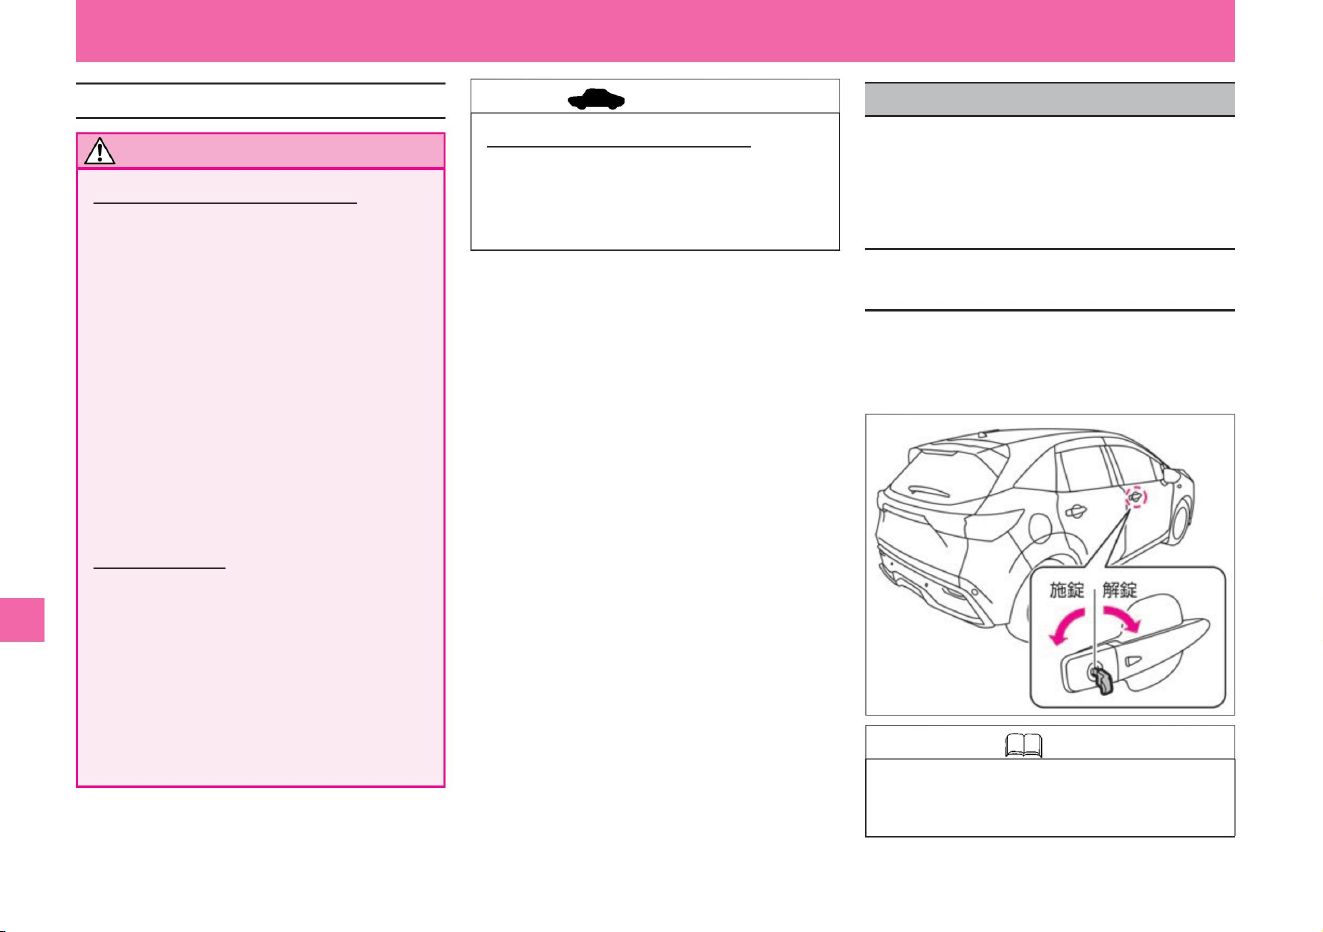
294
Knowledge
advice
Precautions for tire emergency repair kit
How to open the door with the built-in
key (mechanical key)
Notice
If the key (intelligent key/remote control entry
system) battery runs out or the 12V battery is
dead, or if the door does not open, use the
following method to lock/unlock the door.
What to do in an emergency
• The built-in key is built into the key
(intelligent key/remote control entry
system).
stomach.
Insert the built-in key into the keyhole in the driver's
door and turn the built-in key toward the front of the
vehicle to unlock. To lock, turn the built-in key to the
rear of the vehicle.
• Never disassemble or modify the product.
• Do not give a shock to the compressor. It will
be the cause of the failure. •
Be careful not to let children accidentally touch it.
Repair agent •
Do not put the
repair agent in your mouth.
Swallowing the restorative is harmful to your
health. If you accidentally drink it, drink as
much water as possible and see a doctor
immediately. • Should it adhere to your
eyes or skin, rinse thoroughly with water. If you still
feel any abnormality,
please consult a doctor.
• Do not use the emergency tire repair kit for any
purpose other than filling air in car tires or
checking air pressure.
• The tire emergency repair kit is for DC12V only ,
so do not use it with any other power source.
About the emergency tire repair kit •
The emergency tire repair kit is for vehicles
equipped with this kit only, so do not use it for
other vehicles.
Emergency tire repair kit • Be sure to
use a genuine Nissan tire emergency repair kit. •
Keep away from water and dust.
ZEI0367X
when the door won't open
Troubleshooting
Machine Translated by Google
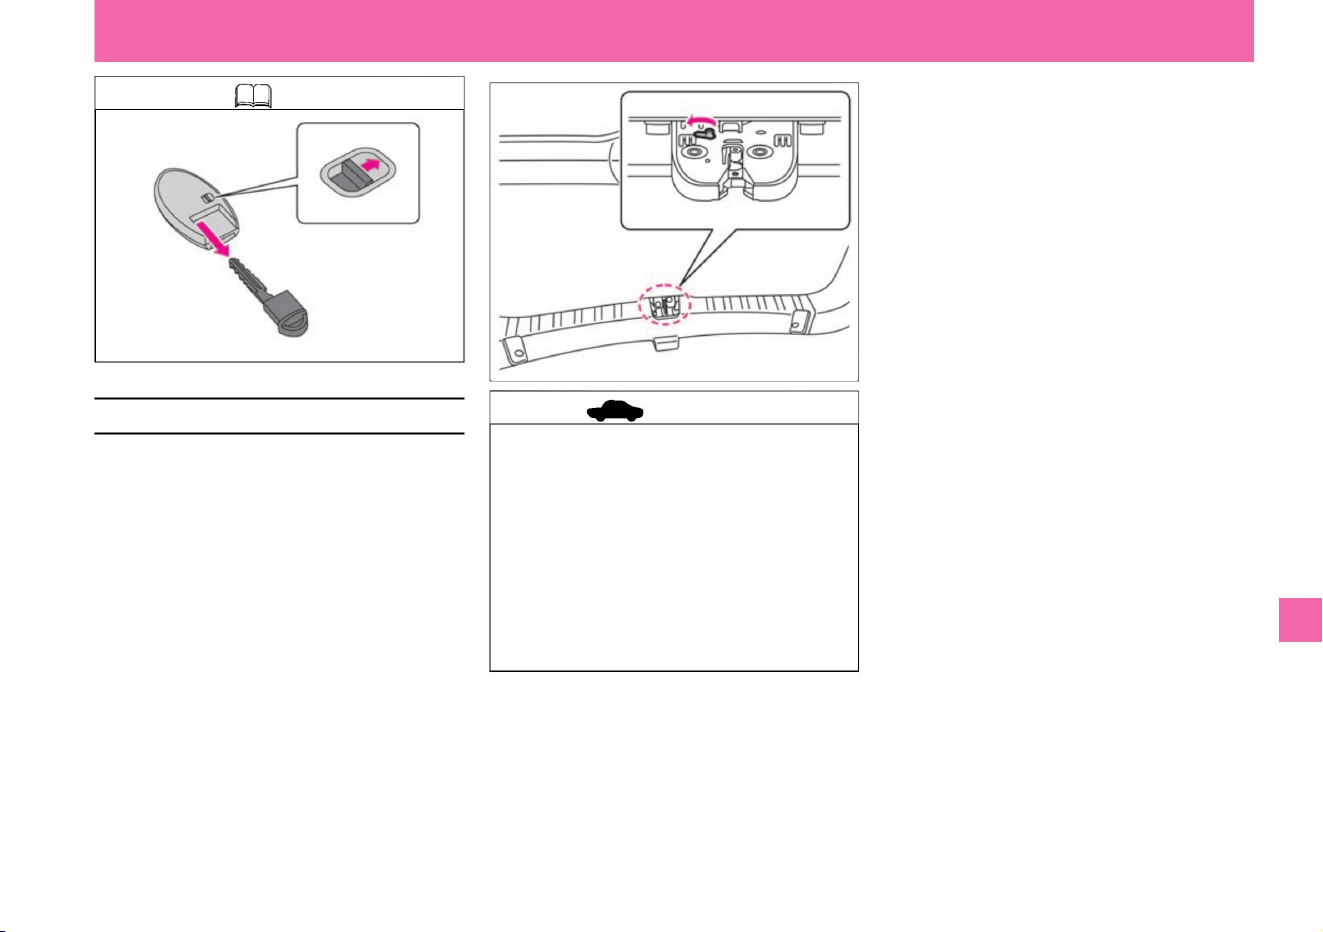
advice
Knowledge
How to open the back door in an emergency
295
Troubleshooting
MEI0026X
ZEI1050X
What to do in an emergency
If the back door cannot be opened due to a dead
12V battery, etc., perform the following operations.
• Move the lever
of the lock mechanism inside the passenger
compartment of the back door in the direction
of the arrow to unlock and lift the back door.
$/$: Different equipment depending on vehicle model, options, etc.
• This procedure is only an emergency measure
in the event of a failure. Do not use the
product when it is normal as it may cause
malfunction.
• If you perform this operation, please have it
inspected by a NISSAN dealer, as it may lead
to malfunction of the back door opener switch,
etc. • Have the system inspected by
a Nissan dealer as soon as possible after
operation.
Machine Translated by Google
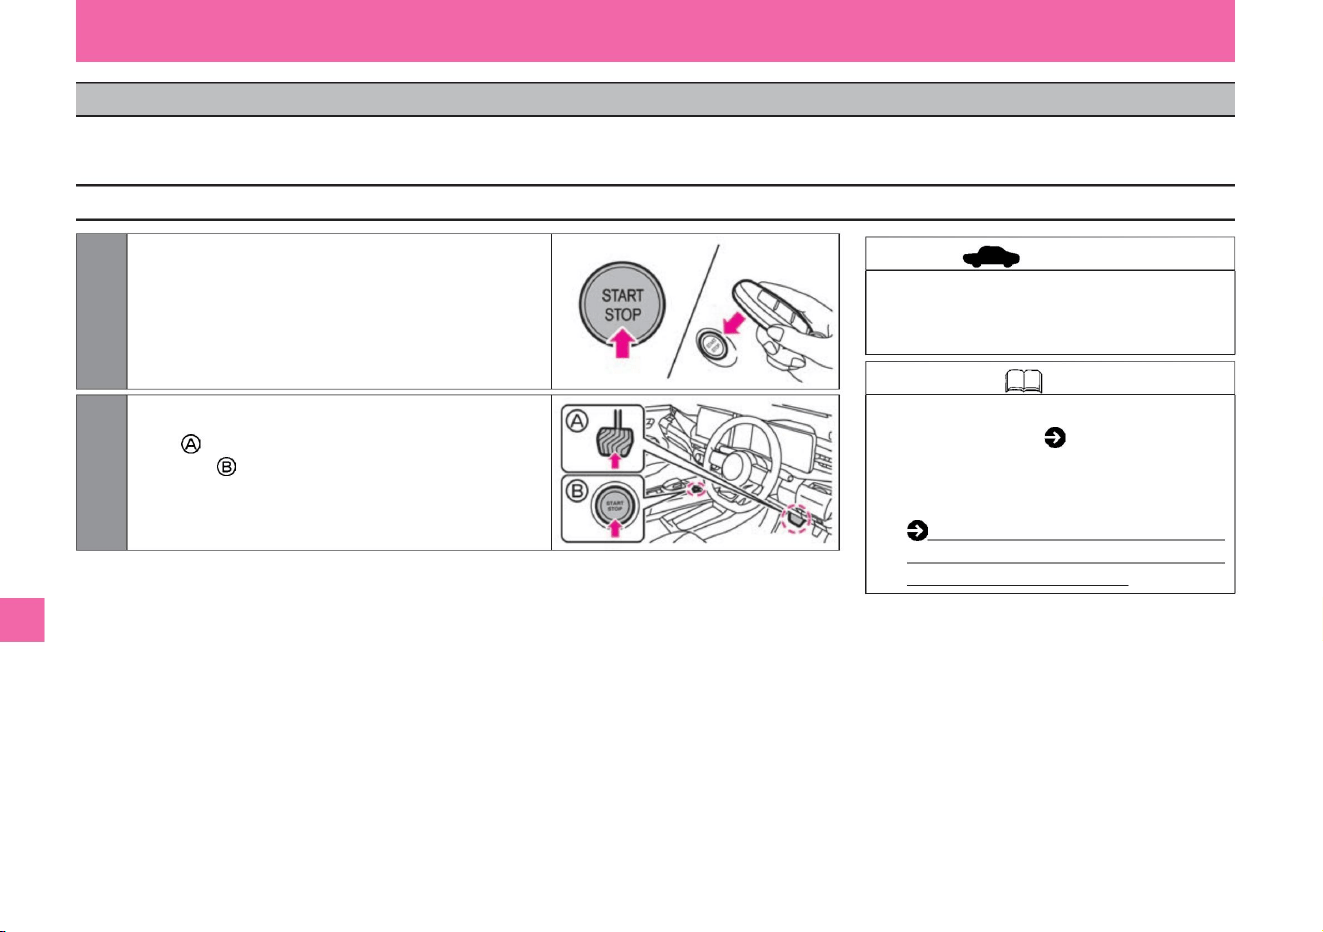
• If you are unable to start the e-POWER system
following the steps on the left, please contact your
Nissan dealer as soon as possible.
Bring the back of the mark into contact with the
power switch. (The buzzer will beep.)
• Use the built-in key (mechanical key)
( P.294) to lock and unlock the door. •
When the
key battery runs out, replace it as soon as
possible. Key (intelligent
key/remote control entry system)
battery replacement (P.364)
What to do in an emergency
2Within 10 seconds after the buzzer sounds,
press the power switch while firmly
depressing the brake pedal .
1Press the power switch, then press the key logo
Troubleshooting
advice
Knowledge
How to start the e-POWER system
296
ZEG0947X
ZEI0410X
When the key battery has run out, or when communication between the key and the vehicle is not working properly due to the operating environment, follow the procedure below to start the e-POWER
system.
If you cannot start with the key (intelligent key/remote control entry system)
Machine Translated by Google
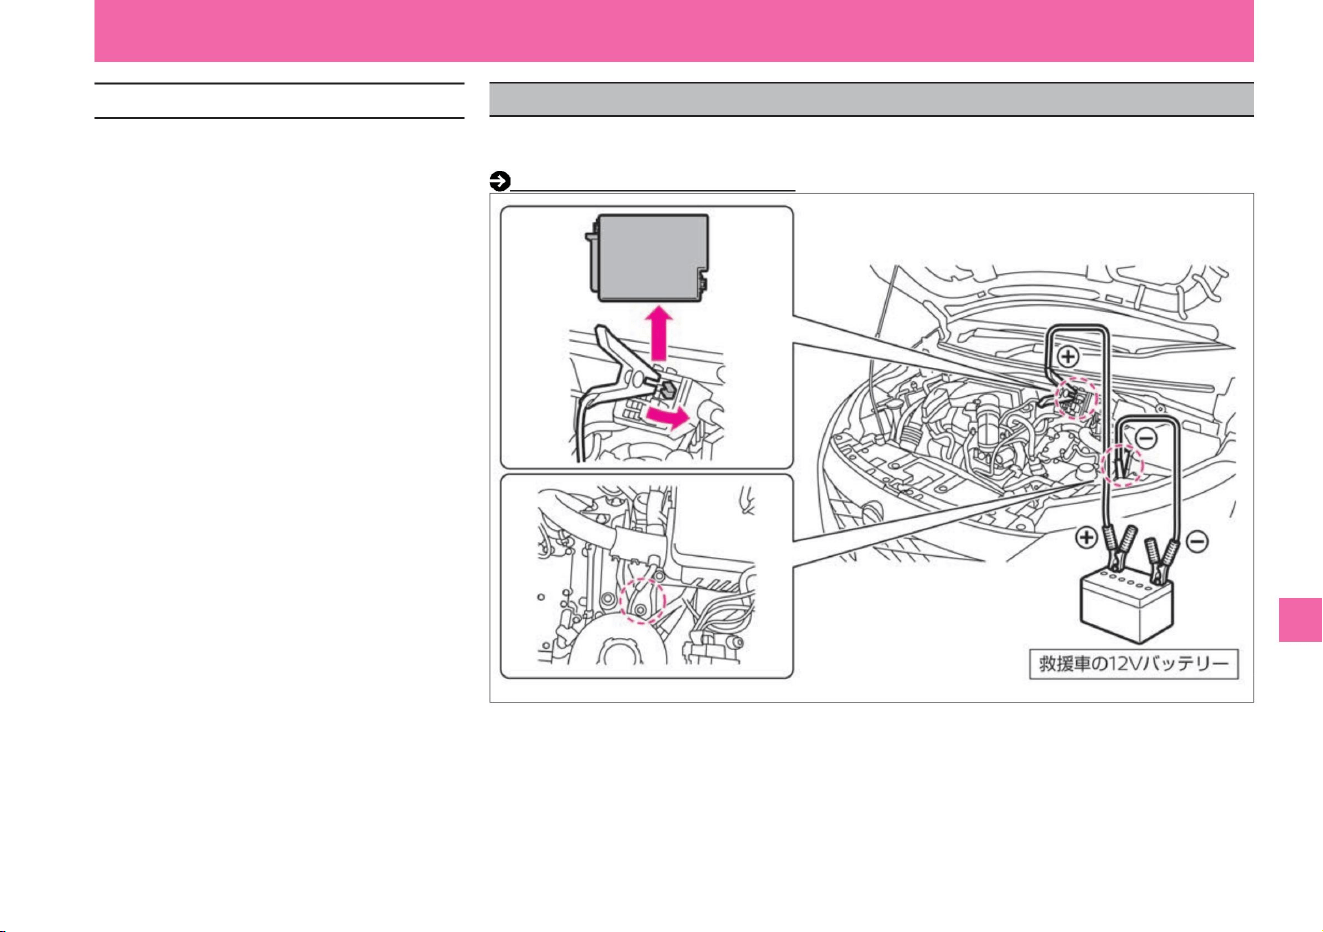
What to do in an emergency
To stop the e-POWER system, perform one of
the following operations. •Press the
power switch three times quickly. •Press
and hold the power switch for 2 seconds or longer.
$/$: Different equipment depending on vehicle model, options, etc.
If the 12V battery is dead and the power switch cannot be turned ON, request a rescue vehicle
and connect the booster cable (sold separately) to start the
vehicle. Layout of engine room (P.353)
ZEI0387X
When the 12V battery is dead
Troubleshooting
How to stop the e-POWER system
297
Machine Translated by Google

298
warn
Troubleshooting
If it is not fixed firmly, it may cause a
short circuit and lead to a fire. For
details, please consult your Nissan
dealer.
What to do in an emergency
keep children out of
contact. A spark may be generated, igniting
the combustible gas from the 12V battery
and causing an explosion, which may
result in serious injury
such as burns. • Make sure that the + terminal
of the 12V battery does not come into
contact with surrounding metal. Touching
them may cause a short circuit and cause
a fire. In addition, if the 12V battery
terminals are loosely tightened, the wiring
may overheat and burn, resulting
in a fire. • When replacing the 12V battery, be
sure to replace it with one of the same size
(model) and fix it firmly so that it does not move.
• Connect the booster cables in the correct
order and
position. • Do not connect the booster cable
directly to the 7 terminals of your
vehicle's 12V battery . • + terminal and 7 end of booster cable
The combustible gas generated from the
12V battery may ignite and explode.
• If the battery fluid gets on your skin,
immediately wash it with plenty of
water. The battery fluid is dilute
sulfuric acid. Contact with eyes
or skin may lead to serious injury
such as blindness or inflammation.
• When jump starting, ventilate well and
keep fire away.
Machine Translated by Google
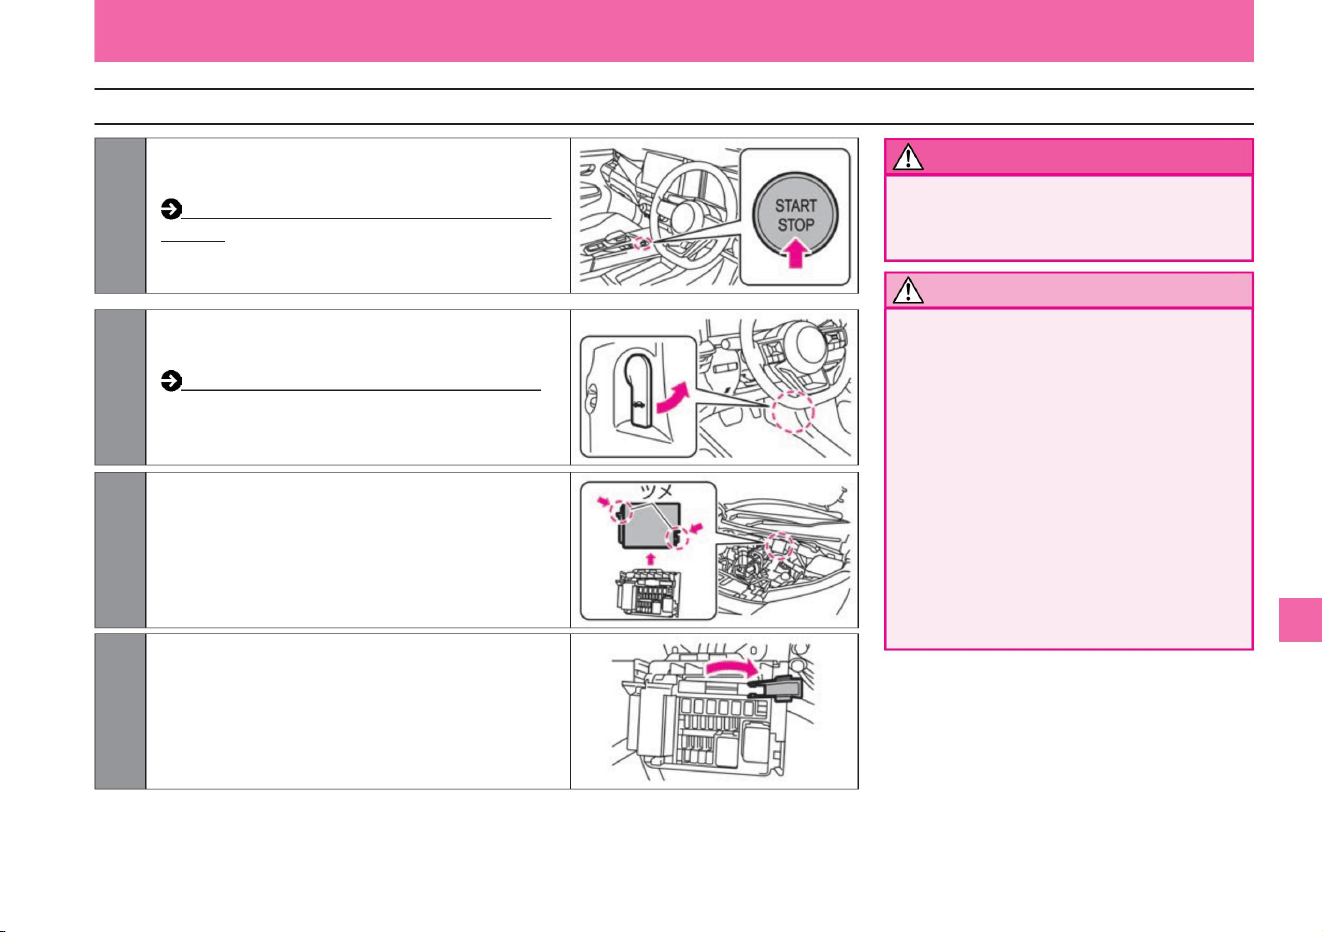
How to jump start
warn
Notice
299
ZEI0390X
ZEI0389X
ZEI0388X
ZEF0286X
2Pull the hood opener at the bottom right of the
driver's seat to open the hood.
4Open the cover inside the fuse box of your vehicle
while pressing the tab.
1Turn off the power switches of your vehicle and the rescue vehicle.
3Remove the fuse box cover of your vehicle while
pressing the tab.
What to do in an emergency
$/$: Different equipment depending on vehicle model, options, etc.
Troubleshooting
• Be careful not to let the alligator clip of the
booster cable touch the vehicle body or
contact other alligator clips. • Connect the
booster
cable securely. Connect securely so that it will
not
come off due to vibration when the engine
is started.
• Be careful with cooling fans and belts.
• Never connect the alligator clip of the booster
cable to the engine or motor.
When connecting or disconnecting the
booster cable, be careful not to let it get
caught in the cooling fan or belt.
How to open and close the bonnet (P.354)
vinegar. How to switch modes with the power switch
(P.135)
Machine Translated by Google
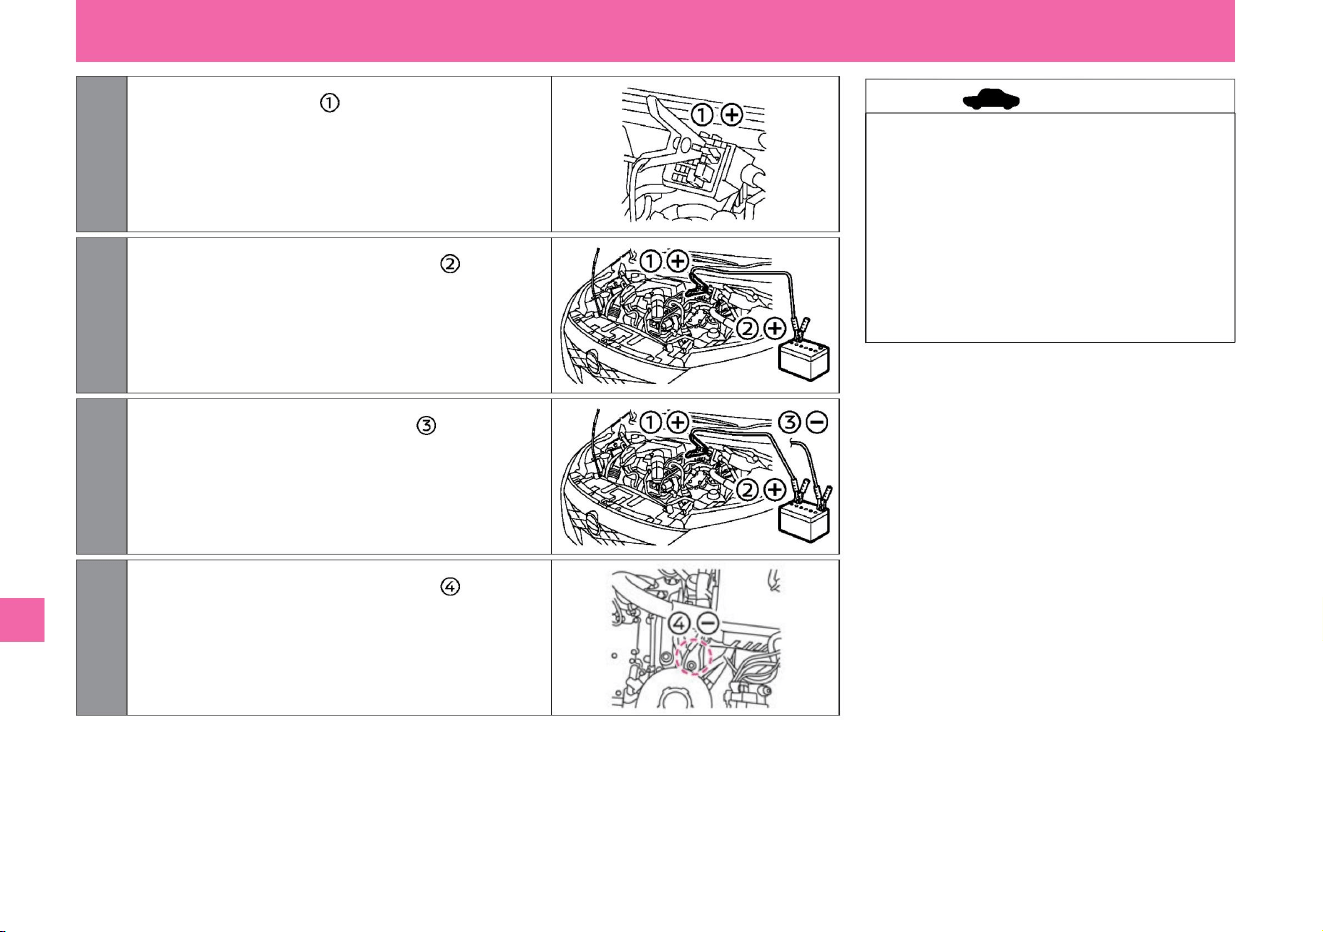
5 Connect the booster cable to the + terminal of your vehicle's
fuse box.
7 Connect another booster cable to the rescue vehicle.
8Connect the other end of the cable connected in step 7 to
the vehicle body (unpainted metal part away from the
position connected in step 5) as shown on the right.
6Connect the other end of the cable connected in step 5 to
the + terminal of the rescue vehicle's 12V battery.
ZEI0392X
ZEI0394X
ZEI0393X
ZEI0391X
• Starting by pushing is not possible. •
Do not use this vehicle as a rescue
vehicle. •
Use a vehicle with a 12V battery as a
rescue vehicle. •
When the 12V battery is dead, the power
switch cannot be turned ON/OFF.
Please charge the 12V battery as
soon as possible.
Connect to 7 terminal of 12V battery.
What to do in an emergency
Troubleshooting
advice
300
Machine Translated by Google
9Start the engine of the rescue vehicle and increase the engine speed a little. Start
your vehicle's e-POWER system.
10 After the e-POWER system has started, disconnect the booster cables in the reverse order of how they
were connected.
$/$: Different equipment depending on vehicle model, options, etc.
If it fails to start, stop the engine of the rescue vehicle and turn off the power switch.
After opening and closing the driver's door, wait at least 3 minutes with the door
closed without performing any operations such as navigation, audio, or door lock.
Start the engine of the rescue vehicle again and increase the engine
speed a little. Start your vehicle's e-POWER system.
• When starting the e-POWER system, turn
off headlamps, air conditioners, and
other electrical equipment.
How to start the e-POWER system (P.132)
• Do not use the air conditioner or audio for
a while after the e-POWER system
starts .
What to do in an emergency
Troubleshooting
301
advice
Machine Translated by Google
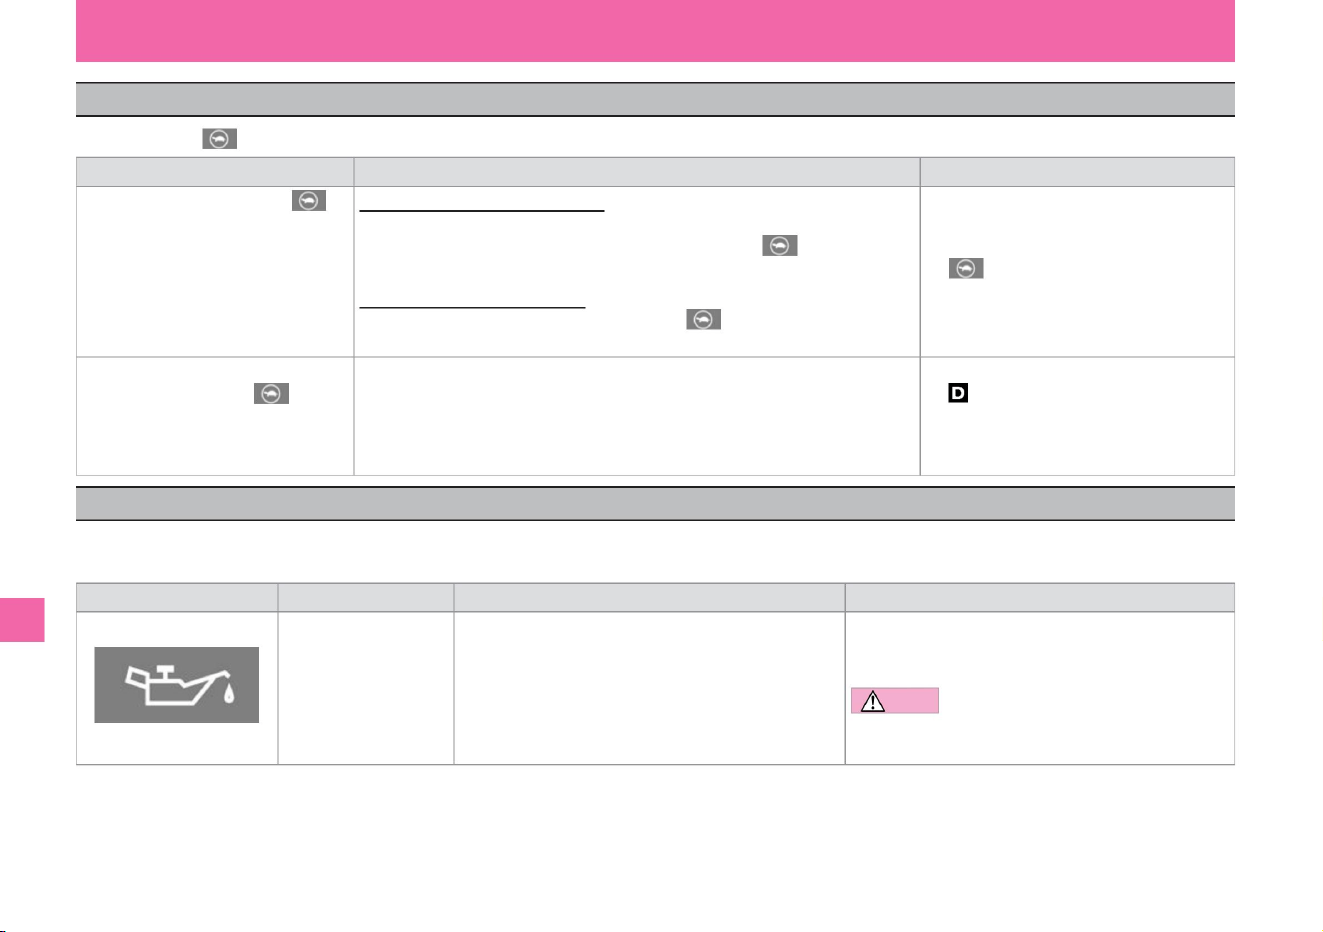
When the output limit indicator lights
When the warning light comes on
Troubleshooting
If the output limit indicator lights up, follow the steps below.
The warning light is for notifying the driver of vehicle troubles, etc. If the warning light lights up or flashes, follow the "Description/Remedy" below.
Warnings and displays in the meter differ depending on the grade, options, etc.
What to do in an emergency
302
MEE0202X
Description/Remedy
• When the light comes on, immediately stop the vehicle in a safe
place and contact a Nissan dealer. Note
When the light comes on
What to do Notes When the output limit indicator light is on When driving on a highway When other warning lights are on, drive at a speed of 80
km/h or less when the light comes on. Stop
the vehicle in the next parking area or its warning light in the priority service area and wait until the power limit indicator light turns off. Wait at the output
limit display. If only the light comes on, follow the remedy on the left. When driving on public roads Stop the vehicle in a safe place and wait until the output limit indicator light turns off. Take your foot
off the accelerator pedal.
If you put the shift position in while the light is on, the
output of the drive motor will be limited, and it will be
difficult to increase the speed even if you depress
the accelerator pedal.
warning light
When the output limit indicator lights up along
with a warning sound (buzzer) while the
vehicle is stopped
oil pressure warning light
name
Pressure of the oil lubricating inside the engine • Do not drive
with the oil pressure warning light on. Lights up when the power
drops. It may damage the engine.
Lighting/blinking conditions
• When the power switch is turned on, the light will turn on, and
the light will turn off when the e-POWER system starts. •
When the e-POWER
system is operating,
Machine Translated by Google
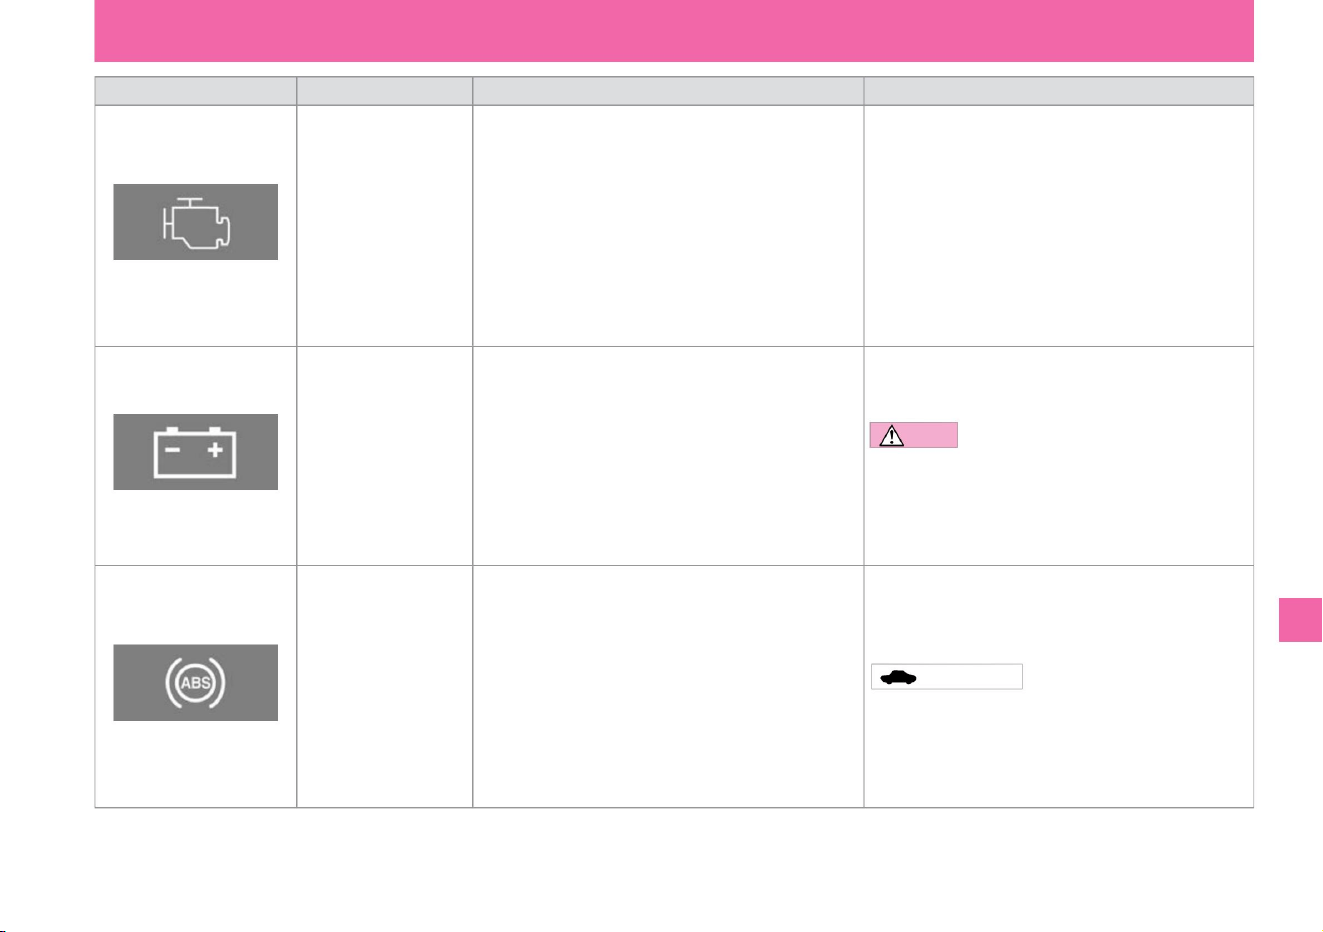
Description/Remedy •
When the light comes on or flashes, immediately stop the vehicle in a
safe place and contact a Nissan dealer.
• When the e-POWER system is operating, it lights up or flashes if
there is an abnormality in the engine electronic control system. •
When the power switch is turned on, the
light turns on and goes off after a few seconds. • When the e-POWER
system is operating,
Lighting/blinking conditions •
When the power switch is turned on, the light will turn on, and the light
will turn off when the e-POWER system starts. • When the power
switch is ON and the
warning light is lit, the system check may cause it to flash, but this is not
a malfunction.
Doing so may damage the 12V battery or cause the engine to stop
suddenly, leading to an unexpected accident.
12V charging warning light
name
stomach.
Malfunction Warning Light (MIL)
• If the light does not come on when the power switch is turned on, or if
the light stays on, avoid high-speed driving or sudden braking, and
immediately have the vehicle inspected by a NISSAN dealer. Advice
• When the ABS warning light illuminates, ABS does not
operate, but
normal braking performance is maintained. In this case, the tires may
lock when braking on slippery roads or when braking hard.
Lights up when there is a problem with the charging system of the
12V battery.
• When the power switch is turned on, the light turns on and goes off
after a few seconds. • When the power switch is ON, it
lights up if there is an abnormality in the ABS system.
• When the light comes on, immediately stop the vehicle in a safe place
and contact a Nissan dealer. Note
ABS warning light
warning light
• Do not drive with the 12V charging warning light on.
Troubleshooting
303
What to do in an emergency
$/$: Different equipment depending on vehicle model, options, etc.
KVH0130X
KVH0133X
KVH0129X
Machine Translated by Google

Lighting/blinking
conditions • In normal conditions, the light will turn on
when the power switch is on and the electric parking
brake is applied, and it will turn off when the electric
parking brake is released. •
Flashes if there is a problem with the electric parking
brake system when the power switch is ON.
• If the brake warning light (red display) lights up while
driving, stop the vehicle and check the following.
(The VDC warning light will illuminate at the same
time as the brake system warning light.) – Make
sure the brake
fluid level is correct. If the brake fluid is low, top up
the brake fluid and have it inspected by a
NISSAN dealer. – If the amount of brake fluid is
correct, there may be another cause, so have it
checked
by a NISSAN dealer.
• When the power switch is turned on, the light turns on
and goes off after a few seconds. • When
the power switch is ON, the light will continue to light in
the following cases.
– When the brake fluid is insufficient –
When there is a problem with the brake system
name
Brake warning light
(red display)
• If the brake system warning light (yellow display)
comes on while driving, have the vehicle inspected
by a Nissan dealer.
warning light
Electric parking brake
warning light
Explanation /
Remedy If the power switch is on and the warning light
is still flashing, and the flashing continues even
after the electric parking brake is released,
immediately stop the vehicle in a safe place and
contact a Nissan dealer. please.
Brake system warning
light
(yellow display)
• When the power switch is turned on, the light turns on
and goes off after a few seconds. • If the
brake system warning light (yellow display) continues
to illuminate while driving, the electric parking brake
function may be malfunctioning.
304
Troubleshooting
What to do in an emergency
KVH0131X
KVH0131X
MEE0203X
Machine Translated by Google
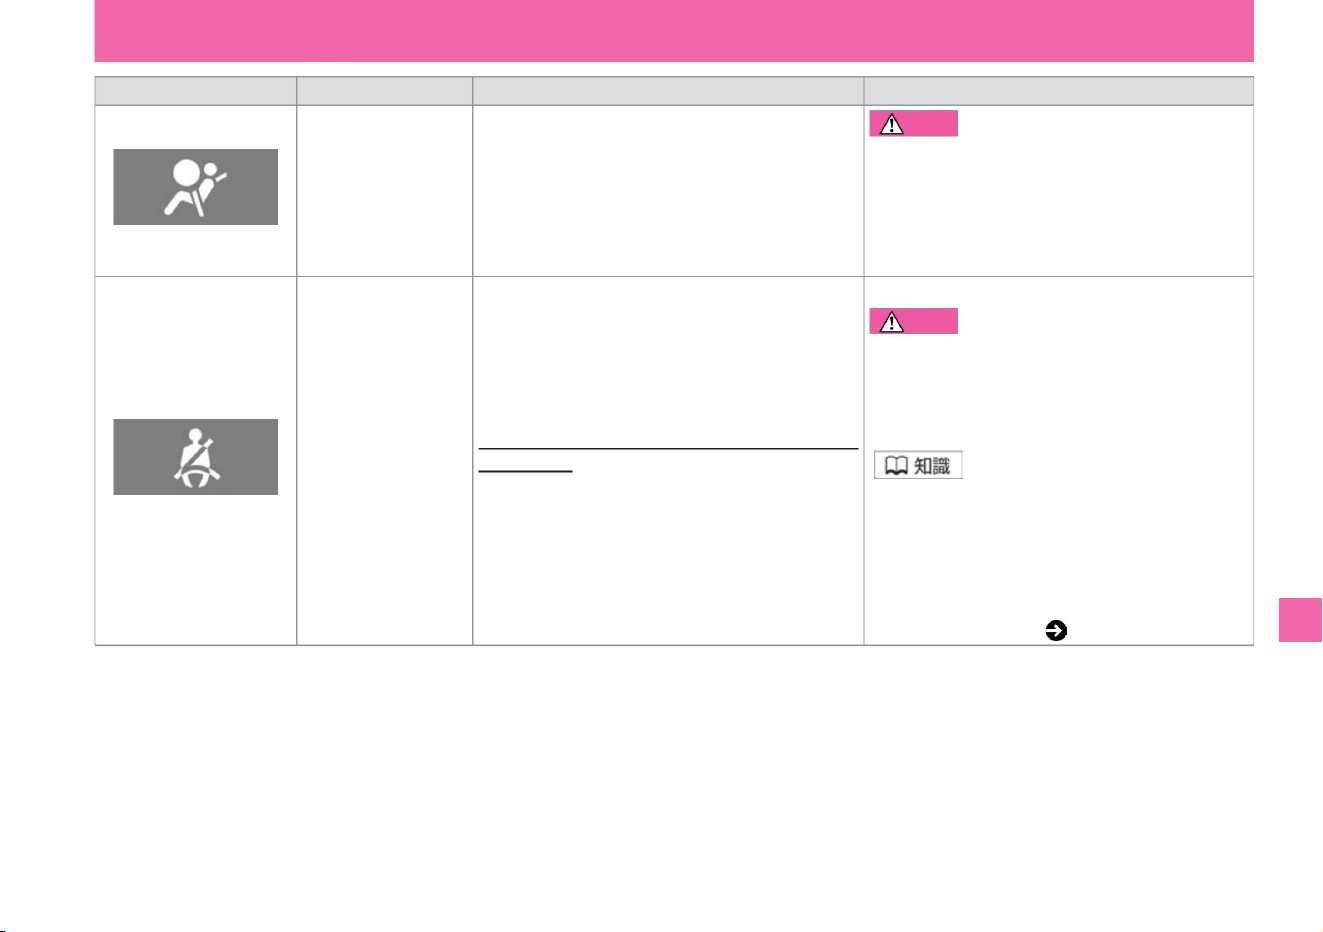
warning light name
• If the light does not come on even after the power
switch is turned on , or if the light continues to
come on, do not drive. In
the unlikely event that the SRS airbag and
pretensioner seatbelt do not operate, there is a risk
of serious injury.
• Please wear a seat belt. caveat
• If you put luggage on the passenger seat or rear seat,
the sensor may detect the weight and the warning
light may turn on. • The state of seat belt use is
also displayed on the Advanced Drive Assist Display.
Warning message ( P.314)
Lighting/flashing
conditions • When the power switch is turned on, the
light turns on and turns off after about 7
seconds. • While the power switch is ON, if there is an
abnormality in the SRS airbag system or pretensioner
function, the light will continue to illuminate.
be.
Failure to do so may result in death or serious injury
in the event of an accident or sudden braking.
Explanation/Remedy
• When the power switch is ON, the light will turn on if
the front and rear seat occupants are not wearing
seat belts. • If you
drive without wearing a seatbelt (approximately 15km/
h or more), the warning light will flash.
• Everyone must wear a seat belt while driving.
SRS airbag warning
light
Seatbelt non-wearing alarm (seatbelt trimmer, seatbelt
warning, inder) Light •
When the
vehicle is driven (approximately 15 km/h or more) without wearing a seatbelt, a
buzzer sounds for approximately 95 seconds.
Troubleshooting
KVH0136X
KVH0134X
What to do in an emergency
305
$/$: Different equipment depending on vehicle model, options, etc.
warn
Machine Translated by Google
Description/Remedy
Conditions for lighting/
blinking • When the power switch is ON, the amount of fuel remaining • Replenish the specified fuel promptly.
Lights up when is low.
name
• When the light is on, VDC and hill start assist will stop
working, but you can drive like a normal car without
those systems. Drive carefully on slippery roads and
have your vehicle checked by a Nissan dealer as soon
as possible.
warning light
low fuel warning light
• Lights up when the remaining amount of fuel is about
5.5ÿ or less. The amount of fuel that can be used for
driving is slightly less than the remaining
amount shown above. • Because fuel moves in the tank
depending on vehicle attitude and driving conditions,
the timing at which the warning light turns on may
change.
Do not repeat the e-POWER system startup operation.
Lithium-ion battery protection may prevent starting. If
the engine does not start even after refueling, contact
your NISSAN dealer.
VDC warning light
Lights up when there is a problem with the electronic
control system of VDC and Hill Start Assist.
• Lights up if an error occurs in the e-POWER system when
the power switch is ON.
• When the power switch is turned on, the light turns on and
goes off after a few seconds. • Blinks when
VDC operates when the power switch is ON. • When the e-
POWER system is
operating,
• When the power switch is turned on, the light will turn on, and it will turn off after a few seconds in a safe place . stop and
contact your Nissan
dealer.
stomach. Advice •
When the engine stops due to lack of fuel,
VDC (Vehicle Dynamics Control) (P.168) Hill Start
Assist (P.171)
e-POWER system warning
light
Troubleshooting
ZEE0470X
KVH0135X
KVH0137X
What to do in an emergency
306
Machine Translated by Google

Lighting/blinking conditions •
When the power switch is turned on, the light turns on and goes off
after a few seconds. • When the power switch is ON,
it lights up in the following cases. – When the remaining charge of the
lithium-ion battery
is extremely low
• When the power switch is turned on, the light turns on and goes off
after a few seconds. • When
the power switch is ON, it lights up if there is a problem with the
electronic shift.
– When the temperature of the lithium-ion battery is extremely
low, such as outdoors in the middle of winter – When
the temperature of the drive motor or lithium-ion battery, etc. is
extremely high, such as when driving continuously uphill –
Power generation output is limited
Occasion – When the accelerator pedal is depressed
while the vehicle is stopped and the shift position is .
name
• Have the vehicle inspected at a Nissan dealer as soon as possible.
• When a
message is displayed in the Advanced Drive Assist Display, follow the
displayed message.
warning light
Output limit indicator
Description/Remedy •
When the light is on, the output of the driving motor or power
generating motor is limited, making it difficult to increase speed
even if the accelerator pedal is depressed. • The message
"Driving
restricted" appears in the Advanced Drive Assist Display. When the
output limit indicator lights up (P.302)
electronic shift warning light
$/$: Different equipment depending on vehicle model, options, etc.
Troubleshooting
What to do in an emergency
307
MEE0011X
MEE0274X
Machine Translated by Google
•It will blink slowly in the following cases.
– When being affected by surrounding radio
sources – When Intelligent Emergency Braking is
temporarily inoperable due to dirt on the radar
sensor, etc. (P.330) • When the room temperature is
high, the operation will resume when the
temperature drops
and the
windshield becomes dirty. When the multi-sensing front camera is in front When the intelligent
cannot be recognized Emergency braking (P.201 )
When you lose direction and Intelligent
FCW (Forward Collision – Camera predictive
warning, e.g. when parking in hot weather) (P.231). When
the temperature is high – When
the multi-sensing front camera cannot recognize the front due to
dew condensation or fogging on the windshield.
name
Explanation/
Remedy • When the intelligent emergency brake or
VDC is turned off, turning it on turns off the light. •
If the warning light continues to
illuminate after the e-POWER system is restarted,
there may be a system malfunction. There is no
problem with normal driving, but please have it
inspected by a Nissan dealer – when the VDC is
OFF. –Intelligent Emergency If the
windshield is dirty, clean the
brakes, Collision Prevention Assist Front Glass, and
check that the warning light has gone out or intelligent
FCW (Forward Collision Warning). If there is
condensation or fogging on the windshield , remove the
condensation or fogging, and check that the
warning light has gone out. please confirm.
warning light
Lighting/blinking
conditions • When the power switch is turned on, the
light will turn on, and the light will turn off when the
e-POWER system
starts. • Lights up in the following
cases. –When the intelligent emergency brake is
turned off
Intelligent emergency
brake warning light
308
Troubleshooting
What to do in an emergency
MEE0279X
Machine Translated by Google
warning light
• Lights up when there is an abnormality in the vehicle proximity notification device
master warning
name
EPS (electric power
steering) warning light
increase.
Lighting/blinking
conditions • When the power switch is turned on, the
light will turn on, and the light will turn off when the e-
POWER system
starts. • Lights up if there is a problem with the electric
power steering system while the e-POWER system
is operating.
• Check the warning message displayed at the same
time, and follow each remedy. Warning message
(P.312)
Explanation/
Remedy • When the light comes on, have it inspected
by a Nissan dealer as soon as
possible. • When the light is on, the electric power
steering does not operate, but the performance of
the manual steering is ensured. In this case, the
operating force of the handle becomes heavy. Advice
• If you
keep applying
force to the steering wheel for a long time or operate it
repeatedly while the vehicle is stopped, the steering
force will increase to prevent the system from
overheating, but this is not a malfunction. When the
steering is not operated for a while and the system
cools down, it will return to normal steering force.
• Have the vehicle inspected at a Nissan dealer as soon
as possible.
• Lights up when a warning message is displayed on the
Advanced Drive Assist Display.
• If you operate the steering wheel quickly, you may hear
a rubbing sound from near the steering wheel, but
this is not a malfunction.
Vehicle proximity notification
system warning light
Troubleshooting
KVH0143X
KVH0128X
KVH0139X
What to do in an emergency
309
$/$: Different equipment depending on vehicle model, options, etc.
Machine Translated by Google
Explanation/Remedy
Conditions for lighting/
blinking • Use ProPILOT to assist the steering • Do not hold the steering wheel while you are operating it. If the driver's steering
wheel operation is not detected, the warning light will turn off
and the steering assist function will turn on. will return. • Even
though the hands-off warning light is on • If the warning light does not turn on even after the e-POWER system is restarted and
the
driver's steering wheel operation is detected and it continues to light, it is assumed
that there is no problem with the system. , let go with an audible warning. The light will flash and the steering assist function will not
be canceled, but please have it inspected by a NISSAN
dealer. will be • Lights up when there is a problem with the ProPILOT
(steering wheel support) system.
Lighting/blinking conditions
• When the emergency flashing indicator switch is pressed, both
left and right lights will
flash at the same time. • When the power switch is ON, if the
direction indicator is activated, only the activated side will
flash.
No hands warning lightÿ
tail lamp indicator light
name
direction indicator light
How to use the light switch (P.149)
• Lights up when the high beam (upward) of the headlamp is
turned on.
How to use fog lights (P.157)
• When the fog lamp is turned on, it lights up.
(P.155)
How to switch to high beam (upward)
Explanation/Remedy
• If the blinking speed becomes faster, have it inspected by a
Nissan dealer. How to use the
direction indicator (P.156)
- Lights up when the car width light, tail light, and number light
are turned on.
Fog lamp indicator lightÿ
Indicating light
Headlamp upward indicator
light
vinegar.
warning light
name
When the indicator light comes on
ZEE0416X
KVH0119X
KVH0120X
KVH0117X
KVH0118X
What to do in an emergency
Troubleshooting
Indicator lights are intended to let you know, for example, that some system is working. Please read the following explanation for why it is lit. Warnings and
displays in the meter differ depending on the grade, options, etc.
310
Machine Translated by Google
Indicating light
increase.
Lighting/blinking
conditions Lights up when the rear fog lamp is turned
on Rear fog lamp indicator
light
• Lights up when the adaptive LED headlight system is
turned on.
High beam assist indicator
light
• When the auto brake hold is in the standby state, the
auto brake hold lights
white. LED indicator (white)
name
Adaptive LED headlight system (Vehicles with LED
headlamps) (P.153)
High beam assist (vehicles with halogen headlamps)
(P.151)
Auto brake hold (P.142)
Car with LED headlamp
Adaptive LED Headlight
Indicator Light
• Auto brake hold is activated Auto brake hold indicator
light (green)
increase.
VDC (Vehicle Dynamics Control) • When the power
switch is turned on, it lights up and goes out after a few
seconds (P.168).
• Lights up when VDC
is OFF when the power switch is ON.
lights green when
Lights up when high beam assist is turned on
Auto brake hold (P.142)
Explanation/
Remedy How to use the rear fog lamp (P.157)
Cars with halogen
headlamps
VDC OFF indicates light
Troubleshooting
KVH0121X
MEE0197X
KVH0121X
MEE0316X
MEE0197X
KVH0122X
What to do in an emergency
311
$/$: Different equipment depending on vehicle model, options, etc.
Machine Translated by Google
Indicating light
Advice • If the
lights continue to come on after driving for a while, the water temperature
sensor may be malfunctioning. Have the vehicle inspected by a
Nissan dealer as soon as possible.
Lighting/blinking conditions •
When the power switch is turned on, the light turns on and turns off after
a few seconds. • Lights up
when the temperature of the engine coolant is low.
• When the light is blinking, keep pressing the power switch while
depressing the brake pedal until the light turns on.
• The display disappears in the following cases.
– When e-POWER system is started – remote control function
or door handle switch
name
low water temperature indicator light
name
When you lock the door with Chiÿ
vinegar.
Explanation/Remedy •
Press the power switch while depressing the brake pedal. The e-POWER system will start.
• When the engine cooling water temperature is low, the low water
temperature indicator light will remain on, but it will turn off after a
while as the engine warms up and the water temperature reaches
or exceeds the specified level. • Lights up when the vehicle is
ready to run. (It will continue to light even while driving.) • When the e-
POWER system starts, it will blink until it is
ready to drive.
Display conditions •
Displays when entering the vehicle with the key (intelligent key/
remote control entry system).
Explanation/Remedy
Ready-to-run indicator light
screen display
e-POWER system
startup operation
display
When a warning message is displayed
KVH0126X
ZEI0418X
KVH0125X
What to do in an emergency
Troubleshooting
warning message
312
If a warning message is displayed, follow the "Description/Remedy" below. The display differs depending on the grade, options, etc.
Machine Translated by Google
When intelligent
key is not
activated e
• Replace the battery with a new battery for the key (intelligent key/remote control). When the
battery of the key (intelligent key/remote
control) is about to run out, you will be notified to replace the battery .
POWER
system startup display
name
Intelligent key
low battery
indicator
• The display disappears when the power switch is set to anything
other than ON. • When the power switch is ON,
check if the key • key (intelligent key/remote control (intelligent key/remote
control entry system) is not taken out of the vehicle) . Displayed when taken out of the vehicle. • Carry the key
(intelligent key/remote control • entry system to switch the power switch at the
following times). displayed when you try to
• Replace with new batteries. – When the key (intelligent key/re-key
(intelligent key/remote control entry system) is not
with you – The battery of the key ( intelligent key/remote
control entry system) you are
carrying is dead e -POWER The system should be shut down
when one of the following occurs – when
carrying an unregistered key (intelligent key/remote control entry system)
screen display
Intelligent key
removal warning
Please perform one of the following
operations. –Press the power switch three times
quickly –Press and hold the power switch for more than 2 seconds
Explanation/
Remedy Display
condition When the battery of the key ( intelligent control entry system key/ remote control entry system) runs out after the
key (intelligent key/remote control power
switch is pressed) or when the operating environment is changed. Contact
the back side of the logo with the power switch to ensure normal communication between the key and the vehicle.
display when not done. key (intelligent key/remote control
Roll entry system) battery replacement (P.364)
(Roll entry system) battery replacement (P.364) • Make sure
it is your vehicle's key (intelligent key/remote control entry system).
If you cannot start with the roll entry system) (P.296)
$/$: Different equipment depending on vehicle model, options, etc.
Troubleshooting
What to do in an emergency
313
ZEI0419X
MEE0217X
MEE0218X
Machine Translated by Google
Explanation/
Remedy • Close the door securely.
name
screen display
• If you put luggage on the passenger seat or the rear seat, the
sensor may detect the weight and the seat belt warning may be
displayed.
• Everyone must wear a seatbelt while driving. Failure
to do so may result in death or serious injury in the event of an
accident or sudden braking.
• Change the shift position to .
• Make sure that the display is off before driving. If the door is not
completely closed (ajar door), it may suddenly open while driving,
resulting in an unexpected accident.
• Seats with seat belts are displayed in green. •
Empty seats are
displayed in gray.
Forgot to return
Warning
• It is displayed that there is an abnormality in the key system.
• Appears when the electric parking brake is
applied, the driver's door is open, the
accelerator pedal is depressed, and the
vehicle starts moving.
door open warning
• Contact your Nissan dealer. The e-POWER system may not start
or the power switch may not switch.
• Please wear a seat belt. caveat
key system
warning
• Close the driver's door. • Release the
electric parking brake as soon as possible.
• When the power switch is ON, if the front and
rear seat occupants are not wearing seatbelts,
the seat belts not wearing are displayed in red.
increase.
Warning for forgetting
to release the electric
parking brake
Conditions for
display • When the door is not completely
closed, the open position is displayed.
seat belt warning
• Lights up when the shift position is other than
and the driver's door is opened.
when.
Electric parking brake (P.139)
Troubleshooting
What to do in an emergency
314
ZEI0368X
MEE0223X
MEE0220X
ZEI0407X
MEE0466X
Machine Translated by Google
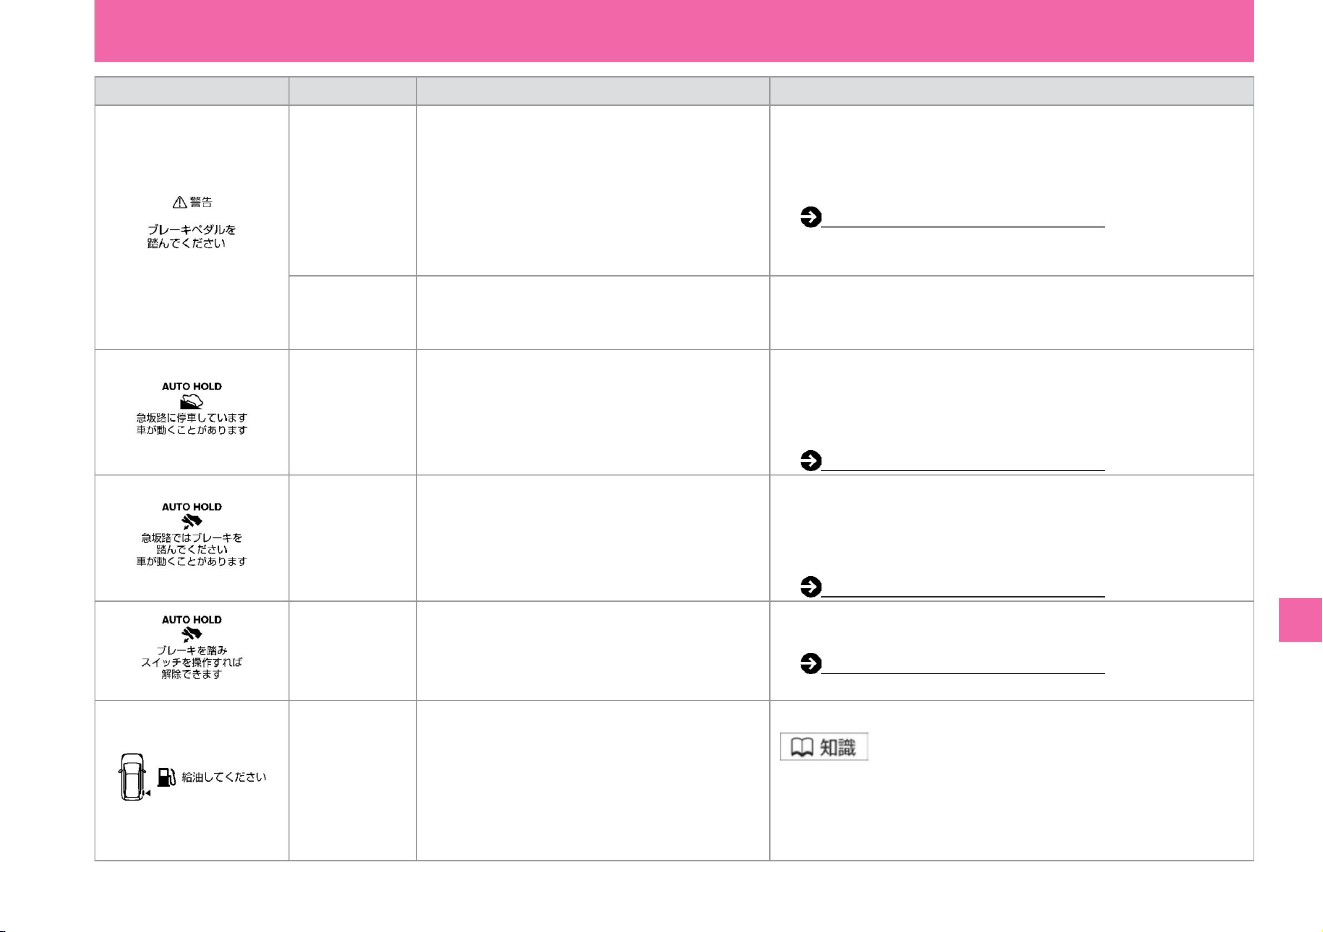
Explanation/
Remedy
Condition to display • Electric parking brake on a steep slope • Please depress the brake pedal
immediately. The vehicle moves while
the brake is applied • To release the brake, step on the brake
pedal, then the electric display
is displayed and the buzzer sounds. Push down the parking brake
switch . Electric Parking Brake (P.139)
Appears
when the electric parking brake switch
is pressed without stepping on the brake
pedal.
Auto brake
hold steep
slope caution display
Electric
parking brake
warning
low fuel warning
name
• Use the auto brake on a steep slope . • Depress the brake pedal as soon as possible. About
3 minutes have passed since the lock
was activated, and about 3 minutes have passed since the
auto brake hold was activated on a
steep slope and the brake was not stepped on. A buzzer sounds.
At times the vehicle may start
to move. AUTO BRAKE HOLD (P.142) • During the auto
brake hold operation, this is
displayed when the auto brake hold switch is pressed without depressing the brake pedal after
depressing the brake pedal .
• Displays when the vehicle moves while
the auto brake hold is in operation.
Auto brake
hold switch
release
operation display
• Displays when the remaining amount of fuel is
about 5.5ÿ or less. • Depending on vehicle attitude and driving
conditions, fuel may move in the tank, so the timing at which the
warning is displayed may change.
Auto brake
hold warning
Auto brake
hold steep
slope operation display
• Use the auto brake on a steep slope . • Depress the brake pedal as soon as possible. This is
displayed when the brake is activated,
and the auto brake halter sounds on steep slopes or slippery
roads . Even if
the lock function is activated, the vehicle may start moving. Auto brake hold (P.142)
Auto brake hold (P.142)
• Push the brake pedal to stop the car.
switch.
screen display
• Displays when fuel is low. • Please supply the specified fuel as soon as possible.
$/$: Different equipment depending on vehicle model, options, etc.
Troubleshooting
What to do in an emergency
315
ZEG1021X
ZEI0215X
ZEI0217X
ZEI0216X
ZEI0370X
Machine Translated by Google
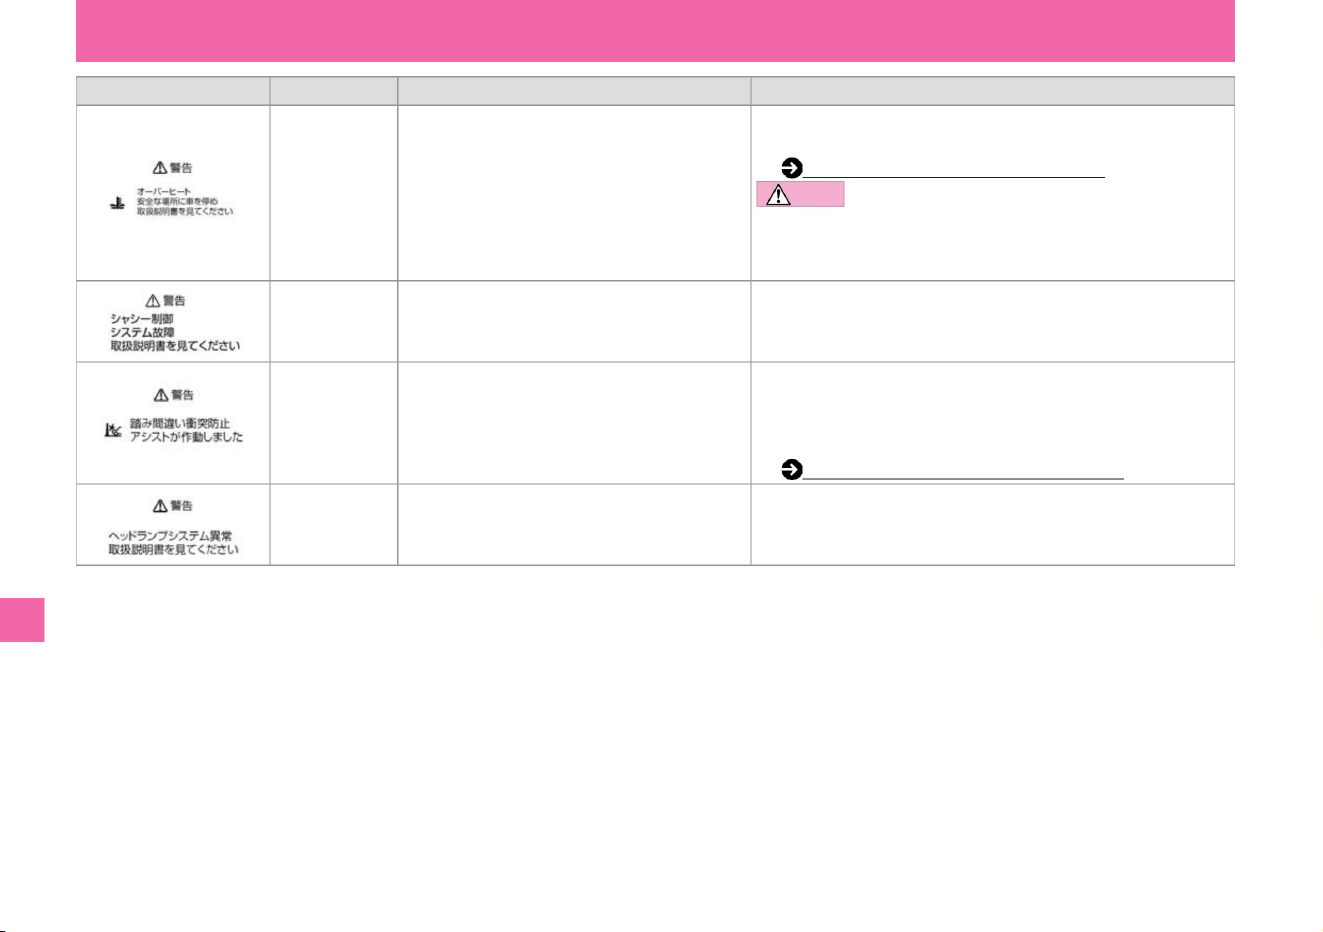
Explanation/
Remedy • When this message appears, stop the car in a safe place immediately.
Please take action.
When overheating (P.332) CAUTION • Do not
drive
while the display is on. Continuing to
drive as is may cause engine failure and may lead to fire.
name
• It activates when the system determines that the accelerator pedal is
quickly and deeply depressed when obstacles such as walls, vehicles,
and pedestrians are detected in the direction of travel. Misapplication
collision prevention assist (P.207)
• Appears when the misapplication collision prevention
assist is activated.
screen display
• Indicates that there is a problem with the LED
headlamp.
overheat warning
Display when
misapplication collision
prevention assist is activated
Chassis control
display
• Have the vehicle inspected by a Nissan dealer as soon as possible.
• Indicates that there is an abnormality in the chassis
control system.
headlamp warning
Display conditions •
It is displayed when the temperature of the engine cooling
water becomes abnormally high.
• Have the vehicle inspected by a Nissan dealer as soon as possible.
Troubleshooting
MEE0307X
MEE0233X
MEE0232X
MEE0579X
What to do in an emergency
316
Machine Translated by Google

Explanation /
Remedy Stop the vehicle in a safe place and turn off the e-POWER system once.
and then restart.
Display
conditions • ProPILOT, Intelligent Emergency
Brake, Misapplication Collision Prevention
Assist, BSW (rear side • If the message is
displayed even after restarting, system-side vehicle detection alarm), or
Intelligent may be malfunctioning. BSI (rear
side collision prevention support system, please have it inspected by a
Nissan dealer.), LDW (Lane Departure
Warning), InproPilotÿ (P.175) TELIGENT LI (Lane Departure
Prevention Assist Intelligent Emergency
Braking System), Intelligent FCW (P.201)
(Forward Collision Prediction Warning), RCTA
(Vehicle detection warning when reversing and misapplication
Collision Prevention Assist (P.207)), BSW
sign detection
function (Rear side vehicle detection alarm)/
intelligent Displayed in the event of a failure.
and then restart.
Line Departure Prevention Support System)
(P.226) Intelligent FCW (Forward Collision Prediction
Warning) (P.231)
Sonar system
error warning
name
Intelligent DA
(sway alarm)
System error
warning
• If the message is still displayed after restarting, the system may be
malfunctioning. There is no
problem with normal driving, but please have it inspected by a
NISSAN dealer. Sonar
function (P.87)
Misapplication collision prevention assist (P.207)
System failure
warning
• If the message is still displayed after restarting, the system may be
malfunctioning. There is no problem with normal driving, but
please have it inspected by a Nissan dealer.
Intelligent DA (sway alarm) (P.239) Stop the vehicle in a
safe place and turn off the e-POWER system.
LDW (Lane Departure Warning) / Intelligent LI (Vehicle
• Displayed when the sonar malfunctions.
BSI (Rear Side Collision Prevention Support System)ÿ (P.217)
screen display
RCTA (reversing vehicle detection alarm) ÿ
(P.235) Traffic sign
detection function (P.241) Intelligent DA ( sway alarm Stop the vehicle in a safe place and turn off the e-POWER system
once) display.
vinegar.
and then restart.
Troubleshooting
ZEI0372X
ZEI0371X
MEE0236X
What to do in an emergency
317
$/$: Different equipment depending on vehicle model, options, etc.
Machine Translated by Google
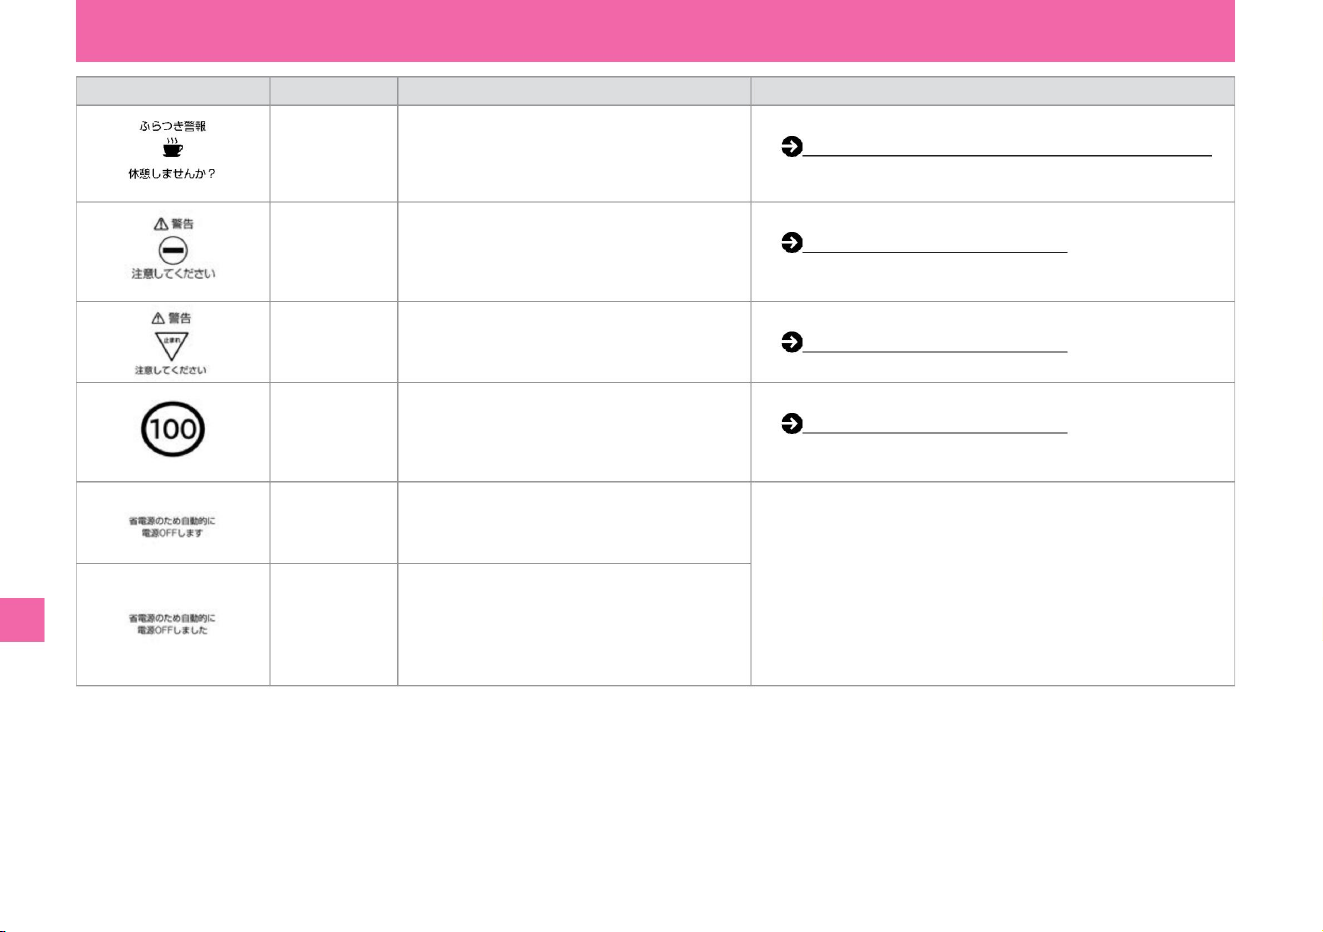
Explanation/Remedy
• Detects a vehicle entry prohibition sign in front
and displays a warning on the Advanced Drive
Assist Display if there is a possibility of entering
a one-way street. • When a stop sign ahead
is detected, it is displayed on the Advanced Drive
Assist Display.
Display conditions
• Displayed when it is determined that the driver's
attention has decreased due to steering wheel
operation.
• You can set to show/hide.
Traffic sign detection function (P.242)
Automatic power OFF
means A
NomenclatureIntelligent DA (sway alarm) display
• If the power switch is not switched, the power switch will turn off to
save energy.
• You can set to show/hide. Intelligent DA
(sway alarm) (P.239)
Automatic power OFF
means B
• This is displayed when the power switch is turned
off automatically after the e-POWER system
has stopped and the power switch has been
turned on for a long time.
stop sign detection
• When the maximum speed sign ahead is detected,
it will be displayed on the Advanced Drive
Assist Display and Driving Assistance Group. •
Appears after a while with the
power switch turned ON while the e-POWER
system is stopped.
Traffic sign detection function (P.242)
• You can set to show/hide.
Traffic sign detection function (P.242)
• You can set to show/hide.
screen display
Entry prohibition
sign ÿÿ indication
Speed limit sign
Detection display
318
Troubleshooting
What to do in an emergency
MEE0241X
MEE0577X
ZEI0194X
MEE0159X
MEE0551X
MEE0160X
Machine Translated by Google
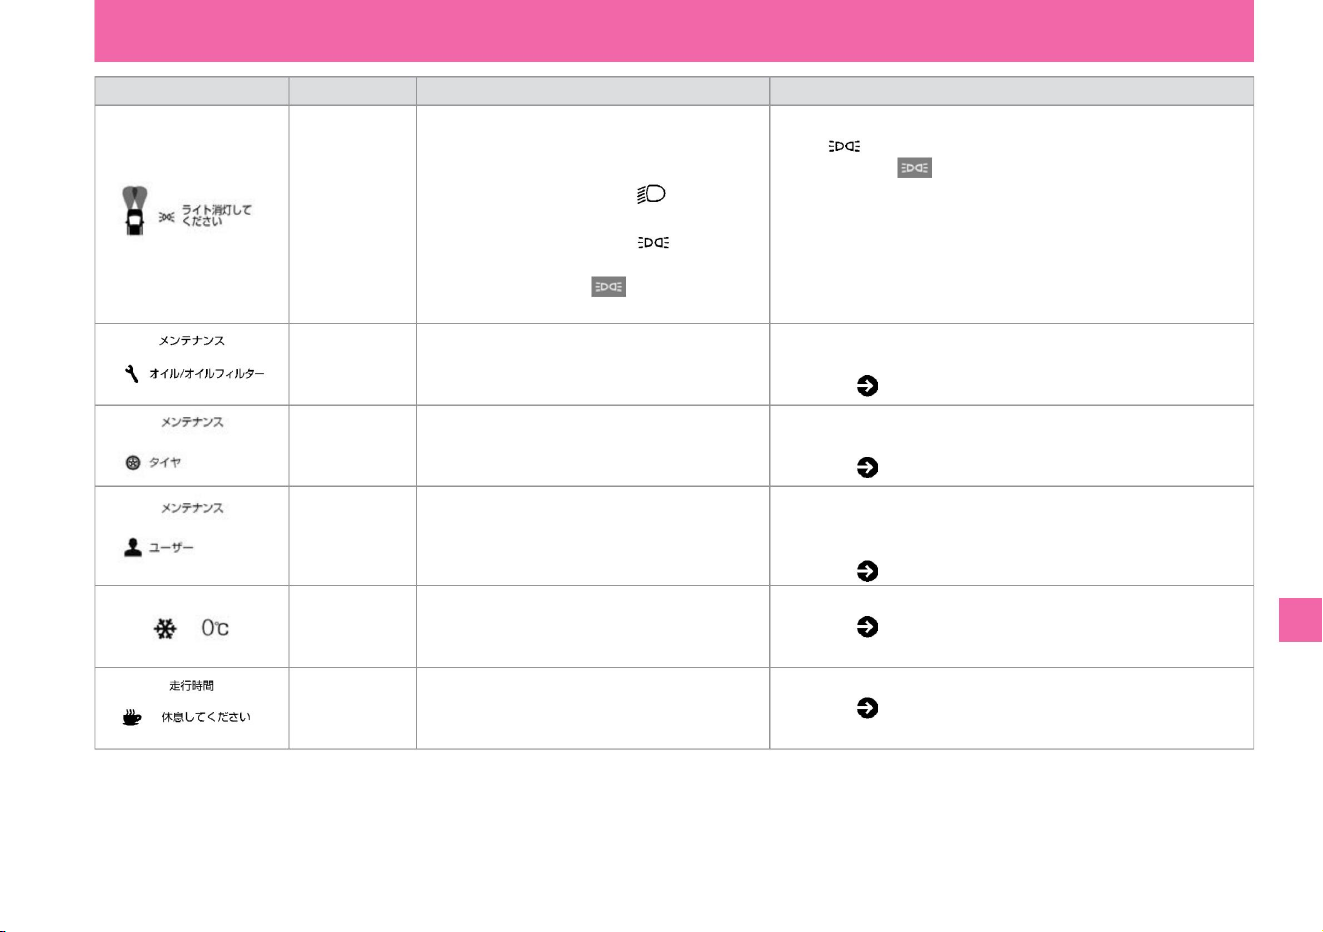
Explanation/Remedy
Condition to be
displayed • When driving with the power switch in a position other than ON • When the light switch is set to the AUTO position or the
reversing door is opened, in the following cases, turn it to the /OFF position and display the light in the meter. display and a buzzer
sounds. turn off the lamp indicator. –
When the light switch is in the position – When the light switch is turned
to the /OFF position and the tail lamp indicator light
in the meter
is illuminated
Tire change display
Forgetting to turn off the
light warning
Running time
alarm display
name
increase. Settings ( P.77)
Oil/oil filter
replacement
indicator
• You can set to show/hide. Settings ( P.73)
• The set oil/oil filter replacement • Oil/oil filter replacement distance is displayed when it reaches the set or re-replacement distance.
You can set Settings ( P.77)
Maintenance
distance display
• Oil/oil filters, tires, etc. • For other maintenance items, you can set the inspection distance or replacement distance for maintenance
items other than tire rotation, for example. Inspect item/ Display when distance is reached. The exchange distance can be set and
reset. Settings ( P.77)
• Displays when the set tire change distance is reached.
• You can set to show/hide. Settings ( P.73)
• Notifies you when the outside temperature drops below
3°C.
screen display
• The tire change distance can be set or reset.
Freezing
caution alarm display
• Notifies you that you have run continuously for the set
time.
$/$: Different equipment depending on vehicle model, options, etc.
Troubleshooting
What to do in an emergency
319
ZEI0403X
MEE0247X
ZEI0374X
ZEI0375X
MEE0246X
MEE0248X
Machine Translated by Google
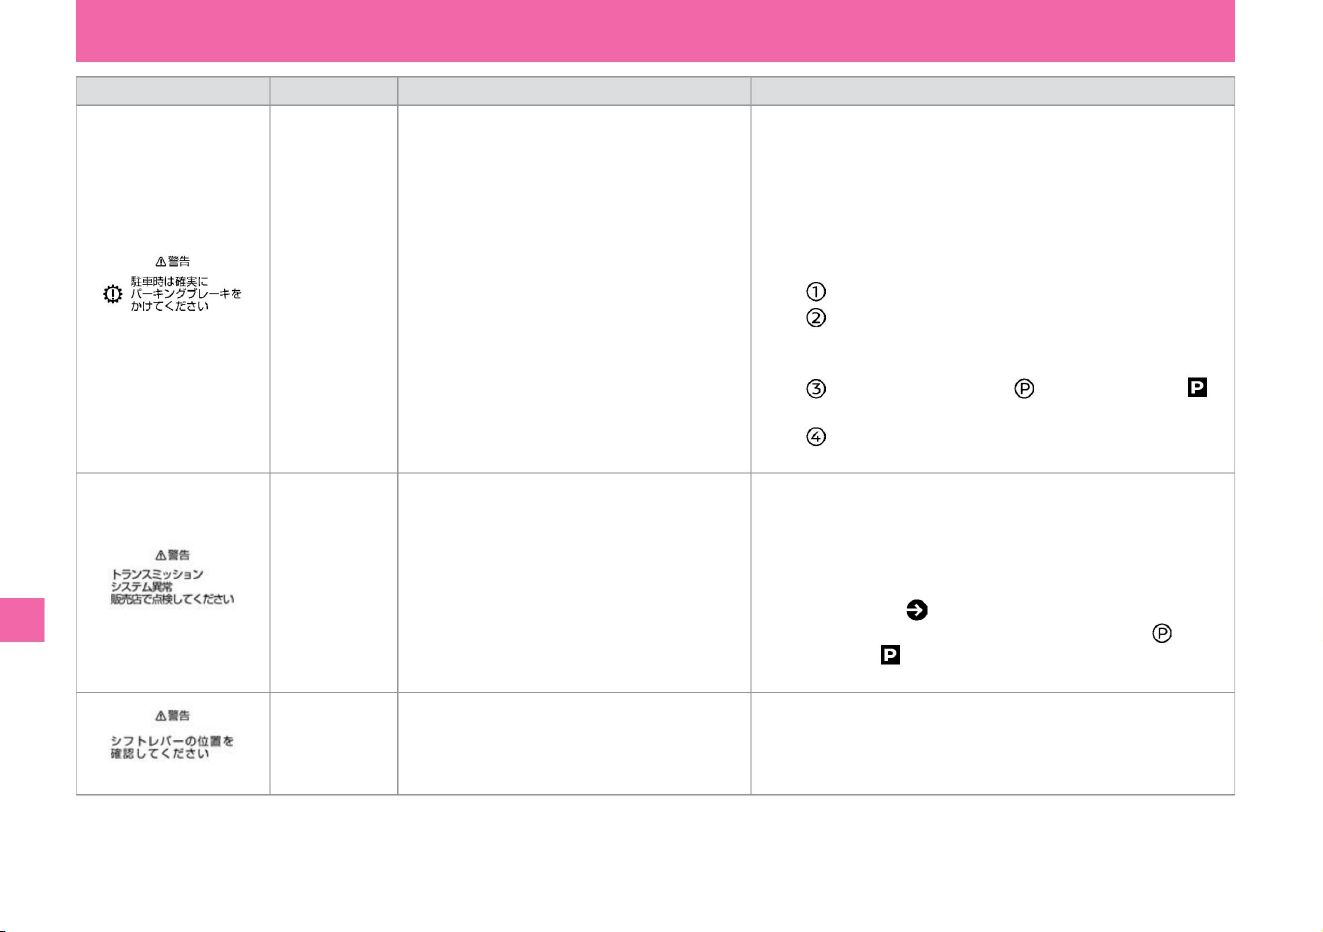
Explanation/Remedy
• Have the vehicle inspected by a Nissan dealer as soon as
possible. • When parking, be sure to apply the parking brake. If the
parking brake is not applied, the power switch may not be turned
off.
Display
conditions • Displays when an error occurs in the
electronic shift.
• Have the vehicle inspected by a Nissan dealer as soon as
possible. • Since the shift position may not change immediately, hold
the select lever at the desired shift position and release it after
confirming that the shift position has changed. • Because the
auto P function ( P.138) may not work, when
parking, press the switch on the select lever and confirm that it has
changed to .
vinegar.
name
Electronic shift
warning B
Electronic shift
warning A
• Check if the select lever is in the center position.
• If you cannot turn off the power switch, do the following. – Stop and
apply the parking
brake. – Press the power switch while depressing the
brake pedal to switch the power switch to ON.
–Press the switch on the selector lever to switch to . –Press the
power switch to
toggle it to OFF.
• Displays when the selector lever is held in a
position other than the center position.
when.
screen display
• Displays when an abnormality occurs in the electronically
controlled shift.
shift position
warning
• If the message appears when the selector lever is in the middle
position, have the vehicle inspected by a NISSAN dealer.
320
Troubleshooting
What to do in an emergency
ZEI0376X
MEE0501X
MEE0500X
Machine Translated by Google
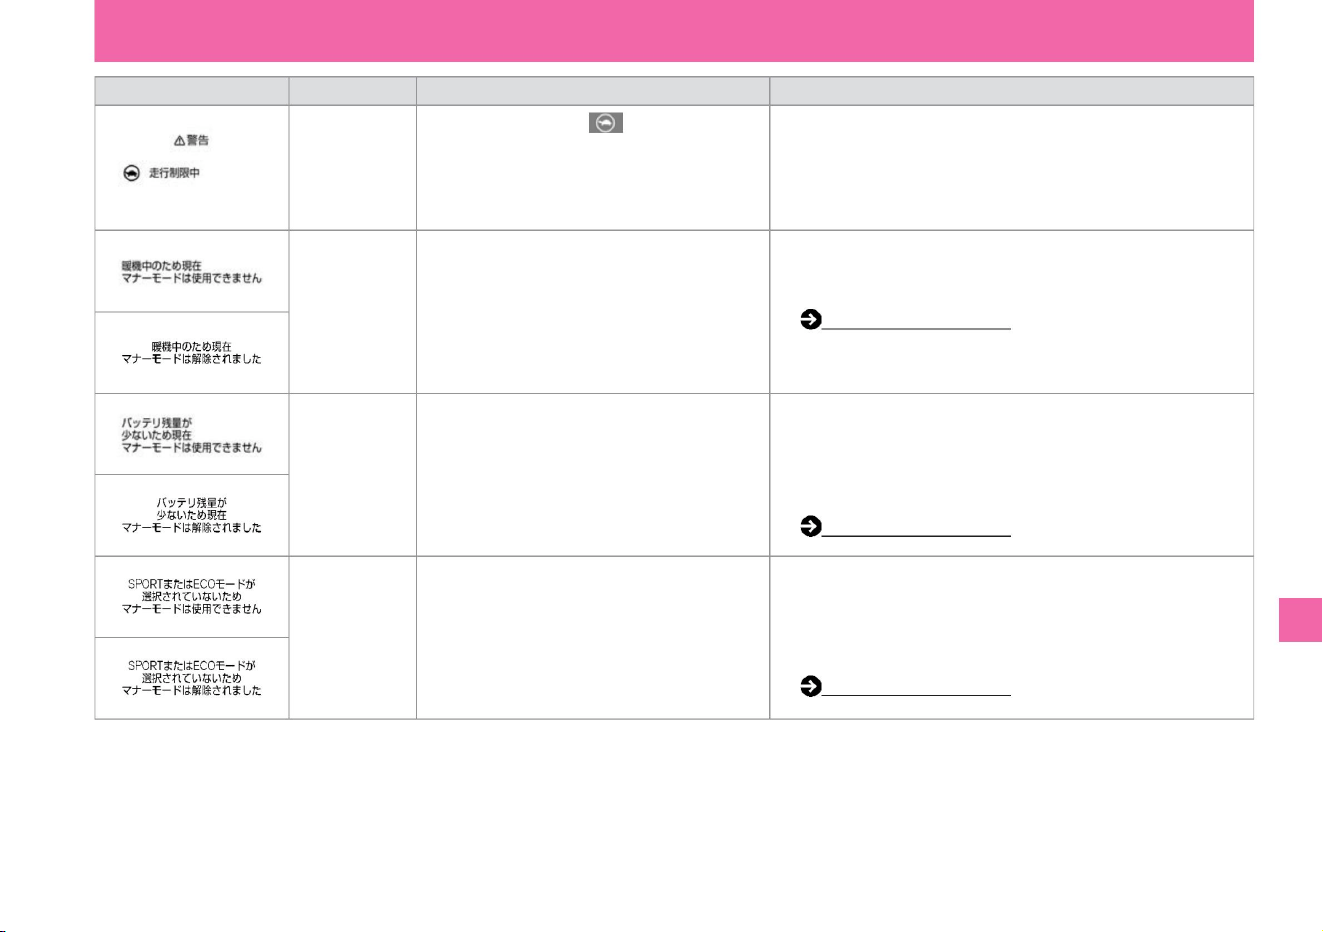
screen display
• Press the EV mode switch after warming up. Manner mode (P.166)
• Displayed when SPORT mode or ECO mode is not
selected.
name
Output limit warning
Manner mode
warning A
• Displayed when the remaining amount of the lithium-ion battery is low due to low • lithium-ion battery level. Mode driving is not
possible. • Increase the lithium-ion battery level by driving in charge mode, etc., and then
press the EV mode switch. Manner mode (P.166)
Display conditions
• Displayed at the same time as the output limit
indicator lights up.
• Manner mode cannot be used because the drive mode is NORMAL.
Switch the drive
mode to SPORT mode or ECO mode, then press the EV mode
switch. Manner mode (P.166)
Manner mode
Warning C
Description/
Remedy • The output is limited, and even if the accelerator pedal is
depressed, the speed will not
increase. • If the lithium-ion battery level is extremely low and the light
comes on, immediately stop the vehicle in a safe place and contact
a Nissan dealer.
Manner mode
warning B
• When the system judges that warming up is necessary • The system judges that warming up is necessary, so it is displayed in
manners. mode is not available.
$/$: Different equipment depending on vehicle model, options, etc.
Troubleshooting
What to do in an emergency
321
MEE0477X
MEE0553X
MEE0552X
ZEI0427X
ZEI0422X
ZEI0423X
ZEI0421X
Machine Translated by Google
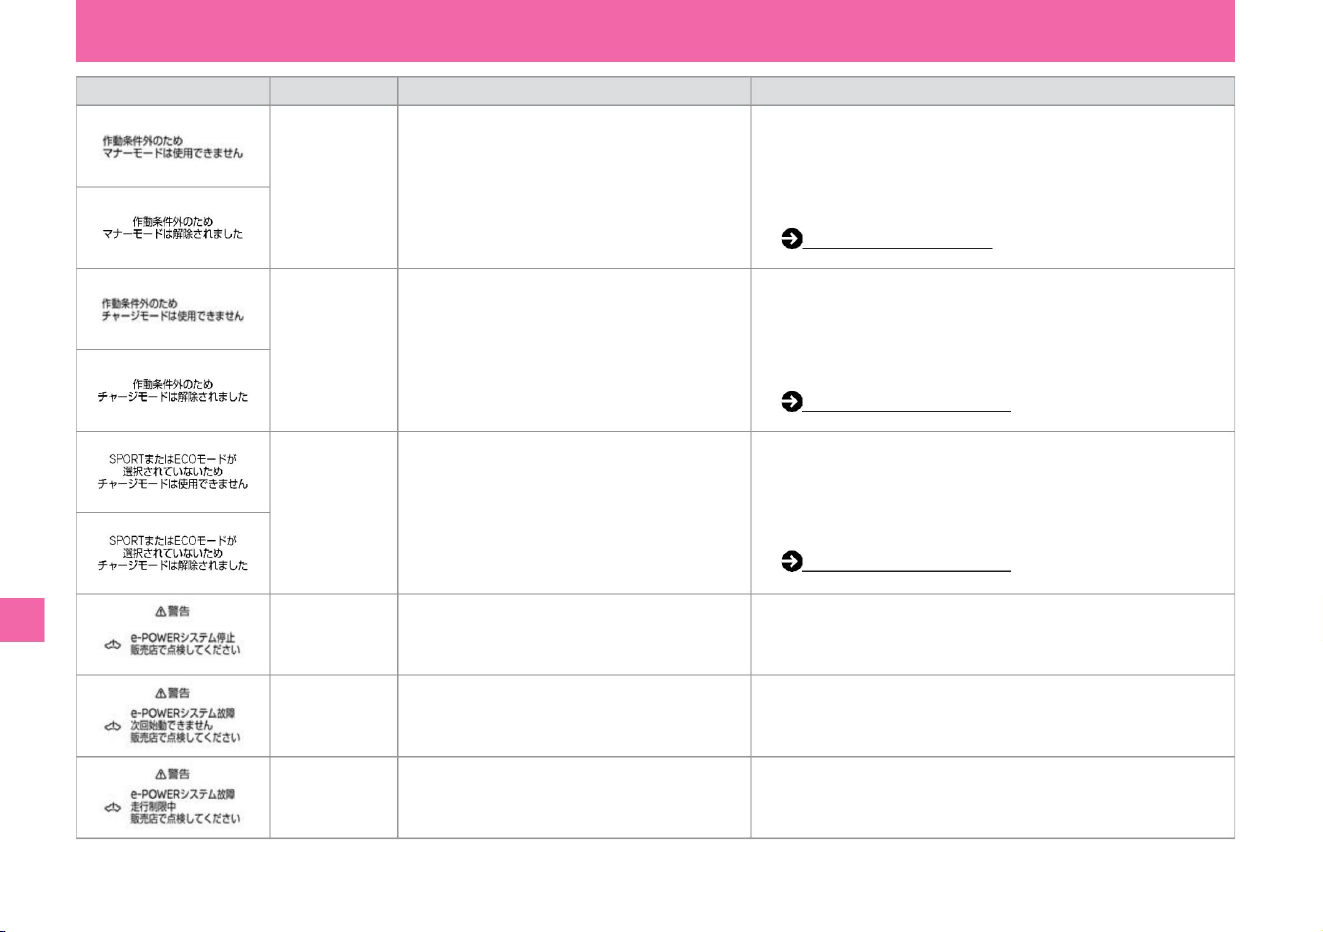
Explanation/
Remedy • Manner mode cannot be used due to system judgment.
yeah. (When the outside temperature is
extremely low, etc.) • The display disappears when the operating
conditions are met, so press the EV mode switch
at that time. Manner mode (P.166)
name
• The charge mode cannot be used because the drive mode is NORMAL.
After switching the
drive mode to SPORT mode or ECO mode, press and hold the EV
mode switch. Charge mode (P.165)
• Charging mode cannot be used at the discretion of the system.
• This is displayed when an error has occurred in
the e-POWER system and the e-POWER system
cannot be restarted.
screen display
plug.
(When the outside temperature is
extremely low, etc.) • The display disappears when the operating
conditions are met, so keep pressing the EV mode
switch at that time. Charge mode (P.165)
• Displayed when the e-POWER system has stopped
due to an error while the vehicle is stopped.
e-POWER
system warning A
• Please contact a Nissan dealer as soon as possible.
• Please contact a Nissan dealer as soon as possible.
Manner mode
Warning D
Charge mode
warning A
• Indicates that an error has occurred in the e-
POWER system and that the output is limited.
• It is out of the operating conditions of the charge mode.
Charge mode
warning B
e-POWER
system warning C
• Displayed when SPORT mode or ECO mode is not
selected.
e-POWER
system warning B
Conditions to
display • Displayed when the operation conditions
for manner mode are not met.
is displayed.
• Please contact a Nissan dealer as soon as possible.
322
Troubleshooting
What to do in an emergency
MEE0564X
ZEI0424X
MEE0562X
MEE0561X
MEE0558X
ZEI0428X
ZEI0425X
MEE0557X
ZEI0426X
Machine Translated by Google

Explanation/
Remedy Display
conditions • The e -POWER system malfunctions
while driving . display when
• This is displayed when an error has occurred in
the e-POWER system, the e-POWER system has
not stopped, and the output is not limited.
• If there is an abnormality in the e-POWER system
while driving • Stop the vehicle immediately in a safe place and report to a
Nissan dealer that the problem has occurred and that the output is limited.
indicate.
e-POWER
system warning E
• When the e-POWER system malfunctions while
driving, • Stop the vehicle immediately in a safe place, and contact a Nissan
dealer when the problem occurs and output is stopped. display.
e-POWER
system warning F
name
• Please contact a Nissan dealer as soon as possible.
• The 4WD system is in 2WD mode due to an error. Do not drive at high
speeds and have the vehicle inspected by a Nissan dealer as soon as
possible.
screen display
e-POWER
system warning G
e-POWER
system warning D
e-POWER
system warning H
• If the e-POWER system malfunctions while the
vehicle is stopped , •Apply the parking brake immediately. display when
4WD system
warning
• Displayed when an abnormality occurs in the 4WD
system.
$/$: Different equipment depending on vehicle model, options, etc.
Troubleshooting
What to do in an emergency
323
MEE0570X
MEE0569X
MEE0568X
MEE0574X
MEE0575X
ZEI0438X
Machine Translated by Google
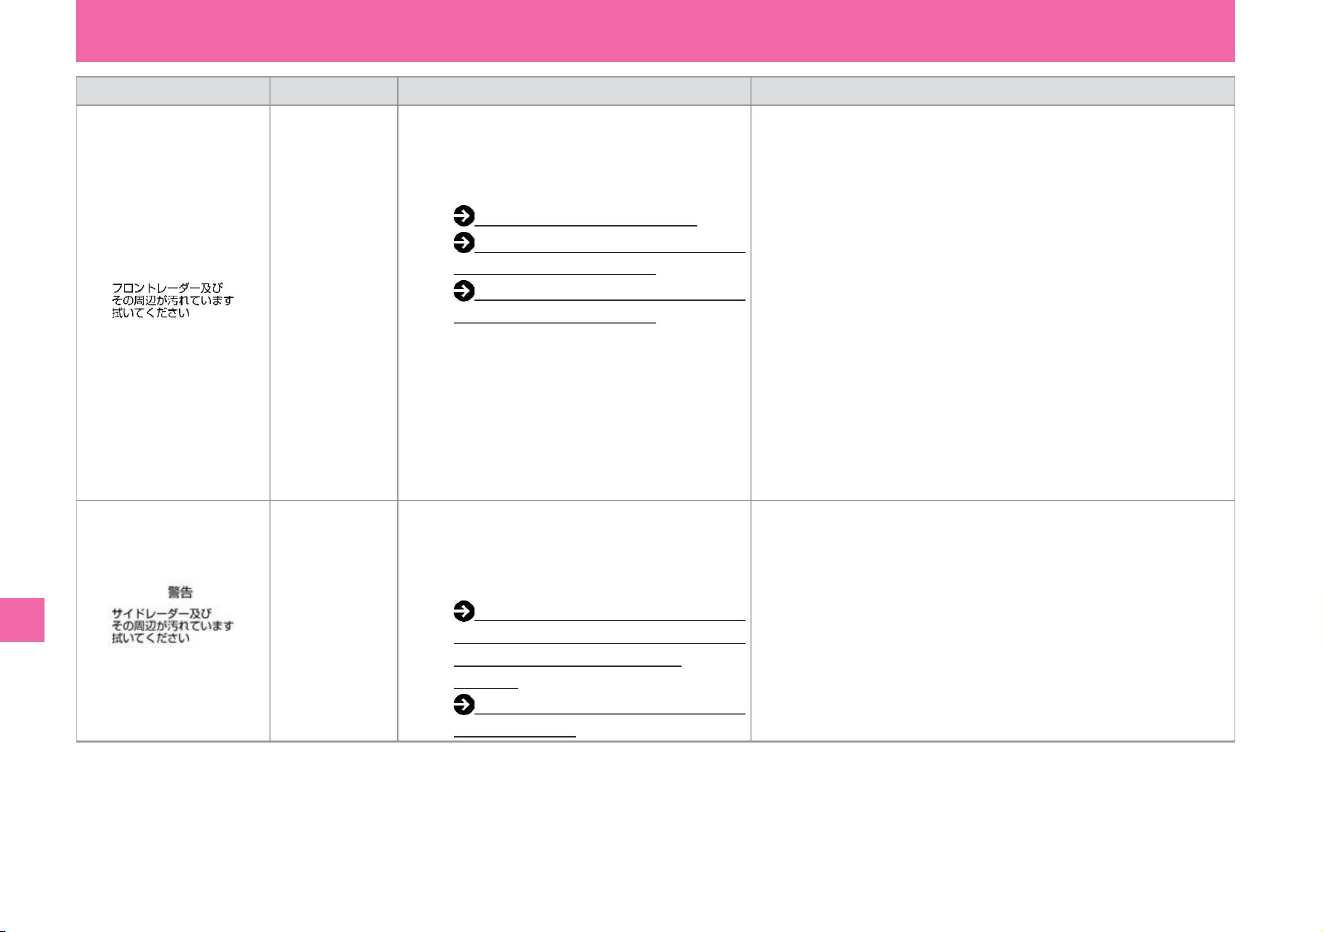
screen display
Front radar
system stop
warning
name
– BSW (rear side vehicle detection alarm) /
intelligent BSI (rear side collision prevention
support system) ÿ (P.217)
Display
conditions • Displays when the following systems
stop due to snow, ice, mud, etc. around the
radar sensor installed in the front of the
vehicle. –
ProPILOT ÿ (P.175) –Intelligent
Emergency Braking (P.201) –Intelligent FCW
(Forward Collision Prediction
Warning) (P.231) If there are any of the
following road shapes or
buildings, radar The sensor cannot accurately
detect the vehicle ahead and stops working.
– When driving over long bridges – When
driving on
sand or snowfields – When driving
near long walls • Radar attached to the
rear of the vehicle • Remove dirt from the
radar sensor and its surroundings After removing
snow, ice, mud, etc. from the surroundings, turn the system off once,
and then turn it on again when the next system stops. indicate.
– RCTA (reversing vehicle detection alarm) ÿ
(P.235)
Description/
Remedy • Stop the vehicle in a safe place, turn off the e-POWER
system, remove dirt from the radar sensor and its surroundings,
and restart the e-POWER system.
Side radar
system stop
warning
• If the conditions at the time of stop are improved or changed, the
system will resume operation. (It may take some time to restart.)
Troubleshooting
ZEI0314X
ZEE0217X
What to do in an emergency
324
Machine Translated by Google

screen display
• When restarting a system that has stopped, turn it back on with the
switch after the state at which it stopped has improved.
name
• Displays when the following system stops.
Please read each system for conditions to
stop. – ProPILOT (P.175) –
Intelligent BSI (rear and side collision
avoidance support system) ( P.217) –
Intelligent LI (Lane Departure
Prevention
Assist System) ( P.226) ABS or VDC (traction
control system) roll function (TCS
not included) is activated
slip warning
Display
conditions • Displays when the following system
stops. Please read each system for conditions
to stop. – ProPILOTÿ (P.175)
– Intelligent BSI (Rear Side Collision
Prevention Assist System) ( P.217) – Intelligent
LI (Lane Departure Prevention Assist
System)
( P.226) When VDC is turned off
Out of operating range
warning
Explanation/
Remedy • When reactivating a system that has stopped, turn it on
again with the switch after the state at which it stopped has
improved.
Troubleshooting
ZEE0279X
ZEG1019X
What to do in an emergency
325
$/$: Different equipment depending on vehicle model, options, etc.
Machine Translated by Google
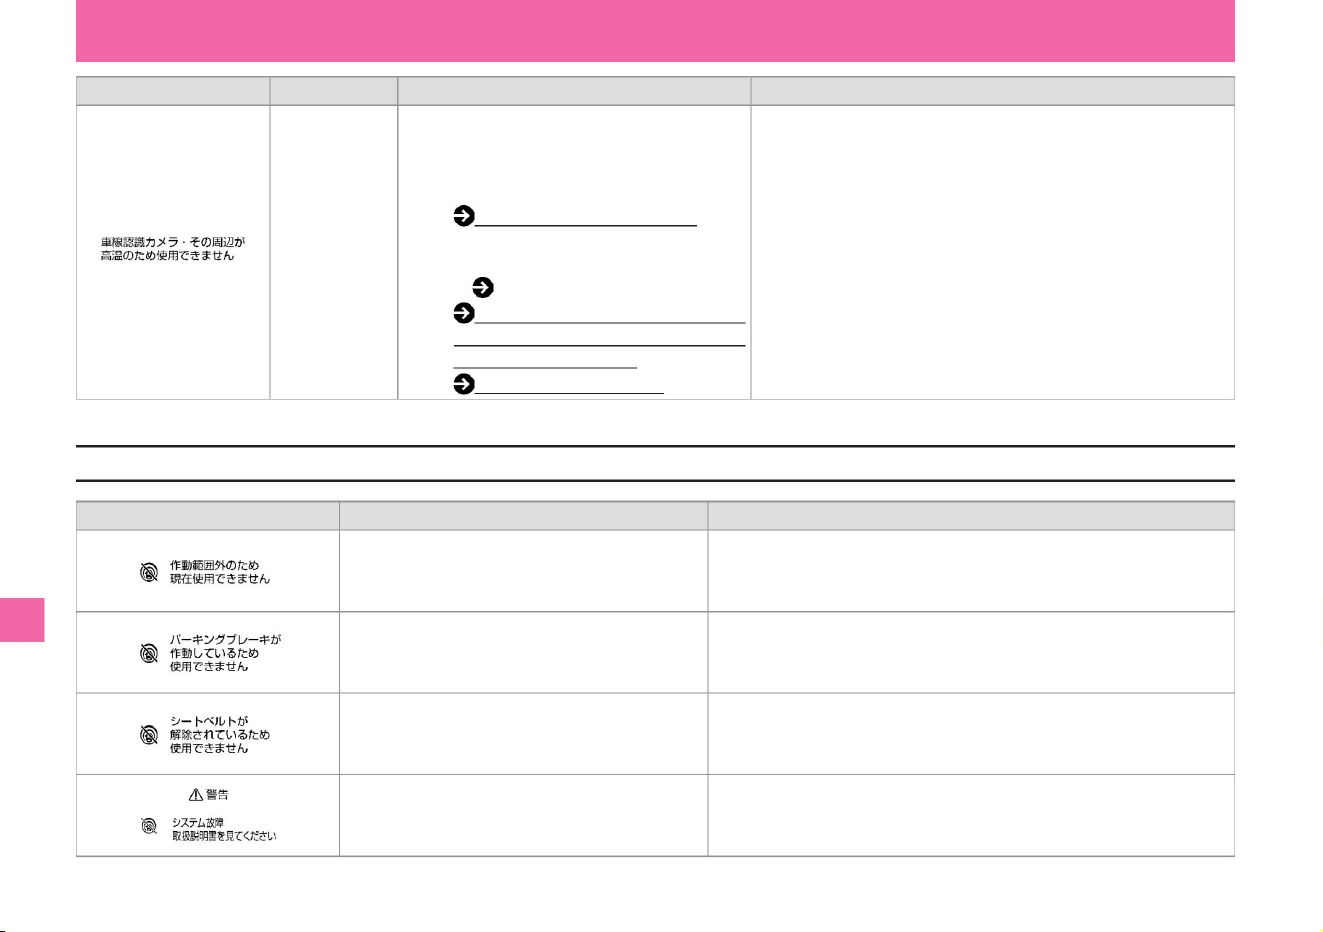
Description/
Remedy • When restarting the stopped system, wait until the
temperature around the multi-sensing front camera drops before
turning it on again.
Camera high temperature
warning
Display
conditions • Displays when the multi-sensing front
camera becomes hot, such as when the car
is parked in the hot sun, and the following
systems
stop working. – ProPILOTÿ (P.175) –
Intelligent BSI (Rear/Side Collision Prevention
Assist System) (P.217) – LDW (Lane
Departure
Warning) / Intelligent LI (Lane Departure
Prevention Assist System) (P.226 ) –
Traffic sign detection
function (P.241)
• When VDC is turned off
Explanation/
Remedy • When VDC is OFF, intelligent cruise control cannot be used.
• System failure
name
• Intelligent cruise control cannot be used when the driver's seat belt is
unfastened.
• Stop the vehicle in a safe place, stop the e-POWER system, restart it,
and turn it on again.
tree
If the electric parking brake is activated
warning sign Condition to display
screen display
• Intelligent cruise control cannot be used when the electric parking brake
is activated.
When the driver's seat belt is unfastened
326
ProPilot (Intelligent Cruise Control) warning message
ZEI0377X
ZEG0819X
ZEG0822X
ZEG0820X
ZEG0821X
What to do in an emergency
Troubleshooting
Machine Translated by Google
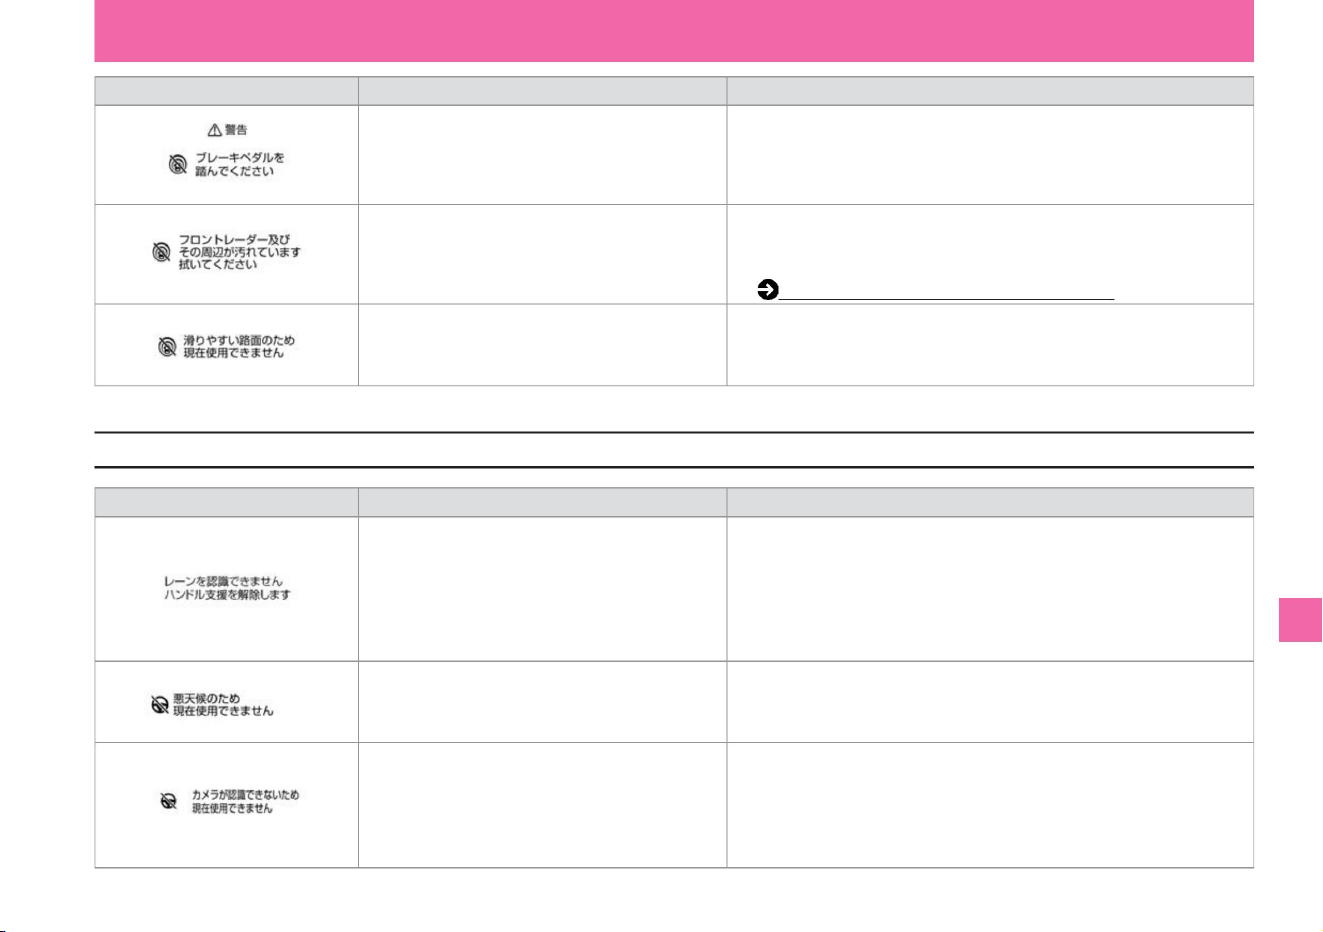
Description/
Remedy • Apply the brakes as soon as possible.
• Stop the vehicle in a safe place, turn off the e-POWER system, remove dirt
from the radar sensor and its surroundings, and restart the e-POWER
system. Handling of Radar Sensorÿ (P.369) • Intelligent
cruise control cannot be used when VDC/TCS is
activated or when the tires are spinning.
Explanation/Remedy
increase.
Display conditions
When the driver's door is opened while the vehicle is
stopped by intelligent cruise control, but the
electric parking brake does not work properly.
• When the situation improves, ProPILOT can be used.
Display conditions
When the lane marker cannot be detected correctly
for a long time, such as when there is
something that looks like a lane marker in the
driving lane (snow ruts, reflection of surrounding
light on a rainy day, forgetting to turn off the
light, etc.) lane markers, etc.)
• When VDC/TCS is activated • When
tire spinning is detected
• If the warning message continues to appear, stop the vehicle in a safe
place, stop the e POWER system temporarily, and clean the windshield in
front of the camera.
When snow, ice, mud, etc. adhere to the radar
sensor installed in the front of the vehicle.
• When you want to use the steering assist function again,
Disengage and re-engage ProPILOT on a road with a clearly marked car.
• Please cancel the high-speed operation of the wiper. Then set the ProPilot
again or press the steering assist switch.
When the field of vision of the camera is obscured
by rain, snow, fog, or frozen or dirty windshield
in front of the camera.
warning sign
warning sign
When the wiper is operated at high speed
ProPilot (steering wheel assistance) warning message
327
ZEE0275X
ZEG1299X
ZEG0524X
ZEG1298X
ZEG1300X
MEE0305X
What to do in an emergency
$/$: Different equipment depending on vehicle model, options, etc.
Troubleshooting
Machine Translated by Google

warning sign
• Stop the vehicle in a safe place, stop the e-POWER system, restart it, and turn it on
again.
• Operate by holding the handle as soon as possible. • The warning
goes off when the driver's steering operation is detected.
Condition to display
When
• Operate by holding the handle as soon as possible. • The warning
goes off when the driver's steering operation is detected.
• Appears when you are not holding the steering wheel or
operating the steering wheel. – Warn by display (red).
• The temperature around the camera is high.
to come.
• Appears when the driver does not operate the steering
wheel after warning by display. – Step-by-
step warning with sound, visual (red) and short brake
control.
Explanation/Remedy
ProPILOT can be used when the room temperature drops.
• System failure
• Displayed when the driver does not operate the steering
wheel after the warning. – The vehicle slows
down and comes to an emergency stop with an
emergency alarm sound.
• Operate by holding the handle as soon as possible. • When the driver's
steering wheel operation is detected, the warning goes off and the ProPilot is released.
328
Troubleshooting
What to do in an emergency
ZEG1083X
ZEG1084X
MEE0304X
ZEG1301X
ZEG1302X
Machine Translated by Google

When the alarm (buzzer) sounds
Troubleshooting
In order to prevent vehicle theft, a buzzer (alarm sound) may sound inside and outside the vehicle.
What to do in an emergency
329
$/$: Different equipment depending on vehicle model, options, etc.
Beep beep… (for a few seconds)
what kind of sound did you hear?
What did you do when it
rang? Is the door
handle indicator light
illuminated? Is the switch ÿ pressed? Is the key (intelligent key)
left inside the vehicle or in
the luggage compartment? Is the door handle switch pressed before closing the door? Is
the ready-to-drive indicator light
on?
outside the car
where did you
hear the noise?
to confirm
car interior
Beep, beep, beep (3 times)
Beep beep beep beep (3 times)
When the door lock switch
of the key (Intelligent Key/
Remote Control Entry
System) is pressed When
the door is closed When
the door handle switchÿ is
pressed unintentionally or when the door is closed When the power switch remains ON , Is the key
(intelligent key/remote control entry system) taken out of the vehicle? Is the brake disc brake pad (friction material)
worn out while driving? Have the vehicle inspected by a Nissan dealer as soon as
possible.
Continuing to drive may
cause the brakes to become ineffective and lead to an accident. When the door is
closed Is the key (intelligent
key/remote control entry system) taken out of the vehicle with the power switch on?
key (metal sound)
Machine Translated by Google
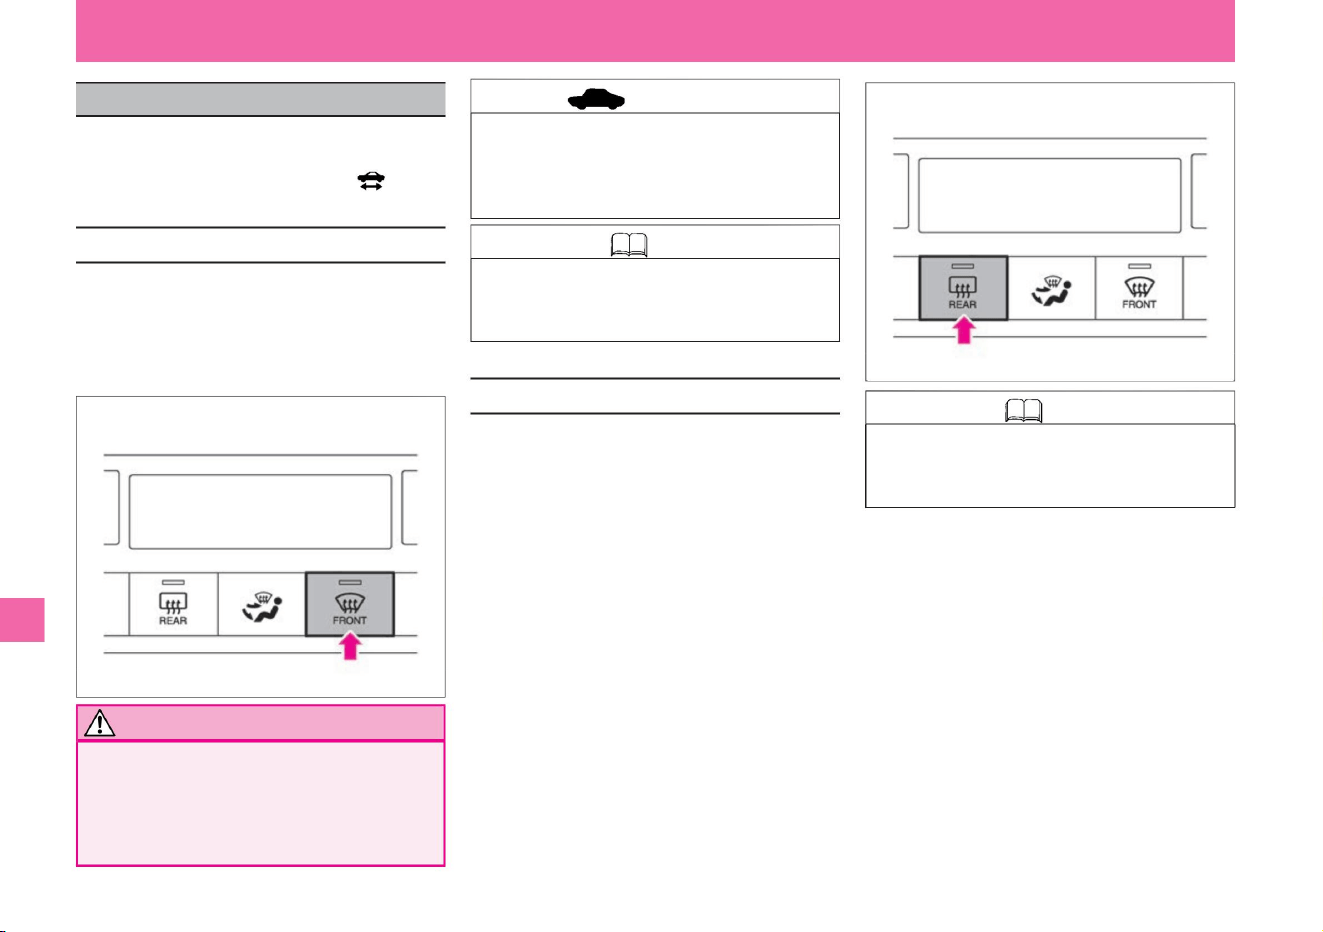
•It warms the windshield to make it easier to remove
the snow accumulated on the bottom edge of the
windshield. It operates for about 20 minutes when
the rear window defogger
switch is pressed. (The indicator light of the rear
window defogger
switch lights up.) To stop, press the switch again.
• When the defroster switch is on , do not lower
the set temperature of the air conditioner.
Condensation
may form on the outside of the windshield
and impair your vision.
increase. (The indicator light of the rear window
defogger switch goes out.)
increase. (The indicator light of the rear window
defogger switch goes out.)
Knowledge • When the rear window defogger
switch is pressed, the door mirror heatersÿ
also operate at the same time.
What to do in an emergency
MEI0135X
MEI0134X
The defroster switch can be used when the
power switch is ON. The rear window defogger
switch can be used when the ready-to-drive
indicator light is on.
• When the defroster switch is on, do not use
internal air circulation. It will be difficult to
remove the fog.
• When the air conditioner is off, pressing the
defroster switch automatically activates the
air conditioner.
• When the rear window defogger switch is pressed,
it operates for about 20 minutes, warming the
heat rays in the back door
glass. (The indicator light of the rear window
defogger switch
lights up.) To stop, press the switch again.
• Pressing the defroster switch activates the air
conditioner and switches to outside air intake.
(The indicator light of the switch
lights up.) • Press the switch again to stop. (The
indicator light of the switch turns off.)
ÿ Wiper Deicerÿ
Troubleshooting
advice
How to remove fog from the windshield
330
Knowledge
Notice
How to remove fog from the rear window
When the window glass fogs up
Machine Translated by Google

331
advice
$/$: Different equipment depending on vehicle model, options, etc.
• Do not use continuously for a long time.
What to do in an emergency
Troubleshooting
stomach. It consumes a lot of power and
may cause the battery
to run out. • Remove snow accumulated on
the glass frequently to secure visibility.
Machine Translated by Google
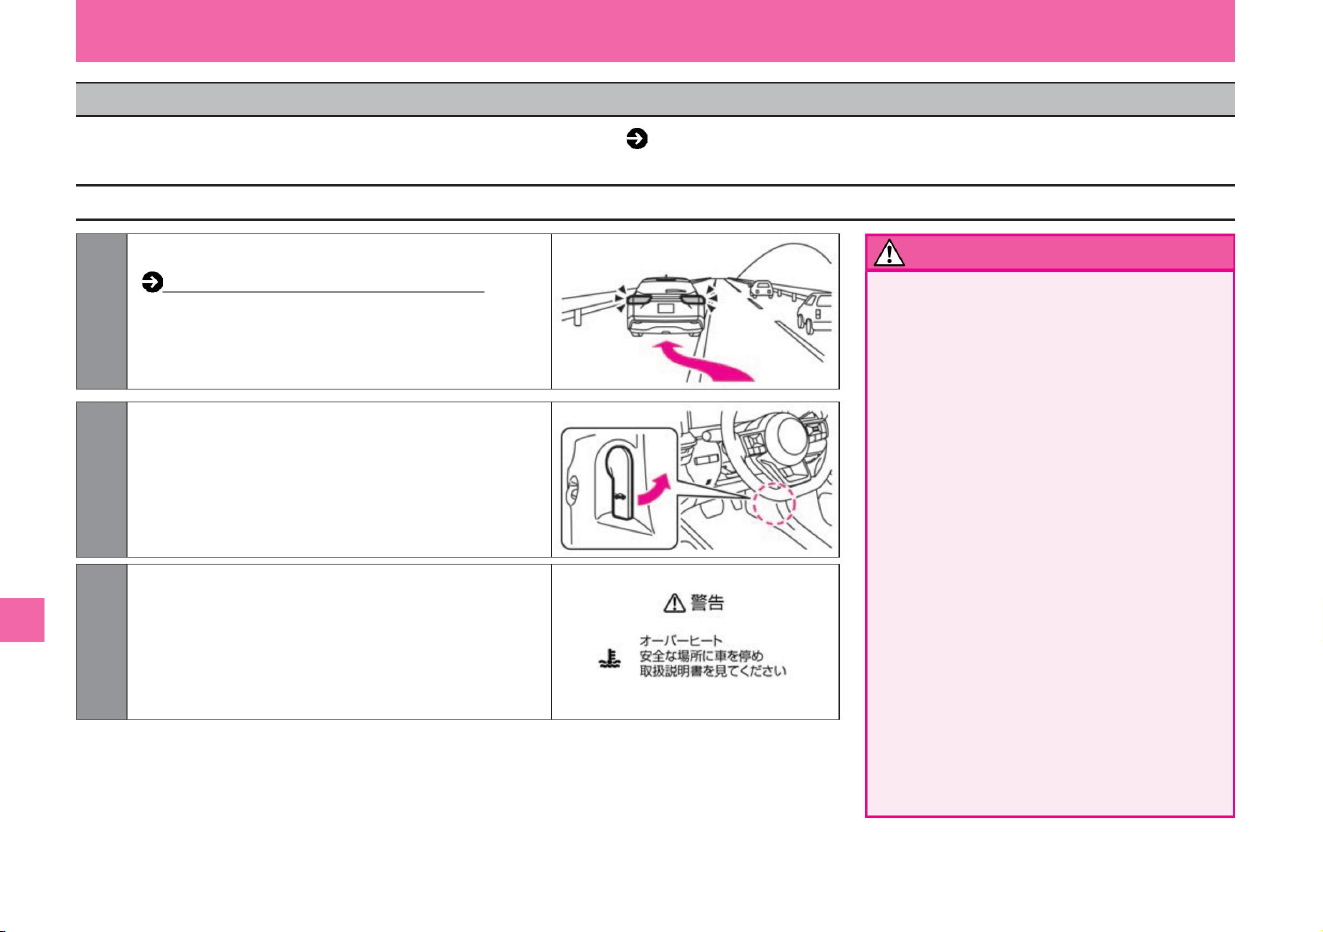
1Immediately stop in a safe place.
Troubleshooting (P.278)
3 After the overheat warning on the Advanced Drive
Assist Display disappears, stop the e-POWER
system and wait for a while. After the
engine cools down sufficiently, check the amount
of cooling water and water leakage from hoses.
2 With the e-POWER system running, open the hood
to improve ventilation and cool the engine. In
the
unlikely event that the cooling fan is not rotating,
immediately stop the e-POWER system and let
it cool naturally.
What to do in an emergency
Troubleshooting
• Be careful when opening the hood.
Serious
injury such as burns may occur due
to the high temperature inside the
engine compartment. •
Do not open the hood when steam is
coming out.
Doing so may result in serious injury
such as burns.
Shut off the e-POWER system, wait
until the steam stops coming out,
and open the
hood. • Do not remove the cap of the
reservoir tank when the engine is not
sufficiently
cooled. Steam or hot water may
shoot out and cause serious
injury such as burns. • In the event of
overheating, immediately stop the
vehicle in a safe place and take
appropriate measures. Continuing to
drive as is may cause engine failure and may lead to fire.
How to treat
warn
332
ZEI0355X
ZEI0388X
MEI0241X
If the Advanced Drive Assist Display shows an overheat warning ( P.316) or if steam is coming out of the gaps in the engine compartment, the
engine is overheating. Please follow the steps below.
when overheating
Machine Translated by Google
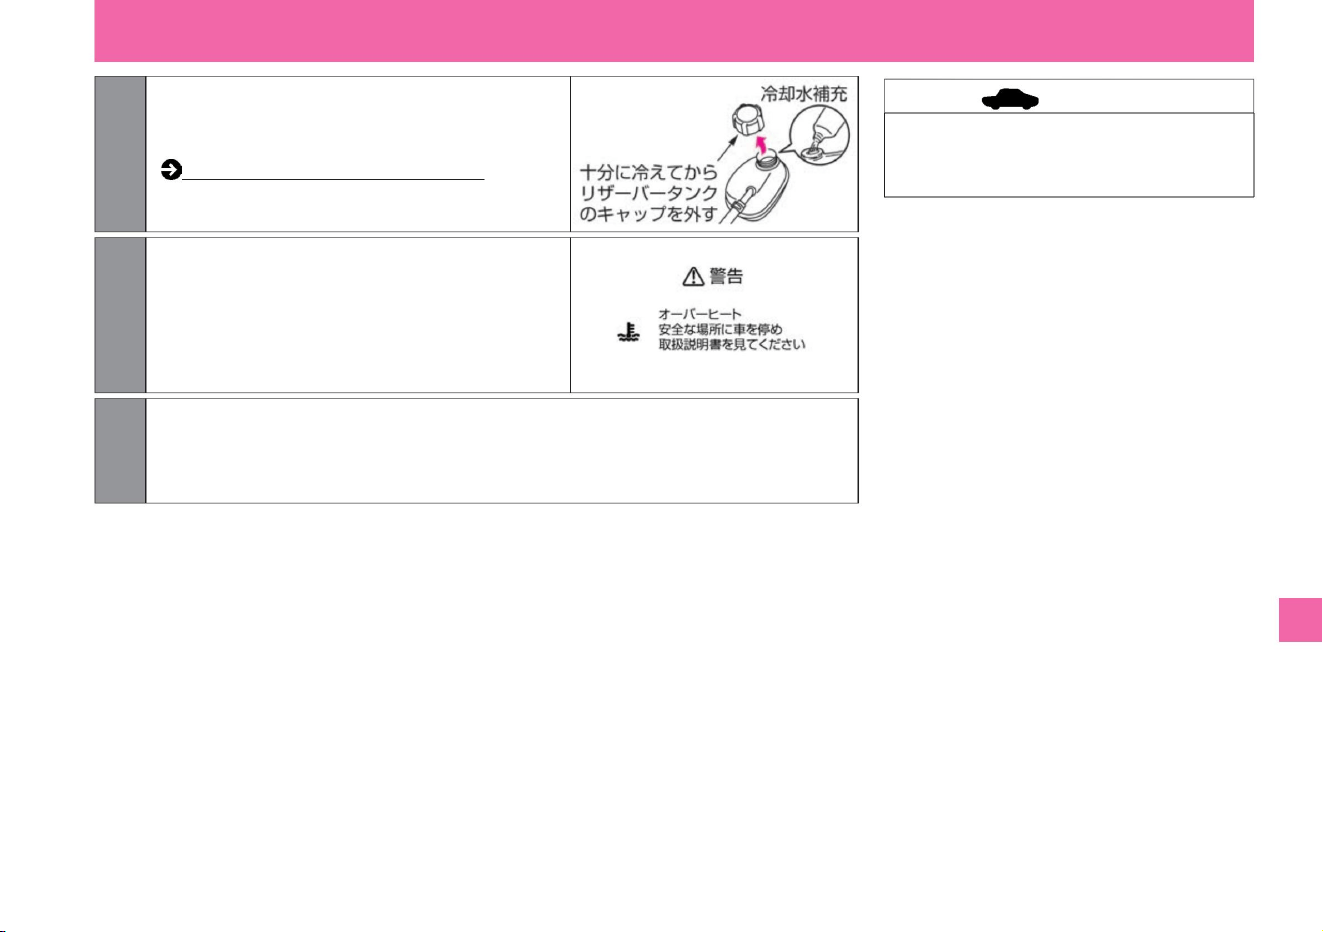
advice
333
MEI0241X
ZEI0251X
6. Have the vehicle inspected at a Nissan dealer as soon as possible.
4If the coolant is insufficient, replenish the
coolant in the engine cooling reservoir
tank.
Engine room layout (P.353)
Close the cap tightly after refilling.
5 If the Advanced Drive Assist Display shows
the overheat warning again while
driving, repeat steps 1 to 4.
What to do in an emergency
$/$: Different equipment depending on vehicle model, options, etc.
Troubleshooting
• If you have refilled only with water as an
emergency, have it inspected by a Nissan dealer
as soon as possible.
Machine Translated by Google
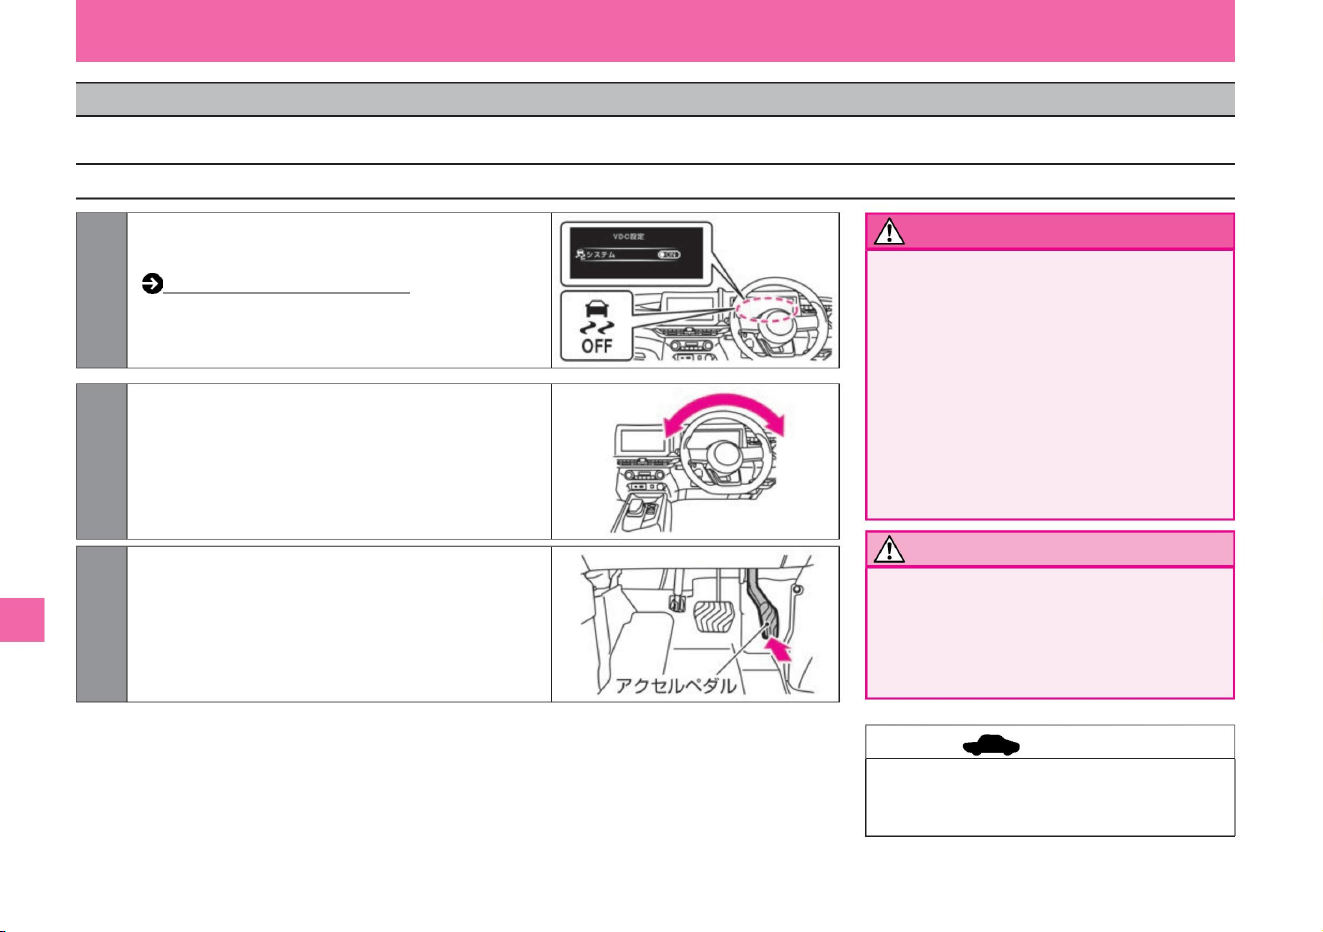
How to stop VDC (page 169)
• When escaping, do not let the tires spin
excessively.
It is dangerous as it may lead to an
unexpected accident due to tire burst
(explosion) or abnormal overheating of drive parts.
• Be sure to check the safety of your
surroundings. To avoid colliding with people
or objects around you, make sure there is
nothing around you when moving forward
and backward. Especially at the moment of
evacuation, the vehicle may fly forward or
backward. • Do not depress the accelerator
pedal
more than necessary. Sudden acceleration
may lead to an unexpected accident.
• If you cannot escape after trying several
times, contact your Nissan dealer or JAF.
Troubleshooting
What to do in an emergency
1 On Advanced Drive Assist Display, turn off VDC.
2 Make sure there are no obstacles in front of or behind the vehicle, then
turn the steering wheel left and right to smooth the area around
the
front wheels. Place a piece of wood or other material under the
tire if necessary.
3 Slowly depress the accelerator pedal to move forward
or backward.
After confirming the safety of the surroundings,
repeat forward and backward.
warn
Notice
334
advice
How to escape
ZEG0698X
ZEI0405X
ZEI0404X
If your tires spin or get stuck in snow, sand, or mud, use the following methods to escape.
When stuck in snow or mud
Machine Translated by Google
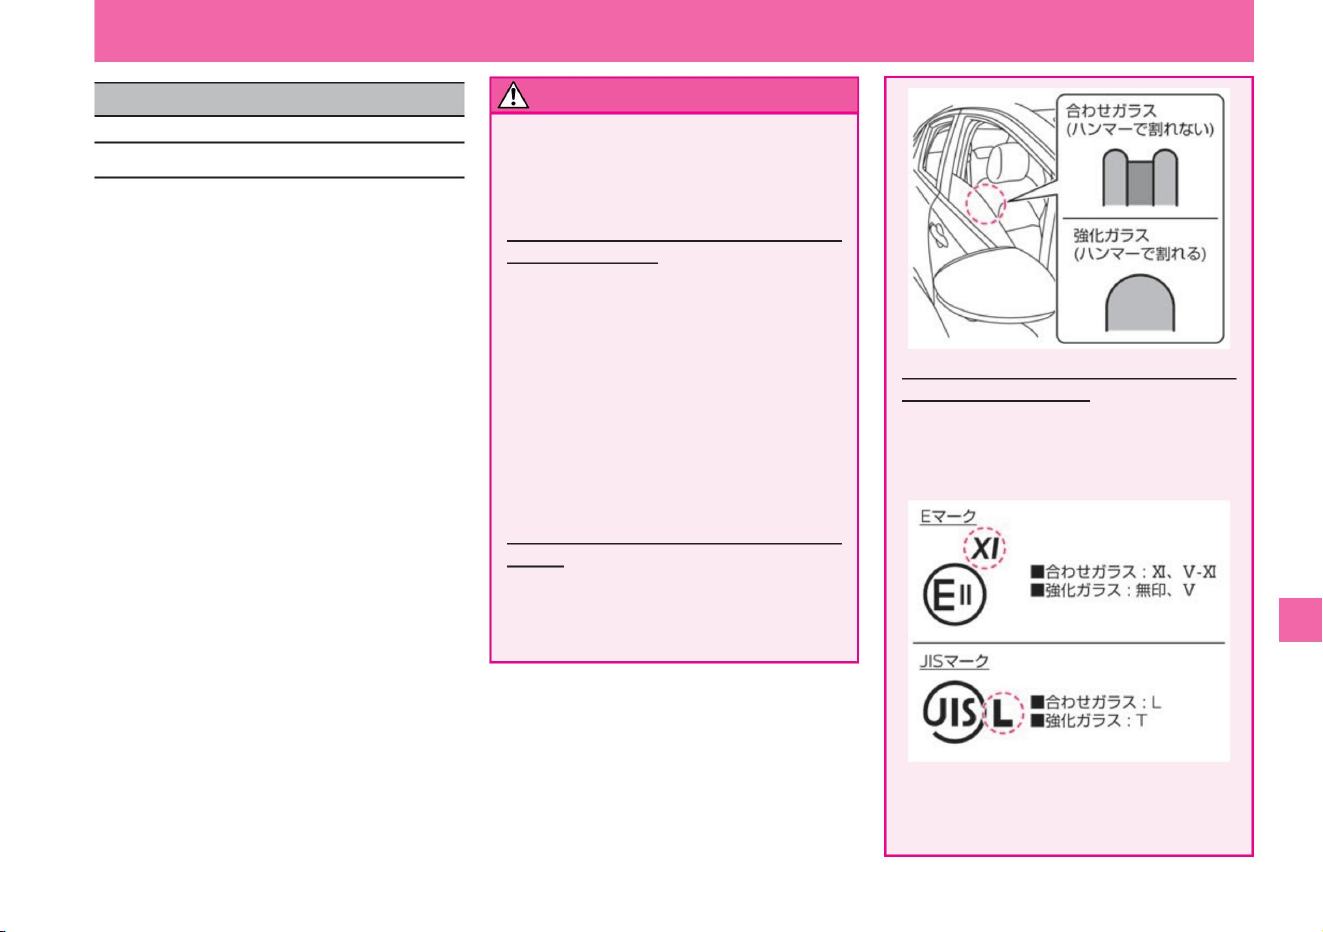
ZEI0626X
ZEI0416X
What to do in an emergency
How to distinguish laminated glass from the
engravings (marks) on
the glass • The following engravings (marks)
are displayed on the door glass. You can
tell whether it is laminated glass or not by
this indication.
If the vehicle is submerged in water, take the
following measures to
escape from the vehicle. •Unfasten your seatbelt
and exit
the vehicle. •Open the door while the water level
at which the door opens is low,
and escape from the vehicle. •If the door does not
open, press the power window switch to open
the window glass and escape from
the vehicle through the window. •If the window
glass does not open even when you press the
power window
switch, use the following method to escape. –If
you have an emergency escape hammer
(dealer option), break the window glass and
escape out of the vehicle.
* Depending on the vehicle, the engraving
(mark) may not be displayed, or the position
of the display indicating the type of glass
may be different.
How to distinguish laminated glass from the
cross
section of the glass • Open the door glass about
halfway and check the cross section from
above.
–If you do not have an emergency escape hammer
(dealer option), or if the emergency escape
hammer does not break the window glass, wait
until the water levels inside and outside the vehicle
reach the same level, then push the door hard.
Please open it and escape from the vehicle. (The
doors can
be opened when the water pressure difference
between the inside and outside of the vehicle disappears.)
• When the water level is higher than the window glass,
if you use the emergency hammer, broken glass
may enter the vehicle and cause injury. Emergency
escape hammer (dealer's
option) • The front window glass is laminated glass
and cannot be broken
with an emergency escape hammer. Break the rear
door glass and back door glass to escape. For
the front door glass, we use laminated glass
depending on the model. *The position of the
laminated glass may
differ due to changes in vehicle specifications.
$/$: Different equipment depending on vehicle model, options, etc.
warn
335
What to do when submerged
Troubleshooting
When submerged
Machine Translated by Google
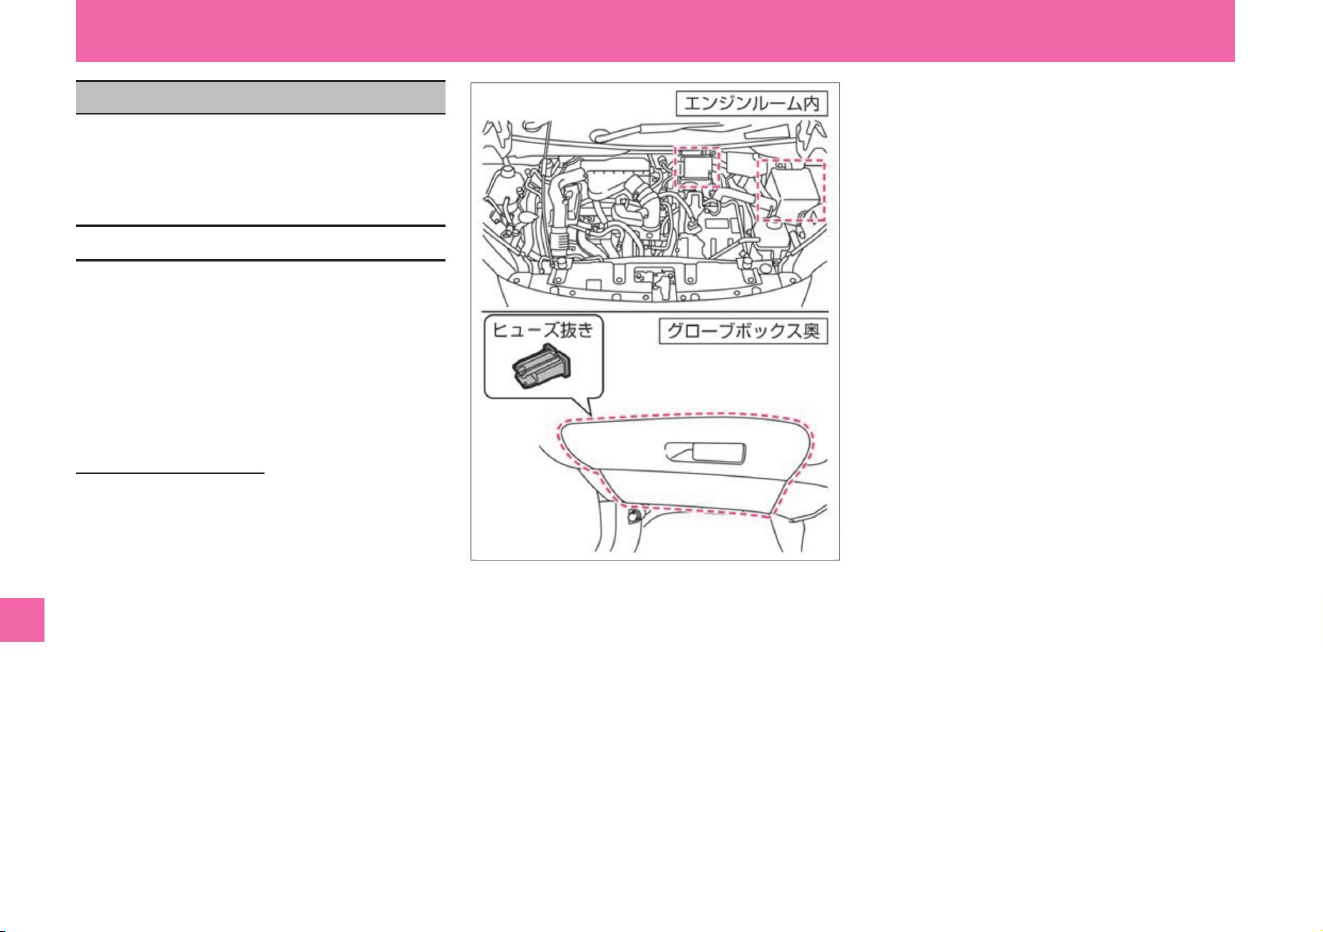
vinegar. – Inside the
engine room – Behind the glove box
Fuse removal • There
is a fuse removal in the fuse box behind
the glove box.
What to do in an emergency
• The fuse box is located as follows.
• The location of each fuse is indicated
on the back side of the fuse box
cover or near the fuse box.
Fuse box location
336
Troubleshooting
If the lamp does not come on or the electrical
system does not work, the fuse may be blown.
Check the related fuses from the fault situation.
ZEI0380X
When the fuse blows
Machine Translated by Google
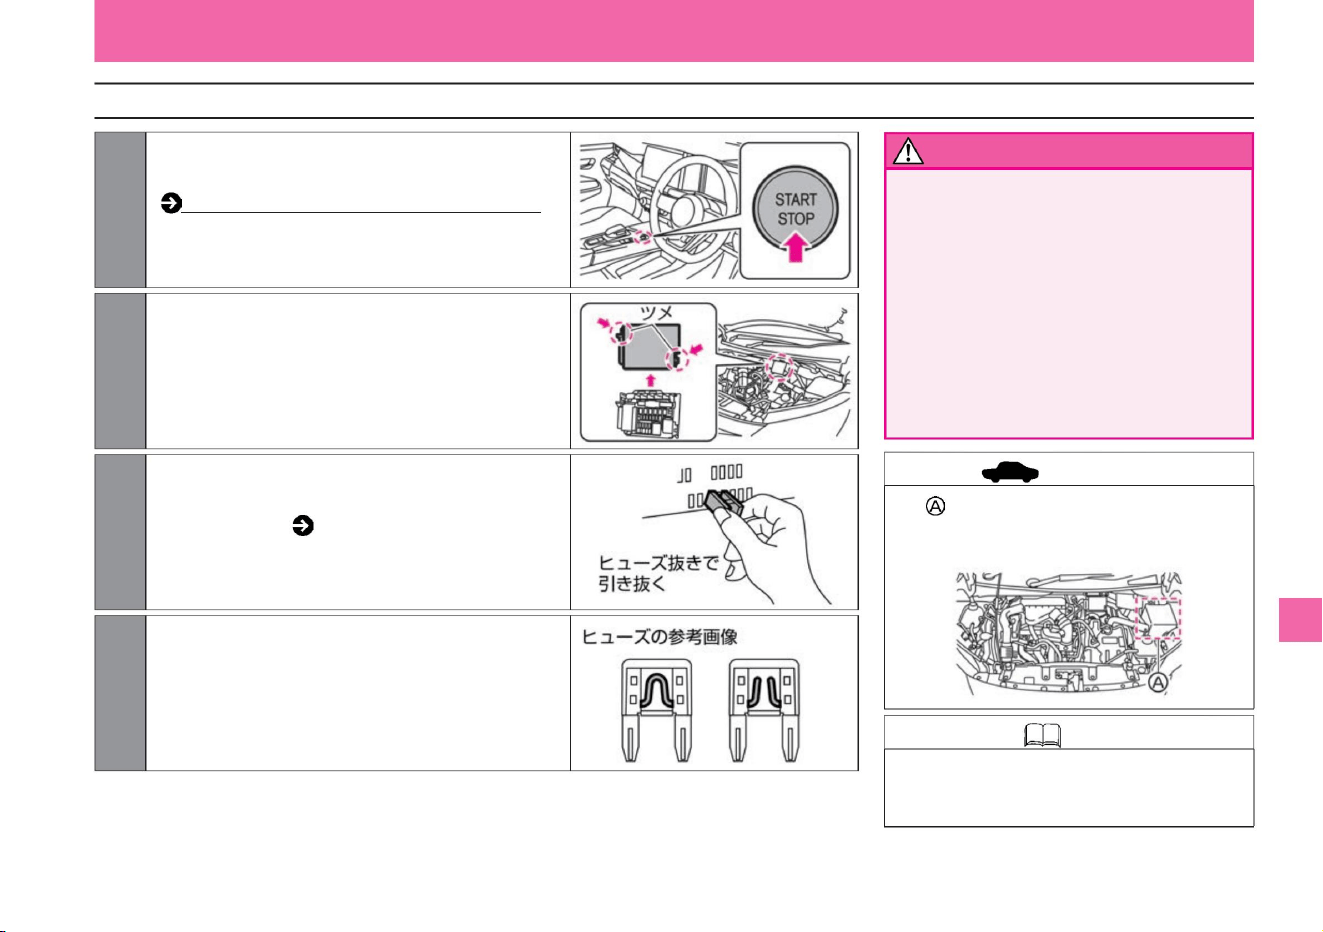
$/$: Different equipment depending on vehicle model, options, etc.
• Never touch, remove, or disassemble the
high-voltage parts, service plug, high-
voltage wiring (orange), and their
connectors. Serious injury may
result.
increase. How to open and close the bonnet (P.354)
When replacing the fuse in the • position,
consult your Nissan dealer.
If blown, replace with a new fuse. If the fuse still
blows after replacement, have it inspected by a
NISSAN dealer.
• Never use a fuse other than the specified
capacity, or use wire or silver paper as a
fuse. Failure to do so
may result in electrical system damage
or fire.
increase. Fuse extraction
( P.336) After replacing the fuse, make sure that it
is securely inserted.
MEJ0022X
ZEF0286X
MEJ0023X
ZEI0389X
What to do in an emergency
Troubleshooting
warn
Knowledge • When replacing the fuse in
the engine room, please consult a
Nissan dealer.
337
How to check and replace the fuse (inside the engine room)
advice
ZEI0417X
3 Remove the fuse using the fuse extractor
2 Remove the lid of the fuse box.
4 Check for blown fuses.
1Turn off the power switch and open the hood.
Machine Translated by Google
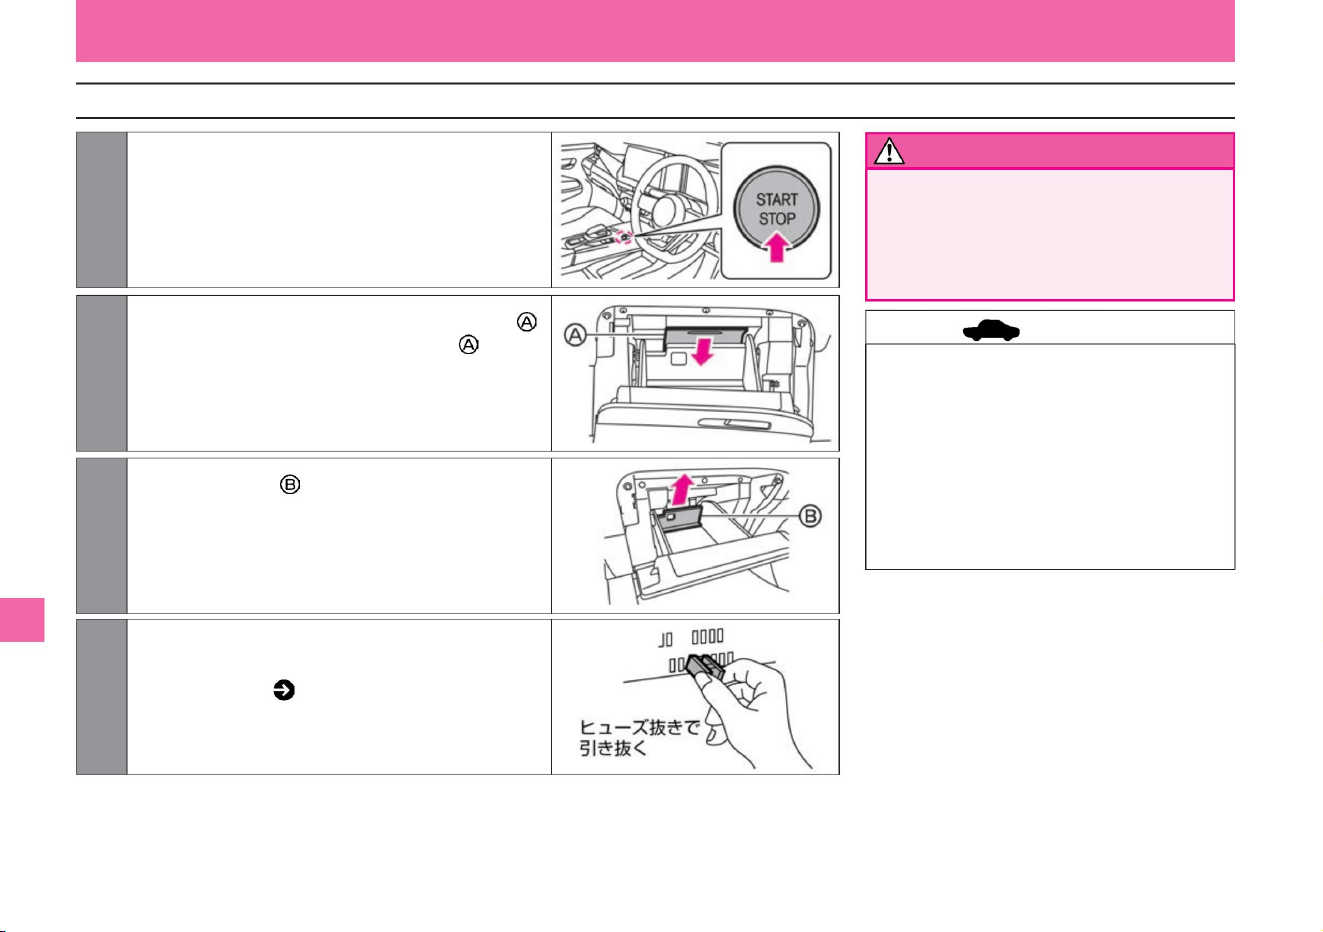
How to check and replace the fuse (back of the glove box)
advice
338
warn
MEJ0022X
ZEI0524X
ZEF0286X
ZEI0533X
3Pull the inner plate upward to remove it.
2 Open the glove box and remove the inner plate
1 Turn off the power switch.
4 Remove the fuse using the fuse extractor
What to do in an emergency
Troubleshooting
• When you replace the fuse, make sure it
is securely inserted. • If the fuse still
blows
after replacement, have it inspected by a
NISSAN dealer. • Install the inner plate
in the
reverse order of removal.
increase. Remove fuse ( P.336 )
• Never use a fuse other than the specified
capacity, or use wire or silver paper as
a fuse. Failure to do
so may result in electrical system
damage or fire.
Remove the plate by pulling the handle on the
front.
remove it.
Machine Translated by Google
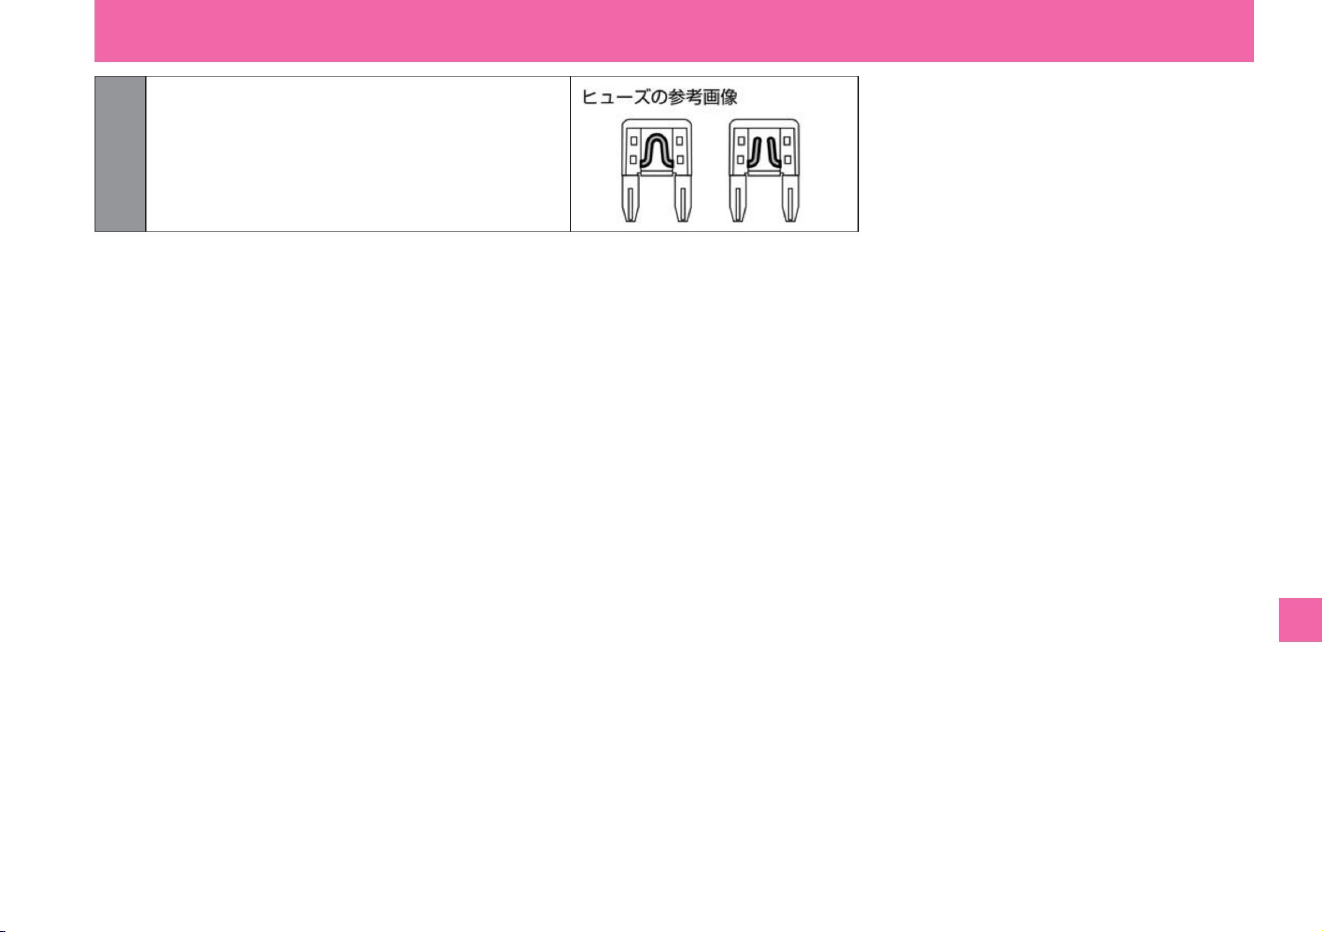
5 Check for blown fuses.
$/$: Different equipment depending on vehicle model, options, etc.
If blown, replace with a new fuse.
What to do in an emergency
Troubleshooting
339
MEJ0023X
Machine Translated by Google
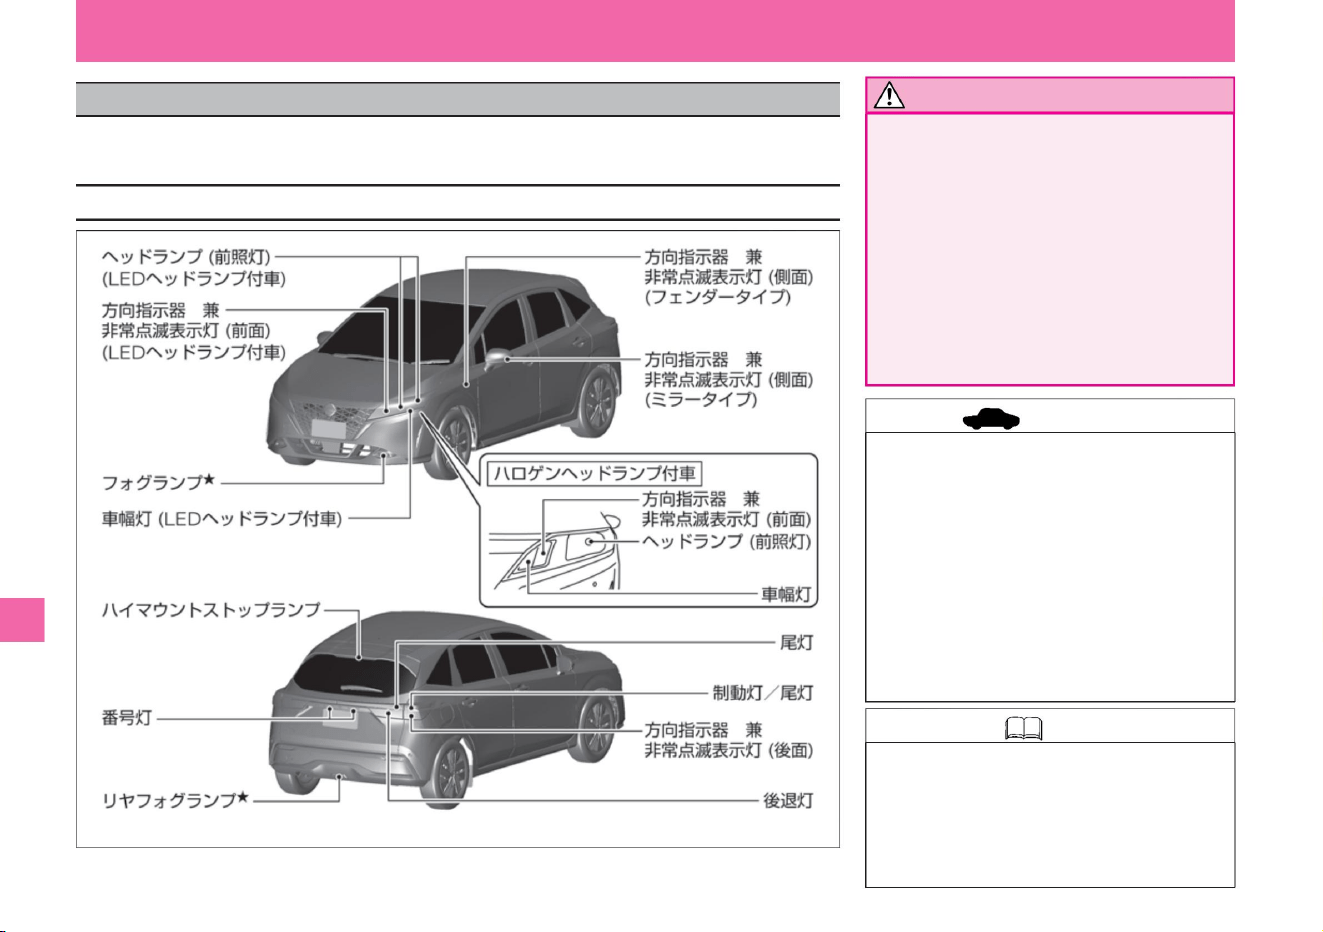
If the exterior lamp does not light up, it is possible that the light bulb has blown out. If you are unfamiliar with replacing light
bulbs or are concerned about damage to parts, please consult your Nissan dealer.
ZEI0395X
What to do in an emergency
be careful not to •
Install the light bulb securely.
The surface of the bulb becomes hot
when lit. If the light bulb is not installed
correctly, it may come off while driving
and come into contact with surrounding
parts, resulting in heat generation or fire.
• Replace the light bulb when the bonnet and
light bulb are cold.
Doing so may result in burns. Do not
injure your fingers or arms with the ends of stays, etc.
• Be sure to attach the removed parts securely.
Water may enter and cause malfunction. •
Wipe off oil with a
soft cloth when oil adheres to the bulb. Also, do
not touch the glass part with bare hands.
The life of the bulb may be shortened or the
bulb may be damaged.
• Wear work gloves when replacing the light bulb.
• Inner lenses of headlamps and brake lights may become
cloudy temporarily when driving in the rain or washing
the car. Condensation may also form on the inner
surface of the lens due to the temperature difference
between the inside of the headlamp and the outside
air. This is the same as window glass fogging up when it rains.
Notice
340
Position of each bulb
advice
Knowledge
Troubleshooting
When the light bulb burns out
Machine Translated by Google

341
Knowledge
This is a similar phenomenon and is not a
functional problem. Also, due to the structure of
the lens, water droplets may adhere to the
edges of the lens, but this is not a functional
problem. However, if there is water inside the
lamp or if there are large droplets of water on the
inner surface of the lens, please contact your Nissan dealer.
What to do in an emergency
$/$: Different equipment depending on vehicle model, options, etc.
Troubleshooting
Machine Translated by Google
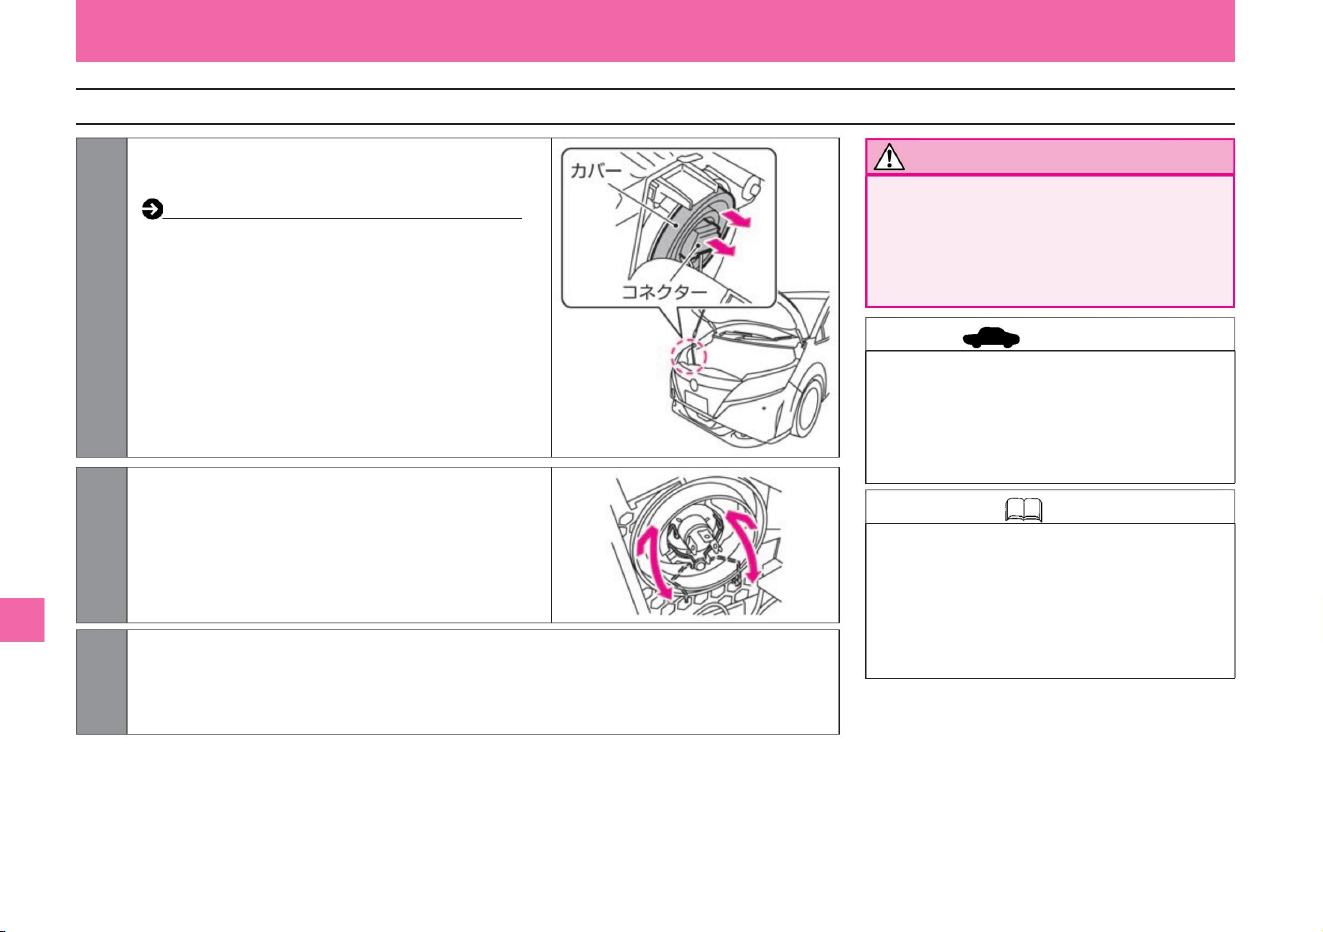
advice
342
High beam / low beam (vehicles with halogen headlamps)
Knowledge
Notice
ZEI0396X
ZEI0397X
• Be careful when handling light bulbs.
• High beam/low beam headlamp: 12V-60/55W
(H4) • High beam/low
beam headlamps on vehicles with LED
headlamps cannot be replaced. If the light
does not come on, have it inspected by a
NISSAN dealer.
• Do not apply excessive force when removing.
Doing so may damage it. • Make sure that
the
retaining spring is fixed.
What to do in an emergency
Troubleshooting
3 When installing, follow the removal procedure in reverse order.
2 Unlock the retaining spring and replace the bulb.
The bulbs used for high beam/low
beam have high internal pressure, so
if broken, the glass may fly out.
1 Open the hood and remove the connector and
cover. How
to open and close the bonnet (P.354)
Machine Translated by Google
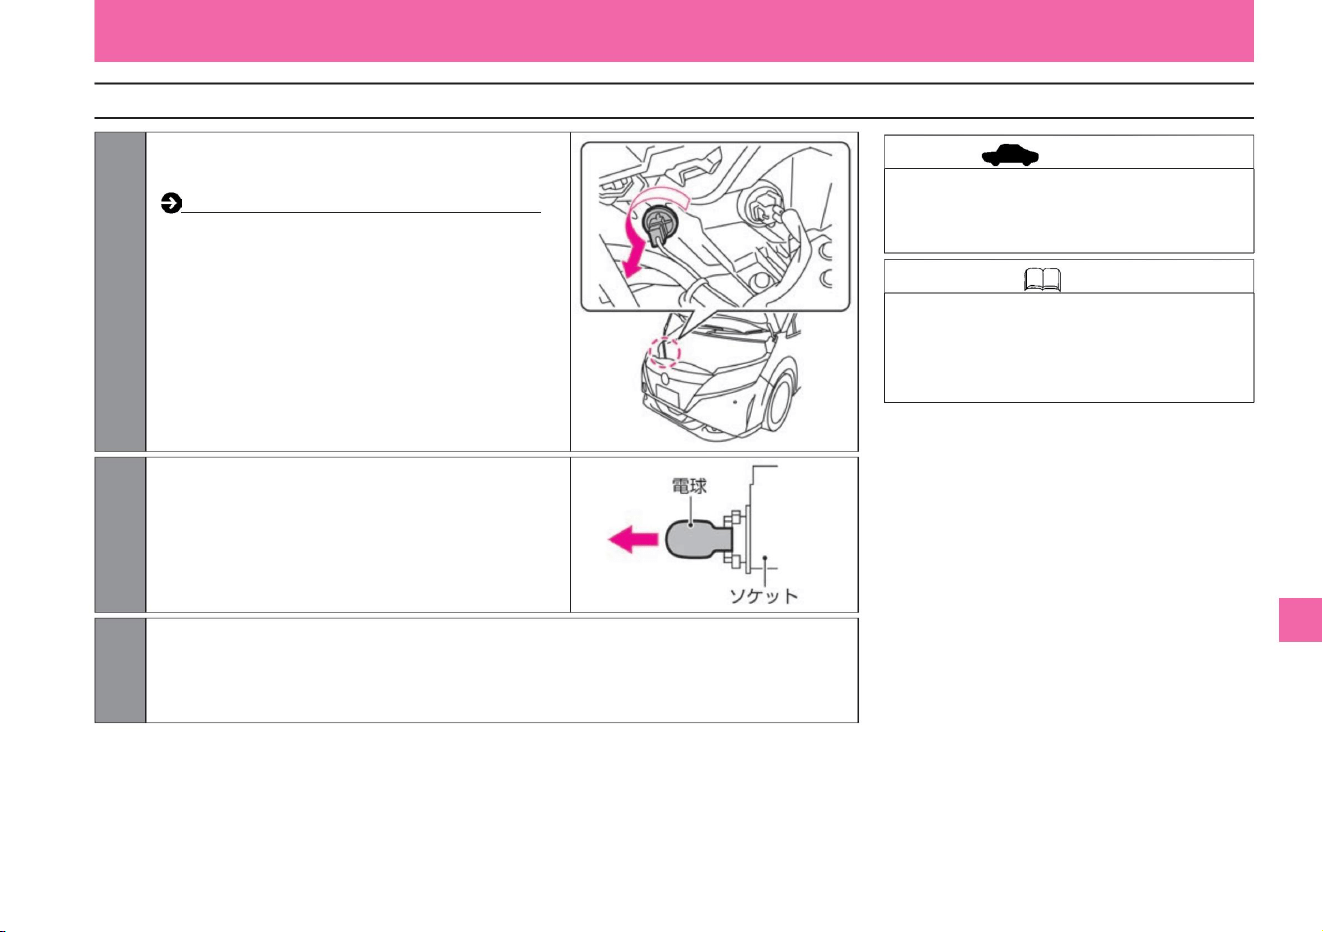
Knowledge
343
Width lights (vehicles with halogen headlamps)
advice
ZEI0398X
MEJ0036X
1 Open the hood, turn the socket in the direction of
the arrow, and pull it out.
3 When installing, follow the removal procedure in reverse order.
2Pull out the old bulb and install the new bulb into the
socket.
What to do in an emergency
$/$: Different equipment depending on vehicle model, options, etc.
Troubleshooting
• Do not apply excessive force when removing.
Doing so may damage it.
How to open and close the bonnet (P.354)
• Car side lights: 12V-5W (W5W)
• Car side lights on vehicles with LED headlamps
cannot be replaced. If the light does not come
on, have it inspected by a NISSAN dealer.
Machine Translated by Google
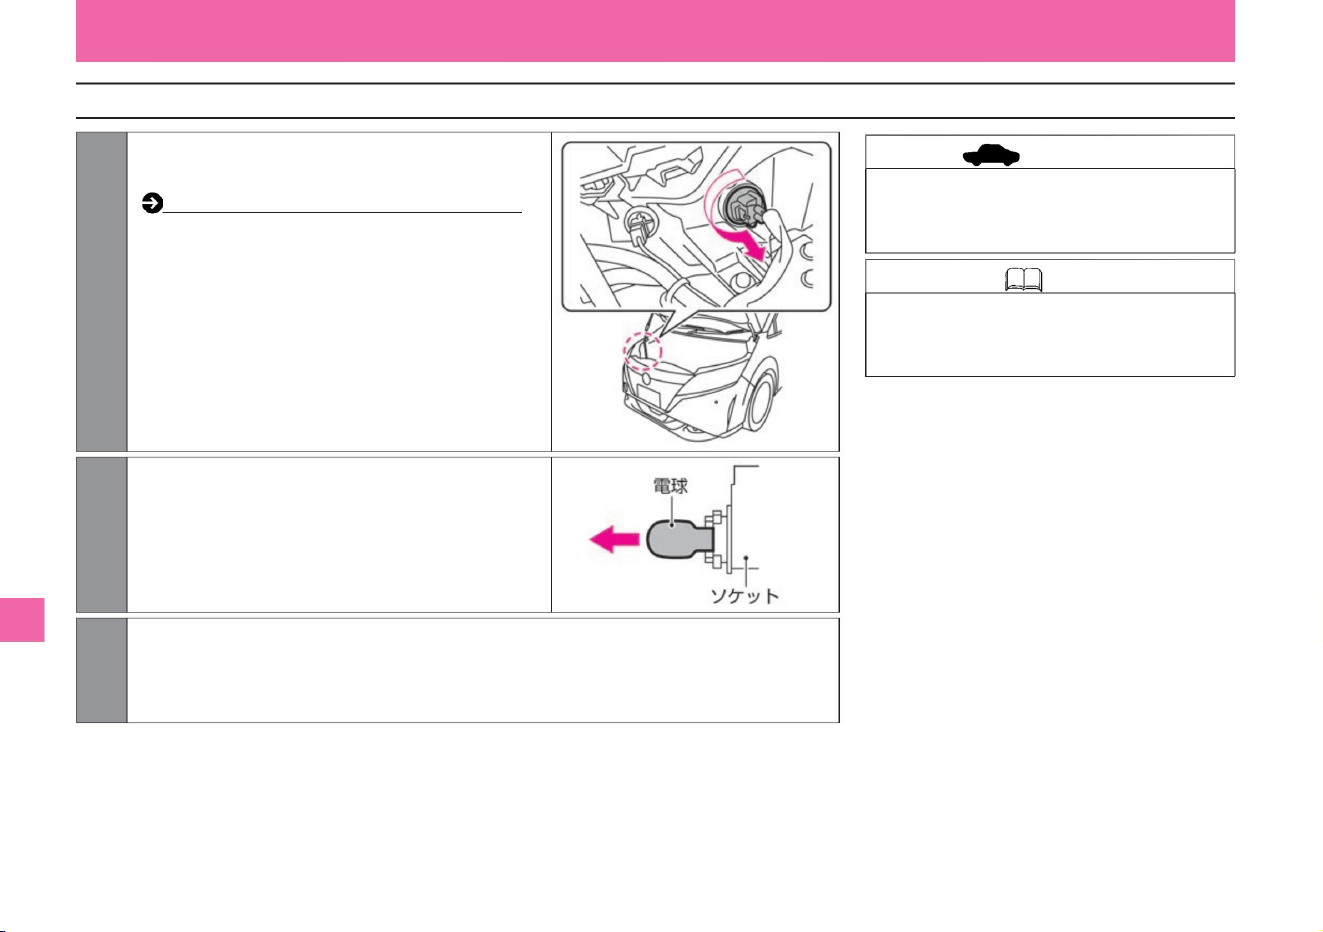
344
Knowledge Direction indicator and emergency
flashing indicator light (front): 12V-21W (amber)
Direction indicator and emergency flashing indicator light (front)
advice
ZEI0399X
MEJ0036X
1 Open the hood, turn the socket in the direction of
the arrow, and pull it out.
2Pull out the old bulb and install the new bulb into the
socket.
3 When installing, follow the removal procedure in reverse order.
What to do in an emergency
Troubleshooting
• Do not apply excessive force when
removing. Doing so may damage it.
How to open and close the bonnet (P.354)
ÿWY21Wÿ
Machine Translated by Google
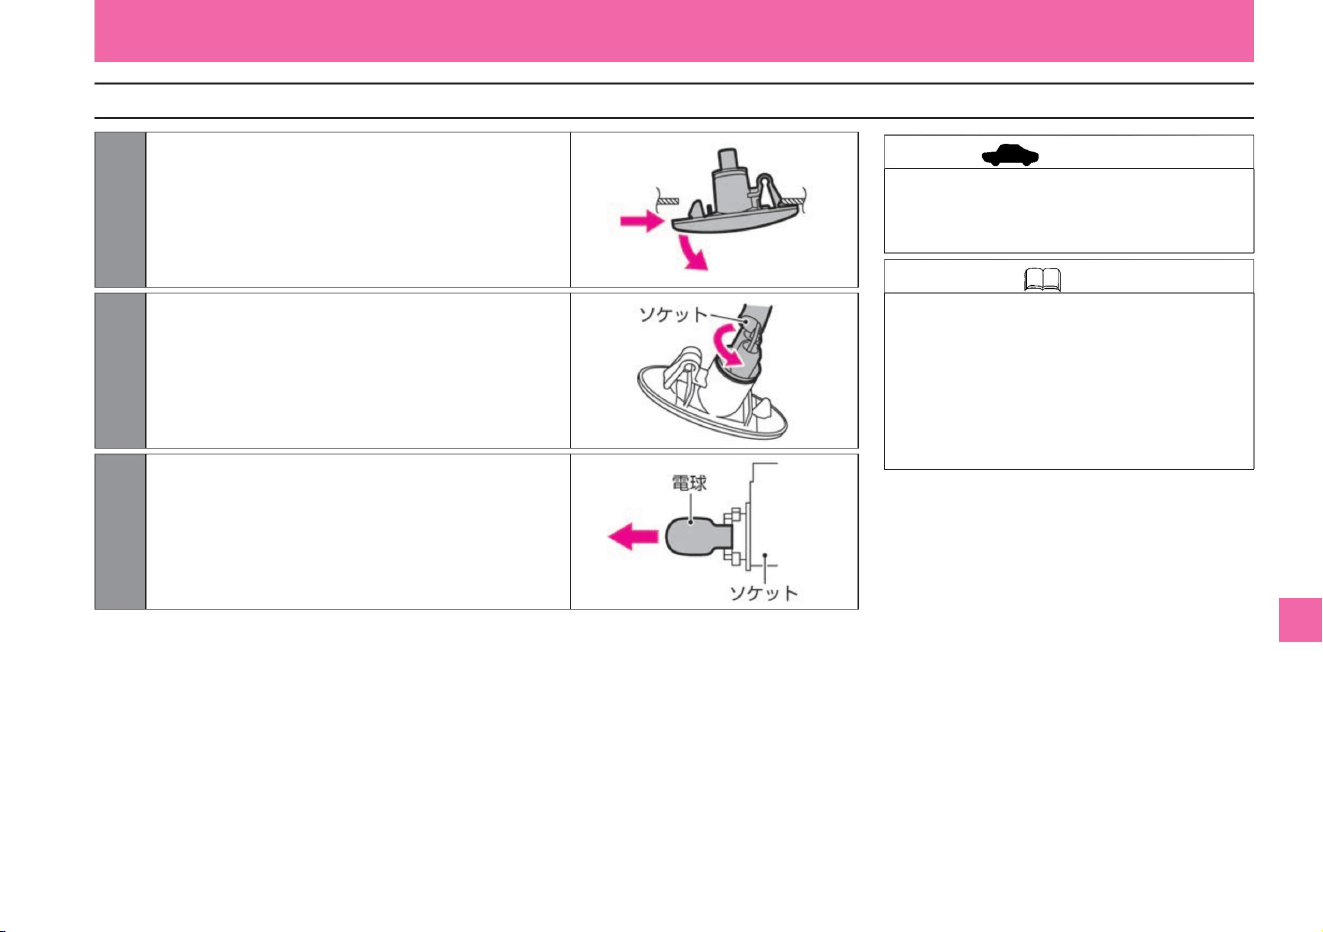
345
Direction indicator and emergency flashing indicator (side/fender type)
Knowledge
advice
MEJ0280X
MEJ0281X
MEJ0036X
1 Pull out the entire direction indicator while pushing it in the
left and right sliding directions.
3 Pull out the old bulb and install the new bulb in the socket.
Install in the
reverse order of removal.
2Turn the socket in the direction of the arrow and pull it out.
What to do in an emergency
$/$: Different equipment depending on vehicle model, options, etc.
Troubleshooting
• Attach the socket to the vehicle body with
tape, etc., and replace the light bulb to
prevent it from falling into the fender. -
Direction
indicator and emergency flashing indicator
(side): 12V-5W (amber) (WY5W)
vinegar.
• Do not apply excessive force when removing.
Doing so may damage it.
Machine Translated by Google

Other light bulbs
346
Troubleshooting
If the following light bulbs do not light up, have the
vehicle inspected by a Nissan
dealer. • Low beam (vehicles with LED
headlamps) • High beam (vehicles with LED
headlamps) • Fog lamps (LED)
• Rear fog lamps (LED) • Vehicle
width lights (vehicles with LED headlamps)
• Number
lights • Brake lights/
tail lights • Tail light (back
door side)
• Reversing light • High mount stop lamp (LED)
• Direction indicator and emergency flashing indicator (side /
Mirror type) (LED) Direction
indicator and emergency flashing indicator (rear)
What to do in an emergency
Machine Translated by Google
maintenance
service data
Tools/jacks
before maintenance
Cleaning/maintenance
Inspection and maintenance
P.379
tire
P.366
P.355
Vehicle status recording function
P.365
P.364
P.357
engine oil
About inspection and maintenance
wiper
P.349
About tools and jacks
Exterior care
P.378
P.361
P.380
Key (intelligent key/remote control entry system) battery
replacement
engine room
Handling in cold weather
P.348
P.353
P.365
P.372
P.356
12V battery
Winter tires and tire chains
P.375
Replenishment of washer fluid
Inspection value/replacement oils and fats
Vehicle
specifications Event data recorder (EDR)
P.360
Interior care
maintenance
347
Machine Translated by Google
• Avoid the multi-sensing front camera on the windshield
and attach from inside the vehicle. Paste it in a
position where it can be easily seen from outside the
vehicle. Multi-sensing
front camera ( P.370)
• Daily
inspection This inspection is performed by the customer
at an appropriate time, judging from the mileage and
usage conditions. If you notice anything out of the
ordinary, have it inspected at a NISSAN dealer.
(Sounds, vibrations, odors, water leaks, oil leaks,
etc.) • Periodical
inspection This is an annual inspection. There are 12
month inspections and 24 month
inspections. • Other
inspections There are free inspections for new vehicles
and necessary inspections for severe usage.
• Regarding vehicle inspections and maintenance, please contact the Nissan dealership.
before maintenance
Knowledge
At the time of vehicle inspection and maintenance
Type of inspection and maintenance
348
Please consult your company.
Periodic and daily inspections are required by the Road
Transport Vehicle Law. Carry out proper inspection and
maintenance and use your vehicle safely.
For details on inspection and maintenance, please read
the separate maintenance note.
ÿ Regarding the location of the inspection
mark (sticker)
maintenance
• Details of inspection, maintenance and
warranty are described in the separate
maintenance note, so please be sure to read it.
About inspection and maintenance
Machine Translated by Google
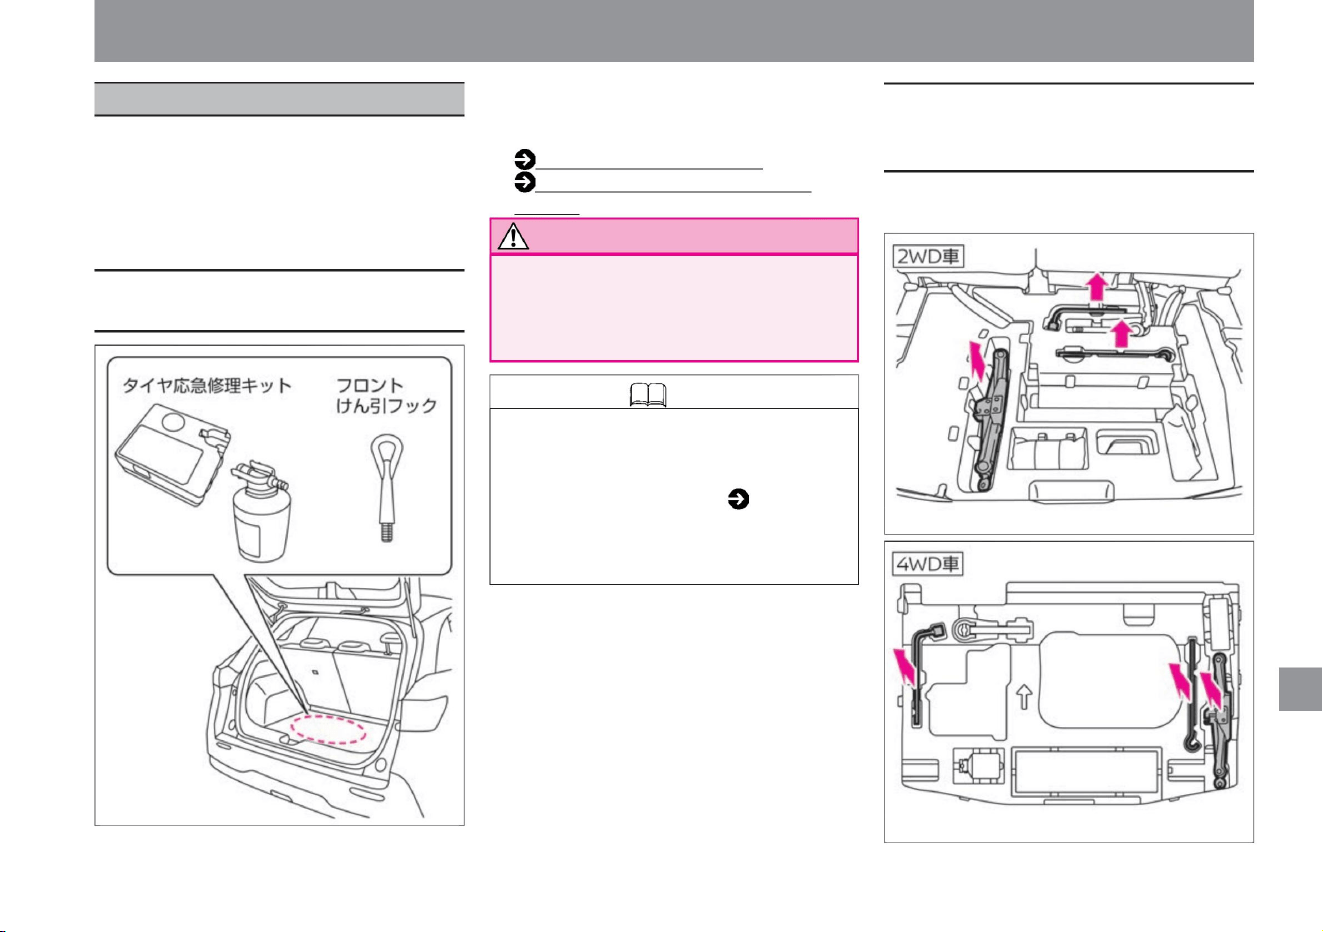
349
Storage location for tools and emergency tire
repair kits
How to remove the jack, handle/wheel nut
wrench, and handle lever (dealer option)
Notice
Knowledge
Tools/jacks
$/$: Different equipment depending on vehicle model, options, etc.
This vehicle does not come standard with a
spare tire, jack, handle/wheel nut wrench, and
handle lever. When jacking up, prepare a jack
specifically for this vehicle. For details, please
consult your Nissan dealer.
It is stored in the room. (The contents of the tire
emergency repair kit and the shape of the parts
differ depending on the vehicle model.)
• Lift the luggage compartment floor cover and
take it out.
• A stop indicator (stop indicator light) and
wheel chock are not included as standard,
so prepare them as necessary. •
Check the position of the type of tool and the
flare ( P.279) in advance so that you will
not be troubled in the event of an
emergency.
• Tool/tire emergency repair kit
• After using tools and emergency tire repair
kits, store them in their original
locations. Leaving it inside the vehicle
may lead to an unexpected accident.
(P.284)
Before emergency repairs
(P.284) Emergency tire repair kit
maintenance
ZEJ0187X
ZEJ0173X
ZEJ0186X
About tools and jacks
Machine Translated by Google
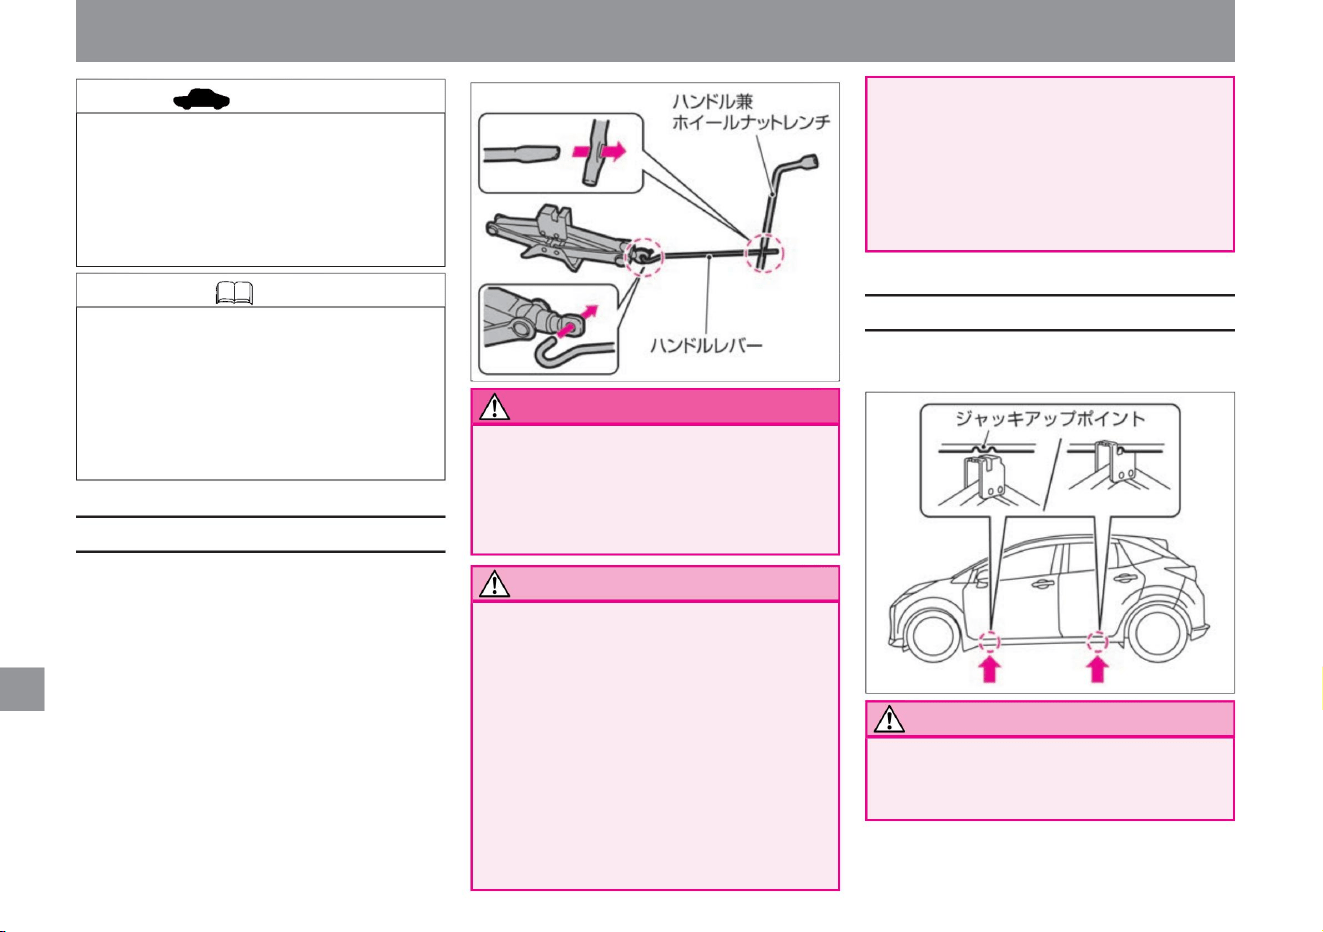
Notice
Notice
Knowledge • This vehicle does not
come standard with a jack, handle/
wheel nut wrench, and handle
lever. When jacking up, prepare
a jack specifically for this vehicle.
For details, please consult your
Nissan dealer.
advice
How to use the jack
350
jack up point
warn
maintenance
If the handle lever is not securely
inserted, it may come off and cause
an unexpected injury.
The position of the arrow is the jack up point
• Do not use the jack for anything other
than changing tires or attaching/
detaching
tire chains. • Make sure that the jack and
floor cover do not hit the interior parts.
Doing so may result in injury.
• When you jack up the car, never
vinegar.
• e-POWER system while jacking up
Do not go under
both. A detached jack is extremely
dangerous and could result in serious
injury.
not start the
system. The vehicle may start and
cause serious injury.
• After using tools and jacks,
store in the location
of Leaving it inside the vehicle may
lead to an unexpected
accident. • When turning the handle/
wheel nut wrench, hold the handle
lever firmly and
turn it. If the handle lever comes off
while it is rotating, it may cause an
unexpected injury. • Firmly insert the
handle lever into the hole of the
handle and wheel nut wrench.
• When using a jack, be sure to observe the
following. –
Always use a jack specifically designed for this vehicle.
• Set the handle lever and wheel nut wrench
on the jack. • When using a jack to lift
the vehicle, place the jack in the correct
position.
Tools/jacks
ZEJ0221X
ZEJ0175X
Machine Translated by Google
Notice
advice
351
maintenance
Please do not use other vehicles'
jacks. Also, do not use the jack for
this vehicle on other vehicles.
Tools/jacks
stomach.
$/$: Different equipment depending on vehicle model, options, etc.
• Do not use the jack for anything other than
changing tires or attaching/detaching tire
chains. •
Do not place the jack anywhere other than the
jack-up point. The vehicle body may be
deformed.
– Do not place a stand or block above or
below the jack. – Always
remove people and luggage from the vehicle.
– Park and work on a flat, hard surface. –
Engage the
parking brake and shift the shift position to
before use.
– Secure the vehicle with wheel chocks, etc.
Machine Translated by Google
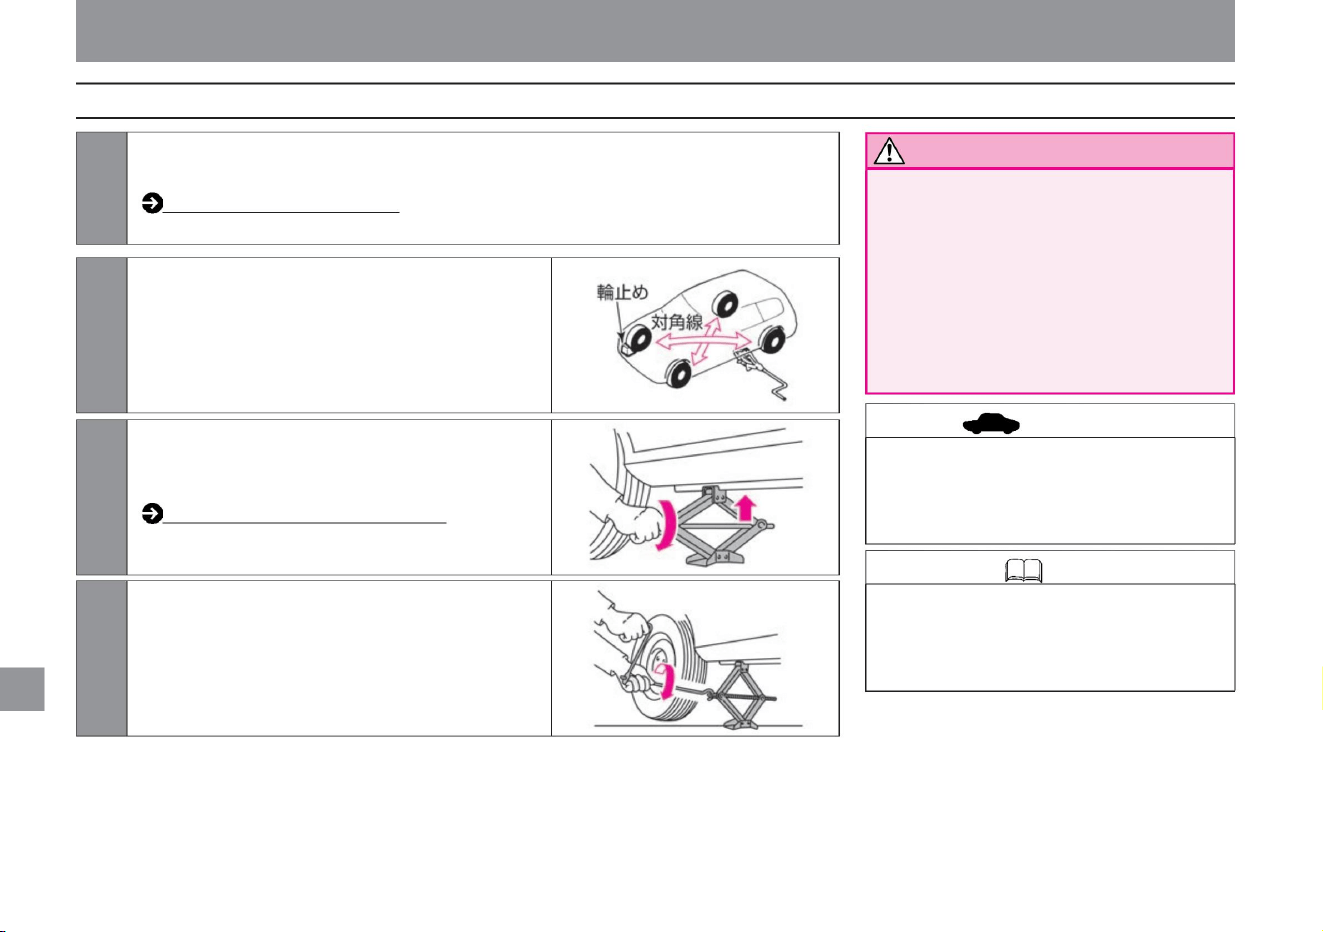
Knowledge
advice
Notice
352
How to jack up
MEJ0005X
MEJ0006X
MEJ0004X
3 Turn the jack by hand in the direction of the
arrow until the top of the jack touches the
jack up
point. Jacking point (P.350)
2Chock the tires diagonally from the jacking
position. Place the
chock behind the rear wheel when jacking
up the front wheel, and in front of the front
wheel when jacking up the rear wheel.
4Turn the handle/wheel nut wrench and jack up
until the tire is slightly separated from the
ground.
1Stop on a safe place to work (a flat, hard place) that does not interfere with traffic.
Tools/jacks
• Wheel chocks are not included as standard,
so prepare them if necessary. A stone or
piece of wood large enough to hold the tire
in place can be substituted for the chock.
maintenance
• Do not place the jack anywhere other
than the jack-up point. The vehicle
body may be deformed.
• Do not jack up on soft ground. The jack
may tip over
and cause an accident. • If you have
no choice but to
work on a slope, chock the downside of
the tires diagonally from the jacking
position to prevent the vehicle from
moving.
or unload the vehicle.
How to stop/park (P.147)
Machine Translated by Google
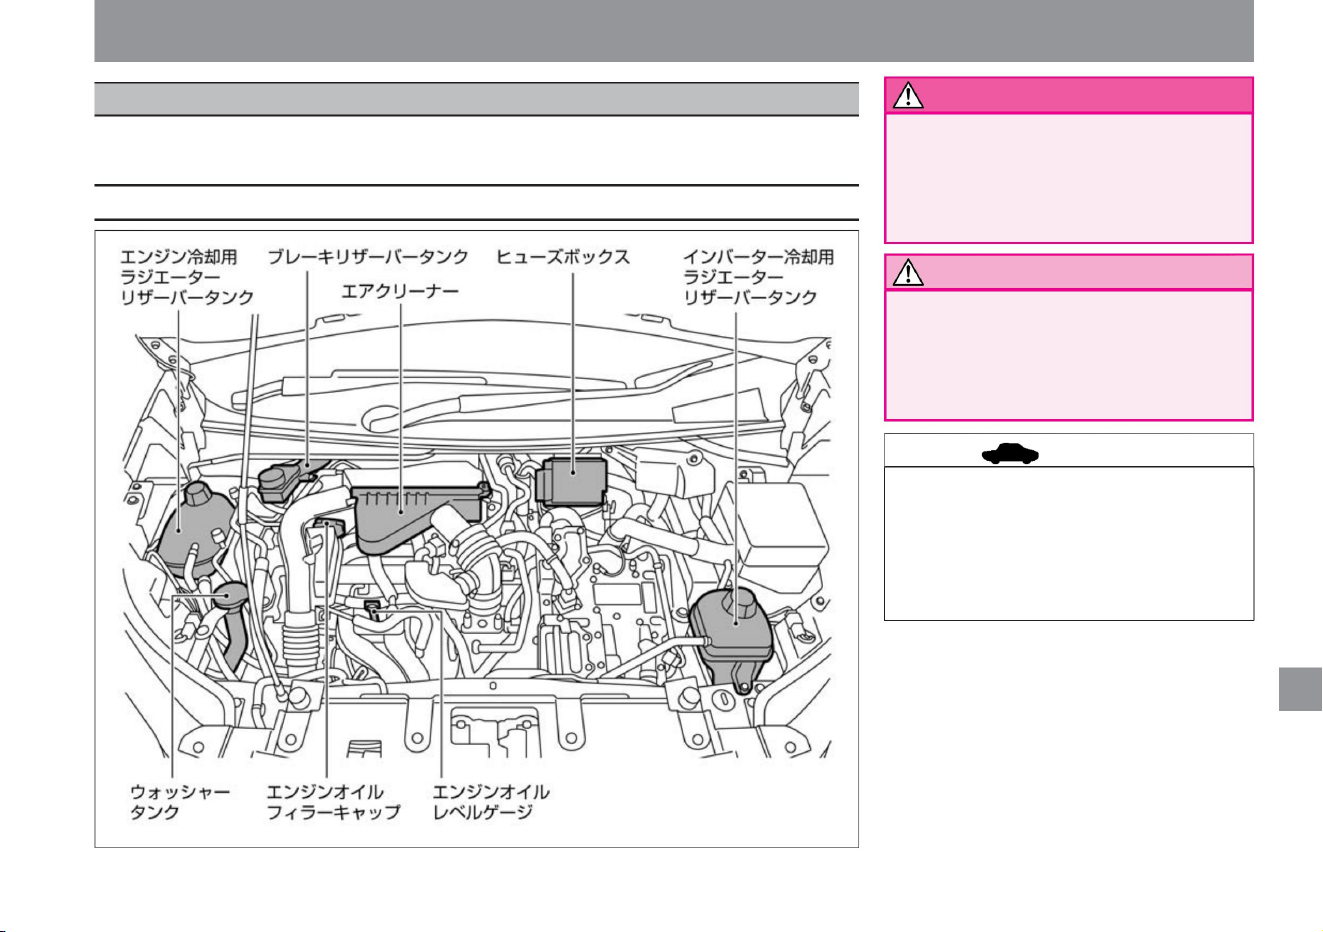
When inspecting the inside of the engine compartment, stop the vehicle in a safe place, apply the parking
brake, and open the hood.
Inspection and maintenance
• Turn off the power switch when working
in the engine room. Inserting
hands, clothes, tools, etc. into the e-
POWER system while it is operating
may result in unexpected injury.
$/$: Different equipment depending on vehicle model, options, etc.
• Do not open the hood with the wiper
arm raised. It will damage the hood
and wipers. • For details on
inspection and maintenance, please read
the separate maintenance note.
• Do not leave tools or cloth used for
inspection or maintenance in the
engine room. It may lead to
malfunction or vehicle fire.
ZEJ0176X
engine room
maintenance
advice
Notice
warn
Layout of the engine room
353
Machine Translated by Google
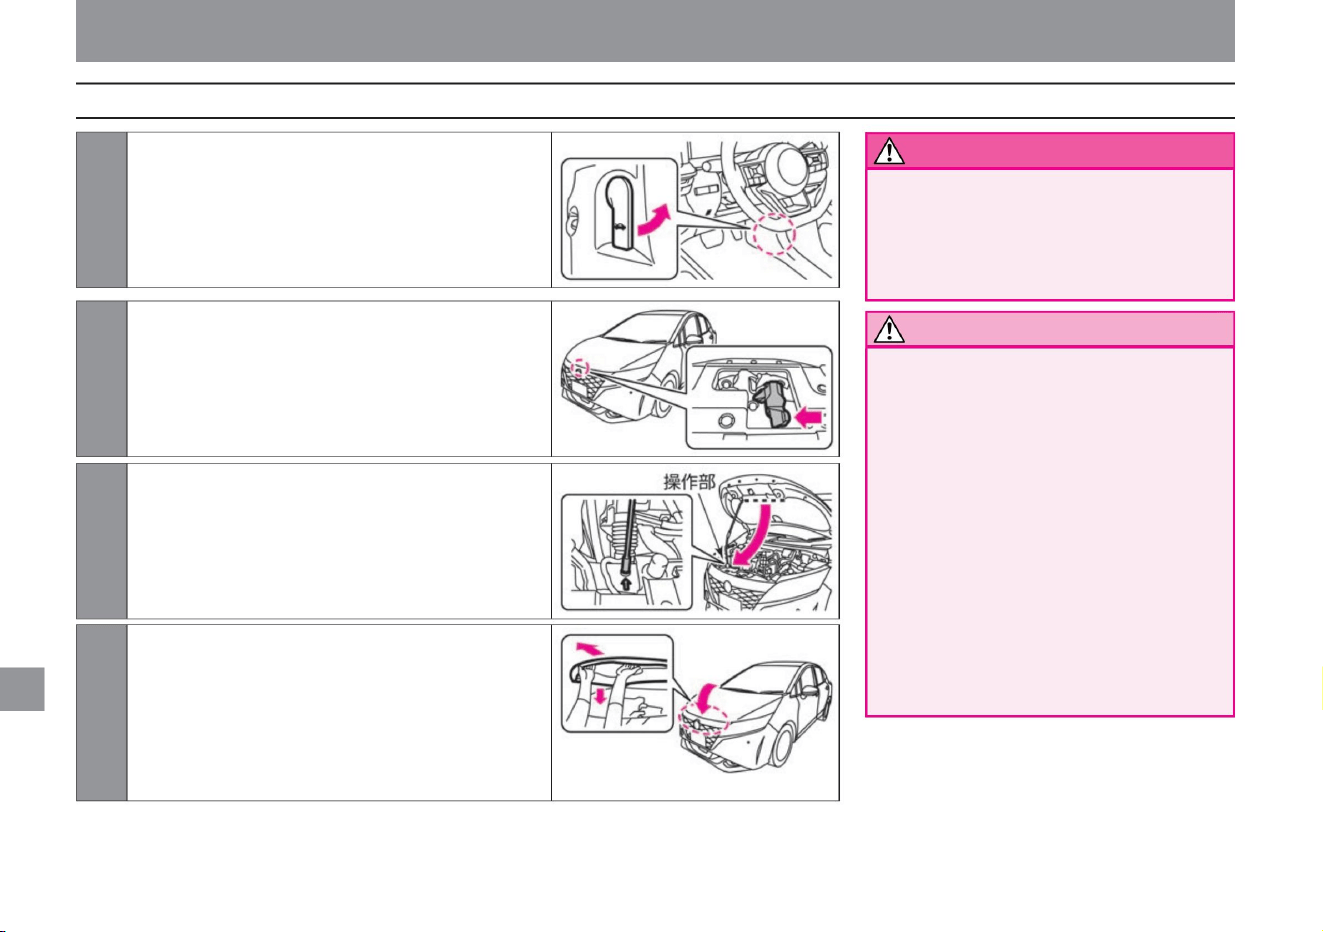
How to open and close the bonnet
Notice
warn
354
ZEI0388X
ZEJ0177X
ZEJ0178X
ZEJ0179X
2 Insert your hand into the gap at the tip of the bonnet and lift the
bonnet while pushing the lever sideways.
1Pull the bonnet opener at the bottom right of the driver's seat.
The bonnet
pops up a little.
3Remove the stay attached to the back of the bonnet from the
hook, and hold the operation part and insert it securely into
the hole in the vehicle body (stay insertion position).
4 When closing, return the stay to the hook and
Inspection and maintenance
maintenance
• When the wind is strong, hold the
bonnet firmly and open it
slowly. • When holding the stay, be sure
to
hold the operation part. Immediately
after the e-POWER system stops, the
stay becomes
hot and there is a risk of burns. • When
opening the hood, be careful not to
hit the
hood with your head. • Do not touch hot
parts
such as radiators. Doing so may
result in burns. • When closing the hood,
take care not to get your hands caught in it.
Slowly lower the net to a height of 20cm to
30cm, then let go and lock it down. If it cannot
be locked, operate the lever to lift the bonnet
again and then drop it again. Do not try to close
the bonnet by pushing it down.
• Before riding, be sure to confirm that
the hood is securely closed. If
it is not locked, the hood may open
while driving and lead to an
unexpected accident.
Machine Translated by Google
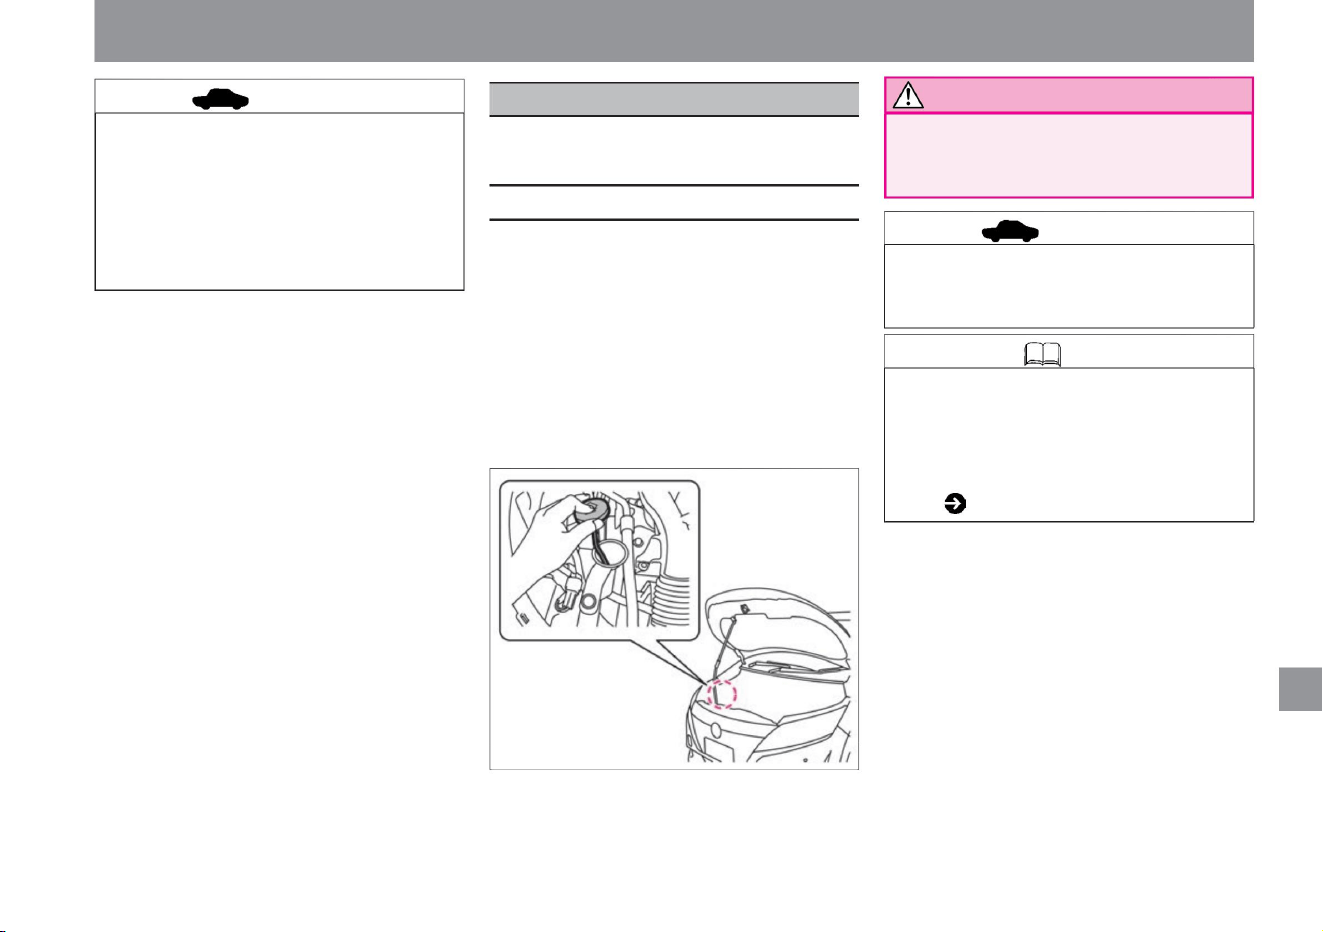
If the washer fluid is insufficient, replenish
the washer fluid.
Inspection and maintenance
$/$: Different equipment depending on vehicle model, options, etc.
• When replenishing the washer fluid, do not
splash the fluid on high
temperature parts. There is a risk of fire.
• Do not drop the bonnet from a height of
30 cm or more. Doing so may damage
it. • When
closing the hood, if you put your weight
on the hood and push it with a strong
force, the hood may be dented.
• Do not use soapy water instead of
washer fluid. Painted surfaces may
stain.
• The washer tank for the front wiper and
rear wiper is also used. • Nissan
genuine windshield washer fluid is
recommended.
Washer tank capacity ( P.376)
• Press the hole in the lid of the washer tank
and pull it out to check the remaining
amount of washer fluid with a
dropper. • When the washer fluid is low,
remove the washer tank cover and
replenish the washer fluid. • Dilute
the washer fluid with water if necessary. For
the dilution ratio, refer to the freezing
temperature indicated on the washer fluid
container.
ZEJ0180X
Replenishment of washer fluid
maintenance
How to replenish
Knowledge
advice
advice
355
Notice
Machine Translated by Google
Handling in cold weather
Cooling water concentration
Freezing
temperature
about -15°C about -35°C
30%
Please check the
If snow slides down the window glass, it will
obstruct your vision and may lead to an unexpected
accident.
Depending on your situation, do the following: • If the
door or wiper is frozen, do not try to force it open or
move it. Pour hot water over the frozen area to melt
the ice. Wipe off the water as soon as it melts. • If
snow or frost has accumulated on the glass, use a
plastic
plate or similar to remove the snow without damaging
the glass. • When the undercarriage (around the
brakes, underside of the fender, etc.) is frozen, remove
the ice
blocks while being careful not to damage the parts. •
Please remove snow from your shoes before getting
into the vehicle. caveat
50%
advice
before driving
How to drive on snowy roads
356
Pre-winter preparation
advice
Inspection and maintenance
• Do not attempt to drive the vehicle forcibly, such as sudden
starts, sudden acceleration, sudden braking, or sudden
turns on slippery roads, as it is dangerous. On snowy
or icy roads, slow down, keep a safe distance, and drive
comfortably.
• Cooling water for cold climate specification vehicles and 4WD
vehicles is set to 50% at the time of shipment from the
factory.
• To prevent the washer fluid from freezing, refer to the
freezing temperature indicated on the washer fluid
container and adjust the dilution ratio (concentration)
according to the outside temperature.
• To prevent freezing of the cooling water, the concentration of the cooling water
• When replenishing or replacing coolant, use genuine
Nissan super long life coolant (50% diluted product).
Service data (cooling water) ( P.376)
• When removing snow from the roof, do not apply strong
force to the antenna. Doing so may damage the
antenna or dent the vehicle.
• Remove snow from the roof.
• When replacing winter tires, replace all 4 wheels with the
same brand and pattern (groove pattern) of the specified
size. • It is recommended to use a genuine
Nissan tire chain that matches the tire size.
• Consult a Nissan dealer for inspection, replenishment,
or replacement of cooling water.
• When snow is piled up on the antenna, remove it.
Receiving sensitivity may decrease and noise may
enter. • Do not force open openings such as doors.
The
rubber may peel off or be damaged. • Do not forcibly
move wipers, door mirrors, power windows, etc.
Equipment may be damaged. • Do
not pour hot water on the key hole of the door. It may
freeze.
Be prepared for cold weather and make proper
preparations and inspections.
ÿ Beware of slippery roads
ÿ Concentration check of cooling water
maintenance
ÿ Checking the washer fluid concentration
ÿ Preparing winter tires and tire chains
Machine Translated by Google
ÿ P.366 ÿ
• Do not park under the eaves or trees. Falling
snow can damage your car.
• Raise the wiper arm when it is likely to snow or
when it is snowing. Blades and window glass
can freeze and break. • Remove the roof
antenna ÿ when
snow is likely to accumulate . Antenna may be
damaged.
• On snowy or icy roads, install winter tires and
tire chains as soon as possible before driving.
Winter
tires and tire chains (P.360)
For safe driving, check the following items when
checking tires. For details,
please read the separate maintenance note. Tire
pressure •
Check the air
pressure of all tires.
• Put the shift position in , and chock the wheels
without applying the parking brake. Applying
the parking brake may freeze the brake and
prevent it from being released.
How to remove the roof antenna ÿ
when.
• Check the tread and sidewalls of the tire for
significant cracks, damage, and foreign objects
such as needles. Tire
tread depth, abnormal wear • Check
whether the tire tread depth is sufficient and
whether the wear indicator (wear limit display)
is visible. • When the tire wears and
the contact surface and the wear indicator (wear
limit display) are at the same height, replace
the tire.
• Snow on the brakes may freeze, reducing the
effectiveness of the brakes. Check the
effectiveness of the brakes from time to time.
When the effectiveness is poor, keep enough
distance from the car in front and behind, and
lightly depress the brake pedal until the
effectiveness is restored at low speed. • Snow
on the back side of the fender may cause the
steering to become difficult to handle. Check
and remove snow from time to time.
• The specified air pressure for the tires is indicated on the
opening of the driver's door.
Presence or absence of cracks/damage on tires
Worn or damaged tires, or improper air
pressure, can affect your riding safety and
comfort.
Please check it on a daily basis.
tire
Inspection and maintenance
Tire inspection items
357
maintenance
ÿ Precautions when parking
ÿ Pay attention to the adhesion of snow while driving
$ / $: Different equipment depending on vehicle model, options, etc.
Machine Translated by Google
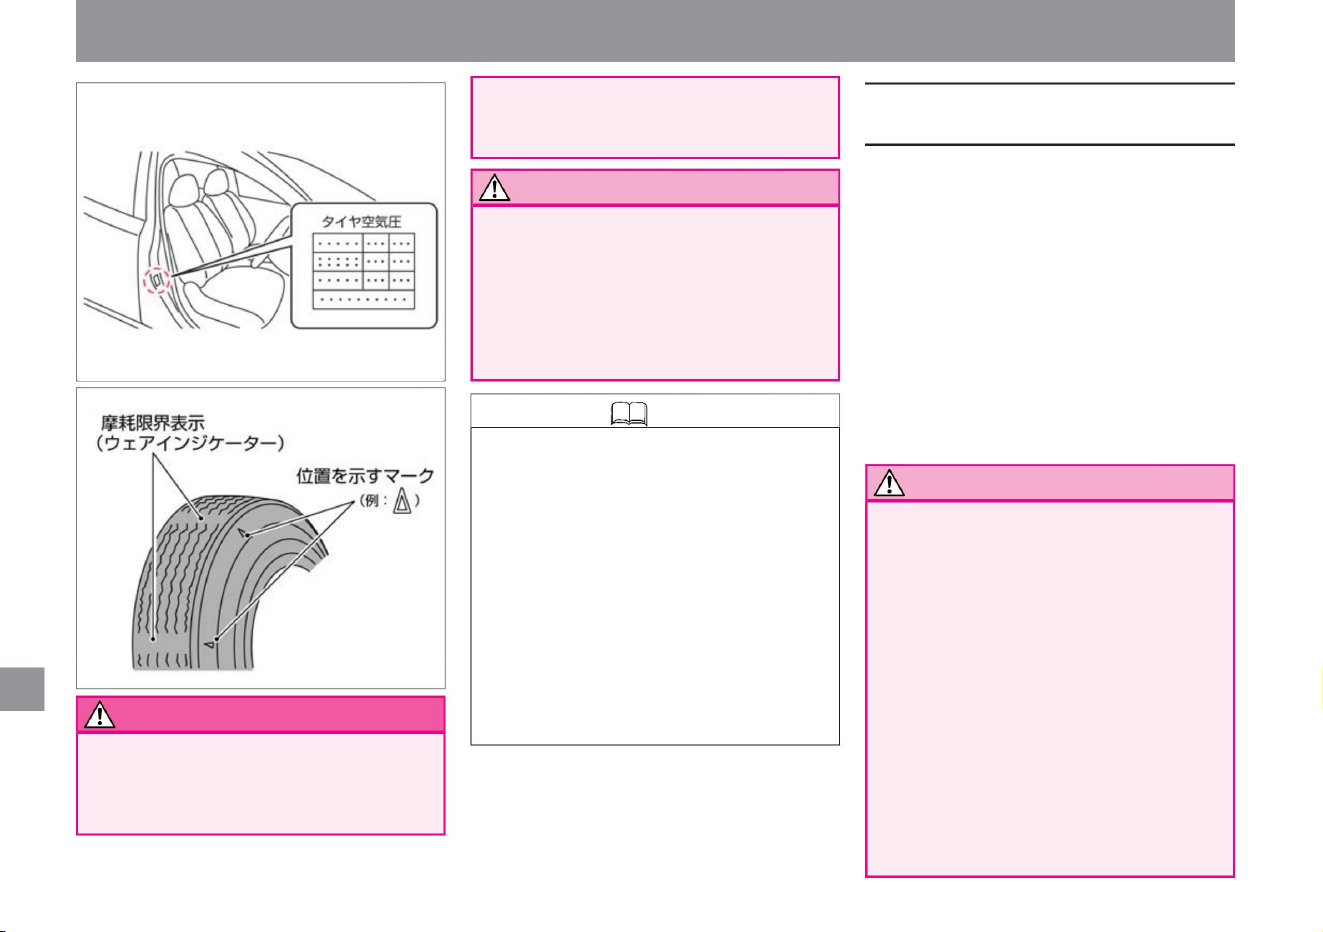
• Do not drive with insufficient tire pressure.
Tire
pressures change with temperature and
altitude changes. tire air
• When replacing tires on all four wheels at
the same time, be sure to install tires of
the same brand and pattern (groove
pattern) of the
specified size. For 4WD vehicles in
particular, if tires with a large difference
in wear or tires of different sizes are
installed, the driving performance of the
vehicle may deteriorate. Also, the VDC
system may not work properly. Do not install tires that:
• Never install tires or road wheels other than
the specified size. Installation of
unsuitable tires/road wheels may
compromise safety and lead to an
unexpected accident.
• Be sure to inspect the product every 5 to 7
years
after the start of use. Since tires are made
of rubber, they deteriorate over time. If
you continue to use it, be sure to have it
inspected to ensure safe driving. For
inspection, please contact a NISSAN dealer.
• When changing tires, consult a NISSAN dealer.
• When replacing
tires on all four wheels at the same time, be sure
to install tires of the same brand and pattern
(groove pattern) of the specified size. • For
the tire size, refer
to the tire pressure display at the driver's door
opening. • When replacing the road
wheels, be sure to install the same type of road
wheels of the specified size. Road wheel
sizes are listed in the
service data at the end of this manual. Note
Driving with insufficient pressure may lead
to unexpected accidents such as bursting.
• The air in the tire naturally decreases little
by little. Check using a tire air gauge once
a month. • Check and adjust the tire
pressure when the tires are cold before
driving. • Because it is difficult to visually
confirm that
the air pressure has decreased in tires with
thin sidewalls, be sure to use a tire air
gauge to check. • Tire pressure may
increase by about 10% immediately after
driving.
maintenance
warn
358
When replacing tires and road wheels
Notice
Knowledge
Inspection and maintenance
MEJ0013X
MEJ0012X
Machine Translated by Google
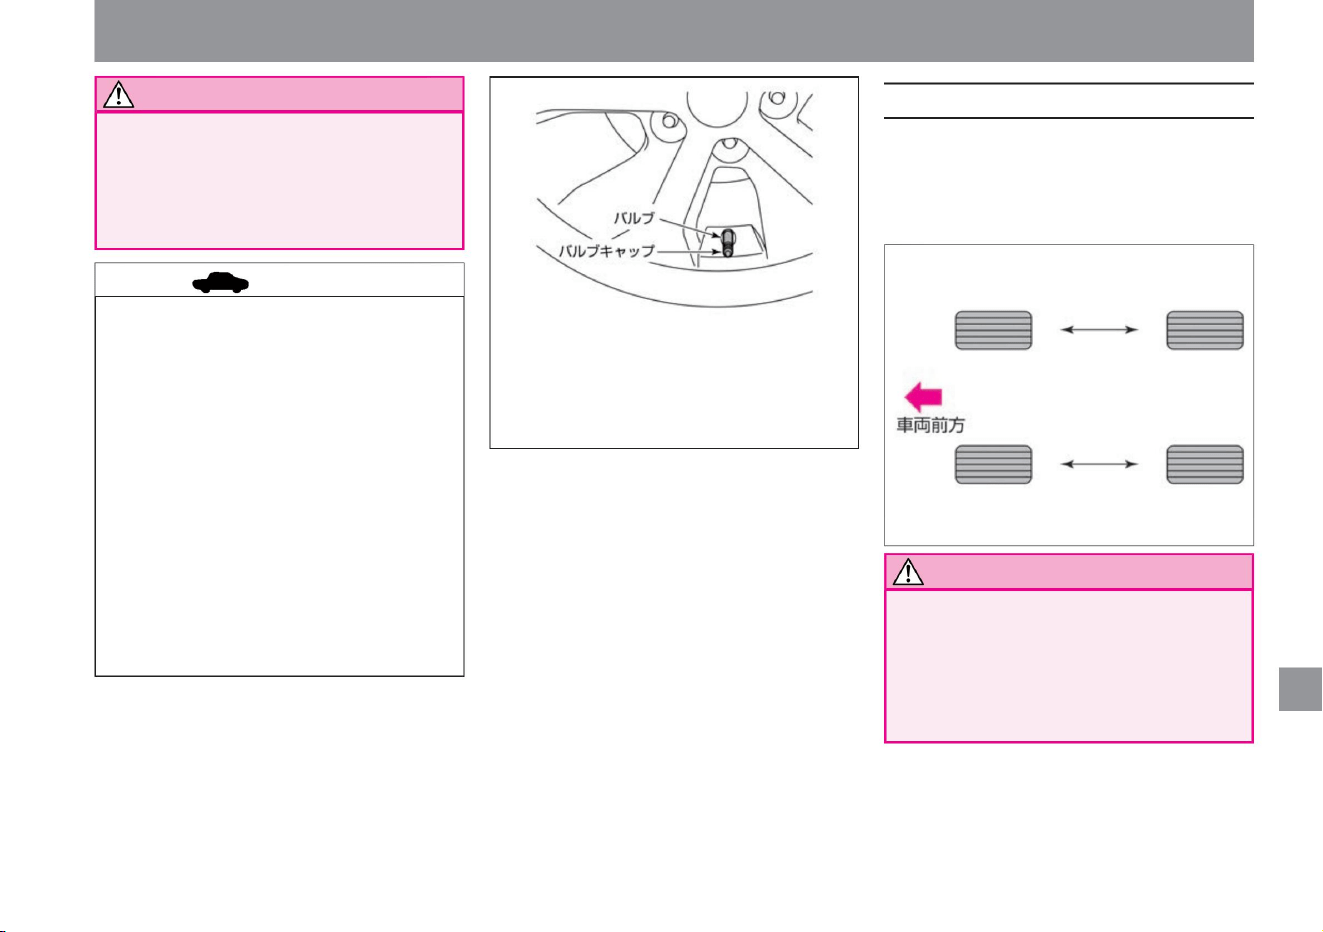
advice
Notice
359
How to rotate tires
Notice
$/$: Different equipment depending on vehicle model, options, etc.
–Installation of tires with large wear
difference –Installation of winter tires only on the
front or
rear wheels –Installation of tires of different sizes
and types individually
• Using a tool to tighten the valve cap
may damage it. • The tightening
torque for the wheel nut is
108Nÿm (11kgÿm).
• Do not use tires with significantly different wear
or tires with air pressure significantly different
from the
specified value. Doing so may hinder the
vehicle's performance, impair safety, and
cause malfunctions.
• Even if the rim size and inset are the
same, it may not be possible to use
road wheels from other vehicles.
When using your own, please consult
your Nissan dealer. • Since
aluminum wheelsÿ have a load limit,
please contact a NISSAN dealer
when replacing them.
• When replacing tires or road wheels,
be sure to balance the wheels. • Use
genuine Nissan
valve caps. If you use non-genuine
Nissan valve caps, they may corrode
and stick, making it difficult to remove.
Inspection and maintenance
MEJ0014X
ZEJ0144X
maintenance
Replace the front and rear tires on the left
and right respectively. To prevent uneven
tire wear and extend the life of the tires,
we recommend rotating the tires
(replacement) every 5,000 km.
Machine Translated by Google
advice
About winter tires
360
About tire chains
When installing winter tires, replace all 4 wheels
with tires of the same brand and pattern
(groove pattern) of the
specified size. Note
Use winter tires and tire chains when driving
on snowy or icy roads.
Winter tires and tire chains
Inspection and maintenance
• Consult with a NISSAN dealer about
changing tire positions.
• Do not install tire chains improperly or
use chains that do not match the tire
size. Brake
pipes and fenders may be damaged.
• Check the air pressure at the same time as changing
the position of the tire.
maintenance
Observe the following when attaching tire
chains. •When
installing tire chains, stop the vehicle on a flat
place where you can work safely, and turn
off the power switch.
•Install a chain suitable for the tire size.
•Install the tire chain according to the
instruction manual attached
to the tire chain. • Drive at the speed specified
in the instruction manual attached
to the tire chain. •In some cases, even tire
chains that match the customer's tire size
cannot be used.
• Attaching tire chains may damage the
wheel coverÿ and aluminum wheelÿ. •
Do not drive on snow-free
paved roads with chains attached. It will
damage the road surface, accelerate
chain wear, and shorten chain life. •
When using tire chains, do
not drive over protrusions or holes, make
sharp turns or brake in a way that locks
the tires.
•Be sure to attach tire chains to the front two wheels.
4WD vehicles should also be installed on the front
two wheels.
•We recommend genuine Nissan tire chains
that match your vehicle. •Consult
your Nissan dealer for compatible tire chains.
advice
Machine Translated by Google
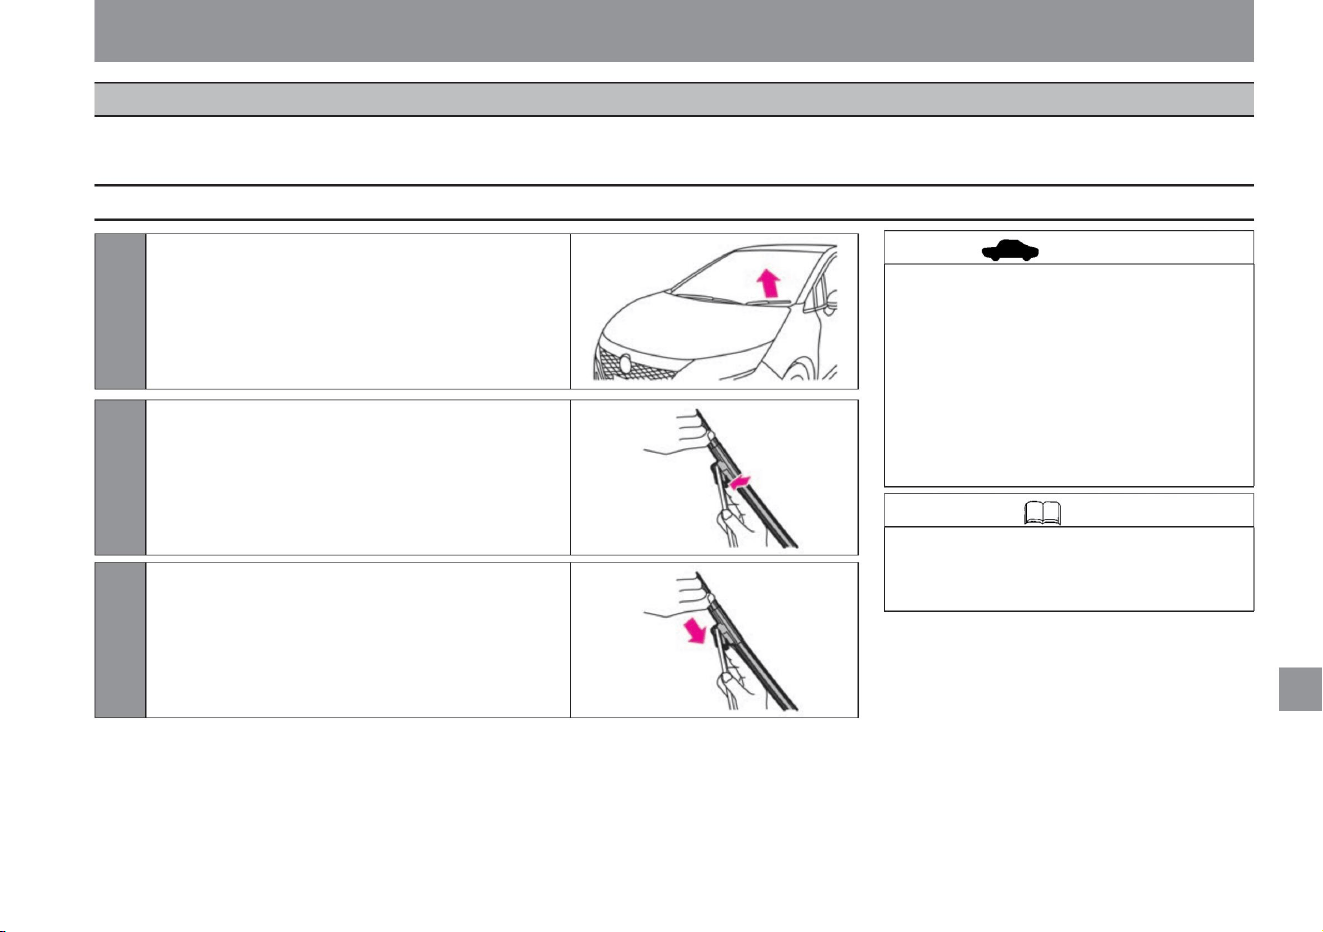
• When replacing the wiper arm and wiper
blade, be careful not to hit the glass.
If it hits the glass, it may break.
vinegar.
• Do not apply a large force to the wiper
blade to deform it. It may become
difficult to wipe off or may be damaged.
tilt slightly.
$/$: Different equipment depending on vehicle model, options, etc.
Inspection and maintenance
1 Raise the wiper arm and remove the wiper blade
2Press and hold the tab of the wiper blade.
3 Remove the wiper blade by moving it in the direction
of the arrow.
MEJ0093X
MEJ0094X
ZEJ0181X
Knowledge • If you need to inspect or
replace the rear wiper blade, please
consult a Nissan dealer.
361
advice
How to replace the wiper blade
maintenance
If the wiper rubber is damaged, it will not be able to wipe cleanly and may damage the window glass. Inspect it regularly, and if it is damaged, replace it according to
the following procedure.
wiper
Machine Translated by Google
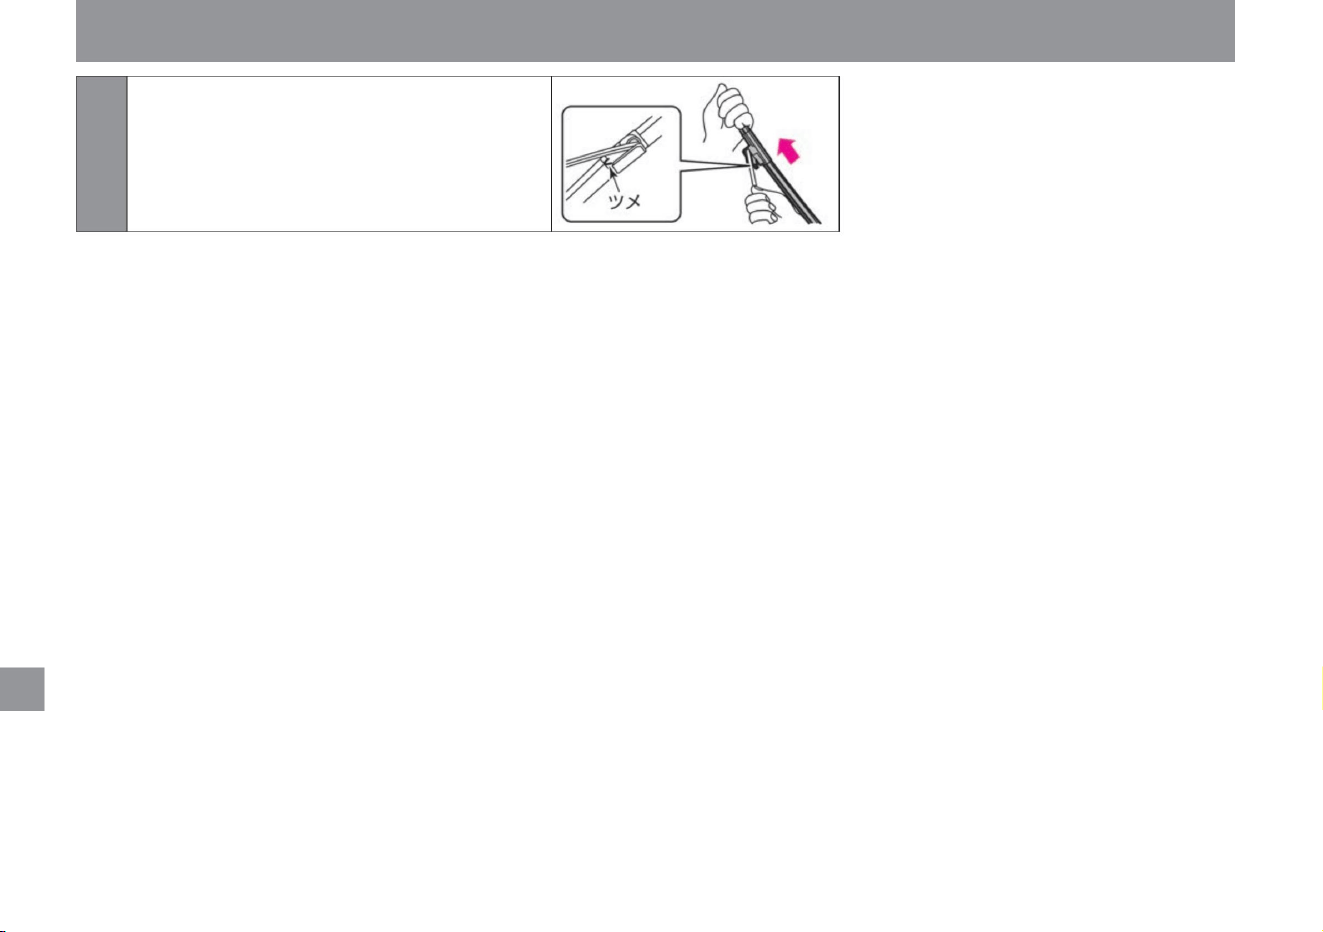
4 Install a new wiper blade. Install the wiper
blade in the reverse order of removal
and make sure that the wiper blade is
securely fastened.
362
maintenance
Inspection and maintenance
MEJ0059X
Machine Translated by Google
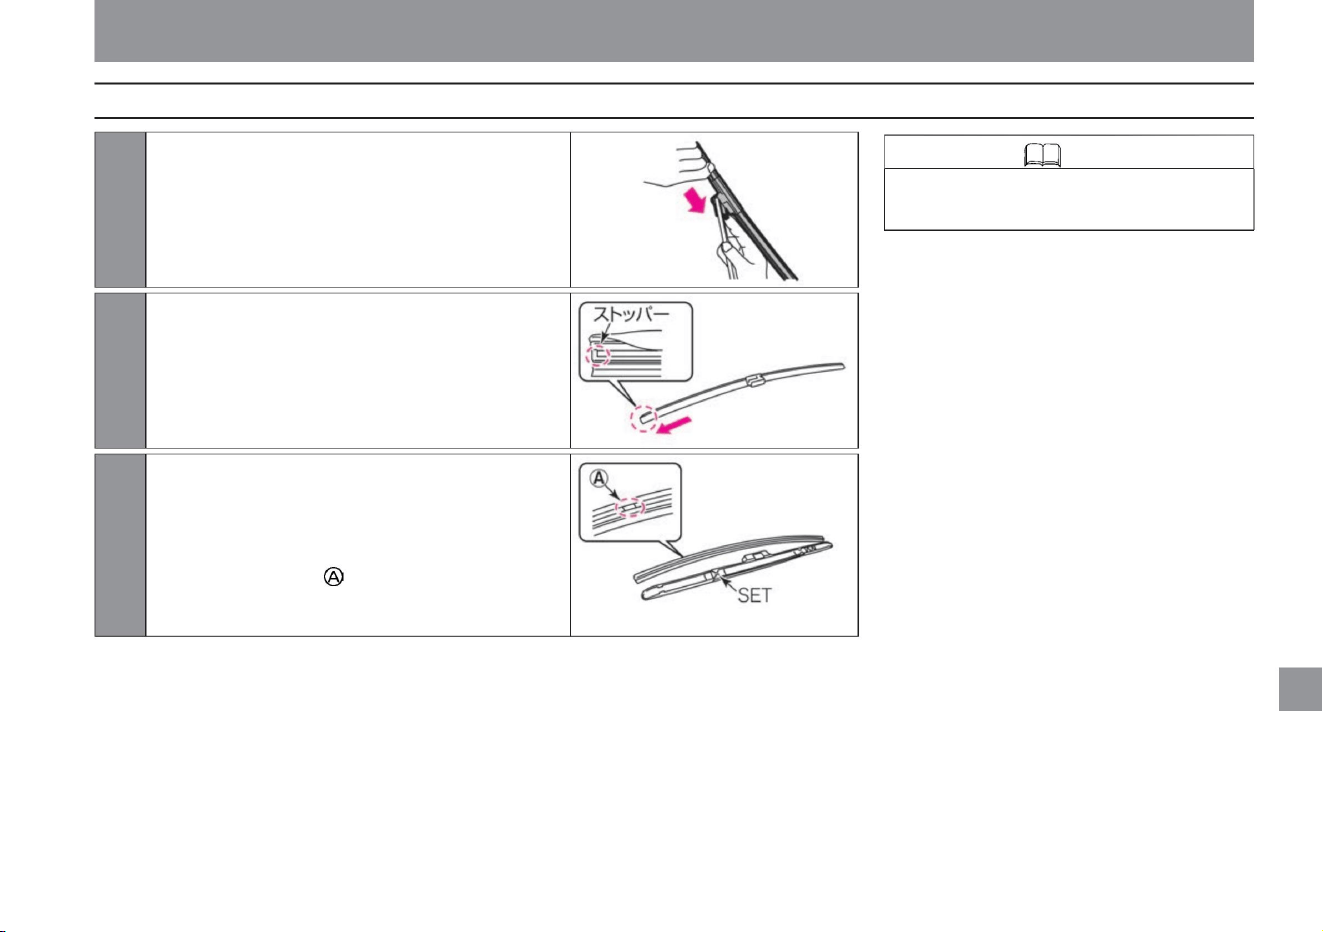
Easier to wear.
Firmly push it in at the “SET” position to fix
it.
1 Remove the wiper blade from the wiper arm.
2Slide the wiper rubber in the direction of the arrow
and remove it.
3 When installing, reverse the removal procedure. •
Insert the wiper
rubber from the non-stopper side along the blade. •
The part of the wiper rubber is
attached to the wiper blade
MEJ0060X
MEJ0094X
MEJ0061X
Inspection and maintenance
• Applying soapy water to the wiper rubber removes it.
maintenance
$/$: Different equipment depending on vehicle model, options, etc.
How to replace the wiper rubber
363
Knowledge
Machine Translated by Google
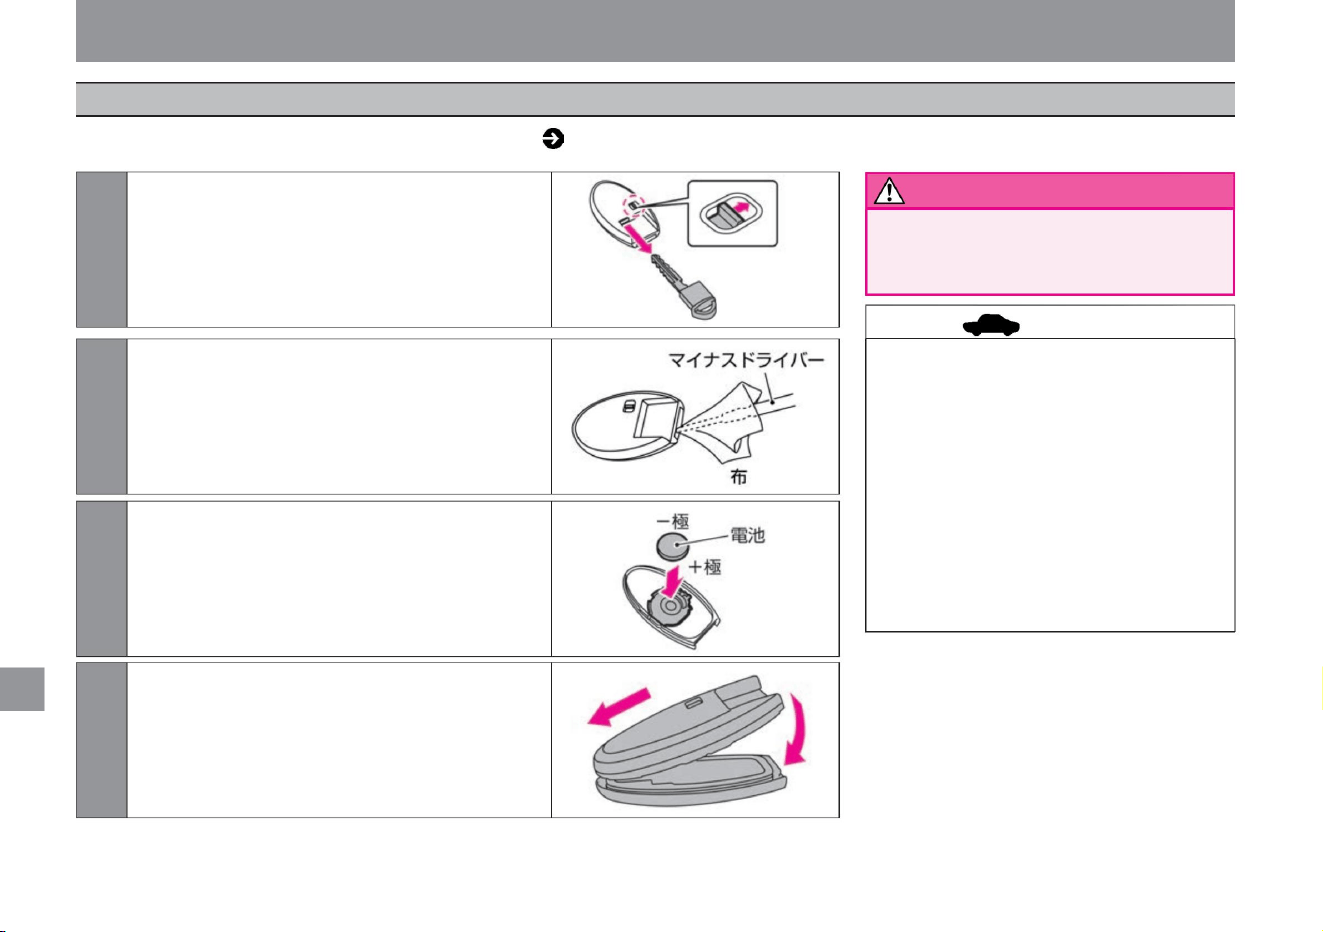
warn
advice
364
Inspection and maintenance
• If you try to remove the cover forcibly to
replace the battery, the key may be
damaged. We recommend that you have
it replaced by a Nissan
dealer. • Do not touch the internal circuits or
electronic terminals. It will be the cause
of the failure.
• After replacing the battery, be sure to check
that each function of the key system
operates normally. If it does not operate
normally, there may be a malfunction.
Please contact your NISSAN dealer.
• Make sure that children do not swallow the
battery or removed parts.
maintenance
4 Assemble the upper and lower covers by aligning
the tips of the covers. Make sure it is
attached securely.
2Insert a slotted screwdriver into the gap and
twist to remove the cover. (Wrap a flat-blade
screwdriver in a cloth so that the cover is
not damaged.)
1While unlocking the back side of the key, pull
out the built-in key (mechanical key).
3 Remove the exhausted battery and insert a new
battery. (Install new batteries with the + pole
facing down.)
Battery used: CR2032
MEJ0103X
MEJ0042X
MEJ0043X
MEJ0104X
If the key switch does not work or if the operation indicator light ( P.92) does not flash, the batteries may be exhausted. Follow the steps below to
replace the battery.
Key (intelligent key/remote control entry system) battery replacement
Machine Translated by Google
• Firmly insert the oil level gauge after
checking the oil. If the oil
level gauge is not inserted all the
way, oil may spurt out and cause a
fire.
• If the battery fluid gets on your skin,
immediately wash it with plenty of
water. The battery fluid is dilute
sulfuric acid. Contact with eyes
or skin may lead to serious injury
such as blindness or inflammation.
• Make sure that the + terminal of the 12V
battery does not come into contact
with surrounding metal. Touching them
may cause a short circuit and cause a
fire. In addition, if the 12V battery
terminals are loosely tightened, the
wiring may overheat and burn,
resulting in a fire. • When replacing the 12V
battery, be sure to replace it with one of
the same size (model) and fix it firmly so that it does not move.
• Securely close the engine oil filler cap.
If the cap
comes off while driving and the engine
oil spouts out, it may cause a fire.
• Failure to properly change the oil may
lead to unexpected accidents such as
engine damage or fire.
• When charging the 12V battery, ventilate
well and keep fire away.
Inspection and maintenance
Notice
warn
Notice
365
12V battery notes
Notes on engine oil
advice
$/$: Different equipment depending on vehicle model, options, etc.
Please read the separate maintenance note
for when to change the
engine oil. For the specified engine oil, please
read the service data ( P.376) at the end of
this manual.
For 12V battery maintenance, please consult
your Nissan dealer.
maintenance
If it is not fixed firmly, it may cause a
short circuit and lead to a fire. For
details, please consult your Nissan
dealer.
The combustible gas generated from
the 12V battery may ignite and
explode.
engine oil
12V battery
Machine Translated by Google
Proper maintenance is important to prevent
discoloration and rust on painted surfaces.
• Completely close the refueling port. How
to close the refueling port ( P.119) •
When using a high-pressure washer, keep a
sufficient distance between the high-pressure
nozzle and the vehicle body. Placing the
high-pressure nozzle too close may deform
or damage resin parts such as moldings,
sealing materials, sash tapes, etc., or
accelerate paint deterioration.
Please remove naÿ. How
to remove the roof antenna ÿ
• Be careful not to injure yourself when
washing the
underside. • Do not wash the inside of the
engine compartment with water or spray
detergent or wax directly.
• When washing the car in an automatic car
wash, retract the door
mirrors. How to retract the door mirrors
(P.114) • When washing the car with a high-
pressure washer, keep a sufficient distance
between
the high-pressure nozzle and the vehicle body. •
Leaving dirt on the painted surface may cause
discoloration or rust. Wash your car
immediately if: – When soot, dead insects,
bird droppings, tree sap, iron powder, coal
tar, etc.
adhere to the vehicle – After driving in coastal
areas or on roads
sprayed with antifreeze – When
the vehicle is extremely dusty or dirty
Rinse off the dirt underneath while
pouring
water. While spraying water, remove the
dirt with a chamois leather or a soft
sponge in order from high to low on the
painted surface. For stubborn stains, use
body shampoo, etc., and then rinse
thoroughly with water.
Wipe off the water so that no specks
remain.
ÿ P.366ÿ
• Remove the roof antennaÿ. • Please store
the door mirrors.
How to retract the door mirrors (P.114)
• When washing a car, if you put your weight
on the car body and push it with a strong
force, the car body may dent depending
on the location.
• When washing the car in cold weather, be
careful not to get water directly on the
brakes. If water gets into the brake system,
it may freeze and make it impossible to
drive.
• When washing the car with a car wash, remove the roof antenna
• Chemical supplies need to be used properly
depending on the application. Please use
the one that suits
your needs. • Do not use organic solvents
such as benzine or thinner, or acid or
alkaline solutions. Doing so may cause
discoloration
or stains. • Do not use hard brushes or
scrubbers. It may damage the painted
surface.
Cleaning/maintenance
It may cause the e-POWER system to fail
to start or malfunction. Also, splashing
water on electrical components is dangerous
as it may lead to vehicle fire due to
malfunction or short-circuiting of
electrical components. When using products
such as water, detergent, or wax, apply
them to a cloth before wiping the engine compartment.
How to wash the car
advice
advice
When washing
when using the washing machine
366
maintenance
Exterior care
Machine Translated by Google
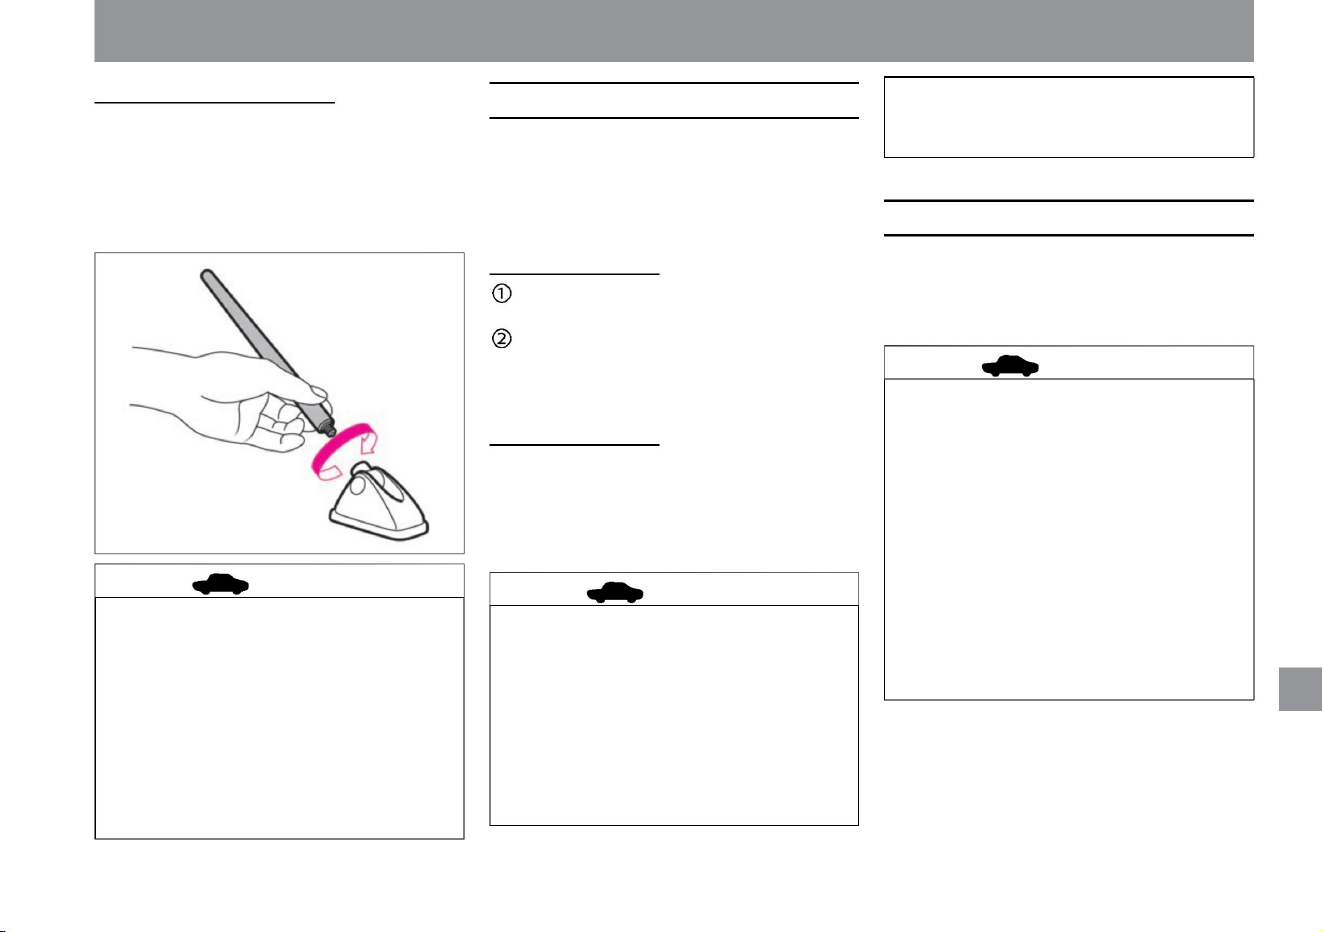
Caring for aluminum wheels
advice
advice
when waxing
advice
367
maintenance
Cleaning/maintenance
MEJ0088X
$/$: Different equipment depending on vehicle model, options, etc.
please don't If there is wax on the surface,
wipe it off with a soft cloth soaked in diluted
neutral detergent.
How to apply wax
• If you wash your car in an automatic car wash,
the brushes may get scratched, causing the
paint to lose its luster or accelerate
its deterioration. • Keep the high-pressure nozzle
away from the door glass. Water may leak
into the passenger compartment.
• When using a high pressure washer, keep the
high pressure nozzle away from the antenna.
The seal may be deformed or damaged.
• Apply wax about once a month or when water
repellency deteriorates. The procedure is the
same for normal painted vehicles, metallic and
pearl painted vehicles.
Remove dirt from the painted surface by
washing the car. Apply wax when the
surface to be painted is cold (around body
temperature or below). Follow the
instructions on the wax
container. How to
choose wax • Use wax that does not contain
compounds (abrasives) and is suitable for
painting. Nissan genuine car wax is
recommended. For details, please consult your
Nissan dealer.
• Do not use wax on resin parts such as
unpainted bumpers and spoilers. It may be
uneven.
• When removing the antenna, hold the base of the
antenna and turn it in the direction of the arrow to
remove.
• When installing, hold the base of the antenna and
turn it in the opposite direction of the arrow to
tighten securely.
• Using wax containing a compound (abrasive)
may cause the painted surface to lose its
luster and water repellency. • Apply wax to
the lens
of the cameraÿ.
How to remove the roof antennaÿ
–Rinse thoroughly as soon as possible after
using
detergent –Do not use hard brushes or
detergents containing compounds
(abrasives)
• Use a sponge soaked in a neutral detergent to
remove dirt. We recommend using a genuine
Nissan cleaner. For details, please consult your
Nissan dealer.
• Please observe the following to prevent
discoloration, stains, and scratches. – Do
not use strong acid
or strong alkaline detergent – Use detergent
when the
surface of the wheel is cold (below body
temperature)
Machine Translated by Google
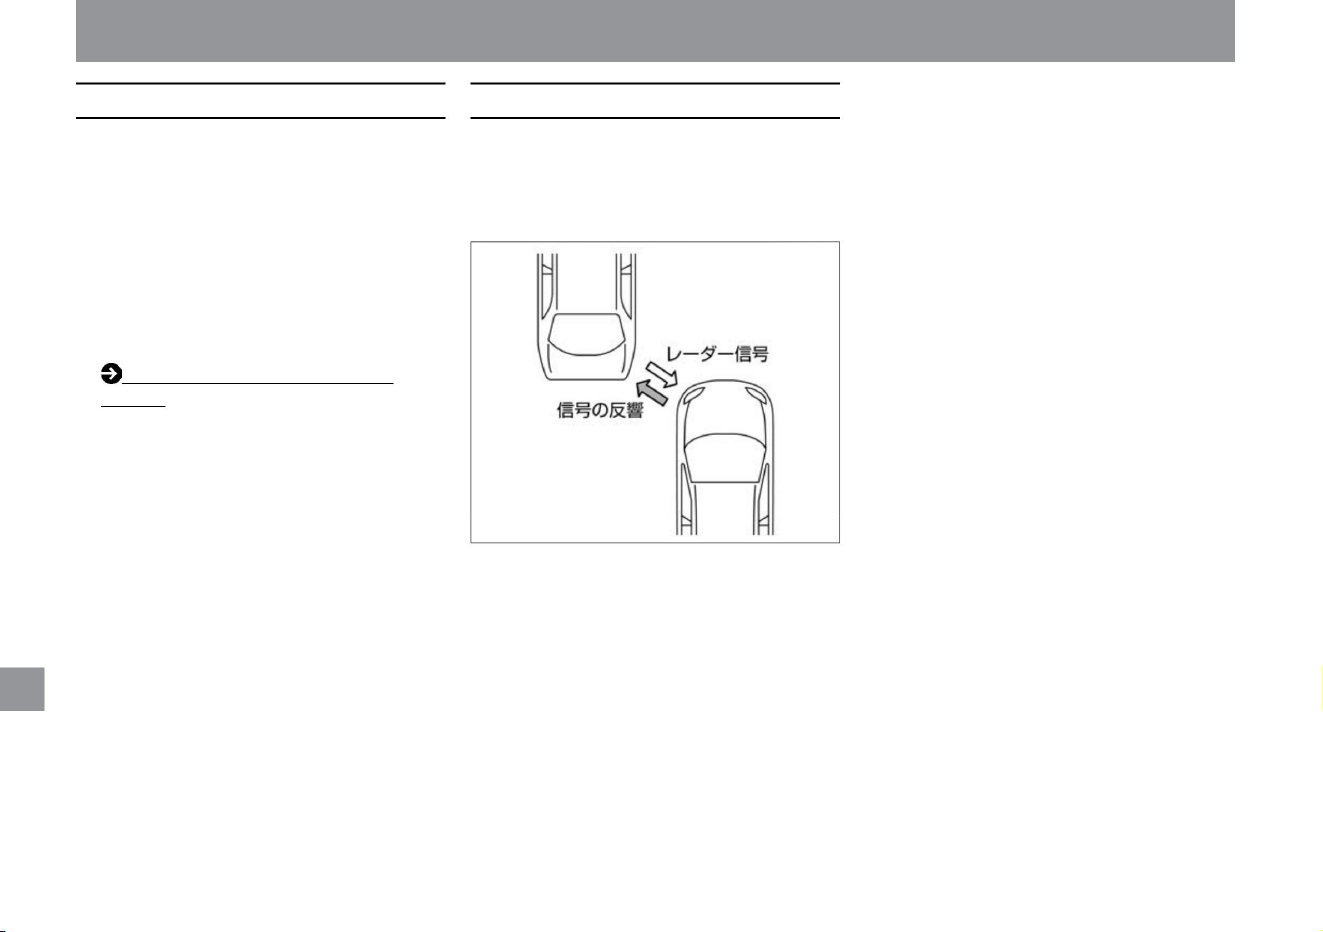
maintenance
Cleaning/maintenance
• Use touch-up paint to repair small scratches
on the paint surface as soon as possible,
except for the areas around the radar sensors
on the front and rear bumpers.
Prevents rust and prolongs the life of painted
surfaces.
A radar signal is generated from the radar
sensor, and obstacles are detected by the echo
of that signal.
Since the bumper has a radar sensor built-in, it
must be repaired with great care. ÿ Radar sensor
mechanism
• Paint repairs, including touch-up paint, are not
permitted around the radar sensors of the
front and rear bumpers. If painting, please
consult a Nissan dealer. Handling the radar
sensor (P.369)
ZEJ0341X
Light repair method
368
bumper repair
Machine Translated by Google
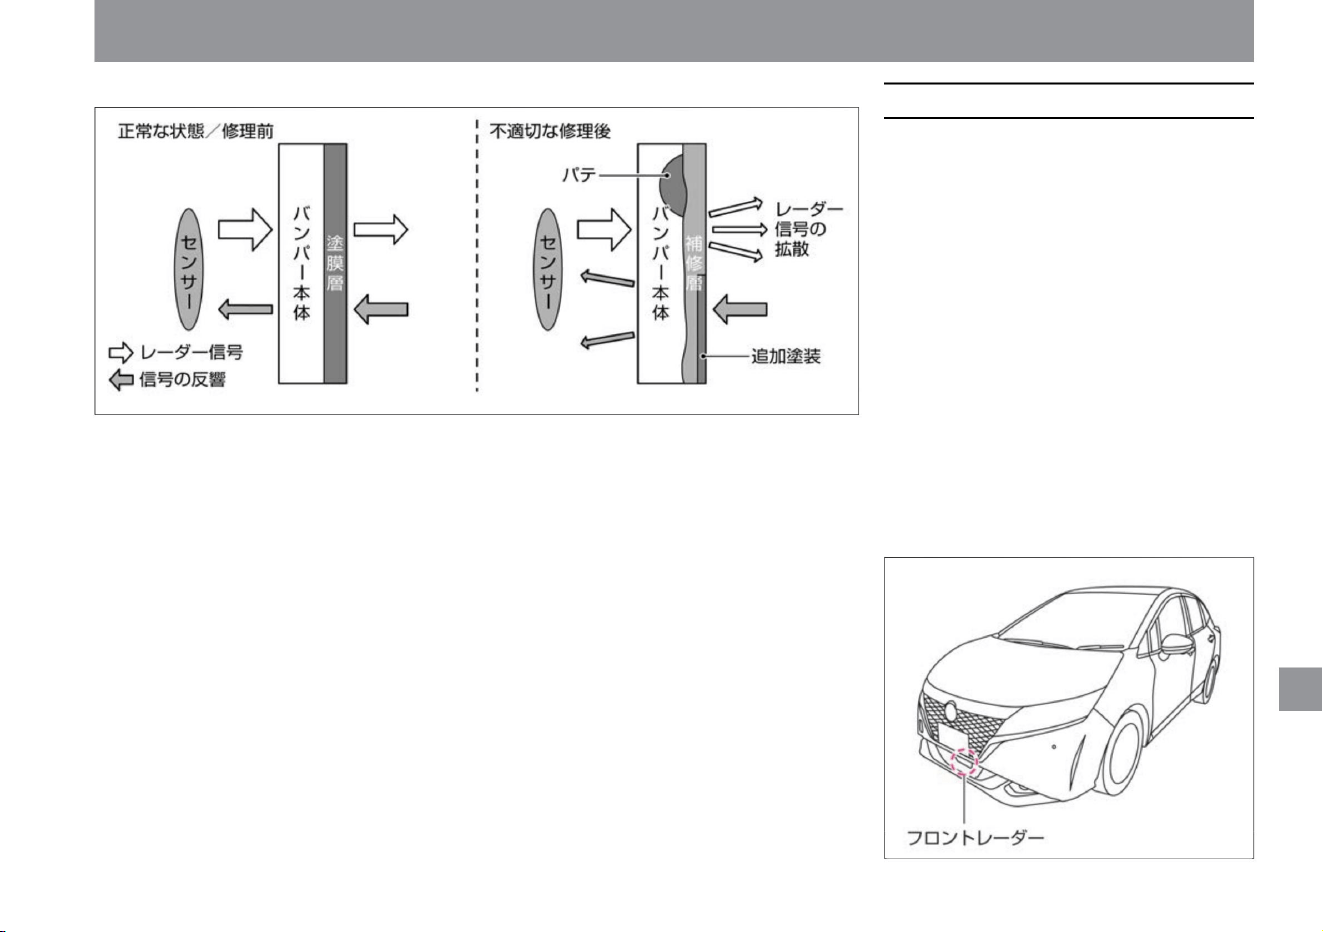
$/$: Different equipment depending on vehicle model, options, etc.
Cleaning/maintenance
Handling the radar sensorÿ
369
– Repair by the customer
– Damage around the radar sensor, bird
droppings, insects, mud,
etc. – Damage around the radar sensor due
to a collision, etc.
• Do not modify, remove, or paint the front and
rear bumpers. When painting, please
consult a NISSAN dealer.
Observe the following to ensure that the system
operates correctly. •
The performance of the radar sensor may not
be fully demonstrated under the following
conditions. Removal of installed parts,
washing, repair or bumper
replacement is recommended. –Stickers
around radar sensors, attachment of
retrofit parts
Inappropriate bumper repairs (e.g. using putty of a different material, additional painting, etc.) can
weaken the radar signal or cause it to not transmit properly, making it impossible to detect
obstacles correctly.
ZEJ0349X
ZEJ0182X
maintenance
ÿ Bumper repair
Machine Translated by Google
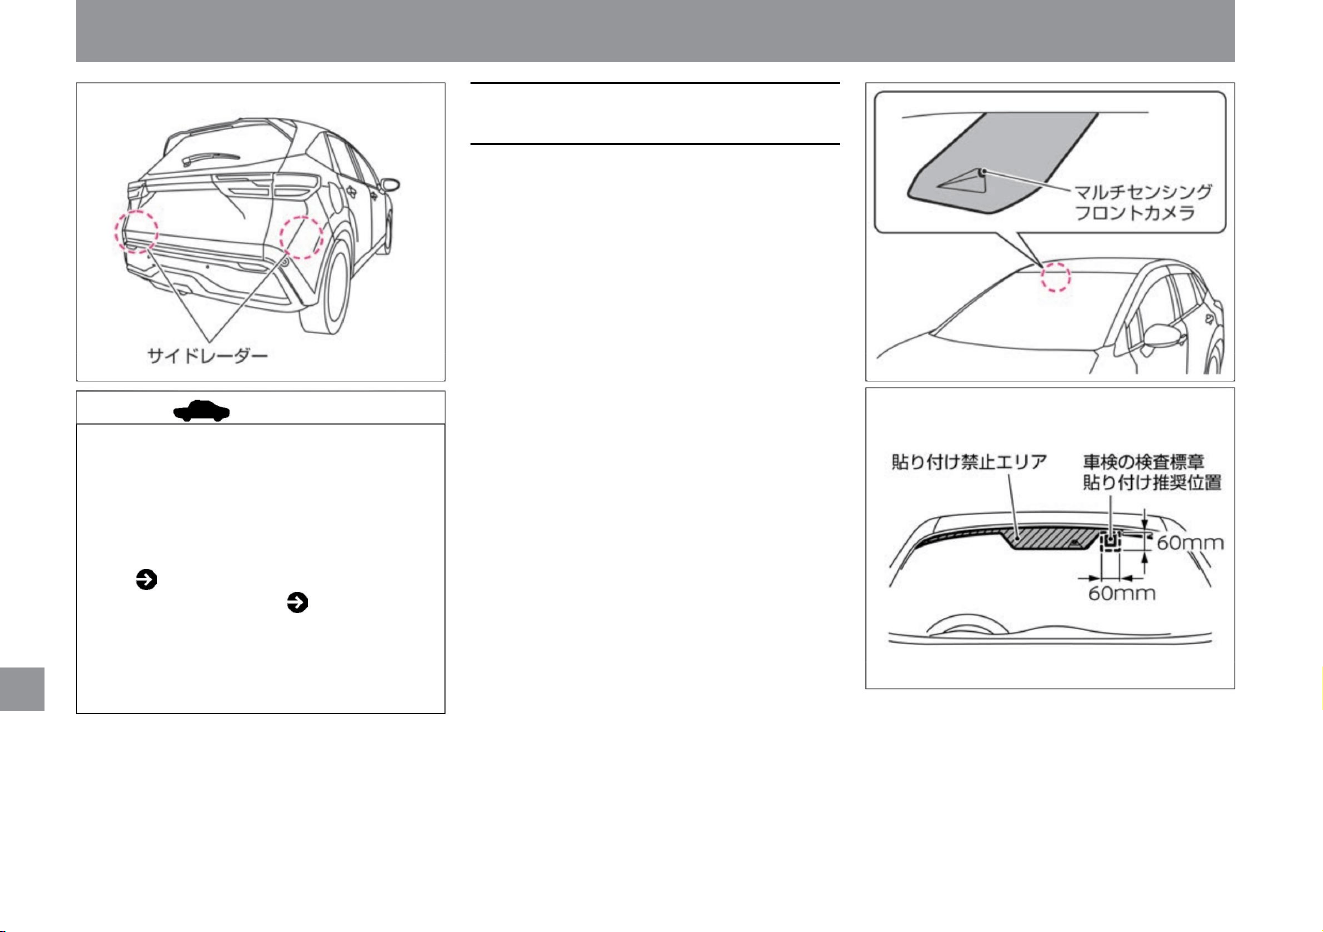
maintenance
Cleaning/maintenance
Observe the following to ensure that the
system operates
correctly. • Always keep the windshield in
front of the camera clean.
Wipe off with a soft cloth soaked in diluted
neutral detergent. Wipe off with a soft,
dry cloth. • Do
not put stickers (including transparent ones)
on the windshield in front of the camera.
• When
attaching the vehicle inspection mark
(sticker) to the windshield, avoid areas
where it is prohibited. The recommended
pasting position is the range starting from
the printed upper corner of the windshield.
• Do not
give a strong impact to the area around the
camera. Also, do not remove the camera.
Failure to do so may result in malfunction
or malfunction. If the area around the
camera is deformed due to an accident, etc., consult a Nissan dealer.
Advice • If
there is snow, ice, mud, etc. around the
front radar, a warning message may
appear on the Advanced Drive Assist
Display. Front radar system stop
warning
( P.324) System failure warning
( P.317) •
Remove the obstructions
around the front radar and drive, and the
system will resume operation. If it
does not restart, please contact your
Nissan dealer.
ZEG0956X
ZEJ0195X
ZEJ0172X
370
Handling the multi-sensing front
camera
Machine Translated by Google
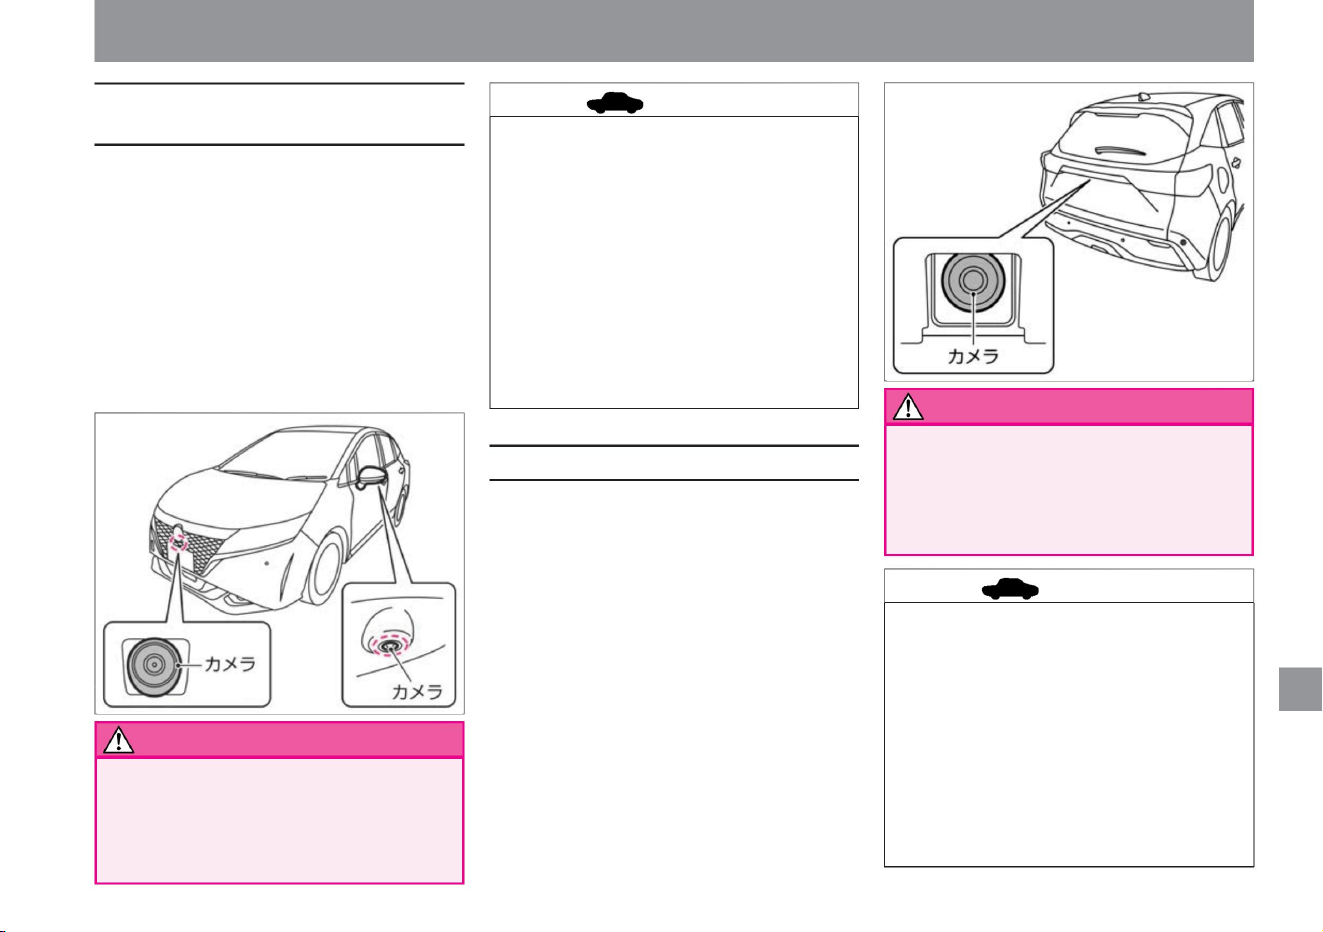
• Do not subject the camera to strong impact.
• Do not subject the camera to strong impact.
• If mud, raindrops, snow, etc. adhere to the camera
lens, the image displayed on the monitor will
deteriorate. Wipe off the dirt with a soft wet
cloth, and then wipe it off with a soft dry cloth.
• If mud, raindrops, snow, etc. adhere to the camera
lens, the image displayed on the monitor will
deteriorate. Wipe off the dirt with a soft wet
cloth, and then wipe it off with a soft dry cloth. •
Do not scratch the camera. The
image on the screen may be affected. • Do not wipe
the camera lens with alcohol, benzene, thinner,
etc. Doing
so may cause discoloration, etc.
• Do not give a strong impact to the area around the
camera. If the area around the camera is damaged
due to a collision, etc., have it inspected by a
NISSAN dealer.
• Do not scratch the camera. The image on the
screen may be affected. • Do not wipe the
camera lens
with alcohol, benzene, thinner, etc. Doing so may
cause discoloration, etc.
ZEJ0184X
ZEJ0183X
Cleaning/maintenance
Observe the following to ensure that the system
operates correctly. • Keep
the area around the camera clean. Wipe off with a soft
cloth soaked
in diluted neutral detergent. Wipe off with a soft, dry
cloth. • Do not attach license plate accessories as
they reflect light.
Since the camera is a precision machine, do
not subject it to strong impacts such as high-
pressure car washing. There is a risk of failure,
fire or electric shock.
Since the camera is a precision machine, do
not subject it to strong impacts such as high-
pressure car washing. There is a risk of failure,
fire or electric shock.
Observe the following to ensure that the system
operates correctly. • Keep
the area around the camera clean. Wipe off with a soft
cloth soaked
in diluted neutral detergent. Wipe off with a soft, dry
cloth. • Do not give a strong impact to the area
around the camera.
If the area around the camera is damaged due to a
collision, etc., have it inspected by a NISSAN dealer.
$/$: Different equipment depending on vehicle model, options, etc.
maintenance
warn
371
advice
advice
warn
Handling of the rear view camera
Handling of the front view/side view
camera ÿ
Machine Translated by Google
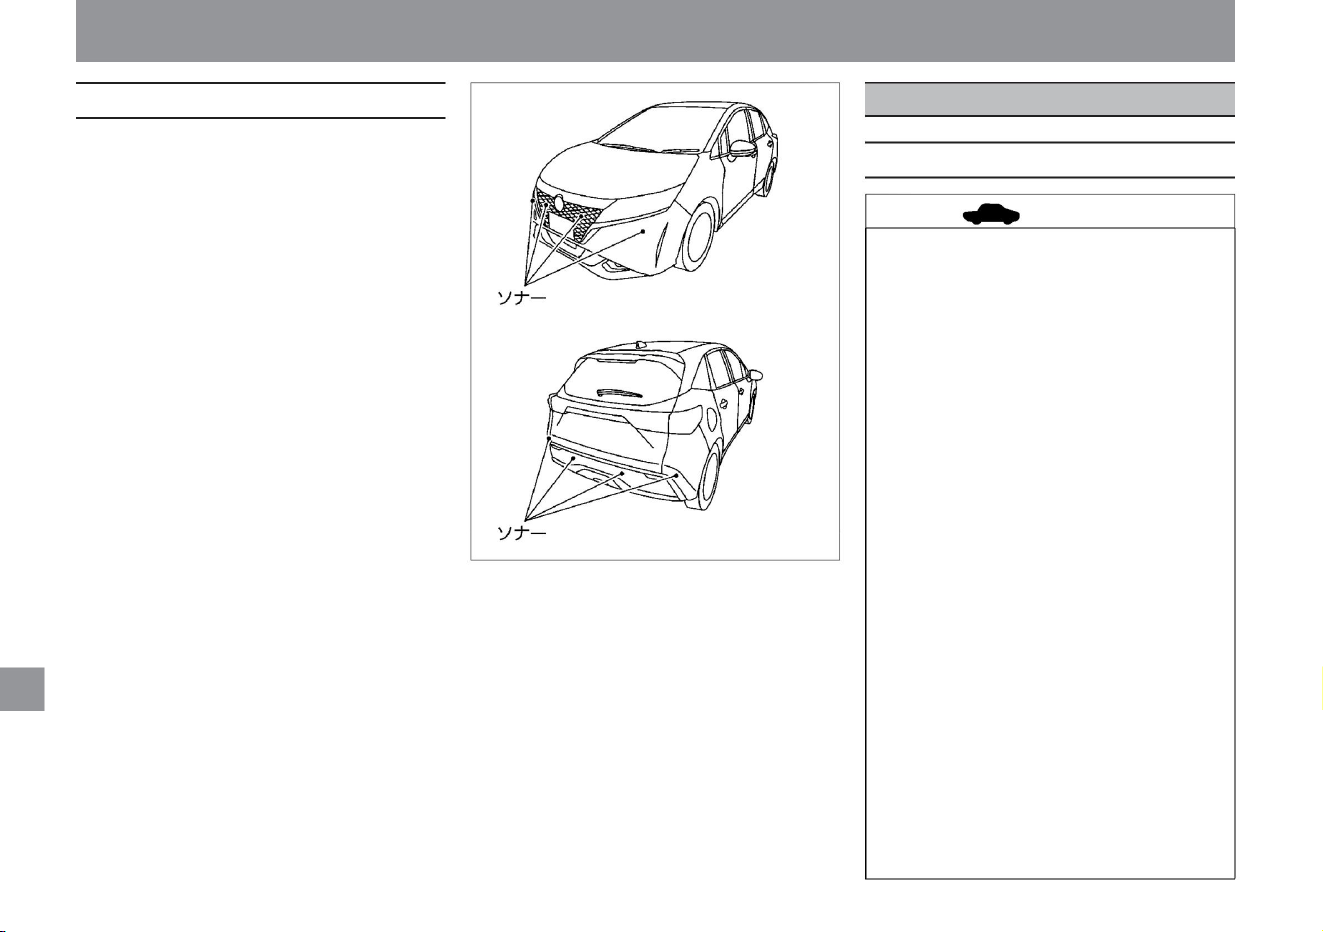
• Do not wipe dry with strong force. Also, when
cleaning with a high-pressure spray gun or
steam cleaner, keep a sufficient distance
from the sonar. It can damage the sonar. •
Do not give a strong shock to
the sonar or its surroundings. Also, do not
remove or disassemble the sonar. Failure
to do so may result in failure or malfunction.
If the mounting part of the sonar is deformed
due to an accident, etc., consult a NISSAN
dealer. • Do not attach stickers
(including transparent ones) or attach
accessories to the sonar or its surroundings.
Failure to do so may result in failure or
malfunction.
when.
If it is dirty, wipe it off with a soft cloth, taking
care not to damage it.
• Do not use chlorine-based (chlorine
dioxide or hypochlorous acid) cleaning
solutions. It may cause paint peeling or
rust. If cleaning (sterilization) is
unavoidable, use ethanol.
• Do not spill deodorants, air fresheners,
cosmetics, sunscreen, etc. from their
containers. Also, do not let hanging-type
deodorants or air fresheners come into
contact with interior parts. Depending on
the ingredients contained, if it adheres
to interior parts, it may cause
discoloration, stains, cracks, paint
peeling, etc. If it adheres, immediately
wipe it off with a soft cloth.
• Do not splash water on the inside of the
vehicle. If water splashes on the audio
ÿ, switches, wiring under the floor, or
electrical parts, they may malfunction.
In order for the system to operate properly,
please observe the
following. • Always keep the sonar clean.
• Do not use organic solvents such as
benzine or thinner, or acid or alkaline
solvents. Doing so may cause
discoloration, stains, cracks, paint
peeling, etc. In addition, various cleaners
may contain these ingredients, so please
check before using.
ZEJ0185X
Cleaning/maintenance
Interior care
maintenance
About interior care
Handling sonar
372
advice
Machine Translated by Google
• Always keep the mirror and camera section
clean. If it is dirty, it may become difficult
to see.
• Do not use alcohol, benzine,
• Use a vacuum cleaner to remove dust, and
use a genuine Nissan room cleaner to
remove dirt. When the floor carpet is
removed, fix it correctly and securely with
the fixing clips so that the floor carpet will
not move when it is replaced.
Floor carpet (P.273)
• Do not use a dry cloth or wet tissue. Doing
so may cause scratches or discoloration.
• Do not wipe with a cloth that
has wax, coating agent, or oil on it. Doing
so may cause discoloration.
• Observe the following to prevent the IR
cut & UV cut coating from being
damaged or
deteriorated. – If the front door glass is
very dirty, avoid opening and closing
the
window glass as much as possible. –
When cleaning, do not use
compound (abrasive) glass
cleaners or alkaline detergents. – Do not
clean with a cloth that has sand on it.
• Soak a soft cloth in diluted neutral detergent
and gently wipe it off. Wipe off with a cloth
soaked in water and wrung out. If it is very
dirty, clean it with a genuine Nissan room
cleaner.
Please use 75% or less. Moisten a dry
cloth with ethanol and wipe the interior
parts. Keep wiping until the ethanol is
gone. Any leftover residue may cause
paint peeling or discoloration. Ethanol
is flammable, so be careful with fire. •
Do not rub or scratch the interior parts
with a hard object. Doing so
may scratch or damage the product.
The inside of the front door glass has an IR
cut & UV cut coating. • When
cleaning the inside of the front door glass,
wipe off dirt as soon as possible with a soft
clean cloth moistened with water or warm
water.
• Remove dust and dirt, soak a soft cloth in
fresh water, wring it out, and then gently
wipe it off. Rubbing with a hard brush,
cloth, or tissue may cause scratches.
• When cleaning the inside of the back door
glass, wipe gently along the heating wire
with a soft cloth moistened with water so
as not
to cut the heating wire. • Do not use glass
cleaners or
detergents. • When cleaning the inside of the
glass, wipe lightly with a soft cloth
moistened with water so as not to cut the antenna wireÿ.
• When cleaning the mirror or camera, wipe
gently with a soft, dry cloth.
$/$: Different equipment depending on vehicle model, options, etc.
Cleaning/maintenance
maintenance
advice
dirt on glass
373
Care for IR-cut & Super UV-cut
insulated green glassÿ
Cleaning of meter surfaces and
other glossy plastic parts
advice
Caring for the Intelligent Rearview
Mirrorÿ
Cloth, stain removal of vinyl leather
advice
carpet stain removal
Machine Translated by Google

maintenance
Cleaning/maintenance
374
Do not wipe the mirror or camera section
with chemicals such as thinner. Doing so
may cause discoloration, deterioration,
or malfunction. If it is very dirty, first wipe
it with a soft wet cloth and then wipe
it with a dry soft cloth. • Always keep the
back door glass in front of the camera
clean. Wipe off with a soft cloth soaked
in diluted neutral detergent. Wipe off
with a dry cloth. If there is an oil film, use
an oil film remover to
clean it. • Do not put stickers (including
transparent ones) on the back door glass
in front of the camera. Appearance Rear (P.4)
Machine Translated by Google

Above 110mm
project
2ÿ9mm
*1: If the brake does not work properly, be sure to have it checked by a NISSAN dealer. Also, adjust the clearance between the brake pedal and the floor plate.
Inspection value
Play
Clearance between the
floor board When the pedal is pressed with a force of about 490 N (50 kg) while the engine
is running.
Please consult your Nissan dealer if you need
Brake pedal*1
maintenance
service data
Inspection value
375
$/$: Different equipment depending on vehicle model, options, etc.
Inspection value/replacement oils and fats
Machine Translated by Google

CBI0009X
service data
In order to keep the performance of your car properly, we recommend using our designated brand.
If you use a brand other than the designated brand, please use the quality equivalent to the designated brand. For
the replacement period, please read the separate maintenance note.
ÿAPI: SPÿSAE: 0W-20ÿ
Application Oil only
change Oil and oil filter change
engine oil HR12DE
3.2
ÿ Regarding engine oil other than the designated brand When
using a brand other than the designated brand, use engine oil that conforms to the following. Grade: Please use API
standard SP. We recommend those with the ILSAC mark.
project
Specified amount ( ÿ ) ÿ1
Viscosity: Use SAE standard 0W-20.
3.4
Designated
Brand Nissan Genuine SP Strong Save X 0W-20
*1: The specified amount is a guideline.
maintenance
376
exchange grease
Machine Translated by Google

maintenance
377
service data
$/$: Different equipment depending on vehicle model, options, etc.
Item
engine coolant
Nissan Genuine Matic Fluid S*5
Nissan Genuine Matic Fluid S*6
Nissan Genuine Brake Fluid No.2500 (DOT3)
Nissan Genuine Windshield Washer Fluid*7
Applicable to the specified amount ( ÿ ) *1
5.7 for the whole vehicle *2
2WD car 3.92ÿ3
4WD car 5.58ÿ3
whole car 1.94
4WD car 0.61
whole car –
whole car 2.0
*1: The specified amount is
a guideline. *2: Includes MAX level capacity (0.8ÿ) of reservoir tank. *3:
Includes MAX level capacity (0.95ÿ) of reservoir tank. *4: Do not add
additives such as commercially available water leakage prevention agents to the cooling water, as they may damage the running motor or inverter. Be
sure to use Nissan genuine super long life coolant. *5: Be sure to use genuine Nissan Matic Fluid S.
Using any fluid other than Nissan genuine Matic Fluid S may damage the gearbox.
Nissan Genuine Super Long Life Coolant *4
Inverter cooling water
Designated brand
Doing so may cause injury.
Gearbox oil Rear final
drive oil Brake fluid Washer fluid
*6: Be sure to use genuine Nissan Matic Fluid S. Using any fluid other than genuine Nissan Matic Fluid S may damage the rear final drive. *7: Adjust
the concentration according to the
outside temperature.
Machine Translated by Google

ÿ
12–21 (amber)
12–5
Car with LED headlamp
12–60/55
W21/5Wÿ
ÿ
12–21 (amber) 12–5
(amber)
car with halogen headlamp
bulb type
H4
12–21/5
Front
Side (fender type) Side (mirror
type) Rear
LEDÿ
LEDÿ
ÿ
Direction indicator and emergency flashing indicator light
12–5
WY21W
ÿ
ÿ
W5W
LEDÿ
WY21Wÿ
Capacity (VW)
W16Wÿ
W5Wÿ
light bulb
headlight (headlamp)
low beam high
beam low
beam high
beam
H4
Front fog light (fog lamp) Rear fog light
(rear fog lamp)
car width light
ÿ
12–16
12–60/55
W5Wÿ
12-5
*: If the bulb does not light up, have it inspected by a Nissan dealer.
WY5W
Vehicle with LED headlamp
Vehicle with halogen headlamp
LEDÿ
LEDÿ
Number
light Brake light/
tail light Tail light (back door
side) High mount stop lamp Reversing
light
LEDÿ
LEDÿ
ÿ
maintenance
service data
Bulb capacity
378
Vehicle specifications
Machine Translated by Google
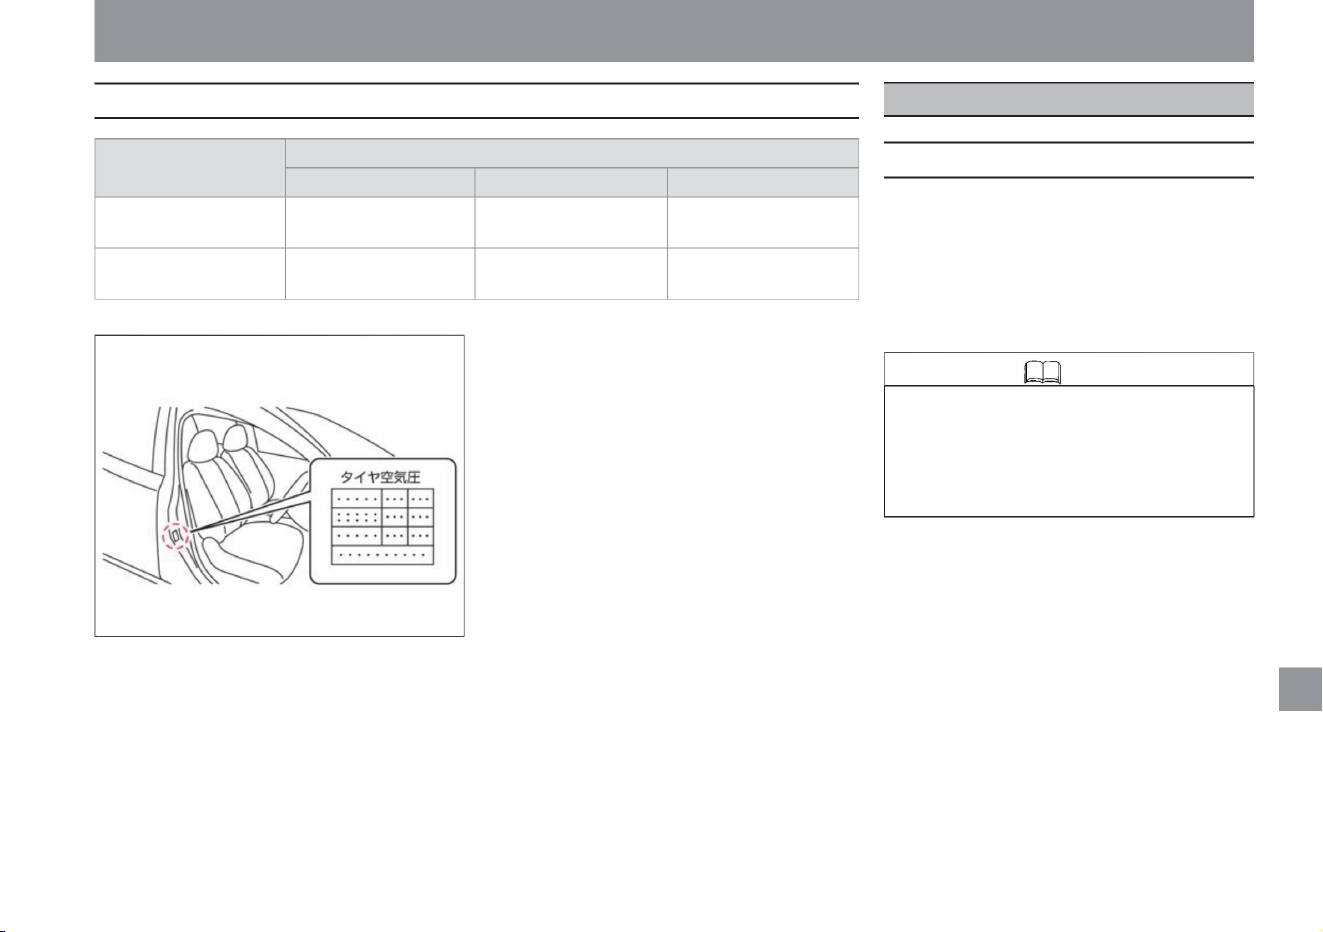
Each computer of the following system equipped
on this vehicle has an event data recorder function.
Each computer in the
system below constantly diagnoses whether it is
operating normally, and records and accumulates
vehicle data such as when the vehicle collides with
the event data recorder.
tire size
road wheel size
50mm
• Unlike general data recorders, the event data
recorder does not record voice such as
conversations. • Personal
information such as name, gender and age will
not be recorded.
15×5.5J
inset
50mm
rim size
(4 holes)
100mm
100mm
16×5.5J
ÿ SRS airbag system When the
SRS airbag system is activated or when a certain
amount of collision occurs, the following vehicle
data is recorded and accumulated.
•Information about the operation of the airbag
system •Failure diagnosis information of the
airbag system •Operation status of the accelerator
pedal, brake pedal, steering wheel, etc.
P.C.D
185/60R16 86H
•Vehicle information such as vehicle speed and engine speed
185/65R15 88H
(4 holes)
Please check the specified air pressure for the tires, which is indicated on the opening of the driver's door.
maintenance
service data
Event Data Recorder (EDR)
MEJ0013X
$/$: Different equipment depending on vehicle model, options, etc.
379
About recording and accumulation of vehicle data
Knowledge
Tire/road wheel size
Machine Translated by Google
Vehicle status recording function
maintenance
service data
Nissan and third parties entrusted by Nissan
may acquire and use the data recorded in the
event data recorder for the purpose of improving
the collision safety performance of Nissan
vehicles.
Nissan and third parties entrusted by Nissan
will not disclose or provide acquired data to
third parties except in the following cases.
•When
there is consent from the vehicle
user • When it is based on a legally enforceable
request such
as a court order when providing to
Nissan and third parties entrusted by Nissan
may acquire and use the data recorded by the
vehicle condition recording function for the
purpose of improving Nissan's vehicle crash
safety
performance. Nissan and third parties entrusted
by Nissan will not disclose or provide acquired
data to third parties except in the following
cases.
•When there is consent from the
vehicle user • When it is based on a legally
enforceable
request such as a court order when providing to
The vehicle condition recording function records and
accumulates the operating condition of the vehicle for
the purpose of quality maintenance. Accurate service can be
provided based on the data obtained from the vehicle status
recording function.
The vehicle status recording function records and accumulates the
following vehicle data.
•Vehicle driving information such as wheel speed
ÿ ProPILOT systemÿ The
ProPILOT system records and accumulates the
following vehicle
data. •Operation status of accelerator pedal,
brake pedal, steering
wheel, etc. •Detection status of preceding
vehicle, lane marker,
etc. •Vehicle information such as vehicle
speed •ProPILOT operation
information •ProPILOT failure diagnosis
information •Multi-sensing front camera image
Information (SRS airbag, when Intelligent Emergency Braking is activated)
Vehicle status recording function
Handling of data
Handling of data
Recording and Accumulation of Vehicle Status
380
Knowledge
• Unlike general data recorders, the vehicle
status recording function does not record
audio or video such as conversations.
Machine Translated by Google

index
381
L
B
1
R
index
AND
N
I
S
T
IN
F
SRS airbag warning light ......................................................... ...
...
...
P.29
P.88
P.53
Eco-driving report .................................. Drive mode
Selector ................................ ...
SPORT mode
RCTA (reversing vehicle detection alarm) .........................................
P.161
ISO FIX lower anchorages for i-Size child
seats .......................................... ...................... ...
P.84
P.271
BSW (rear side vehicle detection alarm) ................................ ...
P.167
O
ODO (Odometer) ................................................ . ..
3-point seat belt with ELR (Emergency Locking) ........P.26 e-Pedal
Step........ ................................................ e-POWER system
P.18
NORMAL mode
SPORT mode .................................................. ..... ...
P.365
P.265
P.52
Tips for improving fuel economy ..........................................
P.162
SRS Airbag ................................................................ ................ ...
EPS (Electric Power Steering) warning light ........ P.55
P.52
ABS ........................................................................... ...
P.55
EDR (Event Data Recorder) ................................ ...
BSW (rear side vehicle detection alarm)
P.235
...
ECO mode
LDW (Lane Departure Warning) ................................... ...
P.51
P.46
SOS call ................................................................ ........................ _
P.121
NORMAL mode indicator...........................
TRIP (trip meter ) ...................................................
LDW (Lane Departure Warning) display ................................ ...
P.231
ABS
P.217
BSW (rear side vehicle detection alarm) display ............. P.85
...
LDW (Lane Departure Warning)
P.51
P.121
12V series charging warning light................................... .........
P.55
P.55
ECO mode ................................................................ ............. _
P.162
P.18
P.124
e-POWER system warning light ...................................... e-
POWER system car was in an accident Precautions
when using ................................................... ........ ...
Precautions for handling the e-POWER
system ........................ ......................................................
When the e-POWER system cannot be started
teeth ................................................. ......................................... ...
P.86
P.55
FCW (Forward Collision Prediction
Warning) FCW (Forward Collision Prediction Warning) ........
Intelligent FCW (Forward Collision Prediction Warning)
display ................................................. ............... ...
P.296
12V battery ................................................................ ............
P.161
P.226
P.161
ABS warning light................................... ................................
P.379
A A/
C (air conditioner) Air
conditioner switch ................................................. .... ...
Precautions when using the air conditioner ..... P.125 Auto air
conditioner .......................................... ................................ ...
Air outlet .................... ........................................................
ECO mode indicator ......................................... ...
SPORT mode indicator ........ Drive mode
selector ........................ ...... ...
P.20
...
USB power socket ......................................................... ...... ...
Please read the "Maintenance Notes". Please
refer to "Automobile inspection certificate".
&1 ÿ&U
Machine Translated by Google

index
IN
Index &V to &U
IN
ah
stomach
hare
(Cornering Stability Improvement System) ..P.170
P.153
Adaptive LED Headlight Indicator Light ............. P.58 Advanced
Drive Assist Display Advanced Drive Assist
Display ........ ................................................. .......... ...
Energy Monitor ...................................... ................ ...
Various setting
screens ................................ ........................................
Warning message ..................... .............................
Vehicle information
screen ............... ..........................................................
Steering switch . ...................................... Power meter ....... ......................................................... ...
VDC warning light................................................ ................................
Alarm (key (intelligent key/remote control entry system
P.156
P.69
P.55
VDC .......................................................................... ...
P.329
P.107
P.226
P.239
Intelligent Emergency
Braking ................................................................ ................... ... Intelligent Emergency Brake Warning Light ....................... .......................................... ...
Intelligent Around View Monitor
Precautions ................................................ About
the Sonar Function ................................ ...................................... ...
Wattage (capacity of light bulb) ................................................ ..... ...
P.217
Intelligent BSI (Rear Side Collision Prevention Support
System) display ................................................ ............
Moving object detection
function ................................................ .. ...
Intelligent Around View Monitor ................................................ ........................................
P.176
P.251
P.64
VDC
P.90
P.367
Intelligent LI (Lane Departure Prevention Support
System)
Outer mirrors (door mirrors) ....................... Adaptive
LED headlight
system ........ ................................................. ................................ ...
P.108
P.150
P.55
P.245
P.60
P.84
P.168
Intelligent Around View
P.231
Illumination Control ......................... Intelligent BSI (Rear
Side Collision Avoidance Support System) Intelligent
BSI (Rear Side
Collision Avoidance support
system) ................................................................................ ... ...
P.251
P.187
P.378
Intelligent DA (sway
alarm) ................................................................ ...................................................... Intelligent FCW (Forward Collision Prediction Warning) ) Intelligent FCW (Forward Collision Prediction Warning) ................................................ ......................................... Intelligent FCW (Forward Collision Warning) display ..... ................................................. ..... ...
Intelligent LI (Lane Departure Prevention Support
System) ................................................ .........................
Intelligent LI (Lane Departure Prevention
Assistance System) display ............................. ................ ...
P.85
P.61
P.379
Stop sign detection .................................................. ....... ...
moving object detection
function ................................... ................... ... Event
Data Recorder (EDR) ................... ...
Immobilizer (Anti-theft device) Immobilizer (Anti-theft device) ........
P.92
P.61
Brake display ......................................................... ..............
P.252
VDC OFF indication light................................... ... ...
P.373
monitor
P.180
P.201
P.114
P.58
P.60
P.312
Intelligent emergency
P.242
)) ................................................................ ...........................................
Caring for Aluminum Wheels ........... ......................................
Answerback function ...................... ................................. ...
Intelligent rearview mirror Intelligent
rearview mirror ........ Cleaning the intelligent
rearview
mirror ...................... ................................................. .... ...
Inner mirror (rearview mirror) .................... ...
Intelligent Cruise
Control ................................................................ ..................................... How to deactivate Intelligent Cruise Control ..... ................................... ... steering switch ............... ................... ... intelligent trace control
P.254
P.48
Turn signal (direction indicator) ................................ ...
P.86
Intelligent auto light system (interlocked with front
wipers, twilight detection with "Omoiyari Light"
function) ..................... Intelligent cruise control
Intelligent emergency braking
P.85
382
Machine Translated by Google

index
Please read the "Maintenance Notes". Please
refer to "Automobile inspection certificate".
o
index
workman
tree
power
P.121
P.15
...
P.149
P.371
P.354
P.89
SRS knee airbag system (driver's
seat) ................................................ ...................................... ...
SRS airbag warning light .......................................... ...
P.35
P.364
P.356
oil .................................................. ..........................................................
Before performing emergency
repairs .......................... ......................................................
Audio Audio ..... ................................................. ..... ...
Steering switch ................................... ... Roof
antenna ................................................. ... Auto ACC function ......................................... ...............
P.332
Energy monitor ................................................................ ... ...
emergency stop signal .... ... engine engine
oil ........................ ..............
P.92
P.167
Auto air conditioner ................................................ .. ...
Auto brake hold Auto brake
hold ...................................... Auto brake hold
indicator light . ........................
P.127
P.353
P.284
P.51
Inspecting the spray condition of the
washer ................................................ When you get
stuck ............................................. when driving
Precautions ......................................... Preparations before operation ......... ................................................. ....... ...
P.263
auto air conditioner
glass antenna ......................................................... .......... ...
Handling in cold weather ................................ ........................
camera
P.127
P.355
Window glass (power
window) .................................................. ................................................... Welcome light function (with farewell function) .. ................................................. .................................. Warning (warning light) ........ ................................. Washer Washer fluid (specified amount) ....... ................................ Replenishing the washer fluid ................................ .............
P.142
P.245
P.23
P.55
P.55
SRS airbag system (front seat) ............. ...
P.332
air conditioner
P.159
P.64
Auto-levelizer ................................................................ ...
auto-lock function ................... ...
overheating ............ ......................................................... ...
When the overheat warning is displayed..................P.332
P.121
P.69
P.116
P.29
ECO mode setting ................................................................ ..............
P.124
P.371
airbag system
P.376
Precautions to be taken when carrying a child ............................
P.37 Odometer (Total distance meter) ....................... ........
Voice-activated display .................. .................................. ...
P.121
P.58
Camera system ......................................................... .............
P.118
P.31
SRS curtain airbag system ............. ...
P.54
P.92, P.96, P.97
P.371
Washer switch ................................................ ...
Side view camera ................................................
Front view camera . ................................................
Multi-sensing front camera ......... ... P.370 Rear view
camera ...................................................... .... ...
P.366
P.136
P.33
Air conditioner switch ................................................ ...
Precautions when using the air conditioner ............ P.125 Auto
air conditioner .......................................... .................. ...
Vent ........................ ................................... ...
P.278
P.92
P.34
SRS side airbag system (front
seats) ................................................ ................................................ ...
P.162
P.128
P.376
P.365, P.376
Checking and replenishing the engine oil level ..............
Engine room ..... .........................................................
Engine room When steam is coming out of
the ...................................... Power
switch ....... ................................................... Hood
(Bonnet) ................................................... Engine
type .......... ................................................. ........ Engine
running condition, abnormal noise check ........................... ...
P.132
Key
Key (Intelligent Key/Remote Control Entry
System) ......... P.92 Key (Intelligent Key/Remote Control Entry
System) Precautions ......... ................................................ ...
key (intelligent key/remote control entry system)
battery
replacement .......................................................... ................................ ...
P.128
P.22
Ambient temperature gauge ................................................ ........................
Regenerative braking ....................... ................................................ ...
Exterior Care ................................................ .......... ...
key .................................... ................................................. ...
various setting screens ................................................ ...................... ...
Gasoline ........................ ................................................. . ..
CUP HOLDER .................................................. ..............
SRS Airbag ................................................................ ...... ...
P.93
383
&U ~&Ki
Machine Translated by Google

index
P.55
...
Tools ................................................ .........................................
rear seat .......... ................................................. ........ ...
P.340
P.55
...
P.260
P.373
P.262
P.378
P.312
P.380
P.149
P.296
P.38
About towing ................................................................ .......... ...
inspection mark ................................ ......................................................
P.269
P.348
P.149
P.17
Rear seat ......................................................... ............. ...
Front seat ...................................... .........................................
Child seat ......................... ................................ ...
P.357, P.379
Care .......................................................... ................... ...
P.217
P.378
P.329
P.106
P.235
switch ................................................. ................ ...
P.260
P.364
Mechanical key ......................................................... ... ...
P.54
P.378
P.27
P.296
Service data (vehicle specifications) .........................
Speed limit sign detection ....... ............................................. ...
maximum speed
Labeling ................................................................ ........ ...
side mirrors (door mirrors) .................... ... side
radars . ................................................. ....... ... Sun visor ...................................... ................................ ...
P.274
P.170
Seat belt
Key (Intelligent Key/Remote Control Entry System)
Function/How to
use ................................................ .........................................
When the battery runs
out ................................ ........................ How to
replace the battery ........................ ................... ...
mechanical key ................... ............................... Key-linked interior lighting ............ ................................................ ...
P.340
Air pressure (tires) ................................
Defogging
Defroster switch ... ................................. Rear
window defogger
switch ......... ................................................. ................................ ...
horn ...................... ..................... Clearance lamp (car width lamp)
P.51
sheet
P.242
P.312
P.263
P.18
...
P.349
P.280
P.378
P.114
P.340
P.55
P.92
P.101
P.262
P.366
P.302
P.349
Heated seat ................................................................ ... ...
P.28
P.103
Cruising range display ................................................................ .............
Rear side vehicle detection warning
(BSW) ................................ .. ... Rear and Side Collision
Avoidance Assistance System (Intelligent
BSI) ..................................... ...............Reversing vehicle
detection
alarm (RCTA)................. .........Reversing lights Bulb
replacement ..................................... ...... ... bulb
capacity ................................... .... ... HIGH VOLTAGE
COMPONENTS ....................................... ............... ...
Malfunction Warning Light
(MIL) ........................... ........................................
Troubleshooting ........................ ...................................... Console pocket ....... ......................................... ... Console Box .... ................................................. ...
Bulb replacement ........................ Bulb ( valve)
capacity .................................. car
care ................................................. ............ How to use
the glove box ........................................... ...
Warning light ................................................ ..................................
When the warning light comes
on ....... ................................................... Warning
message ......... ................................................. . .. When
a warning message is displayed ........ When an alarm sound (buzzer) sounds ........ .... ...
P.226
P.330
Seat belt warning light .......................................... .. How
to wear a seat belt ........... ...................................... In
the event of an accident .................. .................................
Interior light ............ ................................................. ................ ...
Won't start ................................... ................................................
How to start ..... ................................................. ........ ... In-
vehicle
tools .......................................... ...................................................
Chassis control ......... ................................................. .... ...
Lane Departure Warning (LDW) .......................................... .........
Lane Departure Prevention Support System
(Intelligent LI) ......................................... ...............................
Jack Storage
area ............ ................................................. .. ... Car
width
light switch .................................. ........................
Replacement of light bulb
(bulb) ............................ ...................... ... Bulb
capacity .................... ................... ... vehicle
type ................................ ................................................. ....... ...
Vehicle weight ...................................... .............................................
Vehicle specifications . ................................................. ....................... Vehicle status recording function ......................... ................................ ...
P.349
P.378
P.278
P.132
P.294
P.294
P.330
P.217
P.103
P.226
P.369
Ke
Index & key & key
unit
nine
Si
384
Machine Translated by Google

&C ~&So
index
Forward Collision Prediction Warning (Intelligent
FCW) ......................................................... ................................... ...
P.101
P.69
Ready-to-run indicator light ........................................... ........
Driving support function
screen ............................ ................................ ... driving
assistance group ................ ....................................... ...
Ride time alarm .... ................................................. .. ...
How to drive ........................................... ................................ ...
Traction motor ........................ ...................................... ...
speedometer (speedometer) ... ........................ speed sign ........ ................................................. ............
P.96
P.51
P.378
P.242
P.55
P.269
switch ................................................. ................ ...
P.97
Drive mode selector .................................. Trip
selector switch ................................ ................ ...
P.162
P.51
P.335
P.55
Back door opener switch ................................ Power
window switch ......................... ... ... power
switch ................................................... ........ ...
P.340
P.340
P.68
P.60
Heated seat switch .....................................
Emergency flashing indicator light switch
(hazard switch) ..... ................................................. ............. ...
fog light switch ................................. ... ...
P.340
P.378
P.25
P.330
Bulb replacement ........................ Bulb ( valve)
capacity .................................. ...
P.68
P.176
P.265
P.269
When submerged in water ........................................................... ..............
How to wash the
car ................................................................ ................................
Headlamp
switch ......................................... ...............................................
Replacement of light
bulbs ........................................ Bulb
capacity .. ......................................... Advanced Automatic
Accident Notification System Advanced Automatic Accident
Notification System
System ................................ Front
seat ................................ ................................................. ...
center console box ................................... ... front fog lamp switch ..... ................................................. .......... ... Replace the light bulb (bulb) ................................ ........ ... Bulb capacity ..................................... ...... ...
Vehicle information screen ................................................ ...................
vehicle dimensions .......................... ................................................. ...... ...
Vehicle Proximity Alert System Warning Light ........ Vehicle
Proximity notification
device ................................................................ ...... ... How
to jump start .................... ... Output Restriction indicator
light ................................................................ ........ ... Riding
capacity ........................ ................................................. ...
Precautions for those using a cardiac pacemaker,
etc. .................................................. no entry sign detection .. ................................................. ...
P.378
P.121
P.86
P.149
P.51
Steering (steering wheel) ................................ Steering
switch Advanced drive assist
display ... ................................................. .................................
Audio ................................ ...................................................
ProPILOT .......... .....................................................
steering wheel heater ..... ...................................... ...
speedometer ... ............................ Small lamp (car width
light)
P.149
P.99
P.69
P.157
P.378
P.116
P.164
Brake lights (brake lights) About
the brake lights (brake lights) in SPORT mode and
ECO mode .............
P.60
Switch operation EV
mode switch ................................
Illumination control
switch ............. ................................................. ................................ ...
P.137
P.330
P.61
P.146
Air conditioner switch ................................................ ...
Auto brake hold switch ............... P.142 Steering switch
(advanced drive assist display) ............... Steering
switch
(audio ) ................................................................ ............................. Steering switch (ProPILOT) ............... ................................................. .......... ... Steering heater switch ............... ... Defroster switch ........ ................................ ...
P.149
P.132
P.269
P.58
P.340
...
P.366
P.262
P.299
P.128
Door handle switch .................................. ...
P.106
P.90
P.156
P.171
P.176
P.114
P.231
P.165, P.166
Bulb replacement ........................ Bulb ( (valve)
capacity .................................. safety shield
indication ..................................... Settings
(Meters) ..... ................................................. .. Select
lever .................................................. ............... ...
P.8
P.15
P.128
P.158
P.157
Headlamp levelizer switch ..... P.156 Directional indicator
switch ..................................... .......... ... light
switch ................................... ............... ... rear
window defogger
switch ...................... ................................................. .... ...
wiper/washer switch ............ ...
P.83
Door mirror switch .................................. Door
lock switch .. ......................................... ...
index
vinegar
SE
So
385
Please read the "Maintenance Notes". Please
refer to "Automobile inspection certificate".
Machine Translated by Google

index
door
Index & so ~&to
tsu
rice paddy
Te
P.99
tire chain ................................................ ... ...
Electric power steering warning light ................................ ...
Chi-
Ticket Holder ......................................................... ......
Charge mode EV
mode switch ................................................ ........Charging
mode ........................................ .......... ... charge
mode indicator ................... ... child
seat .... ................................................. .. ... Child seat
compatibility table ................................ . .. CHILD SAFETY
DOOR LOCKS ................................ ...
P.38
P.162
P.357, P.379
Door
Door ................................................................ .........................................
When the door does not open .......... ................................ ...
P.372
P.332
P.55
P.375
P.114
Door handle switch .................................. ...
P.367
How to replace the
battery ........................................................ ....... ...
Electrically retractable door
mirrors .................................... ....... ... Electric
parking brake Electric parking brake ........................
Electric Parking brake warning light ............Electric parking brake precautions ............P.141
When replacing tires/wheels ............ Tire/road wheel
size ............ Emergency tire repair
Kit ................................................
P.147
P.378
P.98
P.58
P.97
P.69
switch ................................................. ................ ...
Tail lamp indicator light ........................ ................ ...
Replace the light bulb (bulb) ................................ ............... ...
Bulb Capacity ............................... ............. ... Let go
warning light ................................ ................................ ...
Defroster switch ........... ......................................... Replace
the light bulb (bulb) .......... ...................................... Bulb
capacity .... ........................................... About inspection
and maintenance ................................................. ... ...
power sockets ................................................ ..................
Inspection values/replacement oils and
fats ........ ................................... Electronic shift warning light ............ ......................................... ...
P.165
P.22
P.96
Door mirror ................................................................ ................... ...
Door mirror heaters ...................... ........ Door lock
interlocking retraction function ........ ..................
Inspecting lighting, blinking, dirt, and damage of
lighting devices (lamps) ........ ................................................. ... ...
anti-theft device (immobilizer) .... ...
clock .... ................................................. ........................
drive computer ...................... ........................ Drive Mode
Selector .................... ............. ... Troubleshooting
Tire position change
(rotation) ................................................................ ................................. Tire pressure ............ ........ Tire inspection items .................. ....................... ... Punk ...................... ................................................ .. . Winter tires ................................................................ ........ About the correct driving posture ............................ ..............
Caring for Aluminum Wheels .........................................
Incoming call
indicator ................................................ ............................
How to park ........ ................................................. Tilt Telescopic steering ......................... P.106
P.165
P.284
P.147
P.55
P.275
When the 12V battery is dead.................. P.297 When the unit
overheats.................................. .... ...
P.208
P.87
...
P.359
Periodic inspection ........................................... .................................
How to stop ........ ................................................. ... ... how
to stop ................................................... ................... ... Low
water temperature indicator
light ....................... ............................................... Low-speed
acceleration suppression
function ................................................. ... ...
Low-speed collision mitigation brake function ................... ...
Constant speed control Function (Intelligent Cruise Control) ................................................ Taillight )
P.114
P.340
P.98
P.294
tire
Sonar
Sonar .................................................. .......................... ...
Sonar Settings ................... .................................................................
Sonar Handling ................................................ ...
P.58
P.364
P.115
P.53
P.53
P.197
P.134
P.330
P.88
P.115
P.41
P.208
P.360
P.55
P.340
P.348
Door lock switch ................................................ ...
When the door cannot be opened from inside
the room (child safety door
lock) ...................................... ........................................... ...
back door .. ................................................. ..............
P.357
P.379
P.139
P.48
P.55
P.149
P.96
P.88
P.358
P.62
P.360
P.284
Call Indication ................................................ ................................................... _
P.378
P.270
386
Machine Translated by Google

& D ~ & H
index
Power switch ......................................................... .......... ...
power meter ................................... ................................. When
you get a flat tire .................. ...................................................
number light
P.274
head lamp ................................................ ....... ...
Map lamp ....................................... ..................
Luggage lamp .................................. ...................... ...
P.340
Rearview mirror (rearview mirror) ........................
P.106
P.15
P.302
P.340
P.279
P.269
P.149
High-beam assist ................................................ High
- beam assist indicator light . ...................................................
High mount stop lamp Bulb
replacement ... ..................................... Bulb
capacity ..... ................................... Hazard switch
(emergency flashing indicator
switch) .. ................................................. ................................................
Anti-Pinch Mechanism
Power Window ..... ........................................
Flare ...... ................................................. ...................... ...
back door
P.340
If you cannot start with the key (intelligent key/remote
control entry system) ............................. ... ... When
the warning light comes on ................................... ...
When a warning message is displayed ... P.312
When an alarm (buzzer) sounds ... P.329 When the output limit
indicator is on When the light is on ............... P.302 When the
camera is submerged in
water .......................................... ........................
When the light bulb burns out ........ ... when the door
won't open ................................... ... a flat tire
when ............................................. ... When the fuse
blows........................ When the indicator light comes
on.. ......................................................... When the
window glass becomes fogged ..... ......................... If
you get stuck in snow or mud ............. P.334
P.260
Fuel consumption information
display .................................. ......................... Points to improve
fuel
efficiency ..................................... ..... ... Fuel Fuel
Gauge ....................................... ...................................
Fuel tank capacity ......... .................................................
Fuel filler ... ................................................. ....... ... Remaining fuel warning light ................................... ...................... ...
P.378
P.117
P.336
P.116
P.296
P.260
battery saver
P.372
P.330
switch ................................................. ................ ...
Replace the light bulb
(bulb) ................................ ............... ... Bulb Capacity ............................... ..............
P.378
P.335
P.99
when ................................................ ...................... ...
P.284
P.15
switch ................................................. ................ ...
P.151
P.55
P.145
will not open ................................................ ................. ...
back door ............................ ......................................
Back door opener switch ....... ..............
P.117
Room lamp ......................................................... ....... ...
P.62
P.340
P.119
P.61
P.8
When the 12V battery is dead........P.297 Checking and
replenishing the battery fluid level........ ............. ...
P.295
P.99
P.378
Motor for power
generation ................................................................ ........ ...
vanity mirror ........................ ............................... Replace
the bulb (bulb) ............... ................................. Bulb
capacity ......... ........................................ Power window
anti-pinch mechanism .... ................................................
Power Windows ..... ...................................................... Power windows do not work properly
Lithium - ion battery ...............................................
P.118
P.378
P.149
P.107
P.51
P.260
P.139
P.149
P.284
P.58
P.340
Parking brake (Electric parking
brake) ................................................ ...................... ...
displacement ................... ................................................. ................... ...
High beam assist
P.20
Bulb replacement ........................ Bulb ( valve)
capacity ................................ ...
handle ... ................................................. ........................
P.132
Trip meter (distance distance meter) ................................ ...
Take off ................................................ ................................ ...
battery
P.294
Daily inspection .................................................. ................................. ...
To get along well with Nissan e-POWER ... ..... P.20
Caring for the interior ................................................................ ........ ...
number light (number light)
P.310
P.51
P.117
Heated seat ................................................................ ............. _
vegetable
index
Ne
hi
D
387
Please read the "Maintenance Notes". Please
refer to "Automobile inspection certificate".
Machine Translated by Google

index
centre
Index & H ~ & H
Ho
He
P.156
P.242
P.151
How to connect the booster cable ............... Hood
(Bonnet) ...................... ........................ Fog lights
P.86
P.175
P.310
P.119
switch ................................................. ........................
Replacement of the light bulb
(bulb) ........ ................................ ... Bulb
capacity ..................... ................... ... Tail light
switch ...................... ......................................................
Replacement of light bulbs ... .....................................
Bulb capacity ..... ........................................ When the fuse
blows
out ...... ................................. Road sign detection
function Stop sign detection ........ .....................................
Speed limit sign detection ...... ...................................... ...
Do not enter sign detection .... .................................................
Traffic sign detection
function ... ................................................. .. ... Precautions
regarding the sign detection function .. ... Indicator
light .................. ................................................. ........ When the indicator light comes on ............................ ............... ... Hill Start Assist ........................ ............... ...
Floor carpet ................................................................ ..... ...
P.58
P.340
P.105
P.149
Air outlet ......................................................... .....................
Collision Prevention Assist for Pedal Misapplication
P.118
Headlamp How
to turn off the automatic lamp
P.157
Inspect direction indicators for lighting, blinking,
dirt, and
damage ................................................ ........................................... ... security device Immobilizer (anti-theft device) .............. ...
headrest
P.58
P.208
na ................................................................ ...................... ...
P.208
P.68
P.349
P.242
P.340
Rear seat ......................................................... ............. ...
Front seat .......................................... ................................. ...
P.378
Heated door mirrors .......................................... ... Emergency
How to stop ................................................................... ...... ...
flashing emergency light
P.378
switch ................................................. ................ ...
Replace the light bulb
(bulb) ................................ ............... ... Bulb
Capacity ............................... ............. ... Turn Signal Lights ........................ ........................
P.51
P.378
P.273
P.55
P.336
P.135
P.176
P.243
P.58
Low-speed acceleration suppression
function ................................ . .. Low-speed collision
mitigation braking function . .......... ... Fuel filler lid
(fuel supply opening) Fuel filler lid (fuel supply
opening) ......................... ................................................. .... ...
fuel filler lid open
switch ................................................. ................ ...
Replace the light bulb
(bulb) ................................ ............... ... Bulb
Capacity ............................... ........ Fog lamp indicator
light ................................. ........ Rear fog lamp indicator light ........................ ... ...
P.15
P.340
P.378
How to sound the horn ........................................ ... ...
position indicator .................................... ...
P.124
P.340
wheel size ......................................................... .............
Wheel Nut Wrench ................................................ ......... ...
Direction indicator
P.360
Brake (regenerative brake) ................................ Brake
fluid volume inspection and
replenishment .................................. .. .Brake warning
light .......................................... ............... ... Brake system
warning light ........................ ........ Checking the effectiveness
of the brakes ........................ ............................................
brake pedal stepping
distance .......................... ...................................
Brake lights (brake lights) About brake lights
(brake lights) in SPORT mode and ECO
mode ................... ... Replace the light bulb (bulb) ........ .................. ... Bulb Capacity ........................ ................ ...
P.340
(when the vehicle is
stopped) .......................................................... .....
switch ................................................ ........................
Replacement of light bulb
(bulb) ............................ ...................... ... Bulb
capacity .................... ................... ... Headlight upward
indicator light ....................... ..... Headlamp leveler
switch ..... P.156 Inspecting headlamp lighting, flashing, dirt, and damage ........ ................................................. ................ ...
P.297
P.354
P.58
P.55
P.378
P.241
P.149
P.378
P.106
P.171
Fuel meter (fuel gauge) ............ Winter tires/tire
chains ............ ................................ ...
P.8
ProPILOT vehicle
information
screen ................................................................ ........ ...
Steering switch ................................... .... ...
ProPILOT ................................................ ................ ...
ProPILOT display ................................................ ............. How to remove fog from the windshield ............. P.330
P.164
P.102
P.115
P.340
P.48
P.379
P.242
P.207
P.58
P.52
388
Machine Translated by Google

index
389
mo
Le
index
Yu
A
me
Les
Mi
pose
B
Li
Cooling
water Handling in cold weather .......................................... ...
prescribed amount ................................................ ...............
Checking and Replenishing the Cooling Water Volume ............ ......................................... ...
P.15
How to adjust the brightness of the meter ........Maintenance
settings ........................ ................................. Maintenance
data (service
data) ....... ................................................. ...................... ...
P.149
Lower console tray .......................................................... ...
Oil pressure warning light .......................................... ........................
How to drive on snowy roads .................. .......................................
When stuck in snow or mud ....... ..............
Master warning .................................................. .. . Map
lamp ................................................................ ......................................................................................................................... ......... ... silent mode
P.340
P.274
P.260
Meters
Advanced Drive Assist
Display ................................................................ .............................
Odometer (total distance meter) ........... ........ Various
setting screens ............................ ...................................... ...
P.367
Mirror
Intelligent rearview mirror .......................... ...
P.166
P.58
Warning light ................................................ ................................
Vehicle information screen .................. ......................................... ...
Indicator light .... ................................................. ........................
P.97
P.369
P.51
P.260
P.260
P.61
P.50
Rearview mirror ......................................................... ....... ...
P.60
P.334
Motor .................................................. ...................................... ...
P.356
EV mode switch ................................................................
P.371
Position lamp (width lamp)
switch ................................................................ ........................
Replacement of the light bulb
(bulb) ........ ................................ ... Bulb
capacity ..................... ................... ... bottle
holder .......................... ................................. Bonnet (hood) ........... ................................ ...
P.53
Roof antenna ................................................................ .............
rearview mirror .......................................... ............................
Interior lamp Map
lamp ........ ........................................................ luggage
lamp ..... .........................................................
meter ................................................. ........................
Radar sensor ................................................................ ..... ...
lever (select lever) ................................. ...
Road wheel
care ................................................................ ................... ...
exchange ........................... ................................................ .. .
size ................................................ ...................... ...
...
P.159
P.55
P.137
P.379
P.166
P.375
P.149
P.107
P.358
P.107
P.90
P.376
When the lamp does not light up (bulb
replacement) .......................................................... ................................................. ...
Rear seat ................................................................ ................... ...
rear view camera ...................... ...................................
Rear fog lamp indicator light ......... ................................. rear
wiper switch ................... ........................................
P.260
P.15
P.356
P.330
P.103
P.108
Door mirror ................................................................ ..............
P.262
P.260
P.69
P.330
P.263
Light switch ......................................................... .......... ...
Luggage lamp ................................... ........................ Lamp
(indoor lighting) Map
lamp ........ ........................................ Luggage
lamp ....... .........................................................
silent mode ................................................ .......
Manner mode indicator ............................ Multi-sensing front
Camera .................. ...
P.55
P.55
P.58
vanity mirror ................................................................ ... ...
Lithium-ion battery Lithium-ion
battery .......................................... ...
Locking/unlocking by remote control ..........................................
Rear window Defogger switch .................. P.330 How to remove the
fog on the rear window .....................................
P.354
P.260
P.69
P.370
P.127
P.378
P.114
P.340
Please read the "Maintenance Notes". Please
refer to "Automobile inspection certificate".
&ho ~&b
Machine Translated by Google

index
Wa
Index & B ~ & W
P.361
P.278
Wiper
Wiper/Washer switch ............ Replacement of
wiper rubber ........................... ............................
Replacing the wiper
blades .......................................... . ... wireless
charger ........................................... .......... ... When waxing .......................................... ...... ...
P.272
P.98
P.158
In the event of a breakdown on the road ............................................ . ..
Lock Knob .................................................. ........................................
P.367
P.363
390
Machine Translated by Google
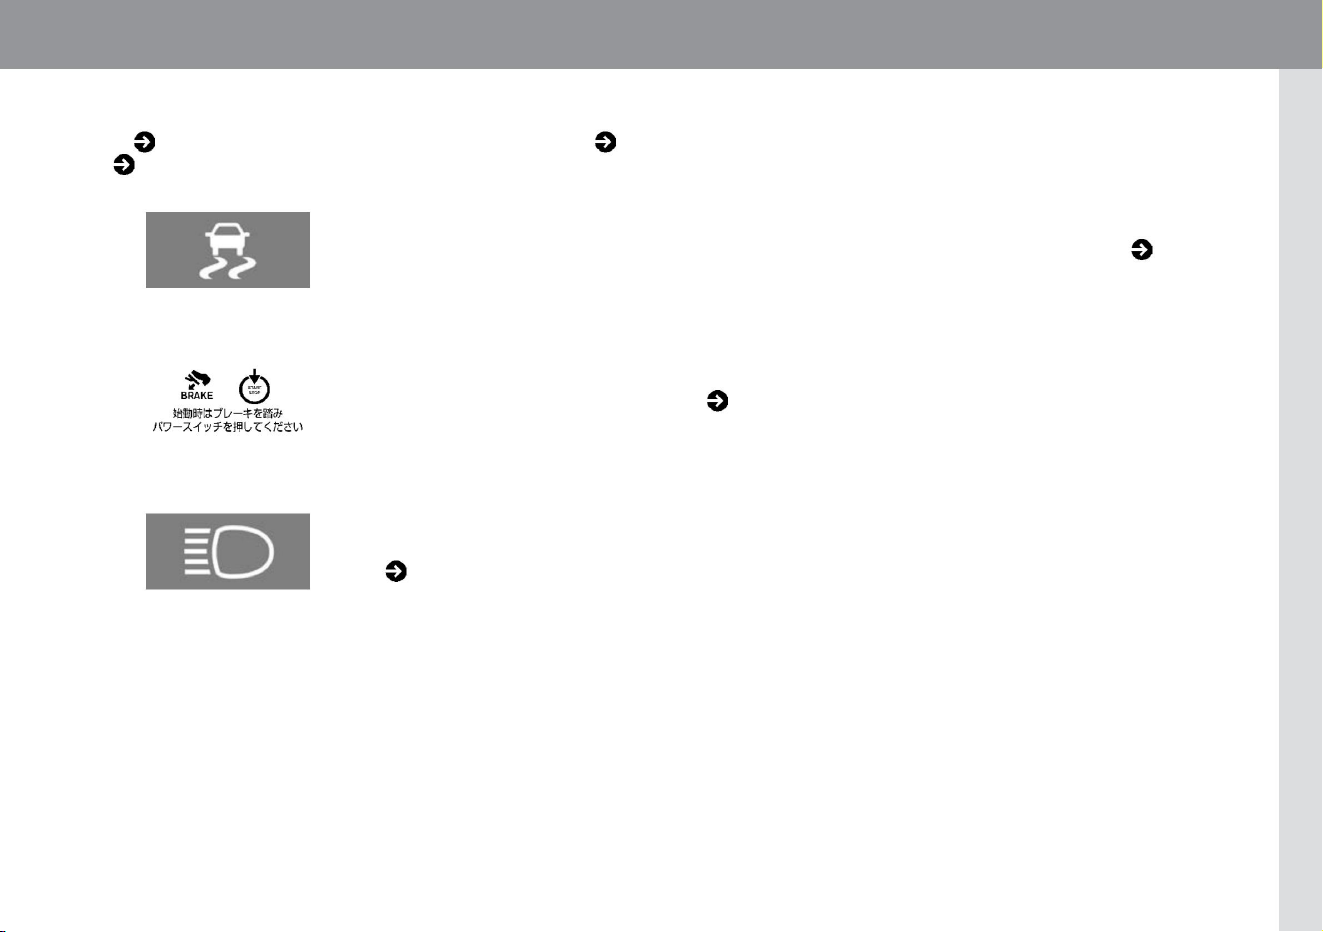
391
When a warning light, indicator light, or warning message is displayed
KVH0137X
ZEI0418X
KVH0118X
The warning light is for notifying the driver of vehicle troubles, etc. When the warning light comes on, please follow the
"Description/Remedy" described in ( P.302).
Indicator lights are intended to let you know, for example, that some system is working. The reason it is lit is
If a warning message is displayed, follow the "Description/Remedy" described in ( P.312).
Please read ( P.310).
warning light example
When a warning light or warning message is displayed in the meter, it is necessary to take appropriate measures immediately. For details, please refer to
When the Warning Light Comes On ( P.302) and When a Warning Message Appears ( P.312). For the indicator light, please refer to When the Indicator
Light Comes On ( P.310).
Warning message example
Indicates light example
Machine Translated by Google

MEMO
392
Machine Translated by Google