HOTO
Compressed Air Capsule
Stay tuned to our social media
(@hoto_official)

HOTO Compressed Air Capsule User Manual
Bedienungsanleitung der HOTO Maschine zum Saugen und Blasen
Manuale d'utente per Capsula d'Aria Compressa HOTO
Manuel d'utilisation de la capsule d'air comprimé HOTO
Manual del usuario de la cápsula de aire comprimido HOTO
·····················1
·19
···········33
··········48
·······62

Warning!
1
Please read all safety warnings, instructions, illustrations, and rules
provided along with the product and keep all warnings and instructions for
reference.
Read this manual carefully before use, and retain it for future reference.
This product will produce noise above 75 dB when in operation. Please
exercise caution.
This product is not a toy, and children are forbidden to use it.
Do not vacuum cleaning without attaching dust cup.
This product is very powerful, please keep distance with your hair while
using.
01 Safety Instructions
2
HOTO Compressed Air Capsule enables vacuum cleaning, inflating, dust
blowing and vacuum deflating after the accessories are installed. For
details, please visit the sales page or contact Hoto customer service.
The images shown are for illustration purposes only and may not be an
exact representation of the product.
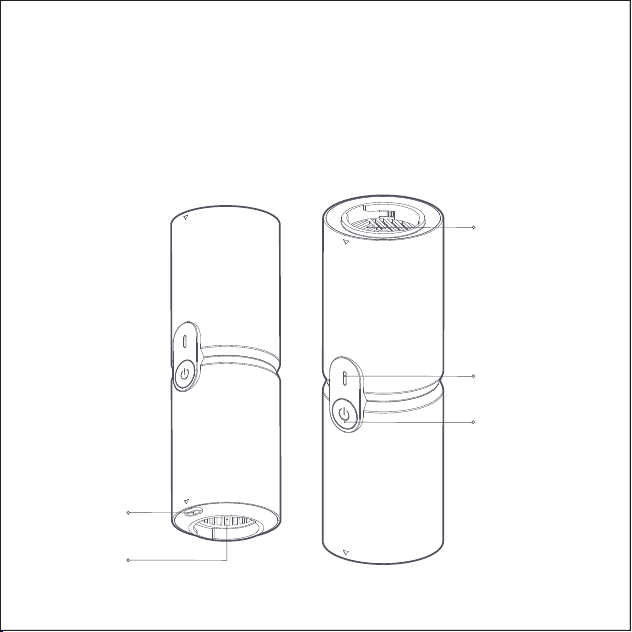
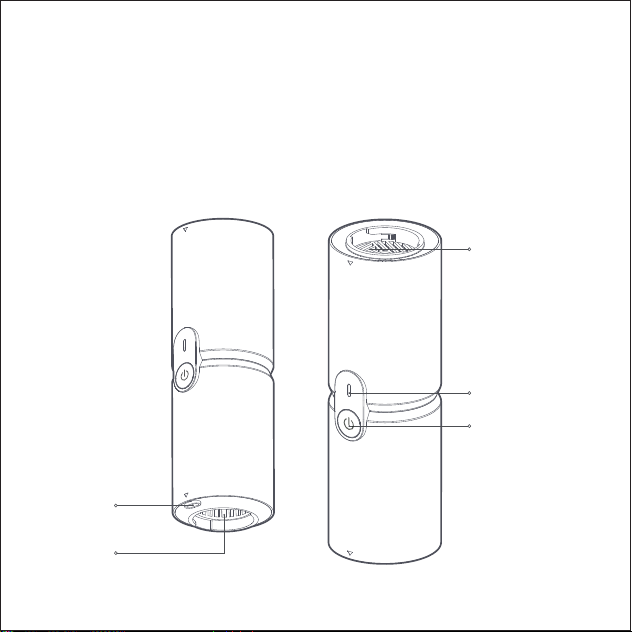
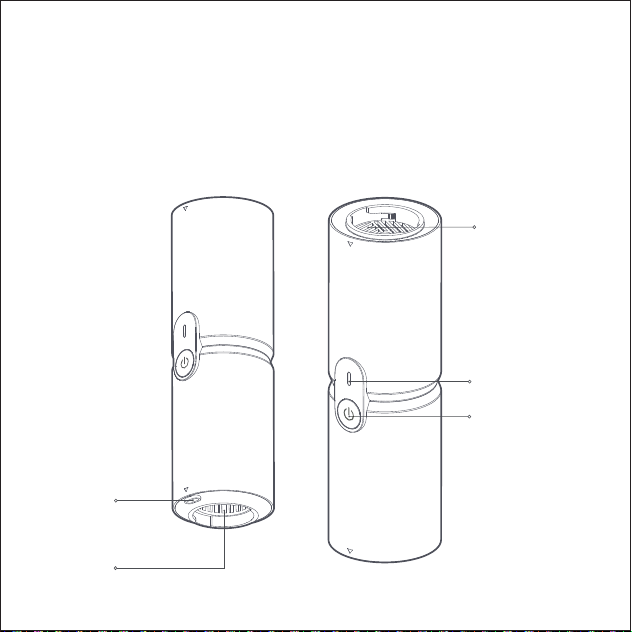
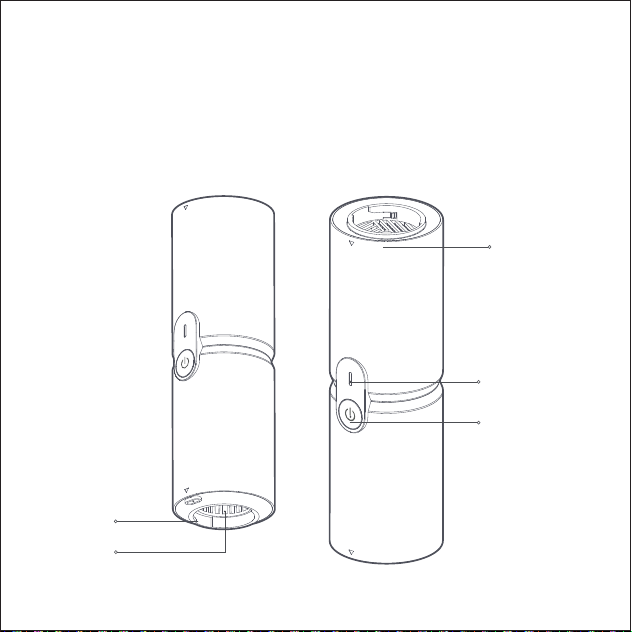
02 Product Overview
Charging
port
Inflating
port
Deflating port
Battery
indicator light
ON/OFF
button
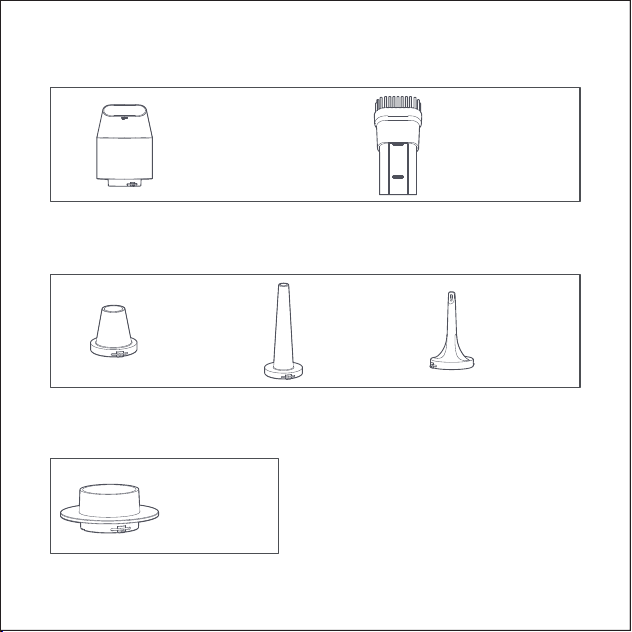
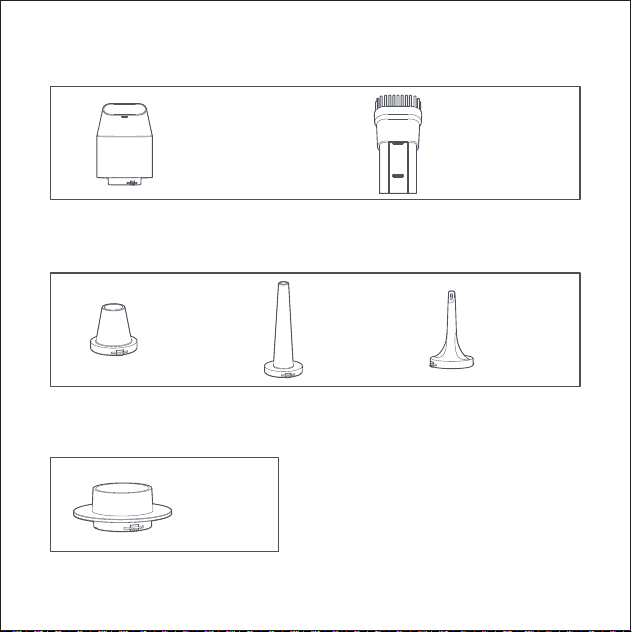
Vacuum cleaning accessories
Inflating/deflate valve
Vacuuming connector
Dust cup (including a
HEPA and metal filter)
Short air valve
Vacuum deflating
connector
Long air valve
Swim ring air
valve
Movable brush
vacuum head
3
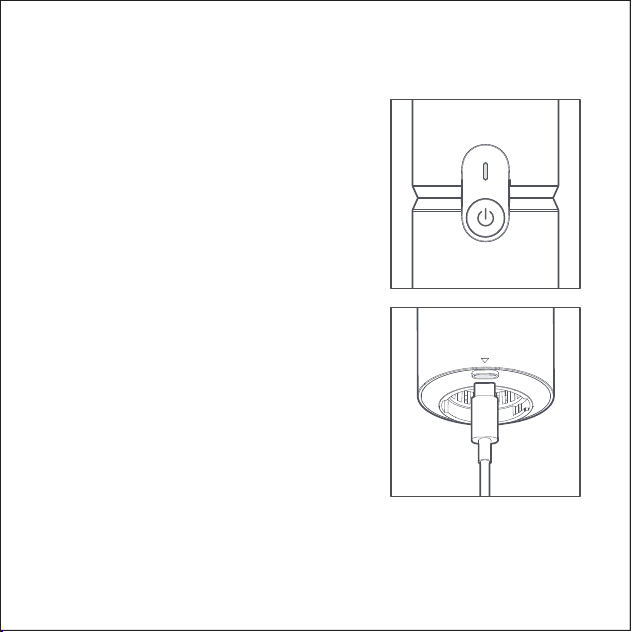
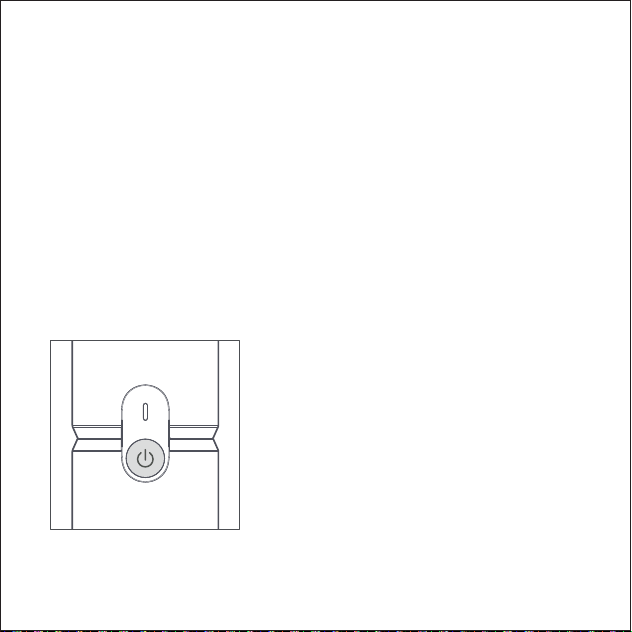
Battery indicator and charging
Battery indicator
When the product is working, its battery indicator
light is on.
When the power is ≥ 20%, the white indicator
light always stays on.
When the power is < 20%, the red indicator light
always stays on, indicating that the product
needs charging.
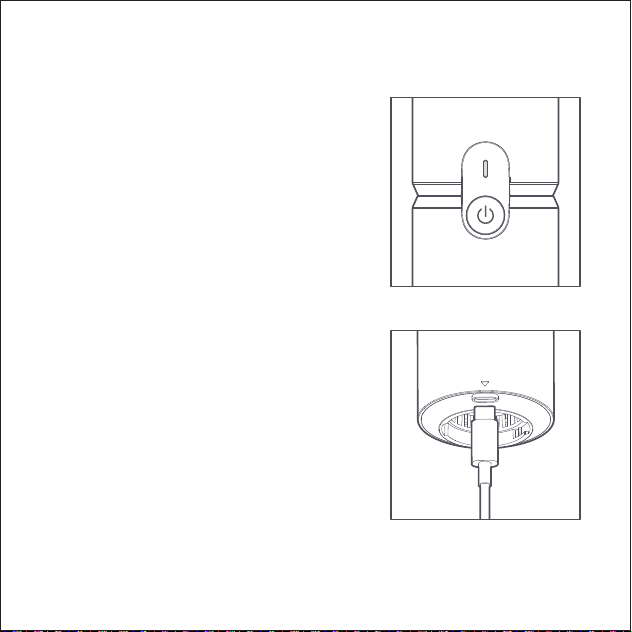
Charging
Please fully charge the product before using it for
the first time. Please charge the product using an
adapter that matches the product's charging
power through a charging cable.
Charging status:
When the product is being charged, the red light
presents a breathing lighting style.
When it is 100% charged, the white light always
stays on.
Suggestions:
The product cannot be used when it is being charged.
Please buy a safe and compliant 5V USB adapter.
03 How to Use
4
5
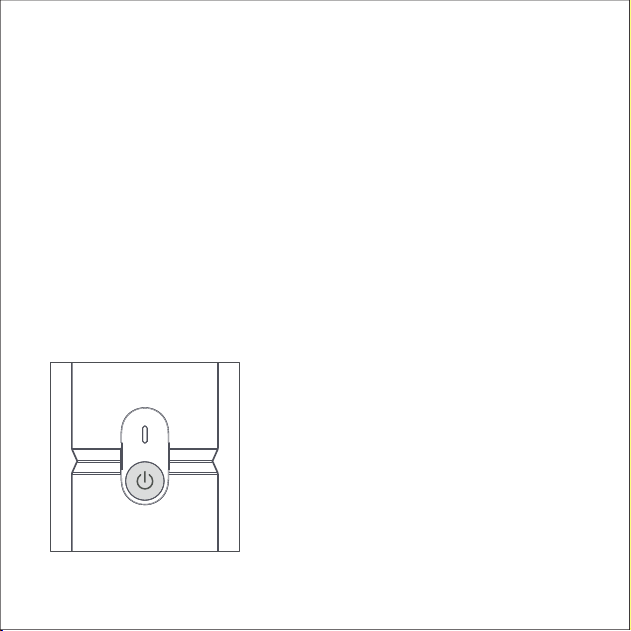
Turn-on/Turn-off/Gear switch
Turn-on
Press and hold the ON/OFF button for 1.5 seconds to turn on the machine
and make it work.
Turn-off
When the machine is working, press and hold the ON/OFF button for 1.5
seconds to make it stop working and turn it off.
Gear switch
By default, the machine will run in high gear when turned on. To switch to
low gear, press the ON/OFF button, and then press the button again to
switch back to high gear.
6
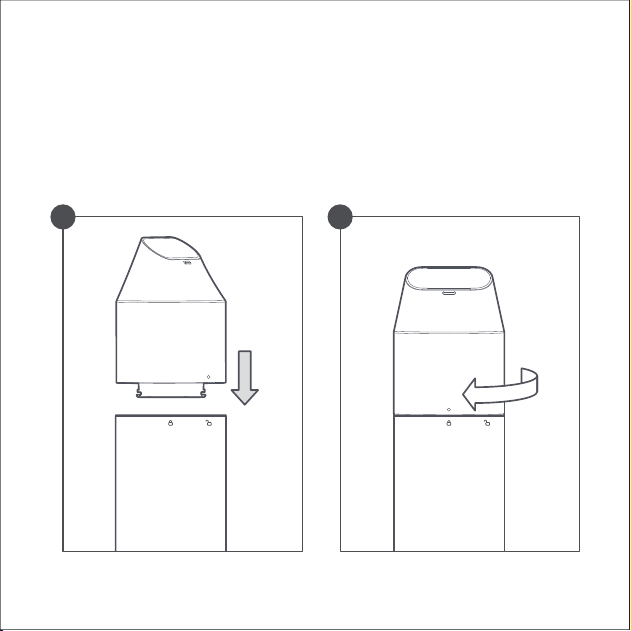
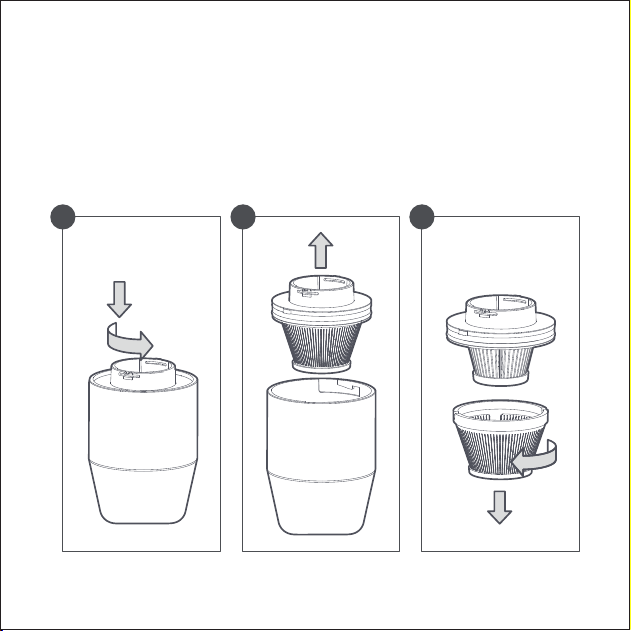
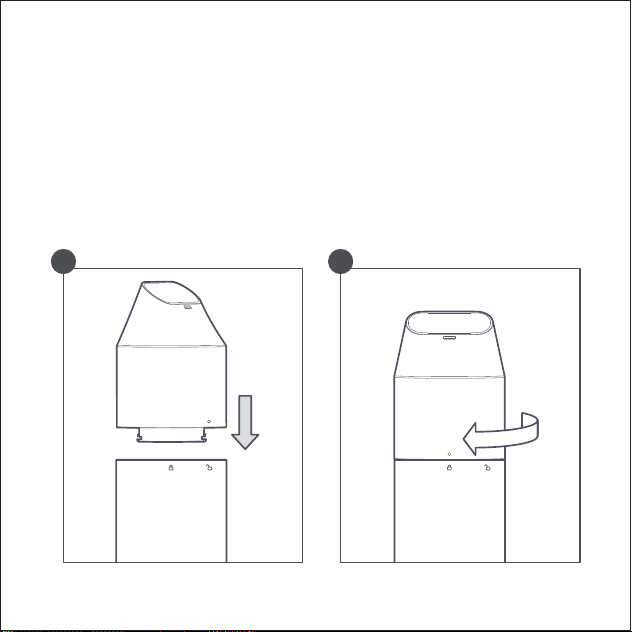
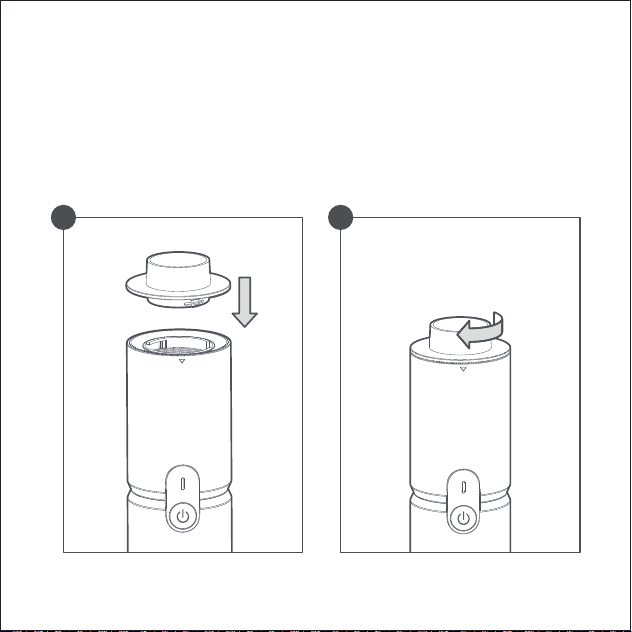
Installation and cleaning of the vacuum cleaning accessories
Installation of the dust cup
Please align the dot marking on the dust cup with the unlocking marking on
the machine body, insert the dust cup, and rotate it clockwise to tighten it up.
When the dust cup is installed, the dot marking on the dust cup will be aligned
with the locking marking on the machine body.
You can remove the dust cup by rotating it counterclockwise.
1 2
7
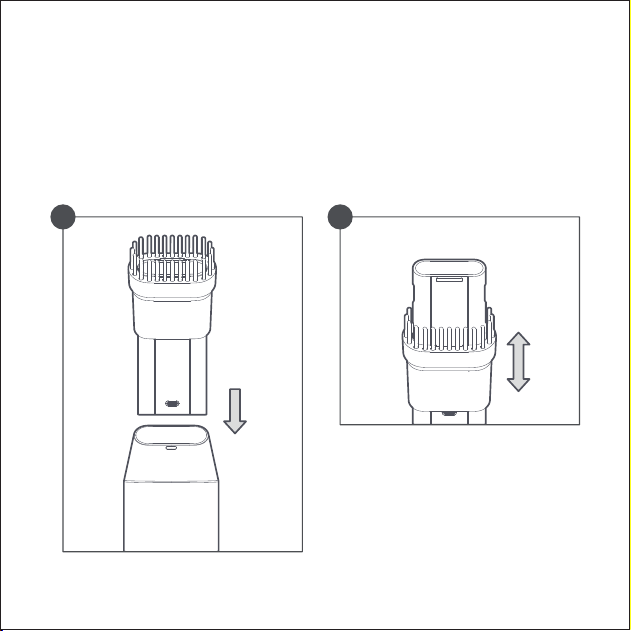
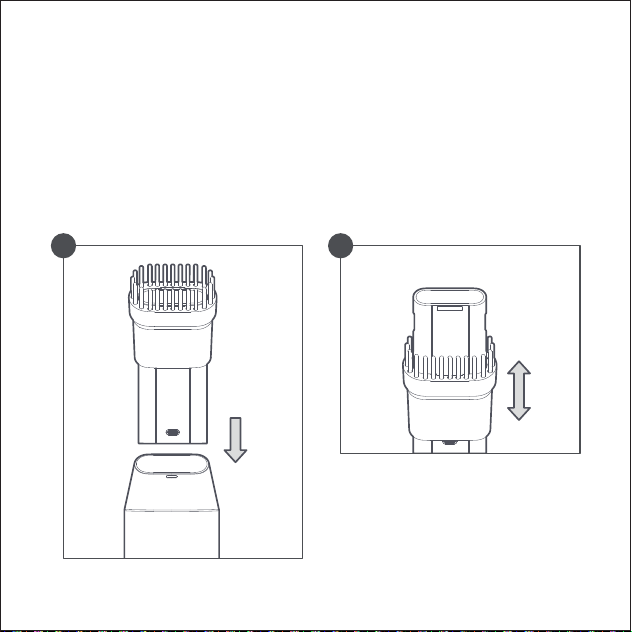
Installation of the movable brush vacuum head
Once the dust cup is installed, insert the vacuum head with movable brush
head into the dust cup as indicated by the arrow. When fully inserted, you'll
feel a noticeable click, indicating that the vacuum head is fully installed.
The brush component is movable, allowing it to be pulled back and forth.
Hold and pull the integrated short brush vacuum head to remove it.
1 2
8
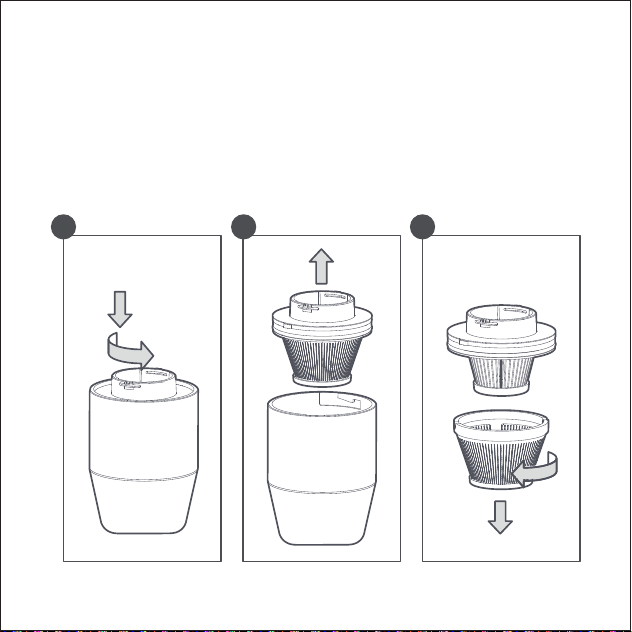
Removal and installation of the HEPA in the dust cup
1. Press the dust cup lid and then rotate to screw it out.
2. Take out the internal filter and remove the dust in the dust cup.
3.To replace the HEPA filter, rotate the metal mesh on the filter to
remove it. Then, rotate and install the new HEPA filter and metal mesh.
1 2 3
2
9
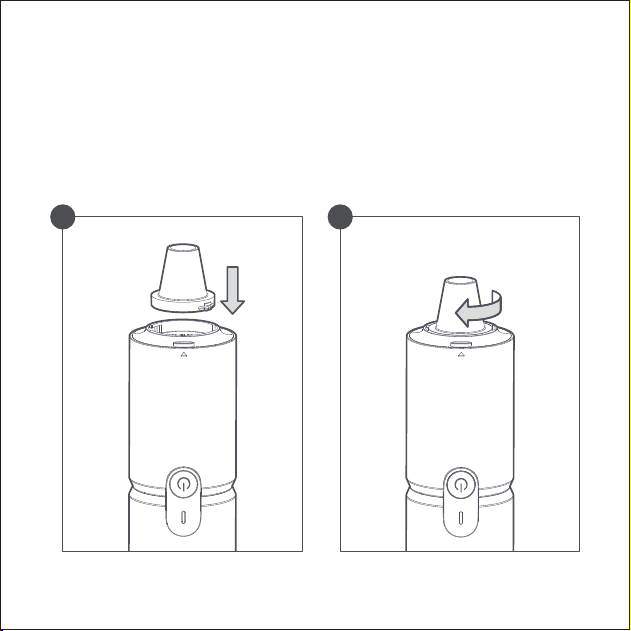
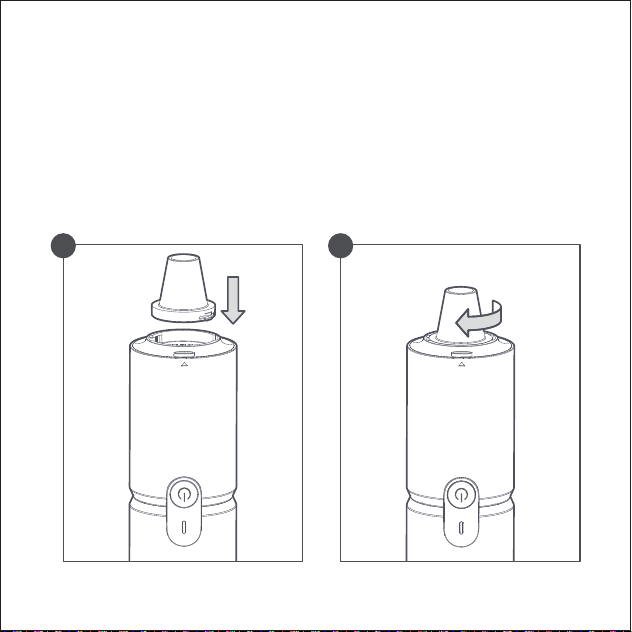
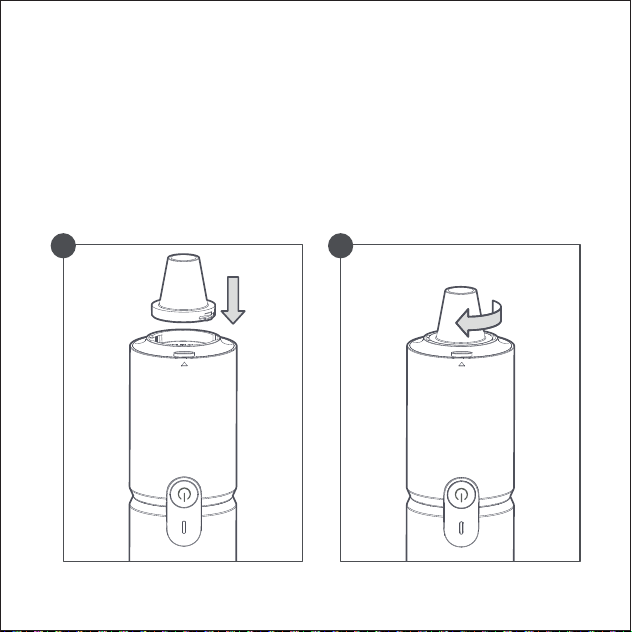
Installation of the air valve and connector
Installation of the air valve
To install the air valve, align the bump on the valve with the groove on the
inflating/suction port. Insert the valve and rotate it clockwise to tighten.
When fully installed, you will feel a noticeable click.
-
You can rotate the air valve counterclockwise to remove it.
1
2
10
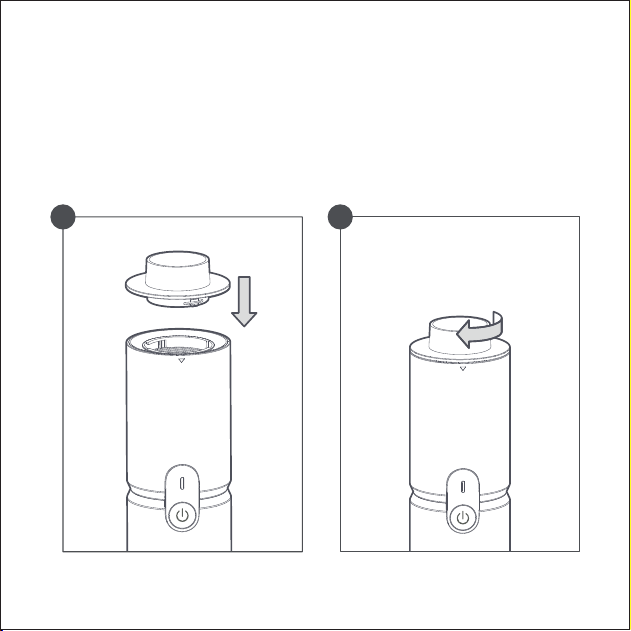
Installation of the suction connector
Please align the bump on the connector with the groove on the suction
port, insert the connector, and rotate it clockwise to tighten it. You will
feel a noticeable click when the connector is fully installed.
You can remove the connector by rotating it counterclockwise.
1

11
Attention
Please use the product with caution when the pressure allowed by the
balloon is smaller than the max inflating pressure of the product.
Please do not use accessories other than the components of the dust cup
for vacuum cleaning, as the intrusion of fine dust may damage the product.
This product is not a toy, and children are forbidden to use it. The
minimum recommended age for users is 16 years old. During working,
please keep children at a safe distance from the product.
The built-in lithium battery of the product cannot be disassembled. Do not
throw the product into the fire or discard it at will. Overheating and hitting
of the lithium battery and water damage to it may cause fire, autoignition,
and explosion. Please do not place the product in hot environments such
as vehicles for long.
Do not keep the product at a temperature below -10℃ or above 45℃,
because overcooling or overheating will shorten the product's life of
service and damage the built-in battery.
If the product is left idle for long, its battery may be damaged. Please
charge the product at least every three months.
The product is equipped with a built-in direct current machine. Please do
not use it in flammable and explosive environments.
04 Precautions

If the machine makes a strange noise or overheats during operation,
please turn it off immediately.
Please do not leave during the inflating. Observe the inflating process to
prevent the inflating pressure from being too high.
Please use the product in a dry and clean environment, as the product is
not waterproof. Do not rinse the product.
Please use a safe and compliant adapter, in combination with a compliant
charging cable, to charge the product. Faults caused by a failure to charge
as stipulated above will not be covered by the warranty.
12
Please do not place the battery in extremely hot environments, such as
sunshine, fire, microwave oven, and oven. Otherwise, explosions or
flammable liquid and gas leakages may be caused.
Please do not disassemble, hit, crush, or cut the battery. Otherwise,
explosions may be caused.
Please do not place the battery under extremely low air pressure.
Otherwise, the battery may explode, or the flammable liquid and gas may
leak.
Please do not use the product if its battery is severely swollen.
05 Battery

13
06 Troubleshooting
Issues
Fail to turn this product on
Slow inflating
Already turned on but
unable to work
Air leaks after the air
valve is connected
Turn on the machine after charing for a while
1. Check whether the power is sufficient.
2. Check whether accessories are fully
installed.
3. Check whether the air outlet is fully
connected to the air valve of the inflated
object.
4. Check whether the inflated object is
subject to any air leakage.
1. Check whether the power is sufficient.
2. Check whether the ambient temperature
is beyond the requested range.
Solutions
1. Check whether the air valve is fully
installed.
2. Check whether the air valve is damaged
or cracked.

Name: HOTO Compressed Air Capsule
Model: QWCXJ001
Item Dimensions:
Approx. 55×56×163.5mm (bare machine,without accessories)
Net Weight: Approx. 356g
Color: Black
Max Suction: 15000 Pa
Operating Temperature: -10°C to 45°C
Battery Type: Lithium-ion battery
Battery Capacity: 1900mAh
Operating Noise: Around 75dB
Rated Input: 5V 3A
Rated Power:120W
Rated Voltage:10.8V
Charging Port: USB Type-C
Charging Time: Approx. 2.5 hours
14
07 Specifications
Charging Temperature: 5°C to 40°C
Storage Temperature: -10°C to 45°C
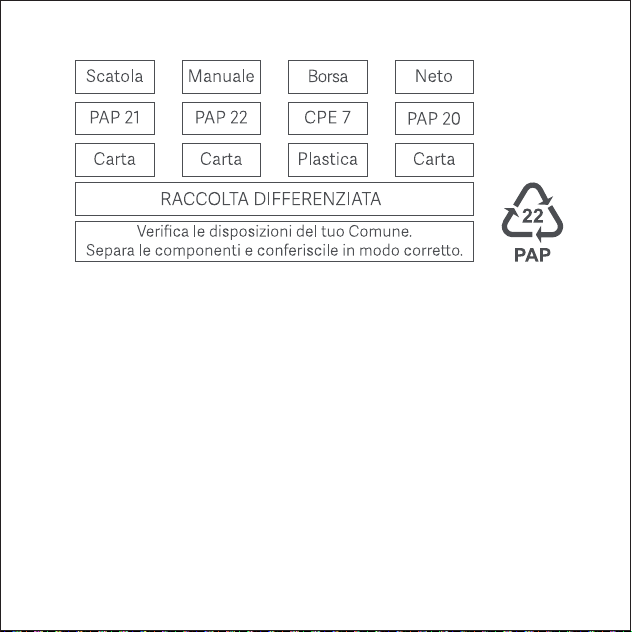
Notes for packaging
The packaging materials are recyclable. Please dispose of packaging in an
environmentally friendly manner.
15
08 Regulatory Compliance Information
Europe — EU declaration of conformity
We, Shanghai HOTO Technology Co., Ltd., hereby, declare that this
equipment is in compliance with the applicable Directives and
European Norms, and amendments.
Disposal and recycling information
All products bearing this symbol are waste electrical and electronic
equipment (WEEE as in directive 2012/19/EU) which should not be
mixed with unsorted household waste. Instead, you should protect
human health and the environment by handing over your waste equipment
to a designated collection point for the recycling of waste electrical and
electronic equipment, appointed by the government or local authorities.
Correct disposal and recycling will help prevent potential negative
consequences to the environment and human health. Please contact the
installer or local authorities for more information about the location as well
as terms and conditions of such collection points.

16
This device complies with part 15 of the FCC Rules. Operation is subject to the
following two conditions: (1) This device may not cause harmful interference, and
(2) this device must accept any interference received, including interference that
may cause undesired operation.
Note: This equipment has been tested and found to comply with the limits for a
Class B digital device, pursuant to part 15 of the FCC Rules. These limits are
designed to provide reasonable protection against harmful interference in a
residential installation. This equipment generates, uses and can radiate radio
frequency energy and, if not installed and used in accordance with the
instructions, may cause harmful interference to radio communications. However,
there is no guarantee that interference will not occur in a particular installation. If
this equipment does cause harmful interference to radio or television reception,
which can be determined by turning the equipment off and on, the user is
encouraged to try to correct the interference by one or more of the following
measures:
This supplier’s declaration of conformity is hereby for
We declare that the above mentioned device has been tested and found in
compliance with CFR 47 Part 15 Regulation.
Product: HOTO Air Compressed Machine
Model Number(s): QWCXJ001
Brand/Trade: HOTO
Federal Communications Commission Supplier’s
Declaration of Conformity

Manufacturer: Shanghai HOTO Technology Co., Ltd.
Address: Building 45, No.50 Moganshan Road, Shanghai, China
17
Reorient or relocate the receiving antenna.
Increase the separation between the equipment and receiver.
Representative of Responsible Party for SDoC
Company: Shanghai HOTO Technology Co., Ltd.
Address: Building 45, No.50 Moganshan Road, Shanghai, China
Country: China
Telephone No.: 400-021-8696
Connect the equipment into an outlet on a circuit different from that to which
the receiver is connected.
Consult the dealer or an experienced radio/TV technician for help.
18
DECLARATION OF CONFORMITY
EU Declaration of Conformity
We
Shanghai HOTO Technology Co., Ltd.
Declare that the product:
HOTO Compressed Air Capsule / QWCXJ001
Complies with the essential health and safety requirements of the
following directives:
2014/30/EU Electromagnetic Compatibility directive References to the
following harmonized standard were made:
20011/65/EU+ (EU) 2015/863 Restrictions of the Use of Certain Hazardous
Substances in Electrical and Electronic Equipment
Authorised signatory and technical file holder:
Shanghai HOTO Technology Co., Ltd.
Building 45, No.50 Moganshan Road,Shanghai, China.
EN55014-1: 2021
EN55014-2: 2021
EN IEC 61000-3-2:2019+A1:2021
EN 61000-3-3:2013+A2:2021

Warnung!
19
Lesen Sie alle Sicherheitshinweise, Anweisungen, Abbildungen und
Vorschriften, die mit dem Produkt geliefert werden, und speichern Sie alle
Warnungen und Anweisungen als Referenz.
Bitte lesen Sie dieses Handbuch sorgfältig durch, bevor Sie das Produkt
verwenden, und bewahren Sie es ordnungsgemäß auf.
Diese Maschine erzeugt etwa 75 dB Rauschen, wenn sie funktioniert. Bitte
achten Sie auf den Schutz.
Dieses Produkt ist kein Spielzeug und darf nicht von Kindern verwendet
werden.
Bitte saugen Sie nicht, ohne dass ein Staubbecher installiert ist.
Aufgrund der starken Saugkraft dieses Produkts halten Sie bei der
Anwendung bitte einen angemessenen Abstand zu Ihren Haaren ein.
01 Sicherheitshinweise
20
02 Produkteinführung
Ladeanschluss
Luftauslass
Lufteinlass
Batterien Anzeige
Schalter Taste
Nach der Installation des entsprechenden Zubehörs kann die kleine
HOTO-Maschine blasen und saugen,aufblasen,Staub blasen,Vakuumlagerung.
Eine detaillierte Liste finden Sie auf der Produktverkaufsseite oder wenden Sie
sich an den HOTO-Kundendienst.
Das Produktbild ist nur zur Veranschaulichung,bitte beziehen Sie sich auf das
eigentliche Produkt.

21
Staubsaugerzubehör
Aufblasbare/pumpende Düsen
Vakuum-Anschluss
Staubbecher
(enthält HEPA und Metallfilter)
Kurze Luftdüse
Pumpadapter
Lange Luftdüse Schwimmring
-Luftdüse
Bewegliche Bürstenspitze

22
Leistungsanzeige und Aufladen
Anzeige des Batteriestands
Wenn das Produkt funktioniert, leuchtet
die Betriebsanzeige auf.
Batterieleistung≥20%: Weißes Licht ist
immer eingeschaltet;
Akkustand<20% : Das rote Licht leuchtet
immer, Aufladen ist erforderlich.
Aufladen
Prompt:
Das Produkt funktioniert während des
Ladevorgangs nicht.
Sie müssen Ihren eigenen sicheren und
konformen 5-V-USB-Adapter erwerben.
03 Bedienungsanweisung
Vor dem ersten Gebrauch vollständig aufladen.
Verwenden Sie das Ladekabel, um den
Adapter anzuschließen, der der Ladeleistung
dieses Produkts entspricht, um das Produkt
aufzuladen.
Ladezustand:
Rotlichtatmung während des Ladevorgangs;
Nach dem Aufladen auf 100 % leuchtet das
weiße Licht immer.

23
Ein-/Ausschalten/Gang-Schalten
Einschalten
Halten Sie die Umschalttaste 1,5 Sekunden lang gedrückt, um die Maschine
einzuschalten und mit der Arbeit zu beginnen.
Ausschalten
Wenn die Maschine arbeitet, halten Sie die Umschalttaste 1,5 Sekunden lang
gedrückt, um sie herunterzufahren, die Maschine hört auf zu arbeiten und
schaltet sich aus.
Schalten Sie die Gänge
Nach dem Einschalten läuft der standardmäßige hohe Gang, drücken Sie
kurz die Umschalttaste, um in den niedrigen Gang zu wechseln, drücken Sie
erneut kurz, um zum hohen Gangbetrieb zurückzukehren, und so weiter.
24
Installation und Reinigung von Staubsaugerzubehör
Installation von Staubbechern
Setzen Sie das Punktlogo auf dem Staubbecher in das Entriegelungslogo
auf dem Rumpf ein, legen Sie es in den Staubbecher, ziehen Sie den
Staubbecher im Uhrzeigersinn fest und richten Sie das Punktlogo auf dem
Staubbecher nach erfolgreicher Installation mit dem Schlosslogo auf dem
Rumpf aus.
Drehen Sie den Staubbecher beim Zerlegen und Zusammenbauen gegen
den Uhrzeigersinn, um ihn zu entfernen.
1 2

25
Installation von beweglicher Bürstenspitzenmontage
Führen Sie nach dem Einbau des Staubbechers die bewegliche Bürstenspi-
tze in der gezeigten Richtung in den Staubbecher ein. Nach dem Einstecken
bis zum Ende gibt es ein klares Gefühl für den Gang, und die Düse ist zu
diesem Zeitpunkt installiert. Die Bürstenteile sind beweglich und schieben
und ziehen hin und her.
Halten Sie die bewegliche Pinselspitze fest und ziehen Sie sie nach außen,
um die bewegliche Pinselspitze zu entfernen.
1 2

26
Demontage und Installation des Staubbechers HEPA
1. Drücken Sie den Deckel nach unten und drehen Sie ihn, um den Deckel
abzuschrauben.
2. Entfernen Sie das innere Filterelement und reinigen Sie den Staub im
Staubbehälter.
3. Wenn Sie die neue HEPA ersetzen müssen, drehen und entfernen Sie
bitte das Metallgitter am Filterelement und drehen und installieren Sie
dann die neue HEPA mit dem Metallgitter.
1 2 3
27
Luftdüse und Adapter installieren
Luftdüse installieren
Richten Sie die Luftdüse an der Blasöffnung / Saugöffnung aus, setzen Sie
die Luftdüse ein und ziehen Sie Luftdüse im Uhrzeigersinn fest, es wird ein
klares Gefühl des Zahnrads geben, das anzeigt, dass die Installation fertig
ist.
Drehen Sie Luftdüse bei der Demontage gegen den Uhrzeigersinn, um es zu
entfernen.
1 2

28
Installation des Absaugadapters
Richten Sie die Beule am Adapter an der Saugöffnung aus, setzen Sie den
Adapter ein und ziehen Sie den Adapter im Uhrzeigersinn fest, um ein
deutliches Gefühl der Ausrüstung zu erhalten, das anzeigt, dass die
Installation vorhanden ist.
Drehen Sie den Adapter beim Zerlegen und Zusammenbauen gegen den
Uhrzeigersinn, um ihn zu entfernen.
1 2

29
Besondere Erinnerung
Der zulässige Druckwert des Ballons ist kleiner als der maximale Luftdruck
der Blas-Saugmaschine, mann muss vorsichtig verwenden. Saugen Sie
kein anderes Zubehör als die Staubbecherbaugruppe ab, da das
Eindringen von Feinstaub das Produkt beschädigen kann.
Dieses Produkt ist kein Spielzeug und darf nicht von Kindern verwendet
werden. Es wird empfohlen, dass Benutzer über 16 Jahre alt sind. Halten
Sie während des Gebrauchs einen Sicherheitsabstand zwischen Kindern
und dem Produkt ein.
Das Produkt verfügt über eine eingebaute Lithiumbatterie, und es ist
verboten, das Produkt nach Belieben ins Feuer zu werfen oder zu
entsorgen. Lithiumbatterien sind überhitzt, beeinträchtigt und überflutet,
wodurch die Gefahr von Brand, Selbstentzündung und Explosion besteht,
daher vermeiden Sie es bitte, Umgebungen mit hohen Temperaturen, wie
z. B. im Auto, ausgesetzt zu werden.
Die Lagertemperatur des Produkts sollte nicht niedriger als -10 ° C oder
höher als 45 ° C sein, zu kalt oder zu heiß verkürzt die Lebensdauer des
Produkts und beschädigt den eingebauten Akku.
Das Produkt kann den Akku beschädigen, wenn es längere Zeit im
Leerlauf bleibt, es wird empfohlen, es mindestens alle drei Monate
aufzuladen.
Das Produkt verfügt über einen eingebauten Gleichstrommotor, bitte
verwenden Sie es nicht in brennbaren und explosionsgefährdeten
Umgebungen.
04 Vorsichtsmaßnahmen

30
Setzen Sie den Akku nicht in der Umgebungen mit extrem hohen
Temperaturen wie Sonnenlicht, Feuer, Mikrowelle, Ofen usw. aus, da
dies zu Explosionen oder Austreten von brennbaren Flüssigkeiten und
Gasen führen kann.
Zerlegen, stoßen, zerquetschen oder schneiden Sie den Akku nicht, da
dies zu einer Explosion führen kann.
Stellen Sie den Akku nicht auf extrem niedrigen Luftdruck, da dies dazu
führen kann, dass der Akku explodiert oder brennbare Flüssigkeiten und
Gase austreten. Wenn der Akku stark aufgebläht ist, verwenden Sie ihn
nicht weiter.
Wenn während des Betriebs ein ungewöhnliches Geräusch auftritt oder
die Temperatur zu hoch ist, schalten Sie die Maschine bitte sofort aus.
Verlassen Sie das Gerät beim Aufblasen nicht und beobachten Sie den
Aufblasvorgang, um einen übermäßigen Luftdruck zu vermeiden.
Bitte verwenden Sie es in einer trockenen und sauberen Umgebung, das
Produkt ist nicht wasserdicht, es ist verboten, es mit Wasser abzuspülen.
Bitte verwenden Sie einen sicheren und konformen Adapter, um dieses
Produkt mit einem konformen Ladekabel aufzuladen. Ausfälle, die
durch Nichtbeachtung der oben genannten Anforderungen verursacht
werden, fallen nicht unter die Garantie.
05 Akku

31
06 Fehlersuche
Fehler
Das Gerät lässt sich nicht
einschalten
Langsame Inflation
Es ist bereits eingeschaltet
und funktioniert nicht
Nach der verbindung der
Luftdüse tritt Luft aus
Ziehen Sie nach einer Weile des
Ladevorgangs das Ladekabel ab und
versuchen Sie erneut, das System
einzuschalten
1. Ob die Batterie ausreichend ist.
2. Ob das Zubehör an Ort und Stelle
installiert ist.
3. Ob der Luftauslass eng mit der
Luftöffnung des aufgeblasenen
Gegenstands verbunden ist.
4. Prüfen Sie, ob der aufgeblasene
Gegenstand undicht ist.
1. Überprüfen Sie, ob die Batterie
ausreichend ist.
2. Ob die Umgebungstemperatur höher als
der erforderliche Bereich ist
Fehlersuche
1. Überprüfen Sie, ob Luftdüse installiert ist.
2.Überprüfen Sie ob Luftdüse
auf Beschädigungen und Risse.

32
07 Standard Parameter
Produktname: HOTO-Maschine zum Saugen und Blasen
Produktmodell: QWCXJ001
Produktgröße:ca 55×56×163,5mm (Größe, ohne Zubehör) Produkts-
gewicht ca 356g
Produktsfarbe: Schwarz
Maximale Absaugung :15000Pa
Betriebstemperatur: -10 °C bis 45 °C
Ladetemperatur: 5 °C bis 40 °C
Lagertemperatur: -10 °C bis 45 °C
Batterietyp:Lithium-Batterie
Batteriekapazität 1900mAh
Arbeitslärm: ca75dB
Nenneingang : 5V 3A
Nennleistung :120W
Nennspannung: 10,8V.
Ladeanschluss: USB Type-C
Aufladezeit: ca 2,5h
Hinweise zur Verpackung
Die Materialien der Verpackung sind recycelbar. Bie entsorgen Sie die Verpackung auf
umweltfreundliche Weise.

Avvertenza!
33
Si prega di leggere tutte le avvertenze di sicurezza, istruzioni, figure e
disposizioni fornite a corredo del prodotto, conservare tutte le avvertenze
ed il manuale d’istruzione per consultazione.
Si prega di leggere attentamente il manuale prima dell’utilizzo del
prodotto e conservarlo con cautela.
La macchina potrebbe generare il rumore di circa 75dB quando è attiva, si
prega di avere cura della prevenzione.
Questo prodotto non è un giocattolo e i bambini non devono usarlo.
Si prega di non aspirare la polvere senza aver installato il bicchiere di
polvere.
Dato che il prodotto vanta la forte aspirazione, si prega di mantenere
l’adeguata distanza dai capelli durante l’uso.
01 Precauzioni di sicurezza
34
02 Introduzione del prodotto
Porta di ricarica
Boccaglio di soffio
Boccaglio
d’aspirazione
Indicatore di carica
Pulsante ON/OFF
La capsula d’aria compressa di HOTO munita di accessori corrispondenti è
in grado di: aspirare la polvere, gonfiarsi, soffiare la polvere, svuotato per
contenimento. Per la lista dettagliata si rimanda alla pagina di vendita del
prodotto o l’assistenza clientela di HOTO.
La figura del prodotto è meramente indicativa, prevarrà il prodotto fisico.

35
Accessori aspirapolvere
Boccaglio di gonfiamento/sgonfiamento
Raccordo di svuotamento
Bicchiere di polvere
(contenente HEPA e filtro
a rete metallico)
Ugello corto
Connettore di
sgonfiamento
Ugello lungo Ugello dell’
anello di nuoto
Testa d’aspirazione
a spazzola mobile

36
Indicazione della carica e ricarica
Indicazione della carica
La spia della carica si accende quando il
prodotto è in moto;
Carica della batteria≥20%: la luce bianca
rimane accesa;
Carica della batteria<20%; la luce rossa
rimane accesa, si richiede la ricarica.
Ricarica
Suggerimento:
Il prodotto non funziona durante la ricarica.
Si deve acquistare ulteriormente l’adatta-
tore USB da 5V sicuro e conforme.
03 Istruzioni sull’utilizzo
Si prega di effettuare completamente la
ricarica prima dell’uso iniziale. Connettere
l’adattatore con la potenza di ricarica
corrispondente per mezzo del cavo di ricarica
per effettuare la ricarica.
Stato di ricarica:
La luce rossa lampeggia durante la ricarica;
La luce bianca rimane accesa dopo il
raggiungimento della carica di 100%.

37
ON/OFF/Cambio di marcia
Accensione
Tenere premuto il pulsante ON/OFF per 1,5 sec per avviare la macchina.
Spegnimento
Quando la macchina è in moto, tenere premuto il pulsante ON/OFF per 1,5
sec per arrestare la macchina.
Cambio di marcia
Dopo l’accensione, si riconosce per default la marcia alta, premere sul
pulsante ON/OFF per passare alla marcia bassa, ripremere per ritornare
all’alta marcia, e così via.

38
Installazione e pulizia degli accessori aspirapolvere
Installazione del bicchiere di polvere
Mirare il simbolo di puntino sul bicchiere di polvere al simbolo di sblocco
sulla macchina, inserire il bicchiere e serrarlo nel senso orario. Riuscita
l’installazione, il puntino corrisponderà al simbolo di blocco sulla
macchina.
Ai fini dello smontaggio, girare nel senso antiorario il bicchiere per prelievo.
1 2
39
Installazione della testa d’aspirazione a spazzola mobile
Installato il bicchiere di polvere, inserire la testa d’aspirazione a spazzola
mobile nel senso indicato per inserimento nel bicchiere. La notevole
sensazione della marcia indica l’installazione a posto del boccaglio. La
parte di spazzola è spingibile in avanti ed indietro.
Tenere la testa d’aspirazione a spazzola mobile verso l’esterno per
estrazione.
1 2

40
Smontaggio ed installazione dell’HEPA del bicchiere di polvere
1. Premere sul coperchio del bicchiere di polvere, girarlo per allentamento.
2. Prelevare la cartuccia interna e pulirla dalla polvere.
3. Quando occorre sostituire l’HEPA, girare e prelevare la rete metallica
dalla cartuccia, poi girare e installare il nuovo HEPA, la rete metallica ecc.
1 2 3
41
Installazione del boccaglio e del connettore
Installazione del boccaglio
Mirare il punto convesso sul boccaglio alla cava sul boccaglio di
soffio/d’aspirazione, inserire il boccaglio e serrarlo nel senso orario fino
alla notevole sensazione della marcia, il boccaglio è installato a posto.
Ai fini dello smontaggio, girare nel senso antiorario il boccaglio per
prelievo.
1 2

42
Installazione del connettore di sgonfiamento
Mirare il punto convesso sul connettore alla cava sul boccaglio d’aspirazi-
one, inserire il connettore e serrarlo nel senso orario fino alla notevole
sensazione della marcia, il boccaglio è installato a posto.
Ai fini dello smontaggio, girare nel senso antiorario il connettore per
prelievo.
1 2

43
Importante
La pressione permessa della palla è minore della massima pressione di
gonfiamento della capsula d’aria compressa, per cui il prodotto viene
usato con cautela.
Non usare gli accessori diversi dal gruppo di bicchiere di polvere per
Questo prodotto non è un giocattolo e i bambini non devono usarlo. È
consigliabile che gli utenti abbiano più di 16 anni. Durante l’uso,
mantenere la distanza di sicurezza tra il bambino ed il prodotto.
Il prodotto contiene la batteria al litio non smontabile, non gettare il
prodotto nel fuoco né abbandonarlo a caso. Il surriscaldo, l’urto, la
penetrazione d’acqua della batteria al litio comportano i rischi di
incendio, auto-accensione, esplosione, si prega di non metterla negli
ambienti caldi come interno dell’auto.
Il prodotto non viene conservato a temperatura minore di -10℃ o
maggiore di 45℃, la temperatura troppo bassa o alta accorcerebbe la vita
del prodotto e danneggerebbe la batteria incorporata.
La disattivazione a lungo del prodotto comporterebbe il danno alla
batteria, si consiglia quindi la ricarica con cadenza almeno trimestrale.
Il prodotto contiene il motore cc, non viene quindi usato nell’ambiente
infiammabile od esplosivo
In caso idi rumore o eccessiva temperatura durante il lavoro, spegnere
immediatamente la macchina.
Durante il gonfiamento, mantenere l’osservazione del relativo processo
per evitare l’eccessiva pressione.
04 Attenzione

44
Non mettere la batteria nell’ambiente caldissimo come sole, incendio,
forno a microonde, stufa ecc., per evitare il liquido o gas infiammabile
che potrebbe causare l’esplosione o la fuga.
Non smontare, urtare, spremere né tagliare la batteria per evitare
l’eventuale esplosione.
Non mettere la batteria sotto la pressione bassissima per evitare
l’esplosione della batteria o la fuga del liquido o del gas infiammabile.
Non proseguire l’uso della batteria in caso di grave gonfiamento.
Si prega di usare il prodotto nell’ambiente asciutto e pulito, il prodotto
non è impermeabile e non viene lavato.
Si prega di usare l’adattatore sicuro e conforme, ricaricare il prodotto
con il cavo di ricarica conforme. L’errore imputabile alla ricarica senza
ottemperanza ai suddetti requisiti sarà escluso dalla presente garanzia.
05 Batteria

45
06 Eliminazione dell’errore
Problemi
Impossibile accensione del
prodotto
Gonfiamento lento
Funzionamento impossibile
dopo l’accensione
C’è la fuga d’aria dopo
la connessione all’ugello
Dopo un certo periodo di ricarica,
staccare il cavo di ricarica prima di
provare l’accensione.
1. Se la carica sia sufficiente.
2. Se gli accessori siano installati a posto.
3. Se lo sfogo sia connesso bene al
boccaglio dell’oggetto gonfiato.
4. Controllare l’oggetto gonfiato per
l’eventuale fuga.
1.Verificare se la carica sia sufficiente.
2. Se la temperatura ambientale sia
superiore alla gamma richiesta.
Metodo di risoluzione
1. Controllare l’ugello per l’installazione a
posto.
2. Controllare l’ugello per la crepatura.

Note per l'imballaggio
I materiali di imballaggio sono riciclabili. Si prega di smaltire gli imballaggi nel rispeo
dell'ambiente.
46
07 Parametri di base
Denominazione: capsula d’aria compressa di HOTO
Modello: QWCXJ001
Dimensioni: circa 55×56×163,5mm (corpo nudo senza accessori)
Peso netto: circa 356g
Colore: Nero
Massima aspirazione: 15000Pa
Temperatura di esercizio: da -10°C a 45°C
Temperatura di ricarica: da 5°C a 40°C
Temperatura di stoccaggio: da -10°C a 45°C
Tipo di batteria: batterie agli ioni di litio
Capacità della batteria: 1900mAh
Rumore di funzionamento: circa 75dB
Ingresso nominale: 5V 3A
Potenza nominale: 120W
Tensione nominale: 10,8V
Porta di ricarica: USB Type-C
Durata di ricarica: c.ca 2,5 ore
47

Attention !
48
Lisez tous les avertissements de sécurité, les instructions, les diagrammes
et les règlements fournis avec le produit et conservez tous les
avertissements et toutes les instructions pour référence ultérieure.
Veuillez lire attentivement ce manuel avant d'utiliser le produit et
rangez-le correctement.
La machine génère environ 75 dB de bruit pendant son fonctionnement, il
faut donc veiller à la protéger.
Ce produit n'est pas un jouet et son utilisation par des enfants est
interdite.
Ne pas aspirer sans le bac à poussière.
En raison de la forte puissance d'aspiration de ce produit, veuillez le
maintenir à une distance appropriée de vos cheveux lorsque vous
l'utilisez.
01 Consignes de sécurité
49
02 Produits
Port de charge
Boccaglio di soffio
Orifice de
dégonflage
Indicateur de
niveau de batterie
Boutons d'alimentation
ON/OFF
La machine peut être installée avec les accessoires appropriés : aspirer,
gonfler, souffler et aspirer pour le stockage. Pour une liste détaillée, veuillez
consulter la page de vente du produit ou demander au service clientèle de
HOTO.
Les images des produits sont fournies à titre d'illustration uniquement,
veuillez vous référer au produit réel.

50
Accessoires pour le vide
Buses de gonflage/dégonflage
Orifice de raccordement à vide
Coupelle à poussière
(avec filtre HEPA et filtre
métallique à l'intérieur)
Buse d'air courte
Connecteur
de dégonflage
à vide
Ugello lungo
Buse d'air
de l'anneau
de natation
Brosse mobile

51
Affichage du niveau de batterie et chargement
Affichage du niveau de batterie
L'indicateur de niveau de batterie s'allume
lorsque le produit est en fonctionnement.
Niveau de batterie ≥ 20 % : la lumière
blanche toujours allumée.
Niveau de batterie <20% : la lumière rouge
est toujours allumée, il faut la recharger.
Chargement
Conseil:
Le produit ne fonctionne pas pendant le
processus de chargement.
Vous devrez acheter votre propre adapta-
teur USB 5V conforme aux normes de
sécurité.
03 Guide de l'utilisateur
Veuillez charger complètement le produit
avant de l'utiliser pour la première fois. Utilisez
le câble de chargement pour charger le
produit en connectant un adaptateur qui
correspond à la puissance de chargement du
produit. État de charge :
La lumière rouge s'allume pendant la charge.
La lumière blanche reste allumée après avoir
été chargée à 100 %.

52
Alimentation ON/OFF
Mise sous tension
Appuyez sur le bouton ON/OFF et maintenez-le enfoncé pendant 1,5 seconde
pour allumer l'appareil.
Mise hors tension
Appuyez sur le bouton ON/OFF pendant 1,5 seconde pour l'éteindre.
Changement de vitesse
Par défaut, il fonctionne en vitesse rapide. Appuyez sur le bouton ON/OFF
pour passer à la vitesse inférieure, et appuyez à nouveau sur le bouton pour
revenir à la vitesse supérieure.

53
Installation et nettoyage des accessoires d'aspiration
Installation de la coupelle à poussière
Alignez le repère Point sur la coupelle à poussière avec le repère Unlock sur
le corps, placez la coupelle à poussière et serrez-la dans le sens des
aiguilles d'une montre.
Pour l'enlever, tournez la coupelle à poussière dans le sens inverse des
aiguilles d'une montre.
1 2

54
Installation de la brosse mobile
Après avoir mis en place la coupelle à poussière, insérez la brosse mobile
dans la coupelle à poussière dans le sens indiqué. Lorsque la brosse est
complètement insérée, il y a un clic perceptible. La brosse mobile peut être
tirée d'avant en arrière.
La brosse mobile peut être retirée en la tenant et en la tirant vers l'extérieur.
1 2
55
Démontage et installation du godet à poussière HEPA
1.Appuyez sur le couvercle du godet à poussière et dévissez-le en le
tournant.
2. Retirez le filtre interne et nettoyez le bac à poussière.
3.Si vous devez remplacer le filtre HEPA par un nouveau, retirez la grille
métallique du filtre en la faisant tourner, puis installez le nouveau filtre
HEPA.
1 2 3

56
Installation de la buse d'air et du connecteur
Installation de la buse d'air
Alignez la bosse de l'embout sur la rainure de l'orifice de gonflage/dégon-
flage, insérez l'embout et serrez-le dans le sens des aiguilles d'une montre.
Lorsque l'embout est complètement installé, il y a un clic perceptible.
Tournez la buse d'air dans le sens inverse des aiguilles d'une montre pour
la retirer.
1 2

57
Installation du connecteur de dégonflage à vide
Alignez la bosse du connecteur avec la rainure de l'orifice de dégonflage,
insérez le connecteur et serrez-le dans le sens des aiguilles d'une montre.
Lorsqu'il est complètement installé, il y a un clic perceptible.
Tournez le connecteur dans le sens inverse des aiguilles d'une montre pour
le retirer.
1 2

58
Rappels spéciaux
La pression admissible du ballon étant inférieure à la pression de gonflage
maximale de l'appareil, il convient de l'utiliser avec précaution. Ne pas
utiliser l'aspirateur avec des accessoires autres que la coupelle à
poussière, car la pénétration de poussières fines peut endommager
l'appareil.
Ce produit n'est pas un jouet et son utilisation par des enfants est
interdite. Il est recommandé que l'utilisateur soit âgé d'au moins 16 ans.
Tenez les enfants à distance du produit pendant son utilisation.
Le produit est équipé d'une batterie au lithium non amovible. Il est
interdit de jeter le produit au feu ou de s'en débarrasser à sa guise. Il
existe un risque d'incendie, de combustion spontanée ou d'explosion si
la pile au lithium est surchauffée, frappée ou arrosée, c'est pourquoi il
faut éviter de l'exposer à des températures élevées, par exemple dans
une voiture.
Ne stockez pas le produit à des températures inférieures à -10°C ou
supérieures à 45°C. Trop de froid ou trop de chaleur réduira la durée de
vie du produit et endommagera la batterie intégrée.
Il est recommandé de recharger la batterie au moins une fois tous les
trois mois, car le produit peut être endommagé s'il n'est pas utilisé
pendant une longue période.
Le produit est équipé d'un moteur à courant continu intégré et ne doit
pas être utilisé dans des environnements inflammables ou explosifs.
Si un bruit étrange se fait entendre ou si la température est trop élevée
pendant le fonctionnement, éteignez immédiatement la machine.
04 Notes

59
Ne laissez pas la batterie dans un environnement où la température est
extrêmement élevée (soleil, feu, four à micro-ondes, four, etc.), car cela
pourrait provoquer une explosion ou une fuite de liquides et de gaz
inflammables.
Ne démontez pas, ne frappez pas, n'écrasez pas et ne coupez pas la
batterie, car cela pourrait provoquer une explosion.
Ne soumettez pas la batterie à une pression d'air extrêmement basse,
car elle pourrait exploser ou laisser échapper des liquides et des gaz
inflammables. Ne continuez pas à utiliser la batterie si elle est fortement
gonflée.
Ne quittez pas le véhicule pendant le gonflage et observez le processus
de gonflage afin d'éviter une pression de gonflage excessive.
Veuillez l'utiliser dans un environnement sec et propre. Le produit n'est
pas imperméable et ne doit pas être rincé à l'eau.
Veuillez utiliser un adaptateur sûr et conforme avec un câble de charge
conforme pour charger ce produit. La garantie ne s'applique pas si le
produit n'est pas rechargé conformément aux instructions ci-dessus.
05 Batteries

60
06 Dépannage
Problèmes
Pas de puissance
Ralentissement de l'inflation
L'appareil est sous tension
mais ne fonctionne pas
Fuite d'air après le
raccordement de la buse
d'air
Après l'avoir rechargé pendant un certain
temps, débranchez le câble de charge-
ment et essayez de le rallumer.
1.La puissance de la batterie est
insuffisante.
2.Les accessoires ne sont pas en place.
3.La sortie d'air n'est pas bien connectée à
la sortie d'air de l'objet à gonfler.
4.Vérifier qu'il n'y a pas de fuites d'air dans
l'objet à gonfler.
1.Vérifier si la puissance de la batterie est
suffisante.
2.Vérifier si la température ambiante est
supérieure à la plage requise.
Solutions
1.Vérifier si la buse d'air est en place.
2.Vérifier si la buse d'air est endommagée.

Remarques pour l'emballage
Les matériaux d'emballage sont recyclables. Veuillez éliminer l'emballage de façon
écologique.
61
07 Spécifications
Nom du produit: Machine à souffler et à sucer le petit singe
Modèle du produit : QWCXJ001
Dimensions du produit : environ 55 x 56 x 163,5 mm (taille nue, sans
accessoires)
Poids net : environ 356 g
Couleur : noir
Puissance de gonflage maximale : 15000 Pa
Température de fonctionnement:-10℃ à 45℃
Température de charge : 5℃ à 40℃
Température de stockage : -10℃ à 45℃
Type de batterie : Lithium-ion
Capacité de la batterie : 1900mAh
Bruit de fonctionnement : environ 75 dB
Entrée nominale : 5V 3A
Puissance nominale : 120W
Tension nominale : 10,8 V
Port de charge : USB Type-C
Temps de charge : environ 2,5 heures

¡Atención!
62
Lea todas las advertencias de seguridad, instrucciones, diagramas y
reglamentos suministrados con el producto y conserve todas las
advertencias e instrucciones para futuras consultas.
Lea atentamente este manual antes de utilizar el producto y, a
continuación, guárdelo correctamente.
La máquina genera aproximadamente 75 dB de ruido durante su
funcionamiento, por lo que debe tener cuidado para protegerla.
Este producto no es un juguete y su uso por niños está prohibido.
No aspire sin el depósito de polvo instalado.
Debido a la fuerte potencia de succión de este producto, manténgalo a
una distancia adecuada de su cabello cuando lo utilice.
01 Instrucciones de seguridad

63
02 Productos
Puerto de carga
Puerto de inflado
Puerto de desinflado
Indicador de
nivel de batería
Boton ON/OFF
La máquina puede instalarse con los accesorios adecuados: aspirado, inflado,
soplado y aspirado para almacenamiento. Para obtener una lista detallada,
consulte la página de venta del producto o pregunte al servicio de atención al
cliente de Monkey.
Las imágenes del producto son meramente ilustrativas. Consulte el producto
real.
64
Accesorios de vacío
Boquillas de inflado/desinflado
Conexión de vacío
Recipiente para el polvo
(con filtro HEPA
y metálico en el interior)
Boquilla de aire corta
Conector
de desinflado
al vacío
Boquilla de aire larga
Boquilla
de aire
de anillo
de natación
Cepillo móvil
65
Indicación del nivel de batería y carga
Indicación del nivel de batería
El indicador de nivel de batería se ilumina
cuando el producto está en funcionamien-
to.
Nivel de batería ≥ 20%: La luz blanca
siempre encendida.
Nivel de batería <20% : La luz roja está
siempre encendida, necesita cargarse.
Cargando
Consejo:
El producto no funciona durante el proceso
de carga.
Deberá adquirir su propio adaptador USB de
5 V que cumpla las normas de seguridad.
teur USB 5V conforme aux normes de
03 Manual del usuario
Cargue completamente el producto antes de
utilizarlo por primera vez. Utilice el cable de
carga para cargar el producto conectando un
adaptador que coincida con la potencia de
carga del producto. Estado de carga:
Luz roja que respira durante la carga.
La luz blanca está siempre encendida después
de cargar al 100%.
66
Encendido/Apagado
Encendido
Mantenga pulsado el botón ON/OFF durante 1,5 segundos para encenderlo.
Apagado
Mantenga pulsado el botón ON/OFF durante 1,5 segundos para apagarlo.
Cambiar de marcha
Funciona en marcha alta por defecto. Pulsa el botón ON/OFF para cambiar a
marcha baja y vuelve a pulsar el botón para volver a marcha alta.

67
Instalación y limpieza de accesorios de aspiración
Instalación del depósito de polvo
Alinee la marca Dot del guardapolvo con la marca Unlock del cuerpo,
coloque el guardapolvo y apriételo en el sentido de las agujas del reloj.
Para retirarlo, gire el guardapolvo en el sentido contrario a las agujas del
reloj.
1 2

68
Instalación del cepillo móvil
Una vez colocado el guardapolvo, introduzca el cepillo móvil en el
guardapolvo en la dirección indicada. Cuando el cepillo esté completa-
mente insertado, se oirá un clic perceptible. El componente móvil del
cepillo se puede tirar hacia adelante y hacia atrás.
El cepillo móvil puede extraerse sujetándolo y tirando de él hacia fuera.
1 2

69
Desmontaje e instalación del depósito de polvo HEPA
1.Presione hacia abajo la tapa del depósito de polvo y desenrósquela
girándola.
2.Retire el filtro interno y limpie el depósito de polvo.
3.Si necesita sustituir el HEPA por uno nuevo, retire la malla metálica del
filtro girándola y, a continuación, instale el nuevo HEPA.
1 2 3

70
Instalación de la boquilla de aire y el conector
Instalación de boquillas de airer
Alinee la protuberancia de la boquilla con la ranura del puerto de
inflado/desinflado, inserte la boquilla y apriétela en el sentido de las agujas
del reloj. Cuando esté completamente instalada, se oirá un clic perceptible.
Gire la boquilla de aire en el sentido contrario a las agujas del reloj para
extraerla.
1 2
71
Instalación del conector de desinflado por vacío
Alinee la protuberancia del conector con la ranura del puerto de desinflado,
inserte el conector y apriételo en el sentido de las agujas del reloj. Cuando
esté completamente instalado, se oirá un clic perceptible.
Gire el conector en el sentido contrario a las agujas del reloj para extraerlo.
1 2

72
Recordatorios especiales
Dado que el valor de presión admisible del globo es inferior a la presión
máxima de inflado de la máquina, debe utilizarse con precaución. No
aspire con accesorios que no sean el conjunto de la ventosa,ya que la
entrada de polvo fino puede dañar el producto.
Este producto no es un juguete y su uso por niños está prohibido. Se
recomienda que el usuario tenga al menos 16 años. Por favor, mantenga
a los niños a una distancia segura del producto durante su uso.
El producto lleva incorporada una batería de litio no extraíble. Está
prohibido arrojar el producto al fuego o deshacerse de él a voluntad.
Existe riesgo de incendio, combustión espontánea o explosión si la
batería de litio se sobrecalienta, se golpea o se riega, por lo que le
rogamos que evite exponerla a altas temperaturas como, por ejemplo, en
el coche.
No almacene el producto a temperaturas inferiores a -10°C ni superiores
a 45°C. Demasiado frío o demasiado calor acortarán la vida útil del
producto y dañarán la batería incorporada.
Se recomienda cargar la batería al menos una vez cada tres meses, ya
que el producto puede dañarse si no se utiliza durante un largo periodo
de tiempo.
El producto lleva incorporado un motor de corriente continua y no debe
utilizarse en entornos inflamables o explosivos.
Si se produce un ruido extraño o la temperatura es demasiado alta
durante el funcionamiento, apague la máquina inmediatamente.
04 Notas

73
No deje la batería en entornos con temperaturas extremadamente altas,
como la luz solar, el fuego, microondas, hornos, etc., ya que podría
provocar una explosión o la fuga de líquidos y gases inflamables.
No desmonte, golpee, aplaste ni corte la batería, ya que podría provocar
una explosión.
No someta la batería a una presión de aire extremadamente baja, ya
que podría explotar o perder líquidos y gases inflamables. No siga
utilizando la batería si se infla mucho.
No se aleje mientras se infla y observe el proceso de inflado para evitar
una presión de inflado excesiva.
Utilícelo en un entorno seco y limpio. El producto no es impermeable y
no debe enjuagarse con agua.
Utilice un adaptador seguro y conforme con un cable de carga
conforme para cargar este producto. La garantía no cubre las cargas
que no se realicen según lo indicado anteriormente.
05 Baterías

74
06 Solución de problemas
Problemas
Sin energía
Inflación lenta
Encendido pero no
funciona
Fuga de aire después de
conectar la boquilla de
aire
Después de cargarlo durante un rato,
desenchufa el cable de carga e intenta
encenderlo de nuevo.
1.Batería insuficiente.
2.Los accesorios no están colocados.
3.La salida de aire no está bien conectada a
la salida de aire del objeto que se está
inflando.
4.Compruebe si hay fugas de aire en el
objeto que se está inflando.
1.Compruebe si la carga de la batería es
suficiente.
2.Compruebe si la temperatura ambiente
es superior a la requerida.
Soluciones
1.Compruebe si la boquilla de aire está en su
sitio.
2. Compruebe si la boquilla de aire está
dañada.

Notas sobre el embalaje
Los materiales de embalaje son reciclables. Elimine el embalaje de forma respetuosa
con el medio ambiente.
75
07 Especificaciones
07 Especificaciones
Nombre del producto: Pequeño mono que sopla y que chupa la máquina.
Modelo del producto: QWCXJ001
Dimensiones del producto: aprox. 55 x 56 x 163,5 mm (tamaño normal, sin
accesorios)
Peso neto: 356 g aprox.
Color: Negro
Potencia máxima de inflado: 15000 Pa
Temperatura de funcionamiento: -10 °C a 45 °C
Temperatura de carga: 5 °C a 40 °C
Temperatura de Almacenamiento: -10 °C a 45 °C
Tipo de batería: Ión-litio
Capacidad de la batería: 1900 mAh
Ruido de funcionamiento: aprox. 75 dB
Entrada nominal: 5V 3A
Potencia nominal: 120 W
Tensión nominal: 10,8 V
Puerto de carga: USB Tipo-C
Tiempo de carga: aprox. 2,5 horas