owner's
manual
MODEL NO.
113.177846
Serial
Number
Model and serial
numbers may be
found on the handle.
You should record
both model and serial
numbers in a safe
place for future use.
AWARNING:
FOR YOUR
SAFETY,
READ ALL
INSTRUCTIONS
CAREFULLY
SAVE THIS
MANUAL
FOR FUTURE
REFERENCE
J
T ®
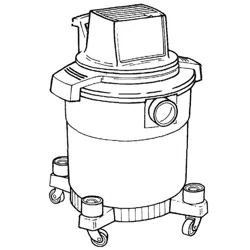
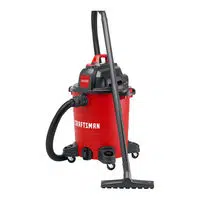
20 GALLON
WET/DRY VAC
• safety
• assembly
• operating
• maintenance
• repair parts
• Espafiol - pagina 19
Sears, Roebuck and Co., Hoffman Estates, IL 60179 U.S.A.
Part No. SP6642 Printed in Mexico
Table of Contents
Section Page
Table of Contents .................. 2
Warranty ........................ 2
Important Safety Instructions ......... 3
Introduction ...................... 5
Unpacking and Checking
Carton Contents ................. 5
Carton Contents List ............. 5
Tools Required .................. 5
Replacement Filter Assembly ........ 6
Drum/Wheel Assembly ............. 7
Wet/Dry Vac Assembly ............. 9
Cord Storage ................... 9
Insert Hose ..................... 9
Accessory and Hose Storage ....... 10
Operation ....................... 10
Vacuuming Dry Materials ......... 11
Section Page
Vacuuming Liquids .............. 11
Emptying the Drum ............. 11
Moving the Wet/Dry Vac .......... 11
Blowing Feature ................ 12
Maintenance .................... 13
Filter ......................... 13
Filter Cleaning ................. 13
Filter Removal ................. 13
Cleaning a Dry Filter ............ 13
Cleaning a Wet Filter ............ 13
Installation .................... 13
Cleaning and Disinfecting
the Wet/Dry Vac .............. 14
Casters ....................... 14
Storage ....................... 14
Repair Parts ..................... 16
Warranty
r
Craftsman One Year Full Warranty
If this Craftsman product fails due to a defect in material or workmanship
within one year from the date of purchase, return it to any Sears store,
Sears Service Center, or other Craftsman outlet for free repair (or
replacement if repair proves impossible).
This warranty applies for only 90 days from the date of purchase if this
product is ever used for commercial or rental purposes.
This warranty does not include bags or filters, which are expendable
parts that can wear out from normal use within the warranty period.
This warranty gives you specific legal rights, and you may also have other
rights, which vary, from state to state.
Sears, Roebuck and Co., Hoffman Estates, IL 60179 j
k.
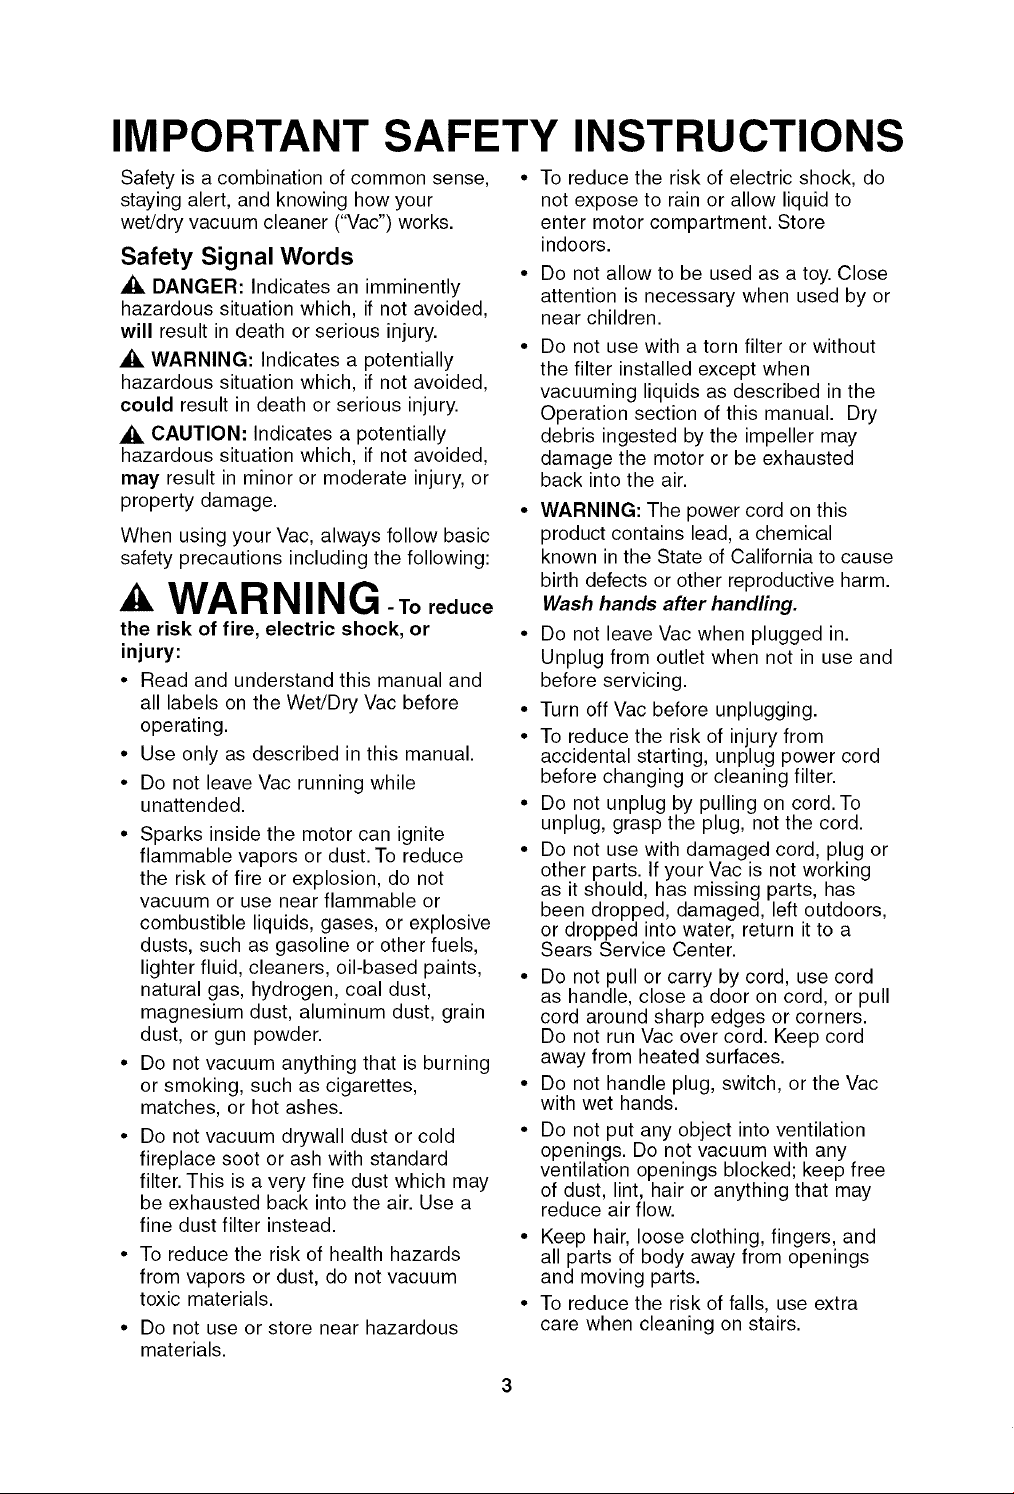
IMPORTANT SAFETY INSTRUCTIONS
Safety is a combination of common sense.
staying alert, and knowing how your
wet/dry vacuum cleaner ("Vac") works.
Safety Signal Words
DANGER: Indicates an imminently
hazardous situation which, if not avoided
will result in death or serious injury.
A WARNING: Indicates a potentially
hazardous situation which, if not avoided
could result in death or serious injury.
CAUTION: Indicates a potentially
hazardous situation which, if not avoided
may result in minor or moderate injury, or
property damage.
When using your Vac, always follow basic
safety precautions including the following:
WARNING -Toreduce
the risk of fire, electric shock, or
injury:
• Read and understand this manual and
all labels on the Wet/Dry Vac before
operating.
• Use only as described in this manual.
• Do not leave Vac running while
unattended.
• Sparks inside the motor can ignite
flammable vapors or dust. To reduce
the risk of fire or explosion, do not
vacuum or use near flammable or
combustible liquids, gases, or explosive
dusts, such as gasoline or other fuels,
lighter fluid, cleaners, oil-based paints,
natural gas, hydrogen, coal dust,
magnesium dust, aluminum dust, grain
dust, or gun powder.
• Do not vacuum anything that is burning
or smoking, such as cigarettes,
matches, or hot ashes.
• Do not vacuum drywall dust or cold
fireplace soot or ash with standard
filter. This is a very fine dust which may
be exhausted back into the air. Use a
fine dust filter instead.
• To reduce the risk of health hazards
from vapors or dust, do not vacuum
toxic materials.
• Do not use or store near hazardous
materials.
To reduce the risk of electric shock, do
not expose to rain or allow liquid to
enter motor compartment. Store
indoors.
Do not allow to be used as a toy. Close
attention is necessary when used by or
near children.
Do not use with a torn filter or without
the filter installed except when
vacuuming liquids as described in the
Operation section of this manual. Dry
debris ingested by the impeller may
damage the motor or be exhausted
back into the air.
• WARNING: The power cord on this
product contains lead, a chemical
known in the State of California to cause
birth defects or other reproductive harm.
Wash hands after handling.
• Do not leave Vac when plugged in.
Unplug from outlet when not in use and
before servicing.
• Turn off Vac before unplugging.
• To reduce the risk of injury from
accidental starting, unplug power cord
before changing or cleaning filter.
• Do not unplug by pulling on cord. To
unplug, grasp the plug, not the cord.
• Do not use with damaged cord, plug or
other parts. If your Vac is not working
as it should, has missing parts, has
been dropped, damaged, left outdoors,
or dropped into water, return it to a
Sears Service Center.
• Do not pull or carry by cord, use cord
as handle, close a door on cord, or pull
cord around sharp edges or corners.
Do not run Vac over cord. Keep cord
away from heated surfaces.
• Do not handle plug, switch, or the Vac
with wet hands.
• Do not put any object into ventilation
openings. Do not vacuum with any
ventilation openings blocked; keep free
of dust, lint, hair or anything that may
reduce air flow.
• Keep hair, loose clothing, fingers, and
all parts of body away from openings
and moving parts.
• To reduce the risk of falls, use extra
care when cleaning on stairs.
• Toreducetheriskofbackinjuryor
falls,donotliftaVacthatisheavywith
liquidordebris.PartiallyemptytheVac
byscoopingordrainingliquidtomake
itcomfortabletolift.
• Toreducetheriskofpersonalinjuryor
damagetoVac,useonlyCraftsman
recommendedaccessories.
• Whenusingasablower:
- Directairdischargeonlyatwork
area.
- Donotdirectairatbystanders.
- Keepchildrenawaywhenblowing.
- Donotuseblowerforanyjobexcept
blowingdirtanddebris.
- Donotuseasasprayer.
- Wearsafetyeyewear.
• Toreducetheriskofeyeinjury,wear
safetyeyewear.Theoperationofany
utilityVacorblowercanresultin
foreignobjectsbeingblownintothe
eyes,whichcanresultinsevereeye
damage.
• Toreducetheriskofbeingstruckby,or
pulleddownby,a rollingVac,blockthe
casterswhenusingonanyunevenor
slopedsurface.
• ThisWet/DryVacisdouble-insulated,
eliminatingtheneedforaseparate
groundingsystem.Useonlyidentical
replacementparts.Readthe
instructionsforServicingDouble-
InsulatedWet/DryVacsbefore
servicing.
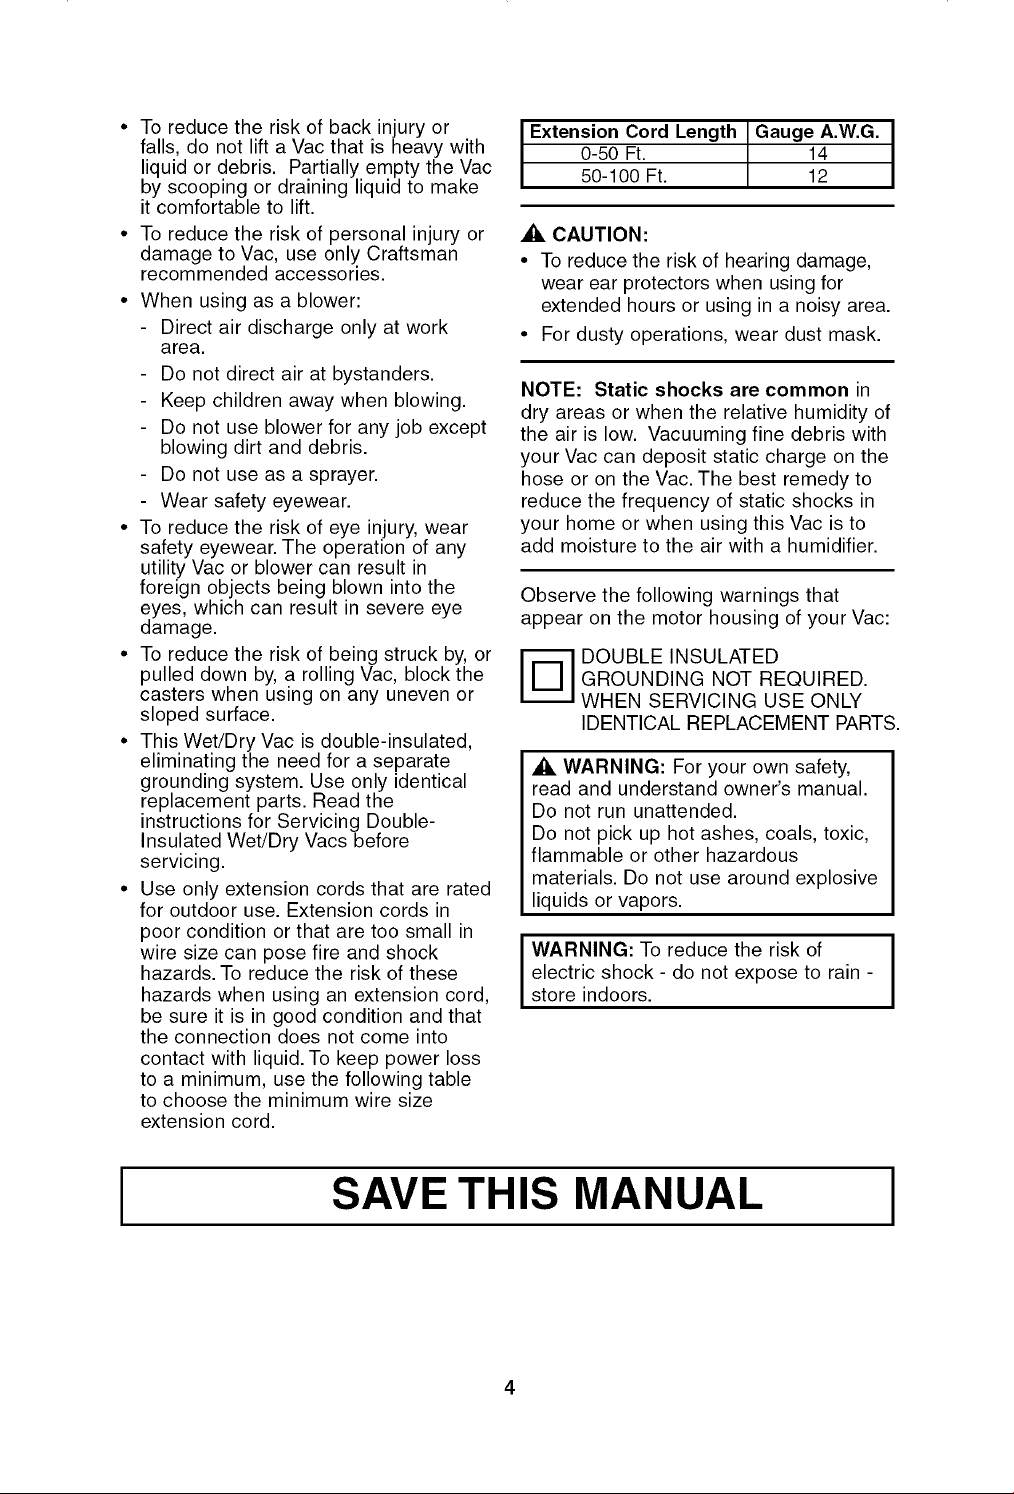
• Useonlyextensioncordsthatarerated
foroutdooruse.Extensioncordsin
poorconditionorthataretoosmallin
wiresizecanposefireandshock
hazards.Toreducetheriskofthese
hazardswhenusinganextensioncord,
besureitisingoodconditionandthat
theconnectiondoesnotcomeinto
contactwithliquid.Tokeeppowerloss
toaminimum,usethefollowingtable
tochoosetheminimumwiresize
extensioncord.
Extension Cord Length Gauge A.W.G.
0-50 Ft. 14
50-100 Ft. 12
CAUTION:
• To reduce the risk of hearing damage,
wear ear protectors when using for
extended hours or using in a noisy area.
• For dusty operations, wear dust mask.
NOTE: Static shocks are common in
dry areas or when the relative humidity of
the air is low. Vacuuming fine debris with
your Vac can deposit static charge on the
hose or on the Vac. The best remedy to
reduce the frequency of static shocks in
your home or when using this Vac is to
add moisture to the air with a humidifier.
Observe the following warnings that
appear on the motor housing of your Vac:
'] DOUBLE INSULATED
GROUNDING NOT REQUIRED.
WHEN SERVICING USE ONLY
IDENTICAL REPLACEMENT PARTS.
A WARNING: For your own safety,
read and understand owner's manual.
Do not run unattended.
Do not pick up hot ashes, coals, toxic,
flammable or other hazardous
materials. Do not use around explosive
liquids or vapors.
I WARNING: To reduce the risk of I
electric shock - do not expose to rain -
store indoors.
SAVE THIS MANUAL I
Introduction
This Wet/Dry Vac is intended for house-
hold use. It may be used for vacuuming of
wet or dry media and may be used as a
blower.
Read this owner's manual to familiarize
yourself with the product features and to
understand the specific usage of your new
wet/dry vac.
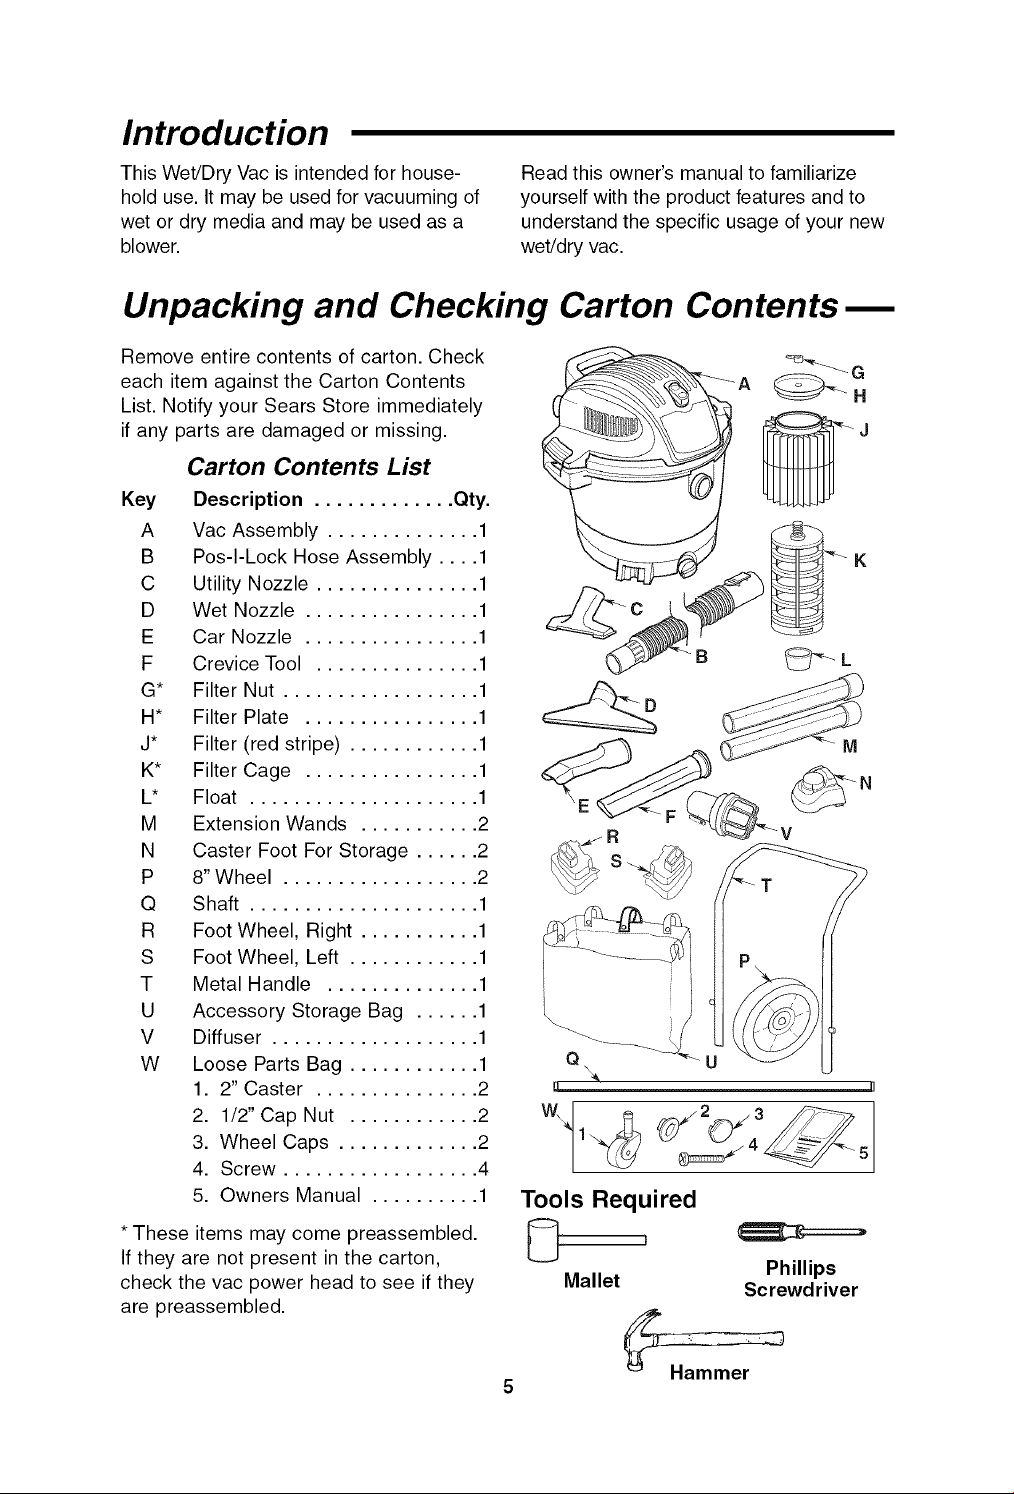
Unpacking and Checking Carton Contents m
Remove entire contents of carton. Check
each item against the Carton Contents
List. Notify your Sears Store immediately
if any parts are damaged or missing.
Key
A
B
C
D
E
F
G*
H*
j*
K*
L*
M
N
P
Q
R
S
T
U
V
W
Carton Contents List
Description ............. Qty.
Vac Assembly .............. 1
Pos-I-Lock Hose Assembly .... 1
Utility Nozzle ............... 1
Wet Nozzle ................ 1
Car Nozzle ................ 1
Crevice Tool ............... 1
Filter Nut .................. 1
Filter Plate ................ 1
Filter (red stripe) ............ 1
Filter Cage ................ 1
Float ..................... 1
Extension Wands ........... 2
Caster Foot For Storage ...... 2
8" Wheel .................. 2
Shaft ..................... 1
Foot Wheel, Right ........... 1
Foot Wheel, Left ............ 1
Metal Handle .............. 1
Accessory Storage Bag ...... 1
Diffuser ................... 1
Loose Parts Bag ............ 1
1. 2" Caster ............... 2
2. 1/2" Cap Nut ............ 2
3. Wheel Caps ............. 2
4. Screw .................. 4
5. Owners Manual .......... 1
* These items may come preassembled.
If they are not present in the carton,
check the vac power head to see if they
are preassembled.
5
Q\
[1
Tools Required
Phillips
Mallet Screwdriver

Replacement Filter Assembly
Ak WARNING: For your own safety,
never connect plug to power source
outlet until all assembly steps are
complete and you have read and
understood the safety and operation
instructions. Do not operate vac with
any parts damaged or missing.
1. Carefully slide the filter over the filter
cage, sliding it over the center ring
covering the 3 slots until the filter stops
against the lid.
2. Place the hole in the filter plate over
threaded stud of the filter cage.
3. Gently push on the filter plate to seat
the rubber ring of the filter inside the
circular channel of the filter plate.
4. Place filter nut onto threaded stud and
tighten it down. Finger tighten only.
NOTE: Lever of filter nut should be away
from plate as shown.
IMPORTANT: Do not overtighten as this
may deform or crack the filter plate, filter
cage, or filter.
NOTE: Your filter has a red stripe that
matches an in-store displayer. When you
visit your local Sears store, just
remember the color of your stripe for the
correct size filter.
Filter Nut
Lever Plate
Stripe
WARNING: To avoid personal
injury or damage to vac be sure to
keep hands, fingers, or any other
foreign objects out of the center
opening when assembling the float.
NOTE: If filter cage needs to be removed,
or replaced, use a flat blade screwdriver
and insert the blade near one of the tabs
between the filter cage and the center
ring of the lid. Pry the tab out of the slot.
Tilt the cage and lift away from the lid.
Replace in the following manner:
5. Place the float over the opening in the
center of the lid with the words "This
Side Towards Lid" laying face down
over the hole.
6. Line up filter cage tabs with slots in the
center ring of the lid.
7. Push on the filter cage until the tabs
snap into slots for a secure fit.
Filter Cage __
Tabs (3)__ Power
Float _ Head
Solid End _._ Assembly
_ Filter )
Tabs(3)
Slots(3)
Drum/Wheel Assembly
If any parts are missing or damaged
contact Customer Service.
Do not assemble until you have all the
parts.
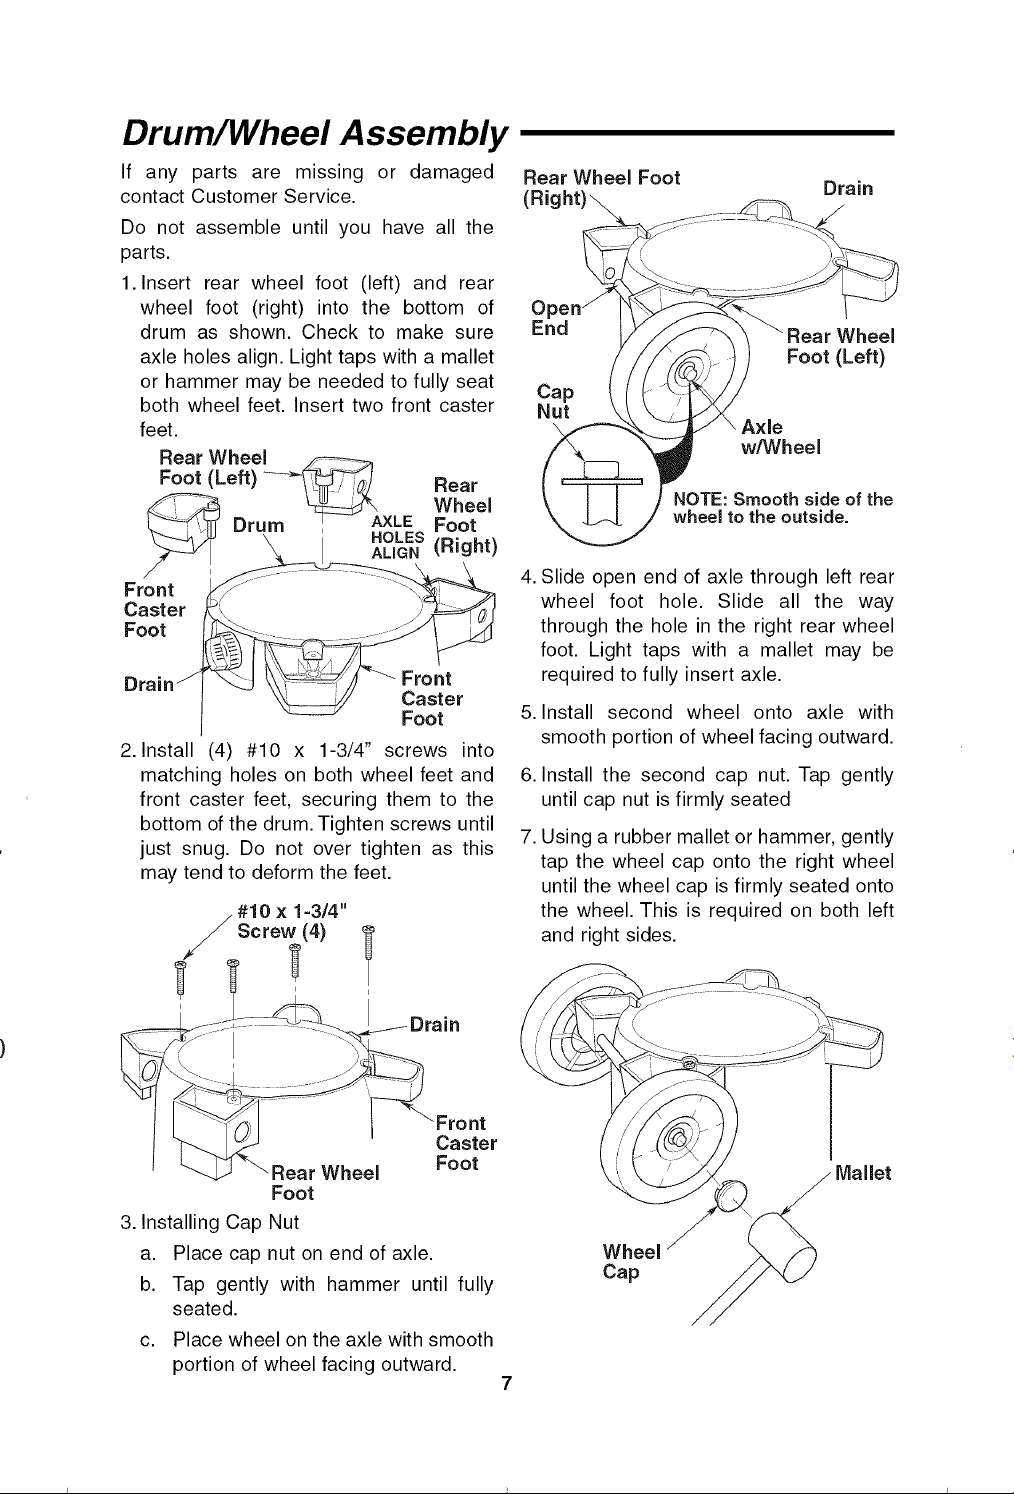
1. Insert rear wheel foot (left) and rear
wheel foot (right) into the bottom of
drum as shown. Check to make sure
axle holes align. Light taps with a mallet
or hammer may be needed to fully seat
both wheel feet. Insert two front caster
feet.
Rear Wheel /F--_-_
Foot (Left) ---_J Rear
Wheel
Drum AXLE Foot
HOLES(Right)
ALIGN
Front
Caster
Foot
Front
Caster
Foot
2. Install (4) #10 x 1-3/4" screws into
matching holes on both wheel feet and
front caster feet, securing them to the
bottom of the drum. Tighten screws until
just snug. Do not over tighten as this
may tend to deform the feet.
#10x1=3/4"
Screw (4)
_' ' Caster
Wheel Foot
Foot
3. Installing Cap Nut
a. Place cap nut on end of axle.
b. Tap gently with hammer until fully
seated.
c. Place wheel on the axle with smooth
portion of wheel facing outward.
Rear Wheel Foot
Drain
/
O
End
Cap
Nut
Wheel
Foot (Left)
w/Wheel
NOTE: Smooth side of the
wheel to the outside.
4. Slide open end of axle through left rear
wheel foot hole. Slide all the way
through the hole in the right rear wheel
foot. Light taps with a mallet may be
required to fully insert axle.
5. Install second wheel onto axle with
smooth portion of wheel facing outward.
6. Install the second cap nut. Tap gently
until cap nut is firmly seated
7. Using a rubber mallet or hammer, gently
tap the wheel cap onto the right wheel
until the wheel cap is firmly seated onto
the wheel. This is required on both left
and right sides.
Wheel
Cap
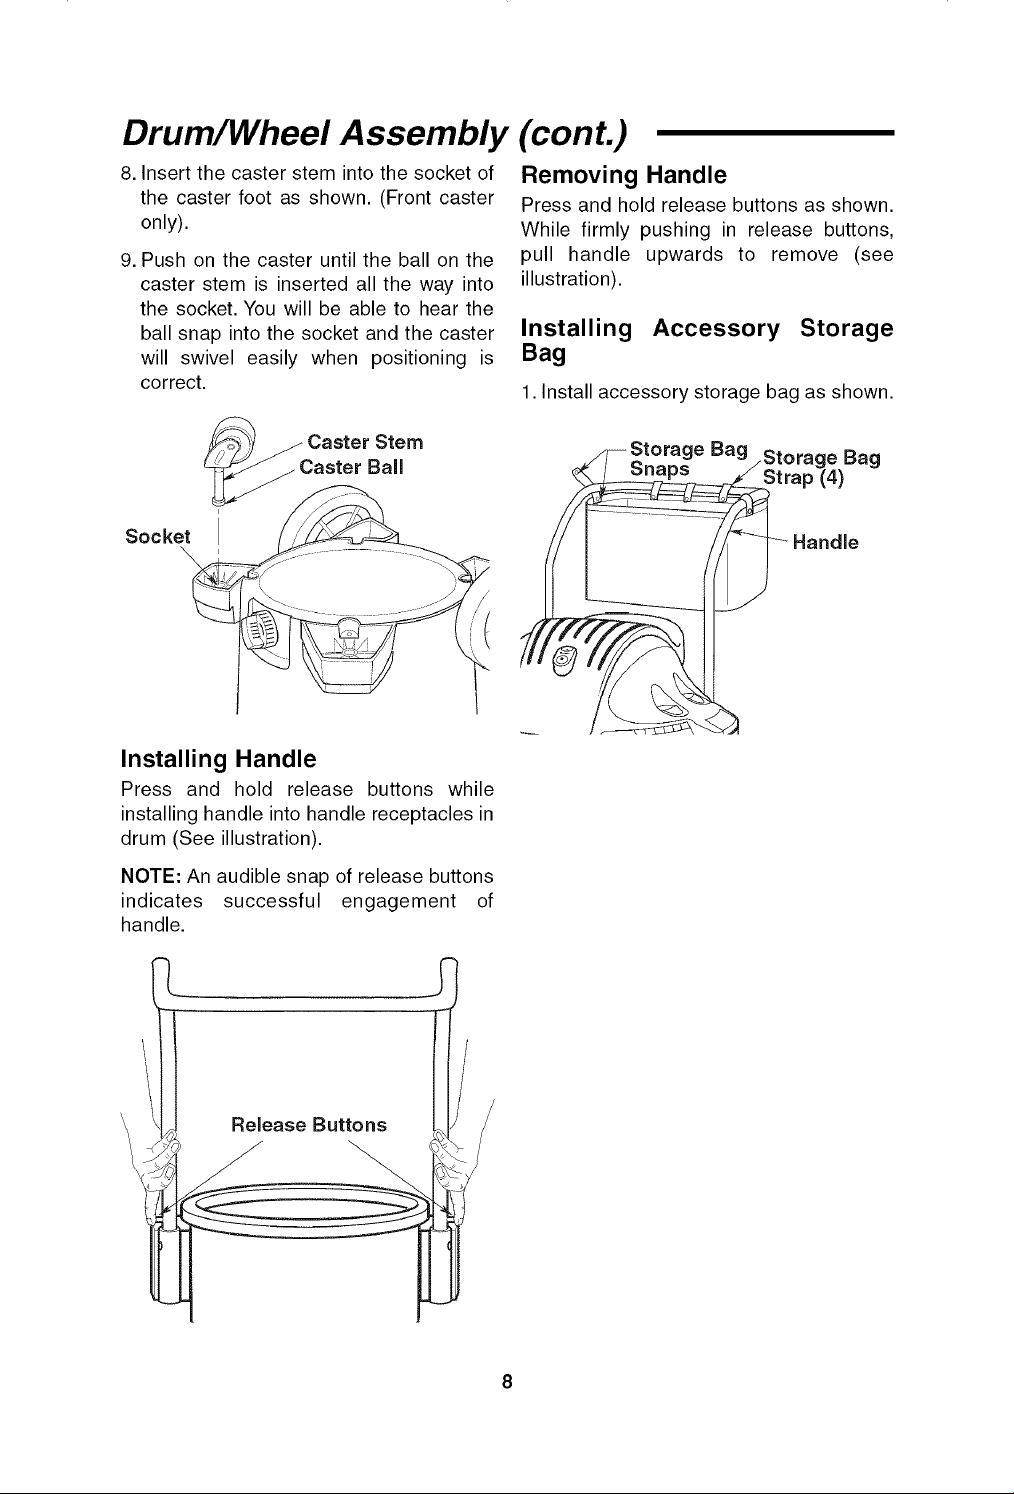
8.Insertthecasterstemintothesocketof
thecasterfootasshown.(Frontcaster
only).
Drum/Wheel Assembly (cont.)
Removing Handle
Press and hold release buttons as shown.
While firmly pushing in release buttons,
pull handle upwards to remove (see
illustration).
9. Push on the caster until the ball on the
caster stem is inserted all the way into
the socket. You will be able to hear the
ball snap into the socket and the caster
will swivel easily when positioning is
correct.
Socket
Cast e r Stem
aster Ball
Installing Handle
Press and hold release buttons while
installing handle into handle receptacles in
drum (See illustration).
Installing Accessory Storage
Bag
1. Install accessory storage bag as shown.
,/F Storage Bag .Storage Bag
NOTE: An audible snap of release buttons
indicates successful engagement of
handle.
Release Buttons
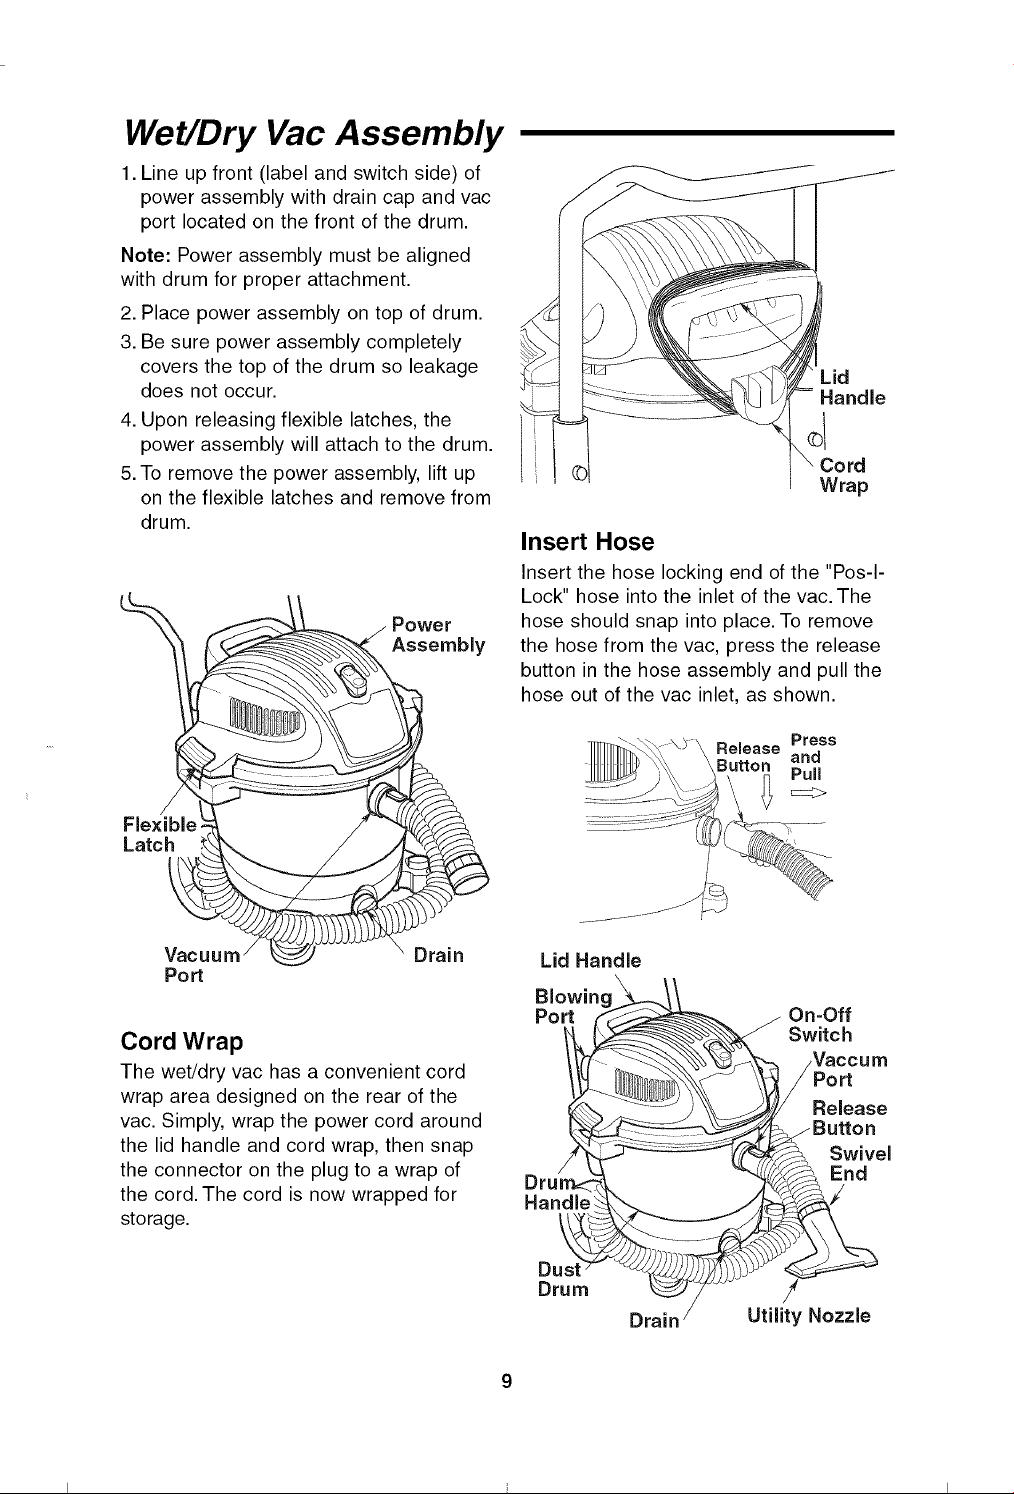
Wet/Dry Vac Assembly
1. Line up front (label and switch side) of
power assembly with drain cap and vac
port located on the front of the drum.
Note: Power assembly must be aligned
with drum for proper attachment.
2. Place power assembly on top of drum.
3. Be sure power assembly completely
covers the top of the drum so leakage
does not occur.
4. Upon releasing flexible latches, the
power assembly will attach to the drum.
5. To remove the power assembly, lift up
on the flexible latches and remove from
drum.
Flexible
Latch _ /
Vacuum / _ ........
Port
Power
Drain
Cord Wrap
The wet/dry vac has a convenient cord
wrap area designed on the rear of the
vac. Simply, wrap the power cord around
the lid handle and cord wrap, then snap
the connector on the plug to a wrap of
the cord. The cord is now wrapped for
storage.
'- - ........... '" •........ I
I
Insert Hose
Insert the hose locking end of the "Pos-I-
Lock" hose into the inlet of the vac. The
hose should snap into place. To remove
the hose from the vac, press the release
button in the hose assembly and pull the
hose out of the vac inlet, as shown.
Press
;e and
Pull
Lid Handle
On-Off
Switch
Vaccum
Release
Swivel
End
Dust
Drum
Drain
Utility Nozzle
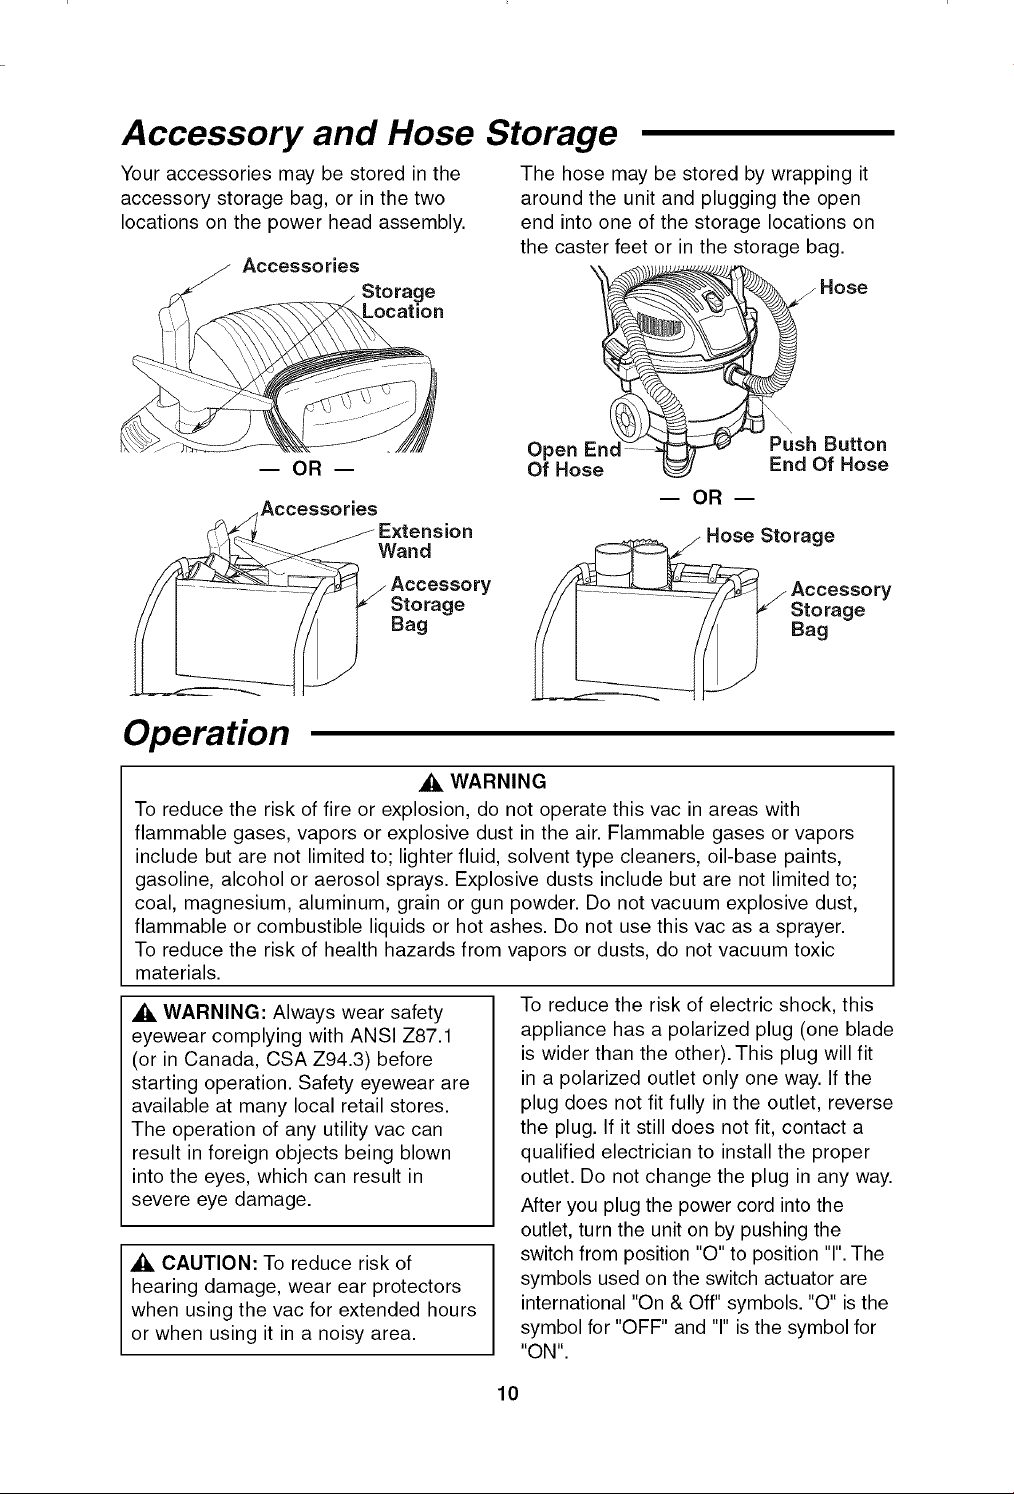
Accessory and Hose Storage
Your accessories may be stored in the
accessory storage bag, or in the two
locations on the power head assembly.
Location
Accessories
The hose may be stored by wrapping it
around the unit and plugging the open
end into one of the storage locations on
the caster feet or in the storage bag.
Open End
Of Hose
-- OR --
-- OR --
Accessories
Wand
__ Hose
Button
End Of Hose
Hose Storage
'y y
Storage Storage
Bag Bag
Operation
Ak WARNING
To reduce the risk of fire or explosion, do not operate this vac in areas with
flammable gases, vapors or explosive dust in the air. Flammable gases or vapors
include but are not limited to; lighter fluid, solvent type cleaners, oil-base paints,
gasoline, alcohol or aerosol sprays. Explosive dusts include but are not limited to;
coal, magnesium, aluminum, grain or gun powder. Do not vacuum explosive dust,
flammable or combustible liquids or hot ashes. Do not use this vac as a sprayer.
To reduce the risk of health hazards from vapors or dusts, do not vacuum toxic
materials.
WARNING: Always wear safety
eyewear complying with ANSI Z87.1
(or in Canada, CSA Z94.3) before
starting operation. Safety eyewear are
available at many local retail stores.
The operation of any utility vac can
result in foreign objects being blown
into the eyes, which can result in
severe eye damage.
CAUTION: To reduce risk of
hearing damage, wear ear protectors
when using the vac for extended hours
or when using it in a noisy area.
To reduce the risk of electric shock, this
appliance has a polarized plug (one blade
is wider than the other). This plug will fit
in a polarized outlet only one way. If the
plug does not fit fully in the outlet, reverse
the plug. If it still does not fit, contact a
qualified electrician to install the proper
outlet. Do not change the plug in any way.
After you plug the power cord into the
outlet, turn the unit on by pushing the
switch from position "O" to position 'T'.The
symbols used on the switch actuator are
international "On & Off" symbols. "O" is the
symbol for "OFF" and 'T' is the symbol for
"ON".
10
I = "ON" O = "OFF"
WARNING: To reduce the risk of
fire or electric shock, do not run vac
unattended.
Vacuuming Dry Materials
1. The filter must always be in correct
position to reduce the risk of leaks and
possible damage to vac.
2. When using your vac to pick up very
fine dust, it will be necessary for you to
empty the drum and clean the filter at
more frequent intervals to maintain
peak vac performance.
NOTE: A dry filter is necessary to pick up
dry material. If you use your vac to pick
up dust when the filter is wet, the filter will
clog quickly and be very difficult to clean.
3. If your filter is wet but you need to use
the vac to pick up dry material, you can
quickly dry the filter by running the vac
without hose attached for about
10 minutes. The clean air rushing
through the vac will help dry the filter.
The optional Craftsman HEPA Rated
Material Filter, stock number 9-17912 will
do a better job stopping the very fine
particles than the 9-17816 filter.
Vacuuming Liquids
1. When picking up small amounts of
liquid the filter may be left in place.
2. When picking up large amounts of
liquid we recommend that the filter be
removed. If the filter is not removed, it
will become saturated and misting may
appear in the exhaust.
3. When the liquid in the drum reaches a
predetermined level, the float
mechanism will rise automatically to cut
off air-flow. When this happens, turn off
the vac, unplug the power cord, and
empty the drum. You will know that the
float has risen because vac airflow
ceases and the motor noise will become
higher in pitch, due to increased motor
speed.
4. After using the vac to pick up liquids, the
filter must be dried to reduce the risk of
possible mildew and damage to the filter.
IMPORTANT: To reduce the risk of
damage to the vac do not run motor with
float in raised position.
Emptying the Drum
A WARNING: To reduce the risk of
injury from accidental starting, unplug
power cord before emptying the drum.
1. The vac comes equipped with a drain
for easy emptying of liquids. Simply
unscrew the drain cap and lift the
opposite side slightly to empty the
drum.
2. Another option is to remove the power
assembly.
3. Lay power assembly aside on a clean
area while emptying drum.
4. Dump the drum contents into the
proper waste disposal container.
WARNING: To reduce the risk of
back injury or falls, do not lift a vac
heavy with liquid or debris. Scoop or
drain enough contents out to make the
vac light enough to lift comfortably.
Moving the Wet/Dry Vac
Should it become necessary to pick the
vac up to move it, the handle on the sides
of the dust drum are used to lift. To
maneuver the vac, the push/pull lid
handle or metal handle in the rear of the
unit should be used.
11
Operation (continued)
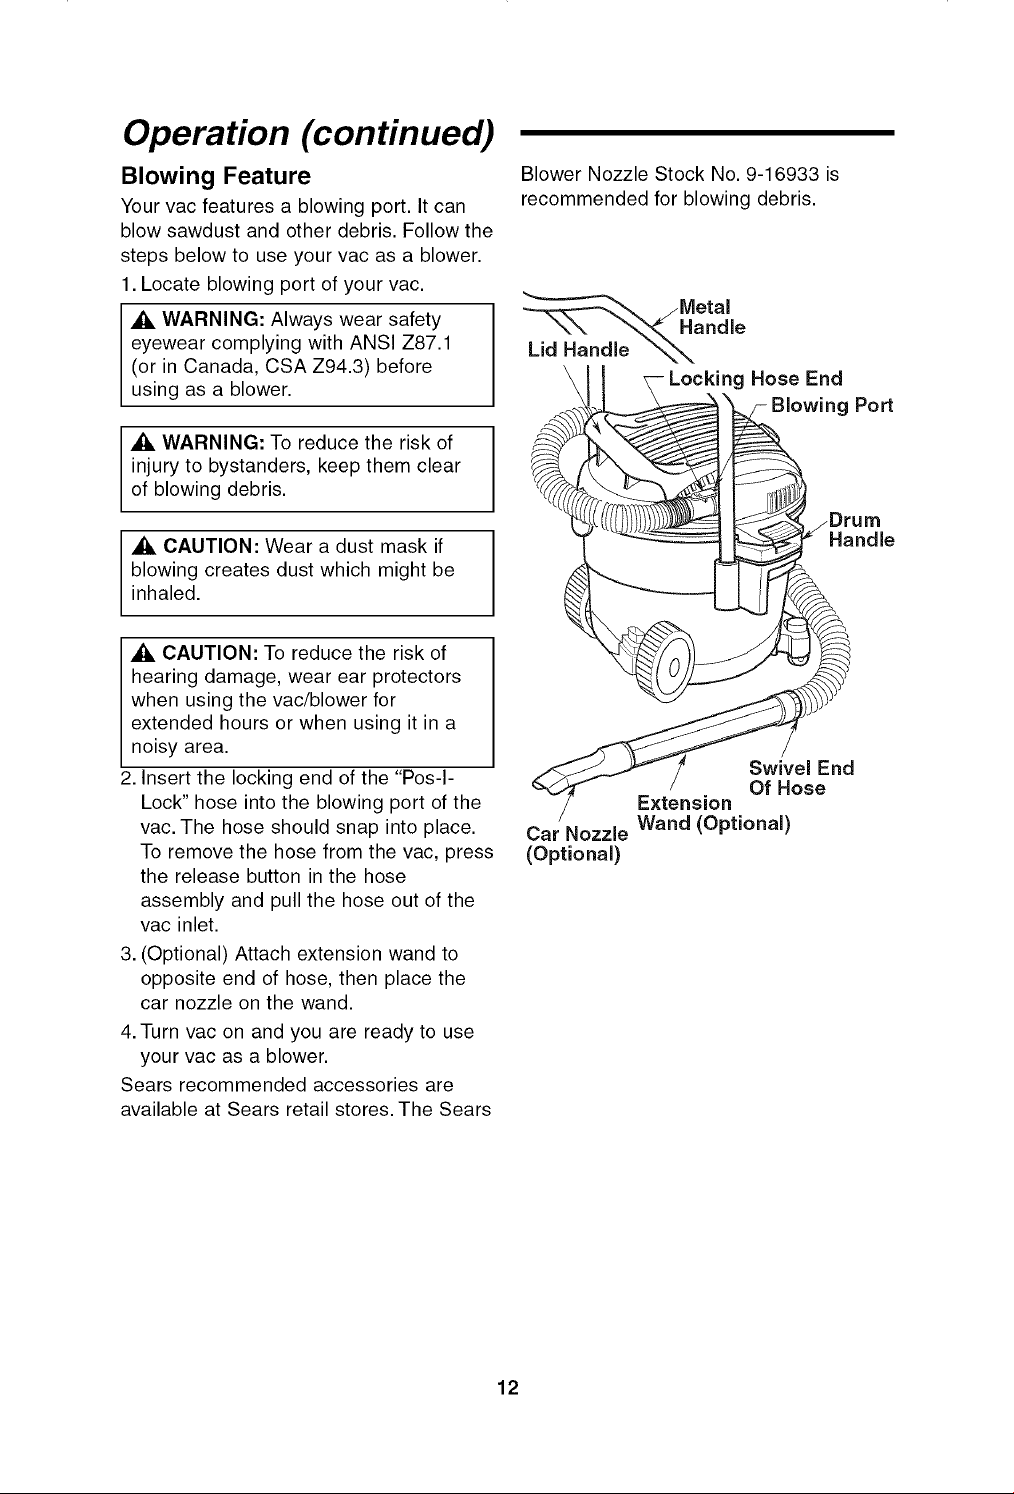
Blowing Feature
Your vac features a blowing port. It can
blow sawdust and other debris. Follow the
steps below to use your vac as a blower.
1. Locate blowing port of your vac.
I A WARNING: Always wear safety
eyewear complying with ANSI Z87.1
(or in Canada, CSA Z94.3) before
using as a blower.
WARNING: To reduce the risk of
injury to bystanders, keep them clear
of blowing debris.
CAUTION: Wear a dust mask if
blowing creates dust which might be
inhaled.
Blower Nozzle Stock No. 9-16933 is
recommended for blowing debris.
Metal
andle
_g Hose End
Port
Handle
A CAUTION: To reduce the risk of
hearing damage, wear ear protectors
when using the vac/blower for
extended hours or when using it in a
noisy area.
2. Insert the locking end of the "Pos-I-
Lock" hose into the blowing port of the
vac. The hose should snap into place.
To remove the hose from the vac, press
the release button in the hose
assembly and pull the hose out of the
vac inlet.
3. (Optional) Attach extension wand to
opposite end of hose, then place the
car nozzle on the wand.
4. Turn vac on and you are ready to use
your vac as a blower.
Sears recommended accessories are
available at Sears retail stores. The Sears
Car Nozzle
(Optional)
Swivel End
Of Hose
Extension
Wand (Optiona0
12
Maintenance
Filter
WARNING: To reduce the risk of
injury from accidental starting, unplug
power cord before changing or
cleaning filter.
NOTE: This filter is made of high quality
paper designed to stop very small
particles of dust. The filter can be used
for wet or dry pick up. Handle the filter
carefully when removing to clean or
installing it. Creases in the filter pleats
may occur from installation but creases
will not affect the performance of the
filter.
Filter Cleaning
Your filter should be cleaned often to
maintain peak vac performance.
Be sure to dry the filter before storing or
picking up dry debris.
IMPORTANT: After cleaning, check the
filter for tears or small holes. Do not use a
filter with holes or tears in it. Even a small
hole can cause a lot of dust to come out
of your vac. Replace the filter
immediately.
Filter Removal
To remove the filter for cleaning or
replacement, unscrew the filter nut from
the filter cage, remove filter plate and lift
off filter.
A WARNING: Do not remove the
filter cage. It is there to help prevent
your fingers from getting into the
blower wheel.
IMPORTANT: To reduce the risk of
damage to the blower wheel and motor,
always reinstall the filter before using the
vac for dry material pickup.
Cleaning A Dry Filter
Some removal of dry debris can be
accomplished without removing the filter
from the vac. Slap your hand on top of
the power assembly while the vac is
turned off.
For best cleaning results due to
accumulated dust, clean the filter in an
open area. Cleaning SHOULD be done
outdoors and not in the living quarters.
After filter removal from vac, remove the
dry debris by gently tapping the filter
against the inside wall of your dust drum.
The debris will loosen and fall.
For thorough cleaning of dry filter with
fine dust (no debris), run water through it
as described under "Cleaning A Wet
Filter".
Cleaning A Wet Filter
After filter is removed, run water through
the filter from a hose or spigot. Take care
that water pressure from the hose is not
strong enough to damage filter.
Remember: To dry a filter quickly, reinstall
the filter on the vac and allow the unit to
run for approximately 10 minutes. The
clean air rushing through the filter will
dry it.
Installation
Refer to "Replacement Filter Assembly"
Section of this manual.
Allow the filter to dry before storing the
vac.
13
Maintenance (continued)
Cleaning and Disinfecting the
Wet/Dry Vac
To keep your Wet/Dry Vac looking its
best, clean the outside with a cloth
dampened with warm water and mild
soap.
To clean the drum:
1. Dump debris out.
2. Wash drum thoroughly with warm water
and mild soap.
3. Wipe out with dry cloth.
Before prolonged storage or as needed
(i.e., waste water pick up) the drum
should be disinfected.
To disinfect the drum:
1. Pour 1 gallon of water and 1 teaspoon
chlorine bleach into the drum.
2. Let solution stand for 20 minutes,
carefully swishing every few minutes,
making sure to wet all inside surfaces
of the drum.
Casters
If your casters are noisy, you may put a
drop of oil on the roller shaft to make them
quieter.
Storage
Before storing your vac, the drum should
be emptied and cleaned. The cord should
be wrapped around the unit and the hose
should be stored as described in this
manual. Accessories should be kept in the
same area as the vac so they can be
readily available. The vac should be stored
indoors.
Ai, WARNING: To assure product
SAFETY and RELIABILITY, repairs
and adjustment should be performed
by Authorized Sears Service Centers,
always using Sears replacement parts.
3. Empty drum after 20 minutes. Rinse
with water until bleach smell is gone.
Allow drum to dry completely before
sealing the motor on the drum.
14

Notes
15
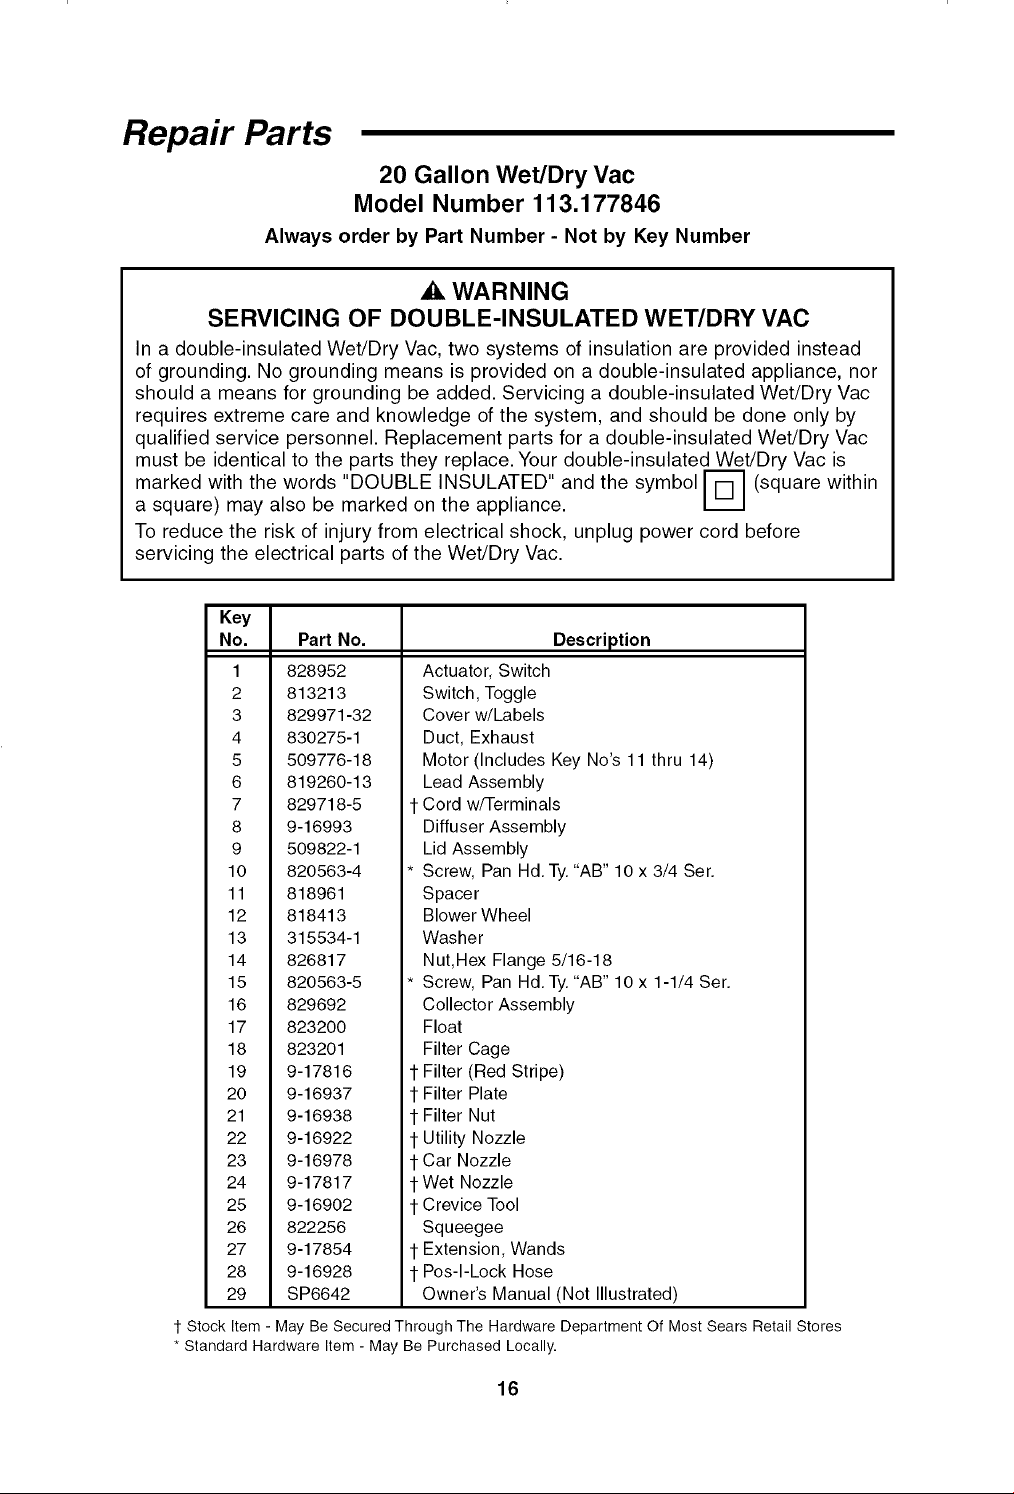
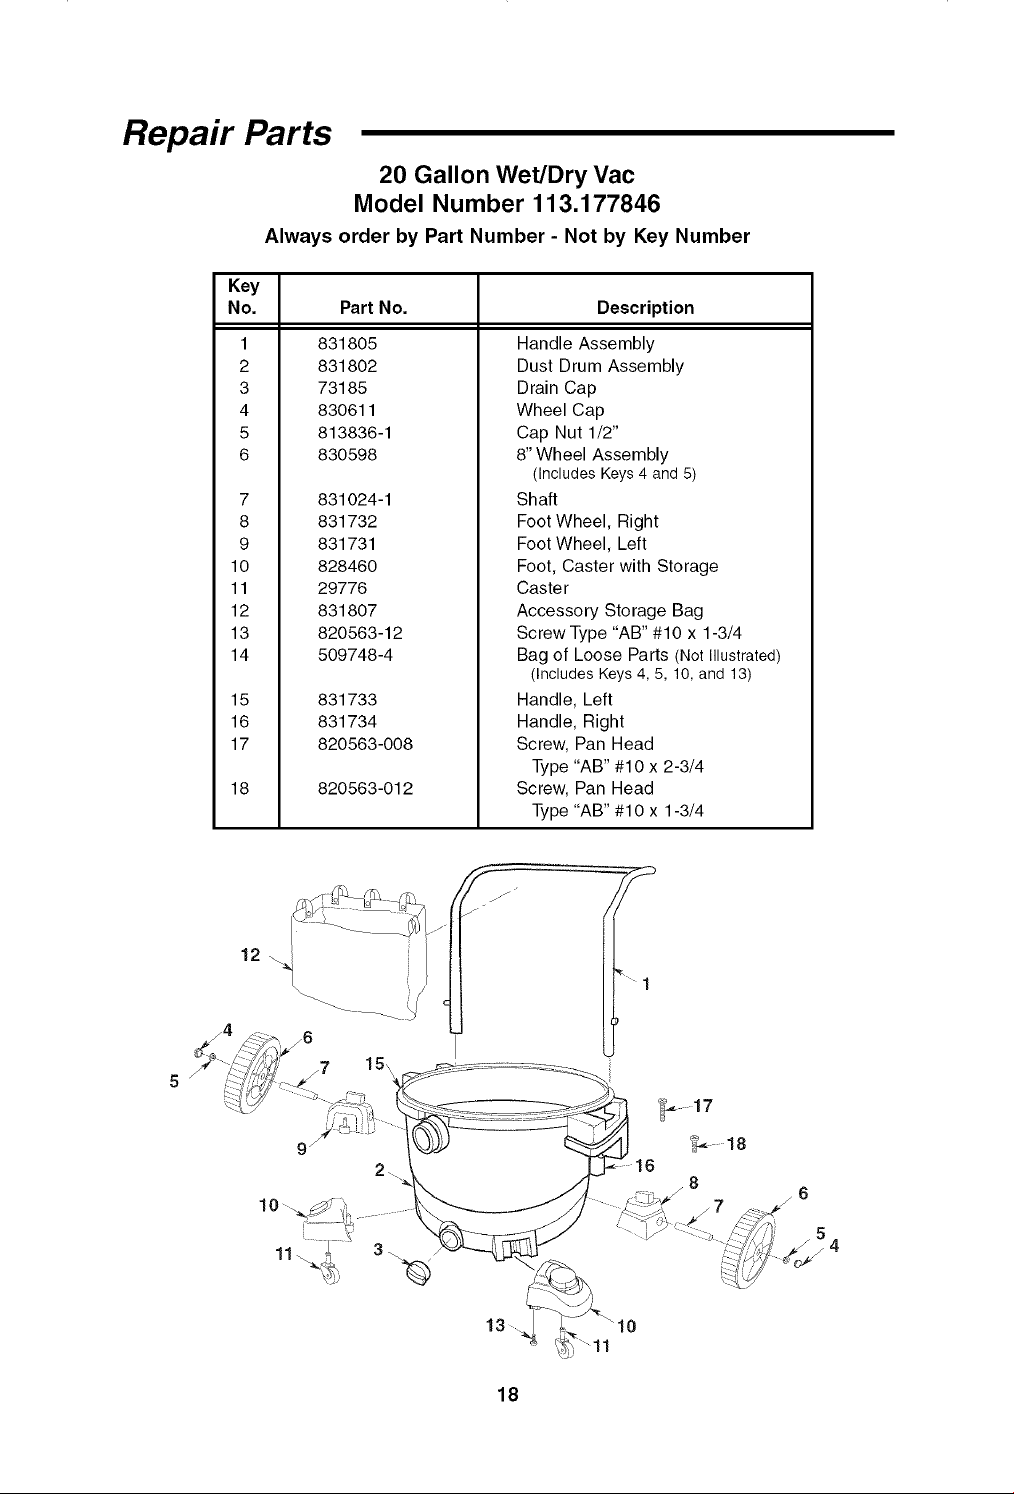
Repair Parts
20 Gallon Wet/Dry Vac
Model Number 113.177846
Always order by Part Number - Not by Key Number
WARNING
SERVICING OF DOUBLE-INSULATED WET/DRY VAC
In a double-insulated Wet/Dry Vac, two systems of insulation are provided instead
of grounding. No grounding means is provided on a double-insulated appliance, nor
should a means for grounding be added. Servicing a double-insulated Wet/Dry Vac
requires extreme care and knowledge of the system, and should be done only by
qualified service personnel. Replacement parts for a double-insulated Wet/Dry Vac
must be identical to the parts they replace. Your double-insulated Wet/Dry Vac is
marked with the words "DOUBLE INSULATED" and the symbol _-] (square within
a square) may also be marked on the appliance.
To reduce the risk of injury from electrical shock, unplug power cord before
servicing the electrical parts of the Wet/Dry Vac.
Key
No. Part No.
1 828952
2 813213
3 829971-32
4 830275-1
5 509776-18
6 819260-13
7 829718-5
8 9-16993
9 509822-1
10 820563-4
11 818961
12 818413
13 315534-1
14 826817
15 820563-5
16 829692
17 823200
18 823201
19 9-17816
20 9-16937
21 9-16938
22 9-16922
23 9-16978
24 9-17817
25 9-16902
26 822256
27 9-17854
28 9-16928
29 SP6642
Description
Actuator, Switch
Switch, Toggle
Cover w/Labels
Duct, Exhaust
Motor (Includes Key No's 11 thru 14)
Lead Assembly
t Cord w/Terminals
Diffuser Assembly
Lid Assembly
* Screw, Pan Hd.Ty. "AB" 10 x 3/4 Ser.
Spacer
Blower Wheel
Washer
Nut, Hex Flange 5/16-18
* Screw, Pan Hd.Ty. "AB" 10 x 1-1/4 Ser.
Collector Assembly
Float
Filter Cage
t Filter (Red Stripe)
t Filter Plate
t Filter Nut
t Utility Nozzle
t Car Nozzle
t Wet Nozzle
t Crevice Tool
Squeegee
t Extension, Wands
t Pos-I-Lock Hose
Owner's Manual (Not Illustrated)
1 Stock Item - May Be Secured Through The Hardware Department Of Most Sears Retail Stores
* Standard Hardware Item - May Be Purchased Locally.
16
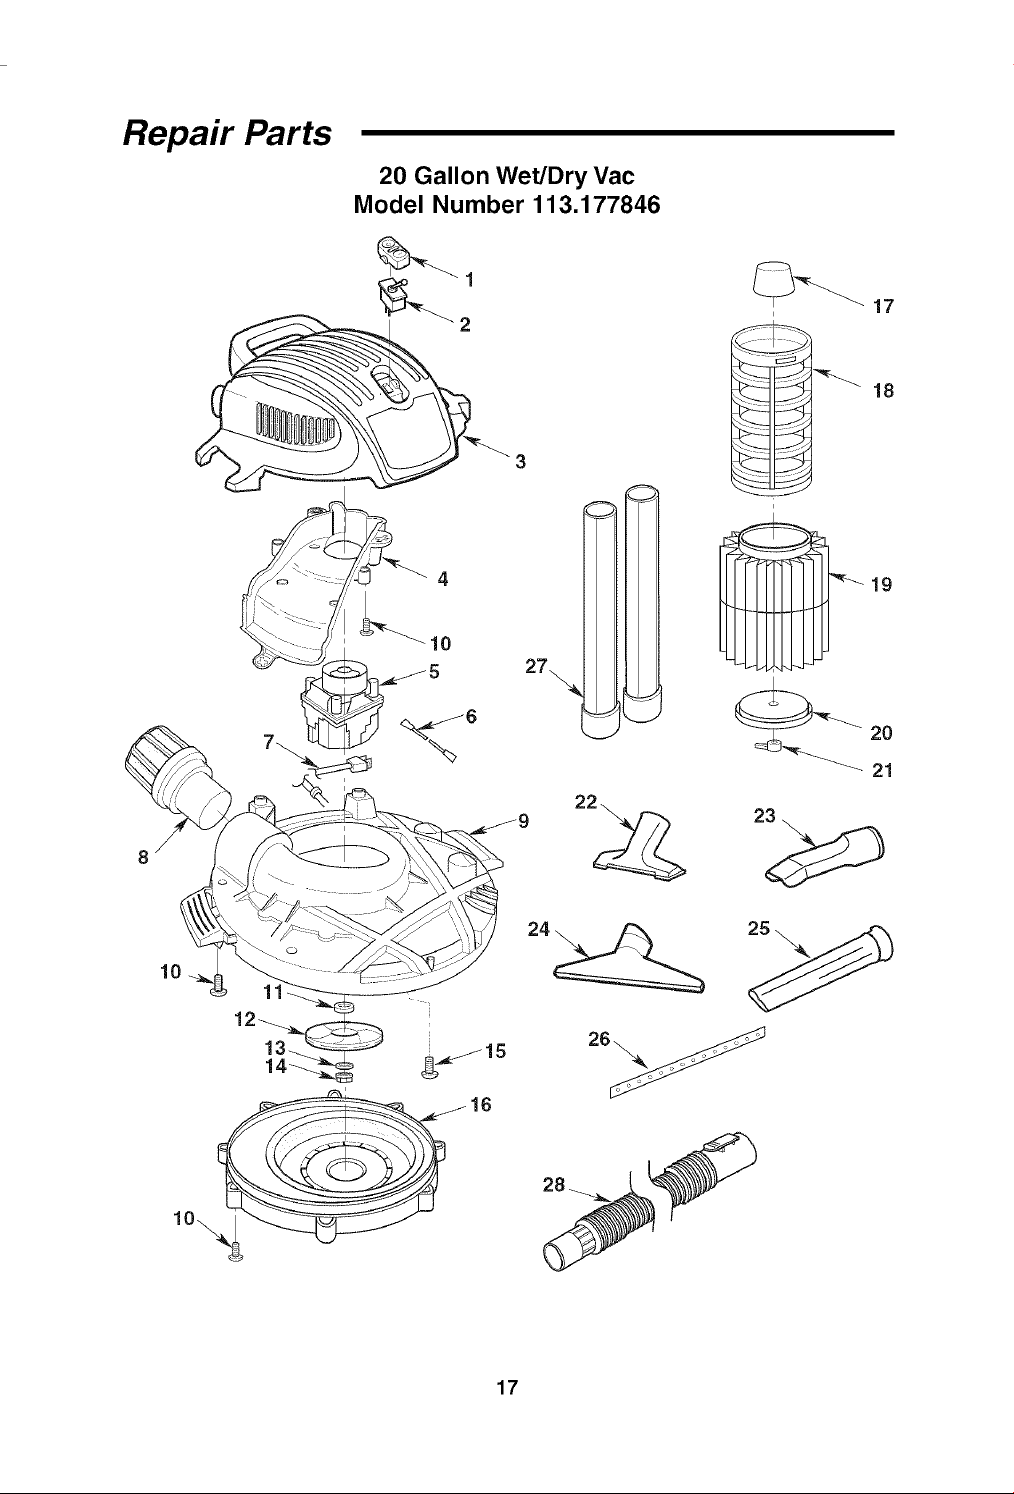
Repair Parts
20 Gallon Wet/Dry Vac
Model Number 113.177846
10
27_
J
17
Repair Parts
20 Gallon Wet/Dry Vac
Model Number 113.177846
Always order by Part Number - Not by Key Number
Key
No. Part No. Description
1
2
3
4
5
6
831805
831802
73185
830611
813836-1
830598
7 831024-1
8 831732
9 831731
10 828460
11 29776
12 831807
13 820563-12
14 509748-4
15 831733
16 831734
17 820563-008
18 820563-012
Handle Assembly
Dust Drum Assembly
Drain Cap
Wheel Cap
Cap Nut 1/2"
8" Wheel Assembly
(Includes Keys 4 and 5)
Shaft
Foot Wheel, Right
Foot Wheel, Left
Foot, Caster with Storage
Caster
Accessory Storage Bag
Screw Type "AB" #10 x 1-3/4
Bag of Loose Parts (Not Illustrated)
(Includes Keys 4, 5, 10, and 13)
Handle, Left
Handle, Right
Screw, Pan Head
Type "AB" #10 x 2-3/4
Screw, Pan Head
Type "AB" #10 x 1-3/4
/7 15\
.......1
/6
!4
18
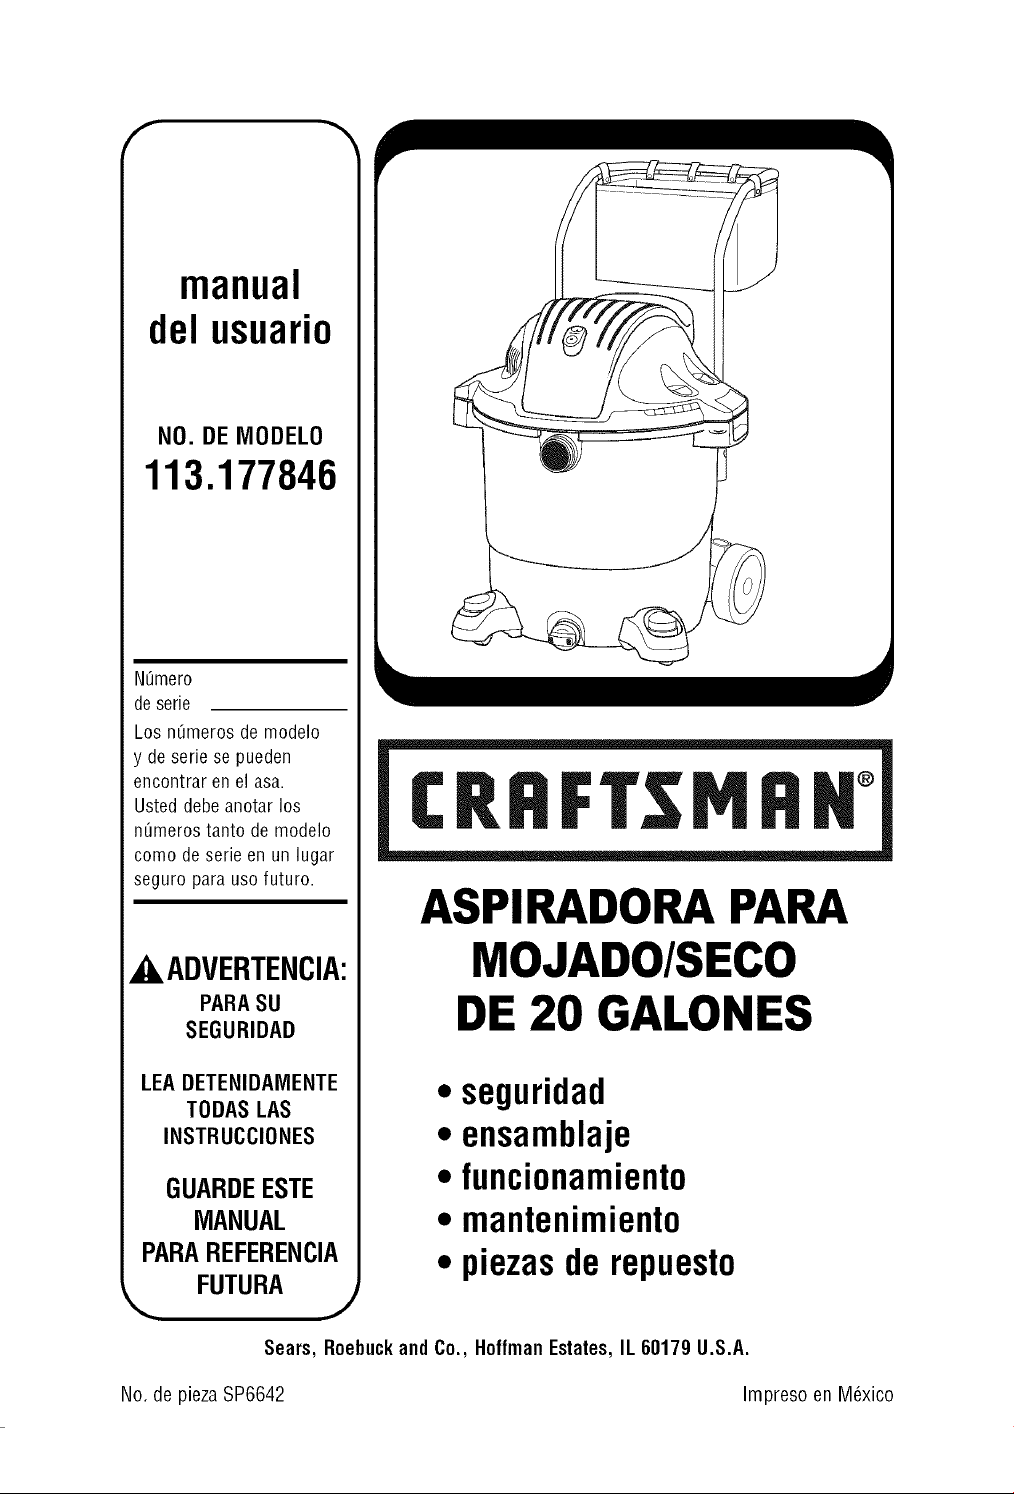
manual
del usuario
NO. DE MODELO
113.177846
NQmero
de serie
Los nQmeros de modelo
y de serie se pueden
encontrar en el asa.
Usted debe anotar los
n_meros tanto de modelo
como de serie en un lugar
seguro para uso futuro.
,AADVERTENCIA:
PARASU
SEGURIDAD
LEADETENIDAMENTE
TODASLAS
INSTRUCCIONES
GUARDEESTE
MANUAL
PARAREFERENCIA
FUTURA
CRIIFTSMRN°
ASPIRADORA PARA
MOJADO/SECO
DE 20 GALONES
• seguridad
• ensamblaje
• funcionamiento
• mantenimiento
• piezasde repuesto
Sears, Roebuckand Co., Hoffman Estates, IL 60179 U.S.A.
No. de piezaSP6642 Impreso en M_xico
SP6642 ES .qxd 10/11/07 11:54 AM
indice
Articulo P_gina
Indice................................ 20
Garantia.............................. 20
Instruccionesde seguridad importantes .... 21
Introducci6n ......................... 23
Desempaquetadoy comprobaci6n del
contenido de la cajade cart6n .......... 23
Lista del contenido de la caja de cart6n .. 23
Herramientasnecesarias ............. 23
Ensamblajedel filtro de repuesto.......... 24
Ensamblajedel tambor y las ruedas ....... 25
Ensamblajede la aspiradora para
mojado/seco ....................... 27
Almacenamientodel cord6n .......... 27
Introduzca la manguera............... 27
Almacenamientode accesorios
y la manguera ...................... 28
Funcionamiento ....................... 28
Recogidade materialessecos ......... 29
Articulo P_gina
Recogidade liquido .................. 29
Vaciadodel tambor ................. 29
Trasladode laaspiradora
para mojado/seco ................. 29
Dispositivo de soplado ............... 30
Mantenimiento ........................ 31
Filtro ............................. 31
Limpieza del filtro ................... 31
Remoci6n del filtro .................. 31
Limpieza de un filtro seco ............ 31
Limpieza de un filtro mojado .......... 31
Instalaci6n ........................ 31
Limpieza y desinfecci6nde
la aspiradora para mojado/seco....... 32
Ruedecillas ........................ 32
Almacenamiento.................... 32
Piezasde repuesto .................... 33
Garantia
r
1
Garantia
completa Craftsman de un afio "_
Si esteproductoCraftsmanfalla debidoa undefectode materialo defabricaci6ndentrodel
plazode unafio a partirdela fechadecompra,devu_lvaloa cualquiertiendaSears,Centro
de ServicioSearsu otropuntodeventaCraftsmanpara quesea reparadogratuitamente(o
reemplazadosi la reparaci6nresultaimposible).
Estagarantiase aplicasolamentedurante90 diasa partirde la fecha de compra,si este
productose utilizaalgunavezparafinescomercialeso dealquiler.
Estagarantianoincluyelasbolsasni losfiltros,quesonpiezasperecederasquese pueden
desgastarporcausadel usonormaldentrodel periodode garantia.
Estagarantiale confierea ustedderechoslegalesespecificosy es posiblequeustedtenga
tambi_notrosderechosquevariande unestadoa otro.
• Sears, Roebuck and Co., Hoffman Estates, IL 60179
20
.........................L<_y........................
SP6642 ES .qxd 10/11/07 11:54 AM
!]h
........<i]7.......
INSTRUCCIONESDESEGURIDADIMPORTANTES
La seguridades unacombinaci6nde sentido
comOn,permaneceralertay saberc6mofunciona
laaspiradoraparamojado/seco("la aspiradora').
Palabras de serial de seguridad
PELIGRO:indicaunasituaci6ninminentemente
peligrosaque,si no seevita,causar_la muerteo
lesionesgraves
_. ADVERTENCIA:indica unasituaci6npotencial-
mentepeligrosaque,si no seevita, podriacausar
la muerteo lesionesgraves
PRECAUCION:indicaunasituaci6npotencial-
mentepeligrosaque,si no seevita, pudieracausar
lesionesleveso moderadas.
Cuando utilice la aspiradora siga siempre las
precauciones b_.sicasde seguridad, incluyendo las
siguientes.
ADVERTENCIA_
Para reducirel riesgode incendio,sacudidas
el_ctricaso lesiones:
• Leay entiendaestemanualdel usuarioy todas
lasetiquetasqueest£ncolocadasen la
aspiradorapara mojado/secoantesde utilizarla.
• Utilicela aspiradora0nicamentede lamanera
quese describeen este manual.
• No dejelaaspiradoraen marchamientrasest6
desatendida.
• Las chispasquese producenen elinterior del
motor puedenincendiarlosvaporesinflamables
o el polvo.Parareducirel riesgode incendioo
explosi6n:No recojacon la aspiradoraliquidos o
gasesinflamableso combustibles,o polvos
explosivoscomo gasolinau otros combustibles,
liquidoencendedor,limpiadores,pinturasa base
de aceite,gasnatural,hidr6geno,polvode
carb6n,polvode magnesio,polvo de aluminio,
polvode granosdecerealo p61vora,ni usela
aspiradoracercadeestos materiales.
• No recojacon la aspiradoranadaqueest6
ardiendoo humeando,como cigarrillos,f6sforos
o cenizascalientes.
• No recojacon la aspiradorapolvode panelde
yesoni hollin frio o cenizafriadechimeneacon
un filtro estindar. Estematerialesun polvomuy
fino quepuedeserexpulsadodevueltaalaire.
Utiliceun filtro parapolvo fino en lugar de un
filtro estindar.
• Parareducirel riesgodequese produzcan
peligrospara lasaludcausadospor vaporeso
polvo,no recojacon la aspiradoramateriales
t6xicos.
21
• No useni almacenelaaspiradoracercade
materialespeligrosos.
• Parareducirel riesgodedescargasel6ctricas,
no expongalaaspiradoraa la Iluvianidejeque
entrenliquidosen el compartimientodel motor.
Guardelaaspiradoraen un lugarinterior.
• No permitaquela aspiradorase utilicecomo un
juguete.Senecesitaprestarm£ximaatenci6n
cuandoseautilizadapor nifios o cercade 6stos.
• No useestaaspiradoracon un filtro desgarrado
o si no tieneelfiltro instalado,exceptocuando
recojaliquidosde la maneraquese describeen
lasecci6n"Funcionamiento"de estemanual.
Los residuossecosabsorbidospor el impulsor
podriandafiarel motor o serexpulsadosde
vueltaal aire.
• ADVERTENCIA:Elcord6ndeenergiadeeste
productocontieneplomo, unasustanciaquimica
queseg0nlos conocimientosdel estadode
Californiacausadefectosde nacimientou otros
daios a la reproducci6n.L#vese/asmanos
despu#sde manejarel producto.
• No abandonelaaspiradoracuandoest6
enchufada.Desench0feladeltomacorriente
cuandonola est6 utilizandoy antesde realizar
serviciode revisi6n.
• Apaguelaaspiradoraantesde desenchufarla.
• Parareducirel riesgodelesionesdebidasa un
arranqueaccidental,desenchufeel cord6nde
energiaantesde cambiaro limpiarel filtro.
• No desenchufelaaspiradoratirandodel cord6n.
Paradesenchufarla,agarreel enchufey no el
cord6n.
• No usela aspiradoracon el cord6ndafiado,el
enchufedafiadou otras piezasdafiadas.Si la
aspiradorano funcionacomodebe,lefaltan
piezas,se ha caido,ha sido dafiada,se ha
dejadoa la intemperieo seha caidoal agua,
devu61valaa un CentrodeServicioSears.
• No tire de laaspiradorausandoelcord6nni la
Ilevepor el cord6n,ni useel cord6ncomoasa,
ni cierreunapuertasobreel cord6n,ni tire del
cord6nalrededorde hordeso esquinasafilados.
Nopaselaaspiradoraen marchasobreel
cord6n.Mantengael cord6nalejadode las
superficiescalientes.
• No manejeelenchufe,el interruptoro la
aspiradoracon lasmanosmojadas.
• No ponganing0nobjetoen lasaberturasde
ventilaci6n.Norecojanadacon laaspiradora
cuandocualquierade lasaberturasde venti-
laci6nest6 bloqueada;mantengadichasaber-
turas libres depolvo,pelusa,peloo cualquier
cosaquepuedareducirel flujo de aire.
!]m
........<i]7.......
i
SP6642 ES .qxd 10/11/07 11:54 AM
!]h
........<i]7.......
• Mantengael pelo,la ropaholgada,los dedosy
todaslaspartesdel cuerpoalejadosdelasaber-
turasy de las piezasm6viles
• Parareducirel riesgodecaidas,tengacuidado
adicionalal limpiaren escaleras
• Parareducirel riesgodelesionesde espaldao
caidas,no levanteunaaspiradoraquepese
mucho debidoa quecontieneliquidoo residuos
Saquepartedel contenidode laaspiradorao
dr6nelaparcialmentepara hacerquesea Io
suficientementelivianacomopara poder
levantarlac6modamente
• Parareducirel riesgodelesionescorporaleso
daios a laaspiradora,utiliceOnicamente
accesoriosCraftsmanrecomendados
• Cuandoutilicela aspiradoracomosoplador:
Dirija la descargade aire solamentehaciael
Areade trabajo
Nodirijaelaire hacialaspersonasqueest6n
presentes
Mantengaalejadosa los niios durantela
operaci6nde soplado
Noutiliceel sopladorparatrabajosqueno
seansoplarsuciedady residuos
Nouselaaspiradoracomorociador
Useprotecci6nocularde seguridad
• Parareducirel riesgode lesionesen los ojos,
use protecci6nocularde seguridad La utilizaci6n
de cualquieraspiradorautilitariao soplador
utilitariopuedehacerquesesoplenobjetos
extraios hacialos ojos, Io cualpuedecausar
daios gravesen los ojos
• Parareducirel riesgodequeunaaspiradora
rodantelegolpeeotire de usted,bloqueelas
ruedecillascuandoutilicela unidadencualquier
superficiedesigualo en pendiente
• Estaaspiradoraparamojado/secotieneaisla-
miento doble,Io cualeliminala necesidadde un
sistemaindependientede conexi6natierra
Utilice8nicamentepiezasde repuestoid6nticas
Lealasinstruccionesde servicio de revisi6nde
lasaspiradoraspara mojado/secocon aisla-
miento dobleantesde realizardichoservicio
• Utilice8nicamentecordonesde extensi6nque
tengancapacidadnominalpara usoa la
intemperie Loscordonesdeextensi6nque
est6nen malascondicioneso cuyotamaio de
alambreseademasiadopequeio pueden
conllevarpeligrosde incendioy sacudidas
el6ctricas Parareducirel riesgode estos
peligroscuandoutiliceun cord6ndeextensi6n,
asegOresede queel cord6nest6en buenas
condicionesy de quela conexi6nno entreen
contactoconliquido Paramantenerlap6rdida
al minimo,utilicela tablaqueaparecea conti-
nuaci6nparaseleccionarel cord6nde extensi6n
con eltamaio de cableminimo
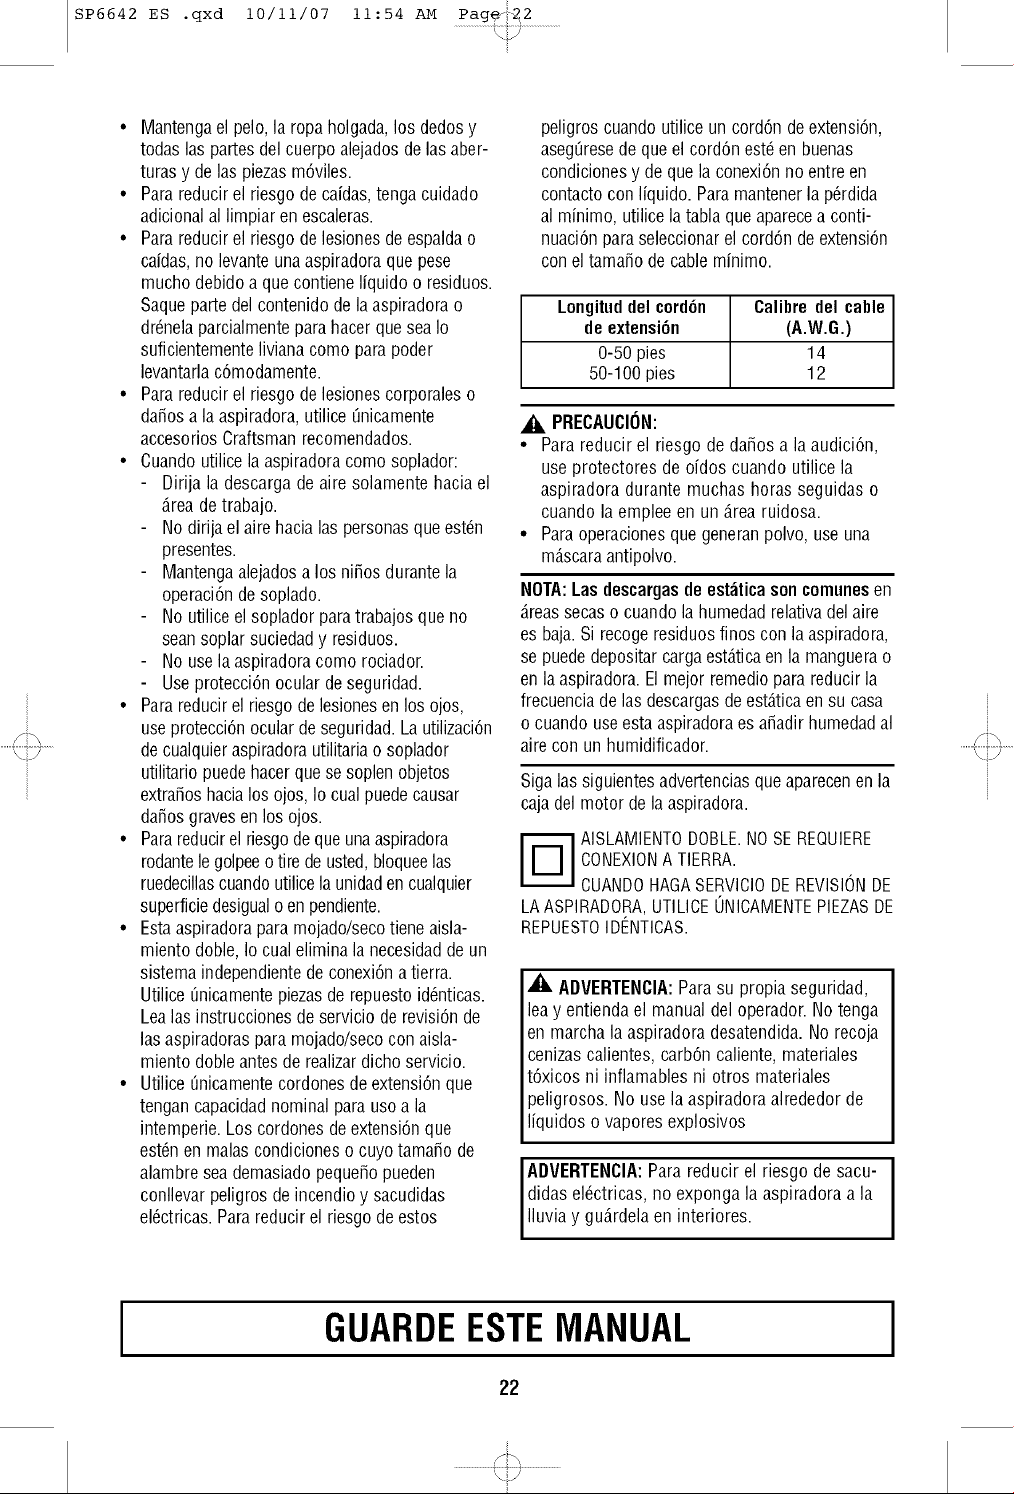
Longituddel ¢ord6n Calibre del cable
deextensi6n (A.W.G.)
0-50 pies 14
50-1O0pies 12
_, PRECAUCION:
• Para reducir el riesgo de daios a la audici6n,
use protectores de oidos cuando utilice la
aspiradora durante muchas horas seguidas o
cuando la emplee en un _.rea ruidosa.
• Para operaciones que generan polvo, use una
m_.scaraantipolvo.
NOTA: Las descargas de est;_ticason comunes en
_.reassecas o cuando la humedad relativa del aire
es baja. Si recoge residuos finos con la aspiradora,
se puede depositar carga est_.ticaen la manguera o
en la aspiradora. El mejor remedio para reducir la
frecuencia de las descargas de est_.ticaen su casa
o cuando use esta aspiradora es aiadir humedad al
aire con un humidificador.
Siga las siguientes advertencias que aparecen en la
caja del motor de la aspiradora.
._ ISLAMIENTODOBLE. NO SEREQUIERE
CONEXIONA TIERRA.
CUANDOHAGASERVICIO DE REVISIONDE
LA ASPIRADORA, UTILICE ONICAMENTEPIEZAS DE
REPUESTOIDt_NTICAS.
_. ADVERTENClA: Para su propia seguridad,
lea y entienda el manual del operador. No tenga
en marcha la aspiradora desatendida. No recoja
cenizas calientes, carb6n caliente, materiales
t6xicos ni inflamables ni otros materiales
peligrosos. No use la aspiradora alrededor de
liquidos o vapores explosivos
ADVERTENClA: Para reducir el riesgo de sacu-
didas el6ctricas, no exponga la aspiradora a la
Iluvia y gu_.rdela en interiores.
!]m
........<i]7.......
GUARDEESTEMANUAL
22
I
i
.........................L<Ty........................
SP6642 ES .qxd 10/11/07 11:54 AM
Introducci6n
Estaaspiradorapara mojado/secoest,. dise_ada
para usodom6stico.Se puedeutilizarpararecoger
materialesmojadoso secosy se puedeusarcomo
soplador.
Leaestemanualdel usuarioparafamiliarizarsecon
lascaracteristicasdel productoy entenderel uso
especificodesu nuevaaspiradorapara
mojado/seco.
Desempaquetadoy compmbaci6nde/contenido
dela cajadecart6n
Saquetodo el contenido de la caja de cart6n.
Aseg0resede queno falte ning0narticulo
utilizando la lista del contenidode la cab.
Notifique inmediatamentea la tienda Searsm_.s
cercanasi alguna piezaest,. da_adao falta.
Lista de/contenido de la caja de cart6n
Clave Descripci6n Cant.
A Ensamblajede laaspiradora ........ 1
B Ensamblajede la manguera
Pos-I-Lock ................... 1
C Boquillautilitaria ................. 1
D Boquillapara mojado ............. 1
E Boquillaparaauto ................ 1
F Boquillarinconera................ 1
G* Tuercadel filtro ................. 1
H* Placadel filtro .................. 1
J* Filtro (raya roja) ................. 1
K* Jaula del filtro .................. 1
L* Flotador ....................... 1
M Tubosextensores ................ 2
N Piede ruedecillapara
almacenamiento ............... 2
P Ruedade 8 pulgadas ............. 2
Q Eje............................ 1
R Piede ruedaderecho ............ 1
S Piede ruedaizquierdo ............ 1
T Asa met_.lica ................... 1
U Bolsade almacenamiento
de accesorios ................. 1
V Difusor ........................ 1
W Bolsade piezassueltas ............ 1
1. Ruedecillade 2 pulgadas ........ 2
2. Tuercade sombreretede
1/2 pulg.................... 2
3. Tapasde rueda ............... 2
4. Tornillo ..................... 4
5. Manualdel usuario............. 1
* Estosarticulospuedenvenirpreensamblados.
Si no est_.npresentesen la cajade cart6n,
compruebeel cabezaldel motor de la aspiradora
paraver si est_.npreensamblados.
R
M
Herramientasnecesarias
Destornillador
IVlazo
Phillips
J
q
Martillo
23
.........................L<_y........................
SP6642 ES .qxd 10/11/07 11:54 AM
!]h
........<i]7.......
Ensamblaje de/filtro de re
•_, ADVERTENCIA:Para su propia seoufidad, no
conecte nunca el enchufe a un tomacorriente de
la fuente de energia hasta que se hayan
completado todos los pasos de ensamblaje y
usted haya leido y entendido las instrucciones de
seguridad y funcionamiento. No utilice la
aspiradora si alguna pieza est,. daiada o falta.
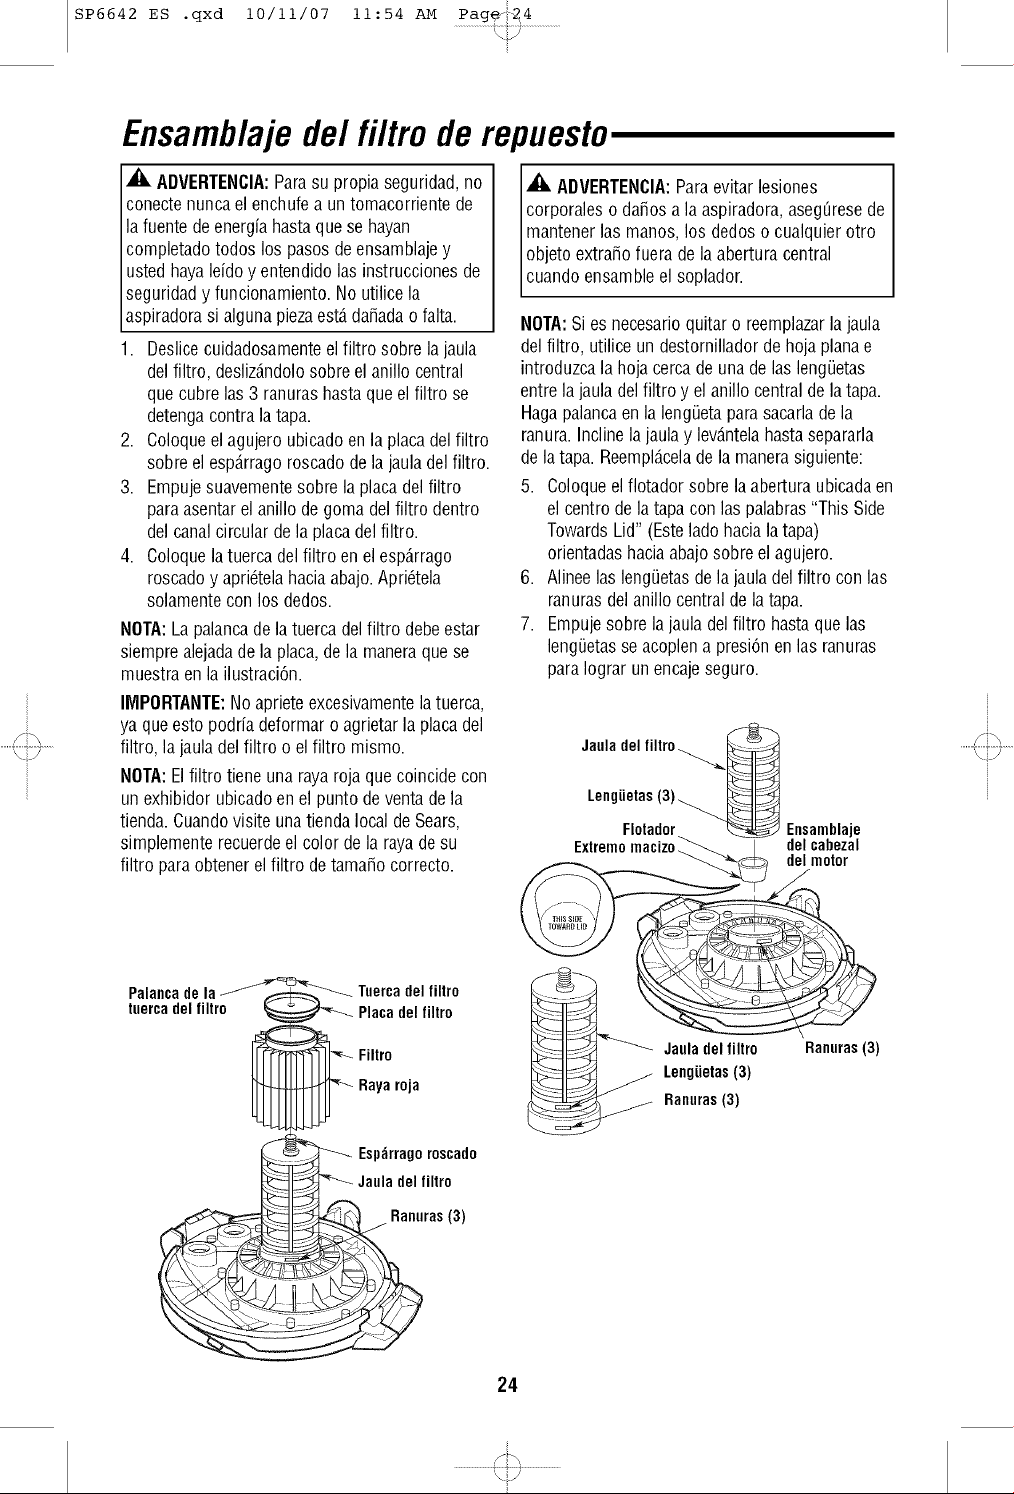
1. Deslice cuidadosamente el filtro sobre la jaula
del filtro, desliz_.ndolo sobre el anillo central
que cubre las 3 ranuras hasta que el filtro se
detenga contra la tapa.
2. Coloque el agujero ubicado en la placa del filtro
sobre el esp_.rrago roscado de la jaula del filtro.
3. Empuje suavemente sobre la placa del filtro
para asentar el anillo de goma del filtro dentro
del canal circular de la placa del filtro.
4. Coloque la tuerca del filtro en el esp_.rrago
roscado y apri6tela hacia abajo. Apri6tela
solamente con los dedos.
NOTA: La palanca de la tuerca del filtro debe estar
siempre alejada de la placa, de la manera que se
muestra en la ilustraci6n.
IMPORTANTE: No apriete excesivamente la tuerca,
ya que esto podria deformar o agrietar la placa del
filtro, la jaula del filtro o el filtro mismo.
NOTA: El filtro tiene una raya roja que coincide con
un exhibidor ubicado en el punto de venta de la
tienda. Cuando visite una tienda local de Sears,
simplemente recuerde el color de la raya de su
filtro para obtener el filtro de tamaio correcto.
Palanca Tuerca del filtro
tuerca del filtro Placa del filtro
Filtro
Raya roja
Esp;_rragoroscado
del filtro
9uesto
_, ADVERTENCIA: Para evitar lesiones
corporales o daios a la aspiradora, asegirese de
mantener las manos, los dedos o cualquier otro
objeto extraio fuera de la abertura central
cuando ensamble el soplador.
NOTA:Sies necesarioquitar o reemplazarlajaula
del filtro, utiliceun destornilladorde hojaplanae
introduzcalahojacercade unade laslengietas
entrela jauladel filtro y elanillo centralde latapa.
Hagapalancaen la lengQetaparasacarlade la
ranura.Inclinelajaulay lev_.ntelahastasepararla
de latapa. Reempl_.celade lamanerasiguiente:
5. Coloqueelfiotadorsobre la aberturaubicadaen
el centrode la tapacon laspalabras"This Side
TowardsLid" (Esteladohacialatapa)
orientadashaciaabajosobre elagujero.
6. Alineelaslengietasde la jauladelfiltro con las
ranurasdelanillo centralde latapa.
7. Empujesobre lajaula delfiltro hastaquelas
lengQetasseacoplena presi6nen las ranuras
paraIograr un encajeseguro.
Jauladel filtro._.._
Lengi_t:Sai3o)r_ Ensamblaje
Extremomacizoi_ delcabezal
del_n__motor
Q_
_ Jauladel liltro Ranuras(3)
Lengietas (3)
_ Ranuras(3)
24
!]m
........<117.......
i
.........................L<_y........................
SP6642 ES .qxd 10/11/07 11:54 AM
........_:]::y.......
Ensamblaje de/tambor y/as ruedas
Sialgunapiezafaltao est,.da_ada,p6ngaseen Piederuedatrasere
contactoconServicioal Cliente. (dereche)
No realiceel ensamblajehastaquetengatodaslas
piezas.
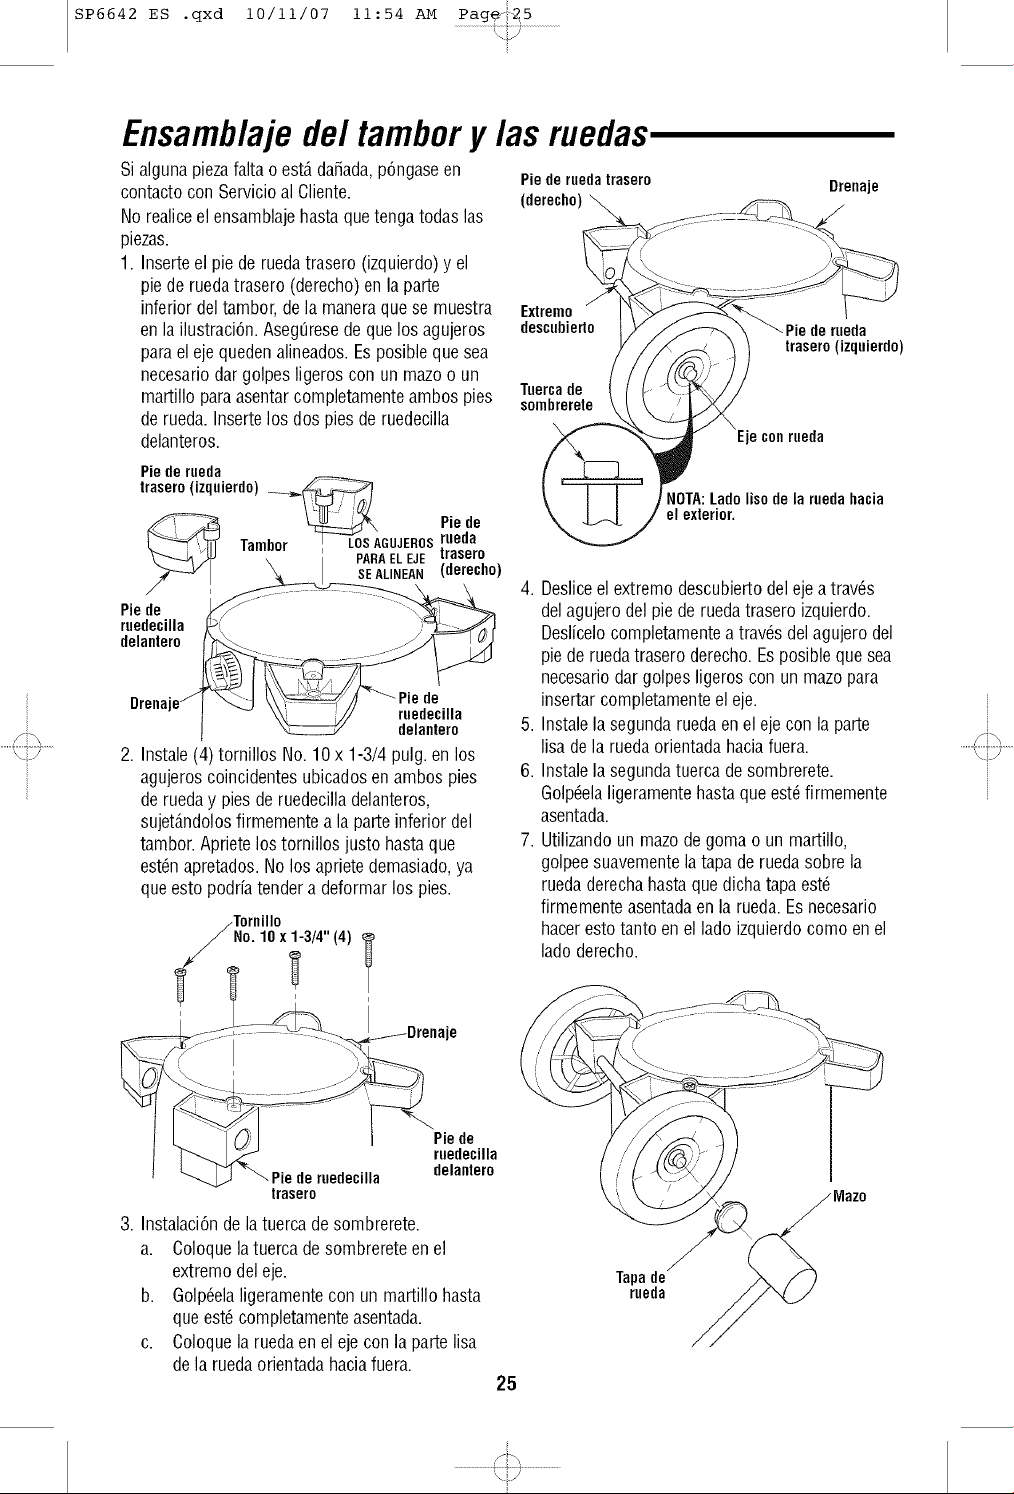
1. Inserteel pie de ruedatrasero(izquierdo)y el
pie deruedatrasero(derecho)en laparte
inferiordel tambor,dela maneraquese muestra Extreme
en la ilustraci6n.AsegOresede quelos agujeros descubierto
parael ejequedenalineados.Esposiblequesea
necesariodar golpesligeroscon un mazeo un
martillo paraasentarcompletamenteambospies Tuercade
sombrerete
de rueda.Insertelos dos piesde ruedeciNa
delanteros.
Drenaje
/
trasero (izquierde)
Eje con rueda
Pie de rueda
trasero
(izquierdo)
_ Pie de
Tambor"_= __, LOSAGUJEROSrueda
PARA EL EJE trasero
SEALINEAN (derecho)
Pie de
ruedecilla
delantero
Drena de
ruedecilla
delantero
2. Instale (4) tornillos No. 10 x 1-3/4 pulg. en los
agujeros coincidentes ubicados en ambos pies
de rueda y pies de ruedecilla delanteros,
sujet_.ndolos firmemente a la parte inferior del
tambor. Apriete los tornillos justo hasta que
est6n apretados. No los apriete demasiado, ya
que esto podria tender a deformar los pies.
Tomillo
No. 10 x 1-3/4" (4)
;o --_ ........ -. --
t
-....
delantero
Pie de ruedecilla
trasero
3. Instalaci6nde latuercade sombrerete.
a. Coloquela tuercadesombrereteenel
extremodel eje.
b. Golp6elaligeramentecon un martillo hasta
queest6completamenteasentada.
c. Coloquela ruedaenel ejecon la partelisa
dela ruedaorientadahaciafuera.
25
NOTA: Lade liso de la rueda hacia
el exterior.
4. Desliceel extremedescubiertodelejea trav6s
delagujerodel pie deruedatraseroizquierdo.
Deslicelocompletamentea trav6sdelagujerodel
pie deruedatraseroderecho.Esposiblequesea
necesariodar golpesligeroscon un mazepara
insertarcompletamenteel eje.
5. Instalela segundaruedaen el ejecon la parte
lisa de la ruedaorientadahaciafuera.
6. Instalela segundatuercade sombrerete.
Golp6elaligeramentehastaqueest6 firmemente
asentada.
7. Utilizandoun mazede goma o un martillo,
golpeesuavementelatapade ruedasobre la
ruedaderechahastaquedichatapaest6
firmementeasentadaen la rueda.Esnecesario
hacerestotanto en el ladeizquierdocomeen el
ladederecho.
Tape de
rueda
........_:]::y.......
.........................L<Ty........................
SP6642 ES .qxd 10/11/07 11:54 AM
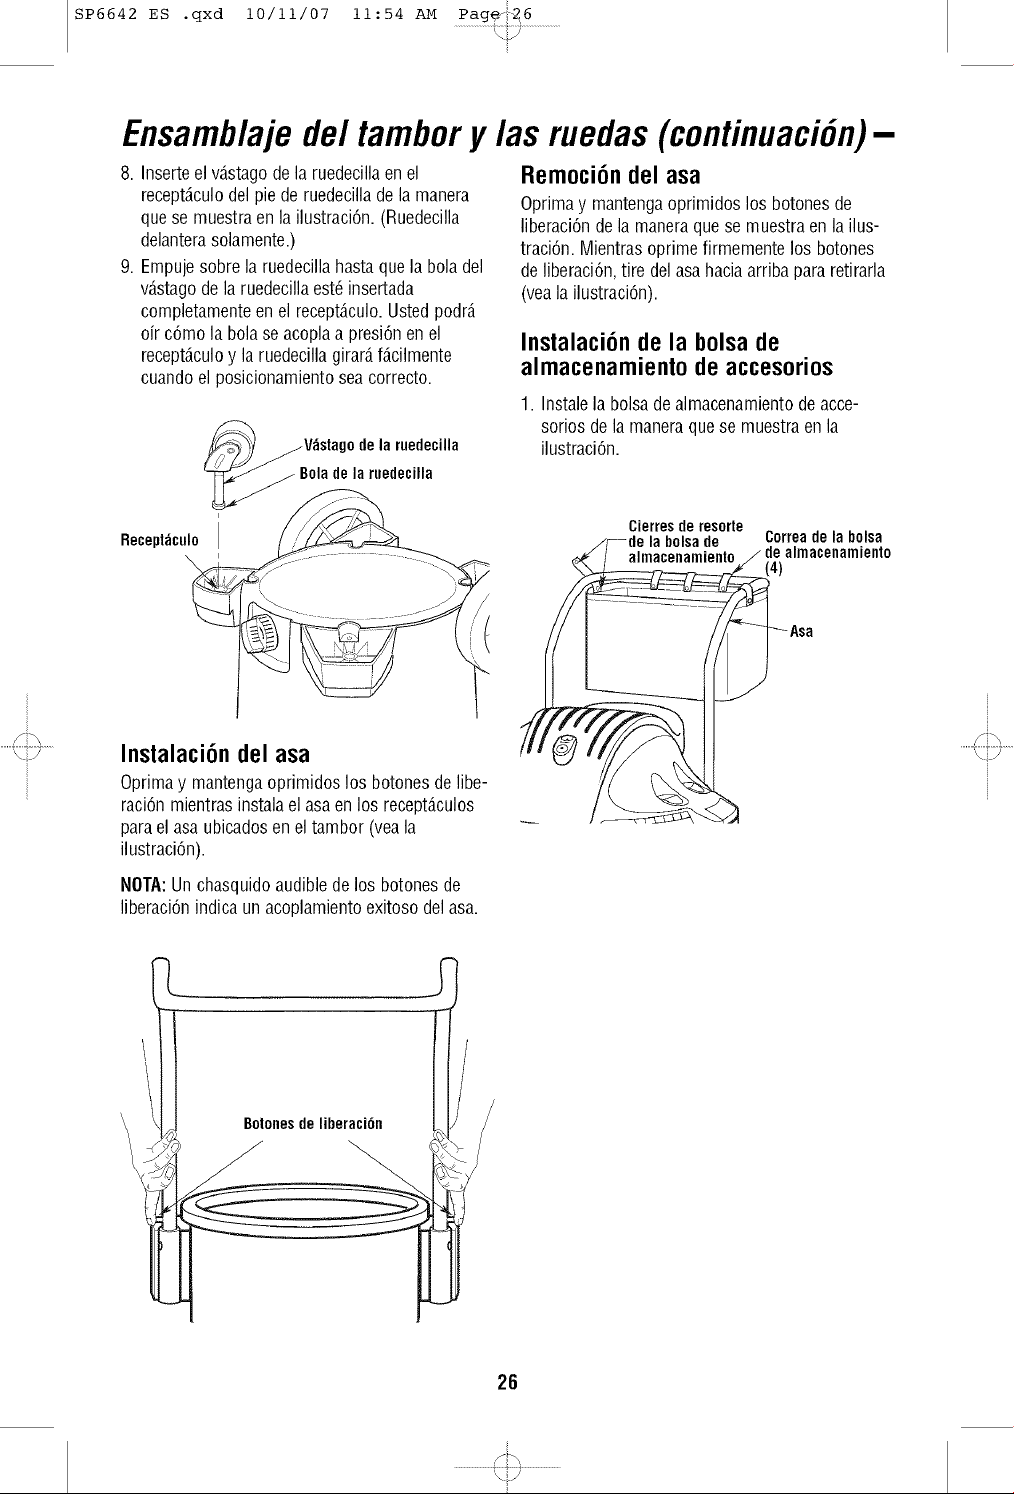
Ensamblaje de/tambor y/as ruedas (continuaci6n)-
Inserte el v_.stagode la ruedecilla en el
recept_.culo del pie de ruedecilla de la manera
que se muestra en la ilustraci6n. (Ruedecilla
delantera solamente.)
Empuje sobre la ruedecilla hasta que la bola del
v_.stagode la ruedecilla est6 insertada
completamente en el recept_.culo. Usted podr_.
oir c6mo la bola se acopla a presi6n en el
recept_.culo y la ruedecilla girard,f_.cilmente
cuando el posicionamiento sea correcto.
V;istago de la ruedecilla
ola de la ruedecilla
Receptdculo
Instalaci6n del asa
Oprima y mantenga oprimidos los botones de libe-
raci6n mientras instala el asa en los recept_.culos
para el asa ubicados en el tambor (vea la
il ustraci6n).
Remoci6ndel asa
Oprima y mantenga oprimidos los botones de
liberaci6n de la manera que se muestra en la ilus-
traci6n. Mientras oprime firmemente los botones
de liberaci6n, tire del asa hacia arriba para retirarla
(vea la ilustraci6n).
Instalaci6n de la bolsa de
almacenamiento de accesorios
1. Instale la bolsa de almacenamiento de acce-
sorios de la manera que se muestra en la
ilustraci6n.
Cierres de resorte
la bolsa de
Correadela bolsa
14)
Asa
NOTA:Un chasquido audible de los botones de
liberaci6n indica un acoplamiento exitoso del asa.
Botones de liberaci6n
26
SP6642 ES .qxd 10/11/07 11:54 AM
!]h
........<i]7.......
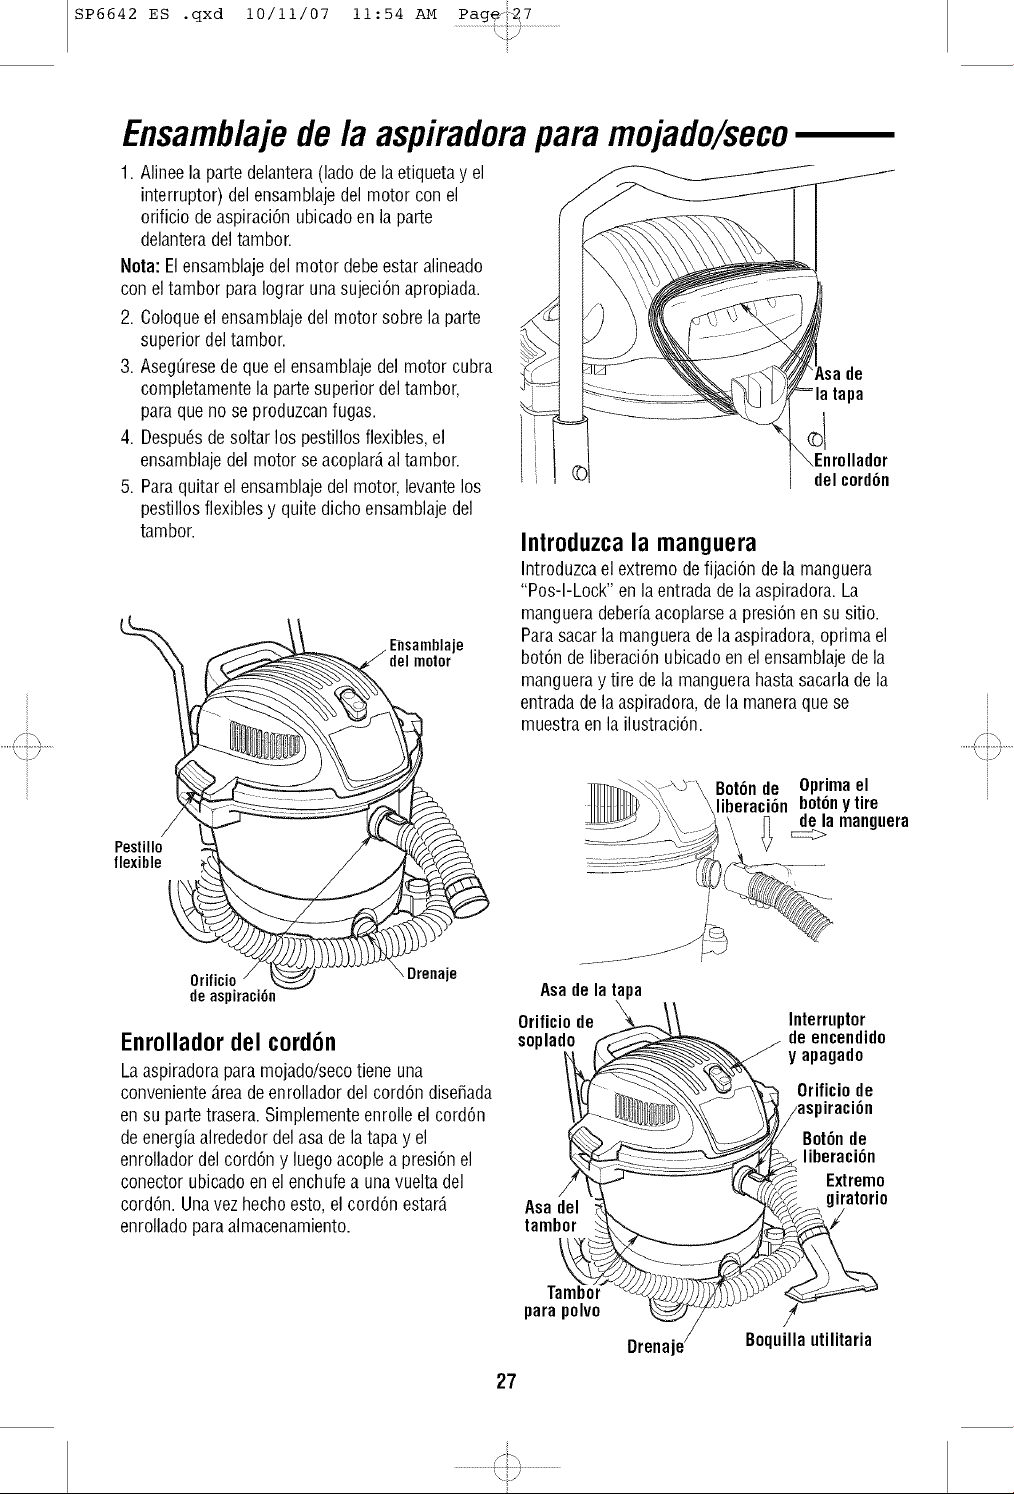
Ensamb/ajede la aspiradorapara mojado/seco
1. Alinee la parte delantera (lado de la etiqueta y el
interruptor) del ensamblaje del motor con el
orificio de aspiraci6n ubicado en la parte
delantera del tambor.
Nota: El ensamblaje del motor debe estar alineado
con el tambor para Iograr una sujeci6n apropiada.
2. Coloque el ensamblaje del motor sobre la parte
superior del tambor.
3. Aseg[irese de que el ensamblaje del motor cubra
completamente la parte superior del tambor,
para que no se produzcan fugas.
4. Despu6s de soltar los pestillos flexibles, el
ensamblaje del motor se acoplar_, al tambor.
5. Para quitar el ensamblaje del motor, levante los
pestillos flexibles y quite dicho ensamblaje del
tambor.
Pestillo i_
flexible
Orificlo
de aspiraci6n
del motor
Drenaje
Enrollador del cord6n
La aspiradora para mojado/seco tiene una
conveniente _.reade enrollador del cord6n diseiada
en su parte trasera. Simplemente enrolle el cord6n
de energia alrededor del asa de la tapa y el
enrollador del cord6n y luego acople a presi6n el
conector ubicado en el enchufe a una vuelta del
cord6n. Una vez hecho esto, el cord6n estar_.
enrollado para almacenamiento.
Introduzca la manguera
Introduzca el extremo de fijaci6n de la manguera
"Pos-I-Lock" en la entrada de la aspiradora. La
manguera deberia acoplarse a presi6n en su sitio.
Para sacar la manguera de la aspiradora, optima el
bot6n de liberaci6n ubicado en el ensamblaje de la
manguera y tire de la manguera hasta sacarla de la
entrada de la aspiradora, de la manera que se
muestra en la ilustraci6n.
Bot6nde Oprimael
liberaci6nbot6ny tire
Asa de la tapa
Orificio de \
soplado
Asadel
tambor
Interruptor
de encendido
y apagado
Orificio de
qraci6n
Bot6nde
liberaci6n
Extremo
giratorio
!]m
........<i]7.......
27
Tambol
parapolvo
Drena
Boquilla utilitaria
i
.........................L<_y........................
SP6642 ES .qxd 10/11/07 11:54 AM
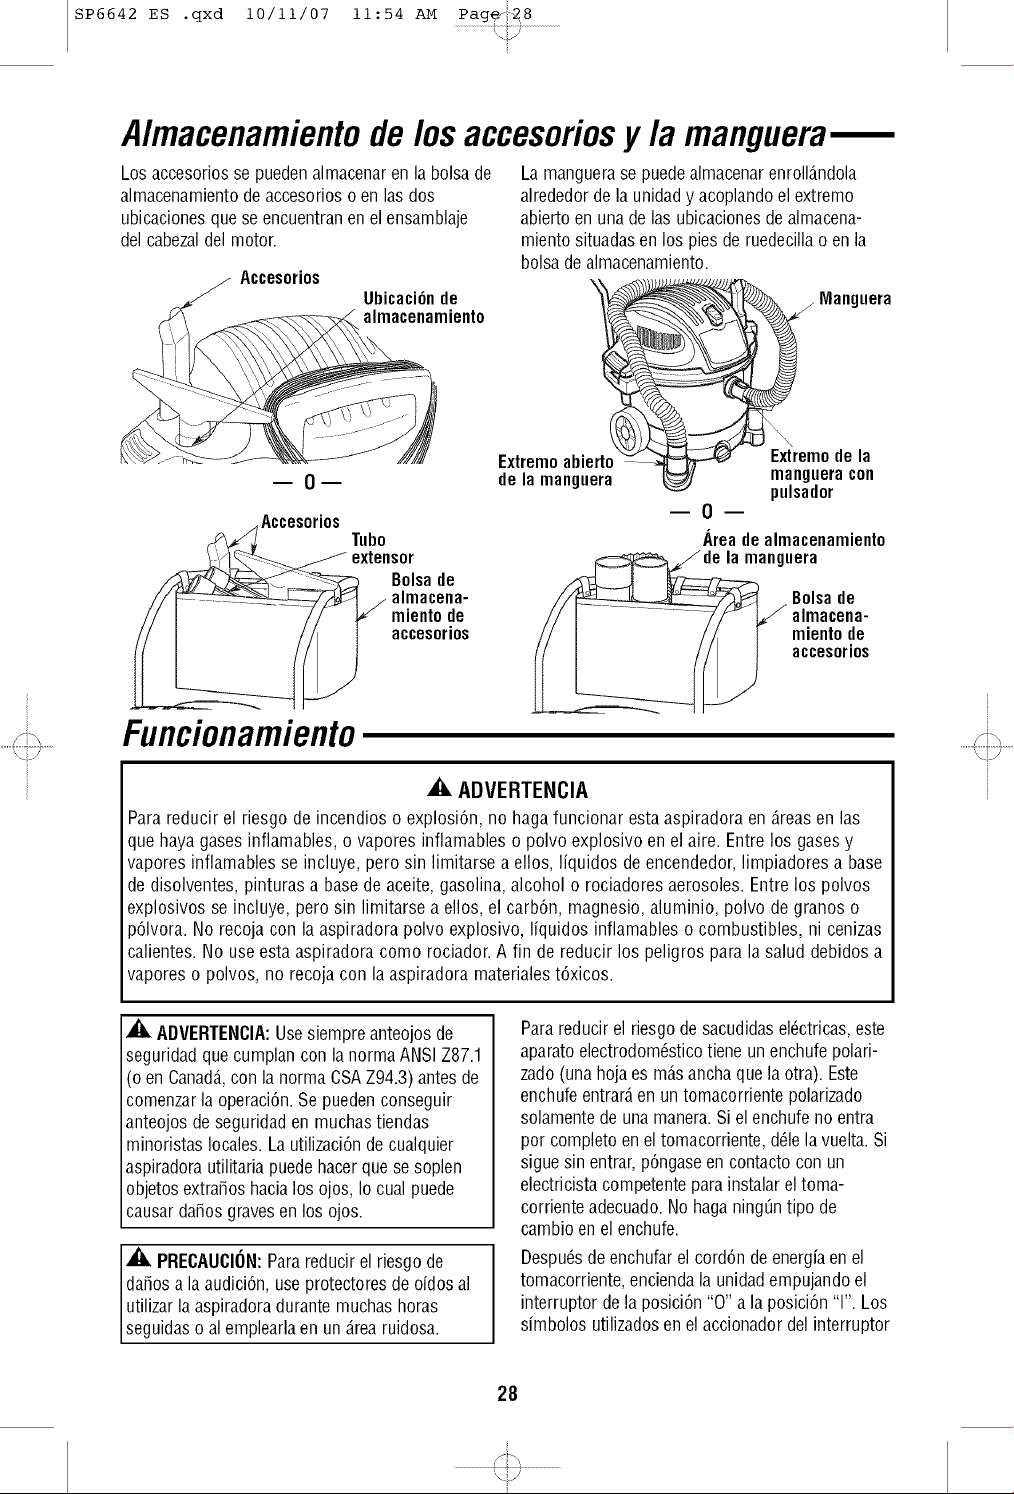
Almacenamientode losaccesoriosy la manguera
Los accesorios se pueden almacenar en la bolsa de
almacenamiento de accesorios o en las dos
ubicaciones que se encuentran en el ensamblaje
del cabezal del motor.
Ubicaci6nde
almacenamiento
0
Accesorios
Tubo
Bolsa de
miento de
accesorios
Extremo abierto
de la manguera
Accesorios
La manguera se puede almacenar enroll_.ndola
alrededor de la unidad y acoplando el extremo
abierto en una de las ubicaciones de almacena-
miento situadas en los pies de ruedecilla o en la
bolsa de almacenamiento.
"_ _Manguera
o de la
_' manguera con
pulsador
-- 0 --
Area de almacenamiento
la manguera
Bolsade
miento de
accesorios
!]h
........<i]7.......
Funcionamiento
A ADVERTENCIA
Para reducir el riesgo de incendios o explosi6n, no haga funcionar esta aspiradora en _.reasen las
que haya gases inflamables, o vapores inflamables o polvo explosivo en el aire. Entre los gases y
vapores inflamables se incluye, pero sin limitarse a enos, liquidos de encendedor, limpiadores a base
de disolventes, pinturas a base de aceite, gasolina, alcohol o rociadores aerosoles. Entre los polvos
explosivos se incluye, pero sin limitarse a enos, el carb6n, magnesio, aluminio, polvo de granos o
)6lvora. No recoja con la aspiradora polvo explosivo, liquidos inflamables o combustibles, ni cenizas
calientes. No use esta aspiradora como rociador. A fin de reducir los peligros para la salud debidos a
vapores o polvos, no recoja con la aspiradora materiales t6xicos.
A ADVERTENCIA: Use siempre anteojos de
seguridad que cumplan con la norma ANSI Z87.1
(o en Canada.,con la norma CSAZ94.3) antes de
comenzar la operaci6n. Se pueden conseguir
anteojos de seguridad en muchas tiendas
minoristas locales. La utilizaci6n de cualquier
aspiradora utilitaria puede hacer que se soplen
objetos extraios hacia los ojos, Io cual puede
causar daios graves en los ojos.
A PRECAUCION:Para reducir el riesgo de
dafios a la audici6n, use protectores de oidos al
utilizar la aspiradora durante muchas horas
seguidas o al emplearla en un _.rea ruidosa.
Para reducir el riesgo de sacudidas el6ctricas, este
aparato electrodom6stico tiene un enchufe polari-
zado (una hoja es m_.sancha que la otra). Este
enchufe entrar_,en un tomacorriente polarizado
solamente de una manera. Si el enchufe no entra
por completo en el tomacorriente, d61ela vuelta. Si
sigue sin entrar, p6ngase en contacto con un
electricista competente para instalar el toma-
corriente adecuado. No haga ning0n tipo de
cambio en el enchufe.
Despu6s de enchufar el cord6n de energia en el
tomacorriente, encienda la unidad empujando el
interruptor de la posici6n "O" a la posici6n 'T'. Los
simbolos utilizados en el accionador del interruptor
!]m
........<i]7.......
28
i
.........................<TY........................
SP6642 ES .qxd 10/11/07 11:54 AM
son los simbolosinternacionalesde "encendidoy
apagado"."0" es elsimbolo de"APAGADO"y 'T'
esel simbolode "ENCENDIDO".
I = ENCENDIDOO = APAGADO
_, ADVERTENClA:Para reducir el riesgo de
incendio o sacudidas el6ctricas, no deje desa-
tendida la aspiradora mientras est6 en marcha.
Recogida de materiales secos
con la aspiradora
1. El filtro debeestarsiempreen la posici6n
correctapara reducirel riesgodefugasy
posiblesdafiosa la aspiradora.
2. Cuandoutilicela aspiradorapara recogerpolvo
muyfino, ser_.necesarioqueustedvacieel
tambory limpie el filtro a intervalosm_.s
frecuentesparamantenerel m_.ximo
rendimientode laaspiradora.
NOTA:Senecesitaun filtro paramedicssecospara
recogermaterialseco.Si utilizala aspiradorapara
recogerpolvocuandoel filtro est6mojado,6stese
taponar_,r_.pidamentey ser_.muydificil limpiarlo.
3. Si el filtro est,.mojadopero ustednecesitausar
laaspiradorapara recogermaterialseco, puede
secarr_.pidamenteelfiltro haciendofuncionarla
aspiradorasin tenerla mangueraconectadaa
elladuranteaproximadamente10 minutos.El
airelimpio queatravesar_,r_.pidamentela
aspiradoraayudar_,a secarel filtro.
Elfiltro opcionalCraftsmanpara materialescon
calificaci6nHEPA(filtro de airede altaeficiencia
paraparticulas),nOmerode existencias9-17912,
har_.un mejortrabajoa la horade atraparlas
particulasmuyfinas queel filtro 9-17816.
Recogida de liquidos con
la aspiradora
1. Cuandorecojacantidadespeque_asde liquido,
sepodr_,dejar colocadoelfiltro en laaspiradora.
2. Cuandorecojacantidadesgrandesde liquido,
recomendamosquitarel filtro. Si nose quitael
filtro, est6se saturar_,yes posiblequeaparezca
nieblaen el escape.
3. Cuandoel liquidocontenidoenel tambor de la
aspiradoraalcanceun nivelpredeterminado,el
mecanismode flotadorsubir_,autom_.ticamente
paracortar lacirculaci6nde aire.Cuandoesto
ocurra,apaguelaaspiradora,desenchufeel
cord6nde energiay vacieel tambor.Sabr_.que
elflotador ha cortadolacirculaci6nde aire
porquela succi6ncesar_,y el ruido del motor
alcanzar_,unafrecuenciam_.saltadebidoal
aumentode lavelocidaddel motor.
4. Despu6sde utilizarla aspiradorapararecoger
liquidos,se debesecarel filtro paraevitaruna
posibleformaci6nde mohoy posiblesdafiosal
filtro.
IMPORTANTE:Parareducirel riesgode da_arla
aspiradora,no hagafuncionarel motor con el
flotadoren la posici6nsubida.
Vaciado del tambor para polvo
ADVERTENCIA:Parareducirel riesgode
lesionespor causade un arranqueaccidental,
desenchufeelcord6nde energiaantesdevaciar
e tambor de a asp radora.
1. La aspiradoravieneequipadacon undrenaje
paravaciarlaf_.cilmentede liquidos.Simple-
mentedesenrosquelatapa deldrenajey levante
ligeramenteel ladoopuestoparavaciarel
tambor.
2. Otraopci6nes quitarel ensamblajedel motor.
3. Pongaelensamblajedel motor en posici6n
invertidaenunasuperficielimpia mientrasvacia
eltambor.
4. Tireel contenidodeltambor en el recipientede
eliminaci6nde residuosapropiado.
ADVERTENCIA:Parareducirel riesgode
lesionesen laespaldao de caidas,no levanteuna
aspiradoraquepesemuchodebidoa que
contieneliquidoo residuos.Saqueo viertabas-
tante contenidoparahacerquela aspiradorasea
Io suficientementelivianacomo parapoder
levantarlac6modamente.
Traslado de la aspiradora
para mojado/seco
En casode queseanecesariolevantarlaaspiradora
paratrasladarla,lasasasubicadasen los ladosdel
tamborpara polvo se utilizanpara levantarla
aspiradora.Paramaniobrarlaaspiradora,se debe
usarel asade latapa o elasamet_.licaubicadaen
la partetraseradela unidad.
29
.........................L<_y........................
SP6642 ES .qxd 10/11/07 11:54 AM
Funcionamiento(continuaci6n)
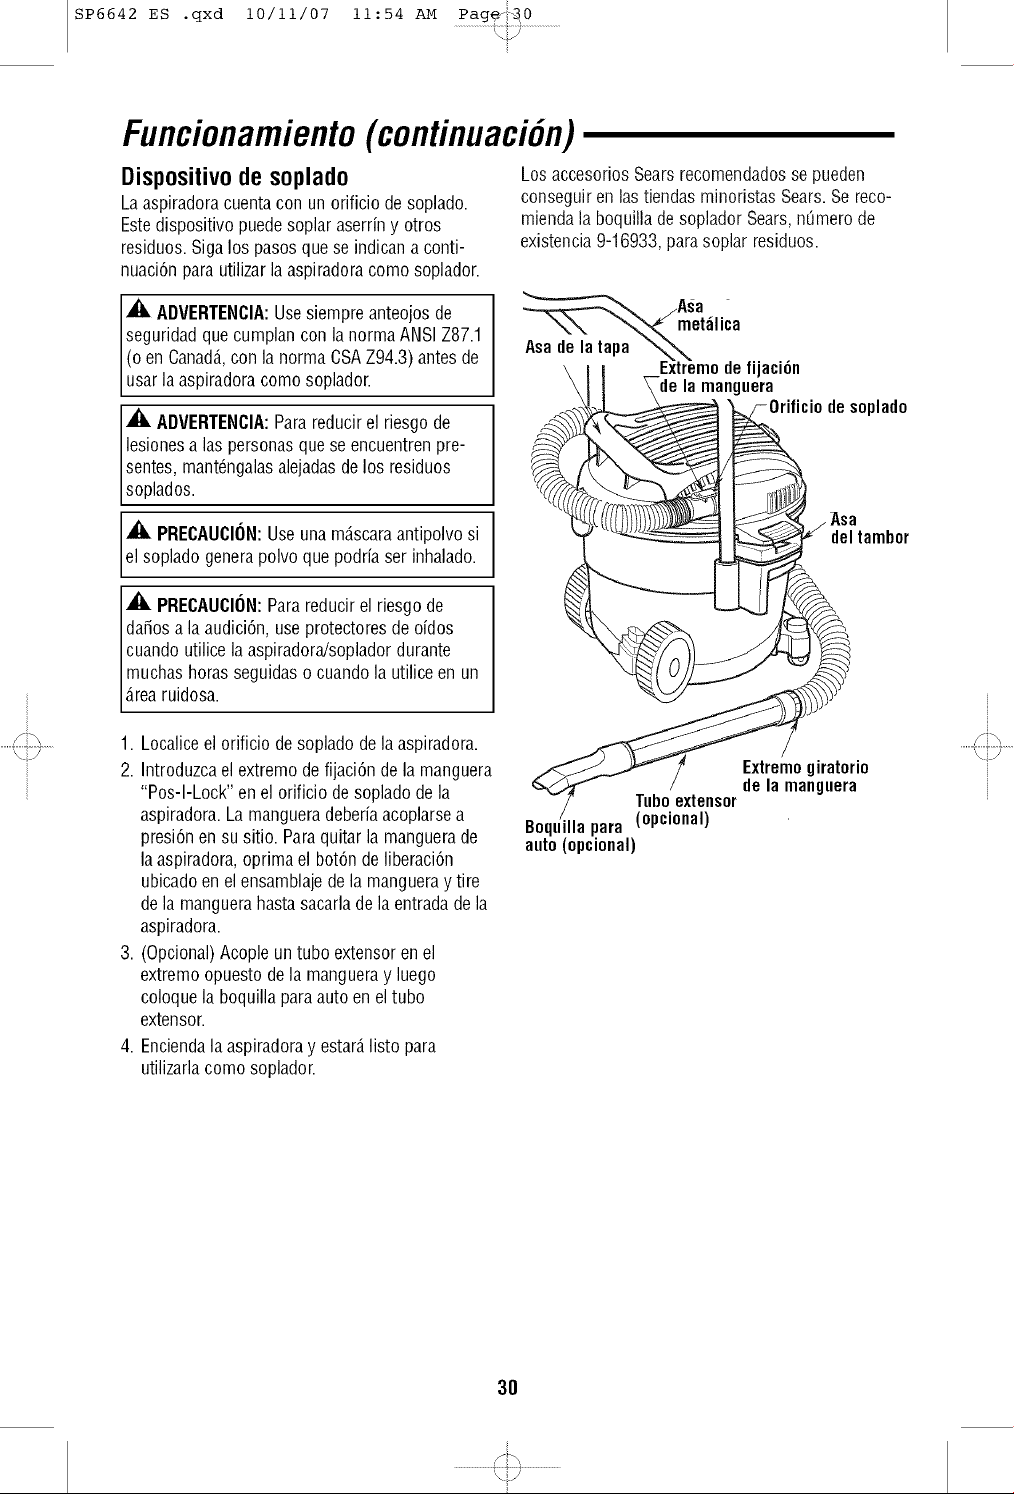
Dispositivo de soplado
La aspiradora cuenta con un orificio de soplado.
Este dispositivo puede soplar aserrin y otros
residuos. Siga los pasos que se indican a conti-
nuaci6n para utilizar la aspiradora como soplador.
A_, ADVERTENCIA:Use siempre anteojos de
seguridad que cumplan con la norma ANSI Z87.1
(o en Canada.,con la norma CSAZ94.3) antes de
usar la aspiradora como soplador.
,_ ADVERTENCIA:Para reducir el riesgo de
lesiones alas personas que se encuentren pre-
sentes, mant6ngalas alejadas de los residuos
soplados.
A PRECAUCION:Use una m_.scaraantipolvo si
el soplado genera polvo que podria ser inhalado.
A PRECAUCION:Para reducir el riesgo de
da_os a la audici6n, use protectores de oidos
cuando utilice la aspiradora/soplador durante
muchas horas seguidas o cuando la utilice en un
_.rearuidosa.
Los accesoriosSearsrecomendadosse pueden
conseguiren lastiendasminoristasSears.Se reco-
miendala boquillade sopladorSears,mimerode
existencia9-16933,parasoplarresiduos.
_m A_a
et_lica
Asa de latapa _
Extremo de fijaci6n
la manguera
de soplado
del tambor
1. Localice el orificio de soplado de la aspiradora.
2. Introduzca el extremo de fijaci6n de la manguera
"Pos-I-Lock" en el orificio de soplado de la
aspiradora. La manguera deberia acoplarse a
presi6n en su sitio. Para quitar la manguera de
la aspiradora, oprima el bot6n de liberaci6n
ubicado en el ensamblaje de la manguera y tire
de la manguera hasta sacarla de la entrada de la
aspiradora.
3. (Opcional) Acople un tubo extensor en el
extremo opuesto de la manguera y luego
coloque la boquilla para auto en el tubo
extensor.
4. Encienda la aspiradora y estar_,listo para
utilizarla como soplador.
Tnho extensor
Boquilla para (opcional)
auto (opcional)
Extremo giratorio
de la manguera
30
SP6642 ES .qxd 10/11/07 11:54 AM
!]h
........<i]7.......
Mantenimiento
Filtro
A ADVERTENCIA:Para reducir el riesgo de
lesiones por causa de un arranque accidental,
desenchufe el cord6n de energia antes de
cambiar o limpiar el filtro.
NOTA:Estefiltro est,. hecho de papel de alta
calidad diseiado para detener particulas de polvo
muy pequeias. El filtro se puede utilizar para
recoger material mojado o seco. Maneje el filtro
con cuidado cuando Io quite para limpiarlo o
cuando Io instale. Es posible que se formen
arrugas en los pliegues del filtro como resultado de
la instalaci6n, pero las arrugas no afectar_.n el
rendimiento del filtro.
Limpieza del filtro
El filtro se debe Nmpiar a menudo para mantener
un rendimiento 6ptimo de la aspiradora.
Aseg0rese de secar el filtro antes de guardar la
aspiradora o de recoger residuos secos.
IMPORTANTE:Despu6s de limpiar el filtro, com-
pruebe si 6ste tiene desgarraduras o agujeros
pequeios. No use un filtro que tenga agujeros o
desgarraduras. Incluso un agujero pequeio puede
hacer que salga mucho polvo de la aspiradora.
Reemplace el filtro inmediatamente.
Remoci6n del filtro
Para quitar el filtro con el fin de limpiarlo o
reemplazarlo, quite la tuerca del filtro del tornillo
ubicado en la jaula del filtro, quite la placa del filtro
y levante el filtro.
_=, ADVERTENCIA:No quite la jaula del filtro.
Est,. ahi para ayudar a evitar que los dedos del
operador entren en la rueda del soplador.
IMPORTANTE: Para reducir el riesgo de daiar la
rueda del soplador y el motor, reinstale siempre el
filtro antes de utilizar la aspiradora para recoger
material seco.
Limpieza de un filtro seco
Se puede Iograr un poco de remoci6n de residuos
secos sin quitar el filtro de la aspiradora. D6 una
palmada con la mano sobre la parte superior del
ensamblaje del motor mientras la aspiradora est,.
apagada.
Para obtener 6ptimos resultados de limpieza
debido a la acumulaci6n de polvo, limpie el filtro en
un _.reaabierta. La limpieza SE DEBErealizar al aire
libre y no en el interior de la vivienda.
Despu6s de quitar el filtro de la aspiradora, saque
los residuos secos golpeando suavemente el filtro
contra la pared interior del tambor para polvo. Los
residuos se soltar_.n y caer_.n.
Para una limpieza a fondo del filtro seco con polvo
fino (sin residuos), haga pasar agua a trav6s del
filtro tal como se describe bajo "Limpieza de un
filtro mojado".
Limpieza de un filtro mojado
Despu6s de quitar el filtro, haga pasar agua a
trav6s de 61 usando una manguera o desde una
espita. Tenga cuidado de que la presi6n del agua
procedente de la manguera no sea tan fuerte como
para daiar el filtro.
Recuerde: Para secar r_.pidamente un filtro,
reinstale el filtro en la aspiradora y deje que la
unidad funcione durante aproximadamente 10
minutos. El aire limpio que atravesar_,el filtro har_.
que 6ste se seque.
Instalaci6n
Consulte la secci6n "Ensamblaje del filtro de
repuesto" de este manual.
Deje que el filtro se seque antes de guardar la
aspiradora.
!]m
........<i]7.......
31
i
.........................<TY........................
SP6642 ES .qxd 10/11/07 11:54 AM
!]h
........<i]7.......
Mantenimiento(continuaci6n)
Limpieza y desinfecci6n de
la aspiradora para mojado/seco
Paramantenerel mejor aspectoposiblede la
aspiradorapara mojado/seco,limpie su exterior
con un paio humedecidoconaguatempladay un
jab6nsuave.
Paralimpiareltambor:
1. Vacielos residuosdeltambor.
2. Lavea fondoeltambor con aguatempladay un
jab6nsuave.
3. Limpieeltamborcon unpaio seco.
Antesde un almacenamientoprolongadoo segOn
seanecesario(porejemplo,si se recogenaguas
residuales),se debedesinfectarel tambor.
Paradesinfectarel tambor:
1. Eche1 gal6nde aguay 1 cucharaditade blan-
queadorde cloroeneltambor.
2. Dejequela soluci6nreposedurante20 minutos
y agitelacuidadosamentecadapocosminutos,
asegur_.ndosede mojartodaslassuperficies
interioresdeltambor.
Ruedecillas
Si lasruedecillashacenruido, puedeponeruna
gotade aceiteen el ejedel rodilloparaque hagan
menosruido.
Almacenamiento
Antesde almacenarlaaspiradora,sedebevaciary
limpiarel tambor.Elcord6nse debeenrollar
alrededorde launidady la manguerase debe
almacenarde la maneradescritaen estemanual.
Los accesoriossedebenmanteneren la misma
_.reaquelaaspiradoraparaqueest6nal alcancede
la manocuandose necesiten.Laaspiradorase
debealmacenaren interiores.
A ADVERTENCIA:Para garantizar la
SEGURIDAD y CONFIABILIDAD del producto, las
reparaciones y el ajuste deben ser realizados por
Centros de Servicio Sears, utilizando siempre
p ezas de repuesto Sears.
Vacieel tambordespu6sde20 minutos.Enju_.-
guelocon aguahastaqueel olor a blanqueador
desaparezca.Dejequeeltambor se seque
completamenteantesde sellarel motorsobre el
tambor.
!]m
........<i]7.......
32
i
.........................<TY........................
SP6642 ES .qxd 10/11/07 11:54 AM
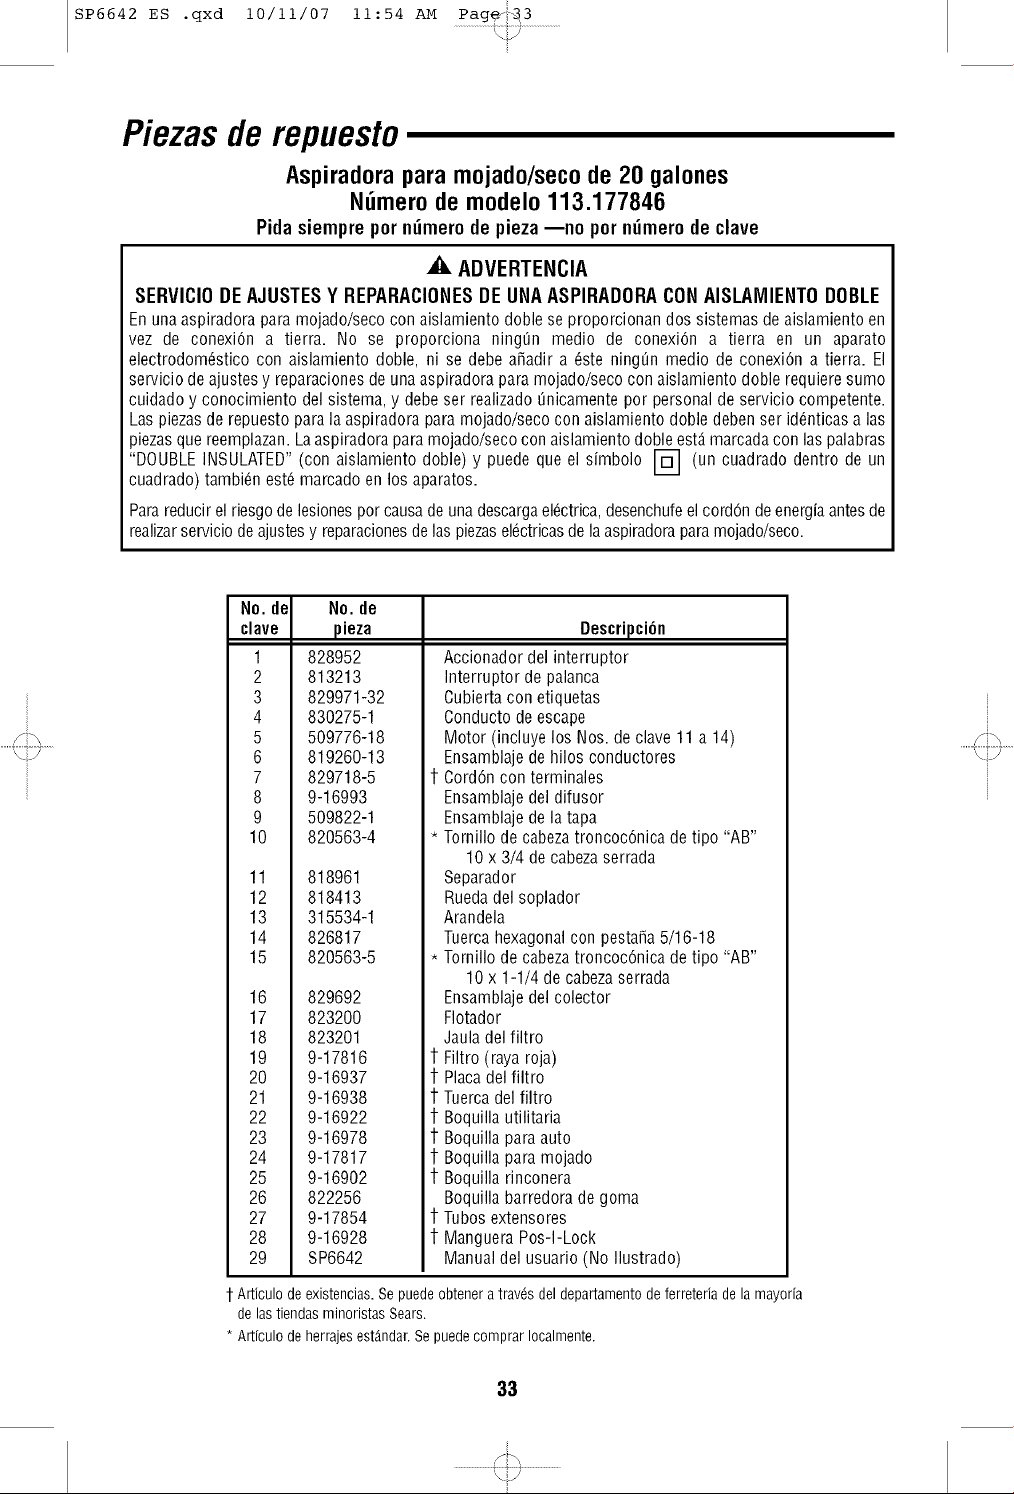
Piezas de repuesto
Aspiradora para mojado/seco de 20 galones
Ntimero de modelo 113.177846
Pida siempre por nimero de pieza --no por nimero de clave
A. ADVERTENCIA
SERVICIO DE AJUSTES Y REPARACIONES DE UNA ASPIRADORA CON AISLAIVIIENTO DOBLE
En una aspiradora para mojado/seco con aislamiento done se proporcionan dos sistemas de aislamiento en
vez de conexiOn a tierra. No se proporciona ningin medio de conexiOn a tierra en un aparato
electrodom_stico con aislamiento done, ni se debe aiadir a _ste ning0n medio de conexiOn a tierra. El
servicio de ajustes y reparaciones de una aspiradora para mojado/seco con aislamiento doble requiere sumo
cuidado y conocimiento del sistema, y debe ser realizado inicamente por personal de servicio competente.
Las piezasde repuesto para la aspiradora para mojado/seco con aislamiento done deben ser id_nticas alas
piezasque reemplazan.La aspiradora para mojado/seco con aislamiento doble est£ marcadacon las palabras
"DOUBLE INSULATED" (con aislamiento done) y puede que el simbolo r_ (un cuadrado dentro de un
cuadrado) tambi_n est_ marcado en los aparatos.
Para reducirel riesgo de lesionespor causa de una descargael_ctrica, desenchufe el cordon de energiaantes de
realizarservicio de ajustesy reparacionesde las piezasel_ctricasde laaspiradora paramojado/seco.
!]h
........<i]7.......
No. de No. de
clave pieza
1 828952
2 813213
3 829971-32
4 830275-1
5 509776-18
6 819260-13
7 829718-5
8 9-16993
9 509822-1
10 820563-4
11 818961
12 818413
13 315534-1
14 826817
15 820563-5
16 829692
17 823200
18 823201
19 9-17816
20 9-16937
21 9-16938
22 9-16922
23 9-16978
24 9-17817
25 9-16902
26 822256
27 9-17854
28 9-16928
29 SP6642
Descripci6a
Accionador del interruptor
Interruptor de palanca
Cubierta con etiquetas
Conducto de escape
Motor (incluye los Nos. de clave 11 a 14)
Ensamblaje de hilos conductores
1-Cord6n con terminales
Ensamblaje del difusor
Ensamblaje de la tapa
* Tornillo de cabeza troncoc6nica de tipo "AB"
10 x 3/4 de cabeza serrada
Separador
Ruedadel soplador
Arandela
Tuerca hexagonal con pestaia 5/16-18
* Tornillo de cabeza troncoc6nica de tipo "AB"
10 x 1-1/4 de cabezaserrada
Ensamblaje del colector
FIotador
Jaula del filtro
1-Filtro (raya roja)
1-Placadel filtro
1-Tuerca del filtro
1-Boquilla utilitaria
1-Boquilla para auto
1-Boquilla para mojado
1-Boquilla rinconera
Boquilla barredora de goma
1-Tubos extensores
1-Manguera Pos-I-Lock
Manual del usuario (No Ilustrado)
1-Articulo de existencias. Se puede obtener a travds del departamento de ferreteria de la mayona
de las tiendas minoristas Sears.
* Artfculo de herrajes estAndar.Se puede comprar Iocalmente.
33
!]m
........<i]7.......
i
Piezas de repuesto
Aspiradora para mojado/seco de 20 galones
N_mero de modelo 113.177846
10
27_
J
34
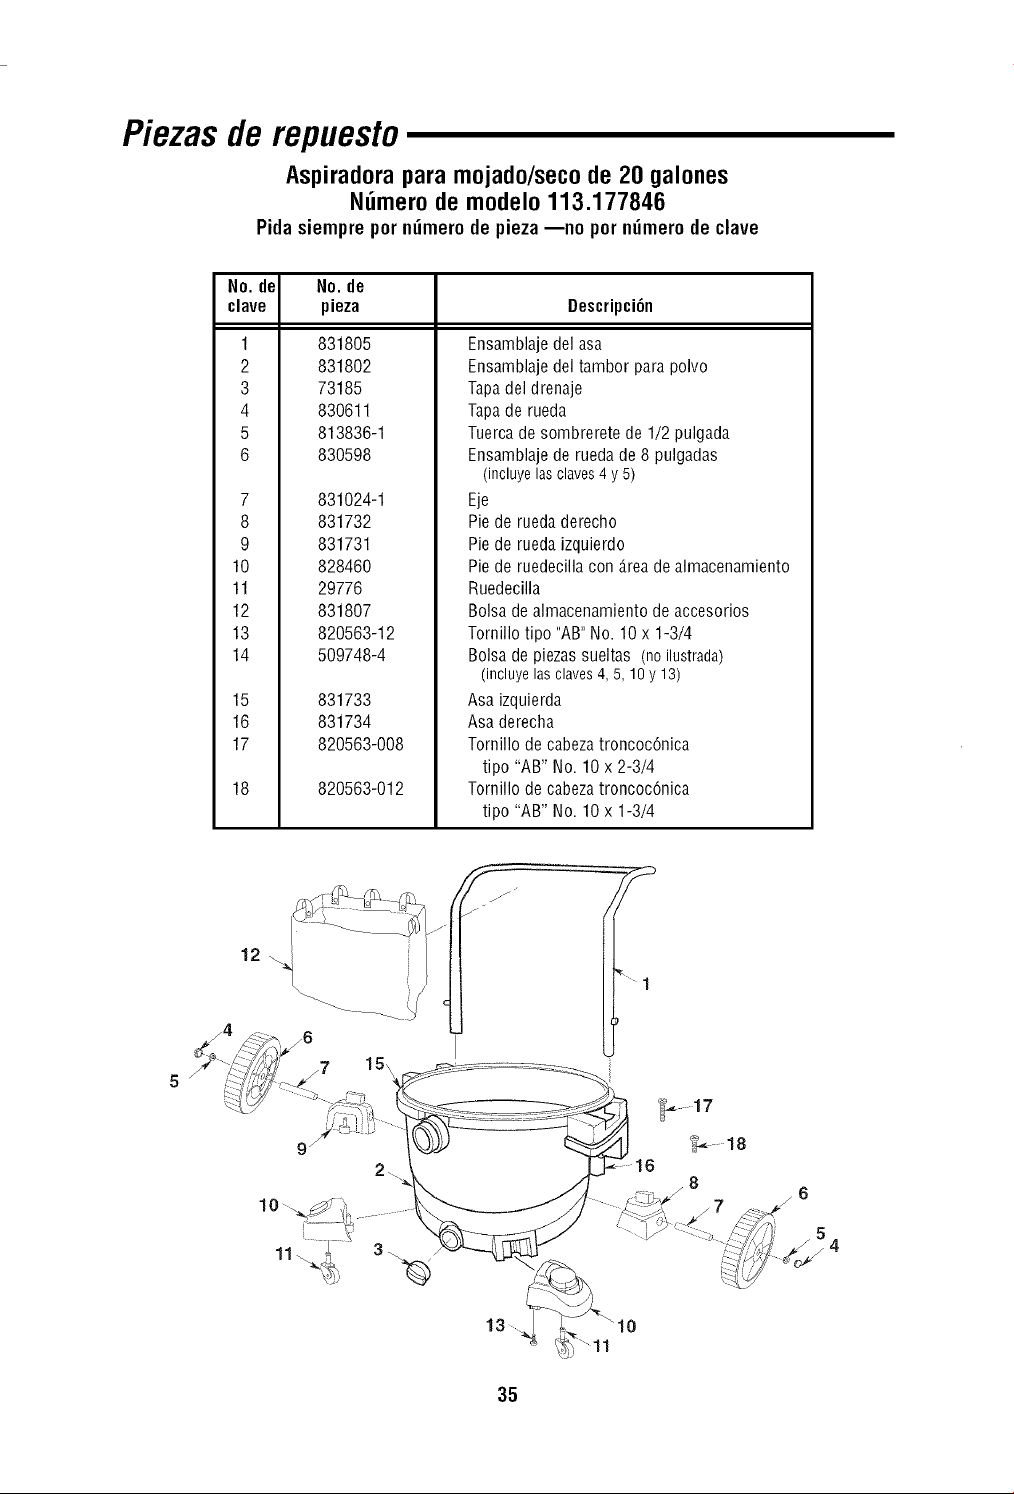
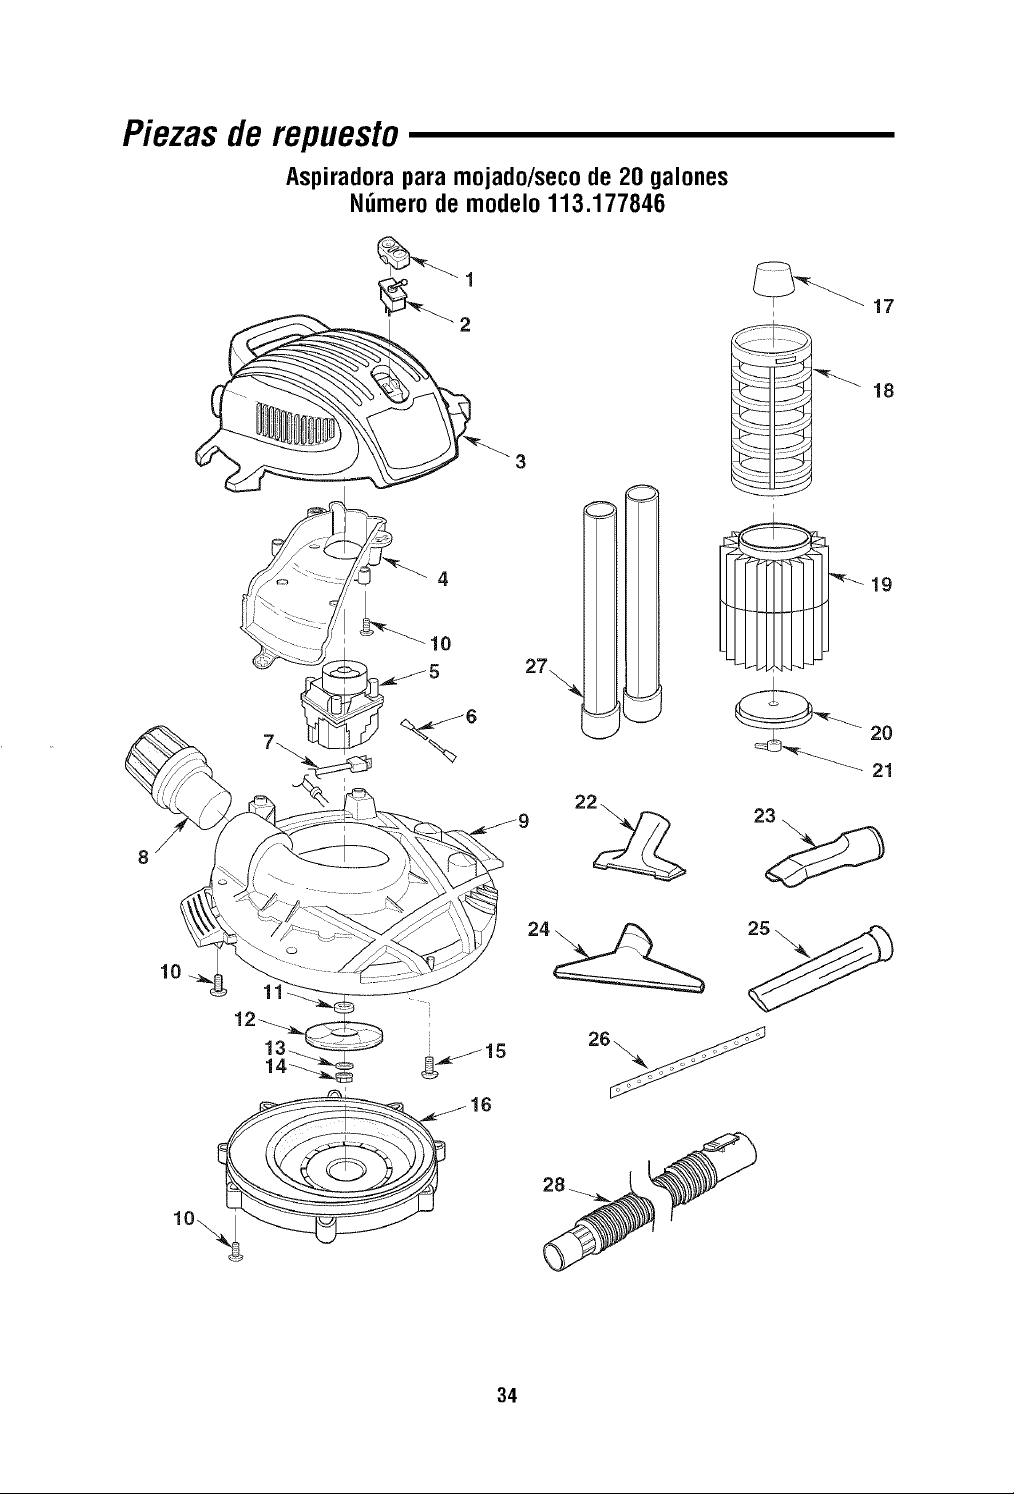
Piezas de repuesto
Aspiradora para mojado/seco de 20 galones
N_mero de modelo 113.177846
Pida siempre pot n_mero de pieza --no pot n_mero de clave
No. de No. de
clave pieza Descripci6n
1
2
3
4
5
6
831805
831802
73185
830611
813836-1
830598
7 831024-1
8 831732
9 831731
10 828460
11 29776
12 831807
13 820563-12
14 509748-4
15 831733
16 831734
17 820563-008
18 820563-012
Ensamblaje del asa
Ensamblaje del tambor para polvo
Tapa del drenaje
Tapa de rueda
Tuerca de sombrerete de 1/2 pulgada
Ensamblaje de rueda de 8 pulgadas
(incluyelasclaves4 y 5)
Eje
Pie de rueda derecho
Pie de rueda izquierdo
Pie de ruedecilla con Area de almacenamiento
Ruedecilla
Bolsa de almacenamiento de accesorios
Tornillo tipo "AB" No. 10 x 1-3/4
Bolsa de piezassueltas (no ilustrada)
(incluyelasclaves4, 5, 10y 13)
Asa izquierda
Asa derecha
Tornillo de cabezatroncoc6nica
tipo "AB" No. 10 x 2-3/4
Tornillo de cabezatroncoc6nica
tipo "AB" No. 10 x 1-3/4
12 _"
j7 15\
.......1
16
8
z6
!4
35
Your Home
For repair - in your home - of all major brand appliances,
lawn and garden equipment, or heating and cooling systems,
no matter who made it, no matter who sold itt
For the replacement parts, accessories and
owner's manuals that you need to do-it-yourself.
For Sears professional installation of home appliances
and items like garage door openers and water heaters.
1-800-4-MY-HOME ®
(1-800-469-4663)
www.sears.com
Anytime, day or night
(U.S.A. and Canada)
www.sears.ca
Our Home
For repair of carry-in products like vacuums, lawn equipment,
and electronics, call or go on-line for the nearest
Sears Parts and Repair Center.
1-800-488-1222 Anytime, day or night (U.S.A. only)
www.sears.com
To purchase a protection agreement (U.S.A.) or
maintenance agreement (Canada) on a product serviced by Sears:
1-800-827-6655 (U.S.A.) 1-800-361-6665 (Canada)
Para pedir servicio de reparaci6n a
domicilio, y para ordenar piezas:
1-888-SU-HOGAR sM
(1-888-784-6427)
Au Canada pour service en frangais:
1-800-LE-FOYER Mc
(1-800-533-6937)
www.sears.ca
@ Sears, Roebuck and Co.
® Registered Trademark / _-MTrademark / s,,_Service Mark of Sears, Roebuck and Co.
® Marca Registrada / TMMarca de Fabrica / sMMarca de Servicio de Sears, Roebuck and Co.
Mc Marque de commerce / MDMarque deposee de Sears, Roebuck and Co.
Part No. SP6642 Form No. SP6642-1 Printed in Mexico 09/07