3084514
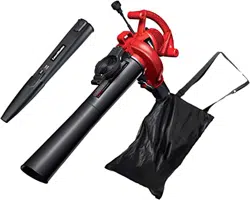
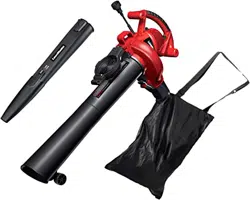
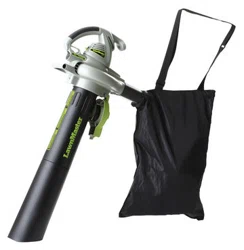
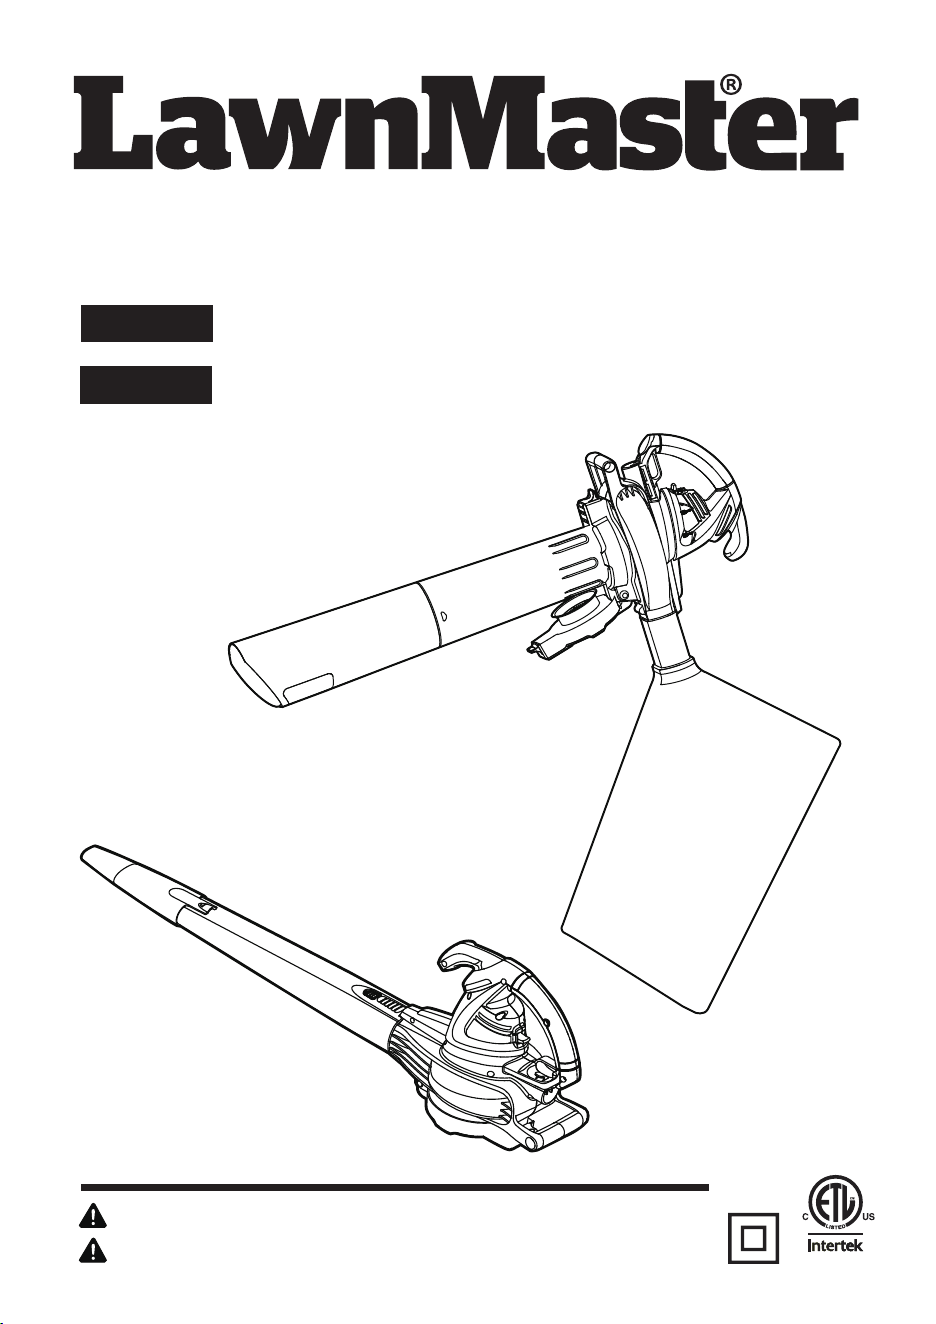
2-Speed Electric Blower / Vacuum BV1211
EN p. 2
Sopladora/aspiradora Eléctrica de 2
Velocidades BV1211
ES p. 21
Operators Manual / Manual del usuario
Read all safety rules and instructions carefully before operating this tool.
Distributed By Cleva North America 601 Regent Park Court Greenville, SC 29607 (866)-384-8432
BV1211_V2
Lea detenidamente todas las normas de seguridad e instrucciones antes de utilizar esta herramienta.
Distribuido por Cleva North America, Inc. 601 Regent Park Court Greenville, SC, 29607 (866)-384-8432

Parts List
2
Symbols
6-7
Electrical Information
7-8
3-4
9
Assembly
Operation
Maintenance
CONTENTS
Know Your Blower / Vac
Troubleshooting
Warranty
Exploded View
2
12 AMP / 2-SPEED ELECTRIC BLOWER/VAC
Voltage
Current
Max Air Speed
Max Air Volume
Mulch Ratio
PRODUCT SPECIFICATIONS
Product Specifications
14:1
Net Weight (Blower)
7.14lbs.
Net Weight (Vac)
8.97lbs.
45.5L (12 Gallon)
Collection Bag Volume
Impeller Type 2 Stage Metal
380 CFM
225 MPH
12 AMP
120 V ~ 60Hz
Important Safety Instructions
5
Specific Safety Rules
10-12
13-14
15
16
17
18
19
Notes
20

READ THESE INSTRUCTIONS BEFORE USING THIS BLOWER / VACUUM
READ AND UNDERSTAND ALL INSTRUCTIONS. Failure to follow all
instructions listed below may result in electric shock, fire, and/or serious
personal injury.
WARNING:
IMPORTANT SAFETY INSTRUCTIONS
Do not operate power tools in explosive atmospheres, such as in the presence of flammable
liquids, gases, or dust. Power tools create sparks which may ignite the dust or fumes.
To reduce the risk of electric shock, this tool has a polarized plug (one blade is wider than the
other) and will require the use of a polarized extension cord. The plug will fit into a polarized
extension cord only one way. If the plug does not fit fully into the extension cord, reverse the
plug. If the plug still does not fit, obtain a correct polarized extension cord. A polarized extension
cord will require the use of a polarized wall outlet. This plug will fit into the polarized wall outlet
only one way. If the plug does not fit fully into the wall outlet, reverse the plug. If the plug still
does not fi
t,
contact a qualified electrician to install the proper wall outlet. Do not change the
equipment plug, extension cord receptacle, or extension cord plug in any way.
Avoid body contact with grounded surfaces such as pipes, radiators, ranges, and refrigerators.
There is an increased risk of electric shock if your body is grounded.
Don’t expose power tools to rain or wet conditions. Water entering a power tool will increase
the risk of electric shock.
Use outdoor extension cords marked W-A, W, SW-A, SOW-A, STW-A, STOW-A, SJW-A,
SJTW-A, or SJTOW-A. These cords are rated for outdoor use and reduce the risk of electric
shock.
Never allow children to operate the equipment. Never allow adults to operate the equipment
without proper instruction.
Wear eye protection with side shields which is marked to comply with ANSI Z87.1 as well as
hearing protection when operating this product.
Always use face or dust mask if operation is dusty.
Use extra care when cleaning on stairs.
Do not leave appliance plugged in. Unplug from outlet when not in use and before servicing.
Do not expose to rain, store indoors.
Use only as described in this manual. Use only manufacturer’s recommended attachments.
Keep hair, loose clothing, fingers and all body parts away from openings and moving parts.
Wear heavy long pants, long sleeves, boots, and gloves. Avoid loose garments or jewelry that
could get caught in moving parts of the machine or its motor.
Do not force tool. Use the correct tool for your application. The correct tool will do the job
better and safer at the rate for which it is designed.
Do not operate the equipment while barefoot or when wearing sandals or similar lightweight
footwear. Wear protective footwear that will protect your feet and improve your footing on
slippery surfaces.
3

Do not use on steps, a ladder, roof top, tree, or other unstable support. Stable footing on a
solid surface enables better control of the blower in unexpected situations.
Secure long hair so it is above shoulder level to prevent entanglement in any moving parts.
Keep firm footing and balance. Do not overreach. Overreaching can result in loss of balance.
Turn off all controls before unplugging.
Do not allow to be used as a toy. Close attention is necessary when used by or near children.
Avoid accidental starting. Be sure the power switch is not on before plugging in. Turn off
power switch before unplugging.
Do not use tool if switch does not turn it on or off. Any tool that cannot be controlled with the
switch is dangerous and must be repaired.
Do not use with damaged plug. If tool is not working as it should or has been dropped,
damaged, left outdoors, or dropped into water, return it to an authorized service center.
Do not leave the tool when plugged in. Unplug from the power outlet when not in use, before
servicing, and before storing the tool. Such preventative safety measures reduce the risk of
starting the tool accidentally.
Keep all bystanders, children, and pets at least 50 ft. away.
Do not operate this unit when you are tired, ill, upset or under the influence of alcohol, drugs,
or medication.
Do not operate in poor lighting.
Keep all parts of your body away from any moving parts and all hot surfaces of the unit.
Do not put any object into openings. Do not use with any opening blocked; keep openings
free of dust, lint, hair, and anything that may reduce air flow.
Check the work area before each use. Remove all objects such as rocks, broken glass, nails,
wire, or string which can be thrown or become entangled in the machine.
Never use blower near fires, fireplaces, hot ashes, barbecue pits, etc., which may cause fire to
spread.
Do not pull or carry by cord, use cord as a handle, close a door on a cord, or pull cord around
sharp edges or corners. Do not run appliance over cord. Keep cord away from heated surfaces.
Do not unplug by pulling on cord. To unplug, grasp the plug, not the cord.
Do not handle plug or appliance with wet hands.
Use only identical manufacturer’s replacement parts and accessories. Use of any other parts
may create a hazard or cause product damage.
In a double insulated appliance, two systems of insulation are provided instead of grounding.
No grounding means is provided on a double insulated appliance, nor should a means for
grounding be added to the appliance. Servicing a double insulated appliance requires extreme
care and knowledge of the system and should be done only by qualified service personnel.
Replacement parts for a double insulated appliance must be identical to the parts they replace.
For household use only.
IMPORTANT SAFETY INSTRUCTIONS
4

Make sure your extension cord is in good condition. When using an extension cord, be sure to
use one heavy enough to carry the current your product will draw. A wire gauge size (A.W.G.)
of at least 14 is recommended for an extension cord 50 feet or less in length. If in doubt, use
the next heavier gauge. The smaller the gauge number, the heavier the cord. An undersized
cord will cause a drop in line voltage resulting in loss of power and overheating.
Do not point the blower nozzle in the direction of people or pets.
Never place blower on any surface, except a hard, clean surface when motor is running.
Gravel, sand, and other debris can be picked up by the air inlet and thrown at the operator or
bystanders, causing possible serious injuries.
Never run the unit without the proper equipment attached. Always ensure the blower tubes are
installed.
When not in use, blower should be stored indoors in a dry, locked up place—out of the reach
of children.
Maintain tool with care. Keep fan area clean for best and safest performance. Follow instructions
for proper maintenance.
Do not attempt to clear clogs from tool without first unplugging it.
Do not pull or carry by cord, use cord as a handle, or pull cord around sharp edges or corners.
Keep cord away from heated surfaces.
Do not unplug by pulling on cord. To unplug, grasp the plug, not the cord.
To reduce the risk of electrical shock, do not expose to rain, do not use on wet surfaces.
Store indoors.
If the power supply cord is damaged, it must be replaced only by the manufacturer or by an
authorized service center to avoid risk.
Protect your lungs. Wear a face or dust mask if the operation is dusty. Following this rule will
reduce the risk of serious personal injury.
Refer to them frequently and use them to instruct others who may use
this power tool. If you loan someone this power tool, loan them these instructions also.
SAVE THESE INSTRUCTIONS.
SPECIFIC SAFETY RULES
5
Safety Alert
V
A
Hz
W
min
MEANING
DANGER:
The following signal words and meanings are intended to explain the levels of risk associated with this product.
SYMBOL
SIGNAL
WARNING
CAUTION:
CAUTION:
Indicates an imminently hazardous situation, which, if not avoided, will result
in death or serious injury.
Indicates a potentially hazardous situation, which, if not avoided, could result
in death or serious injury.
Indicates a potentially hazardous situation, which, if not avoided, may result in
minor or moderate injury.
(Without Safety Alert Symbol) Indicates a situation that may result in property
damage.
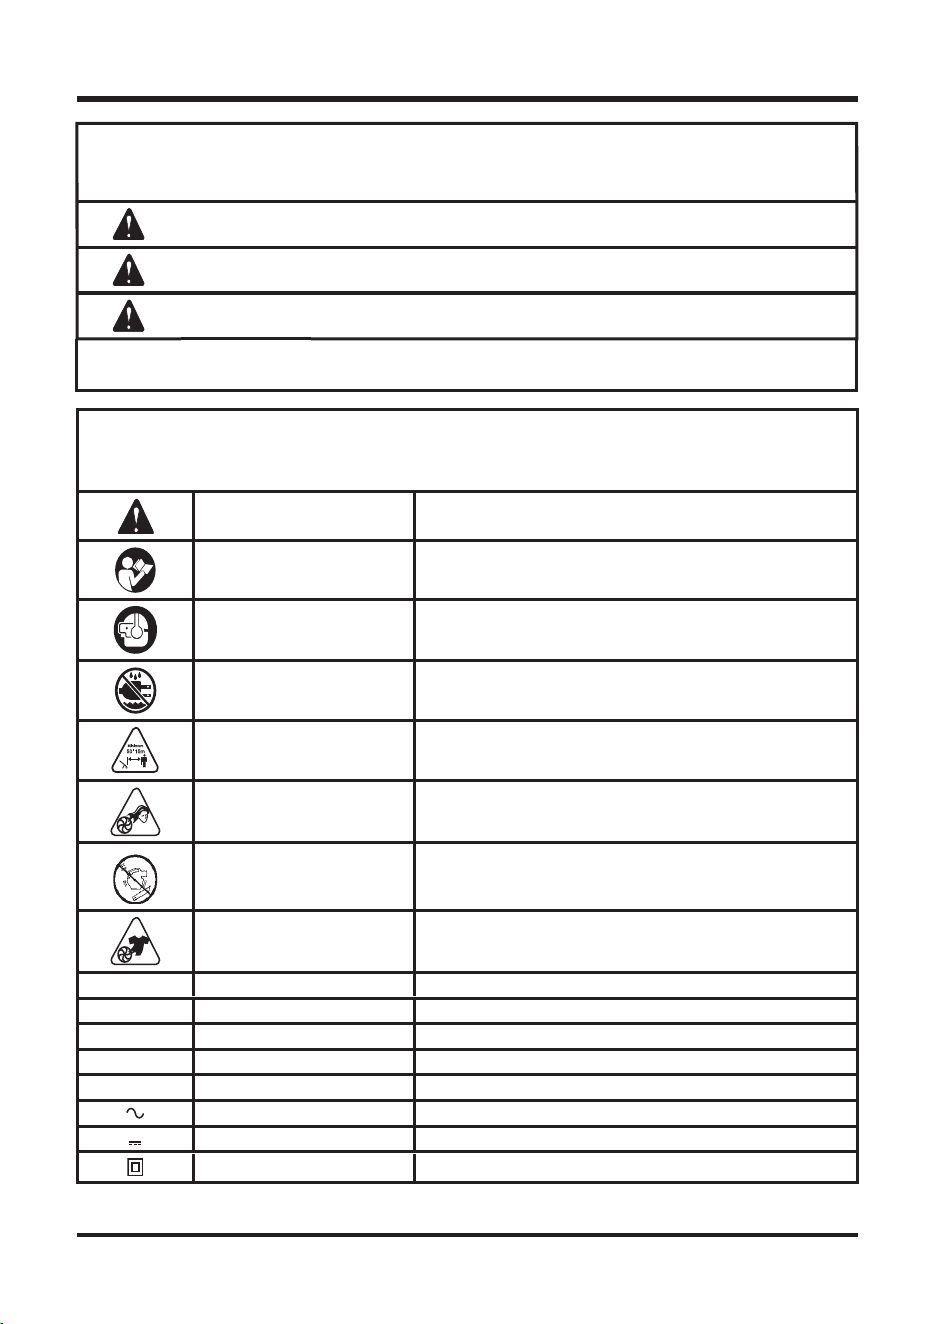
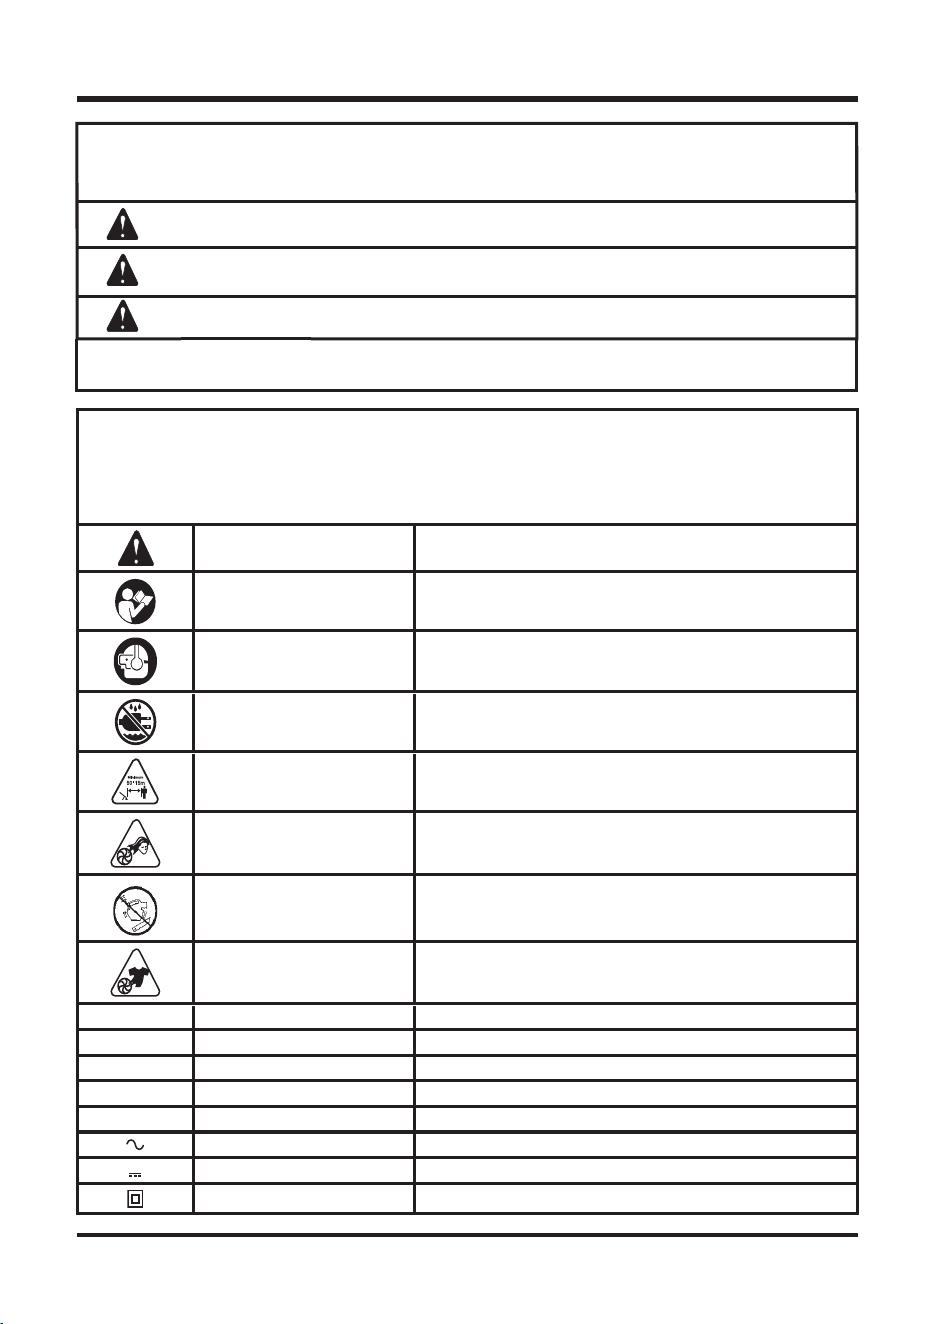
Some of the following symbols may be used on this product. Please study them and learn their meaning. Proper
interpretation of these symbols will allow you to operate the product better and safer.
SYMBOL NAME
DESIGNATION/EXPLANATION
Indicates a potential personal injury hazard.
Read The Operator’s Manual
To reduce the risk of injury, user must read and understand
operator’s manual before using this product.
Eye and Hearing Protection
Always wear eye protection with side shields marked to comply
with ANSI Z87.1, along with hearing protection.
Wet Conditions Alert
Do not expose to rain or use in damp locations.
Keep Bystanders Away Keep all bystanders at least 50 ft. away.
Long Hair
Failure to keep long hair away from the air inlet could result in
personal injury.
Blower Tubes
Do not operate without tubes in place.
Loose Clothing
Failure to keep loose clothing from being drawn into air intake
could result in personal injury.
Volts
Voltage
Amperes
Current
Hertz Frequency (cycles per second)
Watt
Power
Minutes
Time
Alternating Current Type of current
Direct Current Type or a characteristic of current
Class II Construction Double-insulated construction
SYMBOLS
6
DOUBLE INSULATION
Double insulation is a concept in safety in electric power tools, which eliminates the need for the
usual three-pronged grounded power cord. All exposed metal parts are isolated from the internal
metal motor components with protecting insulation. Double insulated tools do not need to be grounded.
The following signal words and meanings are intended to explain the levels of risk associated with
this product.
NOTE:
Servicing of a product with double insulation requires extreme care and knowledge
of the system and should be performed only by a qualified service technician. For service,
we suggest you return the tool to your nearest authorized service center for repair. Always
demand that original factory replacement parts be used when servicing.
ELECTRICAL CONNECTION
This product has a precision-built electric motor. It should be connected to a power supply that
is 120 volts, AC only (normal household current), 60 Hz. Do not operate this product on direct
current (DC). A substantial voltage drop will cause a loss of power and the motor will overheat. If
your product does not operate when plugged into an outlet, double-check the power supply.
WARNING:
The double insulated system is intended to protect the user from shock resulting from a break in
the tool’s internal insulation. Observe all normal safety precautions to avoid electrical shock.
7
ELECTRICAL INFORMATION
SYMBOLS
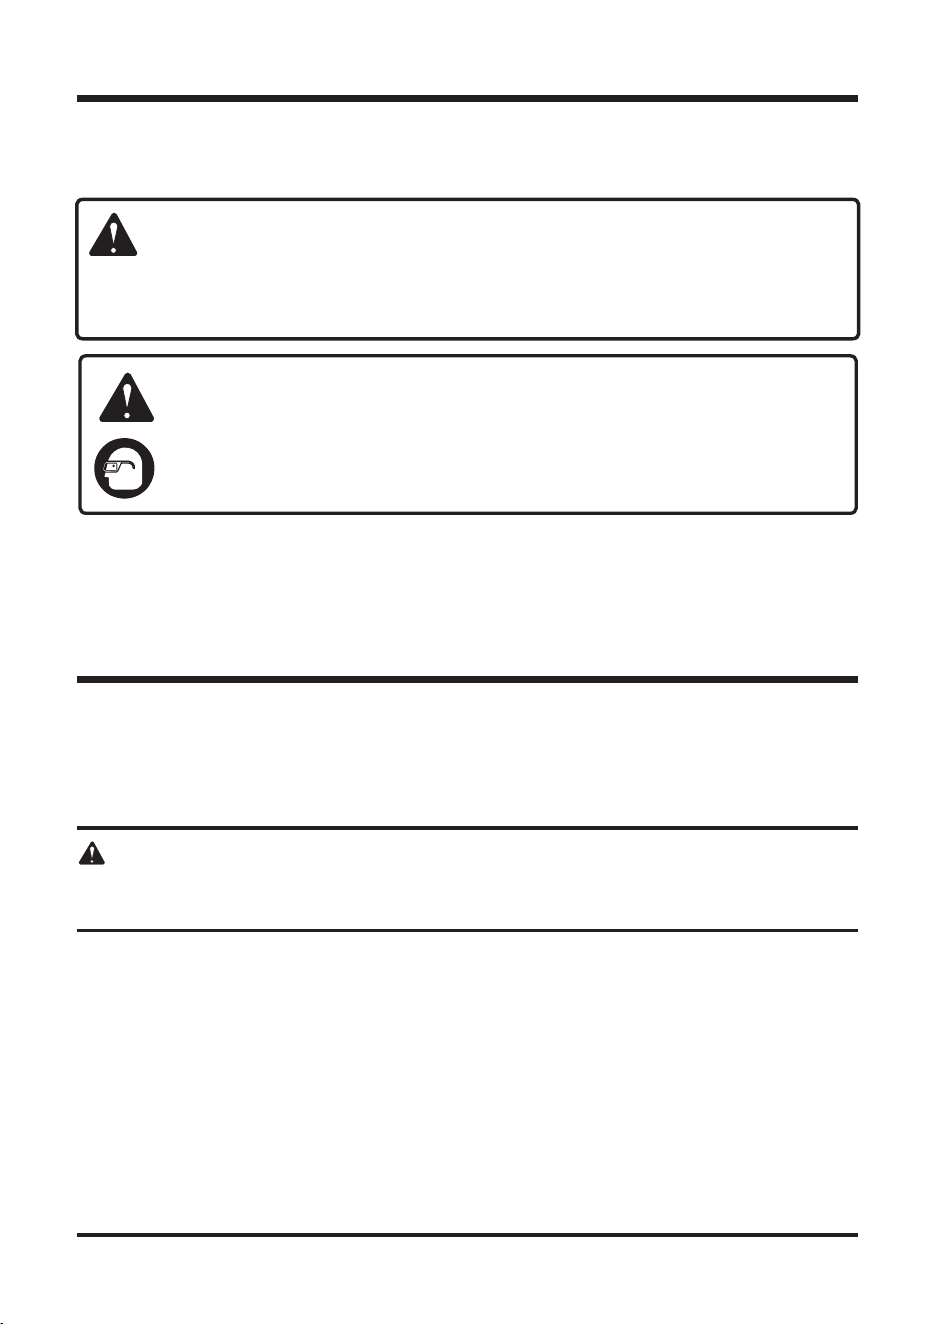
WARNING
To avoid serious personal injury, do not attempt to use this product until you read
thoroughly and understand completely the operator’s manual. If you do not understand
the warnings and instructions in the operator’s manual, do not use this product.
Call customer service for assistance (866)-384-8432.
The operation of any power tool can result in foreign objects being thrown into your
eyes, which can result in severe eye damage. Before beginning power tool operation,
always wear safety goggles or safety glasses with side shields and, when needed, a
full face shield. We recommend Wide Vision Safety Mask for use over eyeglasses or
standard safety glasses with side shields. Always use eye protection which is marked
to comply with ANSI Z87.1.
WARNING:
ALTHOUGH THIS TOOL IS DOUBLE INSULATED, THE EXTENSION CORD AND RECEPTACLE
MUST STILL BE GROUNDED WHILE IN USE TO PROTECT THE OPERATOR FROM ELECTRICAL
SHOCK.
WARNING:
Check extension cords before each use. If damaged replace immediately.
Never use product with a damaged cord since touching the damaged area could cause electrical
shock resulting in serious injury.
GFCI
Ground Fault Circuit Interrupter (GFCI) protection should be provided on the circuit(s) or outlet(s)
to be used for the product. Receptacles are available having built-in GFCI protection and may be
used for this measure of safety.
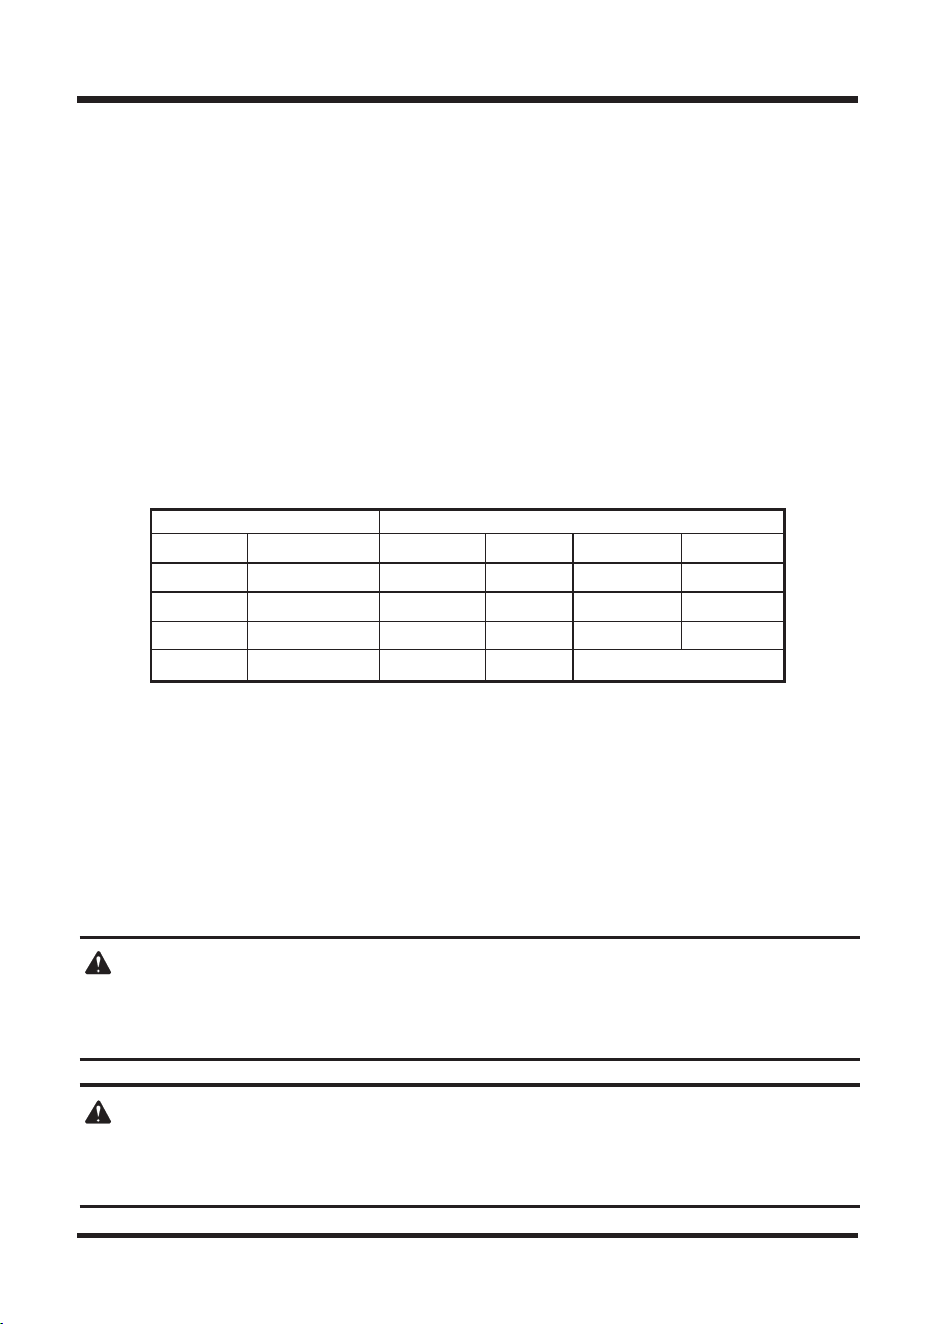
GUIDELINES FOR USING EXTENSION CORDS
USE THE PROPER EXTENSION CORD. Make sure your extension cord is in good condition.
When using an extension cord, be sure to use one heavy enough to carry the current your product
will draw. An undersized cord will cause overheating. The table below shows the correct size to
use depending on cord length and nameplate ampere rating. If in doubt, use the next heavier gauge.
The smaller the gauge number, the heavier the cord.
Minimum Gauge for Extension Cords (AWG)
(when using 120 V only)
Ampere Rating
Total Length of Cord in Feet (meters)
More Than Not More Than
Not Recommended
25' (7.6 m) 50' (15 m) 100' (30.4 m) 150' (45.7 m)
0 6
6
18 16 16 14
10 18 16 14 12
10 12
12
16 16
16
14
14
12
12
Make sure your extension cord is properly wired and in good electrical condition. Always replace
a damaged extension cord or have it repaired by a qualified person before use.
Keep extension cords away from sharp objects, excessive heat and damp or wet areas.
Use a separate electrical circuit for your tools. This circuit should comprise a wire of at least 12
gauge and should be protected with a 15 A time-delayed fuse. Before connecting the motor to the
power line, make sure the switch is in the OFF position and the electric current is identical to that
stamped on the motor nameplate. Running at a lower voltage will damage the motor.
ELECTRICAL INFORMATION
8
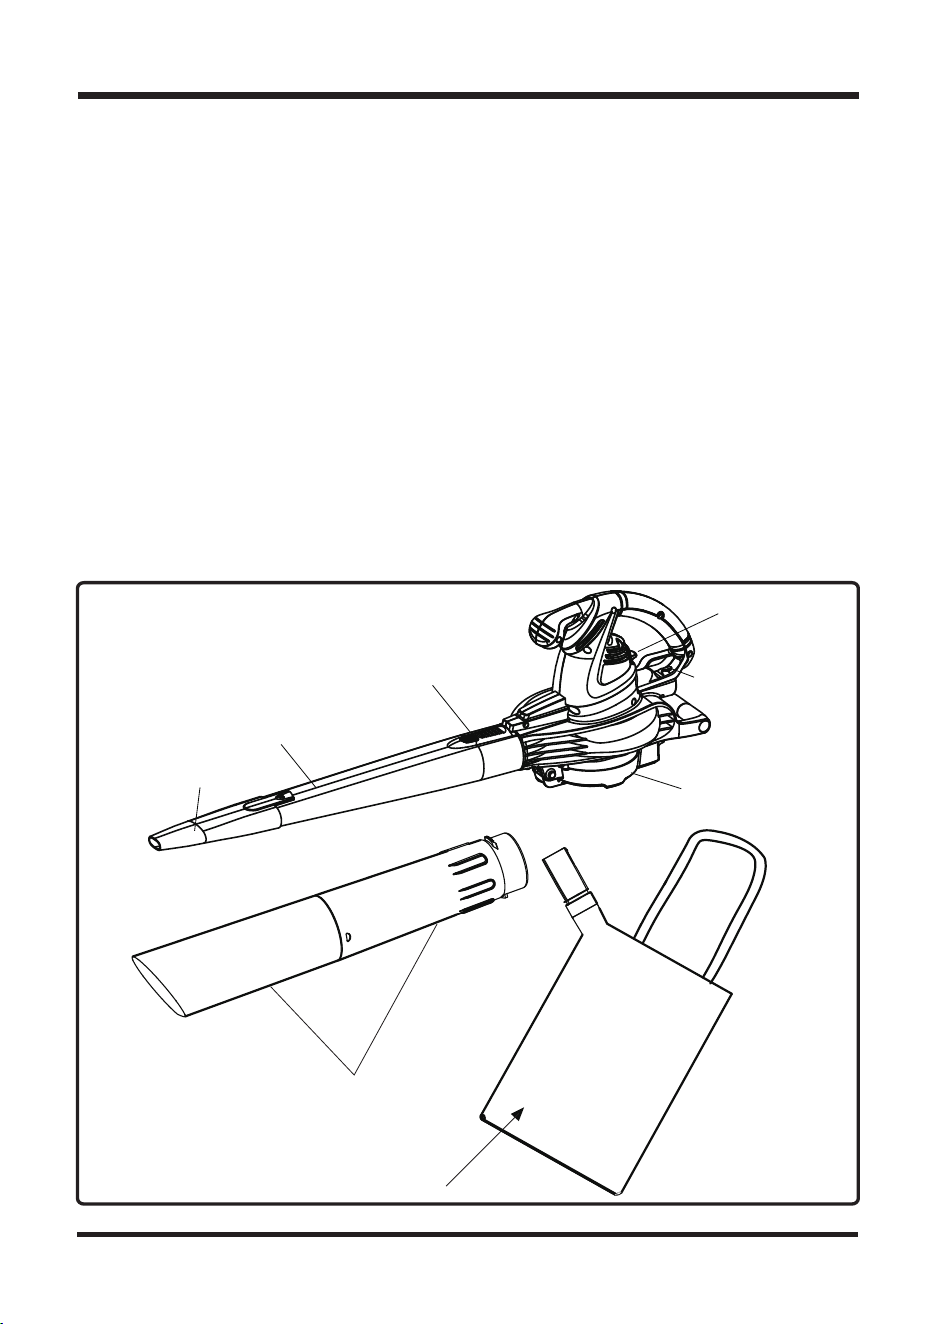
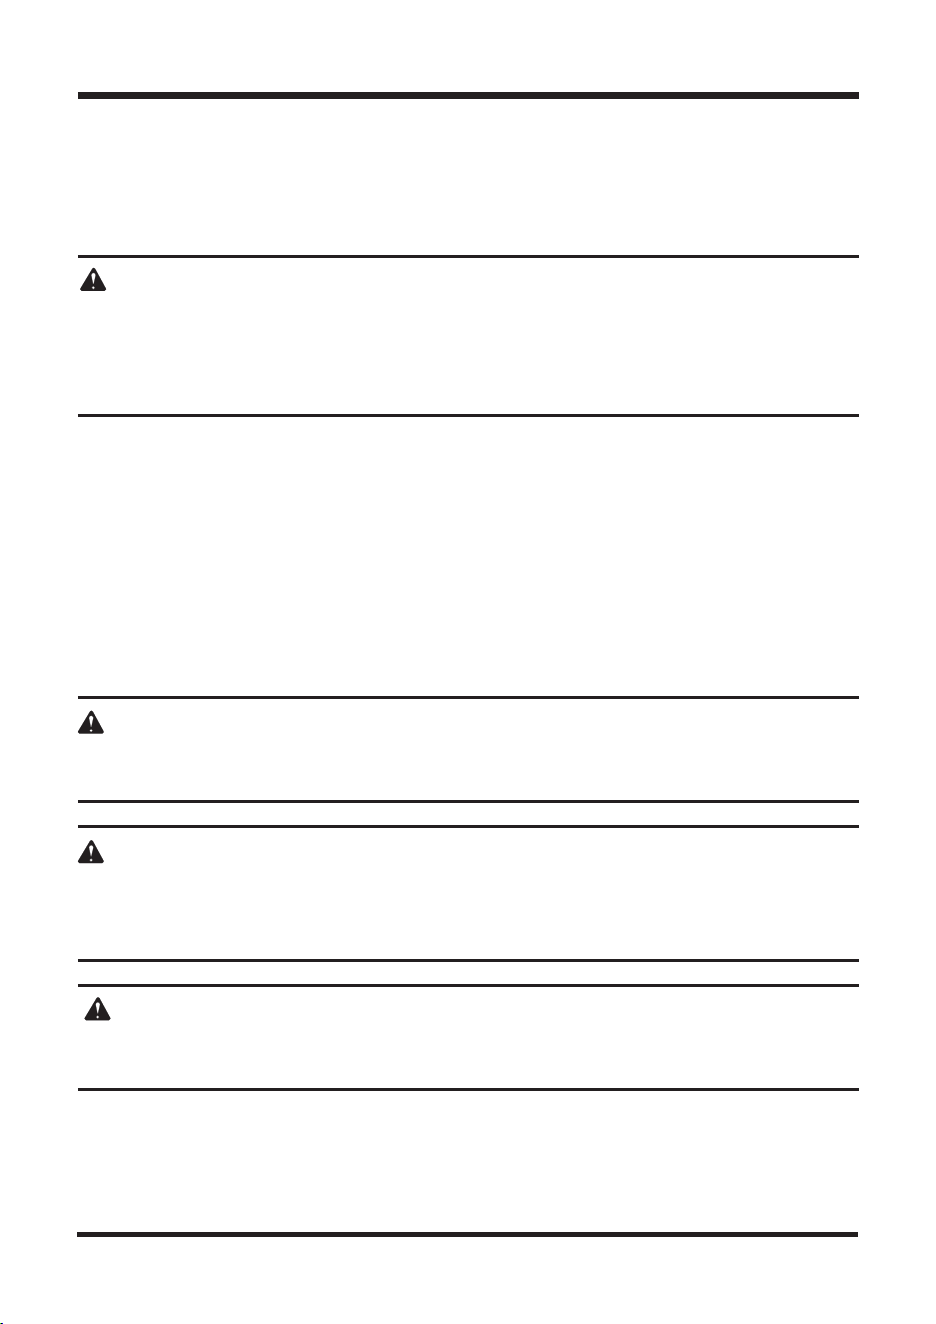
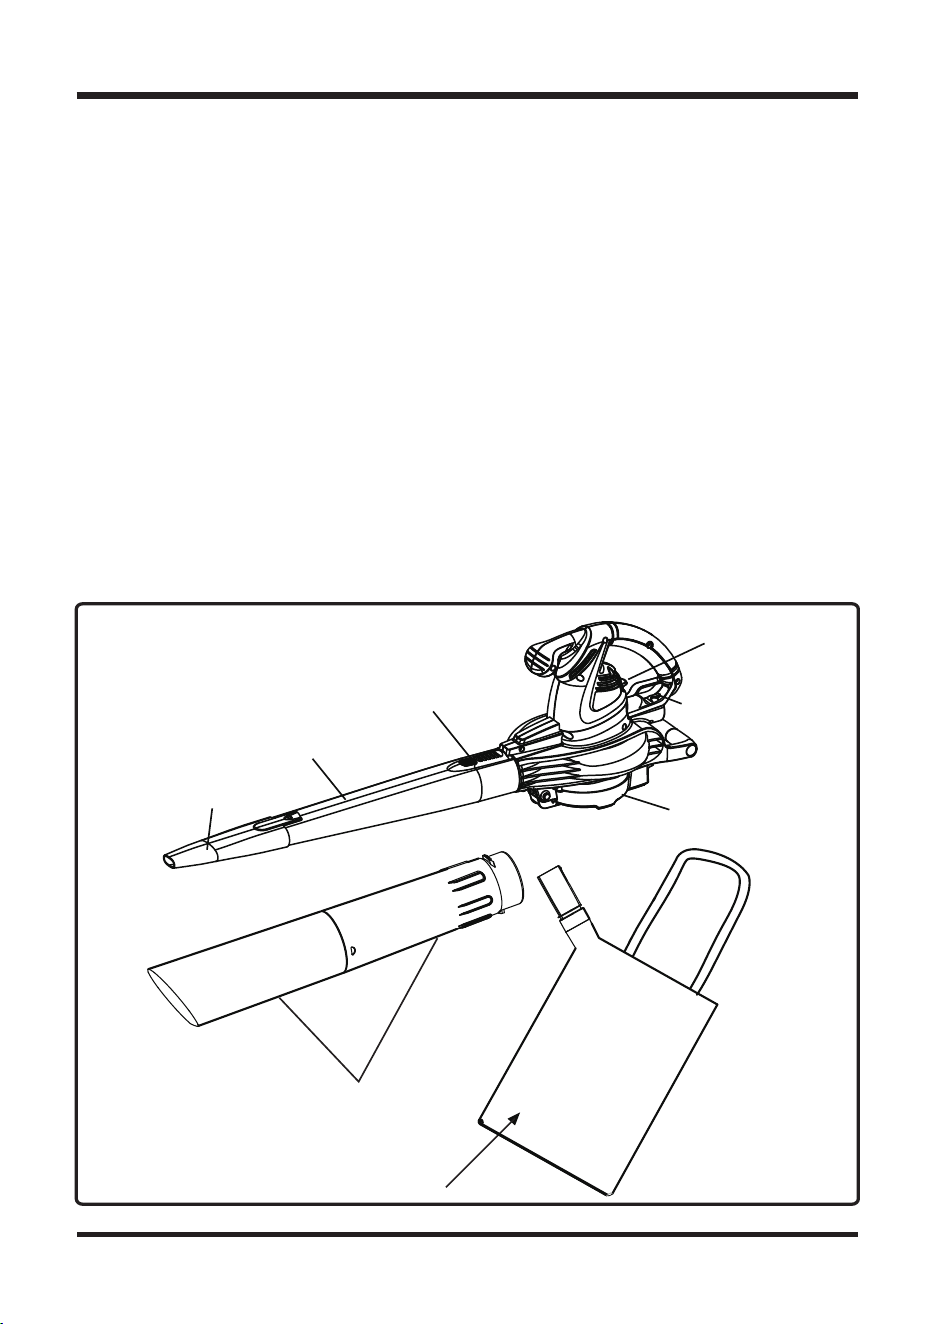
KNOW YOUR BLOWER / VAC
KNOW YOUR BLOWER / VAC
The safe use of this product requires an understanding of the information on the tool spacing and
in this operator’s manual as well as a knowledge of the project you are attempting. Before use of
this product, familiarize yourself with all operating features spacing and safety rules. (See Fig. 2)
MAIN BLOWER TUBE
The main blower tube can be easily installed on blower without any additional tools.
CONCENTRATOR NOZZLE
An accessory that can be added onto the end of the blower tube to increase the air speed (mph).
CORD RETAINER
A convenient cord retainer helps keep extension cord connection secure during spacing blower
operation.
VACUUM TUBES
The vacuum tubes can be added without any additional tools to provide mulching and vacuuming
functionality.
9
Fig. 1
LOCK BUTTON
BLOWER
TUBE
CONCENTRATOR
NOZZLE
VACUUM
ACCESS GATE
2 SPEED SWITCH
CORD RETAINER
VACUUM TUBES
VACUUM COLLECTION BAG
WARNING:
Do not use this product if any parts on the Packing List are already assembled to your product
when you unpack it. Parts on this list are not assembled to the product by the manufacturer and
require customer installation. Use of a product that may have been improperly assembled could
result in serious personal injury.
WARNING:
If any parts are damaged or missing do not operate this product until the parts are replaced.
Use of this product with damaged or missing parts could result in serious personal injury.
WARNING:
Do not attempt to modify this product or create accessories not recommended for use with this
product. Any such alteration or modification is misuse and could result in a hazardous condition
leading to possible serious personal injury.
WARNING:
Do not connect to power supply until assembly is complete. Failure to comply could result in
accidental starting and possible serious personal injury.
UNPACKING
This product requires assembly.
Carefully remove the product and any accessories from the box. Make sure that all items listed
in the packing list are included.
Inspect the product carefully to make sure no breakage or damage occurred during shipping.
Do not discard the packing material until you have carefully inspected and satisfactorily
operated the product.
If any parts are damaged or missing, please call Customer service for assistance (866)-384-8432.
PACKING LIST
Blower Blower Tube Concentrator Nozzle
Collection Bag Upper Vacuum Tube Lower Vacuum Tube
Operator’s Manual
ASSEMBLY
10
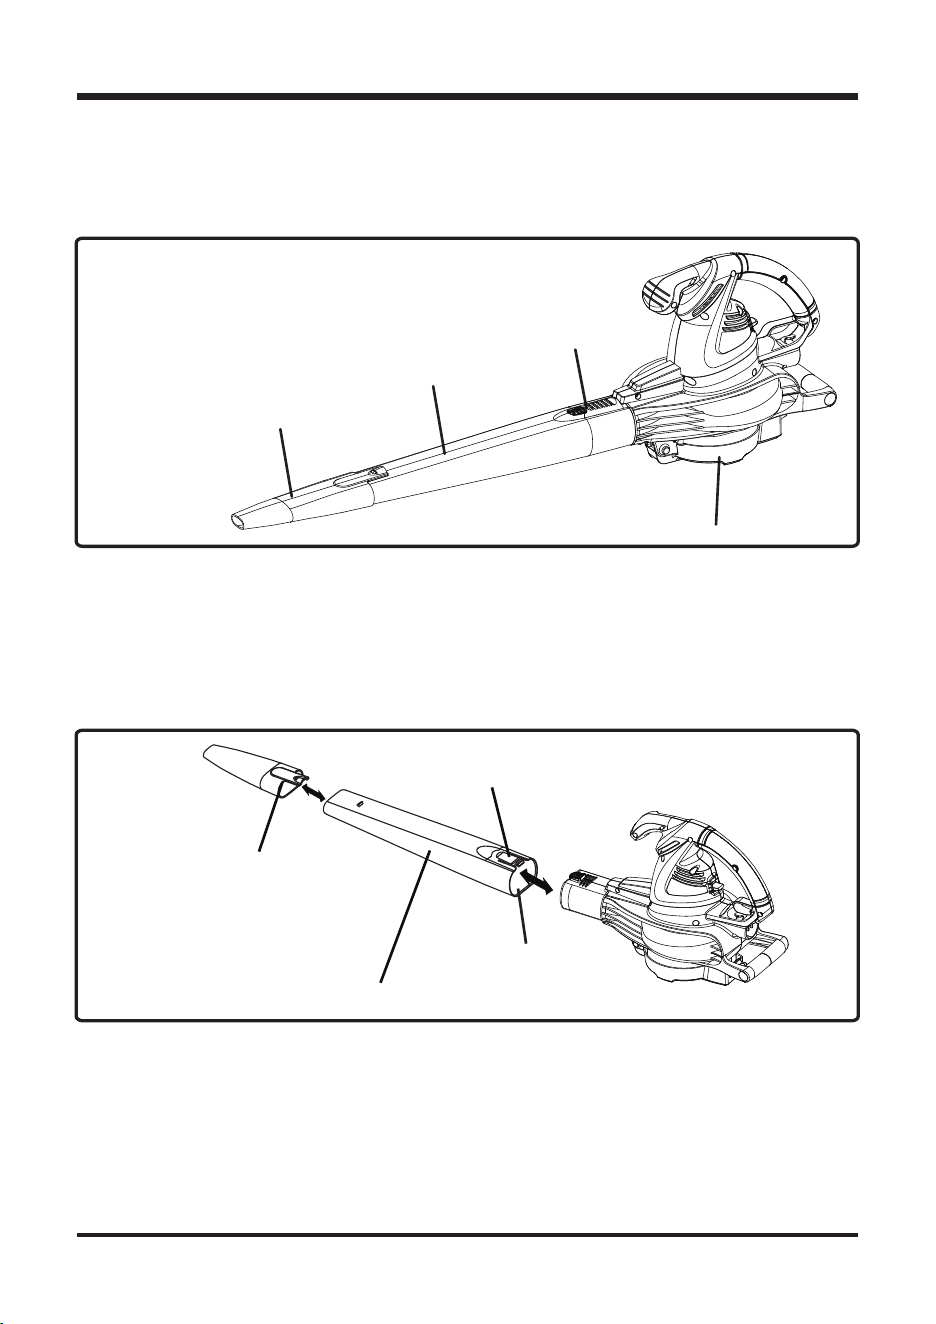
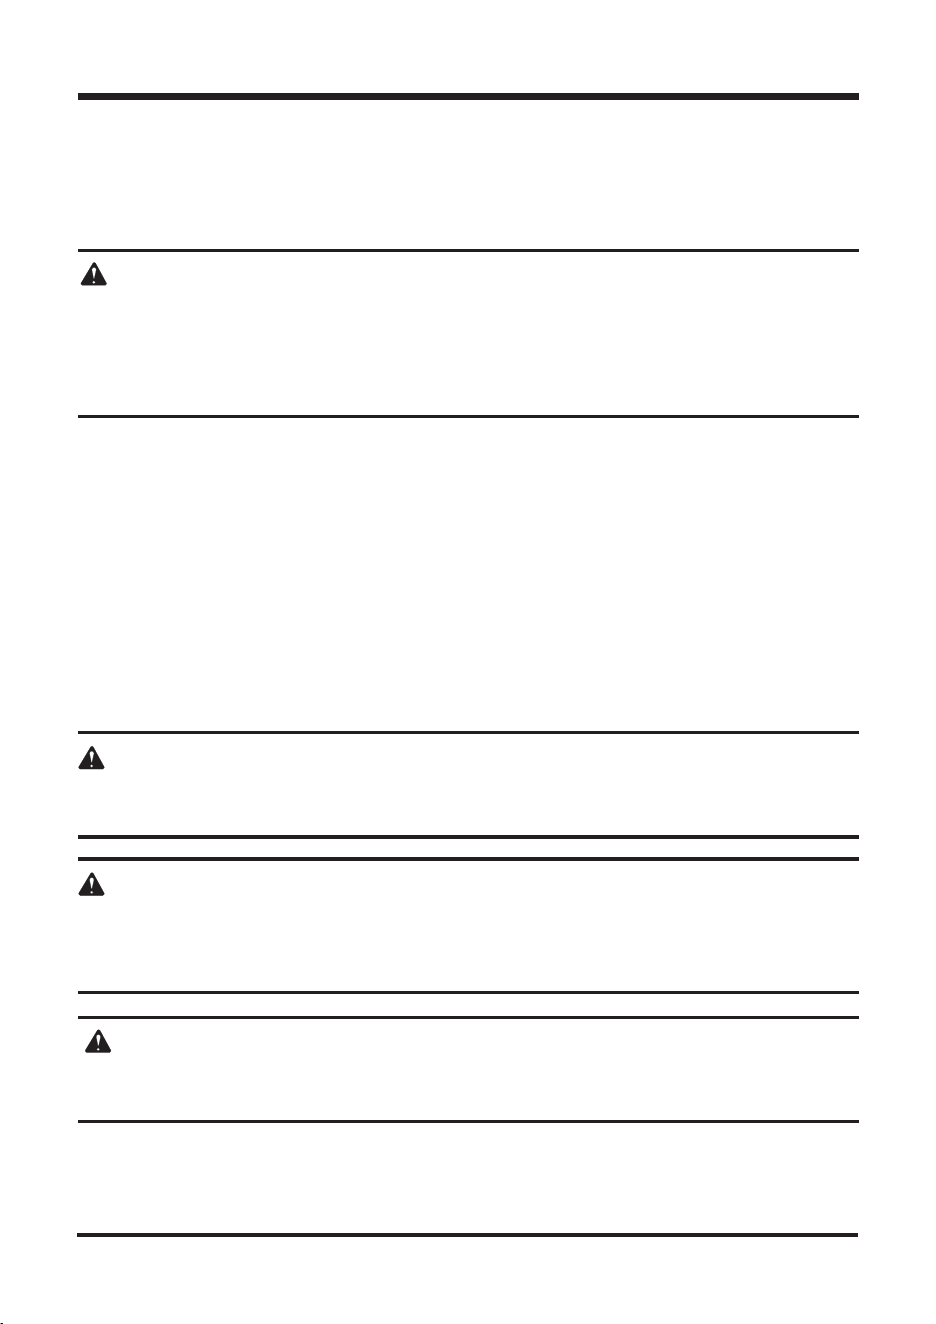
A - Air Inlet
B - Blower Tube Release Button
C - Concentrator Nozzle
D - Blower Tube
See Figure 2.
Slide blower tube forward until the lock button clicks into the top of the tube.
ASSEMBLING THE BLOWER TUBE
A
C
D
B
Fig. 2
ASSEMBLY
11
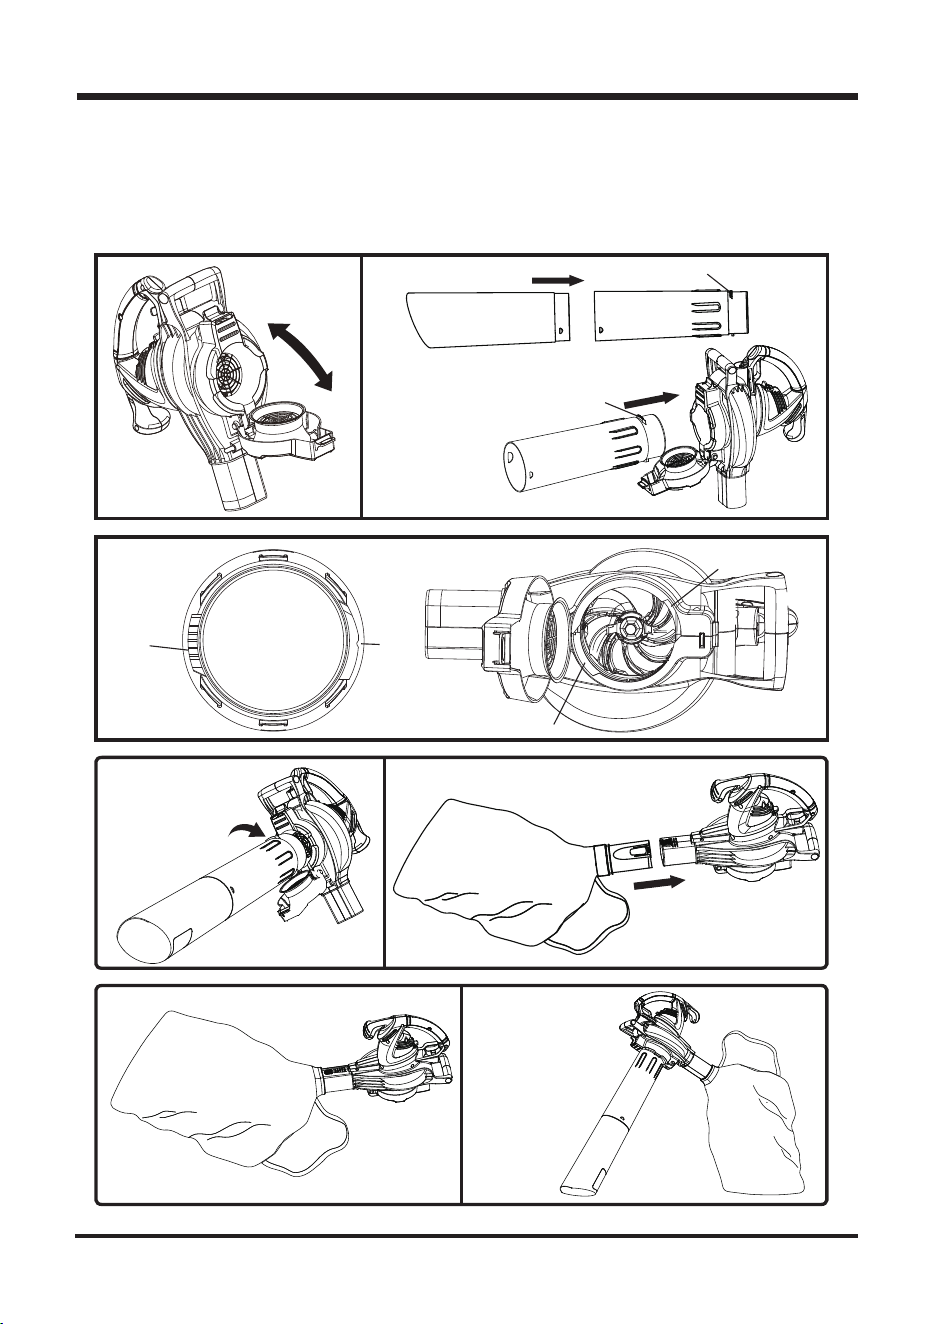
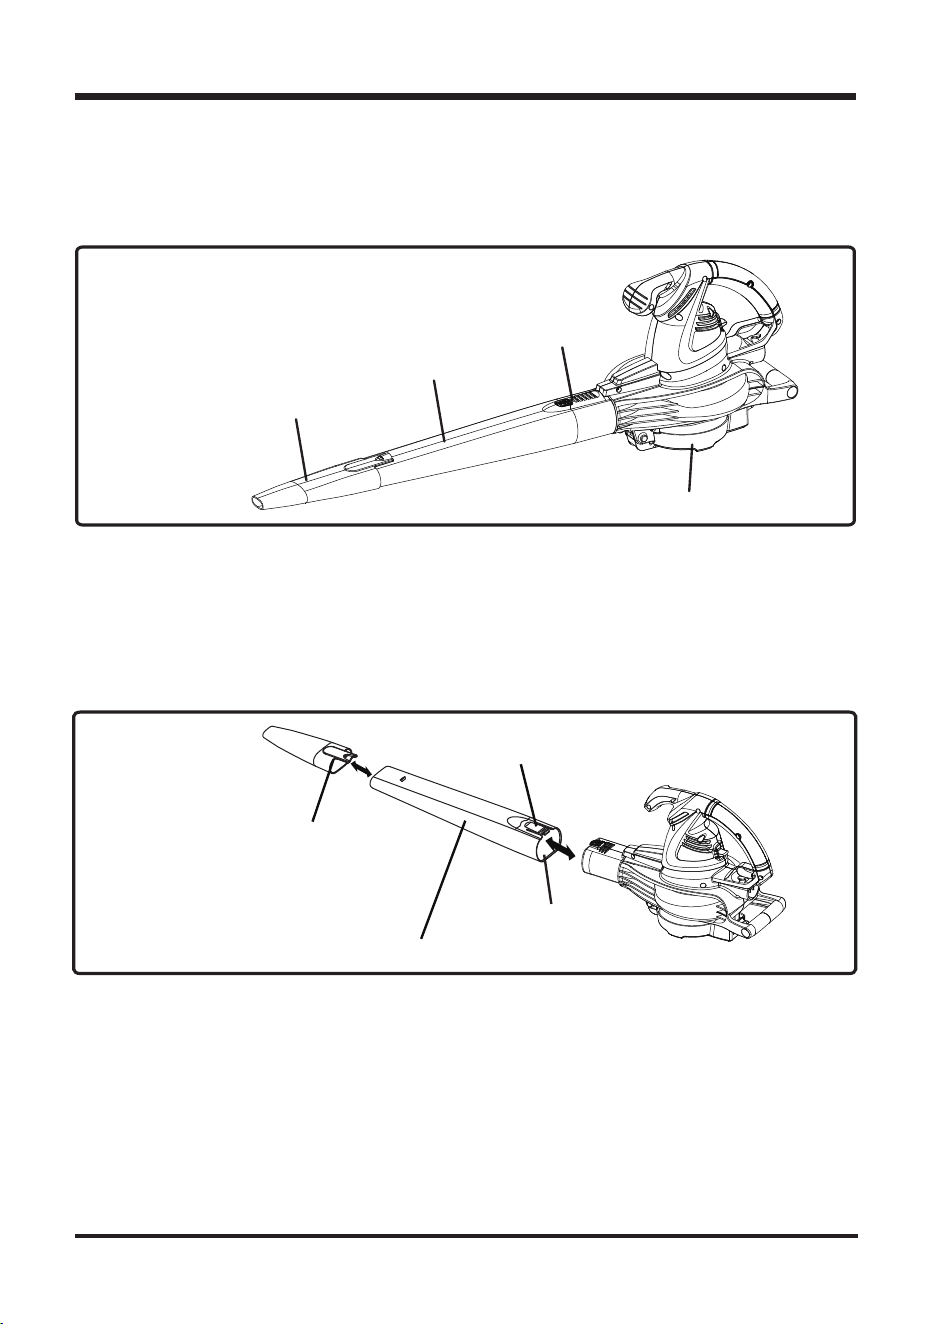
ASSEMBLY FOR USE AS A BLOWER (See Fig. 3) .
1. Slide blower tube forward until the notched areas on the blower housing click into the slots on
the tube.
2. Attach the concentrator nozzle onto the end of the blower tube until locked into position.
(Concentrator nozzle is used to increase air flow in tight areas: flower beds, under decks, etc.).
SLOT
BLOWER
TUBE
CONCENTRATOR
NOZZLE
AIR
OUTLET
Fig.3
INSTALLING VACUUM TUBES AND COLLECTION BAG
1. Open vacuum gate. (See Figure. 4)
2. With gate open, align the two different sized plastic tabs (one large / one small) on the end of the
vacuum tube with the like shaped openings found on the vacuum access gate opening. (See Figure. 5)
3. Insert the tab on the vacuum tube labeled A into the vacuum gate opening labeled A. (See Figure. 6)
4. With Vacuum tube tabs properly aligned, twist vacuum tube. (See Figure. 7)
ASSEMBLY
12
Fig. 8
Fig. 9 Fig. 10
Fig. 7
Fig. 6
Fig. 4 Fig. 5
Tabs
Tabs
Tab A
Tab
Opening
Opening A
A
B
Lock
5. Add collection bag by simply aligning the plastic connector sleeve on the bag to the blowers
exhaust. (See Figure. 8)
6. While standing in the operating position adjust the length to fit the operator’s size. Pull the tab
to lengthen, pull the strap to shorten. (See Figure. 9 - Figure. 10)
Open
Shut
You may use this product for the purposes listed below:
Clearing leaves and other yard debris from your lawn
Keeping decks, patios, garages and driveways free from leaves, pine needles and other debris
APPLICATIONS
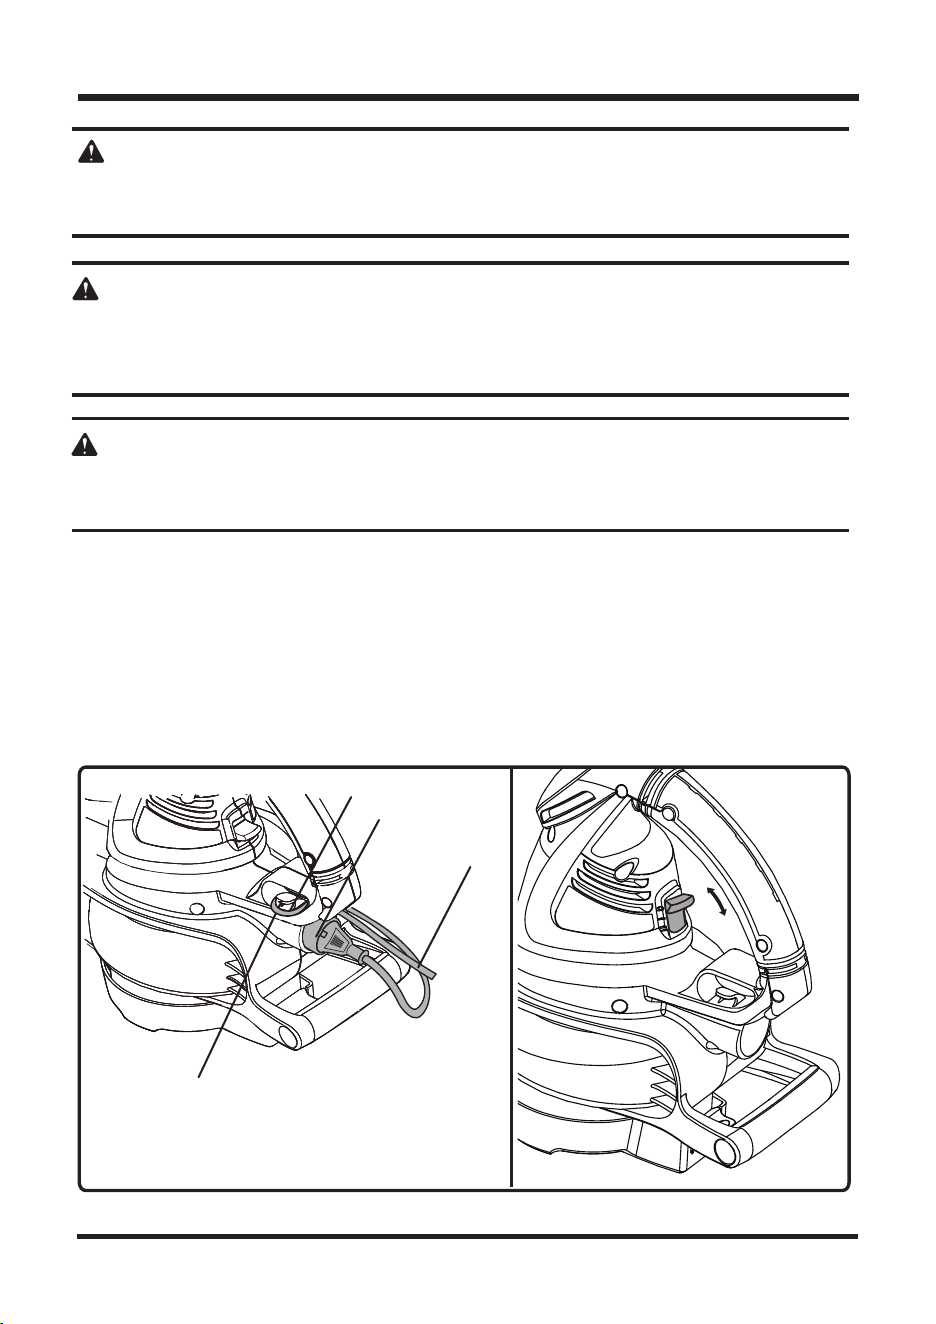
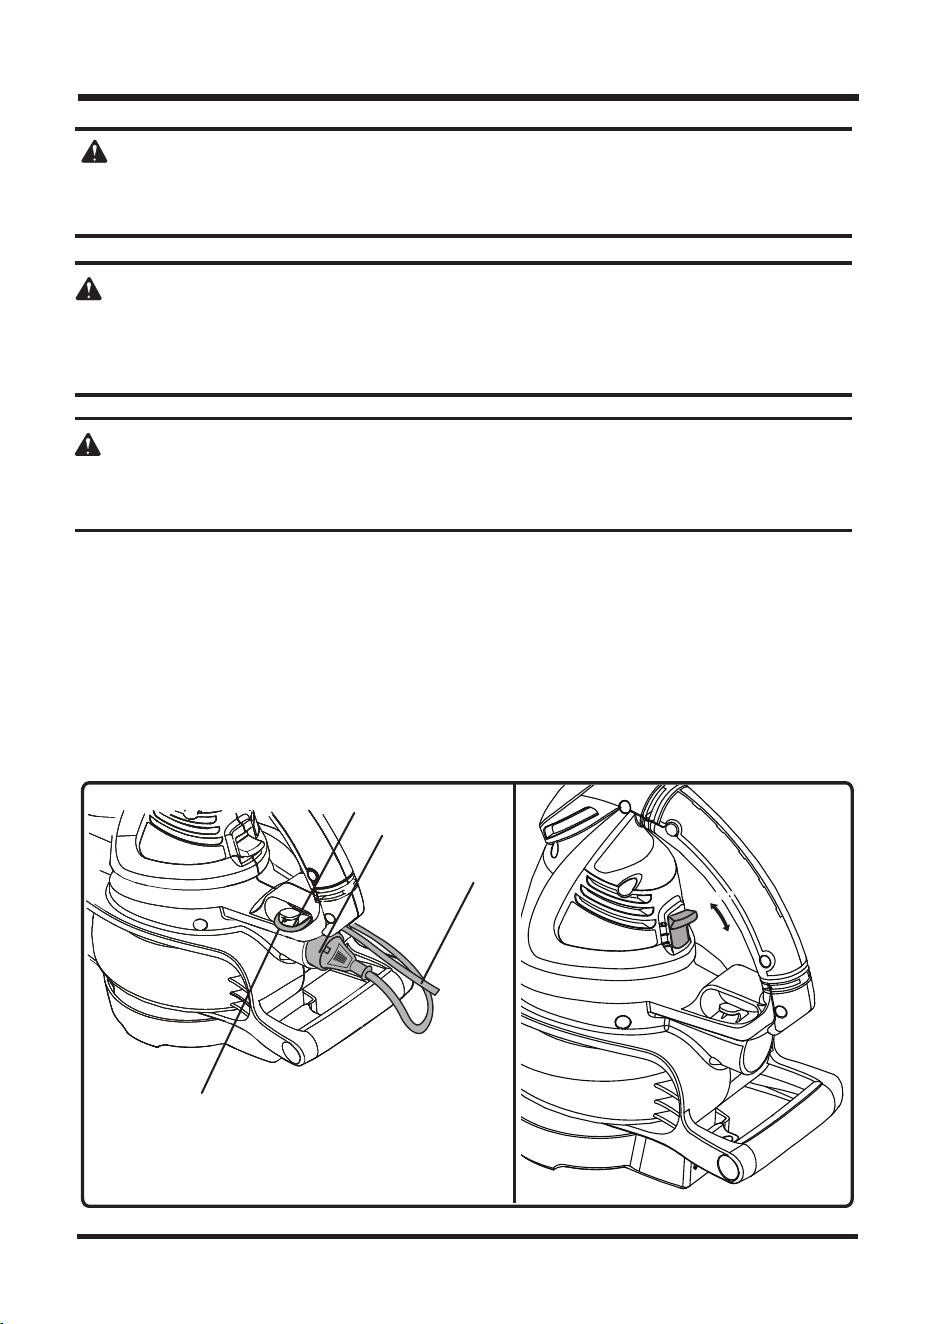
STARTING/STOPPING THE BLOWER/VACUUM
A - Cord Retainer
B - Loop
C - Plug
D - Extension Cord
OFF
LOW
HIGH
OPERATION
WARNING:
Do not allow familiarity with products to make you careless. Remember that a careless fraction of
a second is sufficient to inflict serious injury.
WARNING:
Always wear eye protection with side shields marked to comply with ANSI Z87.1, along with hearing
protection. Failure to do so could result in objects being thrown into your eyes, resulting in possible
serious injury.
WARNING:
Do not use any attachments or accessories not recommended by the manufacturer of this product.
The use of attachments or accessories not recommended can result in serious personal injury.
13
See Figure 11-12.
Fig. 11 Fig. 12
B
C
D
A
To keep from scattering debris, blow around the outer edges of a debris pile. Never blow directly
into the center of a pile.
To reduce sound levels, limit the number of pieces of equipment used at any one time.
Use rakes and brooms to loosen debris before blowing. In dusty conditions, slightly dampen
surfaces when water is available.
Watch out for children, pets, open windows, or freshly washed cars, and blow debris safely away.
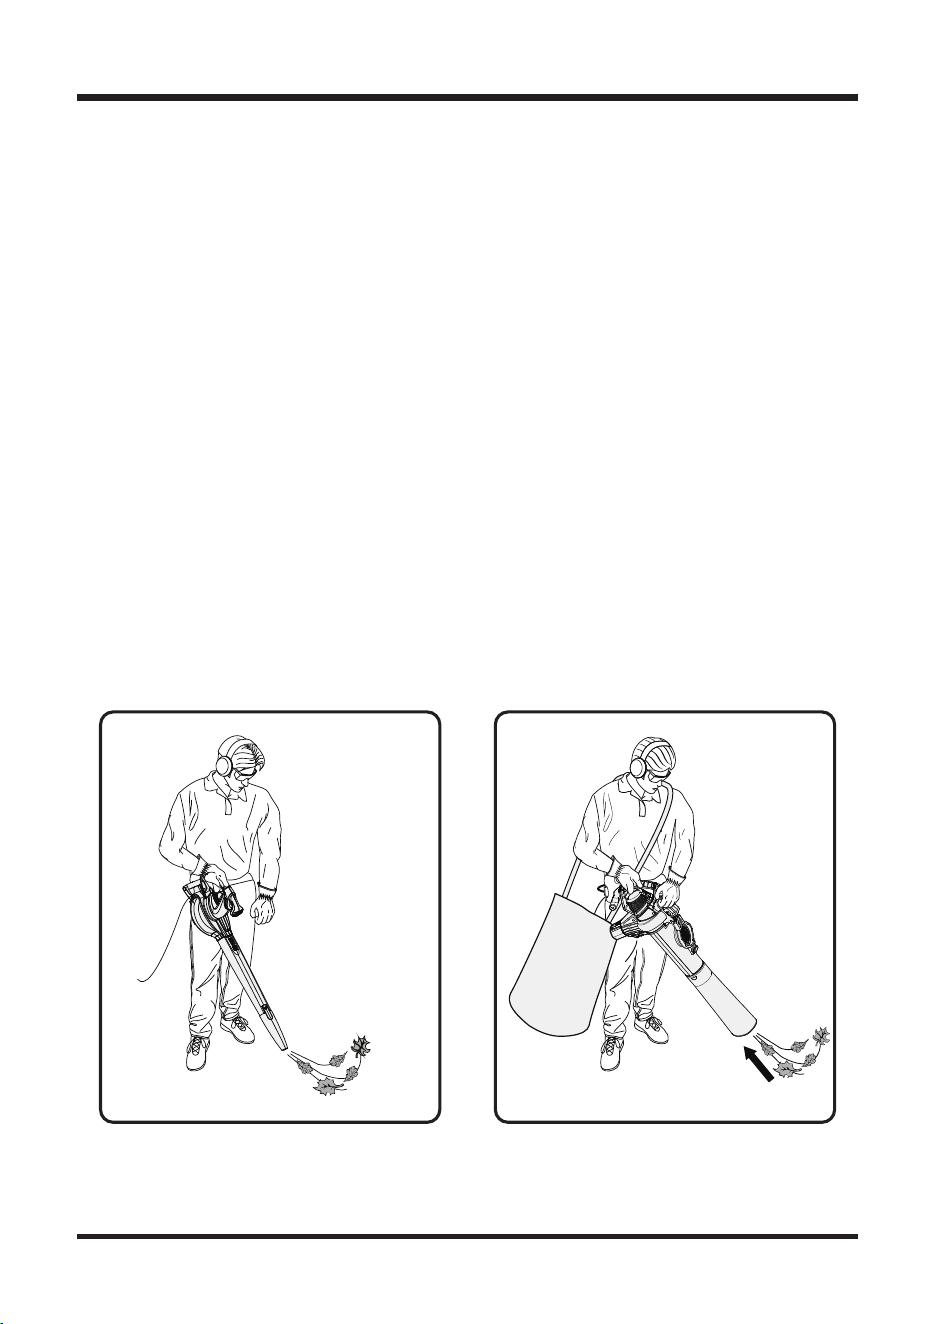
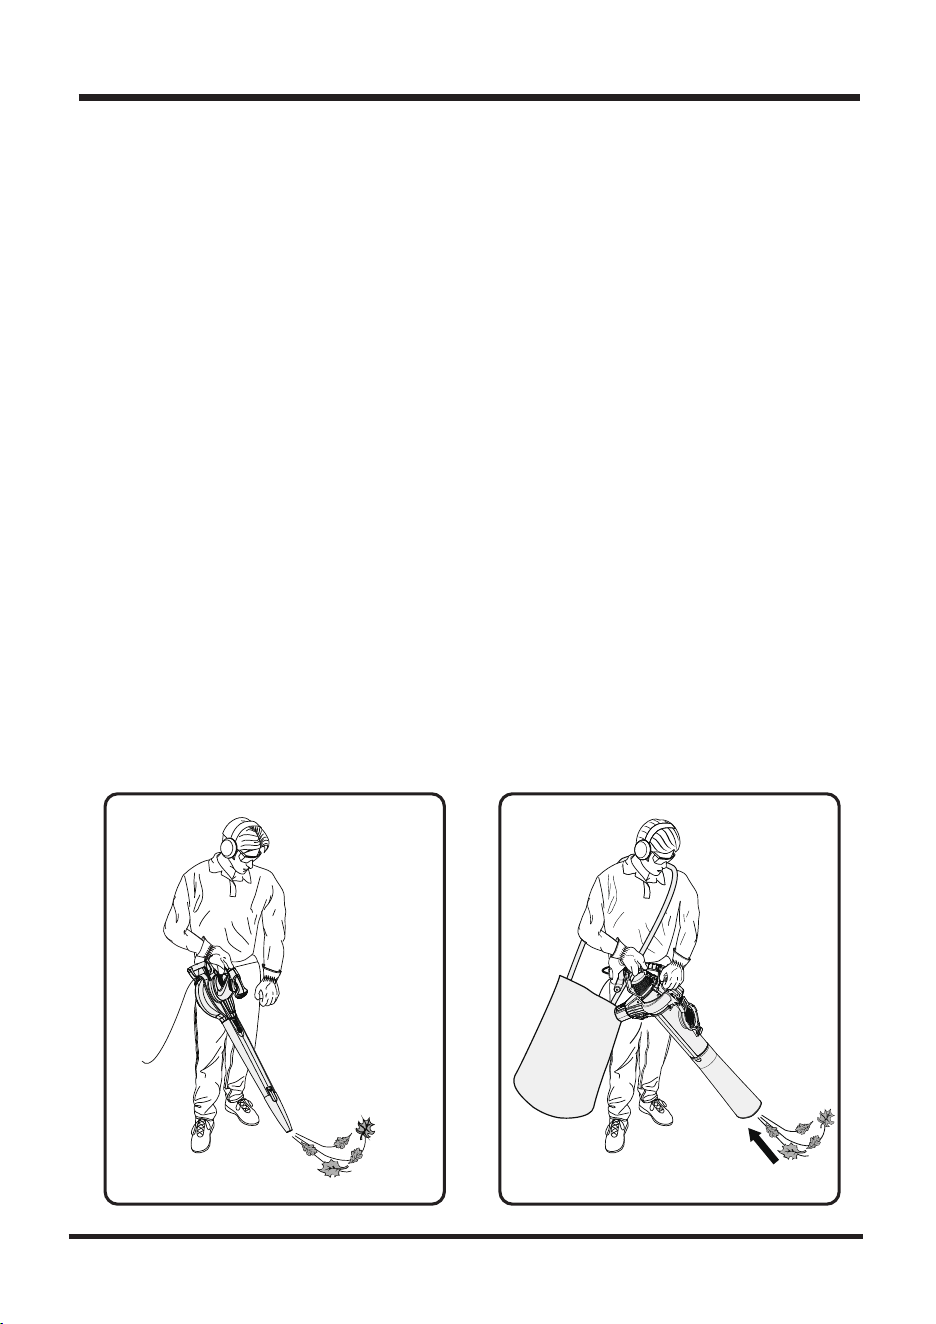
Hold the blower / vaccum with the handle in your dominant hand. (Proper operating position is
shown in Fig 13 and Fig 14.)
Operate power equipment at reasonable hours only — not early in the morning or late at night
when people might be disturbed. Comply with the times listed in local ordinances.
After using blowers or other equipment, CLEAN UP! Dispose of debris properly.
Attach the outlet end of an extension cord to the plug on the rear of the blower/vacuum.
NOTE: Use only an approved outdoor extension cord as described previously in this manual.
Route the extension cord through the side of the loop located on the rear of the blower/vacuum
housing and place underneath the cord retainer.
To start the blower/vacuum, place the power switch in the ON position.
To stop the blower/vacuum, place the power switch in the OFF position.
OPERATING THE BLOWER/VACCUM
OPERATION
14
See Fig.13 and Fig.14
Fig. 13 Fig. 14
WARNING:
When servicing, use only identical replacement parts. Use of any other parts may create a hazard
or cause product damage.
WARNING:
Always wear eye protection with side shields marked to comply with ANSI Z87.1, along with
hearing protection. Failure to do so could result in objects being thrown into your eyes, resulting in
possible serious injury.
WARNING:
Before inspecting, cleaning or servicing the machine, unplug the power cord and wait for all moving
parts to stop. Failure to follow these instructions can result in serious personal injury or property damage.
WARNING:
Do not at any time let brake fluids, gasoline, petroleum-based products, penetrating oils, etc., come in
contact with plastic parts. Chemicals can damage, weaken or destroy plastic, which may result in serious
personal injury.
Avoid using solvents when cleaning plastic parts. Most plastics are susceptible to damage from various
types of commercial solvents and may be damaged by their use. Use clean cloths to remove dirt, dust, oil,
grease, etc.
GENERAL MAINTENANCE
STORAGE (1 MONTH OR LONGER)
Clean all foreign materials from the blower/vacuum.
Store indoors in a place that is out of reach of children. Keep away from corrosive agents such
as garden chemicals and de-icing salts.
MAINTENANCE
15
TROUBLESHOOTING
16
PROBLEM
Unit will not blow
or suck debris.
1. Bag full
2. Blocked tube
3. Blocked impeller
4. Dirty bag
5. Torn bag
6. Bag unzipped
7. Unit unplugged
1. Empty the bag.
2. Clear the blockage.
3. Clear the blockage
4. Clean the bag.
5. Replace the bag.
6. Zip up the bag.
7. Plug into an outlet or an extension
cord.
Unit will not start.
1. Unit is unplugged.
2. Power/speed switch is in
the OFF position.
3. Defective power switch.
4. Vac tubes are not correctly
installed.
5. Vacuum gate is NOT
securely closed.
6. House circuit may have
tripped.
1. Check cord to make sure it is plugged
into an electrical outlet.
2. Slide switch to high or low.
3. Call toll free helpline: 866-384-8432.
4. Check vac tubes to ensure that they
are allowing the switch to be engaged
when correctly installed.
5. Ensure vacuum gate is firmly and
securely closed.
6. Check wall circuit breaker panel and
reset if necessary.
POSSIBLE CAUSE SOLUTION

WARRANTY
We take pride in producing a high quality, durable product. This Lawnmaster
®
product carries a
limited two (2) year warranty against defects in workmanship and materials from date of purchase
under normal household use. Warranty does not apply to defects due to direct or indirect abuse,
negligence, misuse, accidents, repairs or alterations and lack of maintenance.
Please keep your receipt/packing list as proof of purchase. This warranty gives you specific legal
rights, and you may have other rights, which vary from state to state.
For product service call Customer Service at (866) 384-8432.
Items not covered by warranty :
1. Any part that has become inoperative due to misuse, commercial use, abuse, neglect, accident,
improper maintenance, or alteration; or
2. The unit, if it has not been operated and/or maintained in accordance with the owner's manual; or
3. Normal wear, except as noted below;
4. Routine maintenance items such as lubricants, blade sharpening;
5. Normal deterioration of the exterior finish due to use or exposure.
Transportation Charges : Transportation charges for the movement of any power equipment unit or
attachment are the responsibility of the purchaser. It is the purchaser’s responsibility to pay
transportation charges for any part submitted for replacement under this warranty unless such
return is requested in writing by LawnMaster.
SAVE YOUR RECEIPTS. THIS WARRANTY IS VOID WITHOUT THEM.
17

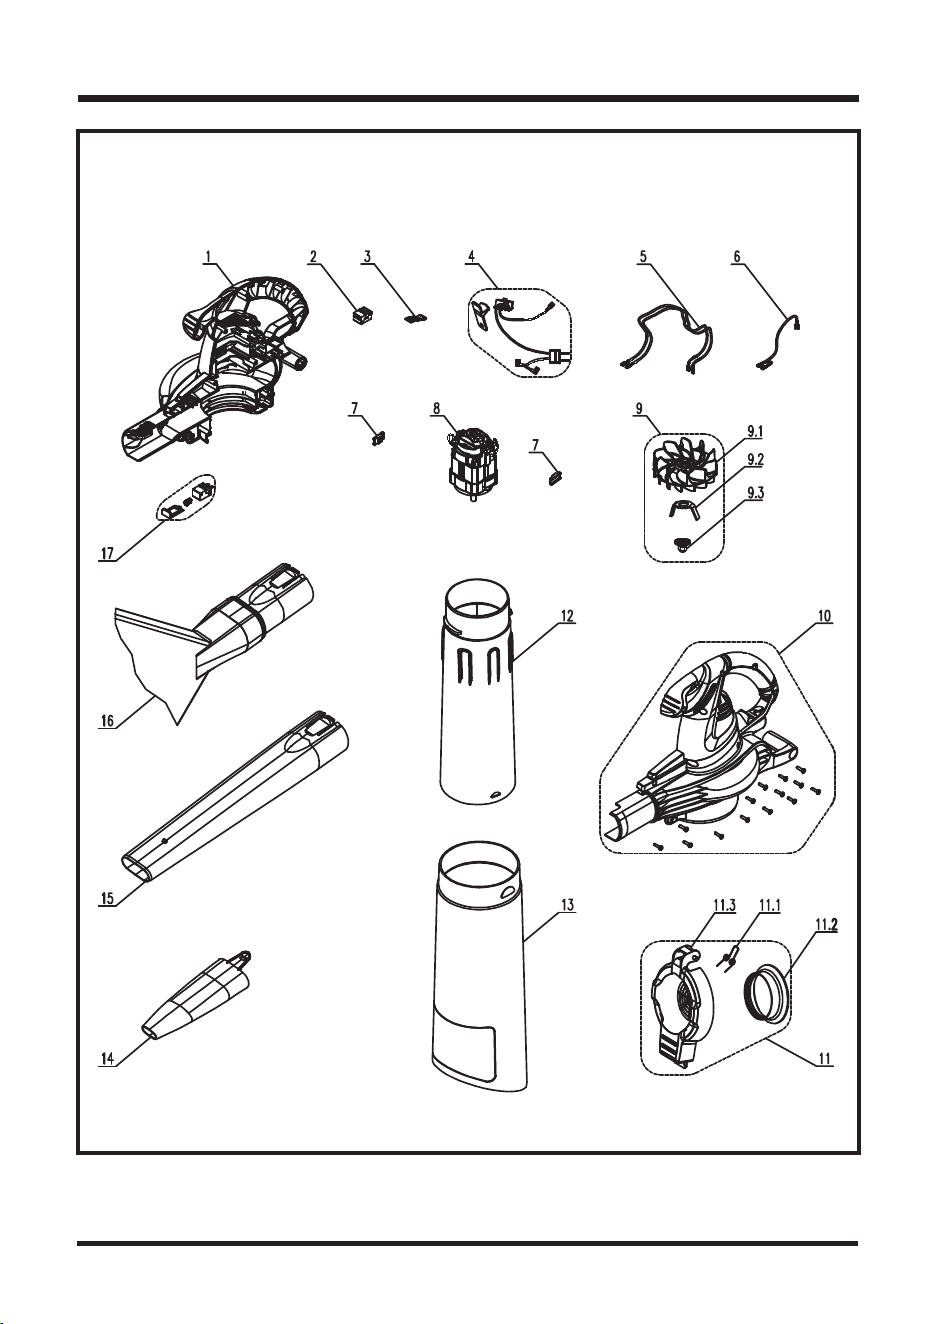
EXPLODED VIEW
BV1211 EXPLODED VIEW
18

PARTS LIST
BV1211 PARTS LIST
ITEM NO. PART NO. DESCRIPTION QTY
1
2
3
4
5
6
7
8
9
9.1
9.2
9.3
10
11
11.1
11.2
11.3
12
13
14
15
16
17
131012101
131012103
131012124
131012125
131012105
131003105
131012108
131003104
131012110
131012111
131012112
131012113
131012114
131012115
131012116
131012117
131012118
131012119
131012120
131003120
131012121
131012122
131012123
1
1
1
1
2
1
2
1
1
1
1
1
1
1
1
1
1
1
1
1
1
1
1
Motor Housing Right Assy
Micro-Switch
Switch Plate
Switch Push Button Assy
Inner Cable(Black)
Inner Cable
Rubber Pad
Motor Assy
Impeller Assy
Impeller
Blade
Nut M8
Motor Housing Left Assy
Air Intake Cover Assy
Spring
Reducing Leaking Ring
Air Intake Cover
Rear Air Intake Tube
Front Blower Tube II
Concentrator Nozzle
Blower Tube
Collection Bag Assy
Switch Assy
19

20
NOTES

22
23-24
25
26-27
28-29
30
31-33
34-35
36
37
38
39
40
41
CONTENIDO
22
SOPLADORA/ASPIRADORA ELÉCTRICA DE 2 VELOCIDAD Y 12 AMP
Current
Corriente
Máxima Velocidad Del Aire
Máximo Volumen De Aire
Proporción De Mantillo
Peso Neto (Sopladora)
Peso Neto (Aspiradora)
Volumen De La Bolsa Recolectora
Tipo De Hélice
ESPECIFICACIONES DEL PRODUCTO
Especificaciones Del Producto
Instrucciones de Seguridad Importantes
Reglas de Seguridad Específicas
Símbolos
Información Eléctrica
Conozca Su Sopladora / Aspiradora
Armado
Funcionamiento
Mantenimiento
Resolución de Problemas
Garantía
Vista en Detalle
Lista de Piezas
Notas
120 V ~ 60Hz
12 AMP
225 MPH
380 CFM
14:1
7,14lbs.
8,97lbs.
45,5 L (12 Galones)
Metal de 2 etapas

LEA ESTAS INSTRUCCIONES ANTES DE USAR LA SOPLADORA / ASPIRADORA
El incumplimiento de las instrucciones detalladas debajo puede derivar en descargas eléctricas,
incendios o lesiones graves:
LEA Y ASEGÚRESE DE COMPRENDER TODAS LAS INSTRUCCIONES.ADVERTENCIA:
INSTRUCCIONES DE SEGURIDAD IMPORTANTES
No utilice herramientas eléctricas en atmósferas explosivas como, por ejemplo, en presencia
de líquidos inflamables, gases o polvo. Las herramientas eléctricas producen chispas que
pueden hacer arder polvo o gases.
Para reducir el riesgo de descarga eléctrica, esta herramienta posee un enchufe polarizado (un
aspa es más ancha que la otra), por lo que será necesario el uso de un cable de extensión
polarizado. El enchufe calzará con el alargador polarizado solo en una posición. Si el enchufe
no entra completamente en el alargador, póngalo al revés. Si aún no entra, consiga el alargador
polarizado correcto. Un alargador polarizado requerirá el uso de un tomacorriente de pared
polarizado. Este enchufe encajará en la toma de corriente de pared de una sola manera. Si el
enchufe no entra completamente en el tomacorriente de pared, póngalo al revés. Si el enchufe
aún no calza, contacte a un técnico electricista calificado que pueda ayudarle a instalar el
tomacorriente indicado. No cambie el enchufe del equipo, receptáculo del alargador o enchufe
del alargador de manera alguna.
Evite que su cuerpo entre en contacto con superficies conectadas a tierra, como por ejemplo
tuberías, radiadores, hornillos y neveras. Que el cuerpo esté conectado a tierra aumenta el
riesgo de sacudidas eléctricas.
No exponga las herramientas eléctricas a la lluvia o a condiciones húmedas. Si entra agua en
una herramienta eléctrica, aumenta el riesgo de choque eléctrico.
Utilice alargadores para exteriores rotulados con W-A, W, SW-A, SOW-A, STW-A, STOW-A,
SJW-A, SJTW-A o SJTOW-A. Estos cables están diseñados para uso en exteriores y reducen
el riesgo de descarga eléctrica.
No permita nunca que niños manejen este equipo. Jamás permita que adultos utilicen el equipo
sin saber cómo utilizarlo.
Mientras use este producto, utilice siempre protección ocular con protectores laterales que
cumplan con ANSI Z87.1, así como también protección auditiva.
Utilice siempre una mascarilla o máscara facial si el uso del equipo genera polvo.
Tenga precaución adicional al limpiar en escaleras.
No deje conectado el dispositivo. Desconéctelo del tomacorriente cuando no esté en uso y
antes de realizarle mantenimiento.
No lo exponga a la lluvia, guárdelo en espacios interiores.
Utilice el producto solo como se describe en este manual. Utilice solo los aditamentos
recomendados por el fabricante.
Mantenga el pelo, ropa suelta, dedos y partes del cuerpo alejados de aberturas y partes móviles.
Utilice pantalones largos y pesados, ropa de manga larga, botas y guantes Evite usar vestimentas
holgadas o joyas que puedan quedar atrapadas en las partes móviles de la máquina o su motor.
23

No fuerce la herramienta. Utilice la herramienta correcta para su necesidad. La herramienta
correcta hará el trabajo de mejor manera y con mayor seguridad si la utiliza de la manera para
la que está diseñada.
No utilice el equipo si está descalzo o lleva sandalias o algún calzado ligero similar. Utilice un
calzado que proteja su pie y mejore su agarre en superficies resbalosas.
No utilizar en escalones, en una escalera vertical, techos, árboles u otras superficies inestables.
Pisar sobre una superficie sólida permite un mejor control de la sopladora bajo situaciones
inesperadas.
Mantenga el cabello largo por encima del nivel de los hombros para evitar que se enrede en las
piezas móviles.
Párese firmemente y de manera equilibrada. No se extralimite. Extralimitarse puede causar una
pérdida del equilibrio.
Apague todos los controles antes de desconectar el dispositivo.
No permita que se utilice como un juguete. Se debe prestar estricta atención cuando el aparato
lo usen niños o cuando se use cerca de ellos.
Evite un encendido accidental. Antes de desconectar el aparato, asegúrese de que el interruptor
de encendido no esté activado. Apague el interruptor antes de desconectar.
No utilice la herramienta si el interruptor no la enciende ni la apaga. Una herramienta que no
puede controlarse con un interruptor es peligrosa y debe ser reparada.
No utilizar si el enchufe está dañado. Si la herramienta no funciona como debiera o si se ha caído,
dañado, dejado en exteriores o sumergido bajo el agua, llévela a un centro de servicio autorizado.
No deje la herramienta sin supervisión mientras esté conectada. Desconéctela cuando no la
utilice, antes de realizarle mantenimiento y antes de guardarla. Estas medidas preventivas de
seguridad reducen el riesgo de que la herramienta se encienda de manera accidental.
Mantenga a todas las personas, niños y mascotas alejados al menos 50 pies (15 metros).
No use esta herramienta cuando esté cansado, enfermo o bajo la influencia de drogas, alcohol
o medicamentos.
No utilice la herramienta bajo mala iluminación.
Mantenga su cuerpo lejos de las partes móviles y de todas las superficies calientes del producto.
No ponga objetos sobre las aberturas. No utilizar si las aberturas están bloqueadas; mantenga
las aberturas libres de polvo, pelo, pelusas y cualquier cosa que pueda reducir el flujo de aire.
Verifique el área de trabajo antes de comenzar. Retire todos los objetos que pudiesen enredarse
o provocar problemas, tales como rocas, vidrios rotos, uñas, alambres o cuerdas.
Jamás utilice la sopladora cerca del fuego, chimeneas, cenizas calientes, parrillas para asar
carne, etc. que podrían causar que el fuego se esparza.
No acerque ni mueva la máquina tirando del cable, no lo utilice como asidero, no cierre una
puerta pillándolo, ni lo pase por bordes afilados ni por esquinas. No utilice el producto sobre
el cable. Mantenga el cable alejado de superficies calientes.
No desconecte jalando el cable. Para desconectarlo tire del enchufe, no del cable.
No toque enchufes ni la herramienta con las manos húmedas.
Utilice solo piezas de recambio y accesorios del fabricante que sean idénticos. El uso de otras
piezas podría generar un peligro o dañar al producto.
INSTRUCCIONES DE SEGURIDAD IMPORTANTES
24

Asegúrese de que el alargador se encuentra en buenas condiciones. Al utilizar un alargador,
asegúrese de utilizar uno lo suficientemente potente como para llevar la corriente necesaria
que el producto necesita. Para un alargador que tenga como máximo 50 pies de longitud, se
recomienda un cable de un calibre (A.W.G.) de al menos 14. En caso de duda, utilice el siguiente
que tenga más capacidad. Cuanto menor sea el calibre, más fuerte será el cable. Un cable muy
pequeño provocará una baja en el voltaje, lo que causará pérdida de energía y sobrecalentamiento.
No apunte la boca de la sopladora hacia personas o mascotas.
Mientras el motor esté funcionando, jamás ponga la sopladora en una superficie que no sea
dura y esté despejada. La grava, arena y otros sedimentos pueden entrar por la toma de aire y
salir disparados hacia el operador o personas cercanas, causando posibles lesiones severas.
Jamás utilice el producto sin el equipo adecuado. Siempre asegúrese de que estén instalados
los tubos de la sopladora.
Cuando no esté en uso, la sopladora debiese almacenarse en interiores bajo un ambiente seco
y en un lugar cerrado con llave (lejos del alcance de los niños).
Cuida la herramienta. Mantenga limpia la zona del ventilador para un desempeño óptimo y seguro.
Siga las instrucciones para realizar un mantenimiento adecuado.
No intente arreglar cualquier atasco que se produzca en la herramienta sin desenchufarla primero.
No jale o transporte utilizando el cable como manilla ni lo jale cerca de bordes afilados o esquinas.
Mantenga el cable alejado de superficies calientes.
No desconecte jalando el cable. Para desconectarlo tire del enchufe, no del cable.
A fin de reducir el riesgo de choque eléctrico, no la exponga a la lluvia ni la utilice en superficies
mojadas. Almacenar en interiores.
Para evitar riesgos, si el cable de alimentación está dañado, debe ser sustituido solo por el
fabricante o por un centro de servicio autorizado.
Proteja sus pulmones. Utilice una mascarilla o máscara facial si el uso del equipo genera polvo.
Siga esta regla y reducirá el riesgo de sufrir lesiones severas.
Consúltelas con frecuencia y úselas para enseñar a otras personas a utilizar esta herramienta.
Si le presta esta herramienta a alguien, hágalo junto con estas instrucciones.
GUARDE ESTAS INSTRUCCIONES
INSTRUCCIONES DE SEGURIDAD IMPORTANTES
REGLAS DE SEGURIDAD ESPECÍFICAS
25
En un aparato con aislación doble, se incluyen dos sistemas de aislación en vez de una conexión
a tierra. No se incluyen conexiones a tierra en un aparato con aislación doble, por lo que tampoco
debiera agregarse una conexión a tierra a dicho aparato. El mantenimiento de un aparato con
doble aislación requiere extremo cuidado y conocimiento del sistema, por lo que debe realizarlo
personal de servicio calificado. Las piezas de repuesto utilizadas en un aparato de aislación
doble deben ser iguales a las originales.
Exclusivamente para uso doméstico.
Alerta de seguridad
V
A
Hz
W
min
SIGNIFICADO
PELIGRO:
Las siguientes palabras y significados están diseñados para explicar los niveles de riesgo
asociados a este producto.
SÍMBOLO
SEÑAL
ADVERTENCIA:
CUIDADO:
CUIDADO:
Indica una situación peligrosa inminente, la cual, de no evitarse,
causará una muerte o lesiones severas.
Indica una situación peligrosa potencial, la cual, de no evitarse,
podría causar una muerte o lesiones severas.
Indica una situación peligrosa potencial, la cual, de no evitarse,
podría causar una lesión menor o moderada.
(Sin símbolo de alerta de seguridad) Indica una situación que
podría causar daños a la propiedad.
Algunos de los siguientes símbolos podrían aparecer en este producto. Estúdielos y aprenda su
significado. Las interpretaciones adecuadas de estos símbolos le permitirán utilizar el producto de
mejor manera y con más seguridad.
SÍMBOLO NOMBRE
NOMBRE/EXPLICACIÓN
Indica un riesgo potencial de lesiones a la persona.
Leer el manual del usuario
Para reducir el riesgo de lesiones, el usuario debe leer
el manual de uso antes de utilizar este producto.
Protección ocular y auditiva
Use siempre protección ocular con escudos laterales para cumplir
con l normativa ANSI Z87.1, junto con protección auditiva.
Alerta de condiciones húmedas
No exponer a la lluvia ni usar en lugares húmedos.
Mantenga a las
personas alejadas
Mantenga a todas las personas alejadas al menos
50 pies (15 metros).
Pelo largo
El no mantener el pelo alejado de la toma de aire puede causar
lesiones personales.
Tubos de la sopladora
No usar sin los tubos.
Ropa holgada
El no mantener la ropa holgada lejos de la toma de aire
puede causar lesiones personales.
Volts
Voltaje
Amperes
Corriente
Hertz
Frecuencia (ciclos por segundo)
Vatio
Energía
Minutos
Tiempo
Corriente alterna
Tipo de corriente
Corriente continua
Tipo o característica de la corriente
Construcción clase II
Doble aislación
SÍMBOLOS
26

Las siguientes palabras y significados están diseñados para explicar los niveles de riesgo asociados
a este producto.
27
SÍMBOLOS
ADVERTENCIA
To avoid serious personal injury, do not attempt to use this product until you read
thoroughly and understand completely the operator’s manual. If you do not understand
the warnings and instructions in the operator’s manual, do not use this product.
Call customer service for assistance (866)-384-8432.Para evitar lesiones severas, no intente
utilizar este producto hasta que haya leído y comprendido exhaustivamente el manual del
usuario. Si no comprende las advertencias e instrucciones del manual del usuario,
no utilice este producto Llame a atención al cliente para que le ayuden (866)-384-8432.
El uso de herramientas eléctricas puede causar que objetos extraños entren en sus
ojos, lo cual puede provocar lesiones severas. Antes de utilizar una herramienta
eléctrica, póngase antiparras o gafas de seguridad con protección lateral y, de ser
necesario, use escudo facial. Recomendamos una máscara de seguridad que permita
una visión amplia para usarse encima de las gafas o bien gafas de seguridad con
protección lateral.
Use siempre protección ocular que cumpla con la normativa ANSI Z87.1.

DOBLE AISLANTE
El aislamiento doble en las herramientas eléctricas elimina la necesidad del cable tradicional de
tres patas con conexión a tierra. Todas las piezas metálicas expuestas están aisladas de los
componentes internos metálicos del motor mediante una aislación protectora. Las herramientas
con doble aislación no necesitan conexión a tierra.
NOTA: Servicing of a product with double insulation requires extreme care and knowledge of the
system and should be performed only by a qualified service technician. For service, we suggest
you return the tool to your nearest authorized service center for repair. Always demand that original
factory replacement parts be used when servicing. El mantenimiento de un producto con doble
aislación requiere extremo cuidado y conocimiento del sistema, por lo que debiera realizarlo personal
de servicio calificado. Para mantenimientos, sugerimos que lleve la herramienta a su centro de
servicio autorizado más cercano. Siempre exija que se utilicen las piezas de repuesto originales.
ADVERTENCIA:
El sistema de doble aislación está diseñado para proteger al usuario de descargas resultantes de una
falla en el aislamiento interno de la herramienta. Tenga en cuenta todas las precauciones de seguridad
normales para evitar una descarga eléctrica.
28
INFORMACIÓN ELÉCTRICA
CONEXIÓN ELÉCTRICA
Este producto tiene un motor eléctrico de precisión. Debe conectarse a un suministro eléctrico de
120 volts, solo CA (corriente normal domiciliaria) de 60 Hz. No utilice este producto en corriente
continua (CC). Una baja sustancial del voltaje causará una pérdida de energía y el motor se
sobrecalentará. Si su producto no funciona estando enchufado a un tomacorriente, revise dos
veces el suministro eléctrico.
ICFT
Debe haber protección del interruptor de circuito por pérdida a tierra (GFCI, por sus siglas en inglés)
en el circuito(s) o toma(s) de corriente que usará el producto. Hay disponible receptáculos con
protección GFCI integrada, los cuales se pueden utilizar para esta medida de seguridad.
PAUTAS PARA UTILIZAR ALARGADORES
USE EL ALARGADOR ADECUADO. Asegúrese de que el alargador se encuentra en buenas
condiciones. Al utilizar un alargador, asegúrese de utilizar uno lo suficientemente potente como
para llevar la corriente necesaria que el producto necesita. Un cable de menor tamaño del adecuado
provocará sobrecalentamiento. La tabla que aparece a continuación muestra el tamaño correcto
dependiendo del largo del cable y clasificación del amperaje. En caso de duda, utilice el siguiente
que tenga más capacidad. Cuanto menor sea el calibre, más fuerte será el cable.
ADVERTENCIA:
SI BIEN ESTA HERRAMIENTA TIENE DOBLE AISLACIÓN, EL CABLE DE EXTENSIÓN Y SU
RECEPTÁCULO DEBEN TENER CONEXIÓN AL TIERRA PARA PROTEGER AL USUARIO DE
DESCARGAS ELÉCTRICAS.
ADVERTENCIA:
Revise los cables de extensión antes de cada uso. Si está dañado, reemplácelo inmediatamente.
Jamás utilice el producto con un cable dañado ya que tocar las zonas dañadas podría causar
descargas eléctricas y lesiones severas.
Calibre mínimo para alargadores (AWG)
(solo al utilizar 120 V)
Amperaje Largo total del cable en pies (metros)
Más de No más de
No se recomienda
25' (7,6 m) 50' (15 m) 100' (30,4 m) 150' (45,7 m)
0 6
6
18 16 16 14
10 18 16 14 12
10 12
12
16 16
16
14
14
12
12
Asegúrese de que su alargador esté en buenas condiciones eléctricas. Reemplace siempre un
alargador dañado o haga que lo repare una persona calificada antes de usarlo.
Mantenga los alargadores lejos de objetos filosos, calor excesivo y zonas mojadas o húmedas.
Utilice un circuito eléctrico separado para sus herramientas. Este circuito debe tener un cable de
al menos calibre 12 y estar protegido con un fusible con retardo de tiempo 15 A. Antes de conectar
el motor a la alimentación eléctrica, asegúrese de que el interruptor esté en la posición de apagado
(OFF) y que la corriente sea igual a la estampada en la placa del motor. El uso de un voltaje menor
dañará el motor.
29
INFORMACIÓN ELÉCTRICA
CONOZCA SU SOPLADORA / ASPIRADORA
CONOZCA SU SOPLADORA / ASPIRADORA
El uso seguro de este producto requiere que conozca la información de la herramienta y la que
aparece en este manual así como también el proyecto en el que está trabajando. Antes de usar
este producto, familiarícese con todas las funciones operativas y reglas de seguridad relacionadas.
(Consulte la Figura 2)
BOQUILLA CONCENTRADORA
Se puede añadir un accesorio al extremo del tubo de la sopladora para aumentar la velocidad del aire (kmh).
TUBO PRINCIPAL DE LA SOPLADORA
El tubo principal de la sopladora se puede instalar fácilmente sin herramientas adicionales.
CONTENEDOR DEL CABLE
Un práctico contenedor para el cable ayuda a mantener la extensión segura mientras se usa la
sopladora.
TUBOS DE LA ASPIRADORA
Los tubos de aspirado se pueden añadir sin herramientas adicionales para crear mantillo y poder aspirar.
30
Fig. 1
BOTÓN DE
BLOQUEO
TUBO DE LA
SOPLADORA
BOQUILLA
CONCENTRADORA
PUERTA DE ACCESO
DE ASPIRADORA
INTERRUPTOR DE
2 VELOCIDADES
CONTENEDOR DEL CABLE
TUBOS DE
LA ASPIRADORA
BOLSA RECOLECTORA
DE ASPIRADORA
ADVERTENCIA:
No utilice este producto si alguna de las piezas mencionadas en la lista de componentes del
empaque ya está ensamblada en el producto al desempacarlo. Las piezas mencionadas en esta
lista no vienen ensambladas al producto y requiere que el cliente las instale. Usar un producto que
podría haberse ensamblado de manera errónea podría causar graves lesiones.
ADVERTENCIA:
Si alguna pieza está dañada o falta, no utilice este producto hasta reemplazarlas.
Usar este producto con piezas dañadas o faltantes podría causar lesiones severas.
ADVERTENCIA:
No intente modificar este producto o crear accesorios no recomendados para su uso con este
producto. Cualquier alteración de este tipo o modificación se considera un uso indebido que
podría causar potenciales lesiones severas.
ADVERTENCIA:
No conectar a la alimentación hasta que el armado esté completo. El no cumplir con esto podría
causar un funcionamiento inicial erróneo y posibles lesiones severas.
DESEMBALAJE
Este producto requiere armado.
Con cuidado, extraiga el producto y sus accesorios de la caja. Asegúrese de que todos los
elementos mencionados en la lista de componentes del empaque estén incluidos.
Inspeccione el producto cuidadosamente para asegurarse de que no se haya roto o dañado
durante el transporte.
No bote el material del empaque hasta que haya inspeccionado completamente y utilizado
satisfactoriamente el producto.
Si alguna parte está dañada o falta, contacte a Servicio al Cliente para obtener ayuda (866)-384-8432.
LISTA DE EMPAQUE
Sopladora Tubo de la sopladora Boquilla concentradora
Bolsa recolectora Tubo de aspiradora superior Tubo de aspiradora inferior
Manual del usuario
ARMADO
31
A. Entrada de aire
B. Botón de liberación del tubo de la sopladora
C. Boquilla concentradora
D. Tubo de la sopladora
Consulte la Figura 2.
Deslice el tubo de la sopladora hacia adelante hasta que el botón de bloqueo haga clic en la parte
superior del tubo.
INSTRUCCIONES PARA ARMAR EL TUBO DE LA SOPLADORA
A
C
D
B
Fig. 2
ARMADO
32
ARMADO PARA USAR COMO SOPLADORA (consulte la Fig. 3)
1. Deslice el tubo de la sopladora hacia adelante hasta que las zonas con muescas de la carcasa
hagan clic al entrar en las ranuras del tubo.
2. Fije la boquilla concentradora en el extremo del tubo de la sopladora hasta que quede bloqueado
en posición. (La boquilla concentradora sirve para aumentar el caudal de aire en zonas pequeñas
como camas de flores o bajo plataformas).
RANURA
BLOWER
TUBE
CONCENTRATOR
NOZZLE
AIR
OUTLET
Fig.3
1. Abra la puerta de la aspiradora (Ver Figura. 4).
2. Con la puerta abierta, alinee las dos lengüetas plásticas de tamaños distintos (una grande / una
pequeña) en el extremo del tubo de la aspiradora con las aberturas de forma similar que se
encuentran en la abertura de la puerta de acceso de la aspiradora (Ver Figura. 5).
3. Inserte la lengüeta en el tubo de la aspiradora etiquetado como A en la abertura de la puerta de
aspirado etiquetada como A (consulte la Figura. 6).
BOQUILLA
CONCENTRADORA
TUBO DE LA
SOPLADORA
SALIDA
DE AIRE
INSTALACIÓN DE LOS TUBOS DE ASPIRADORA Y BOLSA RECOLECTORA

ARMADO
33
4. Con las lengüetas de los tubos de aspirado adecuadamente alineadas, gire el tubo (Ver Figura. 7).
5. Añada la bolsa recolectora alineando la manga conectora de plástico de la bolsa con el escape
de la sopladora (Ver Figura. 8).
6. Mientras permanece en la posición operativa, ajuste el largo según la altura del operador.
Jale la lengüeta para estirar, jale la correa para acortar (Ver Figura. 9-10).
Fig. 8
Fig. 9 Fig. 10
Fig. 7
Fig. 6
Fig. 4 Fig. 5
Lengüetas
Lengüetas
Lengüeta A
Lengüeta
Abertura
Abertura A
A
B
Cierre
Abrir
Cerrar
Puede utilizar este producto para los propósitos mencionados a continuación:
Quitar hojas y otras suciedades de su césped.
Mantener patios, estacionamientos, caminos y cubiertas libres de hojas, agujas de pino y otras
suciedades.
APLICACIONES
CÓMO ENCENDER / DETENER LA SOPLADORA/ASPIRADORA
Consulte la Figura 11-12.
A. Retén del cable
B. Collar
C. Enchufe
D. Alargador
BAJA
ALTA
FUNCIONAMIENTO
ADVERTENCIA:
No permita que estar acostumbrado a usar un producto genere descuidos en usted. Recuerde que
una sola fracción de segundo en que se descuide es suficiente para generar una lesión severa.
ADVERTENCIA:
Use siempre protección ocular con escudos laterales para cumplir con l normativa ANSI Z87.1,
junto con protección auditiva. El no seguir esta instrucción podría causar que objetos salgan
disparados hacia sus ojos, causando una posible lesión severa.
ADVERTENCIA:
No utilice accesorios no recomendados por el fabricante de este producto. El uso de accesorios no
recomendados puede causar lesiones severas.
34
Fig. 11 Fig. 12
B
C
D
A
APAGADOAPAGADO
Inserte el extremo de salida de un cable de extensión en el enchufe de la parte posterior de la
sopladora/aspiradora
.
NOTA: Utilice solo alargadores aprobados para uso en exteriores según se describe anteriormente
en este manual.
Enrute el cable de extensión por el costado del bucle ubicado en la parte posterior de la carcasa
de la sopladora/aspiradora y colóquela debajo del retén del cable.
Para encender la sopladora/aspiradora, coloque el interruptor de encendido en la posición ON.
Para detener la sopladora/aspiradora, coloque el interruptor de encendido en la posición OFF.
CÓMO UTILIZAR LA SOPLADORA / ASPIRADORA
FUNCIONAMIENTO
35
Consulte la Fig. 13 y Fig. 14
Para mantener el producto libre de acumulaciones de sedimentos, sople alrededor de los bordes
exteriores de una pila de suciedad. Jamás sople directamente hacia el centro de una pila.
Para reducir los niveles de ruido, limite el número de piezas adicionales que utiliza cada vez.
Utilice cepillos y rastrillos para soltar los sedimentos antes de soplar. En condiciones de operación
polvorientas, de ser posible humedezca las superficies con agua.
Tenga cuidado con los niños, mascotas, ventanas abiertas o automóviles recién lavados y sople
los sedimentos de manera segura con cuidado.
Sostenga la sopladora/aspiradora con la manilla de su mano dominante (La posición de
funcionamiento correcta se muestra en la Fig. 13 y Fig. 14).
Utilice el equipo solo en horarios razonables (no muy temprano en la mañana ni tarde en la noche
cuando podría molestar a las demás personas). Cumpla con los horarios señalados en las
ordenanzas de su localidad.
Después de usar la sopladora u otro equipo, ¡LIMPIE! Elimine los desechos de manera adecuada.
Fig. 13 Fig. 14
ADVERTENCIA:
Al realizar mantenimiento, utilice solo piezas de repuesto idénticas. El uso de otras piezas podría
generar un peligro o dañar al producto.
ADVERTENCIA:
Use siempre protección ocular con escudos laterales para cumplir con l normativa ANSI Z87.1,
junto con protección auditiva. El no seguir esta instrucción podría causar que objetos salgan
disparados hacia sus ojos, causando una posible lesión severa.
ADVERTENCIA:
Antes de inspeccionar, limpiar o realizar mantenimiento a la máquina, desconecte el cable de
alimentación y espere que se detengan todas las piezas móviles. El no seguir estas instrucciones
puede causar lesiones severas o daños a la propiedad.
ADVERTENCIA:
En ningún momento permita que fluidos de frenos, gasolina, productos derivados del petróleo,
aceites penetrantes, etc. entren en contacto con las piezas móviles. Los químicos pueden dañar,
debilitar o destruir el plástico, lo cual podría causar graves lesiones personales.
Evite el uso de solventes al limpiar piezas plásticas. La mayoría de los plásticos son susceptibles
a daños causados por varios tipos de solventes comerciales. Utilice paños limpios para retirar la
suciedad, polvo, aceite, grasa, etc.
MANTENIMIENTO GENERAL
ALMACENAMIENTO (1 MES O MÁS TIEMPO)
Limpie todos los materiales externos de la sopladora/aspiradora.
Almacene en interiores, en un lugar alejado del alcance de los niños. Mantenga alejado de
agentes corrosivos como químicos para jardín y sales descongelantes.
MANTENIMIENTO
36
RESOLUCIÓN DE PROBLEMAS
37
PROBLEMA
La unidad no
sopla ni aspira.
1. Bolsa llena
2. Tubo bloqueado
3. Impulsor bloqueado
3. Bolsa sucia
5. Bolsa rota
6. La bolsa no está ajustada
7. La unidad está desconectada
1. Vacíe la bolsa.
2. Despeje el bloqueo.
3. Despeje el bloqueo.
4. Limpie la bolsa.
5. Reemplace la bolsa.
6. Ajuste la bolsa.
7. Conéctela a un tomacorriente o
alargador.
La unidad no
arranca.
1. No está conectada.
2. El interruptor de energía /
velocidad está en la
posición de apagado.
3. Interruptor de encendido
defectuoso.
4. Los tubos de la aspiradora
no están instalados
correctamente.
5. La puerta de la aspiradora
NO está cerrada de
manera segura.
6. El disyuntor del circuito de
la casa podría haberse
activado.
1. Revise el cable y asegúrese de que
esté conectado a un tomacorriente.
2. Slide switch to high or low.
3. Línea de ayuda, llamada gratuita:
866-384-8432.
4. Revise los tubos de la aspiradora
para asegurarse de que permiten
que el interruptor se active al
instalarse correctamente.
5. Asegúrese de que la puerta de la
aspiradora esté cerrada de manera
firme y segura.
6. Revise el panel del disyuntor y
reinicie de ser necesario.
.
POSIBLE CAUSA
SOLUCIÓN

GARANTÍA
Nos sentimos orgullosos de ofrecer a usted un producto de alta calidad y durabilidad. Este producto
Lawnmaster
®
posee una garantía limitada de dos (2) años contra defectos de fabricación y materiales
a contar de la fecha de compra, bajo uso doméstico normal. La garantía no se aplica a defectos
causados por abuso directo o indirecto, negligencia, uso indebido, accidentes, reparaciones o
alteraciones y falta de mantenimiento.
Mantenga su recibo/lista de empaque como prueba de su compra. Esta garantía le entrega derechos
legales específicos que pueden variar según su estado (podría tener otros derechos adicionales).
Elementos no cubiertos por la garantía:
1. Any part that has become inoperative due to misuse, commercial use, abuse, neglect, accident,
improper maintenance, or alteration; or
2. The unit, if it has not been operated and/or maintained in accordance with the owner's manual; or
3. Normal wear, except as noted below;
4. Routine maintenance items such as lubricants, blade sharpening;
5. Normal deterioration of the exterior finish due to use or exposure.
Cobros por transporte: Los cobros por transporte para cualquier unidad o aditamento son r
esponsabilidad del comprador. Es responsabilidad del comprador pagar los cobros por transporte
de cualquier pieza enviada para remplazarse bajo esta garantía, a menos que LawnMaster haya
requerido tal devolución por escrito.
GUARDE SUS RECIBOS. ESTA GARANTÍA QUEDA ANULADA SIN ELLOS.
38
VISTA EN DETALLE
BV1211 VISTA EN DETALLE
39

LISTA DE PIEZAS
BV1211 LISTA DE PIEZAS
ITEM NO. PART NO. DESCRIPTION QTY
1
12
3
1
40
Conjunto de piezas de la parte
derecha de la carcasa del motor
131012101
131012103 Microinterruptor
1131012124 Placa del interruptor
5 2131012105 Cable interno (negro)
6 1131003105 Cable interior
7 2131012108 Almohadilla de goma
8 1131003104 Montaje motor
9 1131012110 Conjunto de piezas de la hélice
9.1 1131012111 Hélice
9.2 1131012112 Hoja
9.3 1131012113 Tuerca M8
11.1 1
1
1
1
1
1
1
1
1
131012116 Resorte
11.2 131012117 Anillo reductor de fugas
11.3 131012118 Cubierta de la toma de aire
12 131012119 Tubo de admisión de aire posterior
13 131012120 Tubo frontal de la sopladora II
14 131003120 Boquilla concentradora
15 131012121 Tubo de la sopladora
16 131012122 Conjunto de piezas de la bolsa recolectora
17 131012123 Conjunto de piezas del interruptor
10 1131012114
Conjunto de piezas de la parte izquierda
de la carcasa del motor
11 1131012115
Conjunto de piezas de la cubierta de
la toma de aire
4 1131012125
Conjunto de piezas del botón interruptor
de encendido

41
NOTAS