
Instructions for use
Coffee machine
CM8478G
EN 2
EN
Instructions for use EN 3 - EN 38
Pictograms used
Important information
Tip
EN 3
CONTENTS
Your coffee machine
Introduction 4
Description of the appliance 5
Touch keys and symbols 8
Operation
Before first use 10
Set your appliance to ‘On’ 12
Set your appliance to ‘Standby’ and ‘Off’ 12
Important tips and tricks when you make coffee 13
Make coffee using coffee beans 13
Make coffee using pre-ground coffee 14
Adjust the grind level 14
Make milk-based hot drinks 15
Customise beverages 16
Supply a beverage that is customised 16
Customise a user profile 16
Supply hot water or steam 17
Settings
Settings menu 18
Maintenance
Clean your appliance 20
Clean the hot water spout 21
Clean the internal tubes of the milk container and the nozzle 21
Clean all components of the milk container 22
Clean the appliance’s internal circuit 23
Clean the coffee grounds container 23
Clean the drip tray 24
Clean the inside of the coffee machine 24
Clean the water tank 25
Clean the coffee spouts 25
Clean the pre-ground coffee funnel 25
Descale the appliance 26
Set the water hardness 28
Install a water softener filter 28
Replace a water softener filter 29
Remove a water softener filter 29
Clean the brewing unit / infuser once a month 30
Clean the brewing unit / infuser twice a year 31
Use the milk cleaner 34
Trouble shooting
Trouble shooting 36
Environmental aspects
Disposal of packaging and appliance 38
EN 4
Introduction
Congratulations on your choice of this Asko coffee machine. This product was designed with
simple operation and optimum comfort in mind.
This manual describes the best way to use this coffee machine. In addition to information on
operation, you will also find background information that may come in handy when using the
appliance.
Please read the separate safety instructions carefully before
using the appliance!
Read this manual before using the appliance and keep it in a safe place for future use.
Installation instructions are supplied separately.
YOUR COFFEE MACHINE
EN 5
YOUR COFFEE MACHINE
Description of the appliance
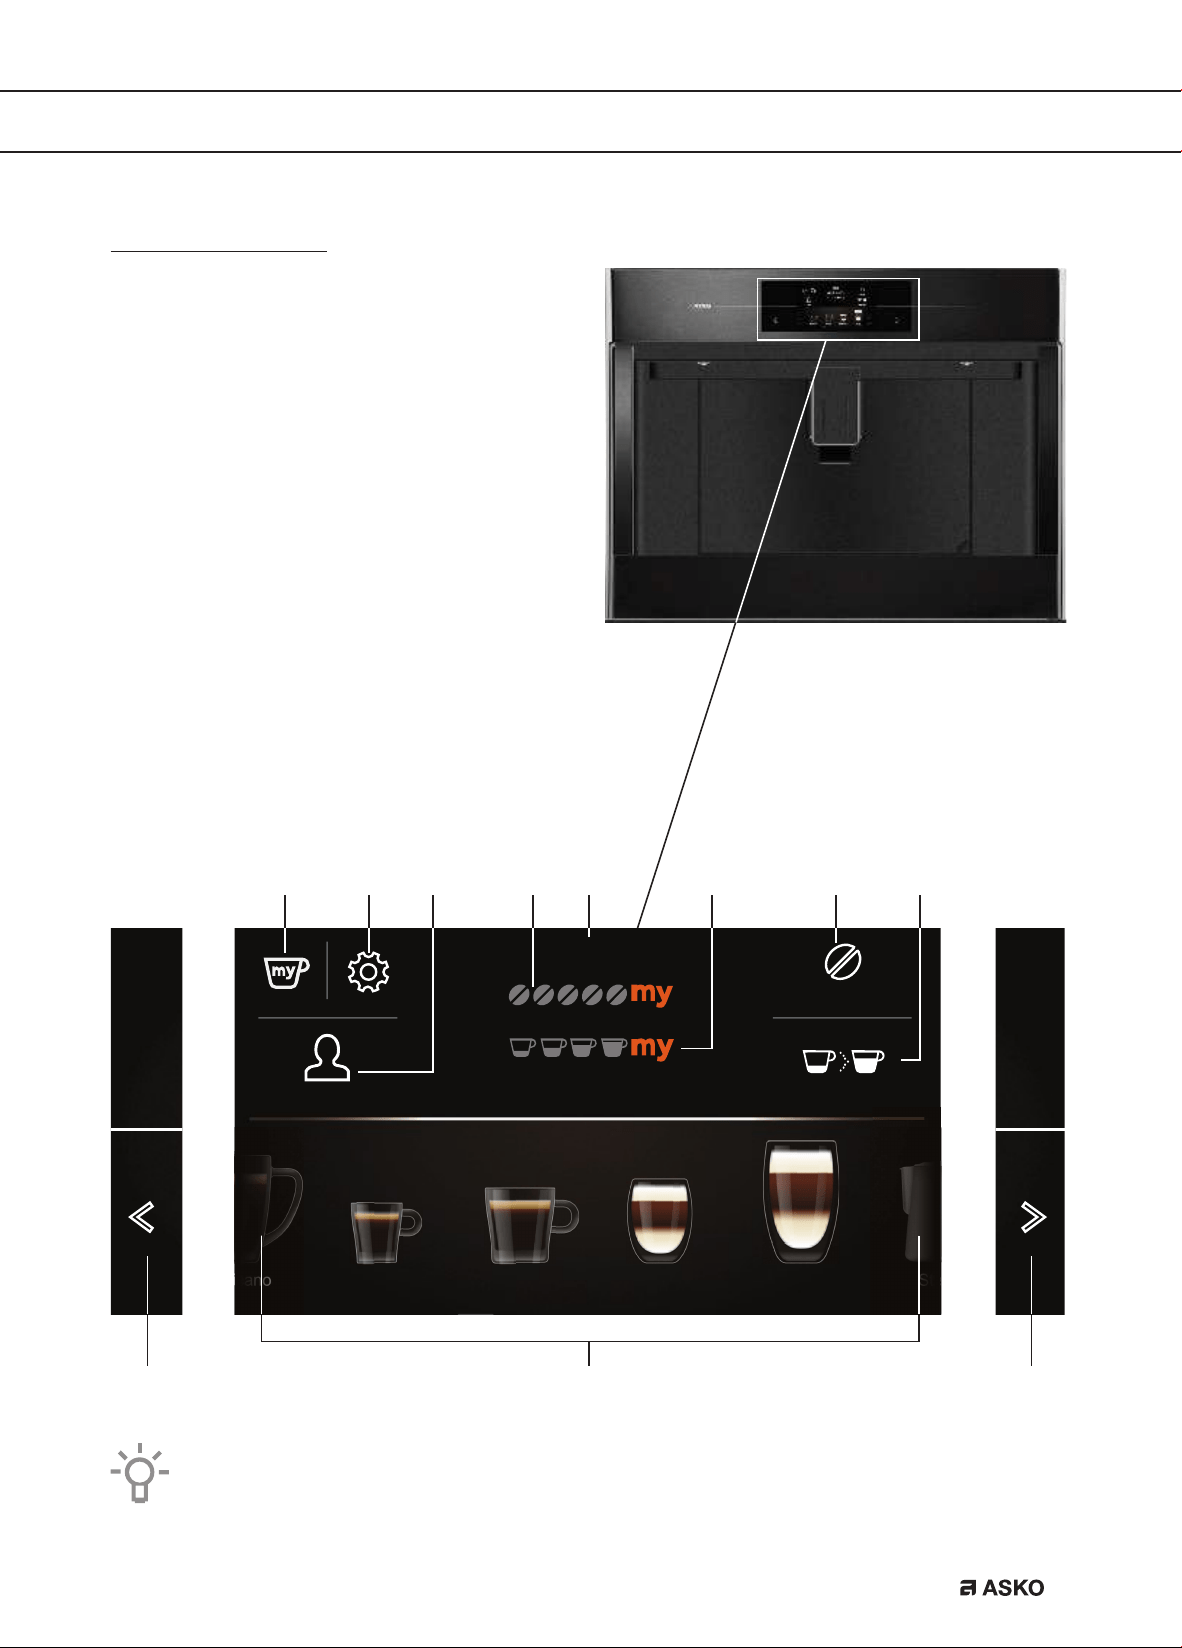
Control panel
A. My profile
B. Settings
C. User profile
D. Selected aroma
E. Time
F. Selected quantity
G. Aroma
H. Quantity
I. Scroll left/right
J. Beverages available to select
When this primary screen is shown, the appliance is ready to use.
Guest Quantity
CappuccinoCoffeeEspresso
Americano
Latte
macchiato
Steam
Aroma
12:30
A B D E
JI I
FC G H
EN 6
YOUR COFFEE MACHINE
1
4
9 10 11 12 13
14
15
16
17
18
19 20 21
22
5
6
7
2 3
15
8
17
EN 7
YOUR COFFEE MACHINE
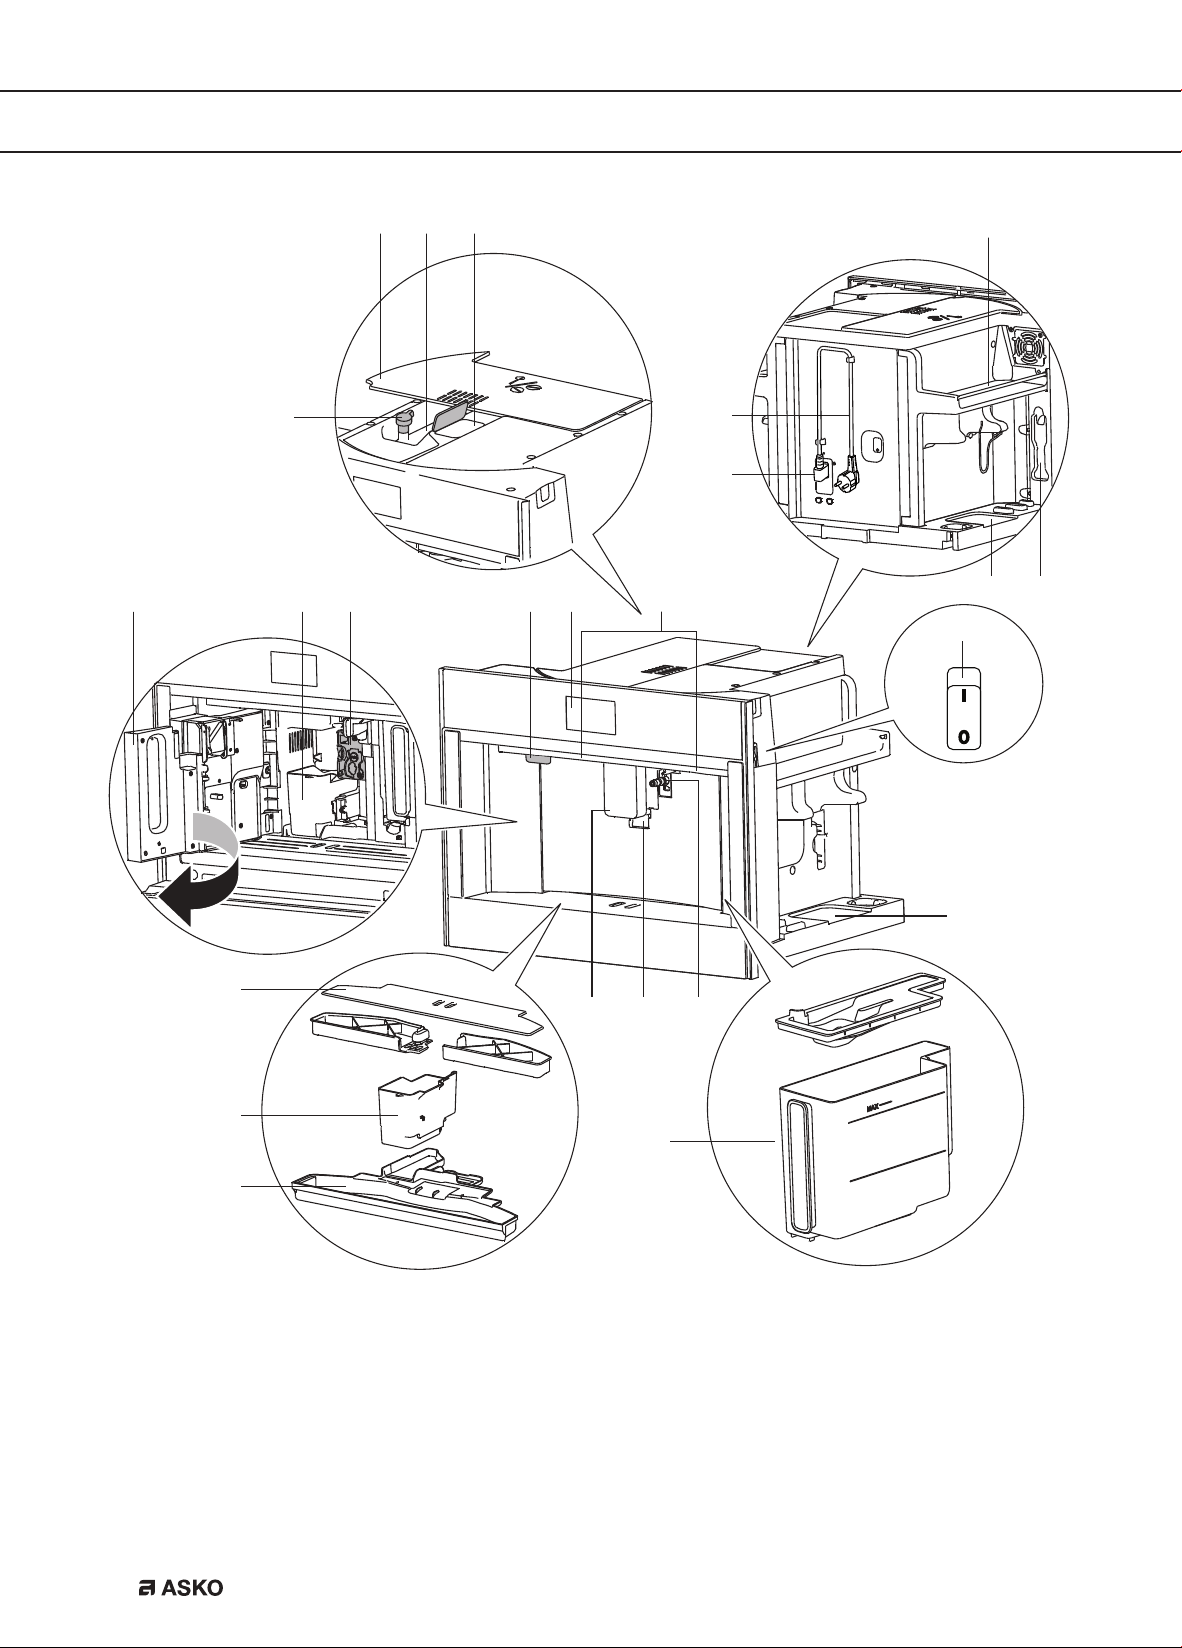
1. Lid bean container
2. Bean container
3. Ground coffee funnel (with lid)
4. Knob to adjust the grind level
5. Power cord
6. IEC connector
7. Area for the measuring spoon
8. Cup warming area
9. Service door
10. Brewing unit
11. On/Standby button
12. Control panel
13. Lighting
14. Main switch
15. Area for accessories (left and right)
16. Cup tray
17. Coffee grounds container
18. Drip tray with level indicator
19. Coffee spouts (adjustable height)
20. Cup lights
21. Hot water connection nozzle
22. Water tank
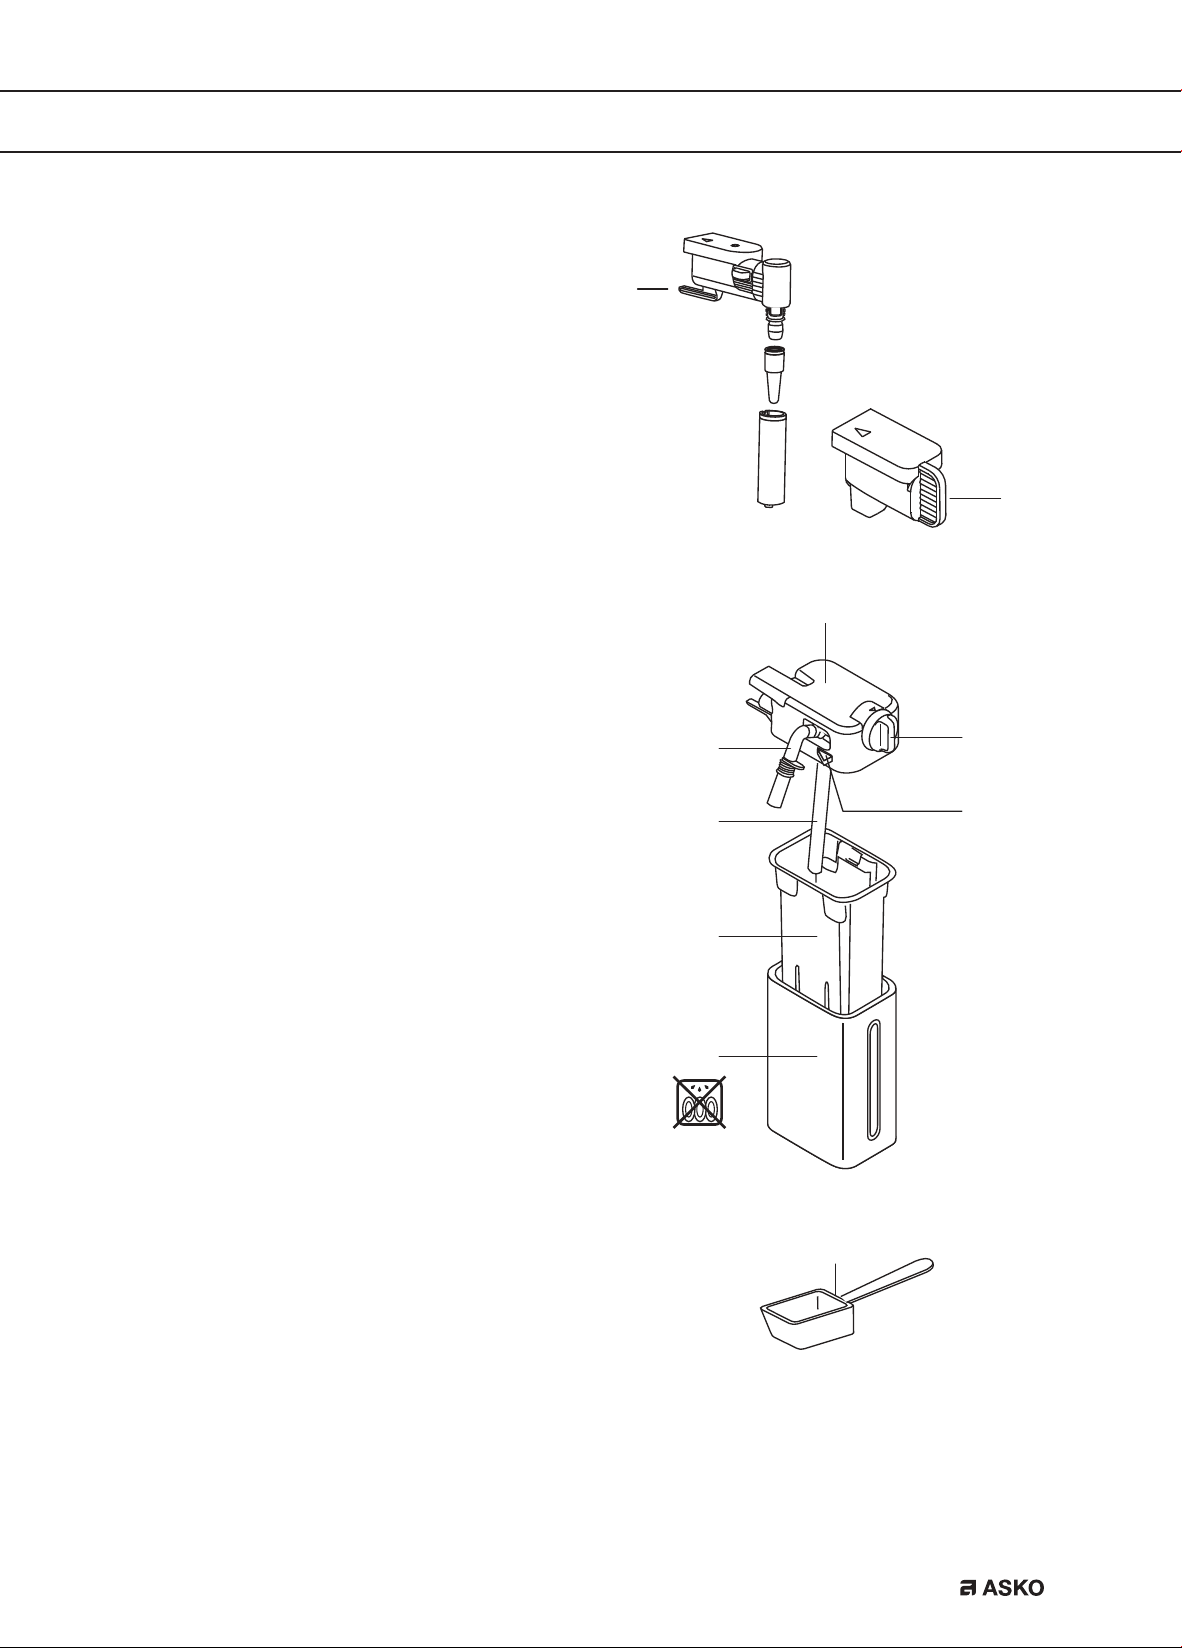
23. Hot water spout
24. Cover connection nozzle
25. Lid with milk frother
26. Frothed milk spout (adjustable)
27. Milk froth adjustment knob
28. Milk intake tube
29. Release button
30. Milk container
31. Thermal casing
32. Measuring spoon for pre-ground coffee
Maintenance set
• ‘Total Hardness Test’ indicator paper
• Descaler
• Water softener filter (certain models only)
• Cleaning brush / cleaning cloth
• Milk cleaner
• O-rings and lubricating grease
23
24
25
26
27
29
28
30
31
32
EN 8
YOUR COFFEE MACHINE
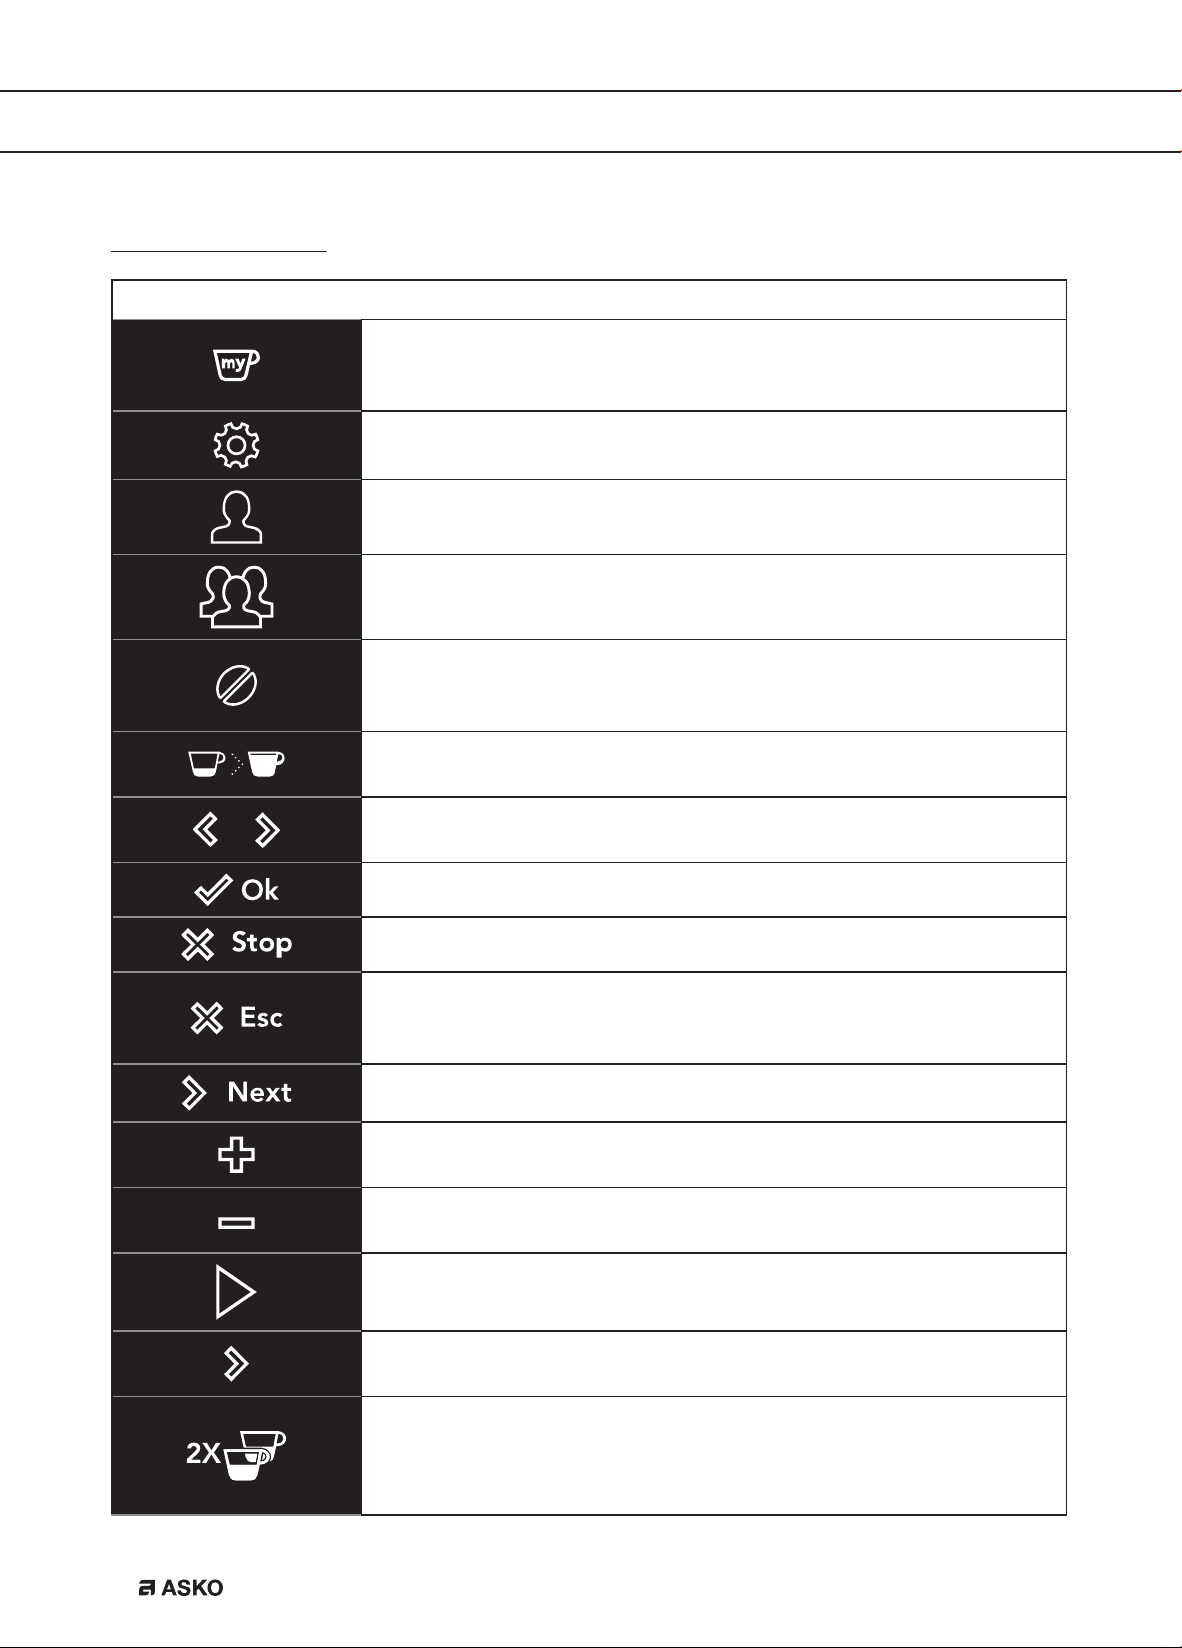
Touch keys and symbols
Touch keys
My profile
Customise several beverage.
• See chapter ‘Customise beverages’.
Settings
• See chapter ‘Settings menu’.
User profile
• See chapter ‘Supply a beverage that is customised’.
Customise a user profile
• See chapter ‘Customise a user profile’.
Aroma
Touch this key (several times) to select ‘Pre-ground’ or to select the
aroma.
Quantity
Touch this key (several times) to select the coffee quantity.
Scroll left/right
Touch these keys until the correct variable is shown on the display.
OK
Stop
Escape
Cancel or go back one step.
• Values will not be saved.
Next
Plus (+)
Adapt the aroma when you customise a beverage.
Minus (-)
Adapt the aroma when you customise a beverage.
Start
Enter
Enter a menu.
2x
Supply twice the amount of espresso.
• This touch key is shown on the display for a few seconds at the
start of preparing espresso.
EN 9
YOUR COFFEE MACHINE
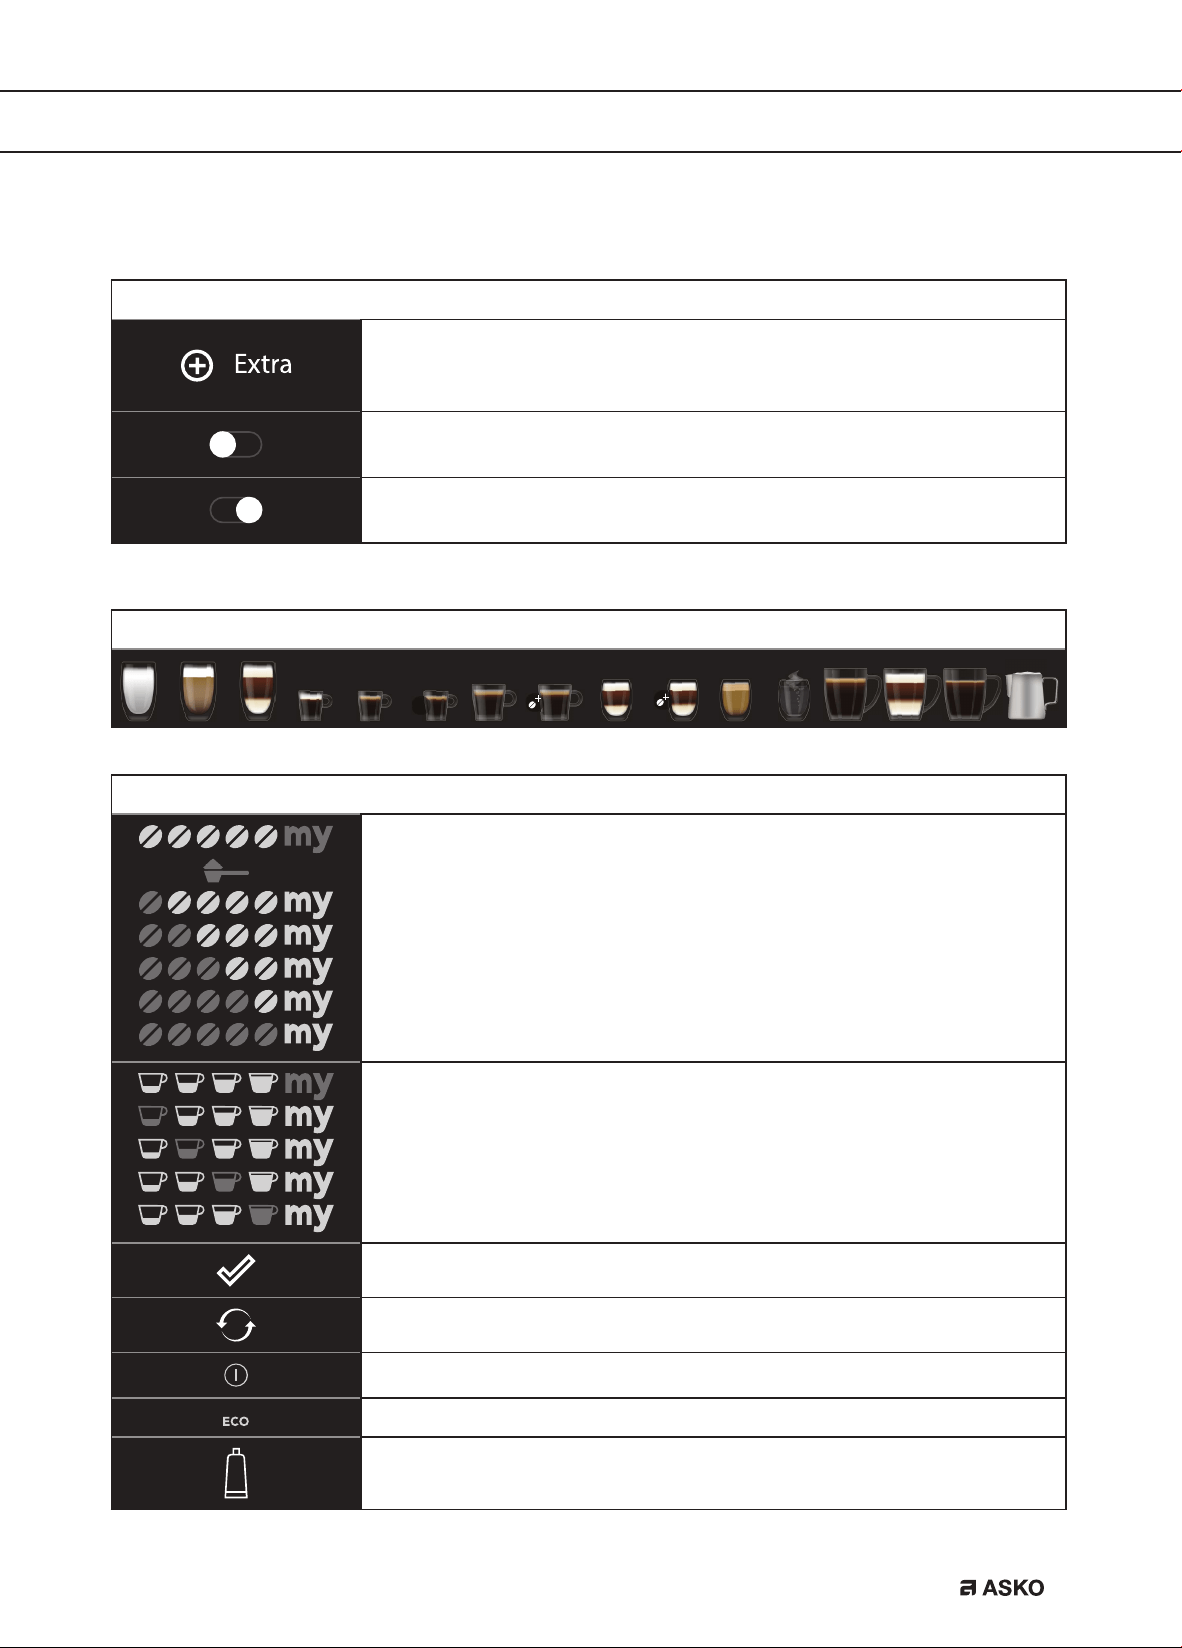
Touch keys
Extra
Increase the quantity after you received your beverage.
On/Off
Setting is ‘off’.
On/Off
Setting is ‘on’.
Beverages available to select
2x
Symbols
My aroma (if programmed) / Standard
Pre-ground
Extra light
Light
Medium
Strong
Extra strong
My quantity (if programmed) / Standard
Small
Medium
Large
Extra large
Settings saved
Default value
Auto start function enabled
Energy saving enabled
Filter enabled
EN 10
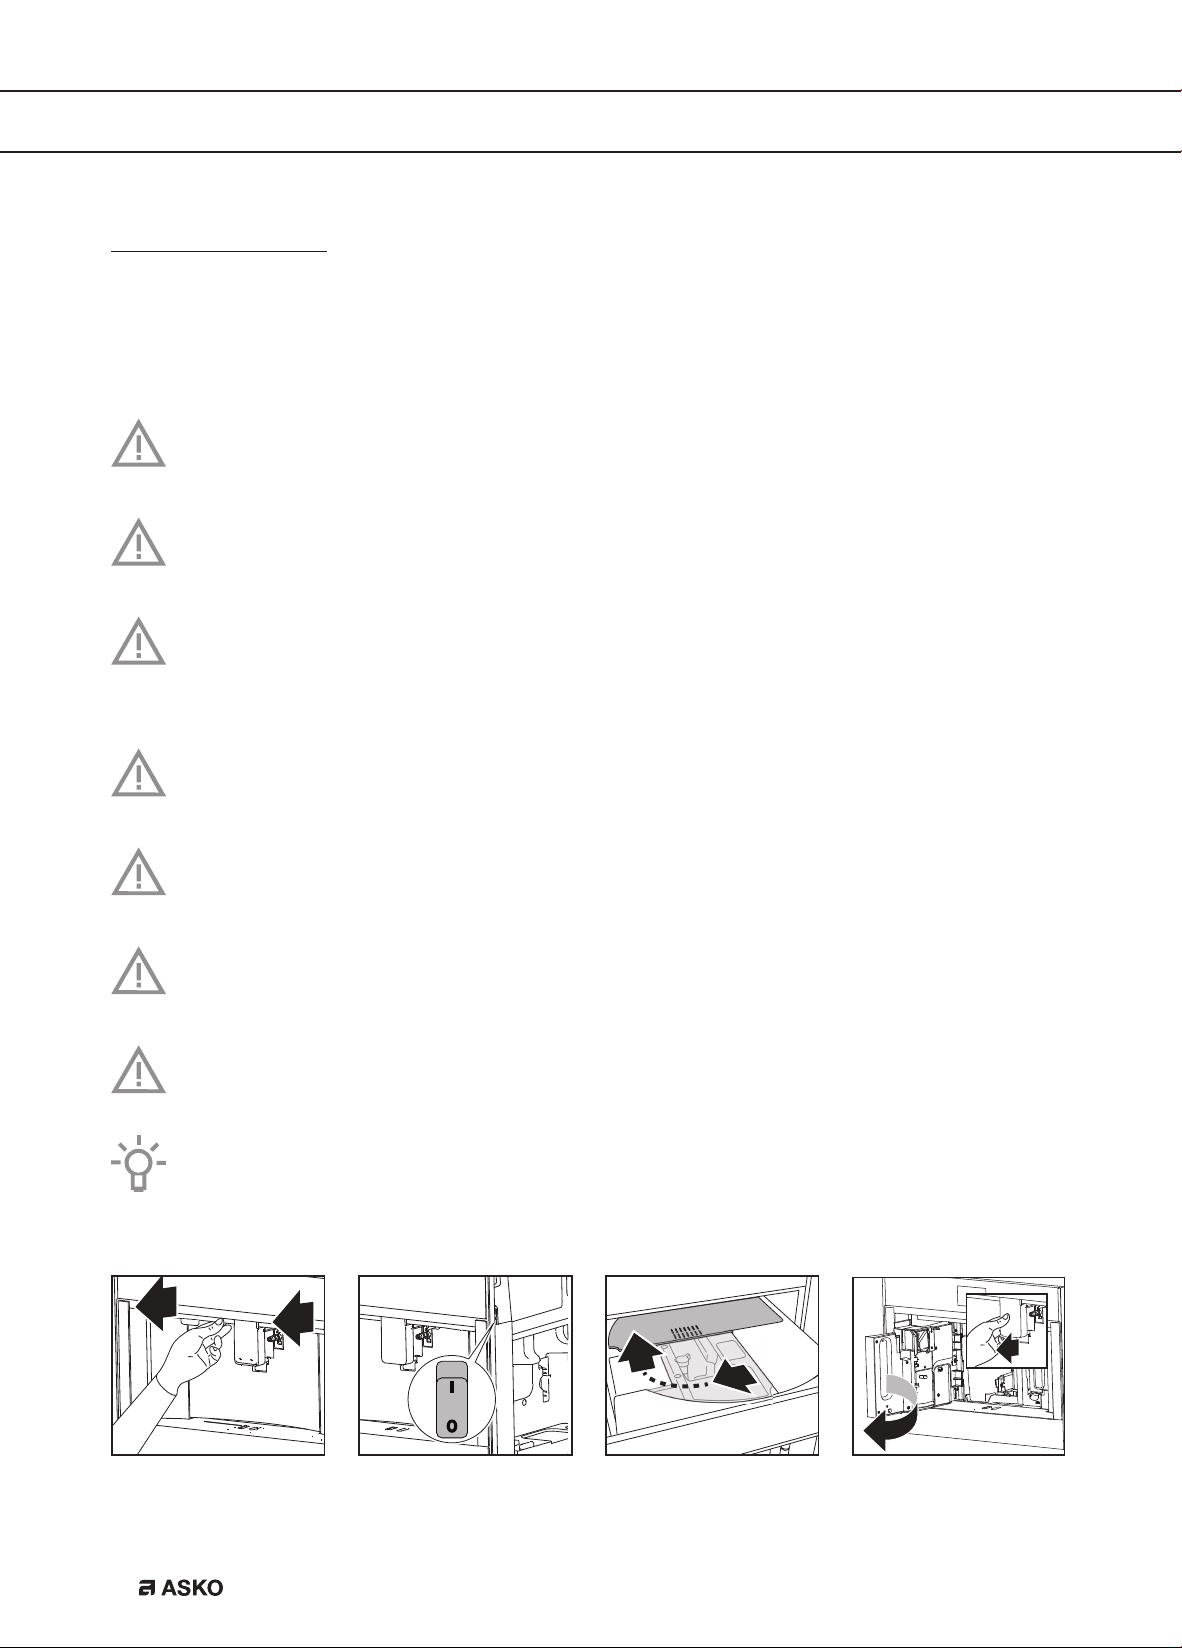
Before first use
Remove the packaging. Make sure the product is complete and undamaged. Check if all
accessories are present. Do not use the appliance if it is visibly damaged. Contact the service
department if there are any problems.
Coffee has been used to test the appliance in the factory. Therefore it is completely
normal that there are traces of coffee in the mill.
Customise the water hardness as soon as possible. Obey the instructions in chapter ‘Set
the water hardness’.
To improve the performance of your appliance, we recommend installing a water softener
filter. If your model is not provided with a filter, you can purchase one from the service
department.
Always use clean and cold tap water, bottled water without added minerals or distilled
water suitable for consumption.
The first time you use the appliance, the water circuit is empty. The appliance could be
very noisy. The noise becomes less when the circuit fills with water.
The first time you use the appliance, you need to make 4-5 cups of coffee before it starts
to give results that are satisfactory.
When making the first 5-6 beverages, it is normal to hear the noise of boiling water. This
noise becomes less during use.
Pull the appliance forward to get access to the main switch, the area for accessories
and the lid of the bean container. Pull the coffee spouts forward to open the service
door.
OPERATION

EN 11
Read and obey the instructions shown on the display. The display shows information
and touch keys to use. Important information is accompanied by an audio signal.
The appliance goes to standby automatically. It is now ready for normal use.
Danger of burns
During rinsing, a little hot water flows out of the coffee spouts. Avoid contact with
splashes of water. Do not let the appliance stay unattended while hot water is being
supplied.
OPERATION
EN 12
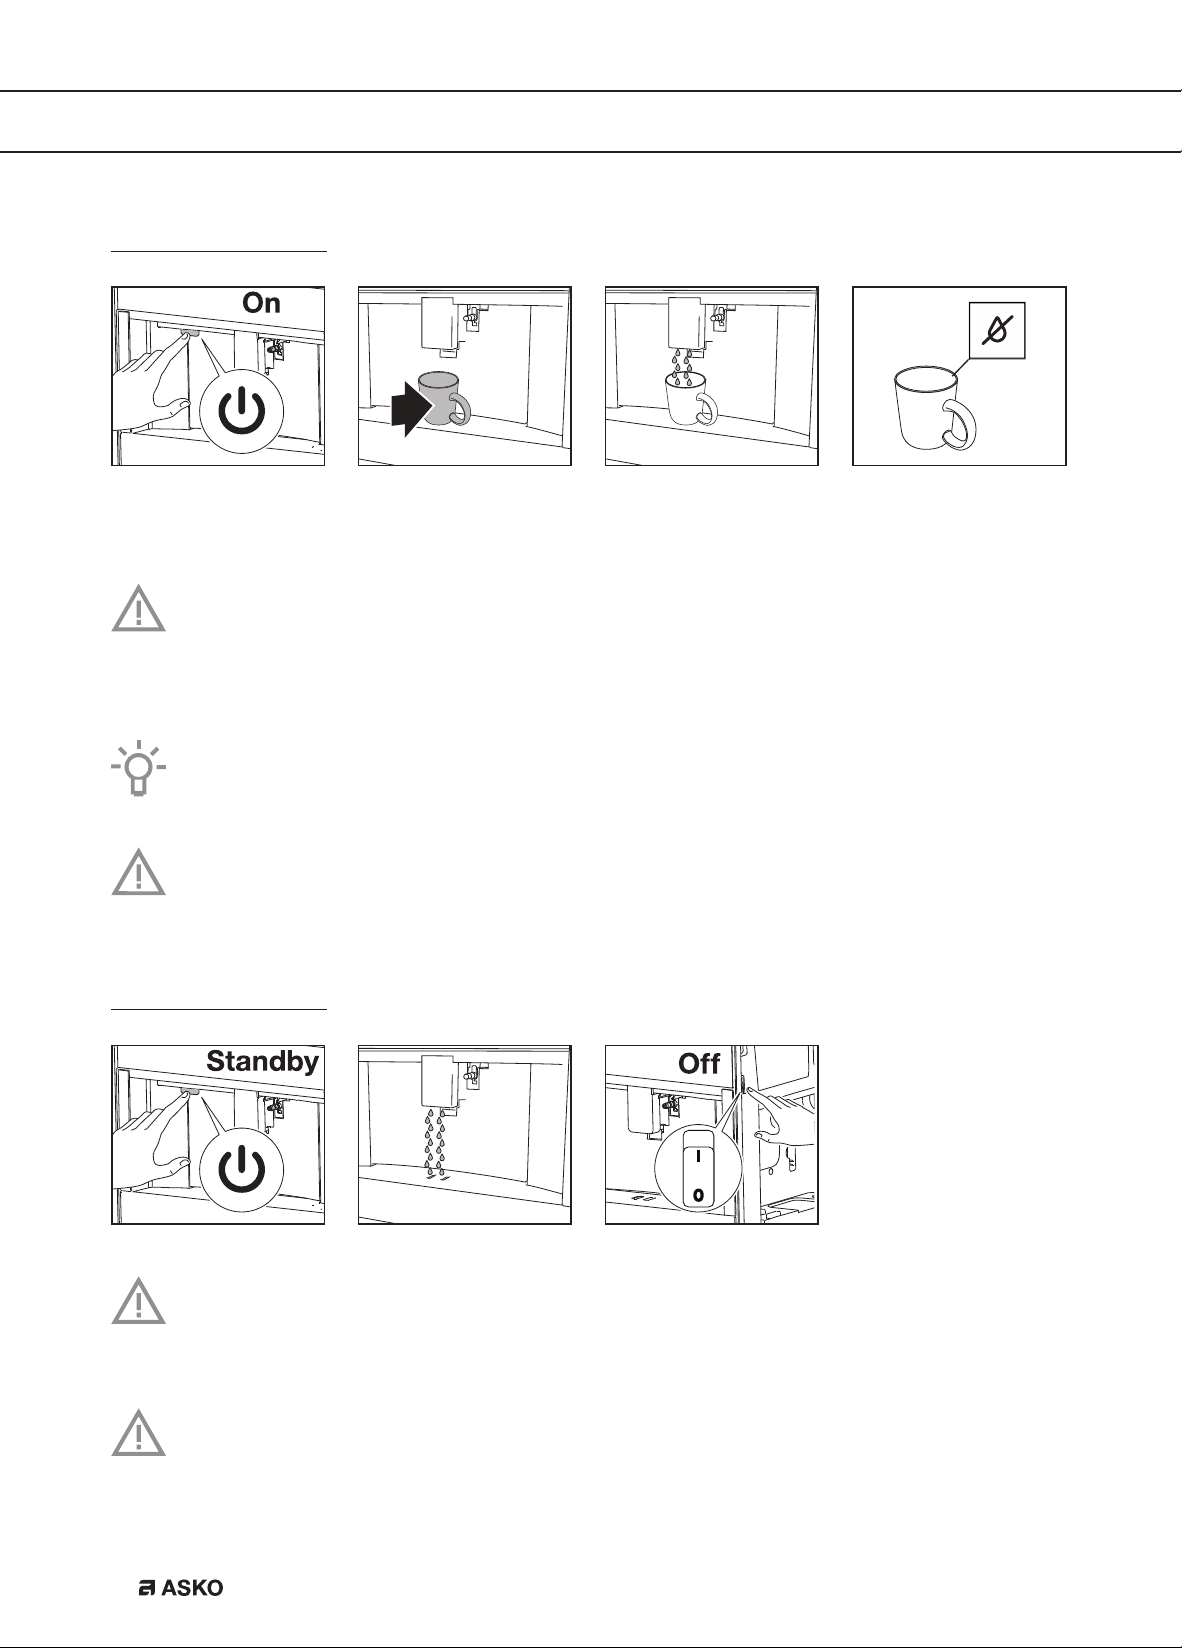
Set your appliance to ‘On’
The appliance is ready to use if it has reached the correct temperature.
The primary screen is shown.
Attention
Each time the appliance is set to ‘On’, it performs an automatic preheat and rinse cycle.
This cycle cannot be interrupted. The appliance is ready for use only after completion of
this cycle.
Tip
Put a cup under the spouts. Collect the hot water from the rinse cycle to warm the cup.
Important!
Do not push the main switch while the appliance is set to ‘On’.
Set your appliance to ‘Standby’ and ‘Off’
Attention
Each time the appliance is set to ‘Standby’ after being used to make coffee, it performs
an automatic rinse cycle.
Please note
If you do not use the appliance for a long period, set the appliance to ‘Off’.
OPERATION
EN 13
Important tips and tricks when you make coffee
• The supply of coffee can be stopped at any moment.
• As soon as the supply has ended, you can increase the quantity of coffee.
• You can customise beverages.
• Adjust the grind level if the coffee is supplied a drop at a time or too weak and not creamy
enough.
• Make a hotter coffee:
Perform a rinse cycle and warm the cups with the hot water from the rinse cycle.
Supply hot water to warm the cups.
Use the cup warmer setting to warm the cups.
Increase the coffee temperature.
• Lower the spouts to the cup as near as possible. This makes the coffee more creamy.
• After the coffee supply, the aroma setting and the quantity setting are reset to the ‘original
recipe’.
• Once a beverage has been made, the appliance is ready to make the next beverage.
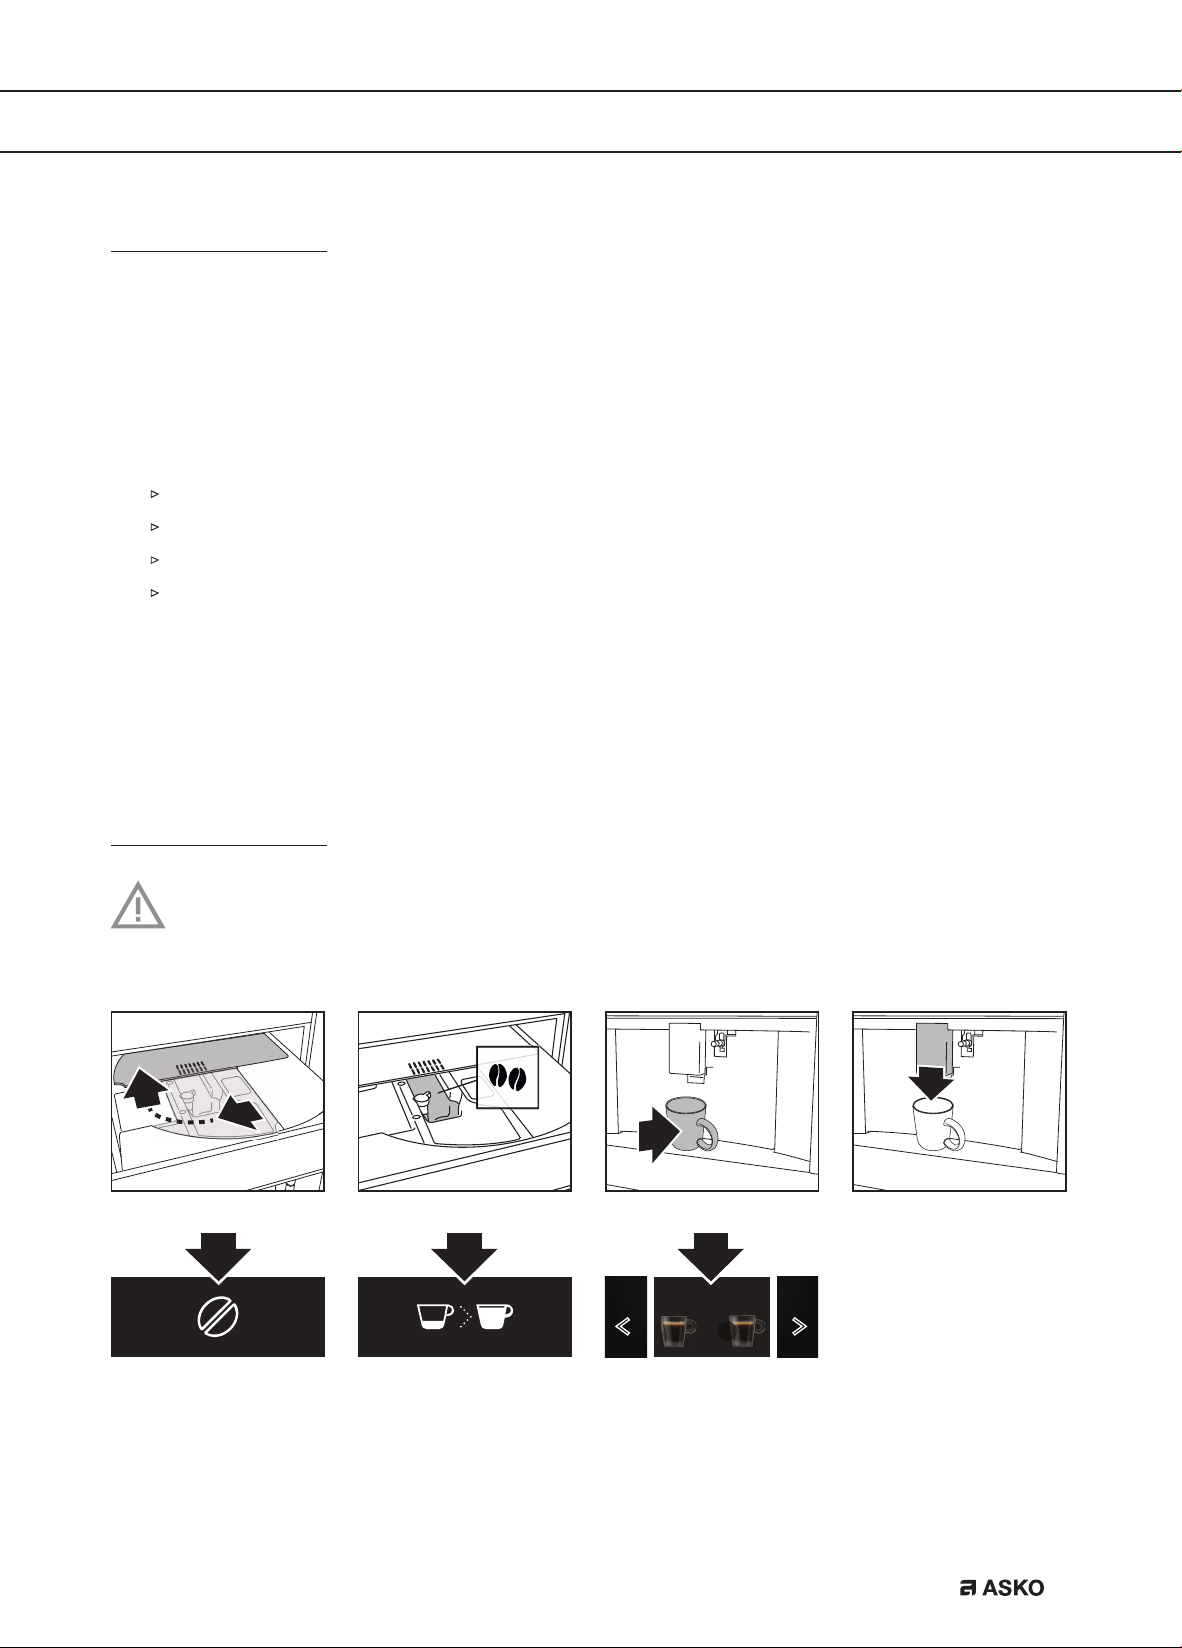
Make coffee using coffee beans
Important!
Do not use green, caramelised or candied coffee beans. They could make the coffee mill
unusable.
2x
Espr
2x Espr
OPERATION
EN 14
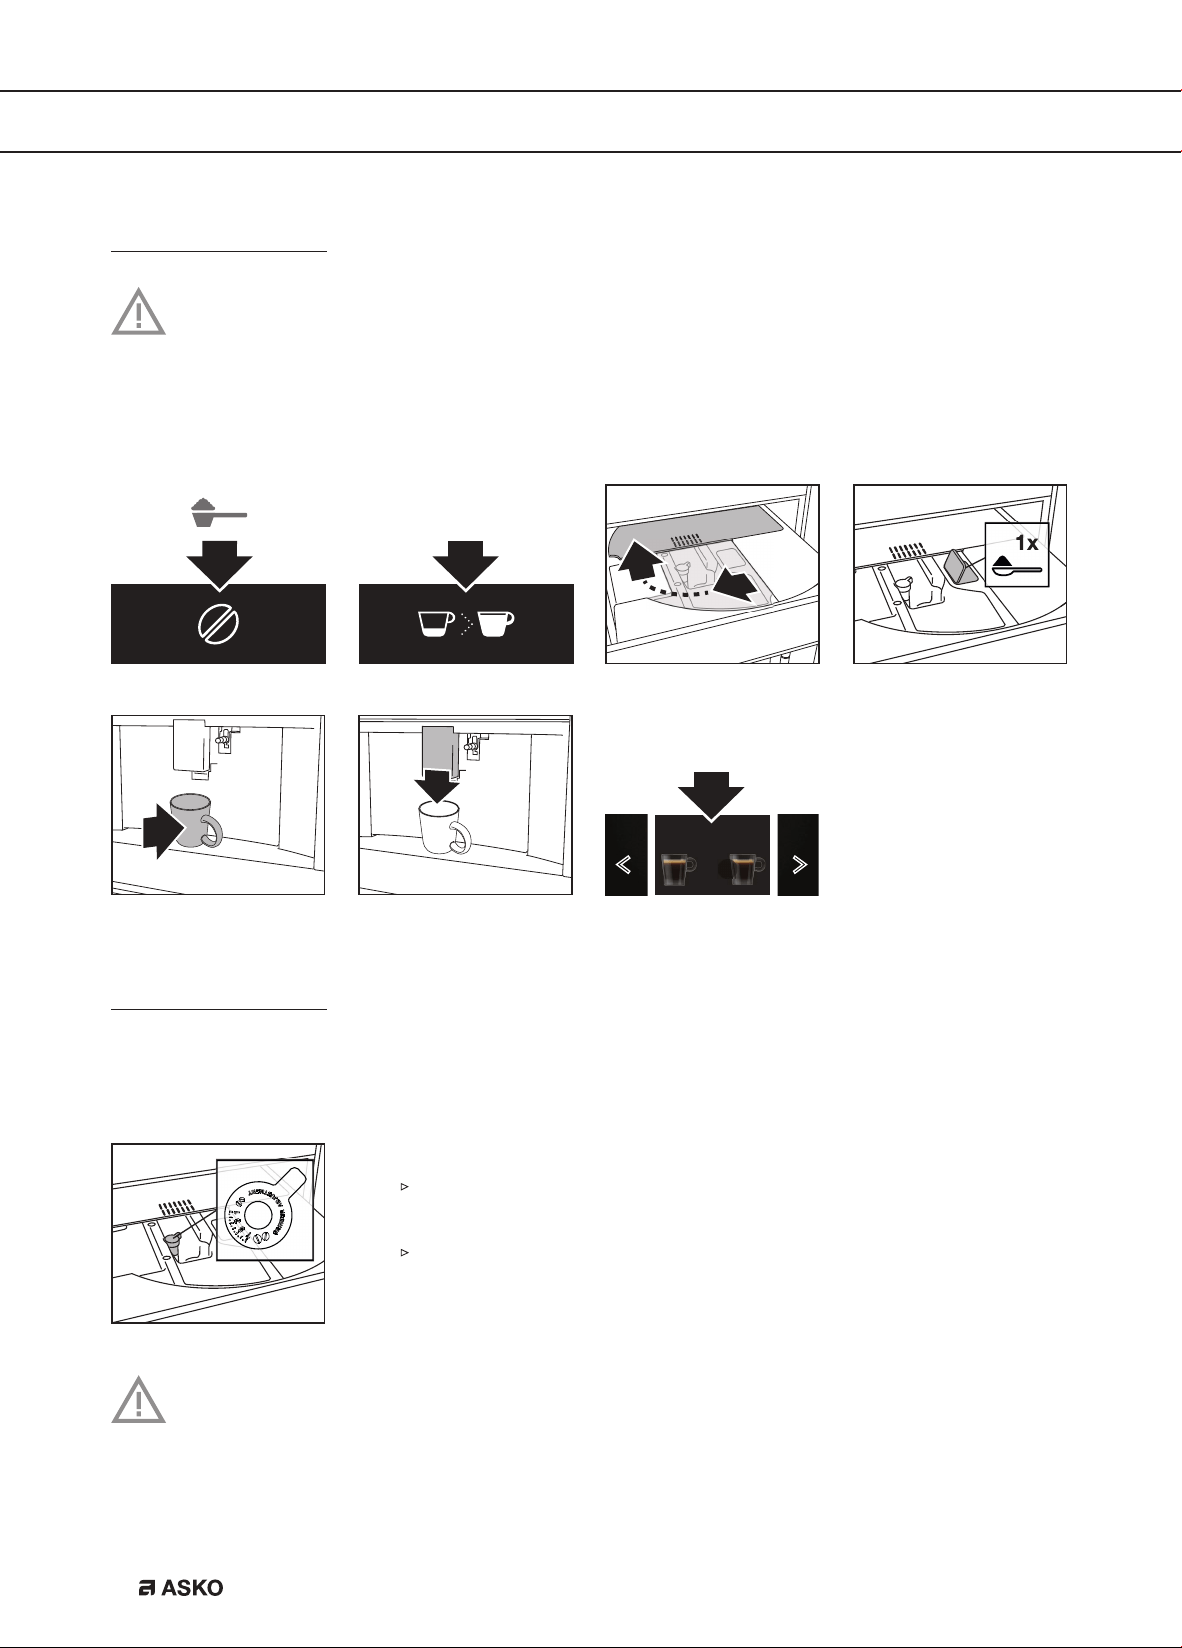
Make coffee using pre-ground coffee
Important!
• Only add pre-ground coffee when the appliance is set to ‘On’. Otherwise, the coffee
could spread through the inside of the appliance and damage it.
• Only make one cup of coffee at a time. Do not use more than 1 measuring spoon.
• Make sure the funnel is not blocked (see chapter ‘Maintenance’).
2x
Adjust the grind level
The coffee mill is set by default to prepare coffee correctly. It should not require regulating initially.
However, you can adjust the grind level:
• if the coffee is supplied too slowly or not at all.
Turn the knob one click clockwise in the direction of 7.
• for a stronger, creamier coffee.
Turn the knob one click anti-clockwise in the direction of 1.
Please note!
• Only turn the knob when the coffee mill is operating (during the start of the coffee
preparation). Turn the knob one click at a time. When you have made at least 2 cups of
coffee, turn the knob another click if the adjustment did not give the desired result.
OPERATION
EN 15
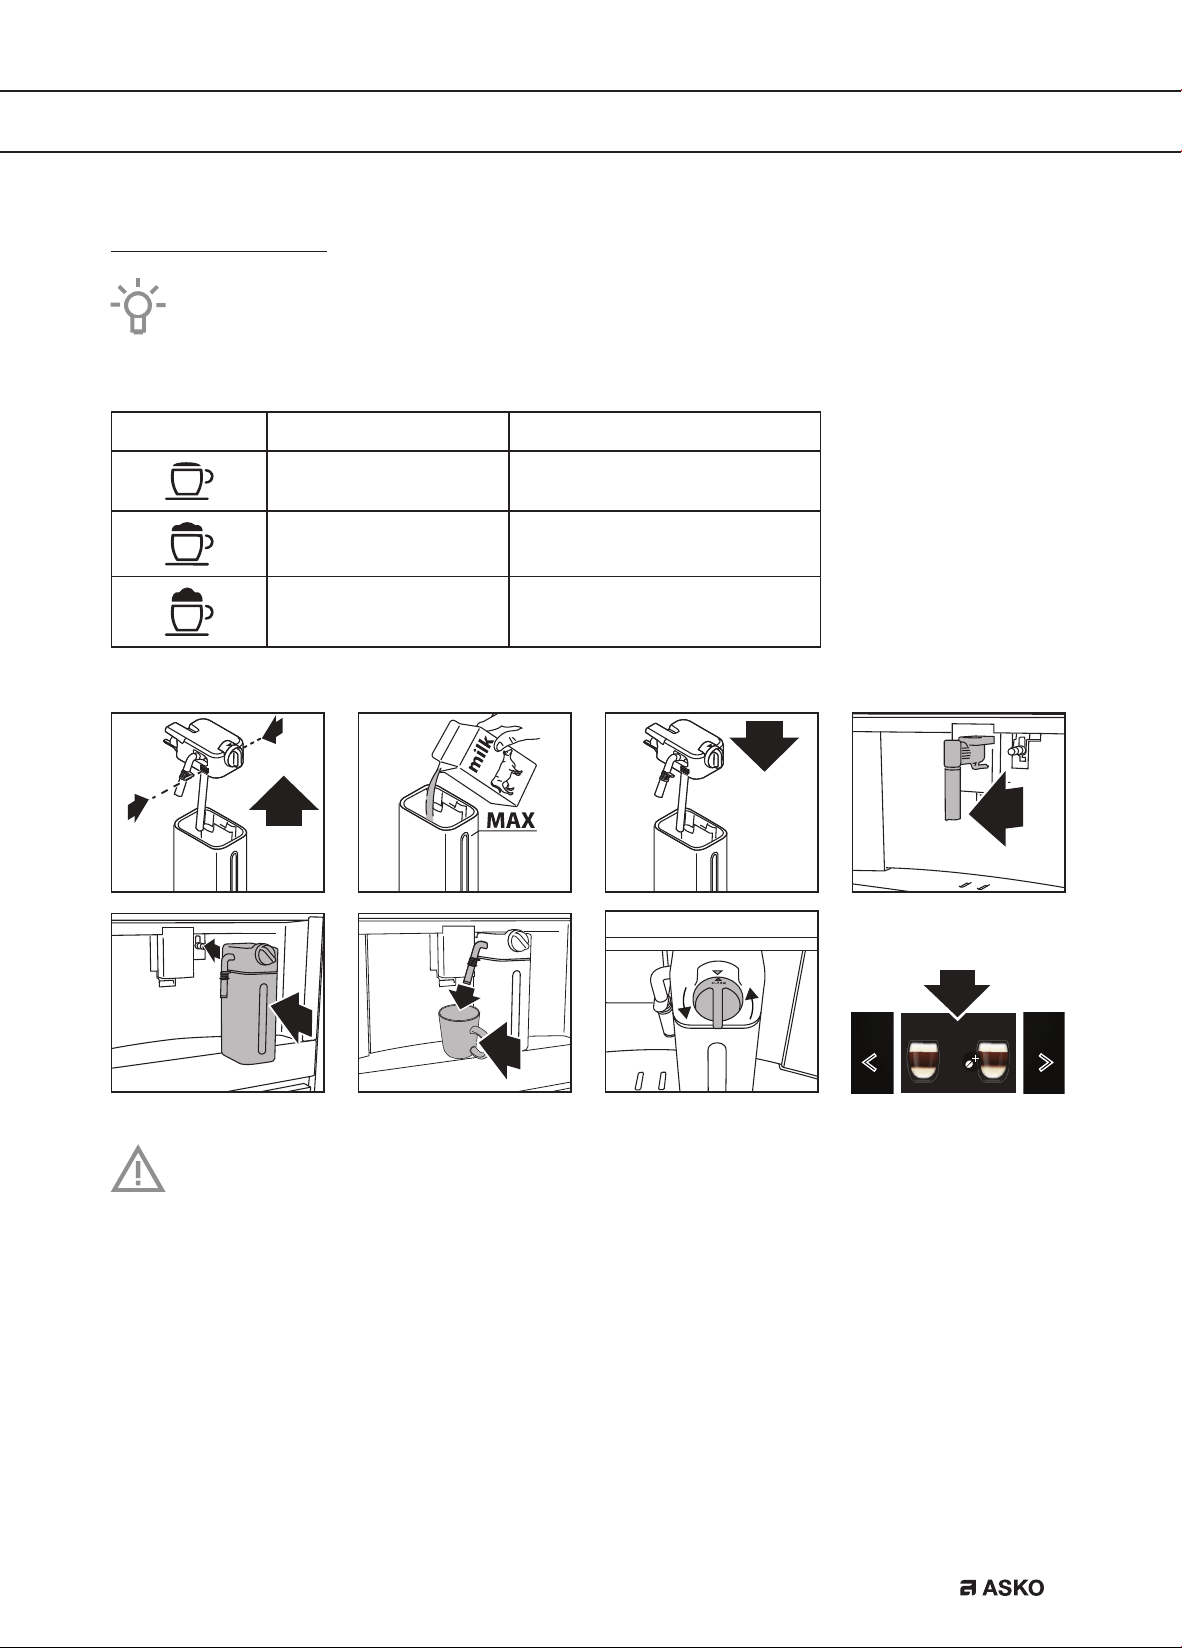
Make milk-based hot drinks
Tip
• Use skimmed or partially skimmed milk at refrigerator temperature (about 5 °C) to get a
richer denser froth.
Dial position Description Recommended for…
No froth Caffe latte / Hot milk
Min. froth Latte macchiato
Max. froth Cappuccino / Frothed milk
C
cino
C
cino plus
Please note!
• After the supply of a milk-based hot drink, the display shows a CLEAN message (see
chapter ‘Maintenance’).
OPERATION
EN 16
OPERATION
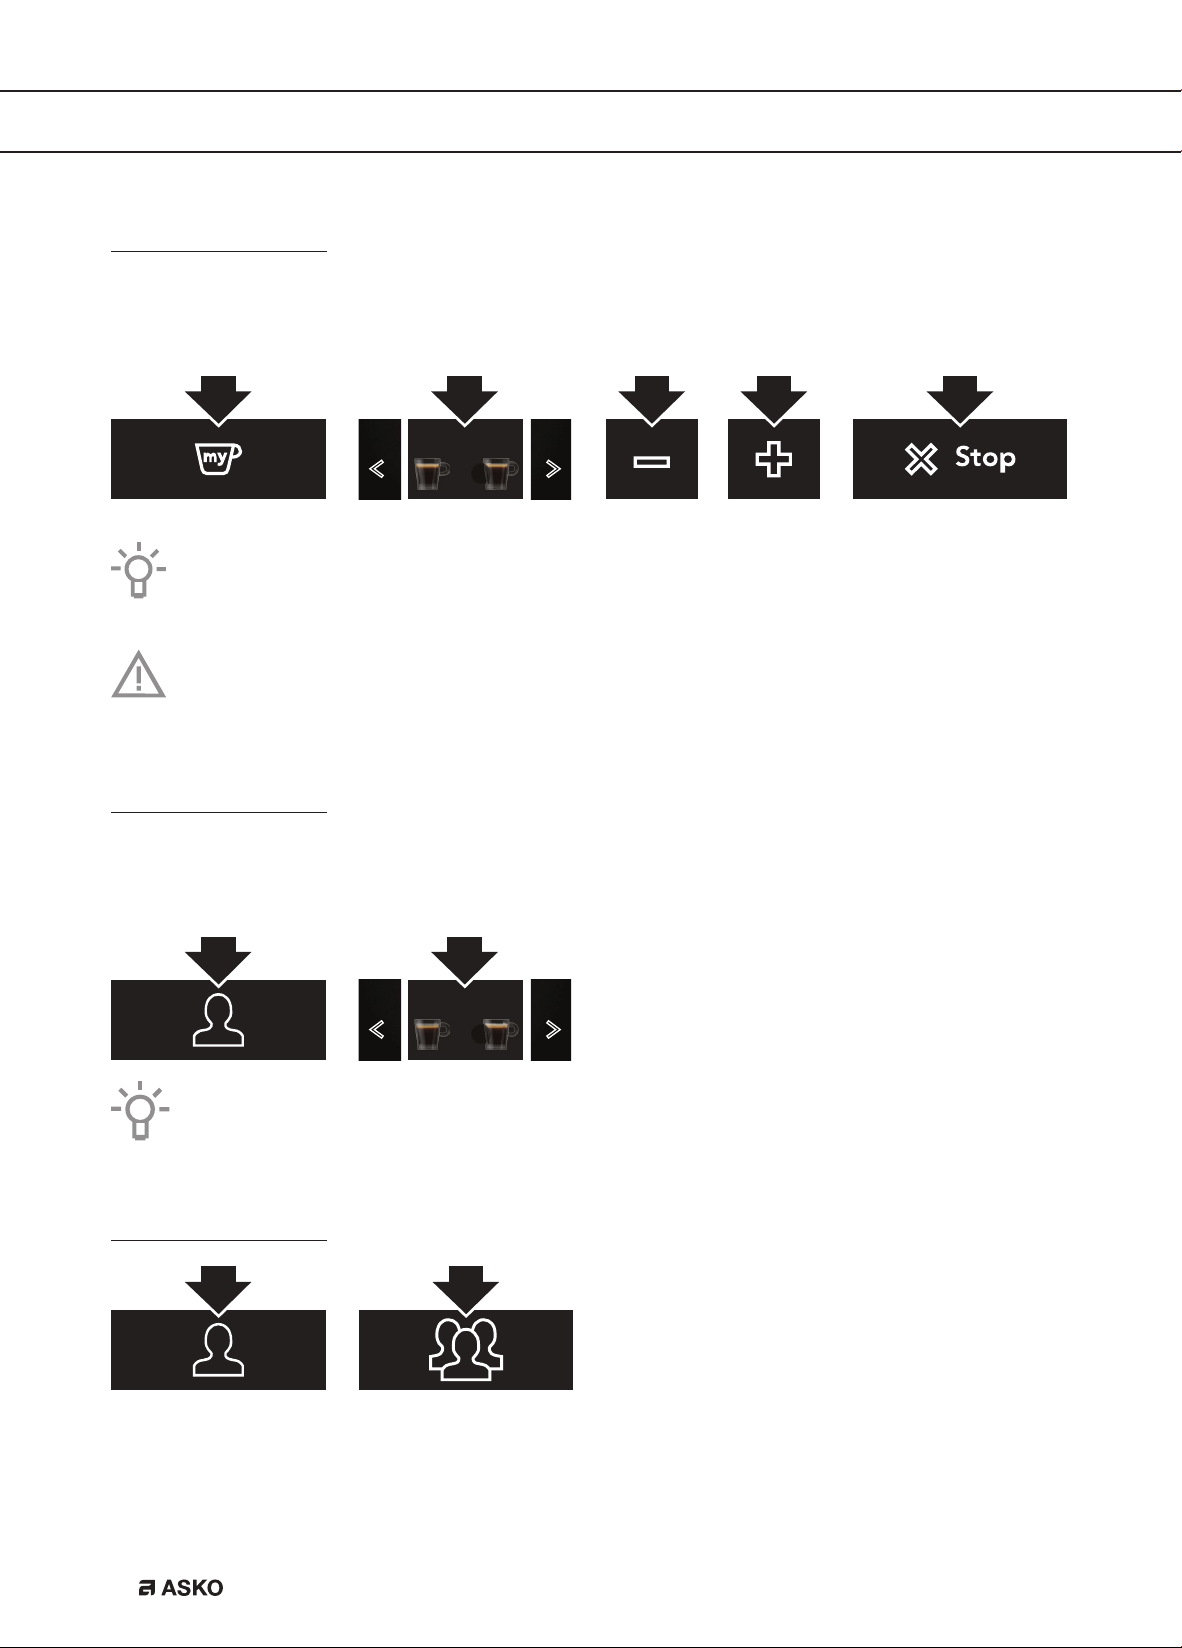
Customise beverages
Customise several beverage settings for the user profile that is shown in the primary screen.
• Touch the user profile key to select another user profile.
2x
The order in which all the beverages for a user profile are displayed is based on the
frequency of selection.
Important!
You cannot use this touch key when the guest profile is shown on the display.
Supply a beverage that is customised
Make sure the primary screen shows the correct user profile. If you select a beverage that has
been customised for this profile, it will be supplied with the customised saved settings.
2x
Espr
2x Espr
If you select the guest profile, beverages will be supplied with the default settings.
Customise a user profile
EN 17
OPERATION
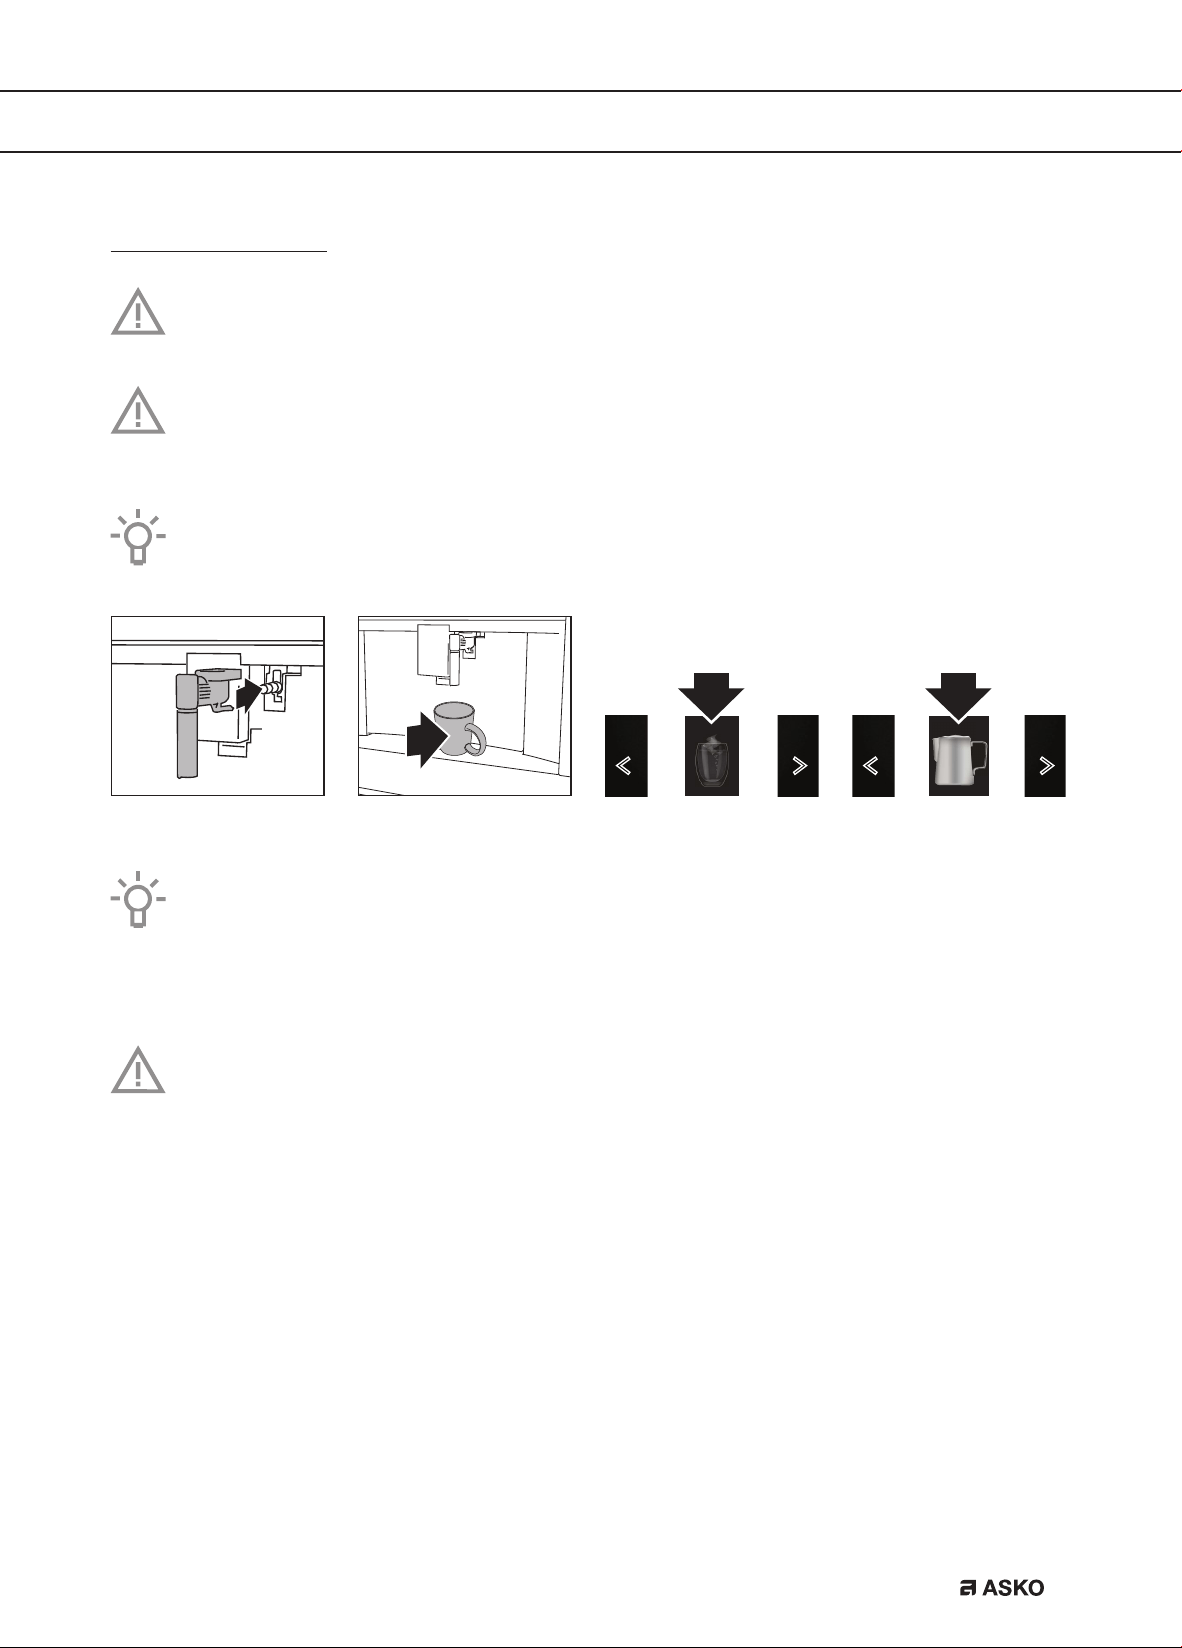
Supply hot water or steam
Danger of burns
Do not let the appliance stay unattended while hot water or steam is being supplied.
Important!
Avoid burns from splashes. Always stop the hot water or steam supply before removing
the cup containing the liquid.
Use steam to heat or froth liquid. Immerse the hot water spout in the liquid. When the
required temperature or level of froth is reached, stop the steam supply.
Hot w
t
S
t
Tips when you use steam to froth milk
• When choosing the size of the cup, bear in mind that the liquid doubles or triples in
volume.
• For a creamier froth, rotate the cup with slow movements up and down.
Please note!
Clean the hot water spout each time you used it to froth milk (see chapter ‘Maintenance’).
EN 18
SETTINGS
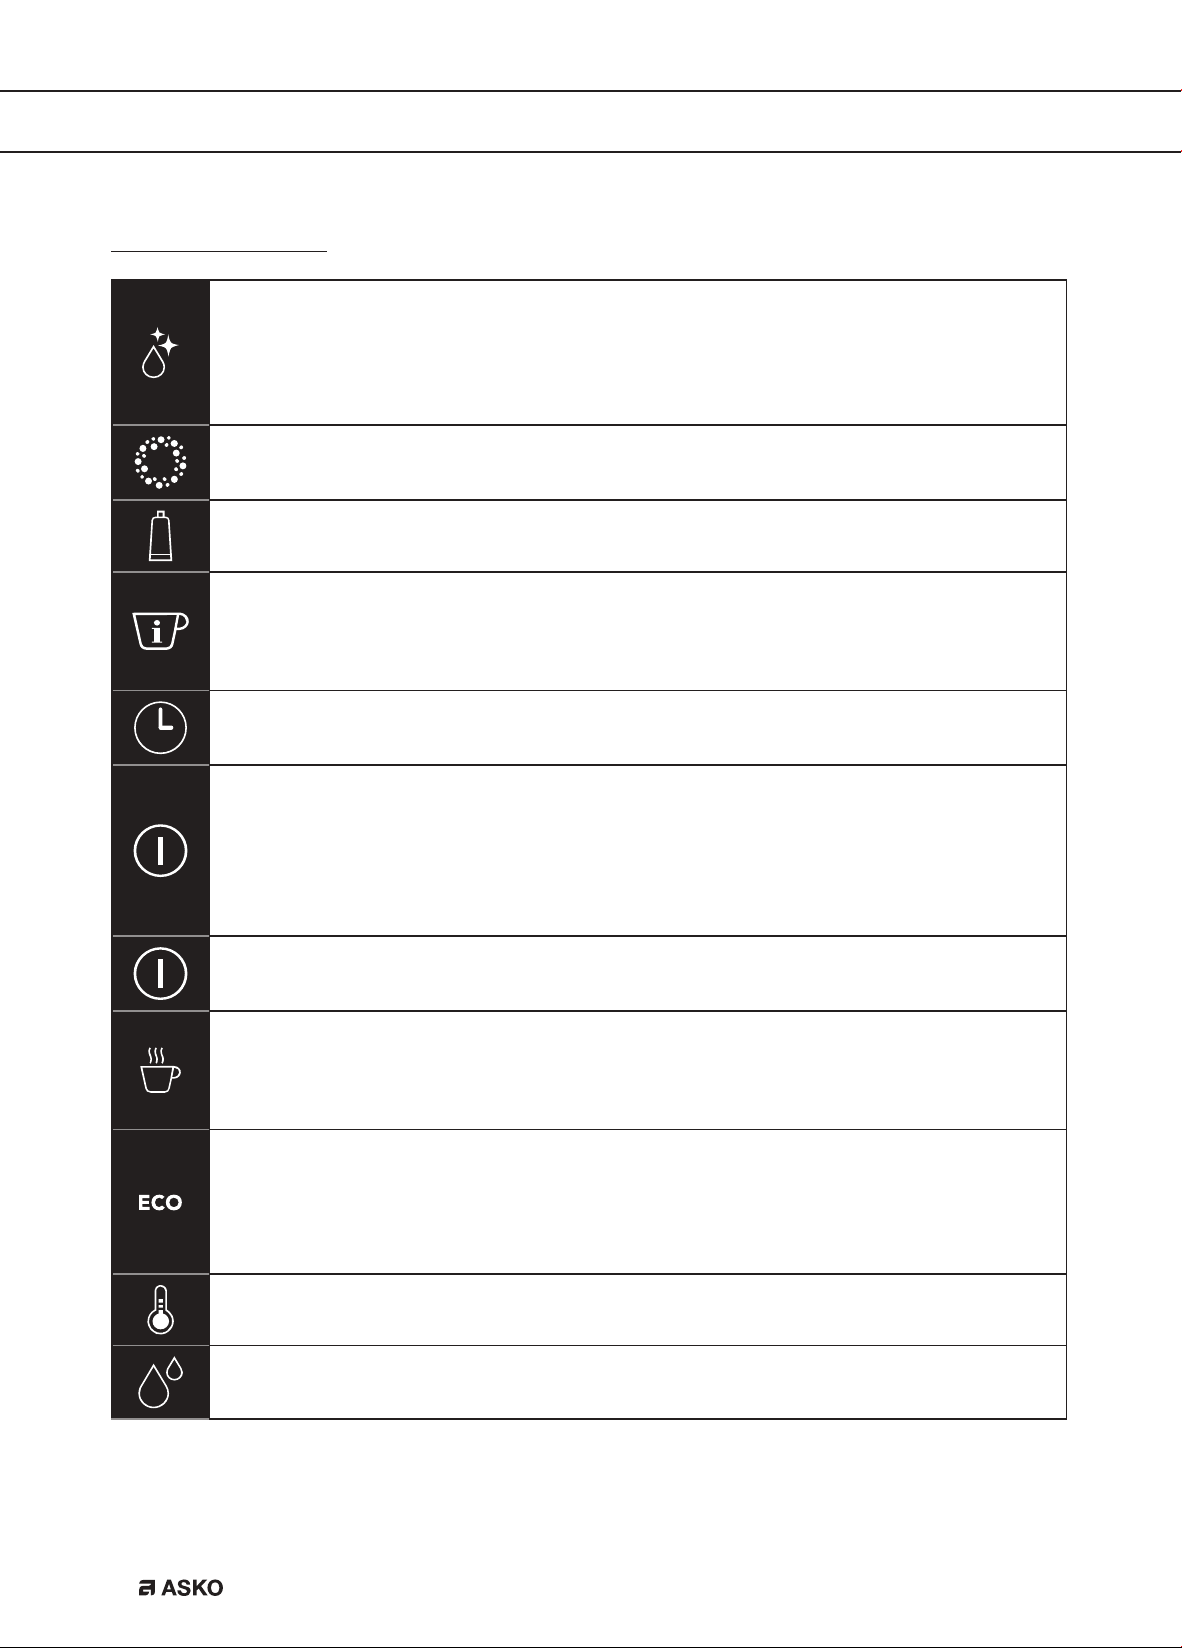
Settings menu
Rinsing
Clean and heat the appliance’s internal circuit. Supply hot water from the coffee
spouts and hot water spout (if inserted).
• Put a container with a minimum capacity of 100 ml under the coffee and hot
water spouts.
Descaling
See chapter ‘Maintenance’.
Water filter
See chapter ‘Maintenance’.
Drink settings
Consult your customised settings for each profile. Reset the default values for each
beverage.
• See also ‘Default values’ for more information.
Set time
Adjust the time shown on the display.
Auto-start
Set the auto-start time. At that time, the appliance is ready to make coffee
immediately.
• To use this setting, make sure that the time of the day is correctly set.
• The corresponding symbol is displayed adjacent to the time to indicate that the
setting is on.
Auto-off (standby)
Set the time for the appliance to go to standby.
Cup warmer
The fan blows hot air into the cup warmer area.
• The residual heat of the appliance is used for heating up the cup. The heat result
is depending on the time the machine is set to ‘On’.
Energy saving
The energy consumption is decreased in compliance with European regulations.
• The corresponding symbol is displayed adjacent to the time to indicate that the
setting is on.
• You may have to wait a few seconds before the first coffee is supplied.
Coffee temperature
Adjust the temperature of the water that is used to make coffee.
Water hardness
See chapter ‘Maintenance’.
EN 19
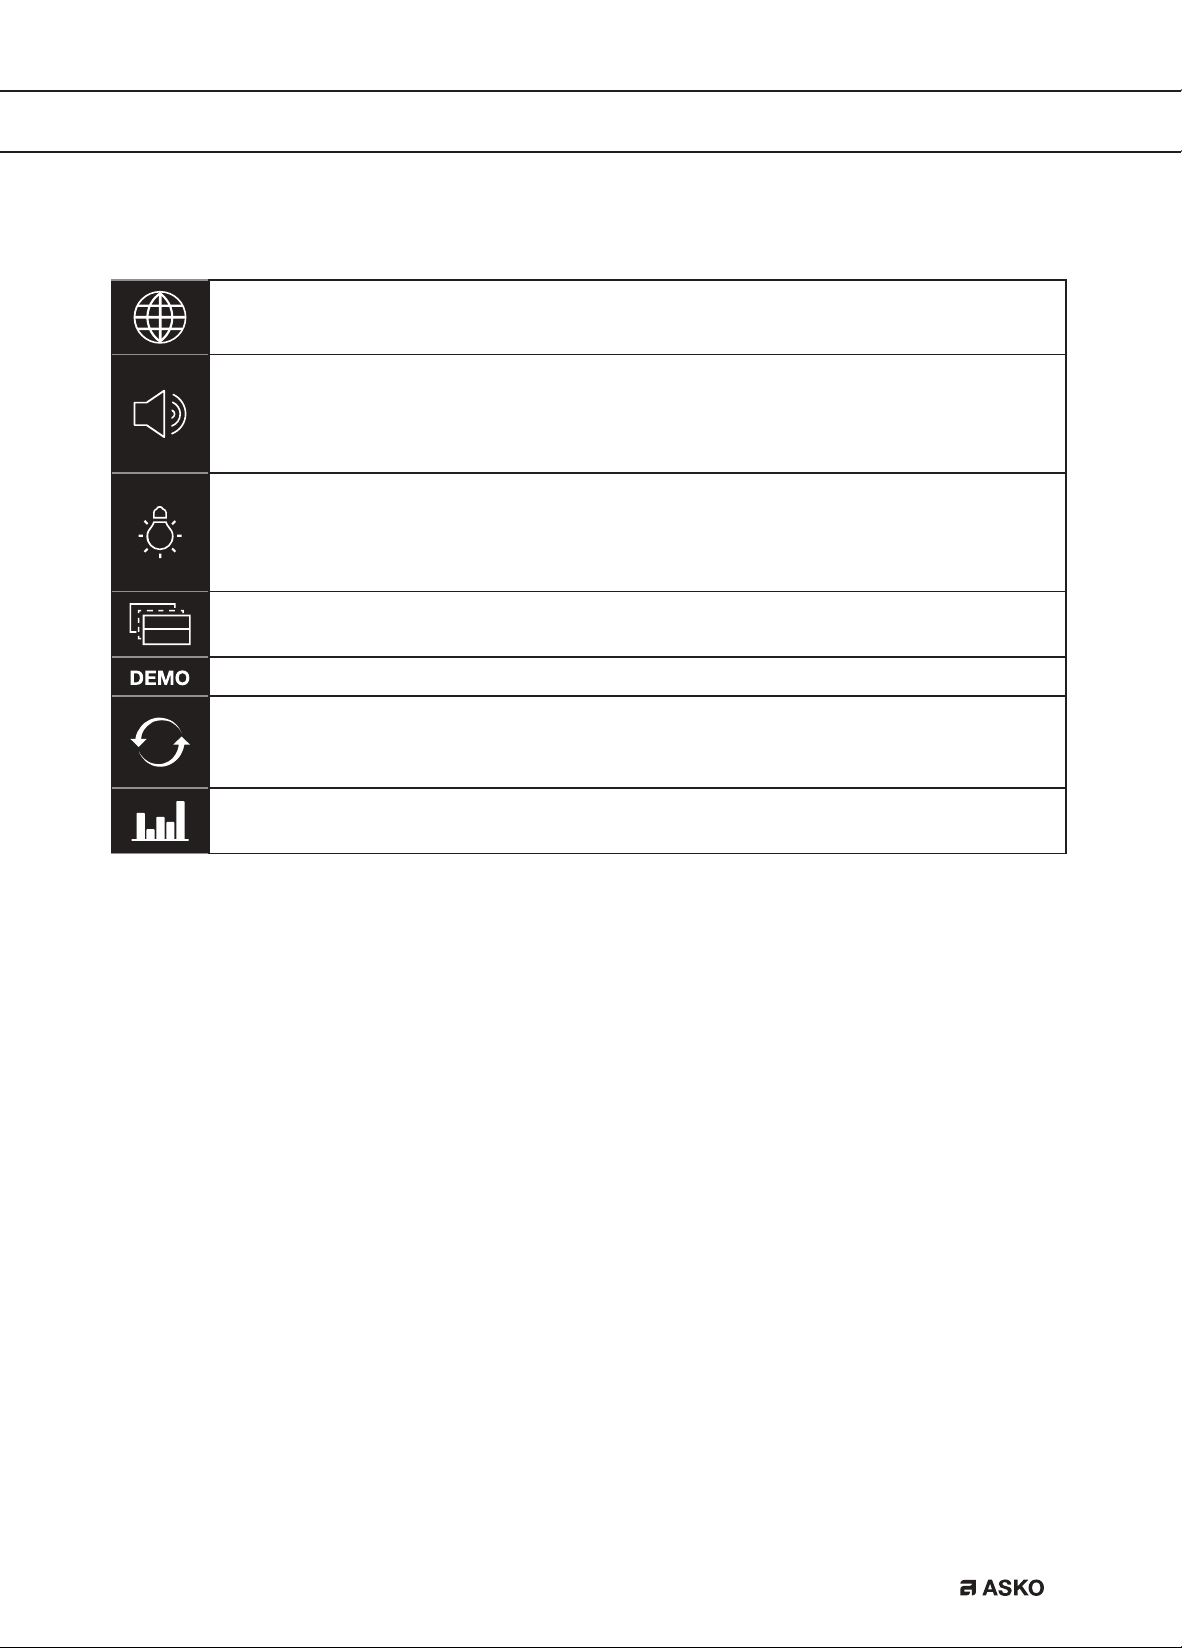
Set language
Adjust the language shown on the display.
Sound
Set the beep on or off.
• You hear a beep every time you touch a key and when you insert/remove an
accessory.
Lighting
Set the lighting on or off.
• The cup lighting comes on each time a beverage is supplied and during each
rinse cycle.
Background
Set the color of the display background.
Demo mode
Default values
Reset all menu settings and programmed quantities back to the default values (with
the exception of the language).
Statistics
Show statistics relating to the appliance.
SETTINGS
EN 20
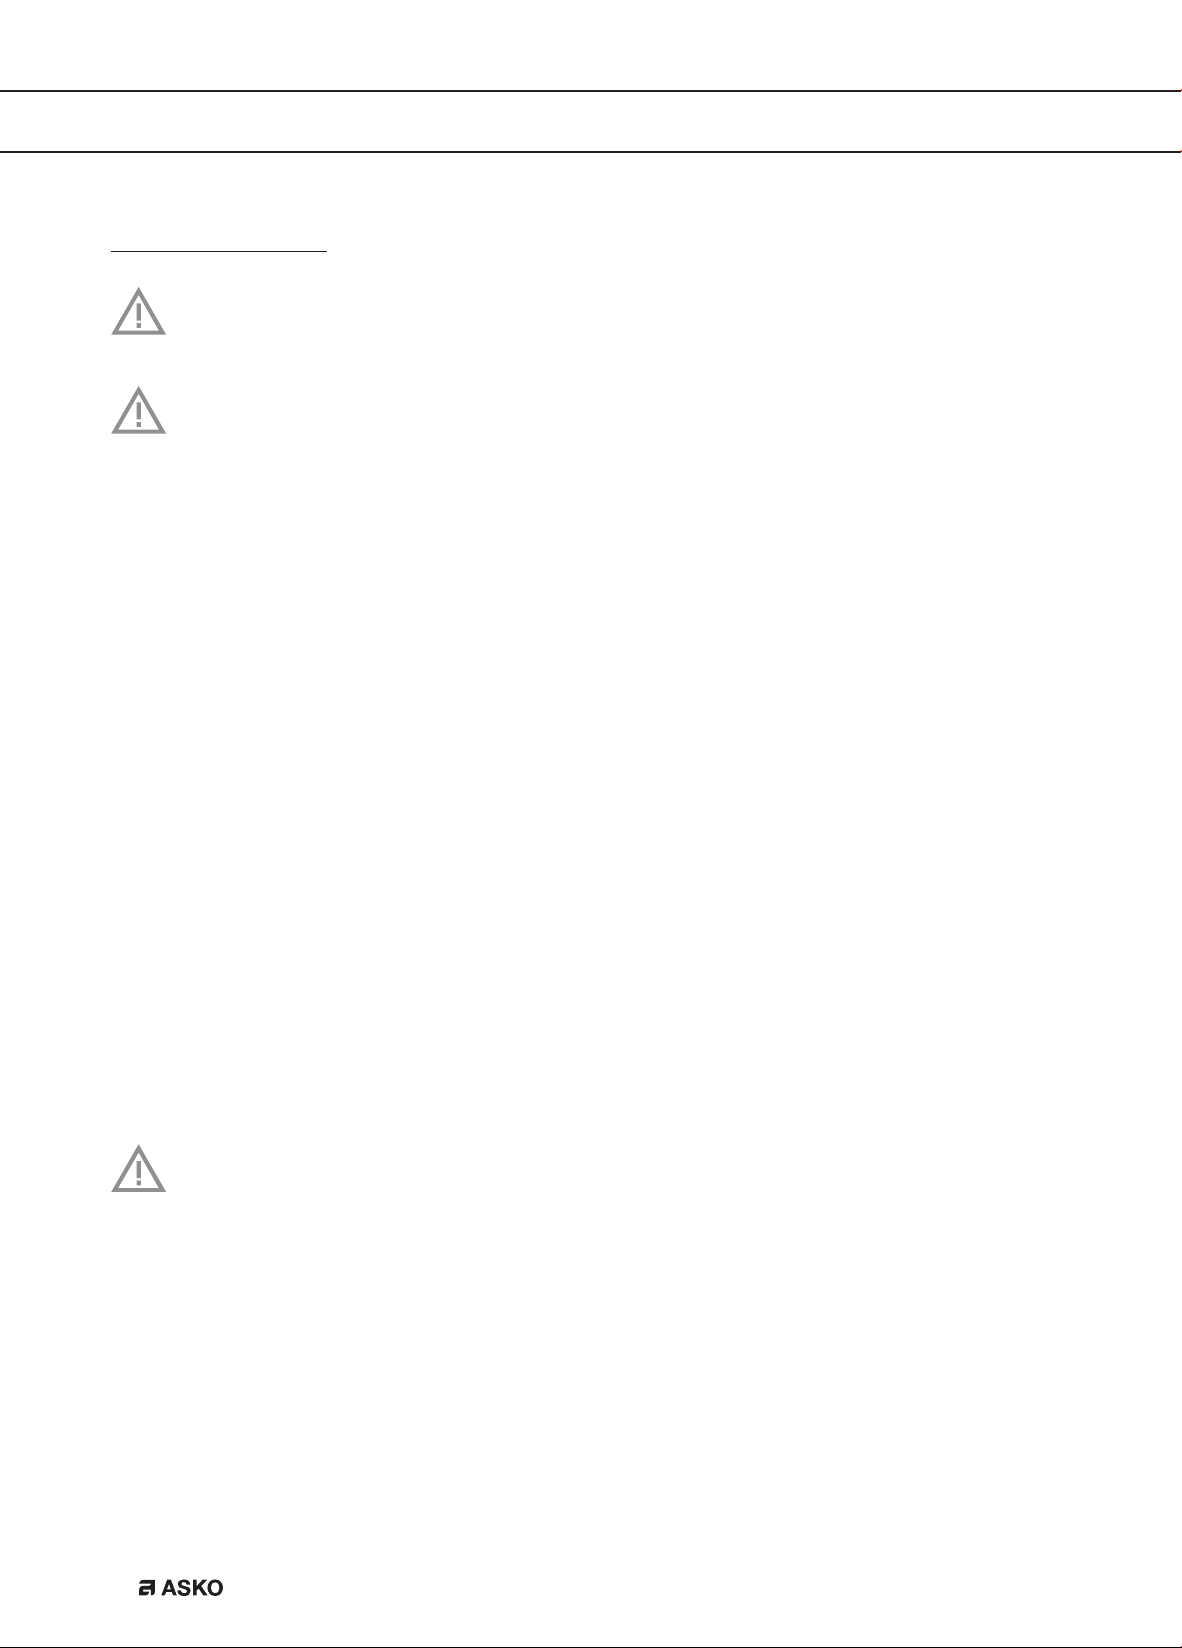
Clean your appliance
Read and obey the instructions shown on the display. The display shows information
and touch keys to use. Important information is accompanied by an audio signal.
Please note!
• Do not use solvents, abrasive detergents, alcohol or chemical products to clean the
appliance!
• Do not use metal objects to remove encrustations or coffee deposits. They could
scratch metal or plastic surfaces.
• Only the milk container is dishwasher safe. Do not clean the other components of the
appliance in the dishwasher!
Regular cleaning
• The hot water spout (each time you used it to froth milk).
• The internal tubes of the milk container and the hot water connection nozzle (each time a
milk-based hot drink is supplied).
• The milk container and all the components (about once a month).
• The appliance’s internal circuit.
• The coffee grounds container.
• The drip tray.
• The inside of the coffee machine (about once a month).
• The water tank (about once a month and when you replace the water softener filter).
• The coffee spouts.
• The pre-ground coffee funnel (about once a month).
• The brewing unit and the infuser (at least once a month).
Special cleaning
• Twice a year you must disassemble the brewing unit, clean the parts and lubricate the
o-rings of the brewing unit and the infuser (see ‘Clean the brewing unit / infuser twice a
year’).
• Each time the milk container is empty, we recommend to clean all components using
the milk cleaner (see ‘Use the milk cleaner’).
MAINTENANCE
EN 21
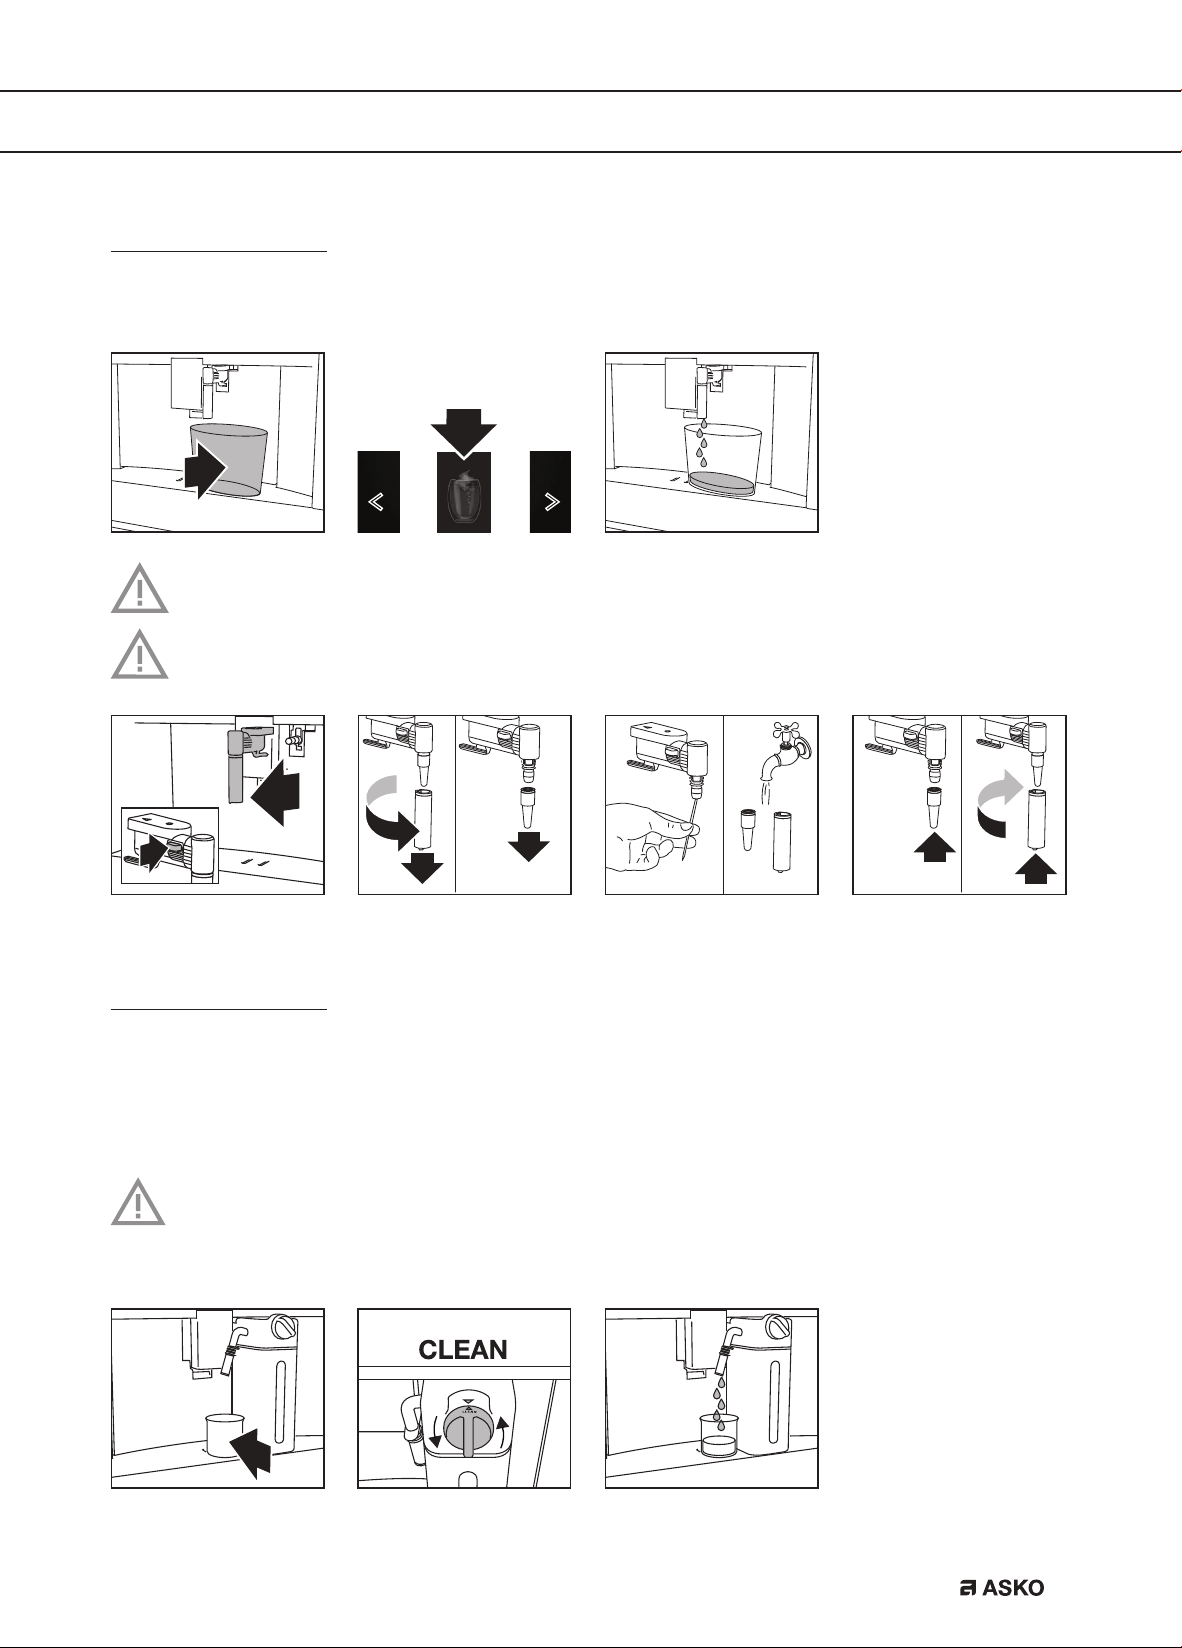
Clean the hot water spout
Clean the hot water spout each time you used it to froth milk. This avoids the build-up of milk
residues and prevents it from clogging.
Wait a few minutes for the hot water spout to cool down.
Wash all parts of the spout thoroughly with a sponge and warm water.
Clean the internal tubes of the milk container and the nozzle
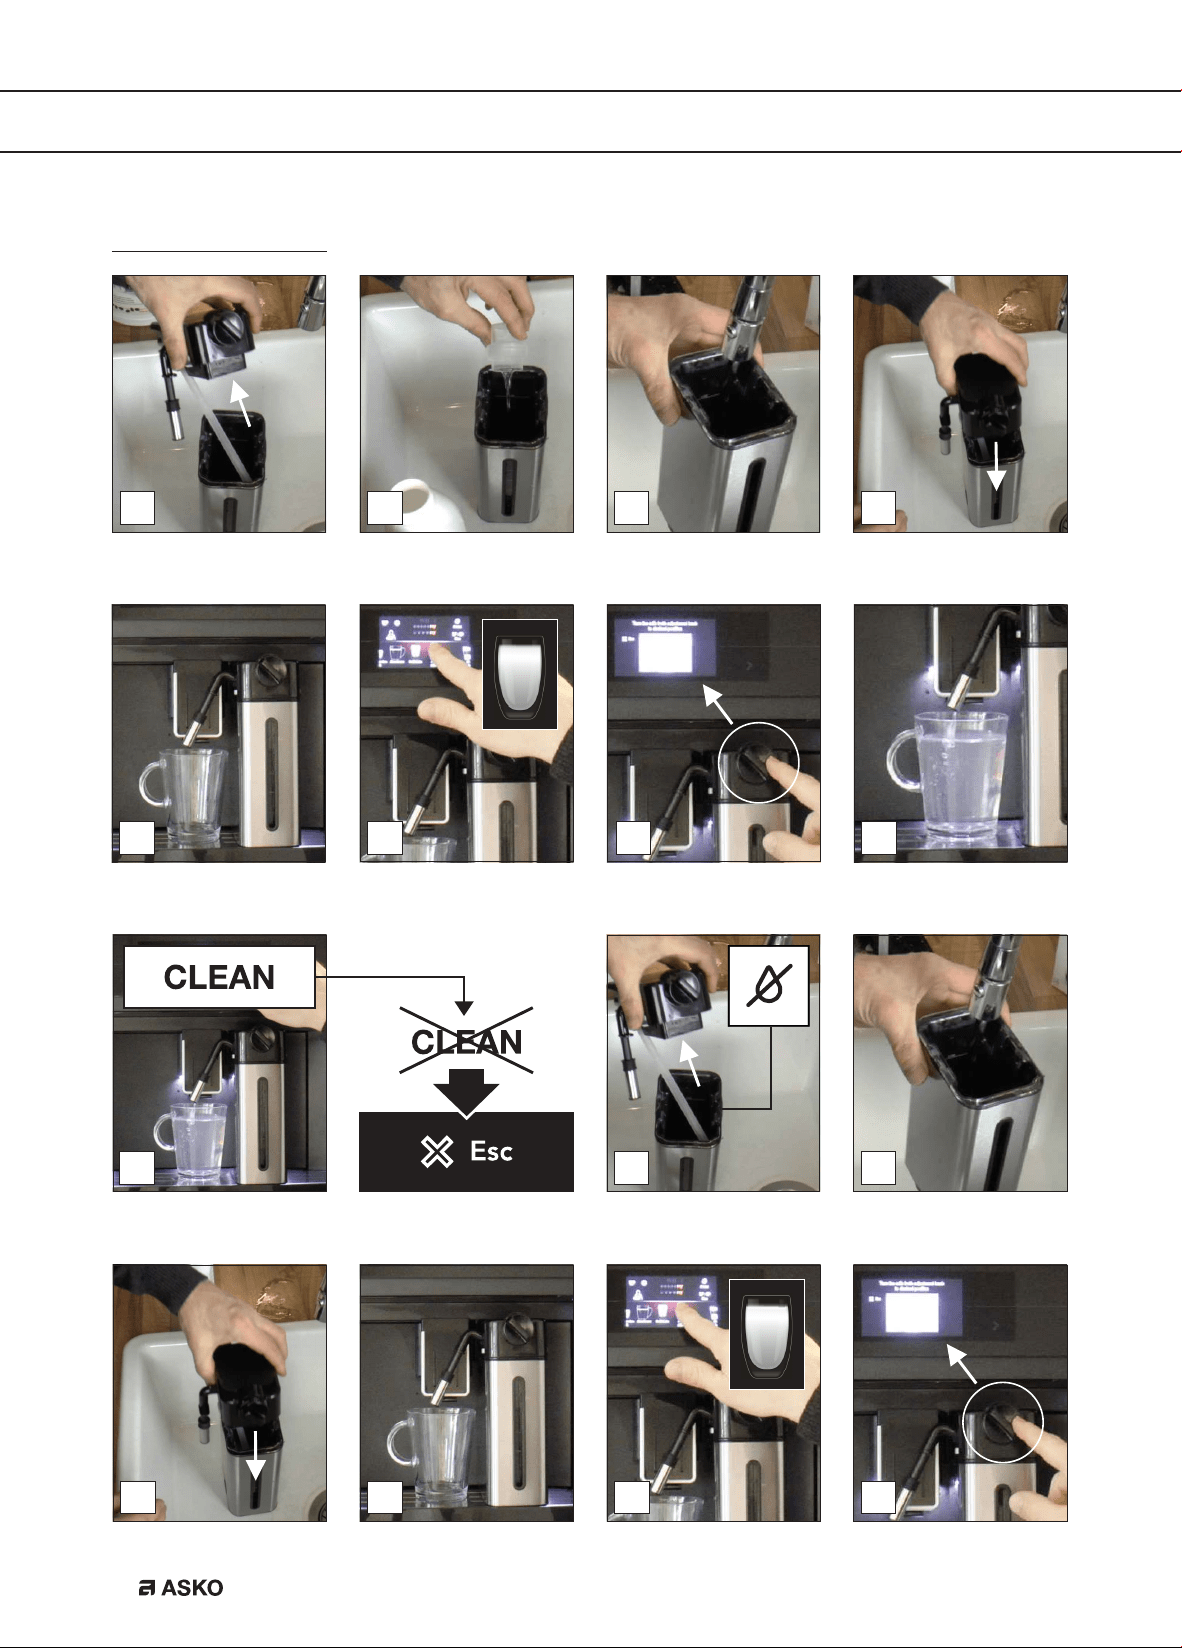
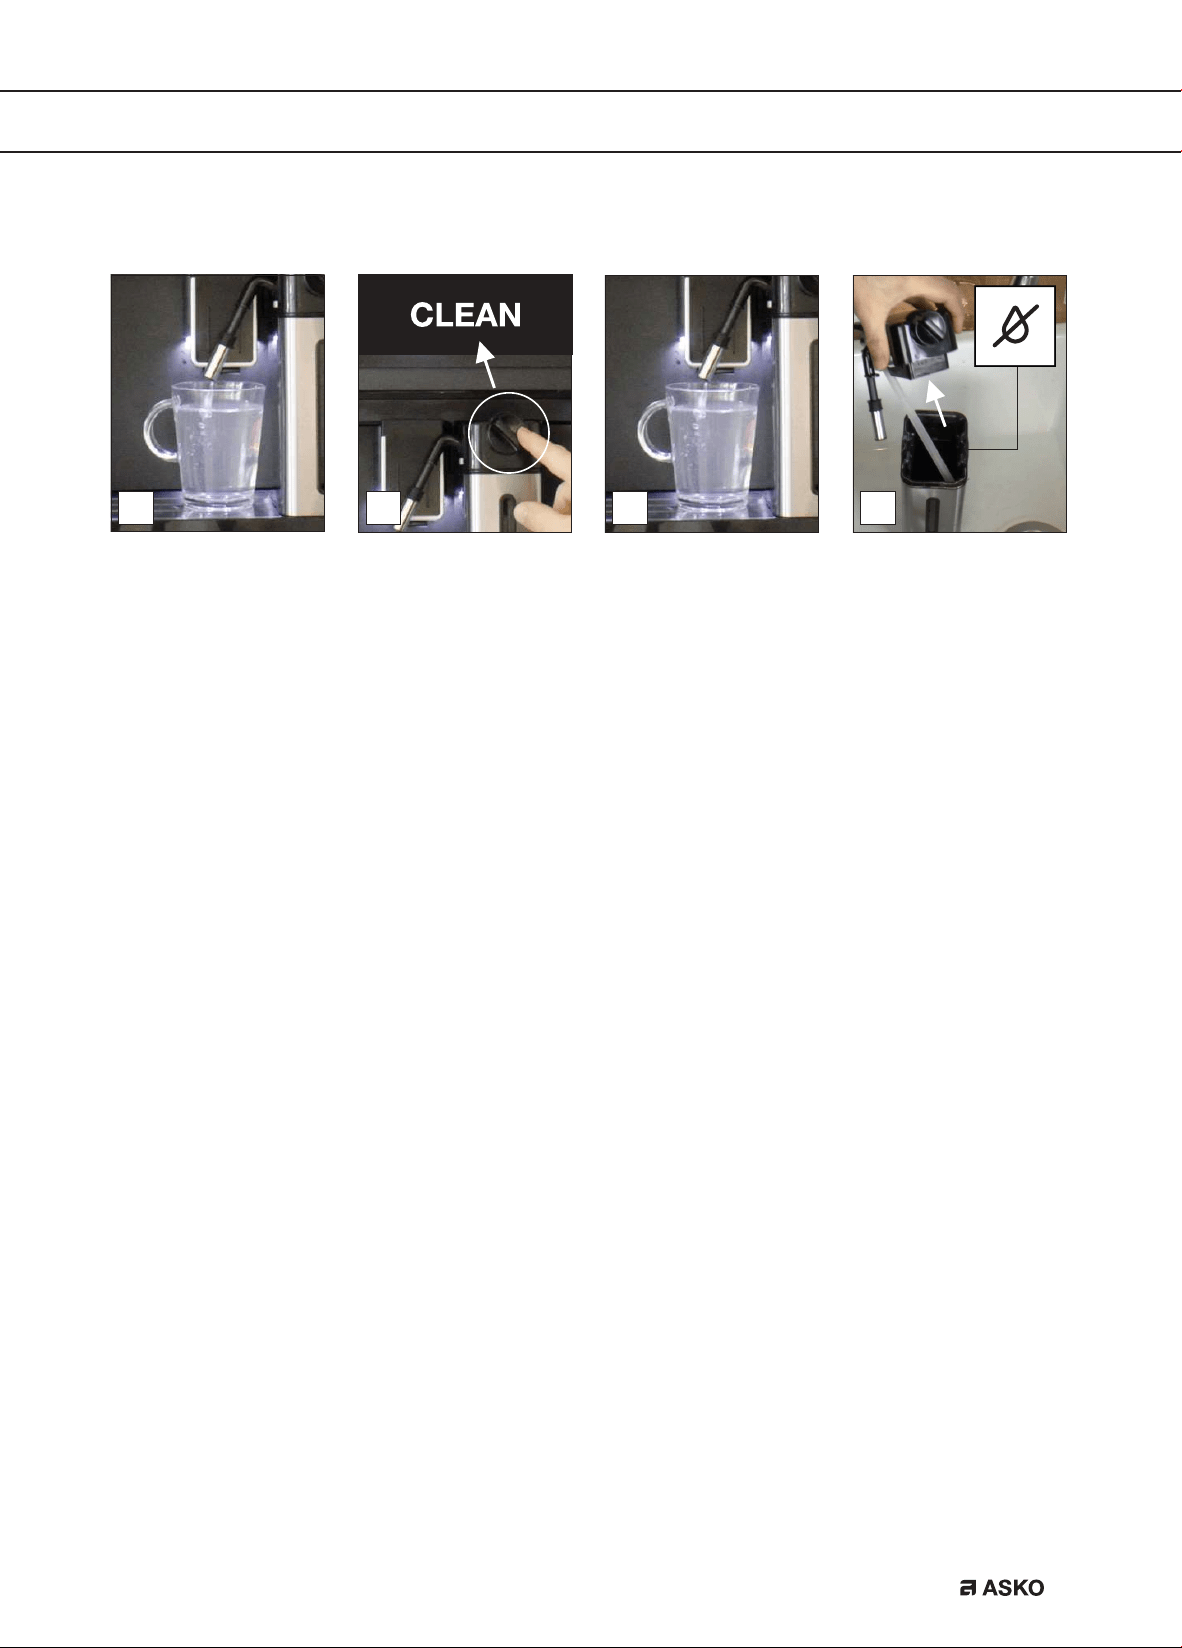
Each time a milk-based hot drink is supplied, the display shows a CLEAN message. Put an
empty cup under the milk spout before you obey this instruction shown on the display. Let the
milk container stay in the appliance (you do not need to empty it).
Danger of burns
When cleaning the internal tubes of the milk container, a little hot water and steam leak
out of the frothed milk spout. Avoid contact with splashes of water.
The cleaning stops automatically.
MAINTENANCE
EN 22
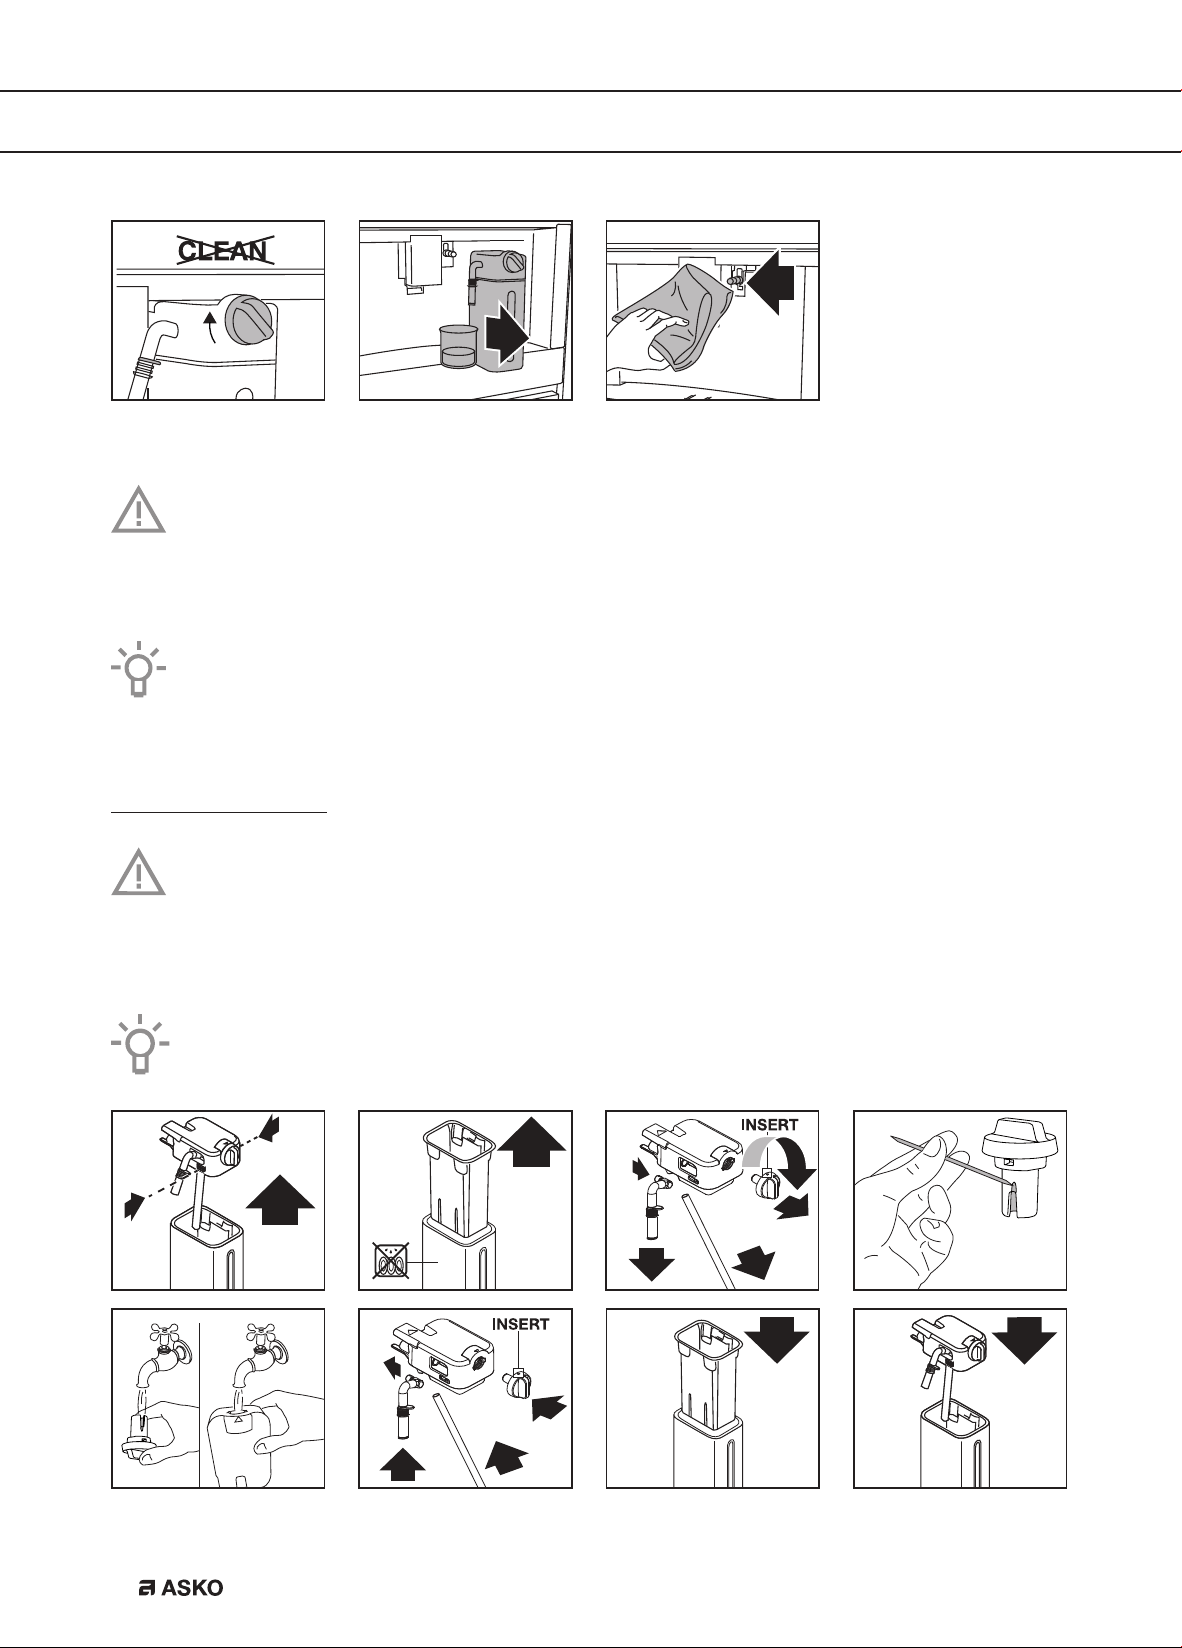
Any milk residues are removed now.
Please note!
To prepare a number of cappuccinos and milk based coffees, only confirm the CLEAN
message after you have prepared the last beverage. To proceed with making the next
beverages, touch the escape key.
If you touch the escape key, a symbol is shown on the display to remind you that the
internal tubes of the milk container need cleaning.
Clean all components of the milk container
Important!
The thermal casing must not be filled with or immersed in water. Clean with a damp
cloth only.
Wash all the components of the frother thoroughly with hot water and light washing-up liquid.
Only the milk container is dishwasher safe.
MAINTENANCE
EN 23
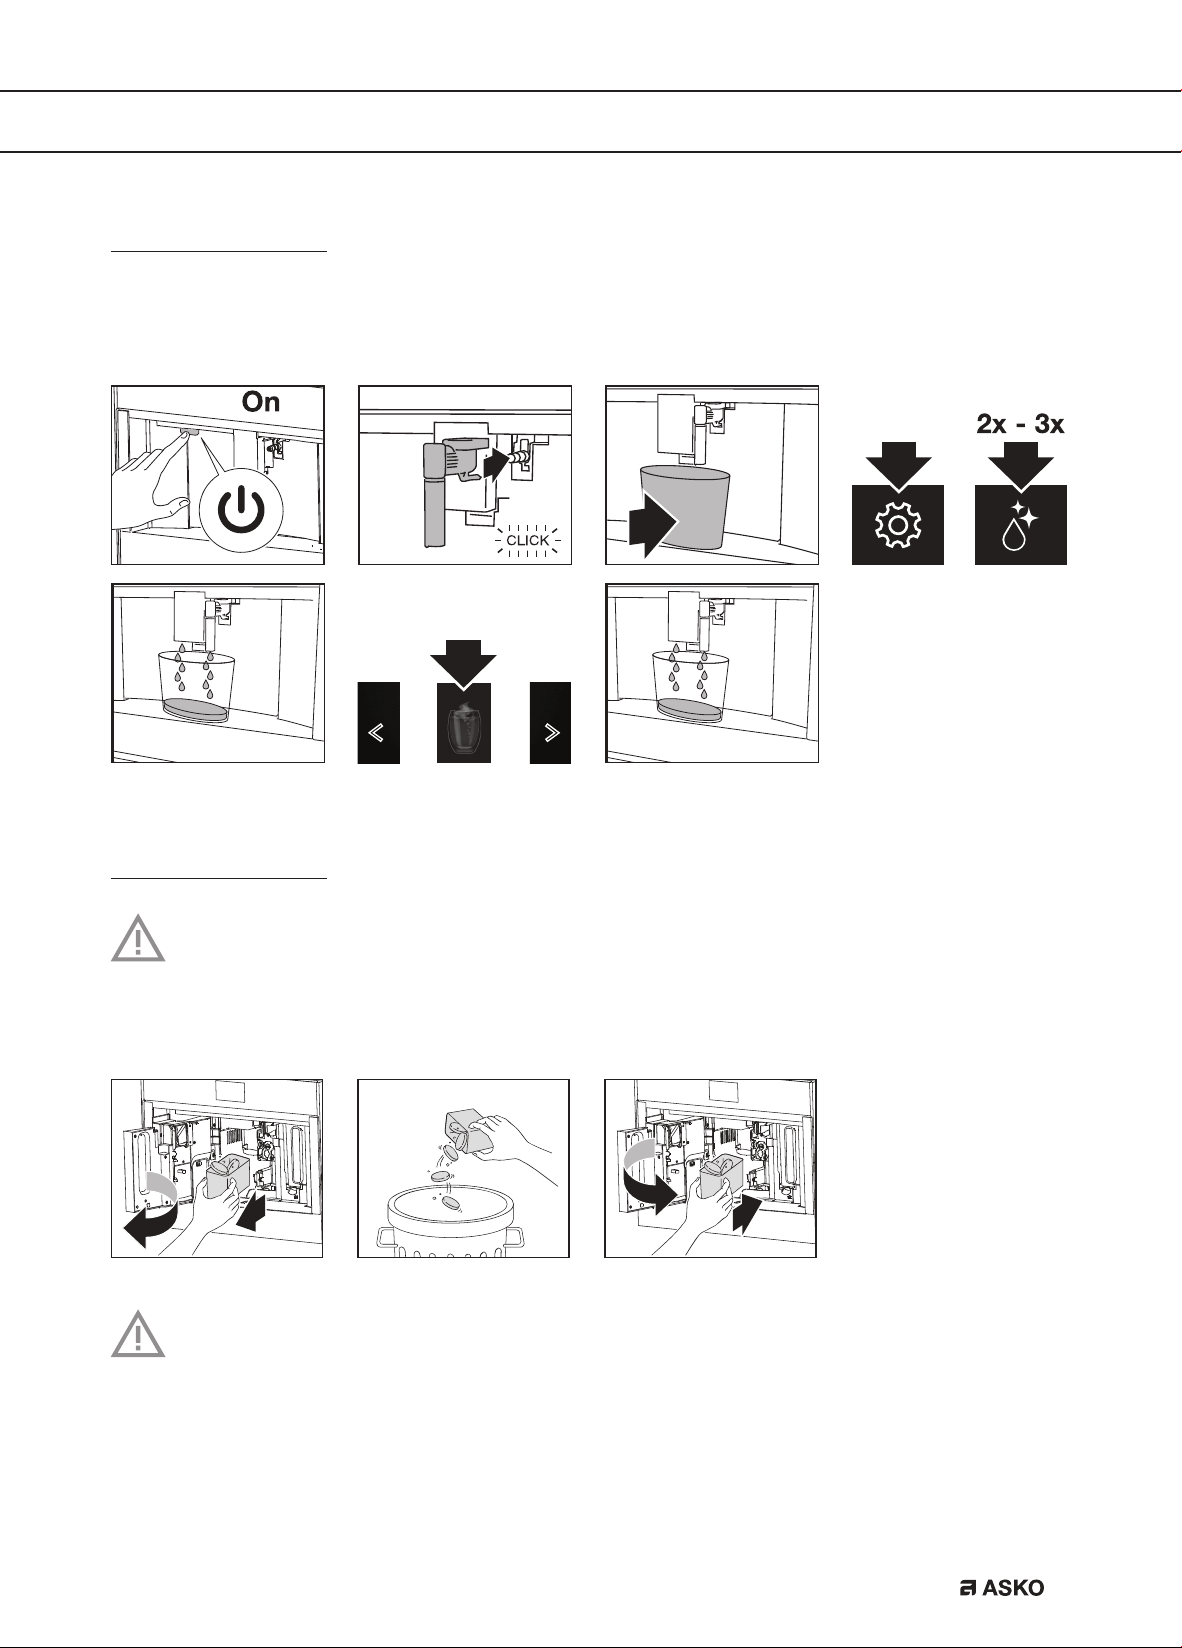
Clean the appliance’s internal circuit
If the appliance is not used for more than 3 or 4 days, we strongly recommend to obey these
steps before using it again.
Hot w
t
Clean the coffee grounds container
Important!
A message to empty the grounds container is displayed 72 hours after the first coffee has
been prepared. Do not set the appliance to ‘Off’ with the main switch. If you do so, the
72 hours cannot be calculated correctly.
Important!
When removing the drip tray, the grounds container must be emptied, even if it contains
few grounds. If this is not done before you make the next coffees, the grounds container
may fill up more than expected and clog the appliance.
MAINTENANCE
EN 24
Clean the drip tray
Important!
Clean and empty the drip tray before the indicator is above the cup tray. If you do not,
water may overflow the edge and damage the appliance, the surface it rests on or the
surrounding area.
D
Clean the inside of the coffee machine
Important!
Before cleaning internal parts, set the appliance to ‘Standby’. Do not immerse the coffee
machine in water.
MAINTENANCE
EN 25
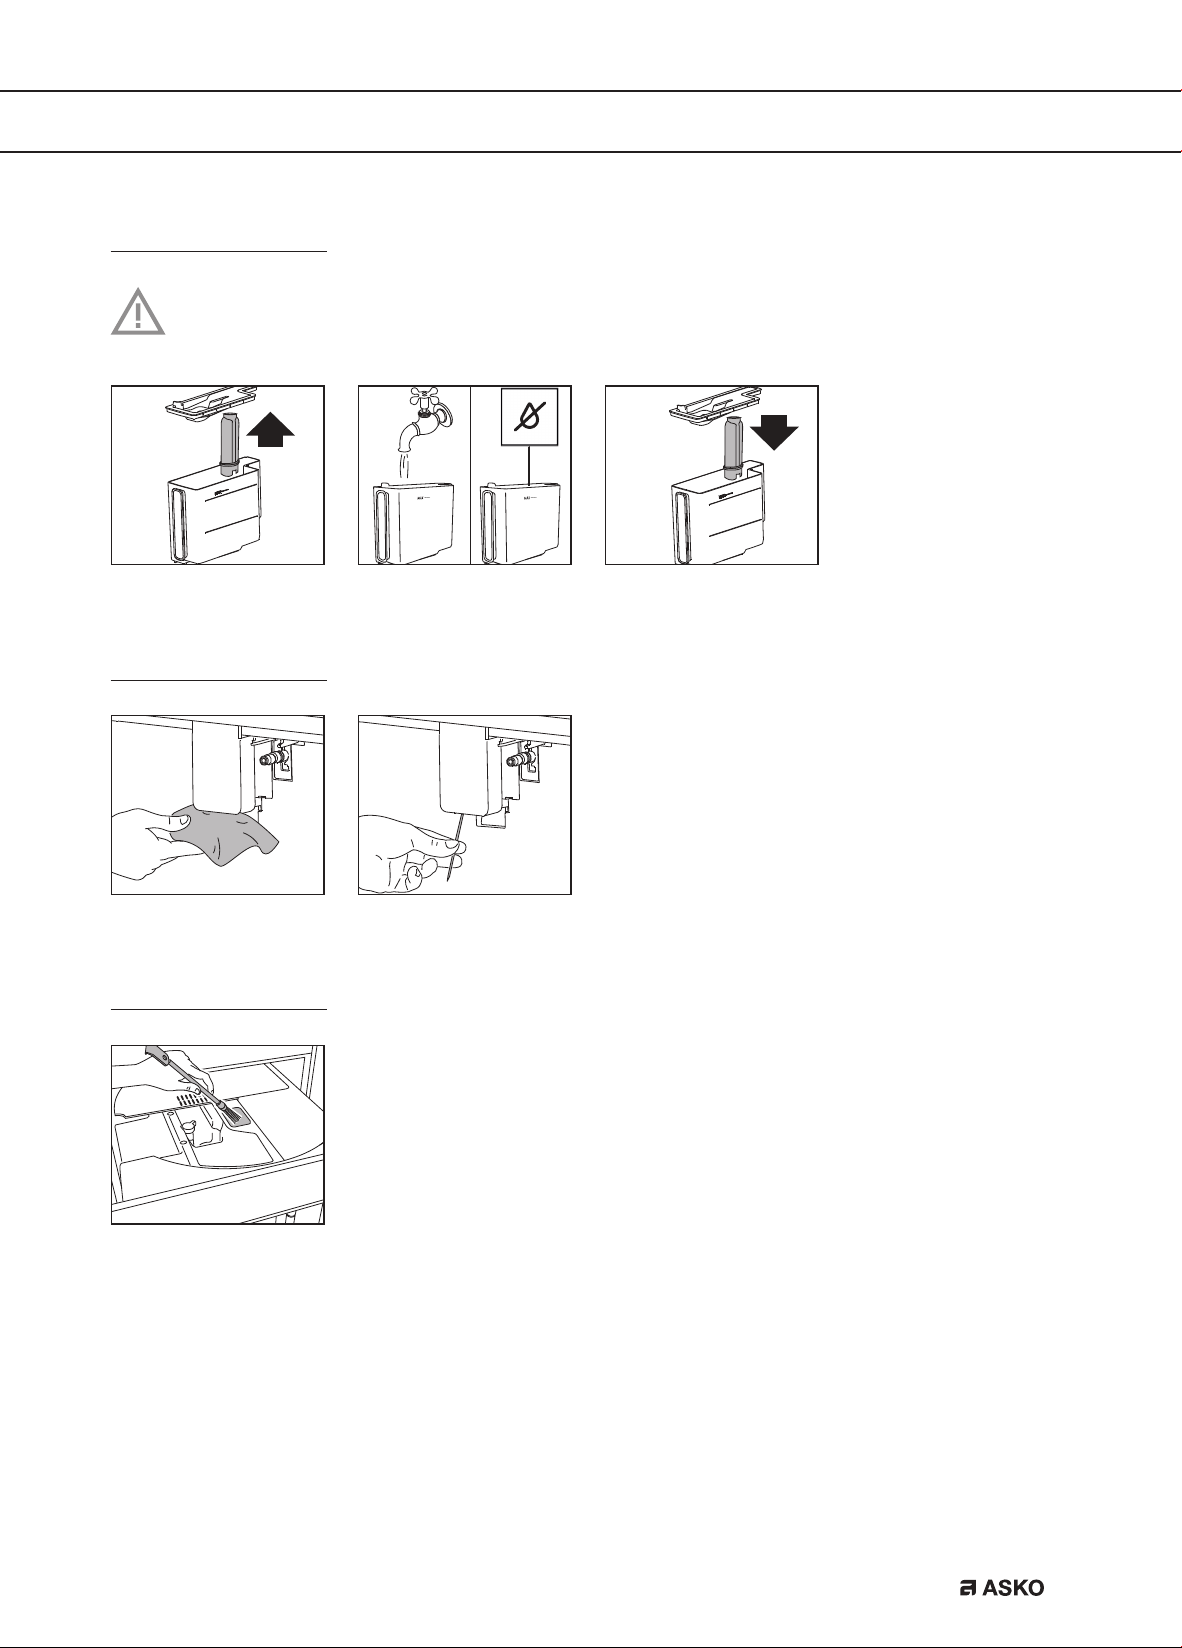
Clean the water tank
Clean the water tank with a damp cloth and a little mild washing up liquid. Rinse
thoroughly before filling the tank and putting it back in the appliance.
Clean the coffee spouts
Clean the pre-ground coffee funnel
MAINTENANCE
EN 26
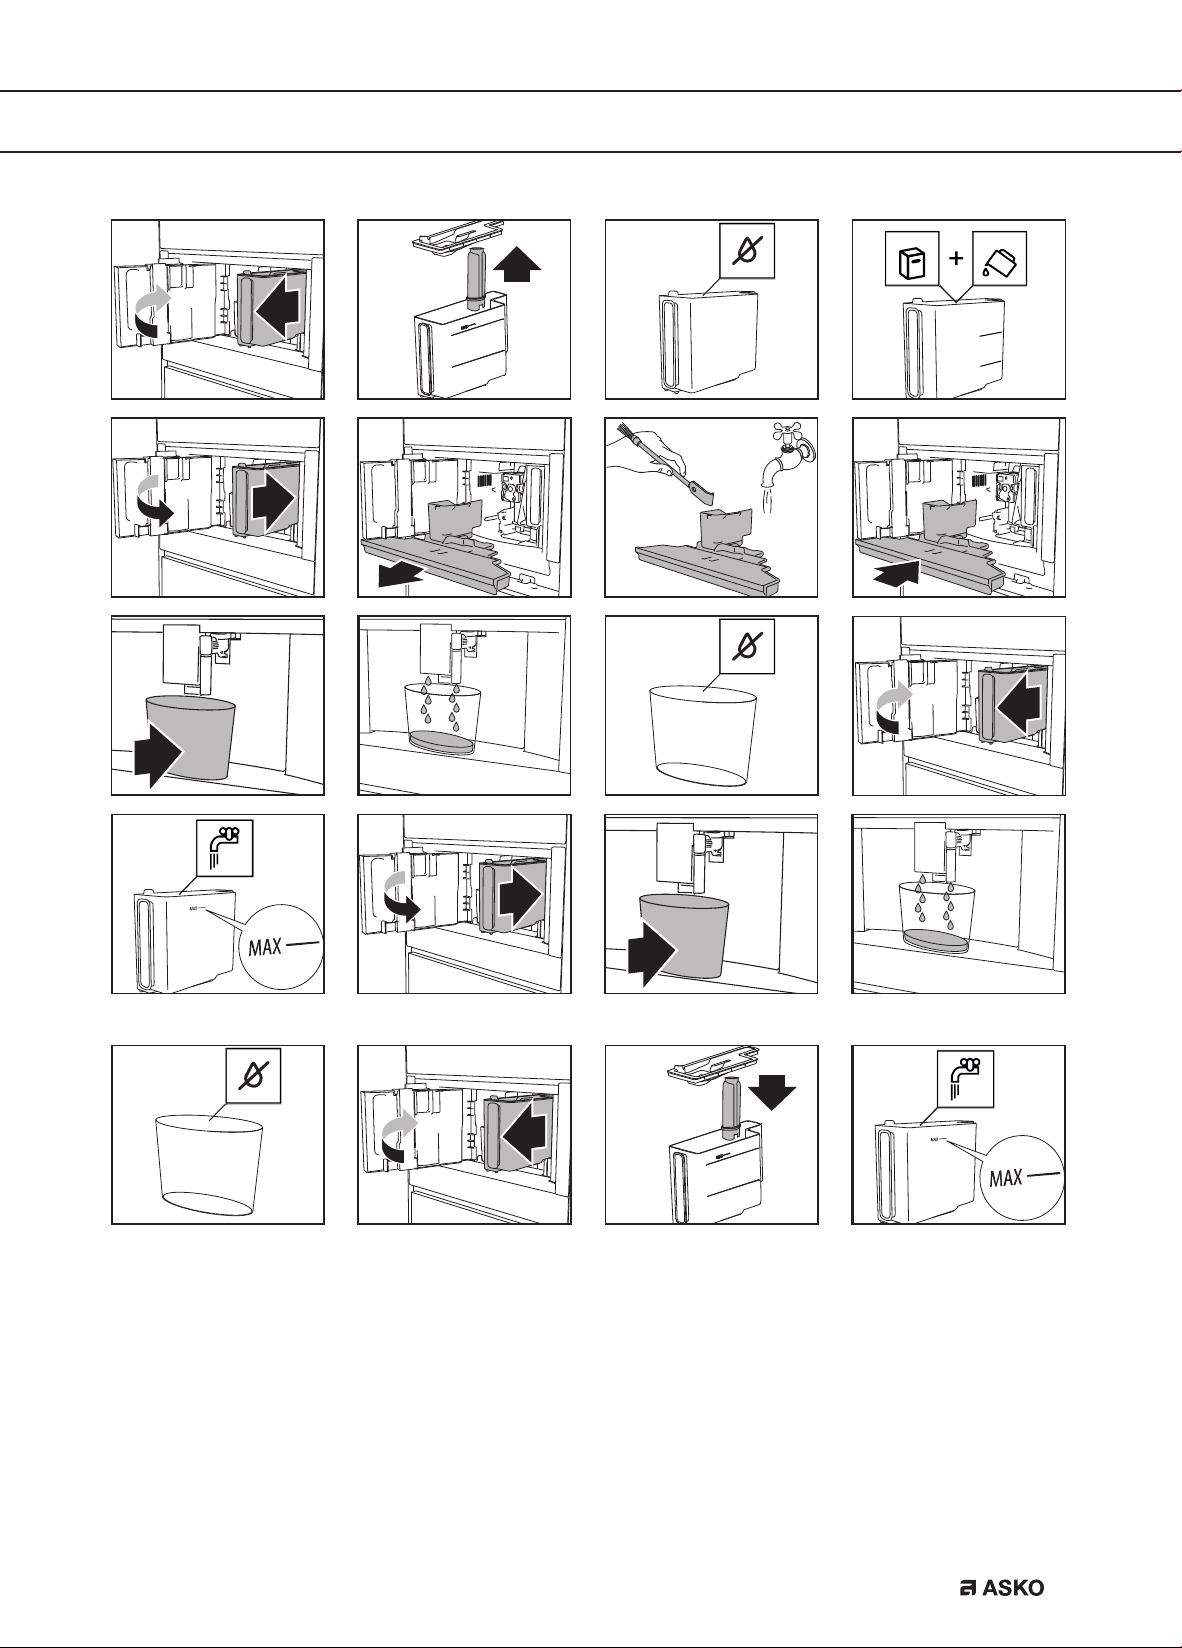
Descale the appliance
Descale the appliance when the related message is shown on the display.
• To descale immediately, read and obey the instructions shown on the display.
• To descale the appliance later, touch the escape key.
A symbol is shown on the display to remind you that the appliance needs descaling.
Important!
Before use, read the instructions and the labelling on the descaler pack. You should
use descaler authorised by the manufacturer only. Using unsuitable descaler and/or
performing descaling incorrectly may result in faults not covered by the manufacturer’s
warranty.
Danger of burns!
Hot water containing acid flows out of the hot water spout. Take care to avoid contact
with splashes of this solution.
Please note
• A series of rinses and pauses is performed automatically to remove all the scale
residues inside the coffee machine. Empty the container every time after it has collected
the rinsing water.
• If a filter was removed previously, the display will show the message when to insert the
filter into the housing. If no filter was present, you can skip this step.
• If the descaling cycle is not completed correctly (e.g. no electricity) we recommend
repeating the cycle.
• If the water tank has not been filled to the MAX level, at the end of descaling, the
appliance requests a third rinse to guarantee that the descaler solution has been
completely eliminated from the appliance’s internal circuits. Before starting rinsing,
remember to empty the drip tray.
• The appliance may request descaling cycles at very short intervals. This is normal due
to the appliance’s advanced control system.
MAINTENANCE
EN 27
A
B
A B
MAINTENANCE
EN 28
MAINTENANCE
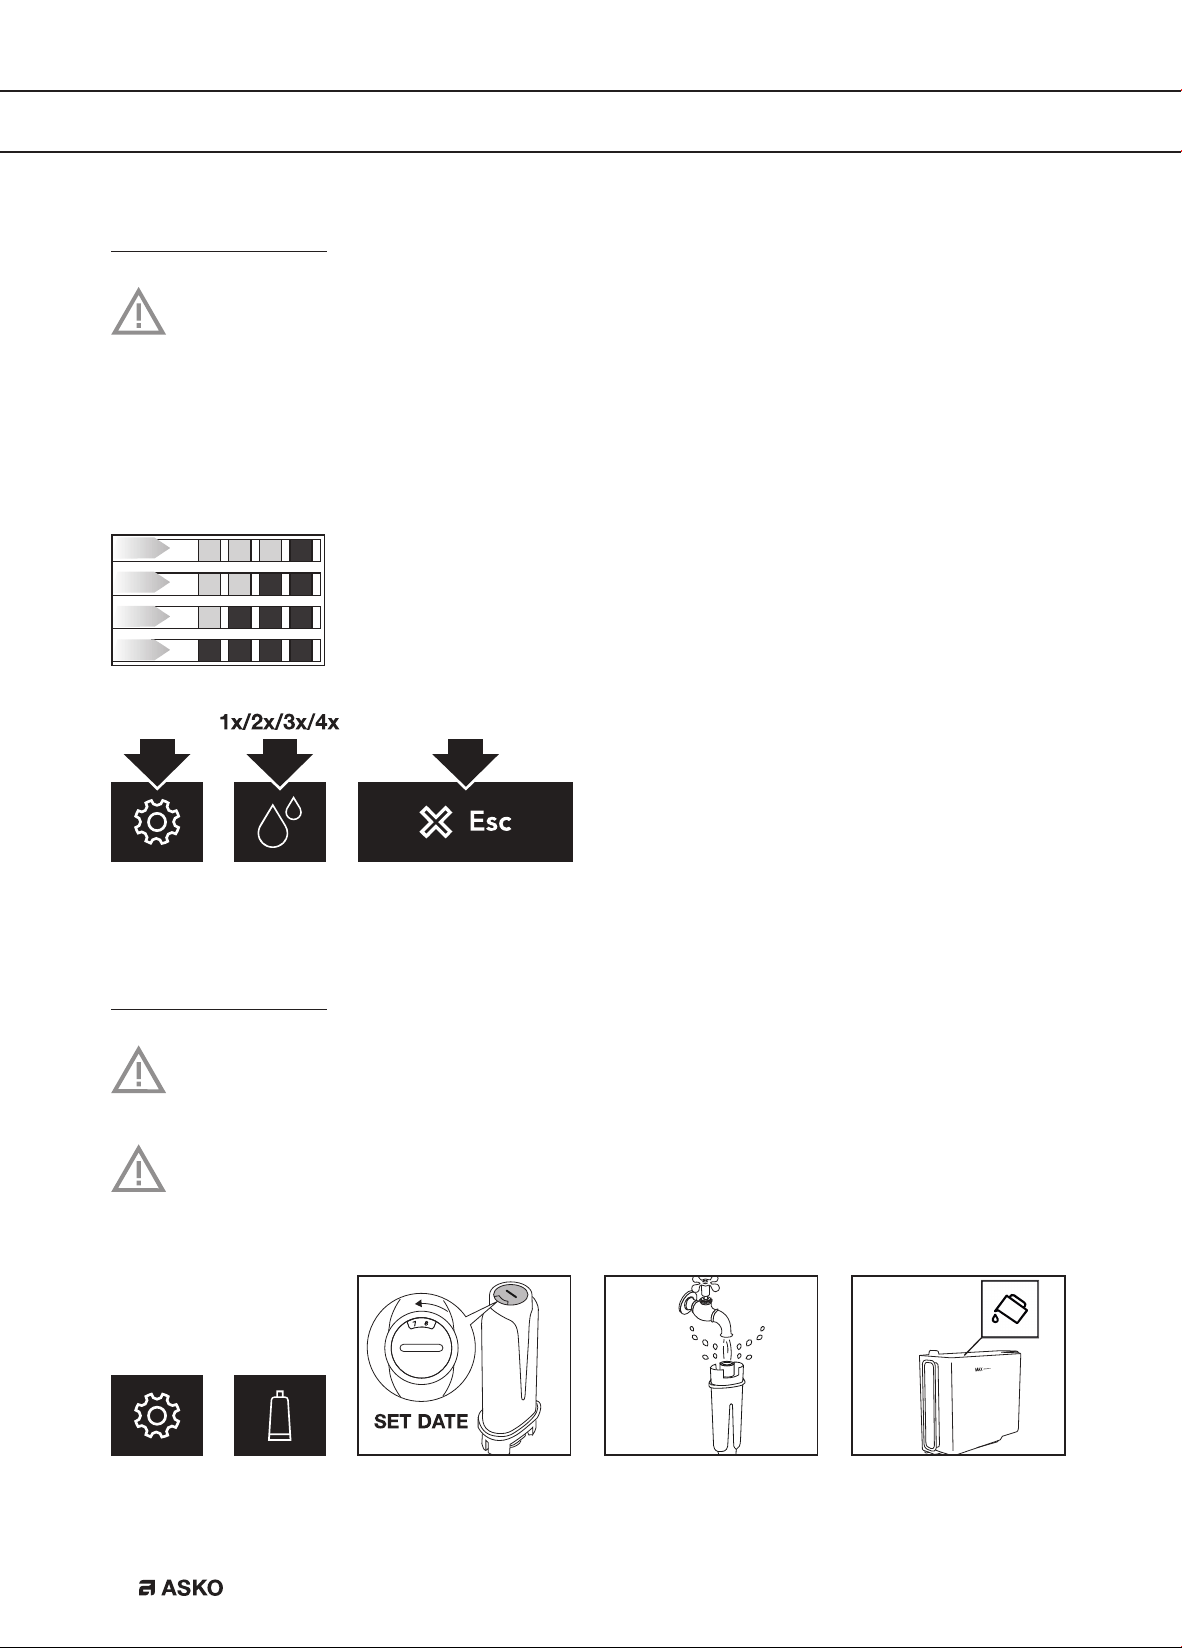
Set the water hardness
The appliance is set by default for a hardness level of 4. The appliance can also be
programmed according to the hardness of the mains water in the various regions.
The appliance needs to be descaled less often if this hardness level is lower.
Immerse the ‘total hardness test’ indicator paper (attached to the instructions) in a glass of water
for one second.
After about a minute, red squares can be seen.
Level 1: soft water.
Level 2: moderately hard water.
Level 3: hard water.
Level 4: very hard water.
The appliance is now programmed with the new water hardness setting.
Install a water softener filter
Certain models are fitted with a water softener filter. If this is not the case with your
model, you are recommended to purchase one from the service department.
Please note
The filter lasts about two months if the appliance is used normally. If the coffee machine
is left unused with the filter installed, it will last a maximum of 3 weeks.
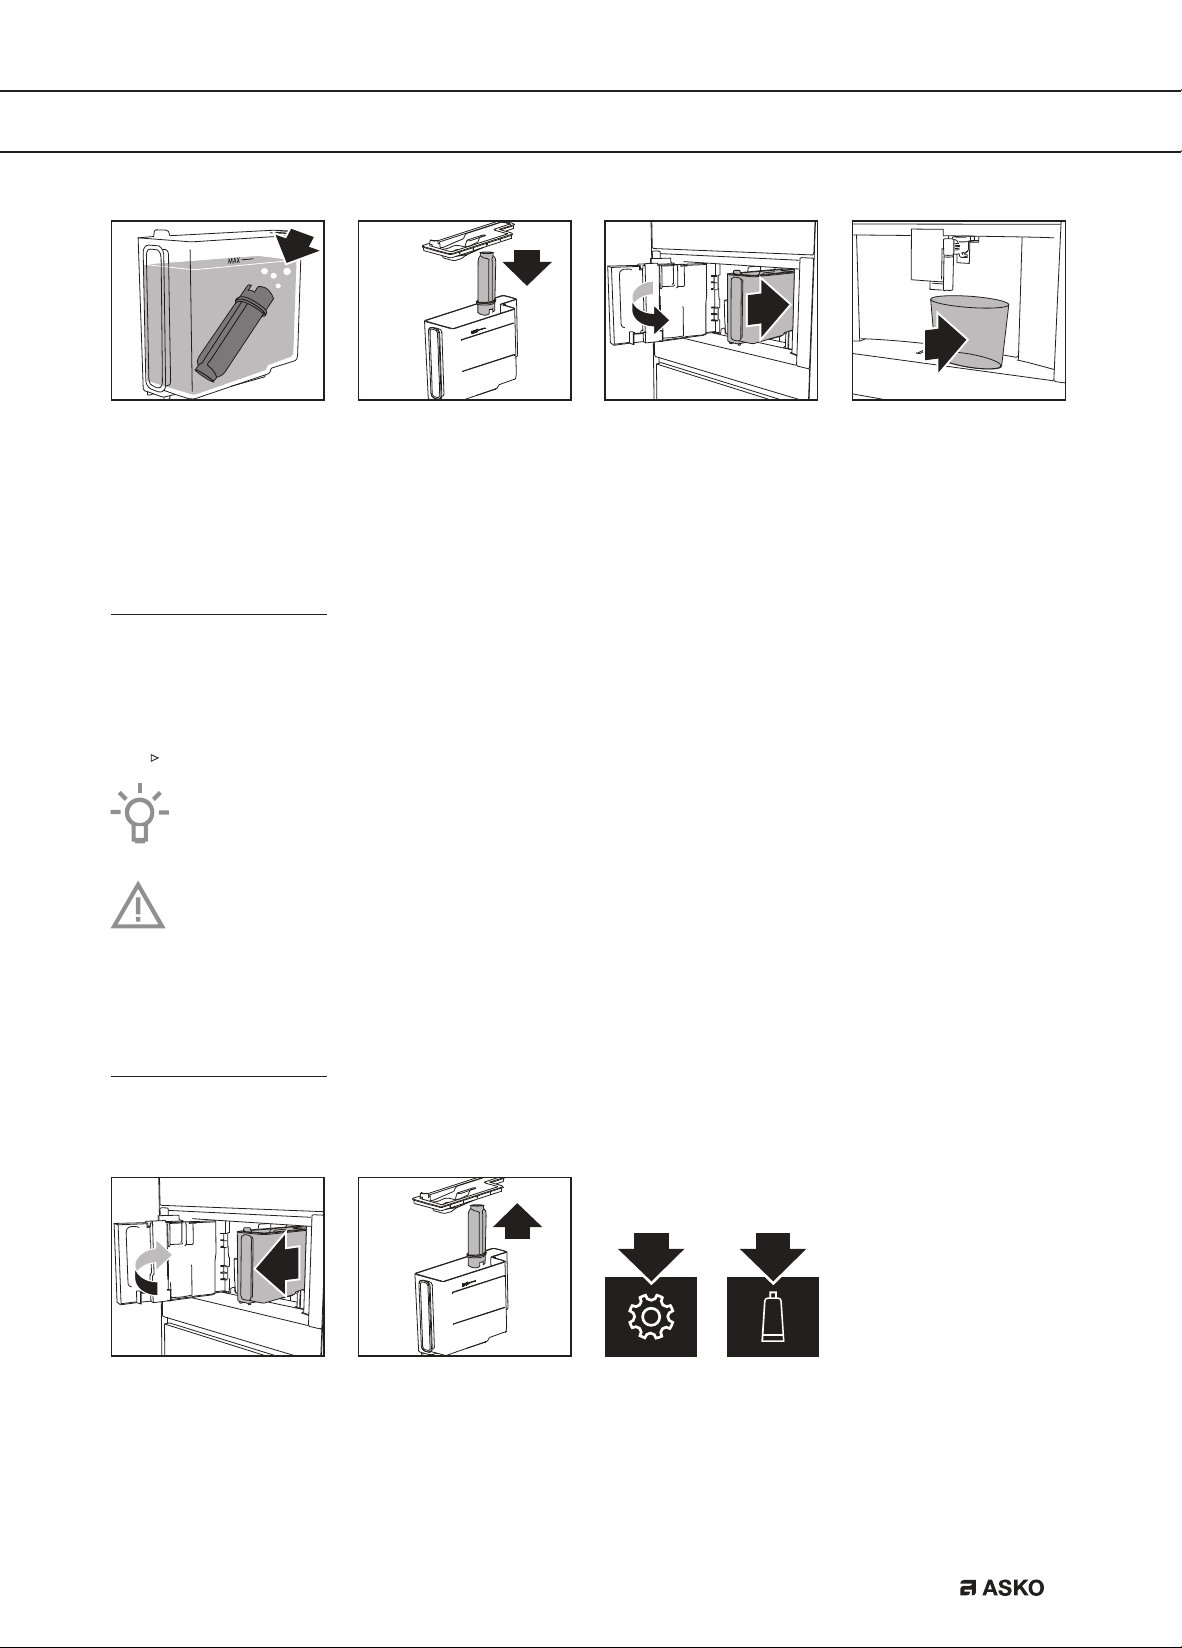
EN 29
The water filter symbol is shown on the display adjacent to the time. This indicates that the filter
has been enabled.
Replace a water softener filter
Replace the filter when the related message is shown on the display.
• To replace the filter immediately, read and obey the instructions shown on the display.
• To replace the filter later, touch the escape key.
A symbol is shown on the display to remind you that the filter needs to be replaced.
Take a look at the pictures in the previous section how to install the filter.
Please note
After two months (see date indicator) or when the appliance has not been used for
3 weeks, you should replace the filter even if the message has not been displayed yet.
Remove a water softener filter
If you want to use the appliance without the filter, you must remove it and notify the appliance of
its removal.
MAINTENANCE
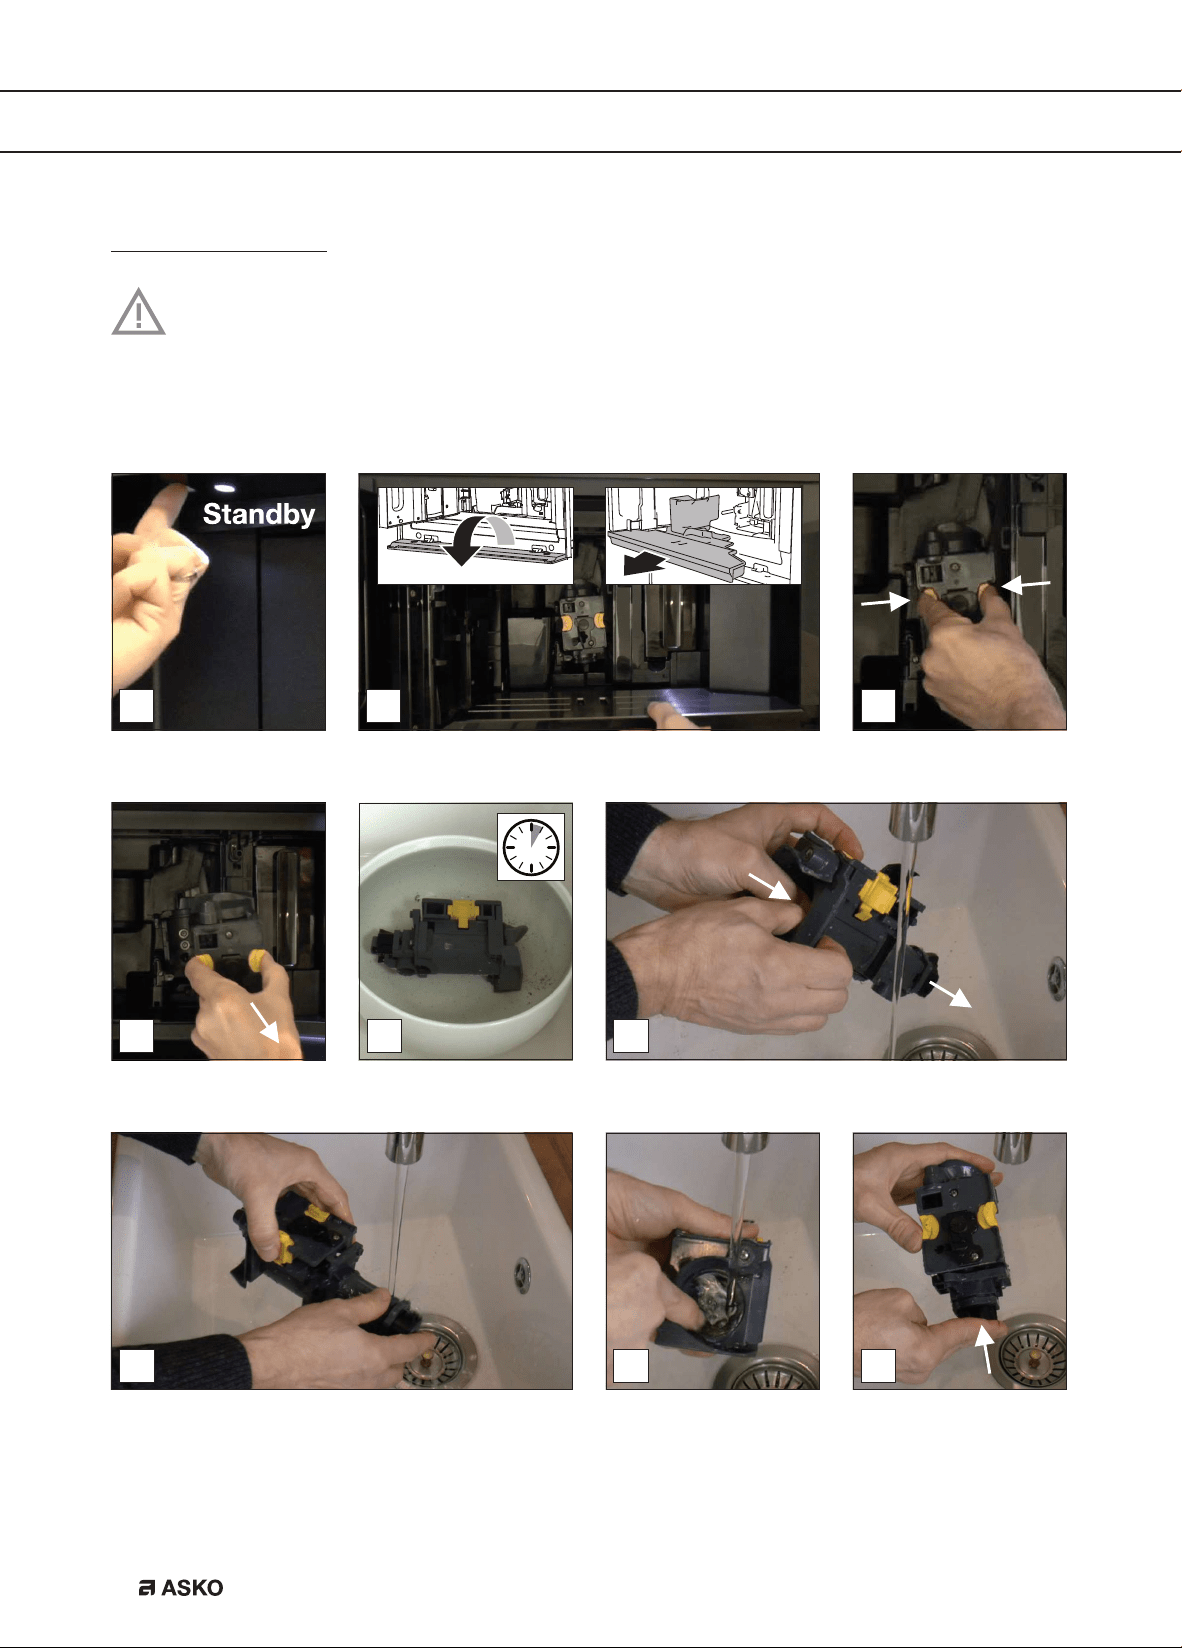
EN 30
MAINTENANCE
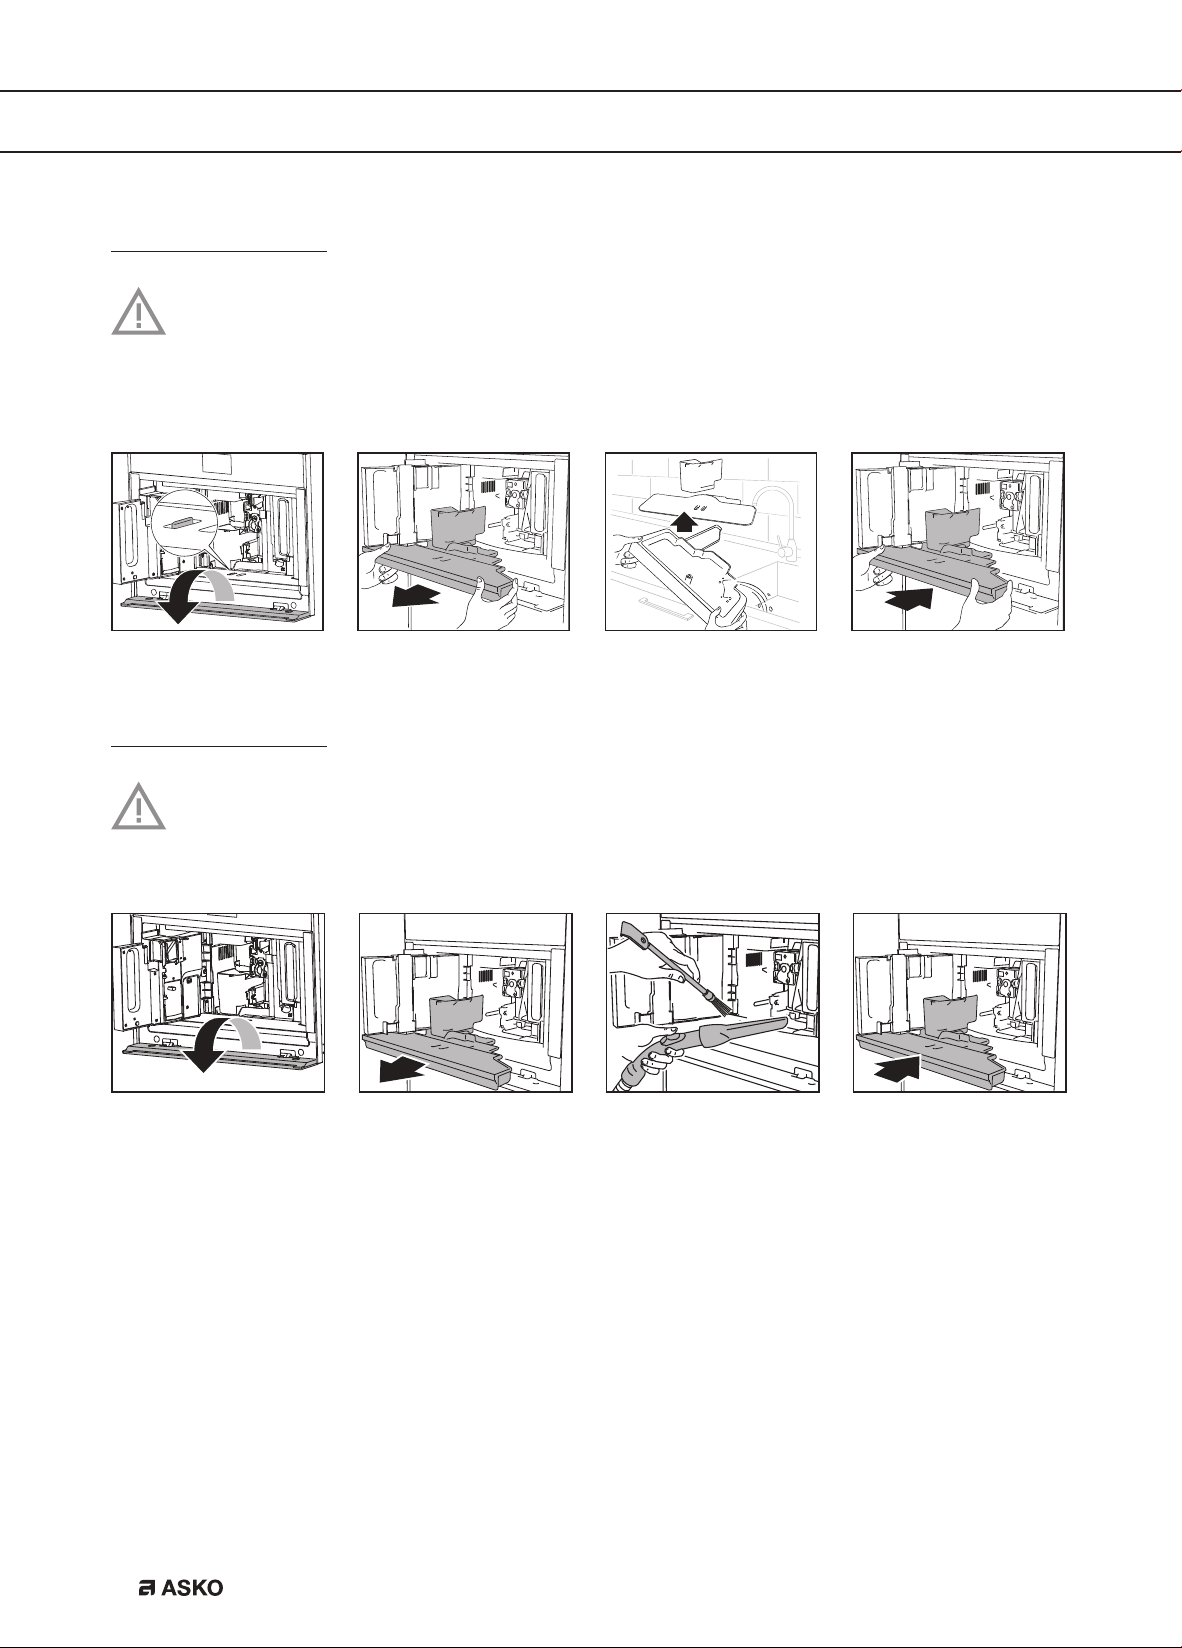
Clean the brewing unit / infuser once a month
Important!
• Do not remove the brewing unit when the appliance is set to ‘On’. Set the appliance to
‘Standby’. Do not use force to remove the brewing unit.
• Do not use washing up liquid to clean the brewing unit. It would remove the lubricant
applied to the inside of the piston.
6
87 9
1
4
2 3
5
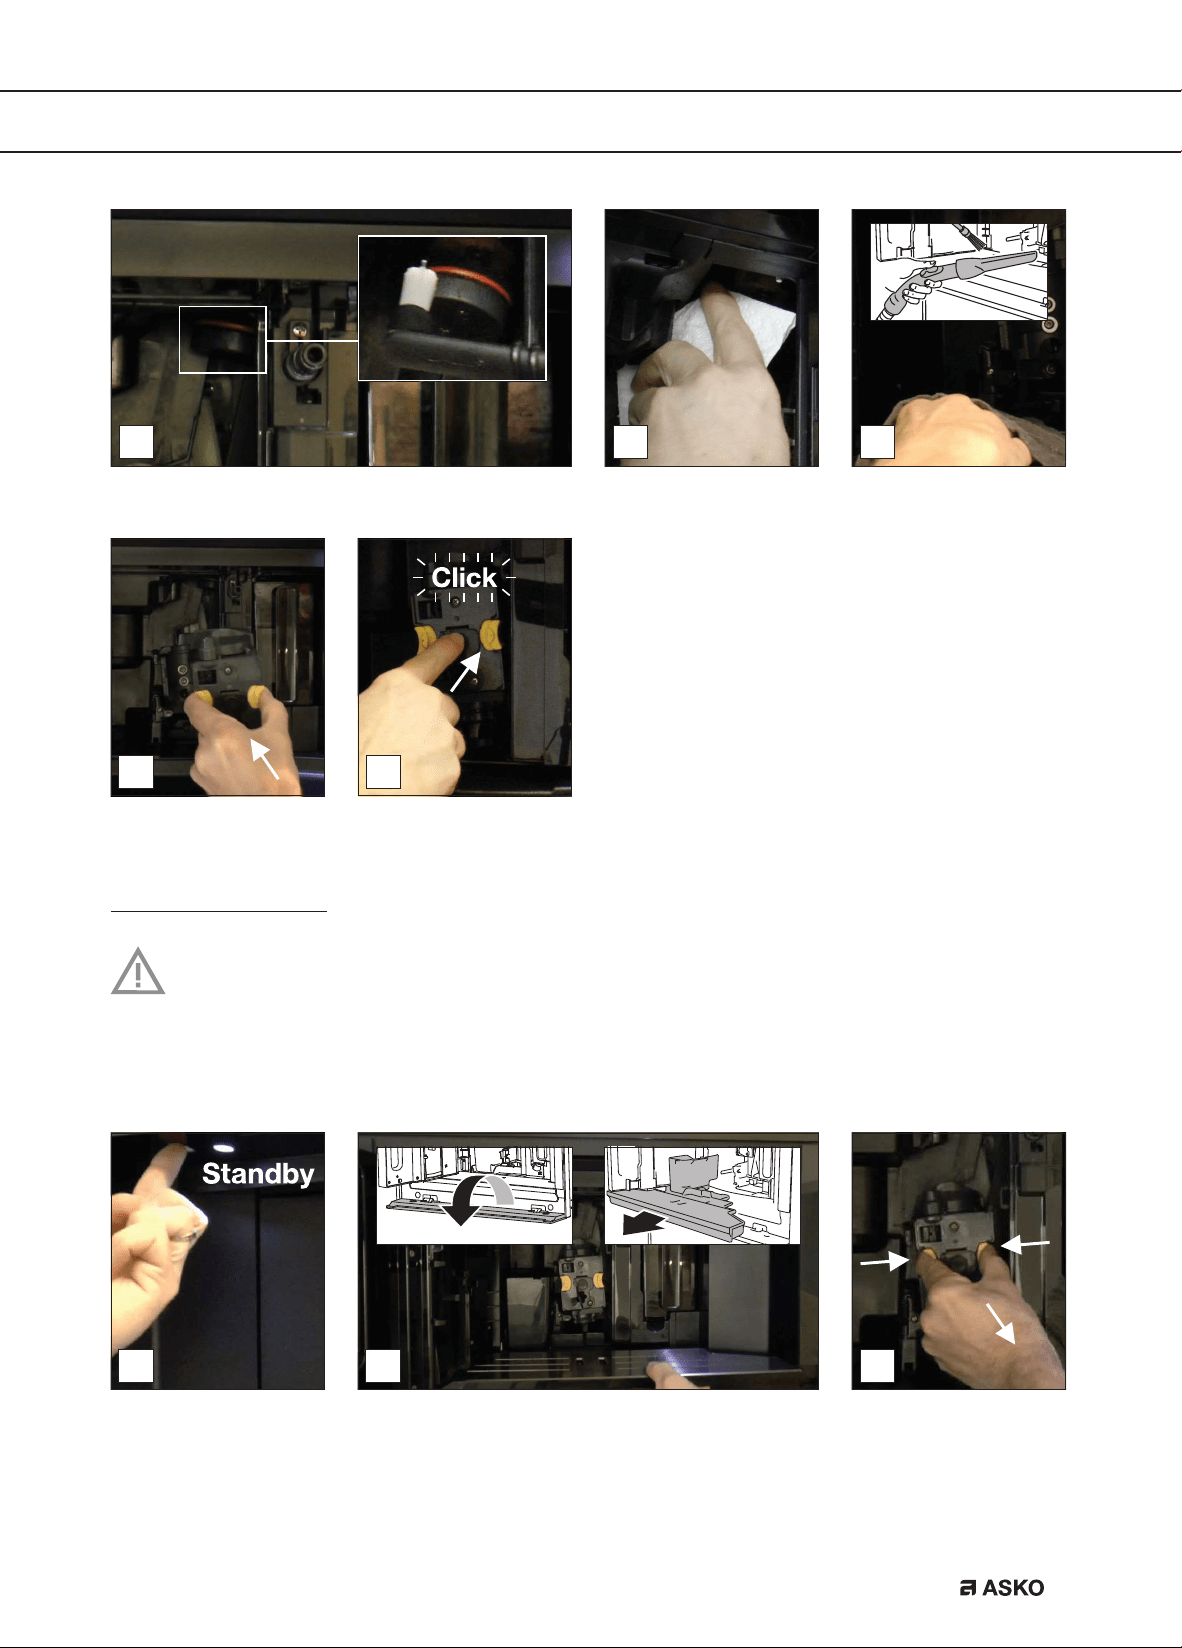
EN 31
MAINTENANCE
10 1211
1413
Clean the brewing unit / infuser twice a year
Important!
• Do not remove the brewing unit when the appliance is set to ‘On’. Set the appliance to
‘Standby’. Do not use force to remove the brewing unit.
• Do not use washing up liquid to clean the brewing unit. It would remove the lubricant
applied to the inside of the piston.
1 2 3
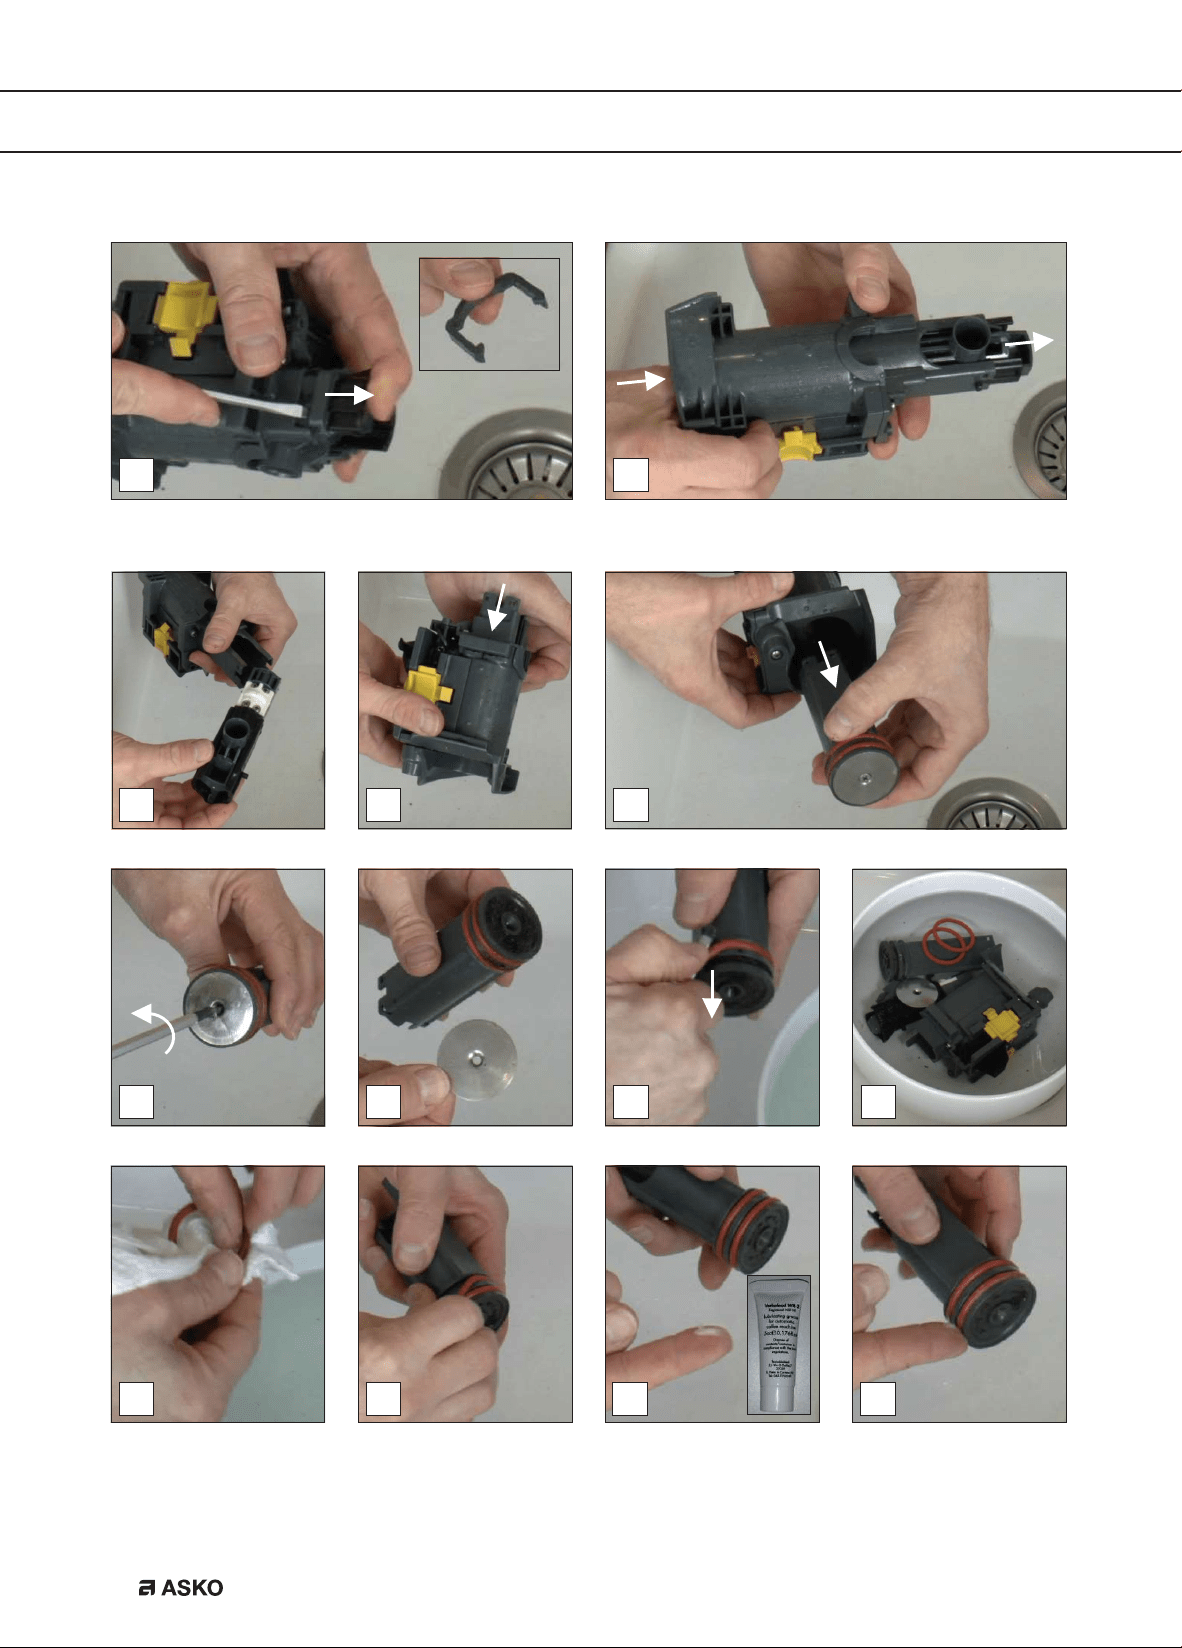
EN 32
MAINTENANCE
11
14 16
12
1513
4
9
5
8
10
6 7

EN 33
MAINTENANCE
17
21
19
22
18
20
23
29
2524 26
2827 30
EN 34
Use the milk cleaner
9
151412
10 11
13
1
7
4
6
2 3
85
MAINTENANCE
EN 35
MAINTENANCE
17 18
16
19
EN 36
Read and obey the instructions shown on the display. The display shows information
and touch keys to use. Important information is accompanied by an audio signal.
If the given instruction shown on the display or the given remedy in the table below is not the
solution to a problem, contact the Customer Services.
Problem Possible cause Remedy
The inside of the appliance is
very dirty.
Clean the inside of the
appliance thoroughly.
Disassemble and clean the
brewing unit.
Reminder that the appliance
needs de-scaling and/or the
filter must be replaced.
Replace or remove the
water filter and/or descale
the appliance as soon as
possible.
Reminder to clean the tubes
inside the milk container.
Turn the milk froth adjustment
knob to ‘CLEAN’.
Reminder to replace the filter. Replace or remove the water
filter.
Reminder to descale the
appliance.
Descale the appliance as
soon as possible.
The coffee is not hot. The cups were not preheated. Warm the cups by rinsing
them with hot water (you can
use the hot water function).
The brewing unit has cooled
down because several
minutes have elapsed since
the last coffee was made.
Before making coffee, use the
rinsing function to heat the
brewing unit.
A low coffee temperature is
set.
Select a higher coffee
temperature.
The coffee is weak or not
creamy enough.
The coffee is ground too
coarsely.
Adjust the grind level.
The coffee is not correct. Use coffee for espresso
machines.
The coffee is supplied too
slowly or a drop at a time.
The coffee is ground too
finely.
Adjust the grind level.
The slices coffee grounds are
soft and mushy.
The grind level is not correct. Adjust the grind level (in the
direction of 1).
TROUBLE SHOOTING
EN 37
Problem Possible cause Remedy
Coffee does not come out of
one or both of the spouts.
The coffee spouts are
blocked.
Clean the coffee spouts.
The appliance does not make
coffee.
The appliance has detected
impurities in its internal
circuits. See the information
shown on the display.
Wait for the appliance to be
ready for use again and select
the required beverage again.
The appliance does not come
on.
The appliance is not set to
‘On’.
Push the main switch to set
the appliance to ‘On’.
Push the On button to set the
appliance to ‘On’.
The brewing unit cannot be
removed.
The appliance has not been
set to ‘Standby’ correctly.
Push the Standby button
to set the appliance to
‘Standby’.
The drip tray has not been
removed.
Remove the drip tray.
The brewing unit is not in the
correct position.
Close the door and set
the appliance to ‘On’. The
brewing unit automatically
returns to the correct position.
The appliance makes a weird
sound (not as normal).
The brewing unit and the
infuser are dirty.
Clean the infuser and all
parts of the brewing unit.
Lubricate the o-rings with the
lubricating grease.
At the end of descaling, the
appliance requests a third
rinse.
During the two rinse cycles,
the water tank has not been
filled to the MAX level.
Obey the instructions shown
on the display.
The milk does not come out
of the milk spout.
The lid of the milk container
is dirty.
Clean all components of the
milk container.
The milk contains large
bubbles and squirts out of
the milk spout or there is little
froth.
The milk is not cold enough
or is not semi-skimmed or
skimmed.
Use skimmed or partially
skimmed milk at refrigerator
temperature (about 5 °C). If
the result is not as you wish,
try changing brand of milk.
The milk froth adjustment
knob is incorrectly adjusted.
Adjust the milk froth
adjustment knob.
The lid of the milk container
or the milk froth adjustment
knob is dirty.
Clean all components of the
milk container.
The hot water connection
nozzle is dirty.
Clean the nozzle.
TROUBLE SHOOTING

EN 38
ENVIRONMENTAL ASPECTS
Disposal of packaging and appliance
Sustainable materials have been used during manufacture of this appliance. This appliance
must be disposed of responsibly at the end of its service life. Ask your local authorities for more
information about how to do this.
The appliance packaging is recyclable. The following materials may have been used:
• Cardboard.
• Polyethylene film (PE).
• CFC-free polystyrene (PS rigid foam).
Dispose of these materials in a responsible manner and in accordance with government
regulations.
The product has been marked with a crossed-out dustbin symbol
to remind you of the obligation to dispose of electrical household
appliances separately. This means that the appliance may not be
included with normal domestic refuse at the end of its service life.
The appliance must be taken to a special municipal centre for
separated waste collection or to a dealer providing this service.
Separate collection of household appliances helps to prevent any
potential negative impact on the environment and on human health
caused by improper disposal. It ensures that the materials of which
the appliance is composed can be recovered to obtain significant
savings in energy and raw materials.
Declaration of Conformity
We hereby declare that our products satisfy the applicable European
Directives, Orders and Regulations, as well as the requirements stated
in the referenced standards.

EN 39

The appliance rating label is located on the side of the appliance.
When contacting the service department, have the complete type number to hand.
You will find the addresses and phone numbers of the service organisation on the guarantee card.
570051 / VER 1 / 12-06-2018
570051
*570051*