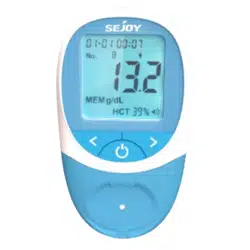
Owner’s Booklet
Hb Hemoglobin Testing System
HB-202
Realiable Hemoglobin Testing System

Contents
Important Safety information
·····································
··
Test Strips ························································
Meter (battery included) ··········································
Meter Display ·····················································
Introduction ························································
Getting to know your system ··································
01
02
04
06
07
08
Lancing Device ····················································
Meter Setup ·······················································
Coding your meter ·················································
Preparing the lancing device ····································
Fingertip blood sampling ········································
Disposal the lancet ··············································
Setting up your meter·············································
Testing ·······························································
Data and Memory ················································
11
12
12
17
20
23
25
20
30
Maintenance ······················································
Replacing the battery ·············································
Caring for your system ············································
31
31
32
Troubleshooting ···················································
Technical information ·············································
Specifications ······················································
Disposing of the meter, test strips, lancets and batteries·
Warranty ····························································
Symbol Index ······················································
35
38
40
41
42
Optical check ············································
16
Important Health-Relate information
·····························
··
03
Computer connection············································
19
38

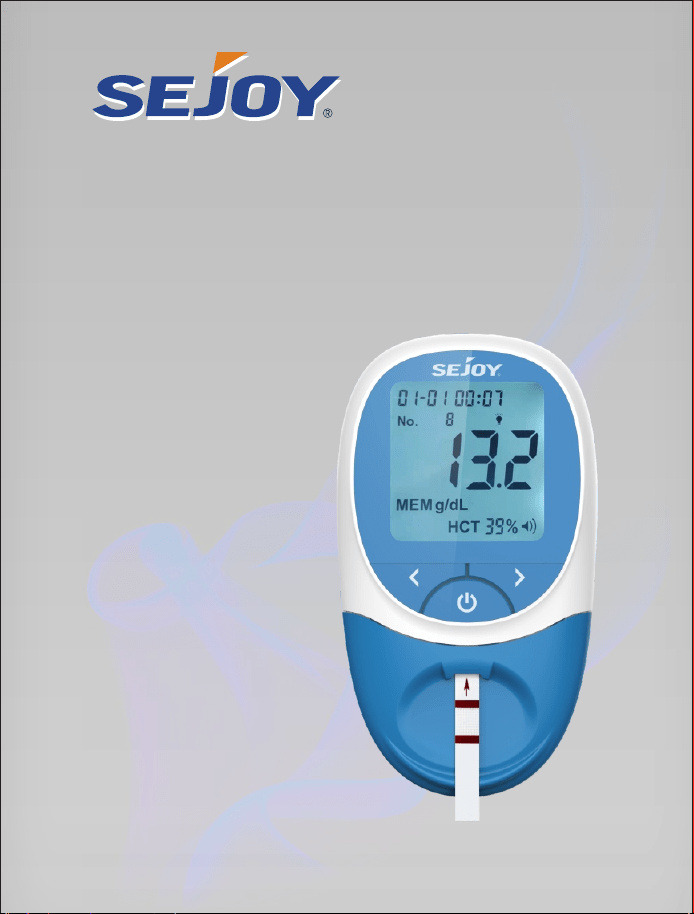
Introduction
Thank you for choosing Sejoy HB-202 Hemoglobin Testing System.
Before you start testing, carefully read this Owner’s Booklet.
Intended Use
Test Principle
The system consists of a portable meter that analyzes the intensity and
color of light reflected from the reagent area of a test strip, ensuring quick and
accurate results.
®
The Sejoy Hb Hemoglobin Testing System provides results in less than 15
seconds and requires only a single drop of whole blood. The meter can store
up to 1000 results. The meter can be operated by 3 AAA (1.5V) batteries.
1
The Sejoy HB-202 hemoglobin Meters are used with the Sejoy HS-101
Test Strips to quantitative measuring hemoglobin content with fresh capillary
wholeblood from the finger or venous blood. The hemoglobin Meters can be
used for self-testing at home or for professional use.The product is for in
vitro diagnostic use only.It can not be used as the only basis for the diagnosis
of anemia.
To ensure accurate results:
• Read instructions and complete any necessary training before use.
• Use the code chip that accompanies each box of test strips.
® ®
• Use only Sejoy Hb Hemoglobin Test Strips with the Sejoy Hb
Hemoglobin Meter.
• For in vitro diagnostic use only.
• Test only whole blood specimens. EDTA or heparin anticoagulantssodium
can be used.
• Keep out of reach of children.

Introduction
Important Safety information
Warning
2
• Venous whole samples collection and preparation should be obtained by
healthcare professionals.
• During normal testing, any Hb Hemoglobin Meter or lancing device may come in
contact with blood. All parts of the kit are considered biohazardous and can
potentially transmit infectious diseases from blood borne pathogens, even after
you have performed cleaning and disinfecting.
• The meter and lancing device should never be used by more than one person. Do
not share the meter and lancing device with anyone, including family members,
due to the risk of infection from blood borne pathogens.
• Cleaning and disinfecting the meter and lancing device destroys most, but not
necessarily all, blood borne pathogens.
• If the meter is being operated by a second person who is providing testing
assistance to the user, the meter and lancing device should be cleaned and
disinfected prior to use by the second person.
• Disinfect the meter and lancing device before allowing anyone else to handle them.
Do not allow anyone else to test with the meter or lancing device.
• It is important to keep the meter and lancing device clean and disinfected. Clean
and disinfect the lancing device once per week to remove visible dirt or other
material for safe handling and/or prior to disinfecting.
For instructions on how to clean and disinfect the meter and lancing device,see
Chapter Caring for your Meter.
• Wash hands thoroughly before and after handling the meter, lancing device,
or test strips.
• Choking hazard. Small parts. Keep away from children.
• Strong electromagnetic fields may interfere with the proper operation of the meter.
Do not use this meter close to sources of strong electromagnetic radiation.
• To avoid electrostatic discharge, do not use the meter in a very dry environment,
especially one in which synthetic materials are present.
• The matching USB data cable is our company’s dedicated data line for hemoglobin
analyzer online .Please do not use the USB data cable not provided by our
company to connect with the computer,So as to avoid damaging the hemoglobin
meter.

Introduction
Important Health-Related information
·Run a control test when you open a new box of test strips or if you think
that your test result is incorrect. Running a Optical check mode you know
that the meter is working properly.
• DO NOT CHANGE YOUR TREATMENT BASED ON A SINGLE RESULT THAT
DOES NOT MATCH HOW YOU FEEL OR IF YOU BELIEVE THAT YOUR TEST
RESULT COULD BE INCORRECT. If your hemoglobin content result doesn’ t
match how you feel and you have followed the instructions in this manual,
follow your doctor’s instructions, or call your doctor.
• Children should be taught how to use the meter and any other medical
products appropriately.
• If you have followed all the instructions in this booklet and still have
symptoms that don’t seem to match your test results – or if you have
questions – talk to your doctor.
• The sejoy hemoglobin monitoring system HB-202 is designed for using
with fresh capillary whole blood from the finger or venous samples.
3
Environmental conditions for normal use of the instrument
·indoor use.
• Altitude :Up to 10,000 feet (3,048meters) above sea level.
• Operating temperature: 10℃~40℃.
• Operating relative humidity: <90%RH.
• Over voltage category : Not applicable.
• Pollution degree of the intended environment:2.
• Resettable fuses :UL type fuse ,Voltage rating DC 6V ,hold current 350mA.
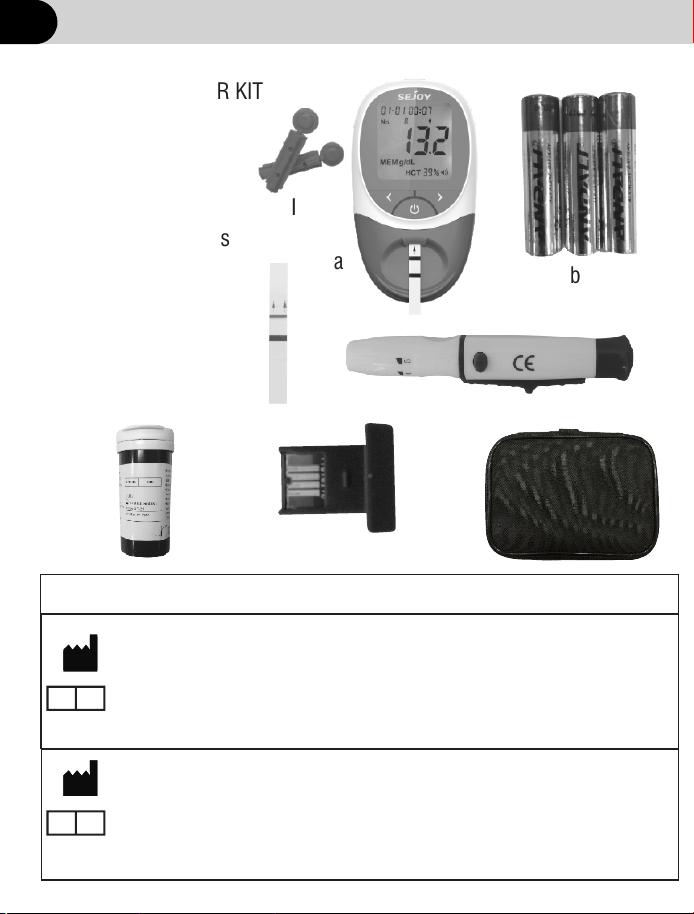
Getting to know your system
a
b
c
d
f
e
a. Hb Meter
b. AAA Batteries
c. Lancing Device
d. Quality control Strips
e. Code Chip
f. Carrying Case
g. Usb data cable
h. test Strips
I . Sterile Lancet
INCLUDED WITH YOUR KIT
4
h
I
Beijing Ruicheng Medical Supplies Co., Ltd.
No. 558 Zhangzikou, Yangsong Town, Huairou District, 101400 Beijing, China
Lotus NL B.V.
Koningin Julianaplein 10, le Verd,2595AA, The Hague, Netherlands.
CE for lancing device; CE0197 for sterile lancet
Manufacturer of Lancing Device and Sterile Lancet
EC
REP
Shandong Lianfa Medical Plastic Products Co., Ltd.No.1
Shuangshan Sanjian Road, 250200, Zhangqiu City, Jinan, Shandong, PEOPLE’S
REPUBLIC OF CHINA
Shanghai International Holding Corp. GmbH (Europe)
Eiffestrasse 80, 20537 Hamburg Germany
CE for lancing device; CE0123 for sterile lancet
EC
REP

Getting to know your system
Hb Meter: Reads the test strips and displays the hemoglobin (Hb)
concentration and calculated hematocrit (Hct) value.
Test Strips: Part of the system and used with the meter to measure
Hb concentration and calculated Hct in blood.
Code Chip: Automatically calibrates the meter with the code number when
inserted into the meter.
AAA Batteries: Provides power for the meter.
Carrying Case: Provides portability for testing.
User's Manual: Provides detailed instructions on using the Hb Hemoglobin
Testing System.
Type C COM:Use Special USB data cable to connect computer(meet the
requirement of IEC 60950 and IEC 62368),input rated voltage is 5V DC
(no external power supply).
Use Usb data cable to connect the Meter to your computer,Usb data cable:
upload the measurement history data to the computer for viewing.
:Quality control Strips In Optical Check mode,Cheak whether the Optical
system works normally.
Provides detailed instructions on using the Test Strip Package Insert:
Hb Hemoglobin Test Strips.
Used with sterile lancets to prick the fingertip for blood Lancing Device:
specimen collection. The packaged lancing device has multiple depth
settings,allowing users to adjust the depth of the puncture and minimize
discomfort. It can also eject the used lancets.
Provides detailed instructions on using theLancing Device Package Insert:
Lancing Device.
Used with lancing device to draw blood specimens. Sterile Sterile Lancets:
lancets are inserted into the lancing device with each blood draw and
discarded after use.
5
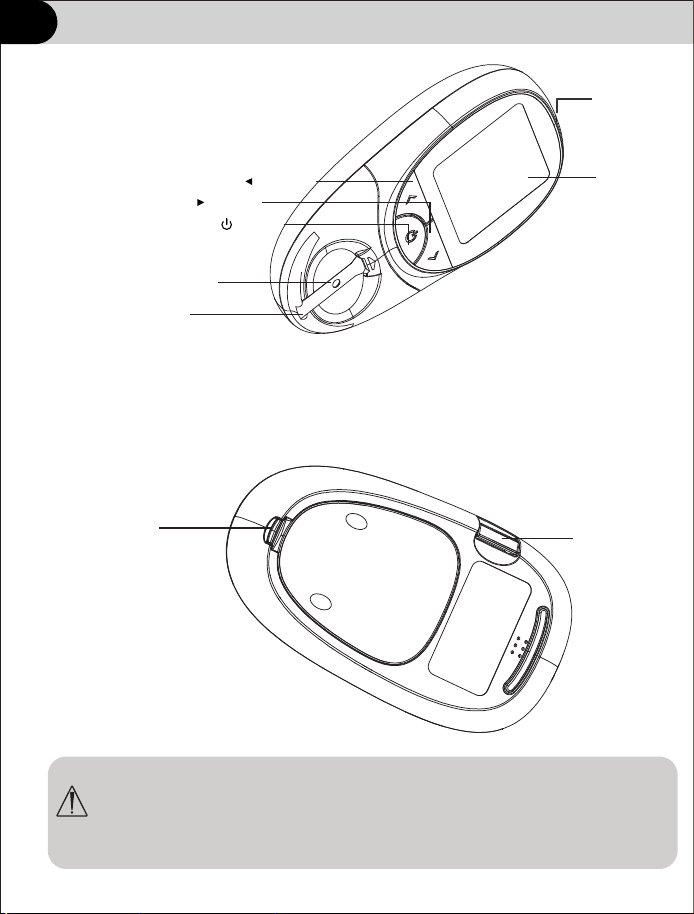
Getting to know your system
a. Meter
6
WARNING: Keep the meter and testing supplies away from young
children. Small items such as the battery cover, batteries and test
strips,are choking hazards.
LCD
Strip Channel
Test strip Holder
Left Arrow Button
Right Arrow Button
On/Off Button
Battery Cover
Code Chip
Type C
Getting to know your system
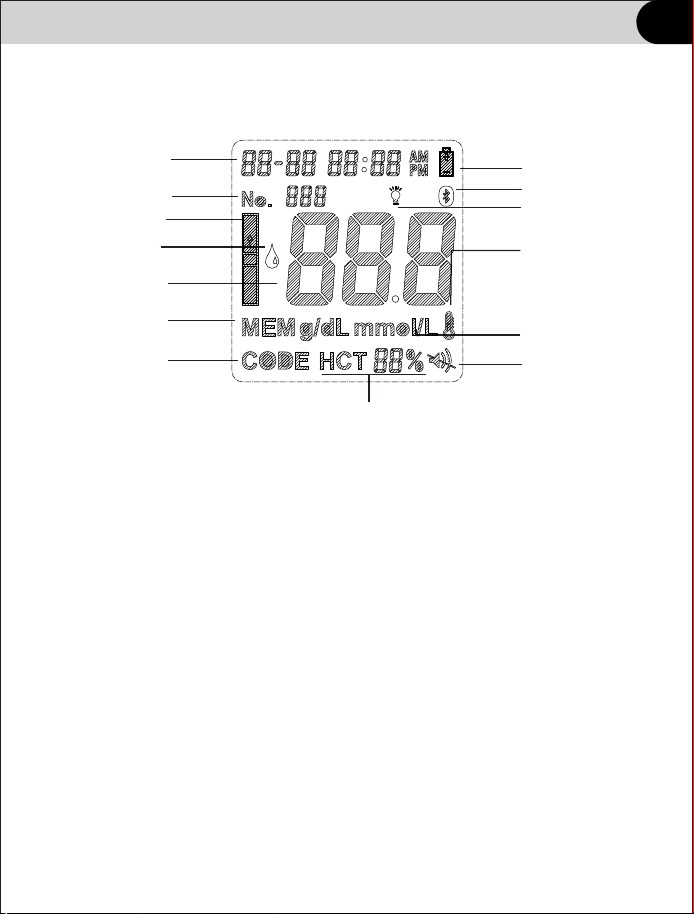
b. Meter Display
Sound Icon: Appears when the sound is turned on.
Low Battery Reminder: Appears when the battery should be replaced.
Code Number or Test Result: Indicates code number or test result.
Memory: Indicates a test result is being recalled from memory.
Code: Indicates the code number of the test strips.
Measurement Units: Indicates the units for the test result.
HCT Value: Shows calculated HCT value.
Test Strip Reminder: Indicates when to insert test strip.
Apply Blood Sample Reminder: Indicates when to apply Blood Sample.
7
Date and Time
Test Strip Reminder
Apply Blood Sample
Reminder
Code Number
or Test Result
Memory
Code
HCT Value
Low Battery Reminder
Measurement
Units
Sound Icon
Out of optimal operating
temperature
(10℃~40℃)
indicator
ID Number
Bluetooth Icon
Backlight Icon
ID Number: Indicates set ID Number.
Bluetooth Icon: Appears when the Bluetooth is turned on.
Backlight Icon: Appears when the backlight is turned on.
Getting to know your system
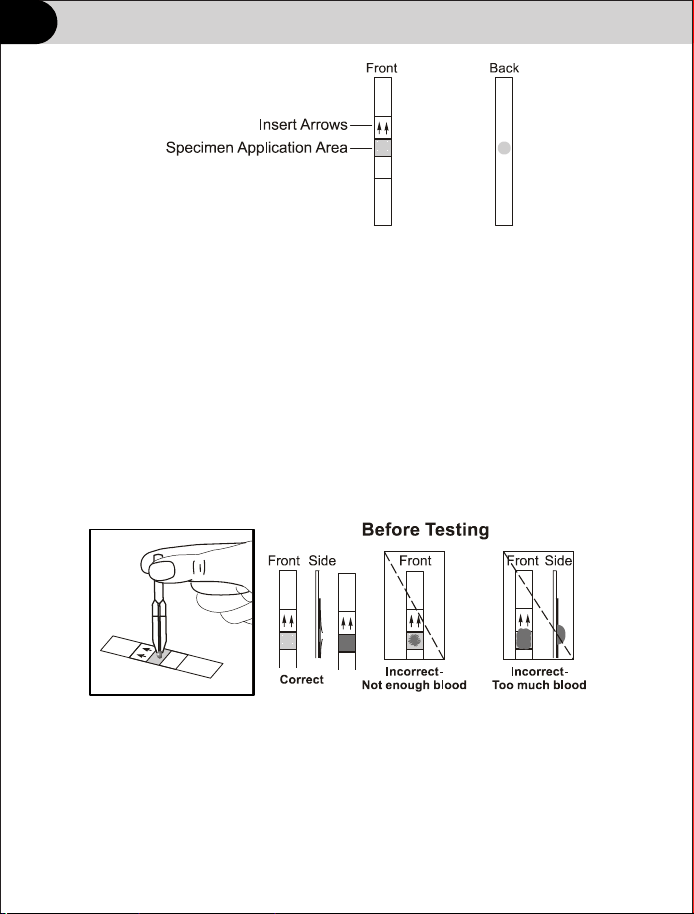
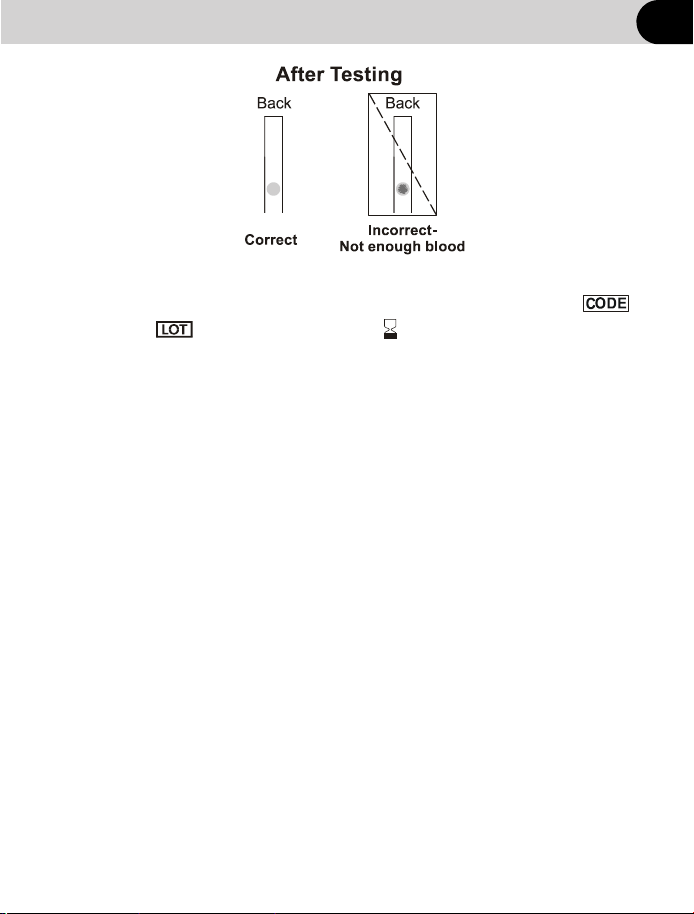
Specimen Application Area - After strip is inser ted into the Strip
Channel, apply a blood drop to the center of test strip. The Specimen
Application Area is visible from the front and the back of the Test Strip.
Insert Arrows - Located on the front of the test strip, the arrows show
the direction in which the test strip should be inser ted.
Important: the meter should only be used with HS-101 test strips.
Using other test strips with this meter can produce inaccurate results.
Specimen Application
For best results, fill the Specimen Application Area with approximately
10 µL of blood specimen. Incorrect results may occur if the specimen
is not applied correctly, or if the Specimen Application Area is not filled.
After applying the specimen, ensure the Specimen Application Area is
completely covered. The Specimen Application Area should remain
covered throughout the entire test. If the Specimen Application Area is
not covered, or if there is too much specimen covering the Specimen
Application Area, repeat the test with a new test strip.
c. Test Strips
8
• The system has operating range of 10℃~ 40℃(50℉~105℉).
For the most accurate results, try to test as close to room temperature
15℃ ~ 30℃ (59 ℉ ~ 86℉)as you can.
• Use test strips only within the system operating temperature range.
• Keep away from direct sunlight or heat.
• Store your test strips in their original vial only; never transfer them to
another vial or any other container.
• Never store individual test strips outside the vial.
Getting to know your system
Code Number
Each package of test strips is printed with a code number ,
lot number and expiration date . Whenever a new
vial is opened, mark the date on the label. Calculate the
expiration date by adding three months. Record this expiration
date on the label.
Important test strip information for use
• Store the test strip package in a cool, dry place between 2℃ ~ 30℃
(35.6 ℉ ~ 86℉).
9

Getting to know your system
removing it from the vial or inserting it into the meter.
• Do not use test strips beyond the expiration date. This may cause
inaccurate results.
• Do not bend, cut, or alter test strips.
Warning: The cap or vial contains drying agents that may be
harmful if inhaled or swallowed and may cause skin or eye
irritation.
• After removing a test strip from the vial, immediately close the vial cap
tightly.
• With clean, dry hands, you may touch the test strip anywhere when
• Write the first open date and expiration date on the vial label
when you first open it. Discard the vial 3 months after first open
date. Usage after this period may result in inaccurate readings.
• For in vitro diagnostic use. Test strips are to be used only outside
the body for testing purposes.
• Do not use test strips that are torn, bent, or damaged in any way.
Do not reuse test strips.
• Before per forming a hemoglobin test, make sure that the code
number on the meter display matches the number shown on the
test strip vial and on the code chip ink-jet printed.
10
Getting to know your system
d. Lancet
c. Lancing Device
Protective Cover
Lancet Pin
Lancet Ejector
Trigger Button
Sliding Barrel
Lancet Carrier
Protective Cover
Lancing Device Cover
Arrow
Adjustable Tip
11
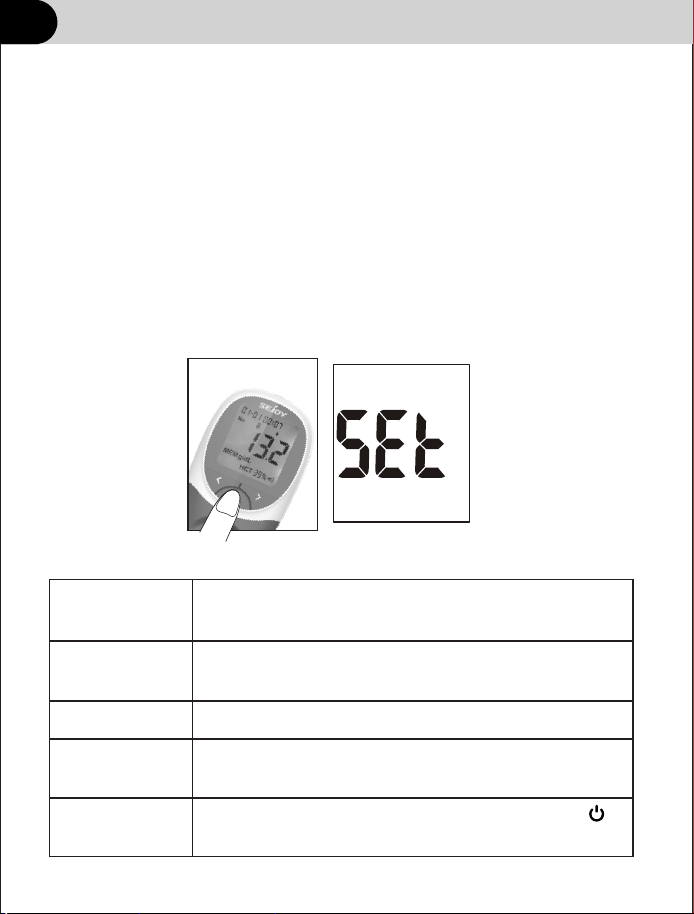
Setting up your meter
b. Meter Setup
When use the meter not for the first time and need to set up the meter, with
the meter turned off, press and hold for 2 seconds to enter Meter Setup
mode shown below.
Press to display several setup sub modes:
Set
CHE
dEL
Elt
System setup, including date, time, units and
sound.
Optical Check mode. Use Quality control
strips.
Memory Delete mode.
Exit setup modes and save changes when is
pressed. The meter will automatically turn off.
PC
Expor t measurement history
◄or►
The meter will turn on automatically after the batteries are inserted. The
meter will display the full screen. Please follow below procedures to set the
parameters of the meter.
a.Initial Setup
Setting up your meter
11
Setting up your meter
12
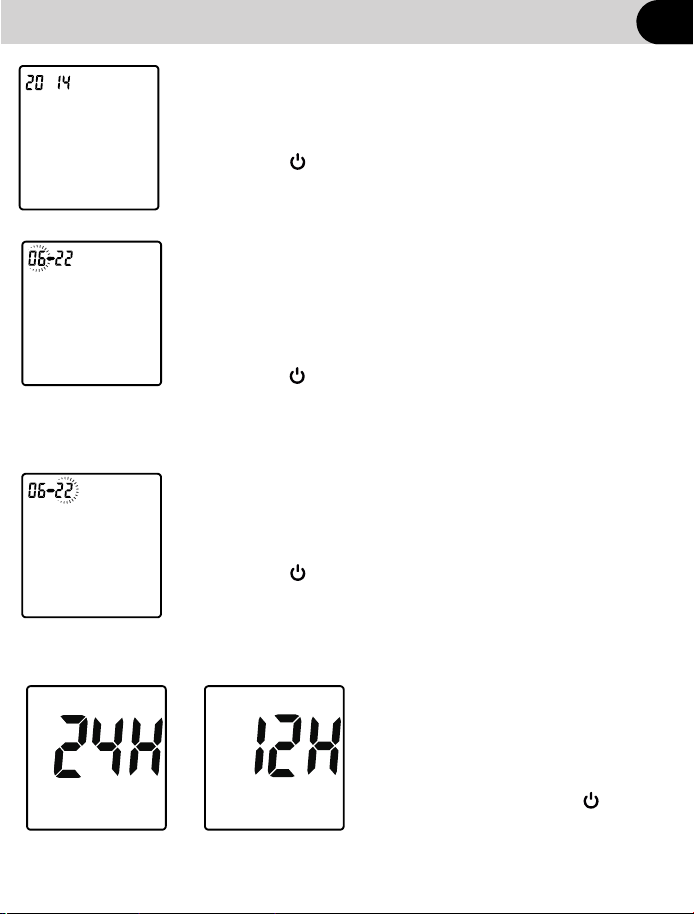
Set the month
The month and date will appear at the top of the
display separated by a single dash (-), with flashing month.
Press until the correct month is displayed.
Press button to save and the Date figure is flashing
automatically.
Set the date
The month and date will appear at the top of the display
separated by a single dash (-), with flashing date.
Press until the correct date is displayed.
Press button to save and the 24 hour figure is flashing
automatically.
②
③
Set the year
The year will appear at the top of the display.
Press ► until the correct year is displayed.
Press button to save and the Month and
Date figure is flashing automatically.
①
Setting up your meter
12
◄ or ►
◄ or ►
◄ or ►
Set the time format
The meter can display the time in either
an AM/PM(12-hour) or a 24:00(24-hour)
format. Press to switch between
the two settings.Press button to save
and Time figure is flashing automatically.
④
OR
◄or►
Setting up your meter
13
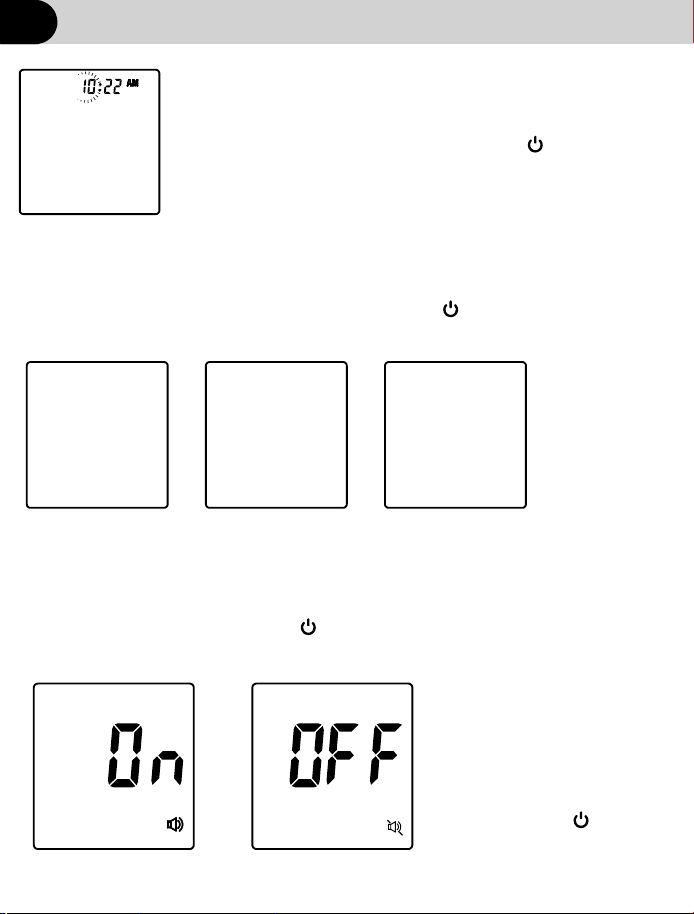
The hour and minutes will appear at the top of the display
separated by a colon, with flashing hour. Press
until the correct hour is displayed. Press to save and
proceed to HOUR.
Note: The meter will display AM or PM if the 12H time
setting is chosen.
Minutes will flash. Press until the correct
minutes are displayed. Press to save and
proceed to Minutes.
Set the measuring unit
The meter can display test results in either grams per decilitre(g/dL) or
millimoles per litre(mmol/L) or grams per litre(g/L). Press to
select g/dL, g/L or mmol/L.Press to save and proceed to Measuring unit setup
Set the time
⑤
⑥
mmol L/
g dL/
OR OR
Setting up your meter
12
◄ or ►
◄or►
◄or►
g L/
OR
Set the sound
Press to select sound
either ON or OFF. The Sound
Symbol will appear on the
display when the sound is
turned on. Press to save
and proceed to Sound setup.
⑦
◄or►
Setting up your meterSetting up your meter
14
Setting up your meter
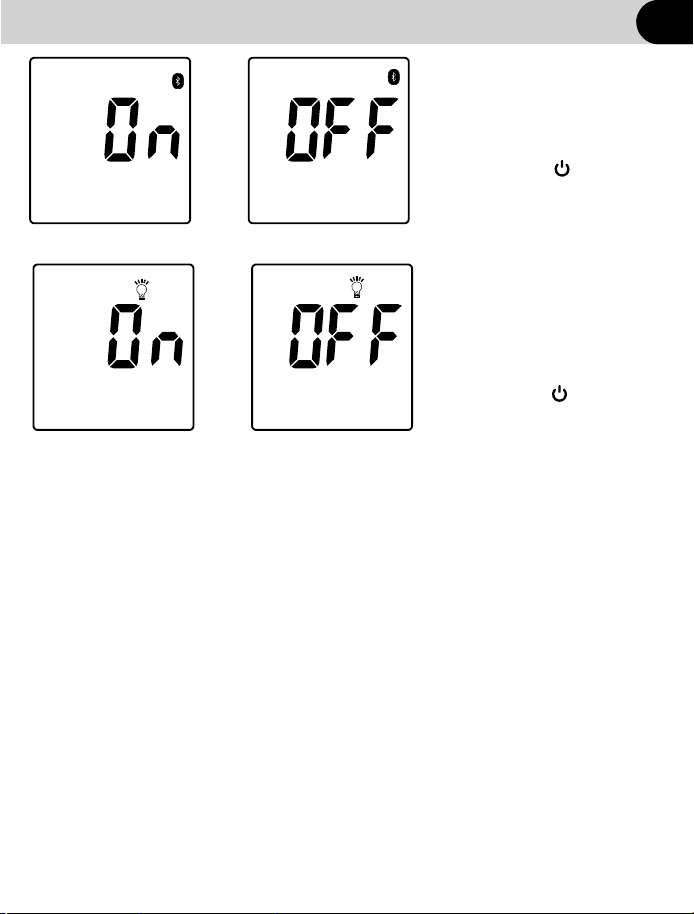
OR
Set the Bluelight
Press to select Bluelight
either ON or OFF. The Bluelight
Symbol will appear on the
display . Press to save
and proceed to Bluelight setup.
⑧
◄or►
Setting up your meterSetting up your meter
OR
Set the Backlight
⑨
12
15
Press to select
backlight either ON or OFF.
The backlight Symbol will
appear. Press to save
and proceed to Backlight setup.
◄or►

Setting up your meterSetting up your meter
c.Optical check
Note:if the optical system is abnormal,please check the
quality control strips for contamination,bending or
damage.If the above phenomenon if found,please check
again with a new quality controlstrip.If there are still
problem in the reinspection,please contact the local
dealer or manufacturer。
with the meter turned off, press and hold for 2 seconds to enter
Meter Setup mode. Press until PC is display.Press to
enter optical check mode,insert the quality control strips,and then
press to start the optical system inspection. If “YES”is displayed,
the Meter is normal;If “NO”is displayed,the Meter is abnormal.
◄ or ►
Setting up your meter
12
16
Setting up your meter
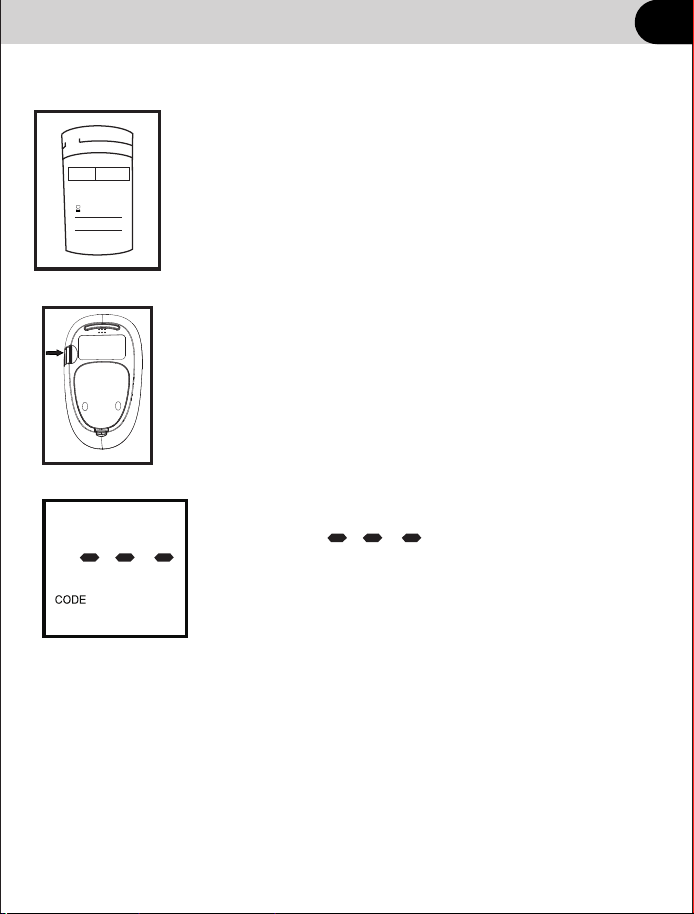
Coding your meter
inserting the test strip
Code numbers are used to calibrate your meter
with the test strips you are using
Put the code chip from strip package into the chip
port of meter.
Each strip package contains one chip code. Replaced
the existed code chip when you start using a new vial
of strips
Check the code on the test strip vial before
Note: If there’s no chip on the meter, the LCD
will display
Follow step 2 to install the code chip.
CODE
LOT:
Expiration date :
Frist open date :
005
①
②
Setting up your meter
15
17
Match the code on the meter with the code
on the test strip vial
If the code on the meter match the code on
the test strip vial, the meter is now ready to
perform a hemoglobin test.
• If the code on the meter does not match the
code on the test strip vial, please discard
this vial test strips and contact vendors.
•
CAUTION: Matching the code on the meter and the code on the
test strip vial is essential to obtain accurate results. Each time
you test, check it to make sure the code numbers match.
④
005
(Example)
Setting up your meter
CODE
LOT:
Expiration date :
Frist open date :
005
12
18

Computer connection
◄ or ►
15
19
Computer requirements
The Hemoglobin Meter requires a Computer device with:
Compatible with win7,win8,win10 operating systems.
Installed with WPS (2016 or later) or Microsoft office(2010 or
later).
And works with: Desktop or laptop.
Using for the first time
1. Download the "HB data software" software and Meter Drive from
Website.
2.Open the software on your Desktop or laptop. Connect computer
and Meter with matching data cable, Installation of meter driver.
3. Login with your administrator account user name(HB202) and
password(Password).
4. Selection device “Port number”.Enable software receiving
status.
5.Turn on the device transmission function.
①.When the meter is in standby mode ,press the “ ”key for long
more than 2S to enter the Setup menu .
②. Press until PC is displayed .Press“ ”to upload all
data , If“ YES ” displayed ,the upload is normal ;If “ NO ”is displayed ,the
upload is abnormal

Preparing the lancing device
Warning
• During normal testing, any Hb Hemoglobin meter or lancing device
may come in contact with blood. All parts of the kit are considered
biohazardous and can potentially transmit infectious diseases
from bloodborne pathogens, even after you have performed
cleaning and disinfecting.
• The meter and lancing device should never be used by more than
one person. Do not share the meter and lancing device with
anyone, including family members, due to the risk of infection
from bloodborne pathogens.
• Cleaning and disinfecting the meter and lancing device destroys
most, but not necessarily all, bloodborne pathogens.
• If the meter is being operated by a second person who is
providing testing assistance to the user, the meter and lancing
device should be cleaned and disinfected prior to use by the
second person.
• Disinfect the meter and lancing device before allowing anyone
else to handle them. Do not allow anyone else to test with the
meter or lancing device.
• It is important to keep the meter and lancing device clean and
disinfected. For instructions on how to clean and disinfect the
meter and lancing device, see Chapter Maintenance.
• Wash hands thoroughly before and after handling the meter,
lancing device, or test strips.
• You must not insert the lancet cap into the lancing device and
simultaneously press the release button or hold the lancing
device with the release button resting on a surface such as a
table top. This could release a lancet and inadvertently cause
injury.
Testing
20
Testing
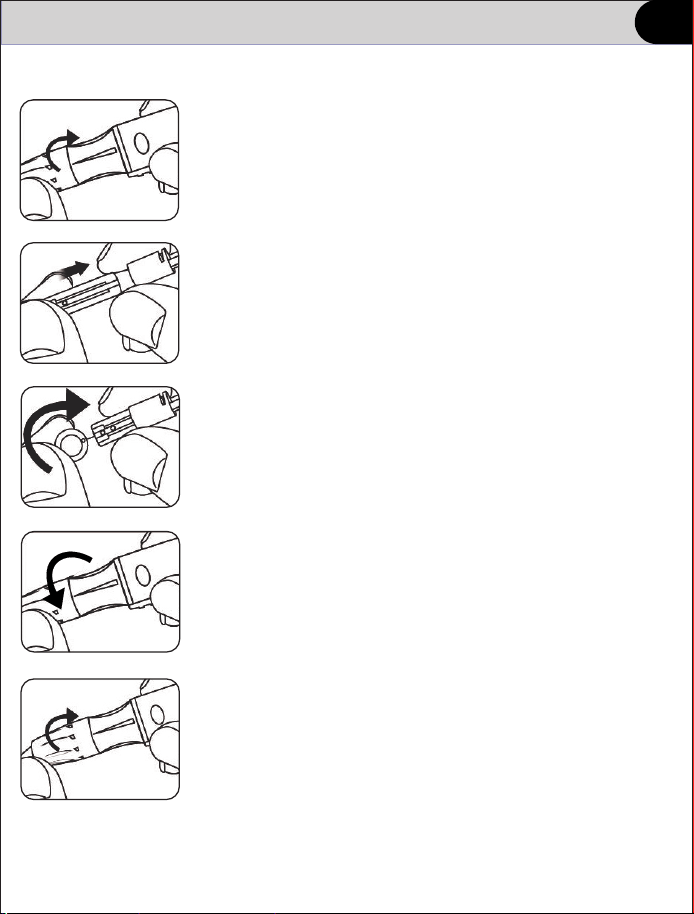
Preparing the lancing device
Note: A shallower puncture may be less painful. Try a shallower setting
first and increase the depth until you find the one deep enough to
get a sufficient blood drop for testing.
① Twist off the lancing device cover.
② Insert a new lancet into the lancet carrier firmly.
③ Hold the lancet needle cover and gently twist
it until it separates from the lancet.
④ Replace the lancing device cap.
Avoid touching the lancet pin.
⑤ Adjust the depth setting
The adjustable tip offers 5 levels of skin
penetration. Twist the lancing device cap
until the desired setting appears.
①
21
Testing
Preparing the lancing device
⑥ Cock the lancing device
Slide the ejection spring controller back
until it clicks. The lancing device isready
to use.
If it does not click, that’s okay. It may have
been cocked when you inserted the lancet.
22
Testing
Fingertip Blood Sampling
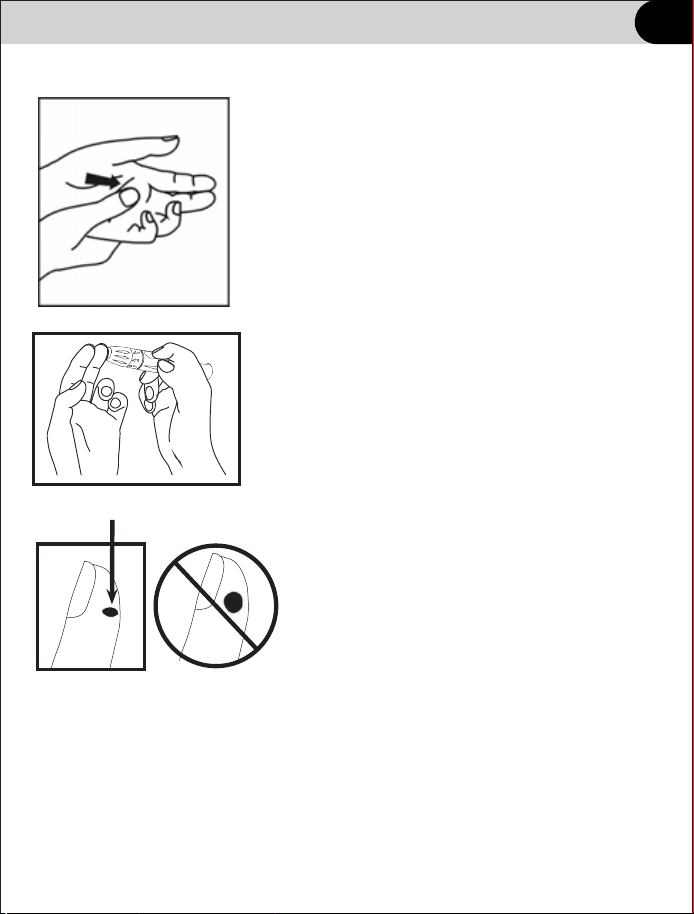
① Prior to testing, make sure the hand is warm
and relaxed before collecting the capillary blood
specimen. Use warm water to increase blood
flow if necessary. Massage the hand from the
wrist up to the fingertip a few times to encourage
blood flow.
Clean the testing site with an alcohol swab and
then dry the testing site thoroughly.
② Place the lancing device firmly against
the side of your fingertip. Press the
Release Button.
③ Gently squeeze your finger until you
get a round drop of blood. Discard the first drop.
If the blood smears or runs, Do Not use that
sample. Wipe the area and gently squeeze
another drop of blood or puncture a new site.
Approximate size
23
5
Testing
Fingertip Blood Sampling
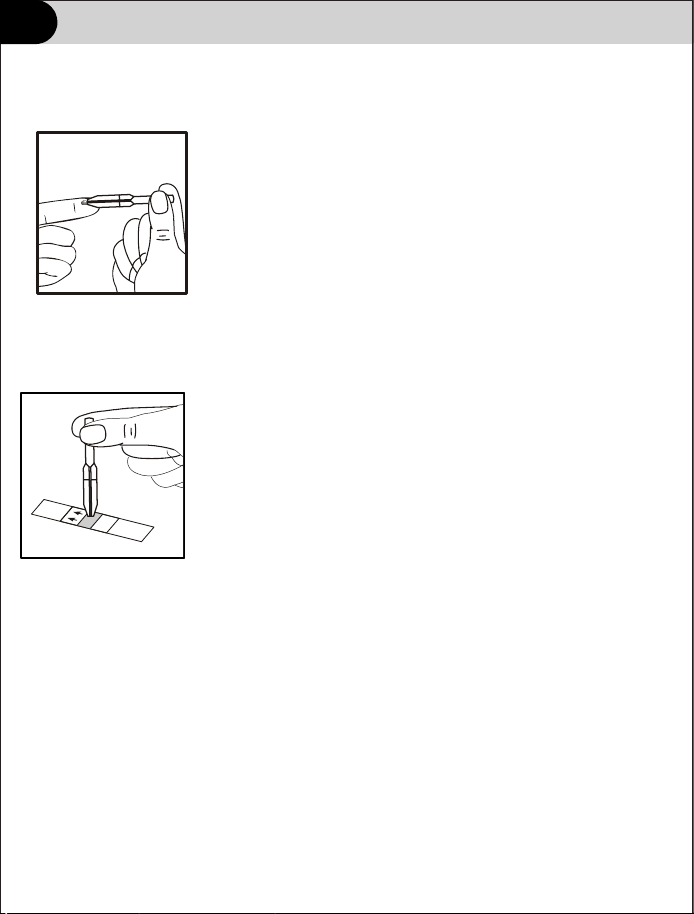
④ For use with the Capillary Transfer Tube, hold the
tube horizontally and touch the tip of the Capillary
Transfer Tube to the blood sample. Capillary action
will automatically draw the sample to the fill line and
stop.
Note: The Capillary Transfer Tube will fill automatically.
Never squeeze the Capillary Transfer Tube while sampling.
Align the tip of the Capillary Transfer Tube with the
Specimen Application Area of the strip to apply the
second drop of blood (approximately 10 µL).
Note: Do not to touch the strip with the Capillary
Transfer Tube or pipette. The capillary blood should
be tested immediately after collected. Use of a
Capillary Transfer Tube or pipette is recommended
for accurate results.
24
Testing
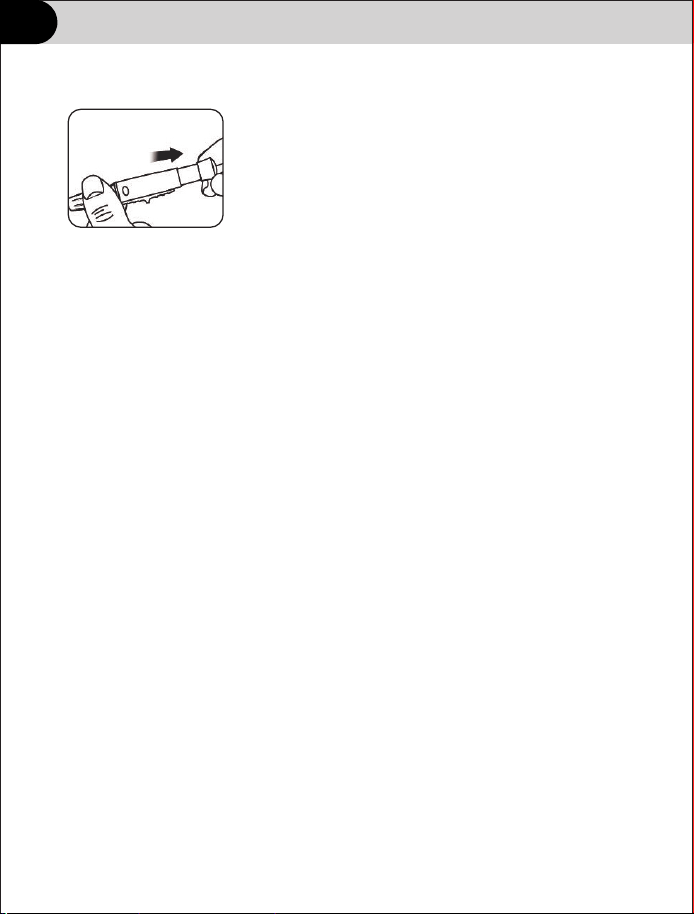
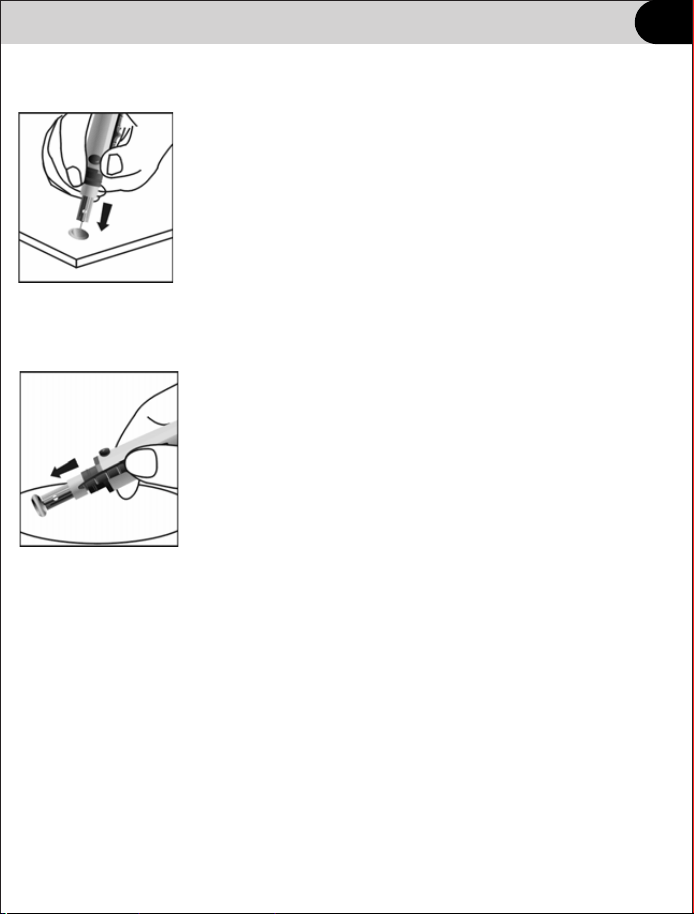
Disposal of the Lancet
Unscrew the lancing device cover. Place the safety tab of
the lancet on a hard surface and carefully insert the lancet
needle into the safety tab.
Press the release button to make sure that the lancet is
in the extended position. Slide the ejection button forward
to eject the used lancet. Place the lancing device cover
back on the lancing device.
25

Testing
Venous Blood Sampling
For fresh whole blood venous specimens, collect the venous blood in a closed
container with EDTA or heparin anticoagulants. Mix the specimen well,sodium
then collect approximately 10 µL into a plastic syringe or pipette. Apply it to the
center of the Specimen Application Area of the strip. Do not to touch the strip
with the pipette.
Whole Blood must be tested within 8 hours of collection.
Mix the specimens well before testing in order to ensure the cellular
components are evenly distributed.
Allow the specimen to come to room temperature (15-30°C or 59-86ºF) for
approximately 15 minutes if the specimen has been refrigerated.
Anticoagulants other than EDTA are not recommended for use.
Note: Refer to NCCLS Documents H3-A6, Collection of Diagnostic Blood
Specimens by Venipuncture.
26

Testing
Blood Sampling
IMPORTANT:
• Use only Test Strips HS-101.
• Make sure your meter and test strips are about the same temperature
before you test.
• Testing must be done within the operating temperature range
10℃~40℃(41℉~104℉).
For the most accurate results, try to test as close to room temperature
15℃ ~ 30℃ (59 ℉ ~ 86 ℉)as you can.
• Tightly close the cap on the vial immediately after use to avoid
contamination and damage.
• Store unused test strips only in their original vial.
• Do Not open the test strip vial until you are ready to remove a test strip
and perform a test. Use the test strip immediately after removing it from
the vial.
• Do Not return the used test strip to the vial after performing a test.
• Do Not re-use a test strip that had blood or control solution applied to it.
Test strips are for single use only.
• Write the first open date on the vial label when you first open it. Discard
the vial 3 months after first open date.
27
Testing
Testing
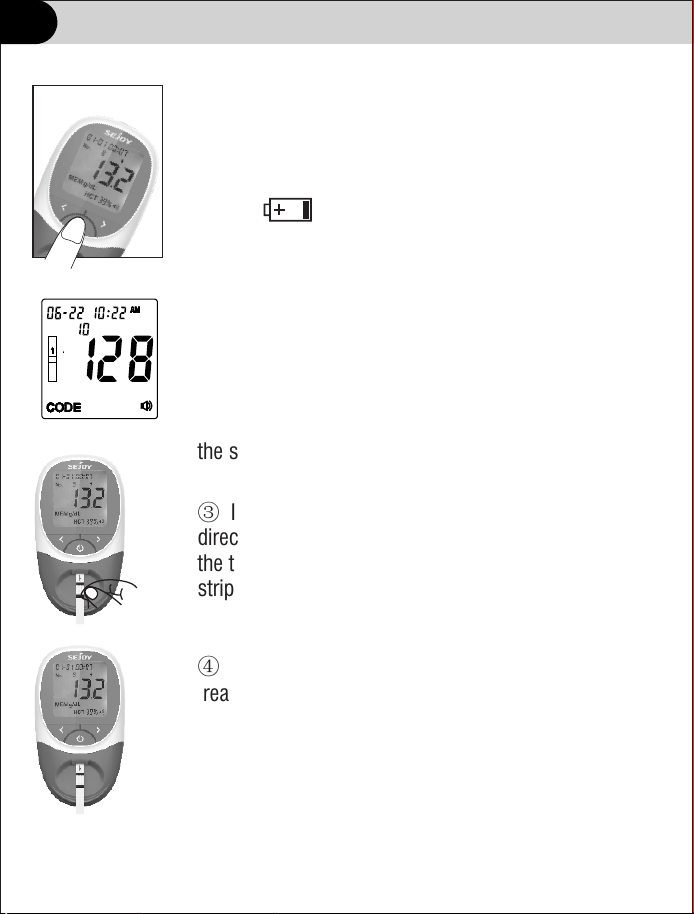
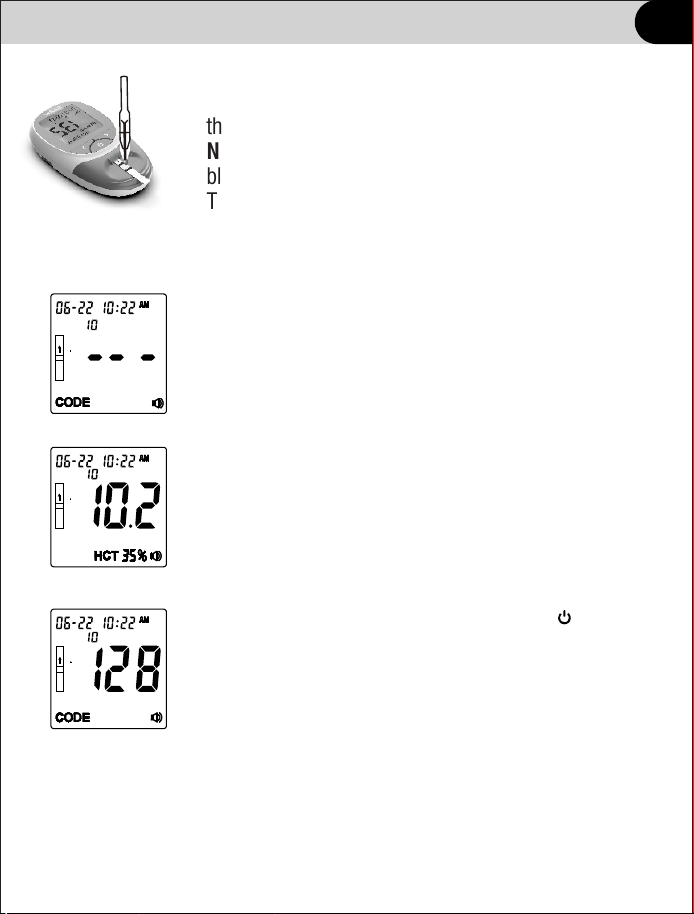
① Turn the meter on. The screen will briefly display all
of the LCD symbols. Observe the LCD at startup to
ensure all segments and display elements are turned
on, and there are no missing icons or elements.
Note: If appears, it indicates the battery is
almost out of power. Replace the battery now.
② After startup, the Initial Screen will be displayed.
Ensure the code chip is inserted, and compare the
number showed in the display with the code number
printed on the test strip canister label. Refer to Section 3
Coding the Meter.
The strip symbol will flash when the meter is ready for
the strip to be inserted.
③ Insert a test strip into the strip channel in the same
direction as the arrows indicated on the strip. Ensure that
the test strip is inserted all the way to the end of the
strip channel.
④ The blood drop symbol will flash when the meter is
ready for the specimen to be applied.
28
No.
Testing
Testing
⑤ Apply approximately 10 µL of blood to the middle of
the Specimen Application Area of the test strip.
Note: For testing capillary blood, use the second drop of
blood for accurate results. Refer to Section 6 Fingertip
Testing for details.
⑥ The meter will begin testing automatically with
three dashes in a line flashing on the display indicating
the test is in progress.
⑦ Hb results will be displayed within 15 seconds,
with Hct value displayed at the bottom of the screen.
⑧ Remove the used test strip and press button, the
meter will return to the initial screen ready for another
strip to be inserted and a test performed.
Note: Discard all blood specimens, used test strips and
materials carefully. Treat all blood specimens as if they
were infectious materials. Follow proper precautions and
obey all local regulations when discarding blood
specimens and materials.
mmol L/
29
No.
No.
No.
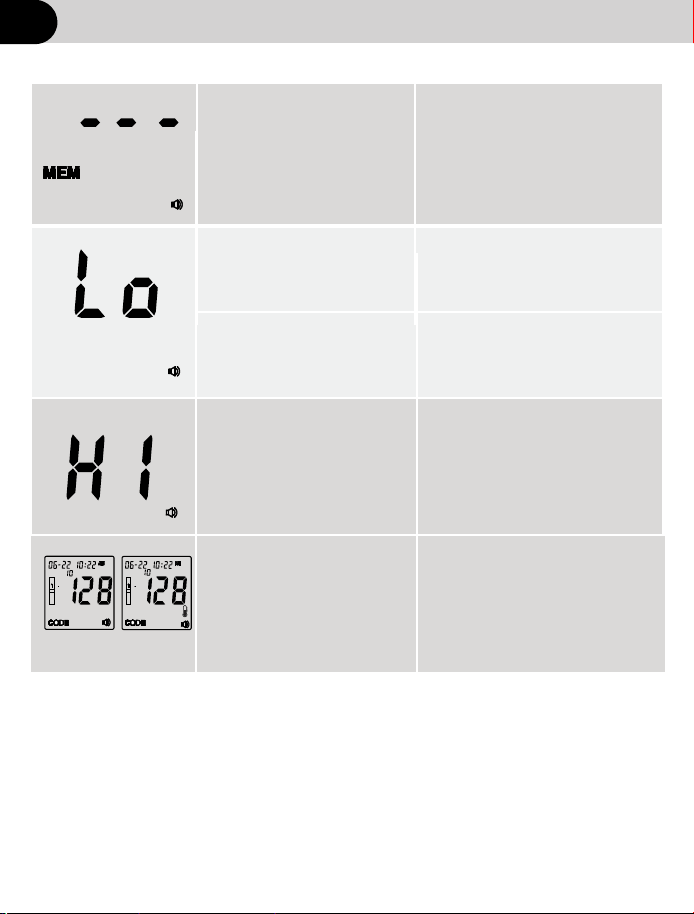
Data and memory
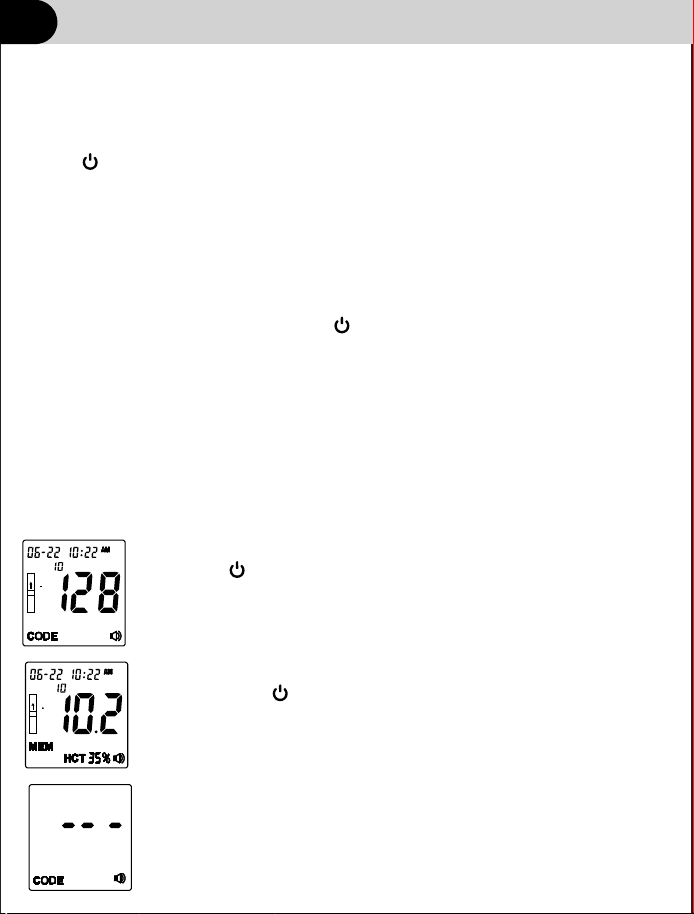
Deleting Data
To delete all data from the meter database, enter the Setup Menu
(refer to Section 4 Meter Setup). Press until dEL is displayed.
Press to delete all data. After flashing, all data will be cleared and dEL
will be displayed again.
Memory
The meter automatically stores up to 1000 test results with the time and date
of the test and any test markers. Results can be reviewed at any time. Test
results are stored from the newest to the oldest, so set the time and date
correctly in the meter.
mmol L/
①Press to turn on the meter.
③If no data is stored the meter will display three
dash(-) and MEM.
②From the Initial Screen, press to review each
record. Press to return to the initial screen.
◄ or ►
◄ or ►
Uploading Data
In standby mode, connect the computer with the USB cable.
To upload all data from the meter database,enter the Setup Menu.Press
until PC is displayed.Press to upload all data.If “YES”is displayed,
the upload is normal;If “NO”is displayed,the upload is abnormal.
◄or►
30
No.
No.
Maintenance
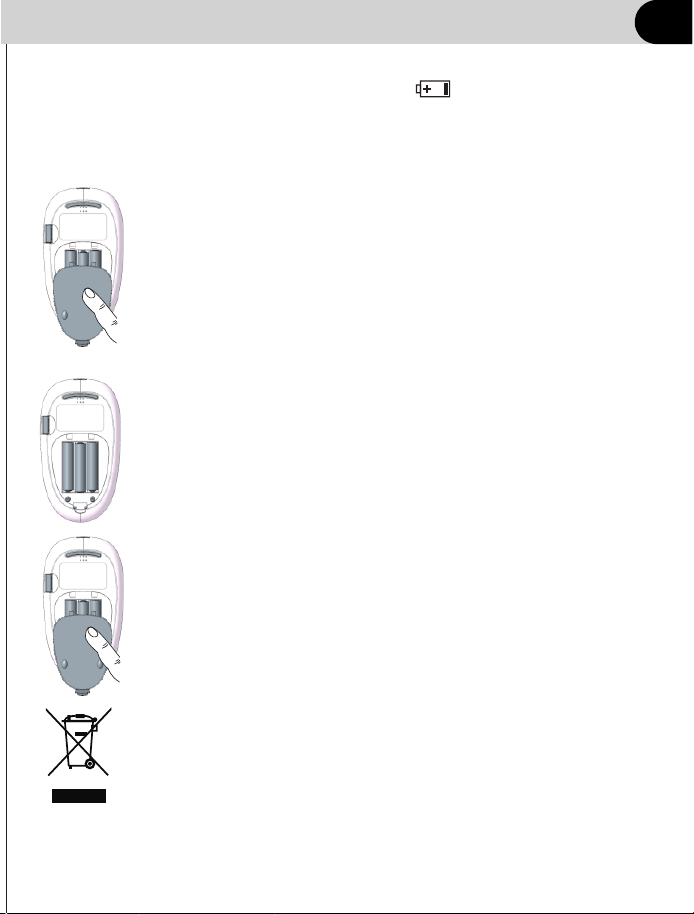
Replacing the battery
If your battery runs low, the battery symbol appears on every display
screen until you change the battery. An E-4 error message will appear if the
battery is too low to perform any more tests. The meter will not function until
the battery is replaced.
① With the meter off, turn the meter over to locate the battery
cover. Press the battery cover tab on the top and lift the cover
to open it.
② Remove and discard the old batteries. Insert three AAA
batteries on top of the plastic tape. Make sure the two outside
batteries are aligned with the plus (+) side down, towards the
bottom of the meter, with the middle battery aligned with the
plus (+) side facing up, towards the top of the meter.
③ Put the battery cover back into position until it
locks into place.
Note: Batteries need to be properly disposed of. Contact
your local government for disposal or recycling practices
in your area.
“
”
31

Maintenance
Caring for your system
Avoid getting dirt, dust, blood, control solution, water, or any other liquid
in the meter’s test strip port.
Important: Never immerse the meter in water or any other liquid. This
may cause inaccurate reading or meter malfunction.
Storing your system
Store your meter, test strips and other items in your carrying case after
each use. Store each item in a cool, dry place .Test strips should be stored
between 2℃~ 30℃ (35.6℉~86℉). Meter and other items should
be stored between -20℃~ 55℃ (-4℉~131℉).
Tightly close the cap on the test strip vial immediately after use to avoid
contamination or damage. Store test strips only in their original vial.
Checking for expiration or damages to test strips and control strip
Expiration dates for test strips are printed on their vial labels.
When you first open a new vial of test strips, record the discard
date on the label. Refer to the test stripvial for instructions on determining
vial for instructions on determining the discard date.
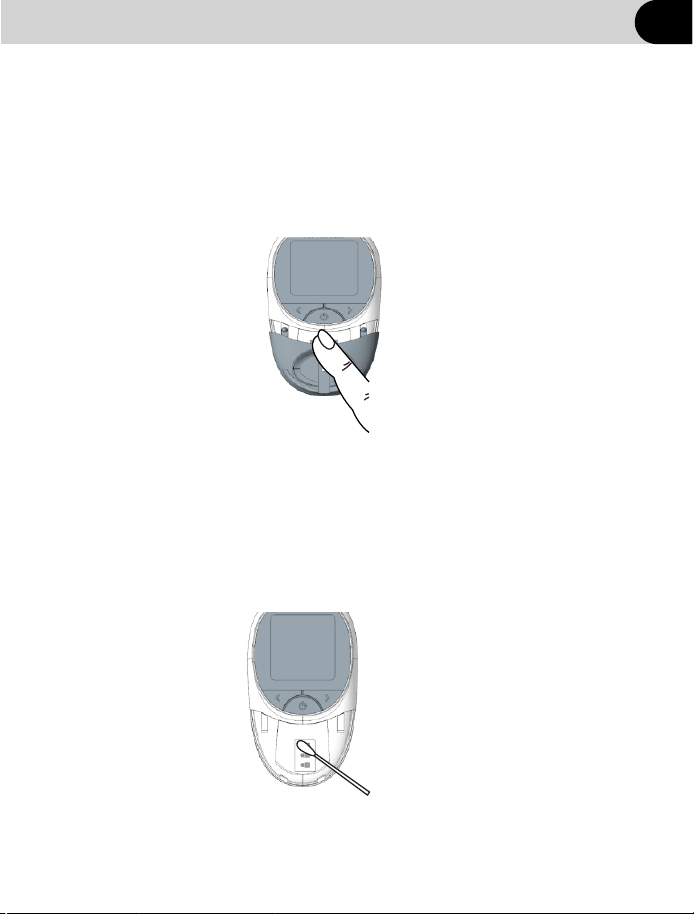
Cleaning your meter
To clean your meter, wipe the outside with a soft cloth dampened with
water and mild detergent. Do Not use alcohol or another solvent to
clean your meter.
Do Not get any liquids, dirt, dust, blood inside the meter through
the test port .
32
Do Not refrigerate. Keep all items away from direct sunlight and heat.
Maintenance
Test Strip Holder
Note: Do not use organic solvents, such as gasoline or paint thinner.
This will cause damage to the meter.
Meter Sensor Area
Remove the Test Strip Holder as described in the previous section. Wipe
down the Meter Sensor Area with a cotton swab. Do not to scratch the
transparent window covering the sensor.
Note: Do not use bleach or alcohol to clean the Meter Sensor Area.
This will cause damage to the meter.
33
Remove the Test Strip Holder by pressing in on middle of the Test Strip Holder
and sliding it out from the meter. Wipe it with a damp cloth or a mild detergent
and dry it with a dry, soft cloth. Slide the Test Strip Holder back into the meter
by laying it flat on the meter. Firmly press down on the center of the Test Strip
Holder with your thumb and push it in until it clicks into place.

Maintenance
Cleaning your lancing device
• To clean, wipe them with a soft cloth dampened with water and mild
detergent. Do Not immerse the lancing device in any liquid.
• To disinfect, prepare a solution of one part household bleach to ten
parts water. Wipe the lancing device with a soft cloth dampened with
this solution. Immerse the caps only in this solution for 30 minutes.
After disinfecting, rinse briefly with water and allow both to air dry.
34
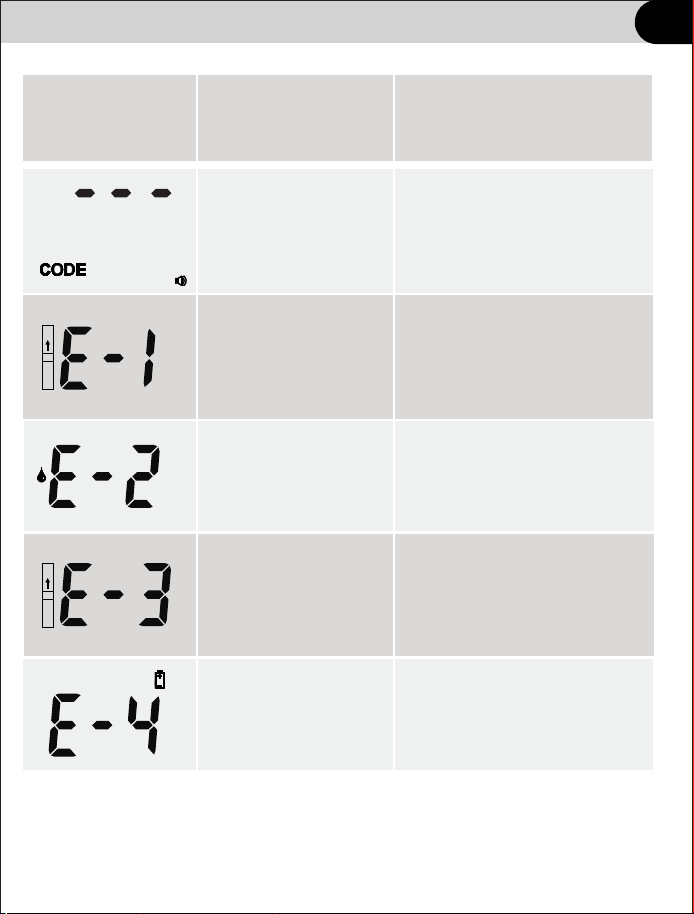
Troubleshooting
Message
Possible Cause
What to do
Specimen was
applied to the test
strip too soon.
Repeat the test and apply
specimen after blood drop
symbol appears.
Used or dirty test strip
Ensure the test strips are
with the expiration date
printed on the canister label.
Test strip was
removed during
the test.
Low battery
Replace the batteries,
then repeat the test.
Repeat the test and ensure
the test strip remains
in place.
No code chip or the
chip is not well
installed.
Insert the code chip to the
meter correctly.
35
No test record.
The test result is lower
than 4.5 g/dL .
Check the memory when
test results are stored.
If the specimen was taken
from a specimen container,
ensure the specimen is
mixed well and repeat test.
Repeat test and apply
enough specimen.Use at
least 10 µL of whole blood.
Insufficient specimen
less than 1µL
If the specimen was taken
from a specimen container,
ensure the specimen is
mixed well and repeat test.
The test result is higher
than .25.0g/dL
Troubleshooting
It is suggested to use
it in the temperature
range of 15℃ ~30℃
(59℉~86℉)to obtain
more accuratetest data
Temperature prompt
flashing,Operation the
working temperature is
not in the range of 10℃~
40℃(50℉~104℉)
36
No.
No.
Contact the vendor.
Contact the vendor.
Meter does not enter the test mode after inserting a test strip.
Probable Cause
What to Do
The battery power is low.
Replace the battery (and reset the date and
time,if necessary.)
The battery is installed
incorrectly or there is no
battery in the meter.
Check that the battery is installed correctly.
Test strip inserted upside
down, wrong end in, or
incompletely inserted
into the meter.
Insert the test strip with the
printed side up
Defective meter or test strips.
Contact the vendor.
Blood or foreign objects put
into the test strip port.
Test does not start after applying the blood sample.
Probable Cause
What to Do
Blood sample too small.
Repeat the test with a new test strips and
a larger blood sample.
Defective test strip.
Repeat the test with a new test strip.
Sample applied after meter
times out and turns off.
Repeat the test using a new test strip. Wait until
you see the blood and test strip symbols on the
display screen before you apply the blood
sample.
Defective meter or test strips.
Troubleshooting
and the top of the strip in the meter.
37
Technical information
Specifications
Meter Type
(-4 ~131
℉ ℉)
38
Blood Sample
Blood Volume
Test Strip Type
Measuring Range
Measuring Time
Power
Battery Life
Memory Capacity
Operation Environment
Dimensions
Weight
Capillary and Venous whole blood
10uL
HS-101
4.5-25.0g/dL
<
15seconds
3*AAA Battery or TypeC USB DC5V
Approximately more than 2000 tests
1000 test results
10℃~40℃ (50 ~104
℉ ℉)
<90%RH (non-condensing)
-20℃~55℃
<90%RH (non-condensing)
Expected service life
Five years
Strip storage
environment
2℃~30℃ (35.6 ~86
℉ ℉)
Meter storage
environment
HB-202
126*71*25 mm
Approximate 113.6g,battery not included
Technical information
Specifications
Automatic power off
Unit of measure
Repeatability
g/dL,g/L or mmol/L
39
Data transmission
with Usb data cable,can be connected
to the computer for data management
4.5-10.0g/dL,Standard
10.1-25.0g/dL,Coefficient
Accuracy
4.5-10.0g/dL,
10.1-25.0g/dL,
absolute deviation≤1g/dL.
relative deviation≤4%.
Deviation (SD)≤0.8g/dL.
of Variation (CV)≤3%.
Approx.3 minutes after last user
action

Disposing of the meter,test strips,lancets and batteries
Warning
• Any product coming in contact with blood is considered contaminated
(potentially infectious).
• During normal testing, any Hemoglobin meter may come in contact
with blood.
• Lancing devices may also be considered sharps. Disposal of sharps
is regulated by law in many jurisdictions.
Comply with any laws or ordinances relating to the disposal of sharps
and/or contaminated products. Contact your local health department
or other appropriate authorities for proper handling and disposal of
used meters, used test strips, used lancets, and used batteries.
Please consider the following points when disposing of used testing
materials:
• Consider recycling of the meters and batteries at an appropriate
facility. Be aware the meter is potentially hazardous electronics
scrap (e-scrap) and should be disposed of accordingly. The batteries
are potentially hazardous also and should be disposed of accordingly.
• Disinfect the meter before recycling or disposing.
* 29 CFR 1910.1030 – Bloodborne pathogens
* Directive 2012/19/EU– Directive on waste electrical and electronic
equipment (WEEE)
40

Warranty
Limited 2-Year Warranty
The meter is guaranteed for 2-year from the date of purchase. If the
meter does not function properly due to defective components or poor
workmanship, we will repair or replace it freely. This warranty does not
cover damage due to improper handling in any way. Battery does not
included in the warranty.
41
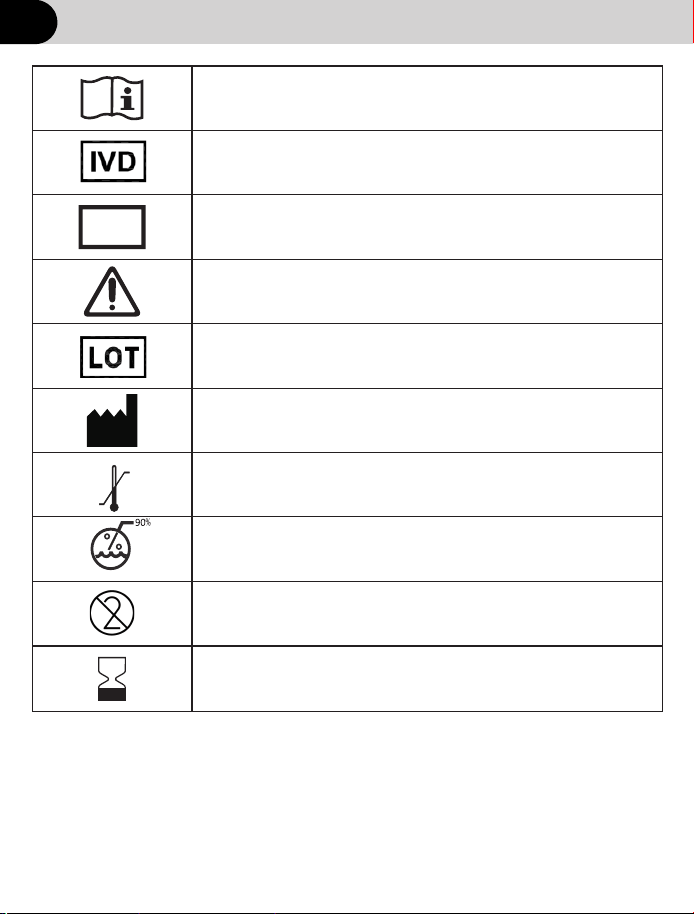
Symbol Index
SN
Consult instructions for use
In vitro diagnostic medical device
Serial number
Batch code
Manufacturer
Caution
Do not reuse
℃
℃
55
-20
Storage temperature limitation
Use by
Storage humidity limitation
42
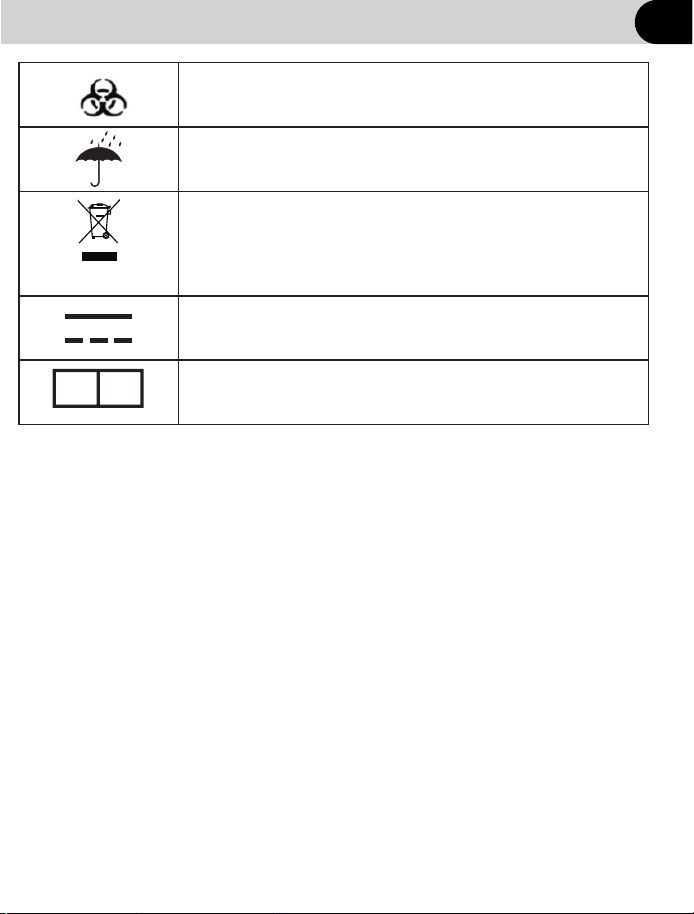
Symbol Index
Biological risks
Keep dry
This symbol indicates that you should not discard
waste electrical or electronic equipment (WEEE)
in the trash. For proper disposal, contact your local
retailer where product was purchased
Direct Current
EC
REP
European Authorized Representative
43

FCC Warnning:
Any Changes or modifications not expressly approved by the par ty
responsible for compliance could void the user's authority to operate
the equipment.
This device complies with par t 15 of the FCC Rules. Operation is
subject to the following two conditions:
(1) This device may not cause harmful interference, and
(2) this device must accept any interference received, including
interference that may cause undesired operation.
Note: This equipment has been tested and found to comply with the
limits for a Class B digital device, pursuant to par t 15 of the FCC Rules.
These limits are designed to provide reasonable protection against
harmful interference in a residential installation. This equipment
generates uses and can radiate radio frequency energy and, if not
installed and used in accordance with the instructions, may cause
harmful interference to radio communications. However, there is no
guarantee that interference will not occur in a par ticular installation.
If this equipment does cause harmful interference to radio or television
reception, which can be determined by turning the equipment off and on,
the user is encouraged to try to correct the interference by one or more
of the following measures:
-Reorient or relocate the receiving antenna.
-Increase the separation between the equipment and receiver.
-Connect the equipment into an outlet on a circuit different from that to
which the receiver is connected.
-Consult the dealer or an experienced radio/TV technician for help.
The device has been evaluated to meet general RF exposure
requirement.
The device can be used in por table exposure condition without
restriction.

Area C, Building 2, No.365, Wuzhou Road,Yuhang
Economic Development Zone,Hangzhou City
311100 Zhejiang China.
Distributed By:
Document No.: DHB-0202-010
Version:Z
Date of Issue: 2020.09
Manufactured by Hangzhou Sejoy Electronics & Instruments Co., Ltd.
