
TIMING TOOL KIT FOR MERCEDES,
CHRYSLER, JEEP - PETROL/DIESEL
MODEL NO: VSE4802.V2
Thank you for purchasing a Sealey product. Manufactured to a high standard, this product will, if used according to these instructions,
and properly maintained, give you years of trouble free performance.
IMPORTANT: PLEASE READ THESE INSTRUCTIONS CAREFULLY. NOTE THE SAFE OPERATIONAL REQUIREMENTS, WARNINGS & CAUTIONS. USE
THE PRODUCT CORRECTLY AND WITH CARE FOR THE PURPOSE FOR WHICH IT IS INTENDED. FAILURE TO DO SO MAY CAUSE DAMAGE AND/OR
PERSONAL INJURY AND WILL INVALIDATE THE WARRANTY. KEEP THESE INSTRUCTIONS SAFE FOR FUTURE USE.
1. SAFETY
WARNING! Wear approved eye protection. Wear appropriate Personal Protective Equipment. A full range of Personal Protective
Equipment is available from your Sealey stockist.
WARNING! Ensure that Health & Safety, Local Authority Regulations and general workshop practice Regulations are adhered to when
using tools.
8 DO NOT use tools if damaged.
9 Maintain tools to ensure that they are in an adequate condition for safe use and optimum performance.
9 Ensure that a vehicle that has been raised by a jack is adequately supported. Use axle stands.
8 DO NOT attempt to start or move a vehicle whilst in gear and with timing devices tted.
9 Wear suitable clothing to avoid snagging. DO NOT wear jewellery. Tie back long hair.
9 Account for all tools, parts and components being used. DO NOT leave these in or near the engine. Return tools to suitable storage
after use.
9 When not in use, store in a safe, dry childproof place.
9 Keep children and unauthorised persons away from the work area.
▲ IMPORTANT! These instructions are intended as a guide only. Always refer to the vehicle manufacturer’s service instructions
or a proprietary manual to establish the correct procedure and data.
WARNING! The warnings, conditions and instructions in this manual cannot cover all possible conditions and situations. The Operator/
User must apply caution and common sense (good practical sense).
9 When timing an engine, always prevent the engine from being turned over. Use a notice and/or inhibit the engine.
WARNING! Incorrect or out of phase camshaft timing can result in contact between the valve head and the piston crown. This will
cause damage to the engine.
2. INTRODUCTION
Timing chain splitting and tting tool kit. Enables timing chain replacement with the minimum of engine dismantling. Suitable for
Mercedes chain drive engines, and some Chrysler and Jeep applications. The kit includes tools to split the chain and also the
temporary chain links required to t the new chain. Supplied in a storage case with instructions.
VSE4802.V2 Issue:1 01/12/22
Original Language Version
© Jack Sealey Limited
Refer to
Instructions
Wear Eye
Protection
Wear Protective
Clothing
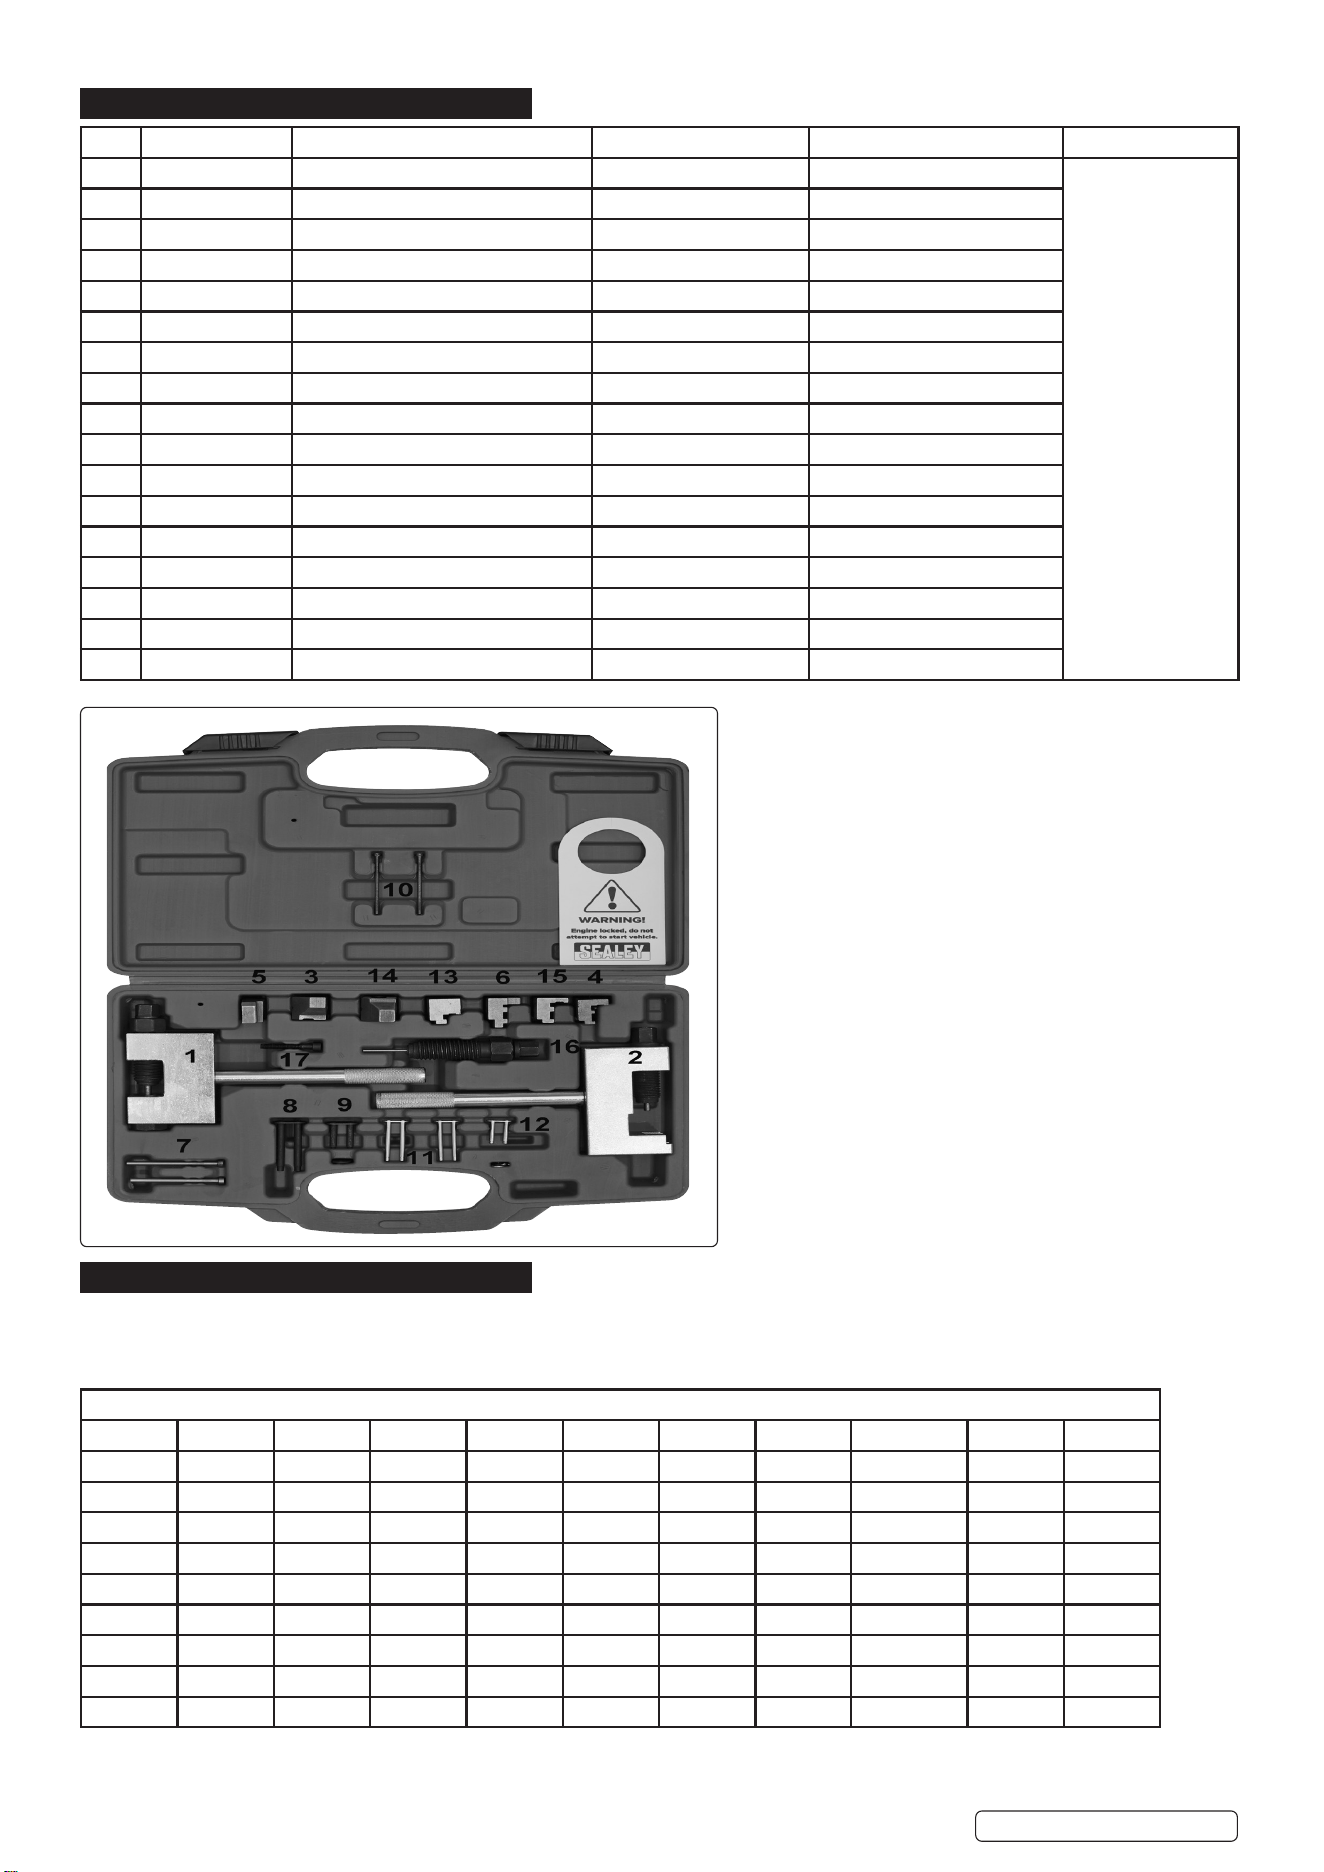
3. CONTENTS
4. APPLICATIONS
Make: Chrysler 300C (05-11), PT Cruiser (02-09) Jeep Commander (05-11), Grand Cherokee (01-11) Mercedes A-Class (98-12), B-Class
(05-12), C-Class (98-13), CL-Class (99-07), CLC-Class (08-12), CLK-Class (98-09), CLS (05-18), E-class (97-16), GLK-Class (08-12),G-Class
(00-15), M-Class (98-07), R-Class (05-07),S-Class (98-13), SL-Class (98-07),Viano (03-10), Vito (03-10).
Item Part no. Description OE Tools ref Mercedes OE Tools ref. Chrysler Jeep Associated Tools
1 VSE4802-V2-01 Link removal tool 602589023300 9312 VSE4808
2 VSE4802-V2-02 Link assembly tool 602589003900
3 VSE4802-V2-03 Swaging jaw (A) 103589016300 8947
4 VSE4802-V2-04 Swaging jaw (B) 112589069300
5 VSE4802-V2-05 Assembly link swaging jaw (A) 602589026300
6 VSE4802-V2-06 Assembly link swaging jaw (B) 602589026300
7 VSE4802-V2-07 Spare link removal pins (*2 per kit) 602589046301
8 VSE4802-V2-08 Temporary link (A) 602589026300
9 VSE4802-V2-09 Temporary link (B) 602589026300
10 VSE4802-V2-10 Temporary threading link (A) 602589024000
11 VSE4802-V2-11 Temporary threading link (B) 602589024000
12 VSE4802-V2-12 End plates for VSE4802-11 602589024000
13 VSE4802-V2-13 Swaging jaw (locating) 103589016300
14 VSE4802-V2-14 4mm swaging jaw (press) 602589036300
15 VSE4802-V2-15 Swaging jaw (locating) 103589016300
16 VSE4802-V2-16 Link removal mandrel 602589046300
17 VSE4802-V2-17 Securing bolt N/A
© Jack Sealey Limited Original Language Version
VSE4802.V2 Issue:1 01/12/22
Engines
1.4 1.5 1.6 1.7 1.7CDi 1.9 2.0 2.1CDI 2.2CDICRD 2.4 2.6
166.940 266.920 166.960 266.940 668.940 166.990 266.960 646.811 611.960 112.910 112.912
668.941 266.980 646.812 611.961 112.911 112.913
668.942 646.820 611.962 112.914
646.821 112.915
626.951 112.916
626.961
626.962
626.963
626.966
5. OPERATION
The VS802.V2 timing chain kit is a great time saving tool, it provides the tools to split the timing chain and make it possible to renew
the chain with the minimum amount of engine dismantling.
▲ Due to the large number of applications this kit is suitable for, these instructions have been prepared as a general guide. It is strongly
advised to follow the procedures in the relevant vehicle manufacturer’s workshop manual with regard to timing chain replacement.
5.1. SPLITTING THE TIMING CHAIN
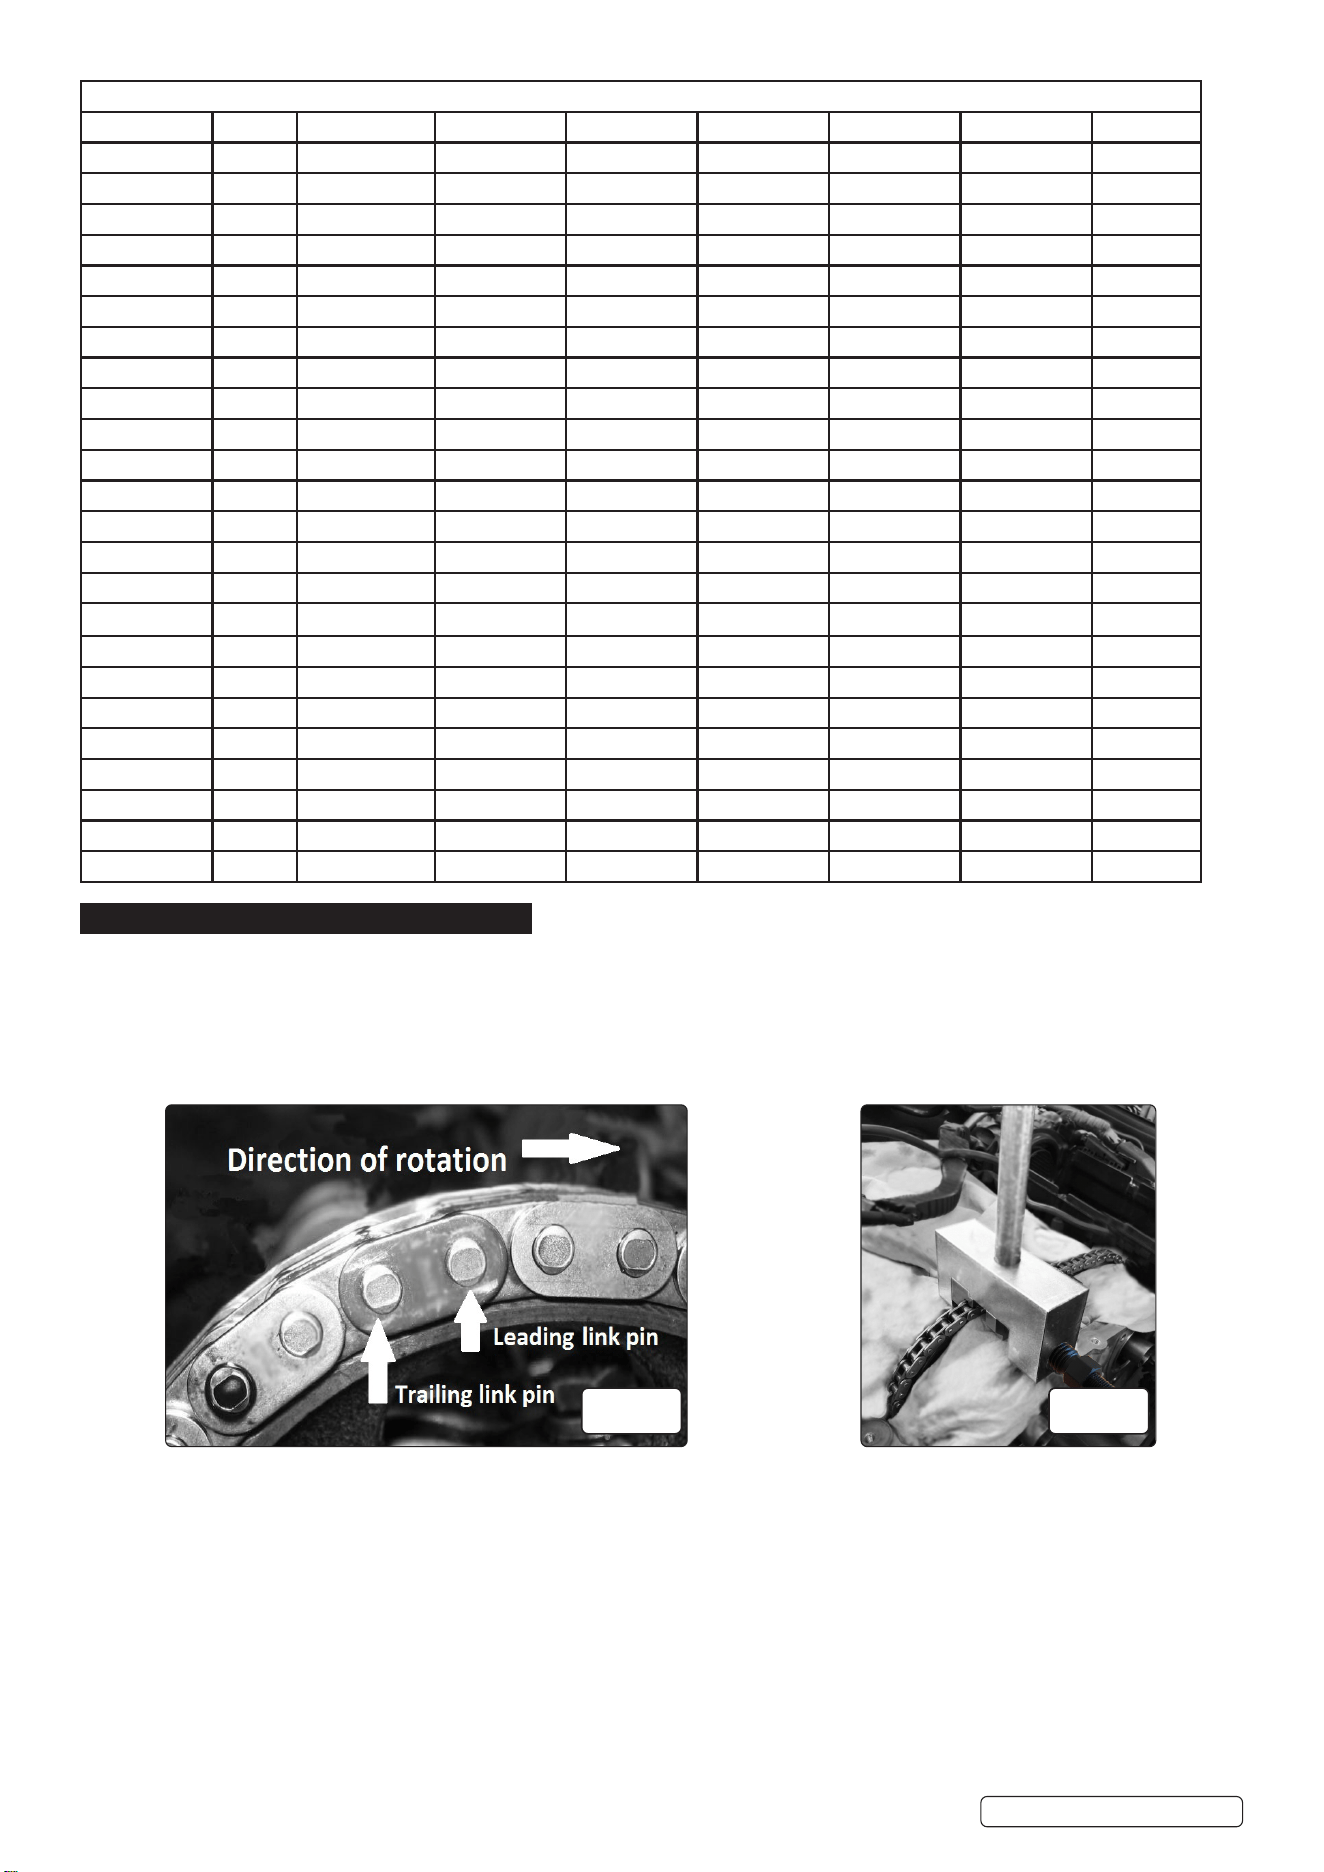
5.1.1. The leading link pin from one of the timing chain links will need to be removed. The leading link is identied as shown in g.1.
Fit the VSE4802-V2-01 link removal tool ensuring that the correct sized removal pin is used, g.2.
NOTE: Two sizes of removal pins are supplied.
5.1.2. Tighten the 19mm hex until the tool is holding the chain and then screw in the13mm hex bolt to remove the chain link.
5.2. FITTING THE NEW TIMING CHAIN
Note: Follow the relevant manufacturer’s specic instructions for the correct method of turning the engine and the direction of rotation.
5.2.1. Connect the new timing chain to the old timing chain using the relevant supplied temporary link. As the engine is turned the new timing
chain replaces the old timing chain.
5.2.2. Once the old timing chain has been replaced with the new timing chain, the permanent link must be tted and swaged over.
5.2.3. Using the VSE4802-V2-02 link assembly tool, the relevant chain guide block and also depending upon link pin, size either the
VSE4802-V2-.03 or VSE4802-V2-14 magnetic Jaw press to press on the outer chain link plate by tightening the 13mm hex bolt, g.3.
5.2.4. Release the 13mm Hex bolt, after ensuring the link end plate is pressed on correctly. Rotate the jaw press so the grooved section is
positioned over the link pin. Tighten the 13mm Hex bolt to swage over the end of the link pin, repeat for the second link pin, see g.4.
5.2.5. The ends of the link pins should appear as shown in g1.1 If necessary repeat the swaging procedure.
Engines
2.7D CDICRD 2.8 3.0D CDI/CRD 3.2D CDI 3.2 3.9D CDI 4.3 4.0D CDI 5.0
612.961 112.920 642.830 613.960 112.940 628.960 113.940 628.962 113.960
612.962 112.921 642.832 613.961 112.942 628.961 113.941 629.910 113.961
612.965 112.922 642.834 648.960 112.943 113.942 629.911 113.963
612.967 112.923 642.836 648.961 112.944 113.943 113.964
647.961 646.838 112.946 113.948 113.965
642.850 112.947 113.966
642.852 112.951 113.967
642.853 112.953 113.968
642.854 112.955 113.969
642.856 113.971
642.858
642.862
642.868
642.886
642.910
642.920
642.921
642.922
642.930
642.932
642.960
642.961
642.970
642.990
VSE4802.V2 Issue:1 01/12/22
Original Language Version
© Jack Sealey Limited
Fig.1 Fig.2
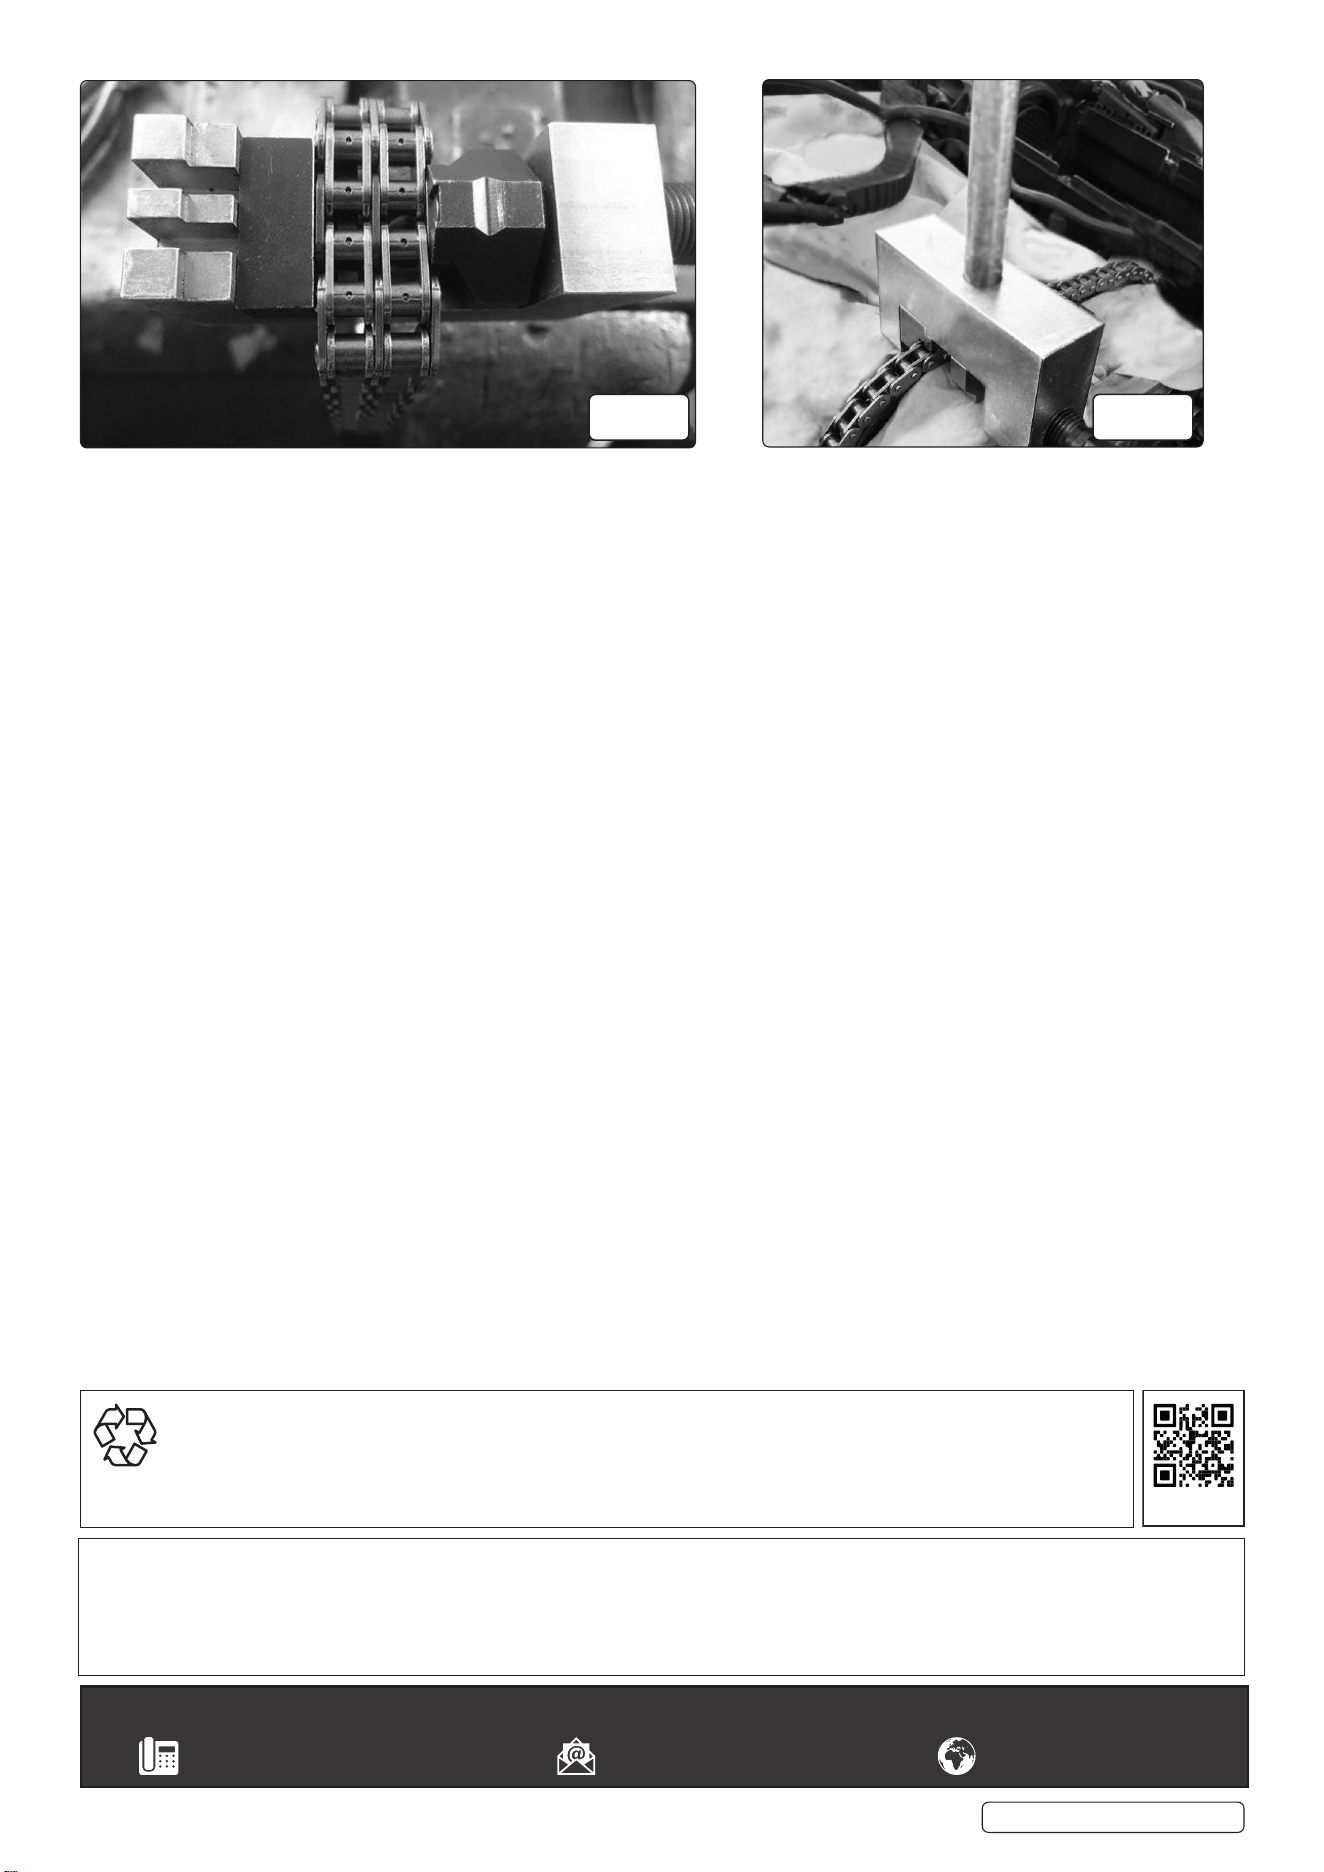
5.2.6. Release the 13mm Hex bolt, after ensuring the link end plate is pressed on correctly. Rotate the jaw press so the grooved section is
positioned over the link pin. Tighten the 13mm Hex bolt to swage over the end of the link pin, repeat for the second link pin, see g.4.
5.2.7. The ends of the link pins should appear as shown in g.1 If necessary repeat the swaging procedure.
Fig.3
VSE4802.V2 Issue:1 01/12/22
Original Language Version
© Jack Sealey Limited
Sealey Group, Kempson Way, Suffolk Business Park, Bury St Edmunds, Suffolk. IP32 7AR
01284 757500 sales@sealey.co.uk www.sealey.co.uk
Note: It is our policy to continually improve products and as such we reserve the right to alter data, specifications and component parts without prior
notice. Please note that other versions of this product are available. If you require documentation for alternative versions, please email or call
our technical team on technical@sealey.co.uk or 01284 757505.
Important: No Liability is accepted for incorrect use of this product.
Warranty: Guarantee is 12 months from purchase date, proof of which is required for any claim.
ENVIRONMENT PROTECTION
Recycle unwanted materials instead of disposing of them as waste. All tools, accessories and packaging should be sorted,
taken to a recycling centre and disposed of in a manner which is compatible with the environment. When the product
becomes completely unserviceable and requires disposal, drain any fluids (if applicable) into approved containers and
dispose of the product and fluids according to local regulations.
REGISTER YOUR
PURCHASE HERE
Fig.4