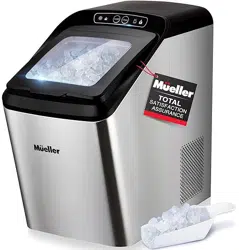
User Manual Mueller NM-530 UltraSonic Nugget Ice Maker
Your satisfaction is guaranteed. If you are not completely satisfied with our UltraSonic Nugget Ice Maker, please let us know. We'll help make it work for you, or we'll refund your money.
IMPORTANT SAFEGUARDS
To reduce the risk of personal injury or damage to your UltraSonic Nugget Ice Maker or other property when using this product, basic safety precautions should always be followed, including the following:
- Read all instructions before assembling and using.
- Keep all packaging materials, including any plastics, out of reach of children.
- Do not remove any safety, warning, or product information labels from your Ice Maker.
- Close supervision is necessary when any appliance is used by or near children, including this Ice Maker.
- This appliance is not intended for use by persons (including children) with reduced physical, sensory, or mental capabilities, or lack of experience and knowledge unless they are provided with supervision and instructions concerning use of the appliance by a person responsible for their safety.
- Wash and thoroughly dry all parts before plugging in and review the "Before First Use" instructions for further setup and cleaning details.
- Always place and operate the appliance on an even, stable, and dry surface, away from direct sunlight and in an upright position.
- Warning: Do not overturn the Ice Maker. If the Ice Maker is overturned accidentally, return to the upright position, and leave for a period of at least 2 hours before powering on again.
- If the Ice Maker is brought in from outside in wintertime, do not use for a few hours, allowing the unit to warm up to the room temperature before operating.
- After moving the appliance, always allow 30 minutes for the unit to rest before re-plugging in.
- When handling, installing, and operating the appliance, care should be taken to avoid damage to the refrigerant tubing.
- Make sure that there is at least 3 inches of space between the rear of your unit and wall. Keep a minimum distance of 3 inches on each side of your unit free.
- Make sure that the voltage indicated on the rating plate of the appliance corresponds to your outlet voltage.
- Do not plug or unplug the appliance with wet hands.
- This appliance must be grounded to reduce the risk of shock or fire. The Ice Maker is equipped with a grounding plug that must be plugged into a corresponding outlet that is correctly installed and grounded. Do not cut or remove the grounding plug. If required, have a certified electrician install the proper receptacle.
- If the outlet is overloaded with other appliances, this appliance may not operate properly. This appliance should be operated on a separate electrical circuit from other operating appliances.
- Do not operate the appliance if the cord or plug is damaged or should the appliance malfunction or is dropped or damaged in any manner. Contact Mueller Customer Support for assistance.
- Avoid the use of an extension cord to prevent possible overheating or a risk of fire. However, if it is necessary to use an extension cord:
- Only use UL-listed extension cords with grounding plug.
- Ensure the marked rating of the extension cord is equal to or greater than the rating of this appliance.
- The power cord or any extension cord should be positioned in such a way that it does not drape over the edge of a counter or tabletop where it can be pulled on by children or cause a tripping hazard.
- Do not place the unit or power cord on or near hot surfaces such as gas flames, electric burners, or in a heated oven.
- Do not place on top of any other appliance.
- Never use the ice maker when there is a flammable gas leakage or other flammable fumes.
- Never store or use gas and other flammable articles near the Ice Maker to avoid any fire.
- To reduce the risk of injury, electric shock, or fire, do not use any accessory attachments not recommended by the manufacturer.
- Check inside the unit for presence of foreign objects before operating.
- Do not fill the Water Reservoir above the MAX line to ensure optimal operation.
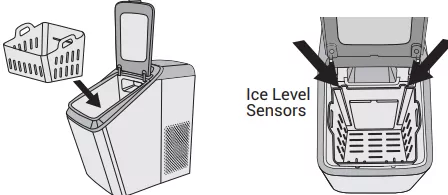
- Ensure the Ice Basket is correctly inserted into the Water Reservoir so as not to interfere with the sensors.
- Do not use water that is microbiologically unsafe or of unknown quality.
- Do not use any liquid substances other than water for ice making.
- Never put flammable, explosive, or corrosive articles into the Ice Maker.
- During operation, do not touch any ice making component beyond the Ice Chamber to avoid the risk of frostbite.
- Do not leave the appliance unattended while in use.
- Children should be supervised to ensure that they do not play with the appliance.
- This Ice Maker is not intended to be operated by means of an external timer or separate remote-control system.
- Ensure to turn the appliance OFF and unplug before assembling or disassembling parts, when not in use, and before cleaning.
- To disconnect, press the ON/OFF button, then grasp the plug to remove from the wall outlet. Never yank the cord to disconnect.
- Unplug the Ice Maker before moving it to avoid damaging the refrigerating system.
- To protect against electrical shock, do not place or submerge this unit including the cord and power plug, in water or other liquid. Any liquid entering the motor housing may damage the unit.
- Do not clean your Ice Maker with any flammable fluids. The fumes may create a fire hazard or explosion.
- To remove frost, scrape with a plastic or wood spatula or scraper. Do not use an ice pick or a metal or sharp-edged instrument as it may puncture the freezer liner and then the flammable refrigerant tubing behind it.
- Do not use any electrical device to defrost your appliance.
- Do not use electrical appliances inside the Water Reservoir compartment of the appliance.
- Do not attempt to disassemble, repair, modify, or replace any part of this product.
- Keep this Ice Maker in a dry and cool place.
- Do not use outdoors.
- Do not use this appliance for any other purpose than for its intended use.
- For household use only.
- Save these instructions.
WARNING: This appliance contains flammable refrigerant and blowing gas which is highly combustible. Adhere to the warnings listed above to reduce the risk of injury or property damage.
Follow Federal and Local Regulations in the case of disposal. The flammable refrigerant and insulation material used in this product require special disposal procedures. Contact your local authorities for the environmentally safe disposal of your Ice Maker.
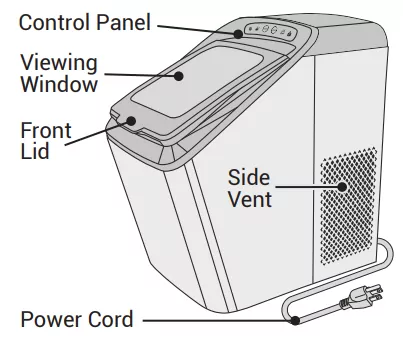
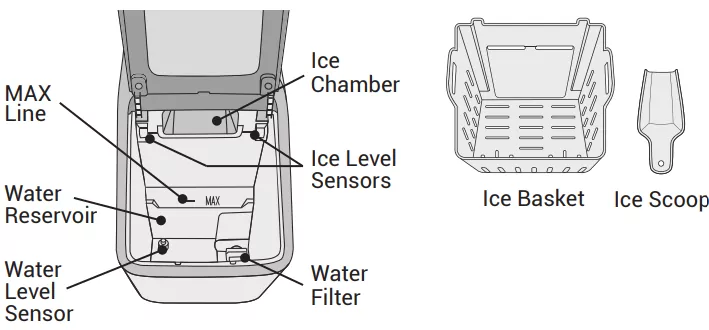
KNOW YOUR ICE MAKER
EXTERIOR
INTERIOR
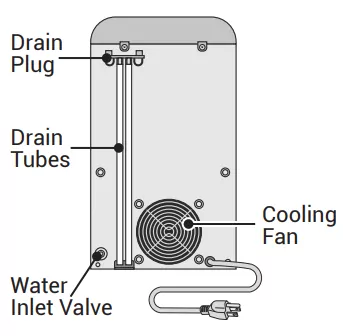
REAR
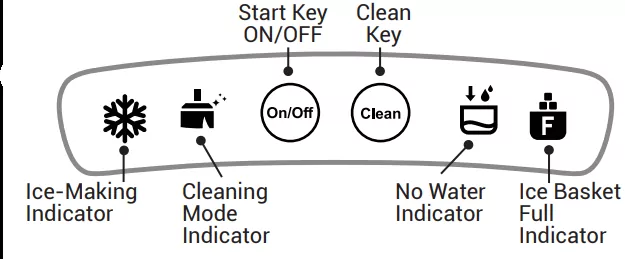
CONTROL PANEL
| Key/Indicator |
Function |
 |
Start or stop the ice-making cycle. |
 |
Start or stop the self-cleaning function. |
 |
The "Ice-making" indicator will flash when:
- Unit has been plugged in.
- Cleaning cycle has completed. |
 |
The "Ice-making" indicator will light up solidly when the appliance is making ice. |
 |
The "Cleaning Mode" indicator will light up solidly when the appliance is performing cleaning. |
 |
Water refill indication. The "No water" indicator will flash when the appliance needs to be refilled. The appliance will be refilled with water automatically if it is connected to an external water supply. |
 |
The "Ice Basket Full" indicator will light up solidly when the ice basket is full. |
 |
Defrosting indication. The appliance is defrosting. This is an automatic process to remove any build-up around the ice formation mechanisms. |
BEFORE FIRST USE
- IMPORTANT: ENSURE THE ICE MAKER IS KEPT IN AN UPRIGHT POSITION AT ALL TIMES. The incline angle of the Ice Maker unit should not exceed 45° during transportation or use. Do not turn the Ice Maker upside down. Doing so could cause the compressor or refrigerating system to operate incorrectly.
- Remove packaging materials and dispose of appropriately by keeping out of reach of children.
- Find a location for your Ice Maker that is protected from direct sunlight and other sources of heat (i.e.: stove, furnace, radiator) or corrosive gases. Ensure the surface is dry, level, stable and able to support the total weight when the unit is full of water.
IMPORTANT: The Ice Maker is not designed to be installed in an outside area such as a garage or porch or in areas of extreme temperatures.
AMBIENT TEMPERATURES OF BELOW 41°F OR ABOVE 90°F WILL HINDER THE PERFORMANCE OF THE APPLIANCE.
- Allow sufficient ventilation around the appliance. Leave a clearance of at least 3 inches on all sides of the Ice Maker for proper ventilation.
- Please allow time for the fluids in the compressor to settle after the Ice Maker is moved or transported. Always allow the unit to come to room temperature.
IMPORTANT: AFTER THE UNIT HAS BEEN POSITIONED AND LEVELED, PLEASE WAIT FOR AT LEAST 2 HOURS BEFORE PLUGGING IN THE ICE MAKER FOR THE FIRST TIME. Note, if the unit has only been slightly moved, (e.g., moved forward for draining purposes), then wait for 30 minutes before re-plugging in.)
- Prior to first use, clean the appliance and accessories in accordance with the "CLEANING AND MAINTENANCE" instructions provided later in this manual.
- Do not consume the first few cycles of ice during initial use, including after cleaning.
WATER SUPPLY
This Ice Maker has been specifically designed for portability allowing you to simply pour water into the Water Reservoir manually as required to make ice. However, the unit is also equipped with a Water Inlet valve at the rear of the Ice Maker, where a 1⁄4” PE water inlet tube can be connected to a cold water line for continuous water supply. Please note an Ice Maker external water source Installation Kit is not supplied with this Ice Maker.

HOW TO USE
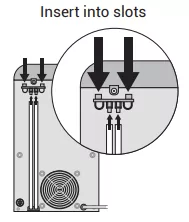
- Ensure that the drain plug at the rear of Ice Maker is properly attached to the tubing and then secured to the back of the Ice Maker.
NOTE: If the Ice Maker has been slightly moved in this process, allow at least 30 minutes before plugging in.
- Plug the Ice Maker into a grounded power outlet. The
 indicator will flash.
- Open the Front Lid and remove the Ice Basket and Ice Scoop.
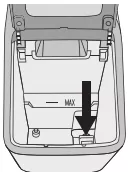
- Fill the Water Reservoir with drinking water.
- IMPORTANT: Do not fill above the MAX water level mark. Also, ensure enough water is added to cover the Water Level Sensor and Water Filter at the base of the Reservoir.
- It is recommended to use filtered water to keep your Ice Maker working optimally.
- Do not fill the Water Reservoir with hot water. This may damage the Ice Maker. It is best to fill the Water Reservoir with room temperature water or lower.
- Do not fill the Reservoir with any other liquid except water. Using any liquid except potable water is misuse and will void your warranty.
- Insert the Ice Basket back into the Water Reservoir. Ensure the shorter side of the basket is positioned towards the front of the unit. The Ice Basket should sit firmly inside the Reservoir grooves, so that the sensors remain unobstructed.
- Close the Front Lid. Press the "ON/OFF" key and the indicator will illuminate with a solid light, indicating that the ice-making process has begun.
- The ice-making cycle will last approximately 20-30 minutes, depending on the ambient temperature and water temperature. As water is pumped into the unit, ice will be produced and will automatically fall from the Ice Chamber directly into the Ice Basket.
NOTE: During initial use, it may take some time for the Ice Maker to regulate. Initial ice produced may be slightly irregular in form.
- The
 indicator will light up when the Ice Basket is full and then the Ice Maker will stop the ice-making cycle automatically. You can open the Front lid of the Ice Maker at any time to monitor progress or remove ice. Gently remove the ice from the Ice Basket with the Ice Scoop or take out the Ice Basket to pour ice into a separate container for use or freeze as desired. Refill the Water Reservoir.
NOTE: If the ice is not removed it will start to melt over time. The meltwater will return to the Water Reservoir.
- Once ice is removed and the Ice Basket has been reinserted and lid closed, the ice-making function will restart automatically. If the ice is not removed, the Ice Maker will automatically restart after approximately 8 hours. Alternatively, you can press the "ON/OFF" key to restart the appliance at any time.
- While the Ice Maker is on, you can manually check the water level periodically by lifting out the Ice Basket. Alternatively, if the water pump cannot inject water, the Ice Maker will stop automatically. The
 indicator will flash when the Water Reservoir needs to be refilled.
- If the appliance is connected to an external water source via a 1/4" PE tube as shown in the section "WATER SUPPLY", it will be refilled with water automatically and the Ice Maker will restart the ice-making cycle; alternatively, the user can remove the Ice Basket and manually refill the water reservoir to the MAX level. The Ice Maker will restart the ice-making cycle after the lid is closed.
NOTE: Make sure the Front Lid is closed after manually refilling water to avoid overflow.
- If the appliance is not connected with an external water source, firstly remove the Ice Basket, and then fill the Water Reservoir with water manually. After the Water Reservoir is refilled with water, reinsert the Ice Basket reinsert the Ice Basket, close the Front Lid, and then the Ice Maker will restart the ice-making cycle automatically.
- When you have your desired amount of ice, you can stop the ice-making cycle at any time by pressing the "ON/OFF" key and unplugging the unit from the wall outlet. Transfer ice to a freezer.
- The unit can remain turned ON for extended periods of time. Ice will continue to be produced up until the Ice Basket is full. Over time, the ice will start to melt, the meltwater will return to the Water Reservoir. After approximately 8 hours, the unit will automatically restart ice-making. This process will continue until the unit is manually turned off. Turn off when not in use.
NOTE: We recommend draining water regularly and adding fresh water to ensure optimal hygiene levels.
NOTE: Certain noises are normal when operating this Ice Maker, including a bubbling, gurgling, or knocking sound when refrigerant is circulating through the pipes, or a clinking sound when ice cubes are dropped into the basket.
WHEN TO DRAIN
We recommend full draining your Ice Maker when:
- Storing or anytime the unit is being relocated.
- You turn it off for more than a few days. (i.e. vacation)
- You are not using much ice. Continuous recirculation of meltwater may affect taste.
See "CLEANING AND MAINTENANCE" instructions, Step 6 for information on how to drain water out of the unit.
CLEANING AND MAINTENANCE
CLEANING
To keep your ice tasting fresh and your UltraSonic Nugget Ice Maker working at its best, we recommend cleaning your Ice Maker before first use and further at least once per week.
- Take out the Ice Basket and Ice Scoop and hand wash only in warm water with mild detergent. Rinse and wipe dry. Do not use any solvents or chemicals.
- Wipe the interior of the Ice Maker with a soft cloth soaked in warm water and white vinegar. Repeat with a clean damp cloth.
- Pour in fresh, room temperature water into the Water Reservoir. Do not fill above the MAX line. Add a couple of drops of mild detergent to the water.
Caution: Do not use organic solvent, harsh chemicals, boiled water, strong acid, and strong alkali products for cleaning, unless otherwise specified.
- Press and hold the "Clean" key for approximately 3 seconds. The
 indicator lights up and the appliance will start the self-cleaning function where the water solution will circulate through the system.
- After cleaning for 8 minutes, the appliance will stop working and the indicator will flash.
- Unplug the unit from the power outlet. At the rear of the unit, detach the Drain Plug from the back of the Ice Maker and position the two Drain Tubes down over a nearby sink or catchment container. Remove the Drain Plug from the end of the Drain Tubes and drain until the Water Reservoir inside the appliance is empty.
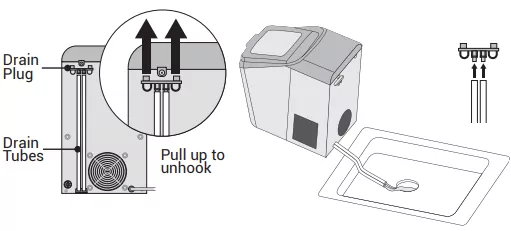
- Reattach the Drain Plug to the Drain Tubes. Attach the Drain Plug back into the two slots at the back of the Ice Maker as illustrated in the "HOW TO USE" instructions earlier in this manual.
- If the unit has been moved in this process, wait for 30 minutes for the unit refrigerant to settle. Repeat steps 3-7, this time using fresh, room temperature water only, to rinse the Water Reservoir and internal mechanisms.
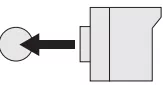
- In the interior of the Water Reservoir, pull off the Water Filter from the water outlet. Separate the two parts and use a small brush to clean any mineral build-up on the mesh filter. Rinse under water. Replace the Water Filter.
- Pull to Remove
- Separate parts to clean.
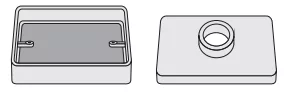
- Position Water Filter correctly before reconnecting to water outlet.
- Dry the Water Reservoir interior with a soft, clean kitchen towel.
- Wipe the exterior of the Ice Maker with a soft, damp cloth. Use a mild dishwashing soap if necessary. Wipe dry. Do not use appliance wax, polish, solvents, or chemicals on the stainless steel exterior.
- Ensure the Water Reservoir is fully drained and wiped dry prior to storage or if the Ice Maker is not going to be used for a long time.
- Always wait 30 minutes after moving the appliance for the refrigerant to settle before plugging in again.
- It is recommended to discard the first few cycles of ice when starting the appliance again after cleaning or storing for an extended period.
DESCALING
Depending on the water that you use in the Ice Maker, there may be signs of mineral build-up. Hard water residue may not always be visible but will impede ice production, and it is therefore recommended to descale the Ice
Maker at least every six months or once a month for hard water areas.
- Wipe the interior of the Ice Maker with a soft cloth soaked in warm water and white vinegar, including the Ice Level and Water Level Sensors.
- Fill the Water Reservoir to the MAX line with a solution of half room-temperature water, and half white vinegar or a commercial cleaning solution specified for household ice makers.
- Press and hold the “Clean” key for about 3 seconds. The indicator lights up and the appliance will start the cleaning cycle and the solution will circulate through the system. Repeat for up to 3 cleaning cycles. It is possible to allow the vinegar to soak for a few hours in between cycles to help dissolve any hard water deposits.
- Drain the water/vinegar solution from the unit by removing the Drain Plug from the Drain Tubes at the back of the unit and emptying into a nearby sink. See Step 6, mentioned in the “CLEANING” section above for further instruction.
- Reattach the Drain Plug and Drain Tubes to the back of the Ice Maker. If the unit has been moved in this process, wait for 30 minutes for the unit refrigerant to settle. Add fresh water to the Water Reservoir and run another “Clean” cycle before draining the water. Repeat this process 3 times.
- Use a clean cloth to wipe the walls of the Water Reservoir.
- Fill the Water Reservoir with fresh water. If the unit has been moved, allow 30 minutes for the refrigerant to settle before plugging in and starting the ice making process.
- Allow the Ice Maker to make several cycles of ice until it is clear there is no remnant of vinegar taste within the ice. Discard the ice.
TROUBLESHOOTING
| Problem |
Possible Causes |
Solution |
 |
1. Lack of water.
2. The Water Filter at the bottom of Water Reservoir is blocked.
3. Foreign object obstruction.
4. Pump malfunction. |
1. Stop the Ice Maker, refill water and then press "ON/OFF" key to restart ice-making cycle.
2. Drain water from Reservoir. Remove and clean the Water Filter and replace.
3. Check for foreign objects and restart the appliance.
4. Contact Mueller Customer Support for further assistance. |
 |
1. Ice basket is full.
2. The Ice Scoop may be blocking the Ice Sensors.
3. Malfunction of infrared sensor. |
1. Remove the ice from Ice Basket and then press "ON/OFF" key to restart the ice-making cycle.
2. Remove or reposition Ice Scoop.
3. The infrared sensor is damaged. Contact Mueller Customer Support or qualified technician for assistance. |
 |
The ice-making assembly is defrosting. |
No action required. The unit will automatically defrost when required to remove any ice blockages, and will return to normal operation after approx. 30-45 minutes. Alternatively, hold and press the "Clean" key for 3 seconds, and then press the "ON/OFF" key again to restart the appliance after the defrosting procedure has finished. |
 |
The ice-making assembly is frozen. |
No action required. Under this condition, let the appliance defrost automatically for about 20 minutes. At that time, the keys can not be operated. The appliance can be used again after the defrosting process has finished. If this problem occurs repeatedly, it can be considered as refrigerant leakage. Contact Mueller Customer Support for further assistance. |
Poor ice-making result.
The ice-making process is normal but the ice produced is broken, which lasts for more than 2 hours. |
1. Poor heat dissipation.
2. The water temperature is too high.
3. The ambient temperature is too high.
4. The ice-making system is abnormal. |
1. Leave a 3" clearance on all sides of the Ice Maker for proper ventilation.
2. Fill the Water Reservoir with water within the temperature range 46°F and 82°F.
3. Operate the Ice Maker in an environment with an ambient temperature between 50°F and 90°F.
4. Contact Mueller Customer Support for further assistance |
| Ice cubes stick together. |
1. The ice cycle is taking longer than usual.
2. The water temperature is too low.
3. The ambient temperature is too low. |
1. Stop the Ice Maker and restart it when the ice has melted.
2. Refill the Water Reservoir with water within the temperature range 46°F and 82°F.
3. Operate the Ice Maker in an environment with an ambient temperature between 50°F and 90°F. |
| No ice being produced. |
1. Ice build-up around mechanisms.
2. Sensor fail.
3. Mineral build-up.
4. Refrigerant liquid leakage.
5. Pipe in the cooling system is blocked. |
1. No Action Required. The automatic defrosting process will start and remove build-up.
2. There might be some form of residue covering the sensors themselves. Use a cotton swab soaked with a little white vinegar to gently clean the surface of the sensors.
3. Descale the unit in accordance with the "Cleaning and Maintenance" instructions.
4. Verify by a qualified technician.
5. Verify by a qualified technician. |
| Ice Basket is full, but no Indicator Light. |
The location of the Ice Maker is too close to a light source and it affects the infrared detection. |
Reposition the Ice Maker out of any direct light source and within an ambient temperature of between 50°F and 90°F. |
| 'Scratchy' noise during ice making. |
Ice-making assembly is frozen. |
1. Turn off the appliance and let defrost for about 20 minutes.
2. Plug in and clean the appliance in accordance with the "Cleaning and Maintenance" instructions. |
SPECIFICATIONS
Power Source: 120V AC/60Hz
Rated Power: 170W
MAX Water Level: 3qt/ 96 floz
Optimum Operating Environment: Between 50°F and 90°F