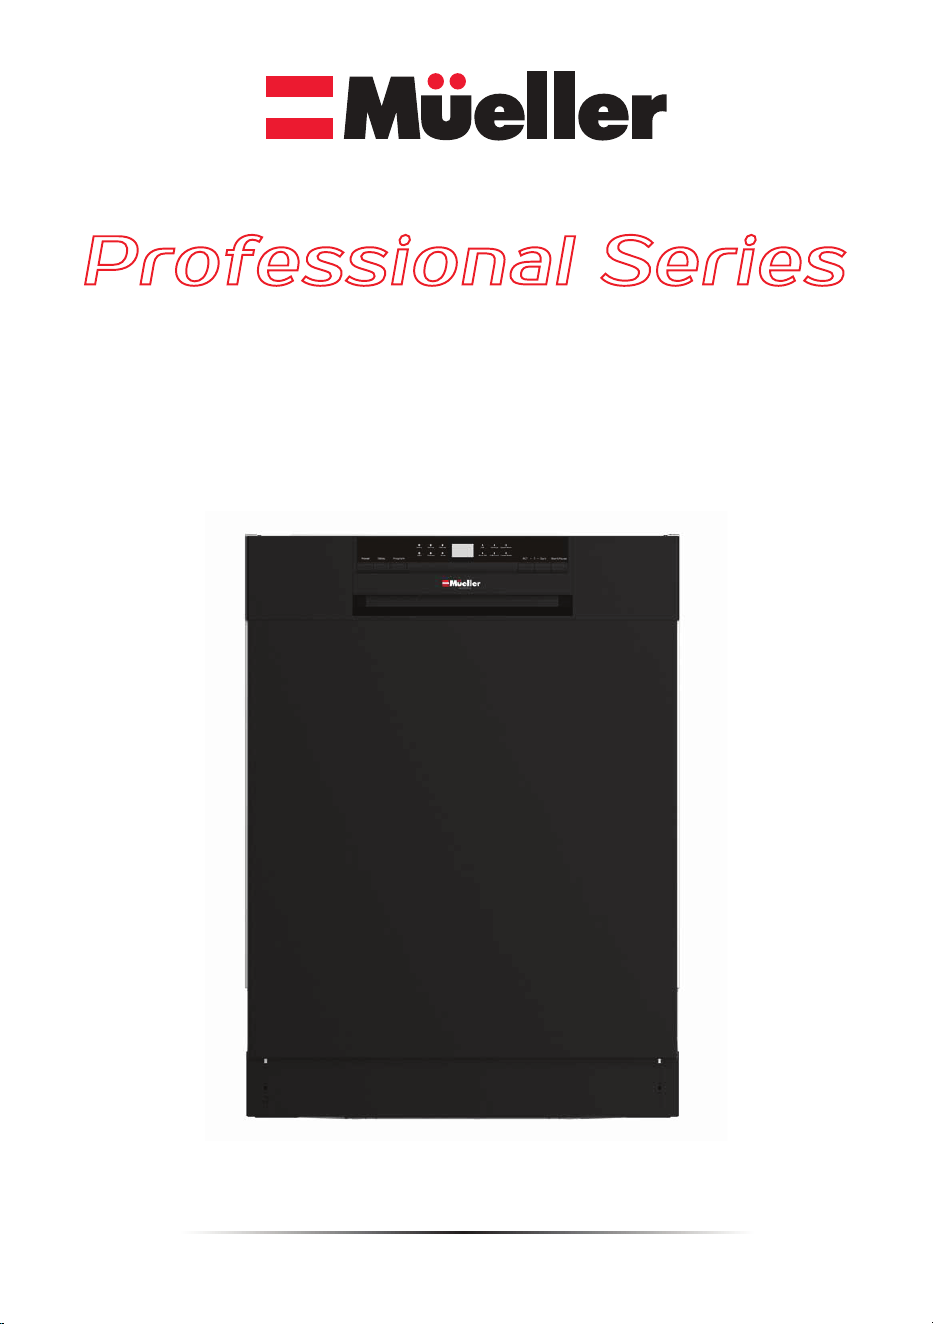
24” Built-In
Dishwasher
Professional Series
U SER M A N U A L
Model DW-2400
HOUSEHOLD USE ONLY

CONTENTS
IMPORTANT SAFEGUARDS ___________
Correct usage ______________________
Children ____________________________
Technical safety ___________________
Operational safety _________________
DISHWASHER COMPONENTS _________
PRODUCT DIAGRAM _________________
INSTALLATION _______________________
DISHWASHER SETUP_________________
Water softener________________________
Adding the salt into the Water softener
Fill the Rinse aid dispenser _________
Fill the Detergent dispenser ________
DISHWARE MATERIALS _______________
LOADING THE DISHWASHER __________
DISHWASHER CYCLES AND OPTIONS _
Wash cycles _________________________
Wash cycle options __________________
WASH CYCLE INFORMATION __________
OPERATING THE DISHWASHER ________
TURNING ON THE APPLIANCE ________
Starting a wash cycle __________________
Changing the wash cycle ______________
Adding a dish during wash cycle _______
End of the washing cycle____________
MAINTENANCE AND CLEANING ________
TROUBLESHOOTING TIPS _____________
SPECIFICATIONS ______________________
1
Your satisfaction is guaranteed. If you are not completely satisfied with our Profession-
al Series 24” Built-In Dishwasher and the results it brings, we insist that you let us know.
We’ll help you make the Dishwasher work for you, or we’ll refund your money.
__________________________________ pg 2
__________________________________ pg 2
__________________________________ pg 3
__________________________________ pg 3
__________________________________ pg 4
__________________________________ pg 7
__________________________________ pg 8
__________________________________ pg 9
__________________________________ pg 9
_______________________________ pg 9
_______________________________ pg 11
__________________________________ pg 12
__________________________________ pg 13
__________________________________ pg 16
__________________________________ pg 17
__________________________________ pg 20
__________________________________ pg 20
__________________________________ pg 20
__________________________________ pg 21
__________________________________ pg 22
__________________________________ pg 23
__________________________________ pg 23
__________________________________ pg 23
__________________________________ pg 24
__________________________________ pg 24
__________________________________ pg 25
__________________________________ pg 28
__________________________________ pg 30

2
IMPORTANT SAFEGUARDS
THIS DISHWASHER IS PROVIDED WITH AN INSTALLATION INSTRUCTION MANUAL
TOGETHER WITH THIS USER MANUAL. READ ALL INSTRUCTIONS BEFORE
INSTALLING AND OPERATING YOUR PROFESSIONAL SERIES 24” BUILT-IN DISH-
WASHER FOR THE FIRST TIME. FAILURE TO ADHERE TO THESE INSTRUCTIONS AND
PRECAUTIONS WILL VOID THE MANUFACTURER’S WARRANTY.
To reduce the risk of personal injury or damage to your PROFESSIONAL SERIES 24”
BUILT-IN DISHWASHER or other property when using this product, basic safety
precautions should always be followed, including the following:
HANDLING AND UNPACKING
•
WARNING: HEAVY UNIT Use proper equipment and adequate manpower to move
the dishwasher to avoid personal injury or damage to the unit or the floor.
• Before moving the dishwasher, protect any finished flooring and secure the dish-
washer door closed to prevent damage.
• WARNING: TIP-OVER HAZARD Opening the door will cause the dishwasher to tip
forward. Do not open the door until you are ready to install the dishwasher. If it is
necessary to open the door, hold the top of the dishwasher securely with one hand
and hold the door with the other hand.
• WARNING: DO NOT LIFT OR CARRY THE DISHWASHER BY THE DOOR OR CONTROL
PANEL.
• Keep the appliance at room temperature for at least 8 hours after receiving the prod-
uct in the winter season.
• Remove any packaging including cable ties on the drainage pipe and power cord
carefully during unpacking. Sharp scissors might burst the drainage pipe or power
cord, which may cause a potential leakage.
CORRECT USAGE
•
This appliance is intended for use in domestic households and in similar working
and residential environments. NSF/ANSI 184 Certified residential dishwashers are
not intended for licensed food establishments.
• WARNING: Misuse of the dishwasher can result in serious injury or death. Do not
use the dishwasher in any way not covered in this manual or for any purpose other
than those explained in the following pages.
• This appliance is not intended for outdoor use.
• Persons (including children) who lack physical, sensory, or mental capabilities, or
experience with the appliance should not use it without supervision or instruction by
a responsible person.

3
CHILDREN
•
Never allow children to play in, on, or with the appliance. To reduce risk of injury,
close supervision and observation of children is needed around the dishwasher.
• Never allow children to sit or stand on any part of the appliance, including the door.
• Do not store items of interest to children inside the appliance. Children pulling down
the door, climbing, or putting their hands inside could be injured.
• The appliance is hot during use and remains so for some time after being switched
off. Keep children away from the appliance door, particularly when opening where
steam may disperse.
• Keep all dishwasher detergents, in particular tablet/pod form, out of reach of
children. Harmful if swallowed, and an eye irritant.
WARNING: Ensure that any packing material, including any plastic bags or film, are
disposed of safely and kept out of the reach of children. Do not use plastic bags in
cribs, beds, carriages or play pens. These bags are not toys. Danger of suffocation!
TECHNICAL SAFETY
•
IMPORTANT: Refer to the included ‘INSTALLATION INSTRUCTIONS’ for important
information and instructions for correct installation.
• Installation of this dishwasher requires basic mechanical and electrical skills.
Proper installation is the responsibility of the installer. Product failure due to improper
installation is not covered under the Appliance Warranty.
• Before installation, make sure that the voltage and frequency listed on the rating
label correspond with the household electrical supply. This data must correspond to
prevent injury and appliance damage. Consult a qualified electrician if in doubt.
• Before installation, select a suitable area that abides by the cabinet measurements
with suitable electrical and water supply as noted in the ‘INSTALLATION INSTRUC-
TIONS’.
• Do not try to use this appliance in damp place. High humidity will make the appli-
ance rust.
• Before installing the dishwasher, check for externally visible damage. Do not oper-
ate a damaged appliance. A damaged appliance is a hazard.
• Electrical shock or fire could result if the electrical supply for the dishwasher
covered in this manual is incorrectly installed or if the dishwasher has been improp-
erly grounded.
WARNING: Do not use the dishwasher covered in this manual unless you are certain
the electrical supply has been correctly installed and the dishwasher has been prop-
erly grounded.
• This appliance must be grounded. In the event of a malfunction or breakdown,
grounding will reduce the risk of electric shock by providing a path of least resistance
for electric current. This appliance is equipped with a cord having an equip-
ment-grounding conductor and a grounding plug. The plug must be plugged into an
appropriate outlet that is installed and grounded in accordance with all local codes
and ordinances.DO NOT cut or remove the grounding prong from this plug.
• WARNING: Improper connection of the equipment-grounding conductor can result
in a risk of electric shock. Check with a qualified electrician or service representative
if you are in doubt whether the appliance is properly grounded. Do not modify the plug
provided with the appliance, if it will not fit the outlet, have a proper outlet installed by
a qualified electrician.
• Do not use the dishwasher until properly leveled.
• WARNING: To reduce the risk of electric shock, fire, or injury to persons, the installer
must ensure that the dishwasher is completely enclosed at the time of installation.
• Do not use an adapter or extension cord to connect this appliance to electricity.
Extension cords do not guarantee the required safety of the appliance.
• To reduce the risk of injury, immediately replace loose or defective power cords,
loose plugs and/or power outlets.
• Do not operate this appliance unless all enclosure panels are properly in place.
• Before servicing, disconnect the water intake hose and power supply.
• Under no circumstance open the outer casing or controls of the appliance. This is a
safety hazard and may damage the appliance.
• Severe product damage and/or injury could result from the use of unqualified
service technicians or non-original replacement parts. All repairs must be performed
by a qualified service technician using only original equipment factory replacement
parts. Do not attempt to repair the appliance yourself.
• Do not operate the appliance if the power cord or plug is damaged, or if the appli-
ance has been damaged in any manner.
• In the event of damage or defect, turn off the appliance immediately. Turn off the
water supply and disconnect completely from the electrical supply. Do not use the
appliance until it has been repaired. Ensure power is not supplied to the appliance
while repair work is carried out.
• Before discarding an old appliance, disconnect it from the water and electrical
supply, and cut off the power cord to prevent it from becoming a hazard.
OPERATIONAL SAFETY
•
Do not operate your appliance in the presence of explosive fumes.
• Do not add or mix any flammable or explosive substances to wash.
• Do not operate your appliance when parts are missing or broken.
• Do not abuse, sit on it, or stand on the door or the dishwasher rack.
• Do not unplug your appliance by pulling on the power cord. Always grasp the plug
firmly and pull it straight out from the outlet.
• This dishwasher is an automatic appliance, do not add water manually when the
appliance is working. It will cause overflow and danger.
• Use only specialized detergents or wetting agents recommended for use in a dish-
washer. Do not use washing-up liquid, washing powder, hand sanitizer soap or other
detergents that not are specialized for a dishwasher.
• Do not wash plastic items unless they are marked “dishwasher safe” or the equiva-
lent. For plastic items without such markings, check the manufacturer’s recommen-
dations.
• Do not load the dishwasher with paper products, plastic bags, packing materials or
anything other than normal, dishwasher safe dishware and kitchenware.
• Knives and other sharp utensils with sharp points must be loaded in the basket with
their points facing downwards or placed in a horizontal position.
• Ensure no sharp items are not close to the front of the dishwasher to prevent acci-
dental piercing of the door seal.
• Utensils will be hot after washing. Allow 30 minutes to cool off before taking out.
• Always use caution when opening the door during or following a wash cycle as hot
water or steam may escape. Do not fully open the door until water noises have
stopped and steam has subsided. If it is necessary to load or unload some utensils,
please push pause button and wait 10 seconds, then open the door slightly and wait
for the steam to dissipate completely, then open the door and move your utensils.
• Never operate the dishwasher without the filter assembly in place. Always reinsert
in the correct order.
• The interior tub base will be extremely hot after use. DO NOT touch.
• Do not move or clean the appliance while it is working. It might cause electrical or
water leakage.
• To avoid floor damage and possible mold growth, do not allow wet areas to remain
around or under the dishwasher.
• Before cleaning, disconnect the water supply hose and power supply.
• Never use harsh chemicals or abrasive cleaners to clean your dishwasher. Some
chloride-containing products can damage your dishwasher and may present health
hazards.
• Never use steam cleaning products to clean your dishwasher. The manufacturer will
not be responsible for possible damages or consequences.
• Protect your dishwasher from the elements. Protect against freezing to avoid possi-
ble damage to the fill valve. Damage caused by freezing is not covered by the
warranty.
• If your old appliance is not being used or will be discarded, we recommend that you
store the unit out of reach of children and remove its door. This will reduce the risk of
injury to children.
• Hydrogen gas may be produced if the water heater has not been used in more than
two weeks. This could be explosive and can explode under certain circumstances. If
this is the case, before using this appliance, turn on all the hot water faucets and let
the hot water run for a few minutes. This will let the trapped hydrogen escape. During
this process to not turn on an electric appliance, smoke, light a match or lighter, or
use a flame to avoid serious injury, due to the highly flammable nature of hydrogen
gas.

4
CHILDREN
•
Never allow children to play in, on, or with the appliance. To reduce risk of injury,
close supervision and observation of children is needed around the dishwasher.
• Never allow children to sit or stand on any part of the appliance, including the door.
• Do not store items of interest to children inside the appliance. Children pulling down
the door, climbing, or putting their hands inside could be injured.
• The appliance is hot during use and remains so for some time after being switched
off. Keep children away from the appliance door, particularly when opening where
steam may disperse.
• Keep all dishwasher detergents, in particular tablet/pod form, out of reach of
children. Harmful if swallowed, and an eye irritant.
WARNING: Ensure that any packing material, including any plastic bags or film, are
disposed of safely and kept out of the reach of children. Do not use plastic bags in
cribs, beds, carriages or play pens. These bags are not toys. Danger of suffocation!
TECHNICAL SAFETY
•
IMPORTANT: Refer to the included ‘INSTALLATION INSTRUCTIONS’ for important
information and instructions for correct installation.
• Installation of this dishwasher requires basic mechanical and electrical skills.
Proper installation is the responsibility of the installer. Product failure due to improper
installation is not covered under the Appliance Warranty.
• Before installation, make sure that the voltage and frequency listed on the rating
label correspond with the household electrical supply. This data must correspond to
prevent injury and appliance damage. Consult a qualified electrician if in doubt.
• Before installation, select a suitable area that abides by the cabinet measurements
with suitable electrical and water supply as noted in the ‘INSTALLATION INSTRUC-
TIONS’.
• Do not try to use this appliance in damp place. High humidity will make the appli-
ance rust.
• Before installing the dishwasher, check for externally visible damage. Do not oper-
ate a damaged appliance. A damaged appliance is a hazard.
• Electrical shock or fire could result if the electrical supply for the dishwasher
covered in this manual is incorrectly installed or if the dishwasher has been improp-
erly grounded.
WARNING: Do not use the dishwasher covered in this manual unless you are certain
the electrical supply has been correctly installed and the dishwasher has been prop-
erly grounded.
• This appliance must be grounded. In the event of a malfunction or breakdown,
grounding will reduce the risk of electric shock by providing a path of least resistance
for electric current. This appliance is equipped with a cord having an equip-
ment-grounding conductor and a grounding plug. The plug must be plugged into an
appropriate outlet that is installed and grounded in accordance with all local codes
and ordinances.DO NOT cut or remove the grounding prong from this plug.
• WARNING: Improper connection of the equipment-grounding conductor can result
in a risk of electric shock. Check with a qualified electrician or service representative
if you are in doubt whether the appliance is properly grounded. Do not modify the plug
provided with the appliance, if it will not fit the outlet, have a proper outlet installed by
a qualified electrician.
• Do not use the dishwasher until properly leveled.
• WARNING: To reduce the risk of electric shock, fire, or injury to persons, the installer
must ensure that the dishwasher is completely enclosed at the time of installation.
• Do not use an adapter or extension cord to connect this appliance to electricity.
Extension cords do not guarantee the required safety of the appliance.
• To reduce the risk of injury, immediately replace loose or defective power cords,
loose plugs and/or power outlets.
• Do not operate this appliance unless all enclosure panels are properly in place.
• Before servicing, disconnect the water intake hose and power supply.
• Under no circumstance open the outer casing or controls of the appliance. This is a
safety hazard and may damage the appliance.
• Severe product damage and/or injury could result from the use of unqualified
service technicians or non-original replacement parts. All repairs must be performed
by a qualified service technician using only original equipment factory replacement
parts. Do not attempt to repair the appliance yourself.
• Do not operate the appliance if the power cord or plug is damaged, or if the appli-
ance has been damaged in any manner.
• In the event of damage or defect, turn off the appliance immediately. Turn off the
water supply and disconnect completely from the electrical supply. Do not use the
appliance until it has been repaired. Ensure power is not supplied to the appliance
while repair work is carried out.
• Before discarding an old appliance, disconnect it from the water and electrical
supply, and cut off the power cord to prevent it from becoming a hazard.
OPERATIONAL SAFETY
•
Do not operate your appliance in the presence of explosive fumes.
• Do not add or mix any flammable or explosive substances to wash.
• Do not operate your appliance when parts are missing or broken.
• Do not abuse, sit on it, or stand on the door or the dishwasher rack.
• Do not unplug your appliance by pulling on the power cord. Always grasp the plug
firmly and pull it straight out from the outlet.
• This dishwasher is an automatic appliance, do not add water manually when the
appliance is working. It will cause overflow and danger.
• Use only specialized detergents or wetting agents recommended for use in a dish-
washer. Do not use washing-up liquid, washing powder, hand sanitizer soap or other
detergents that not are specialized for a dishwasher.
• Do not wash plastic items unless they are marked “dishwasher safe” or the equiva-
lent. For plastic items without such markings, check the manufacturer’s recommen-
dations.
• Do not load the dishwasher with paper products, plastic bags, packing materials or
anything other than normal, dishwasher safe dishware and kitchenware.
• Knives and other sharp utensils with sharp points must be loaded in the basket with
their points facing downwards or placed in a horizontal position.
• Ensure no sharp items are not close to the front of the dishwasher to prevent acci-
dental piercing of the door seal.
• Utensils will be hot after washing. Allow 30 minutes to cool off before taking out.
• Always use caution when opening the door during or following a wash cycle as hot
water or steam may escape. Do not fully open the door until water noises have
stopped and steam has subsided. If it is necessary to load or unload some utensils,
please push pause button and wait 10 seconds, then open the door slightly and wait
for the steam to dissipate completely, then open the door and move your utensils.
• Never operate the dishwasher without the filter assembly in place. Always reinsert
in the correct order.
• The interior tub base will be extremely hot after use. DO NOT touch.
• Do not move or clean the appliance while it is working. It might cause electrical or
water leakage.
• To avoid floor damage and possible mold growth, do not allow wet areas to remain
around or under the dishwasher.
• Before cleaning, disconnect the water supply hose and power supply.
• Never use harsh chemicals or abrasive cleaners to clean your dishwasher. Some
chloride-containing products can damage your dishwasher and may present health
hazards.
• Never use steam cleaning products to clean your dishwasher. The manufacturer will
not be responsible for possible damages or consequences.
• Protect your dishwasher from the elements. Protect against freezing to avoid possi-
ble damage to the fill valve. Damage caused by freezing is not covered by the
warranty.
• If your old appliance is not being used or will be discarded, we recommend that you
store the unit out of reach of children and remove its door. This will reduce the risk of
injury to children.
• Hydrogen gas may be produced if the water heater has not been used in more than
two weeks. This could be explosive and can explode under certain circumstances. If
this is the case, before using this appliance, turn on all the hot water faucets and let
the hot water run for a few minutes. This will let the trapped hydrogen escape. During
this process to not turn on an electric appliance, smoke, light a match or lighter, or
use a flame to avoid serious injury, due to the highly flammable nature of hydrogen
gas.

5
CHILDREN
•
Never allow children to play in, on, or with the appliance. To reduce risk of injury,
close supervision and observation of children is needed around the dishwasher.
• Never allow children to sit or stand on any part of the appliance, including the door.
• Do not store items of interest to children inside the appliance. Children pulling down
the door, climbing, or putting their hands inside could be injured.
• The appliance is hot during use and remains so for some time after being switched
off. Keep children away from the appliance door, particularly when opening where
steam may disperse.
• Keep all dishwasher detergents, in particular tablet/pod form, out of reach of
children. Harmful if swallowed, and an eye irritant.
WARNING: Ensure that any packing material, including any plastic bags or film, are
disposed of safely and kept out of the reach of children. Do not use plastic bags in
cribs, beds, carriages or play pens. These bags are not toys. Danger of suffocation!
TECHNICAL SAFETY
•
IMPORTANT: Refer to the included ‘INSTALLATION INSTRUCTIONS’ for important
information and instructions for correct installation.
• Installation of this dishwasher requires basic mechanical and electrical skills.
Proper installation is the responsibility of the installer. Product failure due to improper
installation is not covered under the Appliance Warranty.
• Before installation, make sure that the voltage and frequency listed on the rating
label correspond with the household electrical supply. This data must correspond to
prevent injury and appliance damage. Consult a qualified electrician if in doubt.
• Before installation, select a suitable area that abides by the cabinet measurements
with suitable electrical and water supply as noted in the ‘INSTALLATION INSTRUC-
TIONS’.
• Do not try to use this appliance in damp place. High humidity will make the appli-
ance rust.
• Before installing the dishwasher, check for externally visible damage. Do not oper-
ate a damaged appliance. A damaged appliance is a hazard.
• Electrical shock or fire could result if the electrical supply for the dishwasher
covered in this manual is incorrectly installed or if the dishwasher has been improp-
erly grounded.
WARNING: Do not use the dishwasher covered in this manual unless you are certain
the electrical supply has been correctly installed and the dishwasher has been prop-
erly grounded.
• This appliance must be grounded. In the event of a malfunction or breakdown,
grounding will reduce the risk of electric shock by providing a path of least resistance
for electric current. This appliance is equipped with a cord having an equip-
ment-grounding conductor and a grounding plug. The plug must be plugged into an
appropriate outlet that is installed and grounded in accordance with all local codes
and ordinances.DO NOT cut or remove the grounding prong from this plug.
• WARNING: Improper connection of the equipment-grounding conductor can result
in a risk of electric shock. Check with a qualified electrician or service representative
if you are in doubt whether the appliance is properly grounded. Do not modify the plug
provided with the appliance, if it will not fit the outlet, have a proper outlet installed by
a qualified electrician.
• Do not use the dishwasher until properly leveled.
• WARNING: To reduce the risk of electric shock, fire, or injury to persons, the installer
must ensure that the dishwasher is completely enclosed at the time of installation.
• Do not use an adapter or extension cord to connect this appliance to electricity.
Extension cords do not guarantee the required safety of the appliance.
• To reduce the risk of injury, immediately replace loose or defective power cords,
loose plugs and/or power outlets.
• Do not operate this appliance unless all enclosure panels are properly in place.
• Before servicing, disconnect the water intake hose and power supply.
• Under no circumstance open the outer casing or controls of the appliance. This is a
safety hazard and may damage the appliance.
• Severe product damage and/or injury could result from the use of unqualified
service technicians or non-original replacement parts. All repairs must be performed
by a qualified service technician using only original equipment factory replacement
parts. Do not attempt to repair the appliance yourself.
• Do not operate the appliance if the power cord or plug is damaged, or if the appli-
ance has been damaged in any manner.
• In the event of damage or defect, turn off the appliance immediately. Turn off the
water supply and disconnect completely from the electrical supply. Do not use the
appliance until it has been repaired. Ensure power is not supplied to the appliance
while repair work is carried out.
• Before discarding an old appliance, disconnect it from the water and electrical
supply, and cut off the power cord to prevent it from becoming a hazard.
OPERATIONAL SAFETY
•
Do not operate your appliance in the presence of explosive fumes.
• Do not add or mix any flammable or explosive substances to wash.
• Do not operate your appliance when parts are missing or broken.
• Do not abuse, sit on it, or stand on the door or the dishwasher rack.
• Do not unplug your appliance by pulling on the power cord. Always grasp the plug
firmly and pull it straight out from the outlet.
• This dishwasher is an automatic appliance, do not add water manually when the
appliance is working. It will cause overflow and danger.
• Use only specialized detergents or wetting agents recommended for use in a dish-
washer. Do not use washing-up liquid, washing powder, hand sanitizer soap or other
detergents that not are specialized for a dishwasher.
• Do not wash plastic items unless they are marked “dishwasher safe” or the equiva-
lent. For plastic items without such markings, check the manufacturer’s recommen-
dations.
• Do not load the dishwasher with paper products, plastic bags, packing materials or
anything other than normal, dishwasher safe dishware and kitchenware.
• Knives and other sharp utensils with sharp points must be loaded in the basket with
their points facing downwards or placed in a horizontal position.
• Ensure no sharp items are not close to the front of the dishwasher to prevent acci-
dental piercing of the door seal.
• Utensils will be hot after washing. Allow 30 minutes to cool off before taking out.
• Always use caution when opening the door during or following a wash cycle as hot
water or steam may escape. Do not fully open the door until water noises have
stopped and steam has subsided. If it is necessary to load or unload some utensils,
please push pause button and wait 10 seconds, then open the door slightly and wait
for the steam to dissipate completely, then open the door and move your utensils.
• Never operate the dishwasher without the filter assembly in place. Always reinsert
in the correct order.
• The interior tub base will be extremely hot after use. DO NOT touch.
• Do not move or clean the appliance while it is working. It might cause electrical or
water leakage.
• To avoid floor damage and possible mold growth, do not allow wet areas to remain
around or under the dishwasher.
• Before cleaning, disconnect the water supply hose and power supply.
• Never use harsh chemicals or abrasive cleaners to clean your dishwasher. Some
chloride-containing products can damage your dishwasher and may present health
hazards.
• Never use steam cleaning products to clean your dishwasher. The manufacturer will
not be responsible for possible damages or consequences.
• Protect your dishwasher from the elements. Protect against freezing to avoid possi-
ble damage to the fill valve. Damage caused by freezing is not covered by the
warranty.
• If your old appliance is not being used or will be discarded, we recommend that you
store the unit out of reach of children and remove its door. This will reduce the risk of
injury to children.
• Hydrogen gas may be produced if the water heater has not been used in more than
two weeks. This could be explosive and can explode under certain circumstances. If
this is the case, before using this appliance, turn on all the hot water faucets and let
the hot water run for a few minutes. This will let the trapped hydrogen escape. During
this process to not turn on an electric appliance, smoke, light a match or lighter, or
use a flame to avoid serious injury, due to the highly flammable nature of hydrogen
gas.

6
CHILDREN
•
Never allow children to play in, on, or with the appliance. To reduce risk of injury,
close supervision and observation of children is needed around the dishwasher.
• Never allow children to sit or stand on any part of the appliance, including the door.
• Do not store items of interest to children inside the appliance. Children pulling down
the door, climbing, or putting their hands inside could be injured.
• The appliance is hot during use and remains so for some time after being switched
off. Keep children away from the appliance door, particularly when opening where
steam may disperse.
• Keep all dishwasher detergents, in particular tablet/pod form, out of reach of
children. Harmful if swallowed, and an eye irritant.
WARNING: Ensure that any packing material, including any plastic bags or film, are
disposed of safely and kept out of the reach of children. Do not use plastic bags in
cribs, beds, carriages or play pens. These bags are not toys. Danger of suffocation!
TECHNICAL SAFETY
•
IMPORTANT: Refer to the included ‘INSTALLATION INSTRUCTIONS’ for important
information and instructions for correct installation.
• Installation of this dishwasher requires basic mechanical and electrical skills.
Proper installation is the responsibility of the installer. Product failure due to improper
installation is not covered under the Appliance Warranty.
• Before installation, make sure that the voltage and frequency listed on the rating
label correspond with the household electrical supply. This data must correspond to
prevent injury and appliance damage. Consult a qualified electrician if in doubt.
• Before installation, select a suitable area that abides by the cabinet measurements
with suitable electrical and water supply as noted in the ‘INSTALLATION INSTRUC-
TIONS’.
• Do not try to use this appliance in damp place. High humidity will make the appli-
ance rust.
• Before installing the dishwasher, check for externally visible damage. Do not oper-
ate a damaged appliance. A damaged appliance is a hazard.
• Electrical shock or fire could result if the electrical supply for the dishwasher
covered in this manual is incorrectly installed or if the dishwasher has been improp-
erly grounded.
WARNING: Do not use the dishwasher covered in this manual unless you are certain
the electrical supply has been correctly installed and the dishwasher has been prop-
erly grounded.
• This appliance must be grounded. In the event of a malfunction or breakdown,
grounding will reduce the risk of electric shock by providing a path of least resistance
for electric current. This appliance is equipped with a cord having an equip-
ment-grounding conductor and a grounding plug. The plug must be plugged into an
appropriate outlet that is installed and grounded in accordance with all local codes
and ordinances.DO NOT cut or remove the grounding prong from this plug.
• WARNING: Improper connection of the equipment-grounding conductor can result
in a risk of electric shock. Check with a qualified electrician or service representative
if you are in doubt whether the appliance is properly grounded. Do not modify the plug
provided with the appliance, if it will not fit the outlet, have a proper outlet installed by
a qualified electrician.
• Do not use the dishwasher until properly leveled.
• WARNING: To reduce the risk of electric shock, fire, or injury to persons, the installer
must ensure that the dishwasher is completely enclosed at the time of installation.
• Do not use an adapter or extension cord to connect this appliance to electricity.
Extension cords do not guarantee the required safety of the appliance.
• To reduce the risk of injury, immediately replace loose or defective power cords,
loose plugs and/or power outlets.
• Do not operate this appliance unless all enclosure panels are properly in place.
• Before servicing, disconnect the water intake hose and power supply.
• Under no circumstance open the outer casing or controls of the appliance. This is a
safety hazard and may damage the appliance.
• Severe product damage and/or injury could result from the use of unqualified
service technicians or non-original replacement parts. All repairs must be performed
by a qualified service technician using only original equipment factory replacement
parts. Do not attempt to repair the appliance yourself.
• Do not operate the appliance if the power cord or plug is damaged, or if the appli-
ance has been damaged in any manner.
• In the event of damage or defect, turn off the appliance immediately. Turn off the
water supply and disconnect completely from the electrical supply. Do not use the
appliance until it has been repaired. Ensure power is not supplied to the appliance
while repair work is carried out.
• Before discarding an old appliance, disconnect it from the water and electrical
supply, and cut off the power cord to prevent it from becoming a hazard.
OPERATIONAL SAFETY
•
Do not operate your appliance in the presence of explosive fumes.
• Do not add or mix any flammable or explosive substances to wash.
• Do not operate your appliance when parts are missing or broken.
• Do not abuse, sit on it, or stand on the door or the dishwasher rack.
• Do not unplug your appliance by pulling on the power cord. Always grasp the plug
firmly and pull it straight out from the outlet.
• This dishwasher is an automatic appliance, do not add water manually when the
appliance is working. It will cause overflow and danger.
• Use only specialized detergents or wetting agents recommended for use in a dish-
washer. Do not use washing-up liquid, washing powder, hand sanitizer soap or other
detergents that not are specialized for a dishwasher.
• Do not wash plastic items unless they are marked “dishwasher safe” or the equiva-
lent. For plastic items without such markings, check the manufacturer’s recommen-
dations.
• Do not load the dishwasher with paper products, plastic bags, packing materials or
anything other than normal, dishwasher safe dishware and kitchenware.
• Knives and other sharp utensils with sharp points must be loaded in the basket with
their points facing downwards or placed in a horizontal position.
• Ensure no sharp items are not close to the front of the dishwasher to prevent acci-
dental piercing of the door seal.
• Utensils will be hot after washing. Allow 30 minutes to cool off before taking out.
• Always use caution when opening the door during or following a wash cycle as hot
water or steam may escape. Do not fully open the door until water noises have
stopped and steam has subsided. If it is necessary to load or unload some utensils,
please push pause button and wait 10 seconds, then open the door slightly and wait
for the steam to dissipate completely, then open the door and move your utensils.
• Never operate the dishwasher without the filter assembly in place. Always reinsert
in the correct order.
• The interior tub base will be extremely hot after use. DO NOT touch.
• Do not move or clean the appliance while it is working. It might cause electrical or
water leakage.
• To avoid floor damage and possible mold growth, do not allow wet areas to remain
around or under the dishwasher.
• Before cleaning, disconnect the water supply hose and power supply.
• Never use harsh chemicals or abrasive cleaners to clean your dishwasher. Some
chloride-containing products can damage your dishwasher and may present health
hazards.
• Never use steam cleaning products to clean your dishwasher. The manufacturer will
not be responsible for possible damages or consequences.
• Protect your dishwasher from the elements. Protect against freezing to avoid possi-
ble damage to the fill valve. Damage caused by freezing is not covered by the
warranty.
• If your old appliance is not being used or will be discarded, we recommend that you
store the unit out of reach of children and remove its door. This will reduce the risk of
injury to children.
• Hydrogen gas may be produced if the water heater has not been used in more than
two weeks. This could be explosive and can explode under certain circumstances. If
this is the case, before using this appliance, turn on all the hot water faucets and let
the hot water run for a few minutes. This will let the trapped hydrogen escape. During
this process to not turn on an electric appliance, smoke, light a match or lighter, or
use a flame to avoid serious injury, due to the highly flammable nature of hydrogen
gas.
KEEP THIS MANUAL IN A SAFE PLACE FOR FUTURE REFERENCE AND
REVIEW PERIODICALLY.
7
DISHWASHER COMPONENTS
REFER TO ‘OPERATING THE DISHWASHER’ FOR FURTHER DESCRIPTION
Additional Features
Description
Time Remaining Indicator
49dBA Sound Level
Delay Start
Rinse Cycle
Plastic Item Clips
Low Salt Notification Light
Low Rinse Aid Notifica-
tion Light
Sanitized Notification Light
Energy Efficient 270kWh
Indicates the cycle time remaining.
Quiet washing.
Start of a cycle can be delayed in 1-hour increments up to
24 hours.
Securely holds light-weight plastic accessories (cups, lids, etc.).
Illuminates to indicate Salt is low.
Illuminates to indicate Rinse Aid is low.
Illuminates to indicate sanitation requirements are met.
ENERGY STAR certified.
If you need to pre-rinse dishes to avoid odors, let the
dishwasher do the work for you. Place unrinsed dishes
inside dishwasher and select the “Rinse” cycle. Uses less
water than hand rinsing and very low energy. Note: Do not
use detergent in this cycle.
8
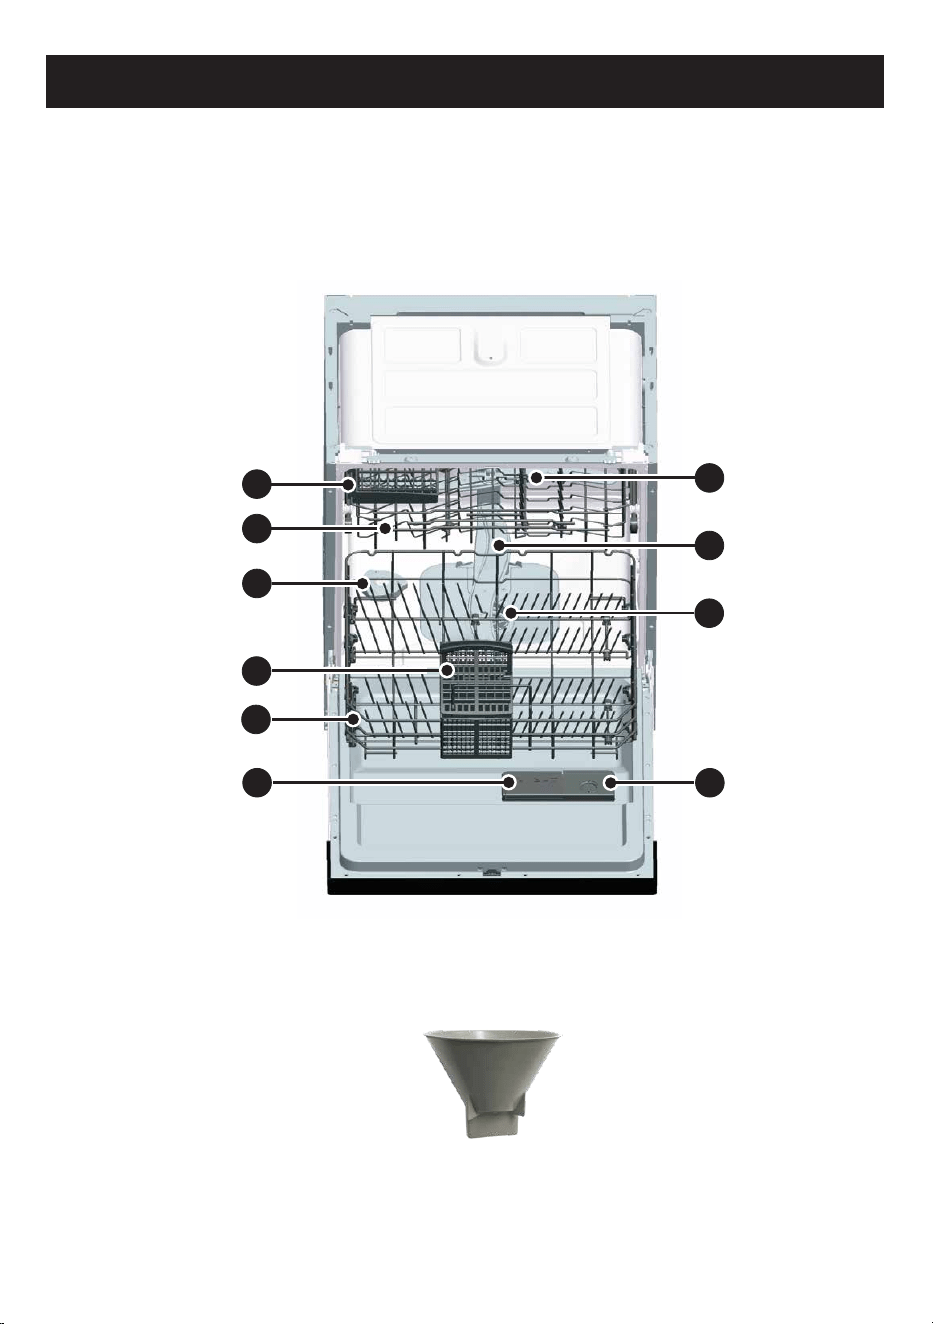
PRODUCT DIAGRAM
Upper Rack
Lower Rack
Detergent
Dispenser
Fork/Knife Shelf
Water Softener
Compartment
Cutlery Basket,
with Cutlery Guide
Top Rack
Spray Arms
1
10
9
3
Filters
8
4
Lower rack
Spray Arms
5
6
Rinse
Aid
Dispenser
Funnel - For Water Softener Compartment
7
2
9
INSTALLATION
REFER TO THE ‘INSTALLATION INSTRUCTIONS’ BOOKLET INCLUDED WITH YOUR
APPLIANCE FOR COMPLETE INFORMATION ON INSTALLING YOUR APPLIANCE.
IMPORTANT: The installation of the pipes and electrical components of this appli-
ance should be carried out by a service professional.
WARNING: ELECTRICAL SHOCK HAZARD
Disconnect electrical power before installing the dishwasher.
Failure to do so can result in electrical shock or possible death.
DISHWASHER SETUP
Before using your dishwasher for the first time:
A) Adjust the Water softener
B) Add the salt into the Water softener
C) Fill the Rinse aid dispenser
D) Fill the Detergent dispenser
A) WATER SOFTENER:
The water softener is designed to remove minerals and salts from the water, which
would have a detrimental or adverse effect on the operation of the appliance. The
higher the content of these minerals and salts, the harder the water is. The softener
should be adjusted according to the hardness of the water in your area. Your local
Water Authority can advise you on the hardness of the water in your area.
WATER SOFTENER
The hardness of the water varies from place to place. If hard water is used in
the dishwasher, deposits will form on the dishes and utensils.
The appliance is equipped with a special softener that uses salts specifically
designed to eliminate lime and minerals from the water.

10
Adjusting the settings:
The amount of salt dispensed can be set from H0 to H7.
Salt is not required at the set value H0.
1. Find out about the hardness value of your tap water. Your water utility company
may help you with this.
2. Use the Water hardness table (listed below) to set the value on your dishwasher
based on the hardness of your tap water.
3. Close the door.
4. Press the "Power" button.
5. Hold down the "Delay" button and then press the "Program" button for 5 seconds.
The buzzer rings one time, and “H”.. flashes on the digital display. (Factory setting is
H0)
To change the settings:
1. Press the " Delay " button.
Each time the button is pressed, the set value increases by one level; when the value
of H7 has been reached, the display goes back to H0 (off).
2. When you have adjusted to the desired level, press the" Program " button. The
chosen setting has now been stored.
Clark
Water hardness
Range
Mmol/l
Set value on
the machine
0-8
9-10
11-12
13-15
16-20
21-26
27-38
39-62
soft
soft
medium
medium
medium
hard
hard
hard
0-1.1
1.2-1.4
1.5-1.8
1.9-2.1
2.2-2.9
3.0-3.7
3.8-5.4
5.5-8.9
H0
H1
H2
H3
H4
H5
H6
H7
Water hardness table
11
B) ADDING THE SALT INTO THE WATER SOFTENER:
Always use salt intended for use with the dishwasher.
ATTENTION! Only use salt specifically designed for use in dishwashers! All other
types of salt not specifically designed for use in a dishwasher, especially table salt,
will damage the water softener. In case of damage caused by the use of unsuitable
salt, the manufacturer does not give any warranty nor is liable for any caused damag-
es caused.
Only fill with salt just before starting one of the complete washing programs.
This will prevent any grains of salt or salty water from remaining on the bottom of the
machine for any period of time, which may cause corrosion.
After the first wash cycle, the control panel light goes OFF.
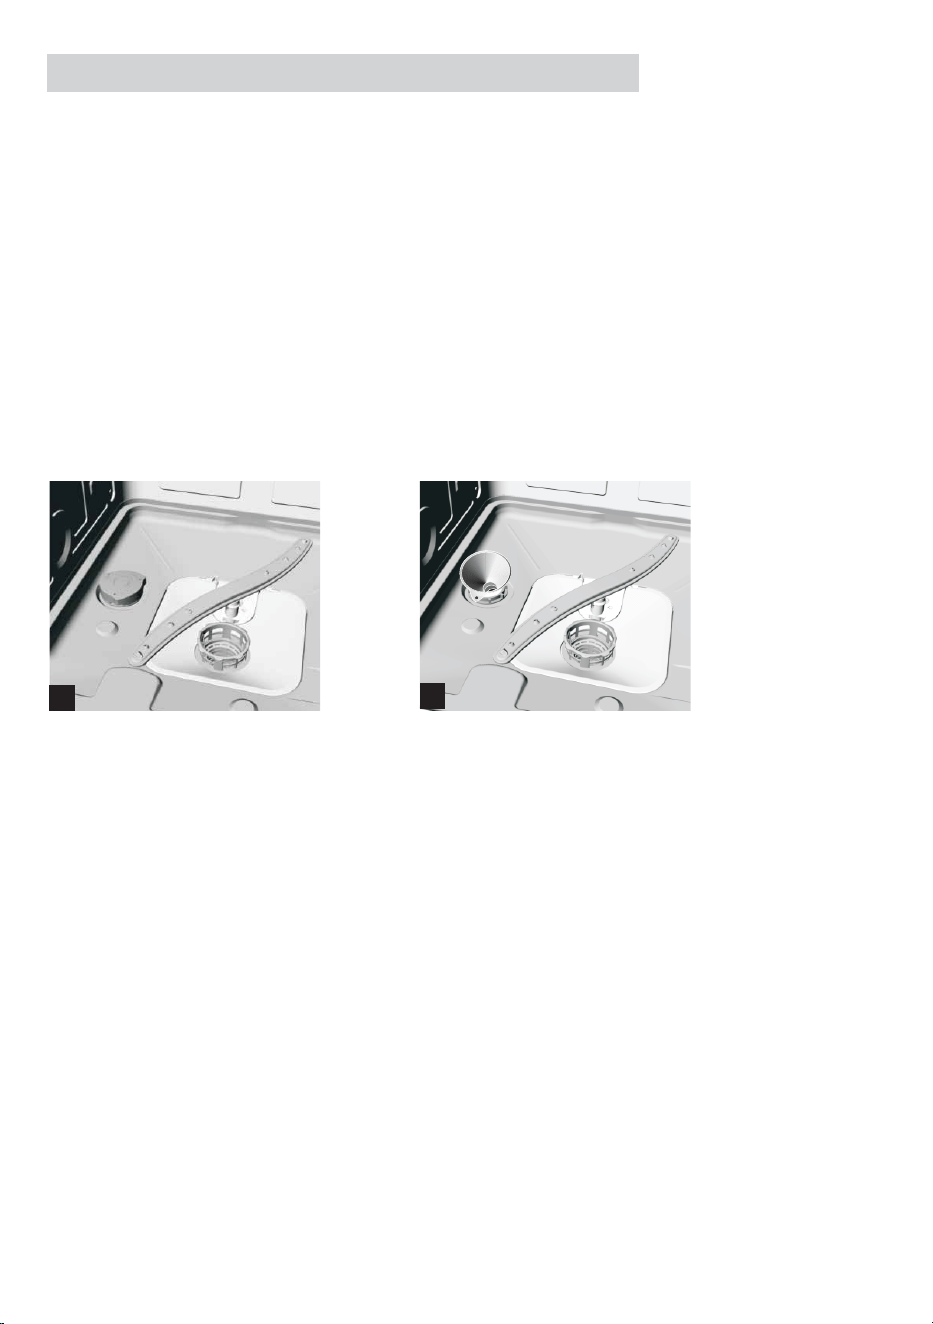
The Water softener/Salt compartment is located beneath the lower rack and should
be filled as follows:
1) Remove the lower rack, then unscrew and remove the cap from the Water soften-
er/Salt compartment. (illustration 1)
2) Before using the appliance for the first time, pour about 17oz / 500 ml of water in
the salt compartment.
3) Using the funnel, fill with dishwasher salt (max. 3.3lbs / 1.5kg) until the salt
container is full. When you refill the salt, it is normal for small amount of water to be
displaced and to drains off.
4) Carefully screw the compartment cap back on.
WARNING: Risk of Corrosion. Immediately after filling the compartment, run the
“Express” program and without any crockery in the dishwasher to remove any traces
of salt from the dishwasher base.
NOTE: It may take up to 2-6 days for the salt warning light to turn OFF, after the Water
softener/Salt compartment is filled with salt.
NOTE: The compartment must be refilled when the salt warning light on the control
panel turns ON. Once the compartment is filled enough, the indicator light may not
turn OFF before the salt fully dissolves.
1
2
11
12
C) FILL THE RINSE AID DISPENSER:
Rinse aid function:
The rinse aid is released during the final rinse to prevent water from forming droplets
on your dishes that can leave spots and streaks. It also improves drying by allowing
water to ‘sheet’ off the dishes.
The rinse aid dispenser is located on the interior side of the door next to the detergent
dispenser.
Your dishwasher is designed to use liquid rinse aids.
ATTENTION! Only use branded rinse aid for the dishwasher. Never fill the rinse aid
dispenser with any other substances (e.g., dishwasher cleaning agent, liquid deter-
gent). This will damage the appliance.
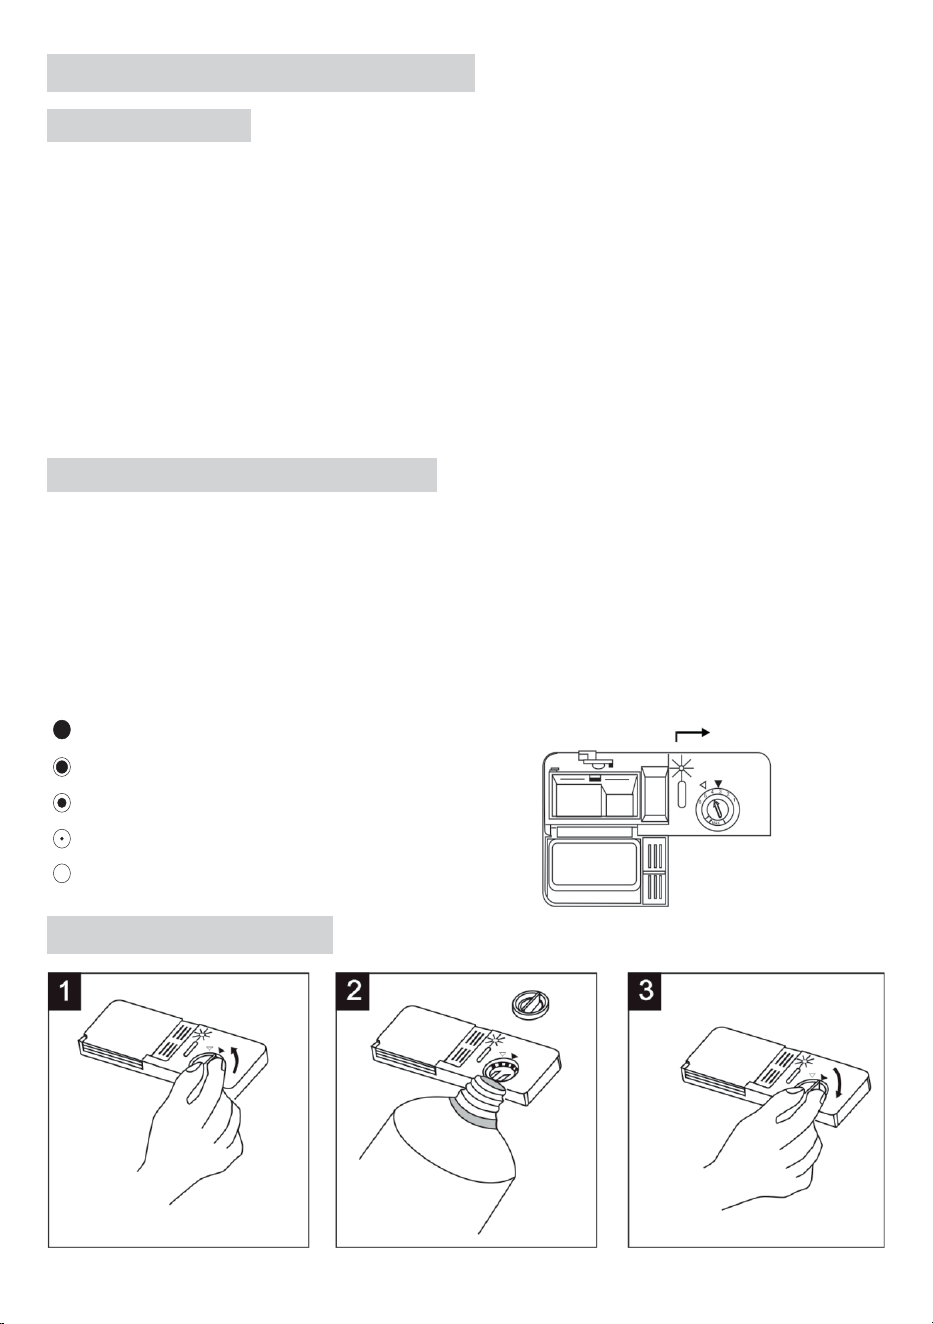
When to refill the Rinse aid dispenser:
The Rinse aid compartment must be refilled when the warning light on the control
panel turns ON. You can also judge the amount of rinse-aid by the color of the optical
level rinse aid indicator located next to the cap. When the rinse-aid container is full,
the whole indicator will be dark. As the rinse aid diminishes, the size of the dark dot
decreases. It would be best if you never let the rinse aid get below 1 / 4 full.
As the rinse aid diminishes, the size of the black dot on the rinse aid level indicator
changes, as illustrated below.
Full
3 / 4 full
1 / 2 full
1 / 4 full - Should refill to eliminate spotting
Empty
RINSE AID DISPENSER
Rinse-Aid indicator

13
1. To open the dispenser, turn the cap to the "open" position (left arrow) and lift it out.
2. Pour the rinse aid into the dispenser, be careful not to overfill. The volume of the
rinse aid container is about 4.7 oz / 140ml.
ATTENTION! Do not overfill and clean up any rinse aid spilled during filling with an
absorbent cloth to avoid excess foaming during the next wash.
3. Replace the cap by inserting it aligned with the "open" arrow and turning it to the
"closed" (right arrow) position.
Adjusting the Rinse aid dispenser:
The rinse aid dispenser has four settings (depending on model). Always start with the
dispenser set on "2". If spots and poor drying problems appear, increase the amount
of rinse aid dispensed by removing the dispenser lid and rotating the dial to "3". If the
dishes are still not drying properly or are spotted, adjust the dial to the next highest
number until your dishes are spot-free.
D) FILL THE DETERGENT DISPENSER:
Function of the Detergent:
Detergents with their chemical ingredients are necessary to remove, break down, and
transport residue out of the dishwasher. Most commercial quality detergents are
suitable for this purpose.
Concentrated Detergent
Based on their chemical composition, the detergents can be placed into two basic
types:
• conventional, alkaline detergents with caustic components, and
• low alkaline concentrated detergents with natural enzymes.
Adjust lever (Rinse)
4
3
2
1
M
A
X

The use of the "Normal" washing program in conjunction with concentrated deter-
gents reduces pollution and is good for your dishes; these washing programs are
specially matched to the soil-dissolving properties of the enzymes of the concentrat-
ed detergent. For this reason, the "Normal" washing program in which concentrated
detergents are used can achieve the same results that can otherwise only be
achieved using an "intensive" program.
Detergent Tablets/Pods
Detergent tablets/pods of different brands dissolve at a different rate. For this reason,
some detergent cannot dissolve and develop their full cleaning power during short
programs. Therefore, please use long programs (Heavy, Normal, Delicate) when using
detergent tablets/pods to ensure the complete removal of detergent residuals.
Detergent Dispenser
The dispenser must be refilled before the start of each washing cycle, following the
instructions provided in the Wash Cycle Table. Your dishwasher uses less detergent
and rinse aid than conventional dishwashers. Generally, only one tablespoon of
detergent is needed for an average wash load. Also, more heavily soiled items need
more detergent. Always add the detergent just before starting the dishwasher; other-
wise, it could get damp and will not dissolve properly.
Adding the detergent to the Detergent dispenser:
The marking engraved within the detergent chambers indicates the dosing levels, as
presented in the illustration below:
1) Main Wash detergent compartment:
"MIN" amount - approximately 0.7oz / 20g of detergent.
"MAX" amount - approximately 2.3oz / 65 g of detergent.
2) Pre-Wash detergent compartment:
Marking - approximately 0.27oz / 7.5g of detergent.
14
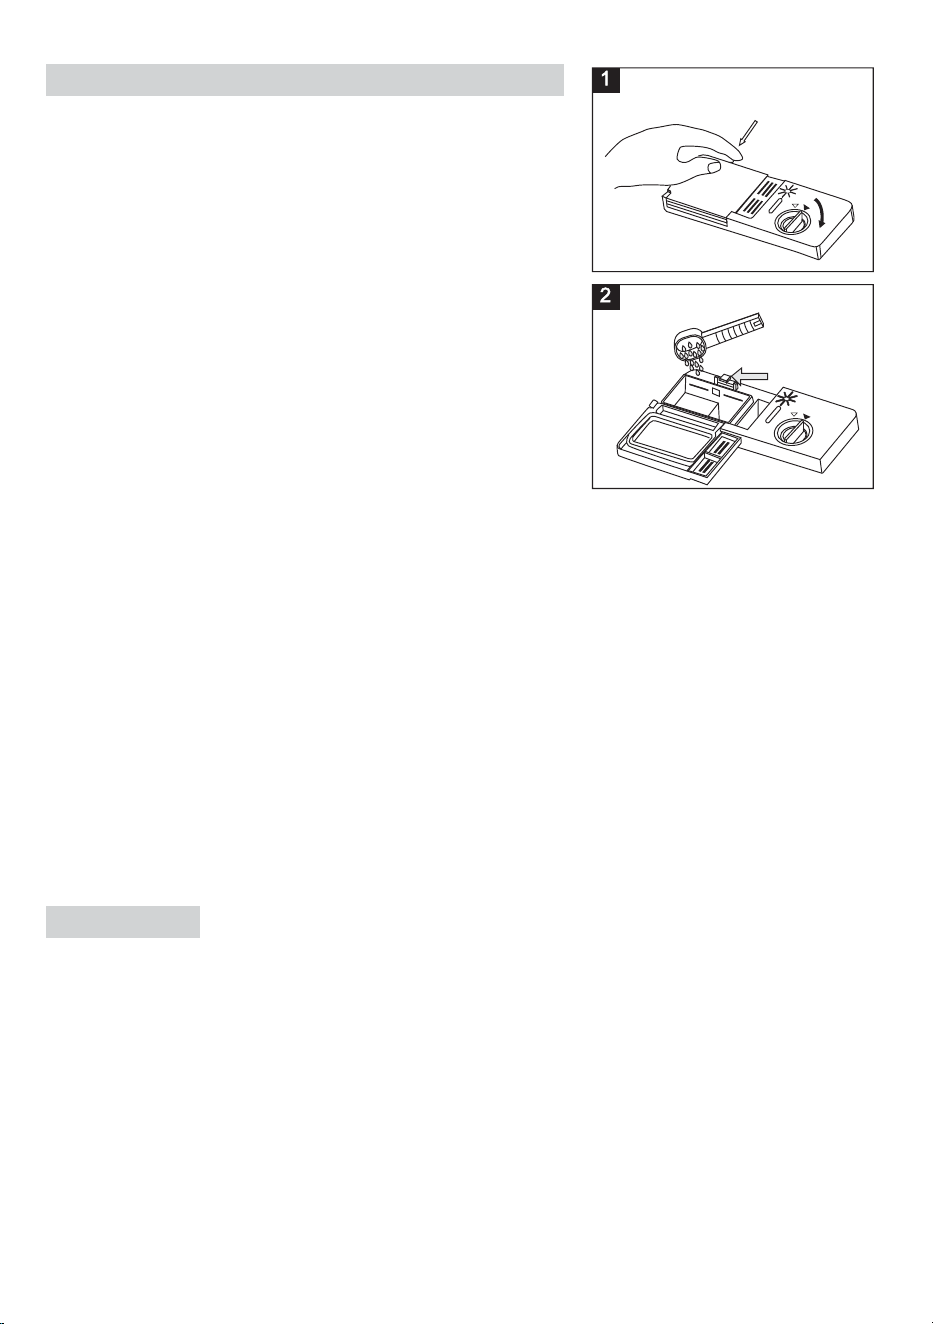
To fill the Detergent dispenser with detergent:
1. Press the release button located on the lid of the
Detergent dispenser. The lid will open.
2. Add one tablespoon of the detergent powder, or
one tablet/pod.
3. If the dishes are heavily soiled, place an additional
detergent dose in the pre-wash detergent chamber.
This detergent will take effect during the pre-wash
phase.
4. Close the lid and press until it locks in place.
NOTE: It is not recommended to use detergent pods
(3-in-1) for Light, Express, and Rinse wash cycles, as
some detergent residue may appear due to short
time length of these cycles.
WARNING! Dishwasher detergent is corrosive! Keep
out of reach of children!
WARNING: Dishwasher detergents can cause burning in the nose, mouth and throat
if swallowed, or inhibit breathing. Avoid inhalation of powder detergents and do not
ingest dishwasher detergent. Seek medical attention immediately if detergent has
been swallowed or inhaled. Keep detergent out of the reach of children at all times.
Keep children away from the dishwasher when the door is open. There could still be
detergent residues in the dispenser. Only add detergent just before starting the
program and close the door, activating the safety lock.
NOTE: Use only detergent specifically made for use in dishwashers. Keep your deter-
gent fresh and dry. Don't put powder detergent into the dispenser until you're ready to
wash dishes.
Please be aware that according to the level of soiling and the specific hardness of
water, differences are possible.
Please observe the manufacturer's recommendations on the detergent packaging.
Detergents:
There are 3 sorts of detergents:
1.With phosphate and with chlorine.
2.With phosphate and without chlorine.
3.Without phosphate and without chloride.
Normally new pulverized detergent is without phosphate. The water softener function
of phosphate is not given. In this case, we recommend filling salt in the salt container
even when the hardness of water is only 6 dH. If detergents without phosphate were
used in case of hard water, often white spots appear at dishes and glasses. In this
case, please add more detergent to reach better results. Detergents without chlorine
only bleach a little. Strong and colored spots will not be removed completely. In this
case, please choose a program with a higher temperature.
15

DISHWARE MATERIALS
NOTE: Before using your dishwasher for the first time, check the information in this
section.
Some items are not dishwasher safe and should be hand-washed; others require
special loading.
Notes Prior to Dishwashing
Aluminum: Colored anodized aluminum may fade over time. Minerals in your water
may cause the aluminum to darken or spot. This can usually be removed with a
soap-filled steel wool pad.
China, Crystal, Stoneware: Some hand-painted utensils may discolor, fade, or spot.
Handwash these utensils. Position fragile glassware so that it will not fall over or
come in contact with other utensils during the wash cycle.
Glass: Milk glasses may discolor or become yellow.
Non-stick Coatings: Apply a light coating of vegetable oil to non-stick surfaces
after drying.
Plastics: Make sure the plasticware is dishwasher safe.
Stainless Steel, Sterling Silver, and Silver Plates: Load these so they do not come in
contact with other metals.
Not Recommended
Acrylic: Crazing, small cracks throughout the acrylic may occur.
Adhesive-Joined Pieces: Adhesives that join materials such as plastic, wood, bone,
steel, copper, tin, etc., may loosen.
Bone-Handled Utensils: Handles may separate.
Iron: Iron will rust. Hand wash and dry immediately.
Non-Dishware items: Your dishwasher is intended for use in cleaning ONLY stan-
dard household dishware and kitchenware.
Pewter, Brass, Bronze: These items will tarnish. Hand wash and dry immediately.
Tin: Tin will stain. Hand wash and dry immediately.
Wood: Wooden bowls, wooden utensils, and utensils with wooden handles can
crack, warp and lose their finish.
16
LOADING THE DISHWASHER
For the best performance of the dishwasher, follow these loading guidelines.
Features and the appearance of rack and silverware baskets may vary from your
model.
Before Loading the Dishwasher racks:
Scrape off any large amounts of leftover food. It is not necessary to rinse the dishes
under running water.
Place objects in the dishwasher in the following way:
1. Items such as cups, glasses, pots/pans, etc., are to be placed upside down.
2. Curved items, or those with recesses, should be at a slant so that water can runoff.
3. Make sure that the dishware is stacked securely and cannot tip over.
4. Make sure that dishware or the utensils do not prevent the spray arms from rotat-
ing during the washing cycle.
NOTE: Very small items should not be washed in the dishwasher as they could easily
fall out of the basket or rack.
NOTE: To avoid dishwasher damage, do not load the dishwasher with paper prod-
ucts, plastic bags, packing materials, or anything other than normal, dishwasher
safe dishware and kitchenware.
WARNING: The sharp points and edges of knives and other sharp utensils can cause
serious injuries. Load knives and other sharp utensils with edges facing down. Do
not allow children to handle or play near knives and sharp utensils.
17
Loading the Upper rack:
The upper rack is
designed to hold more
delicate and lighter dish-
ware such as glasses,
coffee and teacup,
saucers, as well as small
plates, small bowls and
shallow pans (as long as
they are not too dirty).
Position the dishes and
cookware so that they do
not get moved by the
spray of water.
Upper rack
Upper rack
Type
Item
Coffee Cup
Glass
Saucer
A
B
C
A6 A6 B6 C12 B6
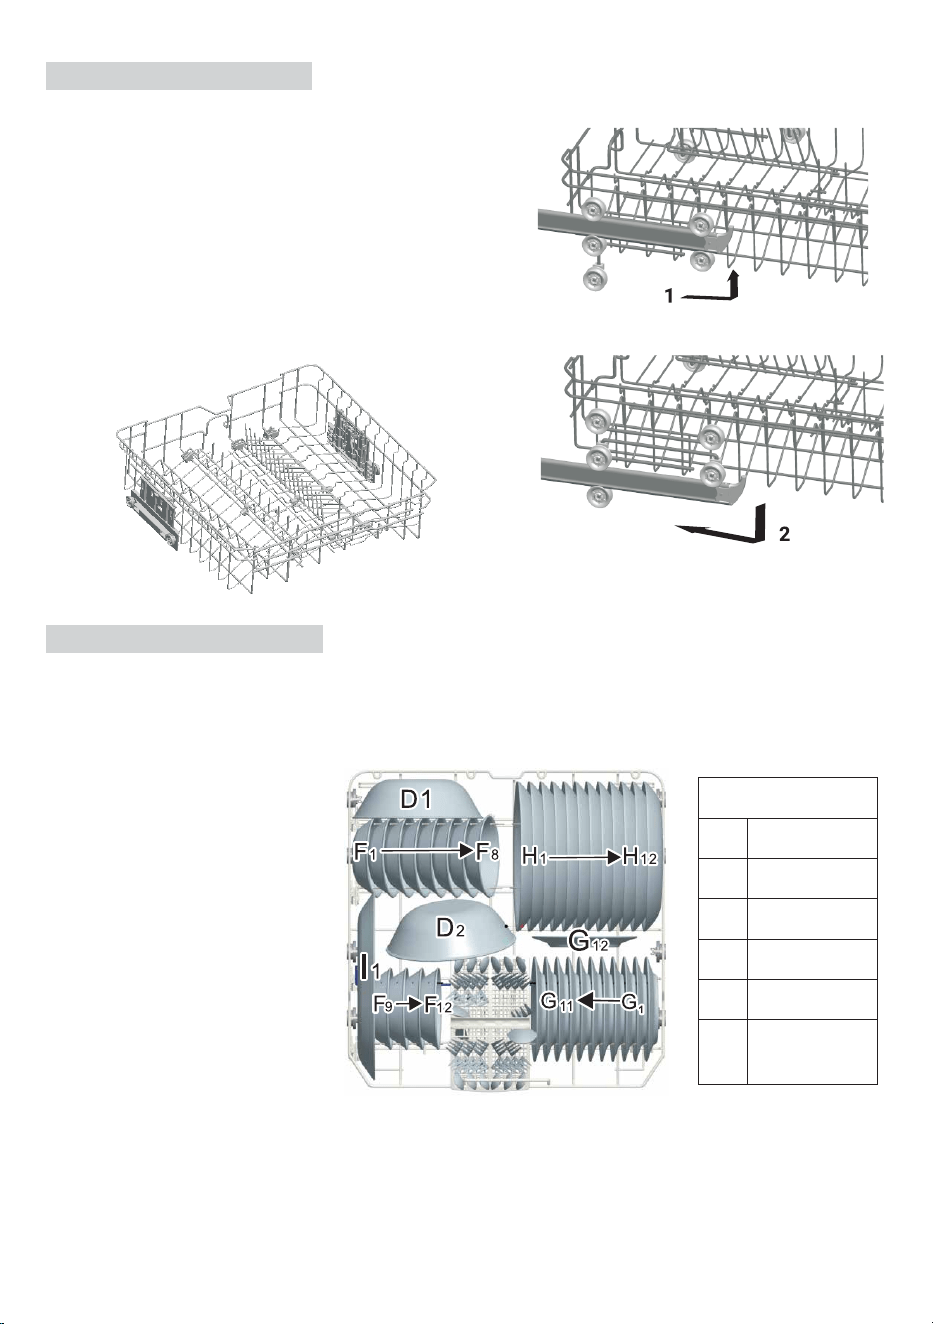
Adjusting the Upper rack:
If required, the upper rack's height can be
adjusted to create more space for large dish-
ware or utensils either in the upper or lower
racks. The upper rack can be adjusted by
pulling out to remove, and repositioning the rail
between the different wheel heights.
NOTE: Long items, serving cutlery, salad serv-
ers, or knives should be placed horizontally on
the rack, or Fork/Knife shelf in the Upper rack,
so that they do not obstruct the rotation of the
spray arms.
18
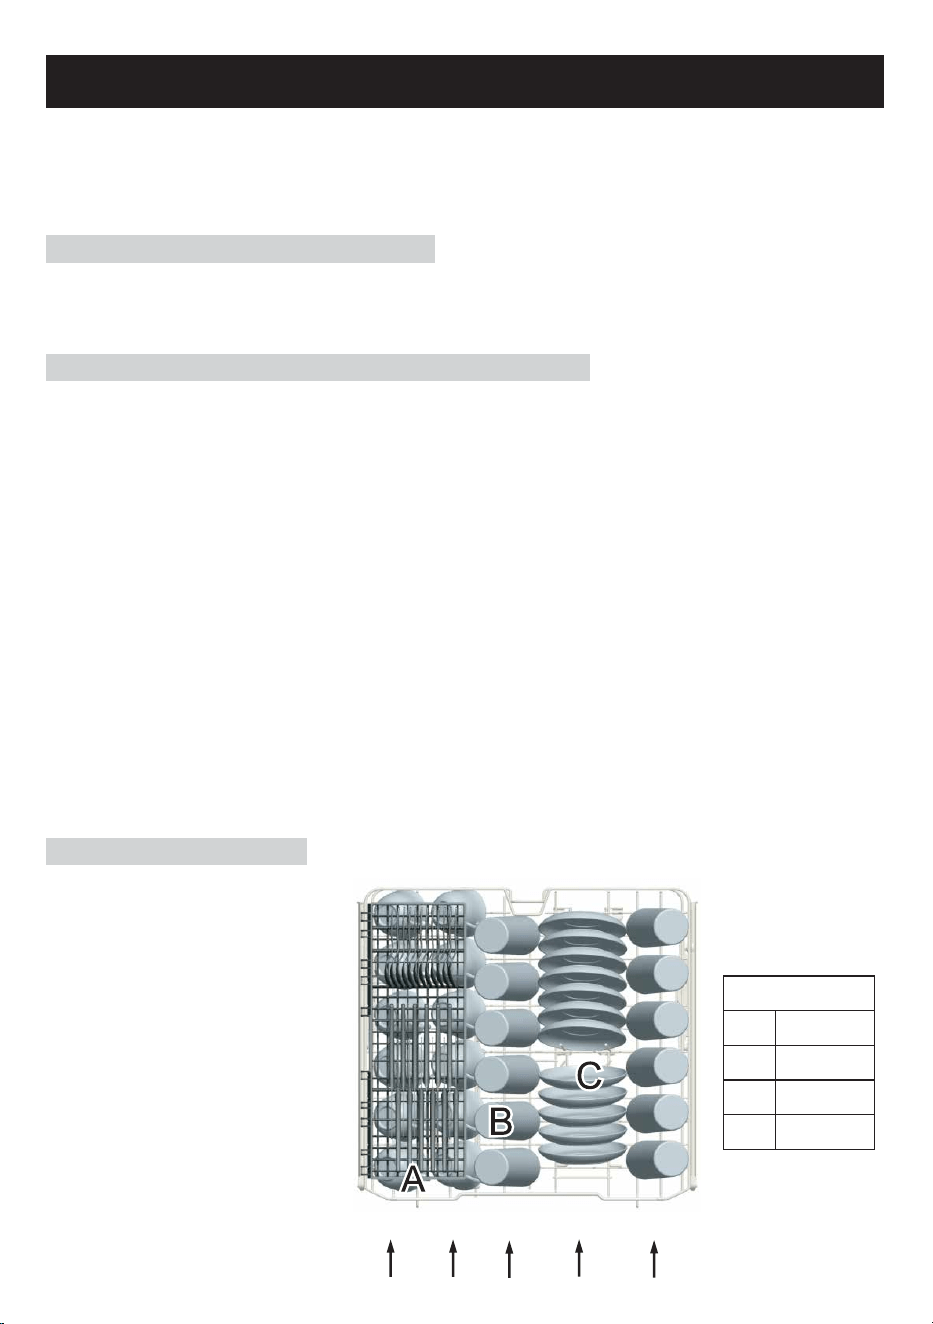
Loading the Lower rack
We recommend that you place large items that are more difficult to clean into the
lower rack: pots, pans, lids, serving dishes, and bowls, as shown in the figure below.
ATTENTION: Do not put into the dishwasher items that are dirty from cigarette ash,
candle wax, lacquer, or paint.
NOTE: Do not use dishware that is not suitable for dishwashers. This is important for
good results and for reasonable energy consumption.
Please do not overload your dishwasher.
It is preferable to place
serving dishes and lids
on the side of the racks
in order to avoid block-
ing the rotation of the
top spray arm.
Pots, serving bowls, etc.,
must always be placed
top down.
Deep pots should be
slanted to allow water to
flow out.
Lower rack
Type
Item
Serving Oval
platter
G
H
I
Dinner plate
Bread plate
Fruit bowl
Serving bowl
F
D
Lower rack

2
1
2
1
Upper and Lower rack Folding racks
Folding racks consisting of three/two parts in the upper/lower rack of your dishwash-
er are designed to allow you to place large items such as pots, pans, etc. If requested,
each part can be folded separately, or all of them can be folded to create more space
in the racks. You can use folding racks by raising them upwards or by folding them
down.
Lower rack: Upper rack:
Cutlery Basket
Cutlery should be placed in the cutlery basket with handles at the bottom. Any long
knives or utensils should not be placed in the cutlery basket. Instead, place horizon-
tally in the Upper Rack, or the designated Fork/Knife shelf in the Upper rack.
ATTENTION: Ensure that the cutlery does not impede the rotation of the spray arms.
ATTENTION: LONG BLADED KNIVES STORED IN AN UPRIGHT POSITION ARE A
POTENTIAL HAZARD! LONG AND/OR SHARP ITEMS OF CUTLERY SUCH AS CARV-
ING KNIVES MUST BE POSITIONED HORIZONTALLY IN THE UPPER RACK OR
FORK/KNIFE SHELF IN THE UPPER RACK!
NOTE: Please do not overload your dishwasher. There is only space for 12 stan-
dard dishes.
19
Door side
1
4
Fork shelf Cutlery basket

WASH CYCLE OPTIONS:
Delay Start: Allows you to delay the start time of your dishwasher in one-hour incre-
ments for up to 24 hours.
Sanitize: The Sanitize feature increases the temperature during the final rinse stage,
and is available with any cycle except Rinse. Select one of these cycles, press
the“Sanitize” button and then press Start to activate the Sanitation features.
The sanitize LED light will illuminate when sanitation requirements are met. The tech-
nical sanitation measures may also improve the drying results.
Upper Wash/Lower Wash: The features are available with any cycle. For convenience,
use it to wash a small load of dishes in the Upper rack only or Lower rack only to help
keep the kitchen continuously clean.
WASH CYCLES:
Heavy: Best for cleaning items with baked-on food or grease. These dishes would
normally require soaking.
Normal: This cycle is recommended to completely wash and dry a full load of normal-
ly soiled dishes. The energy usage label is based on this cycle and option combination.
Delicate: Provides a light wash and gentle dry for delicate items such as china and
crystal.
Light: Cleans lightly soiled dishes and reduces overall wash time. Use this cycle to
clean glasses and dessert dishware that may need to be reused at the event.
Express: When you need fast results, the Express Wash cycle will clean your dishes
using slightly more water and energy. Then, towel dry dishes for immediate use.
Select Sanitize if you want to add a drying option.
Rinse: It allows you to rinse food soil off a partial load and hold the dishes in the dish-
washer until you are ready to run a full load.
NOTE: It is not recommended to use detergent pods (3-in-1) for Light, Express, and
Rinse wash cycles, as some detergent residue may appear due to short time length of
these cycles.
DISHWASHER CYCLES AND OPTIONS
Removing the Dishes
ATTENTION: The dishes are hot and easily breakable immediately after washing
cycle. Please allow 30 minutes for dishes to cool off before unloading the dishwasher.
To prevent water from dripping from the upper basket into the lower basket, we
recommend that you empty the lower rack first and then the upper rack.
20
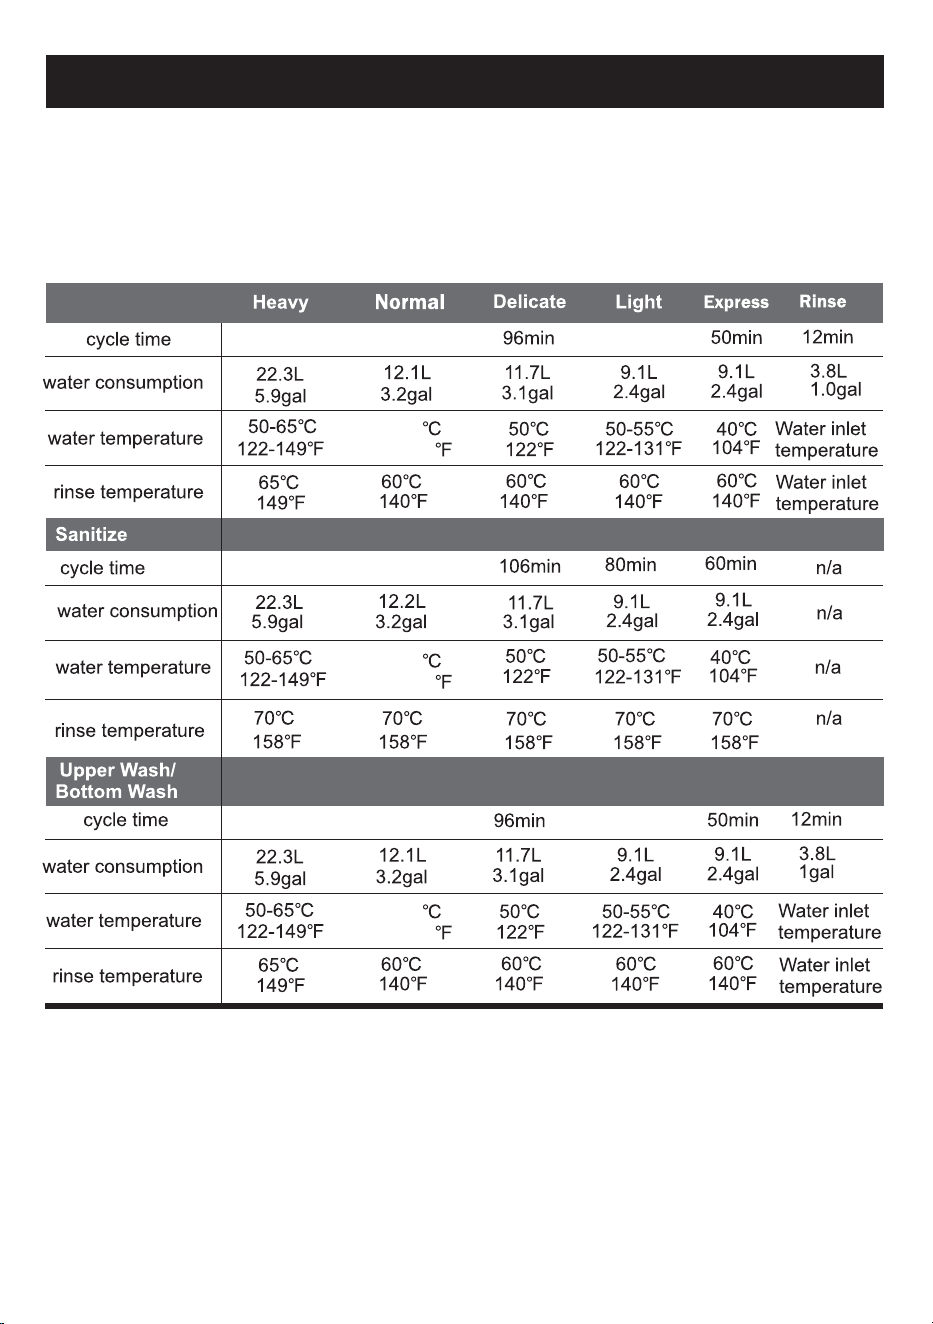
WASH CYCLE INFORMATION
The cycle’s time duration is based on average soil loads and 120˚F water intake
temperature and will vary based on the actual conditions.
WASH CYCLE INFORMATION
21
175min 70min
70min
144min
180min
175min 144min
154min
50-53
122-127
50-53
122-127
50-53
122-127

OPERATING THE DISHWASHER
NOTE: Buttons are sensitive and should be touched gently. Avoid any grease or food
particles resting on the buttons as they could activate the dishwasher. Wiping and
cleaning can also activate the dishwasher. For best results, use bare, clean hands
when touching the buttons.
WARNING: To avoid the risk of injury, always use caution when opening the door
during or following a wash cycle as hot water or steam may escape. Do not fully open
the door until water noises have stopped and steam has subsided.
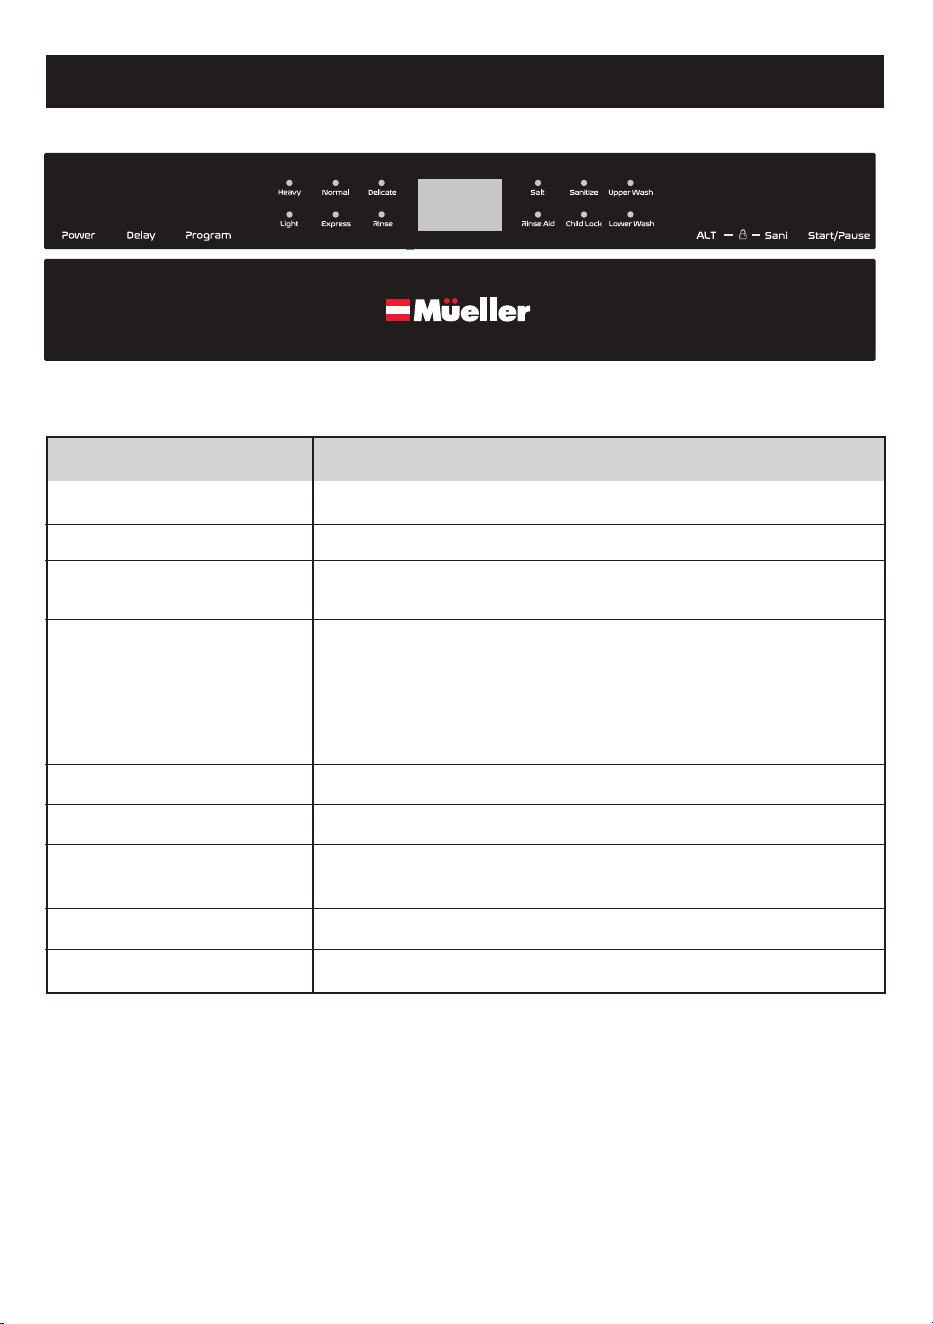
1. Power button: Power ON/OFF button.
2. Delay button: Allows you to delay the start of any wash cycle for up to 24 hours.
3. Program button: Press the button to scroll through the wash cycles. The corre-
sponding program light will illuminate to indicate which wash cycle has been select-
ed.
4. Function alternative (ALT) button: Press this button to choose the additional func-
tion washing of the upper rack or washing of the lower rack. The corresponding light
will illuminate.
5. Sanitize button: Provides an increased temperature during the final rinse stage
which improves the drying process.
6. Start/Pause button: The appliance will start or pause the selected washing cycle.
7. Child lock: Press the ALT button and Sani button together at the same time for 3
seconds to lock the appliance and disable the button’s functions.
8. Program indicator lights: When selecting the wash cycle, the corresponding light
will illuminate.
9. Digital display: Displays the wash cycle remaining time, malfunction codes, and
delay time.
10. Salt indicator: The indicator light turns ON when the water softener dispenser
needs a refill.
11. Sanitize indicator: The indicator light will illuminate when the Sanitize button is
selected.
22
1 2 3 4 5
7
6
13 14 15
12111098

TURNING ON THE APPLIANCE
12. Upper Wash indicator light: The light illuminates when the Upper layer feature is
selected, and the upper spray arm is in motion.
13. Rinse aid refill indicator: The indicator light turns ON when the rinse aid dispenser
needs a refill.
14. Child lock indicator: The “Child Lock” indicator light flashes 6 times and then
stays solid once the Child lock buttons (ALT + Sani) are pressed and held for 3
seconds.
15. Lower Wash indicator light: The light illuminates when the Lower layer feature is
selected, and the lower spray arm is in motion.
STARTING A WASH CYCLE:
1. Pull out the lower and upper racks, load the dishes, and push the racks all the way
back. It is recommended to load the lower rack first, then the upper one (see the
section entitled "Loading the Dishwasher"). Pour in the detergent (see the section
entitled "Dishwasher Setup").
2. Insert the plug into the socket. You must have: 120-volt, 60Hz, AC-only,10-or
12-amp, fused electrical supply.
Make sure that the water supply is turned on to full pressure.
3. Close the door, using a little force to ensure it latches properly.
NOTE: A click could be heard when the door is properly closed.
4. Press the "Power" button. Press the "Program" button to select a desired "Wash
cycle". (See the section entitled "Wash Cycle Information").
5. Press the Start/Pause button, and the dishwasher will start the wash cycle.
When the washing cycle is over, you can shut off the dishwasher by pressing "Power"
button.
CHANGING THE WASH CYCLE:
Prerequisite: The ongoing cycle can only be modified if the detergent dispenser cover
is not open (the door can be opened for viewing). Otherwise, the detergent may have
already been released, and the appliance may have already drained the wash water. If
this is the case, the detergent dispenser must be refilled (see the section entitled "Fill
the Detergent Dispenser").
Press the "Power" button to cancel the program, and press it on again to change the
program to the desired wash cycle setting (see the section entitled "Starting a wash
cycle" ).
NOTE: If you open the door during the wash cycle, the machine pauses, and the warn-
ing alarm rings. On display appears E1.
When you close the door, you must press the Start/Pause button and the the dish-
washer will continue to work.
23

The 6 program lights show the state of the dishwasher:
a) One of the program lights illuminated --> cycle running
b) One of the program lights blinking -->pause
NOTE: If all the lights begin to glimmer, that indicates the machine is out of order;
please turn off the main power and water supply before calling an authorized service
provider.
ADDING A DISH DURING WASH CYCLE:
A forgotten dish can be added at any time before the detergent dispenser lid opens.
1. Carefully open the door a little bit to stop the wash cycle.
2. After the spray arms stop working, you can open the door completely.
3. Add forgotten dishes to the rack.
4. Close the door, and the dishwasher will continue the wash cycle after ten seconds.
WARNING: It is dangerous to open the door during the washing cycle because the hot
water may scald you.
END OF THE WASHING CYCLE:
Once the washing cycle has finished, the buzzer of the dishwasher will ring 6 times,
and then it will go off.
Turn off the appliance using the "Power" button, shut off the water supply and open
the door of the dishwasher ajar. Take caution as hot steam is likely to escape. Wait a
few minutes before unloading the dishwasher to avoid handling the dishes and uten-
sils while they are still hot and more susceptible to breakage. The dishes will also dry
better if you leave them in the dishwasher for some time after the washing cycle ends.
24
MAINTENANCE AND CLEANING
Prior to initial use it is recommended to fill the Water Softener Compartment, Deter-
gent Dispenser and Rinse Aid Dispenser and run an empty program cycle to remove
any foreign manufacturing testing residue. Any yellow-colored water initially is
normal and will dissipate with use.
For optimal performance it is important to take the time to ensure the interior of your
dishwasher is clean.
Warning: Before thorough cleaning of your dishwasher, always disconnect the power
plug from the socket. Pressing the Power ON/OFF button to the OFF position does
NOT disconnect the appliance from the power supply.
FILTERING SYSTEM
The filters are used to avoid large food remnants and other residues getting inside the
dishwasher pump. The residue can obstruct the filter in sometime.
Cleaning:
The filter assembly efficiently removes food particles from the wash water, allowing it
to be recirculated during the cycle. For best performance and dishwashing results, it
is therefore recommended to inspect and clean the filter assembly for any obstruc-
tions or residue after every wash cycle once the dishwasher has cooled.
1. For everyday cleaning, slide the Lower Rack forward and then remove the Coarse
Filter by gently squeezing the tabs located at the top of the filter and lifting out of the
Micro Filter (See previous image). Remove debris, rinse under running water, and
reinsert.
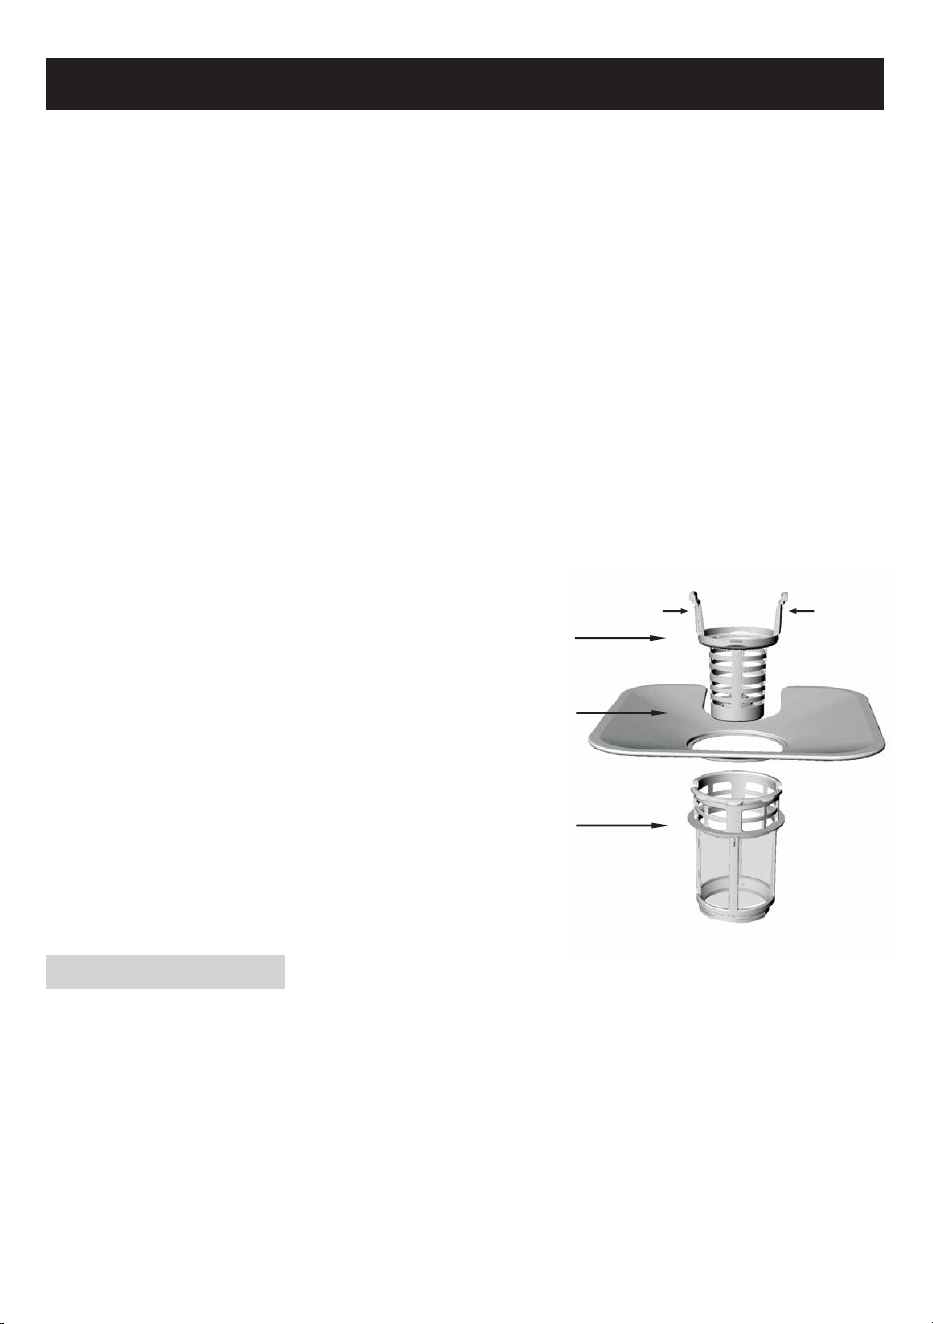
The filter system consists of 3 components:
1. Coarse Filter
Larger debris, such as bone and glass that could
clog the drain will be trapped in the coarse filter. To
remove an item caught in this filter, gently squeeze
the tabs on the top of this filter and lift it out.
2. Micro Filter
This filter holds soil and food residue in the sump
area and prevents it from being redeposited on the
dishes during a cycle.
3. Flat Filter (Main Filter)
Food and debris will be trapped by a special jet on
the lower spray arm.
25
3
1
2
Squeeze
& Lift to
Remove
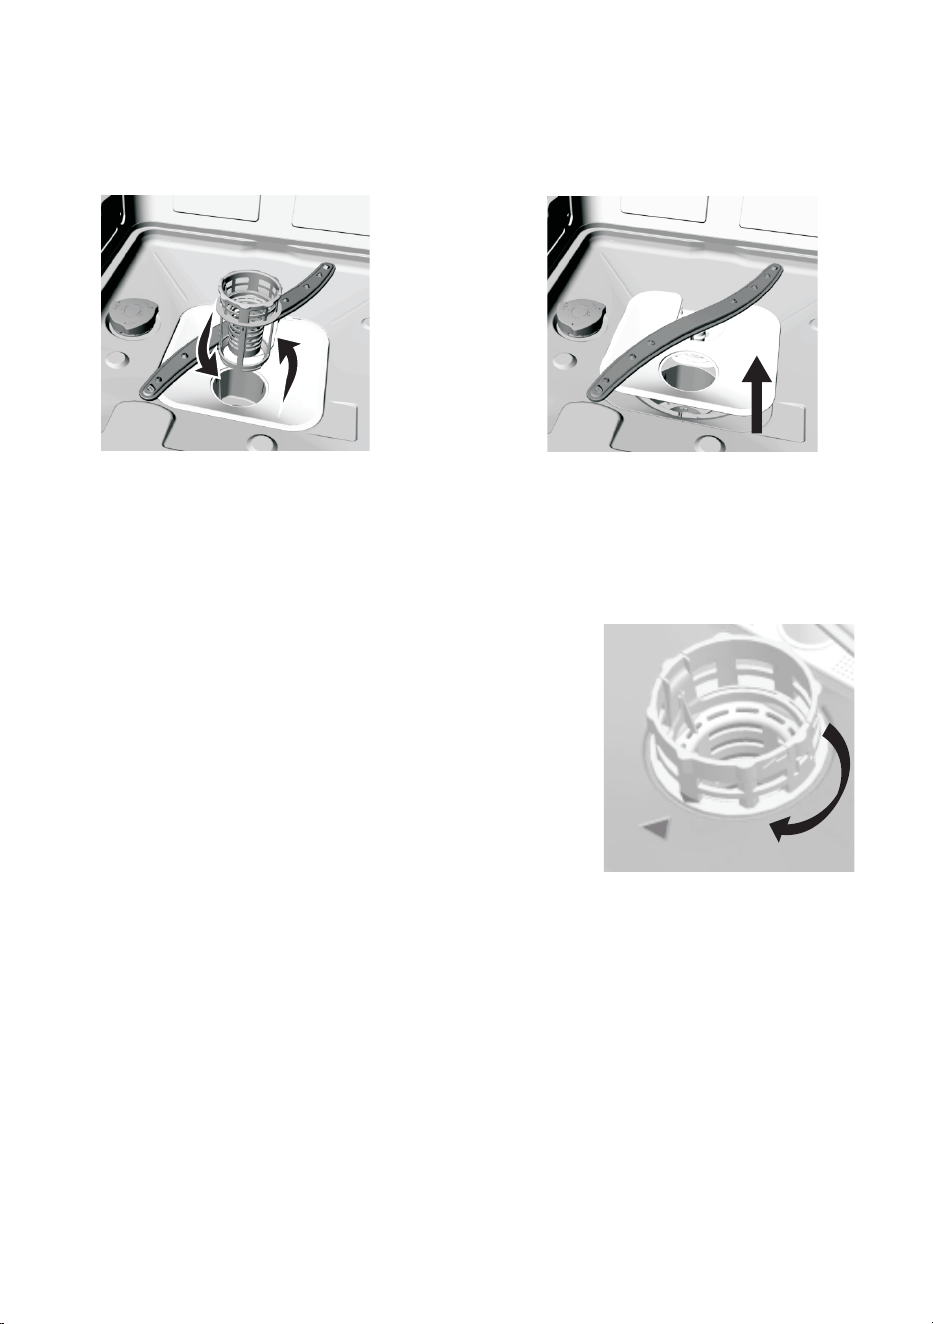
2. For thorough cleaning, rotate the Micro
Filter (with Coarse Filter still inserted)
counterclockwise to release and lift out of
the base of the dishwasher. Remove
Coarse Filter as per Step 1 above.
3. Remove the Flat Filter by lifting up.
4. Rinse the 3 filter parts under running water. Use a small kitchen brush or tooth-
brush to clean the fine holes of filters.
Warning: When cleaning the filters, don't bang or knock them to clean; otherwise,
the filters could become contorted and the performance of dishwasher could be
compromised.
5. To reassemble, position the Flat Filter over the
filter hole at the base of the dishwasher. Insert the
Coarse Filter back into the Micro Filter by pushing in
until tabs are securely positioned. Then, reinsert the
Micro Filter back into the filter hole, pressing down-
wards and turning clockwise to secure.
Note: Do not reinsert the Micro Filter upside down.
6. Thorough cleaning of the filter assembly should be
carried out once a week with regular use of the dish-
washer.
WARNING: THE DISHWASHER MUST NEVER BE USED WITHOUT THE FILTERS.
IMPROPER REPLACEMENT OF THE FILTER MAY REDUCE THE PERFORMANCE
LEVEL OF THE APPLIANCE AND DAMAGE DISHES AND UTENSILS.
26
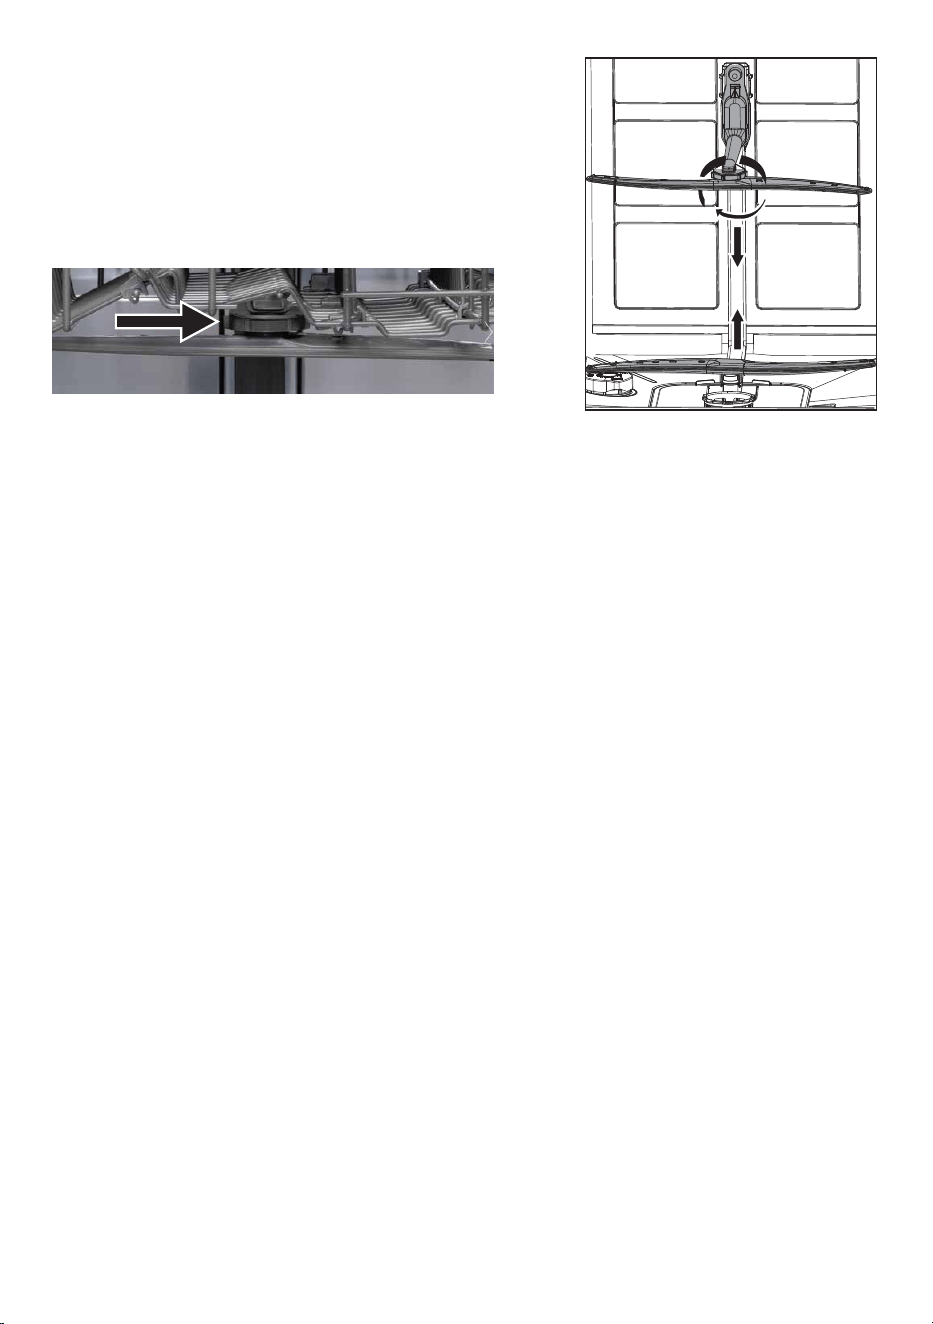
CLEANING THE SPRAY ARMS
It is necessary to clean the spray arms regularly as hard water chemicals will clog
the spray arm jets and bearings.
To remove the top spray arm, unscrew the lock nut clockwise and pull the spray
arm down to release. To remove the bottom spray arm, grasp the middle and pull
up out of the socket with a little force.
INTERIOR
To remove spots or stains from the interior surfaces, use a water dampened cloth and
a little white vinegar, or a cleaning product made specifically for dishwashers.
EXTERIOR
To clean the control panel and door frame, wipe with a lightly dampened cloth then
dry thoroughly. Never use a spray cleaner of any kind for it could damage the door
lock and electrical components.
To clean the exterior surface, use a damp cloth with warm water or spray suitable for
dishwasher surfaces. Never use sharp objects, scouring pads (metal or plastic), abra-
sive cleaners, or abrasive cloths/paper towels for risk of scratching or leaving marks
on the surface.
SEALS
One of the factors that cause odors to form in the dishwasher is food that remains
trapped within the door seals. Clean periodically with a damp sponge. Do not use
abrasive substances or scouring pads that could affect the seal.
PROTECT AGAINST FREEZING
If your dishwasher is to be left in an unheated location during the winter, we recom-
mend the following steps be taken, with the assistance of a service professional:
1.Disconnect the electrical power to the dishwasher.
2.Turn off the water supply and disconnect the water supply hose from the water
valve.
3.Drain water from the inlet hose and water valve. (Use a container to collect draining
water)
4.Reconnect the water supply hose to the water valve.
5.Remove the filter assembly from the interior base of the dishwasher and use a
sponge to soak up water in the sump area.
Wash the arms under running warm water
and use a soft brush to clean the jets. Ensure
there are no blockages in the jet holes.
Carefully reinstall the spray arms, making
sure the rotary movement is in no way
impeded.
27

GENERAL CARE RECOMMENDATIONS
• After every wash, turn off the water supply to the appliance and leave the door
slightly ajar so that moisture and odors are not trapped inside.
• Never use harsh chemicals to clean your dishwasher. Some chloride-containing
products can damage your dishwasher and may present health hazards!
• Never use steam cleaning products to clean your dishwasher. The manufacturer will
not be responsible for the possible damages or consequences.
• If you do not intend to use the dishwasher for an extended period of time, it is
recommended that you run a wash cycle with the dishwasher empty and then remove
the power plug from the socket, turn off the water supply and leave the door of the
appliance slightly ajar. This will help the seals last longer and prevent odors from
forming in the appliance.
• If the appliance must be moved, try to keep it in the vertical position. If absolutely
necessary, it can be positioned on its back.
TROUBLESHOOTING TIPS
ERROR CODES
When some malfunctions happen, the appliance will display error codes to warn you.
WARNING: If overflow occurs, turn off the main water supply before calling for
service. If there is water in the base interior of the dishwasher because of an overfill
or small leak, the water should be removed before restarting the dishwasher.
BEFORE CALLING FOR SERVICE
Review the following troubleshooting guide to assist prior to calling for professional
service.
28
CODES MEANINGS POSSIBLE CAUSE
E1 Door open The door is opened when the dishwasher is operating
E2 Water inlet Water inlet malfunction
E3 Water drainage Water drainage malfunction
E4 Temperature sensor Temperature sensor malfunction
E5 Overflow/leakage Overflow occurs/Water leakage occurs
E6 Water leakage Water leakage occurs
E7 Heating element Abnormal heating

PROBLEM POSSIBLE CAUSES WHAT TO DO
Dishwasher
doesn’t run
Fuse blown, or the
circuit breaker acted
Replace fuse or reset circuit breaker. Remove any
other appliances sharing the same circuit with the
dishwasher.
Power supply is not
turned on
Make sure the dishwasher is turned on and the door is
closed securely. Make sure the power cord is properly
plugged into the wall socket.
Water pressure is low Check that the water supply is connected properly
and the water is turned on.
The system is designed to detect an overflow. When
it does, it shuts off the circulation pump and turns
on the drain pump.
Drain pump
doesn't stop
Overflow
Some audible sounds
are normal
Noise
Sound from detergent cup opening.
Utensils are not secure
in the baskets or
something small has
dropped into the basket
Ensure everything is secured in the dishwasher.
Motor hums Dishwasher has not been used regularly. If you do not
use it often, remember to set it to fill and pump out
every week, which will help keep the seal moist.
Suds in the
tub
Improper detergent
Use only specialized dishwasher detergent to avoid
suds. If suds occurs, open the dishwasher and let
suds evaporate. Add 1 gallon of cold water to the tub.
Close and latch the dishwasher, then start the
"pre-rinse" wash cycle to drain out the water. Repeat
if necessary.
Spilled rinse agent Always wipe up rinse agent spills immediately.
Stained tub
interior
Detergent with
colorant was used
Make sure that the detergent is one without colorant.
Dishes and
flatware
not clean
Improper program Select a stronger program.
Improper basket
loading
Make sure that the action of the detergent dispenser
and spray arms are not blocked by large dishware.
Spots and
filming on
glasses and
flatware
1. Extremely hard water
2. Low inlet temperature
3. Overloading the
dishwasher
4. Improper loading
5. Old or damp powder
detergent
6. Empty rinse agent
dispenser
7. Incorrect dosage of
detergent
8. Use of tablet with
short cycles
To remove spots from glassware:
1. Take out all metal utensils out of the dishwasher.
2. Do not add detergent.
3. Choose the longest cycle.
4. Start the dishwasher and allow it to run for about
18 to 22 minutes, then it will be in the main wash.
5. Open the door to pour 2 cups of white vinegar into
the bottom of the dishwasher.
6. Close the door and let the dishwasher complete the
cycle. If the vinegar does not work: Repeat as above,
except use 1/4 cup (60 ml) of citric acid crystals
instead of vinegar.
Cloudiness
on glassware
Combination of soft
water and too much
detergent
Use less detergent if you have soft water and select a
short cycle to wash the glassware. Avoid using
tablets/pods.
29

PROBLEM POSSIBLE CAUSES WHAT TO DO
Yellow or
brown film
on inside
surfaces
Tea or coffee stains Use a solution of 1/2 cup of bleach and 3 cups of
warm water to remove the stains by hand. Wear
cleaning gloves.
WARNING: Wait for 20 minutes after a cycle to let the
heating elements cool down before cleaning the
interior; otherwise, burns will happen.
Iron deposits in water
can cause an overall film
Contact a water softener company for a specialized
filter.
White film on
inside surface
Hard water minerals
To clean the interior, use a damp sponge with
dishwasher detergent and wear rubber gloves. Use
white vinegar to spot clean or a specialized
dishwasher cleaner. Never use any other cleaner for
the risk of foaming or suds.
The detergent
dispenser lid
cannot be
closed properly
Clogged detergent
residue is blocking the
catch
Clean the detergent dispenser and catch thoroughly.
Avoid using tablets/pods for short programs.
Detergent left
in dispenser
cups
Dishes block detergent
Cups
Re-load the dishes properly.
Use of tablet/pods Only use tablets/pods for Heavy, Normal & Delicate
programs.
Steam Normal phenomenon There is some steam coming through the vent by the
door latch during drying and water draining.
Black or gray
marks on
dishes
Aluminum utensils
have rubbed against
dishes
Use a mild abrasive cleaner to eliminate those marks.
Water sitting on
the bottom of
the tub
This is normal
A small amount of clean water around the outlet on
the tub bottom keeps the water seal lubricated.
Dishwasher
leaks
Overfill dispenser or
rinse aid spills
Be careful not to overfill the rinse aid dispenser.
Spilled rinse aid could cause excess suds and lead to
overflowing. Wipe away any spills with a damp cloth.
Dishwasher is not level
Make sure the dishwasher is level.
SPECIFICATIONS
Rated Power: 120V~60Hz
12 Place Setting Capacity
ENERGY STAR Certified
UL Listed
30

If you are not happy with the product for any reason, please
with your feedback or questions, and we will do our best to
make things right for you!
Your purchase comes with a 100%
satisfaction guarantee from Müeller
168 Mason Way Unit #4A,
City of Industry, CA 91746
Telephone: (888) 632-9981
E-mail: [email protected]
Web: www.muellerdirect.com
Müeller USA