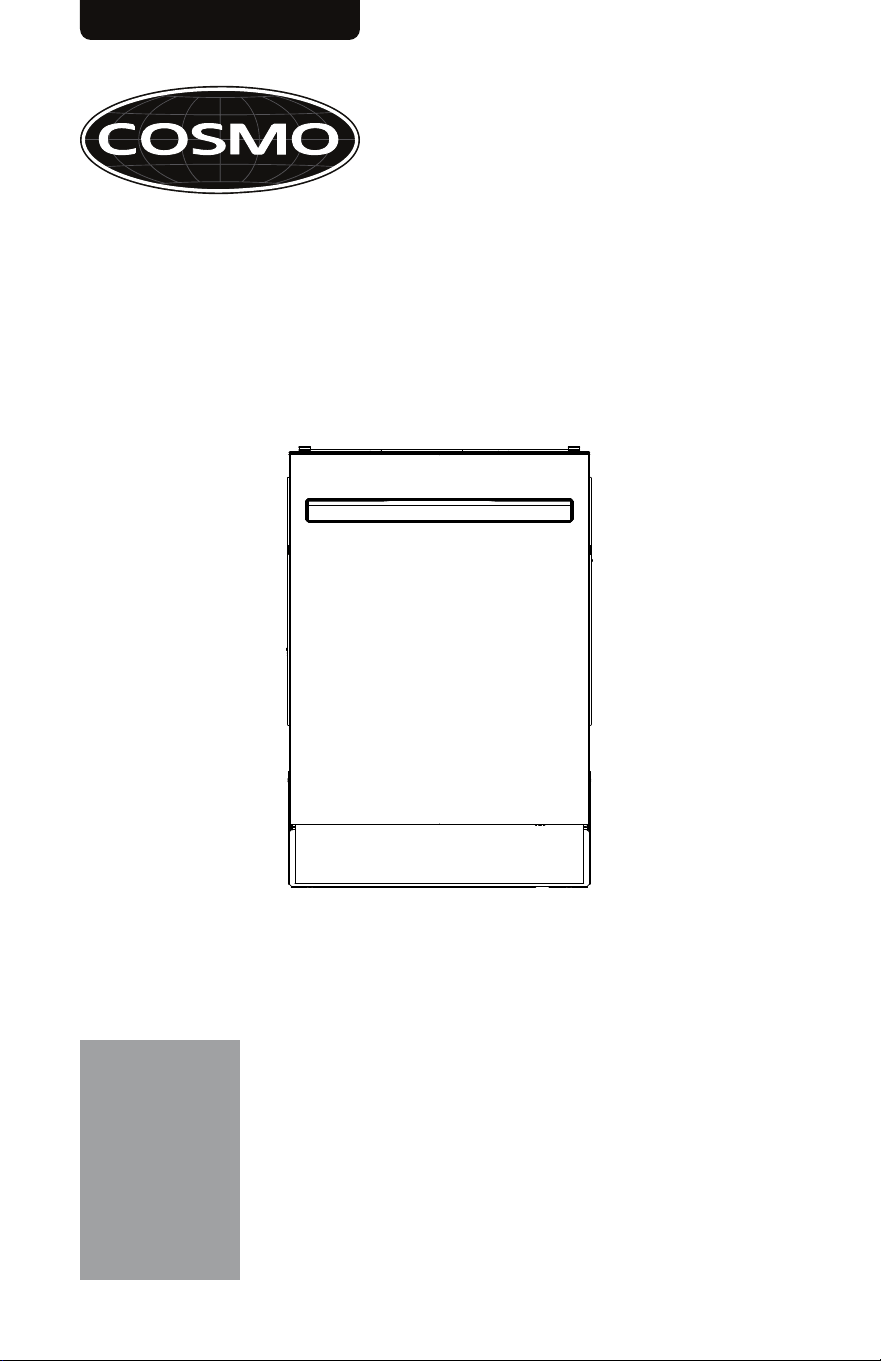
DISHWASHER
INSTALLATION MANUAL
READ AND SAVE THESE INSTRUCTIONS.
FOR RESIDENTIAL USE ONLY.
PLEASE LEAVE THIS GUIDE WITH THE HOMEOWNER.
PLEASE KEEP THIS GUIDE FOR FUTURE REFERENCE.
IMPORTANT:
INSTALLER:
HOMEOWNER:
BUILT-IN DISHWASHER
COS-DWI240TTRBK
Rev.26.03

2
THANK YOU FOR YOUR PURCHASE
Thank you for your purchase. We know that you have many brands and
products to choose from and we are honored to know that you have decided
to take one of our products into your home and hope that you enjoy it.
COSMO Appliances are designed according to the strictest safety and
performance standard for the North American market. We follow the most
advanced manufacturing philosophy. Each appliance leaves the factory after
thorough quality inspection and testing. Our distributors and our service
partners are ready to answer any questions you may have regarding how to
install, use and care for your products. We hope that this manual will help you
learn to use the product in the safest and most effective manner.
Before using this product, please read through this manual carefully. Keep
this user manual in a safe place for future reference. Please ensure that other
persons using this product are familiar with these instructions as well.
If you have any questions or concerns, please contact the dealer from whom you
purchased the product, or contact our Customer Support at:
1-888-784-3108
Reach us online at:
www.cosmoappliances.com

TABLE OF CONTENTS
Dishwasher Safety ............................................................................................ 4
Installation Requirements ................................................................................ 7
Tools and Parts ....................................................................................................... 7
Location Requirements & Clearance .................................................................. 9
Product Dimensions .............................................................................................. 12
Electrical Requirements ...................................................................................... 14
Installation Instructions .................................................................................. 16
Remove Old Appliance ....................................................................................... 16
Unpack Dishwasher ............................................................................................. 18
Preparing Power Cord ......................................................................................... 19
Preparing the Water Supply Line and Drain Hose ........................................ 20
Steam Protection Film ......................................................................................... 21
Kick Plate ............................................................................................................... 22
Installing the Mounting Brackets ..................................................................... 23
Positioning the Dishwasher into the Cabinet .................................................. 26
Water Supply Line Connection ......................................................................... 30
Junction Box Hardwire Connection .................................................................. 31
Drain Hose Connection ...................................................................................... 36
Disposal Connection Without Air Gap ............................................................. 37
Waste Tee Connection Without Air Gap ......................................................... 38
Waste Tee or Disposal Connection With Air Gap .......................................... 39
Leveling the Dishwasher Height ...................................................................... 40
Finishing the Installation ............................................................................... 42
3
DISHWASHER SAFETY
Read All Instructions Before Using the Appliance
WARNING: To reduce the risk of fire, electric shock, serious injury, or
property damage when using this dishwasher, follow these basic safety
precautions.
California Proposition 65 Warning
WARNING: Cancer and Reproductive Harm -
www.P65Warnings.ca.gov
4
Your safety and the safety of others are very important.
We have provided many important safety messages in this manual and on
your appliance. Always read and obey all safety messages.
WARNING
This is the safety alert symbol.
This symbol alerts you to potential hazards that
can kill or hurt you and others.
All safety messages will follow the safety alert
symbol and either the word "WARNING" or
"CAUTION." These words mean:
You can be killed or seriously injured if you don't
follow instructions.
A potentially hazardous situation which, if not
avoided, could result in minor or moderate injury.
CAUTION
All safety messages will tell you what the potential hazard is, tell you how
to reduce the chance of injury, and tell you what can happen if the
instructions are not followed.
5
WARNING
Electrical Shock & Fire Hazard
• This dishwasher must be properly installed and grounded by a qualified
technician. Improper grounding or incorrect electrical installation can
result in electrical shock, fire, or death.
• Do not use an extension cord, power strip, or adapter to power this
appliance.
• Always connect the dishwasher to a properly grounded 3-prong outlet
as described in the installation instructions.
• Before performing any maintenance or repairs, disconnect power at the
circuit breaker or fuse panel.
WARNING
Tip-Over & Injury Hazard
• Do not operate the dishwasher unless it is fully installed and secured in
the cabinet opening.
• Do not place heavy objects, sit, or lean on the open door or racks. The
dishwasher can tip forward or the door may collapse, causing serious
injury or cuts.
• Use caution when opening the door if the racks are loaded — items may
shift or fall.
6
WARNING
Chemical, Hot Water & Steam Hazard
• Use only detergents, rinse aids, and cleaning products specifically
intended for automatic dishwashers.
• Dishwasher detergents are highly alkaline and can cause severe burns
or eye damage if swallowed or splashed on skin or eyes. Keep them out
of reach of children.
• Water inside the dishwasher can reach very high temperatures. Hot
water or steam may be released when the door is opened, especially
immediately after a wash cycle. Open the door slowly and stand back
to avoid burns or scalds.
• Do not wash items in the dishwasher that are labeled “hand-wash
only,” or items not rated dishwasher-safe (e.g. certain plastics, wood,
nonstick cookware), unless explicitly approved by the manufacturer.
• In a hot-water system that has not been used for two weeks or longer,
hydrogen gas may accumulate in the water pipes. Hydrogen gas is
explosive. Before using the dishwasher after such a period, open each
hot-water faucet and let the water run for several minutes. Do not
smoke or use an open flame while the water is running.

INSTALLATION REQUIREMENTS
TOOLS AND PARTS
Gather the required tools and parts before starting installation. Read and
follow the instructions provided with any tools listed here.
TOOLS NEEDED
7
• Measuring Tape
• Phillips Screwdriver
• Flathead Screwdriver
• Marker or pencil
• Electric Drill
• Utility Knife
• Wire Cutter
• Wire Stripper
• 2 ½" Hole Saw
• Level
• Towel and shallow pan (for
checking water leaks)
• Adjustable Wrench
• Gloves and safety glasses
• Tubing Cutter
• Pliers
• ¼" Nut Driver
MATERIALS NEEDED
• Water Supply Line
• Supply Line Fittings
• Hose Adapter
• PTFE Thread Seal Tape
• UL-approved strain relief
• Air Gap
• Hose Clamp
• Electrical Tape
• UL-listed wire nuts
• Electrical cable/conduit
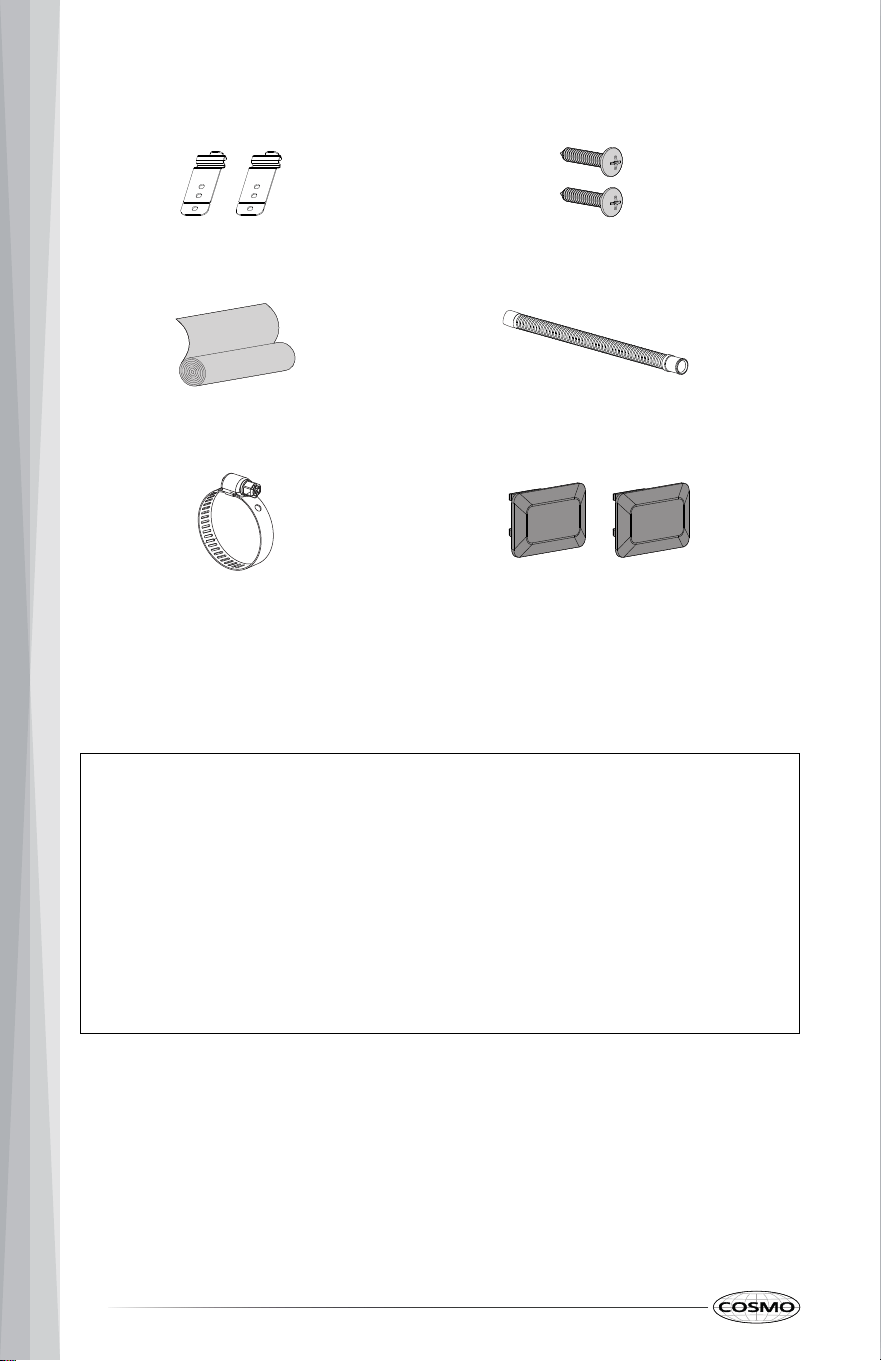
PARTS SUPPLIED
Mounting Bracket (2) Screw (2)
Steam Protection Film (1) Drain Hose (1)
Hose Clamp (1) Door Decorative Cover (2)
Note:
• Reference the contact information at the end of this manual and
contact customer service if any parts are missing.
• To purchase replacement parts or any other accessories, please visit
www.cosmoappliances.com or reference the contact information at the
end of this manual.
• The images in this guide may be different from the actual components
and accessories, which are subject to change by the manufacturer
without prior notice for product improvement purposes.
8
LOCATION REQUIREMENTS & CLEARANCE
This dishwasher is designed to fit a standard dishwasher opening. An opening
may be needed on both sides to route plumbing and electrical connections.
WARNING
• Installation damage is not covered by the warranty, and leaks caused
by improper installation may result in property damage.
• Do not use existing holes unless they are in the target area.
• Failure to properly locate the hole for the water and drain lines may
prevent the dishwasher from installing flush with the cabinets and could
result in kinked, pinched, crushed, stressed or damaged lines.
9
• Install the dishwasher as close to the sink as possible for proper drainage
(recommended no more than 10 ft (3.05 m) from the sink/drain path).
• The location must have sufficient space for the dishwasher door to open
easily and provide at least 0.1” (2 mm) between the dishwasher and the
cabinet sides.
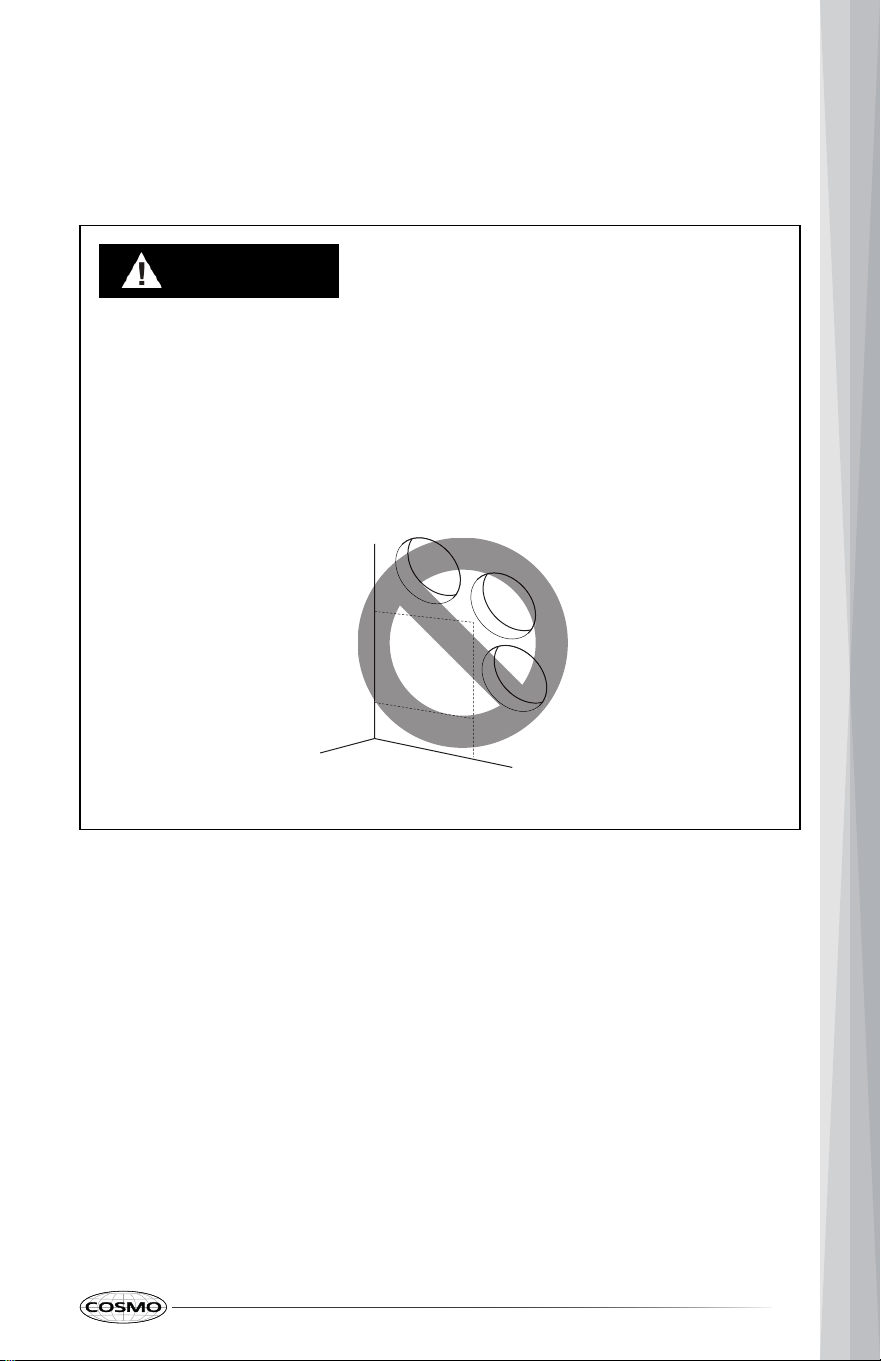
• If installing the dishwasher in a corner, it is recommended to leave
minimum of 2” (50 mm) between the dishwasher and the adjacent wall.
• The adjacent wall must be free of obstructions.
• For flush installations only, you may remove the cabinet brace inside the
cabinet.
• It is the installer's responsibility to comply with installation clearances
specified on the rating plate. The plate is located on the dishwasher door
inside, on the right side.
10
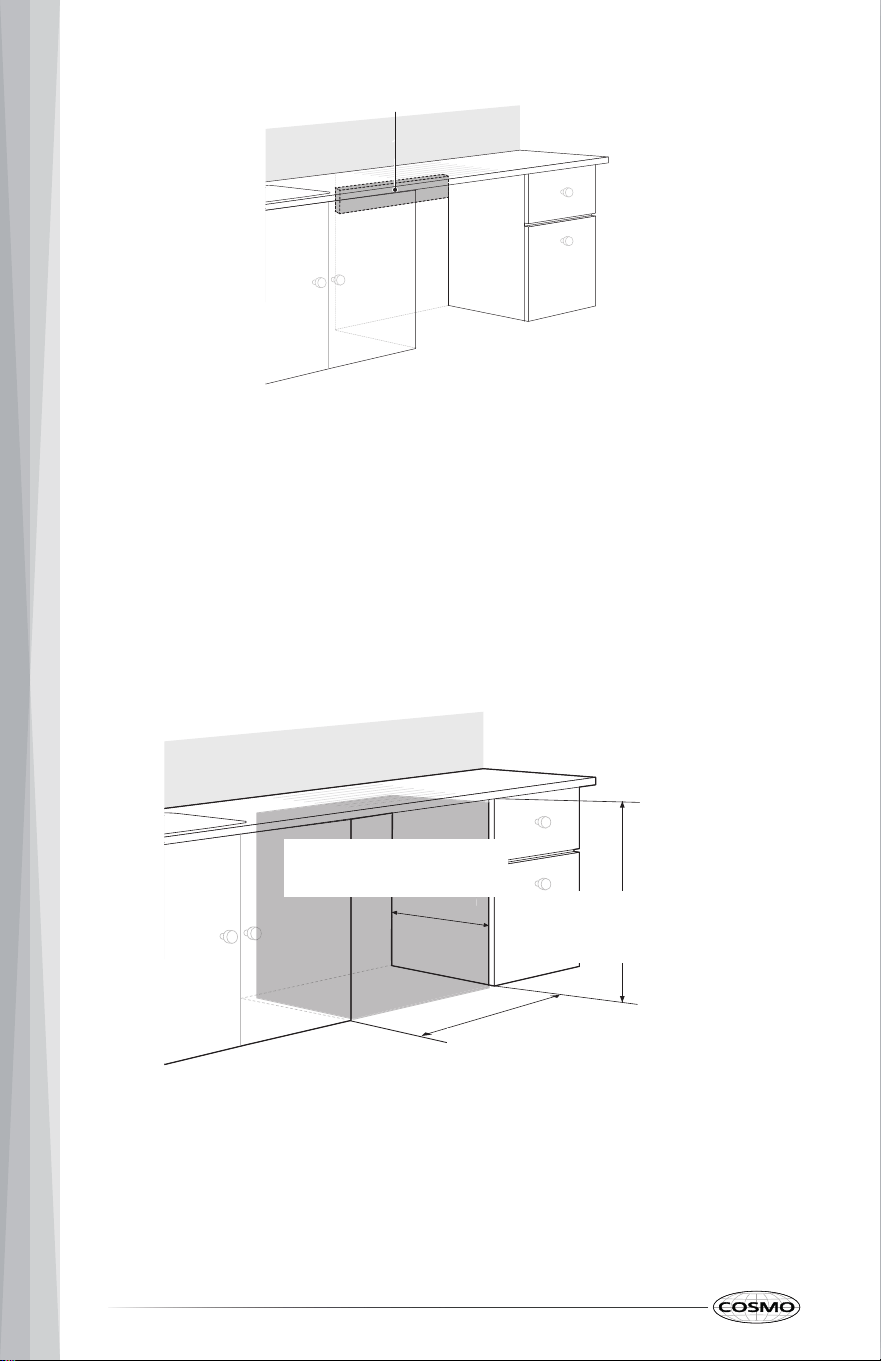
Cabinet Brace
IMPORTANT: Indoor household use only. Observe all local codes and
ordinances. The installation location must allow the door to open freely and
must not block routing of the water line, drain hose, or power cord. (An access
opening may be needed on one or both sides of the cabinet to route
plumbing and electrical connections).
1. Select a location as close to the sink as possible for easy connections to
water supply line, drain hose and electrical connection.
Cabinet clearances for the dishwasher installation are:
Width: 23 13/16" - 24" (605 mm – 610 mm),
Depth: 22 13/16" – 23 5/8" (580 mm – 600 mm),
Height: 34 1/16" – 35 7/16" (865 mm – 900 mm).
34 ¹⁄16" - 35 ⁷⁄16"
(865 mm - 900 mm)
23 ¹³⁄16" - 24"
(605 mm - 610 mm)
22 ¹³⁄16" - 23 ⁵⁄8"
(580 mm - 600 mm)
11
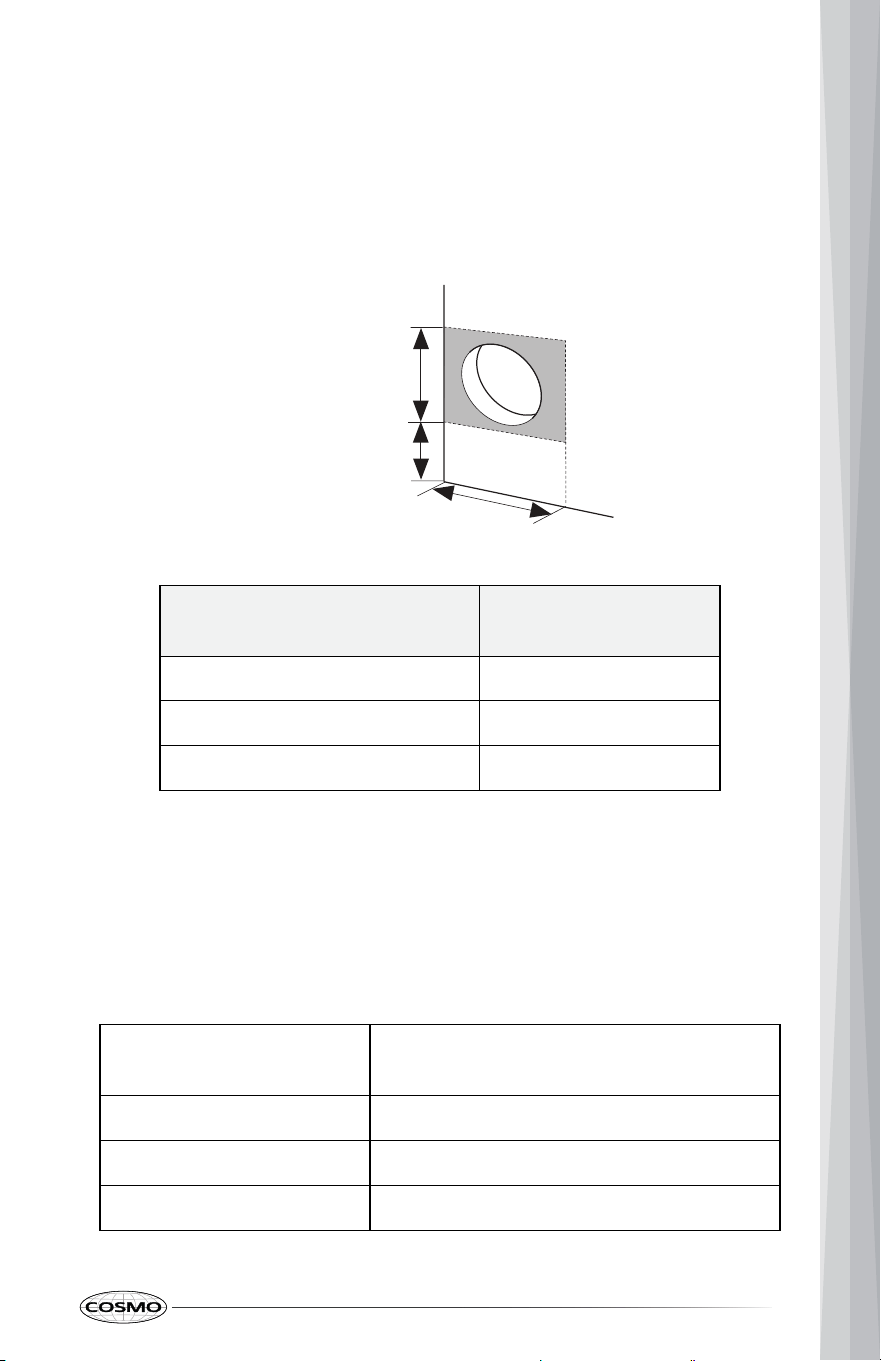
3 ¹⁄2" (88.9 mm)
2 ¹⁄2" (63.5 mm)
4"
(101.6 mm)
PRODUCT SPECIFICATIONS
The appearance and specifications listed in this manual may vary due to
constant product improvements.
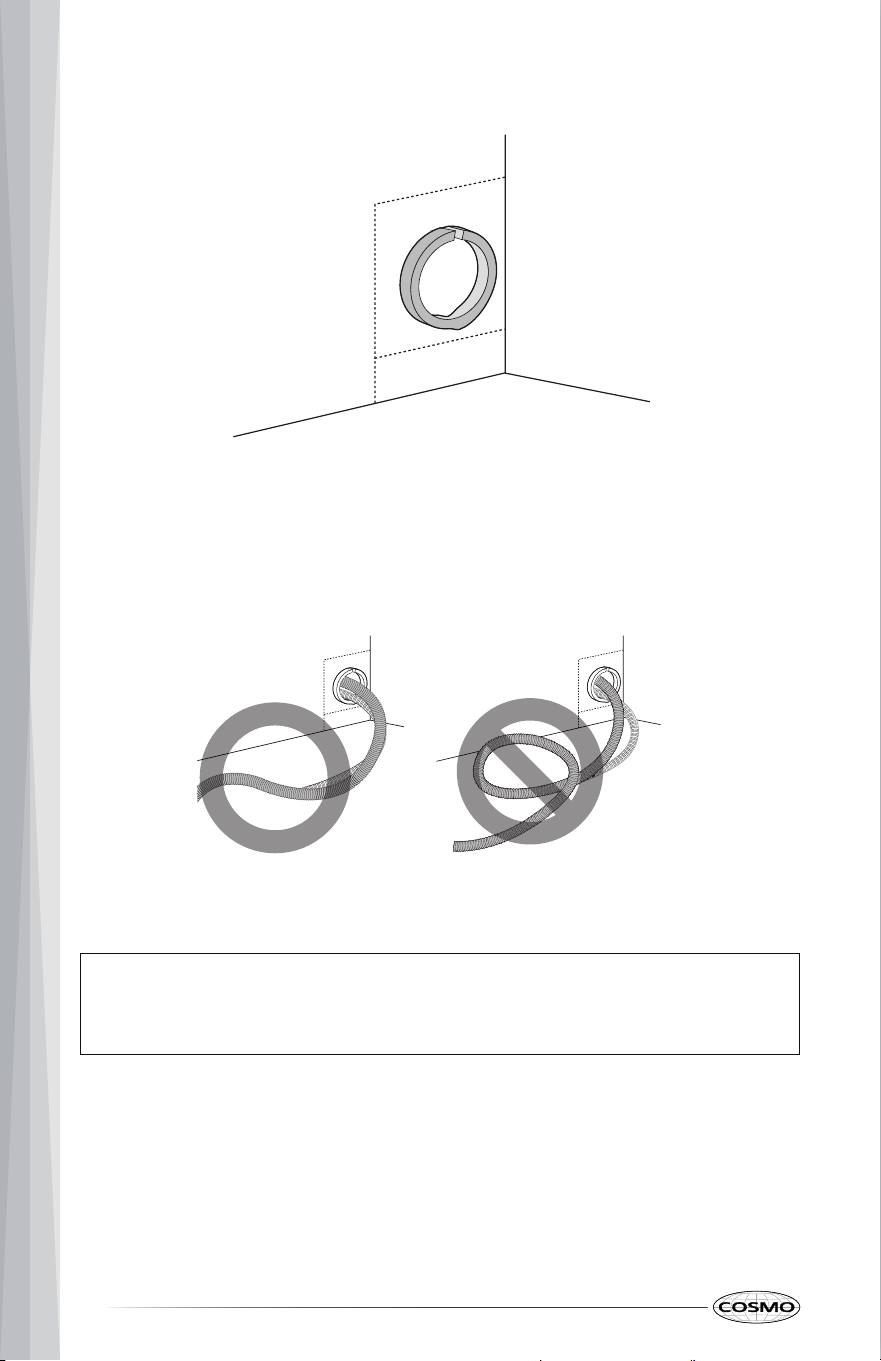
2. To allow for proper clearance of plumbing and electrical, use the
template included with the literature to determine the clearance on the
side of the cabinet where the cabinet meets the back wall.
3. Using a 2 1/2” (64 mm) diameter hole saw, drill a hole in the target area
as shown on the template.
Electrical requirement
12
0 V, 60 Hz AC only, minimum 15 A circuit
breaker
Water pressure 20 – 120 psi (138 – 827 kPa)
Inlet water temperature 50°F - 104°F (10°C - 49°C)
Net weight 82 lbs. (37.4 kg)
Requirement
Installation Routing
Clearances
Side Clearance (each side) 0.1" (2 mm)
Max distance to sink/drain path 10 ft (3.05 m)
Corner Clearance to Wall 2" (50 mm)
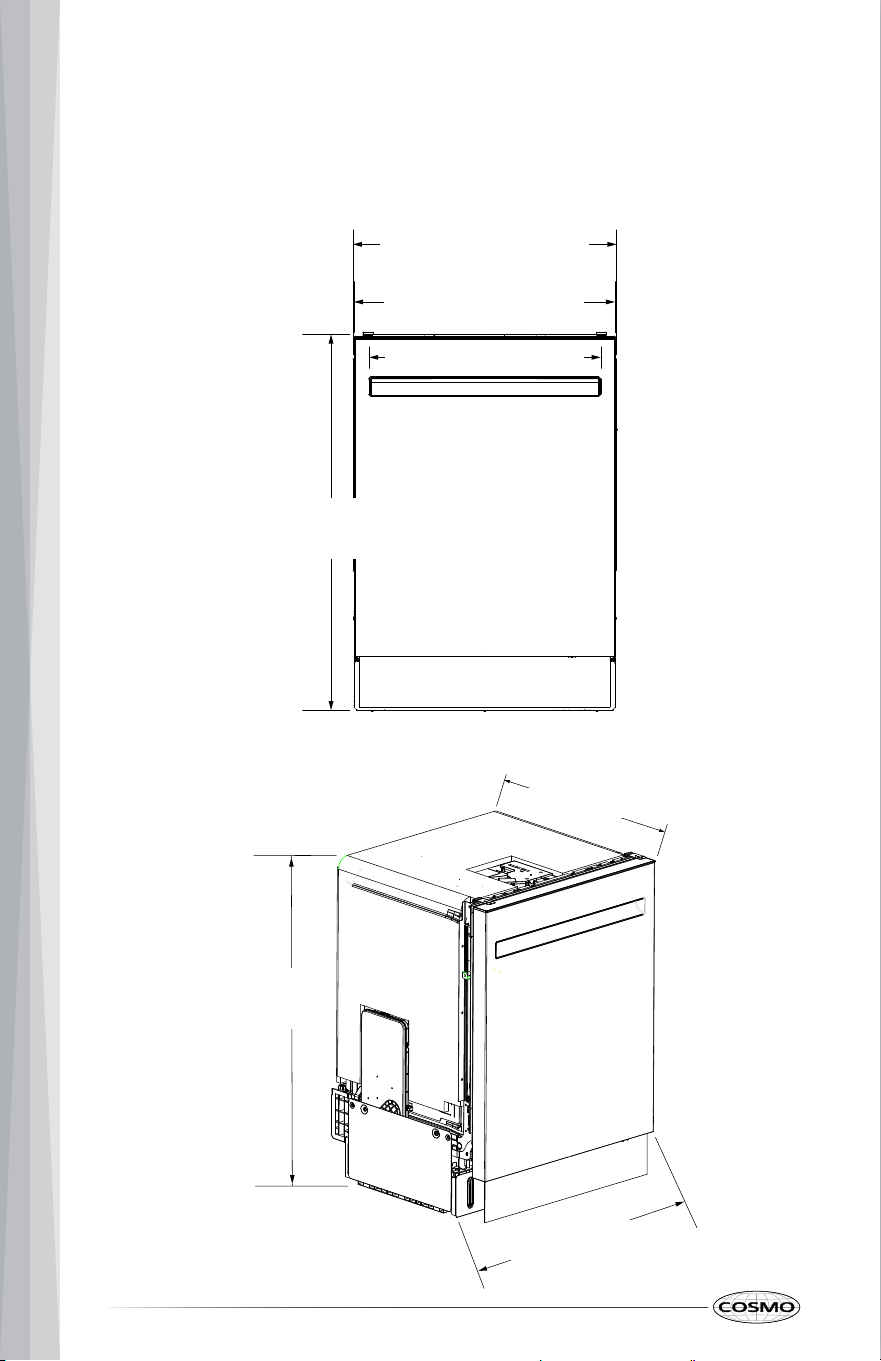
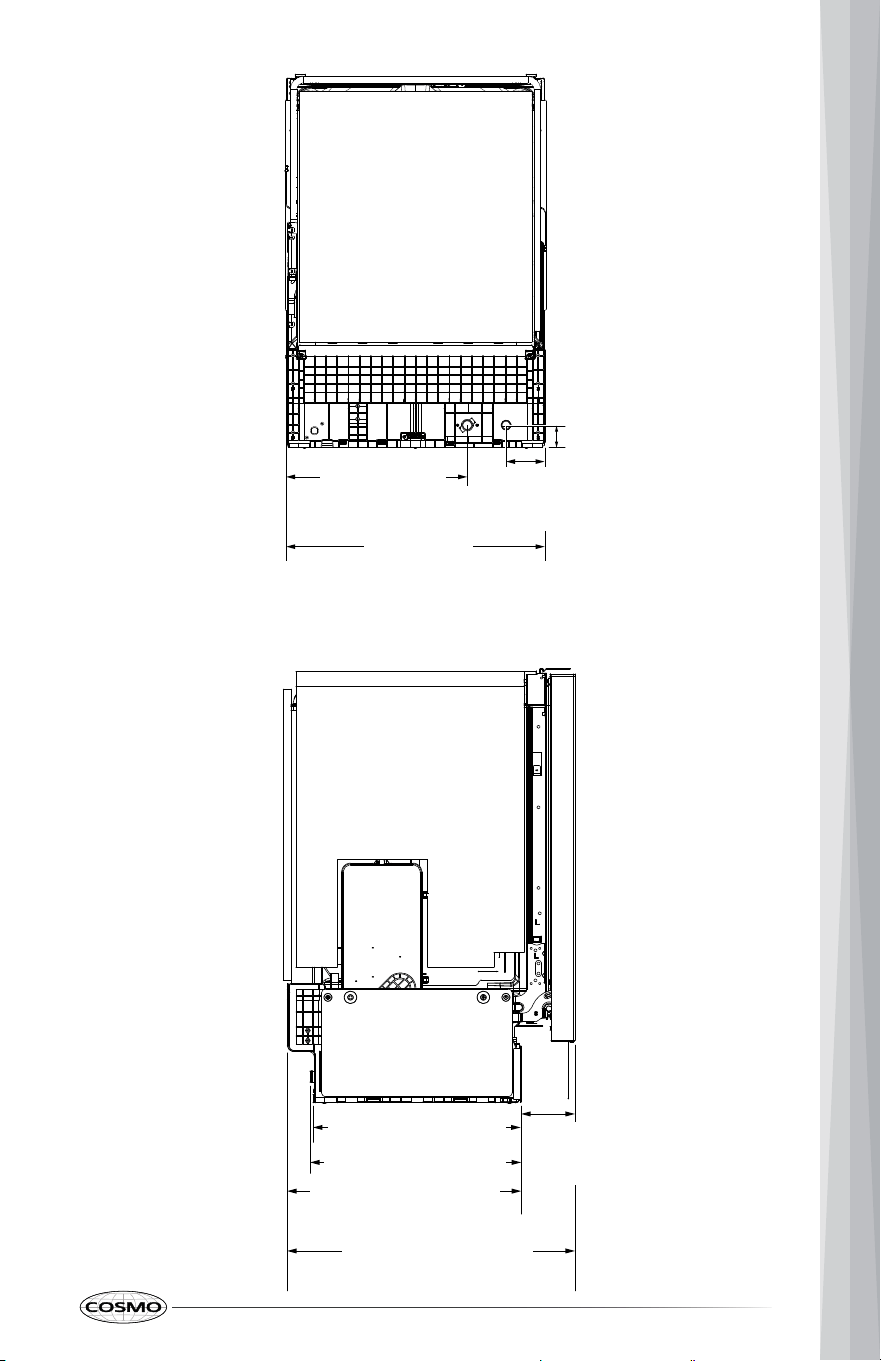
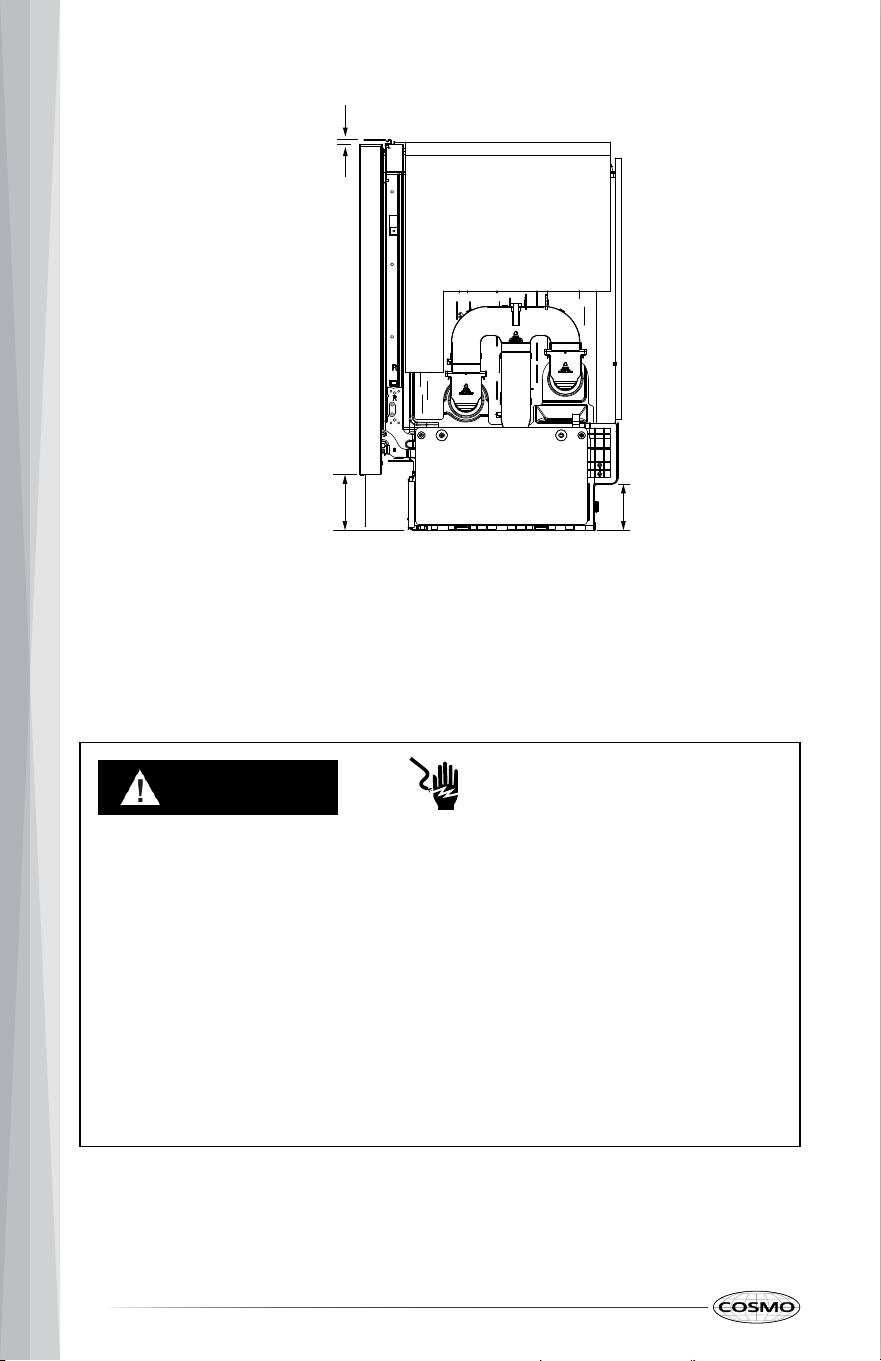
PRODUCT DIMENSIONS
Your model may appear different from the model depicted. Dimensions given
are maximum dimensions.
12
23 ³⁄
4" (604 mm)
20 ¹⁵⁄16" (531.2 mm)
23 ¹⁄2" (597.5 mm)
33 ⁷⁄8"
(860 mm)
33 ⁷⁄8"
(860 mm)
23 ³⁄
4" (604 mm)
22 ⁵⁄8" (574 mm)
13
16 ¹⁄
2"
(419.5 mm)
23 ⁹⁄16"
(599 mm)
3 ¹⁄
2"
(89.5 mm)
2"
(50.8 mm)
16 ⁵⁄16" (414.8 mm)
16 ⁹⁄16" (420.8 mm)
18 ⁵⁄16" (465.7 mm)
4 ¹⁄
4"
(108 mm)
22 ⁵⁄8" (574 mm)
14
ELECTRICAL REQUIREMENTS
WARNING
Electrical Shock Hazard
• Do not use an extension cord with this appliance.
• Remove house fuse or open circuit breaker before beginning
installation.
Electrical Grounding Instructions
• This dishwasher must be connected to a properly grounded 3-prong
outlet.
• Electrical connections must comply with all local codes and ordinances.
• Check with a qualified electrician if you are in doubt as to whether the
appliance is properly grounded.
⁷⁄16" (10.9 mm)
4 ⁷⁄8" (123.5 mm)
4" (102 mm)

U.S.A. ONLY
Be sure that the electrical connection and wire size are adequate and in
conformance with the National Electrical Code, ANSI/NFPA No. 70 - latest
edition and all local codes and ordinances.
A copy of the above code standards can be obtained from:
National Fire Protection Association
1 Batterymarch Park
Quincy, MA 02169
CANADA ONLY
Be sure that the electrical connection and wire size are adequate and in
conformance with the CSA Standard C22.1, Canadian Electrical Code, Part 1 -
latest edition and all local codes and ordinances.
A copy of the above code standards can be obtained from:
Canadian Standards Association
178 Rexdale Blvd.
Toronto, ON M9W 1R3 CANADA
15
ELECTRICAL SPECIFICATIONS
• This appliance is intended for use on a single 120 V, 60 Hz, AC circuit.
• A dedicated 15 A or 20 A circuit is recommended.
• Use only a 3-prong grounded outlet.
• The plug must be accessible after installation.
• If the power cord is damaged, it must be replaced by the manufacturer,
its service agent, or a similarly qualified person to avoid hazard.
• DO NOT remove the grounding prong from the power plug.
• The outlet or branch circuit supplying this dishwasher must be GFCI
protected per NEC 210.8(D). Consult a qualified electrician and follow all
local codes.
• This dishwasher is UL certified to UL 749 (Household Dishwashers) and
certified for Canada to CSA C22.2 No. 167.
INSTALLATION INSTRUCTIONS
IMPORTANT: This appliance shall be installed only by authorized persons and
in accordance with the manufacturer's installation instructions.
REMOVE OLD APPLIANCE
WARNING
Electrical Shock Hazard
• Remove house fuse or open circuit breaker to disconnect power before
servicing. Failure to do so can result in death, fire, or electrical shock.
WARNING
Water Leak
• Shut off the water supply valve before disconnecting the water supply
line.
• Expect residual water in the drain hose and inside the unit. Keep a
towel and shallow pan/bucket ready.
Failure to follow these instructions can result in property damage.
CAUTION
Laceration, Foreign Object, Crush Hazard
• When installing, moving, or servicing any appliance, wear proper
protective equipment, including cut resistant gloves, steel-toed shoes,
and safety glasses.
16

17
1. Turn OFF power to the dishwasher at the breaker box (leave it off until
removal is complete).
2. Turn OFF the water supply at the shutoff valve under the sink. Open the
dishwasher door and remove the lower rack (optional, but helps reduce
weight and prevents damage).
3. Remove the kick plate to access the leveling legs and connections.
4. Disconnect the drain hose from the sink drain/disposal connection. Place
a towel/pan under the connection to catch any water.
5. Disconnect the water supply line from the dishwasher inlet connection
(keep the towel/pan in place).
6. Unplug the power supply from the outlet.
7. Remove the mounting screws/brackets securing the dishwasher to the
countertop or cabinet sides.
8. Lower the dishwasher slightly by adjusting the leveling legs (to clear the
countertop lip, if needed).
9. Carefully pull the dishwasher out a few inches at a time while guiding the
Power Cord, Water Supply Line, and Drain Hose so they don’t snag, kink,
or scratch cabinetry/flooring.
Move the dishwasher away from the installation space and drain any
remaining water into a pan as needed.
UNPACK DISHWASHER
WARNING
Excessive Weight Hazard
• Use two or more people to move and install the dishwasher. Failure to
do so can result in back or other injury.
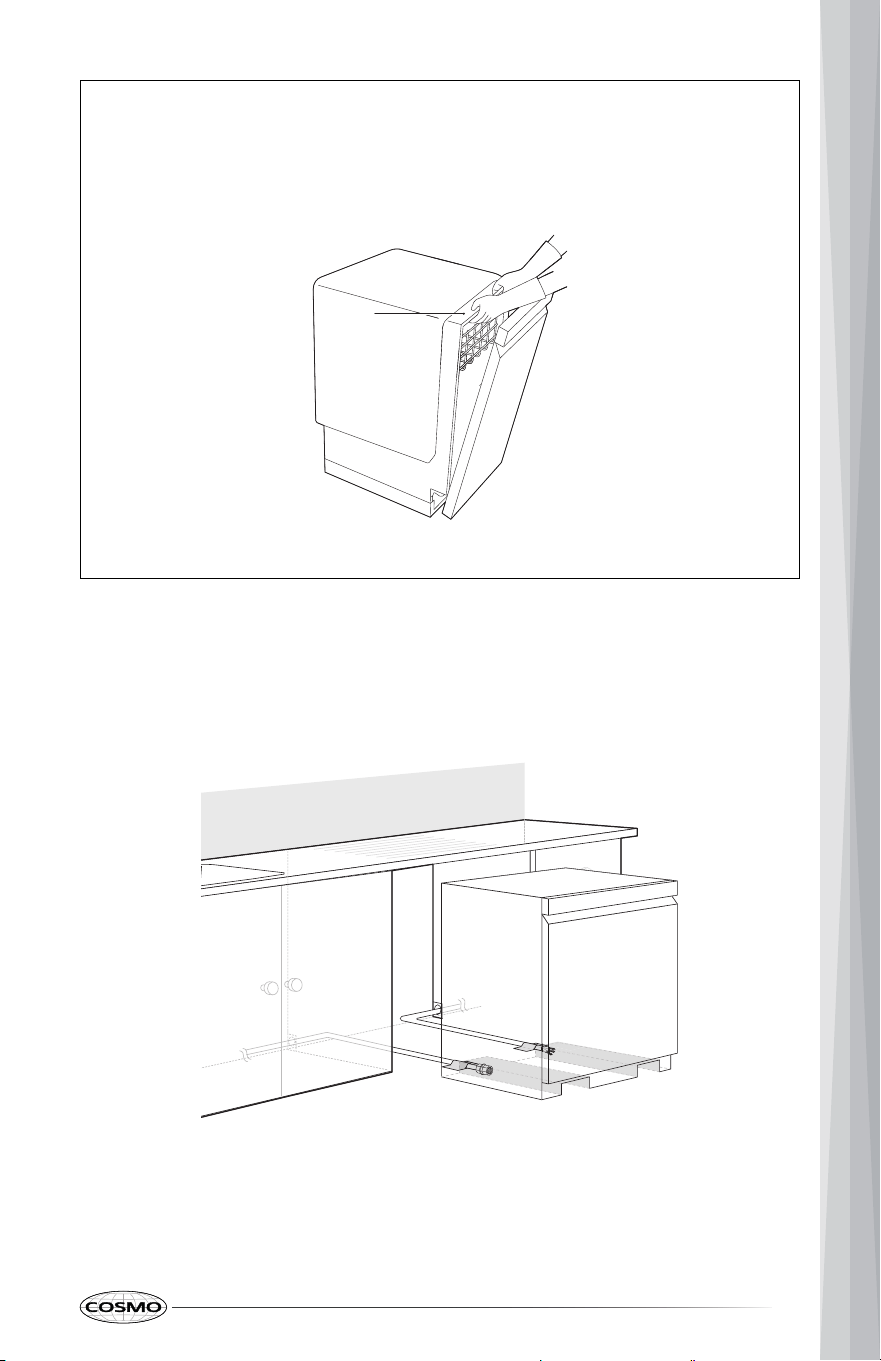
1. Remove shipping materials, tape and film from the dishwasher. Do not
dispose of anything until the installation is complete.
2. Open the door and remove any interior packing materials,
documentation, and accessory/installation parts package. Check that all
supplied parts are present.
3. Using two or more people, carefully move the dishwasher close to—but
not inside—its final installation location so the Power Cord, Water Supply
Line, and Drain Hose can be routed and connected as required.
Note:
• Do not remove any warning labels or the model/serial rating label.
• Do not use sharp tools, abrasive cleaners, or flammable fluids to
remove tape or adhesive. These products can damage the dishwasher’s
surfaces.
• Do not lift or move the dishwasher by pulling on the door, door handle,
or control panel area.
• When moving the dishwasher, keep the door closed and use the
cabinet/frame areas for handling.
• To reduce the risk of damage, avoid rolling the dishwasher over power
cables, hoses, or sharp edges.
• If the dishwasher is laid on its back during handling, protect the Drain
Hose and Water Supply Line from being kinked or crushed.
18
19
PREPARING POWER CORD WIRING
IMPORTANT: Turn off electrical power to the dishwasher at the circuit breaker
before installation. Shut off the house water supply before connecting the
water supply line. Electrical and grounding connections must comply with
local codes.
WARNING
Electrical Connection
• Operate this appliance with the correct voltage as shown in this manual
and on the rating plate.
• The wiring must be grounded properly. If in doubt, have it checked by a
qualified electrician.
• The appliance and outlet must be positioned so that the plug is easily
accessible.
• Do not use an extension cable or adapter with this dishwasher.
• Do not overload the outlet with more than one appliance.
• It is the personal responsibility and obligation of the product’s owner to
have a proper outlet installed by a qualified electrician.
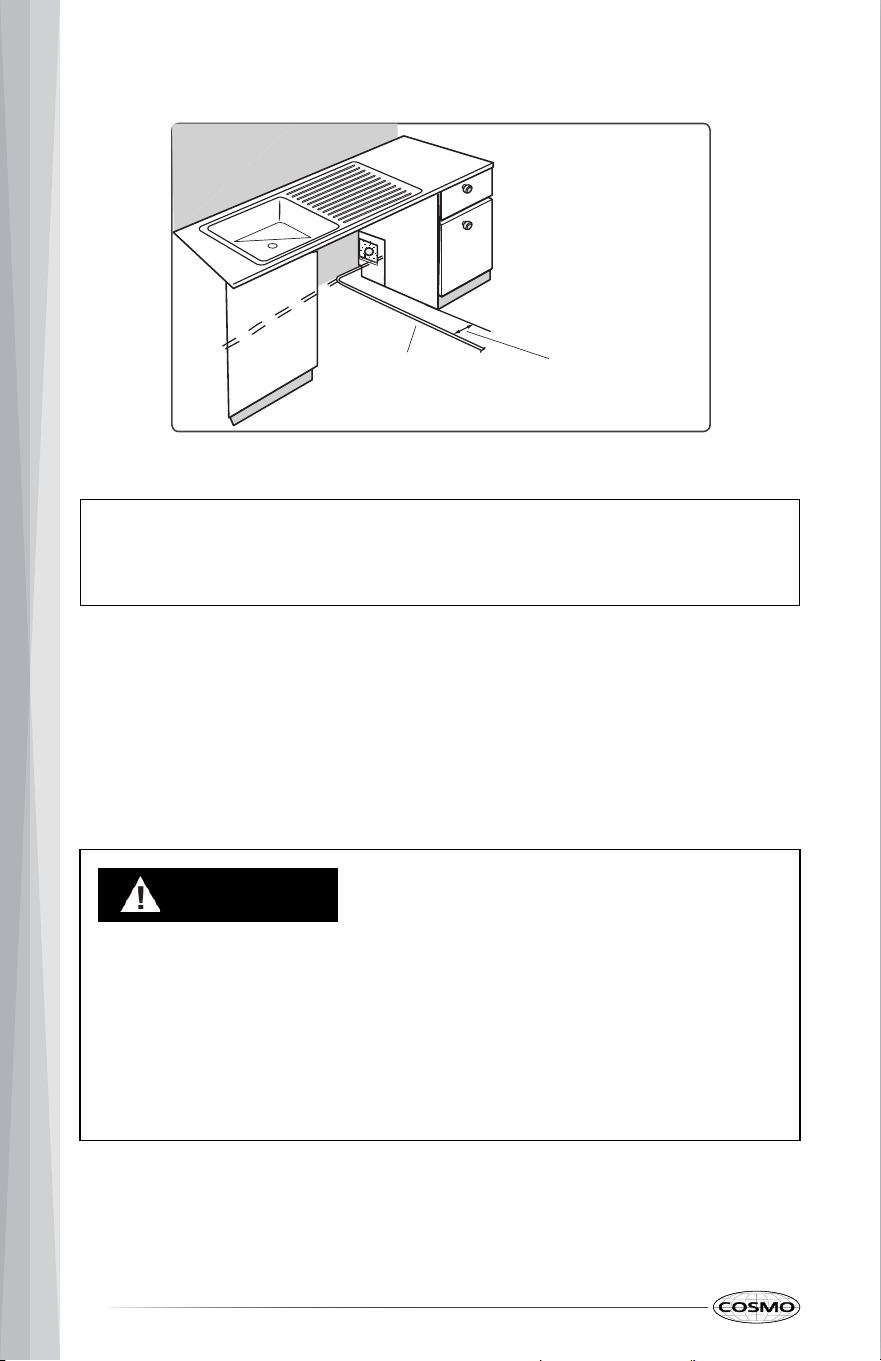
1. Begin by routing the Power Cord to the dishwasher opening.
2. Guide the Power Cord through the cabinet access opening and position it
so it can pass into the dishwasher base area without being pinched when
the unit is slid into place.
3. Ensure the Power Cord is routed through the designated bottom channels
as shown in the installation illustrations.
Note:
• If the dishwasher is laid on its back at any time during installation,
protect the drain hose from damage if it’s already installed.
3 ⁹⁄
16" - 3 ¹⁵⁄16"
(9 cm - 10 cm)
Pow
er Cord
20
PREPARING THE WATER SUPPLY LINE AND
DRAIN HOSE (PRE-CONNECTING AT THE
DISHWASHER)
CAUTION
• When connecting the water supply line to the house water supply,
sealing tape or compound should be used on pipe threads to avoid
leaks. Tape or compound should not be used on compression fittings.
• Connect the dishwasher to a hot water supply with a temperature
between 50°F - 104°F (10°C - 49°C). This temperature provides the best
washing results and shortest cycle time.
• Water supply pressure must be 20 – 120 psi (138 – 827 kPa).
WARNING
Water Connection
• Do not reuse an old hose. Use only a new hose when installing the
dishwasher. The old hose could leak or burst causing flooding and
property damage.
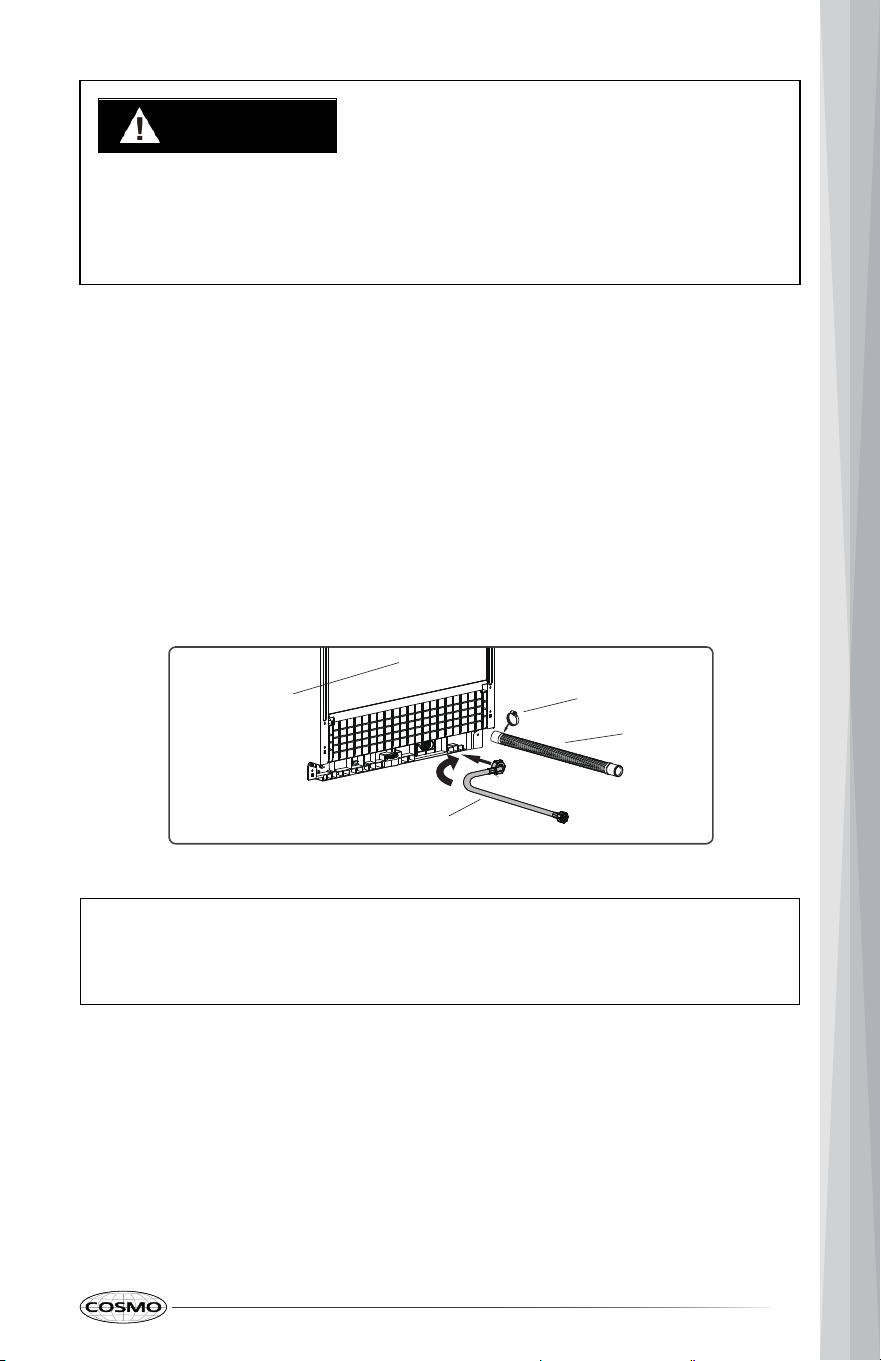
1. Prepare the water supply line and drain hose at the back of the
dishwasher before placing the unit fully into the cabinet opening.
2. With the house water supply shut off, connect the water supply line as
shown in the installation illustrations below.
3. To prevent leaks, use sealing tape or pipe compound only on pipe-thread
connections (where applicable). Do not use tape or compound on
compression fittings.
Back of the
Dish
washer
Drain Hose
Hose Clamp
Water Supply Line
21
Note:
• Use new hose-sets and pipes supplied with the appliance. Do not reuse
old items.
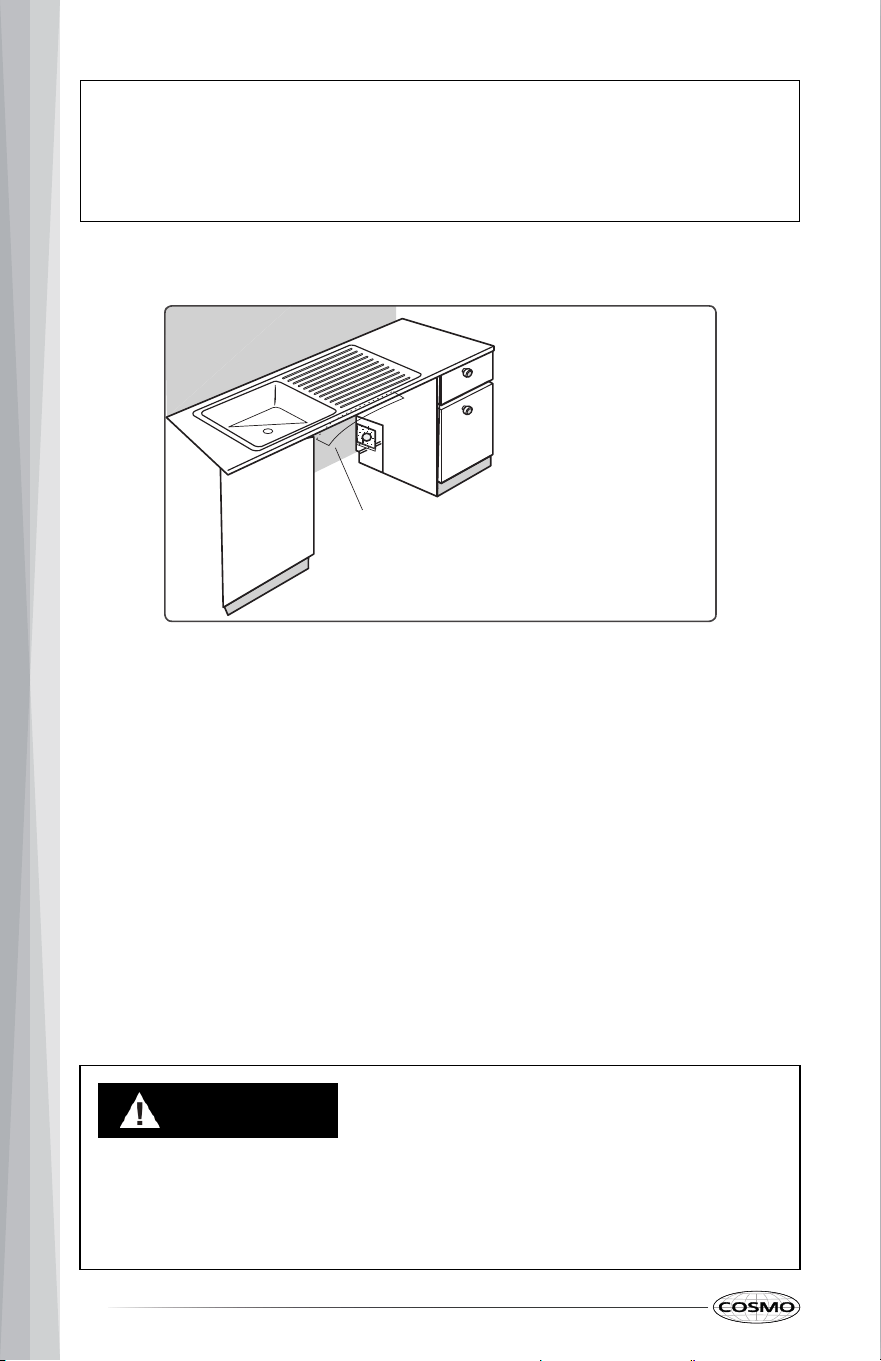
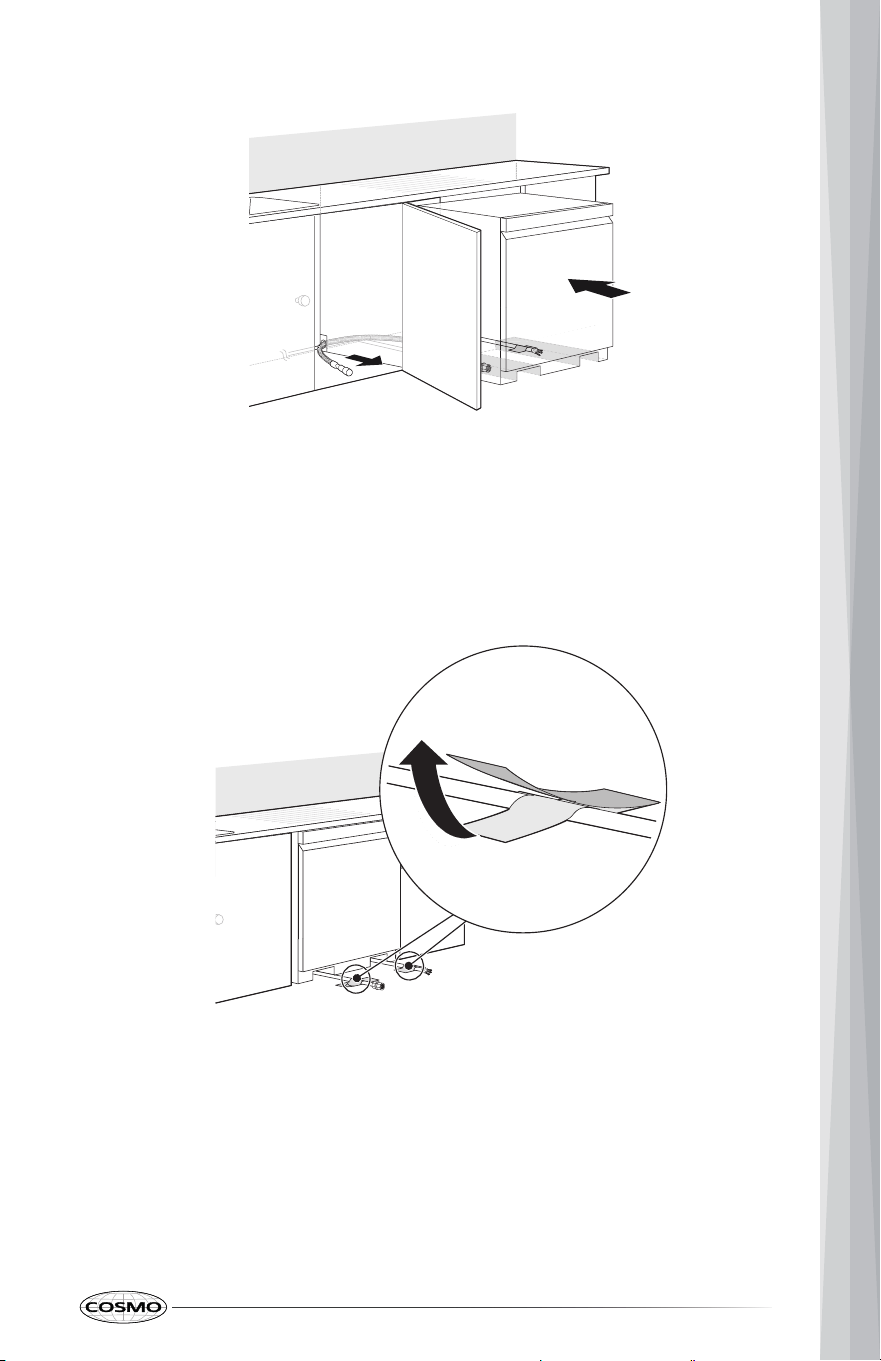
STEAM PROTECTION FILM
IMPORTANT: To help prevent steam released when the dishwasher door is
opened from damaging the cabinet, apply the supplied Steam Protection Film
to the top of the cabinet/underside of the countertop directly above the
dishwasher door opening.
Note:
• Apply the film before sliding the dishwasher into the cabinet opening.
• Do not apply the film over dust, grease, or moisture, as this may reduce
adhesion.
1. Before applying, make sure the surface is clean and completely dry.
2. Peel the backing from the Steam Protection Film, align it along the front
edge above the dishwasher opening, and press firmly into place.
3. Smooth the film so it lays flat and adheres fully.
KICK PLATE
CAUTION
Laceration, Foreign Object, Crush Hazard
• When installing, moving, or servicing any appliance, wear proper
protective equipment, including cut resistant gloves, steel-toed shoes,
and safety glasses.
Steam Pr
otection Film
22
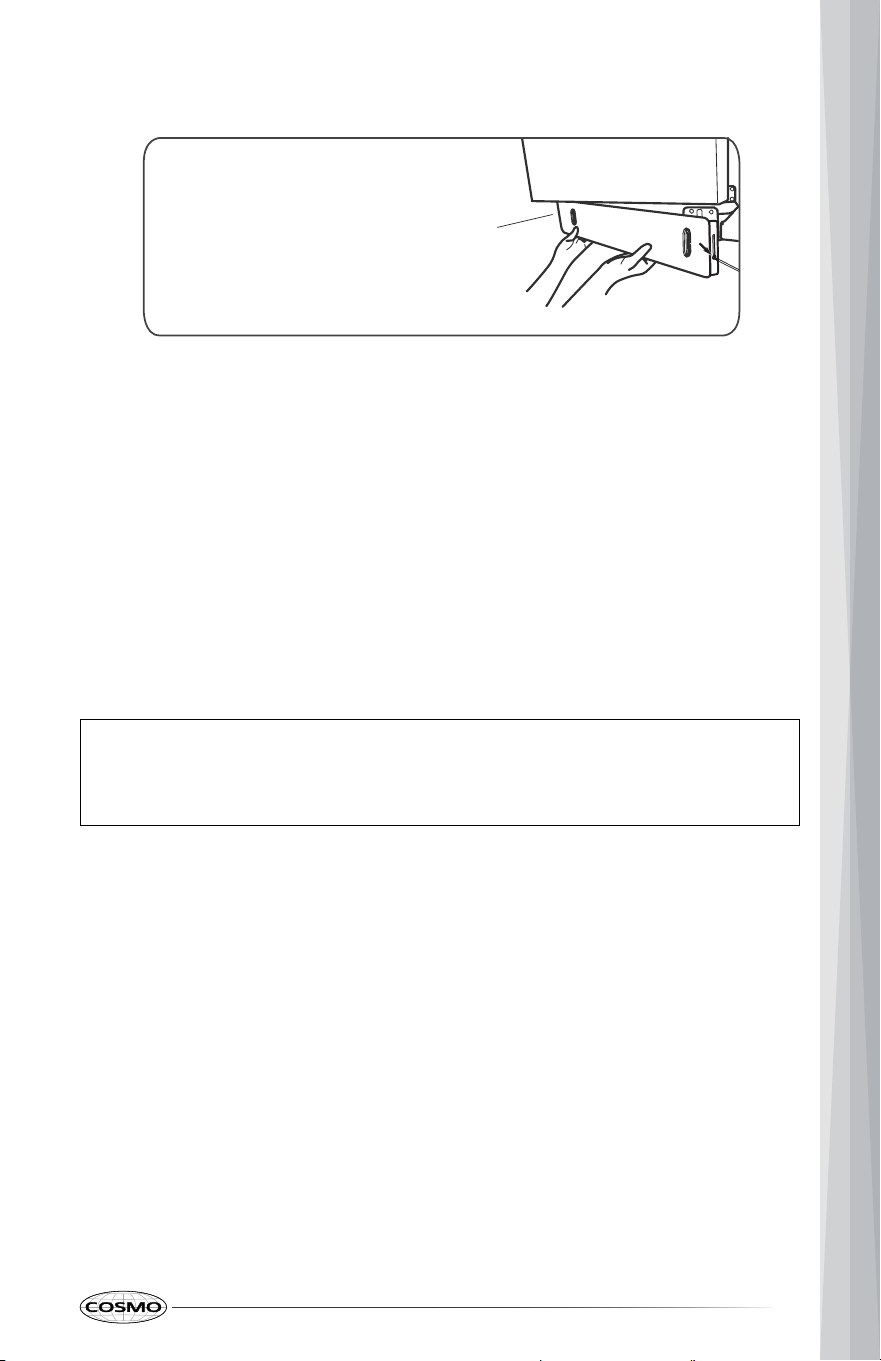
1. The Kick Plate must be removed to access the leveling legs and the front
utility area for final checks, and it is reinstalled after the dishwasher is
fully installed and checked for leaks.
2. Locate the screws securing the Kick Plate at the bottom front of the
dishwasher.
3. Remove the screws, then pull the Kick Plate forward and set it aside along
with the screws for reinstallation later.
Note:
• Do not operate the dishwasher without the Kick Plate installed, after
installation is complete.
INSTALLING THE MOUNTING BRACKETS
For countertops made of wood or that will not be damaged by drilling, use
TOP MOUNTING (METHOD 1).
Use the SIDE MOUNTING (METHOD 2) when the underside of the countertop
cannot be drilled (for example: stone, quartz, granite, solid-surface
countertops) or when required by the installation type.
Kick Plate
23
TOP MOUNTING (METHOD 1)
Note:
• Do not secure the dishwasher to the countertop/cabinet until the unit is
fully positioned, leveled, and aligned with the cabinet opening.
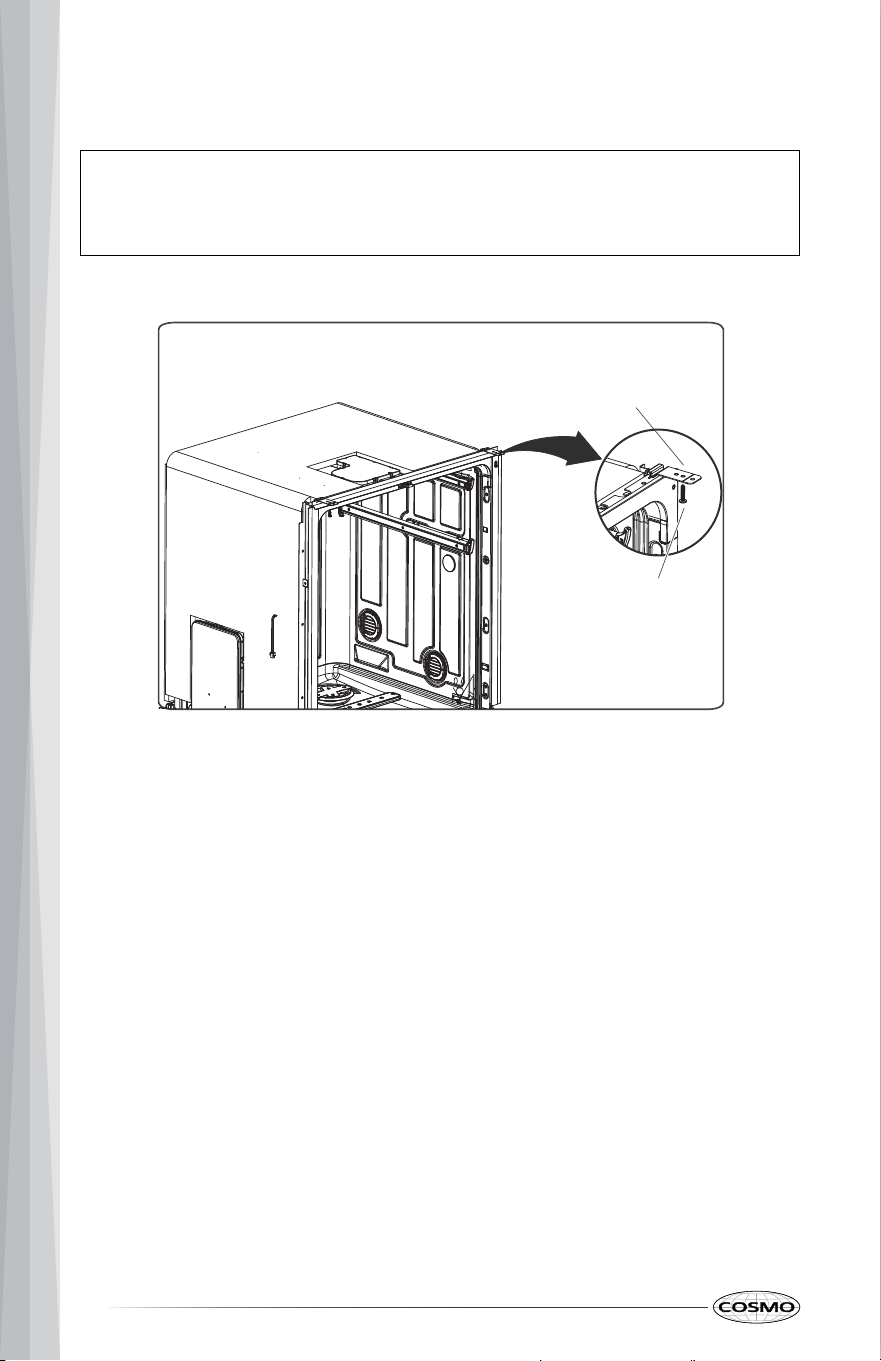
1. Before sliding the dishwasher into the cabinet opening, install the
supplied Mounting brackets on the top front of the dishwasher frame.
2. Position each Mounting bracket in the designated location and secure it
using the provided Screw.
3. Position the Mounting bracket so it will contact the underside of the
countertop after the dishwasher is fully positioned.
4. Keep the mounting screws accessible for later, as the dishwasher is
secured only after it is fully inserted and leveled.
24
Mounting
Br
acket
Screw
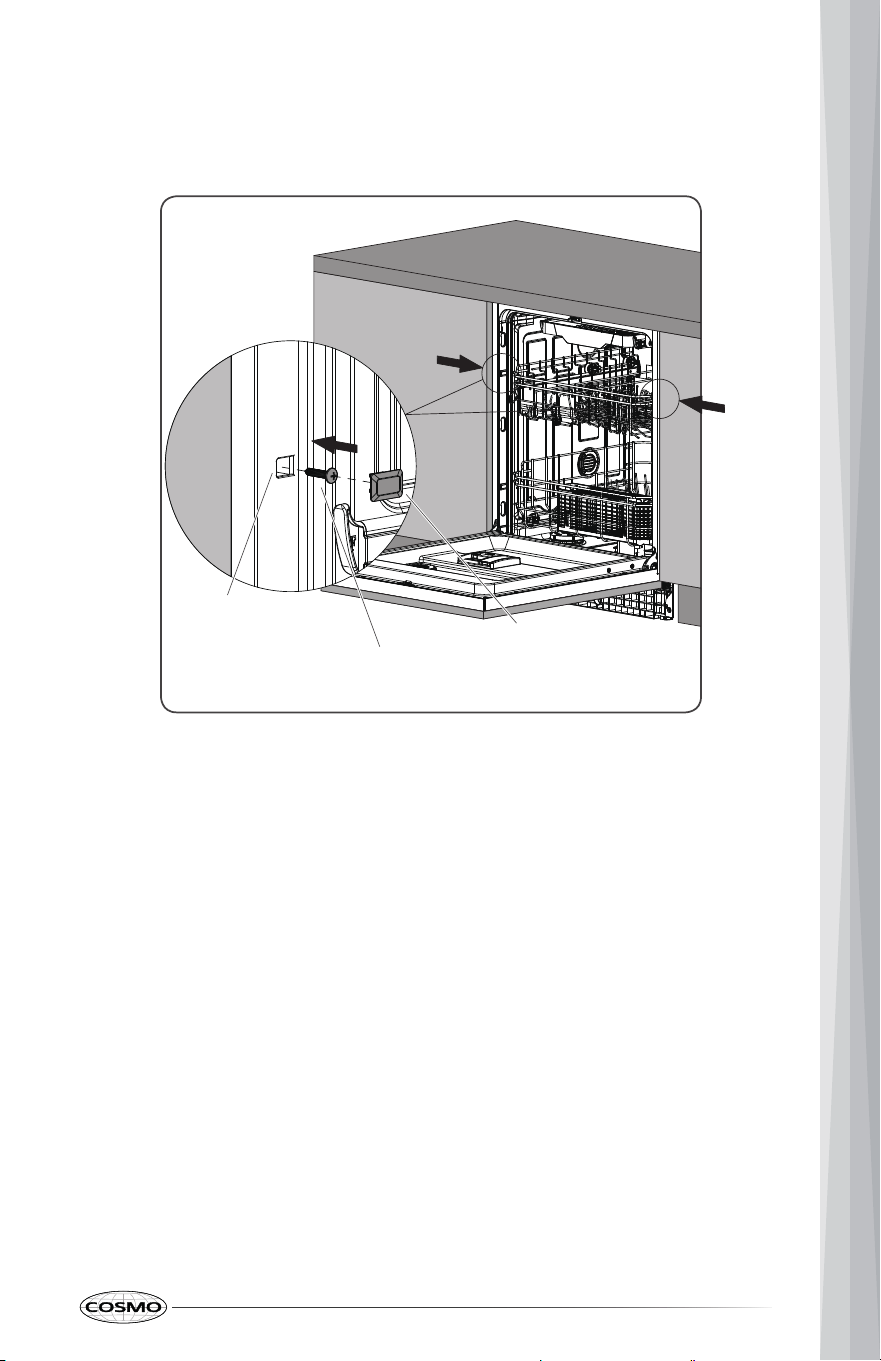
SIDE MOUNTING (METHOD 2)
1. Position the dishwasher fully in the cabinet opening and leveled.
2. Open the door and locate the mounting points on the upper left and right
sides of the dishwasher frame.
3. Remove the upper left and right door decorative caps, if present by
slightly lifting the damper.
4. Align the dishwasher so it is centered in the opening with equal clearance
on both sides.
5. Secure the dishwasher to the cabinet sides using the provided Screws
through the side mounting points and put the door decorative covers to
cover.
Mounting Point
Screw
Decorative Cover
25
POSITIONING DISHWASHER INTO THE CABINET
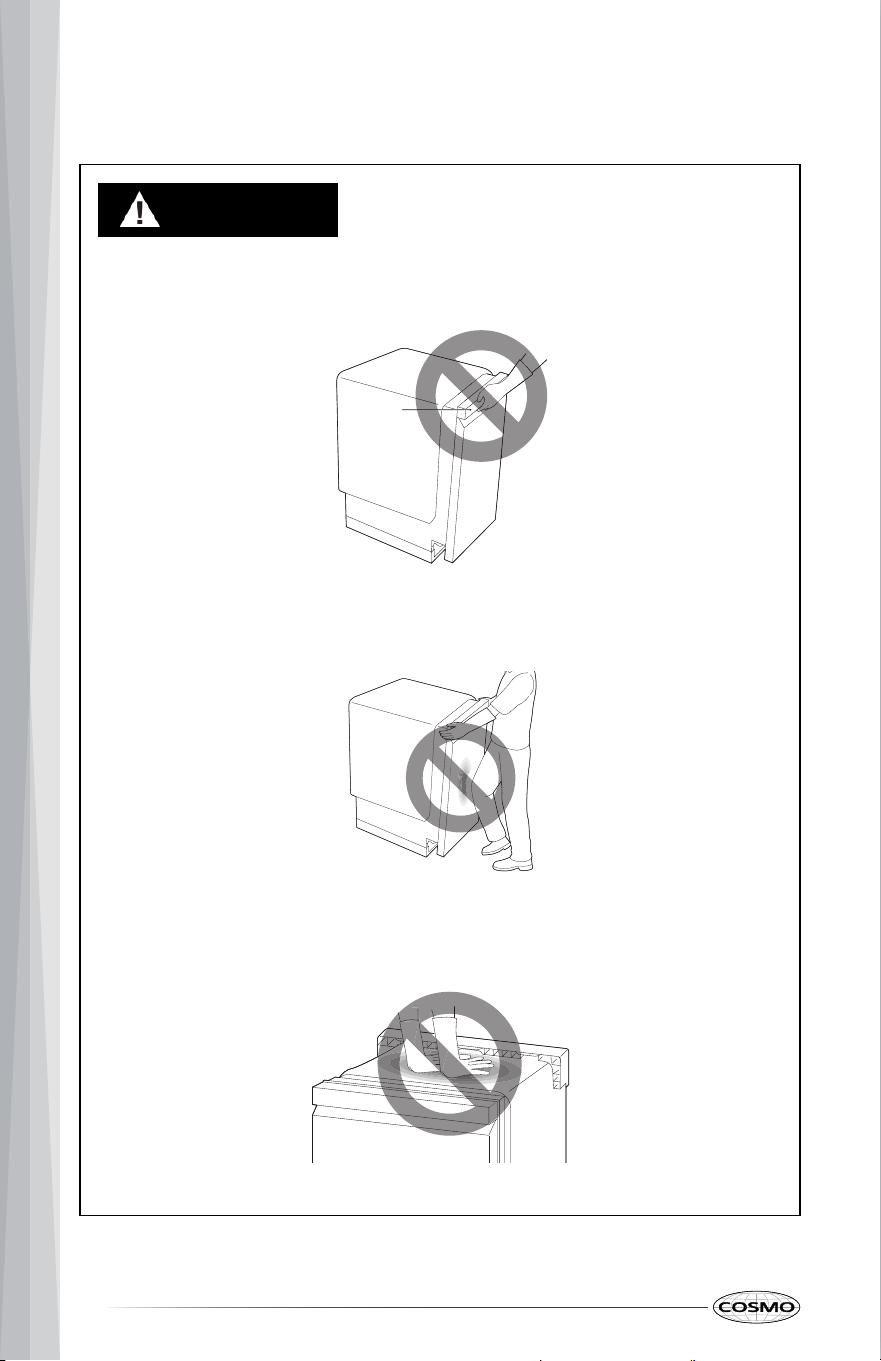
CAUTION
• Do not pull or lift the dishwasher using the handle. Doing so can
damage the door and hinges.
• Do not push the door of the dishwasher with knees when sliding the
dishwasher into position. Doing so can damage the front door panel.
• Do not push the top of the dishwasher. Doing so can damage the
dishwasher’s interior.
26
Handle
Note:
• Open the door and grab the body frame and the top front opening of
the tub to move or lift the dishwasher.
1. Align the dishwasher with the cabinet opening. Make sure the Water
Supply Line and Power Cord are positioned to slide into their channels.
2. Smooth or pad the edges of the cabinet access hole to prevent damage
to the Drain Hose.
27
Top Front
Opening
3. Keep the Drain Hose straight and feed it through the cabinet access hole.
Be careful not to kink, pinch, crush or stress the drain hose during
installation to avoid leaking and water damage.
4. Slide the dishwasher in slowly. From inside the cabinet, pull the Drain
H
ose to remove slack. Stop occasionally and pull more slack if needed.
28
Note:
• To protect flooring, place a piece of cardboard or a blanket under the
dishwasher before sliding it into the cabinet opening.
5. As the dishwasher slides in, make sure the Water Supply Line and Power
Cord move freely and do not get caught under the unit.
6. Remove any tape from the Water Supply Line and Power Cord (if used).
29
CAUTION
• To avoid malfunctions or leakage, it is important that the drain hose not
get kinked, pinched, stressed or crushed behind or under the
dishwasher or inside the neighboring cabinet.
• Damage resulting from improper installation is not covered under the
warranty.
WATER SUPPLY LINE AND POWER CONNECTION
WATER SUPPLY LINE CONNECTION
1. With the home water supply turned off, connect the Water Supply Line to
the dishwasher water inlet connection (rear/base area) as shown in the
installation illustrations.
CAUTION
• Tape or compound should not be used on dishwasher inlet valve.
2. Tighten the compression nut.
3. Slide the Water Supply Line back through the routing channel. From
inside the cabinet, gently pull the line to remove slack. Make sure the line
is not kinked, pinched, stressed or crushed.
Back of the
Dishwasher
Water Supply Line
30
JUNCTION BOX HARDWIRE CONNECTION
The dishwasher should have a dedicated properly grounded branch circuit to
connect the 3-wire setup which includes the ground wire.
If a 3-prong power supply is used, it should be in an accessible location
adjacent to the dishwasher within recommended 4 ft. (1.22 m) of the
dishwasher side and not behind the dishwasher.
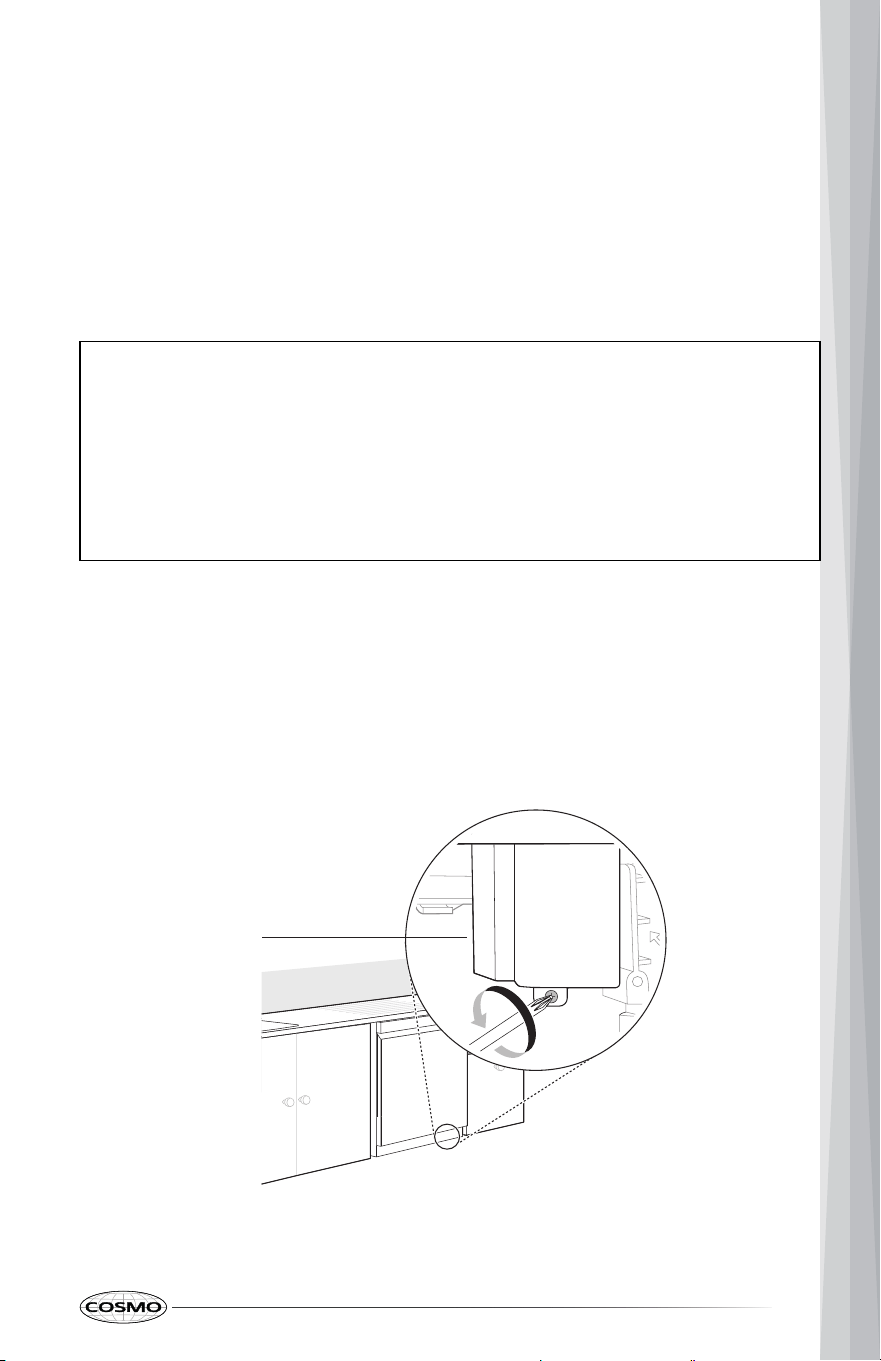
3. Use a Phillips screwdriver to remove 2 screws.
31
Note:
• The best location for the electrical conduit is on the right side of the back
wall. Re-route the electrical cable before installation if the electrical
conduit pipe is longer than 3” (76 mm) and is centered on the back wall.
• Wire size (Hardwire): Use a 3-conductor copper cable with ground sized
per local code and the circuit breaker rating. Typically, use 14 AWG
copper for a 15 A circuit or 12 AWG copper for a 20 A circuit.
1. Turn off electrical power to the unit at the circuit breaker and make sure
the Kick Plate was taken off.
2. Use a Phillips screwdriver to remove the screw from the junction box cover
and remove the cover.
Junction Box
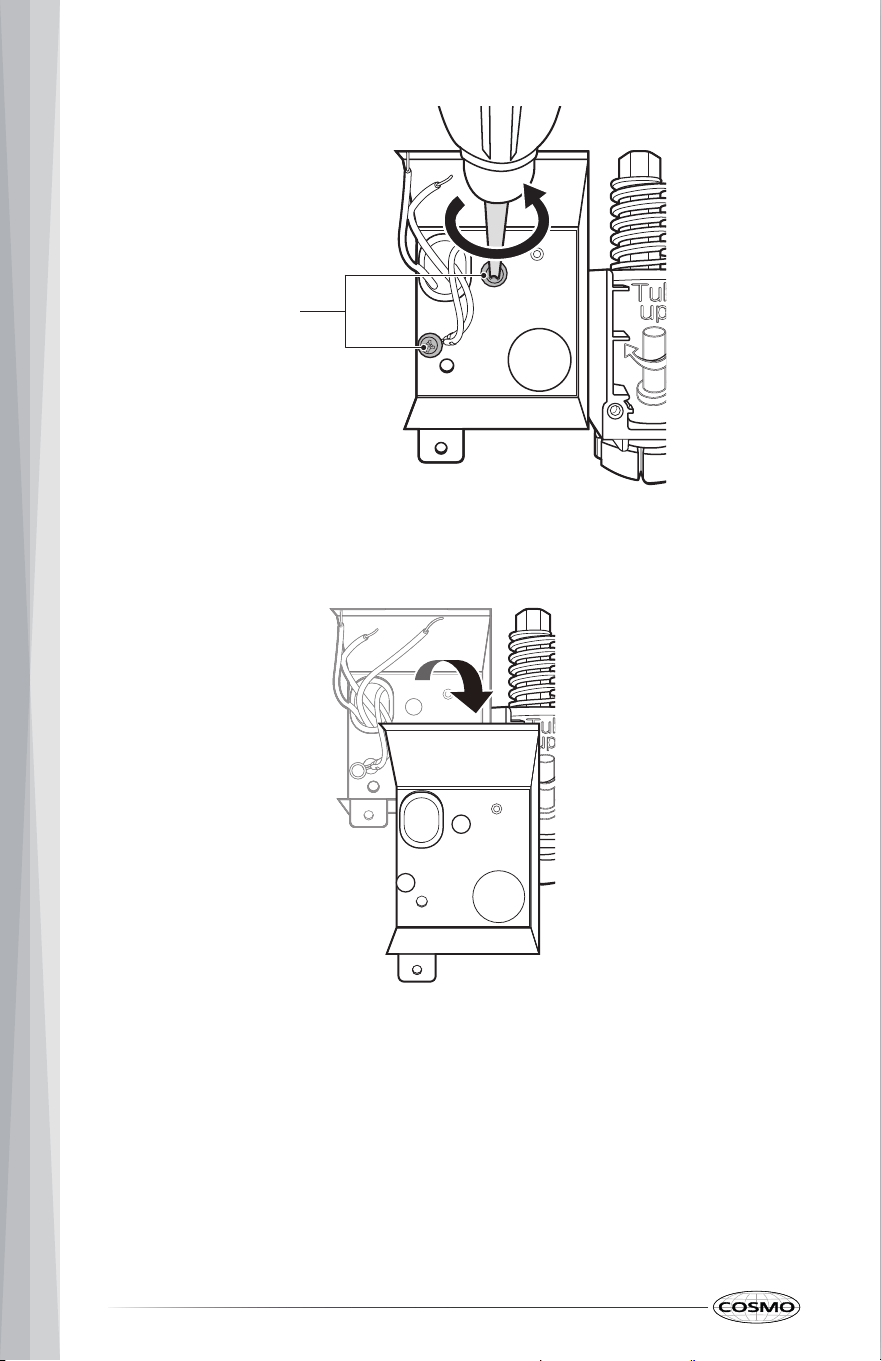
4. Remove the junction box from the appliance.
32
Screws
5. Insert a UL-approved strain relief (not provided) through the hole in the
junction box. Tighten the ring nut to secure it in place.
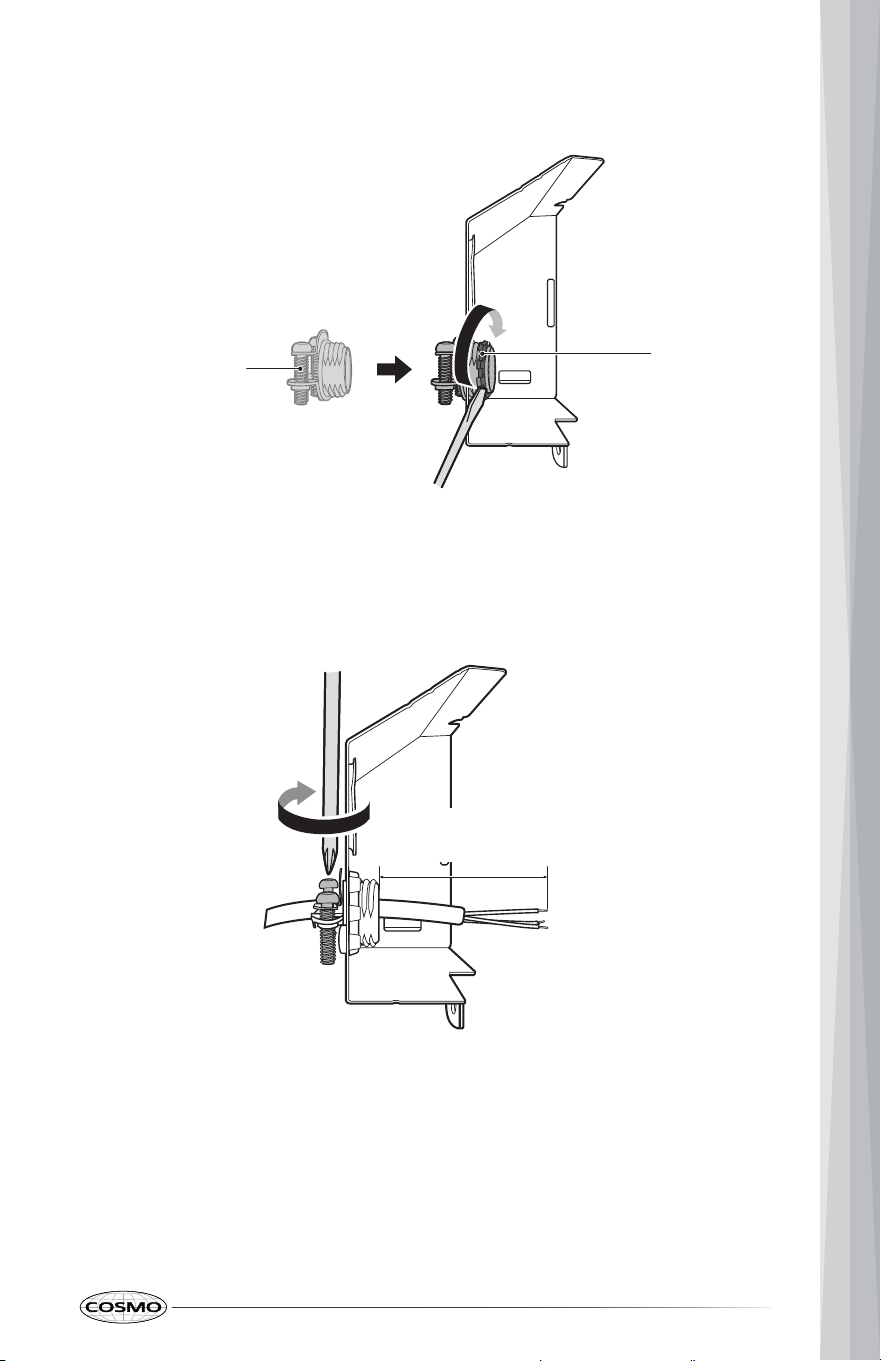
6. Insert the electrical cable through the hole in the strain relief. Tighten 2
screws to secure the cable.
33
Strain
Relief
Ring
Nut
3" (76 mm) - 5" (127 mm)
7. Position the junction box back onto the appliance and reinstall the screws
to secure the junction box assembly.
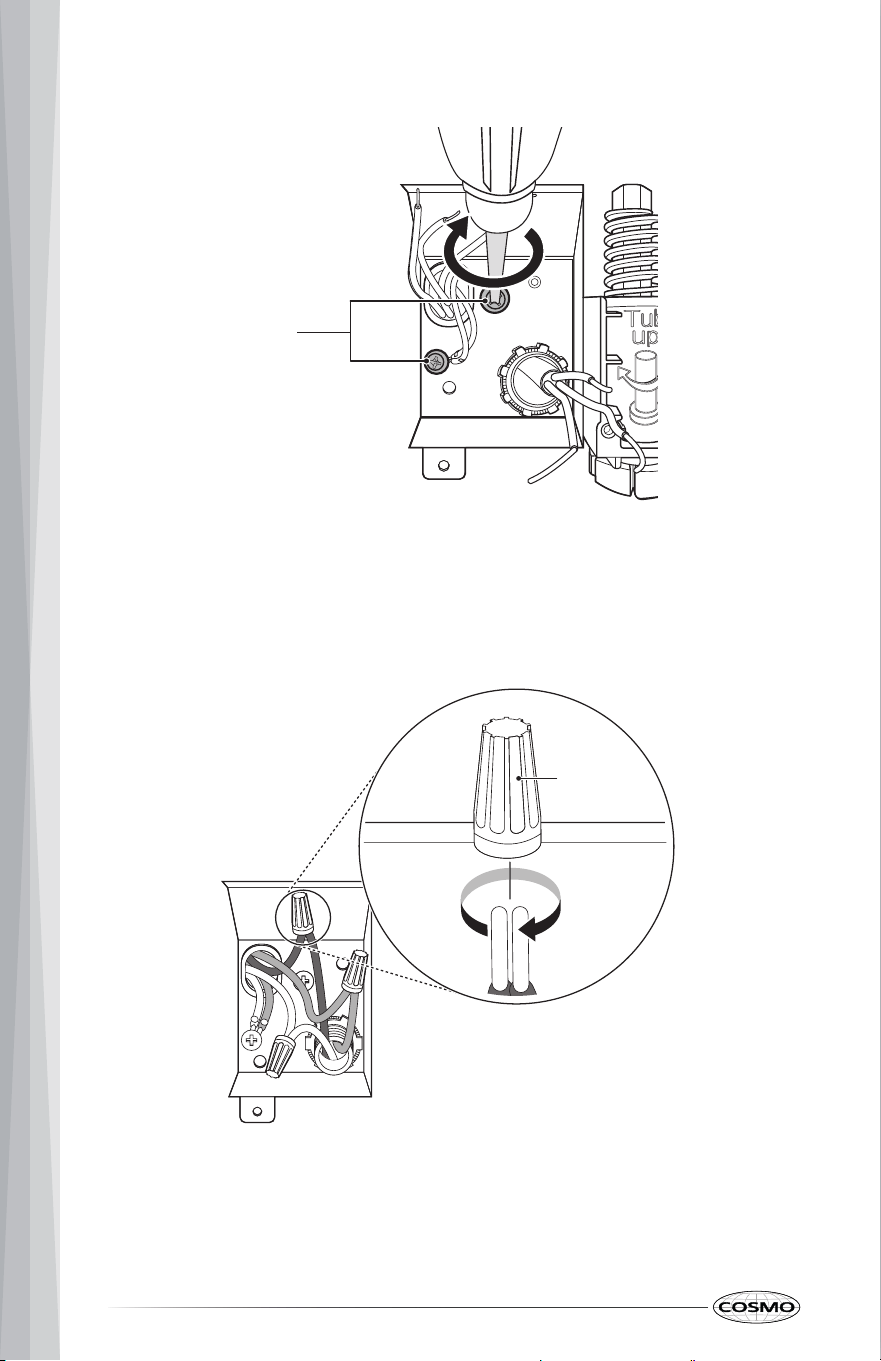
8. Pair the white, black, and green wires to the matching-colored wires from
the dishwasher. Then twist on the provided wire nuts tightly to connect
the corresponding wires.
9. Wrap electrical tape around each connection. Fold the connected wires
back into the junction box and screw on the junction box cover.
34
Screws
Wire
Nut
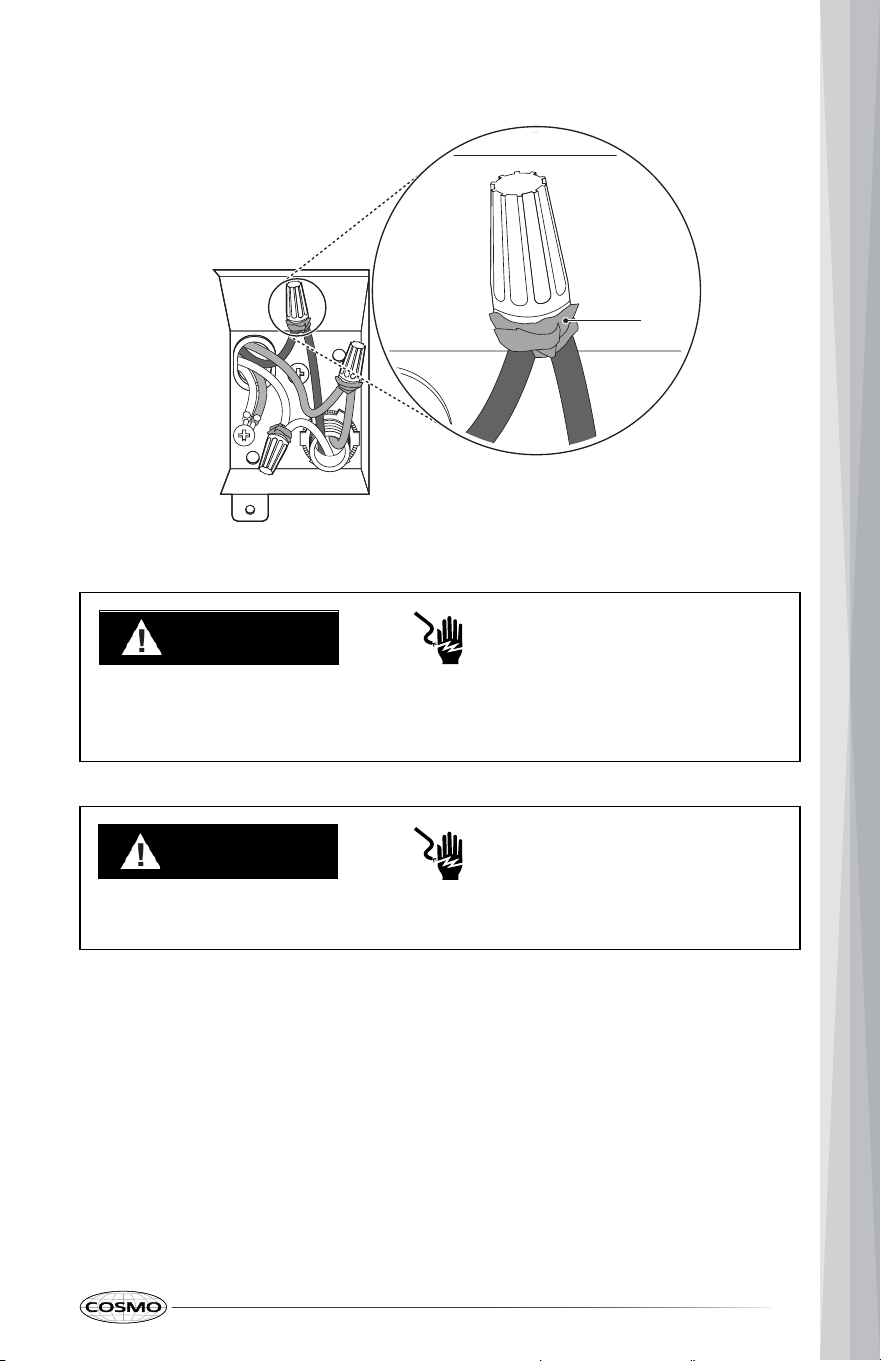
35
Electrical
Tape
WARNING
• Verify the supply provides 120 VAC and that the black conductor is hot
(line). If you are unsure, have the circuit checked by a licensed
electrician.
CAUTION
• Do not leave stripped wire exposed. Trim stripped wire to fit completely
inside wire nuts.
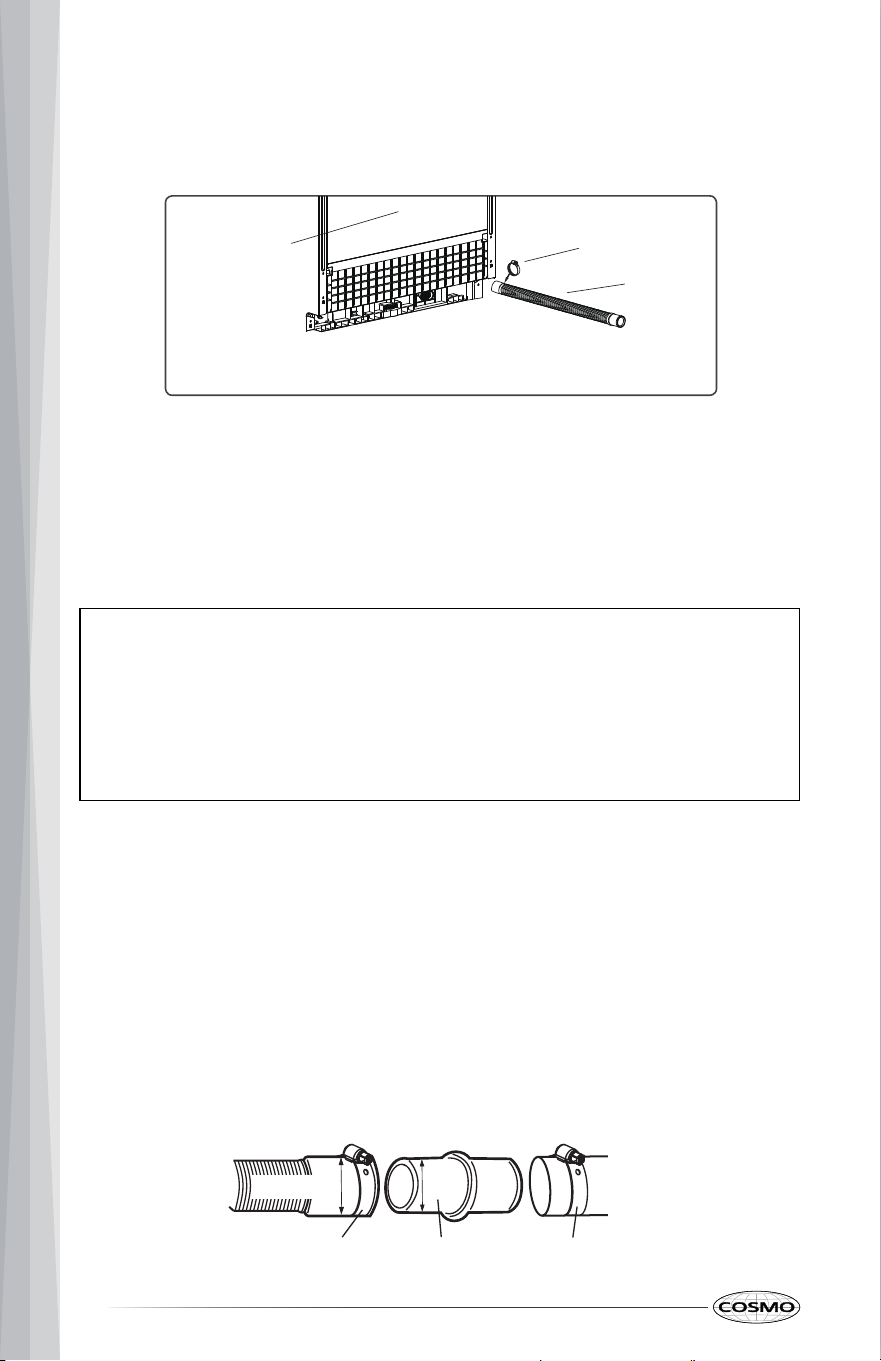
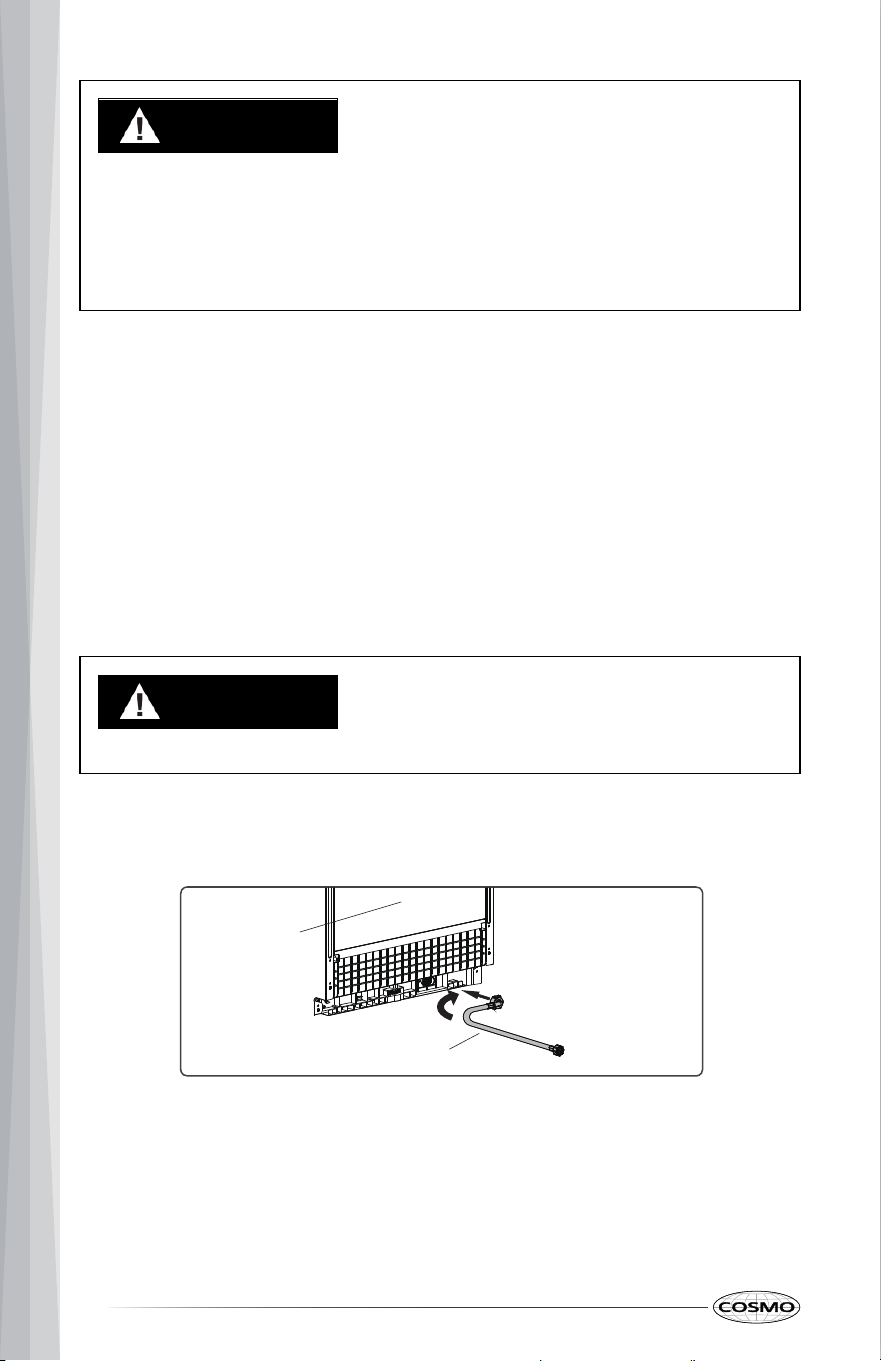
DRAIN HOSE CONNECTION
Drain hose connection is located behind the dishwasher.
If the end of the drain hose does not fit the drain line, use a heat and
detergent resistant adapter (not supplied). These may be obtained from a
local plumbing supply store.
Hose Clamp
Back of the
Dishwasher
Drain Hose
• Cut the adapter so the end matches the size of the drain connection.
Note:
• For drain hose installation, use the screw style hose clamp provided with
this dishwasher in the silverware basket.
• If connecting the dishwasher’s drain hose to the garbage disposal, be
sure to follow your garbage disposal’s manual for proper installation
instructions.
DRAIN HOSE REQUIREMENTS
• Follow local codes and ordinances. Do not exceed 10 ft. (3.05 m) distance
to drain.
• Do not connect drain hoses from other appliances to the dishwasher’s
drain hose.
• If an extension drain hose is required, use a coupler with 7/8" outside
diameter to connect the two hose ends, and secure both ends with hose
clamps.
⁷⁄8"
Ø 1.04"
Hose Clamp Coupler Hose Clamp
36
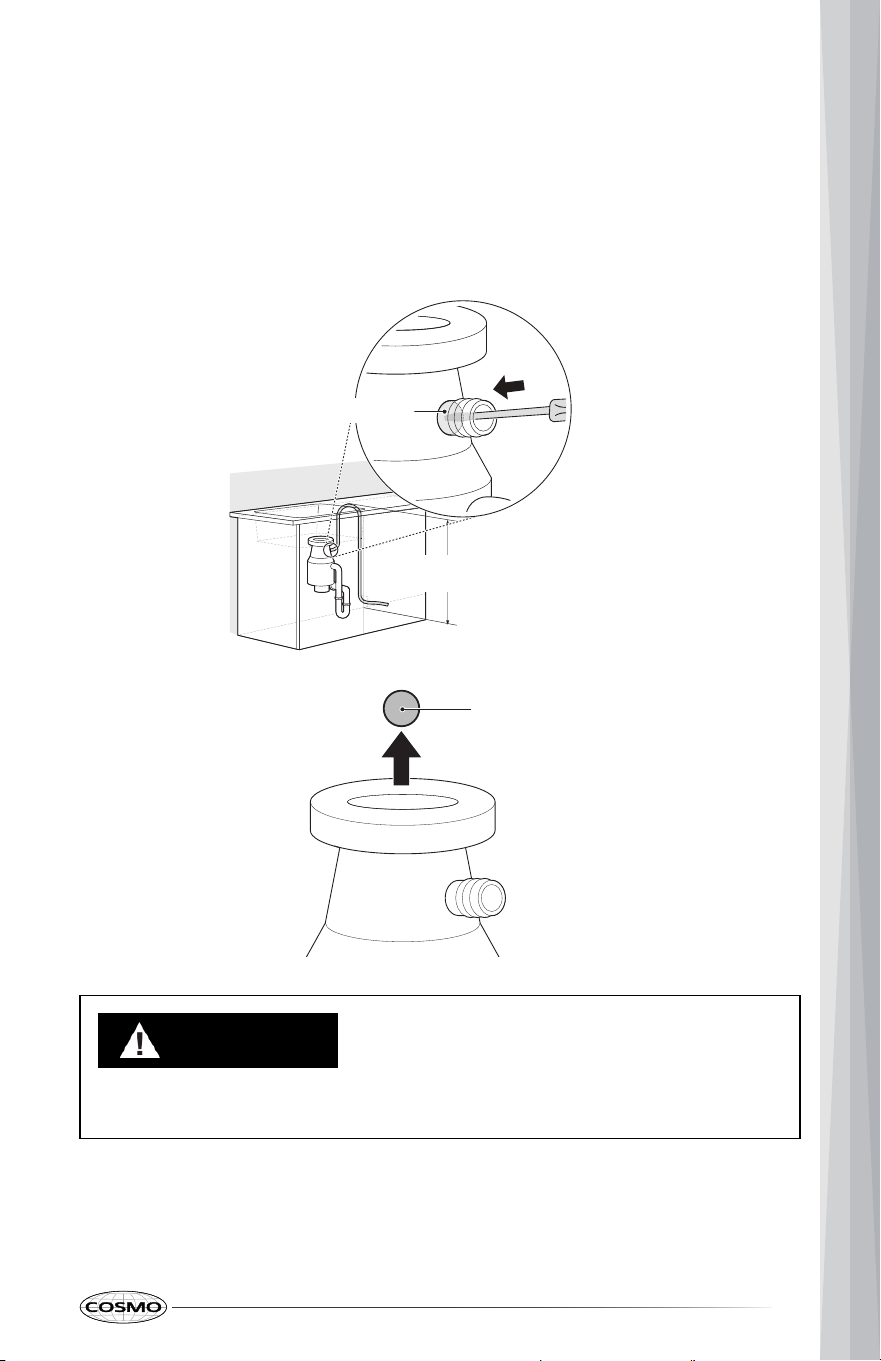
1. Remove the knockout plug on the disposal inlet port with a hammer and
screwdriver.
CAUTION
• If the knockout plug has not been removed, the dishwasher will not be
able to drain properly.
2. Connect the Drain Hose to the disposal inlet port and secure the
connection using the provided hose clamp.
37
Drain Hose end: Over 10" (254 mm)
Knockout Plug
Knockout Plug
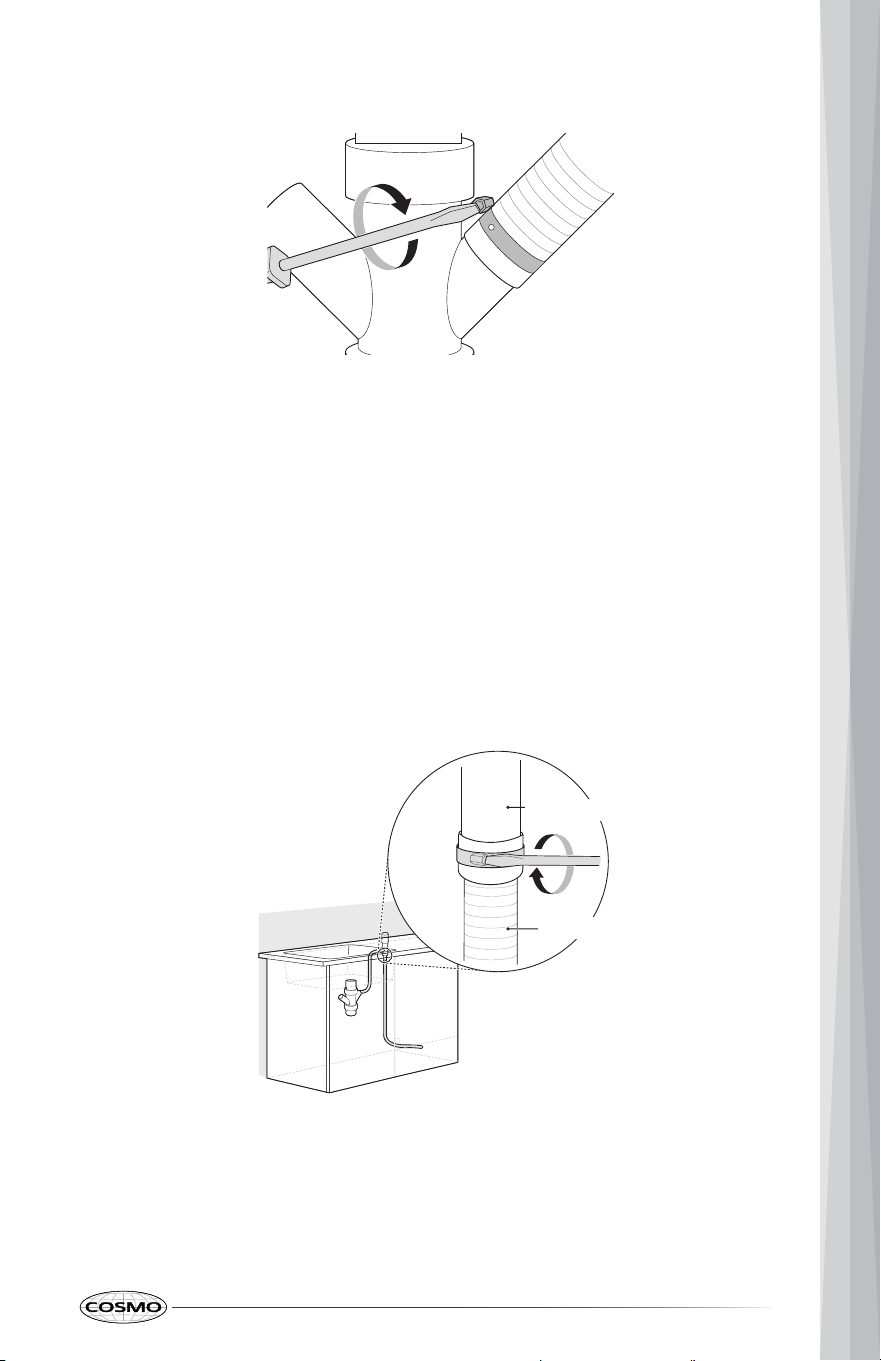
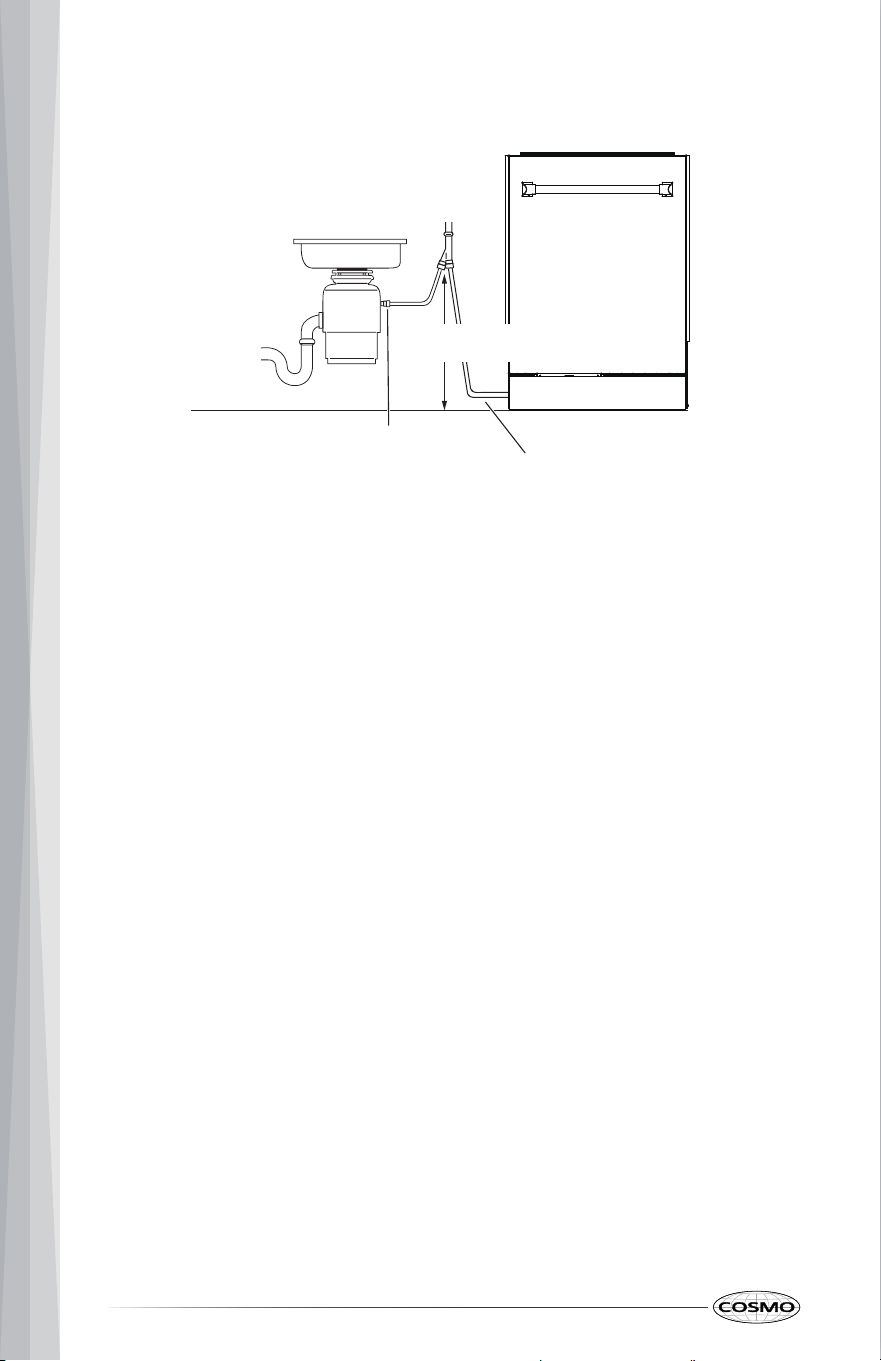
DISPOSAL CONNECTION WITHOUT AIR GAP
The end of the drain hose connection must be over 10" (254 mm) above the
bottom/base of the dishwasher to help prevent siphoning.
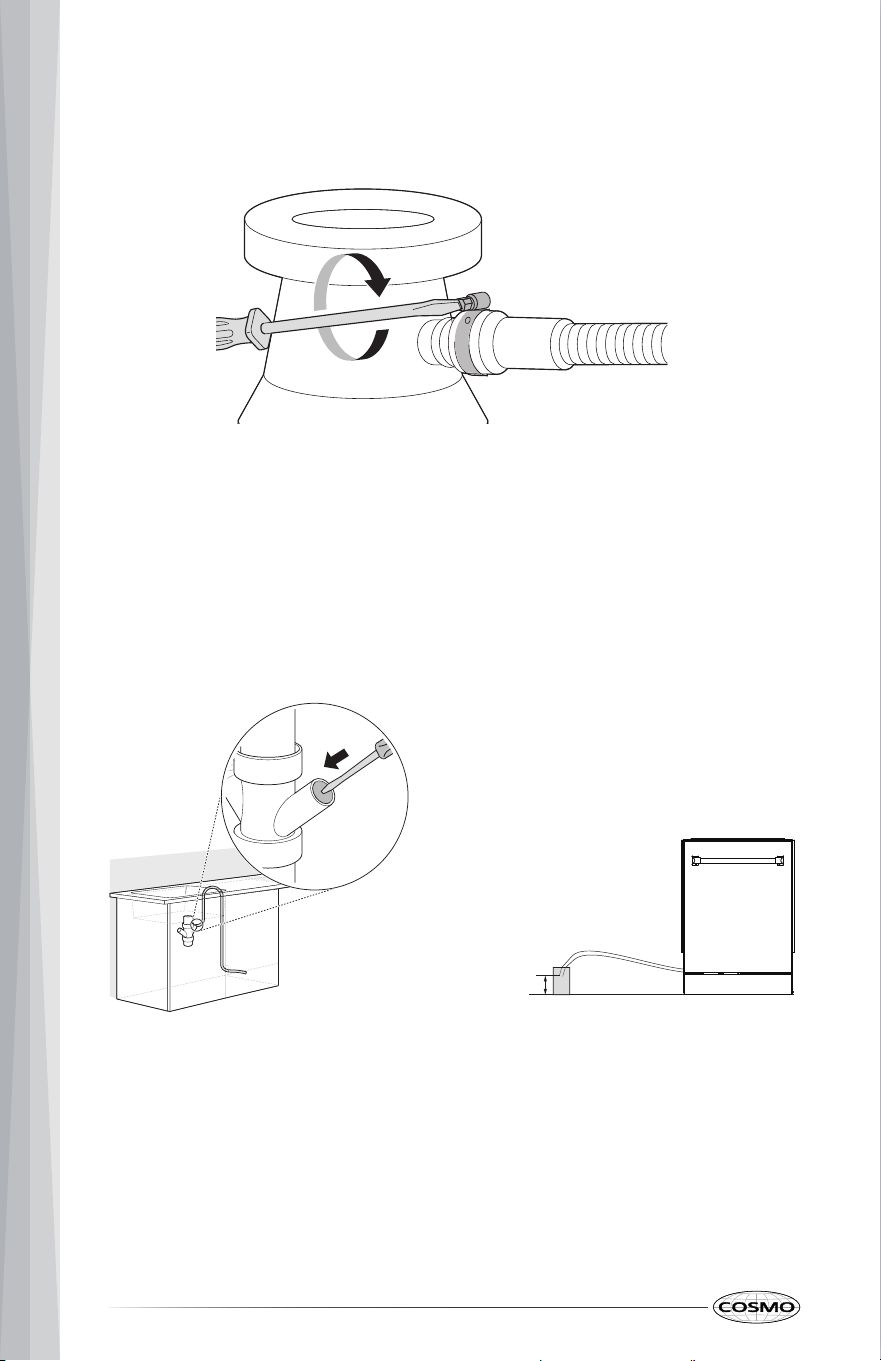
3. Move the hose clamp into position and tighten it with a flat-blade
screwdriver.
1. Remove the plug with a hammer and screwdriver if present.
2. Attach the drain hose to the waste tee with the hose clamp provided.
Move the clamp into position and tighten it with a flat-blade screwdriver.
38
WASTE TEE CONNECTION WITHOUT AIR GAP
The end of the drain hose connection must be over 10" (254 mm) above the
bottom/base of the dishwasher to help prevent siphoning.
Drain Pipe
Drain Hose end:
Over 10" (254 mm)
WASTE TEE OR DISPOSAL CONNECTION WITH AIR GAP
1. If connecting to the disposal, remove the knockout plug with a hammer
and screwdriver. If connecting to a waste tee, ensure the inlet is open
(remove plug if present).
2. Connect the end of the drain hose to the air gap with the hose clamp
provided. Move the clamp into position and tighten it with a flat-blade
screwdriver.
39
Drain Hose
Air Gap
3. If it is not connected, attach the rubber hose connector to the disposal of
waste tee with a hose clamp (not provided). Secure the drain hose in a
40
high loop as high as possible under the countertop. The high loop must
be a minimum of 20 in (508 mm).
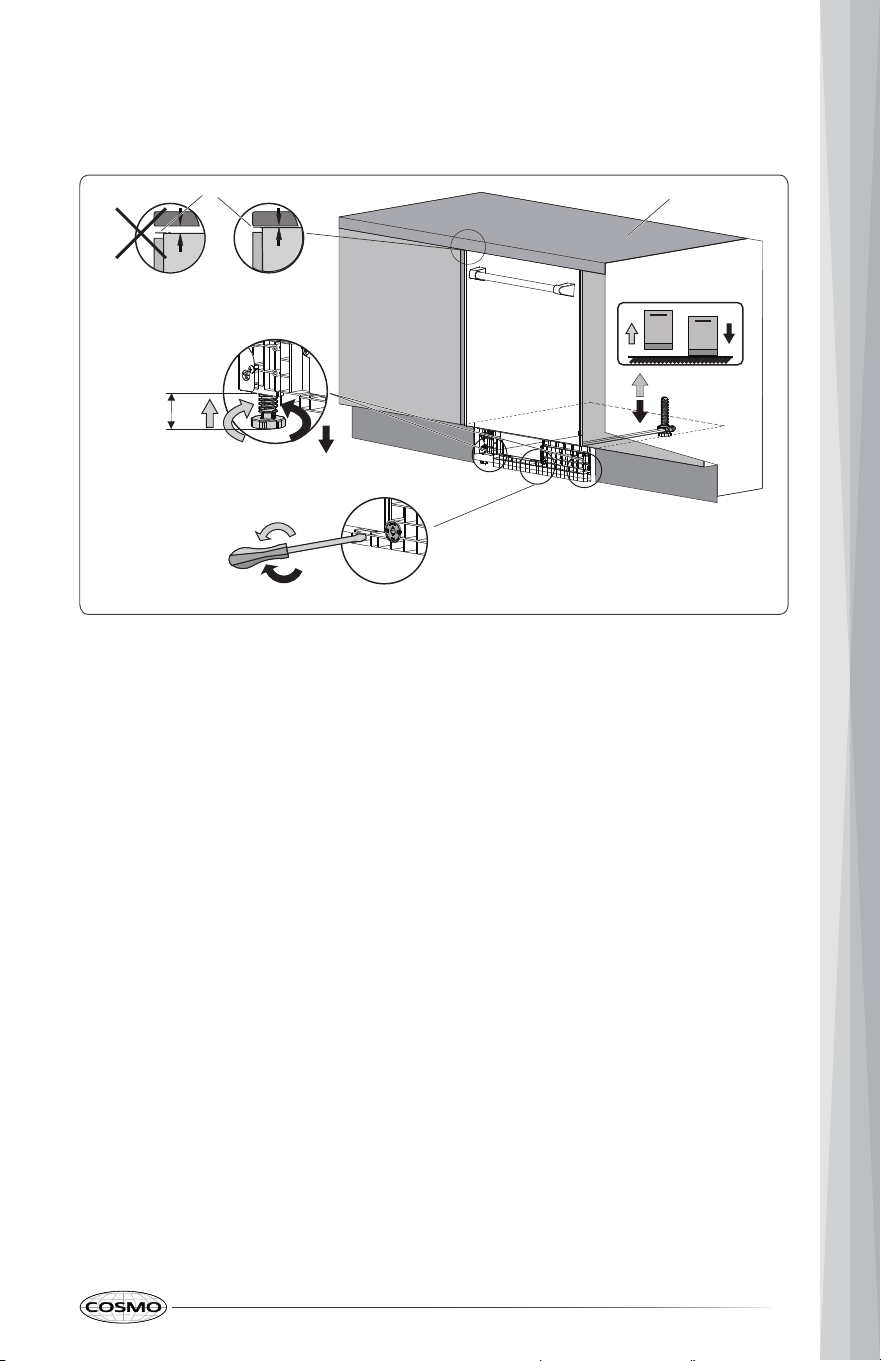
LEVELING THE DISHWASHER HEIGHT
Check that the dishwasher is level and adjust the legs if necessary. To access
the leveling legs, make sure the kick plate has been removed. Refer to the
“Kick Plate” Section.
Adjusting Front Legs
1. Turn the front leveling legs to raise or lower the front of the dishwasher.
2. Adjust the front legs by hand first to get close to the correct height.
Adjusting Rear Leg
1. Locate the rear adjustment screw/lever at the front center of the
dishwasher base.
2. Insert a Flat Screwdriver and rotate the adjuster in the clock-wise
direction to raise or anti clock-wise direction to lower the rear of the
dishwasher.
Drain Hose
Sink
Air
Gap
High Loop: Min. 20" (508 mm)
Rubber Connector
41
3. Continue adjusting until the dishwasher is level and the mounting
brackets are touching the countertop and the unit does not rock.
Mounting Bracket
0-2³⁄8"
(0-60 mm)
Counter Top
Adjusting Rear Leg from the Front
Adjusting Front Legs

FINISHING THE INSTALLATION
1. Make sure to mount the screws with the mounting brackets to the
countertop or cabinet sides using a screwdriver.
2. Confirm the dishwasher is stable and not rocking.
3. Confirm the top of the dishwasher is flush under the countertop.
4. Open and close the door to ensure it moves smoothly and does not rub
the cabinet.
5. Turn ON the water supply valve and restore power to the dishwasher.
6. Run a short cycle (such as the Rinse cycle) and check for leaks under and
around the dishwasher while it runs and drains. Keep the kick plate off
during this test to inspect for any water leaks.
7. After confirming there are no leaks, reinstall the Kick Plate using the
screws removed earlier.
42

IMPORTANT
Do Not Return This Product To The Store
If you have a problem with this product, please contact COSMO Customer
Support at
+1 (888) 784-3108
DATED PROOF OF PURCHASE, MODEL #, AND SERIAL # REQUIRED FOR
WARRANTY SERVICE.
IMPORTANT
Ne pas Réexpédier ce Produit au Magasin
Pour tout problème concernant ce produit, veuillez contacter le service des
consommateurs Cosmo Customer Support au
+1 (888) 784-3108
UNE PREUVE D’ACHAT DATEE EST REQUISE POUR BENEFICIER DE LA GARANTIE.
IMPORTANTE
No regrese este producto a la tienda
Si tiene algún problema con este producto, por favor contacte el ayuda al
cliente COSMO al
+1 (888) 784-3108
(Válido solo en E.U.A.)
NECESITA UNA PRUEBA DE DE COMPRA FECHADA, NÚMERO DE MODELO Y DE
SERIE PARA EL SERVICIO DE LA GARANTÍA.
Correct Disposal of this product:
This marking indicates that this appliance should not
be disposed with other household wastes. To prevent
possible harm to the environment or human health
from uncontrolled waste disposal, recycle it responsibly
to promote the sustainable reuse of material resources.
43

Cosmo is constantly making efforts to improve the quality and
performance of our products, so we may make changes to our
appliances without updating this manual.
Electronic version of this manual is available at:
www.cosmoappliances.com
APPLIANCES