USER MANUAL
Your satisfaction is guaranteed. If you are not completely satisfied
with our Freestanding Gas Range, please let us know. We’ll help
make it work for you, or we’ll refund your money.
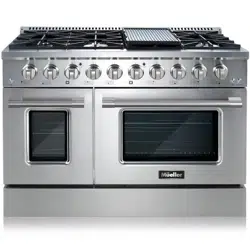
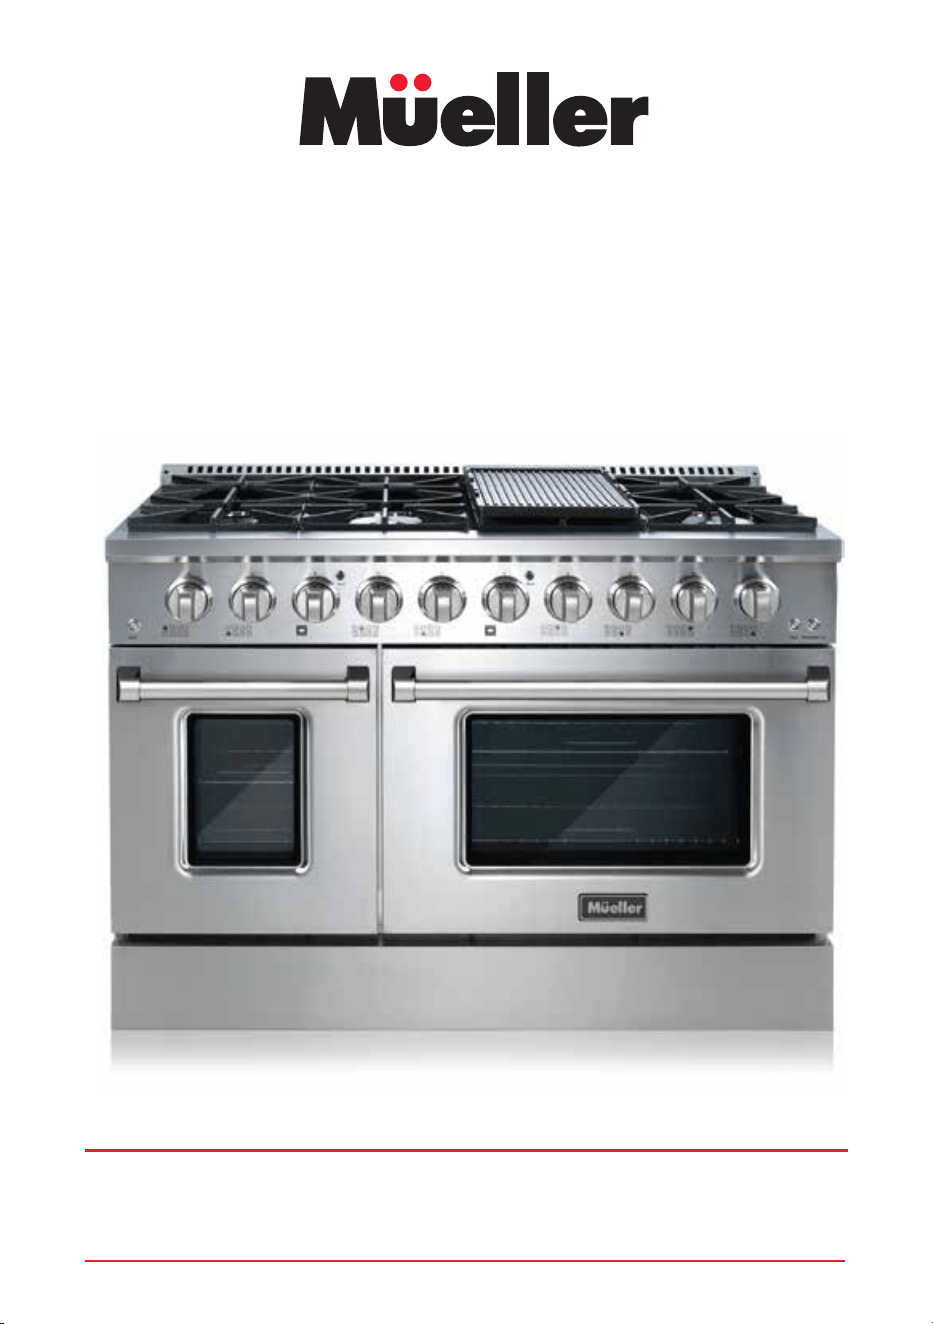
48" FREESTANDING
GAS RANGE
PROFESSIONAL SERIES
Model No: GR-670 and GR-670B
GAS WARNING
IF THE INFORMATION IN THIS MANUAL IS NOT FOLLOWED EXACTLY, A FIRE OR
AN EXPLOSION MAY OCCUR, CAUSING PROPERTY DAMAGE, PERSONAL INJURY
OR POSSIBLE DEATH.
DO NOT STORE OR USE GASOLINE, A LIQUID PROPANE CYLINDER OR OTHER
FLAMMABLE VAPORS AND LIQUIDS IN THE VICINITY OF THIS APPLIANCE. ANY
LIQUID PROPANE CYLINDER NOT CONNECTED FOR USE SHALL NOT BE STORED
IN THE VICINITY OF THIS OR ANY OTHER APPLIANCE.
WHAT TO DO IF YOU SMELL GAS
• Do not try to light any appliance.
• Do not touch any electrical switch.
• Do not use any phone in your building.
• Immediately call your gas supplier from a neighbor's phone. Follow the gas
supplier's instructions.
• If you cannot reach your gas supplier, call the fire department.
INSTALLATION
• Installation and service of your range must be performed by a licensed installer,
an approved service agency or your gas supplier.
• (In Massachusetts installation must be performed by a licensed plumber/ gas
fitter.)
• Note to the installer: Please leave this user manual with the consumer for the
local electrical / gas inspector's use.

1
CONTENTS
IMPORTANT SAFEGUARDS
HANDLING AND UNPACKING
CORRECT USAGE
CHILDREN
TECHNICAL SAFETY
COOKING SAFETY
PARTS
RANGE INSTALLATION
DIMENSIONS
CLEARANCES
HOOD / COMPOSITE OVERLAY INSTALL
LEVELING
ANTI-TIP BRACKET
ELECTRIC POWER SUPPLY REQUIREMENTS
GROUNDING
WIRING DIAGRAM
GAS SUPPLY REQUIREMENTS
CONNECT RANGE TO GAS SUPPLY
COMPONENT PART ASSEMBLY
BEFORE FIRST USE
COOKTOP OPERATION
GRIDDLE OPERATION
OVEN OPERATION
CARE AND CLEANING
TROUBLESHOOTING
SPECIFICATIONS
2
2
2
3
3
5
8
10
10
11
12
12
13
14
14
15
16
17
18
20
22
25
25
29
32
34

IMPORTANT SAFEGUARDS
2
Gas must be installed by a qualified service technician in accordance with all applica-
ble codes and requirements of the authority having jurisdiction. Before proceeding
with any conversion, ensure the gas supply is shut off and the electrical power to the
range is disconnected. Do not operate the cooktop or oven burners of this range when
using LP (bottled) gas before converting the pressure regulator and burner orifices for
LP gas use. Failure to do so could cause high flames and toxic fumes which can
result in serious injury.
• Do not use an adapter or extension cord to connect this appliance to electricity.
Extension cords do not guarantee the required safety of the appliance.
• To guarantee the electrical safety of this appliance, continuity must exist between
the appliance and an effective grounding system. It is imperative that this basic
safety requirement be met. If there is any doubt, have the electrical system of the
residence checked by a qualified electrician.
• Do not operate the appliance until it has been properly installed and grounded by a
qualified technician.
• Have the technician show you the location of the gas shut off valve and how to shut
it off in case of an emergency situation.
• Before servicing, turn off the gas valve and disconnect the power supply by either
removing the fuse, unplugging the unit, or manually "tripping" the circuit breaker.
• Under no circumstance open the outer casing of the appliance. This is a safety
hazard and may damage the appliance.
• Service or repairs should only be carried out by a qualified service technician. Do
not attempt to repair the appliance yourself.
• For safety, only use parts / components recommended by the manufacturer.
• The appliance is not designed for use with an external timer or a remote-control
system.
• Do not operate the appliance if the power cord or plug is damaged, or if the appli-
ance has been damaged in any manner.
• In the event of damage or defect, turn off the appliance immediately. Turn off the
gas shut off valve and disconnect completely from the electrical supply. Do not use
the appliance until it has been repaired. Ensure power is not supplied to the appliance
while repair work is carried out.
WARNING: Gas appliances can cause minor exposure to four of these substances,
namely benzene, carbon monoxide, formaldehyde, and soot, caused primarily by the
incomplete combustion of natural gas fuel. When operating your range on natural
gas, the flames from the burners should be blue in color. In addition, the flames
should be stable, free of yellow tipping, excessive noise and lifting. However, this
yellow tipping should be restricted to the primary flame kernels only. Properly adjust-
ed burners, indicated by a bluish rather than a yellow flame, will minimize incomplete
combustion. Exposure to those substances can be minimized by venting with an
open window or use of a ventilation fan or hood.
• Before discarding an old appliance, disconnect it from the gas and electrical supply,
and cut off the power cord to prevent it from becoming a hazard.
• To reduce the risk of burns, do not move this appliance while hot.
CHILDREN
• Children should not be left alone or unattended in an area where the appliance is in
use.
• Never allow children to sit or stand on any part of the appliance.
• Do not store items of interest to children above or at the back of the appliance.
Children climbing on the appliance to reach these items could be injured.
• The appliance is hot during use and remains so for some time after being switched
off. Keep children away from the appliance.
• Keep all cookware and their handles out of the reach of children. Danger of burning
or scalding.
WARNING: Ensure that any packing material, including any plastic bags or film, are
disposed of safely and kept out of the reach of children. Do not use plastic bags in
cribs, beds, carriages or play pens. These bags are not toys. Danger of suffocation!
TECHNICAL SAFETY
• Installation, repair, and maintenance work must be performed by a licensed install-
er, an approved service agency or your gas supplier in accordance with local building
and safety codes. Work by unqualified persons could be dangerous and may void the
warranty.
• Before installation, make sure that the voltage and frequency listed on the rating
label correspond with the household electrical supply. This data must correspond to
prevent injury and appliance damage. Consult a qualified electrician if in doubt.
• Before installation, select a suitable area that abides by the clearance measure-
ments noted in the ‘RANGE INSTALLATION’ section of this manual.
• Before installation, ensure the area will be well ventilated, with a suitable ventilation
system.
IMPORTANT: Do not install a ventilation system that blows air downward toward this
gas cooking appliance. This type of ventilation system may cause ignition and com-
bustion problems with this gas cooking appliance resulting in personal injury or unin-
tended operation.
• Before installing the range, check for externally visible damage. Do not operate a
damaged appliance. A damaged gas range is a hazard.
IMPORTANT: This appliance is equipped with a three-prong (grounding) plug for
your protection against shock hazard and should be plugged directly into a properly
grounded three-pronged receptacle. DO NOT cut or remove the grounding prong from
this plug.
• The range has been adjusted for Natural Gas at manufacture. Any conversion to LP
This User Manual contains important information on how to install and set up your
new range, safe use, and maintenance, as well as insights into the product features.
READ ALL INSTRUCTIONS BEFORE INSTALLING AND OPERATING YOUR MUELLER
PROFESSIONAL SERIES 48" FREESTANDING GAS RANGE FOR THE FIRST TIME. IF
THE INFORMATION IN THIS MANUAL IS NOT FOLLOWED EXACTLY, A FIRE, EXPLO-
SION OR BURN HAZARD MAY RESULT, CAUSING PROPERTY DAMAGE, PERSONAL
INJURY OR EVEN DEATH.
To reduce these risks when using this product, basic safety precautions should
always be followed, including the following:
HANDLING AND UNPACKING
• WARNING: EXTREMELY HEAVY. Use proper equipment and adequate manpower to
move the range to avoid personal injury or damage to the unit or the floor. The unit is
heavy and rests on adjustable steel legs.
• Before moving the range, protect any finished flooring and secure the oven doors
closed to prevent damage.
• WARNING: DO NOT LIFT OR CARRY THE COOKING RANGE BY THE OVEN DOOR
HANDLES OR THE CONTROL PANEL.
• IMPORTANT: LET THE RANGE REST FOR A PERIOD OF 24 HOURS ONCE YOU HAVE
PLACED IT IN YOUR HOME.
• Do not remove the rating label attached to the range.
• Do not discard the anti-tip bracket or LP Gas Conversion Kit supplied with the range.
CORRECT USAGE
• This appliance is intended for use in domestic households and in similar working
and residential environments.
• This appliance is intended to be used for such purposes as cooking and keeping
food warm. Do not use the appliance in any other way than its intended use.
• This appliance is not intended for outdoor use.
• Persons (including children) who lack physical, sensory, or mental capabilities, or
experience with the appliance should not use it without supervision or instruction by
a responsible person.
• Do not use this range while under the influence of alcohol or other substances that
affect your reaction time or perception.

3
Gas must be installed by a qualified service technician in accordance with all applica-
ble codes and requirements of the authority having jurisdiction. Before proceeding
with any conversion, ensure the gas supply is shut off and the electrical power to the
range is disconnected. Do not operate the cooktop or oven burners of this range when
using LP (bottled) gas before converting the pressure regulator and burner orifices for
LP gas use. Failure to do so could cause high flames and toxic fumes which can
result in serious injury.
• Do not use an adapter or extension cord to connect this appliance to electricity.
Extension cords do not guarantee the required safety of the appliance.
• To guarantee the electrical safety of this appliance, continuity must exist between
the appliance and an effective grounding system. It is imperative that this basic
safety requirement be met. If there is any doubt, have the electrical system of the
residence checked by a qualified electrician.
• Do not operate the appliance until it has been properly installed and grounded by a
qualified technician.
• Have the technician show you the location of the gas shut off valve and how to shut
it off in case of an emergency situation.
• Before servicing, turn off the gas valve and disconnect the power supply by either
removing the fuse, unplugging the unit, or manually "tripping" the circuit breaker.
• Under no circumstance open the outer casing of the appliance. This is a safety
hazard and may damage the appliance.
• Service or repairs should only be carried out by a qualified service technician. Do
not attempt to repair the appliance yourself.
• For safety, only use parts / components recommended by the manufacturer.
• The appliance is not designed for use with an external timer or a remote-control
system.
• Do not operate the appliance if the power cord or plug is damaged, or if the appli-
ance has been damaged in any manner.
• In the event of damage or defect, turn off the appliance immediately. Turn off the
gas shut off valve and disconnect completely from the electrical supply. Do not use
the appliance until it has been repaired. Ensure power is not supplied to the appliance
while repair work is carried out.
WARNING: Gas appliances can cause minor exposure to four of these substances,
namely benzene, carbon monoxide, formaldehyde, and soot, caused primarily by the
incomplete combustion of natural gas fuel. When operating your range on natural
gas, the flames from the burners should be blue in color. In addition, the flames
should be stable, free of yellow tipping, excessive noise and lifting. However, this
yellow tipping should be restricted to the primary flame kernels only. Properly adjust-
ed burners, indicated by a bluish rather than a yellow flame, will minimize incomplete
combustion. Exposure to those substances can be minimized by venting with an
open window or use of a ventilation fan or hood.
• Before discarding an old appliance, disconnect it from the gas and electrical supply,
and cut off the power cord to prevent it from becoming a hazard.
• To reduce the risk of burns, do not move this appliance while hot.
CHILDREN
• Children should not be left alone or unattended in an area where the appliance is in
use.
• Never allow children to sit or stand on any part of the appliance.
• Do not store items of interest to children above or at the back of the appliance.
Children climbing on the appliance to reach these items could be injured.
• The appliance is hot during use and remains so for some time after being switched
off. Keep children away from the appliance.
• Keep all cookware and their handles out of the reach of children. Danger of burning
or scalding.
WARNING: Ensure that any packing material, including any plastic bags or film, are
disposed of safely and kept out of the reach of children. Do not use plastic bags in
cribs, beds, carriages or play pens. These bags are not toys. Danger of suffocation!
TECHNICAL SAFETY
• Installation, repair, and maintenance work must be performed by a licensed install-
er, an approved service agency or your gas supplier in accordance with local building
and safety codes. Work by unqualified persons could be dangerous and may void the
warranty.
• Before installation, make sure that the voltage and frequency listed on the rating
label correspond with the household electrical supply. This data must correspond to
prevent injury and appliance damage. Consult a qualified electrician if in doubt.
• Before installation, select a suitable area that abides by the clearance measure-
ments noted in the ‘RANGE INSTALLATION’ section of this manual.
• Before installation, ensure the area will be well ventilated, with a suitable ventilation
system.
IMPORTANT: Do not install a ventilation system that blows air downward toward this
gas cooking appliance. This type of ventilation system may cause ignition and com-
bustion problems with this gas cooking appliance resulting in personal injury or unin-
tended operation.
• Before installing the range, check for externally visible damage. Do not operate a
damaged appliance. A damaged gas range is a hazard.
IMPORTANT: This appliance is equipped with a three-prong (grounding) plug for
your protection against shock hazard and should be plugged directly into a properly
grounded three-pronged receptacle. DO NOT cut or remove the grounding prong from
this plug.
• The range has been adjusted for Natural Gas at manufacture. Any conversion to LP
This User Manual contains important information on how to install and set up your
new range, safe use, and maintenance, as well as insights into the product features.
READ ALL INSTRUCTIONS BEFORE INSTALLING AND OPERATING YOUR MUELLER
PROFESSIONAL SERIES 48" FREESTANDING GAS RANGE FOR THE FIRST TIME. IF
THE INFORMATION IN THIS MANUAL IS NOT FOLLOWED EXACTLY, A FIRE, EXPLO-
SION OR BURN HAZARD MAY RESULT, CAUSING PROPERTY DAMAGE, PERSONAL
INJURY OR EVEN DEATH.
To reduce these risks when using this product, basic safety precautions should
always be followed, including the following:
HANDLING AND UNPACKING
• WARNING: EXTREMELY HEAVY. Use proper equipment and adequate manpower to
move the range to avoid personal injury or damage to the unit or the floor. The unit is
heavy and rests on adjustable steel legs.
• Before moving the range, protect any finished flooring and secure the oven doors
closed to prevent damage.
• WARNING: DO NOT LIFT OR CARRY THE COOKING RANGE BY THE OVEN DOOR
HANDLES OR THE CONTROL PANEL.
• IMPORTANT: LET THE RANGE REST FOR A PERIOD OF 24 HOURS ONCE YOU HAVE
PLACED IT IN YOUR HOME.
• Do not remove the rating label attached to the range.
• Do not discard the anti-tip bracket or LP Gas Conversion Kit supplied with the range.
CORRECT USAGE
• This appliance is intended for use in domestic households and in similar working
and residential environments.
• This appliance is intended to be used for such purposes as cooking and keeping
food warm. Do not use the appliance in any other way than its intended use.
• This appliance is not intended for outdoor use.
• Persons (including children) who lack physical, sensory, or mental capabilities, or
experience with the appliance should not use it without supervision or instruction by
a responsible person.
• Do not use this range while under the influence of alcohol or other substances that
affect your reaction time or perception.

4
Gas must be installed by a qualified service technician in accordance with all applica-
ble codes and requirements of the authority having jurisdiction. Before proceeding
with any conversion, ensure the gas supply is shut off and the electrical power to the
range is disconnected. Do not operate the cooktop or oven burners of this range when
using LP (bottled) gas before converting the pressure regulator and burner orifices for
LP gas use. Failure to do so could cause high flames and toxic fumes which can
result in serious injury.
• Do not use an adapter or extension cord to connect this appliance to electricity.
Extension cords do not guarantee the required safety of the appliance.
• To guarantee the electrical safety of this appliance, continuity must exist between
the appliance and an effective grounding system. It is imperative that this basic
safety requirement be met. If there is any doubt, have the electrical system of the
residence checked by a qualified electrician.
• Do not operate the appliance until it has been properly installed and grounded by a
qualified technician.
• Have the technician show you the location of the gas shut off valve and how to shut
it off in case of an emergency situation.
• Before servicing, turn off the gas valve and disconnect the power supply by either
removing the fuse, unplugging the unit, or manually "tripping" the circuit breaker.
• Under no circumstance open the outer casing of the appliance. This is a safety
hazard and may damage the appliance.
• Service or repairs should only be carried out by a qualified service technician. Do
not attempt to repair the appliance yourself.
• For safety, only use parts / components recommended by the manufacturer.
• The appliance is not designed for use with an external timer or a remote-control
system.
• Do not operate the appliance if the power cord or plug is damaged, or if the appli-
ance has been damaged in any manner.
• In the event of damage or defect, turn off the appliance immediately. Turn off the
gas shut off valve and disconnect completely from the electrical supply. Do not use
the appliance until it has been repaired. Ensure power is not supplied to the appliance
while repair work is carried out.
WARNING: Gas appliances can cause minor exposure to four of these substances,
namely benzene, carbon monoxide, formaldehyde, and soot, caused primarily by the
incomplete combustion of natural gas fuel. When operating your range on natural
gas, the flames from the burners should be blue in color. In addition, the flames
should be stable, free of yellow tipping, excessive noise and lifting. However, this
yellow tipping should be restricted to the primary flame kernels only. Properly adjust-
ed burners, indicated by a bluish rather than a yellow flame, will minimize incomplete
combustion. Exposure to those substances can be minimized by venting with an
open window or use of a ventilation fan or hood.
• Before discarding an old appliance, disconnect it from the gas and electrical supply,
and cut off the power cord to prevent it from becoming a hazard.
• To reduce the risk of burns, do not move this appliance while hot.
CHILDREN
• Children should not be left alone or unattended in an area where the appliance is in
use.
• Never allow children to sit or stand on any part of the appliance.
• Do not store items of interest to children above or at the back of the appliance.
Children climbing on the appliance to reach these items could be injured.
• The appliance is hot during use and remains so for some time after being switched
off. Keep children away from the appliance.
• Keep all cookware and their handles out of the reach of children. Danger of burning
or scalding.
WARNING: Ensure that any packing material, including any plastic bags or film, are
disposed of safely and kept out of the reach of children. Do not use plastic bags in
cribs, beds, carriages or play pens. These bags are not toys. Danger of suffocation!
TECHNICAL SAFETY
• Installation, repair, and maintenance work must be performed by a licensed install-
er, an approved service agency or your gas supplier in accordance with local building
and safety codes. Work by unqualified persons could be dangerous and may void the
warranty.
• Before installation, make sure that the voltage and frequency listed on the rating
label correspond with the household electrical supply. This data must correspond to
prevent injury and appliance damage. Consult a qualified electrician if in doubt.
• Before installation, select a suitable area that abides by the clearance measure-
ments noted in the ‘RANGE INSTALLATION’ section of this manual.
• Before installation, ensure the area will be well ventilated, with a suitable ventilation
system.
IMPORTANT: Do not install a ventilation system that blows air downward toward this
gas cooking appliance. This type of ventilation system may cause ignition and com-
bustion problems with this gas cooking appliance resulting in personal injury or unin-
tended operation.
• Before installing the range, check for externally visible damage. Do not operate a
damaged appliance. A damaged gas range is a hazard.
IMPORTANT: This appliance is equipped with a three-prong (grounding) plug for
your protection against shock hazard and should be plugged directly into a properly
grounded three-pronged receptacle. DO NOT cut or remove the grounding prong from
this plug.
• The range has been adjusted for Natural Gas at manufacture. Any conversion to LP
This User Manual contains important information on how to install and set up your
new range, safe use, and maintenance, as well as insights into the product features.
READ ALL INSTRUCTIONS BEFORE INSTALLING AND OPERATING YOUR MUELLER
PROFESSIONAL SERIES 48" FREESTANDING GAS RANGE FOR THE FIRST TIME. IF
THE INFORMATION IN THIS MANUAL IS NOT FOLLOWED EXACTLY, A FIRE, EXPLO-
SION OR BURN HAZARD MAY RESULT, CAUSING PROPERTY DAMAGE, PERSONAL
INJURY OR EVEN DEATH.
To reduce these risks when using this product, basic safety precautions should
always be followed, including the following:
HANDLING AND UNPACKING
• WARNING: EXTREMELY HEAVY. Use proper equipment and adequate manpower to
move the range to avoid personal injury or damage to the unit or the floor. The unit is
heavy and rests on adjustable steel legs.
• Before moving the range, protect any finished flooring and secure the oven doors
closed to prevent damage.
• WARNING: DO NOT LIFT OR CARRY THE COOKING RANGE BY THE OVEN DOOR
HANDLES OR THE CONTROL PANEL.
• IMPORTANT: LET THE RANGE REST FOR A PERIOD OF 24 HOURS ONCE YOU HAVE
PLACED IT IN YOUR HOME.
• Do not remove the rating label attached to the range.
• Do not discard the anti-tip bracket or LP Gas Conversion Kit supplied with the range.
CORRECT USAGE
• This appliance is intended for use in domestic households and in similar working
and residential environments.
• This appliance is intended to be used for such purposes as cooking and keeping
food warm. Do not use the appliance in any other way than its intended use.
• This appliance is not intended for outdoor use.
• Persons (including children) who lack physical, sensory, or mental capabilities, or
experience with the appliance should not use it without supervision or instruction by
a responsible person.
• Do not use this range while under the influence of alcohol or other substances that
affect your reaction time or perception.

5
Gas must be installed by a qualified service technician in accordance with all applica-
ble codes and requirements of the authority having jurisdiction. Before proceeding
with any conversion, ensure the gas supply is shut off and the electrical power to the
range is disconnected. Do not operate the cooktop or oven burners of this range when
using LP (bottled) gas before converting the pressure regulator and burner orifices for
LP gas use. Failure to do so could cause high flames and toxic fumes which can
result in serious injury.
• Do not use an adapter or extension cord to connect this appliance to electricity.
Extension cords do not guarantee the required safety of the appliance.
• To guarantee the electrical safety of this appliance, continuity must exist between
the appliance and an effective grounding system. It is imperative that this basic
safety requirement be met. If there is any doubt, have the electrical system of the
residence checked by a qualified electrician.
• Do not operate the appliance until it has been properly installed and grounded by a
qualified technician.
• Have the technician show you the location of the gas shut off valve and how to shut
it off in case of an emergency situation.
• Before servicing, turn off the gas valve and disconnect the power supply by either
removing the fuse, unplugging the unit, or manually "tripping" the circuit breaker.
• Under no circumstance open the outer casing of the appliance. This is a safety
hazard and may damage the appliance.
• Service or repairs should only be carried out by a qualified service technician. Do
not attempt to repair the appliance yourself.
• For safety, only use parts / components recommended by the manufacturer.
• The appliance is not designed for use with an external timer or a remote-control
system.
• Do not operate the appliance if the power cord or plug is damaged, or if the appli-
ance has been damaged in any manner.
• In the event of damage or defect, turn off the appliance immediately. Turn off the
gas shut off valve and disconnect completely from the electrical supply. Do not use
the appliance until it has been repaired. Ensure power is not supplied to the appliance
while repair work is carried out.
WARNING: Gas appliances can cause minor exposure to four of these substances,
namely benzene, carbon monoxide, formaldehyde, and soot, caused primarily by the
incomplete combustion of natural gas fuel. When operating your range on natural
gas, the flames from the burners should be blue in color. In addition, the flames
should be stable, free of yellow tipping, excessive noise and lifting. However, this
yellow tipping should be restricted to the primary flame kernels only. Properly adjust-
ed burners, indicated by a bluish rather than a yellow flame, will minimize incomplete
combustion. Exposure to those substances can be minimized by venting with an
open window or use of a ventilation fan or hood.
• Before discarding an old appliance, disconnect it from the gas and electrical supply,
and cut off the power cord to prevent it from becoming a hazard.
• To reduce the risk of burns, do not move this appliance while hot.
CHILDREN
• Children should not be left alone or unattended in an area where the appliance is in
use.
• Never allow children to sit or stand on any part of the appliance.
• Do not store items of interest to children above or at the back of the appliance.
Children climbing on the appliance to reach these items could be injured.
• The appliance is hot during use and remains so for some time after being switched
off. Keep children away from the appliance.
• Keep all cookware and their handles out of the reach of children. Danger of burning
or scalding.
WARNING: Ensure that any packing material, including any plastic bags or film, are
disposed of safely and kept out of the reach of children. Do not use plastic bags in
cribs, beds, carriages or play pens. These bags are not toys. Danger of suffocation!
TECHNICAL SAFETY
• Installation, repair, and maintenance work must be performed by a licensed install-
er, an approved service agency or your gas supplier in accordance with local building
and safety codes. Work by unqualified persons could be dangerous and may void the
warranty.
• Before installation, make sure that the voltage and frequency listed on the rating
label correspond with the household electrical supply. This data must correspond to
prevent injury and appliance damage. Consult a qualified electrician if in doubt.
• Before installation, select a suitable area that abides by the clearance measure-
ments noted in the ‘RANGE INSTALLATION’ section of this manual.
• Before installation, ensure the area will be well ventilated, with a suitable ventilation
system.
IMPORTANT: Do not install a ventilation system that blows air downward toward this
gas cooking appliance. This type of ventilation system may cause ignition and com-
bustion problems with this gas cooking appliance resulting in personal injury or unin-
tended operation.
• Before installing the range, check for externally visible damage. Do not operate a
damaged appliance. A damaged gas range is a hazard.
IMPORTANT: This appliance is equipped with a three-prong (grounding) plug for
your protection against shock hazard and should be plugged directly into a properly
grounded three-pronged receptacle. DO NOT cut or remove the grounding prong from
this plug.
• The range has been adjusted for Natural Gas at manufacture. Any conversion to LP
This User Manual contains important information on how to install and set up your
new range, safe use, and maintenance, as well as insights into the product features.
READ ALL INSTRUCTIONS BEFORE INSTALLING AND OPERATING YOUR MUELLER
PROFESSIONAL SERIES 48" FREESTANDING GAS RANGE FOR THE FIRST TIME. IF
THE INFORMATION IN THIS MANUAL IS NOT FOLLOWED EXACTLY, A FIRE, EXPLO-
SION OR BURN HAZARD MAY RESULT, CAUSING PROPERTY DAMAGE, PERSONAL
INJURY OR EVEN DEATH.
To reduce these risks when using this product, basic safety precautions should
always be followed, including the following:
HANDLING AND UNPACKING
• WARNING: EXTREMELY HEAVY. Use proper equipment and adequate manpower to
move the range to avoid personal injury or damage to the unit or the floor. The unit is
heavy and rests on adjustable steel legs.
• Before moving the range, protect any finished flooring and secure the oven doors
closed to prevent damage.
• WARNING: DO NOT LIFT OR CARRY THE COOKING RANGE BY THE OVEN DOOR
HANDLES OR THE CONTROL PANEL.
• IMPORTANT: LET THE RANGE REST FOR A PERIOD OF 24 HOURS ONCE YOU HAVE
PLACED IT IN YOUR HOME.
• Do not remove the rating label attached to the range.
• Do not discard the anti-tip bracket or LP Gas Conversion Kit supplied with the range.
CORRECT USAGE
• This appliance is intended for use in domestic households and in similar working
and residential environments.
• This appliance is intended to be used for such purposes as cooking and keeping
food warm. Do not use the appliance in any other way than its intended use.
• This appliance is not intended for outdoor use.
• Persons (including children) who lack physical, sensory, or mental capabilities, or
experience with the appliance should not use it without supervision or instruction by
a responsible person.
• Do not use this range while under the influence of alcohol or other substances that
affect your reaction time or perception.
WARNING: TIP-OVER HAZARD
TO REDUCE THE RISK OF THE APPLIANCE TIPPING OVER, THE RANGE MUST BE
SECURED BY THE ANTI-TIP DEVICE PACKED WITH THE APPLIANCE. IF THE
ANTI-TIP BRACKETS ARE NOT PROPERLY INSTALLED, THE RANGE MAY TIP, CAUS-
ING DAMAGE TO THE APPLIANCE AND SERIOUS BURNS OR INJURY TO PERSONS
OR POSSIBLE DEATH. See 'RANGE INSTALLATION' for further instructions.
COOKING SAFETY
• Make sure all components of the range are assembled correctly before using the
cooktop or oven.
• Do not leave the range unattended while in use. Boil-overs cause smoking, and
greasy spillovers may ignite.
• The range and its parts will be extremely hot during use. Always use protective
gear such as oven mitts or potholders when using the appliance. Do not touch the
open flame.
• Use only dry, heat resistant potholders. Moist or damp potholders used on hot
surfaces can result in steam burns. Do not let the potholder touch the hot heating
elements. Do not use towels or other bulky items near the appliance.
• The appliance is hot during use. Do not touch the Burner Grates, Burner Caps,
Burner Heads, Griddle, Oven Racks, oven glass, or any other parts in proximity to the
flame or oven heating elements. These components may be hot enough to cause
burns.
• Be sure to turn all controls off when not in use. The appliance will remain hot for
some time after turning off. Do not touch the cooktop area or interior of the ovens
until cool.
• Be sure the oven cool air intake (top interior of oven door) and oven exhaust vent
(below the door) are unobstructed at all times.
• When using the oven, open the door carefully to allow hot air or steam to escape
before placing or removing food.

6
• The Burner Grates supplied with the appliance must always be used. Never place
cookware directly on the burner itself.
• Do not operate a Burner for an extended period of time without cookware on the
Burner Grates. The finish of the grates might chip without cookware to absorb the
heat.
• Ensure the cookware you are using is suitable for a gas cooktop or oven. Only
certain types of glass, ceramic or other glazed cookware are suitable for use on a
cooktop without breaking due to the sudden temperature change.
• Cookware that conducts heat slowly, i.e., glass pots, should be used in conjunction
with burner flames at a low or medium setting.
• Do not use cookware with a base that extends past the Burner Grate. Using larger
cookware may cause the flames to spread out and damage the surrounding coun-
tertop or other countertop appliances.
• For safety and stability, do not use cookware with a bottom diameter smaller than
the burner grate opening.
• Do not use cookware so large that it covers several burners. The resulting heat
accumulation can damage the appliance.
• Select a heat source size that is as close as possible to the bottom diameter of the
cookware. Also, keep gas flames confined to the base only and not the sidewalls of
the cookware.
• Do not heat empty pots or pans. This may cause damage to the cookware and the
surrounding area. Danger of fire.
• Always turn pot handles to the side or back of the range. Do not turn handles
towards the area where they can be easily burned. Handles should not extend over
the adjacent burners.
• Do not heat unopened food containers, such as baby food jars or cans. Built-up
pressure may cause the container to explode and result in injury.
• Do not use plastic or aluminum foil to line any part of the range. It melts at high
temperatures and can damage the porcelain and is a fire hazard.
• Do not hang any articles (i.e., dish towels) off the oven handle as some fabrics may
ignite or melt from the heat.
• Do not leave the oven doors open unnecessarily as someone may trip over or be
injured.
• Do not use the ovens for frying.
• Do not use water on grease fires. Smother any fire or flame using a lid, close the
oven door, or use a dry chemical or foam-type extinguisher.

7
• Use an extinguisher ONLY if:
- You know you have a Class A, B or C extinguisher, and you already know how to
operate it.
- The fire is small and contained in the area where it started.
- The fire department is being/has been called.
- You can fight the fire with your back to an exit.
• Do not flambé under an exhaust hood. Flames could be drawn up into the hood by
the suction or the grease filters may ignite.
• Do not let cooking grease or other flammable materials accumulate on the appli-
ance. Fire Hazard.
• Spills containing salt or sugar should be removed as soon as possible (when
surface is safe to touch), particularly on the porcelain surfaces.
• Ensure proper ventilation during use either from an open window or from a running
ventilation hood.
• When using a portable appliance near the range, make sure that its power cord
does not come in contact with the cooktop or oven doors.
• Do not store items on or in the appliance when not in use. Items could melt or
catch fire from residual heat or if the appliance is turned on inadvertently. Always
switch the control knobs off after use.
• WARNING: DO NOT store or use gasoline, aerosols, combustible liquids or other
easily flammable vapors or materials in the vicinity of this appliance.
• Exhaust fan ventilation hoods and grease filters should be kept clean. Do not allow
grease to accumulate on hood or filter. Greasy deposits in the fan could catch fire.
• If the gas range is installed behind a cabinet door, it must only be used with the
door open. Only close the cabinet door when the appliance is switched off and cool.
• Clean appliance with caution. Do not use abrasive or caustic cleaners or deter-
gents on this appliance. They may cause permanent damage to the surface.
• If the gas range has not been used for an unusually long time, it should be thor-
oughly cleaned before using it again and checked that it is working properly by an
authorized expert.
• Keep a fire extinguisher handy.
KEEP THIS MANUAL IN A SAFE PLACE FOR FUTURE REFERENCE
AND REVIEW PERIODICALLY.
WARNING: NEVER USE THIS APPLIANCE AS A SPACE HEATER TO HEAT OR
WARM THE ROOM. DOING SO MAY RESULT IN CARBON MONOXIDE POISONING
AND OVERHEATING.
8
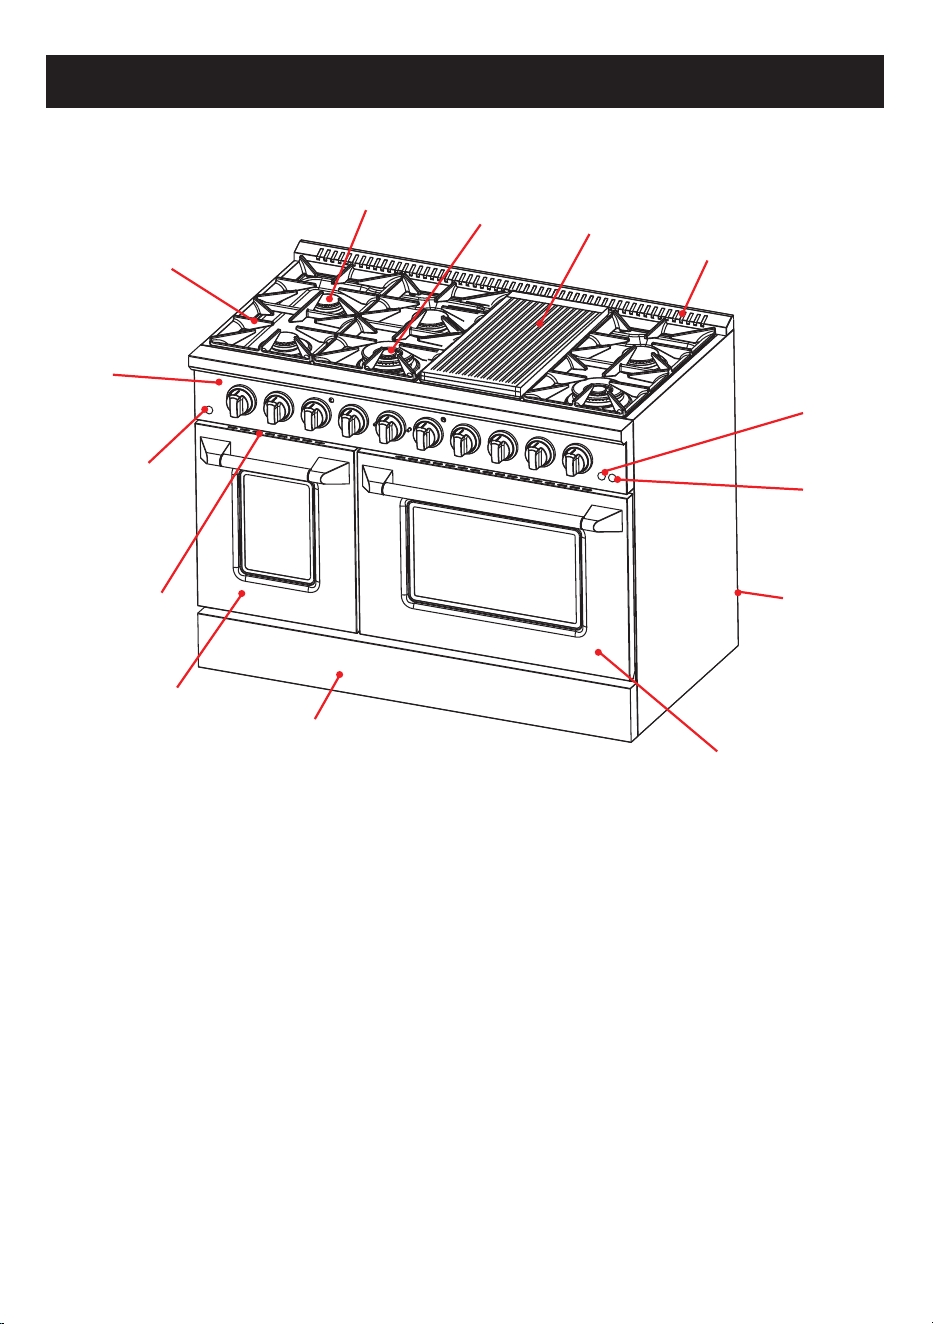
PARTS
INCLUDES:
4 Cast Iron Burner Grates
1 Porcelain Enameled Cast Iron Double-Sided Griddle
6 Standard Burner Caps
2 Double Burner Caps
6 Standard Aluminum Burner Heads
2 Brass Double Burner Heads
4 Stainless Steel Oven Racks
4 Stainless Steel Oven Rack Guides (Attached)
1 Tip-Over Bracket Set (2 Brackets, 2 Bolts, 4 Screws, 4 Wall Anchors)
1 Liquid Propane Gas Conversion Kit (Brass Orifices / Nozzles – 15 Pieces)
Burner
Gate
Control
Panel
Oven 1
Light
Button
Cool Air
Intake
Oven 1-18’’
Conventional
Front
Panel
Standard
Burner
Double
Burner
Griddle
Top Vent
Oven 2
Light Button
Convection
Fan Button
Oven 2-30’’
Conventional
Convection/Broil
Gas
Pressure
Regulator
9
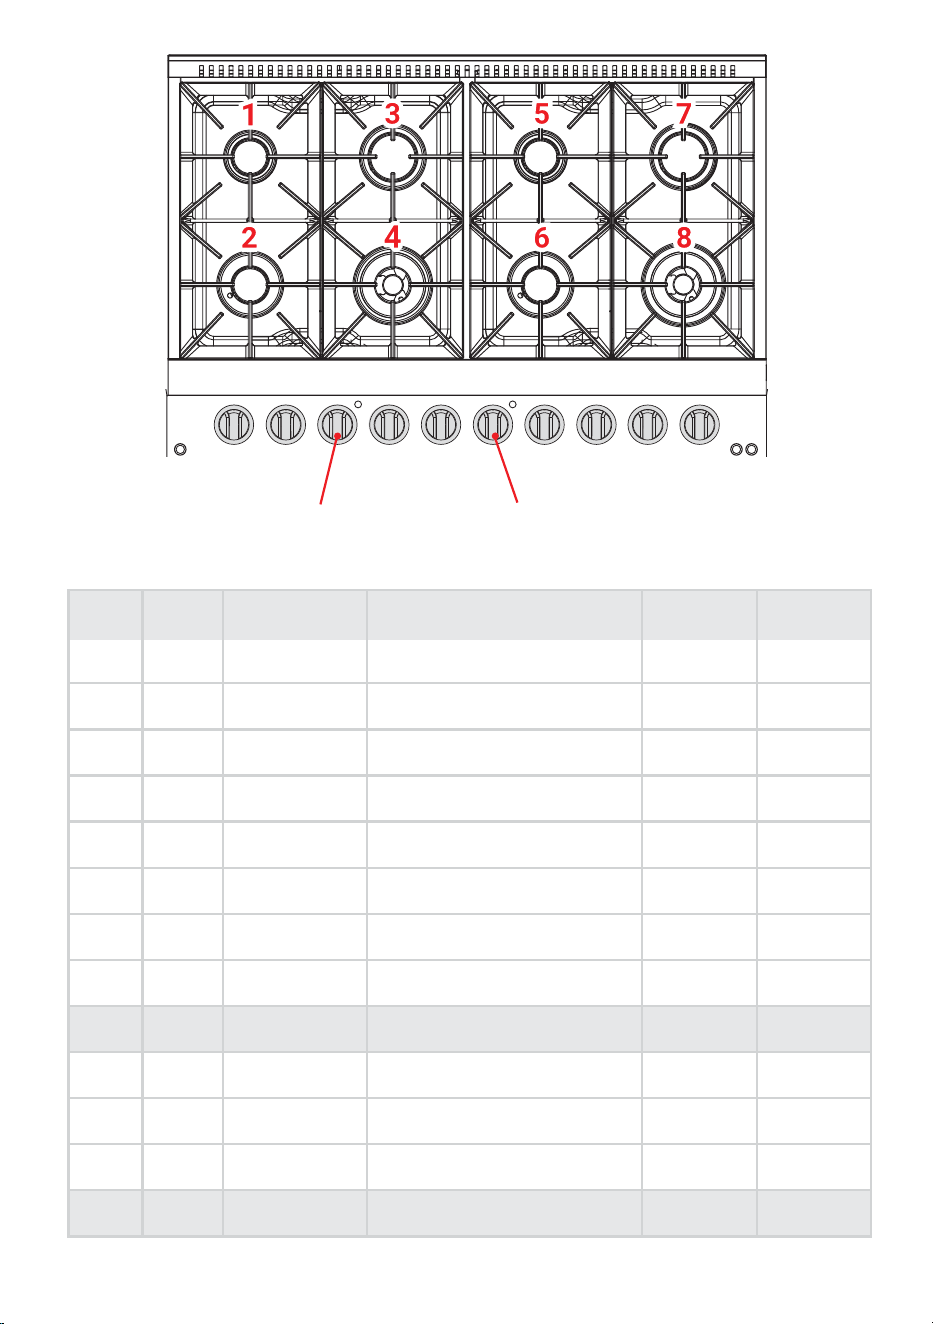
Burner
1
2
3
4
5
6
7
8
Oven
1 – 18”
2 – 30”
2 – 30”
Total
BTU/H
9,000
6,000
12,000
20,000
9,000
6,000
12,000
20,000
BTU/H
14,000
22,000
10,000
140,000
Position
BACK LEFT (B/L)
FRONT LEFT (F/L)
BACK MIDDLE LEFT (B/M/L)
FRONT MIDDLE LEFT (F/M/L)
BACK MIDDLE RIGHT (B/M/R)
FRONT MIDDLE RIGHT (F/M/R)
BACK RIGHT (B/R)
FRONT RIGHT (F/R)
Position
Left
Right
Broil Function, Right Oven only
8 Burners + 2 Ovens
SEMI-RAPID
AUXILIARY
SEMI-RAPID
DOUBLE FLAME
SEMI-RAPID
AUXILIARY
SEMI-RAPID
DOUBLE FLAME
NG Orifice
1.36
1.07
1.57
1.36*2+0.73
1.36
1.07
1.57
1.36*2+0.73
1.68
2.13
1.42
LP Orifice
0.9
0.74
1.0
0.89*2+0.53
0.9
0.74
1.0
0.89*2+0.53
1.09
1.4
0.94
Oven 1-18’’
Conventional
Oven 2-30’’
Conventional/Convection/Broil
1 2 3 4 5 6 7 8
10
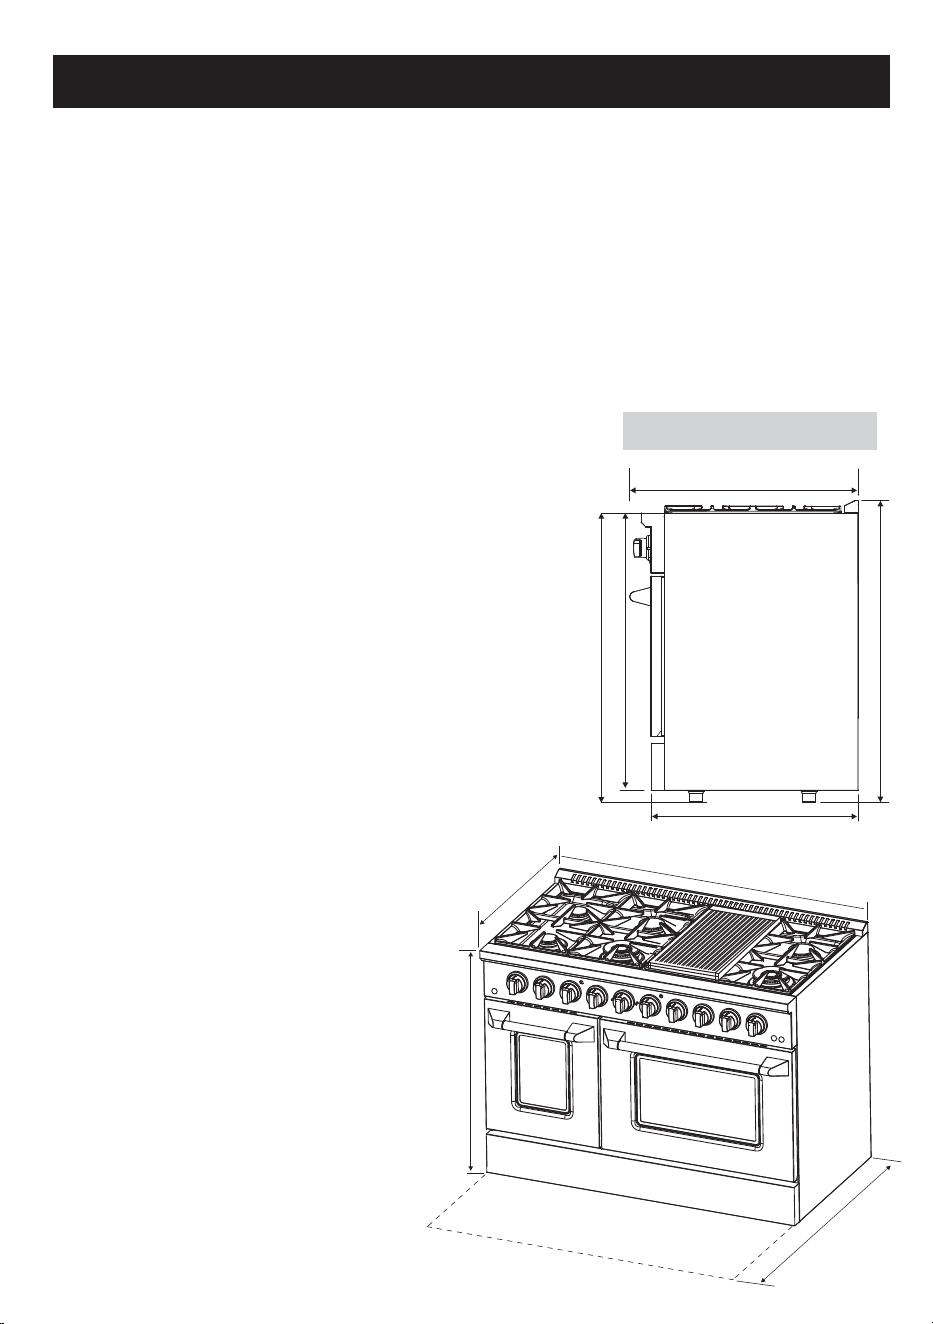
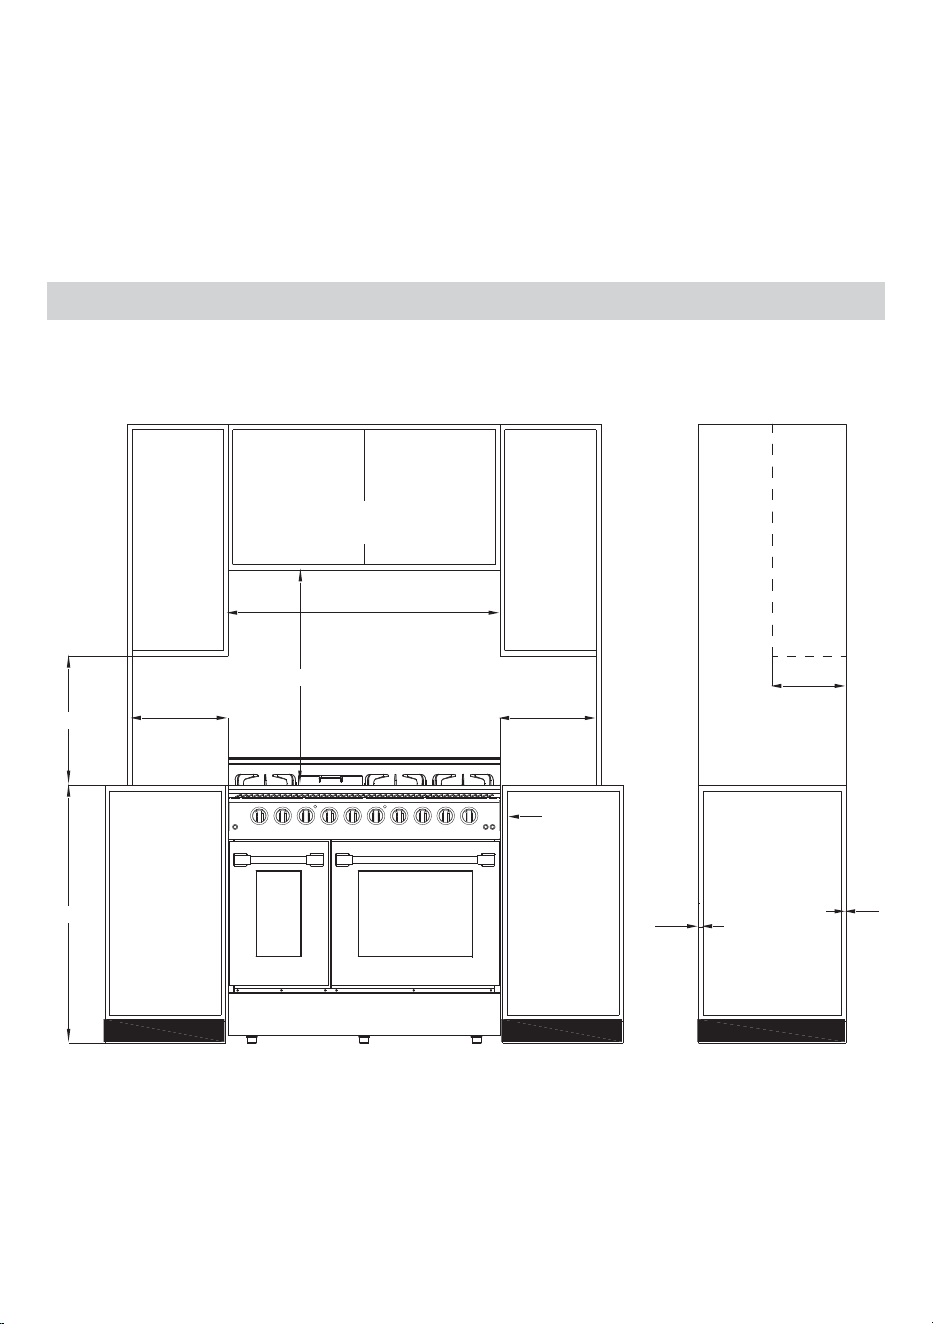
RANGE INSTALLATION
DIMENSIONS
• The range may be installed flush to the rear wall. Install a non-combustible material
on the rear wall above the range and up to the vent hood. It is not necessary to install
non-combustible materials behind the range below the countertop height.
• The minimum vertical clearance between the appliance and combustible construc-
tion extending from the cooking surface is 30 inches.
• The minimum vertical clearance between the countertop surface and combustible
construction above the appliance is 18 inches.
36.9"
48"
depth with door open
44.25"
27.3"
28.7"
37.6"
26.0"
34.8"
36.9"
• WARNING: Do not lift or carry the range by the oven handles.
• Remove and recycle packaging and keep out of reach of children.
• Before installing the range, you must locate and secure the included Anti-Tip
Bracket Set for your range.
• The use of a gas range leads to the formation of heat, moisture, and combustion
effects in the room where the appliance is installed. It is recommended that the unit be
operated with an overhead vented exhaust hood of sufficient size and capacity.
• Do not obstruct the flow of combustion air into the range and ventilation air away from
the range.
• This appliance is not approved for downward
airflow ventilation or air curtain equivalent. This type
of ventilation system may cause ignition and com-
bustion problems with this gas cooking appliance
resulting in personal injury or unintended operation.
• The range may be installed flush to the rear wall.
You may install a non-combustible material on the
rear wall above the range and up to the vent hood. It
is not necessary to install non-combustible materi-
als behind the range below the countertop height.
• The range must be installed on a clean, flat, even
surface. The floor surface should not be combusti-
ble and should resist heat such as concrete or tile.
• WARNING: All openings in the wall behind the
appliance and in the floor under the appliance
shall be sealed.
• Install the appliance so that the power cord
or gas piping does not come into contact
with any portion of the cooktop which
may become hot during use.
• CAUTION: The use of cabinets
for storage above the appliance
may result in a potential fire
hazard. Combustible items may
ignite; metallic items may become hot
and cause burns. If cabinet storage is
to be provided, the risk can be
reduced by installing a range hood
that projects horizontally a minimum
of 5” (12.7cm) beyond the bottom of
the cabinets.
• The cabinetry and ventilation hood
should be installed first to prevent
damage to the range.
• Make sure the wall coverings, countertop, and cabinets around the appliance can
withstand heat up to 200º F (93°C) generated by the appliance.
• Deep fat fryers must not be installed directly next to gas cooktops. Gas flames can
ignite splattering oil. A distance of at least 12in should be maintained between these
two appliances.
• It is the responsibility of the installer to make certain that the appliance is properly
adjusted at the time of installation. Situations caused by improper adjustments or
improper installation are not covered under the warranty.
• The minimum distance from the side of the range above the countertop to combus-
tible sidewalls must be at least 13 inches.
• The minimum horizontal distance between overhead cabinets installed to either
side of the appliance shall not be less than the nominal width of the appliance.
• A floor-supported unit requires zero distance between adjacent combustible
construction (sides and rear).
11
CLEARANCES
WARNING: The minimum distances given in these installation instructions are to
combustible surfaces, and it is the installers' responsibility that clearances are
observed to ensure safe operation.
• The range may be installed flush to the rear wall. Install a non-combustible material
on the rear wall above the range and up to the vent hood. It is not necessary to install
non-combustible materials behind the range below the countertop height.
• The minimum vertical clearance between the appliance and combustible construc-
tion extending from the cooking surface is 30 inches.
• The minimum vertical clearance between the countertop surface and combustible
construction above the appliance is 18 inches.
Front View
Side View
36"
18"
13"
48"
30" Minimum
13"
13"
0"
1/4"
To
cabinets
below
cooktop
height and
at rear of
the range
For
panels
left and
right of
the
range
front
Maximum
depth for
cabinets
above
countertops
0"
Minimum to cabinets on
either side of the range
To
cabinets
below
cooktop
height and
at rear of
the range
• WARNING: Do not lift or carry the range by the oven handles.
• Remove and recycle packaging and keep out of reach of children.
• Before installing the range, you must locate and secure the included Anti-Tip
Bracket Set for your range.
• The use of a gas range leads to the formation of heat, moisture, and combustion
effects in the room where the appliance is installed. It is recommended that the unit be
operated with an overhead vented exhaust hood of sufficient size and capacity.
• Do not obstruct the flow of combustion air into the range and ventilation air away from
the range.
• This appliance is not approved for downward
airflow ventilation or air curtain equivalent. This type
of ventilation system may cause ignition and com-
bustion problems with this gas cooking appliance
resulting in personal injury or unintended operation.
• The range may be installed flush to the rear wall.
You may install a non-combustible material on the
rear wall above the range and up to the vent hood. It
is not necessary to install non-combustible materi-
als behind the range below the countertop height.
• The range must be installed on a clean, flat, even
surface. The floor surface should not be combusti-
ble and should resist heat such as concrete or tile.
• WARNING: All openings in the wall behind the
appliance and in the floor under the appliance
shall be sealed.
• Install the appliance so that the power cord
or gas piping does not come into contact
with any portion of the cooktop which
may become hot during use.
• CAUTION: The use of cabinets
for storage above the appliance
may result in a potential fire
hazard. Combustible items may
ignite; metallic items may become hot
and cause burns. If cabinet storage is
to be provided, the risk can be
reduced by installing a range hood
that projects horizontally a minimum
of 5” (12.7cm) beyond the bottom of
the cabinets.
• The cabinetry and ventilation hood
should be installed first to prevent
damage to the range.
• Make sure the wall coverings, countertop, and cabinets around the appliance can
withstand heat up to 200º F (93°C) generated by the appliance.
• Deep fat fryers must not be installed directly next to gas cooktops. Gas flames can
ignite splattering oil. A distance of at least 12in should be maintained between these
two appliances.
• It is the responsibility of the installer to make certain that the appliance is properly
adjusted at the time of installation. Situations caused by improper adjustments or
improper installation are not covered under the warranty.
• The minimum distance from the side of the range above the countertop to combus-
tible sidewalls must be at least 13 inches.
• The minimum horizontal distance between overhead cabinets installed to either
side of the appliance shall not be less than the nominal width of the appliance.
• A floor-supported unit requires zero distance between adjacent combustible
construction (sides and rear).
12
• The range may be installed flush to the rear wall. Install a non-combustible material
on the rear wall above the range and up to the vent hood. It is not necessary to install
non-combustible materials behind the range below the countertop height.
• The minimum vertical clearance between the appliance and combustible construc-
tion extending from the cooking surface is 30 inches.
• The minimum vertical clearance between the countertop surface and combustible
construction above the appliance is 18 inches.
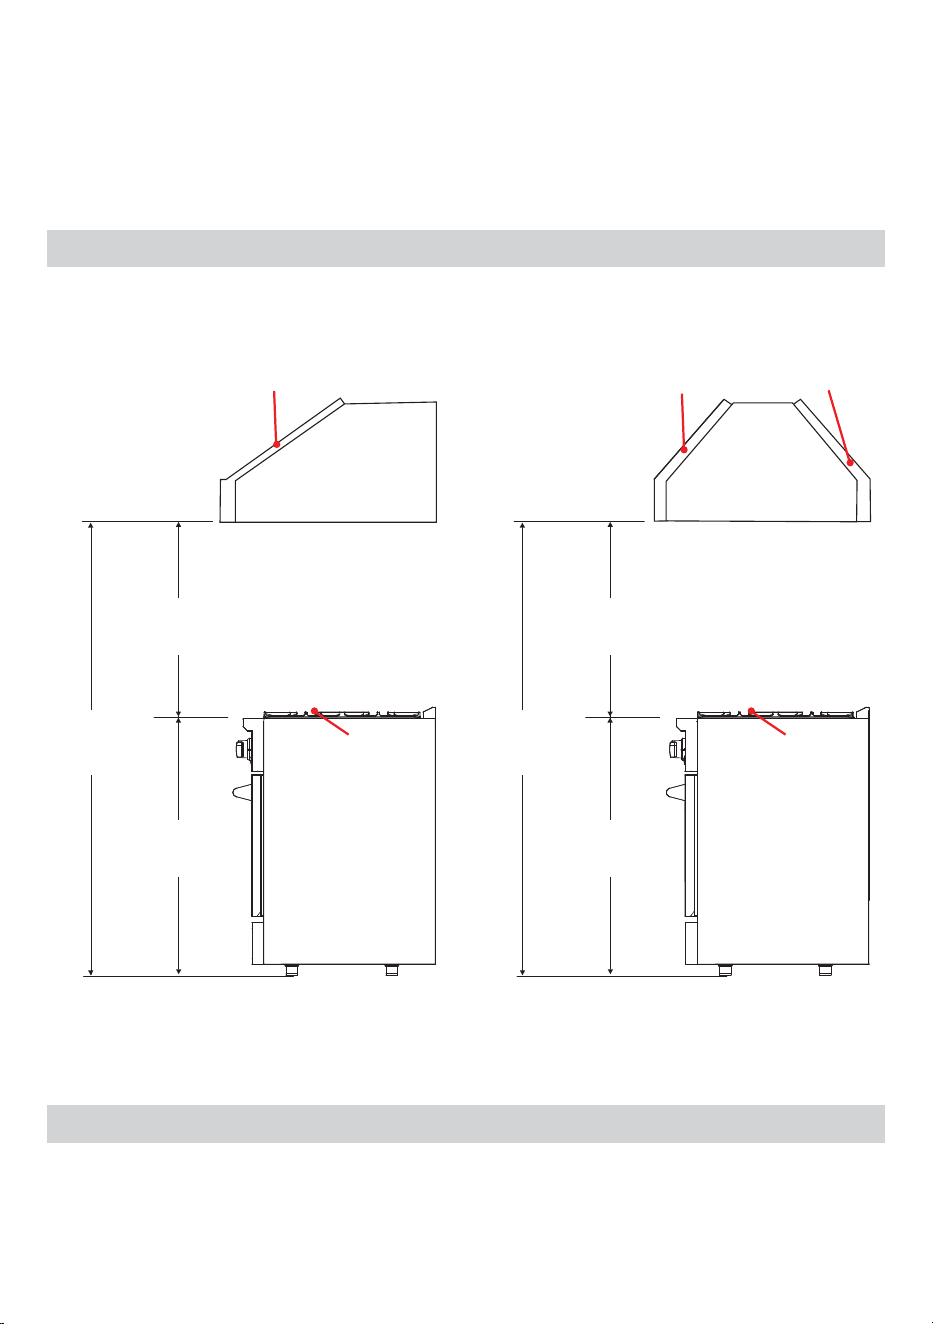
HOOD / COMPOSITE OVERLAY INSTALL
It is recommended that the unit be set under a powered, overhead, vented exhaust
hood of sufficient size and capacity.
The bottom of the hood should be 30” minimum to 36” above the countertop. This
would typically result in the bottom of the hood being 67” to 73” above the floor.
These dimensions provide safe and efficient operation of the hood.
LEVELING
The Front Panel at the base of the range can be removed by unscrewing to access the
4 adjustable legs. Adjust the range to desired height by rotating the legs clockwise to
raise and counterclockwise to lower. The range height can be raised 1.5” (40mm).
30" (762mm) min
36" (914mm) max
67" - 73"
(1700mm)
(1852mm)
37"
938mm
30" (762mm) min
36" (914mm) max
Countertop Countertop
Metal HoodMetal Hood
WALL INSTALLATION
Wood/ Composite Overlay
ISLAND INSTALLATION
Wood/ Composite Overlay
37"
938mm
67" - 73"
(1700mm)
(1852mm)
• The minimum distance from the side of the range above the countertop to combus-
tible sidewalls must be at least 13 inches.
• The minimum horizontal distance between overhead cabinets installed to either
side of the appliance shall not be less than the nominal width of the appliance.
• A floor-supported unit requires zero distance between adjacent combustible
construction (sides and rear).
2
5
4
3
1
13
• The range may be installed flush to the rear wall. Install a non-combustible material
on the rear wall above the range and up to the vent hood. It is not necessary to install
non-combustible materials behind the range below the countertop height.
• The minimum vertical clearance between the appliance and combustible construc-
tion extending from the cooking surface is 30 inches.
• The minimum vertical clearance between the countertop surface and combustible
construction above the appliance is 18 inches.
To prevent the range from tipping forward, the anti-tip brackets must be installed.
Failure to install the Anti-Tip Bracket will allow the range to tip over if excessive
weight is placed on an open door or if a child climbs upon it. Serious injury might
result from spilled hot liquids or from the range itself.
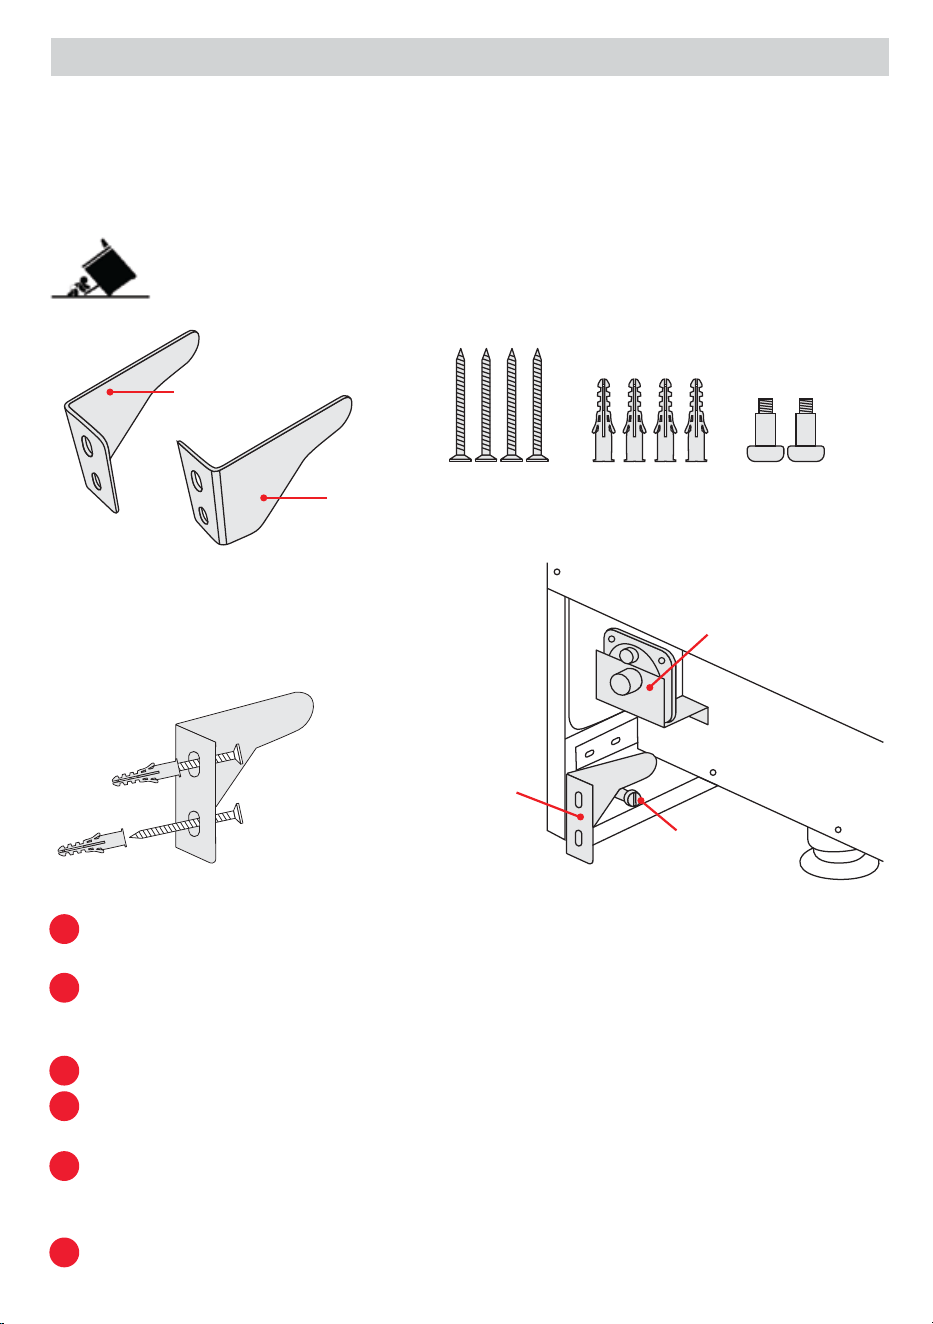
ANTI-TIP BRACKET
WARNING: DO NOT OPERATE THE RANGE WITHOUT THE ANTI-TIP
BRACKETS IN PLACE. IF THE APPLIANCE IS ACCIDENTALLY TIPPED,
THE WEIGHT OF THE RANGE MAY CAUSE SERIOUS INJURY.
There are Two Tip-Over Brackets
which are to be installed at the back
of the range, on the left and right
sides.
At the back of the range, insert and tighten a Bracket Bolt into the reinforced hole
at the bottom of the right-side panel.
Affix the Right Bracket into the wall behind the range using 2 Wall Anchors and 2
Screws and positioning the bracket so that it will line up on top of the Bolt to
engage.
Repeat steps 1 and 2 for the Left side of the range.
Safely tilt the front of the range upward slightly and slide the range back towards
the two brackets on the wall, so that the brackets engage.
Try to slide the range forward slightly to verify the Anti-Tip device has been prop-
erly installed. The range should not tip more than 4 inches from the wall if correct-
ly installed.
Ensure the anti-tip device is re-engaged when this appliance is moved.
6
Screws Wall Anchors Bracket Bolts
Left
Bracket
Right
Bracket
Bracket
Bolt
Right
Bracket
Gas Pressure
Regulator
• The minimum distance from the side of the range above the countertop to combus-
tible sidewalls must be at least 13 inches.
• The minimum horizontal distance between overhead cabinets installed to either
side of the appliance shall not be less than the nominal width of the appliance.
• A floor-supported unit requires zero distance between adjacent combustible
construction (sides and rear).
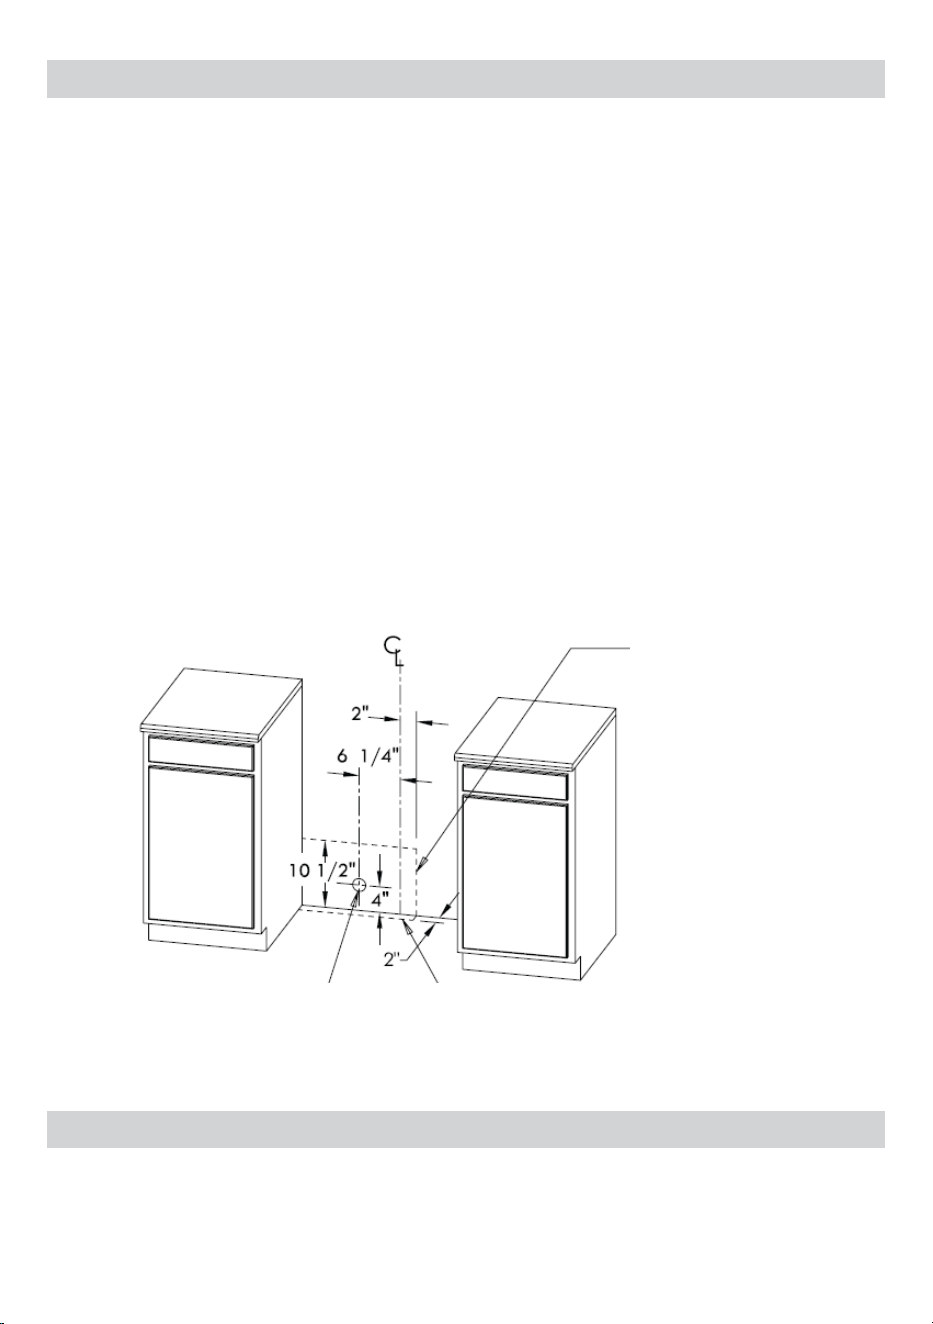
ELECTRIC POWER SUPPLY REQUIREMENTS
GROUNDING
• The power cord is equipped with a three-prong (grounding) plug which mates with
a standard three-prong grounding wall receptacle to minimize the possibility of elec-
trical shock hazard from the range.
14
WARNING: DO NOT cut or remove the grounding prong from the power cord.
• Where a standard two-prong wall receptacle is encountered, it is the responsibility
and obligation of the customer to have it replaced with a properly grounded
three-prong wall receptacle by a licensed electrician.
• All cord connected appliances shall include instructions relative to location of the
wall receptacle and a warning to the user to disconnect the electrical supply before
serving the appliance.
WARNING: Make sure the AC Supply cable does not come in contact with any parts
or components that get hot.
Area allows for flush
installation with
through-the-wall
connection of pipe stub
/ shut-off valve and rear
wall 120V outlet.
Area allows for flush installation
with through-the-floor connection
of pipe stub / shut-off valve.
Shortest connection from
hard pipe stub location to
range hook-up.
• Your range must be electrically grounded in accordance with local codes or, in the
absence of local codes, in accordance with the National Electrical Code (ANSI/NFPA
70, latest edition). A copy of this standard may be obtained from the National Fire
Protection Association.
• The power supply must be the correct polarity. Reverse polarity will result in contin-
uous sparking of the electrodes, even after flame ignition. If there is any doubt as to
whether the power supply has the correct polarity or grounding, have it checked by a
qualified electrician.
• Use 120V, 60Hz, properly grounded branch circuit protected by a 15-amp or
20-amp circuit breaker or time delay fuse.
• A separate circuit, servicing only this appliance is required.
WARNING: Never use reductions, shunts, extension cords or adapters which can
cause overheating or burning.
• Place the power outlet so that it is accessible after the appliance has been installed.
WARNING: Disconnect the appliance from the main power supply before installation
or service.
• The power cord is equipped with a three-prong (grounding) plug which mates with
a standard three-prong grounding wall receptacle to minimize the possibility of elec-
trical shock hazard from the range.
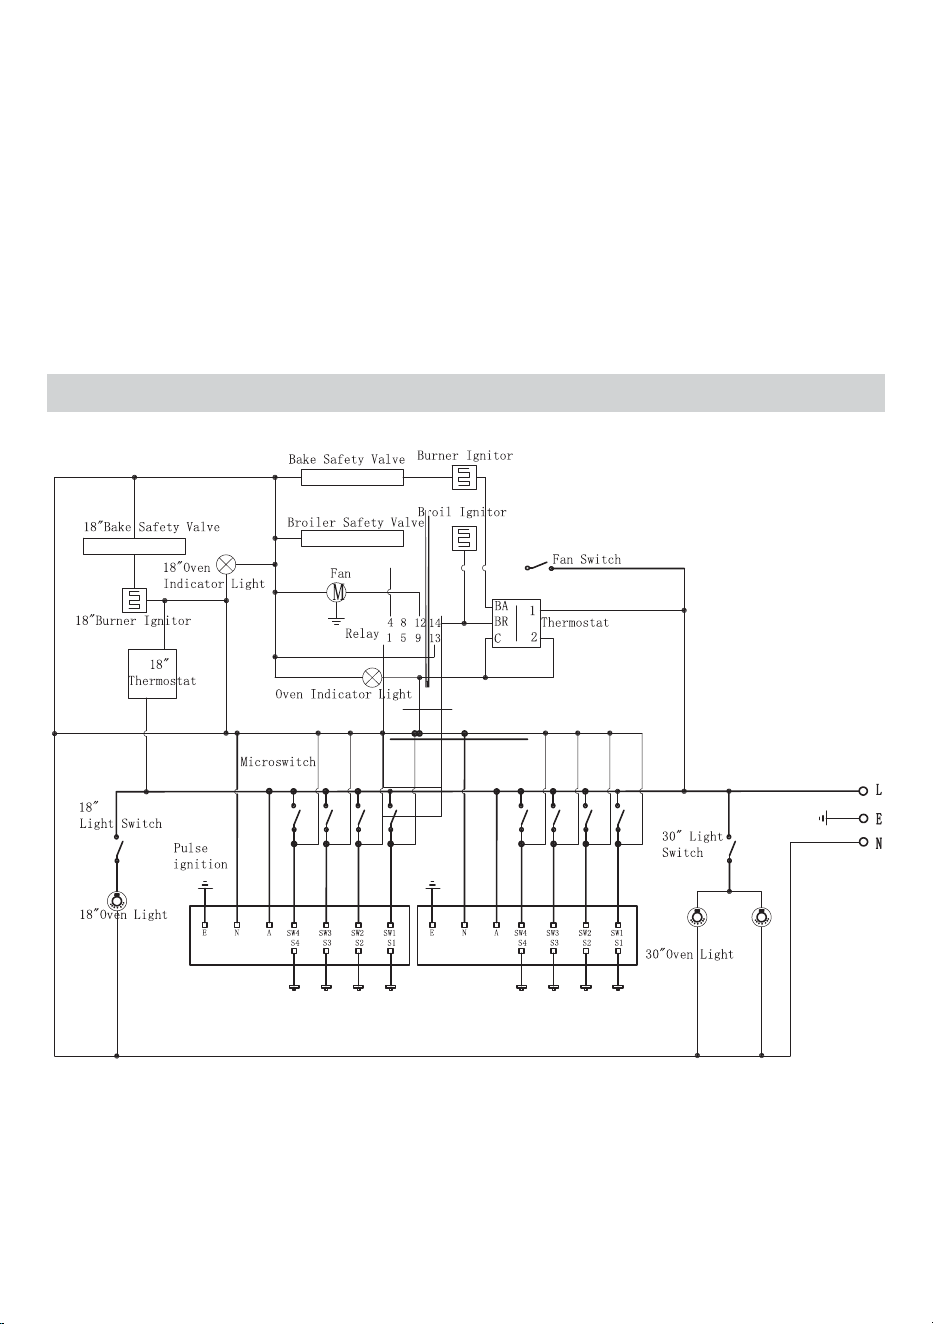
WIRING DIAGRAM
CAUTION: Label all wires prior to disconnection when servicing controls. Wiring
errors can cause improper and dangerous operation. Verify proper operation before
servicing.
15
WARNING: DO NOT cut or remove the grounding prong from the power cord.
• Where a standard two-prong wall receptacle is encountered, it is the responsibility
and obligation of the customer to have it replaced with a properly grounded
three-prong wall receptacle by a licensed electrician.
• All cord connected appliances shall include instructions relative to location of the
wall receptacle and a warning to the user to disconnect the electrical supply before
serving the appliance.
WARNING: Make sure the AC Supply cable does not come in contact with any parts
or components that get hot.
GAS SUPPLY REQUIREMENTS
• Installation and service must be performed by a qualified installer.
• The range has been equipped and adjusted for use with natural gas (NG) at manu-
facture.
• For use with liquid propane (LP) gas, the range must be properly adjusted by a qual-
ified installer. The appliance has been supplied with a liquid propane (LP) Conversion
Kit. Each orifice has been clearly identified on the orifice packaging to identify with
which burner it corresponds with. Refer to the ‘PARTS’ section of this manual for a
table listing orifice sizing.
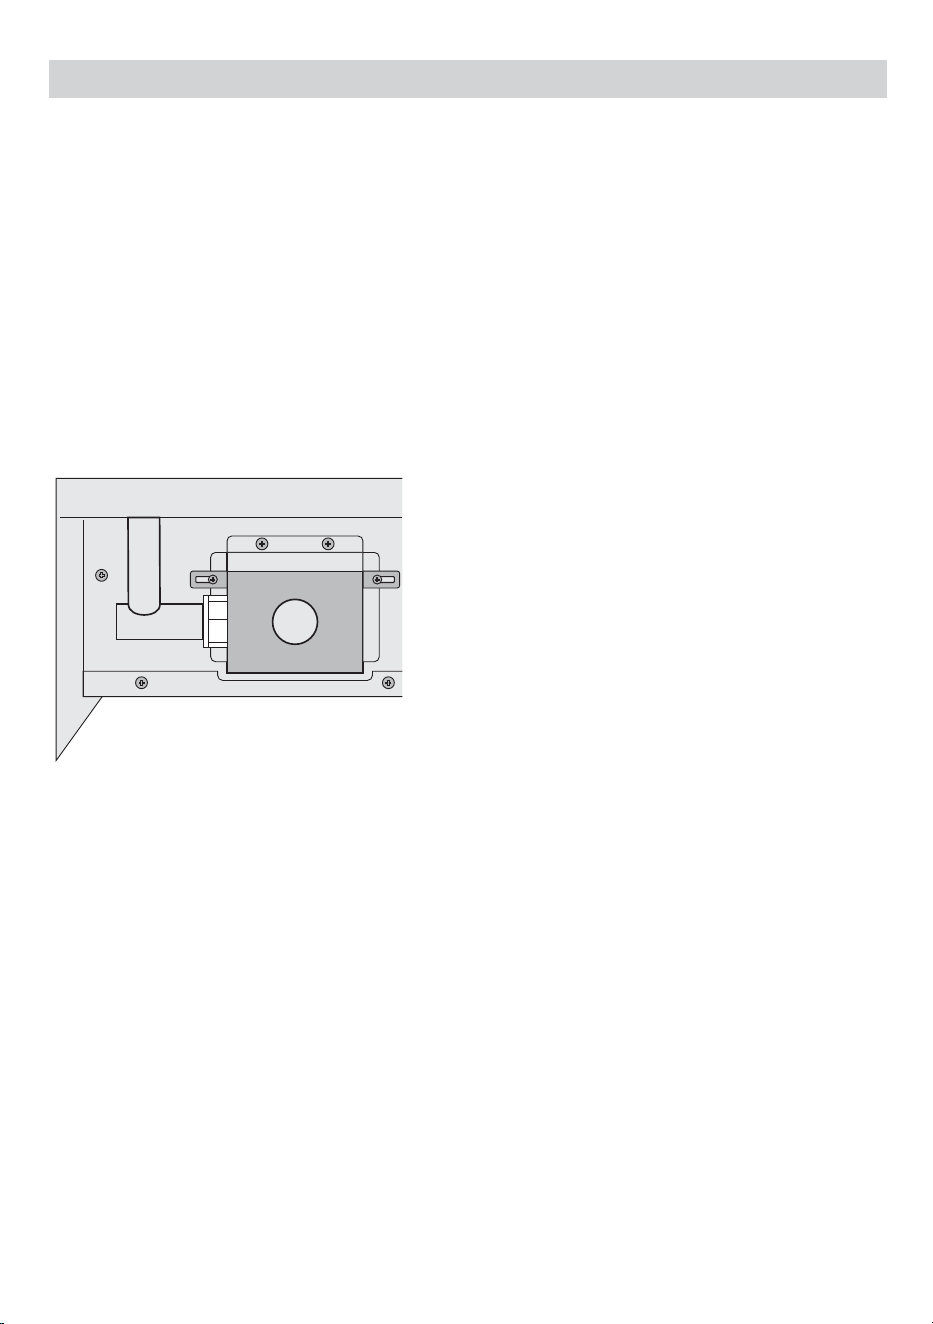
• Ensure the gas appliance pressure regulator has been set for the gas which the
appliance will use. The gas appliance pressure regulator is located at the bottom
right, rear of the range.
• Installation of this range must conform with local codes, or in the absence of local
codes, the National Fuel Gas Code, ANSI Z223.1 / NFPA 54. This range has been
design-certified according to ANSI Z21.1b-2012 latest edition.
• A statement of the maximum gas supply pressure in accordance with the inlet pres-
sure rating of the gas appliance pressure regulator supplied.
MINIMUM GAS SUPPLY PRESSURE TO APPLIANCE FOR NATURAL GAS (NG) – 7.0
IN.W.C.
MINIMUM GAS SUPPLY PRESSURE TO APPLIANCE FOR LIQUID PROPANE GAS (LP)
- 11.0 IN.W.C.
APPLIANCE REGULATOR IS SET AT 5.0 IN. W.C. OUTLET PRESSURE.
16

CONNECT RANGE TO GAS SUPPLY
• When all connections have been made, check
that all range controls are in the ‘OFF’ position
and open the main gas supply valve.
• Leak testing of the appliance shall be conduct-
ed according to the manufacturer’s instructions.
Use some soapy water (50% water and 50%
liquid detergent) or a leak detector at all joints
and connections to check for leaks in the
system. Open the valve and check for leaks by
placing the liquid solution onto all gas connec-
tions. Bubbles around connections indicate a
gas leak. If a leak appears, close the shut-off
valve, and adjust connections. Do not use a
flame to check for gas leaks.
• The appliance must be isolated from the build-
ing’s gas supply piping system by closing its
individual manual shut-off valve during any
pressure testing of the gas supply piping system
at test pressure equal to or less than ½ psi
(3.5kPa).
Gas shut-off valve
IMPORTANT: The range must be connected to a regulated gas supply. The supply
line must be equipped with an approved external gas shut-off valve located near the
range in an accessible location. Do not block access to the shut-off valve.
• All connections to the gas piping must be wrench-tightened. Do not overtighten or
allow pipes to turn when tightening.
• Any pipe connections must be made using a thread sealant approved for gas
connections. Failure to correctly install these items could lead to a gas leak and
subsequent explosion.
• Install male ½” flare union adapter to ½” NPT internal thread elbow at inlet of regu-
lator. On models equipped with standard double burners, install the male pipe thread
end of the ½” flare union adapter to the ½” NPT internal thread at inlet of pressure
regulator. Use a wrench on the regulator fitting to avoid damage.
• Install male ½” or ¾” flare union adapter to the NPT internal thread of the manual
shut-off valve, taking care to secure the shut-off valve to keep it from turning.
• The gas supply pressure for checking the regulator setting is 7” (Natural Gas) and
11” (LP gas). Connect flexible gas line connector to the regulator on the range. Posi-
tion range to permit connection at the shut-off valve.
17

BURNER ASSEMBLY
SB
SB
SB
DB
9000
6000
12000
20000/650
SB
SB
SB
DB
9000
6000
12000
20000/650
COMPONENT PART ASSEMBLY
Align the small ignitor hole/indentation of the Burner Head to fit around the Ignit-
er and place on the Burner Base.
Center the Burner Cap/s on top of the Burner Head. The Burner Cap must be in a
flat, horizontal position.
WARNING: Always keep the Burner Caps in place when using the burners.
WARNING: It is important to install the Burner parts in the correct order. Incorrect
assembly could cause flames or gas to escape or burn between parts, resulting in
poor combustion or damage to your range top.
2
1
SB
Standard Burner
DB
Double Burner
Cast Iron
Burner Cap
Aluminum
Burner Head
Igniter
Burner Base
Cast Iron Inner
Burner Cap
Brass
Burner Head
Igniter
Burner Base
Cast Iron Outer
Burner Cap
18
BURNER GRATES
• There are 4 Cast Iron Burner Grates. Secure the grates vertically, side-by-side on
top of the burners.
• Improper installation of the grates may result in scratching of the cooktop and/or
poor combustion.
• Always use the Burner Grates, and never place cookware directly on the Burners.
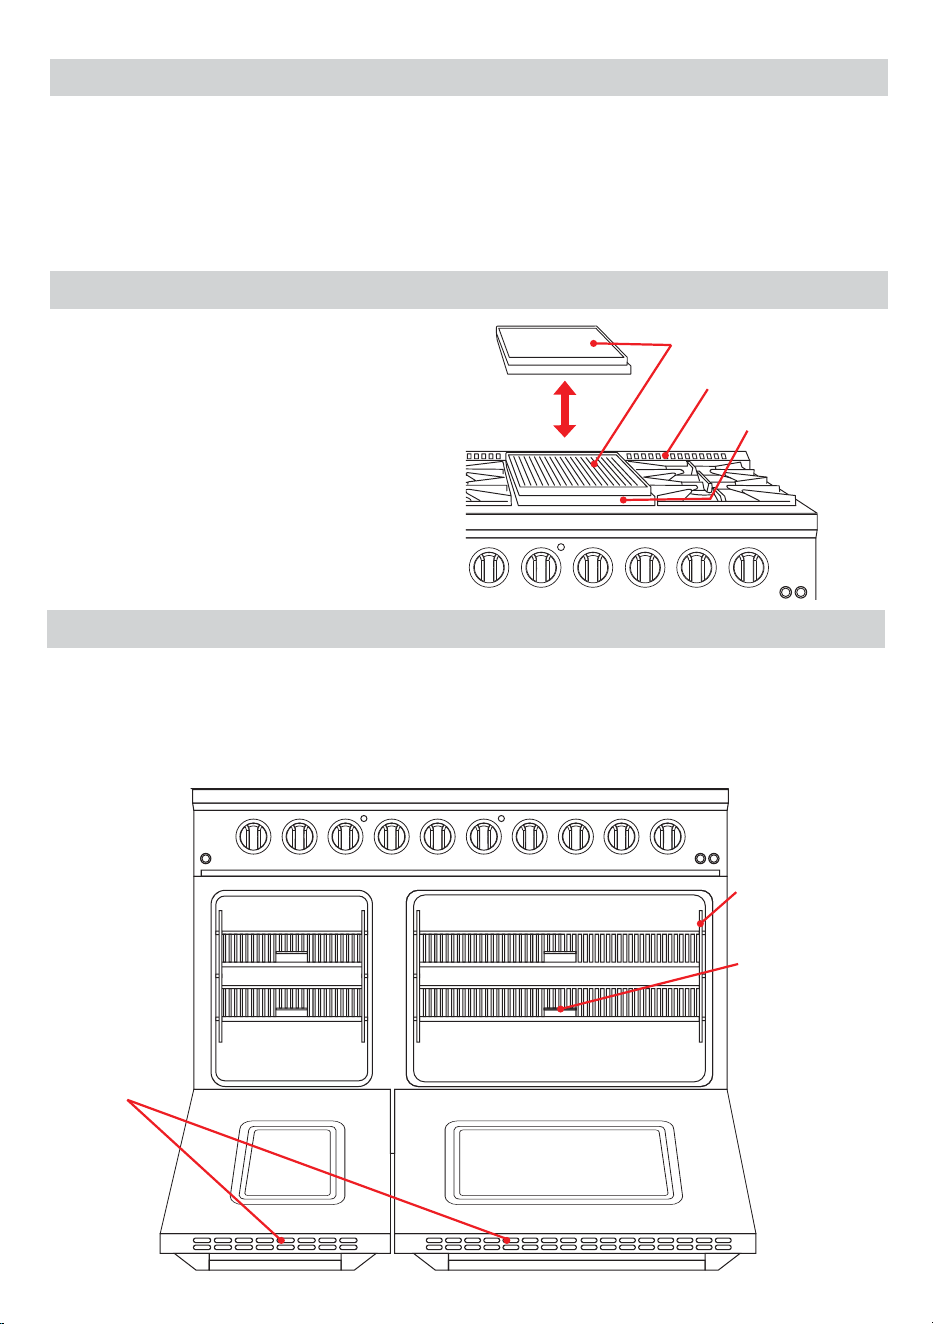
GRIDDLE
The Griddle can be placed on the
range cooktop on top of any one of
the four Burner Grate positions.
The griddle is reversible, such that
both sides, flat and ridged can be
heated. Ensure the grease trap is
positioned toward the front of the
range, rather than toward the Top
Vent.
OVEN RACKS
There are 2 Oven Racks for each oven. Slide the Stainless Steel Oven Racks into any
of the positions on the fixed Oven Rack Guides. The opening on the rack should be
positioned closest to the oven door. Use the opening to assist with removal, together
with the use of an oven mitt/potholder.
Oven Rack
Guide
Oven Rack
Opening
Cool Air
Intake
DO NOT
OBSTRUCT
Reversible Griddle
Top Vent
Grease Trap
19
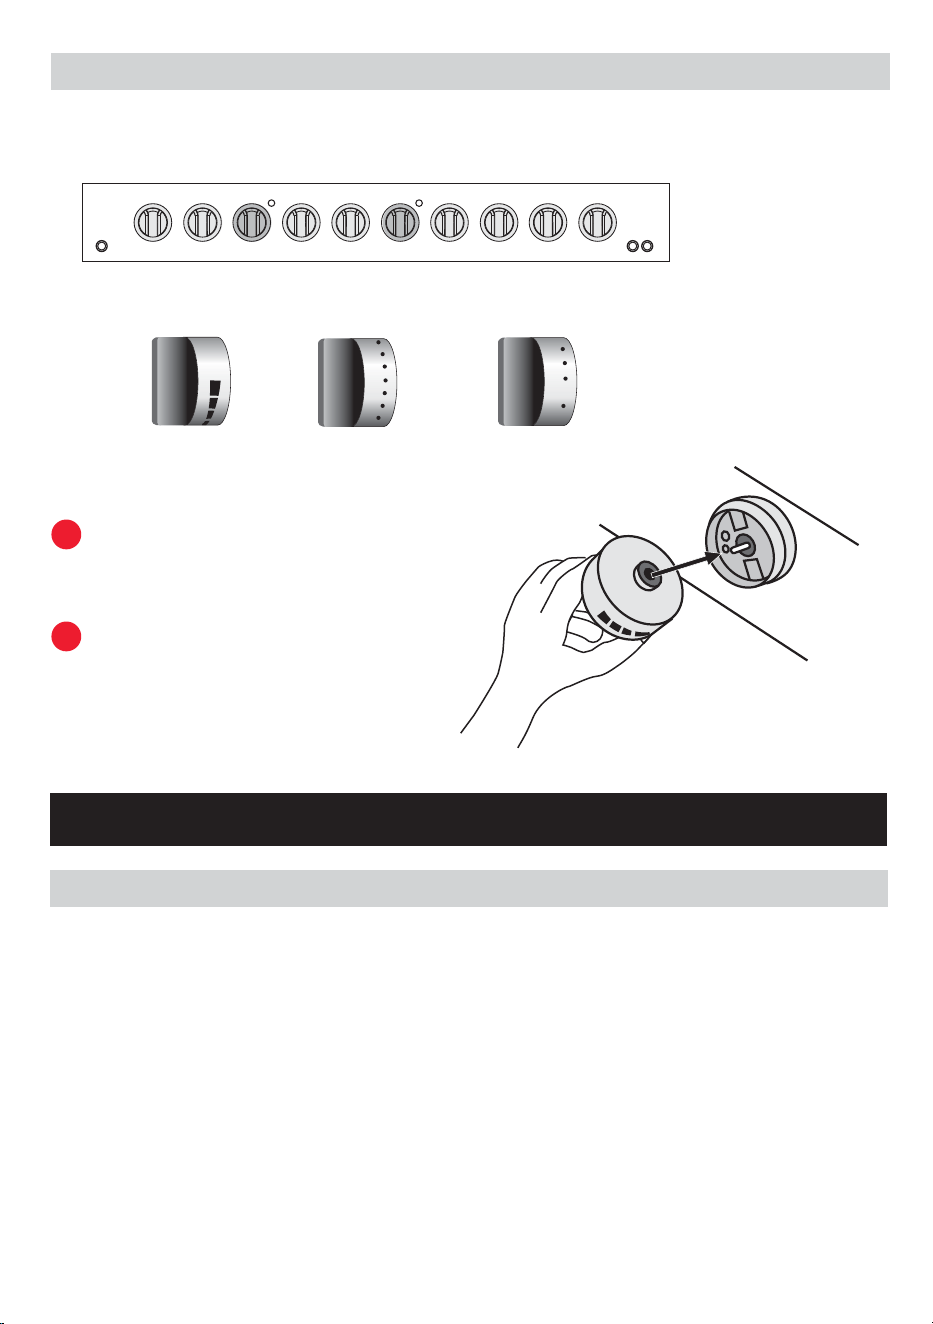
BURNER KNOB REPLACEMENT
BEFORE FIRST USE
CLEAN
• Remove any packaging and protective films.
• Remove any residue oil or grease from the manufacturing process:
COOKTOP: Wash the removable parts (Burner Grates, Griddle, Burner Caps and
Burner Heads) of the cooktop in a mild solution of warm water and liquid dish soap.
Dry thoroughly. Wipe the cooktop surface with a damp cloth and dry thoroughly.
Assemble the burner parts in the correct order. (See ‘COMPONENT PART ASSEM-
BLY’.)
OVEN: Wash the oven racks in a mild solution of warm water and liquid dish soap and
dry. Wipe down the interior of the oven and the Oven Rack Guides with a clean damp
cloth. Dry thoroughly before installing the parts. (See ‘COMPONENT PART ASSEM-
BLY’.)
(A) Standard Burner
Ignite HI – SIM
(B) Small 18” Oven
150-450
(C) Large 30” Oven
150-500 BROIL
A A A A
B C
AA A A
Some Gas Range models include an alternative set of Burner Knobs that can be
used to replace the original knobs based on personal preference.
2
1
To remove the original knobs,
pull firmly until the knob is
released from the control panel.
To attach replacement knobs,
align the hole of the knob with the
pin on the control panel and push
on firmly.
I
g
n
i
t
e
H
I
4
5
0
5
0
0
B
r
o
i
l
1
5
0
2
0
0
3
0
0
20
CHECK
• Once the gas and power are connected, check that all range controls are in the “off”
position and turn on the main gas supply valve.
• Check for gas leaks at all gas connections (using a gas detector, never a flame).
• Check ignition of cooktop burners.
• Check the flame. When properly installed, the flame will be steady and quiet and
approximately 1” in height.
• Check ignition of oven burner.
• Visually check heating elements of both ovens. Carefully lift the panel on the interior
floor of each oven. Turn on the ovens to check the heating elements heat fully. Turn
off ovens and allow to cool before returning the floor panels.
• Visually check the broil heating element of Oven 2.
• Check operation of convection fan of Oven 2.
IMPORTANT:
• Metal components have a protective coating which may give off a slight odor the
first time your new appliance is heated.
• The harmless odor will dissipate after a short time and does not indicate a faulty
connection or appliance defect.
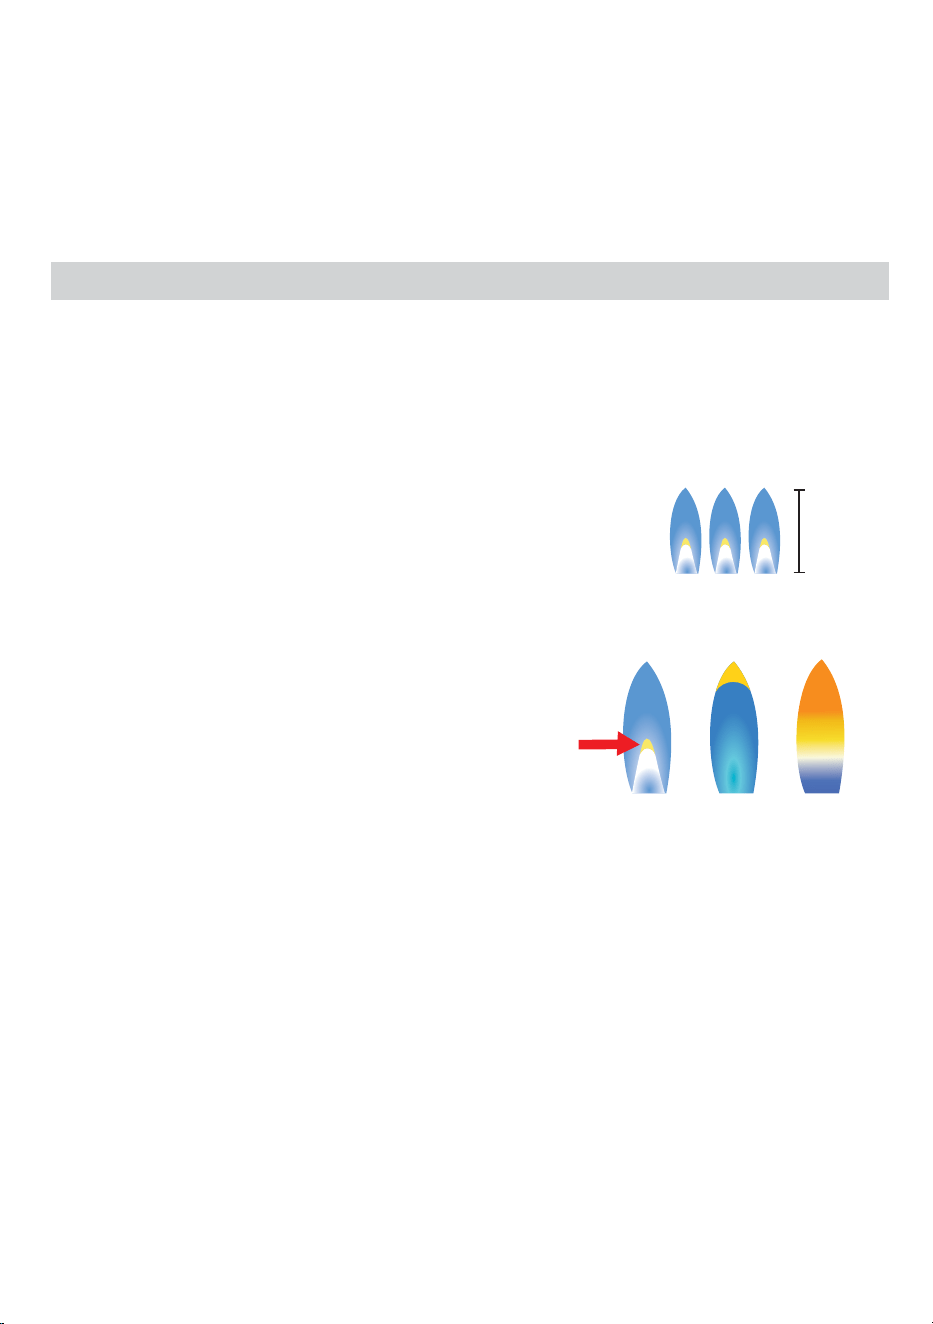
A B
C
NG LP
Yellow at tip of
primary flame
1”
Service
Required
When burning natural gas (NG), the burner
flames should be sharp and almost completely
blue with possibly a small hint of yellow in the
center of the flame as seen in figure ‘A’.
When burning liquid propane (LP), the flames
will usually have a yellow tip as seen in figure ‘B’.
If the flame is mostly yellow in color as seen in
figure ‘C’, this indicates a problem. Discontinue
use and seek assistance from a licensed gas
service. Note: foreign material in the gas line
may cause an orange flame during initial opera-
tion.
IMPORTANT:
The oven and broiler should be turned on to burn off the manufacturing oils. Turn
Oven 1 to 450°F and Oven 2 to 500°F for 20 to 30 minutes. Then turn Oven 2 to ‘BROIL’
for the same length of time. You may wish to turn on the ventilator above your range
at this time. Turn the ovens off and allow to cool with the door closed.
21

COOKTOP: Wash the removable parts (Burner Grates, Griddle, Burner Caps and
Burner Heads) of the cooktop in a mild solution of warm water and liquid dish soap.
Dry thoroughly. Wipe the cooktop surface with a damp cloth and dry thoroughly.
Assemble the burner parts in the correct order. (See ‘COMPONENT PART ASSEM-
BLY’.)
OVEN: Wash the oven racks in a mild solution of warm water and liquid dish soap and
dry. Wipe down the interior of the oven and the Oven Rack Guides with a clean damp
cloth. Dry thoroughly before installing the parts. (See ‘COMPONENT PART ASSEM-
BLY’.)
COOKTOP OPERATION
BEFORE USING BURNERS
• Select the cookware to match the burner. (Large Diameter = Large Burner, Small
Diameter = Small Burner)
• Using oversized cookware may cause the flames to spread out and may cause
damage. The proper cookware size will also improve efficiency.
• Cookware with a smaller diameter than the grate will not sit correctly, and this
creates a spillage hazard.
• Only use heat-resistant cookware, marked safe for gas cooktops.
• Thick cookware bases will give more even results, as hot spots are reduced due to
better heat distribution. Thin cookware bases will conduct heat faster but not as
evenly as thick cookware. Stir the food frequently to prevent burning.
• Always place the cookware on the grate. The cookware must not be placed directly
on the burner.
RAPID
SEMI-RAPID
AUXILIARY
Boiling, steaming, toasting,
paellas, stir-fry
Escalopes, steaks, omelets,
frying
Steamed potatoes, fresh
vegetables, vegetable
stews, pasta
Cooking: casseroles, rice
pudding, caramel
Reheating and keeping things hot:
cooked and precooked dishes
Reheating, keeping things hot and
making casseroles
Steaming: fish,
vegetables
Rice, white
sauce, ragout
Melting: butter,
chocolate, jelly
Burner Type Very High-High Medium Low
Defrosting and slow
cooking: vegetables, fruit
and frozen products
DOUBLE
FLAME
• Use the following table as a guideline to which style burner is suitable for which
cooking style:
22

COOKTOP BURNER IGNITION
To light the surface burners, push and turn the corre-
sponding Burner Control Knob counterclockwise to
the ‘HI’ position. You will hear a clicking noise – the
sound of the electric spark igniting the burner.
IMPORTANT: When one burner is turned to the ‘HI’
position, all the burners will spark. Do not touch any
burner cap, burner base, or igniter while the igniters
are sparking. Do not attempt to disassemble or clean
around any burner while another burner is on.
11
2
3
• If the flame goes out prematurely while trying to ignite, turn the Burner Control Knob
clockwise to the off position. Wait at least 5 minutes for any gas to dissipate before
attempting to reignite. You may have to keep the Burner Control Knob pressed a little
longer.
• The Range has an Auto-Reignition feature to accommodate for situations where
the flame goes out due to external causes such as a draft or door slamming. The
burners will automatically spark to reignite the flame, preventing gas leaking inadver-
tently.
1
When a flame is visible, keep the Burner Control Knob
pressed and continue to turn the knob counterclock-
wise to adjust the flame size. If the knob stays at ‘HI’,
it will continue to click.
The burner can be continuously regulated between
highest and lowest flame.
Note: The outer flame of the Double Burner will go out
when the Burner Knob is rotated to simmer (SIM).
Rotate clockwise to re-ignite the outer flame.
To turn OFF, turn the Burner Control Knob clockwise
back to the dot/off position. The gas supply will stop
and the flame will go out.
OFF
IMPORTANT: The appliance can be damaged if you:
- turn the knob without pushing in
- turn clockwise to turn on
- turn counterclockwise to turn off
TURNING ON IN THE EVENT OF A POWER FAILURE
If there is a power loss, you can ignite the flame manually, e.g., with a utility lighter.
1. Push in the Burner Control Knob and turn counterclockwise to the ‘HI’ position.
23
FLAME REGULATION
Once the flame is ignited, rotate the Burner Control Knob to regulate the flame.
• To reduce the flames from a high to a low setting, push the corresponding knob in
and turn counterclockwise.
• To increase the flames from a low to a high setting, push in and turn the Burner
Control Knob clockwise.
• A smaller flame will give the best simmer results. Small flames offer precise cook-
ing performance for delicate foods, keeping food warm, melting chocolate or butter,
and for cooking that needs to cook over low heat for a long time.
• The highest (larger) flame settings provide the maximum heat that is available on
your range. This setting should be used for heavy cooking loads such as water boiling
and pasta cooking.
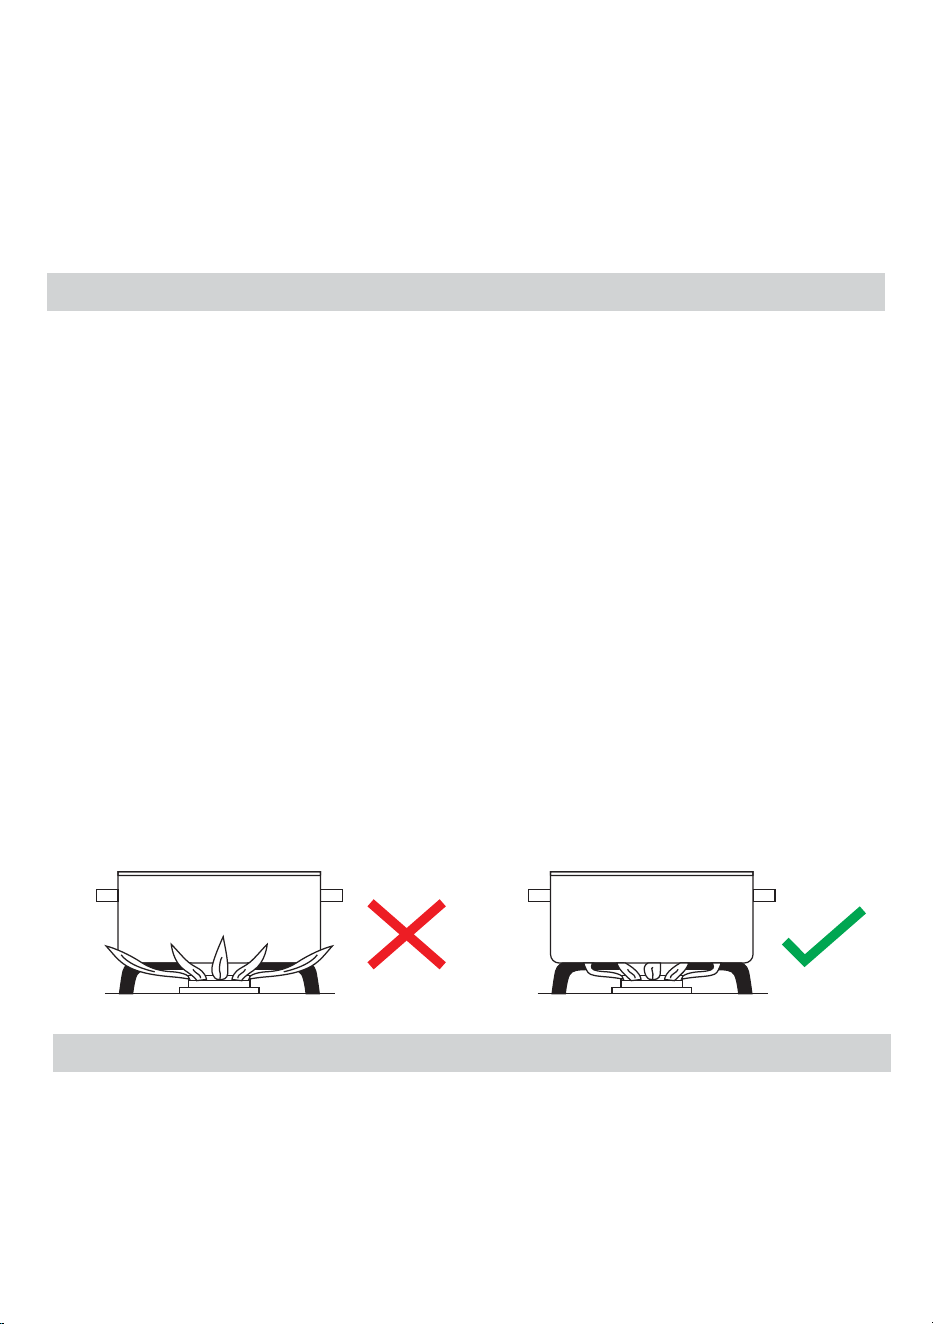
• The flame should be regulated so that it never protrudes beyond the cookware.
Since the outer part of the gas flame is much hotter than the center of the flame, the
flame tips should remain under the base of the cookware. Protruding flame tips give
off unnecessary heat into the air and can damage pot handles and increase the risk
of burning.
ENERGY SAVING TIPS
• If possible, cook in covered pots or pans. This prevents unnecessary heat loss.
• Cook with less water.
• After cooking or frying, promptly set to a lower flame.
• Generally, wide/shallow pans will heat quicker and cook more evenly than
narrow/tall ones.
2. Keep the Knob pushed in and ignite the escaping gas-air mixture with a utility
lighter (that is a minimum 6” in length).
3. When lit, keep pushed in and turn the knob to the desired setting.
IMPORTANT: If the flame is blown out during a power failure, turn the knob immedi-
ately to OFF, as the burner will not automatically relight and gas may escape.
24

GRIDDLE OPERATION
The Griddle offers a versatile cooking surface to cook many food items and allows for
easy flipping with no side edges. The flat side is perfect for pancakes, bacon, eggs,
French toast, hash browns, and hamburgers, while the grooved side it perfect to sear
or char meats such as steaks or sausages.
Place the Griddle on top of any one of the four Burner Grates, with preferred cook-
ing surface facing upwards.
To heat the Griddle, ignite the two burners that sit beneath the Griddle. (It is possi-
ble to light only one for smaller food portions).
Prior to cooking, add vegetable oil or another shortening to the Griddle. This will
prevent sticking.
As the griddle is Cast Iron, it will require preheating (approx 10-12 mins). Use a
Low to Medium flame setting. The cast iron properties will heat up slowly and will
stay warm, so high heat is typically not required. If you do need to use high heat,
lower the setting once the desired heat has been reached.
When finished and the Griddle is still hot, scrape grease into the grease collection
trap after use.
Clean the Griddle. See ‘CLEANING’ instructions.
Note: The Griddle can be placed in the oven and is safe to use up to 500°F.
WARNING: Use wooden, silicone, or heat-resistant nylon utensils to avoid scratching
the surface of the Griddle. Never cut food directly on the Griddle.
CAUTION: The surface of the Griddle is hot after use. Please allow sufficient time for
the Griddle to cool prior to cleaning.
1
2
3
4
5
6
OVEN OPERATION
When using the appliance for the first time, the oven and broiler burners should be
turned on to burn off any manufacture oils. See ‘BEFORE FIRST USE’ for further
details.
BEFORE USING THE OVENS
WARNING: NEVER USE THIS APPLIANCE AS A SPACE HEATER TO HEAT OR
WARM THE ROOM. DOING SO MAY RESULT IN CARBON MONOXIDE POISONING
AND OVERHEATING.
25

WARNING: Oven Vent
Do not block the Top Vent of the range, nor the ducts of the door for cool air intake
and exhaust. It is important that the flow of hot air from the oven and fresh air into
the oven burner never be interrupted. Avoid touching the vent opening or nearby
surfaces during oven or broiler operation – they may become hot.
WARNING: Oven Internal Air Flow
Never cover any slots, holes or passages in the oven bottom or cover an entire rack
with materials such as aluminum foil. Doing so blocks air flow through the oven and
may cause carbon monoxide poisoning.
WARNING: Aluminum Foil
Do not use aluminum foil or other material to line the oven floor or side walls or any
other porcelain surface. Failure to adhere to this notice will damage the porcelain
interior. Further, the aluminum foil traps heat and may create a fire hazard.
OVEN FUNCTIONS
CONVENTIONAL / NATURAL AIR FLOW - OVEN 1 & OVEN 2
Both ovens, small and large, operate as conventional ovens. Heat is transferred into
the oven from the heating element in the bottom of the oven cavity. Heat is then
circulated by natural airflow. This is a traditional bake setting.
Conventional cooking is best for less tender cuts of meat that should be covered,
covered one-dish recipes, and pizzas.
To prevent any issue with over or under-cooked food, rotate your pans throughout
the baking time.
When the oven is turned on, the Indicator Light will illuminate on the Control Panel
indicating that the oven is preheating. The light will turn off when the temperature is
reached and will turn on again when maintaining temperature.
• Operation
To set the oven temperature, press
and turn the oven control knob coun-
terclockwise to the desired tempera-
ture. The oven indicator light illumi-
nates and preheat begins.
Oven 1 – Up to 450°F
Oven 2 – Up to 500°F
26
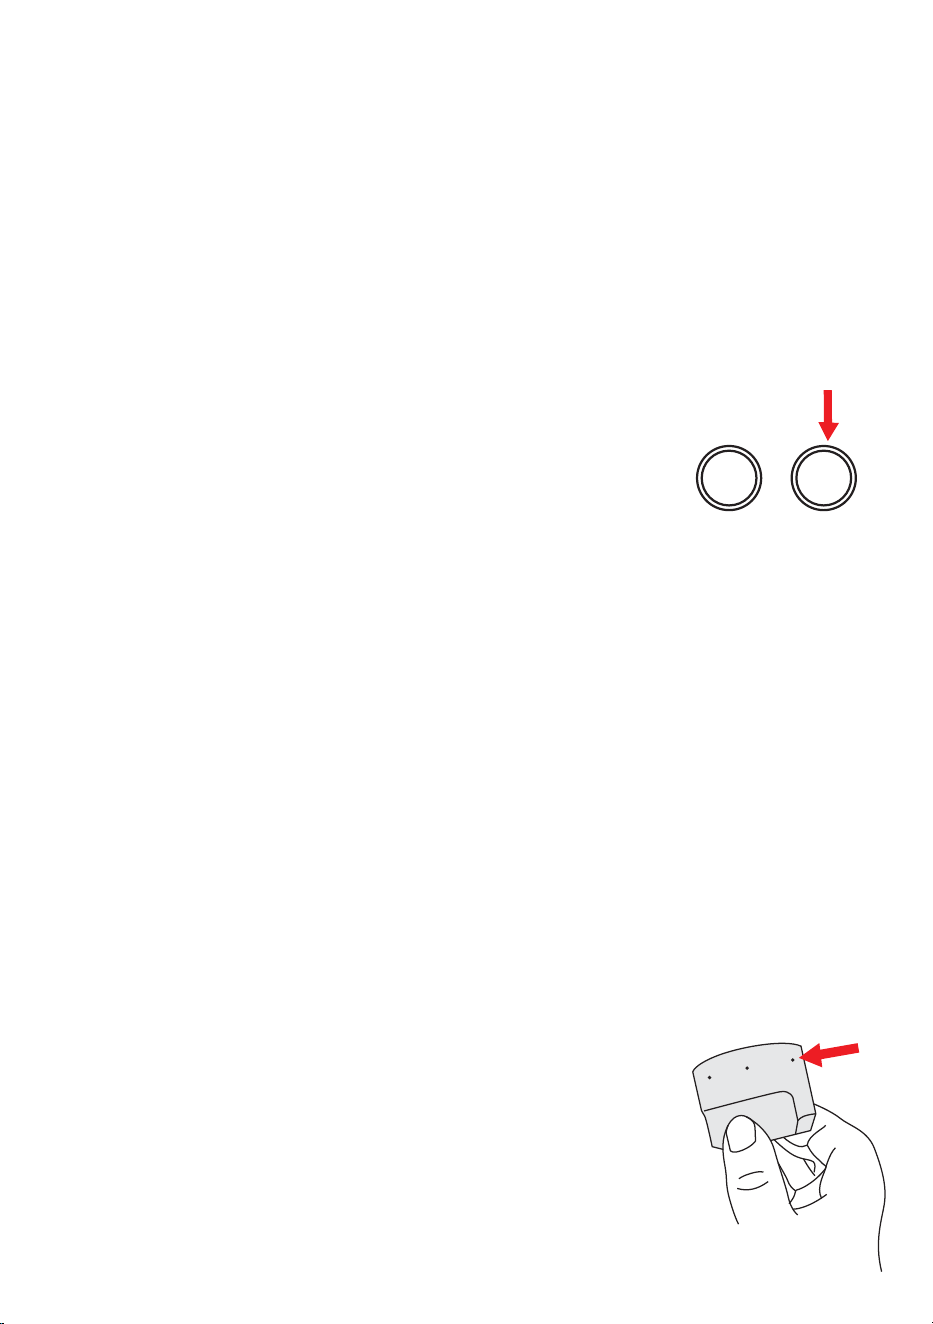
CONVECTION – OVEN 2
The convection function can be set on Oven 2 only. Heat is transferred from the heat-
ing element in the bottom of the oven cavity to the oven cavity itself. The convection
fan in the rear of the oven then circulates the heat. This convection process provides
more even heat distribution throughout the oven cavity. Convection cooking is faster,
can be accomplished at lower temperatures and provides more even temperatures
than regular cooking.
Convection cooking is preferred for tender cuts of meat and poultry, air-leavened
baked foods, breads, cakes, and cookies. For best results, cook foods uncovered in
low-sided pans.
• Operation
To use convection, turn the Oven Control Knob of Oven 2
counterclockwise to the desired temperature. The oven
indicator light will illuminate. Press in the Convection Fan
button on the Control Panel, and it will illuminate blue. The
fan works independently and can be turned off at any time
during the cooking process by pushing the button in again.
BROIL
Broiling is a method of cooking food directly under an infrared broiler in the oven. The
top heating element of the oven will radiate downwards and provide high direct heat
to quickly cook the food’s surface, searing and sealing in juices. Ideal for tender cuts
of meat. The Broil feature temperature is 500˚F.
Light Convection
Fan
• Operation
The Broil function can be operated from Oven 2 only. Push
and turn the corresponding Oven Control Knob counter-
clockwise to the ‘BROIL’ function.
To turn off, push and turn the knob clockwise to the off
position.
• Defrost
With Oven Control Knob set to off, the motorized Convection Fan in the rear of the
oven circulates air. The fan accelerates natural defrosting of the food without heat.
To avoid illness and food waste, do not allow defrosted food to remain in the oven for
more than two hours without being cooked.
• Dehydrate
Turn the Oven Control Knob to 175°F and turn on the Convection Fan. Over a period
of time, water is removed from the food by evaporation. Removal of water inhibits
growth of microorganisms and retards the activity of enzymes.
Broil
500
450
27
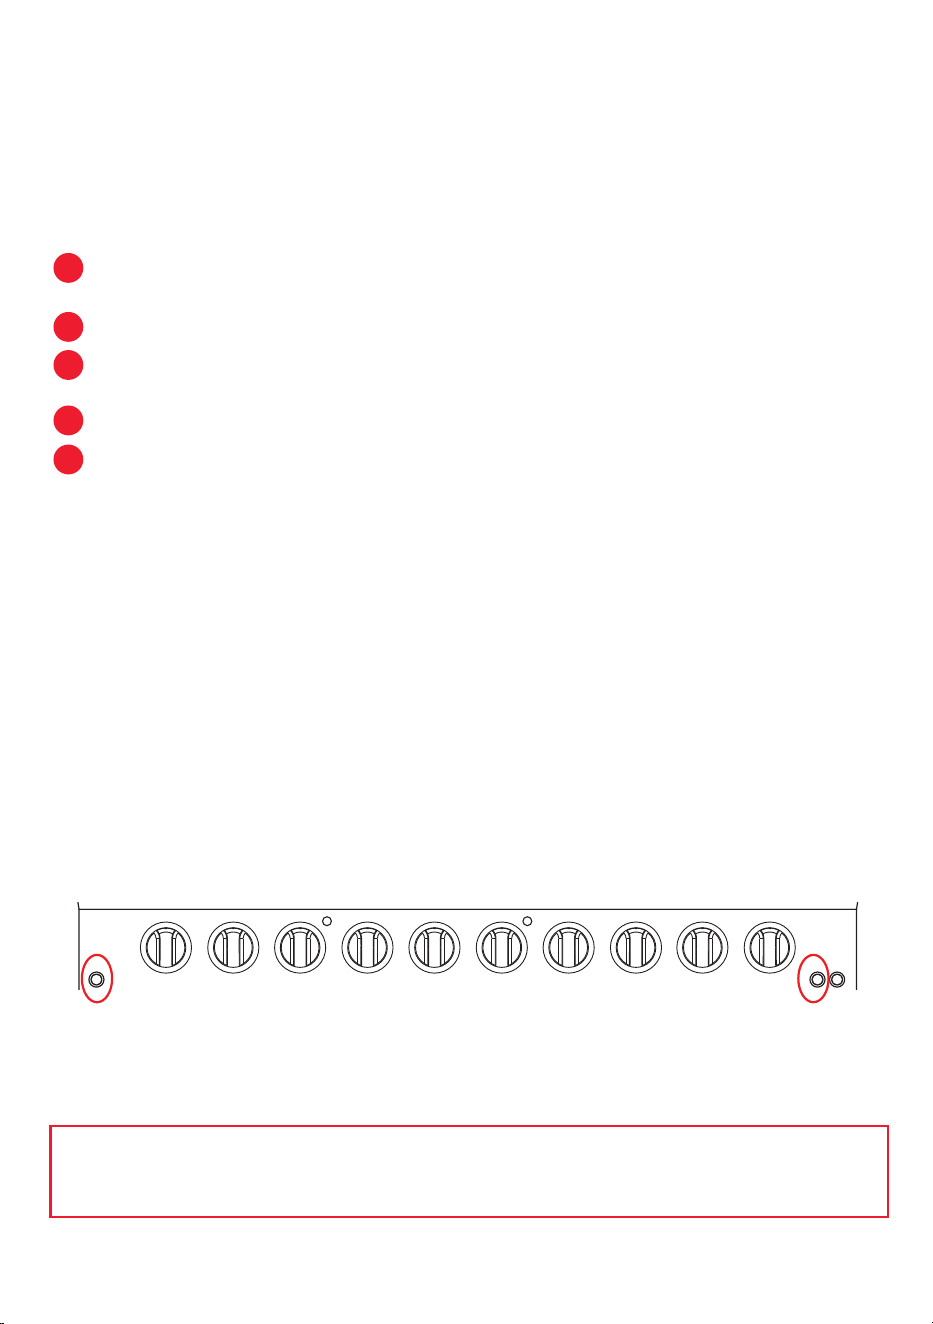
• Preheating
Preheating is suggested when searing rare steaks. (Remove any broiler pan before
preheating with the infrared broiler as foods will stick on hot metal.) Preheat for
approximately 2 minutes, or when the burner is deemed hot. Preheating is not neces-
sary when broiling meat well-done.
• How To Broil
Use a broiler pan with insert. DO NOT use aluminum foil on a broiler pan insert.
The exposed grease could catch fire.
Place the food on the broiler pan insert.
Arrange the interior oven rack and place the broiler pan on rack. Be sure to center
the broiler pan and position directly under the broil burner.
Close the door and turn the Oven Control Knob to the ‘BROIL’ function.
Broil one side until the food is browned. Using pot holders, turn and cook on the
second side.
IMPORTANT: Door must be closed during broiling operation.
– Note: Rack position affects doneness.
– It is normal and necessary for some smoke to be present for a broiled flavor.
– You should never broil for longer than 10 minutes, as this could lead to burnt food
or even fire. For foods with longer cooking times, it’s best to use your broiler to create
a crispy crust, either at the beginning or end of the cooking process. For further cook-
ing, place in the oven in a centered position at a temperature between 300 and 450°F.
OVEN LIGHT
The oven lights for each oven can be turned on using the oven’s corresponding light
button located on the Control Panel. Push in to turn on and the button will illuminate.
Push again to turn off.
WARNING: NEVER USE THIS APPLIANCE AS A STORAGE SPACE. NEVER USE THE
APPLIANCE OVEN DOORS FOR LEANING, STEPPING OR SITITING AS THIS IS HAZ-
ARDOUS AND MAY CAUSE INJURY.
WARNING: NEVER USE THIS APPLIANCE AS A SPACE HEATER TO HEAT OR
WARM THE ROOM. DOING SO MAY RESULT IN CARBON MONOXIDE POISONING
AND OVERHEATING.
The range and its components should be cleaned after each use to avoid build up of
food residue and possible staining or discoloring. Only clean the parts listed in the
following instructions.
WARNING: To avoid the risk of burns or electrical shock, ensure that all burner
controls are in the OFF position and that all components are completely cool before
cleaning.
IMPORTANT: Remove any soiling immediately, including acidic and sugary spills.
Spilled food may discolor the burners or other components.
GRIDDLE
• When you are finished cooking and the Griddle is still warm, scrape off all the food
residue and cooked bits from your Griddle using a non-scratch tool.
• Always allow your Griddle to cool before handling and washing.
• The enamel surface develops a natural patina that will provide a non-stick surface
with use. To maintain the patina, when cool, use a paper towel to remove excess
grease and oil and wash or wipe with water. Dry thoroughly.
• For a thorough clean, soak the Griddle in hot water. Then wash with water and a
mild dish soap. Hand washing is recommended to maintain the enamel finish. Never
place a hot Griddle in cold water to prevent thermal shock.
• For stubborn stains, use a paste of baking soda and water and apply with a soft
brush. Wash with water and mild dish soap.
• Avoid using harsh abrasives, oven cleaners, or scouring pads to maintain the
enamel finish on the Griddle. Nylon or soft abrasive pads/brushes may be used.
• Immediately dry thoroughly. Avoid leaving to air-dry as this can promote rust
should there be any chipped or scratched areas.
BURNER GRATES
• Clean with a sponge and mild solution of liquid dish soap and warm water. If neces-
sary, use a soft kitchen brush with a paste of baking soda and water.
• Dry thoroughly.
• NOT dishwasher safe.
• Note: the grates have rubber pads on the feet to protect the appliance from scratch-
es. Take caution while cleaning to protect the rubber pads. Should they come off, they
can be reapplied using a heat-resistant adhesive.
BURNER CAPS AND BURNER HEADS
• It is important to keep Burner Caps and Burner Heads (in particular the ports) clean
of any food soils as this can clog or limit the gas flow.
• Soak parts in a solution of mild liquid dish soap and warm water for 20-30 minutes,
then clean with a non-abrasive sponge.
• Do not use stainless steel cleaner, as these parts are not stainless steel.
• If necessary, use a soft kitchen brush or toothbrush to clean stains and ports of the
Burner Head.
• Dry thoroughly before reassembly. Any wet ports will prevent the flame from ignit-
ing.
• NOT dishwasher safe.
Note: The surfaces of the burner parts and grates become slightly duller over time.
This is normal and does not indicate any impairment of the material.
1
2
3
4
5
28

CARE AND CLEANING
The range and its components should be cleaned after each use to avoid build up of
food residue and possible staining or discoloring. Only clean the parts listed in the
following instructions.
WARNING: To avoid the risk of burns or electrical shock, ensure that all burner
controls are in the OFF position and that all components are completely cool before
cleaning.
IMPORTANT: Remove any soiling immediately, including acidic and sugary spills.
Spilled food may discolor the burners or other components.
GRIDDLE
• When you are finished cooking and the Griddle is still warm, scrape off all the food
residue and cooked bits from your Griddle using a non-scratch tool.
• Always allow your Griddle to cool before handling and washing.
• The enamel surface develops a natural patina that will provide a non-stick surface
with use. To maintain the patina, when cool, use a paper towel to remove excess
grease and oil and wash or wipe with water. Dry thoroughly.
• For a thorough clean, soak the Griddle in hot water. Then wash with water and a
mild dish soap. Hand washing is recommended to maintain the enamel finish. Never
place a hot Griddle in cold water to prevent thermal shock.
• For stubborn stains, use a paste of baking soda and water and apply with a soft
brush. Wash with water and mild dish soap.
• Avoid using harsh abrasives, oven cleaners, or scouring pads to maintain the
enamel finish on the Griddle. Nylon or soft abrasive pads/brushes may be used.
• Immediately dry thoroughly. Avoid leaving to air-dry as this can promote rust
should there be any chipped or scratched areas.
BURNER GRATES
• Clean with a sponge and mild solution of liquid dish soap and warm water. If neces-
sary, use a soft kitchen brush with a paste of baking soda and water.
• Dry thoroughly.
• NOT dishwasher safe.
• Note: the grates have rubber pads on the feet to protect the appliance from scratch-
es. Take caution while cleaning to protect the rubber pads. Should they come off, they
can be reapplied using a heat-resistant adhesive.
BURNER CAPS AND BURNER HEADS
• It is important to keep Burner Caps and Burner Heads (in particular the ports) clean
of any food soils as this can clog or limit the gas flow.
• Soak parts in a solution of mild liquid dish soap and warm water for 20-30 minutes,
then clean with a non-abrasive sponge.
• Do not use stainless steel cleaner, as these parts are not stainless steel.
• If necessary, use a soft kitchen brush or toothbrush to clean stains and ports of the
Burner Head.
• Dry thoroughly before reassembly. Any wet ports will prevent the flame from ignit-
ing.
• NOT dishwasher safe.
Note: The surfaces of the burner parts and grates become slightly duller over time.
This is normal and does not indicate any impairment of the material.
29

OVEN DOOR
• Clean with a solution of mild liquid dish soap and warm water and a damp sponge.
Rinse well.
• Do not allow excess water to run into any holes or slots in the door, including
around the glass frame. Any soap left on the liner causes additional stains when the
oven is heated.
• Do not use oven cleaners, cleansing powders of harsh abrasives on the external
side of the door.
• You may use a glass cleaner to clean the glass on the oven door to remove finger-
prints or smears. Dry completely with a soft, lint-free cloth.
OVEN RACKS AND RACK GUIDES
• Remove the Oven Racks from the oven by sliding out. The Oven Rack Guides can
be unscrewed for thorough cleaning.
• Clean with a solution of detergent and hot water. To clean heavy soil, use a scouring
pad such as steel wool with plenty of water and a mild abrasive such as a paste of
baking soda and water or oven dedicated cleaning products.
• Dishwasher Safe.
CONTROL PANEL, BURNER KNOBS AND DOOR HANDLE
• Clean with a solution of mild liquid dish soap and warm water and a damp cloth.
Wipe in the direction of the grain.
• Do not use abrasive cleaners or scrubbers; they will permanently damage the finish
and printed surfaces.
The range and its components should be cleaned after each use to avoid build up of
food residue and possible staining or discoloring. Only clean the parts listed in the
following instructions.
WARNING: To avoid the risk of burns or electrical shock, ensure that all burner
controls are in the OFF position and that all components are completely cool before
cleaning.
IMPORTANT: Remove any soiling immediately, including acidic and sugary spills.
Spilled food may discolor the burners or other components.
GRIDDLE
• When you are finished cooking and the Griddle is still warm, scrape off all the food
residue and cooked bits from your Griddle using a non-scratch tool.
• Always allow your Griddle to cool before handling and washing.
• The enamel surface develops a natural patina that will provide a non-stick surface
with use. To maintain the patina, when cool, use a paper towel to remove excess
grease and oil and wash or wipe with water. Dry thoroughly.
• For a thorough clean, soak the Griddle in hot water. Then wash with water and a
mild dish soap. Hand washing is recommended to maintain the enamel finish. Never
place a hot Griddle in cold water to prevent thermal shock.
• For stubborn stains, use a paste of baking soda and water and apply with a soft
brush. Wash with water and mild dish soap.
• Avoid using harsh abrasives, oven cleaners, or scouring pads to maintain the
enamel finish on the Griddle. Nylon or soft abrasive pads/brushes may be used.
• Immediately dry thoroughly. Avoid leaving to air-dry as this can promote rust
should there be any chipped or scratched areas.
BURNER GRATES
• Clean with a sponge and mild solution of liquid dish soap and warm water. If neces-
sary, use a soft kitchen brush with a paste of baking soda and water.
• Dry thoroughly.
• NOT dishwasher safe.
• Note: the grates have rubber pads on the feet to protect the appliance from scratch-
es. Take caution while cleaning to protect the rubber pads. Should they come off, they
can be reapplied using a heat-resistant adhesive.
BURNER CAPS AND BURNER HEADS
• It is important to keep Burner Caps and Burner Heads (in particular the ports) clean
of any food soils as this can clog or limit the gas flow.
• Soak parts in a solution of mild liquid dish soap and warm water for 20-30 minutes,
then clean with a non-abrasive sponge.
PORCELAIN COOKTOP
• Remove the Burner Grates (and the Burner Caps and Burner Heads if required). Use
a damp clean sponge, soft cloth, or nylon pad to wipe over the cooktop surface.
• Soak baked or hardened spills with a small amount of water.
• Do not use harsh or abrasive cleaning agents, rust removers, waxes, polishes, com-
mercial cooktop cleaners, steel wool, metal scrapers, or sharp objects to clean the
cooktop.
• Always dry the surface completely with a lint-free kitchen towel to prevent limes-
cale deposits.
• Never use a steam cleaner to clean this cooktop. Pressurized steam could cause
permanent damage to the surface and to components.
• Keep the igniter in the burner base dry. If it gets wet, it will not spark.
PORCELAIN OVEN INTERIOR
Porcelain is made from natural materials and, therefore, can chip or develop fine lines
and cracks due to the expansion and contraction that occurs as the oven tempera-
ture fluctuates. This can result in cosmetic imperfections, such as a cloudy, dull, or
scratched appearance.
• For best results, wipe up spills and splatters (especially sugary, acidic, and toma-
to-based sauces) as soon as the range has cooled to avoid staining of the surface. If
spills are allowed to cook on the surface, they may permanently stain. Never wipe up
a hot porcelain surface with a damp sponge. It may cause chipping or hair line
cracks.
• Do not use harsh or abrasive cleaning agents, rust removers, waxes, polishes, steel
wool, metal scrapers, or sharp objects to clean the oven interior.
• Wash the entire oven cavity with mild liquid dish soap and warm water.
• Blemishes that remain should not affect the function of the porcelain.
• Note: For easier cleaning, the bottom oven panel is removable by simply lifting up
when cool.
IMPORTANT: Do not clean the oven gasket. The fiberglass material cannot withstand
abrasion and rubbing and moving the gasket may compromise the door seal.
• Do not use any cleaning product containing chlorine bleach.
• Dry the components with a soft, lint-free cloth.
TOP VENT
• The stainless-steel top vent can be removed by unscrewing.
• Use a non-abrasive stainless-steel cleaner to spray on any grease build up on the
underside of the vent. Leave to penetrate.
• Wash with hot water and a mild dish soap.
• Thoroughly dry before reattaching.
STAINLESS-STEEL BODY
• Use a non-abrasive stainless-steel cleaner and apply with a soft lint-free cloth.
• To bring out the natural luster, lightly wipe the surface with a water-dampened
microfiber cloth followed by a dry polishing chamois. Always follow the grain of the
stainless steel.
REPLACING THE OVEN LIGHT
• Turn off the power at the main power supply.
• To prevent electrical shock or personal injury, make sure the oven and light bulb are
cool and power to the oven has been turned off before replacing the light bulb.
• Remove the lens cover from the housing by pulling straight out then replace with a
25W appliance bulb.
• Make sure the lens cover is in place prior to using the oven again.
• Do not use stainless steel cleaner, as these parts are not stainless steel.
• If necessary, use a soft kitchen brush or toothbrush to clean stains and ports of the
Burner Head.
• Dry thoroughly before reassembly. Any wet ports will prevent the flame from ignit-
ing.
• NOT dishwasher safe.
Note: The surfaces of the burner parts and grates become slightly duller over time.
This is normal and does not indicate any impairment of the material.
30
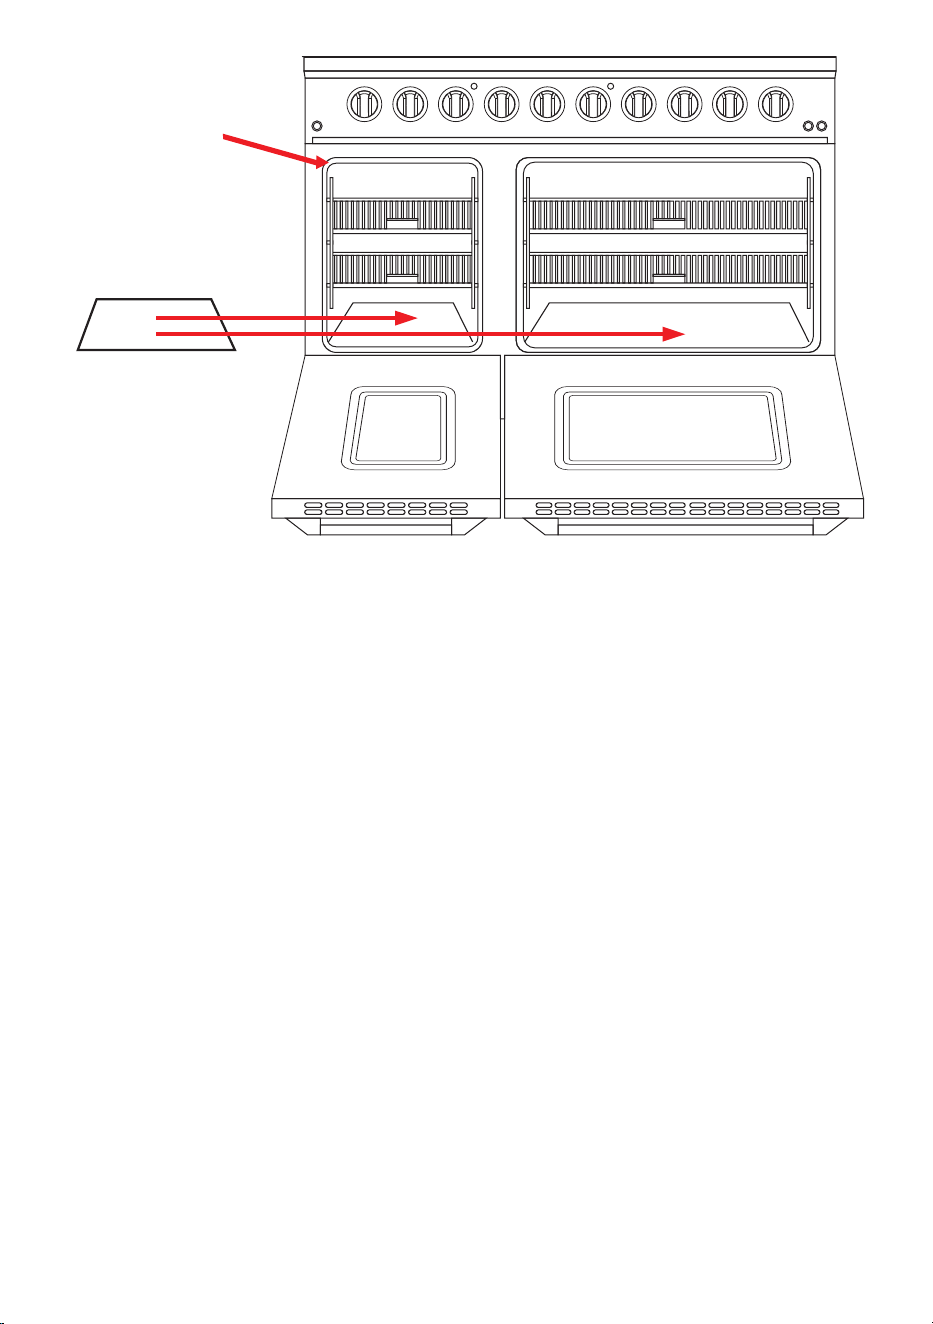
OVEN DOOR
• Clean with a solution of mild liquid dish soap and warm water and a damp sponge.
Rinse well.
• Do not allow excess water to run into any holes or slots in the door, including
around the glass frame. Any soap left on the liner causes additional stains when the
oven is heated.
• Do not use oven cleaners, cleansing powders of harsh abrasives on the external
side of the door.
• You may use a glass cleaner to clean the glass on the oven door to remove finger-
prints or smears. Dry completely with a soft, lint-free cloth.
OVEN RACKS AND RACK GUIDES
• Remove the Oven Racks from the oven by sliding out. The Oven Rack Guides can
be unscrewed for thorough cleaning.
• Clean with a solution of detergent and hot water. To clean heavy soil, use a scouring
pad such as steel wool with plenty of water and a mild abrasive such as a paste of
baking soda and water or oven dedicated cleaning products.
• Dishwasher Safe.
CONTROL PANEL, BURNER KNOBS AND DOOR HANDLE
• Clean with a solution of mild liquid dish soap and warm water and a damp cloth.
Wipe in the direction of the grain.
• Do not use abrasive cleaners or scrubbers; they will permanently damage the finish
and printed surfaces.
The range and its components should be cleaned after each use to avoid build up of
food residue and possible staining or discoloring. Only clean the parts listed in the
following instructions.
WARNING: To avoid the risk of burns or electrical shock, ensure that all burner
controls are in the OFF position and that all components are completely cool before
cleaning.
IMPORTANT: Remove any soiling immediately, including acidic and sugary spills.
Spilled food may discolor the burners or other components.
GRIDDLE
• When you are finished cooking and the Griddle is still warm, scrape off all the food
residue and cooked bits from your Griddle using a non-scratch tool.
• Always allow your Griddle to cool before handling and washing.
• The enamel surface develops a natural patina that will provide a non-stick surface
with use. To maintain the patina, when cool, use a paper towel to remove excess
grease and oil and wash or wipe with water. Dry thoroughly.
• For a thorough clean, soak the Griddle in hot water. Then wash with water and a
mild dish soap. Hand washing is recommended to maintain the enamel finish. Never
place a hot Griddle in cold water to prevent thermal shock.
• For stubborn stains, use a paste of baking soda and water and apply with a soft
brush. Wash with water and mild dish soap.
• Avoid using harsh abrasives, oven cleaners, or scouring pads to maintain the
enamel finish on the Griddle. Nylon or soft abrasive pads/brushes may be used.
• Immediately dry thoroughly. Avoid leaving to air-dry as this can promote rust
should there be any chipped or scratched areas.
BURNER GRATES
• Clean with a sponge and mild solution of liquid dish soap and warm water. If neces-
sary, use a soft kitchen brush with a paste of baking soda and water.
• Dry thoroughly.
• NOT dishwasher safe.
• Note: the grates have rubber pads on the feet to protect the appliance from scratch-
es. Take caution while cleaning to protect the rubber pads. Should they come off, they
can be reapplied using a heat-resistant adhesive.
BURNER CAPS AND BURNER HEADS
• It is important to keep Burner Caps and Burner Heads (in particular the ports) clean
of any food soils as this can clog or limit the gas flow.
• Soak parts in a solution of mild liquid dish soap and warm water for 20-30 minutes,
then clean with a non-abrasive sponge.
PORCELAIN COOKTOP
• Remove the Burner Grates (and the Burner Caps and Burner Heads if required). Use
a damp clean sponge, soft cloth, or nylon pad to wipe over the cooktop surface.
• Soak baked or hardened spills with a small amount of water.
• Do not use harsh or abrasive cleaning agents, rust removers, waxes, polishes, com-
mercial cooktop cleaners, steel wool, metal scrapers, or sharp objects to clean the
cooktop.
• Always dry the surface completely with a lint-free kitchen towel to prevent limes-
cale deposits.
• Never use a steam cleaner to clean this cooktop. Pressurized steam could cause
permanent damage to the surface and to components.
• Keep the igniter in the burner base dry. If it gets wet, it will not spark.
PORCELAIN OVEN INTERIOR
Porcelain is made from natural materials and, therefore, can chip or develop fine lines
and cracks due to the expansion and contraction that occurs as the oven tempera-
ture fluctuates. This can result in cosmetic imperfections, such as a cloudy, dull, or
scratched appearance.
• For best results, wipe up spills and splatters (especially sugary, acidic, and toma-
to-based sauces) as soon as the range has cooled to avoid staining of the surface. If
spills are allowed to cook on the surface, they may permanently stain. Never wipe up
a hot porcelain surface with a damp sponge. It may cause chipping or hair line
cracks.
• Do not use harsh or abrasive cleaning agents, rust removers, waxes, polishes, steel
wool, metal scrapers, or sharp objects to clean the oven interior.
• Wash the entire oven cavity with mild liquid dish soap and warm water.
• Blemishes that remain should not affect the function of the porcelain.
• Note: For easier cleaning, the bottom oven panel is removable by simply lifting up
when cool.
IMPORTANT: Do not clean the oven gasket. The fiberglass material cannot withstand
abrasion and rubbing and moving the gasket may compromise the door seal.
• Do not use any cleaning product containing chlorine bleach.
• Dry the components with a soft, lint-free cloth.
TOP VENT
• The stainless-steel top vent can be removed by unscrewing.
• Use a non-abrasive stainless-steel cleaner to spray on any grease build up on the
underside of the vent. Leave to penetrate.
• Wash with hot water and a mild dish soap.
• Thoroughly dry before reattaching.
STAINLESS-STEEL BODY
• Use a non-abrasive stainless-steel cleaner and apply with a soft lint-free cloth.
• To bring out the natural luster, lightly wipe the surface with a water-dampened
microfiber cloth followed by a dry polishing chamois. Always follow the grain of the
stainless steel.
REPLACING THE OVEN LIGHT
• Turn off the power at the main power supply.
• To prevent electrical shock or personal injury, make sure the oven and light bulb are
cool and power to the oven has been turned off before replacing the light bulb.
• Remove the lens cover from the housing by pulling straight out then replace with a
25W appliance bulb.
• Make sure the lens cover is in place prior to using the oven again.
• Do not use stainless steel cleaner, as these parts are not stainless steel.
• If necessary, use a soft kitchen brush or toothbrush to clean stains and ports of the
Burner Head.
• Dry thoroughly before reassembly. Any wet ports will prevent the flame from ignit-
ing.
• NOT dishwasher safe.
Note: The surfaces of the burner parts and grates become slightly duller over time.
This is normal and does not indicate any impairment of the material.
Oven Gasket
Removable
Bottom Oven Panel
31

OVEN DOOR
• Clean with a solution of mild liquid dish soap and warm water and a damp sponge.
Rinse well.
• Do not allow excess water to run into any holes or slots in the door, including
around the glass frame. Any soap left on the liner causes additional stains when the
oven is heated.
• Do not use oven cleaners, cleansing powders of harsh abrasives on the external
side of the door.
• You may use a glass cleaner to clean the glass on the oven door to remove finger-
prints or smears. Dry completely with a soft, lint-free cloth.
OVEN RACKS AND RACK GUIDES
• Remove the Oven Racks from the oven by sliding out. The Oven Rack Guides can
be unscrewed for thorough cleaning.
• Clean with a solution of detergent and hot water. To clean heavy soil, use a scouring
pad such as steel wool with plenty of water and a mild abrasive such as a paste of
baking soda and water or oven dedicated cleaning products.
• Dishwasher Safe.
CONTROL PANEL, BURNER KNOBS AND DOOR HANDLE
• Clean with a solution of mild liquid dish soap and warm water and a damp cloth.
Wipe in the direction of the grain.
• Do not use abrasive cleaners or scrubbers; they will permanently damage the finish
and printed surfaces.
PORCELAIN COOKTOP
• Remove the Burner Grates (and the Burner Caps and Burner Heads if required). Use
a damp clean sponge, soft cloth, or nylon pad to wipe over the cooktop surface.
• Soak baked or hardened spills with a small amount of water.
• Do not use harsh or abrasive cleaning agents, rust removers, waxes, polishes, com-
mercial cooktop cleaners, steel wool, metal scrapers, or sharp objects to clean the
cooktop.
• Always dry the surface completely with a lint-free kitchen towel to prevent limes-
cale deposits.
• Never use a steam cleaner to clean this cooktop. Pressurized steam could cause
permanent damage to the surface and to components.
• Keep the igniter in the burner base dry. If it gets wet, it will not spark.
PORCELAIN OVEN INTERIOR
Porcelain is made from natural materials and, therefore, can chip or develop fine lines
and cracks due to the expansion and contraction that occurs as the oven tempera-
ture fluctuates. This can result in cosmetic imperfections, such as a cloudy, dull, or
scratched appearance.
• For best results, wipe up spills and splatters (especially sugary, acidic, and toma-
to-based sauces) as soon as the range has cooled to avoid staining of the surface. If
spills are allowed to cook on the surface, they may permanently stain. Never wipe up
a hot porcelain surface with a damp sponge. It may cause chipping or hair line
cracks.
• Do not use harsh or abrasive cleaning agents, rust removers, waxes, polishes, steel
wool, metal scrapers, or sharp objects to clean the oven interior.
• Wash the entire oven cavity with mild liquid dish soap and warm water.
• Blemishes that remain should not affect the function of the porcelain.
• Note: For easier cleaning, the bottom oven panel is removable by simply lifting up
when cool.
IMPORTANT: Do not clean the oven gasket. The fiberglass material cannot withstand
abrasion and rubbing and moving the gasket may compromise the door seal.
• Do not use any cleaning product containing chlorine bleach.
• Dry the components with a soft, lint-free cloth.
TOP VENT
• The stainless-steel top vent can be removed by unscrewing.
• Use a non-abrasive stainless-steel cleaner to spray on any grease build up on the
underside of the vent. Leave to penetrate.
• Wash with hot water and a mild dish soap.
• Thoroughly dry before reattaching.
STAINLESS-STEEL BODY
• Use a non-abrasive stainless-steel cleaner and apply with a soft lint-free cloth.
• To bring out the natural luster, lightly wipe the surface with a water-dampened
microfiber cloth followed by a dry polishing chamois. Always follow the grain of the
stainless steel.
REPLACING THE OVEN LIGHT
• Turn off the power at the main power supply.
• To prevent electrical shock or personal injury, make sure the oven and light bulb are
cool and power to the oven has been turned off before replacing the light bulb.
• Remove the lens cover from the housing by pulling straight out then replace with a
25W appliance bulb.
• Make sure the lens cover is in place prior to using the oven again.
TROUBLESHOOTING
Should you encounter any issues with your range, refer to the following table for
possible troubleshooting solutions.
ISSUE
Nothing works
POSSIBLE CAUSE
Oven is not connected to
the electrical power.
Power supply is not
energized.
SOLUTION
Have oven connected to a
properly sized electrical
power supply by a qualified
electrician.
Have an electrician check the
power supply, including the
house circuit breaker, wiring
and fuses.
Burners do not light or
do not burn evenly
Burner flames very
large and yellow
Sparking but no flame
ignition
Igniters spark continu-
ously after flame
ignition
Burner flame goes out
at low setting
Oven will not heat
Foods over-cooked or
under-cooked
One of the oven lights
does not come on, but
oven works
‘Cracking’ or ‘Popping’
sound
Plug on range is not
completely inserted in the
electrical outlet.
Burner ports/holes on the
side of the burner may be
clogged.
Burner ports/holes are
clogged.
Burner heads or burner
caps are not positioned
properly.
Cooktop is being operated
with the wrong type of gas.
Regulator is not installed,
is faulty, or is set for the
wrong type of gas.
Gas shut-off valve is in the
‘OFF’ position.
Power supply polarity is
reversed.
Igniters are wet or dirty.
Low gas supply pressure.
Air intake holes around
burners are obstructed.
No Power Supply (Oven
light and Igniters do not
come on either).
Incorrect cooking time or
temperature.
The light bulb is loose.
The light bulb has blown.
This is the sound of metal
heating and cooling.
Make sure the unit is properly
connected to the power
supply.
Remove the burner heads
and clean them. Check the
igniter area for burned-on
food or grease.
Clean burner head ports with
straightened paper clip,
needle, or wire.
Remove and carefully
re-install burner head and
caps.
Ensure that the type of
cooktop matches the natural
gas supply.
Check installation, replace
regulator, or set regulator for
proper gas.
Turn shut-off valve to the
‘ON’ position.
Have polarity corrected.
Dry or clean igniters. Use a
hair dryer, if desired.
Contact gas company.
Remove obstruction.
Check that the circuit breaker
hasn’t tripped and there is no
power outage in your area.
Adjust time, temperature, or
rack position.
See ‘Cleaning’ instructions to
check bulb is securely in
socket. If not replace.
This is normal.
32

OVEN DOOR
• Clean with a solution of mild liquid dish soap and warm water and a damp sponge.
Rinse well.
• Do not allow excess water to run into any holes or slots in the door, including
around the glass frame. Any soap left on the liner causes additional stains when the
oven is heated.
• Do not use oven cleaners, cleansing powders of harsh abrasives on the external
side of the door.
• You may use a glass cleaner to clean the glass on the oven door to remove finger-
prints or smears. Dry completely with a soft, lint-free cloth.
OVEN RACKS AND RACK GUIDES
• Remove the Oven Racks from the oven by sliding out. The Oven Rack Guides can
be unscrewed for thorough cleaning.
• Clean with a solution of detergent and hot water. To clean heavy soil, use a scouring
pad such as steel wool with plenty of water and a mild abrasive such as a paste of
baking soda and water or oven dedicated cleaning products.
• Dishwasher Safe.
CONTROL PANEL, BURNER KNOBS AND DOOR HANDLE
• Clean with a solution of mild liquid dish soap and warm water and a damp cloth.
Wipe in the direction of the grain.
• Do not use abrasive cleaners or scrubbers; they will permanently damage the finish
and printed surfaces.
PORCELAIN COOKTOP
• Remove the Burner Grates (and the Burner Caps and Burner Heads if required). Use
a damp clean sponge, soft cloth, or nylon pad to wipe over the cooktop surface.
• Soak baked or hardened spills with a small amount of water.
• Do not use harsh or abrasive cleaning agents, rust removers, waxes, polishes, com-
mercial cooktop cleaners, steel wool, metal scrapers, or sharp objects to clean the
cooktop.
• Always dry the surface completely with a lint-free kitchen towel to prevent limes-
cale deposits.
• Never use a steam cleaner to clean this cooktop. Pressurized steam could cause
permanent damage to the surface and to components.
• Keep the igniter in the burner base dry. If it gets wet, it will not spark.
PORCELAIN OVEN INTERIOR
Porcelain is made from natural materials and, therefore, can chip or develop fine lines
and cracks due to the expansion and contraction that occurs as the oven tempera-
ture fluctuates. This can result in cosmetic imperfections, such as a cloudy, dull, or
scratched appearance.
• For best results, wipe up spills and splatters (especially sugary, acidic, and toma-
to-based sauces) as soon as the range has cooled to avoid staining of the surface. If
spills are allowed to cook on the surface, they may permanently stain. Never wipe up
a hot porcelain surface with a damp sponge. It may cause chipping or hair line
cracks.
• Do not use harsh or abrasive cleaning agents, rust removers, waxes, polishes, steel
wool, metal scrapers, or sharp objects to clean the oven interior.
• Wash the entire oven cavity with mild liquid dish soap and warm water.
• Blemishes that remain should not affect the function of the porcelain.
• Note: For easier cleaning, the bottom oven panel is removable by simply lifting up
when cool.
IMPORTANT: Do not clean the oven gasket. The fiberglass material cannot withstand
abrasion and rubbing and moving the gasket may compromise the door seal.
• Do not use any cleaning product containing chlorine bleach.
• Dry the components with a soft, lint-free cloth.
TOP VENT
• The stainless-steel top vent can be removed by unscrewing.
• Use a non-abrasive stainless-steel cleaner to spray on any grease build up on the
underside of the vent. Leave to penetrate.
• Wash with hot water and a mild dish soap.
• Thoroughly dry before reattaching.
STAINLESS-STEEL BODY
• Use a non-abrasive stainless-steel cleaner and apply with a soft lint-free cloth.
• To bring out the natural luster, lightly wipe the surface with a water-dampened
microfiber cloth followed by a dry polishing chamois. Always follow the grain of the
stainless steel.
REPLACING THE OVEN LIGHT
• Turn off the power at the main power supply.
• To prevent electrical shock or personal injury, make sure the oven and light bulb are
cool and power to the oven has been turned off before replacing the light bulb.
• Remove the lens cover from the housing by pulling straight out then replace with a
25W appliance bulb.
• Make sure the lens cover is in place prior to using the oven again.
ISSUE
Nothing works
POSSIBLE CAUSE
Oven is not connected to
the electrical power.
Power supply is not
energized.
SOLUTION
Have oven connected to a
properly sized electrical
power supply by a qualified
electrician.
Have an electrician check the
power supply, including the
house circuit breaker, wiring
and fuses.
Burners do not light or
do not burn evenly
Burner flames very
large and yellow
Sparking but no flame
ignition
Igniters spark continu-
ously after flame
ignition
Burner flame goes out
at low setting
Oven will not heat
Foods over-cooked or
under-cooked
One of the oven lights
does not come on, but
oven works
‘Cracking’ or ‘Popping’
sound
Plug on range is not
completely inserted in the
electrical outlet.
Burner ports/holes on the
side of the burner may be
clogged.
Burner ports/holes are
clogged.
Burner heads or burner
caps are not positioned
properly.
Cooktop is being operated
with the wrong type of gas.
Regulator is not installed,
is faulty, or is set for the
wrong type of gas.
Gas shut-off valve is in the
‘OFF’ position.
Power supply polarity is
reversed.
Igniters are wet or dirty.
Low gas supply pressure.
Air intake holes around
burners are obstructed.
No Power Supply (Oven
light and Igniters do not
come on either).
Incorrect cooking time or
temperature.
The light bulb is loose.
The light bulb has blown.
This is the sound of metal
heating and cooling.
Make sure the unit is properly
connected to the power
supply.
Remove the burner heads
and clean them. Check the
igniter area for burned-on
food or grease.
Clean burner head ports with
straightened paper clip,
needle, or wire.
Remove and carefully
re-install burner head and
caps.
Ensure that the type of
cooktop matches the natural
gas supply.
Check installation, replace
regulator, or set regulator for
proper gas.
Turn shut-off valve to the
‘ON’ position.
Have polarity corrected.
Dry or clean igniters. Use a
hair dryer, if desired.
Contact gas company.
Remove obstruction.
Check that the circuit breaker
hasn’t tripped and there is no
power outage in your area.
Adjust time, temperature, or
rack position.
See ‘Cleaning’ instructions to
check bulb is securely in
socket. If not replace.
This is normal.
33
ISSUE
Nothing works
Burners do not light or
do not burn evenly
Burner flames very
large and yellow
Sparking but no flame
ignition
Igniters spark continu-
ously after flame
ignition
Burner flame goes out
at low setting
Oven will not heat
Foods over-cooked or
under-cooked
One of the oven lights
does not come on, but
oven works
‘Cracking’ or ‘Popping’
sound
SPECIFICATIONS
NG: Input Pressure 7 inch Output Pressure 5 inch
LP: Input Pressure 11 inch Output Pressure 10 inch
Total BTU: 140,000
Igniter: 120V, 60Hz, 3 Amp
Oven: 120V, 60Hz, 5.0 Amp
Oven Fan: 120V, 60Hz, 0.53 Amp
Oven Lights: 120V, 60Hz, 0.2 Amp, 25 W
Your purchase comes with a 100%
satisfaction guarantee from Müeller
If you are not happy with the product for any reason, please contact
us at [email protected] with your feedback or questions, and
we will do our best to make things right for you!
168 Mason Way Unit #4A, City of Industry, CA 91746
E-mail: [email protected]
Web: www.muellerhome.us
Müeller USA