
WARRANTY INFORMATION
© 2019 Sunbeam Products, Inc. All Rights Reserved. Distributed by Sunbeam Products, Inc., Boca Raton, Florida 33431.
1 YEAR LIMITED WARRANTY
Sunbeam Products, Inc. (“Sunbeam”) or if in Canada, Newell Brands Canada ULC (“NBC”) warrants that for a period
of one year from the date of purchase, this product will be free from defects in material and workmanship. Sunbeam
(or NBC), at its option, will repair or replace this product or any component of the product found to be defective
during the warranty period. Replacement will be made with a new or remanufactured product or component. If the
product is no longer available, replacement may be made with a similar product of equal or greater value. This is
your exclusive warranty. Do NOT attempt to repair or adjust any electrical or mechanical functions on this product.
Doing so will void this warranty.
This warranty is valid for the original retail purchaser from the date of initial retail purchase and is not transferable.
Keep the original sales receipt. Proof of purchase is required to obtain warranty performance. Sunbeam (or NBC)
dealers, service centers, or retail stores selling Sunbeam (or NBC) products do not have the right to alter, modify or
any way change the terms and conditions of this warranty.
This warranty does not cover normal wear of parts or damage resulting from any of the following: negligent use or
misuse of the product, use on improper voltage or current, use contrary to the operating instructions, disassembly,
repair or alteration by anyone other than Sunbeam or an authorized Sunbeam (or NBC) service center. Further, the
warranty does not cover: Acts of God, such as fire, flood, hurricanes and tornadoes.
What are the limits on Sunbeam’s (or NBC’s) Liability?
Sunbeam (or NBC) shall not be liable for any incidental or consequential damages caused by the breach of any
express, implied or statutory warranty or condition.
Except to the extent prohibited by applicable law, any implied warranty or condition of merchantability or fitness for a
particular purpose is limited in duration to the duration of the above warranty. Sunbeam (or NBC) disclaims all other
warranties, conditions or representations, express, implied, statutory or otherwise. Sunbeam (or NBC) shall not be
liable for any damages of any kind resulting from the purchase, use or misuse of, or inability to use the product
including incidental, special, consequential or similar damages or loss of profits, or for any breach of contract,
fundamental or otherwise, or for any claim brought against purchaser by any other party. Some provinces, states or
jurisdictions do not allow the exclusion or limitation of incidental or consequential damages or limitations on how long
an implied warranty lasts, so the above limitations or exclusion may not apply to you. This warranty gives you specific
legal rights, and you may also have other rights that vary from province to province, state to state or jurisdiction to
jurisdiction.
How to Obtain Warranty Service
In the U.S.A.
If you have any questions regarding this warranty or would like to obtain warranty service, please visit our website at
www.holmesproducts.com.
In Canada
If you have any questions regarding this warranty or would like to obtain warranty service, please visit our website at
www.holmesproducts.com.
In the U.S.A., this warranty is offered by Sunbeam Products, Inc. located in Boca Raton, Florida 33431. In Canada, this
warranty is offered by Newell Brands Canada ULC, located at 20B Hereford Street, Brampton, Ontario L6Y 0M1. If you
have any other problem or claim in connection with this product, please write our Consumer Service Department.
PLEASE DO NOT RETURN THIS PRODUCT TO ANY OF THESE ADDRESSES OR TO THE PLACE OF
PURCHASE.
TROUBLESHOOTING
FREQUENTLY ASKED QUESTIONS
FREQUENTLY ASKED QUESTIONS
Question Answer
• What are the variables that affect
run time?
The estimated run time for this humidifier is based on average room
conditions. The actual run time of your humidifier is dependent on numerous
variables such as:
✔ Air exchange in the room where the humidifier is placed.
✔ Room construction of the room where the humidifier is placed.
✔ Temperature of the room where the humidifier is placed.
✔ Humidity levels in the room where the humidifier is placed.
✔ Movement of occupants and the opening and closing of doors in the room
where the humidifier is placed.
✔ Home furnishings in the room where the humidifier is placed.
• How do I remove film on water
tank?
✔ See Daily Maintenance instructions. Regular cleaning is recommended.
• How can I extend the run time?
✔ Run your unit on the lowest setting.
✔ If your unit has electronics, set it to your desired humidity level. The unit
will turn on and off, which will extend the run time.
✔ Fill the tank all the way full, place it on the base, let the water empty into
the base until it stops bubbling, then refill the tank full again. This ensures
maximum water capacity and will extend run time.
TROUBLESHOOTING
TROUBLE PROBABLE CAUSE SOLUTION
• Unit does not turn on. * Not plugged in.
* Outlet not functioning.
4 Plug in unit.
4 Have outlet replaced by a licensed electrician.
• Mist output minimal to
none.
* Cool mist is invisible.
* The filter has not absorbed water.
4 Operate in High setting.
4 Wait 30 minutes for filter to absorb water.
• Filter turns brown. * The filter has absorbed
minerals.
4 Replace your filter (HWF75 / SF221) by calling
1-800-546-5637, or visiting
www.holmesproducts.com
.
CLEANING / MAINTENANCE
STORAGE INSTRUCTIONS
If your humidifier will not be in use for two days or more, or at the end of the season follow these instructions.
1. Clean, rinse and thoroughly dry the humidifier as directed in weekly maintenance. DO NOT leave any water inside the
base or tray.
2. Remove the tank cap. Do not store with the tank cap in place.
3. Place the humidifier in the original carton and store in a cool, dry place.
4. Always clean the humidifier before the next season begins.
5. Order your replacement filter for next year’s use.
REPLACEMENT ACCESSORIES
To order the replacement accessories you can do any of the following:
• Visit your local retailer
• Go to
www.holmesproducts.com
• Call Consumer Service at
1-800-546-5637
If you have any questions regarding your product or would like to learn more about other Holmes
®
products, please
contact our Consumer Service Department at 1-800-546-5637 or visit our website at
www.holmesproducts.com. For inquiries regarding recycling and proper disposal of this product, please contact your
local waste management facility.
198798 HCM3755C_19ESM1 Printed In China
GCDS-SUN581594-SL
Impreso en China
Owner’s Guide
HCM3755C
Cool Mist
Humidifier
FILTER# : HWF75 / SF221
FILTER TYPE : WICK
Manual del propietario
HCM3755C
con rocío fresco
Humidificador
FILTRO# : HWF75 / SF221
FILTRO TIPO : WICK
LEA Y CONSERVE ESTAS IMPORTANTES INSTRUCCIONES
PLEASE READ AND SAVE THESE IMPORTANT INSTRUCTIONS
FILTRO
DE REPUESTO
INFORMACION DE LA GARANTIA
© 2019 Sunbeam Products, Inc. Todos los derechos reservados. Distribuido por Sunbeam Products, Inc., Boca Raton,
Florida 33431.
GARANTÍA LIMITADA DE 1 AÑO
Sunbeam Products, Inc. (“Sunbeam”), o en Canadá, Newell Brands Canada ULC (“NBC”), garantiza que por un período
de uno año a partir de la fecha de compra, este producto estará libre de defectos de materiales y mano de obra.
Sunbeam (o NBC), a su elección, reparará o reemplazará este producto o cualquier componente del mismo que
presente defectos durante el período de garantía. El reemplazo se realizará por un producto o componente nuevo o
reparado. Si el producto ya no estuviera disponible, se lo reemplazará por un producto similar de valor igual o
superior. Ésta es su garantía exclusiva. No intente reparar o ajustar ninguna función eléctrica o mecánica de este
producto. Al hacerlo elimínará ésta garantía.
La garantía es válida para el comprador minorista original a partir de la fecha de compra inicial y la misma no es
transferible. Conserve el recibo de compra original. Para solicitar servicio en garantía se requiere presentar un recibo
de compra. Los agentes y centros de servicio de Sunbeam (o NBC) o las tiendas minoristas que venden productos de
Sunbeam (o NBC) no tienen derecho a alterar, modificar ni cambiar de ningún otro modo los términos y las
condiciones de esta garantía. Esta garantía no cubre el desgaste normal de las piezas ni los daños que se produzcan
como resultado de uso negligente o mal uso del producto, uso de voltaje incorrecto o corriente inapropiada, uso
contrario a las instrucciones operativas, y desarme, reparación o alteración por parte de un tercero ajeno a Sunbeam o
a un Centro de Servicio autorizado por Sunbeam. Asimismo, la garantía no cubre actos fortuitos tales como incendios,
inundaciones, huracanes y tornados.
¿Cuál es el límite de responsabilidad de Sunbeam’s (o NBC’s) ?
Sunbeam (o NBC) no será responsable de daños incidentales o emergentes causados por el incumplimiento de alguna
garantía o condición expresa, implícita o legal.
Excepto en la medida en que lo prohíba la ley aplicable, cualquier garantía o condición implícita de comerciabilidad o
aptitud para un fin determinado se limita, en cuanto a su duración, al plazo de la garantía antes mencionada.
Sunbeam (o NBC) queda exenta de toda otra garantías, condiciones o manifestaciones, expresa, implícita, legal o de
cualquier otra naturaleza. Sunbeam (o NBC) no será responsable de ningún tipo de daño que resulte de la compra,
uso o mal uso del producto, o por la imposibilidad de usar el producto, incluidos los daños incidentales, especiales,
emergentes o similares, o la pérdida de ganancias, ni de ningún incumplimiento contractual, sea de una obligación
esencial o de otra naturaleza, ni de ningún reclamo iniciado contra el comprador por un tercero. Algunas provincias,
estados o jurisdicciones no permiten la exclusión o limitación de los daños incidentales o emergentes ni las limitaciones
a la duración de las garantías implícitas, de modo que es posible que la exclusión o las limitaciones antes mencionadas
no se apliquen en su caso. Esta garantía le otorga derechos legales específicos y es posible que usted tenga otros
derechos que varían de un estado, provincia o jurisdicción a otro.
Cómo solicitar el servicio en garantía
En los Estados Unidos
Si tiene alguna pregunta sobre esta garantía o desea recibir servicio de garantía, póngase visite nuestro sitio web
www.holmesproducts.com.
En Canadá
Si tiene alguna pregunta sobre esta garantía o desea recibir servicio de garantía, póngase visite nuestro sitio web
www.holmesproducts.com.
En los Estados Unidos, esta garantía es ofrecida por Sunbeam Products, Inc. Florida 33431. En Canadá, esta garantía
es ofrecida por Newell Brands Canada ULC, 20 B Hereford Street, Brampton, Ontario L6Y 0M1. Si usted tiene otro
problema o reclamo en conexión con este producto, por favor escriba al Departamento de Servicio al Consumidor.
POR FAVOR NO DEVUELVA ESTE PRODUCTO A NINGUNA DE ESTAS DIRECCIONES NI AL LUGAR DE
COMPRA.
DIAGNÓSTICO DE PROBLEMAS
PREGUNTAS FRECUENTES
PREGUNTAS FRECUENTES
PREGUNTAS RESPUESTAS
• Cuáles son las variables que afectan
el tiempo de funcionamiento?
El tiempo de funcionamiento estimado de este humidificador está basado en
las condiciones ambientales promedio. El tiempo de funcionamiento actual de
su humidificador depende de varios factores tales como :
✔ El intercambio de aire en el cuarto donde se encuentra el humidificador.
✔ La estructura del cuarto donde se encuentra el humidificador.
✔ La temperatura del cuarto donde se encuentra el humidificador.
✔ Los niveles de humedad en el cuarto donde se encuentra el humidificador.
✔ La actividad de los ocupantes y la secuencia en que se abren y cierran las
puertas del cuarto donde se encuentra el humidificador.
✔ El número de muebles presentes en el cuarto donde se encuentra el
humidificador.
• Cómo quito la película del tanque de
agua?
✔ Consulte las instrucciones diarias de mantenimiento. Se recomienda una
limpieza regular.
• Cómo puedo extender el tiempo de
funcionamiento?
✔ Haga funcionar la unidad en el modo más bajo.
✔ Si su unidad tiene electrónicos, ajústela al nivel de humedad deseado. La
unidad se encenderá y apagará, extendiendo el tiempo de
funcionamiento.
✔ Llene el tanque al máximo, colóquelo en la base, deje que el agua se
vacíe en la base hasta que deje de burbujear, luego llene nuevamente el
tanque al máximo. Esto asegura una capacidad máxima de agua que
extenderá el tiempo de funcionamiento.
TROUBLESHOOTING
TROUBLE PROBABLE CAUSE SOLUTION
• La unidad no se
enciende.
* No está enchufada.
* El omacorriente no funciona.
4 Enchúfela.
4 Haga reemplazar el tomacorriente por un
electricista matriculado.
• Salida de vapor mínima
o nula.
* El filtro no ha absorbido el
agua.
*
La niebla fría es invisible.
4 Funcionamiento en configuración High (alta).
4 Espere 30 minutos para que el filtro absorba el
agua.
• El filtro se pone marrón. * El filtro ha absorbido
minerales.
4 Reemplace su filtro (HWF75 / SF221) llamando
al 1-800-546-5637, o visite
www.holmesproducts.com
.
LIMPIEZA / MANTENIMIENTO
INSTRUCCIONES PARA GUARDAR
Si planea no usar su humidificador por dos o más días, o al final de la estación, siga estas instrucciones.
1. Limpie y seque bien el humidificador según se detalla anteriormente en la sección: instrucciones de mantenimiento
semanales. NO deje agua dentro de la base o bandeja.
2. Retire el tapón del tanque. No lo guarde con el tapón del tanque puesto.
3. Coloque el humidificador en su empaque original y guárdelo en un lugar fresco y seco.
4. Siempre limpie el humidificador antes de que empiece la siguiente estación.
5. Encargue su filtro de repuesto para el próximo año.
ACCESORIOS DE REPUESTO
Puede ordenar accesorios de repuesto de una de las siguientes formas:
• Visite su distribuidor local
• Valla a
www.holmesproducts.com
• Llame a servicio al consumidor al 1-800-546-5637
Si tiene preguntas relacionadas con este producto o si está interesado en conocer otros productos Holmes
®
,
póngase en contacto con nuestro Departamento de Servicio al Cliente: llame al 1-800-546-5637 o visite nuestro
sitio web www.holmesproducts.com. Para preguntas relacionadas con el reciclaje y la correcta eliminación de este
producto, por favor póngase en contacto con su centro local de gestión de residuos.

PLEASE READ AND SAVE THESE
IMPORTANT SAFETY INSTRUCTIONS
LEA Y CONSERVE ESTAS IMPORTANTES
INSTRUCCIONES DE SEGURIDAD
FEATURES - OPERATIONS
CARACTERISTICA - FUNCIONAMIENTO
3. Hold the front door handle and open the front door to
access the filter. (see Figure 2).
4. Take off the top filter support and discard the old filter
and follow weekly cleaning instructions.
5. Insert a new filter and replace the filter support on top.
Place the filter back onto the humdifier base. Ensure that
the filter is seated correctly and can come in contact with
water.
6. Close the front door properly.
7. Repeat Operating Instruction steps.
It will take about 30 minutes for the humidifier to reach
maximum output.
NOTE: You can purchase replacement filters (model HWF75/
SF221) at a local retailer, by calling 1-800-546-5637, or by
visiting
www.holmesproducts.com
. It is recommended that a
replacement filter is purchased for uninterrupted use.
CLEANING AND MAINTENANCE
INSTRUCTIONS
Humidifiers provide comfort by adding moisture to dry,
heated indoor air. To benefit most from the humidifier and
avoid product misuse, follow all instructions carefully. Please
note that this is an electrical appliance and requires attention
when in use.
In addition, if you do not follow the recommended care and
maintenance guidelines, micro-organisms may be able to
grow in the water within the water tanks. You must routinely
follow the cleaning procedures that follow in order to ensure
proper, efficient operation of your humidifier. Proper maintenance
and cleaning is essential to the continued performance of
your unit and the avoidance of algae or bacteria build-up.
Daily Maintenance
1. Be sure the humidifier is switched OFF and the unit is
disconnected from the electrical outlet.
2. Remove the tanks from the humidifier and place them in
sink or tub.
3. Carry the base of the unit to the sink, remove the wick
filter, place in sink, drain any remaining water. Wipe
clean, and dry with a clean cloth or paper towel.
4. Drain the water from the tanks into the sink and rinse
each tank thoroughly. Wipe clean, and dry with a clean
cloth or paper towel.
5. Put filter back with the filter support, close the front
door, then refill the tanks with cool tap water as
instructed earlier in the Filling Instructions. Do not
overfill.
6. Follow Operating Instructions.
Weekly Maintenance
To Remove Scale:
1. Repeat steps 1-4 above.
2.
Partially fill the base with Cleanse Clean® solution
(Model S1710) as instructed on bottle, or with two 8 oz.
cups of undiluted white vinegar. Leave this solution in the
base for 20 minutes, while cleaning all the interior
surfaces with a soft brush. Remove base scale by wiping
the base with a cloth dampened with undiluted white
vinegar.
3. Rinse with clean warm water to remove the cleaning
solution before disinfecting the tanks.
To Disinfect Humidifier Base and Tanks:
1. Fill Humidifier Base with 2 gallons of water and 1
teaspoon of chlorine bleach.
2. Fill each tank 1/2 full with water and 1 teaspoon of
chlorine bleach.
3. Let the solution stand for 20 minutes, swishing every few
minutes. Wet all surfaces.
4. Carefully empty the Base and Tanks after 20 minutes,
and rinse with warm water until you cannot detect any
bleach smell. Dry with a clean cloth or paper towel.
5. Depending on the water hardness in your area, it may
be necessary to change the filter every month. Re-insert
the wick filter into the filter support.
6. Refill the water tanks as directed with cool tap water,
replace the humidifier housing, and turn the Control
Knob to ON.
Vida útil del filtro – en condiciones normales de uso continuo,
un filtro nuevo funcionará adecuadamente durante 1 mes. Se
recomienda el reemplazo del filtro cada 30 días de uso.
Para reemplazar el filtro, siga los siguientes pasos.
1. Asegúrese de que el humidificador esté en OFF y
desenchúfelo del tomacorriente.
2. Para acceder al filtro, abra la puerta frontal con el
tirador. (ver Figura 2).
3. Retire el soporte superior del filtro, deseche el filtro viejo
y siga las instrucciones de limpieza semanales.
4. Coloque un filtro nuevo y reemplace el soporte superior.
Coloque nuevamente el filtro en la base del
humidificador.
5. Cierre la puerta frontal de manera adecuada.
6. Repita los pasos de las instrucciones de uso.
Tomará aproximadamente 30 minutos para que el
humidificador alcance su potencia máxima.
NOTA:
Puede comprar repuestos de filtros (modelo HWF75 /
SF221) en una tienda local, llamando al 1-800-546-5637, ó
visitando
www.holmesproducts.com
. Se recomienda que compre
un filtro de repuesto para no interrumpir el funcionamiento de la
unidad.
INSTRUCCIONES DE LIMPIEZA Y
MANTENIMIENTO
Los humidificadores proveen confort agregando humedad al
aire seco de los ambientes interiores calefaccionados. Para
beneficiarse al máximo de los humidificadores y evitar su
mal uso, siga todas las instrucciones cuidadosamente. Tenga
en cuenta que éste es un artefacto eléctrico que requiere
atención cuando esté en uso.
Además, si no se siguen las recomendaciones para el cuidado y
mantenimiento, crecerán microorganismos en el agua dentro de
los tanques. Se deben ejecutar rutinariamente los procedimientos
de limpieza que se indican a continuación para asegurar el
funcionamiento adecuado y eficiente del humidificador que
son esenciales para el rendimiento óptimo constante de la
unidad y para evitar la formación de algas y bacterias.
Mantenimiento diario
1. Retire ambos tanques de la unidad y deje al humidificador
funcionando entre 30 y 40 minutos hasta que se consuma el
agua de la bandeja y del filtro. De este modo, se reducirá el
derrame de agua al retirar el filtro.
2. Asegúrese de que el humidificador esté en OFF
(Apagado) y desconectado del tomacorriente.
3. Retire los tanques del humidificador y colóquelos en el
fregadero o en una cuba.
4. Lleve la base al fregadero, retire el filtro de mechas,
colóquelo en el fregadero y drene el agua remanente.
limpie frotando con un paño y seque con una toalla de
tela o papel.
5. Drene el agua de los tanques en el fregadero y
enjuáguelos completamente. Límpielos frotando con un
paño y séquelos con una toalla de tela o de papel.
Asegúrese de que el filtro quede bien colocado para
tomar contacto con el agua.
6. Coloque nuevamente el soporte del filtro, cierre la
puerta frontal y rellene los tanques con agua fresca del
grifo, tal como se indicó en las Instrucciones de Llenado.
No lo llene de más.
7. Siga las instrucciones de operación.
Mantenimiento semanal
Para extraer el sarro :
1. Repita los pasos 1 al 4 anteriores.
2.
Llene parcialmente la base con solución Cleanse Clean
®
(Modelo S1710) como se indica en la botella, o con dos
tazas de vinagre blanco sin diluir.
Deje reposar esta
solución en la base por 20 min. mientras limpia todas las
superficies interiores con un cepillo blando. Quite el sarro
frotando la base con un trapo humedecido con vinagre
blanco sin diluir.
3. Enjuague con agua tibia limpia para extraer la solución
limpiadora antes de desinfectar el tanque.
Para desinfectar los tanques de la base del
humidificador:
1. Llene la base del humidificador con 8 litros de agua y
una cucharadita de blanqueador de cloro.
2. Llene cada tanque hasta la mitad con agua y 1/2
cucharadita de blanqueador de cloro.
3. Deje que la solución trabaje por 20 minutos, sacudiendo
los tanques de vez en cuando. Moje todas las superficies.
4. Vacíe cuidadosamente la base y los tanques después de
20 minutos y enjuague hasta que ya no se pueda
detectar el olor a cloro. Seque con una tela limpia o con
toalla de papel.
5. Dependiendo de la dureza del agua en su zona, puede
ser necesario cambiar el filtro cada mese. Vuelva a
insertar el filtro de la mecha en el soporte del filtro.
6. Vuelva a llenar los tanques de agua como se indica con
agua fría, vuelva a colocar la carcasa del humidificador,
y gire la perilla de control a encendido.
26. Do not move unit after it has been used until unit cools
completely.
27. Use both hands when carrying full tank of water.
PLEASE READ AND SAVE
THESE IMPORTANT SAFETY
INSTRUCTIONS
CONSUMER SAFETY INFORMATION
NOTE:
This is an electrical appliance and requires attention
when in use.
NOTE:
If moisture forms on the walls or windows of the
room, turn off the humidifier. The room already has plenty of
humidity and additional moisture may cause damage.
NOTE:
DO NOT block air inlet or outlet.
Cord and Plug Installation Safety Instructions:
The length of cord used on this appliance was selected to reduce
the hazards of becoming tangled in, or tripping over a longer
cord. If a longer cord is necessary an approved extension cord
may be used. The electrical rating of the extension cord must be
equal to or greater than the rating of the humidifier (refer to
the rating information placed on the humidifier). Care must be
taken to arrange the extension cord so that it will not drape
over the countertop or tabletop where it can be pulled on by
children or accidentally tripped over.
HOW COOL MIST WORKS
Your Holmes
®
Cool Mist humidifier draws dry air through the
air intake grill area. This air is then passed through a
moisture–laden wick filter, which retains the minerals and
deposits in the water. The resulting moist air is directed back
into the room from the top air grill.
NOTE:
This humidification system provides a cool, invisible
moisture output. It is normal not to see the mist.
NOTE:
A humidity level below 20% can be unhealthy and
uncomfortable. The recommended humidity level is between
40%-50%.
PRE-OPERATING INSTRUCTIONS
1. Be sure the humidifier is switched to OFF and the unit is
disconnected from the electrical outlet.
2. Choose a location out of reach of children. DO NOT place
the humidifier on a finished floor or near furniture which
can be damaged by moisture or water.
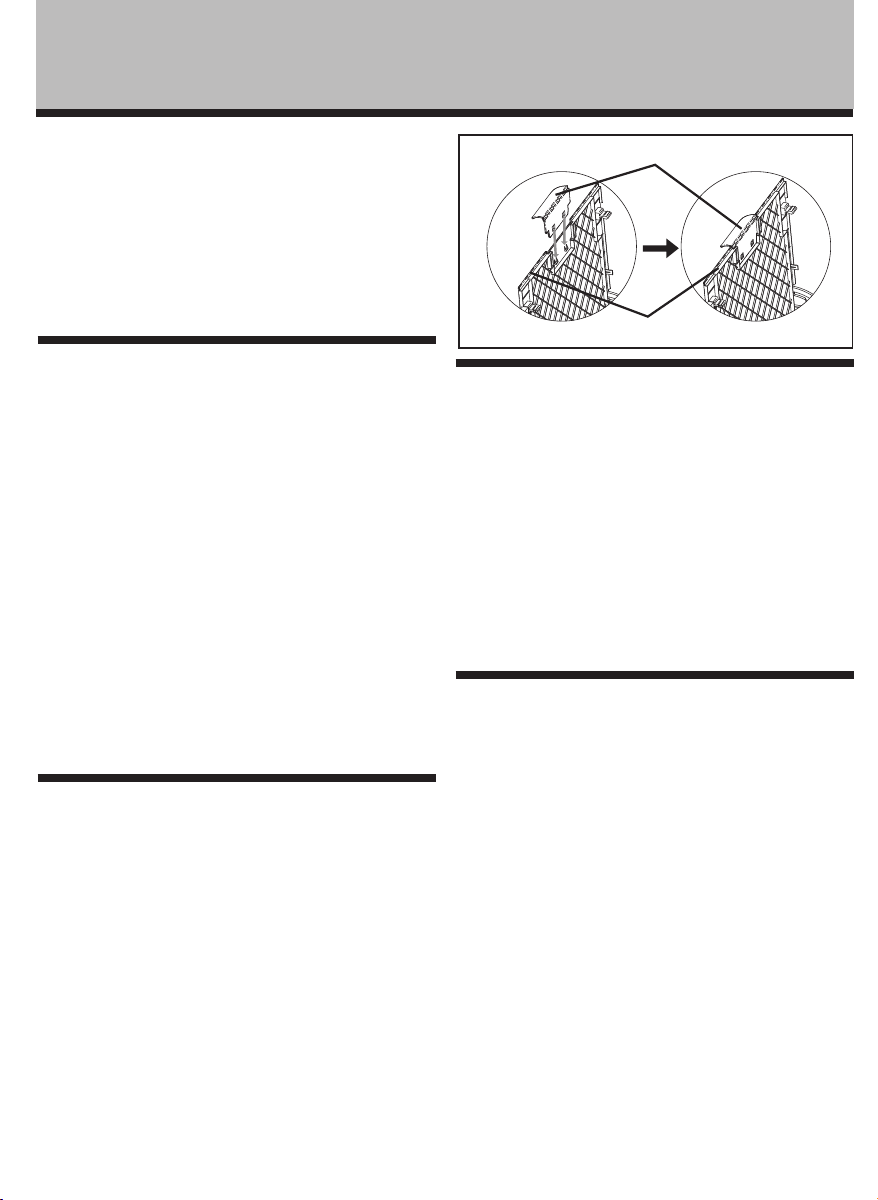
Front Door Handle Assembly
Your humidifier is packed with a separate front door handle in
the box (placed on top of the unit). Take out the handle, line up
holes of the handle with tabs on the top of the front door. Snap
the handle until it is securely installed into the front door (see
Figure 1).
FILLING THE WATER TANKS
1. Remove the two tanks from the back of the humidifier
and bring each tank to the faucet. Turn the tank upside
down and twist off the large tank cap by turning
counter-clockwise. Fill each tank with cool, fresh tap
water. Replace the cap on each tank FIRMLY.
NOTE:
Adding a water softening agent like Water Treatment
(Model S-1705) to the water will soften mineral deposits and
prevent lime and scale build-up. It will also help prolong the
life of the wick filter and make cleaning easier.
2. When full, carry each tank to the humidifier and place
back to the unit (use both hands when carrying each
tank). Each tank holds 1.4 gallons of water. When the
water stops emptying, remove the tanks and refill each
again. Replace the tanks onto the humidifier housing.
The WATER LIMITING feature on the tank cap will
prevent the tanks from overflowing. YOU NOW HAVE 1.4
GALLONS OF WATER IN EACH TANK FOR A TOTAL OF
2.8 GALLONS OF WATER.
3. Plug the power cord into a 120V AC electrical outlet.
22. No enchufe el cable con las manos húmedas. Puede
ocasionarle una descarga eléctrica.
23. No coloque agua en ninguna abertura que no sea el
tanque de agua.
24. Para prevenir el daño a las superficies, no coloque el
humidificador debajo de ninguna superficie que
sobresalga por encima del mismo.
25. NUNCA haga funcionar la unidad sin agua en el tanque.
26. Una vez utilizada la unidad, no la mueva hasta que se
haya enfriado completamente.
27. Use las dos manos cuando cargue el tanque de agua.
LEA Y CONSERVE ESTAS
IMPORTANTES
INSTRUCCIONES DE
SEGURIDAD
INFORMACIÓN DE SEGURIDAD PARA EL
CONSUMIDOR
NOTA:
Este es un artefacto eléctrico y requiere ser usado
con cuidado.
NOTA:
Si se acumula humedad en las paredes o ventanas del
cuarto, apague el humidificador. El cuarto ya tiene demasiada
humedad y la humedad adicional puede causar daños.
NOTA:
NO bloquee la entrada o salida de aire.
Instrucciones de Seguridad en la Instalación del
Cable y el Enchufe :
La longitud del cable de este artefacto fue seleccionada para
reducir el riesgo de enredarse o tropezarse con un cable más
largo. Si necesita usar un cable más largo, puede utilizar un cable
de extensión aprobado. La capacidad eléctrica del cable de
extensión debe ser igual o mayor que la capacidad del
humidificador (consulte la información sobre clasificación que se
encuentra en el humidificador). No debe permitir que el cable de
extensión cuelgue de la mesada o mesa de tal forma que pueda
ser jalado por niños o causar que alguien se tropiece.
COMO FUNCIONA EL VAPOR FRÍO
El humidificador con rocío fresco Holmes
®
produce aire seco a
través de la rejilla de toma de aire. Luego, el aire pasa por 6
filtros de mecha cargados de humedad, los que retienen los
minerales y depósitos del agua. El aire húmedo resultante es
dirigido nuevamente al ambiente por la rejilla superior.
NOTA:
Este sistema de humidificación proporciona
una salida de humedad fría e invisible. Es normal que
no se vea el vapor.
NOTA:
Un nivel de humedad menor al 20% puede ser
nocivo e incómodo. El nivel de humedad recomendado es
entre el 40% y el 50%.
INSTRUCCIONES PREVIAS AL USO
1. Asegúrese de que el humidificador esté en OFF y
desenchúfelo del tomacorriente.
2. Elija un lugar fuera del alcance de los niños. NO coloque
el humidificador sobre un piso pulido o cerca de algún
mueble, ya que lo puede dañar por el exceso de
humedad o agua.
Tirador de la Puerta Frontal
El humidificador viene con un tirador desmontable para la
puerta frontal en la caja (ubicado en la parte superior de la
unidad). Saque el tirador, alinee los orificios del tirador con las
lengüetas de la parte superior de la puerta frontal. Reubíquelo
hasta que quede seguro en la puerta frontal (ver Figura 1).
LLENADO DE LOS TANQUES DE AGUA
1. Retire los dos tanques de la parte posterior del
humidificador y colóquelos bajo el grifo. Invierta la
posición del tanque y desenrosque la tapa del tanque
grande en el sentido contrario al de las agujas del reloj.
Llene cada tanque con agua fría de la canilla. Vuelva a
colocar la tapa del tanque CON FIRMEZA.
When using electrical appliances, basic safety precautions
should always be followed to reduce the risk of fire, electric
shock, and injury to persons, including the following:
1. Read all instructions before using the appliance.
2. To avoid fire or shock hazard, plug the appliance directly
into a 120V AC electrical outlet.
3. Keep the cord out of heavy traffic areas. To avoid fire hazard,
NEVER put the cord under rugs or near heat registers.
4. DO NOT place humidifier near heat sources such as stoves,
radiators, and heaters. DO locate your humidifier on an
inside wall near an electrical outlet. The humidifier should be
at least 4 inches (10 cm) away from the wall for best results.
5. NEVER place humidifier in an area where it is accessible to
children. NEVER use humidifier in a closed room, particularly
where a child may be sleeping, resting, or playing (a closed
room may result in excessive humidity).
6.
WARNING:
Do not attempt to refill humidifier without
first unplugging the unit from its electrical outlet. Failure to
heed this warning may cause personal injury. Be sure to
unplug the unit by pulling on the plug and not the cord.
7. Never place anything over moisture outlet when the unit
is running.
8. NEVER drop or insert any object into any openings.
9. DO NOT operate any appliance with a damaged cord or
plug, after the appliance malfunctions, or if it has been
dropped or damaged in any manner. Return appliance
to manufacturer for examination, electrical or
mechanical adjustment, or repair.
10. Use appliance only for intended household use as described
in this manual. Any other use not recommended by the
manufacturer may cause fire, electric shock, or injury to
persons. The use of attachments not recommended or sold
by the manufacturer may cause hazards.
11. DO NOT use outdoors.
12. Always place humidifier on a firm, flat, level surface. A
waterproof mat or pad is recommended for use under
the humidifier. NEVER place it on a rug or carpet, or on
a finished floor that may be damaged by exposure to
water or moisture.
13. DO NOT allow the Moisture Outlet to directly face the wall.
Moisture could cause damage, particularly to wallpaper.
14. Humidifier should be unplugged when not in use.
15. NEVER tilt, move, or attempt to empty unit while it is
operating. Shut off and unplug before removing the
water tank and moving the unit.
16. This humidifier requires daily and weekly maintenance
to operate appropriately. Refer to daily and weekly
cleaning procedures. Use only cleaners and additives
recommended by the manufacturer.
17. NEVER use detergents, gasoline, glass cleaner, furniture
polish, paint thinner, or other household solvents to
clean any part of the humidifier.
18. Excessive humidity in a room can cause water
condensation on windows and some furniture. If this
happens, turn the humidifier OFF.
19. Do not use humidifier in an area where humidity level is
in excess of 50%. Use a hygrometer, available at your
local retailer or through the manufacturer, to measure
the humidity.
20. DO NOT attempt to repair or adjust any electrical or
mechanical functions on this unit. Doing so will void
your warranty. The inside of the unit contains no user
serviceable parts. All servicing should be performed by
qualified personnel only.
21. Never place housing under water flow or immerse in liquids.
22. Do not plug in the cord with wet hands: electric shock
could result.
23. Do not pour water in any openings other than the water
tank.
24. To prevent damage to surfaces, do not place humidifier
under overhanging surfaces.
25. NEVER operate unit without water in the tank.
Debe tomar precauciones básicas de seguridad siempre que
utilice artefactos eléctricos para reducir el riesgo de incendio,
descarga eléctrica y daños personales, incluyendo lo siguiente:
1. Lea completamente las instrucciones antes de utilizar el
artefacto.
2. Para evitar incendio o descarga eléctrica, enchufe el
artefacto directamente en un tomacorriente de 120V CA.
3. Mantenga el cable fuera de las zonas de mucho tráfico.
Para evitar incendios, NUNCA coloque el cable debajo de
alfombrillas o cerca de salidas de calefacción.
4. NO coloque el humidificador cerca de fuentes de calor
como estufas, radiadores y calefactores. NO coloque el
humidificador contra una pared interna cerca de un
tomacorriente. El humidificador debe estar a por lo
menos 4" de la pared para obtener el mejor resultado.
5. NUNCA coloque el humidificador en una zona accesible
para los niños. NUNCA use el humidificador en un cuarto
cerrado, especialmente donde pueda haber un niño
durmiendo, descansando, o jugando (un cuarto cerrado
puede resultar en excesiva humedad).
6. ADVERTENCIA: No intente llenar nuevamente el
humidificador sin antes desenchufarlo del tomacorriente.
El no tener en cuenta esta advertencia puede causar
daños personales. Asegúrese de desenchufar la unidad
tirando del enchufe y no del cable.
7. Nunca coloque algo sobre la salida de humedad cuando
la unidad esté funcionando.
8. NUNCA inserte ningún objeto en una de las ranuras. No
bloquee la entrada o salida de aire.
9. NO utilice ningún artefacto si el cable o el enchufe están
dañados, luego de una falla, o si se ha caído o ha sufrido
cualquier tipo de daño. Devuelva el artefacto al fabricante
para su inspección, ajuste eléctrico o mecánico, o reparación.
10. Utilice el artefacto únicamente para el propósito
hogareño indicado en este manual. Cualquier uso
distinto al recomendado por el fabricante puede causar
incendio, descarga eléctrica, o daños personales. El uso
de accesorios no recomendados o que no sean vendidos
por el fabricante puede ser peligroso.
11. NO utilizar en el exterior.
12. Siempre coloque el humidificador en una superficie
firme, plana y nivelada. Se recomienda el colocar una
alfombrilla o bandeja resistente al agua debajo del
humidificador. NUNCA lo coloque sobre un tapete o una
alfombra, o en un piso que pueda dañarse con el agua o
la humedad.
13. NO haga que la salida de humedad apunte directamente
a la pared. La humedad puede causar daños,
especialmente al empapelado.
14. Se debe desenchufar el humidificador cuando no se usa.
15. NUNCA incline, mueva o intente vaciar la unidad
mientras esté funcionando. Apague y desenchufe la
unidad antes de quitar el tanque de agua y moverla.
16. Este humidificador requiere mantenimiento diario y
semanal para funcionar correctamente. Refiérase a los
procedimientos de limpieza diarios y semanales. Use
únicamente limpiadores y aditivos recomendados por el
fabricante.
17.
NUNCA use detergentes, gasolina, limpiavidrios,
limpiador de muebles, diluyente de pintura u otro
solvente hogareño para limpiar ninguna parte del
humidificador.
18. La humedad excesiva en un cuarto puede causar
condensación de agua en las ventanas y en algunos
muebles. Si sucede esto, apague el humidificador.
19. No use el humidificador en un área donde el nivel de
humedad es mayor al 50%. Use un Higrómetro,
disponible en su tienda local o a través del fabricante,
para medir la humedad.
20. NO intente reparar o ajustar ninguna función eléctrica o
mecánica de esta unidad. El hacerlo invalidará la
garantía. La unidad no contiene partes reparables por el
usuario. Toda reparación debe ser realizada únicamente
por personal calificado.
21. Nunca coloque el gabinete debajo de la canilla o lo
sumerja en líquidos.
FEATURES - OPERATIONS
CARACTERISTICA - FUNCIONAMIENTO
CLEANING / MAINTENANCE
INSTRUCCIONES DE LIMPIEZA Y
MANTENIMIENTO
THIS APPLIANCE HAS A POLARIZED PLUG (one blade is wider than the
other). To reduce the risk of electric shock, this plug is intended to fit in a
polarized outlet only one way. If the plug does not fit fully in the outlet,
reverse the plug. If it still does not fit, contact a qualified electrician to
install the proper outlet.
DO NOT ATTEMPT TO MODIFY THIS PLUG OR DEFEAT THIS
SAFETY FEATURE IN ANY WAY.
ESTE PRODUCTO TIENE UN ENCHUFE POLARIZADO (una hoja es más ancha que
la otra). A fin de disminuir el riesgo de descarga eléctrica, este enchufe está
diseñado para insertarse en un tomacorriente polarizado en un solo sentido. Si
el enchufe no entra completamente en el tomacorriente, inviértalo. Si aun así no
entra, llame a un electricista calificado para instalar un tomacorriente apropiado.
NO MODIFIQUE EL ENCHUFE NI ANULE ESTA FUNCION DE SEGURIDAD
DE NINGUNA MANERA.
OPERATING INSTRUCTIONS
With the filter installed correctly (with filter support placed on
top of the filter - see Figure 2), front door closed, the tanks
filled and the plug correctly inserted in the outlet, you are
now ready to operate the humidifier.
NOTE: The humidifier produces clean, cool, INVISIBLE
moisture. It is normal not to see the moisture.
1. Press the Power Button ( ) to turn the humidifier on,
the humidifier will run at High setting and the
Hi/Express Mode indicator light will illuminate.
2. Allow up to 30 minutes for the filter to fully absorb
water and the unit to produce the maximum moisture
output.
3. If you want to switch to the Medium/Low settings, press
the Speed Button ( ). Each press of the button will cycle
through the speed settings (High-Medium-Low), and the
selected setting indicator light will illuminate.
4. To shut the humidifier off at any setting, press the Power
Button ( ) until all indicator lights go off.
Digital Humidistat Control
Your humidifier is equipped with a digital humidistat that
allows you to set your humidifier to your desired comfort
level by pressing the +/- buttons to adjust the humidity level
ranging from 45% to Stay On setting. The corresponding
Humidity Indicator will illuminate once selected. When the
room humidity level rises above the set humidity, the
humidifier will stop. When the room humidity level drops
below the set humidity, the humidifier will turn on
automatically to maintain the preset humidity level.
NOTE: When the water tank is empty, and the base is almost
empty, you need to refill the tank. The fan will continue to
run to help dry the humidifier. Shut off and unplug the unit.
Please follow the Daily Cleaning Instructions. Refill the tank
as directed in Filling the Water Tanks Instructions.
NOTE: If moisture forms on the walls or windows, turn off
the humidifier.
REPLACING THE FILTER
Through normal use, waterborne minerals and sediment
become trapped in the wick filter. The harder your water, the
greater the amount of minerals in the water, and the more
often you will need to change your filter.
Filter Life – Under normal conditions of continuous use, a
brand new filter will operate efficiently for 1 month. It is
strongly recommended that a new filter be replaced every 30
days of use.
To replace the filter, follow the steps below:
1. Remove both tanks from the unit and allow humidifier to
operate for 30-40 minutes to consume water in the tray
and in the filter. This will reduce water spillage when
removing the filter.
2. Be sure the humidifier is switched OFF and the unit is
disconnected from the electrical outlet.
NOTA:
El agregado de un agente ablandador de agua como
Water Treatment (Moldeo S-1705) al agua ablandará los
minerales depositados y evitará que el sarro se acumule.
Además ayudará a prolongar la vida útil del filtro de la
mecha y hará más fácil la limpieza.
2. Cuando los tanques estén llenos, colóquelos nuevamente
en el humidificador (utilice ambas manos para
transportarlos). Cada tanque tiene capacidad para 1,4
galones/5,29 L. Cuando deje de salir agua, retire los
tanques y llénelos nuevamente. Colóquelos nuevamente
en el humidificador. El LÍMITE DE AGUA en la tapa del
tanque evitará desbordes. AHORA TIENE 1,4
GALONES/5,29 L DE AGUA EN CADA UNO DE LOS
TANQUES Y UNA CAPACIDAD TOTAL DE 2,8
GALONES/10,59 L.
3. Enchufe el cable de corriente en un tomacorriente de
120 voltios AC.
INSTRUCCIONES DE USO
Con el filtro instalado correctamente (el soporte debe estar
colocado en la parte superior del filtro – ver Figura 2), la puerta
frontal cerrada, los tanques llenos y el enchufe insertado
correctamente en la toma, está listo para operar el humidificador.
NOTA: El humidificador produce una humedad limpia, fría e
INVISIBLE. Es normal no ver la humedad.
1. Presione el Botón de Encendido ( ) para activar el
humidificador; el artefacto funcionará en "High" (alto), y
se encenderá la luz indicadora "Hi/Express Mode".
2. Permita hasta 30 minutos para que el filtro absorba
totalmente el agua y para que la unidad produzca la
mayor salida humedad.
3. Si desea pasar a la velocidad de la configuración Medio/Bajo,
presione el Botón de Velocidad ( ) . Cada vez que presione el
botón, se alternará entre las diferentes configuraciones de
velocidad (Alto-Medio-Bajo), y la Luz indicadora de la
configuración seleccionada se iluminará.
4. Para apagar el humidificador, presione el Botón de Encendido
( ) hasta que se apaguen todas las luces indicadoras.
Control Digital del Humidistato
El humidificador cuenta con un control digital que permite
configurarlo en el nivel deseado presionando los botones +/-
para ajustar el grado de humedad del 45 % al "Stay On"
(encendido constante). El correspondiente Indicador de
Humedad se iluminará una vez que lo haya seleccionado.
Cuando el nivel de humedad ambiental supere el nivel
configurado, se detendrá el humidificador. Cuando el nivel de
humedad ambiental caiga por debajo del nivel configurado,
el humidificador se encenderá automáticamente para
mantener el nivel de humedad preconfigurado.
NOTA: Cuando se vacíe el tanque de agua, y la base esté
casi vacía, tiene que rellenar el tanque. El ventilador
continuará funcionando para secar el humidificador.
NOTA: Si se empañan las paredes o ventanas, apague el
humidificador.
REEMPLAZO DE LOS FILTRO
Durante el uso normal de la unidad, los minerales y
sedimentos arrastrados por el agua quedan retenidos en el
filtro de mecha. Mientras más dura sea el agua, mayor será
el número de minerales que contenga, mientras mayor sea el
número de minerales en el agua, mayor será la frecuencia
en que tenga que cambiar el filtro.
Figure 1
Front Door Handle
Front Door
Figure 1
Tirador de la puerta frontal
Puerta frontal
Figure 2
A. Tank Handles (2)
B. Water Tanks (2)
C. LED Control Panel
D. Humidifier Housing
E. Filter Support
F. Front Door
G. Wick Filter
A
B
F
C
G
E
D
Figure 2
A. Manijas del tanque (2)
B. Tanques de agua (2)
C. Panel de control LED
D. Carcasa del humidificador
E. Soporte del filtro
F. Puerta frontal
G. Filtro de mechas
A
B
F
C
G
E
D
45%
50%
55%
60%
Stay On
Lo/Quiet
Mode
Med/Comfort
Mode
Hi/Express
Mode
45%
50%
55%
60%
Stay On
Lo/Quiet
Mode
Med/Comfort
Mode
Hi/Express
Mode
PLEASE READ AND SAVE THESE
IMPORTANT SAFETY INSTRUCTIONS
LEA Y CONSERVE ESTAS IMPORTANTES
INSTRUCCIONES DE SEGURIDAD
FEATURES - OPERATIONS
CARACTERISTICA - FUNCIONAMIENTO
3. Hold the front door handle and open the front door to
access the filter. (see Figure 2).
4. Take off the top filter support and discard the old filter
and follow weekly cleaning instructions.
5. Insert a new filter and replace the filter support on top.
Place the filter back onto the humdifier base. Ensure that
the filter is seated correctly and can come in contact with
water.
6. Close the front door properly.
7. Repeat Operating Instruction steps.
It will take about 30 minutes for the humidifier to reach
maximum output.
NOTE: You can purchase replacement filters (model HWF75/
SF221) at a local retailer, by calling 1-800-546-5637, or by
visiting
www.holmesproducts.com
. It is recommended that a
replacement filter is purchased for uninterrupted use.
CLEANING AND MAINTENANCE
INSTRUCTIONS
Humidifiers provide comfort by adding moisture to dry,
heated indoor air. To benefit most from the humidifier and
avoid product misuse, follow all instructions carefully. Please
note that this is an electrical appliance and requires attention
when in use.
In addition, if you do not follow the recommended care and
maintenance guidelines, micro-organisms may be able to
grow in the water within the water tanks. You must routinely
follow the cleaning procedures that follow in order to ensure
proper, efficient operation of your humidifier. Proper maintenance
and cleaning is essential to the continued performance of
your unit and the avoidance of algae or bacteria build-up.
Daily Maintenance
1. Be sure the humidifier is switched OFF and the unit is
disconnected from the electrical outlet.
2. Remove the tanks from the humidifier and place them in
sink or tub.
3. Carry the base of the unit to the sink, remove the wick
filter, place in sink, drain any remaining water. Wipe
clean, and dry with a clean cloth or paper towel.
4. Drain the water from the tanks into the sink and rinse
each tank thoroughly. Wipe clean, and dry with a clean
cloth or paper towel.
5. Put filter back with the filter support, close the front
door, then refill the tanks with cool tap water as
instructed earlier in the Filling Instructions. Do not
overfill.
6. Follow Operating Instructions.
Weekly Maintenance
To Remove Scale:
1. Repeat steps 1-4 above.
2.
Partially fill the base with Cleanse Clean® solution
(Model S1710) as instructed on bottle, or with two 8 oz.
cups of undiluted white vinegar. Leave this solution in the
base for 20 minutes, while cleaning all the interior
surfaces with a soft brush. Remove base scale by wiping
the base with a cloth dampened with undiluted white
vinegar.
3. Rinse with clean warm water to remove the cleaning
solution before disinfecting the tanks.
To Disinfect Humidifier Base and Tanks:
1. Fill Humidifier Base with 2 gallons of water and 1
teaspoon of chlorine bleach.
2. Fill each tank 1/2 full with water and 1 teaspoon of
chlorine bleach.
3. Let the solution stand for 20 minutes, swishing every few
minutes. Wet all surfaces.
4. Carefully empty the Base and Tanks after 20 minutes,
and rinse with warm water until you cannot detect any
bleach smell. Dry with a clean cloth or paper towel.
5. Depending on the water hardness in your area, it may
be necessary to change the filter every month. Re-insert
the wick filter into the filter support.
6. Refill the water tanks as directed with cool tap water,
replace the humidifier housing, and turn the Control
Knob to ON.
Vida útil del filtro – en condiciones normales de uso continuo,
un filtro nuevo funcionará adecuadamente durante 1 mes. Se
recomienda el reemplazo del filtro cada 30 días de uso.
Para reemplazar el filtro, siga los siguientes pasos.
1. Asegúrese de que el humidificador esté en OFF y
desenchúfelo del tomacorriente.
2. Para acceder al filtro, abra la puerta frontal con el
tirador. (ver Figura 2).
3. Retire el soporte superior del filtro, deseche el filtro viejo
y siga las instrucciones de limpieza semanales.
4. Coloque un filtro nuevo y reemplace el soporte superior.
Coloque nuevamente el filtro en la base del
humidificador.
5. Cierre la puerta frontal de manera adecuada.
6. Repita los pasos de las instrucciones de uso.
Tomará aproximadamente 30 minutos para que el
humidificador alcance su potencia máxima.
NOTA:
Puede comprar repuestos de filtros (modelo HWF75 /
SF221) en una tienda local, llamando al 1-800-546-5637, ó
visitando
www.holmesproducts.com
. Se recomienda que compre
un filtro de repuesto para no interrumpir el funcionamiento de la
unidad.
INSTRUCCIONES DE LIMPIEZA Y
MANTENIMIENTO
Los humidificadores proveen confort agregando humedad al
aire seco de los ambientes interiores calefaccionados. Para
beneficiarse al máximo de los humidificadores y evitar su
mal uso, siga todas las instrucciones cuidadosamente. Tenga
en cuenta que éste es un artefacto eléctrico que requiere
atención cuando esté en uso.
Además, si no se siguen las recomendaciones para el cuidado y
mantenimiento, crecerán microorganismos en el agua dentro de
los tanques. Se deben ejecutar rutinariamente los procedimientos
de limpieza que se indican a continuación para asegurar el
funcionamiento adecuado y eficiente del humidificador que
son esenciales para el rendimiento óptimo constante de la
unidad y para evitar la formación de algas y bacterias.
Mantenimiento diario
1. Retire ambos tanques de la unidad y deje al humidificador
funcionando entre 30 y 40 minutos hasta que se consuma el
agua de la bandeja y del filtro. De este modo, se reducirá el
derrame de agua al retirar el filtro.
2. Asegúrese de que el humidificador esté en OFF
(Apagado) y desconectado del tomacorriente.
3. Retire los tanques del humidificador y colóquelos en el
fregadero o en una cuba.
4. Lleve la base al fregadero, retire el filtro de mechas,
colóquelo en el fregadero y drene el agua remanente.
limpie frotando con un paño y seque con una toalla de
tela o papel.
5. Drene el agua de los tanques en el fregadero y
enjuáguelos completamente. Límpielos frotando con un
paño y séquelos con una toalla de tela o de papel.
Asegúrese de que el filtro quede bien colocado para
tomar contacto con el agua.
6. Coloque nuevamente el soporte del filtro, cierre la
puerta frontal y rellene los tanques con agua fresca del
grifo, tal como se indicó en las Instrucciones de Llenado.
No lo llene de más.
7. Siga las instrucciones de operación.
Mantenimiento semanal
Para extraer el sarro :
1. Repita los pasos 1 al 4 anteriores.
2.
Llene parcialmente la base con solución Cleanse Clean
®
(Modelo S1710) como se indica en la botella, o con dos
tazas de vinagre blanco sin diluir.
Deje reposar esta
solución en la base por 20 min. mientras limpia todas las
superficies interiores con un cepillo blando. Quite el sarro
frotando la base con un trapo humedecido con vinagre
blanco sin diluir.
3. Enjuague con agua tibia limpia para extraer la solución
limpiadora antes de desinfectar el tanque.
Para desinfectar los tanques de la base del
humidificador:
1. Llene la base del humidificador con 8 litros de agua y
una cucharadita de blanqueador de cloro.
2. Llene cada tanque hasta la mitad con agua y 1/2
cucharadita de blanqueador de cloro.
3. Deje que la solución trabaje por 20 minutos, sacudiendo
los tanques de vez en cuando. Moje todas las superficies.
4. Vacíe cuidadosamente la base y los tanques después de
20 minutos y enjuague hasta que ya no se pueda
detectar el olor a cloro. Seque con una tela limpia o con
toalla de papel.
5. Dependiendo de la dureza del agua en su zona, puede
ser necesario cambiar el filtro cada mese. Vuelva a
insertar el filtro de la mecha en el soporte del filtro.
6. Vuelva a llenar los tanques de agua como se indica con
agua fría, vuelva a colocar la carcasa del humidificador,
y gire la perilla de control a encendido.
26. Do not move unit after it has been used until unit cools
completely.
27. Use both hands when carrying full tank of water.
PLEASE READ AND SAVE
THESE IMPORTANT SAFETY
INSTRUCTIONS
CONSUMER SAFETY INFORMATION
NOTE:
This is an electrical appliance and requires attention
when in use.
NOTE:
If moisture forms on the walls or windows of the
room, turn off the humidifier. The room already has plenty of
humidity and additional moisture may cause damage.
NOTE:
DO NOT block air inlet or outlet.
Cord and Plug Installation Safety Instructions:
The length of cord used on this appliance was selected to reduce
the hazards of becoming tangled in, or tripping over a longer
cord. If a longer cord is necessary an approved extension cord
may be used. The electrical rating of the extension cord must be
equal to or greater than the rating of the humidifier (refer to
the rating information placed on the humidifier). Care must be
taken to arrange the extension cord so that it will not drape
over the countertop or tabletop where it can be pulled on by
children or accidentally tripped over.
HOW COOL MIST WORKS
Your Holmes
®
Cool Mist humidifier draws dry air through the
air intake grill area. This air is then passed through a
moisture–laden wick filter, which retains the minerals and
deposits in the water. The resulting moist air is directed back
into the room from the top air grill.
NOTE:
This humidification system provides a cool, invisible
moisture output. It is normal not to see the mist.
NOTE:
A humidity level below 20% can be unhealthy and
uncomfortable. The recommended humidity level is between
40%-50%.
PRE-OPERATING INSTRUCTIONS
1. Be sure the humidifier is switched to OFF and the unit is
disconnected from the electrical outlet.
2. Choose a location out of reach of children. DO NOT place
the humidifier on a finished floor or near furniture which
can be damaged by moisture or water.
Front Door Handle Assembly
Your humidifier is packed with a separate front door handle in
the box (placed on top of the unit). Take out the handle, line up
holes of the handle with tabs on the top of the front door. Snap
the handle until it is securely installed into the front door (see
Figure 1).
FILLING THE WATER TANKS
1. Remove the two tanks from the back of the humidifier
and bring each tank to the faucet. Turn the tank upside
down and twist off the large tank cap by turning
counter-clockwise. Fill each tank with cool, fresh tap
water. Replace the cap on each tank FIRMLY.
NOTE:
Adding a water softening agent like Water Treatment
(Model S-1705) to the water will soften mineral deposits and
prevent lime and scale build-up. It will also help prolong the
life of the wick filter and make cleaning easier.
2. When full, carry each tank to the humidifier and place
back to the unit (use both hands when carrying each
tank). Each tank holds 1.4 gallons of water. When the
water stops emptying, remove the tanks and refill each
again. Replace the tanks onto the humidifier housing.
The WATER LIMITING feature on the tank cap will
prevent the tanks from overflowing. YOU NOW HAVE 1.4
GALLONS OF WATER IN EACH TANK FOR A TOTAL OF
2.8 GALLONS OF WATER.
3. Plug the power cord into a 120V AC electrical outlet.
22. No enchufe el cable con las manos húmedas. Puede
ocasionarle una descarga eléctrica.
23. No coloque agua en ninguna abertura que no sea el
tanque de agua.
24. Para prevenir el daño a las superficies, no coloque el
humidificador debajo de ninguna superficie que
sobresalga por encima del mismo.
25. NUNCA haga funcionar la unidad sin agua en el tanque.
26. Una vez utilizada la unidad, no la mueva hasta que se
haya enfriado completamente.
27. Use las dos manos cuando cargue el tanque de agua.
LEA Y CONSERVE ESTAS
IMPORTANTES
INSTRUCCIONES DE
SEGURIDAD
INFORMACIÓN DE SEGURIDAD PARA EL
CONSUMIDOR
NOTA:
Este es un artefacto eléctrico y requiere ser usado
con cuidado.
NOTA:
Si se acumula humedad en las paredes o ventanas del
cuarto, apague el humidificador. El cuarto ya tiene demasiada
humedad y la humedad adicional puede causar daños.
NOTA:
NO bloquee la entrada o salida de aire.
Instrucciones de Seguridad en la Instalación del
Cable y el Enchufe :
La longitud del cable de este artefacto fue seleccionada para
reducir el riesgo de enredarse o tropezarse con un cable más
largo. Si necesita usar un cable más largo, puede utilizar un cable
de extensión aprobado. La capacidad eléctrica del cable de
extensión debe ser igual o mayor que la capacidad del
humidificador (consulte la información sobre clasificación que se
encuentra en el humidificador). No debe permitir que el cable de
extensión cuelgue de la mesada o mesa de tal forma que pueda
ser jalado por niños o causar que alguien se tropiece.
COMO FUNCIONA EL VAPOR FRÍO
El humidificador con rocío fresco Holmes
®
produce aire seco a
través de la rejilla de toma de aire. Luego, el aire pasa por 6
filtros de mecha cargados de humedad, los que retienen los
minerales y depósitos del agua. El aire húmedo resultante es
dirigido nuevamente al ambiente por la rejilla superior.
NOTA:
Este sistema de humidificación proporciona
una salida de humedad fría e invisible. Es normal que
no se vea el vapor.
NOTA:
Un nivel de humedad menor al 20% puede ser
nocivo e incómodo. El nivel de humedad recomendado es
entre el 40% y el 50%.
INSTRUCCIONES PREVIAS AL USO
1. Asegúrese de que el humidificador esté en OFF y
desenchúfelo del tomacorriente.
2. Elija un lugar fuera del alcance de los niños. NO coloque
el humidificador sobre un piso pulido o cerca de algún
mueble, ya que lo puede dañar por el exceso de
humedad o agua.
Tirador de la Puerta Frontal
El humidificador viene con un tirador desmontable para la
puerta frontal en la caja (ubicado en la parte superior de la
unidad). Saque el tirador, alinee los orificios del tirador con las
lengüetas de la parte superior de la puerta frontal. Reubíquelo
hasta que quede seguro en la puerta frontal (ver Figura 1).
LLENADO DE LOS TANQUES DE AGUA
1. Retire los dos tanques de la parte posterior del
humidificador y colóquelos bajo el grifo. Invierta la
posición del tanque y desenrosque la tapa del tanque
grande en el sentido contrario al de las agujas del reloj.
Llene cada tanque con agua fría de la canilla. Vuelva a
colocar la tapa del tanque CON FIRMEZA.
When using electrical appliances, basic safety precautions
should always be followed to reduce the risk of fire, electric
shock, and injury to persons, including the following:
1. Read all instructions before using the appliance.
2. To avoid fire or shock hazard, plug the appliance directly
into a 120V AC electrical outlet.
3. Keep the cord out of heavy traffic areas. To avoid fire hazard,
NEVER put the cord under rugs or near heat registers.
4. DO NOT place humidifier near heat sources such as stoves,
radiators, and heaters. DO locate your humidifier on an
inside wall near an electrical outlet. The humidifier should be
at least 4 inches (10 cm) away from the wall for best results.
5. NEVER place humidifier in an area where it is accessible to
children. NEVER use humidifier in a closed room, particularly
where a child may be sleeping, resting, or playing (a closed
room may result in excessive humidity).
6.
WARNING:
Do not attempt to refill humidifier without
first unplugging the unit from its electrical outlet. Failure to
heed this warning may cause personal injury. Be sure to
unplug the unit by pulling on the plug and not the cord.
7. Never place anything over moisture outlet when the unit
is running.
8. NEVER drop or insert any object into any openings.
9. DO NOT operate any appliance with a damaged cord or
plug, after the appliance malfunctions, or if it has been
dropped or damaged in any manner. Return appliance
to manufacturer for examination, electrical or
mechanical adjustment, or repair.
10. Use appliance only for intended household use as described
in this manual. Any other use not recommended by the
manufacturer may cause fire, electric shock, or injury to
persons. The use of attachments not recommended or sold
by the manufacturer may cause hazards.
11. DO NOT use outdoors.
12. Always place humidifier on a firm, flat, level surface. A
waterproof mat or pad is recommended for use under
the humidifier. NEVER place it on a rug or carpet, or on
a finished floor that may be damaged by exposure to
water or moisture.
13. DO NOT allow the Moisture Outlet to directly face the wall.
Moisture could cause damage, particularly to wallpaper.
14. Humidifier should be unplugged when not in use.
15. NEVER tilt, move, or attempt to empty unit while it is
operating. Shut off and unplug before removing the
water tank and moving the unit.
16. This humidifier requires daily and weekly maintenance
to operate appropriately. Refer to daily and weekly
cleaning procedures. Use only cleaners and additives
recommended by the manufacturer.
17. NEVER use detergents, gasoline, glass cleaner, furniture
polish, paint thinner, or other household solvents to
clean any part of the humidifier.
18. Excessive humidity in a room can cause water
condensation on windows and some furniture. If this
happens, turn the humidifier OFF.
19. Do not use humidifier in an area where humidity level is
in excess of 50%. Use a hygrometer, available at your
local retailer or through the manufacturer, to measure
the humidity.
20. DO NOT attempt to repair or adjust any electrical or
mechanical functions on this unit. Doing so will void
your warranty. The inside of the unit contains no user
serviceable parts. All servicing should be performed by
qualified personnel only.
21. Never place housing under water flow or immerse in liquids.
22. Do not plug in the cord with wet hands: electric shock
could result.
23. Do not pour water in any openings other than the water
tank.
24. To prevent damage to surfaces, do not place humidifier
under overhanging surfaces.
25. NEVER operate unit without water in the tank.
Debe tomar precauciones básicas de seguridad siempre que
utilice artefactos eléctricos para reducir el riesgo de incendio,
descarga eléctrica y daños personales, incluyendo lo siguiente:
1. Lea completamente las instrucciones antes de utilizar el
artefacto.
2. Para evitar incendio o descarga eléctrica, enchufe el
artefacto directamente en un tomacorriente de 120V CA.
3. Mantenga el cable fuera de las zonas de mucho tráfico.
Para evitar incendios, NUNCA coloque el cable debajo de
alfombrillas o cerca de salidas de calefacción.
4. NO coloque el humidificador cerca de fuentes de calor
como estufas, radiadores y calefactores. NO coloque el
humidificador contra una pared interna cerca de un
tomacorriente. El humidificador debe estar a por lo
menos 4" de la pared para obtener el mejor resultado.
5. NUNCA coloque el humidificador en una zona accesible
para los niños. NUNCA use el humidificador en un cuarto
cerrado, especialmente donde pueda haber un niño
durmiendo, descansando, o jugando (un cuarto cerrado
puede resultar en excesiva humedad).
6. ADVERTENCIA: No intente llenar nuevamente el
humidificador sin antes desenchufarlo del tomacorriente.
El no tener en cuenta esta advertencia puede causar
daños personales. Asegúrese de desenchufar la unidad
tirando del enchufe y no del cable.
7. Nunca coloque algo sobre la salida de humedad cuando
la unidad esté funcionando.
8. NUNCA inserte ningún objeto en una de las ranuras. No
bloquee la entrada o salida de aire.
9. NO utilice ningún artefacto si el cable o el enchufe están
dañados, luego de una falla, o si se ha caído o ha sufrido
cualquier tipo de daño. Devuelva el artefacto al fabricante
para su inspección, ajuste eléctrico o mecánico, o reparación.
10. Utilice el artefacto únicamente para el propósito
hogareño indicado en este manual. Cualquier uso
distinto al recomendado por el fabricante puede causar
incendio, descarga eléctrica, o daños personales. El uso
de accesorios no recomendados o que no sean vendidos
por el fabricante puede ser peligroso.
11. NO utilizar en el exterior.
12. Siempre coloque el humidificador en una superficie
firme, plana y nivelada. Se recomienda el colocar una
alfombrilla o bandeja resistente al agua debajo del
humidificador. NUNCA lo coloque sobre un tapete o una
alfombra, o en un piso que pueda dañarse con el agua o
la humedad.
13. NO haga que la salida de humedad apunte directamente
a la pared. La humedad puede causar daños,
especialmente al empapelado.
14. Se debe desenchufar el humidificador cuando no se usa.
15. NUNCA incline, mueva o intente vaciar la unidad
mientras esté funcionando. Apague y desenchufe la
unidad antes de quitar el tanque de agua y moverla.
16. Este humidificador requiere mantenimiento diario y
semanal para funcionar correctamente. Refiérase a los
procedimientos de limpieza diarios y semanales. Use
únicamente limpiadores y aditivos recomendados por el
fabricante.
17.
NUNCA use detergentes, gasolina, limpiavidrios,
limpiador de muebles, diluyente de pintura u otro
solvente hogareño para limpiar ninguna parte del
humidificador.
18. La humedad excesiva en un cuarto puede causar
condensación de agua en las ventanas y en algunos
muebles. Si sucede esto, apague el humidificador.
19. No use el humidificador en un área donde el nivel de
humedad es mayor al 50%. Use un Higrómetro,
disponible en su tienda local o a través del fabricante,
para medir la humedad.
20. NO intente reparar o ajustar ninguna función eléctrica o
mecánica de esta unidad. El hacerlo invalidará la
garantía. La unidad no contiene partes reparables por el
usuario. Toda reparación debe ser realizada únicamente
por personal calificado.
21. Nunca coloque el gabinete debajo de la canilla o lo
sumerja en líquidos.
FEATURES - OPERATIONS
CARACTERISTICA - FUNCIONAMIENTO
CLEANING / MAINTENANCE
INSTRUCCIONES DE LIMPIEZA Y
MANTENIMIENTO
THIS APPLIANCE HAS A POLARIZED PLUG (one blade is wider than the
other). To reduce the risk of electric shock, this plug is intended to fit in a
polarized outlet only one way. If the plug does not fit fully in the outlet,
reverse the plug. If it still does not fit, contact a qualified electrician to
install the proper outlet.
DO NOT ATTEMPT TO MODIFY THIS PLUG OR DEFEAT THIS
SAFETY FEATURE IN ANY WAY.
ESTE PRODUCTO TIENE UN ENCHUFE POLARIZADO (una hoja es más ancha que
la otra). A fin de disminuir el riesgo de descarga eléctrica, este enchufe está
diseñado para insertarse en un tomacorriente polarizado en un solo sentido. Si
el enchufe no entra completamente en el tomacorriente, inviértalo. Si aun así no
entra, llame a un electricista calificado para instalar un tomacorriente apropiado.
NO MODIFIQUE EL ENCHUFE NI ANULE ESTA FUNCION DE SEGURIDAD
DE NINGUNA MANERA.
OPERATING INSTRUCTIONS
With the filter installed correctly (with filter support placed on
top of the filter - see Figure 2), front door closed, the tanks
filled and the plug correctly inserted in the outlet, you are
now ready to operate the humidifier.
NOTE: The humidifier produces clean, cool, INVISIBLE
moisture. It is normal not to see the moisture.
1. Press the Power Button ( ) to turn the humidifier on,
the humidifier will run at High setting and the
Hi/Express Mode indicator light will illuminate.
2. Allow up to 30 minutes for the filter to fully absorb
water and the unit to produce the maximum moisture
output.
3. If you want to switch to the Medium/Low settings, press
the Speed Button ( ). Each press of the button will cycle
through the speed settings (High-Medium-Low), and the
selected setting indicator light will illuminate.
4. To shut the humidifier off at any setting, press the Power
Button ( ) until all indicator lights go off.
Digital Humidistat Control
Your humidifier is equipped with a digital humidistat that
allows you to set your humidifier to your desired comfort
level by pressing the +/- buttons to adjust the humidity level
ranging from 45% to Stay On setting. The corresponding
Humidity Indicator will illuminate once selected. When the
room humidity level rises above the set humidity, the
humidifier will stop. When the room humidity level drops
below the set humidity, the humidifier will turn on
automatically to maintain the preset humidity level.
NOTE: When the water tank is empty, and the base is almost
empty, you need to refill the tank. The fan will continue to
run to help dry the humidifier. Shut off and unplug the unit.
Please follow the Daily Cleaning Instructions. Refill the tank
as directed in Filling the Water Tanks Instructions.
NOTE: If moisture forms on the walls or windows, turn off
the humidifier.
REPLACING THE FILTER
Through normal use, waterborne minerals and sediment
become trapped in the wick filter. The harder your water, the
greater the amount of minerals in the water, and the more
often you will need to change your filter.
Filter Life – Under normal conditions of continuous use, a
brand new filter will operate efficiently for 1 month. It is
strongly recommended that a new filter be replaced every 30
days of use.
To replace the filter, follow the steps below:
1. Remove both tanks from the unit and allow humidifier to
operate for 30-40 minutes to consume water in the tray
and in the filter. This will reduce water spillage when
removing the filter.
2. Be sure the humidifier is switched OFF and the unit is
disconnected from the electrical outlet.
NOTA:
El agregado de un agente ablandador de agua como
Water Treatment (Moldeo S-1705) al agua ablandará los
minerales depositados y evitará que el sarro se acumule.
Además ayudará a prolongar la vida útil del filtro de la
mecha y hará más fácil la limpieza.
2. Cuando los tanques estén llenos, colóquelos nuevamente
en el humidificador (utilice ambas manos para
transportarlos). Cada tanque tiene capacidad para 1,4
galones/5,29 L. Cuando deje de salir agua, retire los
tanques y llénelos nuevamente. Colóquelos nuevamente
en el humidificador. El LÍMITE DE AGUA en la tapa del
tanque evitará desbordes. AHORA TIENE 1,4
GALONES/5,29 L DE AGUA EN CADA UNO DE LOS
TANQUES Y UNA CAPACIDAD TOTAL DE 2,8
GALONES/10,59 L.
3. Enchufe el cable de corriente en un tomacorriente de
120 voltios AC.
INSTRUCCIONES DE USO
Con el filtro instalado correctamente (el soporte debe estar
colocado en la parte superior del filtro – ver Figura 2), la puerta
frontal cerrada, los tanques llenos y el enchufe insertado
correctamente en la toma, está listo para operar el humidificador.
NOTA: El humidificador produce una humedad limpia, fría e
INVISIBLE. Es normal no ver la humedad.
1. Presione el Botón de Encendido ( ) para activar el
humidificador; el artefacto funcionará en "High" (alto), y
se encenderá la luz indicadora "Hi/Express Mode".
2. Permita hasta 30 minutos para que el filtro absorba
totalmente el agua y para que la unidad produzca la
mayor salida humedad.
3. Si desea pasar a la velocidad de la configuración Medio/Bajo,
presione el Botón de Velocidad ( ) . Cada vez que presione el
botón, se alternará entre las diferentes configuraciones de
velocidad (Alto-Medio-Bajo), y la Luz indicadora de la
configuración seleccionada se iluminará.
4. Para apagar el humidificador, presione el Botón de Encendido
( ) hasta que se apaguen todas las luces indicadoras.
Control Digital del Humidistato
El humidificador cuenta con un control digital que permite
configurarlo en el nivel deseado presionando los botones +/-
para ajustar el grado de humedad del 45 % al "Stay On"
(encendido constante). El correspondiente Indicador de
Humedad se iluminará una vez que lo haya seleccionado.
Cuando el nivel de humedad ambiental supere el nivel
configurado, se detendrá el humidificador. Cuando el nivel de
humedad ambiental caiga por debajo del nivel configurado,
el humidificador se encenderá automáticamente para
mantener el nivel de humedad preconfigurado.
NOTA: Cuando se vacíe el tanque de agua, y la base esté
casi vacía, tiene que rellenar el tanque. El ventilador
continuará funcionando para secar el humidificador.
NOTA: Si se empañan las paredes o ventanas, apague el
humidificador.
REEMPLAZO DE LOS FILTRO
Durante el uso normal de la unidad, los minerales y
sedimentos arrastrados por el agua quedan retenidos en el
filtro de mecha. Mientras más dura sea el agua, mayor será
el número de minerales que contenga, mientras mayor sea el
número de minerales en el agua, mayor será la frecuencia
en que tenga que cambiar el filtro.
Figure 1
Front Door Handle
Front Door
Figure 1
Tirador de la puerta frontal
Puerta frontal
Figure 2
A. Tank Handles (2)
B. Water Tanks (2)
C. LED Control Panel
D. Humidifier Housing
E. Filter Support
F. Front Door
G. Wick Filter
A
B
F
C
G
E
D
Figure 2
A. Manijas del tanque (2)
B. Tanques de agua (2)
C. Panel de control LED
D. Carcasa del humidificador
E. Soporte del filtro
F. Puerta frontal
G. Filtro de mechas
A
B
F
C
G
E
D
45%
50%
55%
60%
Stay On
Lo/Quiet
Mode
Med/Comfort
Mode
Hi/Express
Mode
45%
50%
55%
60%
Stay On
Lo/Quiet
Mode
Med/Comfort
Mode
Hi/Express
Mode
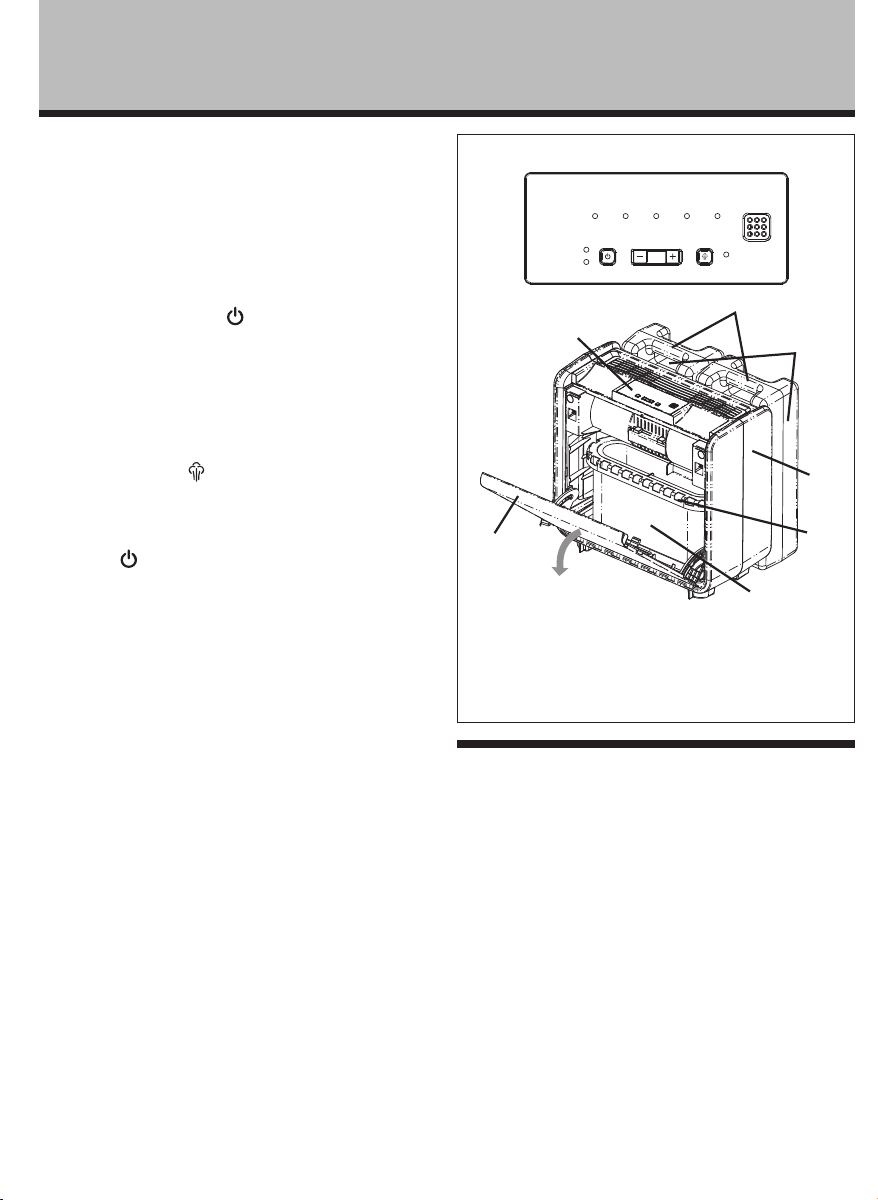
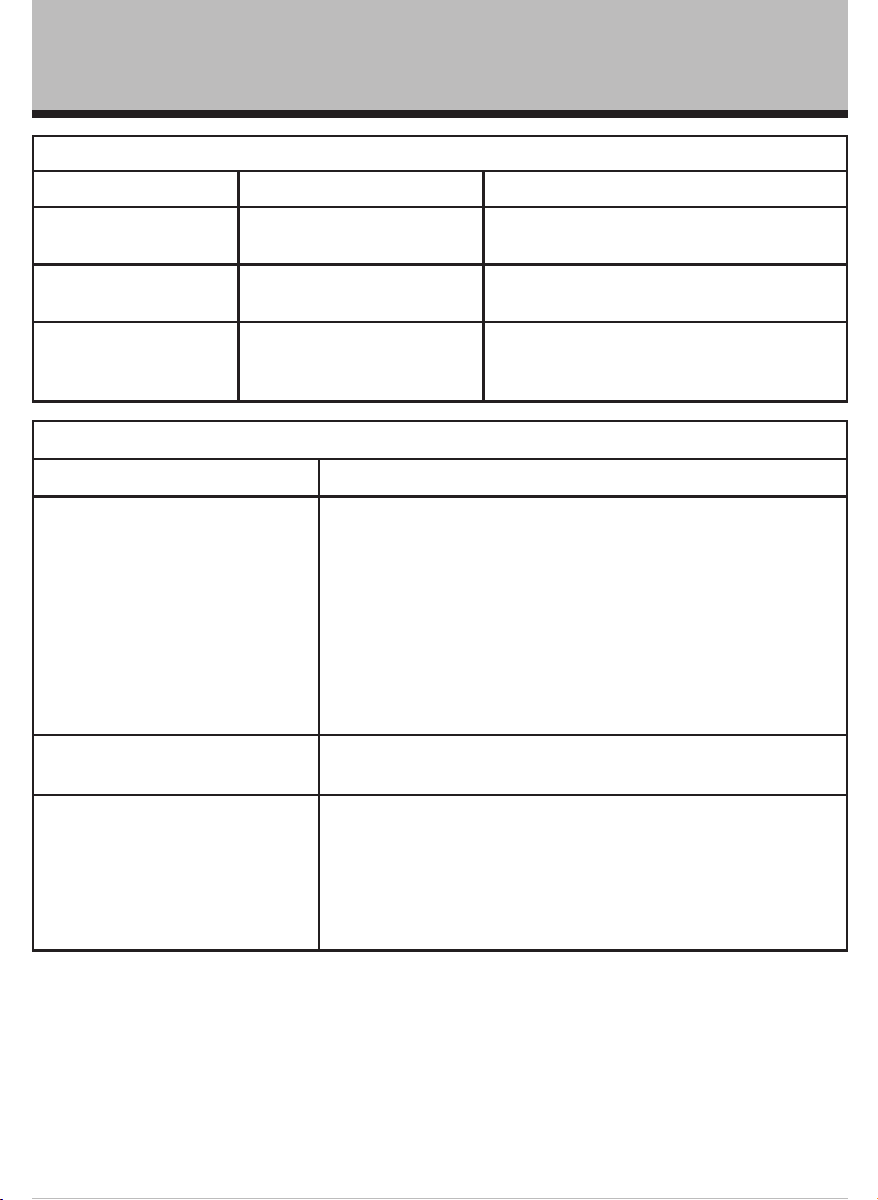
WARRANTY INFORMATION
© 2019 Sunbeam Products, Inc. All Rights Reserved. Distributed by Sunbeam Products, Inc., Boca Raton, Florida 33431.
1 YEAR LIMITED WARRANTY
Sunbeam Products, Inc. (“Sunbeam”) or if in Canada, Newell Brands Canada ULC (“NBC”) warrants that for a period
of one year from the date of purchase, this product will be free from defects in material and workmanship. Sunbeam
(or NBC), at its option, will repair or replace this product or any component of the product found to be defective
during the warranty period. Replacement will be made with a new or remanufactured product or component. If the
product is no longer available, replacement may be made with a similar product of equal or greater value. This is
your exclusive warranty. Do NOT attempt to repair or adjust any electrical or mechanical functions on this product.
Doing so will void this warranty.
This warranty is valid for the original retail purchaser from the date of initial retail purchase and is not transferable.
Keep the original sales receipt. Proof of purchase is required to obtain warranty performance. Sunbeam (or NBC)
dealers, service centers, or retail stores selling Sunbeam (or NBC) products do not have the right to alter, modify or
any way change the terms and conditions of this warranty.
This warranty does not cover normal wear of parts or damage resulting from any of the following: negligent use or
misuse of the product, use on improper voltage or current, use contrary to the operating instructions, disassembly,
repair or alteration by anyone other than Sunbeam or an authorized Sunbeam (or NBC) service center. Further, the
warranty does not cover: Acts of God, such as fire, flood, hurricanes and tornadoes.
What are the limits on Sunbeam’s (or NBC’s) Liability?
Sunbeam (or NBC) shall not be liable for any incidental or consequential damages caused by the breach of any
express, implied or statutory warranty or condition.
Except to the extent prohibited by applicable law, any implied warranty or condition of merchantability or fitness for a
particular purpose is limited in duration to the duration of the above warranty. Sunbeam (or NBC) disclaims all other
warranties, conditions or representations, express, implied, statutory or otherwise. Sunbeam (or NBC) shall not be
liable for any damages of any kind resulting from the purchase, use or misuse of, or inability to use the product
including incidental, special, consequential or similar damages or loss of profits, or for any breach of contract,
fundamental or otherwise, or for any claim brought against purchaser by any other party. Some provinces, states or
jurisdictions do not allow the exclusion or limitation of incidental or consequential damages or limitations on how long
an implied warranty lasts, so the above limitations or exclusion may not apply to you. This warranty gives you specific
legal rights, and you may also have other rights that vary from province to province, state to state or jurisdiction to
jurisdiction.
How to Obtain Warranty Service
In the U.S.A.
If you have any questions regarding this warranty or would like to obtain warranty service, please visit our website at
www.holmesproducts.com.
In Canada
If you have any questions regarding this warranty or would like to obtain warranty service, please visit our website at
www.holmesproducts.com.
In the U.S.A., this warranty is offered by Sunbeam Products, Inc. located in Boca Raton, Florida 33431. In Canada, this
warranty is offered by Newell Brands Canada ULC, located at 20B Hereford Street, Brampton, Ontario L6Y 0M1. If you
have any other problem or claim in connection with this product, please write our Consumer Service Department.
PLEASE DO NOT RETURN THIS PRODUCT TO ANY OF THESE ADDRESSES OR TO THE PLACE OF
PURCHASE.
TROUBLESHOOTING
FREQUENTLY ASKED QUESTIONS
FREQUENTLY ASKED QUESTIONS
Question Answer
• What are the variables that affect
run time?
The estimated run time for this humidifier is based on average room
conditions. The actual run time of your humidifier is dependent on numerous
variables such as:
✔ Air exchange in the room where the humidifier is placed.
✔ Room construction of the room where the humidifier is placed.
✔ Temperature of the room where the humidifier is placed.
✔ Humidity levels in the room where the humidifier is placed.
✔ Movement of occupants and the opening and closing of doors in the room
where the humidifier is placed.
✔ Home furnishings in the room where the humidifier is placed.
• How do I remove film on water
tank?
✔ See Daily Maintenance instructions. Regular cleaning is recommended.
• How can I extend the run time?
✔ Run your unit on the lowest setting.
✔ If your unit has electronics, set it to your desired humidity level. The unit
will turn on and off, which will extend the run time.
✔ Fill the tank all the way full, place it on the base, let the water empty into
the base until it stops bubbling, then refill the tank full again. This ensures
maximum water capacity and will extend run time.
TROUBLESHOOTING
TROUBLE PROBABLE CAUSE SOLUTION
• Unit does not turn on. * Not plugged in.
* Outlet not functioning.
4 Plug in unit.
4 Have outlet replaced by a licensed electrician.
• Mist output minimal to
none.
* Cool mist is invisible.
* The filter has not absorbed water.
4 Operate in High setting.
4 Wait 30 minutes for filter to absorb water.
• Filter turns brown. * The filter has absorbed
minerals.
4 Replace your filter (HWF75 / SF221) by calling
1-800-546-5637, or visiting
www.holmesproducts.com
.
CLEANING / MAINTENANCE
STORAGE INSTRUCTIONS
If your humidifier will not be in use for two days or more, or at the end of the season follow these instructions.
1. Clean, rinse and thoroughly dry the humidifier as directed in weekly maintenance. DO NOT leave any water inside the
base or tray.
2. Remove the tank cap. Do not store with the tank cap in place.
3. Place the humidifier in the original carton and store in a cool, dry place.
4. Always clean the humidifier before the next season begins.
5. Order your replacement filter for next year’s use.
REPLACEMENT ACCESSORIES
To order the replacement accessories you can do any of the following:
• Visit your local retailer
• Go to
www.holmesproducts.com
• Call Consumer Service at
1-800-546-5637
If you have any questions regarding your product or would like to learn more about other Holmes
®
products, please
contact our Consumer Service Department at 1-800-546-5637 or visit our website at
www.holmesproducts.com. For inquiries regarding recycling and proper disposal of this product, please contact your
local waste management facility.
198798 HCM3755C_19ESM1 Printed In China
GCDS-SUN581594-SL
Impreso en China
Owner’s Guide
HCM3755C
Cool Mist
Humidifier
FILTER# : HWF75 / SF221
FILTER TYPE : WICK
Manual del propietario
HCM3755C
con rocío fresco
Humidificador
FILTRO# : HWF75 / SF221
FILTRO TIPO : WICK
LEA Y CONSERVE ESTAS IMPORTANTES INSTRUCCIONES
PLEASE READ AND SAVE THESE IMPORTANT INSTRUCTIONS
FILTRO
DE REPUESTO
INFORMACION DE LA GARANTIA
© 2019 Sunbeam Products, Inc. Todos los derechos reservados. Distribuido por Sunbeam Products, Inc., Boca Raton,
Florida 33431.
GARANTÍA LIMITADA DE 1 AÑO
Sunbeam Products, Inc. (“Sunbeam”), o en Canadá, Newell Brands Canada ULC (“NBC”), garantiza que por un período
de uno año a partir de la fecha de compra, este producto estará libre de defectos de materiales y mano de obra.
Sunbeam (o NBC), a su elección, reparará o reemplazará este producto o cualquier componente del mismo que
presente defectos durante el período de garantía. El reemplazo se realizará por un producto o componente nuevo o
reparado. Si el producto ya no estuviera disponible, se lo reemplazará por un producto similar de valor igual o
superior. Ésta es su garantía exclusiva. No intente reparar o ajustar ninguna función eléctrica o mecánica de este
producto. Al hacerlo elimínará ésta garantía.
La garantía es válida para el comprador minorista original a partir de la fecha de compra inicial y la misma no es
transferible. Conserve el recibo de compra original. Para solicitar servicio en garantía se requiere presentar un recibo
de compra. Los agentes y centros de servicio de Sunbeam (o NBC) o las tiendas minoristas que venden productos de
Sunbeam (o NBC) no tienen derecho a alterar, modificar ni cambiar de ningún otro modo los términos y las
condiciones de esta garantía. Esta garantía no cubre el desgaste normal de las piezas ni los daños que se produzcan
como resultado de uso negligente o mal uso del producto, uso de voltaje incorrecto o corriente inapropiada, uso
contrario a las instrucciones operativas, y desarme, reparación o alteración por parte de un tercero ajeno a Sunbeam o
a un Centro de Servicio autorizado por Sunbeam. Asimismo, la garantía no cubre actos fortuitos tales como incendios,
inundaciones, huracanes y tornados.
¿Cuál es el límite de responsabilidad de Sunbeam’s (o NBC’s) ?
Sunbeam (o NBC) no será responsable de daños incidentales o emergentes causados por el incumplimiento de alguna
garantía o condición expresa, implícita o legal.
Excepto en la medida en que lo prohíba la ley aplicable, cualquier garantía o condición implícita de comerciabilidad o
aptitud para un fin determinado se limita, en cuanto a su duración, al plazo de la garantía antes mencionada.
Sunbeam (o NBC) queda exenta de toda otra garantías, condiciones o manifestaciones, expresa, implícita, legal o de
cualquier otra naturaleza. Sunbeam (o NBC) no será responsable de ningún tipo de daño que resulte de la compra,
uso o mal uso del producto, o por la imposibilidad de usar el producto, incluidos los daños incidentales, especiales,
emergentes o similares, o la pérdida de ganancias, ni de ningún incumplimiento contractual, sea de una obligación
esencial o de otra naturaleza, ni de ningún reclamo iniciado contra el comprador por un tercero. Algunas provincias,
estados o jurisdicciones no permiten la exclusión o limitación de los daños incidentales o emergentes ni las limitaciones
a la duración de las garantías implícitas, de modo que es posible que la exclusión o las limitaciones antes mencionadas
no se apliquen en su caso. Esta garantía le otorga derechos legales específicos y es posible que usted tenga otros
derechos que varían de un estado, provincia o jurisdicción a otro.
Cómo solicitar el servicio en garantía
En los Estados Unidos
Si tiene alguna pregunta sobre esta garantía o desea recibir servicio de garantía, póngase visite nuestro sitio web
www.holmesproducts.com.
En Canadá
Si tiene alguna pregunta sobre esta garantía o desea recibir servicio de garantía, póngase visite nuestro sitio web
www.holmesproducts.com.
En los Estados Unidos, esta garantía es ofrecida por Sunbeam Products, Inc. Florida 33431. En Canadá, esta garantía
es ofrecida por Newell Brands Canada ULC, 20 B Hereford Street, Brampton, Ontario L6Y 0M1. Si usted tiene otro
problema o reclamo en conexión con este producto, por favor escriba al Departamento de Servicio al Consumidor.
POR FAVOR NO DEVUELVA ESTE PRODUCTO A NINGUNA DE ESTAS DIRECCIONES NI AL LUGAR DE
COMPRA.
DIAGNÓSTICO DE PROBLEMAS
PREGUNTAS FRECUENTES
PREGUNTAS FRECUENTES
PREGUNTAS RESPUESTAS
• Cuáles son las variables que afectan
el tiempo de funcionamiento?
El tiempo de funcionamiento estimado de este humidificador está basado en
las condiciones ambientales promedio. El tiempo de funcionamiento actual de
su humidificador depende de varios factores tales como :
✔ El intercambio de aire en el cuarto donde se encuentra el humidificador.
✔ La estructura del cuarto donde se encuentra el humidificador.
✔ La temperatura del cuarto donde se encuentra el humidificador.
✔ Los niveles de humedad en el cuarto donde se encuentra el humidificador.
✔ La actividad de los ocupantes y la secuencia en que se abren y cierran las
puertas del cuarto donde se encuentra el humidificador.
✔ El número de muebles presentes en el cuarto donde se encuentra el
humidificador.
• Cómo quito la película del tanque de
agua?
✔ Consulte las instrucciones diarias de mantenimiento. Se recomienda una
limpieza regular.
• Cómo puedo extender el tiempo de
funcionamiento?
✔ Haga funcionar la unidad en el modo más bajo.
✔ Si su unidad tiene electrónicos, ajústela al nivel de humedad deseado. La
unidad se encenderá y apagará, extendiendo el tiempo de
funcionamiento.
✔ Llene el tanque al máximo, colóquelo en la base, deje que el agua se
vacíe en la base hasta que deje de burbujear, luego llene nuevamente el
tanque al máximo. Esto asegura una capacidad máxima de agua que
extenderá el tiempo de funcionamiento.
TROUBLESHOOTING
TROUBLE PROBABLE CAUSE SOLUTION
• La unidad no se
enciende.
* No está enchufada.
* El omacorriente no funciona.
4 Enchúfela.
4 Haga reemplazar el tomacorriente por un
electricista matriculado.
• Salida de vapor mínima
o nula.
* El filtro no ha absorbido el
agua.
*
La niebla fría es invisible.
4 Funcionamiento en configuración High (alta).
4 Espere 30 minutos para que el filtro absorba el
agua.
• El filtro se pone marrón. * El filtro ha absorbido
minerales.
4 Reemplace su filtro (HWF75 / SF221) llamando
al 1-800-546-5637, o visite
www.holmesproducts.com
.
LIMPIEZA / MANTENIMIENTO
INSTRUCCIONES PARA GUARDAR
Si planea no usar su humidificador por dos o más días, o al final de la estación, siga estas instrucciones.
1. Limpie y seque bien el humidificador según se detalla anteriormente en la sección: instrucciones de mantenimiento
semanales. NO deje agua dentro de la base o bandeja.
2. Retire el tapón del tanque. No lo guarde con el tapón del tanque puesto.
3. Coloque el humidificador en su empaque original y guárdelo en un lugar fresco y seco.
4. Siempre limpie el humidificador antes de que empiece la siguiente estación.
5. Encargue su filtro de repuesto para el próximo año.
ACCESORIOS DE REPUESTO
Puede ordenar accesorios de repuesto de una de las siguientes formas:
• Visite su distribuidor local
• Valla a
www.holmesproducts.com
• Llame a servicio al consumidor al 1-800-546-5637
Si tiene preguntas relacionadas con este producto o si está interesado en conocer otros productos Holmes
®
,
póngase en contacto con nuestro Departamento de Servicio al Cliente: llame al 1-800-546-5637 o visite nuestro
sitio web www.holmesproducts.com. Para preguntas relacionadas con el reciclaje y la correcta eliminación de este
producto, por favor póngase en contacto con su centro local de gestión de residuos.

PLEASE READ AND SAVE THESE
IMPORTANT SAFETY INSTRUCTIONS
LEA Y CONSERVE ESTAS IMPORTANTES
INSTRUCCIONES DE SEGURIDAD
FEATURES - OPERATIONS
CARACTERISTICA - FUNCIONAMIENTO
3. Hold the front door handle and open the front door to
access the filter. (see Figure 2).
4. Take off the top filter support and discard the old filter
and follow weekly cleaning instructions.
5. Insert a new filter and replace the filter support on top.
Place the filter back onto the humdifier base. Ensure that
the filter is seated correctly and can come in contact with
water.
6. Close the front door properly.
7. Repeat Operating Instruction steps.
It will take about 30 minutes for the humidifier to reach
maximum output.
NOTE: You can purchase replacement filters (model HWF75/
SF221) at a local retailer, by calling 1-800-546-5637, or by
visiting
www.holmesproducts.com
. It is recommended that a
replacement filter is purchased for uninterrupted use.
CLEANING AND MAINTENANCE
INSTRUCTIONS
Humidifiers provide comfort by adding moisture to dry,
heated indoor air. To benefit most from the humidifier and
avoid product misuse, follow all instructions carefully. Please
note that this is an electrical appliance and requires attention
when in use.
In addition, if you do not follow the recommended care and
maintenance guidelines, micro-organisms may be able to
grow in the water within the water tanks. You must routinely
follow the cleaning procedures that follow in order to ensure
proper, efficient operation of your humidifier. Proper maintenance
and cleaning is essential to the continued performance of
your unit and the avoidance of algae or bacteria build-up.
Daily Maintenance
1. Be sure the humidifier is switched OFF and the unit is
disconnected from the electrical outlet.
2. Remove the tanks from the humidifier and place them in
sink or tub.
3. Carry the base of the unit to the sink, remove the wick
filter, place in sink, drain any remaining water. Wipe
clean, and dry with a clean cloth or paper towel.
4. Drain the water from the tanks into the sink and rinse
each tank thoroughly. Wipe clean, and dry with a clean
cloth or paper towel.
5. Put filter back with the filter support, close the front
door, then refill the tanks with cool tap water as
instructed earlier in the Filling Instructions. Do not
overfill.
6. Follow Operating Instructions.
Weekly Maintenance
To Remove Scale:
1. Repeat steps 1-4 above.
2.
Partially fill the base with Cleanse Clean® solution
(Model S1710) as instructed on bottle, or with two 8 oz.
cups of undiluted white vinegar. Leave this solution in the
base for 20 minutes, while cleaning all the interior
surfaces with a soft brush. Remove base scale by wiping
the base with a cloth dampened with undiluted white
vinegar.
3. Rinse with clean warm water to remove the cleaning
solution before disinfecting the tanks.
To Disinfect Humidifier Base and Tanks:
1. Fill Humidifier Base with 2 gallons of water and 1
teaspoon of chlorine bleach.
2. Fill each tank 1/2 full with water and 1 teaspoon of
chlorine bleach.
3. Let the solution stand for 20 minutes, swishing every few
minutes. Wet all surfaces.
4. Carefully empty the Base and Tanks after 20 minutes,
and rinse with warm water until you cannot detect any
bleach smell. Dry with a clean cloth or paper towel.
5. Depending on the water hardness in your area, it may
be necessary to change the filter every month. Re-insert
the wick filter into the filter support.
6. Refill the water tanks as directed with cool tap water,
replace the humidifier housing, and turn the Control
Knob to ON.
Vida útil del filtro – en condiciones normales de uso continuo,
un filtro nuevo funcionará adecuadamente durante 1 mes. Se
recomienda el reemplazo del filtro cada 30 días de uso.
Para reemplazar el filtro, siga los siguientes pasos.
1. Asegúrese de que el humidificador esté en OFF y
desenchúfelo del tomacorriente.
2. Para acceder al filtro, abra la puerta frontal con el
tirador. (ver Figura 2).
3. Retire el soporte superior del filtro, deseche el filtro viejo
y siga las instrucciones de limpieza semanales.
4. Coloque un filtro nuevo y reemplace el soporte superior.
Coloque nuevamente el filtro en la base del
humidificador.
5. Cierre la puerta frontal de manera adecuada.
6. Repita los pasos de las instrucciones de uso.
Tomará aproximadamente 30 minutos para que el
humidificador alcance su potencia máxima.
NOTA:
Puede comprar repuestos de filtros (modelo HWF75 /
SF221) en una tienda local, llamando al 1-800-546-5637, ó
visitando
www.holmesproducts.com
. Se recomienda que compre
un filtro de repuesto para no interrumpir el funcionamiento de la
unidad.
INSTRUCCIONES DE LIMPIEZA Y
MANTENIMIENTO
Los humidificadores proveen confort agregando humedad al
aire seco de los ambientes interiores calefaccionados. Para
beneficiarse al máximo de los humidificadores y evitar su
mal uso, siga todas las instrucciones cuidadosamente. Tenga
en cuenta que éste es un artefacto eléctrico que requiere
atención cuando esté en uso.
Además, si no se siguen las recomendaciones para el cuidado y
mantenimiento, crecerán microorganismos en el agua dentro de
los tanques. Se deben ejecutar rutinariamente los procedimientos
de limpieza que se indican a continuación para asegurar el
funcionamiento adecuado y eficiente del humidificador que
son esenciales para el rendimiento óptimo constante de la
unidad y para evitar la formación de algas y bacterias.
Mantenimiento diario
1. Retire ambos tanques de la unidad y deje al humidificador
funcionando entre 30 y 40 minutos hasta que se consuma el
agua de la bandeja y del filtro. De este modo, se reducirá el
derrame de agua al retirar el filtro.
2. Asegúrese de que el humidificador esté en OFF
(Apagado) y desconectado del tomacorriente.
3. Retire los tanques del humidificador y colóquelos en el
fregadero o en una cuba.
4. Lleve la base al fregadero, retire el filtro de mechas,
colóquelo en el fregadero y drene el agua remanente.
limpie frotando con un paño y seque con una toalla de
tela o papel.
5. Drene el agua de los tanques en el fregadero y
enjuáguelos completamente. Límpielos frotando con un
paño y séquelos con una toalla de tela o de papel.
Asegúrese de que el filtro quede bien colocado para
tomar contacto con el agua.
6. Coloque nuevamente el soporte del filtro, cierre la
puerta frontal y rellene los tanques con agua fresca del
grifo, tal como se indicó en las Instrucciones de Llenado.
No lo llene de más.
7. Siga las instrucciones de operación.
Mantenimiento semanal
Para extraer el sarro :
1. Repita los pasos 1 al 4 anteriores.
2.
Llene parcialmente la base con solución Cleanse Clean
®
(Modelo S1710) como se indica en la botella, o con dos
tazas de vinagre blanco sin diluir.
Deje reposar esta
solución en la base por 20 min. mientras limpia todas las
superficies interiores con un cepillo blando. Quite el sarro
frotando la base con un trapo humedecido con vinagre
blanco sin diluir.
3. Enjuague con agua tibia limpia para extraer la solución
limpiadora antes de desinfectar el tanque.
Para desinfectar los tanques de la base del
humidificador:
1. Llene la base del humidificador con 8 litros de agua y
una cucharadita de blanqueador de cloro.
2. Llene cada tanque hasta la mitad con agua y 1/2
cucharadita de blanqueador de cloro.
3. Deje que la solución trabaje por 20 minutos, sacudiendo
los tanques de vez en cuando. Moje todas las superficies.
4. Vacíe cuidadosamente la base y los tanques después de
20 minutos y enjuague hasta que ya no se pueda
detectar el olor a cloro. Seque con una tela limpia o con
toalla de papel.
5. Dependiendo de la dureza del agua en su zona, puede
ser necesario cambiar el filtro cada mese. Vuelva a
insertar el filtro de la mecha en el soporte del filtro.
6. Vuelva a llenar los tanques de agua como se indica con
agua fría, vuelva a colocar la carcasa del humidificador,
y gire la perilla de control a encendido.
26. Do not move unit after it has been used until unit cools
completely.
27. Use both hands when carrying full tank of water.
PLEASE READ AND SAVE
THESE IMPORTANT SAFETY
INSTRUCTIONS
CONSUMER SAFETY INFORMATION
NOTE:
This is an electrical appliance and requires attention
when in use.
NOTE:
If moisture forms on the walls or windows of the
room, turn off the humidifier. The room already has plenty of
humidity and additional moisture may cause damage.
NOTE:
DO NOT block air inlet or outlet.
Cord and Plug Installation Safety Instructions:
The length of cord used on this appliance was selected to reduce
the hazards of becoming tangled in, or tripping over a longer
cord. If a longer cord is necessary an approved extension cord
may be used. The electrical rating of the extension cord must be
equal to or greater than the rating of the humidifier (refer to
the rating information placed on the humidifier). Care must be
taken to arrange the extension cord so that it will not drape
over the countertop or tabletop where it can be pulled on by
children or accidentally tripped over.
HOW COOL MIST WORKS
Your Holmes
®
Cool Mist humidifier draws dry air through the
air intake grill area. This air is then passed through a
moisture–laden wick filter, which retains the minerals and
deposits in the water. The resulting moist air is directed back
into the room from the top air grill.
NOTE:
This humidification system provides a cool, invisible
moisture output. It is normal not to see the mist.
NOTE:
A humidity level below 20% can be unhealthy and
uncomfortable. The recommended humidity level is between
40%-50%.
PRE-OPERATING INSTRUCTIONS
1. Be sure the humidifier is switched to OFF and the unit is
disconnected from the electrical outlet.
2. Choose a location out of reach of children. DO NOT place
the humidifier on a finished floor or near furniture which
can be damaged by moisture or water.
Front Door Handle Assembly
Your humidifier is packed with a separate front door handle in
the box (placed on top of the unit). Take out the handle, line up
holes of the handle with tabs on the top of the front door. Snap
the handle until it is securely installed into the front door (see
Figure 1).
FILLING THE WATER TANKS
1. Remove the two tanks from the back of the humidifier
and bring each tank to the faucet. Turn the tank upside
down and twist off the large tank cap by turning
counter-clockwise. Fill each tank with cool, fresh tap
water. Replace the cap on each tank FIRMLY.
NOTE:
Adding a water softening agent like Water Treatment
(Model S-1705) to the water will soften mineral deposits and
prevent lime and scale build-up. It will also help prolong the
life of the wick filter and make cleaning easier.
2. When full, carry each tank to the humidifier and place
back to the unit (use both hands when carrying each
tank). Each tank holds 1.4 gallons of water. When the
water stops emptying, remove the tanks and refill each
again. Replace the tanks onto the humidifier housing.
The WATER LIMITING feature on the tank cap will
prevent the tanks from overflowing. YOU NOW HAVE 1.4
GALLONS OF WATER IN EACH TANK FOR A TOTAL OF
2.8 GALLONS OF WATER.
3. Plug the power cord into a 120V AC electrical outlet.
22. No enchufe el cable con las manos húmedas. Puede
ocasionarle una descarga eléctrica.
23. No coloque agua en ninguna abertura que no sea el
tanque de agua.
24. Para prevenir el daño a las superficies, no coloque el
humidificador debajo de ninguna superficie que
sobresalga por encima del mismo.
25. NUNCA haga funcionar la unidad sin agua en el tanque.
26. Una vez utilizada la unidad, no la mueva hasta que se
haya enfriado completamente.
27. Use las dos manos cuando cargue el tanque de agua.
LEA Y CONSERVE ESTAS
IMPORTANTES
INSTRUCCIONES DE
SEGURIDAD
INFORMACIÓN DE SEGURIDAD PARA EL
CONSUMIDOR
NOTA:
Este es un artefacto eléctrico y requiere ser usado
con cuidado.
NOTA:
Si se acumula humedad en las paredes o ventanas del
cuarto, apague el humidificador. El cuarto ya tiene demasiada
humedad y la humedad adicional puede causar daños.
NOTA:
NO bloquee la entrada o salida de aire.
Instrucciones de Seguridad en la Instalación del
Cable y el Enchufe :
La longitud del cable de este artefacto fue seleccionada para
reducir el riesgo de enredarse o tropezarse con un cable más
largo. Si necesita usar un cable más largo, puede utilizar un cable
de extensión aprobado. La capacidad eléctrica del cable de
extensión debe ser igual o mayor que la capacidad del
humidificador (consulte la información sobre clasificación que se
encuentra en el humidificador). No debe permitir que el cable de
extensión cuelgue de la mesada o mesa de tal forma que pueda
ser jalado por niños o causar que alguien se tropiece.
COMO FUNCIONA EL VAPOR FRÍO
El humidificador con rocío fresco Holmes
®
produce aire seco a
través de la rejilla de toma de aire. Luego, el aire pasa por 6
filtros de mecha cargados de humedad, los que retienen los
minerales y depósitos del agua. El aire húmedo resultante es
dirigido nuevamente al ambiente por la rejilla superior.
NOTA:
Este sistema de humidificación proporciona
una salida de humedad fría e invisible. Es normal que
no se vea el vapor.
NOTA:
Un nivel de humedad menor al 20% puede ser
nocivo e incómodo. El nivel de humedad recomendado es
entre el 40% y el 50%.
INSTRUCCIONES PREVIAS AL USO
1. Asegúrese de que el humidificador esté en OFF y
desenchúfelo del tomacorriente.
2. Elija un lugar fuera del alcance de los niños. NO coloque
el humidificador sobre un piso pulido o cerca de algún
mueble, ya que lo puede dañar por el exceso de
humedad o agua.
Tirador de la Puerta Frontal
El humidificador viene con un tirador desmontable para la
puerta frontal en la caja (ubicado en la parte superior de la
unidad). Saque el tirador, alinee los orificios del tirador con las
lengüetas de la parte superior de la puerta frontal. Reubíquelo
hasta que quede seguro en la puerta frontal (ver Figura 1).
LLENADO DE LOS TANQUES DE AGUA
1. Retire los dos tanques de la parte posterior del
humidificador y colóquelos bajo el grifo. Invierta la
posición del tanque y desenrosque la tapa del tanque
grande en el sentido contrario al de las agujas del reloj.
Llene cada tanque con agua fría de la canilla. Vuelva a
colocar la tapa del tanque CON FIRMEZA.
When using electrical appliances, basic safety precautions
should always be followed to reduce the risk of fire, electric
shock, and injury to persons, including the following:
1. Read all instructions before using the appliance.
2. To avoid fire or shock hazard, plug the appliance directly
into a 120V AC electrical outlet.
3. Keep the cord out of heavy traffic areas. To avoid fire hazard,
NEVER put the cord under rugs or near heat registers.
4. DO NOT place humidifier near heat sources such as stoves,
radiators, and heaters. DO locate your humidifier on an
inside wall near an electrical outlet. The humidifier should be
at least 4 inches (10 cm) away from the wall for best results.
5. NEVER place humidifier in an area where it is accessible to
children. NEVER use humidifier in a closed room, particularly
where a child may be sleeping, resting, or playing (a closed
room may result in excessive humidity).
6.
WARNING:
Do not attempt to refill humidifier without
first unplugging the unit from its electrical outlet. Failure to
heed this warning may cause personal injury. Be sure to
unplug the unit by pulling on the plug and not the cord.
7. Never place anything over moisture outlet when the unit
is running.
8. NEVER drop or insert any object into any openings.
9. DO NOT operate any appliance with a damaged cord or
plug, after the appliance malfunctions, or if it has been
dropped or damaged in any manner. Return appliance
to manufacturer for examination, electrical or
mechanical adjustment, or repair.
10. Use appliance only for intended household use as described
in this manual. Any other use not recommended by the
manufacturer may cause fire, electric shock, or injury to
persons. The use of attachments not recommended or sold
by the manufacturer may cause hazards.
11. DO NOT use outdoors.
12. Always place humidifier on a firm, flat, level surface. A
waterproof mat or pad is recommended for use under
the humidifier. NEVER place it on a rug or carpet, or on
a finished floor that may be damaged by exposure to
water or moisture.
13. DO NOT allow the Moisture Outlet to directly face the wall.
Moisture could cause damage, particularly to wallpaper.
14. Humidifier should be unplugged when not in use.
15. NEVER tilt, move, or attempt to empty unit while it is
operating. Shut off and unplug before removing the
water tank and moving the unit.
16. This humidifier requires daily and weekly maintenance
to operate appropriately. Refer to daily and weekly
cleaning procedures. Use only cleaners and additives
recommended by the manufacturer.
17. NEVER use detergents, gasoline, glass cleaner, furniture
polish, paint thinner, or other household solvents to
clean any part of the humidifier.
18. Excessive humidity in a room can cause water
condensation on windows and some furniture. If this
happens, turn the humidifier OFF.
19. Do not use humidifier in an area where humidity level is
in excess of 50%. Use a hygrometer, available at your
local retailer or through the manufacturer, to measure
the humidity.
20. DO NOT attempt to repair or adjust any electrical or
mechanical functions on this unit. Doing so will void
your warranty. The inside of the unit contains no user
serviceable parts. All servicing should be performed by
qualified personnel only.
21. Never place housing under water flow or immerse in liquids.
22. Do not plug in the cord with wet hands: electric shock
could result.
23. Do not pour water in any openings other than the water
tank.
24. To prevent damage to surfaces, do not place humidifier
under overhanging surfaces.
25. NEVER operate unit without water in the tank.
Debe tomar precauciones básicas de seguridad siempre que
utilice artefactos eléctricos para reducir el riesgo de incendio,
descarga eléctrica y daños personales, incluyendo lo siguiente:
1. Lea completamente las instrucciones antes de utilizar el
artefacto.
2. Para evitar incendio o descarga eléctrica, enchufe el
artefacto directamente en un tomacorriente de 120V CA.
3. Mantenga el cable fuera de las zonas de mucho tráfico.
Para evitar incendios, NUNCA coloque el cable debajo de
alfombrillas o cerca de salidas de calefacción.
4. NO coloque el humidificador cerca de fuentes de calor
como estufas, radiadores y calefactores. NO coloque el
humidificador contra una pared interna cerca de un
tomacorriente. El humidificador debe estar a por lo
menos 4" de la pared para obtener el mejor resultado.
5. NUNCA coloque el humidificador en una zona accesible
para los niños. NUNCA use el humidificador en un cuarto
cerrado, especialmente donde pueda haber un niño
durmiendo, descansando, o jugando (un cuarto cerrado
puede resultar en excesiva humedad).
6. ADVERTENCIA: No intente llenar nuevamente el
humidificador sin antes desenchufarlo del tomacorriente.
El no tener en cuenta esta advertencia puede causar
daños personales. Asegúrese de desenchufar la unidad
tirando del enchufe y no del cable.
7. Nunca coloque algo sobre la salida de humedad cuando
la unidad esté funcionando.
8. NUNCA inserte ningún objeto en una de las ranuras. No
bloquee la entrada o salida de aire.
9. NO utilice ningún artefacto si el cable o el enchufe están
dañados, luego de una falla, o si se ha caído o ha sufrido
cualquier tipo de daño. Devuelva el artefacto al fabricante
para su inspección, ajuste eléctrico o mecánico, o reparación.
10. Utilice el artefacto únicamente para el propósito
hogareño indicado en este manual. Cualquier uso
distinto al recomendado por el fabricante puede causar
incendio, descarga eléctrica, o daños personales. El uso
de accesorios no recomendados o que no sean vendidos
por el fabricante puede ser peligroso.
11. NO utilizar en el exterior.
12. Siempre coloque el humidificador en una superficie
firme, plana y nivelada. Se recomienda el colocar una
alfombrilla o bandeja resistente al agua debajo del
humidificador. NUNCA lo coloque sobre un tapete o una
alfombra, o en un piso que pueda dañarse con el agua o
la humedad.
13. NO haga que la salida de humedad apunte directamente
a la pared. La humedad puede causar daños,
especialmente al empapelado.
14. Se debe desenchufar el humidificador cuando no se usa.
15. NUNCA incline, mueva o intente vaciar la unidad
mientras esté funcionando. Apague y desenchufe la
unidad antes de quitar el tanque de agua y moverla.
16. Este humidificador requiere mantenimiento diario y
semanal para funcionar correctamente. Refiérase a los
procedimientos de limpieza diarios y semanales. Use
únicamente limpiadores y aditivos recomendados por el
fabricante.
17.
NUNCA use detergentes, gasolina, limpiavidrios,
limpiador de muebles, diluyente de pintura u otro
solvente hogareño para limpiar ninguna parte del
humidificador.
18. La humedad excesiva en un cuarto puede causar
condensación de agua en las ventanas y en algunos
muebles. Si sucede esto, apague el humidificador.
19. No use el humidificador en un área donde el nivel de
humedad es mayor al 50%. Use un Higrómetro,
disponible en su tienda local o a través del fabricante,
para medir la humedad.
20. NO intente reparar o ajustar ninguna función eléctrica o
mecánica de esta unidad. El hacerlo invalidará la
garantía. La unidad no contiene partes reparables por el
usuario. Toda reparación debe ser realizada únicamente
por personal calificado.
21. Nunca coloque el gabinete debajo de la canilla o lo
sumerja en líquidos.
FEATURES - OPERATIONS
CARACTERISTICA - FUNCIONAMIENTO
CLEANING / MAINTENANCE
INSTRUCCIONES DE LIMPIEZA Y
MANTENIMIENTO
THIS APPLIANCE HAS A POLARIZED PLUG (one blade is wider than the
other). To reduce the risk of electric shock, this plug is intended to fit in a
polarized outlet only one way. If the plug does not fit fully in the outlet,
reverse the plug. If it still does not fit, contact a qualified electrician to
install the proper outlet.
DO NOT ATTEMPT TO MODIFY THIS PLUG OR DEFEAT THIS
SAFETY FEATURE IN ANY WAY.
ESTE PRODUCTO TIENE UN ENCHUFE POLARIZADO (una hoja es más ancha que
la otra). A fin de disminuir el riesgo de descarga eléctrica, este enchufe está
diseñado para insertarse en un tomacorriente polarizado en un solo sentido. Si
el enchufe no entra completamente en el tomacorriente, inviértalo. Si aun así no
entra, llame a un electricista calificado para instalar un tomacorriente apropiado.
NO MODIFIQUE EL ENCHUFE NI ANULE ESTA FUNCION DE SEGURIDAD
DE NINGUNA MANERA.
OPERATING INSTRUCTIONS
With the filter installed correctly (with filter support placed on
top of the filter - see Figure 2), front door closed, the tanks
filled and the plug correctly inserted in the outlet, you are
now ready to operate the humidifier.
NOTE: The humidifier produces clean, cool, INVISIBLE
moisture. It is normal not to see the moisture.
1. Press the Power Button ( ) to turn the humidifier on,
the humidifier will run at High setting and the
Hi/Express Mode indicator light will illuminate.
2. Allow up to 30 minutes for the filter to fully absorb
water and the unit to produce the maximum moisture
output.
3. If you want to switch to the Medium/Low settings, press
the Speed Button ( ). Each press of the button will cycle
through the speed settings (High-Medium-Low), and the
selected setting indicator light will illuminate.
4. To shut the humidifier off at any setting, press the Power
Button ( ) until all indicator lights go off.
Digital Humidistat Control
Your humidifier is equipped with a digital humidistat that
allows you to set your humidifier to your desired comfort
level by pressing the +/- buttons to adjust the humidity level
ranging from 45% to Stay On setting. The corresponding
Humidity Indicator will illuminate once selected. When the
room humidity level rises above the set humidity, the
humidifier will stop. When the room humidity level drops
below the set humidity, the humidifier will turn on
automatically to maintain the preset humidity level.
NOTE: When the water tank is empty, and the base is almost
empty, you need to refill the tank. The fan will continue to
run to help dry the humidifier. Shut off and unplug the unit.
Please follow the Daily Cleaning Instructions. Refill the tank
as directed in Filling the Water Tanks Instructions.
NOTE: If moisture forms on the walls or windows, turn off
the humidifier.
REPLACING THE FILTER
Through normal use, waterborne minerals and sediment
become trapped in the wick filter. The harder your water, the
greater the amount of minerals in the water, and the more
often you will need to change your filter.
Filter Life – Under normal conditions of continuous use, a
brand new filter will operate efficiently for 1 month. It is
strongly recommended that a new filter be replaced every 30
days of use.
To replace the filter, follow the steps below:
1. Remove both tanks from the unit and allow humidifier to
operate for 30-40 minutes to consume water in the tray
and in the filter. This will reduce water spillage when
removing the filter.
2. Be sure the humidifier is switched OFF and the unit is
disconnected from the electrical outlet.
NOTA:
El agregado de un agente ablandador de agua como
Water Treatment (Moldeo S-1705) al agua ablandará los
minerales depositados y evitará que el sarro se acumule.
Además ayudará a prolongar la vida útil del filtro de la
mecha y hará más fácil la limpieza.
2. Cuando los tanques estén llenos, colóquelos nuevamente
en el humidificador (utilice ambas manos para
transportarlos). Cada tanque tiene capacidad para 1,4
galones/5,29 L. Cuando deje de salir agua, retire los
tanques y llénelos nuevamente. Colóquelos nuevamente
en el humidificador. El LÍMITE DE AGUA en la tapa del
tanque evitará desbordes. AHORA TIENE 1,4
GALONES/5,29 L DE AGUA EN CADA UNO DE LOS
TANQUES Y UNA CAPACIDAD TOTAL DE 2,8
GALONES/10,59 L.
3. Enchufe el cable de corriente en un tomacorriente de
120 voltios AC.
INSTRUCCIONES DE USO
Con el filtro instalado correctamente (el soporte debe estar
colocado en la parte superior del filtro – ver Figura 2), la puerta
frontal cerrada, los tanques llenos y el enchufe insertado
correctamente en la toma, está listo para operar el humidificador.
NOTA: El humidificador produce una humedad limpia, fría e
INVISIBLE. Es normal no ver la humedad.
1. Presione el Botón de Encendido ( ) para activar el
humidificador; el artefacto funcionará en "High" (alto), y
se encenderá la luz indicadora "Hi/Express Mode".
2. Permita hasta 30 minutos para que el filtro absorba
totalmente el agua y para que la unidad produzca la
mayor salida humedad.
3. Si desea pasar a la velocidad de la configuración Medio/Bajo,
presione el Botón de Velocidad ( ) . Cada vez que presione el
botón, se alternará entre las diferentes configuraciones de
velocidad (Alto-Medio-Bajo), y la Luz indicadora de la
configuración seleccionada se iluminará.
4. Para apagar el humidificador, presione el Botón de Encendido
( ) hasta que se apaguen todas las luces indicadoras.
Control Digital del Humidistato
El humidificador cuenta con un control digital que permite
configurarlo en el nivel deseado presionando los botones +/-
para ajustar el grado de humedad del 45 % al "Stay On"
(encendido constante). El correspondiente Indicador de
Humedad se iluminará una vez que lo haya seleccionado.
Cuando el nivel de humedad ambiental supere el nivel
configurado, se detendrá el humidificador. Cuando el nivel de
humedad ambiental caiga por debajo del nivel configurado,
el humidificador se encenderá automáticamente para
mantener el nivel de humedad preconfigurado.
NOTA: Cuando se vacíe el tanque de agua, y la base esté
casi vacía, tiene que rellenar el tanque. El ventilador
continuará funcionando para secar el humidificador.
NOTA: Si se empañan las paredes o ventanas, apague el
humidificador.
REEMPLAZO DE LOS FILTRO
Durante el uso normal de la unidad, los minerales y
sedimentos arrastrados por el agua quedan retenidos en el
filtro de mecha. Mientras más dura sea el agua, mayor será
el número de minerales que contenga, mientras mayor sea el
número de minerales en el agua, mayor será la frecuencia
en que tenga que cambiar el filtro.
Figure 1
Front Door Handle
Front Door
Figure 1
Tirador de la puerta frontal
Puerta frontal
Figure 2
A. Tank Handles (2)
B. Water Tanks (2)
C. LED Control Panel
D. Humidifier Housing
E. Filter Support
F. Front Door
G. Wick Filter
A
B
F
C
G
E
D
Figure 2
A. Manijas del tanque (2)
B. Tanques de agua (2)
C. Panel de control LED
D. Carcasa del humidificador
E. Soporte del filtro
F. Puerta frontal
G. Filtro de mechas
A
B
F
C
G
E
D
45%
50%
55%
60%
Stay On
Lo/Quiet
Mode
Med/Comfort
Mode
Hi/Express
Mode
45%
50%
55%
60%
Stay On
Lo/Quiet
Mode
Med/Comfort
Mode
Hi/Express
Mode
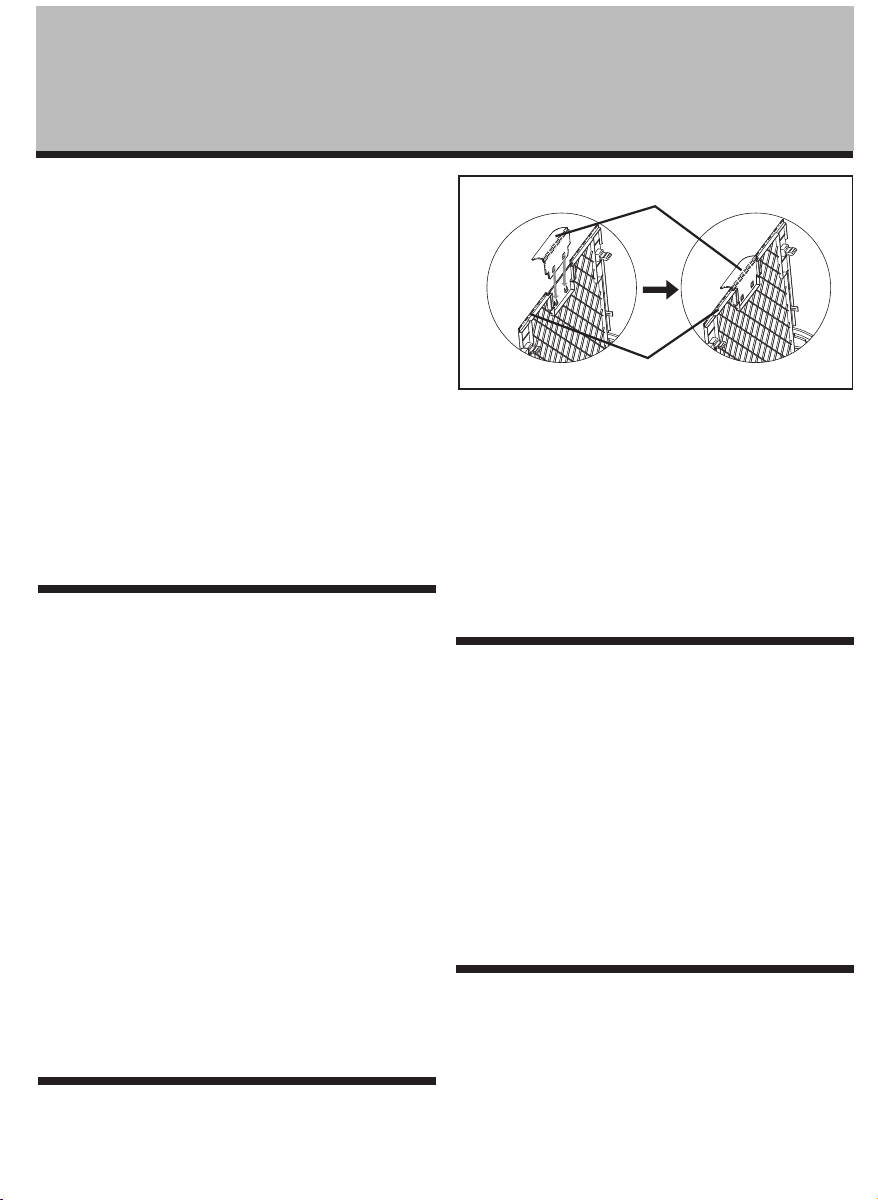
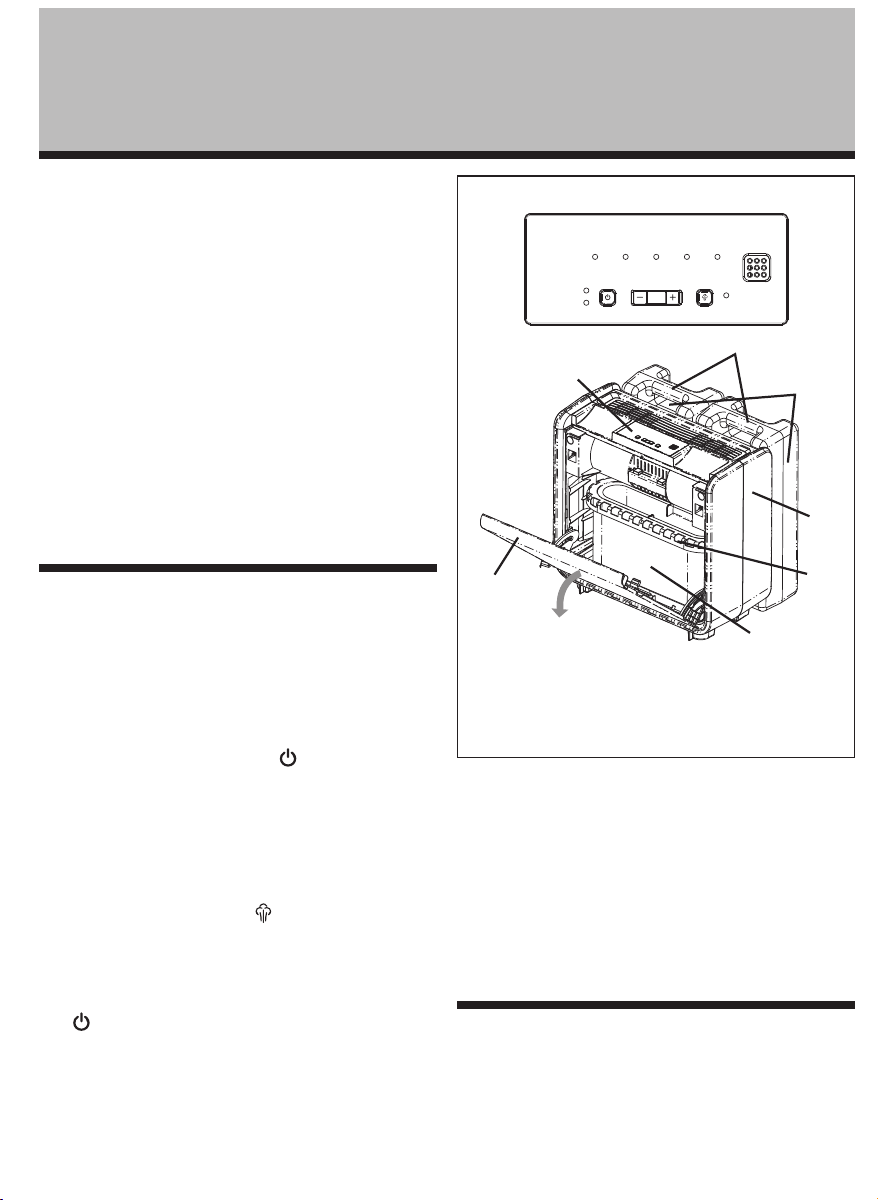
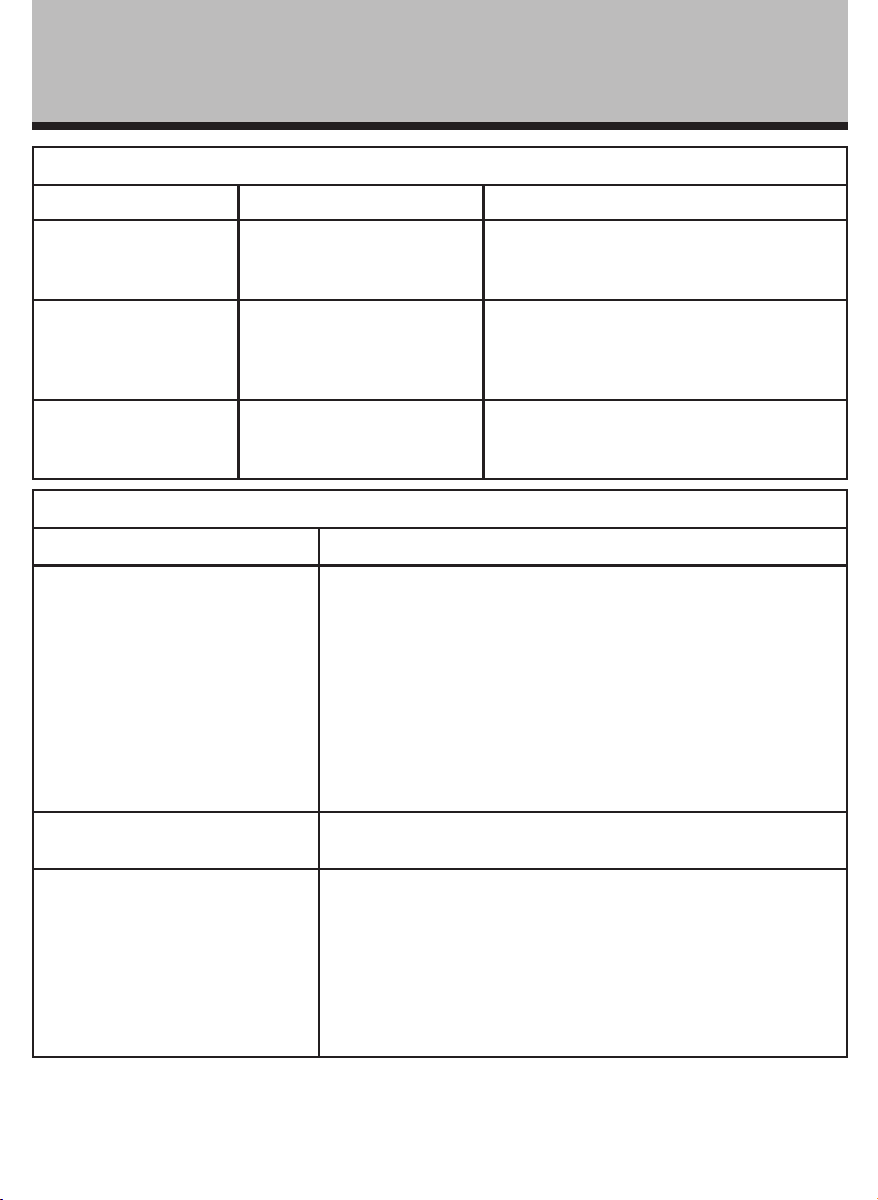
WARRANTY INFORMATION
© 2019 Sunbeam Products, Inc. All Rights Reserved. Distributed by Sunbeam Products, Inc., Boca Raton, Florida 33431.
1 YEAR LIMITED WARRANTY
Sunbeam Products, Inc. (“Sunbeam”) or if in Canada, Newell Brands Canada ULC (“NBC”) warrants that for a period
of one year from the date of purchase, this product will be free from defects in material and workmanship. Sunbeam
(or NBC), at its option, will repair or replace this product or any component of the product found to be defective
during the warranty period. Replacement will be made with a new or remanufactured product or component. If the
product is no longer available, replacement may be made with a similar product of equal or greater value. This is
your exclusive warranty. Do NOT attempt to repair or adjust any electrical or mechanical functions on this product.
Doing so will void this warranty.
This warranty is valid for the original retail purchaser from the date of initial retail purchase and is not transferable.
Keep the original sales receipt. Proof of purchase is required to obtain warranty performance. Sunbeam (or NBC)
dealers, service centers, or retail stores selling Sunbeam (or NBC) products do not have the right to alter, modify or
any way change the terms and conditions of this warranty.
This warranty does not cover normal wear of parts or damage resulting from any of the following: negligent use or
misuse of the product, use on improper voltage or current, use contrary to the operating instructions, disassembly,
repair or alteration by anyone other than Sunbeam or an authorized Sunbeam (or NBC) service center. Further, the
warranty does not cover: Acts of God, such as fire, flood, hurricanes and tornadoes.
What are the limits on Sunbeam’s (or NBC’s) Liability?
Sunbeam (or NBC) shall not be liable for any incidental or consequential damages caused by the breach of any
express, implied or statutory warranty or condition.
Except to the extent prohibited by applicable law, any implied warranty or condition of merchantability or fitness for a
particular purpose is limited in duration to the duration of the above warranty. Sunbeam (or NBC) disclaims all other
warranties, conditions or representations, express, implied, statutory or otherwise. Sunbeam (or NBC) shall not be
liable for any damages of any kind resulting from the purchase, use or misuse of, or inability to use the product
including incidental, special, consequential or similar damages or loss of profits, or for any breach of contract,
fundamental or otherwise, or for any claim brought against purchaser by any other party. Some provinces, states or
jurisdictions do not allow the exclusion or limitation of incidental or consequential damages or limitations on how long
an implied warranty lasts, so the above limitations or exclusion may not apply to you. This warranty gives you specific
legal rights, and you may also have other rights that vary from province to province, state to state or jurisdiction to
jurisdiction.
How to Obtain Warranty Service
In the U.S.A.
If you have any questions regarding this warranty or would like to obtain warranty service, please visit our website at
www.holmesproducts.com.
In Canada
If you have any questions regarding this warranty or would like to obtain warranty service, please visit our website at
www.holmesproducts.com.
In the U.S.A., this warranty is offered by Sunbeam Products, Inc. located in Boca Raton, Florida 33431. In Canada, this
warranty is offered by Newell Brands Canada ULC, located at 20B Hereford Street, Brampton, Ontario L6Y 0M1. If you
have any other problem or claim in connection with this product, please write our Consumer Service Department.
PLEASE DO NOT RETURN THIS PRODUCT TO ANY OF THESE ADDRESSES OR TO THE PLACE OF
PURCHASE.
TROUBLESHOOTING
FREQUENTLY ASKED QUESTIONS
FREQUENTLY ASKED QUESTIONS
Question Answer
• What are the variables that affect
run time?
The estimated run time for this humidifier is based on average room
conditions. The actual run time of your humidifier is dependent on numerous
variables such as:
✔ Air exchange in the room where the humidifier is placed.
✔ Room construction of the room where the humidifier is placed.
✔ Temperature of the room where the humidifier is placed.
✔ Humidity levels in the room where the humidifier is placed.
✔ Movement of occupants and the opening and closing of doors in the room
where the humidifier is placed.
✔ Home furnishings in the room where the humidifier is placed.
• How do I remove film on water
tank?
✔ See Daily Maintenance instructions. Regular cleaning is recommended.
• How can I extend the run time?
✔ Run your unit on the lowest setting.
✔ If your unit has electronics, set it to your desired humidity level. The unit
will turn on and off, which will extend the run time.
✔ Fill the tank all the way full, place it on the base, let the water empty into
the base until it stops bubbling, then refill the tank full again. This ensures
maximum water capacity and will extend run time.
TROUBLESHOOTING
TROUBLE PROBABLE CAUSE SOLUTION
• Unit does not turn on. * Not plugged in.
* Outlet not functioning.
4 Plug in unit.
4 Have outlet replaced by a licensed electrician.
• Mist output minimal to
none.
* Cool mist is invisible.
* The filter has not absorbed water.
4 Operate in High setting.
4 Wait 30 minutes for filter to absorb water.
• Filter turns brown. * The filter has absorbed
minerals.
4 Replace your filter (HWF75 / SF221) by calling
1-800-546-5637, or visiting
www.holmesproducts.com
.
CLEANING / MAINTENANCE
STORAGE INSTRUCTIONS
If your humidifier will not be in use for two days or more, or at the end of the season follow these instructions.
1. Clean, rinse and thoroughly dry the humidifier as directed in weekly maintenance. DO NOT leave any water inside the
base or tray.
2. Remove the tank cap. Do not store with the tank cap in place.
3. Place the humidifier in the original carton and store in a cool, dry place.
4. Always clean the humidifier before the next season begins.
5. Order your replacement filter for next year’s use.
REPLACEMENT ACCESSORIES
To order the replacement accessories you can do any of the following:
• Visit your local retailer
• Go to
www.holmesproducts.com
• Call Consumer Service at
1-800-546-5637
If you have any questions regarding your product or would like to learn more about other Holmes
®
products, please
contact our Consumer Service Department at 1-800-546-5637 or visit our website at
www.holmesproducts.com. For inquiries regarding recycling and proper disposal of this product, please contact your
local waste management facility.
198798 HCM3755C_19ESM1 Printed In China
GCDS-SUN581594-SL
Impreso en China
Owner’s Guide
HCM3755C
Cool Mist
Humidifier
FILTER# : HWF75 / SF221
FILTER TYPE : WICK
Manual del propietario
HCM3755C
con rocío fresco
Humidificador
FILTRO# : HWF75 / SF221
FILTRO TIPO : WICK
LEA Y CONSERVE ESTAS IMPORTANTES INSTRUCCIONES
PLEASE READ AND SAVE THESE IMPORTANT INSTRUCTIONS
FILTRO
DE REPUESTO
INFORMACION DE LA GARANTIA
© 2019 Sunbeam Products, Inc. Todos los derechos reservados. Distribuido por Sunbeam Products, Inc., Boca Raton,
Florida 33431.
GARANTÍA LIMITADA DE 1 AÑO
Sunbeam Products, Inc. (“Sunbeam”), o en Canadá, Newell Brands Canada ULC (“NBC”), garantiza que por un período
de uno año a partir de la fecha de compra, este producto estará libre de defectos de materiales y mano de obra.
Sunbeam (o NBC), a su elección, reparará o reemplazará este producto o cualquier componente del mismo que
presente defectos durante el período de garantía. El reemplazo se realizará por un producto o componente nuevo o
reparado. Si el producto ya no estuviera disponible, se lo reemplazará por un producto similar de valor igual o
superior. Ésta es su garantía exclusiva. No intente reparar o ajustar ninguna función eléctrica o mecánica de este
producto. Al hacerlo elimínará ésta garantía.
La garantía es válida para el comprador minorista original a partir de la fecha de compra inicial y la misma no es
transferible. Conserve el recibo de compra original. Para solicitar servicio en garantía se requiere presentar un recibo
de compra. Los agentes y centros de servicio de Sunbeam (o NBC) o las tiendas minoristas que venden productos de
Sunbeam (o NBC) no tienen derecho a alterar, modificar ni cambiar de ningún otro modo los términos y las
condiciones de esta garantía. Esta garantía no cubre el desgaste normal de las piezas ni los daños que se produzcan
como resultado de uso negligente o mal uso del producto, uso de voltaje incorrecto o corriente inapropiada, uso
contrario a las instrucciones operativas, y desarme, reparación o alteración por parte de un tercero ajeno a Sunbeam o
a un Centro de Servicio autorizado por Sunbeam. Asimismo, la garantía no cubre actos fortuitos tales como incendios,
inundaciones, huracanes y tornados.
¿Cuál es el límite de responsabilidad de Sunbeam’s (o NBC’s) ?
Sunbeam (o NBC) no será responsable de daños incidentales o emergentes causados por el incumplimiento de alguna
garantía o condición expresa, implícita o legal.
Excepto en la medida en que lo prohíba la ley aplicable, cualquier garantía o condición implícita de comerciabilidad o
aptitud para un fin determinado se limita, en cuanto a su duración, al plazo de la garantía antes mencionada.
Sunbeam (o NBC) queda exenta de toda otra garantías, condiciones o manifestaciones, expresa, implícita, legal o de
cualquier otra naturaleza. Sunbeam (o NBC) no será responsable de ningún tipo de daño que resulte de la compra,
uso o mal uso del producto, o por la imposibilidad de usar el producto, incluidos los daños incidentales, especiales,
emergentes o similares, o la pérdida de ganancias, ni de ningún incumplimiento contractual, sea de una obligación
esencial o de otra naturaleza, ni de ningún reclamo iniciado contra el comprador por un tercero. Algunas provincias,
estados o jurisdicciones no permiten la exclusión o limitación de los daños incidentales o emergentes ni las limitaciones
a la duración de las garantías implícitas, de modo que es posible que la exclusión o las limitaciones antes mencionadas
no se apliquen en su caso. Esta garantía le otorga derechos legales específicos y es posible que usted tenga otros
derechos que varían de un estado, provincia o jurisdicción a otro.
Cómo solicitar el servicio en garantía
En los Estados Unidos
Si tiene alguna pregunta sobre esta garantía o desea recibir servicio de garantía, póngase visite nuestro sitio web
www.holmesproducts.com.
En Canadá
Si tiene alguna pregunta sobre esta garantía o desea recibir servicio de garantía, póngase visite nuestro sitio web
www.holmesproducts.com.
En los Estados Unidos, esta garantía es ofrecida por Sunbeam Products, Inc. Florida 33431. En Canadá, esta garantía
es ofrecida por Newell Brands Canada ULC, 20 B Hereford Street, Brampton, Ontario L6Y 0M1. Si usted tiene otro
problema o reclamo en conexión con este producto, por favor escriba al Departamento de Servicio al Consumidor.
POR FAVOR NO DEVUELVA ESTE PRODUCTO A NINGUNA DE ESTAS DIRECCIONES NI AL LUGAR DE
COMPRA.
DIAGNÓSTICO DE PROBLEMAS
PREGUNTAS FRECUENTES
PREGUNTAS FRECUENTES
PREGUNTAS RESPUESTAS
• Cuáles son las variables que afectan
el tiempo de funcionamiento?
El tiempo de funcionamiento estimado de este humidificador está basado en
las condiciones ambientales promedio. El tiempo de funcionamiento actual de
su humidificador depende de varios factores tales como :
✔ El intercambio de aire en el cuarto donde se encuentra el humidificador.
✔ La estructura del cuarto donde se encuentra el humidificador.
✔ La temperatura del cuarto donde se encuentra el humidificador.
✔ Los niveles de humedad en el cuarto donde se encuentra el humidificador.
✔ La actividad de los ocupantes y la secuencia en que se abren y cierran las
puertas del cuarto donde se encuentra el humidificador.
✔ El número de muebles presentes en el cuarto donde se encuentra el
humidificador.
• Cómo quito la película del tanque de
agua?
✔ Consulte las instrucciones diarias de mantenimiento. Se recomienda una
limpieza regular.
• Cómo puedo extender el tiempo de
funcionamiento?
✔ Haga funcionar la unidad en el modo más bajo.
✔ Si su unidad tiene electrónicos, ajústela al nivel de humedad deseado. La
unidad se encenderá y apagará, extendiendo el tiempo de
funcionamiento.
✔ Llene el tanque al máximo, colóquelo en la base, deje que el agua se
vacíe en la base hasta que deje de burbujear, luego llene nuevamente el
tanque al máximo. Esto asegura una capacidad máxima de agua que
extenderá el tiempo de funcionamiento.
TROUBLESHOOTING
TROUBLE PROBABLE CAUSE SOLUTION
• La unidad no se
enciende.
* No está enchufada.
* El omacorriente no funciona.
4 Enchúfela.
4 Haga reemplazar el tomacorriente por un
electricista matriculado.
• Salida de vapor mínima
o nula.
* El filtro no ha absorbido el
agua.
*
La niebla fría es invisible.
4 Funcionamiento en configuración High (alta).
4 Espere 30 minutos para que el filtro absorba el
agua.
• El filtro se pone marrón. * El filtro ha absorbido
minerales.
4 Reemplace su filtro (HWF75 / SF221) llamando
al 1-800-546-5637, o visite
www.holmesproducts.com
.
LIMPIEZA / MANTENIMIENTO
INSTRUCCIONES PARA GUARDAR
Si planea no usar su humidificador por dos o más días, o al final de la estación, siga estas instrucciones.
1. Limpie y seque bien el humidificador según se detalla anteriormente en la sección: instrucciones de mantenimiento
semanales. NO deje agua dentro de la base o bandeja.
2. Retire el tapón del tanque. No lo guarde con el tapón del tanque puesto.
3. Coloque el humidificador en su empaque original y guárdelo en un lugar fresco y seco.
4. Siempre limpie el humidificador antes de que empiece la siguiente estación.
5. Encargue su filtro de repuesto para el próximo año.
ACCESORIOS DE REPUESTO
Puede ordenar accesorios de repuesto de una de las siguientes formas:
• Visite su distribuidor local
• Valla a
www.holmesproducts.com
• Llame a servicio al consumidor al 1-800-546-5637
Si tiene preguntas relacionadas con este producto o si está interesado en conocer otros productos Holmes
®
,
póngase en contacto con nuestro Departamento de Servicio al Cliente: llame al 1-800-546-5637 o visite nuestro
sitio web www.holmesproducts.com. Para preguntas relacionadas con el reciclaje y la correcta eliminación de este
producto, por favor póngase en contacto con su centro local de gestión de residuos.