
Manufactured for: Philips Personal Health
a division of Philips North America LLC
P.O. Box 10313, Stamford, CT 06904, USA
This symbol on the product’s nameplate
means it is listed by Underwriters’
Laboratories, Inc.
Norelco is a registered trademark of Philips North
America LLC.
PHILIPS and Philips shield are registered
trademarks of Koninklijke Philips N.V.
©2024 Philips North America LLC. All rights
reserved.
4222.002.8606.2 (02/06/2024)
>75 % recycled paper
>75 % papier recyclé

English
IMPORTANT SAFETY INSTRUCTIONS
When using an electric product, basic
precautions should always be followed,
including the following:
Read all instructions before using this
product.
DANGER
To reduce the risk of electric shock:
-
Do not reach for a corded product that has
fallen into water. Unplug immediately from
the power outlet.
-
The power cord and the accessories
connected to it are not for immersion or for
use in shower.
-
Do not use an extension cord with this
product.
-
Do not place or store the product where it
can fall or be pulled into a tub or sink. Do
not place or drop the product into water or
other liquid.
-
Always unplug this product from the
electrical outlet immediately after
(re)charging.
-
Remove power cord from power outlet and
product before cleaning.
-
The batteries used in this product may
present a fire or chemical burn hazard if
mistreated. Do not disassemble, heat above
100°C (212°F) or incinerate.
WARNING
To reduce the risk of burns, fire, electric
shock, or injury to persons:
-
Close supervision is required when this
product is used by, on, or near children, or
persons with limited physical, sensory, or
mental capabilities or invalids.
-
Use this product only for its intended
household use as described in this manual.
Do not use attachments not recommended
by Philips North America LLC.
-
Never operate this product if it has a
damaged power cord, if it is not working
properly, if it has been dropped or
damaged, or dropped into water while
plugged in. For assistance call
1-800-243-3050.
-
Keep the power cord away from heated
surfaces.
-
Never drop or insert any object into any
opening.
-
Do not use the adapter in or near a power
outlet that contains an electric air freshener
to prevent damage to the adapter.
-
Do not charge, clean or plug in product
outdoors or operate where aerosol (spray)
products are being used or where oxygen is
being administered.
-
Always check cutters, cutting unit and
guards before using the product. Do not
use the product if cutters, cutting unit or
guards are damaged, as injury may occur.
-
Always attach power cord to product first,
then to power outlet. Be certain plug is
inserted firmly into product up to mark
indicated on plug. To disconnect, turn
product off then remove power cord from
outlet.
-
Keep the power cord dry at all times. Do
not handle with wet hands.

-
Never put the product in direct sunlight or
store at a temperature above 140°F (60°C).
-
To prevent possible damage to the power
cord, do not wrap power cord around the
product.
-
This product is for use on human hair only.
Do not use the product for any other
purpose.
-
Always store the product, attachments and
power cord in a moisture-free area. Make
sure the cord is disconnected from the
product.
-
Do not attempt to open the product to
remove or replace the built-in rechargeable
battery.
-
Only use the power cord and other
accessories supplied with the product.
SAVE THESE INSTRUCTIONS
IMPORTANT: The power plug contains a
transformer. Do not cut off the power plug to
replace it with another plug as this will cause a
hazardous condition.
Introduction
Congratulations on your purchase and
welcome to Philips Norelco!
To fully benefit from the support that Philips
Norelco offers, register your product at
www.norelco.com/register.
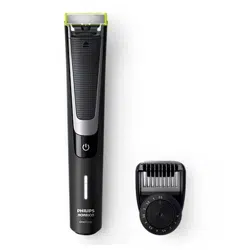
General description (Fig. 1)
1 Blade
2 Blade release slide switch
3 On/off button
4 Battery status indicator
5 Small plug
6 Power plug
7 Precision trimming comb
8 Hair length setting wheel
This symbol indicates that the product can be
used in the bath or shower.
Charging
Charging takes approx. 1 hour.
Charge the product before first use and when
the display indicates that the battery is almost
empty.
-
Charging or using the product at
temperatures below 40°F (4,5°C) or higher
than 95°F (35°C) adversely affects the
lifespan of the battery.
-
If the product is subjected to a major
change in temperature, pressure or
humidity, let the product acclimatize for 30
minutes before use.
Battery status indications
-
When the battery is almost empty, the
bottom light of the battery status indicator
flashes orange (Fig. 2).
-
When the product is charging, first the
bottom light flashes white and then lights
up white continuously (Fig. 3). Then the
second light flashes and then lights up
continuously, and so on until the product is
fully charged.
-
Quick charge: after approx. 5 minutes
charging, the product contains enough
energy for 5 minutes use. During quick
charge the lights of the battery status
indicator will light up continuously one
after another and then all switch off. This
will repeat itself until quick charge is
finished.
-
When the battery is fully charged, all lights
of the battery charge indicator light up
white continuously.
Note: Approx. 30 minutes after the battery
is fully charged or when you disconnect the
product from the outlet, the battery status
indicator turns off automatically.
Charging with the power cord
1 Make sure the product is turned off.
2 Insert the small plug into the product and
put the power plug in any 120V AC outlet
(Fig. 4).
3 After charging, remove the power plug
from the wall outlet and pull the small plug
out of the product.
Operating time
When the product is fully charged, it has a a
cordless operating time of up to 60 minutes.

Note: An adapter plug may be necessary for
cord usage in some foreign countries. Use an
attachment plug adapter of the proper
configuration for the power outlet.
Using the product
Always check the product and all
accessories before using. Do not use the
product or any accessory if it is damaged,
as this may cause injury. Always replace a
damaged part with one of the original
type.
Note: This product is for cordless use only (Fig.
5).
-
Use this product for its intended household
use as described in this manual.
-
For hygienic reasons, the product should
only be used by one person.
-
Trimming is easier when the skin and hair
are dry.
-
Use the product to trim, edge or shave
facial hair (beard, mustache and sideburns).
-
Trim with the trimming comb to obtain a
certain length.
-
Take your time when you first start to use
the product. You have to gain practice with
the product.
-
Allow some time for the skin to adjust to
the product.
-
Use the blade on a clean face. The blades
go blunt faster if on skin that isn't clean.
-
Do not use the blade when damaged or
broken. Replace the blade immediately if it
is damaged.
This product is not intended for shaving,
edging or trimming hairs on lower body
parts or scalp hair.
Turning the product on and off
1 Press the on/off button once to turn the
product on or off (Fig. 6).
Shaving
-
Make sure that the blade is in full contact
with the skin by placing it flat on the skin.
-
For the best result, move the product
against the grain.
-
Make long strokes while pressing lightly.
-
Use the product dry or wet with gel or
foam, even in the shower.
-
Shaving a clean beard and face gives the
best results.
1 Turn the product on (Fig. 6).
2 Place the blade on the skin and move the
product up or against the grain in long
strokes while pressing lightly (Fig. 7).
Note: Make sure you hold the surface of the
blade flat against your skin (Fig. 8).
3 Turn off and clean the product after every
use (see 'Cleaning').
Edging
-
Use both edges of the blade to create sharp
lines and perfect edges.
-
Hold the product in such a way that the
blade is perpendicular to the skin and one
of its edges touches the skin. This allows
more precise detailing of sideburns and the
area around the mouth and nose.
1 To create sharp edges and lines, you can
use either edge of the blade (Fig. 9).
2 Turn the product on (Fig. 6).
3 Place the edge of the blade perpendicular
onto the skin (Fig. 10).
4 Make straight strokes while applying gentle
pressure (Fig. 11).
5 Turn off and clean the product after each
use (see 'Cleaning the product').
Trimming with comb
-
The precision trimming comb allows you to
trim hair to different lengths. When you
trim for the first time, start at the highest
length setting to familiarize yourself with
the product.
-
The settings on the wheel correspond to
the remaining hair length after trimming in
millimeters. You can select a length from
0.5mm (1/64 in.) to 9mm (23/64 in.) (Fig.
12).
-
Always trim in the direction of the teeth of
the precision trimming comb making sure
the flat part of the comb is in full contact
with the skin for an even trimming result
(Fig. 13).

-
Since all hairs do not grow in the same
direction, you may want to try different
trimming directions (i.e. upwards,
downwards, or across). Practice is best for
optimum results.
-
Make sure to always move the product
against the grain.
-
Trimming is easier when the skin and hair
are dry.
1 Place the front part of the comb onto the
blade and push the projection at the back
of the comb into the product (‘click’) (Fig.
14).
2 Turn the hair length setting wheel to select
the desired hair length setting (Fig. 15).The
settings on the wheel correspond to the
remaining hair length after trimming. You
can select a length from 0.5mm (1/64 in.)
to 9mm (23/64 in.) (Fig. 12).
3 Turn on the product (Fig. 6).
4 Place the comb onto the skin and move the
product upwards slowly, against the grain
(Fig. 16).
5 Turn off and clean the product after each
use (see 'Cleaning').
6 To remove the comb, pull the back part off
the product and then slide the comb off the
blade (Fig. 17).
Cleaning
Clean the product after every use.
Never use scouring pads, abrasive cleaning
agents or aggressive liquids such as
gasoline or acetone to clean the product.
Do not tap the product or blade against a
surface to remove hairs and water as this
may cause damage to the product and
blade (Fig. 18). If the blade is damaged,
replace immediately.
Never dry the blade with a towel or tissue,
as this may cause damage.
Cleaning the product
1 Switch off the product.
2 Remove the comb from the blade (Fig. 17).
3 Blow off any hairs that have accumulated
on the blade and/or comb (Fig. 19).
4 Switch on the product for approx. 15
seconds and rinse the blade with lukewarm
water (Fig. 19).
5 Rinse the comb for approx. 15 seconds with
lukewarm water (Fig. 20).
6 Carefully shake off excess water and let all
parts air dry completely.
Note: The blade is fragile. Handle it carefully.
Replace the blade immediately if it is
damaged.
This product has no other user-serviceable
parts. For assistance call 1-800-243-3050.
Storage
-
Always attach the precision trimming comb
on the blade to protect the blade from
damage during traveling or storage (Fig.
14).
-
Make sure the product and attachments
are completely dry before storing.
-
Be sure the product is switched off. Remove
the power cord from power outlet and the
product before storing it in a safe, dry
location where it will not be crushed,
banged, or subject to damage.
-
Do not wrap cord around the product
when storing.
-
Store cord and other accessories in a safe
location where these will not be cut or
damaged.
-
Do not place or store the product where it
can fall or be pulled into a tub or sink,
water or other liquid while plugged in.
Replacement
Blade wear indicator
For optimal cutting and gliding performance,
replace the blade every 4 months or when it
no longer provides the shaving or trimming
results you expect. This advice is based on two
full shaves a week and actual results may vary.
The blade is equipped with a blade wear
indicator. A green bar will gradually appear on
the blade as you use it (Fig. 21). When it is
highly visible, it is recommended to replace
your blade for the best OneBlade experience.
Replace the blade when you are not satisfied
with its performance. Always replace with an

original Philips Norelco blade (see
'Accessories').
Depending on your usage behavior, the exact
lifetime of the blade could be longer or
shorter. Similar to a manual blade, the blade
becomes blunt over time, which results in
increased hair pulling and reduced cutting
performance.
Replacing the blade
1 Turn off the product.
2 Carefully push the blade release slide
switch upwards while holding the blade on
both sides (Fig. 22). This will prevent the
blade from flying away.
3 Hold the new blade on both sides and press
it onto the handle (‘click’) (Fig. 23).
Note:Be careful, the edges of the blade are
sharp. When you hear a click, the new blade is
placed correctly and ready for use.
Accessories
Replacement parts and accessories may be
purchased at a store near you or on our
website www.philips.com/store.
The following accessories are available:
-
Model QP210 Philips Norelco Replacement
Blade, 1-Pack
-
Model QP220 Philips Norelco Replacement
Blade, 2-Pack
-
Model QP230 Philips Norelco Replacement
Blade, 3-Pack
-
Model QP610 Philips Norelco Body Kit
-
Model QP620 Philips Norelco Face + Body
Kit
Assistance
For assistance, visit our website:
www.philips.com/support or call toll free
1-800-243-3050.
Disposal
-
This product contains a rechargeable
lithium-ion battery which must be disposed
of properly. Contact your local town or city
officials for battery disposal information.
You can also call 1-800-822-8837 or visit
www.call2recycle.org for battery drop-off
locations.
-
For assistance, visit our website
www.philips.com/support or call
1-800-243-3050 toll free.
-
Your product is designed and
manufactured with high quality materials
and components, which can be recycled
and reused. For recycling information,
please contact your local waste
management facilities or visit
www.recycle.philips.com
Full Two-Year Warranty
Philips North America LLC warrants this new
product (except blade and guards) against
defects in materials or workmanship for a
period of two years from the date of purchase,
and agrees to repair or replace any defective
product without charge.
IMPORTANT: This warranty does not cover
damage resulting from accident, misuse or
abuse, lack of reasonable care, the affixing of
any attachment not provided with the product
or loss of parts or subjecting the product to
any but the specified voltage or batteries.*
NO RESPONSIBILITY IS ASSUMED FOR ANY
SPECIAL, INCIDENTAL OR CONSEQUENTIAL
DAMAGES.
In order to obtain warranty service, simply go
to www.philips.com/support. It is suggested
that for your protection you return shipments
of product by insured mail, insurance prepaid.
Damage occurring during shipment is not
covered by this warranty.
NOTE: No other warranty, written or oral, is
authorized by Philips North America LLC.
This warranty gives you specific legal rights,
and you may also have other rights which vary
from state to state. Some states do not allow
the exclusion or limitation of incidental or
consequential damages, so the above
exclusion and limitations may not apply to
you.
*Read enclosed instructions carefully.
45-DAY MONEY-BACK GUARANTEE
If you are not fully satisfied with your product
send the product back and we’ll refund you
the full purchase price.
The product must be shipped prepaid by
insured mail, insurance prepaid, have the

original sales receipt, indicating purchase
price and date of purchase.
We cannot be responsible for lost mail.
The product must be postmarked no later
than 45 days after the date of purchase.
Philips reserves the right to verify the purchase
price of the product and limit refunds not to
exceed suggested retail price.
To obtain the money-back guarantee
service, please go to
www.PhilipsMoneyBack.com and follow
the simple 3-step process.
Delivery of refund check will occur 6–8
weeks after receipt of returned product.
