Loading ...
Loading ...
Loading ...
10
7. Electricalwork
Fig.7-7
Fig.7-8
B
1
C
A
2
D
7.3. Remotecontroller
Whenusingawiredremotecontrollertogetherwithawirelessremotecontroller,use
the following wireless remote controller.
7.3.1. Wiredremotecontroller
1)Installingprocedures
Refer to the installation manual that comes with each remote controller for details.
2)Functionselectionofremotecontroller
Iftworemotecontrollersareconnected,setoneto“Main”andtheotherto“Sub”.
For setting procedures, refer to “Function selection of remote controller” in the
operation manual for the indoor unit.
7.3.2. Forwirelessremotecontroller
1)Installationarea
• Areainwhichtheremotecontrollerisnotexposedtodirectsunshine.
• Areainwhichthereisnonearbyheatingsource.
• Areainwhichtheremotecontrollerisnotexposedtocold(orhot)winds.
• Areainwhichtheremotecontrollercanbeoperatedeasily.
• Areainwhichtheremotecontrollerisbeyondthereachofchildren.
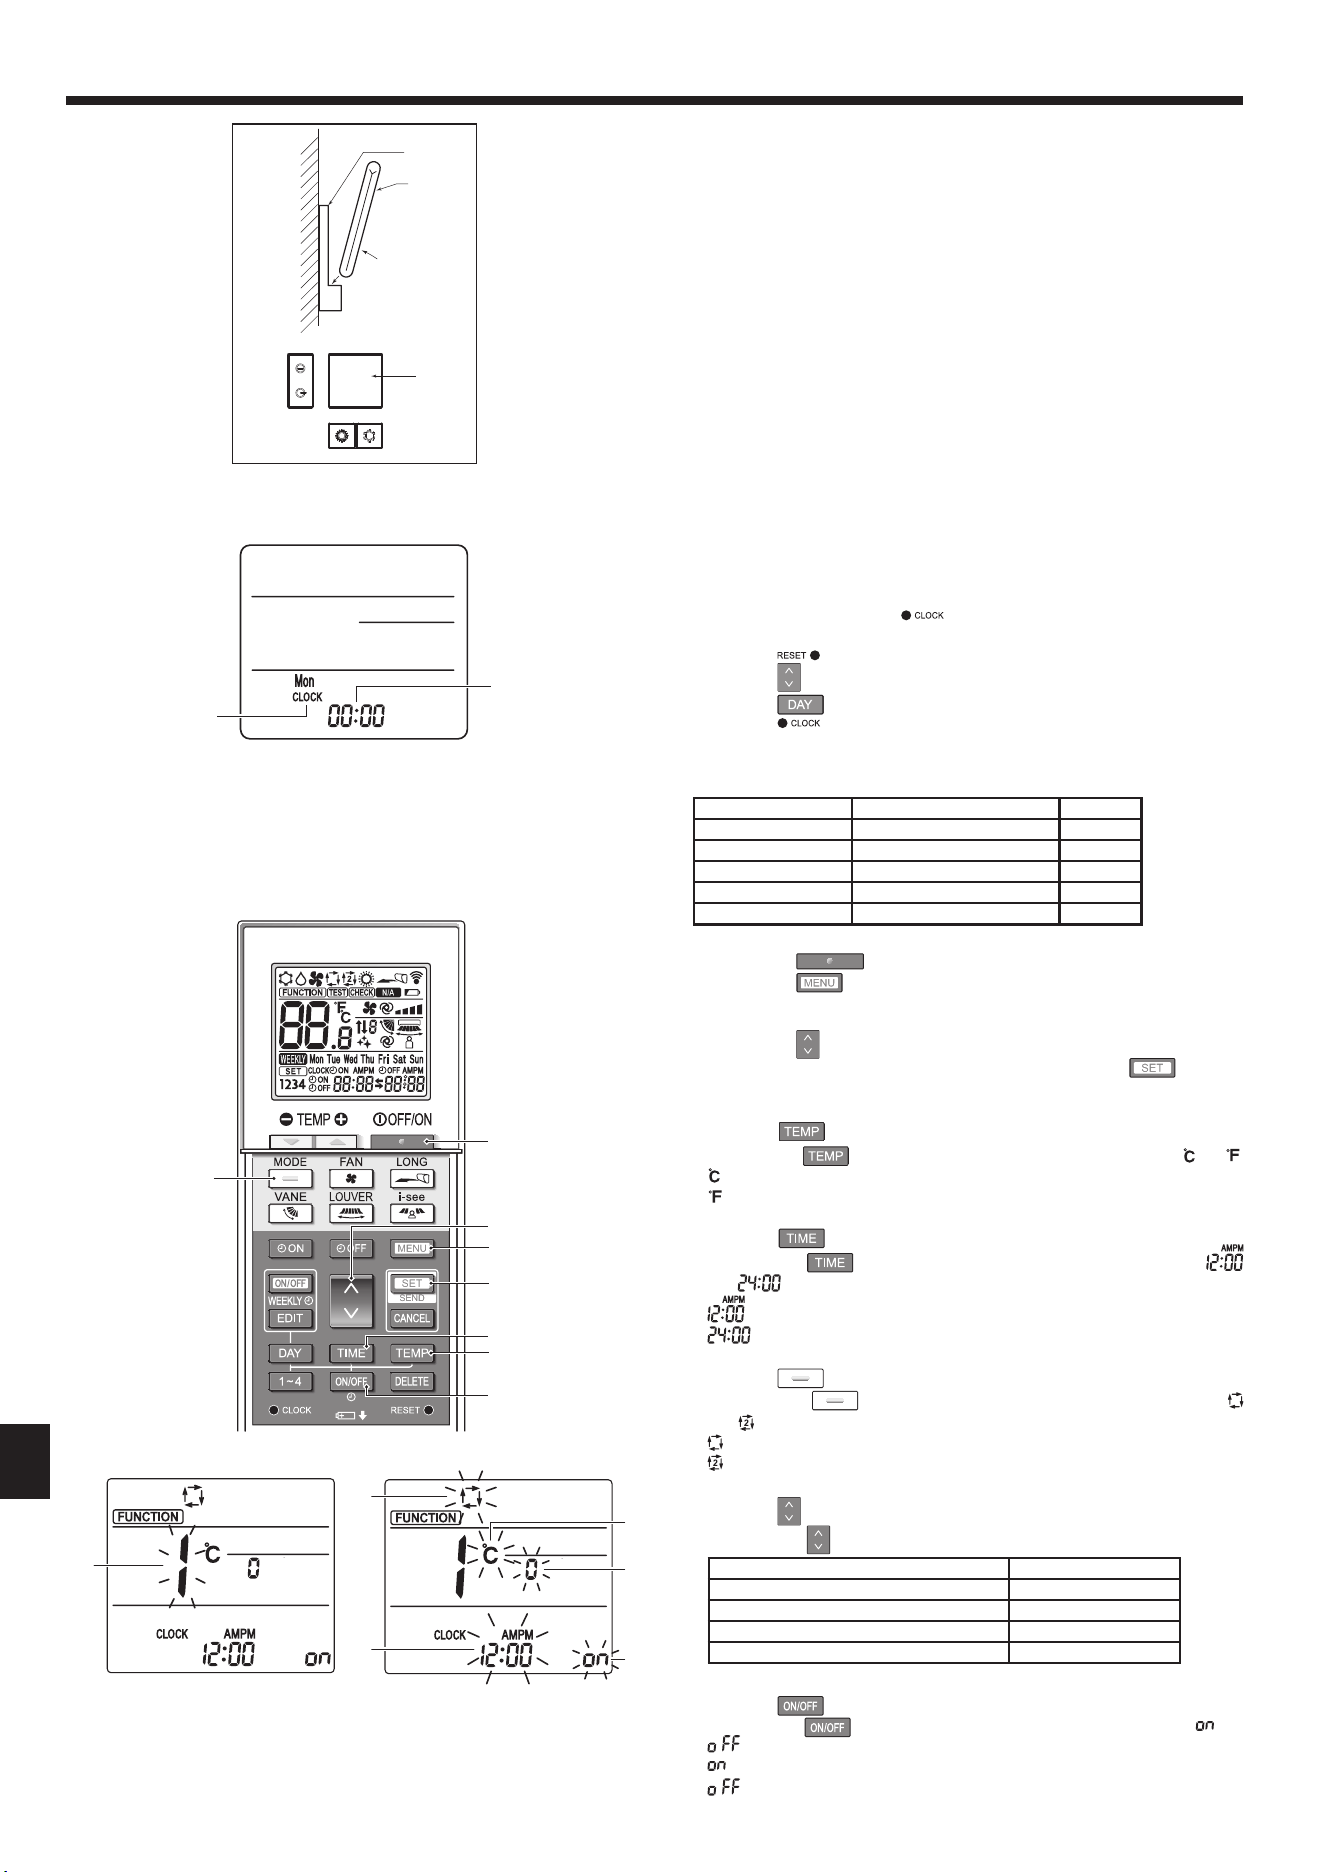
2)Installationmethod(Fig.7-7)
1Attachtheremotecontrollerholdertothedesiredlocationusing2tappingscrews.
2Placethelowerendofthecontrollerintotheholder.
A Remote controller BWallC Display panel DReceiver
• Thesignalcantraveluptoapproximately7meters,23feet(inastraightline)
within45degreestobothrightandleftofthecenterlineofthereceiver.
3)Setting(Clocksetting)(Fig.7-8)
1. Insert batteries or press the
button with something sharp.
[CLOCK]Aand[:]B blinks.
2.Pressthe
button with something sharp.
3.Pressthe button to set the time.
Pressthe
button to set the Day.
4.Pressthe
button with something sharp at the end.
[CLOCK]and[:]lighted.
4)Initialsetting
The following settings can be made in the initial setting mode.
Item Setting Fig.7-10
Temperature unit ºC/ºF
A
Time display 12-hourformat/24-hourformat
B
AUTOmode Singlesetpoint/Dualsetpoint
C
PairNo. 0–3
D
Backlight On/Off
E
4-1.Switchingtotheinitialsettingmode
1.Pressthe
button 1 to stop the air conditioner.
2.Pressthe
button 2.
The Function setting screen will be displayed and the function No. A will
blink.(Fig.7-9)
Pressthe
button 4 to change the function No.
3.CheckthatfunctionNo.“1”isdisplayed,andthenpressthe
button 3.
Thedisplaysettingscreenwillbedisplayed.(Fig.7-10)
4-2.ChangingthetemperatureunitA
Pressthe
button 5.
Each time the
button 5ispressed,thesettingswitchesbetween and .
: The temperature is displayed in degrees Celsius.
: The temperature is displayed in degrees Fahrenheit.
4-3.ChangingthetimedisplayB
Pressthe
button 6.
Each time the
button 6ispressed,thesettingswitchesbetween
and
.
:Thetimeisdisplayedinthe12-hourformat.
:Thetimeisdisplayedinthe24-hourformat.
4-4.ChangingtheAUTOmodeC
Pressthe
button 7.
Each time the
button 7ispressed,thesettingswitchesbetween
and
.
:TheAUTOmodeoperatesastheusualautomaticmode.
:TheAUTOmodeoperatesusingdualsetpoints.
4-5.ChangingthepairNo.D
Pressthe button 4.
Each time the
button 4ispressed,thepairNo.0–3changes.
PairNo.ofwirelessremotecontroller IndoorPCboard
0 Initial setting
1 Cut J41
2 Cut J42
3 CutJ41,J42
4-6.ChangingthebacklightsettingE
Pressthe
button 8.
Each time the
button 8ispressed,thesettingswitchesbetween and
.
: The backlight comes on when a button is pressed.
: The backlight does not come on when a button is pressed.
B
A
Fig.7-9 Fig.7-10
A
A
D
E
C
B
7
1
4
2
3
6
5
8
Loading ...
Loading ...
Loading ...