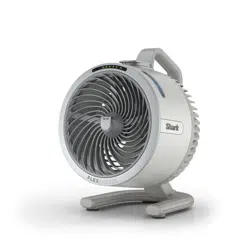
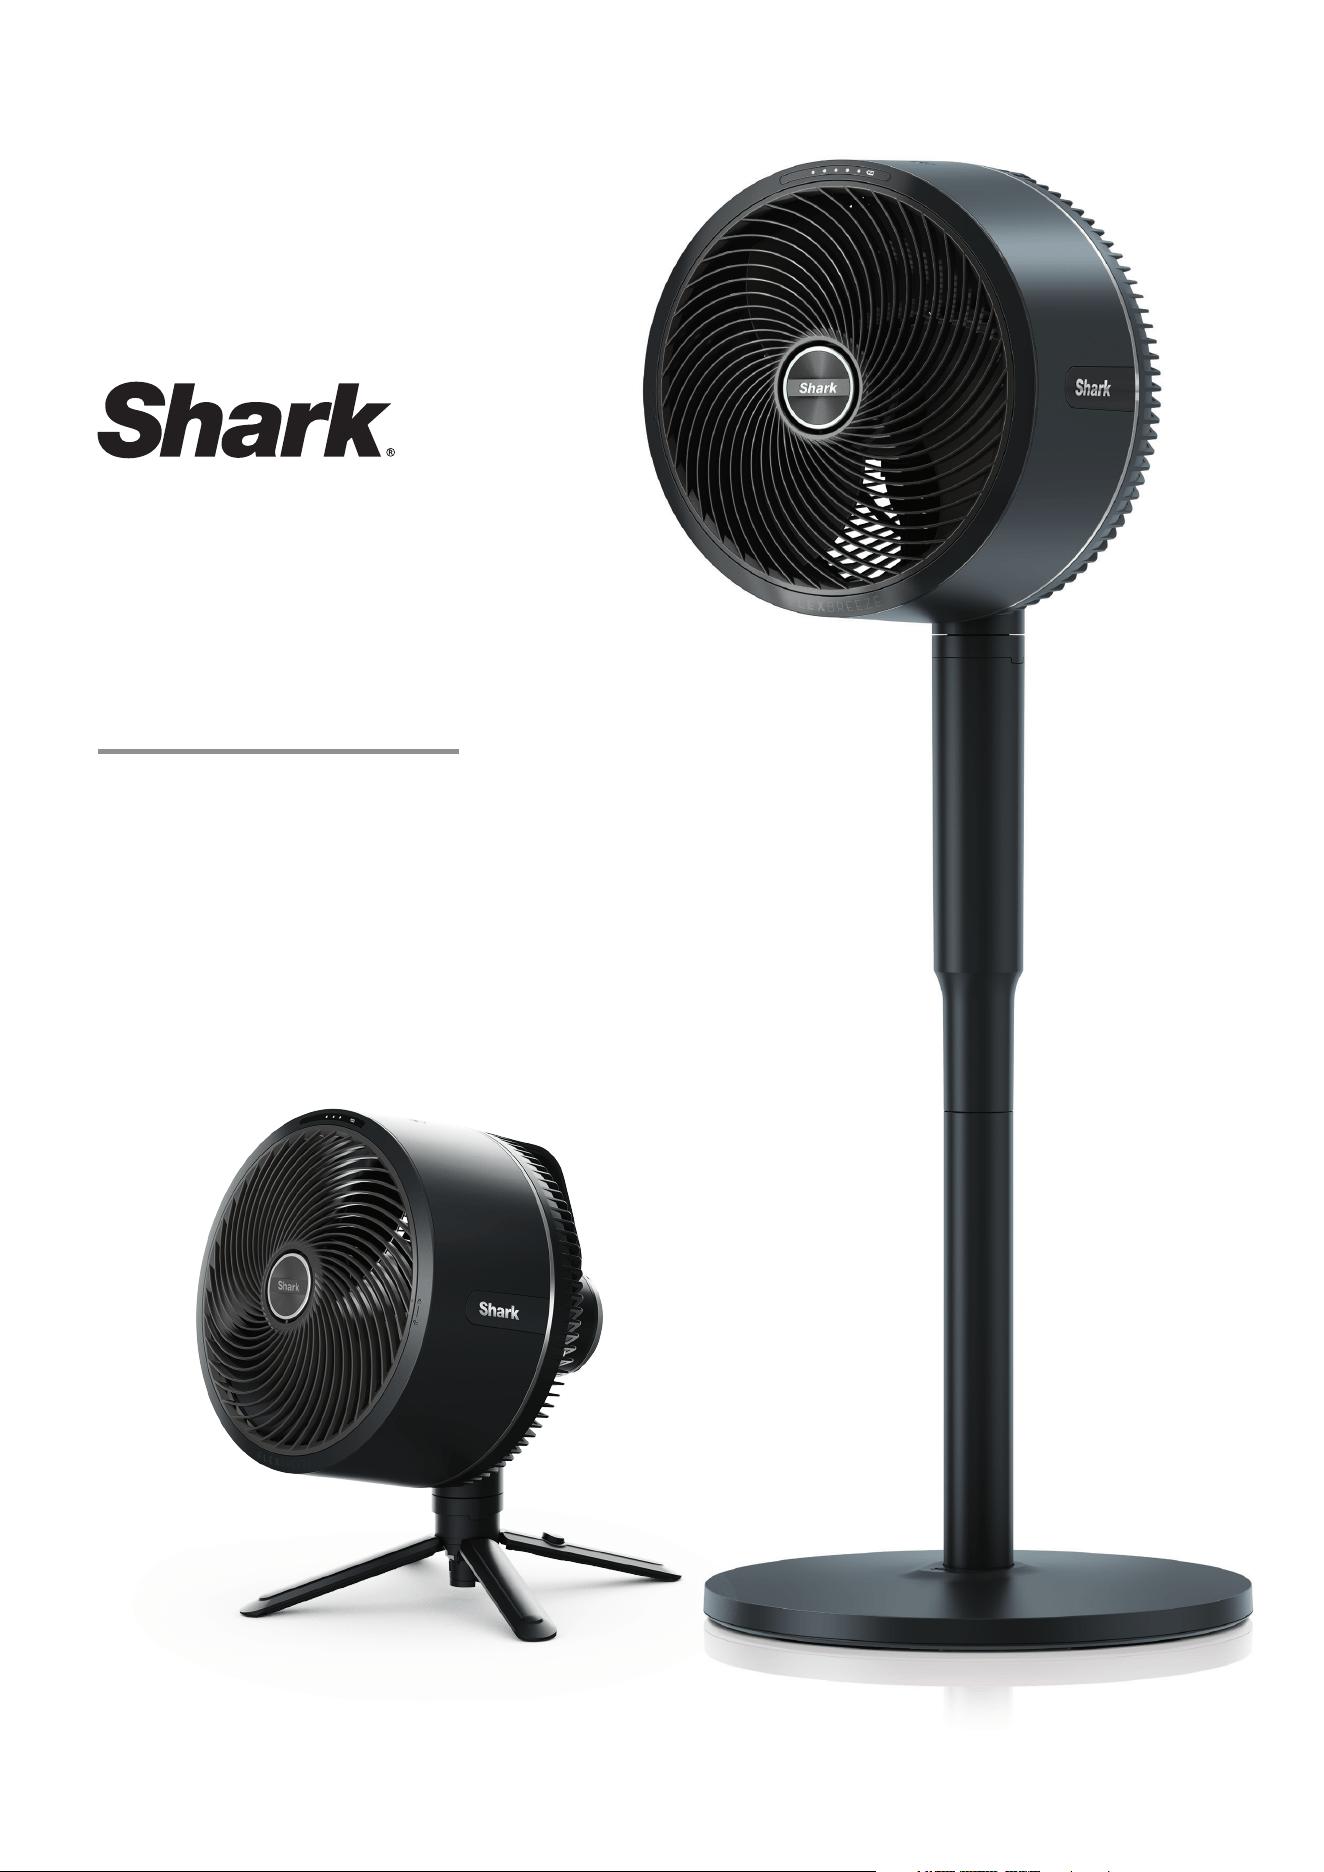
FAN
FA220 Series
OWNER’S GUIDE
2
IMPORTANT SAFETY INSTRUCTIONS
SUITABLE FOR OUTDOOR USE & HOUSEHOLD USE ONLY.
IPX4
IPX4 RAIN RESISTANT (EXCLUDING THE REMOTE)
WARNING
TO REDUCE THE RISK OF FIRE, ELECTRIC SHOCK, OR INJURY: READ ALL THESE INSTRUCTIONS BEFORE USE.
1. This appliance is operated by a rechargeable battery. ONLY
recharge the battery with the charger supplied with the unit,
battery charger for use only with model GQ36-120300-ABO
power supply Donguan Gangqi Electronic Co., Ltd.
A charger that may be suitable for one type of battery may
create a risk of fire when used with another battery.
2. DO NOT attempt to destroy, remove, or disassemble the
battery pack from the machine. DO NOT incinerate battery
cells. Consult your local waste authority for information
regarding available recycling and/or disposal options.
3. This appliance comes with a remote control which contains
a coin battery. Dispose of batteries properly. Always keep
batteries away from children (choke hazard). Even used
batteries can cause injury.
4. To reduce the risk of an electric shock, connect only to an
outlet provided with a Residual Current Device (RCD).
5. The fan should be used on a stable and level surface.
6. Never use this fan near pools, bathtubs, showers, basins, or
other vessels containing water.
7. DO NOT operate any unit with a damaged power supply wire
or battery charger. Discard the unit or return to an authorised
a third party service facility for examination and/or repair.
8. DO NOT run cord under carpeting. DO NOT cover charge cord
with throw rugs, runners, or similar coverings. DO NOT route
charger cord under furniture or appliances. Keep charger cord
away from high-trac areas. Place charger in an area where
the cord will not be tripped over.
9. If the charger cord is damaged, it should be replaced.
10. This appliance is not intended for use by anyone (including
children) with reduced physical, sensory, or mental capabilities,
or lack of experience and knowledge, unless they have
been given supervision or instruction concerning use of the
appliance by a person responsible for their safety.
11. Children should be supervised to ensure that they DO NOT
play with the appliance.
12. Cleaning and user maintenance shall not be made by children
without supervision.
13. Prior to cleaning or other maintenance, the appliance must be
unplugged from the electrical outlet.
14. Only use Shark branded accessories.
15. DO NOT use if appliance is not working as it should, or has
been dropped, damaged, left outdoors for extended periods
of time in poor weather without the protective cover installed
or dropped into water.
16. Turn o all controls before plugging in or unplugging the
appliance.
17. Unplug from electrical outlet when not in use and before any
maintenance or cleaning.
18. Hand wash exterior/hard plastic/non-electronic parts with
water only. DO NOT immerse. Cleaning with chemicals could
damage the unit.
19. DO NOT attempt to repair or adjust any electrical or
mechanical functions of this appliance, as this may cause
danger and void the warranty.
WARNING: Chemical Burn Hazard. Keep batteries away from children.
Dispose of coin cell batteries according to local regulations.
Even used batteries can cause injury. This product contains
a lithium coin cell battery. If a new or used lithium coin cell
battery is swallowed or enters the body, it can cause severe
internal burns and can lead to death in as little as 2 hours. After
changing batteries, always completely close and secure the
battery compartment. If the battery compartment does not
close securely, stop using the product, remove the battery, and
keep it away from children. If you think a battery might have
been swallowed or placed inside any part of the body, seek
immediate medical attention.
WARNING: Not suitable for use with solid-state speed control
or a variable control switch.
LITHIUM BATTERY SAFETY WARNINGS
LITHIUM BATTERIES STORE A LARGE AMOUNT OF ENERGY
AND WILL VENT FIRE OR EXPLODE IF MISTREATED.
1.
DO NOT DO ANY OF THE FOLLOWING TO THE BATTERY PACK:
2. Keep battery pack dry.
3. Charge battery pack only according to its charger's instructions.
4. Inspect battery pack before every use:
DO NOT use or charge if damaged.
BATTERY REMOVAL AND DISPOSAL
This product contains an integral lithium battery (not replaceable),
and the remote control uses a lithium coin battery. When the
remote battery no longer has a charge, it should be removed
from the remote and recycled. DO NOT incinerate or compost
the product with its integral battery or the remote battery. When
your remote battery needs to be replaced, dispose of it or recycle
it in accordance with local ordinances or regulations. In some
areas, it is illegal to place spent lithium batteries in the rubbish
bin or in a municipal solid waste stream. Return spent battery to
an authorised recycling centre or to retailer for recycling. Contact
your local recycling centre for information on where to drop o
the spent battery. This appliance contains an integral battery that
is non-replaceable. When the battery is at end of life, the appliance
shall be properly disposed of.
POWER SUPPLY SAFETY
1. Read and follow all instructions that are on the product
or provided with the product.
2. DO NOT use an extension cord.
3. DO NOT use within 3 metres of pool and DO NOT use in
a bathroom.
4. WARNING: Risk of Electric Shock. When used outdoors, install
only to a covered Class A RCD protected receptacle that is
weatherproof with the power unit connected to the receptacle.
If one is not provided, contact a qualified electrician for proper
installation. Ensure that the power unit and cord DO NOT
interfere with closing the receptacle cover.
a. Open
b. Drop
c. Short-circuit
d. Puncture
e. Incinerate
e. Expose to temperatures
below 0°C and above 60°C
READ AND SAVE
THESE INSTRUCTIONS
© 2024 SharkNinja Operating LLC. SHARK is a registered trademark in the
United Kingdom of SHARKNINJA Operating LLC.
FA220UK_IB_MP_240208_Mv2
BATTERY WARNING
KEEP OUT OF REACH OF CHILDREN
Swallowing can lead to chemical burns,
perforation of soft tissue, and death.
Severe burns can occur within 2 hours
of ingestion. Seek medical attention
immediately.
3
IMPORTANT SAFETY INSTRUCTIONS
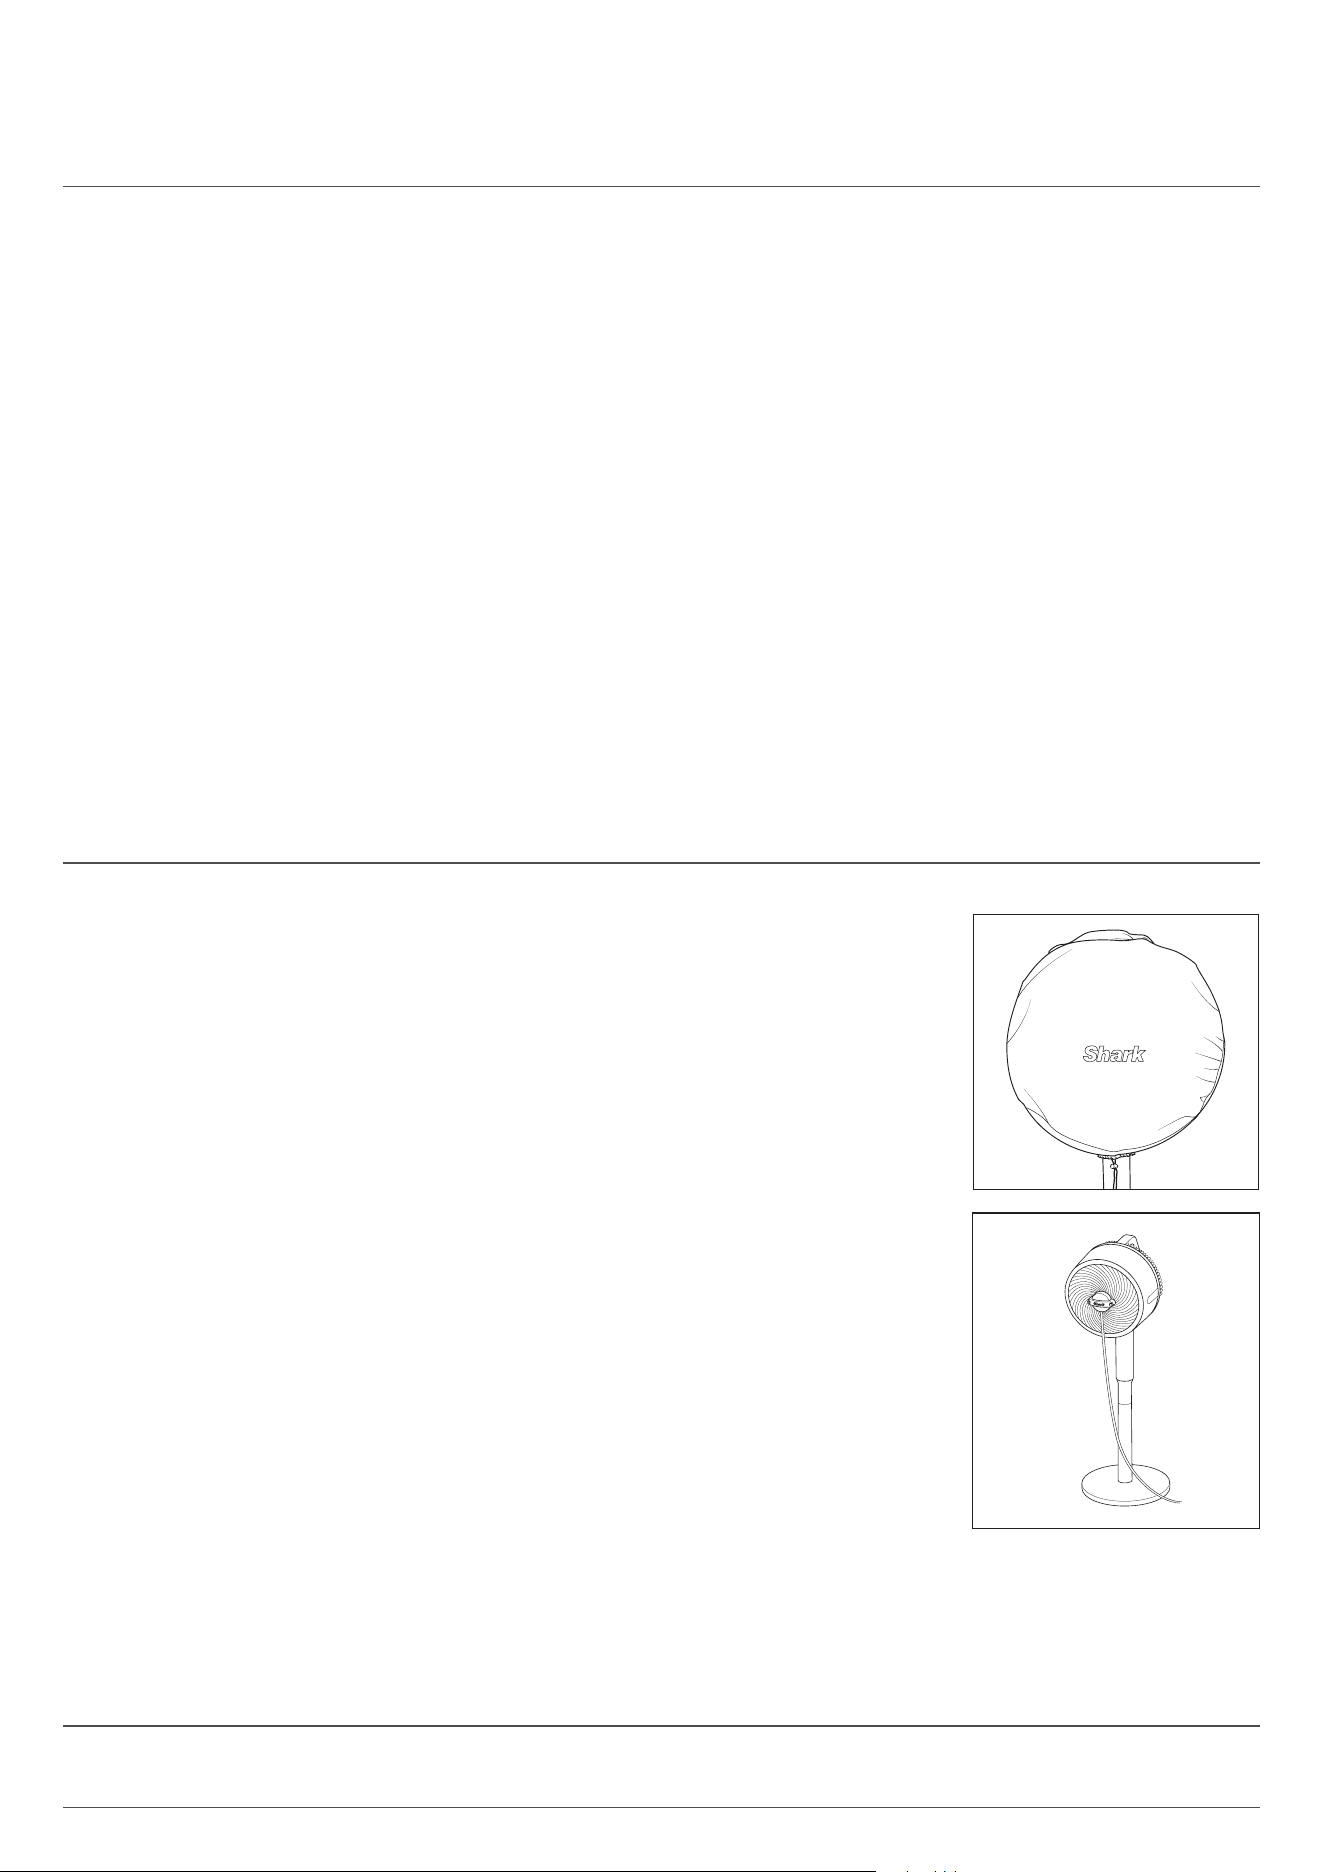
FAN ACCESSORIES
OUTDOOR COVER
1. The fan cover is not a toy. Children should not play with it as it may become unsanitary
during outdoor use.
2. CHOKING HAZARD: Children should not play with the cover as they could choke on the
draw string
.
MISTING ACCESSORY
3. The mister is suitable for outdoor use only.
4. The mister output is not controlled by the fan power. The mister will continue to
operate when fan is powered o.
5. DO NOT operate the mister using water pressure above 4.1 bar.
6. DO NOT operate the mister using warm or hot water. Only use cold or room
temperature water.
7. DO NOT handle live electrical products in the misting stream.
8. Keep non waterproof electronic equipment and appliances out of the mister stream.
9. Children should be supervised to ensure that they DO NOT play with the mister
accessory.
10. WARNING CHOKING HAZARD: Be conscience of the nozzle placement after
removing when cleaning Ensure children do not have access to the nozzles.
11. The cleaning and user maintenance of the mister shall not be done by children
without supervision.
SYMPTOMS FROM BATTERY INGESTION
No obvious symptoms
Unfortunately, it is not obvious when a button or coin battery is stuck in a child’s oesophagus (food pipe).
There are no specific symptoms associated with this. The child might:
• cough, gag or drool a lot;
• appear to have a stomach upset or a virus;
• be sick;
• point to their throat or stomach;
• have a pain in their abdomen, chest or throat;
• be tired or lethargic;
• be quieter or more clingy than usual or otherwise “not themselves”;
• lose their appetite or have a reduced appetite; and
• not want to eat solid food / be unable to eat solid food.
These sorts of symptoms vary or fluctuate, with the pain increasing and then subsiding.
A specific symptom to button and coin battery ingestion is vomiting fresh (bright red) blood. If the child does this seek
immediate medical help.
The lack of clear symptoms is why it is important to be vigilant with “flat” or spare button or coin batteries int he home and
the products that contain them.
READ AND SAVE THESE INSTRUCTIONS
4
Shark® FLEXBREEZE Product Information
According to:
Commission Regulation (EU) 206/2012 implementing Directive 2009/125/EC of the European Parliament and of the
Council with regard to eco-design requirements for air conditioners and comfort fans.
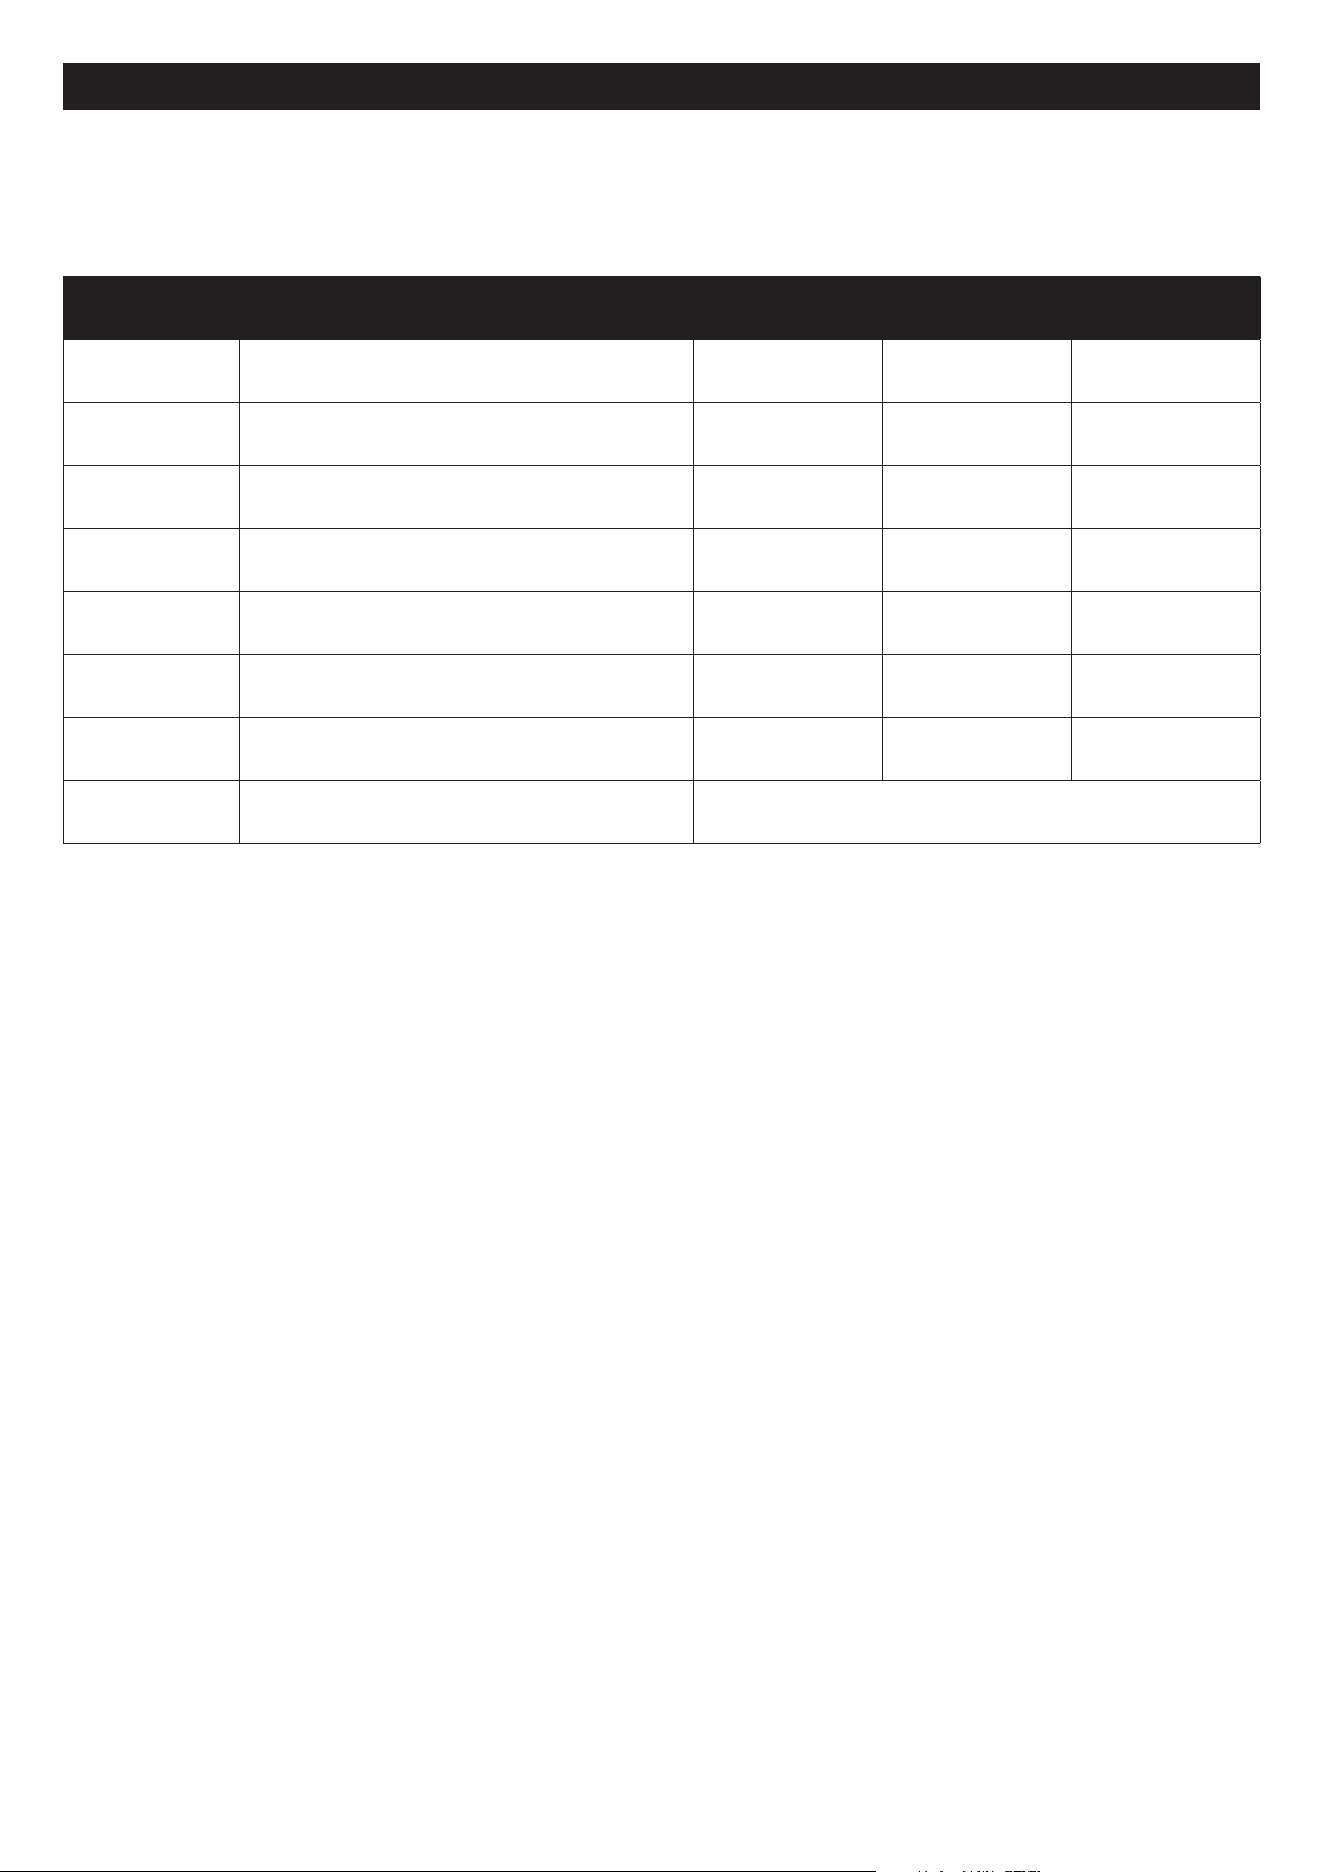
NOTE DESCRIPTION SYMBOL VALUE UNIT
Maximum Fan Flow Rate F 26.66 m
3
/min
Fan Power Input P 15.90 W
Service Value SV 1.68 (m3/min)/W
Standby Power Consumption
P
SB
0.23 W
Table Fan Sound Power Level
L
WA
58.73 dB(A)
Floor Fan Sound Power Level
L
WA
57.53 dB(A)
Maximum Air Velocity c 4.012 m/s
Measurement standard for service value IEC 60879
5
Shark® FLEXBREEZE Fan Instructions
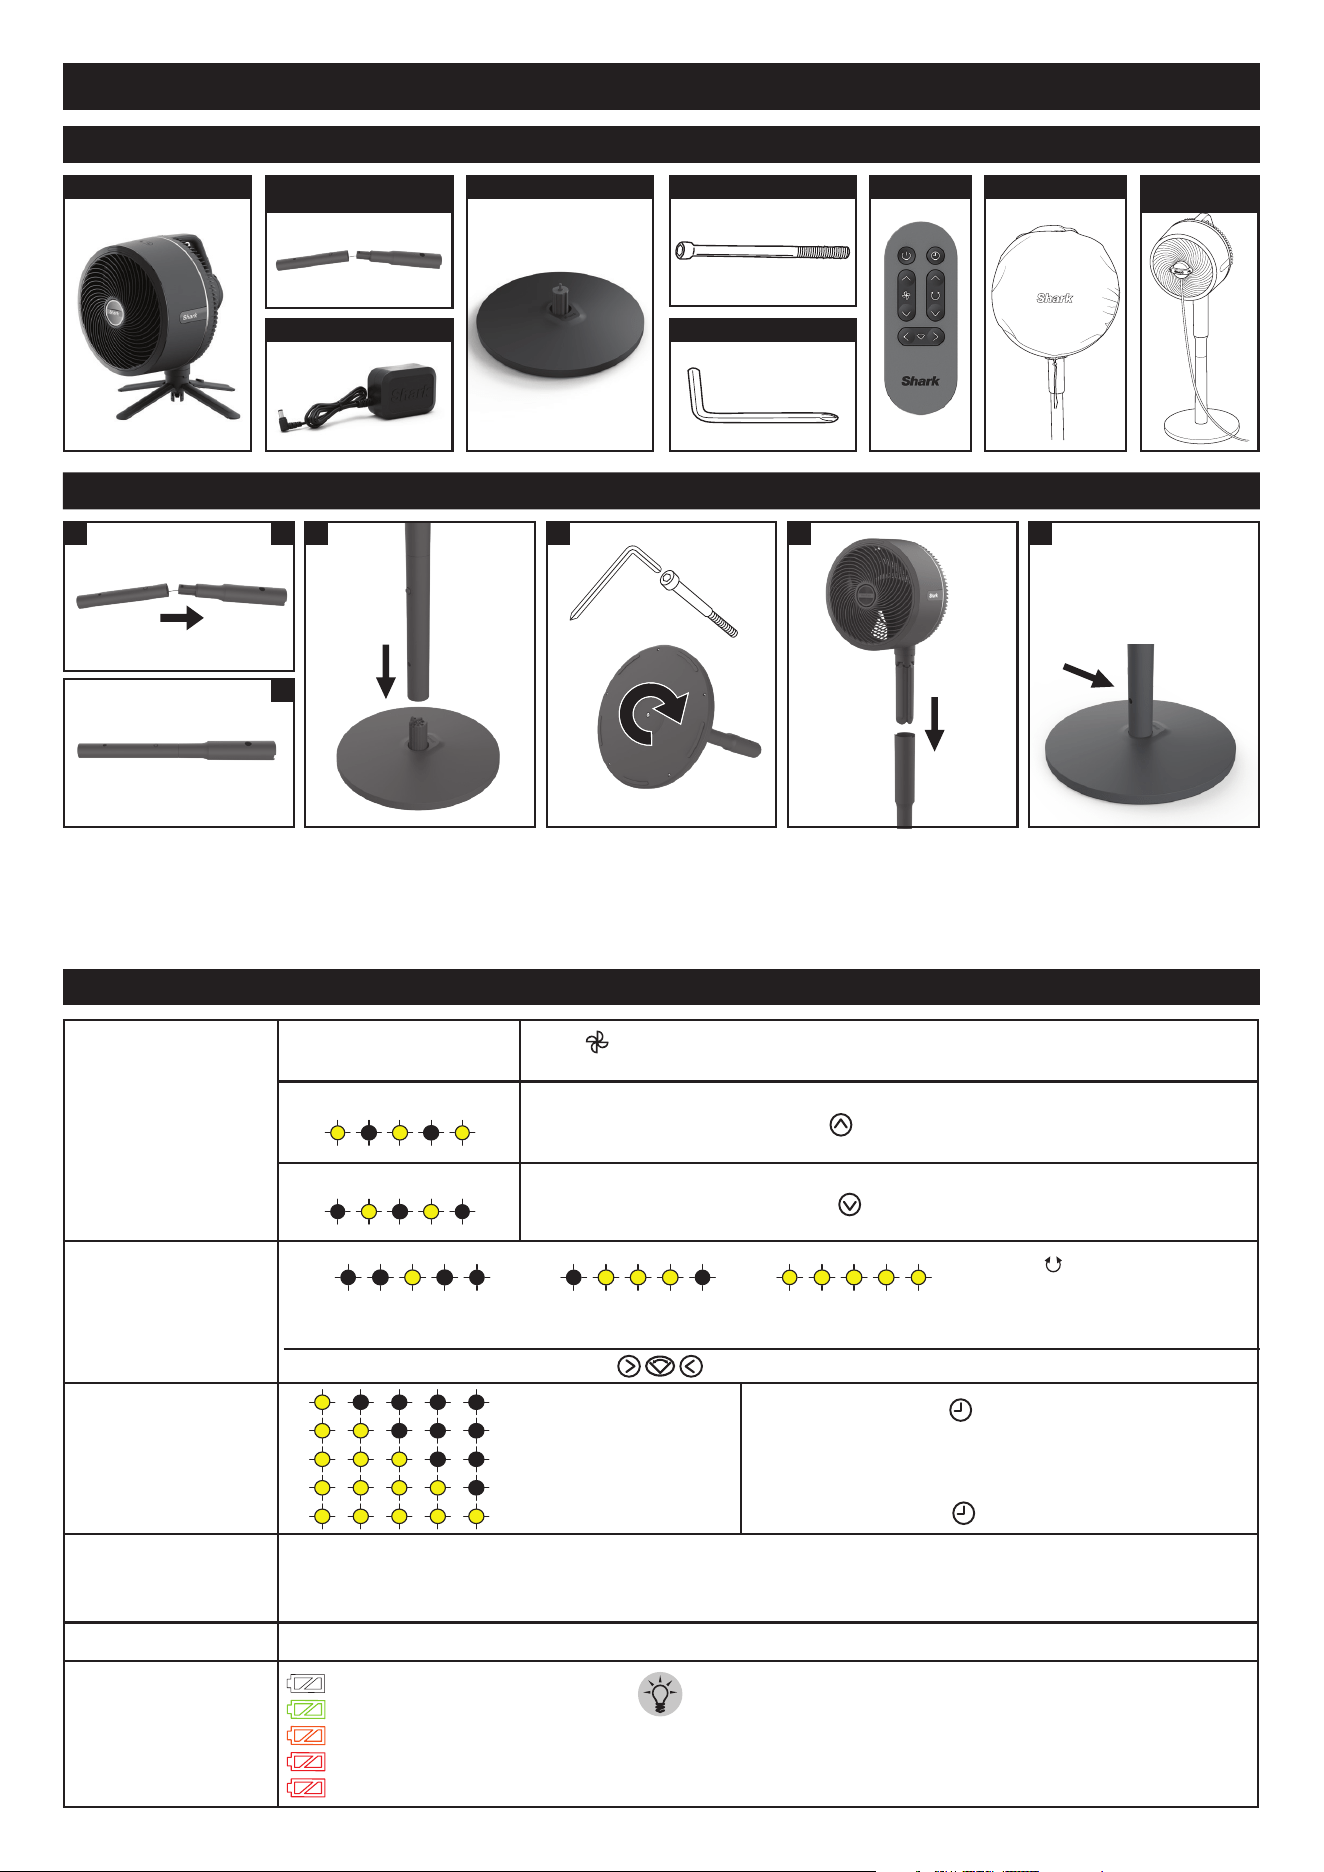
HOW TO USE YOUR FAN
Fan Speeds
1-5
Press to switch between fan speeds 1-5. LED lights will appear to
indicate the fan speed level.
Strong Breeze Mode
(REMOTE ONLY) Press and hold
for 3 seconds for strong breeze mode.
Gentle Breeze Mode
(REMOTE ONLY) Press and hold
for 3 seconds for gentle breeze mode.
Oscillation Settings
1 - 45° angle 2 - 90° angle
3 - 180° angle
Timer
(REMOTE ONLY) Press to switch between timer
settings 1-5 hours. LED lights will appear to indicate
how many hours the timer is set for.
LEDs will switch o after 20 seconds. To check how long is
left on your timer, press and the LED lights will appear.
Runtime without
oscillation
MAXIMUM CORDLESS RUNTIME: Up to 20 hours on fan speed 1.
MAXIMUM CORDLESS PERFORMANCE: Up to 2 hours on fan speed 5.
PLUGGED IN: Indefinite runtime; fan will charge while operating.
Charge Time FROM 0% TO FULLY 100% BATTERY: 5 hours
Battery Indicator
100% charged: white light
51%-99%: green light
21%-50%: amber light
6%-20%: red light steady
5% and below: red light blinking
Press to toggle between
oscillation angles.
LED lights will indicate which
angle is selected.
Setting 1 : 1 Hour
Setting 2 : 2 Hours
Setting 3 : 3 Hours
Setting 4 : 4 Hours
Setting 5 : 5 Hours
(REMOTE ONLY) Press the on the remote to move the fan head to the left or right.
TIP: The fan works while
charging
SETTING UP YOUR FAN
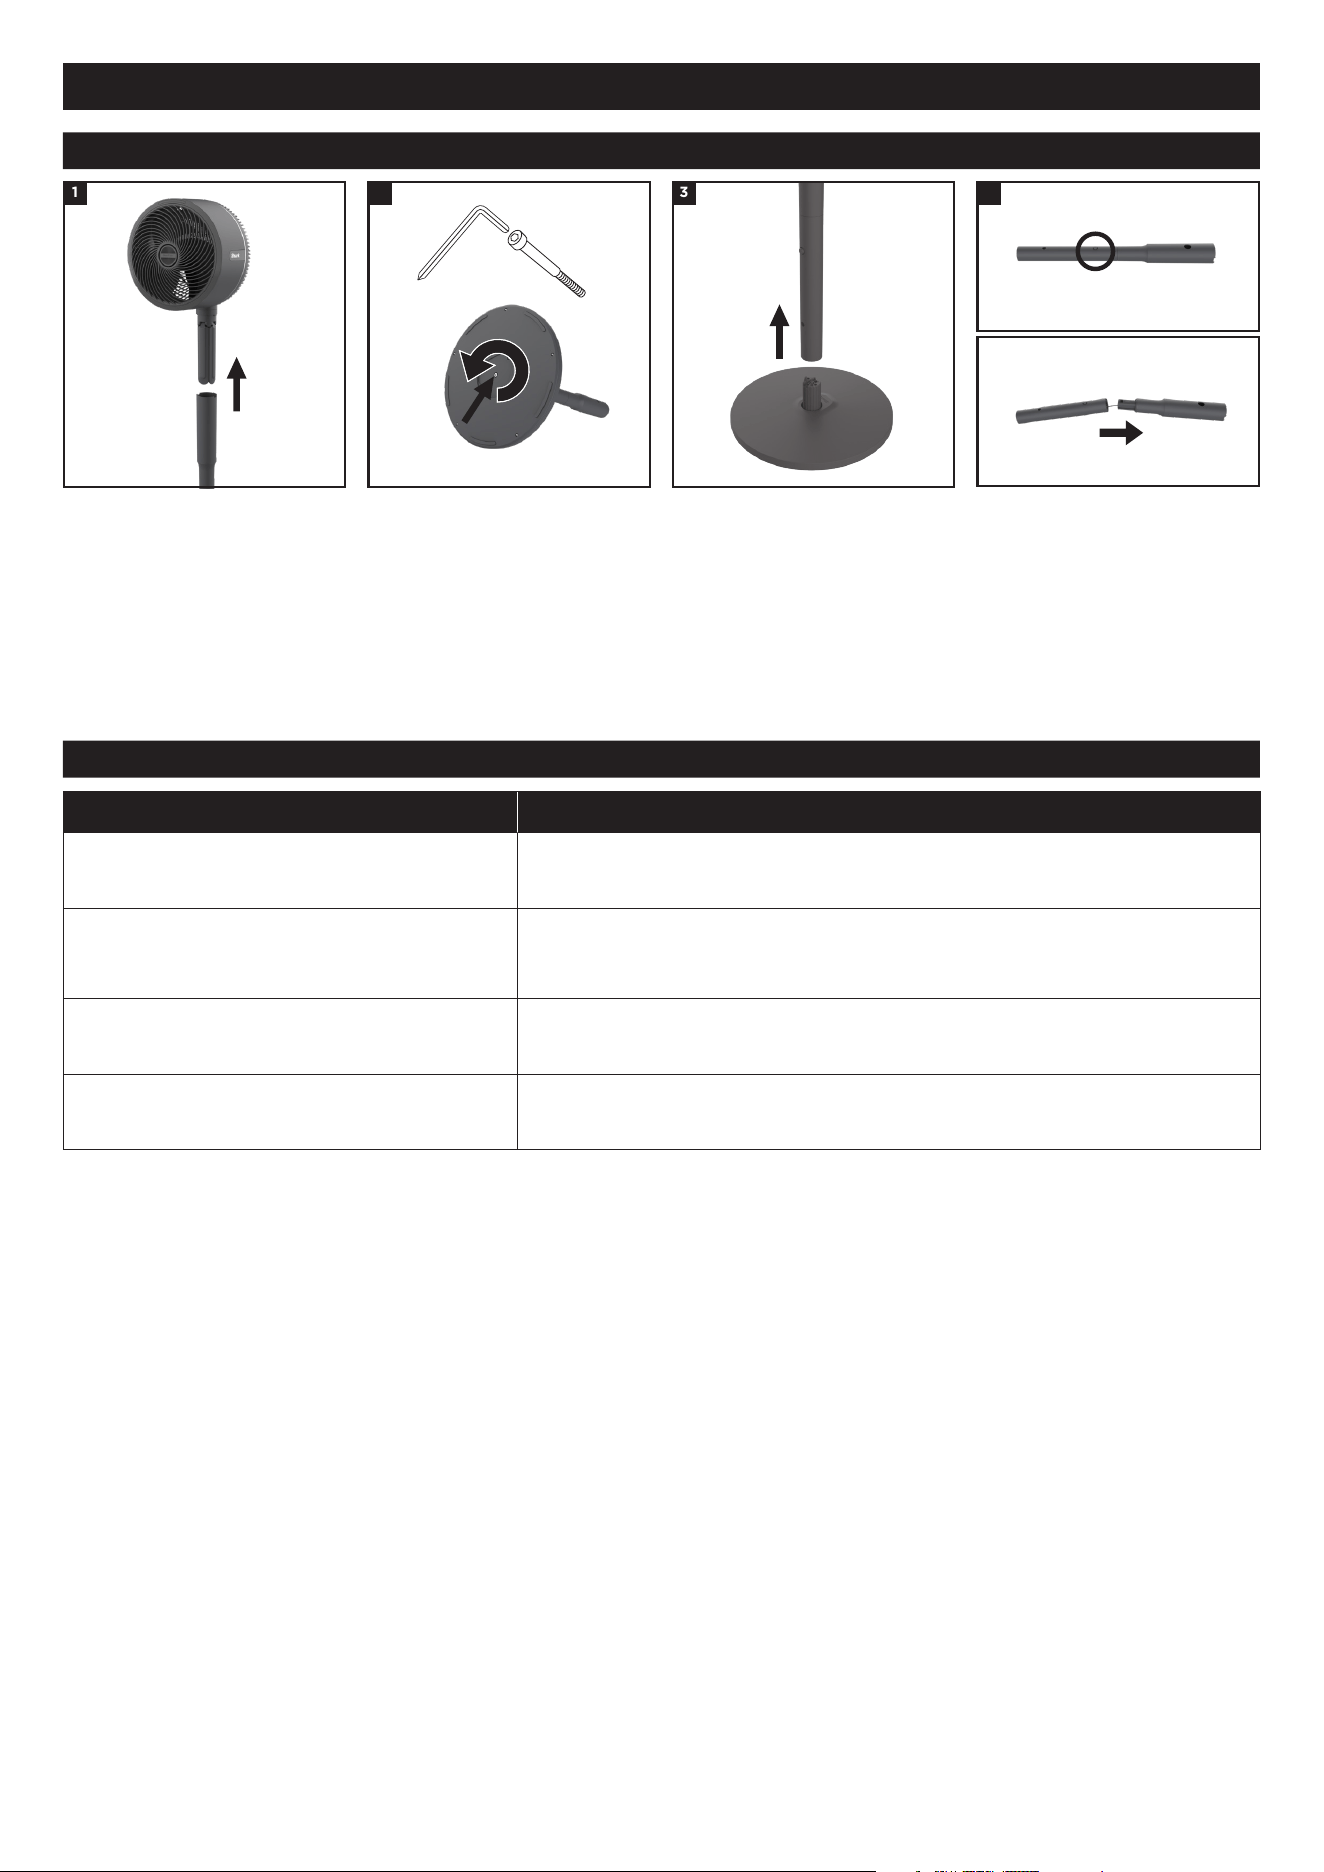
WHAT’S INCLUDED
1. Align and insert the
Upper Pole into the
Lower Pole until it clicks
into place.
2. Align the yellow dot
on the assembled pole
with the yellow dot on
the BASE, slide the pole
down onto the base.
3. Insert the BOLT in the
bottom of the BASE
and twist the HEX KEY
clockwise to fasten it to
the assembled pole.
4. CAUTION: finger pinch
risk. Insert the fan post
into the top of the
ASSEMBLED POLE
until it clicks into place.
5.
Charge fan to 100%
battery before use
without the cord. FIRST
USE: before using remote
control, press POWER
BUTTON on fan.
21 A
B
4 53
A. FAN HEAD
B. POLE
(2 CONNECTED PCS)
C. CHARGER F. HEX KEY
D. BASE E. BOLT G. REMOTE H. COVER
I. MISTING
ACCESSORY
6
Shark® FLEXBREEZE Fan Instructions
LIFT-AWAY USE
CHARGING THE FAN
BATTERY LIFE
SETTINGS APPROX. RUNTIME
Fan Speed 1 20 hours
Fan Speed 1 + Oscillation 10 hours
Fan Speed 2 14 hours
Fan Speed 2 + Oscillation 7 hours and 30 minutes
Fan Speed 3 6 hours and 20 minutes
Fan Speed 3 + Oscillation 4 hours and 30 minutes
SETTINGS APPROX. RUNTIME
Fan Speed 4 3 hours and 30 minutes
Fan Speed 4 + Oscillation 2 hours and 30 minutes
Fan Speed 5 2 hours
Fan Speed 5 + Oscillation 1 hour and 40 minutes
Gentle Breeze 12 hours and 20 minutes
Gentle Breeze + Oscillation 6 hours and 50 minutes
Strong breeze 2 hours and 55 minutes
Strong breeze + Oscillation 2 hours and 20 minutes
Runtime subject to 10% variability
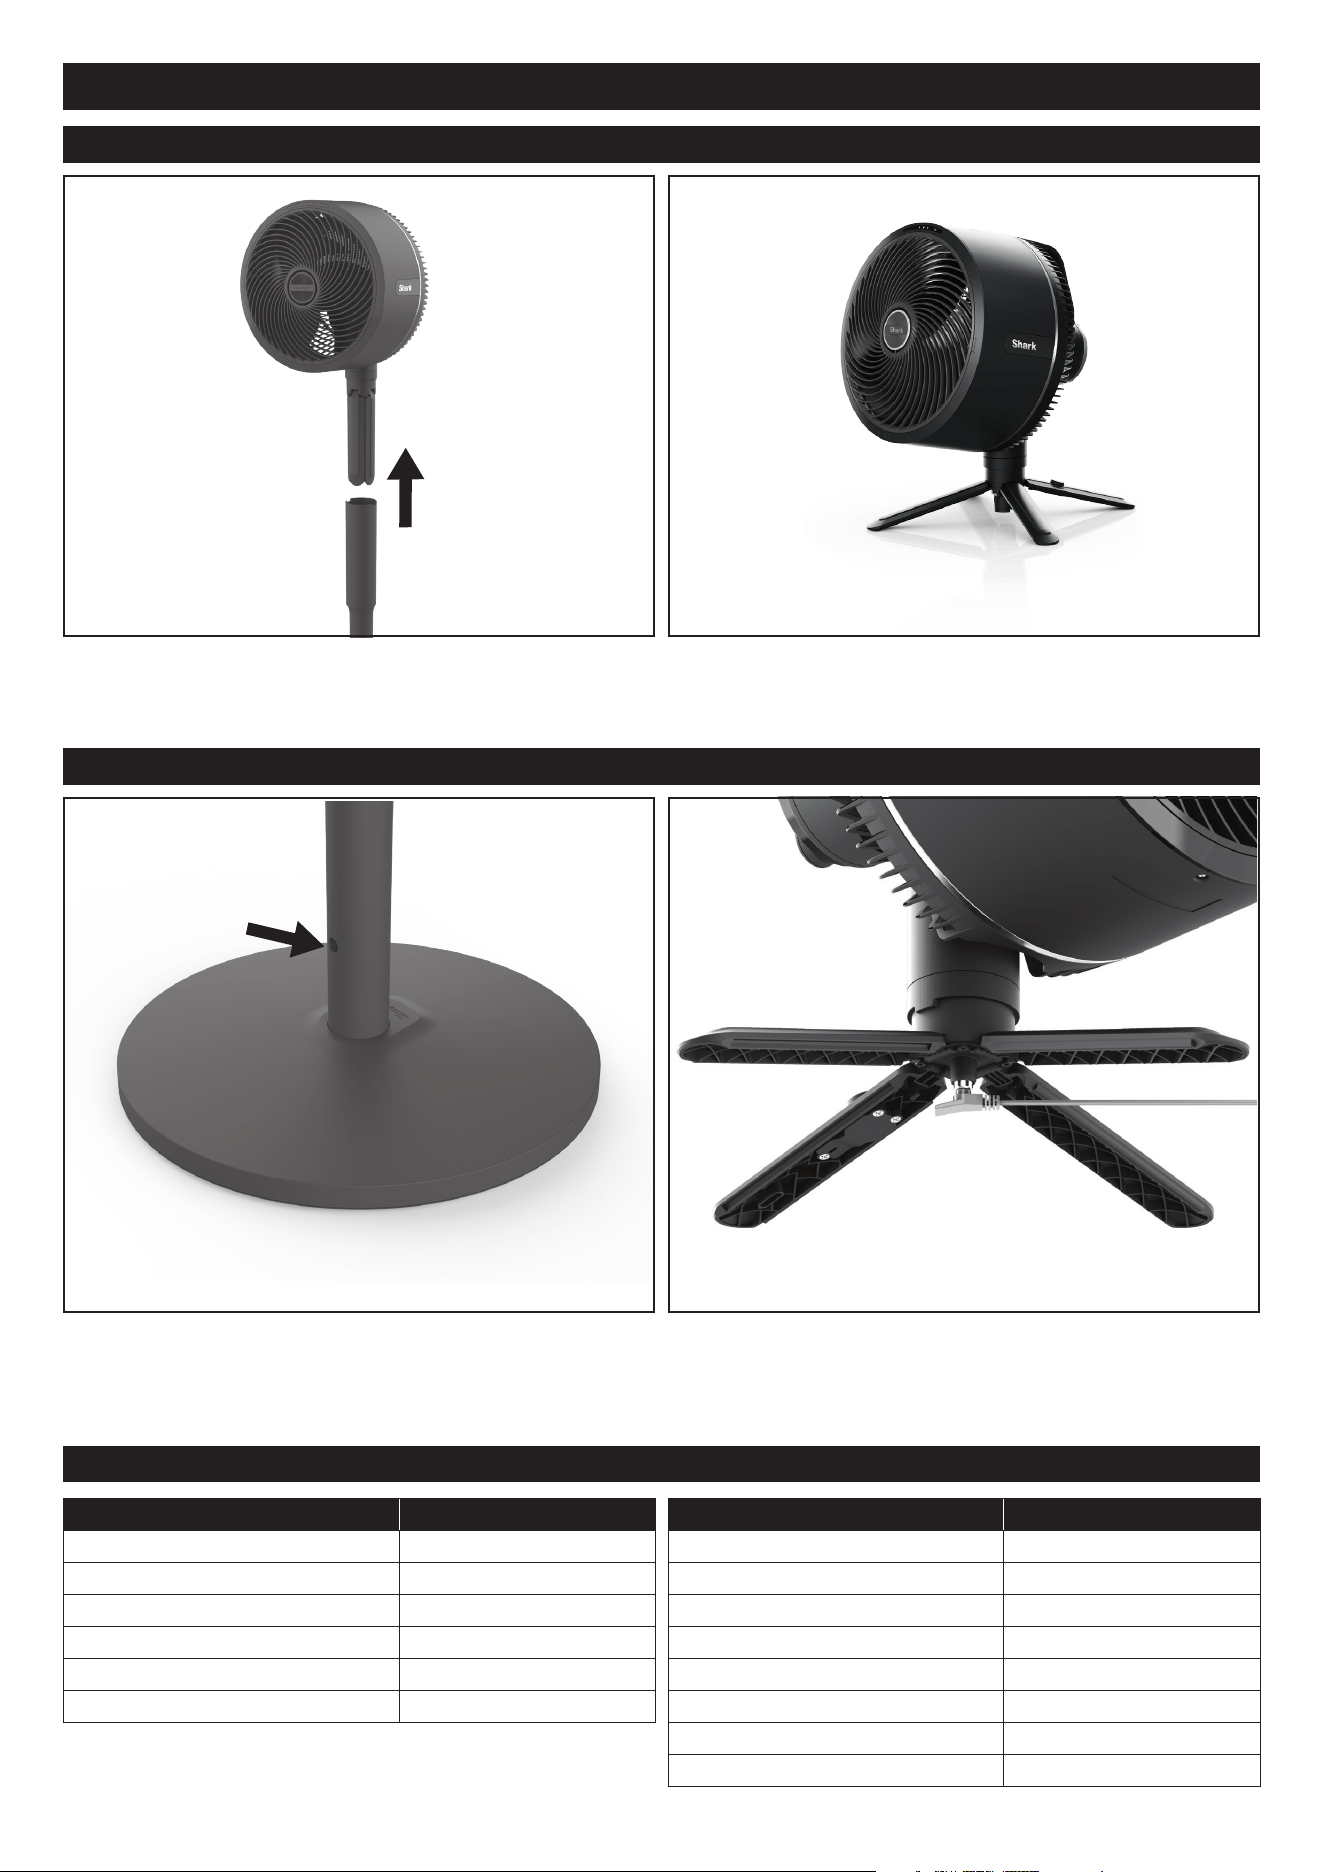
TIP: The fan can be used when in corded and cordless modes.
With one hand on the fan head handle, use the other hand
to press the lift away button and LIFT AWAY the fan head
by pulling upwards.
PEDESTAL MODE: To charge the fan in pedestal mode,
insert the small end of the CHARGER into the charging
port on the lower half of the POLE.
With one hand still on the fan head handle, spread out the
4 support legs using the other hand. Place the fan on a flat,
level surface.
Tabletop Mode: To charge the fan, insert the small end of
the CHARGER into the charging port under the canter shaft
of the fan.
7
DISASSEMBLY
STORAGE
1. Release the fan head by
pressing the lift away button
and carefully remove the
fan from the pole. carefully
remove the fan from the pole.
2. Use the Allen Wrench
on the underside of the
base to rotate the bolt
counterclockwise. Remove
bolt once loosened.
3. Carefully lift the pole to
remove it from the base.
4. Press the small button on the
lower pole to detach the poles
from one another. Carefully
fold as needed for storage.
DO NOT strain the cord.
41 2 3
If grille screw, bolt, or hex key have been lost, please see page 13 for hardware specs to see what type of hardware is
needed to replace each missing part.
Shark® FLEXBREEZE Fan Instructions
Storage Instructions
Short term storage indoors (<24 hours)
Carefully disassemble the fan OR place the assembled fan in the desired
storage location. Ensure it is out of reach of children and pets.
Short term storage outdoors (<24 hours)
Place the assembled fan in the desired storage location. Ensure it is out
of reach of children and pets. If there is inclement weather, it is recom-
mended to bring your fan indoors.
Long term storage indoors (>24 hours)
Carefully disassemble the fan OR place the assembled fan in the desired
storage location. Ensure it is out of reach of children and pets.
Long term storage outdoors (>24 hours)
Store the fan indoors when not in use for long periods of time. Ensure it
is stored out of reach of children and pets.
8
Shark® FLEXBREEZE Fan Instructions
SETTING ADJUSTMENT
• When the fan is unplugged and drawing power from the battery, the remote will enter OFF mode after 24 hours
of no use to preserve battery life. When in OFF mode, the remote cannot be used to power on the fan. The fan will
have to be powered on using the buttons on the top of the fan head.
• The fan head LEDs will only remain illuminated for 20 seconds after a setting adjustment is made, before turning
o to save battery.
• For information on how to activate or deactivate LOCK MODE for fan maintenance, please see the ‘maintenance’
section of this manual.
• Remote may be less eective when used outside.
POWER ON/OFF
FAN SPEEDS
To turn the fan on or o, press the POWER button on REMOTE or USER INTERFACE on the
fan head.
SETTINGS DISPLAY
ON
LED animation will play once
(LEDs from will turn on from left to right, then turn off from right to left)
OFF
LEDs will turn off
Changing the FAN SPEED will increase or decrease the airflow of the fan. There are 5 fan
speed settings, plus two more modes called Strong Breeze Mode and Gentle Breeze Mode.
To increase/decrease the fan speed, press the up/down arrow on the REMOTE. To do so on
the fan head USER INTERFACE, press the fan icon to cycle through the various fan speeds.
SPEED DISPLAY BEST FOR
1
Quietest operation
2
Moderate cooling
3
Balance of noise level and fan power
4
Air circulation
5
Highest power cooling
9
Shark® FLEXBREEZE Fan Instructions
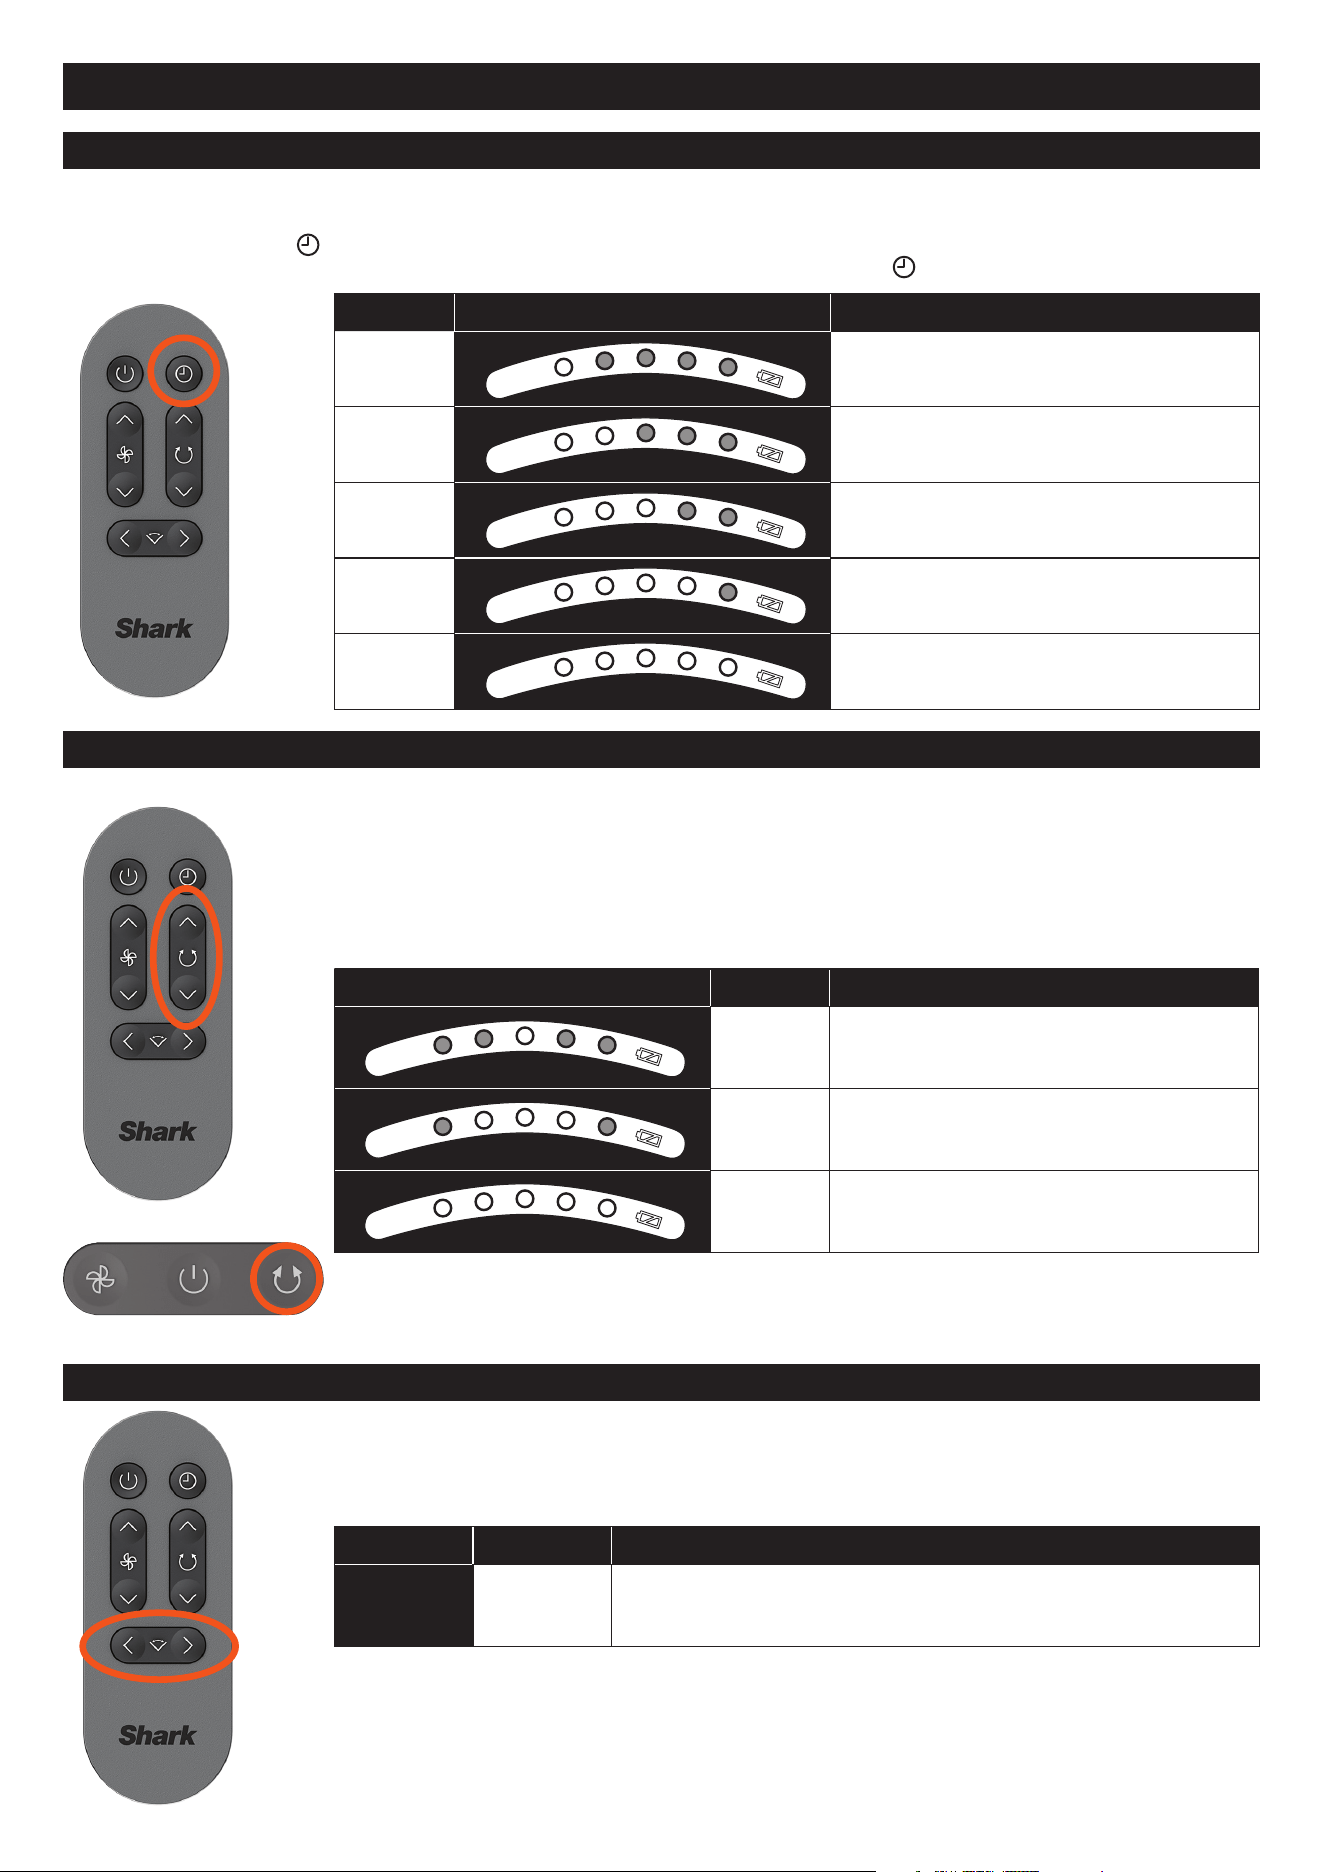
TIMER
SPEED DISPLAY TIME
1
1 Hours
2
2 Hours
3
3 Hours
4
4 Hours
5
5 Hours
If you don’t want to leave your fan constantly on, but don’t want to think about it, use the timer setting (remote only).
You can choose between timer settings 1-5 hours.
To activate timer, press
on your remote. LED lights will appear to indicate how many hours the timer is set for.
LEDs will switch o after 20 seconds. To check how long is left on your timer, press
and the LED lights will appear.
OSCILLATION
HORIZONTAL ANGLE ADJUST
Choose between 3 oscillation angles to best suit your needs.
To change the oscillation angle, press the up/down arrow on the REMOTE. To do so on the
fan head USER INTERFACE, press the oscillation icon to cycle through the various angle
options.
To turn o oscillation, press the down arrow or oscillation icon until no LEDs are illuminated.
DISPLAY ANGLE BEST FOR
45° Circulating air in a small area, 1-2 people
90°
Circulating air in a moderate area, 3-4
people
180° Circulating air in a large area, 5+ people
Use this feature to change the horizontal angle of the fan at a distance. This feature is only
accessible using the REMOTE.
To adjust the angle of the fan using the remote, press the left/right arrows on the REMOTE.
DISPLAY SETTING BEST FOR
N/A
- Adjusting the fan angle toward or away from you at a distance.
10
Shark® FLEXBREEZE Fan Instructions
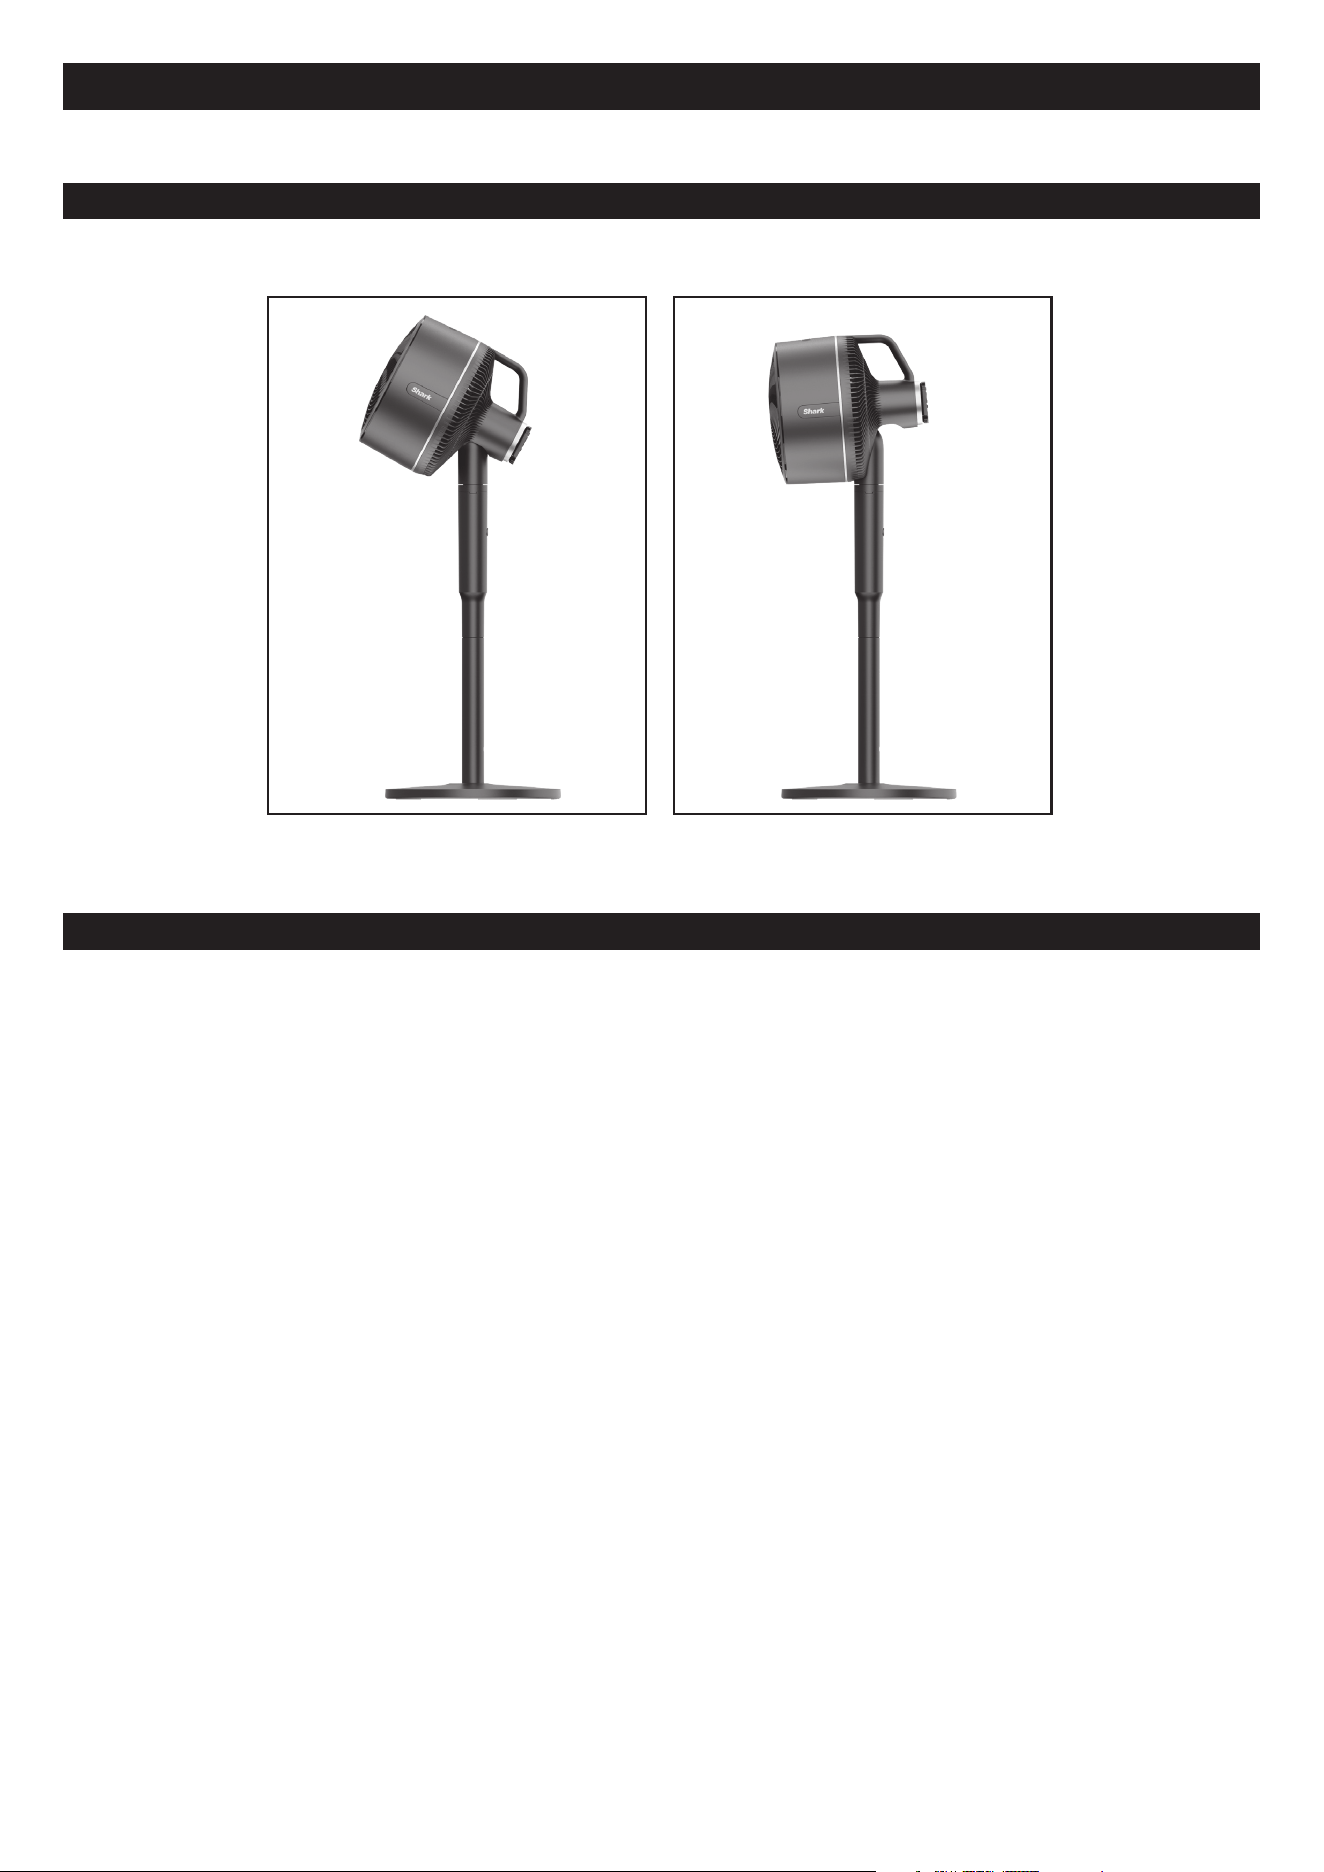
VERTICAL ADJUSTMENT
HOW TO CARRY YOUR FAN
To adjust the vertical height of your fan head, use the handle to tilt the head up or down. The Shark Fan has a vertical
range of 55 degrees.
Fan Head tilted up Fan Head titled down
• If you are carrying your fan for a short distance, it is recommended to carry the fan as a whole and place one hand on
the handle and another hand on the pole.
• For longer distances, it is recommended to carry the fan separately, carrying the fan head in LiftAway mode.
11
Shark® FLEXBREEZE Fan Instructions
TROUBLESHOOTING AND FREQUENTLY ASKED QUESTIONS
General Use
Why is the remote not
working?
Ensure the remote is pointed directly at the front UI/ LEDs
and try again. The remote will enter IDLE MODE after it has
not been used for 24 hours. When in IDLE MODE, the remote
cannot be used to power on the fan. The fan will have to be
powered on using the fan head user interface. To turn off IDLE
MODE, select any button on the fan unit.
If the remote does not work after IDLE MODE has been
deactivated, replace the remote battery.
Why are my remote AND UI
buttons not working?
Ensure that LOCK MODE is not on. LOCK MODE is a feature to
completely deactivate your fan to allow you to safely perform
unit maintenance. To deactivate LOCK MODE, hold down the
oscillation button on the unit UI for 3 seconds.
Can I leave the fan outdoors?
This fan is water resistant and will not be damaged by light
rain. However, it is not able to withstand heavy rain or water
submersion. It is recommended to bring the fan indoors when
not in use. Your fan is IPX4 rain resistant (excluding the remote).
Why is the fan rattling?
Ensure that the fan blade cap is fully installed before operating
the fan. Please see the ‘maintenance’ section of this manual for
more details.
The second LED and the
battery LED (in amber) are
flashing on and o – what is
wrong?
This error state indicates an issue with the voltage of the
charger. Please be sure to only use the provided Shark charging
cable and power supply.
Maintenance
Why do I have to activate lock
mode before maintenance?
Since the Shark® FlexBreeze Fan can be used cordlessly, there
is a risk of the fan turning on when it is not plugged in. To avoid
accidental use while providing maintenance, LOCK MODE will
prevent the fan from powering on while maintenance is being
performed and the blades are exposed.
How often should I clean the
fan?
It is recommended to maintain the fan every 6 months or as
needed.
Accessories
How often should I clean the
misting accessory?
It is recommended to clean the misting accessory every 12
months or as needed. Please note: the hardness of your water
source will impact the frequency at which the misting accessory
will need to be maintained.
Why is my mister not working
eectively/ not producing mist?
To work properly, the mister must have regular maintenance
performed. See page 16 for more information.
12
Shark® FLEXBREEZE Fan Instructions
It is recommended to maintain the fan every 6 months or as needed. If grille screw, bolt or hex key have been lost, please
see page 13 for hardware specifications to see what type of hardware is needed to replace each missing part.
• LOCK MODE must be activated prior to performing maintenance.
• This will temporarily block all fan functions until deactivated. Activating lock mode prevents any risk of the fan
turning on by mistake during maintenance when the fan blades are exposed.
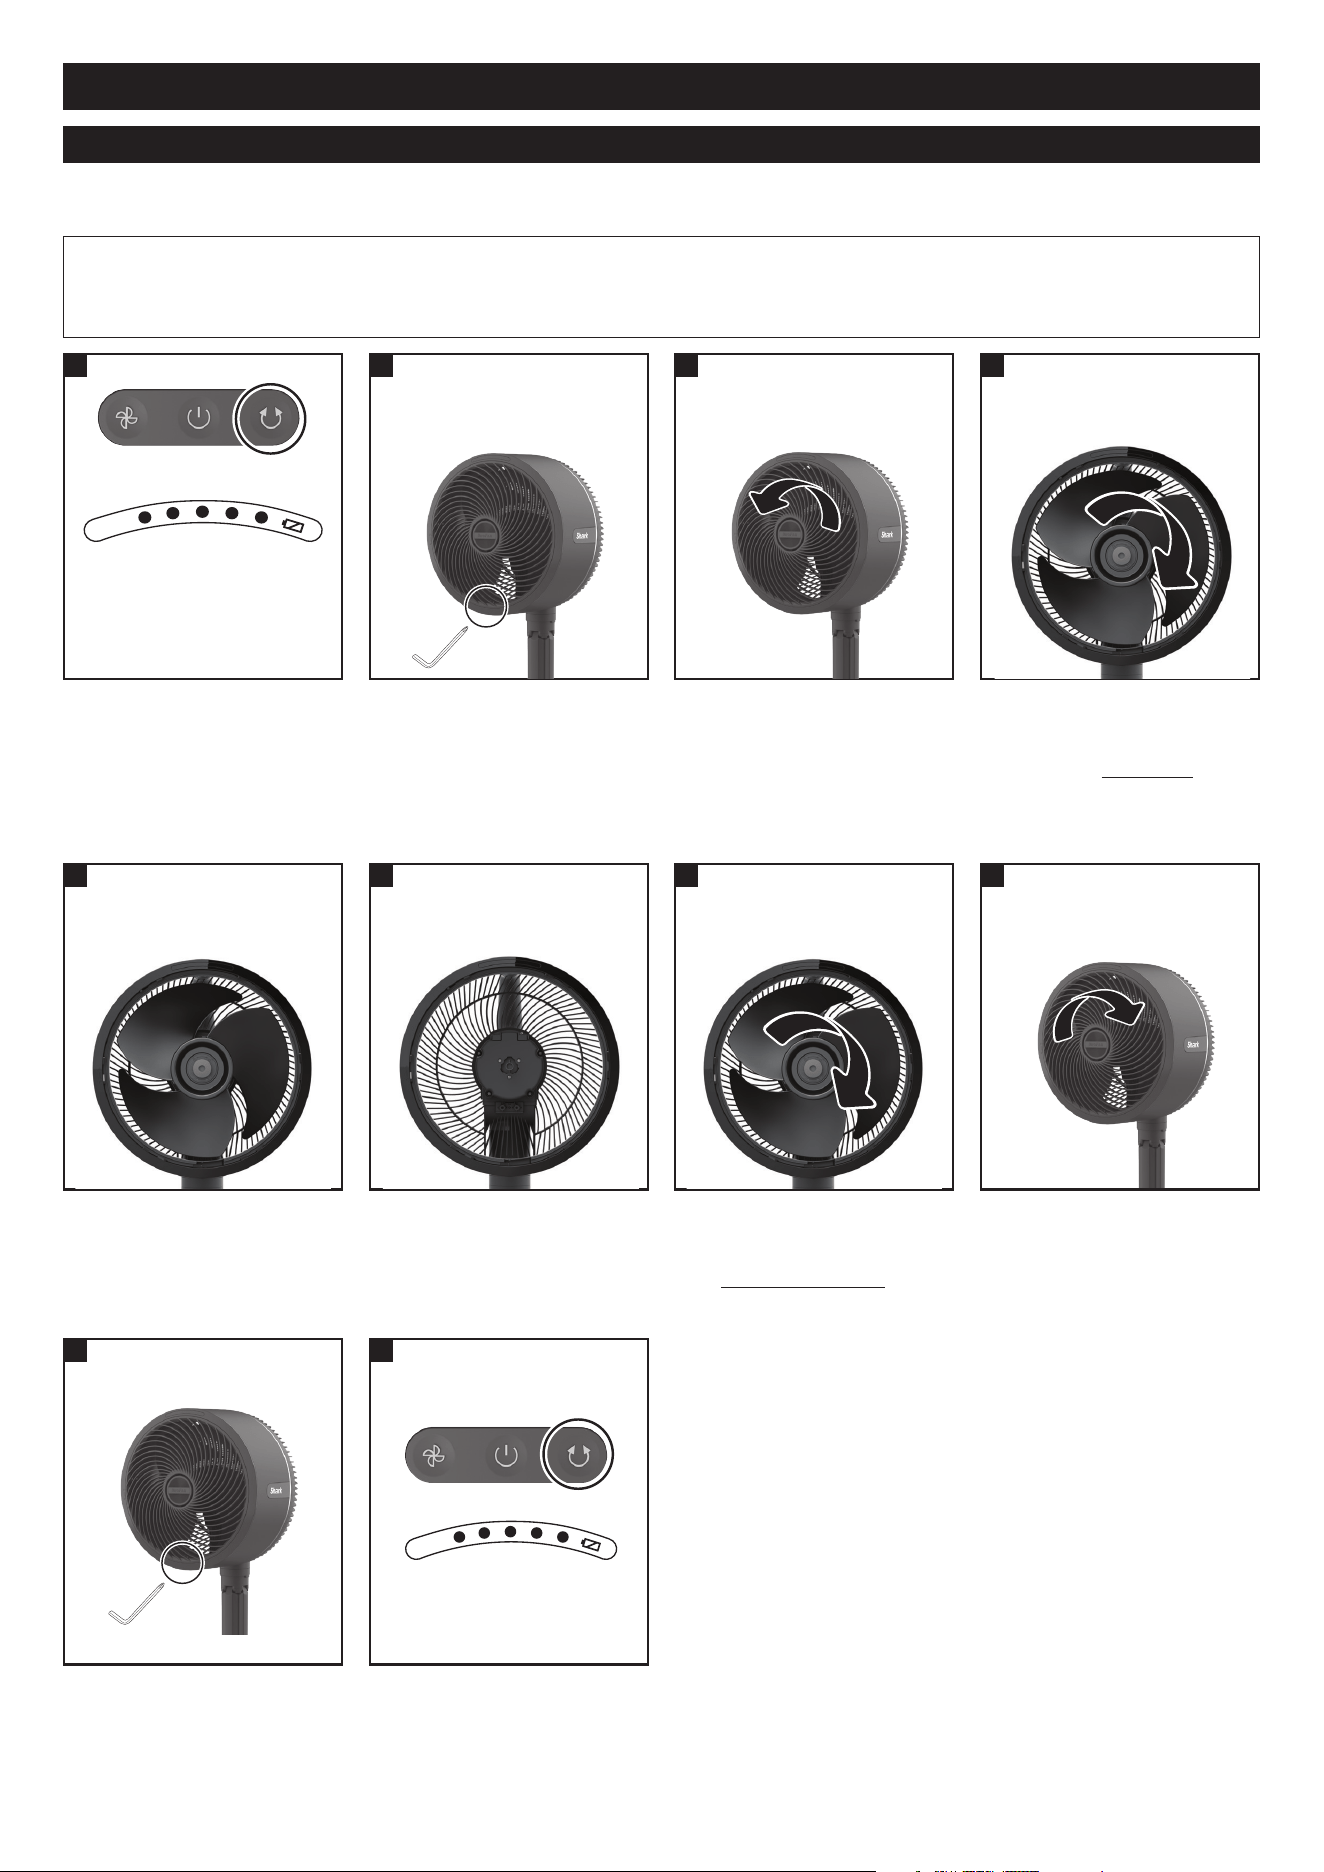
MAINTENANCE
5
Turn on lock mode before
performing maintenance for
safety. To activate, hold down
the OSCILLATION icon on
the fan head user interface
for 3 sec.
Gently pull to remove the
FAN BLADES. Set aside.
Use the Phillip’s screw head
end on your Hex Key to
loosen the screw at the
bottom of the FAN GRILLE.
Rotate the FAN GRILLE
counter-clockwise to
remove from the fan head.
Set grille aside.
6
Carefully replace the FAN
BLADE onto the center shaft.
7
With one hand securing the
fan blades, use the other
hand to rotate the FAN
BLADE CAP clockwise to
remove from the shaft.
Set aside.
With one hand securing the
fan blades, use the other hand
to rotate the FAN BLADE
CAP counterclockwise
to fasten to the shaft.
109
Lights will blink
three times when lock
mode has been activated
Place the fan upright on a flat,
level surface. Use the Phillip’s
screw head end of your Hex
Key to replace and tighten
the screw at the bottom of
the FAN GRILLE.
To deactivate lock mode to
resume normal fan use, hold
down the OSCILLATION icon
on the fan head user interface
for 3 sec.
8
Rotate the FAN GRILLE
clockwise to fasten to the
fan head.
Hold for 3 seconds
1 2 3 4
Lights will blink
three times when lock
mode has been activated
13
Shark® FLEXBREEZE Fan Instructions
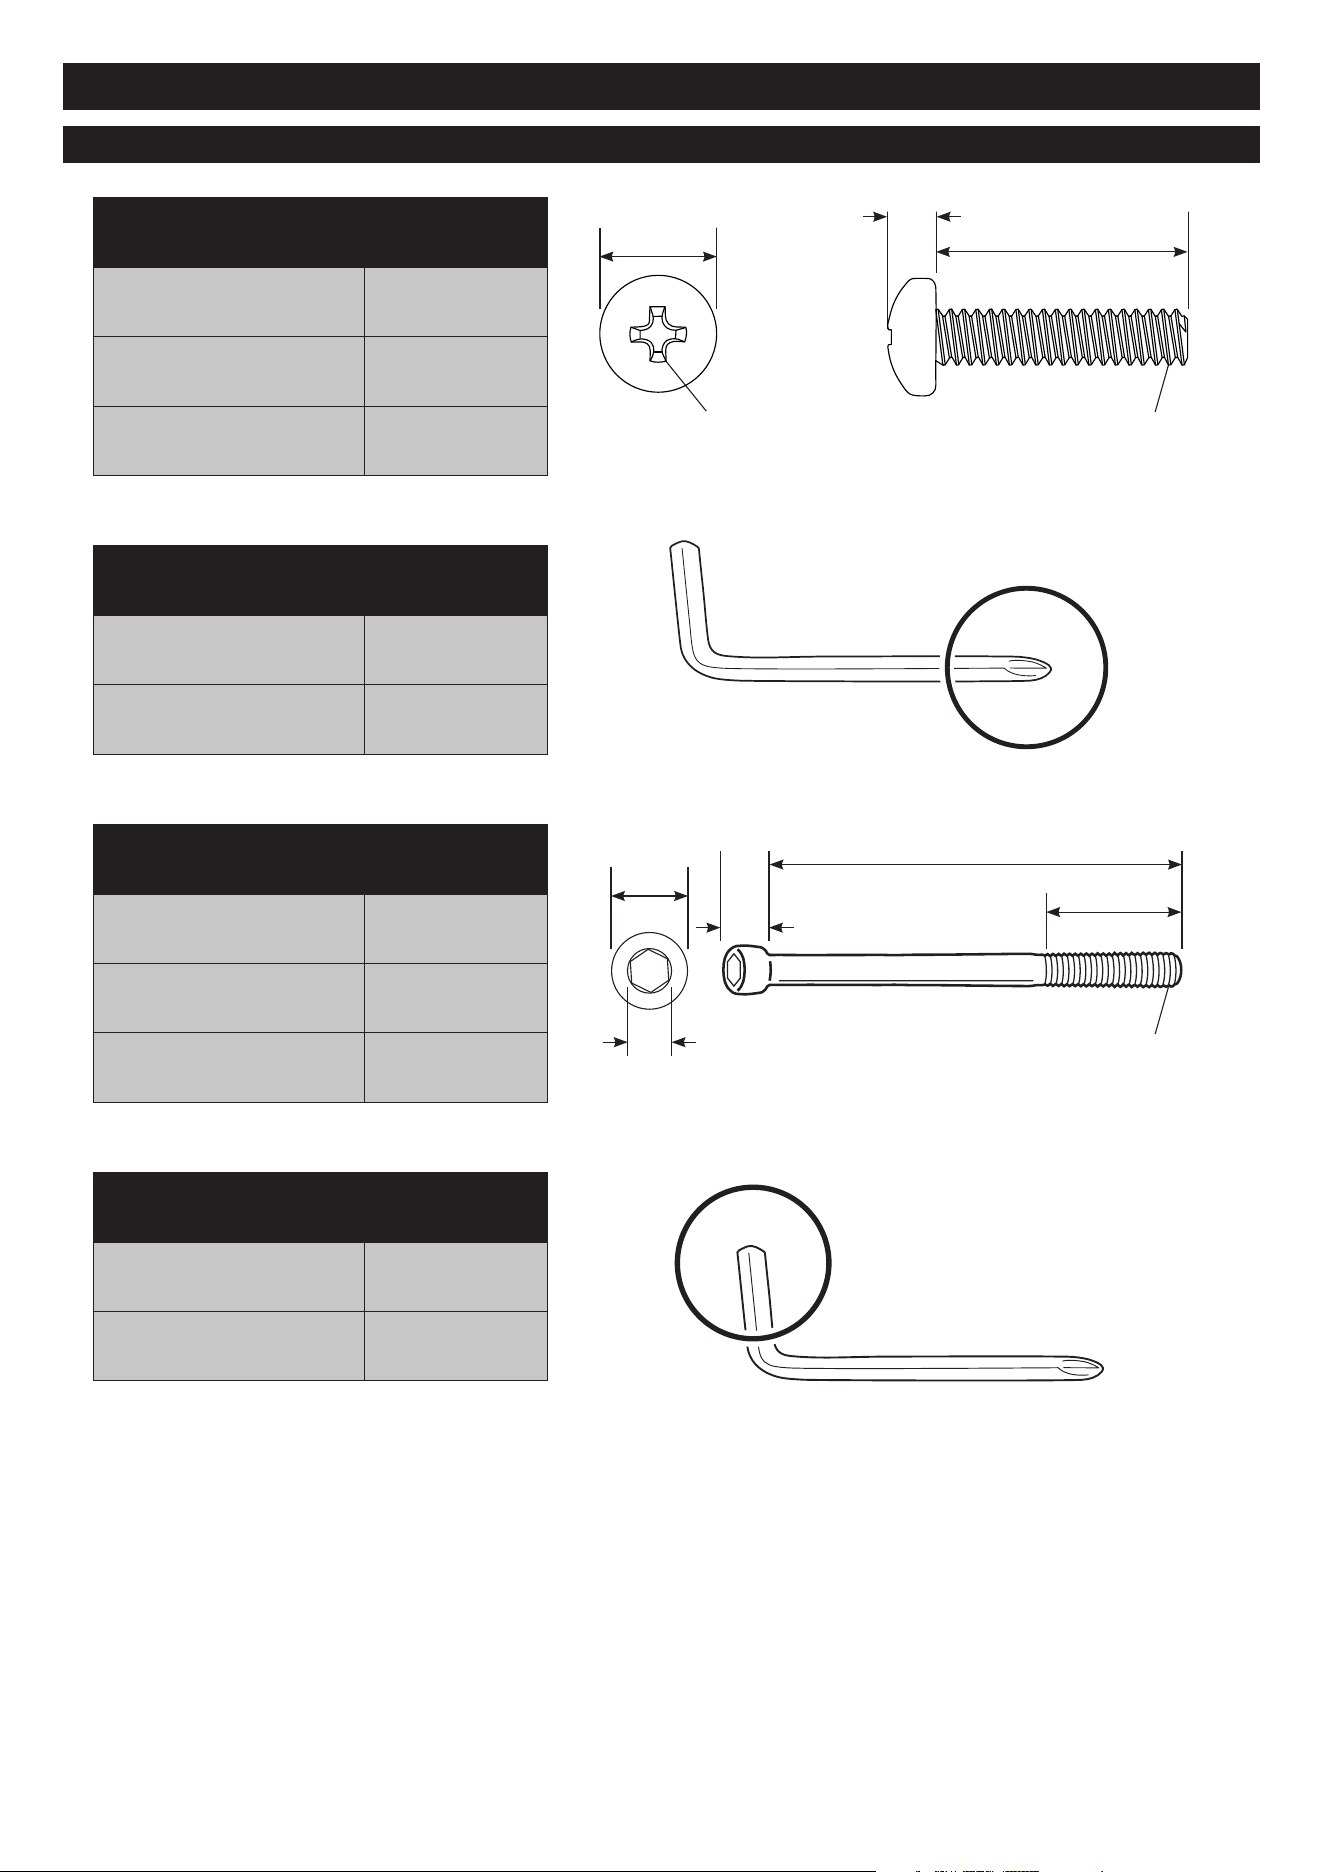
HARDWARE SPECS
Grille Screw
For securing the grille to the fan
Drive Type Phillips
Thread Size / Pitch M3 x 0.5mm
Length 16mm
Bolt
For securing base to the pole
Drive Type Hex
Thread Size / Pitch M6 x 1mm
Length 85mm
Screwdriver
For driving the screw
Drive Type Phillips
Size No. 1
Hex Key
For driving the bolt
Drive Type Hex
Size 5mm
2.52mm
16mm
85mm
M3x0.5mm
M6x1mm
No.1
6mm
10mm
24mm
5mm
6mm
14
Shark® FLEXBREEZE Fan Instructions
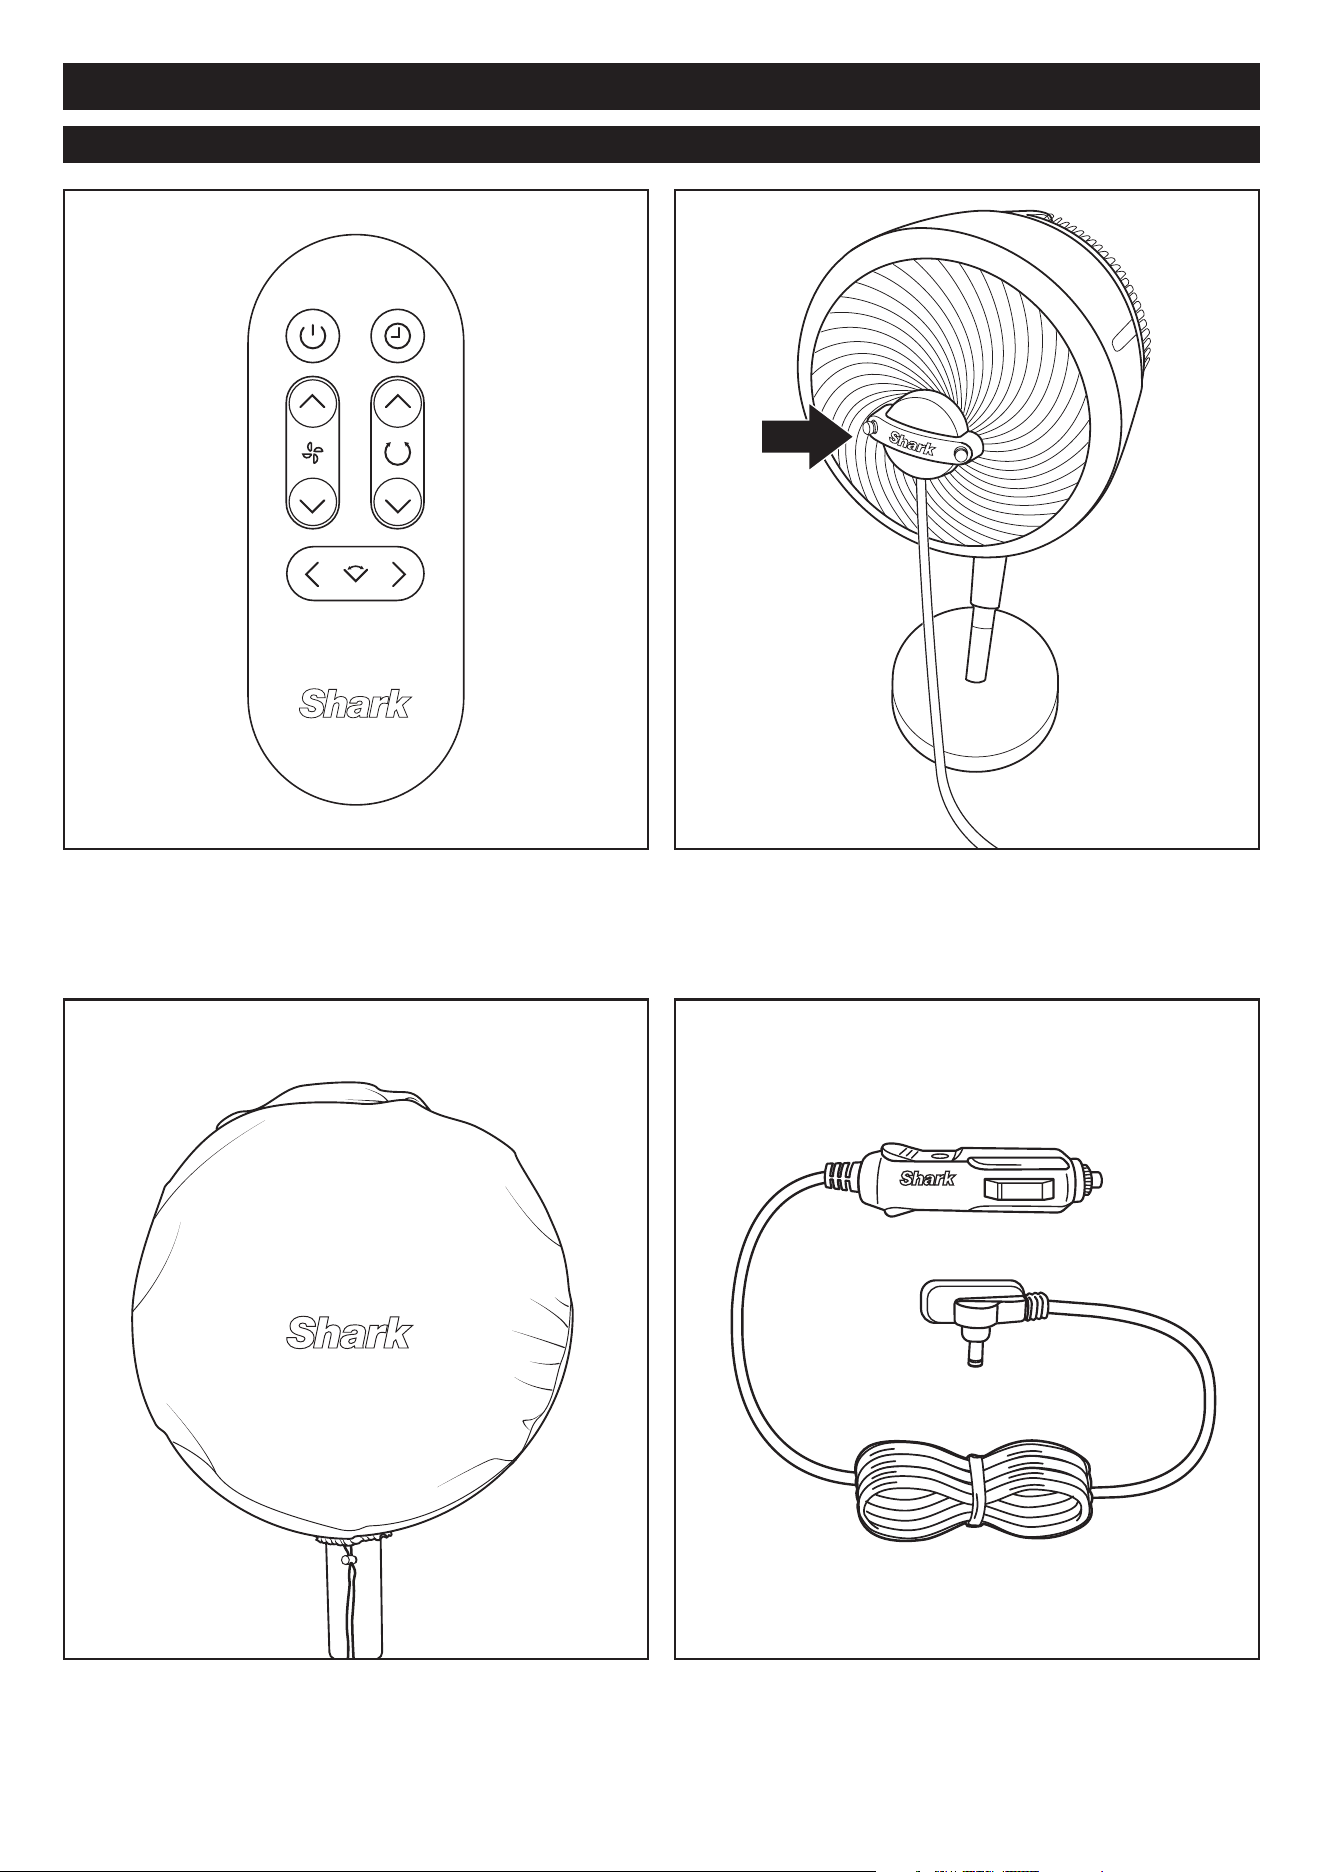
AVAILABLE ACCESSORIES
Remote Control
Use the remote control to operate your fan from a distance.
Mister
Connect the misting accessory to the front grille to product a
fine mist. For more instructions on how to use, please see the
‘misting accessory instructions.’
Fan Cover
Protect your fan from damage and dust. For more instructions
on how to use, please see the ‘fan cover accessory
instructions.’
Car Charger
Charge your fan on the go with the car charger accessory.
For more instructions on how to use, please see the ‘car
charger accessory instructions.’
15
Shark® FLEXBREEZE Fan Instructions
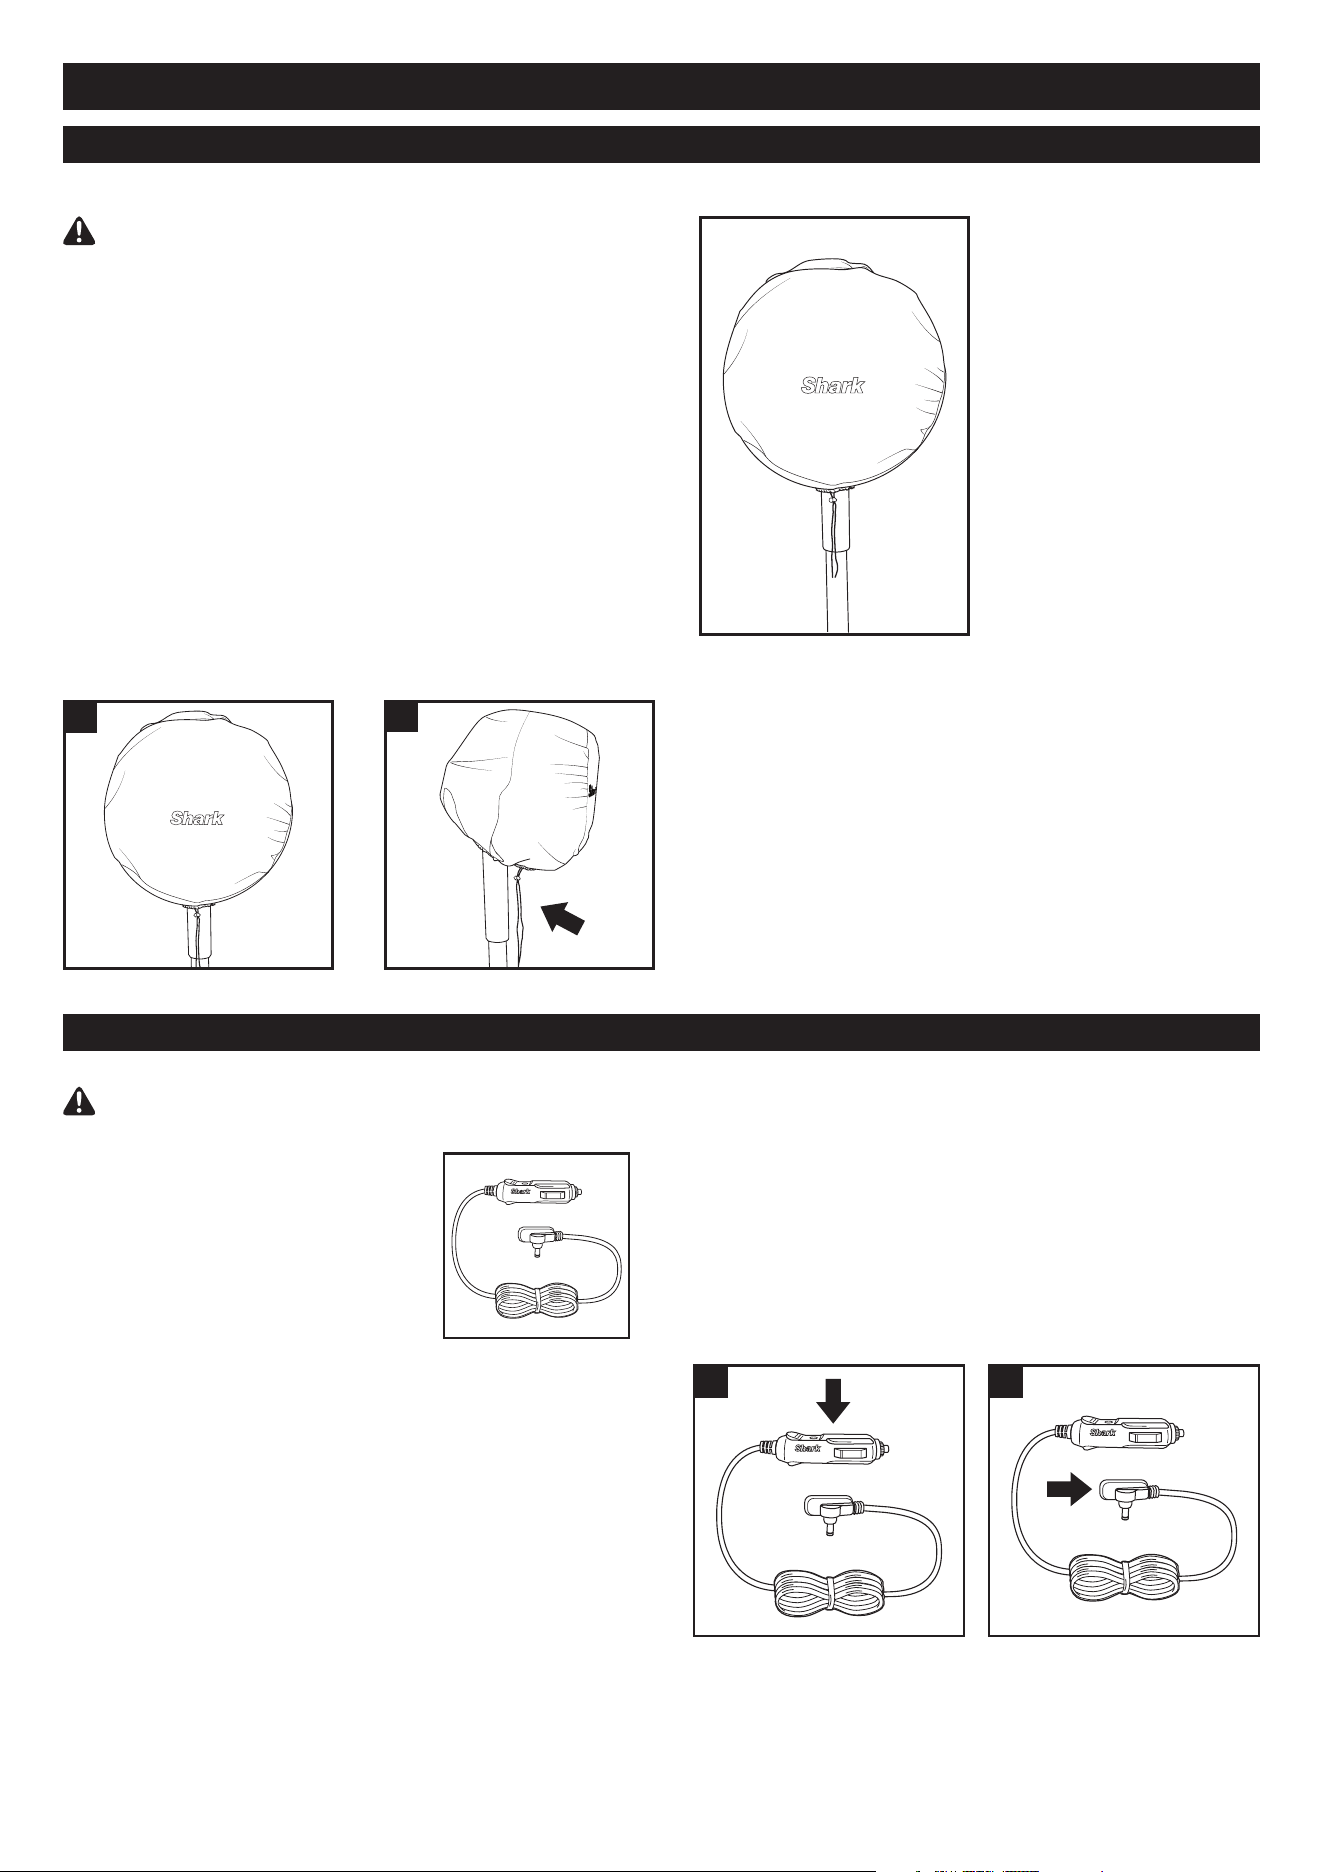
FAN COVER
CAR CHARGER
IMPORTANT SAFETY INSTRUCTIONS
1. SAVE THESE INSTRUCTIONS.
This manual contains important
safety and operating instructions
for battery charger model
FA220CAR from Dongguan City
Gangqi Electronics Co., Ltd.
2. Before using this battery charger,
read all instructions and cautionary
markings on the battery charger,
battery, and product using battery.
3. CAUTION: To reduce risk of injury, charge only the
provided rechargeable battery. Other types of batteries
may burst, causing injury to persons and damage.
4. DO NOT expose charger to rain, moisture, or snow.
5. Use of an attachment not recommended or sold by the
battery charger manufacturer may result in a risk of fire,
electric shock, or injury to persons.
6. To reduce risk of damage to cigarette lighter connector
and cord, pull by cigarette lighter connector rather than
cord when disconnecting charger.
7. To reduce risk of electric shock, unplug charger before
attempting any maintenance or cleaning. Turning off
controls will not reduce this risk.
8. DO NOT operate charger with damaged cord or
cigarette lighter connector. Replace it immediately.
9. The car charger may be wiped clean with a damp
cloth once removed from the power socket. Allow car
charger to fully dry prior to use.
INSTRUCTIONS FOR USE:
1. Firmly insert the larger end of the car charger into a
12-volt outlet in your vehicle.
2. Connect the small end of the car charger to the
charging port on the underside of the fan head,
between the 4 support legs.
3. If the fan is charging in a moving vehicle, be sure to
position the fan in a secure location.
READ ALL INSTRUCTIONS BEFORE USE
1. 2.
IMPORTANT SAFETY INSTRUCTIONS
READ ALL INSTRUCTIONS BEFORE USE
The fan cover is not a toy. Children should not play with it
as it may become unsanitary during outdoor use.
CHOKING HAZARD: Children should not play with the
cover as they could choke on the draw string.
INSTRUCTIONS FOR USE:
1. Position the cover over fan head, then
slide it on until the fan is completely covered.
2. Cinch the drawstring on the bottom of the
cover to secure it in place.
3. The cover will protect the fan from dust and damage
from light. The fan cover does not guarantee that the
product can be left outdoors for an extended time.
1.
2.

16
Shark® FLEXBREEZE Fan Instructions
MISTING ACCESSORY
INSTRUCTIONS FOR USE:
1. Carefully align the misting accessory with the circle in the center of
the fan grill, and push it in to install. Do not use excessive force.
2. Screw the end of the misting accessory into the nozzle of a standard
garden hose.
3. Turn on the hose to create mist.
4. To adjust the amount of mist, increase
or decrease the fan speed, or adjust the
water pressure from the hose. Higher water
pressure or fan speed will mean more mist.
5. The valve is open when the mister
accessory is taken out of the packaging.
Rotate the valve clockwise to stop the flow
of water, as shown in the diagram.
IMPORTANT SAFETY INSTRUCTIONS
READ ALL INSTRUCTIONS BEFORE USE
1. The misting accessory is suitable for OUTDOOR USE
ONLY.
2. The misting accessory will continue to operate when
the fan is powered off. Turn off the water source to
turn off the accessory.
3. DO NOT operate the misting accessory using water
pressure above typical household pressure, 4.1 bar.
4. DO NOT use warm or hot water. Only use cold or room
temperature water.
5. DO NOT handle live electrical products while in range
of the misting stream.
6. Keep non-waterproof electronic equipment and
appliances out of the misting stream.
7. Children should be supervised to ensure that they DO
NOT play with the misting accessory.
8. WARNING: CHOKING HAZARD. Always keep nozzles
and any other small parts out of the reach of children.
9. Cleaning and user maintenance of the misting
accessory shall not be done by children without
supervision.
READ AND SAVE THESE INSTRUCTIONS
INSTRUCTIONS FOR MAINTENANCE:
FOR BEST RESULTS, CLEAN THE MISTING ACCESSORY
ONCE A YEAR, OR AS NEEDED. USING HARDER WATER
WILL REQUIRE MORE FREQUENT CLEANING.
1. Unscrew the misting accessory from the water source,
then pull the other end off the fan grill.
2. Place the accessory on a flat surface and carefully
remove each brass nozzie, one at a time. CAUTION:
Residual pressure may remain in the misting accessory.
3. To remove a nozzle, twist it counterclockwise. Do not
use a wrench or any other tool. WARNING: CHOKING
HAZARD.Keep nozzles out of the reach of children.
4. To flush the misting system, once the nozzles are all
removed, connect the accessory to a garden hose or
other outdoor water source. Aim the accessory away
from yourself or anyone else, then turn on the water and
run it through the system for 30 seconds to flush out any
debris.
5. Soak the nozzles in a solution of undiluted distilled white
vinegar (5% acetic acid by volume) to loosen debris that
may be clogging or restricting the nozzle. DO NOT soak
the nozzles for more than 2 hours.
6. After soaking the nozzles in the solution, rinse them
thoroughly with water.
7. Carefully reinstall each nozzle by twisting clockwise until
you feel resistance.
If your mister becomes less eective or stops working even after following maintenance instructions,
go to sharkclean.com to order replacement nozzles
If your mister becomes less eective or stops working, follow the steps listed in “INSTRUCTIONS FOR MAINTENANCE”.
Do NOT twist nozzles unless they are being removed for cleaning
17
Shark® FLEXBREEZE Fan Instructions
MANUFACTURER’S GUARANTEE
SharkNinja Europe Ltd, 1st/2nd Floor
Building 3150, Thorpe Park, Century Way,
Leeds, England, LS15 8ZB UK
+44 (0)800 862 0453
www.sharkclean.co.uk
SharkNinja Germany GmbH,
Rotfeder-Ring 9,
60327 Frankfurt am Main,
Germany
www.sharkclean.eu
PLEASE READ CAREFULLY AND KEEP FOR FUTURE REFERENCE.
This Instruction Guide is designed to help you get a complete understanding of your new Shark® Fan.
Illustrations may dier from actual product. We are constantly striving to improve our products; therefore the specifications contained
herein are subject to change without notice.
© 2024 SharkNinja Operating LLC. SHARK is a registered trademark in the United Kingdom of SharkNinja Operating LLC.
PHILLIPS is a registered trademark of Phillips Screw Company.
This marking indicates that this product should not be disposed with other household wastes. To prevent possible harm to the environment or human health
from uncontrolled waste disposal, recycle it responsibly to promote the sustainable reuse of material sources. To return your used device, please use the
return and collection systems or contact the retailer where this product was purchased. They can take this product for environmentally safe recycling.
FA220UK_IB_MP_240208_Mv2
@sharkhomeUK
When a consumer buys a product in the country of purchase, they get the benefit of legal rights relating to the quality of the product
(your “legal rights”). You can enforce your legal rights against your retailer, including Shark if you bought your Shark appliance from
sharkclean.co.uk. However, at Shark we are so confident about the quality of our products that we give the owner an additional, free
parts and labour manufacturer’s guarantee of up to 2 years.
A household appliance like a Shark Fan appliance constitutes a sizeable investment. Your new machine needs to work properly for as
long as possible. The guarantee it comes with is an important consideration - and reflects how much confidence the manufacturer has
in its product and manufacturing quality.
The manufacturer’s guarantee does not aect your legal rights.
How long are new Shark machines guaranteed for?
Our manufacturer’s guarantee lasts for one year from the date of purchase as standard, or for two years if you register your purchase
with us within 28 days. There is information on how to register below.
How do I register my Shark guarantee?
If you have purchased your Shark Fan appliance directly from sharkclean. co.uk your guarantee is registered automatically. If you
bought it from anywhere else, you can register your guarantee online within 28 days of purchase.
• To register online, please visit www.sharkclean.co.uk/register-guarantee or scan the QR code in your instruction manual.
• Keep a note of the date you purchased the machine.
IMPORTANT:
• Keep your receipt if you bought your Shark Fan appliance from anywhere except sharkclean.co.uk. You will need it to claim under
your guarantee.
• The free Shark guarantee only applies to Shark owners living permanently in the UK.
What are the benefits of registering my free Shark guarantee?
When you register your guarantee, you will get an extra year of cover. We’ll also have your details to hand if we ever need to get in
touch. If you further agree to receive communications from us, you can also receive tips and advice on how to get the best out of your
Shark Fan appliance and hear the latest news about new Shark technology and launches.
What is covered by the free Shark guarantee?
Repair or replacement (at Shark’s option) of your Shark machine, including all parts and labour.
What is not covered by the free Shark guarantee?
• Normal wear and tear.
• Accidental damage or faults caused by negligent use or care, misuse, neglect, careless operation or handling of the Shark appliance
which is not in accordance with the Shark Operating Manual supplied with your machine.
• Damage caused by use of the Shark appliance for anything other than normal domestic household purposes.
• Damage caused by use of parts not assembled or installed in accordance with the operating instructions.
• Damage caused by use of parts and accessories which are not Shark Genuine Components
• Faulty installation (except where installed by Shark).
• Repairs or alterations carried out by parties other than Shark or its agents.
How can I claim under the free Shark guarantee?
Contact our customer service helpline on 0800 862 0453. For service hours please visit our website under ‘Contact Us’. It’s free to call,
and you’ll be put straight through to a Shark representative. You’ll also find online support at https://support.sharkclean.co.uk/.
The Shark representative will go through some troubleshooting with you, and if we conclude that the item has failed, we will send
you a replacement part or a returns label to send the defective item back to us free of charge. When you have delivered the defective
product to us, we will send you a replacement.
Please remember that the item will need to be boxed when you return it to us, which can be any suitable box; it does not have to be
the original packaging.
Where can I buy genuine Shark spares and accessories?
Shark spares and accessories are developed by the same engineers who developed your Shark Fan appliance. You’ll find a full range of
Shark spares, replacement parts and accessories for all Shark machines at www.sharkclean.co.uk. Please remember that damage caused
by the use of non-Shark spares may not be covered under your guarantee.