
Technical Support and E-Warranty Certificate www.vevor.com/support
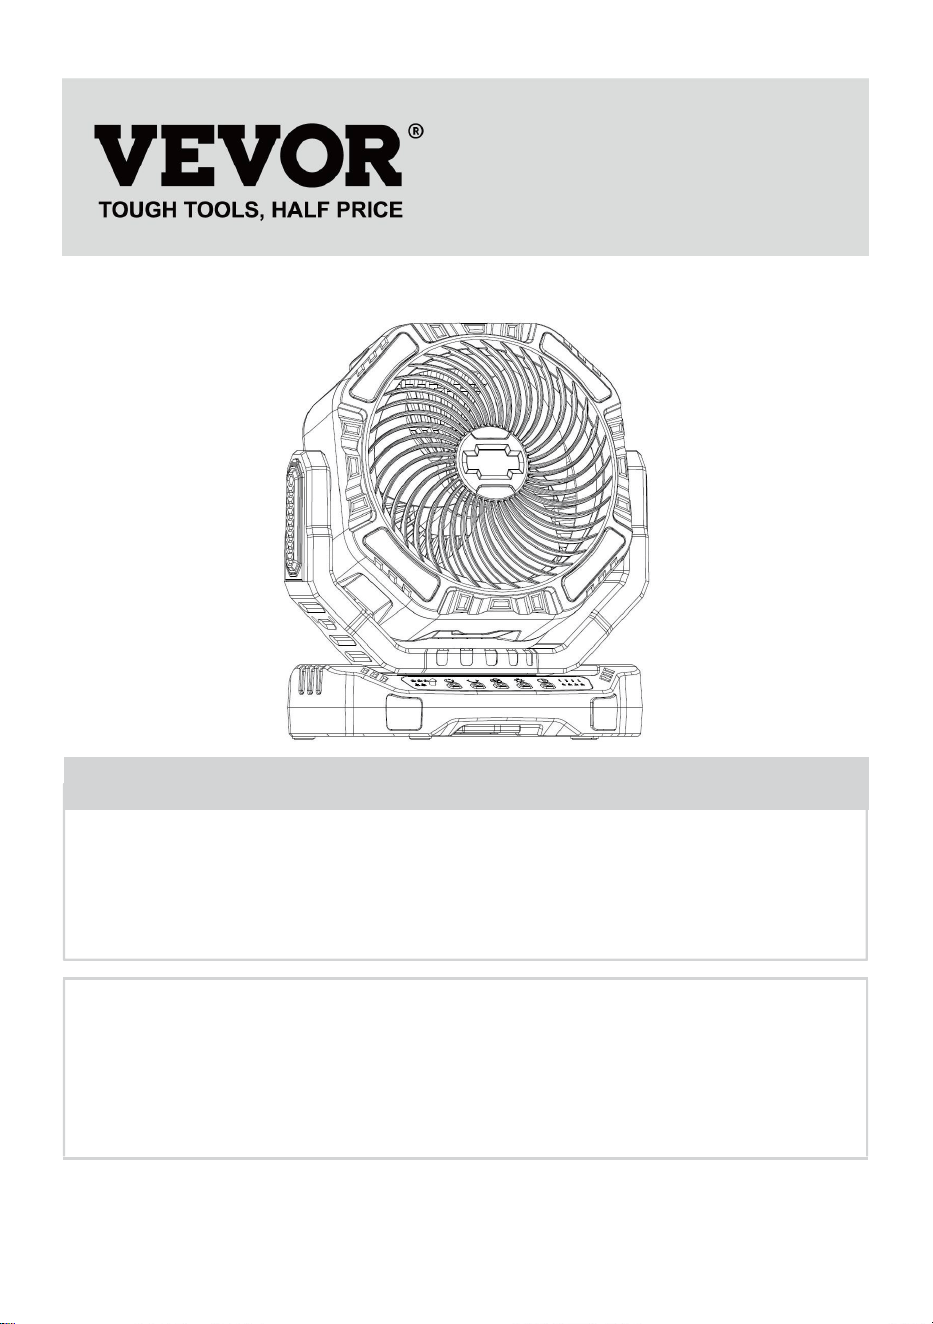
POWERFUL FLOOR FAN
MODEL:D13
We continue to be committed to provide you tools with competitive price.
"Save Half", "Half Price" or any other similar expressions used by us only represents an
estimate of savings you might benefit from buying certain tools with us compared to the major
top brands and does not necessarily mean to cover all categories of tools offered by us. You
are kindly reminded to verify carefully when you are placing an order with us if you are
actually saving half in comparison with the top major brands.
- 1 -
MODEL:D13
Have product questions? Need technical support? Please feel free to
contact us:
Technical Support and E-Warranty Certificate
www.vevor.com/support
NEED HELP? CONTACT US!
This is the original instruction, please read all manual instructions
carefully before operating. VEVOR reserves a clear interpretation of our
user manual. The appearance of the product shall be subject to the
product you received. Please forgive us that we won't inform you again if
there are any technology or software updates on our product.
POWERFUL FLOOR FAN
- 2 -
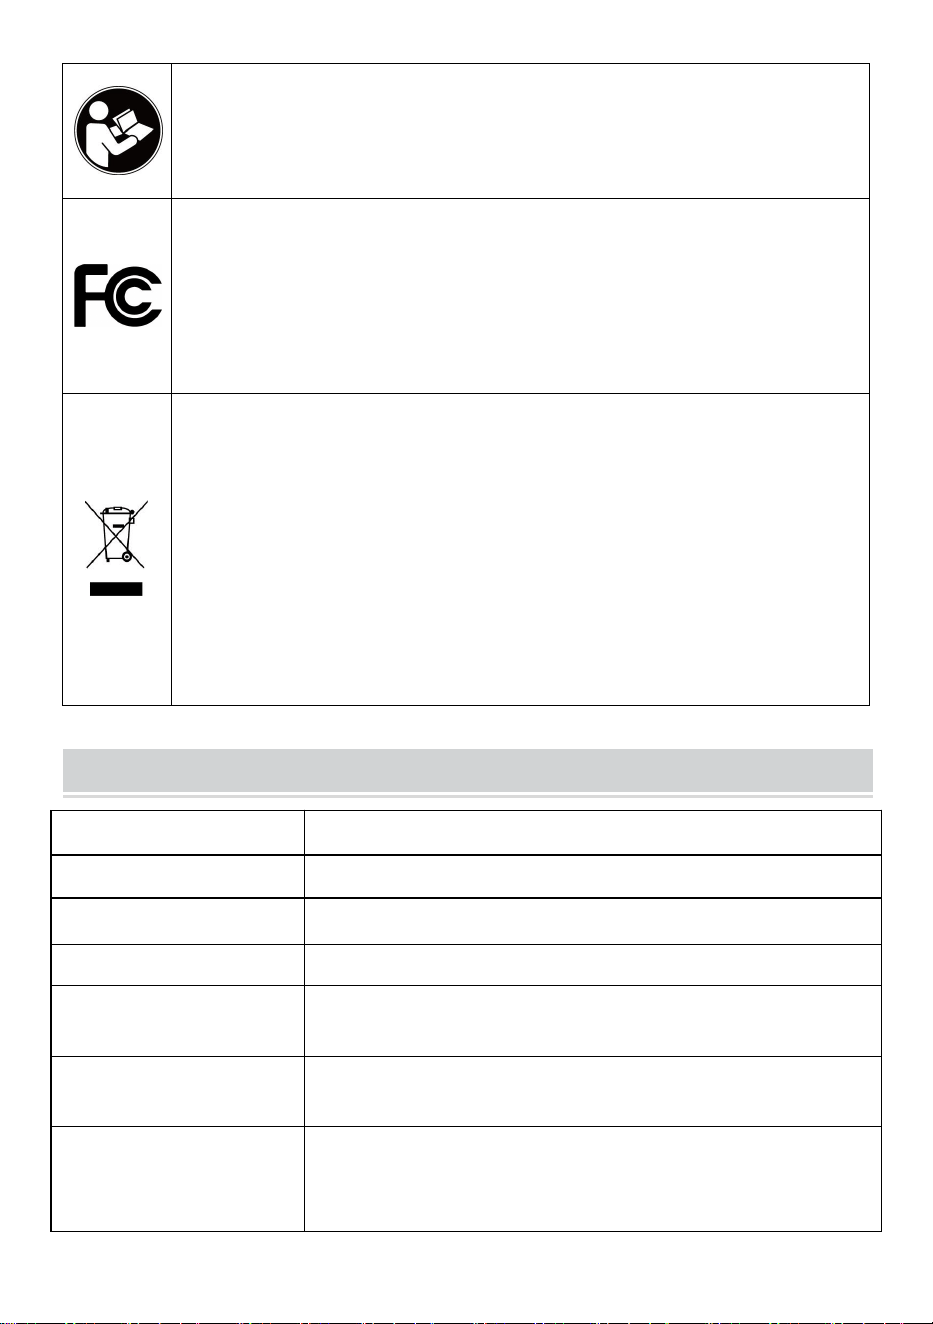
Warning-To reduce the risk of injury, user must read
instructions manual carefully.
This device complies with Part 15 of the FCC Rules. Operation
is subject to the following two conditions:(1)This device may
not cause harmful interference, and (2)this device must accept
any interference received, including interference that may
cause undesired operation.
This product is subject to the provision of European Directive
2012/19/EC. The symbol showing a wheelie bin crossed
through indicates that the product requires separate refuse
collection in the European Union. This applies to the product
and all accessories marked with this symbol. Products marked
as such may not be discarded with normal domestic waste, but
must be taken to a collection point for recycling electrical and
electronic devices.
SPECIFICATION
Product Model
D13
Product Size
210*100*268mm
Battery Capacity
3.7V 40000mAh(148Wh)
Rated Power
15W
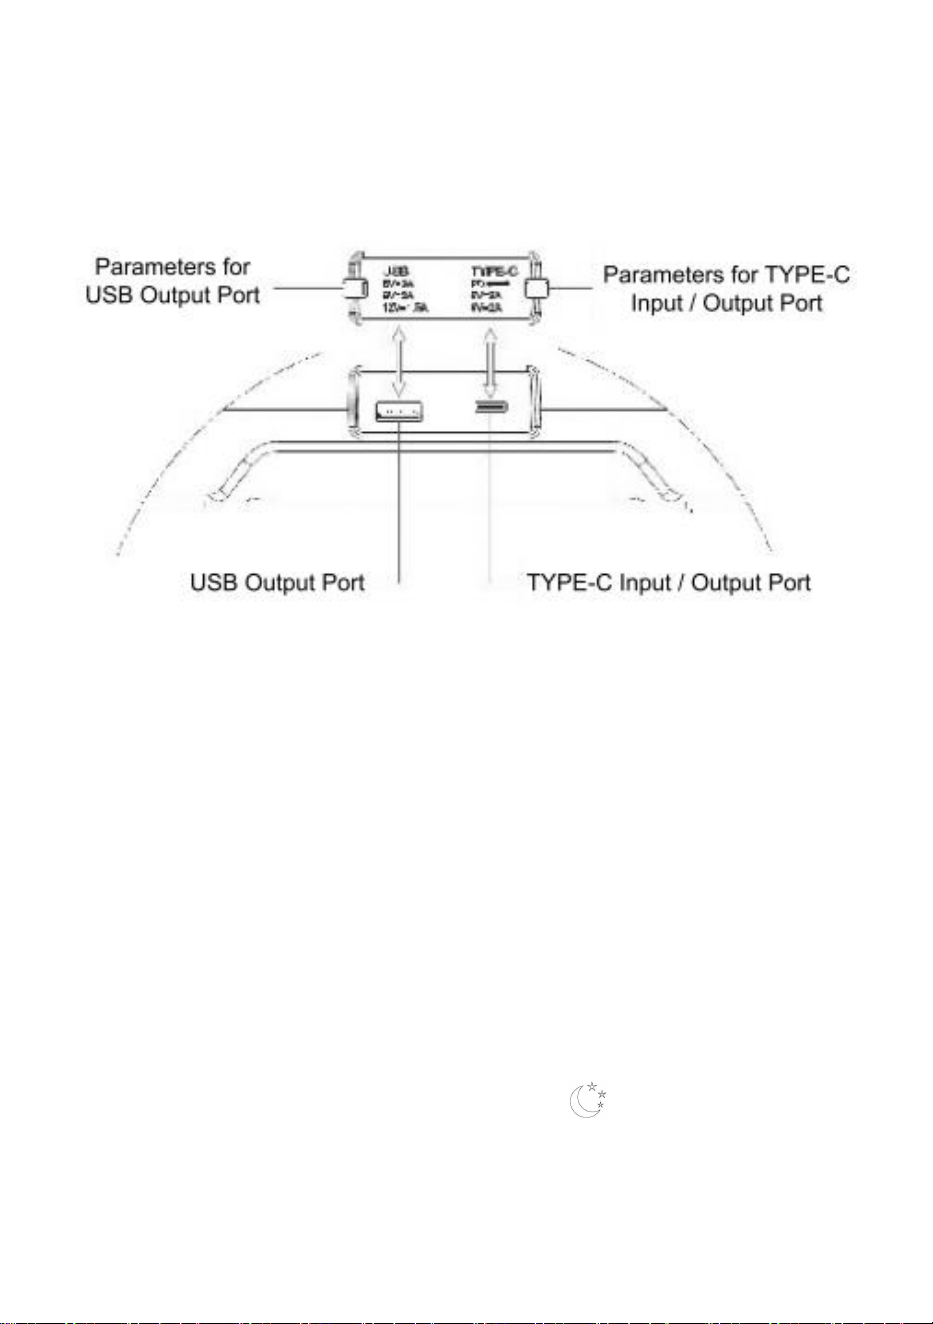
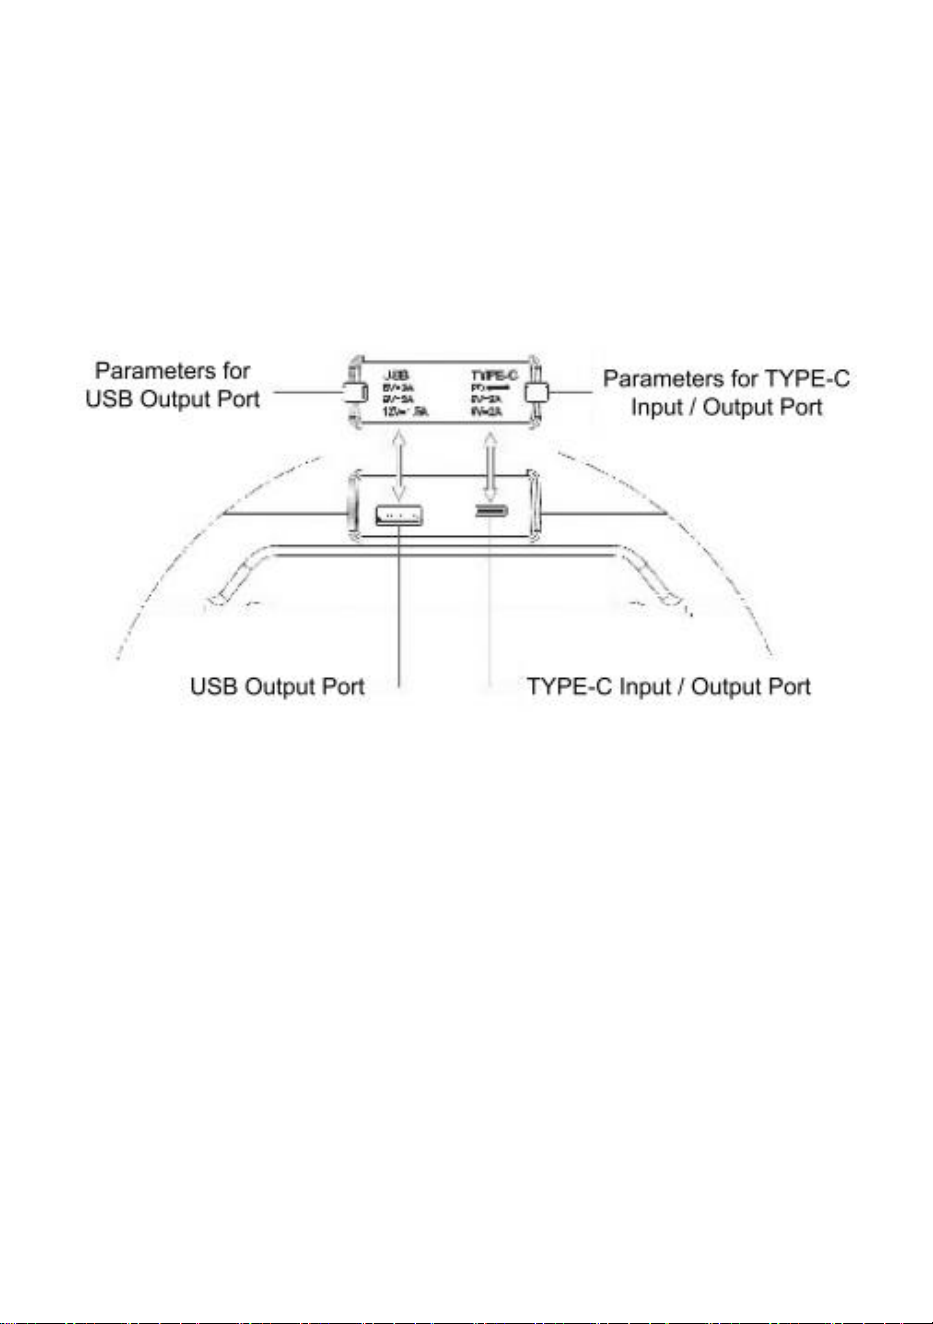
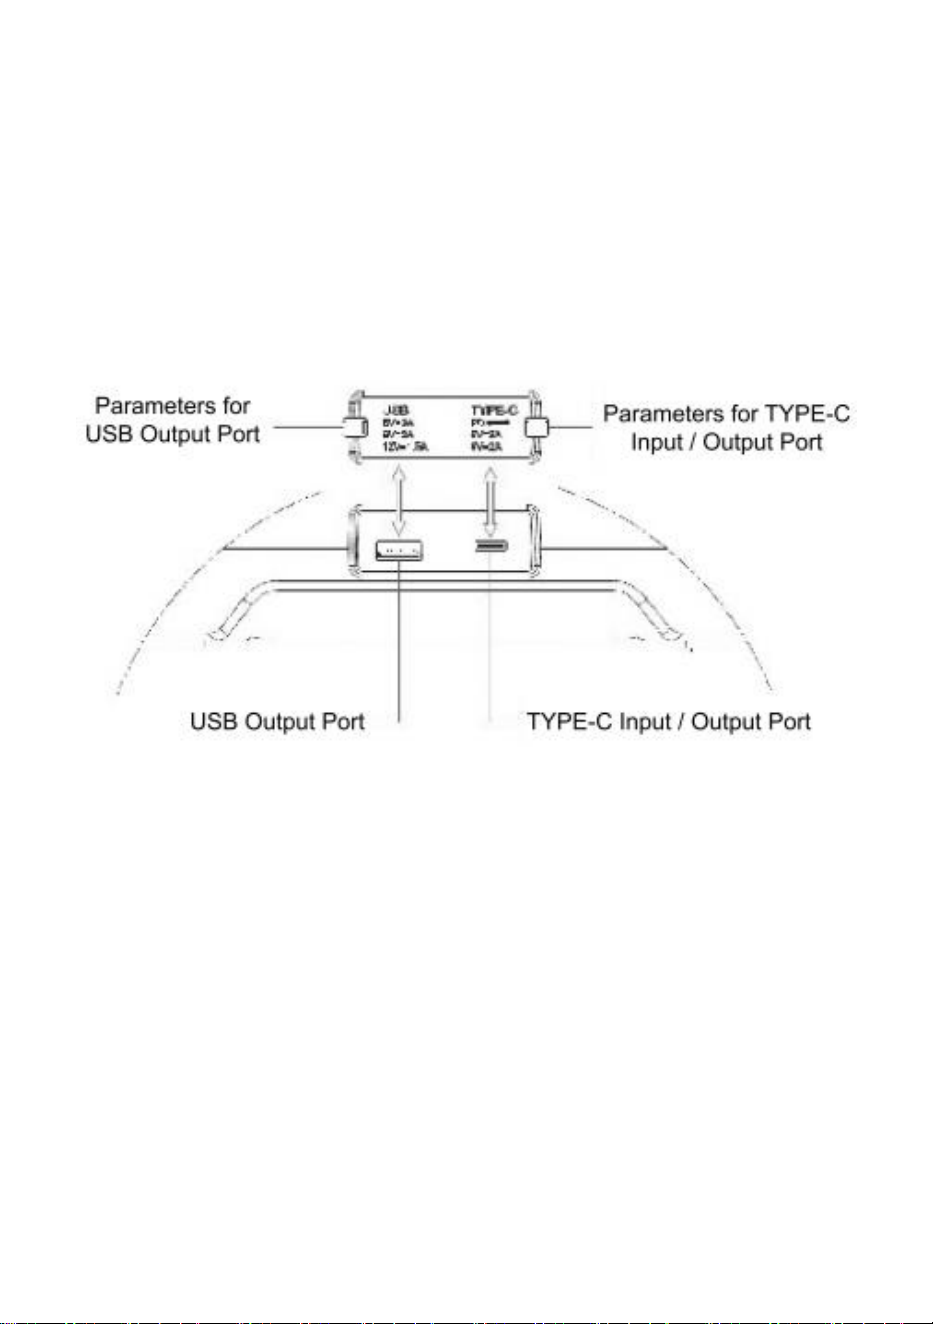
TYPE-C Input
5V=3A 9V=2A 12V=1.5A
(compatible with PD3.0+AFC+FCP+SFCP)
TYPE-C Output
5V=3A 9V=2A 12V=1.5A
(compatible with QC3.0+PD3.0+AFC+FCP+SCP)
USB-A Output
5V=3A 9V=2A 12V=1.5A
(compatible with QC3.0+AFC+FCP+SFCP+SCP
- 3 -
Battery Life
Fan: speed 1 ≈ 136H, speed 2 ≈52H, speed 3 ≈ 24H,
speed 4 ≈15H
Fan+Oscillat10n: speed 1 ≈ 62H speed 2 ≈ 36H
speed 3 ≈ 20H, speed 4 ≈ 13H
LED Lighting: level 1≈ 20H, level 2≈220H, level
3≈50H, level 4≈50H, level 5≈48H
Fan+LED: about 12H at the highest level
Fan+LED+Oscillation: about 1 1H at the highest level
LED Lumen
Value
Level 1:150LM Level 2:150 LM Level 3:400LM
Level 4:400LM Level 5:500LM
Air Blowing
Distance
16.4 foot ( 5 meter)
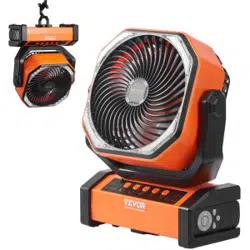
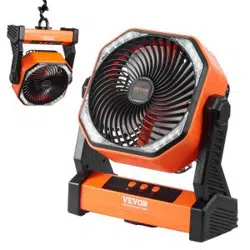
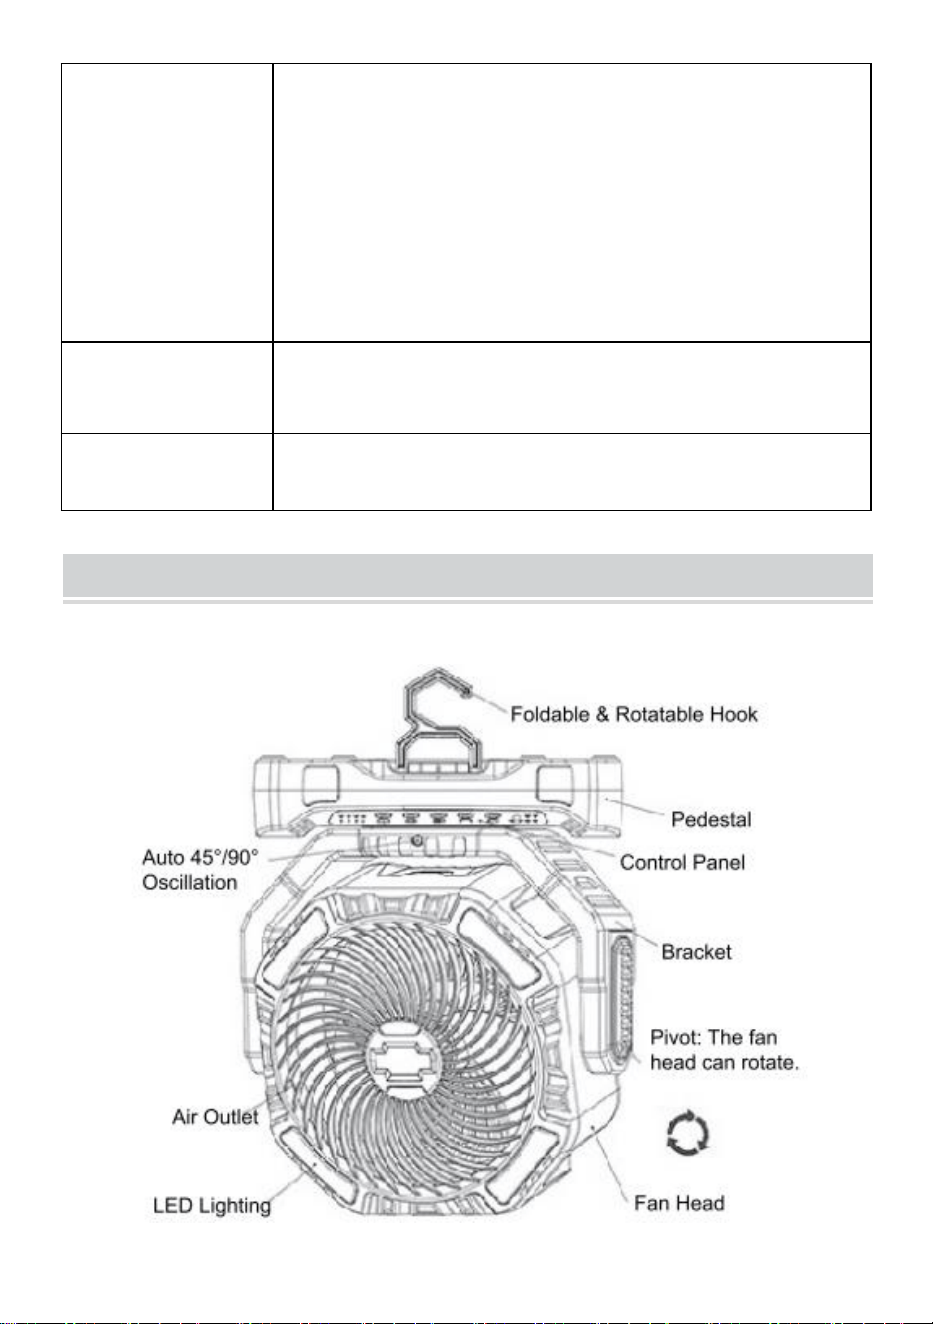
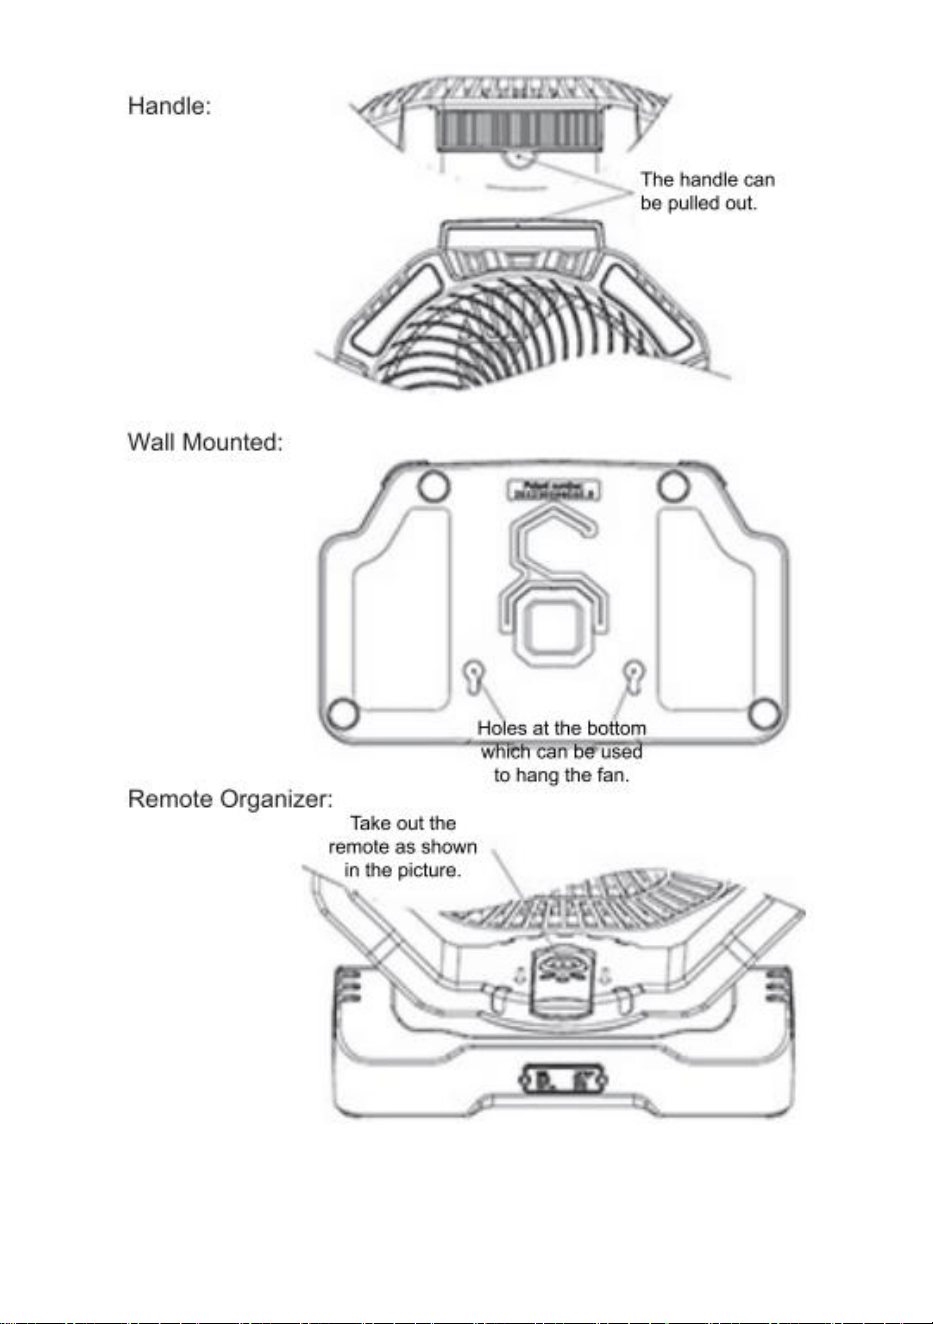
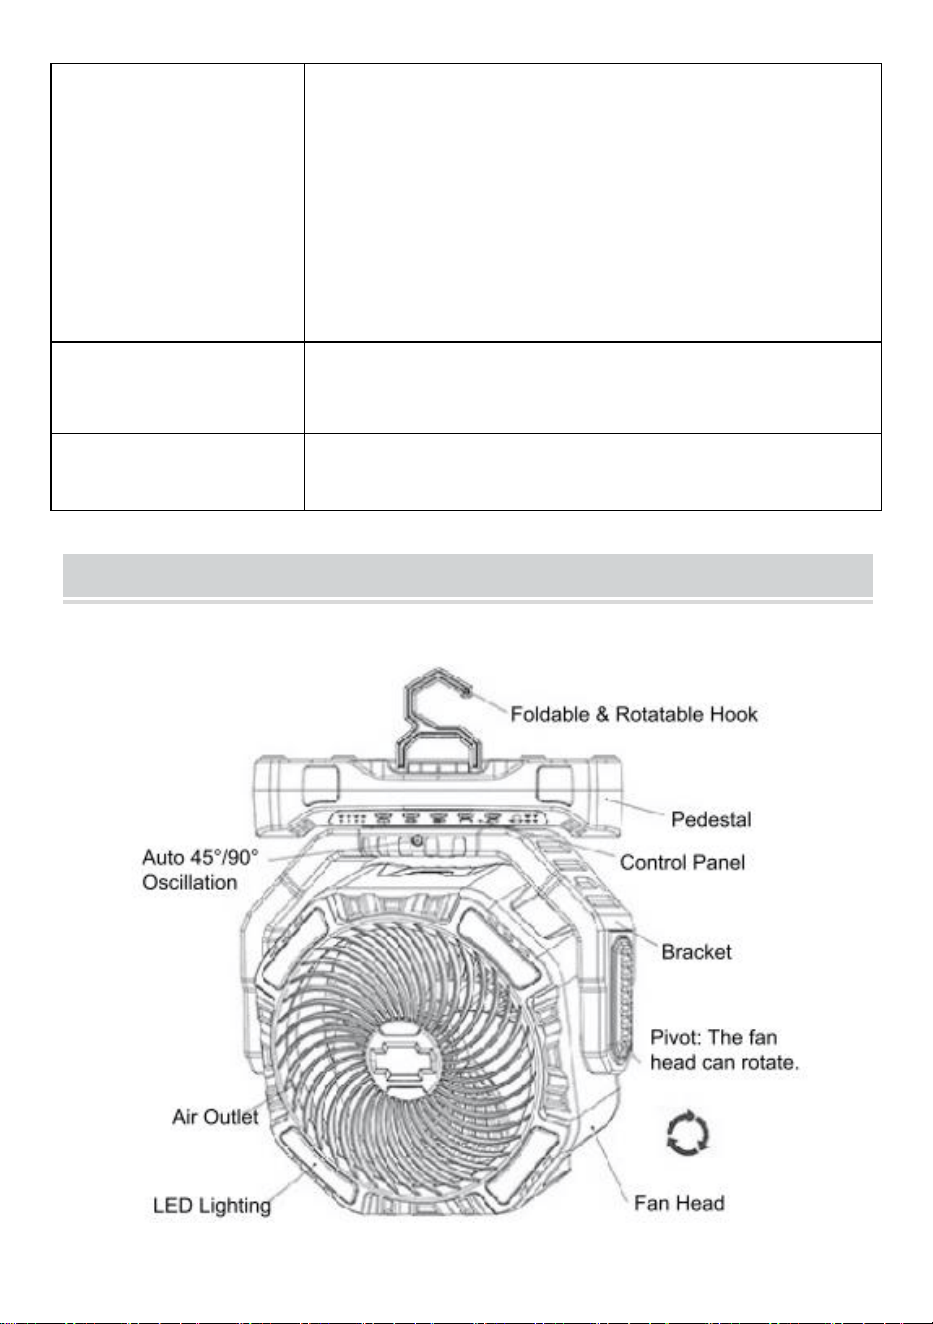
PRODUCT STRUCTURE
Overall Structure

- 4 -
- 5 -
SECURITY & WARNINGS
(1) Please do not place the product in the Sun, high temperature, or close
to the fire, etc.;
(2) Please do not place the product in humid environment;
(3) Please do not throw the product or approach it to the fire, to avoid fire
disaster, etc.;
(4)Please do not disassemble, open, cut, or pierce the product;
(5) Please stop using the product immediately if abnormalities happen
during
(6) When you don’t use the product for a long time, please charge it every
2-3 months, so as to avoid damage to the battery due to long-term storage.
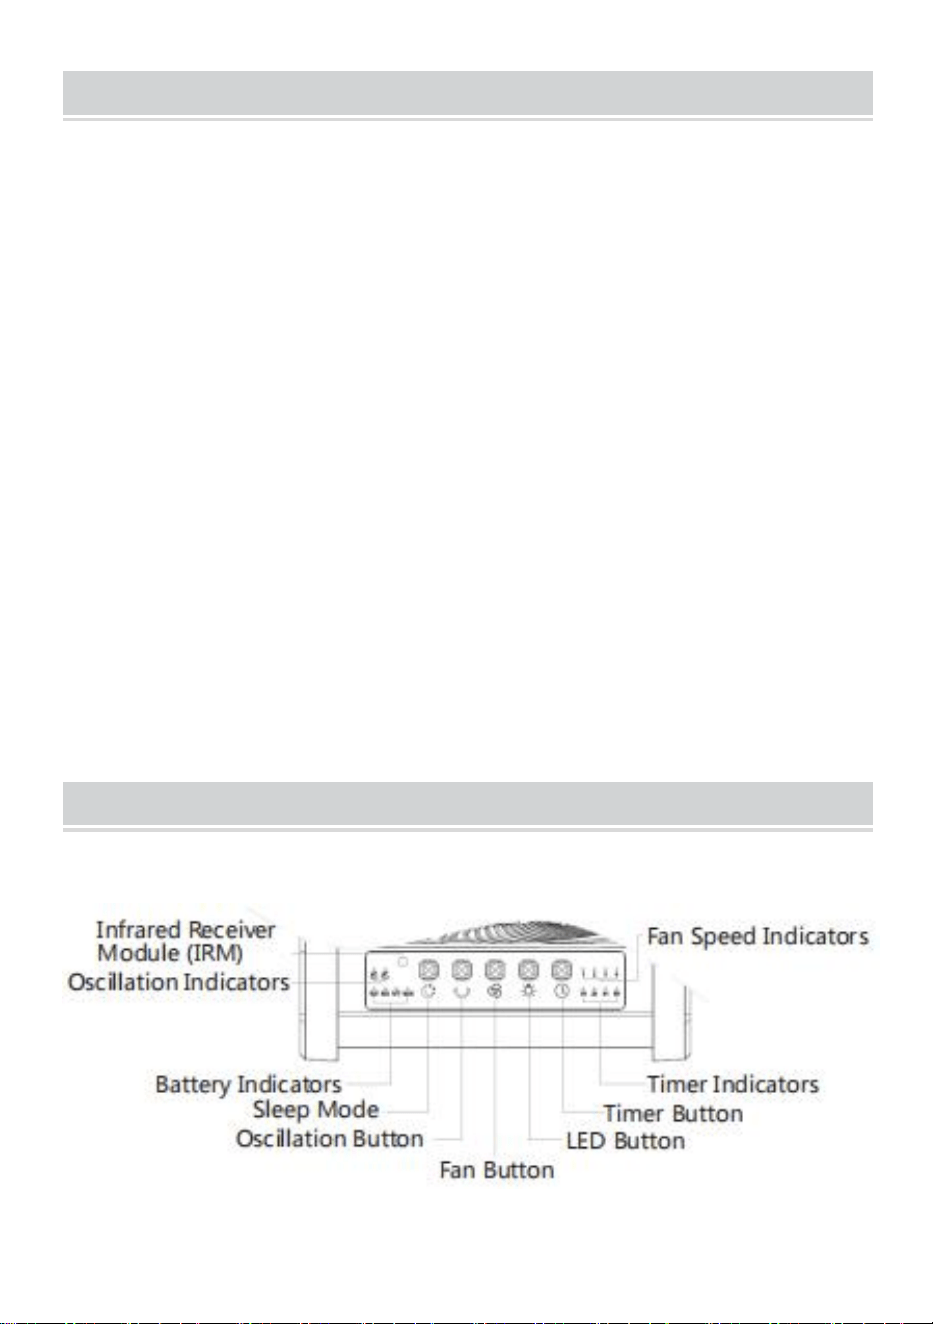
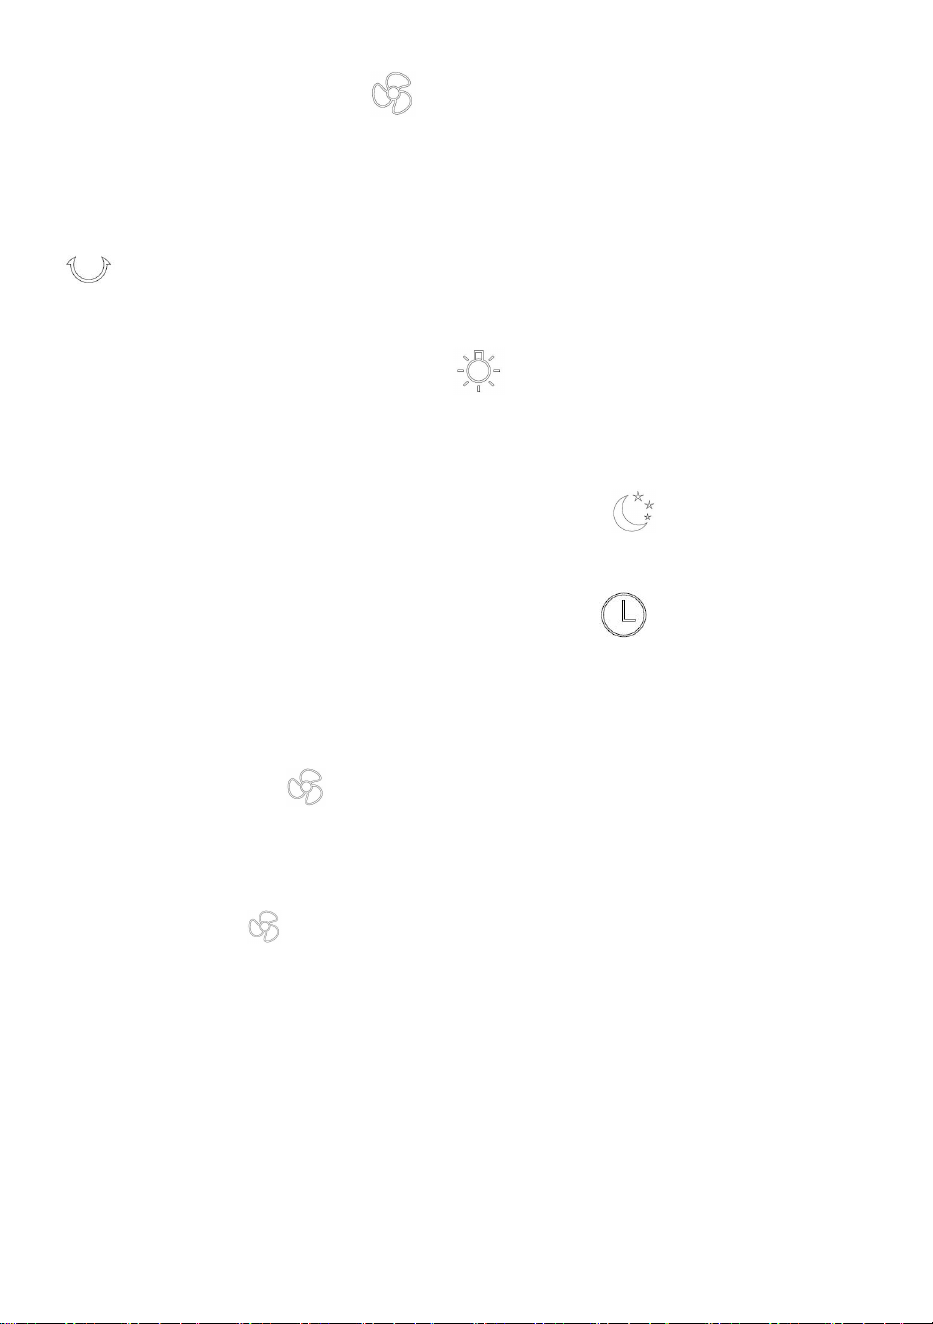
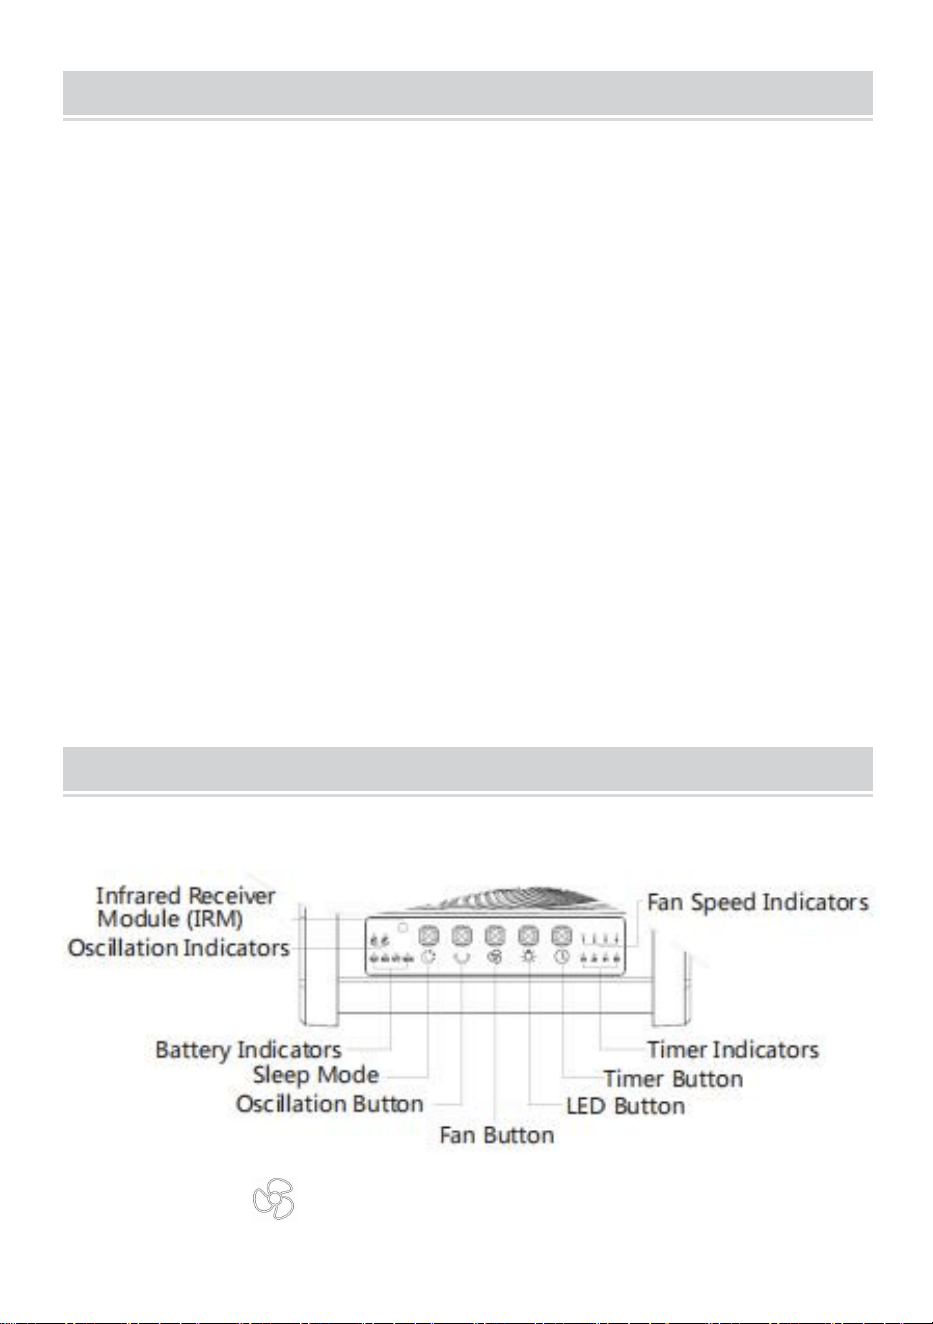
USING INSTRUCTIONS
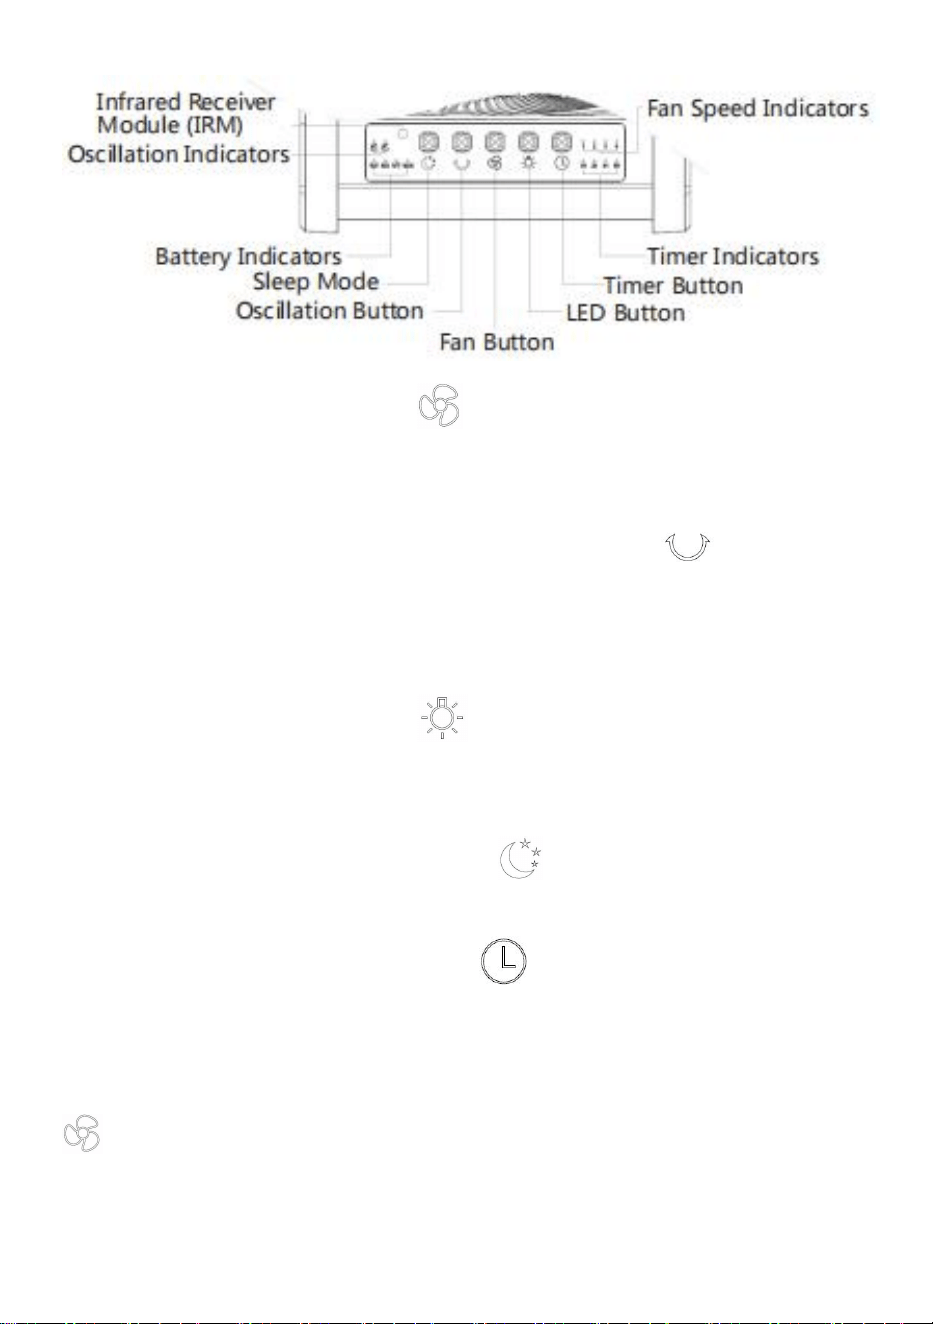
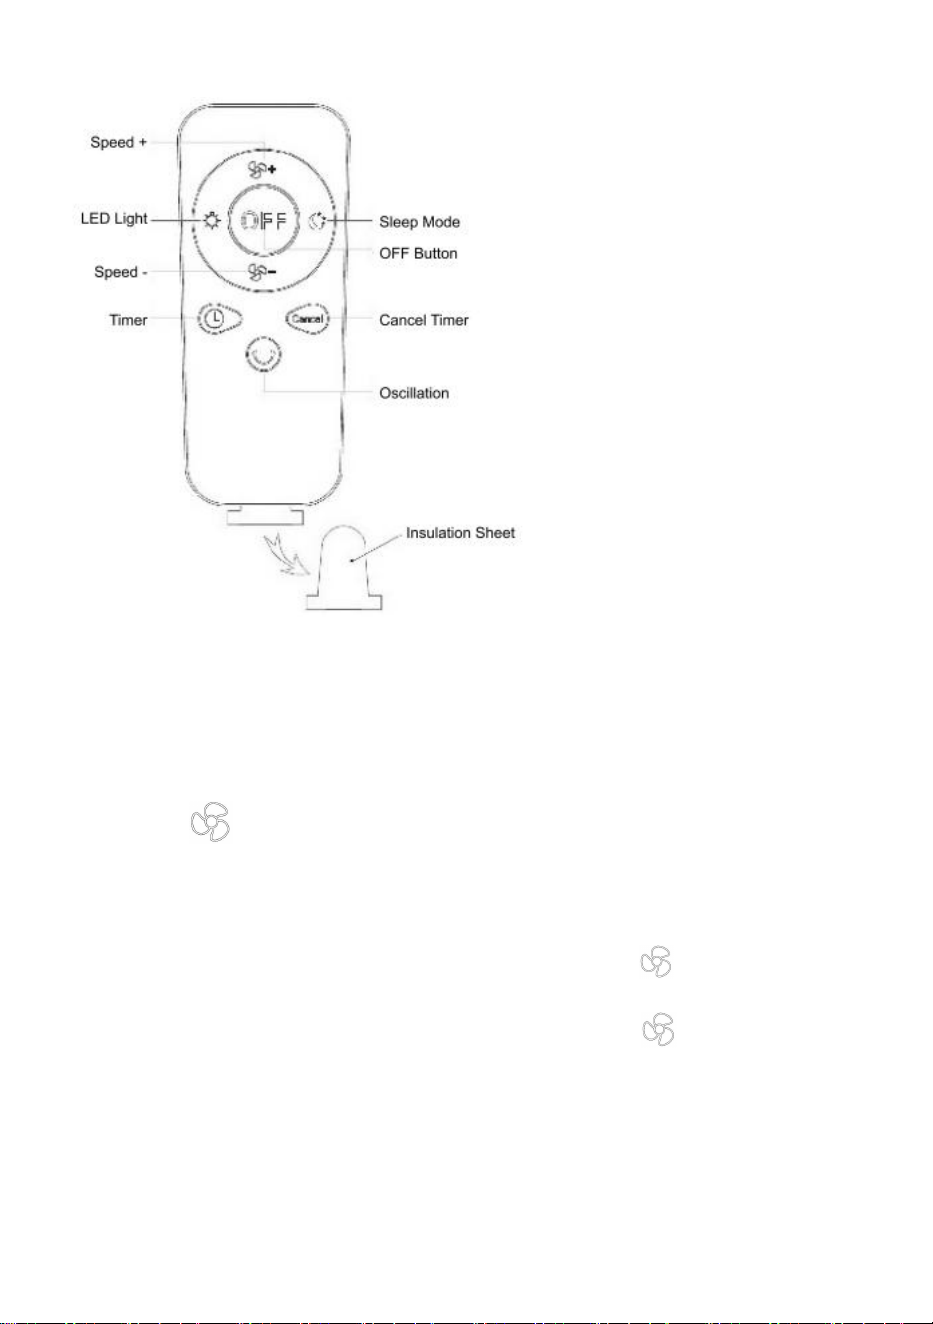
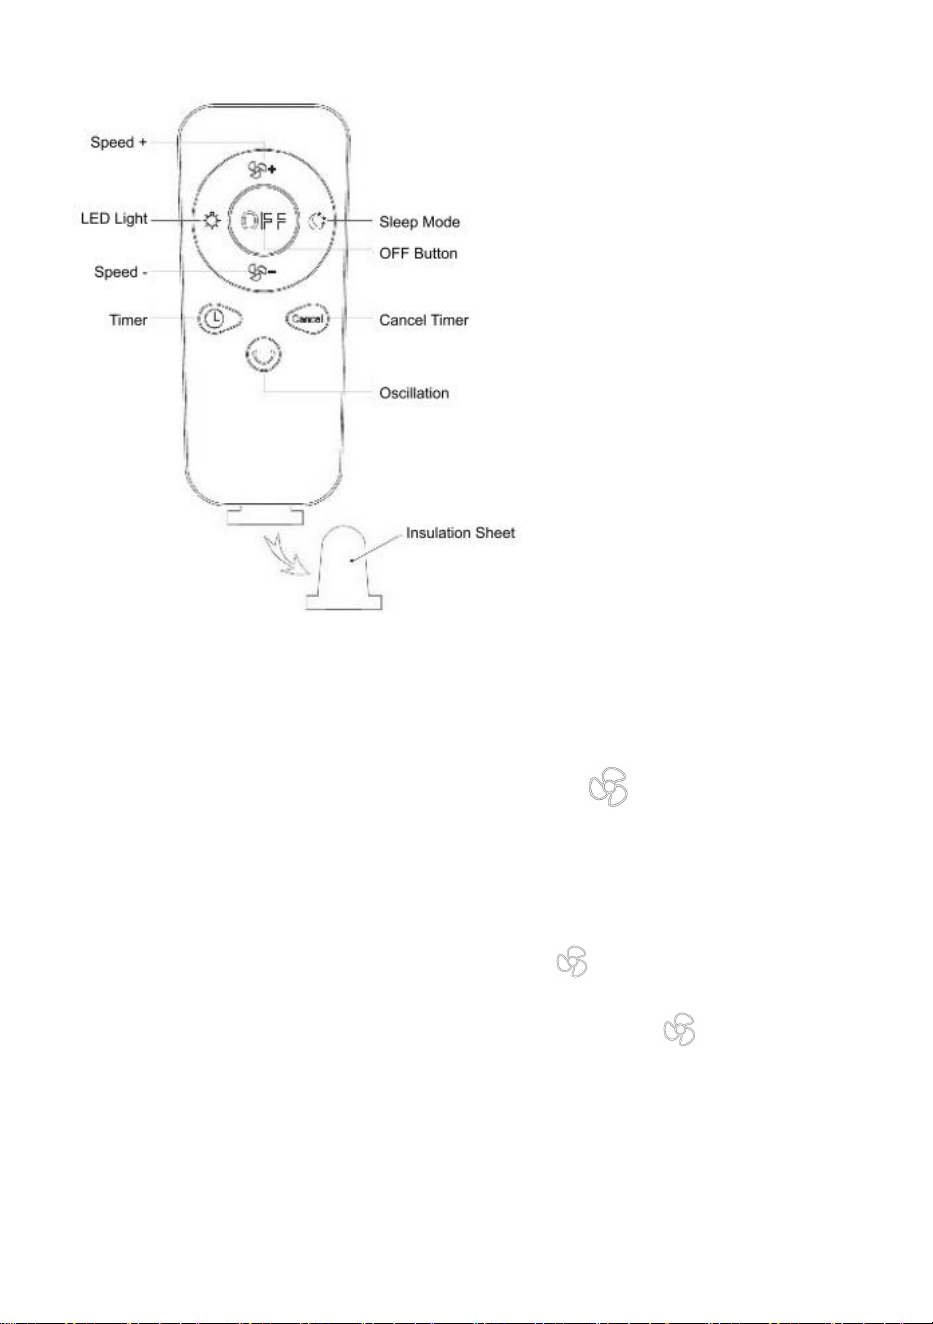
Control Panel:

- 6 -
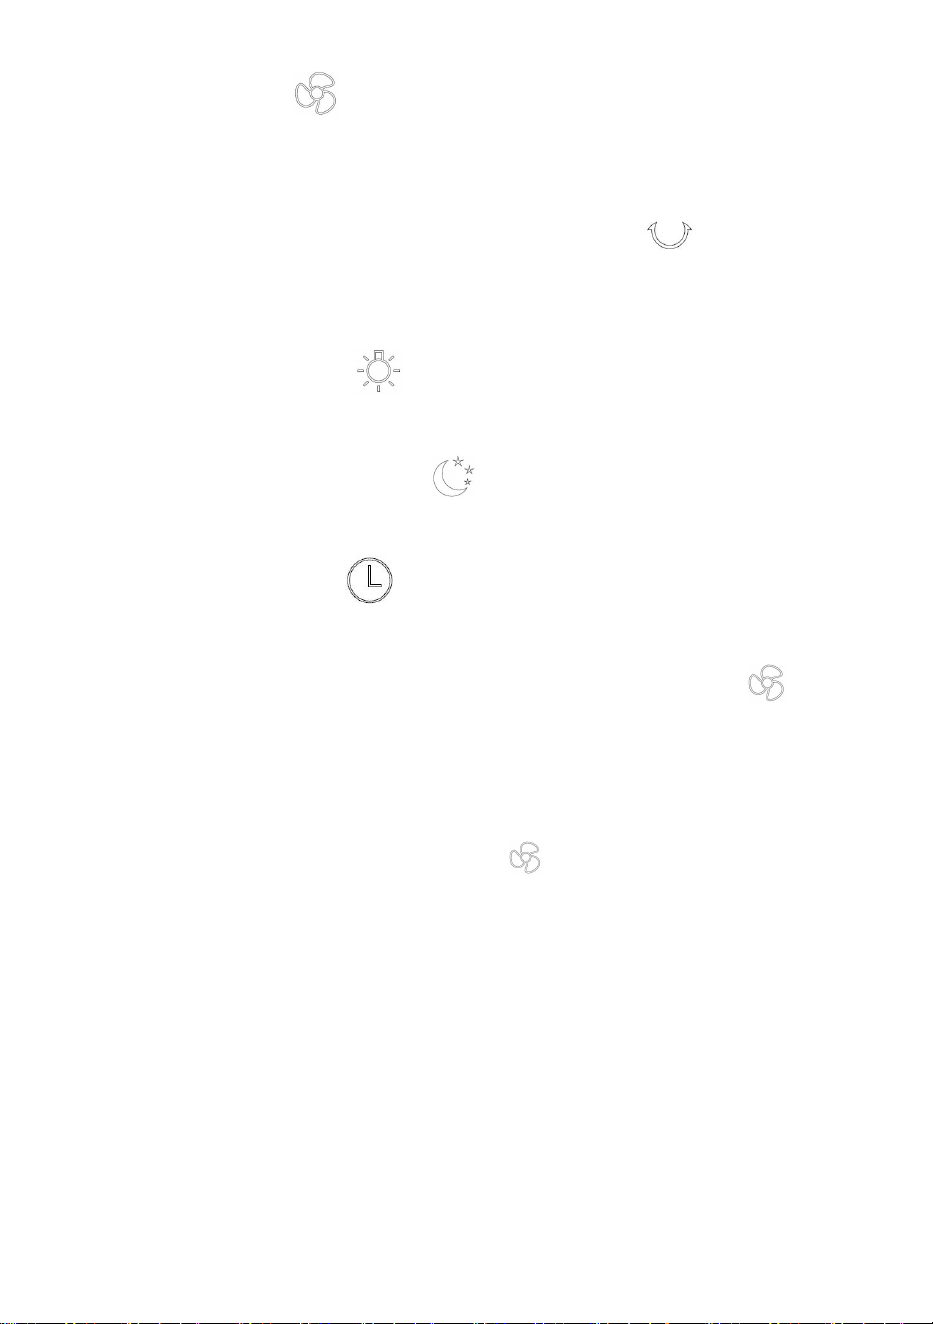
(1) Short press the“ ”button, the fan will switch among speed
1/2/3/4/OFF in turns, long press this button to turn it off at the fan;
(2) When the fan is running, short press the“ ” button, the fan will
oscillate within 90 °/45 °/OFF in turns, long press the button to turn off the
oscillation function;
(3) Short press the“ ”button, the LED lights will switch among
1/2/3/OFF; long press this button to turn off the LED lights;
(4) Sleep mode: short press the“ button,it will turn ON/OFF the sleep
mode;
(5) Timer: short press the“ ”button,the timer will switch among
1H/2H/4H/8H/OFF in turns, long press the button to cancel timer;
(6) Low power consumption : in any case
,
simultaneously press the“ ”
button and the“Cancel”button on the remote for 3 seconds the fan will
turn off and enter low power consumption mode. Meanwhile, the remote is
invalid Press the “ ” button again to turn on the machine and recover
the standard mode and activate the remote. (If you don’t use it for a long
time. please choose the Low Power Consumption mode for storage,
avoiding running out of power and causing damage to the battery.)
Please note that Sleep Mode is to turn off the indicators. After turning off
the indicators,restart the machine or output/input ,the indicators will turn
on again.
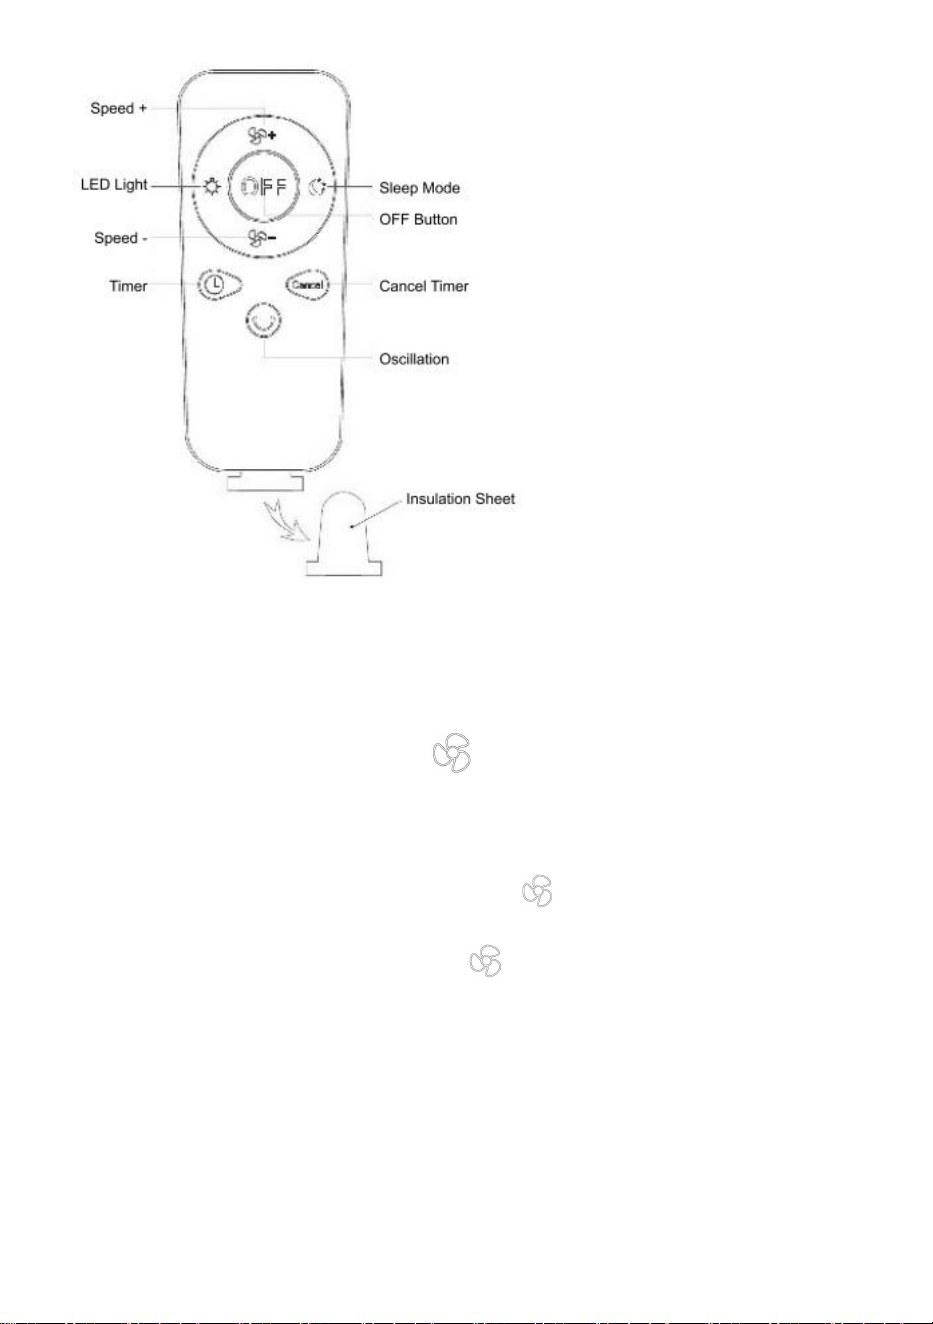
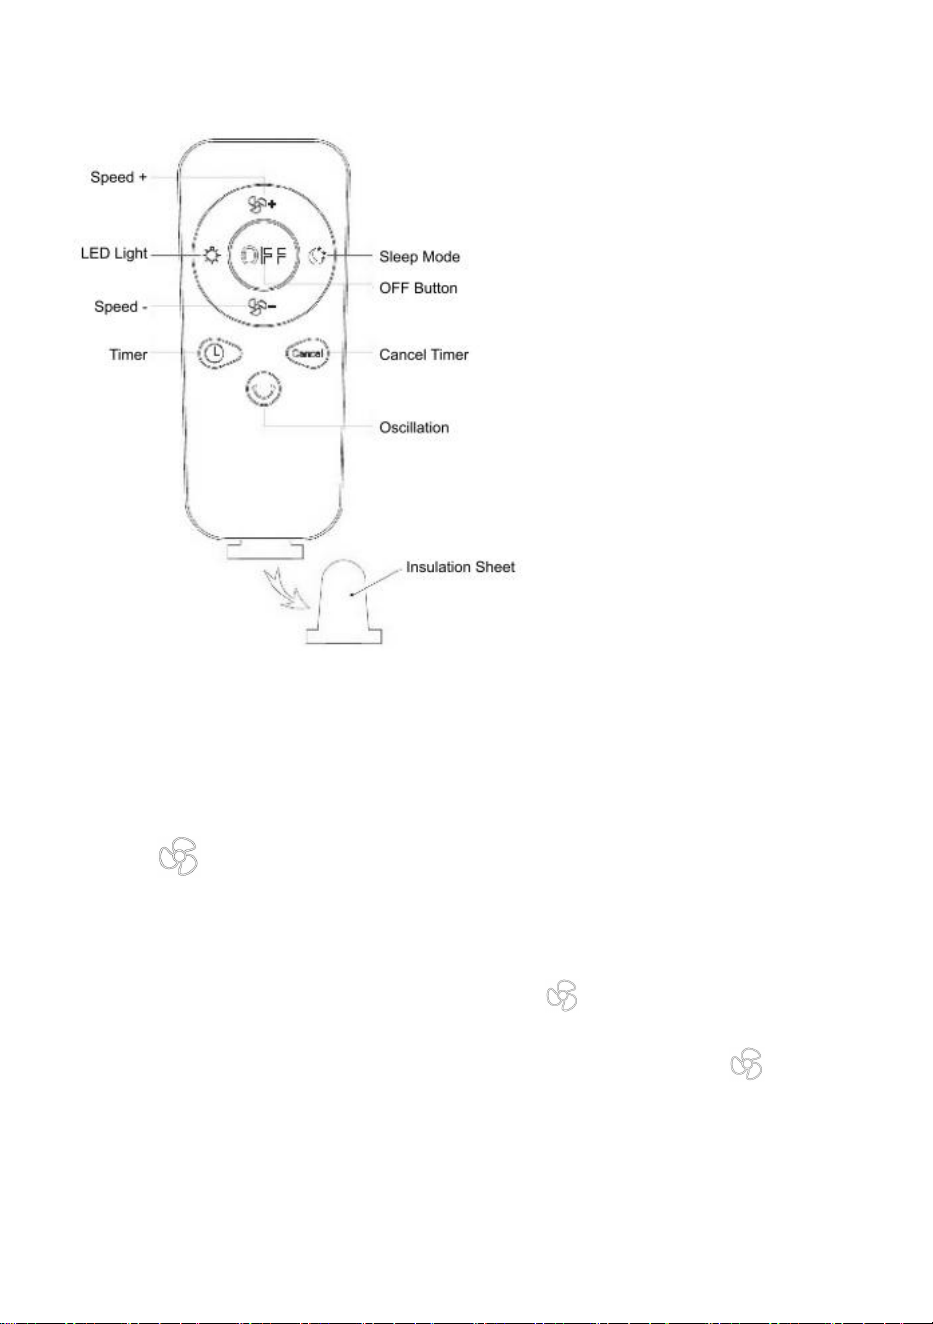
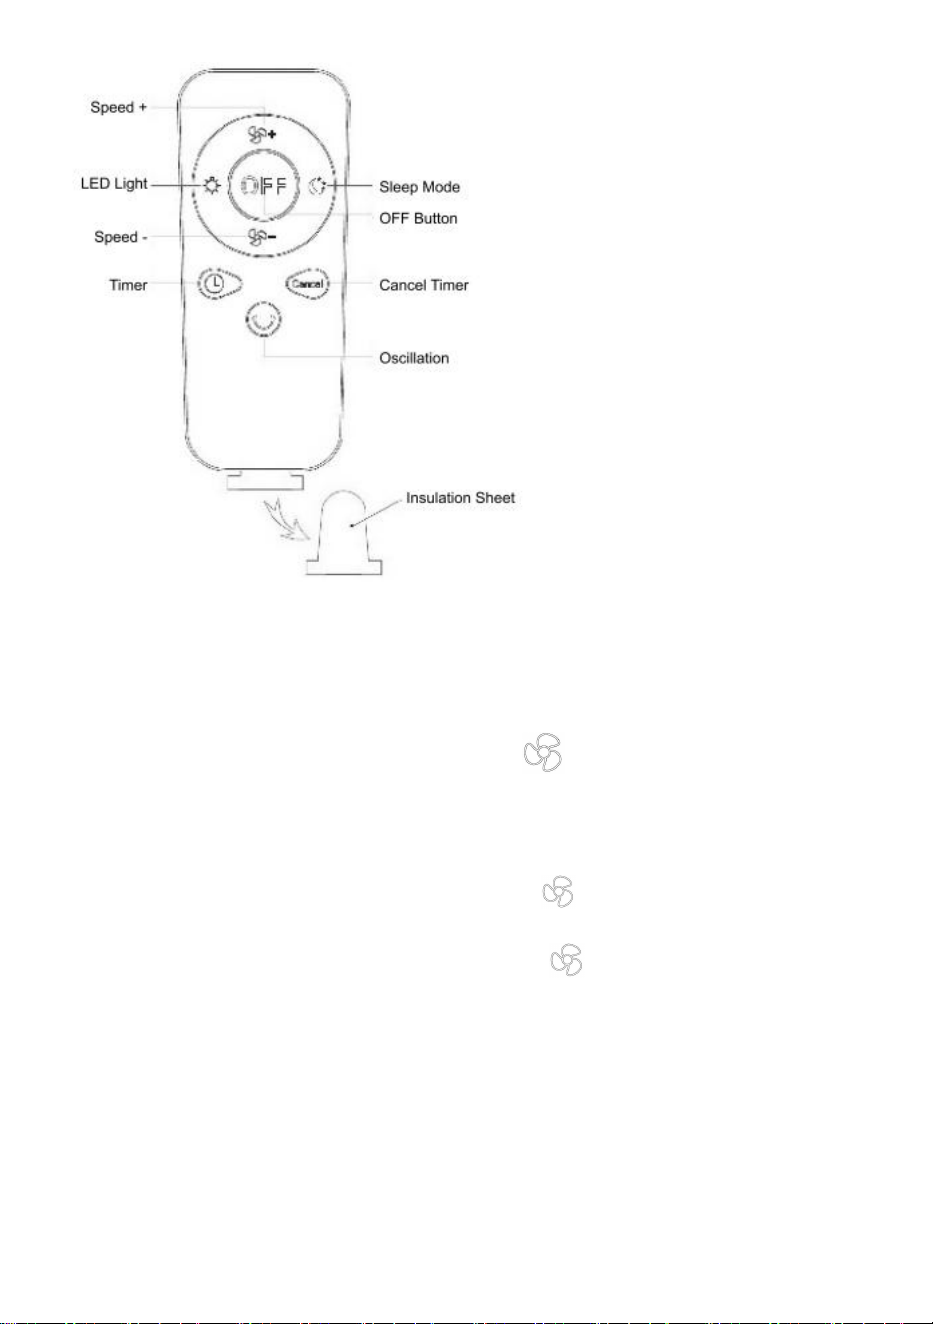
How to Use the Remote:
- 7 -
(1) Please take out the insulation sheet in the remote to power on before
using the remote
(2) Activate the remote: the product is at low power mode when delivered,
the remote is invalid. Press the :“ ”button on the control panel to turn
on the fan and activate the remote;
(3)Speed adjustment: press the " button “ + ” button to switch among
speed 1 / 2 / 3 /4 in turns; press the “ -” button to adjust among speed 4
/3 / 2 / 1 turns,
(4) Remote distance:16.4ft. (5 meters);
(5) The product will make a sound "di" when receiving orders from the
remote.
- 8 -
Note The remote is invalid when delivered, press the speed button to tum
on the machine before using, and the remote is activated
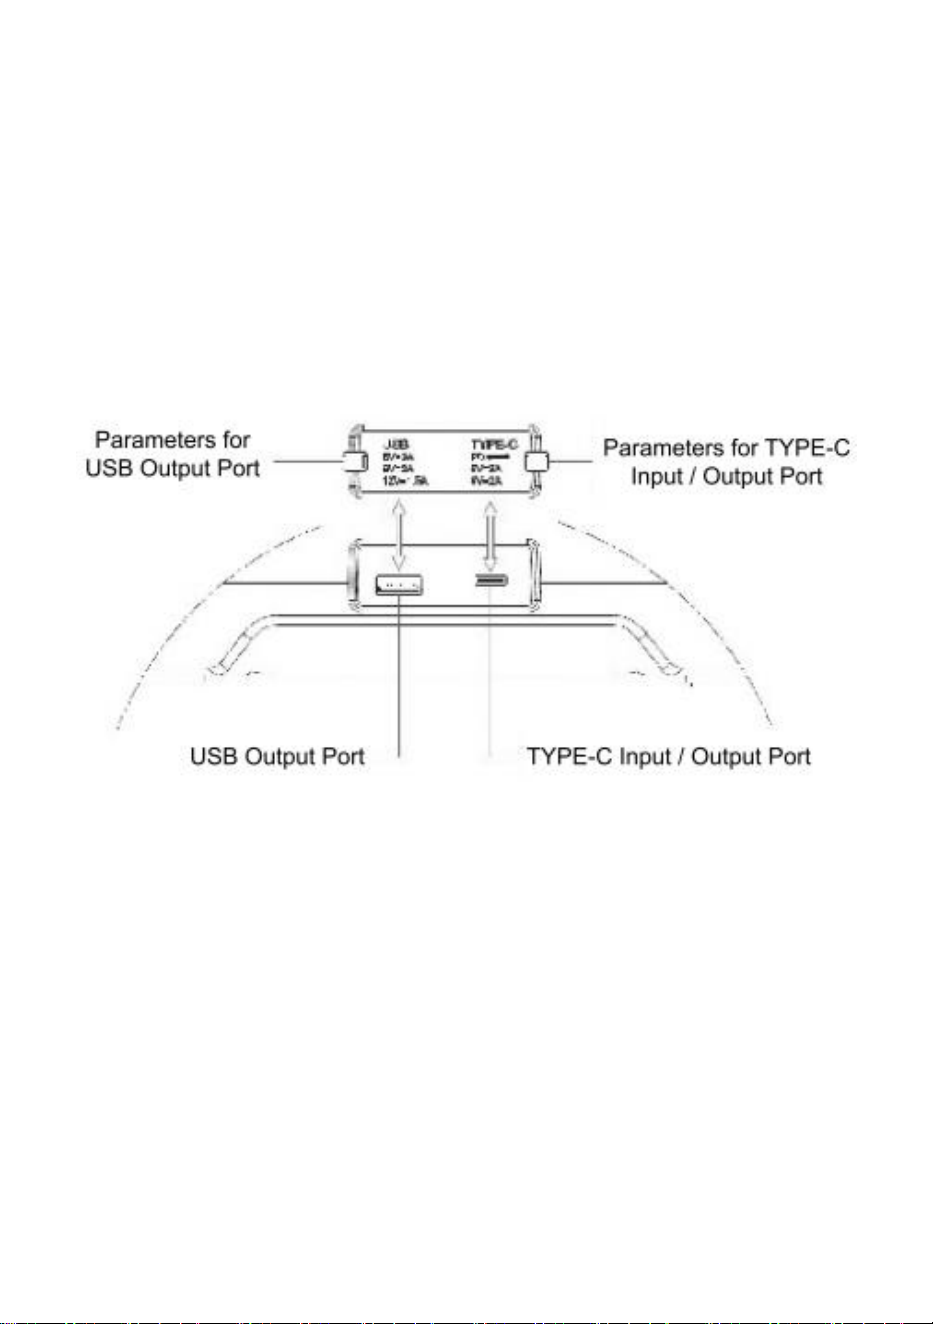
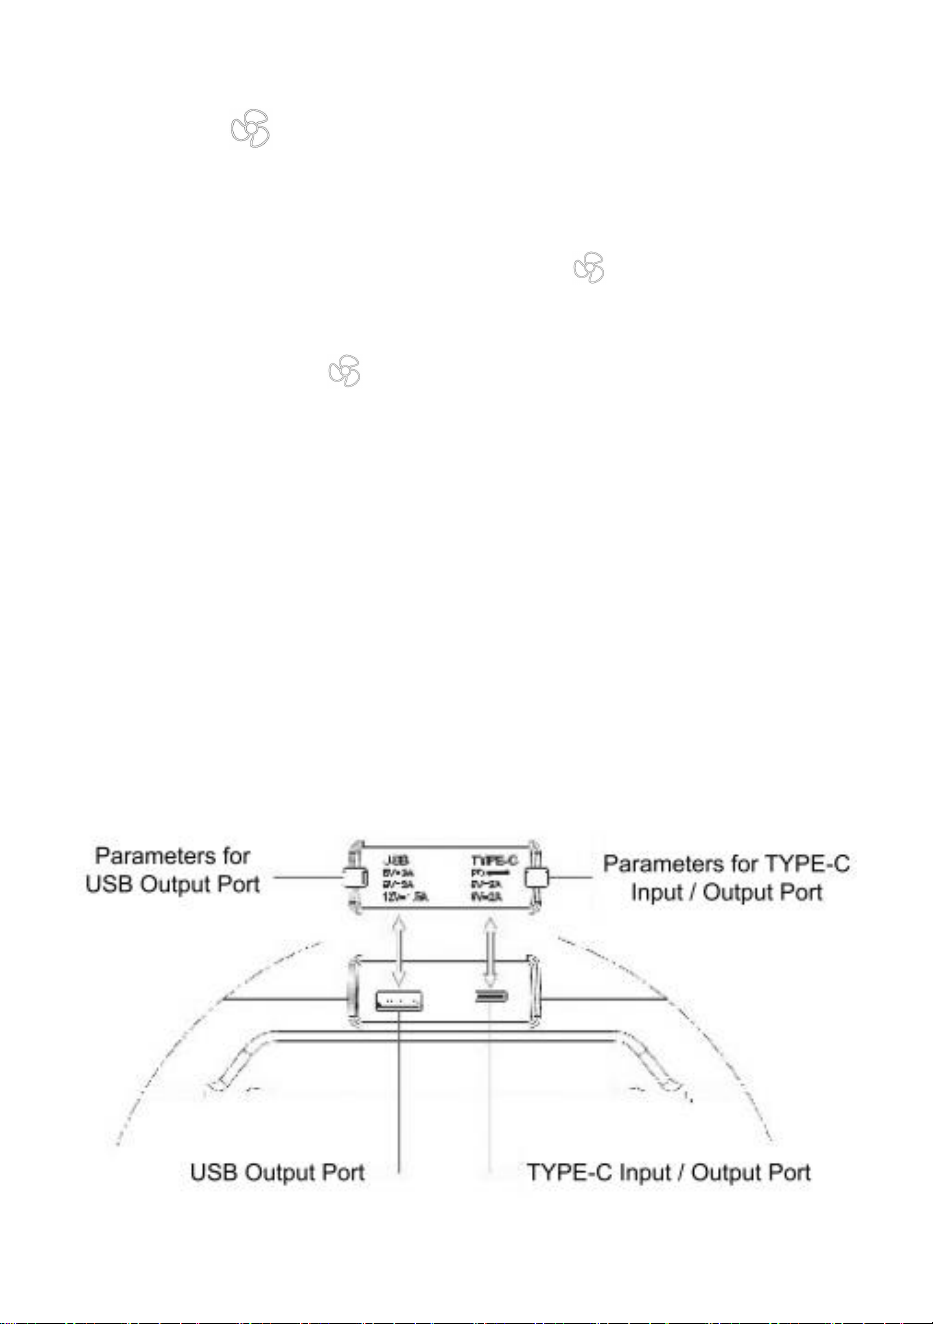
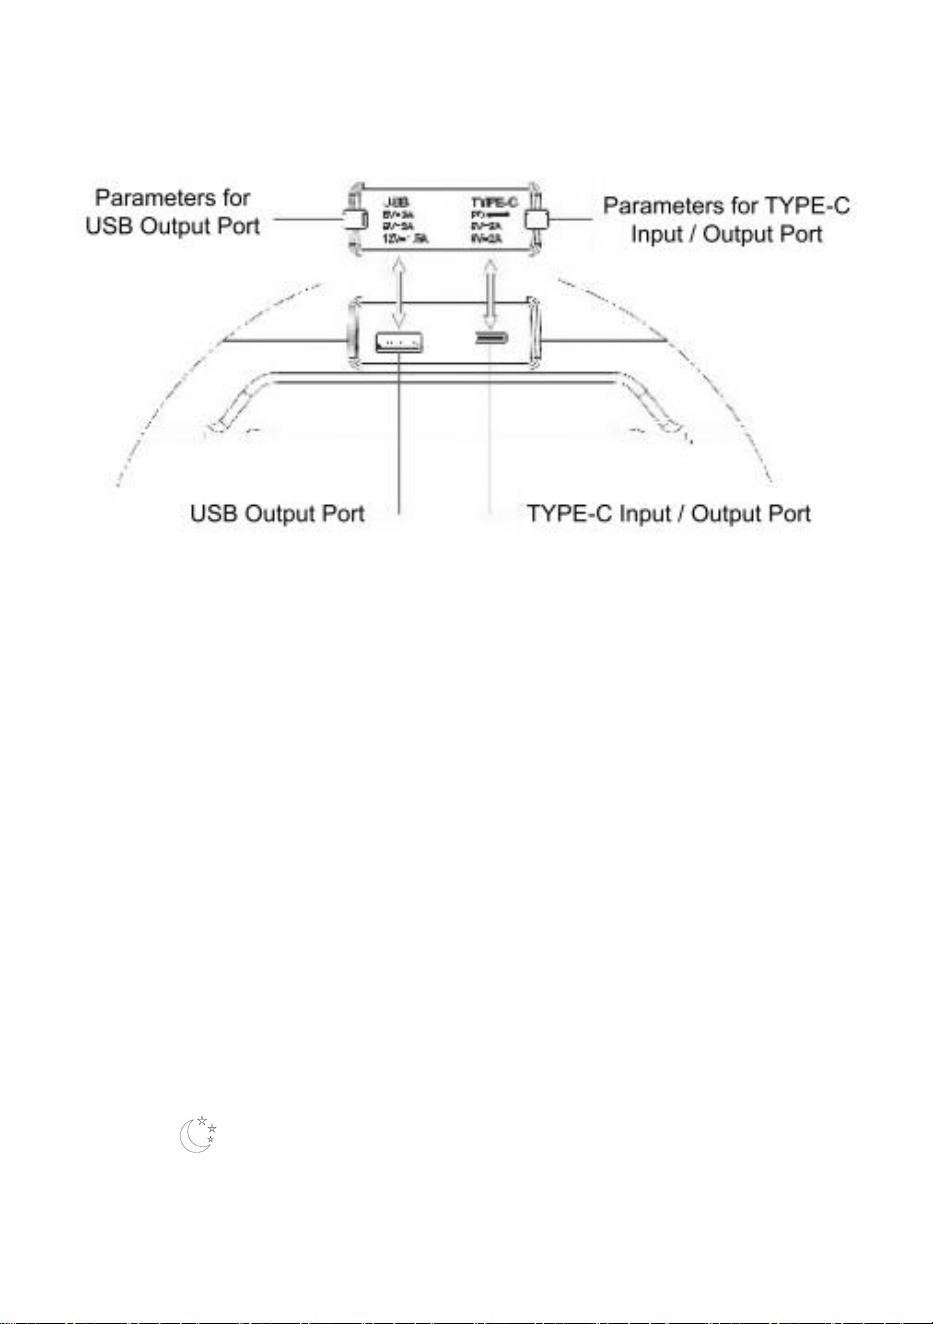
4. Charging / Power Bank Feature Input / Output Ports:
(1) Open the silicone cover before charging.
(2)Charging time: 9-10 hours (tested with 22.5W compatible with PD
protocol charger; if the charging equipment is lower than 22.5W, the
charging time will be a bit longer.)
(3)Plug in and the fan start to charge automatically. The battery indicators
on the control panel flash during charging, the 4 battery indicators will be
steady on after fully charged.
(4)Power bank feature: it can charge other devices via the charging cord.
When connecting with other devices, please choose the power which is
within the parameter range, or it may cause damage to the fan .
Note. Some mobile phones cannot activate the power bank feature
automatically after connecting, long press the “ ”button to manually
activate the power bank feature; the USB output port is not compatible with
some mobile phones for quick charge!
- 9 -
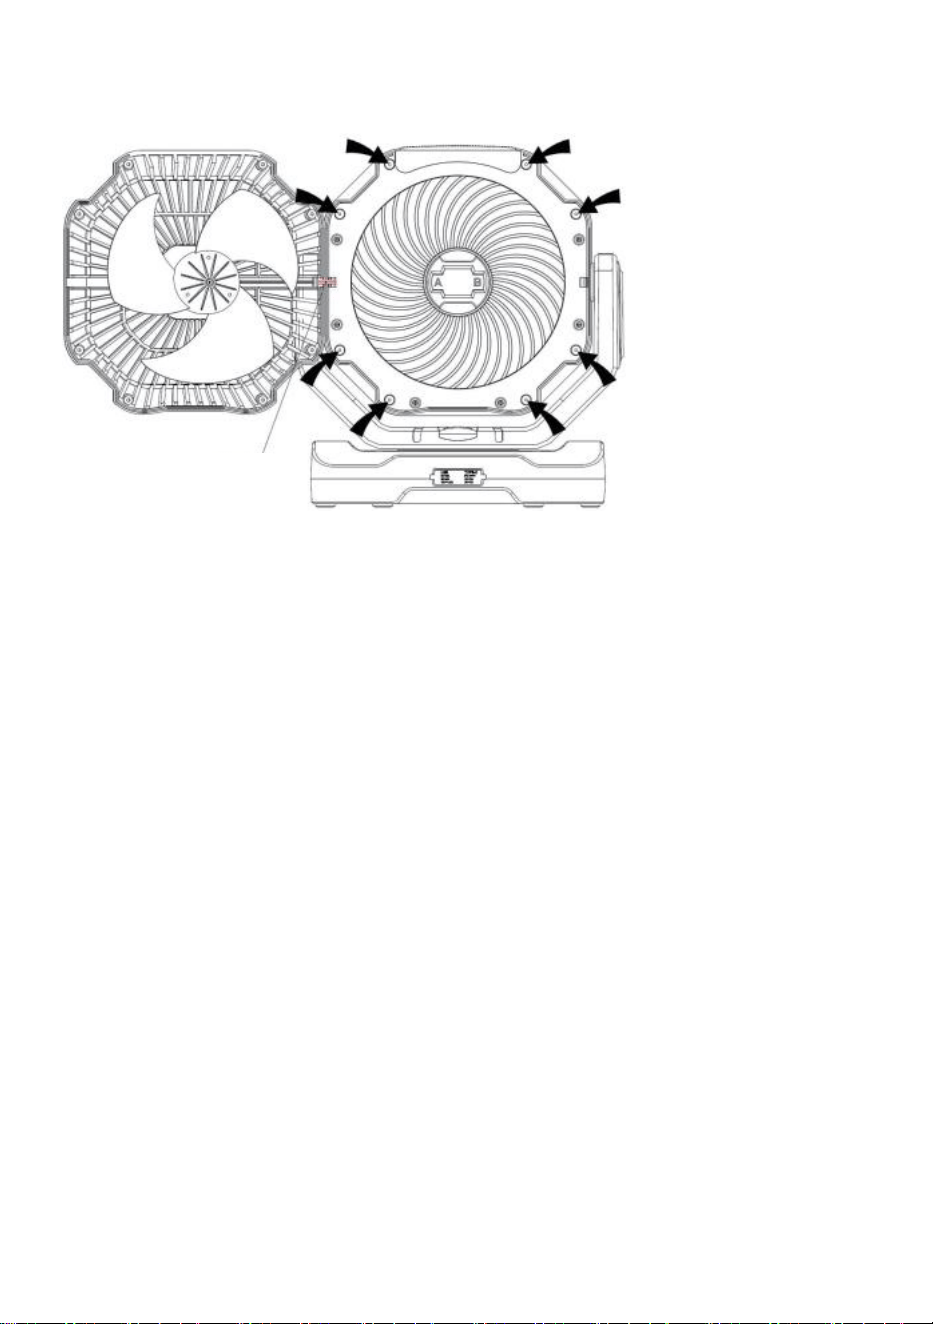
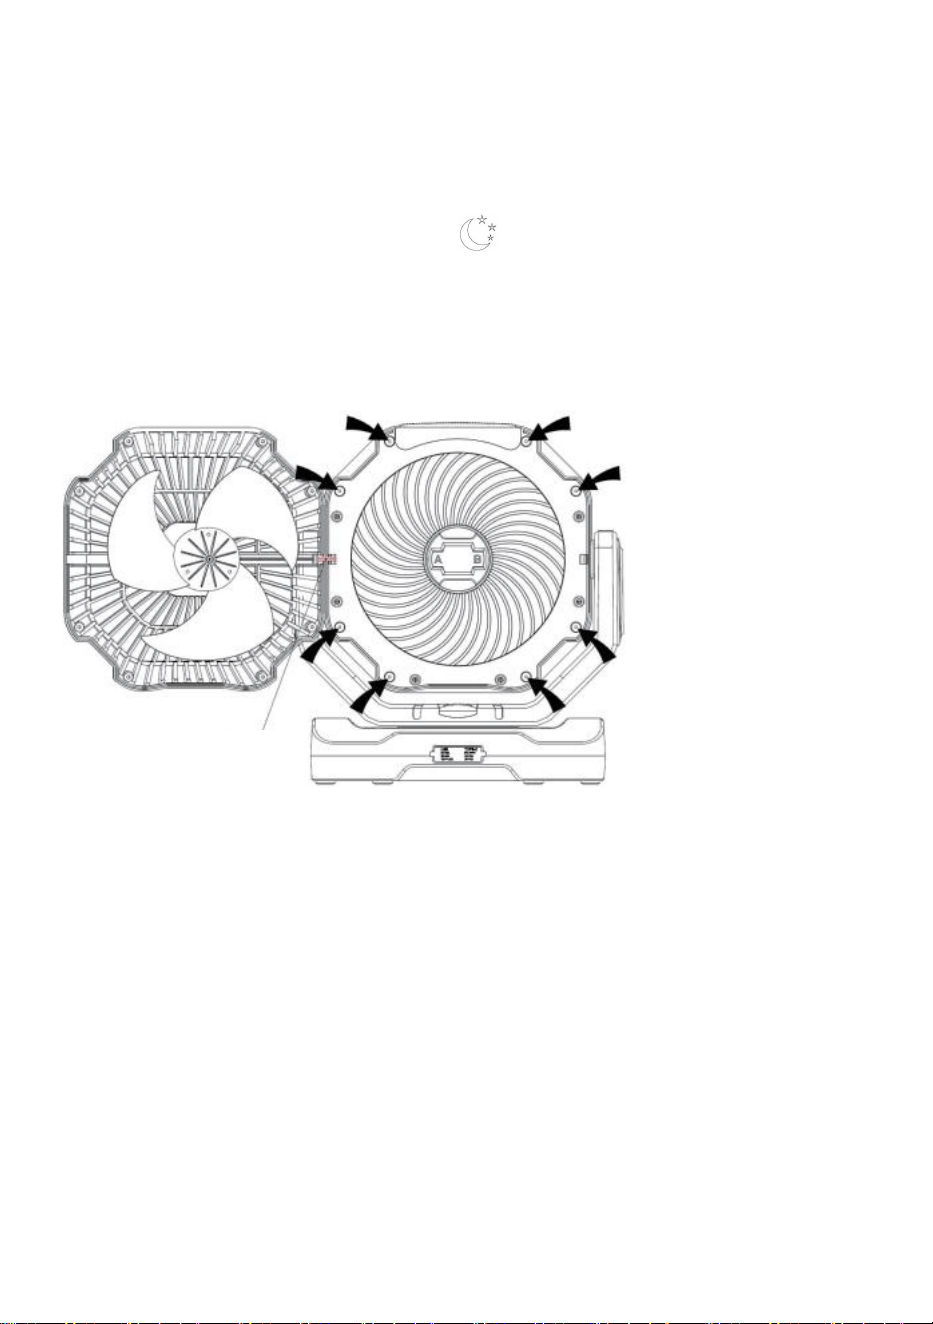
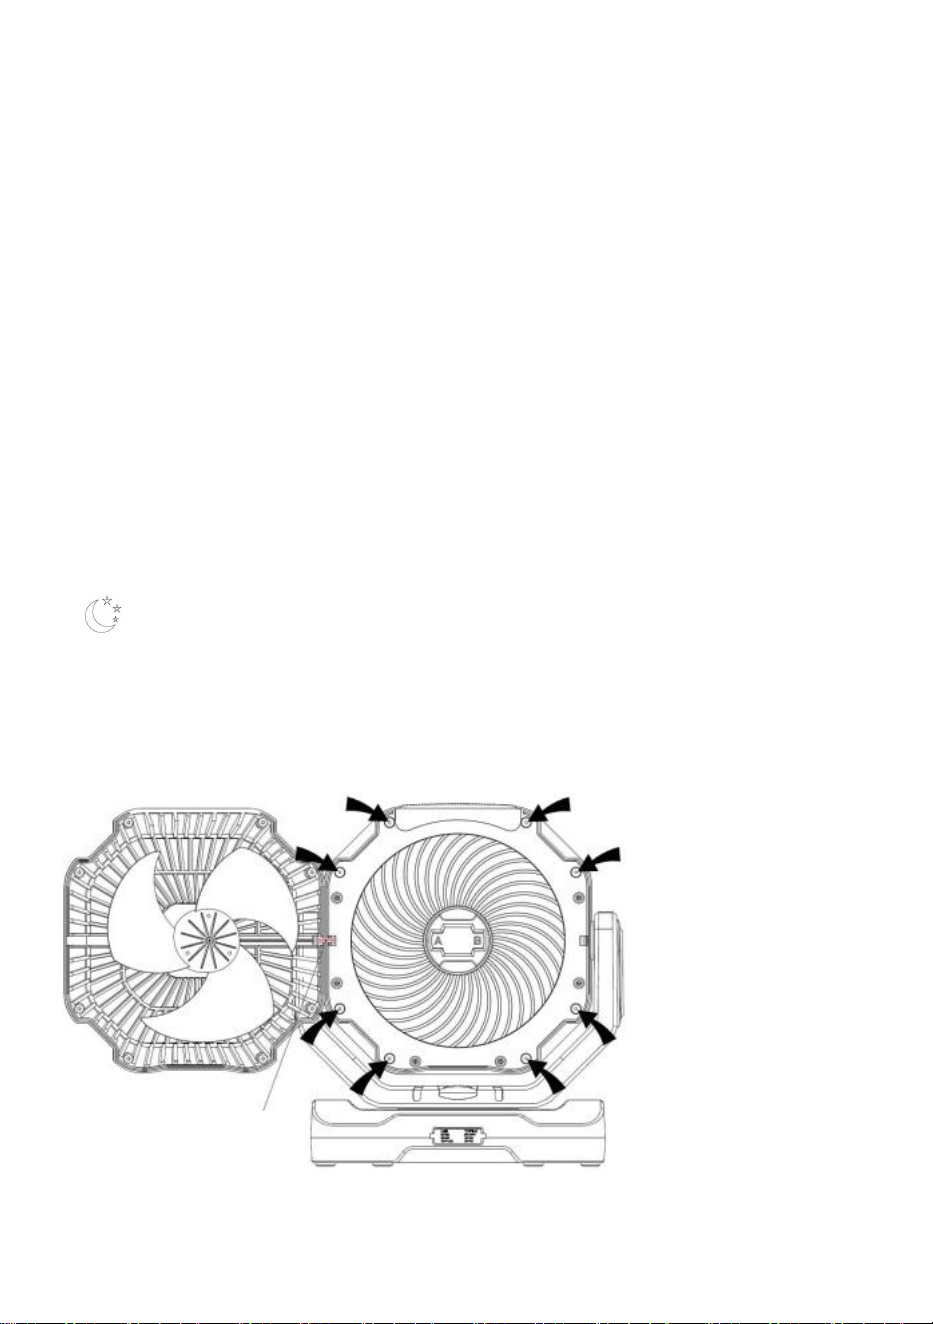
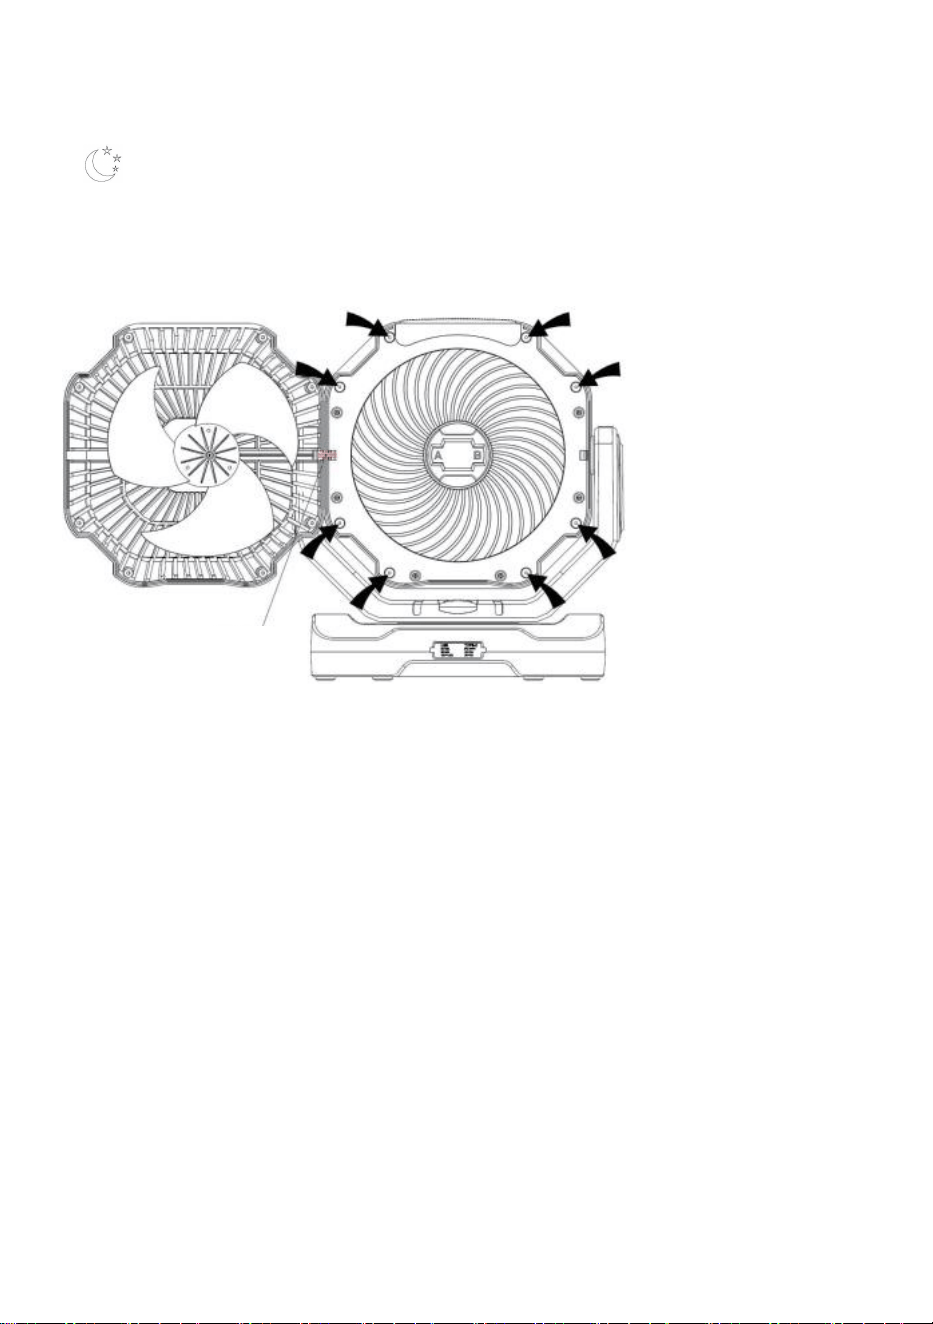
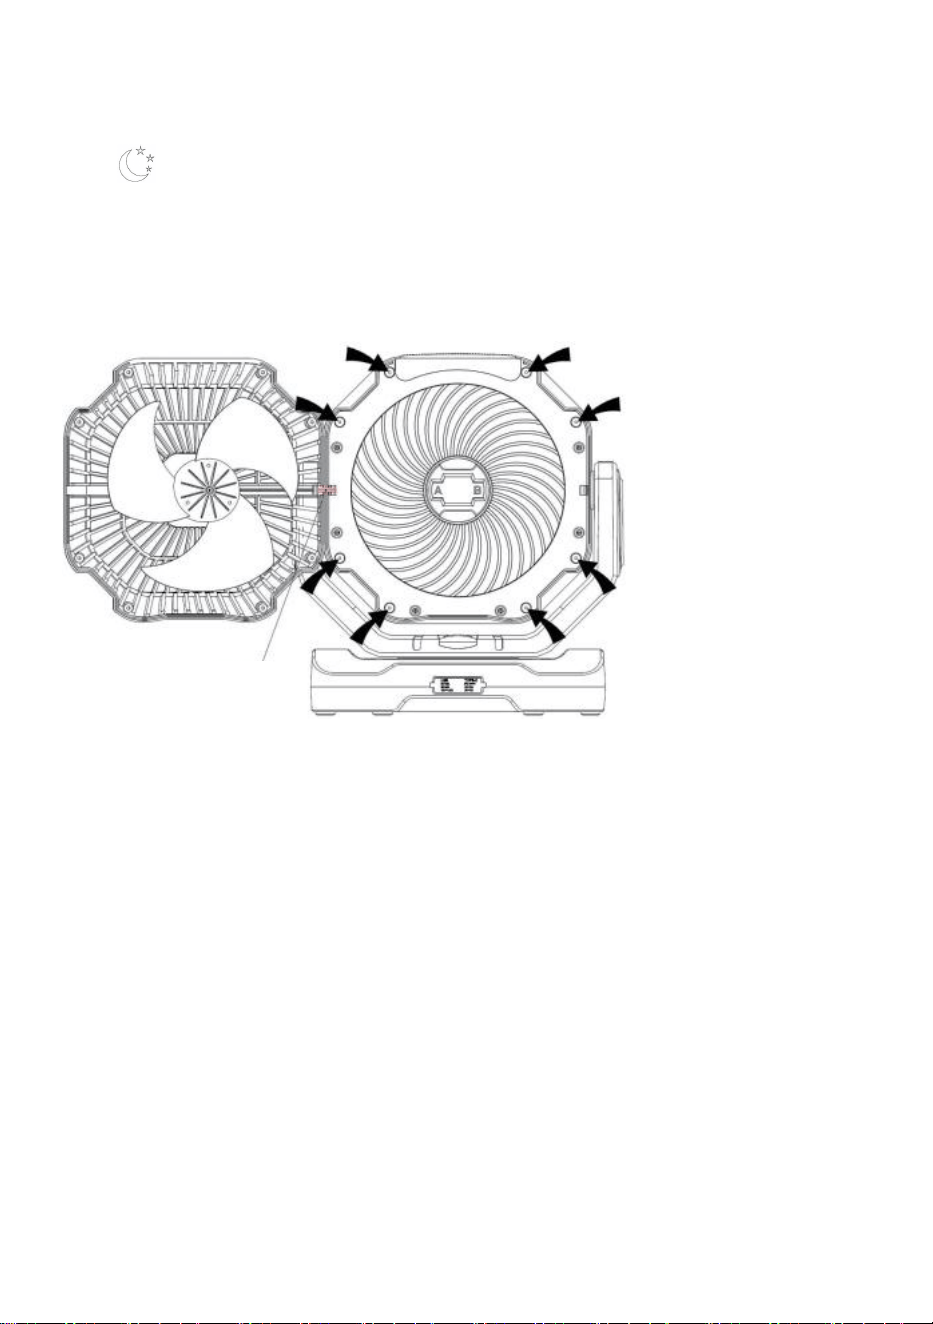
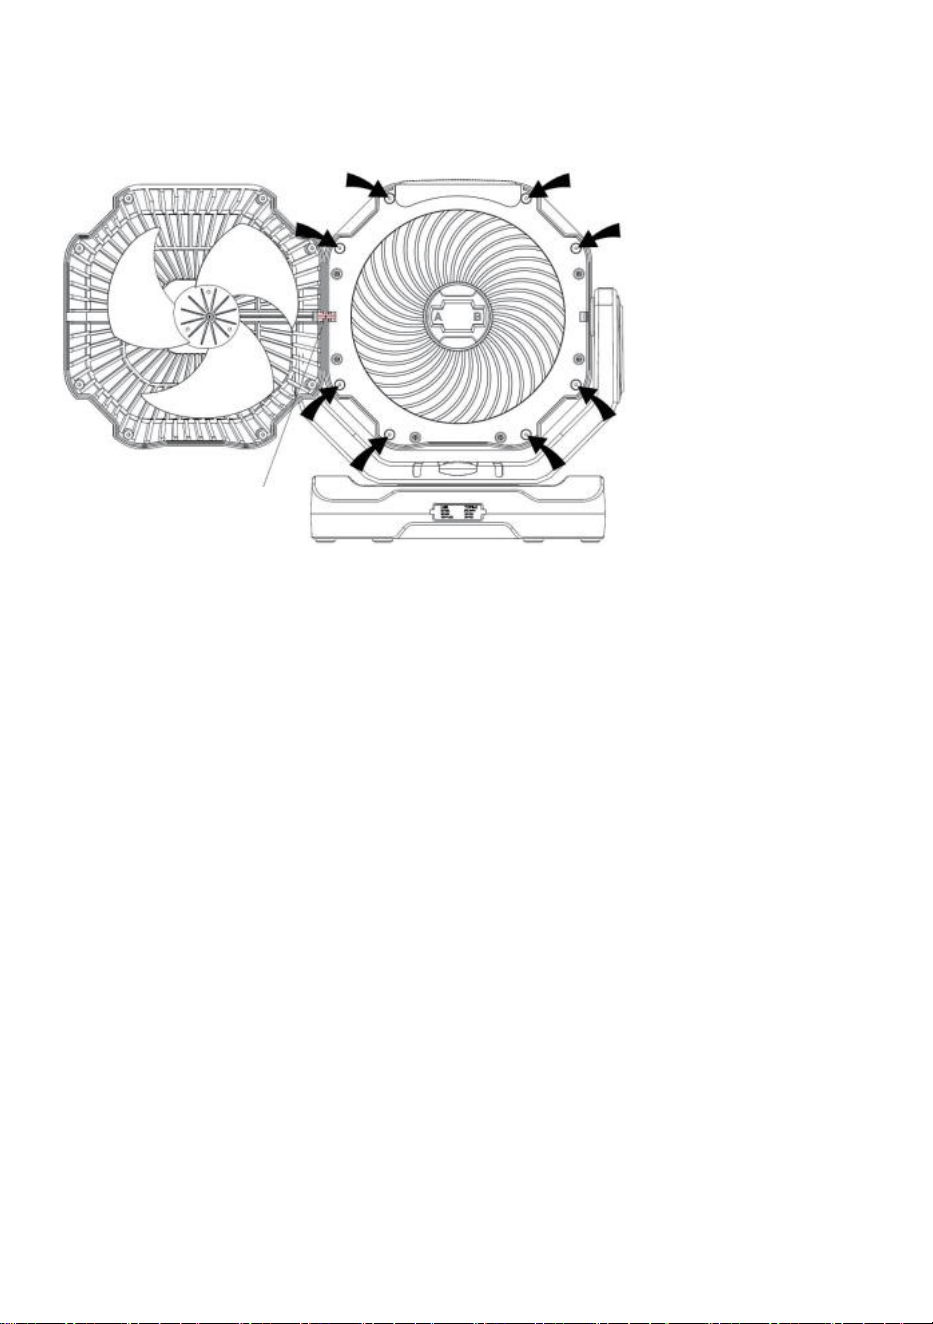
How to Clean the Blades:
Cleaning method of fan blade:
1. Turn off the fan, place the fan flat on the back, take out the 8 screws
(pointed out by arrows) by screwdriver;
2. Open the back cover from right to left, see the picture above. (Note:
There is electric wires inside on the left, so when you open the back cover,
please be careful to avoid damage to the wires);
3. Use clean and wet towel to wipe off the dust on the blades (Note: Do
NOT wash by water directly);
4. After cleaning, close the cover back on in reverse according to the steps
of disassembly
Address:Baoshanqu Shuangchenglu 803long 11hao 1602A-1609shi
Shanghai
Imported to AUS: SIHAO PTY LTD. 1 ROKEVA STREETEASTWOOD
NSW 2122 Australia
Imported to USA: Sanven Technology Ltd. Suite 250, 9166 Anaheim
Place, Rancho Cucamonga, CA 91730
Wire

- 10 -
REP
UK
Pooledas Group Ltd
Unit 5 Albert Edward House, The Pavilions
Preston, United Kingdom
REP
EC
SHUNSHUN GmbH
Römeräcker 9 Z2021, 76351
Linkenheim-Hochstetten, Germany
Made In China


- 2 -
Assistance technique et certificat de garantie électronique www.vevor.com/support
VENTILATEUR DE SOL PUISSANT
MODÈLE : D13
We continue to be committed to provide you tools with competitive price.
"Save Half", "Half Price" or any other similar expressions used by us only represents an
estimate of savings you might benefit from buying certain tools with us compared to the major
top brands and does not necessarily mean to cover all categories of tools offered by us. You
are kindly reminded to verify carefully when you are placing an order with us if you are
actually saving half in comparison with the top major brands.

- 1 -
MODÈLE : D13
Have product questions? Need technical support? Please feel free to
contact us:
Technical Support and E-Warranty Certificate
www.vevor.com/support
NEED HELP? CONTACT US!
This is the original instruction, please read all manual instructions
carefully before operating. VEVOR reserves a clear interpretation of our
user manual. The appearance of the product shall be subject to the
product you received. Please forgive us that we won't inform you again if
there are any technology or software updates on our product.
POWERFUL FLOOR FAN
- 2 -
Avertissement : Pour réduire le risque de blessure, l'utilisateur
doit lire attentivement le manuel d'instructions.
Cet appareil est conforme à la partie 15 des règles FCC.
L'exploitation est soumise aux deux conditions suivantes
conditions : (1) Cet appareil ne doit pas provoquer
d'interférences nuisibles, et (2) cet appareil doit accepter toute
interférence reçue, y compris les interférences susceptibles de
provoquer un fonctionnement indésirable.
Ce produit est soumis aux dispositions de la directive
européenne 2012/19/CE. Le symbole représentant une
poubelle barrée indique que le produit nécessite une collecte
sélective des déchets dans l'Union européenne. Ceci
s'applique au produit et à tous les accessoires marqués de ce
symbole. Les produits marqués comme tels ne peuvent pas
être jetés avec les ordures ménagères normales, mais doivent
être déposés dans un point de collecte pour le recyclage des
appareils électriques et électroniques.
SPECIFICATION
modèle du
produit
D1 3
Taille du produit
21 0*100* 2 6 8mm
Capacité de la
batterie
3,7 V 4 0000 mAh ( 148 Wh )
Puissance
nominale
15W
Entrée TYPE-C
5V=3A 9V=2A 12V=1,5A
( compatible avec PD3.0+AFC+FCP+SFCP)
Sortie TYPE-C
5V=3A 9V=2A 12V=1,5A
( compatible avec QC3.0+PD3.0+AFC+FCP+SCP)
- 3 -
Sortie USB -A
5V=3A 9V=2A 12V=1,5A
( compatible avec QC3.0+AFC+FCP+SFCP+SCP
Vie de la batterie
Ventilateur : vitesse 1 ≈ 136H , vitesse 2 ≈52H ,
vitesse 3 ≈ 24H , vitesse 4 ≈15H
Ventilateur + Oscillant10n : vitesse 1 ≈ 62 heures
vitesse 2 ≈ 36H vitesse 3 ≈ 20H , vitesse 4 ≈ 13H
Éclairage LED : niveau 1≈ 20H , niveau 2 ≈220H ,
niveau 3 ≈50H , niveau 4 ≈50H , niveau 5 ≈48H
Ventilateur+LED : environ 12H au plus haut niveau
Ventilateur+LED+Oscillation : environ 1 1H au niveau
le plus élevé
Valeur lumineuse
des LED
1 :150 LM Niveau 2:150 LM Niveau 3 :400 LM
Niveau 4:400 LM Niveau 5 : 500 LM
Distance de
soufflage d'air
16,4 pieds (5 mètres )
PRODUCT STRUCTURE
Structure globale _ _

- 4 -

- 5 -

- 6 -
SECURITY & WARNINGS
(1) Veuillez ne pas placer le produit au soleil, à haute température ou à
proximité du feu , etc.
(2) Veuillez ne pas placer le produit dans un environnement humide ;
(3) Veuillez ne pas jeter le produit ou l'approcher du feu , pour éviter un
incendie , etc. ;
(4) Veuillez ne pas démonter, ouvrir, couper ou percer le produit ;
(5) Veuillez arrêter immédiatement d'utiliser le produit si des anomalies se
produisent pendant
(6) Lorsque vous n'utilisez pas le produit pendant une longue période,
veuillez le charger tous les 2 à 3 mois, afin d' éviter d'endommager la
batterie en raison d' un stockage à long terme .
USING INSTRUCTIONS
Panneau de contrôle:

- 7 -
(1) Appuyez brièvement sur le bouton « », le ventilateur basculera
entre la vitesse 1/2/3/4/OFF à tour de rôle , appuyez longuement sur ce
bouton pour éteignez-le au niveau du ventilateur ;
(2) Lorsque le ventilateur fonctionne , appuyez brièvement sur le bouton
« » bouton, le ventilateur oscillera entre 90 °/45 °/ OFF en tourne,
appuyez longuement sur le bouton pour désactiver la fonction
d'oscillation ;
(3) Appuyez brièvement sur le bouton « », les lumières LED
basculeront entre 1/2/3/OFF ; appuyez longuement sur ce bouton pour
éteignez les lumières LED ;
(4) Mode veille : appuyez brièvement sur le bouton « » pour
activer/désactiver le mode veille ;
(5) Minuterie : appuyez brièvement sur le bouton " " , la minuterie
basculera entre 1H/2H/4H/8H/ OFF à tour de rôle , appuyez longuement
sur le bouton pour annuler la minuterie ;
(6) Faible consommation d'énergie : dans tous les cas, appuyez
simultanément sur le bouton « » et le bouton « Annuler » de la
télécommande pendant 3 secondes. le ventilateur s'éteindra et entrera
dans une faible consommation d'énergie mode. Pendant ce temps, la
télécommande n'est pas valide. Appuyez sur la touche Appuyez à nouveau
sur le bouton « » pour allumer la machine, récupérer le mode standard
et activer la télécommande. (Si vous ne l' utilisez pas pendant une longue
période. Veuillez choisir le mode de faible consommation d'énergie pour le
stockage, en évitant de manquer d' énergie et d'endommager la batterie.)
Veuillez noter que le mode veille consiste à éteindre les indicateurs. Après
avoir éteint les indicateurs , redémarrez la machine ou la sortie/entrée , les

- 8 -
indicateurs se rallumeront.
Comment utiliser la télécommande :
(1) Veuillez retirer la feuille isolante de la télécommande pour la mettre
sous tension avant d'utiliser la télécommande.
(2) Activer la télécommande : le produit est à faible mode d'alimentation à
la livraison, la télécommande n'est pas valide. Appuyez sur le bouton :
« » du panneau de commande pour allumer le ventilateur et activer la
télécommande ;
(3) Réglage de la vitesse : appuyez sur le bouton " + » bouton pour
basculer entre les vitesses 1/2/3/4 tours ; appuyez sur le bouton « - »
pour régler la vitesse 4/3/2/1 tours ,
- 9 -
(4) Distance à distance : 16,4 pieds (5 mètres) ;
(5) Le produit émettra un son « di » lors de la réception des commandes de
la télécommande.
Remarque La télécommande n'est pas valide à la livraison, appuyez sur le
bouton de vitesse pour allumer la machine avant de l'utiliser, et la
télécommande est activée
4. Fonction de charge/batterie externe Ports d'entrée/sortie :
( 1 ) Ouvrez le couvercle en silicone avant de charger.
( 2 ) Temps de charge : 9 à 10 heures (testé avec un chargeur de 22,5 W
compatible avec le protocole PD ; si l'équipement de charge est inférieur à
22,5 W , le temps de charge sera un peu plus long.)
( 3 ) Branchez et le ventilateur commence à se charger automatiquement.
Les indicateurs de batterie sur le panneau de commande clignotent
pendant la charge, les 4 indicateurs de batterie resteront allumés une fois
complètement chargés.
( 4 ) Puissance Fonctionnalité bancaire : il peut charger d'autres appareils
via le cordon de chargement . Lors de la connexion à d'autres appareils,
- 10 -
veuillez choisir la puissance qui se situe dans la plage des paramètres,
sinon cela pourrait endommager le ventilateur .
Note. Certains téléphones mobiles ne peuvent pas activer
automatiquement la fonction de banque d'alimentation après la connexion,
appuyez longuement sur le bouton « » pour activer manuellement la
fonction de banque d'alimentation ; le port de sortie USB n'est pas
compatible avec certains téléphones mobiles pour une charge rapide !
Comment nettoyer les lames :
Méthode de nettoyage des pales du ventilateur :
1. Éteignez le ventilateur, placez le ventilateur à plat à l'arrière, retirez les 8
vis
(indiqué par des flèches) avec un tournevis ;
2. Ouvrez le capot arrière de droite à gauche, voir l'image ci-dessus. (Note:
Il y a des fils électriques à l'intérieur sur la gauche, donc lorsque vous
ouvrez le capot arrière,
veuillez faire attention à éviter d'endommager les fils);
3. Utilisez une serviette propre et humide pour essuyer la poussière sur les
lames (Remarque : Ne
Wire

- 11 -
NE PAS laver directement à l'eau);
4. Après le nettoyage, refermez le couvercle à l'envers en suivant les
étapes
de démontage
Adresse : Baoshanqu Shuangchenglu 803long 11hao 1602A-1609shi
Shanghai
Importé en Australie : SIHAO PTY LTD. 1 ROKEVA STREETASTWOOD
NSW 2122 Australie
Importé aux États-Unis : Sanven Technology Ltd. Suite 250, 9166
Anaheim Place, Rancho Cucamonga, CA 91730
REP
UK
Pooledas Group Ltd
Unit 5 Albert Edward House, The Pavilions
Preston, United Kingdom
REP
EC
SHUNSHUN GmbH
Römeräcker 9 Z2021, 76351
Linkenheim-Hochstetten, Germany
Fabriqué en Chine

- 12 -


- 2 -
Technischer Support und E-Garantiezertifikat www.vevor.com/support
LEISTUNGSSTARKER
BODENVENTILATOR
MODELL: D13
We continue to be committed to provide you tools with competitive price.
"Save Half", "Half Price" or any other similar expressions used by us only represents an
estimate of savings you might benefit from buying certain tools with us compared to the major
top brands and does not necessarily mean to cover all categories of tools offered by us. You
are kindly reminded to verify carefully when you are placing an order with us if you are
actually saving half in comparison with the top major brands.

- 3 -

- 1 -
MODELL: D13
Have product questions? Need technical support? Please feel free to
contact us:
Technical Support and E-Warranty Certificate
www.vevor.com/support
NEED HELP? CONTACT US!
This is the original instruction, please read all manual instructions
carefully before operating. VEVOR reserves a clear interpretation of our
user manual. The appearance of the product shall be subject to the
product you received. Please forgive us that we won't inform you again if
there are any technology or software updates on our product.
POWERFUL FLOOR FAN
- 2 -
Warnung: Um das Verletzungsrisiko zu verringern, muss der
Benutzer die Bedienungsanleitung sorgfältig lesen.
Dieses Gerät entspricht Teil 15 der FCC-Bestimmungen. Der
Betrieb unterliegt den folgenden zwei Bedingungen: (1) Dieses
Gerät darf keine schädlichen Störungen verursachen und (2)
dieses Gerät muss alle empfangenen Störungen akzeptieren,
einschließlich Störungen, die einen unerwünschten Betrieb
verursachen können.
Dieses Produkt unterliegt den Bestimmungen der
europäischen Richtlinie 2012/19/EG. Das Symbol einer
durchgestrichenen Mülltonne weist darauf hin, dass das
Produkt in der Europäischen Union einer getrennten
Müllsammlung bedarf. Dies gilt für das Produkt und alle
Zubehörteile, die mit diesem Symbol gekennzeichnet sind. Als
solche gekennzeichnete Produkte dürfen nicht über den
normalen Hausmüll entsorgt werden, sondern müssen an
einer Sammelstelle für das Recycling von Elektro- und
Elektronikgeräten abgegeben werden.
SPECIFICATION
Produktmodell
D1 3
Produktgröße
21 0*100* 2 6 8mm
Batteriekapazität
3,7 V 4.0000 mAh ( 148 Wh )
Nennleistung
15W
TYPE-C-Eingang
5V=3A 9V=2A 12V=1,5A
( kompatibel mit PD3.0+AFC+FCP+SFCP)
TYPE-C-Ausgang
5V=3A 9V=2A 12V=1,5A
( kompatibel mit QC3.0+PD3.0+AFC+FCP+SCP)
- 3 -
USB -A- Ausgang
5V=3A 9V=2A 12V=1,5A
( kompatibel mit QC3.0+AFC+FCP+SFCP+SCP
Batterielebensdauer
Lüfter: Geschwindigkeit 1 ≈ 136H , Geschwindigkeit
2 ≈52H , Geschwindigkeit 3 ≈ 24H , Geschwindigkeit
4 ≈15H
Lüfter + Oscillat10n : Geschwindigkeit 1 ≈ 62 H
Geschwindigkeit 2 ≈ 36H Geschwindigkeit 3 ≈ 20H ,
Geschwindigkeit 4 ≈ 13H
LED-Beleuchtung: Stufe 1≈20 Std. , Stufe 2 ≈220
Std. , Stufe 3 ≈50 Std. , Stufe 4 ≈50 Std. , Stufe 5
≈48 Std
Lüfter + LED: ca. 12 Stunden auf höchster Stufe
Lüfter+LED+Oszillation: ca. 1 1H auf höchster Stufe
LED-Lumenwert
Level 1:150 LM Level 2 :150 LM Level 3 :400 LM
Stufe 4:400 LM Stufe 5 : 500 LM
Luftblasentfernung
16,4 Fuß (5 Meter )
PRODUCT STRUCTURE
Gesamtstruktur _ _ _

- 4 -

- 5 -

- 6 -
SECURITY & WARNINGS
(1) Bitte platzieren Sie das Produkt nicht in der Sonne, bei hohen
Temperaturen oder in der Nähe von Feuer usw .;
(2) Bitte stellen Sie das Produkt nicht in eine feuchte Umgebung .
3 ) Bitte werfen Sie das Produkt nicht und nähern Sie es nicht dem Feuer ,
um Brandkatastrophen usw. zu vermeiden .
(4) Bitte zerlegen, öffnen, schneiden oder durchstechen Sie das Produkt
nicht ;
(5) Bitte stellen Sie die Verwendung des Produkts sofort ein, wenn dabei
Unregelmäßigkeiten auftreten
(6) Wenn Sie das Produkt längere Zeit nicht verwenden, laden Sie es bitte
alle 2 bis 3 Monate auf, um Schäden am Akku durch längere Lagerung zu
vermeiden .
USING INSTRUCTIONS
Bedienfeld:
- 7 -
(1) Drücken Sie kurz die Taste „ “, der Ventilator wechselt
abwechselnd zwischen den Geschwindigkeiten 1/2/3/4/AUS . Drücken Sie
diese Taste lange, um Schalten Sie den Ventilator aus .
(2) Wenn der Lüfter läuft , drücken Sie kurz die Taste „ “ . Wenn Sie
die Taste drücken, schwingt der Ventilator innerhalb von 90 °/45 °/ AUS
Umdrehungen, langes Drücken der Taste , um die Oszillationsfunktion
auszuschalten ;
(3) Drücken Sie kurz die Taste „ “, die LED-Leuchten wechseln
zwischen 1/2/3/AUS; Drücken Sie diese Taste lange, um schalten Sie die
LED-Leuchten aus ;
(4) Schlafmodus : Drücken Sie kurz die Taste „ , um den Schlafmodus
ein-/auszuschalten ;
(5) Timer: Drücken Sie kurz die Taste „ ”Taste , der Timer wechselt
abwechselnd zwischen 1H/2H/4H/8H/ AUS , drücken Sie die Taste lange ,
um Timer abbrechen;
(6) Geringer Stromverbrauch: Drücken Sie in jedem Fall gleichzeitig die
Tasten „ “ und die „Abbrechen“-Taste auf der Fernbedienung 3
Sekunden lang gedrückt Der Lüfter schaltet sich aus und der

- 8 -
Stromverbrauch sinkt Modus. Inzwischen ist die Fernbedienung ungültig.
Drücken Sie die Taste Drücken Sie die Taste „ “ erneut, um das Gerät
einzuschalten, den Standardmodus wiederherzustellen und die
Fernbedienung zu aktivieren. (Wenn Sie es längere Zeit nicht verwenden,
wählen Sie bitte für die Lagerung den Modus „Niedriger Stromverbrauch “ ,
um zu vermeiden, dass Ihnen der Strom ausgeht und der Akku beschädigt
wird .)
Bitte beachten Sie, dass im Schlafmodus die Anzeigen ausgeschaltet
werden . Nachdem Sie die Anzeigen ausgeschaltet haben , starten Sie die
Maschine oder die Ausgabe/Eingabe neu . Die Anzeigen leuchten wieder
auf.
So verwenden Sie die Fernbedienung:
(1) Bitte nehmen Sie die Isolierfolie in der Fernbedienung heraus, um sie
einzuschalten , bevor Sie die Fernbedienung verwenden
(2) Aktivieren Sie die Fernbedienung: Das Produkt ist eingeschaltet bei
- 9 -
niedrig Im Auslieferungszustand ist die Fernbedienung ungültig. Drücken
Sie die Taste „ “ auf dem Bedienfeld, um den Ventilator einzuschalten
und die Fernbedienung zu aktivieren.
(3) Geschwindigkeitseinstellung : Drücken Sie die „Taste „ + “ Taste
zum Umschalten zwischen Geschwindigkeit 1 / 2 / 3 / 4 abwechselnd ;
Drücken Sie die Taste „ - “ , um die Geschwindigkeit in 4/3/2/1
Umdrehungen einzustellen.
(4) Fernentfernung : 16,4 Fuß (5 Meter);
(5) Das Produkt gibt ein „di“-Geräusch von sich, wenn es Befehle von der
Fernbedienung empfängt.
Hinweis Die Fernbedienung ist im Auslieferungszustand ungültig. Drücken
Sie vor der Verwendung die Geschwindigkeitstaste, um die Maschine
einzuschalten, und die Fernbedienung wird aktiviert
4. Lade-/Powerbank-Funktion Eingabe-/Ausgabeanschlüsse:
- 10 -
( 1 ) Öffnen Sie die Silikonhülle vor dem Laden.
( 2 ) Ladezeit: 9–10 Stunden (getestet mit 22,5 W , kompatibel mit
PD-Protokoll-Ladegerät; wenn das Ladegerät weniger als 22,5 W hat , ist
die Ladezeit etwas länger.)
( 3 ) Schließen Sie das Gerät an und der Ventilator beginnt automatisch
aufzuladen. Die Batterieanzeigen auf dem Bedienfeld blinken während des
Ladevorgangs, die 4 Batterieanzeigen leuchten nach dem vollständigen
Laden dauerhaft .
( 4 ) Macht Bank -Funktion: Es können andere Geräte über das Ladekabel
aufgeladen werden . Wenn Sie andere Geräte anschließen, wählen Sie
bitte die Leistung, die innerhalb des Parameterbereichs liegt, da es sonst
zu Schäden am Lüfter kommen kann .
Notiz. Einige Mobiltelefone können die Powerbank-Funktion nach dem
Anschließen nicht automatisch aktivieren. Drücken Sie lange auf die Taste
„ “ , um die Powerbank-Funktion manuell zu aktivieren. Der USB -
Ausgangsanschluss ist mit einigen Mobiltelefonen zum Schnellladen nicht
kompatibel !
So reinigen Sie die Klingen:
Wire
- 11 -
Reinigungsmethode des Lüfterflügels:
1. Schalten Sie den Lüfter aus, legen Sie ihn flach auf die Rückseite und
entfernen Sie die 8 Schrauben
(durch Pfeile gekennzeichnet) mit Schraubenzieher;
2. Öffnen Sie die hintere Abdeckung von rechts nach links, siehe Abbildung
oben. (Notiz:
Auf der linken Innenseite befinden sich elektrische Kabel. Wenn Sie also
die hintere Abdeckung öffnen,
Bitte seien Sie vorsichtig, um Schäden an den Drähten zu vermeiden.
3. Wischen Sie den Staub von den Klingen mit einem sauberen und
feuchten Tuch ab (Hinweis: Do
NICHT direkt mit Wasser waschen);
4. Schließen Sie nach der Reinigung den Deckel wieder in umgekehrter
Reihenfolge wie in den Schritten beschrieben
der Demontage
Adresse: Baoshanqu Shuangchenglu 803long 11hao 1602A-1609shi
Shanghai
Importiert nach AUS: SIHAO PTY LTD. 1 ROKEVA STREETEASTWOOD
NSW 2122 Australien
In die USA importiert: Sanven Technology Ltd. Suite 250, 9166 Anaheim
Place, Rancho Cucamonga, CA 91730
REP
UK
Pooledas Group Ltd
Unit 5 Albert Edward House, The Pavilions
Preston, United Kingdom
REP
EC
SHUNSHUN GmbH
Römeräcker 9 Z2021, 76351
Linkenheim-Hochstetten, Germany
In China hergestellt

- 12 -


- 2 -
Supporto tecnico e certificato di garanzia elettronica www.vevor.com/support
POTENTE VENTILATORE DA PAVIMENTO
MODELLO: D13
We continue to be committed to provide you tools with competitive price.
"Save Half", "Half Price" or any other similar expressions used by us only represents an
estimate of savings you might benefit from buying certain tools with us compared to the major
top brands and does not necessarily mean to cover all categories of tools offered by us. You
are kindly reminded to verify carefully when you are placing an order with us if you are
actually saving half in comparison with the top major brands.

- 1 -
MODELLO: D13
Have product questions? Need technical support? Please feel free to
contact us:
Technical Support and E-Warranty Certificate
www.vevor.com/support
NEED HELP? CONTACT US!
This is the original instruction, please read all manual instructions
carefully before operating. VEVOR reserves a clear interpretation of our
user manual. The appearance of the product shall be subject to the
product you received. Please forgive us that we won't inform you again if
there are any technology or software updates on our product.
POWERFUL FLOOR FAN

- 2 -
Avvertenza: per ridurre il rischio di lesioni, l'utente deve
leggere attentamente il manuale di istruzioni.
Questo dispositivo è conforme alla Parte 15 delle norme FCC.
Il funzionamento è soggetto ai due seguenti condizioni: (1)
Questo dispositivo non può causare interferenze dannose e
(2) questo dispositivo deve accettare qualsiasi interferenza
ricevuta, comprese le interferenze che potrebbero causare un
funzionamento indesiderato.
Questo prodotto è soggetto alle disposizioni della Direttiva
Europea 2012/19/CE. Il simbolo del bidone della spazzatura
barrato indica che nell'Unione Europea il prodotto richiede la
raccolta differenziata dei rifiuti. Ciò vale per il prodotto e tutti gli
accessori contrassegnati da questo simbolo. I prodotti
contrassegnati come tali non possono essere smaltiti con i
normali rifiuti domestici, ma devono essere portati in un punto
di raccolta per il riciclaggio di dispositivi elettrici ed elettronici.
SPECIFICATION
Modello di
prodotto
D13 _
Taglia del
prodotto
21 0*100* 2 6 8 mm
Capacità della
batteria
3,7 V 4 0000 mAh ( 148 Wh )
Potenza
nominale
15 W
Ingresso TIPO C
5V=3A 9V=2A 12V=1,5A
( compatibile con PD3.0+AFC+FCP+SFCP)
Uscita TIPO C
5V=3A 9V=2A 12V=1,5A
- 3 -
( compatibile con QC3.0+PD3.0+AFC+FCP+SCP)
Uscita USB -A
5V=3A 9V=2A 12V=1,5A
( compatibile con QC3.0+AFC+FCP+SFCP+SCP
Durata della
batteria
Ventola: velocità 1 ≈ 136H , velocità 2 ≈52H , velocità
3 ≈ 24H , velocità 4 ≈15H
Ventola + Oscillat10n : velocità 1 ≈ 62 H velocità 2 ≈
36H velocità 3 ≈ 20H , velocità 4 ≈ 13H
Illuminazione a LED: livello 1≈ 20H , livello 2 ≈220H ,
livello 3 ≈50H , livello 4 ≈50H , livello 5 ≈48H
Ventola+LED: circa 12H al massimo livello
Ventola+LED+Oscillazione: circa 1 1H al massimo
livello
Valore lumen
LED
Livello 1:150 LM Livello 2:150 LM Livello 3 :400 LM
Livello 4:400 LM Livello 5 : 500 LM
Distanza del
soffio d'aria
16,4 piedi (5 metri )
PRODUCT STRUCTURE
Struttura complessiva _ _

- 4 -

- 5 -

- 6 -
SECURITY & WARNINGS
(1) Si prega di non posizionare il prodotto al sole, ad alte temperature o
vicino al fuoco , ecc .;
(2) Non collocare il prodotto in un ambiente umido;
(3) Si prega di non gettare il prodotto o avvicinarlo al fuoco , per evitare
disastri dovuti a incendio, ecc .;
(4) Non smontare , aprire, tagliare o forare il prodotto;
(5) Si prega di interrompere immediatamente l'uso del prodotto se si
verificano anomalie durante
(6) Quando non si utilizza il prodotto per un lungo periodo, caricarlo ogni 2
- 3 mesi, in modo da evitare danni alla batteria dovuti alla conservazione a
lungo termine .
USING INSTRUCTIONS
Pannello di controllo:

- 7 -
(1) Premere brevemente il pulsante " ", la ventola passerà tra la
velocità 1/2/3/4/OFF a turno , premere a lungo questo pulsante per spegni
il ventilatore ;
(2) Quando la ventola è in funzione , premere brevemente il pulsante "
" pulsante, la ventola oscillerà entro 90°/45°/ OFF in gira, premere a
lungo il pulsante per disattivare la funzione di oscillazione ;
(3) Premere brevemente il pulsante “ ”, le luci LED passeranno tra
1/2/3/OFF; premere a lungo questo pulsante per spegnere le luci LED;
(4) Modalità sospensione : premere brevemente il pulsante “ per
attivare/disattivare la modalità sospensione ;
(5) Timer: premere brevemente il pulsante " " , il timer passerà tra
1H/2H/4H/8H/ OFF a turno , premere a lungo il pulsante per annullare il
timer;
(6) Basso consumo energetico: in ogni caso, premere
contemporaneamente il pulsante “ ” e il pulsante "Annulla" sul
telecomando per 3 secondi la ventola si spegnerà e entrerà in un basso
consumo energetico modalità. Nel frattempo, il telecomando non è valido.
Premere il tasto Premere nuovamente il pulsante “ ” per accendere la
macchina, ripristinare la modalità standard e attivare il telecomando. (Se
non lo usi per un lungo periodo, scegli la modalità Basso consumo
energetico per la conservazione , evitando di rimanere senza energia e di
causare danni alla batteria .)
Tieni presente che la modalità Sleep consiste nello spegnimento degli
indicatori. Dopo aver spento gli indicatori , riavviare la macchina o
l'output/input , gli indicatori si riaccenderanno.
- 8 -
Come utilizzare il telecomando:
(1) Rimuovere il foglio isolante dal telecomando per accenderlo prima di
utilizzare il telecomando
(2) A ttivare il telecomando: il prodotto è A Basso modalità di alimentazione
al momento della consegna, il telecomando non è valido. Premere il
pulsante :“ ” sul pannello di controllo per accendere il ventilatore e
attivare il telecomando;
(3) Regolazione della velocità : premere il pulsante " + " pulsante per
alternare tra velocità 1/2/3/4 ; _ premere il pulsante “ - ” per regolare la
velocità tra 4/3/2/1 giri ,
(4) Distanza remota : 16,4 piedi (5 metri);
- 9 -
(5) Il prodotto emetterà un suono "di" quando riceverà ordini dal
telecomando.
Nota Il telecomando non è valido al momento della consegna, premere il
pulsante della velocità per accendere la macchina prima dell'uso e il
telecomando viene attivato
4. Funzionalità di ricarica/power bank Porte di ingresso/uscita:
( 1 ) Aprire la copertura in silicone prima della ricarica.
( 2 ) Tempo di ricarica: 9 - 10 ore (testato con un caricabatterie da 22,5 W
compatibile con il protocollo PD; se l'apparecchiatura di ricarica è inferiore
a 22,5 W , il tempo di ricarica sarà leggermente più lungo.)
( 3 ) Collegalo e la ventola inizierà a caricarsi automaticamente. Gli
indicatori della batteria sul pannello di controllo lampeggiano durante la
ricarica, i 4 indicatori della batteria rimarranno accesi una volta completata
la carica.
( 4 ) Potenza caratteristica banca : può caricare altri dispositivi tramite il
cavo di ricarica . Quando ci si collega ad altri dispositivi, scegliere la
potenza che rientra nell'intervallo dei parametri, altrimenti potrebbe
causare danni alla ventola .
- 10 -
Nota. Alcuni telefoni cellulari non possono attivare automaticamente la
funzione power bank dopo la connessione, premere a lungo il pulsante
“ ” per attivare manualmente la funzione power bank; la porta di uscita
U SB non è compatibile con alcuni telefoni cellulari per la ricarica rapida !
Come pulire le lame:
Metodo di pulizia della pala del ventilatore:
1. Spegnere la ventola, posizionare la ventola sul retro, estrarre le 8 viti
(indicato dalle frecce) mediante cacciavite;
2. Aprire la cover posteriore da destra a sinistra, vedere l'immagine sopra.
(Nota:
Ci sono dei cavi elettrici all'interno a sinistra, quindi quando apri la cover
posteriore,
fare attenzione a evitare danni ai cavi);
3. Utilizzare un panno pulito e umido per rimuovere la polvere dalle lame
(Nota: non farlo
NON lavare direttamente con acqua);
4. Dopo la pulizia, richiudere il coperchio al contrario seguendo i passaggi
di smontaggio
Wire
- 11 -
Indirizzo: Baoshanqu Shuangchenglu 803long 11hao 1602A-1609shi
Shanghai
Importato in Australia: SIHAO PTY LTD. 1 ROKEVA
STREETEASTWOOD NSW 2122 Australia
Importato negli Stati Uniti: Sanven Technology Ltd. Suite 250, 9166
Anaheim Place, Rancho Cucamonga, CA 91730
REP
UK
Pooledas Group Ltd
Unit 5 Albert Edward House, The Pavilions
Preston, United Kingdom
REP
EC
SHUNSHUN GmbH
Römeräcker 9 Z2021, 76351
Linkenheim-Hochstetten, Germany
Made in China

- 12 -


- 2 -
Soporte técnico y certificado de garantía electrónica www.vevor.com/support
POTENTE VENTILADOR DE PISO
MODELO: D13
We continue to be committed to provide you tools with competitive price.
"Save Half", "Half Price" or any other similar expressions used by us only represents an
estimate of savings you might benefit from buying certain tools with us compared to the major
top brands and does not necessarily mean to cover all categories of tools offered by us. You
are kindly reminded to verify carefully when you are placing an order with us if you are
actually saving half in comparison with the top major brands.

- 1 -
MODELO: D13
Have product questions? Need technical support? Please feel free to
contact us:
Technical Support and E-Warranty Certificate
www.vevor.com/support
NEED HELP? CONTACT US!
This is the original instruction, please read all manual instructions
carefully before operating. VEVOR reserves a clear interpretation of our
user manual. The appearance of the product shall be subject to the
product you received. Please forgive us that we won't inform you again if
there are any technology or software updates on our product.
POWERFUL FLOOR FAN
- 2 -
Advertencia: para reducir el riesgo de lesiones, el usuario
debe leer atentamente el manual de instrucciones.
Este dispositivo cumple con la Parte 15 de las normas de la
FCC. El funcionamiento está sujeto a las siguientes dos
condiciones: (1) Este dispositivo no puede causar
interferencias dañinas y (2) este dispositivo debe aceptar
cualquier interferencia recibida, incluidas las interferencias
que puedan causar un funcionamiento no deseado.
Este producto está sujeto a las disposiciones de la Directiva
Europea 2012/19/CE. El símbolo que muestra un contenedor
con ruedas tachado indica que el producto requiere recogida
selectiva de basura en la Unión Europea. Esto se aplica al
producto y a todos los accesorios marcados con este símbolo.
Los productos marcados como tales no podrán desecharse
junto con la basura doméstica normal, sino que deberán
llevarse a un punto de recogida para el reciclaje de aparatos
eléctricos y electrónicos.
SPECIFICATION
Modelo del
Producto
D1 3
Tamaño del
producto
21 0*100* 2 6 8mm
Capacidad de la
batería
3,7 V 4 0000 mAh ( 148 Wh )
Potencia nominal
15W
Entrada TIPO C
5V=3A 9V=2A 12V=1.5A
( compatible con PD3.0+AFC+FCP+SFCP)
Salida TIPO C
5V=3A 9V=2A 12V=1.5A
( compatible con QC3.0+PD3.0+AFC+FCP+SCP)

- 3 -
Salida USB -A
5V=3A 9V=2A 12V=1.5A
( compatible con QC3.0+AFC+FCP+SFCP+SCP
Duración de la
batería
Ventilador: velocidad 1 ≈ 136H , velocidad 2 ≈52H ,
velocidad 3 ≈ 24H , velocidad 4 ≈15H
Ventilador + Oscilación10n : velocidad 1 ≈ 62 horas
velocidad 2 ≈ 36H velocidad 3 ≈ 20H , velocidad 4 ≈
13H
Iluminación LED: nivel 1≈ 20H , nivel 2 ≈220H , nivel
3 ≈50H , nivel 4 ≈50H , nivel 5 ≈48H
Ventilador+LED: aproximadamente 12H en el nivel
más alto
Ventilador+LED+Oscilación: aproximadamente 1 1H
en el nivel más alto
Valor de lúmenes
LED
: 150 LM Nivel 2:150 LM Nivel 3: 400 LM
Nivel 4:400 LM Nivel 5 : 500 LM
Distancia de
soplado de aire
16,4 pies (5 metros )
PRODUCT STRUCTURE
Estructura general _ _

- 4 -
- 5 -

- 6 -
SECURITY & WARNINGS
(1) No coloque el producto al sol, a altas temperaturas, ni cerca del fuego ,
etc .;
(2) No coloque el producto en un ambiente húmedo;
( 3) No arroje el producto ni lo acerque al fuego , para evitar un incendio ,
etc .;
(4) No desmonte , abra, corte ni perfore el producto;
(5) Deje de usar el producto inmediatamente si ocurren anomalías durante
(6) Cuando no utilice el producto durante un período prolongado, cárguelo
cada 2 o 3 meses para evitar daños a la batería debido al almacenamiento
prolongado .
USING INSTRUCTIONS
Panel de control:
- 7 -
(1) Presione brevemente el botón " ", el ventilador cambiará entre la
velocidad 1/2/3/4/OFF por turnos , presione prolongadamente este botón
para apágalo en el ventilador ;
(2) Cuando el ventilador esté funcionando , presione brevemente el botón "
" botón, el ventilador oscilará dentro de 90 °/45 °/ OFF en gira,
mantenga presionado el botón para apagar la función de oscilación ;
(3) Presione brevemente el botón " ", las luces LED cambiarán entre
1/2/3/APAGADO; mantenga presionado este botón para apague las luces
LED;
(4) Modo de suspensión : presione brevemente el botón “ , encenderá
/apagará el modo de suspensión ;
(5) Temporizador: presione brevemente el botón " " , el temporizador
cambiará entre 1H/2H/4H/8H/ OFF por turnos , mantenga presionado el
botón para cancelar el temporizador;
(6) Bajo consumo de energía: en cualquier caso, presione
simultáneamente el botón " " y el botón “Cancelar” en el control remoto
durante 3 segundos el El ventilador se apagará y entrará en bajo consumo
de energía. modo. Mientras tanto, el control remoto no es válido. Presione
el botón Botón “ ” nuevamente para encender la máquina y recuperar
el modo estándar y activar el control remoto. (Si no lo utiliza durante
mucho tiempo, elija el modo de bajo consumo de energía para el
almacenamiento, evitando quedarse sin energía y causar daños a la
batería).
Tenga en cuenta que el modo de suspensión es para apagar los
indicadores. Después de apagar los indicadores , reinicie la máquina o la
salida/entrada , los indicadores se encenderán nuevamente.
- 8 -
Cómo utilizar el control remoto:
(1) Retire la lámina aislante del control remoto para encenderlo antes de
usarlo .
(2) Active el control remoto: el producto está en bajo Modo de energía
cuando se entrega, el control remoto no es válido. Presione el
botón :“ ” en el panel de control para encender el ventilador y activar el
control remoto;
(3) Ajuste de velocidad : presione el botón " + " botón para cambiar
entre velocidades 1 / 2 / 3 / 4 por turnos ; presione el botón " - " para
ajustar entre la velocidad 4/3/2/1 vueltas ,
(4) Distancia remota : 16,4 pies (5 metros);
- 9 -
(5) El producto emitirá un sonido "di" al recibir pedidos desde el control
remoto.
Nota El control remoto no es válido cuando se entrega, presione el botón
de velocidad para encender la máquina antes de usarla y el control remoto
se activará.
4. Función de carga/banco de energía Puertos de entrada/salida:
( 1 ) Abra la cubierta de silicona antes de cargar.
( 2 ) Tiempo de carga: 9 - 10 horas (probado con cargador de 22,5 W
compatible con protocolo PD; si el equipo de carga es inferior a 22,5 W , el
tiempo de carga será un poco más largo).
( 3 ) Enchúfelo y el ventilador comenzará a cargarse automáticamente.
Los indicadores de batería en el panel de control parpadean durante la
carga, los 4 indicadores de batería permanecerán fijos después de la
carga completa .
( 4 ) Poder Función de banco : puede cargar otros dispositivos a través del
cable de carga . Cuando se conecte con otros dispositivos, elija la potencia
que esté dentro del rango del parámetro, o podría causar daños al

- 10 -
ventilador .
Nota. Algunos teléfonos móviles no pueden activar la función de banco de
energía automáticamente después de conectarse; mantenga presionado
el botón " " para activar manualmente la función de banco de energía;
¡ El puerto de salida USB no es compatible con algunos teléfonos móviles
para carga rápida !
Cómo limpiar las cuchillas:
Método de limpieza de las aspas del ventilador:
1. Apague el ventilador, colóquelo en la parte posterior y retire los 8
tornillos.
(señalado por flechas) con un destornillador;
2. Abra la cubierta trasera de derecha a izquierda, vea la imagen de arriba.
(Nota:
Hay cables eléctricos dentro a la izquierda, así que cuando abres la
cubierta trasera,
tenga cuidado para evitar daños a los cables);
3. Utilice una toalla limpia y húmeda para limpiar el polvo de las cuchillas
(Nota: no
Wire
- 11 -
NO lavar con agua directamente);
4. Después de la limpieza, vuelva a cerrar la cubierta al revés según los
pasos
de desmontaje
Dirección: Baoshanqu Shuangchenglu 803long 11hao 1602A-1609shi
Shanghai
Importado a AUS: SIHAO PTY LTD. 1 ROKEVA STREET ASTWOOD
NSW 2122 Australia
Importado a EE. UU.: Sanven Technology Ltd. Suite 250, 9166 Anaheim
Place, Rancho Cucamonga, CA 91730
REP
UK
Pooledas Group Ltd
Unit 5 Albert Edward House, The Pavilions
Preston, United Kingdom
REP
EC
SHUNSHUN GmbH
Römeräcker 9 Z2021, 76351
Linkenheim-Hochstetten, Germany
Hecho en china

- 12 -


- 2 -
Wsparcie techniczne i certyfikat e-gwarancji www.vevor.com/support
MOCNY WENTYLATOR PODŁOGOWY
MODEL: D13
We continue to be committed to provide you tools with competitive price.
"Save Half", "Half Price" or any other similar expressions used by us only represents an
estimate of savings you might benefit from buying certain tools with us compared to the major
top brands and does not necessarily mean to cover all categories of tools offered by us. You
are kindly reminded to verify carefully when you are placing an order with us if you are
actually saving half in comparison with the top major brands.

- 1 -
MODEL: D13
Have product questions? Need technical support? Please feel free to
contact us:
Technical Support and E-Warranty Certificate
www.vevor.com/support
NEED HELP? CONTACT US!
This is the original instruction, please read all manual instructions
carefully before operating. VEVOR reserves a clear interpretation of our
user manual. The appearance of the product shall be subject to the
product you received. Please forgive us that we won't inform you again if
there are any technology or software updates on our product.
POWERFUL FLOOR FAN
- 2 -
Ostrzeżenie — aby zmniejszyć ryzyko obrażeń, użytkownik
musi uważnie przeczytać instrukcję obsługi.
To urządzenie jest zgodne z częścią 15 przepisów FCC.
Operacja podlega dwóm następującym zasadom
Warunki:(1)To urządzenie nie może powodować szkodliwych
zakłóceń oraz (2)to urządzenie musi akceptować wszelkie
odbierane zakłócenia, w tym zakłócenia, które mogą
powodować niepożądane działanie.
Ten produkt podlega przepisom Dyrektywy Europejskiej
2012/19/EC. Symbol przekreślonego kosza na śmieci
oznacza, że produkt wymaga selektywnej zbiórki śmieci na
terenie Unii Europejskiej. Dotyczy to produktu i wszystkich
akcesoriów oznaczonych tym symbolem. Produktów
oznaczonych jako takie nie można wyrzucać razem ze
zwykłymi odpadami domowymi, lecz należy je oddać do
punktu zbiórki w celu recyklingu urządzeń elektrycznych i
elektronicznych.
SPECIFICATION
Model produktu
D1 3
Rozmiar
produktu
21 0*100* 2 6 8mm
Pojemność
baterii
3,7 V 4 0000 mAh ( 148 Wh )
Moc
znamionowa
15W
Wejście typu C
5 V=3 A 9 V=2 A 12 V=1,5 A
( kompatybilny z PD3.0+AFC+FCP+SFCP)
Wyjście typu C
5 V=3 A 9 V=2 A 12 V=1,5 A
( kompatybilny z QC3.0+PD3.0+AFC+FCP+SCP)

- 3 -
Wyjście USB -A
5 V=3 A 9 V=2 A 12 V=1,5 A
( kompatybilny z QC3.0+AFC+FCP+SFCP+SCP
Żywotność
baterii
Wentylator: prędkość 1 ≈ 136H , prędkość 2 ≈52H ,
prędkość 3 ≈ 24H , prędkość 4 ≈15H
Wentylator + Oscylacja10n : prędkość 1 ≈ 62 godz
prędkość 2 ≈ 36H prędkość 3 ≈ 20H , prędkość 4 ≈
13H
Oświetlenie LED: poziom 1≈ 20H , poziom 2 ≈220H ,
poziom 3 ≈50H , poziom 4 ≈50H , poziom 5 ≈48H
Wentylator+LED: około 12H na najwyższym
poziomie
Wentylator+LED+Oscylacja: około 1 1H na
najwyższym poziomie
Wartość
lumenów diody
LED
1 :150 LM Poziom 2:150 LM Poziom 3 :400 LM
Poziom 4:400 LM Poziom 5 : 500 LM
Odległość
nadmuchu
powietrza
16,4 stopy (5 metrów )
PRODUCT STRUCTURE
Ogólna struktura _ _

- 4 -

- 5 -

- 6 -
SECURITY & WARNINGS
(1) Nie umieszczaj produktu na słońcu, w wysokiej temperaturze ani w
pobliżu ognia itp .;
(2) Proszę nie umieszczać produktu w wilgotnym środowisku;
( 3 ) Nie wrzucaj produktu ani nie zbliżaj go do ognia , aby uniknąć pożaru
itp .;
(4) Nie demontuj, nie otwieraj, nie przecinaj ani nie przebijaj produktu;
(5) Jeżeli w trakcie użytkowania wystąpią nieprawidłowości, należy
natychmiast zaprzestać korzystania z produktu
(6) Jeśli nie używasz produktu przez dłuższy czas, ładuj go co 2-3
miesiące , aby uniknąć uszkodzenia baterii w wyniku długotrwałego
przechowywania .
USING INSTRUCTIONS
Panel sterowania:

- 7 -
(1) Krótko naciśnij przycisk „ ”, wentylator będzie przełączał się na
zmianę z prędkością 1/2/3/4/OFF , naciśnij długo ten przycisk, aby wyłącz
go na wentylatorze ;
(2) Kiedy wentylator pracuje , naciśnij krótko przycisk „ ” przycisk,
wentylator będzie oscylował w zakresie 90°/45° / OFF obraca się, naciśnij
długo przycisk e , aby wyłączyć funkcję oscylacji ;
(3) Krótko naciśnij przycisk „ ”, diody LED będą przełączać się
pomiędzy 1/2/3/OFF; długo naciśnij ten przycisk, aby wyłącz światła LED ;
(4) Tryb uśpienia : krótkie naciśnięcie przycisku powoduje włączenie
/wyłączenie trybu uśpienia ;
(5) Timer: naciśnij krótko przycisk „ ” , timer będzie przełączał się
pomiędzy 1H/2H/4H/8H/ OFF , naciśnij długo przycisk e , aby anulować
timer;
(6) Niskie zużycie energii: w każdym przypadku naciśnij jednocześnie
przycisk „ ” i przycisk „Anuluj” na pilocie przez 3 sekundy wentylator
wyłączy się i przejdzie w stan niskiego zużycia energii tryb. Tymczasem
pilot jest nieprawidłowy. Naciśnij ponownie przycisk „ ”, aby włączyć
urządzenie i przywrócić tryb standardowy oraz aktywować pilota. (Jeśli nie
używasz go przez dłuższy czas. Wybierz tryb niskiego zużycia energii do
przechowywania, aby uniknąć wyczerpania się energii i uszkodzenia
baterii .)
Należy pamiętać, że tryb uśpienia polega na wyłączeniu wskaźników . Po
wyłączeniu wskaźników , ponownym uruchomieniu maszyny lub
wyjścia/wejścia , wskaźniki włączą się ponownie.
Jak korzystać z pilota:

- 8 -
(1) Przed użyciem pilota wyjmij warstwę izolacyjną z pilota, aby go włączyć
(2) Aktywuj pilota : produkt jest Na Niski tryb zasilania w momencie
dostawy, pilot jest nieprawidłowy. Naciśnij przycisk :„ ” na panelu
sterowania, aby włączyć wentylator i aktywować pilota;
(3) Regulacja prędkości : naciśnij przycisk „ + ” przycisk do
przełączania prędkości po kolei 1 / 2 / 3 / 4 ; naciśnij przycisk „ - ” , aby
ustawić prędkość 4 / 3 / 2 / 1 obrotu,
(4) Odległość zdalna : 16,4 stopy (5 metrów);
(5) Produkt wyda dźwięk „di” podczas odbierania poleceń z pilota.
Uwaga Dostarczony pilot jest nieprawidłowy. Przed użyciem naciśnij
przycisk prędkości, aby włączyć maszynę, a pilot zostanie aktywowany
- 9 -
4. Funkcja ładowania/Power Banku Porty wejściowe/wyjściowe:
( 1 ) Przed ładowaniem otwórz silikonową osłonę.
( 2 ) Czas ładowania: 9–10 godzin (testowano przy użyciu ładowarki o
mocy 22,5 W zgodnej z protokołem PD; jeśli sprzęt ładujący ma moc
niższą niż 22,5 W , czas ładowania będzie nieco dłuższy.)
( 3 ) Podłącz, a wentylator rozpocznie ładowanie automatycznie. Podczas
ładowania wskaźniki akumulatora na panelu sterowania migają, a po
całkowitym naładowaniu 4 wskaźniki akumulatora będą świecić światłem
ciągłym .
( 4 ) Moc funkcja banku : może ładować inne urządzenia za pomocą
przewodu ładującego . Łącząc się z innymi urządzeniami należy wybierać
moc mieszczącą się w zakresie parametrów, gdyż może to spowodować
uszkodzenie wentylatora .
Notatka. Niektóre telefony komórkowe nie mogą automatycznie
aktywować funkcji power banku po podłączeniu. Naciśnij i przytrzymaj
przycisk „ ” , aby ręcznie włączyć funkcję power banku; Port wyjściowy
USB nie jest kompatybilny z niektórymi telefonami komórkowymi w celu

- 10 -
szybkiego ładowania !
Jak czyścić ostrza:
Metoda czyszczenia łopatki wentylatora:
1. Wyłącz wentylator, połóż go płasko z tyłu i wykręć 8 śrub
(zaznaczone strzałkami) śrubokrętem;
2. Otwórz tylną pokrywę od prawej do lewej, jak pokazano na powyższym
obrazku. (Notatka:
Wewnątrz po lewej stronie znajdują się przewody elektryczne, więc po
otwarciu tylnej pokrywy,
należy zachować ostrożność, aby uniknąć uszkodzenia przewodów);
3. Użyj czystego i mokrego ręcznika, aby wytrzeć kurz z ostrzy (Uwaga:
Wykonaj to
NIE myć bezpośrednio wodą);
4. Po czyszczeniu zamknij pokrywę w odwrotnej kolejności, zgodnie z
poniższymi krokami
demontażu
Adres: Baoshanqu Shuangchenglu 803long 11hao 1602A-1609shi
Szanghaj
Wire
- 11 -
Import do AUS: SIHAO PTY LTD. 1 ROKEVA STREETEASTWOOD NSW
2122 Australia
Import do USA: Sanven Technology Ltd. Suite 250, 9166 Anaheim Place,
Rancho Cucamonga, CA 91730
REP
UK
Pooledas Group Ltd
Unit 5 Albert Edward House, The Pavilions
Preston, United Kingdom
REP
EC
SHUNSHUN GmbH
Römeräcker 9 Z2021, 76351
Linkenheim-Hochstetten, Germany
Wyprodukowano w Chinach

- 12 -


- 2 -
Technische ondersteuning en e-garantiecertificaat www.vevor.com/support
KRACHTIGE VLOERVENTILATOR
MODEL: D13
We continue to be committed to provide you tools with competitive price.
"Save Half", "Half Price" or any other similar expressions used by us only represents an
estimate of savings you might benefit from buying certain tools with us compared to the major
top brands and does not necessarily mean to cover all categories of tools offered by us. You
are kindly reminded to verify carefully when you are placing an order with us if you are
actually saving half in comparison with the top major brands.

- 1 -
MODEL: D13
Have product questions? Need technical support? Please feel free to
contact us:
Technical Support and E-Warranty Certificate
www.vevor.com/support
NEED HELP? CONTACT US!
This is the original instruction, please read all manual instructions
carefully before operating. VEVOR reserves a clear interpretation of our
user manual. The appearance of the product shall be subject to the
product you received. Please forgive us that we won't inform you again if
there are any technology or software updates on our product.
POWERFUL FLOOR FAN
- 2 -
Waarschuwing-Om het risico op letsel te verminderen, moet
de gebruiker de handleiding zorgvuldig lezen.
Dit apparaat voldoet aan Deel 15 van de FCC-regels. De
bediening is afhankelijk van de volgende twee
voorwaarden:(1)Dit apparaat mag geen schadelijke
interferentie veroorzaken, en (2)dit apparaat moet alle
ontvangen interferentie accepteren, inclusief interferentie die
een ongewenste werking kan veroorzaken.
Dit product valt onder de bepalingen van de Europese richtlijn
2012/19/EG. Het symbool met een doorgestreepte
afvalcontainer geeft aan dat het product in de Europese Unie
een aparte afvalinzameling vereist. Dit geldt voor het product
en alle accessoires die met dit symbool zijn gemarkeerd.
Producten die als zodanig zijn gemarkeerd, mogen niet bij het
normale huisvuil worden weggegooid, maar moeten worden
ingeleverd bij een inzamelpunt voor recycling van elektrische
en elektronische apparaten.
SPECIFICATION
product Model
D1 3
Product grootte
21 0*100* 2 6 8mm
Batterij capaciteit
3,7 V 4 0000 mAh ( 148 Wh )
Nominaal
vermogen
15W
TYPE-C-ingang
5V=3A 9V=2A 12V=1,5A
( compatibel met PD3.0+AFC+FCP+SFCP)
TYPE-C-uitvoer
5V=3A 9V=2A 12V=1,5A
( compatibel met QC3.0+PD3.0+AFC+FCP+SCP)
- 3 -
USB -A -uitgang
5V=3A 9V=2A 12V=1,5A
( compatibel met QC3.0+AFC+FCP+SFCP+SCP
Batterijduur
Ventilator: snelheid 1 ≈ 136H , snelheid 2 ≈52H ,
snelheid 3 ≈ 24 uur , snelheid 4 ≈15 uur
Ventilator + Oscillat10n : snelheid 1 ≈ 62 H snelheid 2
≈ 36H snelheid 3 ≈ 20H , snelheid 4 ≈ 13H
LED-verlichting: niveau 1≈ 20H , niveau 2 ≈220H ,
niveau 3 ≈50H , niveau 4 ≈50H , niveau 5 ≈48H
Fan+LED: ongeveer 12 uur op het hoogste niveau
Fan+LED+Oscillatie: ongeveer 1 1H op het hoogste
niveau
LED-lumenwaarde
Niveau 1:150 LM Niveau 2:150 LM Niveau 3 :400 LM
Niveau 4:400 LM Niveau 5 : 500 LM
Luchtblaasafstand
16,4 voet (5 meter )
PRODUCT STRUCTURE
Algemene structuur _ _

- 4 -

- 5 -

- 6 -
SECURITY & WARNINGS
(1) Plaats het product niet in de zon, bij hoge temperaturen of in de buurt
van vuur , enz .;
(2) Plaats het product niet in een vochtige omgeving ;
(3) Gooi het product niet en benader het niet in het vuur , om brandrampen
enz . te voorkomen ;
(4) Gelieve het product niet te demonteren, openen, snijden of doorboren;
(5) Stop onmiddellijk met het gebruik van het product als er zich tijdens de
behandeling afwijkingen voordoen
(6) Als u het product langere tijd niet gebruikt, laad het dan elke 2 - 3
maanden op , om schade aan de batterij als gevolg van langdurige opslag
te voorkomen .
USING INSTRUCTIONS
Controlepaneel:
- 7 -
(1) Druk kort op de “ ”-knop, de ventilator schakelt afwisselend tussen
de snelheden 1/2/3/4/OFF , druk lang op deze knop om zet hem uit bij de
ventilator ;
(2) Wanneer de ventilator draait , drukt u kort op de “ ” knop, zal de
ventilator oscilleren binnen 90 °/45 °/ UIT in draait, druk lang op de knop
om de oscillatiefunctie uit te schakelen ;
(3) Druk kort op de knop “ ”, de LED-lampjes schakelen tussen
1/2/3/UIT; Druk lang op deze knop om schakel de LED-verlichting uit ;
(4) Slaapmodus : druk kort op de knop ', de slaapmodus wordt
AAN/UIT gezet ;
(5) Timer: druk kort op de“ ”-knop , de timer schakelt om de beurt
tussen 1H/2H/4H/8H/ OFF , druk lang op de knop om timer annuleren;
(6) Laag stroomverbruik: druk in ieder geval tegelijkertijd op de knop “ ”
en de knop “Annuleren” op de afstandsbediening gedurende 3 seconden
ingedrukt De ventilator wordt uitgeschakeld en heeft een laag
stroomverbruik modus. Ondertussen is de afstandsbediening ongeldig.
Druk op de Druk nogmaals op de knop “ ” om de machine in te
schakelen, de standaardmodus te herstellen en de afstandsbediening te
activeren. (Als u het langere tijd niet gebruikt, kies dan de modus Laag
stroomverbruik voor opslag , zodat u niet zonder stroom komt te zitten en
schade aan de batterij kunt veroorzaken.)
Houd er rekening mee dat de slaapmodus bedoeld is om de indicatoren uit
te schakelen . Nadat u de indicatoren hebt uitgeschakeld , start u de
machine opnieuw op of start u de uitvoer/invoer opnieuw op . De
indicatoren gaan weer aan.
- 8 -
Hoe de afstandsbediening te gebruiken:
(1) Verwijder het isolatievel uit de afstandsbediening om deze in te
schakelen voordat u de afstandsbediening gebruikt
(2) Activeer de afstandsbediening : het product is bij laag bij levering is de
afstandsbediening ongeldig. Druk op de knop :“ ” op het
bedieningspaneel om de ventilator in te schakelen en de
afstandsbediening te activeren;
(3) Snelheidsaanpassing : druk op de knop " + " knop om afwisselend
te schakelen tussen snelheid 1 / 2 / 3 / 4 ; druk op de “ - ” knop om de
snelheid aan te passen 4 / 3 / 2 / 1 slagen,
(4) Afstand op afstand : 16,4 ft (5 meter);

- 9 -
(5) Het product maakt een geluid "di" wanneer het bestellingen ontvangt
van de afstandsbediening.
Opmerking De afstandsbediening is ongeldig bij levering. Druk op de
snelheidsknop om de machine in te schakelen voordat u deze gebruikt, en
de afstandsbediening wordt geactiveerd
4. Oplaad-/powerbankfunctie Invoer-/uitvoerpoorten:
( 1 ) Open het siliconen deksel voordat u het oplaadt.
( 2 ) Oplaadtijd: 9 - 10 uur (getest met 22,5 W compatibel met
PD-protocollader; als de oplaadapparatuur lager is dan 22,5 W , zal de
oplaadtijd iets langer zijn.)
( 3 ) Sluit de stekker aan en de ventilator begint automatisch op te laden.
De batterij-indicatoren op het bedieningspaneel knipperen tijdens het
opladen, de 4 batterij-indicatoren zullen continu branden nadat de batterij
volledig is opgeladen.
( 4 ) Macht bankfunctie : hij kan andere apparaten opladen via het
oplaadsnoer . Wanneer u verbinding maakt met andere apparaten, kies
dan het vermogen dat binnen het parameterbereik ligt, anders kan dit
schade aan de ventilator veroorzaken .
- 10 -
Opmerking. Sommige mobiele telefoons kunnen de powerbank-functie niet
automatisch activeren nadat ze verbinding hebben gemaakt. Druk lang op
de “ ” -knop om de powerbank-functie handmatig te activeren; De USB
- uitgang is niet compatibel met sommige mobiele telefoons voor snel
opladen !
Hoe de messen schoon te maken:
Reinigingsmethode van ventilatorblad:
1. Schakel de ventilator uit, plaats de ventilator plat op de achterkant en
verwijder de 8 schroeven
(aangegeven door pijlen) met een schroevendraaier;
2. Open de achtercover van rechts naar links, zie bovenstaande afbeelding.
(Opmerking:
Er zitten aan de linkerkant elektrische draden, dus als je de achterklep
opent,
wees voorzichtig om schade aan de draden te voorkomen);
3. Gebruik een schone en natte handdoek om het stof van de messen af te
vegen (Opmerking: Doen
NIET direct met water wassen);
Wire
- 11 -
4. Sluit na het reinigen het deksel weer in omgekeerde volgorde volgens
de stappen
van demontage
Adres: Baoshanqu Shuangchenglu 803long 11hao 1602A-1609shi
Shanghai
Geïmporteerd naar AUS: SIHAO PTY LTD. 1 ROKEVA
STREETEASTWOOD NSW 2122 Australië
Geïmporteerd naar de VS: Sanven Technology Ltd. Suite 250, 9166
Anaheim Place, Rancho Cucamonga, CA 91730
REP
UK
Pooledas Group Ltd
Unit 5 Albert Edward House, The Pavilions
Preston, United Kingdom
REP
EC
SHUNSHUN GmbH
Römeräcker 9 Z2021, 76351
Linkenheim-Hochstetten, Germany
Gemaakt in China

- 12 -


- 2 -
Teknisk support och e-garanticertifikat www.vevor.com/support
KRAFTIG GOLVFLÄKT
MODELL: D13
We continue to be committed to provide you tools with competitive price.
"Save Half", "Half Price" or any other similar expressions used by us only represents an
estimate of savings you might benefit from buying certain tools with us compared to the major
top brands and does not necessarily mean to cover all categories of tools offered by us. You
are kindly reminded to verify carefully when you are placing an order with us if you are
actually saving half in comparison with the top major brands.

- 1 -
MODELL: D13
Have product questions? Need technical support? Please feel free to
contact us:
Technical Support and E-Warranty Certificate
www.vevor.com/support
NEED HELP? CONTACT US!
This is the original instruction, please read all manual instructions
carefully before operating. VEVOR reserves a clear interpretation of our
user manual. The appearance of the product shall be subject to the
product you received. Please forgive us that we won't inform you again if
there are any technology or software updates on our product.
POWERFUL FLOOR FAN
- 2 -
Varning - För att minska risken för skada måste användaren
läsa instruktionerna noggrant.
Denna enhet uppfyller del 15 av FCC-reglerna. Driften är
föremål för följande två villkor: (1) Den här enheten får inte
orsaka skadliga störningar, och (2) den här enheten måste
acceptera alla mottagna störningar, inklusive störningar som
kan orsaka oönskad funktion.
Denna produkt omfattas av bestämmelserna i det europeiska
direktivet 2012/19/EC. Symbolen som visar en soptunna
korsad anger att produkten kräver separat sophämtning i EU.
Detta gäller för produkten och alla tillbehör märkta med denna
symbol. Produkter märkta som sådana får inte kasseras
tillsammans med vanligt hushållsavfall, utan måste lämnas till
en insamlingsplats för återvinning av elektriska och
elektroniska apparater.
SPECIFICATION
Produktmodell
D1 3
Produktstorlek
21 0*100* 2 6 8mm
Batterikapacitet
3,7V 4 0000mAh ( 148Wh )
Nominell effekt
15W
TYPE-C-ingång
5V=3A 9V=2A 12V=1,5A
( kompatibel med PD3.0+AFC+FCP+SFCP)
TYPE-C-utgång
5V=3A 9V=2A 12V=1,5A
( kompatibel med QC3.0+PD3.0+AFC+FCP+SCP)
USB -A- utgång
5V=3A 9V=2A 12V=1,5A
(
kompatibel med
QC3.0+AFC+FCP+SFCP+SCP
- 3 -
Batteri-liv
Fläkt: hastighet 1 ≈ 136H , hastighet 2 ≈52H ,
hastighet 3 ≈ 24H , hastighet 4 ≈15H
Fläkt + Oscillat10n : hastighet 1 ≈ 62 H hastighet 2
≈ 36H hastighet 3 ≈ 20H , hastighet 4 ≈ 13H
LED-belysning: nivå 1≈ 20H , nivå 2 ≈220H , nivå 3
≈50H , nivå 4 ≈50H , nivå 5 ≈48H
Fläkt+LED: ca 12H på högsta nivå
Fläkt+LED+Oscillation: ca 1 1H på högsta nivå
LED-lumenvärde
Nivå 1:150 LM L evel 2:150 LM L evel 3:400 LM
L evel 4:400 LM L evel 5:500 LM
Luftblåsningsavstånd
16,4 fot (5 meter )
PRODUCT STRUCTURE
Övergripande struktur _ _

- 4 -
- 5 -
SECURITY & WARNINGS
(1) Placera inte produkten i solen, hög temperatur eller nära elden , etc .;
(2) Placera inte produkten i fuktig miljö;
(3) Kasta inte produkten eller närma dig den till elden , för att undvika
brandkatastrofer , etc .;
(4) Vänligen ta inte isär, öppna, skär eller stick hål i produkten;
(5) Sluta använda produkten omedelbart om avvikelser inträffar under
(6) När du inte använder produkten under en längre tid, ladda den
varannan till var tredje månad för att undvika skador på batteriet på grund
av långtidsförvaring .
USING INSTRUCTIONS
Kontrollpanel:
(1) Tryck kort på knappen “ ”, fläkten växlar mellan hastighet

- 6 -
1/2/3/4/OFF i varv , tryck länge på denna knapp för att stäng av den vid
fläkten ;
(2) När fläkten är igång , tryck kort på " " knappen, kommer fläkten att
svänga inom 90 °/45 °/ OFF in vänder, tryck länge på knappen e för att
stänga av oscillationsfunktionen ;
(3) Tryck kort på knappen “ ”, LED-lamporna växlar mellan 1/2/3/OFF;
tryck länge på denna knapp för att stäng av LED-lamporna;
(4) Sömnläge : tryck kort på knappen , det kommer att slå PÅ/AV
viloläget ;
(5) Timer: kort tryck på" ”-knappen , timern växlar mellan
1H/2H/4H/8H/ OFF i tur och ordning , tryck länge på knappen för att avbryt
timer;
(6) Låg strömförbrukning: i alla fall, tryck samtidigt på knappen “ ” och
"Avbryt"-knappen på fjärrkontrollen i 3 sekunder fläkten stängs av och
strömförbrukningen är låg läge. Under tiden är fjärrkontrollen ogiltig Tryck
på “ ”-knappen igen för att slå på maskinen och återställa
standardläget och aktivera fjärrkontrollen. (Om du inte använder den under
en längre tid. Välj läget för låg strömförbrukning för lagring, undvik att ta
slut på ström och orsaka skador på batteriet .)
Observera att viloläge är för att stänga av indikatorerna. Efter att ha stängt
av indikatorerna , starta om maskinen eller utgång/ingång , tänds
indikatorerna igen.
Så här använder du fjärrkontrollen:
- 7 -
(1) Ta ut isoleringsplåten i fjärrkontrollen för att slå på den innan du
använder fjärrkontrollen
(2) Aktivera fjärrkontrollen : produkten är på låg strömläge vid leverans är
fjärrkontrollen ogiltig. Tryck på knappen :“ ” på kontrollpanelen för att
slå på fläkten och aktivera fjärrkontrollen;
(3) Hastighetsjustering : tryck på knappen " + " knapp för att växla
mellan hastighet 1 / 2 / 3 / 4 varv ; tryck på " - " -knappen för att justera
mellan hastighet 4 / 3 / 2 / 1 varv,
(4) Fjärravstånd : 16,4 fot (5 meter);
(5) Produkten kommer att göra ett ljud "di" när den tar emot beställningar
från fjärrkontrollen.

- 8 -
Obs Fjärrkontrollen är ogiltig när den levereras, tryck på
hastighetsknappen för att slå på maskinen innan användning, och
fjärrkontrollen aktiveras
4. Laddning / Power Bank-funktion Ingångs-/utgångsportar:
( 1 ) Öppna silikonskyddet innan du laddar.
( 2 ) Laddningstid: 9 - 10 timmar (testad med 22 ,5 W kompatibel med
PD-protokollladdare; om laddningsutrustningen är lägre än 22 , 5 W , blir
laddningstiden lite längre.)
( 3 ) Koppla in och fläkten börjar ladda automatiskt. Batteriindikatorerna på
kontrollpanelen blinkar under laddning, de 4 batteriindikatorerna kommer
att lysa med fast sken efter full laddning.
( 4 ) Effekt bankfunktion : den kan ladda andra enheter via
laddningssladden . När du ansluter till andra enheter, välj den effekt som
ligger inom parameterområdet, annars kan det orsaka skador på fläkten .
Notera. Vissa mobiltelefoner kan inte aktivera powerbank-funktionen
automatiskt efter anslutning, tryck länge på knappen “ ” för att manuellt
aktivera powerbank-funktionen; U SB- utgångsporten är inte kompatibel
- 9 -
med vissa mobiltelefoner för snabbladdning !
Så här rengör du knivarna:
Rengöringsmetod för fläktblad:
1. Stäng av fläkten, placera fläkten plant på baksidan, ta ut de 8 skruvarna
(pekas ut med pilar) med skruvmejsel;
2. Öppna bakstycket från höger till vänster, se bilden ovan. (Notera:
Det finns elektriska ledningar inuti till vänster, så när du öppnar bakstycket,
var noga med att undvika skador på ledningarna);
3. Använd en ren och våt handduk för att torka av damm på bladen (Obs:
Gör
Tvätta INTE med vatten direkt);
4. Efter rengöring, stäng locket tillbaka i omvänd riktning enligt stegen
av demontering
Adress: Baoshanqu Shuangchenglu 803long 11hao 1602A-1609shi
Shanghai
Importerad till AUS: SIHAO PTY LTD. 1 ROKEVA STREETEASTWOOD
NSW 2122 Australien
Importerad till USA: Sanven Technology Ltd. Suite 250, 9166 Anaheim
Wire

- 10 -
Place, Rancho Cucamonga, CA 91730
REP
UK
Pooledas Group Ltd
Unit 5 Albert Edward House, The Pavilions
Preston, United Kingdom
REP
EC
SHUNSHUN GmbH
Römeräcker 9 Z2021, 76351
Linkenheim-Hochstetten, Germany
Tillverkad i Kina

- 11 -