
Technical Support and E-Warranty Certificate www.vevor.com/support
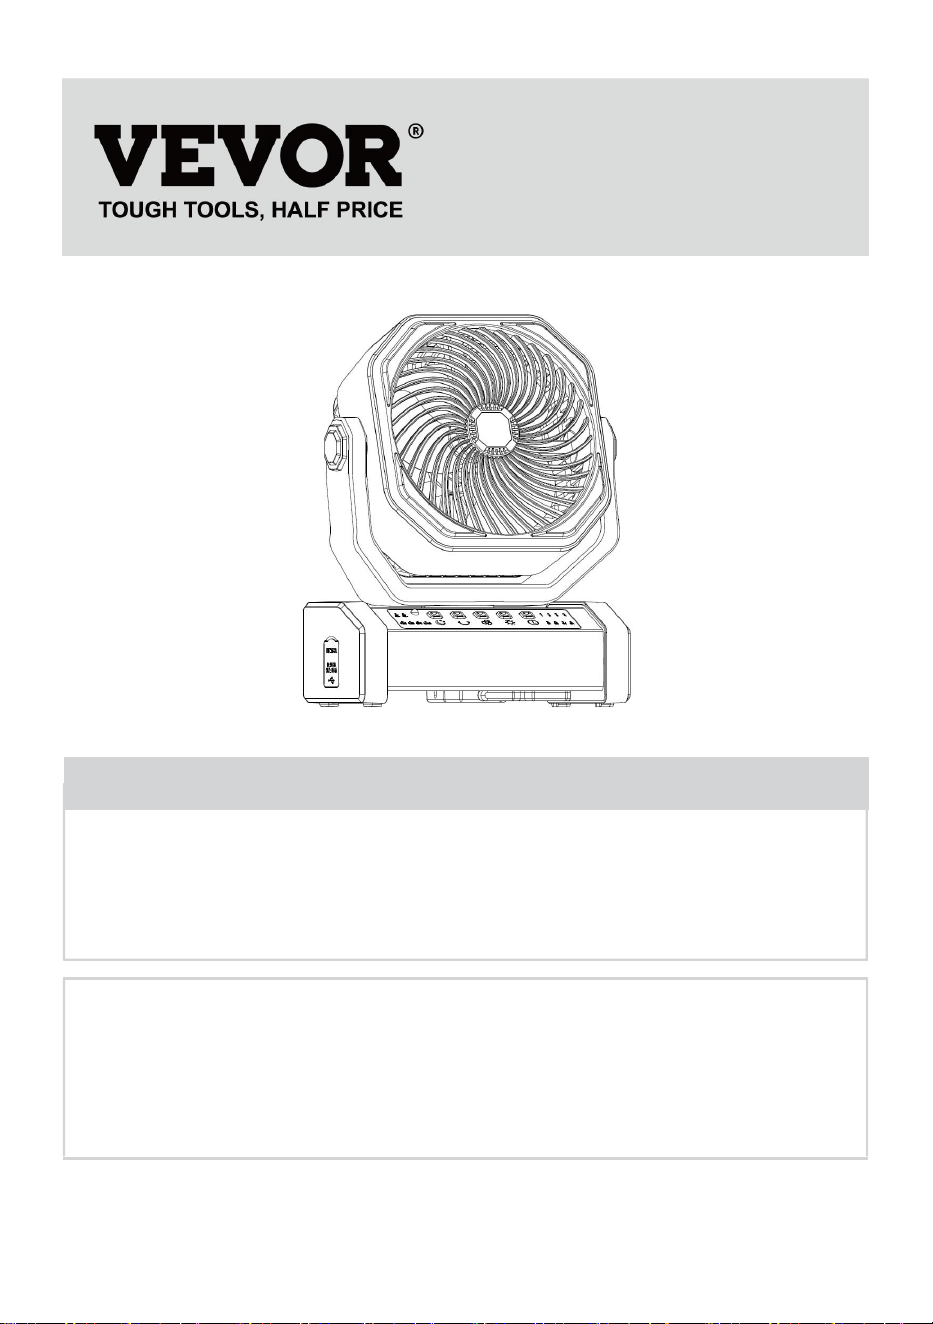
POWERFUL FLOOR FAN
MODEL:D12
We continue to be committed to provide you tools with competitive price.
"Save Half", "Half Price" or any other similar expressions used by us only represents an
estimate of savings you might benefit from buying certain tools with us compared to the major
top brands and does not necessarily mean to cover all categories of tools offered by us. You
are kindly reminded to verify carefully when you are placing an order with us if you are
actually saving half in comparison with the top major brands.


- 1 -
MODEL:D12
Have product questions? Need technical support? Please feel free to
contact us:
Technical Support and E-Warranty Certificate
www.vevor.com/support
NEED HELP? CONTACT US!
This is the original instruction, please read all manual instructions
carefully before operating. VEVOR reserves a clear interpretation of our
user manual. The appearance of the product shall be subject to the
product you received. Please forgive us that we won't inform you again if
there are any technology or software updates on our product.
POWERFUL FLOOR FAN

- 2 -
Warning-To reduce the risk of injury, user must read
instructions manual carefully.
This device complies with Part 15 of the FCC Rules. Operation
is subject to the following two conditions:(1)This device may
not cause harmful interference, and (2)this device must accept
any interference received, including interference that may
cause undesired operation.
This product is subject to the provision of European Directive
2012/19/EC. The symbol showing a wheelie bin crossed
through indicates that the product requires separate refuse
collection in the European Union. This applies to the product
and all accessories marked with this symbol. Products marked
as such may not be discarded with normal domestic waste, but
must be taken to a collection point for recycling electrical and
electronic devices.
SPECIFICATION
Product Model
D12
Product Size
210*100*268mm
Battery Capacity
20000mAh
Rated Power
15W
TYPE-C Input
5V-3A
TYPE-C Output
5V-3A
USB Output
5V-2A
- 3 -
Battery Life
Fan: speed 1≈60H, speed 2≈35H, speed 3≈25H,
speed 4≈16H Fan + Oscillation: speed 1≈32H, speed
2≈23H speed 3≈18H, speed 4≈13H
LED Lighting: level 1≈200H, level 2≈50H, level
3≈28H
Fan + LED: about 10H at the highest level
Fan + LED + Oscillation: about 8.5H at the highest
level
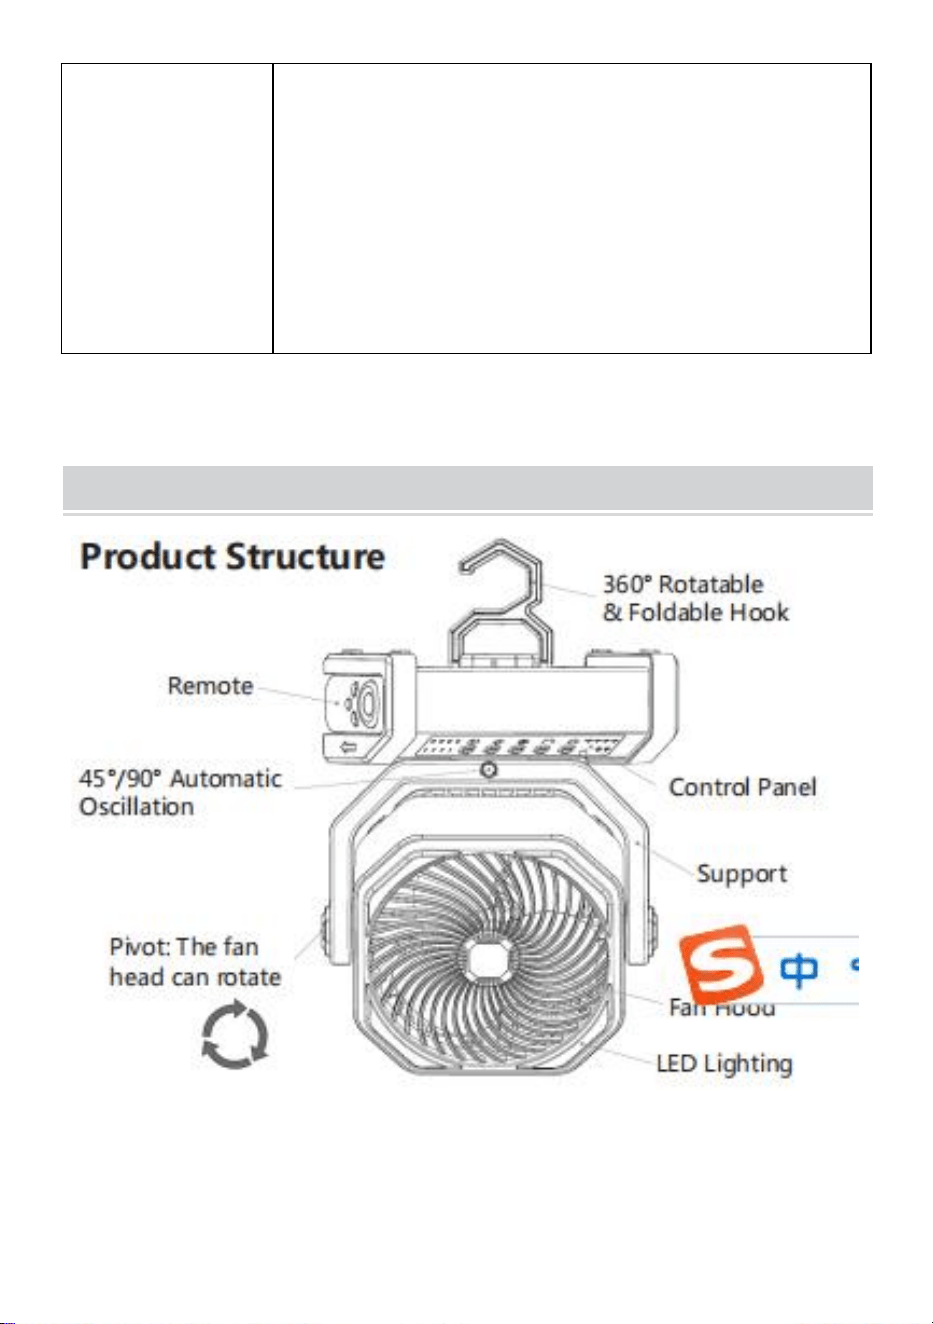
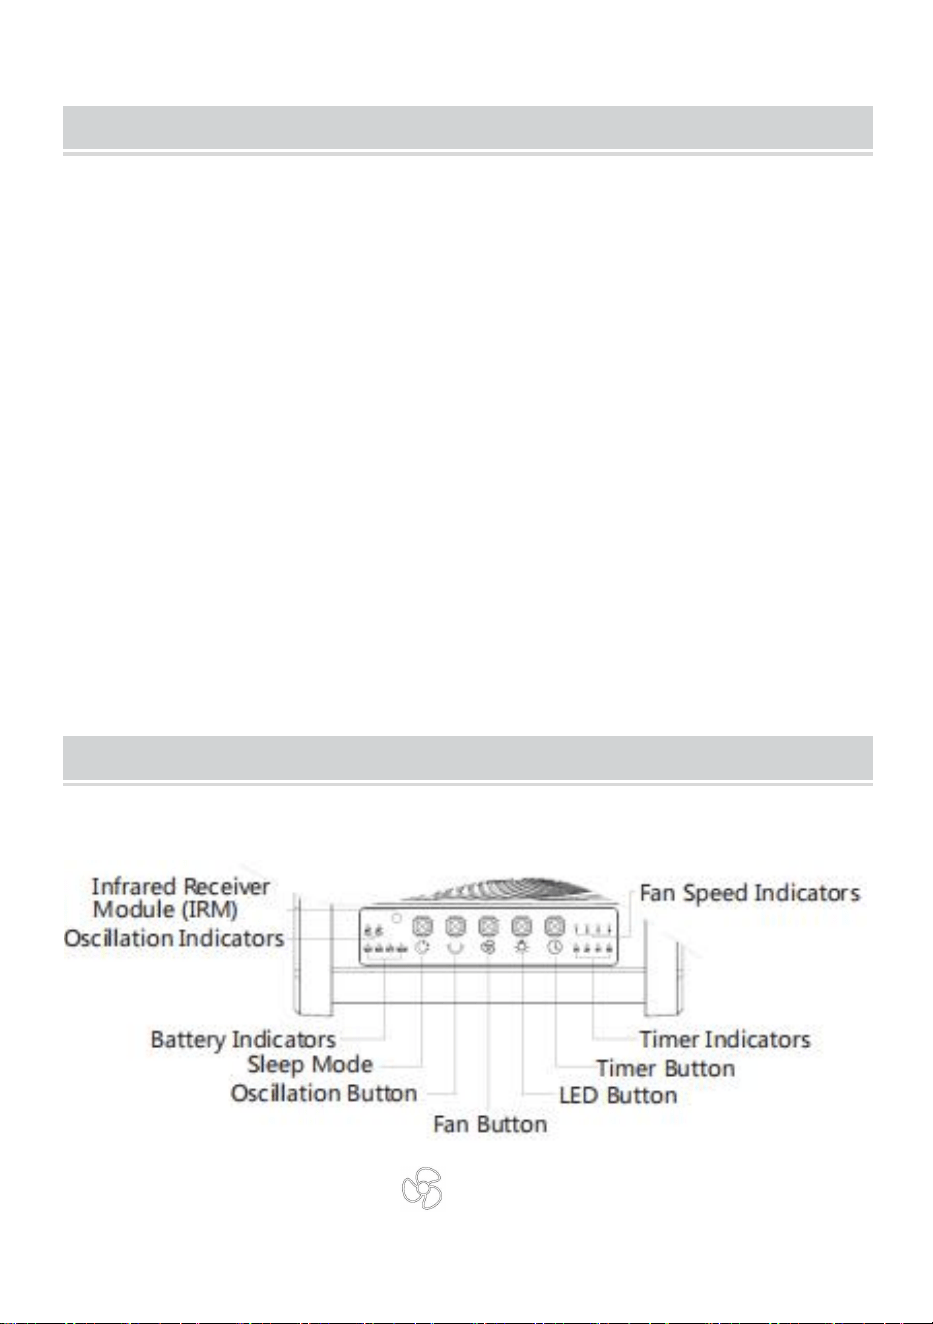
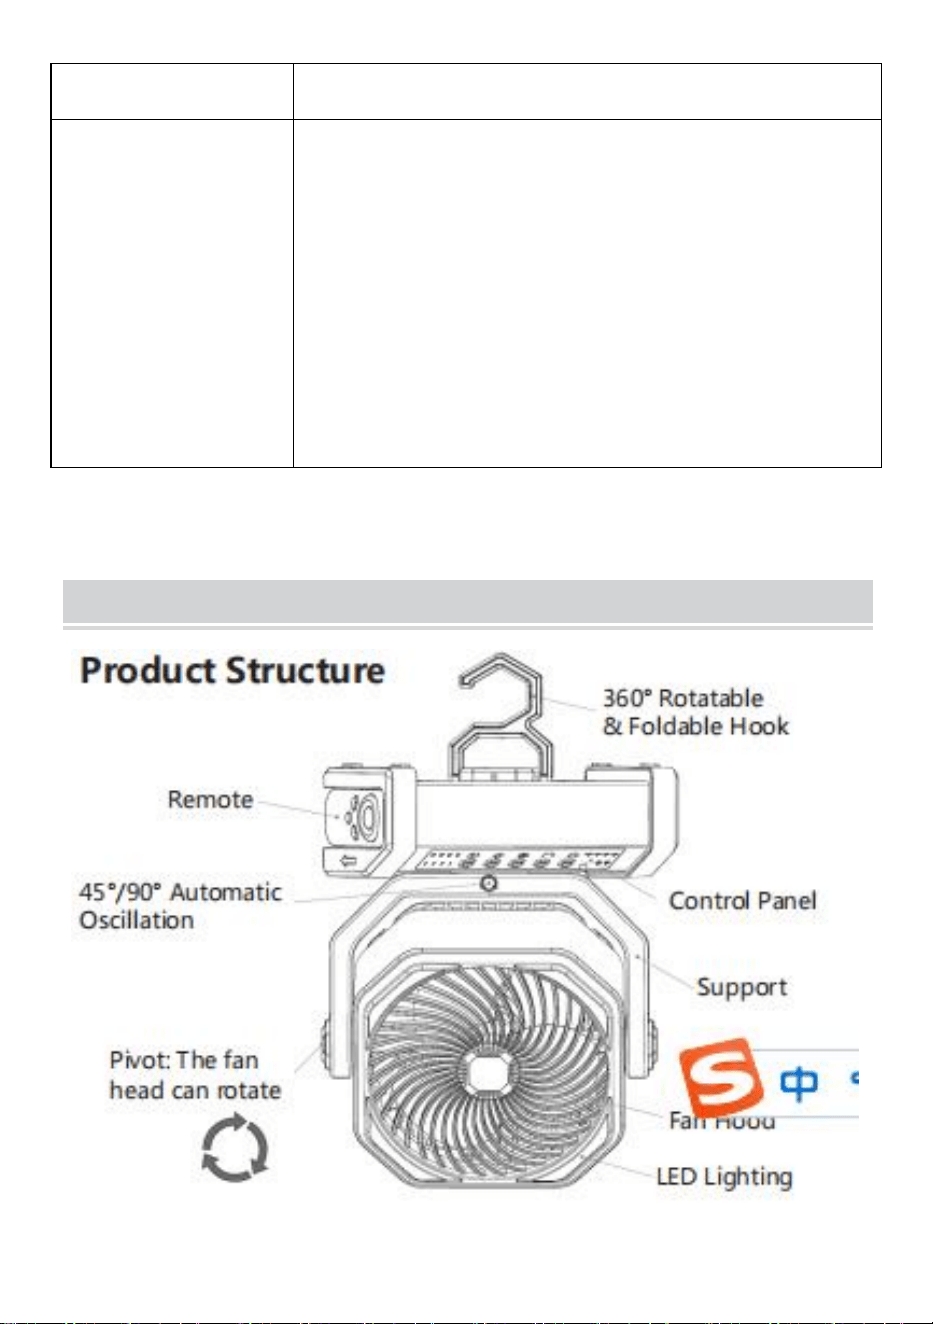
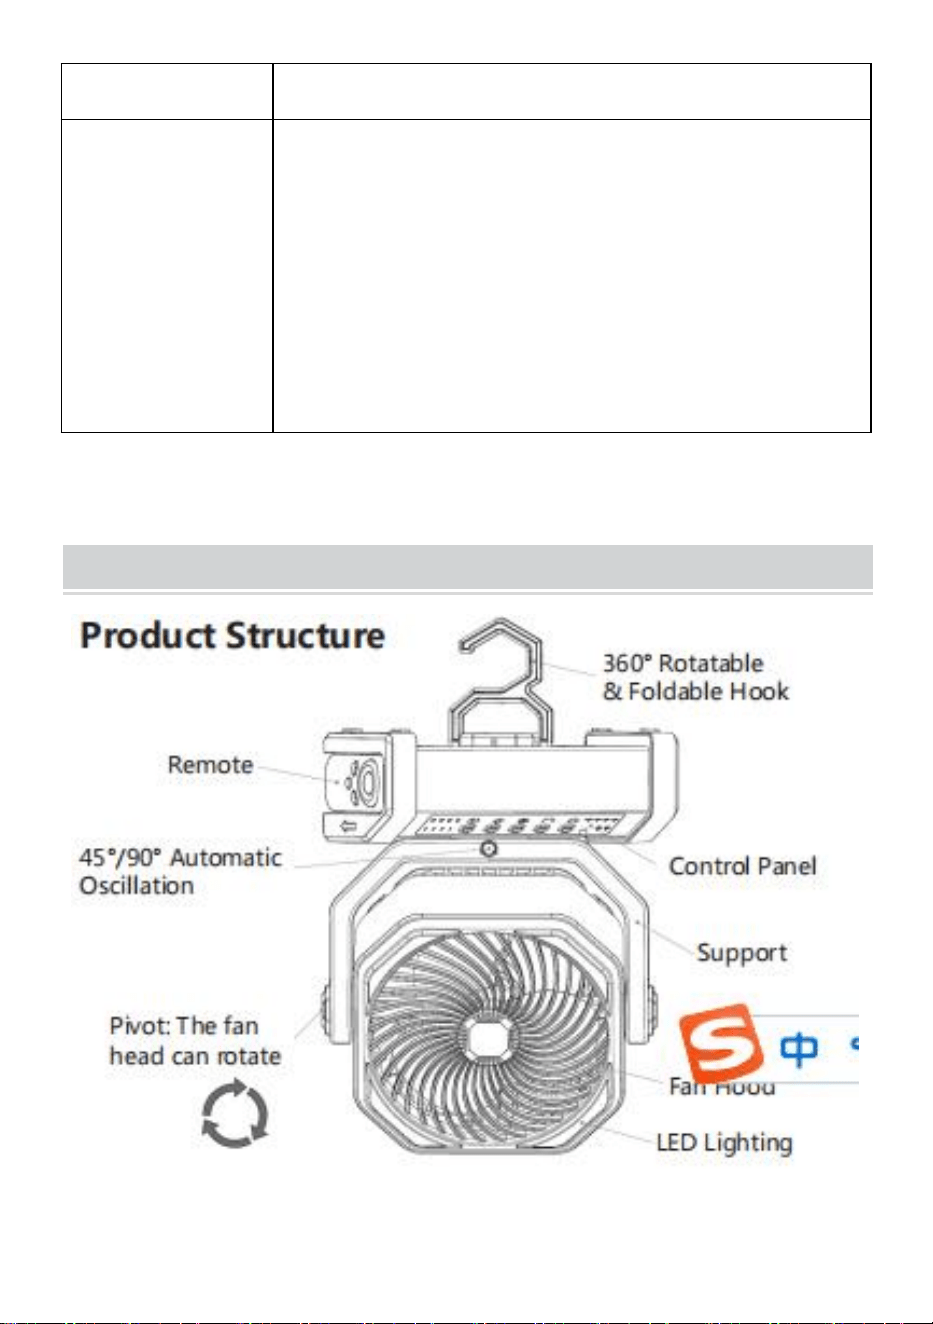
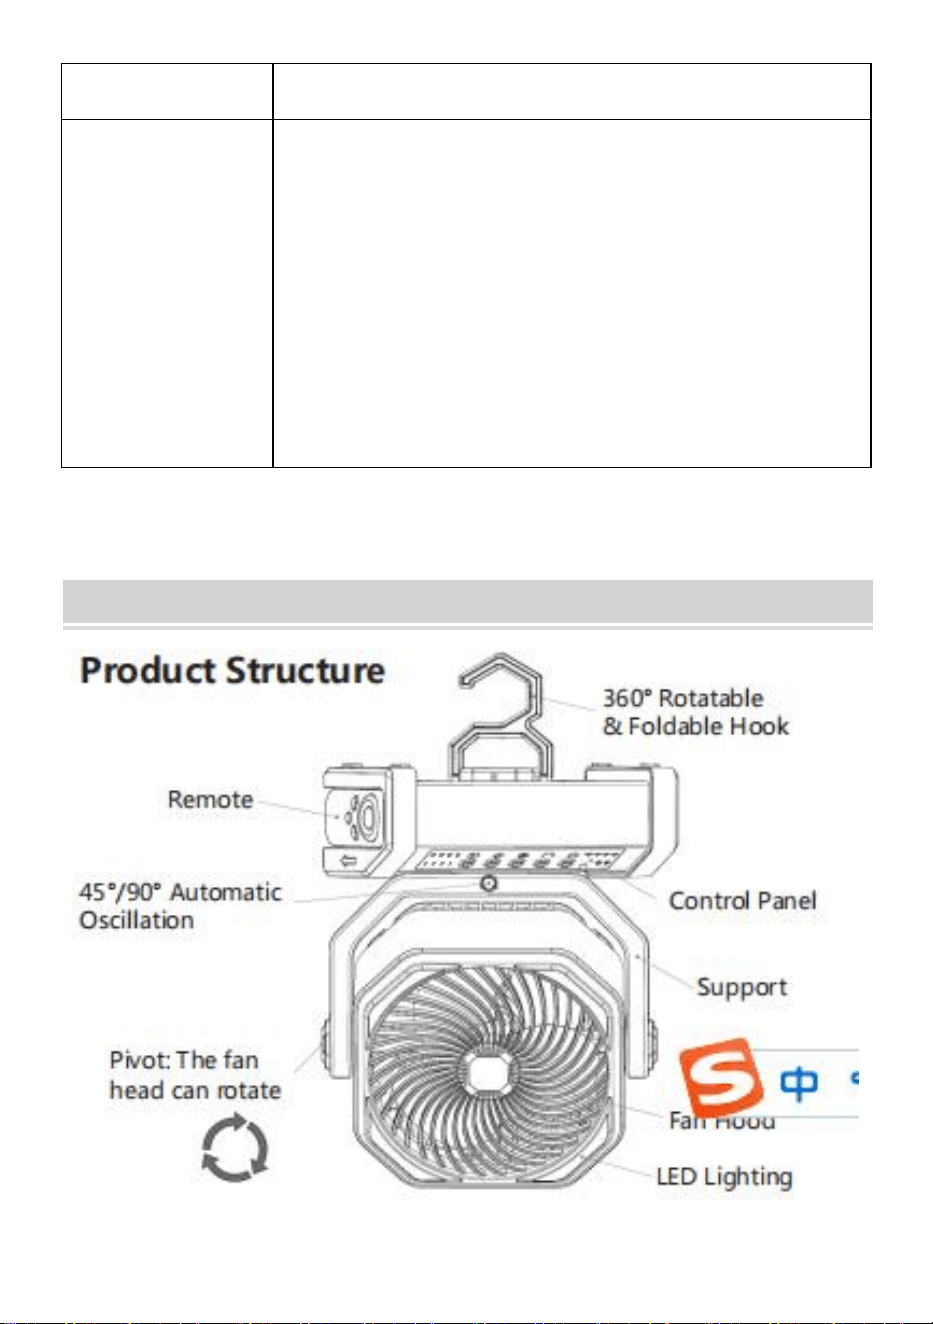
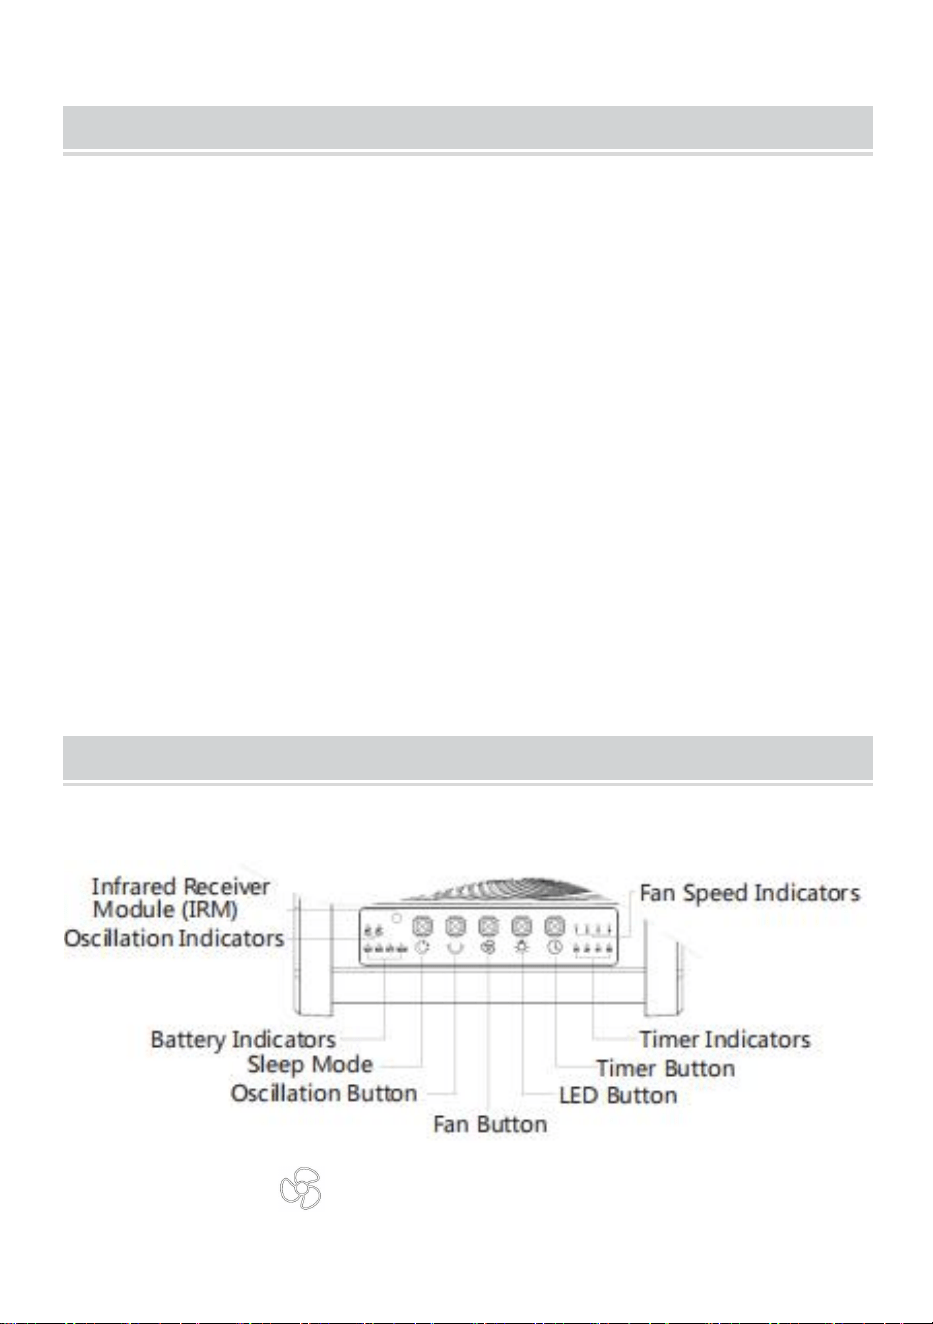
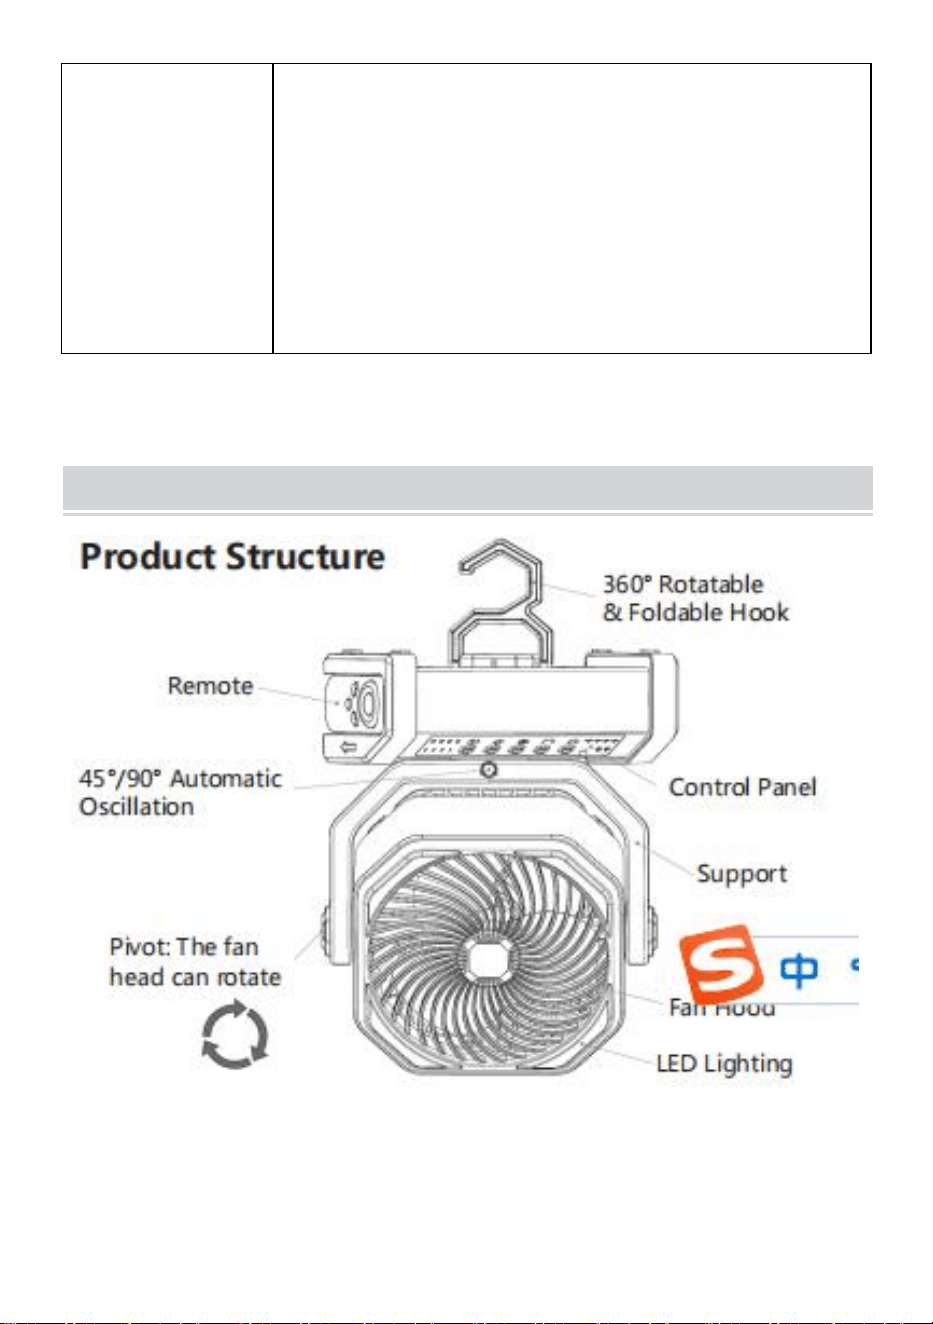
PRODUCT STRUCTURE
- 4 -
SECURITY & WARNINGS
(1) Do not expose the product to high temperature, fire or under the Sun;
(2) Do not put the product in humid place;
(3) Do not throw the product into a fire or approach a fire to avoid fire
disaster;
(4) Do not disassemble, cut or pierce the product;
(5) Please stop using if abnormal conditions happen during the use of the
product;
(6) Please charge the product every 2-3 months if not used for a long time,
to avoid damage to the battery.
USING INSTRUCTIONS
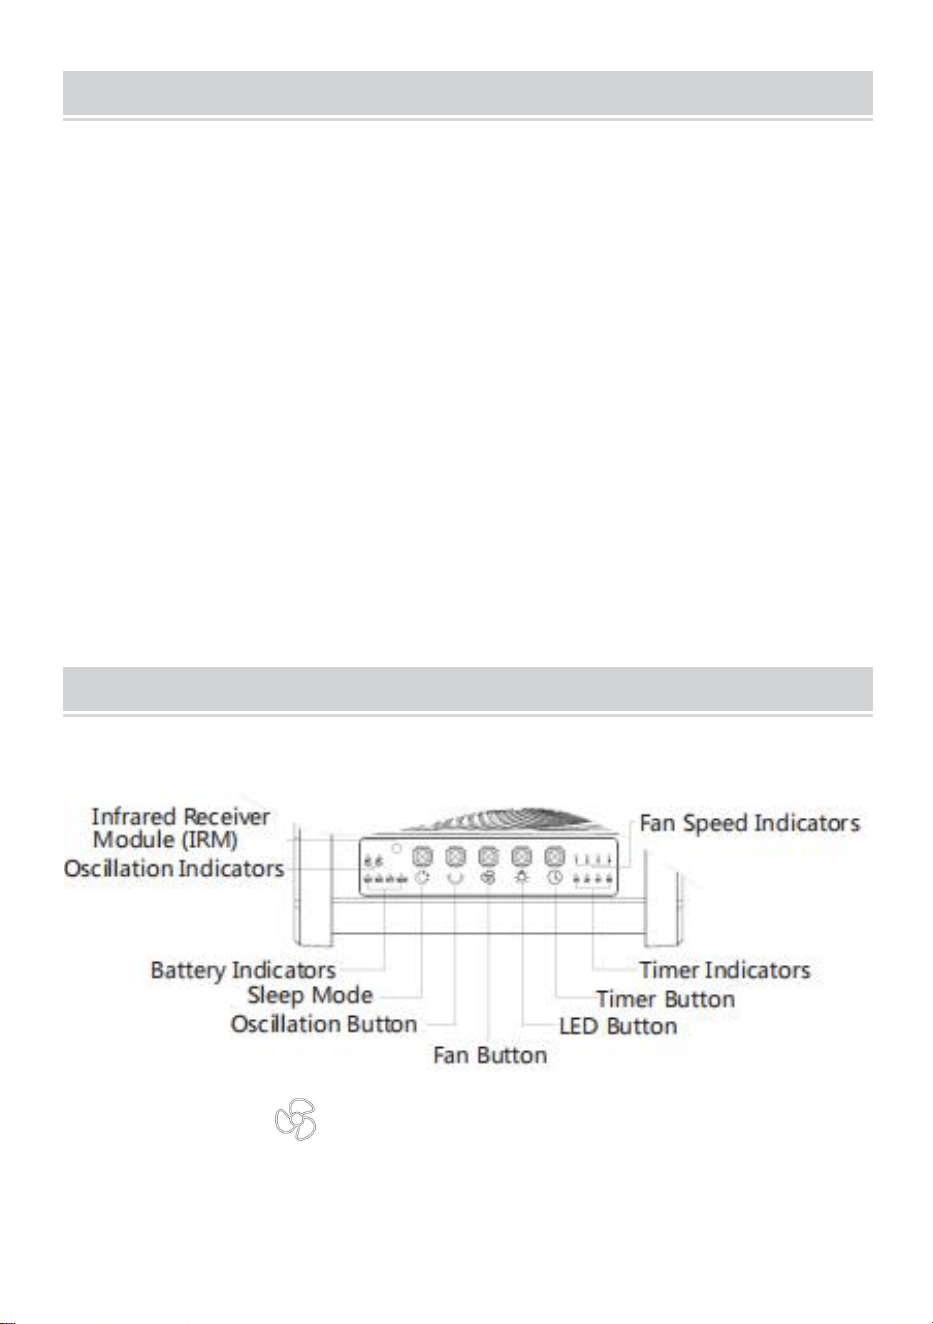
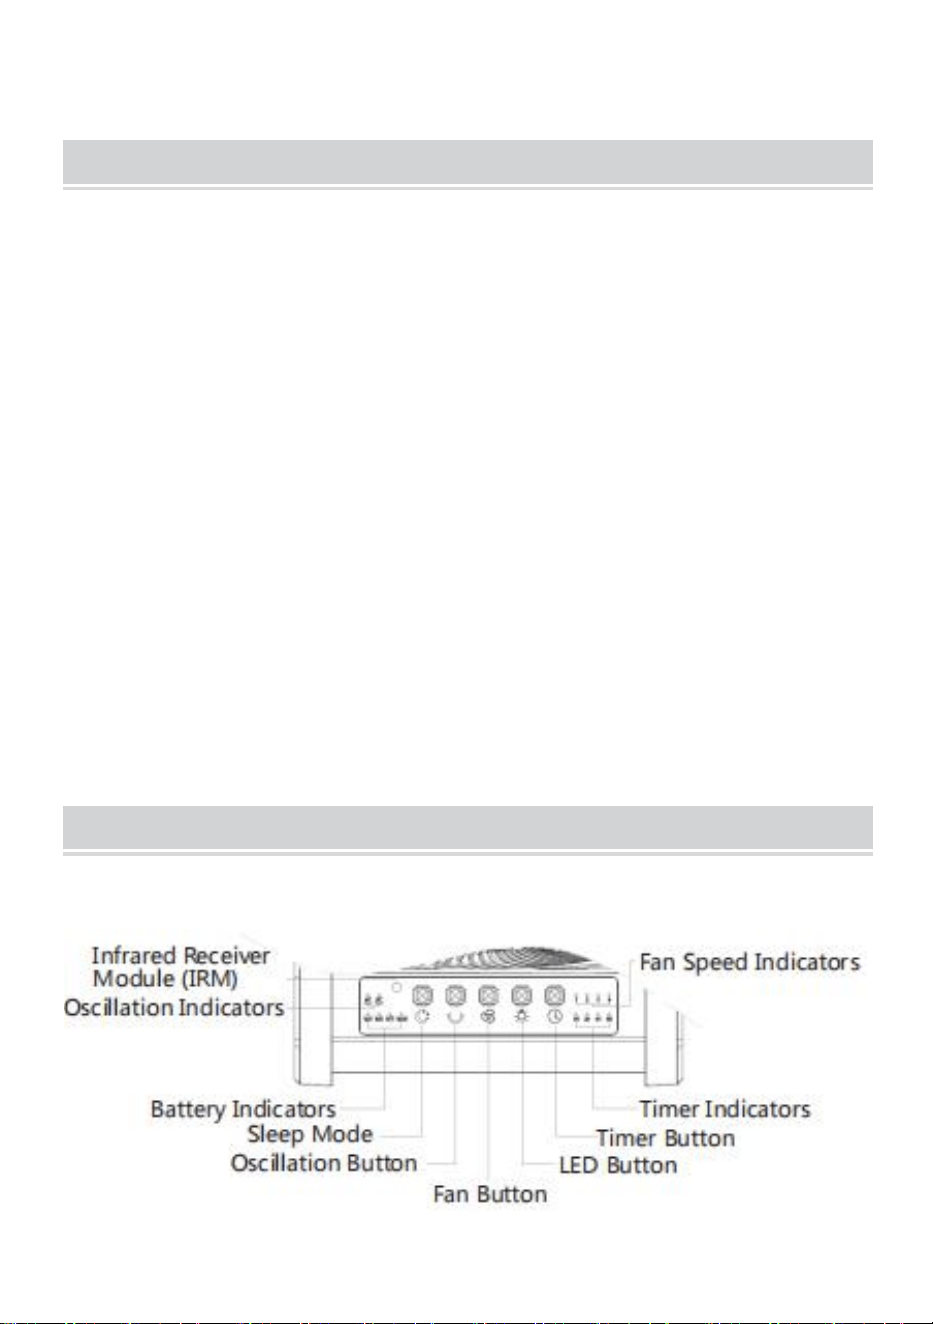
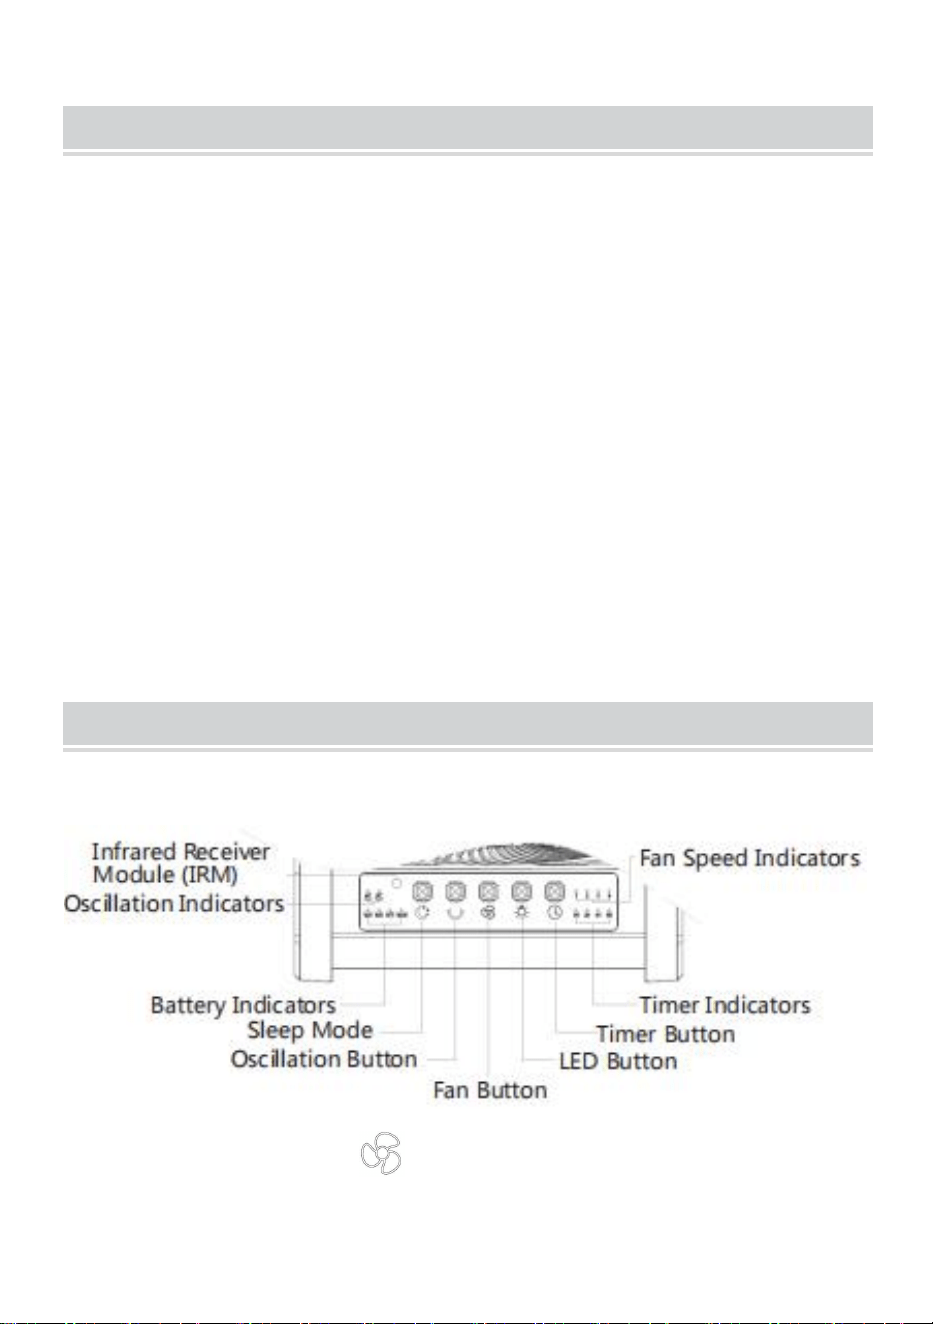
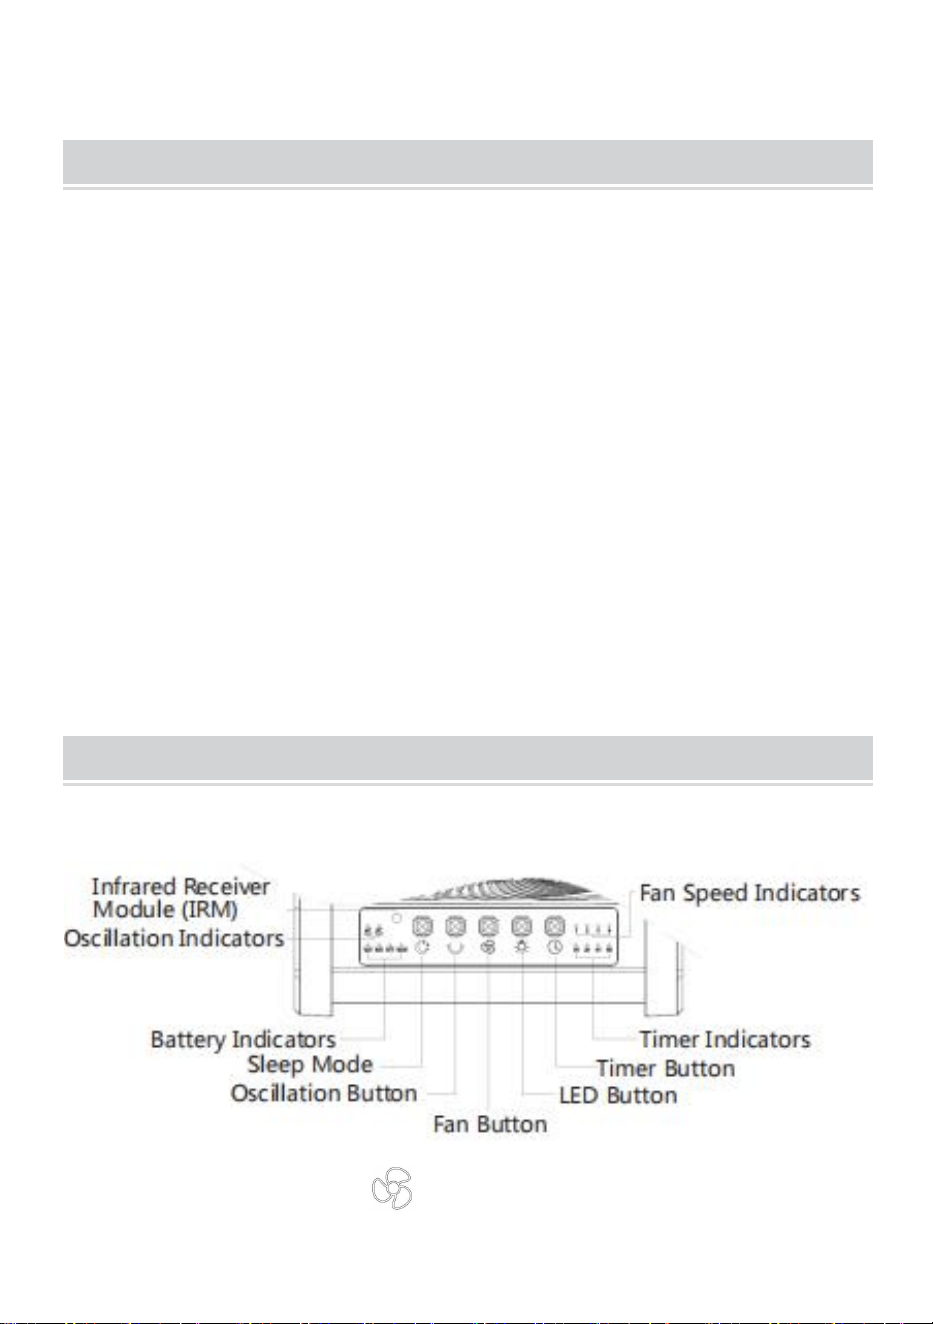
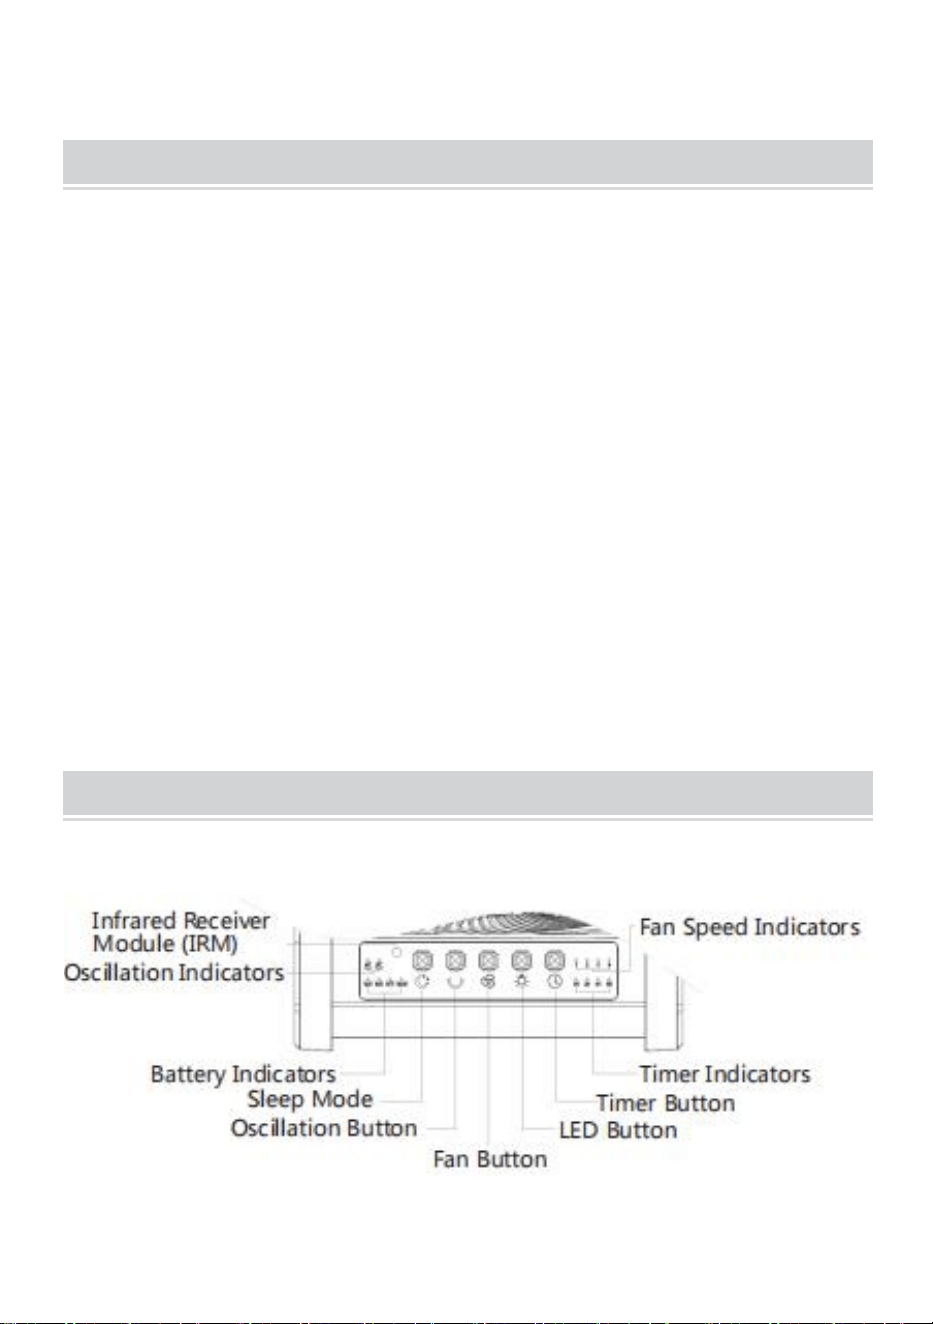
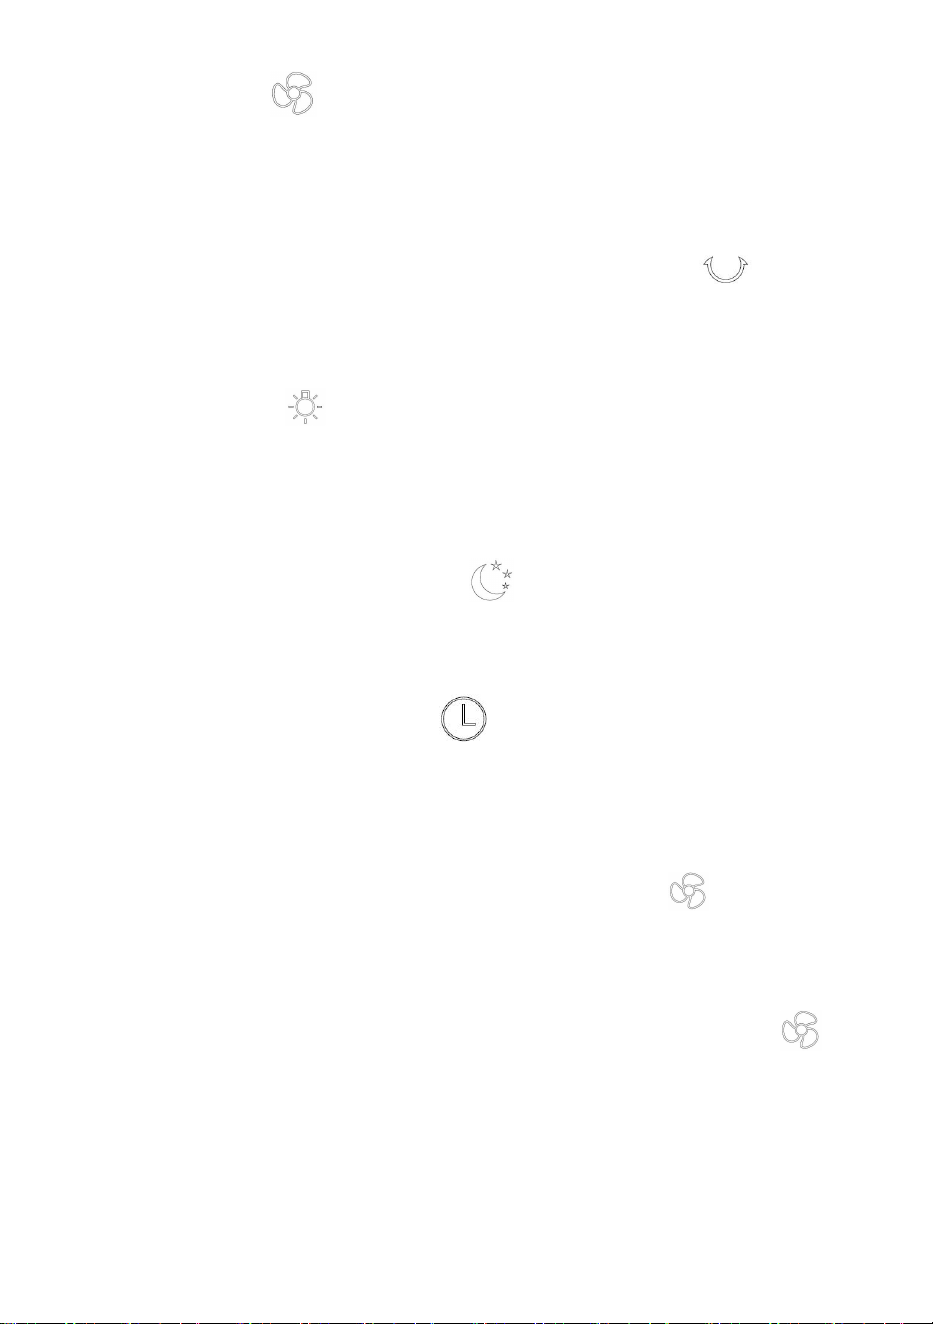
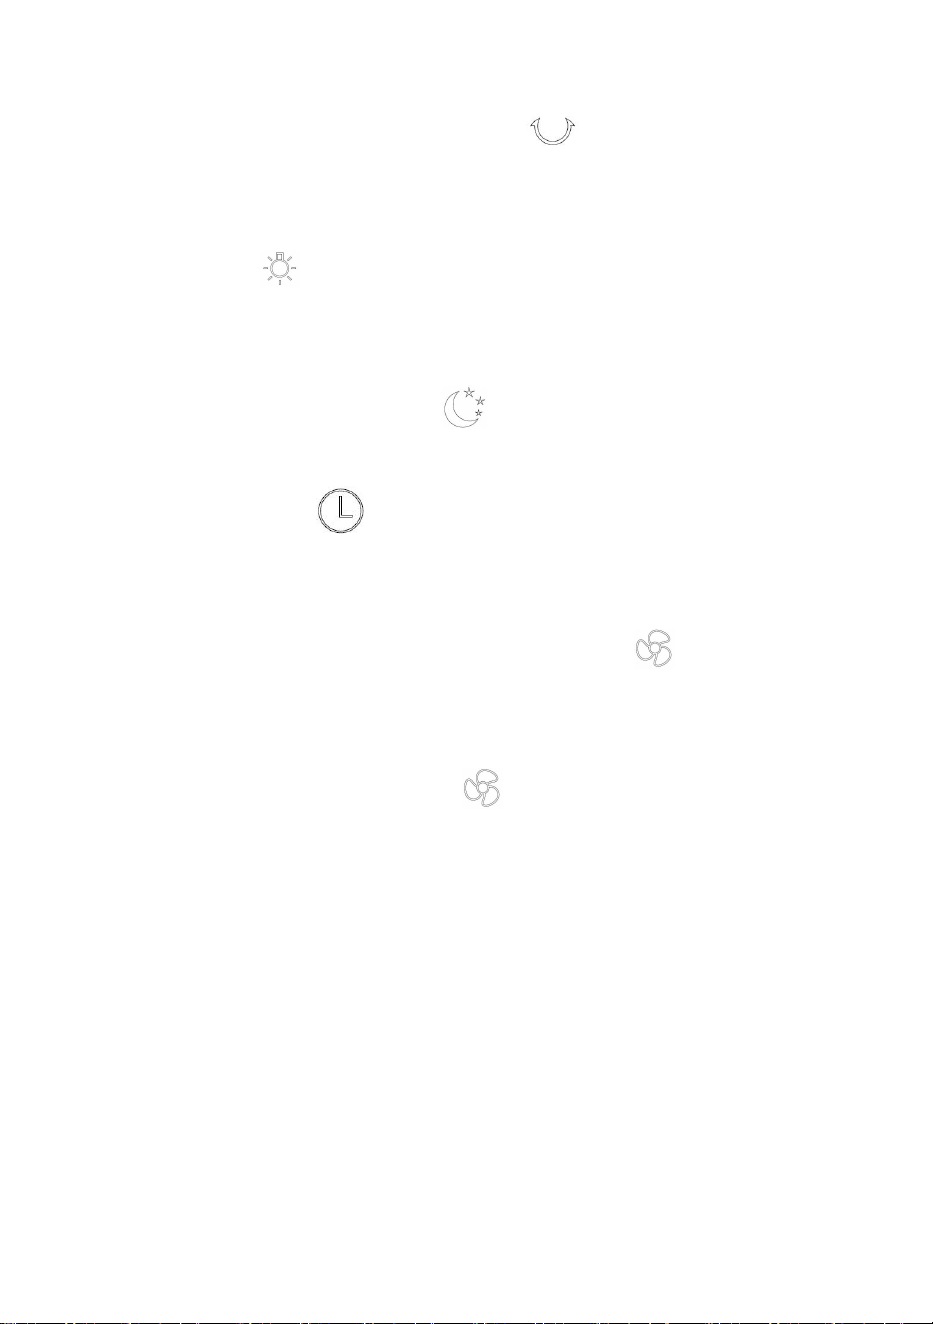
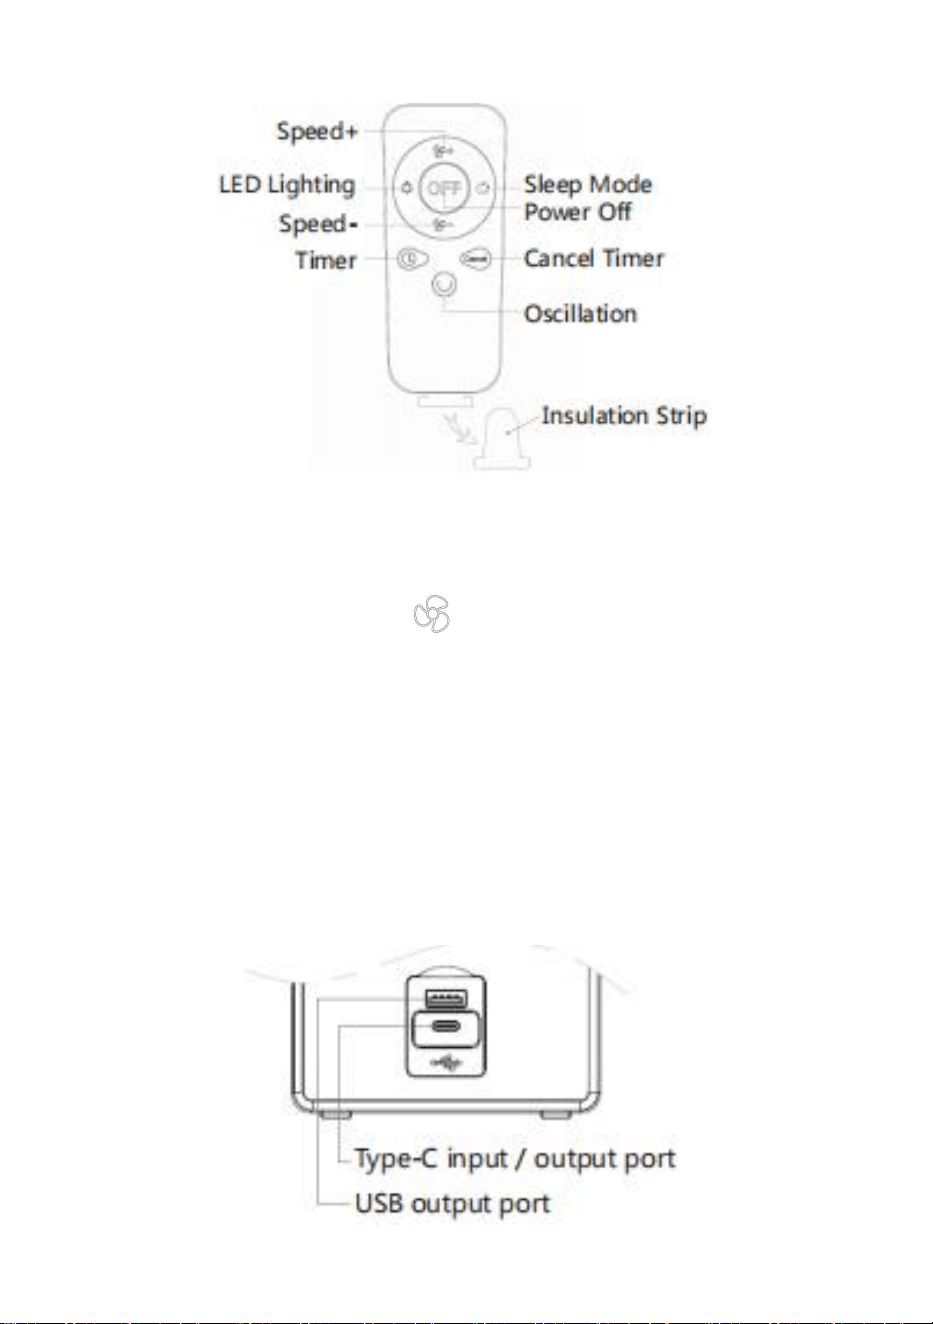
Control Panel:
(1) Short press the“ ”button, the fan will switch among speed
1/2/3/4/OFF, long press this button to turn it off at any speed;
- 5 -
(2) When the fan is enabled, short press the“ ” button, the fan will
oscillate within 90 ° /45 ° /off in turns, long press this button to turn off the
oscillation;
(3) Short press the“ ”button, the LED lights will switch among
1/2/3/OFF; long press this button to turn the LED lights off at any level;
(4) leep mode: short press the“ button to turn ON/OFF all the indicators;
(5) Timer: short press the“ ”button to switch among timer at
1H/2H/4H/8H/off, long press this button to cancel timer;
(6) Low power consumption mode: simultaneously press the“ ” button
on the panel and the“Cancel”button on the remote for 3 seconds in any
case, the fan will turn off and enter low power consumption mode.
Meanwhile, the remote is disabled. Press the “ ” button again to restart
the standard mode and enable the remote at the same time. (When the fan
is not used for a long time, it’s better to be stored at low power
consumption mode, to avoid the battery running out and cause damage to
the battery.)
Note: Sleep mode is to turn off the indicators; when the indicators are off,
restart or output/input will turn on the indicators again.
- 6 -
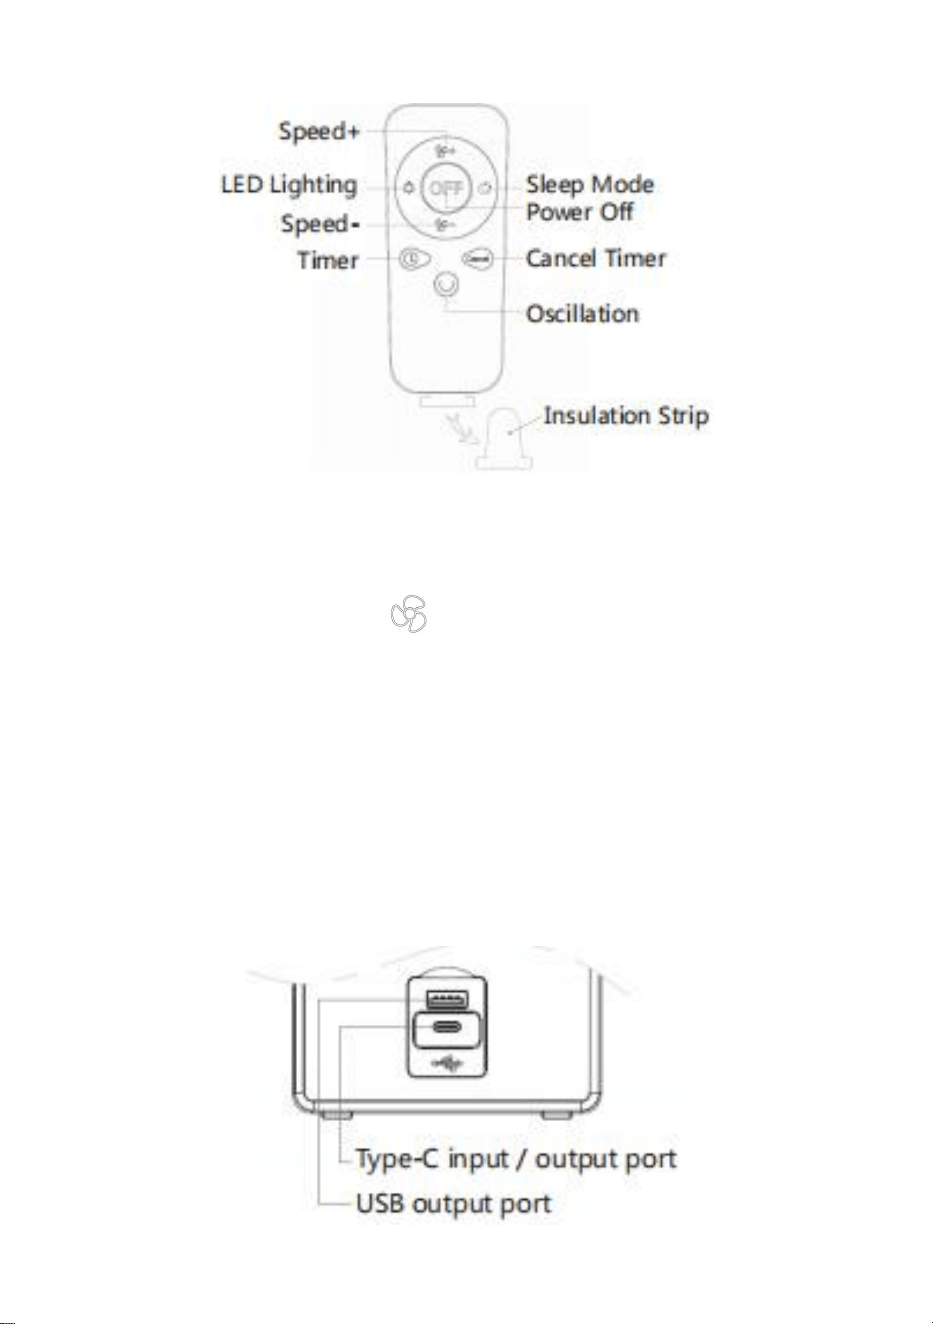
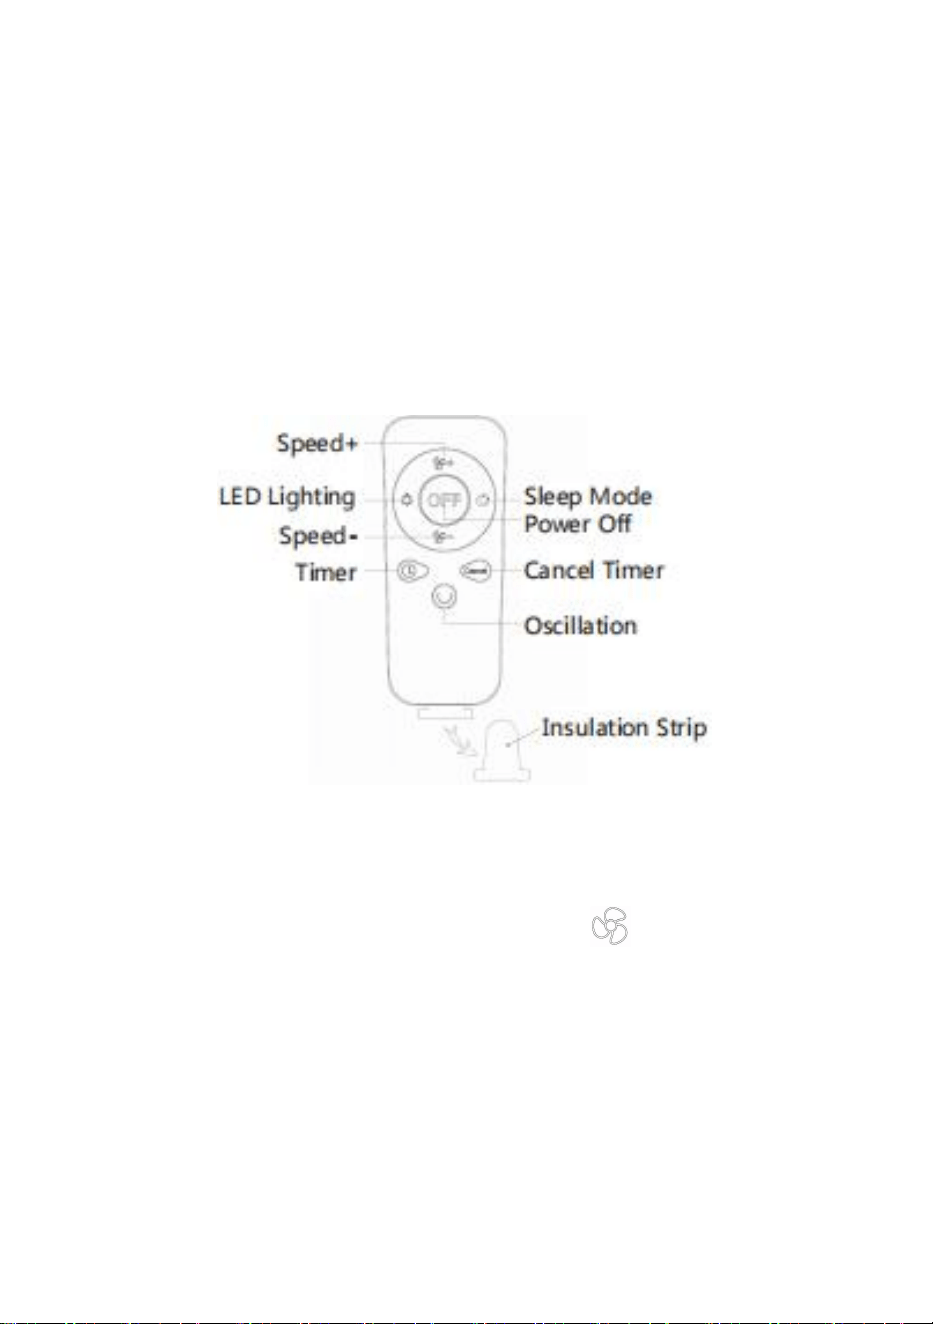
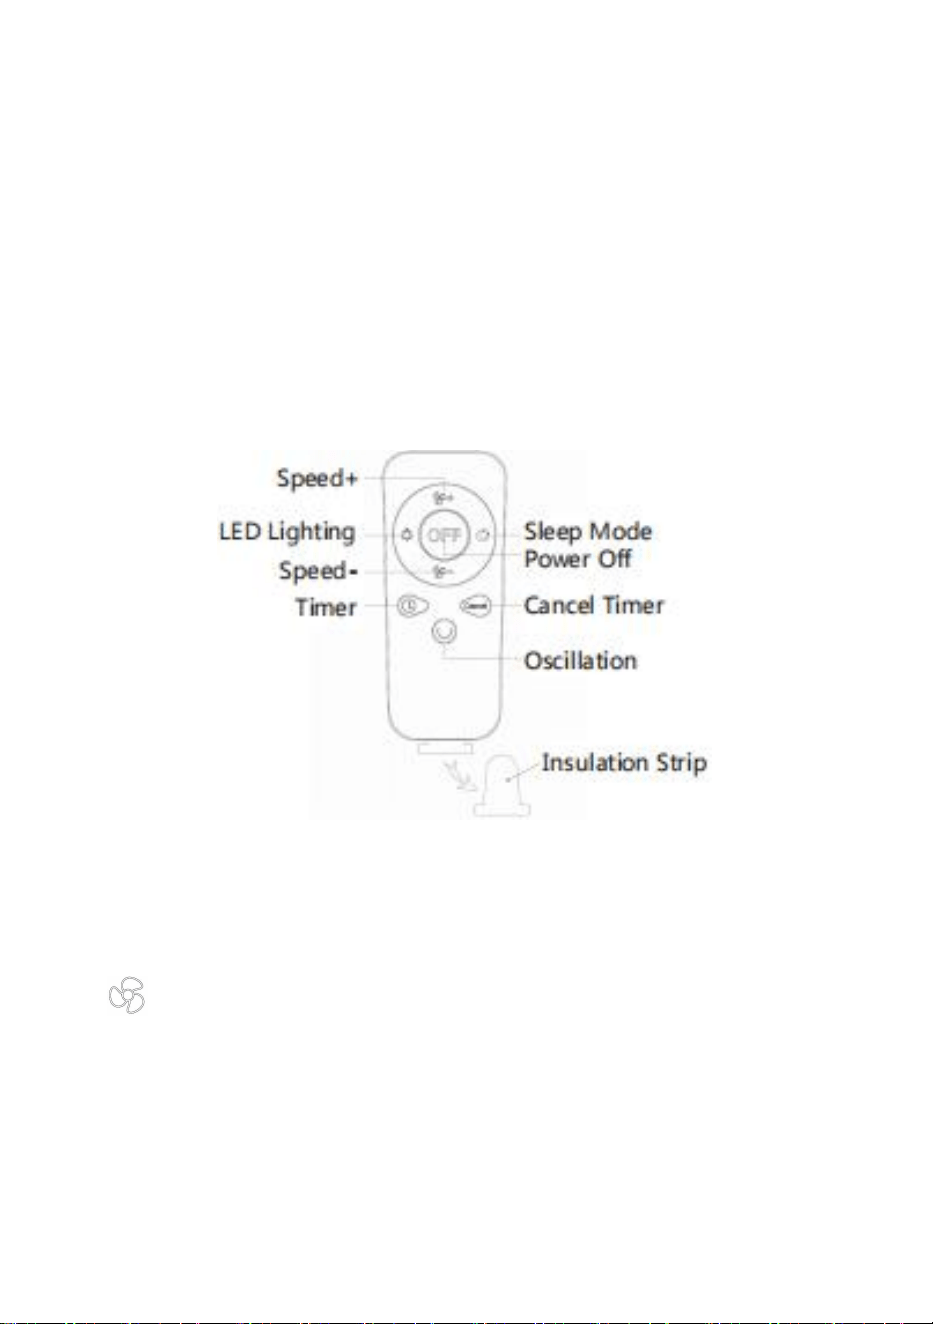
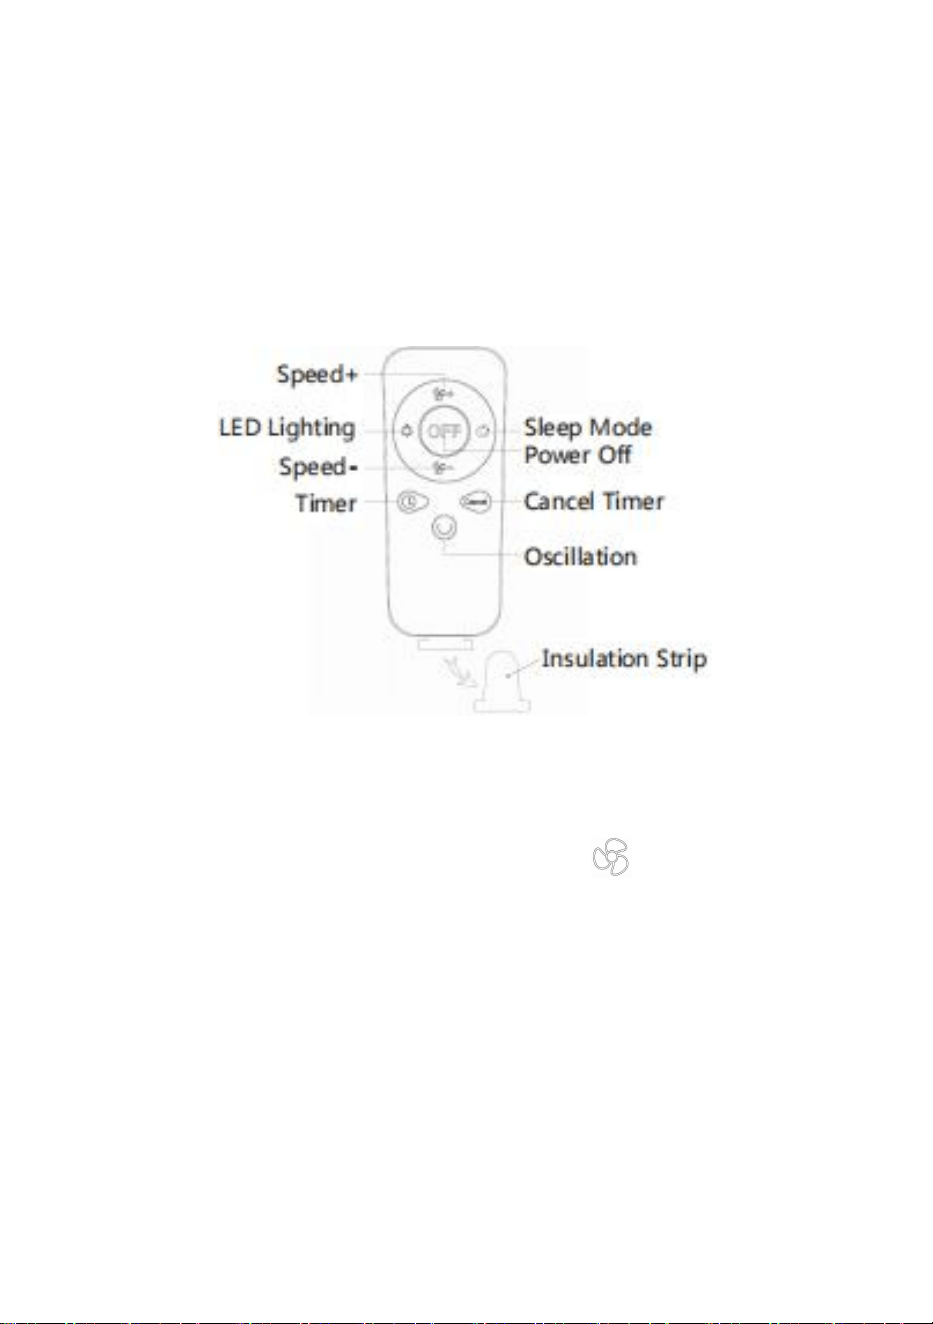
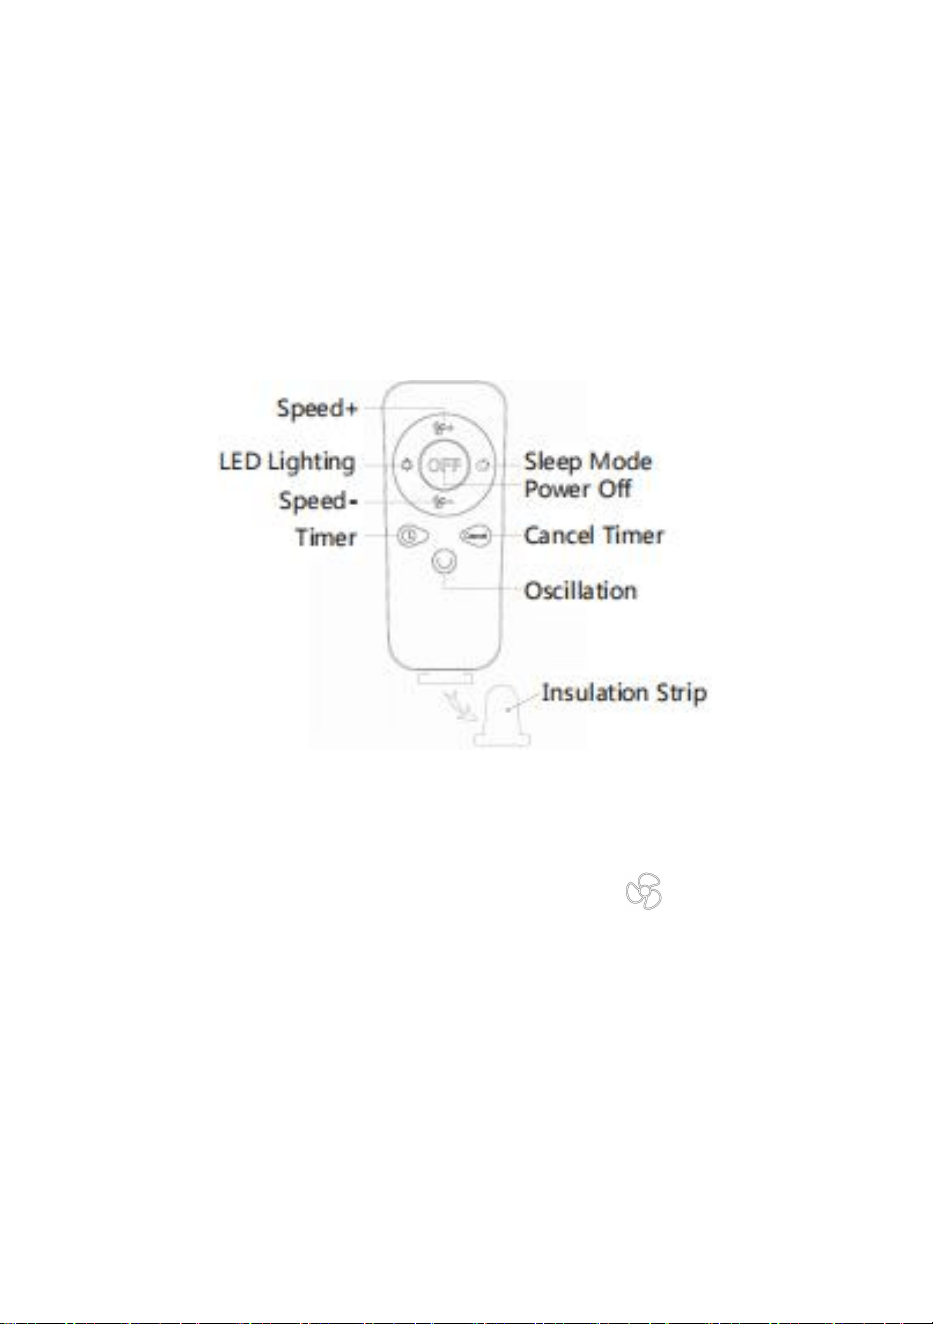
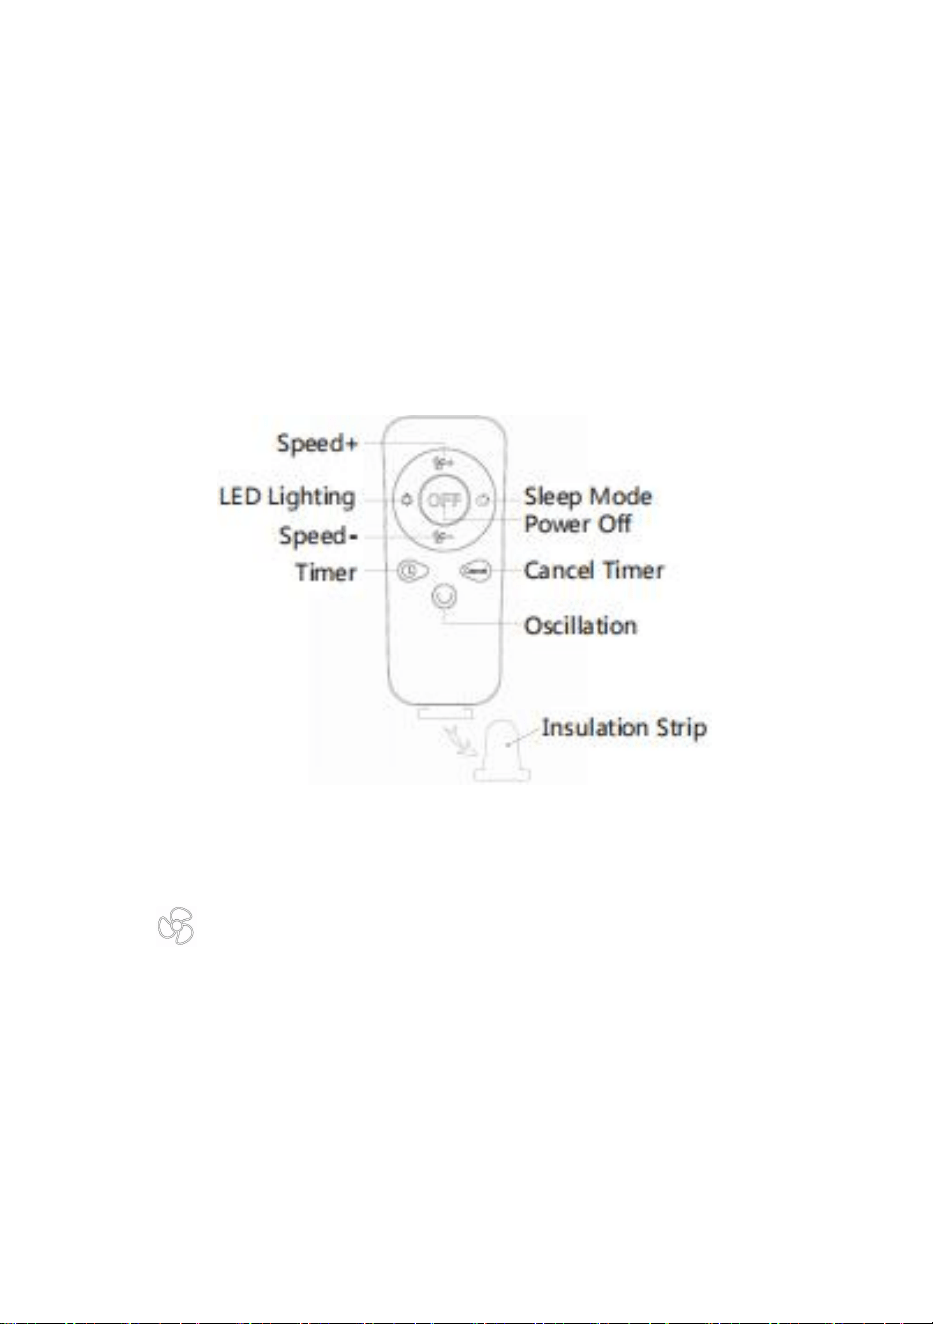
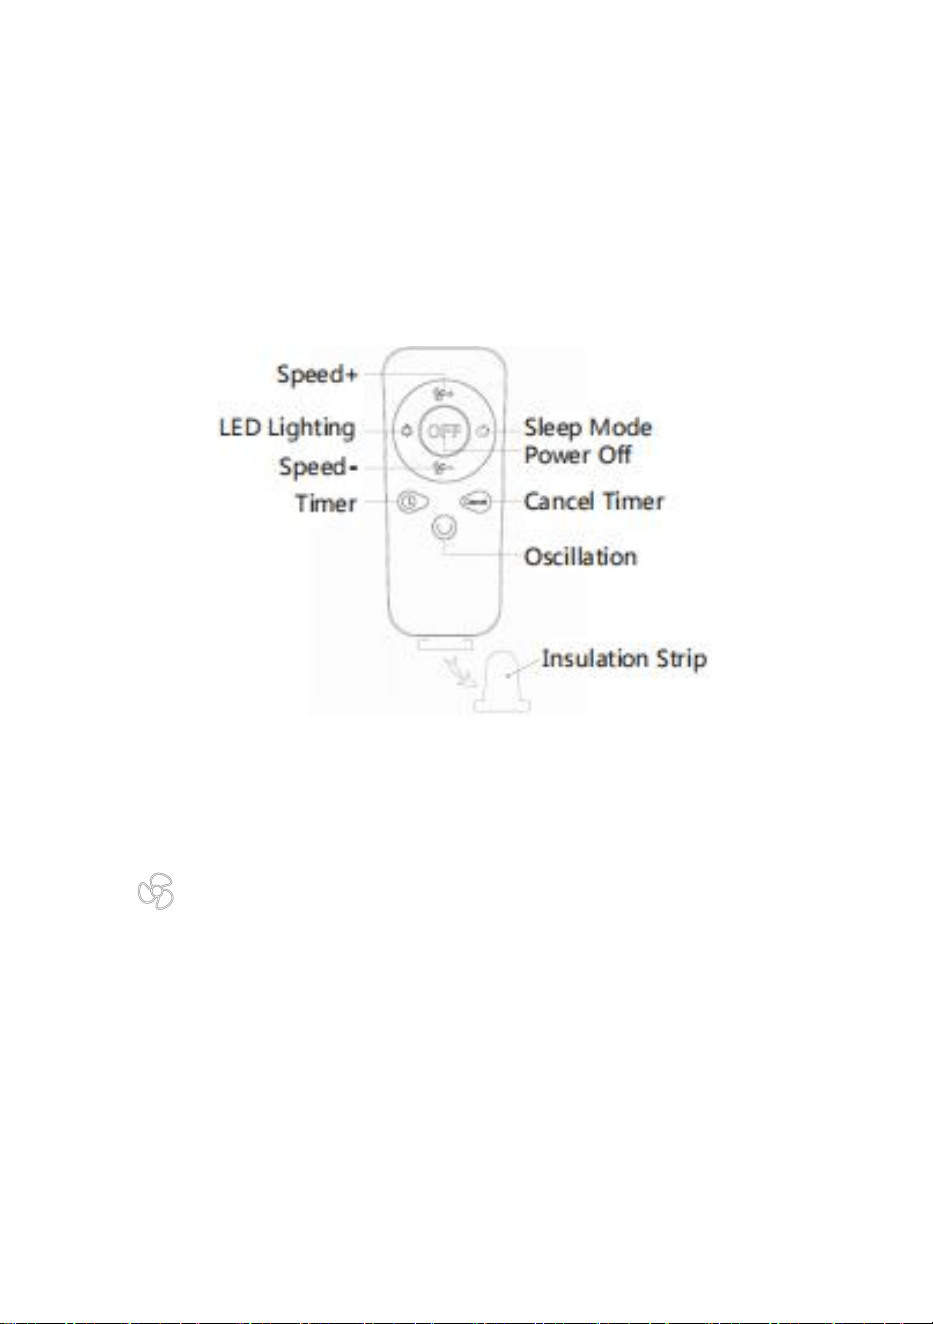
How to Use the Remote:
(1) Please remove the insulation strip before using the remote (see the
picture above);
(2) Activate the remote: The product is at low power consumption mode
when out of factory, press the“ ” button to turn it on and restore the
standard mode as well as activate the remote;
(3) Remote distance: 16.4 feet;
(4) The fan will make a Beep sound when receiving the remote command.
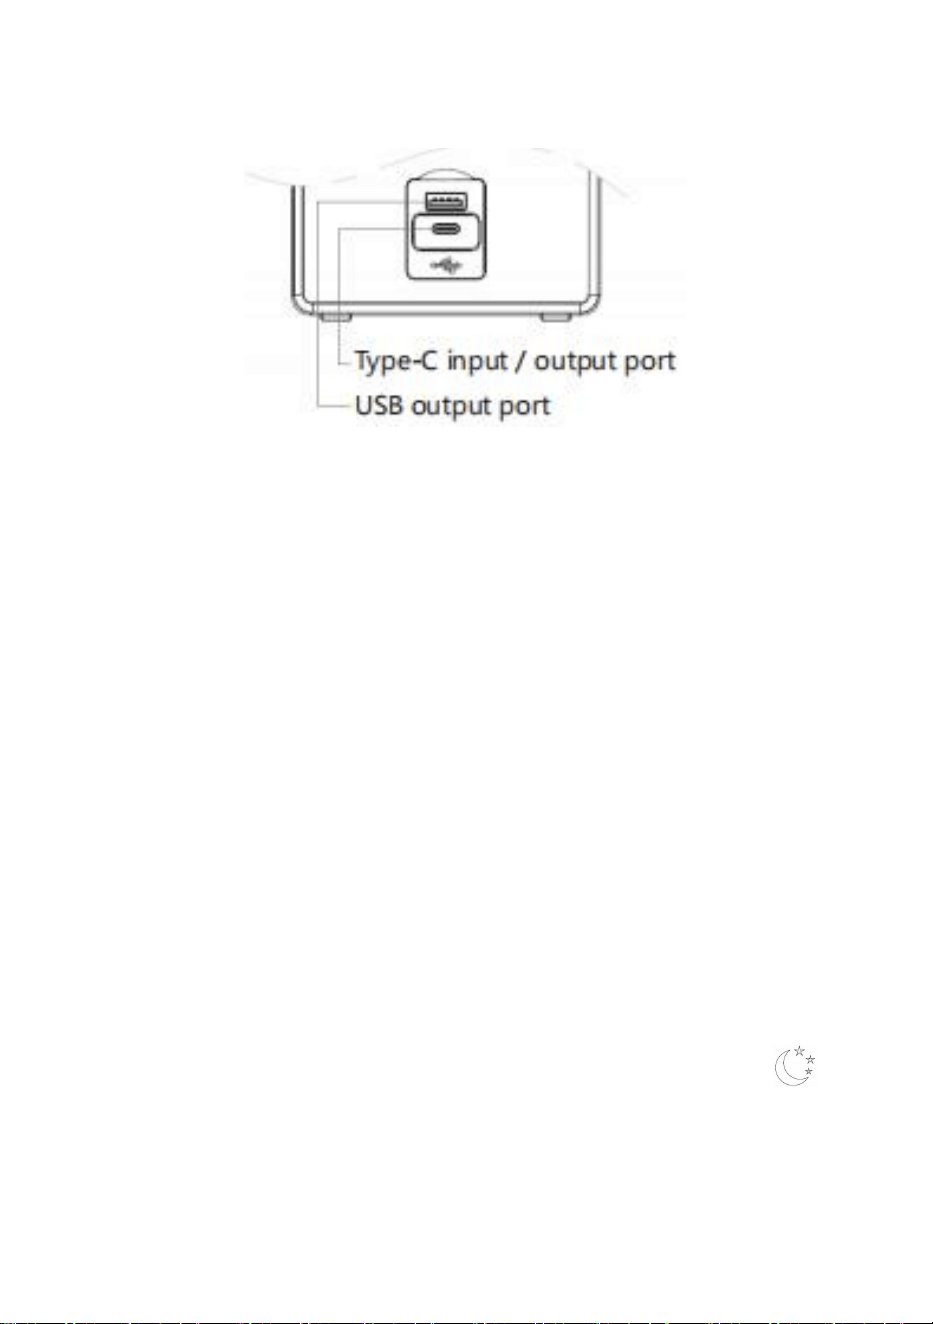
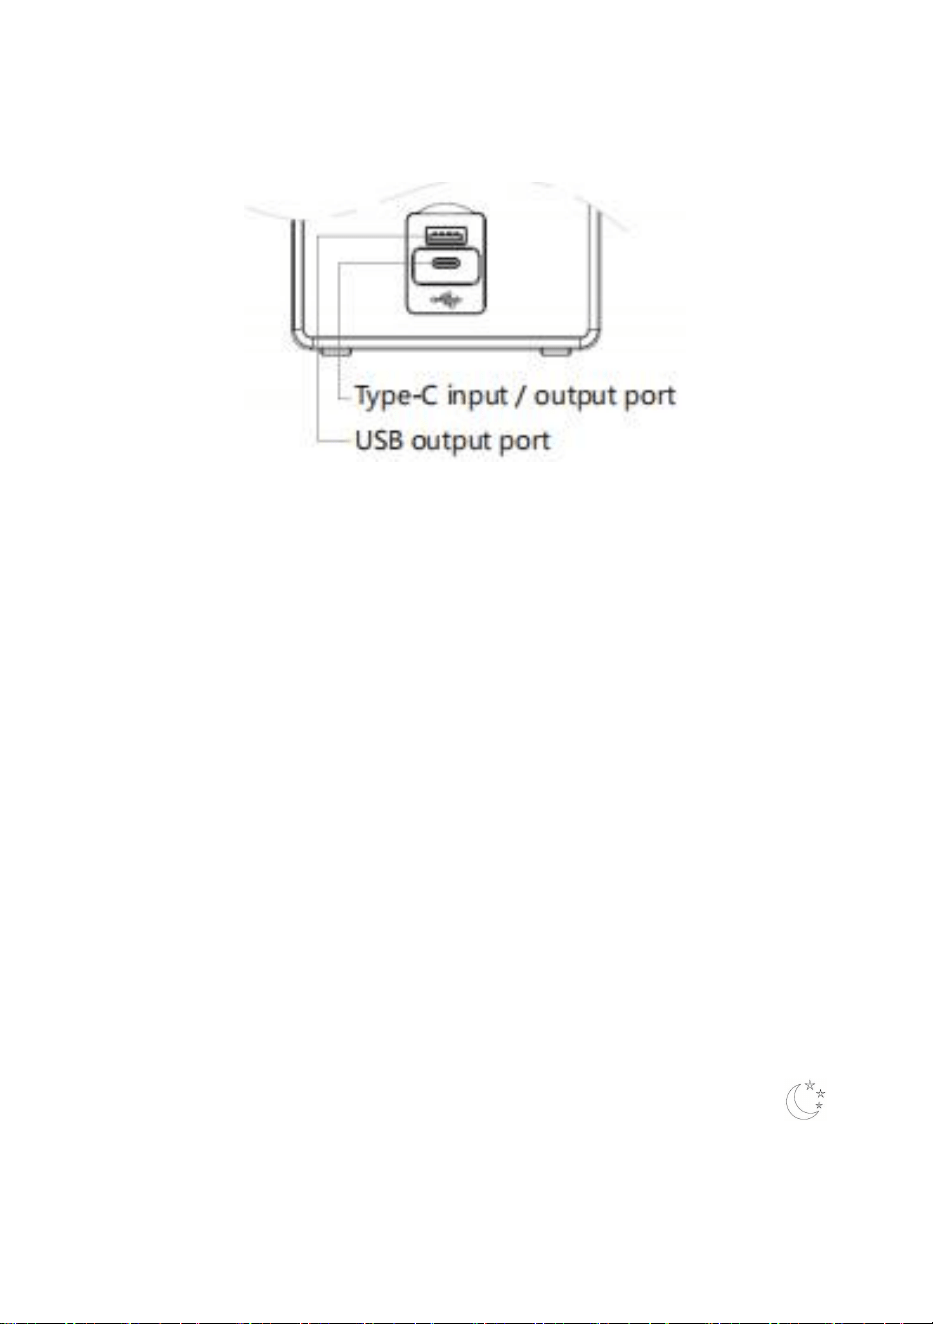
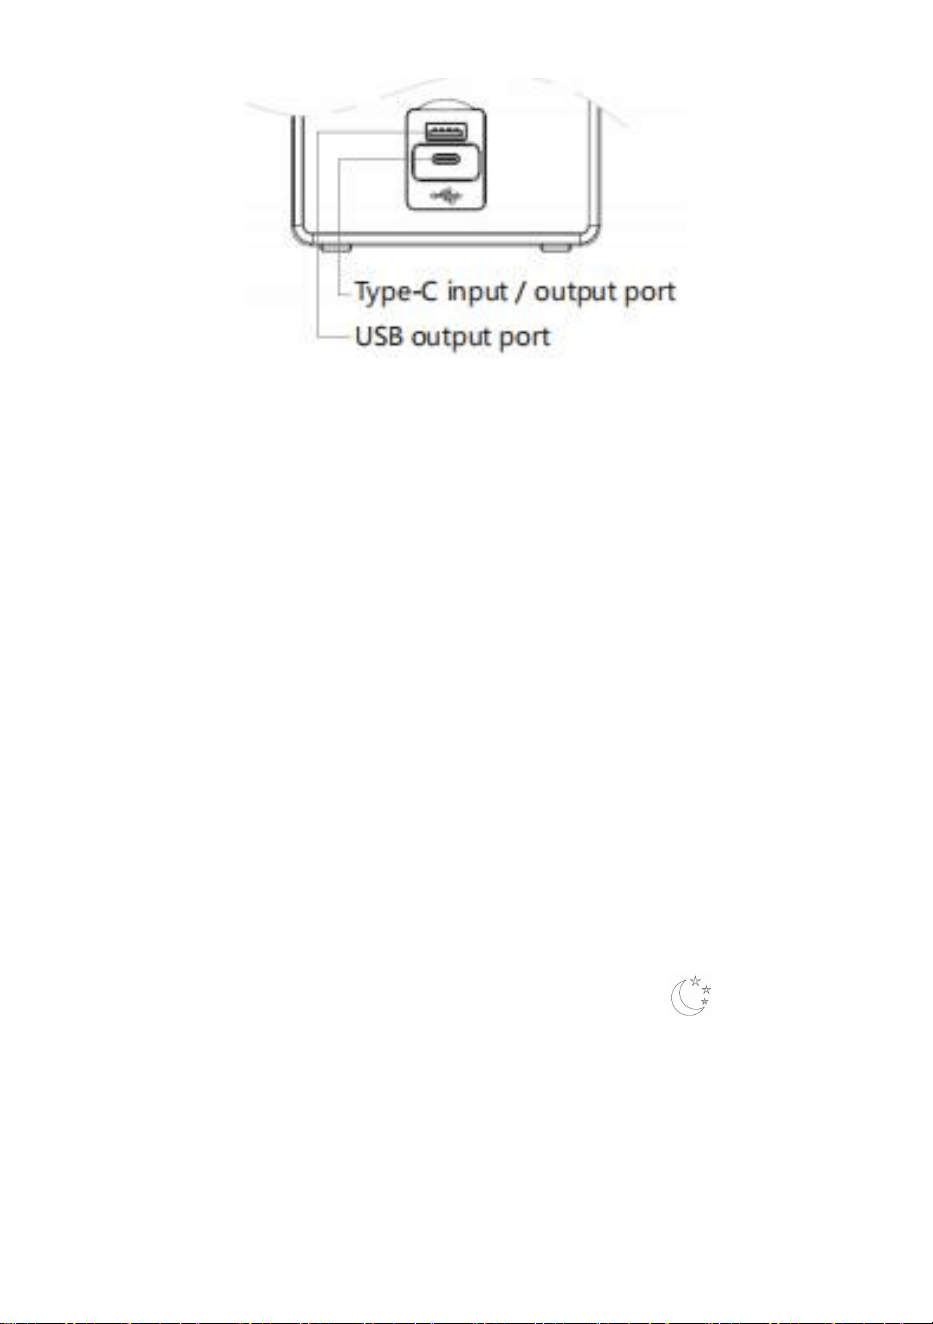
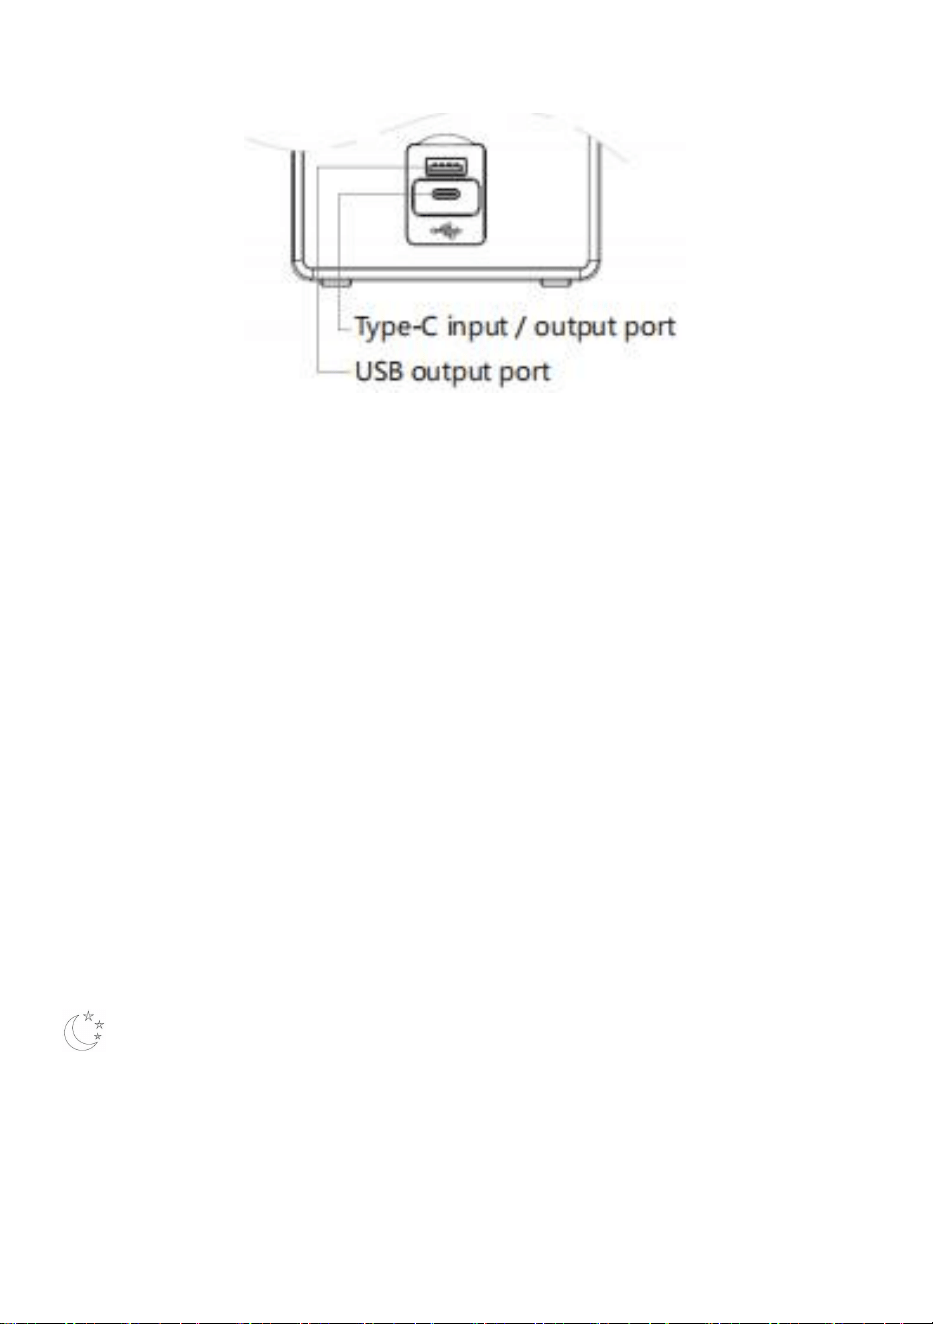
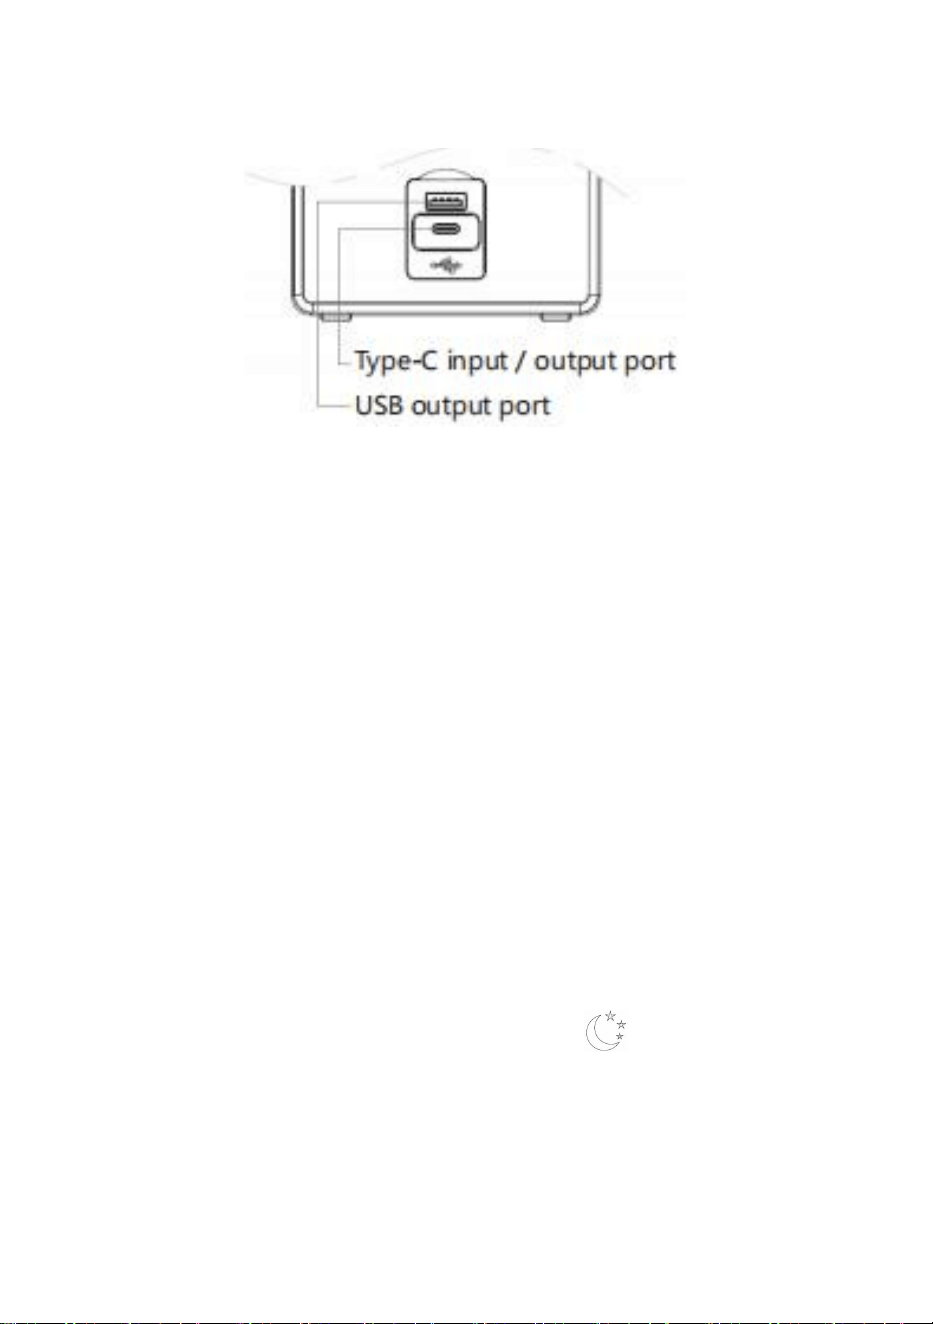
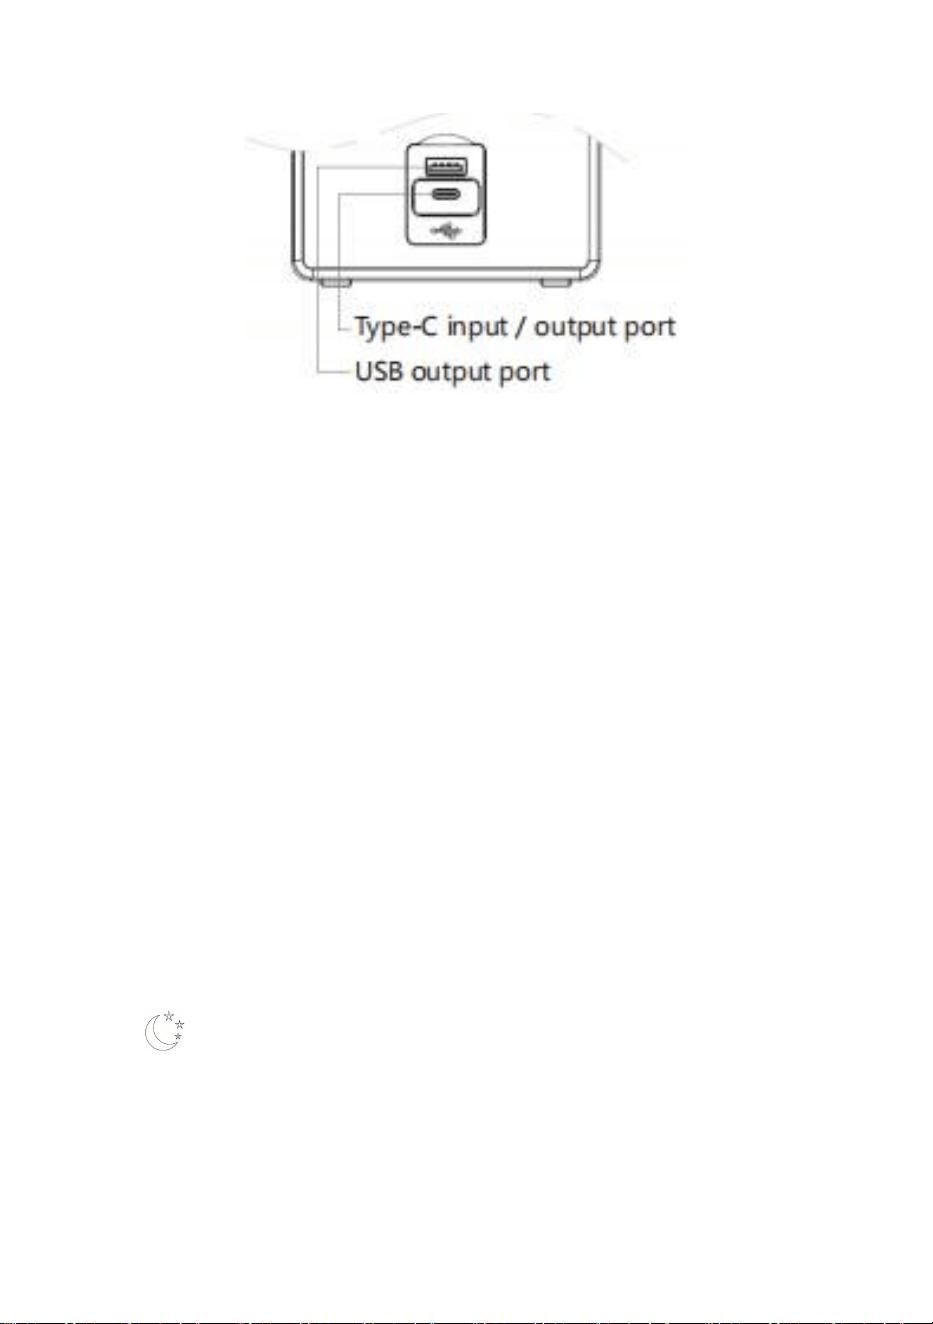
4. Charging / Power Bank Feature Input / Output Ports:

- 7 -
(1) Open the silicone cover before charging.
(2) Charging time: 9-10 hours (test with 5V-3A charger;the charging time
may be a bit longer when power supply is lower than 5V-3A)
(3) Plug in with DC-5V power supply, it will be charged automatically. The
battery indicators will flash during charging, and be steady on when fully
charged.
(4) Power bank feature: it can charge other devices via the charging cord.
When connecting with other devices, please choose the power which is
within the parameter range, or it may cause damage to the
device.
Some mobile phones cannot activate the power bank feature automatically
after connecting, press the“ ” button to manually activate the power
bank feature.
Note: Type-C output port are not compatible with some mobile phones!
Address:Baoshanqu Shuangchenglu 803long 11hao 1602A-1609shi
Shanghai
Imported to AUS: SIHAO PTY LTD. 1 ROKEVA STREETEASTWOOD
NSW 2122 Australia
Imported to USA: Sanven Technology Ltd. Suite 250, 9166 Anaheim
Place, Rancho Cucamonga, CA 91730

- 8 -
REP
UK
Pooledas Group Ltd
Unit 5 Albert Edward House, The Pavilions
Preston, United Kingdom
REP
EC
SHUNSHUN GmbH
Römeräcker 9 Z2021, 76351
Linkenheim-Hochstetten, Germany
Made In China


Assistance technique et certificat de garantie électronique www.vevor.com/support
VENTILATEUR DE SOL PUISSANT
MODÈLE : D12
We continue to be committed to provide you tools with competitive price.
"Save Half", "Half Price" or any other similar expressions used by us only represents an
estimate of savings you might benefit from buying certain tools with us compared to the major
top brands and does not necessarily mean to cover all categories of tools offered by us. You
are kindly reminded to verify carefully when you are placing an order with us if you are
actually saving half in comparison with the top major brands.


- 1 -
MODÈLE : D12
Have product questions? Need technical support? Please feel free to
contact us:
Technical Support and E-Warranty Certificate
www.vevor.com/support
NEED HELP? CONTACT US!
This is the original instruction, please read all manual instructions
carefully before operating. VEVOR reserves a clear interpretation of our
user manual. The appearance of the product shall be subject to the
product you received. Please forgive us that we won't inform you again if
there are any technology or software updates on our product.
POWERFUL FLOOR FAN
- 2 -
Avertissement : Pour réduire le risque de blessure, l'utilisateur
doit lire attentivement le manuel d'instructions.
Cet appareil est conforme à la partie 15 des règles FCC.
L'exploitation est soumise aux deux conditions suivantes
conditions : (1) Cet appareil ne doit pas provoquer
d'interférences nuisibles, et (2) cet appareil doit accepter toute
interférence reçue, y compris les interférences susceptibles de
provoquer un fonctionnement indésirable.
Ce produit est soumis aux dispositions de la directive
européenne 2012/19/CE. Le symbole représentant une
poubelle barrée indique que le produit nécessite une collecte
sélective des déchets dans l'Union européenne. Ceci
s'applique au produit et à tous les accessoires marqués de ce
symbole. Les produits marqués comme tels ne peuvent pas
être jetés avec les ordures ménagères normales, mais doivent
être déposés dans un point de collecte pour le recyclage des
appareils électriques et électroniques.
SPECIFICATION
modèle du
produit
D1 2
Taille du produit
21 0*100* 2 6 8mm
Capacité de la
batterie
20000mAh
Puissance
nominale
15W
Entrée TYPE-C
5V-3A
Sortie TYPE-C
5V-3A

- 3 -
Sortie USB
5V-2A
Vie de la batterie
Ventilateur : vitesse 1≈60H, vitesse 2≈35H, vitesse
3≈25H, vitesse 4≈16H Ventilateur + Oscillation :
vitesse 1≈32H, vitesse 2≈23H vitesse 3≈18H, vitesse
4≈13H
Éclairage LED : niveau 1≈200H, niveau 2≈50H,
niveau 3≈28H
Ventilateur + LED : environ 10H au plus haut niveau
Ventilateur + LED + Oscillation : environ 8,5H au
plus haut niveau
PRODUCT STRUCTURE
- 4 -
SECURITY & WARNINGS
(1) N'exposez pas le produit à des températures élevées, au feu ou sous le
Soleil ;
(2) Ne placez pas le produit dans un endroit humide ;
(3) Ne jetez pas le produit dans un feu et ne vous approchez pas d'un
incendie pour éviter un incendie catastrophique ;
(4) Ne démontez pas, ne coupez pas et ne percez pas le produit ;
(5) Veuillez cesser d'utiliser si des conditions anormales se produisent
pendant l'utilisation du produit ;
(6) Veuillez charger le produit tous les 2-3 mois sinon utilisé pendant une
longue période, pour éviter d'endommager la batterie.
USING INSTRUCTIONS
Panneau de contrôle:
(1) Appuyez brièvement sur le bouton « », le ventilateur basculera

- 5 -
entre la vitesse 1/2/3/4/OFF, appuyez longuement sur ce bouton pour
éteignez-le à n'importe quelle vitesse ;
(2) Lorsque le ventilateur est activé, appuyez brièvement sur le bouton
« » Bouton, le ventilateur oscillera dans les 90 °/45 °/arrêt en tourne,
appuyez longuement sur ce bouton pour désactiver l'oscillation ;
(3) Appuyez brièvement sur le bouton « ", les lumières LED
basculeront entre 1/2/3/OFF ; appuyez longuement sur ce bouton pour
éteignez les lumières LED à n'importe quel niveau ;
(4) mode veille : appuyez brièvement sur le bouton "pour
allumer/éteindre tous les indicateurs ;
(5) Minuterie : appuyez brièvement sur le bouton " "bouton pour
basculer entre minuterie à 1H/2H/4H/8H/off, appuyez longuement sur ce
bouton pour annuler la minuterie ;
(6) Mode faible consommation d'énergie : appuyez simultanément sur le
bouton « » du panneau et le bouton « Annuler » de la télécommande
pendant 3 secondes. Dans tous les cas, le le ventilateur s'éteindra et
entrera dans une faible consommation d'énergie mode. Pendant ce temps,
la télécommande est désactivée. appuie sur le Appuyez à nouveau sur le
bouton « » pour redémarrer le mode standard et activer la
télécommande en même temps. (Lorsque le ventilateur est pas utilisé
depuis longtemps, il est préférable de le conserver à batterie faible mode
consommation, pour éviter la batterie s'épuiser et endommager la
batterie.)
- 6 -
Remarque : le mode veille consiste à éteindre les indicateurs ; quand le
Les indicateurs sont éteints, redémarrez ou la sortie/entrée s'allumera à
nouveau les indicateurs.
Comment utiliser la télécommande :
(1) Veuillez retirer la bande isolante avant d'utiliser le télécommande (voir
l'image ci-dessus);
(2) Activez la télécommande : le produit est à faible puissance Mode de
consommation en sortie d'usine, appuyez sur le bouton « » pour
l'allumer et restaurer la norme mode ainsi que d'activer la télécommande ;
(3) Distance à distance : 16,4 pieds ;
(4) Le ventilateur émettra un bip lors de la réception du commande à
distance.
- 7 -
4. Fonction de charge/batterie externe Ports d'entrée/sortie :
(1) Ouvrez le couvercle en silicone avant de charger.
(2) Temps de charge : 9 à 10 heures (test avec un chargeur 5 V-3 A ; le
temps de charge peut être un peu plus long lors de l'alimentation.
l'alimentation est inférieure à 5V-3A)
(3) Branchez avec l'alimentation DC-5V, il sera chargé automatiquement.
Les indicateurs de batterie clignotent pendant en charge et reste allumé
lorsqu'il est complètement chargé.
(4) Fonction de banque d'alimentation : elle peut charger d'autres appareils
via le cordon de chargement. Lors de la connexion avec d'autres Appareils,
veuillez choisir la puissance qui se trouve dans la plage de paramètres,
sinon cela pourrait endommager le
appareil.
Certains téléphones mobiles ne peuvent pas activer automatiquement la
fonction Power Bank après la connexion, appuyez sur le bouton « »
bouton pour activer manuellement la fonction de banque d'alimentation.
Remarque : les ports de sortie Type-C ne sont pas compatibles avec
certains téléphones portables!

- 8 -
Adresse : Baoshanqu Shuangchenglu 803long 11hao 1602A-1609shi
Shanghai
Importé en Australie : SIHAO PTY LTD. 1 ROKEVA STREETASTWOOD
NSW 2122 Australie
Importé aux États-Unis : Sanven Technology Ltd. Suite 250, 9166
Anaheim Place, Rancho Cucamonga, CA 91730
REP
UK
Pooledas Group Ltd
Unit 5 Albert Edward House, The Pavilions
Preston, United Kingdom
REP
EC
SHUNSHUN GmbH
Römeräcker 9 Z2021, 76351
Linkenheim-Hochstetten, Germany
Fabriqué en Chine

- 9 -


Technischer Support und E-Garantiezertifikat www.vevor.com/support
LEISTUNGSSTARKER
BODENVENTILATOR
MODELL: D12
We continue to be committed to provide you tools with competitive price.
"Save Half", "Half Price" or any other similar expressions used by us only represents an
estimate of savings you might benefit from buying certain tools with us compared to the major
top brands and does not necessarily mean to cover all categories of tools offered by us. You
are kindly reminded to verify carefully when you are placing an order with us if you are
actually saving half in comparison with the top major brands.


- 1 -
MODELL: D12
Have product questions? Need technical support? Please feel free to
contact us:
Technical Support and E-Warranty Certificate
www.vevor.com/support
NEED HELP? CONTACT US!
This is the original instruction, please read all manual instructions
carefully before operating. VEVOR reserves a clear interpretation of our
user manual. The appearance of the product shall be subject to the
product you received. Please forgive us that we won't inform you again if
there are any technology or software updates on our product.
POWERFUL FLOOR FAN
- 2 -
Warnung: Um das Verletzungsrisiko zu verringern, muss der
Benutzer die Bedienungsanleitung sorgfältig lesen.
Dieses Gerät entspricht Teil 15 der FCC-Bestimmungen. Der
Betrieb unterliegt den folgenden zwei Bedingungen: (1) Dieses
Gerät darf keine schädlichen Störungen verursachen und (2)
dieses Gerät muss alle empfangenen Störungen akzeptieren,
einschließlich Störungen, die einen unerwünschten Betrieb
verursachen können.
Dieses Produkt unterliegt den Bestimmungen der
europäischen Richtlinie 2012/19/EG. Das Symbol einer
durchgestrichenen Mülltonne weist darauf hin, dass das
Produkt in der Europäischen Union einer getrennten
Müllsammlung bedarf. Dies gilt für das Produkt und alle
Zubehörteile, die mit diesem Symbol gekennzeichnet sind. Als
solche gekennzeichnete Produkte dürfen nicht über den
normalen Hausmüll entsorgt werden, sondern müssen an
einer Sammelstelle für das Recycling von Elektro- und
Elektronikgeräten abgegeben werden.
SPECIFICATION
Produktmodell
D1 2
Produktgröße
21 0*100* 2 6 8mm
Batteriekapazität
20000 mAh
Nennleistung
15W
TYPE-C-Eingang
5V-3A
TYPE-C-Ausgang
5V-3A
- 3 -
USB-Ausgang
5V-2A
Batterielebensdauer
Lüfter: Geschwindigkeit 1≈60H, Geschwindigkeit
2≈35H, Geschwindigkeit 3≈25H, Geschwindigkeit
4≈16H Lüfter + Oszillation: Geschwindigkeit 1≈32H,
Geschwindigkeit 2≈23H Geschwindigkeit 3≈18H,
Geschwindigkeit 4≈13H
LED-Beleuchtung: Stufe 1≈200 Std., Stufe 2≈50
Std., Stufe 3≈28 Std
Lüfter + LED: ca. 10H auf höchster Stufe
Lüfter + LED + Oszillation: ca. 8,5 Stunden auf
höchster Stufe
PRODUCT STRUCTURE
- 4 -
SECURITY & WARNINGS
(1) Setzen Sie das Produkt keinen hohen Temperaturen oder Feuer aus
oder unter der Sonne;
(2) Stellen Sie das Produkt nicht an einem feuchten Ort auf;
(3) Werfen Sie das Produkt nicht ins Feuer oder nähern Sie sich nicht
einem Feuer zur Vermeidung einer Brandkatastrophe;
(4) Zerlegen, zerschneiden oder durchstechen Sie das Produkt nicht;
(5) Bitte stellen Sie die Verwendung ein, wenn ungewöhnliche
Bedingungen auftreten während der Verwendung des Produkts;
(6) Wenn nicht, laden Sie das Produkt bitte alle 2-3 Monate auf nicht über
einen längeren Zeitraum verwendet werden, um Schäden am Akku zu
vermeiden.
USING INSTRUCTIONS
Bedienfeld:

- 5 -
(1) Drücken Sie kurz die Taste „ “, der Ventilator wechselt zwischen
der Geschwindigkeit 1/2/3/4/AUS, drücken Sie diese Taste lange, um
schalten Sie es bei jeder Geschwindigkeit aus;
(2) Wenn der Lüfter aktiviert ist, drücken Sie kurz die Taste „ “ . Wenn
Sie die Taste drücken, schwingt der Lüfter innerhalb von 90 °/45 °/aus
Umdrehungen, langes Drücken dieser Taste schaltet die Oszillation aus;
(3) Drücken Sie kurz die Taste „ ”Taste, die LED-Leuchten wechseln
zwischen 1/2/3/AUS; Drücken Sie diese Taste lange, um Schalten Sie die
LED-Leuchten auf jeder Ebene aus.
(4) Leep-Modus: Drücken Sie kurz die Taste „, um alle Anzeigen
ein-/auszuschalten;
(5) Timer: Drücken Sie kurz die Taste „ ”-Taste zum Umschalten Timer
um 1H/2H/4H/8H/aus, drücken Sie lange auf diese Taste Timer abbrechen;
(6) Modus mit geringem Stromverbrauch: Drücken Sie gleichzeitig die
Taste „ “ auf dem Bedienfeld und Drücken Sie auf jeden Fall 3
Sekunden lang die Taste „Abbrechen“ auf der Fernbedienung Der Lüfter
schaltet sich aus und der Stromverbrauch sinkt Modus. Inzwischen ist die
Fernbedienung deaktiviert. Drücken Sie die Taste „ “-Taste erneut, um
den Standardmodus neu zu starten und Aktivieren Sie gleichzeitig die
Fernbedienung. (Wenn der Lüfter ist Wenn es längere Zeit nicht verwendet
wird, ist es besser, es aufzubewahren geringer Strom Verbrauchsmodus,
um die Batterie zu schonen Die Batterie kann leer werden und den Akku
- 6 -
beschädigen.)
Hinweis: Im Schlafmodus werden die Anzeigen ausgeschaltet. wenn das
Wenn die Anzeigen aus sind, wird ein Neustart oder Ausgang/Eingang
eingeschaltet die Indikatoren wieder.
So verwenden Sie die Fernbedienung:
(1) Bitte entfernen Sie den Isolierstreifen, bevor Sie das verwenden
Fernbedienung (siehe Bild oben);
(2) Fernbedienung aktivieren: Das Produkt hat einen niedrigen
Stromverbrauch Wenn Sie den Verbrauchsmodus verlassen, drücken Sie
die Taste „ “, um ihn einzuschalten und den Standard
wiederherzustellen Modus sowie die Fernbedienung aktivieren;
(3) Fernentfernung: 16,4 Fuß;
(4) Der Ventilator gibt beim Empfang einen Piepton von sich Fernbefehl.
- 7 -
4. Lade-/Powerbank-Funktion Eingabe-/Ausgabeanschlüsse:
(1) Öffnen Sie die Silikonhülle vor dem Laden.
(2) Ladezeit: 9–10 Stunden (Test mit 5 V–3 A Ladegerät; die Ladezeit kann
bei Stromversorgung etwas länger sein Versorgung ist niedriger als 5V-3A)
(3) Schließen Sie das Gerät an ein 5-V-Gleichstromnetzteil an und laden
Sie es auf automatisch. Die Batterieanzeigen blinken währenddessen
geladen wird, und leuchtet dauerhaft, wenn der Akku vollständig
aufgeladen ist.
(4) Powerbank-Funktion: Es können andere Geräte darüber aufgeladen
werden das Ladekabel. Bei der Verbindung mit anderen Geräte, bitte
wählen Sie die Leistung aus, die innerhalb der liegt Parameterbereich, da
es sonst zu Schäden am Gerät kommen kann
Gerät.
Einige Mobiltelefone können die Powerbank-Funktion nach dem
Anschließen nicht automatisch aktivieren. Drücken Sie die Taste „ “ .
Drücken Sie die Taste, um die Powerbank-Funktion manuell zu aktivieren.
Hinweis: Der Typ-C-Ausgangsanschluss ist mit einigen nicht kompatibel
- 8 -
Mobiltelefone!
Adresse: Baoshanqu Shuangchenglu 803long 11hao 1602A-1609shi
Shanghai
Importiert nach AUS: SIHAO PTY LTD. 1 ROKEVA STREETEASTWOOD
NSW 2122 Australien
In die USA importiert: Sanven Technology Ltd. Suite 250, 9166 Anaheim
Place, Rancho Cucamonga, CA 91730
REP
UK
Pooledas Group Ltd
Unit 5 Albert Edward House, The Pavilions
Preston, United Kingdom
REP
EC
SHUNSHUN GmbH
Römeräcker 9 Z2021, 76351
Linkenheim-Hochstetten, Germany
In China hergestellt

- 9 -


Supporto tecnico e certificato di garanzia elettronica www.vevor.com/support
POTENTE VENTILATORE DA PAVIMENTO
MODELLO: D12
We continue to be committed to provide you tools with competitive price.
"Save Half", "Half Price" or any other similar expressions used by us only represents an
estimate of savings you might benefit from buying certain tools with us compared to the major
top brands and does not necessarily mean to cover all categories of tools offered by us. You
are kindly reminded to verify carefully when you are placing an order with us if you are
actually saving half in comparison with the top major brands.


- 1 -
MODELLO: D12
Have product questions? Need technical support? Please feel free to
contact us:
Technical Support and E-Warranty Certificate
www.vevor.com/support
NEED HELP? CONTACT US!
This is the original instruction, please read all manual instructions
carefully before operating. VEVOR reserves a clear interpretation of our
user manual. The appearance of the product shall be subject to the
product you received. Please forgive us that we won't inform you again if
there are any technology or software updates on our product.
POWERFUL FLOOR FAN
- 2 -
Avvertenza: per ridurre il rischio di lesioni, l'utente deve
leggere attentamente il manuale di istruzioni.
Questo dispositivo è conforme alla Parte 15 delle norme FCC.
Il funzionamento è soggetto ai due seguenti condizioni: (1)
Questo dispositivo non può causare interferenze dannose e
(2) questo dispositivo deve accettare qualsiasi interferenza
ricevuta, comprese le interferenze che potrebbero causare un
funzionamento indesiderato.
Questo prodotto è soggetto alle disposizioni della Direttiva
Europea 2012/19/CE. Il simbolo del bidone della spazzatura
barrato indica che nell'Unione Europea il prodotto richiede la
raccolta differenziata dei rifiuti. Ciò vale per il prodotto e tutti gli
accessori contrassegnati da questo simbolo. I prodotti
contrassegnati come tali non possono essere smaltiti con i
normali rifiuti domestici, ma devono essere portati in un punto
di raccolta per il riciclaggio di dispositivi elettrici ed elettronici.
SPECIFICATION
Modello di
prodotto
D12 _
Taglia del
prodotto
21 0*100* 2 6 8 mm
Capacità della
batteria
20000 mAh
Potenza
nominale
15 W
Ingresso TIPO C
5V-3A
Uscita TIPO C
5V-3A
- 3 -
Uscita USB
5 V-2 A
Durata della
batteria
Ventola: velocità 1≈60H, velocità 2≈35H, velocità
3≈25H, velocità 4≈16H Ventola + Oscillazione:
velocità 1≈32H, velocità 2≈23H velocità 3≈18H,
velocità 4≈13H
Illuminazione a LED: livello 1≈200H, livello 2≈50H,
livello 3≈28H
Ventola + LED: circa 10H al massimo livello
Ventola + LED + Oscillazione: circa 8,5H al
massimo livello
PRODUCT STRUCTURE
- 4 -
SECURITY & WARNINGS
(1) Non esporre il prodotto a temperature elevate o fuoco o sotto il sole;
(2) Non mettere il prodotto in luoghi umidi;
(3) Non gettare il prodotto nel fuoco né avvicinarsi a fuoco per evitare
disastri incendiari;
(4) Non smontare, tagliare o forare il prodotto;
(5) Interrompere l'utilizzo se si verificano condizioni anomale durante
l'utilizzo del prodotto;
(6) In caso contrario, caricare il prodotto ogni 2-3 mesi utilizzato per un
lungo periodo, per evitare danni alla batteria.
USING INSTRUCTIONS
Pannello di controllo:
(1) Premere brevemente il pulsante “ ”, la ventola passerà da una
velocità all'altra 1/2/3/4/OFF, premere a lungo questo pulsante per spegnilo
- 5 -
a qualsiasi velocità;
(2) Quando la ventola è abilitata, premere brevemente il pulsante " "
pulsante, la ventola oscillerà entro 90°/45°/spenta in gira, premere a lungo
questo pulsante per disattivare l'oscillazione;
(3) Premere brevemente il tasto " ”, le luci LED passeranno tra
1/2/3/OFF; premere a lungo questo pulsante per spegnere le luci LED a
qualsiasi livello;
(4) modalità leep: premere brevemente il pulsante “per
accendere/spegnere tutti gli indicatori;
(5) Timer: premere brevemente il pulsante " "pulsante per passare da
uno all'altro timer alle 1H/2H/4H/8H/off, premere a lungo questo pulsante
per annullare il timer;
(6) Modalità a basso consumo energetico: premere contemporaneamente
il pulsante " " sul pannello e in ogni caso il pulsante “Annulla” sul
telecomando per 3 secondi, il la ventola si spegnerà e entrerà in un basso
consumo energetico modalità. Nel frattempo il telecomando è disabilitato.
premi il Premere nuovamente il pulsante “ ” per riavviare la modalità
standard e abilitare contemporaneamente il telecomando. (Quando il
ventilatore è non utilizzato per molto tempo, è meglio conservarlo bassa
potenza modalità di consumo, per evitare la batteria esaurirsi e causare
danni alla batteria.)
Nota: la modalità di sospensione prevede lo spegnimento degli indicatori;
- 6 -
quando il gli indicatori sono spenti, si riavvierà o l'uscita/ingresso si
accenderà nuovamente gli indicatori.
Come utilizzare il telecomando:
(1) Rimuovere la striscia isolante prima di utilizzare telecomando (vedi
immagine sopra);
(2) Attivare il telecomando: il prodotto è a bassa potenza modalità
consumo quando fuori dalla fabbrica, premere il pulsante “ ” per
accenderlo e ripristinare lo standard modalità e attivare il telecomando;
(3) Distanza remota: 16,4 piedi;
(4) La ventola emetterà un segnale acustico quando riceverà il comando
remoto.
4. Funzionalità di ricarica/power bank Porte di ingresso/uscita:
- 7 -
(1) Aprire la copertura in silicone prima della ricarica.
(2) Tempo di ricarica: 9-10 ore (test con caricabatterie 5V-3A; il tempo di
ricarica potrebbe essere leggermente più lungo quando è acceso
l'alimentazione è inferiore a 5 V-3 A)
(3) Collegare con l'alimentatore DC-5V, verrà caricato automaticamente.
Gli indicatori della batteria lampeggeranno durante ricarica e rimanere
acceso quando è completamente carico.
(4) Funzione power bank: può caricare altri dispositivi tramite il cavo di
ricarica. Quando ti connetti con altri dispositivi, si prega di scegliere la
potenza che rientra nei limiti intervallo dei parametri, altrimenti potrebbe
causare danni al
dispositivo.
Alcuni telefoni cellulari non possono attivare automaticamente la funzione
power bank dopo la connessione, premere il pulsante " " pulsante
per attivare manualmente la funzione power bank.
Nota: la porta di uscita di tipo C non è compatibile con alcuni cellulari!
- 8 -
Indirizzo: Baoshanqu Shuangchenglu 803long 11hao 1602A-1609shi
Shanghai
Importato in Australia: SIHAO PTY LTD. 1 ROKEVA
STREETEASTWOOD NSW 2122 Australia
Importato negli Stati Uniti: Sanven Technology Ltd. Suite 250, 9166
Anaheim Place, Rancho Cucamonga, CA 91730
REP
UK
Pooledas Group Ltd
Unit 5 Albert Edward House, The Pavilions
Preston, United Kingdom
REP
EC
SHUNSHUN GmbH
Römeräcker 9 Z2021, 76351
Linkenheim-Hochstetten, Germany
Made in China

- 9 -


Soporte técnico y certificado de garantía electrónica www.vevor.com/support
POTENTE VENTILADOR DE PISO
MODELO: D12
We continue to be committed to provide you tools with competitive price.
"Save Half", "Half Price" or any other similar expressions used by us only represents an
estimate of savings you might benefit from buying certain tools with us compared to the major
top brands and does not necessarily mean to cover all categories of tools offered by us. You
are kindly reminded to verify carefully when you are placing an order with us if you are
actually saving half in comparison with the top major brands.


- 1 -
MODELO: D12
Have product questions? Need technical support? Please feel free to
contact us:
Technical Support and E-Warranty Certificate
www.vevor.com/support
NEED HELP? CONTACT US!
This is the original instruction, please read all manual instructions
carefully before operating. VEVOR reserves a clear interpretation of our
user manual. The appearance of the product shall be subject to the
product you received. Please forgive us that we won't inform you again if
there are any technology or software updates on our product.
POWERFUL FLOOR FAN
- 2 -
Advertencia: para reducir el riesgo de lesiones, el usuario
debe leer atentamente el manual de instrucciones.
Este dispositivo cumple con la Parte 15 de las normas de la
FCC. El funcionamiento está sujeto a las siguientes dos
condiciones: (1) Este dispositivo no puede causar
interferencias dañinas y (2) este dispositivo debe aceptar
cualquier interferencia recibida, incluidas las interferencias
que puedan causar un funcionamiento no deseado.
Este producto está sujeto a las disposiciones de la Directiva
Europea 2012/19/CE. El símbolo que muestra un contenedor
con ruedas tachado indica que el producto requiere recogida
selectiva de basura en la Unión Europea. Esto se aplica al
producto y a todos los accesorios marcados con este símbolo.
Los productos marcados como tales no podrán desecharse
junto con la basura doméstica normal, sino que deberán
llevarse a un punto de recogida para el reciclaje de aparatos
eléctricos y electrónicos.
SPECIFICATION
Modelo del
Producto
D1 2
Tamaño del
producto
21 0*100* 2 6 8mm
Capacidad de la
batería
20000mAh
Potencia nominal
15W
Entrada TIPO C
5V-3A
Salida TIPO C
5V-3A

- 3 -
Salida USB
5V-2A
Duración de la
batería
Ventilador: velocidad 1≈60H, velocidad 2≈35H,
velocidad 3≈25H, velocidad 4≈16H Ventilador +
Oscilación: velocidad 1≈32H, velocidad 2≈23H
velocidad 3≈18H, velocidad 4≈13H
Iluminación LED: nivel 1≈200H, nivel 2≈50H, nivel
3≈28H
Ventilador + LED: aproximadamente 10H al nivel
más alto
Ventilador + LED + Oscilación: alrededor de 8,5 H
en el nivel más alto
PRODUCT STRUCTURE
- 4 -
SECURITY & WARNINGS
(1) No exponga el producto a altas temperaturas, fuego o bajo el sol;
(2) No coloque el producto en un lugar húmedo;
(3) No arroje el producto al fuego ni se acerque a una fuego para evitar
desastres provocados por incendios;
(4) No desmonte, corte ni perfore el producto;
(5) Deje de usarlo si ocurren condiciones anormales durante el uso del
producto;
(6) Cargue el producto cada 2-3 meses si no utilizado durante mucho
tiempo, para evitar daños a la batería.
USING INSTRUCTIONS
Panel de control:
(1) Presione brevemente el botón " ", el ventilador cambiará entre

- 5 -
velocidades 1/2/3/4/OFF, mantenga presionado este botón para apáguelo
a cualquier velocidad;
(2) Cuando el ventilador esté habilitado, presione brevemente el botón "
" Botón, el ventilador oscilará dentro de 90 °/45 °/apagado en gira,
mantenga presionado este botón para apagar la oscilación;
(3) Presione brevemente el botón " ", las luces LED cambiarán entre
1/2/3/OFF; mantenga presionado este botón para apague las luces LED
en cualquier nivel;
(4) modo de suspensión: presione brevemente el botón "para
encender/apagar todos los indicadores;
(5) Temporizador: presione brevemente el botón " "Botón para
cambiar entre temporizador en 1H/2H/4H/8H/apagado, mantenga
presionado este botón para cancelar el temporizador;
(6) Modo de bajo consumo de energía: presione simultáneamente el
botón " " en el panel y el botón “Cancelar” en el control remoto durante
3 segundos en cualquier caso, el El ventilador se apagará y entrará en
bajo consumo de energía. modo. Mientras tanto, el control remoto está
desactivado. presione el Botón “ ” nuevamente para reiniciar el modo
estándar y habilite el control remoto al mismo tiempo. (Cuando el
ventilador está no se utiliza durante mucho tiempo, es mejor guardarlo en
baja potencia modo de consumo, para evitar que la batería agotándose y
causando daños a la batería.)
- 6 -
Nota: El modo de suspensión sirve para apagar los indicadores; cuando el
Los indicadores están apagados, reinicie o la salida/entrada se encenderá.
los indicadores nuevamente.
Cómo utilizar el control remoto:
(1) Retire la tira aislante antes de usar el control remoto (vea la imagen de
arriba);
(2) Active el control remoto: El producto tiene poca energía. Modo de
consumo cuando esté fuera de fábrica, presione el botón " " para
encenderlo y restaurar el estándar. modo así como activar el control
remoto;
(3) Distancia remota: 16,4 pies;
(4) El ventilador emitirá un pitido al recibir la señal. comando remoto.
4. Función de carga/banco de energía Puertos de entrada/salida:
- 7 -
(1) Abra la cubierta de silicona antes de cargar.
(2) Tiempo de carga: 9-10 horas (prueba con un cargador de 5V-3A; el
tiempo de carga puede ser un poco más largo cuando la energía el
suministro es inferior a 5V-3A)
(3) Conéctelo con una fuente de alimentación DC-5V, se cargará
automáticamente. Los indicadores de batería parpadearán durante
cargando y permanece encendido cuando esté completamente cargado.
(4) Función de banco de energía: puede cargar otros dispositivos a través
de el cable de carga. Al conectarse con otros dispositivos, elija la potencia
que esté dentro del rango de parámetros, o puede causar daños al
dispositivo.
Algunos teléfonos móviles no pueden activar la función de banco de
energía automáticamente después de conectarse, presione el botón "
" para activar manualmente la función del banco de energía.
Nota: El puerto de salida tipo C no es compatible con algunos ¡teléfonos
móviles!

- 8 -
Dirección: Baoshanqu Shuangchenglu 803long 11hao 1602A-1609shi
Shanghai
Importado a AUS: SIHAO PTY LTD. 1 ROKEVA STREET ASTWOOD
NSW 2122 Australia
Importado a EE. UU.: Sanven Technology Ltd. Suite 250, 9166 Anaheim
Place, Rancho Cucamonga, CA 91730
REP
UK
Pooledas Group Ltd
Unit 5 Albert Edward House, The Pavilions
Preston, United Kingdom
REP
EC
SHUNSHUN GmbH
Römeräcker 9 Z2021, 76351
Linkenheim-Hochstetten, Germany
Hecho en china

- 9 -


Wsparcie techniczne i certyfikat e-gwarancji www.vevor.com/support
MOCNY WENTYLATOR PODŁOGOWY
MODEL: D12
We continue to be committed to provide you tools with competitive price.
"Save Half", "Half Price" or any other similar expressions used by us only represents an
estimate of savings you might benefit from buying certain tools with us compared to the major
top brands and does not necessarily mean to cover all categories of tools offered by us. You
are kindly reminded to verify carefully when you are placing an order with us if you are
actually saving half in comparison with the top major brands.


- 1 -
MODEL: D12
Have product questions? Need technical support? Please feel free to
contact us:
Technical Support and E-Warranty Certificate
www.vevor.com/support
NEED HELP? CONTACT US!
This is the original instruction, please read all manual instructions
carefully before operating. VEVOR reserves a clear interpretation of our
user manual. The appearance of the product shall be subject to the
product you received. Please forgive us that we won't inform you again if
there are any technology or software updates on our product.
POWERFUL FLOOR FAN

- 2 -
Ostrzeżenie — aby zmniejszyć ryzyko obrażeń, użytkownik
musi uważnie przeczytać instrukcję obsługi.
To urządzenie jest zgodne z częścią 15 przepisów FCC.
Operacja podlega dwóm następującym zasadom
Warunki:(1)To urządzenie nie może powodować szkodliwych
zakłóceń oraz (2)to urządzenie musi akceptować wszelkie
odbierane zakłócenia, w tym zakłócenia, które mogą
powodować niepożądane działanie.
Ten produkt podlega przepisom Dyrektywy Europejskiej
2012/19/EC. Symbol przekreślonego kosza na śmieci
oznacza, że produkt wymaga selektywnej zbiórki śmieci na
terenie Unii Europejskiej. Dotyczy to produktu i wszystkich
akcesoriów oznaczonych tym symbolem. Produktów
oznaczonych jako takie nie można wyrzucać razem ze
zwykłymi odpadami domowymi, lecz należy je oddać do
punktu zbiórki w celu recyklingu urządzeń elektrycznych i
elektronicznych.
SPECIFICATION
Model produktu
D1 2
Rozmiar
produktu
21 0*100* 2 6 8mm
Pojemność
baterii
20000 mAh
Moc
znamionowa
15W
Wejście typu C
5V-3A
Wyjście typu C
5V-3A
- 3 -
Wyjście USB
5V-2A
Żywotność
baterii
Wentylator: prędkość 1≈60H, prędkość 2≈35H,
prędkość 3≈25H, prędkość 4≈16H Wentylator +
oscylacja: prędkość 1≈32H, prędkość 2≈23H
prędkość 3≈18H, prędkość 4≈13H
Oświetlenie LED: poziom 1≈200H, poziom 2≈50H,
poziom 3≈28H
Wentylator + LED: około 10H na najwyższym
poziomie
Wentylator + LED + Oscylacja: około 8,5H na
najwyższym poziomie
PRODUCT STRUCTURE
- 4 -
SECURITY & WARNINGS
(1) Nie wystawiaj produktu na działanie wysokiej temperatury i ognia lub
pod Słońcem;
(2) Nie umieszczaj produktu w wilgotnym miejscu;
(3) Nie wrzucaj produktu do ognia ani nie zbliżaj się ogień, aby uniknąć
katastrofy pożarowej;
(4) Nie demontuj, nie przecinaj ani nie przebijaj produktu;
(5) W przypadku wystąpienia nietypowych warunków należy zaprzestać
używania podczas stosowania produktu;
(6) Jeśli nie, ładuj produkt co 2-3 miesiące używany przez dłuższy czas,
aby uniknąć uszkodzenia akumulatora.
USING INSTRUCTIONS
Panel sterowania:
- 5 -
(1) Krótko naciśnij przycisk „ ”, wentylator zmieni prędkość
1/2/3/4/OFF, naciśnij i przytrzymaj ten przycisk, aby wyłącz go przy
dowolnej prędkości;
(2) Gdy wentylator jest włączony, naciśnij krótko przycisk „ ” przycisku,
wentylator będzie oscylował w zakresie 90° /45° /wył obraca się, naciśnij
długo ten przycisk, aby wyłączyć oscylację;
(3) Krótko naciśnij „ ”, diody LED będą przełączać się pomiędzy
1/2/3/OFF; długo naciśnij ten przycisk, aby wyłącz światła LED na
dowolnym poziomie;
(4) tryb snu: krótko naciśnij przycisk, aby włączyć/wyłączyć wszystkie
wskaźniki;
(5) Timer: naciśnij krótko przycisk „ ”, aby przełączać się pomiędzy
minutnik o godz 1 H/2 H/4 H/8 H/off, naciśnij i przytrzymaj ten przycisk, aby
anulować timer;
(6) Tryb niskiego zużycia energii: jednocześnie naciśnij przycisk „ ” na
panelu i w każdym przypadku naciśnij przycisk „Anuluj” na pilocie przez 3
sekundy wentylator wyłączy się i przejdzie w stan niskiego zużycia energii
tryb. Tymczasem pilot jest wyłączony. wciśnij ponownie przycisk „ ”,
aby ponownie uruchomić tryb standardowy i włącz jednocześnie pilota.
(Kiedy wentylator jest nieużywane przez dłuższy czas, lepiej je
przechowywać niska moc tryb zużycia, aby uniknąć baterii wyczerpie się i
spowoduje uszkodzenie akumulatora.)
- 6 -
Uwaga: tryb uśpienia polega na wyłączeniu wskaźników; kiedy wskaźniki
są wyłączone, należy uruchomić ponownie lub włączyć wyjście/wejście
ponownie wskaźniki.
Jak korzystać z pilota:
(1) Przed użyciem należy zdjąć pasek izolacyjny pilot (patrz obrazek
powyżej);
(2) Aktywuj pilota: Produkt ma niską moc tryb zużycia poza fabryką,
naciśnij przycisk „ ”, aby go włączyć i przywrócić standard tryb, a także
aktywuj pilota;
(3) Odległość zdalna: 16,4 stopy;
(4) Wentylator wyda sygnał dźwiękowy po otrzymaniu sygnału zdalne
polecenie.
- 7 -
4. Funkcja ładowania/Power Banku Porty wejściowe/wyjściowe:
(1) Przed ładowaniem otwórz silikonową osłonę.
(2) Czas ładowania: 9–10 godzin (test z ładowarką 5 V-3 A; czas ładowania
może być nieco dłuższy, gdy zasilanie jest zasilanie jest niższe niż 5V-3A)
(3) Podłącz do zasilacza DC-5V, zostanie naładowany automatycznie.
Wskaźniki baterii będą migać podczas ładowania i świeci światłem ciągłym
po pełnym naładowaniu.
(4) Funkcja banku mocy: może ładować inne urządzenia za
pośrednictwem przewód ładujący. Podczas łączenia się z innymi urządzeń,
wybierz moc znajdującą się w zakresu parametrów lub może to
spowodować uszkodzenie
urządzenie.
Niektóre telefony komórkowe nie mogą automatycznie aktywować funkcji
powerbanku po podłączeniu, naciśnij przycisk „ ” przycisk, aby
ręcznie włączyć funkcję powerbanku.
Uwaga: port wyjściowy typu C nie jest kompatybilny z niektórymi
urządzeniami telefony komórkowe!
- 8 -
Adres: Baoshanqu Shuangchenglu 803long 11hao 1602A-1609shi
Szanghaj
Import do AUS: SIHAO PTY LTD. 1 ROKEVA STREETEASTWOOD NSW
2122 Australia
Import do USA: Sanven Technology Ltd. Suite 250, 9166 Anaheim Place,
Rancho Cucamonga, CA 91730
REP
UK
Pooledas Group Ltd
Unit 5 Albert Edward House, The Pavilions
Preston, United Kingdom
REP
EC
SHUNSHUN GmbH
Römeräcker 9 Z2021, 76351
Linkenheim-Hochstetten, Germany
Wyprodukowano w Chinach

- 9 -


Technische ondersteuning en e-garantiecertificaat www.vevor.com/support
KRACHTIGE VLOERVENTILATOR
MODEL: D12
We continue to be committed to provide you tools with competitive price.
"Save Half", "Half Price" or any other similar expressions used by us only represents an
estimate of savings you might benefit from buying certain tools with us compared to the major
top brands and does not necessarily mean to cover all categories of tools offered by us. You
are kindly reminded to verify carefully when you are placing an order with us if you are
actually saving half in comparison with the top major brands.


- 1 -
MODEL: D12
Have product questions? Need technical support? Please feel free to
contact us:
Technical Support and E-Warranty Certificate
www.vevor.com/support
NEED HELP? CONTACT US!
This is the original instruction, please read all manual instructions
carefully before operating. VEVOR reserves a clear interpretation of our
user manual. The appearance of the product shall be subject to the
product you received. Please forgive us that we won't inform you again if
there are any technology or software updates on our product.
POWERFUL FLOOR FAN
- 2 -
Waarschuwing-Om het risico op letsel te verminderen, moet
de gebruiker de handleiding zorgvuldig lezen.
Dit apparaat voldoet aan Deel 15 van de FCC-regels. De
bediening is afhankelijk van de volgende twee
voorwaarden:(1)Dit apparaat mag geen schadelijke
interferentie veroorzaken, en (2)dit apparaat moet alle
ontvangen interferentie accepteren, inclusief interferentie die
een ongewenste werking kan veroorzaken.
Dit product valt onder de bepalingen van de Europese richtlijn
2012/19/EG. Het symbool met een doorgestreepte
afvalcontainer geeft aan dat het product in de Europese Unie
een aparte afvalinzameling vereist. Dit geldt voor het product
en alle accessoires die met dit symbool zijn gemarkeerd.
Producten die als zodanig zijn gemarkeerd, mogen niet bij het
normale huisvuil worden weggegooid, maar moeten worden
ingeleverd bij een inzamelpunt voor recycling van elektrische
en elektronische apparaten.
SPECIFICATION
product Model
D1 2
Product grootte
21 0*100* 2 6 8mm
Batterij capaciteit
20000 mAh
Nominaal
vermogen
15W
TYPE-C-ingang
5V-3A
TYPE-C-uitvoer
5V-3A

- 3 -
USB-uitgang
5V-2A
Batterijduur
Ventilator: snelheid 1≈60H, snelheid 2≈35H,
snelheid 3≈25H, snelheid 4≈16H Ventilator +
oscillatie: snelheid 1≈32H, snelheid 2≈23H snelheid
3≈18H, snelheid 4≈13H
LED-verlichting: niveau 1≈200H, niveau 2≈50H,
niveau 3≈28H
Fan + LED: ongeveer 10H op het hoogste niveau
Ventilator + LED + Oscillatie: ongeveer 8,5 uur op
het hoogste niveau
PRODUCT STRUCTURE
- 4 -
SECURITY & WARNINGS
(1) Stel het product niet bloot aan hoge temperaturen of vuur of onder de
zon;
(2) Plaats het product niet op een vochtige plaats;
(3) Gooi het product niet in vuur en benader het niet brand om
brandrampen te voorkomen;
(4) Demonteer, snijd of doorboor het product niet;
(5) Stop alstublieft met het gebruik als zich abnormale omstandigheden
voordoen tijdens het gebruik van het product;
(6) Laad het product elke 2-3 maanden op als dit niet het geval is lange tijd
gebruikt, om schade aan de batterij te voorkomen.
USING INSTRUCTIONS
Controlepaneel:
(1) Druk kort op de knop “ ”, de ventilator schakelt tussen de

- 5 -
snelheden 1/2/3/4/OFF, druk lang op deze knop schakel het op elke
snelheid uit;
(2) Wanneer de ventilator is ingeschakeld, drukt u kort op de knop “ ”
knop, zal de ventilator oscilleren binnen 90 ° /45 ° /uit draait, druk lang op
deze knop om de oscillatie uit te schakelen;
(3) Druk kort op de“ ”knop, de LED-lampjes schakelen tussen
1/2/3/UIT; Druk lang op deze knop om schakel de LED-verlichting op elk
niveau uit;
(4) Leap-modus: druk kort op de knop “om alle indicatoren AAN/UIT te
zetten;
(5) Timer: druk kort op de“ ”knop om tussen te schakelen timer bij
1H/2H/4H/8H/uit, druk lang op deze knop timer annuleren;
(6) Modus voor laag stroomverbruik: druk tegelijkertijd op de knop “ ”
op het paneel en in ieder geval de knop “Annuleren” op de
afstandsbediening gedurende 3 seconden ingedrukt De ventilator wordt
uitgeschakeld en heeft een laag stroomverbruik modus. Ondertussen is de
afstandsbediening uitgeschakeld. druk de Druk nogmaals op de knop
“ ” om de standaardmodus opnieuw te starten en schakel tegelijkertijd
de afstandsbediening in. (Als de ventilator aanstaat Lange tijd niet gebruikt,
kan beter worden bewaard laag vermogen verbruiksmodus, om de batterij
te vermijden leeg raken en schade aan de batterij veroorzaken.)
Opmerking: in de slaapmodus worden de indicatoren uitgeschakeld;
- 6 -
wanneer de indicatoren zijn uit, herstarten of uitgang/invoer wordt
ingeschakeld de indicatoren opnieuw.
Hoe de afstandsbediening te gebruiken:
(1) Verwijder de isolatiestrip voordat u de afstandsbediening (zie
afbeelding hierboven);
(2) Activeer de afstandsbediening: Het product heeft een laag
stroomverbruik verbruiksmodus wanneer deze niet in de fabriek is, drukt u
op de knop " " om deze in te schakelen en de standaard te herstellen
modus en activeer de afstandsbediening;
(3) Afstand op afstand: 5,4 meter;
(4) De ventilator maakt een piepgeluid wanneer hij de signaal ontvangt
commando op afstand.
4. Oplaad-/powerbankfunctie Invoer-/uitvoerpoorten:
- 7 -
(1) Open de siliconen hoes voordat u deze oplaadt.
(2) Oplaadtijd: 9-10 uur (test met 5V-3A-oplader; de oplaadtijd kan iets
langer zijn als de voeding is ingeschakeld voeding is lager dan 5V-3A)
(3) Sluit aan op een DC-5V-voeding, deze wordt opgeladen automatisch.
De batterij-indicatoren knipperen tijdens het gebruik opladen en brandt
continu wanneer deze volledig is opgeladen.
(4) Powerbank-functie: hij kan andere apparaten opladen via het
oplaadsnoer. Wanneer u verbinding maakt met anderen apparaten, kies
dan het vermogen dat binnen de parameterbereik, anders kan dit schade
aan het apparaat veroorzaken
apparaat.
Sommige mobiele telefoons kunnen de powerbank-functie niet
automatisch activeren nadat ze verbinding hebben gemaakt. Druk op de
knop “ ” knop om de powerbankfunctie handmatig te activeren.
Opmerking: Type-C-uitvoerpoorten zijn met sommige niet compatibel
mobieltjes!
- 8 -
Adres: Baoshanqu Shuangchenglu 803long 11hao 1602A-1609shi
Shanghai
Geïmporteerd naar AUS: SIHAO PTY LTD. 1 ROKEVA
STREETEASTWOOD NSW 2122 Australië
Geïmporteerd naar de VS: Sanven Technology Ltd. Suite 250, 9166
Anaheim Place, Rancho Cucamonga, CA 91730
REP
UK
Pooledas Group Ltd
Unit 5 Albert Edward House, The Pavilions
Preston, United Kingdom
REP
EC
SHUNSHUN GmbH
Römeräcker 9 Z2021, 76351
Linkenheim-Hochstetten, Germany
Gemaakt in China

- 9 -


Teknisk support och e-garanticertifikat www.vevor.com/support
KRAFTIG GOLVFLÄKT
MODELL: D12
We continue to be committed to provide you tools with competitive price.
"Save Half", "Half Price" or any other similar expressions used by us only represents an
estimate of savings you might benefit from buying certain tools with us compared to the major
top brands and does not necessarily mean to cover all categories of tools offered by us. You
are kindly reminded to verify carefully when you are placing an order with us if you are
actually saving half in comparison with the top major brands.


- 1 -
MODELL: D12
Have product questions? Need technical support? Please feel free to
contact us:
Technical Support and E-Warranty Certificate
www.vevor.com/support
NEED HELP? CONTACT US!
This is the original instruction, please read all manual instructions
carefully before operating. VEVOR reserves a clear interpretation of our
user manual. The appearance of the product shall be subject to the
product you received. Please forgive us that we won't inform you again if
there are any technology or software updates on our product.
POWERFUL FLOOR FAN
- 2 -
Varning - För att minska risken för skada måste användaren
läsa instruktionerna noggrant.
Denna enhet uppfyller del 15 av FCC-reglerna. Driften är
föremål för följande två villkor: (1) Den här enheten får inte
orsaka skadliga störningar, och (2) den här enheten måste
acceptera alla mottagna störningar, inklusive störningar som
kan orsaka oönskad funktion.
Denna produkt omfattas av bestämmelserna i det europeiska
direktivet 2012/19/EC. Symbolen som visar en soptunna
korsad anger att produkten kräver separat sophämtning i EU.
Detta gäller för produkten och alla tillbehör märkta med denna
symbol. Produkter märkta som sådana får inte kasseras
tillsammans med vanligt hushållsavfall, utan måste lämnas till
en insamlingsplats för återvinning av elektriska och
elektroniska apparater.
SPECIFICATION
Produktmodell
D1 2
Produktstorlek
21 0*100* 2 6 8mm
Batterikapacitet
20 000 mAh
Nominell effekt
15W
TYPE-C-ingång
5V-3A
TYPE-C-utgång
5V-3A
USB-utgång
5V-2A
- 3 -
Batteri-liv
Fläkt: hastighet 1≈60H, hastighet 2≈35H, hastighet
3≈25H, hastighet 4≈16H Fläkt + Oscillation: hastighet
1≈32H, hastighet 2≈23H hastighet 3≈18H, hastighet
4≈13H
LED-belysning: nivå 1≈200H, nivå 2≈50H, nivå
3≈28H
Fläkt + LED: ca 10H på högsta nivå
Fläkt + LED + Oscillation: ca 8,5H på högsta nivå
PRODUCT STRUCTURE

- 4 -
SECURITY & WARNINGS
(1) Utsätt inte produkten för hög temperatur, eld eller under solen;
(2) Placera inte produkten på fuktig plats;
(3) Kasta inte produkten in i en eld och närma dig inte en eld för att undvika
brandkatastrof;
(4) Ta inte isär, skär eller stick hål på produkten;
(5) Sluta använda om onormala förhållanden inträffar under användningen
av produkten;
(6) Ladda produkten var 2-3 månad om inte används under lång tid för att
undvika skador på batteriet.
USING INSTRUCTIONS
Kontrollpanel:
(1) Tryck kort på knappen “ ”, fläkten växlar mellan hastighet
1/2/3/4/OFF, tryck länge på denna knapp för att stäng av den i vilken
hastighet som helst;
- 5 -
(2) När fläkten är aktiverad, tryck kort på " " knappen kommer fläkten
att svänga inom 90 ° /45 ° /off in vänder, tryck länge på den här knappen
för att stänga av oscillationen;
(3) Tryck kort på" ”knapp, LED-lamporna växlar mellan 1/2/3/OFF;
tryck länge på denna knapp för att stäng av LED-lamporna på valfri nivå;
(4) viloläge: tryck kort på knappen för att slå PÅ/AV alla indikatorer;
(5) Timer: kort tryck på" ”knapp för att växla mellan timer kl
1H/2H/4H/8H/off, tryck länge på denna knapp för att avbryt timer;
(6) Läge för låg strömförbrukning: tryck samtidigt på knappen “ ” på
panelen och "Avbryt"-knappen på fjärrkontrollen i 3 sekunder i alla fall
fläkten stängs av och strömförbrukningen är låg läge. Under tiden är
fjärrkontrollen inaktiverad. tryck på “ ”-knappen igen för att starta om
standardläget och aktivera fjärrkontrollen samtidigt. (När fläkten är inte
använts på länge, det är bättre att förvaras på låg effekt förbrukningsläge,
för att undvika batteriet tar slut och orsakar skador på batteriet.)
Obs: Viloläge är att stänga av indikatorerna; när indikatorerna är släckta,
omstart eller utgång/ingång slås på indikatorerna igen.
- 6 -
Så här använder du fjärrkontrollen:
(1) Ta bort isoleringsremsan innan du använder fjärrkontroll (se bilden
ovan);
(2) Aktivera fjärrkontrollen: Produkten har låg effekt förbrukningsläge när
det inte är fabriksställt, tryck på knappen “ ” för att slå på det och
återställa standarden läge samt aktivera fjärrkontrollen;
(3) Fjärravstånd: 16,4 fot;
(4) Fläkten kommer att avge ett pip när den tar emot fjärrkommando.
4. Laddning / Power Bank-funktion Ingångs-/utgångsportar:

- 7 -
(1) Öppna silikonskyddet innan du laddar.
(2) Laddningstid: 9-10 timmar (testa med 5V-3A laddare; laddningstiden
kan vara lite längre när ström matningen är lägre än 5V-3A)
(3) Anslut med DC-5V strömförsörjning, den kommer att laddas
automatiskt. Batteriindikatorerna blinkar under laddas och vara konstant på
när den är fulladdad.
(4) Powerbank-funktion: den kan ladda andra enheter via
laddningssladden. När du ansluter med andra enheter, välj strömmen som
finns inom parameterintervall, eller det kan orsaka skada på
enhet.
Vissa mobiltelefoner kan inte aktivera powerbank-funktionen automatiskt
efter anslutning, tryck på " " knappen för att manuellt aktivera
powerbank-funktionen.
Obs: Typ-C-utgångsportar är inte kompatibla med vissa mobiltelefoner!
Adress: Baoshanqu Shuangchenglu 803long 11hao 1602A-1609shi
Shanghai
Importerad till AUS: SIHAO PTY LTD. 1 ROKEVA STREETEASTWOOD
NSW 2122 Australien
Importerad till USA: Sanven Technology Ltd. Suite 250, 9166 Anaheim
Place, Rancho Cucamonga, CA 91730

- 8 -
REP
UK
Pooledas Group Ltd
Unit 5 Albert Edward House, The Pavilions
Preston, United Kingdom
REP
EC
SHUNSHUN GmbH
Römeräcker 9 Z2021, 76351
Linkenheim-Hochstetten, Germany
Tillverkad i Kina