Loading ...
Loading ...
Loading ...
En-6
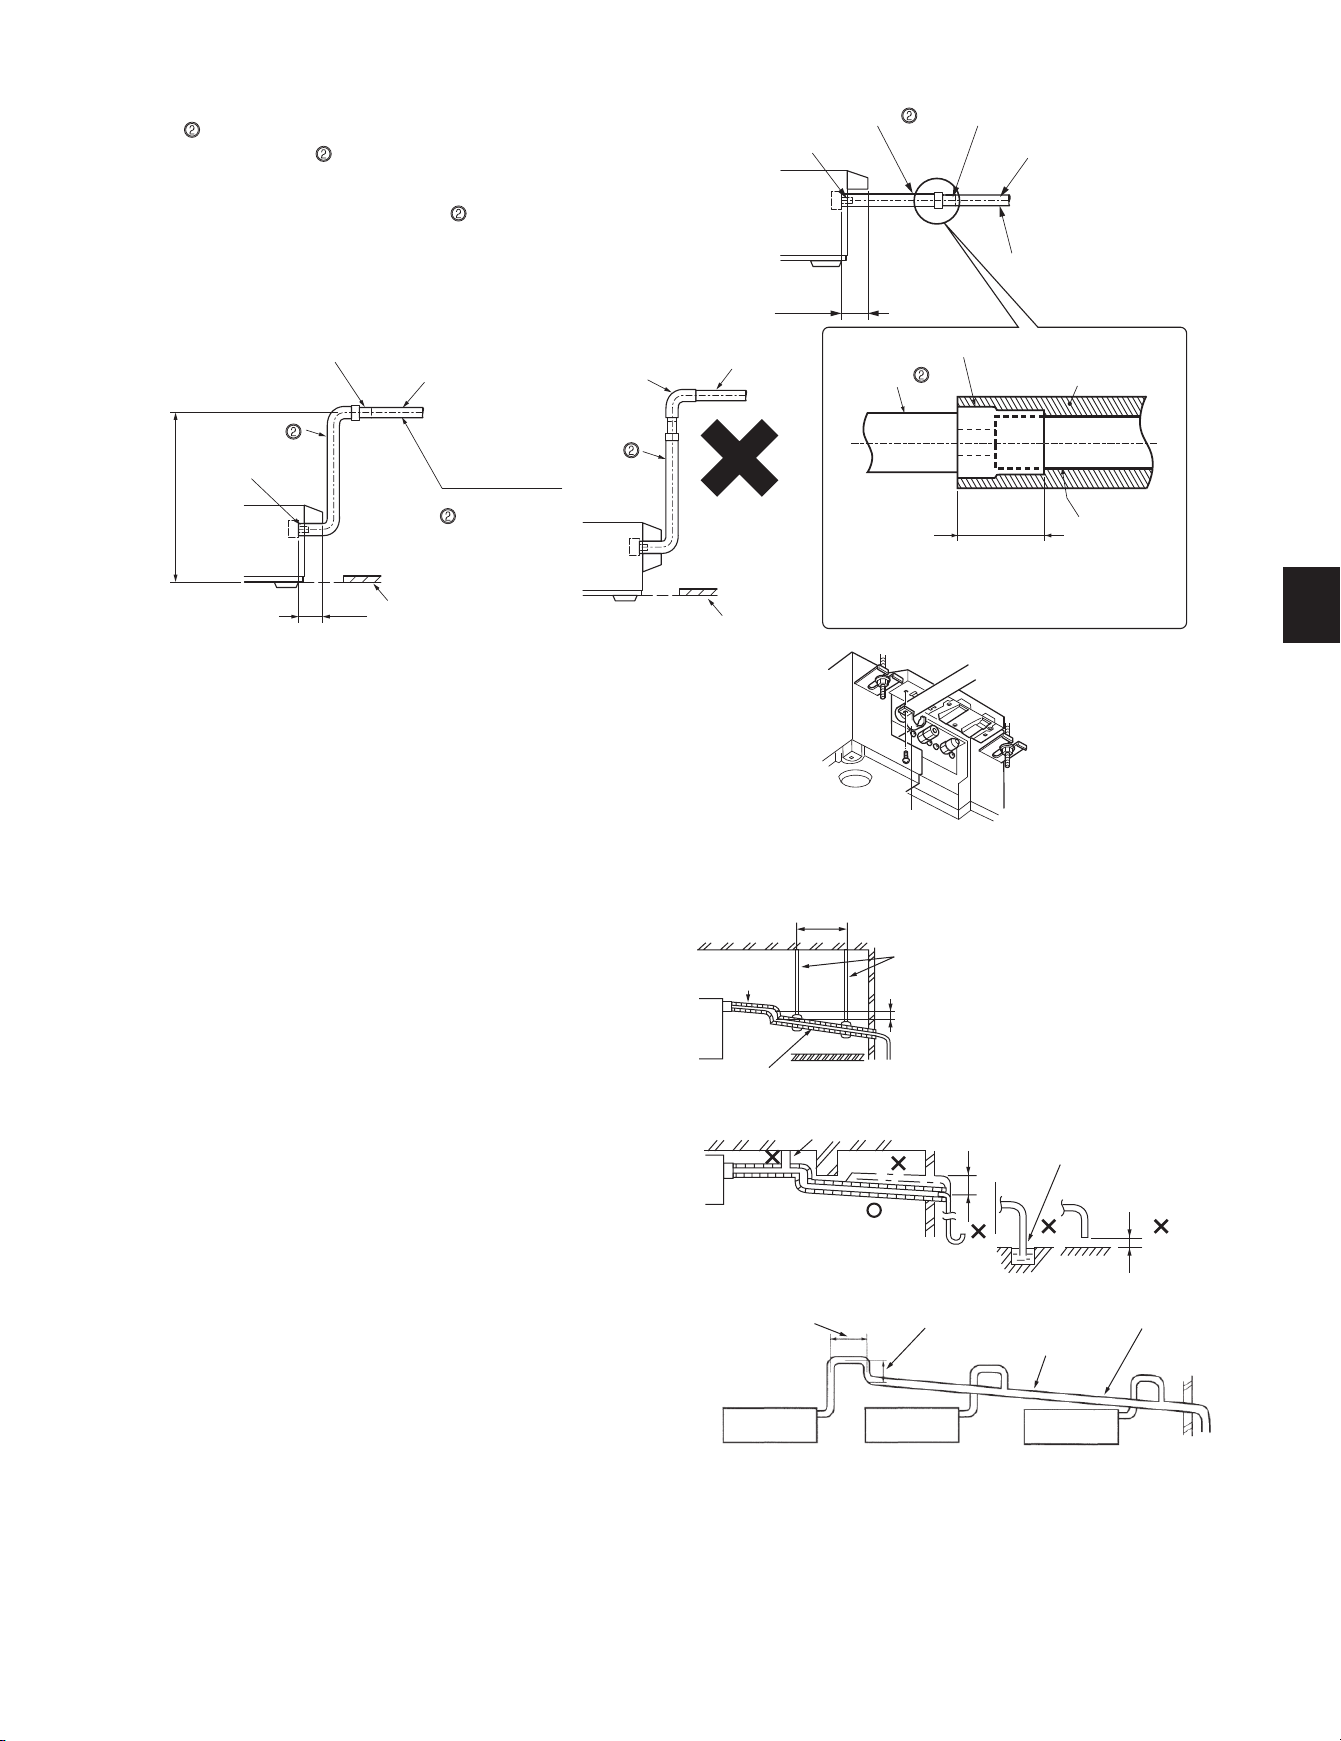
• Insert the drain pipe
B
completely into drain
piping connecting part.
• Apply insulating material
J
until drain piping
connecting part, as shown above.
Drain hose connecting part
Drain hose
Drain piping connecting part (with socket)
1/100 or more downward slope
Drain piping connecting part
Drain hose
Insulating material
J
Drain piping con-
necting part
About 2-3/8 in. (60
mm) from the end
Drain piping connecting part
Drain pipe
B
Drain hose
Drain hose
connecting part
19-11/16 in. (500 mm)
or less
1/100 or more
downward slope
* Drain hose
can be cut by
tools such as cutters.
Ceiling
• Connect drain pipe B directly to drain piping connecting part (socket side) of
drain hose
.
• Be sure to connect drain hose
to the indoor unit side as shown in the illus-
tration on the right. Be sure to connect the drain hose connecting part using
adhesive of polyvinyl chloride family to prevent leakage.
• Tobringupthedrainexit,rstarrangedrainhose
to go upward vertically,
and then provide 1/100 or more downward slope, as shown in the illustration
below.
• If the drain piping pass indoor, be sure to apply insulating material
J (Foamed
polyethylene,specicgravity0.03,thicknessmorethan3/8in.(10mm)).
Connect drain hose connecting part using adhesive of polyvinyl chloride family
before installing the hose band.
Drain hose
Drain pipe
B
* Do not make drain
piping as shown.
Pipe elbow
Hose band
• Apply insulating material J until drain piping connecting part, as shown in the
upper right illustration.
• Drain piping should form a downward slope (1/100 or more) to the outdoor
drain exit. Do not form trap or raise the pipe.
• Do not arrange the pipe horizontally for more than 65 ft. (20 m). When the drain
piping is too long, use support metal to prevent the drain pipe from forming
an up or down curve. Be sure not to install a air bleeder. (Since drain lift-up
mechanism is built-in, drain may blow out.)
• Odor trap for drain outlet is not necessary.
• For grouped piping, arrange piping so that the grouped piping is about 3-15/16
in.(100mm)lowerthantheunitdrainexit,asshowninthegure.Useabout
a drain pipe (O.D. 1-1/2 in. (38 mm)) for grouped piping, and arrange it so that
it forms about 1/100 or more downward slope.
• Do not place drain piping directly into a place where ammonia gas or sulfuric
gas is formed, such as sewage tanks or septic tanks.
2 to 5 ft.
(0.75 m to 1.5 m)
Support metal
Insulating
material
J
1/100 or more downward slope
As much as possible
(about 4 in. (100 mm))
Air bleeder
Do not raise
Tip of drain hose
dipped in water
At least 2 in.
(50 mm) gap
Odor trap
2-3/8 in.
(61 mm)
2-3/8 in.
(61 mm)
As short as possible
Drain pipe
B
Drain pipe B
Ceiling
As long as possible
(about 4 in. (100 mm))
Drain pipe
(O.D. 1-1/2 in. (38 mm))
1/100 or more
downward slope
BH79A643H01_01En.indd 6 2021/05/06 17:37:22
Loading ...
Loading ...
Loading ...