


Contents
Copyright, trademarks, and disclaimer 4
Supported VMS products and versions 5
Overview 6
XProtect Transact (explained) 6
XProtect Transact system architecture 6
Licensing 8
Before you start 8
XProtect Transact trial license 8
Requirements and considerations 9
Compatibility 9
Configuration 10
Connectors (explained) 10
Transaction definitions (explained) 10
Transaction events (explained) 11
Configuring transactions 11
Add transaction source (wizard) 11
Transaction sources (properties) 12
Create and add transaction definitions 13
Transaction definitions (properties) 14
Configuring transaction events and alarms 16
Define transaction events 16
Create alarms based on transaction events 18
Set up rules on an event 18
Enable filtering of transaction events or alarms 19
Verify XProtect Transact configuration 20
Maintenance 22
Managing transaction sources 22
Edit transaction source settings 22
Disable transaction sources 22
Delete transaction sources 22
Administrator manual | XProtect® Transact 2023 R1
2 | Contents


Copyright, trademarks, and disclaimer
Copyright © 2023 Milestone Systems A/S
Trademarks
XProtect is a registered trademark of Milestone Systems A/S.
Microsoft and Windows are registered trademarks of Microsoft Corporation. App Store is a service mark of
Apple Inc. Android is a trademark of Google Inc.
All other trademarks mentioned in this document are trademarks of their respective owners.
Disclaimer
This text is intended for general information purposes only, and due care has been taken in its preparation.
Any risk arising from the use of this information rests with the recipient, and nothing herein should be
construed as constituting any kind of warranty.
Milestone Systems A/S reserves the right to make adjustments without prior notification.
All names of people and organizations used in the examples in this text are fictitious. Any resemblance to any
actual organization or person, living or dead, is purely coincidental and unintended.
This product may make use of third-party software for which specific terms and conditions may apply. When
that is the case, you can find more information in the file 3rd_party_software_terms_and_conditions.txt located
in your Milestone system installation folder.
Administrator manual | XProtect® Transact 2023 R1
4 | Copyright, trademarks, and disclaimer

Supported VMS products and versions
This manual describes features supported by the following XProtect VMS products:
l
XProtect Corporate
l
XProtect Expert
l
XProtect Professional+
l
XProtect Express+
l
XProtect Essential+
Milestone tests the features described in this manual with the above-mentioned XProtect VMS products in the
current release version and the two previous release versions.
If new features are only supported by the current release version and not any previous release versions, you
can find information about this in the feature descriptions.
You can find the documentation for XProtect clients and add-ons supported by the retired XProtect VMS
products mentioned below on the Milestone download page (https://www.milestonesys.com/downloads/).
l
XProtect Enterprise
l
XProtect Professional
l
XProtect Express
l
XProtect Essential
Administrator manual | XProtect® Transact 2023 R1
5 | Supported VMS products and versions
Overview
XProtect Transact (explained)
XProtect Transact is an add-on to Milestone's IP video surveillance solutions that lets you observe ongoing
transactions and investigating transactions in the past. The transactions are linked with the digital surveillance
video monitoring the transactions, for example to help you prove fraud or provide evidence against a
perpetrator. There is a 1-to-1 relationship between the transaction lines and video images.
The transaction data may originate from different types of transaction sources, typically point of sales (PoS)
systems or automated teller machines (ATM). When selecting a transaction line, a video still frame from each of
the associated cameras is displayed in a preview area that allows you to review the recordings. Below the
preview area, the transaction associated with the selected line is displayed as a receipt.
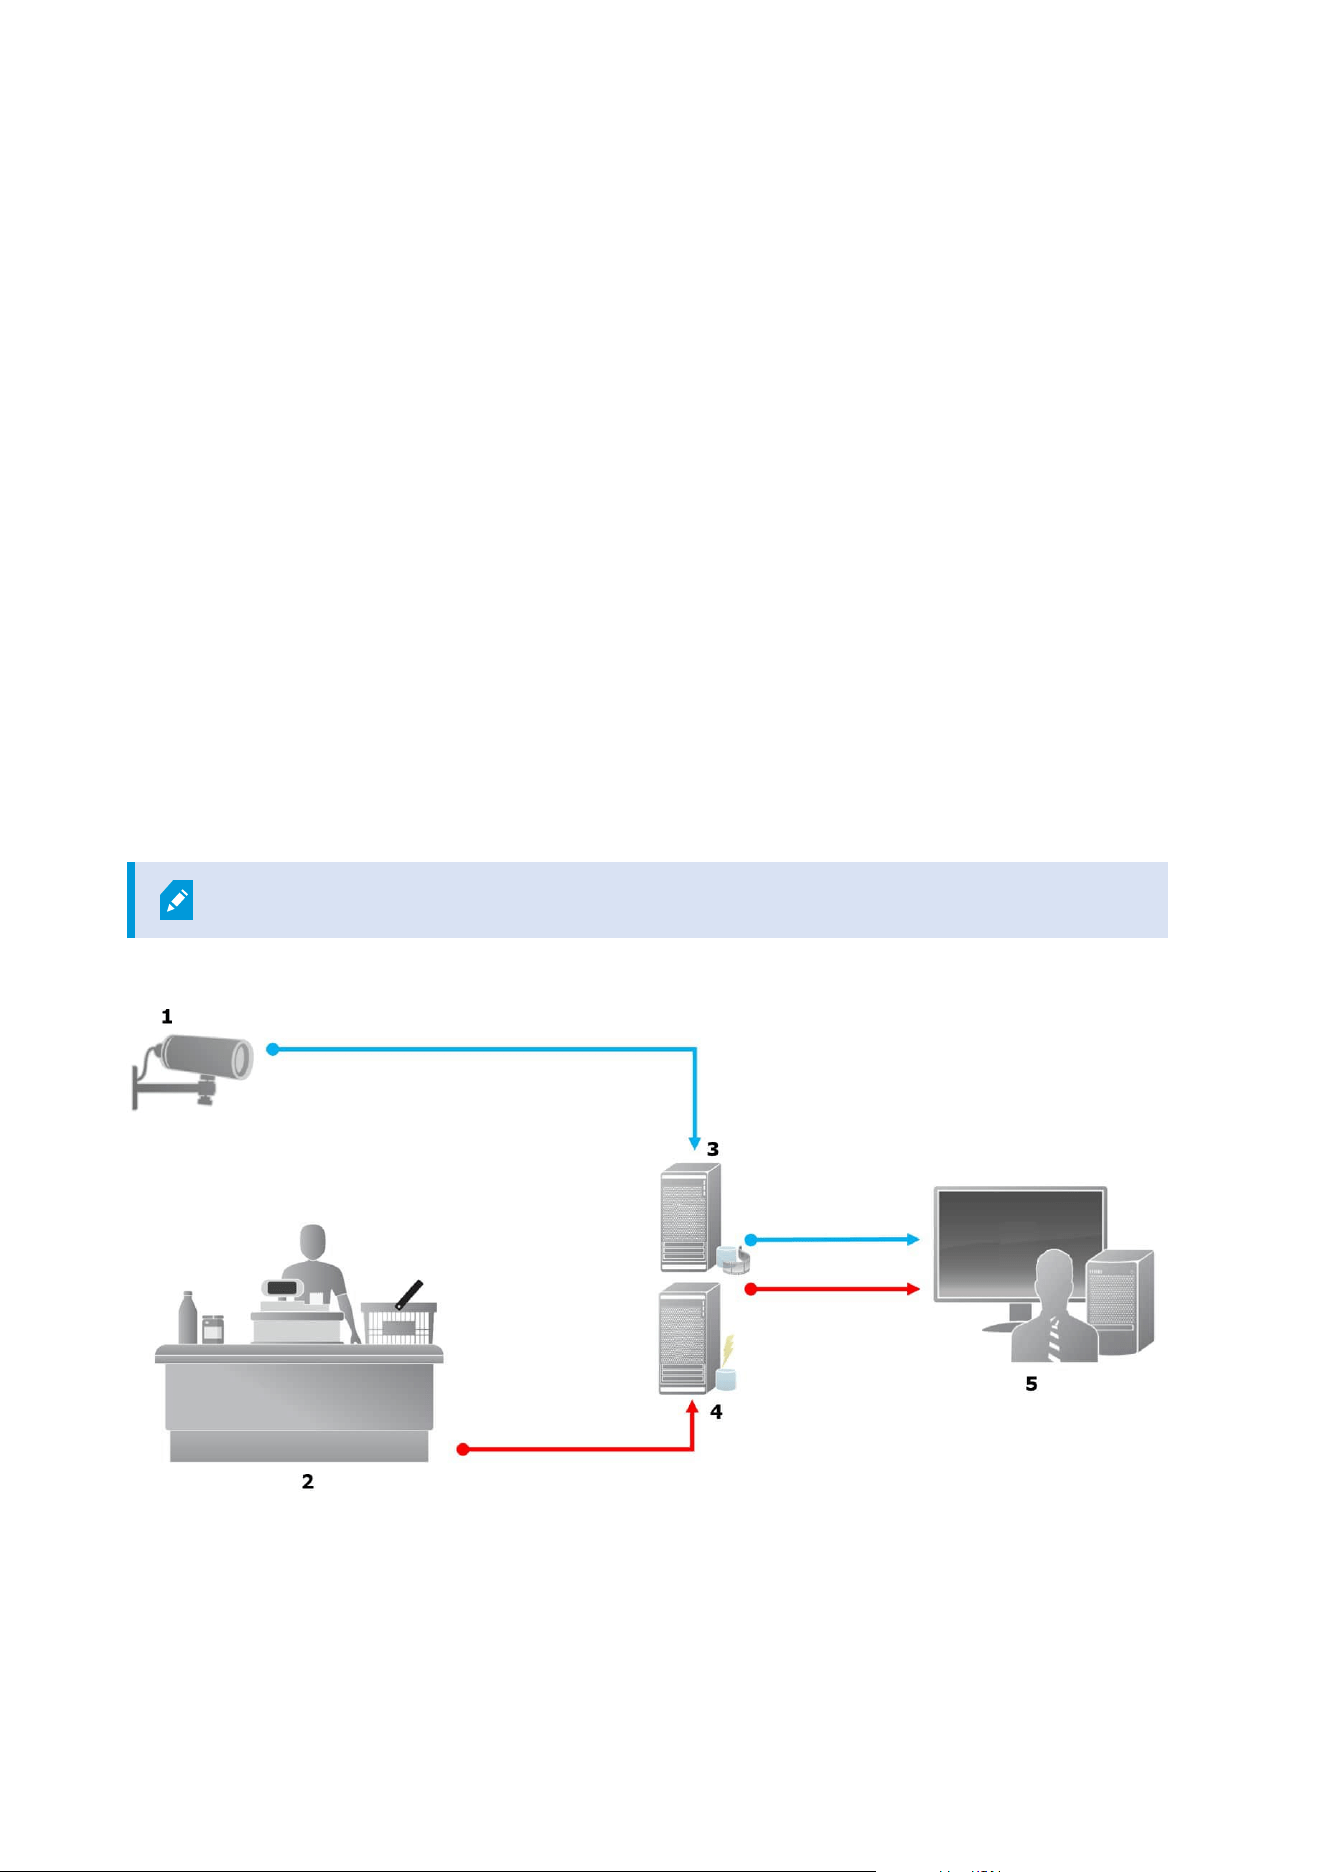
XProtect Transact system architecture
There are several components in the XProtect Transact communication flow. The input data originates from
the video surveillance cameras and the transaction sources providing the transaction data, for example cash
registers or ATMs. The transaction data is stored on the event server, whereas the video stream is stored on
the recording server. From the servers, the data is passed on to XProtect Smart Client.
Depending on your system, there may be several recording servers.
Illustration:
Administrator manual | XProtect® Transact 2023 R1
6 | Overview

l
1 = Camera
l
2 = Cash register
l
3 = Recording server
l
4 = Event server
l
5 = Smart Client
l
The blue arrows outline video recordings from the surveillance system
l
The red arrows outline transaction data from the transaction sources
By standard, XProtect Transact supports two types of transaction sources:
l
Serial port clients
l
TCP server clients
Additional types of transaction sources may be supported through custom connectors developed with the MIP
SDK, for example a connector that retrieves transaction data from an enterprise resource planning (ERP)
system.
Administrator manual | XProtect® Transact 2023 R1
7 | Overview

Licensing
Before you start
The XProtect Transact functionality is standard in Management Client. When you have activated the base
license and transaction source licenses, the features are available immediately.
Before using the XProtect Transact features in XProtect Smart Client, you should verify that:
1. Your base license for XProtect Transact has been activated.
2. You have a transaction source license for each transaction source that you need to monitor. License
information is available under the Basics node.
If you do not have the sufficient number of transaction source licenses, make
sure that you acquire additional licenses before the 30-days grace period expires.
3. Next, configure XProtect Transact. For more information, see Configuring transactions on page 11.
Even if you have not purchased any XProtect Transact licenses, you can try out XProtect
Transact with a trial license. For more information, see XProtect Transact trial license on
page 8.
XProtect Transact trial license
With an XProtect Transact trial license, you can try out the XProtect Transact functionality up to 30 days. All
related features are enabled, and you can add one transaction source, for example a cash register. When the
30 days trial period expires, all XProtect Transact features are deactivated, including the Transact workspace
and transaction view items. By purchasing and activating an XProtect Transact base license and the transaction
source licenses you need, you can use XProtect Transact again, and your settings and data are maintained.
You need to acquire the trial license from Milestone. The system administrator must activate the trial license in
the configuration.
For more information about licensing, see Before you start on page 8.
Administrator manual | XProtect® Transact 2023 R1
8 | Licensing

Requirements and considerations
Compatibility
XProtect Transact is compatible with version 2016 R1 or newer of:
l
XProtect Corporate
l
XProtect Expert
XProtect Transact is compatible with version 2017 R2 or newer of:
l
XProtect Professional+
l
XProtect Express+
Administrator manual | XProtect® Transact 2023 R1
9 | Requirements and considerations
Configuration
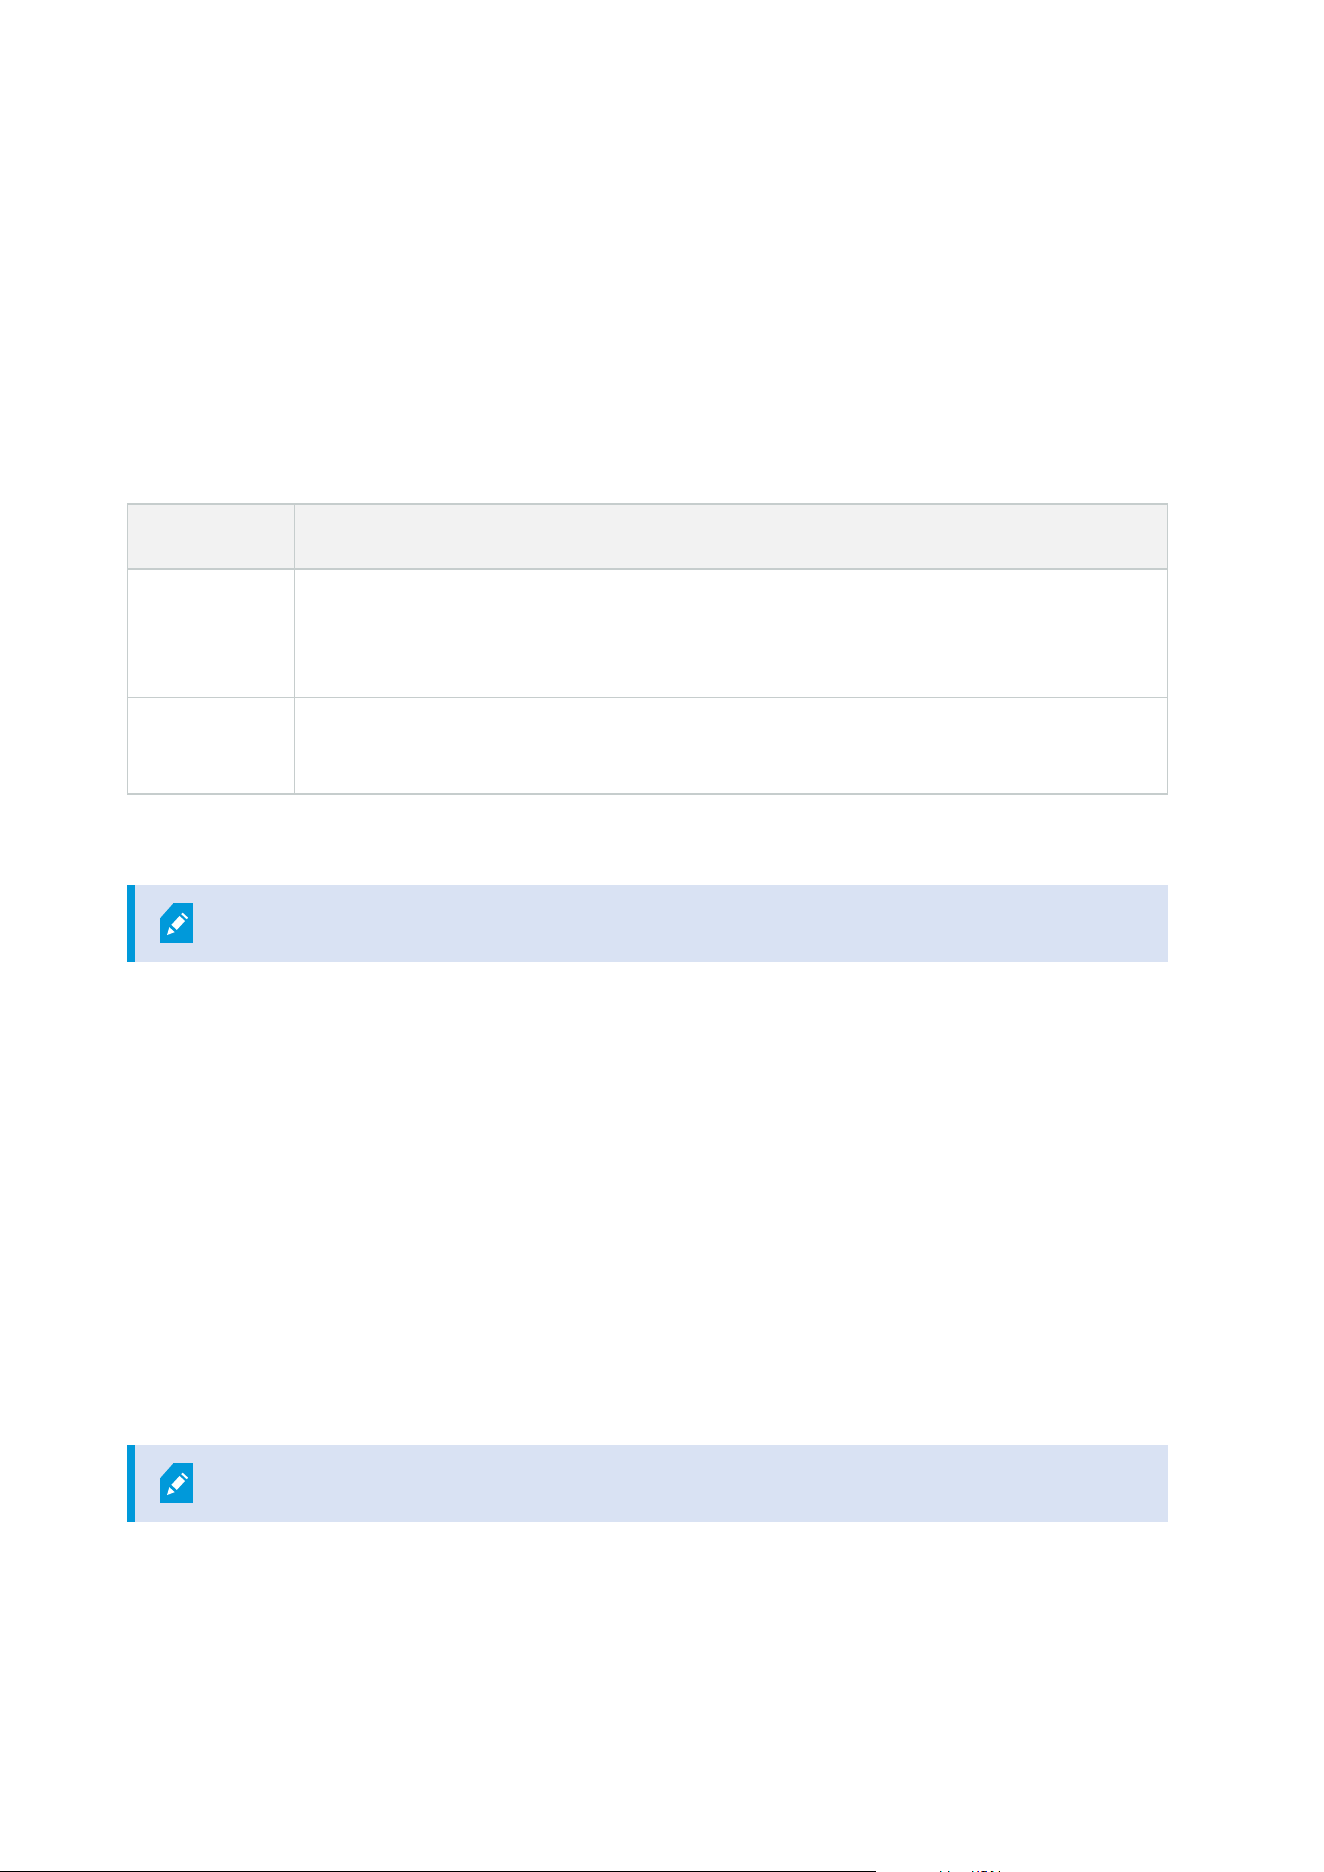
Connectors (explained)
A connector facilitates import of raw transaction data from the transaction source, for example the ATM, into
the event server associated with the VMS.
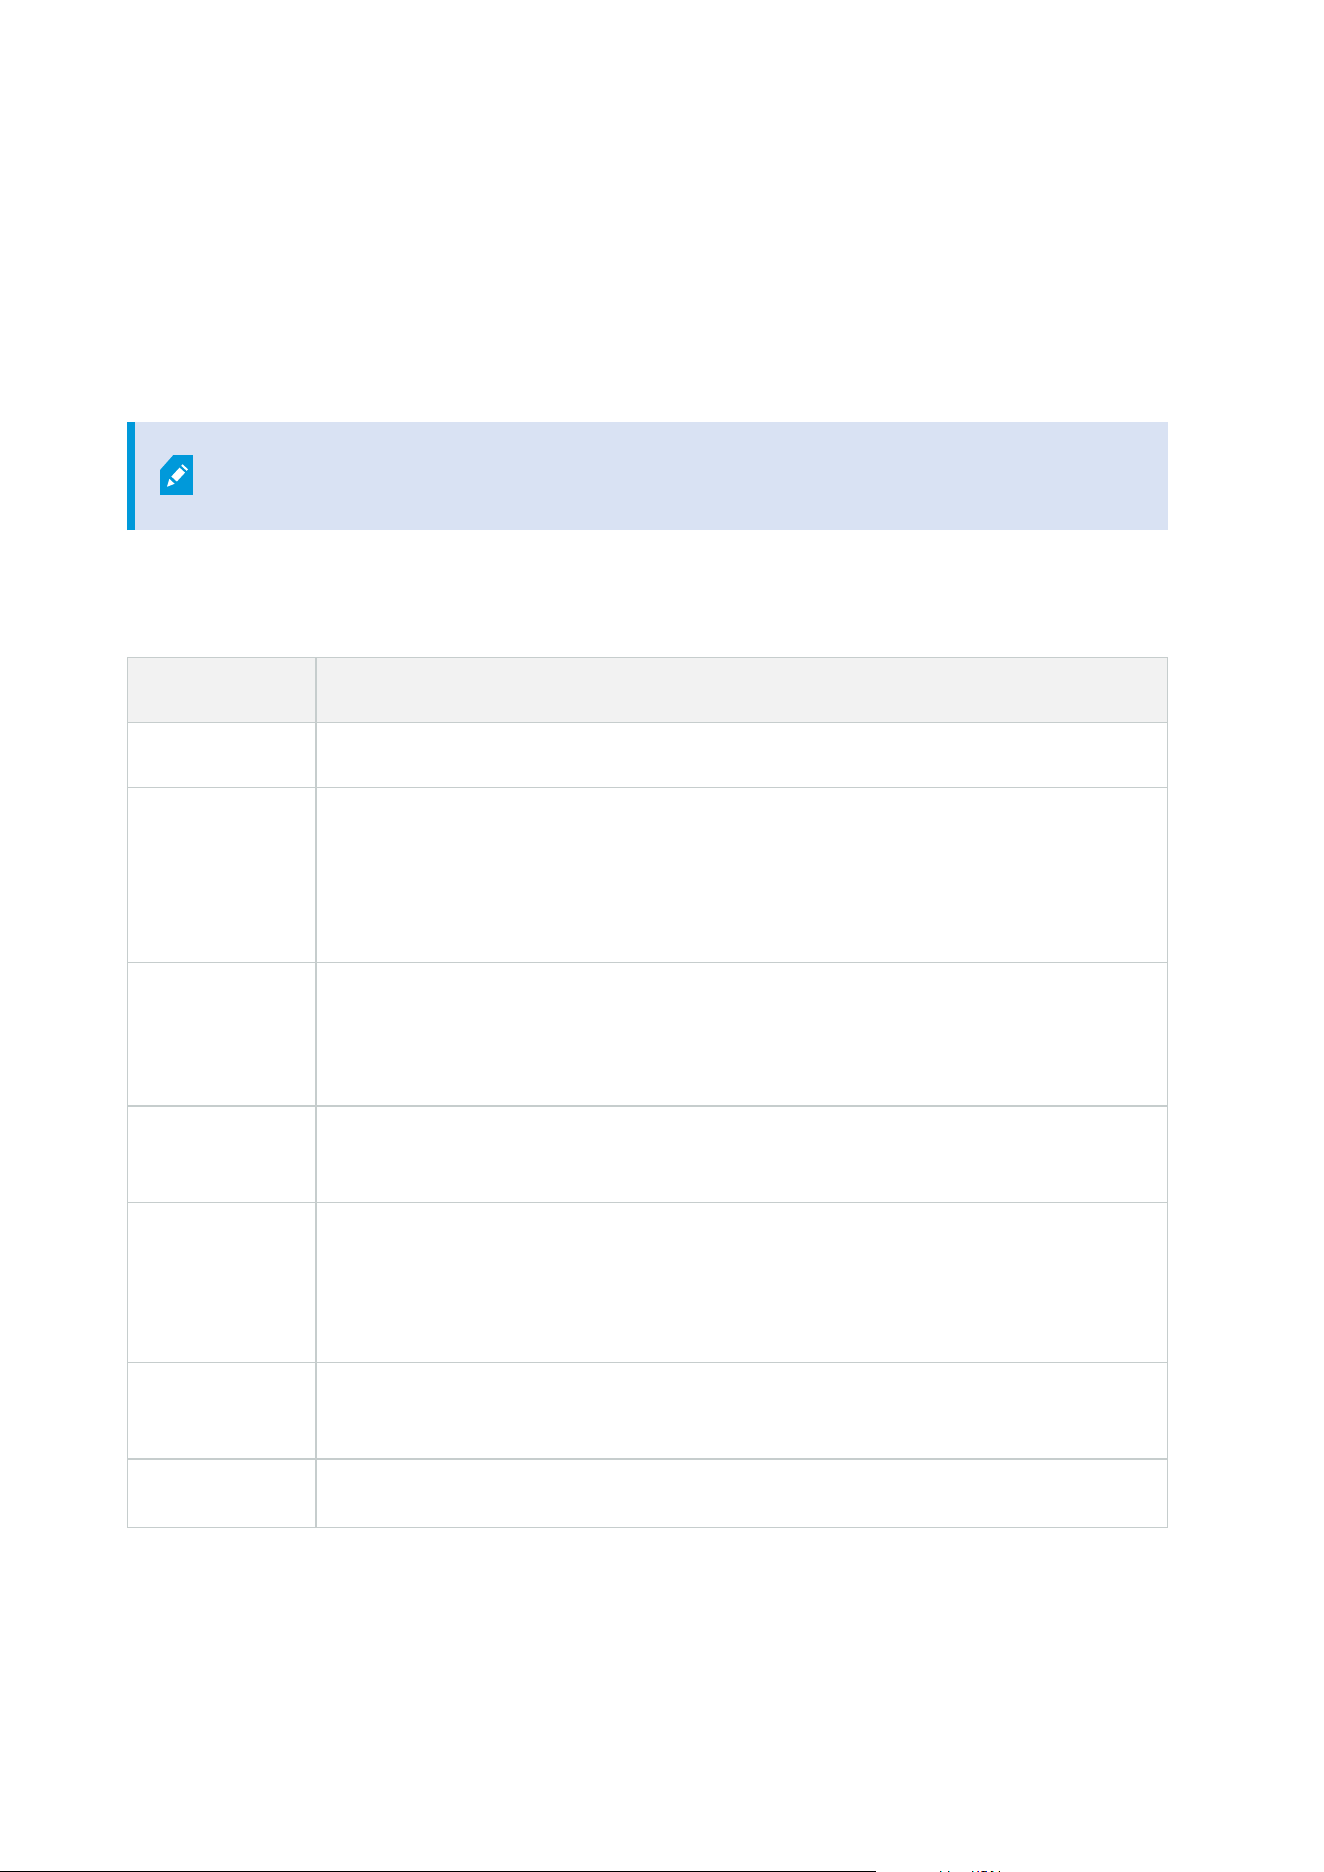
The built-in connectors available are described in the table:
Name Description
TCP client
connector
Use when the transaction source delivers the transaction data through a TCP server
interface. This connector has two settings that you can specify: host name and port
number.
Serial port
connector
Use when receiving transaction data as input on a serial port on the event server.
Connectors developed through the MIP SDK may also be available.
Transaction definitions (explained)
A transaction definition is a group of settings that help you control how raw data from the transaction sources
are displayed in XProtect Smart Client together with the video recordings. The output is a reader-friendly
format that resembles real-life receipts, for example till receipts and receipts from automated teller machines.
More specifically, transaction definitions let you:
l
Define when the individual transactions begin and end
l
Insert line breaks as required
l
Filter out unwanted characters or text strings, for example if the data comes from a printer connection
and contains unprintable characters for indicating line breaks, when to cut off a till receipt
l
Substitute characters with other characters
You can use the same transaction definition on multiple transaction sources.
Administrator manual | XProtect® Transact 2023 R1
10 | Configuration
Transaction events (explained)
A transaction event is the occurrence of specific words, numbers, or characters in the stream of transaction
data that flows from the transactions sources, for example the cash registers, to the event server. As a system
administrator, you need to define what the events are. This allows the operator to track and investigate
transaction events in XProtect Smart Client. For each event, a method (match type) must be specified to
identify strings in the transaction data: exact match, wildcard, or regular expression.
Configuring transactions
After activating your XProtect Transact licenses:
1. Add and configure the sources providing the transaction data, for example the cash registers.
2. Specify what defines a transaction, that is, where it begins and ends, including how it should be
presented in XProtect Smart Client.
When you are done setting up transaction, you can define transaction events and
configure them to trigger rules or alarms. In XProtect Smart Client, operators can
investigate transactions based on these events. For more information, see Configuring
transaction events and alarms on page 16.
Add transaction source (wizard)
To connect data from a transaction source to XProtect Transact, you need to add the sources of the
transactions, for example an automated teller machine. In the wizard, you select a connector, and you can
connect one or more cameras.
If you do not have a transaction source license for the transaction source you are about
to add, the system will work during the 30-days grace period. Make sure that you
acquire an additional transaction source license and activate it in due time.
Steps:
1. In the Site Navigation pane, expand Transact.
2. Go to the Overview pane.Right-click the Transaction sources node and select Add source. The wizard
appears.
3. Follow the steps in the wizard.
4. Depending on the connector you select, different fields appear that you need to fill in. For more
information, see Transaction sources (properties) on page 12. You can change these settings after
Administrator manual | XProtect® Transact 2023 R1
11 | Configuration
completing the wizard.
5. If the transaction definition you need is not available, click Add new to create a new transaction
definition.
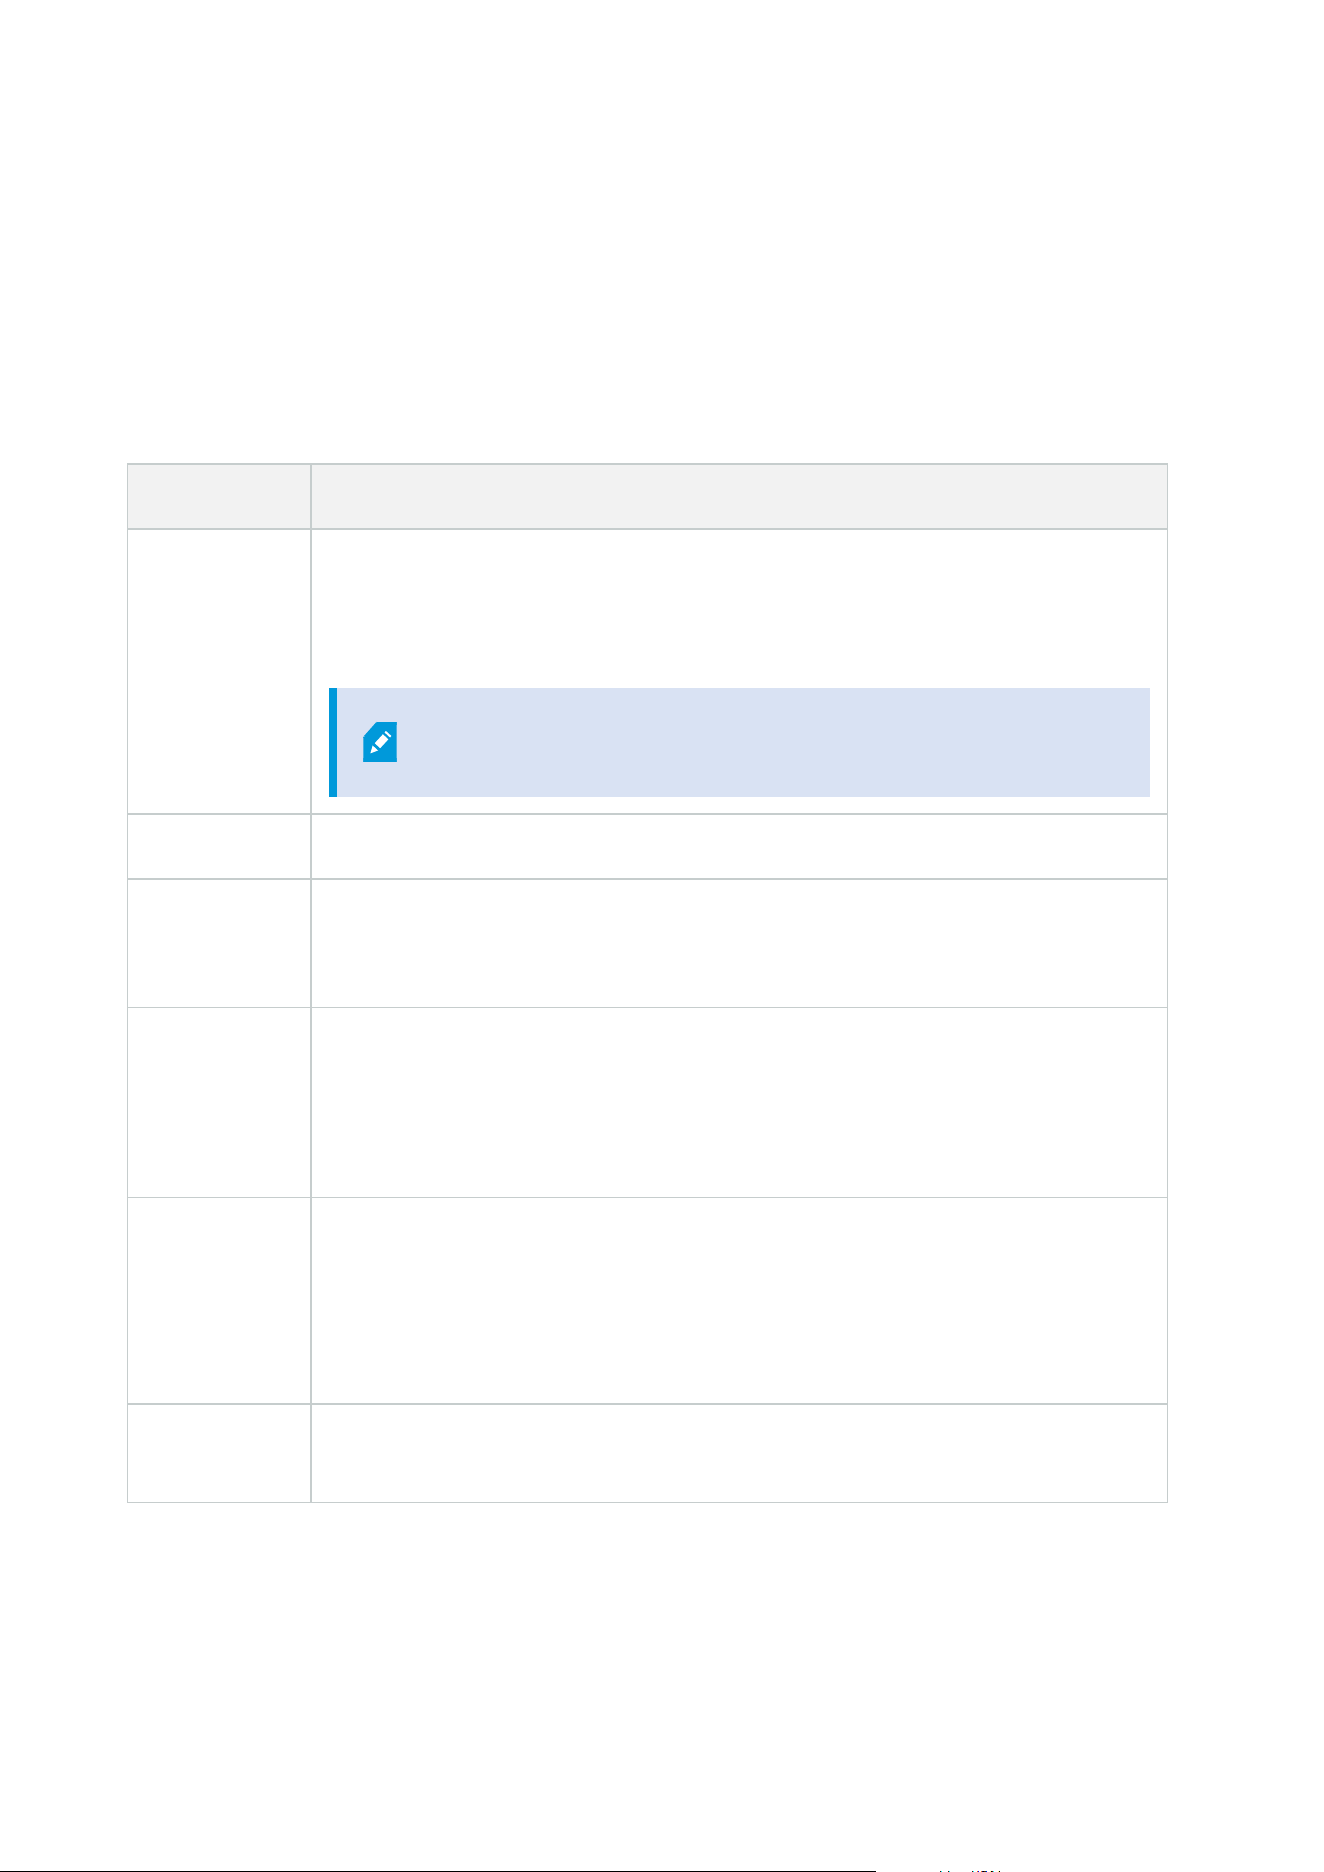
Transaction sources (properties)
The settings for transaction sources are described in the table.
Name Description
Enable
If you want to disable the transaction source, clear this check box. The stream of
transaction data stops, but the data already imported remains on the event server. You
can still view transactions from a disabled transaction source in XProtect Smart Client
during its retention period.
Even a disabled transaction source requires a transaction source
license.
Name If you want to change the name, enter a new name here.
Connector
You cannot change the connector you selected when you created the transaction
source. To select a different connector, you need to create a new transaction source,
and during the wizard, select the connector you want.
Transaction
definition
You can select a different transaction definition that defines how to transform the
transaction data received into transactions and transaction lines. This includes defining:
l
When a transaction begins and ends
l
How transactions are displayed in XProtect Smart Client
Retention
period
Specify, in days, for how long transaction data is maintained on the event server. The
default retention period is 30 days. When the retention period expires, automatically
the data is deleted. This is to avoid the situation, where the storage capacity of the
database is exceeded.
The minimum value is 1 day, whereas the maximum value is 1000 days.
TCP client
connector
If you selected TCP client connector, specify these settings:
Administrator manual | XProtect® Transact 2023 R1
12 | Configuration

Name Description
l
Host name: enter the host name of the TCP server associated with the
transaction source
l
Port: enter the port name on the TCP server associated with the transaction
source
Serial port
connector
If you selected Serial port connector, specify these settings and make sure that they
match the settings on the transaction source:
l
Serial port: select the COM port
l
Baud rate: specify the number of bits transmitted per second
l
Parity: specify the method for detecting errors in the transmissions. By default,
None is selected
l
Data bits: specify the number of bits used to represent one character of data
l
Stop bits: specify the number of bits to indicate when a byte has been
transmitted. Most devices need 1 bit
l
Handshake: specify the handshaking method determining the communication
protocol between the transaction source and event server
Create and add transaction definitions
As part of defining a transaction source, you specify a definition for the source. A definition transforms the raw
data received into presentable data, so that users can view the data in XProtect Smart Client in a format that
matches real-life receipts. This is necessary, because typically the raw data consists of a single string of data,
and it can be difficult to see where the individual transactions begin and end.
Steps:
1. In the Site Navigation pane, expand Transact.
2. Select Transaction definitions.
3. Go to the Overview pane.Right-click Transaction definition and select Add new. A number of settings
appear in the Properties section.
4. Use the Start pattern and Stop pattern fields to specify what data defines the start and end of a
receipt.
5. Click Start collecting data to collect raw data from the connected data source. The more data you
collect, the smaller the risk of missing characters, for example control characters, you want to replace
or omit.
Administrator manual | XProtect® Transact 2023 R1
13 | Configuration
6. In the Raw data section, highlight the characters you want to replace or omit. If you want to enter the
characters manually, skip this step and click Add filter.
7. Click Add filter to define how the selected characters from the transaction source data are displayed in
XProtect Smart Client.
8. For each filter, select an action to determine how the characters are transformed. The Preview section
gives you a preview of how data is presented with the filters defined.
You can also load previously collected data stored locally on your computer. To do this,
click Load from file.
Transaction definitions (properties)
Name Description
Name Enter a name.
Encoding
Select the character set used by the transaction source, for example the cash register.
This helps XProtect Transact convert the transaction data to understandable text that
you can work with when configuring the definition.
If you select the wrong encoding, the data may appear as non-sense text.
Start collecting
data
Collect transaction data from the connected transaction source. You can use the data
to configure a transaction definition.
Wait for at least one, but preferably more, transactions to complete.
Stop collecting
data
When you have collected sufficient data to configure the definition, click this button.
Load from file
If you want to import data from an already existing file, click this button. Typically this
is a file that you have created previously in the file format .capture. It can be other file
formats. What is important here is that the encoding of the import file matches the
encoding selected for the current definition.
Save to file
If you want to save the collected raw data to a file, click this button. You can reuse it
later.
Match type
Select the match type to use to search for the start pattern and the stop pattern in the
Administrator manual | XProtect® Transact 2023 R1
14 | Configuration

Name Description
collected raw data:
l
Use exact match: The search identifies strings that contain exactly what you
have entered in the Start pattern and Stop pattern fields
l
Use wildcards: The search identifies strings that contain what you have entered
in the Start pattern and Stop pattern fields in combination with a wild card
symbol (*, #, ?)
* matches any number of characters. For example, if you have entered "Start
tra*tion", the search identifies strings that contain "Start transaction".
# matches exactly 1 digit. For example, if you have entered "# watermelon", the
search identifies strings that contain, for example, "1 watermelon".
? matches exactly 1 character. For example, you may use the search expression
"Start trans?ction" to identify strings that contain "Start transaction"
l
Use regular expression: Use this match type to identify strings that contain
specific notation methods or conventions, for example a date format or credit
card number. For more information, see the Microsoft website
(https://docs.microsoft.com/dotnet/standard/base-types/regular-expression-
language-quick-reference/)
Raw data
Transaction data strings from the connected transaction source are displayed in this
section.
Start pattern
Specify a start pattern to indicate where a transaction begins. Horizontal lines are
inserted in the Preview field to visualize where the transaction starts and ends, and
will help to keep individual transactions separated.
Stop pattern
Specify a stop pattern to indicate where a transaction ends. A stop pattern is not
mandatory, but is useful if the received data contains irrelevant information, such as
information about opening hours or special offers, between actual transactions.
If you do not specify a stop pattern, the end of the receipt is defined in terms of where
the next receipt starts. The start is determined by what is entered in the Start pattern
field.
Add filter
Use the Add filters button to point out the characters that you want to be omitted in
XProtect Smart Client or replaced by other characters or a line break.
Replacing characters is useful when the transaction source string contains control
Administrator manual | XProtect® Transact 2023 R1
15 | Configuration

Name Description
characters for non-printing purposes. Adding line breaks is necessary to make receipts
in XProtect Smart Client resemble the original receipts.
Filter text
Displays the characters currently selected in the Raw data section. If you are aware of
characters that you want to be omitted or replaced, but they do not occur in the
collected raw data string, you can enter the characters manually in the Character field.
If the character is a control character, you need to enter its hexadecimal byte value.
Use this format for the byte value: {XX} and {XX, XX,...} if a characters consists of more
bytes.
Action
For each filter you add, you should specify how the characters you have selected are
handled:
l
Omit: the characters you select are filtered out
l
Substitute: the characters you select are replaced with the characters you
specify
l
Add line break: the characters you select are replaced by a line break
Substitution
Enter the text to replace the characters selected. Only relevant if you have selected the
action Substitute.
Remove
control
characters that
are not defined
as filter text
Remove non-printing characters that were not already removed after adding filters.
In the Raw data pane and the Preview section, see how the transaction data strings
change when you enable or disable this setting.
Preview
Use the Preview section to verify that you have identified and filtered out unwanted
characters. The output you see here resembles what the real-life receipt looks like in
XProtect Smart Client.
Configuring transaction events and alarms
Define transaction events
To track and investigate transaction events in XProtect Smart Client, first you need to define what the events
are, for example the acquisition of a smartphone. You define transaction events on a transaction definition, so
that the events defined apply to all transaction sources, for example cash registers, that use the transaction
Administrator manual | XProtect® Transact 2023 R1
16 | Configuration
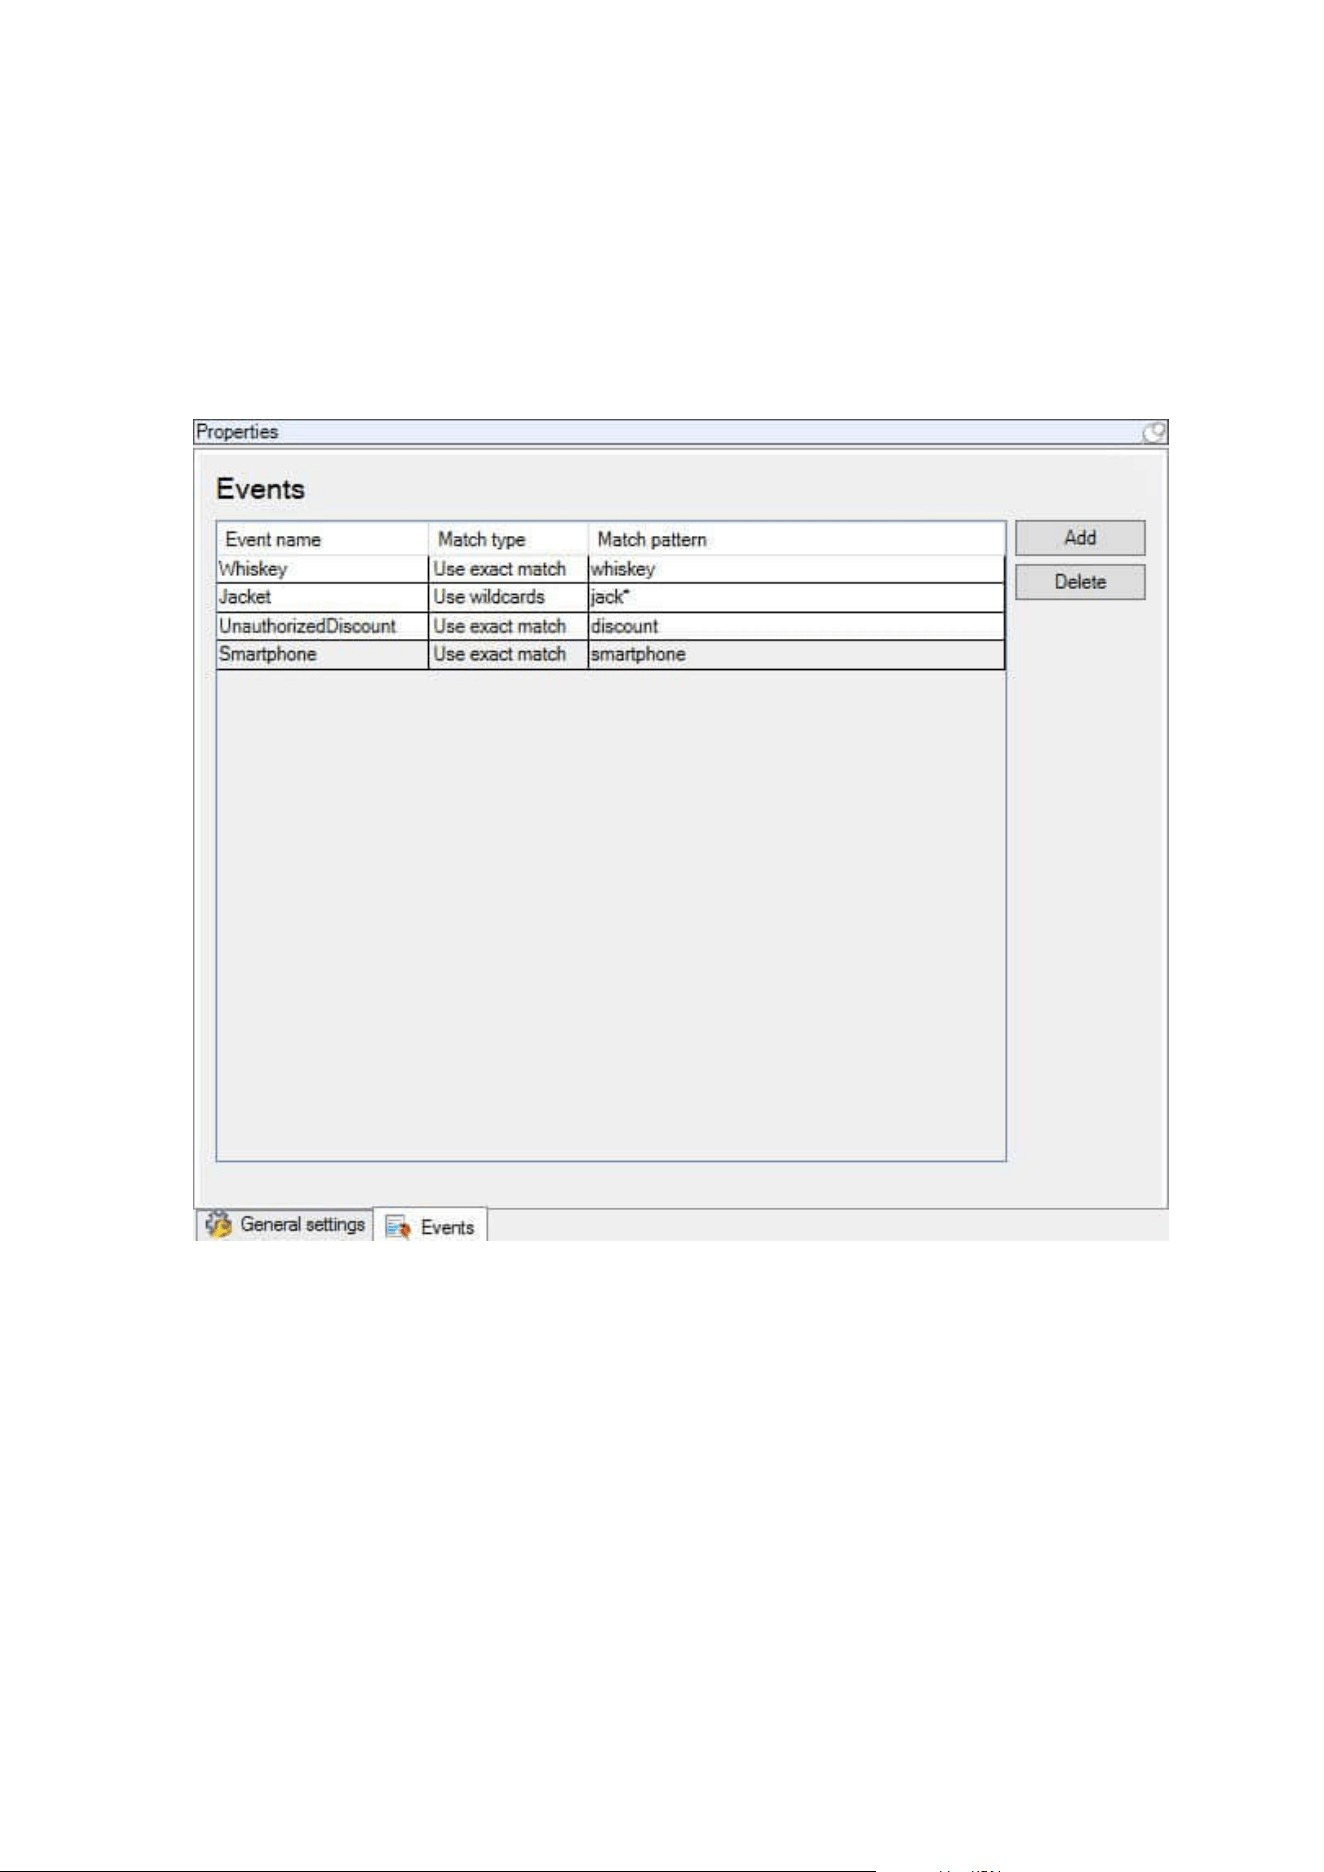
definition.
Steps:
1. In the Site Navigation pane, expand Transact.
2. Go to the Overview pane.Select the transaction definition, where you want to define an event.
3. Click the Events tab.
4. In the Properties pane, click Add. A new line is added.
5. Enter a name for the event.
6. Select the match type to use to identify a specific string in the transaction data as an event. You can
choose between exact match, wildcard symbols, and regular expressions. For more information, see the
description of match type in Transaction definitions (properties) on page 14.
7. In the Match pattern column, specify what you want the system to identify as an event, for example
"smartphone".
8. For each event, repeat the steps above.
Administrator manual | XProtect® Transact 2023 R1
17 | Configuration

Create alarms based on transaction events
To notify the XProtect Smart Client operator whenever a specific transaction event occurs, first you need to
create a transaction alarm in Management Client. The alarm will appear on the Alarm Manager tab in XProtect
Smart Client allowing the operator to investigate the event and, if required, take action.
Steps:
1. In the Site Navigation pane, expand Alarms.
2. Go to the Overview pane. Right-click the Alarm Definitions node and select Add New. . The settings in
the Properties pane become active.
3. Enter a name for the alarm and, in the Description field, possibly also instructions for XProtect Smart
Client operator on what action to take.
4. In the Triggering event drop-down menu, select Transaction events.
5. In the drop-down menu below Transaction events, select the specific event.
6. In the Sources field, click the Select. button. A pop-up window appears.
7. Click the Servers tab and select the transaction source.
8. Specify additional settings. For more information, see Alarm Definitions (Alarms node).
Set up rules on an event
To trigger an action when a specific transaction event occurs, you need to configure a rule, where you select an
event and specifies what needs to happen, for example that a camera starts recording or an e-mail is sent.
Steps:
1. In the Site Navigation pane, expand Rules and Events.
2. Go to the Overview pane.Right-click Rules and select Add Rule. A wizard appears.
3. Follow the steps in the wizard.
4. Make sure that the Perform an action on <event> radio button is selected.
5. Select the transaction event under Transact > Transaction events.
Administrator manual | XProtect® Transact 2023 R1
18 | Configuration
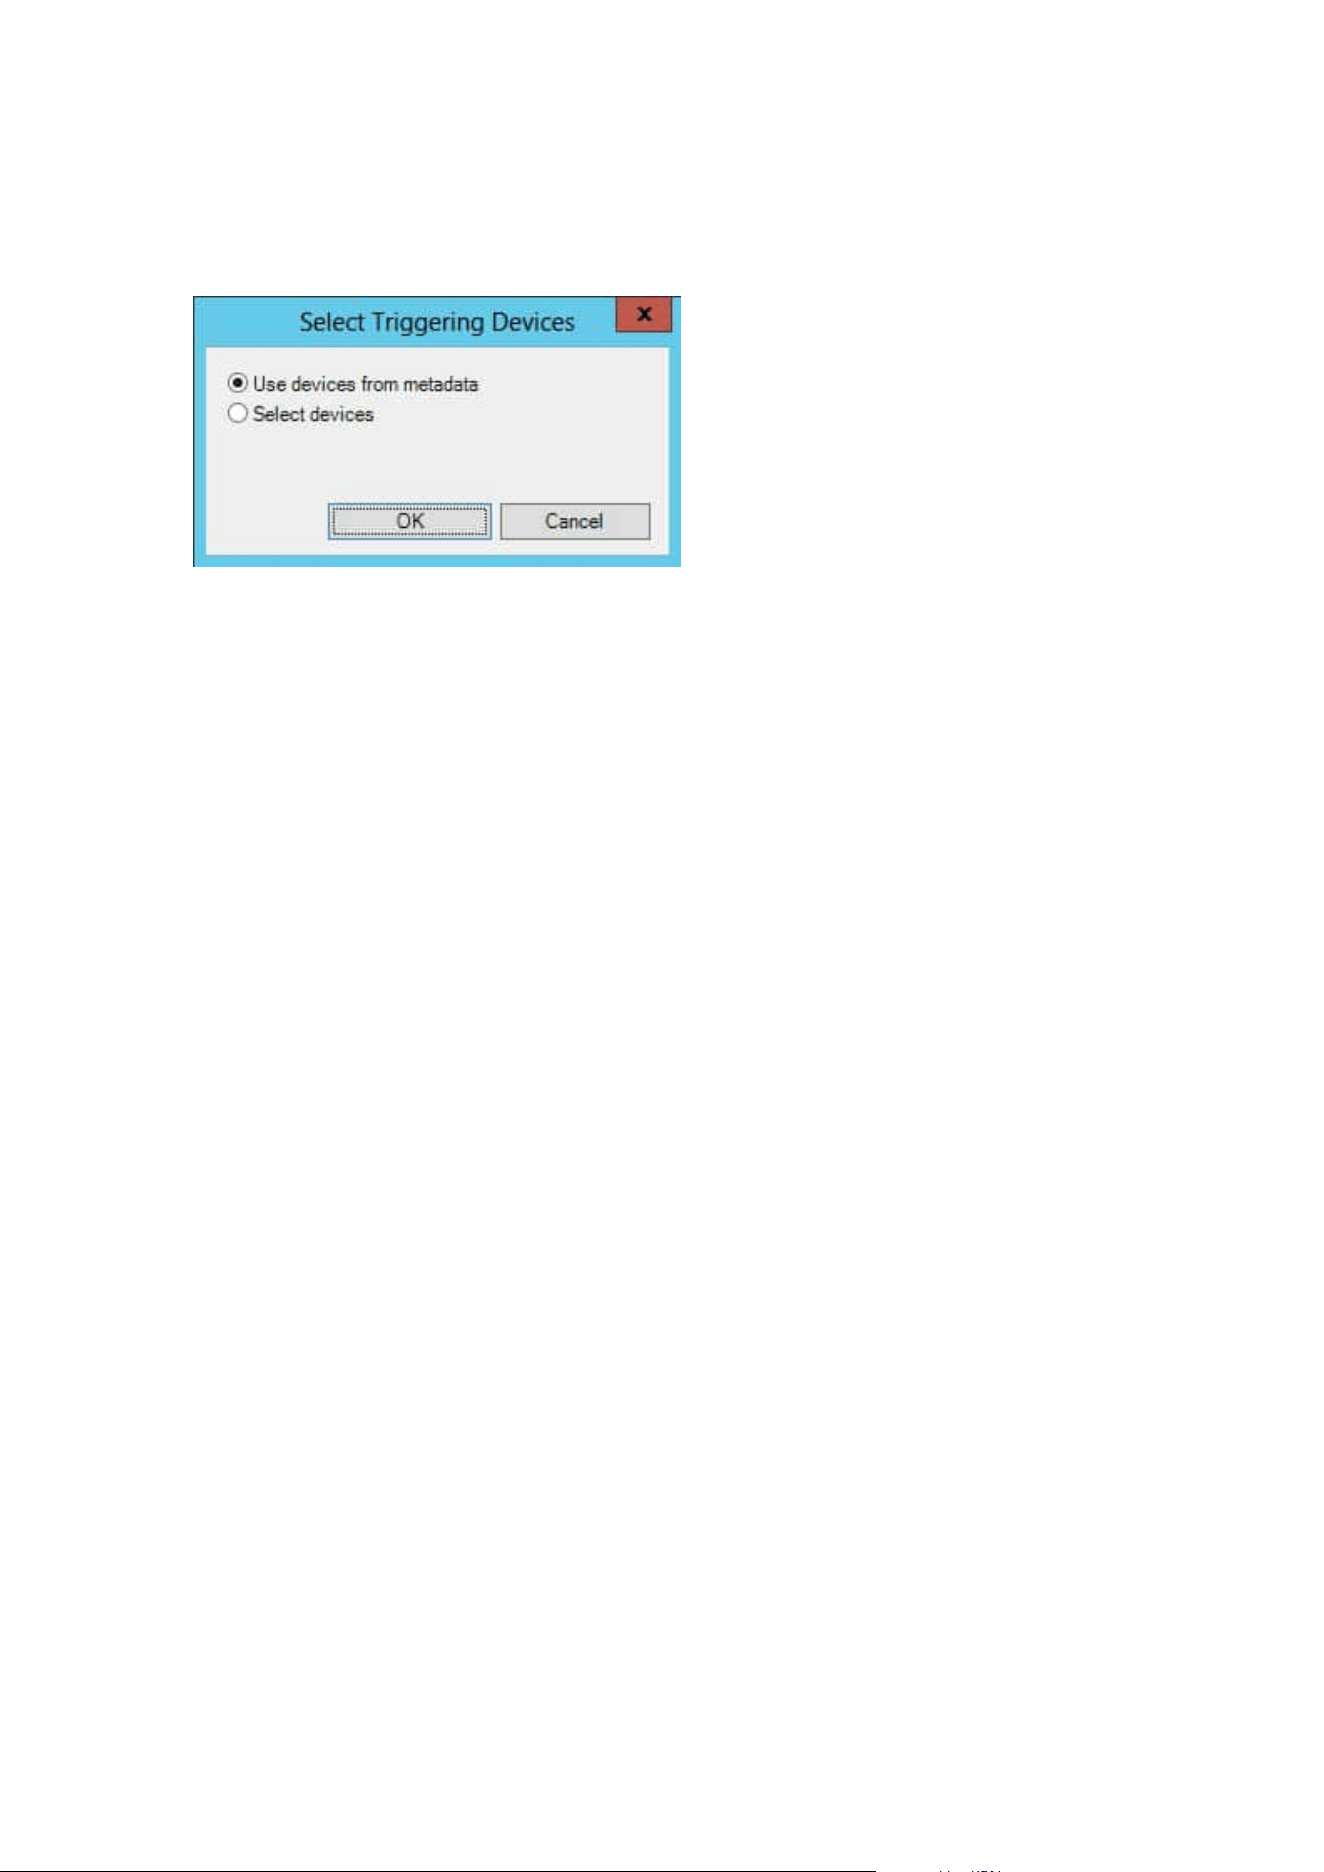
6. If an action involves recording, and you want to use the cameras associated with the transaction
sources, for example the cash registers, select the Use devices from metadata radio button in the
dialog box that appears during the wizard.
Enable filtering of transaction events or alarms
If you want the XProtect Smart Client operator to be able to filter events or alarms by transactions, first you
need to enable the Type field in Management Client. Once enabled, the field is available in the filter section on
the Alarm Manager tab in XProtect Smart Client.
Steps:
Administrator manual | XProtect® Transact 2023 R1
19 | Configuration
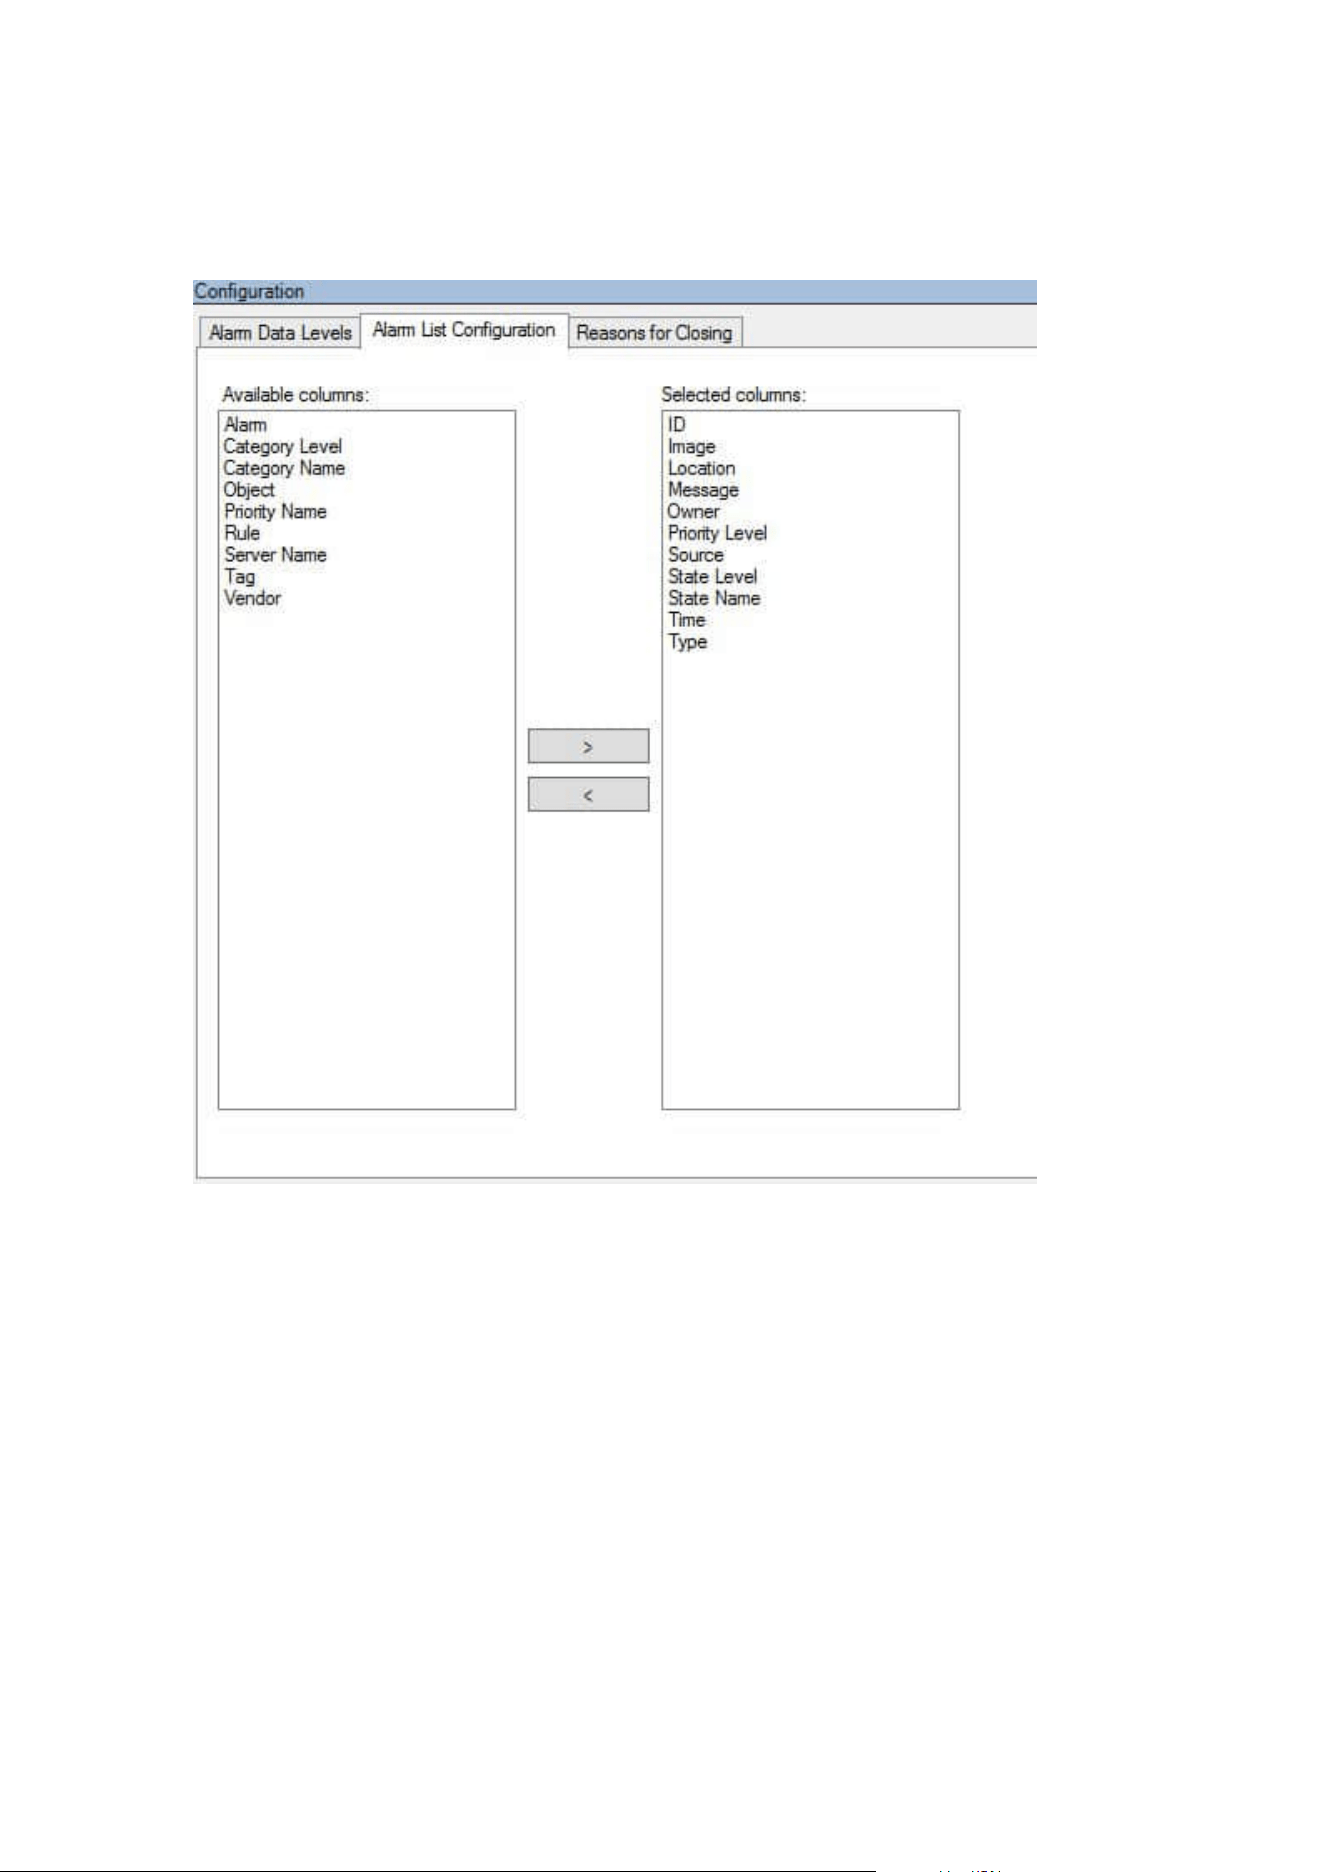
1. In the Site Navigation pane, expand Alarms
2. Select Alarm Data Settings and click the Alarm List Configuration tab.
3. In the Available columns section, select the Type field.
4. Add the field to Selected columns.
5. Save the changes. Now, the field is available in XProtect Smart Client.
Verify XProtect Transact configuration
When you are done configuring XProtect Transact and its components, you can test that XProtect Transact
works as expected in XProtect Smart Client.
Administrator manual | XProtect® Transact 2023 R1
20 | Configuration

1. Verify that all required transaction sources have been added correctly in XProtect Management Client:
1. Open XProtect Smart Client and click the Transact tab.
2. Click the All sources drop-down menu and verify that all the transaction sources appear.
2. Verify that the transaction definitions have been configured correctly in XProtect Management Client. If
configured correctly, there is one receipt per transaction, and the lines break correctly:
1. Open XProtect Smart Client and click the Transact tab.
2.
Select a transaction source that you know is active and click . The transaction lines for today
appear.
3. Click a line to view the associated receipt and video recordings.
3. Verify that transaction events are configured correctly:
1. Define a transaction test event in XProtect Management Client, for example an item that is likely
to be purchased and registered on a connected transaction source, for example a cash register.
2. When the event has occurred, open XProtect Smart Client and click the Alarm Manager tab.
3. Open the alarm list and select Event. The most recent events are displayed at the top of the list.
The test event you created should appear in the list.
Administrator manual | XProtect® Transact 2023 R1
21 | Configuration
Maintenance
Managing transaction sources
Edit transaction source settings
After adding a transaction source, you can change the name or select a different transaction definition.
Depending on the connector selected, there may be additional settings you can modify, for example the host
name and port number of a connected TCP server. In addition, you can disable a transaction source. This will
interrupt the flow of transaction data from the transaction source to the event server.
Once you have selected a connector, you cannot change it.
Steps:
1. In the Site Navigation pane, expand Transact.
2. Select Transaction sources.
3. Go to the Overview pane.Click the transaction source. The properties are displayed.
4. Make the required changes and save them. For more information, see Transaction sources (properties)
on page 12.
Disable transaction sources
You can disable a transaction source, for example if an ATM is temporarily out of order, or a service on a
registered cash register is disabled. The flow of transaction data to the event server is disrupted.
Steps:
1. In the Site Navigation pane, expand Transact.
2. Select Transaction sources.
3. Go to the Overview pane.Click the transaction source. The properties are displayed.
4. Clear the Enable check box and save the changes. The transaction source is disabled.
Delete transaction sources
You can delete the transaction sources you have added. The stored transaction data from that source is
deleted from the event server.
Administrator manual | XProtect® Transact 2023 R1
22 | Maintenance

As an alternative, you can disable the transaction source to avoid that stored transaction
data is deleted. A disabled transaction source also requires a transaction source license.
Steps:
1. In the Site Navigation pane, expand Transact.
2. Select Transaction sources.
3. Go to the Overview pane.Click the Transaction sources item. Right-click the source you want to delete.
4. Select Delete. A dialog box appears.
5. Click OK to confirm that you want to delete the transaction source.
Administrator manual | XProtect® Transact 2023 R1
23 | Maintenance

Troubleshooting
XProtect Transact (troubleshooting)
Error messages and warnings
Failed to retrieve transaction data from the event server.
The event server is not running or not responding, or the connection to the server has been lost.
There is an internal error on the event server or in the associated database. This may include issues with the
connection to the database. To resolve this issue, please contact your system administrator.
Your search timed out before completion. Try narrowing your search by shortening the search period.
There is an internal error on the event server or in the associated database. This may include issues with the
connection to the database. To resolve this issue, please contact your system administrator.
Administrator manual | XProtect® Transact 2023 R1
24 | Troubleshooting
About Milestone
Milestone Systems is a leading provider of open platform video management software; technology that
helps the world see how to ensure safety, protect assets and increase business efficiency. Milestone
Systems enables an open platform community that drives collaboration and innovation in the development
and use of network video technology, with reliable and scalable solutions that are proven in more than
150,000 sites worldwide. Founded in 1998, Milestone Systems is a stand-alone company in the Canon
Group. For more information, visit https://www.milestonesys.com/.
