1. SAFETY
1.1. GENERAL SAFETY
9 It is the users responsibility to read and follow all instructions.
9 Keep these instructions with the product at all times and review before each use.
9 Inspect the product before use to ensure it is assembled properly and all parts are in safe working order and free of defects.
WARNING! Ensure Health & Safety, and local authority regulations are adhered to when assembling and using this motorcycle tie
down rack.
9 Keep the general area clean, uncluttered and ensure there is adequate lighting.
9 All circumstances cannot be addressed in these instructions. Please use common sense and practice general safety measures when
using this product. Check with vehicle manufacturer's manual before installing.
9 Installing the motorcycle tie down rack requires drilling holes into the bed of your vechicle. Please make sure all measurements are
exact before drilling.
WARNING! Erect tie-down rack on a solid surface.
WARNING! Never modify this product in any way.
8 DO NOT attempt to mount the motorcycle tie down rack on your own. Obtain assistance.
8 DO NOT use the motorcycle tie down rack for any purpose other than that for which it is designed.
8 DO NOT clean the motorcycle tie down rack with any solvents which may damage the coated surface.
9 Ensure that the motorcycle tie down rack is properly assembled before loading it with motorcycles.
8 DO NOT exceed the recommended capacity of 2 motorcycles.
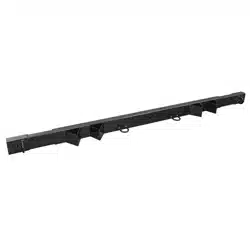
2. INTRODUCTION
Securely hold up to two motocross bikes, with two wheel chocks and three tie down points. Adjustable width between 1372mm to
1854mm to fit a majority of pick-up truck beds and vans. The tapered wheel slots help to prevent tire slip resulting in damage to the
vehicle or bikes. The three heavy-duty tie down loops provide excellent tie down points. Cancelling the need to crisscross tie downs to
awkward to reach factory fitted points on the vehicle bed. Heavy-duty steel construction with black powder paint coating for strength
and rust resistance.
3. SPECIFICATION
4. ASSEMBLY
4.1.1. Carefully unpack the product and check the contents
referring to the spares list, and as detailed in Fig.1. Should
any items be missing or damaged contact your Sealey
stockist.
4.1.2. Step 1. Measure the width of the front of your truck bed
box and divide this number by 2. Measure from one side of
the truck box in with that number to determine the center
of you truck bed. Mark the center of the truck bed box for
reference.
4.1.3. Step 2. Place the motorcycle tie down rack on the truck
bed box with the center mounting hole matching the center
mark from step 1. Position the motorcycle tie down rack as high as possible on the truck bed box. If your truck bed box has a lip at
the top, the rack should fit squarely underneath the lip. Once the motorcycle tie down rack is centered and lined up, mark through the
center mounting hole on the truck bed box. This is where your center mounting hole will be drilled.
4.1.4. Step 3. Note: Slide a block of scrap wood (optional) in between the truck bed box and the truck cab before drilling to prevent punching
through the truck cab. Using the drill and 1/2'' drill bit, drill a hole through the truck bed box at the mark from Step 2.
Original Language Version
© Jack Sealey Limited
MOTORCYCLE TIE DOWN RACK
Thank you for purchasing a Sealey product. Manufactured to a high standard, this product will, if used according to these
instructions, and properly maintained, give you years of trouble free performance.
IMPORTANT: PLEASE READ THESE INSTRUCTIONS CAREFULLY. NOTE THE SAFE OPERATIONAL REQUIREMENTS, WARNINGS & CAUTIONS. USE
THE PRODUCT CORRECTLY AND WITH CARE FOR THE PURPOSE FOR WHICH IT IS INTENDED. FAILURE TO DO SO MAY CAUSE DAMAGE AND/OR
PERSONAL INJURY AND WILL INVALIDATE THE WARRANTY. KEEP THESE INSTRUCTIONS SAFE FOR FUTURE USE.
Wear eye
Protection
Refer to
instruction
manual
TDPR01 Issue 1 23/08/24
MODEL NO: TDPR01
Model No: TDPR01
Weight: 8kg
Fig.1
Each end section slides onto
the main rack section

4.1.5. Step 4. Once the center hole is drilled, install the motorcycle tie down rack with a M12 x 80 hex bolt, washer, and nut from the
hardware kit.
4.1.6. Make sure the motorcycle tie down rack is level and mark through the holes on each side. repeat step 3 for drilling the side holes and
secure with the remaining M12 x 80 bolts, washers, and nuts.
4.1.7. Step 5. Using a wrench, securely tighten all bolts.
5. CLEANING
9 Use warm water and mild soap to clean the motorcycle tie down rack. DO NOT use harsh detergents or solvents for cleaning. Doing
so will damage the motorcycle tie down rack.
Sealey Group, Kempson Way, Suffolk Business Park, Bury St Edmunds, Suffolk. IP32 7AR
01284 757500 sales@sealey.co.uk www.sealey.co.uk
NOTE: It is our policy to continually improve products and as such we reserve the right to alter data, specications and component parts
without prior notice.
IMPORTANT: No Liability is accepted for incorrect use of this product.
WARRANTY: Guarantee is 12 months from purchase date, proof of which is required for any claim.
ENVIRONMENT PROTECTION
Recycle unwanted materials instead of disposing of them as waste. All tools, accessories and packaging should be
sorted, taken to a recycling centre and disposed of in a manner which is compatible with the environment. When
the product becomes completely unserviceable and requires disposal, drain any uids (if applicable) into approved
containers and dispose of the product and uids according to local regulations.
Original Language Version
TDPR01 Issue 1 23/08/24
© Jack Sealey Limited
