
Electric Fireplace with Mantel
Cheminée Électrique avec Manteau
THIS INSTRUCTION BOOKLET CONTAINS IMPORTANT SAFETY INFORMATION. PLEASE READ AND KEEP FOR FUTURE REFERENCE.
FP10534US
2
Before You Start
Please read all instructions carefully.
Retain instructions for future reference.
Separate and count all parts and hardware.
Read through each step carefully and follow the proper order.
We recommend that, where possible, all items are assembled near to the area in
which they will be placed in use, to avoid moving the product unnecessarily once
assembled.
Always place the product on a flat, steady and stable surface.
Keep all small parts and packaging materials for this product away from babies
and children as they potentially pose a serious choking hazard.
FR
Conservez les instructions pour vous y référer ultérieurement.
Vérifiez toutes les pièces et les accessoires.
Lisez attentivement chaque étape et suivez l'ordre correct.
Nous recommandons que, dans la mesure du possible, tous les produits
soient assemblés à proximité de la zone où ils seront utilisés, afin d'éviter tout'
déplacement inutile du produit une fois assemblé.
Placez toujours le produit sur une surface plane et stable.
Conservez toutes les petites pièces de ce produit et les matériaux d'emballage
hors de portée des bébés et des enfants, car ils pourraient présenter un risque
d'étouffement.
Avant de Commencer
EN
Veuillez lire attentivement toutes les instructions.
3
4
Right side horizontal bar
Countertop middle horizontal bar
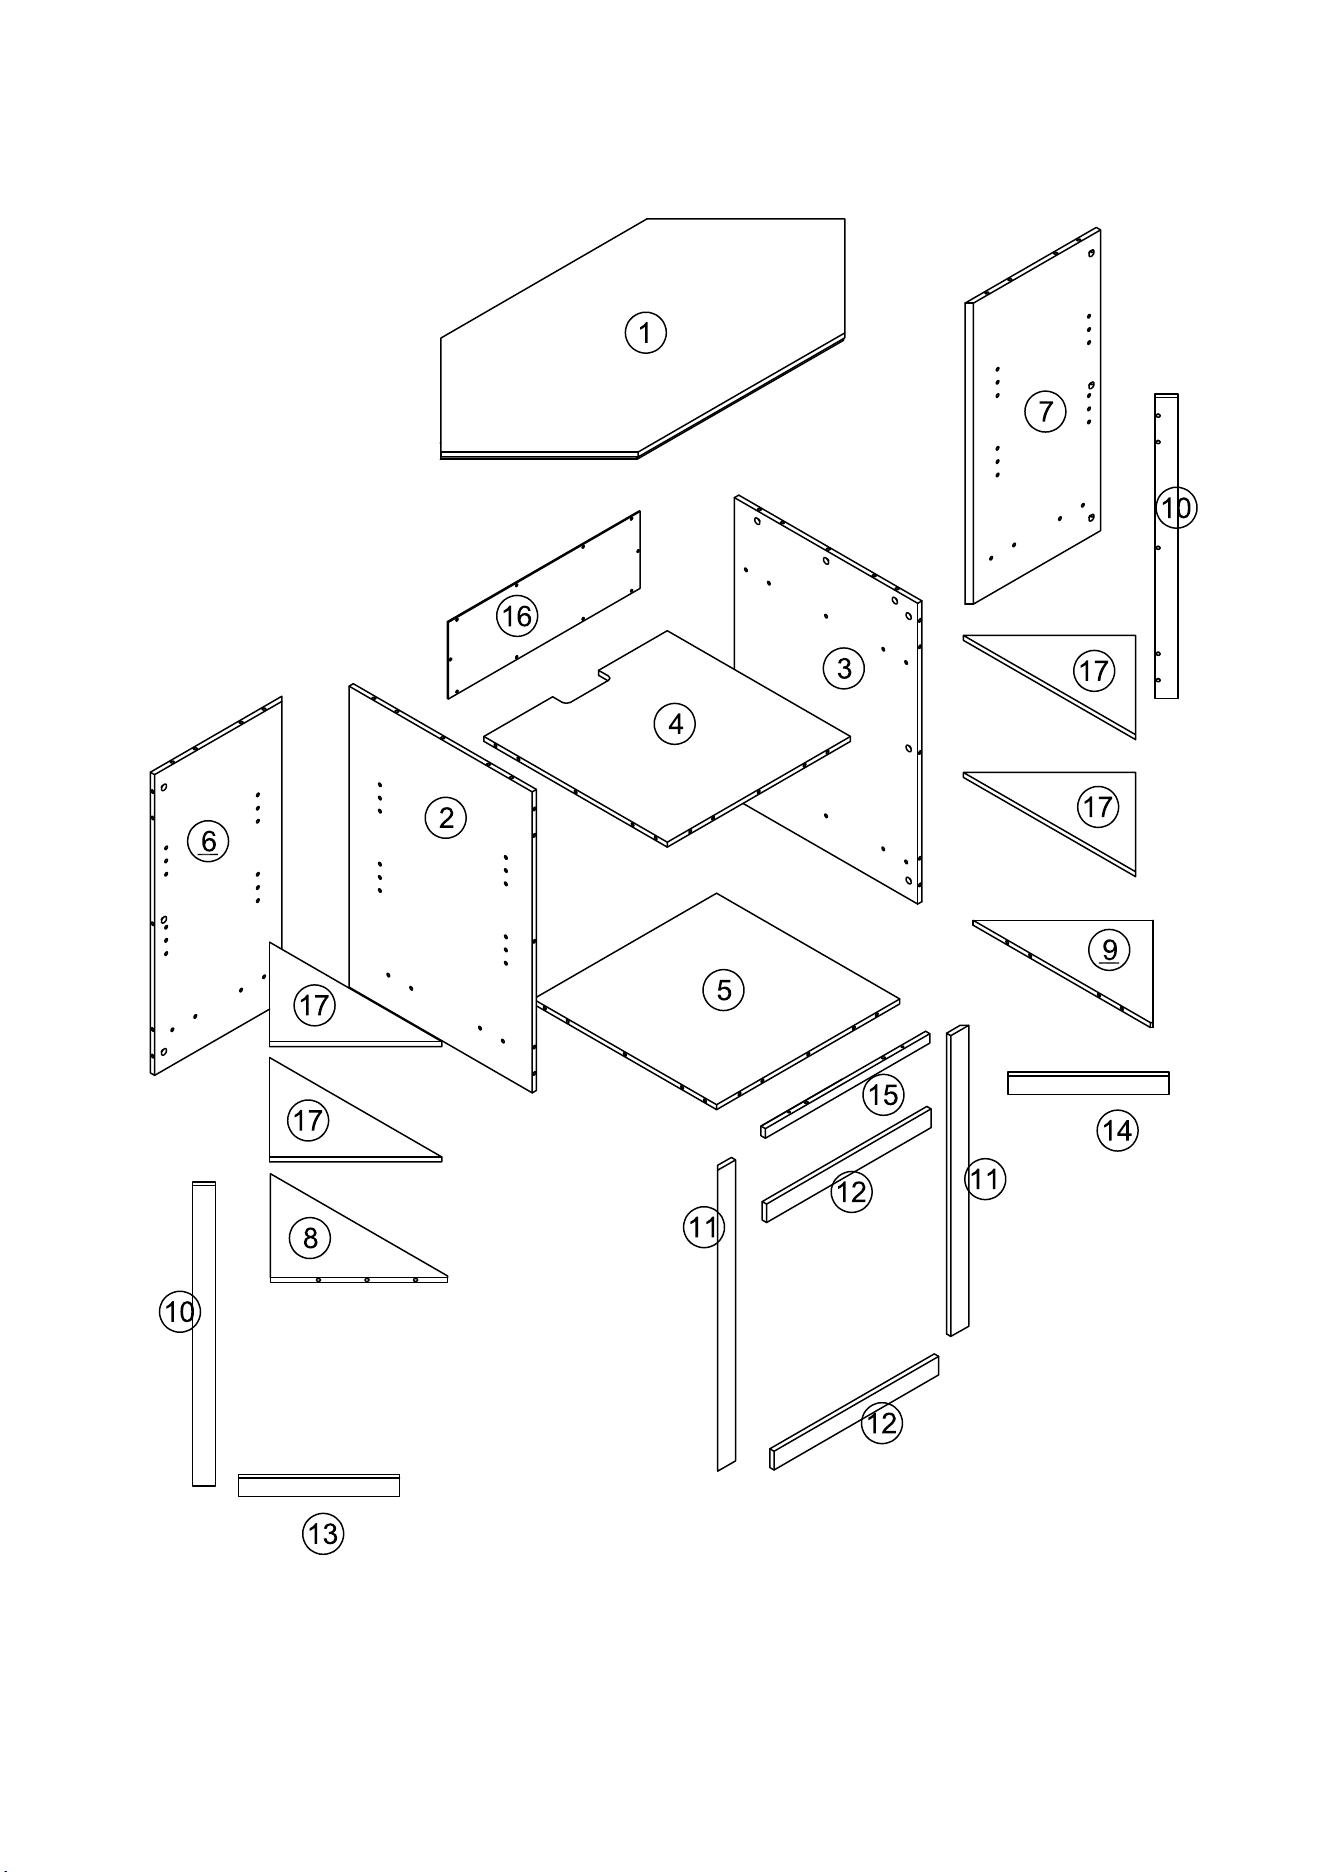
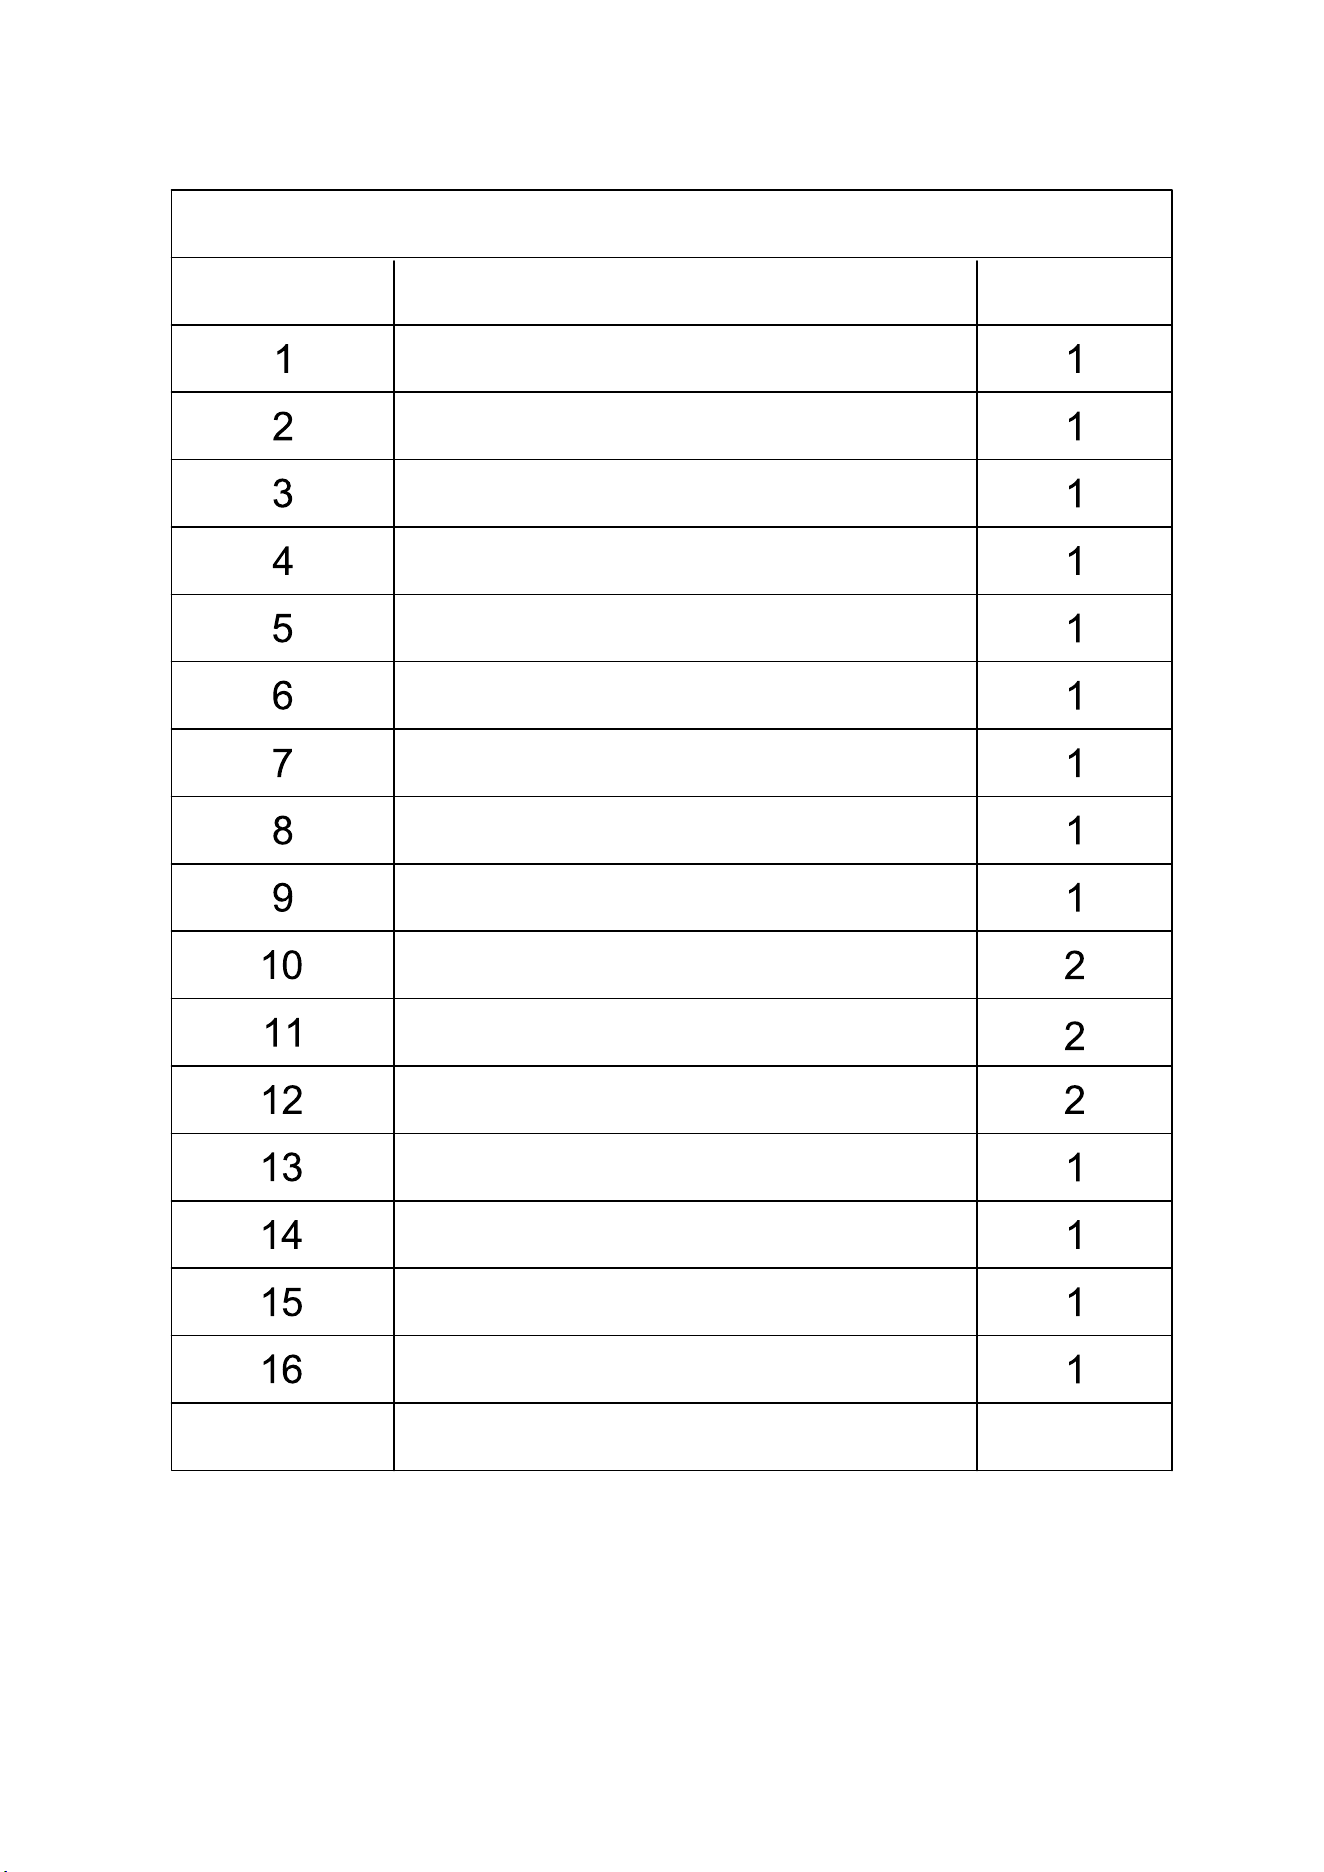
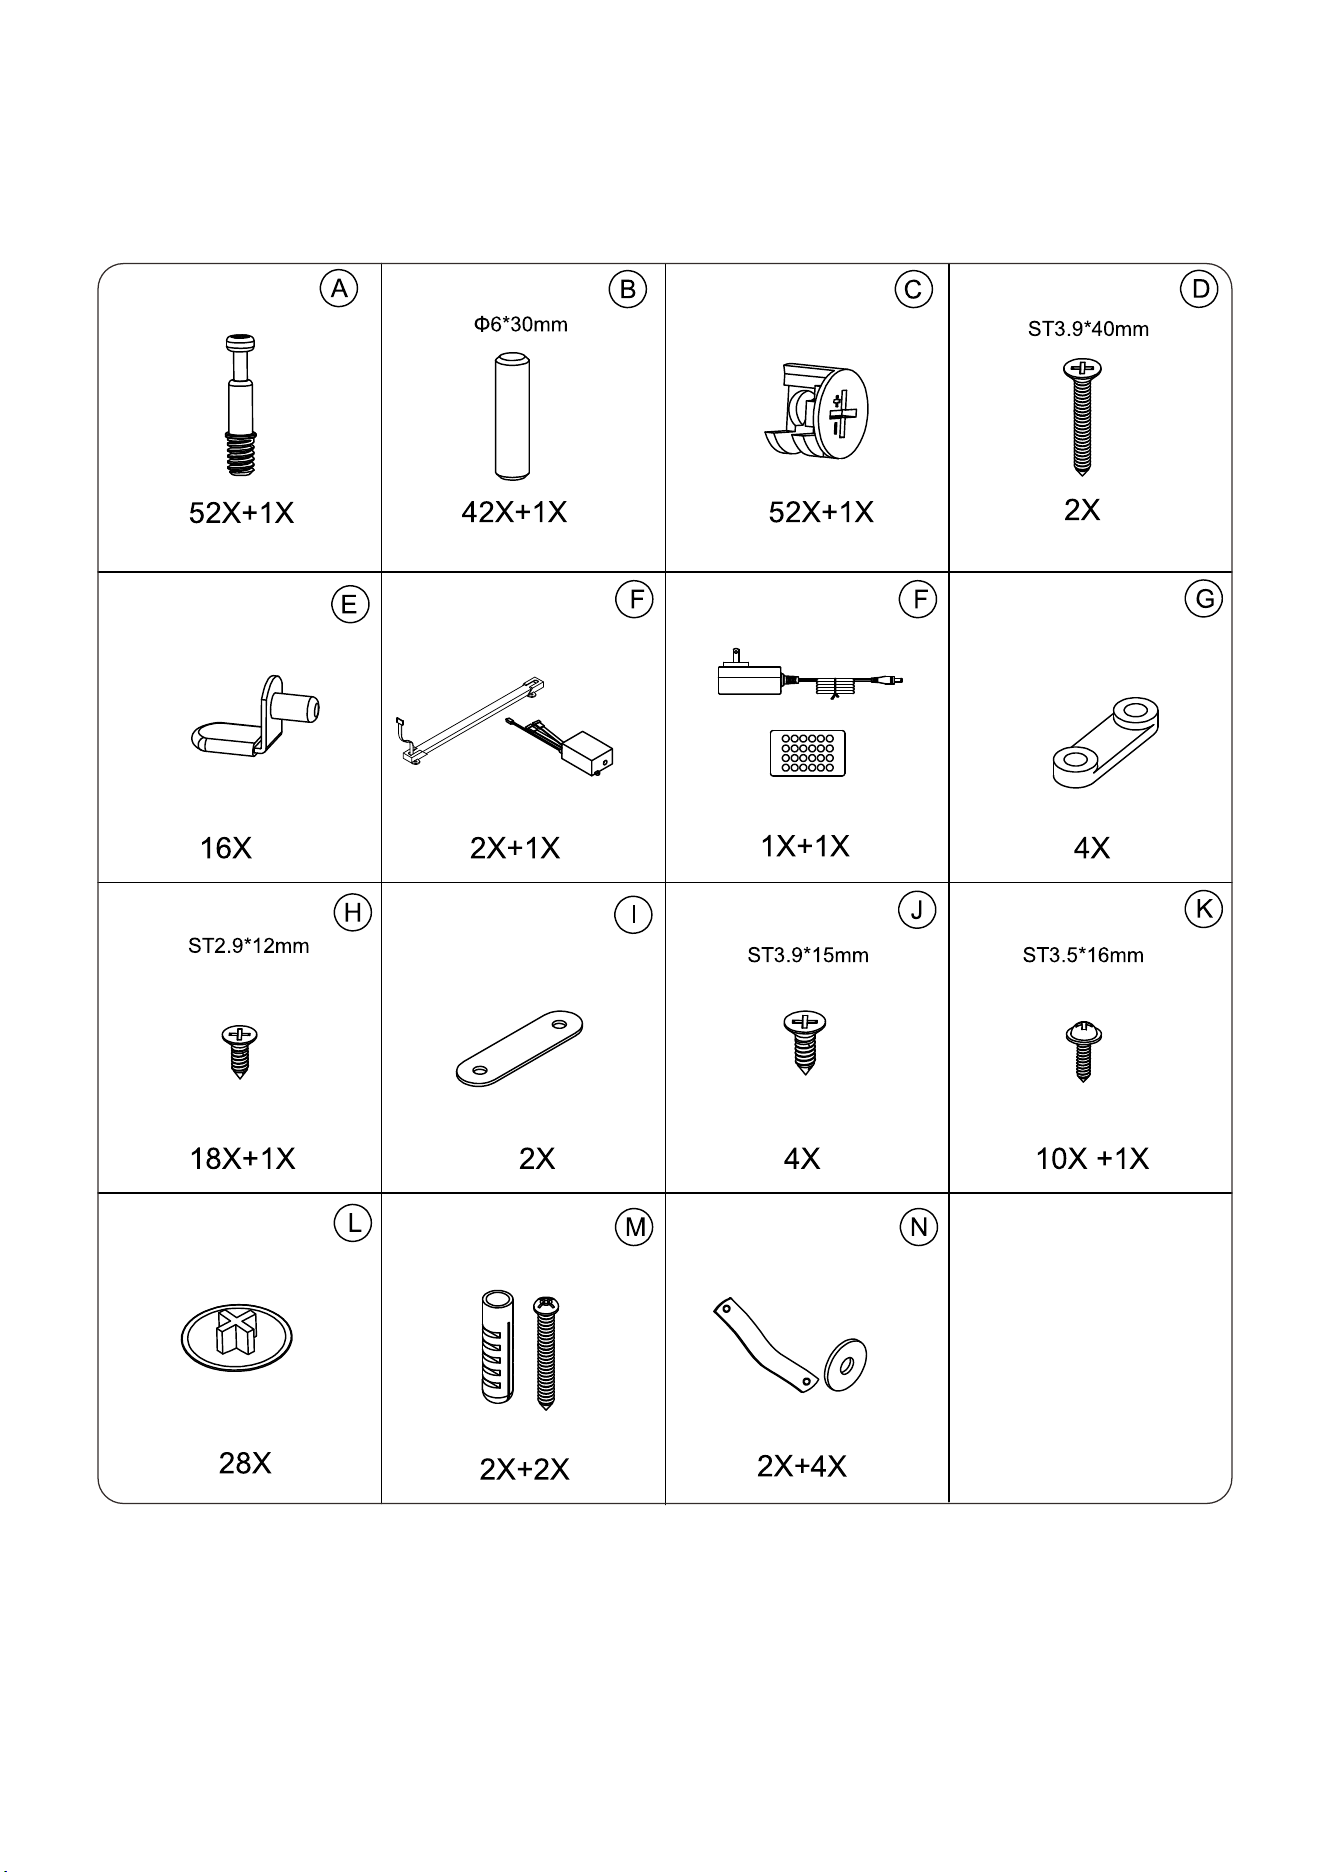
CODE
PACKAGE CONTENT
DESCRIPTION
Countertop board
Left middle panel
Right middle panel
Laminate
Bottom board
Left side panel
Right side panel
Left bottom plate
Right bottom plate
Left and right vertical blocking bar
Middle vertical blocking bar
Middle horizontal bar
Left side horizontal bar
QTY
Upper backboard
Glass movable shelf
17 4

5
Barre horizontale droite
Barre horizontale centrale du comptoir
CODE
CONTENU DU PAQUET
DESCRIPTION
Panneau de comptoir
Panneau central gauche
Panneau central droit
Stratifié
Panneau inférieur
Panneau latéral gauche
Panneau latéral droit
Panneau inférieur gauche
Plateau inférieur droit
Barre de blocage verticale gauche et droite
Barre de blocage verticale centrale
Barre horizontale centrale
Barre horizontale gauche
QTÉ
Panneau arrière supérieur
Étagère mobile en verre
17 4
6
7
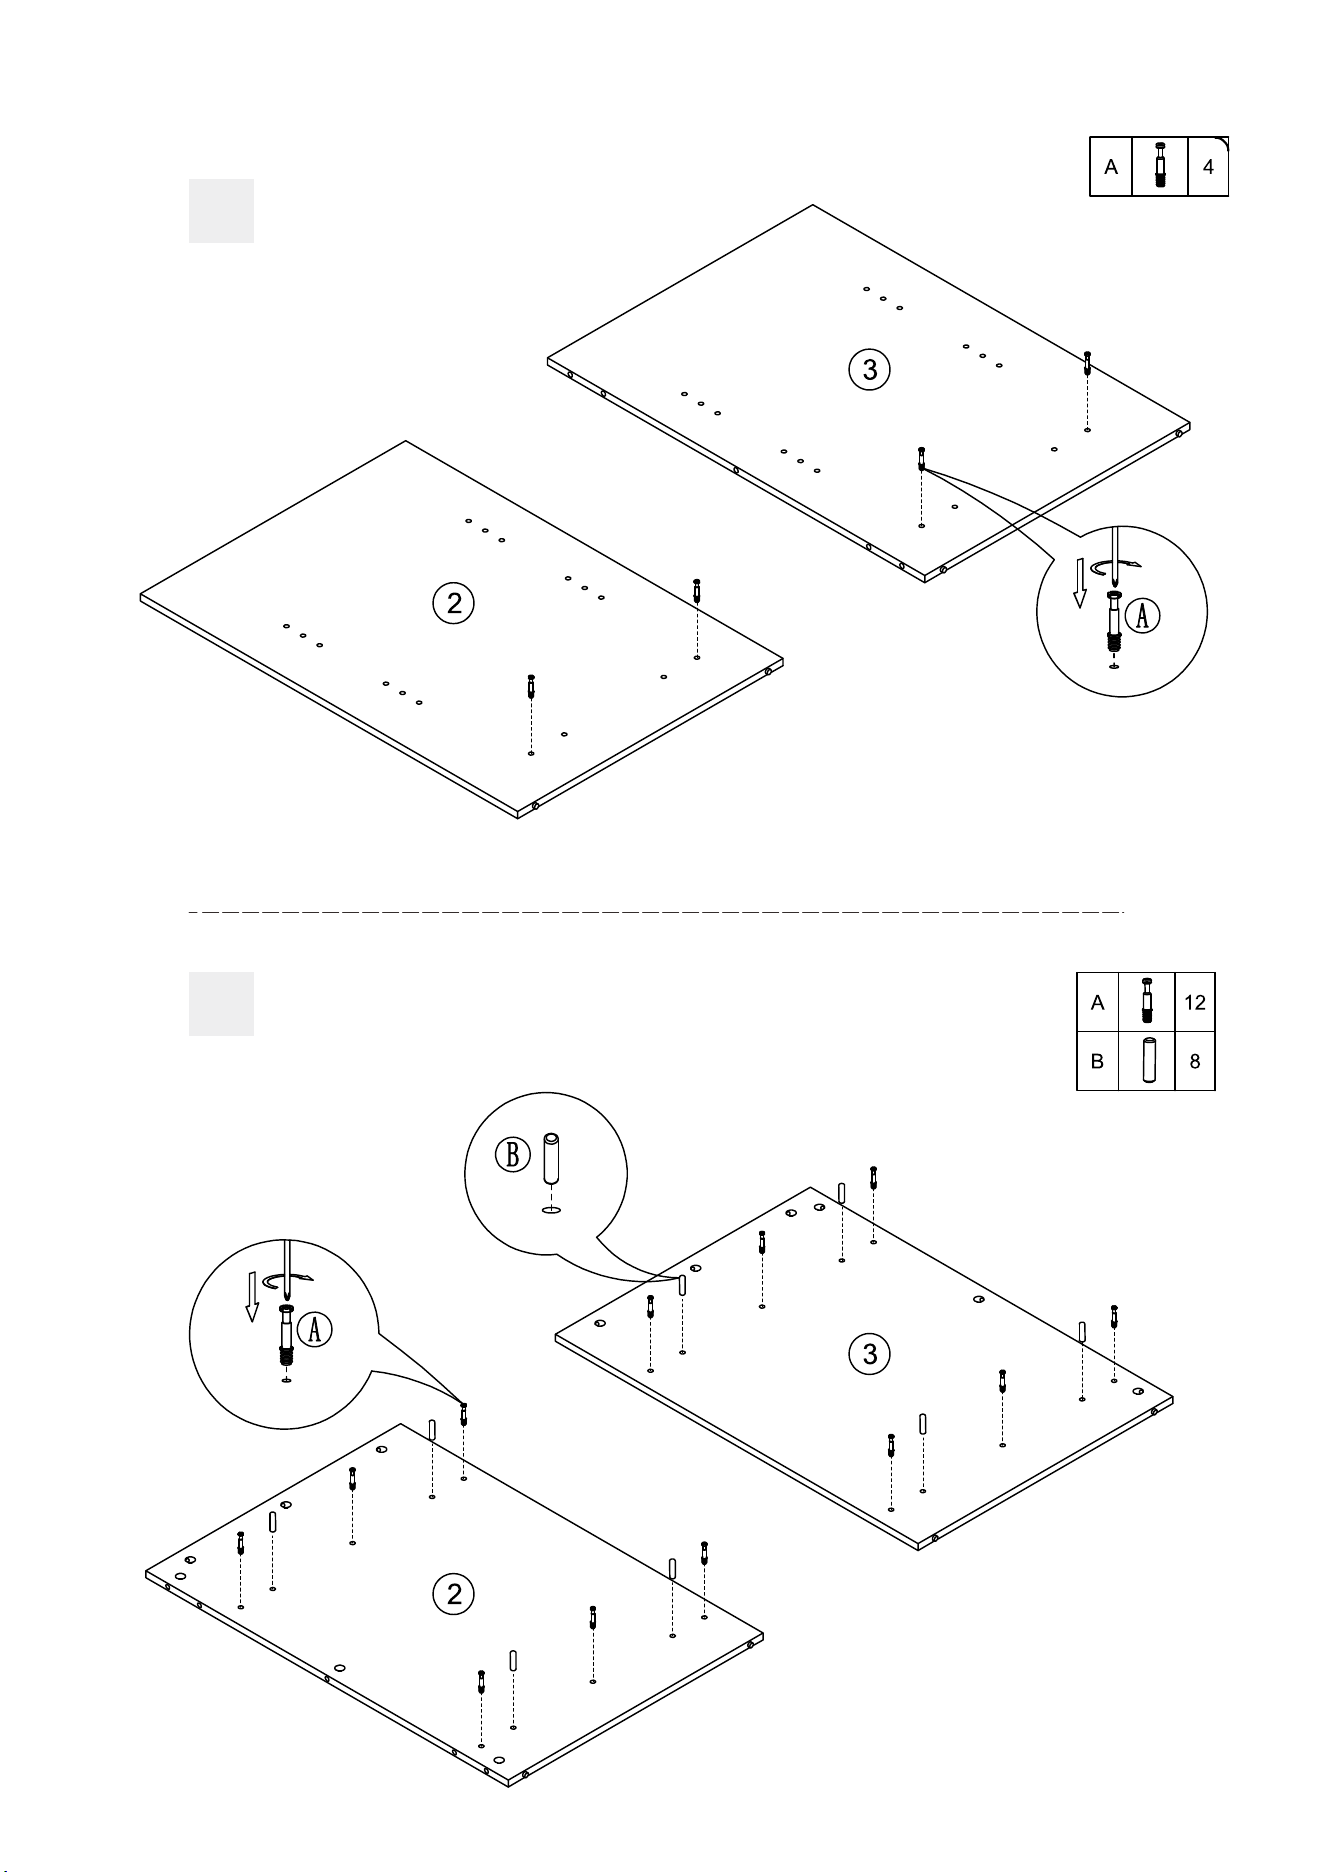
1
2
8
3
4
9
5
6
10
7
8
11
9
10
12
11
12
13
13
14
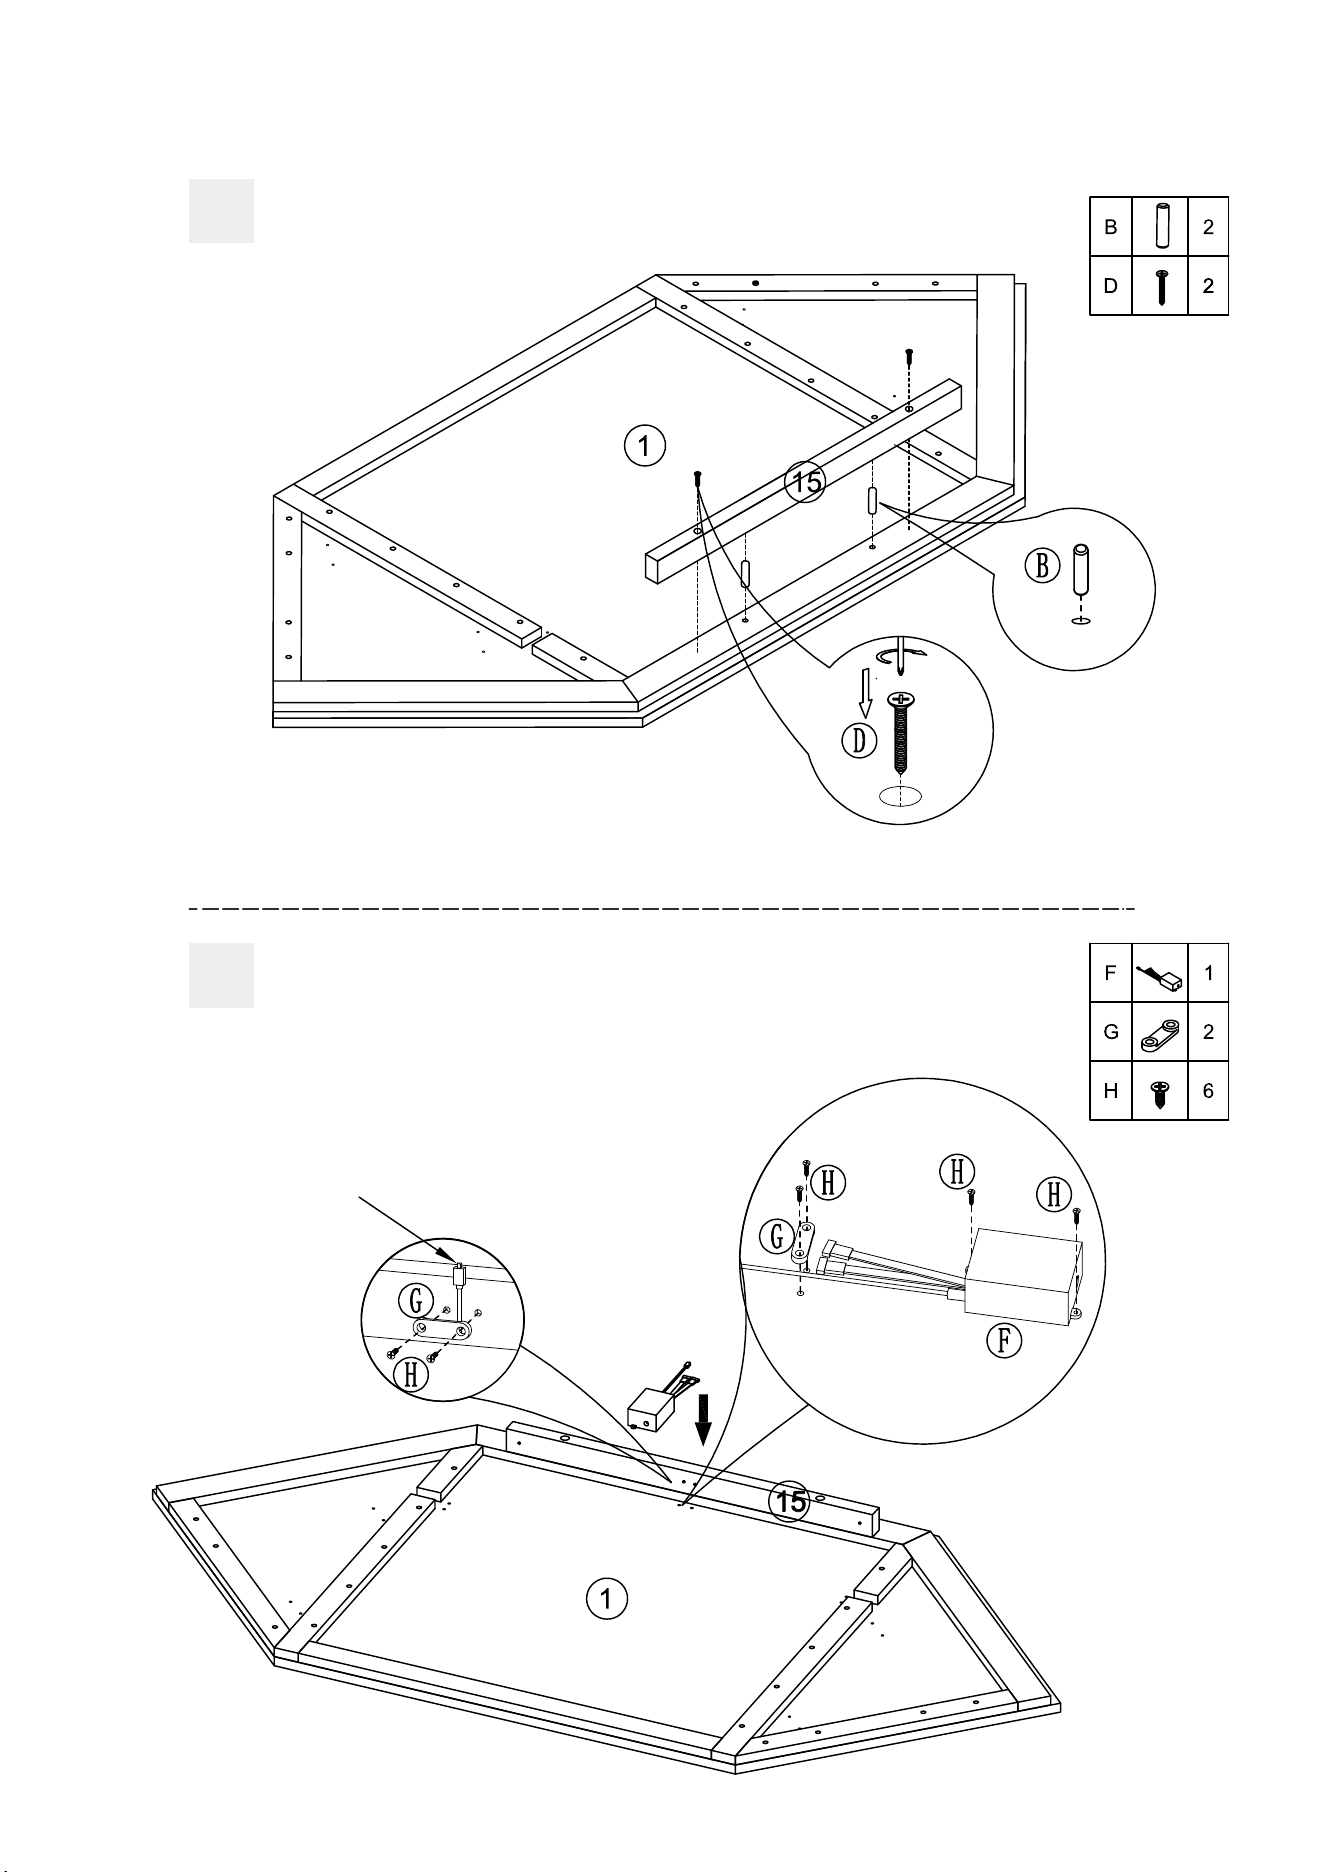
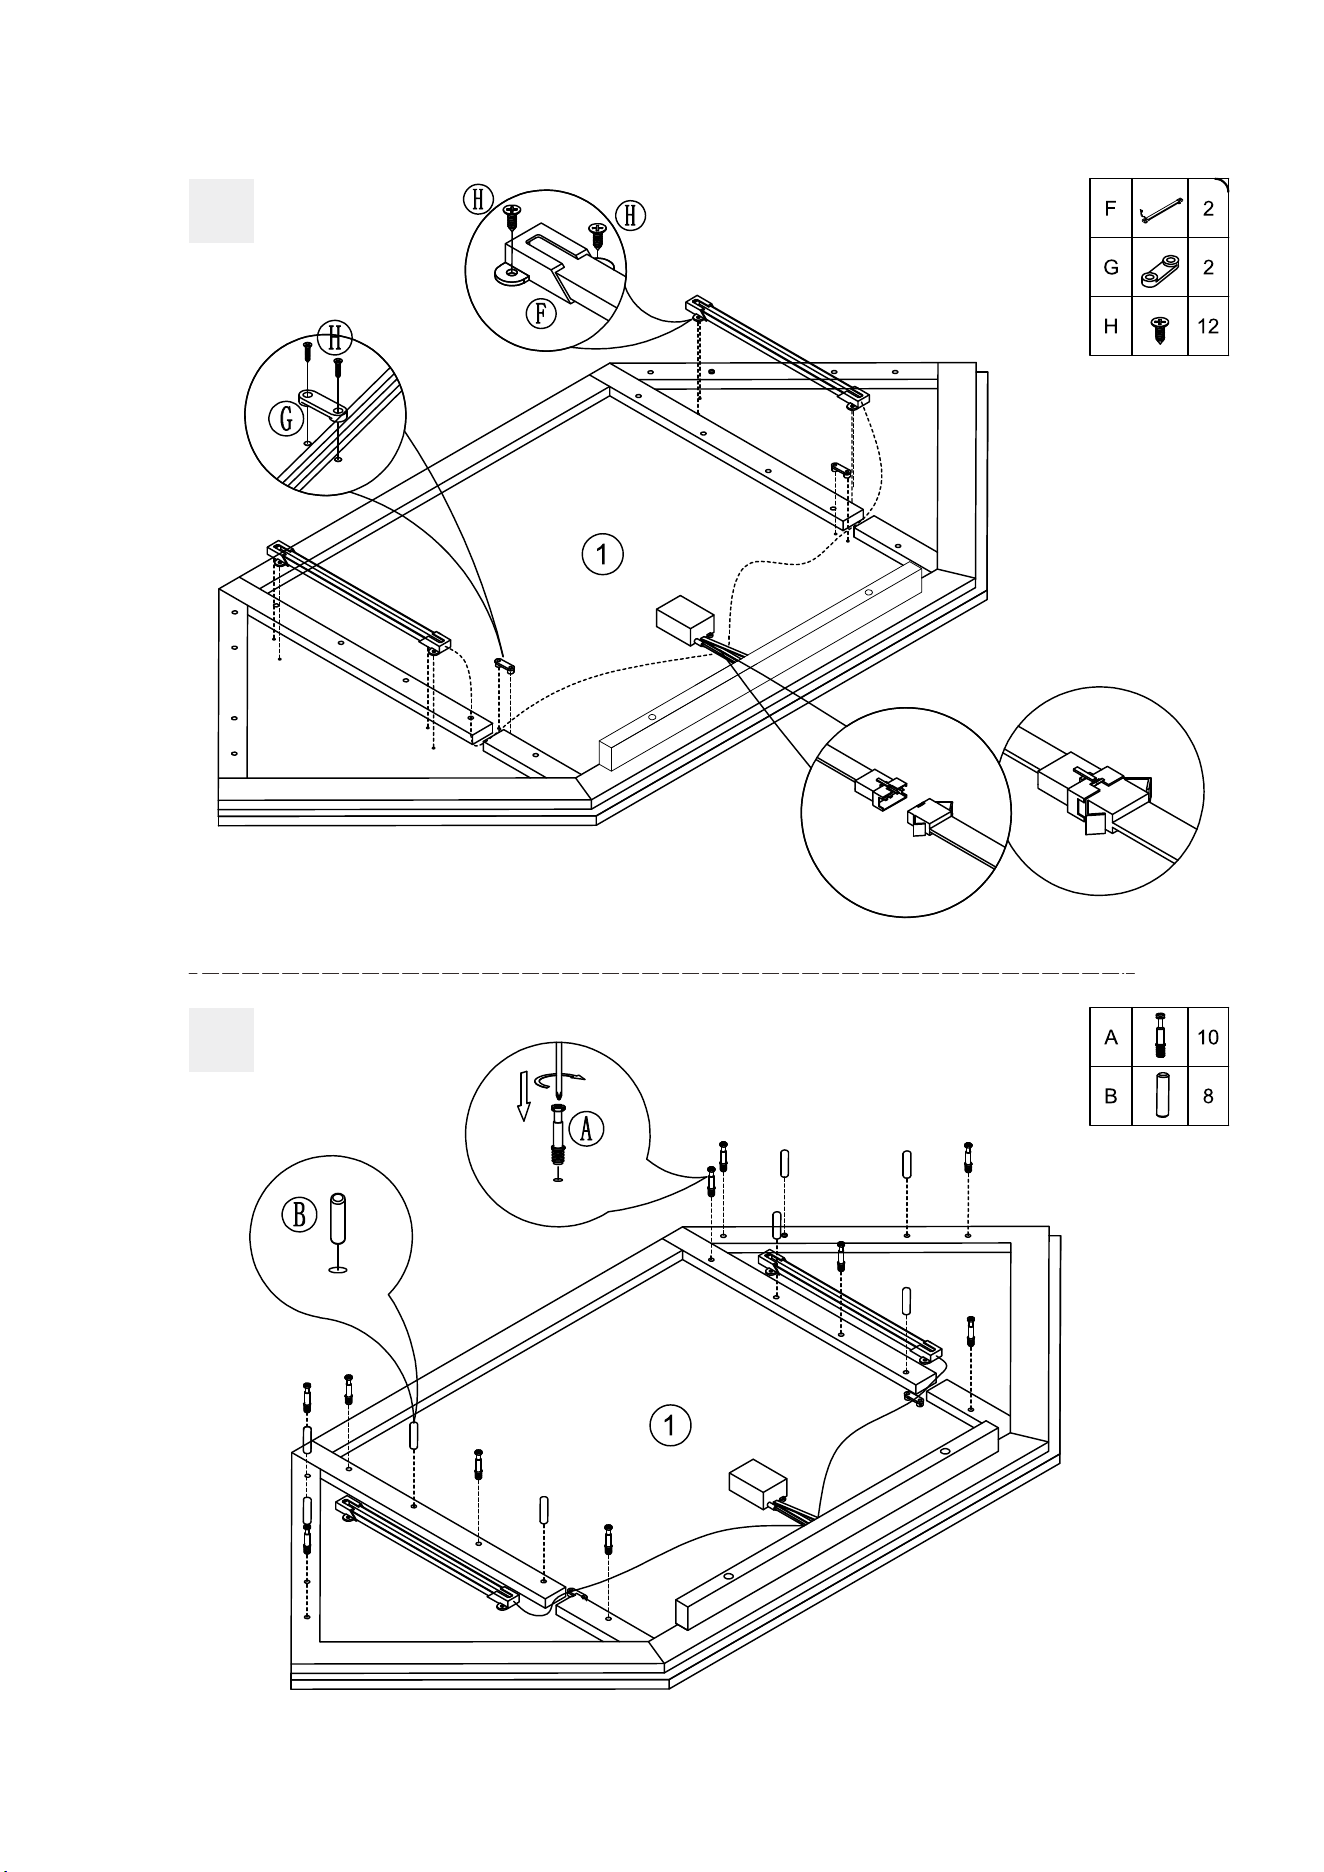
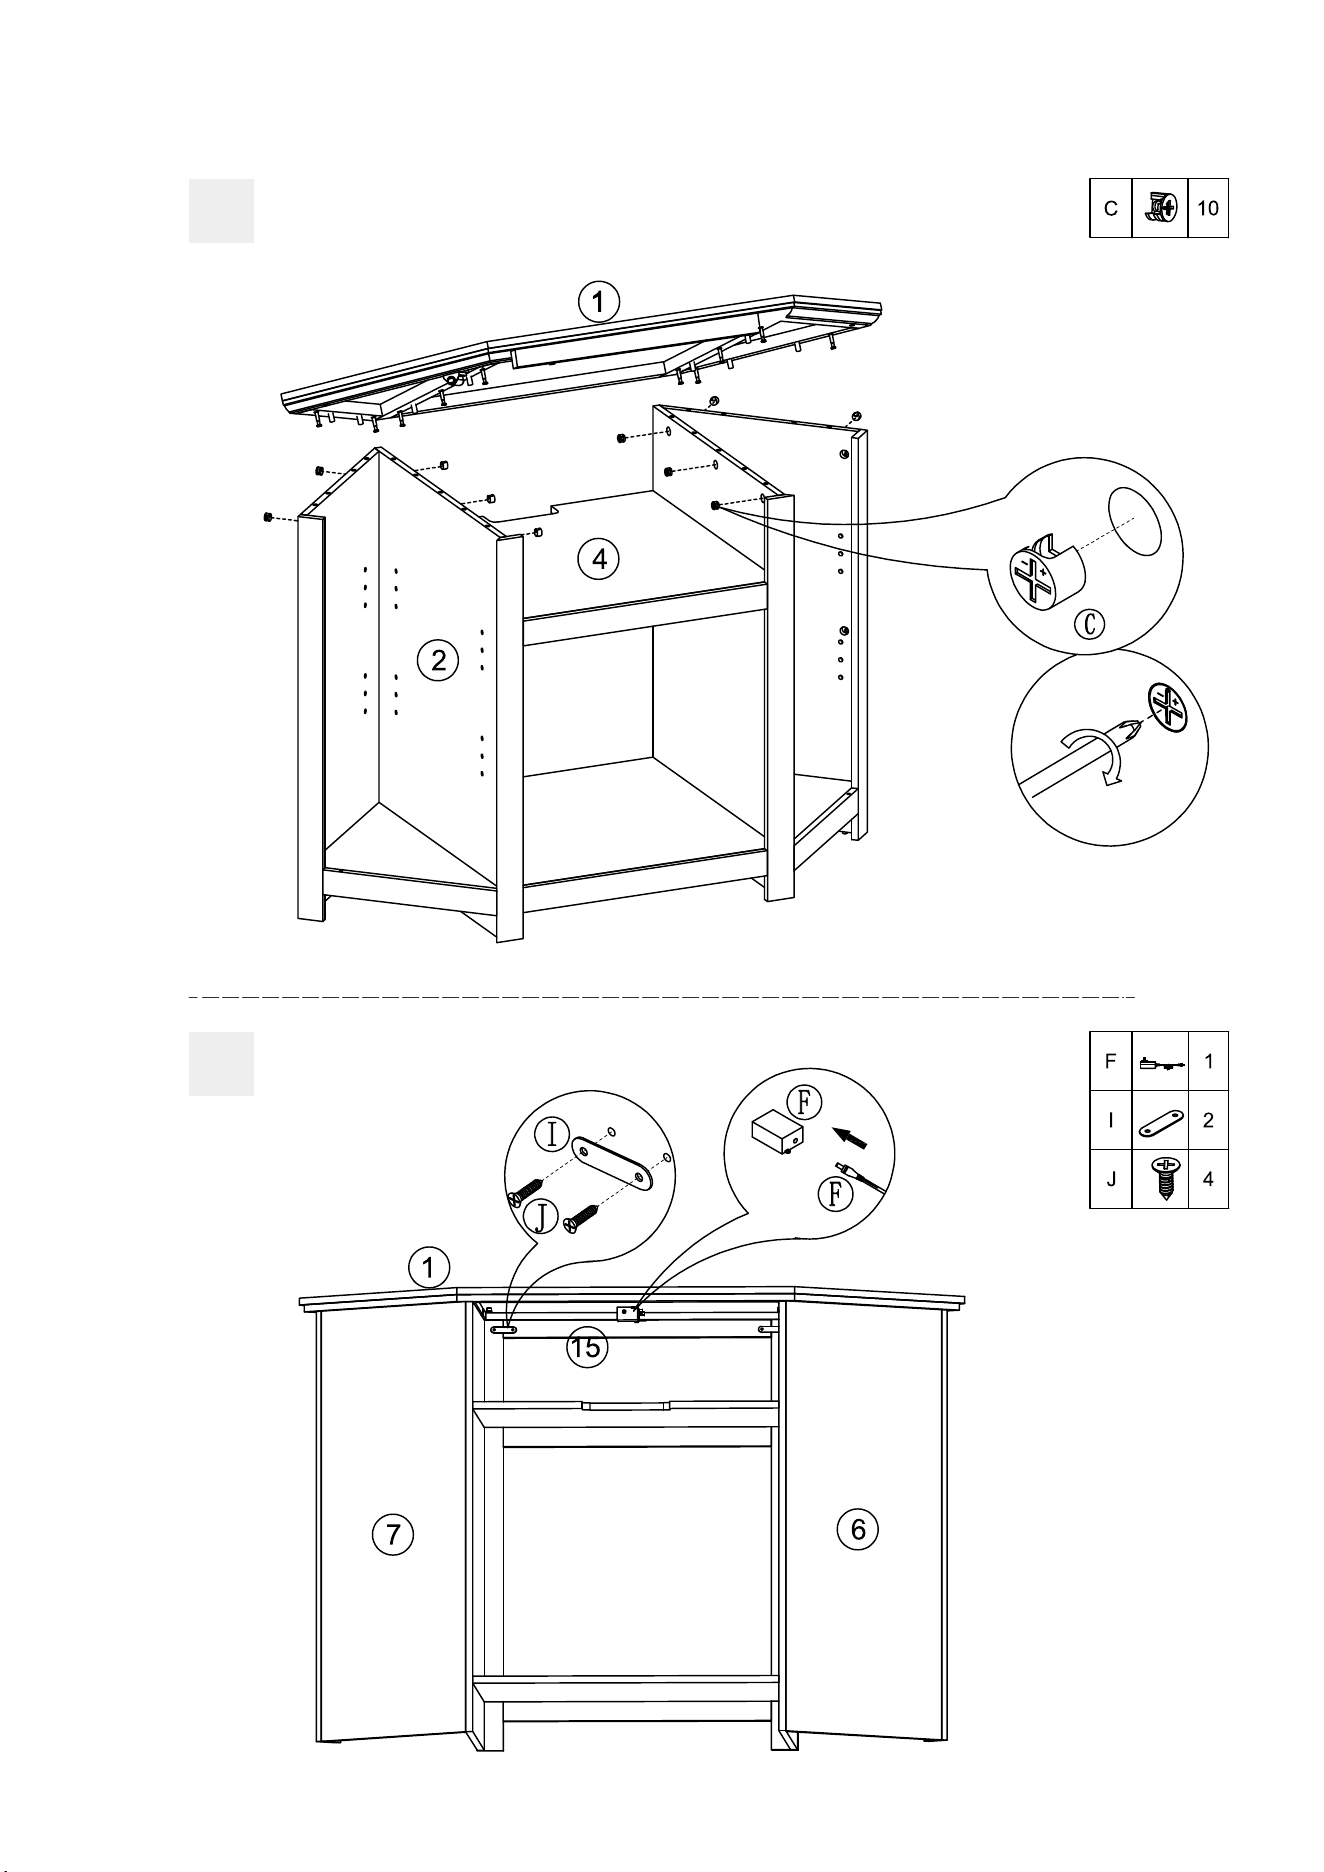
EN:(2)Use (G) to secure the probe of (F),
EN:(1) Use (H) to lock (F) on board 15 with (G),
and the probe of the controller (F) should
extend out of the board.
FR:(1) Utiliser (H) et (G) pour verrouiller (F)
sur la carte 15 , et la sonde du contrôleur (F) doit
déborder de la carte.
and use (H) to secure the controller of (F).
FR:(2)Utilisez (G) pour fixer la sonde de (F),
et utilisez (H) pour fixer le contrôleur de (F).
14
15
16
15
17
18

16
19
20
17
21
18
EN
ElectricFireplace
When using electrical appliances, basic safety precautions should
always be followed including the followings
19
:
1. Read all instructions before using this heater.
2. Do not use this heater outdoors.
3. This heater is not intended for use in bathrooms, laundry areas and
similar indoor locations. Never locate the heater where it may fall into a
bathtub or other water container.
4. Do not run the power cord under carpeting. Do not cover the power
cord with throw rugs, runners, or the like. Arrange the power cord away
from traffic areas and where it will not be tripped over.
5. To disconnect the heater, turn controls to off, then remove the plug
from the outlet.
6. Connect to properly grounded outlet only. Always plug heaters directly
into a wall outlet/receptacle. Never use with an extension cord or
reloadable power tap(outlet/power strip).
7. To prevent possible fires, please do not use fireplace heaters on soft
surfaces, such as beds, carpets, which may block the opening.
8. There is a thermostat limiter inside the heater. When the inner
temperature overheat or abnormal heating occurs, the thermostat
protective device cuts off the power supply to avoid damage to the
fireplace or risk of fire.
9. Use the heater only as described in the manual. Any other use not
recommended by the manufacturer may cause fire, electric shock, or
injury.
READ ALL INSTRUCTIONS BEFORE USE
There is no user serviceable parts inside fireplace/heater. If the unit
appears to malfunction, turn the unit off and unplug from the wall
immediately and contact qualified technician.
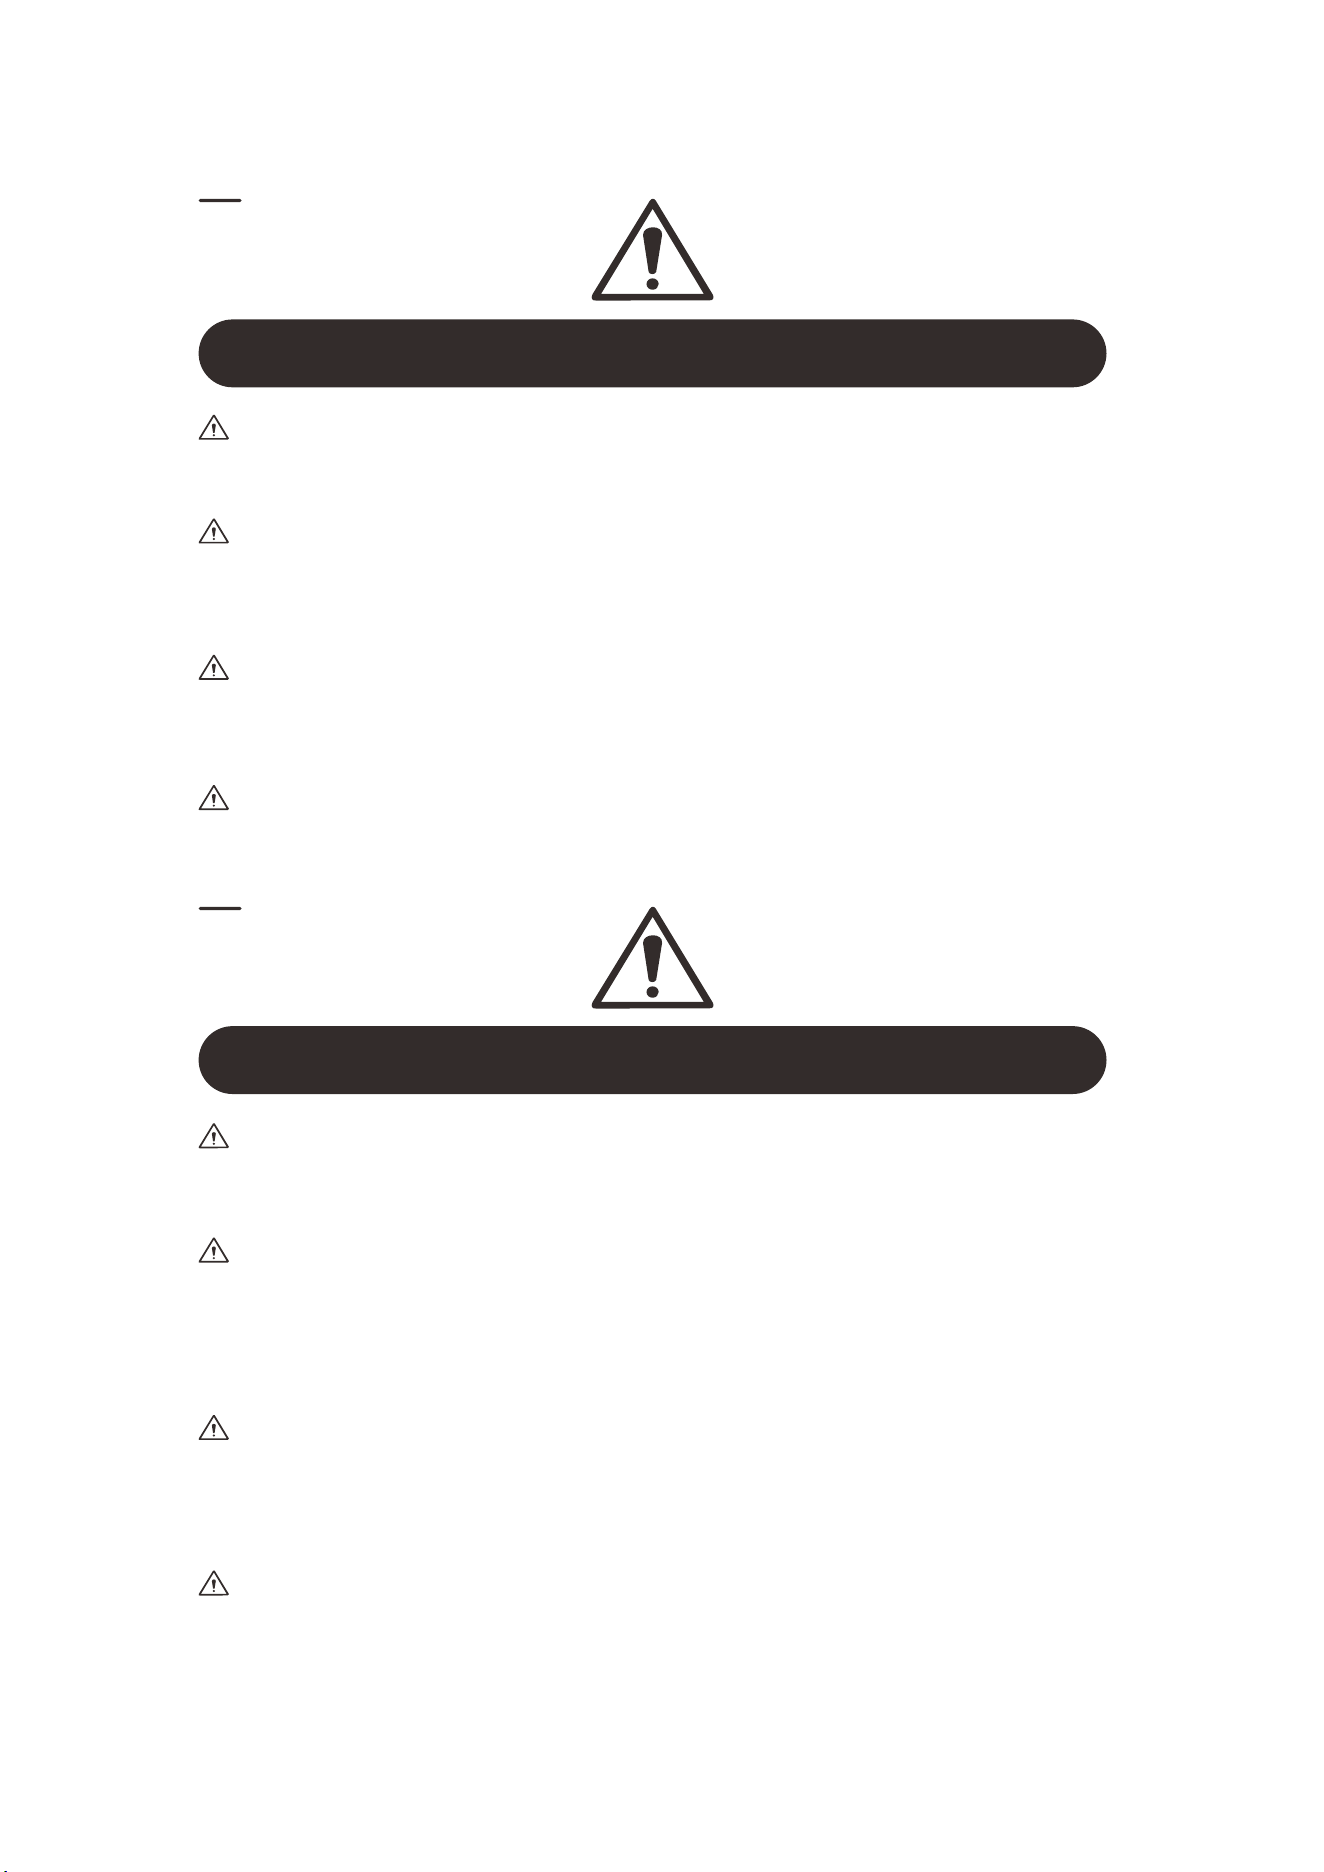
WARNING
20
This heater is hot when in use. To avoid burns, do not let bare skin
touch hot surfaces. If provided, use handles when moving the
heater. Keep combustible material, such as furniture, pillows,
bedding, papers, clothes, and curtains at least 3ft (0.9m) from the
front of the heater and keep them away from the side or rear.
WARNING
Extreme caution is necessary when any heater is used by or near
children or invalids and whenever the heater is left operating and
unattended.
WARNING
Do not operate any heater with a damaged cord or plug or after the
heater malfunctions, has been dropped, or damaged in any manner.
Ask qualified technician for help.
WARNING
Do not insert or allow foreign objects to enter any ventilation or
exhaust openings as this may cause an electric shock or fire, or
damage to the heater.
WARNING
A heater has hot and arching or sparking parts inside.
Do not use in areas where gasoline, paint, or flammable liquids are
used or stored.
WARNING
Always unplug the heater when not in use.
WARNING

21
While the heater is in use, the top center of the fireplace can get hot
to the touch, and may cause serious injury or burns. Always
supervise small children around the fireplace/heater. Do not place
any cloth or decorations over the heater outlet or fireplace, or
otherwise obstruct the heater outlet of the fireplace, as this may
cause a fire and serious injury.
CAUTION
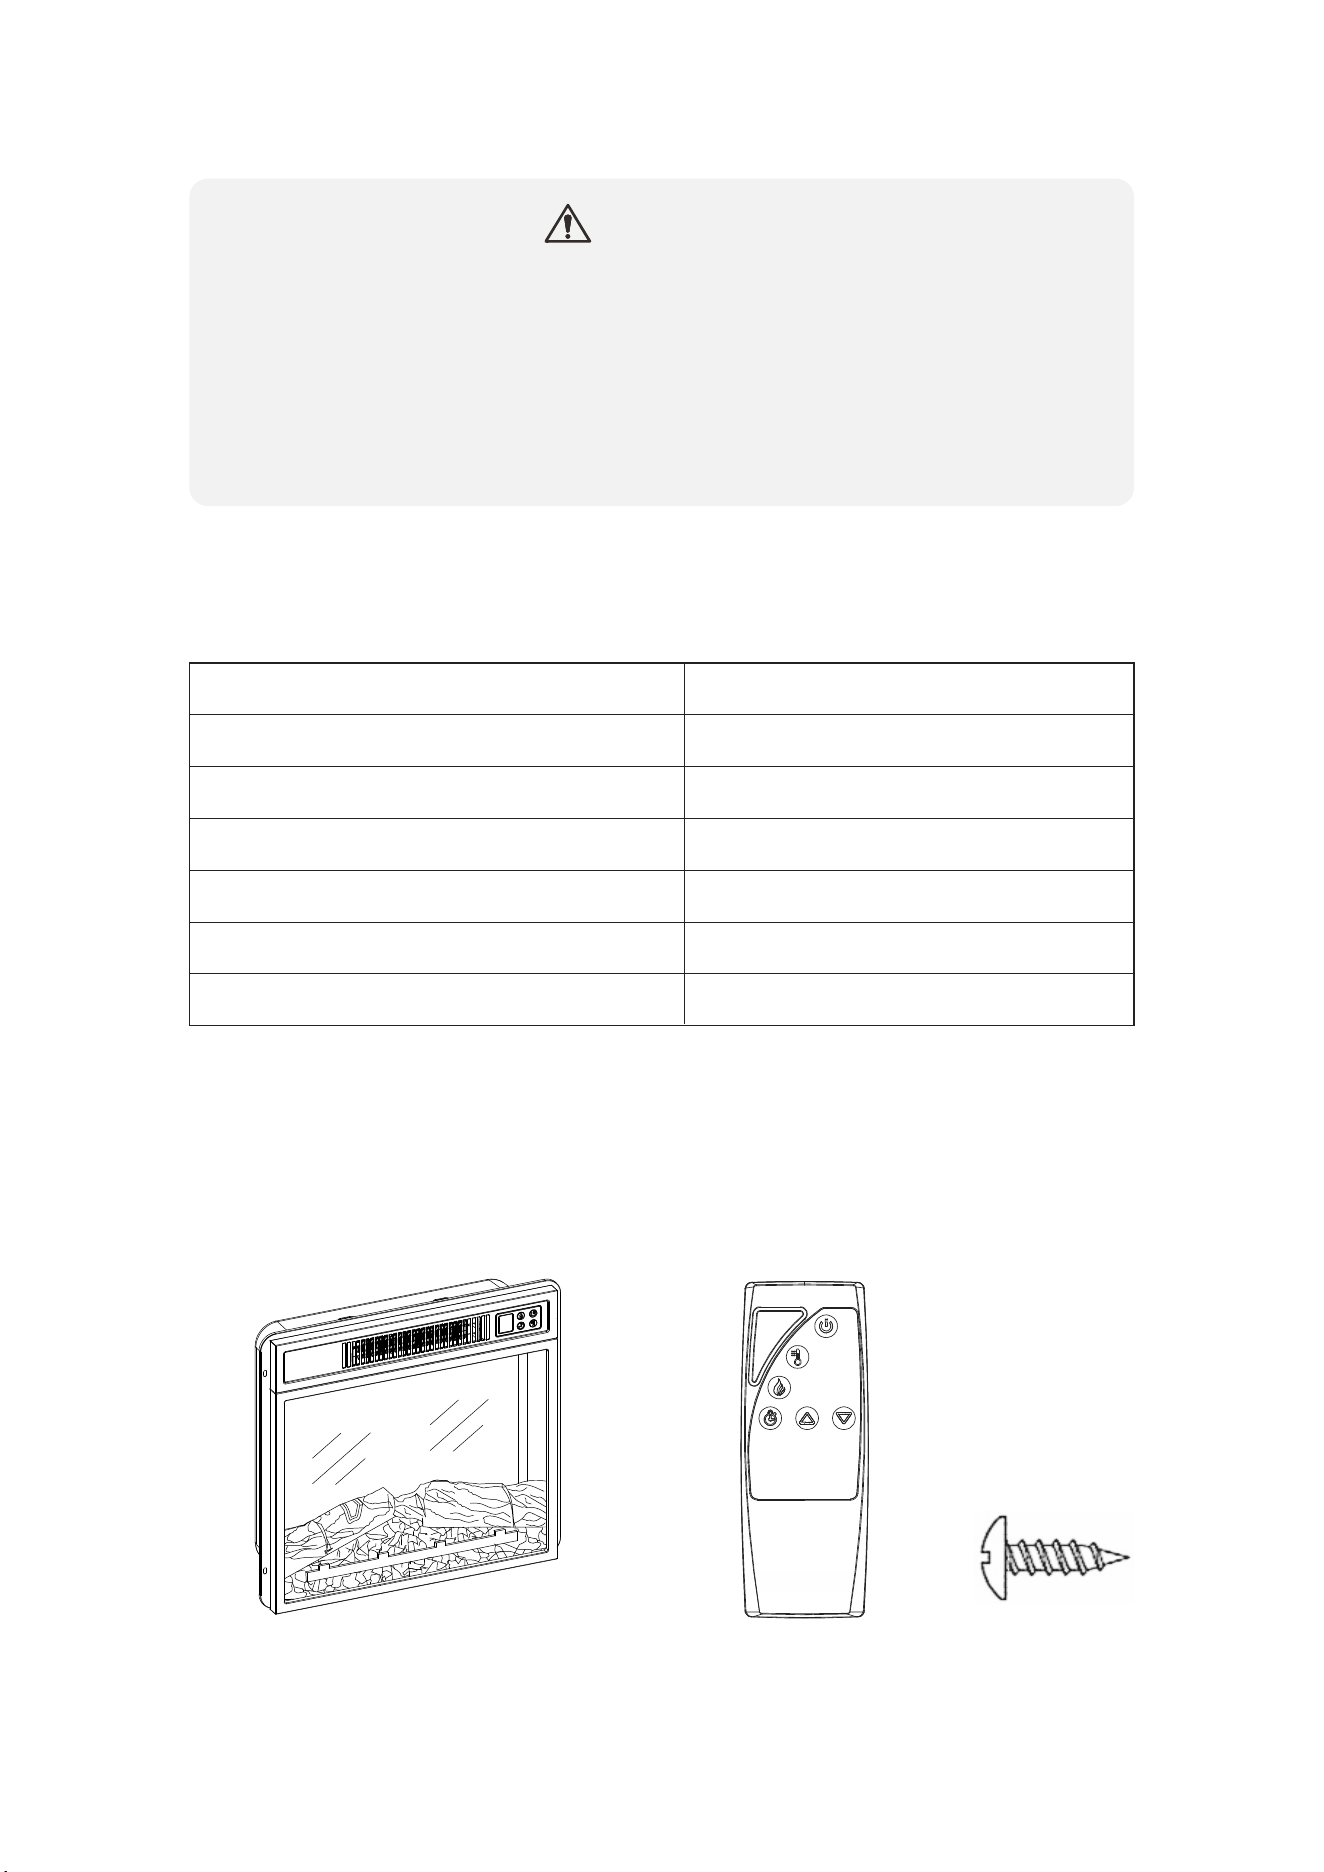
Remote ControlFireplace Unit
Model Number
Dimensions (W x D x H)
Net Weight
Gross Weight
Power Rating
Voltage
FP10534US
19.17" x 5.08" x 17.52"
9.7 lbs
12 lbs
1400 W
120 V
60 Hz
Frequency
TECHNICAL SPECIFICATION
PACKAGECONTENT
Screw x5
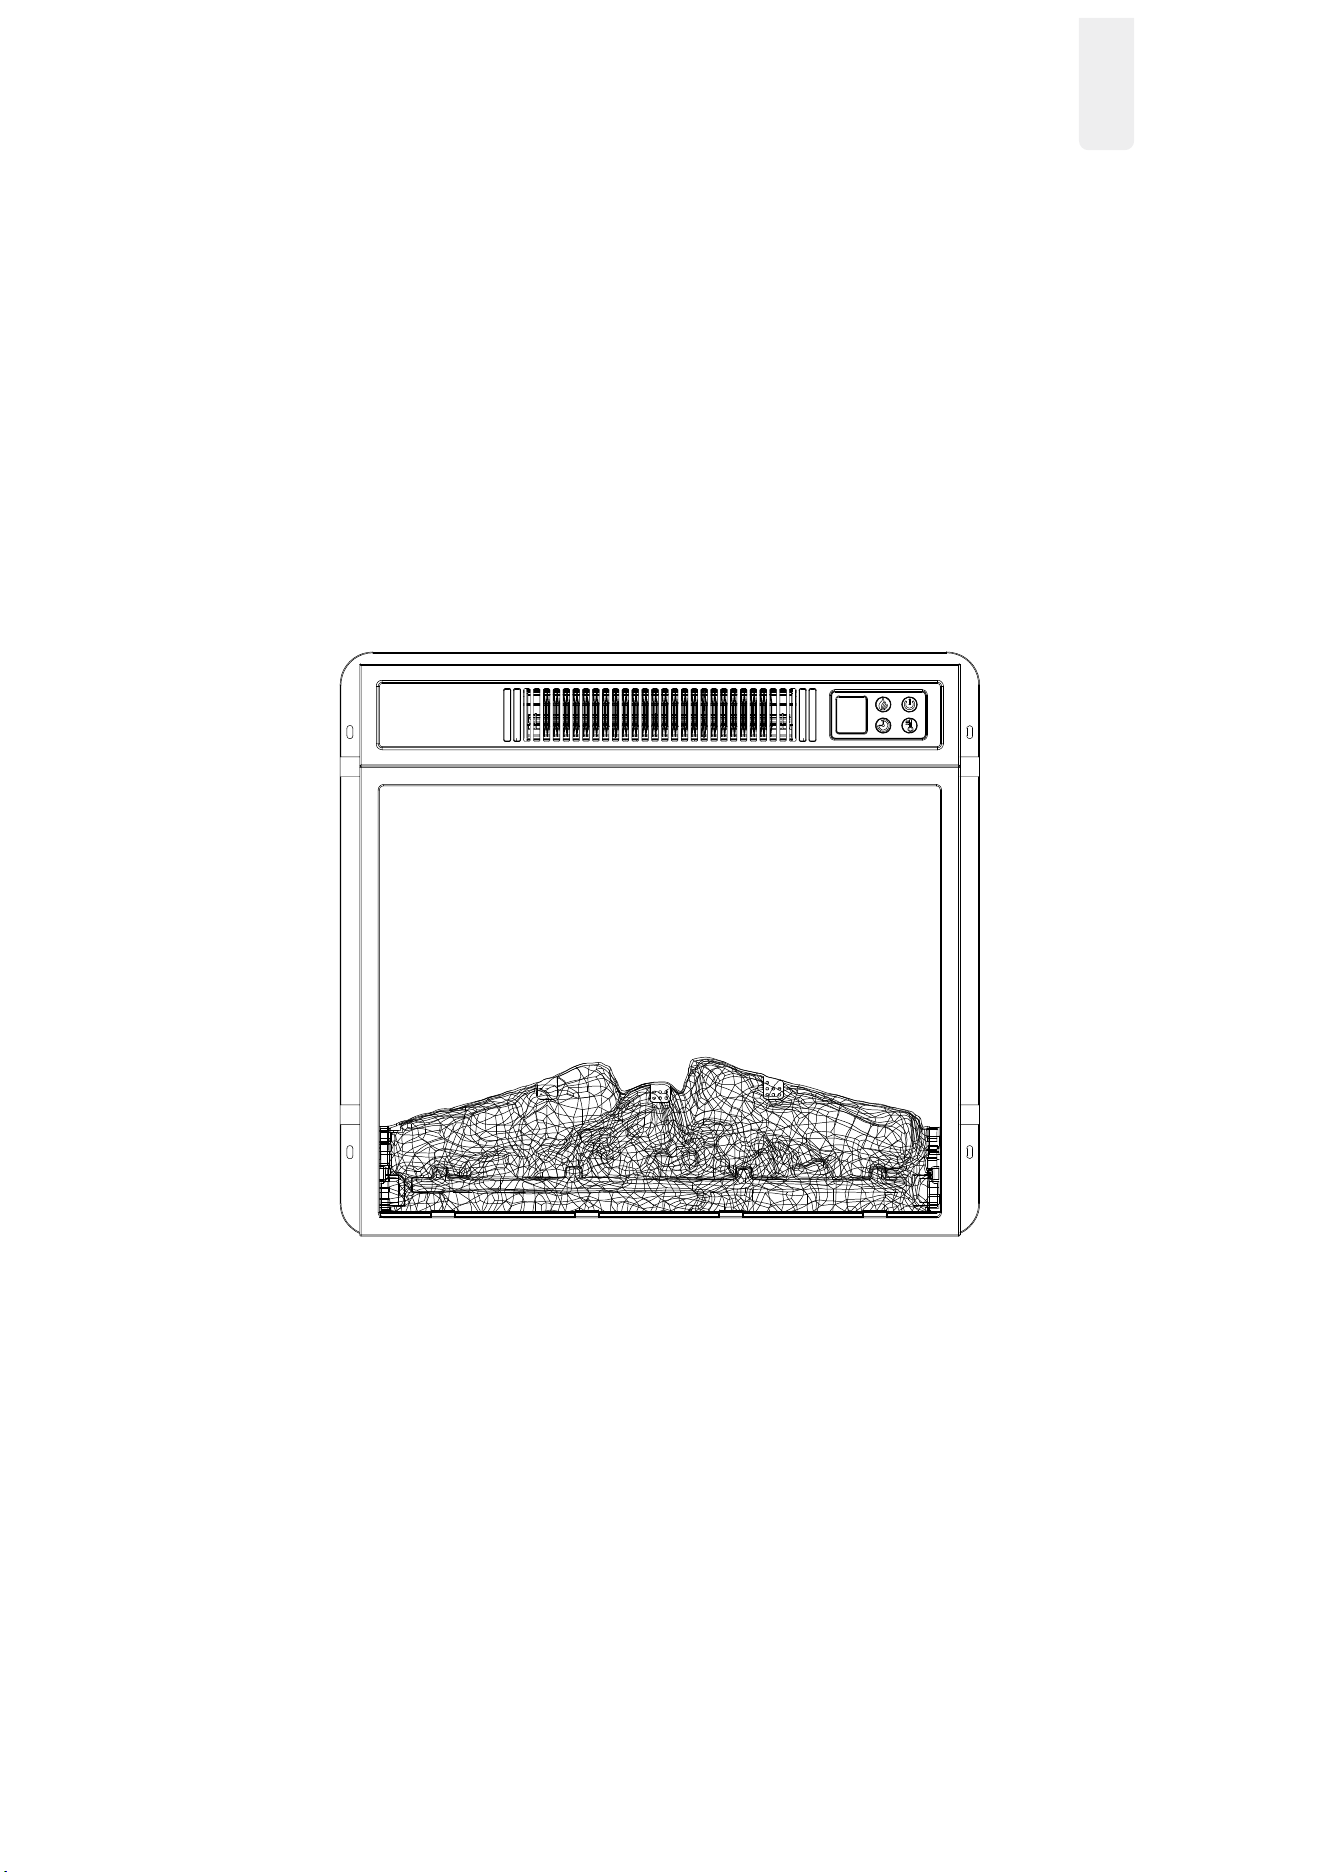
STEP 1
Take out the unit from the box and layout all the spare parts for easy
assembly. Make sure all small items are not left in packaging materials
22
.
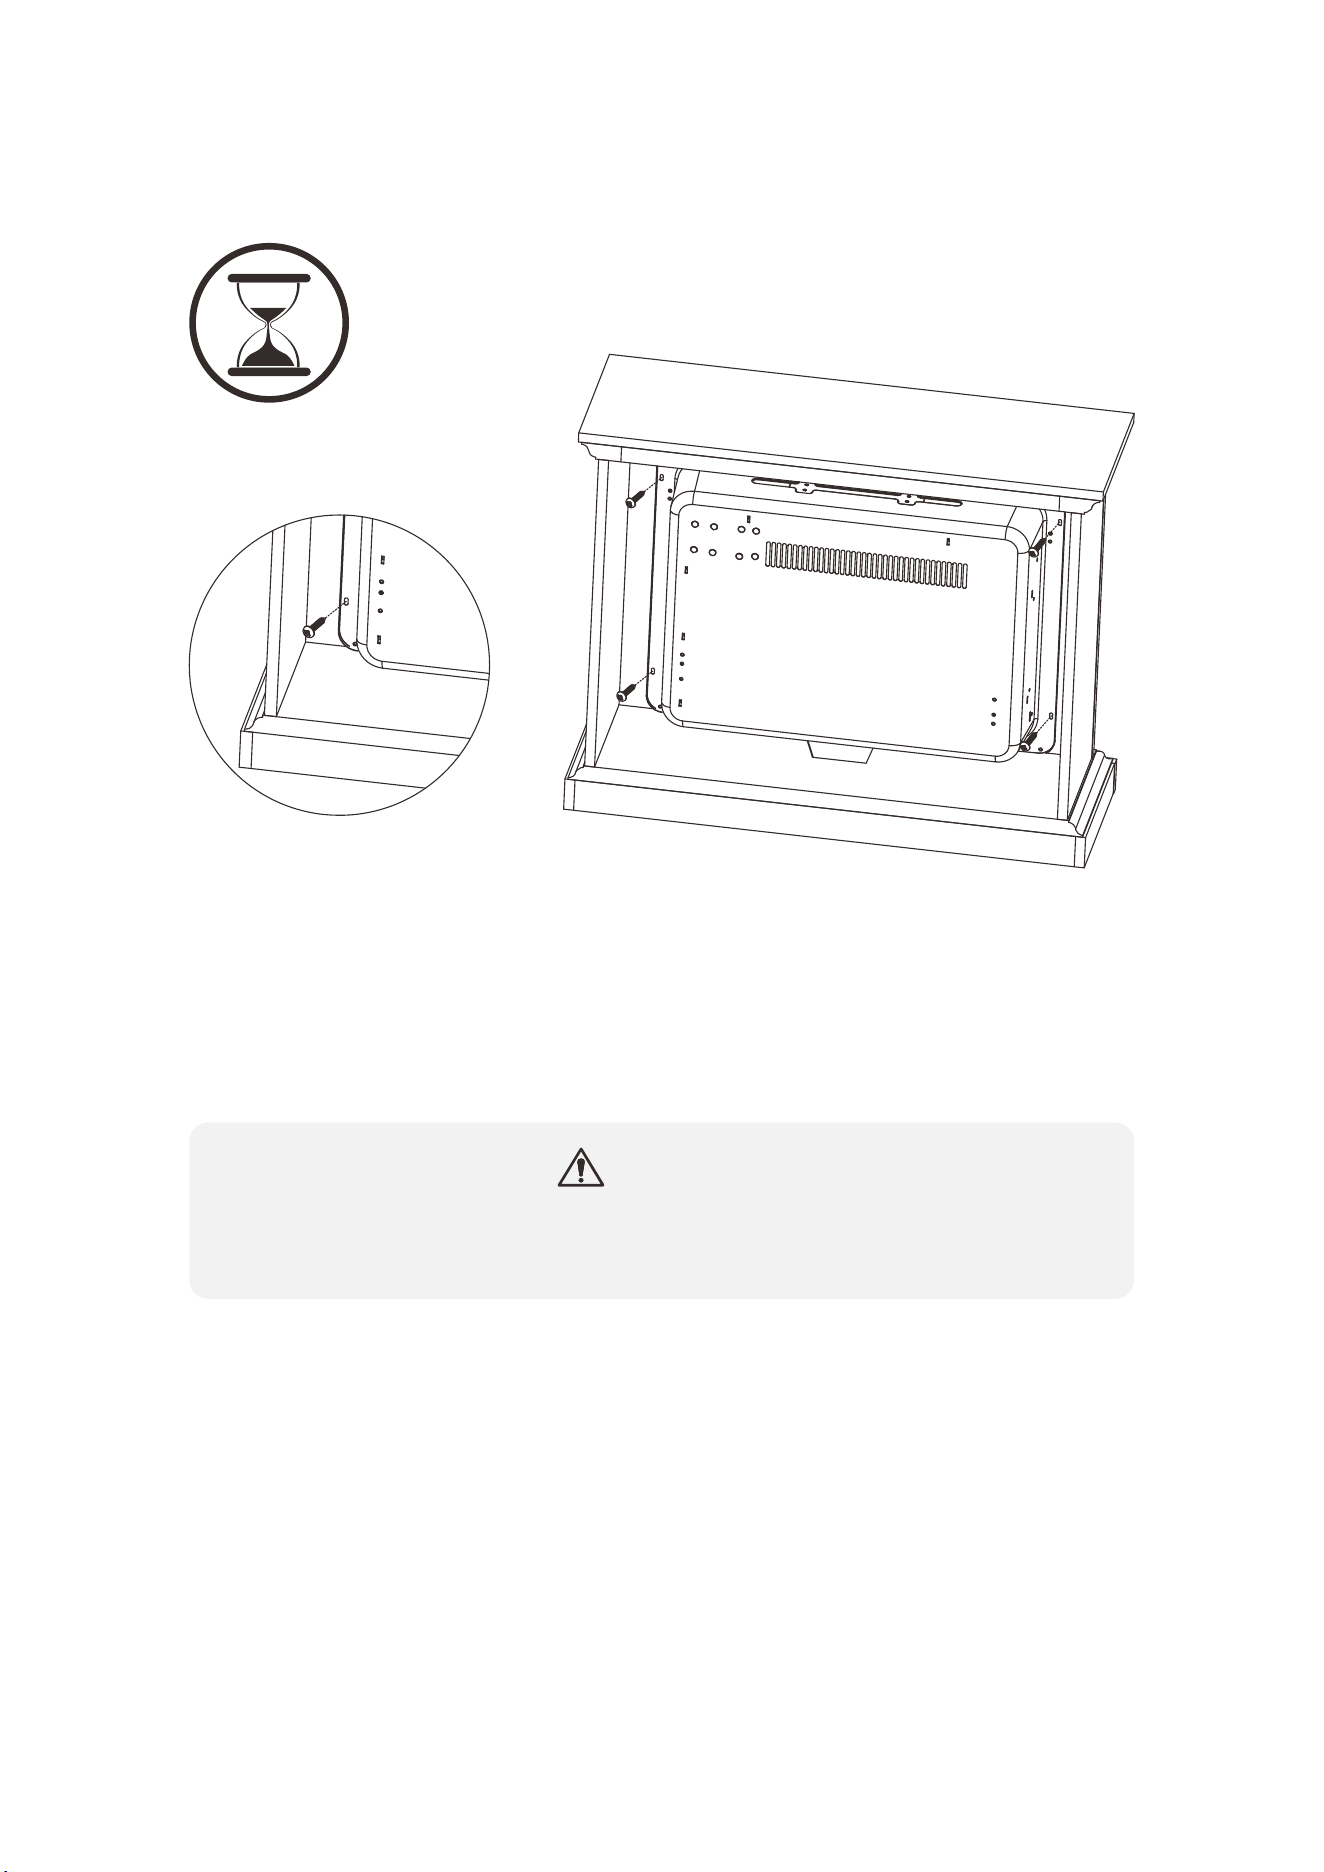
STEP 2
Carefully set the unit from the back of the mantel and center it in the
opening.
Check the alignment and attach the unit of the mantel by inserting
screws through the drilled holes on the trim of the mantel.
NOTE: Do not attempt to install the unit from the front of the mantel. It
will not fit.
This unit has a glass front panel. Use extreme caution when
handling glass to prevent personal injury or damage.
CAUTION
ASSEMBLY INSTRUCTION
Estimated Time for Assembly
20:00 Mins
Before use
Check that the air intake and exhaust is not covered or obstructed in
anyway.
Keep combustible objects at least 3 ft(0.9 m) away from the unit.
Plug the unit to a grounded power socket.
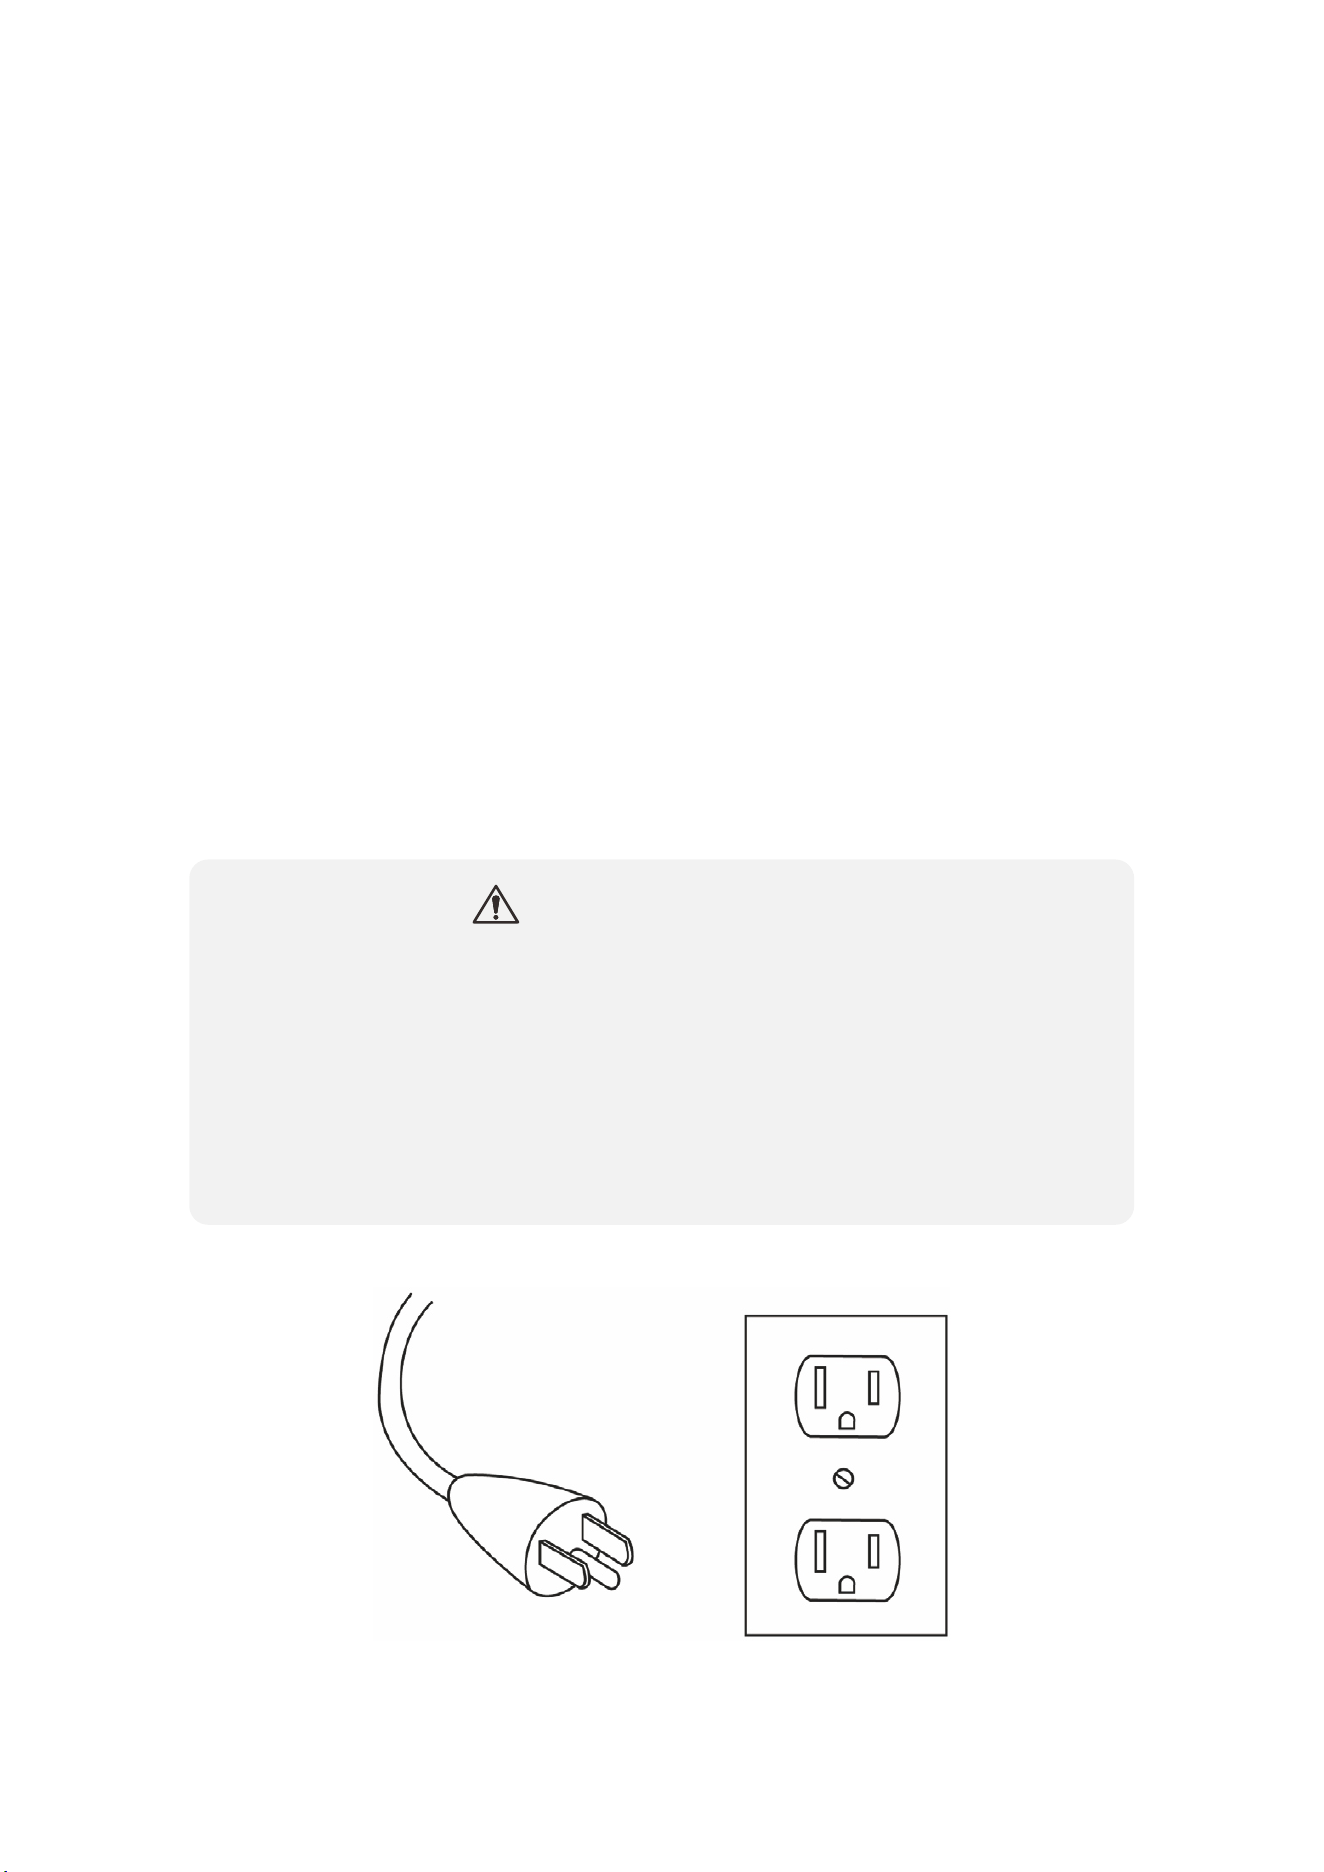
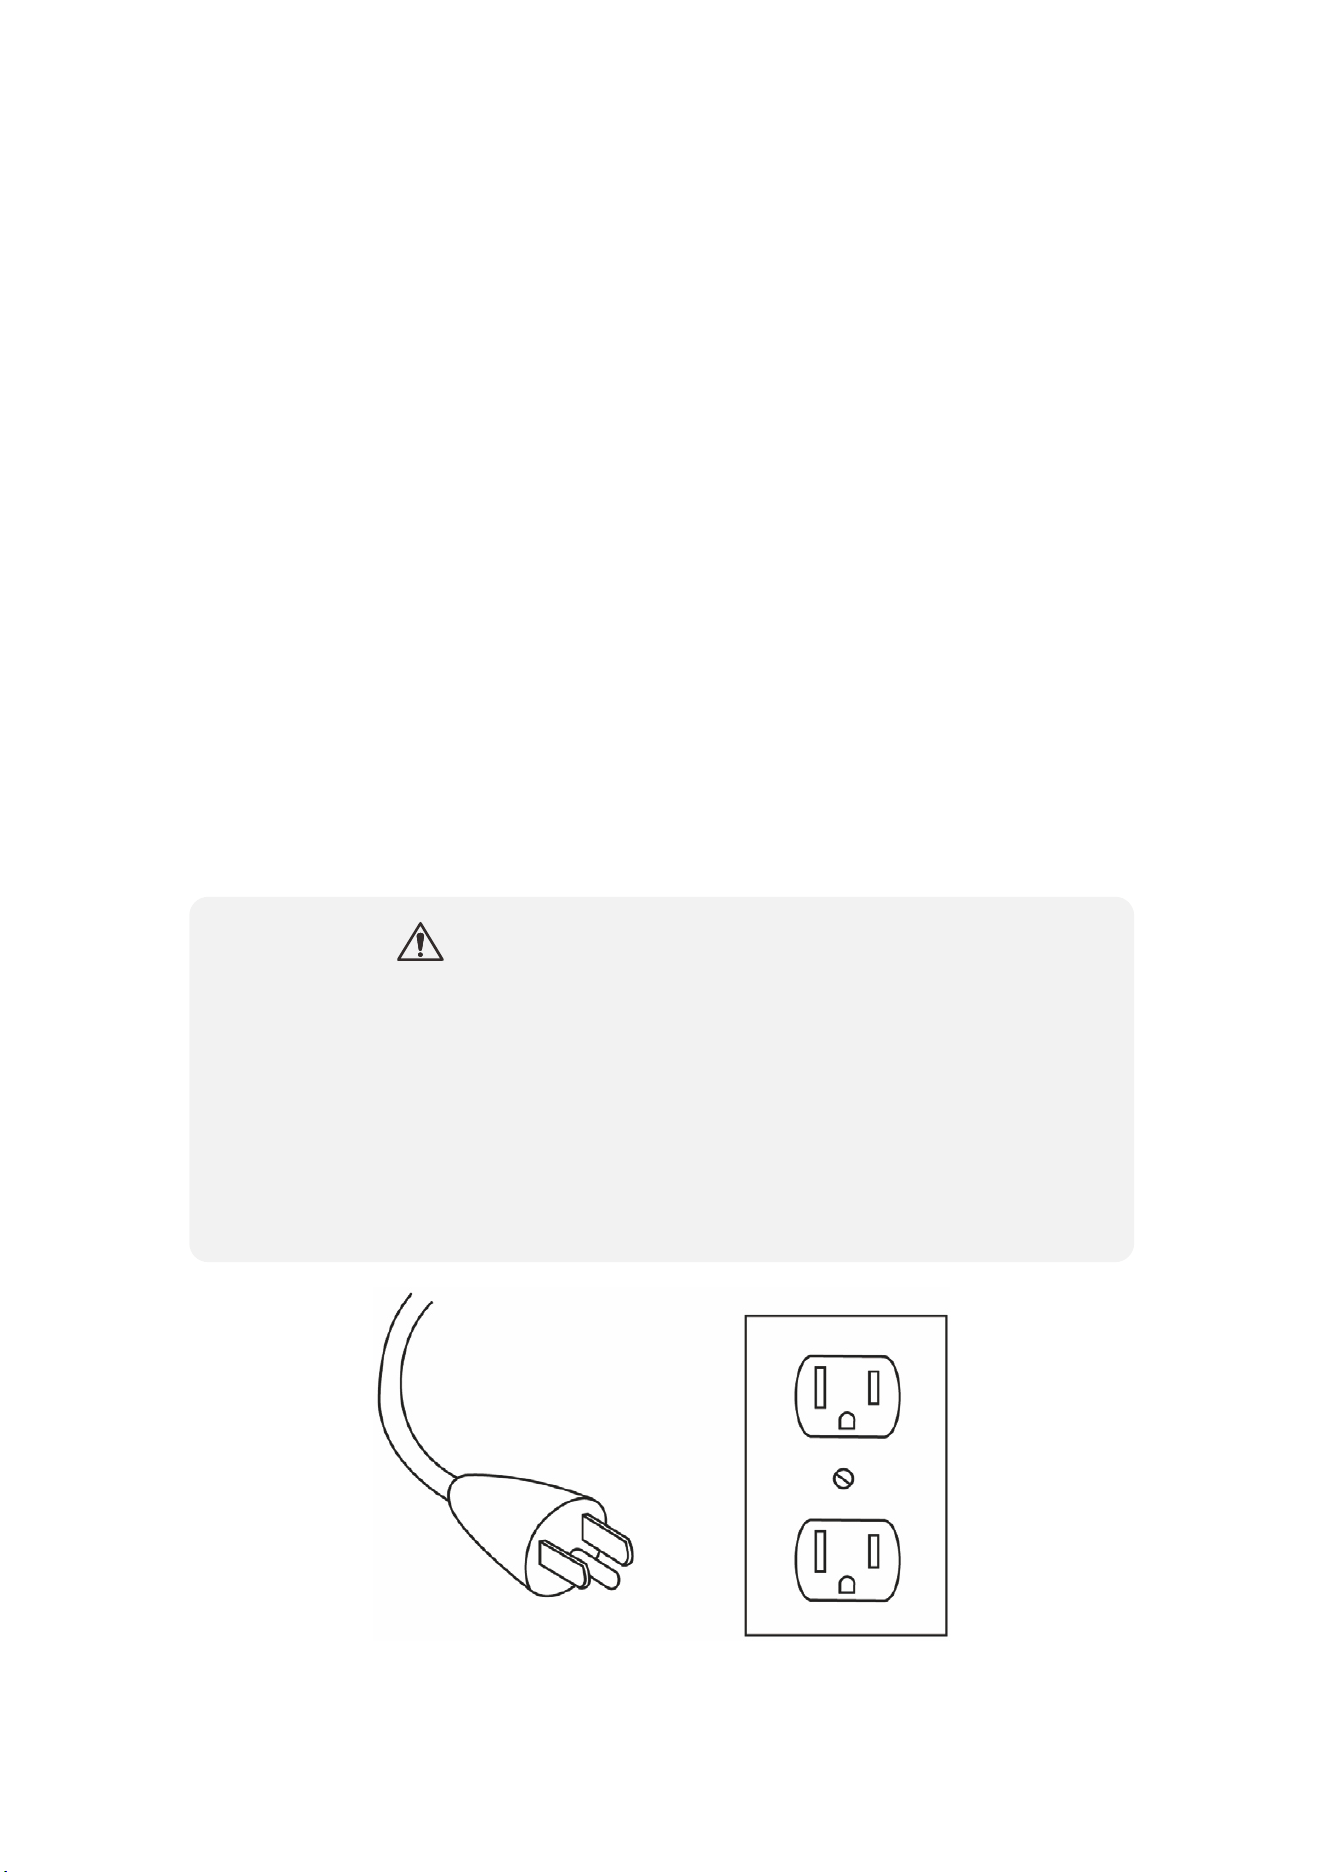
Grounding
This product must be grounded. If it should malfunction or breakdown,
grounding provides a path of least resistance for electric current to
reduce the risk of electric shock.
This unit comes standard with a 6 ft(1.8 m) long, three wired cord.
Always plug the unit into a wall outlet. An extension or relocate tab
should never be used
23
.
USER INSTRUCTION
• Improper connection of the equipment grounding conductor can
result in a risk of electric shock. Check with a qualified electrician or
serviceman if you are in doubt as to whether the product is properly
grounded.
• DO NOT modify the plug provided with the product nor using any
bypass device if the plug does not fit the outlet. Have a proper
outlet installed by a qualified electrician.
CAUTION / WARNING
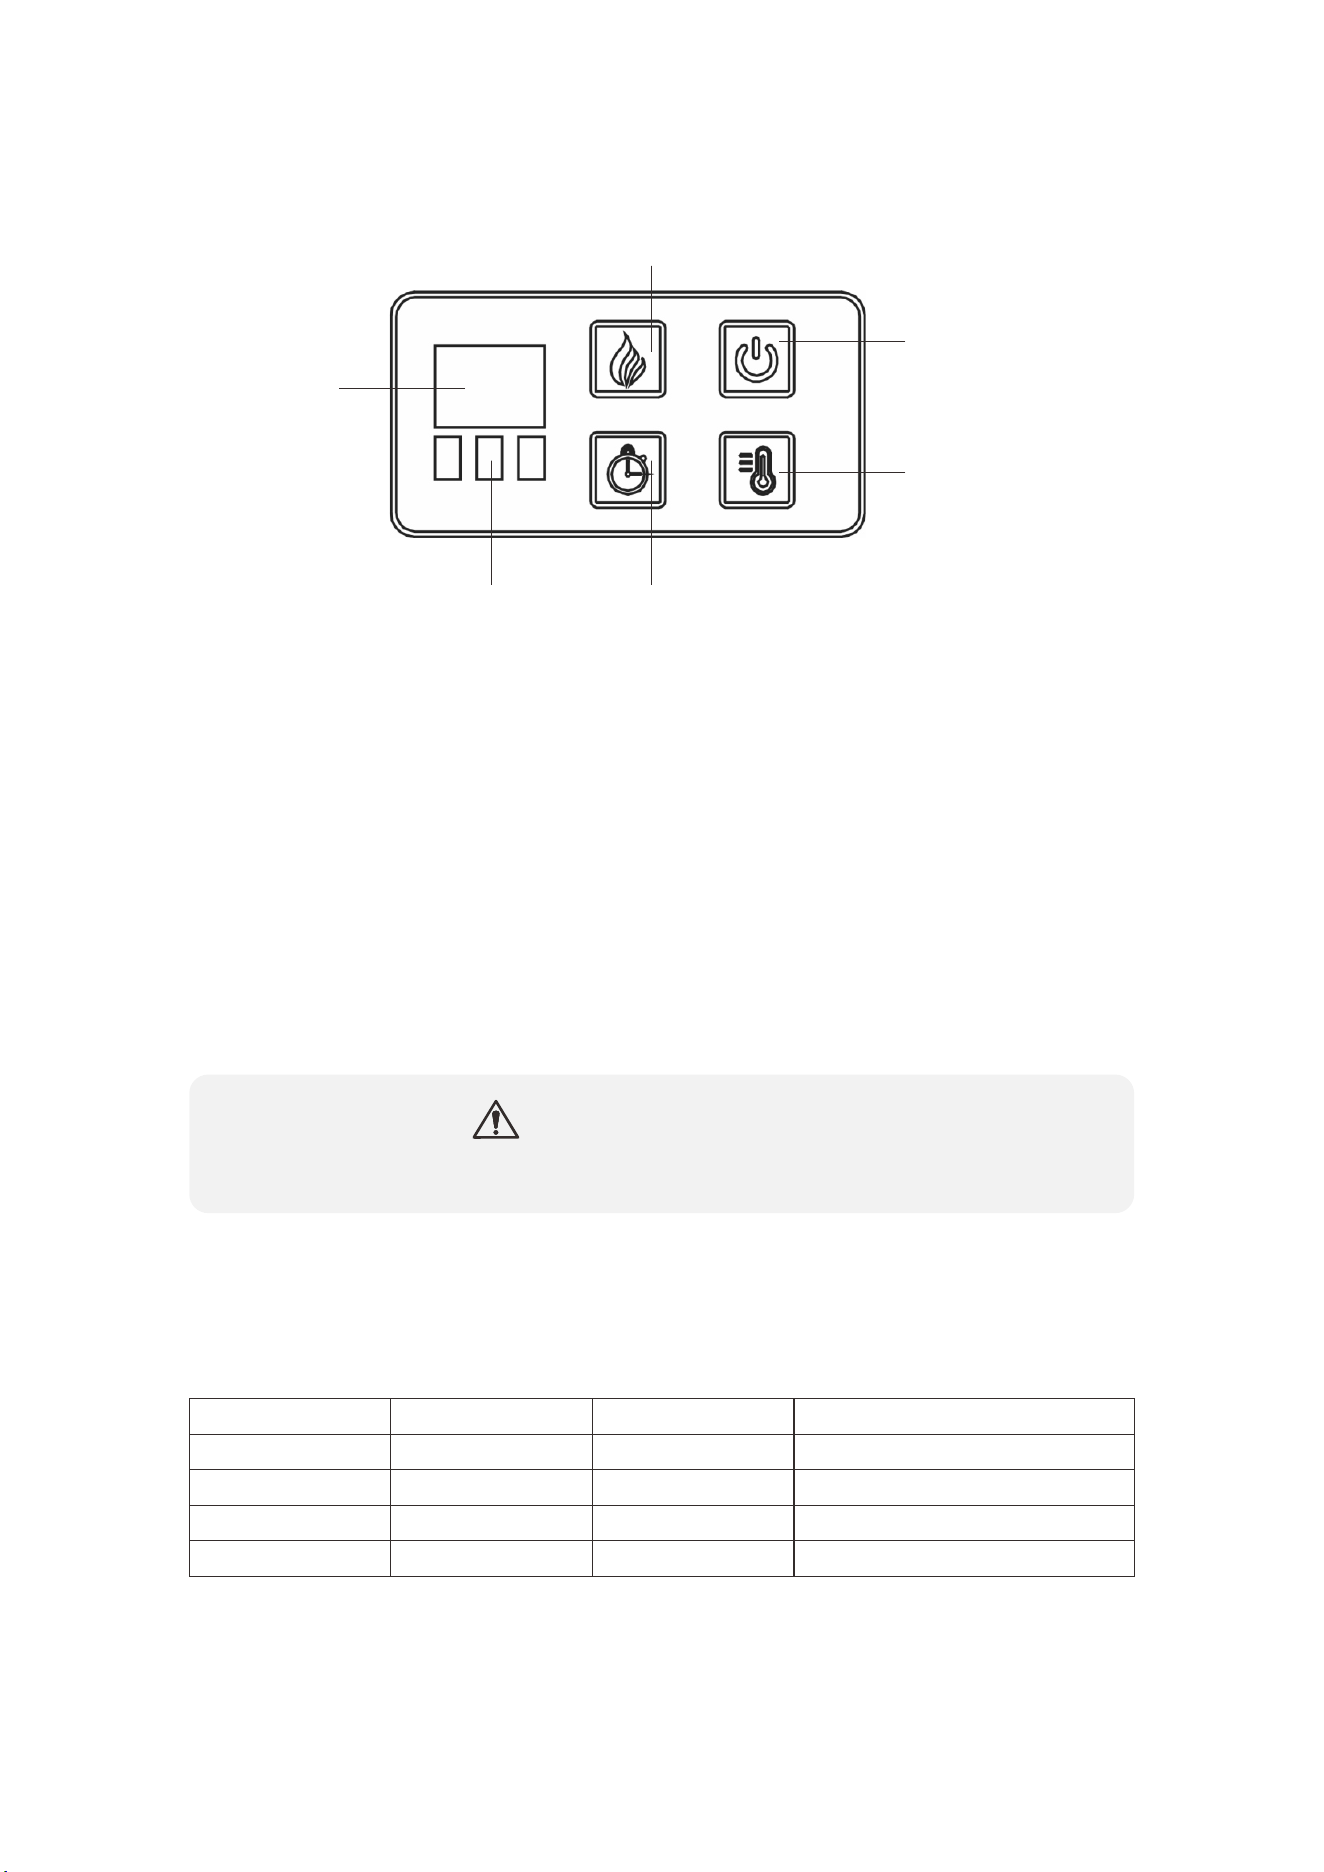
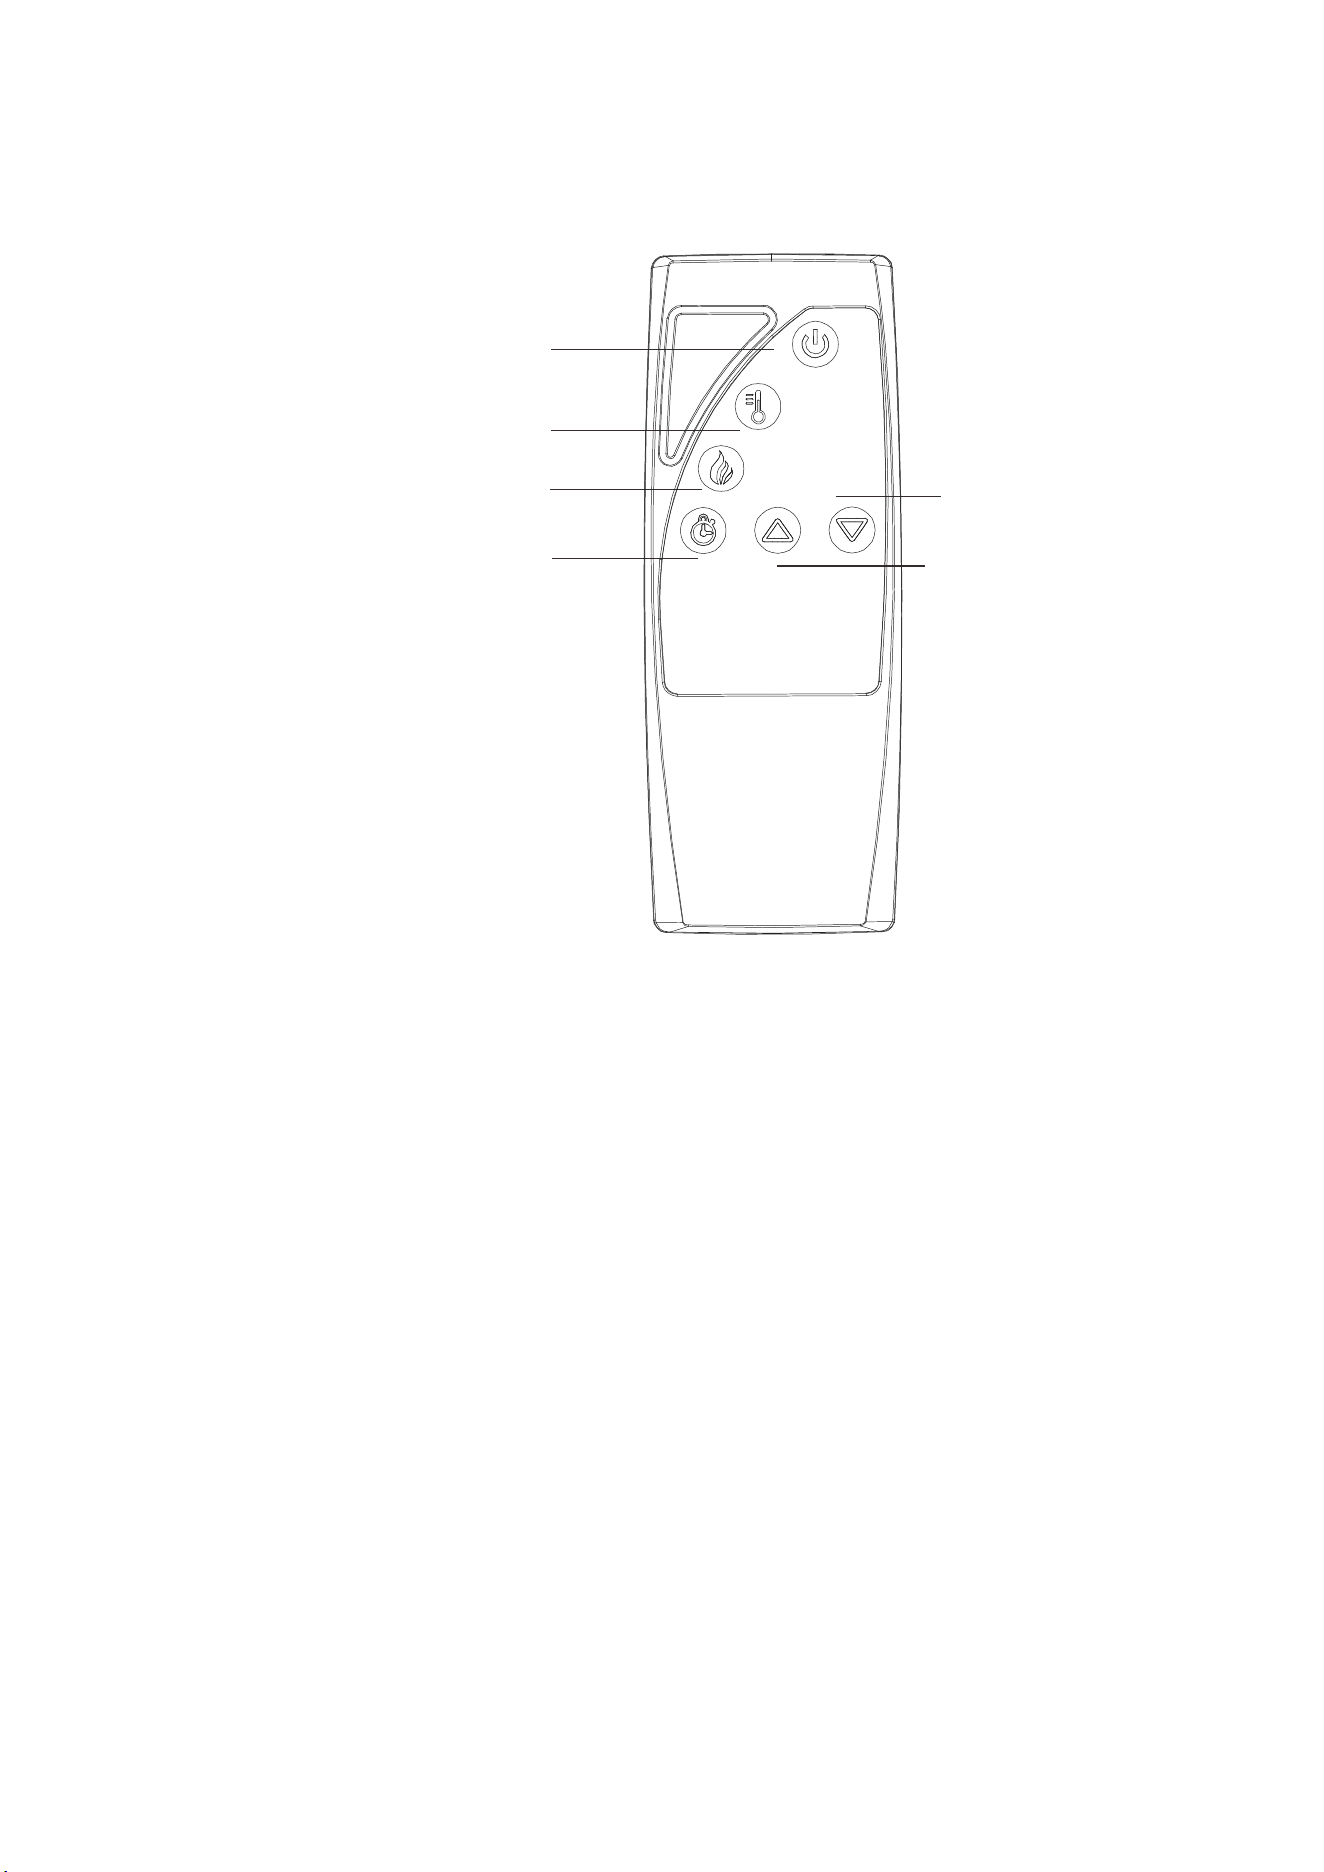
Control Panel
The control panel is located on the top right corner of the unit
24
.
Flame Control
Press the flame control button to rotate and set flame effect levels. The
flame setting are as follows.
Power ON / OFF
Press the power button to turn on the unit. Press again to turn off the unit.
NOTE: There is a thermostat limiter inside the unit. When the inner
temperature is too hot, the unit will automatically turn off to avoid damage
to the product or risk of fire.
• DO NOT unplug the unit when it is still “ON”
CAUTION / WARNING
Power Button
Flame Control
Heater Control
Timer Control
Function Indicator
Display
NOTE: When the heater is turned on, the flame effect level can only
rotate and set between Low, Medium, and High.
Button Press
1st Press
2nd Press
3rd Press
4th Press
Flame Level
High
Medium
Low
OFF
Display Value
L3
L2
L1
None
Fireplace Appearance
Highest flame, logs glow
Medium flame, logs glow
Low flame, logs glow
OFF
USER INSTRUCTION (CONTROL PANEL)
25
NOTE: Timer can control both heater and flame effect function.
Button Press
1st press
2nd press
3rd press
4th press
5th press
6th press
7th press
8th press
Timer Interval
30 Minutes
1 Hour
2 Hours
3 Hours
4 Hours
5 Hours
6 Hours
OFF
Display
30
1h
2h
3h
4h
5h
6h
None
Heater Control
Press the heater control to turn on and off the heater.
When the heater is turned on, press and hold the heater control button for 5
seconds to enter temperature adjustment mode. The LED indicator is red.
In adjustment mode, the display will flash. There are 22 levels to change
Fahrenheit temperature (ON, 62°F - 82°F). After this is set, the display will
flash 5 times and exit from setting status.
To switch from degree Fahrenheit to degree Celsius, press and hold the
power button for 5 seconds when the heater is turned on. The LED indicator
will turn to green. There are 12 levels to change Celsius temperature (ON,
17°C - 27°C). Repeat the same process to convert Celsius to Fahrenheit.
NOTE: Degree Fahrenheit will be displayed in RED and degree Celsius will
be displayed in Green.
Timer Control
Press the timer button to turn the timer on. The timer function can controls
both the flame effect and heater.
The timer can set as the table suggested below.
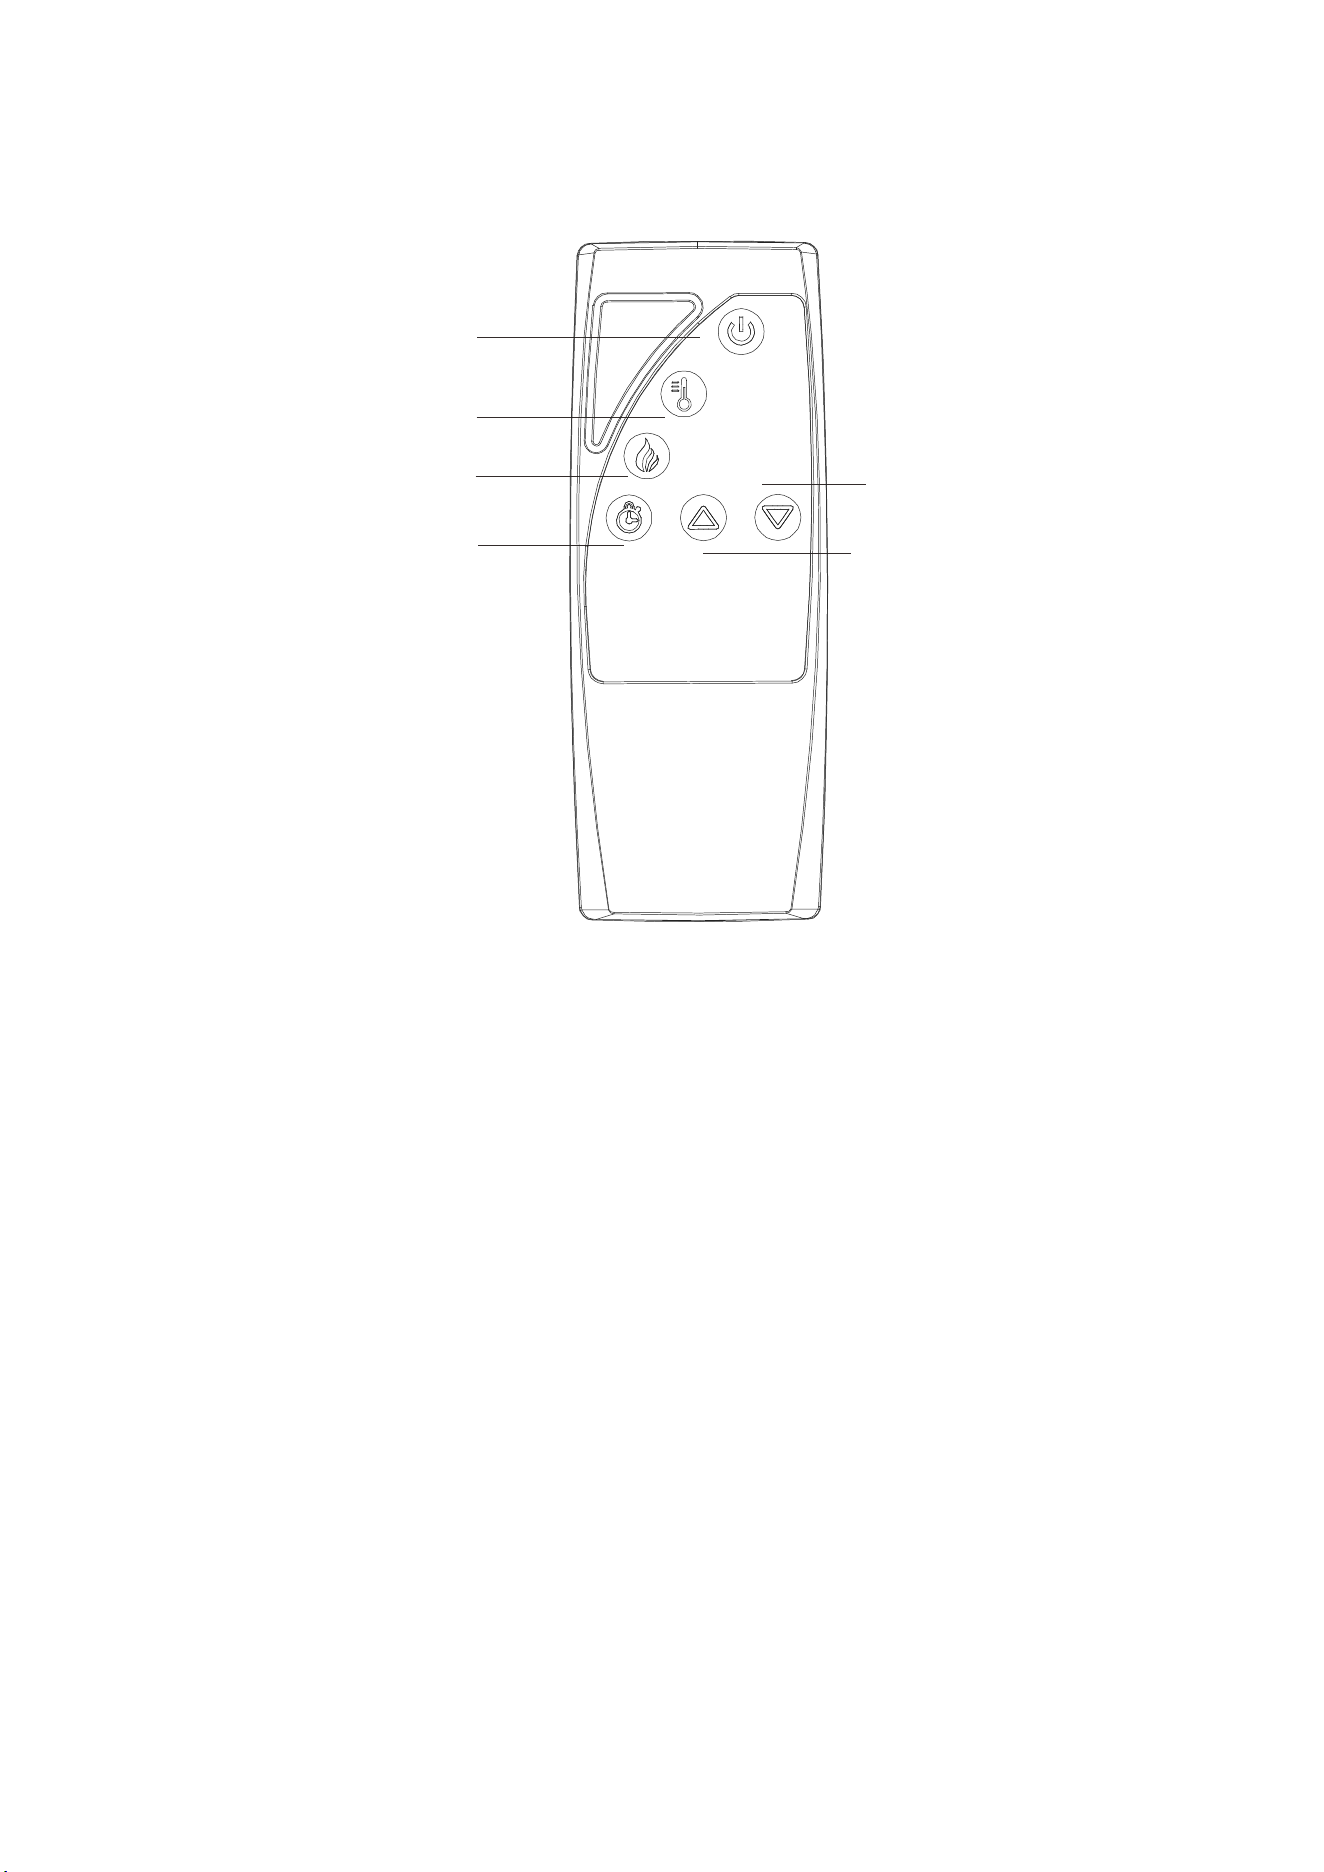
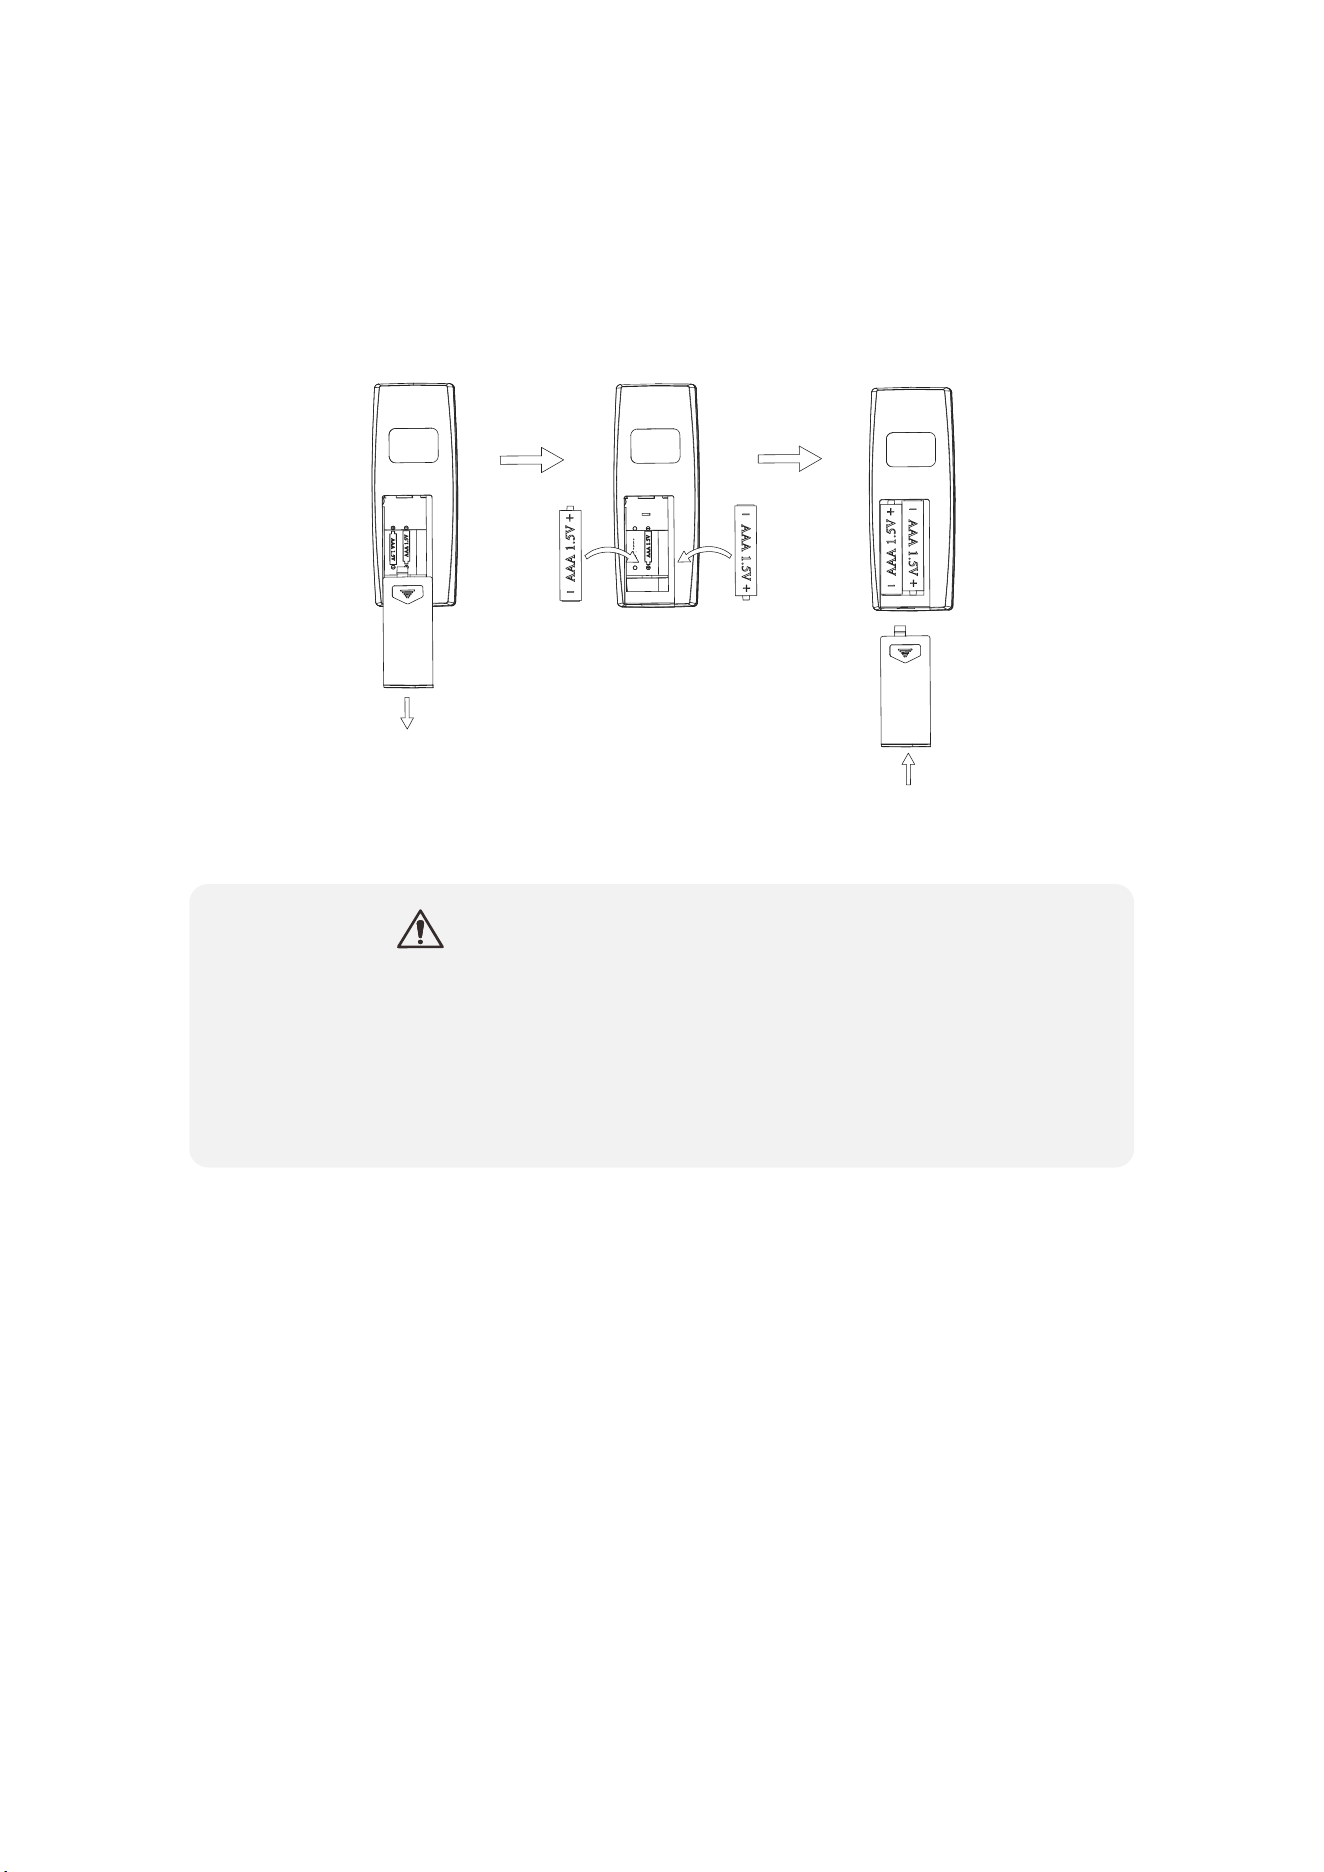
Install / Replace Battery
The remote control requires AAA batteries. Press down and slide back off
the battery compartment. Insert two AAA batteries into the battery
compartment making sure that then ends of the batteries with the
negative(-) symbols are against the springs in the battery compartment.
To replace or remove old battery, push in the clip and pull the battery
bracket out simultaneously.
Insert a new battery with the button side into the battery bracket, make sure
the battery is firmly seated
USER INSTRUCTION (REMOTE CONTROL)
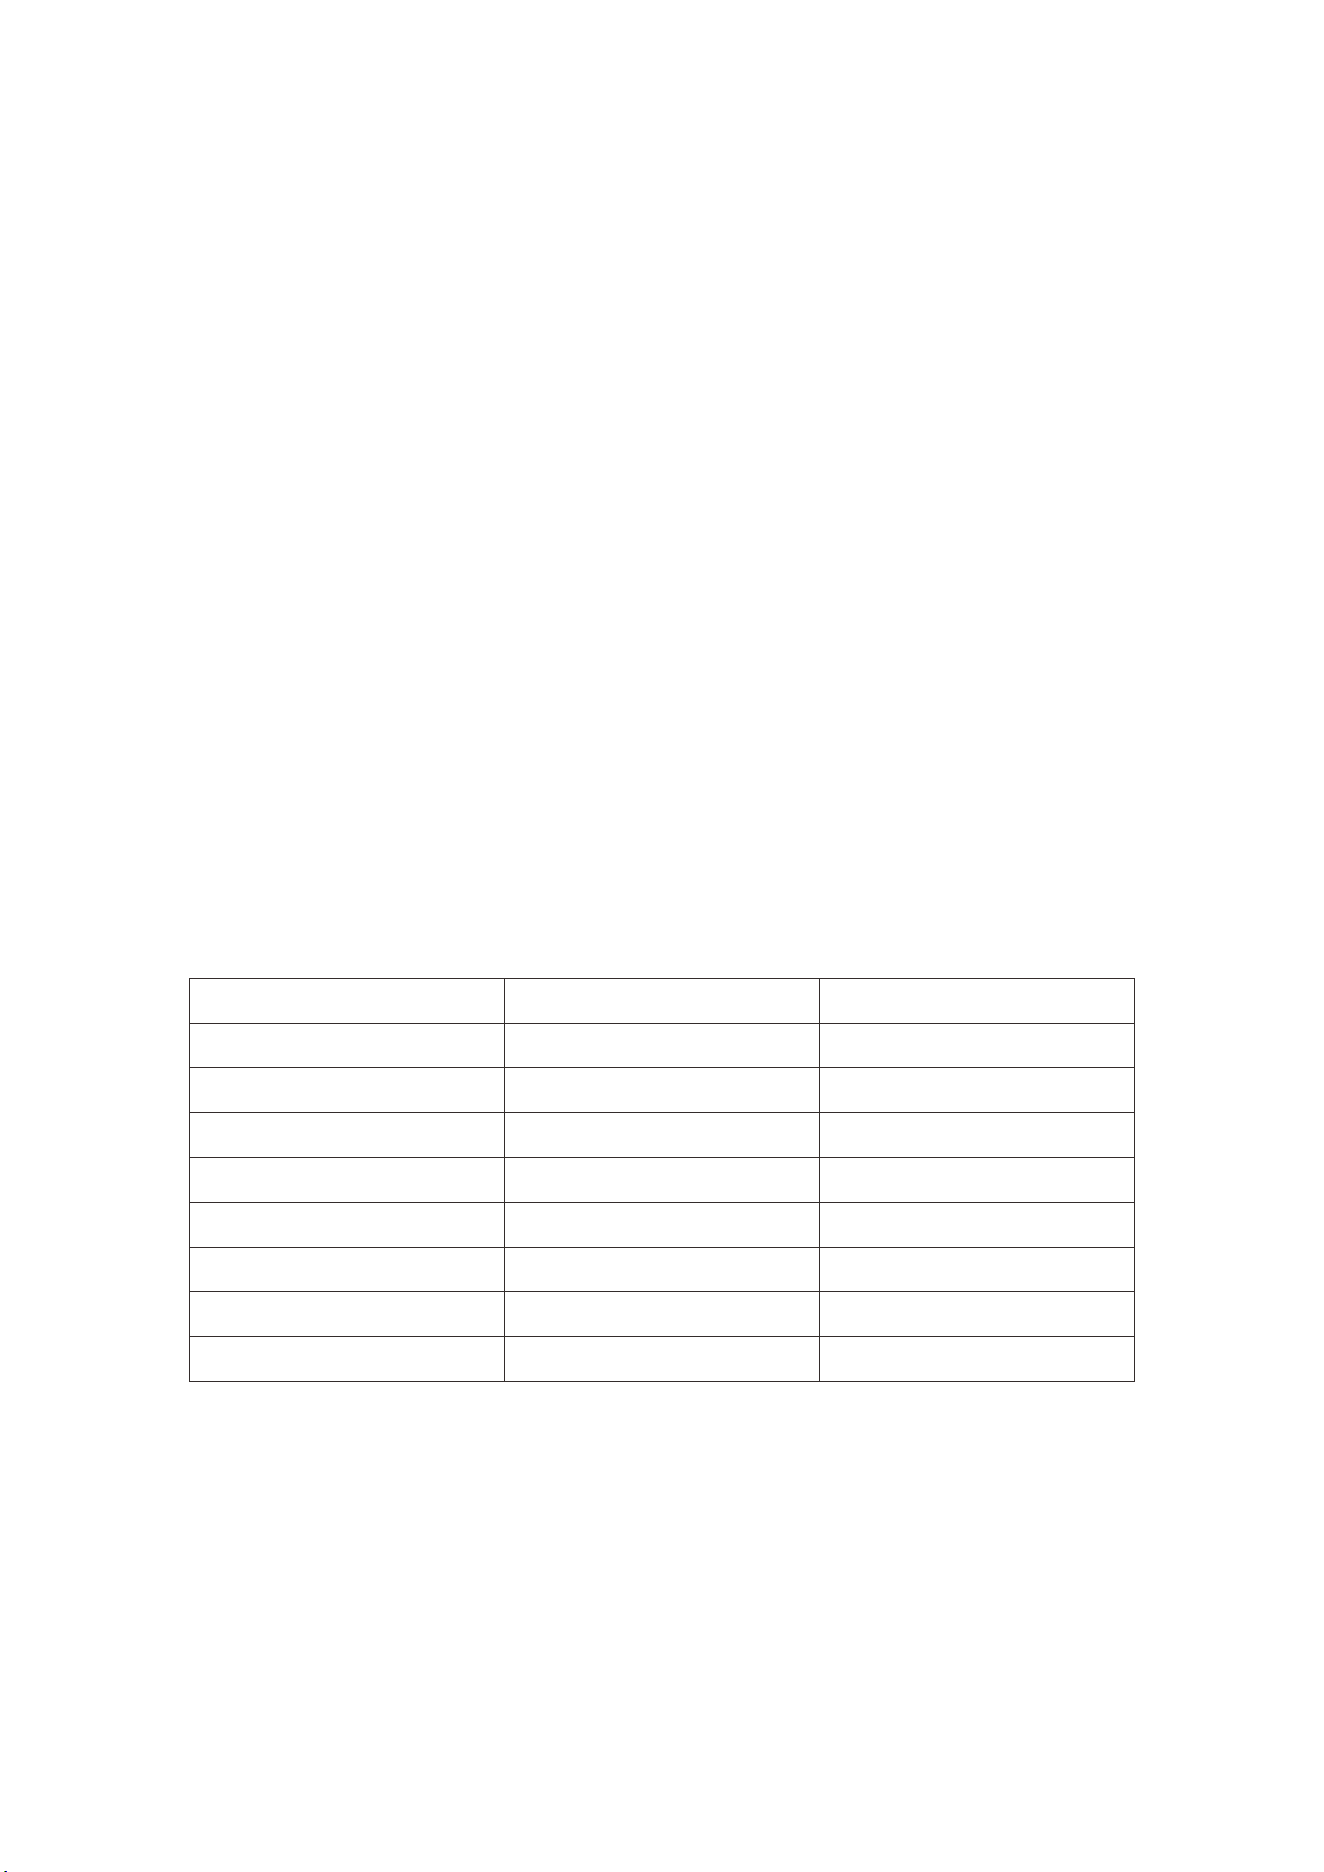
Remote Control
The operation of the remote control buttons work the same as the button on
the control panel.
NOTE: The remote control can be used to switch between degree
26
Fahrenheit and degree Celsius.
.
Power Button
Heater Control
Flame Control
Timer Control
Heater Up
Heater Down
USER INSTRUCTION (REMOTE CONTROL)
27
OPEN
CLOSE
To replace the bracket, simply push it into the remote control. Make sure
the bracket snaps into position.
NOTE: Remove battery from remote control if not use for an extended
period of time. Batteries need to be purchased separately.
● Dispose old / used battery at a suitable recycling point or
according to local regulations.
● DO NOT ingest battery. If accidentally swallowed, seek for
medical help immediately.
CAUTION / WARNING
CARE AND MAINTENANCE
Cleaning the unit:
Always turn off and unplug the unit from power outlet before cleaning.
Allow the unit to cool down completely before performing any maintenance
or cleaning.
Use a vacuum cleaner or duster to regularly remove any accumulated dust
on the unit.
Use a damp soft cloth to clean the surface and buff with a dry cloth.
Do not use abrasive cleansers, liquid sprays or any cleaner that could
scratch the surface.
TROUBLE SHOO
28
TING
The unit does not turn on Make sure the unit is plugged
intoa standard 120V grounded
power source. Press the power
button on the control panel.
Flame effect is on, but there is
no flame effect
Open the top and back panel to
check if the flame spindle has,
fallen off from the spindle motor.
The heater does not work Turn all switches to OFF and
unplug the unit for 5 minutes.
Plug the unit back to power and
operate as normal.
Error Code E3 shown on the
indicator
Reset the unit by unplugging the
unit from power source for 5
minutes and then plug it back.
Remote control does not work Use it closer to the unit / change
battery.
The heater does not blow warm
air
Make sure the set temperature
ishigher than the room
temperature.
Problem
Solution

29
FR
Cheminée Électrique

Lors de l'utilisation d'appareils électriques, des précautions de sécurité de
base doivent toujours être suivies, notamment les suivante
30
s :
1. Lisez toutes les instructions avant d'utiliser cet appareil de chauffage.
2. N'utilisez pas cet appareil de chauffage à l'extérieur.
3. Cet appareil de chauffage n'est pas destiné à être utilisé dans les salles
de bains, les buanderies et autres emplacements intérieurs similaires. Ne
placez jamais l'appareil de chauffage à un endroit où il pourrait tomber
dans une baignoire ou un autre récipient d'eau.
4. Ne faites pas passer le cordon d'alimentation sous un tapis. Ne couvrez
pas le cordon d'alimentation avec des carpettes, des tapis de passage ou
autres. Disposez le cordon d'alimentation à l'écart des zones de circulation
et à un endroit où il ne risque pas de trébucher.
5. Pour débrancher l'appareil de chauffage, éteignez les commandes, puis
retirez la fiche de la prise.
6. Connectez uniquement à une prise correctement mise à la terre.
Branchez toujours les appareils de chauffage directement dans une prise
murale/réceptacle. N'utilisez jamais de rallonge ou de prise d'alimentation
rechargeable (prise/multiprise).
7. Pour éviter d'éventuels incendies, veuillez ne pas utiliser les foyers
chauffants sur des surfaces molles, telles que des lits et des tapis, qui
pourraient obstruer l'ouverture.
8. Il y a un limiteur de thermostat à l'intérieur du cheminée. Lorsque la
température intérieure surchauffe ou qu'un échauffement anormal se
produit, le thermostat le dispositif de protection coupe l'alimentation
électrique pour éviter d'endommager le foyer ou le risque d'incendie.
9. Utilisez le cheminée uniquement comme décrit dans le manuel. Toute
autre utilisation non recommandée par le fabricant peut provoquer un
incendie, un choc électrique ou des blessures.
LISEZ TOUTES LES INSTRUCTIONS AVANT UTILISATION
Il n'y a aucune pièce réparable par l'utilisateur à l'intérieur du
foyer/appareil de chauffage. Si l'appareil semble mal fonctionner,
éteignez-le et débranchez-le immédiatement de la prise murale et
contactez le technicien qualifié.
AVERTISSEMENT
31
Ce cheminée est chaud lorsqu'il est utilisé. Pour éviter les brûlures, ne
laissez pas la peau nue toucher les surfaces chaudes. Le cas échéant,
utilisez les poignées pour déplacer l'appareil de chauffage. Gardez les
matériaux combustibles, tels que les meubles, les oreillers, la literie,
les papiers, les vêtements et les rideaux à au moins 3 pieds (0,9 m) de
l'avant du cheminée et éloignez-les du côté ou de l'arrière.
AVERTISSEMENT
Une extrême prudence est nécessaire lorsqu'un appareil de chauffage
est utilisé par ou à proximité d'enfants ou de personnes invalides et
chaque fois que l'appareil de chauffage est laissé en marche et sans
surveillance.
AVERTISSEMENT
Ne faites pas fonctionner un cheminée avec un cordon ou une prise
endommagés ou après un dysfonctionnement du cheminée une chute
ou des dommages de quelque manière que ce soit. Demandez de
l’aide à un technicien qualifié.
AVERTISSEMENT
N'insérez pas ou ne laissez pas d'objets étrangers pénétrer dans les
ouvertures de ventilation ou d'évacuation, car cela pourrait provoquer
une électrocution ou un incendie, ou endommager le cheminée.
AVERTISSEMENT
Un appareil de chauffage a des pièces chaudes et arquées ou
produisant des étincelles à l'intérieur. Ne pas utiliser dans des endroits
où de l'essence, de la peinture ou des liquides inflammables sont
utilisés ou entreposés.
AVERTISSEMENT
Débranchez toujours le cheminée lorsqu'il n'est pas utilisé.
AVERTISSEMENT
32
Lorsque le cheminée est en marche, le centre supérieur du foyer peut
devenir chaud au toucher et causer des blessures graves ou des
brûlures. Surveillez toujours les jeunes enfants autour du
foyer/chauffage. Ne placez aucun chiffon ou décoration sur la sortie de
chauffage ou le foyer, ou n'obstruez pas la sortie de chauffage du
foyer, car cela pourrait provoquer un incendie et des blessures graves.
ATTENTION
TélécommandeUnité de cheminée
Numéro de modèle
Dimensions (L x l x H)
Poids net
Poids brut
Puissance nominale
Tension
Fréquence
FP10534US
48,7cm x 13cm x 44,5cm
4.4 kg
5.5 kg
1400 W
120 V
60 Hz
SPÉCIFICATIONS TECHNIQUES
CONTENUDEL'EMBALLAGE
Visx5

ÉTAPE 1
Sortez l'appareil de la boîte et disposez toutes les pièces de rechange
pour un assemblage facile. Assurez-vous que tous les petits objets ne
sont pas laissés dans les matériaux d'emballage
33
.
ÉTAPE 2
Placez soigneusement l'unité à l'arrière du manteau et centrez-la dans
l'ouverture.
Vérifiez l'alignement et fixez l'unité du manteau en insérant des vis dans
les trous percés sur la garniture du manteau.
REMARQUE : N'essayez pas d'installer l'unité à partir de l'avant du
manteau. Cela ne conviendra pas.
• Cet appareil a un panneau avant en verre. Soyez extrêmement
prudent lorsque vous manipulez du verre pour éviter des blessures ou
des dommages.
ATTENTION
INSTRUCTIONS DE MONTAGE
Temps estimé pour l'assemblage
20:00 Mins
Avant utilisation
Vérifiez que l'entrée et la sortie d'air ne sont pas couvertes ou obstruées
de quelque manière que ce soit.
Gardez les objets combustibles à une distance d'au moins 3 pieds (0,9
m) de l'appareil.
Branchez l'appareil sur une prise de courant mise à la terre.
Mise à la terre
Ce produit doit être mis à la terre. En cas de dysfonctionnement ou de
panne, la mise à la terre fournit un chemin de moindre résistance pour le
courant électrique afin de réduire le risque de choc électrique.
Cet appareil est livré en standard avec un cordon à trois fils de 6 pieds
(1,8 m) de long. Branchez toujours l'appareil sur une prise murale. Il ne
faut jamais utiliser de rallonge ou de languette de repositionnement
34
.
INSTRUCTIONS D'UTILISATION
• Une connexion incorrecte du conducteur de mise à la terre de
l'équipement peut entraîner un risque d'électrocution. Vérifiez
auprès d'un électricien ou d'un réparateur qualifié si vous n'êtes pas
certain que le produit est correctement mis à la terre.
• NE modifiez PAS la fiche fournie avec le produit et n'utilisez aucun
dispositif de dérivation si la fiche ne rentre pas dans la prise. Faites
installer une prise appropriée par un électricien qualifié.
ATTENTION / AVERTISSEMENT

Panneau de Commande
Le panneau de commande est situé dans le coin supérieur droit de
l'appareil.
Contrôle de la Flamme
Appuyez sur le bouton de contrôle de la flamme pour faire pivoter et régler
les niveaux d'effet de flamme. Le réglage de flammes est le suivant
35
.
Marche / Arrêt
Appuyez sur le bouton d'alimentation pour allumer l'appareil. Appuyez à
nouveau pour éteindre l'appareil.
REMARQUE : Il y a un limiteur de thermostat à l'intérieur de l'appareil.
Lorsque la température intérieure est trop élevée, l'appareil s'éteint
automatiquement pour éviter d'endommager le produit ou le risque
d'incendie
• NE débranchez PAS l'appareil lorsqu'il est encore « ON ».
ATTENTION / AVERTISSEMENT
Bouton
d'alimentation
Contrôle de la flamme
Contrôle
de chauffage
Contrôle de la minuterieIndicateur de fonction
Affichage
REMARQUE : Lorsque le cheminée est allumé, le niveau d'effet de flamme
ne peut tourner et se régler qu'entre Bas, Moyen et Haut.
Appuyez sur le
bouton
1ère Fois
2ème Fois
3ème Fois
4ème Fois
Niveau de
flamme
Haut
Moyen
Bas
ARRÊT
Valeur
d'affichage
L3
L2
L1
ARRÊT
Apparence de
cheminée
Flamme la plus élevée, les bûches brillent
Flamme moyenne, les bûches brillent
Flamme faible, les bûches brillent
ARRÊT
INSTRUCTIONS POUR L'UTILISATEUR
(PANNEAU DE COMMANDE)
REMARQUE : La minuterie peut contrôler à la fois le chauffage et la fonction
36
d'effet de flamme.
Appuyez sur le bouton
1ère Fois
2ème Fois
3ème Fois
4ème Fois
5ème Fois
6ème Fois
7ème Fois
8ème Fois
Intervalle de Minuterie
30 Minutes
1 Heure
2 Heures
3 Heures
4 Heures
5 Heures
6 Heures
ARRÊT
Affichage
30
1h
2h
3h
4h
5h
6h
Aucun
Contrôle de Chauffage
Appuyez sur le contrôle de cheminée pour allumer et éteindre le cheminée.
Lorsque le cheminée est allumé, appuyez et maintenez enfoncé le bouton de
commande du chauffage pendant 5 secondes pour entrer en mode de réglage
de la température. L'indicateur LED est rouge. En mode de réglage, l'affichage
clignote. Il y a 22 niveaux pour changer la température Fahrenheit (ON, 62°F -
82°F). Une fois cela réglé, l'affichage clignotera 5 fois et sortira de l'état de
réglage
Pour passer du degré Fahrenheit au degré Celsius, maintenez enfoncé le
bouton d'alimentation pendant 5 secondes lorsque le cheminée est allumé.
L'indicateur LED deviendra vert. Il y a 12 niveaux pour changer la température
Celsius (ON, 17°C - 27°C). Répétez le même processus pour convertir Celsius
en Fahrenheit.
REMARQUE : Les degrés Fahrenheit seront affichés en ROUGE et les degrés
Celsius seront affichés en Vert.
Contrôle de la Minuterie
Appuyez sur le bouton de la minuterie pour activer la minuterie. La fonction de
minuterie peut contrôler à la fois l'effet de flamme et le chauffage.
La minuterie peut être réglée selon le tableau suggéré ci-dessous.
Installer/Remplacer la batterie
La télécommande nécessite des piles AAA. Appuyez vers le bas et retirez
le compartiment à piles. Insérez deux piles AAA dans le compartiment à
piles en vous assurant que les extrémités des piles avec les symboles
négatifs (-) sont contre les ressorts dans le compartiment à piles.
Pour remplacer ou retirer l'ancienne batterie, poussez le clip et retirez le
support de la batterie simultanément.
Insérez une nouvelle batterie avec le côté bouton dans le support de la
batterie et assurez-vous que la batterie est bien en place
INSTRUCTIONS POUR L'UTILISATEUR (TÉLÉCOMMANDE)
TÉLÉCOMMANDE
Le fonctionnement des boutons de la télécommande fonctionne de la même
manière que le bouton du panneau de commande.
REMARQUE : La télécommande être utilisée pour basculer
37
entre les degrés Fahrenheit et les degrés Celsius.
.
Bouton d'alimentation
Contrôle du chauffage
Contrôle de la flamme
Contrôle de la minuterie
Chauffage vers
le haut
Chauffage vers
le bas
INSTRUCTIONS POUR L'UTILISATEUR
(TÉLÉCOMMANDE)
38
OUVRIR
FERMER
Pour remplacer le support, poussez-le simplement dans la télécommande.
Assurez-vous que le support s'enclenche en position.
REMARQUE : Retirez la pile de la télécommande si elle n'est pas utilisée
pendant une période prolongée. Les piles doivent être achetées
séparément.
• Débarrassez-vous des batteries anciennes/usagées dans un point
de recyclage approprié ou conformément aux réglementations
locales.
• NE PAS ingérer la batterie. En cas d'ingestion accidentelle,
consultez immédiatement un médecin.
ATTENTION / AVERTISSEMENT
ENTRETIEN
Nettoyage de l'appareil :
Éteignez et débranchez toujours l'appareil de la prise de courant avant de le
nettoyer.
Laissez l'appareil refroidir complètement avant d'effectuer tout entretien ou
nettoyage.
Utilisez un aspirateur ou un plumeau pour éliminer régulièrement toute
poussière accumulée sur l'appareil.
Utilisez un chiffon doux et humide pour nettoyer la surface et polissez avec
un chiffon sec. N'utilisez pas de nettoyants abrasifs, de vaporisateurs liquides
ou tout autre nettoyant qui pourrait rayer la surface.

DÉPANNA
39
GE
L'appareil ne s'allume pas. Assurez-vous que l'appareil est
branché sur une source
d'alimentation standard de 120
V mise à la terre. Appuyez sur
le bouton d'alimentation du
panneau de commande.
L'effet de flamme est activé,
mais il n'y a pas d'effet de
flamme
Ouvrez le panneau supérieur et
arrière pour vérifier si la broche
de flamme est tombée du
moteur de broche.
Le cheminée ne fonctionne
pas
Mettez tous les interrupteurs sur
OFF et débranchez l'appareil
pendant 5 minutes. Rebranchez
l'appareil sur le secteur et
faites-le fonctionner
normalement.
Code d'erreur E3 affiché sur
l'indicateur
Réinitialisez l'appareil en le
débranchant de la source
d'alimentation pendant 5
minutes, puis rebranchez-le
La télécommande ne
fonctionne pas
Rapprochez-le de
l'appareil/changez la pile.
Le cheminée ne souffle pas
d'air chaud
Assurez-vous que la
température réglée est
supérieure à la température
ambiante.
Problème
Solution
40
Instructions De Retour / Rclamation De Dommages
Dans le cas où un retour est requis, l'article doit être retourné dans sa boîte
d'origine. Sans cela, votre retour ne sera pas accepté.
NE PAS jeter la boîte/l'emballage d'origine.
Prenez une photo des marquages de la boîte.
Prenez une photo des dommages (le cas échéant)
Envoyez-nous un e-mail avec les images demandées.
Une photo des marquages (texte) sur le côté de la boîte est requise au cas où
une pièce serait nécessaire pour le remplacement. Cela aide notre personnel à
identifier votre numéro de produit pour s'assurer que vous recevez les bonnes
pièces.
Une photo des dommages est toujours requise pour déposer une réclamation et
obtenir rapidement votre remplacement ou votre remboursement. Assurez-vous
d'avoir la boîte même si elle est endommagée.
Envoyez-nous un e-mail directement depuis le marché où votre article a été
acheté avec les images ci-jointes et une description de votre réclamation.
FR
In case a return is required, the item must be returned in original box. Without this
your return will not be accepted.
DO NOT discard the box / original packaging.
Take a photo of the box markings
Take a photo of the damaged part (if applicable).
Send us an email with the images requested.
A photo of the markings (text) on the side of the box is required in case a part is
needed for replacement. This helps our staff identify your product number to
ensure you receive the correct parts.
A photo of the damage is always required to file a claim and get your replacement
or refund processed quickly. Please make sure you have the box even if it is
damaged.
Email us directly from marketplace where your item was purchased with the
attached images and a description of your claim.
EN
Return / Damage Claim Instructions
Instructions De Retour / Réclamation De Dommages

If you're having difficulty, our friendly
customer team is always here to help.
USA office: Fontana AUS office: Truganina GBR office: Ipswich FRA office: Saint Vigor d'Ymonville
USA:cs.us@costway.com
AUS:cs.au@costway.com
GBR:cs.uk@costway.com
FRA:cs.f r @costway.com
