Please give us a chance to make it right and do better !
Contact our friendly customer service department for help first.
Replacements for missing or damaged parts will be shipped ASAP !
Contact Us!
Do NOT return this item.
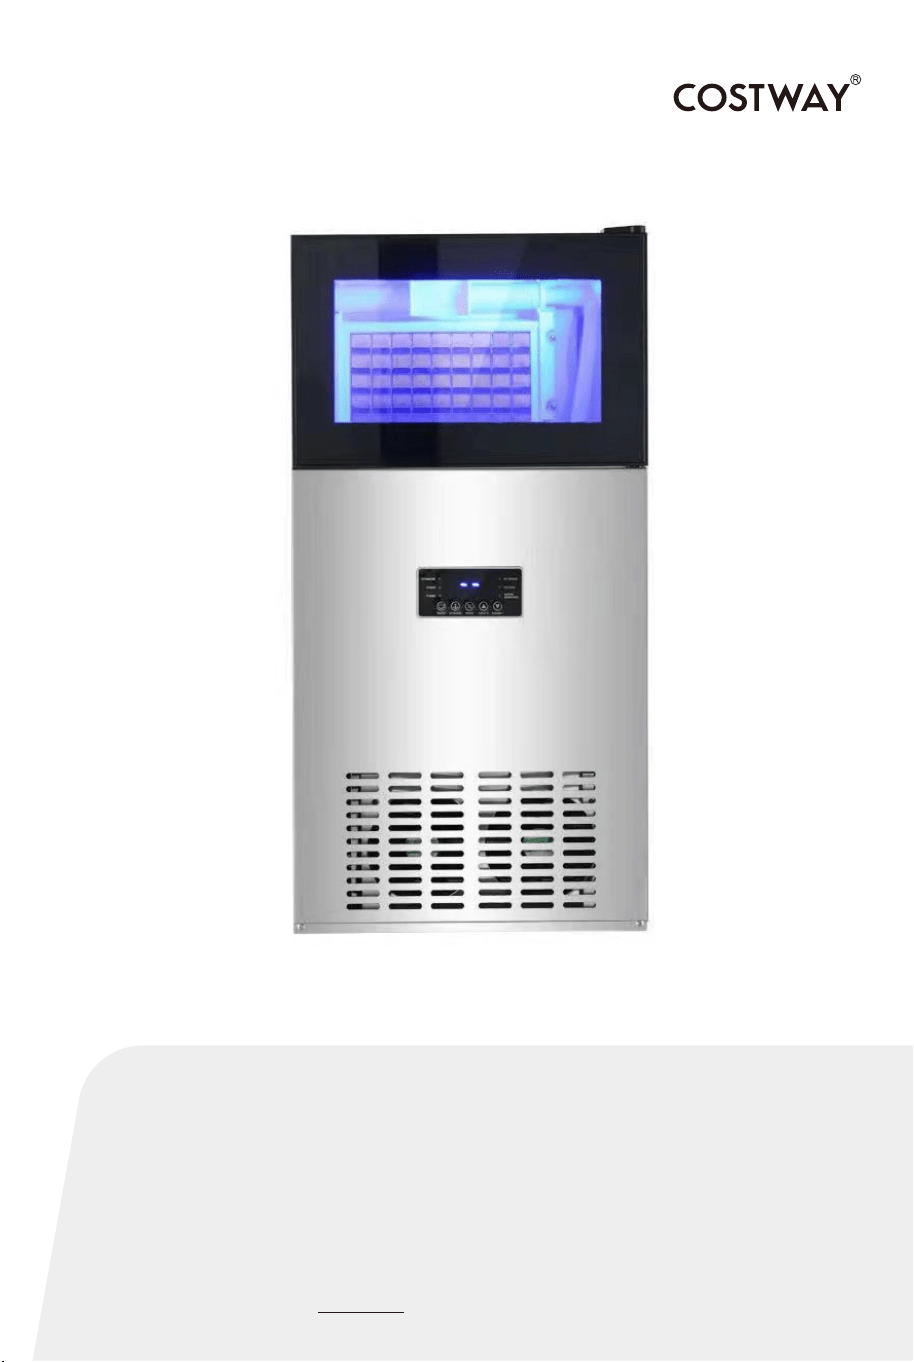
COMMERCIAL ICE MAKER
FP10096US
USER’S MANUAL
THIS INSTRUCTION BOOKLET CONTAINS IMPORTANT SAFETY INFORMATION. PLEASE READ AND KEEP FOR FUTURE REFERENCE.
US office: Fontana UK office: Ipswich AU office: Truganina
DE office: Hamburg
FR office: Saint Vigor d'Ymonville
PL office: Gdańsk
US:cs.us@costway.com
UK:cs.uk@costway.com
Before You Start
Please read all instructions carefully.
Retain instructions for future reference.
Separate and count all parts and hardware.
Read through each step carefully and follow the proper order.
We recommend that, where possible, all items are assembled
near to the area in which they will be placed in use, to avoid
moving the product unnecessarily once assembled.
Always place the product on a flat, steady and stable surface.
Keep all small parts and packaging materials for this product
away from babies and children as they potentially pose a serious
choking hazard.
02 03
INSTRUCTION MANUAL
IMPORTANT SAFETY TIPS
RECEPTION AND INSPECTION
It is important that you read these instructions before using your
commercial ice maker and we strongly recommend that you keep them in
a safe place for future reference.
Thank you for selecting our company's automatic ice maker. In order to
protect your legitimate rights and interests, please pay attention to the
following things when receiving and checking the machine:
1. The outer packing of the machine is intact.
2. Machine’s model is consistent with your purchased.
3. The appearance of the machine is in good condition.
4. The attached parts are complete.
5. The internal components of the machine are in good condition.
WARNING:This appliance is not intended for use by persons (including
children) with reduced physical, sensory or mental capabilities, or lack of
experience and knowledge, unless they have been given supervision or
instruction concerning use of the appliance by a person responsible for
their safety. Children should be supervised to ensure that they do not
play with the appliance.
WARNING: When positioning the appliance, ensure the supply cord is
not trapped or damaged.
WARNING: Do not locate multiple portable socket-outlets or portable
power supplies at the rear of the appliance.
WARNING: The illuminating LED lamp can not be replaced by the user,
it must be replaced by the manufacturer or a similarly qualified person in
order to avoid a hazard.
WARNING: Do not store explosive substances such as aerosol cans with
a flammable propellant in this appliance.
04 05
DANGER
Your personal safety and safety of others are the most
important.
We have prepared many safety tips related to this
machine for you.
Be sure to read and follow these tips.
This is a security warning sign
All security alerts follow the words "danger" and "warning".
If you do not comply with these safety tips, you may be seriously
injured.
All safety tips describe potential hazards, instruct you how to reduce
the chances of injury and what will happen if you do not follow the
safety tips.
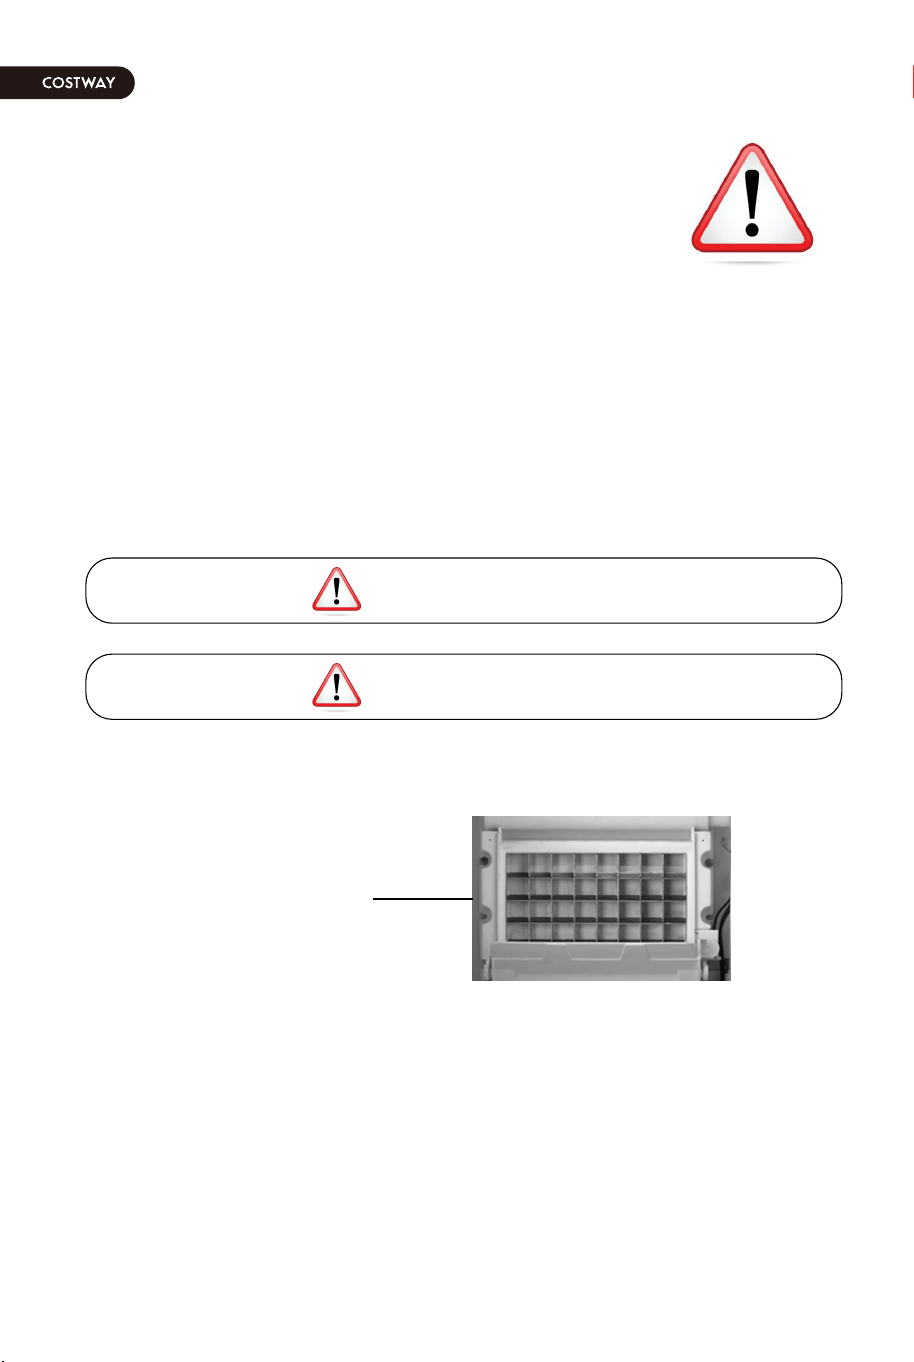
WARNING
If the ice maker is using or making ice, please do not touch the
evaporator, which may freeze your skin.
Before using electrical appliances, basic safety rules must be observed to
reduce fire, electric shock and damage to people or material. Please read
the safety tips carefully before using this appliance.
• When the power cord is damaged, do not use and operate the machine.
• Use the correct power outlet and ensure that the power plug is
completely inserted into the socket.
• Please do not put the power line on the carpet or heat insulation, do
not cover the power line, the power line should leave the walking
channel, and do not immerse into the water.
• It is not recommended to use the power extension cord. This may
result in overheating or fire. If you must use it, use at least 5FT
extension line.
• Please cut off the power supply before cleaning or repairing.
• When children are nearby, they must be supervised.
• Please do not use flammable liquids to clean the ice maker. This may
cause fire or explosion.
• Please do not overturn the ice maker. If there is any overturn, the
machine will be placed for 2 hours before starting.
In winter, if the ice maker is moved indoors from outside, wait for a few
hours before power up, so that the temperature of the ice maker rises
to the same temperature as that of the room.
Warning: keep ventilation around the appliance. Do not use it in the
embedded structure.
Warning: in addition to the manufacturer's recommended method, no
mechanical or other means should be used to accelerate the defrosting
process.
Warning: no damage to the refrigeration circuit.
Warning: please do not use other liquids to make ice except drinking
water.
Warning:Except for the type recommended by the manufacturer,
electrical appliances should not be used in the food storage room of
utensils. Explosives, such as combustion-supporting sprays, should not
be stored in appliances. This product is suitable for coffee shops, bars
and club.
evaporator

04 05
DANGER
Your personal safety and safety of others are the most
important.
We have prepared many safety tips related to this
machine for you.
Be sure to read and follow these tips.
This is a security warning sign
All security alerts follow the words "danger" and "warning".
If you do not comply with these safety tips, you may be seriously
injured.
All safety tips describe potential hazards, instruct you how to reduce
the chances of injury and what will happen if you do not follow the
safety tips.
WARNING
If the ice maker is using or making ice, please do not touch the
evaporator, which may freeze your skin.
Before using electrical appliances, basic safety rules must be observed to
reduce fire, electric shock and damage to people or material. Please read
the safety tips carefully before using this appliance.
• When the power cord is damaged, do not use and operate the machine.
• Use the correct power outlet and ensure that the power plug is
completely inserted into the socket.
• Please do not put the power line on the carpet or heat insulation, do
not cover the power line, the power line should leave the walking
channel, and do not immerse into the water.
• It is not recommended to use the power extension cord. This may
result in overheating or fire. If you must use it, use at least 5FT
extension line.
• Please cut off the power supply before cleaning or repairing.
• When children are nearby, they must be supervised.
• Please do not use flammable liquids to clean the ice maker. This may
cause fire or explosion.
• Please do not overturn the ice maker. If there is any overturn, the
machine will be placed for 2 hours before starting.
In winter, if the ice maker is moved indoors from outside, wait for a few
hours before power up, so that the temperature of the ice maker rises
to the same temperature as that of the room.
Warning: keep ventilation around the appliance. Do not use it in the
embedded structure.
Warning: in addition to the manufacturer's recommended method, no
mechanical or other means should be used to accelerate the defrosting
process.
Warning: no damage to the refrigeration circuit.
Warning: please do not use other liquids to make ice except drinking
water.
Warning:Except for the type recommended by the manufacturer,
electrical appliances should not be used in the food storage room of
utensils. Explosives, such as combustion-supporting sprays, should not
be stored in appliances. This product is suitable for coffee shops, bars
and club.
evaporator
06 07
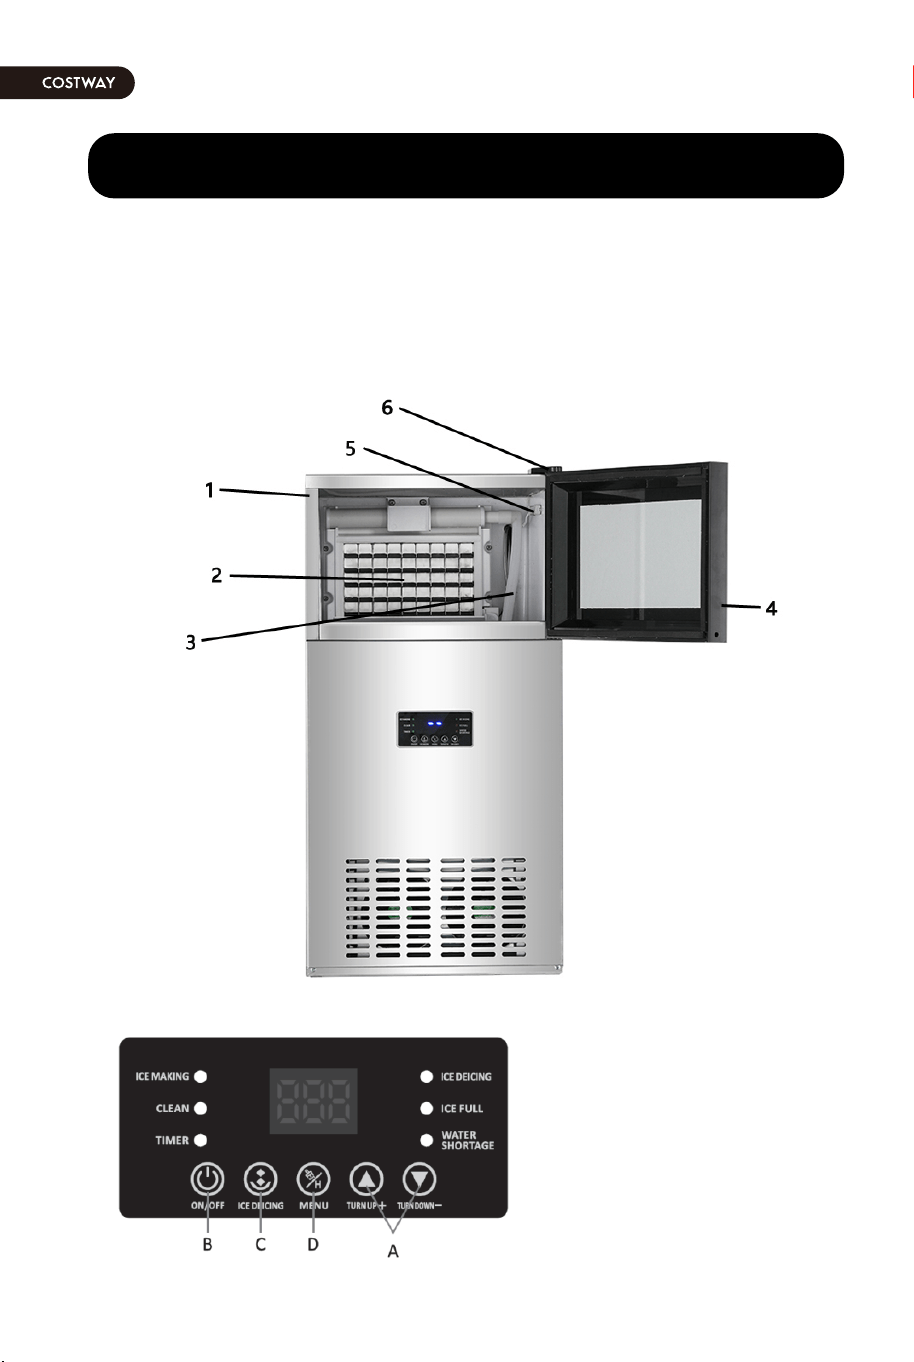
APRELIMINARY UNDERSTANDING OF YOUR ICE MAKER
FP10096US(YD-Z63)
1.Box shell:No other articles are allowed to be placed on it.
2. Evaporator
3. Water pipe: no deformation, breakage
4. Door
5. Light: bactericidal effect
6. Door Hinge
7. Control Panel:
A.Regulates ice making
time
B. Power ON/OFF
C. Ice Deicing
D. Cleaning/Timer
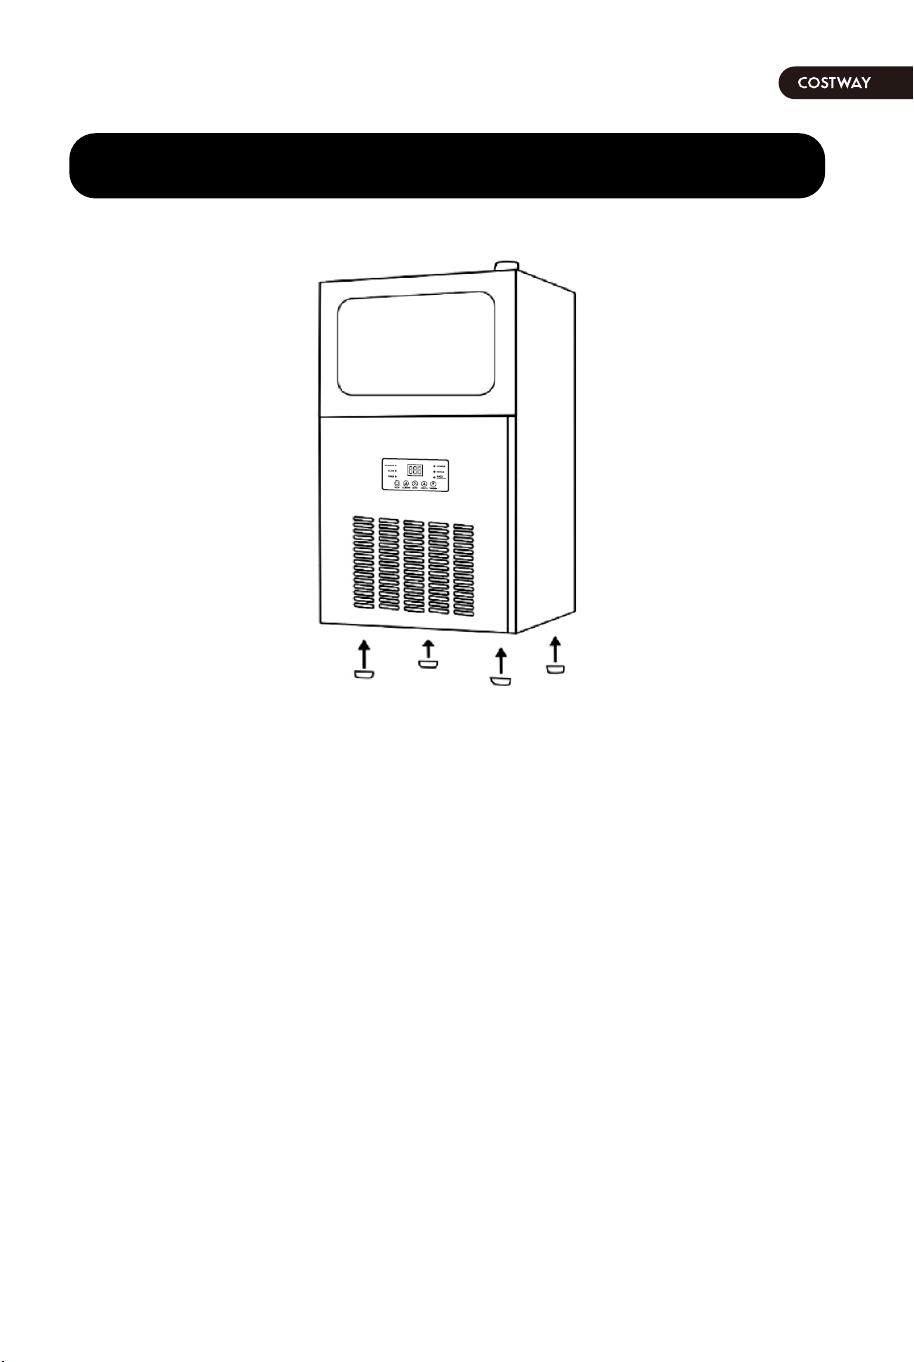
INSTALLATION AND PLACEMENT OF FEET
Feet Installation and Placement
1. Screw the feet of the ice maker to the base-plate.
2. Each foot must be screwed up and tightened so as not to bend.
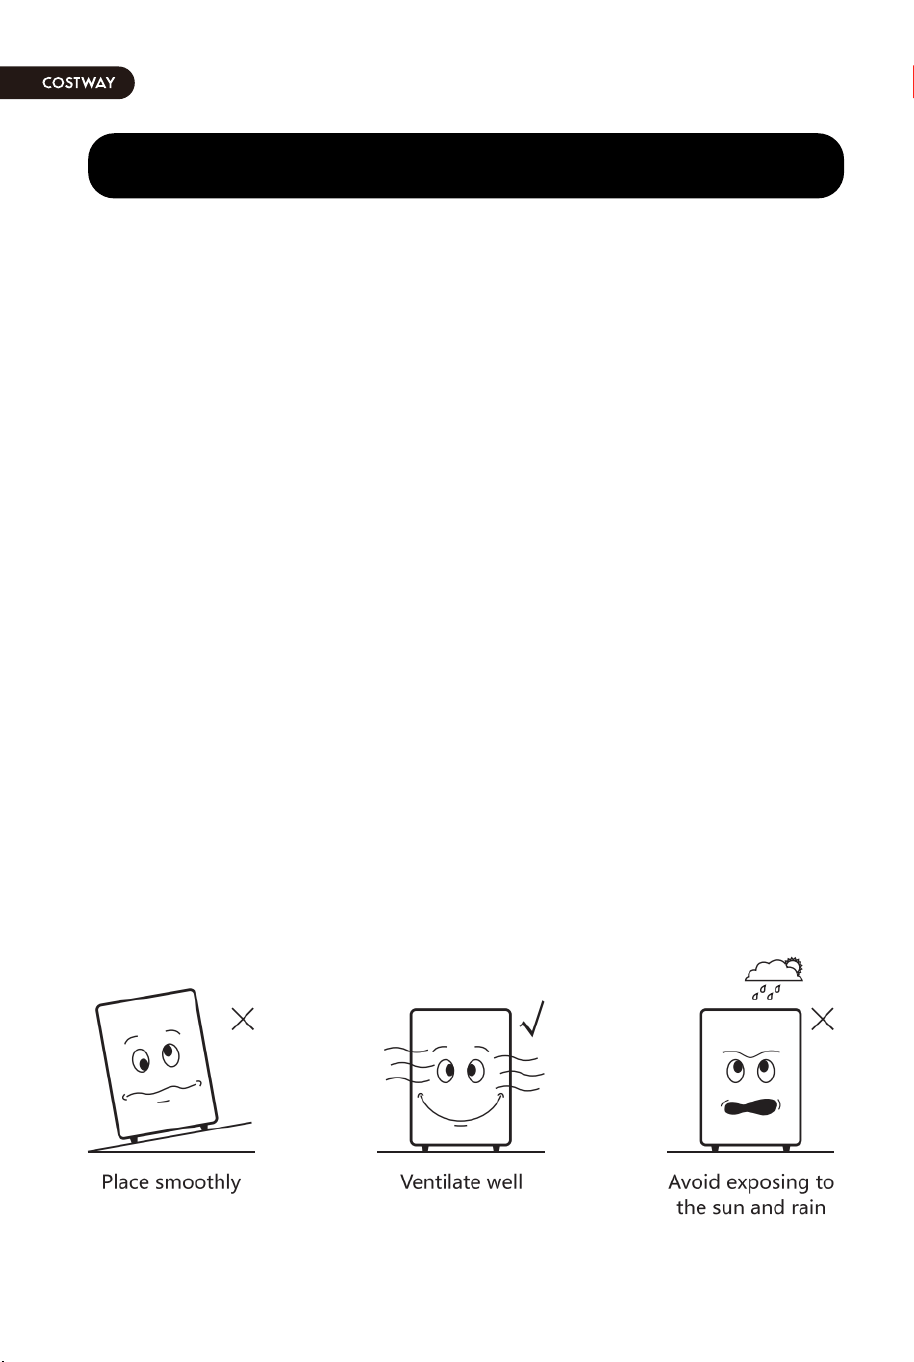
3. Put the ice maker in a sturdy and flat position.
4.Adjust the height of the foot to make the ice maker level.
5. The ice making machine should not be installed in the environment
without sewer and water seepage, and it is strictly prohibited from high
temperature equipment.
6. Air-cooled ice making machines (such as refrigerators, ovens, etc.)
rely on air circulation to dissipate heat, so it is necessary to keep the
space above 12-inch to benefit the heat dissipation.
7.Please do not put anything in front of the machine that may block the
vent.
06 07
APRELIMINARY UNDERSTANDING OF YOUR ICE MAKER
FP10096US(YD-Z63)
1.Box shell:No other articles are allowed to be placed on it.
2. Evaporator
3. Water pipe: no deformation, breakage
4. Door
5. Light: bactericidal effect
6. Door Hinge
7. Control Panel:
A.Regulates ice making
time
B. Power ON/OFF
C. Ice Deicing
D. Cleaning/Timer
INSTALLATION AND PLACEMENT OF FEET
Feet Installation and Placement
1. Screw the feet of the ice maker to the base-plate.
2. Each foot must be screwed up and tightened so as not to bend.
3. Put the ice maker in a sturdy and flat position.
4.Adjust the height of the foot to make the ice maker level.
5. The ice making machine should not be installed in the environment
without sewer and water seepage, and it is strictly prohibited from high
temperature equipment.
6. Air-cooled ice making machines (such as refrigerators, ovens, etc.)
rely on air circulation to dissipate heat, so it is necessary to keep the
space above 12-inch to benefit the heat dissipation.
7.Please do not put anything in front of the machine that may block the
vent.
08 09
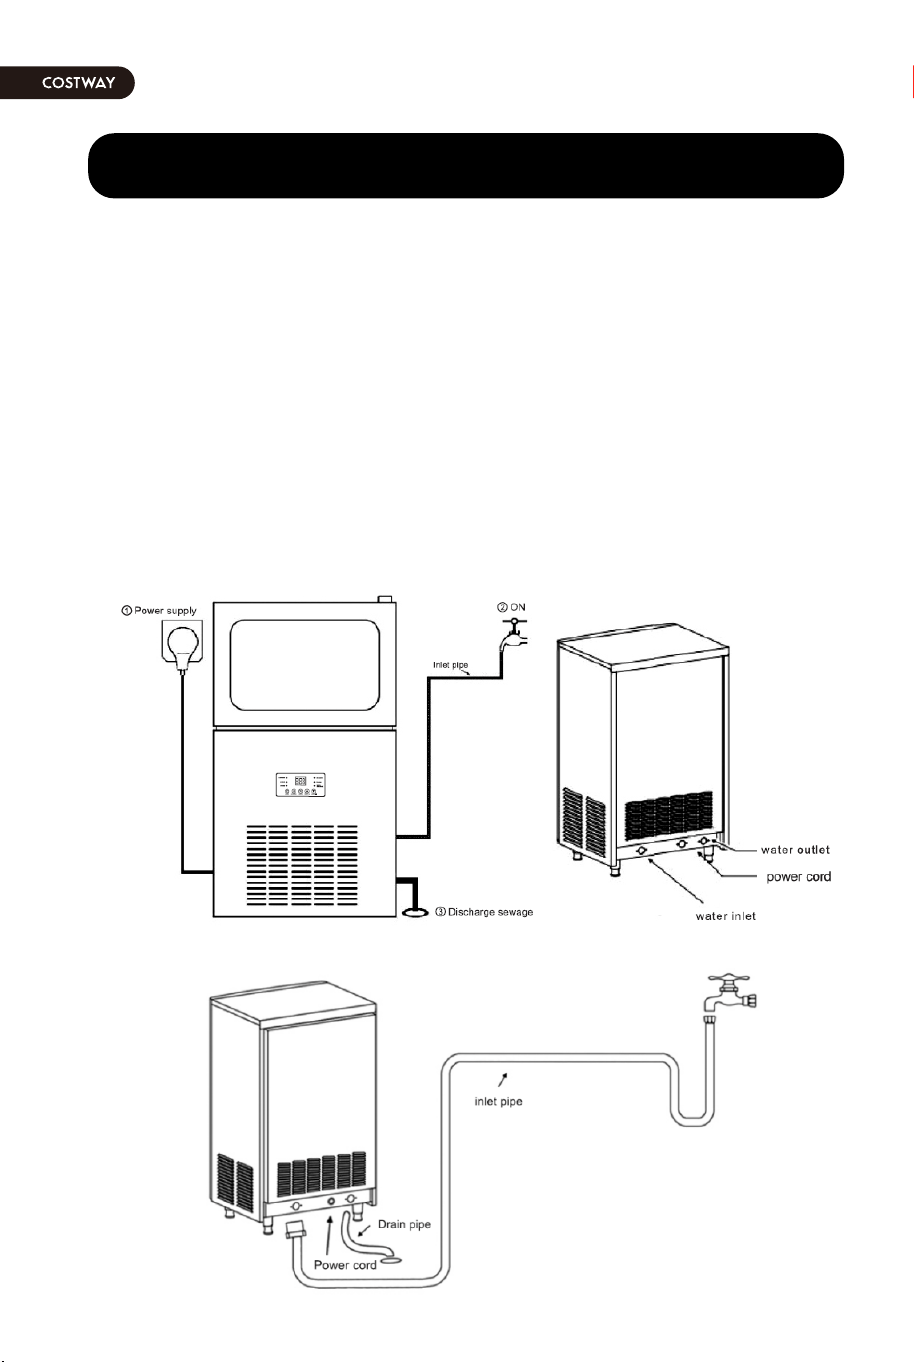
INSTALLATION OF WATER SUPPLY AND DRAINAGE
Warning: Only drinking water can be connected. New hose assemblies
attached to the appliances must be used. Old hose assemblies cannot be
reused. Water supply pressure should be 0.1-0.8 MPa. If the pressure is
greater than 0.8 MPa, a pressure relief valve needs to be connected to
drain the water from the dry place through its own weight, the drain
pipe should have sufficient height or drop.
A. Connect the right-angle joint of the external intake pipe to the G3/4
head of the rear cover plate. Make sure that the rubber seals are in the
correct position and hang the joint by hand to ensure no leakage.
B. Connect the other end of the external water inlet pipe to the tap.
C. The drain pipe should be connected to the outlet of the room, while
ensuring that the drain outlet of the machine is high enough to drain the
room.
Note: Before any cleaning or maintenance steps, please unplug the
power plug and do not use the alcohol and other highly corrosive
liquid to clean the ice maker. This may cause cracking of plastic
parts.
1.Peripheral: Use a clean, soft cloth to wipe the periphery of the
ice maker. At least once a week. Use a wet cloth with a neutral
cleaner to remove grease or other impurities.
2.Ice-spoon cleaning: Dip the ice-spoon into neutral detergent
and water compound for at least 3 minutes, then rinse it with clean
water and shake it dry.
3.Interior cleaning: Open the ice door, remove all the ice, clean
the inner wall of the refrigerator with neutral detergent, and then
rinse with clean water.
4.Pump cleaning: Take off the hose, take out the pump, take off
the front cover. After rotating the inner cover counterclockwise, you
can take off the inner cover. Clean the pump fan blade with a
brush. It is recommended to wash once a week.
Warning: Cyclopentane is used for insulation and insulation
materials of ice machines, and should be properly disposed of when
discarded, such as being sent to a qualified recycling company for
disposal, and should not be incinerated.
CLEANING AND MAINTENANCE

08 09
INSTALLATION OF WATER SUPPLY AND DRAINAGE
Warning: Only drinking water can be connected. New hose assemblies
attached to the appliances must be used. Old hose assemblies cannot be
reused. Water supply pressure should be 0.1-0.8 MPa. If the pressure is
greater than 0.8 MPa, a pressure relief valve needs to be connected to
drain the water from the dry place through its own weight, the drain
pipe should have sufficient height or drop.
A. Connect the right-angle joint of the external intake pipe to the G3/4
head of the rear cover plate. Make sure that the rubber seals are in the
correct position and hang the joint by hand to ensure no leakage.
B. Connect the other end of the external water inlet pipe to the tap.
C. The drain pipe should be connected to the outlet of the room, while
ensuring that the drain outlet of the machine is high enough to drain the
room.
Note: Before any cleaning or maintenance steps, please unplug the
power plug and do not use the alcohol and other highly corrosive
liquid to clean the ice maker. This may cause cracking of plastic
parts.
1.Peripheral: Use a clean, soft cloth to wipe the periphery of the
ice maker. At least once a week. Use a wet cloth with a neutral
cleaner to remove grease or other impurities.
2.Ice-spoon cleaning: Dip the ice-spoon into neutral detergent
and water compound for at least 3 minutes, then rinse it with clean
water and shake it dry.
3.Interior cleaning: Open the ice door, remove all the ice, clean
the inner wall of the refrigerator with neutral detergent, and then
rinse with clean water.
4.Pump cleaning: Take off the hose, take out the pump, take off
the front cover. After rotating the inner cover counterclockwise, you
can take off the inner cover. Clean the pump fan blade with a
brush. It is recommended to wash once a week.
Warning: Cyclopentane is used for insulation and insulation
materials of ice machines, and should be properly disposed of when
discarded, such as being sent to a qualified recycling company for
disposal, and should not be incinerated.
CLEANING AND MAINTENANCE
10 11
CONVENTIONAL PRECAUTIONS
1.The ice machine tilt shall not exceed 45 degrees when transporting or
moving.
2.Please use an independent water source and check it regularly to
prevent low water pressure, fluctuations or filter blockage.
3.Do not store any sundries in the ice storage room, or freeze any food
in the ice storage room and keep the ice shovel clean.
4.When opening and closing the plastic door of the ice storage bucket,
you should open and close it gently. Don't knock on the door of the
box. After taking the ice, close the sliding door of the ice bucket.
5.Ice machine should be far away from the heat source. It is strictly
prohibited to use in high temperature or low temperature environment.
It is necessary to avoid direct sunlight in order to avoid affecting the
heat dissipation of the machine.
6.It is forbidden to wash the surface of ice machine directly with water,
otherwise it may lead to short circuit, leakage and other faults.
7. After the ice machine is used for a period of time, if it is stopped for
a long time, it should be electrified every two months for four to six
hours.
Warning: the machine must be grounded.
A、 must have a power or socket that can provide 120V-/60Hz, and the
power supply or the socket must be reliably grounded.
B、The rated current of the electric box is 2.5A. If it is to be replaced, it
must be completed by professionals.
C、If the power supply or plug needs to be replaced, it must be
completed by a professional technician.
General description : This is a fully automatic ice making machine, all
programs of the control panel have been set up in the factory. Usually,
the user just need to do some simple operation. Please place the
machine in the appropriate location and connect to power supplies.
Then the control panel will light up, the machine will run automatically,
the user need no any other operation. If you want to stop the machine,
just close the ON/OFF switch.
Note: Unplug the power supplies after finishing the day's work .
ELECTRICAL SAFETY MATTERS
CONTROL PANEL OPERATING MANUAL

12 13
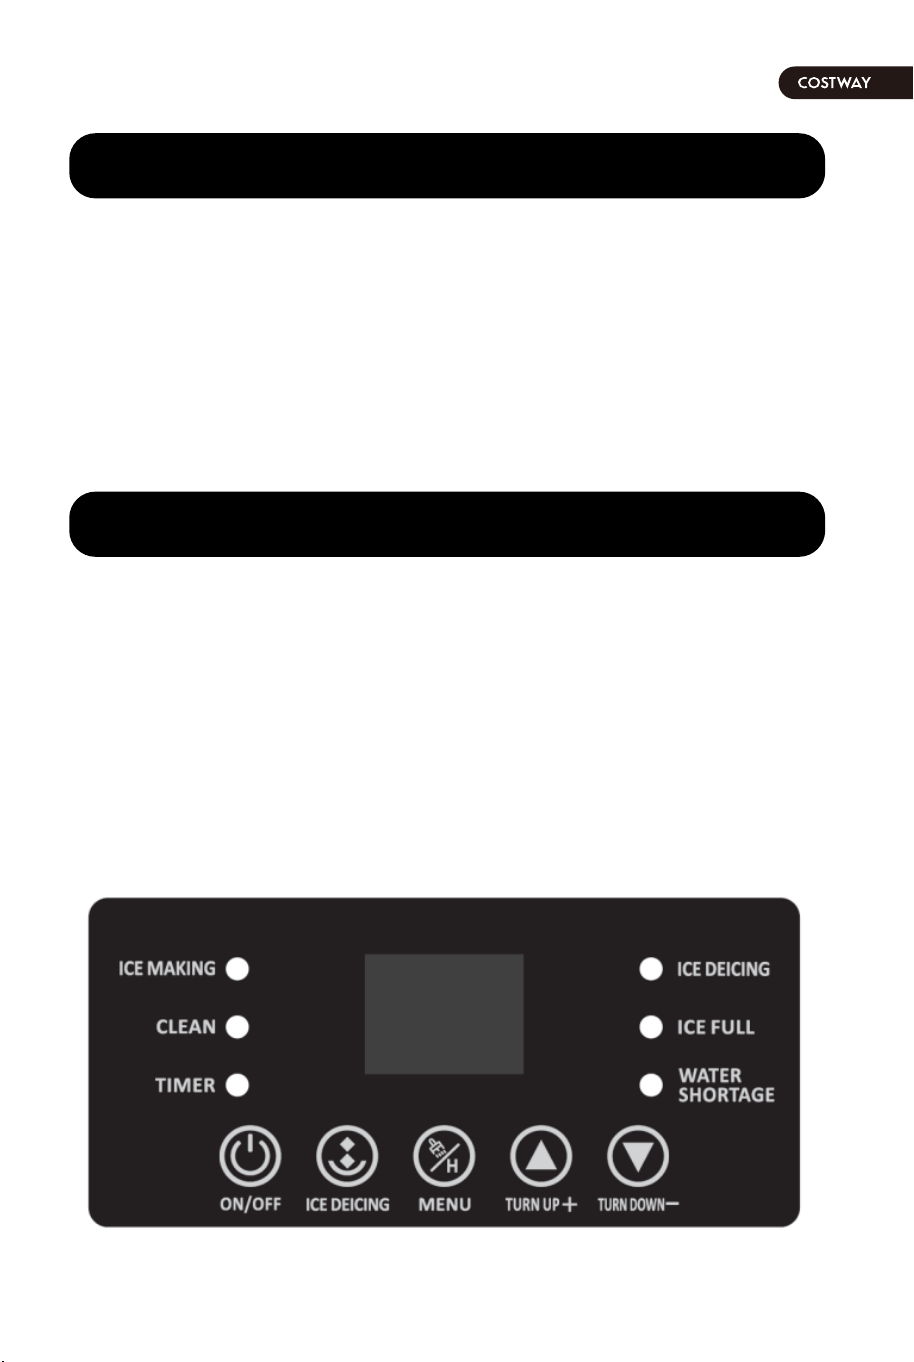
OPERATION STEPS OF ICE MAKER
1.ON/OFF
In standby state, LCD panel display “--”, press the button "on/off" ,
the machine enters the ice making mode, the indicator light of “ICE
MAKING" and the blue lamp in the machine will keep on; long press
the button "on/off" for 2 seconds when the machine is running, the
machine stops running and enters the standby state. The original
ice-making time is 20 minutes. It takes at least 13 minutes to make
ice for each first use.
2.ICE DEICING
Press the “ICE DEICING” button when the machine is running, turn
on/ turn off the built-in blue light. Long press the “ICE DEICING”
button when the machine is running, the indicator light of “ICE
DEICING” will be on, the machine immediately into the deicing
state(It can be used when ice cannot be removed or force deicing);
In the deicing process, the ice will be heated until it melts, and when
the ice is unable to adhere to the ice web due to its weight, it falls
off. It will take 1 minute to complete a deicing process.
3.MENU
The MENU button is used for cleaning or timer.
4.Clean
In standby state, long press the "MENU" button for 3 seconds,
"clean" light on while the machine into the"clean"state.
5.Timer
When the machine is running, press the MENU button to set the
timing shut down, the"TIMER" lamp will be on, and the "01" appears
on the display screen, indicating that the machine will shut down
automatically after an hour. The reservation time can be adjusted by
button "TURN UP/TURN DOWN". The machine provides 24 hours
reservation. After the setting is completed, the"Timer" lamp will be
on. Boot-up time is reserved for shutdown time, standby time is
reserved for boot-up time.
6.Turn up/Turn down
By "turn up/turn down", the ice-making time is controlled and the ice
thickness is controlled. Press"turn up/turn down" and the number
will flicker on the display screen. The original ice-making time is 20
minutes. The digital display range is"-8 to 8 ". The smaller the
number, the shorter the ice making time and the thinner the ice. The
bigger the number, the longer the ice making time and the thicker
the ice. Neither ice too thin nor too thick is not conducive to deicing.
7.Display Panel
In working condition,display panel digitally flashes the countdown
timer(minutes) for ice making.
8.Ice Full
When the ice is fulled in the storage bin,the indicator light "ICE
FULL" will be on. The machine will stop making ice and enter standby
mode. Rebooting requires taking out the ice and waiting for three
minutes.

12 13
OPERATION STEPS OF ICE MAKER
1.ON/OFF
In standby state, LCD panel display “--”, press the button "on/off" ,
the machine enters the ice making mode, the indicator light of “ICE
MAKING" and the blue lamp in the machine will keep on; long press
the button "on/off" for 2 seconds when the machine is running, the
machine stops running and enters the standby state. The original
ice-making time is 20 minutes. It takes at least 13 minutes to make
ice for each first use.
2.ICE DEICING
Press the “ICE DEICING” button when the machine is running, turn
on/ turn off the built-in blue light. Long press the “ICE DEICING”
button when the machine is running, the indicator light of “ICE
DEICING” will be on, the machine immediately into the deicing
state(It can be used when ice cannot be removed or force deicing);
In the deicing process, the ice will be heated until it melts, and when
the ice is unable to adhere to the ice web due to its weight, it falls
off. It will take 1 minute to complete a deicing process.
3.MENU
The MENU button is used for cleaning or timer.
4.Clean
In standby state, long press the "MENU" button for 3 seconds,
"clean" light on while the machine into the"clean"state.
5.Timer
When the machine is running, press the MENU button to set the
timing shut down, the"TIMER" lamp will be on, and the "01" appears
on the display screen, indicating that the machine will shut down
automatically after an hour. The reservation time can be adjusted by
button "TURN UP/TURN DOWN". The machine provides 24 hours
reservation. After the setting is completed, the"Timer" lamp will be
on. Boot-up time is reserved for shutdown time, standby time is
reserved for boot-up time.
6.Turn up/Turn down
By "turn up/turn down", the ice-making time is controlled and the ice
thickness is controlled. Press"turn up/turn down" and the number
will flicker on the display screen. The original ice-making time is 20
minutes. The digital display range is"-8 to 8 ". The smaller the
number, the shorter the ice making time and the thinner the ice. The
bigger the number, the longer the ice making time and the thicker
the ice. Neither ice too thin nor too thick is not conducive to deicing.
7.Display Panel
In working condition,display panel digitally flashes the countdown
timer(minutes) for ice making.
8.Ice Full
When the ice is fulled in the storage bin,the indicator light "ICE
FULL" will be on. The machine will stop making ice and enter standby
mode. Rebooting requires taking out the ice and waiting for three
minutes.

14 15
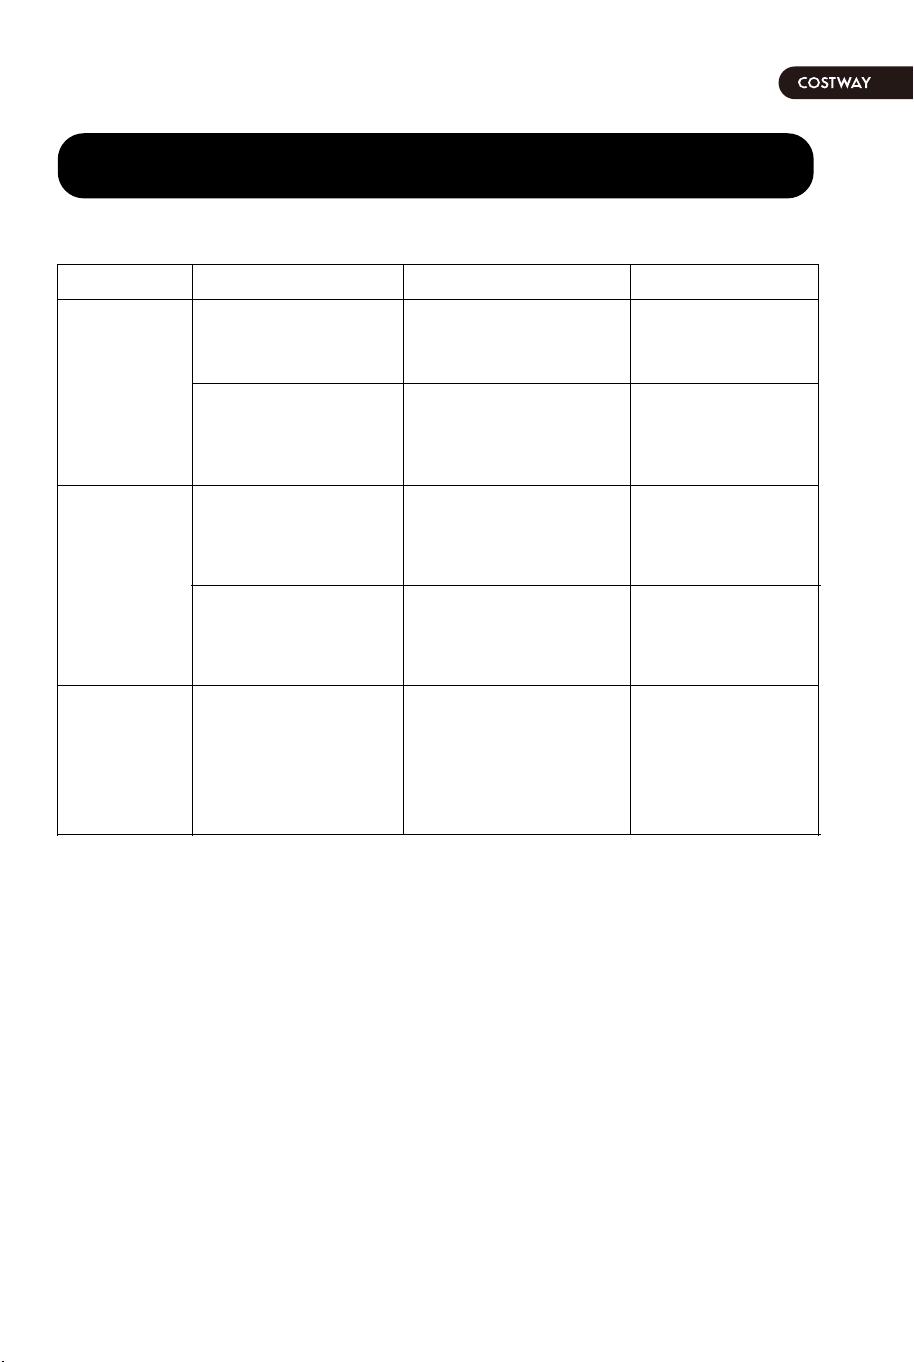
TROUBLESHOOTING
1)Do not make ice
Problem Inspection Project Possible Reasons Solution
Press "open key".In the closed
position
Power switch
Plug in a socketNo connection socketPower cord
Check and replaceFusing or damagingControl panel fuse
Remove the ice or
remove the ice from
the evaporator.
Ice full ice blocks the
evaporator swing
blade.
Replace proximity
switch
If there is no such
case, proximity
switch fault.
Storage of
refrigerators
Contact the power
supply department
No electricity or
voltage is too low.
Power supply
Increase water
pressure
No water or low
water pressure.
Water supply faucet
Clean filter screen
or follow change
valve.
Filter clogged or inlet
valve bad.
Inlet valve
Contact the power
supply department
Low voltagePower supply
At least 6FT
distance between
left and right sides.
Air intake is blocked.Air inlet
Cleaning condenserOverabundance of
ash
condenser
Contact after-sales
service personnel
Leakage of
refrigeration system
refrigeration system
Contact after-sales
service personnel
The connecting line
is broken or
dropped.
Compressor
The ice
maker is
not running
The
compressor
doesn't
work or
stop
suddenly
TROUBLESHOOTING
1)Do not make ice
Problem Inspection Project Possible Reasons Solution
Replacement of
inlet valve
Internal leakage of
inlet valve
Inlet valve
Contact
after-sales
service personnel
Water level detection
insensitive
Water level sensor
replaceRupture leads to
water leakage.
Intake pipe or drain
pipe
Tighten or
re-install
Loosening or
installation is not in
place.
Water intake
Long press the
“ICE DEICING”
button when the
machine is
running
long time to make
ice or deicing ice
abnormality
Evaporator
Water keeps
on adding
water
Water
leakage
Ice cannot
be removed
from
Evaporator
14 15
TROUBLESHOOTING
1)Do not make ice
Problem Inspection Project Possible Reasons Solution
Press "open key".In the closed
position
Power switch
Plug in a socketNo connection socketPower cord
Check and replaceFusing or damagingControl panel fuse
Remove the ice or
remove the ice from
the evaporator.
Ice full ice blocks the
evaporator swing
blade.
Replace proximity
switch
If there is no such
case, proximity
switch fault.
Storage of
refrigerators
Contact the power
supply department
No electricity or
voltage is too low.
Power supply
Increase water
pressure
No water or low
water pressure.
Water supply faucet
Clean filter screen
or follow change
valve.
Filter clogged or inlet
valve bad.
Inlet valve
Contact the power
supply department
Low voltagePower supply
At least 6FT
distance between
left and right sides.
Air intake is blocked.Air inlet
Cleaning condenserOverabundance of
ash
condenser
Contact after-sales
service personnel
Leakage of
refrigeration system
refrigeration system
Contact after-sales
service personnel
The connecting line
is broken or
dropped.
Compressor
The ice
maker is
not running
The
compressor
doesn't
work or
stop
suddenly
TROUBLESHOOTING
1)Do not make ice
Problem Inspection Project Possible Reasons Solution
Replacement of
inlet valve
Internal leakage of
inlet valve
Inlet valve
Contact
after-sales
service personnel
Water level detection
insensitive
Water level sensor
replaceRupture leads to
water leakage.
Intake pipe or drain
pipe
Tighten or
re-install
Loosening or
installation is not in
place.
Water intake
Long press the
“ICE DEICING”
button when the
machine is
running
long time to make
ice or deicing ice
abnormality
Evaporator
Water keeps
on adding
water
Water
leakage
Ice cannot
be removed
from
Evaporator
16 17
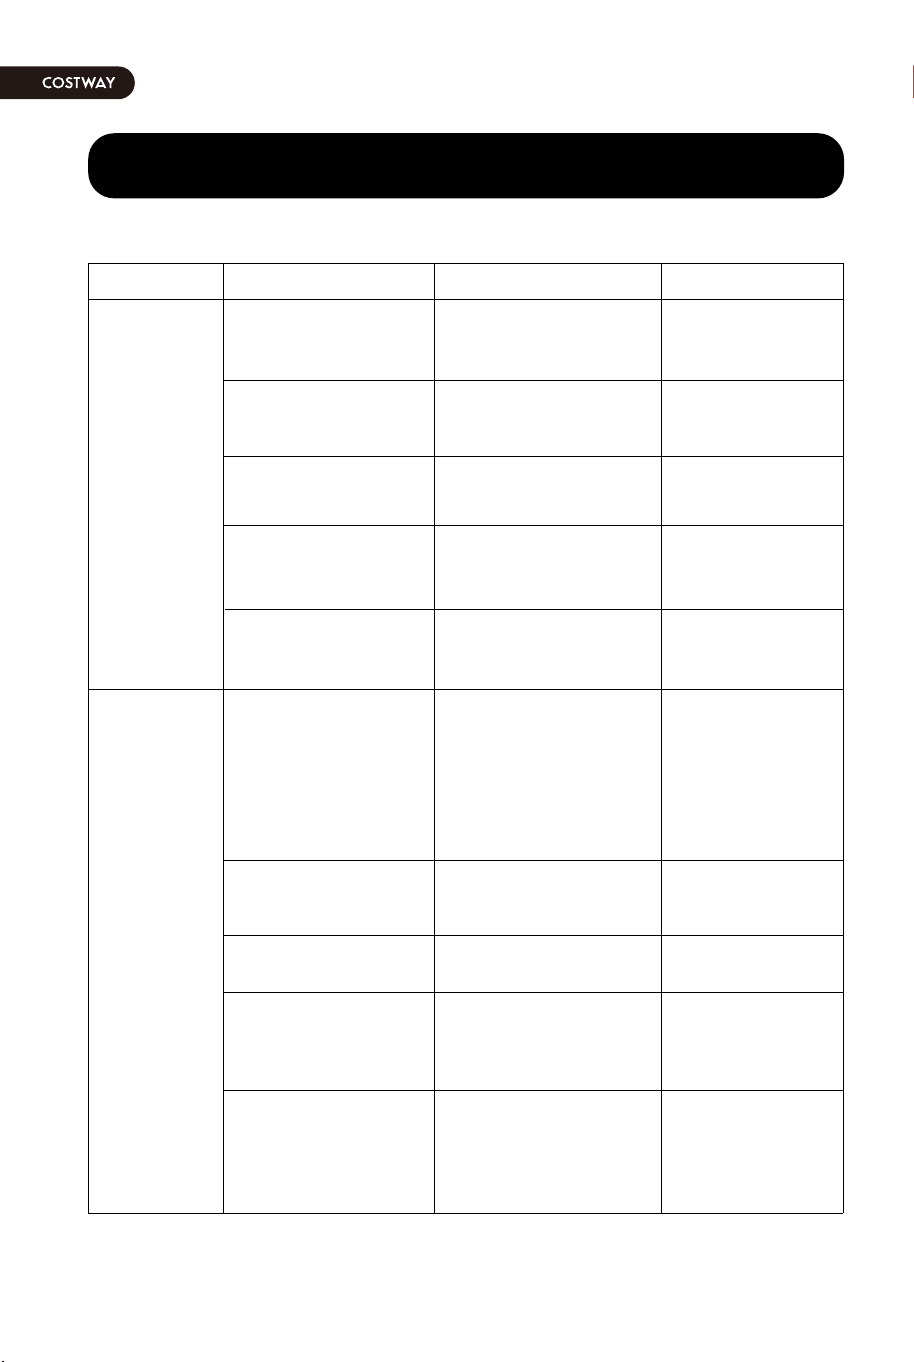
TROUBLESHOOTING
2)Low ice production
Problem Inspection Project Possible Reasons Solution
Increase water
pressure
The water pressure is
too low, and the water
supply time is long.
Water pressure of
water supply
Water
temperature
reduction
High water
temperature
water temperature
Suitable
temperature
setting
The ambient
temperature is too
high or too low.
ambient temperature
Contact
after-sales
service personnel
Refrigerant leakage
Replacement of
inlet valve
Leakage makes
cooling time longer.
Cryogen
Inlet valve
Cleaning
condenser
Too much ash
accumulation in
condenser results in
bad inlet air, high
condensation
temperature and long
ice making time.
condenser
Cleaning or
replacing filter
screen
The blockage of the
filter leads to poor
water flow.
Filter screen
Ice making
time is too
long.
No ice or
thin ice.
Change the water
pump
Poor water flow due
to pump failure
Water pump
The ambient
temperature is
too high.
The ambient
temperature is too
high.
ambient
temperature
At least 6FT space
left and rear.
Poor intake air leads
to high condensation
temperature and
long ice making
time.
Air inlet
TECHNICAL PARAMETER
Model
Rated Voltage
Rated Frequency
Refrigerant
Rated Current
Vesicant
FP10096US(YD-Z63)
120V
60Hz
R290a/72g
2.5A
C5H10

16 17
TROUBLESHOOTING
2)Low ice production
Problem Inspection Project Possible Reasons Solution
Increase water
pressure
The water pressure is
too low, and the water
supply time is long.
Water pressure of
water supply
Water
temperature
reduction
High water
temperature
water temperature
Suitable
temperature
setting
The ambient
temperature is too
high or too low.
ambient temperature
Contact
after-sales
service personnel
Refrigerant leakage
Replacement of
inlet valve
Leakage makes
cooling time longer.
Cryogen
Inlet valve
Cleaning
condenser
Too much ash
accumulation in
condenser results in
bad inlet air, high
condensation
temperature and long
ice making time.
condenser
Cleaning or
replacing filter
screen
The blockage of the
filter leads to poor
water flow.
Filter screen
Ice making
time is too
long.
No ice or
thin ice.
Change the water
pump
Poor water flow due
to pump failure
Water pump
The ambient
temperature is
too high.
The ambient
temperature is too
high.
ambient
temperature
At least 6FT space
left and rear.
Poor intake air leads
to high condensation
temperature and
long ice making
time.
Air inlet
TECHNICAL PARAMETER
Model
Rated Voltage
Rated Frequency
Refrigerant
Rated Current
Vesicant
FP10096US(YD-Z63)
120V
60Hz
R290a/72g
2.5A
C5H10
Please give us a chance to make it right and do better !
Contact our friendly customer service department for help first.
Replacements for missing or damaged parts will be shipped ASAP !
Contact Us!
Do NOT return this item.
COMMERCIAL ICE MAKER
FP10096US
USER’S MANUAL
THIS INSTRUCTION BOOKLET CONTAINS IMPORTANT SAFETY INFORMATION. PLEASE READ AND KEEP FOR FUTURE REFERENCE.
US office: Fontana UK office: Ipswich AU office: Truganina
DE office: Hamburg
FR office: Saint Vigor d'Ymonville
PL office: Gdańsk
US:cs.us@costway.com
UK:cs.uk@costway.com